
ASSEMBLY INSTRUCTIONS SHEET
Item No. KF-FB Flaming Ball Fire Pit
* Do not discard any of packaging until you have verified that you have all parts and pack of fittings.
* Keep children away during assembly and operation.This item contains small parts which can be swallowed by children.
* Retain the assembly instructions for future reference.
Part list:
NO. Parts Qty. NO. Hardware Qty.
A(A1&A2) Top Mesh Ball 2 T1 Bolt (1/4"x5/8") 6
B(B1&B2) Bottom Mesh Ball 2 T2 Bolt (1/4"x 3/4") 10
C Log Grate 1 T3 Bolt (1/4"x1-3/4") 2
D Fire Bowl 1 U Washer 24
ELeg 3 VNut 18
F1
Large Handle (front
handle)
1 X Allen Key 1
Prior to assembly, please read these instructions carefully. We suggest you carry out assembly on a soft surface so as to avoid scratching the paint.
For all cast iron products,please note that because of the nature of cast metal, you may find roughness on the surface. This enhances the beauty of
the product and is not a defect.
Thank you for choosing Sunnydaze Decor. If you have any questions, comments or concerns please feel
free to contact us by phone at: 888-881-4668, by email:customerservice@serenityhealth.com, or you
could also email us via our contact us page at: www.SerenityHealth.com/contact_us.php. To contact
us via live chat, select green “Live Chat” button on the upper right of our home page:
www.SerenityHealth.com.
We stand behind our brand and the quality of the items we sell. We will send new parts, or replace
products at our discretion within the one year warranty period. Before we can help, you will need to
provide proof of purchase with the date of purchase and photos of the defective merchandise. We will
use the photos to determine the cause of defect and for future quality control.
)
F2
Small Handle (Side
handle)
2 Y Wrench 1
G Connection piece 6 Z Poker 1
H: Raincover 1
Assembly Instructions:
Tool required: Allen key(X), Wrench (Y) provided in package.
DO NOT FULLY TIGHTEN THE BOLTS BEFORE ASSEMBLING ALL OF THE LEG FRAMES.
Prior to assembly, please read these instructions carefully. We suggest you carry
out assembly on a soft surface so as to avoid scratching the paint.
Step 1: Assemble 3 x Legs (E) to Bottom Mesh Ball (B1&B2)
with 6 x Bolts(T1), each legs use 2 x Bolt (T1).
Step 2: Assemble Bottom Mesh Ball (B1&B2) with 6 x Bolt (T2),
3 x connection pieces (G), 6 x Washer (U)and 6 x Nut (V).
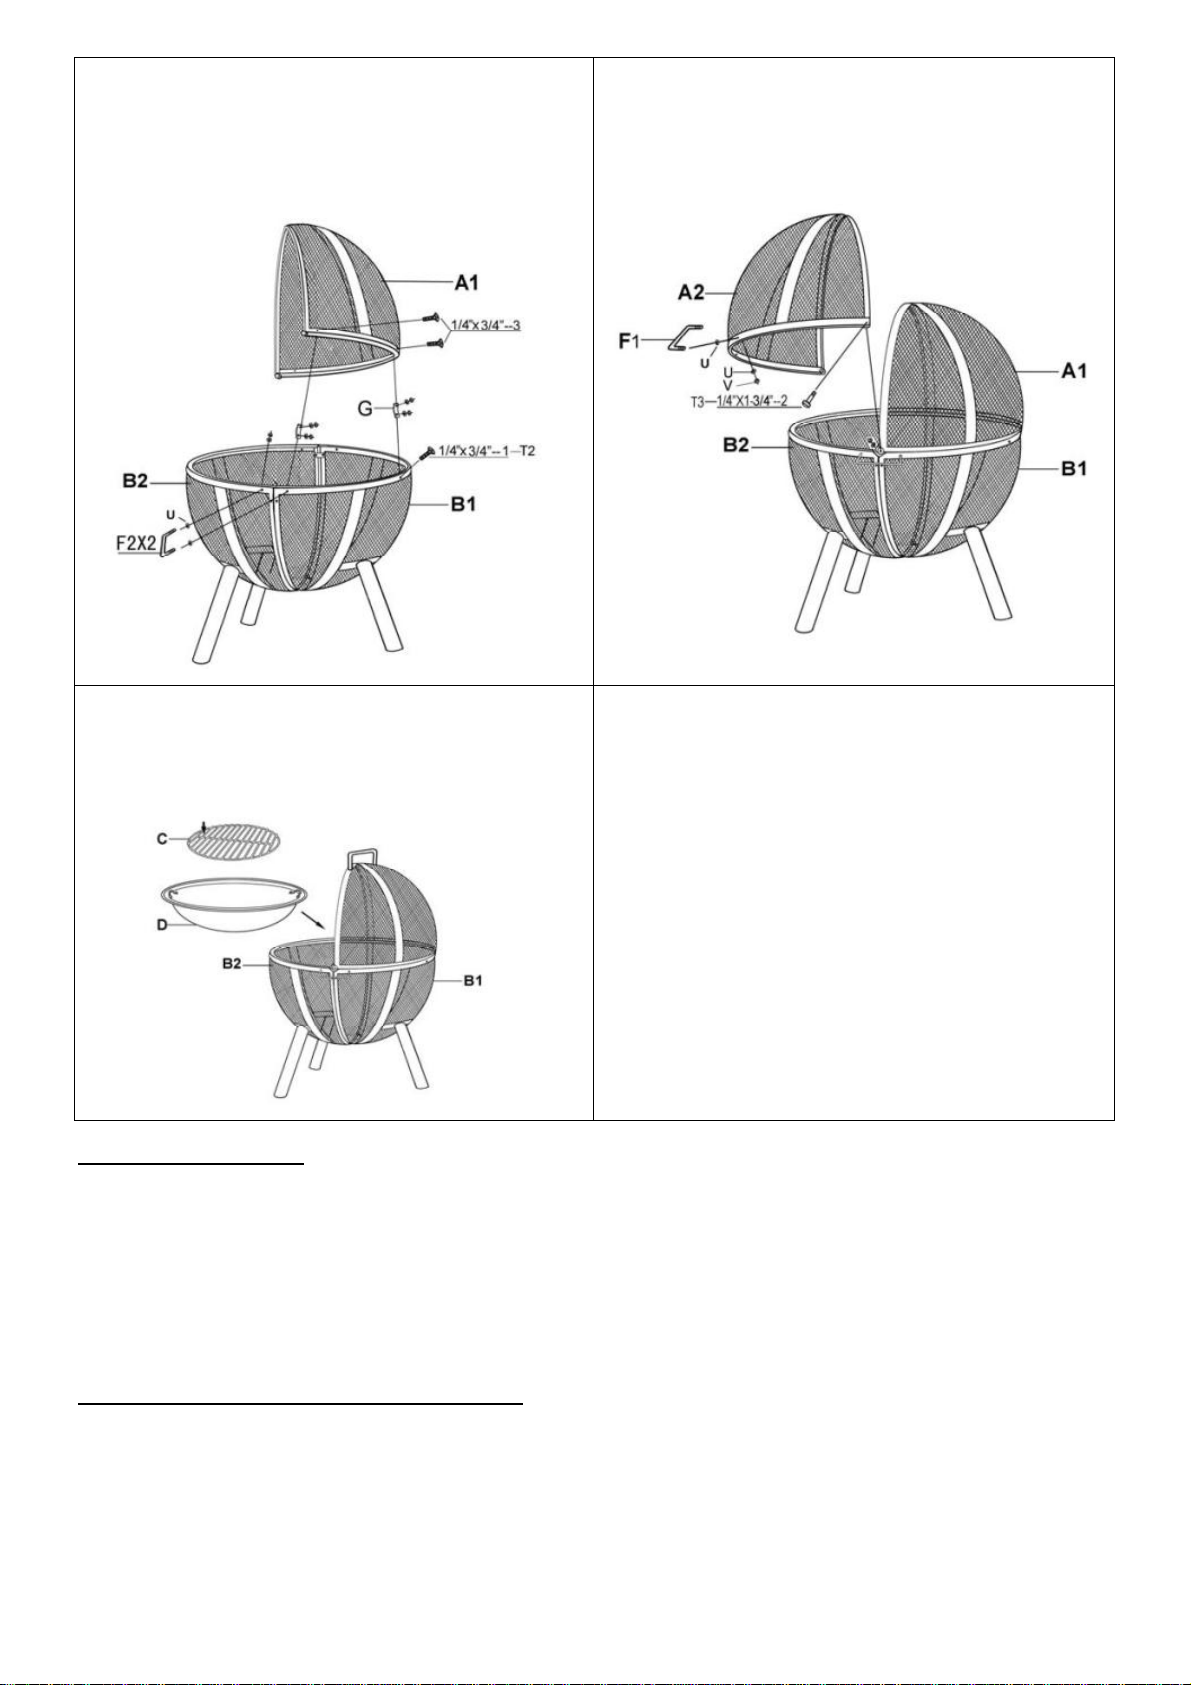
Step 5: Put the Fire Bowl (D) into assembled Bottom Mesh Ball
(B1&B2),place Log Grate (C) into bottom of Fire Bowl(D).
Step 3: Attach Top Mesh Ball A1 to Bottom Mesh Bowl B1 with
4 x Bolt (T2),3 x connection pieces (G), 4 x Washer (U) and 4x Nut
(3 x T2 should be locked on the Top mesh bowl(A1 & A2), 1 x T2
shoule be locked on the Bottom Mesh bowl(B1) )
Assemble 2 Small Handle (F2) to Bottom Mesh Ball (B1&B2) ,each
Handle use 4 x Washers(U), 2 x Nuts (V).
Assemble Top Mesh Ball (A1&A2) with 2 x Bolt (T3),2 x Washer (U)
and 2 x Nut (V).
Attach Large Handle (F1) to Top Mesh Ball (A2) with 4 x Washers(U),
2 x Nuts (V).
Care And Maintenance:
1.To extend the life of your fire pit,clean the bowl after each use and cover the unit to protect it from the elements.
2.To maintain the coating color,cover the bottom of the fire bowl with small stones or sandstones before each use.
3.To maintain the finish,clean the surface by using a soft cloth.Do not use a metal brush.
4.If metal is scratched,the fire pit may need touch up painting.Ask your local paint store representative which paint is best for
your type of fire pit.To prevent rusting,coat the exposed surface immediately.
5.Although fire pits in general do well in adverse weather conditions,store it in an enclosed structure during the off-season.
6.Don't wipe the real slate top with acidic material.Coat the surface of natural slate with floor wax or liquid wax to protect
it from corrosion,oxidation and moisture.(Only available for firepit that with real slate top)
Outdoor Chimenea & Fire Pit User Guide
This product is for outdoor use and will become very hot during use.
Before Setting Up
This product should only be used outdoors. If setting up on a patio, the area should be cleared, and the roof should be open
so any smoke emissions can escape easily
Now the assembly is complete.
Users should exercise care and caution when using this product.
so
any
smoke
emissions
can
escape
easily
.
Set up on a flat surface, away from anything that could pose a fire threat. As this item is low to the ground, always keep
an eye on the fire.

Warning
1. DO NOT use if you suffer from heart and lung conditions because smoke inhalation may exacerbate existing conditions.
2. DO NOT move the product after it is alight.
3. DO NOT sit too close to the product.
4. DO NOT overfill the fire pit during use.
5. DO NOT use accelerants to light the fire.
6.DONOTuseininclementweather.
7. Keep flammable liquids well away from the product as some flammable liquids can catch fire from the emitting heat.
8. Only handle the product with the poker. Once lit, do not touch the lid with bare hands or oven mitts.
Only use the poker to lift the lid if you have to.
9. Keep a considerable distance away from the product. Keep kids and pets away from the product.
10. Adults should set up and maintain product.
11. Keep the set up area clear from any combustible materials.Dry leaves, paper, dry grass or pine needles can catch fire
easily from the embers that come out of the product.
12. Once lit, approach the product with caution to avoid slipping and falling into it.
Considerations Before Use
Check with your fire department for information on burning bans and chimenea & fire pit regulations in your area. Chimenea
& Fire pits can continue to remain hot and smoulder for a full 24 hours after the visible fire has been extinguished.
Smouldering chimeneas or fire pits are a common cause of injuries and burns, especially for children.
The surface of this product will discolour when placed outdoors and from first use,due to the nature of the product and the
heat/naked flames.
Choosing a Location For Setup
Chimeneas or Firepits need to be placed in a safe location. Do not place them near buildings,walls,outdoor furniture,inflatable
pools or other flammable items. Nearby items could catch fire from heat or flames. Position on a non flammable surface,
clear of overhanging objects.
Using The Chimeneas Or Fire Pits
The product is for outdoor use only,and will become very hot during use.
Using the wrong materials inside a fire pit can be dangerous.Make sure touse only coal or wood.
Do not use highly flammable items such as clothing, rags, paper towels, tissues or other items that could burn uncontrollably. Do not use petrol, white
spirit, lighter fuel, alcohol or similar substances to light a fire. Never leave the product unattended.
Wind
Chimeneas or Fire pits should be protected from wind and not used when winds are high or gusty. Wind casuses the smoke and fire to blow around,
which could spread burning embers.When using Chimeneas or Fire pits during light breezes, keep an eye on it to ensure no small embers escape.
Do not place Chimeneas or Fire pits near anything that could catch fire.
People & Pets
SupervisedChildrenandPetswhenthefirepitisinuse.
Ensure that everyone near the Chimeneas or Fire pits understands it is an active fire and can produce smoke and embers. Do not allow children or
animals to get close to Chimeneas or Fire pits to avoid smoke inhalation and burns.
The Chimeneas or Fire pits will get very hot and could burn someone if they get too close.
Extinguishing The Fire Properly
Chimeneas or Fire pits are dangerous if the fire is not extinguished properly. Do not extinguish the fire by pouring water into a hot fire bowl because
this may cause distortion, rust or flaking paint. Fire should be allowed to die out on its own, or extinguished with a fire extinguisher. Its important to note
that fire can continue to smoulder and embers remain hot even if there is no visible flame. Make sure to stay near the fire pit after the flame is out to
check for burning embers or smoke, which could indicate that a live fire still exists. When in doubt, after the bowl has been allowed plenty of time to coo
l
down, fill the inside of the fire pit with water to make sure all the fire is out. The fire pit could still be hot for hours after use.
Cleaning The Fire Pit
Once you are sure the fire is out and there is no danger of being burned, dispose of any remaining ash and fire fuel(coal or wood), then wipe the fire pit
clean with a rag and water.
DO NOT USE A CHEMICAL BASED CLEANER as this may ignite a flame on next use.
Storage
It is best to keep the Chimeneas or Fire pits out of the rain. After you are sure the fire is completely extinguished, clean it out and store it away so it
does not get wet from outdoor conditioins.
The fire pit should be completely cleaned and dried after use.
Make sure to cover the fire pit to prevent rust.
We can't be held liable for rust due to weather conditions.