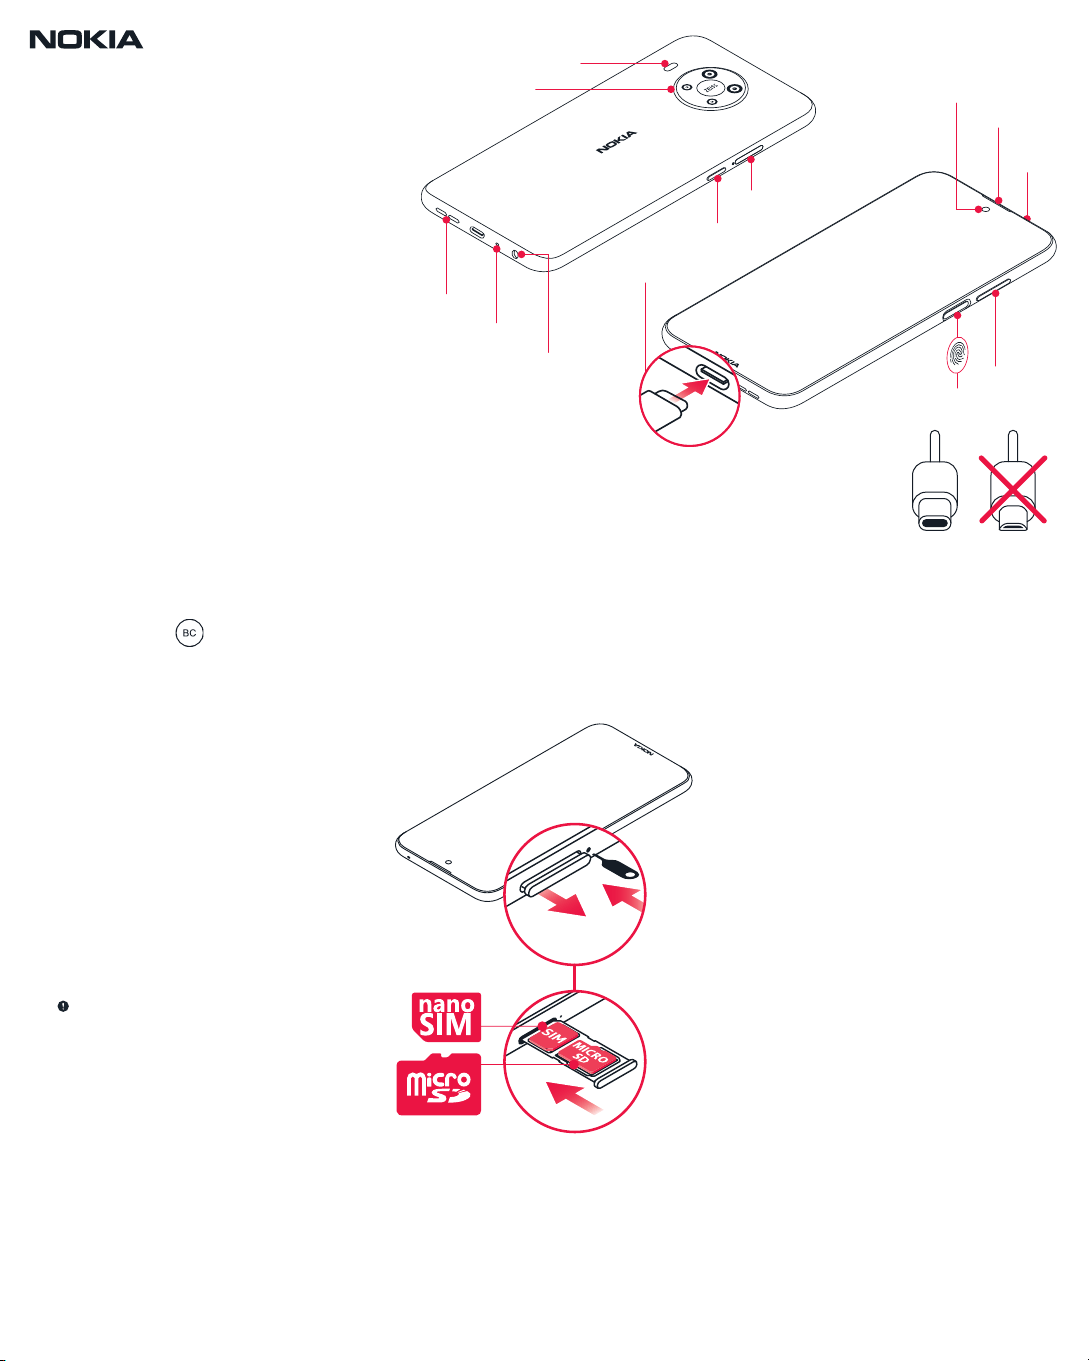
1. Insert the SIM and memory
card
1.Open the SIM card tray: push the tray opener pin
in the tray hole and slide the tray out.
2. Put the nano-SIM in the SIM slot on the tray with
the contact area face down.
3. If you have a memory card, put it in the memory
card slot.
4. Slide the tray back in.
Use only original nano-SIM cards. Use of incompati-
ble SIM cards may damage the card or the device,
and may corrupt data stored on the card.
Use only compatible memory cards approved for
use with this device. Incompatible cards may dam-
age the card and the device and corrupt data stored
on the card.
Important: Do not remove the memory card
when an app is using it. Doing so may damage the
memory card and the device and corrupt data
stored on the card.
2. Charge the battery and switch
th
e phone on
Plug a compatible charger into a wall outlet, and
connect the cable to your phone. Your phone
supports the USB-C cable. You can also charge your
phone from a computer with a USB cable, but it may
take a longer time.
If the battery is completely discharged, it may take
several minutes before the charging indicator is
displayed.
To switch your phone on, press and hold the power
key until the phone vibrates. The phone guides you
through the setup.
For an online user guide and troubleshooting help,
go to www.nokia.com/mobile-support.
Get Started
Nokia X100
TA-1399 EN
8. Volume keys
9. Power/Lock key, Fingerprint sensor
10. USB connector
11. Headset connector
12. Microphone
13. Loudspeaker
1. Camera
2. Flash
3. Google Assistant/Google Search key*
4. SIM and memory card slot
5. Front camera
6. Earpiece
7. Microphone
*Google Assistant is not available in certain languages and countries. Where not available, Google Assistant is replaced by
Google Search. Check availability at https://support.google.com/assistant.
2
3
4
1
5
6
7
8
9
10
11
12
13
Product and safety info
Important: For important info on the safe use of your device and
battery, read the Product and safety info booklet before you take
your device into use.
You can only use your device on the GSM 850, 900, 1800, 1900;
WCDMA 1, 2, 4, 5, 8; LTE 1, 2, 3, 4, 5, 7, 8, 12, 13,17, 20, 25, 26, 38,
39, 40, 41, 66, 71; 5G NR: n25, n41, n66, n71 networks.
You need a subscription with a service provider.
Important: 5G might not be supported by your network service
provider or by the service provider you are using when traveling. To
make sure your device works seamlessly when full 5G service is not
available, it is recommended that you change the highest connection
speed from 5G to 4G. To do this, on the home screen, tap Settings >
Network & Internet > Mobile network > Advanced, and switch
Preferred network type to 4G.
5G service plan and 5G network coverage required; available only in
select areas. Not all devices, signals, or uses are compatible; check
device specs. See www.t-mobile.com, www.metrobyt-mobile.com, or
www.sprint.com for 5G coverage, access, & network management
details.
For more info, contact your network service provider.
Your device has an internal, non-removable, rechargeable battery.
Do not attempt to remove the battery or back cover, as you may
damage the device. To replace the battery, take the device to the
nearest authorised service facility.
Charge your device with the 1-CHUSQ302-097 charger. HMD Global
may make additional battery or charger models available for this
device. Charging time can vary depending on device capability. Some
of the accessories mentioned in this user guide, such as charger,
headset, or data cable, may be sold separately.
The surface of the device is nickel-free.
Parts of the device are magnetic. Metallic materials may be attracted
to the device. Do not place credit cards or other magnetic stripe
cards near the device for extended periods of time, since the cards
may be damaged.
Note: Pre-installed system software and apps use a significant
part of memory space.
Keep a safe distance when using the flash. Do not use the flash on
people or animals at close range. Do not cover the flash while taking
a photo.
Certification information (SAR)
This mobile device meets guidelines for exposure to radio waves as
set forth by the Federal Communications Commission (FCC). Refer to
the following.
FCC RF Exposure Information
Your handset is a radio transmitter and receiver. It is designed and
manufactured not to exceed the emission limits for exposure to radio
frequency (RF) energy set by the Federal Communications
Commission of the U.S. Government. The guidelines are based on
standards that were developed by independent scientific
organization through periodic and thorough evaluation of scientific
studies. The standards include a substantial safety margin designed
to assure the safety of all persons, regardless of age and health. The
exposure standard for wireless handsets employs a unit of
measurement known as the Specific Absorption Rate, or SAR. The
SAR limit set by the FCC is 1.6 W/kg. The tests are performed in
positions and locations (e.g. at the ear and worn on the body) as
required by the FCC for each model. The highest SAR value for this
handset model as reported to the FCC when tested for use at the ear
is X.XX W/kg, and when worn on the body in a holder or carry case, is
X.XX W/kg.
Body-worn Operation; This device was tested for typical body-worn
operations with the handset kept xx cm from the body. To maintain
compliance with FCC RF exposure requirements, use accessories that
maintain a xx cm separation distance between the user’s body and
the handset. The use of belt clips, holsters and similar accessories
should not contain metallic components in its assembly. The use of
accessories that do not satisfy these requirements may not comply
with FCC RF exposure requirements, and should be avoided. The FCC
has granted an Equipment Authorization for this handset model with
all reported SAR levels evaluated as in compliance with the FCC RF
emission guidelines. SAR information on this handset model is on file
with the FCC and can be found under the FCC ID Search section of
www.fcc.gov/oet/ea/ after searching on FCC ID 2AJOTTA-1399.
Additional information on Specific Absorption Rates (SAR) can be
found on the FCC website at www.fcc.gov/general/radio-frequency-
safety-0.
To send data or messages, a good connection to the network is
needed. Sending may be delayed until such a connection is available.
Follow the separation distance instructions until the sending is
finished.
During general use, the SAR values are usually well below the values
stated above. This is because, for purposes of system efficiency and
to minimise interference on the network, the operating power of your
mobile is automatically decreased when full power is not needed for
the call. The lower the power output, the lower the SAR value.
Device models may have different versions and more than one value.
Component and design changes may occur over time and some
changes could affect SAR values.
For more info, go to www.sar-tick.com. Note that mobile devices
may be transmitting even if you are not making a voice call.
Your mobile device is also designed to meet the United States
Federal Communications Commission (FCC) guidelines. FCC ratings
for your device and more information on SAR can be found at http:/
/transition.fcc.gov/oet/rfsafety/sar.html.
The World Health Organization (WHO) has stated that current
scientific information does not indicate the need for any special
precautions when using mobile devices. If you are interested in
reducing your exposure, they recommend you limit your usage or use
a hands-free kit to keep the device away from your head and body.
For more information and explanations and discussions on RF
exposure, go to the WHO website at www.who.int/peh-emf/en.
Copyrights and other notices
FCC notice:
This device complies with part 15 of the FCC rules. Operation is
subject to the following two conditions: (1) This device may not cause
harmful interference, and (2) this device must accept any
interference received, including interference that may cause
undesired operation. For more info, go to www.fcc.gov/engineering-
technology/electromagnetic-compatibility-division/radio-
frequency-safety/faq/rf-safety. Any changes or modifications not
expressly approved by HMD Global could void the user’s authority to
operate this equipment. Note: This equipment has been tested and
found to comply with the limits for a Class B digital device, pursuant
to part 15 of the FCC Rules. These limits are designed to provide
reasonable protection against harmful interference in a residential
installation. This equipment generates, uses and can radiate radio
frequency energy and, if not installed and used in accordance with
the instructions, may cause harmful interference to radio
communications. However, there is no guarantee that interference
will not occur in a particular installation. If this equipment does cause
harmful interference to radio or television reception, which can be
determined by turning the equipment off and on, the user is
encouraged to try to correct the interference by one or more of the
following measures:
• Reorient or relocate the receiving antenna.
• Increase the separation between the equipment and receiver.
• Connect the equipment into an outlet on a circuit different from
that to which the receiver is connected.
• Consult the dealer or an experienced radio/TV technician for help.
HAC notice:
Your phone is compliant with the FCC Hearing Aid Compatibility
requirements.
The FCC has adopted HAC rules for digital wireless phones. These
rules require certain phones to be tested and rated under the
American National Standard Institute (ANSI) C63.19-2011 hearing aid
compatibility standards. The ANSI standard for hearing aid
compatibility contains two types of ratings:
• M-Ratings: Rating for less radio frequency interference to enable
acoustic coupling with hearing aids.
• T-Ratings: Rating for inductive coupling with hearing aids in
telecoil mode.
Not all phones have been rated. A phone is considered hearing aid
compatible under FCC rules if it is rated M3 or M4 for acoustic
coupling and T3 or T4 for inductive coupling. These ratings are given
on a scale from one to four, where four is the most compatible. Your
phone meets the Mxx/Txx level rating.
However, hearing aid compatibility ratings don't guarantee that
interference to your hearing aids won't happen. Results will vary,
depending on the level of immunity of your hearing device and the
degree of your hearing loss. If your hearing device happens to be
vulnerable to interference, you may not be able to use a rated phone
successfully. Trying out the phone with your hearing device is the
best way to evaluate it for your personal needs.
This phone has been tested and rated for use with hearing aids for
some of the wireless technologies that it uses. However, there may
be some newer wireless technologies used in this phone that have
not been tested yet for use with hearing aids. It is important to try the
different features of this phone thoroughly and in different
locations, using your hearing aid or cochlear implant, to determine if
you hear any interfering noise. Consult your service provider or the
manufacturer of this phone for information on hearing aid
compatibility. If you have questions about return or exchange
policies, consult your service provider or phone retailer.
Hearing devices may also be rated. Your hearing device manufacturer
or hearing health professional may help you find this rating. For more
information about FCC Hearing Aid Compatibility, please go to http:/
/www.fcc.gov/cgb/dro.
This device has an electronic label for certification information. To
access it, select Settings > System > Certification.
© 2021 HMD Global. HMD Global Oy is the exclusive licensee of the
Nokia brand for phones & tablets. Nokia is a registered trademark of
Nokia Corporation.
Qualcomm and Snapdragon are trademarks of Qualcomm
Incorporated, registered in the United States and other countries.
Qualcomm aptX is a product of Qualcomm Technologies
International, Ltd. aptX is a trademark of Qualcomm Technologies
International, Ltd, registered in the United States and other
countries, used with permission.
Android, Google and other related marks and logos are trademarks of
Google LLC.
ZEISS and the ZEISS logo are registered trademarks of Carl Zeiss AG
used under license of Carl Zeiss Vision GmbH.
OZO is a trademark of Nokia Technologies Oy.