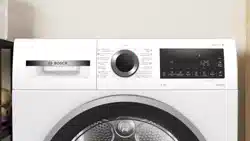
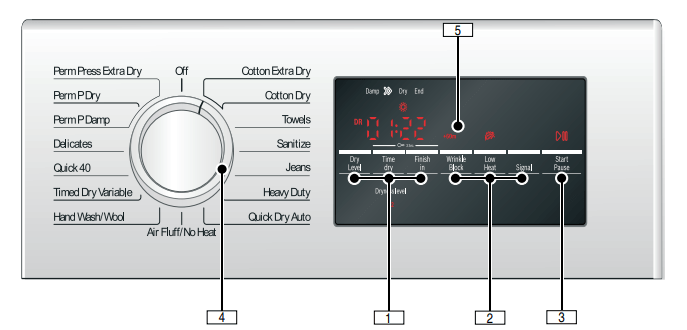
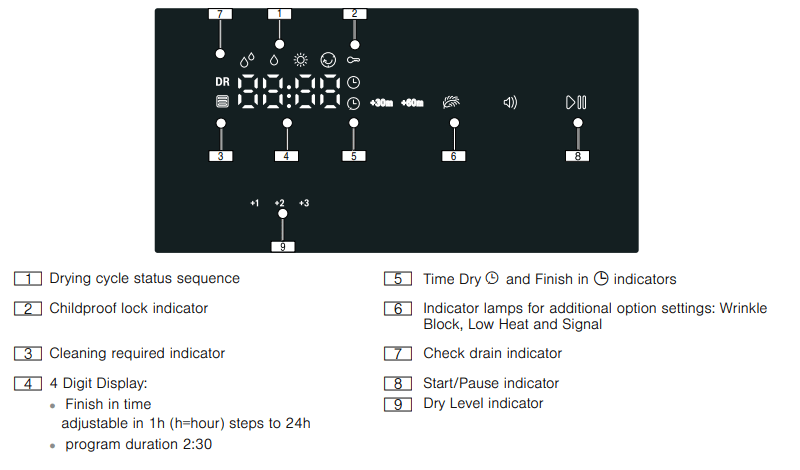
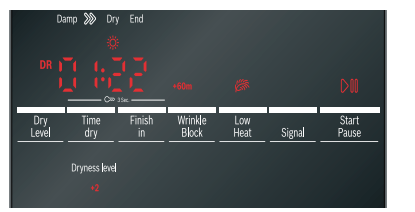
Selectable Option Settings for customizing Programs as desired. Indicator Symbol lights or desired time is displayed if setting is active.→Default Program and Option settings
2. Wrinkle Block, Low Heat, Signal
Additional option settings. Indicator Symbol lights if setting is active.~ Additional Program Option settings;
3. Start/Pause
starts or pauses the selected cycle;
indicator lamp on (steady) - cycle running, can be paused;
indicator lamp blinking - options can be changed; cycle can be started; door is closed; cycle is in Pause mode.
4. Program Selector
Selecting a program and switching on/off; turns in both directions.
5. Display area for settings and information.
Display area
OPERATING INSTRUCTIONS
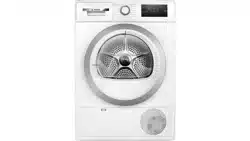
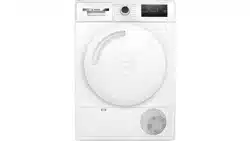
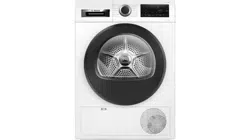
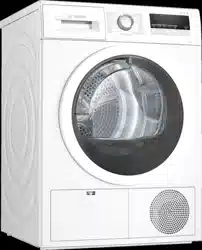
Your new dryer
Program selection
For optimum drying results your dryer offers several different types of programs to choose from. Select the required drying program from the program table according to the examples
→ Program selection table
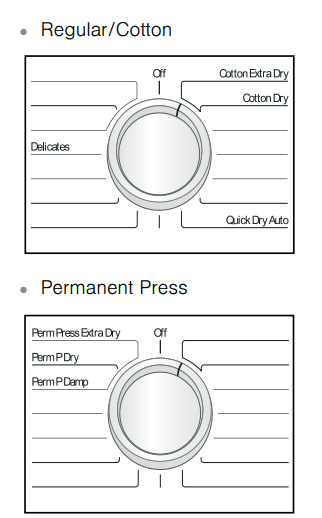
Automatic programs
There are automatic programs for different types of textiles (regular/cotton, permanent press).
The program sequence of automatic programs is controlled by sensors. The duration of the program depends on the measured degree of moisture in the laundry and on the selected degree of dryness (e.g. Cotton Dry or Cotton Extra Dry).
Special programs
The programs Sanitize, Jeans, Towels, Hand Wash/Wool and Heavy Duty (depending on model) are made for special type fabric loads.→ Program selection table
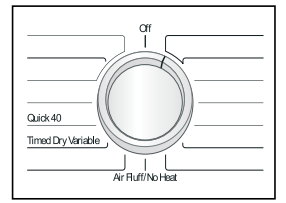
Time programs
Time programs run at specific temperatures and are suitable for delicate items, individual or a few small items and for adding additional drying time if necessary. → Default Program and Option settings
Selecting program settings and additional options
By selecting program settings and additional options, you can adjust the drying process to better suit the items you are drying. The settings can be selected and deselected depending on the cycle progress.
The indicator lamps of the buttons light up if the setting is active. For Time Dry, Finish in, Wrinkle Block, Low Heat and Signal the settings are not retained after the appliance is switched off.
→ Default Program and Option settings;
→ Additional Program Option settings
For Dry Level the setting is retained after the appliance is switched off.
→ Dry Level
Loading the laundry
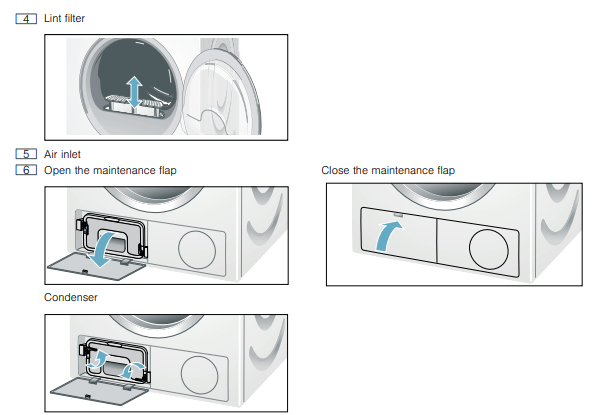
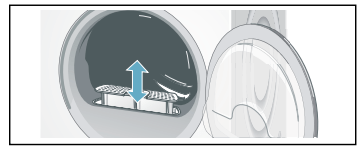
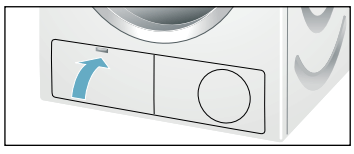
1. Check lint filter.
The filter should be cleaned after or before every drying process. Cleaning the filter reduces the drying time and saves energy. → Cleaning the lint filter;
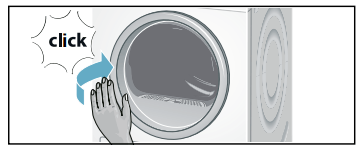
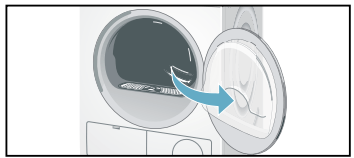
2. Load the laundry into the drum and close the door.
Tip: If the door has not been closed properly, the dryer will not start.
Load the laundry
Place laundry in the empty drum. Put each piece of laundry into machine separately. For best results the laundry should be sorted according to type of laundry and desired degree of drying.
→ Sorting the laundry;
→ Program selection table;
→ Dry Level;
Starting the program
1. Rotate program selector to the desired program. Select the program which corresponds to the laundry in the dryer from Program selection table.
→ Program selection table
The Start/Pause indicator light starts flashing.
2. Touch the Start/Pause button. Indicator lamp lights up and the cycle starts.
During the cycle, the display area indicates the estimated remaining time and symbols showing the cycle progress are lit.→ Display area
3. If required, select Low Heat by pressing the button.
→ Additional Program Option settings; Page 29
4. If required, select Wrinkle Block by pressing the button.
→ Additional Program Option settings; Page 29
Tip: The estimated remaining time will be updated.
Indicator of program sequence
Bosch dryers use an advanced control system which continually monitors the laundry’s remaining moisture.
The current state of the process and status of the program is shown by indicator lights (Damp, =, Dry,
End).
Childproof lock
You can secure the dryer against inadvertent changing of the set functions. To do this, activate the childproof lock after cycle start.
To Activate/Deactivate, touch Time dry and Finish in buttons at the same time for 3 seconds. In the display field, you will see the symbol light indicating the childproof lock is active.
NOTICE: The childproof lock will remain activated until the next cycle start even after switching the machine off.
You must deactivate the childproof lock before the next cycle and, if necessary, activate it again after starting the cycle.
Selecting a different program
If you have inadvertently started the wrong program, you can change this as follows:
Touch Start/Pause.
Select another program.
Touch Start/Pause. The new drying cycle starts from the beginning.
Cancel program
If required, you can cancel the selected program:
Touch Start/Pause.
Rotate the program selector to Off.
Program end
End appears in the display area and the Start/Pause button indicator lamp is off. After the program end, rotate the program selector to Off. Removing laundry/switching the appliance off
1. Open the door and remove the laundry. 2. Turn the program selector to the Off position. Appliance is switched off and dryer light goes out. 3. Clean lint filter. → Cleaning the lint filte 4. Close the door. Tip: If the display panel switches off and the Start/Pause button indicator is blinking at the end of a program, the Energy-saving mode is active. To activate the display, press any button. → Environmentally friendly use of your dryer;
Signal
For switching the buzzer on and off touch the Signal button.
The buzzer indicates program end if it is activated.
Other alarms are not influenced by this option.
You can also change the following settings:
volume for buzzer
volume for button signals
To change these settings always activate adjustment mode first.
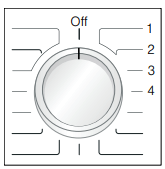
Activate adjustment mode
1. Select Cotton Extra Dry on position 1. The appliance is on.
2. Hold down Start/Pause and turn the program selector to the right (position 3). Release Start/Pause button.
Adjustment mode is now activated and the default volume for buzzer appears in the display.
Changing the volume
You can set the volume by touching the Time dry (volume down) or Finish in (volume up) button with the program selector in the following positions:
Quit adjustment mode
Turn the program selector to Off position. The settings were saved.
USER-MAINTENANCE INSTRUCTIONS
USER-MAINTENANCE INSTRUCTIONS
Your appliance is designed to give you years of service. Observe the following instructions to maintain your appliance and keep it in top operating condition
Cleaning the Dryer's exterior
Clean the Dryer's exterior surfaces by wiping with a soft cloth and soapy water only.
Wipe the drum, door seal and inside of the door with a damp cloth only.
NOTICE: Do not clean with a water jet.
Remove detergent and cleaning agent residue immediately.
During drying, water may occasionally accumulate between the window and the seal. This does not affect the proper operation of your dryer.
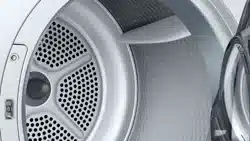
Cleaning the lint filter area
Over time, lint from the drying process collects in the lint filter area.
This lint can be easily removed using a vacuum cleaner.
Cleaning the lint filter
Dirty filters prolong the drying time and increases energy consumption.
The filter should be cleaned before or after each drying process.
If indicator lights up during a drying program, clean the filter immediately.
Tip: The program is interrupted automatically.
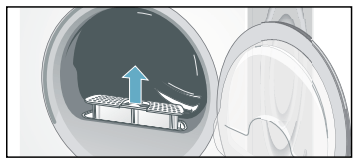
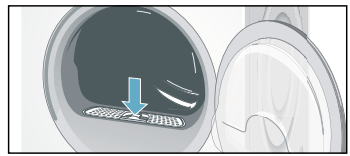
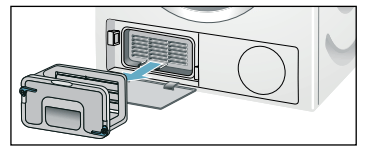
To clean the lint filter:
1. Turn the Program Selector to switch off the appliance.
2. Open the door.
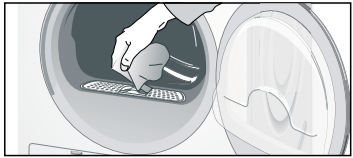
3. Pull out filter.
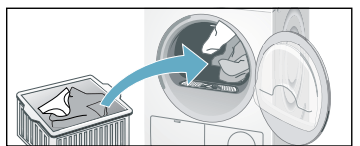
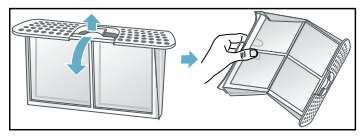
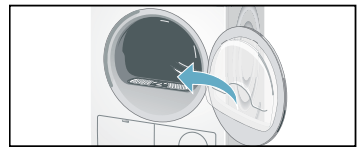
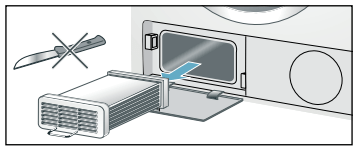
Remove the lint from the lint filter opening and area below. Ensure that no lint falls into opening below. 4. Open the filter.
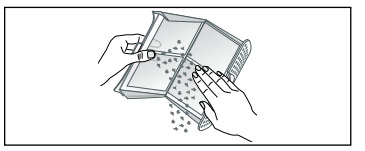
5. Remove lint (run hand over filter).
NOTICE: Severely dirty or clogged lint filter should be rinsed under warm running water.
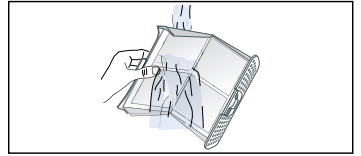
The filter must be dried thoroughly before being placed back into dryer. 6. Close the filter and re-insert it.
7. Close the door.
Cleaning the Condenser
The Condenser requires periodic cleaning (recommended once per month under normal drying conditions). The frequency of cleaning depends on the amount and type loads being dried.
To clean the Condenser:
1. If the dryer is hot, run on Air Fluff/No Heat program to allow the dryer to cool down.
2. Residual water may escape, place an absorbent cloth under the maintenance flap.
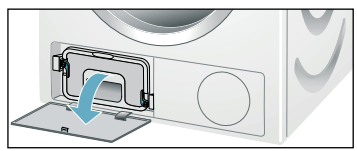
3. Unlock the maintenance flap and open it completely.
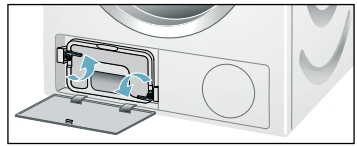
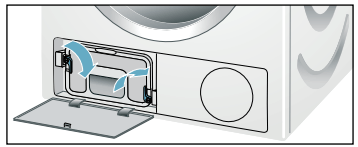
4. Turn both locking levers towards each other.
5. Pull out the Condenser cap.
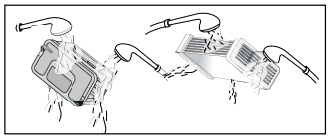
6. Remove the Condenser. NOTICE: Do not damage the Condenser! Clean with warm water only. Do not use hard or sharp edged objects!
7. Rinse the Condenser and the cap on all sides with a jet of water to completely remove all of the lint and fluff.
8. Remove all lint and fluff from the seals on the dryer and Condenser.
9. Allow the cap and the Condenser to dry fully.
10. First insert the Condenser, then the cap.
11. Turn back both locking levers.
12. Close the maintenance flap until it locks into position.
13. Look in the Troubleshooting table to reset the maintenance indication.
Cleaning the moisture sensors
The dryer is equipped with a stainless-steel moisture sensor. The moisture sensor measures how damp the laundry is. After long periods of use the moisture sensor may become covered by a fine layer of limescale or residue of detergents and textile care products. Such residue must be removed regularly as the sensor function will be impaired and the drying results less than desired.
To clean the moisture sensors:
1. Open the door
2. The deposit on the sensors can easily be removed by wiping the sensors (the two bars next to the lint filter) with a cloth and white vinegar.
Maintenance of drain hose
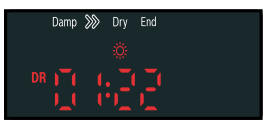
If DR indicator lights up check the drain hose for kinks, restrictions or blockage.
NOTICE: If DR indicator still lights up after the above steps are taken, you should contact Customer Service.
Replacing fuses in the Power Adapter - step-by-step
Fuses are a required safety device intended to last for the life of the product. In the unlikely event one fails follow the below steps to replace it.
1. Unplug the Washer and Dryer cords from the Power Adapter.
Unplug the Power Adapter from the wall outlet.
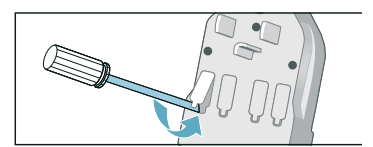
2. Remove fuse holder using a pointed tool as shown (e.g. pick or small screwdriver).
3. Replace suspected bad fuse with a known good one. NOTICE: USE ONLY THE REPLACEMENT FUSE, PART NUMBER 10013781.
4. Reinstall the fuse and fuse holder in the Power Adapter ensuring it snaps into place.
Troubleshooting
Introduction
NOTICE: Before doing maintenance work or trying to fix a problem, rotate the program selector to Off.
If the power supply is interrupted during operation, the program will not continue when power is restored. When power is restored, confirm program and selected options are as desired and then press the Start/Pause button.
Before calling Customer Service, check whether you can rectify the problem yourself by means of the following table.
If a problem cannot be rectified or a repair is required:
Set program selector to Off.
Disconnect the dryer from the power outlet.
Call Customer Service.
→ Customer service;
General Troubleshooting
Often when you encounter a problem it will be something minor. Before you call Customer Service, consider the suggestions and instructions below:
NOTICE: The troubleshooting items listed below can help resolve minor issues with your dryer quickly and without the necessity of a service call.
Determing the Problem
Dryer does not start.Start/Pause indicator light does not flash.
Power cord end not inserted at all or not inserted correctly.
Insert power cord end correctly.
A fuse is blown or breaker is tripped.
Replace fuse or reset breaker. For replacing the fuses in the supplied Power Adapter.→ Replacing fuses in the Power Adapter - step-by-step;
Door not closed properly.
Check if laundry is caught in the door. Close the door until a click is heard.
Program not selected.
Rotate the program selector to desired program. → Program selection table;
The display panel and indicator lights go out, Start/Pause indicator light flashes.
Energy-saving mode is activated.
Touch any button to activate the display. →Environmentally friendly use of your dryer;
The display panel and Start/Pause indicator switch off.
Sleep mode after setting the Finish in option is activated.
Touch any button to activate the display.
Dryer does not start. Start/Pause indicator flashes.
Start/Pause button not pressed.
Press the Start/Pause button to start the cycle.
indicator light up.
Lint filter dirty.
Clean lint filter. →Cleaning the lint filter;
Touch the Start/Pause button to reset the displayed indication and then touch Start/Pause button again to reset the appliance if necessary.
Condenser dirty.
Clean Condenser. →Cleaning the Condenser;
Touch the Start/Pause button to reset the displayed indication and then touch Start/Pause button again to reset the appliance if necessary.
DR indicator light up. Water has not drained completely.
Drain hose is blocked.
Check drain hose. →Maintenance of drain hose;
Check drain hose connection conditions.
Water is leaking out.
Dryer is not leveled.
Level the dryer. →Leveling the dryer;
The Condenser seal is dirty.
Clean the Condenser seal.→Cleaning the Condenser;
Drain hose is leaking.
Check entire length of drain hose for leaks; replace if necessary.
Check that hose is clamped on hose barb at back of the dryer securely.
Program terminates shortly after starting.
Laundry is not loaded. Load the laundry.
Loading the laundry;
Load too small for selected program.
Use time program.
→Program selection;
→Program selection table;
Loaded laundry is too dry.
Check the loaded laundry. If it is dry, open the door, remove laundry and turn program selector to Off.
The door opens by itself.
The door not closed properly.
Close the door until a click is heard.
Creasing.
Laundry load exceeded. Unsuitable program selected.
Do not exceed the maximum load for selected program. Remove items of laundry immediately after the end of the program, hang them up and pull into shape. Turn program selector to Off.→Program selection table;
Select Wrinkle Block button to prevent the laundry from creasing or wrinkling.→Wrinkle Block;
Drying result is not satisfactory (laundry feels too damp).
Warm laundry may feel more damp than it really is.
Remove items of laundry immediately after the end of the program and turn the program selector to Off.
The selected program does not suit the load.
Use another drying program or, in addition, select the time program. →Program selection table;
Dryness level is not adjusted.
Use Dry Level to adjust the dryness level. →Dry Level;
Fine layer of limescale or detergent and textile care products residues on the moisture sensors.
Clean the moisture sensors.→Cleaning the moisture sensors;
Program termination e.g. main power supply failure, door open or maximum drying time reached.
See the problem(s) mentioned in this table.
Initial load is too wet.
Spin laundry at higher speed in the washing machine, before drying.
Switch off the dryer, and than turn it on again.
Drying time too long.
Lint filter and/or Condenser is dirty.
Clean lint filtefilter→Cleaning the lint filter; and/or Condenser.→Cleaning the Condenser;
Insufficient supply of ambient air for cooling. Air inlet possibly blocked.
Ensure that cool ambient room air can freely circulate near the dryer. →Installation for best performance;
Do not obstruct the air inlet on the front of the dryer.
Ambient temperature is lower than 59°F/15°C or higher than 86°F/30°C .
Ensure the ambient room conditions are within this range.
Program does not start Finish in (remaining) time is displayed.
A delayed starting time has been selected and activated.
Drying cycle will begin at proper time to complete at the selected Finish in time.
Program does not start - symbol lit up.
Childproof look is activated.
Deactivate Childproof look.
One or more indicator lights are flashing.
Lint filter or/and Condenser is dirty.
Clean lint filter or/and Condenser (see solution of the problem(s) in this table above).
Installation conditions are not adequate.
Check the installation conditions.→Electrical Connections;
Fault in program sequence or malfunction.
Switch off the dryer, allow it to cool down, switch back on and restart the program.
Power failure.
Remove laundry from the dryer immediately and spread out. This allows the heat to dissipate. Be careful as the door, the drum and the laundry may be hot
#1 Can you switch the power cord out for a 3 prong power cord?
If you change the provided 4 wire cord to a 3 wire it will void the Bosch warranty.
#2 Is there a pedestal available for the dryer? or just for the washer?
The pedestal, Model #WMZ20500 for the Dryer is currently out of stock.
#3 Does the Bosch 300 series dryer comes on gas or electric only?
This dryer is only available in electric.
#4 If this dryer is stacked on top of the companion washing machine, what is the height of the dryer controls?
The minimum stack height for both the Compact Washer and Compact Dryer is 67 3/4". As the controls are almost at the top of the Dryer, they are going to be almost that high.


 symbol light indicating the childproof lock is active.

 indicator lights up during a drying program, clean the filter immediately.
 indicator light up.
 symbol lit up.