• Follow the guidelines below for preparing the load for drying.
• Read the Dryer Operating lnstructions, pages 19-20,for operating yours pecific model.
• Always read and follow fabric care labels and laundry product labels.
WARNING : To reduce the riskof fire, electrical shock, or injury to persons,read Important Safetylnstructions, pages 2-4, before operating this dryer.
1. Prepare items for drying.
• Dry items of similar fabric, weight and construction in the same load.
• Separate dark items from light-colored items. Separate items that shed lint from those that attract lint. If an item sheds lint, turn it inside out.
• Be sure buckles, buttons and trim are heat proof andwon't damage the drum finish. Close zippers,fasten hooks and Velcro®-Iike fasteners. Tiestrings and sashesto prevent snagging and tangling.
• If possible, turn pockets inside out for even drying.
• Check for stains which may not have been removed in washing. Dryer heat may permanently set some stains. Repeat stain removal process before drying.
• Place small items in a mesh bag to prevent tangling and for easy removal.
2. Check that lint screen is clean and in place.
3. Load the dryer.
• The average load will fill the drum 1/3 to 1/2full. Items need room to tumble freely for even drying and less wrinkling. Do not overload dryer.
• When drying large items, dry only 2 or 3 at a time. Fillout the load with small and medium sized items.
• For delicate or very small loads, add 2 lint-free towels for better drying, less wrinkling, and to prevent grease stains caused by fabric softener sheets.
• Do not overd ry items. Overd rying can cause wrinkling, shrinkage, harshness, and a build-up of static electricity, which can produce more lint.
• If desired, add a dryer fabric softener sheet
4. Close the dryer door and set dryer controls (some models). See Dryer Operating Instructions card for your specific model controls.
5. Turn cycle selector clockwise to the desired setting.
6. Start the dryer.
7. When the cycle ends, remove items immediately and hang or fold. If load is removed before the cycle ends, turn cycle selectorto OFF.
Features
Cycle Signal Control (some models)
When the CycleSignalControl is ON,asignal will sound at the end of eachcycleand during the PressSaversetting (some models). The volume is adjustable on some models.
Drum Light (some models)
A drum light will come onwhenever the door isopened to illuminate the dryer drum during loading and unloading. Closingthe door turns off the light.
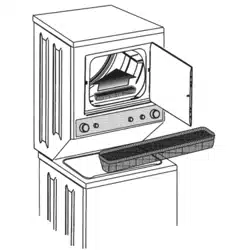
Drying Rack (some models)
Usethe drying rackto dry items which should not be tumble dried.
1. Open the dryer door and remove the lint screen.
2. Insert drying rack into the dryer drum. Place the front bar under the lip of the lint screen opening.
3. Place items to be dried on top of rack. Weight should not exceed 10 Ibs. Leave space between items, but do not let items hang over the sides or through the grids. Do not tumble other items when using the drying rack.
4. Selectatimed dry setting bestsuited for items being dried. Use only the Air Fluff (no heat)temperature setting for items containing plastic,foam rubber, rubberlike materials, feathers or down.
5. When items are dry, remove the rack and replace the lint screen. If lint screen is not in place, tumbling items could enter the exhaust system and cause damage to the dryer
Care and Cleaning
WARNING : To reduce riskof fire or serious injury to persons or property, cornply with the basicwarnings listed in important Safety Instructions, pages 2-4, and those listed below.
• Before cleaning the washer or dryer interior, unplug the electrical powercord to avoid electrical shock hazards.
• Do not use any type spray cleanserwhen cleaning dryer interior. Hazardous fumes or electrical shock could occur.
Inside the Washer
• Removeitems from thewasher assoon asthe cycleends. Excesswrinkling, color transfer, and odors may develop in items left in the washer
• Dry the washer top, the areaaround the lid opening, and the underside of the lid. These areasshould always be dry before the lid is closed,
• Before cleaning thewasher interior, unplug the electrical powercord to avoid electrical shock hazards.
•When extremely soiled items have been washed, a dirty residue may remain on the tub. Remove this by wiping the tub with a nonabrasive household cleanser. Rinse thoroughly with water.
• The agitator or tub may become stained from fabric dye. Clean these parts with a nonabrasive household cleanser.This prevents dye transfer to future loads