wwvv.Hotpoint.com
N
:13
0
4_a
Safety Information
Connecting Electricity ........... 3
Extension Cords ............... 2
Safety Precautions .............. 2
Operati_ Instructions
Automatic Icemaker ............ 8
Care and Cleaning .......... 9, 10
Shelves ..................... 5, 6
Storage Drawers .............. 6, 7
Temperanlre Controls ........... 4
Installation Instructions
Preparing to Install
the Refligerator .............. 11
Reversing the Door Swing ... 16-22
V\amr Line Installation ...... 12-16
Troubleshooting Tips
Before You (:all
For Service ................ 24, 25
Normal Operating Sounds ...... 23
Consumer Support
Consumer Support .... Back Co_r
Product Regdstration ........ 29, 30
_¢\arranty' .................... 31
Write the model and serial numbers here:
Model #
Serial #
You can find them on a label on the upper
left side of the fresh ii>od compartment.
16206736P010 39-60454 01-06 JR
iMPORTANTSAFETYiNFORMATiON.
READALL iNSTRUCTiONSBEFOREUSING.
WARNING!
Use this appliance only for its intended purpose as described in this Owner's Manual.
SAFETYPRECAUTIONS
When using electrical appfiances, basic safety precautions should be followed, including the foflowing:
_:_This refrigerator must be properl} installed
and located in accordance with the Installation
InstHictions before it is used.
i_¢'Do not allow children to climb, stand or hang
on the shelves in the refl'igerator. They could
damage the refl'igerator and seriously ii_jm'e
themselves.
%Do not touch the cold suriaces in the freezer
compartment when hands are damp or wet.
Skin may stick to these extremely cold
S//I'J[;I ces.
::17Do not store or use gasoline or other flammable
vapors and liquids in tile vicinity of this or any
other appliance.
_::_Keep finge_s out of tile "pinch point" areas;
clearances between the doo_s and between
tile doors and cabinet are necessarily small.
Be careflfl closing doors when children are
in the area.
:)_ln refl'igeratots with automatic icemakers,
avoid contact with the moving parts of the
ejector mechanism, or with the heating
element that releases the cubes. Do not place
finge_s or hands on the automatic icemaking
mechanism while the refl'igerator is plugged in.
:)_ Unplug tile refl'igerator befln'e cleaning and
making repairs.
NOTE:Westronglyrecommendthatanyservicingbe
performedbya quafifiedindividual.
i)::Tm'ning tile control to tile 0 position does
not remove power to tile light circuit.
:_/)Do not refl'eeze ti'ozen foods which have
thawed completely.
DANGER!RISKOFCHILDENTRAPMENT
PROPERDISPOSALOFTHEREFRIGERATOR
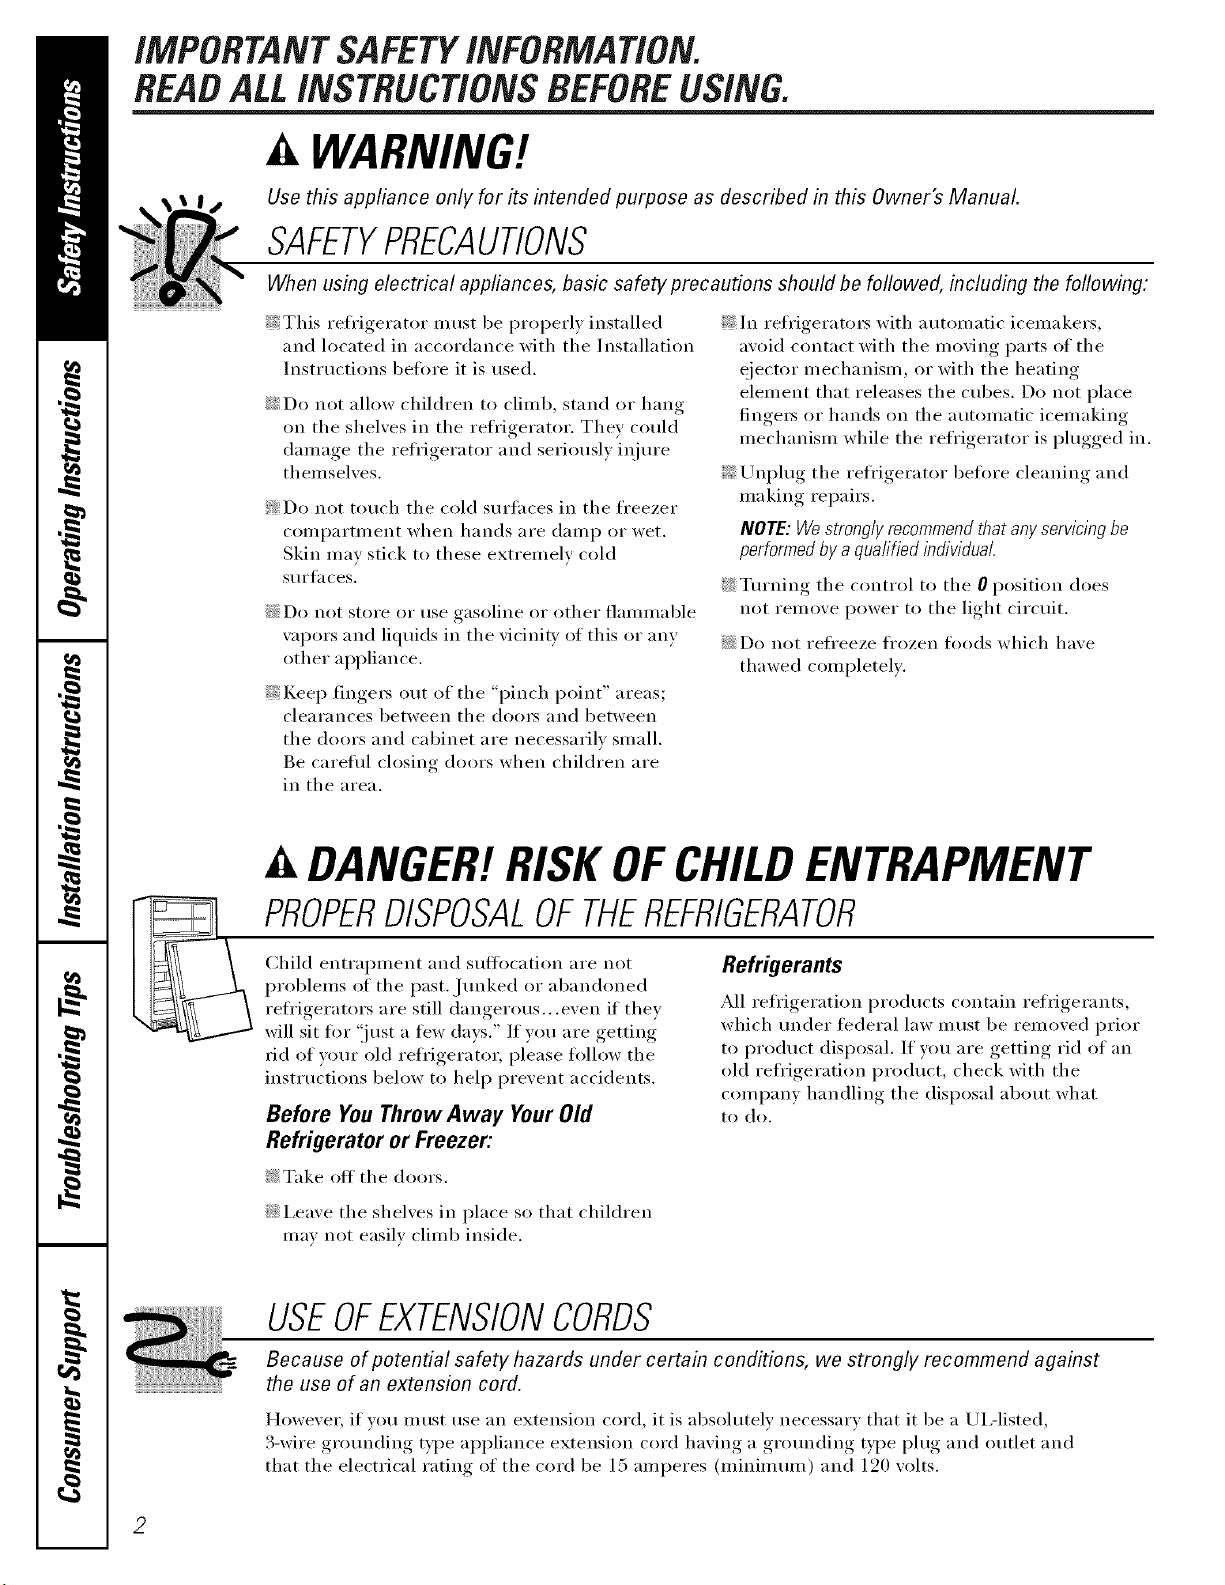
Child entrapment and suffocation are not
problems of tile past. ,Junked or abandoned
refl'igerators are still dangerous...even if they
will sit fl_r "just a few days." If wm are getting
rid of wmr old refl'igerator, please fi_llow the
inst_ uctions below to hel I) prevent accidents.
Before You ThrowAway YourOld
Refrigerator or Freezer:
_; Take off tile doors.
iJi::I,eaxe tile shelxes in place so that children
max not easilx climb inside.
Refrigerants
All refl'igeration products contain refrigerants,
which under fi_deral law must be removed prior
to product disposal. If wm are getting rid of an
old refl'igeration product, check with the
company handling tile disposal about what
to (lo.
USEOFEXTENSIONCORDS
Because of potential safety hazards under certain conditions, we strongly recommend against
the use of an extension cord.
However if you must use an extension cord, it is absolutely necessarx that it be a UiAisted,
grounding tx )e )lug and outlet and
3-wire gr(mnding type appliance extension cord haxing a , , ,'l I ,
that tile electrical rating of tile cord be 15 amperes (minimum) and 12(1 xolts.
2
www.Hotpointcom
WARNING!
HOWTOCONNECTELECTRICITY
Do not, under any circumstances, cut or remove the third (ground) prong from the power cord.
For personal safety, this appfiance must be properly grounded.
The power cord of this appliance is equipped
with a 3-prong (grounding) plug which mates
with a standard 3-prong (grounding) wall outlet
to minimize the possibility of electric shock
hazard from this appliance.
Have the wall outlet and circuit checked bv a
qualified electrician to make sm'e the outlet is
properly grounded.
Where a standard 2-prong wall outlet is
encotmtered, it is y()ur pers()nal resp()nsibility
and obligati()n t() have it replaced with a
properly grotmded 3-prong wall outlet.
The refrigerator sh(mld always be pltlgged into
its own individual electrical outlet which has a
voltage rating that matches the rating plate.
This provides the best peril)finance and also
prexents oxerloading house wiring circtfits which
cotfld cause a fire hazard from oxerheated wires.
Never tmphlg your refrigerator by pulling on the
power cord. Always grip pltlg firmly and ptfll
straight out fl'om the outlet.
Repair or replace immediately all power cords
that have become frayed or otherwise damaged.
Do not use a cord that shows cracks or abrasion
damage along its length or at either end.
When moving the refrigerator away fi'om the
wall, be careflfl not to roll over or damage the
power cord.
READANDFOLLOWTHISSAFETYINFORMATIONCAREFULLY.
SAVETHESEINSTRUCTIONS
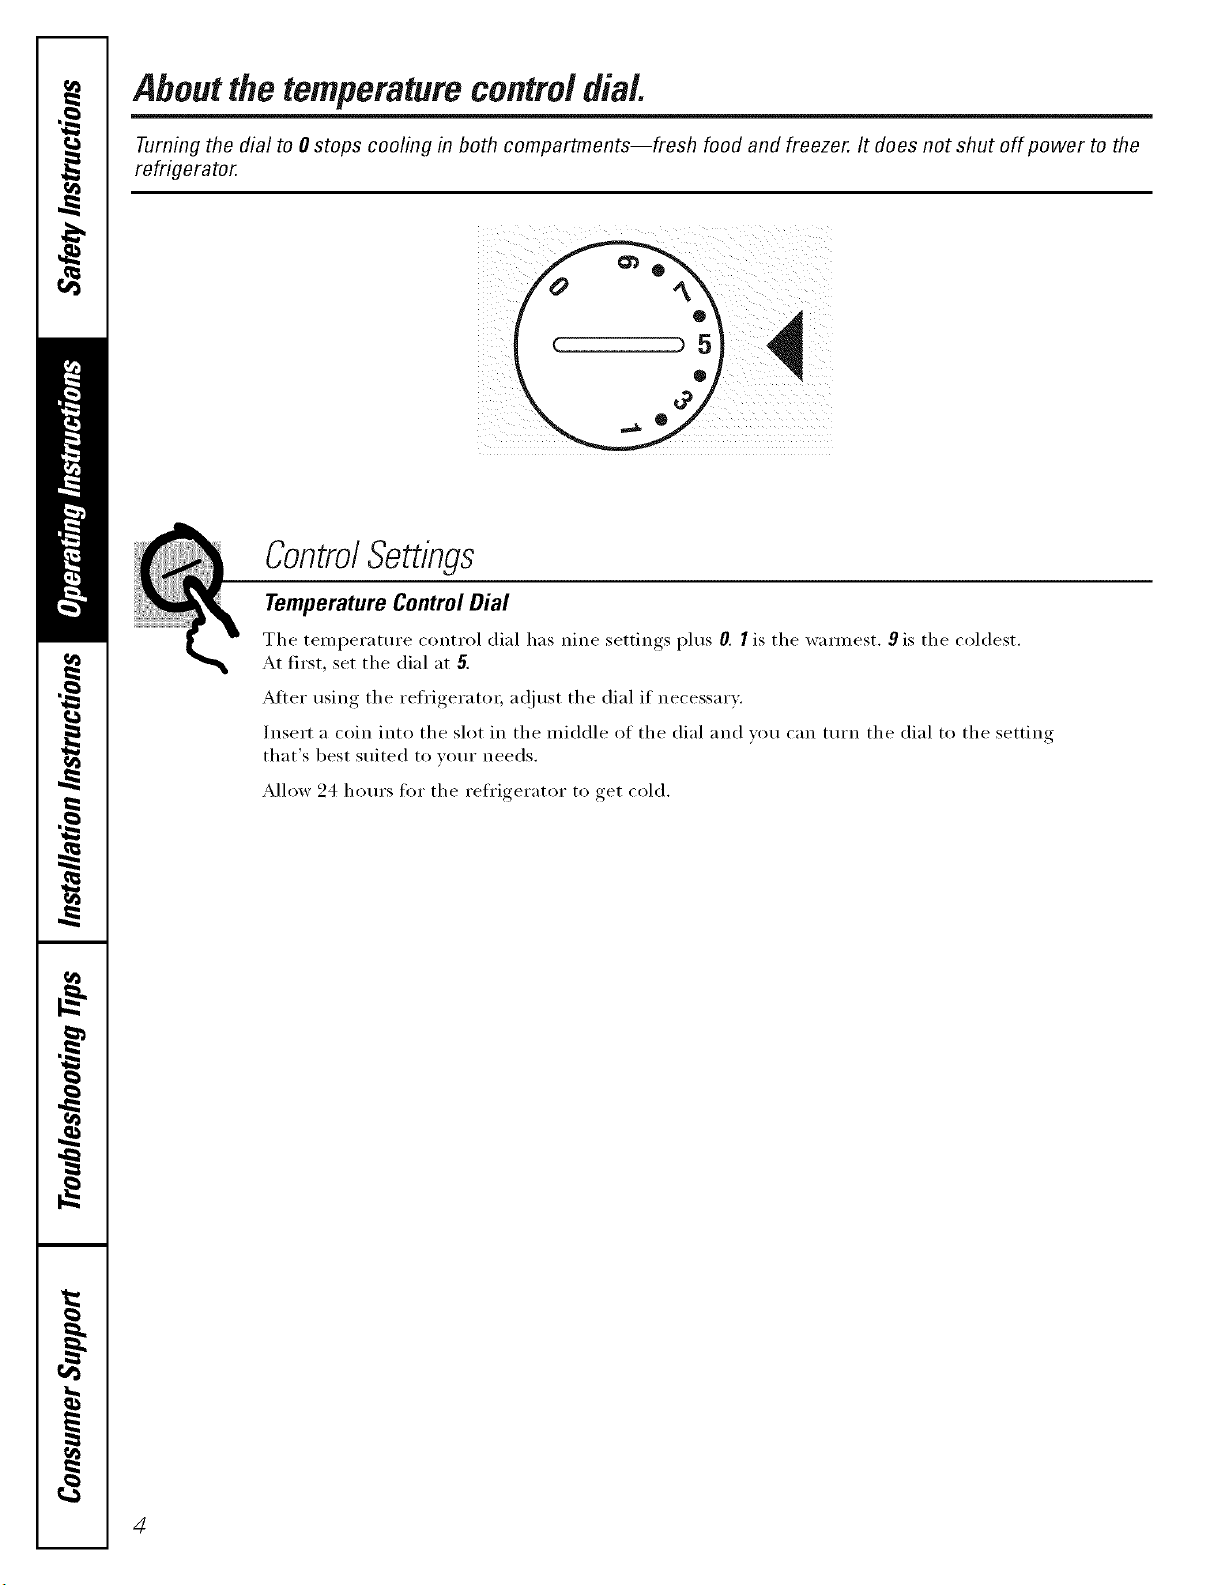
Aboutthetemperaturecontroldial.
Turning the dial to 0 stops cooling in both compartments--fresh food and freezer. It does not shut off power to the
refrigerator.
ControlSettings
Temperature Control Dial
The temperature control dial has nine settings plus 0. I is the wam_est. 9 is the coldest.
At first, set the dial at 5.
After using the refrigerator; a(!just the dial if necessary.
Insert a coin into the slot in the middle of the dial and w)u can [tlI'n the dial to the setting
that's best suited to votlr needs.
Allow 24 horn's ti)r the reti'igerator to get cold.
4
Aboutthefreshfoodcompartmentshelves, w Hetpeint.cem
Shelf supports at various levels allow you to custom-space your shelves. Not all features are on all models.
iFrl
I
r
[_Tilt up
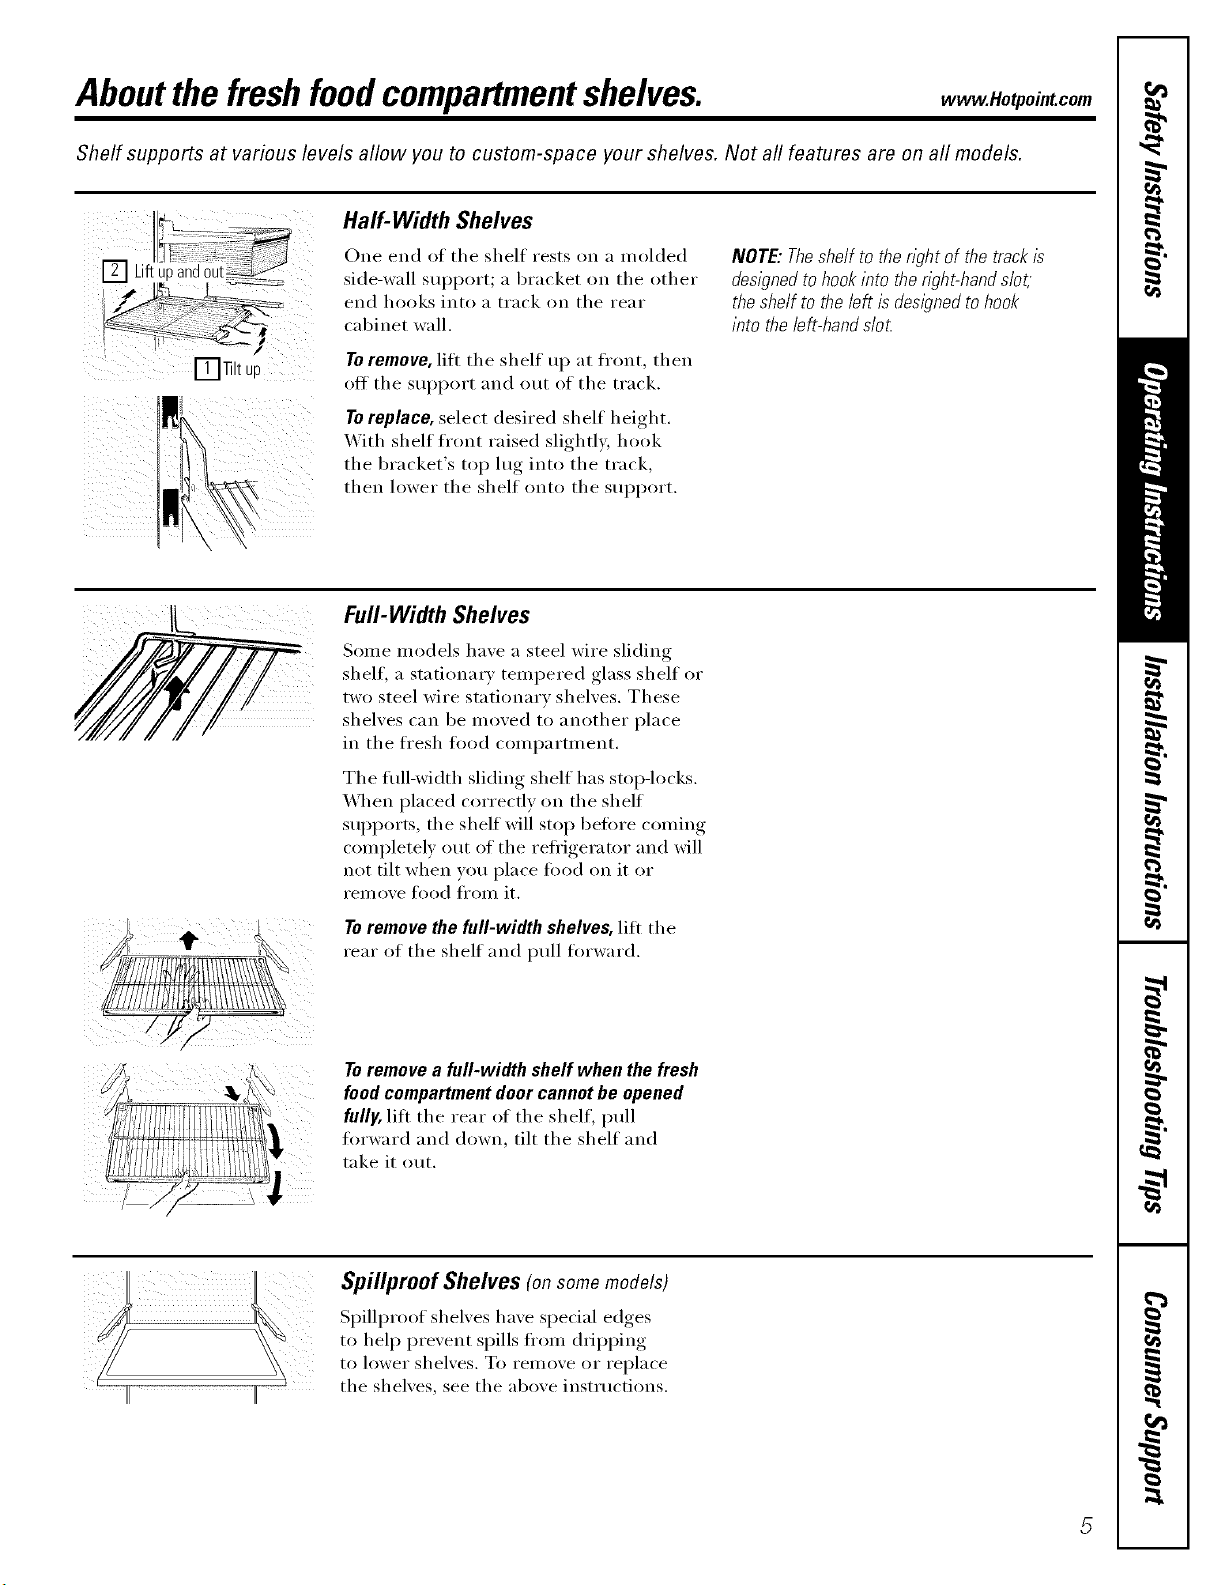
Half-Width Shelves
One end of the shelf rests on a molded
side-wall Stll)l)OI't; _1bracket on the other
end hooks into a track on the rear
cabinet wall.
Toremove, lifi the shelf uI) at front, then
off the sui_port and out of the track.
Toreplace, select desired shelf height.
_._ith shelf front raised slightly hi)ok
the bracket's top lug into the track,
then lower the shelf onto the support.
NOTE:Theshelf to theright of thetrackis
designedtohookintotheright-hands/ot;
theshelf to theleft isdesignedtohook
into theleft-hands/o_
Full-Width Shelves
Some models have a steel wire sliding
shelf, a stationary tempered glass shelf or
two steel wire stationary shelves. These
shelves can be moved to another place
in the ti'esh li)od compartment.
The flfll-width sliding shelf has stoi>locks.
_,_]_en placed correctly on the shelf
suI_ports, the shelf will stop heft)re coming
completely out of the refi'igerator and will
not tilt when you place tood on it or
rein ove Ii)od fl'om it.
To remove the full-width shelves, lift the
rear of the shelf and ptfll forward.
Toremove a full-width shelf when the fresh
food compartment door cannot be opened
fully, lift the rear oI the shelf, pull
forward and down, tilt the shelf and
take it out.
Spillproof Shelves (onsomemodels)
Spillproof shelves have special edges
to hel I) prevent spills ti'om d_ipping
to lower shelves. To remove or replace
the shelves, see the above instructions.
About the freezer compartment shelves.
Some models have an ice-tray shelf and some have a full-width step shelf.
PlugSupp0rts
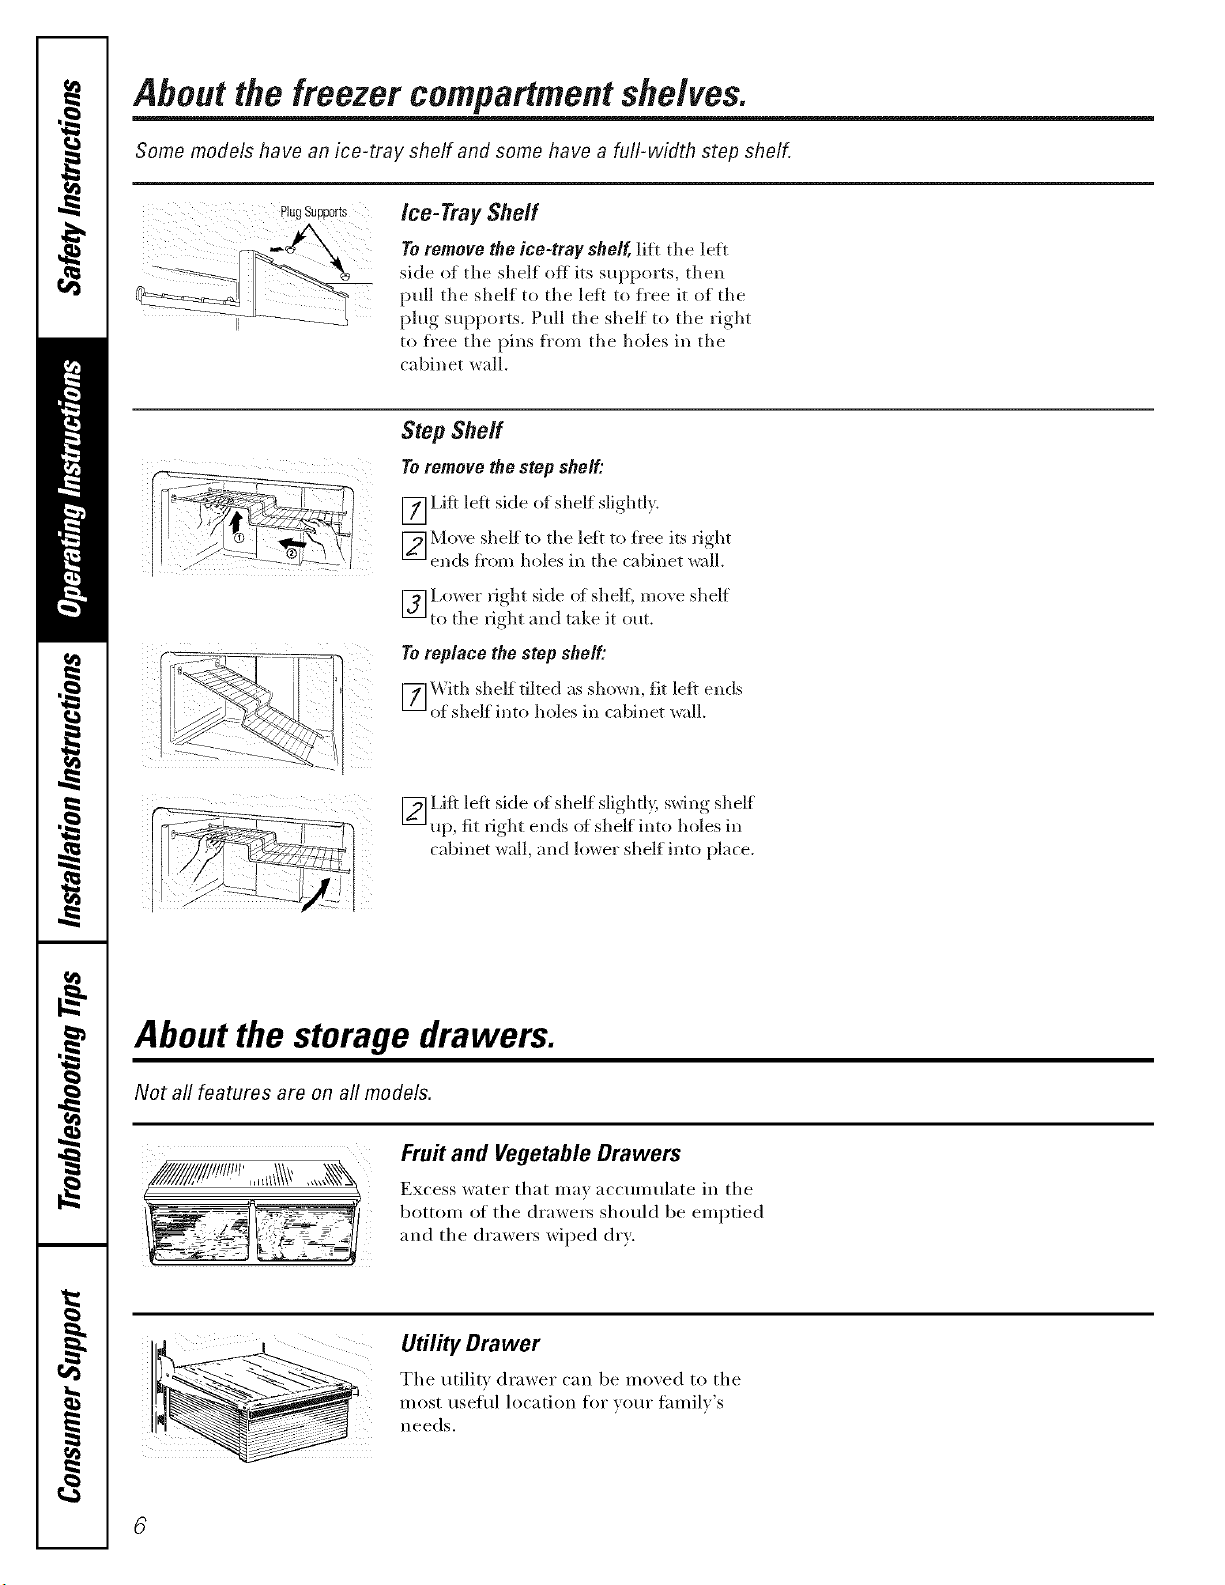
Ice-Tray Sheff
Toremove the ice-tray shelf, li_t tile left
side of tile shelf off its supports, then
pull tile silelf to tile left to fl'ee it of tile
plug supports. Pull tile shelf to tile rigilt
to fl'ee tile pins fl'om tile holes in tile
cabinet wall,
StepShelf
Toremove the step shelf:
[_I,ifl left side of shelf sligiltl?.
[_ Mo_.e sileif to tile left to fl'ee its figllt
ends fl'om holes in tile cabinet wall.
Lower fight side of shelf, moxe shelf
[] to tile fight and take it out.
Toreplace the step shelf:
F_] \'Vith sileif tilted as shown, fit left ends
of shelf into holes in cabinet wall
[_I,ifl left side of shelf slightl?, swing shelf
up, fit right ends of shelf into lloles in
cabinet v4_ll, and iox,_er shelf into place.
About the storage drawers.
Not all features are on all models.
! i_i
Fru# and Vegetable Drawers
Excess water that may accumulate in tile
bottom of tile drawe_ should be emptied
and tile drawers wiped dry.
Utility Drawer
Tile utili D drawer can be mined to tile
i ETy,.i
About storage drawer and cover removal, vvww.Hotpointcom
Not all features are on all models.
Humidity Control
Y _5
HIGH LOW
Adjustable Humidity Drawer (onsomemodels)
Slide the control all the way to the Slide the control all the way to the LOW
HIGH setting to proxide high humidity setting to provide lower humidit_ levels
reconm/ended fi)r most xegetables, recommended for most fruits.
Drawer and Cover Removal
Drawers can be removed easily by grasping
the sides and lifting up slightly while
pulling drawei_ past tile stop location.
i i
ii
iii! i
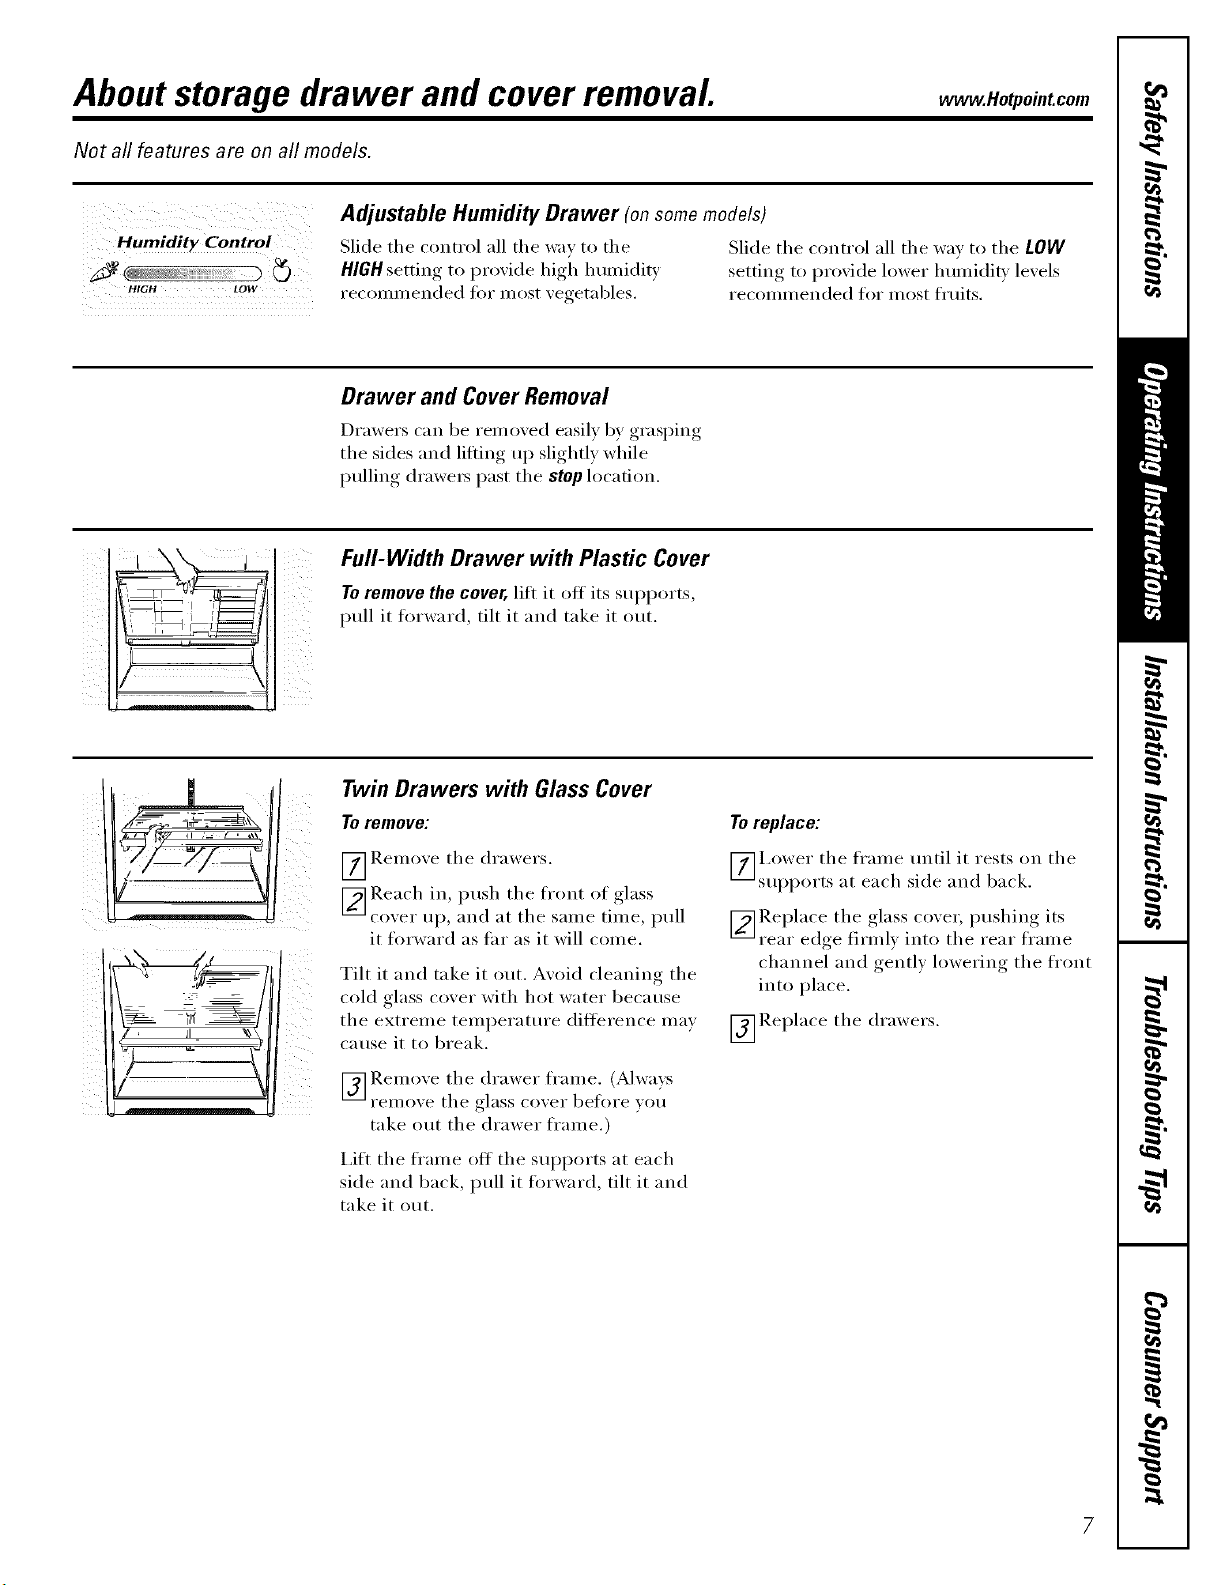
Full-Width Drawer with Plastic Cover
To remove the cover, litt it off its supports,
pull it fi:,rvvard, tilt it and take it ()tit.
7 , JI %\
Twin Drawers with Glass Cover
To remove:
_] Remoxe the drawers.
_ Reach in, push the front of glass
coxer up, and at the same time, pull
it forward as tar as it will conle.
Tilt it and take it ()lit. Avoid cleaning tile
cold glass cover with hot water because
the extreme temperature difference may
Catlse it to break.
[_] Remoxe tile drawer frame. (Always
FeI//oxe tile glass coxer before }ou
take out the drawer fl'ame.)
I,itt the fl'ame off the supports at each
side and back, pull it fi_rward, tilt it and
take it out.
To replace:
_]i,ower tile frame until it rests on tile
supports at each side and back.
V_ Re I)lace tile ,glass cox er, I)ushin°_ its
rear edge firml) into tile rear frame
channel and gentl) lowering tile front
into place.
_]Replace tile drawers.
7
About the automatic icemaker.
A newly-installed refrigerator may take 12to 24 hours to begin making ice.
Power
Switch Icemaker
C
PowerLight erArm
Powerswitch model
FeelerArmI0 lueJ Besleon
theON/down
[)OSI[IO[
Feelerarmmodel
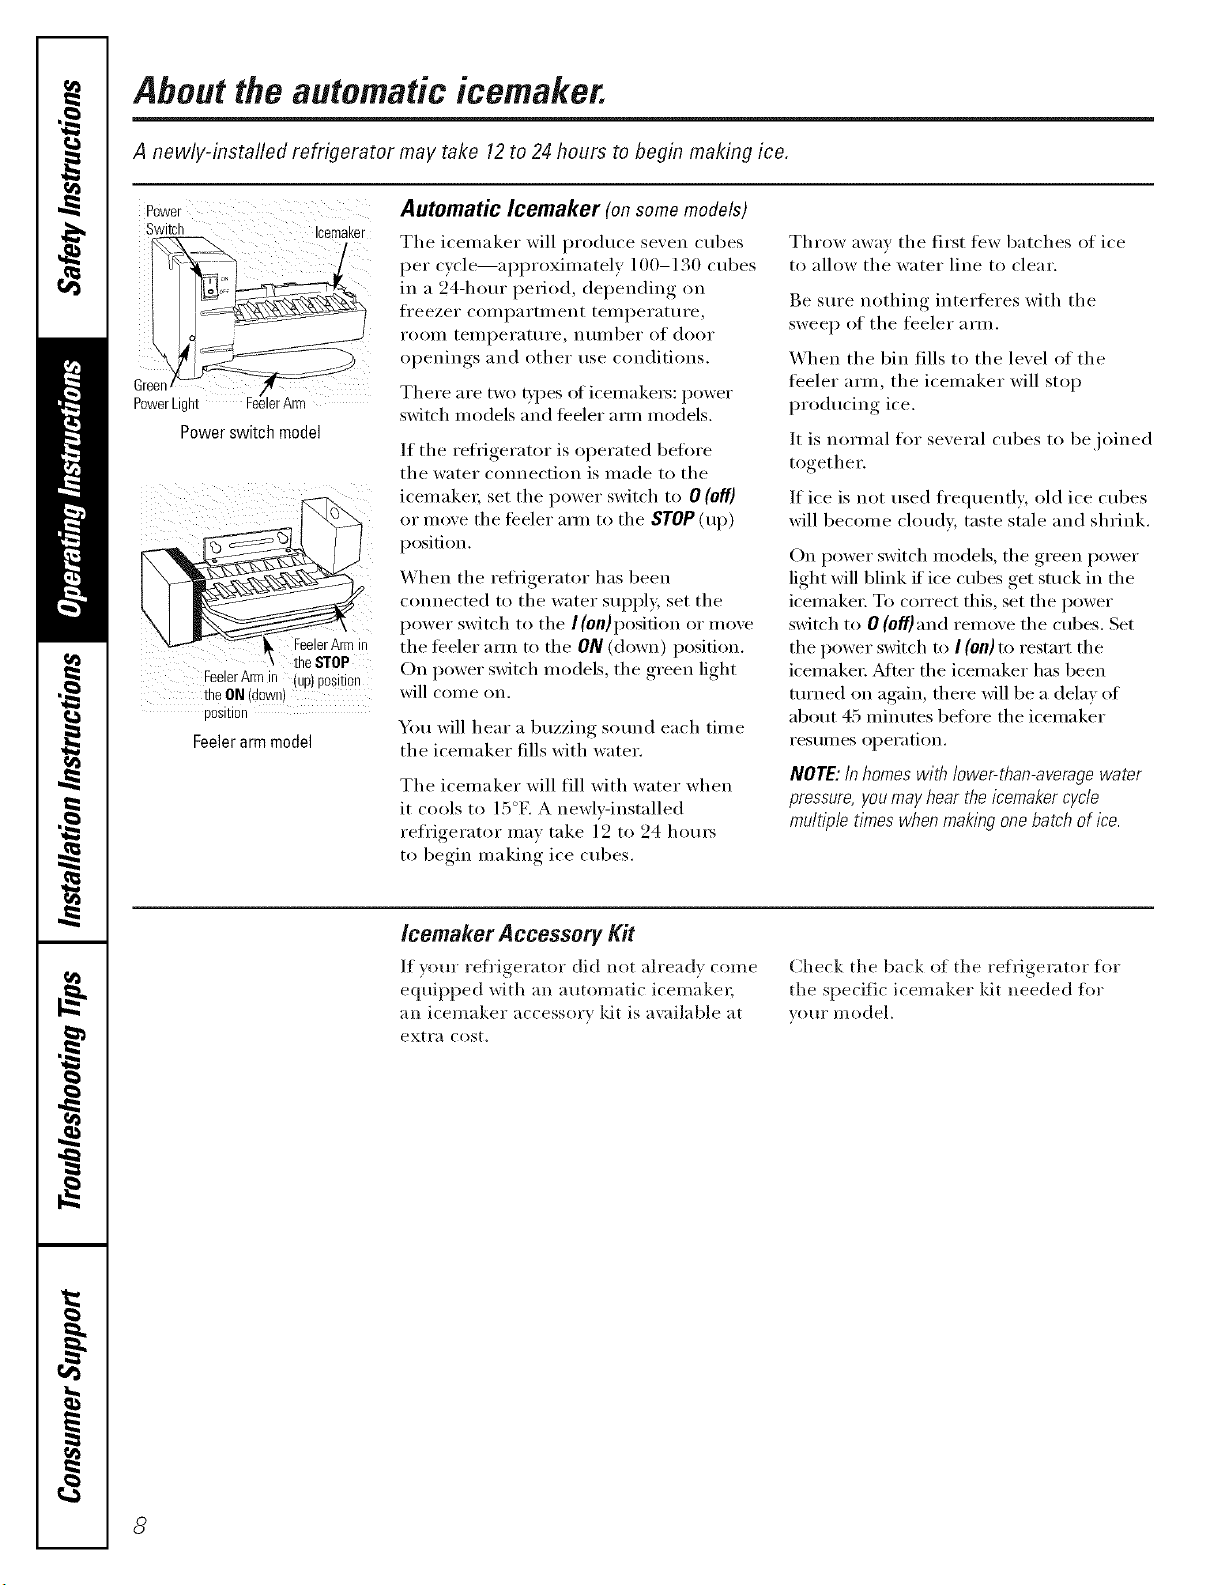
Automatic Icemaker (on some models)
The icemaker will produce seven cubes
per cycle--ai)i)roxinlately 100-130 cubes
in a 24-ham" period, depending on
fl'eezer coml)artn/ent temperature,
I'OOIll teillpei'attti'e, nttI/tbeI" of dooI"
openings and other use conditions.
There are two bpes of icemaket_: power
switch models and feeler arm models.
If the refl{gerator is operated befin'e
the water connection is made to the
icemakei; set the power switch to 0 (off)
or move the feeler aml to the STOP(up)
position.
When the refl_gerator has been
connected to the water SUl)l)ly, set the
power switch to the I (0n)position or move
tile feeler aml to the ON (down) position.
On power switch models, the green light
will come on,
You will hear a buzzing sotmd each time
the icemaker fills with water.
The icemaker will fill with water when
it cools to ] 5°E A newly-installed
refl'igerator mav take ] 2 to 24 hours
to begin making ice cubes.
Throw away the first few batches of ice
to allow the water line to clear.
Be sure nothing interferes with the
sweep of the feeler arm.
When the bin fills to the level of the
feeler arm, tile icemaker will stop
producing ice.
It is normal fin" several cubes to be joined
together.
If ice is not used fl'equently, old ice cubes
will become cloudy, taste stale and shrink.
On power switch models, the green power
light will blink if ice cubes get stuck in the
icemaket: To correct this, set the power
switch to 0 (off)and remove the cubes. Set
the power switch to I (0/1) to restart the
icemaket; ,Mter the icemaker has been
turned on again, there will be a delay of
about 45 minutes before the icemaker
i'eStlliles operation.
NOTE: In homes with lower-than-average water
pressure, you may hear the/cemaker cycle
multipletimes when makingone batch of ice.
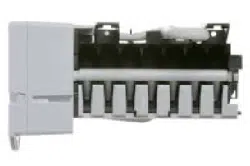
lcemaker Accessory Kit
If your refl'igerator did not already come
equipped with an automatic icemake_;
an icemaker accessory kit is a_;dlable at
exti';i cost.
Check the back of the refl-l_elat_ t for
the specific icemal<er kit needed for
}our model.
8
Care and cleaning of the refrigerator. .eotpoint.com
Cleaning the Outside
The door handles and trim (on some
models). Clean with a cloth (lmnl)ened
with soapy water. Dry with a soft cloth.
Keep the outside clean. Wipe with a clean
cloth lightly dan_i)ened with kitchen
appliance wax or mild liquid dish
detergent. Dry and polish with a clean,
soft cloth.
The stainless steel panels and door handles
(oil some models) can be cleaned with
a commercially availal)le stainless steel
cleaner. Do not use al)pliance wax or
polish on the stainless steel,
Donot wipetherefrigeratorwith a soileddish
cloth orwet towel.Thesemayleavea residue
that canerodethepainLDonot usescouring
pads,powderedcleaners,bleachorcleaners
containingbleachbecausetheseproductscan
scratchand weakenthepaintflelsh.
Cleaning the Inside
To help prevent odors, leave an open bo×
ot baking soda in the fresh fl)od and
fl'eezer compartments,
Unplug the refrigerator before cleaning.
If this is not i)ra(tical, wring excess
moisture out of sponge or cloth when
cleaning arotmd switches, lights or
controls,
Use wam_ water and baking soda
solution--about a tablespoon (l 5 ml) of
baking soda to a quart (l liter) ot water,
This both cleans and neutralizes odors.
Rinse and wipe (hT:
After cleaning the door gaskets, apply a
thin laver of petrolemn.jelly to the door
gaskets at the hinge side, This helps kee I)
the gaskets fl'om sticking and bending
()tit of shape.
Avoidcleaningcoldglassshelves(onsome
models)with hot waterbecausetheextreme
temperaturedifferencemaycausethemto
break.Handleglassshelvescarefully.Bumping
temperedglasscancauseit toshatter
Donot washanyplasticrefrigeratorpartsin
thedishwasher
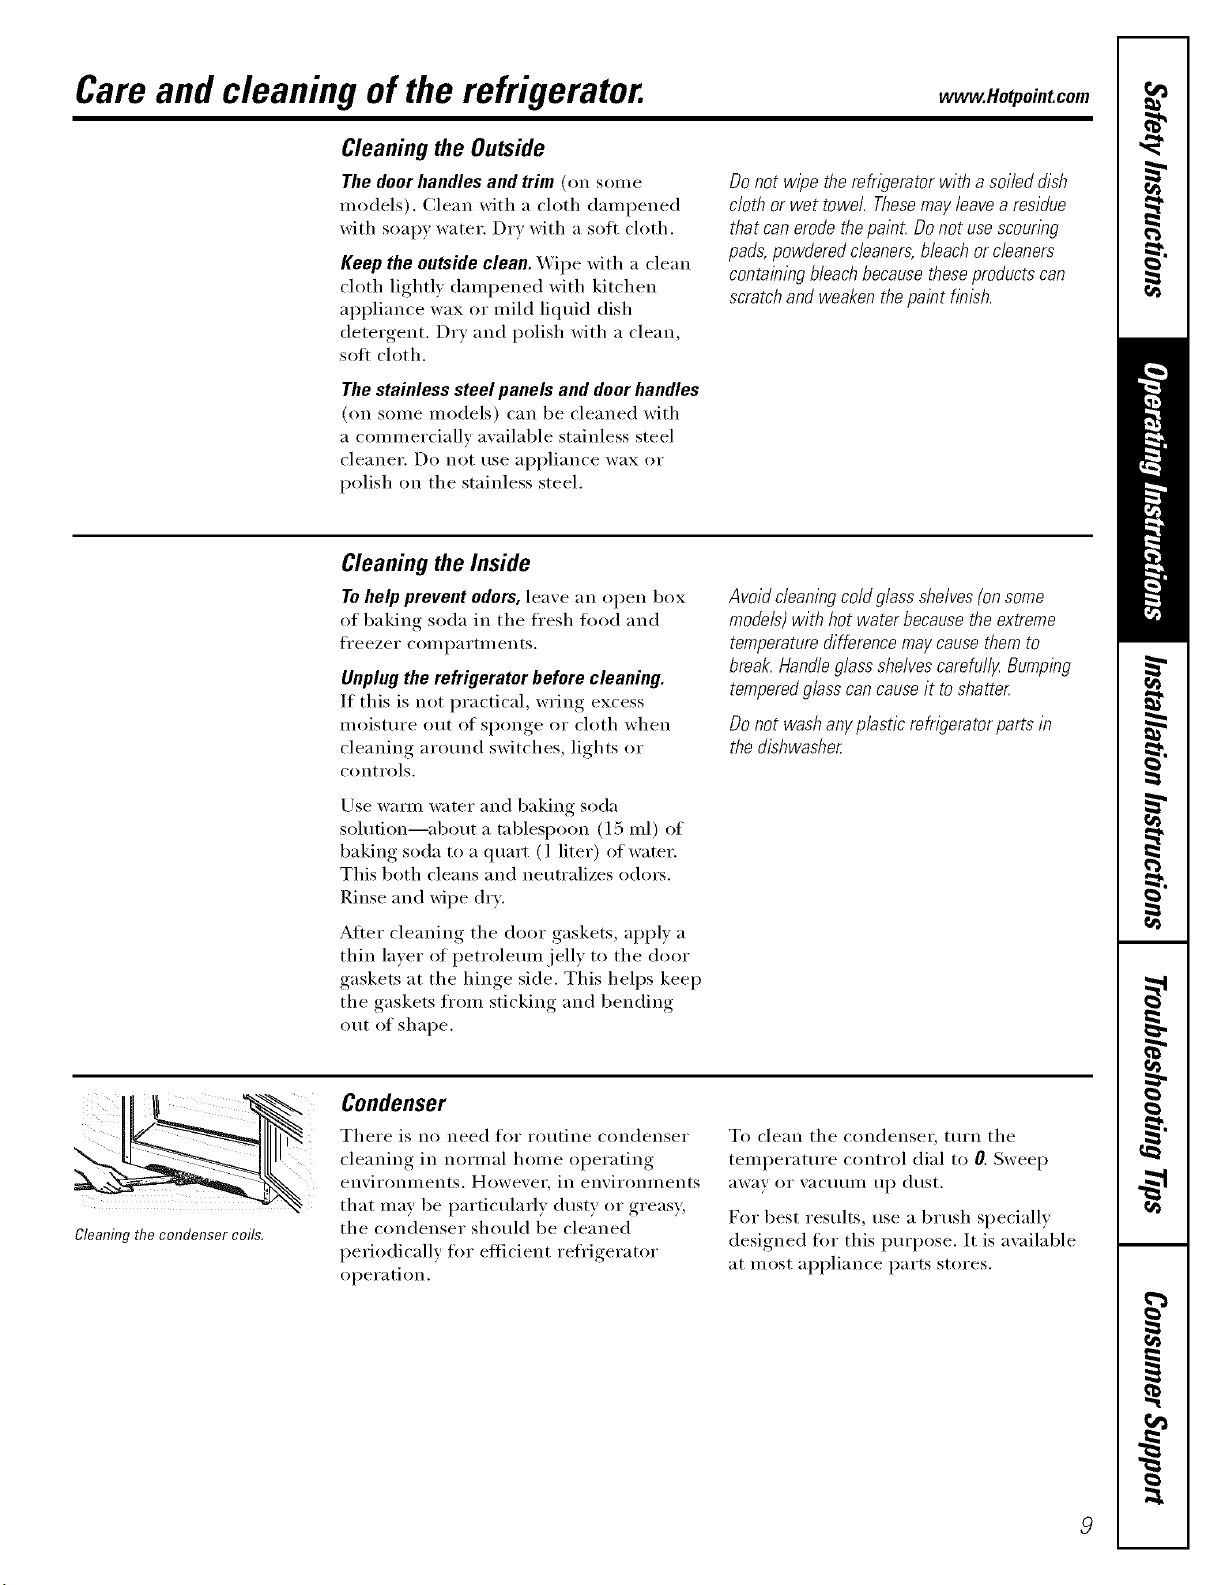
CleanflTgthe condenser coils.
Condenser
There is no need for routine condenser
cleaning in normal home operating
environments, However, in environments
that may be particularly dusty or greasy;
the condenser should be cleaned
periodically fl)r efficient refl'igerator
operation.
To clean the con(lenset; turn the
temperature control dial to 0, Sweep
}IW}IV 0I" V}IC/IIIIII 1113 dust.
For best results, use a bIush specially
designed fl)r this imrpose. It is available
at most appliance parts stores.
Care and cleaning of the refrigerator.
Behind the Refrigerator
Be careful when moving the refl'igerator
away from tile wall. All types of floor
coverings call be damaged, particularly
cushioned coverings and those with
eI//bossed stlr_lces.
Turn tile leveling legs at each fl'ont corner
of tile refligerator counterclockwise tmtil
tile rolle_ support tile ret}'igeratol: Pull tile
refl_igexwtor straight out and return it to
position by pushing it straight in. Moving
tile refl_igemtor in a side direction may
result in damage to tile floor coveting or
refligemtor.
When pushing the refngerator back, make sure
you don't rofl over the power cord or icernaker
supply/1be (onsome models).
After rolling tile refl'igerator back into
place, turn tile legs (h)rkwise until tile
legs again bear the weight of the
refi'igerator.
Light Bulb Replacement
To replace a burned-out bulb, unplug
the refi'igerator fl'om its electrical outlet,
unscrew tile bulb when cool and replace
it with an appliance bulb of the same or
lower wattage.
Turningthecentre/to the0 positiondoesnot
removepowerto the//_Thtcircuit.
Preparing for Vacation
For long vacations or nbsenres, remo\ e
fl)od and unplug tile refi'igeratm: Move
the temperature control dial to tile 0
position, and clean the interior with a
baking soda solution of one tablespoon
(15 ml) of baking soda to one quart
(1 liter) of water. Leave tile doors open.
Set the icemaker power switch to tile
O(Off) position or move the feeler arm to
tile STOP (up) position (depending on
model) and shut off tile water supply to
tile reti'igerator.
If tile temperature can drop below
fl'eezing, have a qualified servicer drain
tile water supply system (on some models)
to prevent serious property damage (Isle
to flooding.
Preparing to Move
Secure all loose items such as grille,
shelves and drawers by taping them
securely in place to prevent damage.
Be sure the refn)erator stays rn an upr/)ht
position dunbg rnov/bg.
70
Installation
Instructions
Refrigerator
Models 16,17,18
ffyou have questions,call 1.800.GE.CARESor ,isit ore" Website at: www.Hotpoint.com
BEFORE YOU BEGIN
Read tlmse instructions completely and carefully.
" IMPORTANT - 8 ,,e hese
instructions for local inspector's use.
" IMPORTANT - Obse,,e.ll
,_OXeI'llill o" codes _l]d ol'dill_llces.
* Note to Installer - Be sure to leave these
instructions with the Consumer.
* Note to Consumer - Keep these instructions
for future reference.
* Skill level - Installation of this appliance requires
basic mechanical skills.
" Completion time - I).efrigerator Installation
15 minutes
Re_ersino, _ the Door Swing
1 hour
" Proper installation is tile responsibilit} oi tile
installer.
" Product failure due to improper installation is not
covered under tile \'\_u'rant}.
WATER SUPPLY TO THE ICEMAKER
(on some models)
If tile refrigerator has an icemaker, it will have to be
connected to a cold water line. A water sui)ply kit
(containing COl)per tubing, shutoff' valve, fittings and
instructions) is available at extra cost fl'om vom" dealer
or fl'om Parts and Accessories, 800.626.2002.
REFRIGERATOR LOCATION
• Do not install tile refl_igerator where tile temperatme
will go below 60 °F (l 6 °C) beca use it will not run otten
enough to maintain i)roper temperatures.
• Install it on a floor strong enough to SUl)pOll it flfllv
loaded.
CLEARANCES
_Mlow tile fi)llowing clearances for ease of installation,
i)roper air circulation and i)lumbing and electrical
connections.
• Sides./4 (19ram)
• Top 1" (25 ram)
• Back 1" (25 ram)
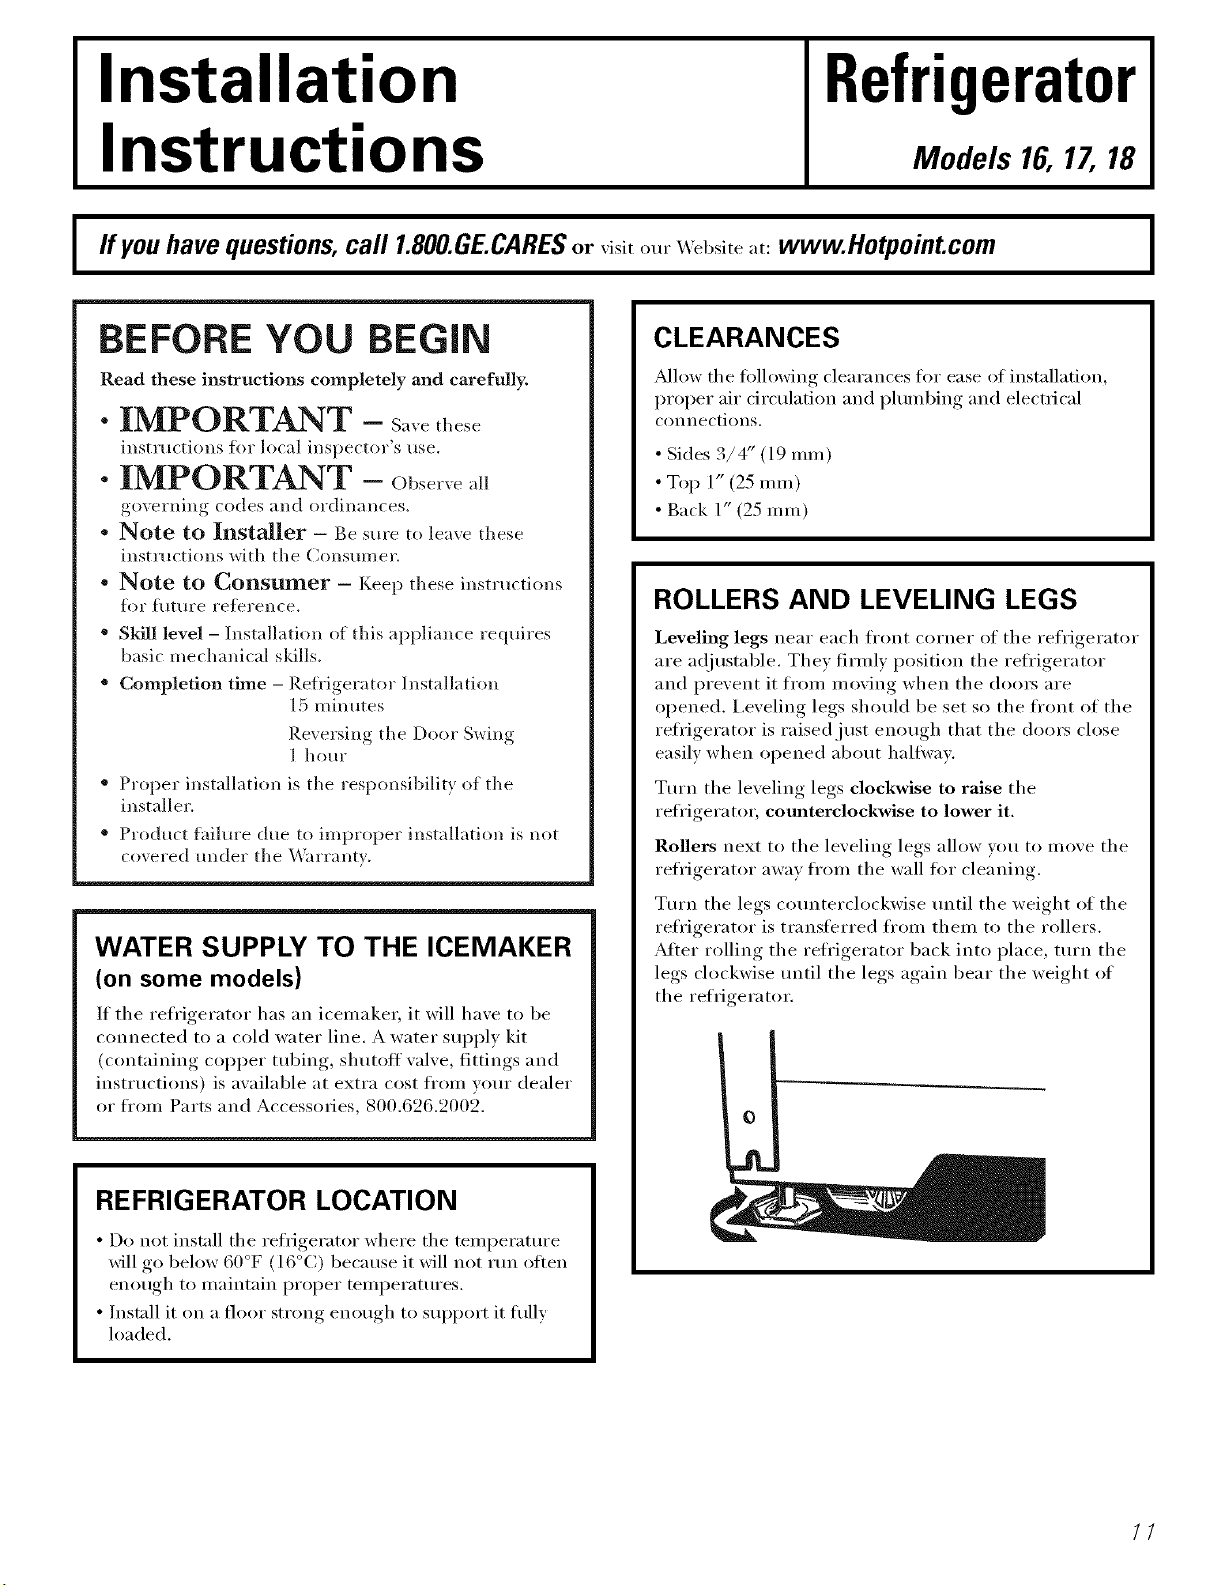
ROLLERS AND LEVELING LEGS
Leveling legs near each fl'ont corner of tile refl'igerator
are a(!justable. They firmly position tile refl'igerator
and prevent it from moving when tile dom_ are
opened. I,eveling legs should be set so the front of the
reli'igerator is raised just enough that tile doors close
easily when opened about hallway.
Tm'n the leveling legs clockwise to raise the
refl'igerator, counterclockwise to lower it.
Rollers next to the leveling legs allow you to inove the
refl'igerator awav fl'oln tile wall fl_i" cleaning.
Turn the legs c(mnterclockwise tmtil the weight of the
refl'igerator is transferred fl'om them to tile rollers.
After rolling tile refl'igerator back into place, turn tile
legs clockwise tmtil the legs again bear the weight of
the refrigerator.
I
//
Installation instructions
iNSTALLiNG THE WATER LiNE
BEFORE YOU BEGIN
Ilecommended copper water supply kits are _4UXSX2,
WXSX3 or WXSX4, depending on the amount of
tubing you need. Approved plastic water sui)ply lines
are refrigerator tubing kits _X08X10002,
WX08X10006, WX08X10015 and WX08X10025.
When connecting yore" refl'igerator to a reverse
osmosis water system, follow the mamlthcturer's
recoi_lHleilda tioils.
This water line installation is not warranted bv the
refl'igerator or icemaker manufi_cturer. Follow these
instructions careflfllv to minimize the risk of expensive
water damage.
_4'ater hammer (water banging in the pipes) in house
i_lmnbing can cause damage to refrigerator parts and
lead to water leakage or flooding. Call a qualified
i)lmnber to correct water hammer before installing
the water supply line to the refrigerator.
To prevent bm'ns and product damage, do not hook
up the water line to the hot water line,
If w)u use your refl'igerator heft)re connecting the
water line, make sm'e the icemaker power switch is
in the 0 (off} position (on power switch models) or the
teeler arm is in the STOP (up) position (on feeler arm
models).
Do not install the icemaker tubing in areas where
temperatm'es tall below fl'eezing.
When using any electrical device (such as a power
drill) dm'ing installation, be sm'e the device is double
insulated or grounded in a manner to prevent the
hazard of electric shock, or is battery powered.
All installations must be in accordance with local
i)lmnbing code requirements.
WHAT YOU WILL NEED
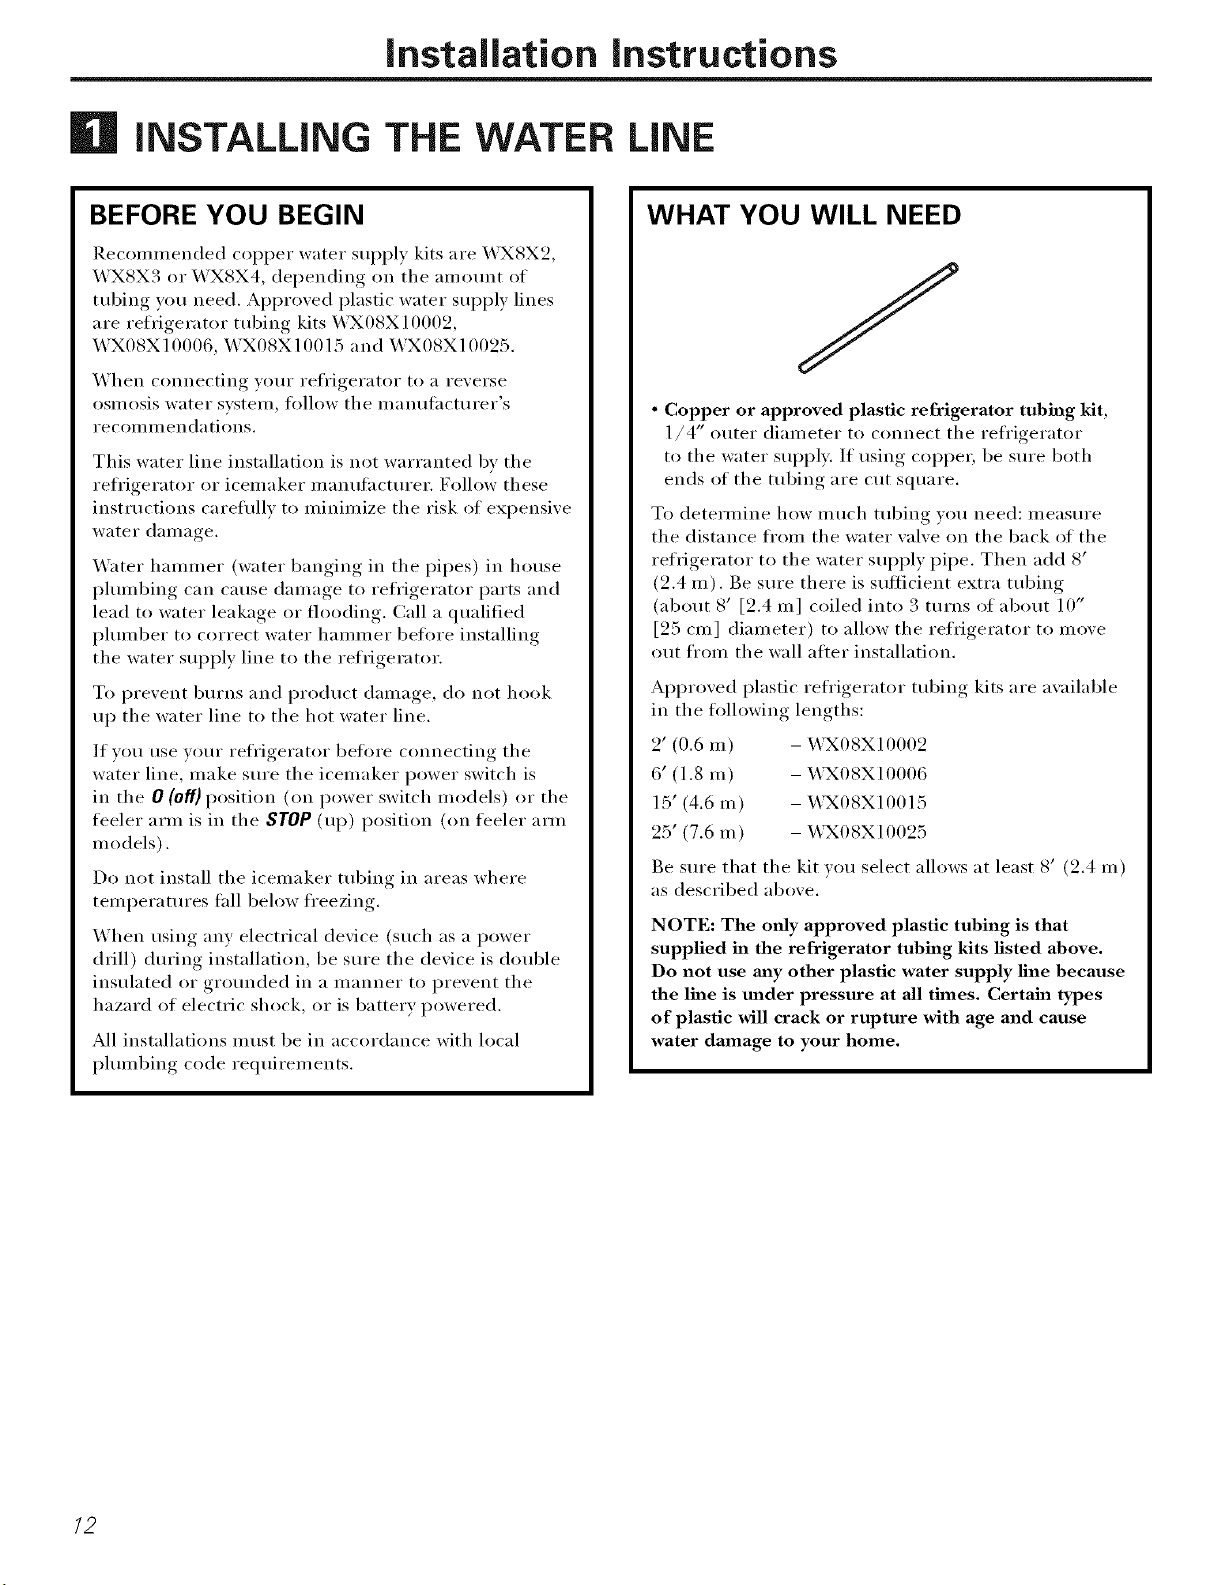
• Copper or approved plastic refrigerator tubing Mt,
1/4" outer diameter to connect the refl'igerator
to the water supply: If using COl)per, be sm'e both
ends of the tubing are cut square.
To determine how much tubing you need: measure
the distance fl'om the water wflve on the back of the
refrigerator to the water supply pipe. Then add 8'
(2.4 m). Be sm'e there is sufficient extra tubing
(about 8' [2.4 m] coiled into 3 turns of about 10"
[25 cm] diameter) to allow the refrigerator to move
out from the wall alter installation.
Approved plastic refl'igerator tubing kits are available
in the ti)llowing lengths:
2' (0.6 m) - _X08X10002
6' (1.8 m) - X,\3X08X10006
15' (4.6 m) - _4UX08X10015
25' (7.6 m) - X,\3X08X10025
Be sure that the kit w)u select allows at least 8' (2.4 m)
as described above.
NOTE: The tufty approved plastic tubing is that
supplied in the refrigerator tubing kits listed above.
Do not use m_y other plastic water supply line because
the line is under pressure at all thnes. Certain types
of plastic will crack or rupture with age and cause
water damage to your home.
/2
installation instructions
WHAT YOU WiLL NEED (CONT.}
• A water supply Mt (containing tubing, shutoff valve
and fittings listed below) is available at extra cost
t]'OUl voHr dealer or t]'om Parts alld Accessories,
1.888.261.3055.
• A cold water supply. The water pressure m ust be
between 20 and 120 p.s.i. (1.4-8.1 bar).
• Power drill.
• 1/2" or adjustable wrench.
• Straight and Phillips blade screwdriver.
• Two 1/4" outer diameter compression nuts and
2 ferrules (sleeves)--to connect the copper tubing
to the shutoff _dve and the refl'igerator water _dve.
OR
• If wm are using an approved plastic refi'igerator
tuiAng kit, tile necessary fittings are preassembled
to tile robing.
• If your existing copper water line has a flared fitting
at the end, you will need all adapter (available at
plumbing supply stores) to connect the water line to
tile refl'igerator OR you call cut off tile flared fitting
with a tube cutter and then use a compression
fitting. Do not cut fl)rmed end fl'om approved
plastic refl'igerator tubing.
° Shutoff vaJve to comlect to tile cold water lille.
Tile shutoff valve should have a water inlet with a
minimum inside diameter of 5/32" at the point of
connection to the COLD WATER LINE. Saddle-type
shutoff valves are included ill many water supply kits.
Before purchasing, make sure a saddle-t_pe valve
complies with your local plumbing codes.
Install the shutoff valve on the nearest frequeutl,_ used
drinking water line.
[] SHUT OFF THE MAIN WATER
SUPPLY
Turn on tile nearest fimcet hmg enough to clear
the line of water.
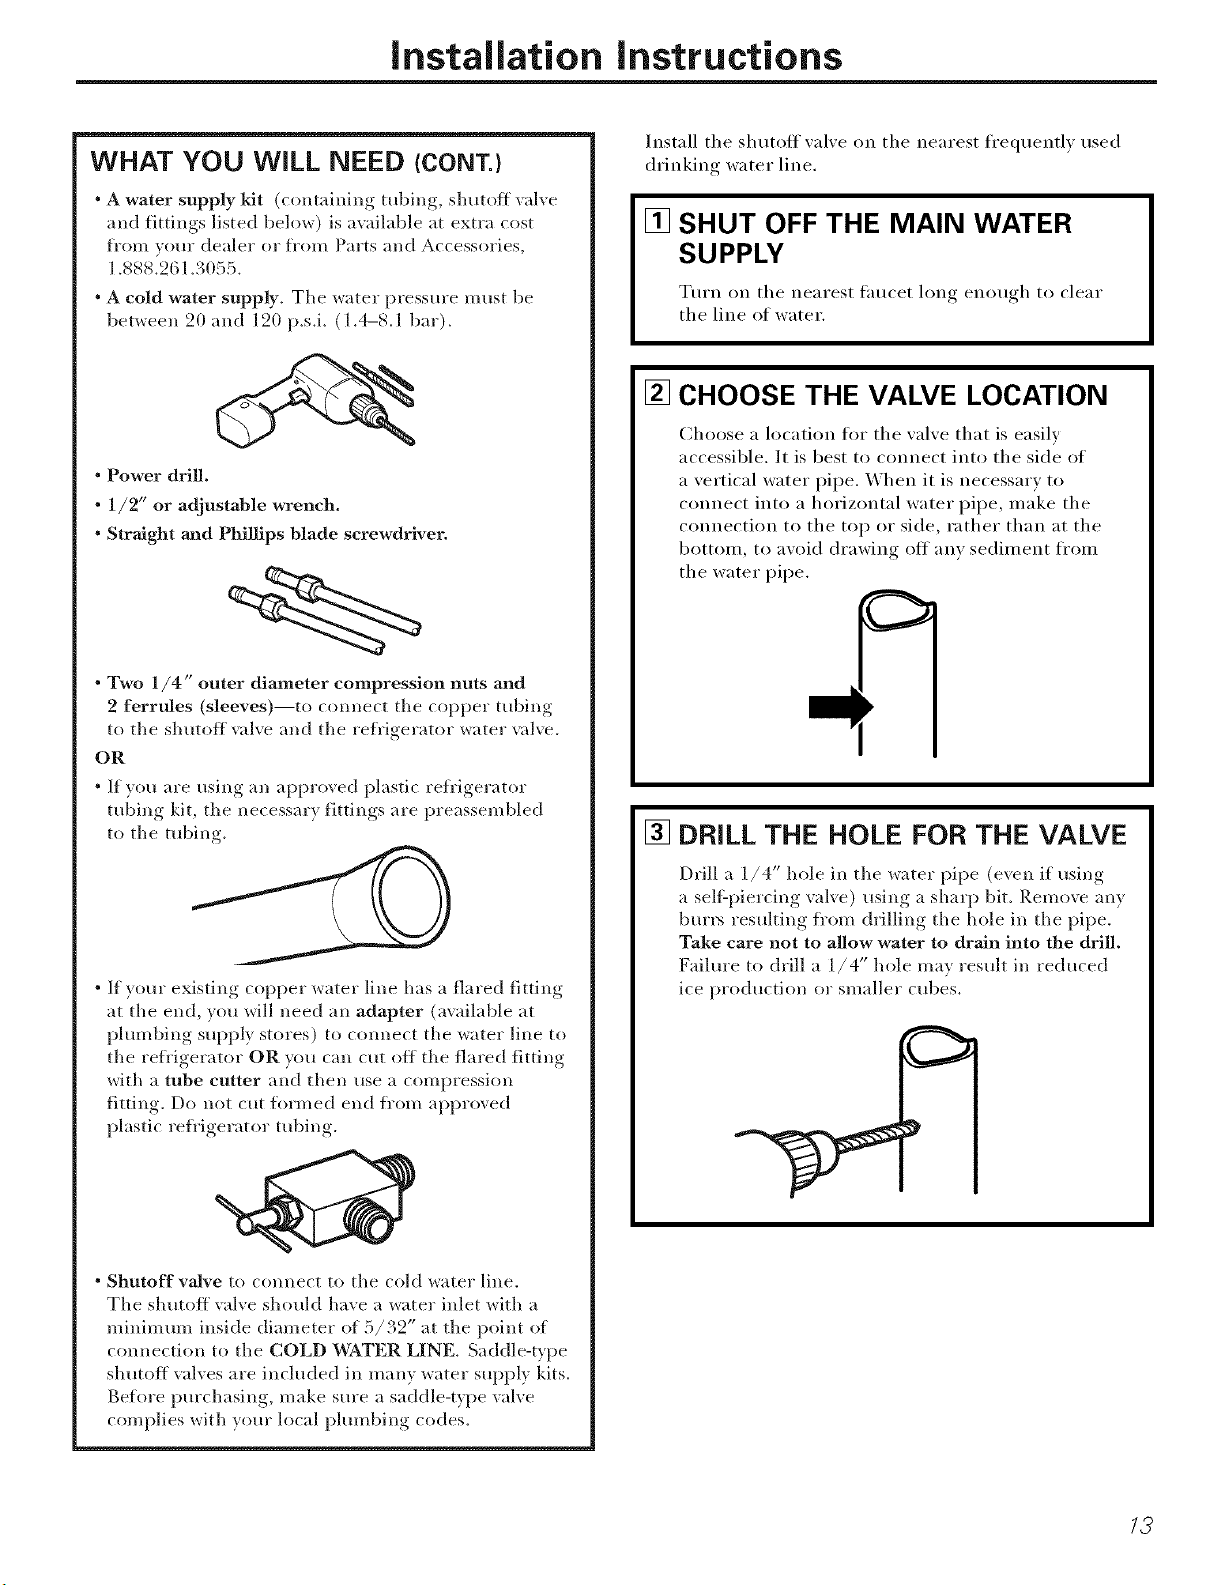
[] CHOOSE THE VALVE LOCATION
Choose a location fl)i" the valve that is easily
accessible. It is best to connect into the side of
a vertical water pipe. When it is necessary to
Couuect into a horizontal water pipe, u/ake the
COlmectiou to the top or side, rather than at the
bottom, to avoid drawing off auv sedilneut fl'oln
the water pipe.
k_
[] DRILL THE HOLE FOR THE VALVE
Drill a 1./4" hole in tile water pipe (e_eu i_ usino.,.,
a selfZpiercing val_e) using a sharp bit. Remoxe an}
btu'l> resulting from drilling tlle hole ill the pipe.
Take care not to allow water to drain into the drill.
Failure to drill a 1/4" hole ma} result in reduced
ice production or smaller cubes.
/3
Installation instructions
| iNSTALLiNG THE WATER LiNE (CONT.)
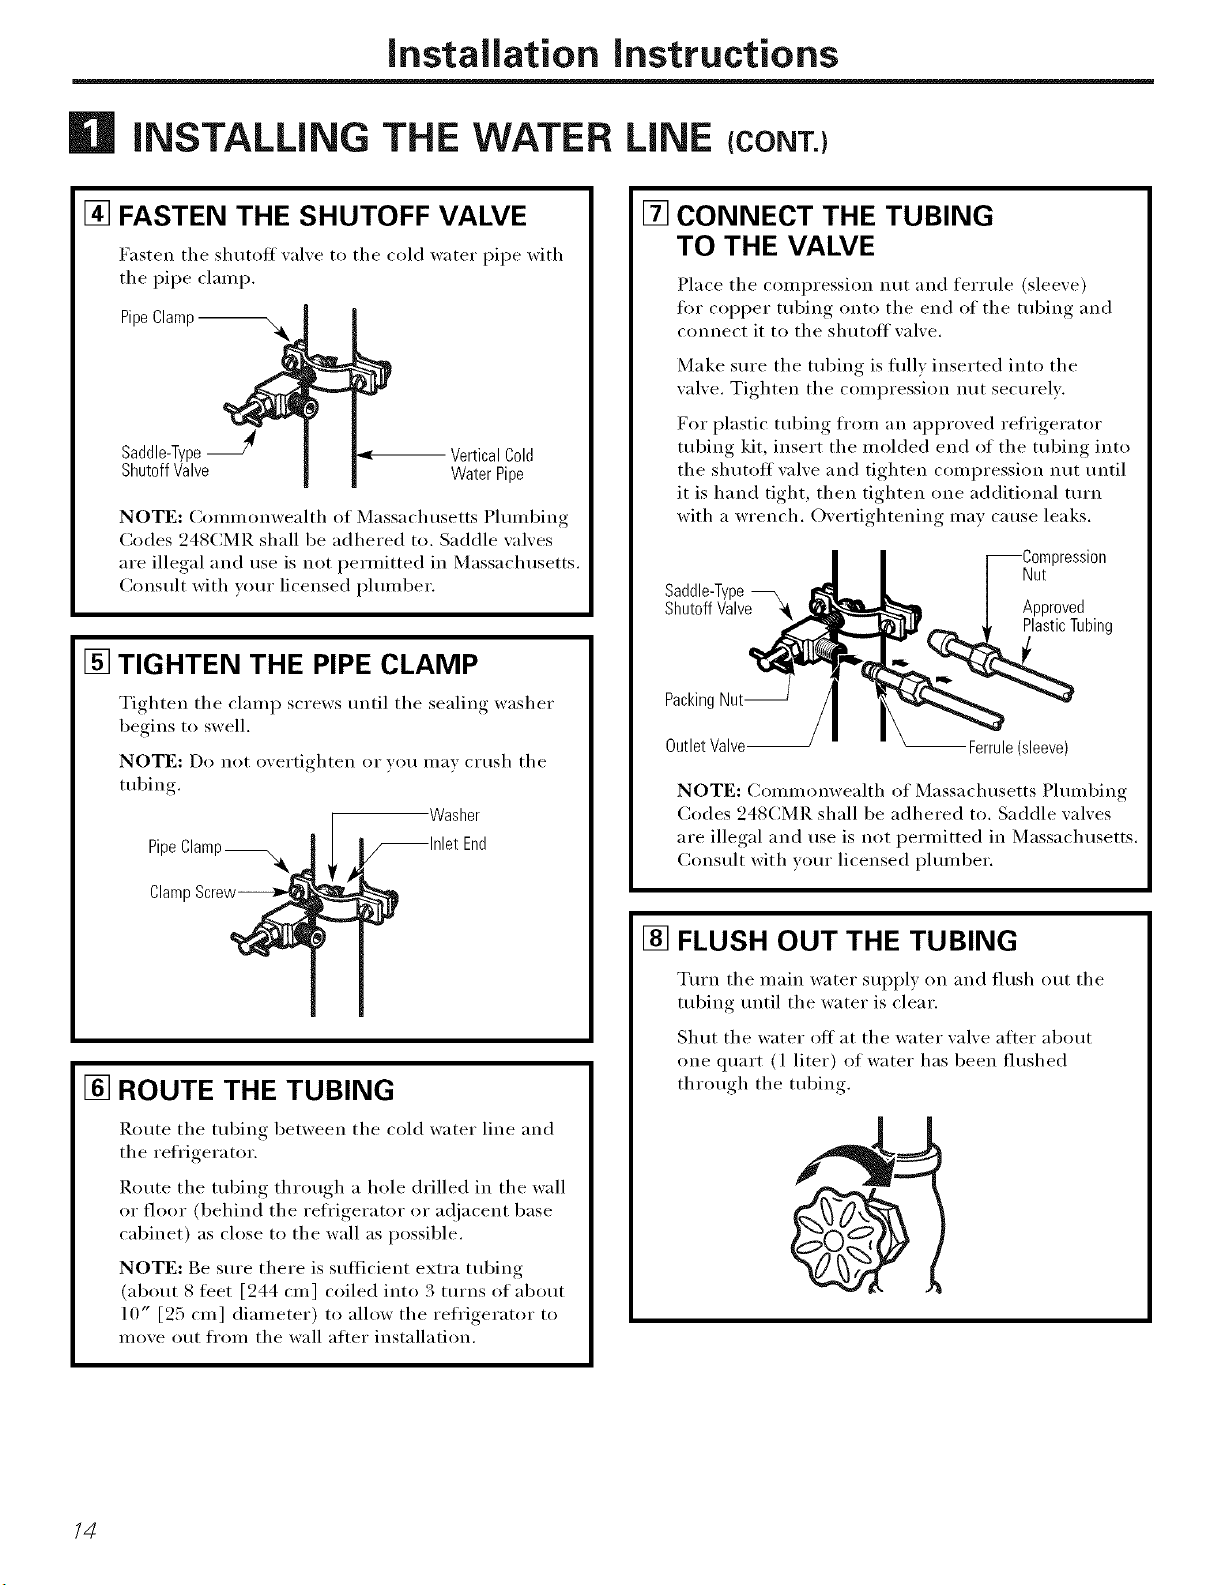
[] FASTEN THE SHUTOFF VALVE
Fasten the shutoff _al_e to the cold water pipe with
tile pipe clamp.
Pipe Clamp --
Saddle-TypeJ VerticalCold
ShutoffValve WaterPipe
NOT[:: (;ommonwealth of Massachusetts Plmnbing
Codes 248CMR shall be adhered to. Saddle valves
are illegal and use is not l)erlnitted in Massachusetts.
Consult with wmr licensed i)lmnber.
[] TIGHTEN THE PIPE CLAMP
Tighten tile clamp screws tmtil tile sealing washer
begins to swell.
NOTE: Do not overtighten or vo/I Ill}IV cI/Ish tile
tubing.
Washer
Pipe
Claml
[] ROUTE THE TUBING
Route tile tubing between tile cold water line and
tile refrigerator,
Route tile tubing through a hole drilled in tile wall
or floor (behind tile refl'igerator or a@_cent base
cabinet) as close to the wall as possible,
NOTE: Be sure there is sufficient extra tubing
(about 8 fl_et [944 cm] coiled into 3 turns of about
10" [25 cm] diameter) to allow the refl'igerator to
move out fl'om tile wall after installation.
[]
CONNECT THE TUBING
TO THE VALVE
Place tile compression nut and feHule (sleexe)
fi_r COl)per tubing onto tile end of tile tubing and
connect it to tile shutoff xalxe.
Make sm'e tile tubing is flflly inserted into tile
wdve, Tighten the compression nut securely,
For plastic tubing fl'om an approved refl'igerator
tubing kit, insert the molded end of the tubing into
the shutoff wdve and tighten compression nut until
it is hand tight, then tighten one additional turn
with a wrench, Overtightening may cause leaks,
Saddle-T_
ShutoffValve
)ression
Nut
Approved
PlasticTubing
Packing Nut--
Outlet Valve-- Ferrule (sleeve)
NOT[:: Collllllonwealth of Massachusetts Phllllbing
Codes 948CMR shall be adhered to. Saddle wdves
are illegal and use is not permitted in Massachusetts.
Consult with wmr licensed i)lmnber,
[] FLUSH OUT THE TUBING
Turn tile main water supply on and flush out tile
tubing until tile water is clear.
Shut tile water off at tile water wdve after about
one quart (l liter) of water has been flushed
through tile tubing.
14
Installation instructions
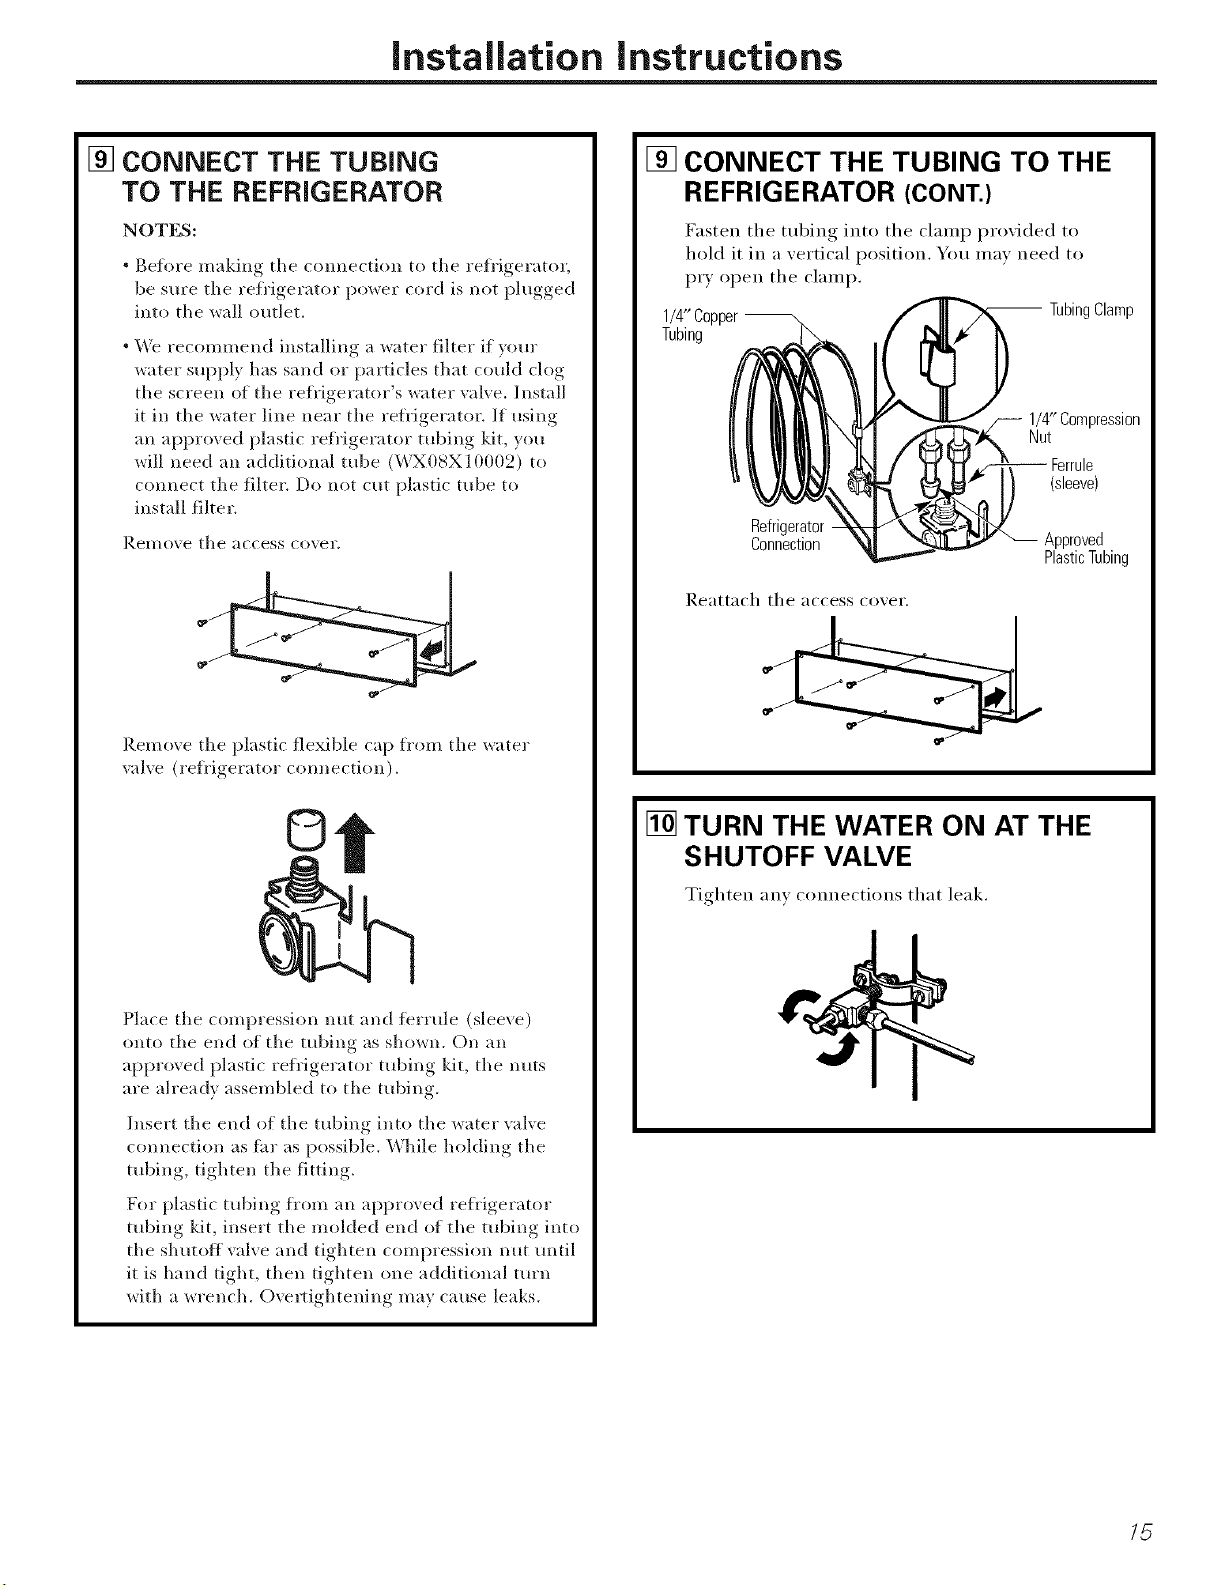
[] CONNECT THE TUBING
TO THE REFRIGERATOR
NOTES:
• Before making the connection to tile refrigerator
be sure tile refrigerator power cord is not l_lugged,,
into tile _all outlet.
• We recommend installing a water filter if yore"
water supply has sand o_" particles that could clog
tile screen of the refl'igerator's water valve. Install
it in the water line Ileal" tile refligerator. If using
an approved plastic *efl'igerator tubing kit, you
will need all additional robe (WX08X10002) to
connect tile filter. Do not cut plastic tube to
install filter.
Remo'_e the access co'_el'.
Remo_e the i)lastic flexible cap from tile water
vaEe (refrigerator cmmection).
©
Place the compression nut and terrule (sleeve)
onto tile end of the tubing as shown. On an
approved plastic refi'igerator tubing kit, tile nuts
are ah'eadv assembled to tile tubing.
Insert the end of the tubing into tile water valve
connection as flu" as possible. While hokling tile
tubing, tighten tile fitting.
For plastic tubing fl'om all approved refl'igerator
tubing kit, insert tile molded end of tile tubing into
tile shutoff valve and tighten compression nut until
it is hand tight, then tighten one additional turn
with a wrench. Ovel_ightening may cause leaks.
[] CONNECT THE TUBING TO THE
REFRIGERATOR (CONT.)
Fasten tile tubing into tile clamp provided to
hold it in a vertical position. You may need to
P_T open tile clamp.
1/4" Copper -- -- TubingClamp
Tubing
1/4"Compression
Nut
Ferrule
(sleeve)
Refrigerator
Connection
Approved
PlasticTubing
Reattach tile access co_,ei ",
[] TURN THE WATER ON AT THE
SHUTOFF VALVE
Tighten an) connections that leak.
/5
Installation instructions
B INSTALLING THE WATER LINE (CONT.)
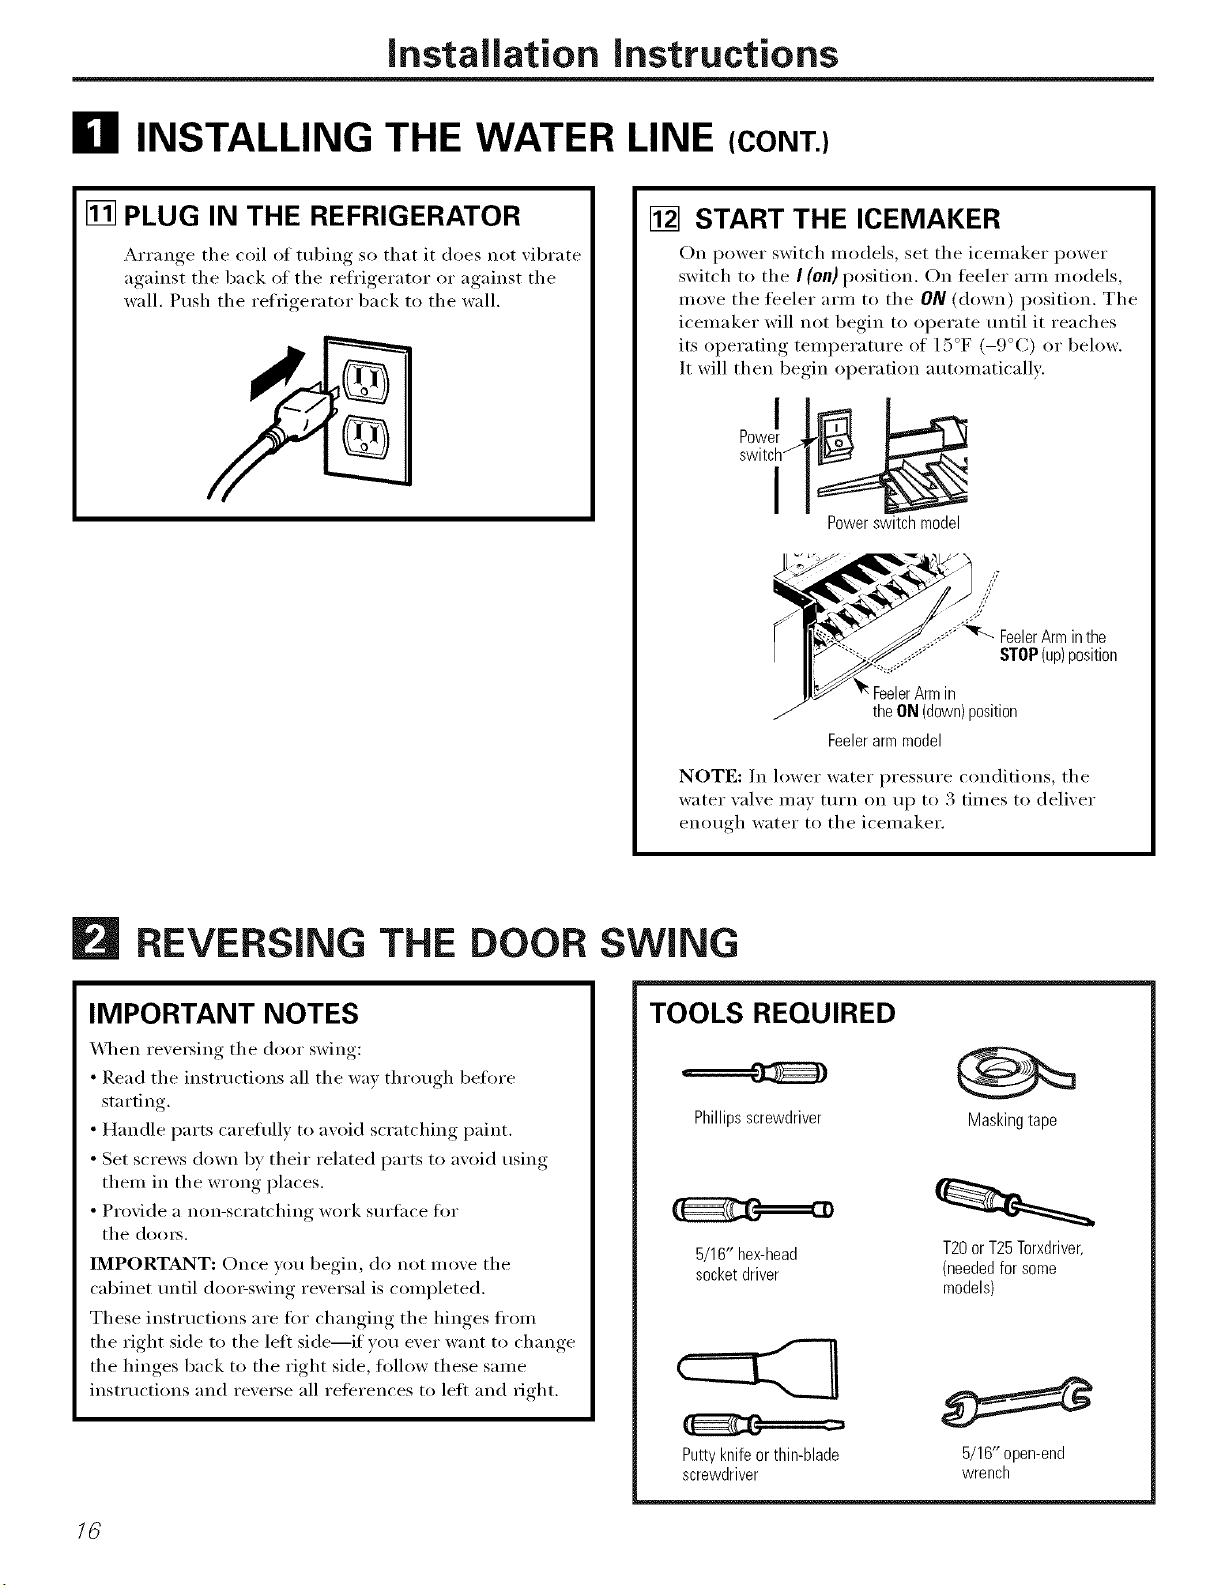
[] PLUG IN THE REFRIGERATOR
Arrange the coil of tubing so that it does not _ibrate
against the back of the refrigerator or against the
wall. Push the refrigerator back to the wall.
[] START THE ICEMAKER
On power switch models, set the icemaker power
switch to the I (on} position. On feeler arm models,
move the feeler arm to the ON (down) position. The
icemaker will not begin to operate until it reaches
its operating temperatm'e of 15°F (-9°C) or below.
It will then begin operation automatically:
Power switch model
theON(down)position
Feelerarmmodel
NOTE: In lower water pressm'e conditions, the
water _al_e may turn on up to 3 times to deliver
enouoh water to the icemaker.
16
REVERSING THE DOOR
IMPORTANT NOTES
\,_l_en re\'e_ing the door swing:
• Read the instructions all the way through beflwe
starting.
• Handle parts carefully to aw)id scratching paint.
• Set screws down by their related parts to avoid using
them in the wrong places.
• Provide a non-scratching work sm'tace fin.
the doms.
IMPORTANT: Once wm begin, do not move the
cabinet tmtil doo>swing reversal is completed.
These instructions are fi)r changing the hinges fl'om
the right side to the lett side--if you ever want to change
the hinges back to the right side, fi)llow these same
inst_ uctions and reverse all references to left and dght.
SWING
TOOLS REQUIRED
Phillips screwdriver Masking tape
5/16" hex-head T20orT25Torxdriver,
socketdriver (neededfor some
models)
Putty knife or thin-blade
screwdriver
5/16" open-end
wrench
Installation Instructions
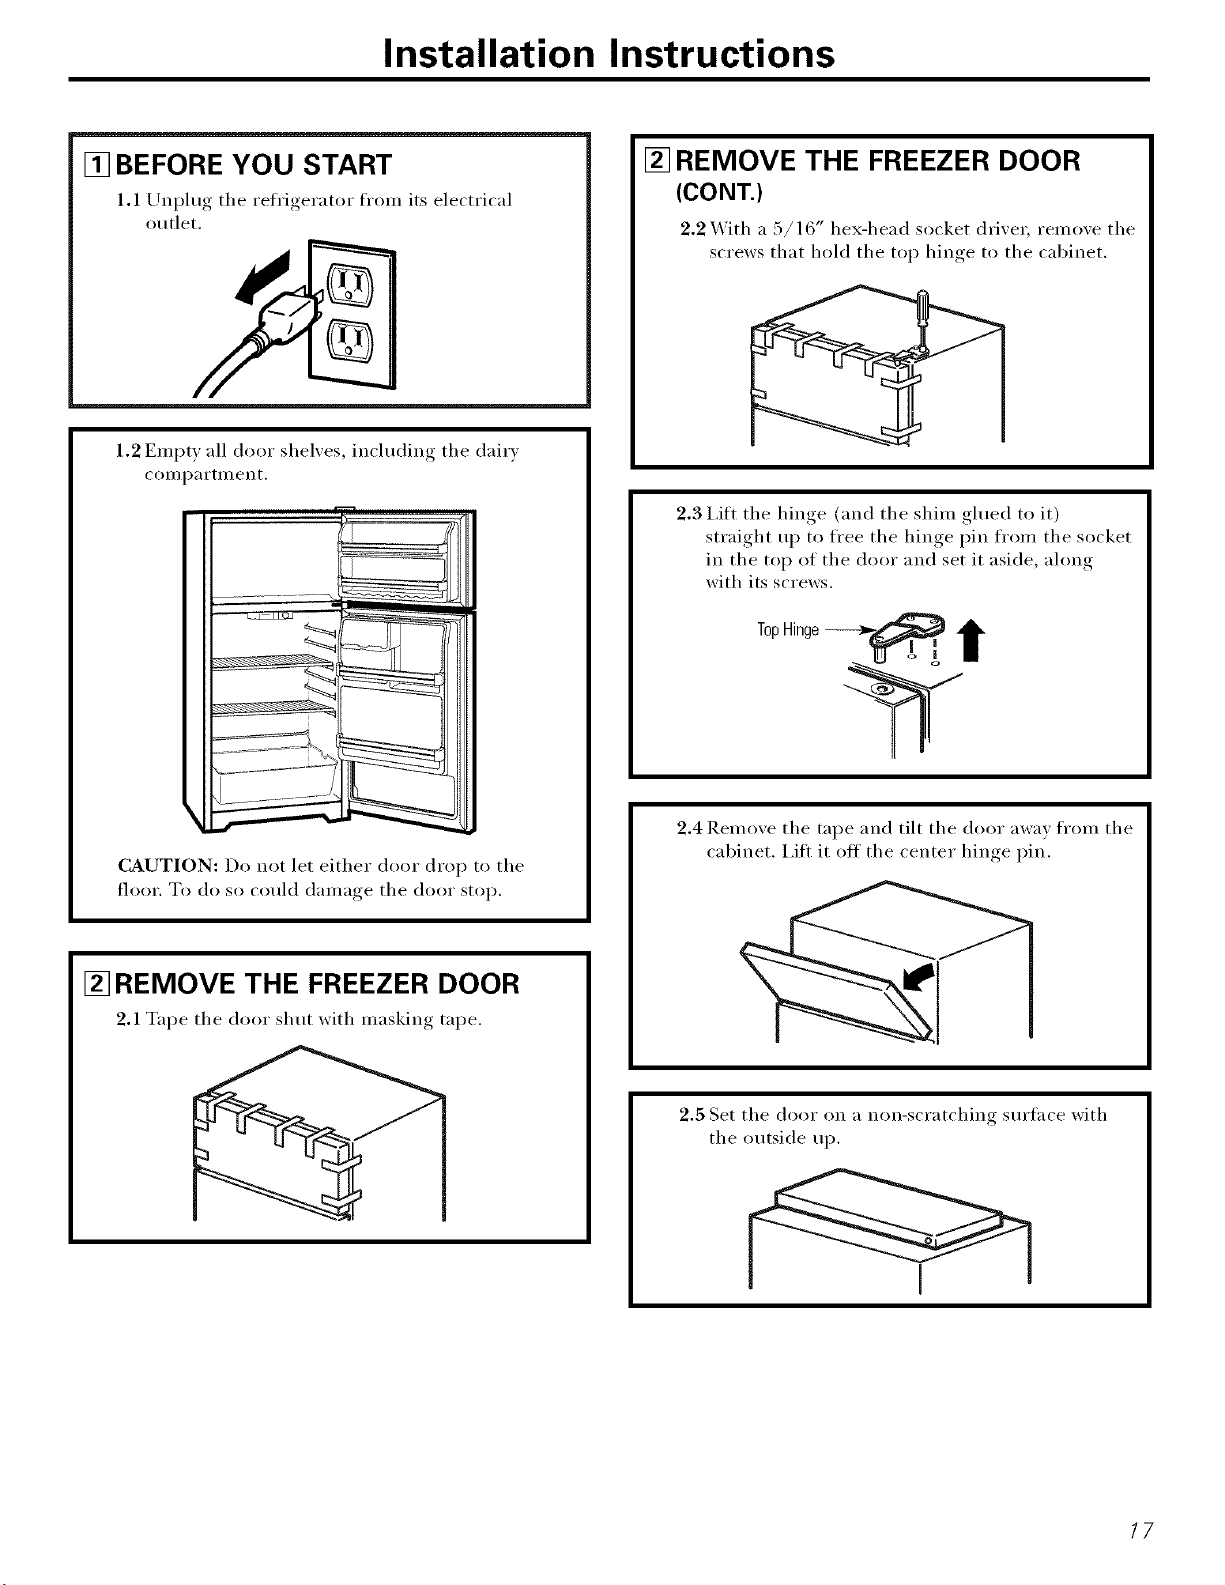
[] BEFORE YOU START
1.1 Unplug the refrigerator fron_ its electrical
outlet.
1.2 Erupt)all door shelxes, including the dairx
coi//p_li'tillent.
CAUTION: Do not let either door drop to the
floor. To do so could (l_li/l_loe_the door stop,
[] REMOVE THE FREEZER DOOR
2.1 Tape the door shut with masking tape.
[] REMOVE THE FREEZER DOOR
(CONT.)
2.2 X_ith a :5/16" hex-head socket drixer, remoxe the
screws that hold the toi _ hinge, to the cabinet.
2.3 I,ifl the hinge (and the shim glued to it)
straight up to free the hinge pin from the socket
in the top of the door and set it aside, ahmg
with its screws.
2.4 Remoxe the tape and tilt the door awax from the
cabinet. I,ift it off the center hinge pin.
2.5 Set the door on a non-scratching sm'face with
the outside up.
17
Installation Instructions
B REVERSING THE DOOR SWING (CONT.)
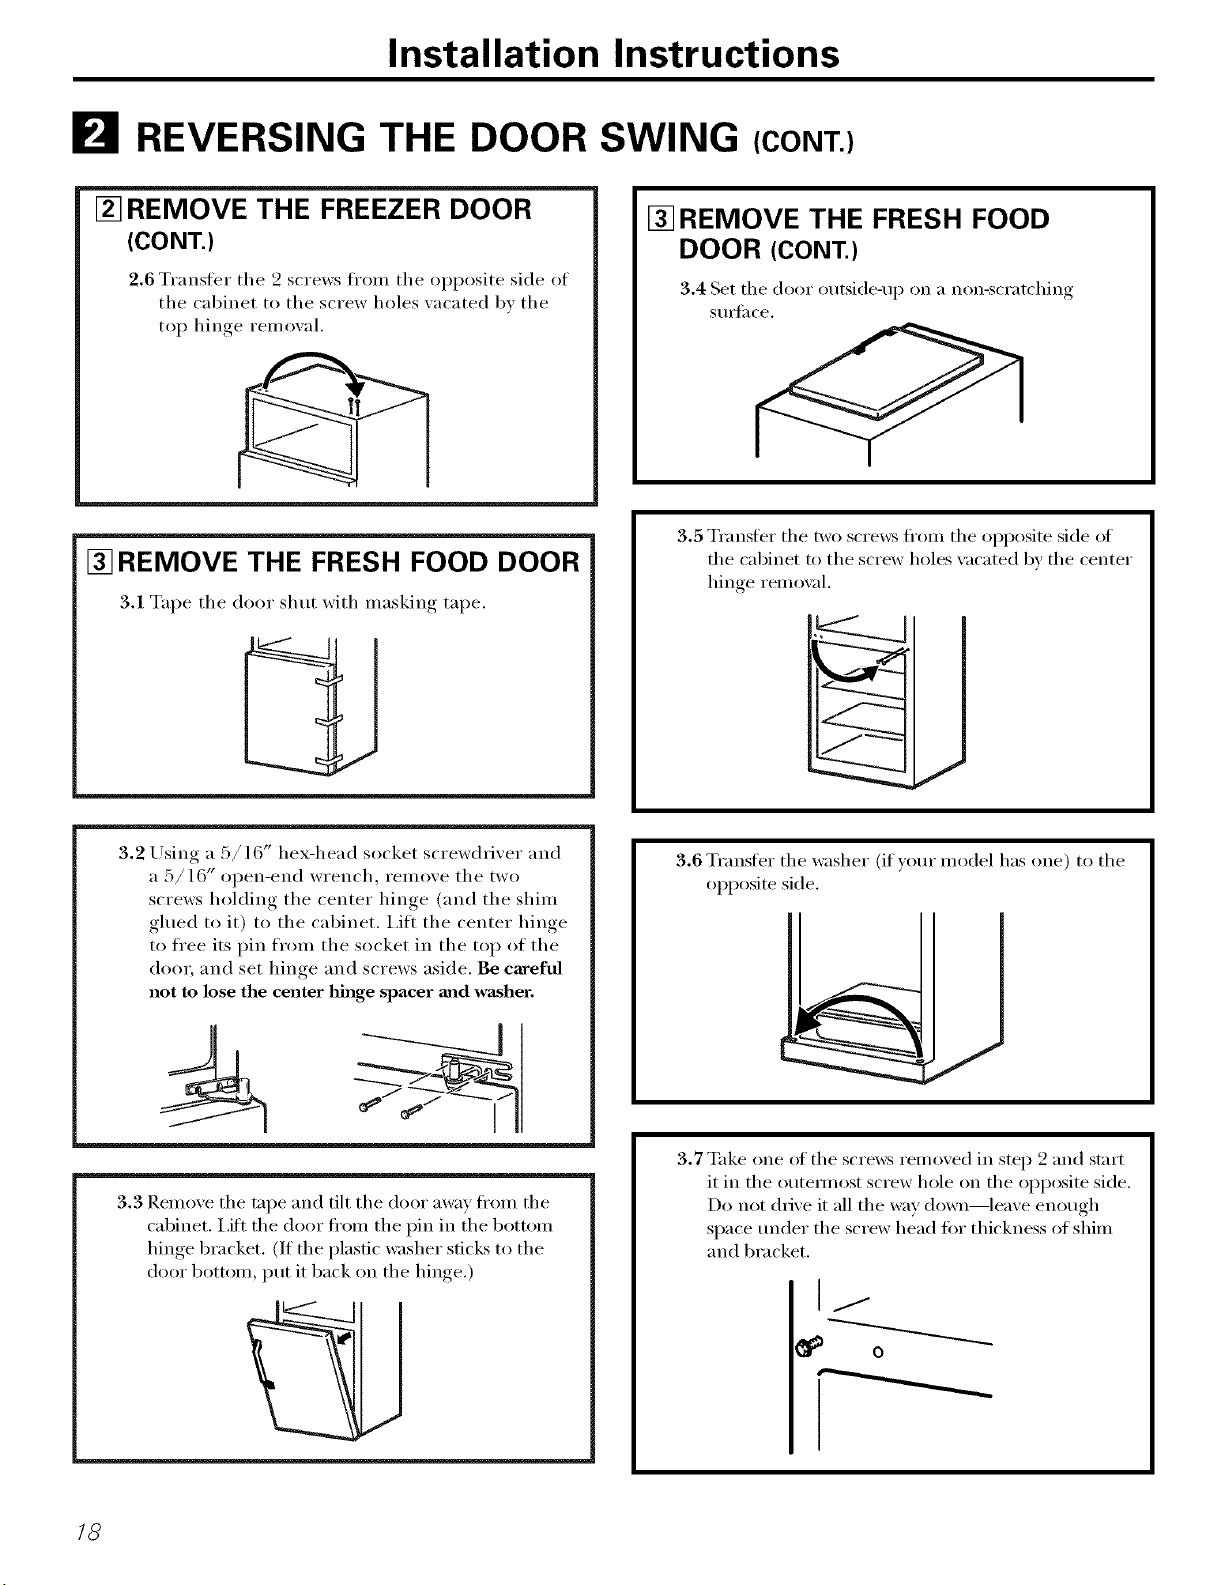
[] REMOVE THE FREEZER DOOR
(CONT.)
2.6 Transter the 2 screws from the opposite side of
the cabinet to the screw holes xacated bx the
top hinge remoxal.
[] REMOVE THE FRESH FOOD DOOR
3.1 Tape the door shut with maskino, _ tape.
[] REMOVE THE FRESH FOOD
DOOR (CONT.)
3.4 Set the door outside-up on a non-scratching
SIIIS[il ce.
3.5 Transfer the two screws fl'om the opposite side of
the cabinet to the screw holes xacated by the center
hin(_e i'eillox¢ll.
/
J
3.2 Using a 5/16" hex-head socket screwdriver and
a 5/16" open-end wrench, remove the two
screws holding the center hinge (and the shim
glued to it) to the cabinet. I,ift the center hinge
to ti'ee its pin from the socket in the top of the
doo_; and set hinge and screws aside. Be careful
not to lose the center hinge spacer and washer.
3.3 Remove the tape and tilt the door away fl'om the
cabinet. I,ift the door fl'om the pin in the bottom
hinge bracket. (If the plastic washer sticks to the
door bottom, put it back on the hinge.)
3.6 Transfer the washer (if)our model has one) to the
opposite side.
3.7 Take one (ff the scre_vs removed in step 9 and start
it in the outeHnost screw hole on the opposite side.
Do not drive it all the _;_y down--leave enough
space under the screw head tot thickness of shim
and bracket.
I/
18
Installation Instructions
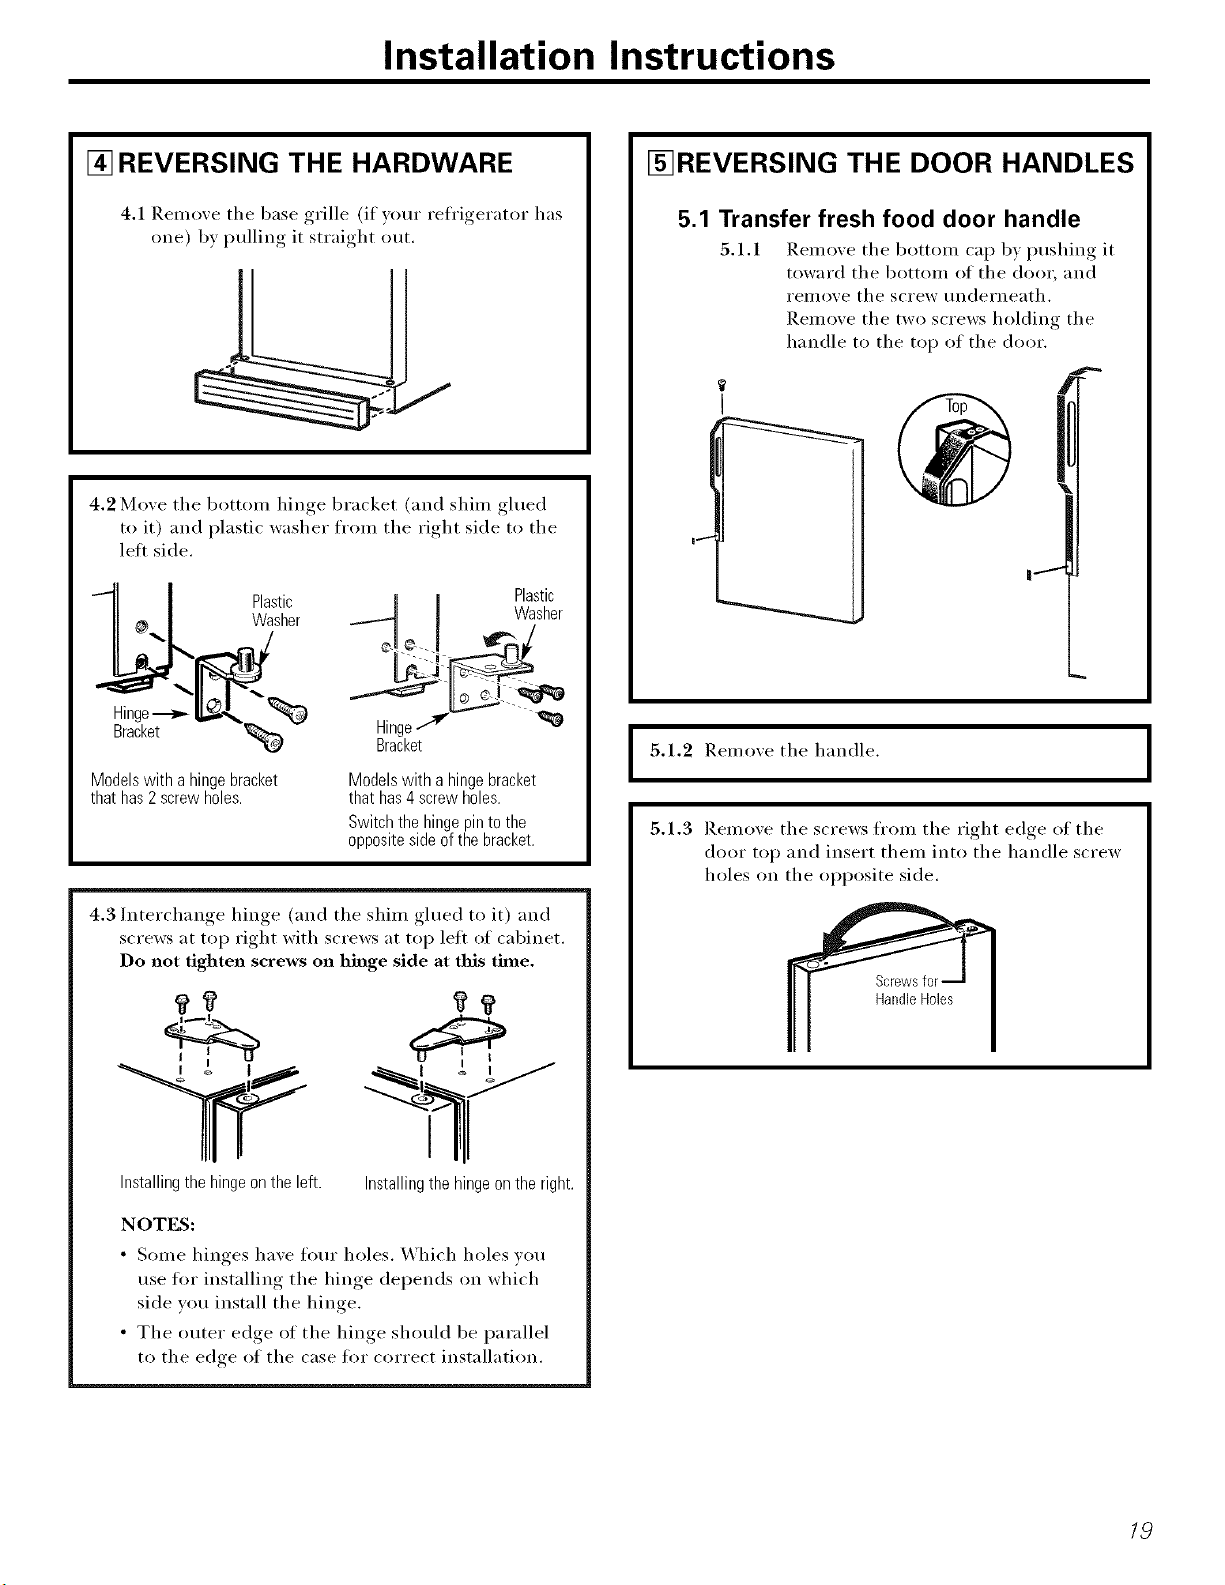
[] REVERSING THE HARDWARE
4.1 Remo_e the base grille (if your reh'igerator has
one) b} pulling it straight otlt.
4.2 Mo',e the bottom hinoe_ bracket (and shim glued
to it) and plastic washer from the right side to the
left side.
Plastic Plastic
Washer Washer
Hinge-_ --_
Bracket Hinge
Bracket
Modelswith a hingebracket
thathas2screwholes.
Modelswith a hingebracket
thathas4screwholes.
Switchthehingepinto the
oppositesideofthe bracket.
Installingthe hingeonthe left.
4.3 Interchange hinge (and the shim glued to it) and
screws at top right with screws at top left of cabinet.
Do not tighten screws on hinge side at this tbne.
I
Installingthe hingeonthe right.
NOTES:
• Solne hinges have ffmr holes. Which holes wm
use tin" installing the hinge depends on which
side you install the hinge.
• The outer edge of the hinge should be parallel
to the edge of the case fin" correct installation.
I_REVERSING THE DOOR HANDLES
5.1 Transfer fresh food door handle
5.1.1 Remove the bottom cap by pushing it
toward the bottom of the door, and
reillove the screw tlnderneath.
Remove the two screws holding the
handle to the top of the door.
1 t
I
5.1.2 Remoxe the handle.
5.1.3 Remo_e the screws from the right edge of the
door top and insert them into the handle screw
holes on the opposite side.
I
19
Installation Instructions
B REVERSING THE DOOR SWING (CONT.)
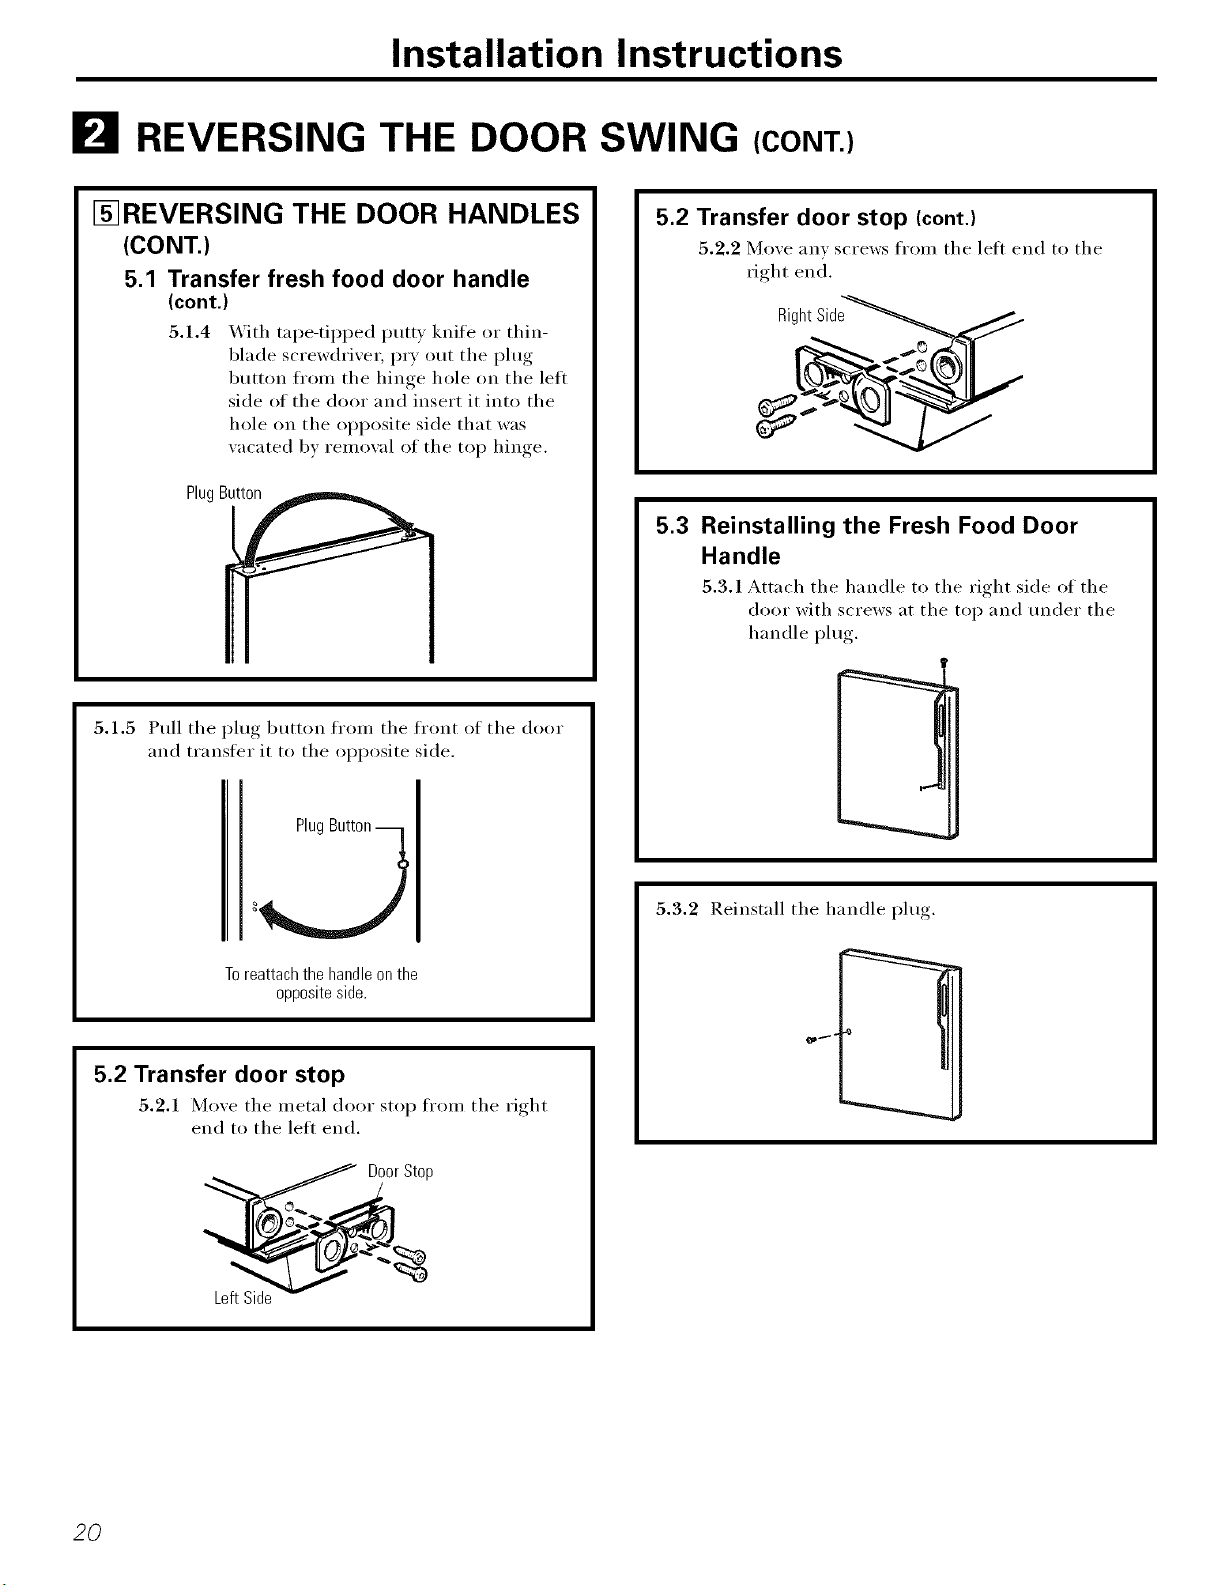
[_REVERSING THE DOOR HANDLES
(CONT.)
5.1 Transfer fresh food door handle
(cont.)
5.1.4 _]th tape-tipped putty knife or thin-
blade screwdriver, P_T out the plug
button fl'om the hinge hole on the left
side of the door and insert it into the
hole on the opposite side that was
w_cated by remowd of the top hinge.
PlugBu_
5.1.5 Pull the plug button from the front of the door
and transfer it to the opposite side.
Plug
Toreattachthehandleonthe
oppositeside.
5.2 Transfer door stop
5.2.1 Mo_e the metal door stop from the right
end to the leii end,
__Door Stop
5.2 Transfer door stop (cont.)
5.2.2 Mo',e any screws from the left end to the
fight end.
RightSide
5.3 Reinstalling the Fresh Food Door
Handle
5.3.1 Attach the handle to the right side of the
door with screws at the top and under the
handle plug.
t
5.3.2 Reinstall the handle I)lu°_,
20
Installation instructions
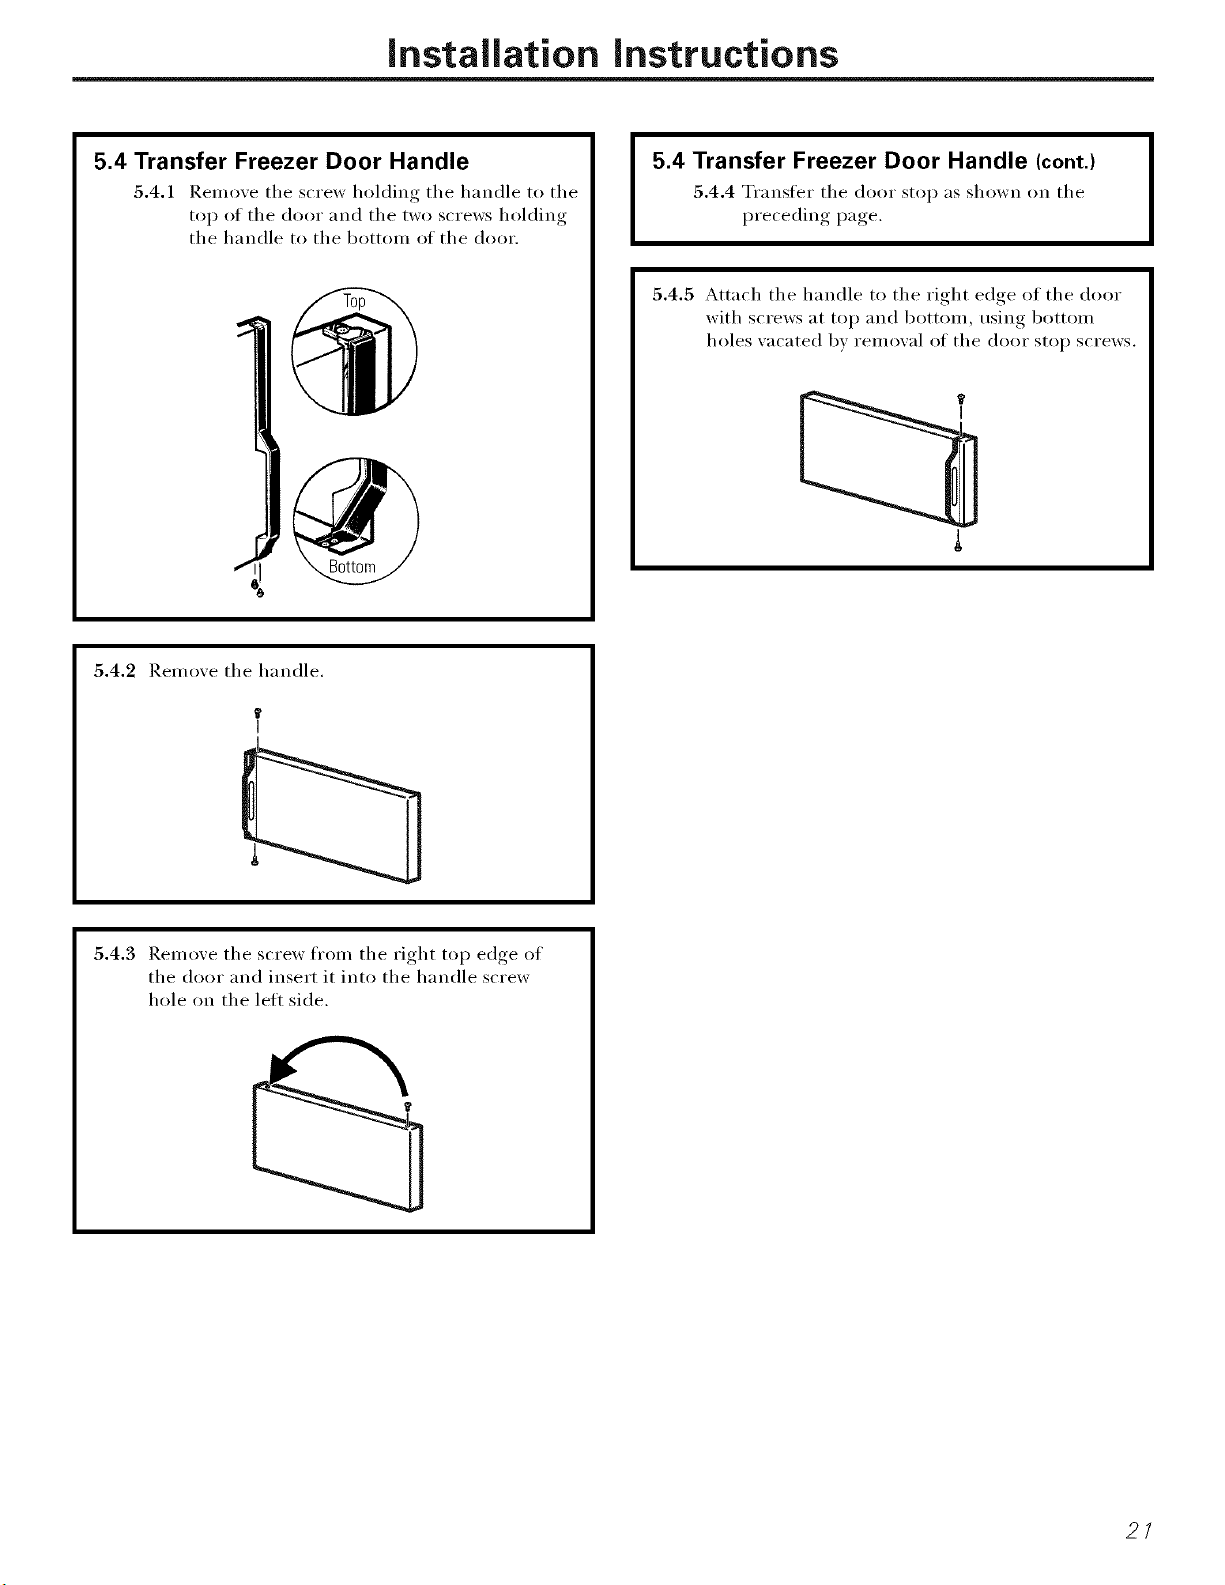
5.4 Transfer Freezer Door Handle
5.4.1 Remove the screw holding the handle to the
top of the door and the two screws holding
the handle to the bottom of the door.
5.4 Transfer Freezer Door Handle (cont.)
5.4.4 Transfer the door stop as shown on the
preceding page.
5.4.5 Attach the handle to the right edge of the door
with screws at top and bottom, using bottom
holes vacated bv removal of the door stop screws.
5.4.2 Remove the handle.
5.4.3 Remove the screw fl'om the right top edge of
the door and insert it into the handle screw
hole on the lett side.
21
Installation Instructions
B REVERSING THE DOOR SWING (CONT.)
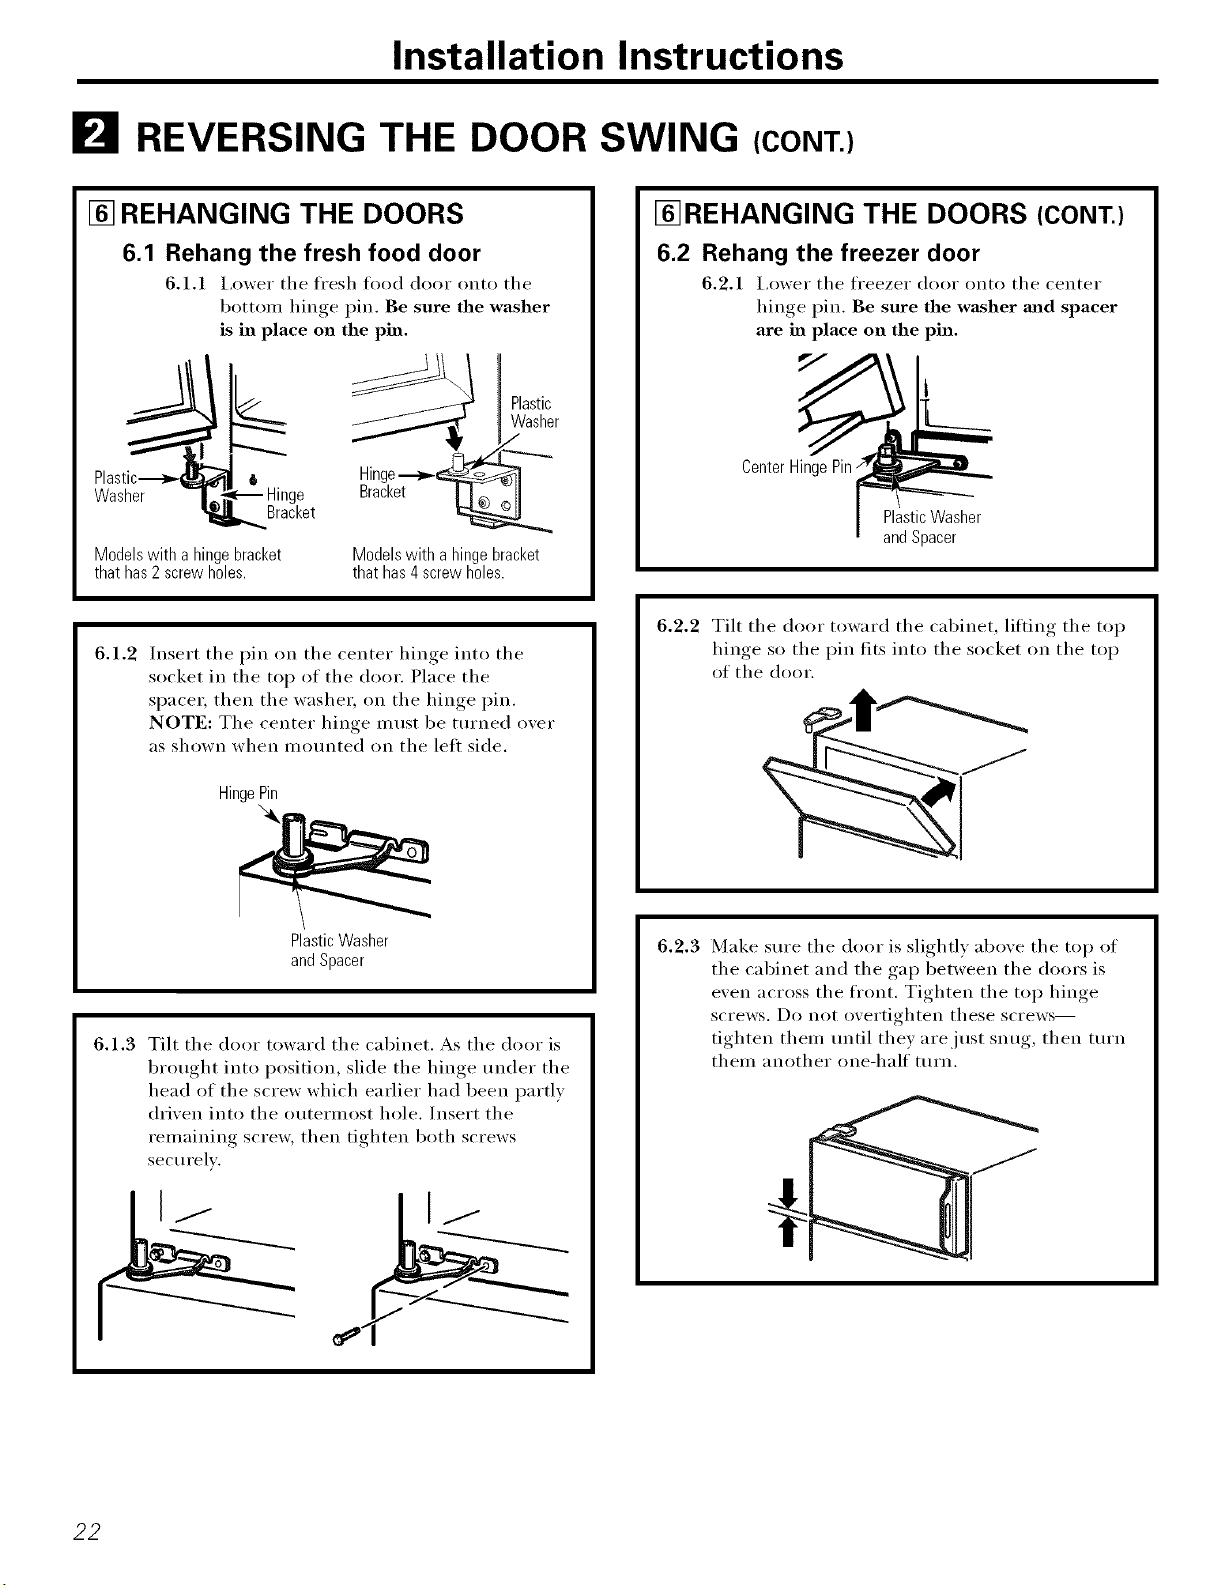
[] REHANGING THE DOORS
6.1 Rehang the fresh food door
6.1.1 I,ower the fl'esh food door onto the
botton_ hinge pin. Be sure the washer
is in place on the pin.
I
Washer Hinge
Bracket
Modelswith a hingebracket
thathas2screwholes.
Plastic
Washer
Hinge-_
Modelswith a hingebracket
thathas4screwholes.
6.1.2 Insert the pin on the center hinge into the
socket in the top of the door. Place the
space_; then the washe_; on the hinge pin.
NOTE: The center hinge must be turned over
as shown when mounted on the left side.
HingePin
PlasticWasher
andSpacer
6.1.3 Tilt the door toward the cabinet. As the door is
brought into position, slide the hinge under the
head of the screw which earlier had been partly
driven into the outermost hole. Insert the
remaining screw, then tighten both screws
securely.
[]REHANGING THE DOORS (CONT.)
6.2 Rehang the freezer door
6.2.1 I,ower the freezer door onto the center
hinge pin. Be sure the washer and spacer
are in place on the pin.
5/
CenterHingePin;
PlasticWasher
andSpacer
6.2.2 Tilt the door toward the cabinet, lifting the top
hinge so the pin fits into the socket on the top
of the door.
6.2.3 Make sure the door is slightly above the top of
the cabinet and the gap between the doors is
even across the front. Tighten the top hinge
screws. Do not overtighten these screws--
tighten them tmtil they are just snug, then turn
them another one-half turn.
22
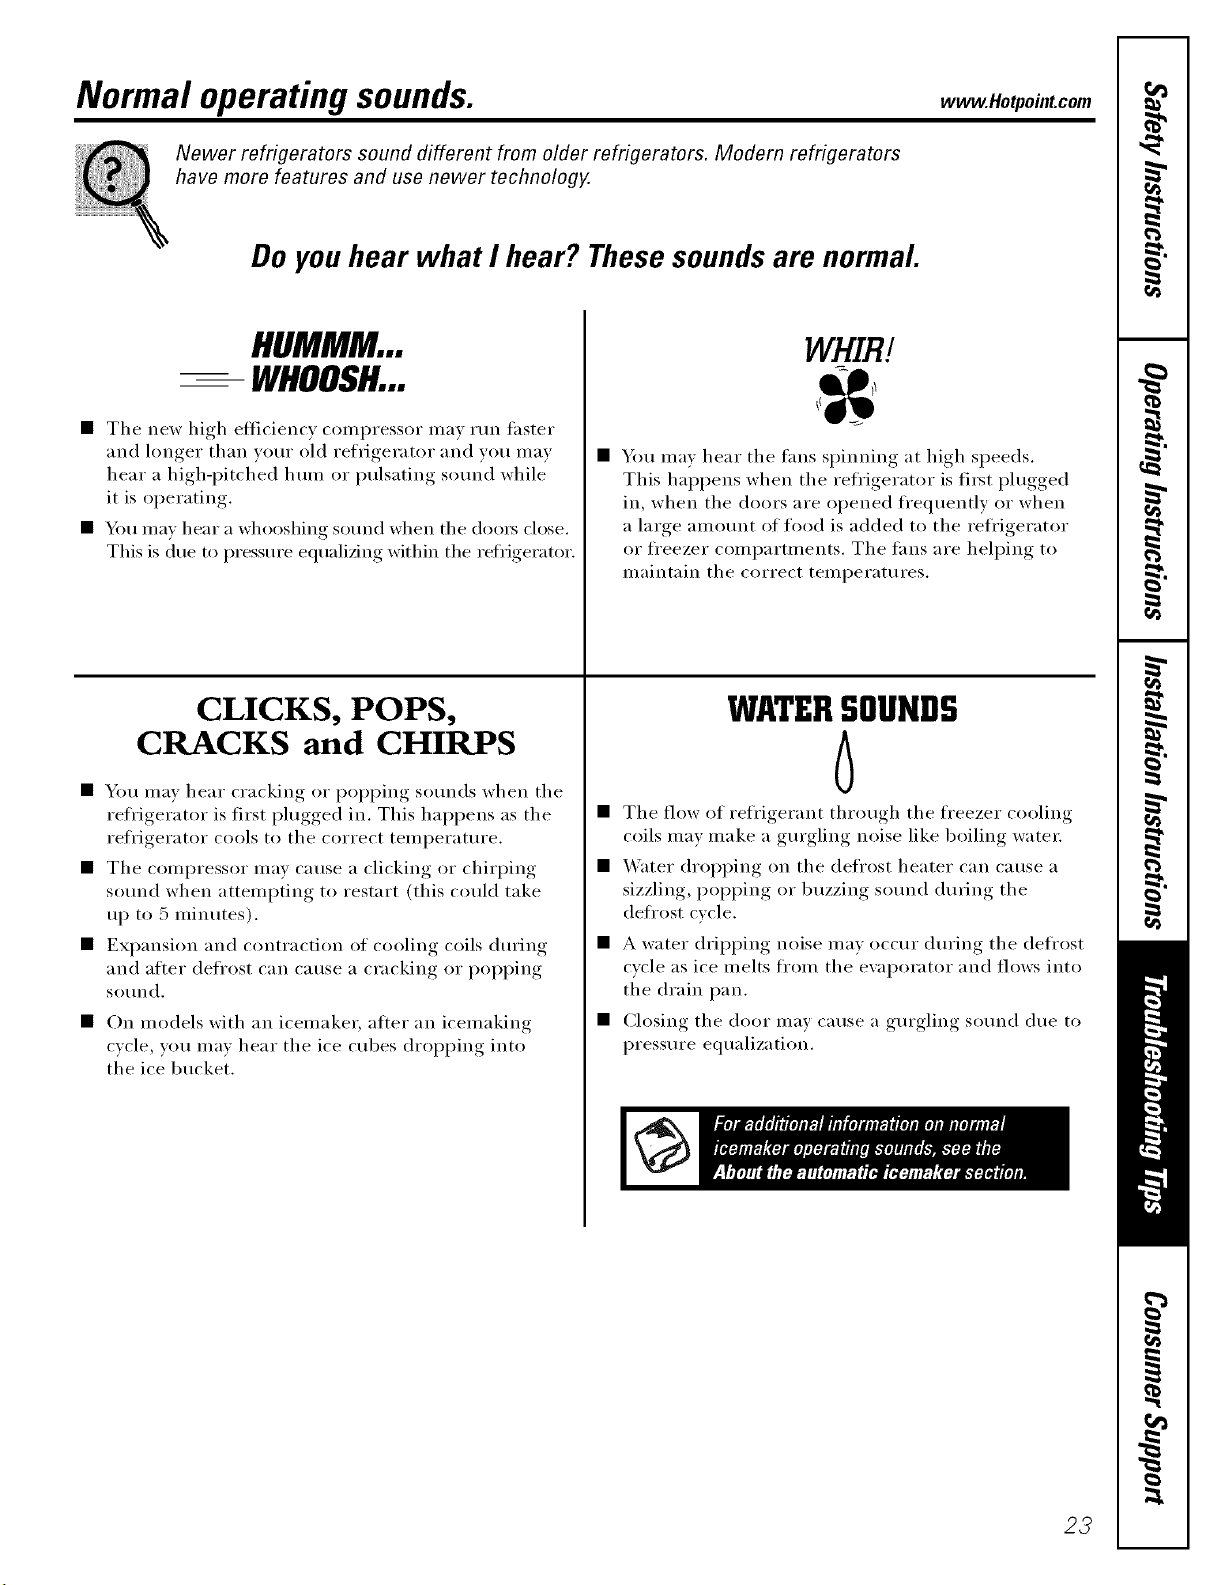
Normal operating sounds, w Ho,,oi.,.com
Newer refrigerators sound different from older refrigerators. Modern refrigerators
have more features and use newer technology.
Do you hear what I hear? These sounds are normal.
HUMMM...
-- WHOOSH...
• The new high efficiency compressor may tun thster
and longer than wmr old refrigerator and you mav
hear a high-i)itched hum or pulsating so/md while
it is operating,
• You may hear a whooshing sound when the (loo_ close.
This is due to pressure equalizing within the refrigerator.
CLICKS, POPS,
CRACKS and CHIRPS
• You may hear cracking or poi)ping so/mds when tile
reli'igerator is first plugged in. This hal)pens as tile
refl'igerator cools to the correct temperature.
• The compressor may cause a clicking or chirping
sound when attempting to restart (this could take
up to 5 minutes).
• Expansion and contraction of cooling coils dm'ing
and after defrost can Catlse a cracking or i)oi)ping
so/ind.
• On models with an icemake_; atter an icemaking
cycle, you may hear the ice cubes dropping into
the ice bucket.
WHIRl
• You may hear the fans spinning at high speeds.
This hal)pens when tile refrigerator is fii_t plugged
in, when the doors are opened ti'equently or when
a large amount of food is added to the refl'igerator
or fl'eezer compartments. Tile fans are helping to
maintain the correct temperatures.
WATERSOUNDS
6
• The flow of refl'igerant through the fl'eezer cooling
coils may make a gm'gling noise like boiling water;
• _'ater dropping on the defl'ost heater C_lil cause a
sizzling, i)oi)ping or buzzing SOtllld during tile
deii'ost cycle.
• A water dripping noise may occur dm'ing the defrost
cycle as ice melts from the evaporator and flows into
the drain pan.
• Closing tile door may cause a gm'gling SOtlild due to
pressure equalization.
23
Before you call for service...
Troubleshooting Tips
Save time and money! Review the charts on the following
pages first and you may not need to call for service.
Possible Causes What To Do
Refrigerator does not Refrigerator in defrost cycle. * Wait ab()ut 30 miuutes fi)i defi ost (x ('le to eud.
operate
Temperature control dial * Move tile temperature control dial to a temperature
in Oposifion. setfiu
Refrigerator is unplugged. * Push the plug completely into the outlet.
The fuse is blown/circuit • Replace fl/se (>r reset the l_reaker.
breaker is tripped.
Vibration or rattling Roller screws or leveling legs * See Rollers and Leveling Legs.
(slight vibration need adjusting.
is normal)
Motor operates for Normal when refrigerator * _4_fit 24 hott_s fin" the refi_gerator to completely
long periods or cycles is f'test plugged in. c()()1d()wu.
on and off frequently.
Often occurs when large * This is u(n_ual.
(Modern refrigerators amounts of food are
with more storage
space and a larger placed in refrigerator.
freezer require more Door left open. * Check to see if package is holding door open.
operating time. They
start and stop often Hot weather or frequent * This is u()nual.
to maintain even door openings.
temperatures.) Temperature control dial * See About the temperature control dial.
set at the coldest setting.
Grille mad condenser * See Care and cleaning.
need clem_h_g.
Freshfood or freezer Temperature control dial * See About the temperature control dial.
compartment too warm not set cold enough.
Warm weather or frequent * Set the temperature control dial one step colcle_:
door ope_mags. See About the temperature control dial
Door left open. * (_he('k to see it package is holding door open.
Package blocking air duct ill * Che(k to see if l)a( kage, is 1)1o(king air du(t in fi'eezer
freezer compartment, c( )Illl)[IYtIHcut.
Frost or ice crystals Door left open. * Check to see if l)ackage, is holding d()or open.
on frozen food
(frost within package Too frequent or too long
is normal) door ope_mlgs.
24
www.Hotpointcom
Automaticicemaker
doesnotwork
(onsomemodels)
Possible Causes
Icema_ker power switch
is not on.
What ToDo
• On power switch models, set tile power switch to tile
I (on)position. On teeler aml models, move tile teeler
aHn to tile ON (down) position.
Water supply turned off or • See Installing the water line.
not com_ected.
Freezer compartment • _4'ait 24 hotu_ fin" tile retiJgerator to couqlletely
too warlll, cool dowu.
Piled up cubes in the storage • l,evel cubes by hand.
bin cause the icemaker
to shut off.
Frequent "buzzing"sound lcemaker is on but the water • Turn tile icemaker off. On power switch ulodels, set tile
supply to the refrigerator has power switch to tile 0 (of/) position. On feeler m'm
not been collnected, models, inure tile teeler arm to tile STOP(up) position.
Keeping it on will dmuage tile water \_dve.
Cubes too small Water shutoff valve connecting • (;:ill tile pltunl)er to clear tile valve.
refrigerator to water line may
be clogged.
Slow ice cube freezing Door left open. • Check to see if l/ackage, is holding, door open.
Temperature control dial • See About the temperature control dial
not set cold enough.
Ice cubes have Ice storage bin needs clemfing. • Empty and wash bin. Discard old tribes.
odor/taste
Food trmlsmitthag odor/taste • _4_'ap too(Is well.
to ice cubes.
Interior of refrigerator • See Care and cleaning.
needs clemfing.
Moisture forms on Not unusual during • _4]I)e suriiwe (hy and reset temperature control dial
cabinet surface periods of high humidity, one setting c()ldel:
between the doors
Moisture collects inside Too frequent or too
(in humid weather, air long door ope_fings.
carries moisture into
refrigerator when doors
are opened)
Refrigerator has odor Foods lrm_smitth_g • Fl)()(ls with strl)ng odln_ sh(mld be tightly wrapped.
odor to refrigerator. • Keep till olleu box of bakiug soda ill tile l'efiJgel'ator;
replace every three U/Ollths.
Interior needs clemlh_g. • See Care and cleaning.
25

m
i
m
m
m
m
m
m
m
Notes.
26
Notes.
I
w
m
w
==
€=
27
m
Notes.
m
m
i
m
m
m
m
m
m
x:
m
28
GE Service Protection Plus rM
GE, a name recognized _xorldwide fbr quality and dependability, offsets you
Service Protection Plus '"--comprehensive protection on all your appliances--
No Matter What Brand!
Benefits Include:
• Backed by GE
• All brands covered
• Unlimited service calls
• All parts and labor costs included
• No out-of-pocket expenses
• No hidden deductibles
• One 800 nmnber to call
We TI Cover Any Appliance.
Anywhere. Anytime. *
You _ill be completel) satisfied with our service protection or )on ma} request }our mone} back
on the remaining value of }our contract. No questions asked. It's that simple.
Protect your refl'igerator, dishwasher, washer and (byer, range, TV, VCR and much more--any brand!
Plus there's no extra charge fl)r emergency service and low monthly financing is available. Even icemaker
coverage and fl)od spoilage protection is offered. You can rest easy, knowing that all your valuable
household products are protected against expensive repairs.
Place ,our confidence in GE and call us in the U.S. toll-free at _UU.DZD.ZZZz]:
_()r I/}ore ill_orI/}atiOll.
*-MI ])l';llldS (7o_(?l(!d, up IO _0 }'(?_tl'_ old, in Ihe (o]ltJn(!llta] W._.
Please place in envelope and mail to:
GeneralElectricCompany
Warranty Registration Department
P.O. Box 32150
Louisville, KY 40232-2150
29
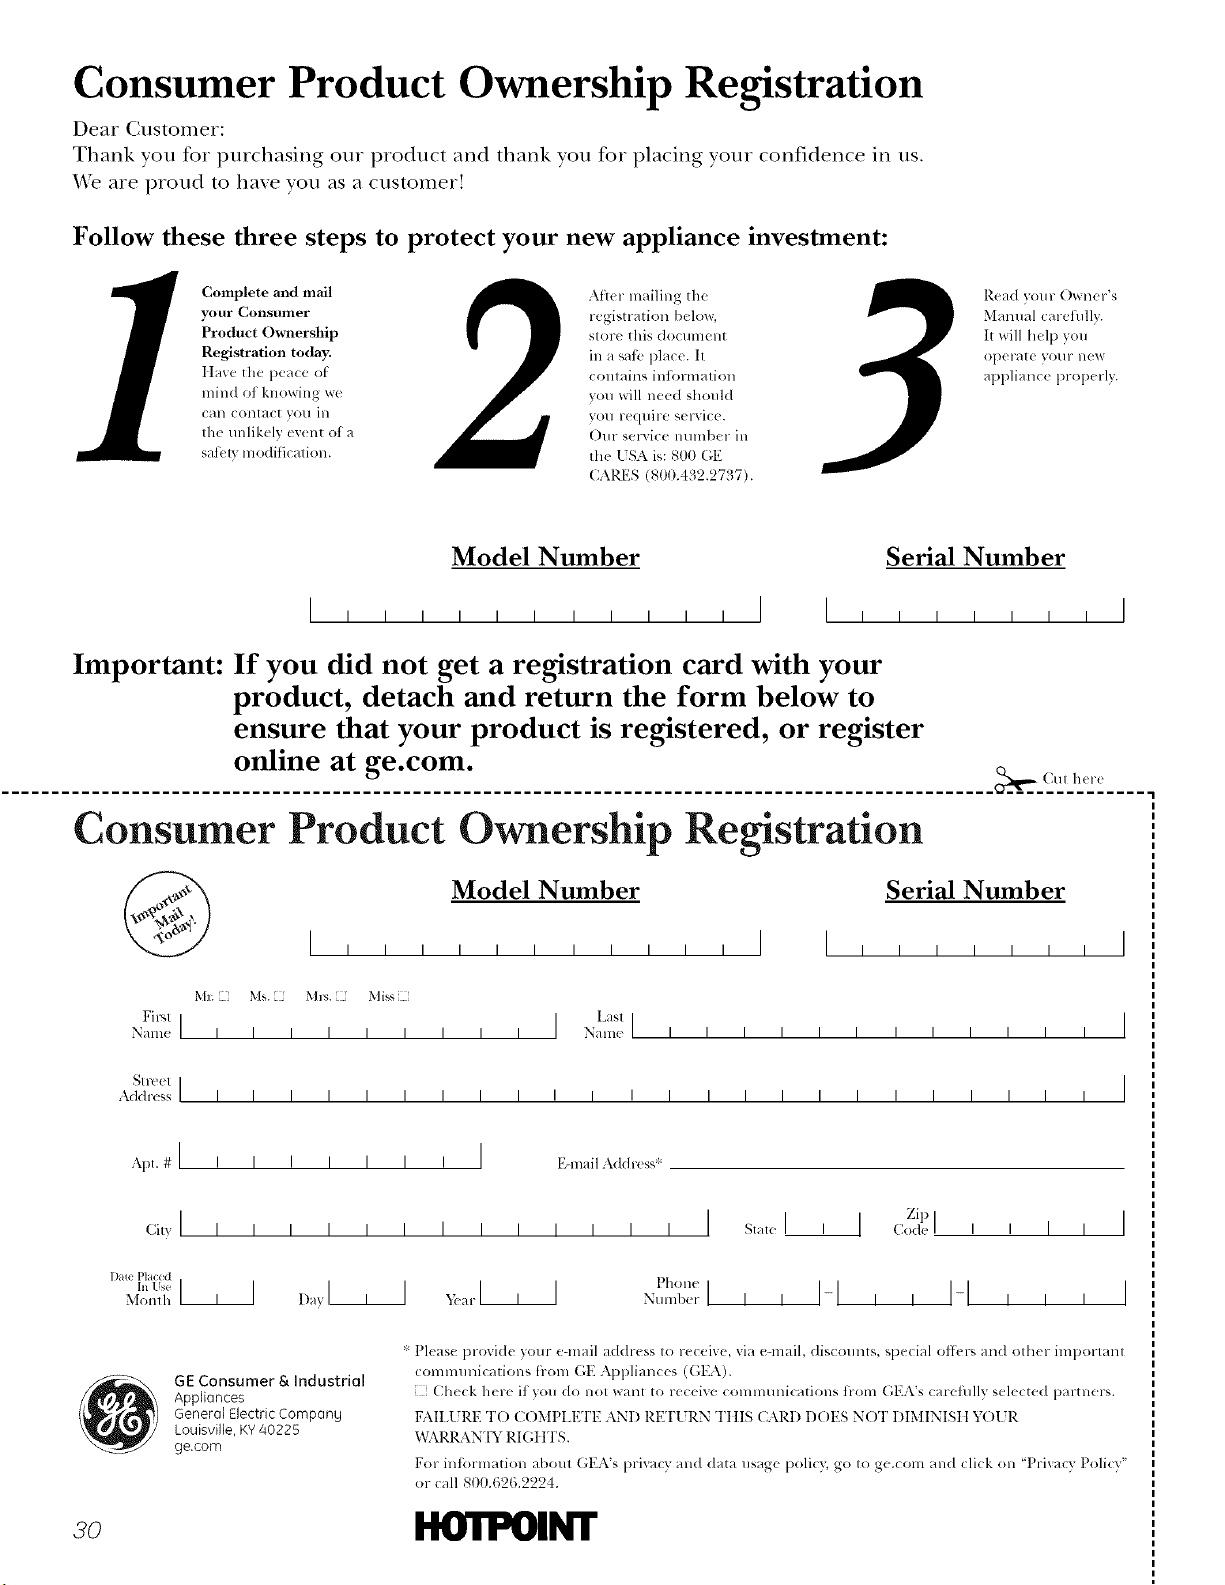
Consumer Product Ownership Registration
Dear Customer:
Thank you tbr purchasing our product and thank you for placing your confidence in us.
_'e are proud to haxe you as a customer'.
Follow these three steps to protect your new appliance investment:
Complete and mail
your Consunler
Product Ownership
Registration today.
ttave tile peace of
mind of knowing wc
Call COlltact VOll ill
the unlikely exent of a
sati:ly modification.
After mailing tile
registration below,
store this document
in a satb place. It
contains intormation
you will need should
you require service.
Our selwice lmmber in
the [SA is: 800 (;E
CARES (800.432.2737).
Read your Owner's
Manual carefilllv.
It will help you
opel-_lte yOllr llew
appliance properly.
Model Number Serial Number
I I I I I I
Important: If you did not get a registration card with your
product, detach and return the form below to
ensure that your product is registered, or register
online at ge.com.
._,,,,_ Cm h(r(
Consumer Product Ownership Registration
Model Number Serial Number
Ms. M*_. Mixs
Fir'q ] I Lasl]
Name I I I I I I I I I Naine I I I I I I I I I I I I
_1 r( el I
Addr(';s I I I I I I I I I I I I I I I I I I I I I I I I
, I
I
I
Apt. # I i
ciw I
Dale P[aced
In Use ]1]
Monlh
I I I I I I I EqnailAddress*
I I I I I I I I I I
1,_,>,l, I _arl , I
, , I
Pholl(
Nt/llll)er I
Zip I
State I , 1 ,:o_le
I I I-I I I
I I
I I
I
I
GE ConsumerS, Industriol
Appliances
General Electric Company
Louisville, KY40225
ge.com
* Please provide your e-mail address to receive, via e-mail, discounts, special ottk,p, and other important
communications [roln GE Appliances ((',EA).
Check here if you do not want to receive commtmications ti-om GEA's carefiflly selected partners.
FAII.I 7RE TO C()MPI.ETE AND RE'F[ RN Tt tIS CARD DOES NOT DIMINISII Y( )l JR
x,_L\RRANTY RI (;I ITS.
For intormation about GEA's prixacy and data usage policy; go to ge.com and click on 'Prixacv Policy"
or call 800.626.2224.
3o ltO'iI_II_I"
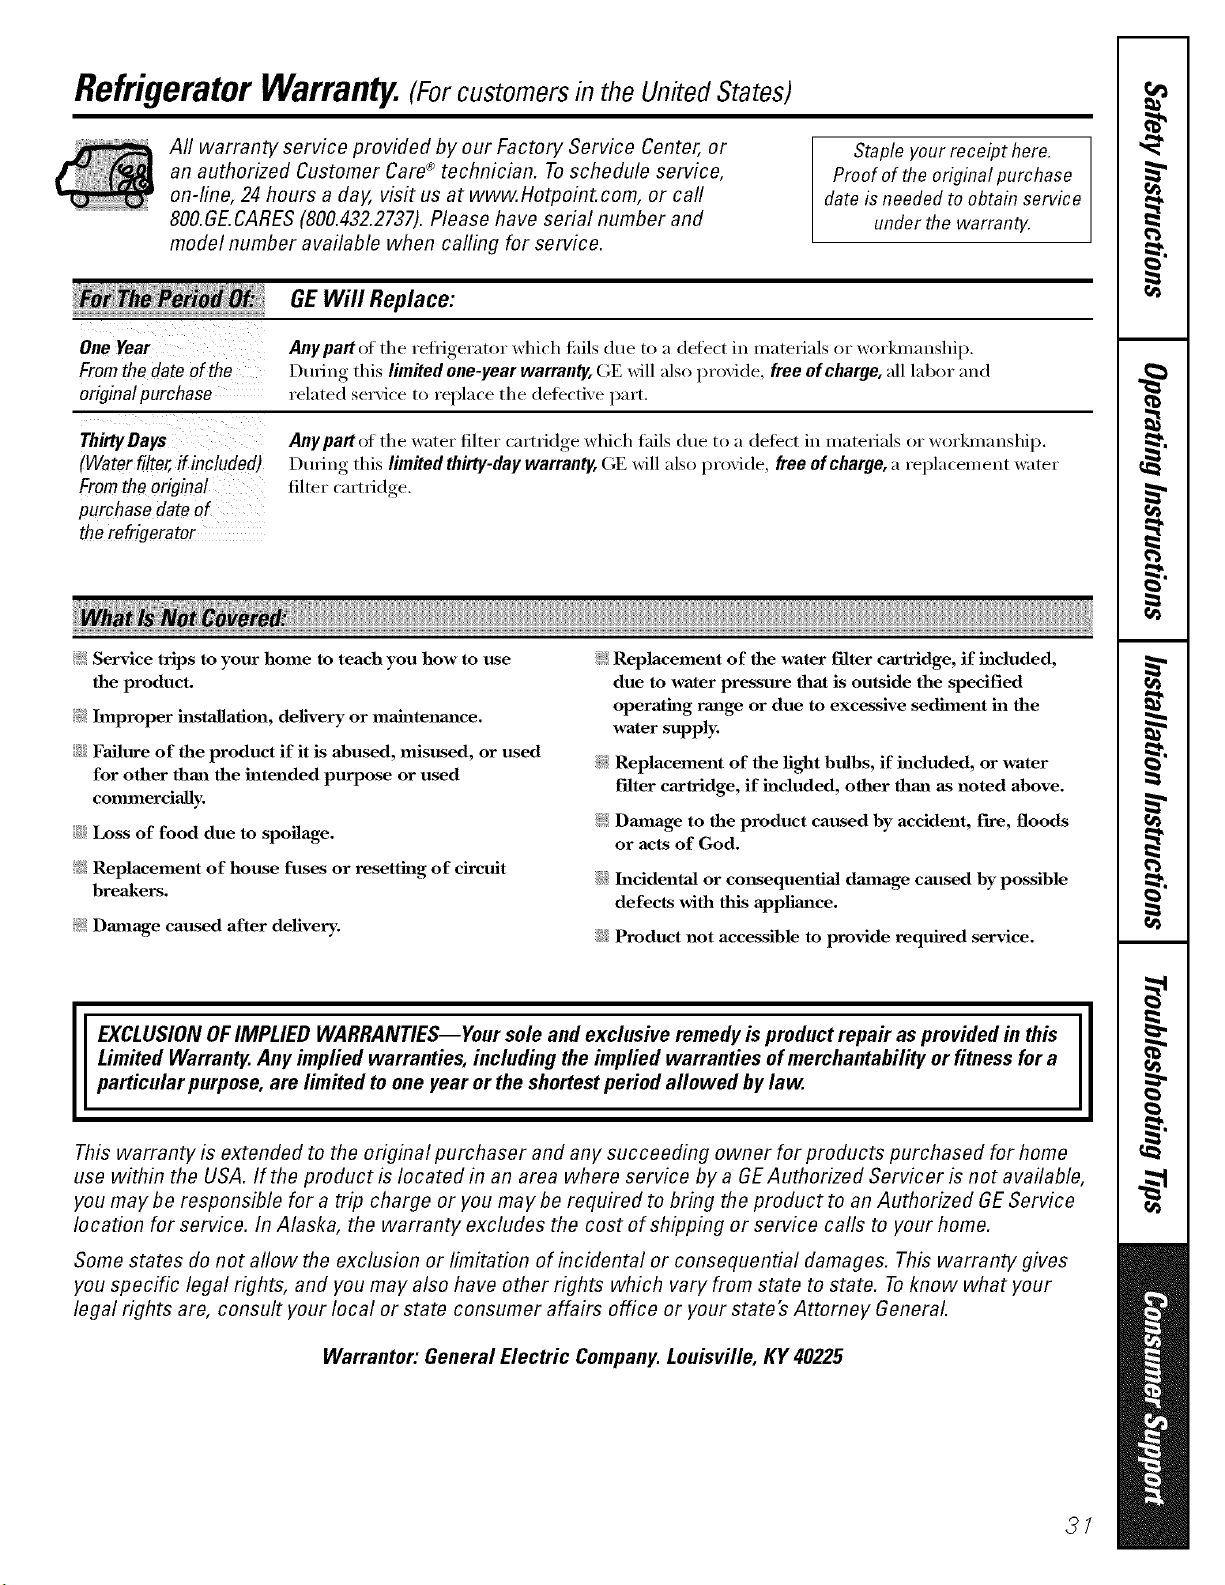
RefrigeratorWarranty.(Forcustomers in the United States)
Aft warranty service provided by our Factory Service Center, or
an authorized Customer Care®technician. Toschedule service,
on-line, 24 hours a day, visit us at www.Hotpoint.com, or carl
800.GE.CARES (800.432.2737).Please have serial number and
model number available when calling for service.
Staple your receipt here.
Proof of the original purchase
dateis needed to obtain service
under the warranty.
GEWill Replace:
OneYear
Fromthedateof the
originalpurchase
Anypattof the refl]gerator which tifils due to a defect in materials or workananship.
During this limited one-year warranty, GE will also provide, free of charge, all labor and
related service to replace the defecti\'e [)art.
ThirtyDays
(Waterfilter,if included)
Fromtheoriginal
purchase dateof
therefrigerator
Anypart of the water filter carti_dge which thils due to a defect in materials or workananship.
During this limited thirty-day warranty, GE will also provide, free ofchartle, a replacement water
filter carti_dge.
?_: Service trips to your home to teach you how to use
the product.
?_: Improper installation, delivery or maJntenm_ce.
::Ji::Failure of the product if it is abused, misused, or used
for other than the intended purpose or used
commercially.
::Ji::Loss of food due to spoilage.
?_: Replacement of house fuses or resetting of circuit
breakers.
?_: Damage caused after delivery.
_: Replacement of the water filter cartridge, if included,
due to water pressure that is outside the specified
operating raalge or due to excessive sediment ha the
water supply.
_: Replacement of the light bulbs, if included, or water
Fdter cartridge, if included, other than as noted above.
_: Dmnage to the product caused by accident, Fn'e, floods
or acts of God.
::Ji::h_cidentaJ or consequential dmnage caused by possible
defects with this applimlce.
iJi::Product not accessible to provide required service.
EXCLUSION OFIMPLIED WARRANTIES--Your sole and exclusive remedy is product repa# as provided in this
Limited Warranty. Any implied warranties, including the implied warranties of merchantability or fitness for a
particular purpose, are limited to one year or the shortest period allowed bylaw.
This warranty is extended to the original purchaser and any succeeding owner for products purchased for home
use within the USA. If the product is located in an area where service by a GE Authorized Servicer is not available,
you may be responsible for a trip charge or you may be required to bring the product to an Authorized GEService
location for service. In Alaska, the warranty excludes the cost of shipping or service calls to your home.
Some states do not allow the exclusion or limitation of incidental or consequential damages. This warranty gives
you specific legal rights, and you may also have other rights which vary from state to state. Toknow what your
legal rights are, consult your local or state consumer affairs office or your state's Attorney General
Warrantor: General Electric Company. Louisville, KY 40225
37

ConsumerSupport.
q l Hotpobt Website www.Hotpoint.com
Hme a question ox need assistance _ith }ore" appliaure? %'} the Hotpoint XA_bsite 24 hours a day,
' am da_, of the _ear'. You can also shol ) tkw moxe ,great Hotl)oint I re)ducts and take ad_mtage, of
all of our on-line support services designed ik_x?ore" com'enience.
ScheduleService www.Hotpoint.com
Expex_ Hotpoint repair service is onl} one step awa_ h'om _our dool: (;et on-line and schedule }our service
at xour convenience 24 hom_ an} da} of tile ?ear! (:)r call 800.(;E.CARES (800.432.2737) dining normal
business hem's.
ilealLifeDesignStudio go.corn
Og supp(n'ts tile l_)nive_sal Design concept--produrts, services and environments that can be used by
people ot all ages, sizes and capabilities. We recognize the need to design fi_r a wide range d phusical and
mental abilities and impaim_ents. Fox" details of OE's Universal Design applications, including kitchen
design ideas ti_r people with disabilities, check out our Website today. For the hearing impaired, please call
800.TDD.GEAC (800.833.4322).
ExtendedWarranties
go.corn
Purchase a Hotpoint extended warrant} and learn about special discotmts that are ax'ailable while }our
_arrantv, is still in effect. Y_)u can purchase it on-line amtime, , or call 800.626.2224 during, n(mnal business
hom_. Hotp(_int (]OllS(In/eF Home Services will still be there after }our warrant'_ expires.
PartsandAccessories www.Hotpoh?t.com
Individuals qu;ditied to service their own ;q:)pli;mces can have p;u_s or access(rues sent directly to their
homes (VISA, MasterCaxd and Discover cards are accepted). Order on-line today, 24 hom_ e\w)' day or
by phone at 800.626.2002 during n(mnal business hom_.
Instructions contained in this manual cover procedures tohe performed by any user. Other servicing generally
should he referred to qualified service personnel. Cautionmust he exercised, since improper servicing may cause
unsafe operation.
_ontact Us www.Hotpointcom
It you are not satisfied with tile service you receive i_'om Hotpoint, contact us on our Website with ;d] tile
details including your phone numbe_; or write to: Oeneml Managex; Customer Relations
Hotpoint, Appliance Park
Ix_uisville, KY 40225
q l ilegister YourApp/bnce www.Hotpoint.com
Register your new appliance on-line---at your convenience! Timel} produrt registration xdll allow tot
, enhanced communication and prompt serxice under the tem/s of}our warranty, should tile need arise.
YOu max also mail in tile pre-printed registration card included in tile l)acldng, material.
_ ?rintedin theUnitedStates
_ ?rintedonflecyc/edPaper