_0. COrn
Safety Instructions ........... 2-4
Operating Instructions
Additional Features ............ ] 0
Automatic Icemaker ........... 12
Care and Cleaning .......... 14, 15
Crispers and Pans ............. 11
Ice and _'ater Dispenser ..... 13, 14
Refligerator Doors .......... 10, 11
Replacing the Light Bulbs ....... 16
Shelves and Bins ............. 8, 9
TemperaUlre Controls ........... 5
TurboCool r'* . .................. 6
_'ater Fiher . .................. 7
Installation Instructions
Installing the Refrigerator . . . .22-25
Preparing to Install
the Refligerator . ........... 1 7-19
Removing and
Replacing Doors ........... 19-21
Water Line Installation ...... 26-28
Troubleshooting Tips ....... 30-32
Normal Operating Sounds ...... 29
Consumer Support
Consumer Support ..... Back Cover
Performance Data Sheet ........ 38
Product Registration
(Canadian) ............... 35, 36
Product Registration
(U.S.) .................... 33, 34
State of California Water
Treatment Device Certificate ..... 39
VVarranty (Canadian) ........... 40
_'arranty (U.S.) ............... 41
Modols23 and 25
C6te fiC6te
R frig rateurs
La section fran_aise commencea la page 42
Lado a Lado
Refrigeradores
La seccion en espa#ol empieza en la pagina 76
Write the model and serial numbers here:
#
#
Find these numbers on a label inside
the reti'igerator compartment at the
top on the right side.
200DSO74PO08 49-60407 11-05JR
IMPORTANTSAFETYINFORMATION.
READALLINSTRUCTIONSBEFOREUSING.
WARNING!
Use this appliance only for its intended purpose as described in this Owner's Manual
SAFETYPRECAUTIONS
When using electrical appliances, basic safety precautions should be followed, including the following:
i)::This refi'igerator must be properly installed
and located in accordance with tile Installation
Instructions before it is used.
i)::Do not allow children to climb, st;rod or hang
on the shelves in the reti-igerato_: They could
damage the refrigerator and seriously iqjure
themselves.
::_ Do not touch tile cold sui_lilces in tile fl'eezer
compartment when hands are damp or wet.
Skin may stick to these extremely cold s/u_hces.
}_'<Do not store or use gasoline or other flammable
\_q)o_ and liquids in tile vicinity of this or any
other appliance.
i)_:In refl'igerato_ with automatic icemake_,
avoid contact with the moving parts of the
ejector mechanism, or with tile heating
element located on the bottom of the icemaket:
Do not place finge_ or hands on the automatic
icemaking mechanism while the refrigerator
is plugged in.
i)::Kee I) finge_ ()/It of tile "pinch point" areas;
clearances between the doo_ and between
the doo_ and cabinet are necessarily small.
Be caretul closing doo_ when children are
in the area.
i)_:Unplug tile refrigerator befiwe cleaning and
making repairs.
NOTE."We stronglyrecommendthat any servicing be
performedby a qualified individual
i)::Setting either or both controls to 0 (off)does not
remove power to the light circuit,
::__Do not refl'eeze fl'ozen fi)ods which have
thawed completely,
ge.com ........
A DANGER! RISK OF CHILD ENTRAPMENT
PROPERDISPOSALOFTHEREFRIGERATOR
Child entrapment and .alff cation are not problems CFCDisposal ,.of the past.Junked or abandoned refl_igerato_ are
still danoerotlS exen if they will sit for "'ust a few _mr old refl_igerator i//a_ have a cooling svstelll
days." ]f)ou are getting cid of)our old refcigeratot; that used CFCs (chlorofluorocarbons). (_[_<Cs are
please fi_llow the instructions below to help prexent beliexed to ham_ stratospheric ozone.
accidents. If you are throwing away your old refl'igeraum make
Before You ThrowAway YourOld Refrigerator sure the CFC refcigerant is remoxed fiw proper
or Freezer: disposal b)a qualified serxicex; It xou intentionally __,
release this CFC refl_igerant you can be subject to ,_
iJi::Take off the (loo_. fines and impcisonment under provisions of
!i_:I,eaxe the shelxes in place so that children ma) emironmental legislation.
not easilx climb inside.
USEOFEXTENSIONCORDS
Because of potential safety hazards under certain conditions, we strongly recommend against the use
of an extension cord. _"
Howevei, ifxou I/ltlSt rise an extension cord, it is absolutely ne('essai'v that it be a UiAisted (in the United _'*"
States) or a CSA-listed (in Canada), 3-wire gr )unding q])e appliance extension cord haxing a grounding
_])e I)hw_ and outlet and that the electcical ratin,* of the cord be 15 amperes (minim urn) and 120 xolts.
g
g
g
3
IMPORTANTSAFETYINFORMATION.
READALLINSTRUCTIONSBEFOREUSING.
WARNING'!
HOWTOCONNECTELECTRICITY
Do not, under any circumstances, cut or remove the third (ground) prong from the power cord.
For personal safety, this appliance must be properly grounded.
The power cord of this appliance is equipped
with a 3-prong (grounding) plug which mates
with a standard 3-prong (grounding) wall outlet
to minimize the possibili V of electric shock hazard
fi'om this appliance.
Have the wall outlet and circuit checked by
a qualified electrician to make sure the outlet
is properly grounded.
If the outlet is a standard 2-prong outlet, it is
your personal responsibili V and obligation to
have it replaced with a properly grounded
3-prong wall outlet.
The refl_igerator should always be plugged into
its own individual elect_ical outlet which has
a voltage rating that matches the rating plate.
This provides the best pe_om_ance and also
I)rexents oxerloading, house wi_ing circuits which
could cause a fire hazard fl'om oxerheated wires.
Never unplug )'our refl_igerator bv pulling on
the power cord. _Mwa):s g_ip plug firefly and pull
straight out fl'om the outlet.
Repair or replace immediately all power cords that
have become fl'ayed or otherwise damaged. Do not
use a cord that sho_vs cracks or abrasion damage
along its length or at either end.
\4]_en moving the refl_igerator away fl'om the
wall, be careflfl not to roll over or damage the
power cord.
READANDFOLLOWTHISSAFETYINFORMATIONCAREFULLY.
SAVETHESEINSTRUCTIONS
4
Aboutthe temperaturecontrols. .ecorn
Not all features are on all models.
f
® Adjust Temperature
rooo
,orm wo mor
• olde olde 0
_Light_ o°FisR....... ..... E_pressChi_
37°F is Recommended
• ® • 0
_JCwater_') _-w er_ _r ed_ _-C d_ _u _ _Lock_
|Fitter I at ush ube ickt
.o,d......d.o.ooot .o,d......d.
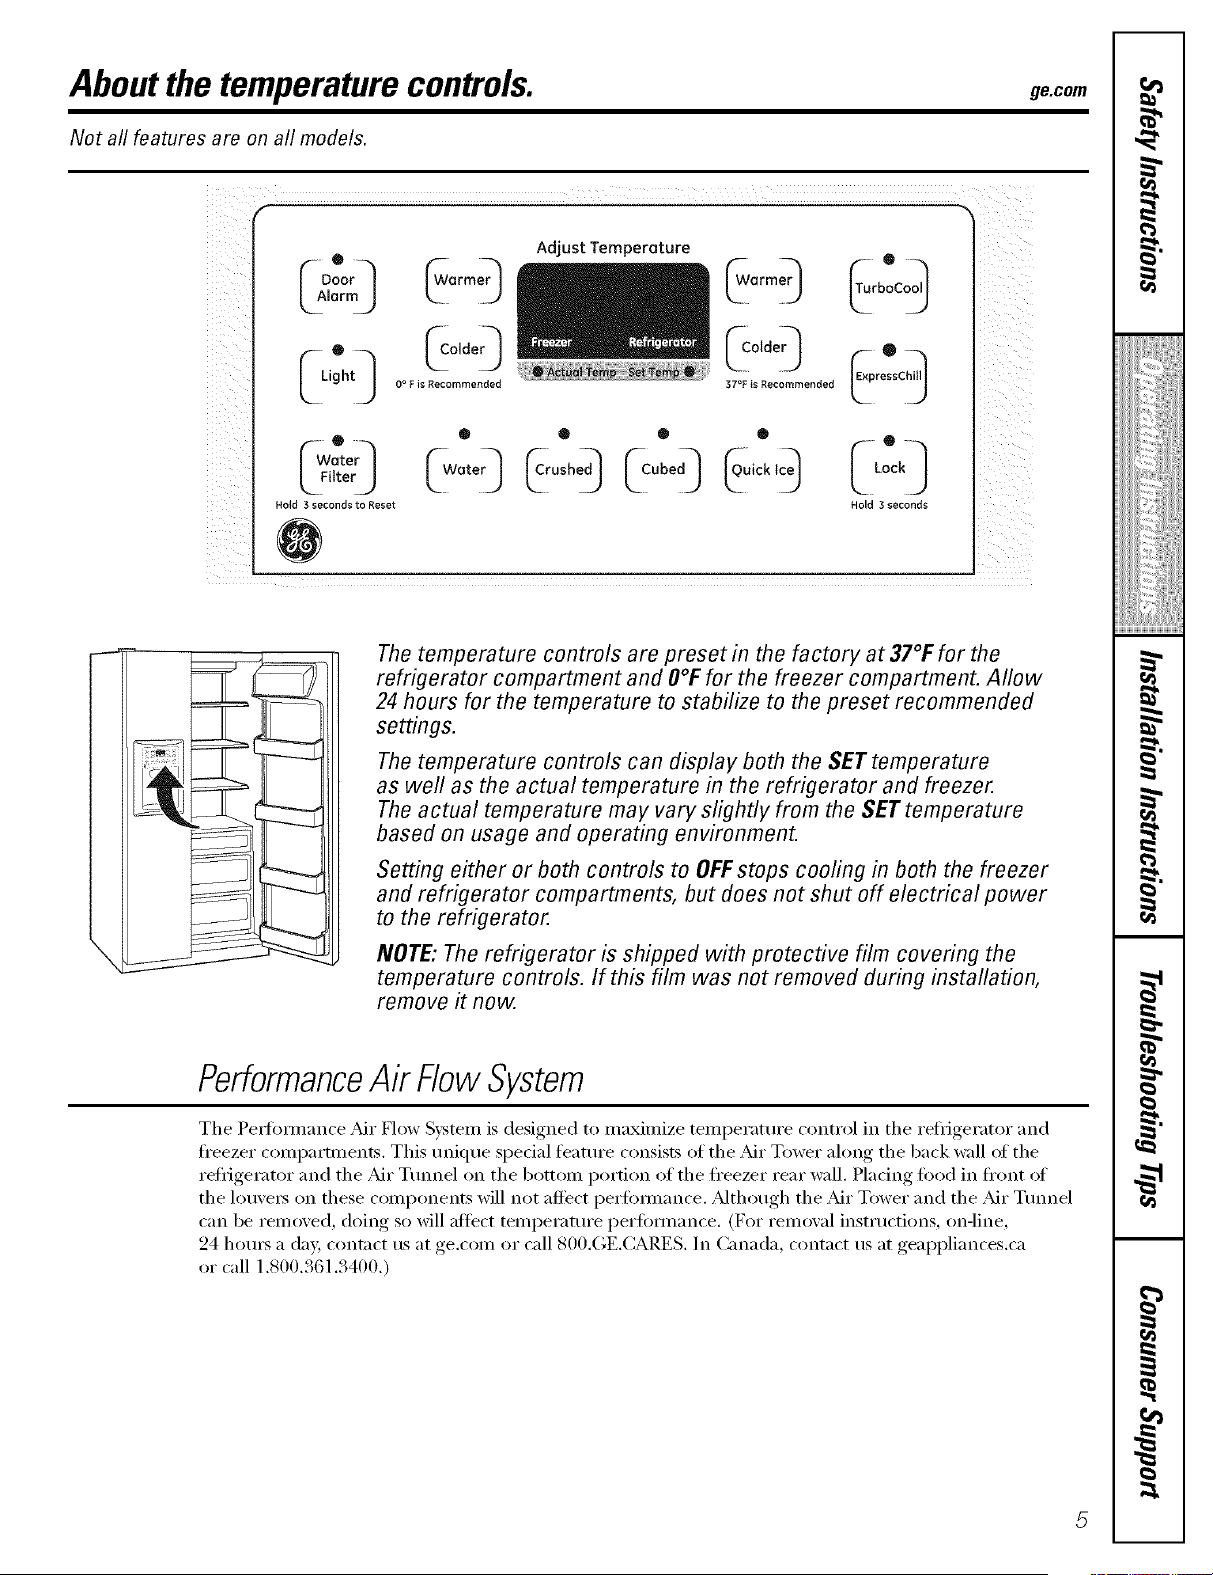
The temperature controls are preset in the factory at 37°F for the
refrigerator compartment and O°Ffor the freezer compartment. Allow
24 hours for the temperature to stabilize to the preset recommended
settings.
The temperature controls can display both the SET temperature
as well as the actual temperature in the refrigerator and freezer.
The actual temperature may vary slightly from the SET temperature
based on usage and operating environment.
Setting either or both controls to OFFstops cooling in both the freezer
and refrigerator compartments, but does not shut off electrical power
to the refrigerator.
NOTE: The refrigerator is shipped with protective film covering the
temperature controls. If this film was not removed during installation,
remove it now.
PerformanceAir FlowSystem
The PeHkmnance Air How System is designed to maximize temperattu'e control in the reiiigerator and
fl'eezer compartments. This tmique special feature consists of the Air Tower along the back wall of the
refiigerator and the _dr Tmmel on the bottom portion of the ti'eezer rear wall. Plating food in ti'ont oI
the lou\'e_ on these components will not affect perf0nnance. _Mthough the _dr Tower and the _Mr Ttmnel
can be removed, doing so will aftoct temperatm'e perfkmnance. (For removal instructions, on-line,
24 hom_ a day, contact us at ge.com or call 800.GE.CARES. In (_mada, contact us at geappliances.ca
or call 1.800.361.3400.)
About TurboCoo/Y(on some models)
How it Works
TurboCoolrapidl) cools the refi-igerator
compartn_ent in order to more quickl)
cool fi)ods. Use TurboCoolwhen adding a
large amomK of food to the refi-igerator
compartment, putting away fi)ods alter they
have been sitting out at room temperature
or when putting away warn/lettove_. It can
also be used if the refligerator has been
without power fin" an extended period.
Once acti\;_ted, the compressor will turn oil
immediately and the fires will cycle on and
oiI at high speed as needed fin" eight hom_.
The compressor will continue to rtm tmtil
the refi_igemtor compartment cools m
approximately 34°F (1 °C), then it will cycle
on and off to maintain this setting. _Mter 8
hom_, or if TurboCoolis pressed again, the
refl-igerator compartment will return to
the original setting,
How to Use
Press TurboCool.The refl_igerator
temperature displa) _dll show Tc and
the I,ED will be acti_ _ted.
_Mter TurboCool is complete, the
refl-igerator compartment will return
to the original setting.
NOTES: The refl-igerator temperature
cmmot be changed dm_ing
TurboCoot
The fl'eezer temperatm'e is not
affected dm_ing TurboCooL
_q_en opening the refrigerator
door dining TurboCool,the fires
will continue to run if they have
c_cled (m.
About the water filter. (onsomemodels) ge.com
On some models
Water Filter Cartridge
The water filter cartridge is located in the back upper right
corner of the refl_igerator coml)artn/ent.
When to Replace the Filter on Models With a
Replacement Indicator Light
There is a replacement indicator light for the water tilter
cartridge on the dispense_; This light will turn orange to tell
w)u that you need to replace the filter soon.
The filter cartridge should be replaced when the
replacement indicator light turns red or if the flow of water
to the dispenser or icemaker decreases.
When to Replace the Filter on Models Withouta
Replacement Indicator Light
Tile filter cartridge should be replaced evei)' six months
or earlier if tile flow of water to the water dispenser or
icemaker decreases.
Removingthe Filter Cartridge
If you are replacing the cartridge, fi_t remove the old one
by sh>wly turning it to the left. Do not pull (h)wn on the
cartridge. A small amount of water may dil I) down.
Installing the Filter Cartridge
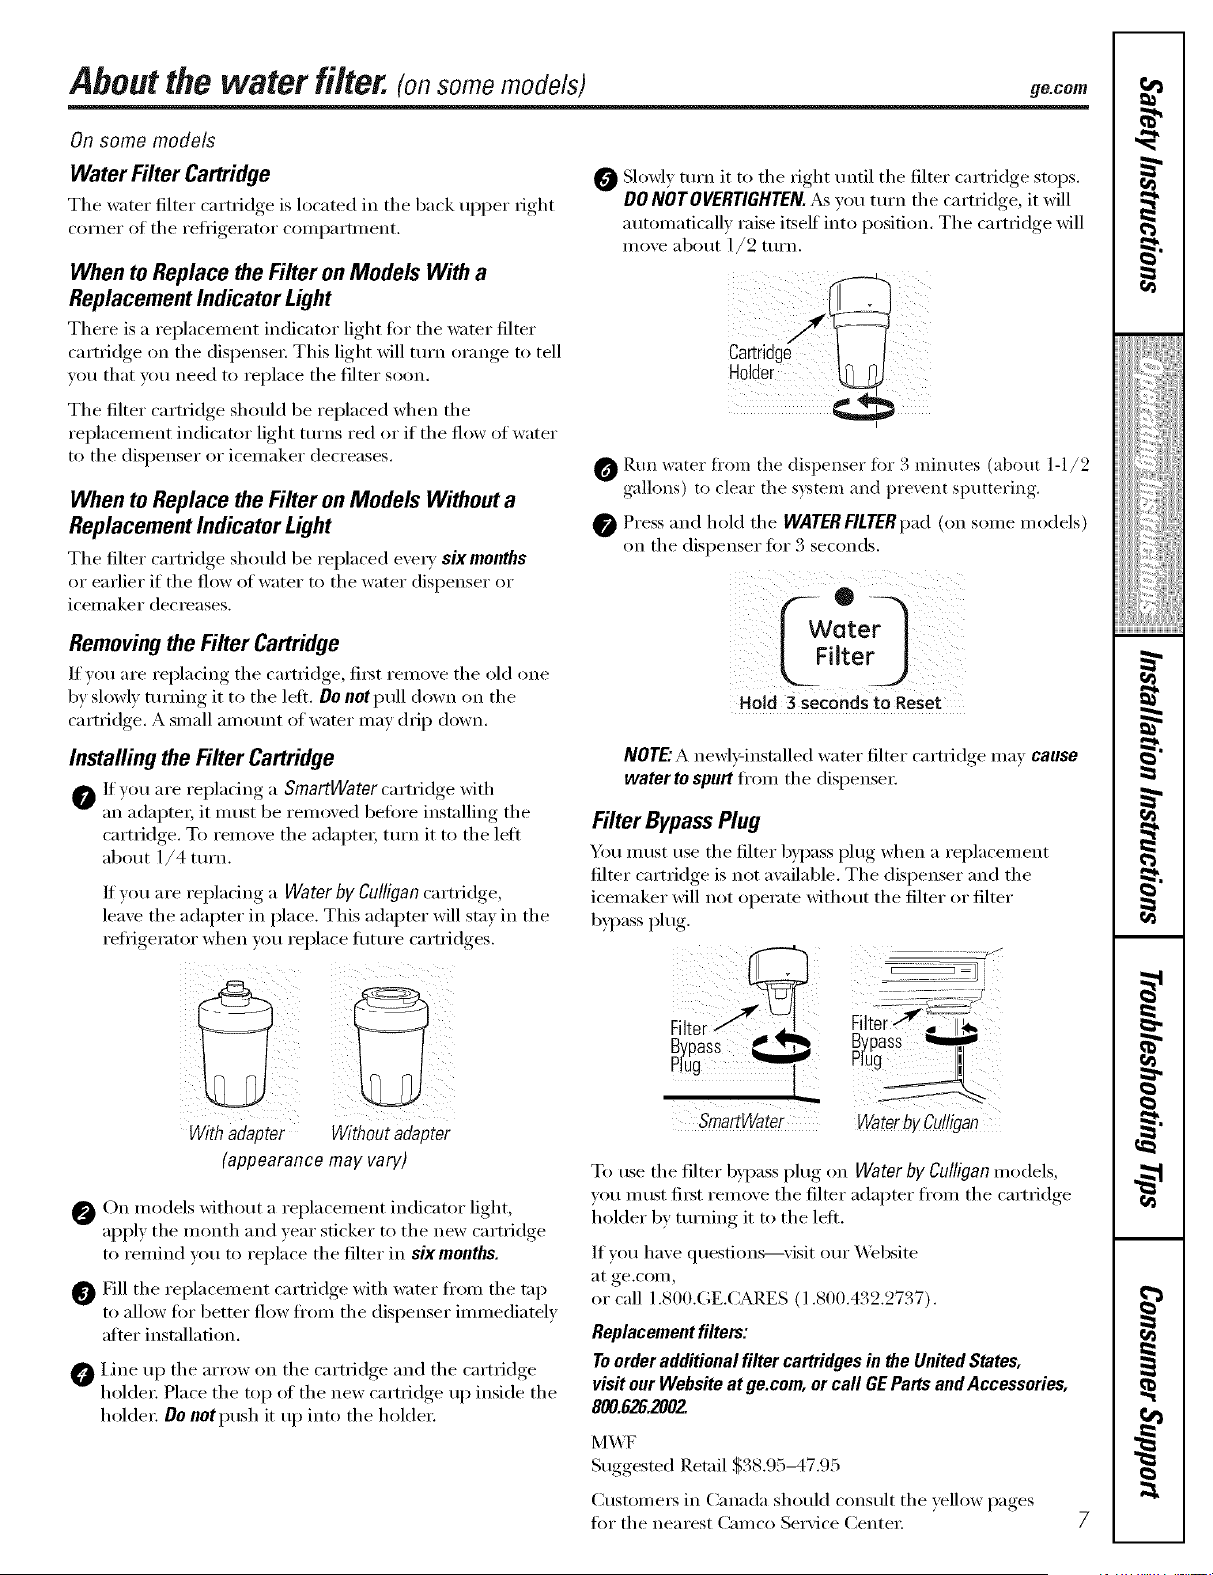
@ If you are replacing a SmartWater cartridge with
an adapte_, it Hltlst be removed befiwe installing the
cartridge. To remove the adapter; ttlrn it to the left
about l/4 turn.
If you are replacing a Water by Culligan cartridge,
leaxe the adapter in place. This adapter will stay in the
refl_igerator, when you. rei)lace .... flfftu'e cartridoes_.
i_ i/i
!i i
iI _ _i i i I
With adapter Withoutadapter
(appearance may vary)
On models without a replacement indicator light,
appl) the month and )ear sticker to the new cartridge
to remind xou to replace the filter in sixmonths.
@ Fill the replacement cartridge with water fl'om the tap
to allow fin" better flow from the dispenser immediately
after installation.
@iJne up the arrow on tile cartridge and the cartridge
holder: Place the top of the new cartridge up inside the
holder; Do not push it up into the holder;
Slowlx turn it to the right tmtil the filter cartridge stops.
DONOTOVERTIGHTEN.._sVOlt tt/I'n the cartridge, it will
automaticalh raise itself into position. The cartrid<*e_ will
illo'_e about ]/2 tui'n.
@ Run water fl+om the dispense_ +fin +3 minutes (about 1-I/9
galhms) to clear the sxstem and pre_ent sputte_'ing+
@ Press and hold the WATERFILTERpad (on some models)
• " ¢2
on the (hsl)enser fin" o seconds.
i_IiiI i • ii_i_ii_
ii?i i!ii i:
Hoid 3 secOnds to ReSet
NOTE:A newl>installed water filter cartridoe may cause
water to spurt from the dispensex;
Filter BypassPlug
You must use the filter byl)aSS plug when a replacement
filter cartridge is not available. The dispenser and the
icemaker will not operate without the filter or filter
byl)aSS plug.
_ilters
Filter7!_ __-_
Bypass
Plug_
SmartWater Water byCulligan
To use the filter bypass plug on Water by Culligan models,
w)u must fi_st remove the filter adapter fl'om the cartridge
holder b v turning it to the left.
If you have questions--visit our Website
at ge.coln,
or call 1.800.GE.CARES (1.800.432.2737).
Replacement filters:
To order additional filter cartridgesin the United States,
visit our Website at ge.com, or carl GE Parts and Accessories,
800.626.2002
M_F
Suggested Retail $38.95-47.95
Custome_ in Canada should consult the xellow, I)ages,
for the nearest Camco Serxice Center:
I
_!!ii::,,_i4ii_i:il
ii_iiiii_iiii}ii;i
iii!iiiiii_i_ii{ii¸
g
Aboutthe shelves and bins.
Not all features are on all models.
Refrigerator bin
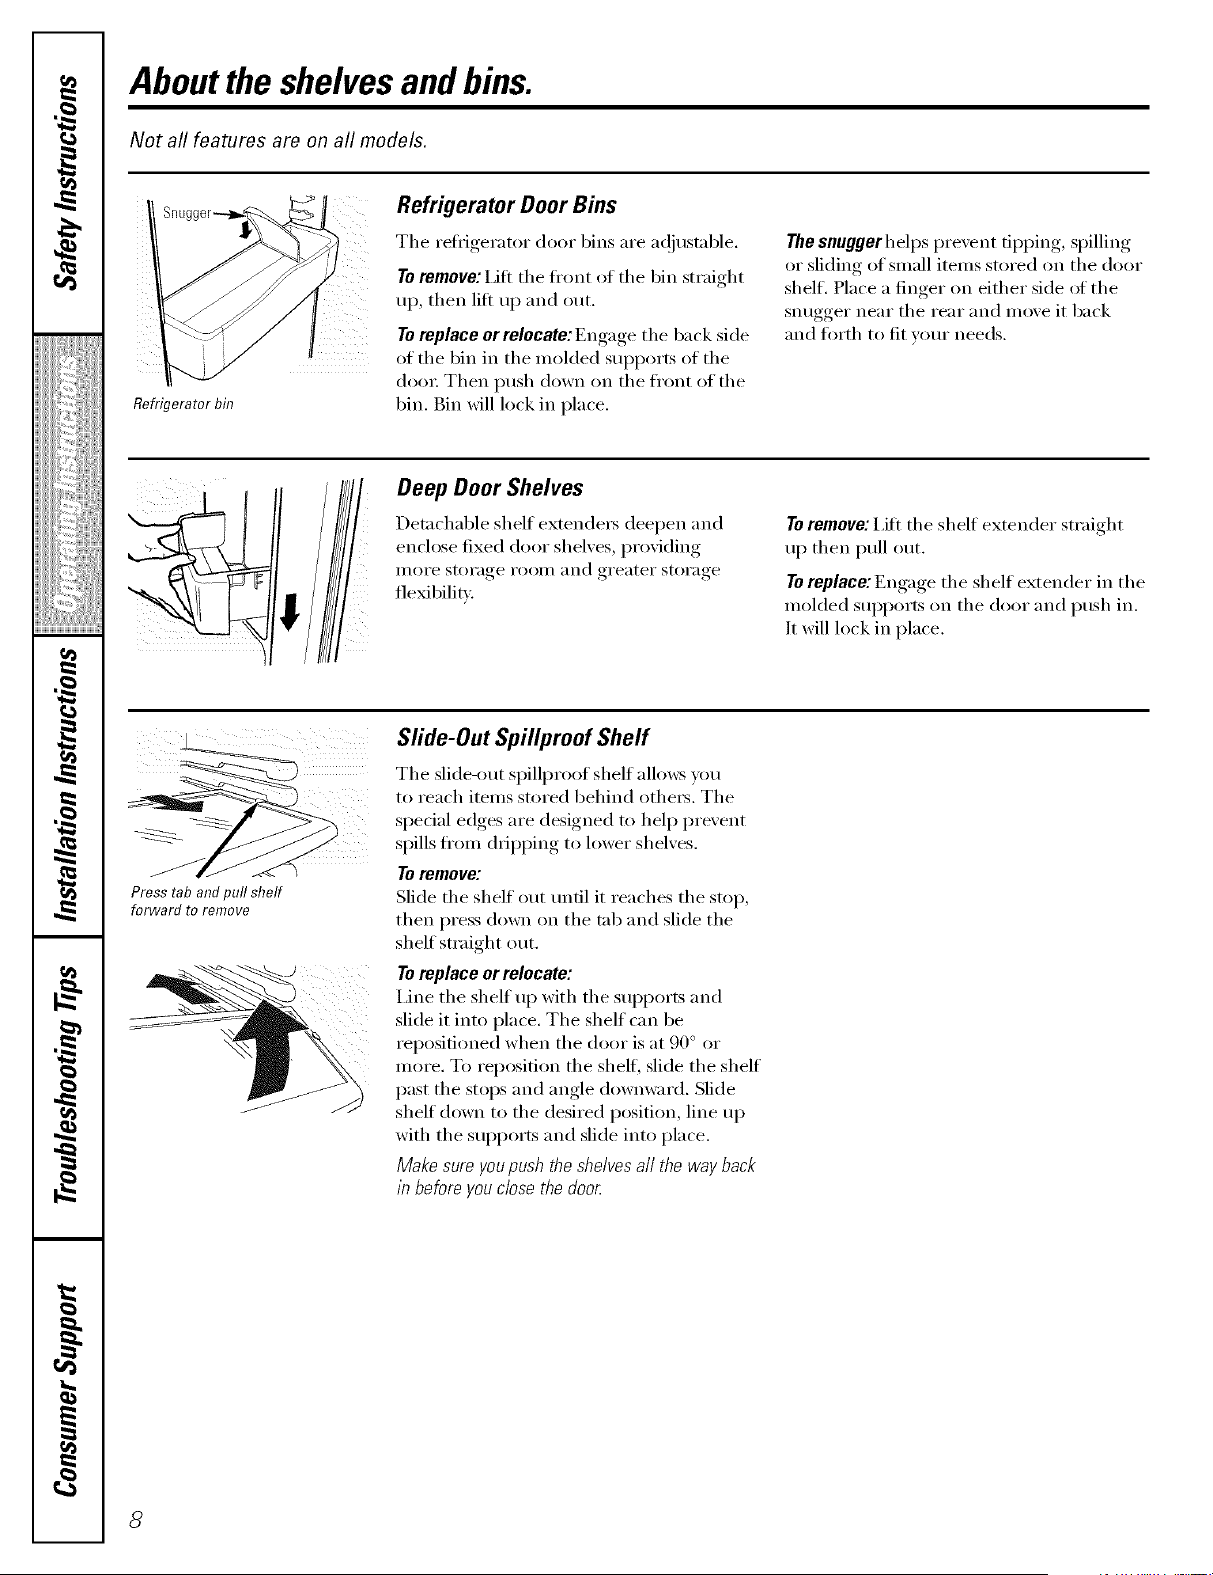
Refrigerator Door Bins
The reti_igerator door bins are a(!iusmble.
Toremove: I,ifl the ti'ont of the bin straight
up, then lilt up and out.
To replace er relecate: Engage the back side
of the bin in the molded supports of the
doo_; Then push down on the fl'ont of the
bin. Bin will lock in place,
Thesnuggerhelps prevent tipping, spilling
or sliding of small items stored on the door
shelf. Place a finger on either side (ff the
snugger near the rear and move it back
and fi)rth to fit your needs.
Deep Door Shelves
Detachable shell extende_ deepen and
enclose fixed door shelves, providing
ii/oi'e storage I'OOII/ and greater storage
flexibility.
To remove: i,iti the shelf extender straight
up then pull out.
To replace:Engage the shelf extender in the
molded supports on the door and push in.
It will lock in place.
Press tab and pull shelf
forward to remove
Slide-Out Spillproof Shelf
The slide-out spillprooI shell alhm:s you
to reach items stored behind othe_. The
spedal edges are designed m help prevent
spills ti'om dripping to lower shelves.
Toremove:
Slide the shell out tmtil it reaches the stop,
then press down on the tab and slide the
shelf straight out.
Toreplace or relocate:
i,ine the shell uI) with the SUl)ports and
slide it into place. The shelf can be
repositioned when the door is at 90 ° or
more, To reposition the shell slide the shelf
past the stops and angle downward, Slide
shelf down to the desired position, line up
with the supports and slide into place.
Make sure you push the shelves a// the way back
in before you close the dooc
ge.com
Not all features are on all models.
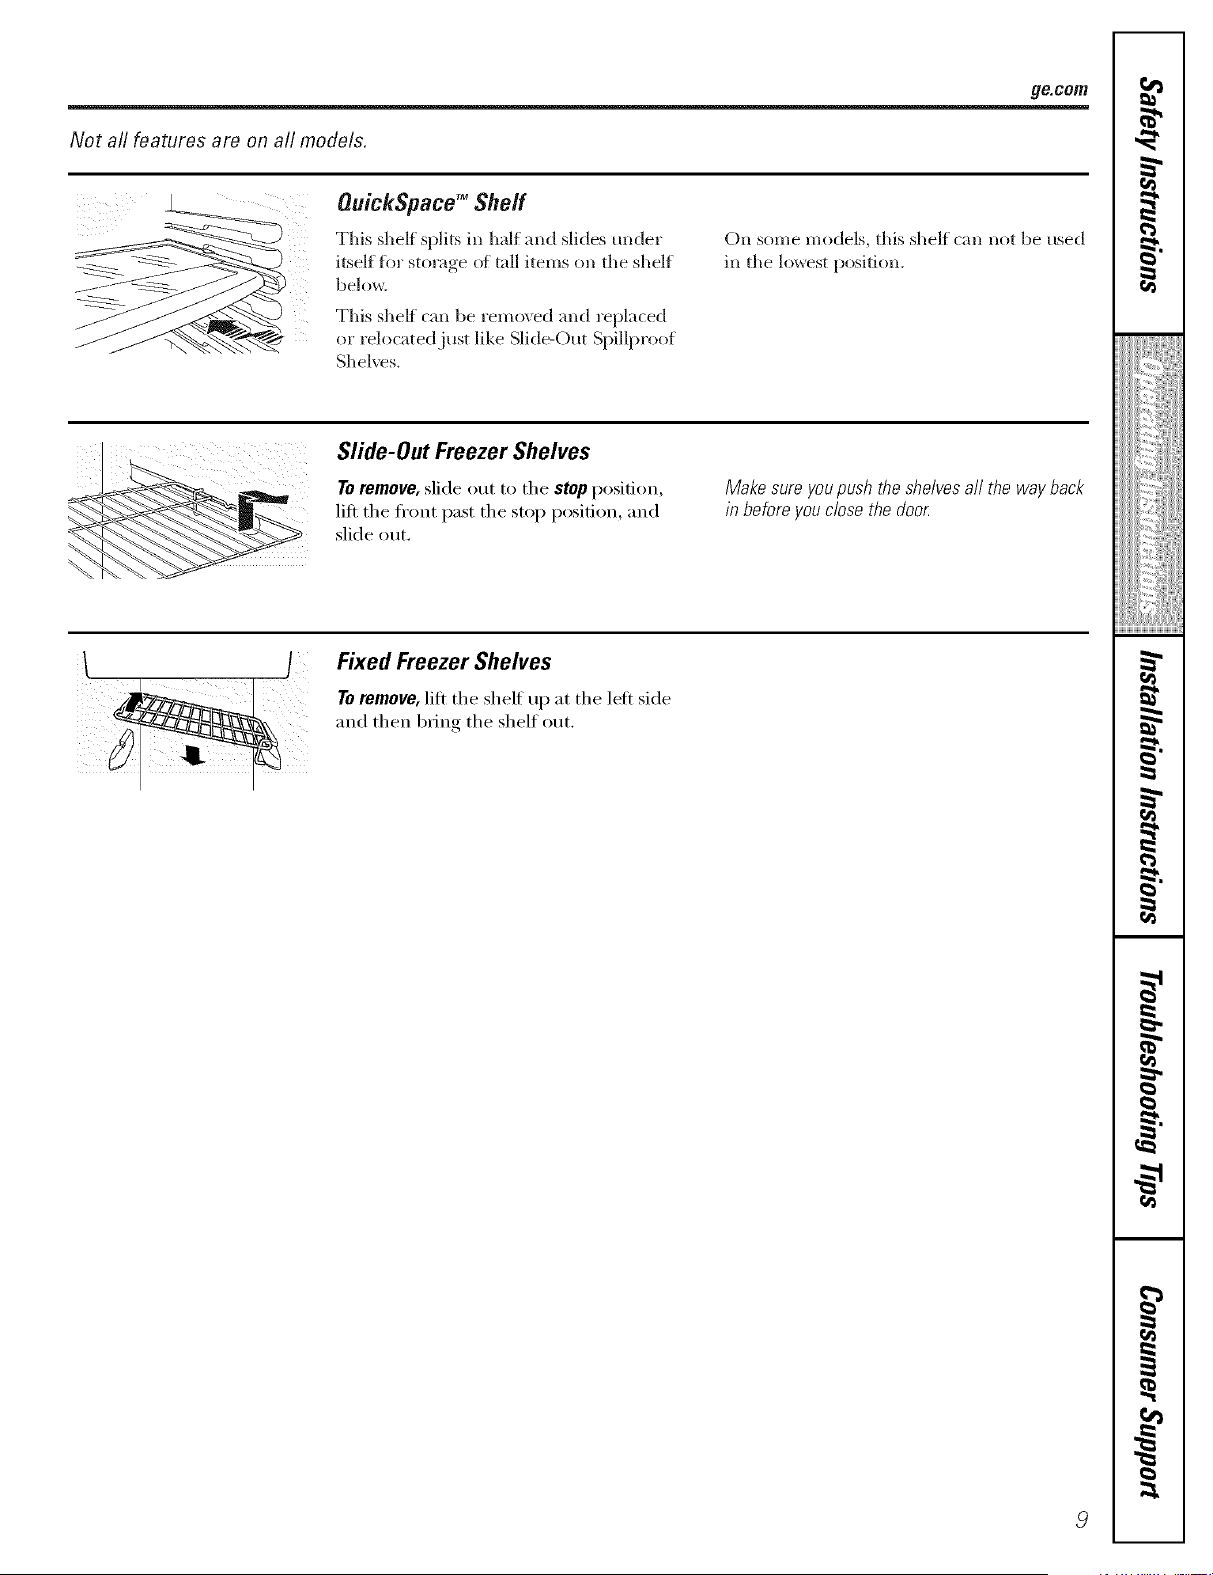
OuickSpace TM Sheff
This shelf splits ill half and slides tllldeI"
itself flw storage ot tall items on tlle shelf
below.
This sheff call be remox ed and replaced
or relocated just like Slide-Out Spillproof
Shel_vs.
On some models, this shelf can not be used
ill tile lowest position.
Slide-Out Freezer Shelves
To remove, slide out to tile stop position,
lilt tile fl'ont past tile stop position, and
slide ()/It.
Makesureyoupushthe shelvesall the wayback
inbeforeyouclosethe doo_
I I
Fixed Freezer Shelves
To remove, lilt tile shelf up at tile lelt side
and then bI_ing tile shelf out.
Aboutthe additional features.
Not all features are on all models.
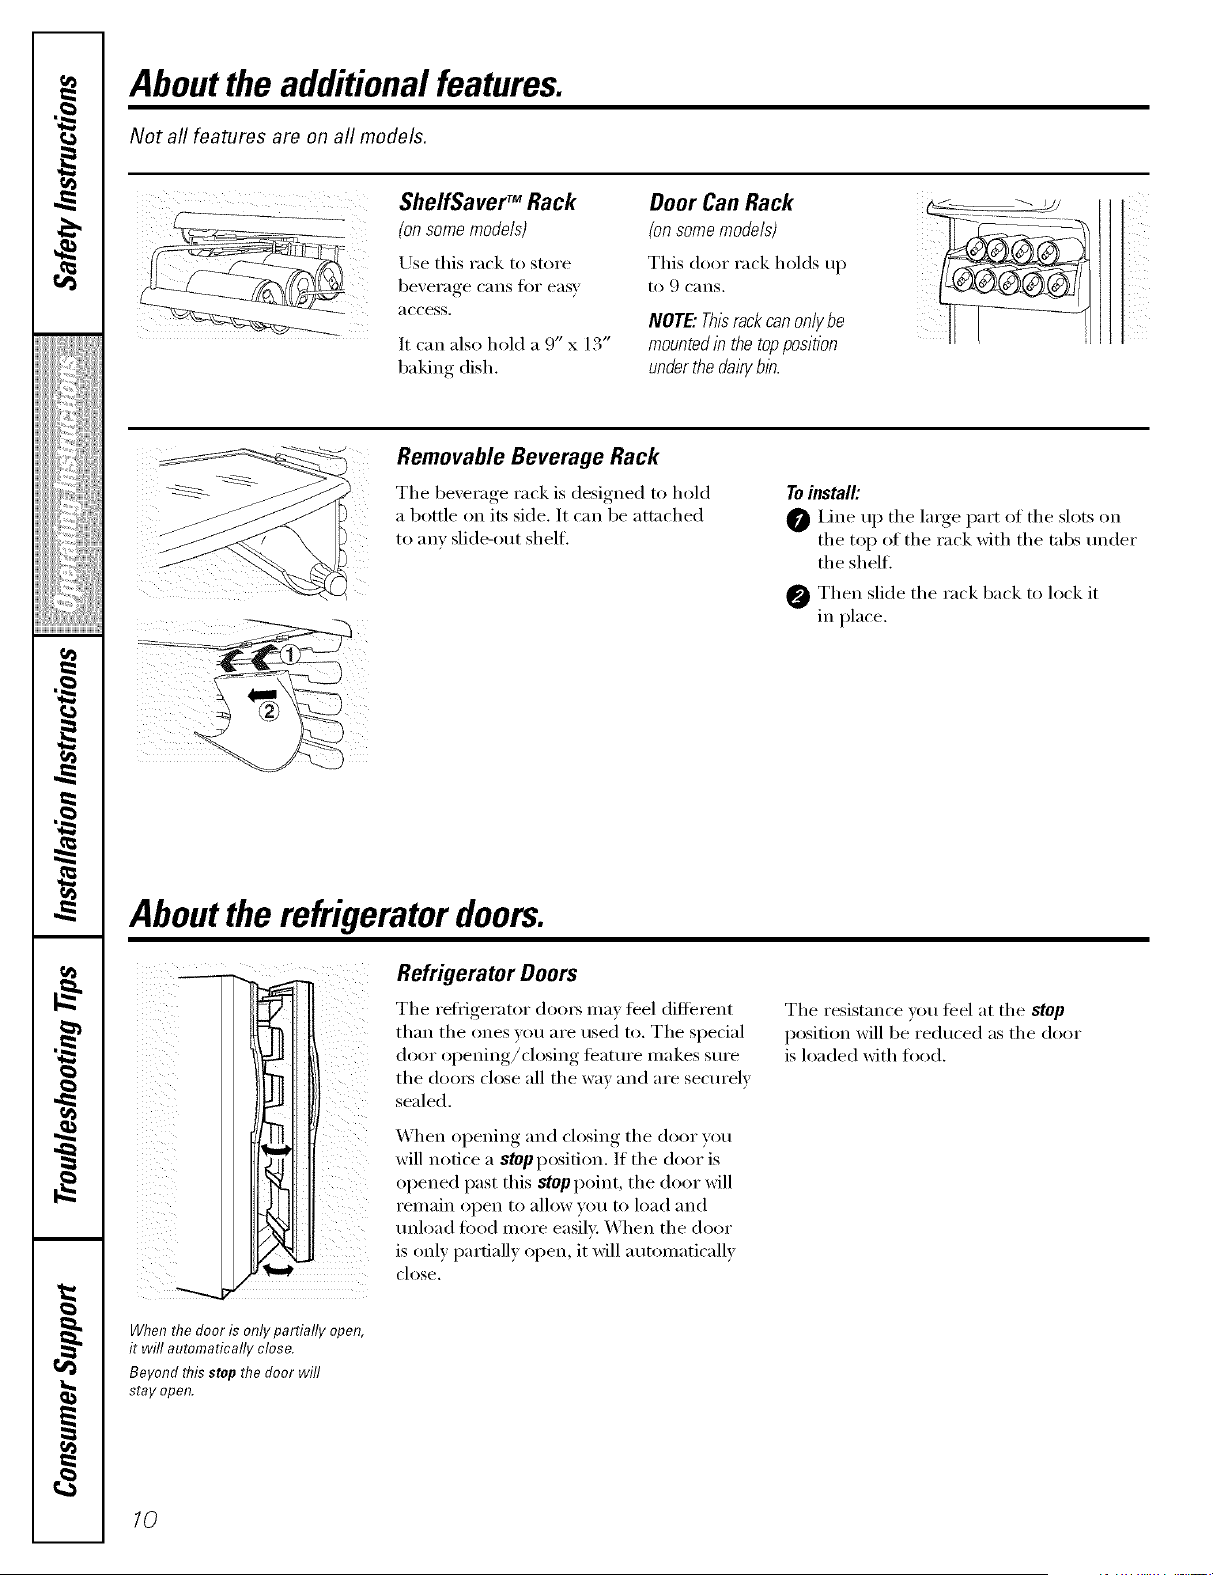
ShelfSaverTM Rack
(onsomemodels)
Use this rack to store
beverage C[lIIS ilk)I" eas\'
access.
It can also heM a 9" x 13"
baking dish.
Door Can Rack
{on some models)
This door rack holds up
10 9 cans.
NOTE."Thisrackcanonlybe
mountedin thetopposition
underthedaw bin.
Removable Beverage Rack
The bexerage rack is designed to hold
a bottle on its side. It can be attached
to any slide-out shelf.
Toinstall:
O Line up the large part of the slots on
the top of the rack with the tabs trader
the shelf.
Then slide the rack back to lock it
in place.
Aboutthe refrigeratordoors.
i _ _
i( iii_
i i i
k i(
iii _ i
Refrigerator Doors
The refligerator (lom_ ma} feel different
than the ones _ou are used to. The special
door oi_ening/closing, , teatm'e..... makes Stli'e
the (loo_ close all the wax and are secm'elv
sealed.
When opening and closing the door you
will notice a stop position. If the door is
opened past this stop point, the door will
remain open to allow _ou to load and
tmload food more easily: _Ahen the door
is onl} partiall} open, it will automaticallx
close.
The resistance xou teel at the stop
position will be reduced as the door
is loaded with food.
When the door is only partially open,
it will automatically close.
Beyond this stop the door will
stay open.
10
ge.com
!
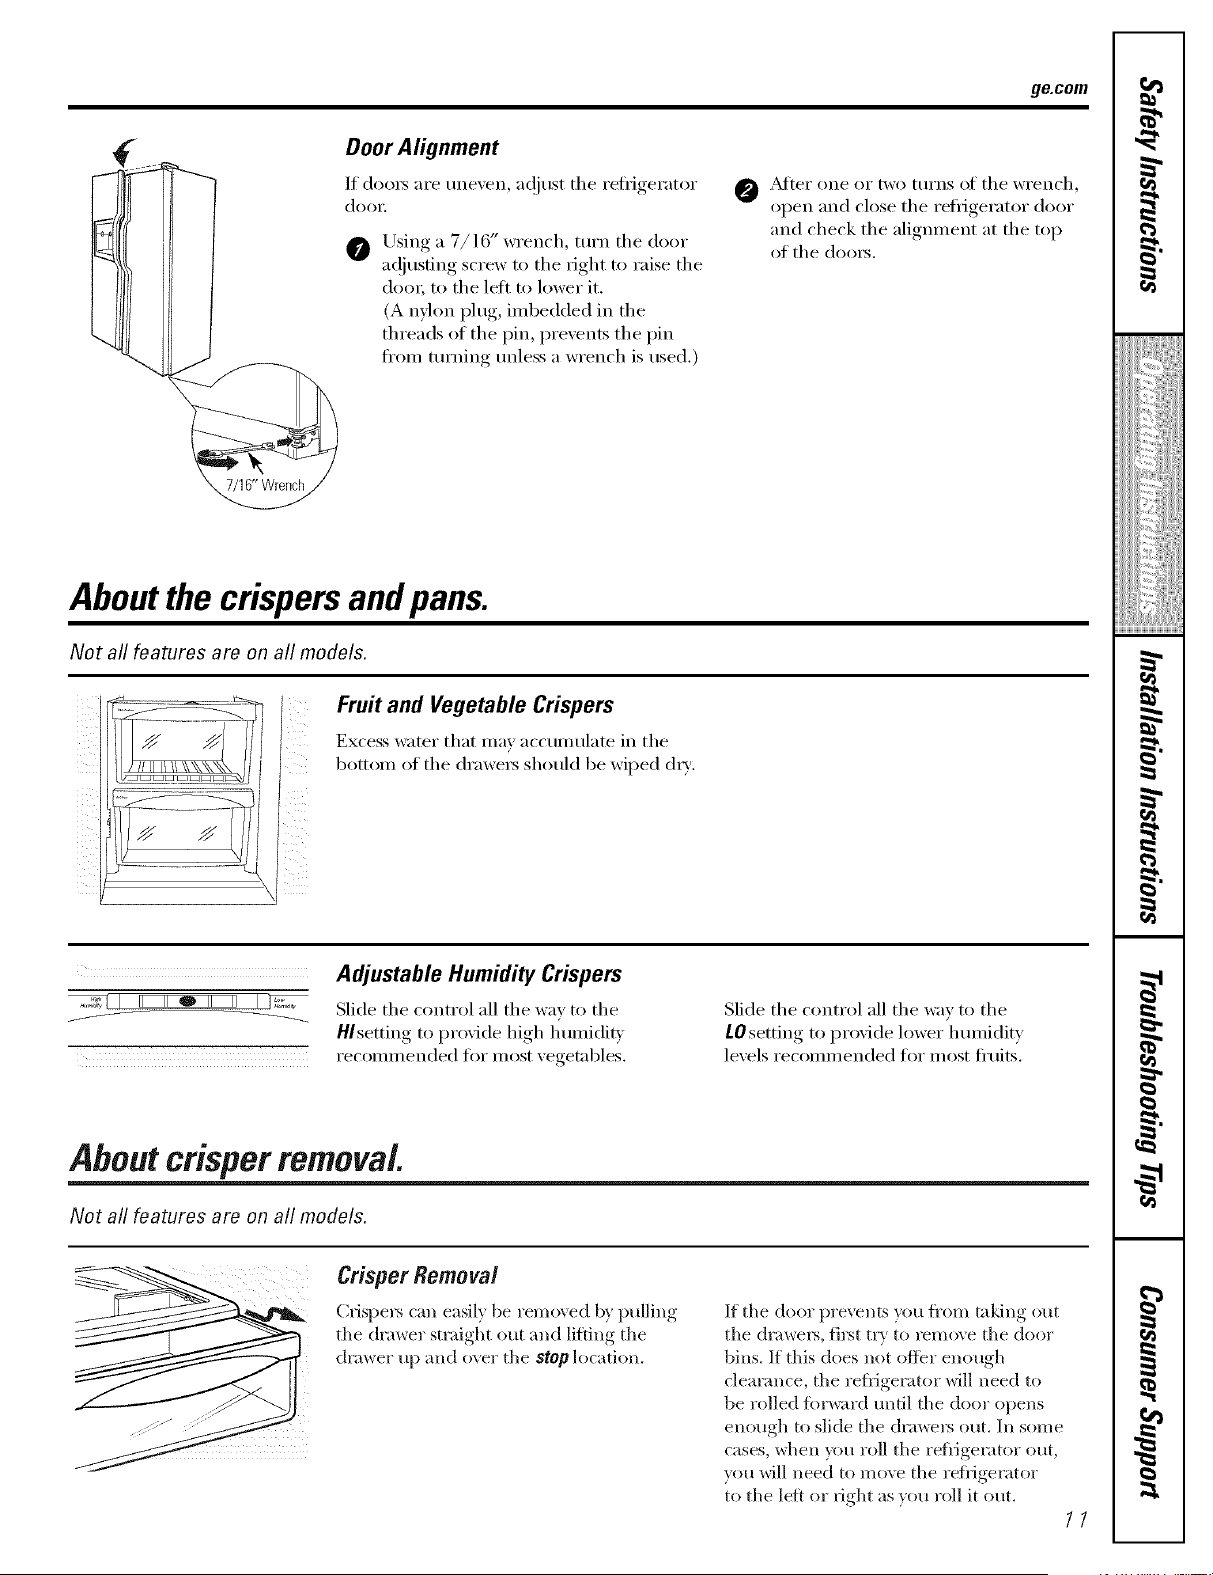
Door Alignment
It (loo_ are une;en, a(!iust the refl_igerator
door.
0 Using a 7/16"wrench, turn the door
a(!justing screw to the right to raise the
dora; to the lett to lower it.
(A nflon plug, imbedded in the
threads of the pin, prevents the pin
ti'om turning tmless a wrench is used.)
O AJter one or [we ttlrns of tile wI'ench,
oi)en.... and close the refl_Jgerator, door
and check the aligmnent at the top
of the dooi_.
Aboutthe crispersand pans.
Not all features are on all models.
Fruit and Vegetable Crispers
Excess water that may accumulate in the
bottom of the (h'awe_ should be wiped (h_'.
.,,_]1 II II O II II I_
ii i i i i i i i i
Adjustable Humidity Crispers
Slide the control all the way to the
H/setting to proxide high humidit_
recomm ended fin" most ; egetables.
Slide the control all the way to the
LOsetting to proxide lower humidity
le;els recommended for most fl'uits.
Aboutcrisper removal.
Not all features are on all models.
Crisper Removal
Crispers can easily be removed by pulling
the (hawer maight out and lifting tile
drawer up and over the stop location.
If the door prevents you fl'om taldng out
the (hawers, first try to rein(we the doo_
bins. If this does not oflbr enough
clearance, tile refl_igerator will need to
be rolled tin'ward tmtil the door opens
enough to slide the drawers out. In some
cases, when you roll the refiigemtor ()lit,
you will need to move tile refl_igemtor
to the left or fight as you r(dl it out,
//
Aboutthe automatic icemaker.
A newly-installed refrigerator may take 12 to 24 hours to begin making ice.
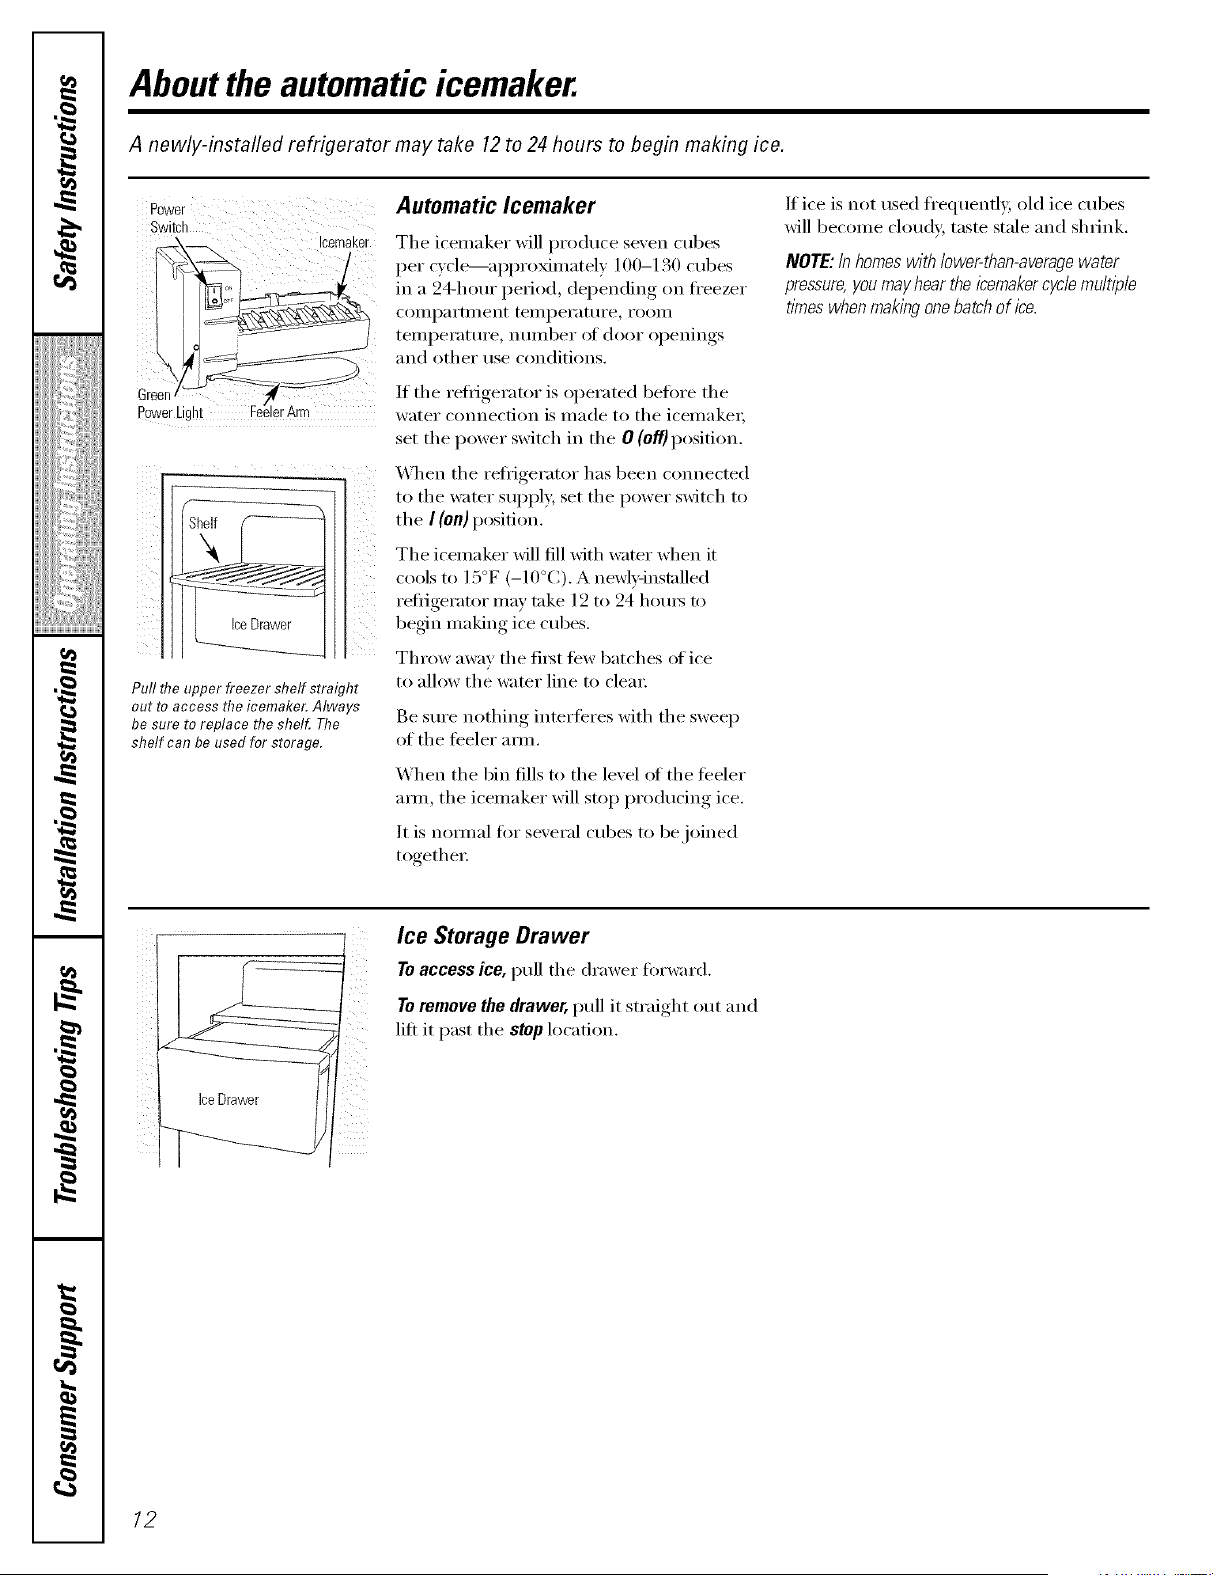
Power Automatic Icemaker
Switch
Puff the upper freezer shelf straight
out to access the icemaker. Always
be sure to replace the shel_ The
shelf can be used for storage.
The icemaker will produce seven cubes
per cycle---aI)I)roxinrately 100-130 cubes
ill a 94-hour period, depending on fl'eezer
COillpai'tlllent [eillpei'attli'e_ i'OOill
teml)erature, nmnber of door openings
and other use conditions.
If the refl_igerator is operated befi)re the
water cmmecfion is made to the icemakei;
set the power switch ill the 0 (Of'/) position.
When the refl-igerator has been connected
to the water supply, set the power switch to
the I (on) position.
Tim icemaker will fill with water when it
cools to ] 5°F (-10°C). A newl_qnstalled
reflJgerator nlay take 12 to 24 houI_ to
beg{n ,nakhlg ice cubes.
Throw away the fiI_t tew batches (f ice
to allow the water lille to cleai:
Be sure nothing interteres with the sweep
of the feeler aml.
When the bin fills to the level ot the feeler
aml, the icemaker will stop producing ice.
It is nom/al fi)I" several cubes to be joined
together
If ice is not used fl'equenfly, old ice cubes
will becolne cloudy, taste stale and shrink.
NOTE: In homes with lower-than-averagewater
pressure,you may hear the/cemaker cycle multiple
times whenmaking onebatch of ice.
ice Drawer
Ice Storage Drawer
To access ice, pull the drawer forward.
To remove the drawer, pull it straight out and
lift it past the stop location.
12
About the ice and water dispenser.(onsomemodels) ge.oom
On some models
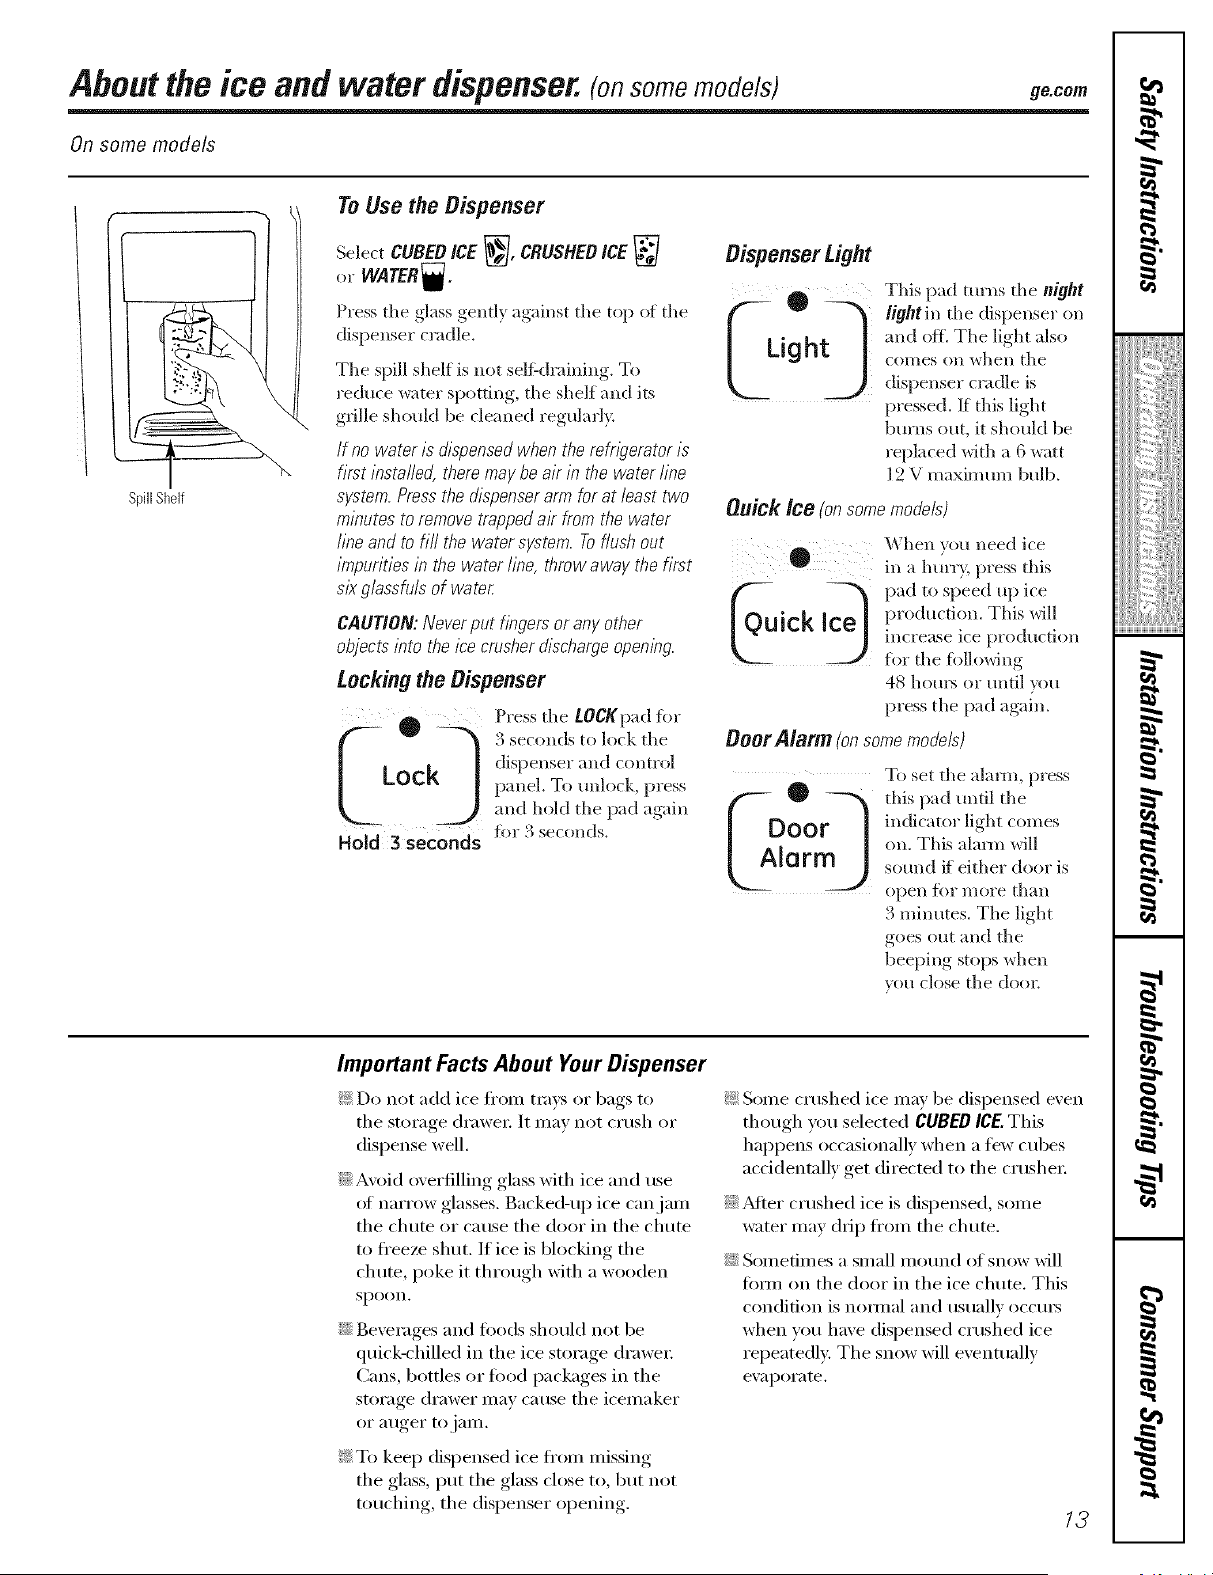
SpillShelf
To Use the Dispenser
SelectCUBE#iCE_, CRUSHEDICE
or WATER_.
Press tile glass gently against the top of the
dispenser cradle.
The spill shelf is not selfkhaining. To
reduce water spotting, the shelf and its
grille shouM be cleaned regularly.
If no water is dispensed when No refn)erator is
first installed, there may be air in the water/ine
system.Pressthe dispenserarm for at/east two
Dispenser Light
This pad tm'ns the flight
light in the dispenser on
and oil The light also
COllies (751 _Ahen tile
dispenser cradle is
pressed. If this light
burns out, it should be
replaced with a 6 watt
12 V maximum bulb.
CAUTION: Never put hbgers or any other
objects into the ice crasher discharge opembg.
Locking the Dispenser
Press tile LOCgpad *br
3 sec(mds to lock tile
LOC panel. To tmh)ck, press
and hold tile pad again
HoJd3 seconds tin" 3 sec(mds.
minutes to remove trapped air from the water Ouick Ice {on some mode/s)
/ine and to fill the water system. Toflush out
impurities in the water /ine, throw away the first When you need ice
in a hmTv, press this
six g/assfu/s of water. _ __ pad to speed up ice
t oirk Jd production. This will
increase ice production
for the fbl] owing
48 hom_ or until *ou
press the pad again.
Ooer Alarm (onsomemodels)
®
To set the alarm, press
this pad until the
indicator light comes
on. This alaml will
sound if either door is
open [()r more than
24minutes. The light
goes out and the
beeping stops when
you close the do(m
Important Facts About Your Dispenser
_: Do not add ice ti'onl trays (7I"bags to
the storage drawei: It nlav not crush or
dispense well.
iJi::Avoid overfilling glass with ice and use
of narrow glasses. Backed-up ice canjanl
the chute (7I"cause the door ill the chute
to ti'eeze shut. If ice is blocking the
chute, poke it through with a wooden
spoon.
iJi::Beverages and foods should not be
quick-chilled ill tile ice storage drawei:
Cans, bottles or food packages ill the
storage drawer nlav cause the icelnaker
or a/iger to jaIll.
_: To keep dispensed ice fl'oln nlissing
the glass, put the glass close to, but not
touching, the dispenser opening.
_: Seine crushed ice Inav be dispensed e;'en
though y(:,u selected CUBED ICE.This
happens occasionally when a few cubes
acddentally get directed to the crushei:
iJi::_MteI" crushed ice is dispensed, s(mle
water nlay drip fl'Oln the chute.
iJi::Sonletilnes a slnall Inound (ff sn(m' will
timn on the door ill the ice chute. This
conditi(m is n(mnal and usually occm_
when vou have dispensed crushed ice
repeatedly. The snow will eventually
evapoi';ite.
13
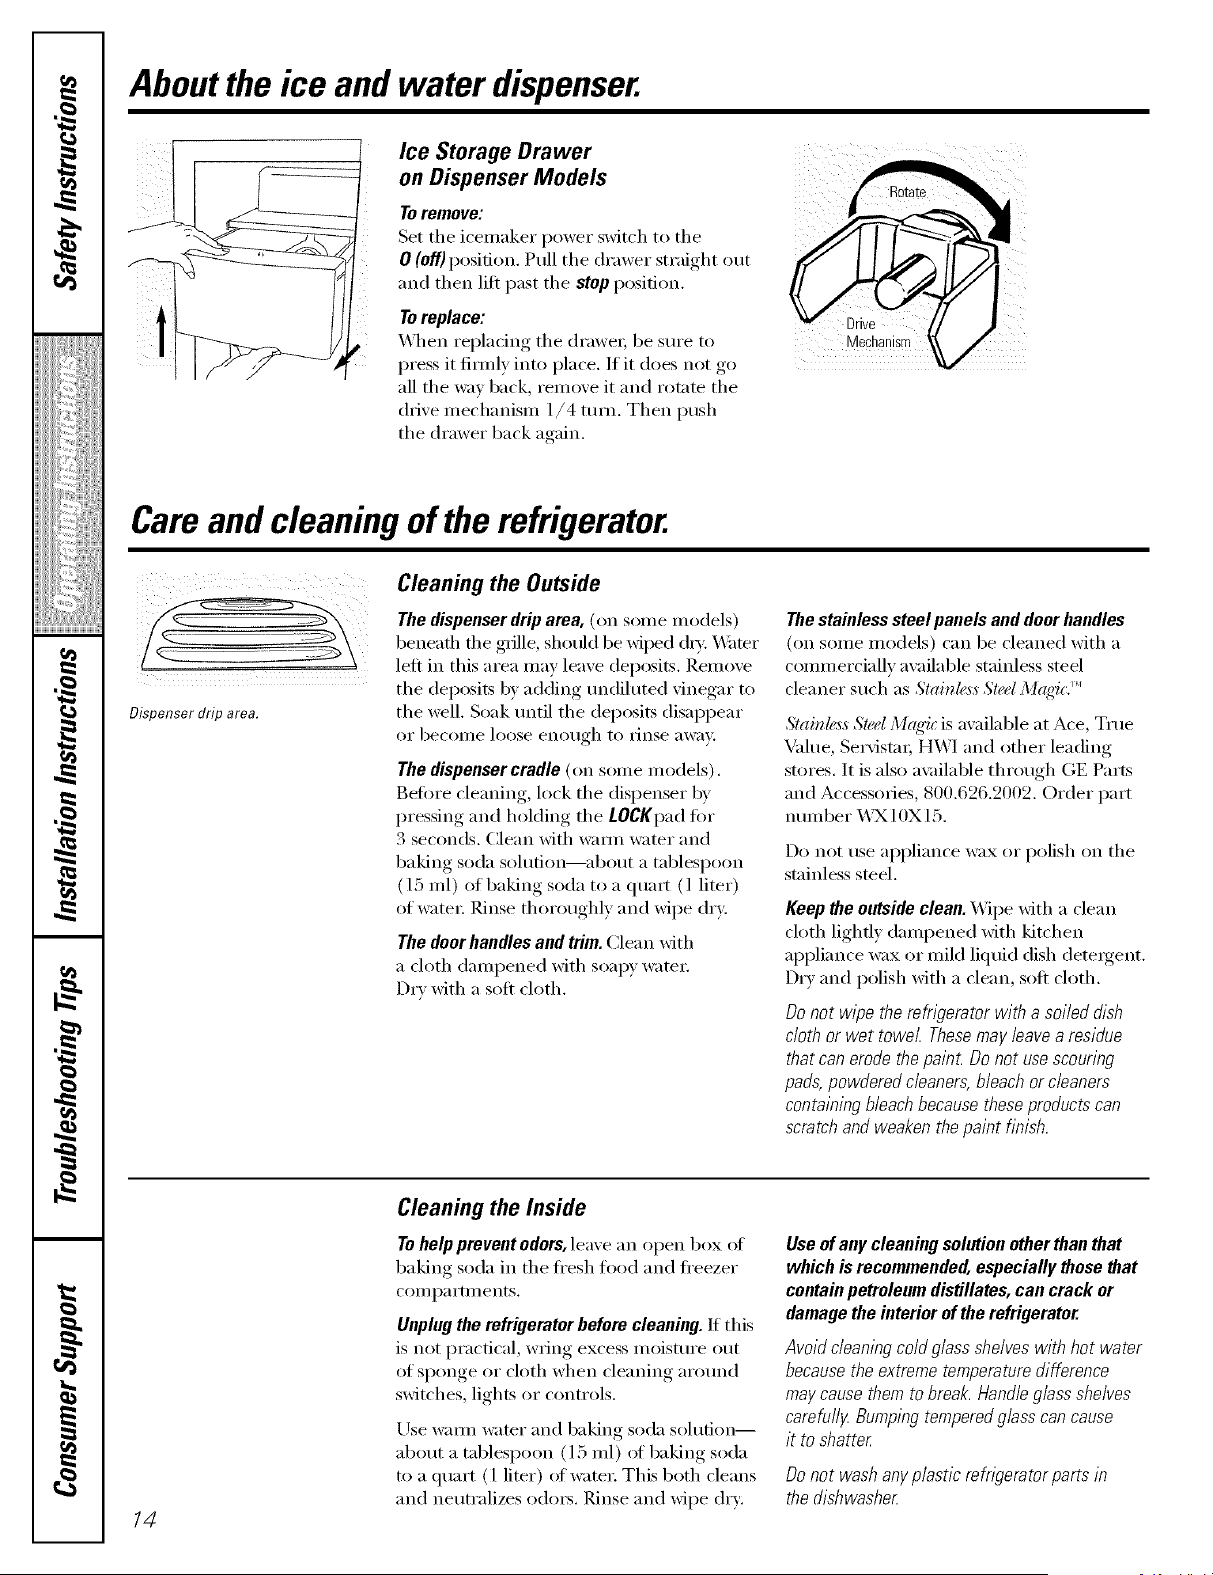
Aboutthe ice and water dispenser.
Ice Storage Drawer
on Dispenser Models
Toremove:
Set the icenmker power switch to the
0 (Off)position. Pull the drawer straight out
and then lilt past the stop position.
Toreplace:
_]_en replacing the (h'awe_; be sure to
press it firefly into place. If it does not go
all the way back, i'eillove it and rotnte the
drive mechanism 1/4 ram. Then push
the drawer back again.
Drive
Care and cleaning of the refrigerator.
Dispenser drip area.
Cleaning the Outside
The dispenser drip area, (on some models)
beneath the grille, shotfld be wiled (h_. _,_ter
left in this area may leaxe deposits. Remove
the deposits by adding mMiluted vinegar to
the well. Soak tmtil the deposits disappear
or becoi/le loose eno/Igh to Yinse "dW'dv,
The dispenser cradle (on some models).
Before cleaning, lock the dispenser by
pressing and holding the tOCKpad fin.
3 seconds. Clean with warn/water and
baking soda solution--about a tablespoon
(l 5 ml) of baking soda to a quaxt (l liter)
of watex: Rinse thoroughly and wipe dry.
The door handles and trim. Clean with
a doth dampened with soapy water.
Dry with a soft cloth.
The stainless steel panels and door handles
(on some models) can be cleaned with a
commercially available stainless steel
cleaner such as Slainle,_,_Sla<l M(_'ic. ''_
5'lainl_<ssSled M((_{'i(is available at Ace, True
Value, Se_Mst;u; HW] and other leading
stores. It is also a\_filable through GE Parts
and Accessories, 800.626.2002. Order part
ntllllbei" _._)N10X 15.
Do not use appliance wax or polish on the
st;finless steel.
Keep the outside clean. Wipe Mth a clean
cloth lightly dampened Mth kitchen
appliance wax or miM liquid dish detexgent.
Dry and polish Mth a clean, soft cloth.
Do not wipe the refnoerator with a soiled dish
cloth or wet towel. These may/lave a residue
that can erode the painL Do not use scouring
pads, powdered cleaners, bleach or c/laners
containing bleach because these products can
scratch and weaken the paint finish.
14
Cleaning the Inside
Tohelp prevent odors, leave an open box of
baking soda in the fi'esh fl)od and fi'eezer
COII/l)_l I'tlIlents.
Unplug the refrigerator before cleaning. If this
is not practical, wring excess moisture out
of sponge or cloth when cleaning arotmd
switches, lights or controls.
Use wann water and baking soda sohltion--
about a tablespoon (15 ml) of baking soda
to a quart (1 liter) of water: This both cleans
and neutralizes o(lo_s. Rinse and wipe dry:
Useof anycleaningsolution otherthanthat
which isrecommended,especiallythosethat
containpetroleumdistillates,can crackor
damagethe interiorof therefrigerator.
Avoidcleaningco/c/glassshelveswith hot water
becausethe extremetemperaturedifference
maycausethemto break.Handleglassshelves
carefufi_zBumpingtemperedglasscan cause
it to shatter
Donot washanyp/astic refngeratorpartsin
thedishwasher
ge.com
Behind the Refrigerator
Be careiul when moving the reti_igerator
away fl'om the wall. _M1types of floor
coverii_gs can be dalnaged, particularly
cushioned coverix_gs and those with
elllbossed S/llS[;ices.
Pull the refl_igerator straight out and return
it to position by pushing it straight in.
Moving the refl_igerator in a side direction
inay result in dalnage to the floor c()vering
or refl_igeratoi:
Whenpushingthe refrigeratorback,makesure
youdon't roll overthe powercordor icemaker
supplyline(on somemodels).
Preparing for Vacation
For long ;;l('ations or absen('es_ relllOVe
fi)od and Ulq)lug the reli_igeratoi: (_lean
the interior with a baking soda solution
of one tablespoon (15 ml) of baking soda
to one quart (l liter) of watei: i,eave the
doolN open.
Set the icelnaker power switch to the
0 (off) position and shut off the water supply
to the retiigeratoi:
If the telnperature can drop below fl'eezing,
have a qualified servicer drain the water
supply system (on some models) to prevent
serious propert}, dalnage due to flooding.
Preparing to Move
Secure all loose items such as shelves and
di'awei_ by taping thenl securely ill place
to prevent damage.
X_]_en using a hand truck to move the
reli_igeratoi; do not rest the fl'ont or back
(ff the refiJgerator against the hand truck.
This could dalnage the refrigerator. Handle
only fi'om the sides of the reli_igeratoi:
Be sure the refn)erator stays in an upright
position during moving.
15
I
_!!ib_iiiii_i:il
ii_iiiii_iiii}iiii
,_"_>,,,,Hiiiiiii
iii!iiiiii_i_ii{ii¸
i
i
g
g
}
Replacing the light bulbs.
Setting either or both controls to 0 does not remove power to the light circuit.
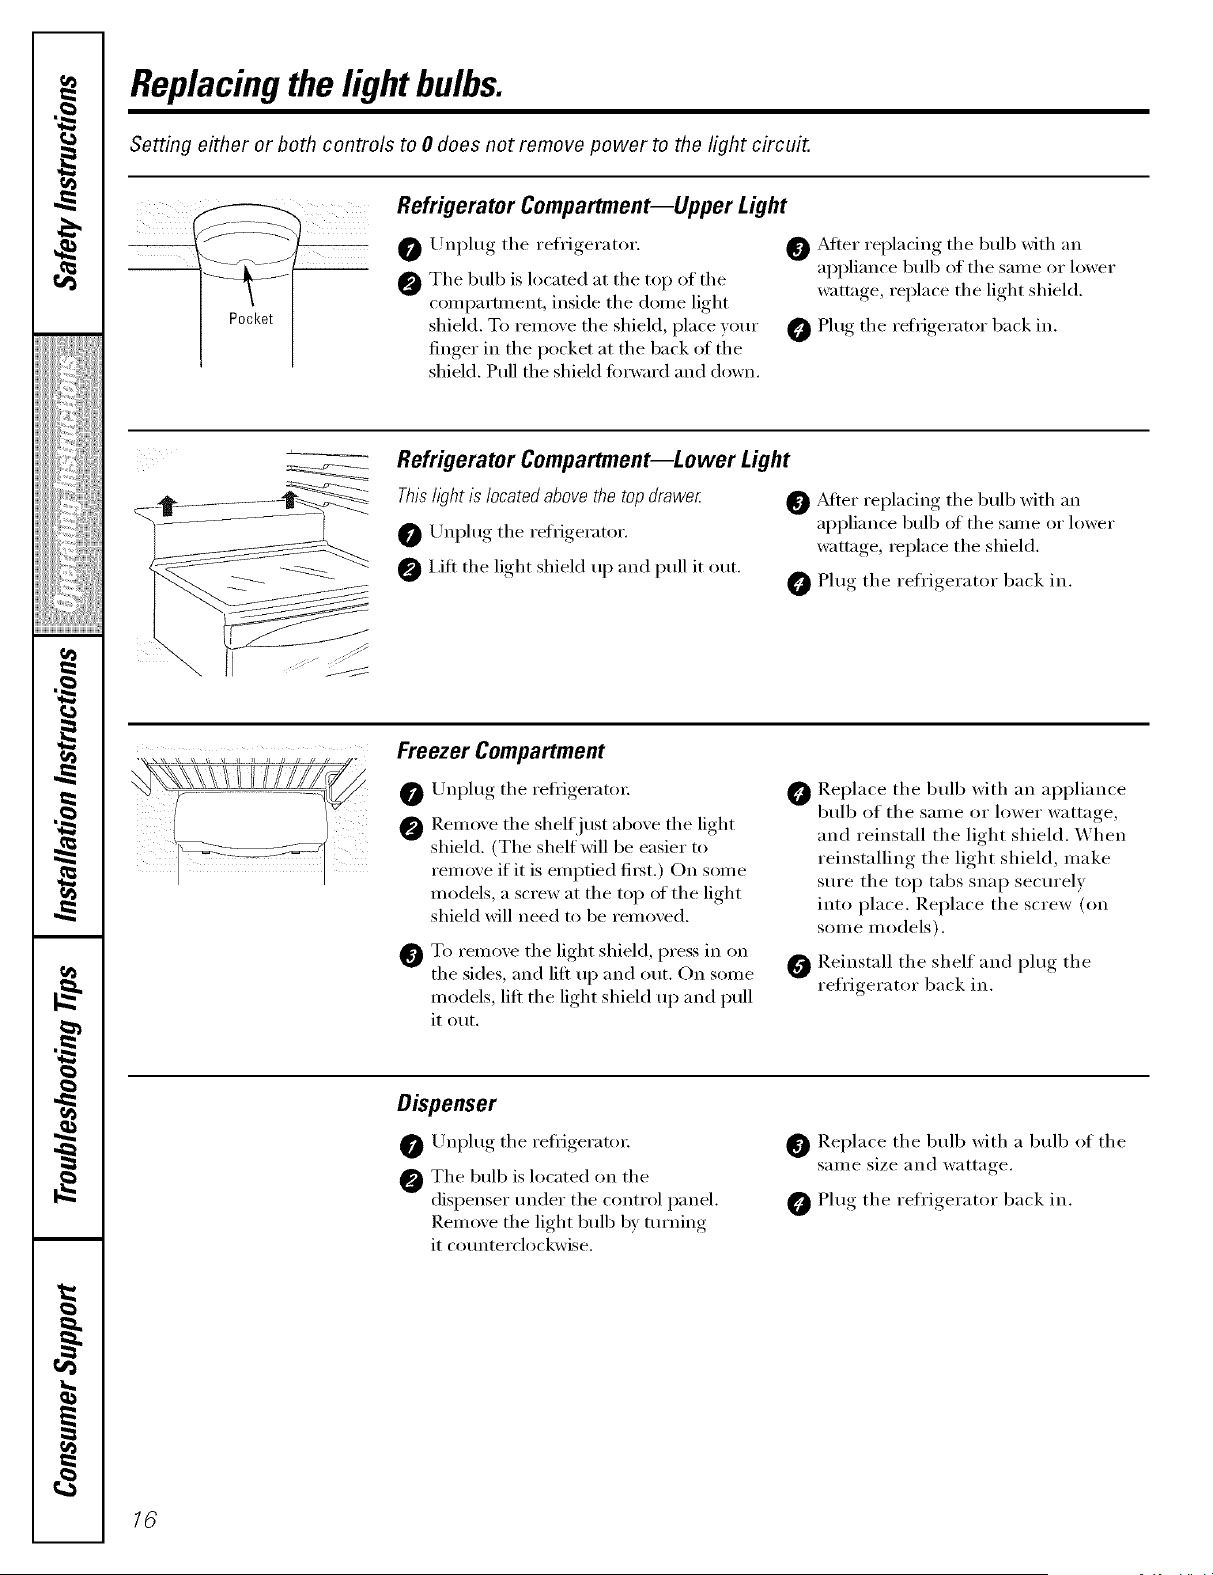
f---_- Refrigerator Compartment--Upper Light
Pocket
O Unplug the refrigerator.
@ The bulb is located at the top of the
conq)artment, inside the dome light
shield. To remove the shield, place your
finger in the pocket at the back of the
shield. Pull the shield t0rward and down.
O _Mter replacing the bulb x_th an
appliance bulb of the same or lower
watta{m_, replace the light shield.
O Plug the refrigerator back in.
Refrigerator Compartment--Lower Light
Thishght is located above the top drawer
O Unplug the refrigerator.
@ I,ifl the light shield up and pull it out.
O _Mter rei)lacing, the bulb with an
appliance bulb of the same or lower
wattage, replace the shield.
Plug the refrigerator back in.
Freezer Compartment
O Unplug the refl'igeratm:
Remove the shelf just above the light
shield. (The shelf will be easier to
remove if it is emptied fiist.) Oil some
models, a screw at the top of the light
shield will need to be removed.
@
To remoxe the light shield, press in on
the sides, and lift up and out. Oil some
models, lift the light shield up and pull
it out.
Replace the bulb with an appliance
bulb of the same or lower wattage,
and reinstall the light shield. When
reinstalling the light shield, make
sure the top tabs snap securely
into place. P,eplace the screw (on
some models).
Reinstall the shelf and plug the
refl'igerator back in.
Dispenser
Unplug the refl_igeratm:
The bulb is located oil the
dispenser under the control panel.
Remove the light bulb b v turning
it counterclockwise.
Replace the bulb with a bulb of the
same size and wattage.
Plug the refrigerator back in.
16
Installation
Instructions
Refrigerator
Models 23 & 25
I
BEFORE YOU BEGIN
Questions? Call 800.GE.CARES (800.432.2737) or Visit our Website at: ge.com
In Canada, call 1.800.361.3400 or Visit our Website at: www.geappliances.ca
Read these instructions completely
and carefully.
• iMPORTANT - Savethese
instructions for local inspector's use.
• iMPORTANT - Observeall
governing codes and ordinances.
• Note to installer - Be sure to leave these
instructions with the Consumer.
• Note to Consumer - Keep these
instructions for future reference.
= Skill level - installation of this appliance
requires basic mechanical skills.
• Completion time - Refrigerator Installation
30 minutes
Water Line Installation
30 minutes
• Proper installation is the responsibility of
the installer.
• Product failure due to improper installation
is not covered under the Warranty.
if the refrigerator has already been installed,
remove the base grille (see Step 2 in Moving
the Refrigerator), then skip to Step 5 in
Installing the Refrigerator.
I
PREPARATION
WATER SUPPLY TO THE ICEMAKER
If the refrigerator has an icemaker, it will have
to be connected to a cold water line. AGE
water supply kit (containing tubing, shutoff
valve, fittings and instructions) is available
at extra cost from your dealer, by visiting
our Website at ge.com (in Canada at
www.geappliances.ca) or from Parts and
Accessories, 800.626.2002 (in Canada
1.888.261.3055).
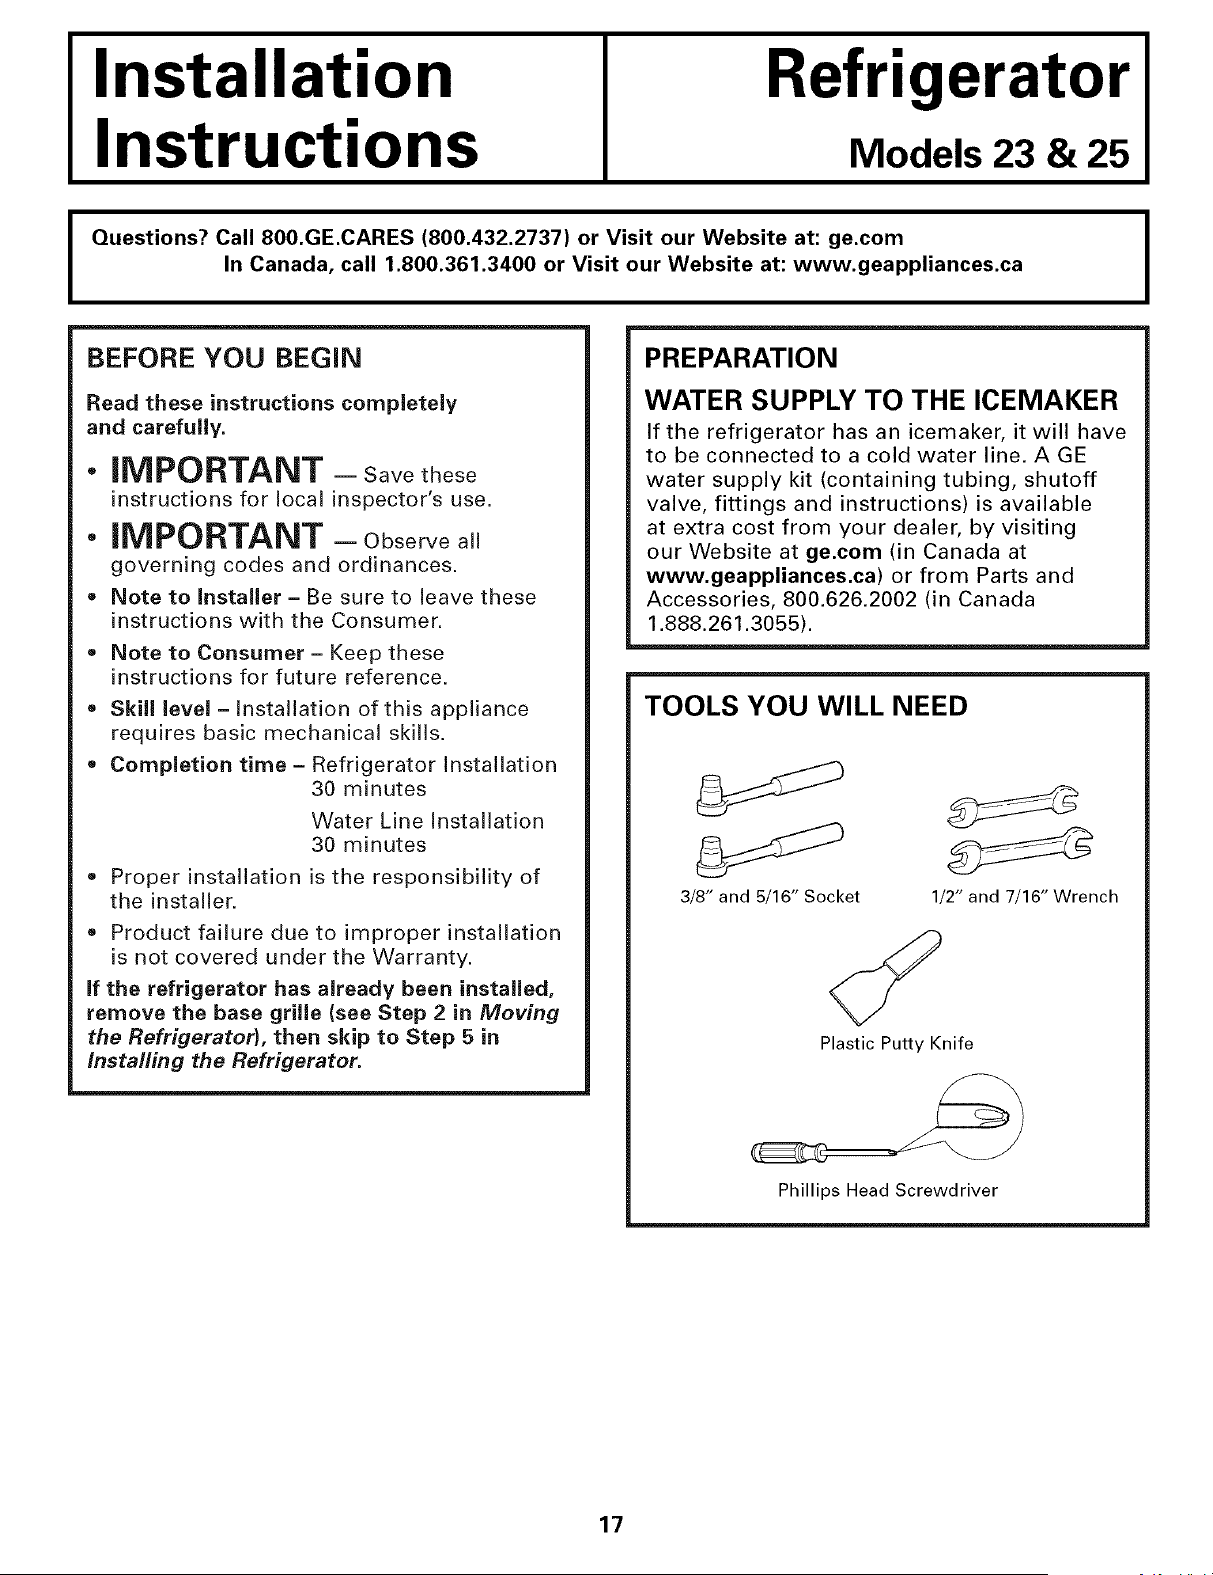
TOOLS YOU WILL NEED
3/8" and 5/16" Socket 1/2" and 7/16" Wrench
Plastic Putty Knife
Phillips Head Screwdriver
17
Installation Instructions
MOVING THE REFRIGERATOR
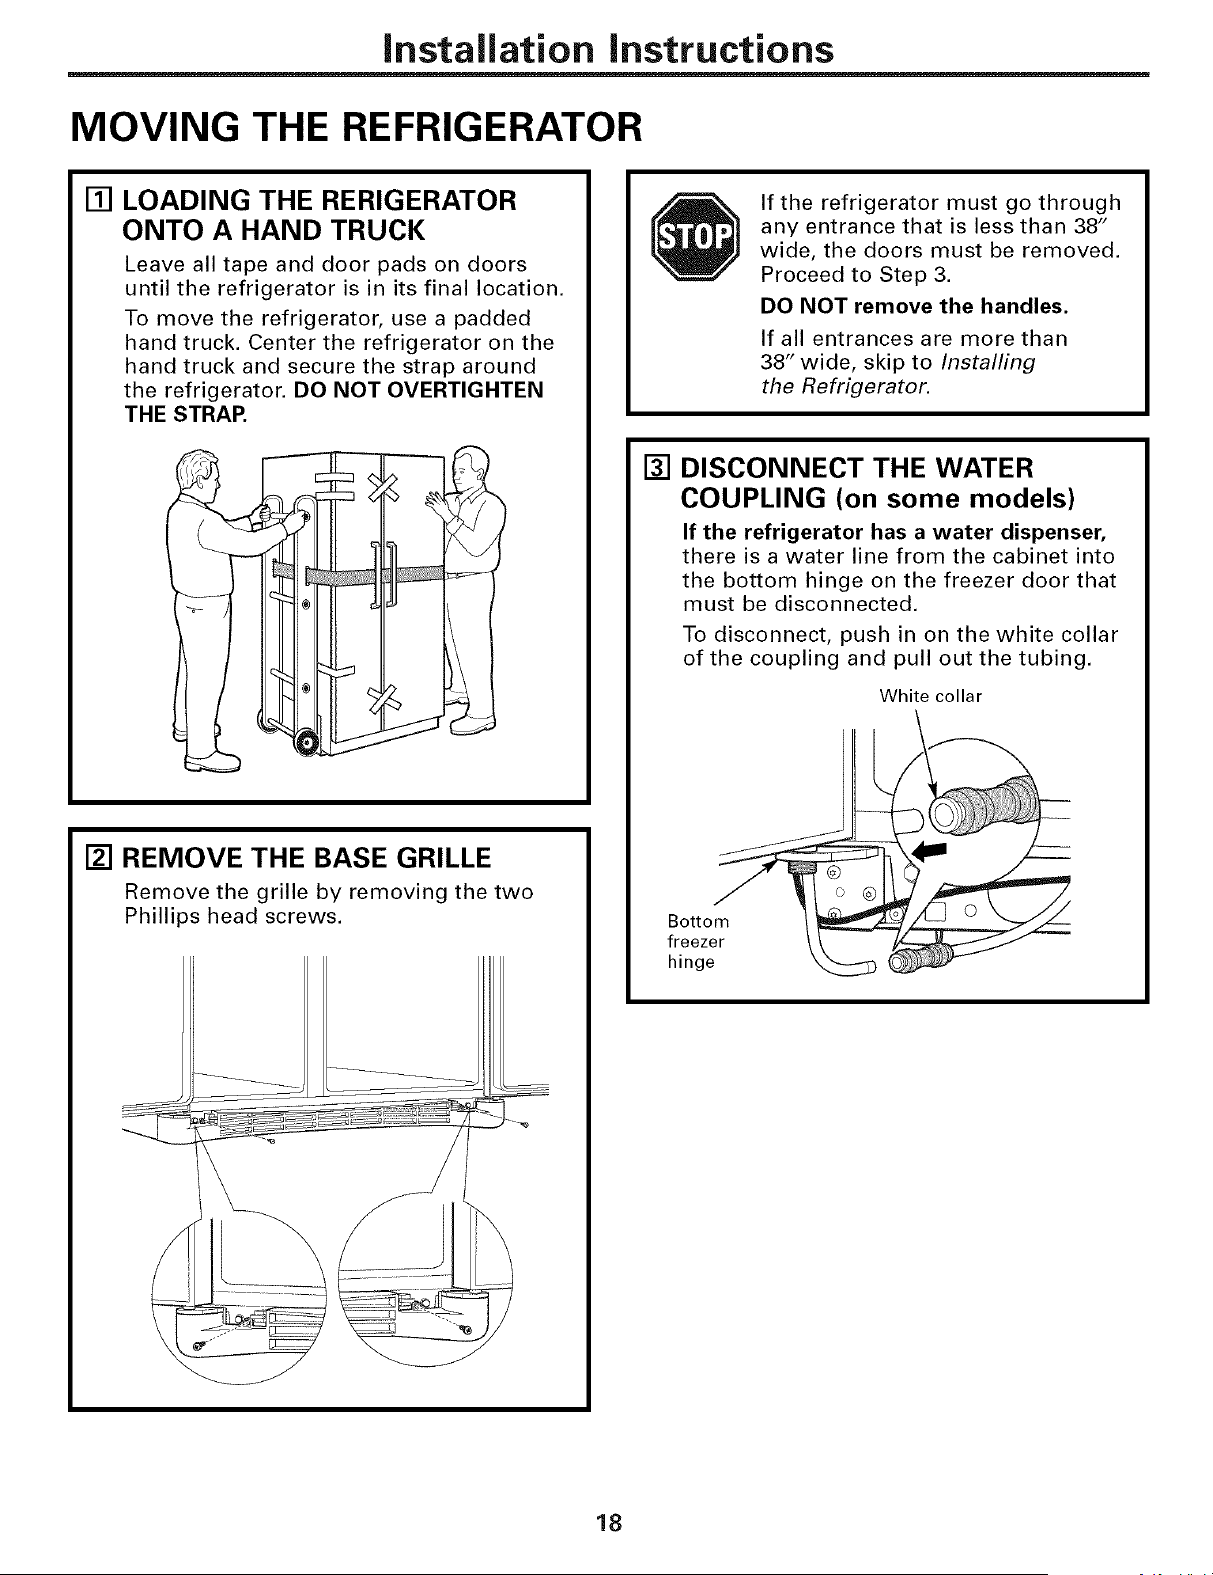
[] LOADING THE RERIGERATOR
ONTO A HAND TRUCK
Leave all tape and door pads on doors
until the refrigerator is in its final location.
To move the refrigerator, use a padded
hand truck. Center the refrigerator on the
hand truck and secure the strap around
the refrigerator. DO NOT OVERTIGHTEN
THE STRAP.
[] REMOVE THE BASE GRILLE
Remove the grille by removing the two
Phillips head screws.
If the refrigerator must go through
any entrance that is less than 38"
wide, the doors must be removed.
Proceed to Step 3.
DO NOT remove the handles.
If all entrances are more than
38" wide, skip to Installing
the Refrigerator.
[] DISCONNECT THE WATER
COUPLING (on some models)
If the refrigerator has a water dispenser,
there is a water line from the cabinet into
the bottom hinge on the freezer door that
must be disconnected.
To disconnect, push in on the white collar
of the coupling and pull out the tubing.
White collar
Bottom
freezer
hinge
18
Installation instructions
[]
Bottom
freezer
hinge
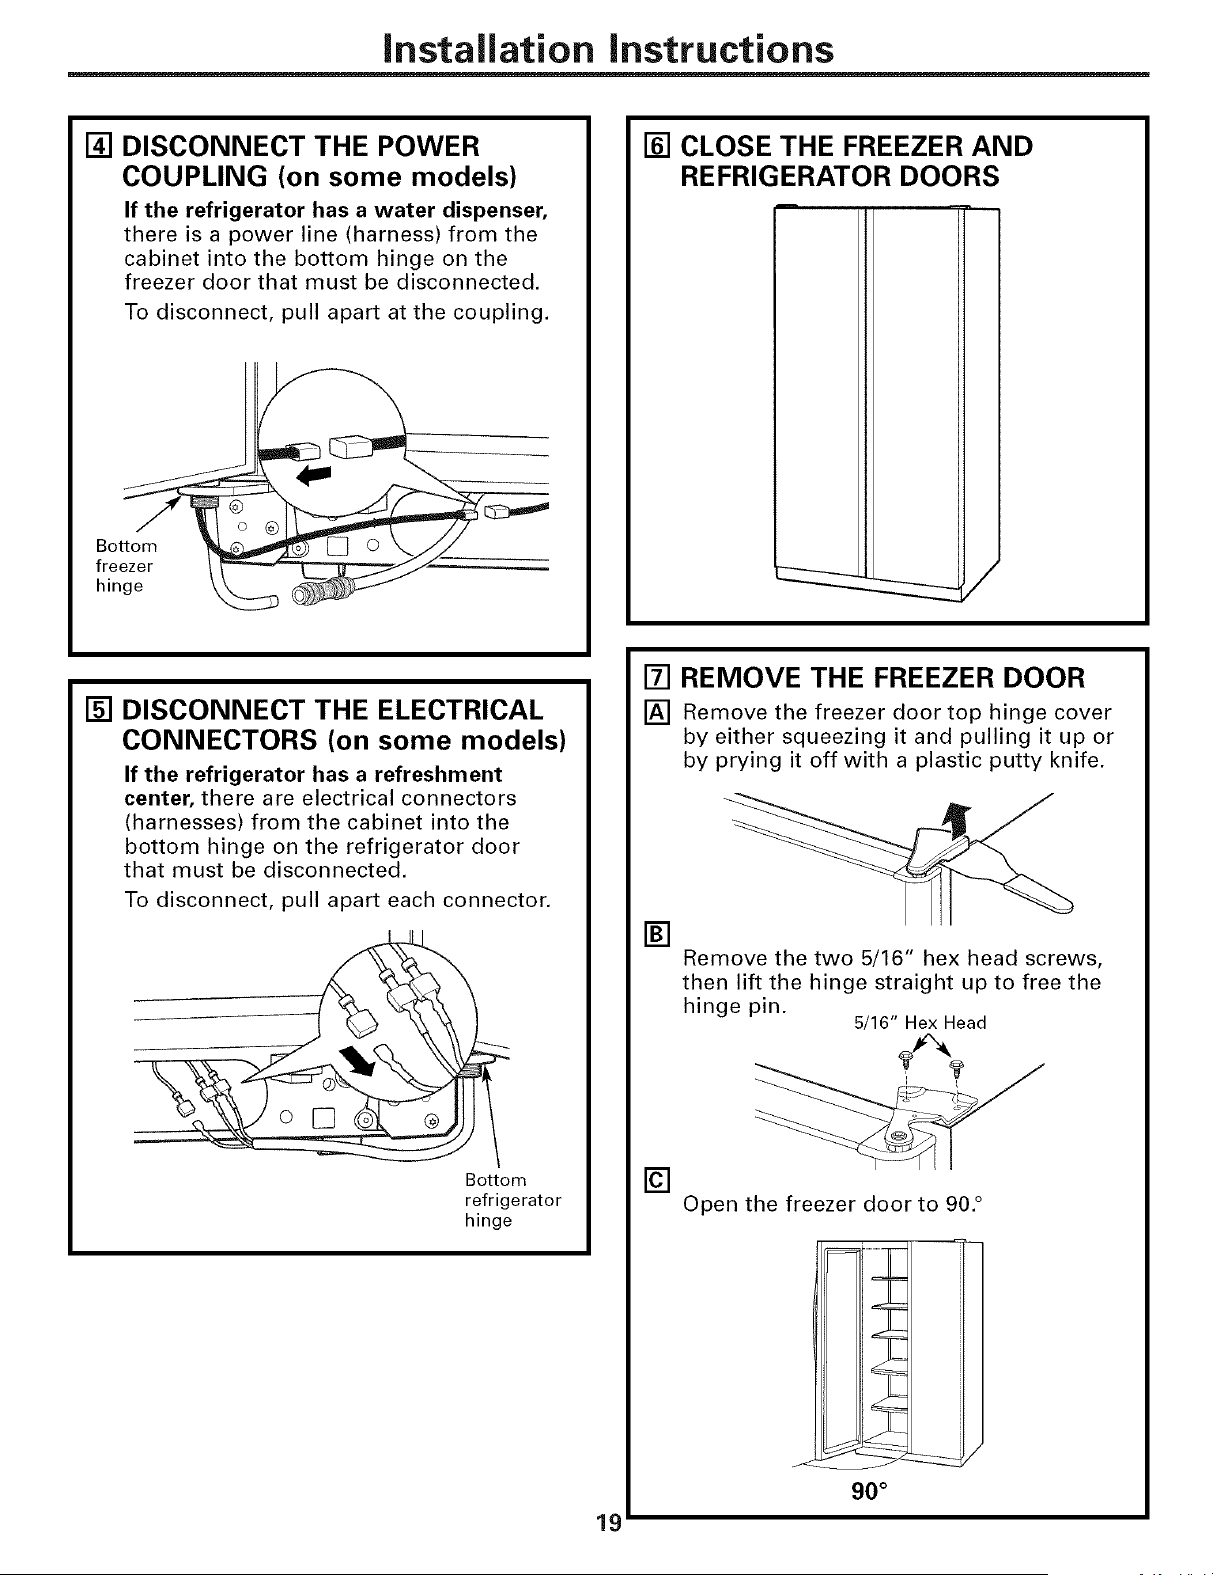
DISCONNECT THE POWER
COUPLING (on some models)
If the refrigerator has a water dispenser,
there is a power line (harness) from the
cabinet into the bottom hinge on the
freezer door that must be disconnected.
To disconnect, pull apart at the coupling.
[] CLOSE THE FREEZER AND
REFRIGERATOR DOORS
[]
DISCONNECT THE ELECTRICAL
CONNECTORS (on some models)
If the refrigerator has a refreshment
center, there are electrical connectors
(harnesses) from the cabinet into the
bottom hinge on the refrigerator door
that must be disconnected.
To disconnect, pull apart each connector.
Bottom
refrigerator
hinge
[] REMOVE THE FREEZER DOOR
[] Remove the freezer door top hinge cover
by either squeezing it and pulling it up or
by prying it off with a plastic putty knife.
[]
[]
Remove the two 5/16" hex head screws,
then lift the hinge straight up to free the
hinge pin.
5/16" Hex Head
Open the freezer door to 90. °
19
90 °
Installation Instructions
MOVING THE REFRIGERATOR (CONT.)
[]
[]
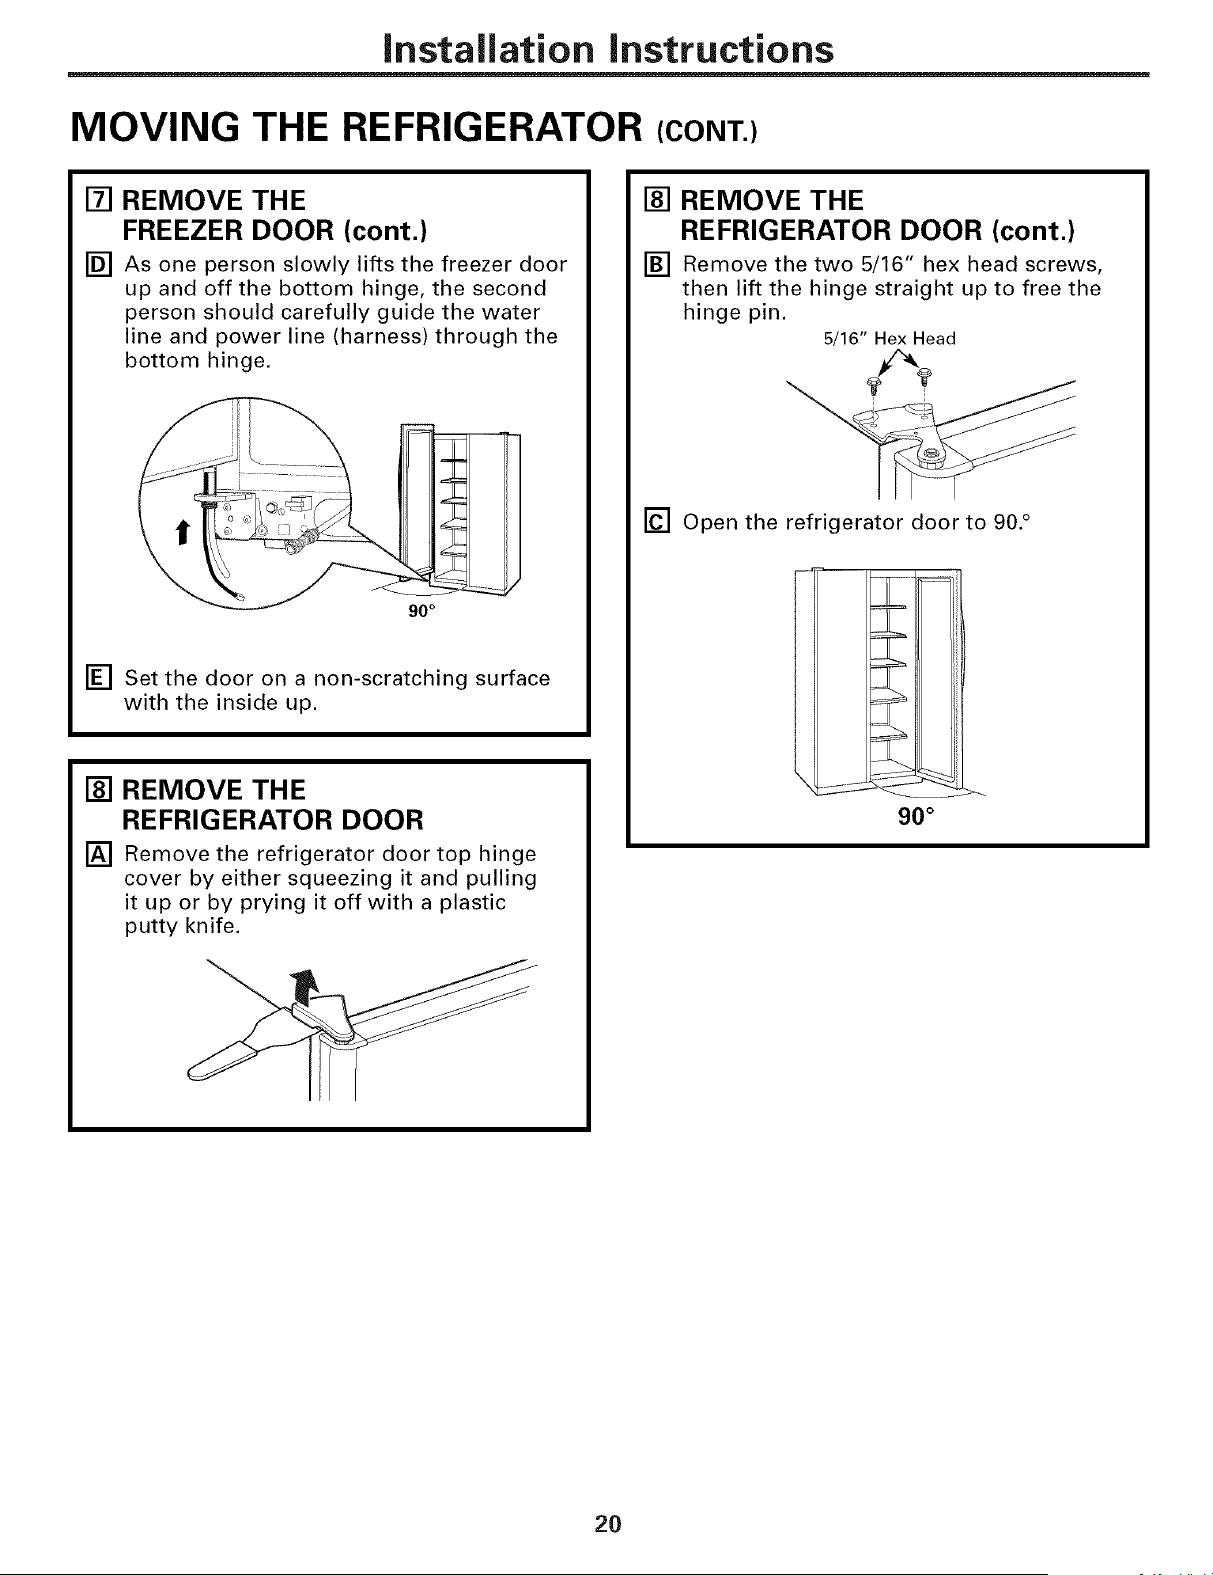
REMOVE THE
FREEZER DOOR (cont.)
As one person slowly lifts the freezer door
up and off the bottom hinge, the second
person should carefully guide the water
line and power line (harness) through the
bottom hinge.
,==_=
90 °
[] Set the door on a non-scratching surface
with the inside up.
[] REMOVE THE
REFRIGERATOR DOOR
[] Remove the refrigerator door top hinge
cover by either squeezing it and pulling
it up or by prying it off with a plastic
putty knife.
[] REMOVE THE
REFRIGERATOR DOOR (cont.)
[] Remove the two 5/16" hex head screws,
then lift the hinge straight up to free the
hinge pin.
5/16" Hex Head
[] Open the refrigerator door to 90. °
_ i4
.t_/ f
90 °
20
Installation instructions
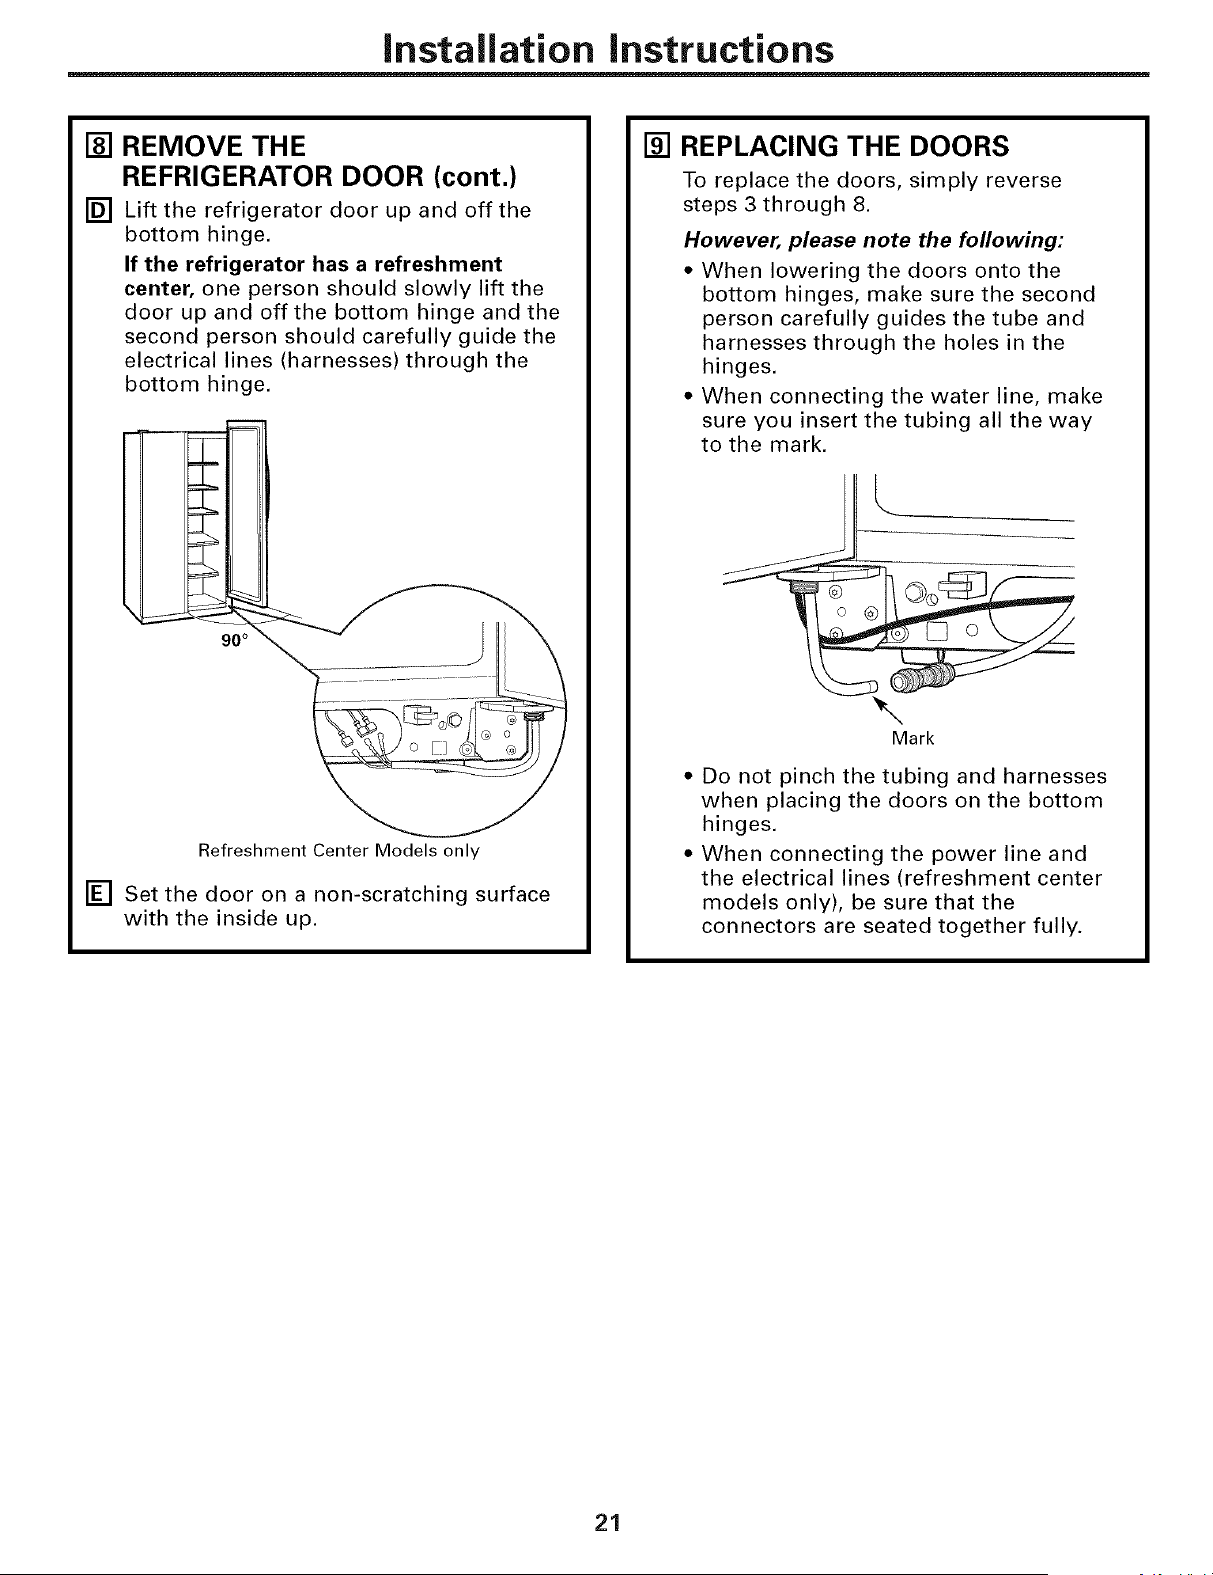
[]
[]
REMOVE THE
REFRIGERATOR DOOR (cont.)
Lift the refrigerator door up and off the
bottom hinge.
If the refrigerator has a refreshment
center, one person should slowly lift the
door up and off the bottom hinge and the
second person should carefully guide the
electrical lines (harnesses) through the
bottom hinge.
====4===
90 °
Refreshment Center Models only
[] Set the door on a non-scratching surface
with the inside up.
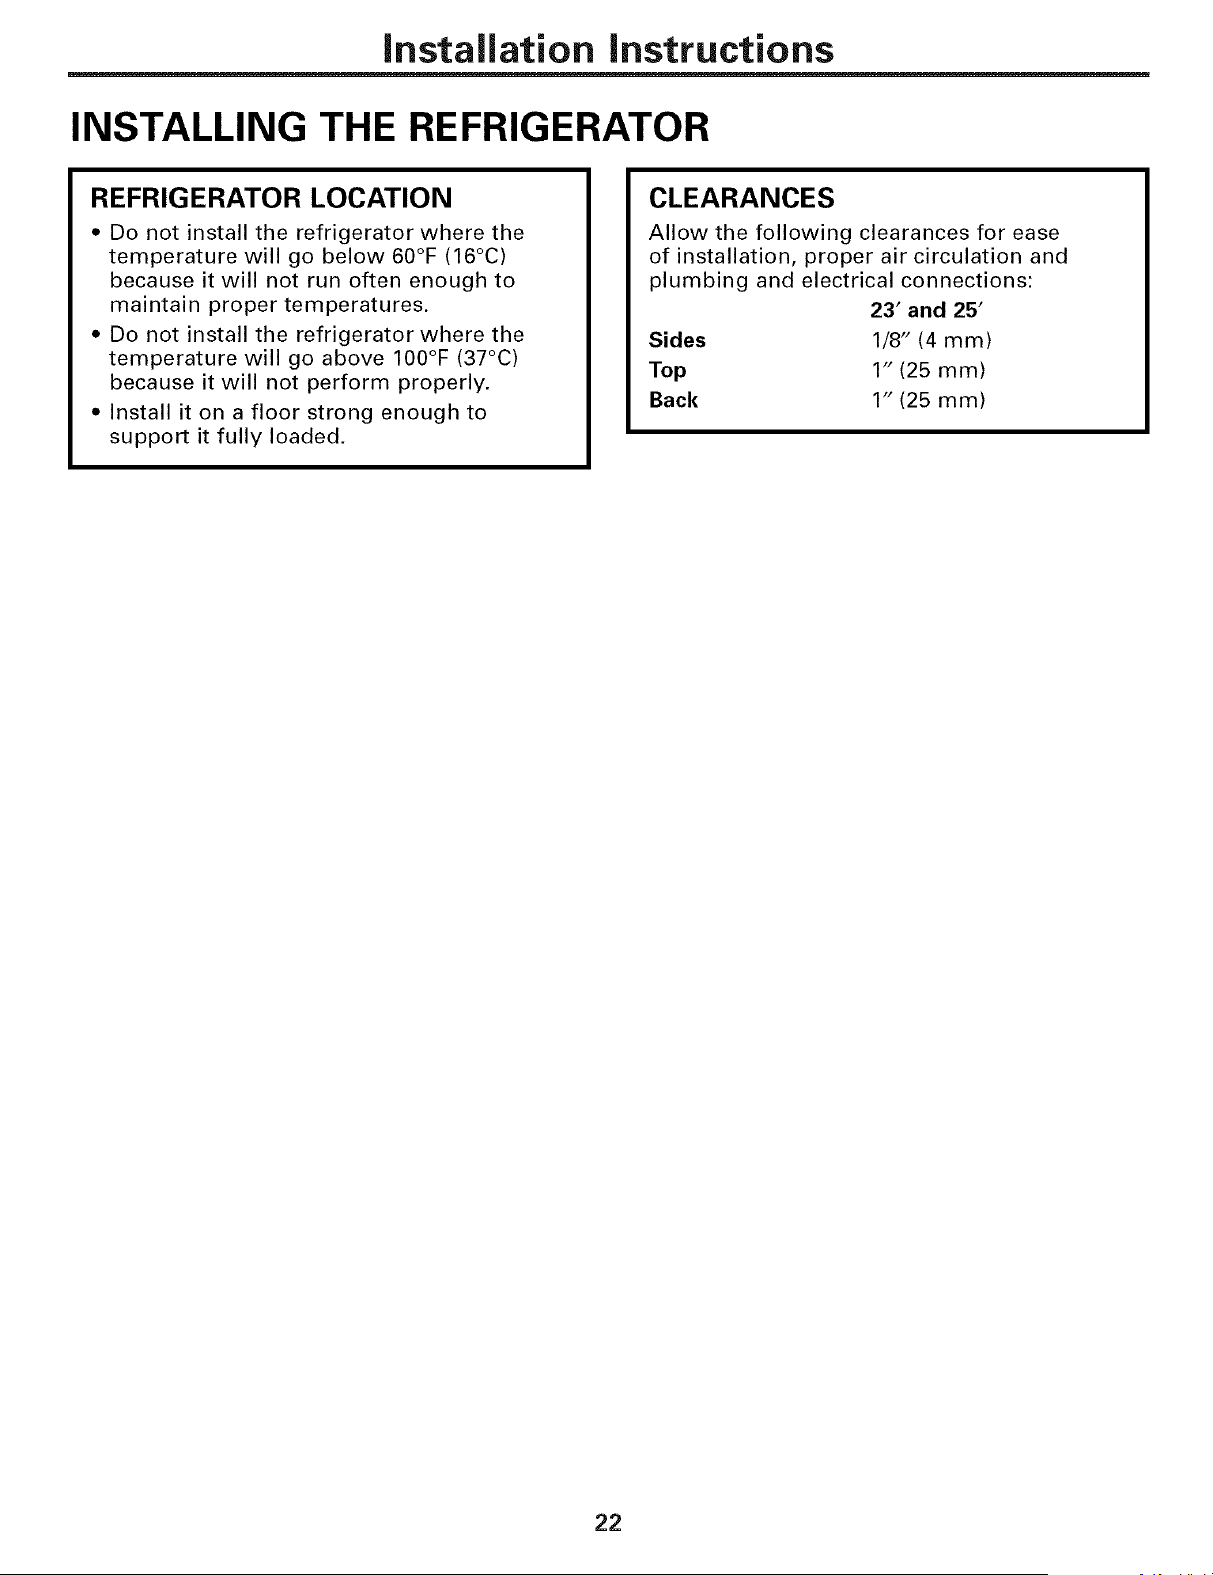
[] REPLACING THE DOORS
To replace the doors, simply reverse
steps 3 through 8.
However, please note the following:
• When lowering the doors onto the
bottom hinges, make sure the second
person carefully guides the tube and
harnesses through the holes in the
hinges.
• When connecting the water line, make
sure you insert the tubing all the way
to the mark.
L
Mark
• Do not pinch the tubing and harnesses
when placing the doors on the bottom
hinges.
• When connecting the power line and
the electrical lines (refreshment center
models only), be sure that the
connectors are seated together fully.
21
Installation instructions
INSTALLING THE REFRIGERATOR
REFRIGERATOR LOCATION
• Do not install the refrigerator where the
temperature will go below 60°F (16°C)
because it will not run often enough to
maintain proper temperatures.
• Do not install the refrigerator where the
temperature will go above 100°F (37°C)
because it will not perform properly.
• Install it on a floor strong enough to
support it fully loaded.
CLEARANCES
Allow the following clearances for ease
of installation, proper air circulation and
plumbing and electrical connections:
23' and 25'
Sides 1/8" (4 mm)
Top 1" (25 mm)
Back 1" (25 mm)
22
Installation instructions
[]
[]
[]
CONNECTING THE REFRIGERATOR
TO THE HOUSE WATER LINE
(icemaker and dispenser models)
A cold water supply is required for
automatic icemaker and dispenser
operation. If there is not a cold water
supply, you will need to provide one.
See "Installing the Water Line" section.
NOTES:
Before making the connection to the
refrigerator, be sure the refrigerator
power cord is not plugged into the wall
outlet.
• If your refrigerator does not have a
water filter, we recommend installing
one if your water supply has sand or
particles that could clog the screen of
the refrigerator's water valve. Install it
in the water line near the refrigerator.
If using GE SmartConnect TMRefrigerator
Tubing Kit, you will need an additional
tube (WXO8XIO002) to connect the filter.
Do not cut plastic tube to install filter.
If you are using copper tubing, place a
compression nut and ferrule (sleeve) onto
the end of the tubing coming from the
house cold water supply.
If you are using the GE SmartConnect TM
tubing, the nuts are already assembled to
the tubing.
If you are using copper tubing, insert
the end of the tubing into the refrigerator
connection, at the back of the refrigerator,
as far as possible. While holding the
tubing, tighten the fitting.
If you are using GE SmartConnect TM
tubing, insert the molded end of the
tubing into the refrigerator connection,
at the back of the refrigerator, and tighten
the compression nut until it is hand tight.
Then tighten one additional turn with a
wrench. Overtightening may cause leaks.
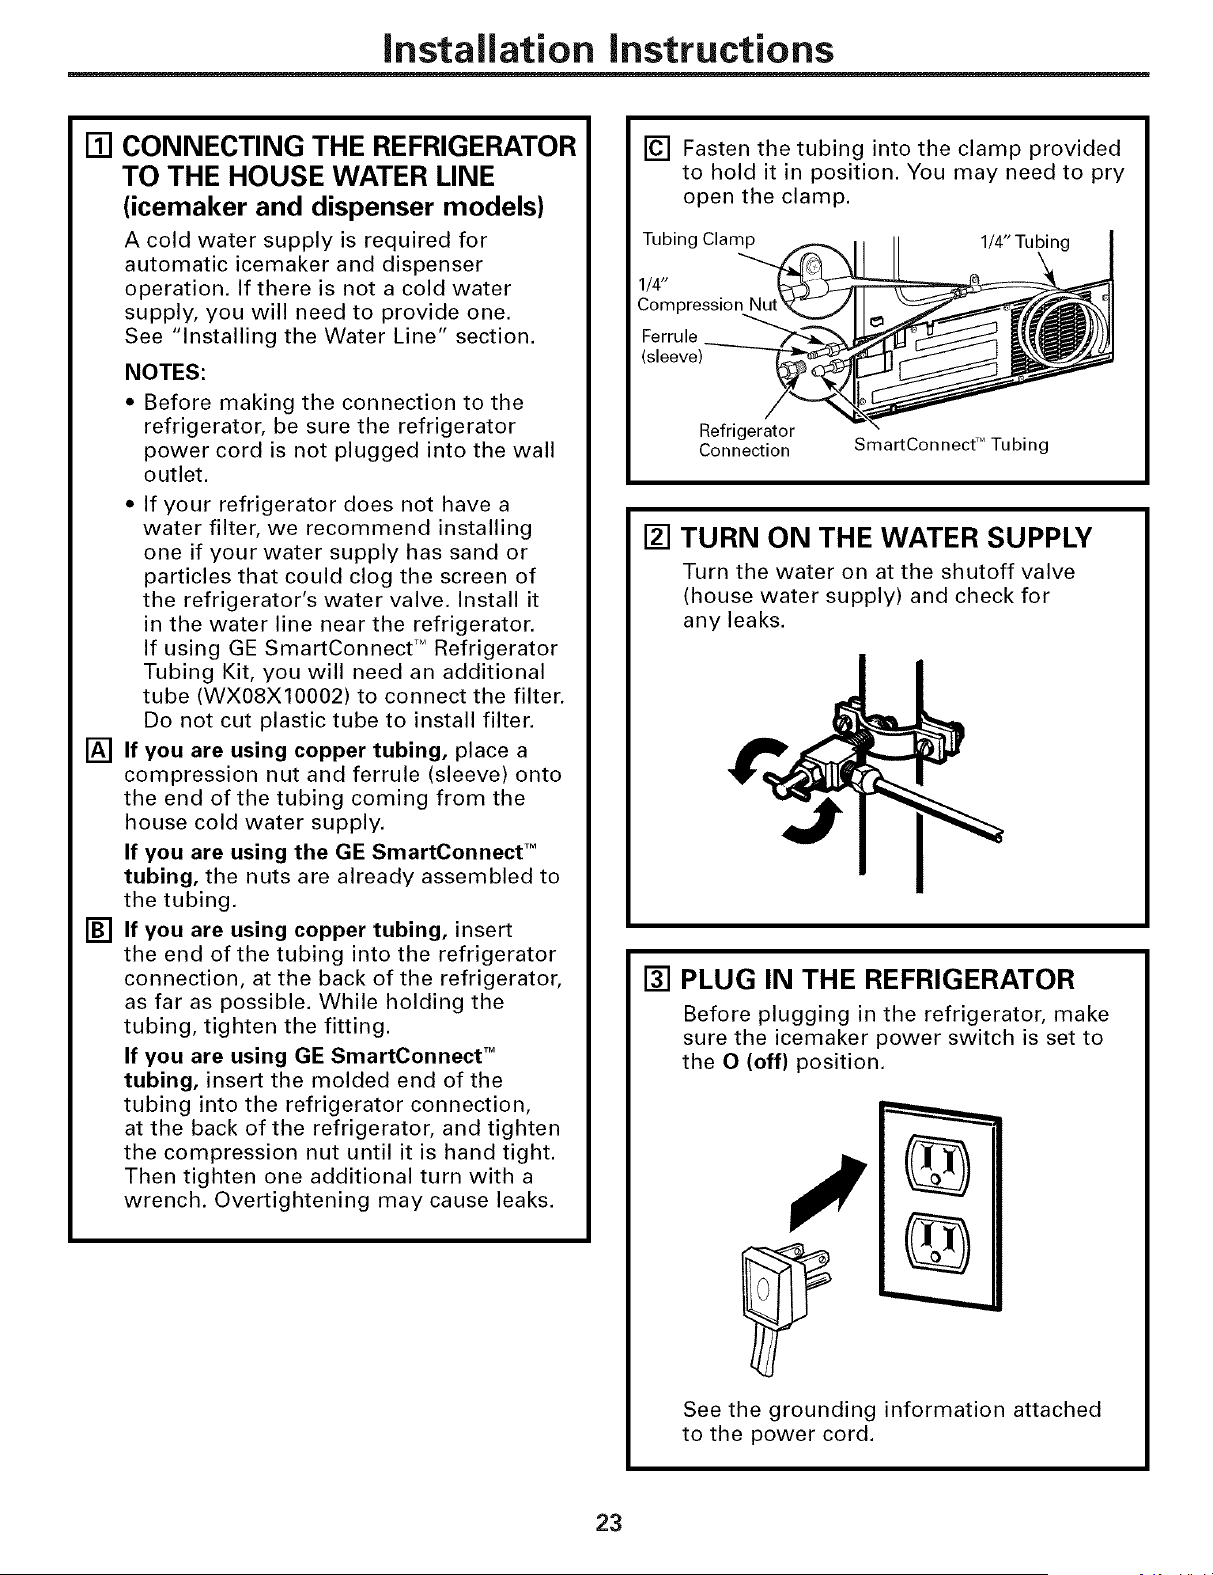
[] Fasten the tubing into the clamp provided
to hold it in position. You may need to pry
open the clamp.
Tubing Clamp 1/4" Tubin
1/4"
Compression
Ferrule
(sleeve)
Refrigerator
Connection
SmartConnect 'MTubing
[] TURN ON THE WATER SUPPLY
Turn the water on at the shutoff valve
(house water supply) and check for
any leaks.
[] PLUG IN THE REFRIGERATOR
Before plugging in the refrigerator, make
sure the icemaker power switch is set to
the O (off) position.
%
See the grounding information attached
to the power cord.
23
Installation instructions
INSTALLING THE REFRIGERATOR (CONT.)
[] PUT THE REFRIGERATOR
IN PLACE
Move the refrigerator to its final location.
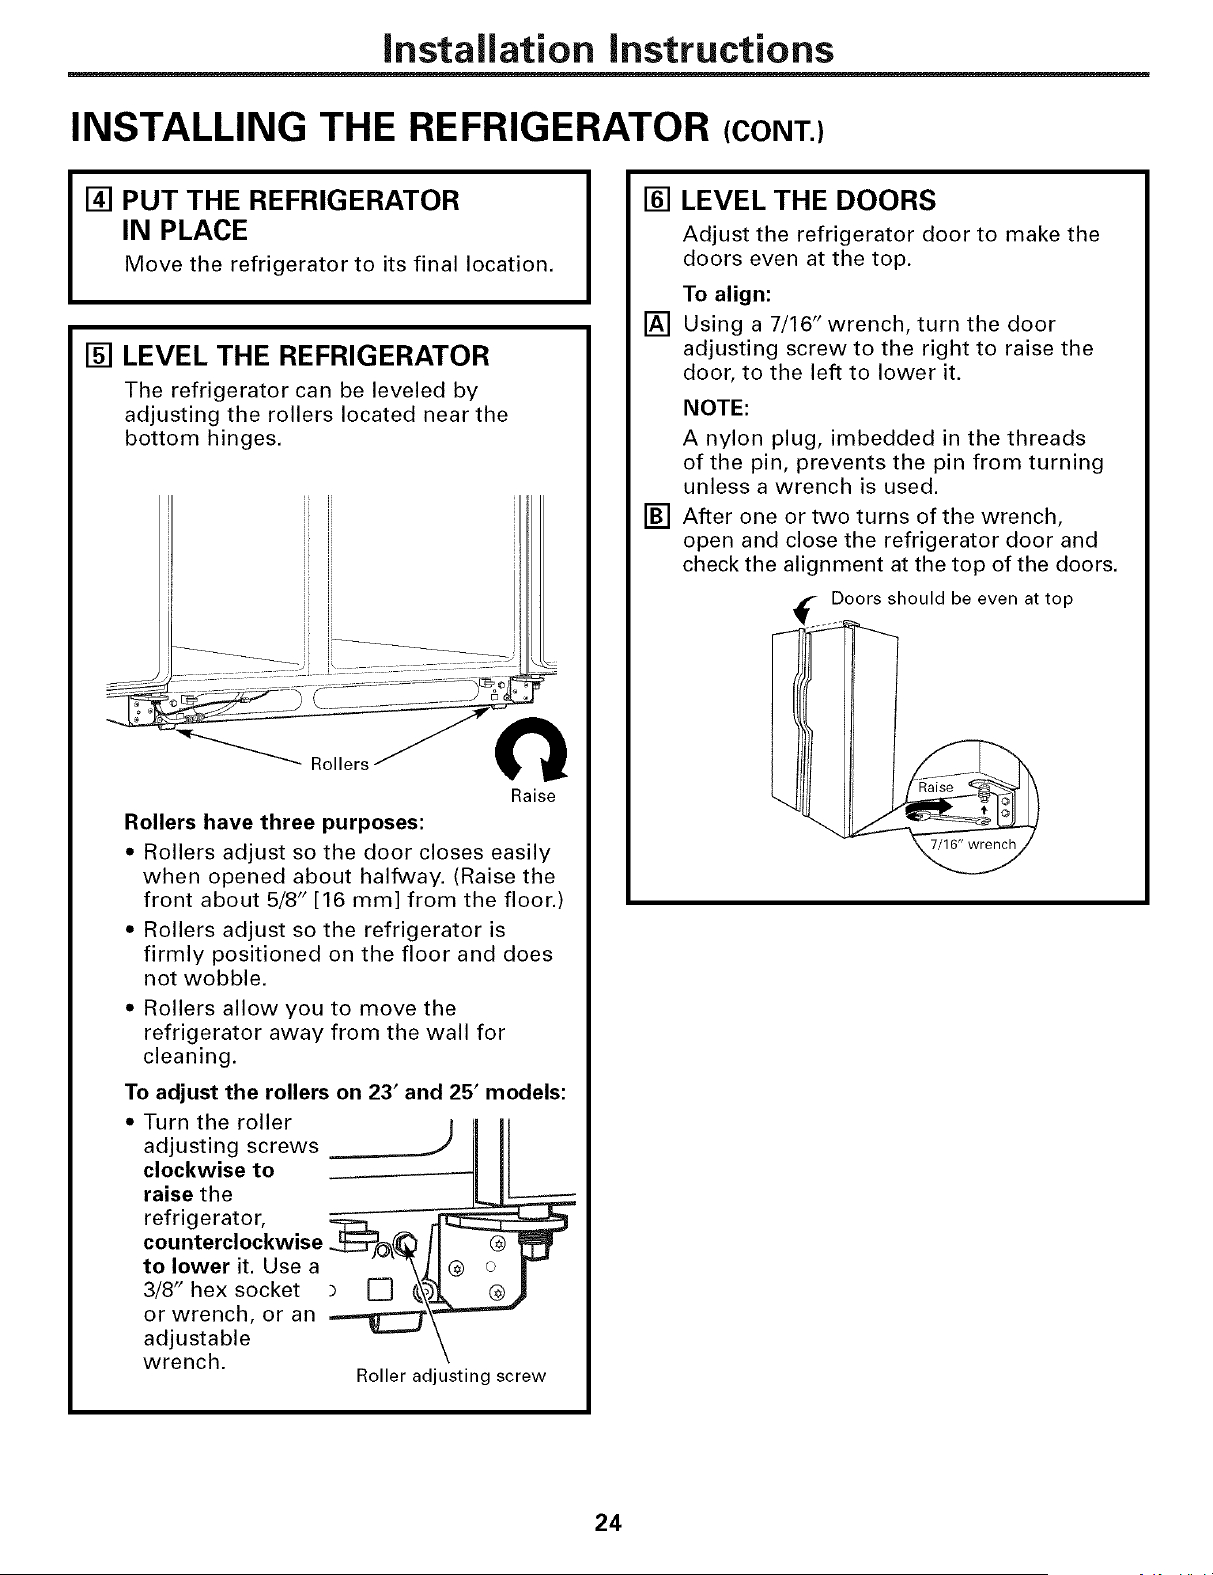
[] LEVEL THE REFRIGERATOR
The refrigerator can be leveled by
adjusting the rollers located near the
bottom hinges.
Rollers have three purposes:
Raise
• Rollers adjust so the door closes easily
when opened about halfway. (Raise the
front about 5/8" [16 mm] from the floor.)
• Rollers adjust so the refrigerator is
firmly positioned on the floor and does
not wobble.
• Rollers allow you to move the
refrigerator away from the wall for
cleaning.
To adjust the rollers on 23' and 25' models:
• Turn the roller _
adjusting screws
clockwise to
raise the
refrigerator, _y_
counterclockwise
to lower it. Use a
3/8" hex socket
or wrench, or an
adjustable
wrench.
Roller adjusting screw
[] LEVEL THE DOORS
[]
[]
Adjust the refrigerator door to make the
doors even at the top.
To align:
Using a 7/16" wrench, turn the door
adjusting screw to the right to raise the
door, to the left to lower it.
NOTE:
A nylon plug, imbedded in the threads
of the pin, prevents the pin from turning
unless a wrench is used.
After one or two turns of the wrench,
open and close the refrigerator door and
check the alignment at the top of the doors.
Doors should be even at top
I
24
Installation instructions
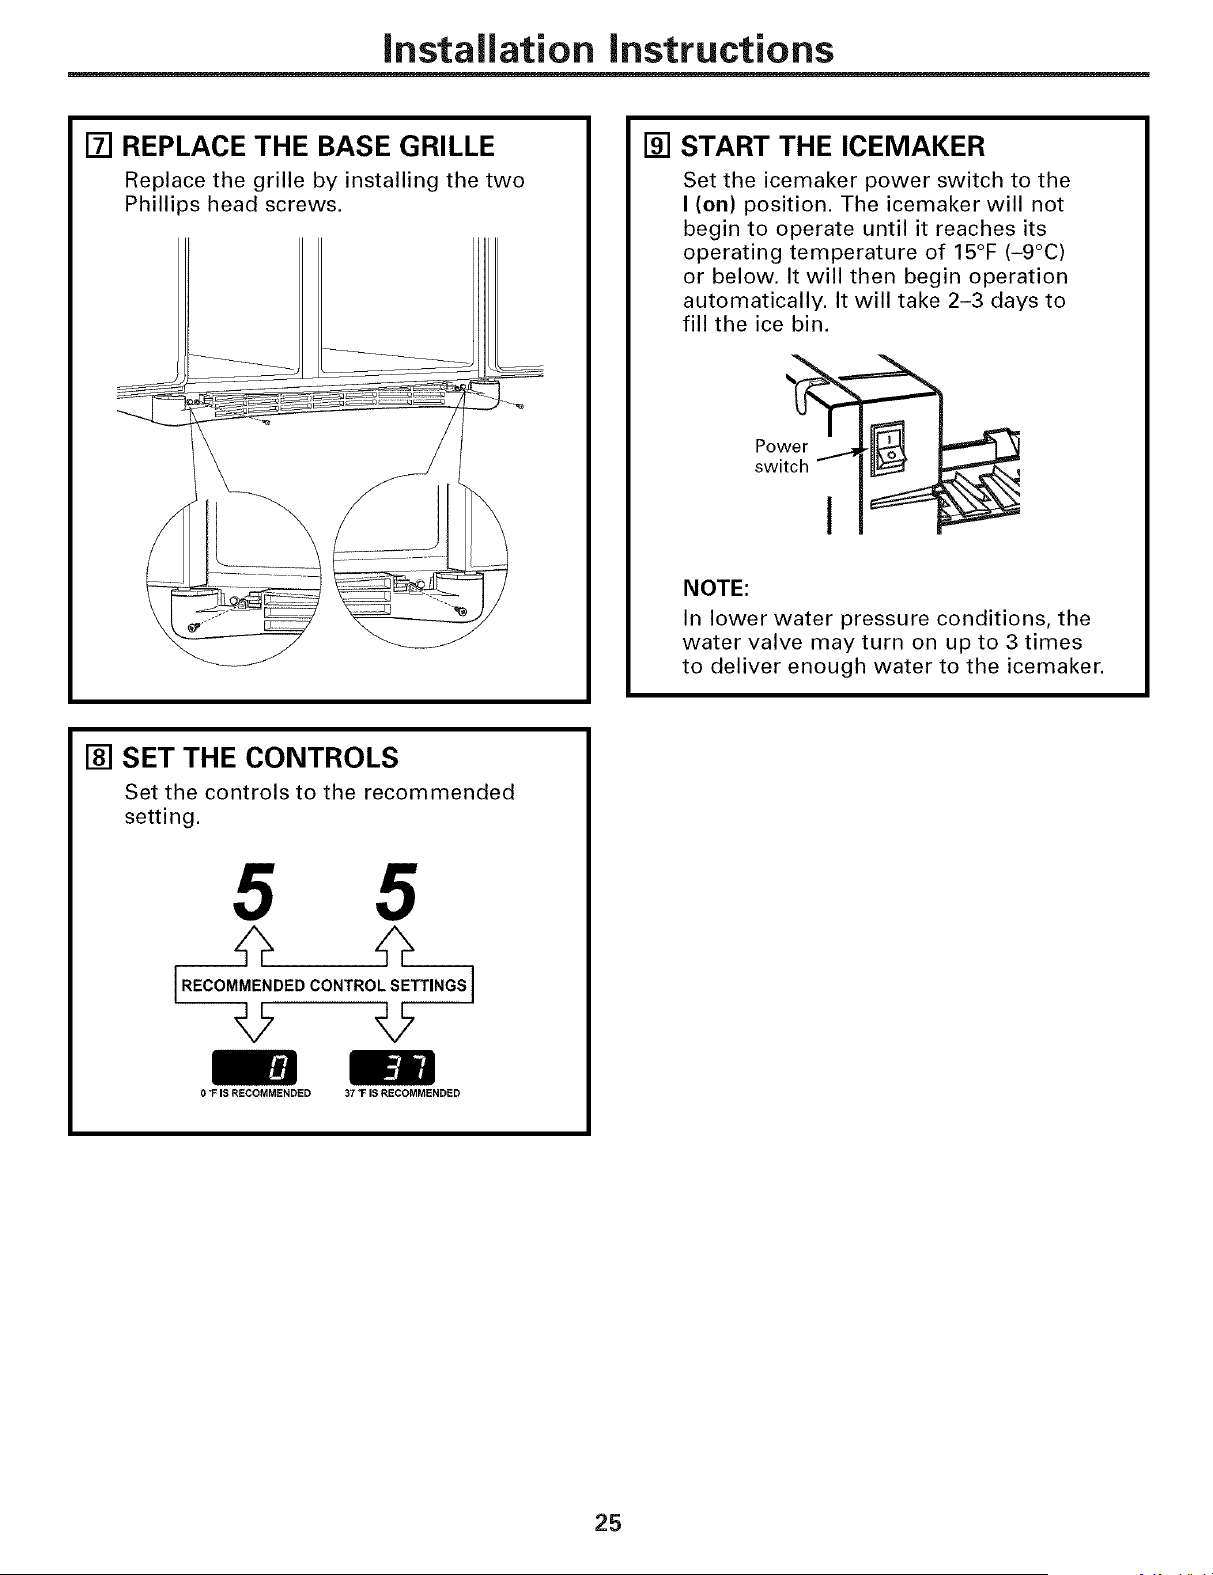
[] REPLACE THE BASE GRILLE
Replace the grille by installing the two
Phillips head screws.
[] START THE ICEMAKER
Set the icemaker power switch to the
I (on) position. The icemaker will not
begin to operate until it reaches its
operating temperature of 15°F (-9°C)
or below. It will then begin operation
automatically. It will take 2-3 days to
fill the ice bin.
Pow
switch - I
NOTE:
In lower water pressure conditions, the
water valve may turn on up to 3 times
to deliver enough water to the icemaker.
[] SET THE CONTROLS
Set the controls to the recommended
setting.
[.EOOMME.0E0CO.T.O'SE"..OS]
0 _FIS RECOMMENDED 37 °F IS RECOMMENDED
25
Installation instructions
iNSTALLiNG THE WATER LiNE (ICEMAKER &DISPENSERMODELS)
BEFORE YOU BEGIN
Recommended copper water supply kits are
WX8X2, WX8X3 or WX8X4, depending on the
amount of tubing you need. Approved plastic
water supply lines are GE SmartConnect TM
Refrigerator Tubing (WX08Xl0002,
WX08X10006, WX08X10015 and
WX08X 10025).
When connecting your refrigerator to a GE
Reverse Osmosis Water System, the only
approved installation is with a GE RVKit. For
other reverse osmosis water systems, follow
the manufacturer's recommendations.
If the water supply to the refrigerator is from
a Reverse Osmosis Water Filtration System
AND the refrigerator also has a water filter,
use the refrigerator's filter bypass plug. Using
the refrigerator's water filtration cartridge in
conjunction with the RO filter can result in
hollow ice cubes and slower water flow from
the water dispenser.
This water line installation is not warranted
by the refrigerator or icemaker manufacturer.
Follow these instructions carefully to
minimize the risk of expensive water damage.
Water hammer (water banging in the pipes)
in house plumbing can cause damage to
refrigerator parts and lead to water leakage
or flooding. Call a qualified plumber to correct
water hammer before installing the water
supply line to the refrigerator.
To prevent burns and product damage, do not
hook up the water line to the hot water line.
If you use your refrigerator before connecting
the water line, make sure the icemaker power
switch is in the O (off} position.
Do not install the icemaker tubing in areas
where temperatures fall below freezing.
When using any electrical device (such as a
power drill) during installation, be sure the
device is double insulated or grounded in a
manner to prevent the hazard of electric
shock, or is battery powered.
All installations must be in accordance with
local plumbing code requirements.
WHAT YOU WiLL NEED
J
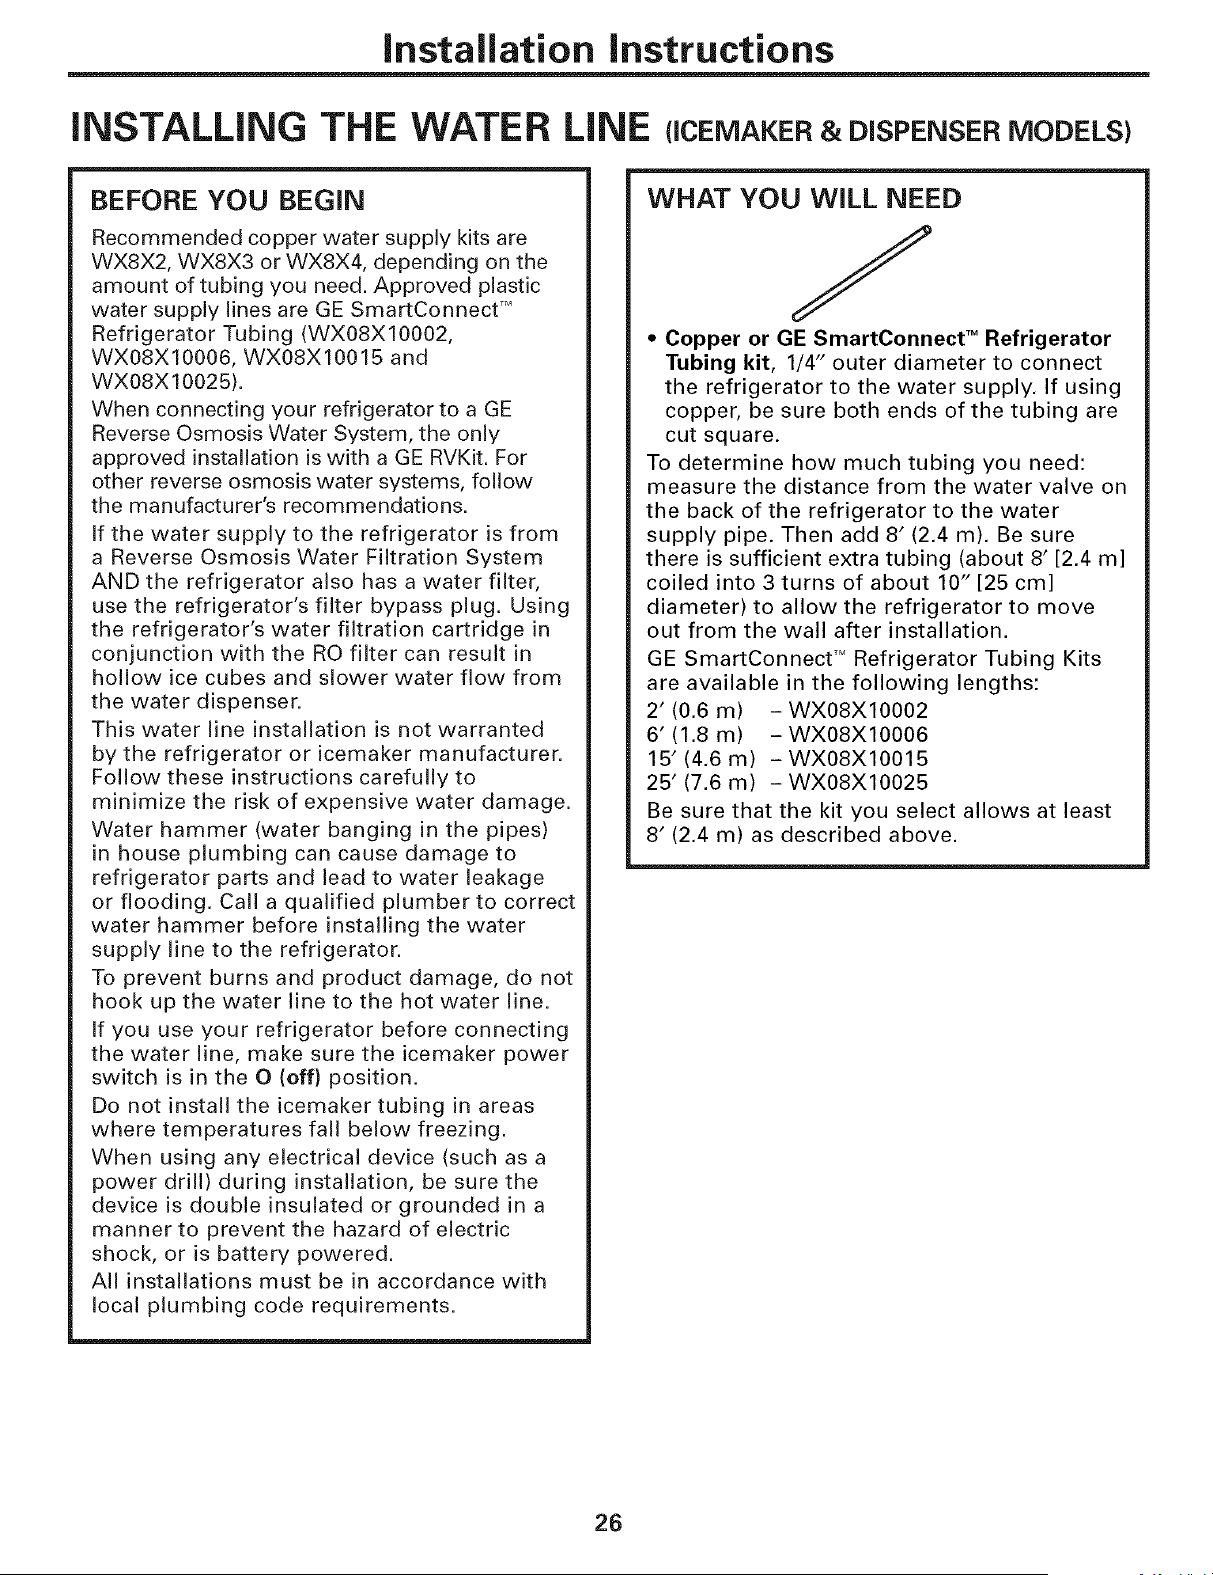
* Copper or GE SmartConnect TM Refrigerator
Tubing kit, 1/4" outer diameter to connect
the refrigerator to the water supply. If using
copper, be sure both ends of the tubing are
cut square.
To determine how much tubing you need:
measure the distance from the water valve on
the back of the refrigerator to the water
supply pipe. Then add 8' (2.4 m). Be sure
there is sufficient extra tubing (about 8' [2.4 m]
coiled into 3 turns of about 10" [25 cm]
diameter) to allow the refrigerator to move
out from the wall after installation.
GE SmartConnect TM Refrigerator Tubing Kits
are available in the following lengths:
2' (0.6 m) - WX08Xl0002
6' (1.8 m) -WX08Xl0006
15' (4.6 m) - WX08X10015
25' (7.6 m) - WX08X10025
Be sure that the kit you select allows at least
8' (2.4 m) as described above.
26
Installation Instructions
WHAT YOU WILL NEED (CONT.)
NOTE: The only GE approved plastic tubing
is that supplied in GE SmartConnect TM
Refrigerator Tubing kits, Do not use any
other plastic water supply line because the
line is under pressure at all times. Certain
types of plastic will crack or rupture with age
and cause water damage to your home.
• AGE water supply kit (containing tubing,
shutoff valve and fittings listed below) is
available at extra cost from your dealer or
from Parts and Accessories, 800.626.2002
(in Canada 1.888.261.3055).
• A cold water supply. The water pressure must
be between 20 and 120 p.s.i. (1.4-8.1 bar).
• Power drill.
,, 1/2" or adjustable wrench.
= Straight and Phillips blade screwdriver.
,, Two 114" outer diameter compression nuts
and 2 ferrules (sleeves)--to connect the
copper tubing to the shutoff valve and the
refrigerator water valve.
OR
If you are using a GE SmartConnect TM
Refrigerator Tubing kit, the necessary
fittings are preassembled to the tubing.
• If your existing copper water line has a
flared fitting at the end, you will need an
adapter (available at plumbing supply
stores) to connect the water line to the
refrigerator OR you can cut off the flared
fitting with a tube cutter and then use a
compression fitting. Do not cut formed end
from GE SmartConnect TM Refrigerator tubing.
• Shutoff valve to connect to the cold water
line. The shutoff valve should have a water
inlet with a minimum inside diameter of
5/32" at the point of connection to the COLD
WATER LINE. Saddle-type shutoff valves are
included in many water supply kits. Before
purchasing, make sure a saddle-type valve
complies with your local plumbing codes.
Install the shutoff valve on the nearest
frequently used drinking water line.
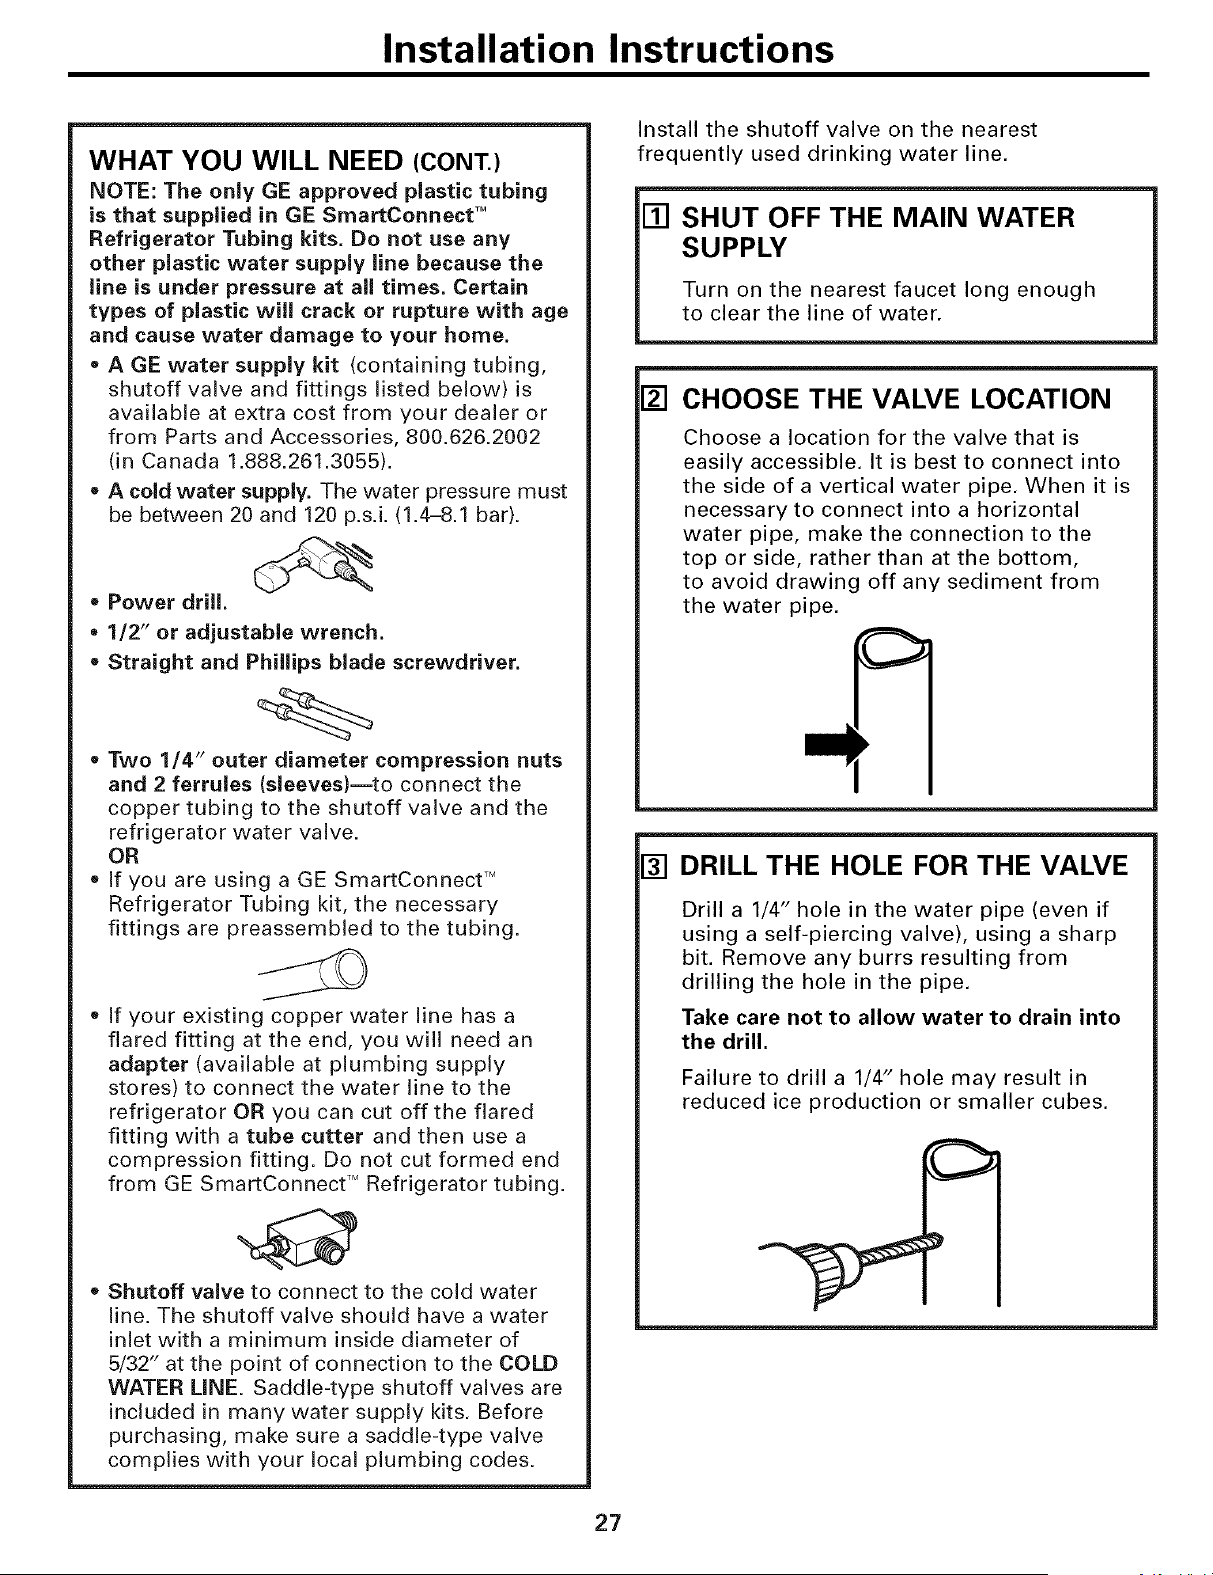
[] SHUT OFF THE MAIN WATER
SUPPLY
Turn on the nearest faucet long enough
to clear the line of water.
[] CHOOSE THE VALVE LOCATION
Choose a location for the valve that is
easily accessible. It is best to connect into
the side of a vertical water pipe. When it is
necessary to connect into a horizontal
water pipe, make the connection to the
top or side, rather than at the bottom,
to avoid drawing off any sediment from
the water pipe.
[] DRILL THE HOLE FOR THE VALVE
Drill a 1/4" hole in the water pipe (even if
using a self-piercing valve), using a sharp
bit. Remove any burrs resulting from
drilling the hole in the pipe.
Take care not to allow water to drain into
the drill.
Failure to drill a 1/4" hole may result in
reduced ice production or smaller cubes.
27

Installation Instructions
INSTALLING THE WATER LINE (CONT.)
[] FASTEN THE SHUTOFF VALVE
Fasten the shutoff valve to the cold water
pipe with the pipe clamp.
Pipe Clamp _k
Saddle-Type
Shutoff Valve
Cold Water Pipe
NOTE: Commonwealth of Massachusetts
Plumbing Codes 248CMR shall be adhered
to. Saddle valves are illegal and use is not
permitted in Massachusetts. Consult with
your licensed plumber.
[] TIGHTEN THE PIPE CLAMP
Tighten the clamp screws until the sealing
washer begins to swell.
NOTE: Do not overtighten or you may
crush the tubing.
Pi
Clamp
Screw
Washer
Inlet End
[] ROUTE THE TUBING
Route the tubing between the cold water
line and the refrigerator.
Route the tubing through a hole drilled in
the wall or floor (behind the refrigerator or
adjacent base cabinet) as close to the wall
as possible.
NOTE: Be sure there is sufficient extra
tubing (about 8' [2.4 m] coiled into 3 turns
of about 10" [25 cm] diameter) to allow the
refrigerator to move out from the wall after
installation.
[] CONNECT THE TUBING
TO THE VALVE
Place the compression nut and ferrule
(sleeve) for copper tubing onto the end
of the tubing and connect it to the
shutoff valve.
Make sure the tubing is fully inserted
into the valve. Tighten the compression
nut securely.
For plastic tubing from a GE
SmartConnect TM Refrigerator Tubing kit,
insert the molded end of the tubing into
the shutoff valve and tighten compression
nut until it is hand tight, then tighten one
additional turn with a wrench.
Overtightening may cause leaks.
Saddle-Type
Sh utoff Va Ive
Packing Nut
Outlet Valve
Compression Nut
/ SmartConnect _
: (_ Tubing
errule (sleeve)
NOTE: Commonwealth of Massachusetts
Plumbing Codes 248CMR shall be adhered
to. Saddle valves are illegal and use is not
permitted in Massachusetts. Consult with
your licensed plumber.
[] FLUSH OUT THE TUBING
Turn the main water supply on and flush
out the tubing until the water is clear,
Shut the water off at the water valve after
about one quart (1 liter) of water has been
flushed through the tubing,
I To complete the installation of the refrigerator, I
go back to Step 1 in Installing the Refrigerator.
28
Normal operatingsounds, gecom
Newer refrigerators sound different from older refrigerators.
Modem refrigerators have more features and use newer
technology.
Do you hear what I hear? These sounds are normal.
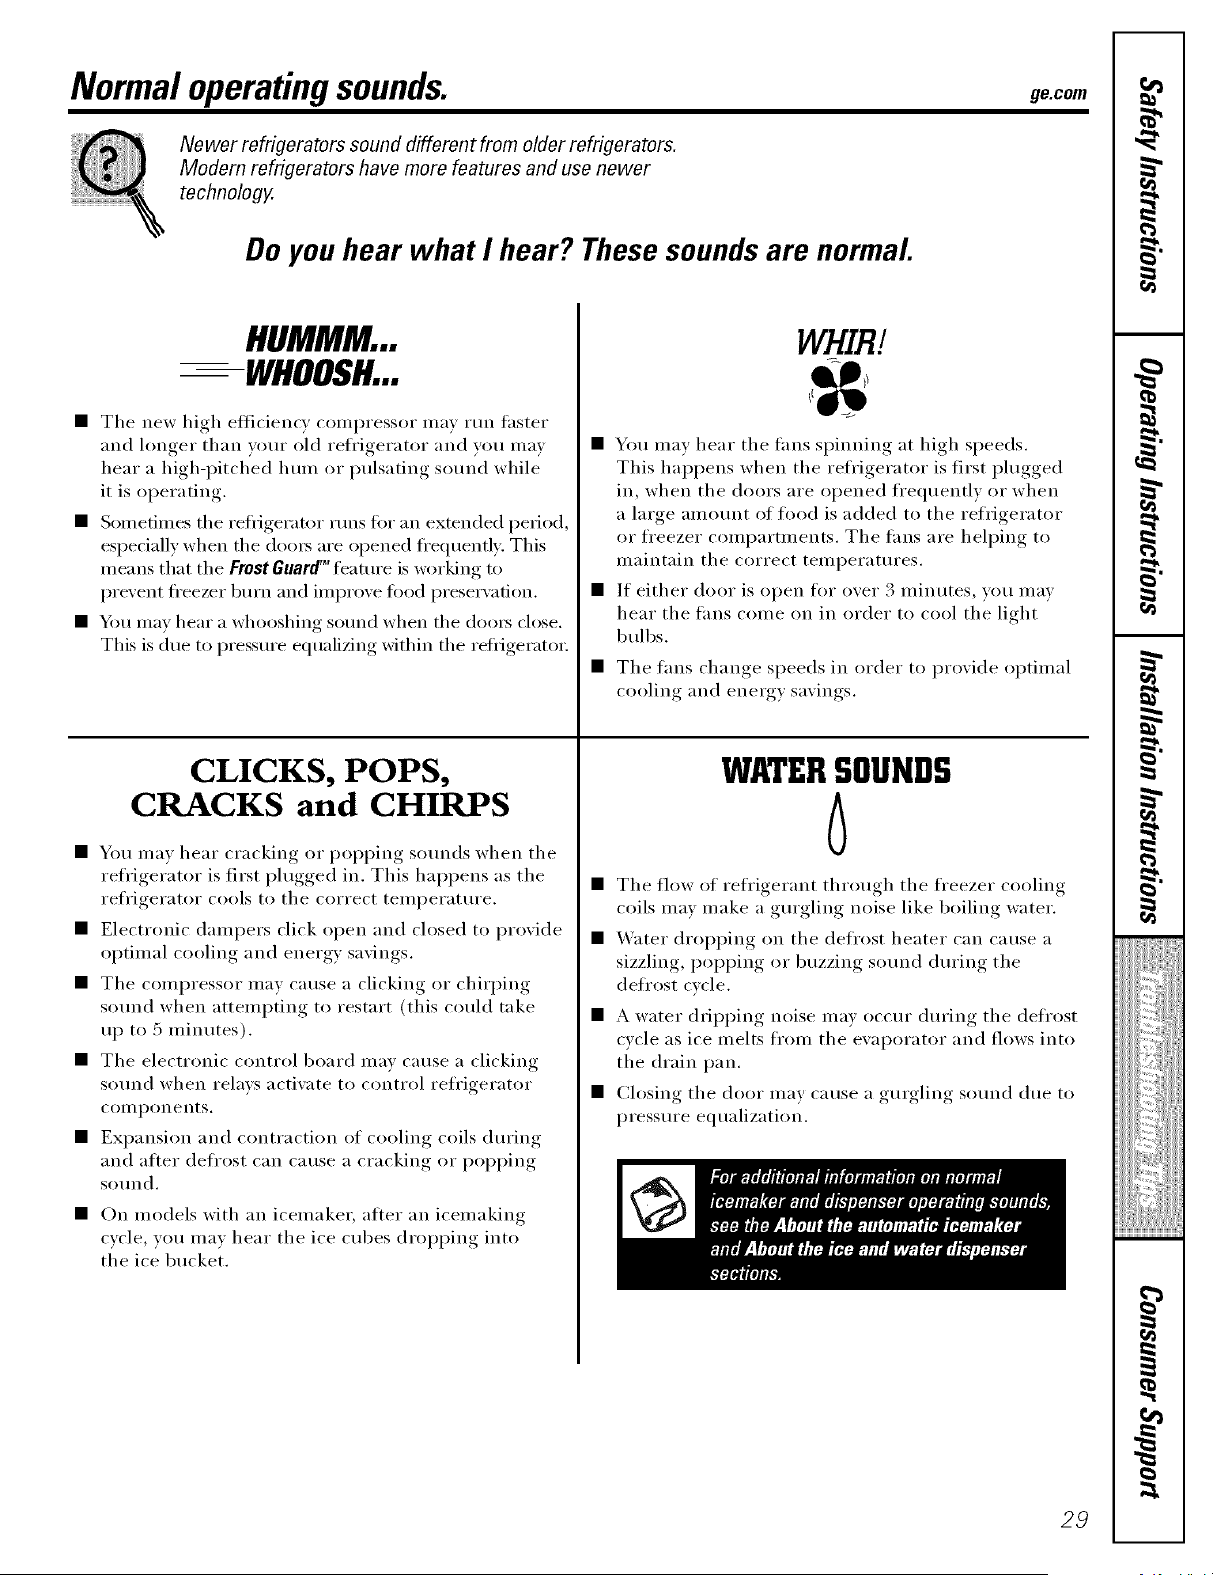
HUMMM...
--WHOOSH...
• The new high eflicienc) conq)ressor ma) Hm faster
and hmger than your old refl'igerator and you may
hear a high-i)itched hmn or pulsating sound while
it is operating.
• Sometimes the reflJgerator rtms ti)r an extended period,
especially when the doo_ are opened ti'equently. This
means that the Frost Guard_"featm'e is working to
prevent fl'eezer burn and improve tood preservation.
• You may hear a whooshing sotmd when the do(n_ close.
This is due to pressm'e equalizing within the reli_igerato_:
CLICKS, POPS,
CRACKS and CHIRPS
• You may hear cracking or poi}i}ing sotmds when the
refl'igerator is first i)lugged in. This hai)pens as the
refrigerator cools to the correct tei/ll)erattlre.
• Electronic dampers click open and closed to provide
optimal cooling and energy savings.
• The compressor may cause a clicking or chirping
sotmd when attempting to restart (this could take
up to 5 minutes).
• The electronic control board may cause a clicking
sotmd when relays activate to control reii'igerator
COII/l)OIleIltS.
• Expansion and contraction of cooling coils during
and atter deii'ost can cause a cracking or poi_i_ing
SOtlnd.
• On models with an icemake_; after an icemaking
cycle, you mav hear the ice cubes dropping into
the ice bucket.
WHIRl
• You may hear the rims spinning at high speeds.
This hal)pens when the refrigerator is first plugged
in, when the doors are opened frequently or when
a large anlount of tood is added to the refrigerator
or freezer compartments. The rims are helping to
maintain the correct temperatures.
• If either door is open ti)r over 3 minutes, you may
hear the rims come on in order to cool the light
bulbs.
• The fans change speeds in order to provide optimal
cooling and energy savings.
WATERSOUNDS
6
• The flow of refl'igerant through the fl'eezer cooling
coils may make a gm'gling noise like boiling water,
• Water dropping on the defl'ost heater can cause a
sizzling, I)oI)ping or buzzing sotmd dm'ing the
defrost cvcle.
• A water dripping noise may occm" during the defrost
cycle as ice melts fl'om the ewq)orator and flows into
the drain pan.
• Closing the door may cause a gurgling sotmd due to
pressm'e equalization.
29
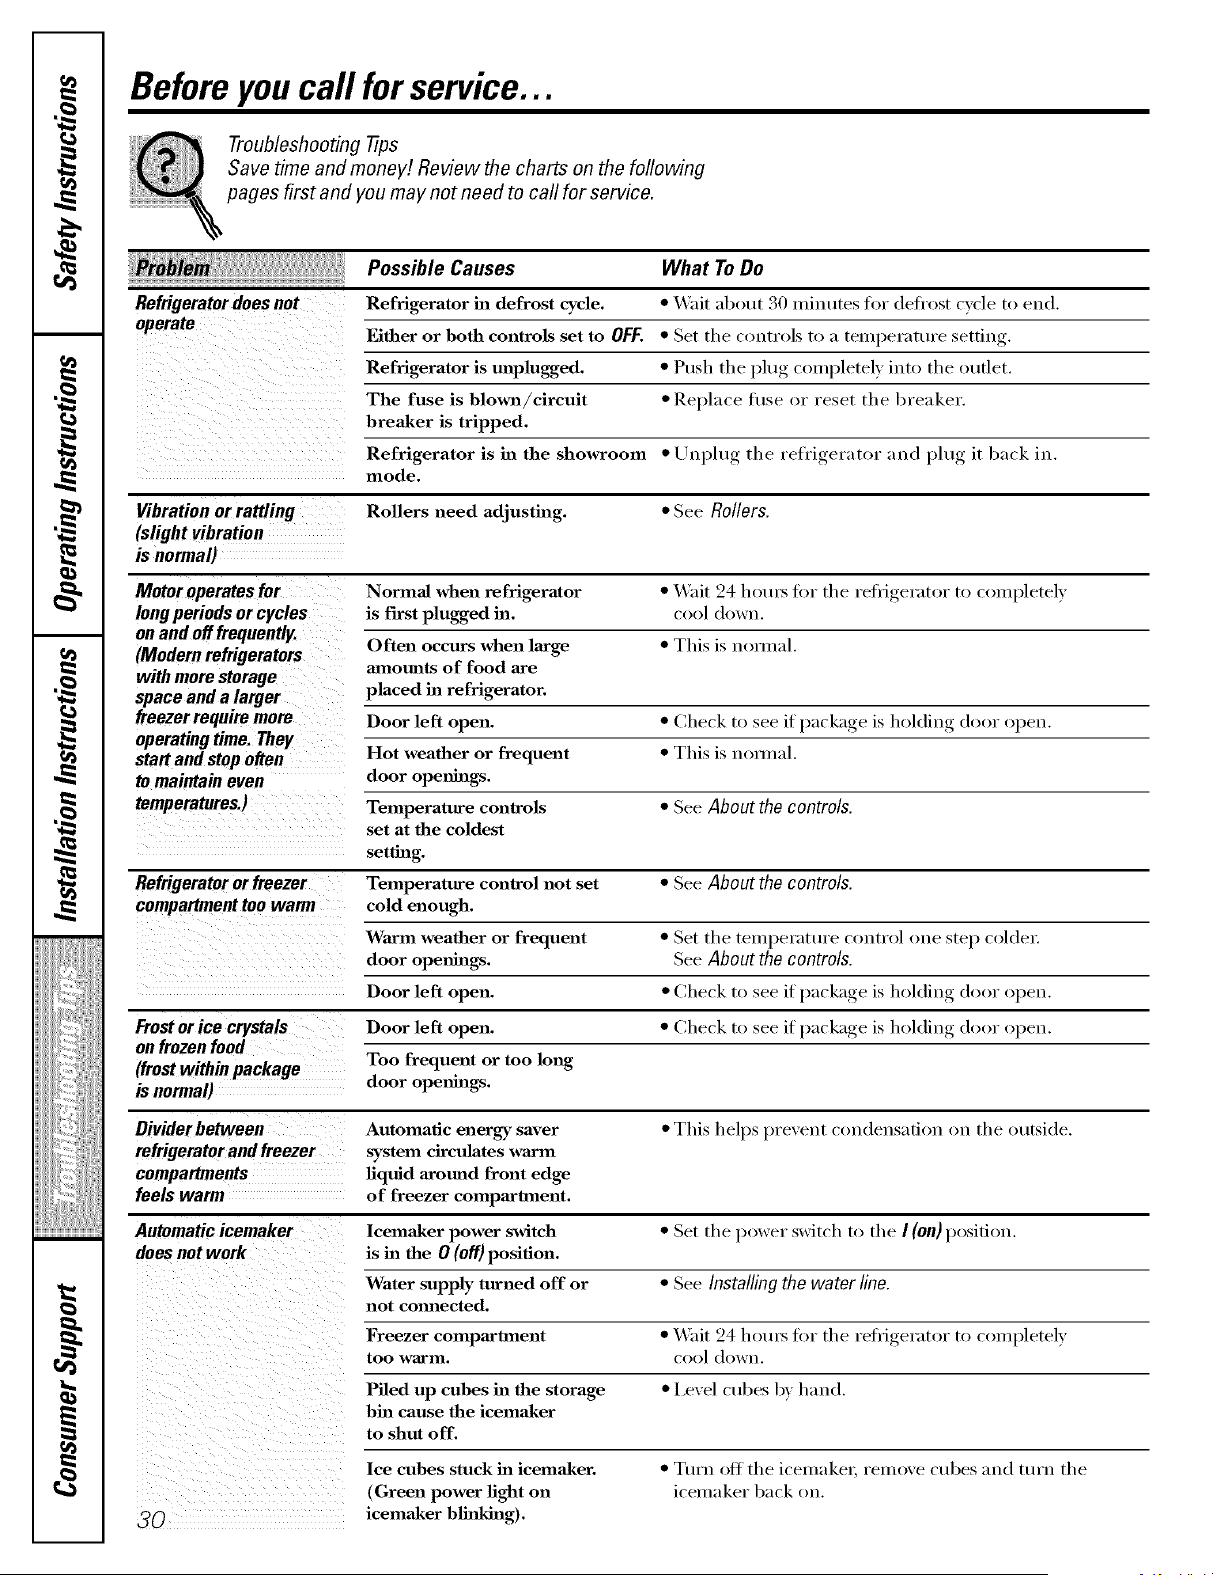
Before you call forservice...
Troubleshooting -tips
Save time and money/. Review the charts on the following
pages first and you may not need to call for service.
Possible Causes What ToDo
Refrigerator does not Refrigerator in defrost cycle. • Wait ab()ut 30 minutes t(n" deft'()st cycle to end.
operate
Either or both controls set to OFF, • Set tire controls to a teml)erature setting
Refrigerator is unplugged. * Push the l_ltu'_ completely, into the outlet.
The fuse is blown/cireult * Replace fl/se or reset tire breaker.
breaker is tripped.
Refrigerator is in the showroom * Lluplug the refrigerator and plug it back in.
mode,
Vibrationorrattling Rollers need adjusting, * See Rollers.
(slight vibration
is normal)
Motor operates for Normal when refrigerator • _fit 24 hom_ fl)r th e refi_igerat()r t() (()mpletely
long periods or cycles is Fwst plugged in, c()()l d()wu.
onand offfrequently.
Often occurs when large * This is uom_al.
(Modernrefrigerators
with more storage amounts of food are
space and a larger placed in refrigerator.
if )acka_,e is holding door open.
freezer require more Door left open. * (;beck to see }
operatingtime. They
start and stop o#en Hot weather or frequent • This is uomml.
to maintain even door openings,
temperatures.) Temperature controls * See About the controls.
set at the coldest
setting,
Refrigeratororfreezer Temperature control not set • See About the controls.
compartment too warm cold enough.
WaJ_n weather or frequent * Set tire tenll_eratuI'e control one step coldeL
door openings. See About the controls.
if )acka_,e is holding door open.Door left open. * Check to see } _ ,
if )acka_,e is holding door open.Frost or ice crystals Door left open. * Check t() see }
onfrozenfood
(frostwithinpackage Too frequent or too long
is normal) door openings,
Divider between Automatic energy saver * This helps prevent condensation on tire outside.
refrigerator and freezer system circulates warm
compartments liquid around front edge
feels warm of freezer compartment.
Automatic icemaker lcemaker power switch • Set tire power switch to tire I (on) position.
does not work is in the 0 (off) position.
Water supply turned off or * See Installingthe water line.
not comlected.
Freezer compartment • _'ait 24 hom_ fl)r tire refiJgerator to conq)letely
too warm. cool dowu.
Piled up cubes in the storage • Level cubes by hand.
bin cause the icemaker
to shut off.
Ice cubes stuck in icema_ker.
(Green power light on
_0 icemaker blinking),
• Tuna off the icemakei, remove cubes and tm'n the
icelnaker 1)ack oil
ge.com
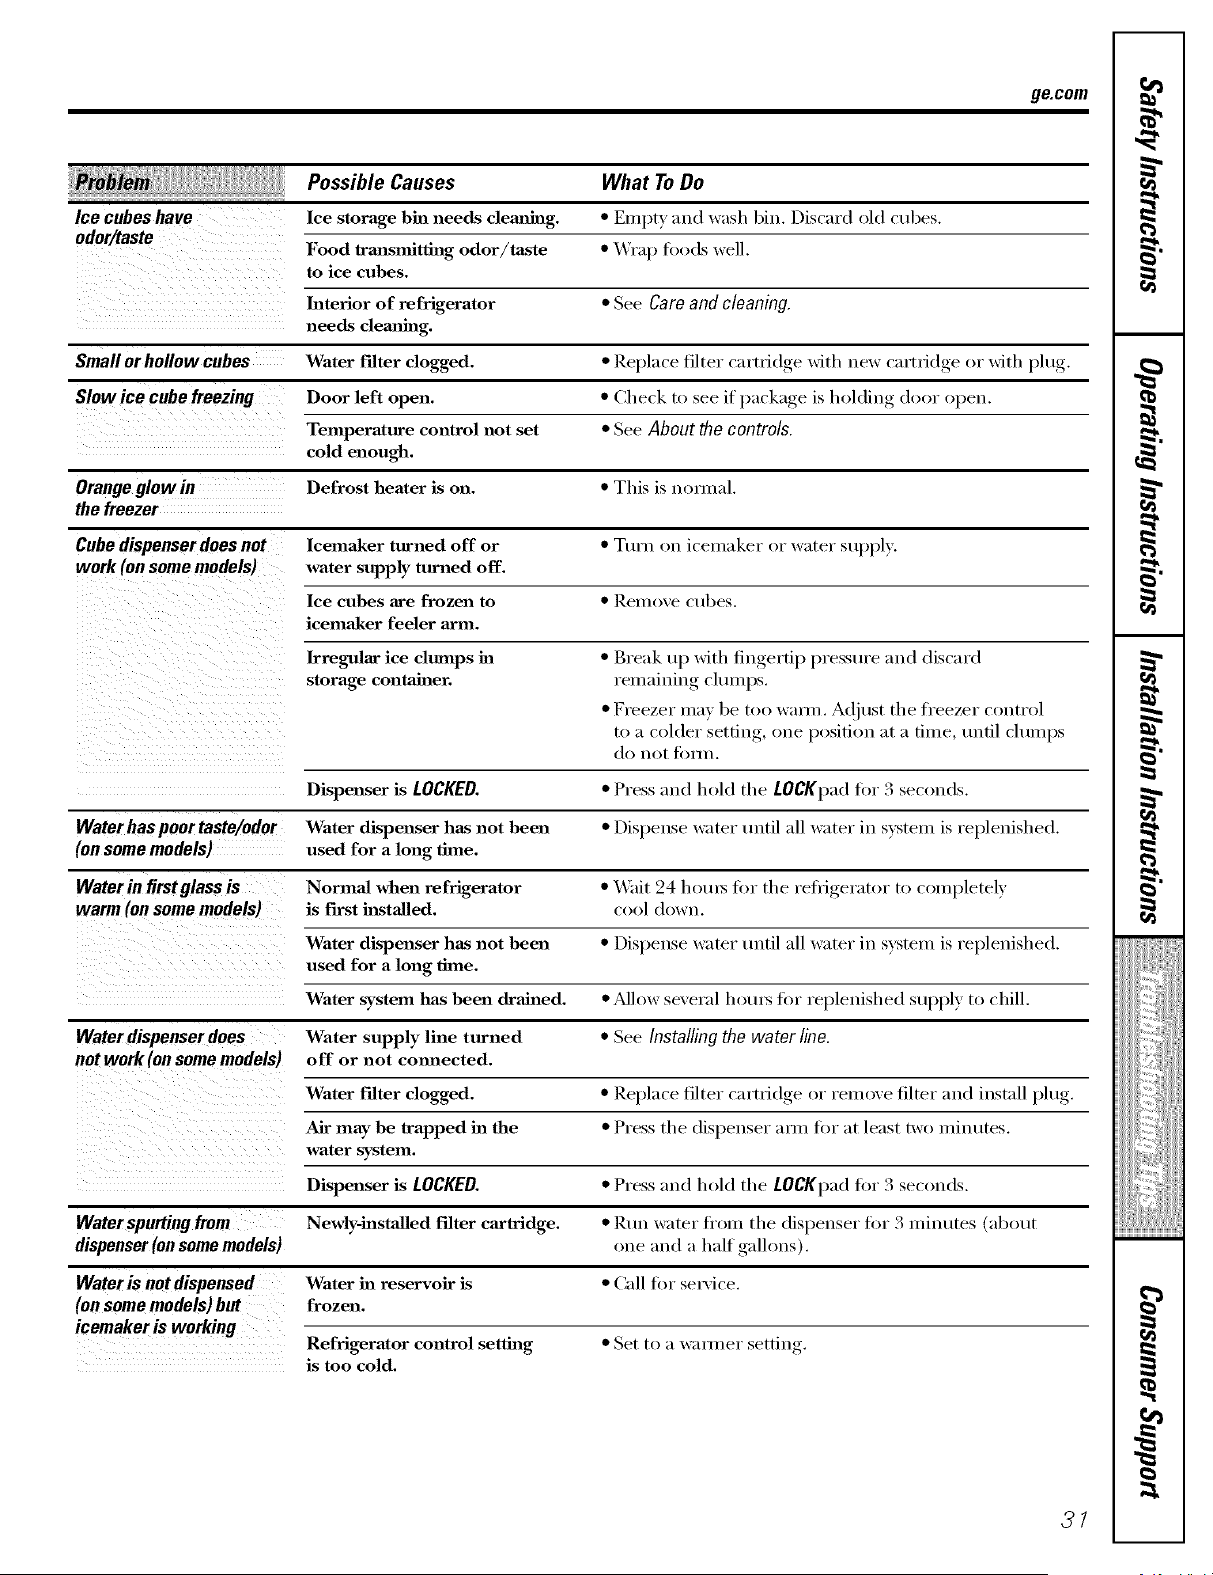
Possible Causes What ToDo
Ice cubes have Ice storage bin needs clem_hag. * Empty and wash bin. Discard old cubes.
Food transmitting odor/taste * Wrap foods well.
to ice cubes.
Interior of refrigerator * See Careand cleaning.
needs clemlh_g.
Smallorhollow cubes Water f'dter clogged. * Replace filter cartridge with new cartridge or with )lu
Slow ice cube freezing Door left open. * Check to see if l)ackage, is holding door ol)eu.
Temperature control not set * See About the controls.
cold enough.
Orange glow in Defrost heater is on. * This is nominal.
Cube dispenser does not lcemaker turned off or * Turn on i( eluaker or water supply.
work(onsome models) water supply turned off.
Ice cubes are frozen to * Remove cubes.
icemaker feeler arm.
Irregular ice clmnps in • Break up with fingertip presstwe and discard
storage container, remaining, cluml)S.
• Freezer may be too Wal_m. Ac!iust tile fl'eezer coutrol
to a colder setting, one position at a time, until clumps
do uo[ t()l]l],
Dispenser is LOCKED. • Press and hold tile LOCKpad fin 3 seconds.
Waterhaspoortaste/odor Water dispenser has not been • Dispense water until all water in system is replenished.
(on some models) used for a long time.
Waterin firstglass is Normal when refrigerator • _4'ait 24 hotu_ fin" tile refiigerator to (ompletely
warm (on some models) is first h_stalled, c()ol (h)wu.
Water dispenser has not been • Dispense water until all water in system is replenished.
used for a long time.
Water system has been drained. • _dlow several l/()tus fi)r replenished supply to chill.
Water dispenser does Water supply line turned • See Installing the water line.
not work (on some models) off or not cmmected.
Water f'flter clogged. • Repla( e filter (';ll'tYidge, of l'elllOVe filter aud iust;dl l)lu_'
Air may be _'apped in the • Press the dispenser ann fi)r at least two minutes.
water system.
Dispenser is LOCKED. • Press and hold tile LOCKpad fi)_ 3 seconds.
Water spurting from Newly-h_staUed filter cartridge. • Run water fi'om tile disl)euser for 3 mim/tes (about
dispenser (on some models) one and a half galh)us).
Wateris notdispensed Water in reservoir is • Call fin" seia:ice.
(on some models) but frozen.
icemaker is working
Refrigerator control setting • Set to a w:muer setting.
is too cold.
31
i:iii:iiii_iii
i

Before you call forservice...
Possible Causes What ToDo
No waterorice cube Supply line or shutoff • Call a plmnbe_:
production valve is clogged.
Water filter clogged. * Replace filter cartridge or remoxe filter and instnll )lu 7
Dispe_zser is LOCKED. * Press and hold tile £0CKpad for 3 seconds.
CUBED ICE was selected Last setting was * A tew cubes were leti in tile crusher from tile prexious
butCRUSHEDICE CRUSHEDICE. settin, This is hernial.
wasdispensed
(on some models)
Refrigerator has odor Foods trmasmitthag * Foods with strong odox_ should be tightly wrapped.
odor to refrigerator. * Keep an o )en box of baking soda in tile refl_igerator;
replace every three im)nths.
Interior needs cleaalhag. * See Care and cleaning.
Moistureformson Not unusual during * _ipe s/u_i_ce (h 3.
outside of refrigerator periods of high hmuidJty.
Moisture collects inside Too frequent or too
(in humid weather, air long door ope_thags.
carriesmoistureinto
refrigerator when doers
are opened)
lnteriorlightdoes No power at outlet. • Replace fllse or reset tile breakei:
not work
Light bulb burned out. * See Replacing the light bulbs.
Wateron kitchen flooror Cub_ jmnmed ha chute. • Poke ice through with a wooden spoon.
onbottomoffreezer
Hot air from bottom Normal air flow cooling
motor, ha the refrigeration
process, it is normaJ that
heat be expelled ha the
area under the refrigerator.
Some floor coverings
axe sensitive mad will
discolor at these nonnaJ
mad safe temperatures.
Refrigerator never Adaptive defrost keeps * This is nomaal. Tile reflJgerator will cxcle off after tile
shutsoffbutthe compressor rmmhag during door remains dosed fl)r 2 hom_.
temperatures are OK door openings.
Refrigerator is beeping Door is open. * Close (looi:
Door not closing properly Door gasket on hinge side * __ ) )Ix' )araflin wax to tile thee ot tile gasket
_II ,I ...... , _ •
sticking or folding over.
A door bin is hitting a shelf * Mo;e tile door bin up one position.
inside the refrigerator.
Actualtemperaturenot Ulfit just plugged ha. * _Mlow 24 hom_ fin" s) stem to stnbilize.
equal to Set temperature Door open for too long. * _Mlow 24 hems fin" s'_steIn to stnbilize.
Warm food added to refrigerator. * _Mlow 24 hol,,S fin" system to stnbilize.
Defrost cycle is ha process. * _Mlow 24 hems fin" system to stnbilize.
32

GE Service Protection Plus 'M
GE, a name recognized worldwide fbr quality and dependability; offers you
Service Protection Plus'_'-comprehensive protection on all yore appliances-
No Matter What Brand!
Benefits Include:
• Backed by GE
• All brands covered
• Unlimited service calls
• All parts and labor costs included
• No out-of-pocket expenses
• No bidden deductibles
• One 800 number to call
We TI Cover Any Appliance.
Anywhere. Anytime.
You _dll be completel) satisfied with our service protection or )ou ma) request )our mone) back
on the remaining value of your contract. No questions asked. It's that simple.
Protect yore" refrigerator, dishwashe*; washer and dryei; range, TV; VCR and much more-any brand!
Plus there's no extra charge flw emergency service and low monthly financing is available. Even icemaker
coverage and fl)od spoilage protection is o/tbred. You can rest easy, knowing that all your valuable
household products are protected against expensive repairs.
Place ,our confidence in (lie and call us in the U.S. toll-free at _UU._Z_.ZZZ_
for l//Ol'e infol'I//atioll.
:_,_*]1 hi}in(Is (o_.{!l_{!(L tip t(t _0 ){!alS Ill(I, 111 the (on[lllenl tl [_.S.
_ (_/ll here
Please place in envelope and mail to:
GeneralElectric Company
Warranty Registration Department
P.O. Box 32150
Louisville, KY 40232-2150
33
Consumer Product Ownership Registration
Dear Customer:
Thank you for purchasing our product and thank you for placing your confidence in us.
_'e are proud to ha_e you as a customer!
Follow these three steps to protect your new appliance investment:
Complete mid mail
your Consumer
Product Ownerslfip
Registration today.
t ]a_e the t}eace o/
mind of knowing we
c_ln contact you ill
th( unlikely (v(m of
a sa/bty nlodi/ication.
AJler mailing tile
registration below,
store this(toctll/]ellt
in a sa/b place. It
contains int{)rnlation
you will need should
you require service.
Our service nmnber is
800.GE.CAI,_ES
(800.432.2737).
[_{'}t(t VO/lr Owner's
Mamml carefullx.
It will hel t ) you
operate your new
appliance properly.
Model Number Serial Number
, , , , , I I , , , , , , , I
Important: If you did not get a registration card with your
product, detach and return the form below to
ensure that your product is registered, or register
online at ge.com.
.................................................................................................... _K,,,_ Cm h{r(
Consumer Product Ownership Registration
_) Model Number Serial Number
I,,,,,, , , , , , I I , , , , , , I
Ms. M*>,. Mi_s
Nalne ] ] ] ] ] ] ] ] ] Name ] ] ] ] ] ] I I I I I I
SI 1-( (!1 ]
A&hx ss I I I I I I I I I I I I I I I I I I I I I I I I
Apt. # ] I I
Ciw ] I I
l}a_c Placed
In Use ]l]
Monlh
I [ ] ] I [ E-mailAddress*
"_m,-]l] Phone
Number ] I I
Zip ]
I J (2)de I I ] I
I-I,, I-I , , ,
I
I
@
GE Consumer & Industrial
Appliances
General Electric Company
Louisville, KY/40225
ge.com
* Please l)rovi(le your e-mail address to receixe, via e-mail, discounts, special otlbp, and other important
communications froln GE Appliances (GEA).
Check here if you do not want to receive communications h-ore GEA's careflllly selected partners.
FAII.[ 7RE TO COMPLETE AND RET[ 7RN Tt tlS CARD DOES NOT D IMINISt t Y()I 5R
X\(\RRAN'[Y RIGt H'S.
For intkmnation about GEA's prixacy and data usage polio B go to ge.com and click on "Prixacy Policy" ol*
call 800.626.2224.
34
Please place in envelope and mail to:
Veuillez mettre dans une enveloppe et envoyez _ :
OWNERSHIPREGISTRATION
P,O. BOX1780
MISSISSAUGA,ONTARIO
L4Y 4G1
(FOR CANADIANCONSUMERSOHLY)
35
For Canadian
Customers
Pour ;es
Consommateurs
Canadiens
ol
UJI
Zl
=.1 I
I
Zl
L) I
P',easeregisteryourproduct_oenab;eusto contactyou i,Veui[[ezenregis_ervolreproduitafindenousperme_ede
intheremoteeventasafetyno'dceisissuedforthisproduct ,,communiqueravecvoussijamaisunavisdes6curit6concemant
andtoa',',owforefficientcommunicationunderthetermsi,ceproduit_tait6misetdecommuniquerfaci',ementavecvousen
ofyourwarranty,shou[dtheneedarise. Lvertudevotregararde,si[ebesoins'enfairsenlir.
REGISTERON-LINE: www.geapp;iances,ca MA;L TO: P.O. BOX 1788, M;SS;SSAUGA
ENREG[STREMENTSUR[NTERNET_,: www:e;ectramenag#_rsg#cca POSTERA: ONTARIO, IL4Y4GI
[] MR./M [] MRS./MME. IIFIRSTNAME/PRENOM IIIJ_TNAME/NOM
[] MiSS/MLLE.[] MS. I I
b L
r r
S'I_EET NO/N° RUE IIS_EF NAME/RUE IiAP_. NO/APR/RR#
I I
_ / V[LI2 ] PROVINCE /POSTAL
I
I I
J L
• r ? .
AREACODE/iND. REG.ITELEPHONE IE-MAiL
I I
I I
L 1
DiDYOU PURCHASE A SERVICECON rP_CT FORTNiS APPkiANCE? ¥ES/OU[ D IF'_S / Si OU[:EXP[P_TION
Y/A M DiJ
AVEZ-VOUSACH_t_ UN CONTP&TDE SE_ICE POUR CEr ARPAREIL? NO/NON []
NAMEOF SELLINGDEALER/ NOM DU MARC,HAND r
I MODEL/MODELE
I
I
INSTALLATIONDATE/DATED'INSTALLATION"_-
Y/A M D/J I CORRESPONDENCE [] ENGbSH
i CORRESPONDANCE [] FRANCAiS SERiAL/SI_RiE
.I
[] i do notwish to receiveanypromotionaloffersregardingthis product.
[] Je ned&sirepasrecevoird'offrespromotionneiiesconcernantce produit.
36
I
w
i
w
37
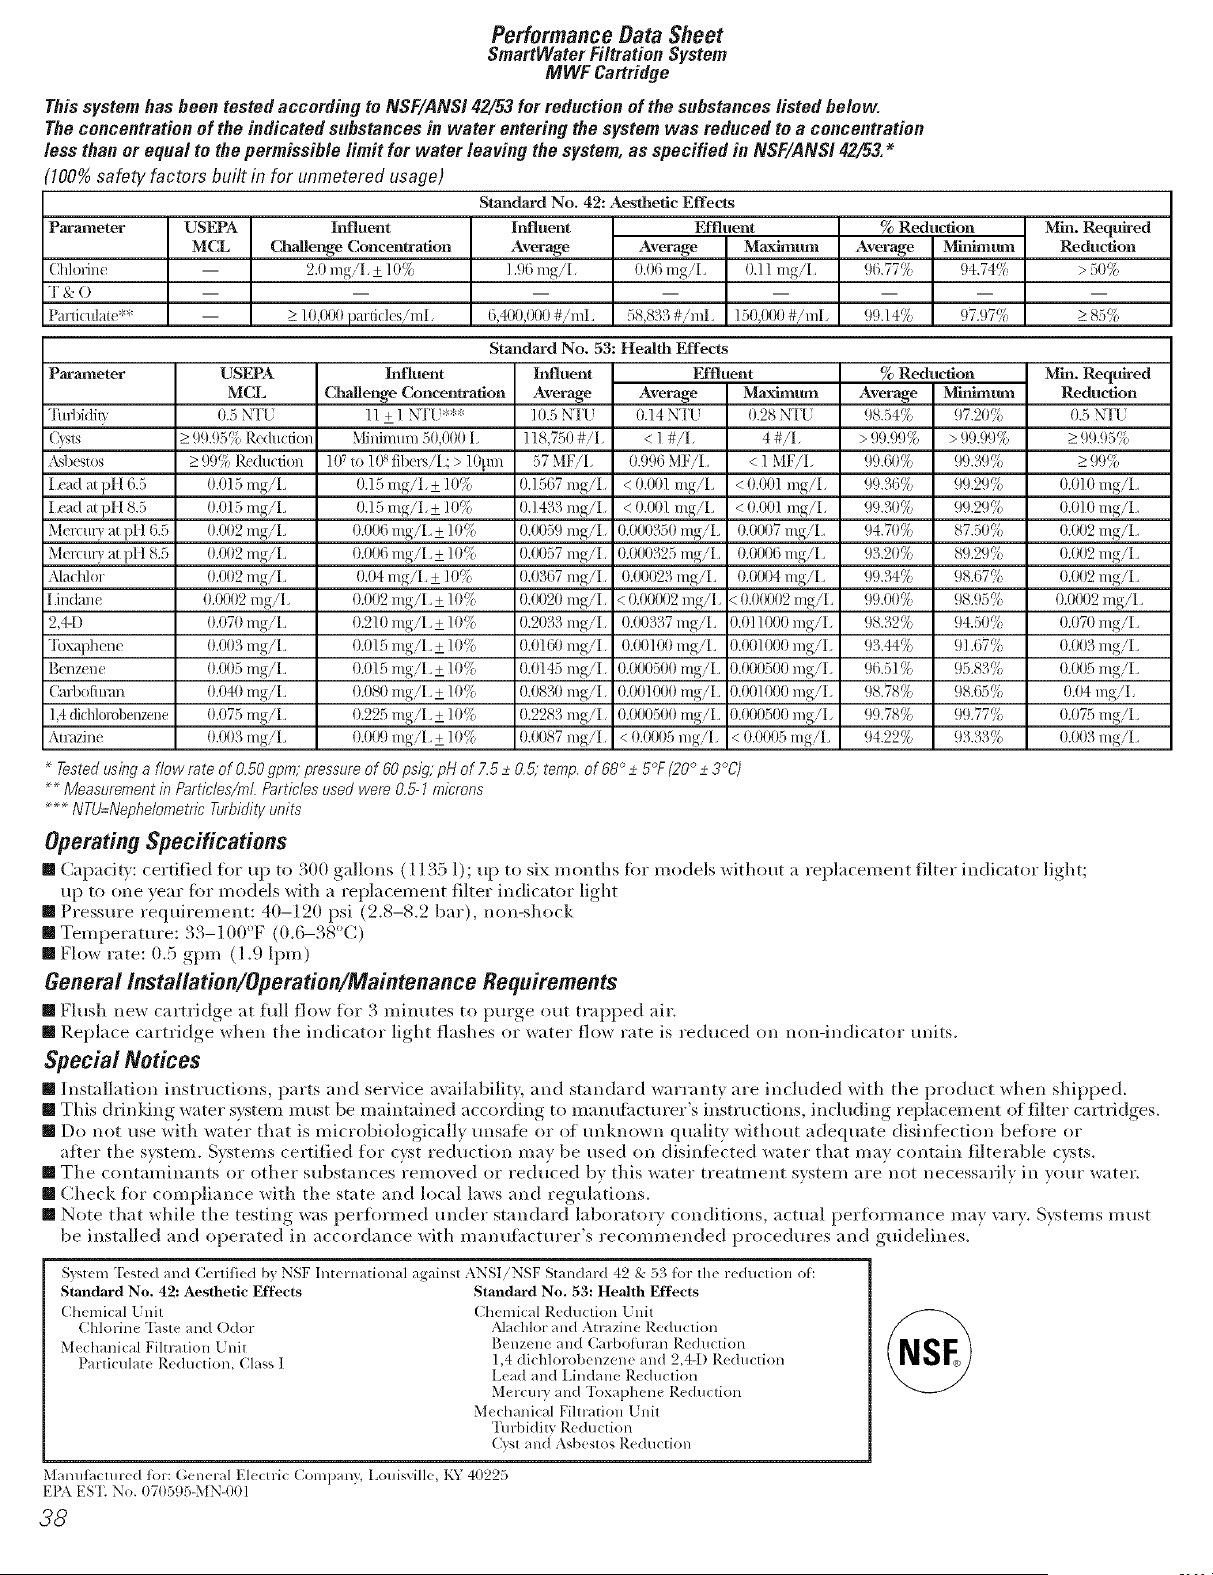
Performance Data Sheet
SmartWater Filtration System
MWF Cartridge
This system hasbeen testedaccordingto NSF/ANS142/53for reductionof thesubstanceslisted below.
Theconcentrationof the indicatedsubstances in water entering the systemwas reducedto a concentration
less than or equal to the permissible fimit for water leaving the system,as specified in NSF/ANS142/53.*
qO0%safety factors built in for unmetered usage)
USEPA
M(%
Parameter
Chlorine
T&O
Parlk:ulate**
m
m
m
_l_Juent
Challenge Concentration
2.0 rag/I, _+] 0%
_>] 0,000 partJcl_ s/m I,
Stmldard No. 42: Aesthetic Effects
lnfluent Effluent
Average Average Maximum
].96 rag/I, 0.06 mg/L 0.1 ] mg/L
6,400,{X)0 #/mL 58,833 #/mL ]50,000 #/mI,
Standard No. 53: Health Effects
Parameter
"Iin-bi(/iB
(Xsts
•_sbestos
I _ead at pH 6.,5
I _ead at pH 8.,5
Men m'} at pH 6.,5
Men m'} at pH 8.,5
Nachl0r
I,indane
2,4-1)
"Ibxaphene
Benzene
Carb0fin'an
1,4dichl0mbenzene
Atrazine
USEPA
MCL
0.5 NT[
_>99.!),5% Reduction
_>9!}% Reduction
0.01,5 mg/L
0.01,5 mg/L
0.002 mg/L
0.002 mg/L
0.002 mg/L
O.OIX)2rag/l,
0.070 mg/L
0.003 mg/L
0.00,5mg/L
0.040 mg/L
0.07,5 mg/L
0.003 mg/L
[n['_uent
Challenge Concentration
11 ±1 N I'('***
Minimmn ,50,000 I,
] 0 7 tO ] 0 8 fibers/I _;> ]Opm
0.1,5 rag/I, + ]()!_{
0.1,5 rag/I, + ]()!_{
0.006 mg/L + 1()!_
0.006 mg/L + 1()!_
0.04 mg/L + 1()!_{
0.002 mg/L + ] 0!_
hffluent
Average
]0.`5NT( '
]] 8,7,50#/I,
,57MF/I,
1).1,567rag/I,
t).1433 rag/I,
0.00,59rag/I,
0.00,57rag/I,
0.0367 rag/I,
0.0020 rag/I,
Effluent
Average Maximum
0.14 NI'( ' 0.28 NT[
< ] #/I, 4 #/I,
0.996 MF/L < ] MF/I,
< 0.001 mg/L < 0.001 rag/I,
< 0.001 mg/L < 0.001 rag/I,
0.0003,50 mg/L 0.0007 mg/L
0.00032,5 mg/L 0.0000 mg/L
0.00023 mg/L 0.0IX)4 mg/L
< 0.00IX)2rag/l, < O.O0(X)2nN/L
0.2]0 mg/L + ]0!_ 02033 rag/I, 0.(X)337 mg/L 0.01 ]000 rag/I,
0.0] 2,mg/L +_]0!{ O.O]|iO rag/I, O.(X)]O0 mg/L 0.00] Ot)Orag/I,
0.0]Smg/L+]0!_ 0.0]45mg/I, 0.000500mg/L 0.000500rag/I,
0.08|)mg/L+]0% 0.083|)rag/I, 0.00] 000 mg/L 0.00]000mg/I,
().225mg/L+]0!_, 0.2283mg/1, 0.000500mg/L 0.(X)0,500mg/I,
(}.009mg/L±10% 0.{X)87mg/I, <(}.(}lX),smg/I, <0.(}(}0,smg/L
% ReduOion
Average
96.77%
99.14%
Min_llln
94.74%
97.97%
% Reduction
Average Minimum
98.,54% 97.20!i
> 99.99% > 99.99%
99.60% 99.39!_
99.36% 99.29%
99.30% 99.29%
94.7|)_/c 87.,5()!_
93.20_/c 89.29!_
99.34% 98.67%
99.(}0% 98.9,5%
98.32% 94.50%
93.44_/c 91.67%
96.,51% 9,5.83!_
98.78% 98.6,5!:_
99.78% 99.77!_
94.22% 93.33%
Min. Required
Reduction
> ,50%
_>85%
]_n. Required
Reduction
0.,5NT[
_>99.!),5%
_>99%
0.010 mg/L
0.010 mg/L
0.002 mg/L
0.002 mg/L
0.002 mg/L
0.0002 mg/L
0.070 mg/L
0.()03 mg/L
0.00,5 mg/L
0.04 mg/l,
0.07,5 mg/L
0.003 mg/L
Tested usbg a f/ow rate of O.5Ogpm; pressure of 6O psig; pH of 7.5_+0.5; temp. of 68°_+ 5°F120°_+3°C)
_* Measurement in Partic/es/m/. Partic/es used were 0,5-1 microns
..... NTU=Nephe/ometric Turbidity units
Operatino Specifications
[] Capacit) : certified fin" up to ,,00 galhms ( l l ,'4:5 1) ; up to six months fi)r models without a repl_wement filter indicator light;
up to one xear fin" models _ith ;l replacement filter indicator light
[] Pressm'e requirement: 40-1 20 psi (2.8-8.2 bar), non-shock
[] Temperature: 33-1 00°F (0.6-38°(2)
[] Flow r_te: 0 5 _t"']m (I .9 1pro)
General Installation/Operation/Maintenance Requirements
[] Flush ne_ cartridge at hdl fl()_ _()r 3 minutes to I)urge_ out tr_pped air.
[] Replace cartridge when the indicator light flashes or water flow nite is reduced on non-indicator units.
Special Notices
[] Installation instructions, pm'ts and service availabiliB and standard _arrant} are included _ith the product _hen shipped.
[] This dfinldng _,_ater s}stem must be maintained according to manufhcttuer's instructions, including replacement of filter c'n_tfid res
[] Do not use with water their is microbiologiGdl,_ tmsafe or of tmknox_n qualit) without adequate disinfection before or
after the s_stem. Sxstems certified for cxst ieduction m;_x be used on disinfected water that ma} contain filterable c_sts.,
[] The contaminants or other substances remoxed or reduced b_ this water treatment s}stem are not necessafil)in }ore" water.
[] Check for compliance _ith the state and local la_s and regnlations.
[] Note theft while the testing w;_s performed trader standard lab()ratot) c(mditions, actual performance ma} vat}. %stems must
be installed and operated in accordance with n]amdhcturer's recomn]ended procedm'es and guidelines.
Stm_dard No. 42: Aesthetic Effects
Chenaical [nit
Chlorine qhste m_d Odor
Mechmfital Filtration Enit
Partitulat_ Reduction, Class I
Syst(m Tested and Certified by NSF International against ANSIiNSF Standard 42 & 53 fbr the reduction of:
Standard No. 53: Health Effects
Chemical Reduction Unit
Alachlor and Atrazine Reduction
Benzene and Carboftwan Reduction
1,4 dichlorobenzene and 2,44) Reduction
Lead and Lindane Reduction
Merculv and "Ibxaphene Reduction
Mechanical Fihration 1 nit
Ttwbidity Retluction
Cyst and Asbestos Re(luction
Malmthctured %r: ( eneral Electric Colnpan}, Louisville, KY 40225
ElL\ EST No. (}70595-MN4)01
38
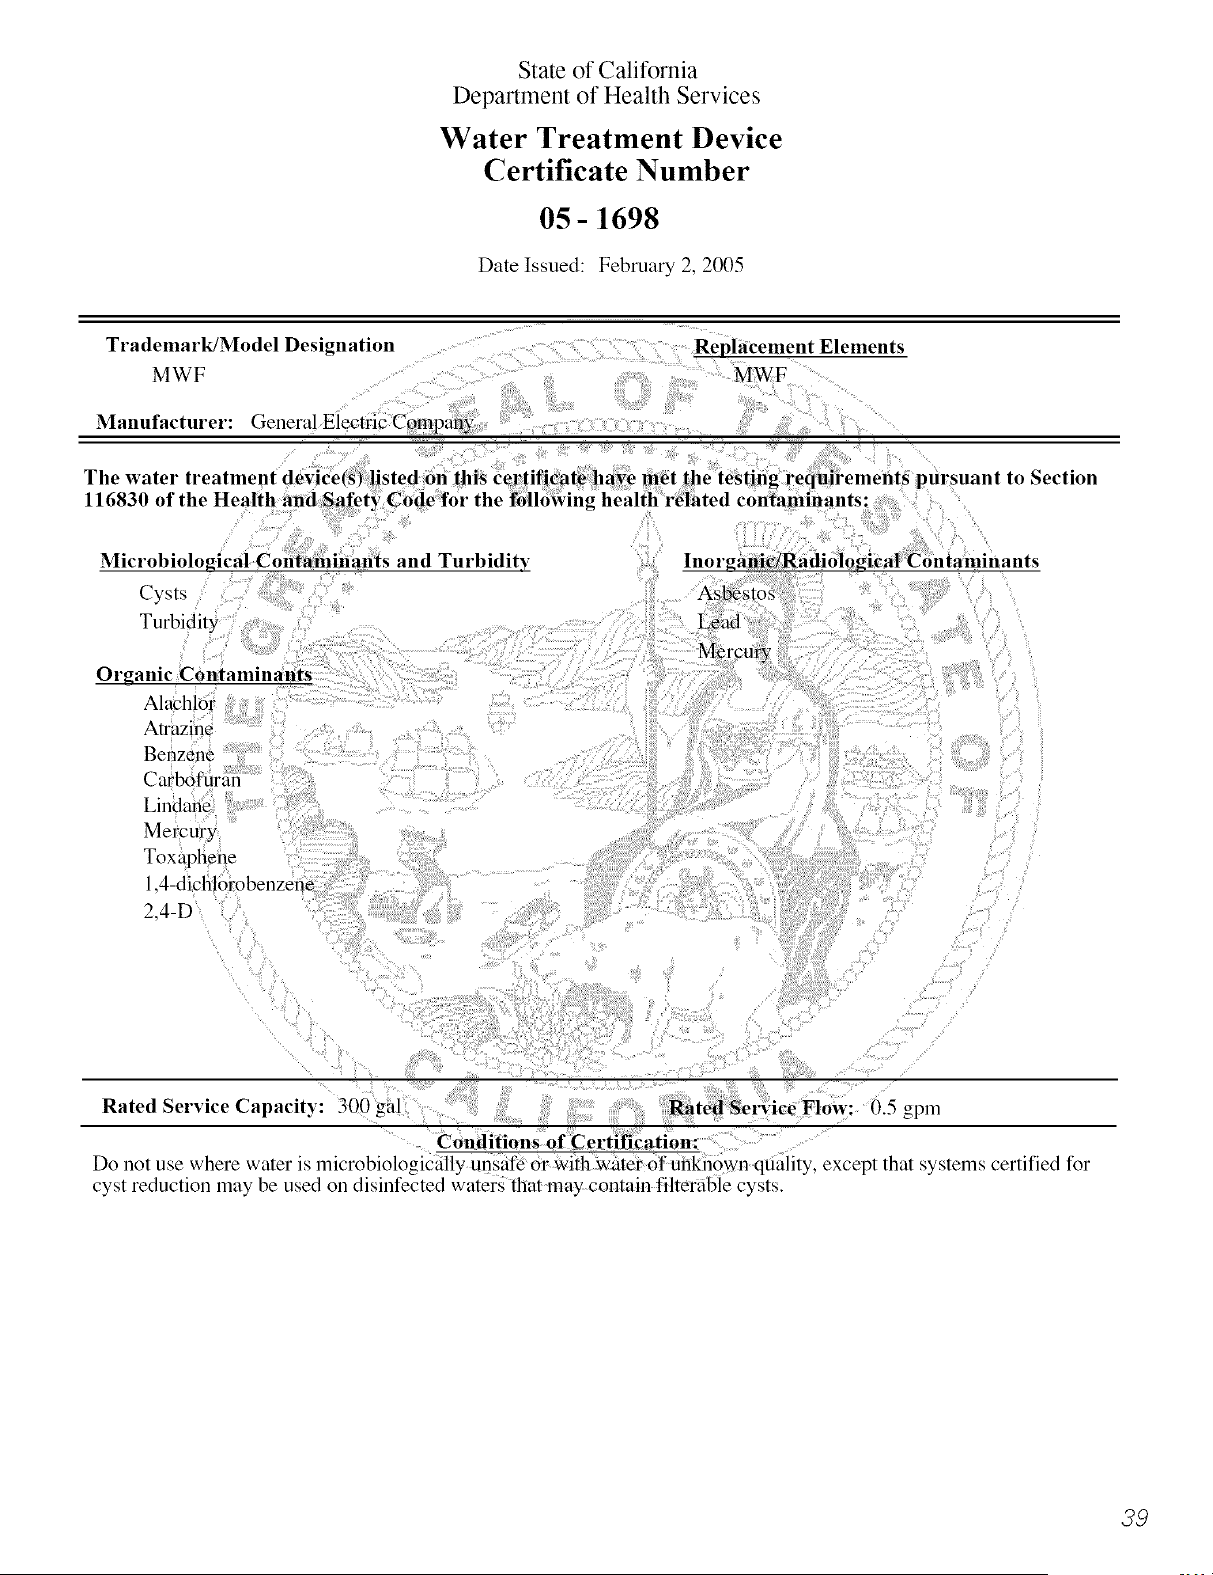
State of Califf)rnia
Department of Health Services
Water Treatment Device
Certificate Number
05-1698
Date Issued: February 2, 2005
Trademark/Model Designation
MWF
Replacement Elements
MWF
Manufacturer: General Electric Company
j
The water treatment device(s) listed on this certificate haye met the testing requirements pnrsnant to Section
116830 of the Health and Safety Code for the following health related contaminants:
Microbiological Contaminants and Turbidity Inorganic/Radiological Contaminants
Cysts
Turbidity
Organic Contaminants
Alachlor
Atrazine
Benzene
Carb0furan
Lindane
Mercury
Toxaphene
1.4-diclitorobenzene
2.4-D
Rated Service Capacity: 300 gal Rated Service Flow: 0.5 gpm
Conditions of Certification:
Do not use where water is microbiologically unsafe or with water of unknown quality, except that systems certified for
cyst reduction may be used on disinfected waters that may contain filterable cysts.
79
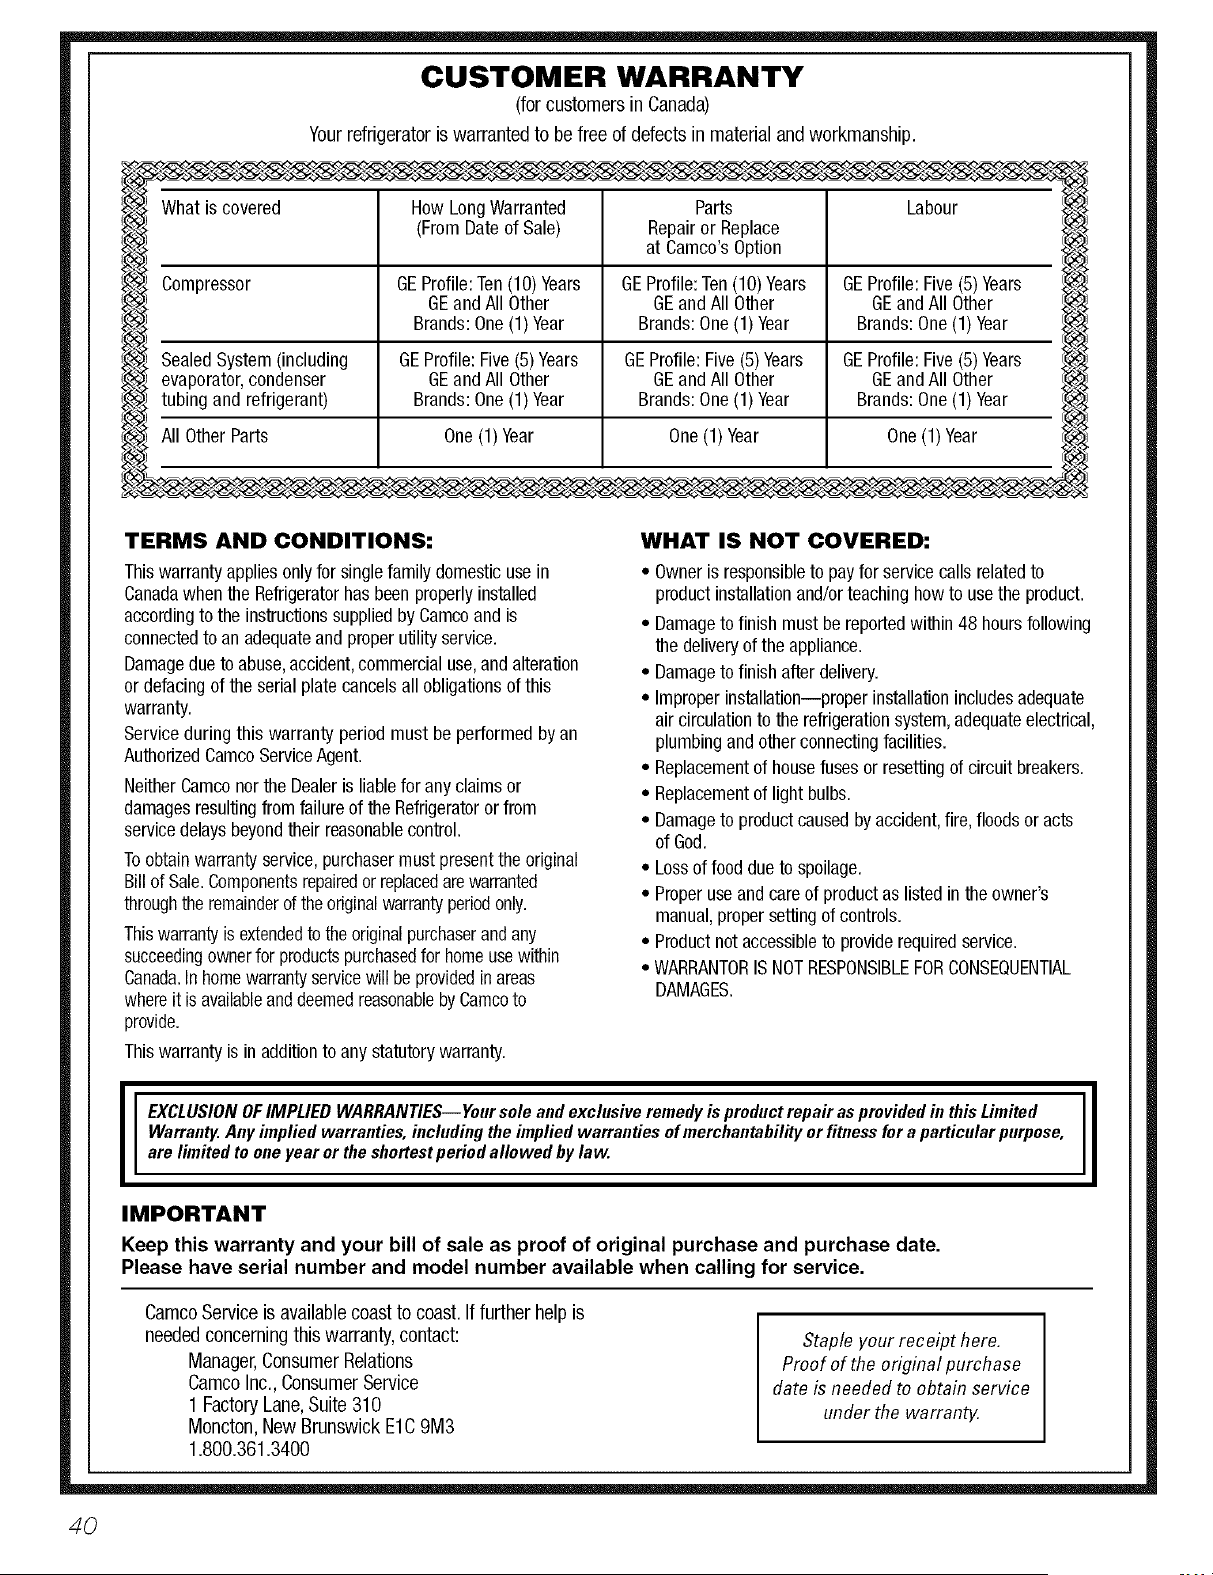
CUSTOMER WARRANTY
(for customersin Canada)
Yourrefrigeratoris warrantedto be free of defectsin materialand workmanship.
Whatis covered HowLong Warranted Parts Labour
(FromDateof Sale) Repairor Replace
at Camco'sOption
Compressor GEProfile:Ten(10)Years GEProfile:Ten(10) Years GEProfile:Five (5)Years
GEandAll Other GEand All Other GEandAll Other
Brands:One(1)Year Brands:One(1) Year Brands:One(1)Year
SealedSystem(including GEProfile:Five(5)Years GEProfile:Five(5)Years GEProfile:Five (5)Years
evaporator,condenser GEandAll Other GEand All Other GEandAll Other
tubing and refrigerant) Brands:One(1) Year Brands:One(1) Year Brands:One(1)Year
All OtherParts One(1)Year One(1)Year One(1)Year
TERMS AND CONDITIONS:
Thiswarrantyappliesonlyfor singlefamily domesticusein
Canadawhenthe Refrigeratorhasbeenproperlyinstalled
accordingto the instructionssuppliedbyCamcoand is
connectedto an adequateandproperutilityservice.
Damagedue to abuse,accident,commercialuse,and alteration
or defacingof the serialplate cancelsallobligationsof this
warranty.
Serviceduringthis warrantyperiodmust be performedbyan
AuthorizedCamcoServiceAgent.
NeitherCamconorthe Dealeris liablefor anyclaimsor
damagesresultingfrom failureof the Refrigeratororfrom
servicedelaysbeyondtheir reasonablecontrol.
Toobtainwarrantyservice,purchasermust presentthe original
Billof Sale.Componentsrepairedorreplacedarewarranted
throughthe remainderof theoriginalwarrantyperiodonly.
Thiswarrantyisextendedto theoriginalpurchaserandany
succeedingownerfor productspurchasedfor homeusewithin
Canada.In homewarrantyservicewill be providedinareas
whereit isavailableanddeemedreasonableby Camcoto
provide.
Thiswarrantyis in additionto any statutorywarranty.
WHAT IS NOT COVERED:
• Owneris responsibleto payfor servicecallsrelatedto
productinstallationand/orteachinghowto usethe product.
• Damageto finish mustbereportedwithin48 hoursfollowing
the deliveryof the appliance.
• Damageto finish afterdelivery.
• Improperinstallation--properinstallationincludesadequate
air circulationto the refrigerationsystem,adequateelectrical,
plumbingand otherconnectingfacilities.
• Replacementof housefusesor resettingof circuitbreakers.
• Replacementof light bulbs.
• Damageto productcausedbyaccident,fire,floodsor acts
of God.
• Lossof fooddue to spoilage.
• Properuseand careof productas listedin theowner's
manual,propersettingof controls.
• Productnot accessibleto providerequiredservice.
• WARRANTORIS NOTRESPONSIBLEFORCONSEQUENTIAL
DAMAGES.
EXCLUSION OFIMPLIED WARRANTIES--Your sole and exclusive remedy is product repair as provided in this Limited
Warranty. Any implied warranties, iucludiug the implied warranties of merchantability or fitness for a particular purpose,
are limited to one year or the shortestperiod allowed by law.
11
IMPORTANT
Keep this warranty and your bill of sale as proof of original purchase and purchase date.
Please have serial number and model number available when calling for service.
CamcoServiceis availablecoast to coast.If further help is
neededconcerningthis warranty,contact:
Manager,ConsumerRelations
CamcoInc., ConsumerService
1 FactoryLane,Suite 310
Moncton,NewBrunswick E1C9M3
1.800.361.3400
Staple your receipt here.
Proof of the original purchase
date is needed to obtain service
under the warrant_
4O
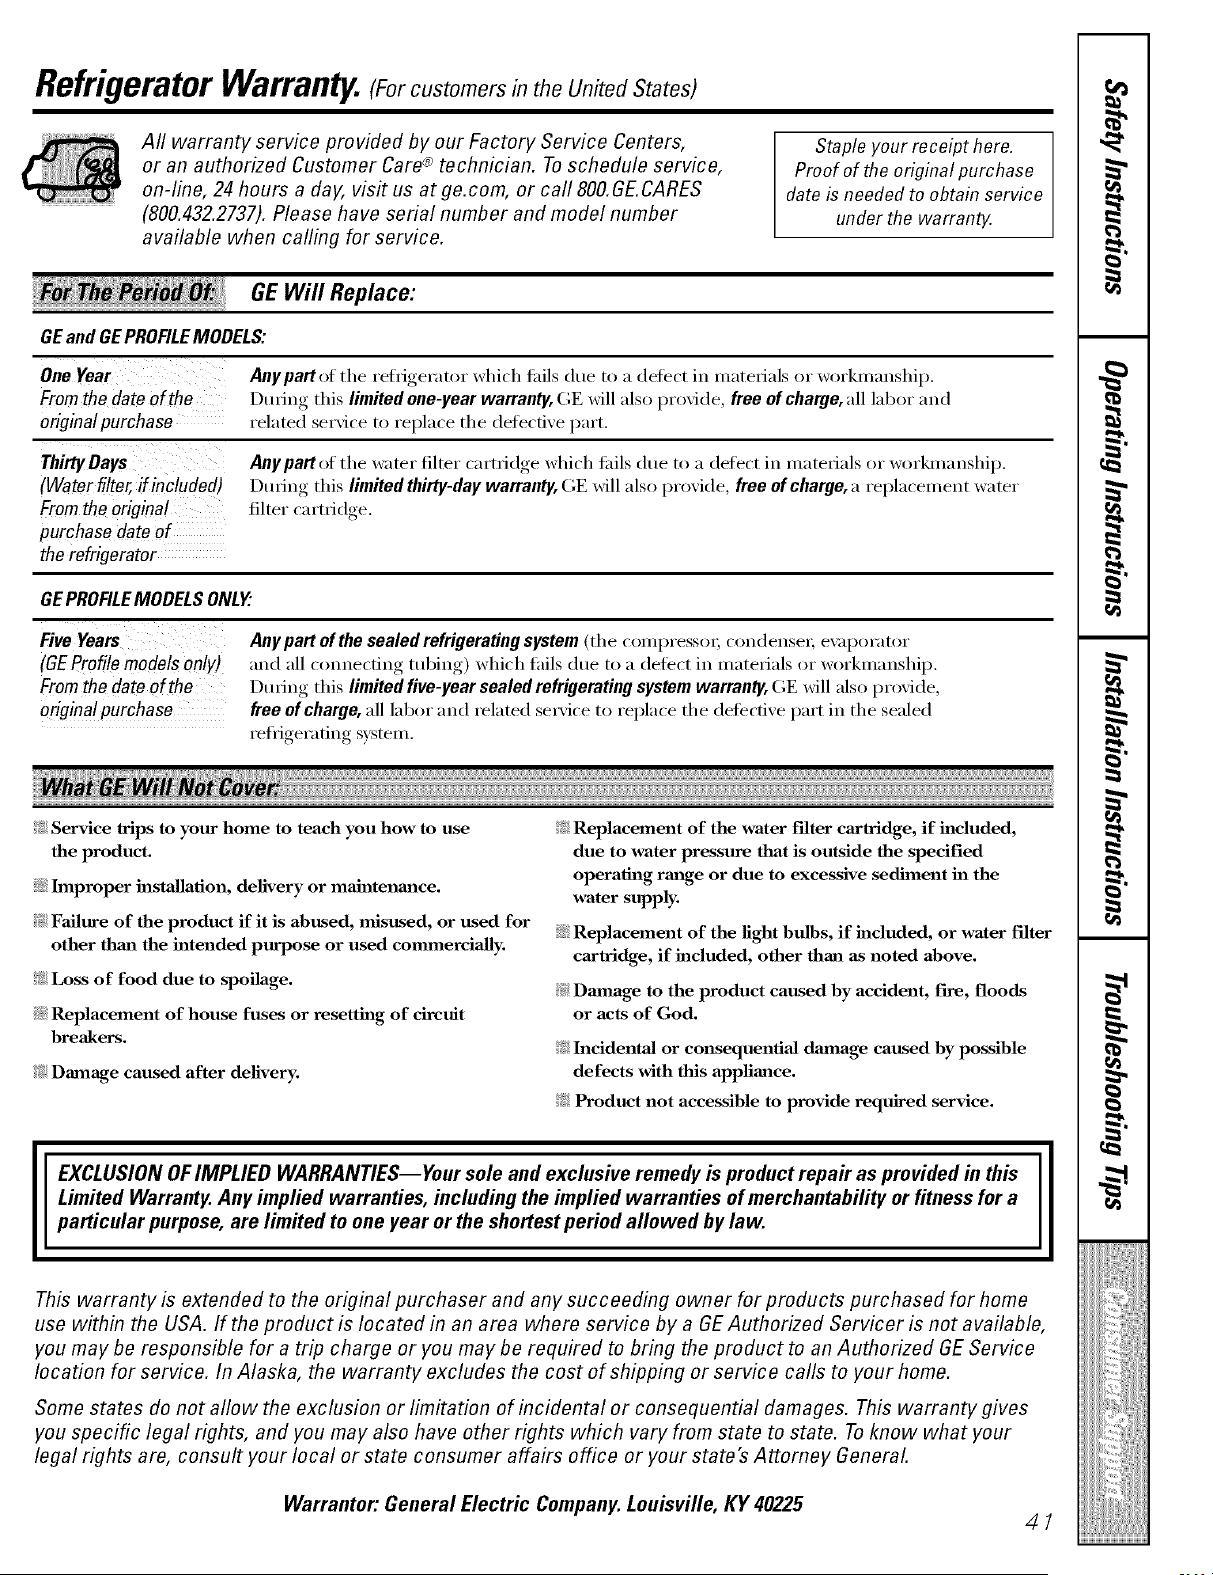
Refrigerator Warranty.(Forc.stomersintheUnitedStates)
Aft warranty service provided by our Factory Service Centers,
or an authorized Customer Care® technician. To schedule service,
on-line, 24 hours a day, vis# us at ge.com, or call 800.GE.CARES
(800.432.2737). Please have serial number and model number
available when cafling for service.
Staple your receipt here.
Proof of the original purchase
date is needed to obtain service
under the warrant_
GE Will Replace:
GEand GEPROFILEMODELS:
One Year Anypattof tile ref]_igerator which filils due to a defect in materials or workmanship.
From the date of the During this limited one-year warranty, GE will also l)rofi(le, free of charge, all labor and
originalpurchase related service to replace the (lefective part.
ThirtyDays
(Waterfilter, if includedJ
Fromthe original
purchase date of
the refrigerator
Any part of the water filter cartridge which tifils due to a defect in materials or workmanship,
During this limited thirty-day warranty, GE will also proxicle, free of charge, a replacement water
filter cartridge,
GEPROFILEMODELSONLY'.
(GEProfilemodels only)
Fromthe date of the
originalpurchase
Any part of the sealed refrigerating system (the compressoi; condensei; ex q)orator
and all com_e(ting tubing) which tails due to a (letect in materials or workmanship,
During this limited five-year sealed refrigerating system warranty, GE will also provide,
free of charge, all labor and related seI_'ice to replace the defecti\'e part in the sealed
refl-igerafing system.
_: Service trips to your home to teach you how to use
the product.
::Ji::Improper installation, delivery or ma'_mtenm_ce.
_: Failure of the product if it is abused, misused, or used for
other thml the intended purpose or used commercially.
_: Loss of food due to spoilage.
::Ji::Replacement of house fuses or resetting of circuit
breakers.
)_: Damage caused after delivery.
!i_:Replacement of the water filter cartridge, if included,
due to water pressure that is outside the specified
operating rm_ge or due to excessive sediment in the
water supply.
iJi::Replacement of the light bulbs, if included, or water filter
cartridge, if included, other than as noted above.
)_: Dmnage to the product caused by accident, fire, floods
or acts of God.
!i_:h_cidentaJ or consequential dmnage caused by possible
defects with this appliance.
!i_:Product not accessible to provide required service.
EXCLUSION OF IMPLIED WARRANTIES--Your sole and exclusive remedy is product repair as provided in this
Limited Warranty, Any implied warranties, including the implied warranties of merchantability or fitness for a
particular purpose, are limited to one year or the shortest period allowed by law.
This warranty is extended to the original purchaser and any succeeding owner for products purchased for home
use within the USA. If the product is located in an area where service by a GE Authorized Servicer is not available,
you may be responsible for a trip charge or you may be required to bring the product to an Authorized GE Service
location for service. In Alaska, the warranty excludes the cost of shipping or service calls to your home.
Some states do not allow the exclusion or limitation of incidental or consequential damages. This warranty gives
you specific legal rights, and you may also have other rights which vary from state to state. To know what your
legal rights are, consult your local or state consumer affairs office or your state's Attorney General
Warrantor: General Electric Company. Louisville, KY 40225
,0a
w_
0a
.o
.o
0a
I
I
0a
m
mh
Mesures de s&_rit_ ............... 43, 44
Fonaionnement
Autres caract_fisfiques ................ 50
Clayettes et bacs ................... 48, 49
Enl_x_ment des contenants ............ 51
Entrefien et nettoyag_
du rSflig_ratem. .................. 54, 55
Le distfibuteur d'eml et de g]aqons ...53, 54
Le filtre _ eau ....................... 47
Les commandes ..................... 45
Les portes du r_frig_rateur .......... 50, 5]
Les tiroirs de rang_ment .............. 5]
Machine _ glaqons automatique ........ 52
Remplacement des ampoules .......... 56
TurboCooF _ . ........................ 46
Installation
D_monmg_ et remontag_
des portes ........................ 59-61
Installation de la conduite d'eau ..... 66-68
Installation du r_fl-ig_ratem . ........ 62-65
Preparation ...................... 57-59
Conseils de d_pannage ............ 70-72
Brtfits de fonctionnement normaux ..... 69
Soutien au consommateur
Feuillet de donn_es relatives _ la
perfommnce de la cartouche ........... 74
Fiche d'inscripfion du pioplJ_taire
au Canada ....................... 35, 36
Garantie pour la clientele au Canada .... 73
Soufien au consommamur ............. 75
Transcrivez les numeros de modMe et de serie ici :
# de modMe
# de s6rie
]Is figurent sur l'_tiquette qui se trouve _'_
l'interieur du compartiment r_fl'ig_rateur
en haute _'_droite.
42
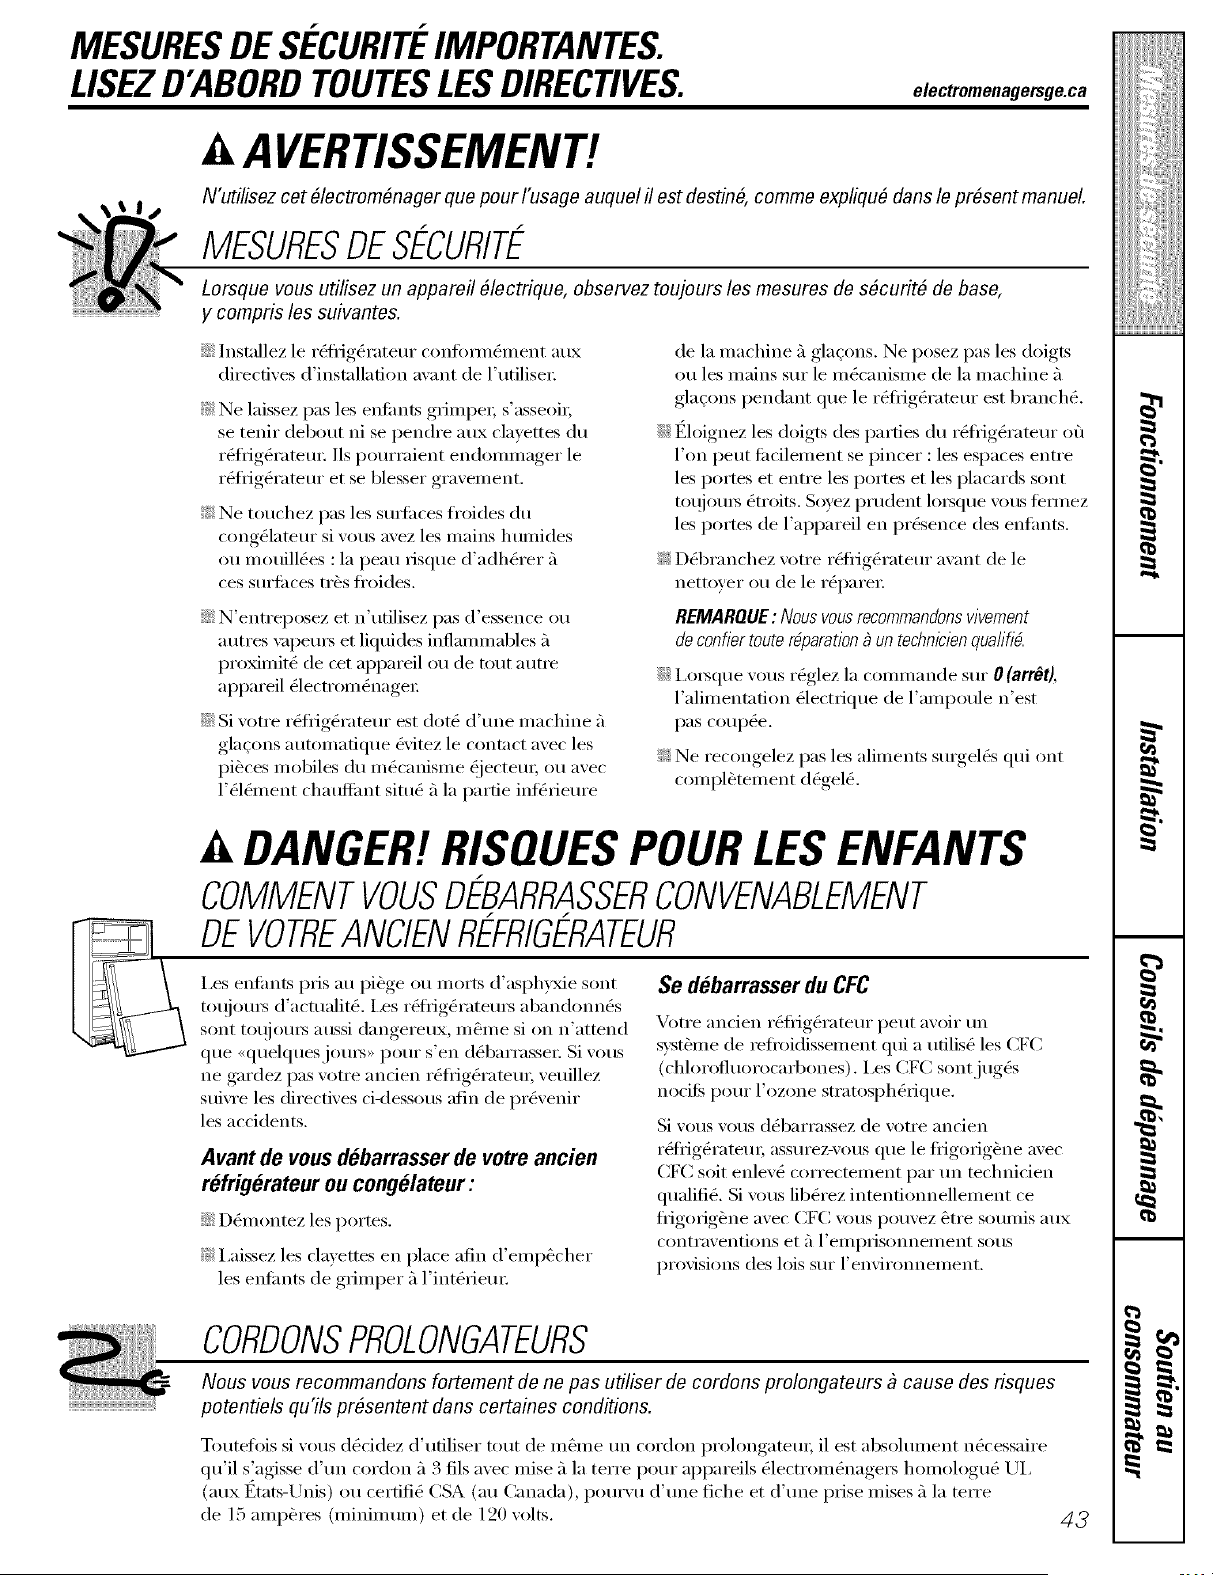
MESURESDES£:CURIT£:IMPORTANTES.
LISEZD'ABORDTOUTESLESDIRECTIVES.
electromenagersge.ca
A A VERTISSEMENT!
N'utilisez cet #lectrom#nager que pour I'usage auquel il est destin#, comme expliqu# dans le present manuel.
MESURESDES@URITk-
Lorsque vous utilisez un appareil #lectrique, observez toujours les mesures de s#curit# de base,
y compris les suivantes.
iJi::Installez le l'_fl_ig_l'ateur cox_tbl_n&nent aux
dil'ectixes d'installatiol_ axant de 1)ltilisel:
_: Ne laissez pas les enflmts gl_impel; s'asseoil;
se tenir debout ni se pendre aux clavettes du
r_fl_ig&'ateur. ]ls pourraient endonlmager le
rg_fl_ig_l'ateur et se blesser gravenlent.
_: Ne touchez pas les sui_ilces fl'oides du
cong_lateur si wins avez les mains humides
ou nlouill_es : la peau risque d'adh&'er fi
ces surfi_ces tl'_S tixfides.
::Ji::N'entreposez et n'utilisez pas d'essence ou
autres \:q)eul_ et liquides inflanlnmbles _'l
proxilnit_ de cet appareil ou de tout a utre
appareil _lecm nn &mgel:
::Ji::Si votre r_fl_ig_rateur est dot_ d'une nlachine _'l
glaqons autonlatique &'itez le contact avec les
pi_ces nlobiles du nlg_canislne _jecteul; Oil avec
l'_l&nent chauflimt situ_ _'lla partie inl_l_ieul'e
de la nlachine _'lglaqons. Ne posez pas les doigts
ou les mains sur le nl_canisme de la machine _'l
gla<ons pendant que le l'_fl_ig&'ateur est branch,.
::Ji::t_loignez les doigts des parties du r_liig_l'ateur Ot'l
l'on peut fi_cilenlent se pincer: les espaces entre
les portes et entre les portes et les placards sont
tot/jOtllS _tl'oits. Soyez prudent lol_que volts temlez
les portes de l'appareil ell pl'_sence des enfimts.
_: D_branchez W_tl'e r6fl_ig_l'ateur avant de le
nettover ou de le rg_pal'el:
REMARQUE : Nous vous recommandonswvement
de confier toute r@aration _ un technicienqua/ifiO.
::_i::I,ol_que w_us l'_glez la conm/ande Sill" 0 (arrOt),
l'alimentation _lectrique de Fampoule n'est
pas couple.
_: Ne recongelez pas les alilnents SUlgel_s qui ont
conlpl&telnent d_gel_.
A DANGER! RISQUES POUR LES ENFANTS
COMMENTVOUSDEBARRASSERCONVENABLEMENT
DEVOTREANCIENREFRIGERATEUR
I,es enfants pris au pii_ge ou morts d'asph):xie sent
toujoul_ d'actualit_, i,es r_li-ig_rateul_ abandonn_s
sent toujoul_ aussi dangereux, nl_lne si on n'attend
que <_quelquesjoul_,, pour s'en d_barl'aSSel: Si vous
ne gardez pas votre anden l_flJg_ramul; veuillez
suiwe les directives ci-dessous afin de pr6venir
les accidents.
Avant de vousdebarrasserde votreancien
refrigerateur ou congelateur :
::_i::D_nl ontez les portes.
_: I,aissez les clavettes ell place afin d'elnp_cher
les enfimts de gl_ilnper fi l'int&_Jeul:
Se debarrasser du CFC
Votre ancien l'(_fl_ig_l'ateur peut avoir un
s}:st_lne de lefl'oidisselnent qui a ufilis_ les CFC
(chhmOuorocarbones). I,es CFC sontjug_s
nocifk pour l'ozone stratosph&&lue.
Si vous w_us d_barl'assez de w)tre ancien
r6tiJgg_rateul; assurez-vous que le fl_igorig_)ne avec
CFC soit enlev_ correctement par un mchnicien
qualifi_. Si vous lib&'ez intentionnellenlent ce
flJgorigOne avec CF(', ;_/lS pouvez &tre sounlis aux
conti'aventions et _'_l'ell/plJsonnell/ent SOilS
provisions des lois Sill" l'environnement.
CORDONSPROLONGATEURS
Nous vous recommandons fortement de no pas utiliser de cordons prolongateurs _ cause des risques
potentiels qu'ils prOsentent dans certaines conditions.
Toutetois si vous dOddez d'ufiliser tout de ln_lne un cordon prolongateul; il est absohnnent nOcessaire
qu'il s)_gisse d'un cordon _'_3 ills avec raise _'_la terre pour appareils _lectrom&mgel5 honlologu_ UI,
(aux Etats-Unis) ou certifi_ CSA (au Canada), pourvu d'une fiche et d'une prise nlises _'_la telTe
de 15 alnp_res (nlininmm) et de 120 volts.
43
MESURESDESECURITEIMPORTANTES.
LISEZD'ABORDTOUTESLESDIRECTIVES.
A VERTISSEMENT!
RACCORDEMENTELECTRIOUE
Ne coupez ni retirez en aucun cas la troisiOme broche (mise _ la terre) de la fiche du cordon
d'alimentation. Pour votre s_curit#, cet appareil doit Otre correctement mis _ la terre.
I,e cordoi,_ d'alimentation de cet appareil est
muni d'une fiche 5 3 bmches (raise 5 la te_xe)
qui se branche darts une prise m urale ordinaire
5 3 alv&_les (raise 5 la terre) pour r_duire au
minimum les fisques de chocs _lectfiques.
gaites examiner la prise de courant et le drcuit
par un _lectfiden qualifi_ pour w_us aSStli'er que
la prise est correctement raise 5 la terse.
Si la prise murale est du _'pe standard fi 2 alv&_les,
il vous incombe de la fifire remplacer par tlne prise
5 3 alv&_les correctement raise 5 la terre.
I,e r_flig_rateur doit toujom_ &tre branch_ darts sa
propre prise de courant, dont la tension nominale est
identique 5 celle indiqu_e sur la plaque signal_tique.
Cette precaution est recommand_e pour garanfir
un rendement optimum et &'iter une surcharge des
drcuits _lectfiques de la r_sidence, ce qui pourrait
crOer un risque d'incendie par surchaufle des ills.
Ne d_branchezjamais le r6li_ig_rateur en firant sur le
cordon d'alim entadon. Saisissez tbm_ement la fiche
du cordon et firez droit pour la refirer de la prise.
ROparez ou remplacez imm&liatement tout cordon
efliloch_ ou endommag_. N'ufilisez pas un cordon
fbndill_ ou pr_sentant des signes d'tlStli'e.
I,o_que \'otts d_placez votre r_flJg_rateur du ram;
fifites attention de ne pas le edre fouler sur le cordon
d'alimentation afin de ne pas l'endommaget;
VEUILLEZLIREETSUIVREATTENTIVEMENT
CESMESURESDESECURITE.
CONSERVEZCESDIRECTIVES
44

L_S co_d_s, e/ectromenagetsge.ca
Toutes /es caract_ristiques ne sont pas disponib/es sur tous /es modOles.
iii _i
Adjust Temperature
. ....
rooo orm
Lf,° mj
• olde old •
igh 0o F is Recommended .... 37_F is Recommende d
• 0 • ®
" "k]_Water_ _Watei _ _r e_ _Cubed_ _uick '_ LOC
LFilterJ ush
Hold 3 seconds to Reset Hold 3 seconds
La temperature est pr&r#gl#e _ I'usine au num#ro 37°F pour le
compartiment r#frig#rateur et 0 ° Fpour le compartiment cong#lateur.
Attendez 24 heures que la temperature se stabilise aux temperatures
recommand#es pr#-r#gl#es.
Le r#glage de temp#rature peut indiquer la temp#rature SET (r#gl#e)
ainsi que la temperature r#efle dans le compartiment r#frig6ration et
dans le compartiment cong61ation. La temperature SET (r#gl#e) peut
varier I#gOrement de la temp#rature r#efle, selon I'utilisation et les
conditions de fonctionnement.
Le placement d'une ou des deux commandes sur OFF (Arr#t)arr#te
le refroidissement _ la fois clans les compartiments du r#frig#rateur
et du cong#lateur mais ne coupe pas I'alimentation #lectrique
du r#frig#rateur.
NOTE: Le r#frig#rateur est exp6di# avec une pellicule de protection
couvrant les commandes de temperature. Si cette pellicule n'a pas
#t# retiree au cours de I'installation faites-le maintenant.
Syst me de circulationd'air
Ce svst&me est con(u pore" ma_miser le rendement darts les compartiments du r_fl_ig_ratem" et du
congg_lateun Ce concept tmique consiste en tree canalisafion (Fair fix_e au long des patois artistes du
r_liig_ratem" et d'tm tmmel _'_air au bas de la paroi artiste du compartiment du cong_latem: I,e rangement
d'aliments en avant des pe_iennes de ces compartiments n'aflecte pas le rendement de l'appareil. Bien
qu'il soit possible d'enlever la canalisation (Fair et le tmmel ;'1ain tree mile op&'ation aflectera le
rendement en ce qui concerne la temp&'ature. (Pore" recevoir les instructions de d&nontage de ces
_l&nents en ligne 24 hem'es parjom; veuillez contacter (;E sin" le site Web electromenage_ge.ca ou
appelez le 800.361.3400.)
45
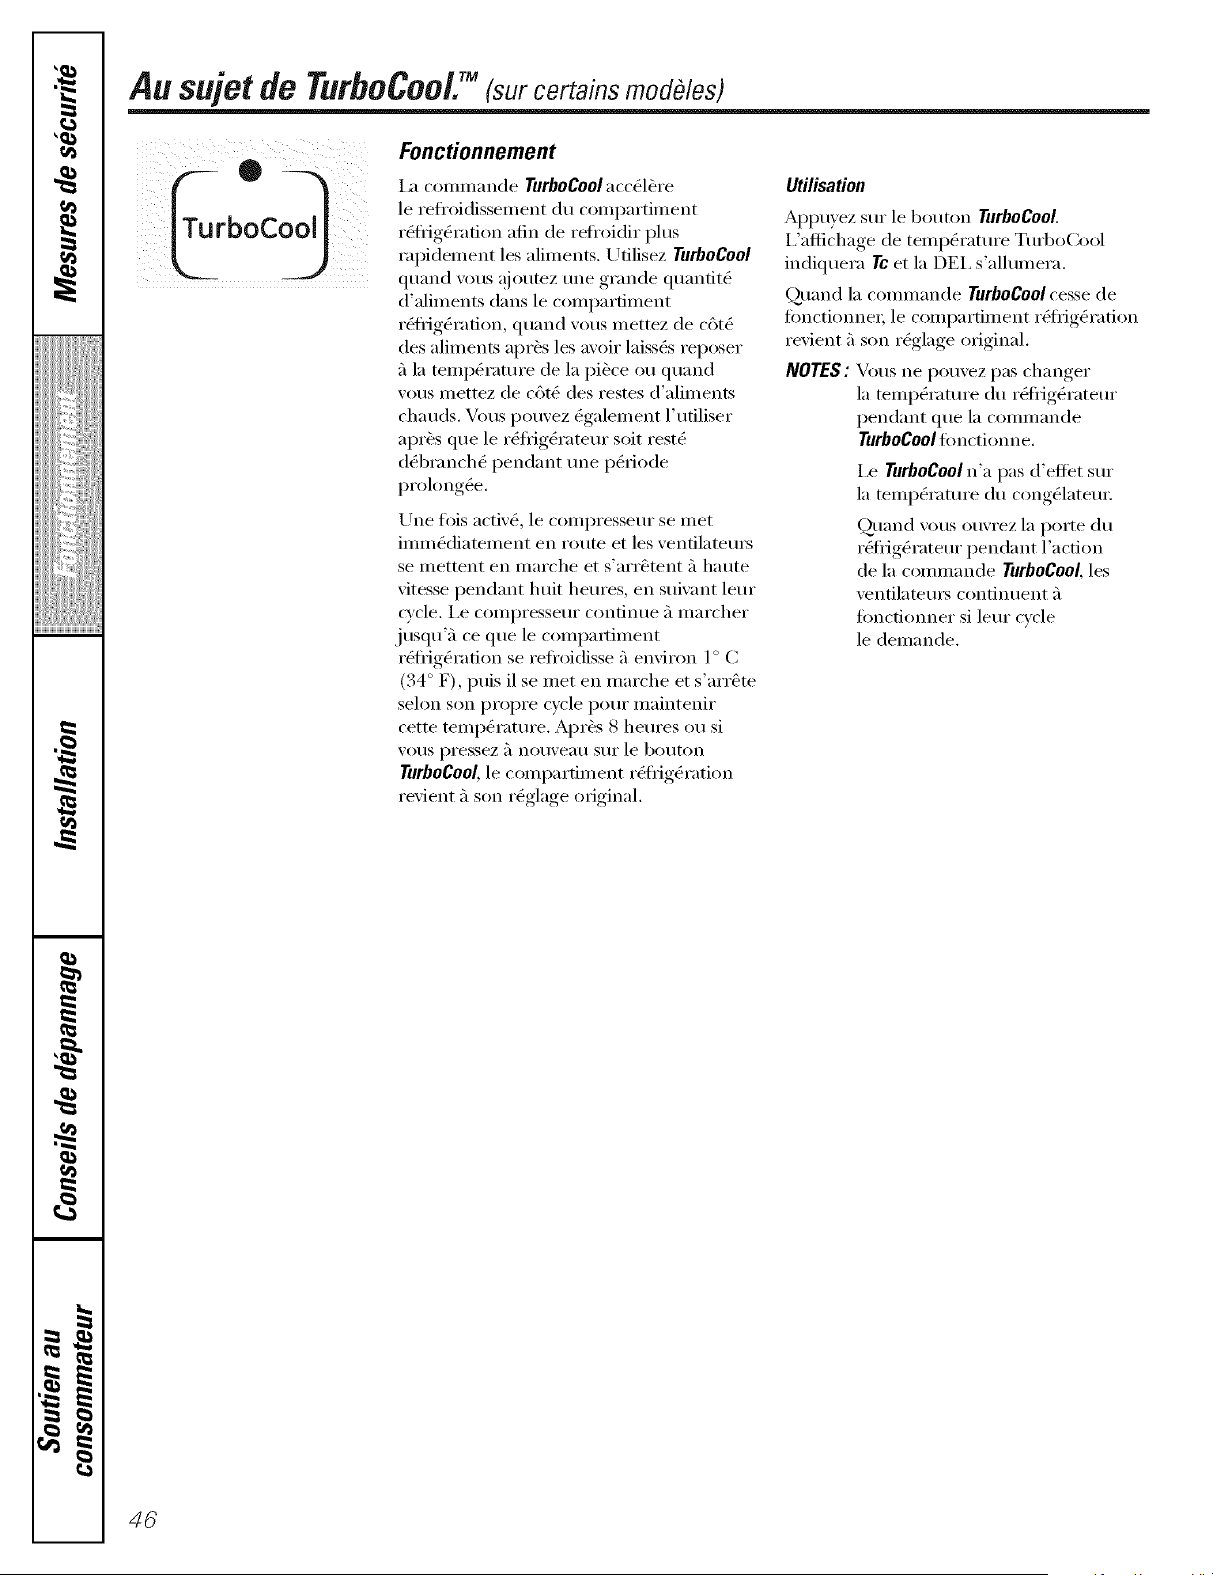
Au sujet de TurboCooLTM (surcertains modOles)
Turb°C°o j
Fonctionnement
i_ commande TurboCoolaccOl_I'e
le refl'oidissement du compartiment
i'_fi-ig_i'afion afin de refl'oidir phls
rapidement les aliments, Ufilisez TurboCool
quand \'o/is @_utez une grande quantit_
d'aliments dans le compartiment
r_fi'ig_rafion, quand vous mettez de c6t(_
des aliments api'_s les avoir laiss_s reposer
_'lla temp&'ature de la piece Oil quand
w)us mettez de c6t(: des restes d'aliments
cha uds. Vous pouvez 0galem ent l' utiliser
api'&s que le r_fl_ig_rateur soit restO
d_branch_ pendant tllle p&'iode
prolong_e.
Une lois activ0, le compresseur se met
imm&liatement en route et les venfilateui_
se mettent en marche et s'arr&tent a haute
vitesse pendant huit heures, en suivant leur
cycle. I,e compresseur con[intle _'1marcher
jllSqtl'_'l ce qlle le compai*iment
r6fi_ig&'ation se refl'oidisse a environ 1 ° C
(34 ° F), puis il se met en marche et s'arr&te
selon son propre wcle pour maintenir
cette temp0rature. Api'_s 8 heures ou si
VO/IS pressez a no/lveatl Sill" le go/Iron
TurboCooLle compartiment i'_ti_ig_ration
revient _'lson rOglage original.
Utilisation
Appuvez Sill" le bouton TurboCooL
I,'aflichage de temp&'ature Turbo(:ool
indiquera Tcet la DEI, s'alhunera.
Qmnd la commande TurboCoo/cesse de
fimctionnei; le compartiment r_li-ig_ration
revient a son rOglage original.
NOTES: Vous ne pouvez pas changer
la temperature du i'6fiig&'ateur
pendant que la commande
TurboCoolfimctionne.
i,e TurboCooln'a pas (l'eflet Sill"
la temp&'ature du cong_lateui:
%land vous ouvrez la porte du
r_liig_rateur pendant l'action
de la commande TurboCool,les
venfilateuI_ confinuent _'l
fimcfionner si leur cycle
le demande,
46
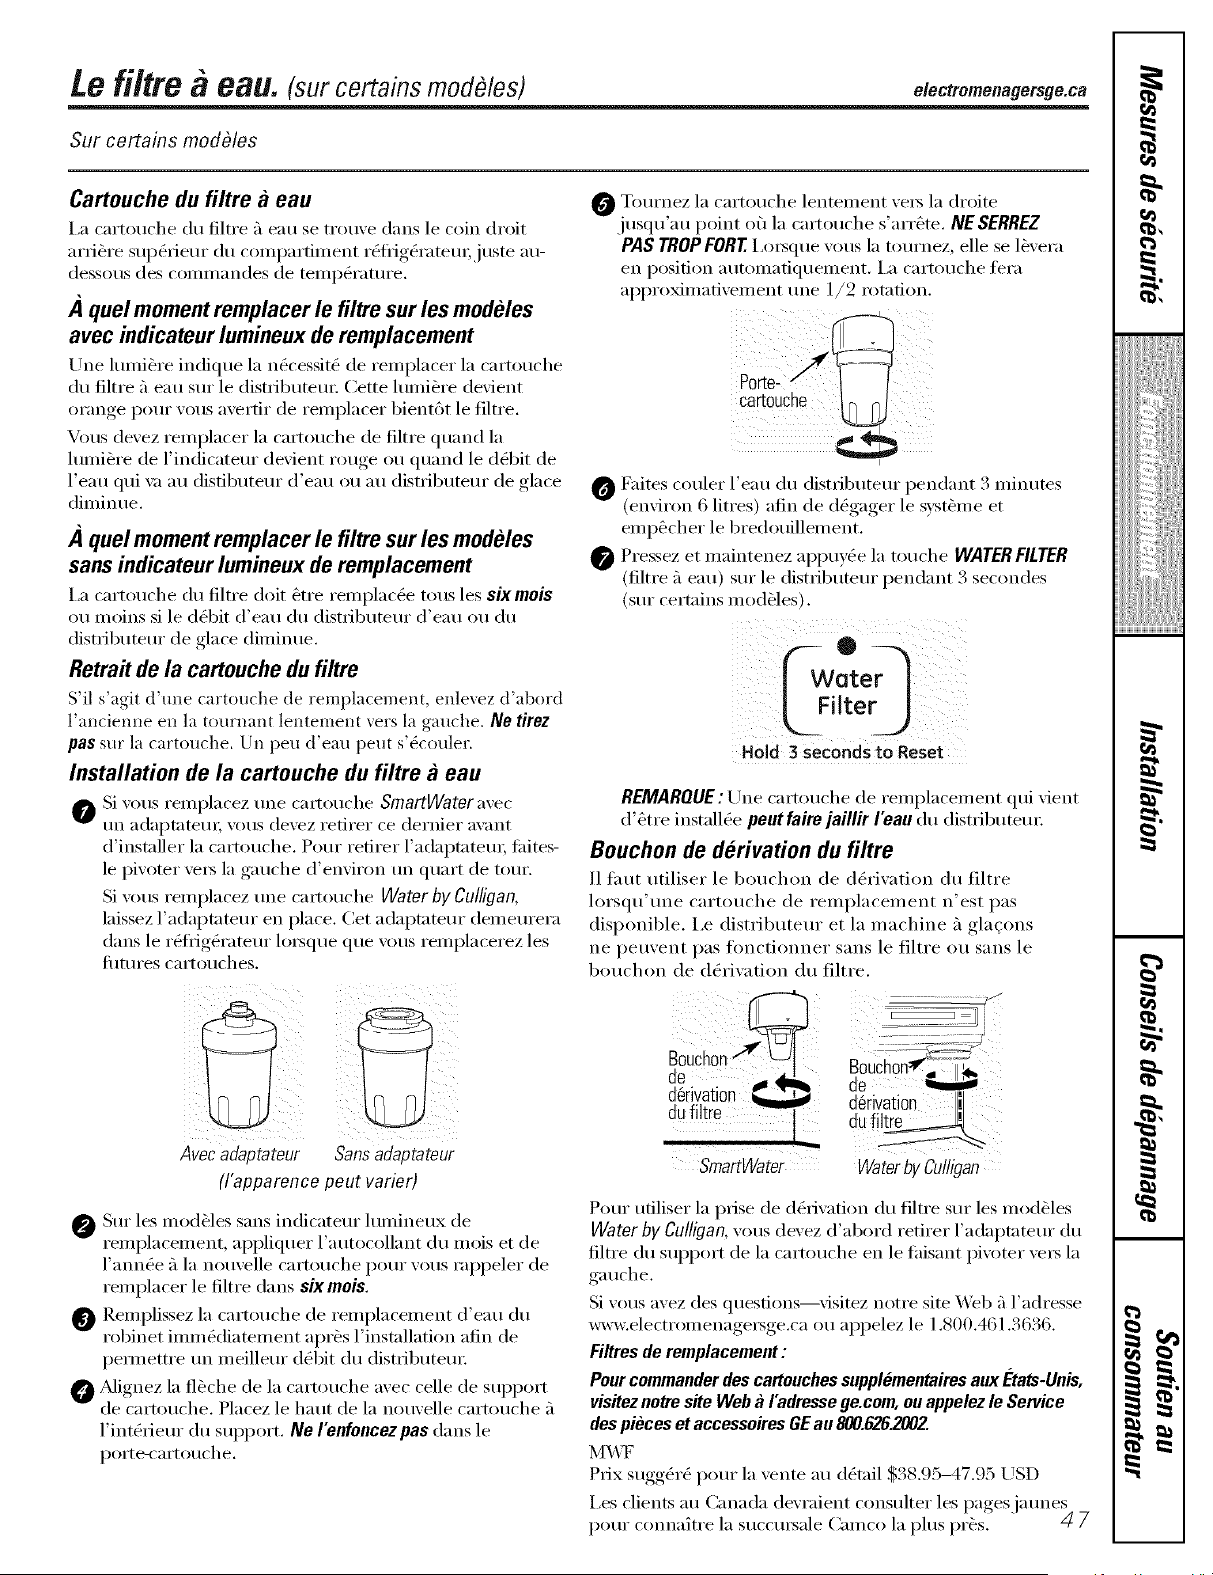
te fi/tm a eau. tsurterrainsmodOles) e/ectromenagersge.ca
Sur certains modOles
Cartouche du filtre gl eau
I,a cartouche du filtre _'1eau se trouve darts le coin droit
artiste supg_rieur du conq)artiment rg_fl_igg_ratem;juste au-
dessous des commandes de tempgwature.
,4 quel moment remplacer le filtre sur los modeles
avec indicateur lumineux de remplacement
Une lmniOre indique la n&'essitO de remplacer la cartou('he
du filtre _'1eau sin" le distributem: Cette lumi_re devient
orange pore" vous avertir de remplacer bient6t le filtre.
Vous devez remplacer la cartouche de filtre quand la
lumi_re de l'indicatem" devient rouge ou quand le d_bit de
l'eau qui \_1au distibutem" d'eau ou au distributem" de glace
diminue.
,4 quel moment remplacer le filtre sur los modeles
sans indicateur lumineux de remplacement
I,a cartouche du filtre dolt _tre remplac_e tousles six mois
ou moins si le d6bit d'eau du distributem" d'eau ou du
distributem" de glace diminue.
Retrait de la cartouche du filtre
S'il s'agit d'une cartouche de remplacement, enlevez d'abord
l'ancienne en la tournant lentement vers la gauche. Ne tirez
pas sur la cartouche. Un peu d'eau peut s'_couler.
Installation de la cartouche du filtre gl eau
Si _ous remplacez tree (a_touche SmattWatora_ec
tm adaptatem; xous dexez retirer ce dernier axant
d'installer la cartouche. Pour retirer l'adaptatem; filites-
le pivoter ve_ la gauche d'environ tm quart de tom'.
Si vous remplacez une ca_touche Watorbygulligan,
laissez l'adaptateur en place. Cet adaptateur demem'era
darts le r_fl'ig(q'atem" lo_que que w)us remplacerez les
flmues cartouches.
Avecadaptateur Sans adaptateur
(l'apparence pout varier)
Sin" les mod&les sans indicatem" hunineux de
remplacement, appliquer l'autocollant du mois et de
l'mmOe fi la nouvelle cartouche pore" w)us rappeler de
remplacer le filtre darts six mois.
O Remplissez la cartouche de remplacement d'eau du
robinet imm&liatement apr_s l'installation afin de
pem_ettre tm meillem" dgd)it du dist_ibutem:
Adionez la fl&che de la cartouche axec celle de support
de_-artouche. Placez le haut de la nomelle cartouche _'_
l'int&_iem" du support. Ne renfoncez pas darts le
porte-cartouche.
0 Tom'nez la cartouche lentement vets la droite
,lusqu'au point off la cartouche s'arr_te. NESERREZ
PAS TROPFORT.i,m_que _ous la tournez, elle se l_xera
en position automatiquement. I_1 cartouche tera
approximatixement une 1/2 rotation.
[_21itescouler l'eau du distributem" pendant 3 minutes
(environ 6 litres) afin de d_gager le s) st_me et
emp_cher le bredouillement.
@ Pressez et nlaintenez appuycae la touche WATERFILTER
(tiltre ;'1eau) sur le distributeur pendant 3 secondes
(sur terrains modb]es).
e
Hold 13Seconds to Reset
REMARQUE: Une cartouche de remplacement qui vient
d'etre installOe peut faire jaillir I'eau du distributeur
Bouchon de derivation du filtre
]1 faut utiliser le bouchon de d&'ivation du filtre
lorsqu' une cartouche de remplacem ent n'est pas
disponible. I,e distributeur et la machine ;'1glaoms
ne peuvent pas flmctionner sans le tiltre ou sans le
bouchon de d_rivation du tiltre.
Bouchon/I¢@
ae _ lira
d_rivation
dufiltre
SmartWater
J
Bouchon,_2_ °_
de
dOrivation _1
du fil_
Water by Culligar,
Pour ufiliser la prise de dOriwltion du filtre sur les modOles
Water by Cul[igan, vous devez d'abord retirer l'adaptatem" du
filtre du support de la cartouche en le taisant piw)ter ve_s la
gauche.
Si vous avez des quesfions--visitez notre site _'el) _'1l'adresse
w_:electromenage_sge.ca ou appelez le 1.800.461.3636.
Filtres de remplacement :
Pour commander des cartouches supplementairesaux Etats-Unis,
visiteznotre site Web a I'adressege.com, ou appelez le Service
des pieces et accessoires GEau 800.626200Z
Prix sugg&'O pore" la vente au d_tail $38.95-47.95 USD
i,es clients au Canada devraient consulter les pagesjatmes
pour conna_tre la succui_ale Camco la phls pi'_s. 4 7
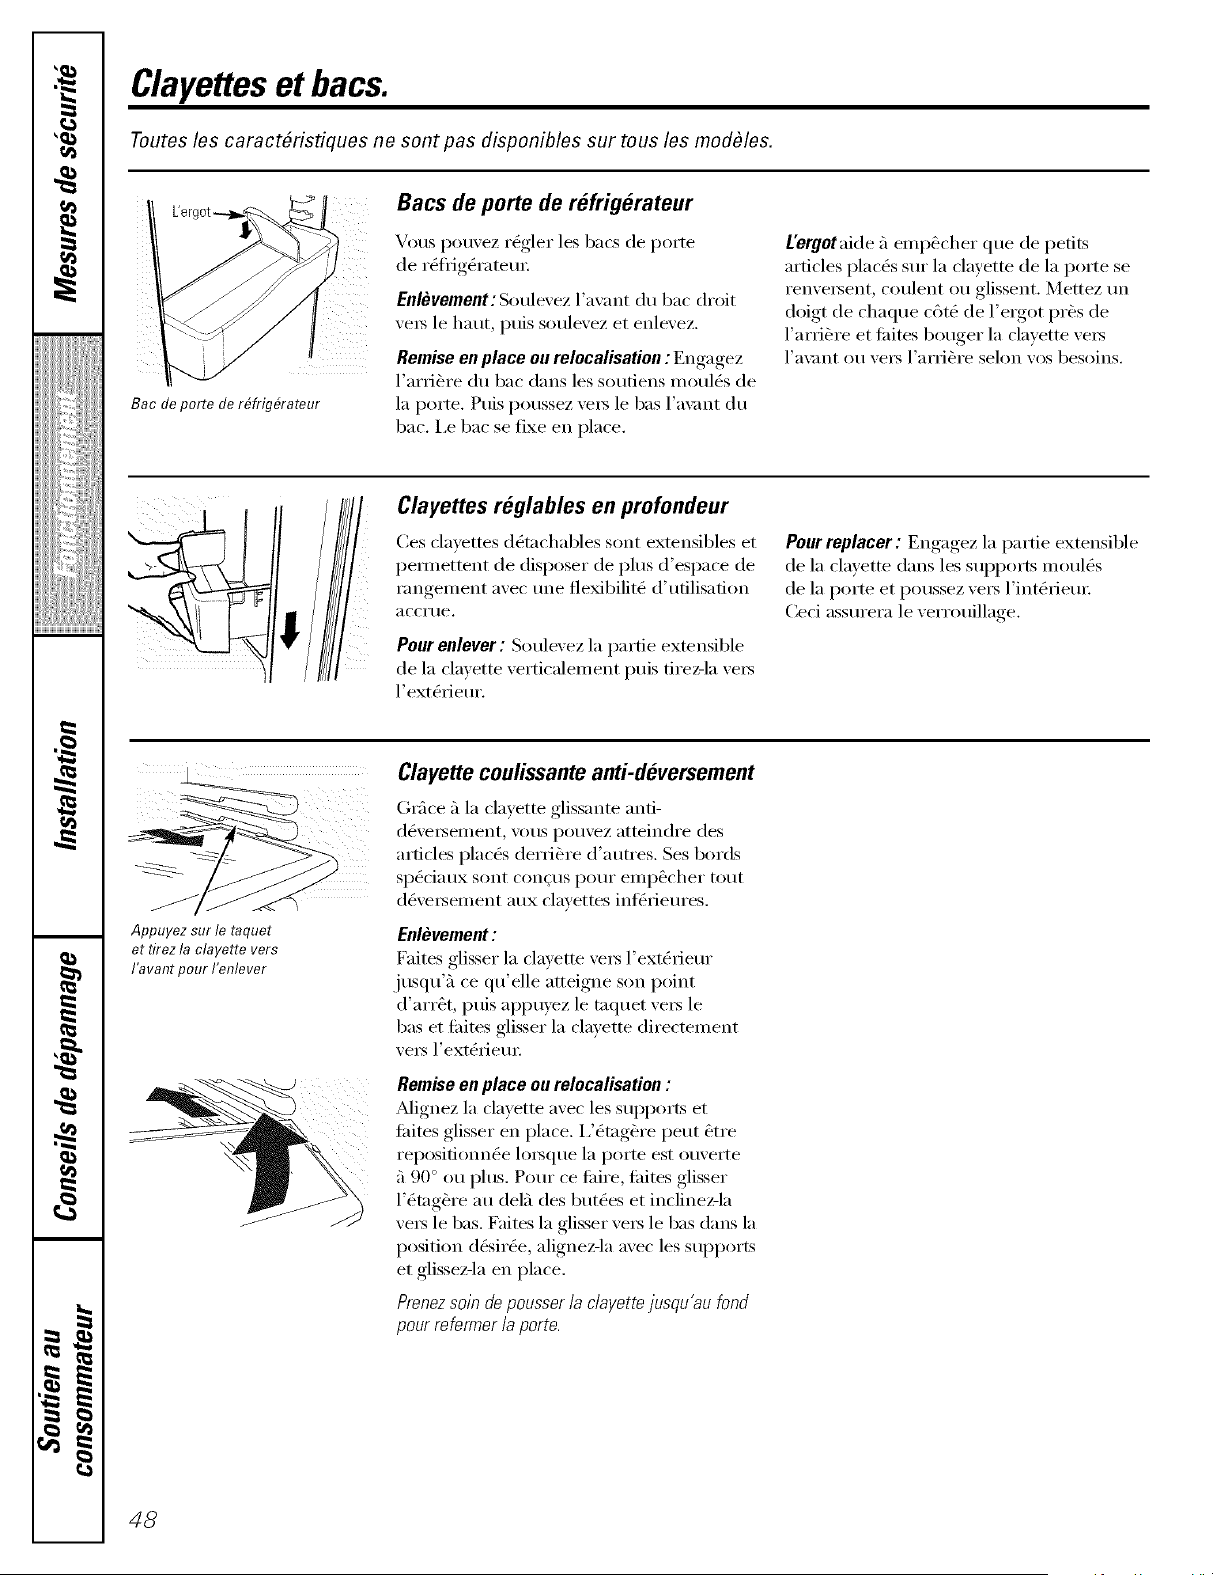
Clayetteset bacs.
Toutes les caract_ristiques ne sont pas disponibles sur tous les modbles.
Bats de porte de refrigerateur
Bac de porte de r#frig&ateur
Vous pouvez r_gler les bacs de porte
de rOfl_igt)rate m:
Enlevement: Soulevez l'avant du bac droit
veis le haut, puis soulevez et exllevez.
Remise eu place ou relocalisation : Engagez
l'arri_re du bac darts les soutiens moul_s de
la porte. Puis poussez ve_ le bas l'a\m_t du
bac. I,e bac se fixe en place.
L'ergotaide 5 emp&cher que de petits
articles places sur la clayette de la porte se
renve_ent, coulent ou glissent. Mettez un
doigt de chaque cgt_ de l'e_got pros de
l'arri&re et tifites bouger la clayette ve_s
l'a\:mt ou ve_s l'arri&re selon w)s besoins.
Clayettes reglables en profondeur
Ces cla_ettes dt)tachables sont extensibles et
pem_ettent de disposer de plus d'espace de
rangement axec tlne flexibilit(_ d'utilisation
accrtle.
Pour enlever: Soulexez la pattie extensible
de la clmette xerticalement puis tirez-la xe_
1' extt)tJeur,
Pour replacer: Engagez la pattie extensible
de la clayette darts les supports moul&
de la porte et poussez ve_ l'intOriem;
Ceci assurera le verrouillage.
Appuyez sur le taquet
et tirez la clayette vers
I'avant pour I'enlever
Clayettecoulissanteanti-deversement
GrSce 5 la clayette glissante anti-
d&'e_ement, vous pouvez atteindre des
articles plac& derriere d'autres. Ses bords
sp_ciaux sont con(us pour emp_cher tout
d&'e_sement aux clavettes intcarieures.
Enlevement :
Faites glisser la clayette vex_ l'ext&_ieur
jusqu'5 ce qu'elle atteigne son point
(l'arr_t, puis appuyez le taquet ve_ le
bas et tifites glisser la clavette directement
vets l'extOriem;
Remise en place ou relocalisation :
Mignez la clayette avec les supports et
tifites glisser en place. I,'_tag_)re peut _tre
repositionn_e lo_que la porte est ouverte
5 90 ° ou plus. Pour ce tifire, tifites glisser
l'_tag_re au del5 des buttes et inclinez-la
ve_5 le bas. Faites la glisser ve_5 le bas darts la
position d_sir_e, alignez-la avec les supports
et glissez-la en place.
Prenezsoin de pousser la clayette jusqu'au fond
pour refermer ia porte.
48
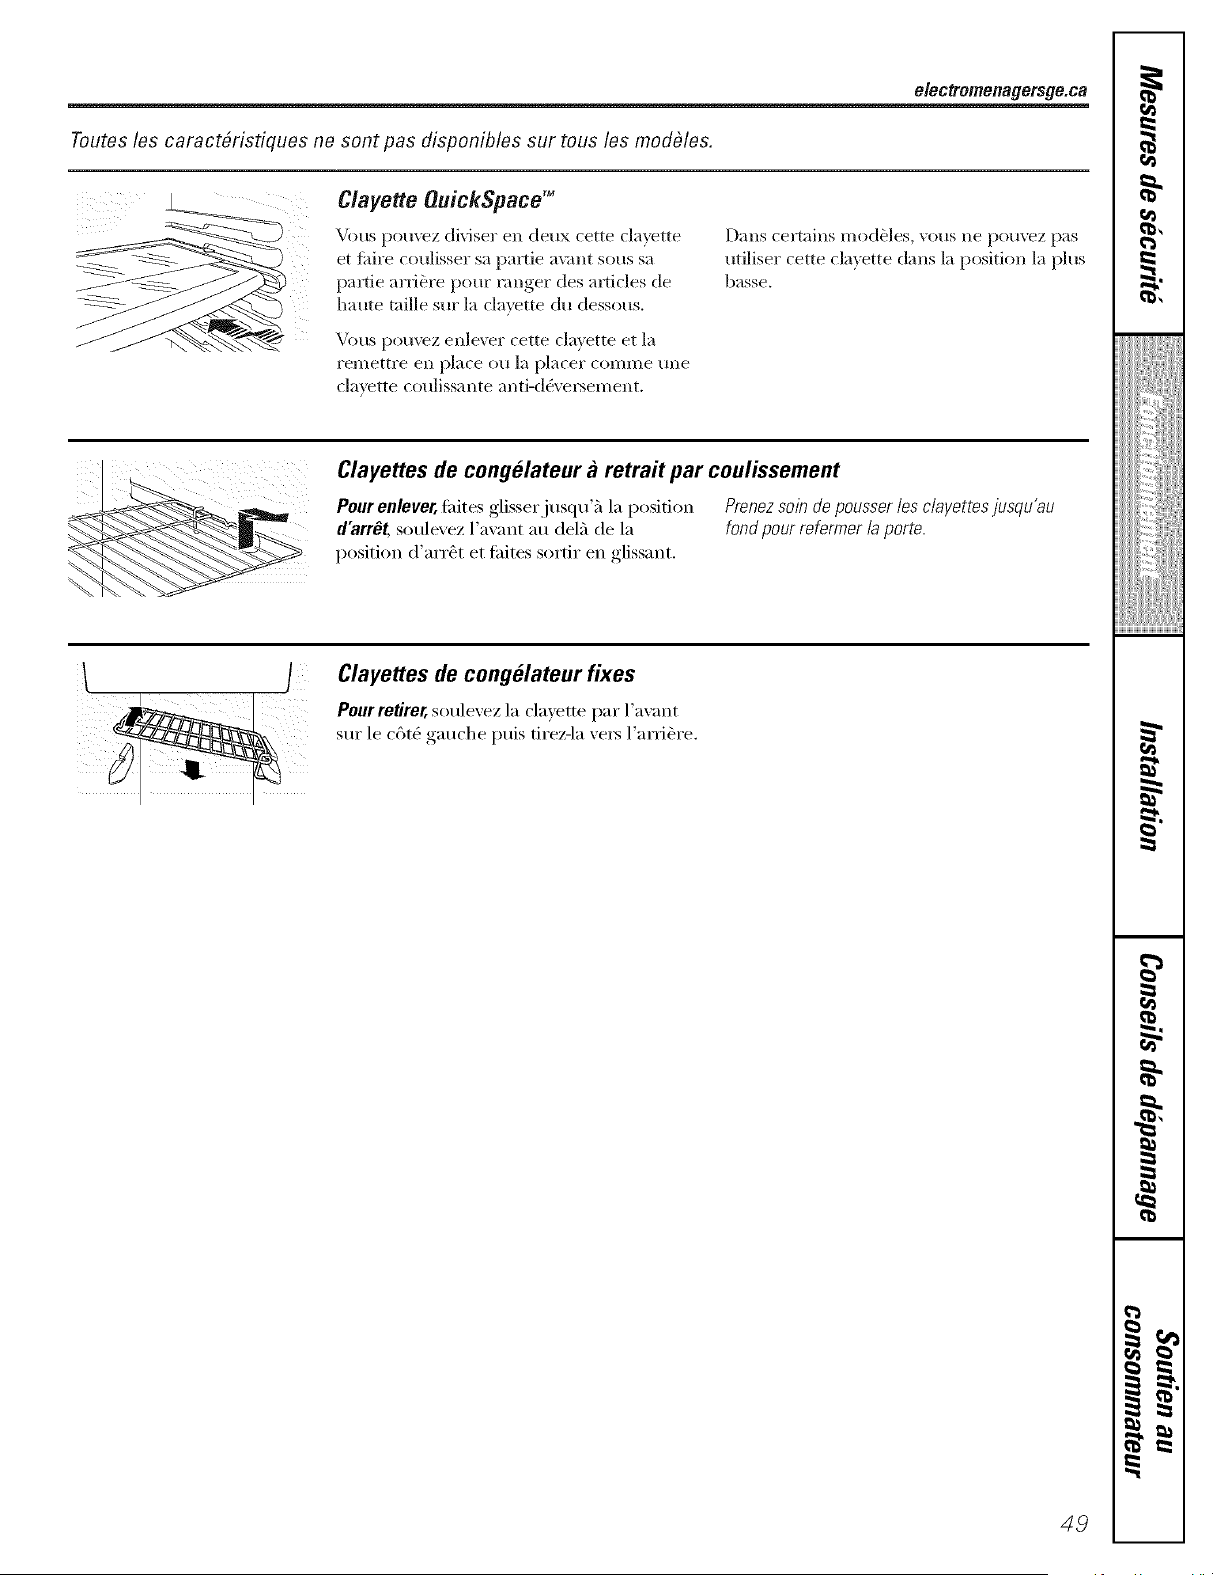
electromenagersge.ca
Toutes les caract#risfiques ne sont pas disponibles sur tous les modOles.
Clayette OuickSpace TM
Vi)us pouvez diviser en deux cette clayette
et fidre coulisser sa pro'tie a_;mt sous sa
partie arri_re pour ranger des m'ticles de
haute taille sur la clayette du dessous.
Vous pomvz enlever cette clavette et la
remettre en place on la placer coI//Ille fine
clayette coulissante anti-(l&el_ement.
Darts certains I/lodOles, VOtlS ne l)O/lVeZ pas
utiliser cette dayette darts la position la plus
basse.
Clayettes de congelateur it retrait par coulissement
Pour enlever, fifites glisserjusqu'_'_ la position Prenez soin de pousser /es c/agettes jusqu'au
d'arr_t soulevez l'avant au delft de la fond pour reformer la porte.
position d'arr_t et fifites sortir en glissant.
Clayettes de congelateur fixes
Pourretirer, soulevez la clayette par l'avant
sur le (_n6 gauche puis tirez-la \'exs l'arri_re.
49
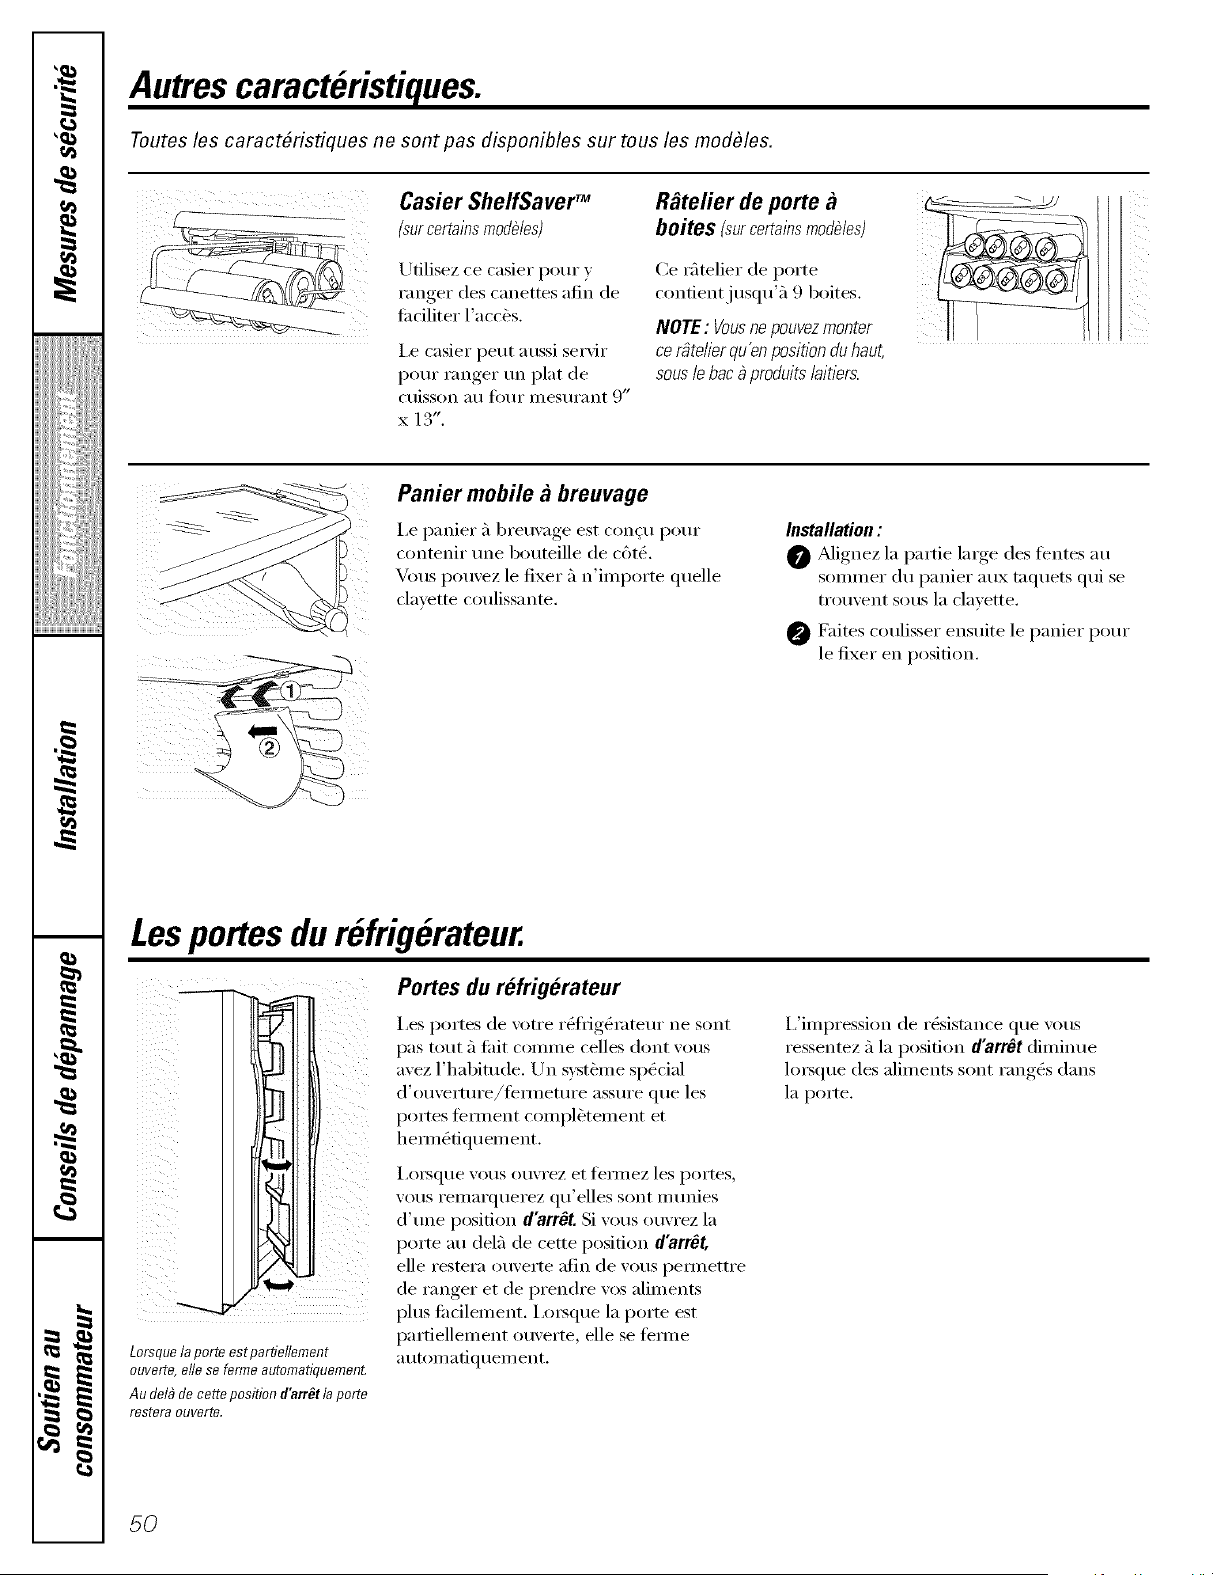
Autres caract#ristiques.
Toutes les caract6ristiques ne sont pas disponibles sur tous les modOles.
Casier ShelfSaver TM
(sur certains mod#les)
Utilisez ce casier pour _,
ranger des canettes afin de
ti_ciliter l'acc_s.
I,e casier peut aussi servir
pour ranger un plat de
Ctlisson _111 _()tlI" IIleStlI'ilnt 9"
x 13".
R_telier de porte
boites (sa ce_ainsmoc/_les)
Ce rfitelier de porte
contientjusqu'5 9 boites.
NOTE: gous no pouvez monter
cergte/ierqu'enpositionduhaut,
sous/ebac_ produits/aitiers.
ii!i
ij i
Panier mobile a breuvage
I,e panier ;'l breuvage est conqu pour
contenir tlne bouteille de cGtO.
Vous pouvez le fixer fl n'importe quelle
clayette coulissante.
Installation:
Mignez la pattie large des tentes au
SOlmner du panier aux taquets qui se
ti'Otl_ent SOilS la claxette.
0 Fakes coulisser ensuite le panier pour
le fixer en position.
Lesportes du refrig&ateur.
iii_ ii
iii_i
ill
Z
Z_
W
j
i i
i(i
ii i
!orsque Io porte estpartiel/ement
ouverto, ells so forms automatiquomont,
Au del_ de cette position d'arr#t la porte
rsstsra oovsrts,
Portes du refrig6rateur
i,es portes (le xotre r0flJgt)mteur ne sont
pas tout fi tidt comme celles dont xous
avez l'habitude. Un syst_me sp0cial
d'ouverture/ternleture assure que les
portes tem_ent compl&tement et
hennt)fiquement.
I,oi3que VOIIS Otl\TeZ et l[_illleZ les portes,
_,O/IS i'eillai'qt/ei'ez qu'elles sont II/t/nies
d' une position d'arrOtSi _,,us ouxrez la
porte au delft de cette position d'arrOt,
elle restera omerte afin de xous pem/ettre
de ranger et de prendre vos aliments
plus tildlelnent. Ixn_que la porte est
partiellement ouverte, elle se tbm_e
atltOi//a[iqt lei//ent.
I,'impression de r_sistance que vous
ressentez ;'1la position d'arr_t diminue
lox_que des aliments sont rangt)s darts
la porte.
5O
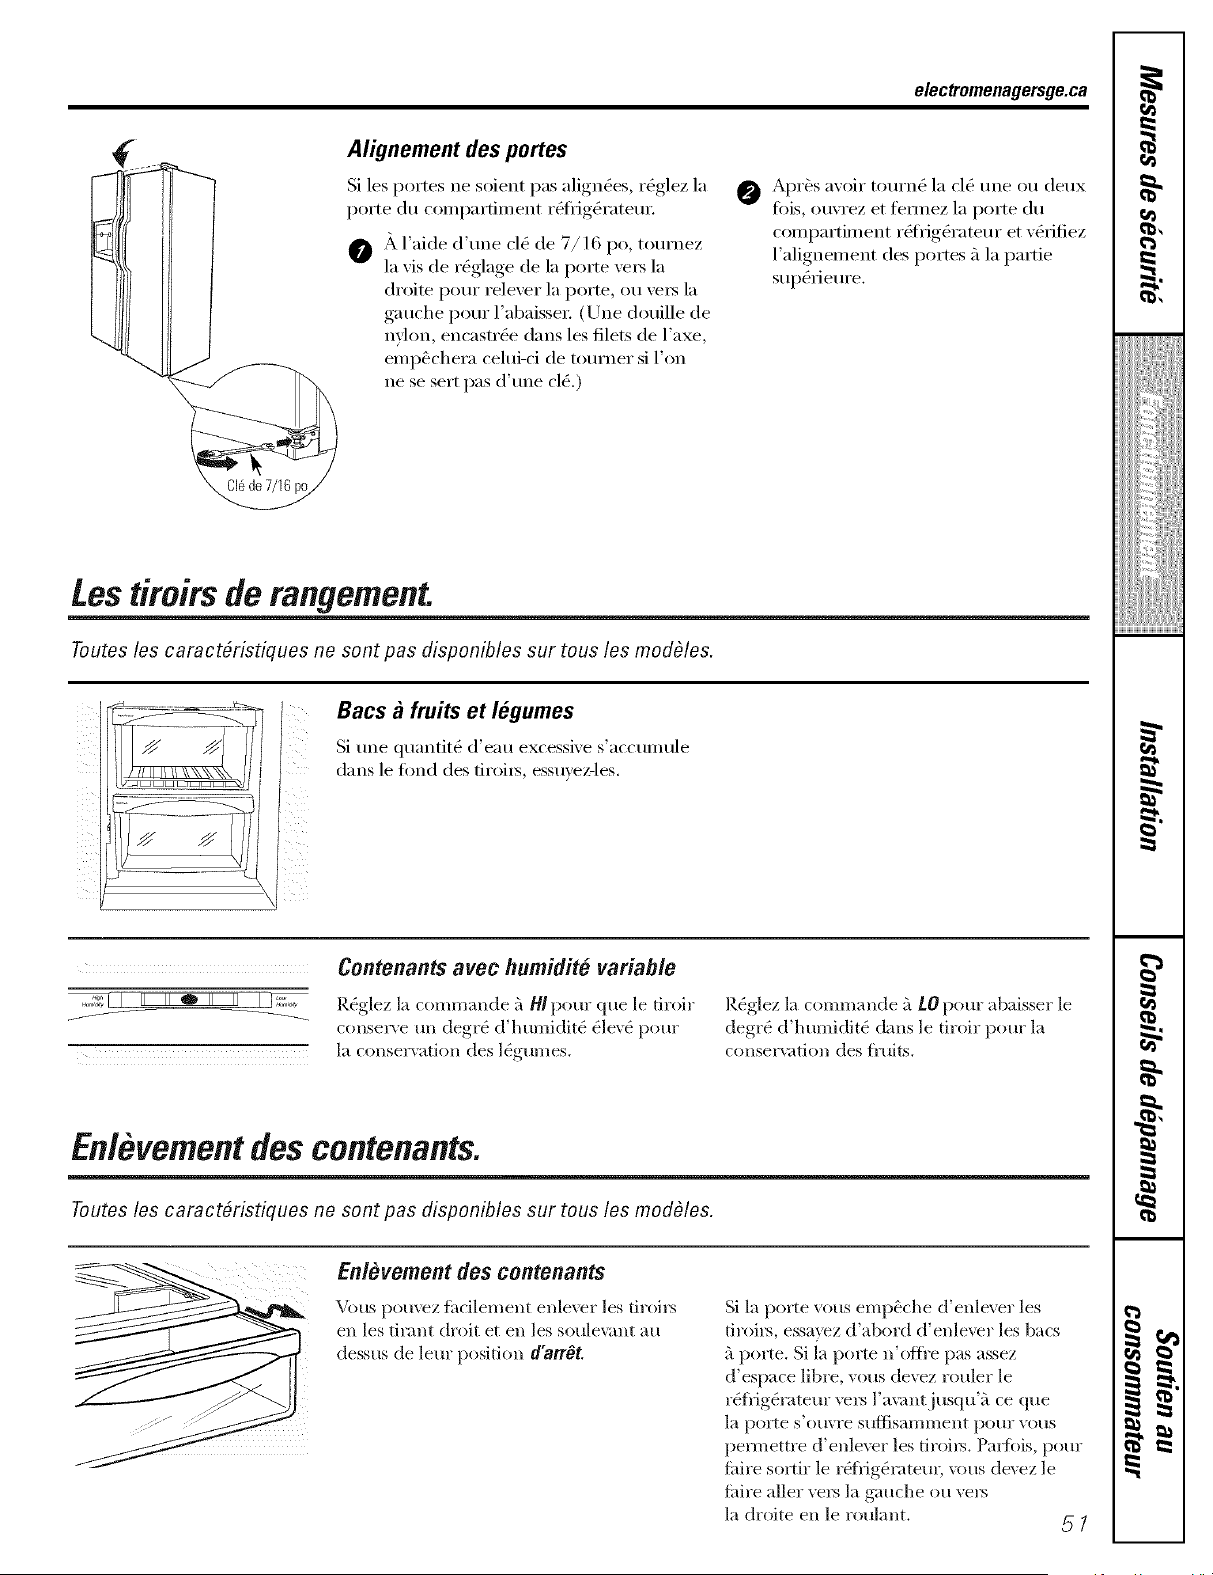
electromenagersge.ca
Alignement des portes
Si les portes ne soient pas align(_es,, r&,lez,_, la
porte du c(nni)artiment r(_fl_ig_rateur, .
O A 1 rode d une cle de //lb i)o, tournez
la xis de r_glage de la porte xe_ la
droite pour relever la porte, ou vei3 la
gauche pour l'abaisse_: (/Jne douille de
nylon, encastr_e darts les filets de l'axe,
emp_chera cehfi-ci de tourner si l'on
ne se sert pas d'une cir.)
Apr_s a_oir tourn_ la cl() tree ou deux
Ibis, ouxrez et fermez la porte du
comi)artiment r_frig()rateur,...... et __rifiez
l'alignement des portes _'lla pattie
supg_rieure.
Los tiroirs do mnoement
Toutes los caract&istiques no sont pas disponibles sur tous los modbles.
Bacs a fruits et legumes
Si une quantit_ d'eau excessive s'accumule
darts le fired des tiroi_s, essuvez-les.
Contonants avec humidite variable
R._glez la commmlde 5/41 pore" que le droir
consei-ce un deor_ d'humidit(_ (_lev(_pour
la conservation des l(_gumes.
I_&,lez,_. la commande :'1tO pore" abaisser le
degr_ d'humidit_ darts le tiroir pour la
COllSel'va[ioll des fl-uits.
Enlevementdes contenants.
Toutes los caract&istiques no sont pas disponibles sur tous los modOles.
Enlevement des contenants
Vous pomvz thcilement enle\vr les tiroi_
en les tirant choir et en les Sotlle',rnnt all
dessus de leur position d'arr_t
Si la po*te vous emp&che d'enlever les
tiroiis, essayez d'abord d'enlever les bacs
_'1 polle. Si la porte n'oih'e pas assez
d'espace lib_e, vous devez fouler le
r(_fl-ig(_rateur _w_ l'a_mltjusqu'_ ce que
la porte s'omre sttflisal/]l/lent potlr VOtlS
pem_ettre d'enlever les tiroi_s. Pan,his, pour
fidre so_ir le r6fl'igg_rateuc _ms devez le
fidre aller ve_ la gauche ou ve_>
la droite en le roulant, _ ]
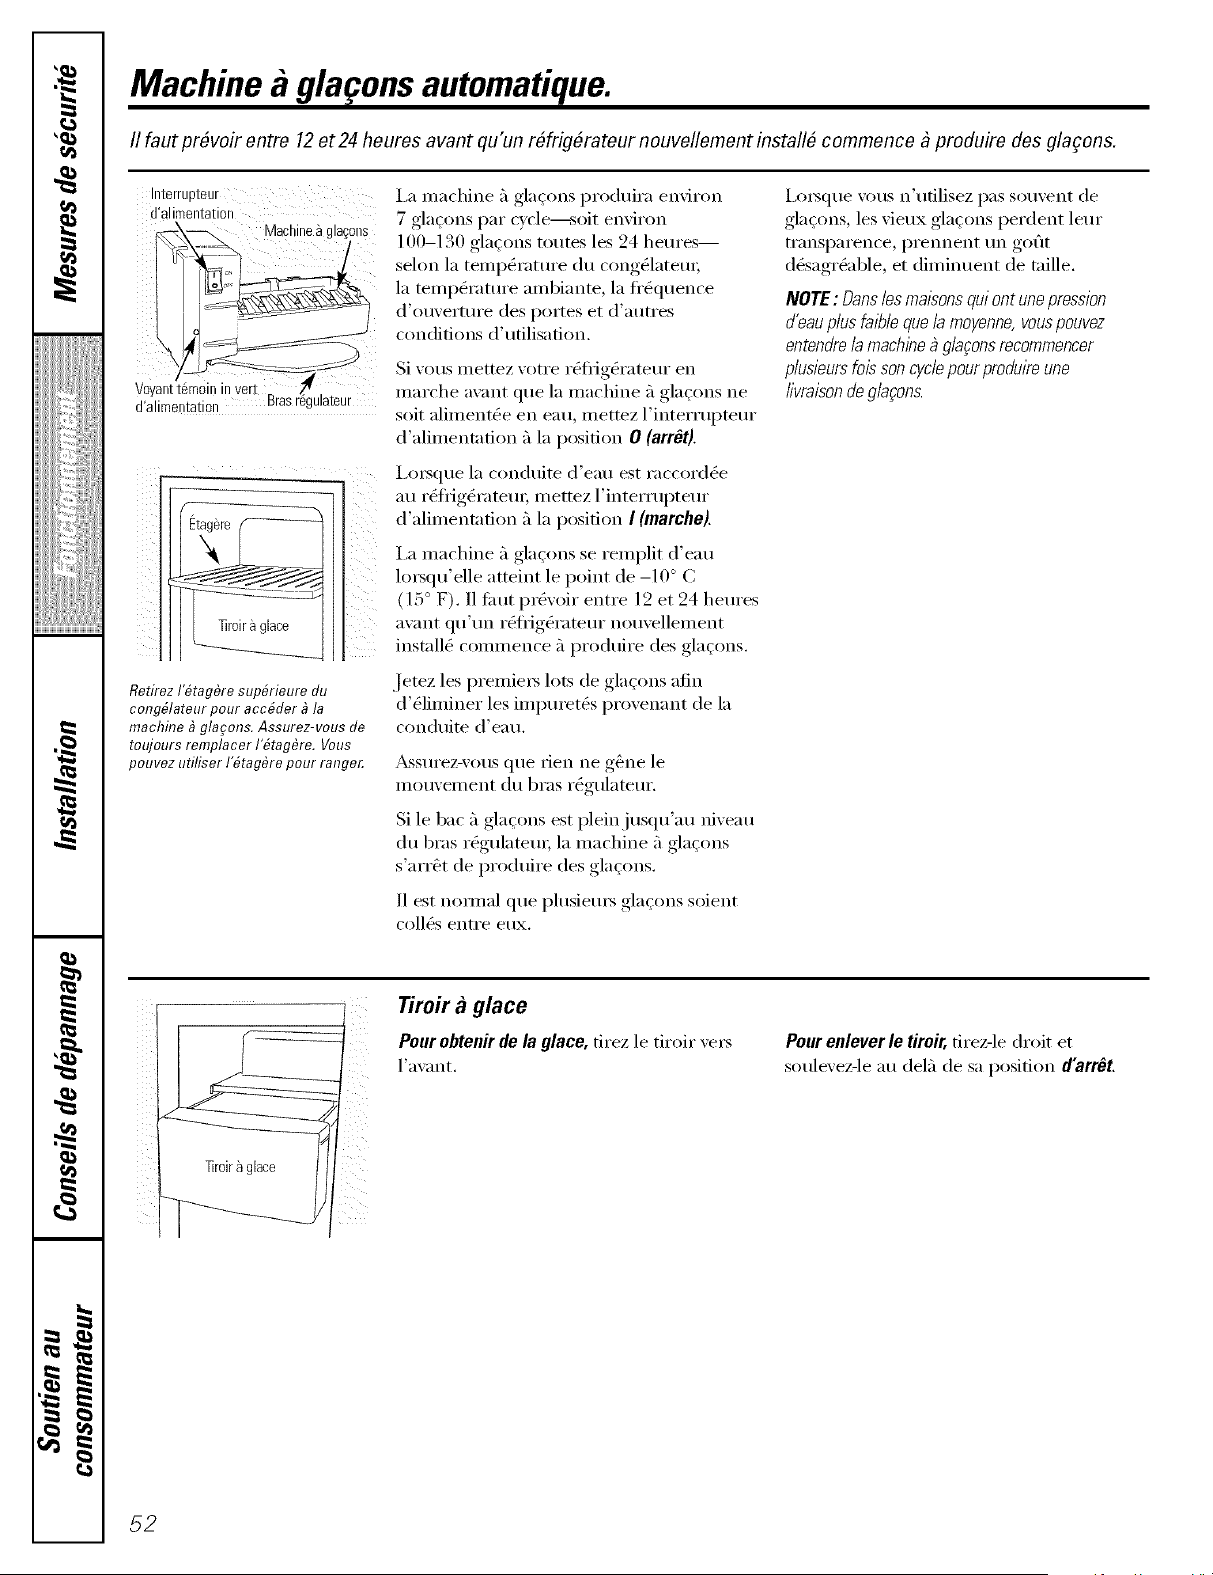
Machine a gla ons automatique.
II faut pr_voir entre 12 et 24 heures avant qu'un r_frig_rateur nouvellement install_ commence _ produire des glagons.
Interrupteur
d'alimentati0n
_ii_ M!_hin_! gla_!!is
d'alimelltation rasrNgulateur
Retirez I'#tag&e sup#rieure du
cong#lateur pour acc#der _ la
machhTe_ glacons. Assurez-vous de
toujours remplacer I'#tag&e. Vous
pouvez utiliser I'fitagfire pour range_
l,amachine 5 glaqonsproduiraenviron
7 glao>nspar cvcle:soit,environ
100-130 gla(ioi:s toutes les 24 h eures--
selon la temi)_i'ature du cong_lateui,
la temp&'amre ambiante, la fl'&luence
d'ouxertm'e des portes et d'autres
conditions d' utilisation.
Si xous mettez xotre r_fl'ig&'atem" en
marche axant que la machine _'_glaqons ne
soit aliment_e en eau, mettez l'interruptem"
d'alimentation 5 la position 0 (arr_t).
i,o:sque la conduite d'eau est raccordGe
au r_fl'ig&'atetu; mettez l'interrupteur
d'alimentafion 5 la position I (marche).
i,a machine 5 glaoms se remplit d'eau
lo:squ'elle atteint le point de -10 ° C
b °
(1: F). I1 filut pr&oir entre 12 et 94 hem'es
a',ant qtl't/n r_fl'ig&'atem" nouxellement
insmll_ commence 5 produire des glaqons.
Jetez les premie:s lots de glaqons afin
d'(qiminer les impm'et& proxenant de la
conduite d'eau.
_&ssm'ez-v(ms que rien ne g&ne le
inouvelnent du bras rtXgulateur.
Si le bac 5 glaqons est pleinjusqu'au niveau
du bras r_gulatem; la machine 5 glaqons
s'arr&t de produire des glaqons.
I1 est nomml que plusieu:5 glaoms soient
toll,s entre eux.
I,orsque vous n'ufilisez pas souvent de
glaqons, les vieux glaqons perdent leur
transparence, prennent tm goOt
d_sagr&d)le, et diminuent de taille.
NOTE: Oansles malsons qui ont unepression
d'eau plus fal#/e que /a moyenne, vouspouvez
entendre /a machine_ g/a;ons recommencer
plusieurs lois son cyclepour produlYeune
@raison de g/a_ons.
Tiroir a glace
Pour obtenir de la glace, tirez le tiroirxel_
l'axant.
Pour enlever le tiroir, tirez-le droit et
soulexez-le au del5 de sa position d'arrOt
52
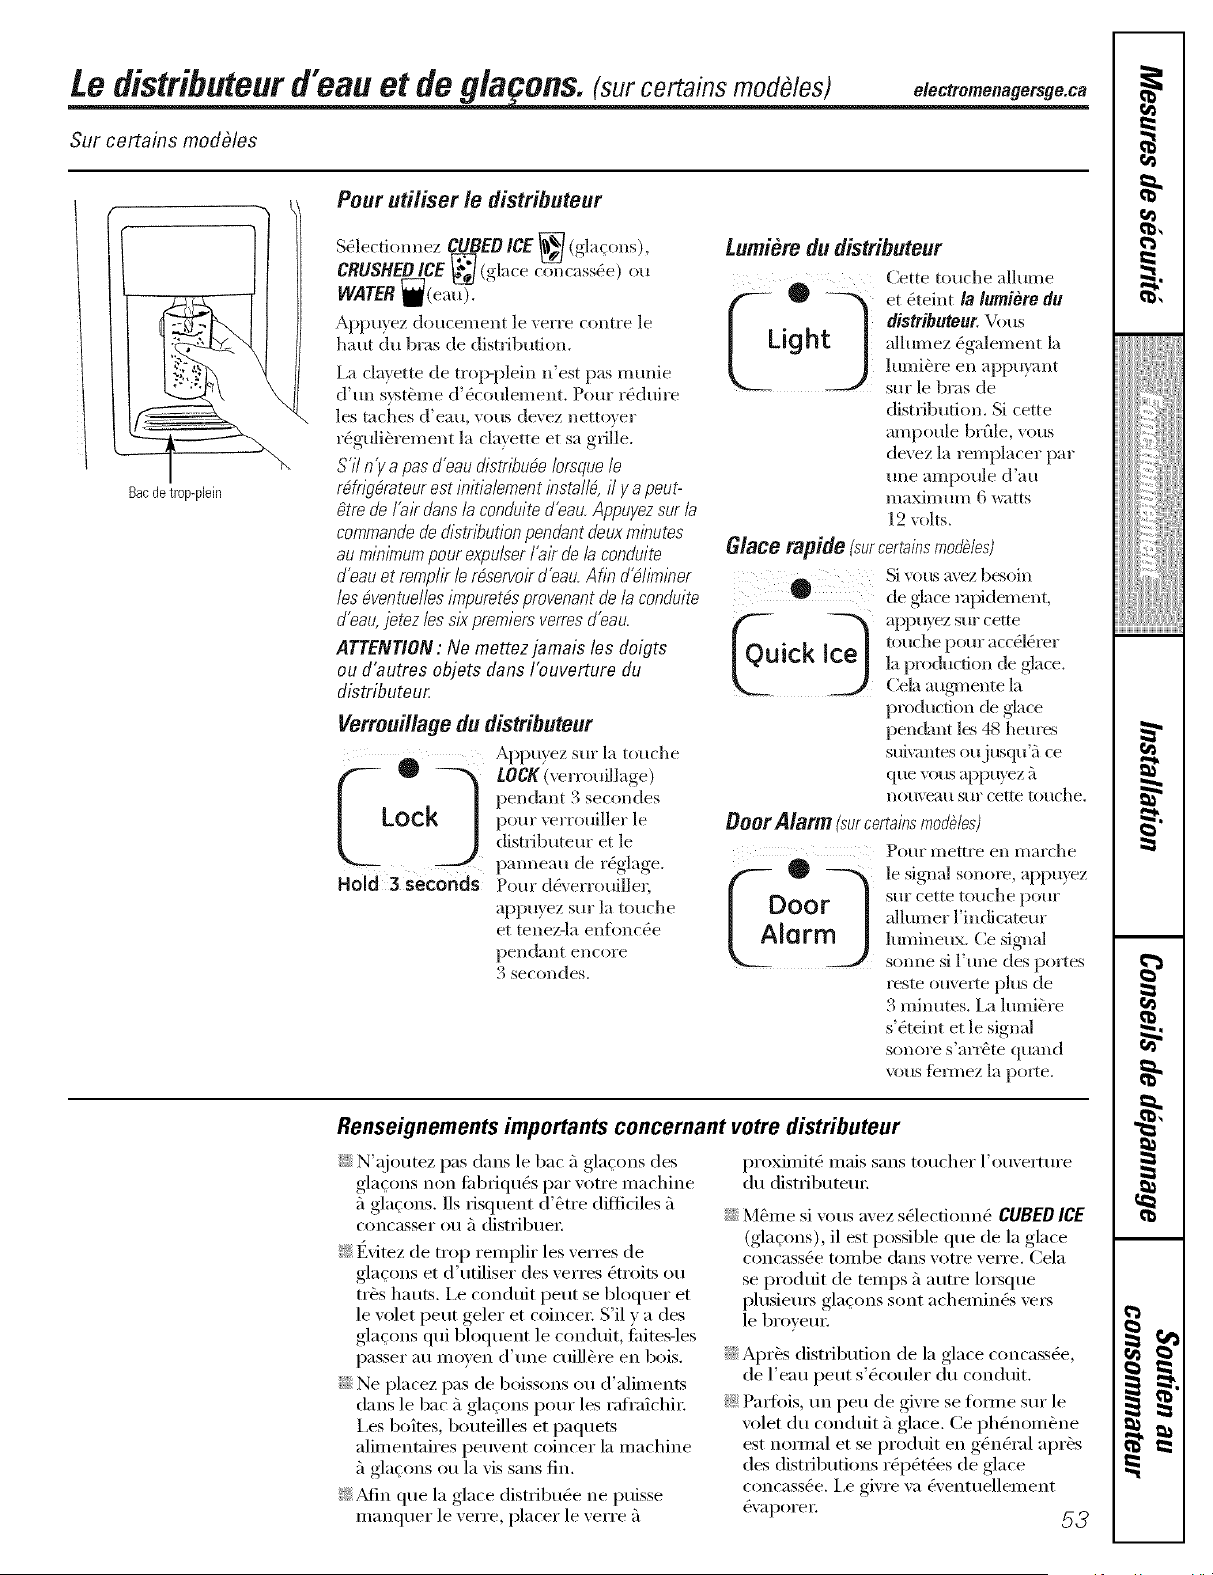
Le di'stn'buteurd'eau et de g/a ons.(surce ainsmodOles) elearome.agersge.oa
Sur certains modO/es
Bacdetr0p-plein
Pour utiliser le distributeur
SOlecfiomlez CUBEDICE_ (glacons),
CRUSHEOICE _ (_lace concassee) ou
WATER_(eau).
Appu} ez doucement le verre centre le
haut du bras de distribution.
I,a clavette de trop-plein n'est pas mmfie
d'un svst_me d'(!coulement. Pour r(!duire
les taches d'eau, vo{/s de\ ez Ilettovel"
r(!gulibrement la dayette et sa griile.
S'i/ n'ya pead'eaud/str/7)u_e/orsque/e
rOfr/_7Orateurest bitialement bstallO,il ya peut-
gtrede/'air densla conduited'eau.Appwezsur la
commando,dedistributionpendantdeuxmbutes
aumbbTumpourexpulserI'ak dola conduite
d'eauet remplk lerOservo/rd'eau.Afin d_l/?77/k_er
ventue//e impuret provenantde/a onduite
d'ealzjetez/esslkpremiersverresd'oau _ _-_
d
ATTENTION: Ne mettezjamais les doigts i ck J
ou d'autres objets dans /'ouverture du
distributeu_
Verrouillage du distributeur
Appu}ez sur la touche
_ _0 ZOC_(verrotliUage)
pendant 3 secondes
L c p/,.I verrouiller le
distfibutem" et le
pamleau de rOglage.
Hold 3 sec0nds Pore" d& errouille_;
appuyez sin" la touche
et tenez-ia enflmcOe
pendant ellcoi'e
3 secondes.
tumiere du distributeur
Cette touche allume
_L __ et _teiI,t Ia Iumi,redu
distributeur. Vous
ig allumez 6galement la
lumibre en appu}ant
sur le bras de
distribution. Si cette
ampoule b_ file, vous
de_vz la remplacer par
lille alllpotl]e d'atl
lll;ixiill {lI//(}/v;!t[s
12 volts.
G/ace rapido (surcertainsmodbles)
Si vous m'ez besoin
de ,_,olace mpidement,
appu) ez sur cette
touche pore" acc_k!rer
la I)_°ducd°n de ,glace .
Cela au_nente la
pl'_)duction de glace
penchnt los z_ hetll'eS
suivantes oujusqu'a ce
que "a_us appuyez ;'l
IIOIIVe';[{I Sill" cette tOtlche.
Ooor Alarm (surcertainsmodb/es)
LA,°rmJ
Pour mettre ell marche
le signal sonore appuyez
SIII" cette touche })()Ill"
allumer Fincficatem"
lumineux. Ce signal
senile Si l'tlne des portes
reste ouvelle plus de
3 minutes. I,a lumibre
s'Oteint et le signal
sonol'e s'arr_te qtland
x_>us iermez la porte.
Renseignements importants concemant votre distributeur
::Ji::N'ajoutez pas darts le bac _'lgla<ons des
glaoms non tM)riqu(!s par votre machine
fi glaqons. Ils fisquent d'etre diflidles fi
concasser ou fi dist_ibuer
_: t_vitez de trop remplir les verres de
glaqons et d'utiliser des verres _troits ou
tr&s hauts, i,e conduit pout se bloquer et
le volet pout geler et coince_: S'il v a des
glaqons qui bloquent le conduit, tilites-les
passer au moyen d'une cuill_re en bois.
::Ji::Ne placez pas de boissons ou d'aliments
dens le bac _'lglaqons pore" los rafraichi_:
I,es boites, bouteilles et paquets
alimentaires peuvent coincer la machine
_'lgla<ons ou la vis sans fin.
_: _Min que la glace dist_ibu(_e ne puisse
ii/anqtlei" le verre, placer le verre fi
proximit_ mais sans toucher l'ouverture
du distrJbutetm
::_i::M&me si vous avez sgdectionn_ CUBEDICE
(glaoms), il est possible que de la glace
concass&e tombe darts votre verre. Cela
se produit de temps _'lautre lorsque
plusiem's gla<ons sent achemin_s vers
le brovem:
::_i::Apr_s distribution de la glace concass6e,
de l'eau pout s'0couler du conduit.
_: Pmtois, tm peu de giwe se tonne sur le
volet du conduit fi glace. Ce ph0nom_ne
est nomml et se produit en g&_(q'al aprbs
des distributions r_p_t(!es de glace
concass(!e, i,e giwe va &'enmellement
&apore_: 53

Le distributeurd'eau et de gla ons.
Tiroir a glace dans les modeles
distributeur de glace
Enlevement :
Mettez l'intermpteur du distributeur de
glace en position 0 (arrOt).Tirez le firoir
droit, puis soulevez-le pour d_passer la
position d'arrOt.
Remise en place:
Pour remettre le tiroi_, prenez soin
d'appuyer fi)rt en place. S'il n'entre pas
j usqu'a u fired, enlevez-le et fifites tourner
le m0canisme (]'tlIl qtlart de [Otli: Poussez
_'1not/;'eatl le tiroirjtlsqtl'atl l'ond,
Entretienet nettoyagedu refrigerateur.
ZotTe de ramasse-gouttes
du r@arfiteu_
Nettoyage de I'exterieur
Le bac de trop-plein du distributeur (sur
certains mod_les)devmit &tre soigneusement
essuyS. Vous pouvez _liminer les (l_p6ts
calcaires laiss_s par les taches d'eau en
trempant le 1)ac darts du vinaigre non dilu&
I.aissez tremperjusqu'h ce que les (l_pgts
disparaissent ou soient suflisamment
ramollis pore" _tre _limin& par rinqage.
te bras de distribution (sur certnins modules).
Avant nettovage, appuyez pendant
3 secondes sur la touche LOCK. Nettovez-la
a u inoyen d' une solution d'eau et de
bicarbonate de soude---environ 15 1111
fl soupe (une cuill_re) de bicarbonate de
soude par 1 liter (pinte) d'eau. Rincez bien
et esstwez.
Lespoign#es de porte et leur gam#ure.
Nettovez-les au moyen d'tm linge humect0
d'eatl sa\'onnetlse. S(_chez avec/111 linge dotlx.
Vouspouvez nettoyer los panneaux et los
poignees de porte en acier inoxydable (sur
terrains mo(l_les) a\'ec un netto)mlt d'acier
inoxydable vendu sin" le march_, conlme le
Slainl_,ss 57eelMag'i< "_
Vous trou\'erez le Slainless Sled Mag'ic chez
Ace, True Value, Servistm; HX_'I et darts
d'autres magasins connus. Vous pou\'ez
egalei//ent le COillil/andei" en VOtlS adi'essailt
au Service de pi_ces et accessoires GE par
t_l_phone au num&'o 1.888.261.3055.
Commandez la piece nmn&'o X_3X10X15.
N' utilisez pas de cite pore" appareils
m_nage_ sur l'ader inoxydable.
aardez I'exterieur du refrig_rateur propre.
Essuyez-le a\'ec tm linge propre lOgOrement
lmmect_ de cite pore" appareils
01ectrom_nagei_ ou d'tm (10te_gent liquide
doux pour la wfisselle. S_chez et polissez
a\'ec tm lingo doux et propre.
N'essuyozpas lor_fn)_ratour avoc un lingo_ va/ssollo
sale ou unesemette humido. i/spourralbnt /alsserun
r#sidu qui pourra endommager/a pelnture. N'utihsez
pas de tampons _ r#curer,de produits nettoyants en
poudre,dejave/lisants ou de produits nettoyants
contenant unjave/hsant, car cosproduits peuvent
@ratigner /a pe_ntureet /a rendremoinsr#ststante.
54
Nettoyage de I'interieur
Pour #viter les mauvaises odeurs, laissez
une 1)oite ou\'erte de bicafl)onate de soude
darts les compartiments r_li_ig_rateur
et cong_lateur.
Debranchez le refrigerateur avant de le
nettoyer.S'il est trop diflicile de le fifire,
essorez bien votre lingo ou wme _ponge
pour enle\'er l'exc_s d'eau lo_que vous
nettovez atltOtlY des inteITtlptetlIN_ des
laIllpes Oil des COIllIl/_lndes.
/Jtilisez tree soludon d'eau ti&de et de
bicarbonate de soude-environ 15 ml _'_
soupe (une cuill_re) de bicarbonate de
soude par 1 liter (pinte) d'eau---afin de
netto)'er tout en neutralisant les odeuls.
Rincez et essuvez bien.
L'utilisationde solutions nettoyantesautres
quecelles quenousrecommandens,plus
particulierementcellescontenantdes
distillatsdepOtrolepeut fissurerou
endemmagerI'interieurdurefrigOrateur.
E-wtezde nettoyerlosclayettesonverre(surcertains
mod#/es)encorefroidesclansde/'eauchaudecar
oliosnsquentde socasser_causede/'ficart
excessifdetempfirature.Man))u/ez/esc/ayetteson
verreavecprudence.Si vouscognez/e verretremp#,
i/ pourrasobrise_
Noiavezaucunepibcodepiast/)uodurbfr/_?brateur
aubve-vaisselle.
electromenagersge.ca
Derriere le refrigerateur
Prenez un soin particulier lo_(lue vous
_loignez le r_fl_ig_rateur du m m: T_)us les
types de rev&tements de sol peuvent &tre
endommag_s, particuli_rement ceux qui
sont coussin_s ou dont la sm]i_ce est gaufl'g_e.
Ti_ez le rbfrigg_rateur en ligne droite
et, lot_que vous le remettez en place,
poussez-le vei_ le iron" en ligne droite.
I,es d_placements latg_raux du rg_ffigg_ratem"
pomTaient endommager le rev&tement
de sol ou le r_ffig&'atem:
Lorsque vous remettez le r_fr/_l_rateur en place
en /e poussant, veiflez _ne pas /e fake rouler sur
le cordon d'alimentation ou sur la conduite d'eau
de/a machine _ g/a_ons.
Depart en vacances
i,olNqtle \'Oils VO/lS absentez pend;int line
p&_io(le prolong_e, videz et d_branchez le
r&fl_igg_ratem: Nettovez l'intg_riem" avec tree
solution d'eau et de bicarbonate de soude,
_'lraison d'tme cuill_re _'lsoupe (15 ml) de
bicarbonate par pinte (l I,) d'eau.
IMssez les portes ouvertes.
Mettez l'interrepteur d'alimentafion de
la machine ;'l glaqons ;'l la position 0 (arr_t)
et tem_ez l'alimentation d'ea u a u
r_qi_igg_ratem:
Si la tempg_ratm'e risque de descendre sous
le point de cong_lation, demandez _'ltm
r_paratem" de vidanger la conduite d'eau
afin d'&'iter les (l_gfits s&_ieux causes par
les inondations.
Demenagement
]mmobilisez tousles (q(qnents amovib]es,
tels que les clavettes et les ba(s, _'ll'aide
de ruban gomm(_ pore" &'iter de les
endolilli/agei:
Si vous utilisez tm charriot pore" (l&n_nager
le r6frigg_ratem; ne laissezjamais le devant
ou le derriere du r_qi_ig&'atem" reposer
contre le charriot. Cela pomTait
endommager le rg_fl_ig&'atetm
Ne transportez le rg_li_ig_ratem" que
par les c6t_s.
Assurez-vousque le r_fn)_rateur demeuredebout
pendant son dbmdnagemenL
e_
ii::;;;;:_:ii{ii
ii:!iii!i:iiiiii
i;;;7!iiiii
i<', ,4i'?i
Y'",,_,HH_
m
m
I
; €
€
€
I
55
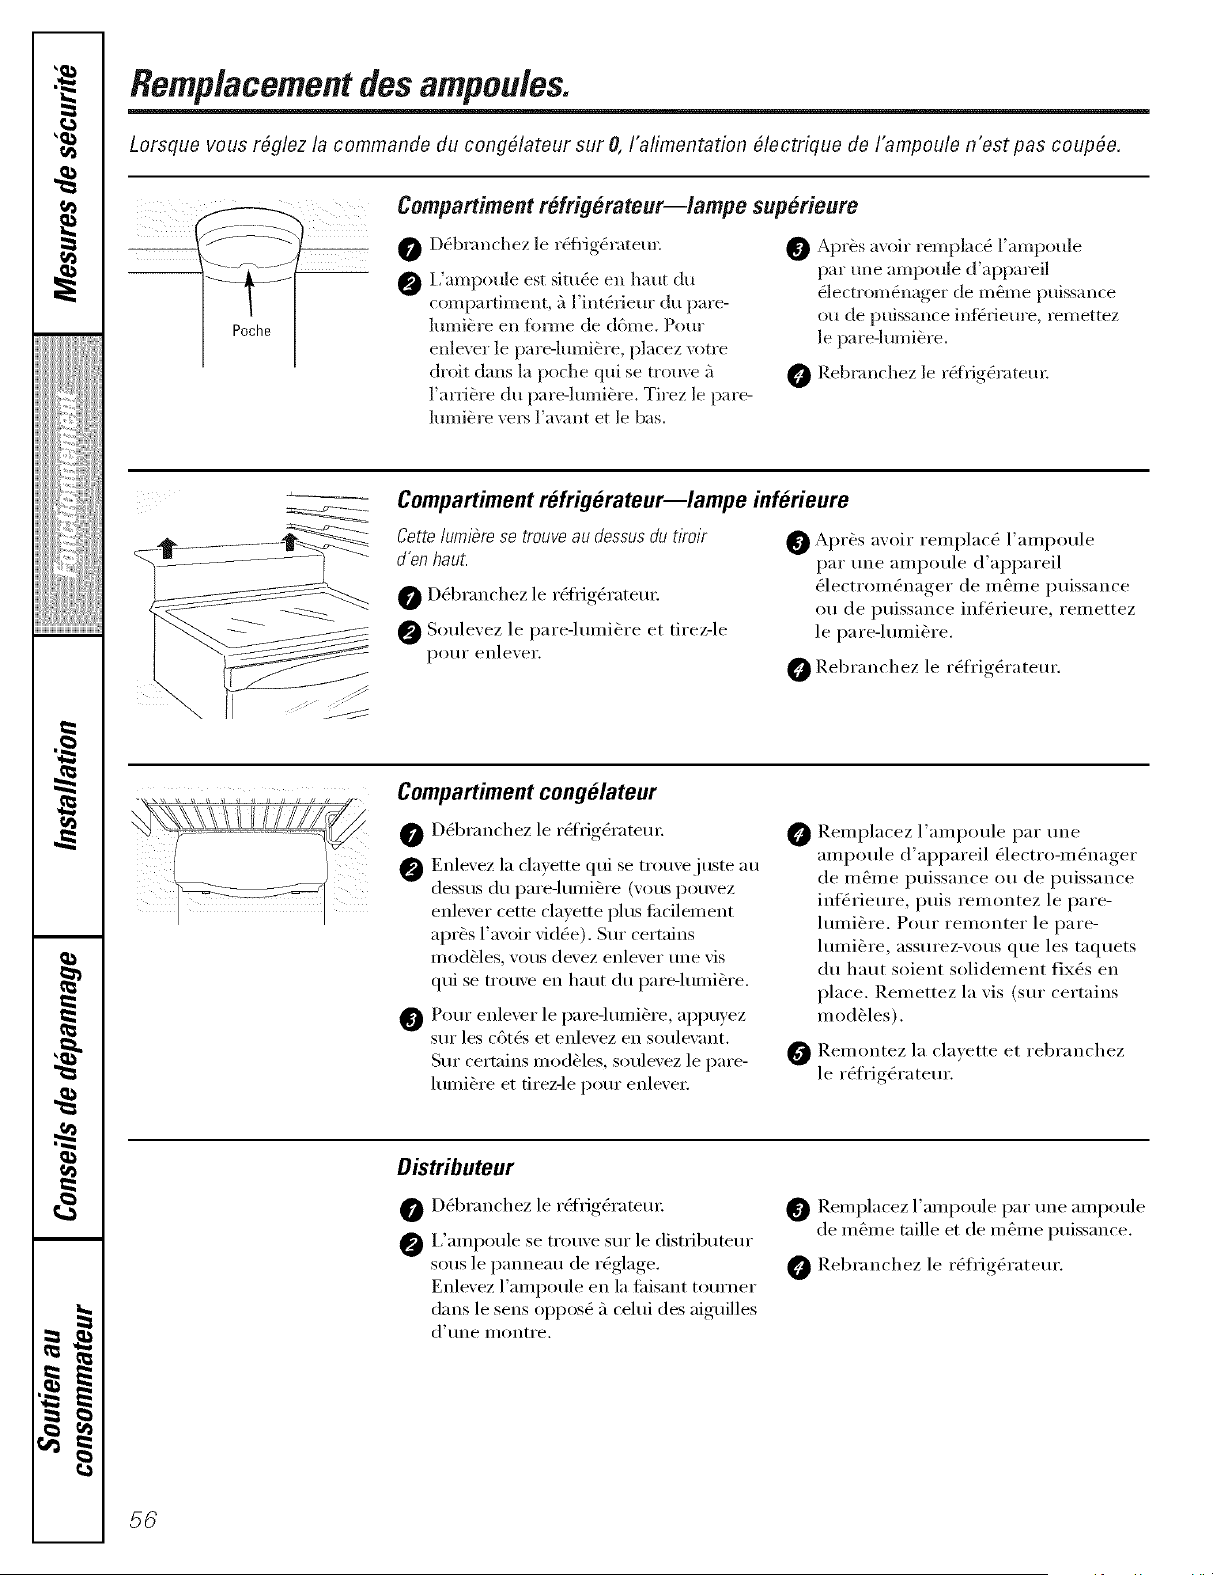
Remp/acementdesampou/es.
Lorsque vous r@lez la commande du cong#lateur sur 0, I'alimentation #lectrique de I'ampoule n'est pas coup#e.
P0che I
Compartiment refrig#rateur--lampe sup#rieure
@
0
D_bl'imchez ]e r_fl_igt4rateur_
L'alnpoule est situ(% en hlu/t du
conlpartilnent, _ ]'int(q_ieur du pare-
hllniOre ell torme de d6me. Pour
enlever ]e parequlni_re, placez _)tre
dloit dims la poche qui se trom'e 5
]'arfibre du parequmi&re. Tirez le pare-
]mni&re vel_ ]'ax_mt et le bas.
@ Apr&s avoir reInplacO l'an/pou]e
par role anlpoule d'appareil
Olectrom&lage," de ln&ne puissance
ou de puissance inf>riem'e, remettez
le pare-himi&re.
0 Rebl';mchez le r(q_ig(q'atem:
--_____=_
Compartiment refrigerateur--lampe inferieure
Cettelumi#rese trouveau dessusdu tiroir
d'en haut.
O D_branchez le i'(qi_ig_i'ateui:
@ Soulevez le pare-lulni_re et tire>le
potlI" enlever.
Apr&s avoir relnplac_ l'anlpoule
par lille anlpoule d'appareil
(_lectronigmager de in&ine puissance
ou de puissance inf(ai_ieure, relnettez
le pare-huni&re.
0 Rebranchez le r0fl'ig_rateui:
Compartiment congelateur
0 D0bi'anchez le i'(qi_ig0i'ateui:
@ Enlexez la cla)ette qui se trouxejuste au
dessHs (hi pai'e-hlllli0i'e (vot/s poHxez
enlever cette clayette phis filcilelnent
api'&s l'avoir vidg_e). Sur certains
Inod&les, vous devez enlever lille vis
qui se trouve ell haut du pare-huni_re.
Pour enlever le pal'e-hmii&l'e, appuyez
sur les cGt0s et enlevez el1 soulevant.
Sur certains inod&les, soulevez le pare-
lulni&re et firez-le pour enleveI:
0
Relxlplacez l'anlpoule par une
alxlpoule d'appareil 01ectro-ixi0nager
de in&ine puissance ou de puissance
inl_rieure, puis relnontez le pare-
lulni_re. Pour renlonter le pare-
hiini_re, assurez-vous que les taquets
du haut soient solidenient fixes ell
place. Reniettez la vis (stir certains
inod_les).
0 ]_elnontez la clayette et rebranchez
le r_fl'ig_ra teur.
Oistributeur
D0branchez le i'(qi_ig0i'ateui:
I,'anlpoule se trouve sur le distlJbuteur
sous le panneau de i'0glage.
Enlevez l'anlpoule ell la filisant tourner
dans le SellS oppos0 _'lcehIi des aiguilles
d' lille I/IOntI'e.
0 ]).enIplacez l'ampoule par lille alxlpoule
de ni&ne taille et de ni_nie puissance.
]_ebranchez le i'Ofl'ig&'ateur.
56
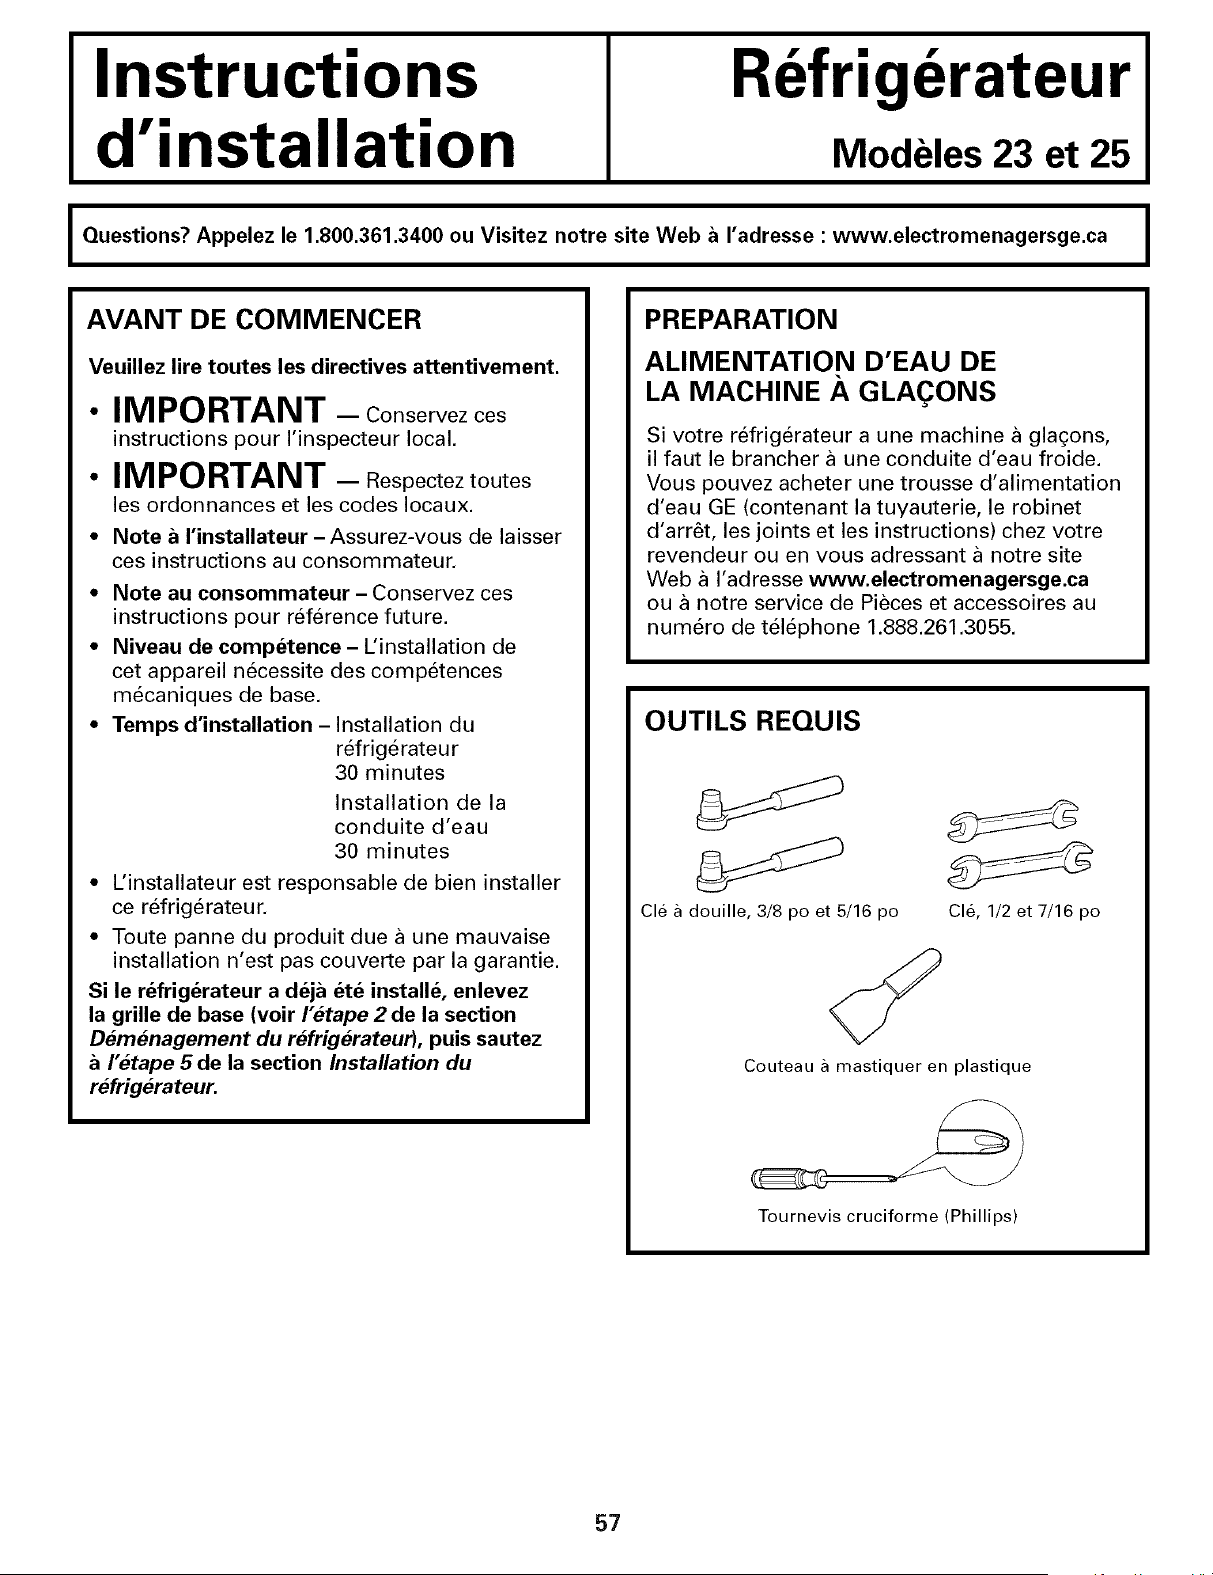
Instructions
d'installation
Refrigerateur
IVlodeles23 et 25
I Questions? Appelez le 1.800.361.3400 ou Visitez notre site Web a radresse : www.electromenagersge.ca I
AVANT DE COMMENCER
Veuillez lire toutes les directives attentivement.
• IMPORTANT - Conservezces
instructions pour I'inspecteur local.
• IMPORTANT - Respectez toutes
les ordonnances et les codes Iocaux.
• Note a I'installateur - Assurez-vous de laisser
ces instructions au consommateur.
• Note au consommateur - Conservez ces
instructions pour reference future.
• Niveau de competence - L'installation de
cet appareil necessite des competences
mecaniques de base.
• Temps d'installation - Installation du
refrigerateur
30 minutes
Installation de la
conduite d'eau
30 minutes
• L'installateur est responsable de bien installer
ce refrigerateur.
• Toute panne du produit due a une mauvaise
installation n'est pas couverte par la garantie.
Si le refrigerateur a deja ete installe, enlevez
la grille de base (voir I'etape 2 de la section
Demenagement du refrigerateur), puis sautez
I"etape 5 de la section Installation du
refrigerateur.
PREPARATION
ALIMENTATION D'EAU DE
LA MACHINE A GLAqONS
Si votre refrigerateur a une machine a gla_ons,
il faut le brancher a une conduite d'eau froide.
Vous pouvez acheter une trousse d'alimentation
d'eau GE (contenant la tuyauterie, le robinet
d'arr6t, les joints et les instructions) chez votre
revendeur ou en vous adressant a notre site
Web a I'adresse www.electromenagersge.ca
ou a notre service de Pieces et accessoires au
numero de telephone 1.888.261.3055.
OUTILS REQUIS
Cle a douille, 3/8 poet 5/16 po Cle, 1/2 et 7/16 po
Couteau a mastiquer en plastique
Tournevis cruciforme (Phillips)
57
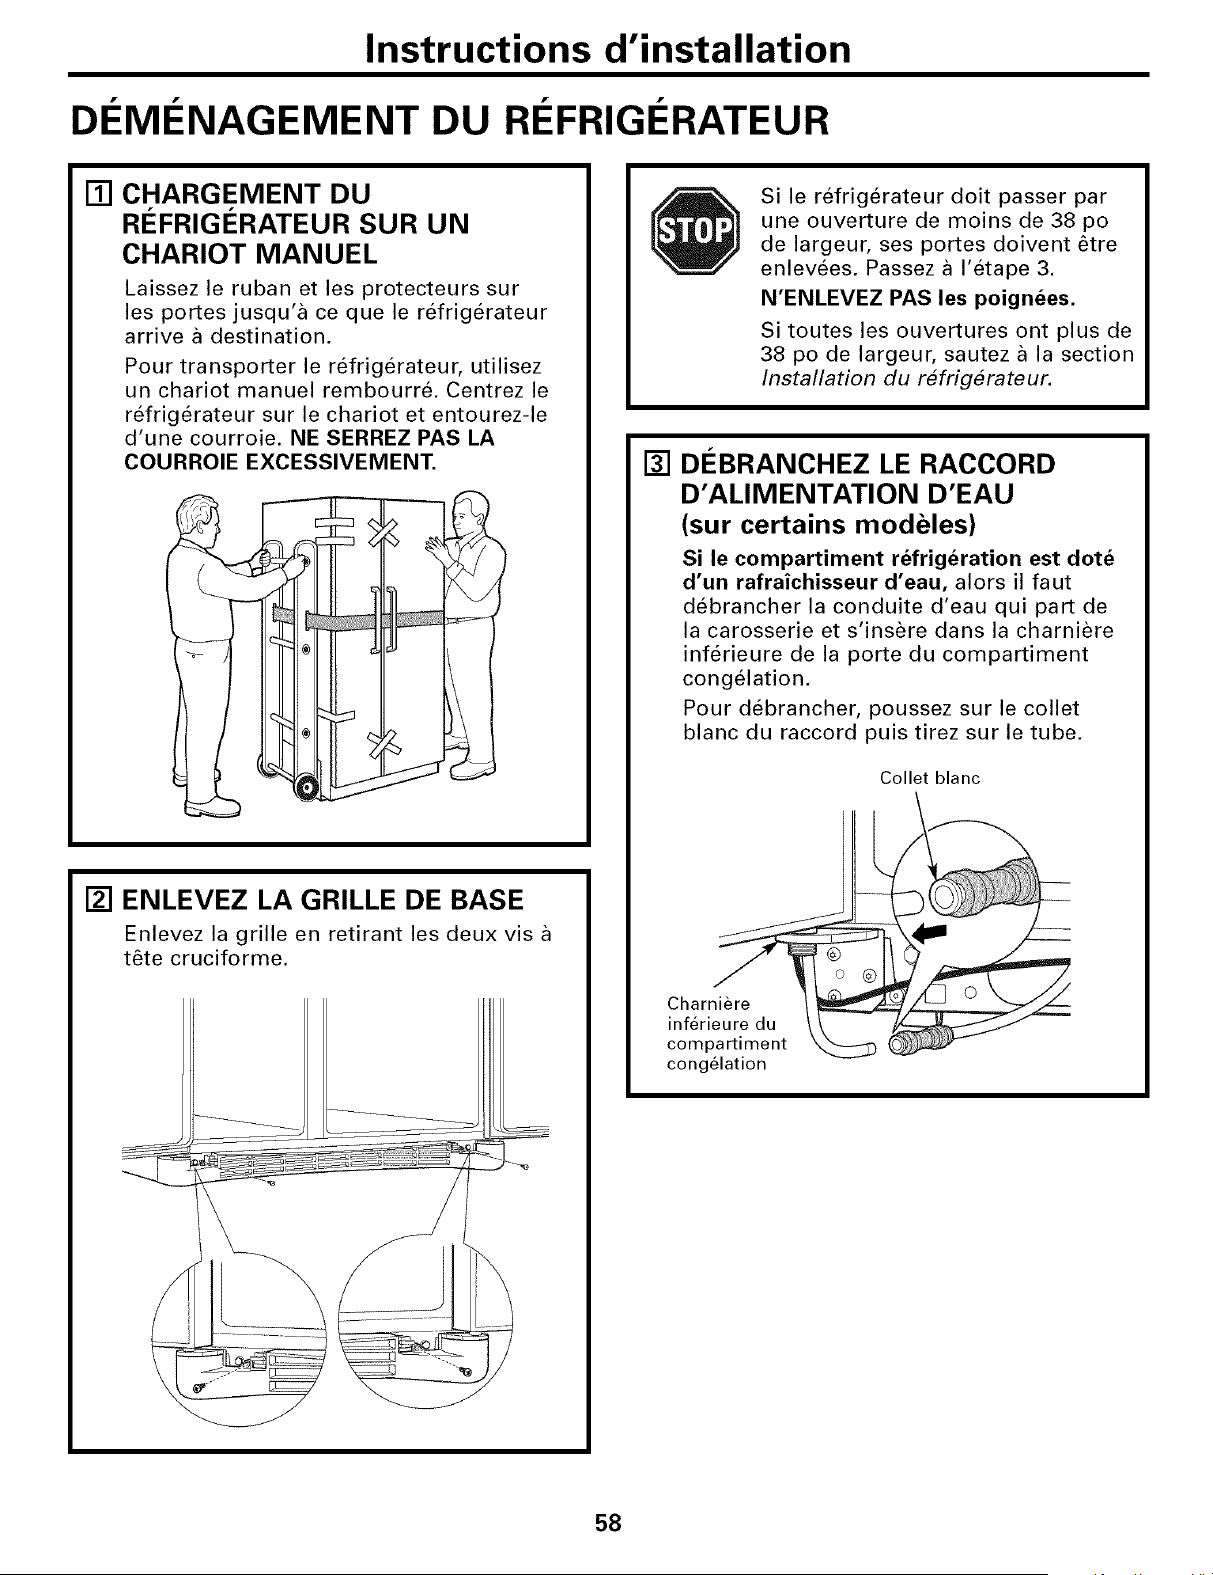
Instructions d'installation
DI MI NAGEMENT DU RI FRIGI RATEUR
[] CHARGEMENT DU
RI_FRIGERATEUR SUR UN
CHARIOT MANUEL
Laissez le ruban et les protecteurs sur
les portes jusqu'a ce que le refrigerateur
arrive a destination.
Pour transporter le refrigerateur, utilisez
un chariot manuel rembourre. Centrez le
refrigerateur sur le chariot et entourez-le
d'une courroie. NE SERREZ PAS LA
COURROIE EXCESSlVEMENT.
[] ENLEVEZ LA GRILLE DE BASE
Enlevez la grille en retirant les deux vis
t6te cruciforme.
[]
Si le refrig6rateur doit passer par
une ouverture de moins de 38 po
de largeur, ses portes doivent 6tre
enlevees. Passez a I'etape 3.
N'ENLEVEZ PAS les poignees.
Si toutes les ouvertures ont plus de
38 po de largeur, sautez a la section
Installation du refrig6rateur.
DI_BRANCHEZ LE RACCORD
D'ALIMENTATION D'EAU
(sur certains modeles)
Si le compartiment refrig6ration est dote
d'un rafraichisseur d'eau, alors il faut
debrancher la conduite d'eau qui part de
la carosserie et s'insere dans la charniere
inferieure de la porte du compartiment
congelation.
Pour debrancher, poussez sur le collet
blanc du raccord puis tirez sur le tube.
Collet blanc
Charniere
inferieure du
compartiment
congelation
58
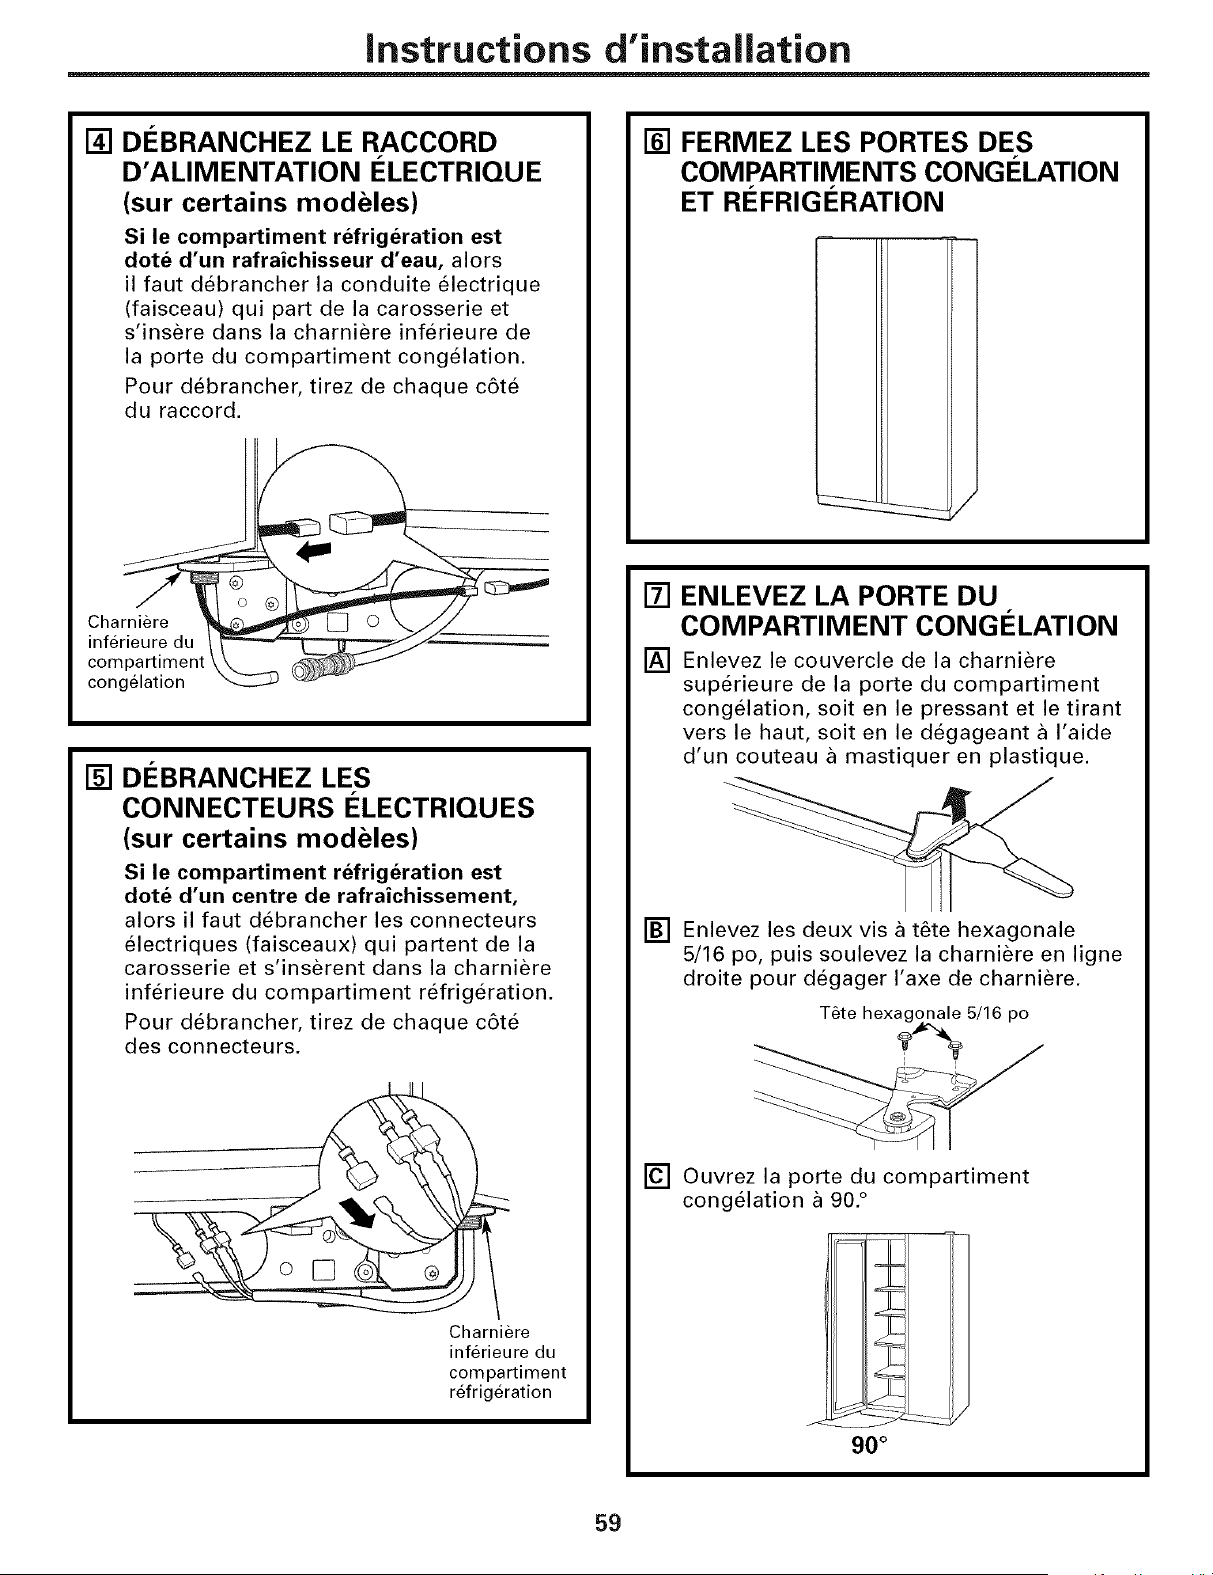
instructions d'instaliation
[]
DI_BRANCHEZ LE RACCORD
D'ALIMENTATION I_LECTRIQUE
(sur certains modeles)
Si le compartiment refrigeration est
dote d'un rafraichisseur d'eau, alors
il faut debrancher la conduite electrique
(faisceau) qui part de la carosserie et
s'insere dans la charniere inferieure de
la porte du compartiment congelation.
Pour debrancher, tirez de chaque c6te
du raccord.
a
[]
DI_BRANCHEZ LES
CONNECTEURS I_LECTRIQUES
(sur certains modeles)
Si le compartiment refrigeration est
dote d'un centre de rafraichissement,
alors il faut debrancher les connecteurs
electriques (faisceaux) qui partent de la
carosserie et s'inserent dans la charniere
inferieure du compartiment refrigeration.
Pour debrancher, tirez de chaque c6te
des connecteurs.
Charniere
inferieure du
compartiment
refrigeration
[] FERMEZ LES PORTES DES
COMPARTIMENTS CONGELATION
ET RI_FRIGERATION
[] ENLEVEZ LA PORTE DU
COMPARTIMENT CONGI_LATION
[] Enlevez le couvercle de la charniere
superieure de la porte du compartiment
congelation, soit en le pressant et le tirant
vers le haut, soit en le degageant a I'aide
d'un couteau a mastiquer en plastique.
[] Enlevez les deux vis a t_te hexagonale
5/16 po, puis soulevez la charniere en ligne
droite pour degager I'axe de charniere.
-_ T_te hexago_ 5/16 po
[] Ouvrez la porte du compartiment
congelation a 90. °
J_
90 °
59
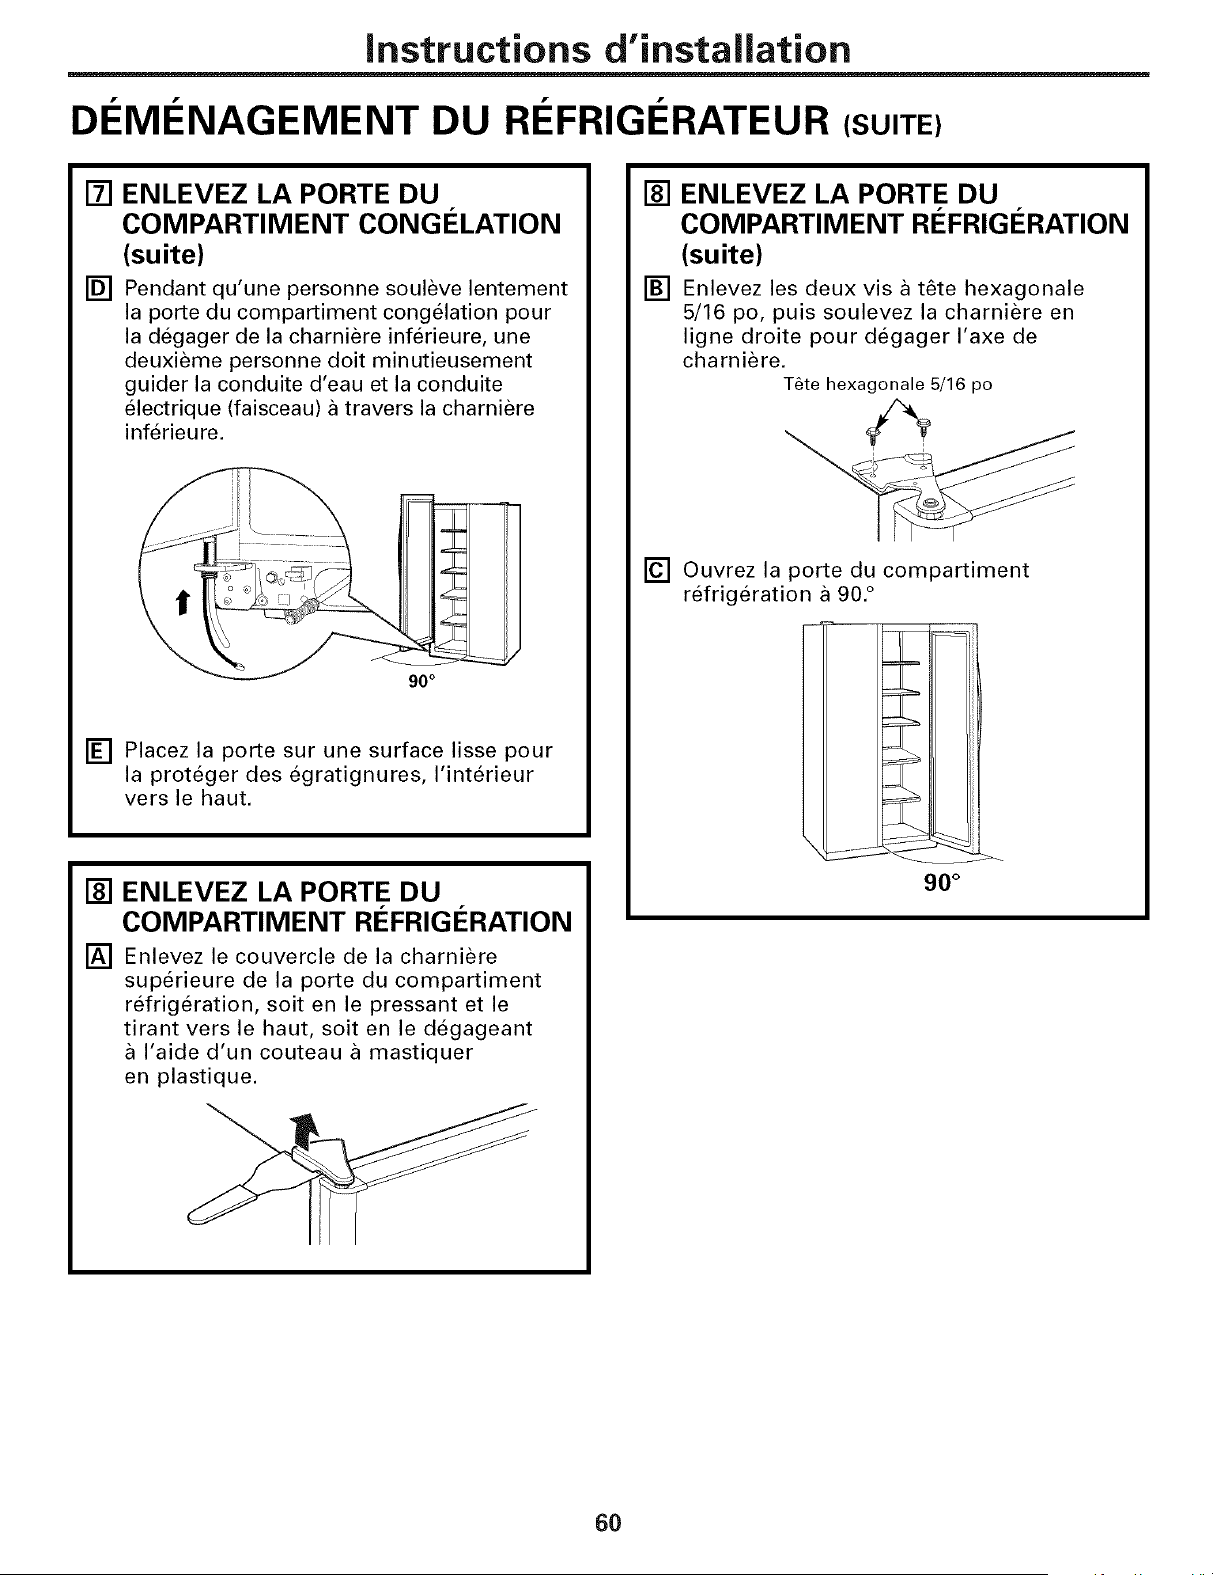
instructions d'instaliation
DI MI NAGEMENT DU RI FRIGI RATEUR (SUITE)
[]
[]
ENLEVEZ LA PORTE DU
COMPARTIMENT CONGI_LATION
(suite)
Pendant qu'une personne souleve lentement
la porte du compartiment congelation pour
la degager de la charniere inferieure, une
deuxieme personne doit minutieusement
guider la conduite d'eau et la conduite
electrique (faisceau) a travers la charniere
inferieure.
_
90 °
[] Placez la porte sur une surface lisse pour
la proteger des egratignures, I'interieur
vers le haut.
[]
[]
ENLEVEZ LA PORTE DU
COMPARTIMENT RI_FRIGI_RATION
Enlevez le couvercle de la charniere
superieure de la porte du compartiment
refrigeration, soit en le pressant et le
tirant vers le haut, soit en le degageant
I'aide d'un couteau a mastiquer
en plastique.
[] ENLEVEZ LA PORTE DU
COMPARTIMENT RI_FRIGI_RATION
(suite)
[] Enlevez les deux visa t_te hexagonale
5/16 po, puis soulevez la charniere en
ligne droite pour degager I'axe de
charniere.
T6te hexagonale 5/16 po
[] Ouvrez la porte du compartiment
refrigeration a 90. °
_ H
_ H
90 °
60
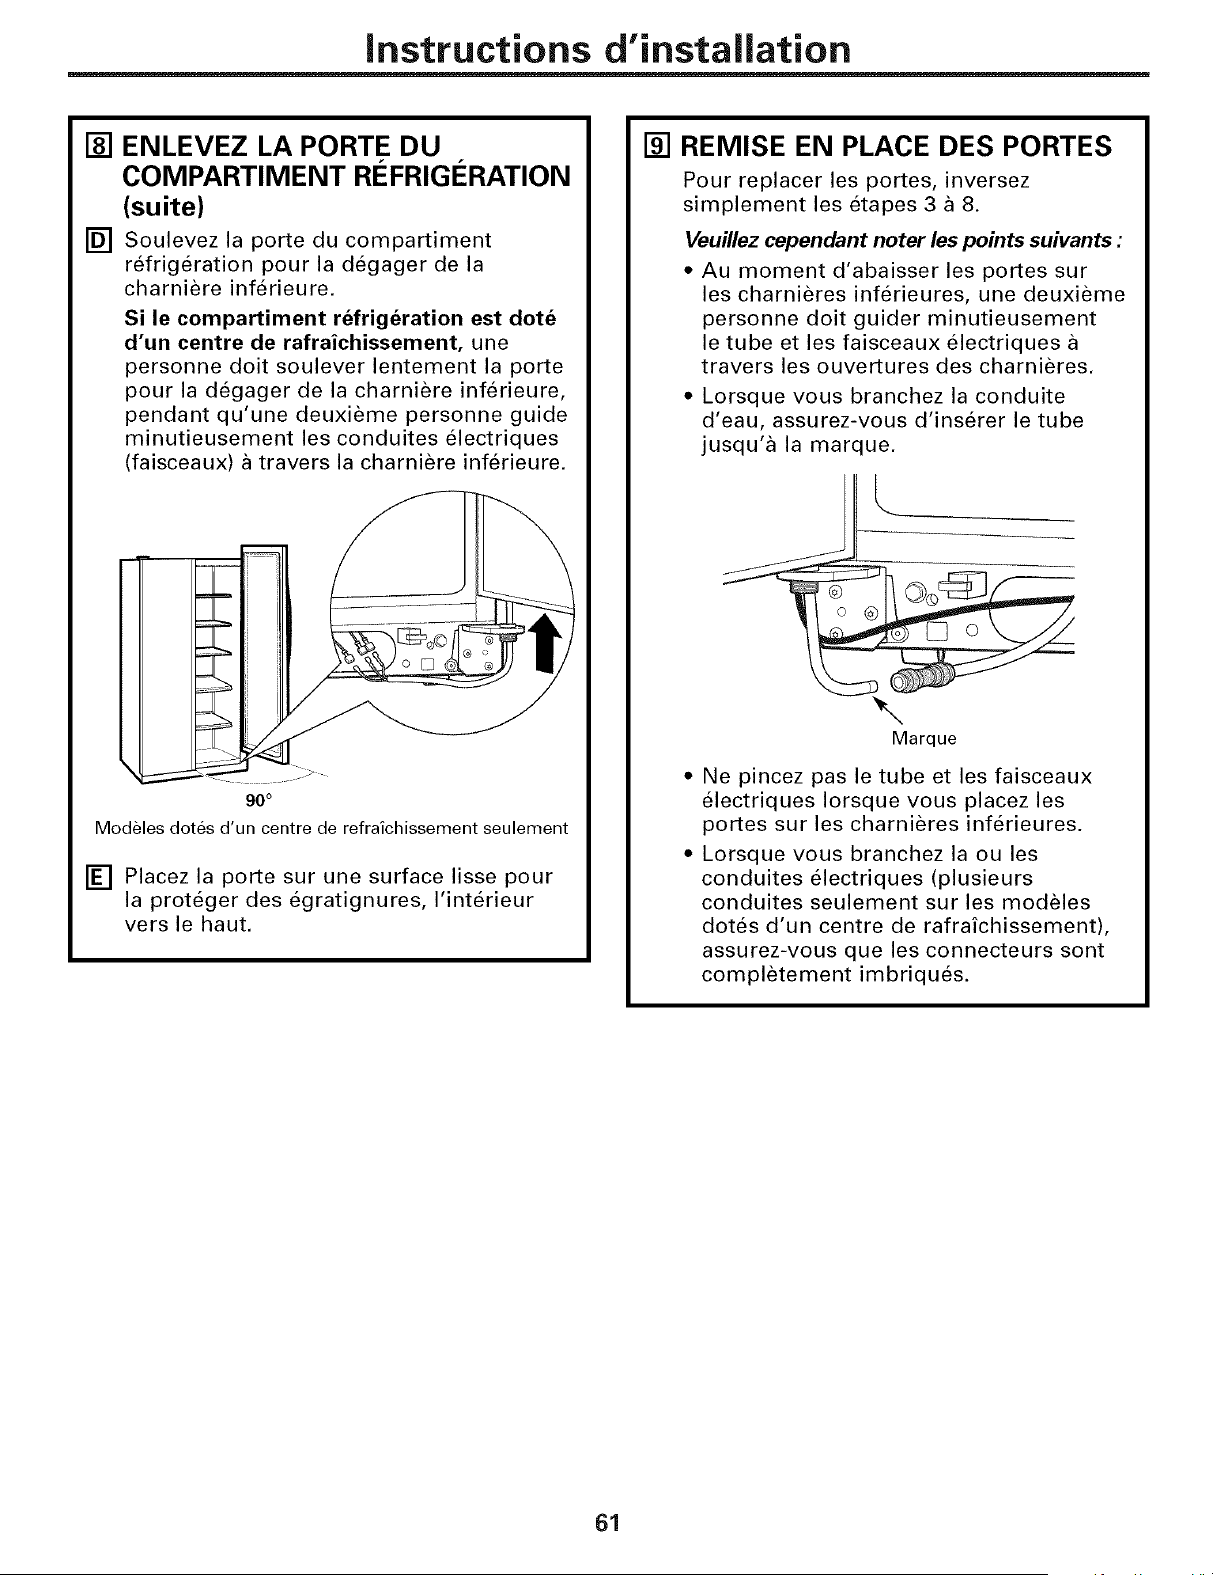
instructions d'instaliation
[]
[]
ENLEVEZ LA PORTE DU
COMPARTIMENT RI_FRIGI_RATION
(suite)
Soulevez la porte du compartiment
refrigeration pour la degager de la
charniere inferieure.
Si le compartiment refrigeration est dote
d'un centre de rafraichissement, une
personne doit soulever lentement la porte
pour la degager de la charniere inferieure,
pendant qu'une deuxieme personne guide
minutieusement les conduites electriques
(faisceaux) a travers la charniere inferieure.
- - _11
!........
90 °
Modeles dotes d'un centre de refraichissement seulement
[] Placez la porte sur une surface lisse pour
la proteger des egratignures, I'interieur
vers le haut.
[] REMISE EN PLACE DES PORTES
Pour replacer les portes, inversez
simplement les etapes 3 a 8.
Veuillez cependant noter les points suivants :
• Au moment d'abaisser les portes sur
les charnieres inferieures, une deuxieme
personne doit guider minutieusement
le tube et les faisceaux electriques
travers les ouvertures des charnieres.
• Lorsque vous branchez la conduite
d'eau, assurez-vous d'inserer le tube
jusqu'a la marque.
L
Marque
Ne pincez pas le tube et les faisceaux
electriques Iorsque vous placez les
portes sur les charnieres inferieures.
Lorsque vous branchez la ou les
conduites electriques (plusieurs
conduites seulement sur les modeles
dotes d'un centre de rafrafchissement),
assurez-vous que les connecteurs SORt
completement imbriques.
61
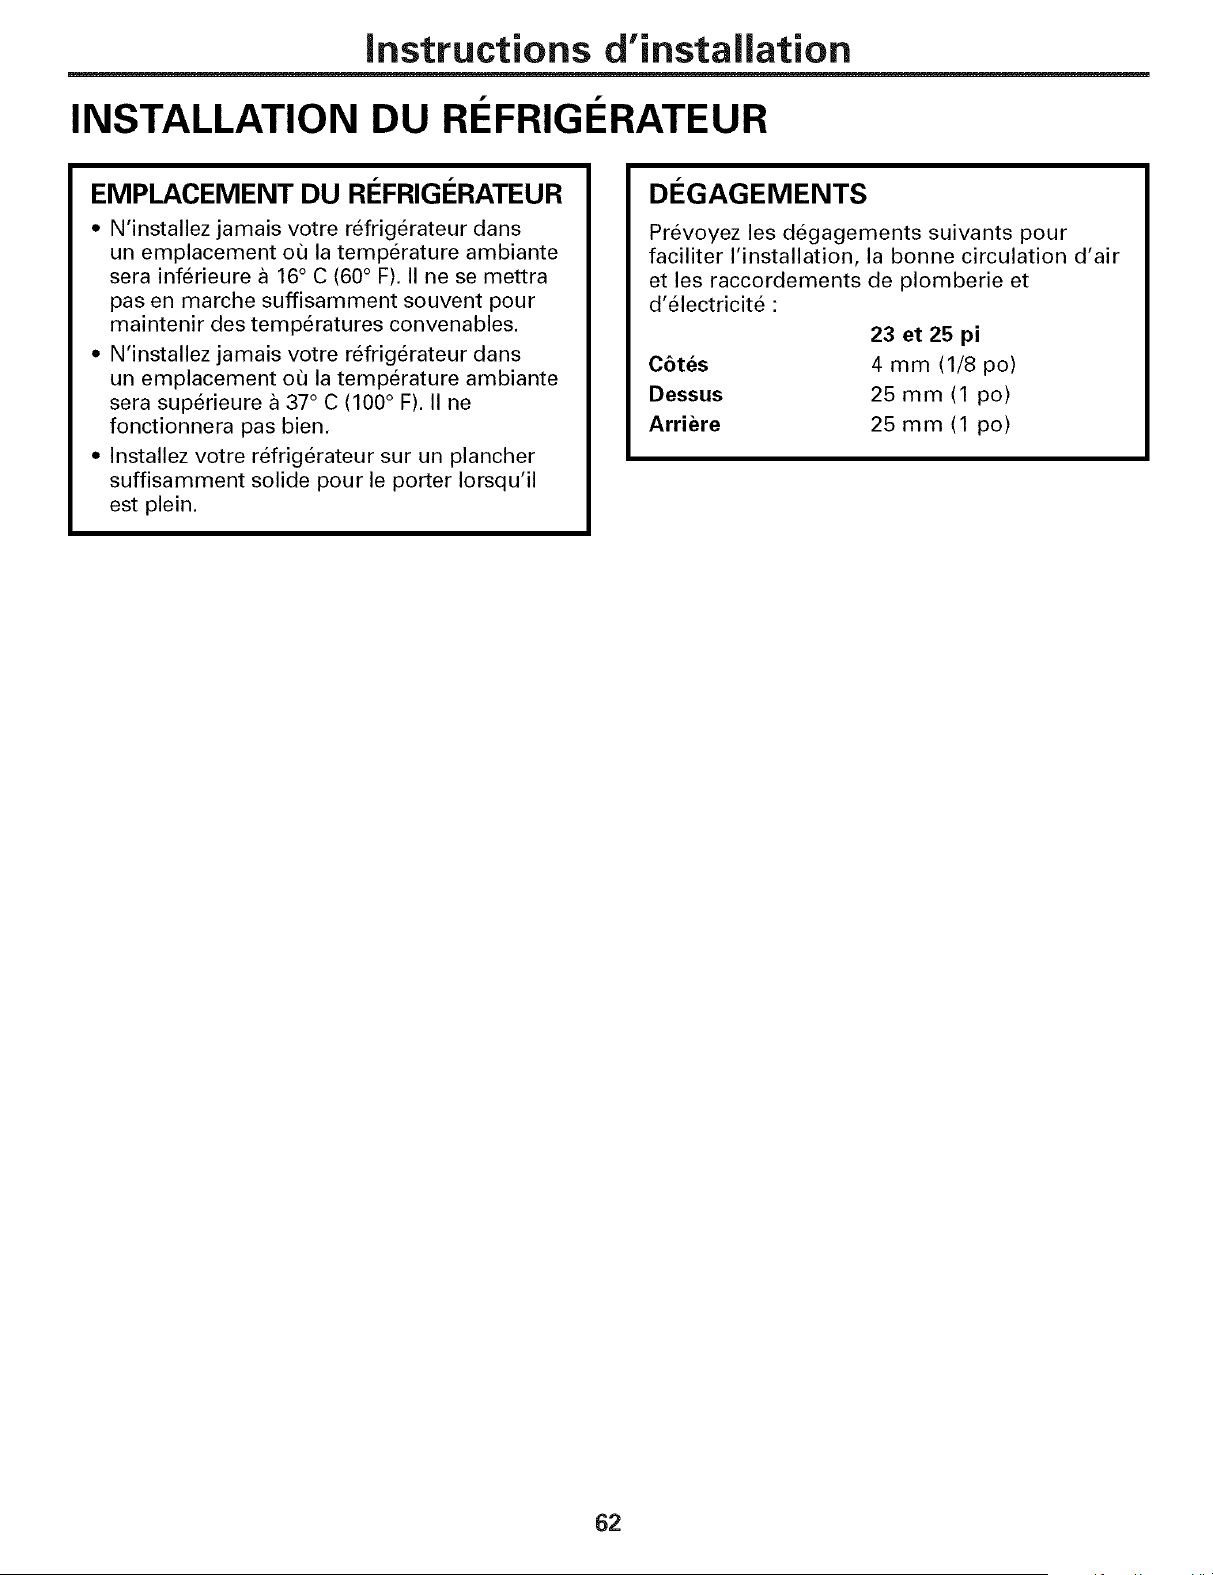
Instructions d'instaliation
INSTALLATION DU RI FRIGI RATEUR
EMPLACEMENT DU RI_FRIGERATEUR
• N'installez jamais votre refrigerateur dans
un emplacement ou la temperature ambiante
sera inferieure a 16 ° C (60° F). II ne se mettra
pas en marche suffisamment souvent pour
maintenir des temperatures convenables.
• N'installez jamais votre refrigerateur dans
un emplacement ou la temperature ambiante
sera superieure a 37 ° C (100 ° F). II ne
fonctionnera pas bien.
• Installez votre refrigerateur sur un plancher
suffisamment solide pour le porter Iorsqu'il
est plein.
DI_GAGEMENTS
Prevoyez les degagements suivants pour
faciliter I'installation, la bonne circulation d'air
et les raccordements de plomberie et
d'electricite :
23 et 25 pi
Cbtes 4 mm (1/8 po)
Dessus 25 mm (1 po)
Arriere 25 mm (1 po)
62
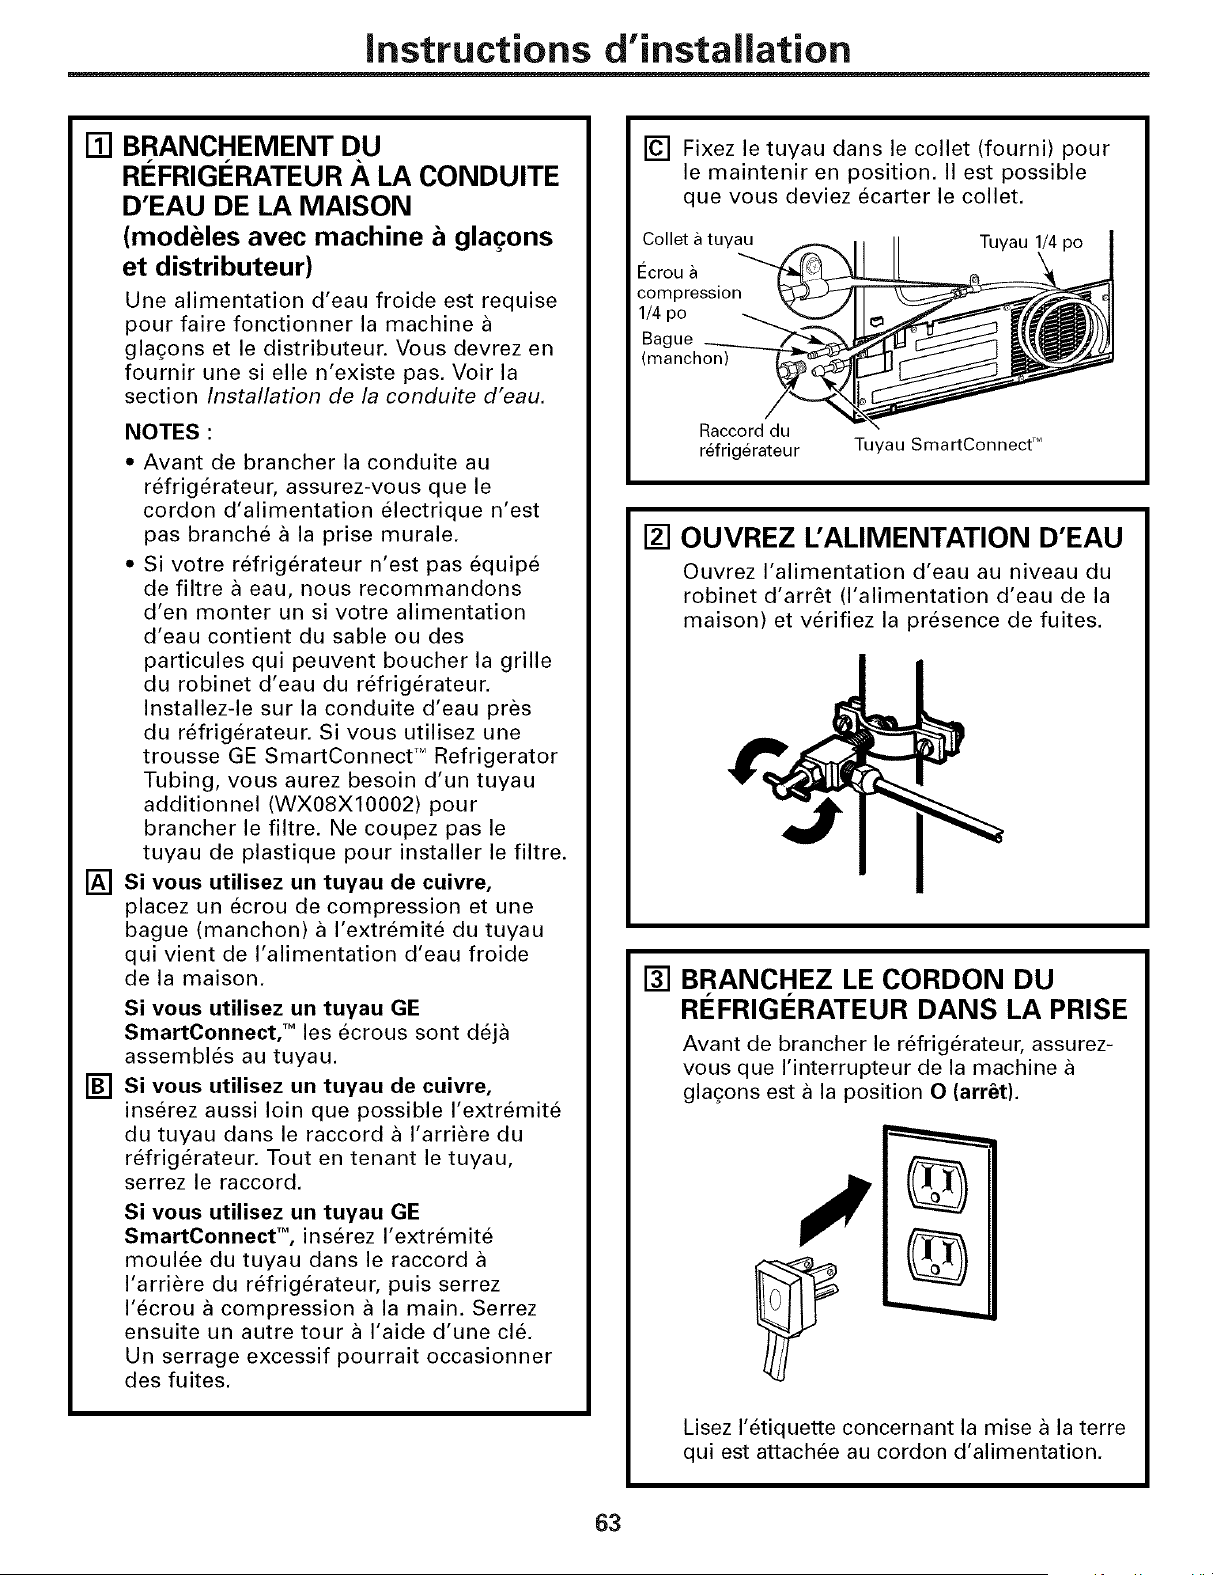
instructions d'instaliation
[]
[]
[]
BRANCHEMENT DU
REFRIGI'--RATEUR A LA CONDUITE
D'EAU DE LA MAISON
(modeles avec machine a gla_ons
et distributeur)
Une alimentation d'eau froide est requise
pour faire fonctionner la machine
gla_:ons et le distributeur. Vous devrez en
fournir une si elle n'existe pas. Voir la
section Installation de la conduite d'eau.
NOTES :
• Avant de brancher la conduite au
refrigerateur, assurez-vous que le
cordon d'alimentation electrique n'est
pas branche a la prise murale.
• Si votre refrigerateur n'est pas equipe
de filtre a eau, nous recommandons
d'en monter un si votre alimentation
d'eau contient du sable ou des
particules qui peuvent boucher la grille
du robinet d'eau du refrigerateur.
Installez-le sur la conduite d'eau pres
du refrigerateur. Si vous utilisez une
trousse GE SmartConnect TMRefrigerator
Tubing, vous aurez besoin d'un tuyau
additionnel (WX08X10002) pour
brancher le filtre. Ne coupez pas le
tuyau de plastique pour installer le filtre.
Si vous utilisez un tuyau de cuivre,
placez un ecrou de compression et une
bague (manchon) a I'extremite du tuyau
qui vient de I'alimentation d'eau froide
de la maison.
Si vous utilisez un tuyau GE
SmartConnect, TM les ecrous sont deja
assembles au tuyau.
Si vous utilisez un tuyau de cuivre,
inserez aussi loin que possible I'extremite
du tuyau darts le raccord a I'arriere du
refrigerateur. Tout en tenant le tuyau,
serrez le raccord.
Si vous utilisez un tuyau GE
SmartConnect TM, inserez I'extremite
moulee du tuyau dans le raccord
I'arriere du refrigerateur, puis serrez
I'ecrou a compression a la main. Serrez
ensuite un autre tour a I'aide d'une cl&
Un serrage excessif pourrait occasionner
des fuites.
[] Fixez le tuyau dans le collet (fourni) pour
le maintenir en position. II est possible
que vous deviez ecarter le collet.
Collet a tuyau
I_crou
compression
1/4 po
Bague
(manchon)
Tuyau
Raccord du
refrigerateur
Tuyau SmartConnect T_
[] OUVREZ L'ALIMENTATION D'EAU
Ouvrez I'alimentation d'eau au niveau du
robinet d'arr_t (l'alimentation d'eau de la
maison) et verifiez la presence de fuites.
[] BRANCHEZ LE CORDON DU
RI_FRIGI:!:RATEUR DANS LA PRISE
Avant de brancher le refrigerateur, assurez-
vous que I'interrupteur de la machine
gla_ons est a la position O (arr6t).
Lisez I'etiquette concernant la mise a la terre
qui est attachee au cordon d'alimentation.
63
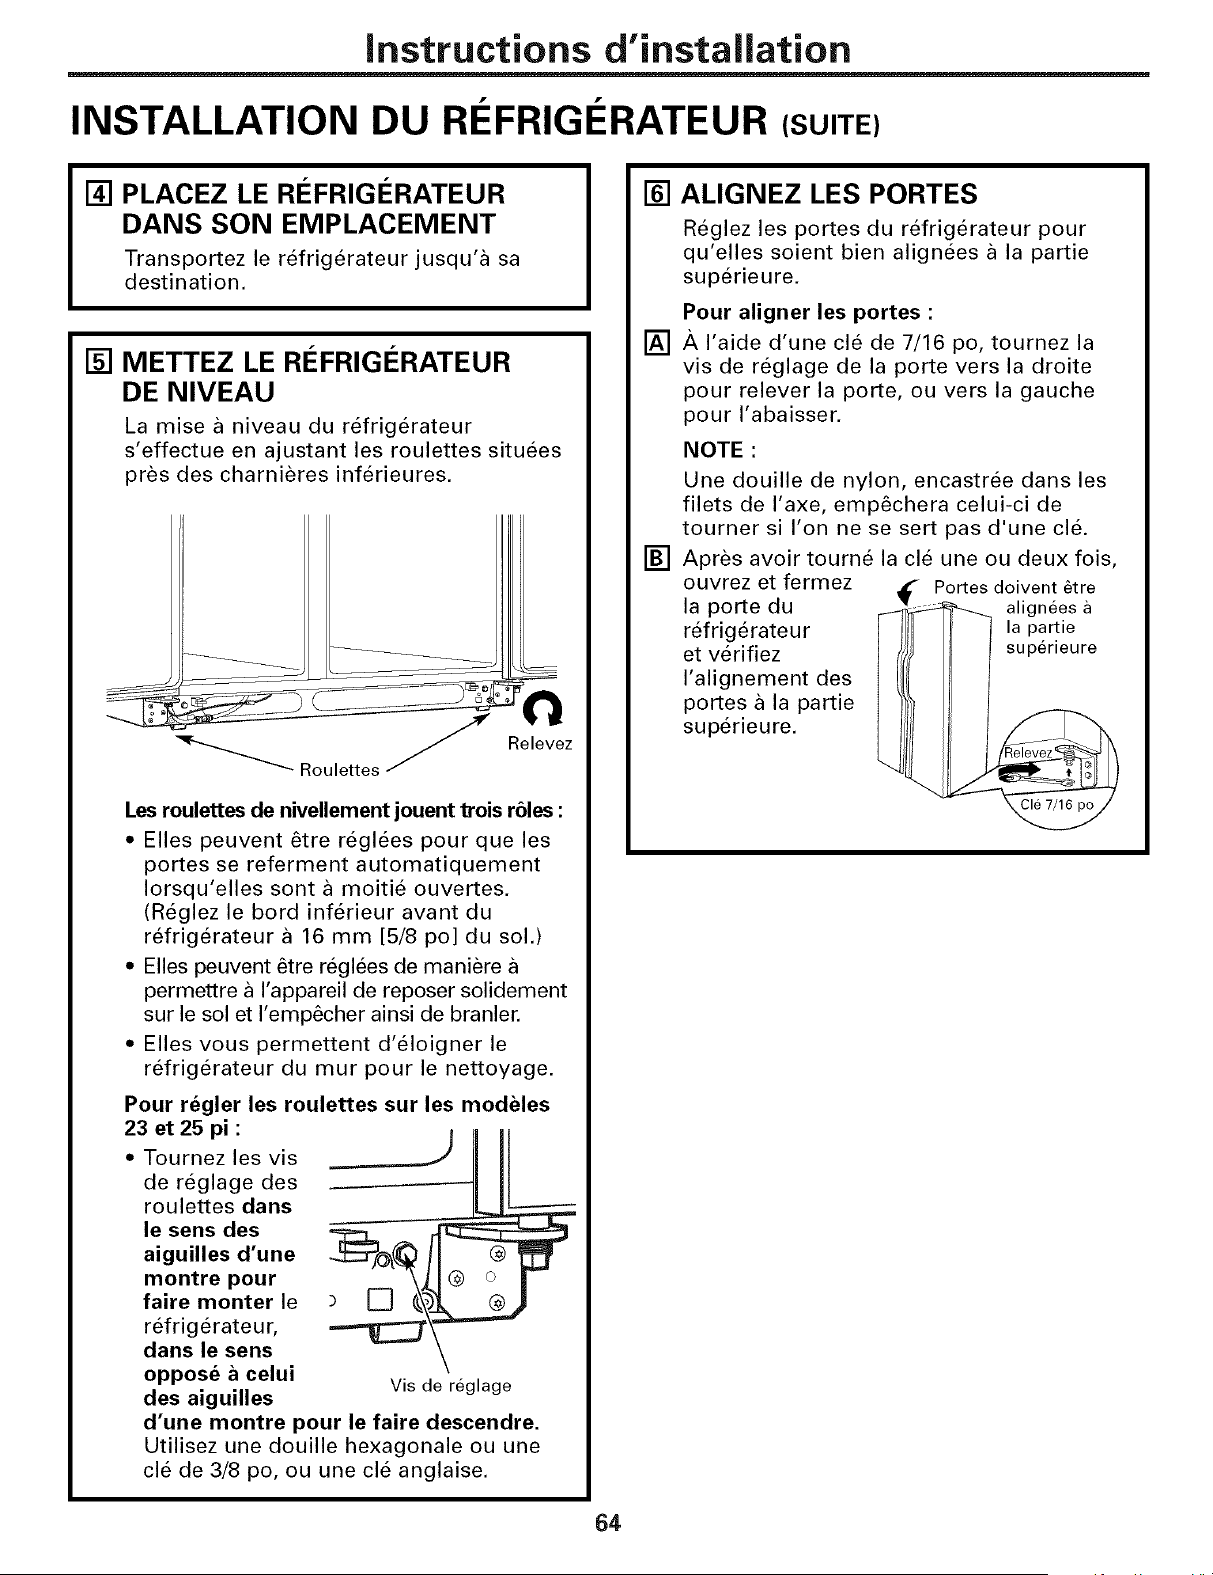
Instructions d'instaliation
INSTALLATION DU RI FRIGI RATEUR (SUITE)
[] PLACEZ LE RC:FRIGI_RATEUR
DANS SON EMPLACEMENT
Transportez le refrigerateur jusqu'a sa
destination.
[] METTEZ LE RrtFRIGERATEUR
DE NIVEAU
La mise a niveau du refrigerateur
s'effectue en ajustant les roulettes situees
pres des charnieres inferieures.
_""""'_ R o u Iett es
Relevez
Les roulettes de nivellement jouent trois r61es :
• Elles peuvent 6tre reglees pour que les
portes se referment automatiquement
Iorsqu'elles sont a moitie ouvertes.
(Reglez le bord inferieur avant du
refrigerateur a 16 mm [5/8 po] du sol.)
• Elles peuvent _tre reglees de maniere
permettre a I'appareil de reposer solidement
sur le sol et I'emp_cher ainsi de branler.
• Elles vous permettent d'eloigner le
refrigerateur du mur pour le nettoyage.
Pour regler les roulettes sur les modeles
23 et 25 pi :
• Tournez les vis
de reglage des
roulettes dans
le sens des
aiguilles d'une
montre pour
faire monter le
refrigerateur,
dans le sens
oppose a celui
des aiguilles
Vis de reglage
d'une montre pour le faire descendre.
Utilisez une douille hexagonale ou une
cle de 3/8 po, ou une cle anglaise.
[] ALIGNEZ LES PORTES
[]
[]
Reglez les portes du refrigerateur pour
qu'elles soient bien alignees a la partie
superieure.
Pour aligner les portes :
_, I'aide d'une cle de 7/16 po, tournez la
vis de reglage de la porte vers la droite
pour relever la porte, ou vers la gauche
pour I'abaisser,
NOTE :
Une douille de nylon, encastree dans les
filets de I'axe, emp_chera celui-ci de
tourner si I'on ne se sert pas d'une cl&
Apres avoir tourne la cle une ou deux fois,
ouvrez et fermez
la porte du
refrigerateur
et verifiez
I'alignement des
portes a la partie
superleure.
Portes doivent 6tre
alignees
la partie
superieure
Cle 7/16 po
64
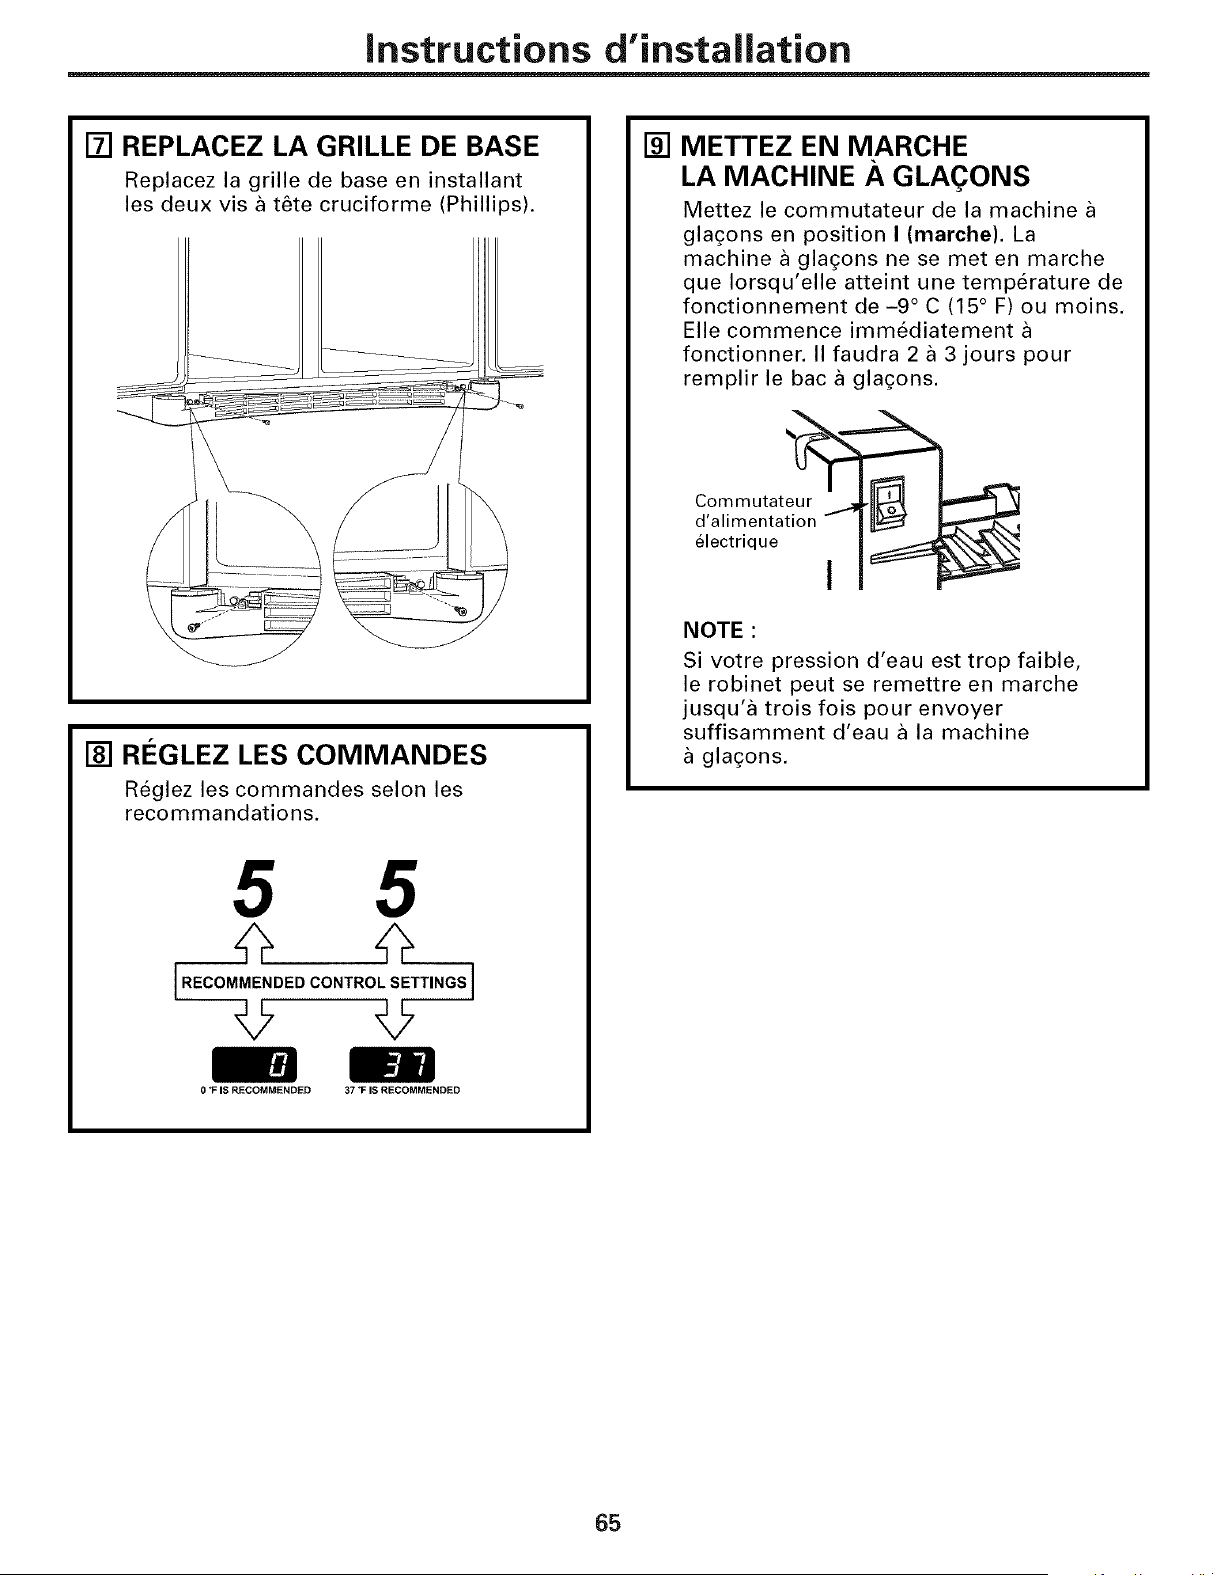
instructions d'instaliation
[] REPLACEZ LA GRILLE DE BASE
Replacez la grille de base en installant
les deux visa t6te cruciforme (Phillips).
[] REGLEZ LES COMMANDES
Reglez les commandes selon les
recommandations.
5 5
[RECOMMENOEOCONTROLSETT,NOS]
0 _FIS RECOMMENDED 37 "F IS RECOMMENDED
[]
METTEZ EN MARCHE
LA MACHINE A GLA(_ONS
Mettez le commutateur de la machine
gla£ons en position I (marche). La
machine a gla_:ons ne se met en marche
que Iorsqu'elle atteint une temperature de
fonctionnement de -9 ° C (15 ° F) ou moins,
Elle commence immediatement
fonctionner. II faudra 2 a 3 jours pour
remplir le bac a gla_ons.
Com mutatlur___
d'alir_entation - _
electr,que i I_
NOTE :
Si votre pression d'eau est trop faible,
le robinet peut se remettre en marche
jusqu'a trois fois pour envoyer
suffisamment d'eau a la machine
gla_:ons.
65
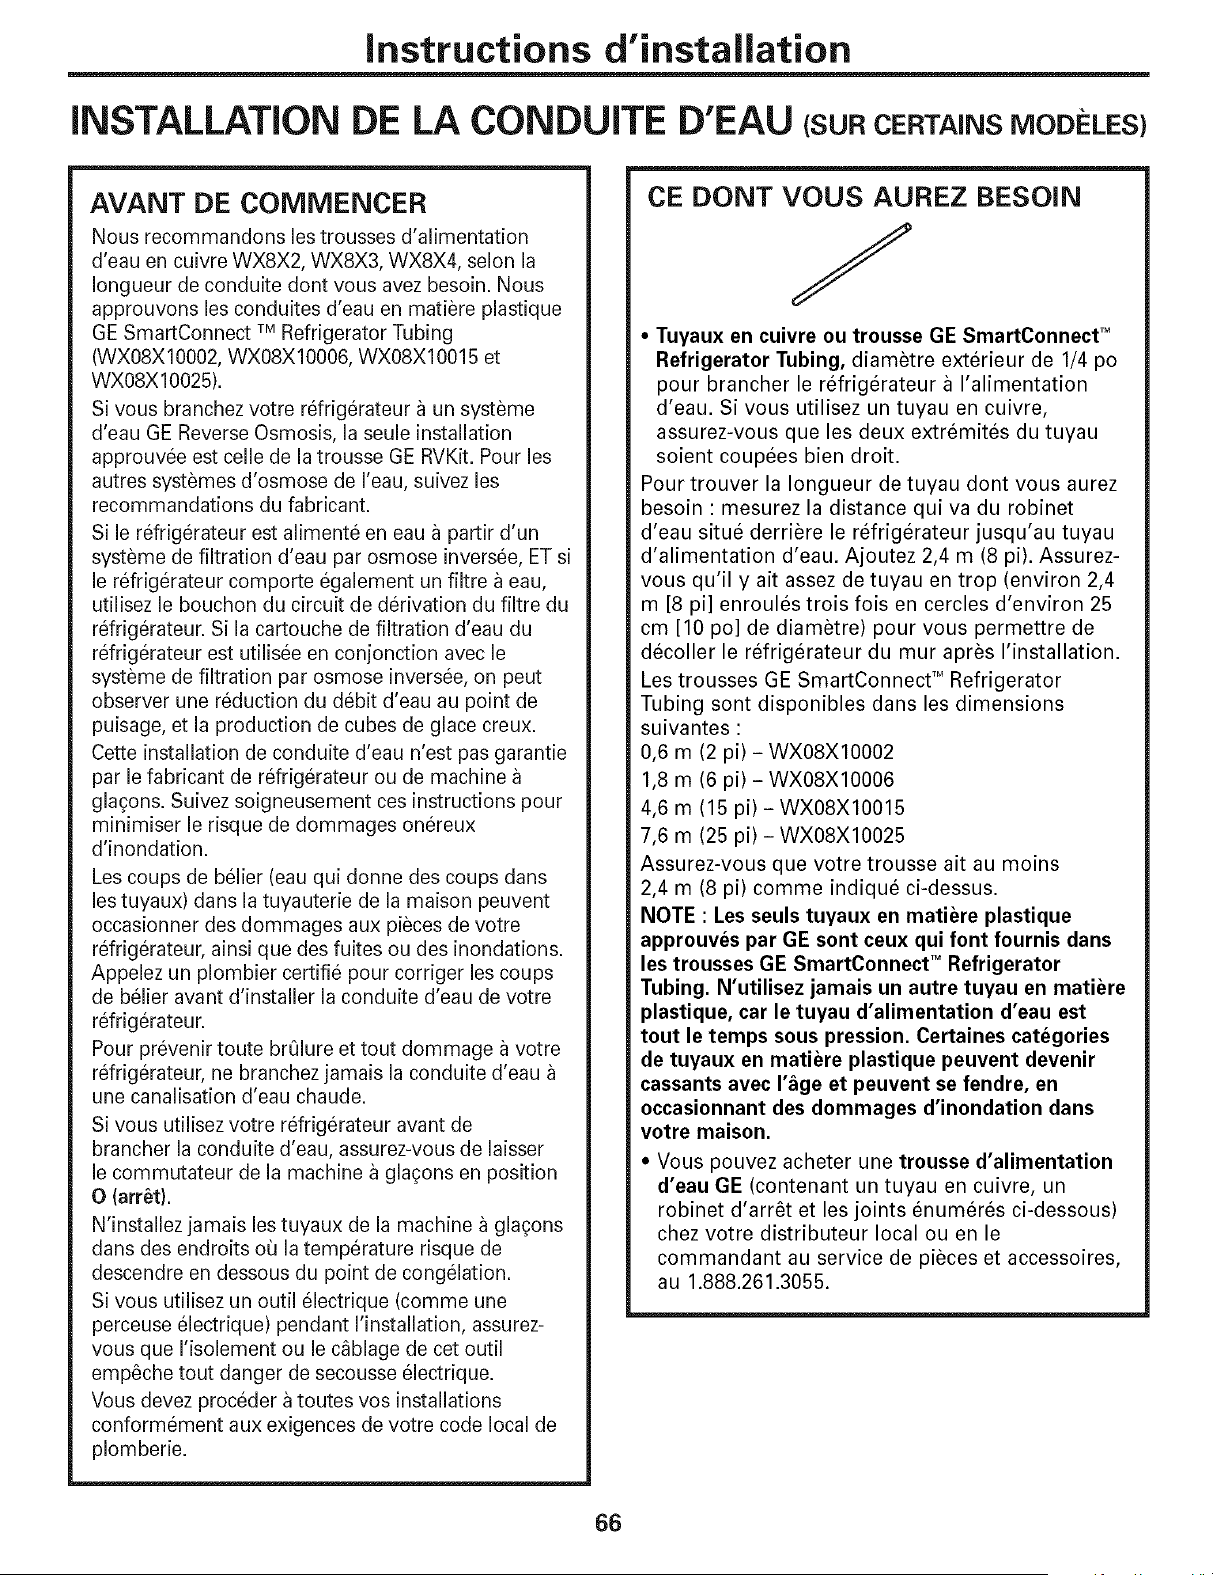
instructions d'instaliation
iNSTALLATiON DE LA CONDUITE D'EAU IsuRCERTAINSMODi LES}
AVANT DE COMMENCER
Nous recommandons les trousses d'alimentation
d'eau en cuivre WX8X2, WX8X3, WX8X4, selon la
Iongueur de conduite dont vous avez besoin. Nous
approuvons les conduites d'eau en matiere plastique
GE SmartConnect TMRefrigerator Tubing
(WX08XI0002, WX08X10006, WX08X10015 et
WX08X10025).
Si vous branchez votre refrigerateur a un systeme
d'eau GE Reverse Osmosis, la seule installation
approuvee est celle de la trousse GE RVKit. Pour les
autres systemes d'osmose de I'eau, suivez les
recommandations du fabricant.
Si le refrigerateur est alimente en eau a partir d'un
systeme de filtration d'eau par osmose inversee, ET si
le refrigerateur comporte egalement un filtre a eau,
utilisez le bouchon du circuit de derivation du filtre du
refrigerateur. Si la cartouche de filtration d'eau du
refrigerateur est utilisee en conjonction avec le
systeme de filtration par osmose inversee, on peut
observer une reduction du debit d'eau au point de
puisage, et la production de cubes de glace creux.
Cette installation de conduite d'eau n'est pas garantie
par le fabricant de refrigerateur ou de machine
glagons. Suivez soigneusement ces instructions pour
minimiser le risque de dommages onereux
d'inondation.
Les coups de belier (eau qui donne des coups dans
les tuyaux) dans la tuyauterie de la maison peuvent
occasionner des dommages aux pieces de votre
refrigerateur, ainsi que des fuites ou des inondations.
Appelez un plombier certifie pour corriger les coups
de belier avant d'installer la conduite d'eau de votre
refrigerateur.
Pour prevenir toute brOlure et tout dommage a votre
refrigerateur, ne branchez jamais la conduite d'eau
une canalisation d'eau chaude.
Si vous utilisez votre refrigerateur avant de
brancher la conduite d'eau, assurez-vous de laisser
le commutateur de la machine a gla(_ons en position
O (arr_t}.
N'installez jamais les tuyaux de la machine a gla(;ons
darts des endroits ou la temperature risque de
descendre en dessous du point de congelation.
Si vous utilisez un outil electrique (comme une
perceuse electrique) pendant I'installation, assurez-
vous que I'isolement ou le c_blage de cet outil
emp_che tout danger de secousse electrique.
Vous devez proceder a toutes vos installations
conformement aux exigences de votre code local de
plomberie.
CE DONT VOUS AUREZ BESOIN
J
• Tuyaux en cuivre ou trousse GE SmartConnect TM
Refrigerator Tubing, diametre exterieur de 1/4 po
pour brancher le refrigerateur a I'alimentation
d'eau. Si vous utilisez un tuyau en cuivre,
assurez-vous que les deux extremites du tuyau
soient coupees bien droit.
Pour trouver la Iongueur de tuyau dont vous aurez
besoin : mesurez la distance qui va du robinet
d'eau situe derriere le refrigerateur jusqu'au tuyau
d'alimentation d'eau. Ajoutez 2,4 m (8 pi). Assurez-
vous qu'il y ait assez de tuyau en trop (environ 2,4
m [8 pi] enroules trois fois en cercles d'environ 25
cm [10 po] de diametre) pour vous permettre de
decoller le refrigerateur du mur apres I'installation.
Les trousses GE SmartConnect TM Refrigerator
Tubing sont disponibles dans les dimensions
suivantes :
0,6 m (2 pi) - WX08X10002
1,8 m (6 pi) - WX08X10006
4,6 m (15 pi) - WX08X10015
7,6 m (25 pi) - WX08X10025
Assurez-vous que votre trousse ait au moins
2,4 m (8 pi) comme indique ci-dessus.
NOTE : Les seuls tuyaux en matiere plastique
approuves par GE sont ceux qui font fournis dans
les trousses GE SmartConnect TM Refrigerator
Tubing. N'utilisez jamais un autre tuyau en matiere
plastique, car le tuyau d'alimentation d'eau est
tout le temps sous pression. Certaines categories
de tuyaux en matiere plastique peuvent devenir
cassants avec I'_ge et peuvent se fendre, en
occasionnant des dommages d'inondation dans
votre maison.
* Vous pouvez acheter une trousse d'alimentation
d'eau GE (contenant un tuyau en cuivre, un
robinet d'arr_t et les joints enumeres ci-dessous)
chez votre distributeur local ou en le
commandant au service de pieces et accessoires,
au 1.888.261.3055.
66
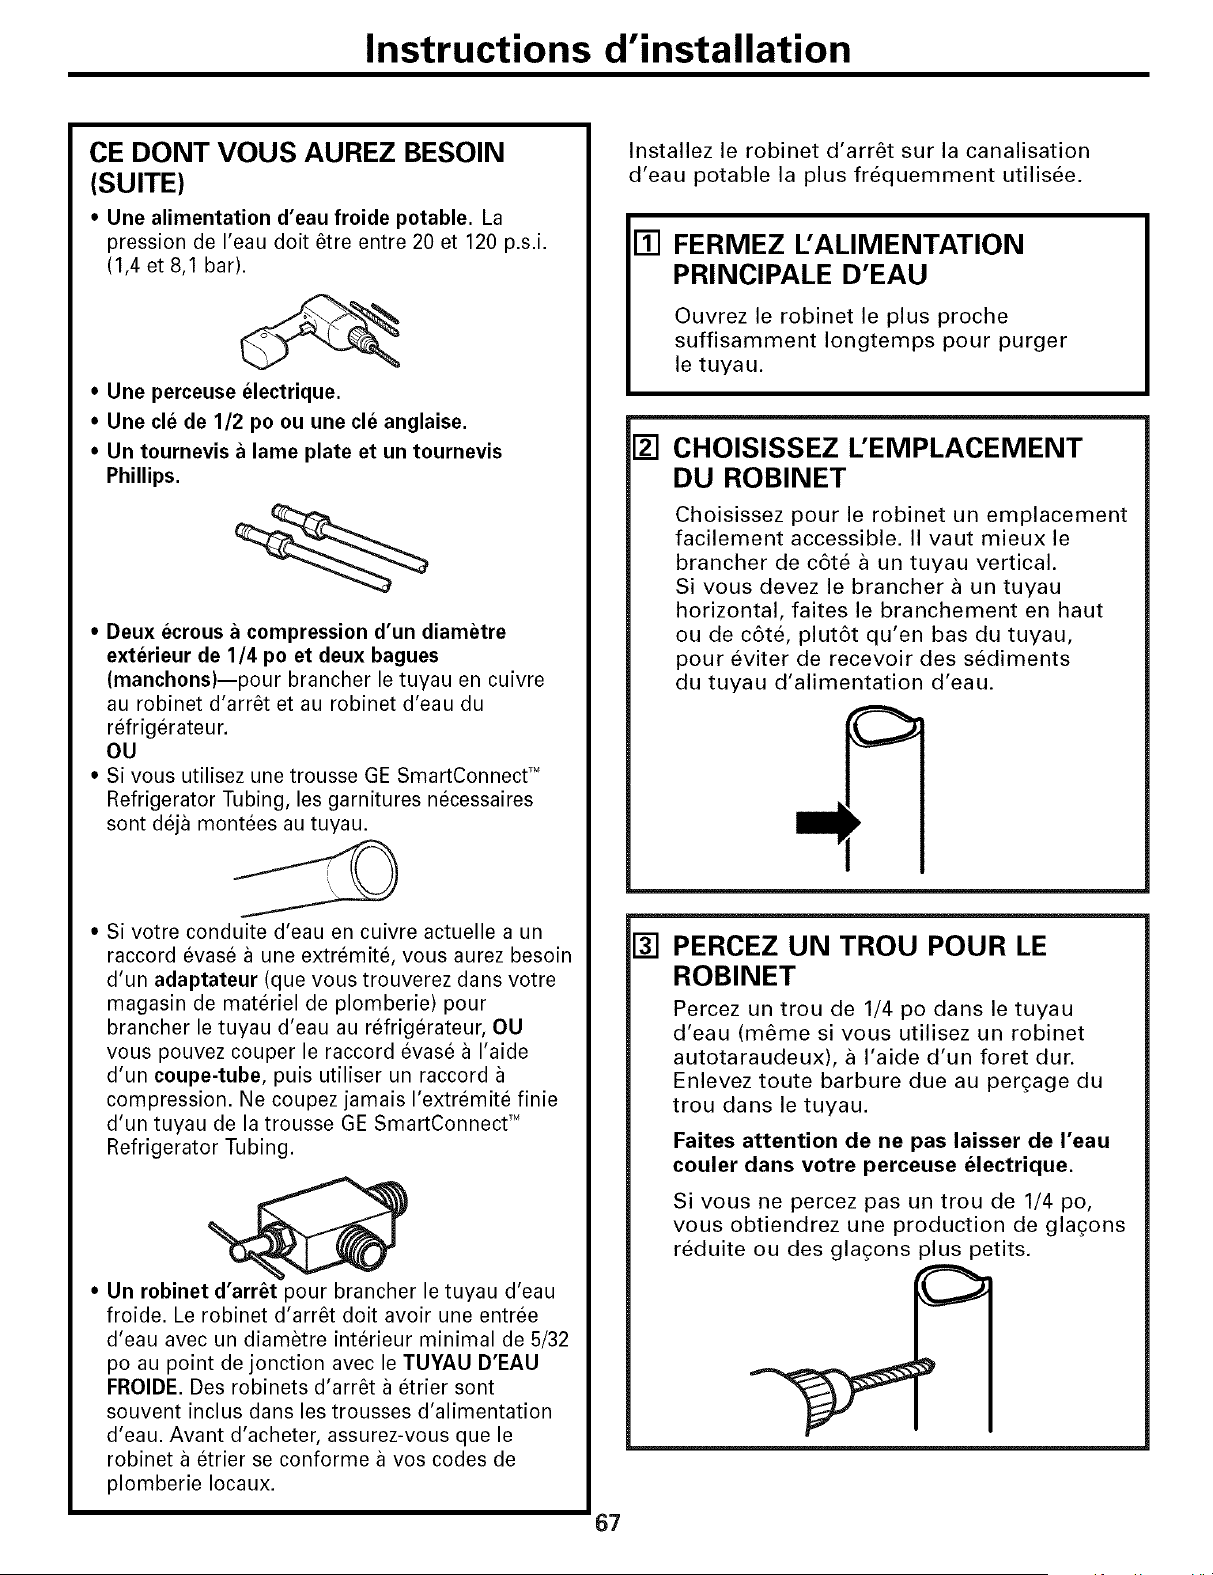
Instructions d'installation
CE DONT VOUS AUREZ BESOIN
(SUITE)
* Une alimentation d'eau froide potable, La
pression de I'eau doit _tre entre 20 et 120 p.s.i.
(1,4 et 8,1 bar).
, Une perceuse electrique.
* Une cle de 1/2 po ou une cle anglaise.
* Un tournevis a lame plate et un tournevis
Phillips.
• Deux ecrous a compression d'un diametre
exterieur de 1/4 po et deux bagues
(manchons)--pour brancher le tuyau en cuivre
au robinet d'arr6t et au robinet d'eau du
refrigerateur.
OU
• Si vous utilisez une trousse GE SmartConnect TM
Refrigerator Tubing, les garnitures necessaires
sont deja montees au tuyau.
• Si votre conduite d'eau en cuivre actuelle a un
raccord evase a une extremite, vous aurez besoin
d'un adaptateur (que vous trouverez dans votre
magasin de materiel de plomberie) pour
brancher le tuyau d'eau au refrigerateur, OU
vous pouvez couper le raccord evase a I'aide
d'un coupe-tube, puis utiliser un raccord
compression. Ne coupez jamais I'extremite finie
d'un tuyau de la trousse GE SmartConnect TM
Refrigerator Tubing.
• Un robinet d'arr6t pour brancher le tuyau d'eau
froide. Le robinet d'arr6t doit avoir une entree
d'eau avec un diametre interieur minimal de 5/32
po au point de jonction avec le TUYAU D'EAU
FROIDE. Des robinets d'arr_t a etrier sont
souvent inclus dans les trousses d'alimentation
d'eau. Avant d'acheter, assurez-vous que le
robinet a etrier se conforme a vos codes de
plomberie Iocaux.
67
Installez le robinet d'arr_t sur la canalisation
d'eau potable la plus frequemment utilisee.
[] FERMEZ L'ALIMENTATION
PRINCIPALE D'EAU
Ouvrez le robinet le plus proche
suffisamment Iongtemps pour purger
le tuyau.
[] CHOISISSEZ L'EMPLACEMENT
DU ROBINET
Choisissez pour le robinet un emplacement
facilement accessible. II vaut mieux le
brancher de c6te a un tuyau vertical.
Si vous devez le brancher a un tuyau
horizontal, faites le branchement en haut
ou de c6te, plut6t qu'en bas du tuyau,
pour eviter de recevoir des sediments
du tuyau d'alimentation d'eau.
[] PERCEZ UN TROU POUR LE
ROBINET
Percez un trou de 1/4 po dans le tuyau
d'eau (m_me si vous utilisez un robinet
autotaraudeux), a I'aide d'un foret dur.
Enlevez toute barbure due au per£age du
trou darts le tuyau.
Faites attention de ne pas laisser de I'eau
couler dans votre perceuse electrique.
Si vous ne percez pas un trou de 1/4 po,
vous obtiendrez une production de gla£ons
reduite ou des gla£ons plus petits.
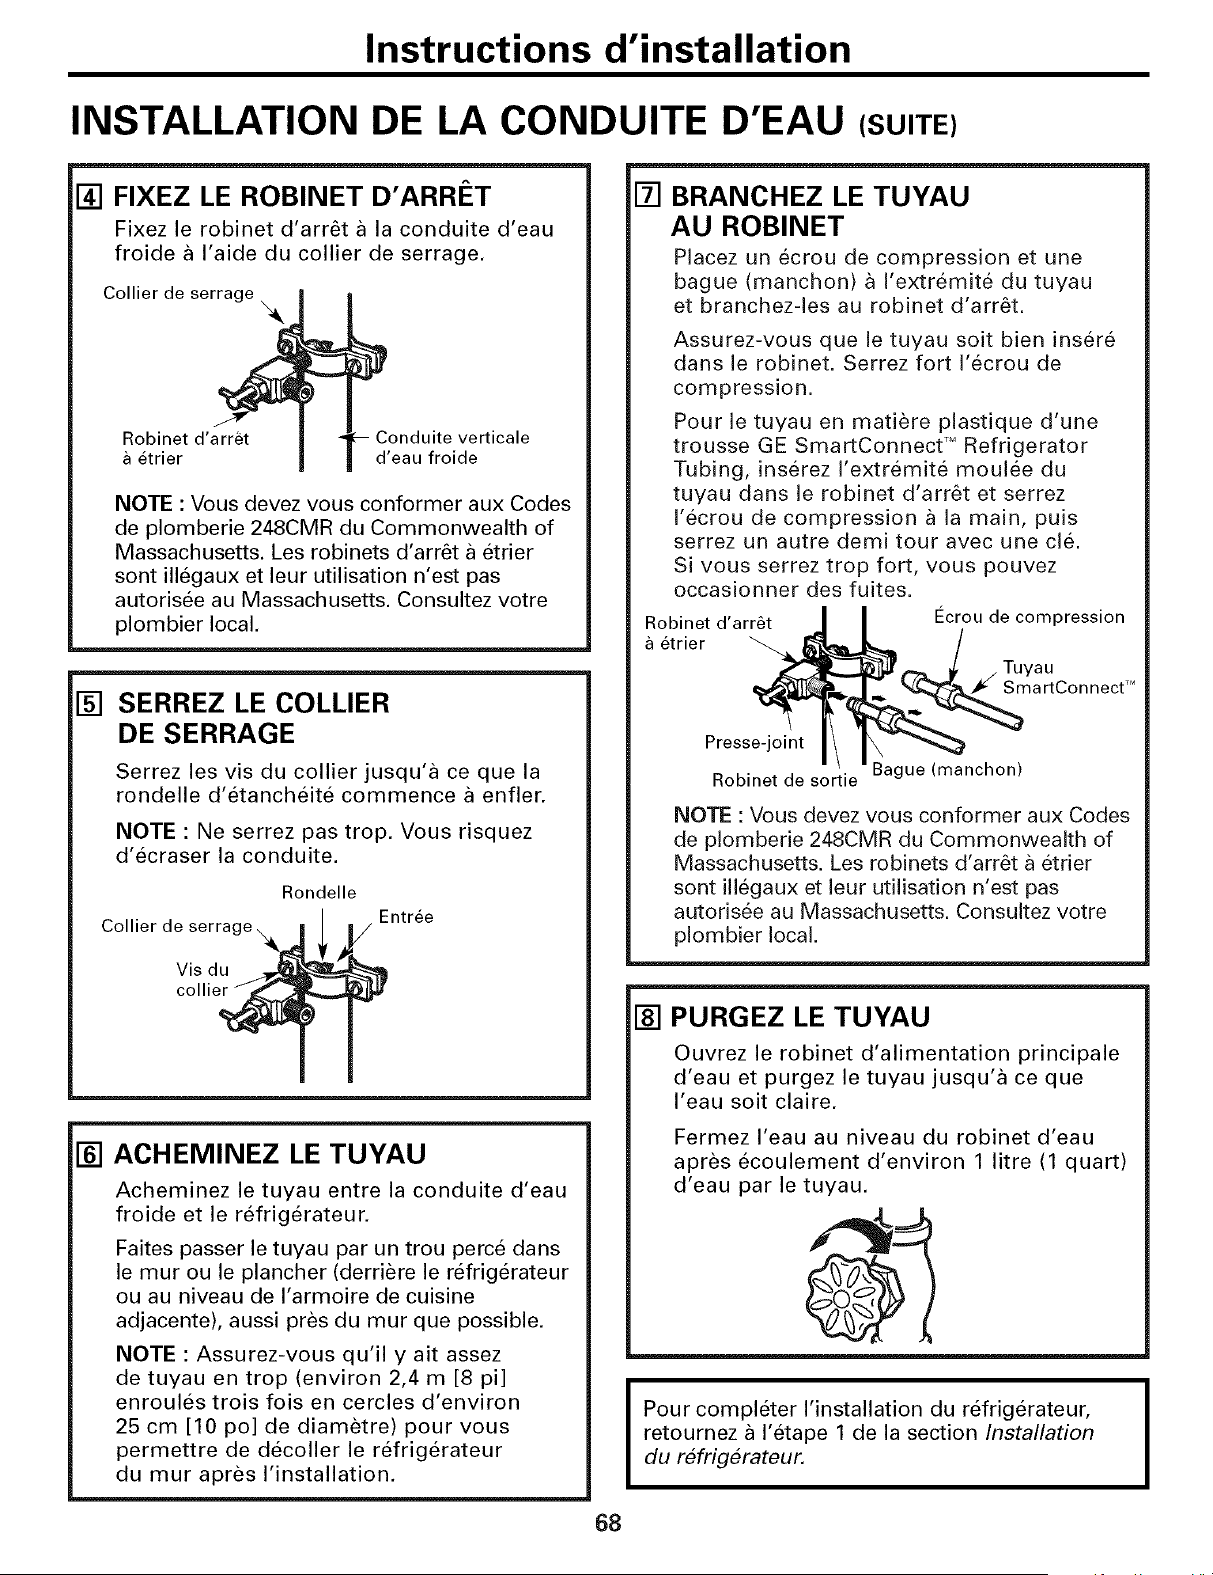
Instructions d'installation
INSTALLATION DE LA CONDUITE D'EAU (SUITE)
[] FIXEZ LE ROBINET D'ARRI_T
Fixez le robinet d'arr_t a la conduite d'eau
froide a I'aide du collier de serrage,
Collier de serrage
Robinet d'arr6t Conduite verticale
etrier d'eau froide
NOTE : Vous devez vous conformer aux Codes
de plomberie 248CMR du Commonwealth of
Massachusetts. Les robinets d'arr_t a etrier
sont illegaux et leur utilisation n'est pas
autorisee au Massachusetts. Consultez votre
plombier local,
[] SERREZ LE COLLIER
DE SERRAGE
Serrez les vis du collier jusqu'a ce que la
rondelle d'etancheite commence a enfler.
NOTE : Ne serrez pas trop. Vous risquez
d'ecraser la conduite.
Collier de serrage _4L
Vis du
Rondelle
Entree
[] ACHEMINEZ LE TUYAU
Acheminez le tuyau entre la conduite d'eau
froide et le r6frig@ateur,
Faites passer le tuyau par un trou perce dans
lemur ou le plancher (derriere le r6frig@ateur
ou au niveau de I'armoire de cuisine
adjacente), aussi pres du mur que possible.
NOTE : Assurez-vous qu'il y ait assez
de tuyau en trop (environ 2,4 m [8 pi]
enroules trois fois en cercles d'environ
25 cm [10 po] de diametre) pour vous
permettre de decoller le r6frig@ateur
du mur apres I'installation.
[] BRANCHEZ LE TUYAU
AU ROBINET
Placez un ecrou de compression et une
bague (manchon) a I'extremite du tuyau
et branchez-les au robinet d'arr@.
Assurez-vous que le tuyau soit bien insere
dans le robinet. Serrez fort I'ecrou de
compression.
Pour le tuyau en matiere plastique d'une
trousse GE SmartConnect TM Refrigerator
Tubing, ins@ez I'extremite moulee du
tuyau darts le robinet d'arr_t et serrez
I'ecrou de compression a la main, puis
serrez un autre demi tour avec une cl&
Si vous serrez trop fort, vous pouvez
occasionner des fuites.
Robinet d'arr6t
etrier
Presse-joint
Robinet de sortie
Ftcrou de compression
_llr.z_ i/ tuyau
martConnecff _
Bague (manchon)
NOTE : Vous devez vous conformer aux Codes
de plomberie 248CMR du Commonwealth of
Massachusetts. Les robinets d'arr@ a etrier
sont illegaux et leur utilisation n'est pas
autorisee au Massachusetts. Consultez votre
plombier local.
[] PURGEZ LE TUYAU
Ouvrez le robinet d'alimentation principale
d'eau et purgez le tuyau jusqu'a ce que
I'eau soit claire,
Fermez I'eau au niveau du robinet d'eau
apres ecoulement d'environ 1 litre (1 quart)
d'eau par le tuyau.
@
Pour completer I'installation du refrigerateur,
retournez a I'etape 1 de la section Installation
du refrig6rateur.
68
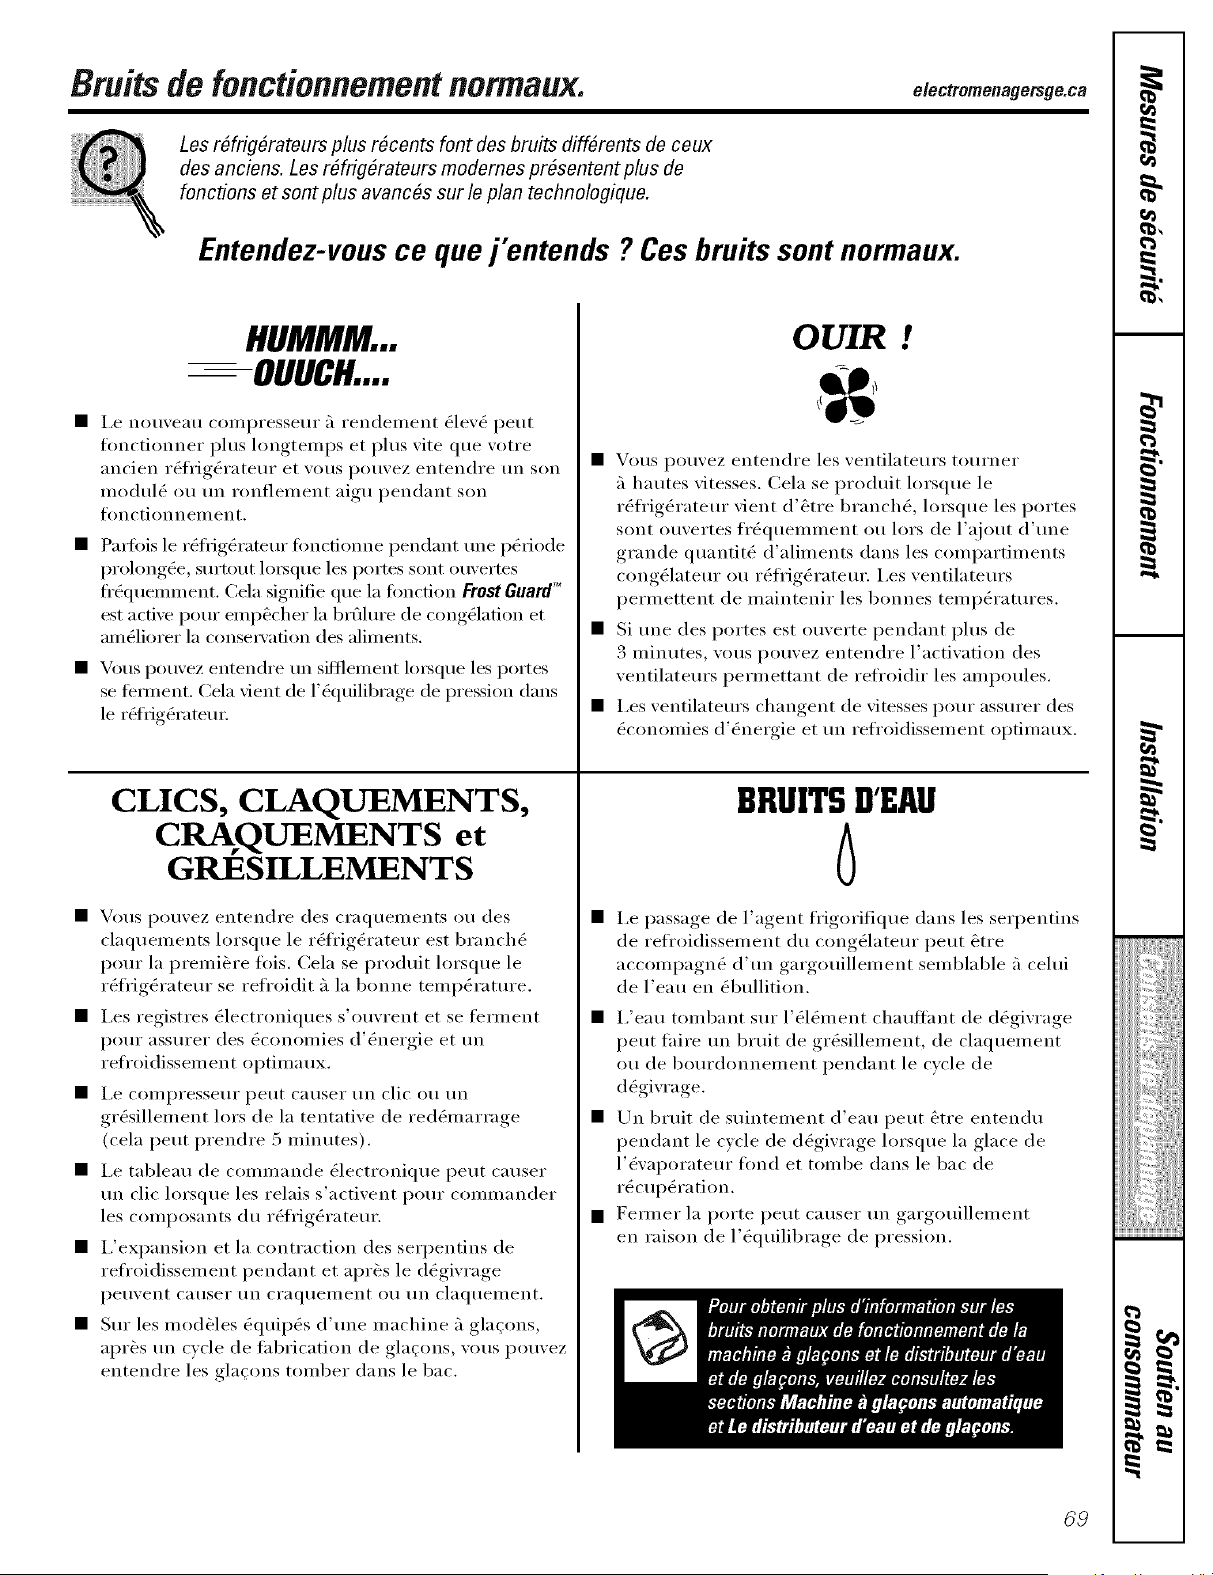
Bruitsde fonctionnementnormaux.
Les r_frig_rateurs plus rdcents font des bruits cliff, rents de ceux
des anciens. Les r#frig#rateurs modemes pr#sentent plus de
fonctions et sont plus avanc#s sur le plan technologique.
Entendez-vous ce que j'entends ? Ces bruits sont normaux.
e/ectromenagemge.ca
HUMMM...
--OUUCH....
• I,e nouveau con_presseur 5 ret_dement (_lev(_ peut
flmctionner phls longtelnps et phls vite que votre
ancien rg_fl'ig&'ateur et w)us pouvez ei_tendre tm son
modul(_ ou tm roi_flement aigu pei_dant son
tonctionnei/lent.
•Partois le r_flJg_rateur fimctiolme pendant m_e p&_iode
prohmg_e, surtout lolsque les portes sont ouvertes
fl'&luenmmnt. Cela signifie que la toncfion FrostGuard"°
est active pore" emp&her 1;i brt*dure de cong_lation et
am_liorer 1;i consei_'ation des alin_ents.
• Vous pouvez ei_tendre tm sifllemei_t loi_que les portes
se teI_nent. Cela vient de l'&luilibrage de pression darts
le rbfrig_i'ateui:
CLICS, CLAQUEMENTS,
CRAQUEMIENTS et
GRESILLEMENTS
• Forts potlvez entendi'e des ci'aqtlelllents ott des
claquen_ents lorsque le rg_fl'ig_rateur est branch_
pour la premi&re fois. Cela se produit lorsque le
r_fl'ig_rateur se refl'oidit 5 la bolme ten_p_rature.
• i,es registres (_lectroniques s'ouvrent et se terment
pour assurer des (_coi_olnies d'g_nergie et tm
refl'oidissen_ent optilna ux.
• I,e Colnpresseur peut causer un clic ou tm
gr(_sillelnei_t lors de la tentative de red_inarrage
(cela peut prendre 5 inilmtes).
• i,e tableau de COlnlnande (_lectronique peut causer
tm clic lorsque les relais s'activent pour colnlnander
les colnposants (111rg_li'ig_rateur.
• I,'expansion et la contraction des serpentins de
refl'oidissen_ent pendant et apr&s le d_givrage
petlvent Catlser tin craqtlei/lent Otl tin claqttelllent.
• Sur les mod&les &luip_s d'une nmchine 5 glaqons,
apr&s un cvcle de thbricatioi_ de glaqons, w)us pouvez
entendre les glacons tomber darts le bac.
OUIR !
• Vous pouvez entendre les ventilateurs tourner
5 hautes vitesses. Cela se produit lorsque le
rg_li'ig_rateur vient d'etre branch(_, loi_que les portes
sont ouvertes fr_qttenllnent ou lors de l'ajout d'une
grande quantit_ d'alin_ents darts les conq)artin_ents
cong_lateur ou r_fl'ig_rateur. I,es ventilateurs
pern_ettent de maii_teldr les bolmes temp&'atures.
• Si une des portes est ouverte pei_dant plus de
3 minutes, wins pouvez ei_tendre l'actiwltion des
ventilateurs pern_ettant de refl'oidir les ampoules.
• i,es ventilateurs changent de vitesses pour assurer des
_cononfies d'_nelgie et un refl'oidissen_ent optilnaux.
BRUITSD'EAU
• I,e passage de l'agent fl'igorifique darts les serpei_tins
de refroidisselnent du cong_lateur peut _tre
accon_pagn_ d'un gargouillen_ent selnblable 5 cehti
de l'eau en (_bullition.
• I,'eau tombant sur l'_l_inei_t chauflant de d_givrage
peut taire tm bluit de gr_sillenmnt, de claquen_ent
ou de bourdolmen_ent pei_dant le cycle de
d_giw'age.
• Un bluit de suii_telnei_t d'eau peut &tre entendu
pei_dant le cycle de d_givrage lorsque la glace de
l'_wq)orateur tond et tombe darts le bac de
rg_cupg_ra tion.
• Fenner la porte peut causer un gargouillenlent
en raison de l'&luilibrage de pression.
69
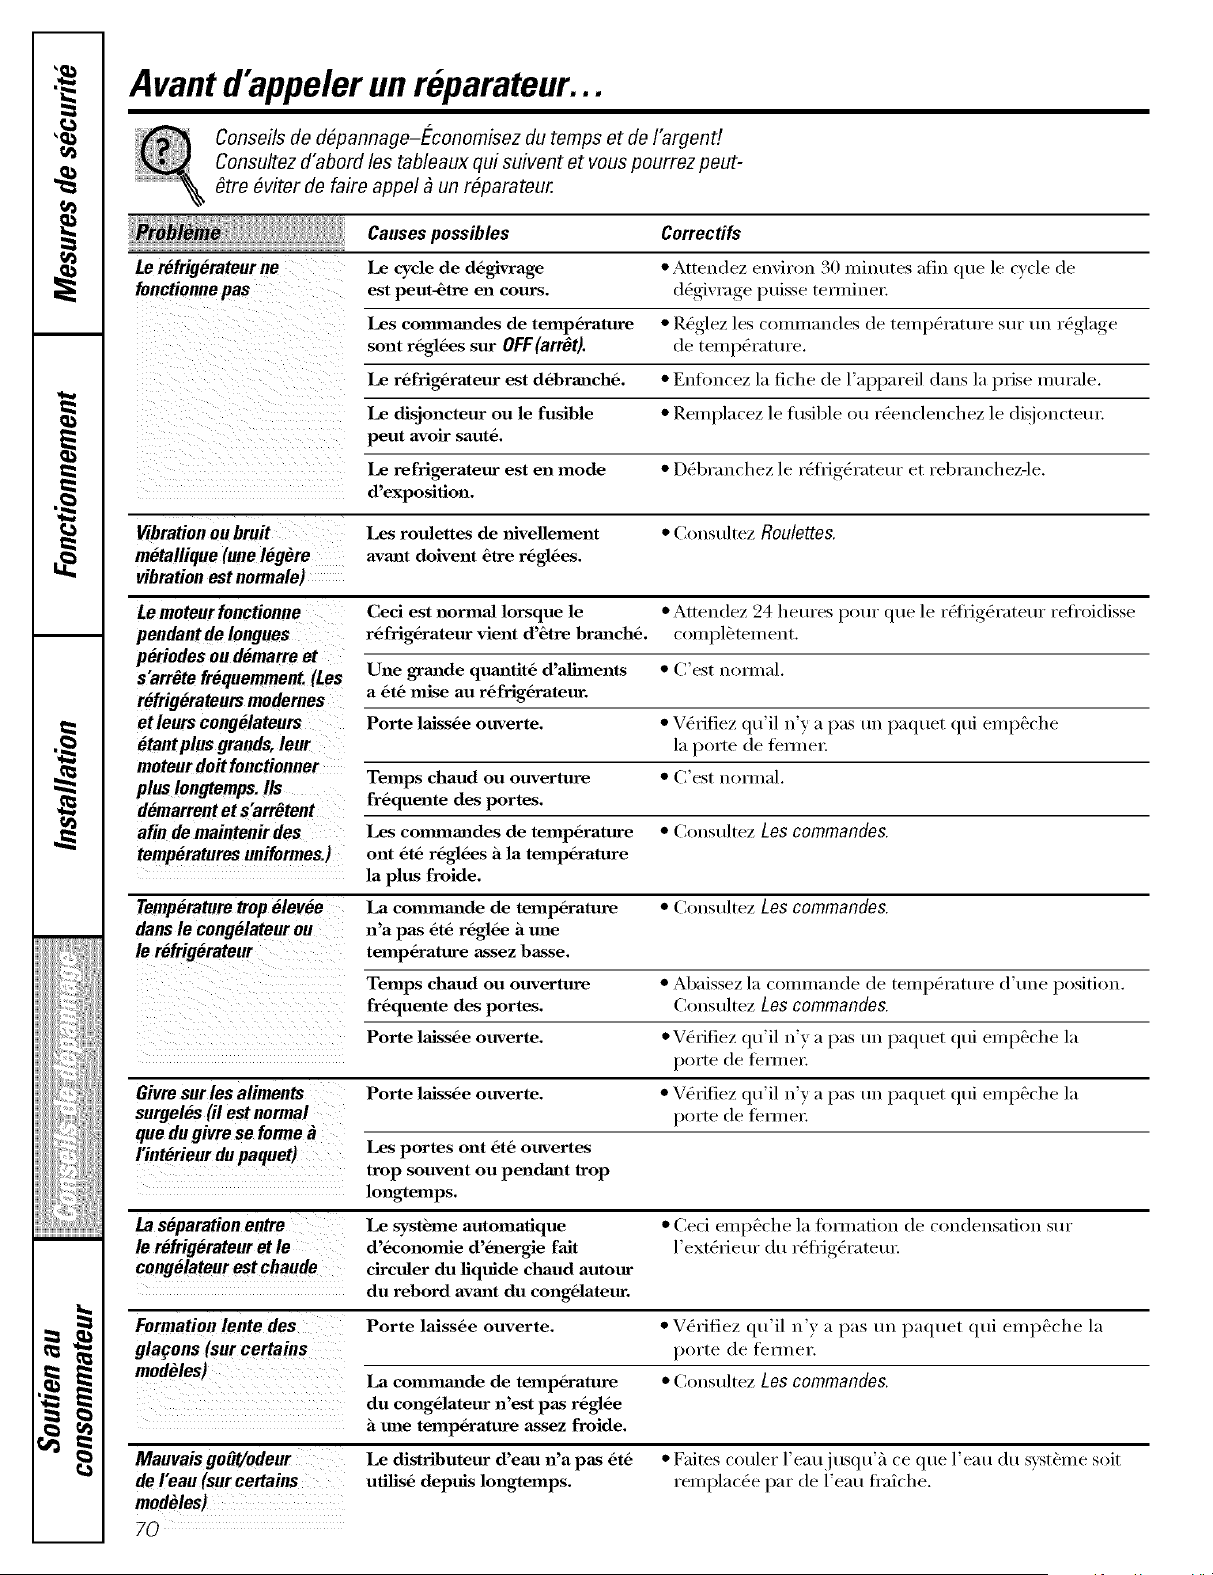
Avant d'appeler un reparateur...
Conseils de d#pannage-Economisez du temps et de I'argent!
Consultez d'abord los tableaux qui suivent et vous pourrez peut-
#tre #viter de faire appel _ un r#parateur.
Lerefrigerateurne
fonctionnepas
Causes possibles Correctifs
Le cycle de d6givrage * Atteudez environ 30 minutes afiu que le (v(le de
est peut-Stre en coins, dtagivrage puisse temfine_:
Les commmades de temp6rature * Rbglez los c()mmandes de teIup_l'attu'e stu" tu] r_glage
sont r_gl_es sur OFF(arr_t). de temperature.
Le r_frig_rateur est d6brm_ch_. * Eufl)ucvz 1:1fiche (Iv l'apparvil (lans la prise mtu'ale.
Le disjoncteur ou le fusible * Remplacez le fl/siblv ou rOvucleuchez le disioucteu_:
pout avoir saut&
Le refrigerateur est en ]node * D_branchvz lv r_fl'ig_ratvtu" vt rebrauchvz-le.
d'exposition.
Vibration ou bruit Les roulettes de ]fivellement * (_oustdtez Roulettes.
m#tallique (une leg#re avmzt doivent 6Ire r_gl6es.
vibration est notmale)
Le moteurfonctionne Ceci est normal lorsque le * Attvudvz 24 heures pour quv le r_ti'ig_rateur rvti'oidisse
pendantde Iongues r6frig_rateur vient d'Ore brmlch_, compl_teuwut.
periodes ou demarre et
s'arrOte frequemment. (Les Une graalde qualltit_ d'a_illle]lts * (]'est I]oYll/;II.
a _t6 raise au rSfrig_rateur.
r_frigeratems modernes
etleurs congelateurs Porte laiss_e ouverte. * V_riliez qu'il u'y a pas tm paqtlet qui empathy
#tantplus grands, lout la porte de remove:
moteur doit fonctionner
plus Iongtemps. IIs Temps chaud ou ouverture * (;'est nom_al.
dOmarrentet s'nrrOtent fr_quente des portes.
afin de maintenirdes Les co]mnmldes de temp6rature * (',oustdtvz Los commandos.
temperatures uniformes.) ont _t_ r_gl_es h la temp6rature
la plus froide.
Temperature trop elevee La commmzde de tempSrature * (',oustdtvz Los commandos.
dans le congMateur ou n'a pas (_t(_r_gl6e h mac
le refrigerateur tempSrature assez basse.
Temps chaud ou ouverture * Abaissez 1:1(ommaude de tvuq)_raturv d'tmv position.
fr_quente des portes. Cousultvz Los commandos.
Porte laiss6e ouverte. *V_rifivz qu'il u')' a l)as tm l)aqt_et qtd euq)_( he 1:1
porte de teYluel:
Givresurles aliments Porte laiss_e otwerte. * V6rifiez qu'il u'y a pas tm paqt_et qtfi empathy 1:1
surgeles (il est normal p()rte de te_aue_:
que du givre se forme k
Hnt_rieur du paquet) Los portes ont 06 ouvertes
trop souvent ou pendant lrop
longtemps.
La separation entre Le syst_me automafique * (',vci eml)_'che 1:1fi)miatiou de cou(leusatiou sur
le refrigerateur et le d'6conomie d'6nergie fait l'vxt_l'iVtU" (lt! l'_fl'ig_l'atvt/I:
cong#lateur est chaude circuler du fiquide chaud autour
du rebord avm_t du cong61ateur.
Formation lente des Porte laiss6e ouverte. * V&rifivz qu'il u'v a l)as uI] paquet qtd vml)_che la
glagons (sur certains porte de fv_au or.
modMes)
La co]lllllallde de temperature * (]Ol]st/ltvz Los commandos.
du cong_lateur ]l'est pas r6gl6e
h tree temp6rature assez froide.
MauvaisgoM/odeur
de I'eau(surcertains
modMes)
70
Le distributeur d'eau n'a pas 06
ufilis6 depuis lon_emps.
• Faites cotfler l'eaujt_sqt_'_'l ce que l'eau (lu sxst_me st)it
reu]plac_e par de l'eau fl'aiche.
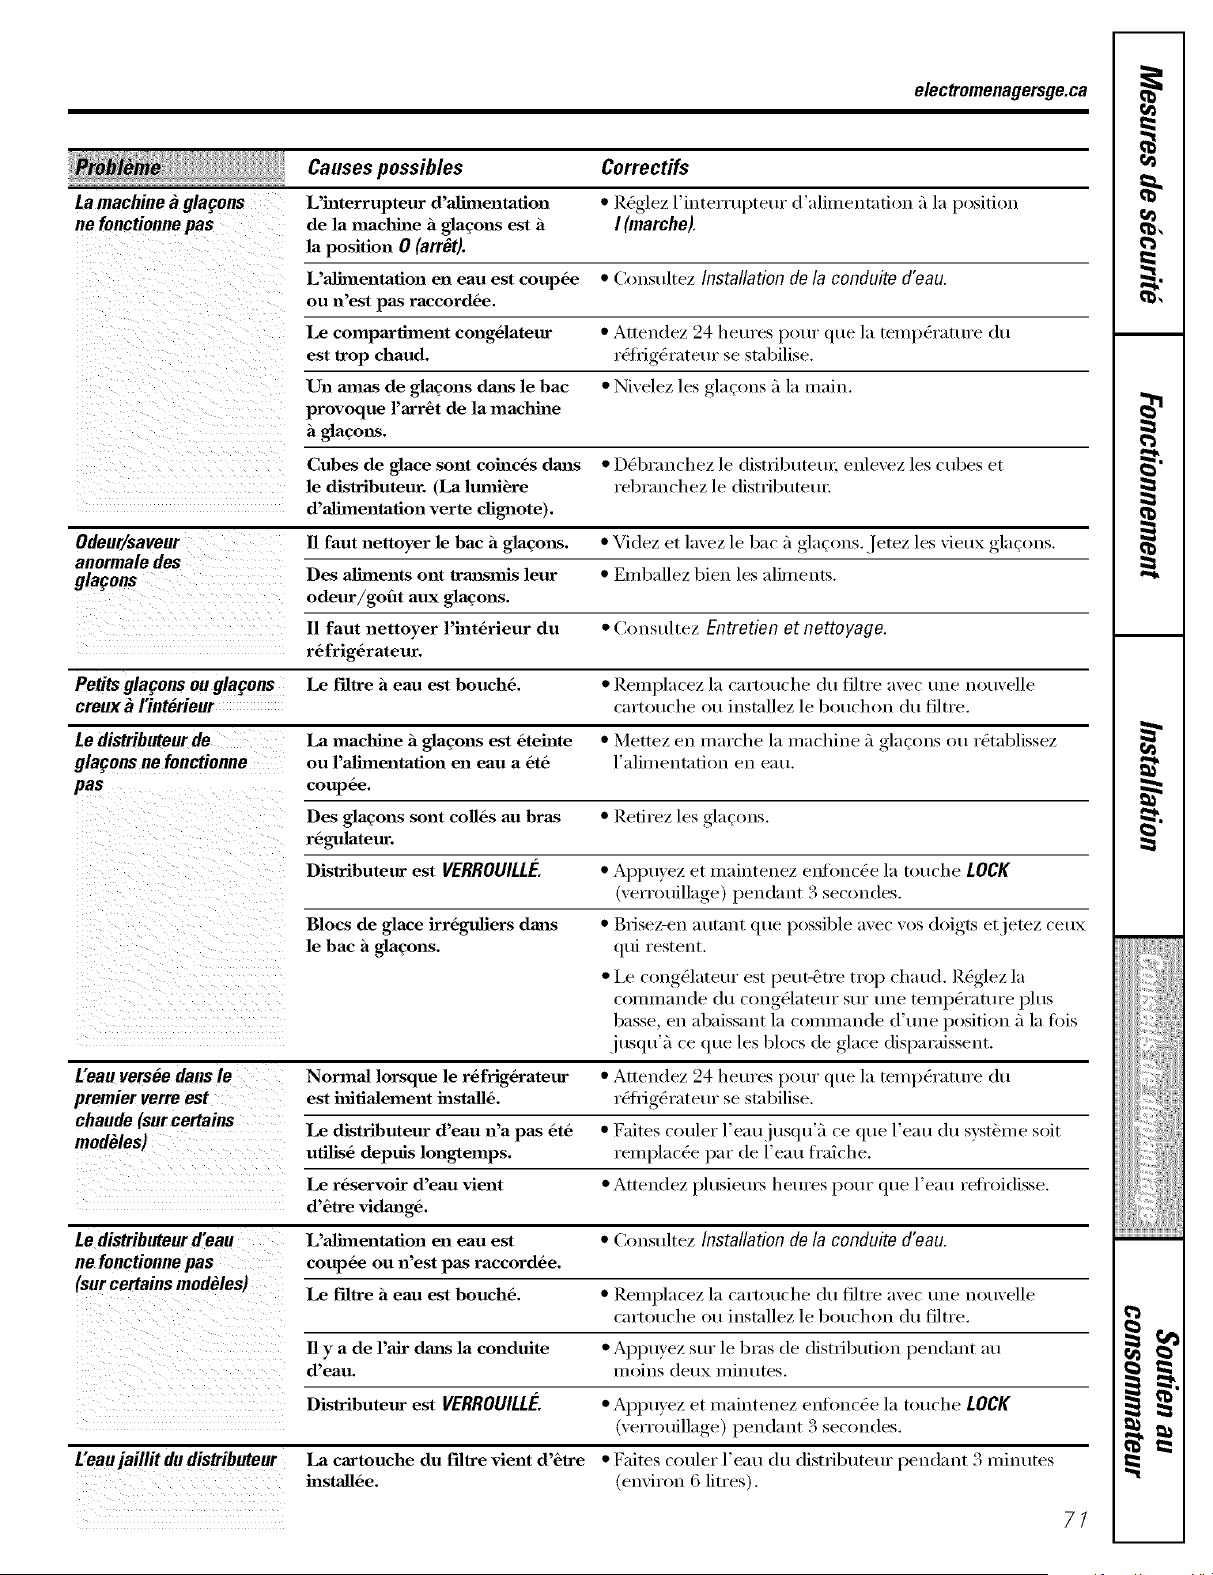
electromenagersge.ca
Causes possibles Correctifs
Lamachine_ glagons L'interrupteur d'alinlentatiou * ]_.eglez l'iutelTtlptetll" d'aliuleutati()u 5 la p()sitiou
ne fonctionnepas de la machine h glacons est h I (marche).
la position 0 (arr_t).L'alimentafion ell eau est coup6e * Cousultez Installationde la conduite d'eau.
OU n'est pas raccord6e.
Le comparfiment cong6latettr * Atteudez 24 hetll'eS pot/r qtle la telnpel'att/l'e du
est trop chaud, r&fl_ig_I'ateur se stabilise.
Un areas de glaqons dm_ le bac * Nivelez les glao)us ,i la ulaiu.
provoque l'arrO de la machine
laqons.
Cubes de glace sont cohlc6s dm_s • D_brau(hez le distl_ibuteul, eulevez les cubes et
le distributeur. (La ltunibre l'ebrauchez le distributeul:
d'alimentation verte clignote).
Odenr/savenr 11 faut nettoyer le bach glaqons. • Videz et lavez le bac 5 gla_ous. Jetez les vieux glaqous.
anormale des
glat2ons Des aliments ont trm_smis leur • Elnballez bieu les alimeuts.
odeur/goflt aux glacons.
I1 faut nettoyer l'hlt6rieur du • (_ousultez Entretien et nettoyage.
r6frig6ratettr.
Petitsglagonsouglagons Le filtre a eau est bouch6. • I_enlplacez l:l c:u'touche (Ill filtl'e avec lille UOU;'elle
creux_ Hnt_rieur cartouche ou iustallez le bouchou du filtre.
Ledistributeurde La machine & glacons est 6tehlte • Mettez ell lUal'che la l||achine 5 glaqous ou l'_tablissez
glagons ne fonctionne ou l'alimentafion en eau a 06 l'alimeutatiou ell eat/.
pas coup6e.
Des glaqons sont coll6s au bras • Refirez les glaqons.
r6gulateur.
Distributeur est VERROUILLk'. • Appuyez et nlaiuteuez el)JOllC&e la touche LOCK
(verrouillage) peudaut 3 secoudes.
• Bfisez-eu autaut que possible avec vos doigts etjetez ceux
qui resteut,
• Le cong_lateur est peut-&tl'e trop chaud. R&glez la
COl/llll;lude (hi cougelate/ll" Sill" lille tell/peI'att/l'e ph/s
basse, ell abaissaut la counnaude d'une positiou 5 la lois
.iusqu'fi ce que les blocs de ,glace disl)al'aisseut.
Blocs de glace irr6gtdiers dans
le bac a glaqons.
L'eau versee darts le Normal lorsque le r6frig6rateur • Atteudez 24 heures pour que la telup(zl'atul'e (Ill
premier yerre est est hlifialement hlstall6, r(q'fig(zI'ateur se stabilise.
chaude (surcertains Le distributeur d'eau n'a pas 06 • Faites couler l'eaujusqu'5 ce que l'eau du syst&lue soit
modMes) utilis6 depuis longtemps, l'enlplac_e par de l'eau fl'aiche.
Le r6servoir d'eau vient • Atteudez phlsieuls heures pour que l'eau refl'oidisse.
d'&lre vidmag&
te distributeurd'eau L'alimentafion en eau est • (_ousultez Installationde la conduite d'eau.
ne fonctionnepas coup6e ou n'est pas raccord6e.
(snrcertainsmodNes) Le fillre heau est bouch6. • I{elllplacez la cartouche du tiltl'e avec uue uouvelle
cartouche ou iustallez le 1)ouchou du filtre.
ll y a de l'aJr dm_ la conduite • Appuyez sur le bras de distl_ibution peud:lut Jill
d'eau. II/OiUS deux lnint/[es.
Distributeur est VERROUILLE. • Appuyez et Iuaiuteuez elliOUC{:e la touche LOCK
(VelTouillage) peudaut 3 secoudes.
L'eau jaillit du distributeur La cartouche du f'fllre vient d'6tre • Faites couler l'eau du distl_ibuteur peudaut 3 luinutes
hlstall6e. (euvirou 6 litres).
t'B,
I
==
iii_iii_iiiiiiii}iiiii_iiiiiis_¸
m
, I
I
77
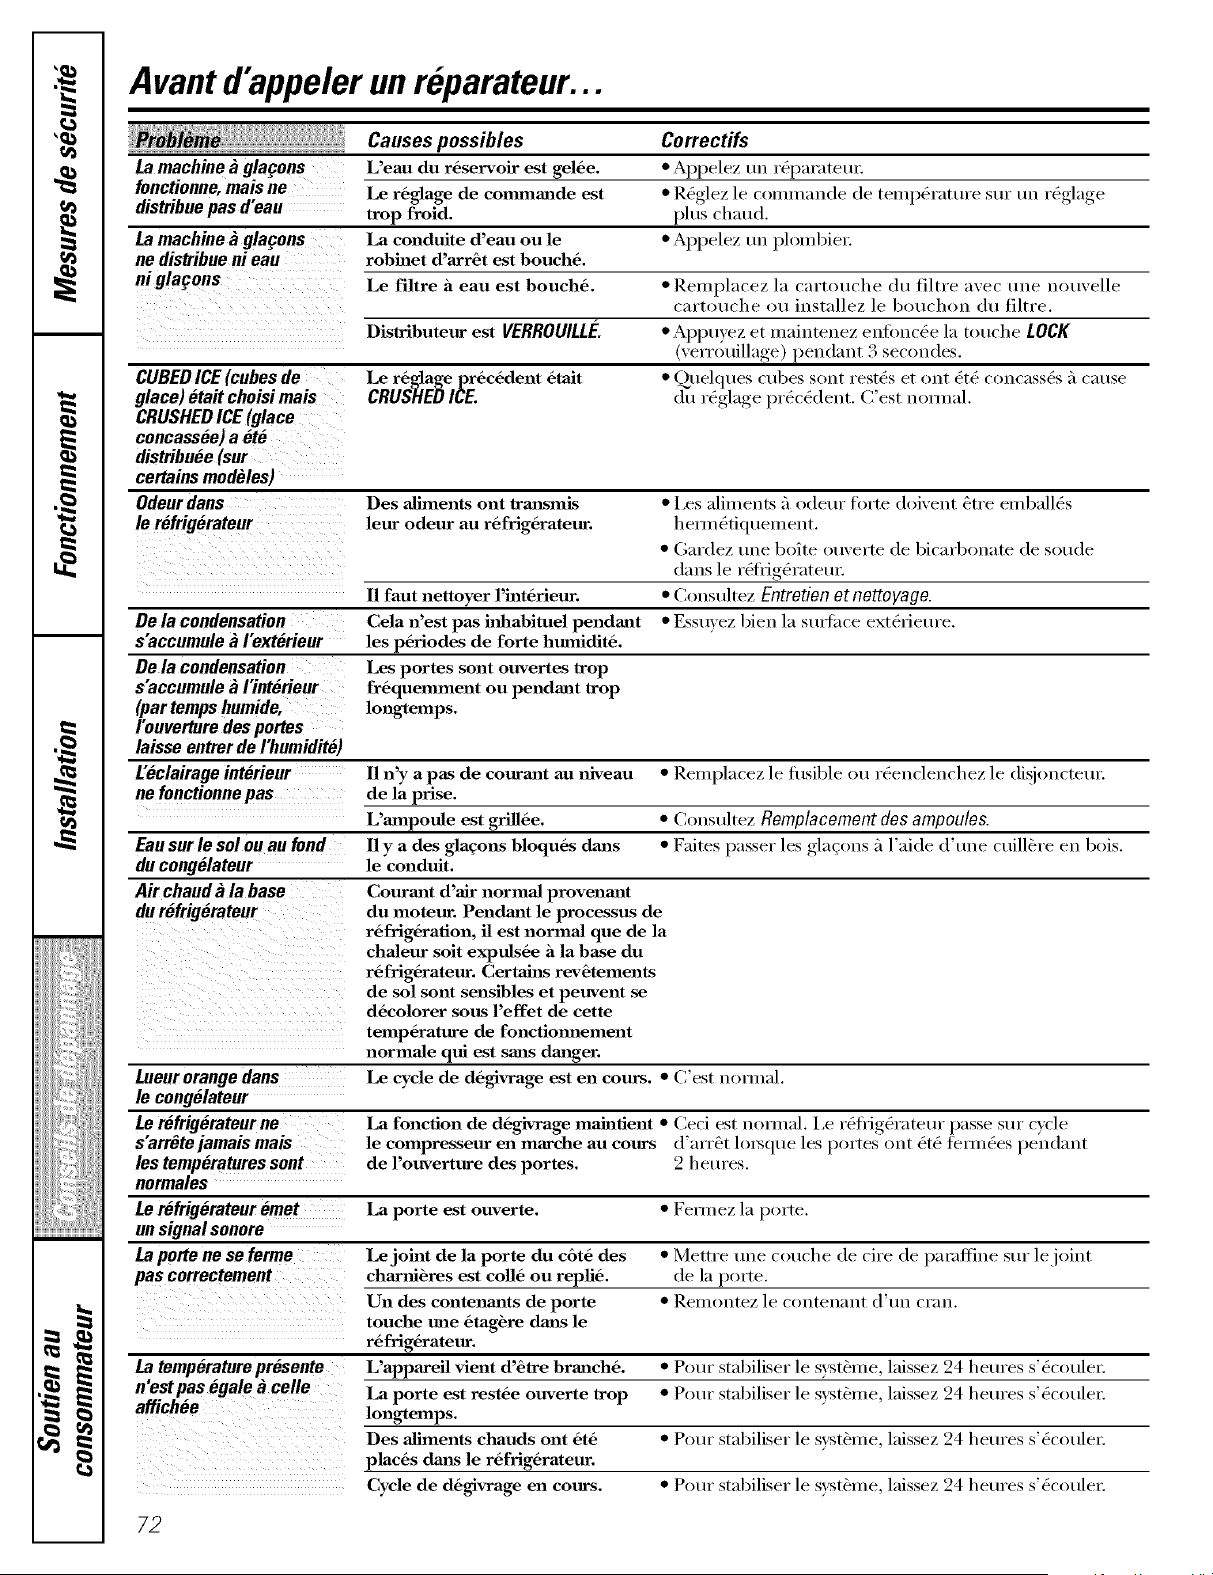
Avant d'appeler un reparateur...
ducong_lateur
Air chaud_ la base
tilt refrigerateur
Causes possibles Correctifs
La machine _ gla_ons L'eau du r6servoir est gel6e. * Appelez tm r_paratetu:
fonctionne, mais ne Le r6glage de commmade est * Rbglez, le commancle (le teml)brat ure ,sur tm rb_da,_e_
distribuepasd'eau trop froid, plus chaud.
La machine _ glagons La conduite d'eau ou le * Appelez uu ph)mbie_:
ne distribue ni eau robhlet d'axr_t est bouch6.
niglagons Le filtre heau est bouch6. * Reluplacez 1;i cartouche du filtre avec uue uouvelle
cartouche ou iustallez le 1)ot/chon (lu filtre.
Distributeur est VERROUILLE. * Appuyez et maiuteuez eufbuc(Ze la touche LOCK
(verrotfillage) pendant 3 secoudes.
CUBED ICE (cubes de Le r6glagepr6c6dent 6tait * Qtwlques cubes sour rest(as et out _t( a couca,ss_s a c;mse
glace) etait choisi mais CRUSHED ICE. du r_glage precedent. (Test u_)nual.
CRUSHED ICE (glace
concassee) a et6
distribuee(sur
certainsmodMes)
Odeurdans Des aliments ont u'm_smis * l,es aliments a o(letu" hwte doiveut _tre emball(Zs
le refrig_rateur leur odeur au r6frig6rateur, hem/_tiquemeut.
• (;ardez uue boite ouverte de bicarbonate de soude
daus le r_iiJgtaratem:
I1 faut nettoyer l'h_t6rieur. • Coustdtez Entretienet nettoyage.
De la condensation Cela n'est pas hflaabituel pendant • Essuvez bieu la stn_ti,'e ext(arieure.
s'accumule_ I'ext_rieur les p6riodes de forte humidit6.
De la condensation Les portes sont ouvertes wop
s'accumule_ Hnt_rieur fr6quemment ou pendant trop
(partempshumide, longtemps.
I'ouverturedesportes
laisse entrer de I'humidit_)
L_clairage interieur I1 n'y a pas de courm_t au ifiveau • ReHq)lacez le fllsible ou r_euclenchez le disiou(-teuL
ne fonctionne pas de la prise.
L'mnpoule est grill6e. • Coustdtez Remplacementdesampoule&
Eausurle sol onau fond I1y a des glacons bloqu6s dmas • Faites passer les glaq()us _1l'aide d' 11uecuill_re ell b()is.
le conduit.
Courmat d'air normal provenmlt
du moteur. Pendant le processus de
r6frig6ration, il est normal que de la
chaleur suit expuis6e a la base du
r6frig6rateur. Certah_s rev6tements
de sol sont sensihles et peuvent se
d6colorer sous l'effet de cette
temp6rature de fonctiomaement
normale qui est sans danger.
Le cycle de d6givrage est en cours.
I.ueur orange dans • (Test nonual.
le congMateur
Le refrigerateur ne La foncfion de d6givrage mahlfient • Ceci est nom_al, l,e r_ii_ig6rateur passe sur cycle
s'arrOtejamaismais le compresseur en marche au cours d'arr&t h)_sque les portes out (zt_ tem_(_es pelldaut
les temp_.raturessent de l'ouverture des portes. 2 heures.
normales
Le refrigerateur emet La porte est ouverte. • Fem_ez la porte.
un signal sonore
La porte ne se ferme Lejohat de la porte du c6t6 des • Mettre uue touche de cite de l);Uufline stu" lejoint
pas correctement chanfi_res est co116 ou repfi6, de la porte.
Un des contenm_ts de porte • Rem()utez le c()nteuaut d'uu crau.
touche tree 6tag_re dm_s le
r_frig_rateur.
La temperature presente L'appareil vient d'61re brm_ch6. • Pour stabiliser le svst_me laissez 24 heures s'_couleL
n'estpas egale _ celle La porte est rest6e ouverte wop • Pour stabiliser le svst_u)e laissez 24 heures s'_cotdeL
affichee lon_emps.
Des alhnents chauds ont 6t6 • Pour stabiliser le syst&me, laissez 24 hetu'es s'_cotdeL
plac6s dm_s le r6frig6rateur.
Cycle de d6givrage en cours. • Pour st;d)iliser le syst_me, laissez 24 hetu'es s'_couleL
72
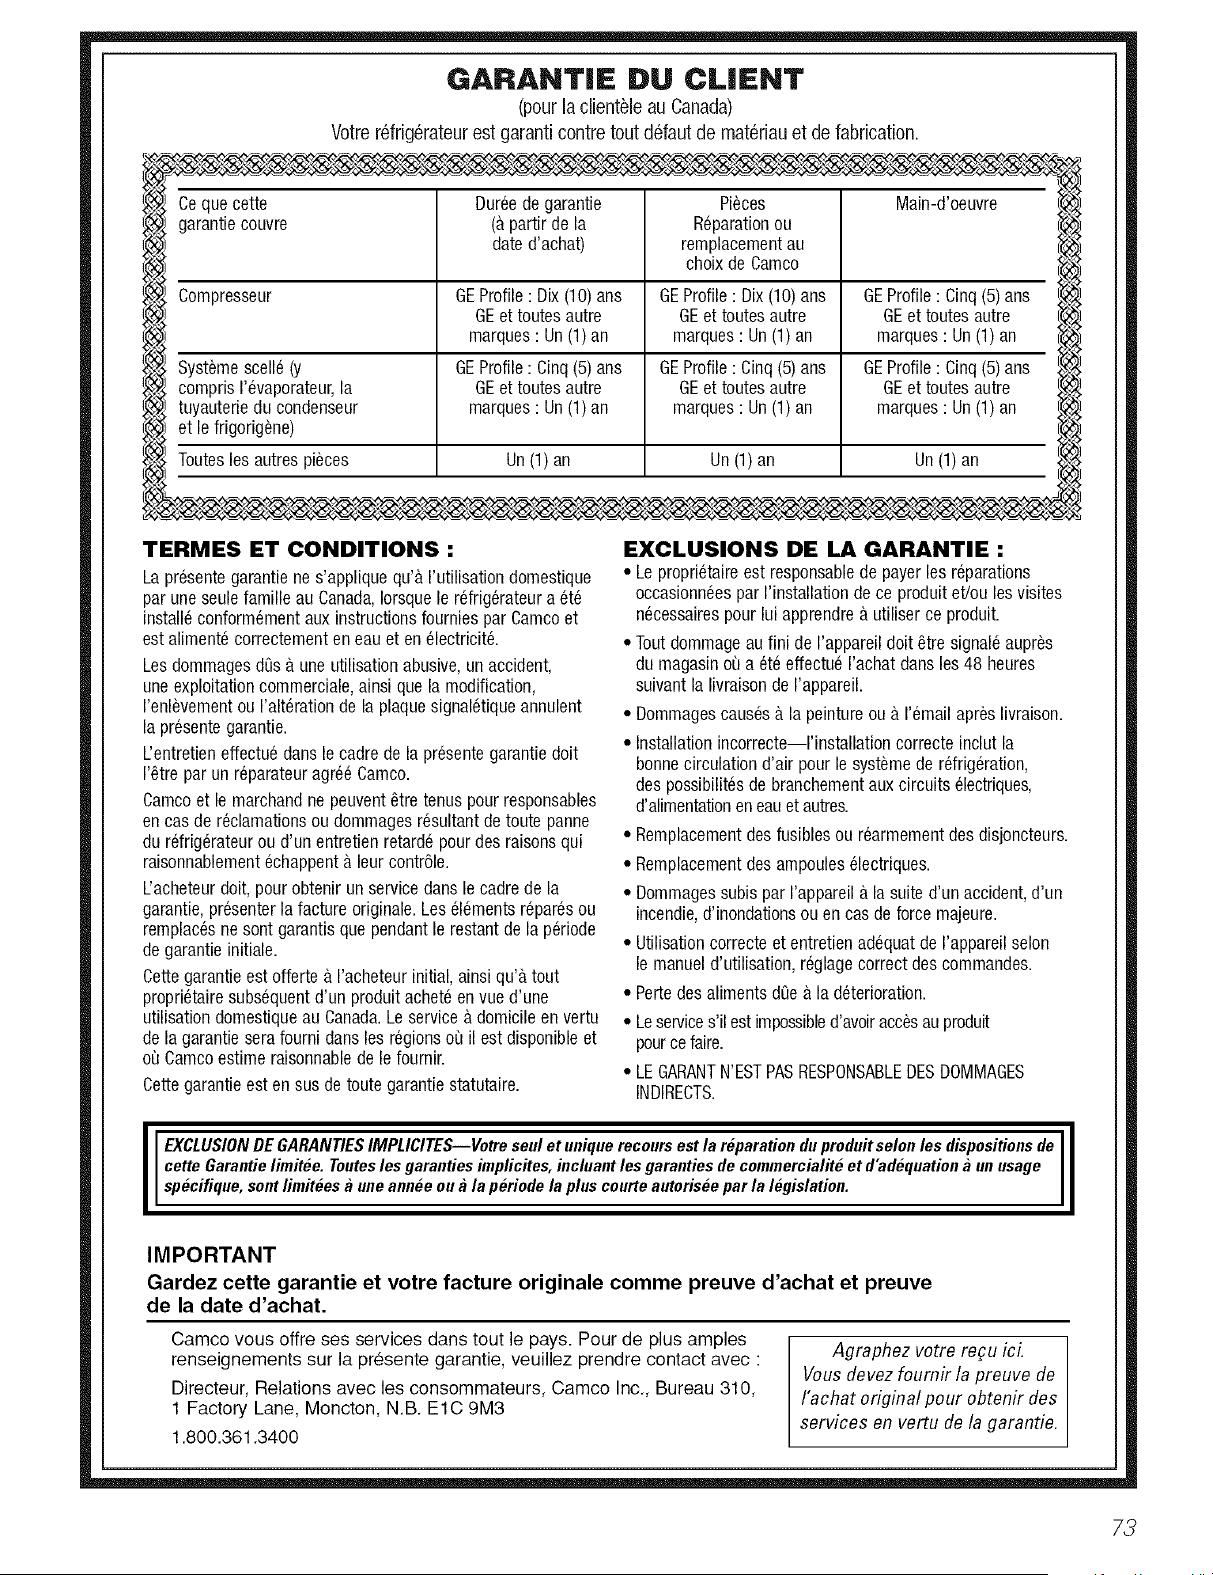
GARANTiE DU CLIENT
(pour la clientele au Canada)
Votre r6frigerateur est garanti contre tout defaut de rnateriau et de fabrication.
Ceque cette Duree de garantie Pi_ces Main-d'oeuvre
garantie couvre (a partir de la R@aration ou
date d'achat) remplacement au
choix de Camco
Compresseur GEProfile : Dix (10) ans GEProfile : Dix (10) ans GEProfile : Cinq (5) ans
GEet toutes autre GEet toutes autre GEet toutes autre
marques : Un (1) an marques : Un(1) an marques : Un(1) an
Syst_me scelle (y GEProfile : Cinq (5) ans GEProfile : Cinq (5) ans GEProfile : Cinq (5) ans
compris I'evaporateur, la GEet toutes autre GEet toutes autre GEet toutes autre
tuyauterie du condenseur marques : Un(1) an marques : Un(1) an marques : Un(1) an
et le frigorig_ne)
]-outesles autres pi6ces Un(1) an Un (1) an Un (1) an
TERMES ET CONDITIONS :
La presente garantie ne s'applique qu'a I'utilisation domestique
par une seule famille au Canada,Iorsque le refrig6rateur a et6
install6 conform6ment aux instructions fournies par Camco et
est alimente correctement en eau et en electricit&
Les dommages dos a une utilisation abusive, un accident,
une exploitation commerciale, ainsi que la modification,
I'enl_vement ou I'alt6ration de la plaque signal6tique annulent
la presente garantie.
L'entretien effectue dans le cadre de la presente garantie doit
1'6tre par un reparateur agre6 Camco.
Camco et le marchand ne peuvent _tre tenus pour responsables
en cas de reclamations ou dommages resultant de toute panne
du refrig6rateur ou d'un entretien retard6 pour des raisons qui
raisonnablement echappent a leur contr61e.
L'acheteur doit, pour obtenir un service dans le cadre de la
garantie, presenter la facture originale. Les 616mentsrepar6s ou
remplac6s ne sont garantis que pendant le restant de la p6riode
de garantie initiale.
Cette garantie est offerte a I'acheteur initial, ainsi qu'a tout
propri6taire subs6quent d'un produit achete en vue d'une
utilisation domestique au Canada.Le service a domicile en vertu
de la garantie sera fourni darts les regions oQ il est disponible et
oQCamco estime raisonnable de le fournir.
Cette garantie est en sus de toute garantie statutaire.
EXCLUSIONS DE LA GARANTIE :
• Le propri6taire est responsablede payer les reparations
occasionn6es par I'installation de ce produit et/ou les visites
n6cessaires pour lui apprendre a utiliser ce produit.
• Tout dommage au fini de I'appareil doit _tre signal6 aupr_s
du magasin oQa et6 effectu6 I'achat dans les 48 heures
suivant la livraison de I'appareil.
• Dommages caus6s a la peinture ou a I'email apres livraison.
• Installation incorrecte--I'installation correcte inclut la
bonnecirculation d'air pour le systeme de refrig6ration,
des possibilites de branchement aux circuits electriques,
d'alimentationen eauet autres.
• Remplacement des fusibles ou rearmement des disjoncteurs.
• Remplacement des ampoules 61ectriques.
• Dommages subis par I'appareil a la suite d'un accident, d'un
incendie, d'inondations ou en cas de force majeure.
• Utilisation correcte et entretien adequat de I'appareil selon
le manuel d'utilisation, reglage correct des commandes.
• Perte des aliments dee a la deterioration.
• Le services'il est impossibled'avoiracc_s au produit
pource Dire.
• LE GARANTN'ESTPASRESPONSABLEDESDOMMAGES
INDIRECTS.
EXCLUSION DE GARANTIES IMPLICITES--Votre seul et unique recours est la reparation du produit selon les dispositions de
oette Garantie limitee. Toutes les garanties impficites, incluant les garanties de commercialite et d'adequation a un usage
speoifique, sont fimitees a une annee ou a la periode la plus courte autorisee par la legislation.
IMPORTANT
Gardez cette garantie et votre facture originale comme preuve d'achat et preuve
de la date d'achat.
Camco vous offre ses services dans tout le pays. Pour de plus amples
renseignements sur la presente garantie, veuillez prendre contact avec :
Directeur, Relations avec les consommateurs, Camco Inc,, Bureau 310,
1 Factory Lane, Moncton, N,B. E1C 9M3
1,800.361,3400
Agraphez votre re9u icL
Vous devezfournir la preuve de
I'achat original pour obtenir des
services en vertu de la garantie.
73
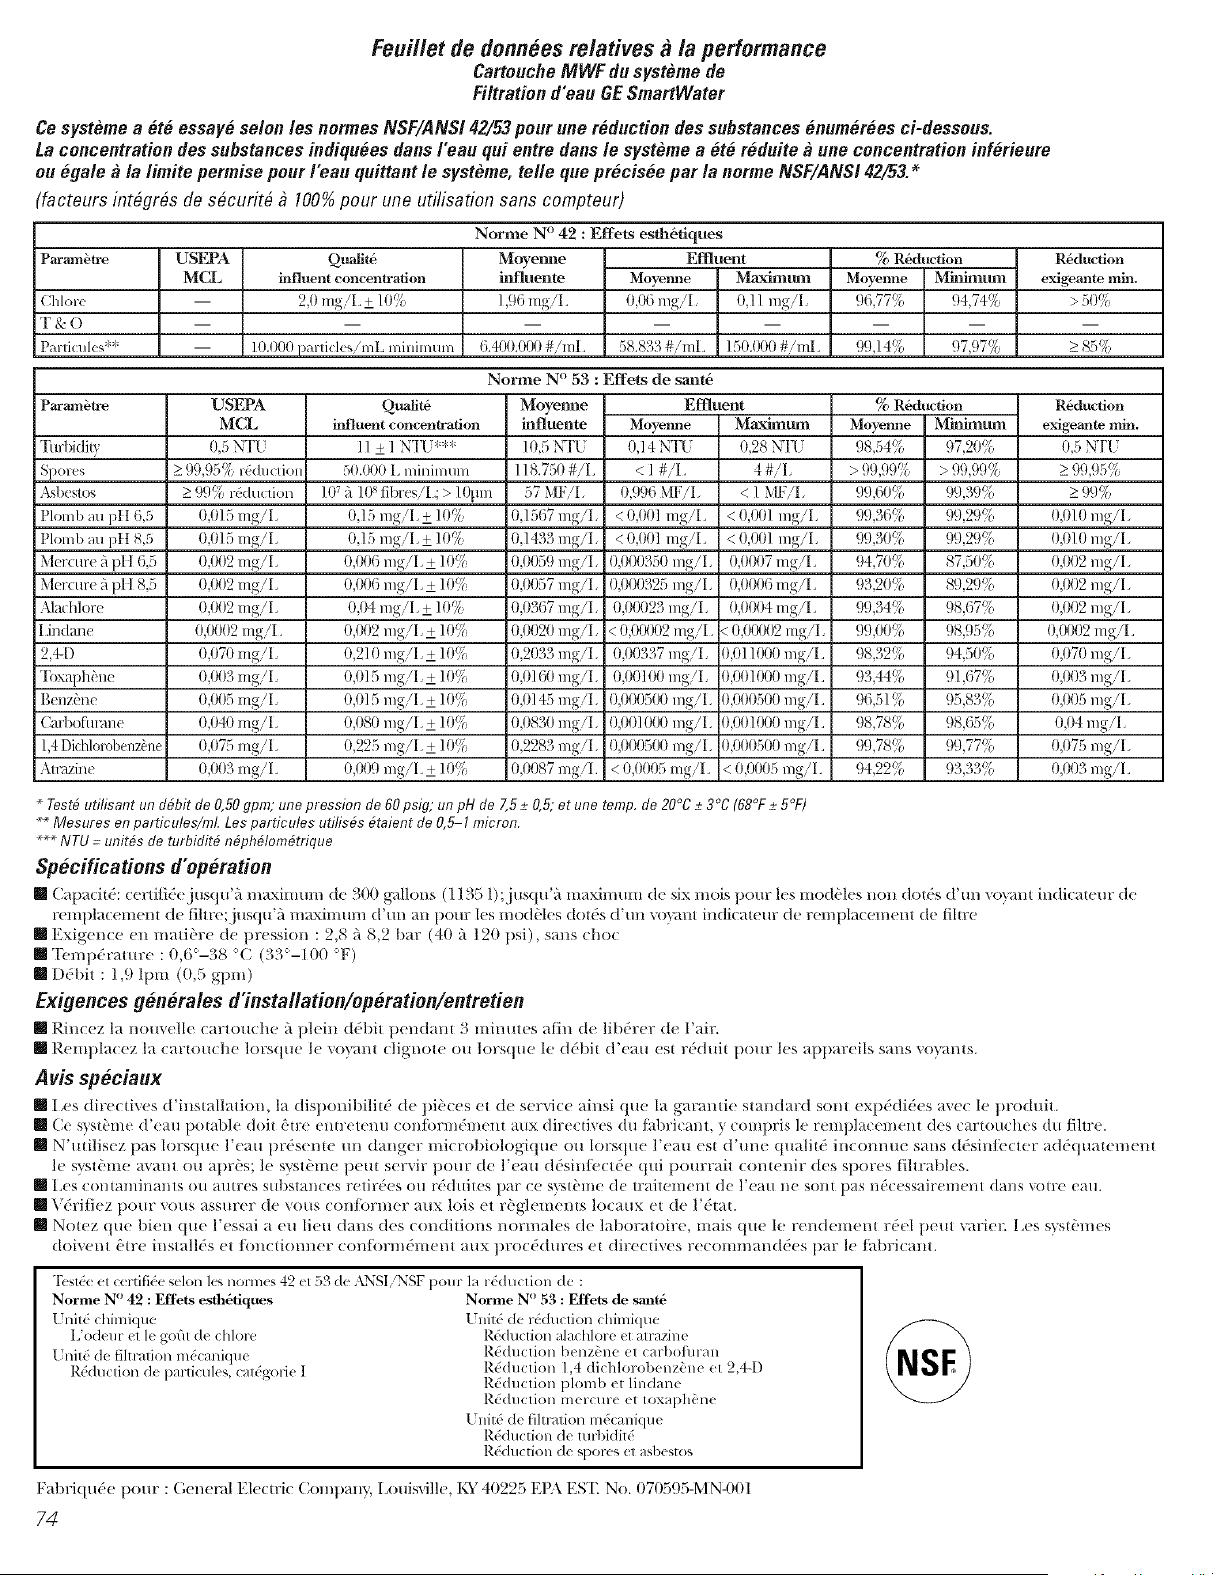
Feuillet de donn#es relatives a/a performance
Cartouche MWF dusyst#me de
Filtration d'eau GE SmartWater
Cesgst#me a #t# essay#selon les normesNSF/ANSI42/53pour une r#duction dessubstances #num#r#es ci-dessous.
La concentrationdes substances indiqu#esdansI'eau qui entre dansle syst#me a #t# r#duitea une concentrationinf#rieure
ou #gale a/a/imite permise pour/'eau quittantle syst#me, retie quepr_cis6e par la norme NSF/ANS142/53.*
facteurs int@r_s de s@urit6 _ 100%pour une utilisation sans compteur)
Param6_re
Chlow
T & 0
I_articul(,s **
USEPA
MCL
Quali_
influent concentration
2,0 mg/L +_10%
10.000 partMes/mL nfininmm
Norme N ° 42 : Effets esth6fiques
Muyemle Effluent
influente Moyemle Maximum
],96 mg/L 0,06 rag/I, 03 ] rag/I,
6.41X).00(}#/mL 58.833 #/mL 15(}.(X)O#/mL
Norme N ° 53 : Effets de sant6
Parmn6lre
Turbklit3
Spows
Asllesto,;
Plomb m/pH 6,5
Plomb m/pH 8,5
Mer(ur_ 5 pi { 6,5
Mercur( 5 p} { 8,5
Al_ldflore
I Jn(/an_
2,_D
'I'oxaphhne
Benz_'ne
C;u'bo[-tll_l//e
1,4 Di&loTobenz_ne
Alra:/ine
Qualit_
iIff[uent concentration
50.(}00 L minimuln
]075 ] ()_fibres/I; > ] %m
03 5 rag/I, £ ]0%
03 5 rag/I, + ]0%
0,006 mg/I, + ]0!{
0,006 rag/I,_+ ]0!{
0,04 rag/I,_+ ] 0%
0,002 rag/I,_+ ]()!{
0,2] 0 rag/l,_+ ] ()!:_
0,0] 5 rag/l,_+ ] ()!_(
0,0] 5 mg/l< +_] ()!_(
0,080 rag/I,_+ ] ()!_{
0,225 rag/I,_+ ] 0!_{
0,009 rag/l,_+ ] 0!_{
USEPA
MCL
0,5 NI'[ '
_>99,95% ldduction
-> !)9% rOdu,.:tiol',
0,015 mg/I_
0,015 mg/I_
0,002 mg/I_
0,002 mg/I_
0,002 mg/I_
0,0002 mg/L
0,070 mg/I,
0,003 rag/l,
0,005 mg/l,
0,040 rag/I,
0,075 mg/I,
0,003 rag/l,
Muyenne
influente
]0,5 KI'[
l 18.750 #/L
57 MF/I,
03 567 mg/I_
03 433 mg/I_
0,0059 mg/I,
0,0057 rag/I,
0,0367 rag/I,
0,0020 rag/I,
0,2033 rag/I,
0,0] _) rag/I,
0,0] 45 rag/I,
0,0830 rag/I,
0,2283 rag/I,
0,0087 rag/l,
Effluent
Moyemle Maximlml
0,14 NT( 028 NT(
< ] #/L 4 #/I,
0,996 \'IF/I, < ] \IF/I,
< 0,001 rag/I, < O,(_)l rag/I,
< 0,00] mg/L < O,(X)I rag/I,
0,000350 rag/I, 0,0007 mg/L
0,000325 rag/I, 0,0006 mg/L
0,00023 rag/I, 0,0004 mg/L
< 1),()0(_)2mg/L < (),(_)02 rag/I,
0,00337 rag/l, 0,0] ]000 mg/L
0,00]00 rag/l, 0,(_)] 000 mg/L
0,0005(_) rag/I, 0,(_)0500 mg/L
0,0010t_) rag/I, 0,(_)]000 mg/L
0,0005(_) rag/I, 0,1_)0500 mg/L
< 0,0005 mg/L < 0,0005 rag/l,
% R6ducfion
Moyemle _um
96,77% 94,74%
99,] 4% 97,97%
% R6&,ction
Moyemle Minimum
98,54% 97,20%
> !)9,99% > 99,99%
99,60!{ 99,39!{
99,36% 99,2!)%
99,30% 99,2!)%
94,70!_ 87,50!_
!)3,20!_{ 89,29!_{
99,34% 98,67%
99,00!{ 98,95!{
98,32!:i 94,50!_{
93,44!{ 91,67!{
96,5] !{ 95,83!{
98,78!_ 98,65!_
99,78!{ 99,77!_
!)4,22!{ 93,33!{
R6ducfion
exigem_te mh_.
> 50%
_>85%
R6duction
exigeaa_e rain.
0,5 NT[
_>99,95%
_>99%
0,010 rag/I,
0,010 rag/I,
0,002 rag/I,
0,002 rag/I,
0,002 rag/I,
0,IX)02mg/L
0,070 rag/I,
0,003 rag/I,
0,005 mg/I.
0,04 rag/l,
0,075 rag/I,
0,003 rag/l,
* Test# utilisant un dbbit de 0,58 gpm; une pression de 60 psig; un pH de 7,5 +_0,5; et une temp. de 20°C +_3°C (68°F +_5°F)
_ Mesures on particules/ml. Losparticules utilis#s #talent de 0,_1 micron.
*** NTU = unitbs de turbidit# n@h#lom#trique
Sp#cifications flop#ration
[] Capt,:it(': certilid_ jusqu'f_ nl_txiinmn de ,31)0 g:dlons (1135 1);jusqu'fi Innxinuun (11 six mois pour Its inod_'l('s non (lotds d'un v(_yallt indk'atem: de
r('illi)lacelllei/l de tiltre;jusqu'fi l/i}tXilllHl/l d'/lI/ all pour les mod_'les dotds (l'tln \x/}:ult indieateur de remplacement de lihre
[] Exigence en mall#re de pression : 2,8 5 8,2 bar (40 a 120 psi), sails choc
[] T(.mpdrature : 0,6°-38 'C (33°-100 T)
[] Ddbit : 1,9 lpm (0,5 gpm)
Exigences genorales dTnsta/lation/oporation/entretien
[] RJH(ez I_t I/OU'_('lie (artoH('h(' _'tpl(ill ddl)it ])en(laHt 3 iIliIultcs alill (I(' libdrer (h' l'air.
[] Remplacez la cartouche lorsque le voyant clignote ou lorsque le (l('I)it d'eau est rdduit [)our les ai)i)areils sans voyants.
A vis sp#ciaux
[] I x's (life( tives d'installation, la (lisponil)ilit(' de pii'ces et (h' service _6nsi que la gm:m_ti( stkm(lm:d sont exi)d(lidcs avcc le produit.
[] Ce s}stbme d'(au potable &fit 0tr( entretem_ confi)rmdm( m aux directives dn Jhbricant, y compris le remplac( ment d(s cartot_ches du fihr(.
[] Wutilisez 1)as lorsq/le Ueau iu:ds_ me un danger microbiologique ou lorsque Ueau est (Fune (pmlitd ii/c()lliUl( sails ddsinlbcter ad&tuatement
k svsff'me mant ou aprf's; le sysff'me peru ser_ir pour de Ueau ddsintbctde qui pourrait contenir des spores iihrables.
[] ][_(S COl/[al//Jl/al/tS (Ill autres st/bstal/ces retir('(s o/1 r('dui[es par c( s\Mt'l//e de tl?aJteii/el/t de l'(au lie soil[ pas ilia'c( ss_/Jl'e/u( lit dal/s _otr( eau.
[] \ dritiez 1)o/lr vous assm:er de vous contbrmer aux lois et r0glemems Iocaux et (le I%tat.
[] Notez que bien que Uessai a eu lieu dans des conditions normales de laboratoire, mais qu( le rendement r4(1 peut varier. I _es s} sff'mes
doivent Otr_ installds et Ibncti(mner conJbrmdment aux procddur_ set directives r(commanddes par le Ihl)ricant.
Norme N ° 42 : Effets esfl_ftiques
I nitd chimique
L'odeur et le gofit de dflore
I Jnitd de filtF,_fion mdcmfiqu<
Rdduction de particules, caldgorie I
"I'(,s[(,( (t c(rtifi(,e selon les normes 42 et 53 de ,LNSI/NSF pour la rd(luction (le :
Norme N ° 53 : Fdfets de sant6
[ nitd de rdduction (himi(lue
Rdduction alachlore et anazine
R(_(hlction benz_,ne et carl)ofln-an
Rdduction 1,4 dichlorobenzbne et 2,4-[)
R_(hlction plomb et lindane
R_(luction mercure et toxaphbne
[ nitd de filtl-,,tion mdcani(lue
Rdduction de mrl)idit(:
Rdduction de _[)orcs et asl)estos
Fabriqude t)our: (;eneml Elecn:ic Company, I _ouisville, KY 40225 EPA EST No. 070595-M N4)01
74
Soutienau consommateur.
Site Webappareilsgectrom_nagersGE electromenagersge.ca
Vous a'_ez une question ou "_ous a'_ez besoin d'aide pour "_otre appareil 01ectrom0nager? (_ontactez-nous
par ]nternet au site eleetromenagersge.ea 24 heures parjoui; tous lesjoui_ de l'ann0e.
Servicede r_parations
Service de r_parafions GE est tout pros de vous.
Pour tifire r0parer "_otre 0lectrom0nager GE, il suliit de nous t_l_phonel:
1.800.361.3400
Studio de conception r#aliste
Sur demande, GE peut ti_urnir une brochure Sill" l'am_nagement d'une cuisine pour les pei_onnes
fi mobilit_ r&luite.
Ecrivez: Directeui; Relations avec les consommateui_, (_amco, Inc.
Bureau 310, 1 Factory lane
Moncton, N.B. E 1C 9M3
Prolongationde garantie electromenagersge.ca
Achetez un ('ontrat d'entretien (;E axant que xotre garantie n'expire et b_n0ficiez d'un rabais substantiel.
_dnsi le service apr_s-\ ente GE sera toqjouI_ l_'lapr_s expiration de la garantie.
Visitez notre site Web ou appelez-nous au 1.800.461.3636.
Pibceset accessoires
Ceux qui d0sirent r0parer eux-m&mes leui_ 01ectrom0nagei_ petlvent recevoir pi&ces et accessoires
directement _'lla maison (cartes VISA, MasterCard et Discover accept0es).
Los directives stipulees dans le present manuel peuvent _tre effectuees par n'importe quel utilisateur. Los autres
reparations doivent generalement Otre effectuOespar un technicien qualifie. Soyez prudent, car une reparation
inadOquate peut affecter le fonctionnement sOcuritaire de I'appareil.
Vous trouverez dans les pagesjaunes de votre annuaire le num0ro du Centre de set\ice (_amco le phls
proche. Autrement, appelez-nous au 1.888.261.3055.
Contactez-nous
Si v()tlS n'&tes pas satistifit du seI_'ice apr&>vente dont v()tlS avez b_n0fici0 :
Premi_rement, comm uniquez avec les gens qui ont r(_par(_ votre appareil.
I_]nsuite, si vous n'&tes to/ljoui_ pas satistifit envovez toils les dOtails--nulnOro de tOl_phone con/plJS---au
Directeui; Relations avec les consommateui_, Camco, Inc.
Blli'eatl 310, 1 Factory im_e
Moncton, N.B. E 1 (: 9M3
Inscr/vezvotreappareil_lectrom_nager
Inserivez votre appa_eil &lectrom_nager en direct, aussit6t que possible. (:ela aing_li(_rera nos
COlllilltllliC;|tions et llotl'e service apl'eS-X elite. MoilS })OtlX ez. (4galel]]ellt, ll()[is ellvo} el" par la poste
le fom/ulaire d'inscriptionjoint fi votre documentation.
75
S
Informad6n de seguridad ....... 77, 78
Instrucciones de operaci6n
Caracteffsficas adicionales ........... 84
C6mo sacar las gm'ems .............. 85
Cuidado y limpieza del
retiig>rador. ................... 88, 89
E1 dispensador de agua y de hielo.. 87, 88
El dispositixo automfitico
para hacer hielo ................... 86
El filtro de agua ................... 81
Gin>ms y cacerolas ................. 85
Los controles de reffigerador ........ 79
Los ent[epafios y recipientes
del refl-igerador. ................ 89, 83
Puertas del [effigerador. ......... 84, 85
Reemplazo de bombillas ............ 90
Tmq)oCool% ...................... 80
Instrucciones de instalad6n
C6mo retirar y reemplazar
las puerms ..................... 93-95
Instalaci6n de la lfnea del agua.. 100-109
Insmlaci6n del reffig>rador. ...... 96-99
Preparaci6n para insmlar
el reflig>rador. ................. 91-93
Soludonar problemas ........ 104-107
Sonidos normales de la operaci6n ... 103
Soporte al consumidor
Garantfa para consumidores
en los Estados Unidos ............. 110
Hoja de datos de flmcionamiento ... 108
Soporm al consumidor. ............ 111
Anoteaqui losnumerosde modelo de serie:
Modelo No.
Serie No.
Usted los xerfi en una etiqueta en el interior
del compartimiento de refrigerador en la
parte superior en el lado derecho.
76
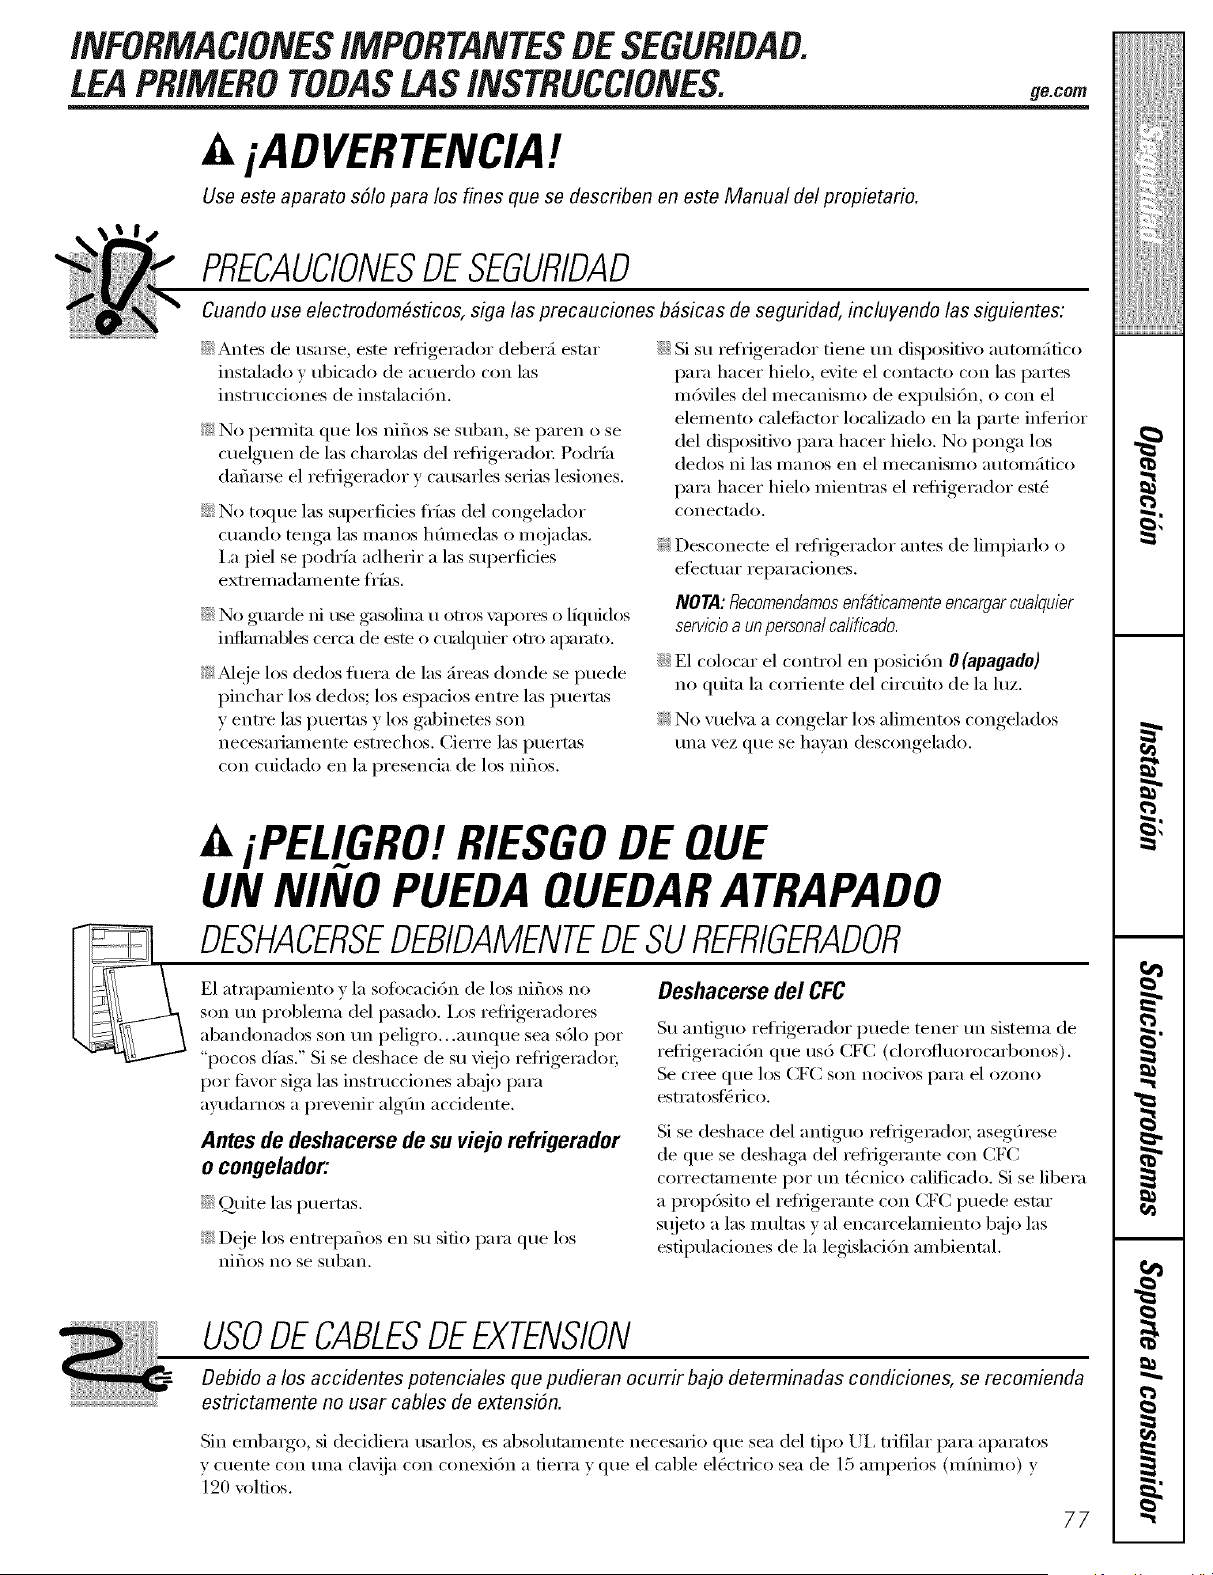
/NFORMAC/ONES/MPORTANTESBESEGUR/DAB.
LEAPR/MEROTODASLAS/NSTRUCC/ONES.
iADVERTENCIAt.
Use este aparato sSIo para los fines que se describen en este Manual del propietario.
PRECAUCIONESDESEGURIDAD
Cuando use electrodom6sficos, siga las precauciones b#sicas de seguridad, incluyendo las siguientes:
iJi::Antes de usatse, este refl_igerador deber;i estnr
insmlado '_ ubicado de acuerdo con las
instrucciones de insmlaci6n.
_: No pemfim que los nifios se suban, se paten o se
cuelguen de las charolas del refiigera(hn: Podrfa
(lafia_e el reli_igerador y causa_tes serias lesiones.
::Ji::No toque las superficies tHas del congelador
cuando tenga las manos hOmedas o m(,jadas.
I,a piel se podrfa adhedr a las superficies
extremadamente tHas.
::Ji::No gt_arde ni use gasolina t, otros\:q)ores o lkluidos
inflamabl_ cerca de este o ct_flqtfier otto apamto.
_: _Meje los dedos fllera de las ;h'eas donde se puede
pinchar los de(los; los espacios entre las puert;_s
y entre las puertns y los gabinems son
necesariamente estrechos. Cierre las puert;_s
con cuidado en la presencia de los niflos.
::Ji::Si su refrigerador tiene tm dispositivo automfiftco
para hacer hielo, evite el contncto con las partes
mdviles del mecanismo de eN)tflsidn, o con el
elemento calefi_ctor locali/_ldo en la parte infbrior
del disposiftvo para hacer hielo. No ponga los
de(los ni las manos en el mecanismo atltomfiftco
para hacer hielo mientras el refi_igerador est(_
conecmdo.
_: Desconecte el refrigerador antes de limpiarlo o
ei_cttlar i'epa i'a ciones.
NOTA: RecomendamosenNticamente encargarcualquier
servicioa un personal cafificado.
::Ji::E1 colocar el control en posicidn 0 (apagado)
no qtfitn la corriente del cir('tfito de la luz.
_: No vuelw_ a congelar los alimenU_s congelados
tma vez que se ha)m_ descongelado.
IXiPELIGRO! RIESGO DE QUE
UN IVINO PUEDA QUEDARATRAPADO
E1 atrapamient y la .; caci 5n de 1 ,; nifl( ,; n Deshacerse del CFC
son tm problema del pasado, i,os ref_'igeradores
abandonados son tm peligro...atmqtle sea sdlo pot Su anftguo ref_'igerador puede tenet un sistema de
")ocos dias" Si se deshace de su viejo ref_'igerad(n; reffigeraddn que us6 (;FC (dorofluorocarbonos).
pot fi_xor siga las instrucciones abajo para Se tree que los CF(2 son nocixos para el ozono
avudarnos a prevenir algfin accidente.
,antes tie doshacerse tiesu viojoro#igerador
o congelador:
::Ji::Qtfite las puertns.
_: Deje los entrepaflos en su sift() para que los
nifios no se st]ban.
esti'atost_iJco.
Si se deshace del anftgt,o refi_igeradcn; asegfirese
de clue se deshaga del refi_igerante con CFC
correcmmente pot tm tg_cnico calNcado. Si se libera
a propdsito el reliigerante con (;F(_ puede estnr
sqjeto alas mtfltns y al encarcelamiento b;!jo las
esftptflaciones de la legislaci6n ambienml.
USODECABLESDEEXTENSION
Debido a los accidentes potenciales que pudieran ocurrir bajo determinadas condiciones, se recomienda
estrictamente no usar cables de extensidn.
Sin embargo, si decidiera usarlos, es absohm_mente necesario que sea del tipo UI, trifilar para aparatos
y cuente con tma clax!ja con conexi6n a tierra y clue el cable elg_ctrico sea de 15 amperios (mfnimo) y
12(1 xoltios.
77
INFORMACIONESIMPORTANTESDESEGUR/DAD.
LEAPRIMEROTODA/.ASINSTRUCCIONES.
iAD VERTENCIA!
COMOCONECTARLAELECTRICIDAD
Bajo ninguna circunstancia debe cortar o quitar la tercera punta (fierra) de la clav#a. Para su seguridad
personal, este aparato deber# conectarse debidamente a fierra.
E1 cable el(_ctrico de este aparato est_ equipado
con una clav!ia de tres puntns (den'a) que enchufil
en tm contacto estfindar de pared de tres salidas
(fierra) para reducir al mfifimo la posibilidad de
d_lflos pOE tin choque el_ctrico con este aparato.
Haga que tm electficista calificado vefifique el
enchufe de la pared y el circuito para asegura_e
que la salida est(_ conectnda debidamente a tierra.
Donde se dispon_ s61o de un contncto de pared con
salida para dos puntas, _ su responsabilidad personal
v su obli_ddn reempla/_Mo pot tm contacto
adect_do pare tres p/lilt_ls ('on ('onexi()n a tieY/'a.
E1 refl_gerador debei'_] conectni_e sieinpre en su
propio contncto el_ctrico individual que tenga
tm volt:lie que va);_ de acuerdo con la tabla de
clasificaci6n,
Esto garanfiza la mejor eiecuci6n ) evitn la
sobrecarga del circuito el6ctrico de la casa _ los
dafios a causa del sobrecalentnmiento de los cables,
Nunca desconecte el refl_igeradorjalando el cable,
Tome siempre fim/emente la cla',!ja ) sfiquela del
contncto sin doblarla.
Repare o reemplace imnediammente to(los los
cables el_ctricos de servicio que se ha)ml desgastndo
o dafiado en algtma otra fimna. No utilice cables
que illtlesti'en i'O[tli'ilS o d[ll_lOS poi" [ibi'_lsi6n [i lo
largo de (_ste ni en la clav!ja o en algtmo de sus
extreiilos.
_Malejar su refl_igerador de la pared, cuide que no
pase sobre el cable o lo dafle.
FAVORDELEERYSEGUIRCUIDADOSAMENTELASPRECAUCIONES
DESEGURIDAD.
GUARBEESTASINSTRUCCIONES
78
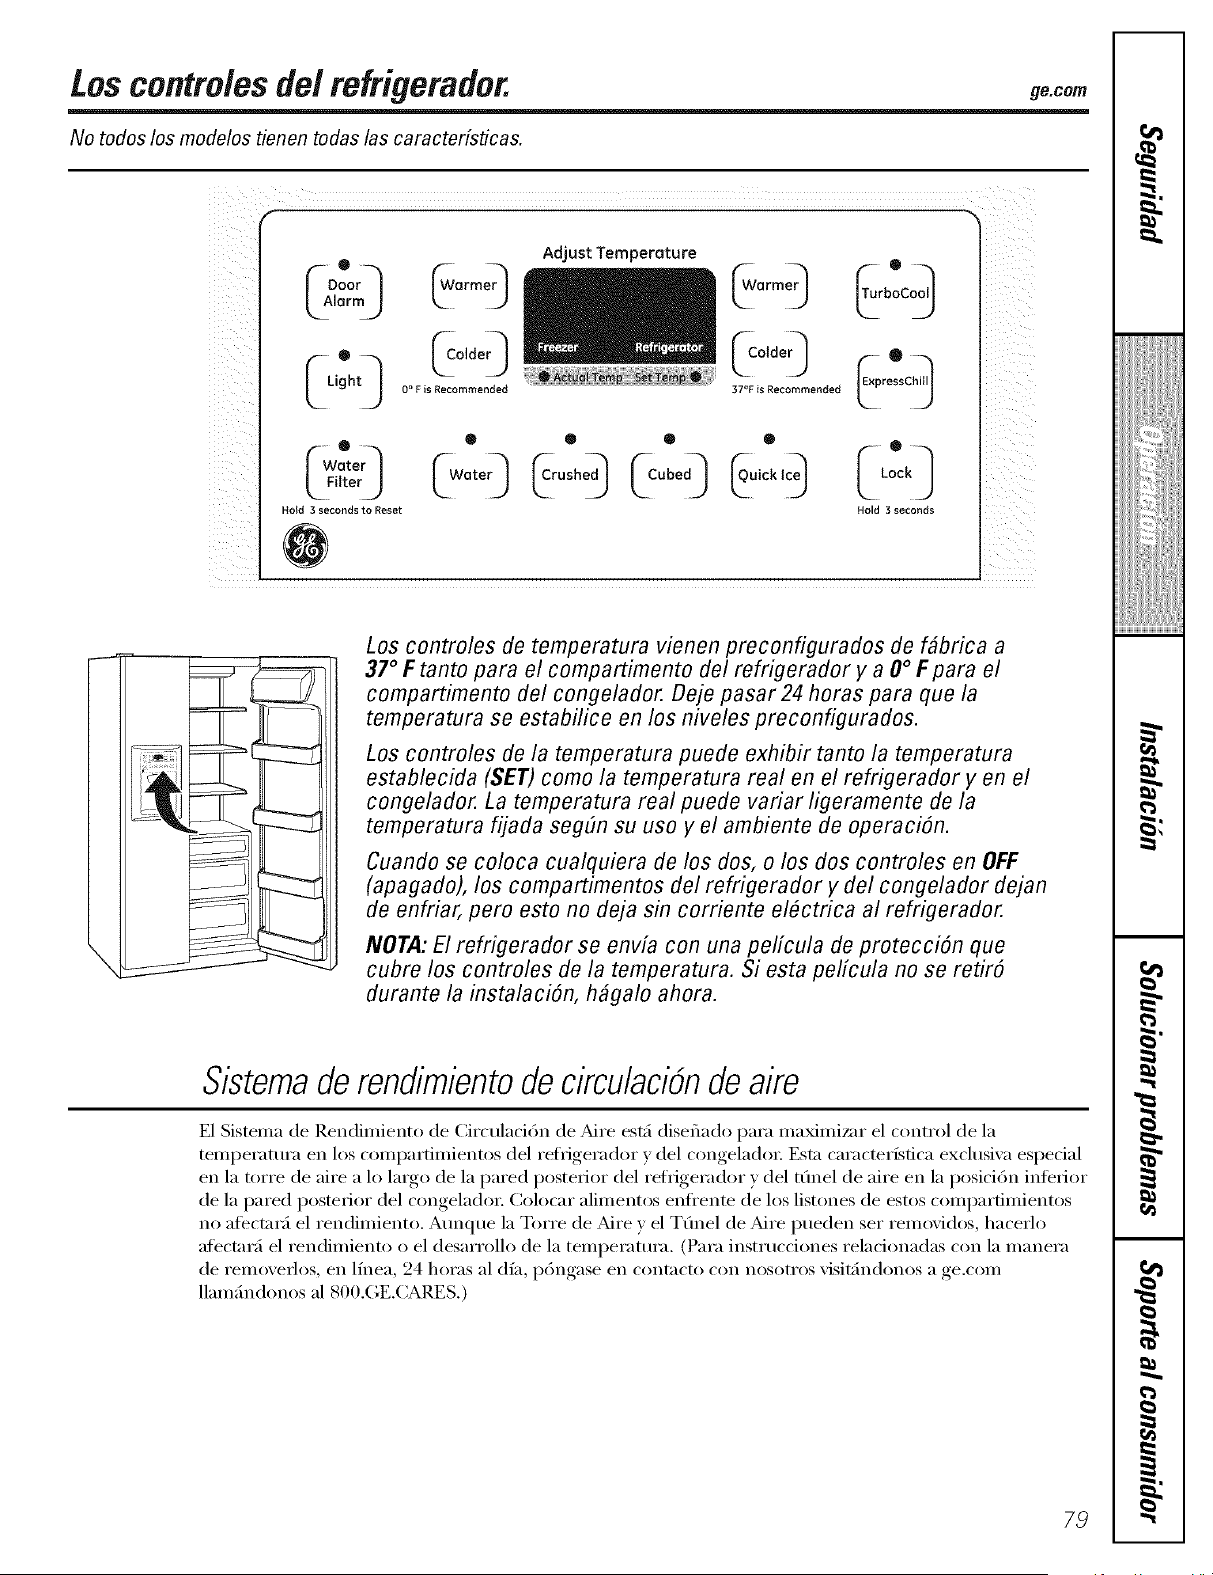
Los contro/esde/refrigerador, g .oo,,
No todos los modelos tienen todas las caracterfsticas.
Fooorq
®
Hold 3 seconds to Reset
Adjust Temperature
0 Cco, e0
0 ° F is Recommended 37°F is Recommended
® ® ® ®
_-WateO _rushed_ _¢ubed_ _iicklce_
®
Hold 3 seconds
115 ii
Los contreles de temperatura vienen preconfigurados de f#brica a
37° F tanto para el compartimento del refrigerador y a 0 ° F para el
compartimento del congelador. Deje pasar 24 horas para que la
temperatura se estabilice en los niveles preconfigurados.
Los controles de la temperatura puede exhibir tanto la temperatura
establecida (SET) come la temperatura real en el refrigerador yen el
congelador. La temperatura real puede variar ligeramente de la
temperatura fijada segEm su use y el ambiente de operaci6n.
Cuando se coIoca cualquiera de los dos, o los dos controles en OFF
(apagado), los compartimentos del refrigerador y del congelador dejan
de enfriar, pero esto no deja sin corriente elOctrica al refrigerador.
NOTA: Elrefrigerador se envfa con una pelicula de protecci6n que
cubre los controles de la temperatura. Siesta _elicula no se retir6
durante la instalaci6n, h#galo ahora.
Sistemade rendimientode circulaci6nde aire
E1 Sistema de Rendimiento de Circtdaci6n de Mre est;i diseflado para maxami,';_r el control de la
temperamra en los compartimientos del re/i_igerador y del congeladon Esm caracterfsfica exclusiva especial
en la torte de aire a lo largo de la pared posterior del refi'igerador )' del t(mel de aire en la posici6n inferior
de la pared posterior del congelado_: Colt)car alimentos enfl'ente de los listones de estos ct)mpartimientos
no afbct;mi el rendimiento. Atmque la Torte de Mre v el T(mel de Mre pueden set removidos, hacerlo
afect;ml el rendimiento o el desarrollo de la temperattu'a. (Para instrucdones relacionadas con la manera
de i'elllOvei']os, en llllea, 94 hoi'as al (lf_l, pOllgase en cont_lcto con noso[i'os visit_in(lollt)S a ge.coll/
llamfindonos al 800.GE.CARES.)
79
Acerca de TurboCooE (onalgunosmodelos)
e
TurboCoo
Como funciona
TurboCoolenfrfa rfipidamente el
(ompartinfiento del reffigerador para
refl_igerar los alimentos mils rfipidan_ente.
Use TurboCoolcuando agregue grandes
cantidades de alimentos al compartimiento
del refl_gera(h)r, guardando alimentos
(lespu_s de que ban estado expuestos a
temperatm'a ambiental o cuando se
disponga a guardar platos sobrantes.
Talnbi_n puede ser usa(h) si el refrigerador
ha estado sin smninistro el_ctrico pot tm
perfodo extenso.
[JIl[I VeZ acti\'ado, el COIIlpI'eSoI" se
encen(lerfi imnediatamente v h)s
ventiladores harfin el cich) de encendido
y apagado a alms velocidades, segfin sea
necesalJO poY ocho hoi'ilS. E1 COlllpi'esoF
continuarfi flmcionando hasta que el
compartimiento del reldgerador se
refl_igere a aproximadamente 34 ° F (1 o C),
luego ham el ciclo de encendido y apagado
para mantener este ajuste. Despu_s de 8
horas, o si el rurboCoo! es presionado otra
vez, el compartimiento del refl_igerador
regresarfi al @lste original.
C6mousar
Presione TurboCool. i:a pantalla de
temperatura TurboCool mostrarfi TCv
se activarfi el indicador I,ED luminoso,
Despu(_s de que TurboCoolsea completado,
el compartimiento del reffigerador
regresarfi al ajuste original.
NOTAS: Ia temperatm'a del refl_igerador
no puede cambia_e (lm'anm
rurboCool.
I_ temperatura del congelador
no es atecta(la durante TurboCool.
Cuando abra la puerta del
reflJgerador durante TurboCool,
los ventiladores contintlai'}]n
flmcionando si hart hecho
el cich) de encendi(h).
80

El fi#ro de agua. (enalgunosmodelos) go.corn
En algunos modelos
Cartucho del filtro de agua
E1 cartucho (]el filtro de agua est_i ubicad() el/ la esquina
superior derecha trasera del colnpartirriento del refl'igeradol:
Cugmdoreemplazar el filtro on los modelos con luz
indicadora de recambio
Ell el dispensador lla_ una luz de indicacidn de recan/bio del
cartucho del filtro del agua. Esta luz se volverfi anarai_jada
para advertirle que necesita reerrq)lazar el tiltro pronto.
E1 cartucho del filtro deberfa reemplazaise cuando la luz
indicadora de recambio se vuehu roja o si la salida de agua
al dispensador o al dispositivo para hacer hielo disminuvera.
Cugmdoreemplazar el filtro en los modelossin luz
indicadora de recambio
E1 cartucho del filtro se debe reen_plazar cada seis meses,
o antes, si dislninuye el flujo de agua al dispensador o al
dispositivo paIa hacer hielo.
C6mo retirar el cartucho del filtro
Si est;i cambiando el cartucho, relnueva primero el viejo
girfii_dolo lei_tamente hacia la izquierda. N0jale el cartucho
directan/ente hada ab@). Un poco de agua puede gotear
Instalar el cartucho del filtro
Si estfi reerrq)lazandt) un cartucho SmartWater con
adaptador, debe quitarse antes de instalar el cartucho.
Para retirar el adaptador, gh'elo hacia la izquierda
aproxin/adarrlente 1/4 de giro.
Si wl a reelnplazar un cartucho Waterby Culligan,deje el
adaptador colocado. Este adaptador peI_manecer_i ell el
refligerador cuando reemplace cartuchos en el fllttlro.
Con adaptador Sfi7adaptador
(el aspecto puede variar)
En los modelos sin luz indicadora de recambio, pegue
la efiqueta con el rues y el aria al nuevo cartucho para
que se recuerde de cambiar el filtro en seis moses.
@ IJene el cartucho de reemplazo con agua de la llave
para permitir que ocurra 1lll inejor flqjo a partir del
dispensador ilm_ediatan/ente despu_s de la instalaci6n.
_Minee la flecha del cartucho ) del soporte del cartucho.
Coloque la parle superior del nuexo cartucho hacia
arfiba dentro del soporte. NO en/ptlje el cartucho hacia
ari_ba a dentro del soporte.
Gire el cartucho lentan_ente hada la derecha hasta que
el cartucho se pare. NOAPRETARMUYFUERTE. Mientras
estfi gii':h_dolo, el se alzai':i par si mismo en su posici6n.
E1 cartucho rotarfi aproxinmd;unente l/2 de vuelta.
Deje correr el agua desde el dispensador pal 3 minutes
(aprox. l ½ galons) para aclarar el sisten/a y para
prexenir salpicaduras.
Presione la tecla WATERFILTERen el dispensador y
inantg_ngala presionada durante tres segundos (ell
algunos modelos).
Hold 3 seconds to Reset
NOTA: Un cartucho de filtro de agua reci_n instalado
puede causar el agua de chorrear del dispensadoi:
Yapon de derivaci6n del filtro
Se debe usar el tapdn de deli\uci(;n (lel filtro cuando
un cartucho de filtro de reeulplazanliento no se puede
encontral: E1 dis/)ensador x el disposifivo i):u'a hacer hielo
no pueden fllncionar sin el filtro ,, sin el tapdn de
defivaci6n del filtro.
Tap(inde _ i
derivaci6n"_
delfiltro
SmartWater
,. Tap6nde_.._.._
derivaci6n
delfi_
Waterby Cu//igan
Para usar el tap6n de deiivaci6n del filtro en los inodelos
Water by Culligan, plin_ero debe quitar el adaptador del
filtro del soporte del carttlcho gir;]ndolo hacia la izqtlierda.
Si tiene preguntas, visite nuestro sifio web en ge.com,
o llame al 1.800.GE.CAIIES (1.800.432.2737).
Nitros de recambio:
Para pedir cartuchos adicionales en los Estados Unidos,
visite nuestro sitio Web, go.cam, o Ilame a GEpara partes y
accesorios a1800.6262002.
MWF
Precio sugerido de venta al pfiblico ,$38.95-47.95 USD o° 7
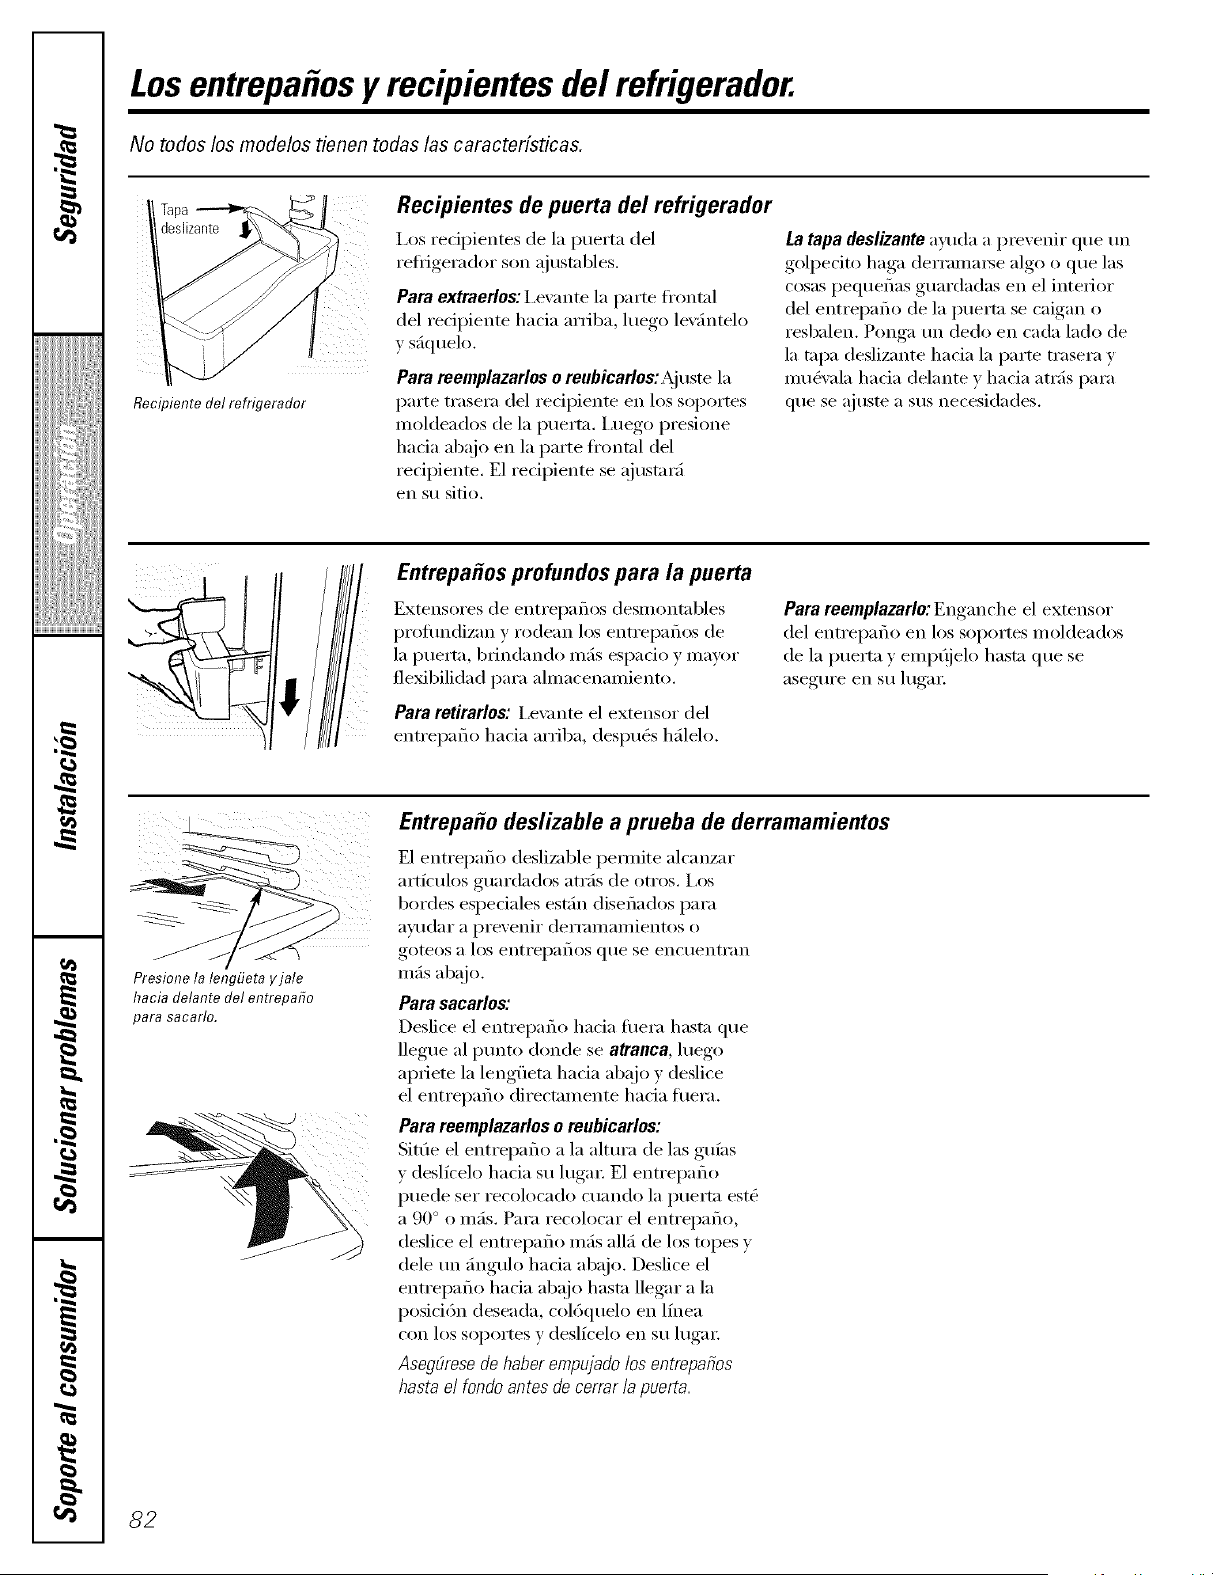
Losentrepa os y recipientes del refrigerador.
No todos los modelos tienen todas las caractedsticas.
Recipiente del refrigerador
Recipientes de puerta del refrigerador
I,os recipientes de la puerta del
refl-igerador son ajustables.
Para extraerlos: I,evante la parte tionml
del recipiente hacia arfiba, luego levfintelo
y sfiquelo.
Para reemplazarlos o reubicarlos: Ajuste la
parte trasera del recipiente en los soportes
moldeados de la puerta, iamgo presione
hacia abajo en la parte ti'ontal del
recipiente. E1 recipiente se ajustarfi
en su sitio.
La tapa deslizante a_l(la a prevenir que un
golpecito haga (lerrama_e algo o qtle las
cosas pequefias guardadas en el interior
del entrepafio de la puerta se caigan o
resbalen. Ponga tm dedo en cada lado de
la tapa deslizante hacia la parte trasera y
mu&'ala hacia delante y hacia atrfis para
que se ajuste a sus necesidades.
!
Entrepa_os profundos para la puerta
Extensores de entrepafios desmontables
proflmdizan y rodean los entrepafios de
la puerta, brindando mils espado y mayor
flexibilidad para almacenamiento.
Para retirarlos: i,e\:mte el extensor del
entrepafio hada arfiba, despug_s hfilelo.
Para reemplazarloJ Enganche el extensor
del entrepafio en los soportes moldeados
de la puerta y empOjelo hasta que se
asegm'e en su lugar
Presione la lengz_etayjale
hacia delante del entrepafio
para sacarlo.
Entrepa_o deslizable a prueba de derramamientos
E1 entrepafio deslizable pemfite ah'anzar
artfculos guardados atrfis de otros. I,os
hordes especiales estfin disefiados para
aDl(lar a prevenir dermmamientos o
goteos a los entrepal-lOS que se enctlentriln
m_is abajo.
Para sacarlos:
Deslice el entrepafio hacia fllera hasta que
llegue al punto donde se atranca, luego
apriete la lengfleta hacia abajo y (lesli(e
el entrepafio directamente hacia fuera.
Para reemplazarlos o reubicarlos:
SitOe el entrepafio a la altm'a de las gufas
y deslfcelo hacia su luga_: E1 entrepaflo
puede set recolocado cuando la puerta est(_
a 90 ° o mils. Para recolocar el entrepafio,
deslice el entrepafio mils allfi de los topes y
dele tm fingulo hacia abajo. Deslice el
entrepafio hada ab_tjo hasta llegar a la
posici6n deseada, col6quelo en lfnea
con los soportes y deslfcelo en su luga_:
Aseg_rese de haber empujado los entrepafios
basra e/fondo antes de cerrar ia puerta.
82
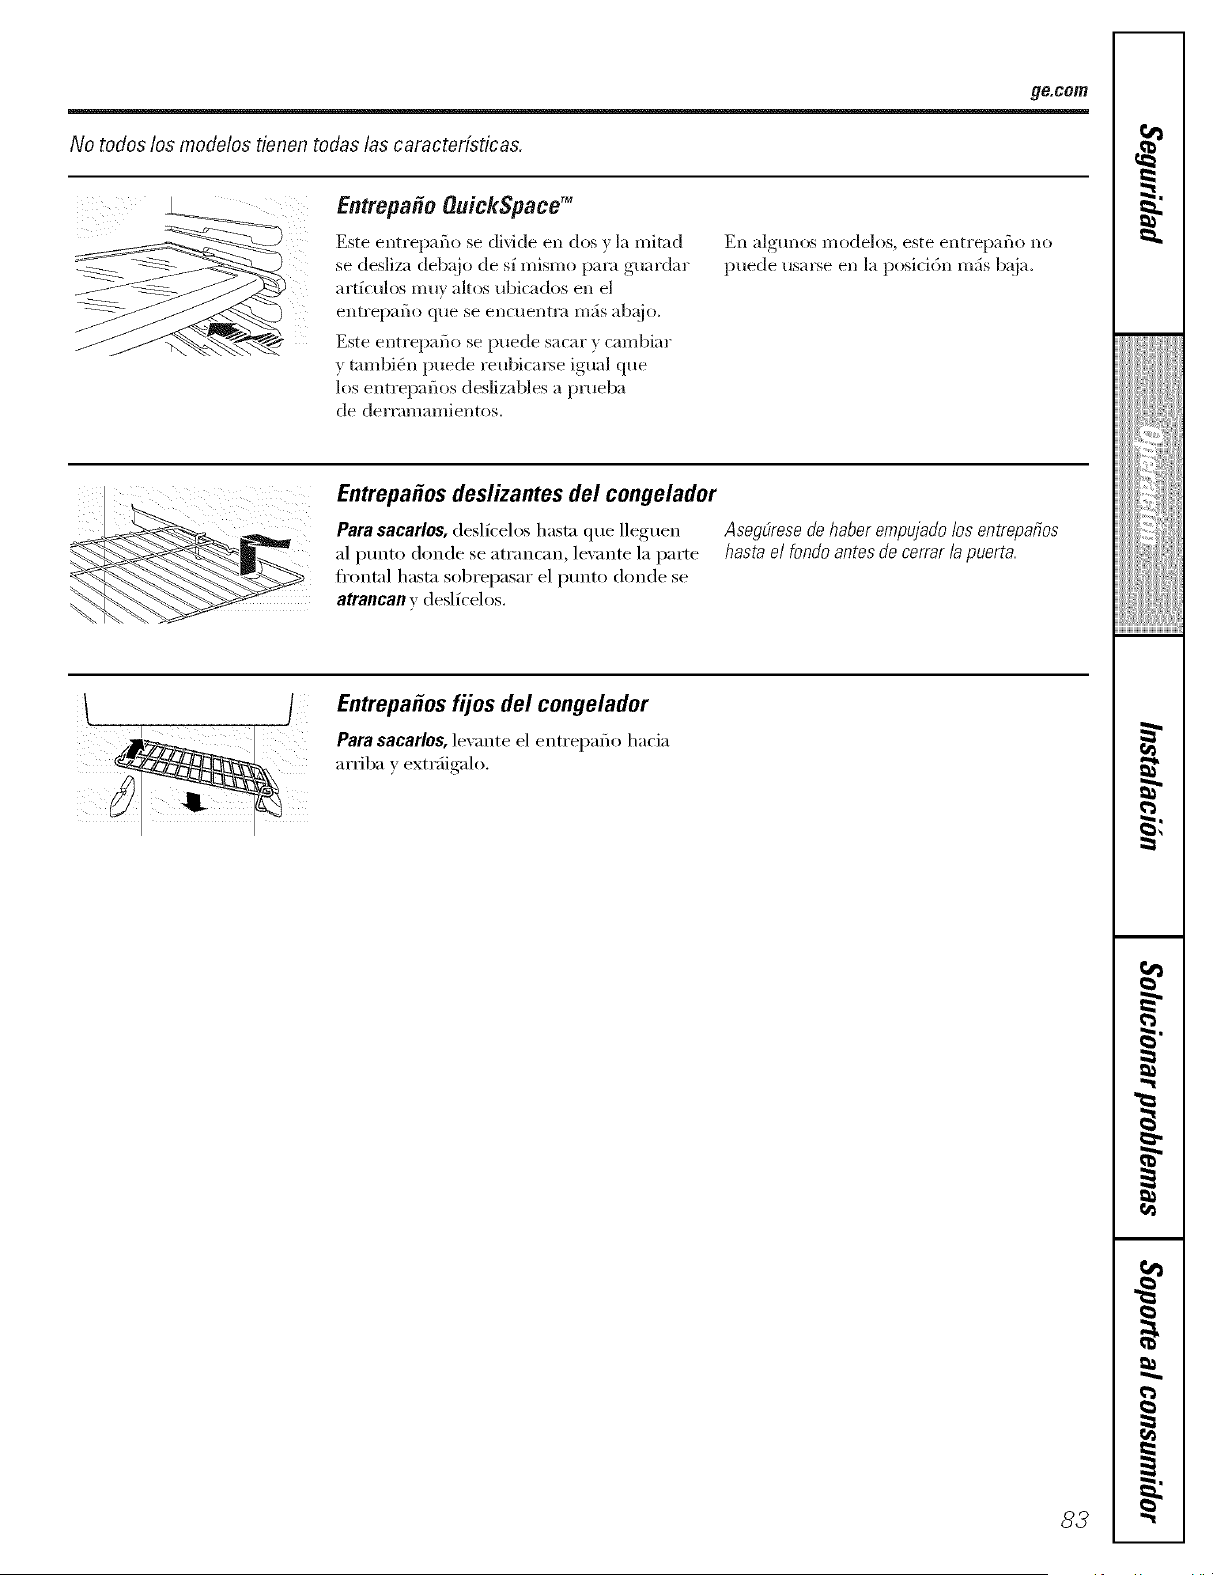
ge.com
No todos los modelos tienen todas las caractedsticas.
Entrepafio OuickSpacg _
Este entrepaflo se divide en dos v la mitad
se desliza deb_!)o de sf Inisl'ao para guardar
artfculos muy altos ubicados en el
entrepaflo que se encuentr;_ m;_s ab@).
Este entrepaflo se puede sacar v cambiar
y tmnbigm puede reubical_e igual que
los entrepaflos deslizables a prueba
de derramamientos.
Ell a]gtlll()S I//ode]os, este elltl'epal_lo no
puede usarse en la posici6n m_s baja.
Entrepa#os deslizantes del congelador
Para sacarlos, deslfcelos hasm que lleguen
al punto donde se atrai_(an, le_ante la parte
ti'ontal hasta sol)repasar el punto donde se
atrancan v deslfcelos.
Aseg6resede haberempujadolos entrepafios
hastae/fondo antesdecerrar/apuerta.
l I
Entrepa#os fijos del congelador
Para sacarlos, le_ante el entrepaflo ha('ia
arfil)a y extr_iigalo.
83
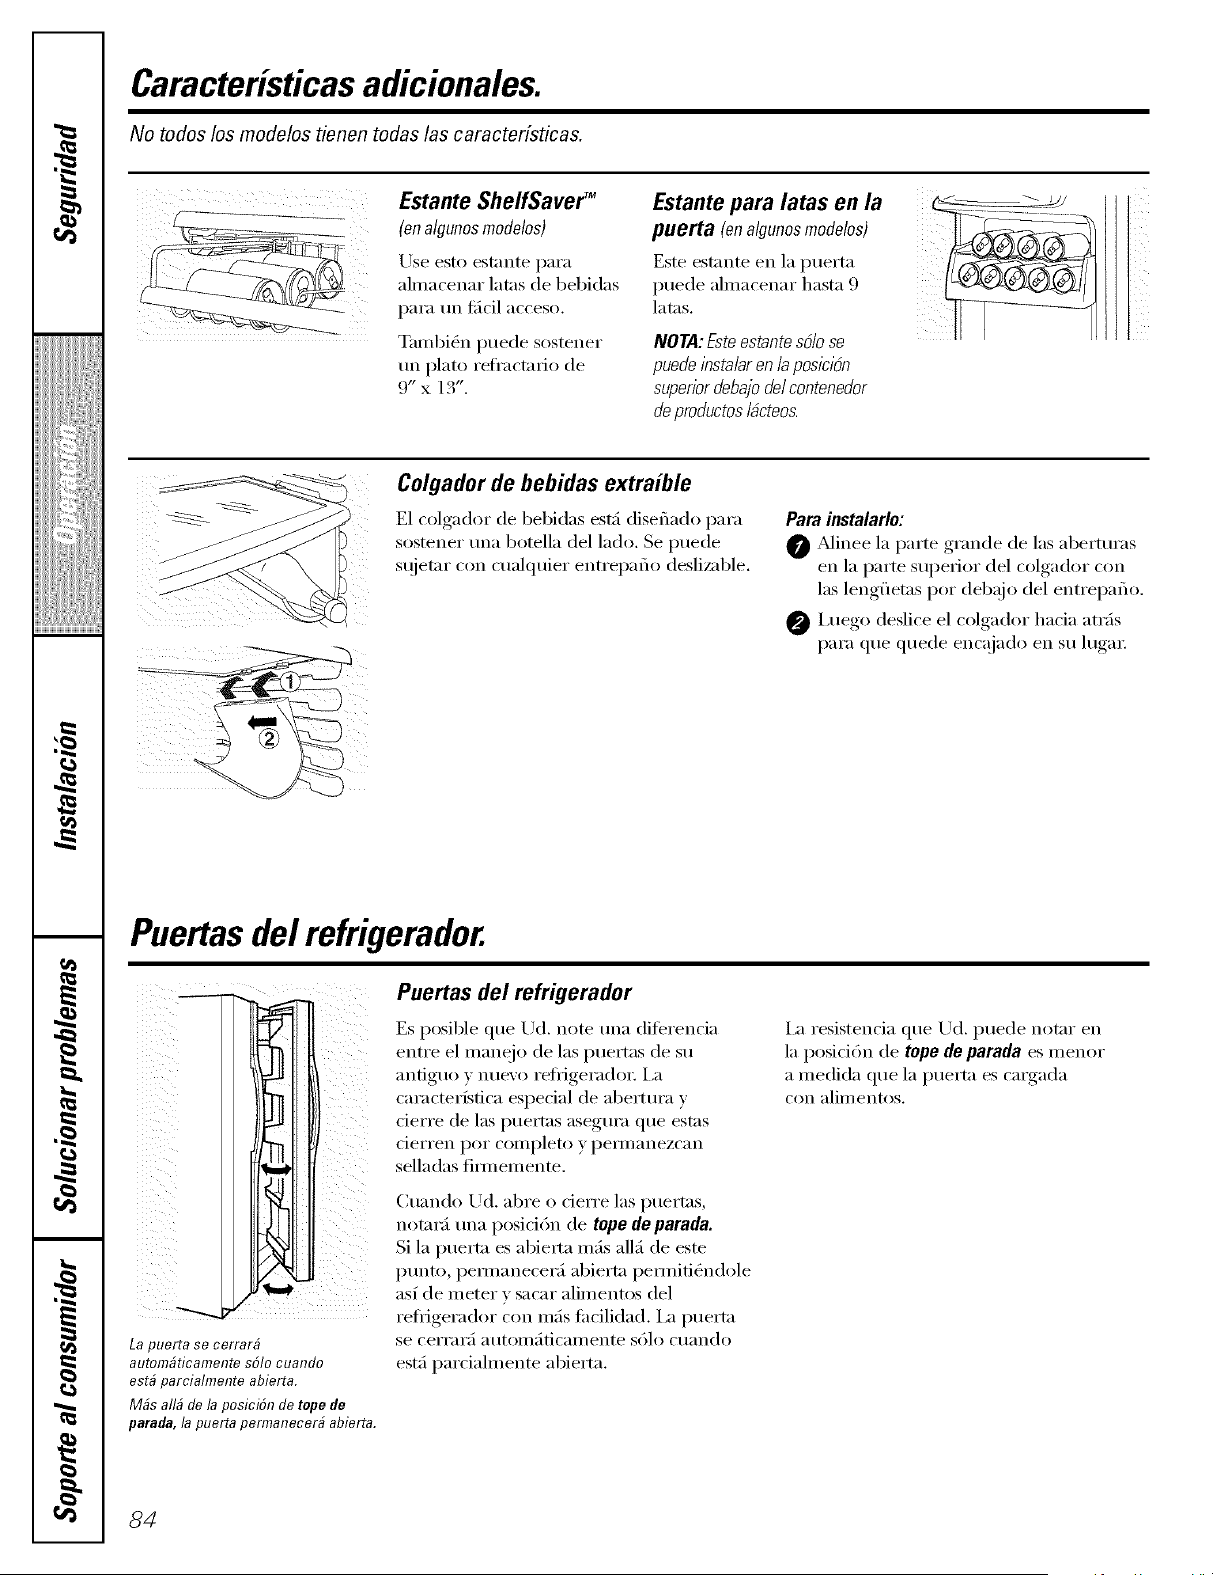
Caracteristicasadicionales.
No todos los modelos tienen todas las caracteristicas.
Estante ShelfSaver TM
(on algunos mode&s)
Use esto estante para
ahnacenar latas de bebidas
para un filcil acceso.
Tambi(q_ puede sostener
un plato reli'acta_io de
9" x 13".
Estante para latas en la
puerta (enalgunosmode&s)
Este estante en la puerta
puede ahnacenar hasta 9
latas.
NOTA: Este estantes6/o se
puede insta/aren /a posici6n
superior debajo de/contenedor
de productos /ficteos.
iTM
Colgador de bebidas extraible
E1 colgador de bebidas est;i diseflado para
sostener una botella del lado. Se puede
st!jetar con cualquier entrepafio deslizable.
Pare instalarlo:
O _Minee la parte grande de las aberturas
en la parte supei'ior del colgador con
las lengfletas per deb_!jo del entrepafio.
@ I,uego deslice el colgador hacia atrfis
para que quede encajado en su luga_:
Puertasdel refrigerador.
_il iii
ii
Z
ii
_,_ i!_ili_TM
)
_i! i i
La puerta so cerrarfi
autom6ficamente s61ocuando
est6 parcialmente abierta.
M6s arid de la posici6n de tope de
parada, la puerta permanecer6 abierta.
Puertas del refrigerador
Es posible que Ud. note una difbrencia
entre el manejo de las puertas de su
anfiguo y iltlevo refl_igeradot: i,a
caracterfsfica especial de abertura v
cierre de las puertas asegura que estas
derren pot completo y pe_nanezcan
selladas fim_emente.
(Mando Ud. abre o derre las puertas,
notanl una posid6n de topedeparada.
Si la puerta es abie_ta mils allfi de este
punto, pem_anecerfi abierta pe_mifi_ndole
as_ de meter v sacar alimentos del
refl_igerador con mils thcilidad. I_ puerta
se ceI'I'aI';/atltOiil;/ticaii/eilte solo CtlaIldo
estfi parcialmente abierta,
I_ resistencia que Ud. puede notar en
la posici6n de topedeparada es menor
a medida que la puert;_ es cmgada
COIl alim eiltos,
84
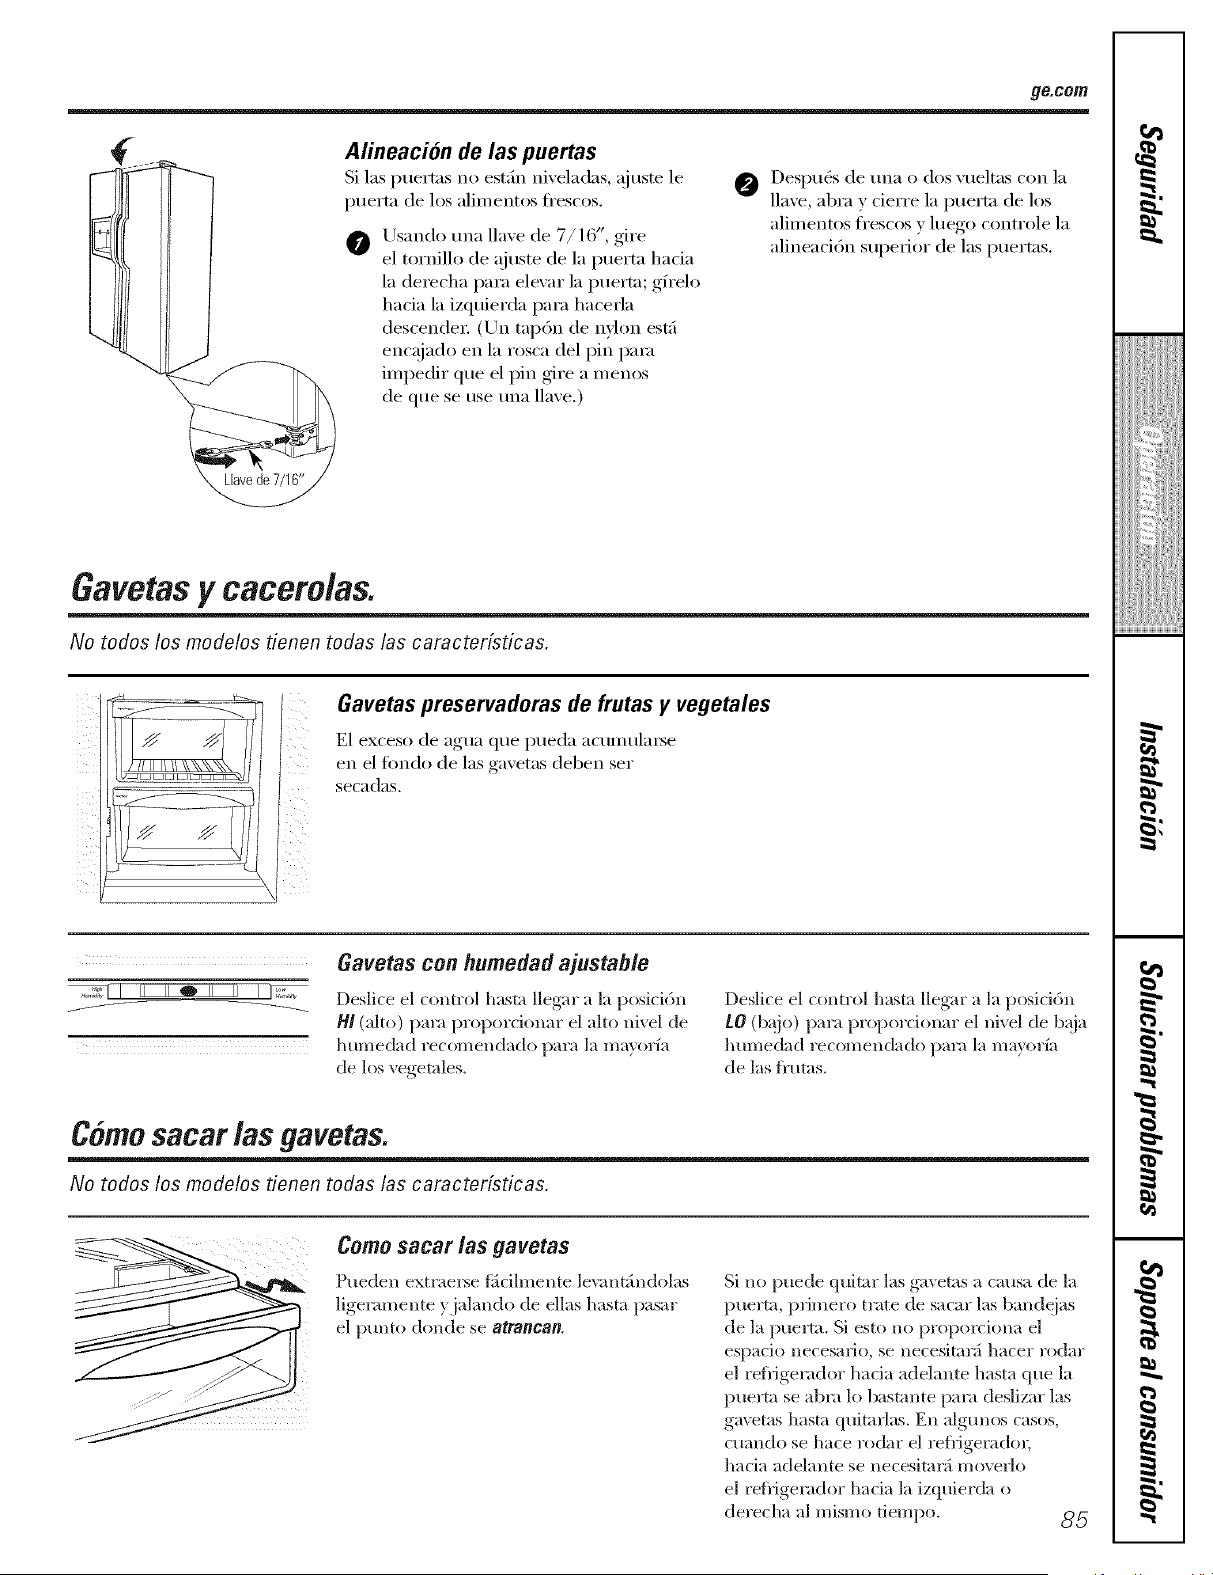
ge.com
Alineacion de las puertas
Si las puertas no est_in niveladas, ajuste le
puerta de los alimentos fl'escos.
Usando una llaxe de 7/16", gire
el tornillo de ajuste de la puerta hacia
la (le_echa para elevar la i)uerm; gfrelo
hacia la izqtfierda para hacerla
descende_: (Un tapdn de nylon estzl
enc@_do en la rosca del pin pare
impedir que el pin gire a menos
de que se use una llave,)
Despu_s de una o dos vueltas con la
llaxe abra v cierre la puerta de los
alimentos frescos y luego controle la
alineaci6n superior de las puertas.
Gavetasjr cacerolas.
No todos los modelos tienen todas las caracter[sticas.
Gavetas preservadoras de frutas y vegetales
E1 exceso de agua que pueda acumulaise
en el fiindo de las gaxetas deben ser
secadas.
j
ii i i i i i i i i
Gavetas con humedad ajustab/e
Deslice el control hasta llegar a la posici6n
HI (alto) para proporcionar el alto nivel de
humedad recomendado para lama) orfa
de los vegetales.
Deslice el control hasta llegar a la posid6n
tO (b:!io) para proporcionar el nivel de b:!ia
humedad recomendado pm'a lama) orf:l
de las fi'utas.
Comosacar /as gavetas.
No todos los modelos tienen todas /as caracterfsticas.
Como socor los goltotos
Pueden extraeise _i_cilmente levant_]ndolas
ligeramente } jalanclo de elias hasta pasar
el l)tmto donde se atrancan.
Si no p/lede quimr las gavetas a causa de la
puerta, pfimero tmte de sacar las bandejas
de la i:merta. Si esto no proporciona el
espado necesario, se necesimr5 hacer rodar
el ref]-igemdol hada adelante hasta que la
pne_nta se abra lo bastante pare deslizar las
gm'etas hasta quitadas. En algLmos casos,
cuanclo se hace rodar el reii-igeiaclol;
hada adelante se necesimr:_ movedo
el ret]igeiaclor hada la izquierda o
derecha al mismo tiempo, oo_
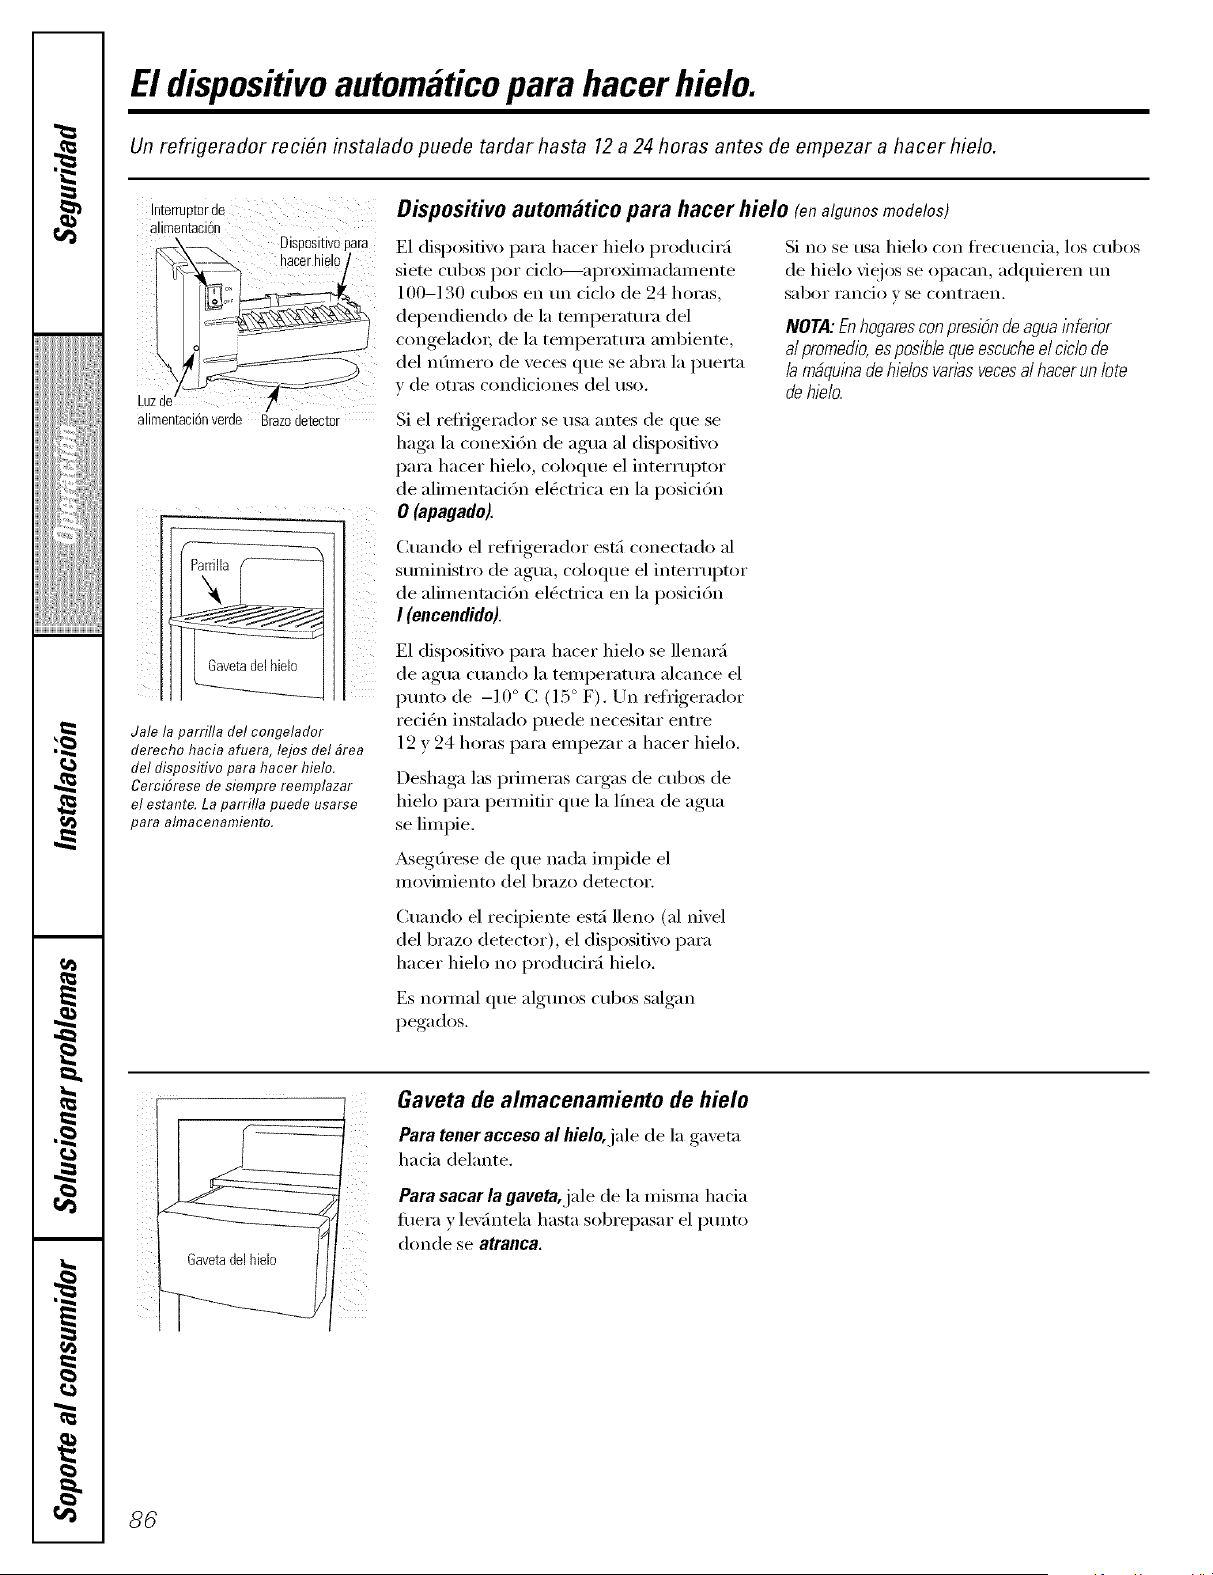
El dispositivoautomMicopara hacer hielo.
Un refrigerador reci_n instalado puede tardar hasta 12 a 24 horas antes de empezar a hacer hielo.
Interrupt0rde
alimentaci6n
- Disp0sitiv0para
_k-_'_. haoerhie!0/
i!°
alimentaci6nverde gram detector
Jale la parrilla del congelador
derecho hacia afuera, lejos del #rea
del dispositivo para hacer hielo.
Cerci6rese de siempre reemplazar
el estante. La parrilla puede usarse
para almacenamiento.
Dispositivo automglticopara hacer hielo fena/gunosmodelos)
E1 disposifixo para hater hielo producirfi
siete cubos pot ciclo--aproximadamente
100-] 30 cubos entm ciclo de 94 horas,
dependiendo de la temperattn'a del
congeladm'_ de la temperatm'a ambiente,
del ilOmero de xeces que se abra la puertn
y de otras condiciones del uso.
Si el refl'igerador se usa antes de que se
haga la conexi6n de agua al disposifiw)
para hacer hielo, coloque el intermptor
de alimentad6n el_ctrica en la posici6n
0 (apagado).
0 " *0" " "
Cuand el refn_e_ado_ esta conectado al
suministro de aoua_ , coloque el interruptor
de alimentaci6n el&'trica en la posici6n
I (encendido).
E1 dispositi_o para hater hielo se llenarfi
de aoua_ cuando la temperatm'a alcance el
punto de -10 ° C (15 ° F). Un refrigerador
reciSn instalado puede necesitar entre
12 y 24 horns pare empezar a hacer hielo.
Deshaga las primeras cargas de cubos de
hielo para pemfifir que la lfnea de agua
se limpie.
_seg(u'ese de que nada impide el
movimiento del brazo detector.
Si no se tlS[I hielo con fl'ect/encia, los ctlbos
de hielo viejos se opacan, adquieren tm
saboI" i'ancio "_ se conti'aen.
NOTA:Enhogaresconpresidndeaguainferior
alpromedio,esposibleclueescucheelcl21ode
b mfiquinade hielosvarbs vecesalhacerun bte
dehielo.
(_uando el recipiente estfi lleno (al Ifivel
del brazo detector), el dispositiw) para
hacer hielo no producirfi hielo.
Es nom_al que algtmos cubos salgan
pegados.
Gaveta de almacenamiento de hielo
Para tener acceso al hielo, jale de la gaxeta
hacia delante.
Para sacar la gaveta, jale de la misma hacia
flmI'a y levfintela hasta sobrepasar el i)tmto
d()nde se atranca.
86
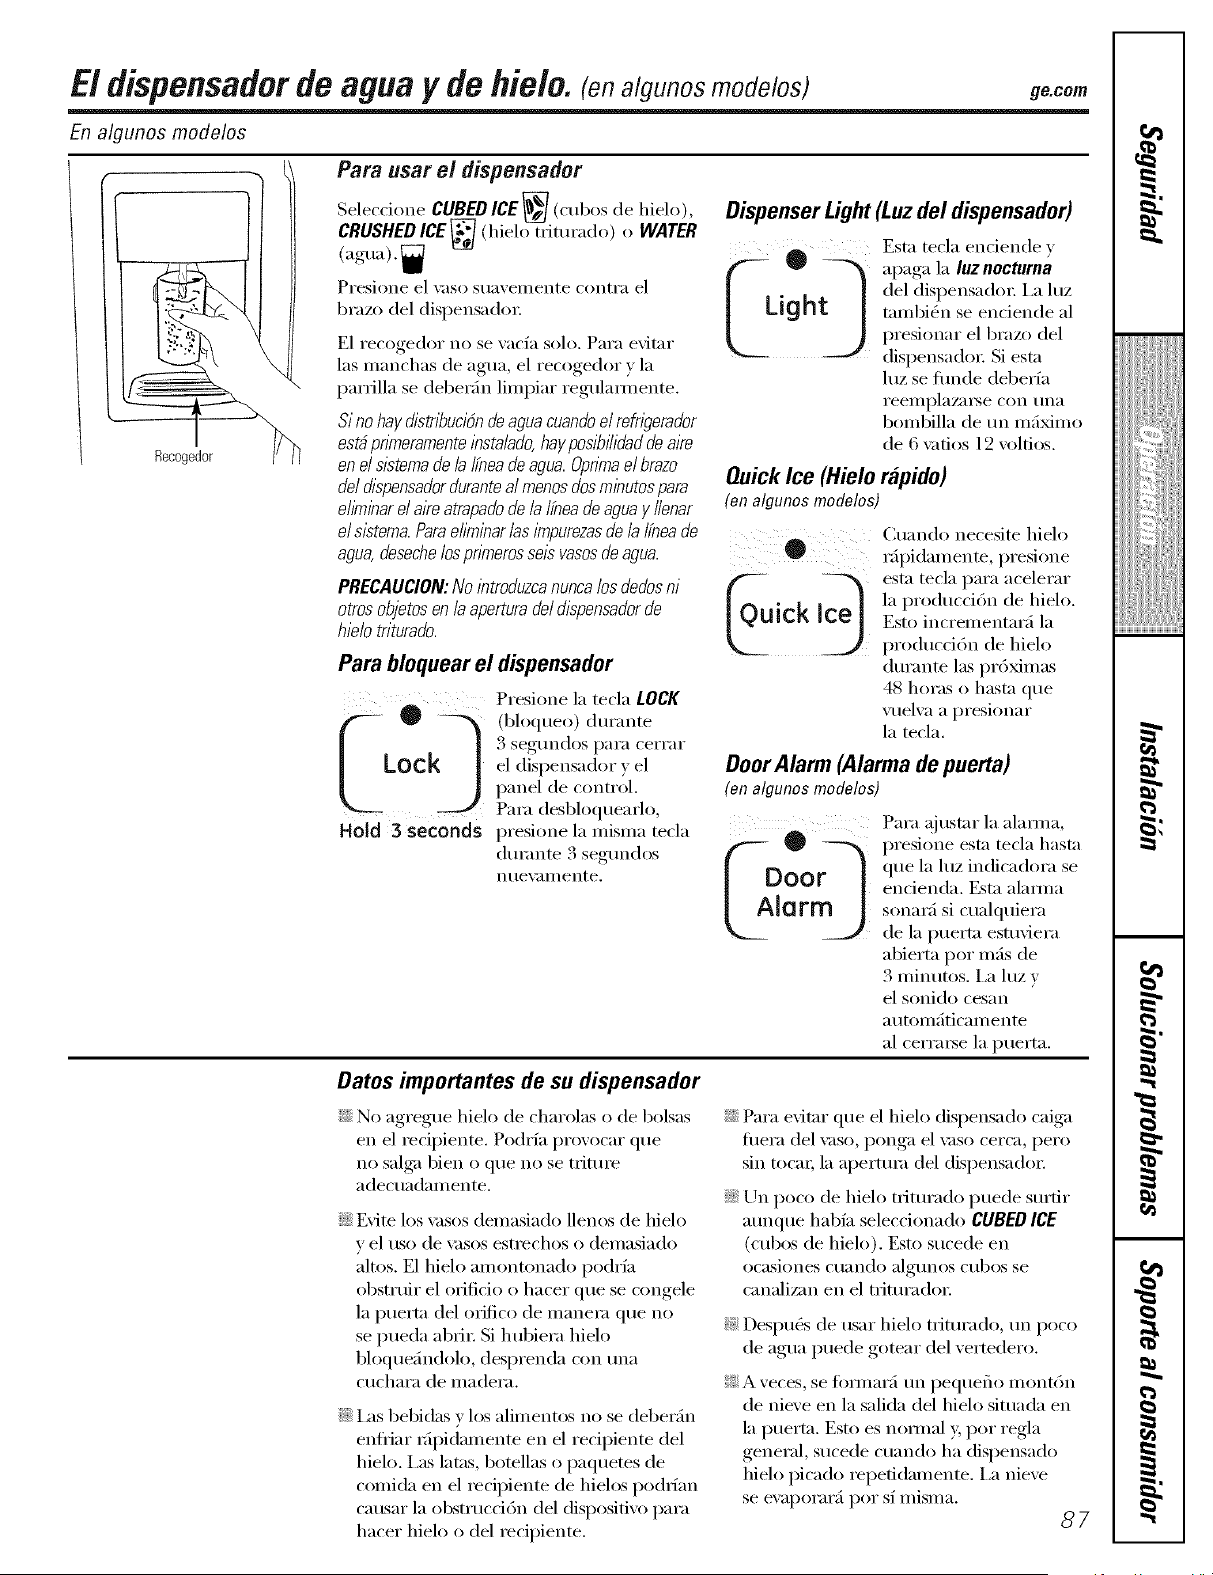
El dispensadorde aguay dehie/o.(enalgunosmode/os) ge.com
En algunos modelos
Rec0ged0r
\
Para usar el dispensador
Selecd,,neCUBEDICE_ (cubosde hielo), Dispenser Light
CRUSHEDICE_ (hielo tfimrado) o WATER
(agua)._
Presione el _lso s//ax, eillellte COllti'a el
brazo del dispensadm:
E1 i'ecogedor ilo se _acfa solo. Para evltar
las manchas de agua, el recogedor } la
parfilla se deberfin limpiar regulam_ente.
S/no haydistnbucidnde aguacuandoel refngerador
estfipnYneramentelnsta/ado,hayposibffidaddeake
enelslstemadelalfneadeagua.OpnYnaelbrazo
deldlspensadordurantealmendsdosminutospara
ehkninarel akeatrapadodela lfneadeaguay llenar
elslstema.ParaehYninar/aslYnpurezasdela lfneade
agua,desechelospnYnerosselsvasosdeagua.
PRECAUCION:Nointroduzcanuncalosdedosni
otrosobjetosen /aaperturade/dispensadorde
hielotr/turado.
Para bloquear el dispensador
LLoc
Hoid 3 seconds
Presione la tecla LOCK
(bloqueo) durante
3 segtmdos para cerrar
el dispensador ) el
panel de control.
Para desbloquearlo,
presione la misma tecla
(hmmte 3 segtmdos
Iltlex, IIl/eilte.
(Luzdel dispensador)
Esta tecla endende y
apaga la luznocturna
del dispensadm: i,a luz
tambi_n se endende ;11
presionar el brazo del
dispensado_: Si esta
luz se tirade deberfa
i'eeillplazai'se COil tlil_l
bombilla de tm mfiMmo
de 6 \afios 12 volfios.
Quick Ice (Hielo rflpido)
(en algunos modolos)
0
Cuando necesite hielo
r;lpidamente, presione
esta tecla para acelerar
la produccidn de hielo.
Esto incrementarfi la
produccidn de hielo
dtmmte las pr6ximas
48 horas o hasta que
vuelva a presionar
la mcla.
DoorAlarm (Alarma de puerta)
(on algunos modelos)
oorq
L2,or j
Para ajustar la alarum,
presione esta tecla hasta
que la luz indicadora se
endenda. Esta alarum
somml si cualqtfiera
de la puerta estuviera
abierta pot mils de
3 minutos. I,a luz v
el sonido cesan
a utomfiticam ente
al cerrarse la puerta.
Dates importantes de su dispensador
_Ji::No agregue hielo de charolas o de bolsas
en el _ecipiente. Podrfa provocar que
no sal_l bien o que no se tfiture
adecuadamente.
::Ji::Evite los \asos demasiado llenos de hielo
v el uso de \_lsos estrechos o demasiado
altos. E1 hielo amontonado podrfa
obstrtfir el orificio o hacer que se congele
la puerta del ofifico de manem que no
se pueda abfiI: Si hubiera hielo
bloquefindolo, desprenda con tma
cuchara de madera.
::Ji::I as bebidas y los alimentos no se deberfin
enflJar r,lpidamente en el recipiente del
hielo. I,as latas, botellas o paquetes de
comida en el recipiente de hielos pod6an
causar la obstrucddn del dispositivo para
hacer hielo o del recipiente,
::Ji::Para evitar que el hielo dispensado caiga
fllera del \_lso, ponga el \_lso cerca, pero
sin tocm; la apertma del dispensado_:
::J?::Un pocx_ de hielo t_itm'ado puede sm'tir
atlllqtle habfa seleccionado CUBED ICE
(cubos de hielo). Esto sucede en
ocasioIles C/l[lIl(lo alg/lIlOS c/ibos se
canalizan en el tfitm'ado_:
_: Despu0s de usar hielo ttiturado, tm poco
de agua puede gotear del vertedero.
_: A veces, se toilnai'_i t111pequefio inont6n
de nieve en la salida del hielo situada en
la puerta. Esm es nomml > pot regla
general, sucede cuando ha dispensado
hielo picado repefidamente. I,a nieve
se eV_lpoI';lI'}/ poI" S[ II/iSIIl_l,
87
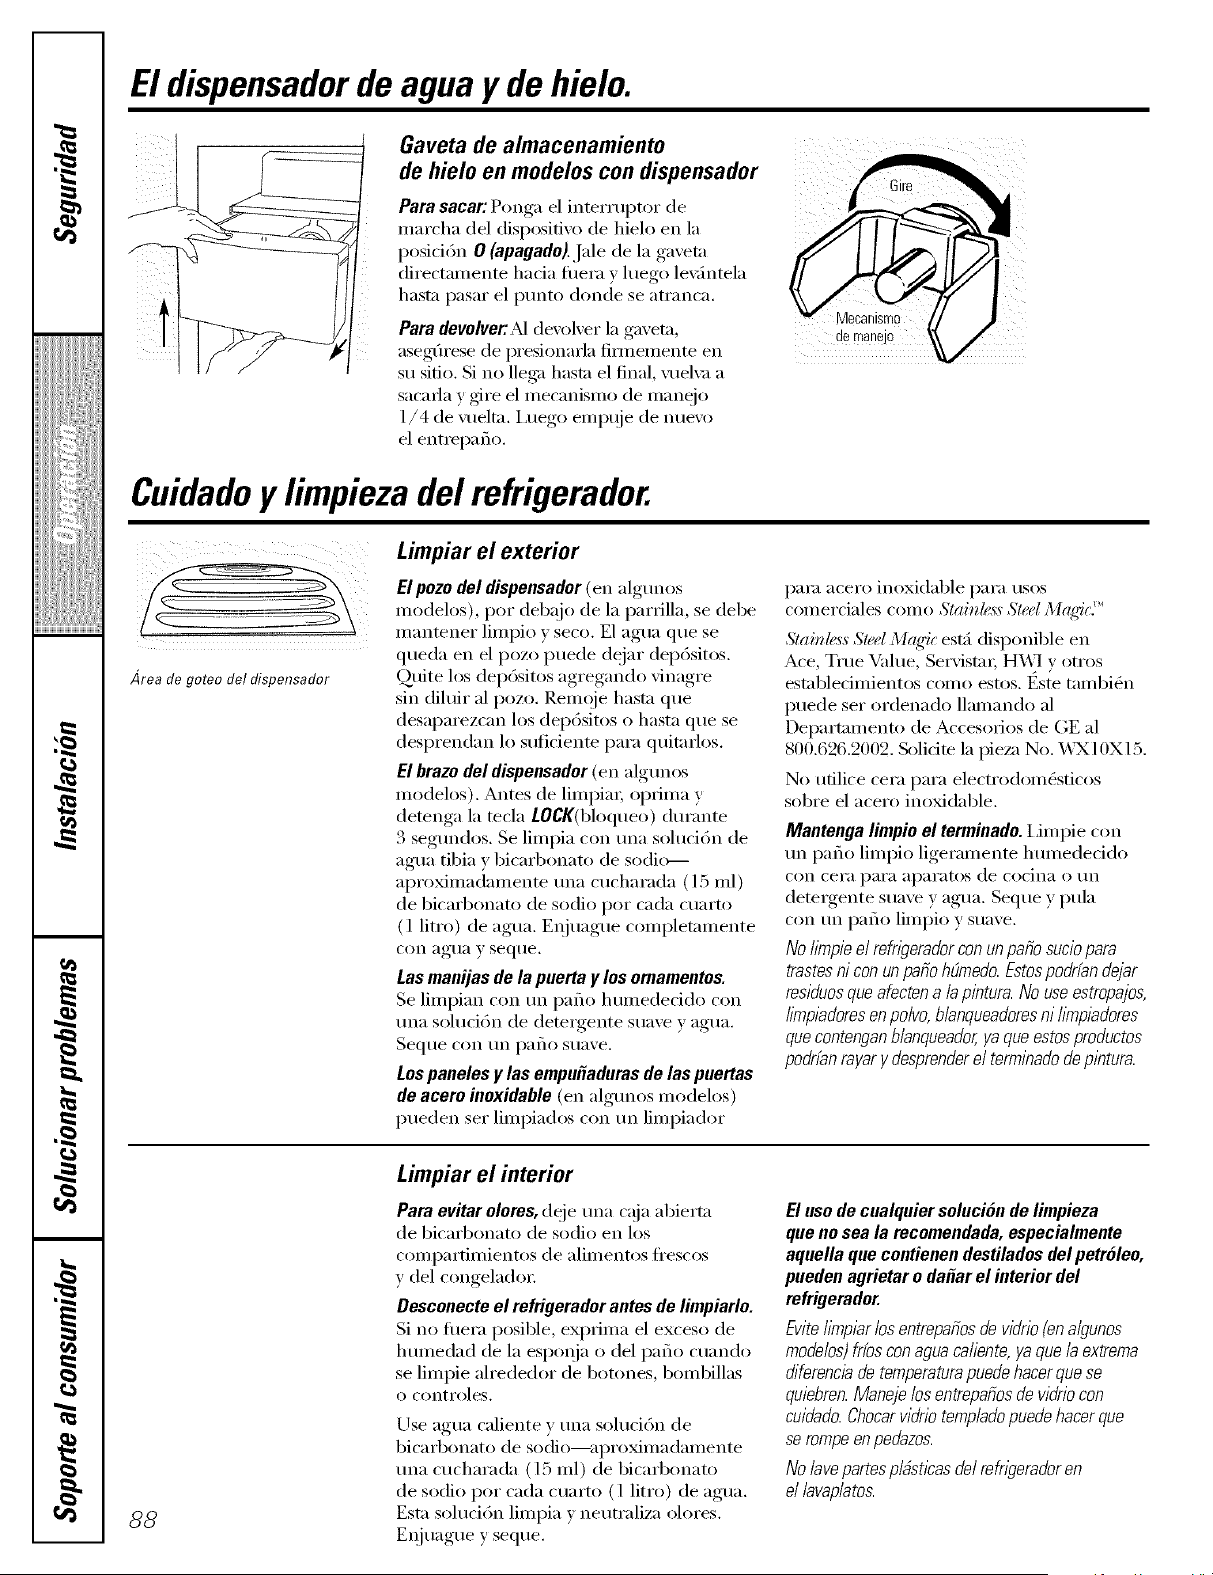
El dispensadorde agua y de hielo.
Gaveta de almacenamiento
de hielo en modelos con dispensador
Para sacar: Ponga el interrupter de
marcha del disposifivo de hielo en la
posid6n 0 (apagado).Jale de la gareth
clirecmmente hacia filera y luego levfintela
hastn pasar el ptmto donde se atranca.
Para devolver:M devolver la gareth,
asegfirese de presionaita firnlelnente en
su sitio. Si no lle_l hasm el final, vuel\_l a
sacafla y gfire el inecanislno de manejo
1/4 de vueltn, i,uego elnpuje de nuevo
el entrepafio.
Cuidadoy limpiezadel refrigerador.
,4rea de goteo del dispensador
Limpiar el exterior
El pozo del dispensador (en algtmos
inodelos), per debajo de la parrilla, se debe
inantener limpio ) seco. E1 agua que se
queda en el pozo puede deiar depdsitos.
Qtfite los depdsitos agregando vinagre
sin dihfir al pozo. RemL)ie hasm que
desaparezcan los dep6sitos o hasta que se
desprendan 1/) suficiente para quitnrlos.
El braze del dispensador (en algm_os
modelos). Antes de limpim; optima y
detenga la tecla LOCK(bloqueo) din'ante
3 segundos. Se limpia con una solucidn de
agua tibia y bicarbonate de socli_---
aproMmadamente tma cucharada (l 5 ml)
de bicarbonate de sodio per cada cuarto
(1 litro) de agua. Eqjuague completnmente
con agua y seque.
tas manijas de la puerta y los ornamentos.
Se limpian con tm patio lmmedecido con
una soludtn de deteigente suave y agua.
Seque con tin p_ll-lO S/l_lVe.
Lospaneles y las empuSaduras de las puertas
de acero inoxidable (en algm_os modelos)
pueden set limpiados con tm limpiador
pare acero inoxidable para usos
comerciales como Slainlex_ Sled A'l((q'ic._''
Slainle,_,_Sled Magfc estfi (lisponible en
Ace, Tree Value, Servistn_; H_._] y ()tros
esmblecimientos come est()s. Este tambiSn
puede set ordenado llamando al
Departnment() de Accesofios de GE al
800.626.2002. S()lidm la pieza N(). _._X10X15.
N() ufilice cera para electr()domSstic()s
sobre el acero inoxidable.
Mantenga limpio el terminado. I,impie con
tm patio limpio ligeramente hmnedecido
con (eI'a p}1I'_1 }lp}lI'}ltos de (o('ina o t111
(lem_gente SII_IVe y agua. Seque y pula
con tm patio limpio y suave,
No/Imp/e el refrlgeradorcon un patio sucio para
trastes ni con un patio hOmedo.Estospodrfan dejar
residuosque afectena la pintura. No use estropajos,
hknpladoresen poivo, blanqueadoresni hknplaclores
que contenganb/anqueador,ya que estosproductos
podrfanrayar y desprenderel terml))adode p/)_tura.
88
Limpiar el interior
Para evitar oleres, deje una c@1 abiertn
de bicarbonate de sodio en los
compartimientos de alimentos frescos
y del congelado_:
Desconecte el refrigerador antes de limpiarlo.
Si no fuera posible, exprima el exceso de
lmmedad de la espoqja o del patio cuando
se limpie ah'ededor de botones, bombillas
o controles.
/_)se agua caliente y tma soluci6n de
bicarbonate de sodio---aproMmadamente
tma cucharada (15 ml) de bicarbonato
de sodio per cada cuarto (1 litro) de agua.
Estn soluci6n limpia y neutraliza olores.
Eqjuague y seque.
El use de cualquier soluci6n de limpieza
que no sea la recomendada, especialmente
aquella que contienen destilados del petr61eo,
pueden agrietar o da#ar el interior del
refrigerader.
Evite l/Tnpiarlosentrepafiosde vidrio(en algunos
mode/os)frfoscon agua caliente, ya que /a extrema
diferencia de temperaturapuede hacer que se
quiebren.Maneje los entrepafios de vidrio con
cuidado.Chocarvidrio temp/adopuede hacer que
se rompe en pedazos.
No/ave partes p/#stlcas de/refngerador en
el/avaplatos.
_e.com
Arras de/refr_gerador
Se deberfi tenet cuidado al retirar el
refl_igerador de la pared, To(los los tipos
de recubrinfiento de pisos se pueden
(lafla_; sobre todo los recubrinfientos
acojinados y los que tienen superficies
reptljadas,
Jale el reli_igerador en fi)mm recta y empt!je
nue\:m_ente para devolverlo a su posici6n,
Mover el refl_igerador en direcci6n lateral
puede causar dafios al recubrimiento del
piso o al reflJgerad(n;
AI empujarelrefweradora sulugar,asegElrese
denopasarsobreel cableelfictriconi sobrela lfnea
deaflYnentacidndel dlsposifivoparahacerhielos
(enalgunosmoddos).
Preparacion para vacaciones
En el caso de \_l(aciones o atlsencias
prolongadas, qtfite los alimentos v
desenchttfe el reffigeradm: IJmpie el
interior con solud6n de bicarbonato
de tma cucharada (l 5 ml) de bicarl)onato
por un cuarto (l litro) de agua. Deje
abiertns las puertas.
Coloque el interruptor de alimentaci6n
el(_ctfica del (lisposifiw) automfitico pare
hacer hielo en la posid6n 0 (apagado)y
cierre el suministro de agua al refligera(lm:
Si la temperatm'a pueda llegar al ptmto
de congelaci6n, ha)_ tma persona calificada
para desaguar el sistema del suministro
de agua (en algunos modelos) para evitnr
(lafios a la propiedad causados pot
intmdad6n.
En caso de mudanza
_segure [()dos los elementos sueltos
como entrepafios y redpientes pegfin(lolos
con cinm adhesiva en su lugar pare
evitnr daflos.
_M usar tma carretilla para mover el
refiigeraclo_; no haga descansar la parte
ti'ontal o trasera del refiigera(lor contra
la carrefilla. Esto po(lrfa dafiar el
refl_igeradm; Man_jelo s61o desde
los laterales del refl_igerado_:
AsegOresede que el refn)erador so coloque
en poslci6n verticaldurante ia mudanza.
89
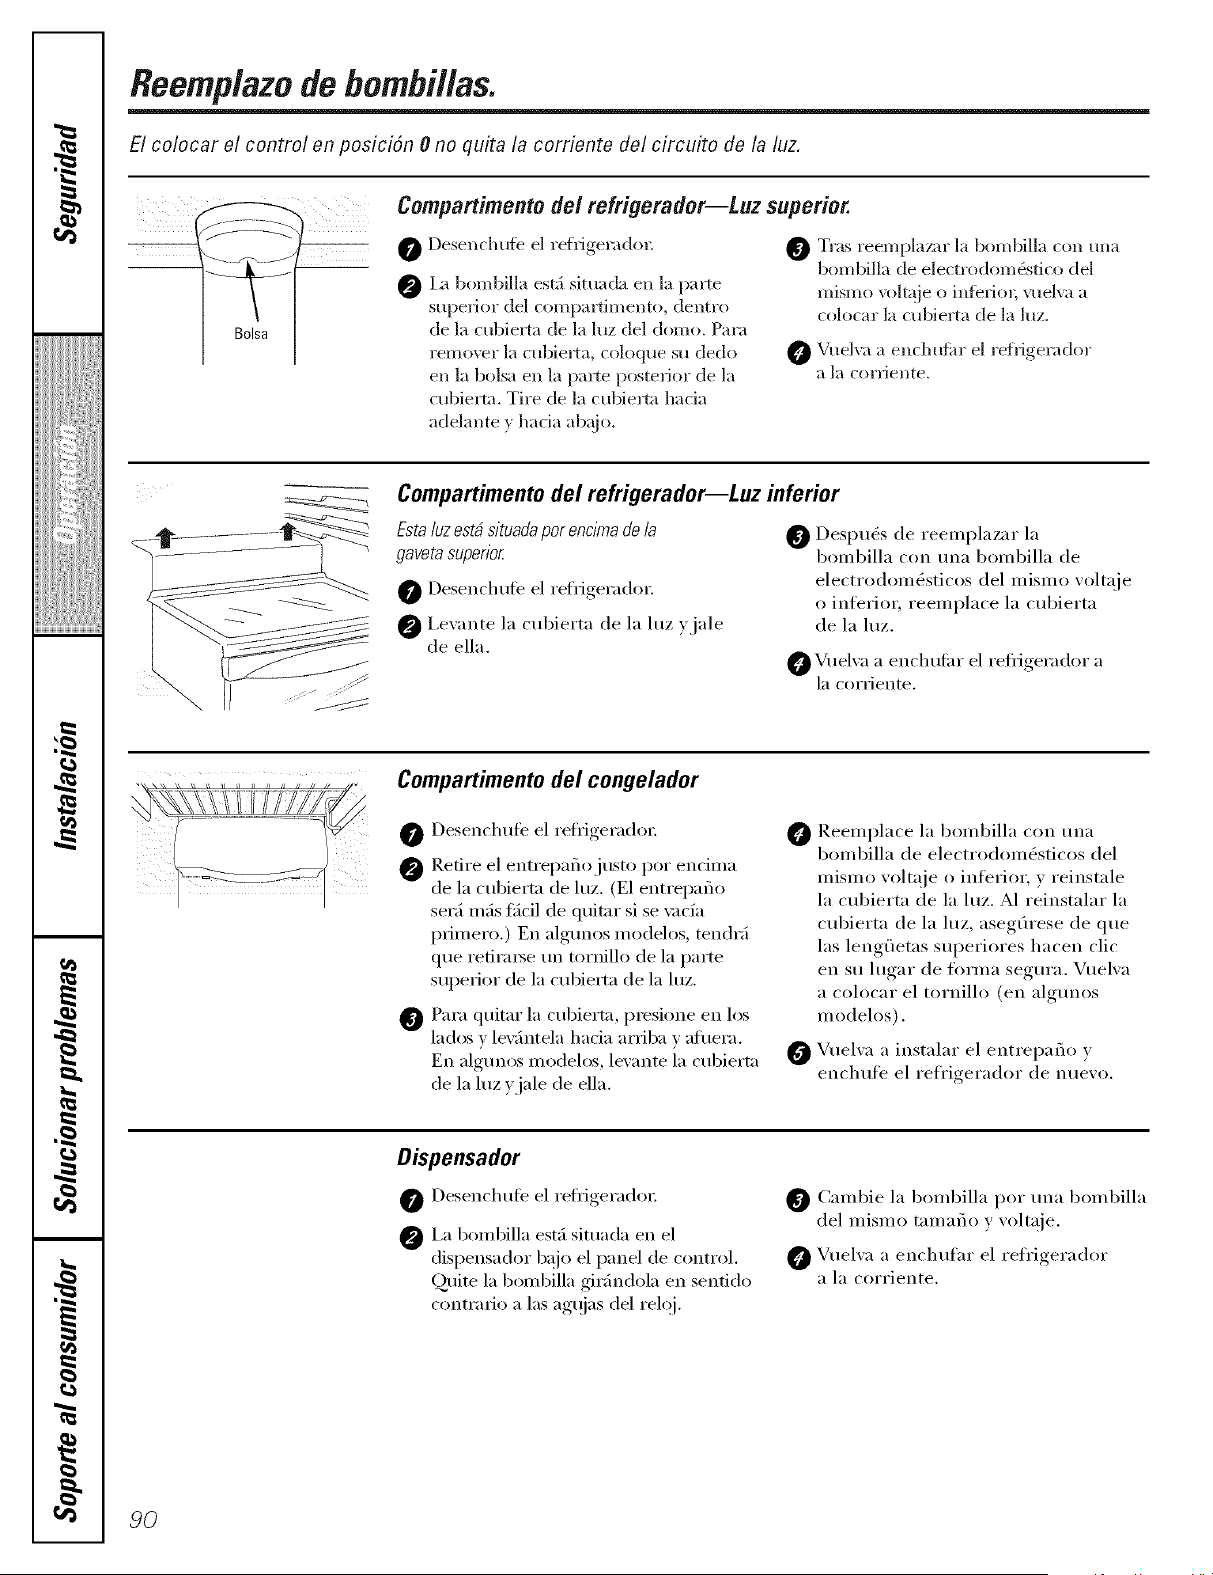
Reemplazodebombil/as.
El colocar el control en posicidn 0 no quita la corriente del circuito de la luz.
W m
Bolsa
Compartimento de/refrigerador--Luz superior.
0 Desenchu4'e el ret_igeradol:
0 I_ bombilla est5 situada en la parte
superior del compartimento, dentro
de la cubierta de la ]uz del domo. Para
remover la cubie_ta, coloque su dedo
en la bolsa en la pm_e posterior de la
cubiexm. Tire de la cubierta hada
O Tras reempla/m" la bombilla ctm una
bombilla de electrodomOstico del
mismo voltaje o infbri(n; vuelva a
colocar la cubierta de la luz.
O Vue]va a enchufiu" el reffigerador
a ]a corsJeslte.
ade]ante } hacia ab@).
Compartimento del refrigerador--Luz inferior
Esta /uzest# s/tuadapor enc/made/a
gaveta supedo_
0 Desenchufe el refrigeradm:
i,ewmte la cubierm de la luz yjale
de ella.
O Despu(_s de reemplazar la
bombilla con 5ma bombilla de
electrodomg_sticos del mismo voltaje
o infi_rior, reemplace la cubierta
de la luz.
0 Vuelxa a enchufisr el refrigerador a
la corriente,
Compartimento del congelador
O Desenchufe el reliJgerad(n:
0 Retire el entrepafiojusto por encima
de la cubierta de luz. (El entrepaflo
ser5 mils filcil de quitar si se \_scfa
primero.) En algtmos modelos, tendr5
que retira_3e 5m tornillo de la parte
superior de la cubierta de la luz.
Para quitar la cubierta, presione en los
lados v levfintela hada arriba v afllera.
En algtmos modelos, levante la cubierta
de la luz yjale de ella.
Reemplace la bombilla con una
bombilla de electrodom_sticos del
mismo voltaje o inferim; y reinstale
la cubierta de la luz. AI reinstalar la
cubierta de la luz, asegfirese de que
las lengfietas superiores hacen clic
en su lugar de torma segura. Vuelva
a colocar el tornillo (en algtmos
modelos).
0 Vuelva a instalar el entrepafio y
enchufi _ el refrigerador de nuevo.
Oispensador
Desenchufb' el refi_igerad(n:
I,a bombilla estfi situada en el
dispensador bajo el panel de control.
Quite la bombilla girfndola en senfido
contrario alas agujas del reh)j.
Cambie la bombilla por tma bombilla
del mismo tamafio y xoltaje.
0 Vuel;a a enchufar el refrigerador
a la corriellte.
9O
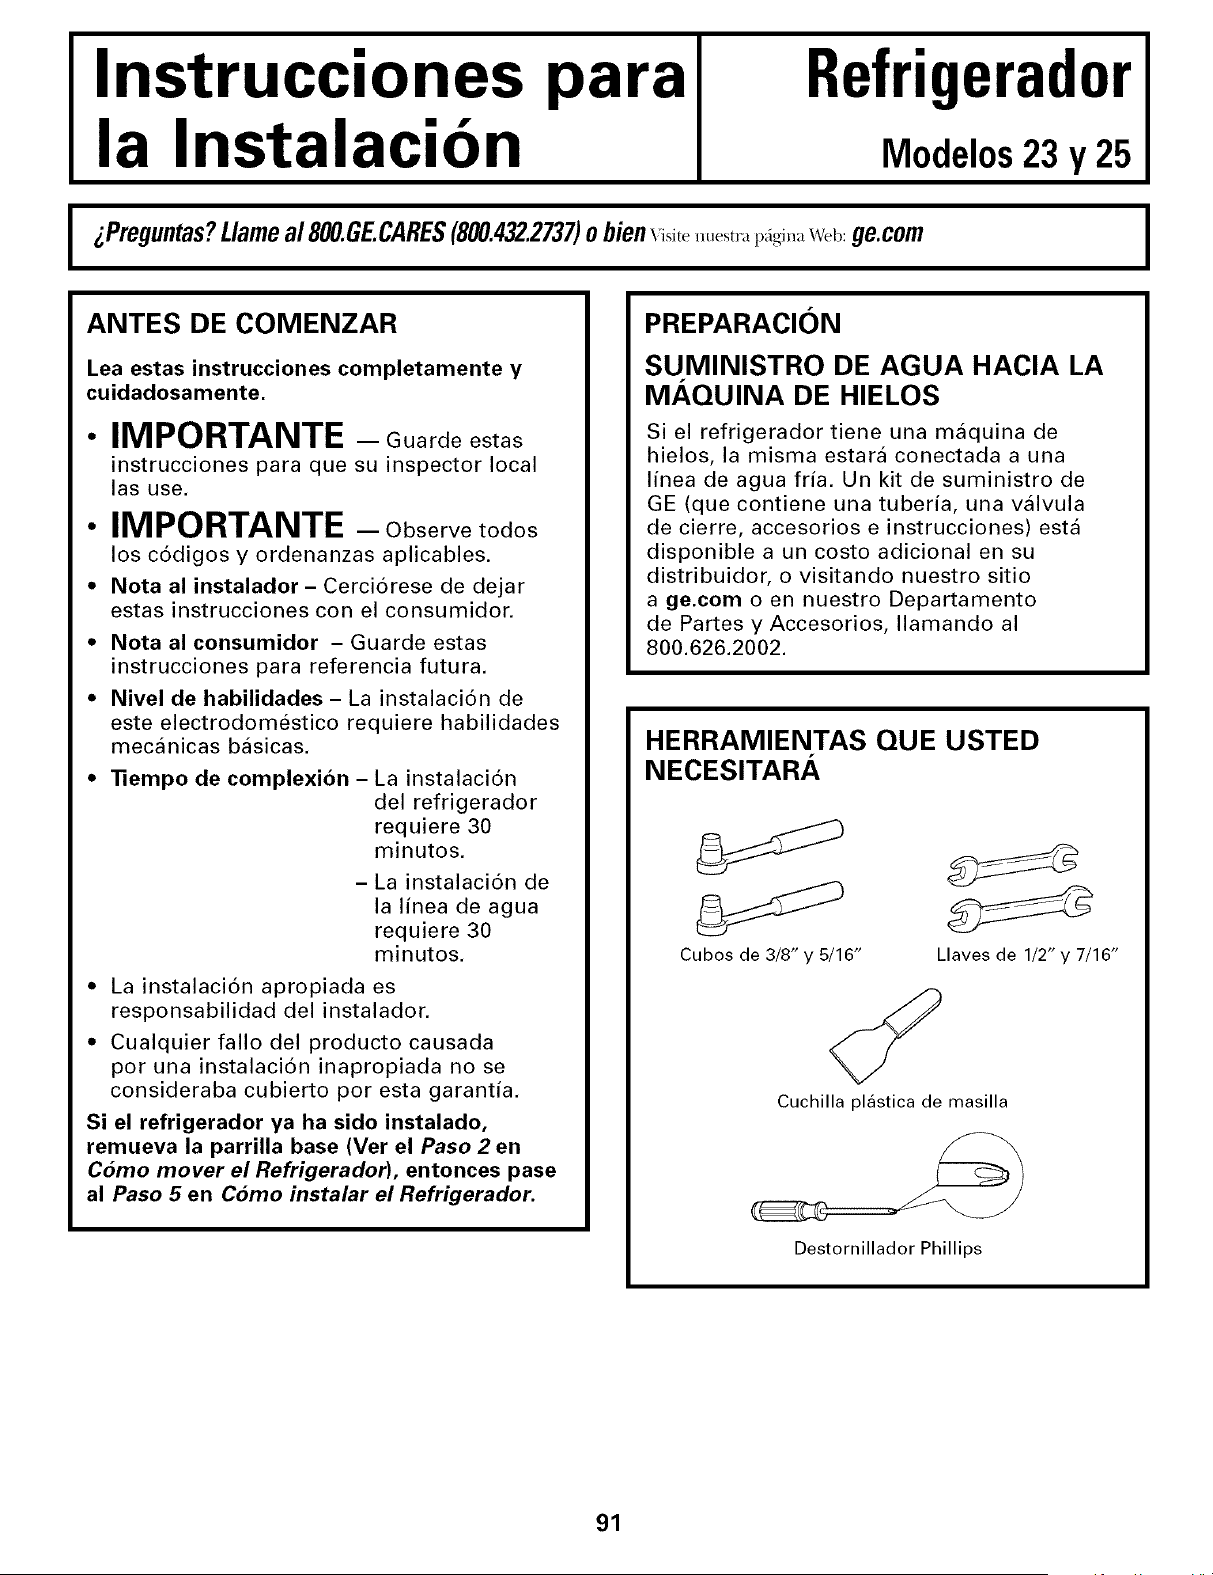
I
Instrucciones pare
la Instalacion
Refrigerador
Modelos23 y 25
i Preguntas? Llamea1800.GECARES(800.432.2737)o bien",i_it_,,_tr_,p_i,_,w,4_:ge.com
I
ANTES DE COMENZAR
Lea estas instrucciones completamente y
cuidadosamente.
• IMPORTANTE - Guardeestas
instrucciones para que su inspector local
las use.
• IMPORTANTE - Observetodos
los c6digos y ordenanzas aplicables.
• Note al instalador - Cerci6rese de dejar
estas instrucciones con el consumidor.
• Note al consumidor - Guarde estas
instrucciones pare referencia future.
• Nivel de habilidades - La instalaci6n de
este electrodomestico requiere habilidades
mecanicas basicas.
• l"iempo de complexion - La instalaci6n
del refrigerador
requiere 30
minutos.
- La instalaci6n de
la linea de ague
requiere 30
minutos.
• La instalaci6n apropiada es
responsabilidad del instalador.
• Cualquier fallo del producto causada
por una instalaci6n inapropiada no se
consideraba cubierto por esta garantia.
Si el refrigerador ya ha sido instalado,
remueva la parrilla base (Ver el Paso 2 en
Como mover el Refrigerador), entonces pase
al Paso 5 en Como instalar el Refrigerador.
PREPARACION
SUMINISTRO DE AGUA HACIA LA
MAQUINA DE HIELOS
Si el refrigerador tiene una maquina de
hielos, la misma estara conectada a una
linea de ague fria. Un kit de suministro de
GE (que contiene una tuberia, una valvula
de cierre, accesorios e instrucciones) esta
disponible a un costo adicional en su
distribuidor, o visitando nuestro sitio
a ge.com o en nuestro Departamento
de Partes y Accesorios, Ilamando al
800.626.2002.
HERRAMIENTAS QUE USTED
NECESITARA
Cubos de 3/8" y 5/16" Llaves de 1/2"y 7/16"
Cuchilla plastica de masilla
Destornillador Phillips
91
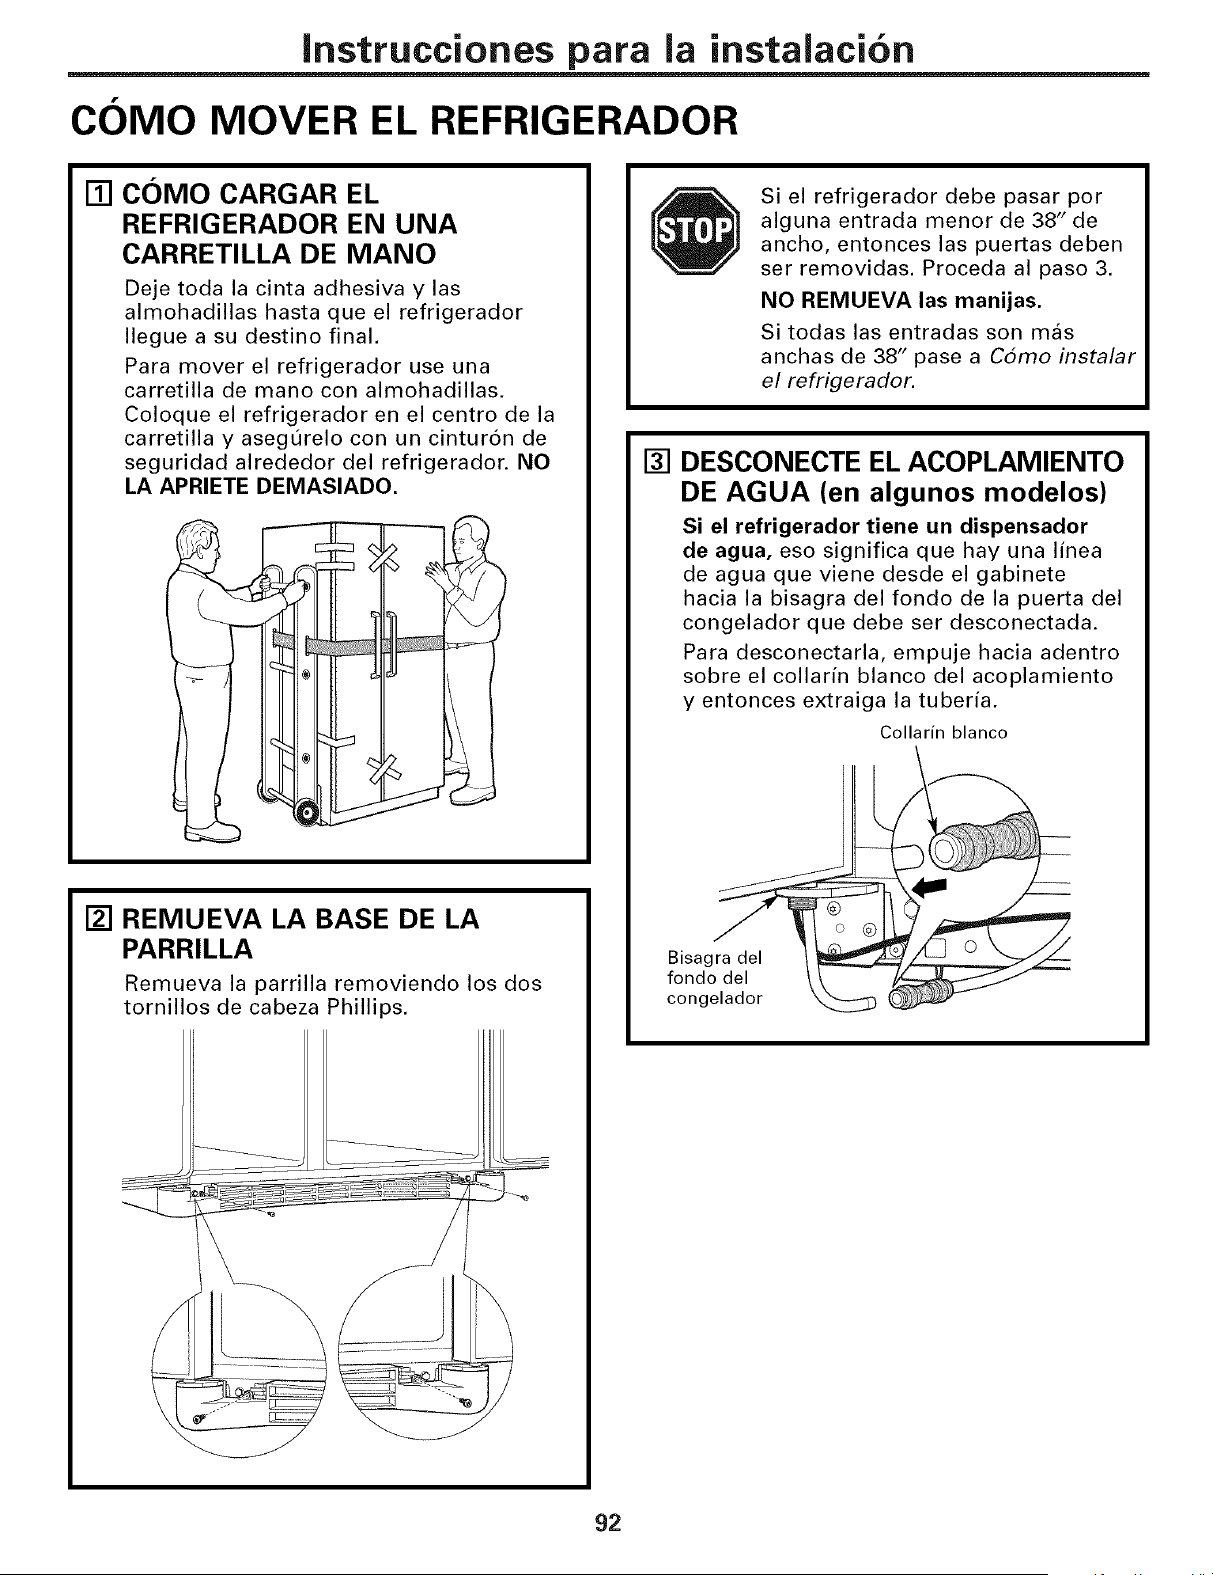
Instrucciones para la instalaci6n
COMO MOVER EL REFRIGERADOR
[] COMO CARGAR EL
REFRIGERADOR EN UNA
CARRETILLA DE MANO
Deje toda la cinta adhesiva y las
almohadillas hasta que el refrigerador
Ilegue a su destino final.
Para mover el refrigerador use una
carretilla de mano con almohadillas.
Coloque el refrigerador en el centro de la
carretilla y asegt3relo con un cintur6n de
seguridad alrededor del refrigerador. NO
LA APRIETE DEMASlADO.
[] REMUEVA LA BASE DE LA
PARRILLA
Remueva la parrilla removiendo los dos
tornillos de cabeza Phillips.
Si el refrigerador debe pasar por
alguna entrada menor de 38" de
ancho, entonces las puertas deben
ser removidas. Proceda al paso 3.
NO REMUEVA las manijas.
Si todas las entradas son mas
anchas de 38" pase a C6mo instalar
el refrigerador.
[] DESCONECTE EL ACOPLAMIENTO
DE AGUA (en algunos modelos)
Si el refrigerador tiene un dispensador
de agua, eso significa que hay una linea
de agua que viene desde el gabinete
hacia la bisagra del fondo de la puerta del
congelador que debe ser desconectada.
Para desconectarla, empuje hacia adentro
sobre el collarin blanco del acoplamiento
y entonces extraiga la tuberia.
Collarin blanco
Bisagra del
fondo del
congelador
92
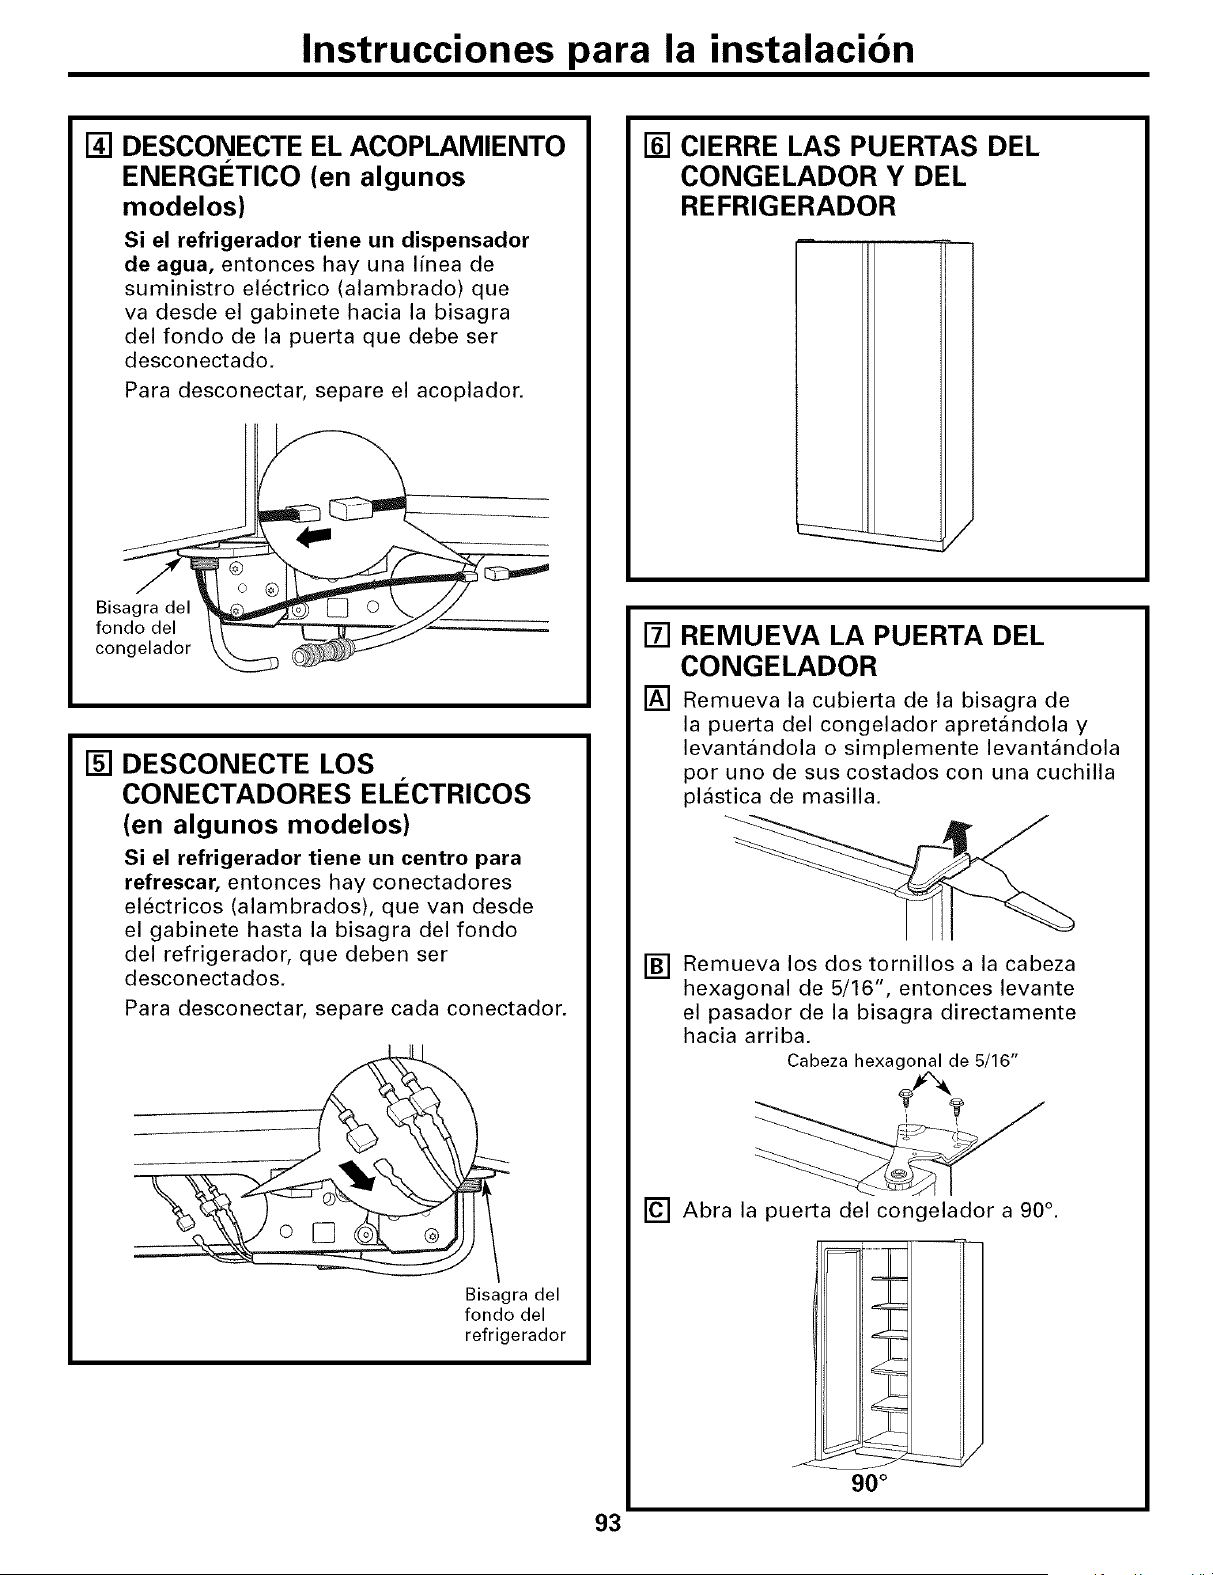
Instrucciones para la instalacion
[] DESCONECTE EL ACOPLAMIENTO
ENERGI_TICO (en algunos
modelos)
Si el refrigerador tiene un dispensador
de agua, entonces hay una linea de
suministro electrico (alambrado) que
va desde el gabinete hacia la bisagra
del fondo de la puerta que debe ser
desconectado.
Para desconectar, separe el acoplador.
Bisagra del
fondo del
congelador
[] DESCONECTE LOS
CONECTADORES ELI_CTRICOS
(en algunos modelos)
Si el refrigerador tiene un centro para
refrescar, entonces hay conectadores
electricos (alambrados), que van desde
el gabinete hasta la bisagra del fondo
del refrigerador, que deben ser
desconectados.
Para desconectar, separe cada conectador.
Bisagra del
fondo del
refrigerador
[] CIERRE LAS PUERTAS DEL
CONGELADOR Y DEL
REFRIGERADOR
[]
[]
REMUEVA LA PUERTA DEL
CONGELADOR
Remueva la cubierta de la bisagra de
la puerta del congelador apretandola y
levantandola o simplemente levantandola
por uno de sus costados con una cuchilla
plastica de masilla.
[] Remueva los dos tornillos a la cabeza
hexagonal de 5/16", entonces levante
el pasador de la bisagra directamente
hacia arriba.
Cabeza hexagonal de 5/16"
_'_2
[] Abra la puerta del congelador a 90 ° .
93
90 °
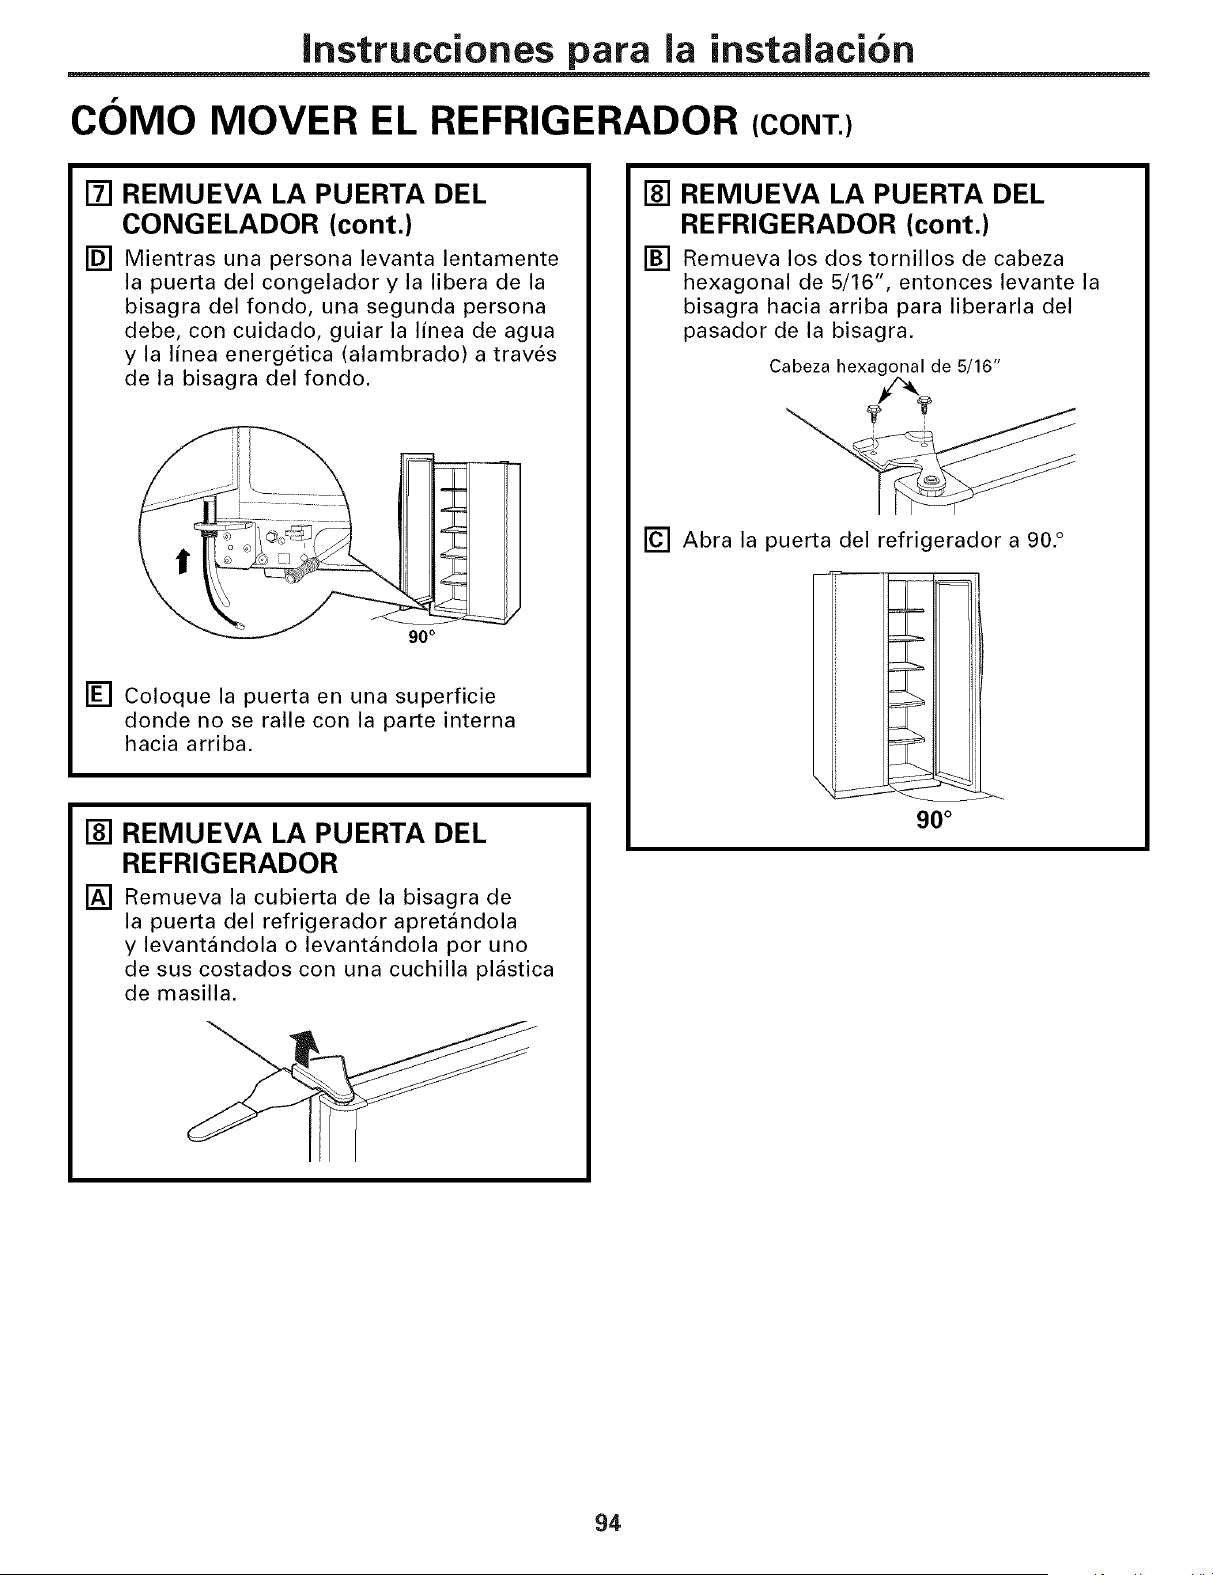
Instrucciones para la instalaci6n
COMO MOVER EL REFRIGERADOR (CONT.)
[]
[]
REMUEVA LA PUERTA DEL
CONGELADOR (cont.)
Mientras una persona levanta lentamente
la puerta del congelador y la libera de la
bisagra del fondo, una segunda persona
debe, con cuidado, guiar la linea de agua
y la linea energetica (alambrado) a traves
de la bisagra del fondo.
_
90 °
[] Coloque la puerta en una superficie
donde no se ralle con la parte interna
hacia arriba.
[]
[]
REMUEVA LA PUERTA DEL
REFRIGERADOR
Remueva la cubierta de la bisagra de
la puerta del refrigerador apretandola
y levantandola o levantandola por uno
de sus costados con una cuchilla plastica
de masilla.
[] REMUEVA LA PUERTA DEL
REFRIGERADOR (cont.)
[] Remueva los dos tornillos de cabeza
hexagonal de 5/16", entonces levante la
bisagra hacia arriba para liberarla del
pasador de la bisagra.
Cabeza hexagonal de 5/16"
[] Abra la puerta del reffigerador a 90. °
_H
i
90 °
94
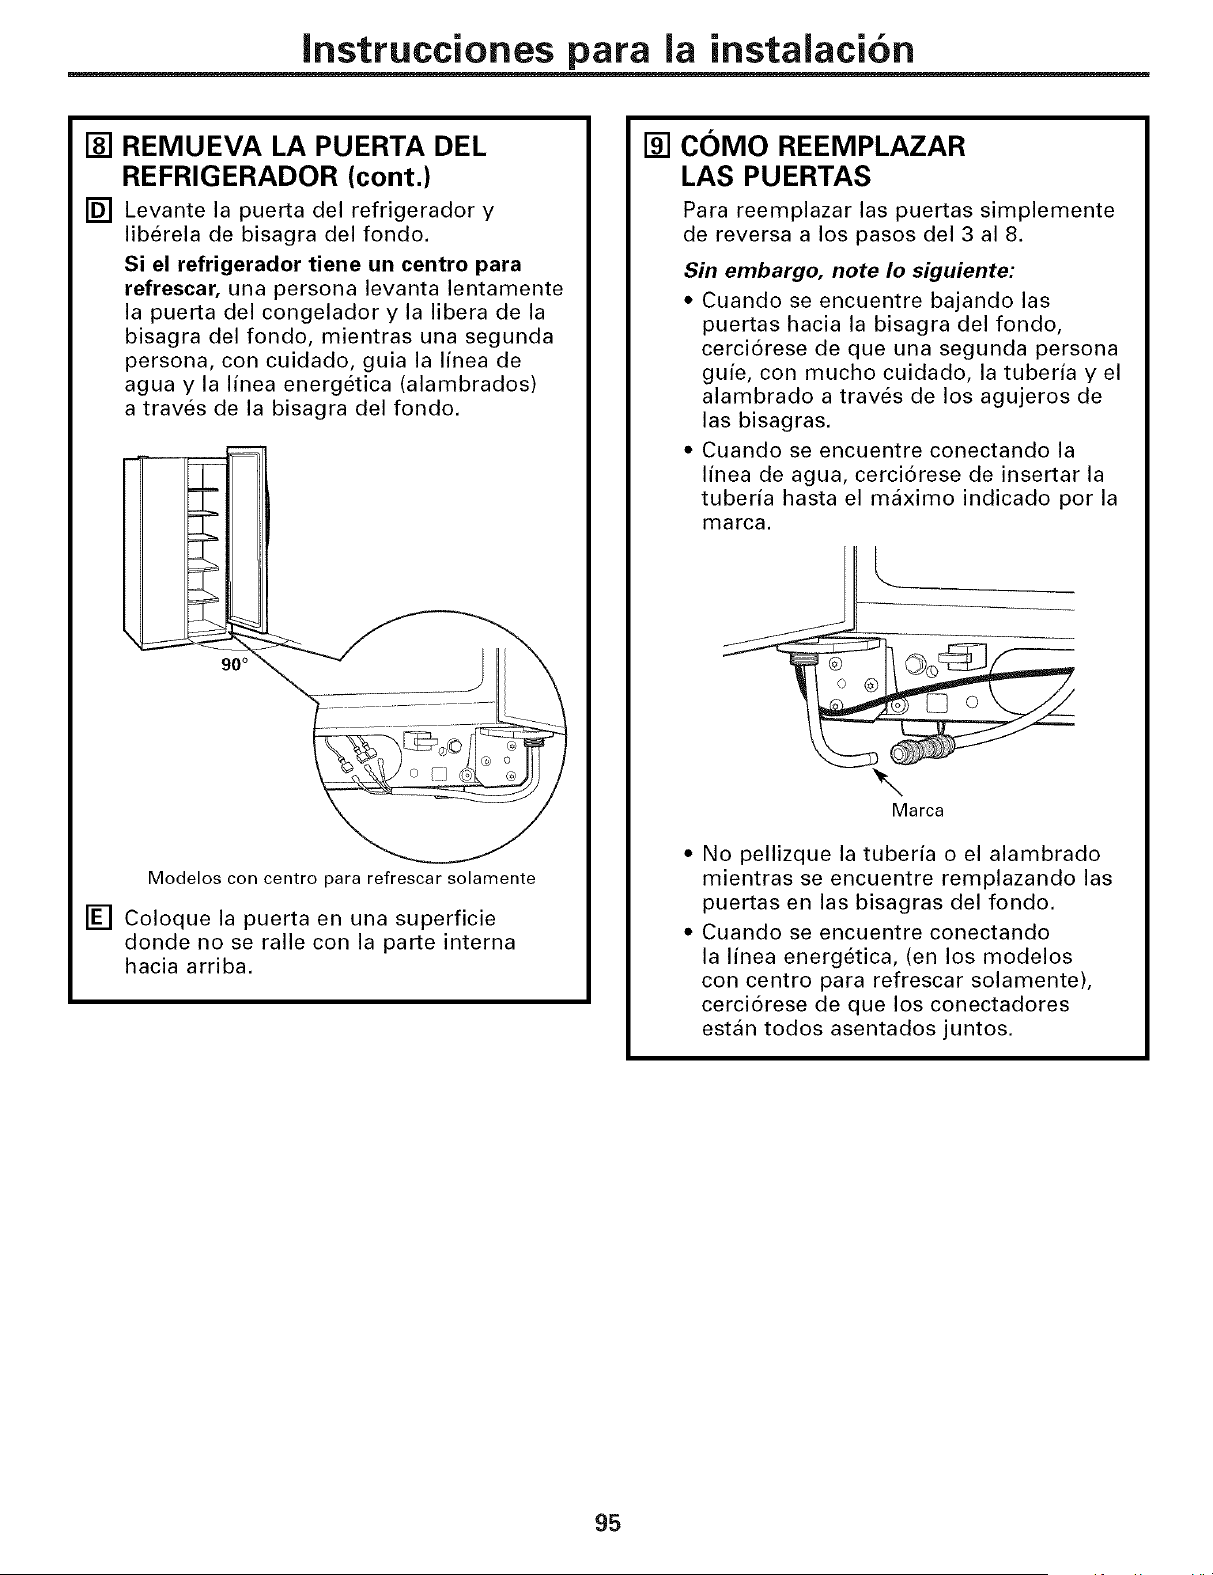
Instrucciones para la instalaci6n
[]
[]
REMUEVA LA PUERTA DEL
REFRIGERADOR (cont.)
Levante la puerta del refrigerador y
liberela de bisagra del fondo.
Si el refrigerador tiene un centro para
refrescar, una persona levanta lentamente
la puerta del congelador y la libera de la
bisagra del fondo, mientras una segunda
persona, con cuidado, guia la linea de
agua y la linea energetica (alambrados)
a traves de la bisagra del fondo.
===_==
=_
90 °
Modelos con centro para refrescar solamente
[] Coloque la puerta en una superficie
donde no se ralle con la parte interna
hacia arriba.
[] COMO REEMPLAZAR
LAS PUERTAS
Para reemplazar las puertas simplemente
de reversa a los pasos del 3 al 8.
Sin embargo, note Io siguiente:
• Cuando se encuentre bajando las
puertas hacia la bisagra del fondo,
cerci6rese de que una segunda persona
guie, con mucho cuidado, la tuberia y el
alambrado a traves de los agujeros de
las bisagras.
• Cuando se encuentre conectando la
linea de agua, cerci6rese de insertar la
tuberia hasta el maximo indicado por la
marca.
Marca
No pellizque la tuberia o el alambrado
mientras se encuentre remplazando las
puertas en las bisagras del fondo.
Cuando se encuentre conectando
la linea energetica, (en los modelos
con centro para refrescar solamente),
cerci6rese de que los conectadores
estan todos asentados juntos.
95
Instrucciones para la instalacion
COMO INSTALAR EL REFRIGERADOR
LOCALIZACION DEL
REFRIGERADOR
• No coloque el refrigerador donde la
temperatura este por debajo de 16° C
(60 ° F) porque no operara con la suficiente
frecuencia como para mantener las
temperaturas apropiadas.
• No instale el refrigerador donde la
temperatura este por encima de 37 ° C
(100 ° F) porque no funcionara
apropiadamente.
• Instalelo en un piso suficientemente
resistente como para soportar todo su
peso.
ESPAClO
Permita los siguientes espacios para
Iograr una instalaci6n facil, una circulacion
apropiada del aire y conexiones electricas
y de plomeria.
23' y 25'
Lados 1/8" (4 mm)
Superior 1" (25 mm)
Posterior 1" (25 mm)
96
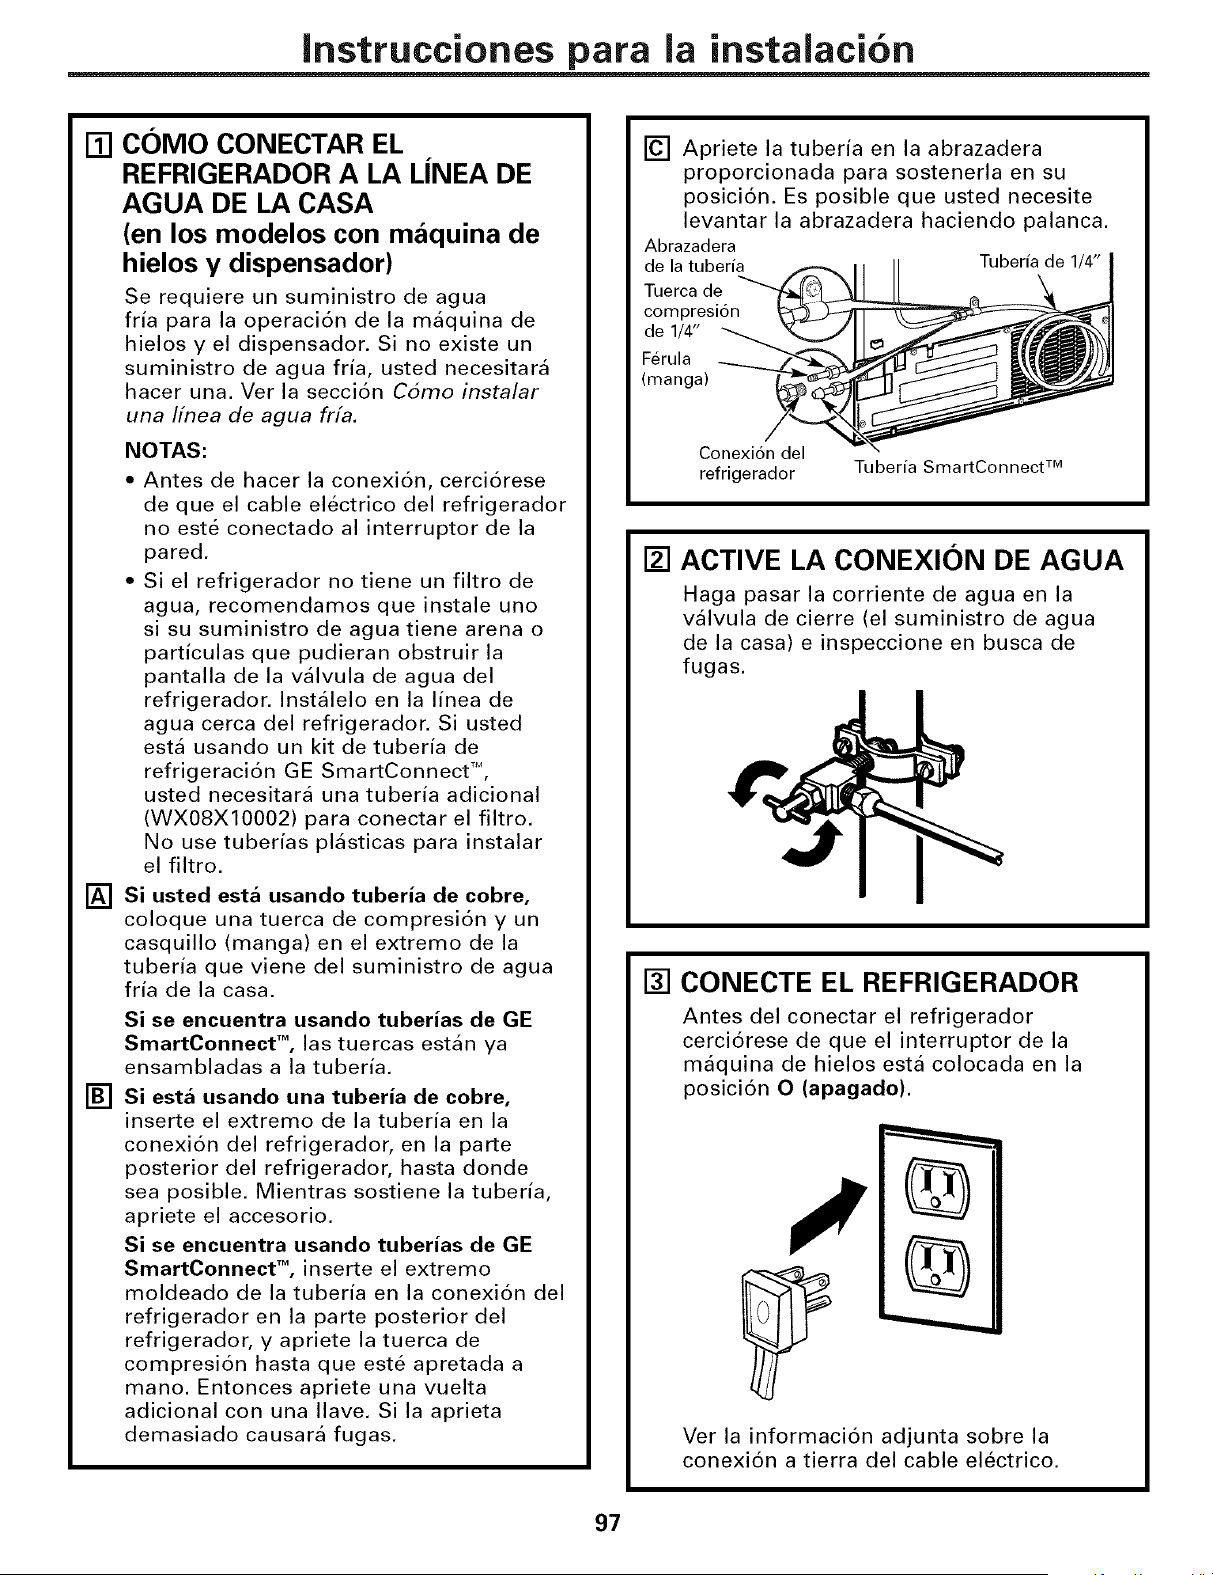
Instrucciones para la instalaci6n
[]
[]
[]
COIVIO CONECTAR EL
REFRIGERADOR A LA LINEA DE
AGUA DE LA CASA
(en los modelos con mfiquina de
hielos y dispensador)
Se requiere un suministro de agua
fria para la operaci6n de la maquina de
hielos y el dispensador. Si no existe un
suministro de agua fria, usted necesitara
hacer una. Ver la secci6n Como instalar
una Ifnea de agua frfa.
NOTAS:
Antes de hacer la conexi6n, cerci6rese
de que el cable electrico del refrigerador
no este conectado al interruptor de la
pared.
Si el refrigerador no tiene un filtro de
agua, recomendamos que instale uno
si su suministro de agua tiene arena o
particulas que pudieran obstruir la
pantalla de la valvula de agua del
refrigerador. Instalelo en la Iinea de
agua cerca del refrigerador. Si usted
esta usando un kit de tuberia de
refrigeraci6n GE SmartConnect TM,
usted necesitara una tuberia adicional
(WX08X10002) para conectar el filtro.
No use tuberias plasticas para instalar
el filtro.
Si usted estfi usando tuberia de cobre,
coloque una tuerca de compresi6n y un
casquillo (manga) en el extremo de la
tuberia que viene del suministro de agua
fria de la casa.
Si se encuentra usando tuberias de GE
SmartConnect TM, las tuercas estan ya
ensambladas a la tuberia.
Si estfi usando una tuberia de cobre,
inserte el extremo de la tuberia en la
conexi6n del refrigerador, en la parte
posterior del refrigerador, hasta donde
sea posible. Mientras sostiene la tuberia,
apriete el accesorio.
Si se encuentra usando tuberias de GE
SmartConnect TM, inserte el extremo
moldeado de la tuberia en la conexi6n del
refrigerador en la parte posterior del
refrigerador, y apriete la tuerca de
compresi6n hasta que estd apretada a
mano. Entonces apriete una vuelta
adicional con una Ilave. Si la aprieta
demasiado causara fugas.
[] Apriete la tuberia en la abrazadera
proporcionada para sostenerla en su
posicion. Es posible que usted necesite
levantar la abrazadera haciendo palanca.
Abrazadera
de la tuberia Tuberia de 1/4"
Tuerca de
compresi6n
de 1/4"
Ferula
(manga)
Conexi6n del
refrigerador
Tuberia SmartConnect TM
[] ACTIVE LA CONEXION DE AGUA
Haga pasar la corriente de agua en la
vfilvula de cierre (el suministro de agua
de la casa) e inspeccione en busca de
fugas.
[] CONECTE EL REFRIGERADOR
Antes del conectar el refrigerador
cerci6rese de que el interruptor de la
mfiquina de hielos estfi colocada en la
posici6n O (apagado).
Ver la informaci6n adjunta sobre la
conexi6n a tierra del cable electrico.
97
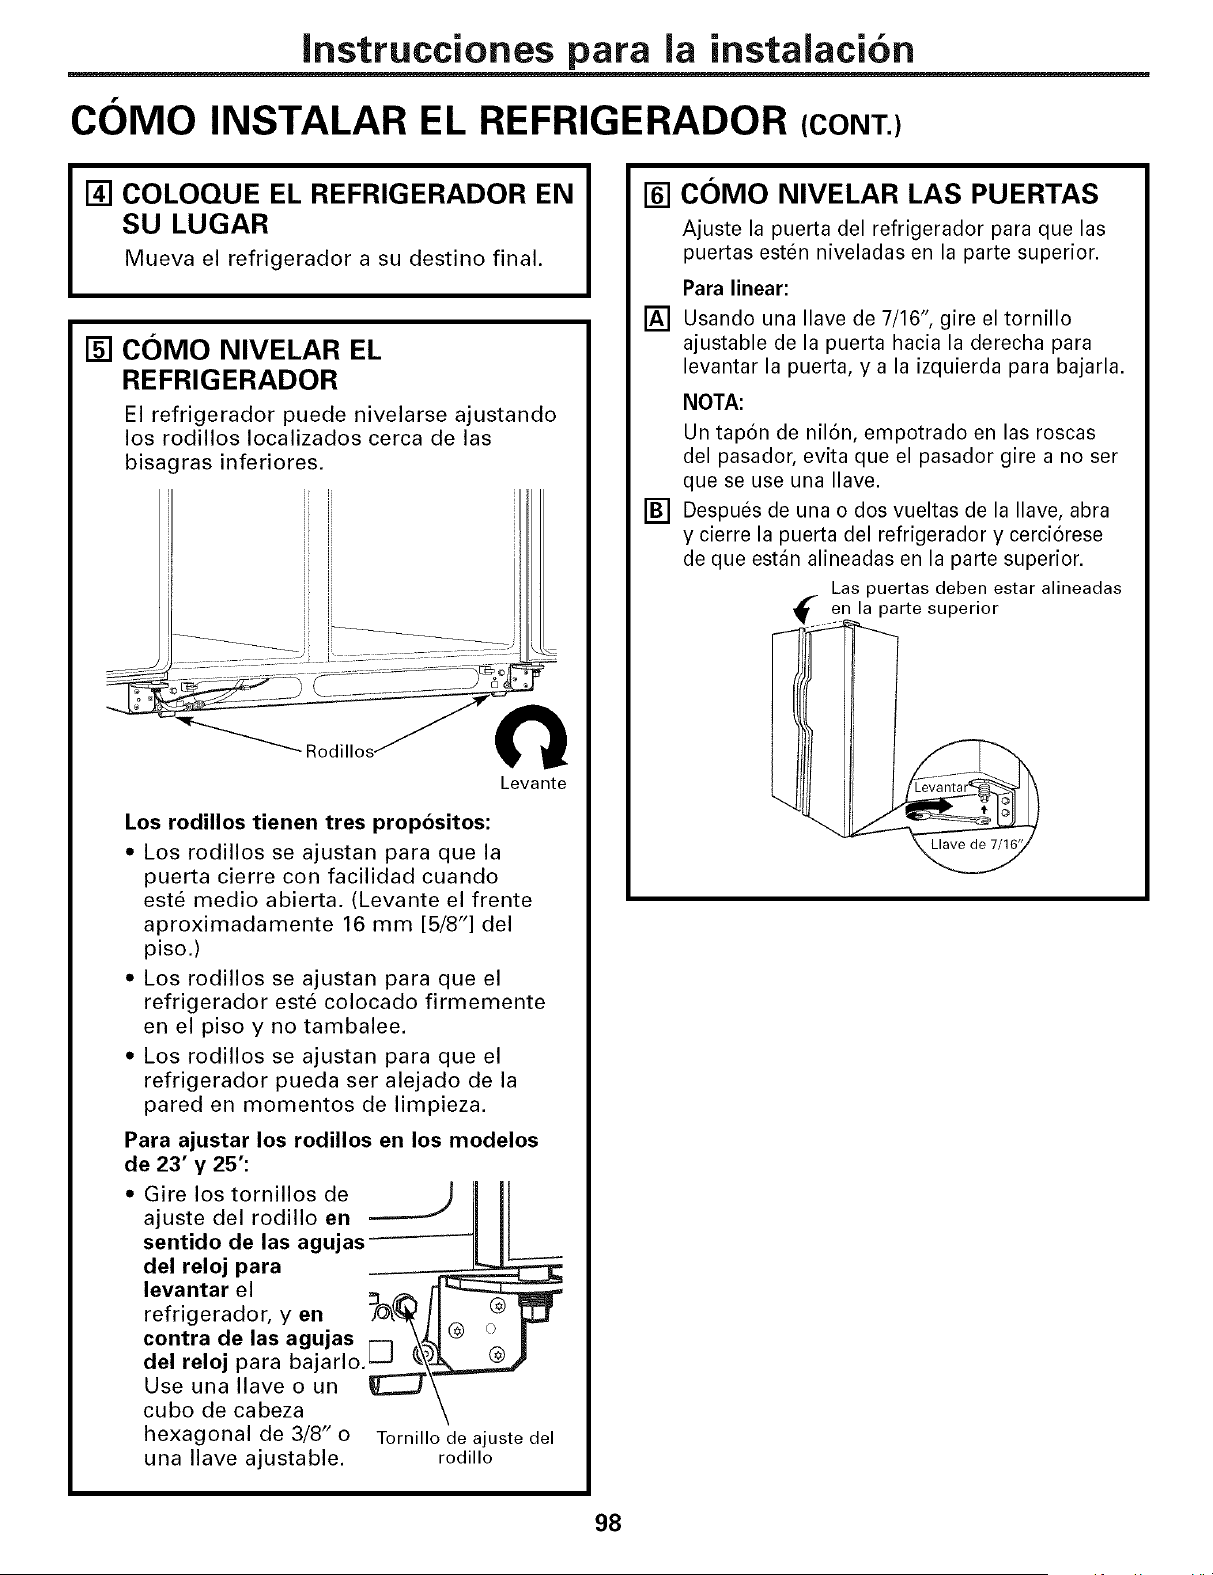
Instrucciones para la instalaci6n
COMO INSTALAR EL REFRIGERADOR (CONT.)
[] COLOQUE EL REFRIGERADOR EN
SU LUGAR
Mueva el refrigerador a su destino final.
[] COMO NIVELAR EL
REFRIGERADOR
El refrigerador puede nivelarse ajustando
los rodillos Iocalizados cerca de las
bisagras inferiores.
Levante
Los rodillos tienen tres propositos:
• Los rodillos se ajustan para que la
puerta cierre con facilidad cuando
este medio abierta. (Levante el frente
aproximadamente 16 mm [5/8"] del
piso.)
• Los rodillos se ajustan para que el
refrigerador este colocado firmemente
en el piso y no tambalee.
• Los rodillos se ajustan para que el
refrigerador pueda ser alejado de la
pared en momentos de limpieza.
Para ajustar los rodillos en los modelos
de 23" y 25":
• Girelostornillosde ) II II
ajuste del rodillo en _ II II
sentido de las agujas------_l II _
del reloj para
levantar el ___ /1_
refrigerador, yen _O't(_ 11,:, _Q
contra de las agujas _-_ \_J _ _ |
del reloj para bajarlo._Lz j __
Use una Ilave o un _T_ =
cubo de cabeza \
hexagonal de 3/8" o Tornillo de ajuste del
una Ilave ajustable, rodillo
[] COMO NIVELAR LAS PUERTAS
[]
[]
Ajuste la puerta del refrigerador para que las
puertas esten niveladas en la parte superior.
Para linear:
Usando una Ilave de 7/16", gire el tornillo
ajustable de la puerta hacia la derecha para
levantar la puerta, y a la izquierda para bajarla.
NOTA:
Un tapon de nilon, empotrado en las roscas
del pasador, evita que el pasador gire a no ser
que se use una Ilave.
Despues de una o dos vueltas de la Ilave, abra
y cierre la puerta del refrigerador y cerciorese
de que estan alineadas en la parte superior.
Las puertas deben estar alineadas
en la parte superior
I
98
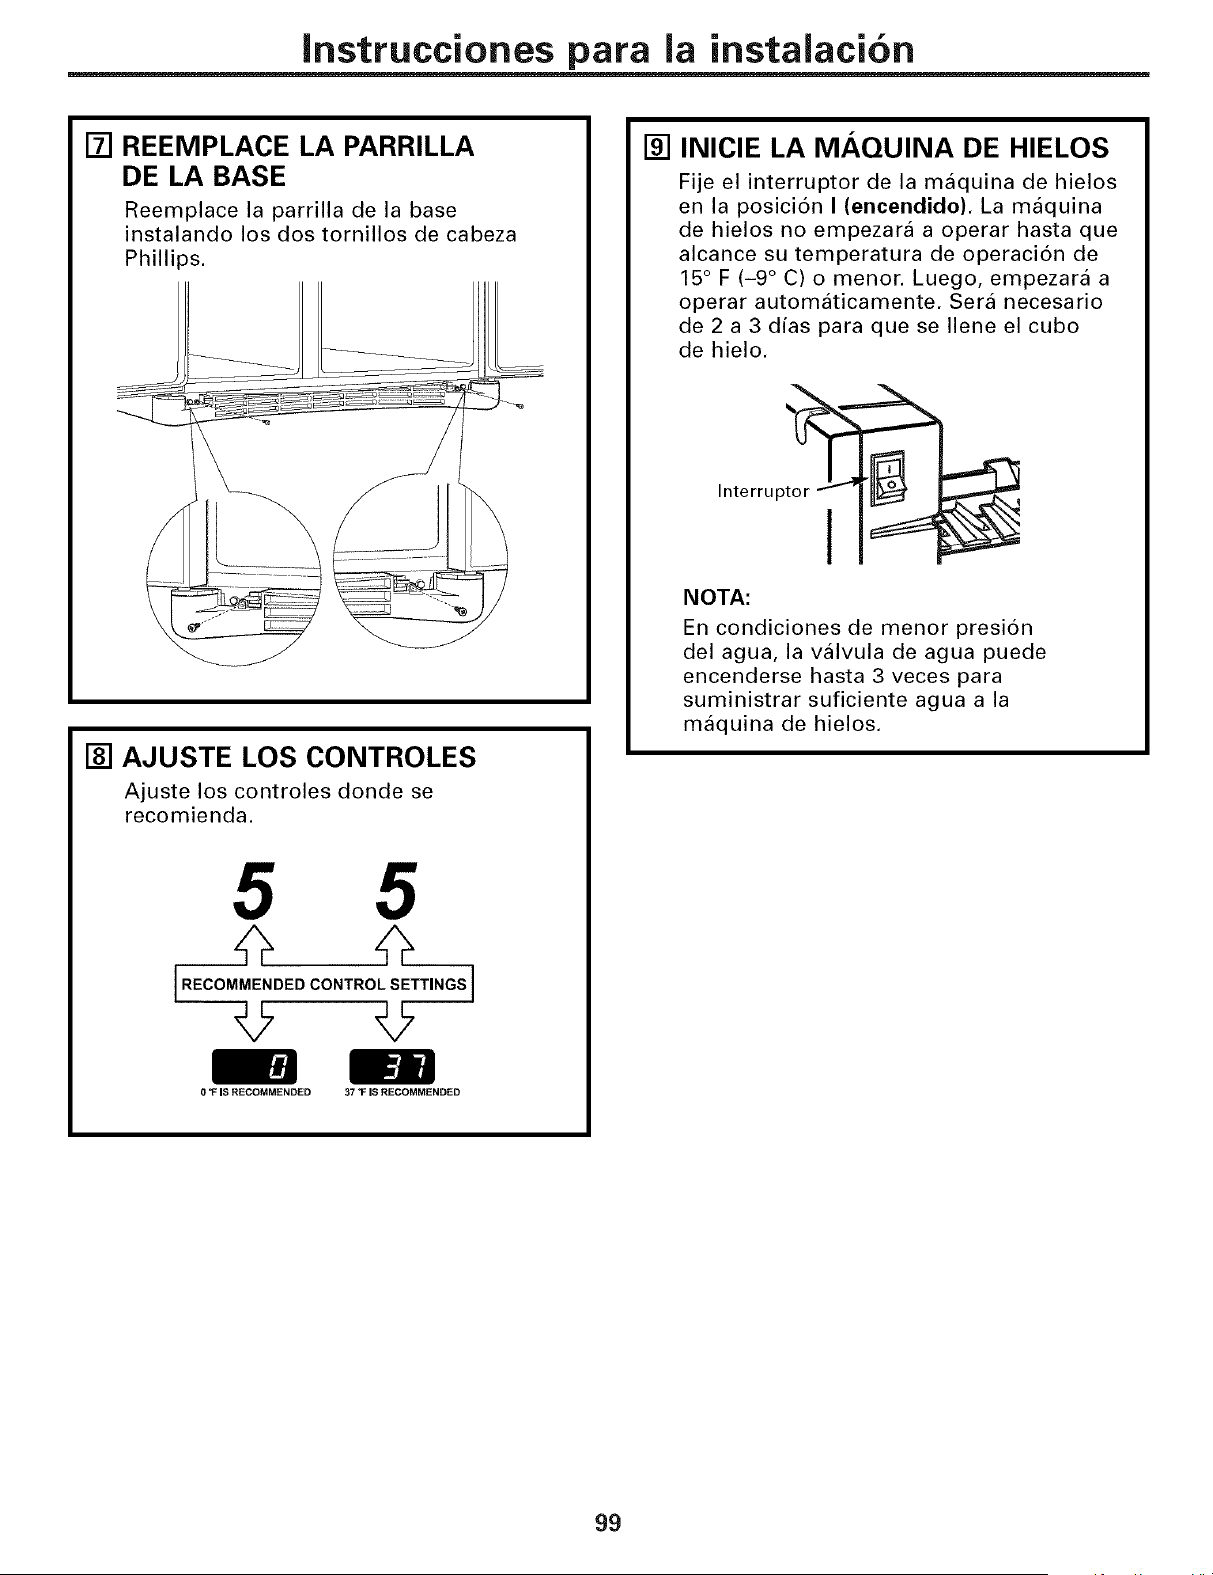
Instrucciones para la instalaci6n
[] REEMPLACE LA PARRILLA
DE LA BASE
Reemplace la parrilla de la base
instalando los dos tornillos de cabeza
Phillips.
[] AJUSTE LOS CONTROLES
Ajuste los controles donde se
recomienda.
[REOOMOCONTRO'SE ,NOS]
0 °F IS RECOMMENDED 37 OFIS RECOMMENDED
[] INICIE LA IVIAQUlNA DE HIELOS
Fije el interruptor de la maquina de hielos
en la posici6n I (encendido). La maquina
de hielos no empezara a operar hasta que
alcance su temperatura de operaci6n de
15° F (-9 ° C) o menor. Luego, empezara a
operar automaticamente. Sera necesario
de 2 a 3 dias para que se Ilene el cubo
de hielo.
InterruptOr__
I I
NOTA:
En condiciones de menor presi6n
del agua, la valvula de agua puede
encenderse hasta 3 veces para
suministrar suficiente agua a la
maquina de hielos.
99
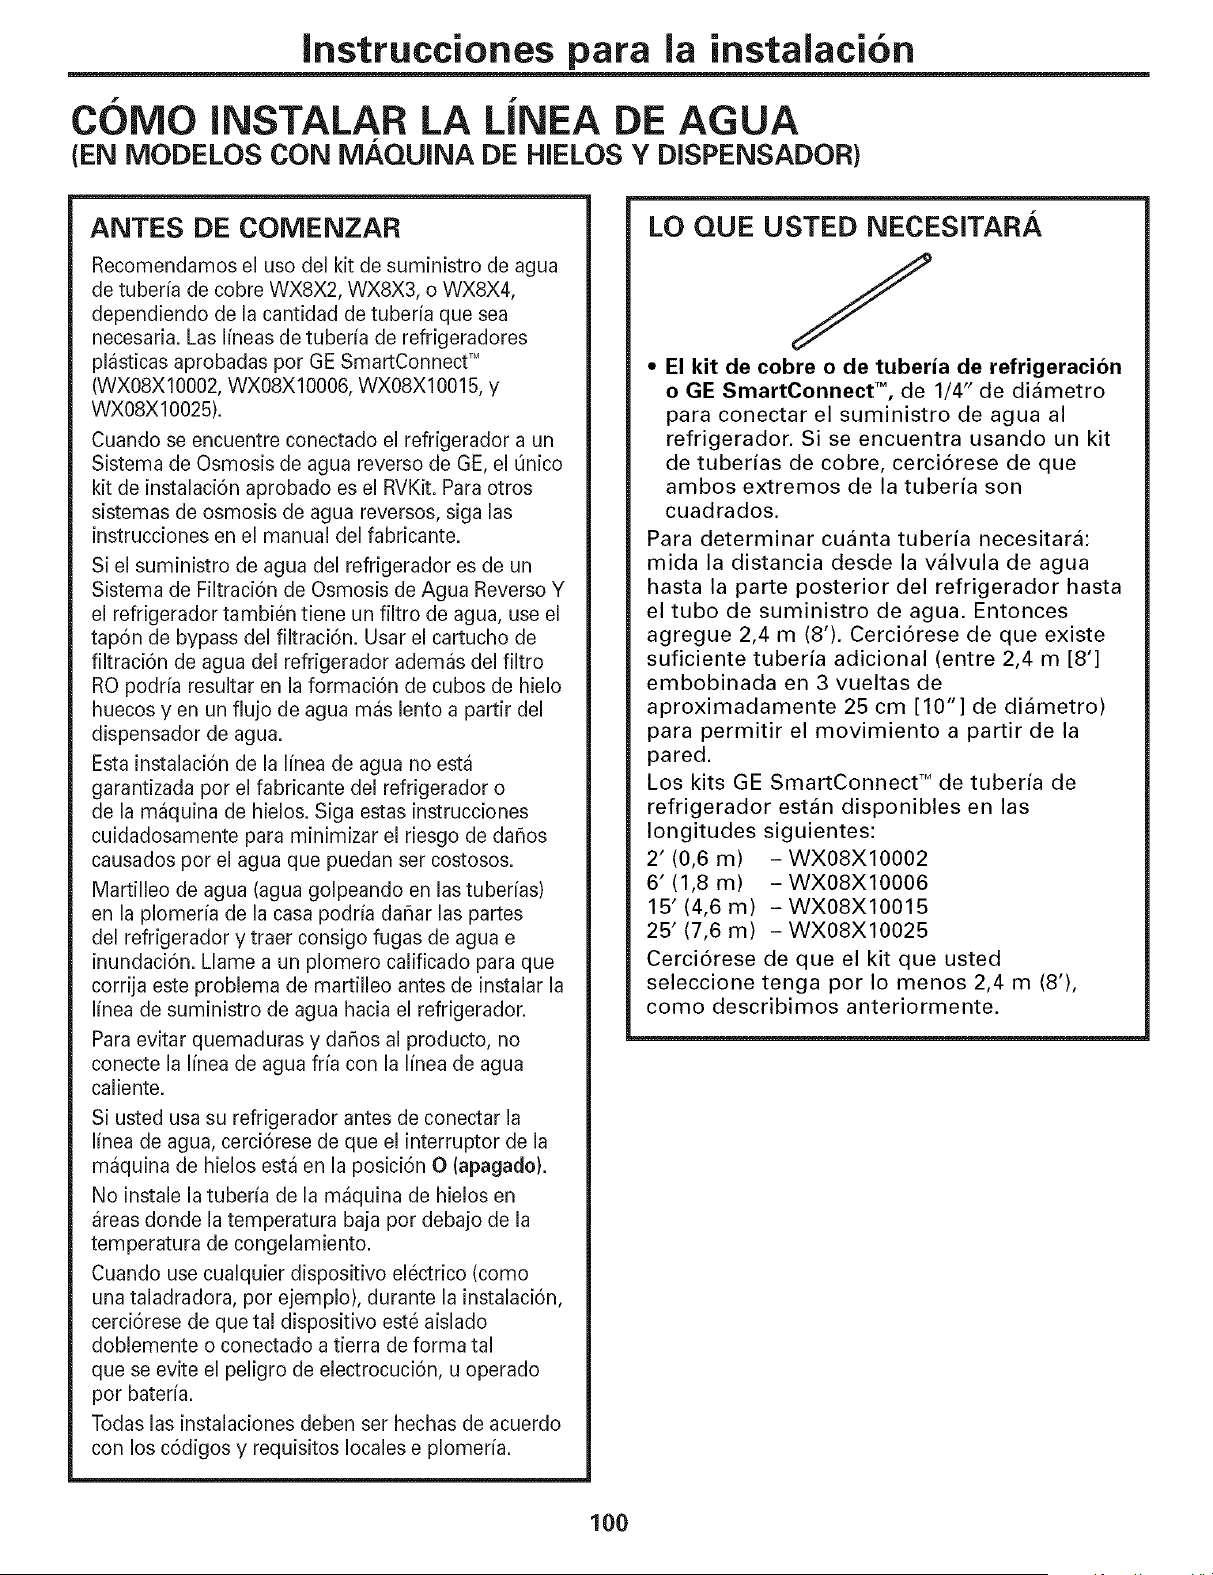
Instrucciones para la instalaci6n
COIVIO INSTALAR LA LJNEA DE AGUA
(EN IVIODELOS CON MAQUINA DE HIELOS Y DISPENSADOR)
ANTES DE COMENZAR
Recomendamos el uso del kit de suministro de agua
de tuberia de cobre WX8X2, WX8X3, o WX8X4,
dependiendo de la cantidad de tuberia que sea
necesaria. Las lineas de tuberia de refrigeradores
plasticas aprobadas por GE SmartConnect TM
(WXO8XIO002, WXO8XIO006, WXO8X10015, y
WXO8X10025).
Cuando se encuentre conectado el refrigerador a un
Sistema de Osmosis de agua reverso de GE, el Qnico
kit de instalaciSn aprobado es el RVKit. Para otros
sistemas de osmosis de agua reversos, siga las
instrucciones en el manual del fabricante.
Si el suministro de agua del refrigerador es de un
Sistema de Filtraci6n de Osmosis de Agua Reverso Y
el refrigerador tambien tiene un filtro de agua, use el
tap6n de bypass del filtraciSn. Usar el cartucho de
filtraci6n de agua del refrigerador ademas del filtro
RO podria resultar en la formaciSn de cubos de hielo
huecos yen un flujo de agua mas lento a partir del
dispensador de agua.
Esta instalaci6n de la linea de agua no esta
garantizada por el fabricante del refrigerador o
de la maquina de hielos. Siga estas instrucciones
cuidadosamente para minimizar el riesgo de dahos
causados per el agua que puedan ser costosos.
MartJlleo de agua (agua golpeando en las tuberias)
en la plomeria de la casa podria dahar las partes
del refrigerador y traer consigo fugas de agua e
Jnundaci6n. Llame a un plomero calificado para que
corrija este problema de martilleo antes de instalar la
linea de suministro de agua hacia el refrigerador.
Para evitar quemaduras y dahos al producto, no
conecte la linea de agua fria con la linea de agua
caliente.
Si usted usa su refrigerador antes de conectar la
linea de agua, cerciSrese de que el interruptor de la
maquJna de hJelos esta en la posJciSn 0 (apagado}.
No instale la tuberia de la maquina de hielos en
areas donde la temperatura baja por debajo de la
temperatura de congelamiento.
Cuando use cualquier dispositivo el6ctrico (como
una taladradora, por ejemplo), durante la instalaciSn,
cerci6rese de que tal dispositivo este aislado
doblemente o conectado a tierra de forma tal
que se evite el peligro de electrocuciSn, u operado
pot bateria.
Todas las instalaciones deben ser hechas de acuerdo
con los c6digos y requisitos locales e plomeria.
LO QUE USTED NECESITARA
J
• El kit de cobre o de tuberia de refrigeracion
o GE SmartConnect% de 1/4" de diametro
para conectar el suministro de agua al
refrigerador. Si se encuentra usando un kit
de tuberias de cobre, cerci6rese de que
ambos extremos de la tuberia son
cuadrados.
Para determinar cuanta tuberia necesitara:
mida la distancia desde la valvula de agua
hasta la parte posterior del refrigerador hasta
el tubo de suministro de agua. Entonces
agregue 2,4 m (8'). Cerci6rese de que existe
suficiente tuberia adicional (entre 2,4 rn [8']
embobinada en 3 vueltas de
aproximadamente 25 cm [10"] de diametro)
para permitir el movimiento a partir de la
pared.
Los kits GE SmartConnect TM de tuberia de
refrigerador estan disponibles en las
longitudes siguientes:
2' (0,6 m) - WXO8XIO002
6' (1,8 m) -WXO8XIO006
15' (4,6 m) - WXO8X10015
25' (7,6 m) - WXO8X10025
Cerci6rese de que el kit que usted
seleccione tenga por Io menos 2,4 m (8'),
como describimos anteriormente.
100
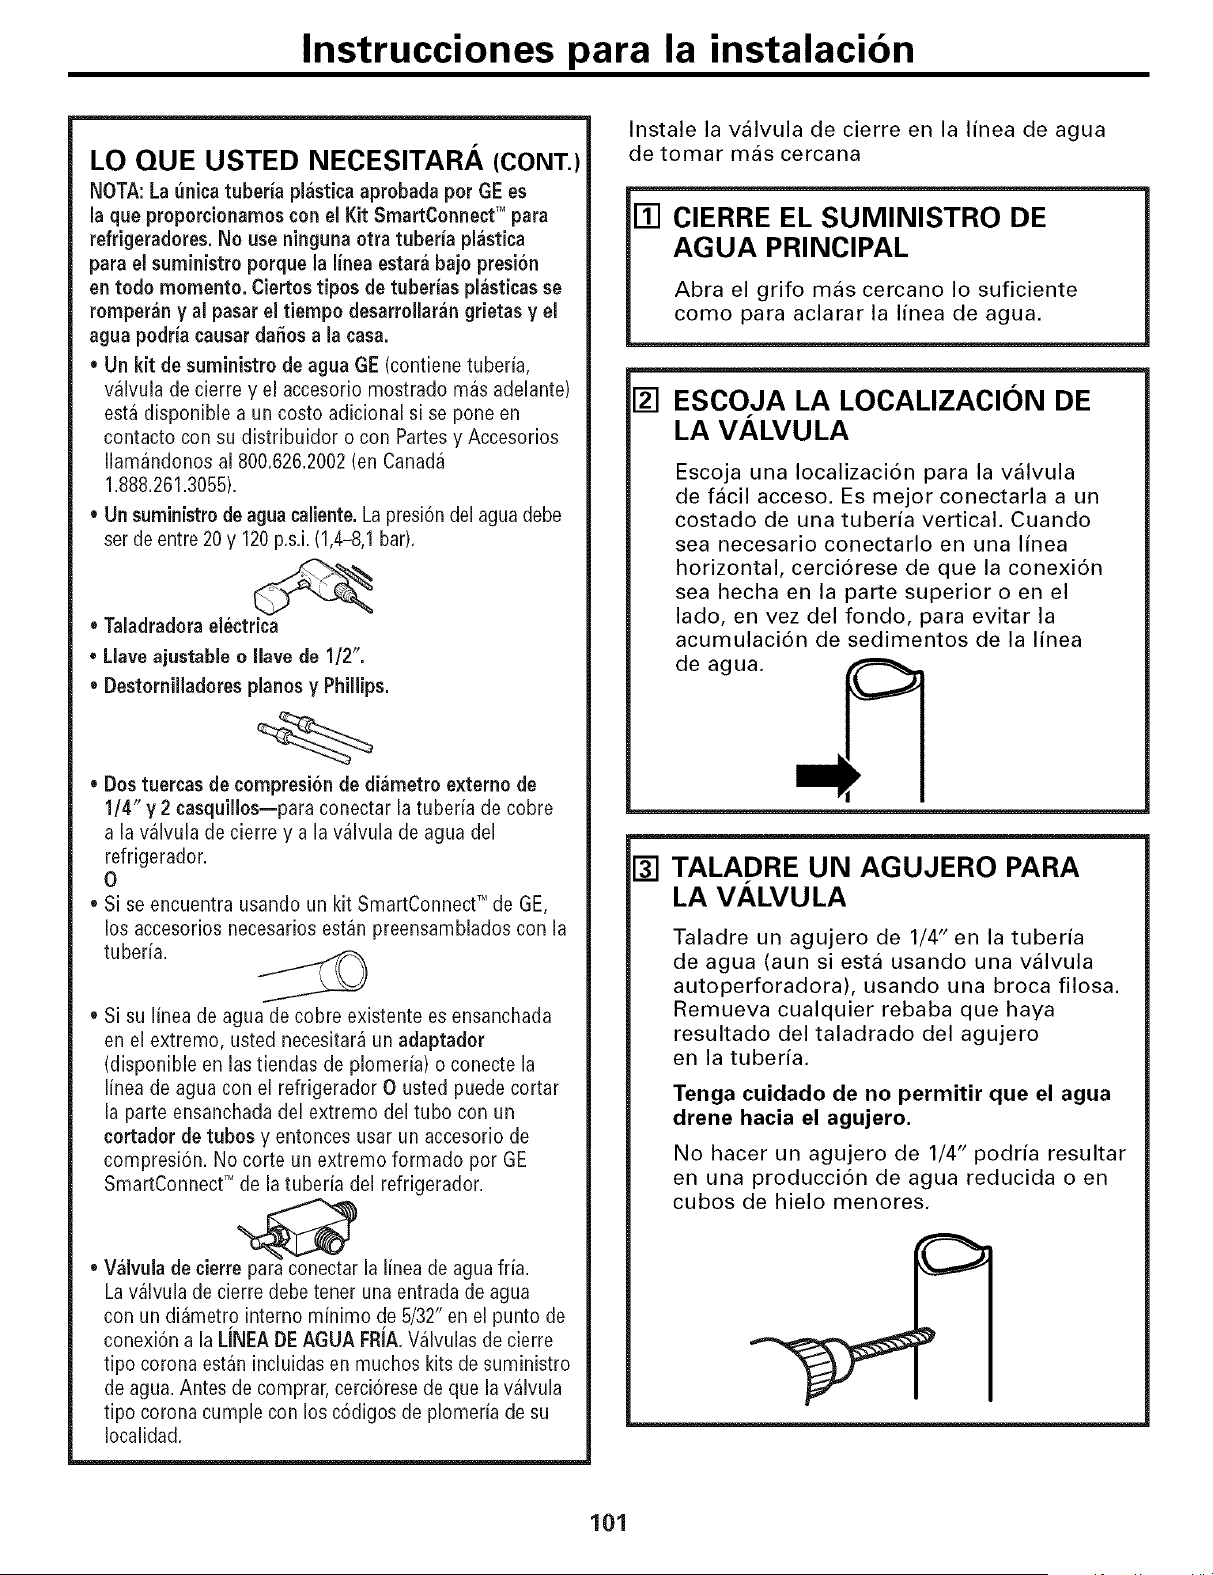
Instrucciones para la instalacion
LO QUE USTED NECESITARA (CONT.)
NOTA: La unica tuberia plastica aprobada per GE es
la que proporcionamoscon el Kit SmartConnectTM para
refrigeradores=No use ninguna otra tuberia plastica
para el suministro porque la linea estara bajo presion
en todo memento. Ciertos tipos de tuberias plasticasse
rornperan y al pasar el tiempo desarrolJarangrietas y el
agua podria causarda_os a la casa=
, Un kit de suministro de agua GE (contiene tuberia,
valvula de cierre y el accesorio mostrado mas adelante)
esta dJsponible a un costo adJcional si se pone en
contacto con su distribuidor o con Partes y Accesorios
Ilamandonos aJ800.626.2002(en Canada
1.888.261.3055).
, Un suministro de agua caJiente.La presi6n del agua debe
ser de entre 20 y 120 p.s.i.(1,4-8,1 bar).
• TaJadradoraelectrica
• Liave ajustabie o liave de 1/2".
• DestorniJladores pianos y PhiJlips.
%
Dostuercas de compresionde diametro externo de
1/4" y 2 casquillos--para conectar la tuberia de cobre
a la valvula de cierre y a la valvula de agua del
refrigerador.
O
• Si se encuentra usando un kit SmartConnect Tr'de GE,
los accesorios necesarios estan preensamblados con la
tuberia.
• SJsu linea de agua de cobre existente es ensanchada
en el extreme, usted necesJtara un adaptador
(disponible en las tiendas de plomeria) o conecte la
linea de agua con el refrigerador 0 usted puede cortar
la parte ensanchada del extreme del tube con un
cortador de tubes y entonces usar un accesorJo de
compresion. No corte un extreme formado per GE
SmartConnect TM de la tuberia del refrigerador.
• Valvub de cierre para conectar la linea de agua ffia.
ka valvula de cierre debe tenet una entrada de agua
con un diametro interno minimo de 5/32" en el punto de
conexidn a la LJNEADE AGUA FRIA.Valvulas de cJerre
tipo corona estan incluidasen touches kits de suministro
de agua. Antes de comprar, cerci6rese de que la valvula
tipo corona cumple con los c6digos de plomeria de su
Iocalidad.
Instale la valvula de cierre en la linea de agua
de tomar mas cercana
[] CIERRE EL SUMINISTRO DE
AGUA PRINCIPAL
Abra el grifo mas cercano Io suficiente
come para aclarar la linea de agua.
[] ESCOJA LA LOCALIZACION DE
LA VALVU LA
Escoja una Iocalizaci6n para la valvula
de facil acceso. Es mejor conectarla a un
costado de una tuberia vertical. Cuando
sea necesario conectarlo en una linea
horizontal, cerci6rese de que la conexi6n
sea hecha en la parte superior o en el
lade, en vez del fondo, para evitar la
acumulaci6n de sedimentos de la linea
de agua.
[] TALADRE UN AGUJERO PARA
LA VALVU LA
Taladre un agujero de 1/4" en la tuberia
de agua (aun si esta usando una valvula
autoperforadora), usando una broca filosa.
Remueva cualquier rebaba que haya
resultado del taladrado del agujero
en la tuberia.
Tenga cuidado de no permitir que el agua
drene hacia el agujero.
No hacer un agujero de 1/4" podria resultar
en una producci6n de agua reducida o en
cubes de hielo menores.
101
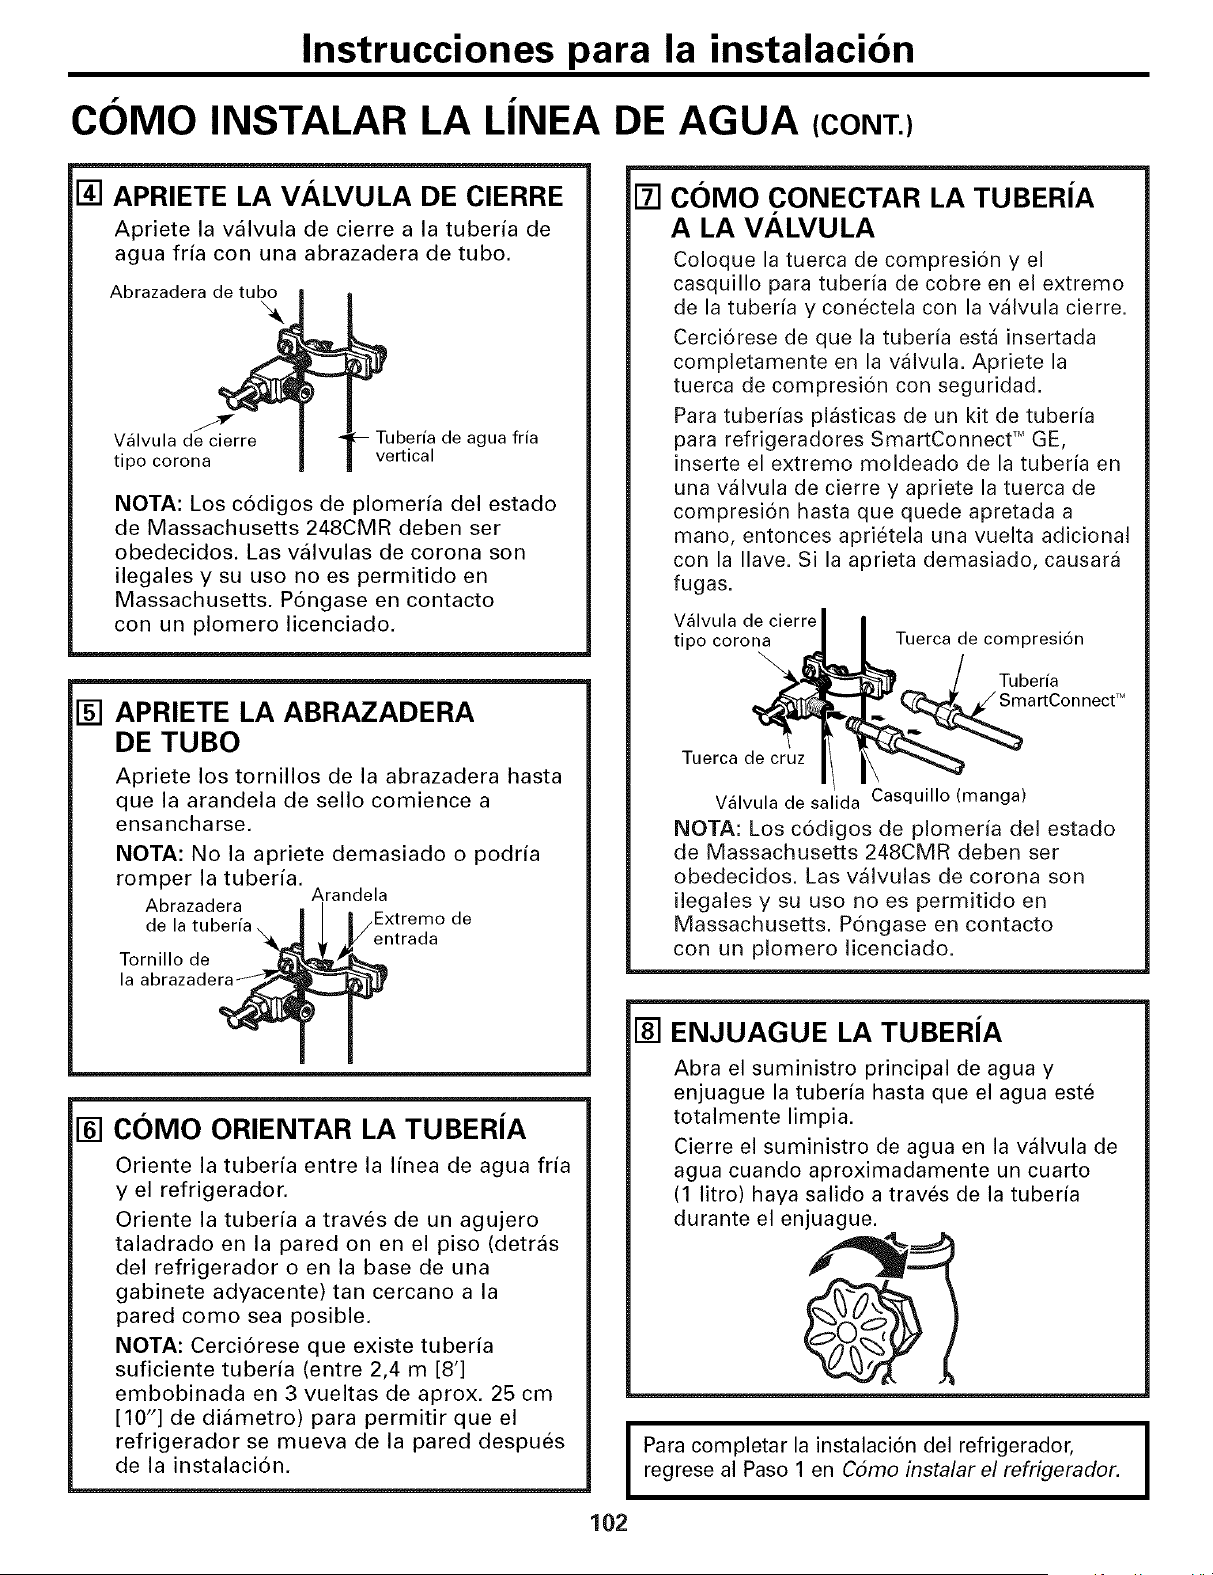
Instrucciones para la instalacion
COMO INSTALAR LA LJNEA DE AGUA (CONT.)
[] APRIETE LA VALVULA DE CIERRE
Apriete la valvula de cierre a la tuberia de
agua fria con una abrazadera de tubo.
Abrazadera de tubo
Valvula de cierre Tuberia de agua fria
tipo corona vertical
NOTA: Los c6digos de plomeria del estado
de Massachusetts 248CMR deben ser
obedecidos. Las valvulas de corona son
ilegales y su uso no es permitido en
Massachusetts. P6ngase en contacto
con un plomero licenciado.
[] APRIETE LA ABRAZADERA
DE TUBO
Apriete los tornillos de la abrazadera hasta
que la arandela de sello comience a
ensancharse.
NOTA: No la apriete demasiado o podria
romper la tuberia.
Arandela
Abrazadera
de Extremo de
Tornillo de
la
[] COIVIO ORIENTAR LA TUBERJA
Oriente la tuberia entre la linea de agua fria
y el refrigerador.
Oriente la tuberia a traves de un agujero
taladrado en la pared on en el piso (detras
del refrigerador o en la base de una
gabinete adyacente) tan cercano a la
pared como sea posible.
NOTA: Cerci6rese que existe tuberia
suficiente tuberia (entre 2,4 m [8']
embobinada en 3 vueltas de aprox. 25 cm
[10"] de diametro) para permitir que el
refrigerador se mueva de la pared despues
de la instalaci6n.
[] COIVIO CONECTAR LA TUBERIA
A LA VALVULA
Coloque la tuerca de compresi6n y el
casquillo para tuberia de cobre en el extremo
de la tuberia y conectela con la valvula cierre.
Cerci6rese de que la tuberia esta insertada
completamente en la valvula. Apriete la
tuerca de compresi6n con seguridad.
Para tuberias plasticas de un kit de tuberia
para refrigeradores SmartConnect TM GE,
inserte el extremo moldeado de la tuberia en
una valvula de cierre y apriete la tuerca de
compresi6n hasta que quede apretada a
mano, entonces aprietela una vuelta adicional
con la Ilave. Si la aprieta demasiado, causara
fugas.
Valvula de cierre
tipo corona Tuerca de compresi6n
Tuberia
Tuerca de cruz
Valvula de salida Casquillo (manga)
NOTA: Los c6digos de plomeria del estado
de Massachusetts 248CMR cleben ser
obedeciclos. Las valvulas de corona son
ilegales y su uso no es permitido en
Massachusetts. P6ngase en contacto
con un plomero licenciado.
[] ENJUAGUE LA TUBERIA
Abra el suministro principal de agua y
enjuague la tuberia hasta que el agua este
totalmente limpia.
Cierre el suministro de agua en la valvula de
agua cuando aproximadamente un cuarto
(1 litro) haya salido a traves de la tuberia
durante el enjuague.
@
I Para completar la instalaci6n del refrigerador, I
regrese al Paso 1 en Como instalar el refrigerador.
102
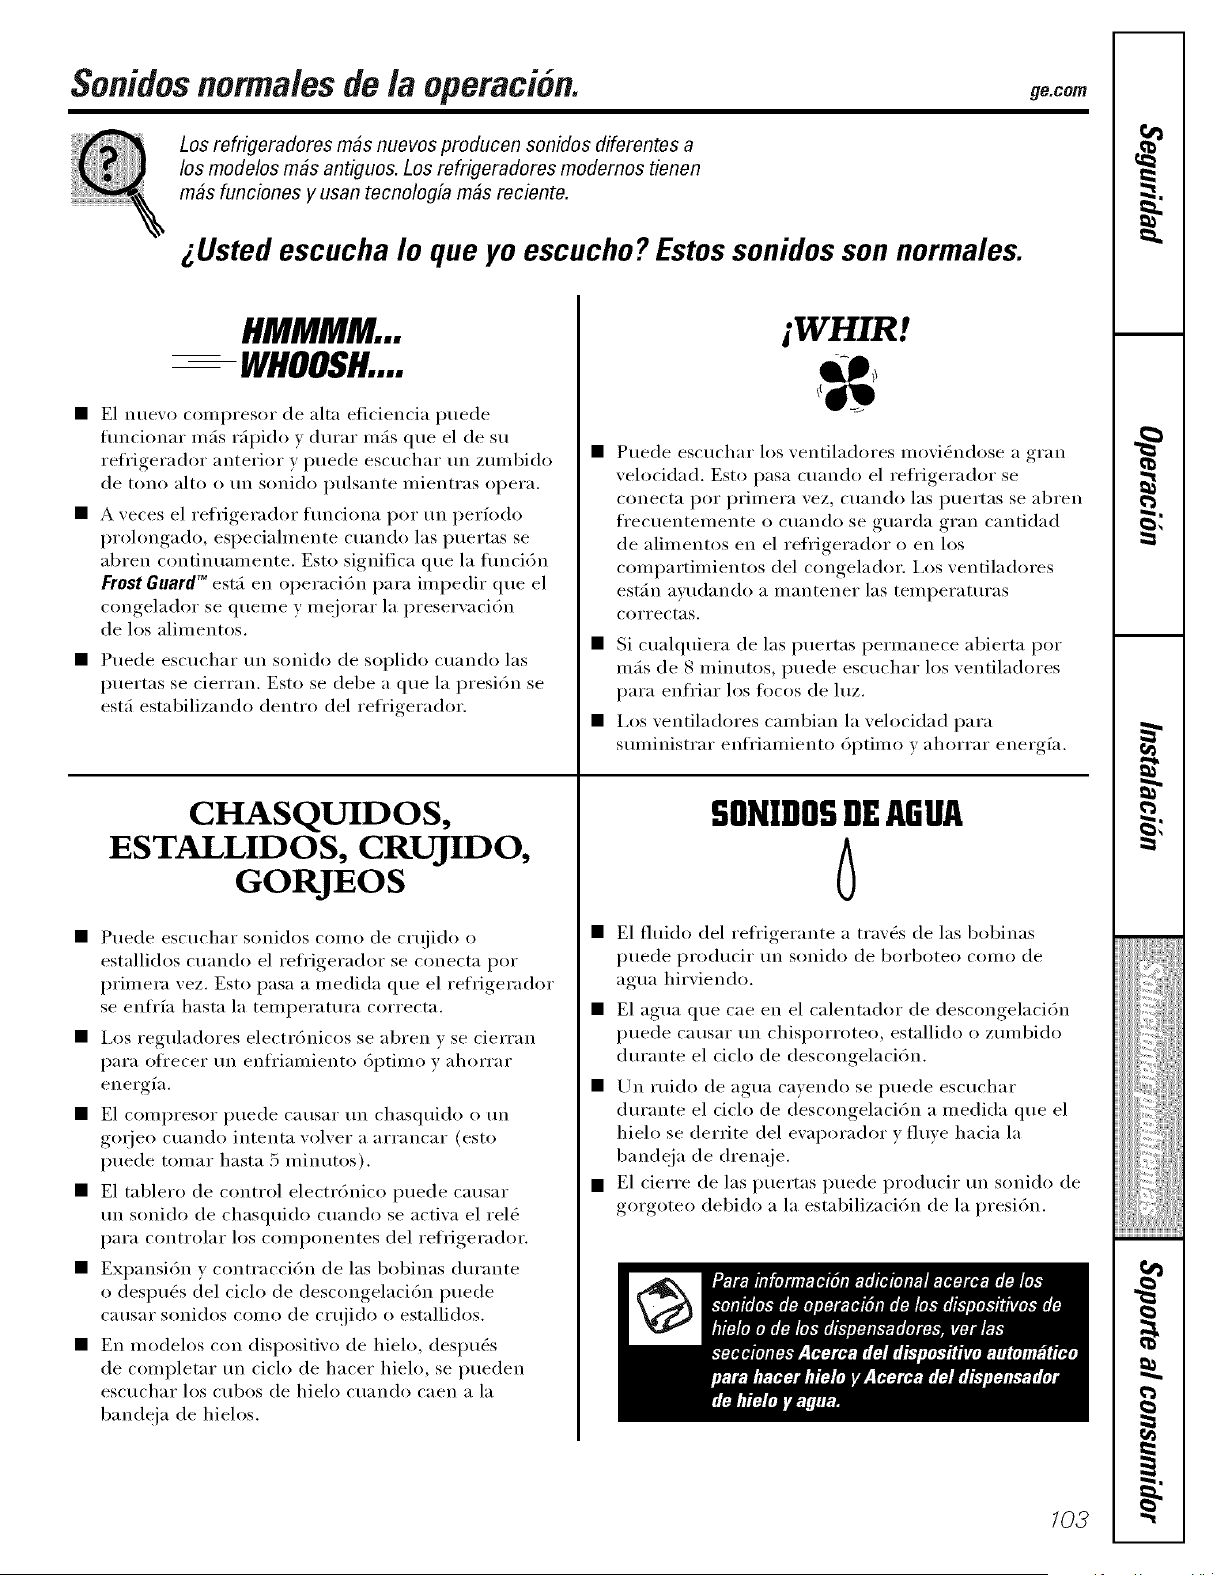
Sonidosnorma/esdela operacl n.
Los refrigeradores m_s nuevos proclucen sonidos diferentes a
los modelos rods antiguos. Los refrigeradores modemos tienen
rods funciones y usan tecnologb rods reciente.
Usted escucha Io que yo escucho ?Estossonidosson normales.
_e.COIgl
HMMMM...
--WHOOSH....
• E1 nuew) compresor de alta eficiencia puede
flmcionar re;is r;ipido y durar re;is que el de su
refl'igerador anterior y puede escuchar tm zumbido
de tono alto o tlll sonido ptllsante i/lientras opera,
• A veces el refrigerador funciona pot un perfodo
prolongado, especiahnente cuando las puertas se
abren continuamente. Esto significa que la flmci6n
Frost Guard T"estfi en operaci6n para impedir que el
congelador se quelne y inejorar la preserwlci6n
de los alimentos.
• Puede escuchar tm sonido de soplido cuando las
puertas se cierran. Esto se debe a que la presidn se
estfi estabilizando dentro del refl'igerador.
iWHIR!
CHASQUIDOS,
ESTALLIDOS, CRU D O,
GORJEOS
• Puede escuchar sonidos como de cHijido o
estallidos cuando el refl'igerador se conecta por
primera vez. Esto pasa a medida que el ref_igerador
se enfl'fa hasta la temperatura correcta.
• I,os reguladores electr6nicos se abren v se cierran
para ofl'ecer tm enfl'iamiento 6ptimo y ahorrar
energfa.
• E1 compresor puede causar tm chasquido otm
go_jeo cuando intenta volver a arrancar (esto
puede tomar hasta 5 minutos).
• E1 tablero de control electr6nico puede causar
tm sonido de chasquido cuando se activa el rel_
para controlar los componentes del refligerador.
• Expansi6n y contraccidn de las bobinas durante
o despu_s del ciclo de descongelaci6n puede
causar sonidos como de c_qjido o estallidos.
• En modelos con dispositivo de hielo, despu_s
de completar tm ciclo de hacer hielo, se pueden
escuchar los cubos de hielo cuando caen a la
bandeja de hielos.
• Puede escuchar los ventiladores movi_ndose a gran
velocidad. Esto pasa cuando el refl'igerador se
conecta por primera vez, cuando las puertas se abren
frecuentenlente o cuando se guarda gran cantidad
de alimentos en el refrigerador o en los
compartimientos del congelador. I,os ventiladores
est;/II avtldaIldo a illailteilei" las [eil/pei'attli'as
correctas.
• Si cualquiera de las puertas permanece abierta pot
mfs de 8 minutos, puede escuchar los ventiladores
para enfriar los tOcos de luz.
• I,os ventiladores cambian la velocidad para
suministrar enfl'iamiento 6ptimo y ahorrar energfa.
SONIDOSDEAGUA
6
• E1 fluido del refligerante a tray,s de las bobinas
puede producir t111sonido de borboteo COlnO de
agua hi_Mendo.
• E1 agua que cae en el calentador de descongelaci6n
puede causar tm chisporroteo, estallido o zumbido
din'ante el ciclo de descongelaci6n.
• Un _uido de agua cayendo se puede escuchar
durante el dclo de desc(mgelacidn a medida que el
hielo se deHite del evaporador y fluye hacia la
bandeja de drenaje.
• E1 cierre de las puertas puede producir tm sonido de
gorgoteo debido a la estabilizaci6n de la presi6n,
/03
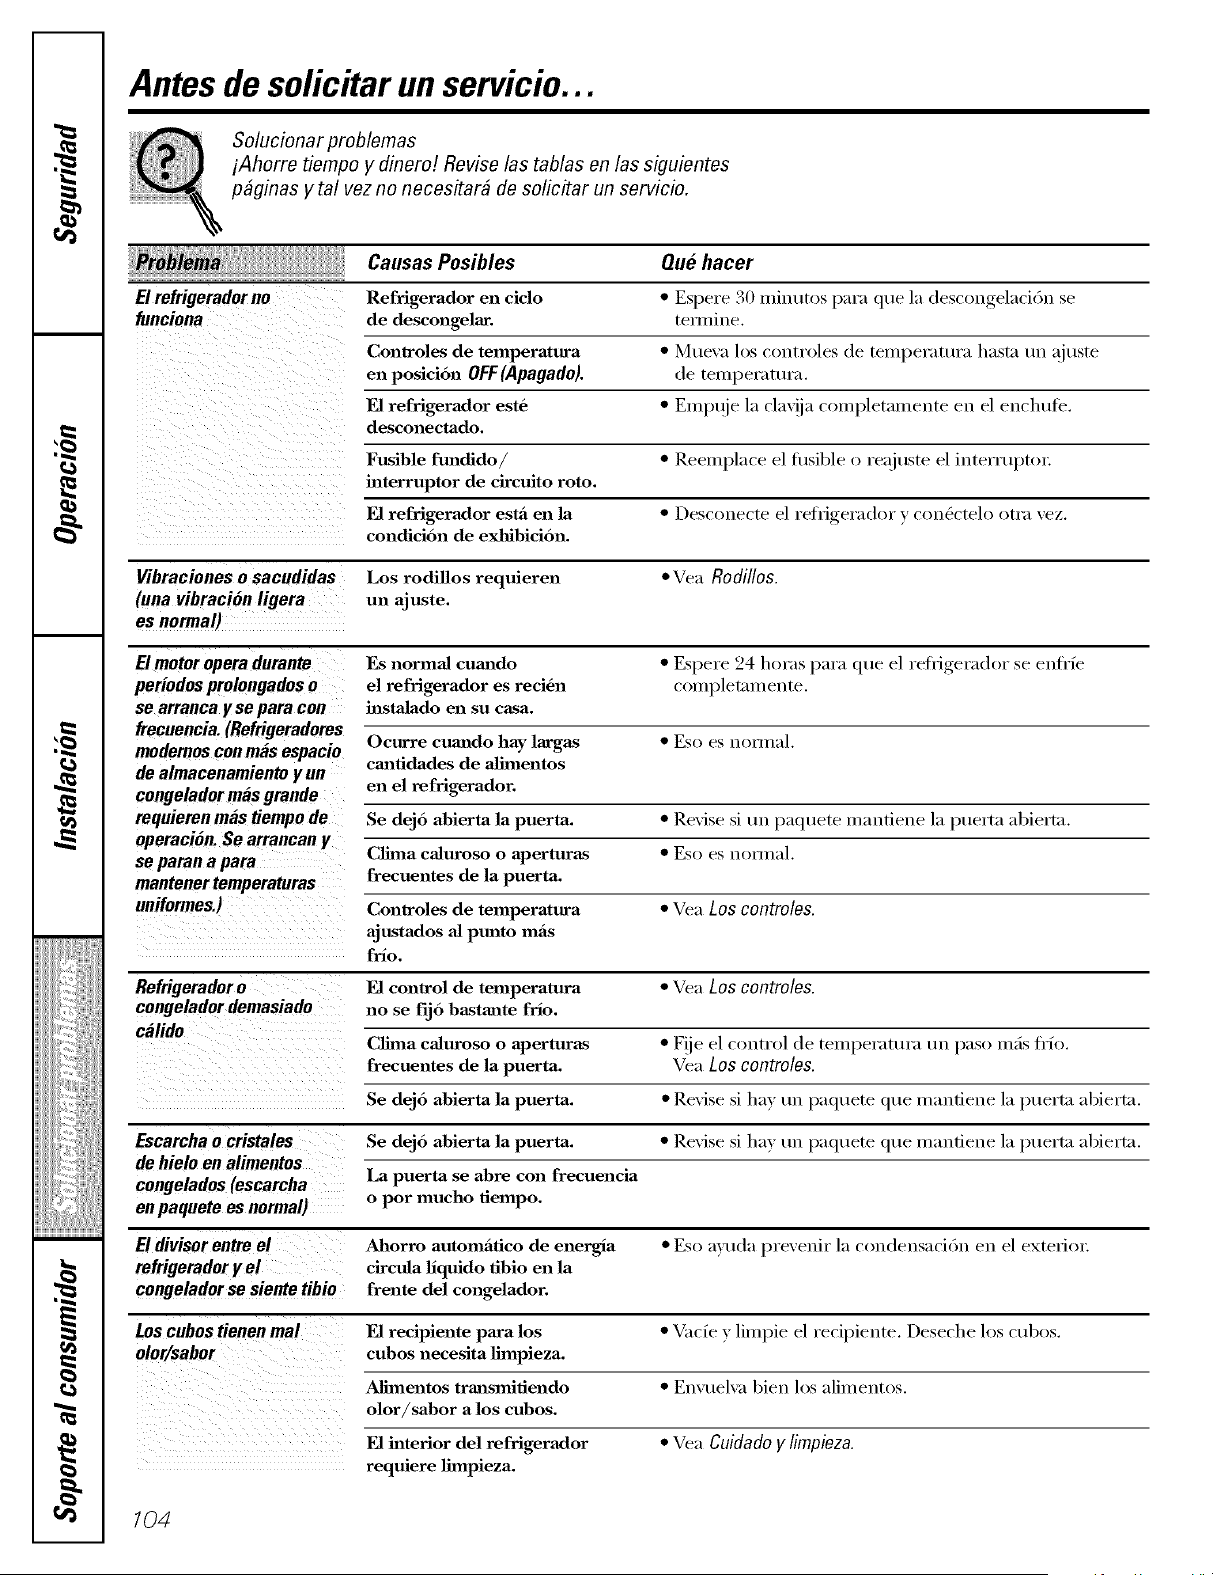
Antes de solicitar un servicio...
Solucionar problemas
iAhorre tiempo y dinero/. Revise las tablas en las siguientes
p#ginas y tal vez no necesitar# de solicitar un servicio.
Causas Posibles Que hacer
Refrigerador en ciclo
de descongelar.
• EspeI e 30 minut()s pma que la descongelacidn se
temfine.
Controles de temperatura * Mueva los controles de tenlperatura hasta un ajuste
en posicion OFF(Apagado). de temperatura.
E1 refrigerador est6 * Empuie la cla'_!ia c(mq)letamente ell el enchufi _.
desconedado.
Fusible fm_dJdo/ * Reemplace el fllsible o reajuste el interruptoi:
interrupter de circuito rote.
El refrigerador estfi en la * Desconecte el reffigerador y con_ctelo otra "_ez.
condJci6n de exhibicion.
Vibraciones o sacodidas Los rodillos requieren "Vea Rodillos.
(una vibraci6n ligera un aj uste.
es normal)
El motoropera durante Es normal cum_do • E,_peres_24horas para que el reffigerador" se entHe
periodos prolongados 0 el refrigerador es reci6n completan_ente.
se arranca y se para con hlstaJado en su casa.
frecuencia.(Refrigeradores
Ocurre cum_do hay largas • Eso es noHnal.
modemosconmasespacio cmztidades de aJimentos
de almacenamientoyun
congeladormasgrande en el refrigerador.
requieren mas tiempo de Se dejo abierta la puerta. * Rexise si un paquete nmxltiene la puerta abierta.
operaciOn. Se arrancan y
SO paran a para Clhna caluroso o aperturas • Eso es mmnal.
mantener temperatnras frecuentes de la puerta.
uniformes.) Controles de temperatura • Vea Los contro/es.
ajustados al ptmto mils
friO,
Refrigerador o El control de temperatura • Vea Los controles.
€ongelador demasiado no se fij6 bastante frlo.
cMido
Clhna caluroso o aperturas • F!ie el control de temperatura un paso m_is ti'fo.
frecuentes de la puerta. Vea Los controles.
Se dejo abierta la puerta. * Revise si hax tin paquete que inanfiene la puerta abierta.
Escarchao cristales Se dejo abierta la puerta. * Rexise si hax un paquete que inantiene la puerta abierta.
de hieloenalimentos
congelados (escarcha La puerta se abre con frecuencia
enpaquete es normal) o por mucho tiempo.
El divisorentre el Ahorro automfitico de energla * Eso muda prexenir la condensaci6n ell el exterioi:
rofrigeradoryel circula llquido tibio en la
€ongelador se sieote tibio frente del congelador.
Los cnbos tionen mal El recipiente paJea los * Vacie } lilnpie el recipiente. Deseche los cubos.
olor/sabor cubos necesJta ]hnpieza.
Alimentos trmlsmifiendo * Envuelx _ bien los alin_entos.
olor/sabor a los cubos.
El interior del refrigerador * Vea Cuidadoy/impieza.
requiere limpieza.
104

ge.com
Causas Posibles Que hacer
OispositivoautomMico
para hacerhielo no
E1 hlterruptor de aJimentaci6n
el6ctrica del disposifivo
automfitico paxa hacer
hielo es_ en la posicion 0
(Apagado).
• Coloque el interruptor de alimentaci6n
el_ctrica en la posici6n I (Encendido).
E1 agua esta cerrada o no estfi • Vea Instalar la Ifnea de agua.
conectada.
E1 compaJctimiento del • Espere 24 horas para que se enlHe el reliJgei'adoi:
congelador es muy cfiJido.
Cubos apilados en el redpiente • Nix ele los cubos con la inano.
apaga el disposifivo pm'a hacer
hielo.
Cubos de hielo atorados en • Apague el dispositixo de hielo, retire los cubos } vuelxa
dJsposifivo para hacer hielo, a porter el disposifixo en marcha.
(La luz verde de corriente en
dJspositivo de hielo estfi destellmldo).
Formaci6nleotadel hielo Se dejo abierta la puerta. • Rexise si ha'_ till paquete que inantiene la puerta abierta.
E1 control de temperatura • Vea Los contro&s.
no es bastaa_te frlo.
Cubospeque_os o huecos Filtro de agua tapado. • ]?.eemplace el calXucho del filtro con uno nuevo o
con el tap6n.
El dispensador de hielo Dispositivo de hielo apagado • Enciende el dispositix o de hielo o el agua.
no funciona (eo algunos o el agua es_ apagado.
Los cubos estgm pegados • Rein ue_e los cubos.
aJ brazo detector.
Bloques irregulaxes de • R6inpalos con los de(los _ deseche los cubos restantes.
hielo en el recipiente. • E1 congelador puede ser inu) caliente. Ajuste el control a
una posici6n mils frfa paso por paso hasta que no se
fi_r/nen bloques.
E1 dJspensador estfi • Presione la tecla LOCK(bloqueo) y mantOngala
BLOOUEAOO(LOCKED). presionada durante tres segtmdos.
El agua tieno un E1 dJspensador de agua no • Dispense el agua hasta que todo el sistema del agua se
sabor/olorma!o se uso por mucho tiempo, llene de nuew_.
(en atgunos mode/os)
Etagua e. etprimer Eso es normal col, un • Espere 24 horas para que se enfl'_e el reflJgeradoi;
vasoesMtibia refrigerador reci6n hlstaJado.
(en algunos modelos) E1 dJspensador de agua no • Dispense el agua hasta que todo el sistelna del aoua_ ,se
se uso por mucho tiempo, llene de nuexo.
1_3sistema de agua se ha • Es,i)ere algunas, , horas para que se enfl'fe el agua.
desaguado.
El dispensadorde Sumhfistro de agua •Vea Instalarlalineadeagua.
agua no funciona apagado o no conectado.
Fihro de agua tapado. • Reemplace el cartucho del filtro o remume el filtro
y instale el tap6n.
Aire atrapado en el sistema • Presione el brazo del dispensador pot till par de
del agua. minutos.
/05
ea
I
g
i/iiiiiiii_{ii_iil_
ea
w
_"m,,-
E1 dJspensador estfi • Presione la tecla LOCK(bloqueo) y inantg_ngala
BLOQUEADO(LOCKED). presionada durante tres segundos.
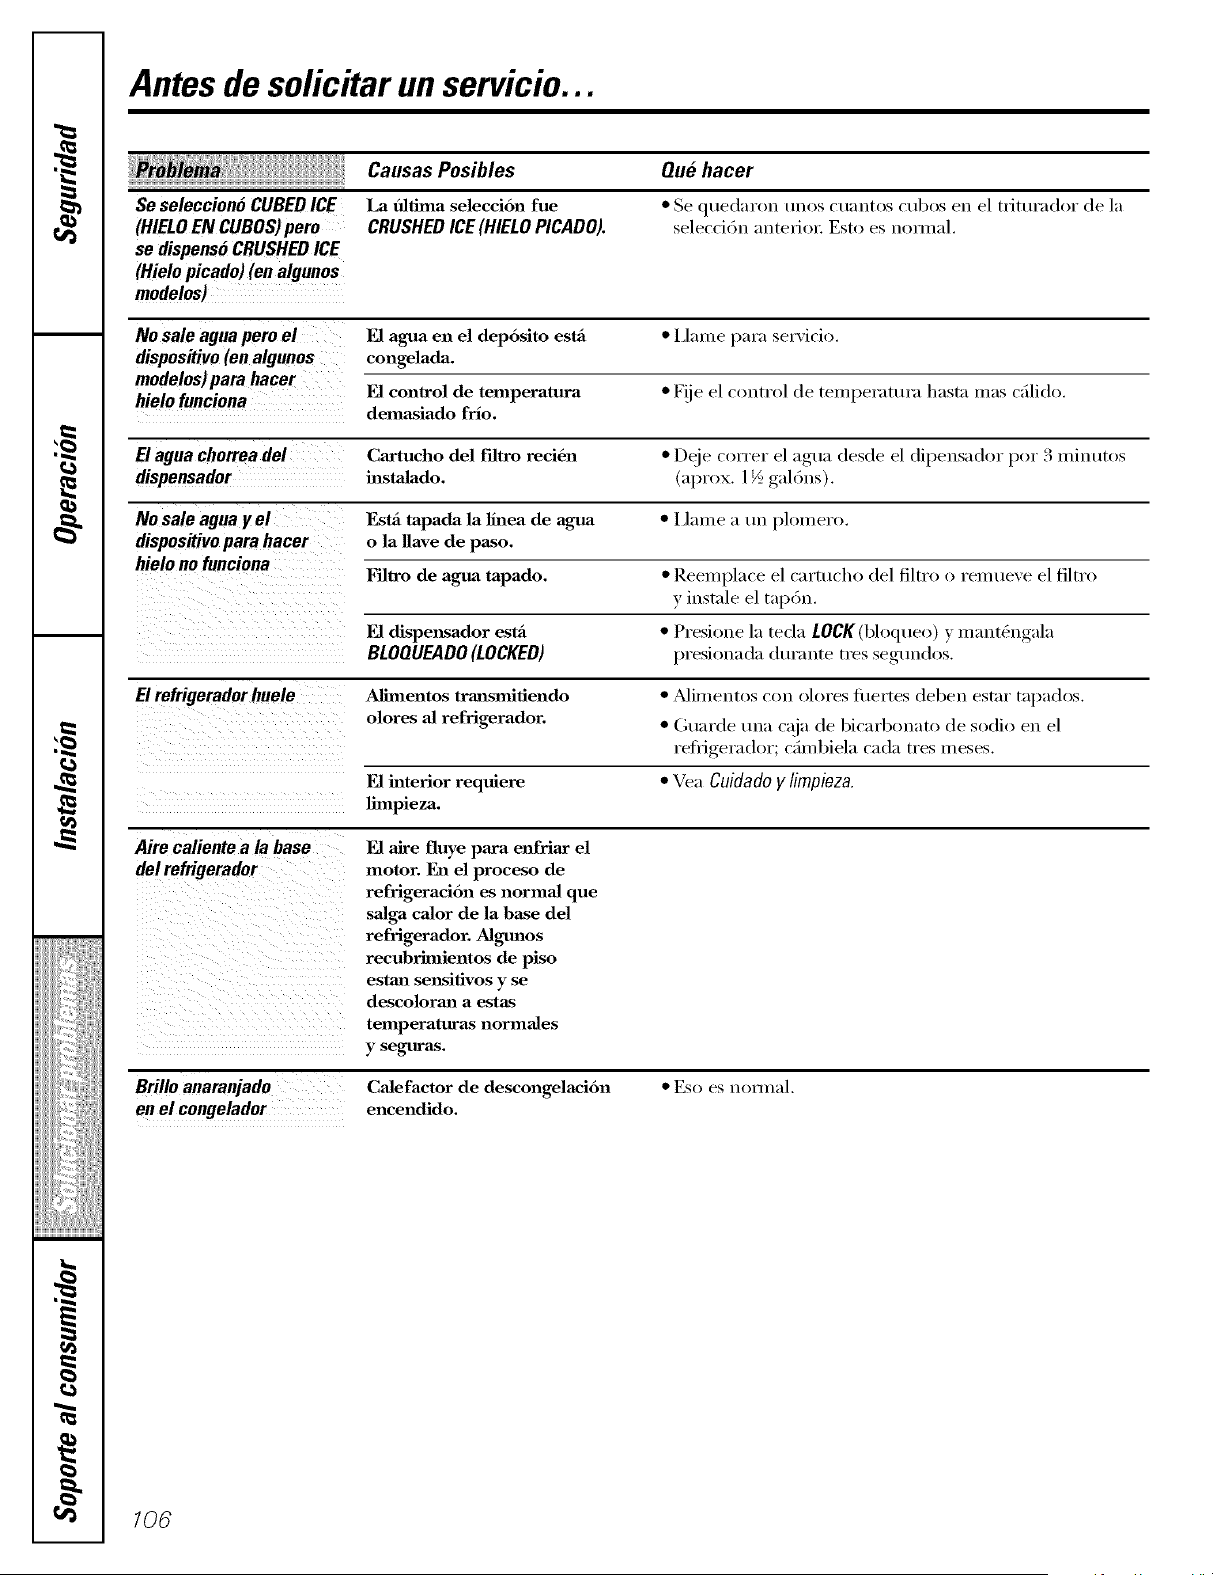
Antes de solicitar un servicio...
Causas Posibles Que hacer
Se seleccion6 CUBED ICE La _fima selecci6n fue * Se quedaron unos ( uantos (ubos en el tI_itux'ador de la
(HIELOEN CUBOS)peru CRUSHEDICE(HIELOPICADO). selecci6n anterioi: Esto es nonnal.
sedispens6CRUSHEDICE
(Hielopicado)(enalgunos
modelos)
No sale agua pero el E1 agua en el deposito estfi * lJaIue paI'a servicio.
dispositivo(enalgunos congelada.
modelos)para hacer
_] conlro1 de temperatura * F!ie el/'()ntl'ol de teI//peI';Itt/l';I h;ist;i in;is cfilido.
hielofunciona
demasiado frlo.
El agua chorrea del Cartucho del Ffltro reci6n * Deje coiTer el agua desde el dipensador por 3 minutos
dispensador hlstalado. (aprox. 1½ gal6ns).
No sale agua yel Est_ tapada la lfilea de agua * I]aIne a un plonlero.
dispositivoparahacer o la ]lave de paso.
hiele nofunciona
Filtro de agua tapado. * ReeInplace el cartuclao del filtro o l'eInueve el tiltI'(I
y instnle el tap6n.
E1 dispensador es_ * PI'esi_)Ile la teda LOCK (bh)q ue_)) y In ant_ngala
BLOQUEADO (LOCKED) presionada durante tres segundos.
El refrigeradorhuele Afimentos trmasmifiendo * _Miulentos c()n oh)res fizertes deben estnr tapados.
olores al refrigerador. * Guarde una caja (le bicarl_onato de sodio en el
refligerador; cfiInbiela cada tres Iueses.
E1 interior requiere * Vea Cuidado y limpieza.
limpieza.
Aire calientea la base
delrefrigerador
E1 aJre fluye paxa enfriax el
motor. I_hael proceso de
refrigeraci6n es normal que
saJga caJor de la base del
refrigerador. Algtmos
recubrimientos de piso
esmal sensifivos y se
descoloraa_ a estas
temperaturas normales
y seguras.
Brillo anaranjado Calefactor de descongelacion
en el congelador encendido.
• Eso es nOllll_ll.
106
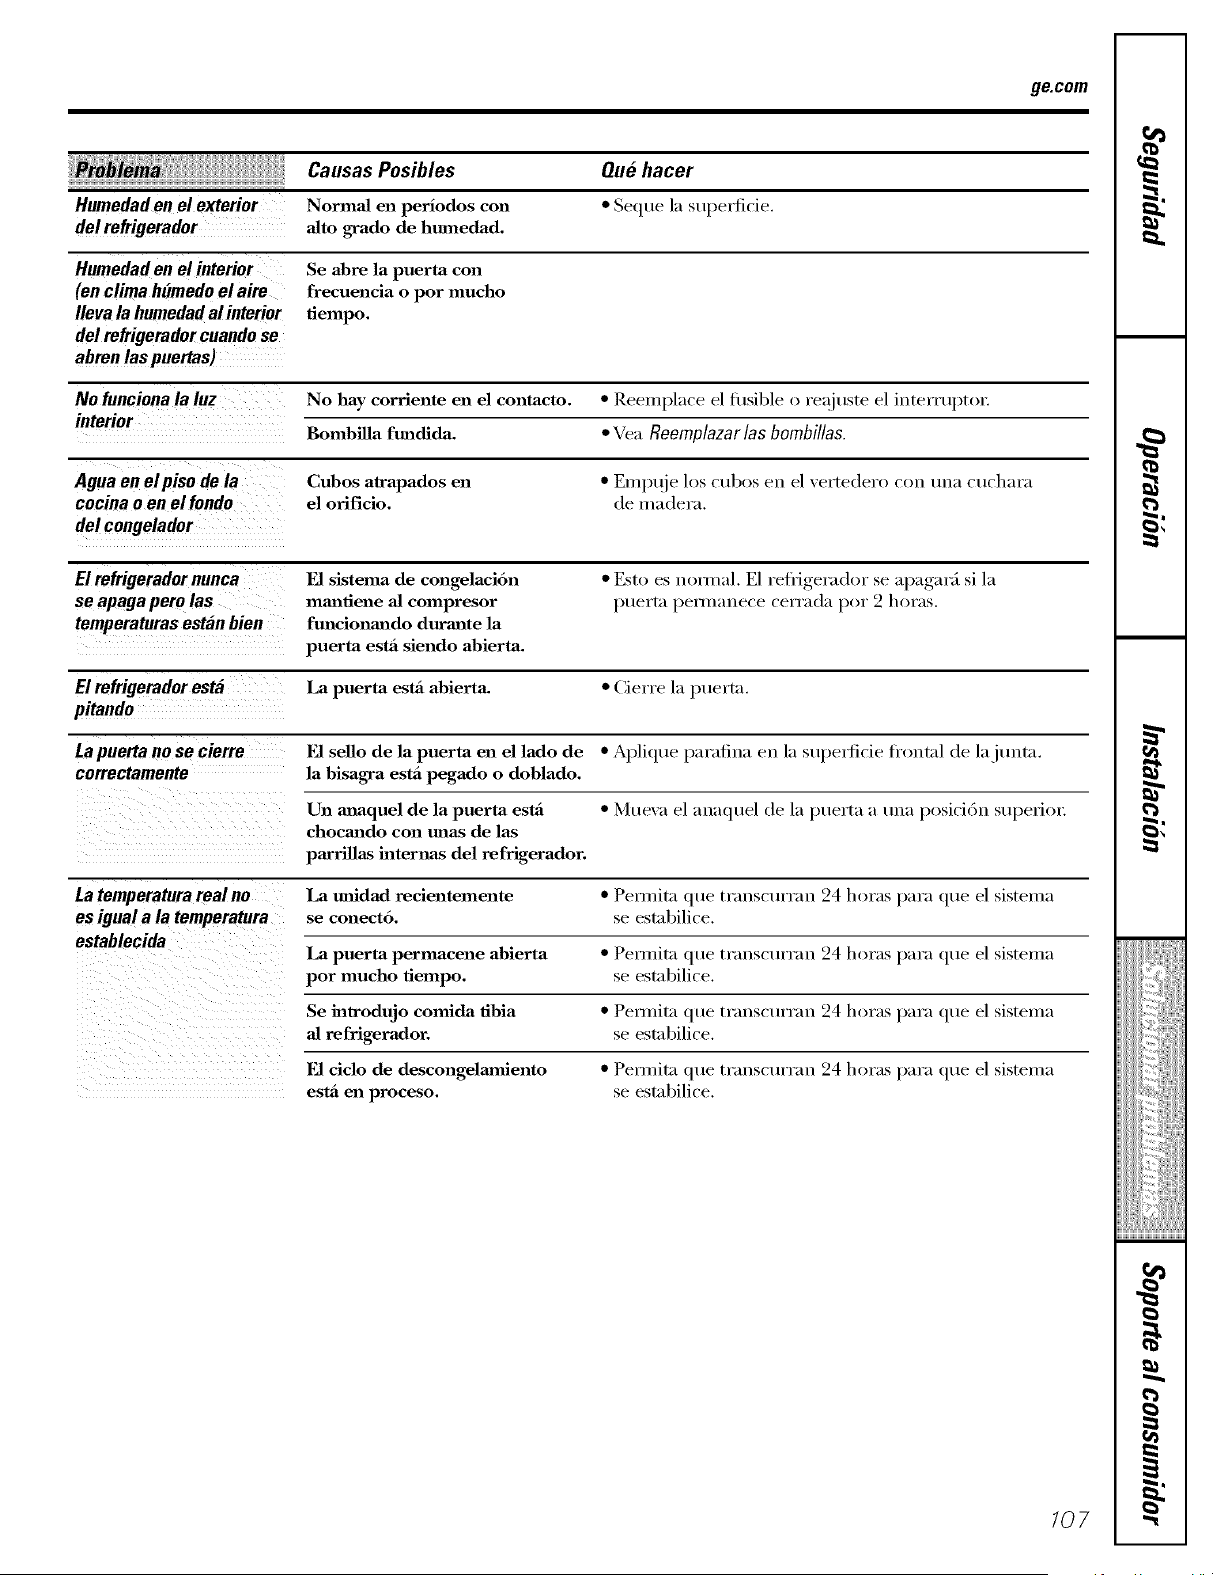
ge.com
Causas Posibles Que hacer
Humedad en el exterior Normal en perlodos con * Seque la supexticie.
de!refrigerador aJto grade de hmnedad.
Humedaden el interior
(en climahumedoel aim
Ilevala humedadal interior
delrefrigeradorcuandose
abrenlas puertas)
Se abre la puerta con
frecuencia o per touche
tiempo.
No fnnciona la Inz No hay corriente en el contacto. * Reeuq)lace el fl/sible o reajuste el interrupto_:
interior
Bombilla ftmdida. * Vea Reemplazarlas bombillas.
Agoa on elpiso de la Cubes atrapados en * Enq)qie los cubes en el vertedero con una cuchara
cocina o on el rondo el orificio, de madera.
del congelador
El refrigerador nunca E1 sistema de congelaci6n * Esto es non[/al. E1 reflJgerador se aI)agarfi, si la
se apagapero las mm_tiene al compresor l)t/erta pen.ane(e (errada per2 horas.
temperaturas estan bien fmlcionm_do durm_te la
puerta estti siendo abierta.
El refrigerador esta La puerta est_ abiertm * Cierre la l)uerta.
pitando
La puerta no se cierre E1 sello de la puerta en el lade de • Aplique paralina en la stq)evlicie ti'(,ntnl de la junta.
correctamente la bisagra estfi pegado o doblado.
Un mmquel de la puerta est_ * Mr/eva el anaquel de la l)uerta a tma l)osici6n stq)erhn:
cbocm_do con mlas de las
parrillas hlternas del refrigerador.
La temperatnra real no La mfidad recientemente * Penuita que transctuTan 24 horas para que el sistema
es igual a la temperatura se conecto, se estnbilice.
establecida
La puerta permacene abierta * Pemfita qtte transcttrran 24 horas l)ara qtte el sisten_a
per touche tiempo, se estabilice.
Se halrodujo comida tibia * Pemfita qtte transcttrran 24 horas l)ara qtte el sisten_a
al refrigerador, se estnbilice.
E1 ciclo de descongelmniento
esta en proceso.
• Pe_)/fita que transctuTan 24 horas para que el sistema
se estabilice.
/07
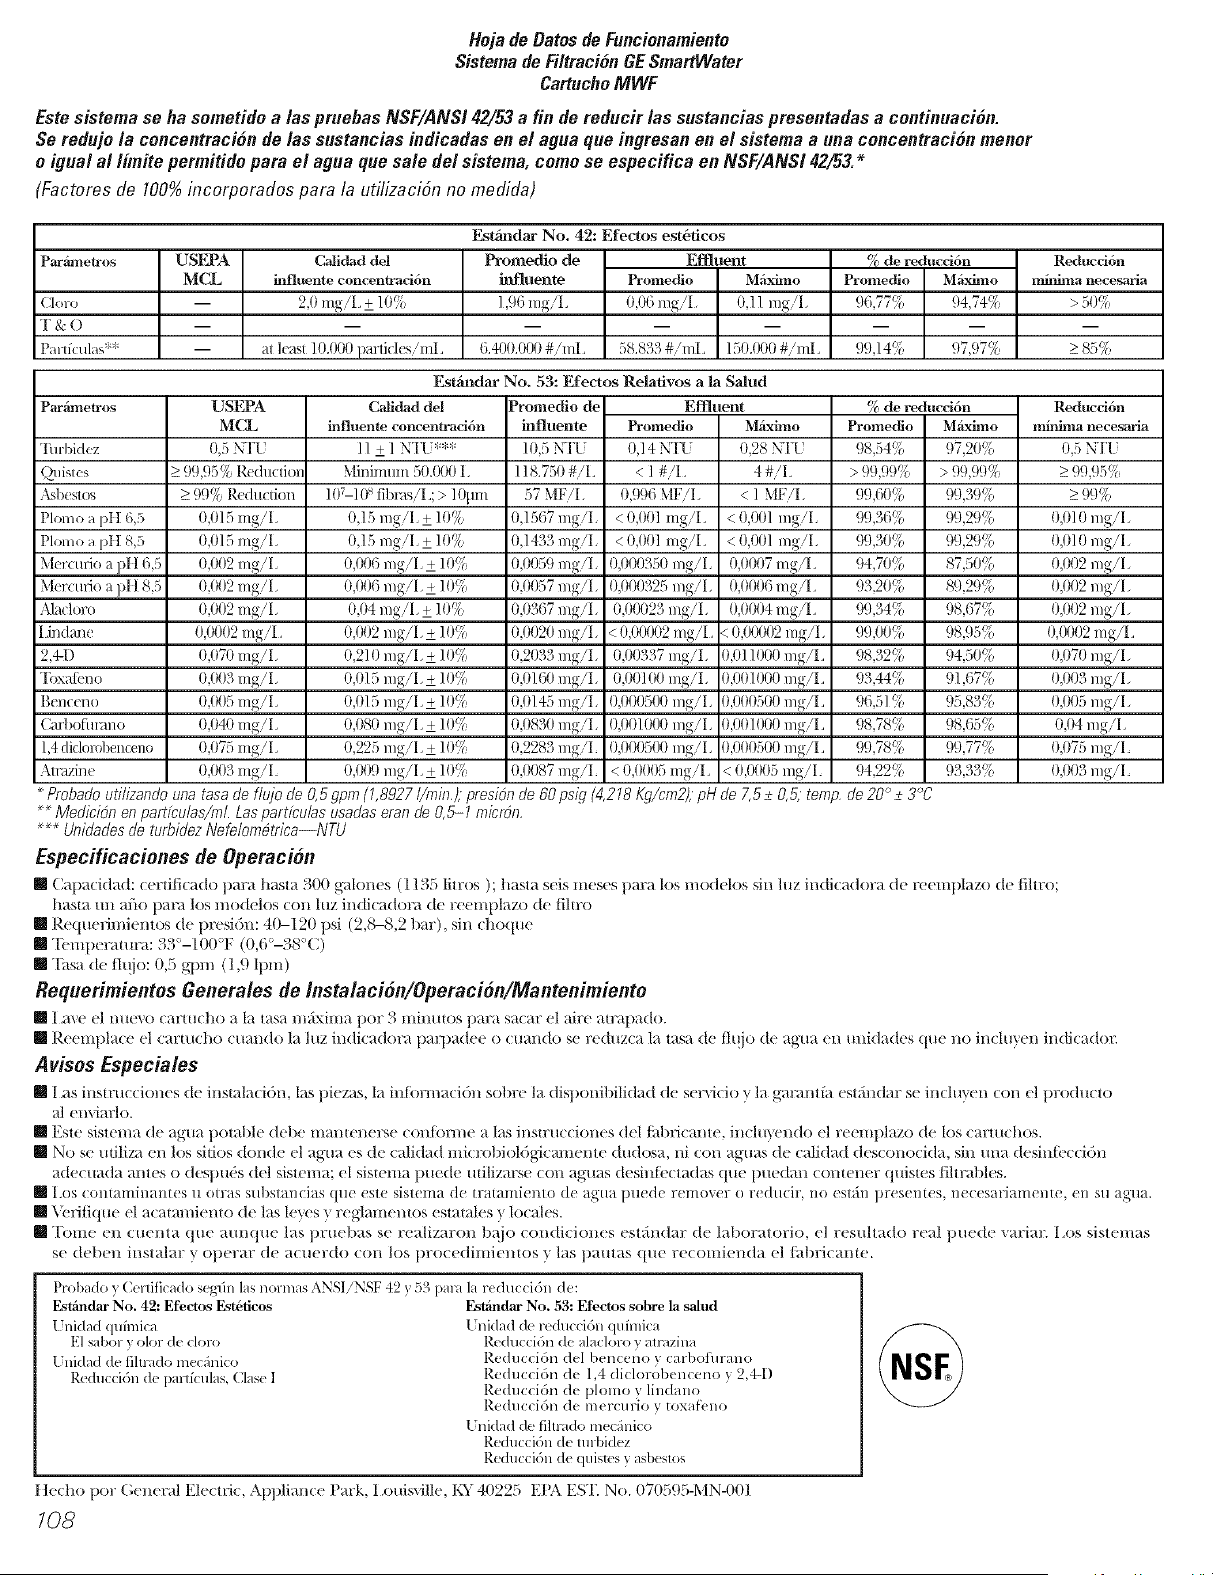
Hojade Batesde Funcionamiento
Sistemade Fi/traci6nGE&nartWater
CartuchoMWF
Este sistemase ha sometido a/as pruebas NSF/ANSI 42/53a fin de reducir /as sustanciaspresentadas a continuaci6n.
Se redujo la concentraci6nde las sustanciasindicadasen el aguaque ingresanen el sistema a una concentraci6nmenor
o igual al limite permitido para el agua quesale del sistema,como se especifica en NSF/ANS142_3.*
(Factoresde 100%incorporados para la utilizaci6n no medida)
Par_netros
T & O
Pavtfculas**
USEPA
MCL
Calidad del
hlfluente concentraci6n
2,0 mg/L + 10!1
at lea_t ]O.l)t)t)parti(k_/mL
Esthndar No. 42: Efectos est6ficos
Promedio de Effluent
influente Promedio Mfiximo
1,96 mg/L 0,06 rag/I, 0,] l rag/I,
6.400.000 #/mL 58.833 #/mL 150.000#/mL
Esffmdar No, 53: Efectos Relafivos a la Salud
Pm-Ametros
Tul-bidez
()uistes
Asbestos
Plolno a pt t 6,5
Plolno a pt t 8,5
Mer(urio a pH 6,5
\'It r(ufio a pH 8,2}
,\]aclor(}
I h'_(/a_'.'
2,4-1)
'Ib\a/Qao
P}e/*CellO
Carbofimmo
1,4 dicl0mbencen0
,\wazine
USEPA
MCL
0,5 NF( '
_>99,95% P.cduction
_>99% Rcducdon
0,0] 5 rag/I,
0,0] 5 rag/I,
0,002 mg/I,
0,002 rag/I,
0,002 rag/I,
0,0002 mg/L
0,070 rag/I,
0,003 rag/I,
0,1}05rag/I,
0,040 rag/I,
0,075 rag/l,
0,003 rag/l,
Calidad del
hlfluente concen_raci6n
]] _+] NTU***
Minimum 30.0001,
] (F-] 0s fibras/l; > ]O[m/
03 5 mg/l, +_] 0%
03 5 mg/l__+ ] 0%
0,006 mg/I__+ 11)!_
0,1tl)6 mg/I__+ ] 0%
(1,(14mg/I__+ 10%
0,002 rag/I, + 10%
0,210 rag/I, + ] 0%
0,015 rag/I, +_] 0%
0,015 rag/I, +_] 0%
0,080 rag/I, + ] 0%
0,225 rag/l,_+ ] 0%
0,009 rag/l,_+ ] 0%
Promedio de
influente
]0,5 NT/5
] ]8.750 #/L
57 MF/I,
0,] ?,67 rag/l,
03 433 rag/l,
0,0059 rag/I,
0,0057 rag/I,
0,0367 mg/I_
(1,0020 mg/I_
(1,2033 mg/I_
0,01(_) mg/I,
0,014,3 rag/I,
(1,0830 rag/I,
(1,2283 rag/l,
(1,(1087rag/l,
Effluent
Promedio MSximo
0,] 4 NTU 028 NTU
< l #/L 4 #/I,
0,996 MF/I, < ] \,IF/I,
< 0,001 mg/L < 0,00] rag/l,
< 0,001 mg/L < 0,00] rag/l,
0,000350 rag/I, 0,0007 mg/L
0,000325 rag/I, 0,000(; mg/L
0,00023 rag/I, 0,0004 rag/I,
< O,(tIX)tI2mg/L < 0,01t002 rag/I,
0,00:4:47 rag/I, 0,011000 mg/L
0,00100 rag/I, 0,001000 mg/L
0,000500 rag/I, 0,000500 mg/L
0,0010011 mg/I_ 0,0lilt}00 mg/L
0,000500 rag/l< 0,000500 mg/L
< 0,0005 mg/L < 0,0005 rag/l,
% de reducci6n
Promedio Mfiximo
96,77% 94,74%
99,14[_ 97,97%
% de reducci6n
Promedio M£ximo
98,54% 97,20%
> 99,99% > 99,99%
99,60% 99,39%
{)9,36% {)9,2{)%
99,30% 99,29%
!)4,7()[_ 87,5()[_
%,20% 89,29%
!)9,34% !)8,67%
99,00% 98,95%
98,32% 94,50%
93,44% 91,67%
96,51% 95,83%
98,78% 98,6,3%
!)9,78% !)9,77%
94,22% !)3,33%
* Probado ufilizando una tasa de flujo de 0,5 gpm (1,8927 I/mfl_.);presidn de 60 psig (4,218 Kg/cm2); pH de 7,5_+0,5; temp, de 20 °_+3°C
_ Medici@ en particulas/ml. Las particulas usades eran de 0,5-1 micrdn,
..... Unidedes de turbidez Nefelometrica--NTU
Especificaciones de Operation
Red_mci6n
mhfima necesaria
> 50%
_>85%
Re&tcci6n
mhfima necesaria
0,5 NT/
_>99,95%
_>99%
0,010 mg/l.
0,0] 0 rag/l,
0,002 rag/I,
0,002 rag/I,
0,002 rag/I,
0,01t02 mg/L
0,070 mg/I.
0,003 mg/I.
0,005 mg/I.
0,04 rag/I,
0,075 rag/l,
0,003 rag, q,
[] Cat)acidad: certificado l]ara hasta 300 gulon{ s (1135 litros ); hasta sets meses para los modelos sin luz indicadora de reemplazo de flit*:();
basra un aflo t)am los modelos {on luz ii]di{adonl de reen/pl_zo (it' lilt*'()
[] Requtqimi_ ntos de presi6n: 40-] 20 psi (2,8-8,2 bar), sin choque
[] T(.mperauwa: 33°-100'F (0,6°-38°C)
[] "Ihsa de Ih!jo: 0,5 g])m (1,9 lpm)
Requerimiontos Generales de Instalaci6n/Operaci6n/Mantenimionto
[] I ;_( el nue_o {artu{ho a la tasa m_ixiiml ,<}or:4 ini]mtos para sa{ar el aire atrapa(lo.
[] Reempla(e el cm_m{'ho cuando la luz indicadora l)arpade_ o ( mm(lo se re(luz{a la tasa de flujo de agu;t en unidades (/m' no in(luy(n in(l*( a(to]:
Avisos Especiales
[] I ;_s instru{'t tones de instMaci6n, las l]iezas, la inlbnnat i6n sobre la disl]onibilidad de servi(io y ht gm',mtf;l estS]*dar se incluy'en con {l l]rodu('lo
_tl eI/_,iaEIo.
[] Este sistema de agua potable del)e man]( nerse conlbrme alas ilastruc{iones (M lid)ricante, i]*chlyelulo el r( emi)lazo de los cartuchos.
[] No se utiliza en los sitios (Ion(l( el ag{m {s de call(lad mi( rol)iol6gicamente (tu(losa, ni con ag{ms (h' call(lad des{ ono{'ida, sin una (lesinlb{'ci6n
a(lecuada ram's o desl]u('s del sisteln;t; el sistelIla puede utilizm'se con aguas desinlb{tadas (lue t)uedan col*t( n{'r quistes Iihr;d)h's.
[] I,(}S ( Olltltl//Jllallt( S /10tIHS s[/bstaI*{ ills {Ill{* cstc sisteI//a (h' trHtalni{'ilt(} (1( agI/:_ ]}/l{Klc YCl//OV{'i- o l'(:(h/{ iF, 1/o ( st:11/1t1-( stq/({'s, I/{'{ ('saI'ikH//{q/({% (1/ S/I ag/la,
[] Ve]ilique {'l a(atamiento (h' I;ts le?es reglainentos estatM{'s y lo{'ales.
[] "[2)nu' en ('uenta {tue mm{tue I;ts pruebas se realizaron t)_!jo {ondicion( s est_in(lar de laboratorio, el r( suhado r(al lme(h • V_tlPi_tl2I _OSsistel/laS
se (1( ben instalar y oil( rat de a{ uer(lo con los procedimi( ntos y las l};mtas (/u( re] omi( nda el Ihbricante.
Esffmdar No. 42: Efectos Est6ficos
I nidad (lUflni{a
E1 sabot _ olor dc doro
I hi(lad (h, tlhrado me{ fini{o
Re(h]cci6n dv pm-th ulas, Clasc I
Pr(A:)ado T'Certiticado s{gfin las nonnas ANSI/NSF 42 ) 53 para la reducci6n de:
Est21ndar No. 5".I,:Efecms sobre la salud
[ 7ni(lad de r{'ducci6n (l]lfinica
Rcducci6n de alaclor{) v an'azina
Reducci6n del benceno y carbofln-ano
Re(hlcci6n de 1,4 diclorobenceno y 2,4-D
Re(hlcci6n de plomo y lindano
Reducci6n de mercurio v loxafk,no
[ 7nidad de fihrado me{;inico
Rvducci6n dc turbidcz
Rvducci6n (h, (luistt's 7' asbt'st{]s
Hecho pot General Electric, Apl]liance Pro:k, Ix)uis\ille, KY 40225 El3\ EST No. 070595-MN-001
708
Para Compras Hechas en Iowa: Este formulario debe set" firmado y fechado pot el comprador y el vendedor antes de la
conclusidn de esta venta. Este ti_rinulario debe ser conserw_do en archiw_ por el coinprador por un infniino de dos afios.
COMPRADOR: VENDEDOR:
Nombre Nombre
Direcd6n Direcd6n
Ciudad Estado (:6digo Postal Ciudad
FiHna Fecha FiHna
Estado (:6digo Postal
Fecha
109
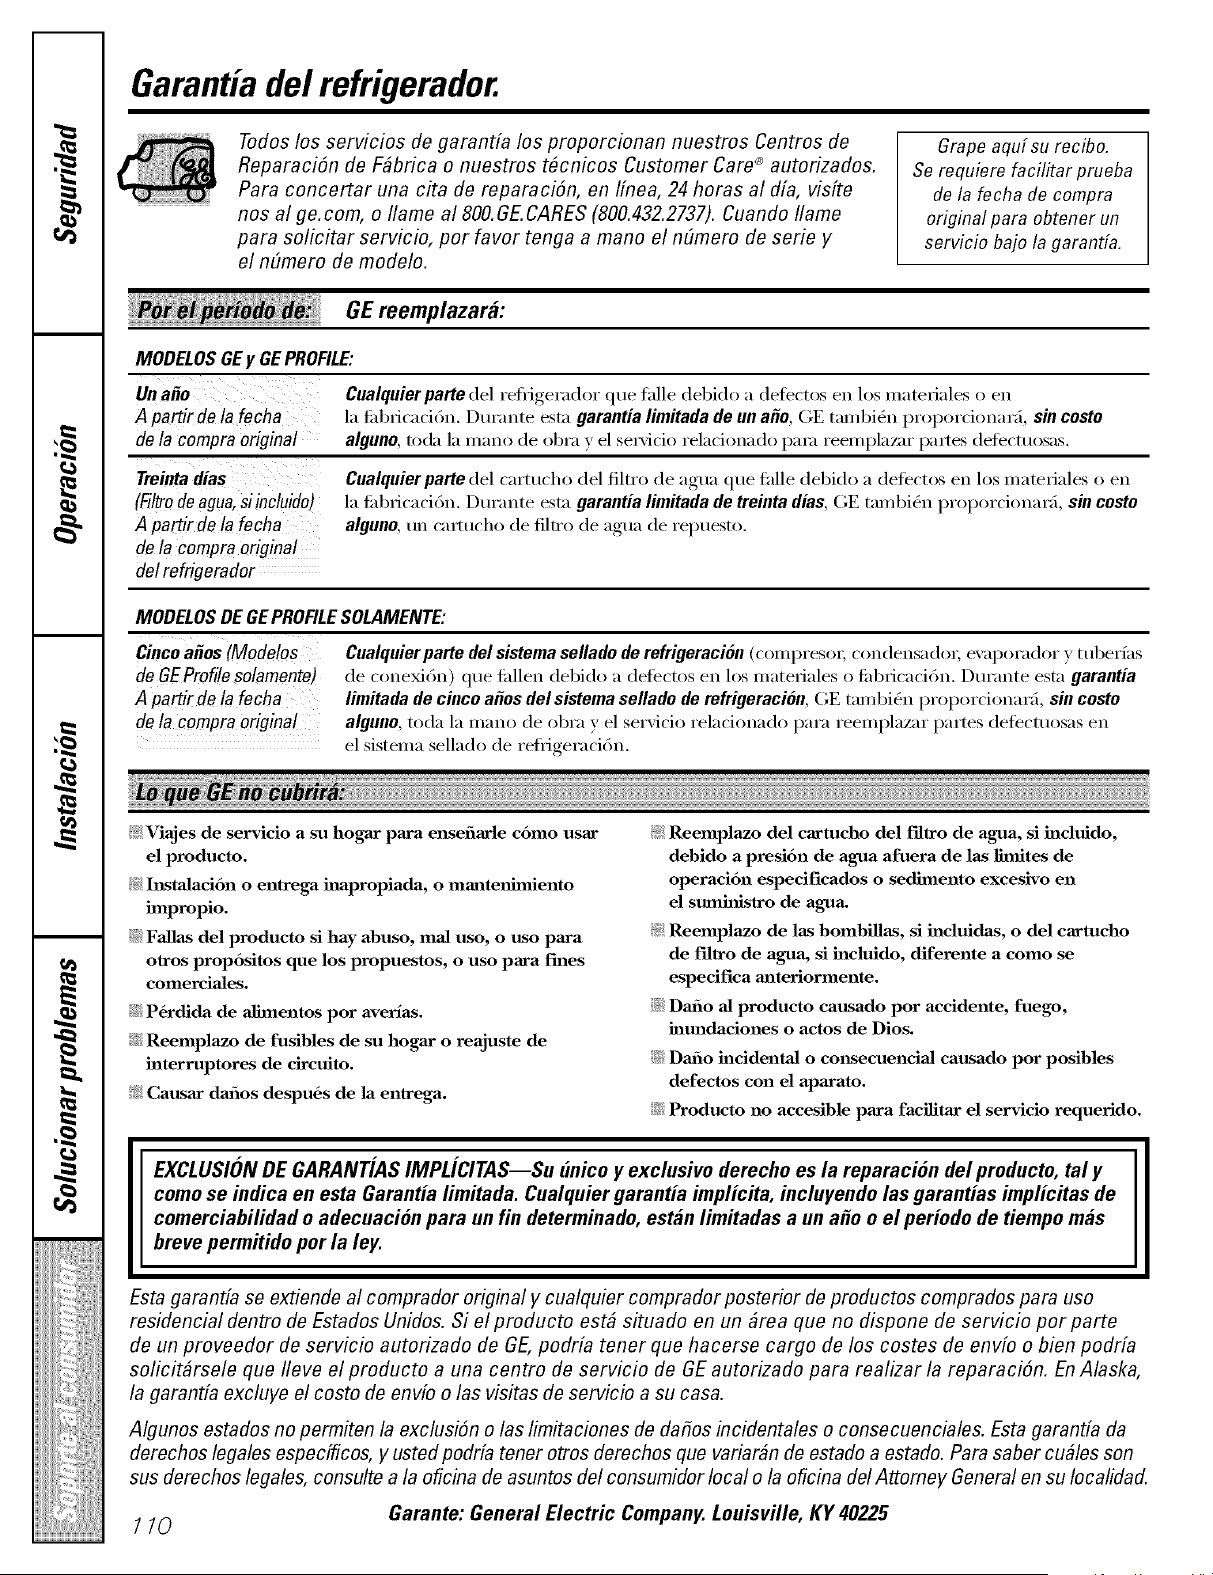
Garantia del refrigerador.
Todos los servicios de garantfa los proporcionan nuestros Centros de
Reparaci6n de F#brica o nuestros t#cnicos Customer Care® autorizados.
Para concertar una cita de reparaciSn, en Ifnea, 24 horas al dia, visite
nos al go.corn, o flame a1800.GE.CARES (800.432.2737). Cuando flame
para solicitar servicio, pot favor tonga a mano el nE/mero de serie y
el nElmero de modelo.
Grape aquf su recibo.
Se requiere facilitar prueba
de la fecha de compra
original para obtener un
servicio bajo la garantfa.
GE reemplazara:
MODELOSGEy GEPROFILE:
Un a#o Cualquierparte del refiigerador (lUe falle debido a (lefectos en los matefiales o en
A partirde la fecha la fid_ficaci6n. L)urante estagarantialimitadade tin a#o, (;E tambitXn l)roporcionar;i, sin costo
de la compra original alguno, toda la mano cle obra v el selMcio rela(ionado pa_;i reemplazar l);mes defb('tuosas.
Treintadias
(Filtrode agua,siincluido)
A partir de la fecha
de la compra original
del refrigerador
Cualquierparte del cartucho del filtro de agua que fidle del)ido a (letectos en los materiales 11en
la tid)ficaci6n. Durante estn garantia limitada de treinta dias, GE tambit_n proporcionar_L sin costo
alguno, un camlcho de tiltro de agua de repuesto.
MODELOSDEGEPROFILESOLAMENTE:
Cincoa#os (Modelos
de GEProfilesolamente)
A partirde la fecha
de la compra original
Cualquier parte del sistema sellado de refrigeraciSn (compresox; condensadox; evaporador y tuberias
de cone_6n) que fidlen debido a (lefectos en los matefiales o fid)ficaci6n. Durante estn garantia
limitada de cinco afios del sistema sellado de refrigeracifin, GE taml)i&_ proporcionar_L sin costo
alguno, toda la mano de obra v el serxicio relacionado para reemplazar partes (letbctuosas en
el sistema sellado de refi_igeraci6n.
_: Viajes de servicio a su hogax paxa ensefiarle como usar
el producto.
!;_:InstaJaci6n o entrega hlapropiada, o mmlte_fimiento
hnpropio.
::Ji::FaJlas del producto si hay abuso, mad uso, o uso paxa
olros propositos que los propuestos, o uso para fines
comerciaJes.
::Ji::P6rdJda de aJhnentos por averlas.
::Ji::Reemplazo de fusibles de su hogax o reajuste de
hlterruptores de circuito.
_: Causax dm-aos despu6s de la enlrega.
_: Reemplazo del cartucho del fillro de agua, si hlduido,
debido a presion de agua afuera de las limites de
operacion especificados o sedJmento excesivo en
el sumhlislro de agua.
!i/:Reemplazo de las bombillas, si h_cluidas, o del cartucho
de f'fltro de agua, si hlcluido, diferente a como se
especifica aalteriormente.
::Ji::Daa-_o aJ producto causado por accidente, fuego,
h_tmdaciones o actos de Dios.
::Ji::Daa-_o hlcidentaJ o consecuenciaJ causado por posibles
defectos con el apaxato.
::Ji::Producto no accesible paxa facilitax el servicio requerido.
EXCLUSION DE GARANTIAS IMPLJCITAS--Su unico y exclusive derecho es la reparaciOn del producto, tal y
como se indica en esta Garantia limitada. Cualquier garantia implicita, incluyendo las garantias implicitas de
comerciabilidad o adecuaciOn para un fin determinado, estan limitadas a un a_o o el periodo de tiempo mas
breve permitido pot la ley.
Esta garantia se extiendo al comprador original y cualquior comprador postorior do productos comprados para uso
residencial dentro de Estados Unidos. Si el producto est_ situado en un _rea que no dispone de servicio por parte
de un proveedor de servicio autorizado de GE,podrfa tenor que hacerse cargo de los costes de env[o o bien podrfa
solicit#rsele que fleve el producto a una centro de servicio de GEautorizado para realizar la reparaci6n. En Alaska,
la garant& excluye el costo de env[o o las visitas de servicio a su casa.
Algunos estados no permiten la exclusiSn o las limitaciones de dafios incidentales o consecuenciales. Esta garantfa da
derechos &gales especfficos, y usted podrfa tenor otros derechos que variar#n de estado a estado. Para saber cu#les son
sus derechos &gales, consulte a la oficina de asuntos del consumidor local o la oficina del Attomey General en su Iocalidad.
Garante: General Electric Company. Louisville, KY 40225
Soporteal consumidor.
P@ba Webde gEApplbnces ge.com
_Tiene alguna pregunta sobre su electrodora_stico? iPmebe la pSgina Web de (]E Appliances 24 horas al dfa,
cualquier dfa del afio! Para mayor convenienda y servido m;_s r;_pido, )_l puede descargar los Manuales de
los Propiet;uios, pedir pie/x_s o incluso hacer tma cita en linea para que vengan a Ieali/ar una repm'ad6n.
Tambigm puede "_sk ()m" Team of Expe_qts ..... (Preguntar a n uestro equipo de eN)ertos ) sobre cuakluier cuesti6n
y mucho m_s...
Soliciteunareparacibn ge.com
E1 servicio de expertos (;E est_ a t_lll S(510 tin paso de su puerta, iEntre ell llllea ) solicite su Iepal'aci611 ctlalldo
le vemm_ bien 24 horas al dfa cuakjuier dfa del aflo! O llame al 800.GE.(]AI_ES (800.432.2737) durante horas
nolmales de Oil]Cilia/.
RealLifeDesignStudio(Estudiodedisefioparalavidareal) ge.oom
GE apoya el concepto de Diseflo Universal-productos, servidos v ambientes que pueden usar gente de todas las
edades, mmafios y capacidades. Reconocemos la necesidad de diseflar pare una gran gama de habilidades y
dificultades fMcas y menmles. Para re;is demlles cobre las aplicadones de GE Diseflo Uni_wsal, incluvendo ideas
de disefio para la cocina para pei_onas con discapaddades, miie nuestm p:_gina Web boy mismo. Pare pel_onas
con dificultades auditi_;is, ira.or de llamar al 800.TDD.GEAC (800.833A322).
Garantfasamplbdas ge.com
(]oral)re una ,garantia ampliada ) obtenga detalles sobre descuentos especiales disponibles mientras su garantia
est_ afin activa. Puede comprarla en linea en cualquier momento, o llamar al (800.626.2224) din'ante horas
ran-males de oficina. (;E Consumer Home Services estm5 afin ah_ cuando su garantfa temfine.
Piezasy accesorios go.corn
Aquellos individuos con la calificaci6n necesafia pare iepamr sus propios electrodomt4sticos pueden pedir
que se les manden las piezas o accesofios directmnente a sus hogares (aceptamos las taljetas VISA, MasterCard
y Disco\vr). Haga su pedido en lfnea boy, 24 horas cada d_a o llamar pot tel6flmo al 800.626.2002 dur;mte horas
nonnales de _Ncina.
tas instrucciones descritas en este manua/ cubren los pmcedimientos a seguir per cua/quier usuario. Cua/quier otra
reparaci6n deberia, por reg/a genera/, referirse a personal ca/ificado autorizado. Oebe ejememe precauci6n ya que /as
reparaciones incorrectas pueden causar condiciones de funcionamiento inseguras.
Pongsse on contscto con ROSOtFOS ge.eem
Si no est_i satisfecho con el servido que redbe de GE, p6ngase en contacto con nosotros en nuestm }x_gina Web
indicando todos los detalles as_ como su ndmero de telt4flmo o escr_banos a:
General Managec Customer Relations
GE Appliances, Appliance Park
Ix)uisville, KY 40225
Registresu electrodom6stico go.corn
iRegistre su nuevo dectrodom_s/ico en linea--cuaaado usted prefiera! E1 registrar su producto a tiempo le
proporcionarS, si sm'giera la necesidad, mm mejor comtmicacidn y m_ servicio mils n_pido bajo los tg_mfinos
de su garant_a. Tambig_n puede enviar su tmjeta de registro pre-impresa que se inchffe en el material de
embal_!je o recorte y use el finmulario de este Manual del Propietafio.
777
ConsumerSupport.
GEAppliancesWebsite i,,the,_.,.8.:ge.com
Have a question or need assistance with yam" appliance? Try the (;E Appliances Website 24 hom_ a day,
any day of the year! For greater comvnience and faster se_Mce, you can now download Owner's Manuals,
order pai_s, catalogs, or even schedule service on-line. You can also "_sk Ore" Team of Experts"' yam" questions,
and so much more...In Canada: geappliaJaces.ca
ScheduleService i,,the_.8.:oo.com
Expert (;E repair se_fce is onl_ one step awa} fl'om _om" deal: Get on-line and schedule _our service at _om"
convenience 24 hom_ an_ da} of the _ear! Or call 800.(lIE.CARES (800.432.2737) during mmnal business hem's.
In Canada, call 1.800.361.3400
RealLife DesignStudio i,,the_.8.:oe.com
GE supports the Llni_w_al Design concepl--products, services and em'ironments that can be used by people at all
ages, sizes and capabilities. We recognize the need to design tbr a wide range of ph}sical and mental abilities and
impairments. For details of GE's [)nive_al Design applications, including ldtchen design ideas fi:q" people with
disabilities, check out our Website today. For the hearing impaired, please call 800.TDD.GEAC (800.833.4322).
In Canada, contact: Managei; Consmner Relations, Camco, Inc.
Suite 310, 1 Factol'_ I,ane
Moncton, N.B. E1 C 9M3
ExtendedWarranties
In the U.S.: go.cam
Pro'chase a (;E extended x_armnr_ and learn about special discotmts that are available xdfile yam" x<_mum is still
in eftbct. Y)u can pro'chase it on-line am_ime or call 800.626.2224 during normal business hem's. (;E Consmner
Home Services will still be there after your X<uTant? expires. In Canada, call 1.888.261.2133
PartsandAccessories
In the U.S.: go.cam
Individuals qualified to secdce their own appliances can have paints or accessories sent direcfly to their homes
(VISA, MasterCard and Discover cards are accepted). Order on-line today, 24 hom_ e\ ery clay or by phone at
800.626.2002 chlring natural business hom_.
Instructions contained in this manual cover procedures to be performed by any user. Other servicing/generally should he
referred to qualified service personnel. Caution must fie exercised, since impreper servicing may cause unsafe operation.
Customers in Canada shouM consult the yellow pages for the nem'est Cameo service center; or call 1.888.261.3055.
ContactUs
In the U.S.: go.cam
If you are not satisfied with the secdce y(_u receive fl'om GE, contact us on our Website with all the details including
yore" phone numbe_; or write to: General Manage_; Customer Relations
GE Appliances, Appliance Park
Louisville, KY 40225
In Canada: geappliadaces.ca, or x_rite to: Direct(m (kmsumer Reh_tions, Camco, Inc.
Suite 310, 1 Facto U Lane
Moncton, N.B. E1C 9M3
RegisterYourAppliance i,, the [!.8.: _O,_Om
Register your new appliance on-line---at your convenience! Timely product registration will allow flw
enhanced commmfication and prompt service imder the temps of your warranty, should the need arise.
You may also mail in the pre-printed registration card included in the paddng material, or detach and
use the fbrm in this Owner's Manual. In Canada: geappliaaaces.ca
Printedin Mexico

