/
PSDI00
PSD200
PSD300
PSD330
PSD900
Pat_ No 163D3527P034
Pub No i'9 3033 1
3 99 CG
Welcome to the RCA tamily. We're proud of our quality products and
we are committed to providing dependable service. You'll see it in this
easpto-use manual and you'll hear it in the fl'iendly voices of our
customer service department.
Best of all, you'll experience
these vahles each time you
use your dishwasher. That's
important, becmlse your new
dishwasher will be part of yore"
tamily ibr many years. And we
hope you will be part of om's R)r
a long t]llle to coille.
We thank you tor buying RCA. We appreciate your purchase, and hope
yon will cominue to rely on us whenever you need quality appliances tk)r
your home.
Important!
Staple sales slip or cancelled
check here.
Proof of the original purchase date is needed
to obtain service under the warran_
Write themodel and serial numbershem.
#
#
Youcan find them on the tub wafljust inside
the door.
RCA& You,
AServicePartnership_
Ask any RCA appliance owner and they will
tell you we stand behind our products with
unmatched quality service. However, did
you know that most questions result from
simple problems that you can easily
fix yourself in just a few minutes? This
Owner's Manual can tell you how.
ReadthisManual
Inside you will find many
helpful hints on how to use and
maintain your washer properly.
Just a little preventive care on
yotlr part Call save yo[l a g_eat
deal of time and money over
the liIe oi your dish_vlsher.
ReviewtheSectionon
Troubleshootingtips
You'll find many answers to
collllllon problems here.
llyou reviewour chart of
Troubleshooting Tips tirst,
you may not need to (:alllot
service at all.
If YouNeedService
ltyou do need service, you can
relax knowing help is only a
phone call away. A list of toll-lt'ee
customer service numbers is
included in the back section.
Safely Information .4 7
OperatingInstructions
ControlPanels .............. 8
ControlSettings............. 9
OialCvcles............. !0, 11
Usi_ rneDishwasher .... 1Z 13
Loadff_gthe
OishwasherRacks....... !4, 15
ChangingColorPanels ... !6-19
Careand Cleaning.......... 20
Troubleshooting Tips
Before You
CallForService ......... 21 25
CustomerService
Warranty ................ 27
ServiceTelephone
Numbers .......... BackCover
iMPORTANTSAFETYINFORMAtiON.
READALLiNSTRUCTiONSBEFOREUSING.
For your safe_ the information in this manual must be
followed to minimize the risk of fire, explosion, electric
shock, or toprevent property damage, personal injury,
or loss of life.
WATERHEATERSAFETY
Under certain conditions hydrogen gas may be produced in
a water heater that has not been used for two weeks or
more. HYDROGENGASIS EXPLOSIVE
Ifthe hot water has not been used tot twoweeks or more, prevent
the possibility of damage or iqjuU byturning on all hot water
l_mcetsand allow diem to mn fbr several minutes. Do tillsbefbre
using an},electrical appliance _llit ll isconnected to the hot water
system.This simple procedure willallowany built-up hydrogen gas
to escape. Sincetile gas isflammable, do not smoke or use an open
llame or appliance during this process.
Use your dishwasher only for its intended purpose as
described in this Owner's Manual.
PROPERINSTALLATION
ANDMAINTENANCE
This dishwasher must be properly installed and located in
accordance with the Installation Instructions before it is used.
If you did not receive an Installation Instructions sheet with
your dishwasher, you can receive one by calling us toll-free
at the GEAnswer Cente_ _800.626.2000.
Connecttoagrounded
metal, permanent wiring
system; or mn an equipment-
g-rounding- conductor with
tile drcuit Colldllctors and
connect to tile equipment-
gTounding terminal or lead
of ttle appliance.
, hnproper comlection of tile
equipment-grounding
conductor call result ill a risk
of electric shock. Check with
a qualilied electrician or
selvice representative ityou
are in doubt whether the
appliance is properly
gTounded.
I)ispose of discarded
applian(es and shipping or
packing material properly.
Do notattempt to repair or
replace any part of}our
dishwasher unless it is
specificall} recommended in
this manual. All other
To minimize ttle possibility ot
electric shock, dis(onnect
power supply betore
. temptin ..,m.,.enan e
NOTE:Turning ttle
dishwasher oil"does not
disconnect tile appliance
fl'om the power suppl}. _,te
recommend having a
qualified technician service
}our appliance.
5
iMPORTANTSAFETYiNFORMAtiON.
READALLiNSTRUCtiONSBEFOREUSING.
O0NOT...
Do not tanlper with (:ontrols.
Do not abuse, sit on, or stand
on tile door OFdish rack of
the dishwasher.
Do not allow (:hildren to play
inside, on or with this
appliance or any discarded
appliance.
Do not discard a dishwasher
without first removing tile
door of the washing
COlllpar tlllen[.
Do not store or use
combustible materials,
gasoline or other tlammable
vapors and liquids ill the
vicinity of this or ally other
appliance.
WHENUSINGYOURDISHWASHER
Use only powder, tabs or
liquid detergents or wetting
agents recommended tar use
in a dishwasher and keep
them out oi tile reach of
children. Cascade
Automatic I)ishwashing
Detergent has been approved
tar use in all GE dishwashers.
l,ocate sharp items so that
they are not likely to damage
the door seal.
l_oad sharp knives with the
handles up to reduce tile risk
of cut-type injuries.
Do not wash plastic items
unless marked dishwasher
safeor the equivalent. For
plastic items not so marked,
check the lllalltl[acttlrer's
recoml-nendations.
, Non-l)ishware hems: Do not
wash items SllCh aSelectronic
air cleaner fihers, turnace
filters and paint brushes in
}our dislmasher. Damage to
dishwasher and discoloration
or staining of dishwasher
may result.
I)o not tou(h tile heating
element during, or
milled atelv alker llse.
Do not operate your
dishwasher unless all
enclosure panels are properly
in place.
, Close supervision is necessa_ T
if this appliance is used by or
near children.
, lxmd light plastic items so
they will not become
isl ) t " n r
d"' (dged a d d op to tile
bottom of the dislra_asher -
they might come into contact
with the heating element and
be damaged.
Readandfollow this
SafetyInformation carefully.
SAVETHESEINSTRUCTIONS
l//lill!li
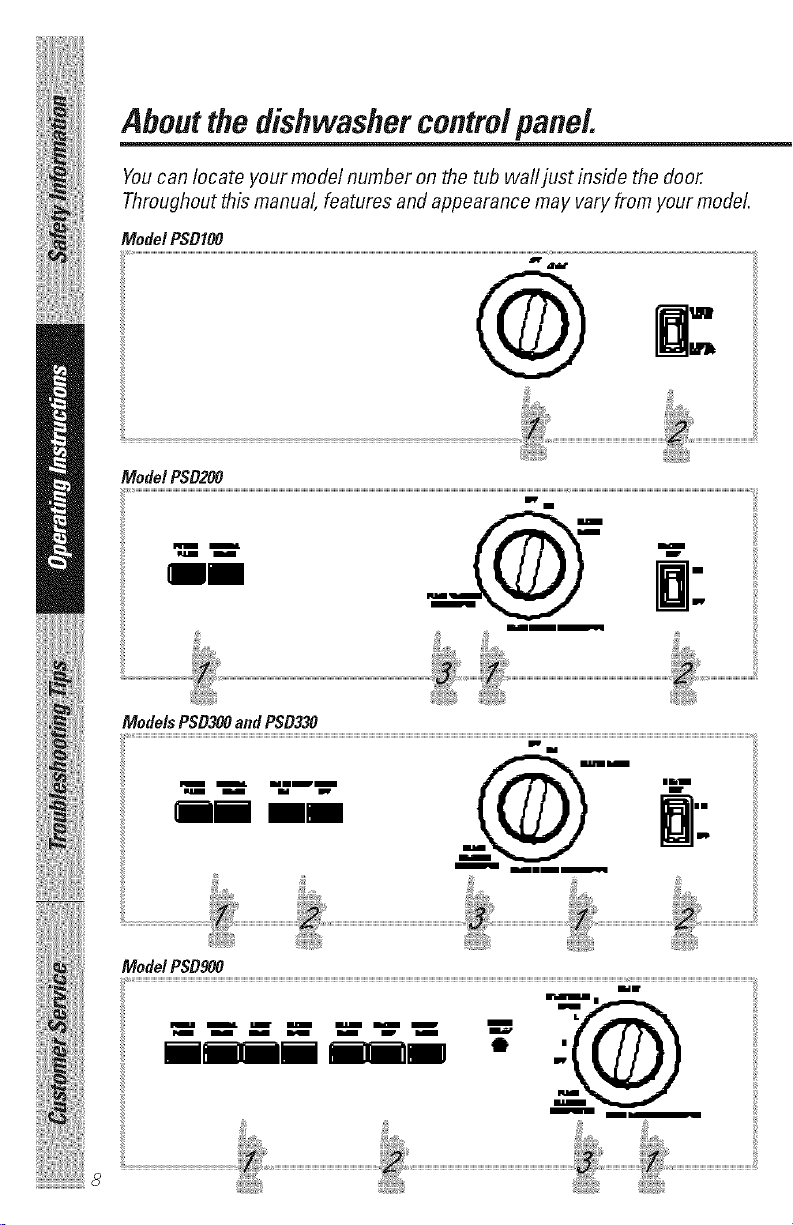
Aboutthedishwashercontrol panel.
Youcan locate your model number on the tub wall just inside the door.
Throughout this manual, features andappearance may vary from your model.
ModelPSDIO0
ModelsPSB300andPSB330
M M
ibm Bmlm
Mode!PSB900

ControlSettings
Cycles
POTS& PANS Forheavilysoileddisbesorcookwarewith dried-on
or baked-onsoils.Everydaydishesmaybeincluded.
Tbiscyclewiii not removeburned-onfoods.
NORMALWASH Forloadsof everydaydishes,glassesandcookware
with mediumsoils.NOTE:Manydishesbaveiigbter
soil thannormal.Choosingacycleotherthan
NORMALWASH will saveenergyandwater.
LIGHTWASH/ Fordisheswith ligbt soils.
WATERSAVER
RINSE& HOLD Forrinsingpartial loadstbat will bevvasbedlater.
Donotusedetergent
PLATEWARMER Forwarming cleandishesandservingplates.Tbis
cyclewill takeapproximately32minutes.
, Make sure the Dial ix at the OFFposition.
1Jatch the door.
Options
WASH TEMP Providesextra heatfor bestperformance,it isused
BOOSTON/ bestwitb beavdy-soileddisbes.
HEATEDWASH
WASH TEMP TurnsWASH TEMPBOOSToff.
BOOST OFF
HEATEDDRY Turnsthedryingbeateronforfast drying.Tbiscycle
ON/HEATED will extendtbetime to yourwashcycle.
DRY
HEATEDDRY Sbutsoff tbedryingheatoption.Dishesairdry
OFF naturallyandenergyissaved.
ENERGYSAVER Turnsall Optionsoff.
Start
Slowly mrn the Dial to the STARTorONposition. Don't
turn it past the STARTor ON position, or you could
accidentally miss a rinse. There is a time delay between
start-up and water fill so you will not hear anv wash
action right away.
ii!iiYi:iii/ii iiiliiiii!:!:!JHii
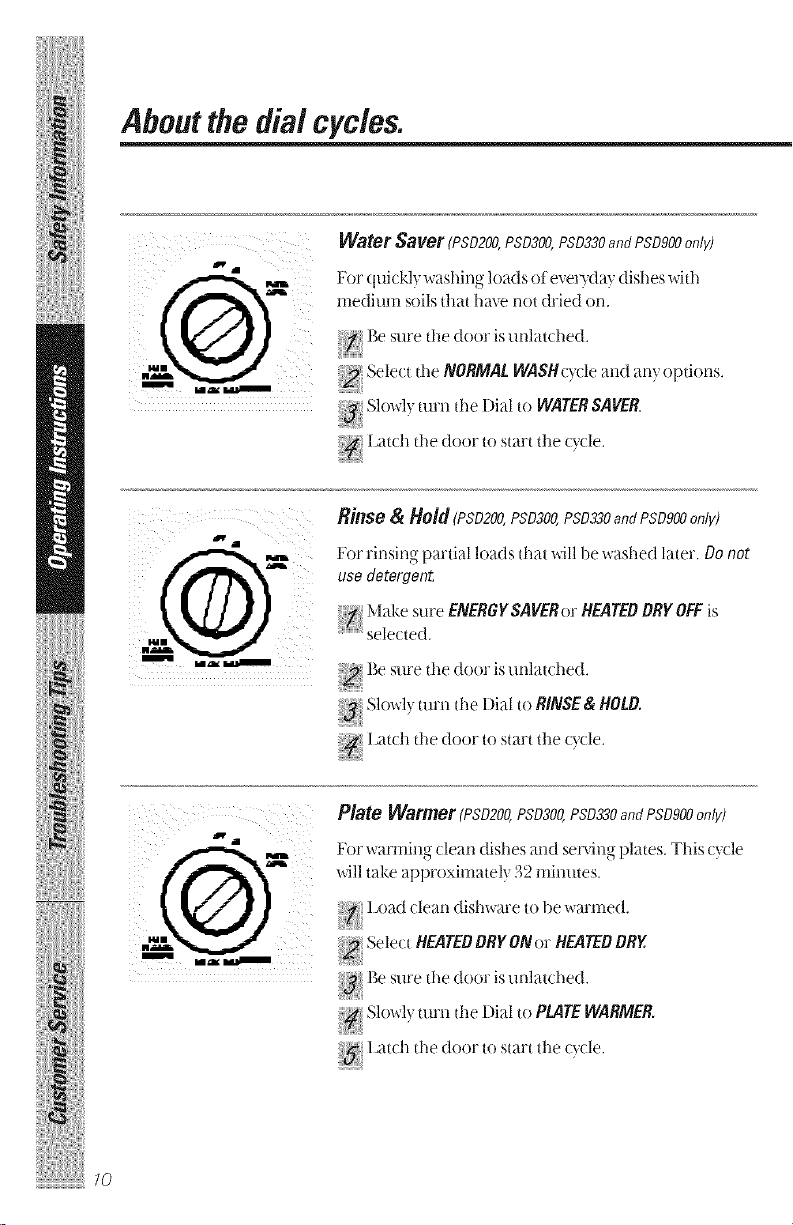
Aboutthe dial cycles.
WaterSaver_Pso2oo,PSD300,PSD330an_PSDgO0only)
oe
,.,,,, l_or qui( klv washirzg loads of everyday dishes with
(_[_ I]ledl[li]_l _°llfg th_[t l]_[ve l_l()t dl'led (}1_1"
_,,_h._ Select the NORMALWASHc? cle and any options.
}_ SIo'M?,turn the Dial to WATERSAVER.
:{{
{i_ l_atch the door to start the cycle
{:
Rinse _ Hold (PSD200,PSD300,PSD330andPSDgO0only)
For rinsing partial loads that will be',_ashed later, Do not
use detergent
Make sure ENERGY SAVERor HEATED DRY OFF is
_ sele(ted.
_? Be sure the door is unlatched
to RINSE & HOLD.
Latd_ the door to start the (y(le.
Plate Warmer(PSD200,PSD300,PSD330andPSD900only)
For _ arming clean dishes and serving plates. This c}cle
_11 take approximately 32 mimltes.
l_oad clean dishware to be warmed.
,/
Select HEATEDDRYONor HEATEDDRY.
l_ sure the door is unlatched
r:
to PLATEWARMER.
l_atch the door to start the cycle
10
!iiiI
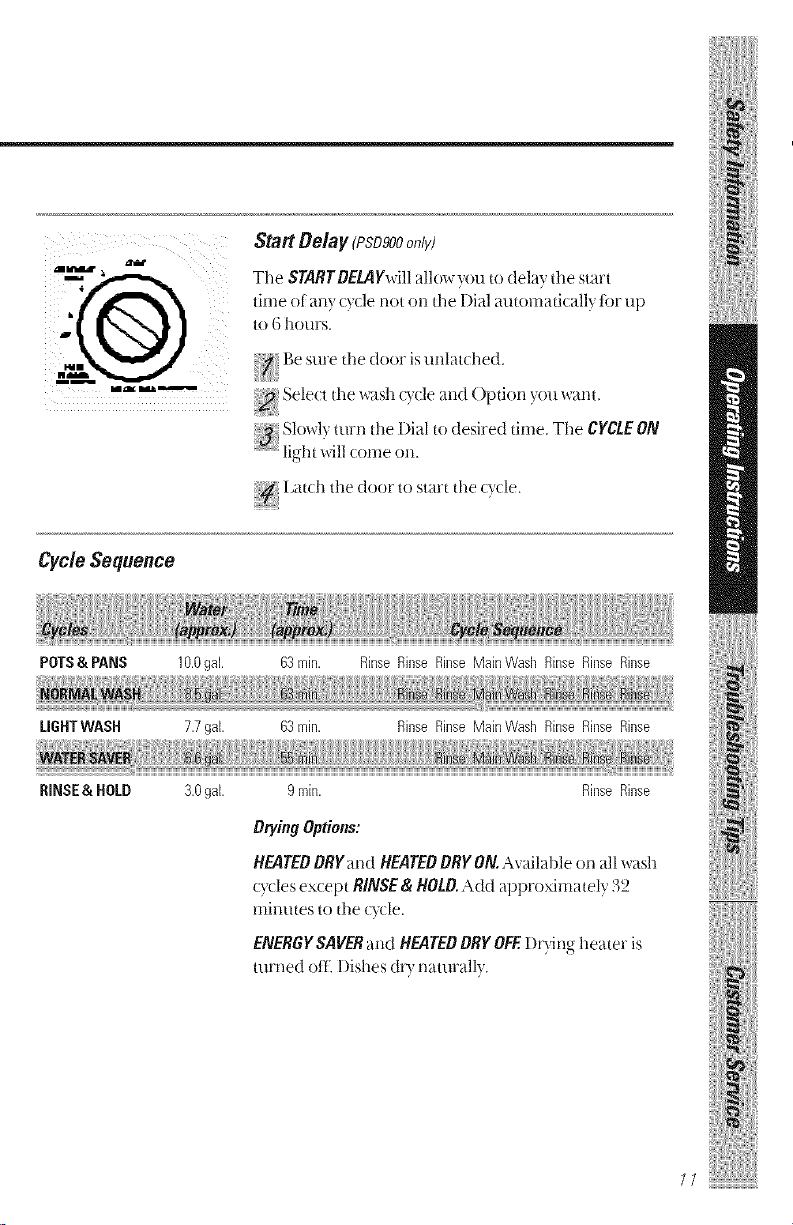
StartDelay (PSD900only)
The STARTBELAY_d]I allow you to delay the start
time of_my cyde not on the l)i_tl antomaticall) for tip
to 6 hours.
{ Be sure the door is unlatched.
Sele(t the wash c_cle and ( )ption "_on',_ant.
Slo'My turn the Dial to desired time. The CYCLEON
light will come o11.
l_atd_ the door to start the cycle
Cyc/eSequence
POTS&PANS lO.Ogal. 63min. RinseRinseRinseMainWasll RinseRinseRinse
LIGHTWASH 7.7gal. 63rain.
RinseRinseMainWash RinseRinseRinse
RINSE& HOLD 3.0gal. 9 rain. RinseRinse
Drying Options:
HEATEDDRYand HEATEDDRYON.Available on all wash
cycles except RINSE&HOLD.Add approximately 32
minutes to the cycle.
ENERGYSAVERand HEATEDDRYOFF.l)o'ing heater is
turned o111Dishes (It'7,'naturally.
ii!iiYiiiii/ii iiiliiiii!!!JHii
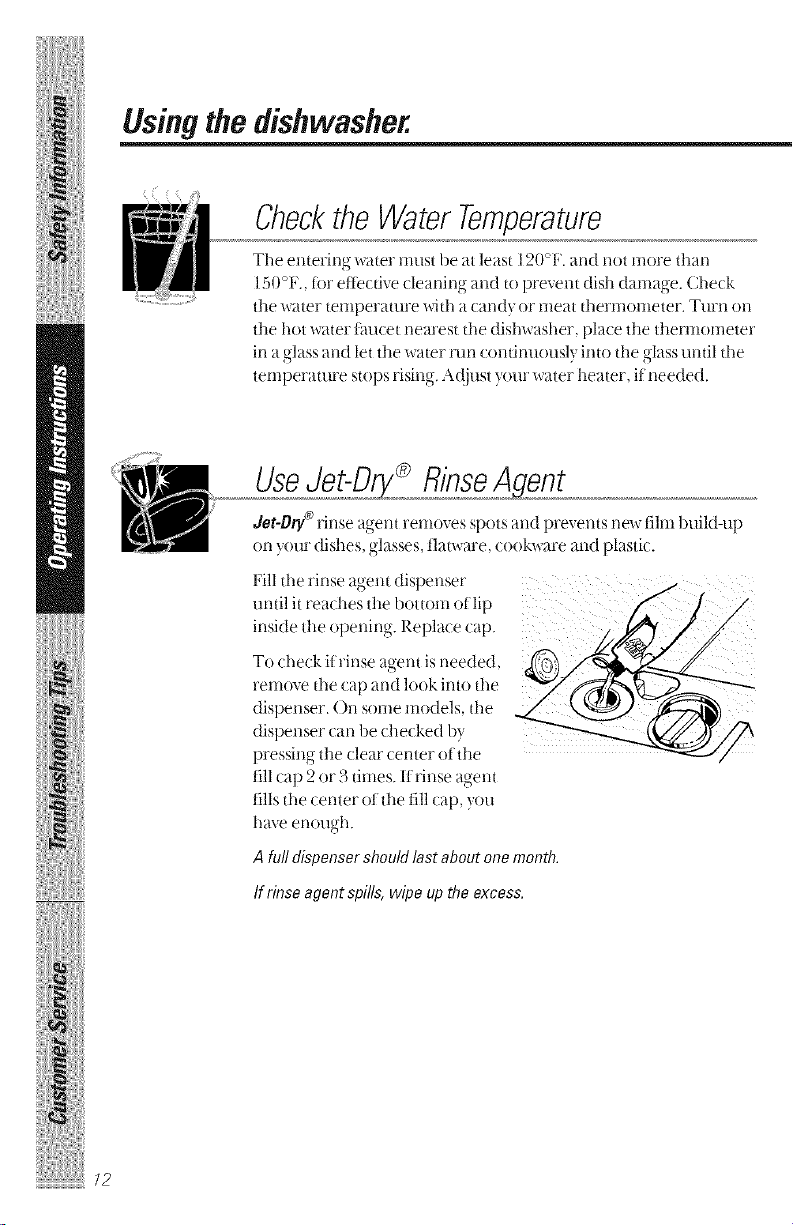
Usingthe dishwasher.
Checkthe WaterTemperature
The entering water must be at least 12()°F. and not more than
150°F., for effective cleaning and to prevent dish damage. Check
the water telllpel"atllre with a can(l} or llleat therlllonleter. TtllTil(111
the hot water thucet nearest the dislmasher, place the thermonleter
in _l s
• ag a:s and let the water mn continuousl} into tile glass until tile
temperature stops rising. A(!just }'()Ill"water heater, if needed.
Jet-Dp/®rinse agent removes spots and prevents ne_ film buiM-up
. l son your dishes g a 'ses tlat_are cook_are and plastic.
Fill the rinse agent dispenser
until itreaches tile bot_onl of lip
inside the opening. Replace cap.
To check it'rinse agent is needed,
remove tile cap and look into tile
dispenser. ()n some models, the
dispenser (:an be checked )v
pressing the clear (:enter of the
fill cap 2 or 3 times. If rinse agent
fills the center (11"thet511cap, you
have enough.
Afull dispensershouldlast aboutonemonth.
If rinse agent spills, wipe up the excess.
/2
ProperUseof Detergent
Else only detergent spedfirally made for use in dishwashers. ( ascade >
Automatic Dishwashing I)etergem has been approved tar use ill all (;t,2
dishwashers. Keep your detel\gent Fesh and (ll)'. I)on't put powder
detel\gent into the dispenser until you're ready to wash dishes.
The amount of detergent to use depends on whether your water is
hard or soft. With hard water, you need extra detergent. With salt
water. }Oil need less detergent.
Prote(t your dishes and dishwasher b} contacting your uater
department and asking how hard ",our water is Twelve or more _,rains
is extremely hard water. A water softener is recommended. Without
it, lime (;an build up in the water valve, which could stick while open
and cause flooding. Too mu(h detergent with soft water call cau_ a
permanent cloudiness of g-lassv,_lre,called etching.
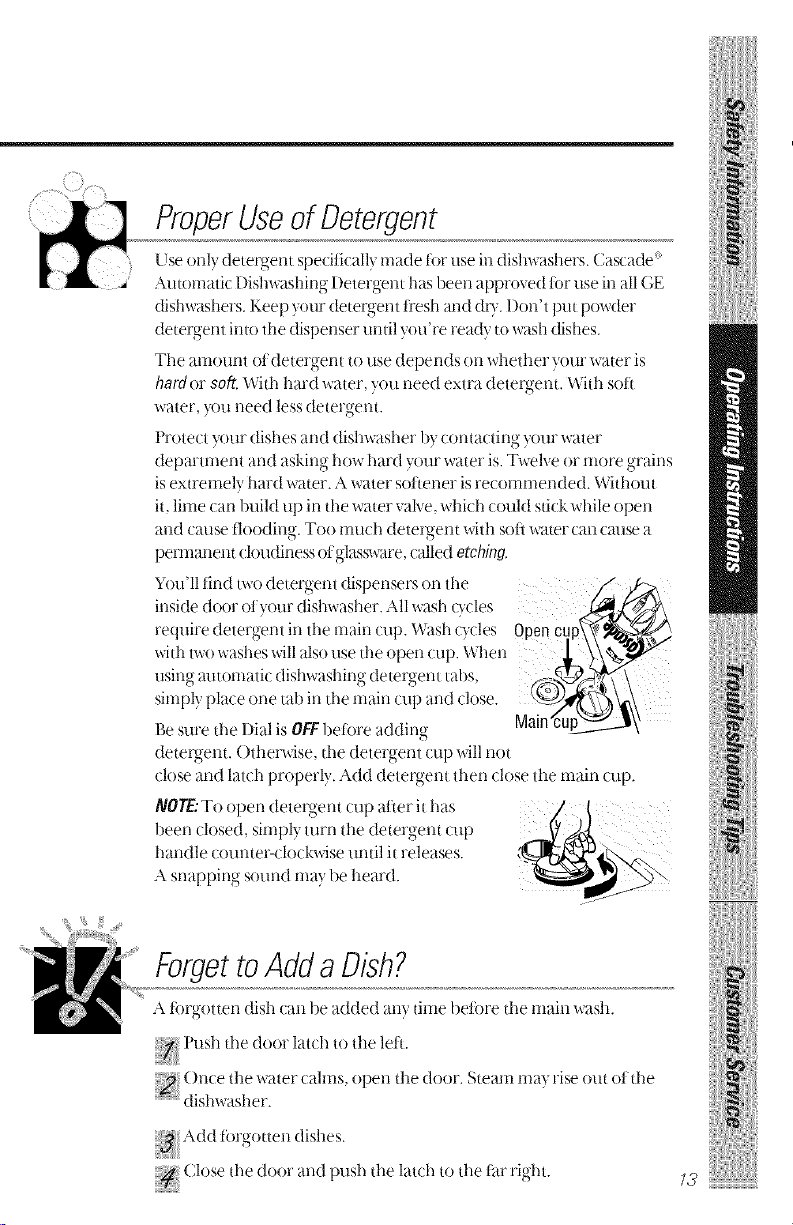
You'll find two detergent dispensers on tile /,_
.ls dedoor ou,"d sh,,asherAllwash, ,cles
require detergent in the main cup. Wash cycles 0pen € !P
with two _sashes will also use the open cup. When L \\%._"°_l>"
using automatic dishwashing detergent tahs,
4
simply place one tah in the main cup and close. _u
Main/cl
ge sure the Dial is OFF1)efk_readding
deteNent. ()therwise, the detergent cup will not
close and latch properly. Add deteNent then close the main cup.
NOlO:To open detergent cup alker it has /.{
been closed, simply turn the detergent cup
handle counter-clockwise until it releases.
A snapping sotmd may be heard.
ForgettoAdd a Dish?
A forgotterl dish can be added any time beiore tile main uash.
()nce the uater cahns, open the door. Steam may rise out of tile
::: dishwasher.
Close tile door and push ttle latch to ttle tiu"right.
ii!iiYi:iii/ii iiiliiiii!!:!JHii
Loadingthedishwasherracks.
For best dishwashing results, fellow these loading guidelines. Features and
appearance of racks and silverware baskets may vary from your model.
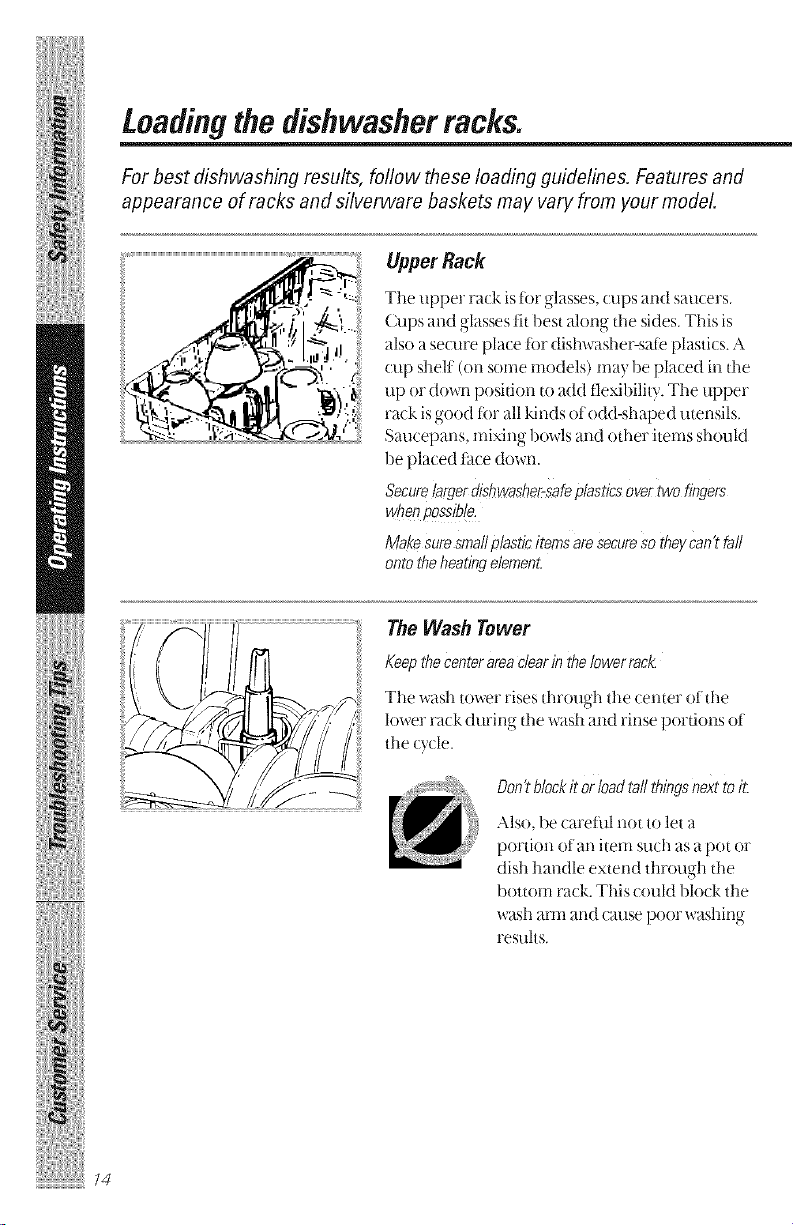
UpperRack
The upper rack is tor glasses, cups and saucers.
Cups and glasses fit best along the sides. This is
also ase_lre place for dishwasher-sate plastics. A
cup shell (on some models) may be placed in tile
up or down position to add tlexibility. The upper
I kl _) ) "
"ac "sgo( d for all kinds ot odd-shaped utensils.
Saucepans, mixing bowls and other items should
be placed lhce down.
Securelargerdishwasher-safeplasticsovertwo fingers
whenpossible.
Makesuresmafiplasticitemsaresecuresotheycan'tfall
ontotheheatingelement.
i The Wash Tower
f_/f-_._/l/_,j_._ Keepthecenterareaclearir_thel°werrack-
Tile wash tower rises throtlgh the cellter of tile
((/ll&_g/j.//,/ lower rack during tile wash and rinse portions of
the cycle.
// _._ Oon'tblockitorloa</tallthingsnexttoit
Also, be caretill not to let a
portion oiail item Stlch as a pot or
dish handle extend through tile
bottom rack. This could block the
x_ash alTtl aild Catlse poor',_ ashiilg
results.
14
',7" i>
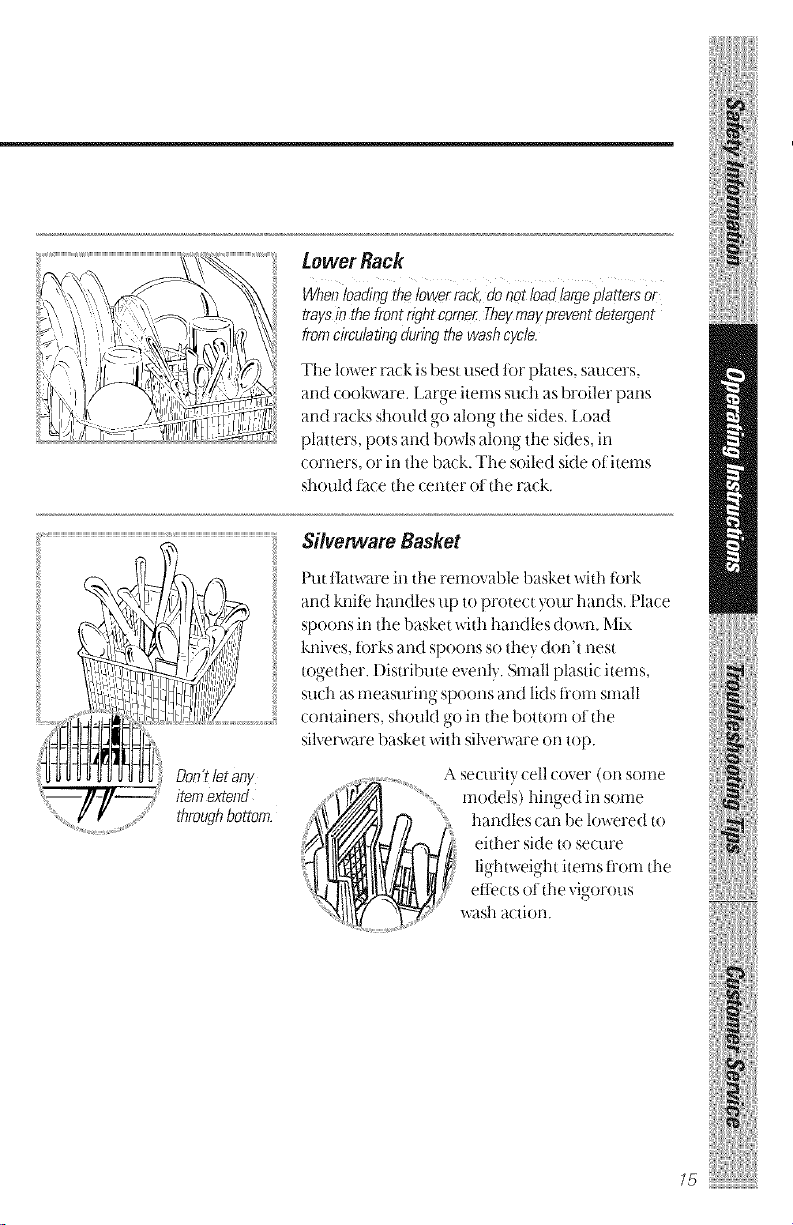
Lower Rack
whenloadingthelowerrack,do_otloM largepia_ersO}
traysin thefrontrightcomerTheymaypmventdetergent
fromcirculatingduringthewashcych.
The lower rack is best used for plates, saucers.
and cool,:ware,l_arge itei-nsStlch as broiler pans
and racks should go along the sides. [.oad
platters, pots and bowls along the sides, in
corners, or in the back. The soiled side of items
should fa(e tim center of the racl.:.
If: Don'tletany
itemextend
throughbottom.
Silverware Basket
_qlt tlatware in the removable basket Mtb tork
and kniie handles up to protect your bands. Place
spoons in the basket with handles down. Mix
knives, torks and spoons so they don't nest
together. Disuibute eve _ly.Small plastic items,
such as measuring spoons and lids fi'om small
containers, should go in the bottom of the
silverware basket with silverware on top.
...........A security cell cover (on sortie
model;>h:ngedinsome
wash action.
ii!iiYiiii/ii iiiliiiii!!!JHii
Changingcolorpanels.
If you are redecorating, you can change your dishwasher's front
panel to match or blend with your new colors by flipping # over.
Each side of each panel is a different color. Youmay also paint a
panel with a color of your own choice.
_, WARNING!
Wear gloves when handling door panels. Failure to do so can
cause serious cuts.
Donot operate dishwasher while changing panels.
_-J •
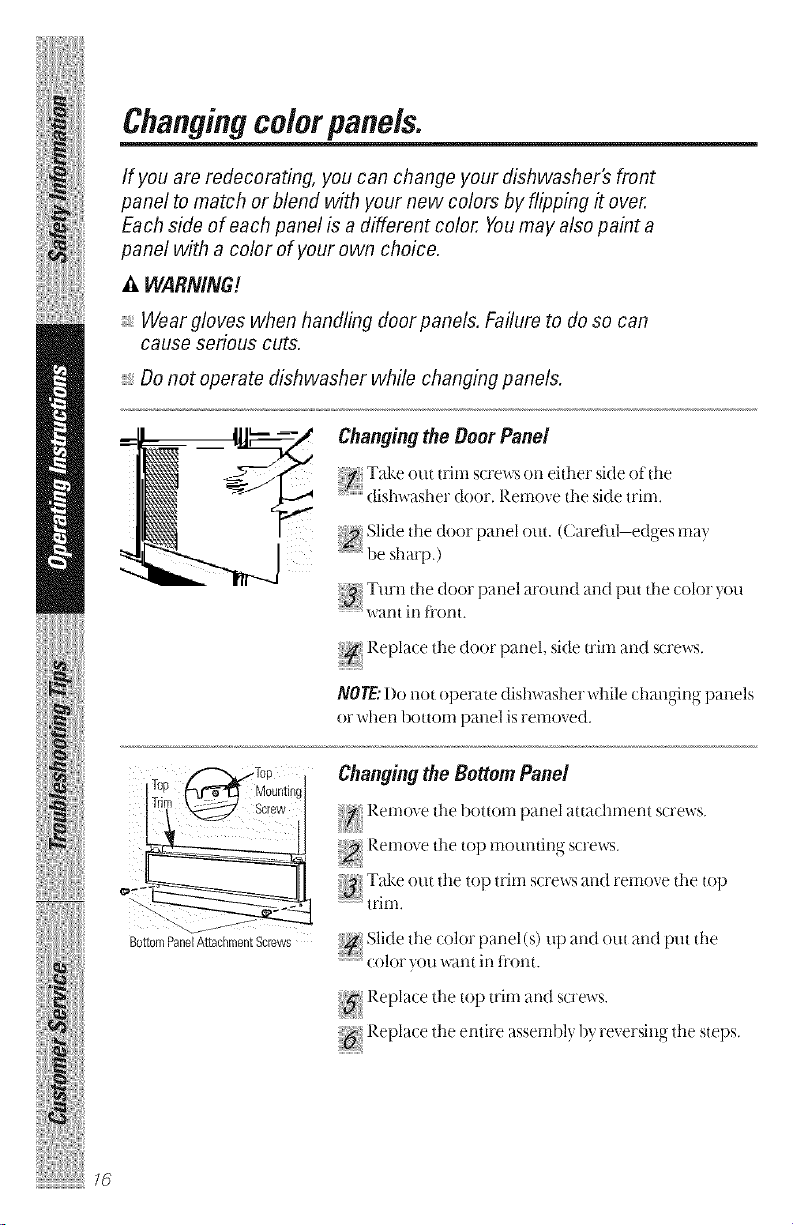
ChangingtheDoor Panel
Take out trim s(rex_s on either side of ttle
dishx_asher door. Remove tile side trim.
Slide tile door panel ()tit. (Careful-edges may
be sharp.)
Turn tile door panel around and put tile color }on
_A_ln [ in t['()n [.
Replace tile door panel side u"m a ill screws
NOTE:I)o not operate dish_ asher Mille changing panels
or when bott()m panel is removed.
/,_'N/Tep
ITr_p &_ Moantiec
_""_....,_
BottomPanelAttachmentScrews
ChangingtheBottomPanel
]_,enl()ve tile bottom p_tnel att_t(hment s(re'a s
top inollnting screws.
top trim screws and remove tile top
Slide tile color panel(s) up and out and put tile
(olor VO[l wilnt in tl"ont.
Replace tile top trim and scre_ s.
Replace tile entire assemI)lv )'_revers lg tile steps
16

Cut-OutOrderFormforPSD300andPSDgO0
Kyou have redecorated and the colorpanelsin your dishwasher do
not blend ",_th y!)ur new color scheme you may order an additional
color panel without charge.
Specify the colorpane!when ordering
[] GPF24White!Almond
[] GPF26Harvest!Black
Fold Here
E)
Nalne:
Address:.
City:
State:
Model No.:.
Serial No.:
ZipCode:
Date Purchased:
Use tape, not staple / 7
Nal-ne:
Address:
City, State:
Zip:
,q
c/o
4701
1[.oll
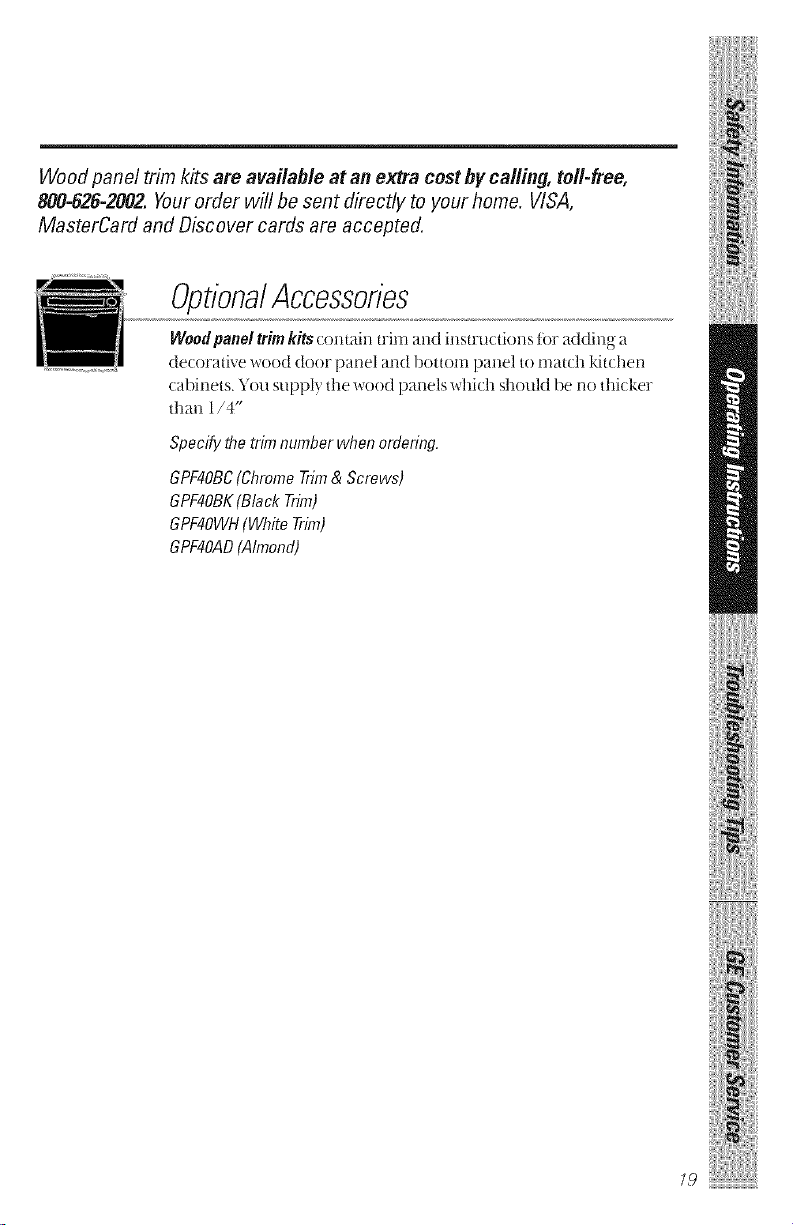
Wood panel trim/<its are available at an extra cost by calling, toll-free,
800-828-2002.Yourorder will be sent directly to your home. VISA,
MasterCard and Discover cards are accepted.
OpfionalAccessories
Wood paneltrimkits cont_dn trhn and instructions i_)l"adding a
decorative wood door Dane] and l/ottolr_ ])Rile] t() IlI}tt(]l kitdlen
cabinets. You supply the wood panels which should be no thicker
than 1/4"
Specify the trim number when ordering.
GPF4OBC(ChromeTrim& Screws)
GPF4OBK(BINck Trim)
GPF4OWH(WhiteTrim)
GPF4OAD(Almond)
/9

ii!iiYiiiii/ii iiiliiiii!!:!JHii
Caringforthedishwasher.
Toclean the control panel use a lightly dampened cloth then dry
thoroughly. Toclean the exterior use a good appliance polish wax.
Never use sharp objects, scouring pads or harsh cleaners on any
part of the dishwasher.
Protect against freezing
II your dishw_sher is lel_ in an unheated place during
the winter, ask a service teclmicim_ to:
f Cut otl electrical power to the dishwasher. Remove
liases or trip circuit breaker.
Sur _c_ _rscrews 2 Turn otl the water supply and disconnect the water
inlet line li'om tile ware)" vMve.
37 l)rain water ti'om the inlet line i))1(1water valve.
" (Use a pan to catch the water.)
Reconnect the water inlet line to the water valve.
Remove the plastic sump cover in the mb
1)ottom _md use a sponge to soak up water in the
rubber boot.
Two_ypesof F .;,N'., II Ill
ChecktheairgapanyNz_eyour
dishwasherisn'tdrafi_ingwell.
Does your dishwasher have an air gap?
An air gap protects your dislmasher against _ater
bacldng up into it it a drain clogs. The air gap is not a
part of the dishwasher. It is not covered by your
warranty. Not all plumbing (:()des require air gaps, so
}1)11 may II()t have (tile.
The air gap h; easy to clean.
Turn off ttle dishwasher and lift off'ttle chrome
(:over.
Unscre_ tile plasti( cap and clean with a toothpi(k.
_0
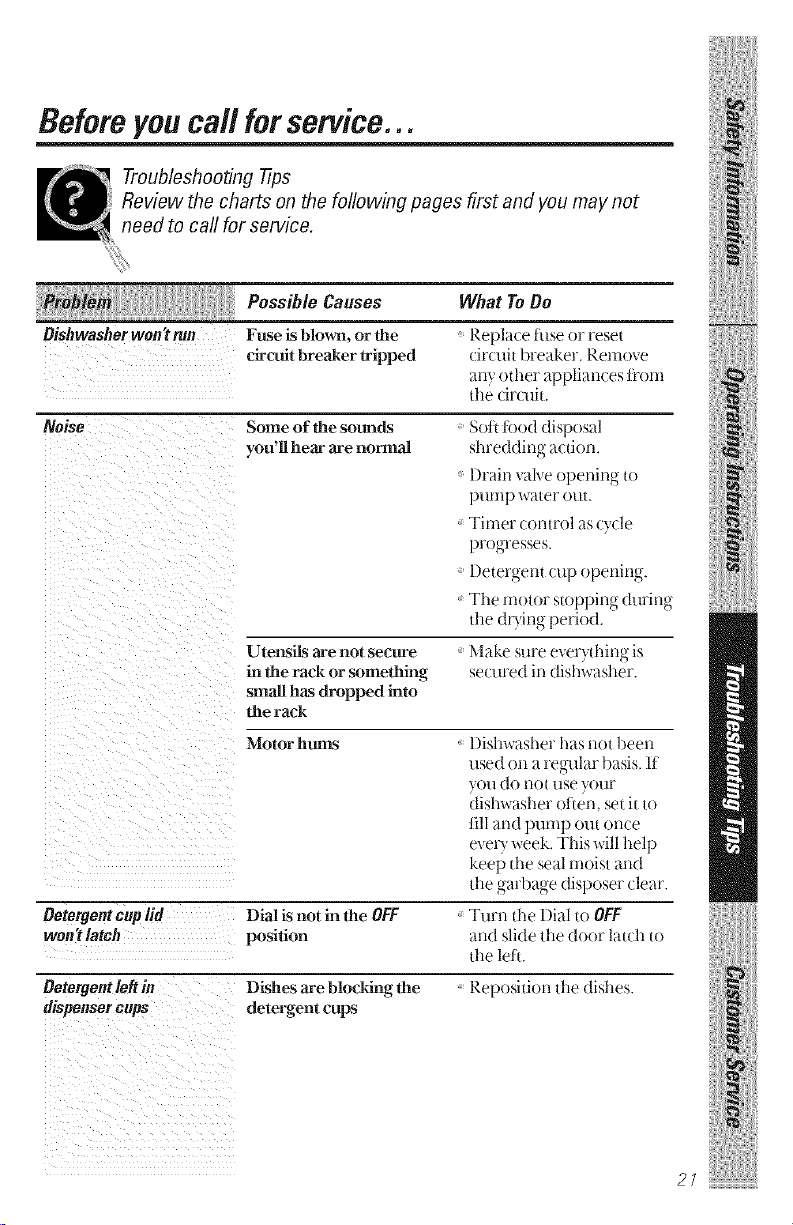
Beforeyoucall forservice...
Troubleshooting -tips
Review the charts on the following pages first and you may not
need to ca//for service.
Possib/e Causes What To Do
Dishwasher won't mn Fttse is blown, or the
ch'cuit breaker tripped
Noise Some of the sounds
you'll hear are normal
Replace tklse or reset
circuit breaker. Remove
any other appliances lmm
the cir(afit.
Soi_ iood disposal
shredding acdon.
l)rain valve opening to
pump water out.
Timer conu'ol as cycle
progresses.
Detergent cup opening.
The motor stopping during
the drying period.
Utensils are nol secure
in the rack or something
small has dropped into
the rack
Make sure evel)_thing is
secured in dislm asher.
l)ishwasher has not been
used on a regaflar basis. If
you do not use your
dishwasher olten, set it to
lill and pump out once
evel T week. This will help
keep tl_e seal moist and
the garbage disposer clear.
Oetetrjent cup lid Dial is not in the OFF Turn the Dial to OFF
won't latch position alld slide the do_r lard1 to
the lelL
Oetorgentle#in Dishes are blocking the Reposidon the dishes.
dispensercups detergent cups
Motor hums
27
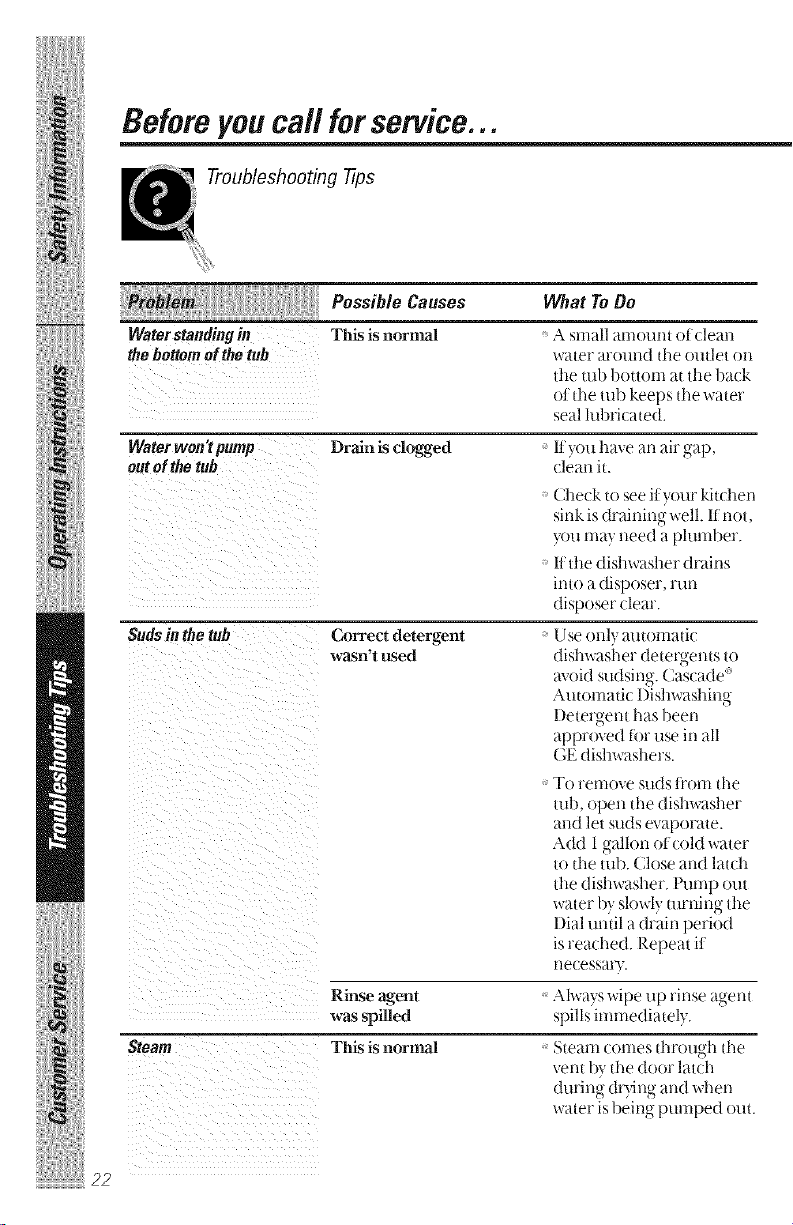
Beforeyoucall forservice...
Troubleshooting -tips
Possible Causes What ToDo
This is normal A small amount ot dean
water arOtllld tile Otltlet Oil
the mb bottom at the back
of the tub keeps the water
seal lubricated.
Drain is clogged ff)ou have an air _t"a)
clean it.
Waterstandingin
thebottomof thetub
Waterwon'tpump
outofthetub
Sudsin thetub
Correct detergent
wasn't used
Steam
Rinse agent
was spilled
This is normal
Check to see it your kitchen
sink is draining-well. If
not,
yt_umay need a pluml)er.
II the dishwasher drains
into a disposer, run
disposer clear.
Use only automatic
dishwasher deter\gents to
m_oid sudsing. Cascade:
Automatic Dishwashing
I)etergent has been
approved lor use in all
(;E dishwashers.
To remove suds fl'om tile
tub, open tile dishwasher
and let suds evaporate.
Add 1 gallon of cold water
to the rob. (;lose and latch
the dishwasher. Pump out
water by slowly turning the
Dial until a drain period
is reached. Repeat if
necessal3-.
Always wipe up rinse agent
spills immediatel?.
Steam comes through tile
veto by tile door latch
during (ha_ng and when
_ ater is being pumped OUt.
72
Possible Causes What To Do
Stained tub interior Detergent with
colorant was used
Some detergents contain
colorant (pigment or dyes)
that will discolor the mb
interior with extended use.
(heck the detergent cup
lot signs ot any
discoloration. If cup is
dis(olored, change to
detergent without any
colorant. Cascade _
Automatic Dislra,aslfing
I) *? lere "geat has been
approved tor use in all
GE dishwashers.
Dishes don't dry
Dishesandflatware
notclean
Some tomato,based
foods can stain
Low inlet water
temperature
Riuse agent dispenser
is empty
Inlet water temperature
is below 120°F.
Water pressure is
temporm'ily low
Ak gap is clogged
Improper rack loadi_g
Use of the R/NSE&HOLD
cycle (on some models)
alter adding the dish to the
load can decrease the level
oi stainin ,
Make sure inlet water
temperature is correct.
Check the rinse agent
dispenser.
Raise the water beater
temperature to 120°F.
Tllrll Oil a l_tllcet. [s water
coming OIlt iIlore slowly
than usual? It so, wait until
pressure is normal befi)re
using your dislr,_asher.
(;lean the air gap.
Make sure lane dishware
does not block the
deteNent dispenser or the
wash arl'n.
23
Beforeyoucall forservice...
Troubleshooting -tips
Spotsandfilming
onglassesand
flatware
Possible Causes
Extremely hard water
Low inlet water
temperatm'e
Overloading the
di_lwasher
hnproper loadhlg
Old or damp powder
detergent
Rh_se agent dispenser
empty
Too little detergent
What ToBe
tlse Jet-Dry® rinse agent to
reulove spots and prevent
new film buildalp.
To remove Sttlbl)orll spots
and pre-existing flhn lmm
glassware:
I Remove all metal utensils
fl'om the dishwasher.
2 I)o not add detergent.
3 Select tile longest (ycle.
4 Start the disliwasher and
allow to run tot lS to 22
minutes. I)ishwasher will
now be in tile main _ash.
5 Open the door and pour
2 cups (500 ml) of white
vinegar into the bottom of
the dishwasher.
Cloudinesson
glassware
Combination of soft
water and too much
detergent
6 Close tile door and allow
to complete tile cycle.
If vinegar rinse doesn't
work: Repeat as above,
except use l/4 (!ip (60ml)
of ciu'ic acid (:i)-stals
instead of vinegar.
This is called etching and
is permanent. To prevent
this fl'om happening, nse
less detergent if you have
solt water. Wash glassware
in the shortest (ycle that
will get them clean.
Water temperature Ix)wer the water heater
enteril ,Nthe dishwasher temperature.
exceeds 150°F.
Black or gray
marksondishes
Aluminmn utensils have
rubbed against dishes
Remove marks with a mild,
abrasive (leaner.
;4
Ve//oworbrownfi/m
ontub
PosMh/e Causes What ToOo
Tea or coffee stains
Remove the stain by hand,
using a solution of i/2 cup
bleach and 3 cups warm
water.
_, WARMNll
gefore cleaning interior,
wait at least 20 minutes
_dter a Q-cle for the
heating element to cool
down. l:aihlre to do so can
result in burns.
Whitefi/monhlsido
sutfacos
An overall yellow or
brown fihn can be caused
by iron deposits h_water
Hard water minerals
A special filter in the water
supply line is the only way
to correct this problem.
( ontact awater soltener
company.
To clean the interior, apply
dishwasher detergent to a
damp sponge. Wear
rubber gloves. Donotnse
any type of cleanser other
than dish_-asher detergent
because it illay cause
foaming or sudsin ,
, o"
Cascade Automatic
I)ishwashing ]Detergent has
been approved tbr use in
all (;E dishwashers.
25
Notes
_6
RCADishwasher Warranty
All warranty service provided by our Factory Service Centers,
or an authorized Customer Care®technician. Forservice,
call 800-GE-CARES.
One Year
Fromthe dateOfthe
originalpurchase
Ten Years
From the date of the
original purchase
We Will Replace:
Pnypart ot the dishwasher whidl tails doe to a detect in
materials or workmanship, l)uring this full one-year
warrenff, we will also provide, free of charge, all labor,
and in-home service to replace the delective part.
The tub or door liner, ii it t)ils to (:ontain water due to a
dete(:t in materials or workmanship such as cracking,
(hipping. peeling or rusting. I)uring this full ten-year
warrenff, we will also provide, free of charge, all labor,
and in-home service to repla(e the delective part.
Service trips to your home to teach you
how to use the product.
_ Improper installation.
Replacement of house fuses or
resetting of circuit breakers.
Failure of the product if it is
abused, misused, or used for other
than the intended purpose or used
conunercially.
Damage to the product caused by
accident, fire, floods or acts of God.
Incidental or consequential damage to
personal property caused by possible
defects with this appliance.
CAeani_Nor servicing of the airgap
device in the ch'ainlh_e.
fl_is warranty is extended to theorigbal purchaserand anysucceeding owner for productspurchased
for home use within the USA, InAlaska, the warrantyexcludes the costof shipping or se_/icecalls to
yourhome,
Some statesdo notallow theexclusionor limitation of bcidental or consequential damages.This
warrantygives you specific legal rights, andyou may alsohave other rights which varyfrom state to
state. Toknow what your legalrights are, consult yourlocal or state consumeraffairs office or your
state'sAttorney General.
27
ServiceTelephoneNumbers.
In-HomeRepairService800-GE-CARES(800-M2-2737)
Expert GE repair sepA(e s only a p _o m call m_ay.
i[ ii
SpecialNeedsServiceeoo.626.2ooo
TDD800-TDD-GEAC(800-833-43221
Consumers ",_ith impaired hearing or speech who have access to a
TDD or a conventional teletypewriter ma) call to request
information or se_'vi( e.
ServiceContracts800-626-2224
Purchase a GE sel_ice contract while your warranty is still in effect
and you'll receive a substantial disc(rant. GE Consumer Se_x_ice will
still be there alker your warranty expires.
28
PartsandAccessories800-626-2002
Individuals qualified to sel_-ice their own appliances can have parts
or ac(essories sent directly to their homes (VISA, MasterCard and
I)iscover cards are accepted}.
Instructionscontained in thismanua/coverprocedurestoheperformed
byanyuser.Otherservicinggenerallyshouldhe referredtoqualified
servicepersonnelCautionmusthe exercised,since improperservicing
maycauseunsafeoperation.
ServiceSatisfaction
lfyon are not satisfiedwith the sel'viceyou receive, iollow these three
steps. First contact the people who sexwicedyour appliance. Next,if
youare stillnot pleased, write all the details--including your phone
numbe_=to: Manager, Customer Relations, RCA Appliances,
Appliance Park,l.ouisville,KY40225.Finally,ifyour problem isstill
not resolved, _xTite:
M@)rAppliance Consmner Action Program
20North Wacker Drive,Chicago, IL 601;06.
Printedin totuswlle, KY

