Product Manual
Oris SA Ribigasse 1 4434 Hölstein Switzerland oris.ch
10.18 Printed in Germany

Product Manual.
5
English

Adjusting Oris watches to fit the wrist . . . . . . . . 20
Watches with leather straps . . . . . . . . . . . . . . 20
Watches with rubber straps . . . . . . . . . . . . . . . 20
Watches with metal bracelets . . . . . . . . . . . . . 20
Fine adjustment of folding clasps . . . . . . . . . . . 20
Notes . . . . . . . . . . . . . . . . . . . . . . . . . . . . . . . . 22
Accuracy . . . . . . . . . . . . . . . . . . . . . . . . . . . . 22
Chronometer . . . . . . . . . . . . . . . . . . . . . . . . . 22
Water-resistance . . . . . . . . . . . . . . . . . . . . . . . 24
Use and maintenance . . . . . . . . . . . . . . . . . . . 24
Technical information and
summary tables . . . . . . . . . . . . . . . . . . . . . . . . 26
Pictograms . . . . . . . . . . . . . . . . . . . . . . . . . . . 26
Metals for cases and straps . . . . . . . . . . . . . . 27
PVD coatings . . . . . . . . . . . . . . . . . . . . . . . . . 27
Sapphire crystal . . . . . . . . . . . . . . . . . . . . . . . 27
Mineral glass . . . . . . . . . . . . . . . . . . . . . . . . . 28
Plexi glass . . . . . . . . . . . . . . . . . . . . . . . . . . . 28
Luminescent dials and hands . . . . . . . . . . . . . 28
Metal bracelets, leather and rubber straps . . . . 28
Lunar calendar . . . . . . . . . . . . . . . . . . . . . . . . 29
Time zones . . . . . . . . . . . . . . . . . . . . . . . . . . 30
Movements . . . . . . . . . . . . . . . . . . . . . . . . . . 30
International guarantee for Oris watches . . . . . . 32
Proof of ownership . . . . . . . . . . . . . . . . . . . . . . 33
Subject to modifications.
Introduction . . . . . . . . . . . . . . . . . . . . . . . . . . . . 9
Starting Oris watches . . . . . . . . . . . . . . . . . . . . 10
Crown positions . . . . . . . . . . . . . . . . . . . . . . . . 10
Standard crown . . . . . . . . . . . . . . . . . . . . . . . . 10
Screw-down crown . . . . . . . . . . . . . . . . . . . . . . 10
Crown with Oris Quick Lock system (QLC) . . . . . 10
Screw-down pushers . . . . . . . . . . . . . . . . . . . . 10
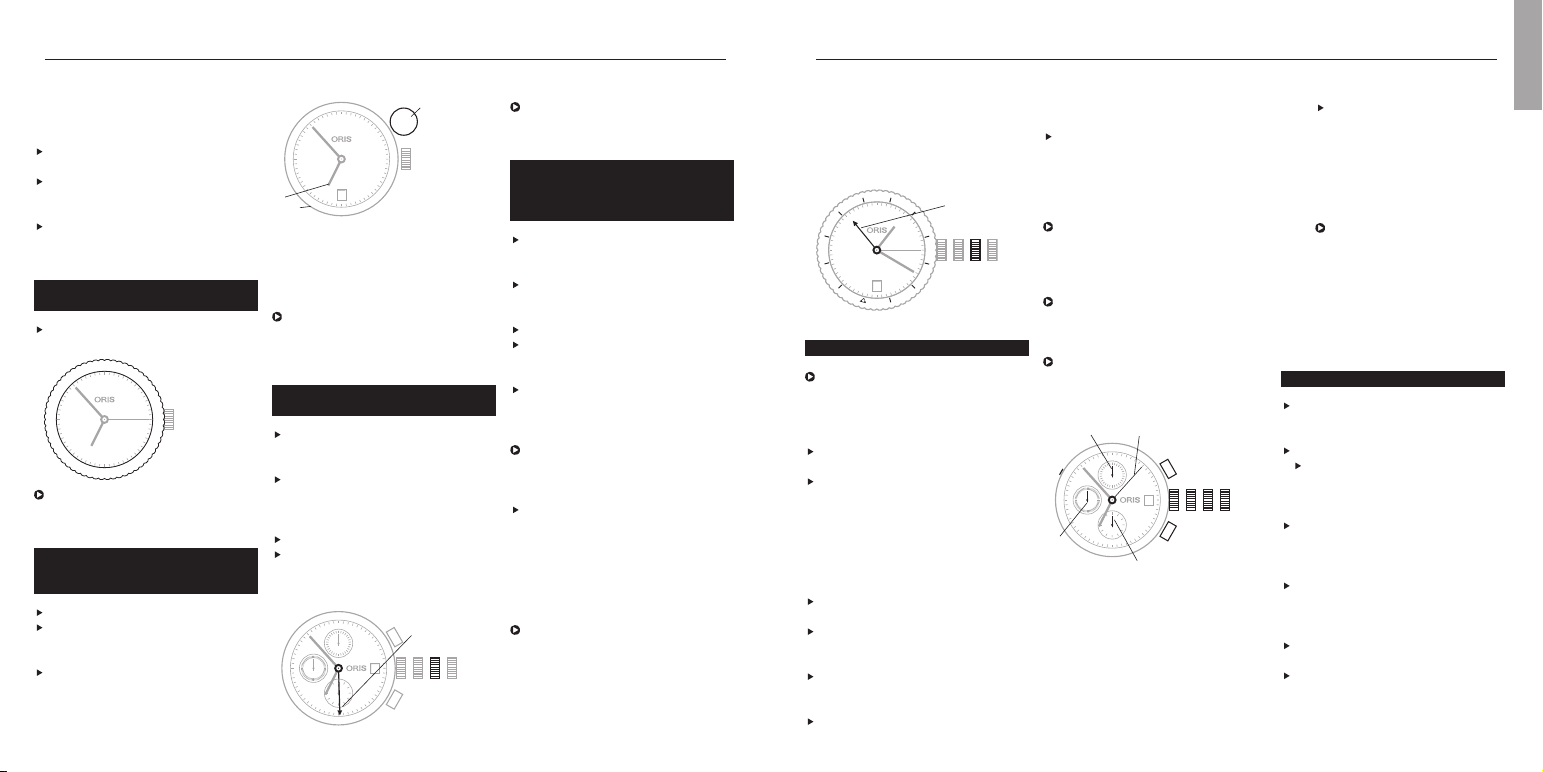
Automatic winding watches . . . . . . . . . . . . . . . 11
Manual winding watches . . . . . . . . . . . . . . . . . 11
Setting and operating Oris watches . . . . . . . . . . 12
Date, day of the week and time . . . . . . . . . . . . 12
Setting the date . . . . . . . . . . . . . . . . . . . . . . . 12
Worldtimer . . . . . . . . . . . . . . . . . . . . . . . . . . . 12
Worldtimer with 3
rd
time zone and compass . . . 13
2
nd
time zone on outer rotating bezel . . . . . . . . 14
2
nd
time zone indicator on inner rotating
bezel with vertical crown . . . . . . . . . . . . . . . . . 14
2
nd
time zone with additional 24 hr hand . . . . . 14
2
nd
time zone with additional 24 hr hand and
city markers on the rotating bezel . . . . . . . . . . 14
Chronograph . . . . . . . . . . . . . . . . . . . . . . . . . 15
Complication . . . . . . . . . . . . . . . . . . . . . . . . . 15
Regulator . . . . . . . . . . . . . . . . . . . . . . . . . . . . 16
Pointer calendar . . . . . . . . . . . . . . . . . . . . . . . 16
Alarm with automatic winding . . . . . . . . . . . . . 16
Tachymeter scale – measuring speeds . . . . . . . 17
Telemeter scale – measuring distances . . . . . . 17
Rotating bezel for diving watches with
a 60 minute graduation . . . . . . . . . . . . . . . . . . 18
Helium valve . . . . . . . . . . . . . . . . . . . . . . . . . . 18
Watch as a compass . . . . . . . . . . . . . . . . . . . . 18
Contents.
7
English
We congratulate you on the
purchase of your new Oris watch
and extend a warm welcome to
the ranks of mechanical watch
devotees. You see, Oris’ world is
all about mechanics, and nothing
but mechanics.
Your Oris watch sets itself firmly
apart from mass market and
fashion products, and instead
embodies the true values of the
Swiss art of watchmaking, with
its fascinating micro-mechanical
internal components and its
stylishly seamless exterior. Oris
watches not only inherit a long
tradition dating back to 1904,
but also all incorporate a refined
‘High-Mech’ system, imbued with
the craftsmanship of our watch-
makers and co-developed by
well-known professionals from
the worlds of Formula One, diving
and aviation.
Another very important feature
in our modern times:
Oris watches do not require
any batteries because you supply
your Oris watch with power via
your own movements, or by
winding it manually.
Please visit our site at
www.oris.ch
for further infor-
mation and for a free extended
guarantee period when you
sign up to the exclusive Oris
members club:
MyOris
.
We wish you quality time with
your Oris.
Ulrich W. Herzog
Executive Chairman
Explanation of instruction arrows:
= Operating instructions
= Useful information
Introduction. 9
English
you can see how the red rotor, the
hallmark of Oris watches, rotates
and winds the movement.
Manual winding movement.
A
On mechanical Oris watches with
manual winding, the barrel spring
is wound by hand. The power
reserve of a fully wound watch is
approximately 42 hours.
Release the screw-down crown
or QLC crown (if fitted) as per the
instructions in chapter 1.
Turn the crown clockwise in
position 1. It can also be turned
forwards and backwards.
Stop as soon as you encounter
resistance. The barrel spring is now
fully wound.
If more force is applied after
the spring is fully wound, there
is a risk of the end of the spring
breaking. In such cases, the
barrel needs to be replaced at
the watch owner’s expense.
Wind the watch once a day.
Lock the screw-down crown or
QLC crown (if fitted) as per the
instructions in chapter 1.
it clockwise until you encounter
resistance.
The watch is only water-resistant
to its specified depth if the pusher
has been screwed down.
pushers must never be operated
underwater.
Automatic winding
movement.
a
An Oris watch that has started
and is worn daily for about
12 hours, does not need manual
winding. Instead, arm movements
cause the red rotor to rotate,
thereby tightening the barrel
spring. Even if you take off your
watch at night, it continues to run.
It only stops working if it is not
worn for approx. 40 hours.
If an automatic winding watch
stops, it must be restarted as
follows:
Release the screw-down crown or
QLC crown (if fitted) as per the
instructions in chapter 1.
With the crown in position 1, rotate
it clockwise through 12 turns
(it can also be turned for wards
and backwards).
Carr y out the settings, as
described below.
Lock the screw-down crown or
QLC crown (if fitted) as per the
instructions in chapter 1.
On the crystal case-back of certain
Oris automatic winding watches,
11
Crown with Oris Quick Lock
system (QLC).
r
The Quick Lock Crown (QLC)
developed by Oris is simpler to
release than the screw-down
crown because it has a bayonet
fastening instead of a thread.
Press the crown gently against the
case and turn it slightly anti-clock-
wise until the crown releases.
Now the crown is in position 1 and
can be operated as described in
the following chapters.
After the setting, the crown must
be relocked by pressing it against
the case and, at the same time
while turning it slightly clockwise
until it locks in position.
The watch is only water-resistant
to its specified depth if the crown
has been locked.
Screw-down pusher.
?
Some Oris models, especially
diving watches, have screw-down
pushers as well as screw-down
crowns.
Turn the crown which encloses
the pusher anti-clockwise until you
encounter resistance.
Now the pusher can be operated,
as described in the following
chapters.
After the setting, press the crown
gently against the case and turn
Crown positions.
The positions described below
are valid in most cases. Any
deviations will be mentioned for
the relevant type of movement.
Pos. 0
Crown locked, for
screw-down crowns
and for crowns with
Oris Quick Lock
system
Pos. 1
Winding position
Pos. 2
Date and day of
the week setting
Pos. 3
Setting the time
None of the following operations
must be performed in water.
Starting Oris watches.
Standard crown.
Oris standard crowns are high-
precision components. They are
equipped with seals to prevent
any water penetration. About half
of Oris watches are equipped with
this kind of standard crown.
The crown is in position 1 and
can be operated immediately, as
described in the following chapters.
Screw-down crown.
B
A few Oris watches, especially
the divers’ watches, are equipped
with a screw-down crown. Before
you can operate a crown of this
kind, it must first be unscrewed.
Turn the crown anti-clockwise until
it is released from its thread.
Now the crown is in position 1 and
can be operated as described in
the following chapters.
After the setting, the crown must
be tightened back down by
pressing it against the case while
turning it clockwise.
Check from time to time to ensure
that the crown is properly screwed
down.
The watch is only water-resistant
to its specified depth if the crown
has been screwed down.
English
2
|
0
2
|
0
2
|
0
2
|
0
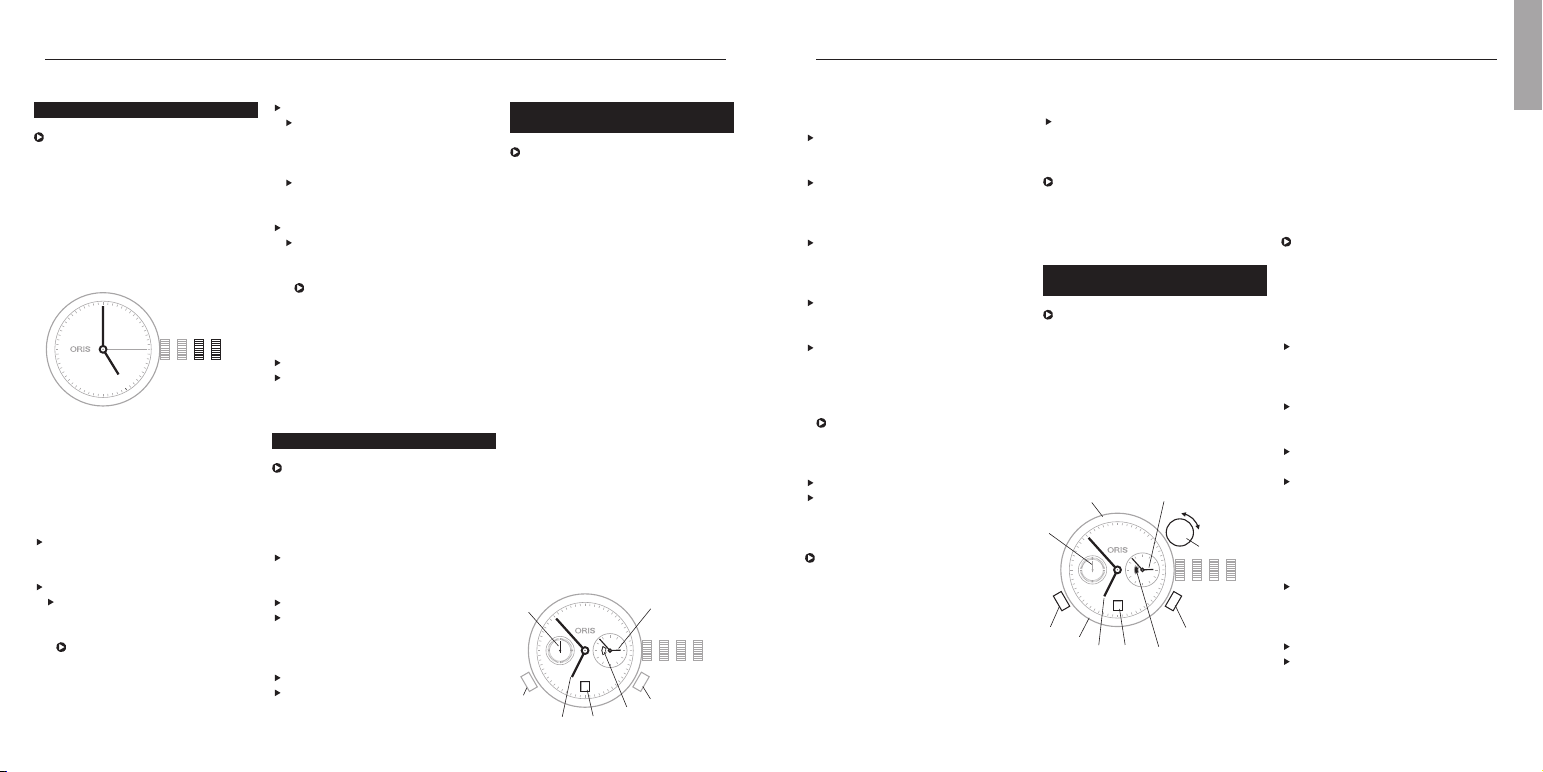
Setting T1 (local time):
Press the + or – pusher once for
each hour’s difference from T2
(home time).
The date can be corrected forwards
or backwards (Oris patent filed)
if setting the time with the + or –
pusher and passing midnight.
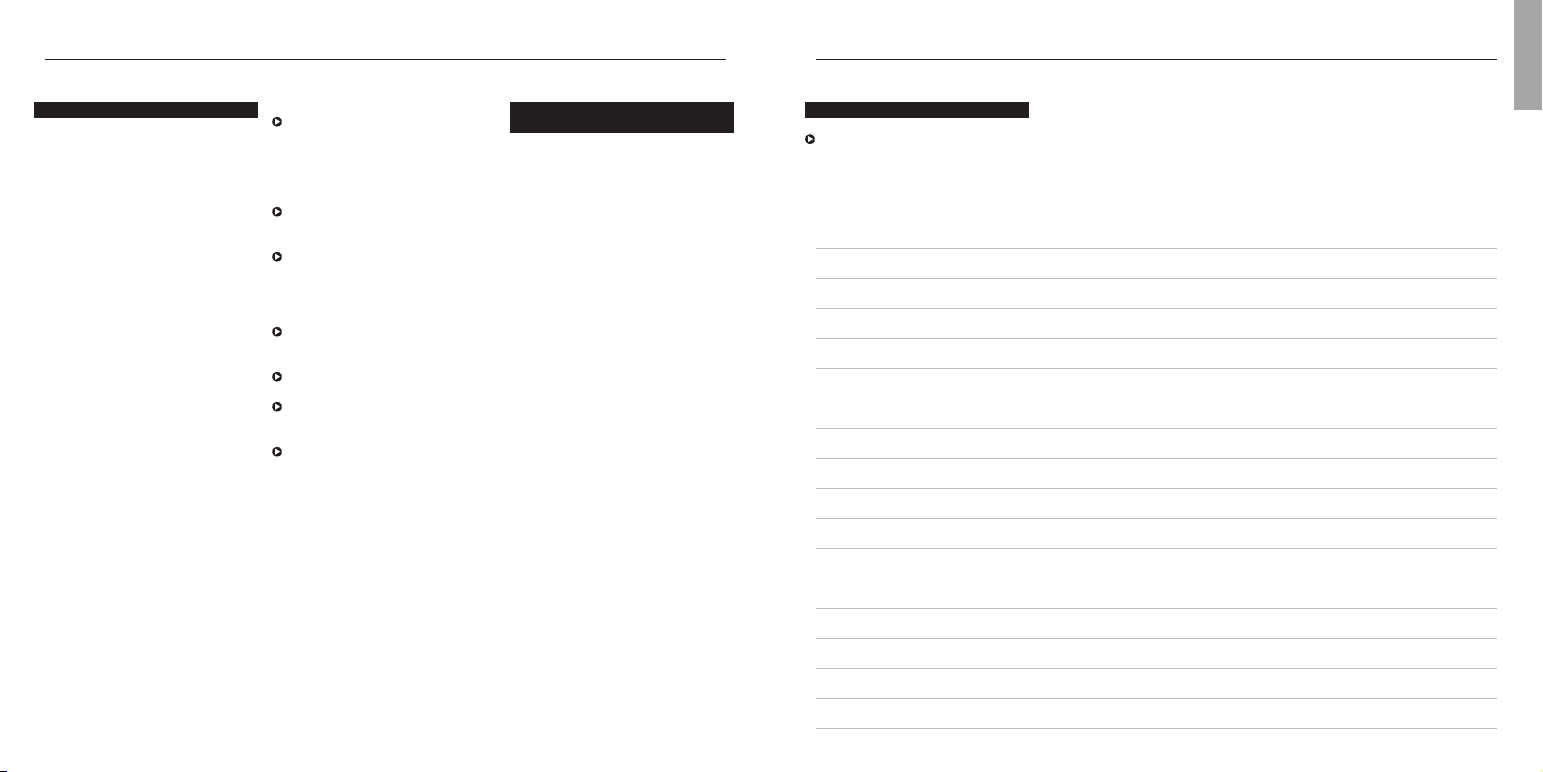
Worldtimer with 3
rd
time
zone and compass.
C
As well as the functions described
in the previous ‘Oris Worldtimer’
chapter, this watch has a
separately adjustable inner rota-
ting bezel for an additional time
zone, and the cardinal points of
a compass. This watch is ideal
for people who need a constant
display of 3 time zones, e.g.
pilots, frequent flyers, international
business people, etc.
T1 Time at star ting location
T2 Home time or GMT
T3 Time at destination location
4 Compass graduation
5 Small second
6 Day/night display
7 Date
8 – pusher T1
9 + pusher T1
10 Vertical crown for setting of T3
and compass
On the figure above
T1 indicates 06:53 or 18:53
T2 02:53
T3 09:53 or 21:53
Synchronising T1 and T2,
setting the time and date:
Proceed as described in
‘Worldtimer’ chapter.
Setting T3:
Determine T3 i.e. the time at
destination and/or time difference
from departure location.
Pull the vertical crown (10)
upwards.
Turn the vertical crown (10) clock-
wise or anti-clockwise and set
the corresponding + or – time
difference, i.e. that between
12:00 in T3 (time at destination)
and 12:00 in T1 (time at starting
point).
Press the vertical crown down-
wards to the neutral position.
Setting the compass:
Remove watch from wrist.
Pull the vertical crown upwards
and set south on the compass
rotating bezel on the bisector (i.e.
mid-point) between the hour hand
and 12 o’clock. (Between 18.00
Synchronising times, setting the
time and date:
Release the screw-down crown
or QLC crown (if fitted) as per the
instructions in chapter 1.
Pull out the crown to position 3,
turn it anti-clockwise and set T2 to
05:00. The day/night display
appears dark.
Using the + pusher, set T1 to
05:00 too, i.e. the date must
change between 01:00 and
03:00.
Press the crown into position 2,
turn it anti-clockwise and set the
date.
Pull out the crown again to posi-
tion 3 and set the current time,
completing another full turn of the
dial for an afternoon time.
The watch is stopped in this
position and can be restarted at
any time, by pressing the crown
into position 1.
Press the crown into position 1.
Lock the screw-down crown or QLC
crown (if fitted) as per the instruc-
tions in chapter 1.
It takes about 10 minutes until T1
and T2 start running simultaneously.
The tolerance can be up to one
minute.
13
Worldtimer.
C
The Oris Worldtimer has two
separate time zone displays: T1
local time and T2 home time. Both
displays have their own hour and
minute hands. The minute hands
of T1 and T2 run simultaneously.
The hour hand on T1 can be
adjusted forward or backward an
hour at a time or very rapidly by
pressing the two pushers. In rapid
adjustment, the date can be
moved forward or backward
between 23:00 and 03:00 (Oris
patent filed). T2 also has a
day/night indicator.
Pos. 0 Crown locked with screw-down
crown or crown with Oris
Quick Lock system (QLC)
Pos. 1 Winding position
Pos. 2 Setting the date
Pos. 3 Setting the time
4 T1 (local time)
5 T2 (home time)
6 Small second
7 Day/night indicator
8 Date
9 – pusher for T1
10 + pusher for T1
Date, day of the week and time.
This instruction applies to most
movements produced for Oris
watches, with date and day of the
week window display or date and
day of the week hand indicators.
Exceptions such as the Oris
Complication or Oris Chronograph
(movement 676) are described in
the sections for the corresponding
types of movement.
Pos. 0 Crown locked, for screw-down
crowns and for crowns with
Oris Quick Lock system
Pos. 1 Winding position
Pos. 2 Date and day of the week
setting
Pos. 3 Setting the time
Release the screw-down crown
or QLC crown (if fitted) as per the
instructions in chapter 1.
Pull out the crown to position 3.
Turn the hands forward until the
date changes, and 05:00 the
next day is indicated.
The rapid date and day correc-
tions cannot be performed
between 21:00 and 03:00
because the mechanism is
meshed for the change and
damage may occur.
Setting and operating Oris watches.
Push the crown back into position 2.
Depending on the movement
type, turn the crown clockwise or
anti-clockwise and then set the
current date.
If a day of the week display
is provided, turn the crown
anti-clockwise and set the day.
Pull out the crown to position 3.
Set the time – completing
another full turn of the dial for
an afternoon time.
The watch is stopped in this
position and can for example
be restarted at a time signal,
by pressing the crown into
position 1.
Press the crown into position 1.
Lock the screw-down crown or
QLC crown (if fitted) as per the
instructions in chapter 1.
Setting the date.
After months with fewer than
31 days, the date must be set
forward manually to the first day
of the following month via rapid
correction (crown in position 2).
Release the screw-down crown
or QLC crown (if fitted) as per the
instructions in chapter 1.
Pull out the crown to position 2.
Depending on the movement type,
turn the crown clockwise or anti-
clockwise and then set to the
desired date.
Press the crown into position 1.
Lock the screw-down crown or QLC
crown (if fitted) as per the instruc-
tions in chapter 1.
English
10 23
28
12
11
10
9
8
7
6
5
4
3
2
1
N
330
300
W
240
210
S
150
120
E
60
30
T1
T2
4
6
7
10
8
9
T3
5
28
4
5
6
7
8
10 23
9
10
stops the chronograph hand once
again and freezes timing.
Press pusher 5 – the stopped
chronograph hand and the minute
and hour counters are reset to
their starting positions.
Reading chronograph timing:
With the chronograph second
hand (7), the elapsed time can be
read on the dial scale, between
1
/4 second and 60 seconds
maximum.
With the chronograph minute hand
(8), you can read the
elapsed minutes, up to 30 minutes
maximum.
With the chronograph hour hand
(9), you can read the elapsed half-
hours and hours, up to 12 hours
maximum.
Pos. 0 Crown locked, for screw-down
crown or QLC crown
Pos. 1 Winding position
Pos. 2 Date setting
Pos. 3 Time setting
4 Start and stop pusher
5 Reset pusher
6 Vertical pusher for setting date
on movement 676
Press the pusher in using an
appropriate tool or a wooden
toothpick to set the date
7 Chronograph second hand
8 Chronograph minute hand
9 Chronograph hour hand
10 Second hand for normal time
display, running constantly
On some models, the
second hand is deliberately
omitted. In this case, the
chronograph second hand
(7) can be left in motion
permanently, for use as a
second hand for normal time
display.
Complication.
Release the screw-down crown
or QLC crown (if fitted) as per the
instructions in chapter 1.
Pull out the crown to position 2.
Turn the hand forwards. The
moon phase indicator moves its
position
1
/28
th
of a month right
between 22:00 and 23:00.
One day before the current moon
position is reached, take account
of the date change, then set the
time to 05:00.
Press pusher 3 with the
special tool provided, or with a
wooden toothpick, until the
desired date is set.
Press pusher 4 and set the day of
the week.
Set the current time with the
crown – completing another full turn
of the dial for an afternoon time.
on the rotating bezel can now
be read off. New York 08:20,
Cairo 15:20, Moscow 16:20, etc.
This setting does not take into
account daylight saving time.
24 hour
hand (T2)
Chronograph.
The Oris chronograph has a
stop watch function as well as a
time and date display. This is a
very useful function for everyday
use.
Crown and pusher operation, see
chapter: ‘Starting the watch’
Time and date setting, see chapter:
‘Operating Oris watches’
(exception: date setting on move-
ment 676 – see below).
Stop timer and reset all chrono-
graph indicators to their starting
positions:
Press pusher 4 – the chronograph
hand starts running
Press pusher 4 again – this stops
the chronograph hand and freezes
timing.
Press pusher 4 again – the
chronograph hand restar ts run-
ning from the previous stop point.
Press pusher 4 once again – this
15
In the above example, it is 11:53
in the 2
nd
time zone.
2
nd
time zone with
additional 24 hr hand and
city markers on the
rotating bezel.
»
Release the screw-down crown
or QLC crown (if fitted) as per the
instructions in chapter 1.
Pull out the crown to position 2,
turn it clockwise and set the desired
time for T2 (e.g. home time).
Press the crown into position 1.
Lock the screw-down crown or QLC
crown (if fitted) as per the instruc-
tions in chapter 1.
Turn the outer bezel with the city
marker until the time in the
desired city (home city) matches
T2 (24 hour hand).
Times in the cities listed on the
rotating bezel can now be read
off. This setting does not take into
account daylight saving time.
To read off the time in these cities
on the rotating bezel again,
assuming that T2 is showing
‘home time’, always align ‘home
city’ on the rotating bezel with
the T2 hand (updated).
Example:
Local time in London (GMT) is
13:20. The 24 hour hand points
to 21:00, home time in Hong
Kong. The rotating bezel was
adjusted so that the 24 hour hand
displays Hong Kong as the home
city. The time in the cities listed
and 06.00, take the bigger
angle between the hour hand and
12 o’clock.)
Press the vertical crown down-
wards to the neutral position.
Align the hour hand with the sun
and read off the cardinal points
on the compass bezel.
See figure in the chapter ‘Watch
as a Compass’.
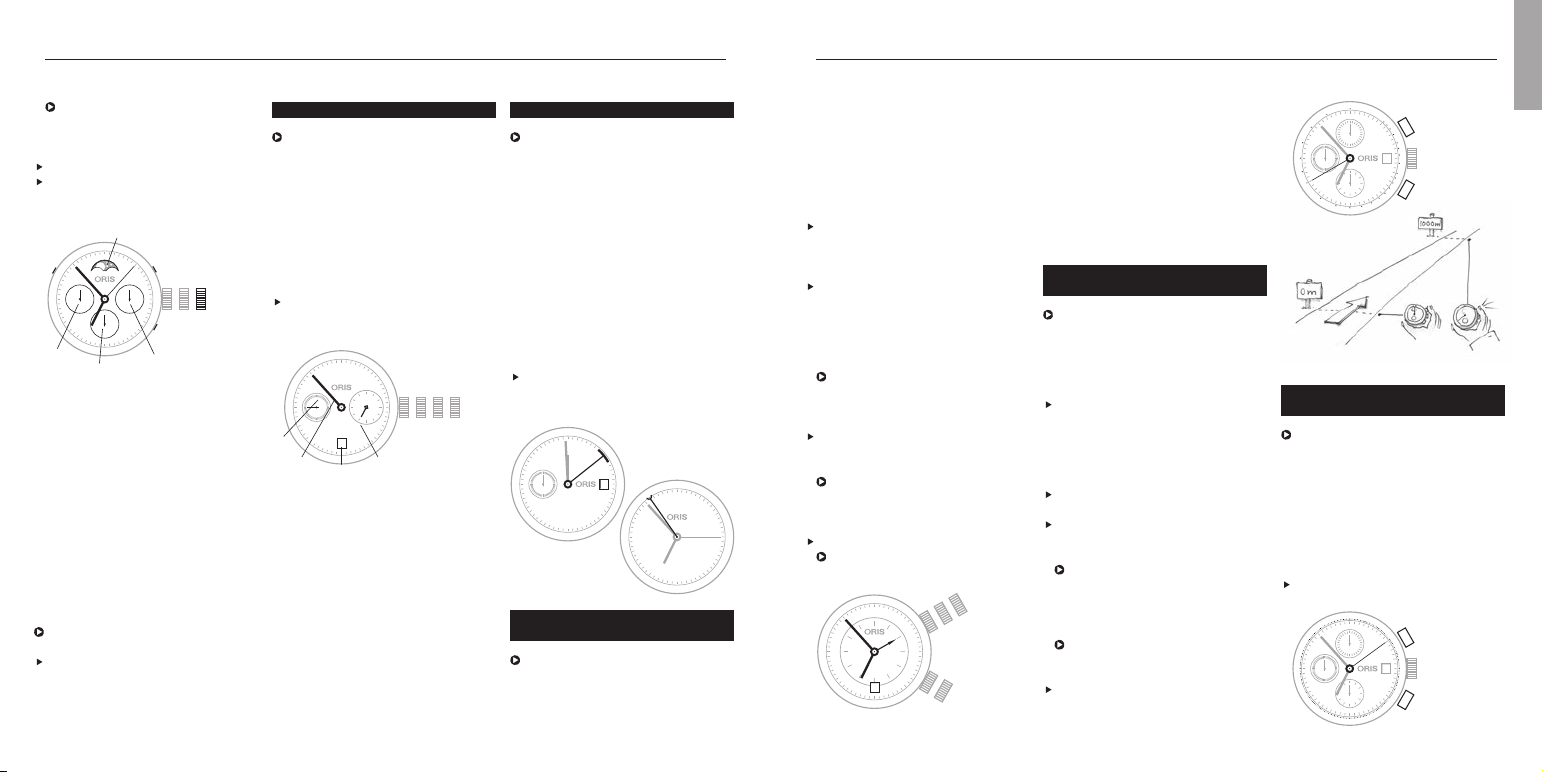
2
nd
time zone on outer
rotating bezel.
Turn the rotating bezel to the
desired 2
nd
time zone
In the above example, the 2
nd
time zone shows 08:53 or 20:53.
2
nd
time zone indicator
on inner rotating bezel with
vertical crown.
Pull the vertical crown (1) upwards.
Turn the crown clockwise or anti-
clockwise and set the desired 2
nd
time (T2).
Press the vertical crown down-
wards to the neutral position.
Setting and operating Oris watches.
1 Ver tical crown
2 T1 (local time)
3 T2 on inner rotating bezel
(e.g. home time)
In the figure above, T1 indicates
06:53 or 18:53 and T2 to 03:53
or 15:53
2
nd
time zone with additional
24 hr hand.
Release the screw-down crown
or QLC crown (if fitted) as per the
instructions in chapter 1.
Pull out the crown to position 2,
turn it anti-clockwise and set the
desired time for T2 (e.g. home
time).
Press the crown into position 1.
Lock the screw-down crown or QLC
crown (if fitted) as per the instruc-
tions in chapter 1.
T2 (e.g.
home time)
English
12
11
10
9
8
7
6
5
4
3
2
1
28
12
11
10
9
8
7
6
5
4
3
2
1
1
2
3
2828
24
16
14
12
10
8
|
22
|
20
|
18
|
|
|
|
|
|
6
|
4
|
2
|
10 2 3
12
1
2
3
4
5
6
7
8
9
10
11
28
P
A
R
I
S
A
Z
O
R
E
S
R
I
O
D
.
J
.
N
E
W
Y
O
R
K
D
E
N
V
E
R
J
U
N
E
A
U
M
I
D
W
A
Y
N
O
U
M
E
A
T
O
K
Y
O
B
A
N
G
K
O
K
K
A
R
A
C
H
I
M
O
S
C
O
W
L
O
N
D
O
N
S
.
G
E
O
R
G
I
A
C
A
R
A
C
A
S
M
E
X
I
C
O
C
I
T
Y
L
.
A
N
G
E
L
E
S
H
A
W
A
I
I
A
U
C
K
L
A
N
D
S
Y
D
N
E
Y
H
O
N
G
K
O
N
G
D
H
A
K
A
D
U
B
A
I
C
A
I
R
O
1
17
15
13
11
9
7
|
23
|
21
|
19
|
|
|
|
|
|
|
5
|
3
|
10 2 3
28
10 23
4
5
6
8
7
9
10
Crown A, Pos. 1 movement spring win-
ding position
Crown A, Pos. 2 date setting
Crown A, Pos. 3 time setting
Crown B, Pos. 1 alarm spring winding
position, Alarm not
activated
Crown B, Pos. 2 alarm time setting,
alarm activated
Tachymeter scale –
Measuring speeds.
The tachymeter scale on the ring
or dial of the Oris chronograph is
used to measure speed, e.g. of a
car travelling a measured distance
of 1 km (or 1 mile).
If a rotating tachymeter ring is
fitted, position the 60 of the
tachymeter to 12 o’clock. Start
the chronograph function by
pressing pusher 4 as soon as the
vehicle passes the start line.
Press pusher 4 again as soon as
the vehicle crosses the finish line.
The chronograph hand will indicate
the average speed in km (or miles)
per hour on the tachymeter.
In the following example, the
vehicle required 40 seconds to
cover the measured distance,
which equates to an average
speed of 90 km/h (or 90 mph).
Average speeds of less than
60 km/h (60 mph) cannot be
measured.
Press pusher 5 to reset all the
counters.
Telemeter scale –
Measuring distances.
The telemeter scale on the ring or
dial of Oris chronographs is used
to measure the distance between
an immediately visible and subse-
quently audible event (thunder and
lightning, burst and sound from
fireworks, etc.). The graduation on
this telemeter scale is based on
the speed of sound, i.e. 343 m/s
in air at 20 °C.
With a rotating telemeter ring,
position the zero to 12:00.
racterised by a special alarm
chime created by a sound spring.
This product is perpetuating a
long tradition, and one which rea-
ched a high point with the Oris
alarm clock with 8-day movement
back in 1949.
Crown A: Movement winding, time
and date setting as per instruc-
tions in chapter 1.
Turn crown B clockwise to position
1 and, if necessary, tighten alarm
movement (e.g. if used several
times a day, or if the watch is being
restarted) by turning the crown
12 times.
In normal use of an automatic
winding alarm, the movement
and alarm springs are constantly
wound.
Pull out crown B to position 2,
turn it anti-clockwise and set the
desired alarm time.
In this crown position, the alarm
function is enabled, and the
alarm will sound at the set time
within the next 12 hours.
Press crown B into position 1.
The alarm function is disabled.
Crown A
Crown B
17
Pointer calendar.
The launch of the first Oris
movement with pointer calendar in
1938 was a milestone in company
history. The Oris Pointer offers
the advantage of indicating not
only the time or day of the week
spatially on the relevant scale
on the dial. Since the introduction
of this typical Oris movement,
various models with this type of
indicator have been made.
Naturally, the movement has
changed several times since its
introduction to meet the latest
technological requirements.
Crown operation, time and date
setting as per instructions in
chapter 1.
Alarm with
automatic winding.
«
In 1988, the first Oris alarm watch
with manual winding appeared on
the market. The alarm watch laun-
ched in 2008 has a movement
with automatic winding. It is cha-
The watch is stopped in this
position and can be restarted at
any time, by pressing the crown
into position 1.
Press the crown into position 1.
Lock the screw-down crown or QLC
crown (if fitted) as per the instruc-
tions in chapter 1.
Pos. 0 Crown locked, for screw-down
crown or QLC crown
Pos. 1 Winding position
Pos. 2 Time and moon phase
setting
3 pusher for date setting
4 pusher for day of the week
setting
5 pusher for 2
nd
time zone indi-
cator setting
6 Date indicator
7 Day of the week indicator
8 2
nd
time zone indicator
9 Moon phase indicator
Setting the 2
nd
time zone
This setting can be made at
any time.
Press pusher 5 (2
nd
time zone) with
the special tool provided, or with a
wooden toothpick, and set the de-
sired time.
Setting and operating Oris watches.
Regulator.
Originally, the regulator was an
extremely accurate clock which
was used to test and adjust (set)
small clocks. To prevent the
hands from overlapping, they were
separated. On a regulator, only
the minute hand turns in the
centre, whereas the seconds
and hour are indicated in small
separate sub-dials.
Crown operation, time and date
setting as per instructions in
chapter 1.
Pos. 0 Crown locked, for screw-down
crowns and for crowns with
Oris Quick Lock system
Pos. 1 Winding position
Pos. 2 Date and day of the week
setting
Pos. 3 Time setting
4 Second hand
5 Minute hand
6 Hour hand
7 Date indicator
English
·
S
A
T
·
S
U
N
·
M
O
N
·
F
R
I
·
T
H
U
·
W
E
D
·
T
U
E
31
23
21
19
17
15
13
11
9
·
29
27
·
25
·
·
·
·
·
·
·
·
·
7
·
5
·
3
·
1
24
16
14
12
10
8
·
22
·
20
·
18
·
·
·
·
·
·
6
·
4
·
2
·
102
4
5
3
8
7
6
9
28
0123
4
6
7
5
28
S
U
N
D
A
Y
M
O
N
D
A
Y
T
U
E
S
D
A
Y
W
E
D
N
E
S
D
A
Y
T
H
U
R
S
D
A
Y
F
R
I
D
A
Y
S
A
T
U
R
D
A
Y
31
8
9
10
11
12
13
14
15
16
17
18
19
20
21
22
23
30
29
28
27
26
25
24
7
6
5
4
3
2
1
21 3
21
28
28
T
A
C
H
Y
M
E
T
E
R
500
400
350
300
275
250
225
200
190
180
170
160
150
140
130
120
110
100
90
85
80
75
70
65
60
5
4
28
T
E
L
E
M
E
T
E
R
19
18
17
16
15
10
11
12
13
14
9
8
7
6
5
4
3
2
1
KM
5
4
In the above example, 33 minutes
have elapsed since the start of
measurement.
Rotating bezel for measuring time
to the nearest hour:
Position the marker on the
rotating bezel opposite the hour
hand, or to the desired hour end
position.
The hours elapsed, or the hours
past the preset end time can be
read on the bezel.
Helium valve.
0
Watches with a helium valve are
intended for divers who spend
extended periods on board a
diving bell, or in any other cham-
ber with a helium-enriched
atmosphere.
The inert gas helium has one of
the smallest molecules, meaning
that it can penetrate the seals on
watches and enter the case. Once
inside the case, this gas is unable
to escape rapidly enough unless a
special valve is fitted, i.e. the
helium valve. Opening this valve
prevents any excess pressure on
the watch glass from inside
after the ascent. The helium valve
is identified on Oris diving watches
by a coloured spot on the crown.
Before a dive, turn the helium
valve crown clockwise to its limit
stop and close the valve.
Before leaving the diving station,
turn the crown on the helium valve
anti-clockwise as far as it will go
(to open).
Even if the valve remains open,
the watch would still be water-resi-
stant for normal purposes. But for
diving operations of any kind, the
valve must be closed, as descri-
bed above.
Watch as a compass.
Watches with an analogue hour
and minute display can be used
as compass, using the position of
the sun as a guide. This depends
on the sun’s position being clearly
visible, and on the watch showing
the correct time.
If the watch has a graduated
bezel, this can be used to find the
bisector (mid-point).
Remove the watch from your wrist
and turn it until the hour hand is
pointing at the sun.
Determine the bisector (mid-point)
between the hour hand and 12
o’clock. (Between 18.00 and
Start the chronograph function
using pusher 4 as soon as a
visible event occurs.
Press pusher 4 again as soon as
you hear the sound.
In the above example, the
thunderstorm is still at a distance
of 3 kilometres.
Rotating bezel for diving
watches with a 60 minute
graduation.
The rotating bezel on all Oris diving
watches can only be adjusted in
an anti-clockwise direction. This
prevents the measured or set
time from being extended if the
bezel is turned accidentally. This
ensures that the diver has enough
time left to decompress properly.
The rotating bezel on a diving
watch can also be used as a timer
or for any kind of time indication
to the nearest minute or hour, e.g.
parking, cooking, game time, etc.
Rotating bezel for measuring time
to the nearest minute:
Position the marker on the rotating
bezel opposite the current minute
hand position, or to the desired
minute hand end position.
The minutes elapsed, or the
minutes past the preset end
time can be read on the bezel.
19Setting and operating Oris watches.
English
28
|
50
|
40
|
30
|
20
|
10
|
06.00, take the bigger angle bet-
ween the hour hand and 12
o’clock.) This equates to South.
Once you have established where
South lies, the other cardinal
points can be extrapolated from
that.
If the watch has a rotating bezel
with compass graduation, it is
easier to identify all the cardinal
points other than South. With a
watch of this kind, proceed as
follows:
Remove the watch from your wrist
and determine South using the
compass bezel by calculating the
bisector (mid-point) between the
hour hand and 12 o’clock.
Point hour hand at the sun and
determine the cardinal points
using the compass bezel.
12
1
2
3
4
5
6
7
8
9
10
11
x
x
N
330
300
W
240
210
S
150
120
E
60
30
S

21
English
Fig. 1
Remove watch from wrist and
place on a soft surface with its
buckle open.
Hold the buckle end of the strap
and pull the watch end of strap
upwards (Fig. 1).
Shorten the strap by pulling the
loose end, or tighten it by pulling
the watch end.
Press the clamp until a ‘click’ is
heard.
The folding clasp cannot be
closed if the clamp is not
properly engaged.
Watches with rubber straps.
All Oris rubber straps are equipped
with folding clasps.
Straps which need to be cut to
length:
Consult an approved retailer to
have the strap adjusted to suit
your wrist size.
If the strap buckle has fine ad-
justment, you can adjust the
length yourself to a certain degree
Fig. 1
Fig. 2
Fig. 3
On rubber straps with fold-out
extension for diving suits, fine
adjustment is not possible.
Wear protective goggles to prevent
injury from the tool.
Open the folding clasp and place
the watch and strap (crown facing
upwards) on a piece of cardboard.
Using a wooden toothpick, insert
the fine adjustment metal pin into
the strap buckle (Fig. 1).
Carefully unfasten the strap and
remove it.
Place the lower part of the pin in
the new position then press the
strap outer obliquely against the
new, upper pin position (Fig. 2).
Press the pin down carefully using
a nail file or screwdriver (Fig. 3)
and slide it under the buckle
opening until the pin clicks in.
Check that the strap again holds
firmly.
(see ‘Fine adjustment of folding
clasps’).
Straps with folding clasp and
one-sided holes in the strap:
Remove watch from wrist.
Adjust strap to your wrist size
using the holes.
Once the strap is adjusted, press
the buckle firmly into the correct
hole to prevent the strap from
detaching.
On rubber straps with fold-out
extension for diving suits, fine
adjustment is not possible.
Watches with metal bracelets.
Metal bracelets must be adjusted
to suit your wrist by an approved
retailer. This involves removing or
adding link elements.
If the bracelet buckle has fine
adjustment, you can adjust the
length yourself to a certain degree
(see ‘Fine adjustment of folding
clasps’).
Fine adjustment of
folding clasps.
Provided that the buckle on the
metal bracelet or rubber strap has
a fine adjustment feature, the
length can be adjusted to a limited
extent as follows:
Instructions about the kinds of
leather, rubber, metals used, etc.
can found in the ‘Technical
Information and Summar y Tables’
chapter.
Watches with leather straps.
Fasten the buckle around the wrist
over a table, ensuring that the
watch cannot fall to the ground if
the process goes wrong.
Straps with a folding clasp are
easier to work with and offer
greater security against theft.
Also, if the process goes wrong
the watch will not drop to the
floor because it will be held
by the folding clasp.
Remove watch from wrist.
Adjust the strap to your wrist
size using the preformed holes.
Once the strap is adjusted,
press the buckle firmly into the
correct hole to prevent the strap
from detaching.
Some older folding clasps are
hard to adjust. Do not hesitate to
contact your approved retailer
if you have any questions.
Straps with continuously adjustable
folding clasp: this is a new folding
clasp design, developed and
patented by Oris and based on the
principle of seat belts in aircraft.
The strap length can be adjusted
to any desired length:
Adjusting Oris watches to fit the wrist.
23
English
Accuracy.
Mechanical watches measure
time accurately and reliably.
However, in circumstances where
optimum accuracy timekeeping
is required at all times, the
mechanical watch is not the best
instrument for the job. Time is
important to the wearer of a
mechanical watch, but accuracy
to the nearest second is not
something the wearer is likely to
lose sleep about.
The accuracy rate of a mechanical
watch depends on the type of
movement used, on the wearer’s
personal habits and on fluctuati-
ons in the ambient temperature.
Oris watches are checked and
set in the workshop, so daily rate
variation is within a tolerance
range of – 5 to + 20 seconds per
day. Chronometers are set and
tested to tighter tolerance ranges
than this (see Chapter on ‘Oris
Chronometers’).
If a watch is not keeping to time
within these limits, it can be set
by an approved retailer or at
the Oris service centre in your
country. During the guarantee
period, this service is free of
charge.
Notes.
Chronometer.
D
A Swiss watch can only be
designated as a chronometer if
its Swiss watch movement has
satisfied a test as per the
standards NIHS 95 -11/ISO 3159
and conducted by the independent
Swiss Observatory’s Contrôle
Officiel Suisse des Chronomètres
(COSC).
The chronometer test at the COSC
takes 15 days. All tests are
conducted at an ambient humidity
of 24 %. Every 24 hours, the
variance is measured, then the
movements wound and reset. On
the tenth day of this test, any
complications on the watch, such
as the chronograph, are switched
on to determine the movement’s
operating rate accuracy. The
movement rate is determined in
five different positions and at
three different temperatures, as
shown opposite.
If the movement passes the test,
it receives a certificate confirming
its rate accuracy and its status as
a chronometer. Every movement
is identified with an engraved
number and a COSC certification
number.
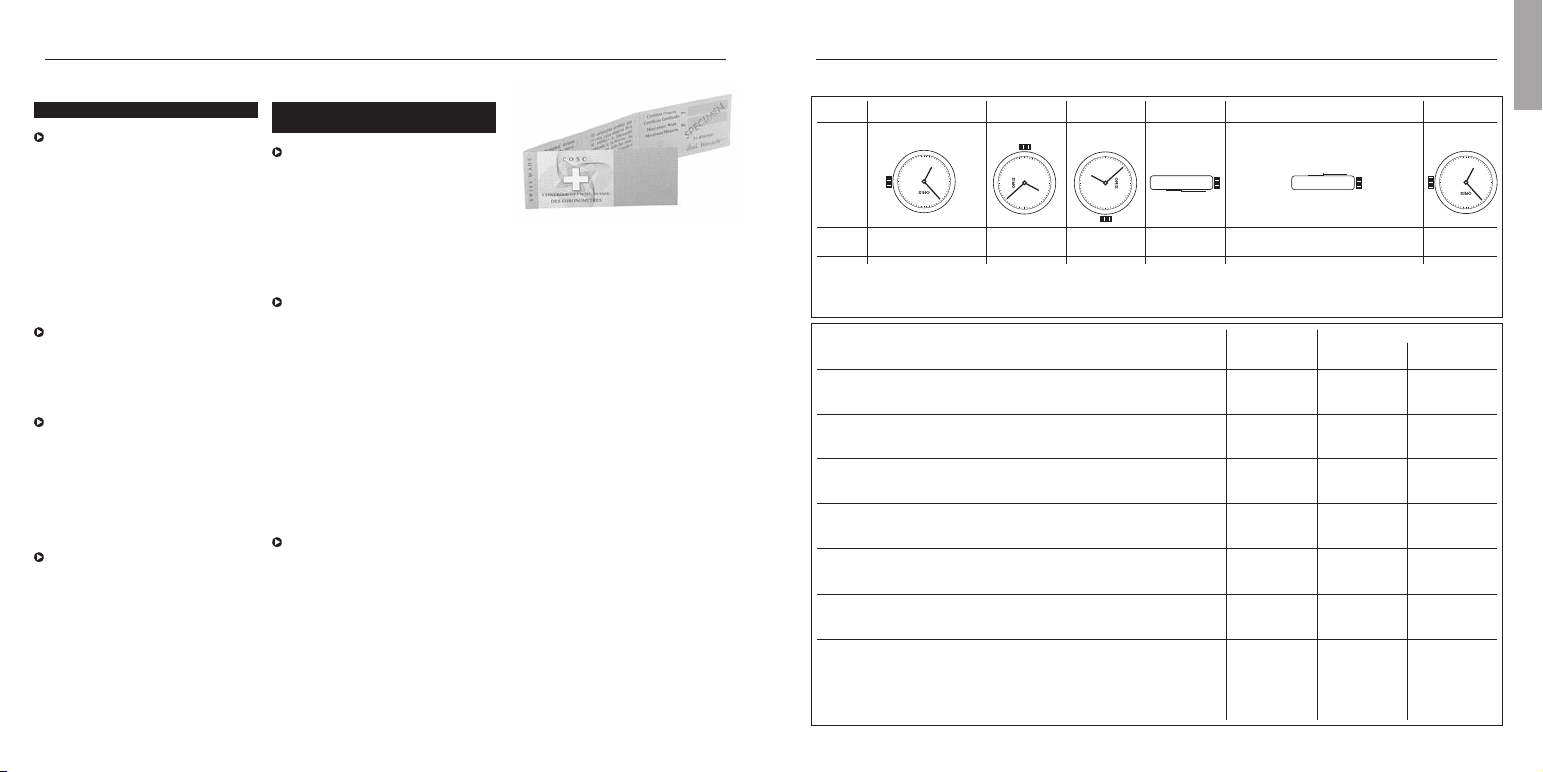
Day0123456789101112131415
Pos. 6 H 3 H 9 H F H C H 6 H
T °C 23 23 23 23 23 23 23 23 23 23 23 8 23 38 23 23
R(s/d) R1 R2 R3 R4 R5 R6 R7 R8 R9 R10* R11 R12 R13 R14 R15
*Any complications are activated.
Test criteria Ø (mov.) Ø (mov.)
All figures in seconds (s) per day (d) Abbrev. > 20 mm < 20 mm
Average daily rate
(in 5 different positions) Mmoy – 4 to + 6 – 5 to +8
Average rate variation
(average daily rate difference in 5 positions) Vmoy max. 2 max. 3.4
Largest rate variation
(difference between two rates in the same position) Vmax max. 5 max. 7
Flat-suspended difference
(between horizontal and vertical position) D – 6/+ 8 – 8/+ 10
Largest difference
(between average daily rate and rate in one of the 5 positions) P max. 10 max. 15
Thermal difference
(variation per °C of temperature difference) C ± 0.6 ± 0.7
Rate reproduction
(difference between average variation on day 15 and
average variation on the first two days of the test) R ± 5 ± 6
Do not place the watch on equip-
ment emitting strong magnetic
fields (e.g. radio alarms, refrigera-
tors, speakers, etc.)
If possible, avoid exposing your
watch to extreme temperatures,
i.e. in excess of 60 °C and less
than –5 °C. While the watch is
being worn, body heat protects
the watch from any such extreme
fluctuations in temperature.
Protect your watch against sudden
temperature shocks, e.g. do not
take it into the sauna with you.
Oris watches, like any other
device with mechanical compo-
nents, needs maintenance from
time to time. However, the need
for maintenance depends heavily
on personal usage, the climate
and how the watch is looked after.
For normal, careful use, Oris
recommends general maintenance
every 4 – 5 years.
Hand in your watch to an official
Oris retailer or send it to the Oris
service centre in your countr y.
You can find a directory listing all
approved retailers and ser vice
centres in the attached document,
or the latest updated version can
be viewed at
www.oris.ch
If you have any further questions,
do not hesitate to consult an
approved Oris retailer or the site
www.oris.ch
25
English
Over time, everyday wear and
ageing of seals in particular
adversely affect the water-resistance
of a watch. Oris therefore recom-
mends having the water-resistance
of your watch tested once a year
by an approved Oris retailer.
Standard crowns must always be
pressed into position 1 to ensure
that they satisfy the specified
water-resistance levels.
Screw-down crowns, crowns with
the Oris Quick Lock system (QLC)
and screw-down pushers must
always be locked in order to
satisfy the specified water-resistance
levels.
Crowns and pushers must not be
operated underwater.
Use and maintenance.
Clean watches, metal bracelets
and rubber straps regularly, and
whenever they have been immersed
in salt water, using a toothbrush
and lukewarm soapy water, then
dry with a soft cloth.
Avoid getting the watch and strap
into direct contact with solvents
and cleaning agents, cosmetics,
perfumes, etc. These products
can damage the case, the strap
and the seals.
Protect leather and fabric straps
from grease, water and humidity
and avoid excessive exposure to
sunlight.
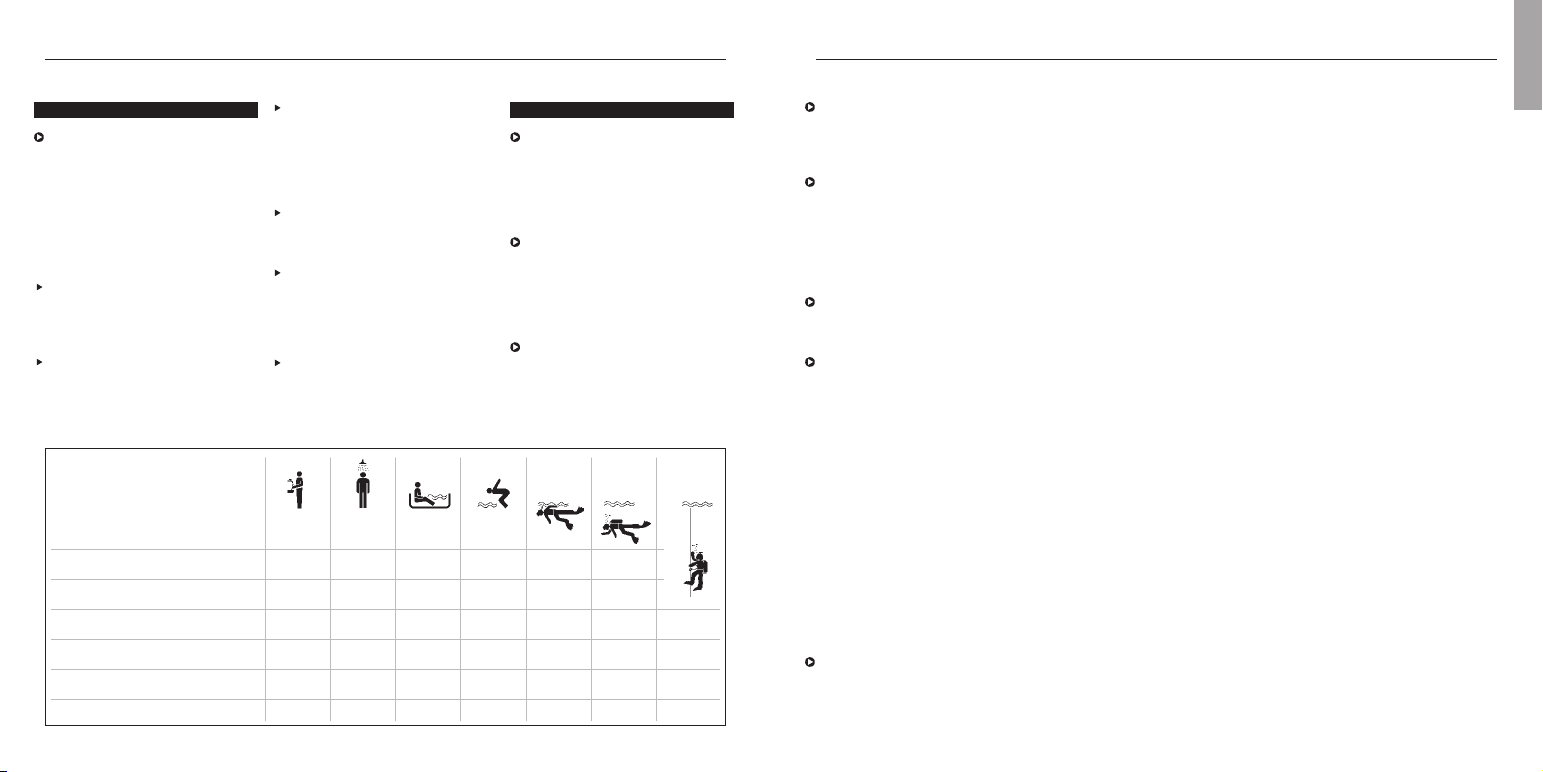
Water-resistance.
Oris tests all its watches to
ensure that they comply with
the specified figure for water-
resistance. All Oris watches are
water-resistant to at least 3 bar
or 30 metres. The actual figure
on individual models is either
shown on the case back and/or
on the dial.
Oris watches designated with less
than 10 bar or 100 m (328 ft.)
water-resistance must not be worn
in the water (see graph below).
Oris watches designated as 10
bar (100 m) or more can be worn
in water.
Notes.
Bar Feet ( Metres)
(bar) (ft) (m)
3 98.5 (30) ✓ –––––
5 164 (50) ✓✓✓ –––
10 328 (100) ✓✓✓✓✓––
30 984 (300) ✓✓✓✓✓✓ ✓
100 3281 (1000) ✓✓✓✓✓✓ ✓
200 6562 (2000) ✓✓✓✓✓✓ ✓
Dial with diamonds
Stainless steel
Stainless steel/18 carat gold
18 carat gold
5 microns
Diamond
DLC coating (Diamond like
carbon)
PVD coating (Physical Vapour
Deposition)
Titanium
Ceramic Top Ring
Skeleton back with
mineral glass
Flexible lugs
Distance between horns
Distance outside horns
Genuine calf skin
Rubber
Fabric
Genuine crocodile
Water-resistant to XX bar
out under a forced vacuum in a
coating chamber. This procedure
is one of the most modern and
ecologically sustainable coating
technologies.
PVD coatings are highly adhesive,
hard and abrasion-resistant.
They are extremely smooth and
particularly suited to coating
watch parts. These coatings can
be single-layer, multi-layer or can
be applied in graduated layers.
The layer thickness ranges from
1 to 5 microns, although in some
cases, just 0.5 microns or 15
microns and more can be applied.
Depending on the initial material
and the inert gas employed, a
wide range of PVD coatings can
be applied. Essentially, these fall
into four main groups: nitrides,
carbides, oxides and carbons
(Diamond like carbon).
Diamond Like Carbon (DLC)
Coating.
$
As mentioned above, the DLC
coating process is a PVD coating
process using diamond like carbons.
This durable and friction-reducing
coating with an anthracite-coloured
appearance essentially comprises
diamonds measuring just a few
nanometres across, coated in
graphite. This structure is commonly
referred to as Diamond-Like
Carbon (DLC). Thanks to its
diamond-like layered structure,
DLC layers possess exceptionally
hard surface properties. They are
substantially harder and more
wear-resistant than ultra-hardened
grades of steel, and are excep-
tionally corrosion-resistant, as
well as being skin-friendly.
Sapphire crystal.
d
Most Oris watches are now equip-
ped with sapphire crystal on the
dial face. This fact is noted on the
case back.
With a Moh hardness of 9,
sapphire crystal is the hardest of
all grades of crystal. It comprises
a synthetic sapphire and is
exceptionally scratch-resistant.
Only diamond, with a Moh
hardness of 10, is harder than
this. In addition a sapphire crystal
is much more impact-resistant
than mineral glass.
To improve dial readability, the
internal faces of most Oris
sapphire crystal have anti-reflective
coating.
To obtain even clearer dial
readability, a few Oris models
have sapphire crystal which has
anti-reflective coating on both
sides. This outer layer can
become scratched in the course
of wearing the watch. This
constitutes normal wear and tear
is not covered by the guarantee.
Metals for cases and straps.
The 316 L stainless steel used
by Oris is robust, durable and
complies with the stringent
dermatological requirements for
preventing nickel allergies. The
nickel directive applicable in many
countries states that objects
which are in direct, prolonged
contact with the skin are only
allowed to release 0.5 µg of nickel
per cm
2
skin/week. The nickel
content in an alloy is not the
crucial factor. The rate of nickel
release on the skin is much more
important. Altough 316 L stain-
less steel is not entirely nickel-
free it does not release nickel.
The grade 2 titanium used by Oris
is a pure grade of titanium that
can also be used in implants and
which possesses an excellent
resistance/expansion ratio. Tita-
nium is 45 % lighter than steel,
and is also corrosion-resistant,
skin-friendly and has a warm feel.
PVD coatings.
O
Physical Vapour Deposition (PVD)
is a process where an exceptionally
pure, solid coating material is
used to generate an ionized metal
vapour which forms a coating
mixture with inert gases. Through
condensation, a thin layer is
deposited onto the surface of the
watch. The PVD process is carried
27
Pictograms.
Automatic winding
Oris own development
(Automatic winding)
Manual winding
Worldtimer
Chronometer
Alarm
2
nd
time zone indication
Screw down safety crown
Screw down safety
pusher
‘Quick Lock’ Crown
Helium valve
Sapphire crystal
Mineral glass
Plexi glass
Anti-reflective coating (inside)
Luminous dial
Luminous indices
and luminous hands
with superluminova
Luminous hands with
superluminova
a
(
A
C
D
«
»
B
?
r
0
d
E
f
e
5
2
4
Q
n
N
m
o
p
$
O
Z
ß
b
;
y
z
s
S
)
t
!
Technical information and summary tables.
English
Lunar calendar.
29
Oris rubber straps are robust,
durable and water resistant. The
rubber mixture used is non-toxic
and does not contain any potential
allergens.
Mineral glass.
E
The mineral glass provides un-
blemished, clear readability, but
is not as scratch-resistant. It is
therefore only used by Oris for
case backs.
Plexi glass.
f
Plexi glass or acrylic glass is a
tried and tested material. It deli-
vers clear readability, it is highly
impact-resistant and feels warm
to the touch. It is very prone to
scratching, especially in comparison
with sapphire crystal.
Scratched Plexi glass can be re-
polished on a polishing machine.
Oris uses Plexi glass primarily on
its traditional Oris Big Crown
models as this was used for the
original models.
Luminescent dials
and hands.
2
On most Oris watches, the hands
and hour indices on the dials
Super-LumiNova luminescent
colour is applied. This lumines-
cent paint is charged by sunlight,
or even by artificial light, and is
absolutely free of any radioactive
additives. The phosphorescent
pigments retain their proper ties
Technical information and summary tables.
and can therefore be recharged as
often as necessary.
This phosphorescent proper ty is
at its most powerful during the
early stages of darkness, and
diminishes fairly rapidly during the
first 60 minutes. After this initial
period, the loss of light intensity
is much lower, and it is possible
to read the time clearly even after
5 – 6 hours of darkness.
To achieve the highest possible
level of phosphorescence, the
watch must not be continuously
obscured from sunlight or ar tificial
light (e.g. by being covered by a
shirt sleeve).
Metal bracelets,
leather and rubber
straps.
nsS
All genuine Oris straps bear the
Oris inscription on the reverse of
the straps and on the buckle.
Metal bracelets are made of 316L
stainless steel or from Grade 2
titanium. (See ‘Metals used for
cases and straps’).
Oris sources all of its genuine
crocodile, alligator, ostrich, ray
and lizard leather from animal
species not subject to protected
status. This is backed up by ClTES
certification (Convention on
International Trade in Endangered
Species of Wild Fauna or Flora).
English
2017 2018 2019 2020 2021 2022 2023 2024
January ❍ 12 ❍ 2/31 ● 6 ❍ 10 ● 13 ● 2 ❍ 6 ● 11
● 28 ● 17 ❍ 21 ● 24 ❍ 28 ❍ 17 ● 21 ❍ 25
February ❍ 11 ● 15 ● 4 ❍ 9 ● 11 ● 1 ❍ 5 ● 9
● 26 ❍ 19 ● 23 ❍ 27 ❍ 16 ● 20 ❍ 24
March ❍ 12 ❍ 2/31 ● 6 ❍ 9 ● 13 ● 2 ❍ 7 ● 10
● 28 ● 17 ❍ 21 ● 24 ❍ 28 ❍ 18 ● 21 ❍ 25
April ❍ 11 ● 16 ● 5 ❍ 8 ● 12 ● 1/30 ❍ 6 ● 8
● 26 ❍ 30 ❍ 19 ● 23 ❍ 27 ❍ 16 ● 20 ❍ 23
May ❍ 10 ● 15 ● 4 ❍ 7 ● 11 ❍ 16 ❍ 5 ● 8
● 25 ❍ 29 ❍ 18 ● 22 ❍ 26 ● 30 ● 19 ❍ 23
June ❍ 9 ● 13 ● 3 ❍ 5 ● 10 ❍ 14 ❍ 4 ● 6
● 24 ❍ 28 ❍ 17 ● 21 ❍ 24 ● 29 ● 18 ❍ 22
July ❍ 9 ● 13 ● 2 ❍ 5 ● 10 ❍ 13 ❍ 3 ● 5
● 23 ❍ 27 ❍ 16 ● 20 ❍ 24 ● 28 ● 17 ❍ 21
August ❍ 7 ● 11 ● 1/30 ❍ 3 ● 8 ❍ 12 ❍ 1/31 ● 4
● 21 ❍ 26 ❍ 15 ● 19 ❍ 22 ● 27 ● 16 ❍ 19
September ❍ 6 ● 9 ❍ 14 ❍ 2 ● 7 ❍ 10 ● 15 ● 3
● 20 ❍ 25 ● 28 ● 17 ❍ 20 ● 25 ❍ 29 ❍ 18
October ❍ 5 ● 9 ❍ 13 ❍ 1/31 ● 6 ❍ 9 ● 14 ● 2
● 19 ❍ 24 ● 28 ● 16 ❍ 20 ● 25 ❍ 28 ❍ 17
November ❍ 4 ● 7 ❍ 12 ● 15 ● 4 ❍ 8 ● 13 ● 1
● 18 ❍ 23 ● 26 ❍ 30 ❍ 19 ● 23 ❍ 27 ❍ 15
December ❍ 3 ● 7 ❍ 12 ● 14 ● 4 ❍ 8 ● 12 ● 1/30
● 18 ❍ 22 ● 26 ❍ 30 ❍ 19 ● 23 ❍ 27 ❍ 15
● New moon ❍ Full moon
31
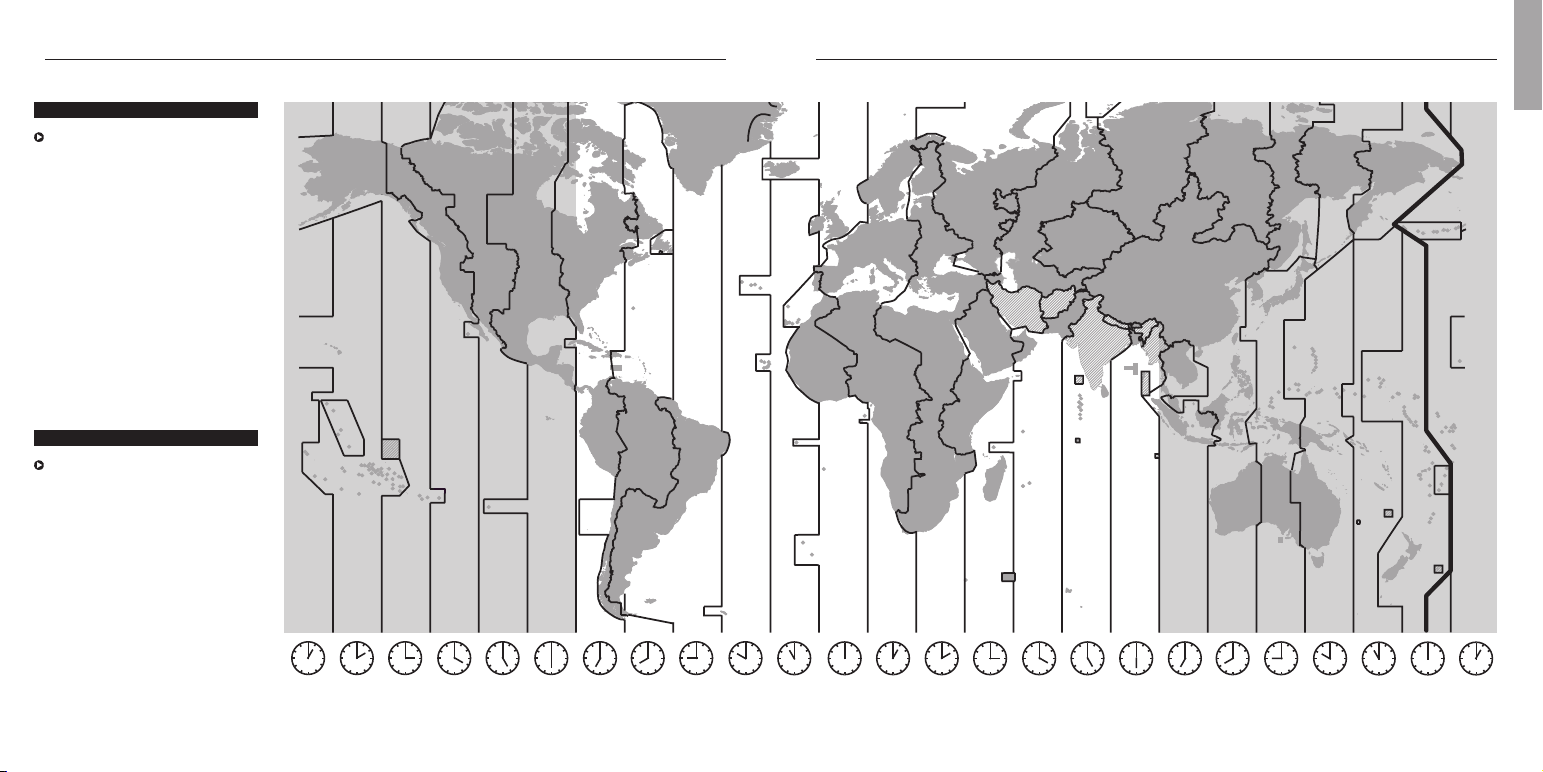
Time zones.
The times in the various time
zones are based on UTC (Universal
Coordinated Time). UTC has taken
over the function formerly per for-
med by Greenwich Mean Time
(GMT). UTC and GMT are both
based on longitude zero which
runs through Greenwich near
London. In most cases, the times
in other zones are calculated by
adding or subtracting whole hours,
depending on their respective
distances from the zero meridian.
In a few countries, e.g. Iran,
Afghanistan, India and certain
regions of Australia, there are
also time differences from UTC
of 3½, 4½, 5½ or 9½ hours.
Movements.
Detailed specifications can be
viewed at
www.oris.ch
.
Technical information and summary tables.
English
– 11
Midway
– 10
Hawaii
–9
Juneau
–8
L.A.
–7
Denver
–6
Mexico
City
–5
New
York
–4
Caracas
–3
Rio
–2
South
Georgia
–1
Azores
0
London
+ 1
Paris
+ 2
Cairo
+ 3
Moscow
+ 4
Dubai
+ 5
Karachi
+ 6
Dhaka
+ 7
Bangkok
+ 8
Hong
Kong
+ 9
Tokyo
+ 10
Sydney
+ 11
Noumea
+ 12
Auckland
– 11
Midway
First owner
Date
Name und address
Comments
Second owner
Date
Name und address
Comments
Third owner
Date
Name und address
Comments
International guarantee for Oris watches.
This guarantee excludes:
Normal wear and tear resulting
from wearing the watch and
ageing, e.g. scratched glass,
discolouration and/or material
alteration with leather, fabrics,
rubber, etc.
Damage resulting from failure to
observe the instructions for use
issued by Oris.
Damage such as knock, dents,
crashing, broken crystal etc.
resulting from improper, abnormal
or careless handling, neglect,
accident, collision impact, etc.
Damage resulting from improper
work performed by service
centres not authorised by Oris.
Watches modified without Oris
supervision.
Additional form of guarantee
granted by a direct outlet e.g.
retailer etc.
Indirect damage and/or secondary
damage, of any kind e.g. due to
watch stoppage or inaccuracy, etc.
This guarantee does not affect
your statutory rights.
The guarantee services described
here and the recommended main-
tenance work shall be performed
by an authorised Oris retailer
and/or by the national representa-
tives of Oris. A list is attached,
accurate at date of issue.
The current version of the list is
published at
www.oris.ch
.
Proof of ownership.
This list is supplied for information
only and does not form par t of the
guarantee terms and conditions.
Guarantee.
Oris SA provides a guarantee for
the first twenty four (24) months
following the date of purchase on
the attached and numbered
‘Guarantee Card’, in accordance
with the following terms and
conditions:
This guarantee covers material
and manufacturing defects, as
well as flaws existing when this
Oris watch was delivered to the
owner. This guarantee is only
applicable if the guarantee card
has been filled in completely and
correctly, and stamped by an
official Oris retailer, and if the
serial number on the guarantee
card matches the number on the
watch.
During this guarantee period,
and on presentation of the valid
guarantee card, the owner of the
watch has the right to a repair
free of charge. If Oris deems the
repair to be unsuitable, the watch
shall be replaced with an identical
or similar Oris watch within the
aforementioned guarantee period.
33
English
Proof of ownership.
Guarantee supplement for
watches bought in the USA.
All applicable implied warranties,
incl. the implied guarantee of
merchantability and of fitness for
a particular purpose given to you
by law are hereby limited to the
duration of this guarantee. Some
states in the USA do not allow
time limitations of warranties,
or exclusions or limitations of
incidental or consequential dama-
ges, so exclusions or limitations
mentioned may not apply to the
owner. This guarantee gives the
owner specific legal rights and he
may also have other rights which
may vary from state to state.
Oris’ obligation is strictly limited
to repair or replacement as stated
herein. Your Oris dealer carries
sole responsibility for any other
guarantees.

Product Manual Supplement.
Movement 915.
Complication (movement 915).
The quick date and day adjustment
must not be used between
3 p.m. and 1 a.m., because the
wheels for the change are active
during this time and may be dam-
aged.
Where fitted, open the screw-down
crown or QLC crown in accordance
with the instructions in Chapter 1.
Pull out the crown to position 2.
Turn the hand forwards past
12 oʼclock until the date
changes. Turn the hand further
until quarter past three.
Press pusher 3 with the special
tool provided, or with a wooden
toothpick, until the desired day
of the week is set.
Press pusher 4 and set the month.
Press pusher 5 and set the date.
Press pusher 6 and set the moon
display.
Since the moon moves a rela-
tively small distance within a
24 hour period, it is best to set
the moon setting when there
is a new moon or a full moon.
Use the crown to set the current
time – if it is in the afternoon,
turn it a further 12 hours.
The watch remains stopped when
it is in this crown position and
it can, for example, be started on
a time signal or the crown can be
pushed to position 1.
Push the crown to position 1.
Where fitted, close the screw-down
crown or QLC crown in ac-
cordance with the instructions in
Chapter 1.
Pos. 0 Crown is closed if it is a
screw-down crown or a
QLC crown
Pos. 1 Winding position
Pos. 2 Time and moon phase
setting
3 Pusher for day of the week
setting
4 Pusher for month setting
5 Pusher for date setting
6 Pusher for the moon phase
indicator
7 Day of the week indicator
8 Month indicator
9 Date indicator
10 Moon phase indicator
English
SUN JAN
31
8
9
10
11
12
13
14
15
16
17
18
19
20
21
22
23
30
29
28
27
26
25
24
7
6
5
4
3
2
1
102
4
56
3
10
87
9

Product Manual Supplement.
Oris Aquis Depth Gauge.
cleaning agents or solvents,
as this may damage the gasket
of the sapphire crystal.
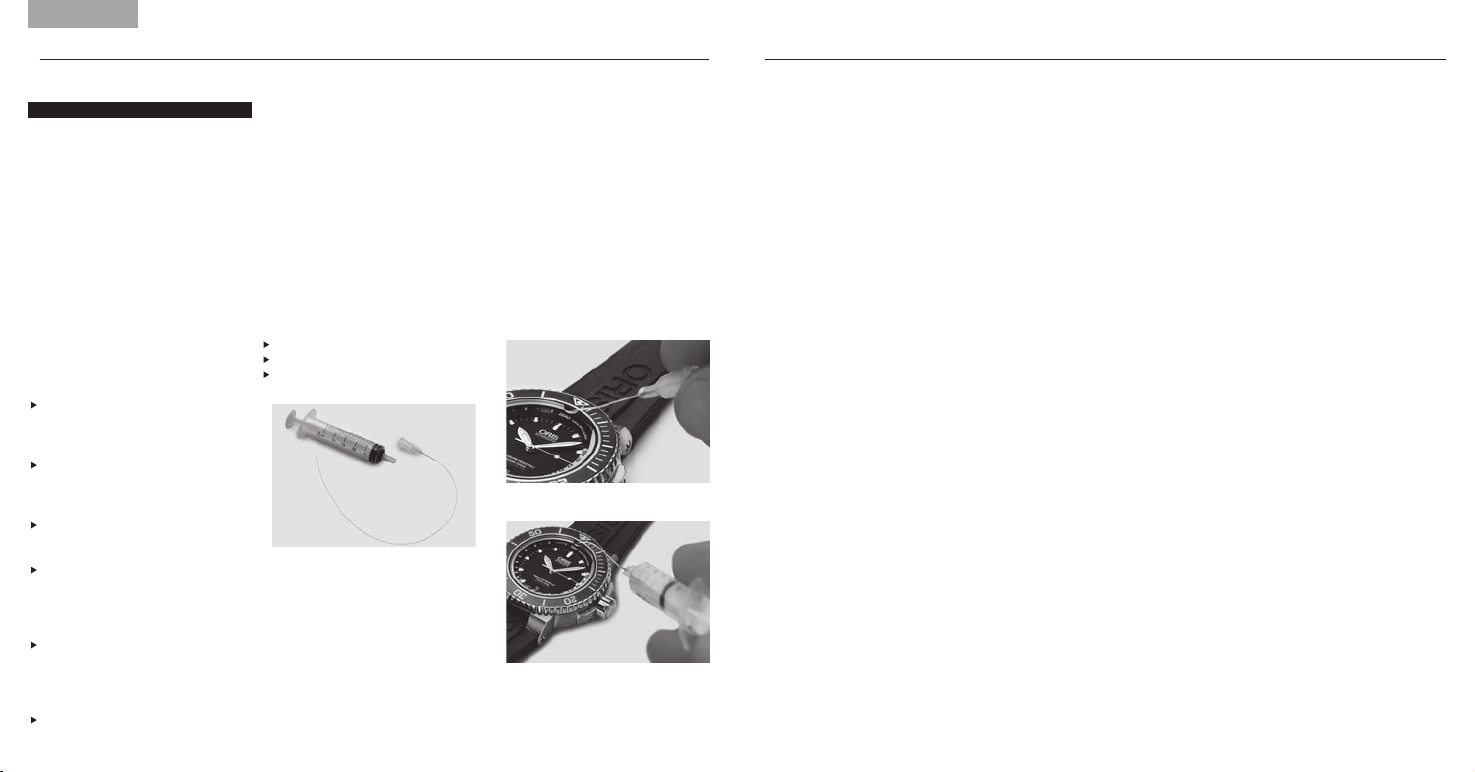
3. Plug the syringe on the cannula
and inject the water to rinse the
channel. (Fig. B)
4. If necessary, repeat steps 2 and 3
5. Withdraw the tube with the
mounted syringe slowly out of the
channel and, at the same time,
pull the piston of the syringe in
order to remove the water from
the channel
6. To remove residual water from
the channel apply step 1 & 5 only
(Fig. A)
(Fig. B)
Guidelines
Each Oris Aquis Depth Gauge has
been tested and found to comply
with the Oris testing standards.
It is possible that due to physical
damage, inadequate handling
or uncontrollable influence, the
depth indication may not function
properly. These guidelines will
help to make the Oris Aquis Depth
Gauge the best possible dive
companion.
Accuracy of the Depth Gauge
The following parameters interact
with the physical functionality of
the Oris Aquis Depth Gauge and
may slightly influence the accuracy
of depth indication:
Change of ambient air pressure
due to different temperature,
weather conditions and height
above sea level
Temperature difference of
ambient air/water, particularly
the difference in temperature
between the watch and the water
Salinity of the water
Safety Precautions Prior to Dive
Check there is no water residue
(dark grey colour spots) in the
gauging channel. If there is, clean
the channel as explained under
’How to Use the Cleaning Kit’
Ascertain that the Oris Aquis Depth
Gauge has ambient temperature,
i.e. that it has not been exposed
to extreme sunlight or other heat
or cold before the dive
Use the Oris Aquis Depth Gauge
only as a supplemental mechanical
depth gauge, in addition to the
usual diving instruments
Oris declines any responsibility
if these instructions are not
followed. The international guaran-
tee applies as stated in the Oris
Product Manual supplied with
each Oris watch and available on
www.oris.ch
Cleaning Kit Components
The cleaning kit for the Oris
Aquis Depth Gauge contains the
following parts:
1 x syringe 5 ml ➀
5 x cannula ➁
5 x flexible tube ➂ (mounted to
cannula)
How to Use the Cleaning Kit
The kit is designed to clean the
gauging channel and to remove
residual water. Proceed as follows:
1. Feed the flexible tube transversely
towards the channel into the
opening of the sapphire crystal
and push the tube until it reaches
the end of the channel. (Fig. A)
2. Fill the syringe with water
Note: Do not use any aggressive
English
➀
➁
➂

PRODUCT MANUAL SUPPLEMENT
ORIS BIG CROWN PROPILOT ALTIMETER

3. SETTING THE ALTIMETER
(Crown position 2): Pull the crown
out to position 2 and set the alti-
meter by rotating the crown. There
are different modes of settings,
such as rotating the crown until
the reference air pressure QNH/
QFE/QNE (e.g. supplied by an
airport control tower) aligns with
the red triangle at 6 o‘clock on the
central dial, or rotating the crown
to adjust the yellow indicator to
your known altitude. The watch
now displays the present altitude,
yellow indicator, and the actual
atmospheric pressure, red
indicator.
4. MEASURING ALTITUDE
(Crown position 1): Once the
altimeter has been set, push the
crown into position 1. Changes in
altitude are shown by the yellow
indicator against the outer dial
ring, on a scale from 0 – 15’000
feet, or from 0 – 4’500 metres.
GUIDELINES
Each Oris Big Crown ProPilot
Altimeter has been tested and
found to comply with the Oris
testing standards. It is possible
that due to physical damage,
inadequate handling or uncon-
trollable influence, the altitude
and air pressure indication may
not function properly. These
guidelines will help to make the
Oris Big Crown ProPilot Altimeter
the best possible companion.
Accuracy of the Altimeter
The following parameters interact
with the functional principle and
the barometric functionality of the
Oris Big Crown ProPilot Altimeter
and may slightly influence the
accuracy of the altitude indication:
Change of atmospheric pressure
due to different temperatures
Change of atmospheric pressure
due to different temperature
gradients at different locations of
reading the altitude
Changing weather conditions,
such as high pressure systems/
low pressure systems
Weather dynamics in general
Safety Precautions Prior to Use
Ascertain that the Oris Big Crown
ProPilot Altimeter has ambient
temperature, i.e. that it has not
been exposed to extreme sunlight
or other heat or cold before the
use.
Make sure that the crown at
4 o’clock is unscrewed and in
position 1 as described in the
section «How to use the Oris
Big Crown ProPilot Altimeter».
The red ring on the crown shaft
must be clearly visible. The alti-
meter does not work if the crown
is screwed in to the case.
Prevent the watch from getting in
contact with water once the crown
at 4 o’clock is unscrewed. The
case is open and not water resist-
ant when the crown at 4 o’clock is
not tightly screwed into position 0.
The special PTFE membrane only
ensures a protection against
water-vapour and humidity
entering into the watch. The
membrane does not ensure any
water-resistance.
Avoid dirt from coming into contact
with the watch. Dirt might block
the PTFE membrane and the case
openings and as a consequence
disable any free circulation of air
into/out of the case. The display
of the altitude will then be delayed
or completely out of operation.
Always tickle with your fingertips
on the watch before reading the
correct altitude. The smooth tick-
ling allows the aneroid cell and
the mechanism of the barometric
altimeter to work smoothly.
Always adjust the altimeter before
using according to the instruc-
tions given in the section «How to
use the Oris Big Crown ProPilot
Altimeter/setting the altimeter».
Check and recalibrate the alti-
meter frequently, whenever having
a reference point indicating its
altitude or a given reference pres-
sure in order to compensate for
changing ambient and weather
conditions.
For safety reasons: Use the Oris
Big Crown ProPilot Altimeter in
flight operations or on expeditions
only as a secondary instrument
in addition to any other device
indicating altitude, e.g. on-board
instruments of a plane.
Note: Pressurized aircraft cabins
simulate an environment of a
lower altitude than the airplane
is actually flying. Every baromet-
ric altimeter, be it electronic or
mechanical as the Oris Big Crown
ProPilot Altimeter, indicates the
current air pressure in the cabin
when flying with air carriers. The
altimeter instruments in such air-
planes have a pressure connec-
tion on the exterior of the plane
in order to measure pressure and
altitude.
Oris declines any responsibility
if these instructions are not
followed. The international
guarantee applies as stated in
the Oris Product Manual supplied
with each Oris watch and availa-
ble on www.oris.ch.
How to use the Oris Big Crown
ProPilot Altimeter
The dial is split into three zones –
in the centre is a traditional watch
dial showing the time; around that
is a gauge showing atmospheric
air pressure, read using the red
indicator; and an outer ring dis-
plays altitude up to 15’000 feet
or 4’500 metres, shown by the
yellow indicator.
1. NEUTRAL MODE
(Crown position 0): With both
crowns screwed down securely,
the Big Crown ProPilot Altimeter
performs like a regular auto-
matic watch. The central dial and
hands tell the time and date (ad-
justed by the crown at 2 o’clock)
and the watch is water-resistant
to 100 metres/10 bar.
2. ACTIVATING THE ALTIMETER
(Crown position 1): Unscrew the
crown at 4 o’clock into position
1 to activate the altimeter. A red
ring appears, indicating that the
altimeter is in use.
5. RETURNING TO NEUTRAL
(Crown position 0): To deactivate
the altimeter and return it to
neutral, screw the crown back
into position 0. This also re-seals
the watch so that it is once again
water-resistant to 100 metres/
10 bar.
English