27" Self-Cleaning
8uilt-lln Wall Oven
Homo de Pared Empotrado
de 27" con Autolimpieza
Models, Modelos 911.47702, 47703, 47704, 47709
229C4020P303-2
(SR-10492-2)
Sears, Roebuck and Co.,
Hoffman Estates, IL 60179 U,,S,A, www.sears.com
27" SELF-CLEANINGOVEN
Table of Contents
Oven Safety.. 3-4
Features of Your Oven .. 5
Removal of Packaging Tape 5
Oven Control, Clock, Timer 6
Control Display ........ 7
Clock .......... 8
Kitchen Timer . . 8
Control Lockout ...... 8
Tones .......... 9
F Codes .................... 9
Oven Cooking Tips 10-12
Baking ....................... 13
Broiling ........ 14
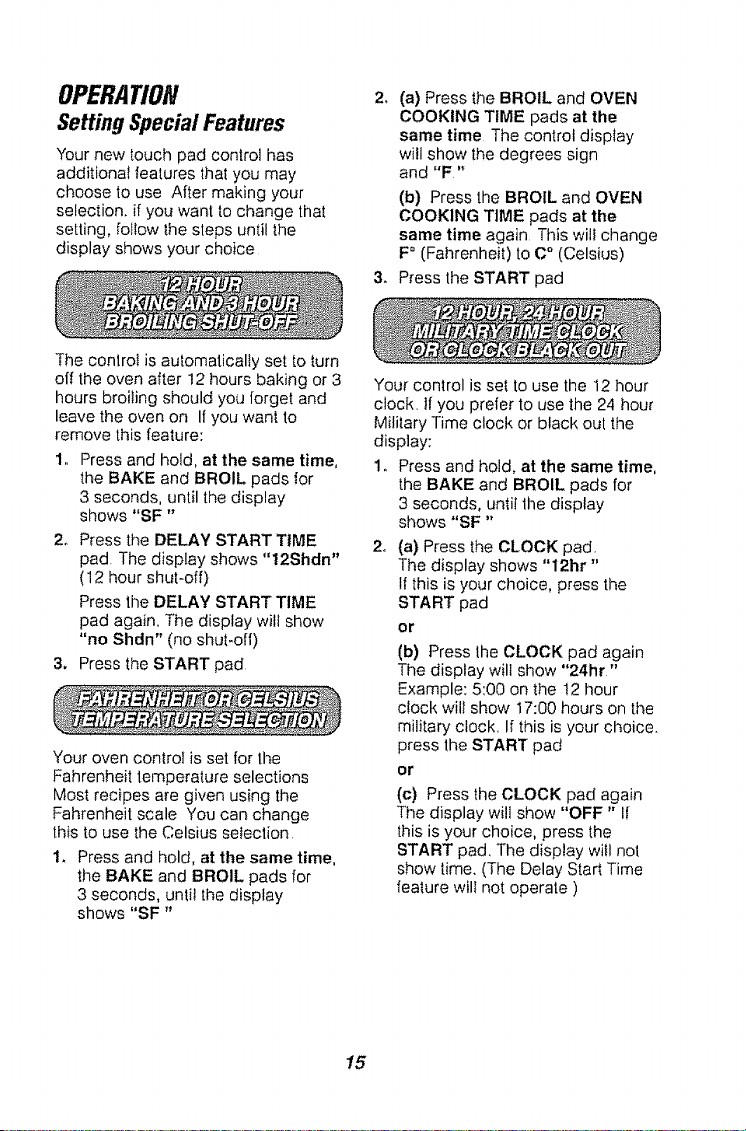
Setting Special Features 15-19
Self-Cleaning Cycle 20-21
Control Panel .... 22
Broiler Pan and Grid ....... 22
Self-Cleaning Oven Interior 22
Oven Light Bulb 22
Oven Racks ................. 23
Oven Door ......... 23-24
Before Calling for
Service ............. 25-26
Temperature Adjustment 27
Warranty , , 30
Service Numbers .... 60
For your convenience and future reference, please write down your model
and serial numbers in the space provided, They are located on the vertical
side trim, when the door is opened.
MODEL NUMBER:
SERIAL NUMBER:
ill illl
© Sears Roebuck andCo
2
iMPORTANTSAFETY
INSTRUCTIONS
SAVE THESE JNSTRUCTnONS
Read all instructions before using this appliance° When using gas or
electrical appliances, basic safety precautions should be followed,
including the following:
IMPORTANT: To ensure safety for
yourself, family and home, please
read your Use and Care Guide
carefully Keep it handy for
reference Pay close attention to
Safety Sections BE SURE your
appliance is installed and grounded
by a qualified technician
* DO NOT leave children alone
or unattended near an appliance
in use.
o TEACH CHILDREN not to play
with controls or any part of the
appliance, and not to sit, climb or
stand on the door or any parts of
the appliance
o CAUTION: NEVER STORE items
of interest to children in cabinets
above the appliance. Children
climbing on the appliance could
be seriously injured.
• KEEP THIS book for later use
o NEVER TRY to repair or replace
any part of the appliance unless
instructions are given in this guide
All other work should be done by a
qualified technician.
• NEVER USE your appliance for
warming or heating the room
° ALWAYS KEEP combustible wail
coverings, curtains, dishcloths,
towels, potholders and other linens
a safe distance from the appliance
o NEVER USE a towel or other bulky
cloth as a potholder, Make sure the
potholder is dry Moist potholders
could cause steam burns DO NOT
let potholders louch hot surfaces
• ALWAYS KEEP the appliance
area free from things that will burn
Food, wooden utensils and grease
buildup could catch fire Plastic
ulensils could melt and canned
foods could explode Your
appliance should never be
used as a storage area
° ALWAYS KEEP your appliance
clear of things that will burn
(gasoline and other flammable
vapors or liquids)
. NEVER HEAT unopened food
containers Pressure buildup can
cause the container to burst and
cause injury
• NEVER LEAVE containers of fat or
drippings in your oven
° NEVER TRY to clean a hot surface
Some cleaners produce noxious
fumes, and wet cloths or sponges
could cause steam burns.
• NEVER WEAR loose fitting clothing
when using your appliance
° BE SURE the oven is securely
installed in a cabinet that is firmly
attached to the house structure
° LARGE SCRATCHES OR
IMPACTS to glass doors can lead
to broken or shattered glass
3
IMPORTANTSAFETY
INSTRUCTIONS
• DO NOTtouch heating elements,
surfaces near them or interior oven
surfaces Thesemay be hot enough
to cause burns even though they are
dark in color, During and afteruse. do
nottouch or let clothing or flammable
mate_iaIcontact the elementsor hot
surfaces until they have had time to
cool Other surfaces near theoven vent
openings, oven door and window may
also be hot enough to cause bums
• PLACE OVEN RACKS in the desired
position while the oven is cool tf racks
must be moved while oven is hot do not
let polhotder contact the hot oven
element,
• AFTER BROILING always takethe
broiter pan and grid out of the oven and
clean them Leftover grease in the
broiler pan could catch fire the next time
you use your oven
. ALWAYSUSE care when opening
theoven door Let hot air and steam
escape before moving foods
• NEVERUSE aluminum foil to line
the oven botIom Improper use of foiJ
coutd start a fire, or electrical shock
could result
• NEVER BLOCK the oven vent opening
• CLEAN ONLY the parts listed in this
manual Follow all cleaning instructions
• NEVER RUB, move clean or damage
the door gasket on self-cleaning ovens
I[ is essential for a good seal
• NEVERTRY to clean utensils,
cookware, removable parts or broiler
SAVE THESE
pan and grid in the self-clean cycle
• DO NOT USE oven cleaners - No
commercial oven cleaner or protective
coating of any kind shoutdbe used in or
around any part of theoven
• IF THE SELF-CLEANINGmode
maIIunctions, turn the oven off and
disconnect the power supply, Have it
serviced by a qualified technician
IMPORTANT SAFETY NOTICE!
The California Safe Drinking Water and
Toxic Enforcement Act requires the
governor of California to publish a list
of substances known to the state to
cause birth defects orother
reproductive harm and requires
businesses to warn their customers
of potentialexposure to such
substances.The fiberglass insulation in
a self-cleaningoven will give off a very
small amount of carbon monoxide
during the cleaning cycle, Exposure
can be minimized by venting with an
open door or window or using a
ventilation fan or hood,
IMPORTANT: The health of some
birds is extremely sensitiveto the
fumes given off duringthe self-cleaning
cycle of any range. Move birds to
another well-ventilatedroom.
READ AND UNDERSTAND
THIS iNFORMATION NOW!
Be sure everyone fn your home knows
what to do in case of fire. Never'use
water on a grease fire; it will only
spread the flames,
OVEN FIRE:
Do not try to move the pan[
1o Close the oven door and turn
controfs off
2. If fire continues, carefully open the
door,throw baking soda on the fire,
or use a dry chemical, foam or ha!on
typeextinguisher
INSTRUCTIONS
4
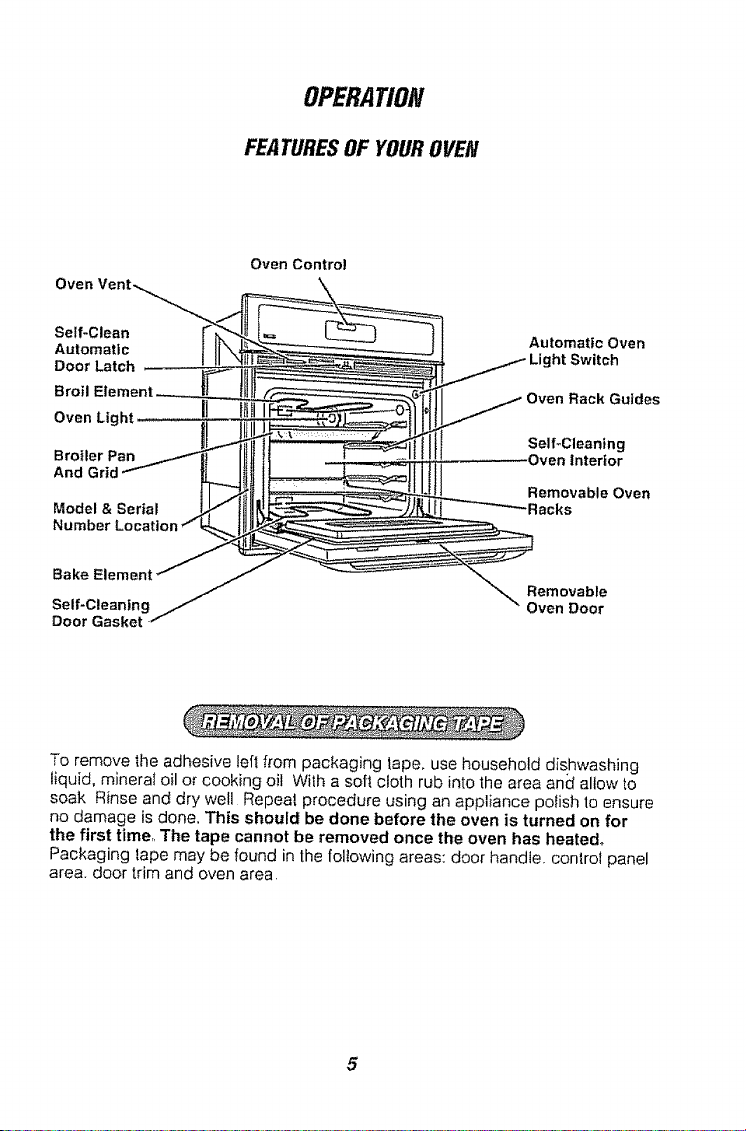
OPERATION
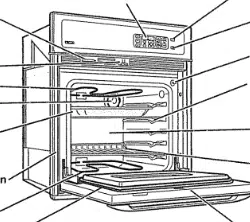
FEATURES OF YOUROVEN
Oven Control
To remove the adhesive left from packaging tape, use household dishwashing
liquid, mineral oil or cooking oil With a soft cloth rub into the area and allow to
soak Rinse and dry well Repeat procedure using an appliance polish 1o ensure
no damage is done. This should be done before the oven is turned on for
the first time,, The tape cannot be removed once the oven has heated°
Packaging tape may be found in the following areas: door handle, control panel
area. door trim and oven area.
5
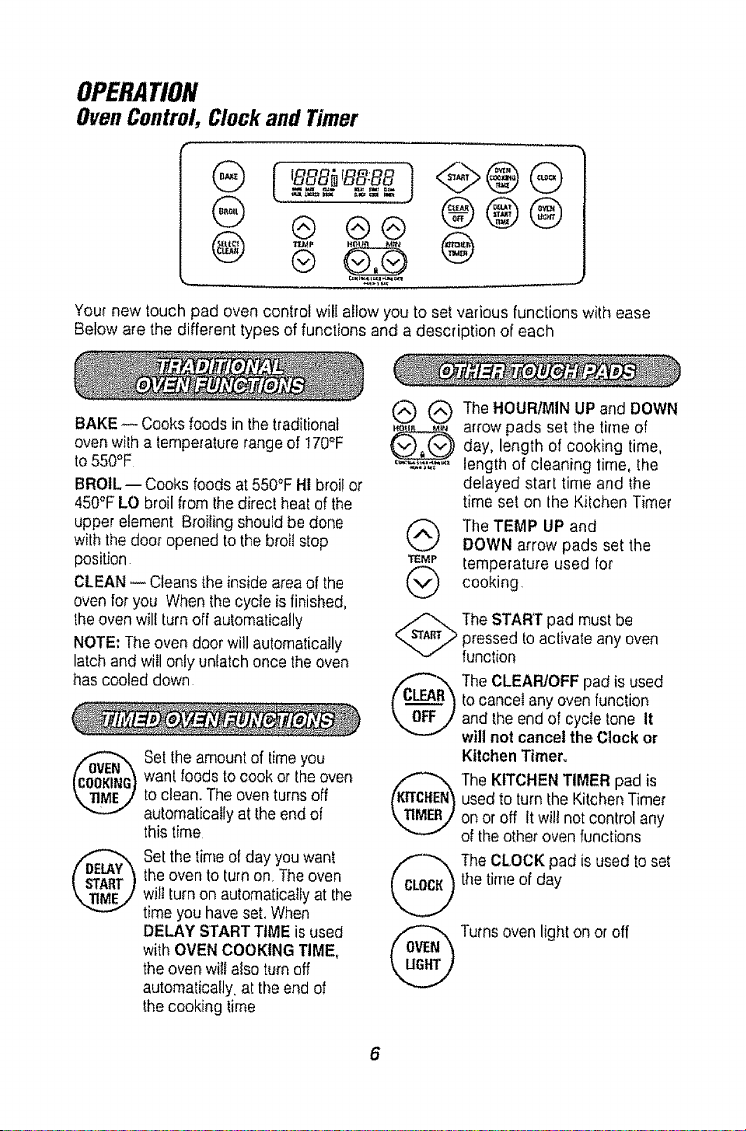
OPERATION
OvenControl,Clockand Timer
G ® ®® @®®
Your new touch pad oven control will allow you to set various functions with ease
Below are the different types of functions and a description of each
BAKE -- Cooks foods in the traditional
oven with a temperaturerange of 170°F
to550°F
BROIL -- Cooks foods at 550°F HI broil or
450°F LO broil from the direct heat of the
upper element Broiting shouJdbe done
with the door opened to the broil stop
position
CLEAN -- Cleans the inside area of the
ovenfor you When the cycIe is finished,
theoven will turn off automatically
NOTE: The oven door will automatically
latch and will only unlatch once the oven
has cooled down
®
@
Set the amount of timeyou
want foods to cook or the oven
to clean. The oven turns off
automatically at the end of
this time
Set the time of day youwant
theoven to turn on. Theoven
wilt turn on automatically at the
time you have set, When
DELAY START TIME is used
with OVEN COOKING TIME,
the oven will also turn off
automatically, at the end of
the cooking time
(_ Q The HOURIMIN UP and DOWN
.o, ,,, arrow pads set the time of
_day, length cooking time,
of
..... length of cleaning time, the
delayed start time and _he
time set on Ihe Kitchen Timer
(_ TheTEMP UP and
DOWN arrow pads set the
_r._P temperatureused for
cooking,
@
The START pad must be
pressed to activate any oven
function
The CLEAR/OFF pad is used
to cancel any oven function
and the end of cycle tone It
will not cancel the Clock or
KitchenTimer,
The KITCHEN TIMER pad is
used to turn the Kitchen Timer
on or off it will not control any
of the other oven functions
CL_ The CLOCK pad is used to set
the time of day
Turns oven light on or off
6

OPERATION
Control Display
OvenTemperature
indicator
- Timed indicator
Oven Function
Indicator
The Control Disptay is an easy
reference !or using your oven control
BeIow are descriptions of how the
Control Display works
OVEN TEMPERATURE INDICATOR
This indicator has a multiple purpose
,, Displays the temperature
,, Displays error code "ERR" -
If the oven temperature indicator
flashes "ERR", then you have set
an invalid time or temperature.
• Displays Oven Problems - If your
contro! flashes "F" and a number or
!etter, you have experienced an
oven probrem. Please read the
section on F-CODES in your
manual.
"ON" INDICATOR - Will light when
the oven turns on.
Oven Function
Indicator
SET INDICATOR - The set indicator
wilf flash in combination with an oven
function or timed function to let you
know you need to set a time or
temperature Example: "SET" and
"BAKE" witl flash Io let you know you
need to set the bake temperature
TIMED INDICATOR - Displays the
time of day, cooking time, delay start
time, cleaning time or the time set on
the Kitchen Timer
° Displays reminder code "PUSH
START" - If the time indicator
flashes the word "PUSH START",
then you need to press the START
pad to activate your setting
OVEN FUNCTION INDICATORS-
Display which oven function has been
set, when the oven door locks and if
the function is delayed
7
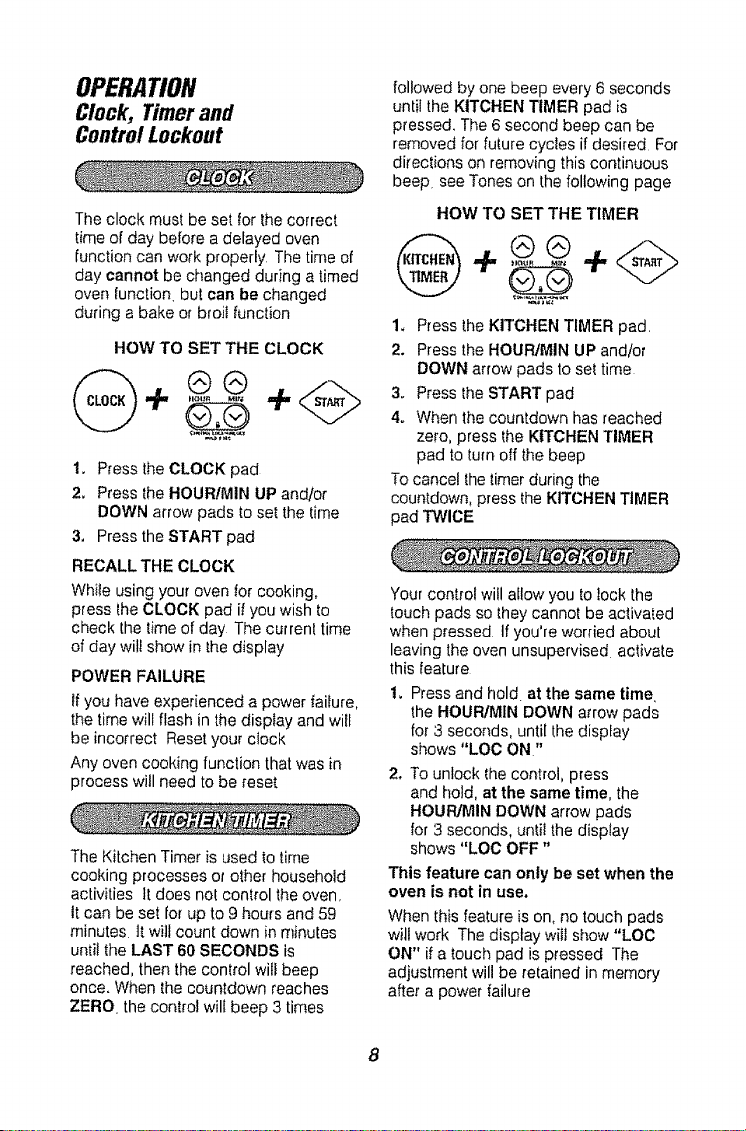
OPERATION
Clock, Timer and
Control Lockout
The clock must be set for the correct
time of day before a delayed oven
function can work properly, The time of
day cannot be changed during a timed
oven function but can be changed
during a bake or broil function
HOW TO SET THE CLOCK
1_ Press the CLOCK pad
2. Press the HOUR/MIN UP and/or
DOWN arrow pads to set the time
3. Press the START pad
RECALL THE CLOCK
Whiie using your oven for cooking,
press _heCLOCK pad if you wish to
check the time of day The current time
of day will show in the display
POWER FAILURE
If you have experienced a power failure,
the time will flash in the display and will
be incorrect Reset your clock
Any oven cooking function that was in
process will need to be reset
The Kitchen Timer is used to time
cooking processes or other household
activities It does not control the oven,
It can be set for up to 9 hours and 59
minutes ]t will count down in minutes
until the LAST 60 SECONDS is
reached, then the control wilt beep
once. When the countdown reaches
ZERO the control will beep 3 times
followed by one beep every 6 seconds
until the KITCHEN TIMER pad is
pressed. The 6 second beep can be
removed for future cycles if desired For
directions on removing this continuous
beep. see Tones on the following page
HOW TO SET THE TIMER
1. Press the KrT'CHEN TIMER pad.
2. Press the HOUR/MIN UP and/or
DOWN arrow pads to set time
3o Press the START pad
4. When the countdown has reached
zero, press the KITCHEN TIMER
pad to turn off the beep
To cancel the timer during the
countdown, press the KITCHEN TIMER
pad TWICE
Your control will allow you to lock the
touch pads so they cannot be activated
when pressed If you're worried about
leaving the oven unsupervised activate
this feature
I. Press and hold at the same time
the HOUR/MIN DOWN arrow pads
for 3 seconds, unti[ the display
shows "LOC ON"
2. To unlock the control, press
and hold, at the same time, the
HOUPJMIN DOWN arrow pads
for 3 seconds, unlil the display
shows "LOC OFF"
This feature can only be set when the
oven is not in use.
When this feature is on, no touch pads
will work The display will show "LOC
ON" if a touch pad is pressed The
adjustment will be retained in memory
after a power failure
OPERATION
OvenControl, Clock and Timer
Your new control has a series ol tones
that will sound at different times.These
tones may sound while you set the
control for an oven function, or at the
end of the oven function tt will also alert
you that there may be a problem with
the functions Below are the types of
tones and a brief description of each
TONES WHILE SETTING THE
CONTROL- When you press a touch
pad you will heat a beep This beep will
let you know you have placed enough
pressure on the pad to activate it (The
arrow pads de not beep )
END OF TIMED CYCLE TONE - At the
end of a timed cooking function,
you will hear 3 short beeps followed by
I beep every 6 seconds This 6-second
beep wil! continue to sound until the
CLEAR/OFF pad is pressed or you may
select the special feature to cancel this
6-second beep from sounding at the
end of future cycles
TO CANCEL THE 6 SECOND BEEP
1,, Press and hold the BAKE and
BROIL pads. at the same time
for 3 seconds, untit the display
shows "SF"
2, Press the KITCHEN TIMER pad.
The display will show "CON BEEP"
(continuous beep)
3. Press the KITCHEN TIMER pad
again, The display will show
"BEEP" (beep canceled)
& Press the START pad to cancel the
6-second beep and leave the
special feature mode
If you would like to return the 6 second
beep, repeat steps above until the
display st_ows your choice and press
the START pad
ATTENTION TONE - This tone will
sound if you make an error or an
oversight is made while setting an
oven function
Examples would be:
a, Setting a clean cycle and the oven
door is not properly closed
b° Setting function and not pressing the
START pad
co Pressing an additional function pad
without first setting a temperature or
time
do ERR will flash if you set an invalid
temperature Press the CLEAR/OFF
pad 1oclear the control and reset the
oven function,
Any of these can be quickly identified
by watching the display.
PREHEAT TONE - When you
select a cooking mode, set an oven
temperature and press the START
pad, the oven starts to heat When the
temperature inside the oven reaches
fhe temperature you have set, a tone
wil! sound to let you know the oven is
ready for baking,
If you set an oven function and 1he
control beeps while the display is
flashing "F" and a number or lelter
such as "F-4" or "FI," there may be
a problem with the control or oven.
Simply press the CLEAR/OFF pad
and wait about an hour Try setting the
function again 1fthe code repeats, write
down the flashing code and call for
service Tell the technician what code
was flashing
9
OPERATION
OvenCookingTips
it is normal to have some odor when
using your oven for the first time To
help e]iminate this odor ventilate the
room by opening a window or using
a vent hood
IMPORTANT: Never cover the oven
bottom or oven rack with aluminum
foil Improper use can cause poor
heat flow, poor baking results and
may damage the oven finish To
prevent staining from spiflovers, you
may place a piece of aluminum foil or
a cookie sheet below foods which
may spill over
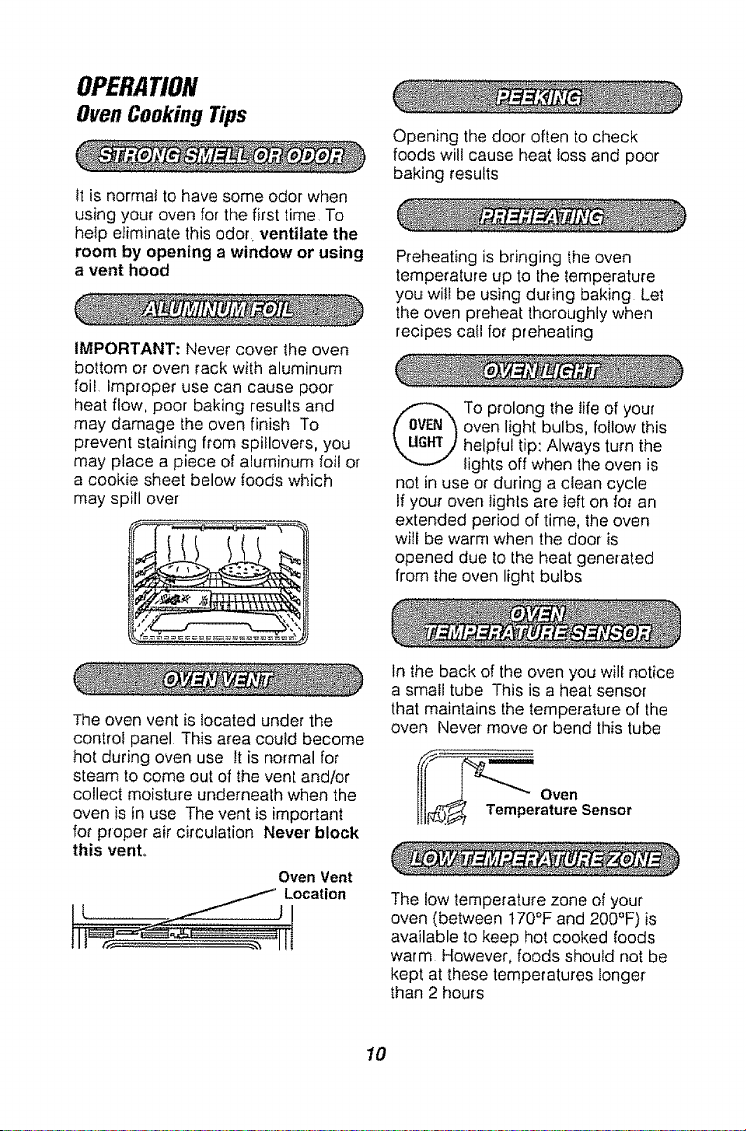
The oven vent is Iocated under the
contro} panel This area could become
hot during oven use It is normal for
steam to come out of the vent and/or
collect moisture underneath when the
oven is in use The vent is important
for proper air circulation Never' block
this vent°
Oven Vent
Location
!
Opening the door often to check
foods will cause heat loss and poor
baking results
Preheating is bringing the oven
temperature up to the temperature
you wiII be using during baking Let
the oven preheat thoroughly when
recipes call for preheating
To prolong the life of your
oven light bulbs, follow this
helpful tip: Always turn the
lights off when the oven is
not in use or during a clean cycle
If your oven lights are left on for an
extended period of time, the oven
will be warm when the door is
opened due to the heat generated
from the oven light bulbs
In the back of the oven you will notice
a small tube This is a heat sensor
that maintains the temperature of the
oven Never move or bend this tube
_ .,_ Oven
Ill_._ TemperatureSensor
The low temperature zone of your
oven (between 170°F and 200°F)is
available to keep hot cooked foods
warm However, foods should not be
kept at these temperatures longer
than 2 hours
10
OPERATION
OvenCookingTips
When using your convenient Delay
Start operation, foods such as dairy
products, fish, poultry, etc,, should
never sit more than '1 hour before
cooking Room temperature and the
heat from the oven light promote
bacterial growth
Most recipes for baking have been
developed using high4at products
such as butter or margarine (80% fat
by weight--the federat requirement
for products labeled "margarine")
You witl get poor results if cakes, pies,
pastries, cookies or candies are made
wi_h tow4at spreads Low-fat spreads
contain less fat and more water The
high moisture content of these
spreads affects the texture and flavor
of favorite baked recipes The lower
the fat content of a spread product,
the more noticeable these differences
become To ensure best results, use
margarine, butter or stick spreads
containing at least 70% vegetable oil
The Oven Temperature Sensor at the
back of the oven continuously senses
and controls the temperature inside
the oven To keep a constant set
temperature, the elements will cycle
(turn on and off during cooking)
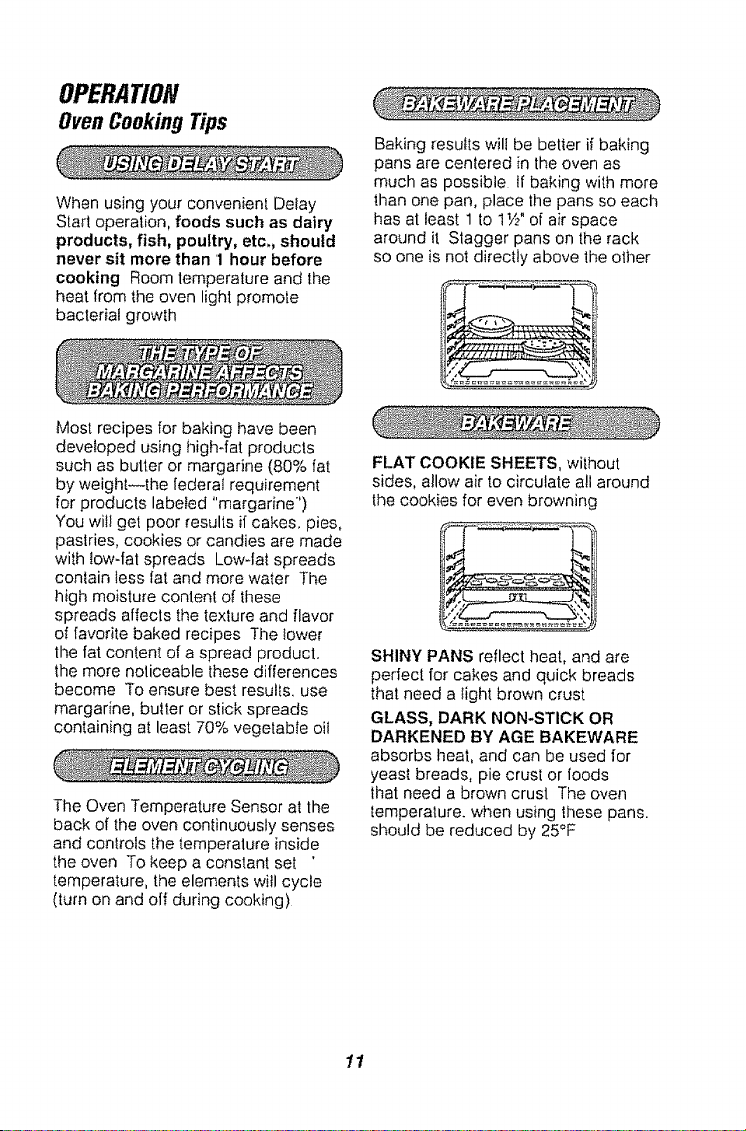
Baking results will be better if baking
pans are centered in the oven as
much as possible tf baking with more
than one pan, place the pans so each
has at least 1 to 1i/£ of air space
around it Stagger pans on the rack
so one is not directly above the other
FLAT COOKIE SHEETS, without
sides, allow air to circulate all around
the cookies for even browning
SHINY PANS reflect heat, and are
perfect for cakes and quick breads
that need a light brown crust
GLASS, DARK NON-STICK OR
DARKENED BY AGE BAKEWARE
absorbs heat, and can be used for
yeast breads, pie crust or roods
that need a brown crust The oven
temperature, when using these pans.
should be reduced by 25_F
11
OPERATION
OvenCookingTips
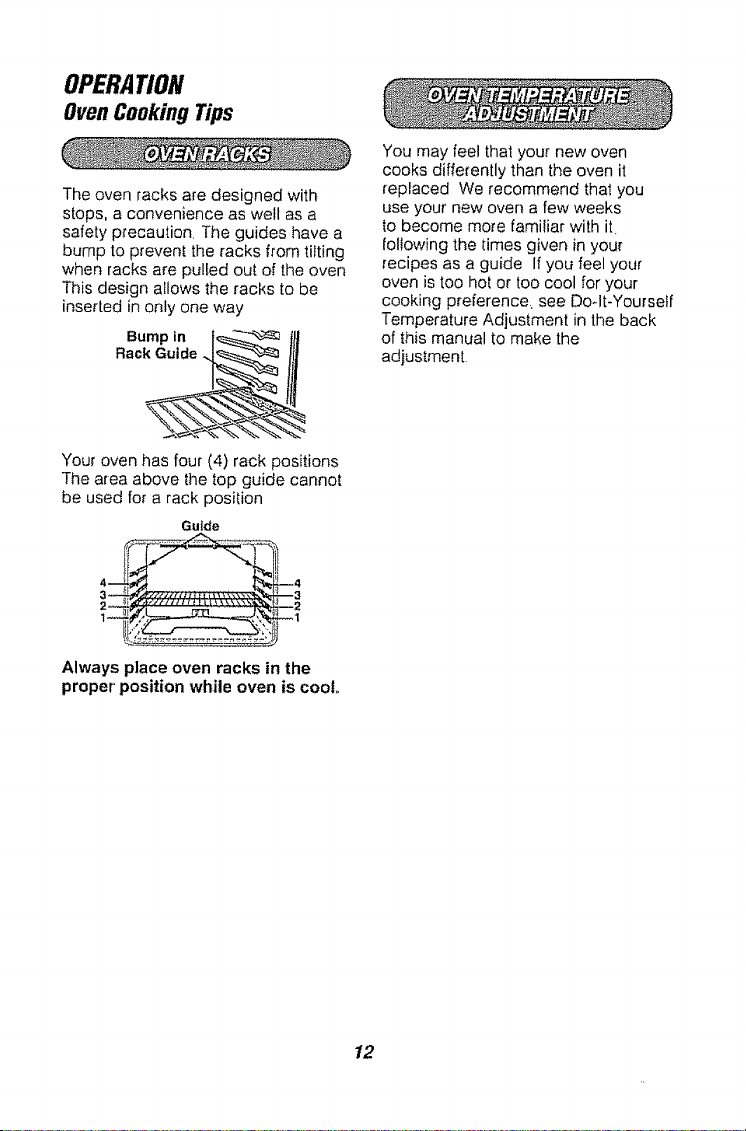
The oven racks are designed with
stops, a convenience as well as a
safety precaution, The guides have a
bump to prevent the racks from tilting
when racks are pulled out of the oven
This design allows the racks to be
inserted in only one way
Bump in
Rack Gui,
You may feel that your new oven
cooks differently than the oven it
replaced We recommend that you
use your new oven a few weeks
to become more familiar with it
following the times given in your
recipes as a guide If you feel your
oven is too hot or too cool for your
cooking preference see Doqt-Yourself
Temperature Adjustment in the back
of this manual to make the
adjustment
Your oven has four (4) rack positions
The area above the top guide cannot
be used for a rack position
Guide
Always place oven racks in the
proper' position while oven is coolo
12
OPERATION
Baking&Roasting
1. Press the
BAKE pad
(_ 2,. Press the TEMP UP
and/or DOWN arrow
TEMP pads to set the oven
temperature you
prefer to use
3° Press the
START pad
To set the oven to cook for a specilic
time and turn off automatically
(_ 1_ Press the
BAKE pad
(_ 2. Press the TEMP UP
and/or DOWN arrow
TEMP pads to set the oven
temperature you
prefer to use
3o Press the
OVEN COOKING
TIME pad
(_ (_ 4, Press the HOUR/
MIN UP and/or
_ouR M_N DOWN arrow pads
to set the amount of
• time you prefer your
foods to cook
_ 5o Press the
START pad
To set the oven _oturn on at
a later time of day, cook for a
specific amount of time and lurn
off automatically
1. Press the BAKE pad
(_ 2., Press the TEMP UP
and/or DOWN arrow
TEMP pads tOset the oven
temperature you
prefer to use
3, Press the
OVEN COOKING
TIME pad
(_ (_) 4. Press the HOUR/MIN
UP and/or DOWN
_ouR M_N arrow pads to set the
amount time you
of
co,,,%,%=#1.... prefer your foods to
cook
5. Press the DELAY
START TIME pad
@ @ 6o Press the HOUR/MIN
UP and/or DOWN
HOUR M[N arrow pads to set the
time of day you
,,_,.o_,._,.o_, prefer the oven to
"°'°'_ turn on
(_7o Press the
START pad
The oven will turn off at the end of the
cooking time unless the cook and
hold feature has been activated
13
OPERATION
Broiling
Broiling is cooking by direct heat
from the upper element The oven
door should remain open to the broil
stop position during broiling
It is not necessary to preheat the
oven when broiling Use the broiter
pan and grid that came with your
oven Both are designed for proper
drainage of fat and liquids
lf foil is used it must be
molded tightly to the
grid and slits cut into
the foil to match those
of the grid. This allows fats and
liquids to drain into the broiler
pan, preventing fire and
excessive smoke.
Always remove the pan and grid
from the ovem Storing or'
forgetting a soiled
broiler pan in the oven
is a potential smoke or
fire hazard,
k,
The U S Department of Agriculture
recommends to cook meat and
poultry thoroughly--meat to at least
an INTERNAL temperature of 160°F
and poultry to at least an INTERNAL
temperature of 180°F Cooking to
these temperatures usually protects
against food-borne illness
The closer you place foods to the
broil element the faster foods brown
on the outside yet remain red to pink
in the center
Moving meats away from the element
will allow the meat to cook to the
center while browning on the outside
Cook side 1 at least 2 minutes longer
than side 2 If your' oven is connected
to 208 volts, you may want to use a
higher rack position and/or broil
foods longer
The size, weight, thickness starting
temperature and your preference of
the doneness of the meat will affect
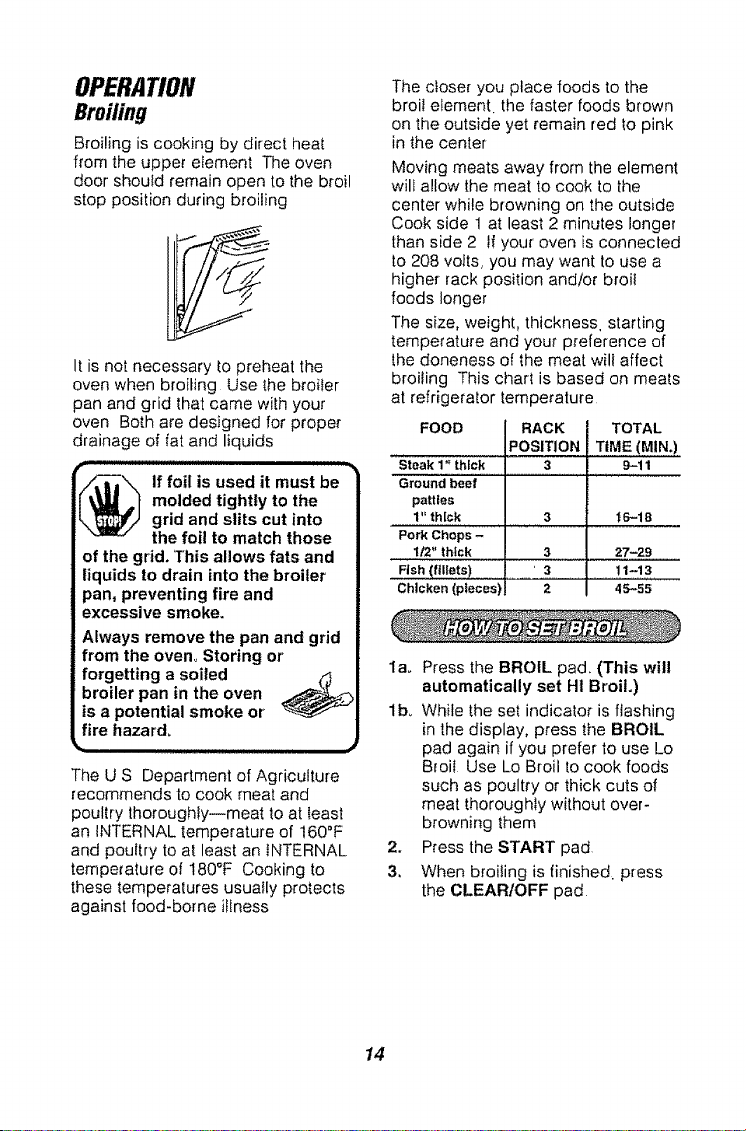
broiling This chart is based on meats
at refrigerator temperature
FOOD
Steak 1" thick
Ground beef
patties
1" thick
Pork Chops -
1t2" thick
Fish (fi!lets)
Chicken (pieces)
RACK
POSITION
3
TOTAL
TIME (MINo)
9-11
3
'3
2
3 16-18
27-29
11-13
45.'_55
lao Press the BROIL pad. (This will
automatically set Ht Broil.)
lbo While the set indicator is flashing
in the display, press the BROIL
pad again if you prefer to use Lo
Broil Use Lo Broil to cook foods
such as poult_'y or thick cuts of
meat thoroughly without over-
browning them
2. Press the START pad
3, When broiling is finished, press
the CLEAR/OFF pad
14
OPERATION
Setting Special Features
Your new touch pad control has
additional features that you may
choose to use After making your
selection, if you want to change that
setting, follow the steps until the
display shows your choice
2_
3_
(a) Press the BROIL and OVEN
COOKING TIME pads at the
same time The control display
will show the degrees sign
and "F"
(b) Press the BROIL and OVEN
COOKING TiME pads at the
same time again This witi change
F= (Fahrenheit) to C ° (Celsius)
Press the START pad
The control is automatically set to turn
off the oven after 12 hours baking or 3
hours broiling should you forget and
leave the oven on If you want to
remove this feature:
1 ,,
Press and hold, at the same time,
the BAKE and BROIL pads for
3 seconds, until the display
shows "SF"
2,. Press the DELAY START TIME
pad. The display shows "12Shdn"
(12 hour shut-off)
Press the DELAY START TIME
pad again, The display will show
"no Shdn" (no shut-off)
3. Press the START pad
Your oven control is set for the
Fahrenheit temperature selections
Most recipes are given using the
Fahrenheit scale You can change
this to use the Celsius seIecfion
Press and hold, at the same time,
the BAKE and BROIL pads for
3 seconds, until the display
shows "SF "
Your control is set to use the 12 hour
clock. If you prefer to use the 24 hour
Military Time clock or black out the
display:
1o Press and hold, at the same time,
the BAKE and BROIL pads for
3 seconds, until the display
shows "SF "
24
(a) Press the CLOCK pad
The display shows "12hr"
If this is your choice, press the
START pad
or
(b) Press the CLOCK pad again
The display will show "24hr"
Example: 5:00 on the !2 hour
clock wilt show 17:00 hours on the
military clock. If this is your choice.
press the START pad
or
(c) Press the CLOCK pad again
The display will show "OFF" If
this is your choice, press the
START pad, The display wi!l not
show time. (The Delay Start Time
feature wilI not operate )
15

OPERATION
SettingSpecialFeatures
Your new control has a cook and hold
feature for timed cooking only that will
keep hot cooked foods warm up to 3
hours after the timed cooking is
finished To activate this feature:
1. Press and hold, at the same time,
the BAKE and BROIL pads for
3 seconds, until the display
shows "SF"
2. (a) Press the OVEN COOKING
TIME pad. The display will show
"HLd OFF"
(b) Press the OVEN COOKING
TIME pad again to activate the
feature. The display wiElshow
"HLd ON "
3. Press the START pad
This special feature witl aglow you to
change the speed; #1 means speed
of change is stow up to #5 which
means speed of change is fast.
To set the speed you prefer, follow
these steps:
1. Press and hold, at the same time,
the BAKE and BROIL pads for
3 seconds, until the display
shows "SF "
2. Press any UP arrow pad The
display will show the current set
speed
3. Press any UP arrow to increase
the speed up to the number 5
or
Press any DOWN arrow pad to
decrease the speed down Io the
number t
4. Press the START pad
16
OPERATION
Setting Special Features
(Designed for use on the Jewish
Sabbath and Holidays.)
The Sabbath feature can be used
for baking/roasting only. It cannot
be used for broiling, selLcleaning
or Delay Start cooking
NOTE: The oven light comes on
automatically (on some models)
when the door is opened and goes
off when the door is closed. The bulb
may be removed See the Oven Light
Replacement section On models with
an OVEN LIGHT pad, the oven light
may be turned on and left on
HOW TO SET FOR REGULAR
BAKING/ROASTING
NOTE; To understand how the oven
control works, practice using regular
baking (nomSabbath) be[ore entering
the Sabbath mode
Make sure the clock shows the
correct time of day and the oven
is off
@
@'.
Touch and hold both
the BAKE and BROIL
pads, at the same
time, until the display
shows "SF"
Tap the DELAY START
TIME pad until "SAb
bAtH" appears in the
display.
Touch the START pad
and D will appear in the
display
Touch the BAKE pad
No signal wilI be given
TEMP
@
The preset starting
temperature wilt
automatically be set to
350°F Tap the UP or
DOWN arrow pads to
increase or decrease
the temperature in
5° increments The
temperature can be set
between 170°F and
550°F No signal or
lemperalure will be given
Touch the START pad
After a random delay
period of approximately
30 seconds to t minute.
D a will appear in the
display indicating that the
oven is baking/roasting
If _ c does not appear in
the display, start again at
Step 4
To adjust the oven temperature.
touch the BAKE pad and tap the
UP or DOWN arrow pads to increase
or decrease the temperature in 5°
increments Touch the START pad
NOTES:
* When the display shows D the
oven is set in Sabbath When the
display shows D a the oven is
baking/roasting
o The CLEAR/OFF and OVEN
COOKING TIME pads are active
during the Sabbath feature
17

OPERATION
SettingSpecialFeatures
HOW TO SET FOR TIMED BAKING/
ROASTING-IMMEDIATE START
AND AUTOMATIC STOP
NOTE: To understand how the oven
control works, practice using regular
(non-Sabbath) Immediate Start and
Automatic Stop before entering the
Sabbath mode
Make sure the clock shows the
correct time of day and the oven
is off
G
4_
HOUR MIN
_l_lmL Lo_ u__o_x
Touch and hold both
the BAKE and BROIL
pads, at the same
time, until the display
shows "SF"
Tap the DELAY START
TIME pad until "SAb
bAtH" appears in the
display
Touch the START pad
and D will appear in the
display
Touch the OVEN
COOKING TIME pad
No signal will be given
Touch the UP or DOWN
arrow pads to set the
desired length of
cooking time between
1 minute and 9 hours
and 59 minutes The
cooking time that
you entered wilI be
displayed
Touch the START pad
G
(_ 8_ The preset starting
temperature will
automaticatly be set to
TEI',AP 350°F Tap the UP or
DOWN arrow pads to
increase or decrease
the temperature in 5°
increments The
temperature can be
set between t70°F and
550'>F No signal or
temperature will be
given,
<_9o Touch the START pad
10, After a random detay
period of approximately
30 seconds to 1 minute,
D c will appear in the
display indicating that
the oven is baking/
roasting if _ c does not
appear in the display,
start again at Step 7
To adjust the oven temperature,
touch the BAKE pad and tap the UP
or DOWN arrow pads to increase or
decrease the temperature in 5°
increments Press the START pad
NOTES:
• When the display shows D the
oven is set in Sabbath When the
display shows D c the oven is
baking/_oasting
° When cooking is finished, the
display wilI change from D c to D
and 0:00 will appear, indicating
that the oven has turned OFF but
is still set in Sabbath Remove the
cooked food
7o Touch the BAKE pad
No signal will be given
18
OPERATION
Setting Special Features
HOW TO EXIT THE SABBATH
FEATURE
1_ ouch the CLEAR/OFF
pad
2o If the oven is cooking.
wait for a random delay
period of approximately
30 seconds to t minute.
until only D is in the
display
3oTouch and hold both
the BAKE and BROIL
pads, at the same
time, until ti_e display
shows "SF"
Tap the DELAY START
TIME pad until "12
shdn" or "no shdn"
appears in the display
"12 shdn" indicates
that the oven will
automatically turn
off after 12 hours "no
shdn" indicates that
the oven witf not
automatically turn off
Touch the START pad
NOTE: if a power outage occurred
while the oven was in Sabbath mode,
the oven will automatically turn off and
the oven control must be reset
19
CARE AND CLEANING
Self.CleaningCycle
Iv
Remove the broiler pan and grid.
utensils and any foil that may be
in the oven
2. If your oven is equipped
with nickel oven racks, they
should be removed If your
oven is equipped with gray
porcelain-coated oven racks,
they may stay in the oven during
the self-clean cycle
3. Soil on the front frame and
outside the gasket of the door
liner will need to be cleaned
by hand
Front Frame
Clean these areas with hot water,
soap-filled pads or cleansers such as
Soft Scrube to remove any soil Rinse
well with clean water and dry
Do not use oven cleaners--
no commercial oven cleaner or
protective coating of any kind should be
used in or around any part of the oven.
4. Wipe up any heavy spillovers on the
oven bottom
5_
Do not clean the door gasket The
fiberglass material of the oven door
gasket canno_withstand abrasion It
is essential for the gasket to remain
intact If you notice it becoming
worn or frayed, it should be
replaced
The door gasket is designed to have
a 5"-6" gap at the bottom of the door
This allows for proper air circulation
DoorPanel Gasket
DoorLiner
it is normal for your oven door to give
the appearance of not having a good
seat against the oven This is due to
the gasket The location of the gasket
on the door maintains a good sea! and
prevents any heat loss
. i,Jllill i/llJJJl ii i ,U,,I,L._
/_ Utensils should never be
I _1 left in the oven during a
self-clean cycle.
Nickel oven racks may be
cleaned during the self-clean
cycle, but will lose their luster
and become hard to slide° if you
choose to leave them in durina
the cycle, wiping the edges do-wn
with vegetable oil after the cycle
will help them slide easier_
Gray porcelain-coated oven
racks may safely be cleaned in
the oven during a self-clean
cycle. It wilt be necessary to
grease the edges of the oven
rack with a light coating of
vegetable oil after a clean cycle.
This will help maintain the ease
of sliding the racks in and out of
the oven°
For the first clean cycle, vent the
room with an opened window or
hood vent. This will reduce the
odor when heating new parts_
= a
20
CAREAND CLEANING
Self-C/eaningCycle
The Clean Cycle, includingcool down
lime. offers preset options of 3.4, or 5
hours, bul you maychange lt_is1oany
time between 3 and 5 hours
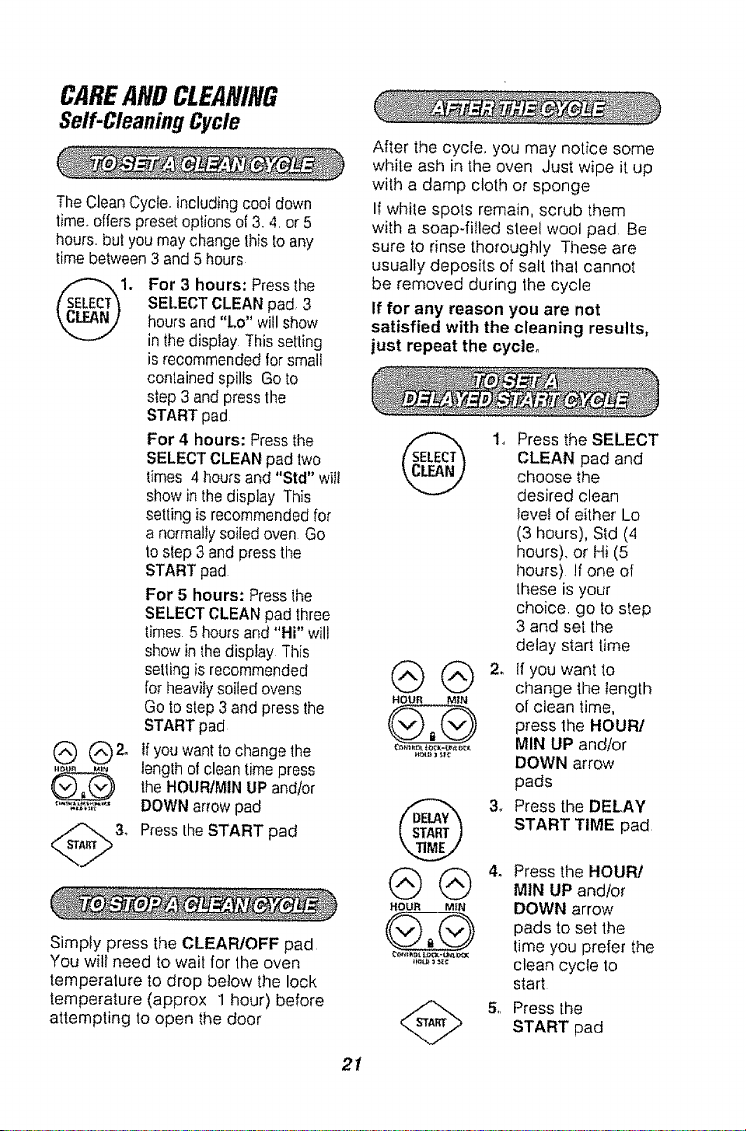
1.
For 3 hours: Press the
SELECTCLEAN pad, 3
hours and "Lo" will show
in the display This setting
is recommended tor small
contained spills Go to
step 3 and press the
START pad
For 4 hours: Pressthe
SELECTCLEAN pad two
times 4 hours and "Std" will
show in the display This
setting is recommended for
a normallysoiled oven Go
to step 3 and press the
START pad
For 5 hours: Press the
SELECTCLEAN pad three
times.5 hoursand "Hi" will
show in the display This
setting is recommended
for heavily soiled ovens
Go to step 3 and press the
START pad
If you want to change the
length of cleantime press
lhe HOURIMIN UP and/or
DOWN arrow pad
Press the START pad
Simpty press the CLEAR/OFF pad
You will need to wait for the oven
temperalure to drop betow the lock
temperature (approx 1 hour) before
attempting to open the door
21
After the cycle, you may notice some
white ash in the oven Just wipe it up
with a damp clott_ or sponge
If white spots remain, scrub them
with a soap-filled steel wool pad Be
sure to rinse thoroughly These are
usually deposits of salt lhal cannot
be removed during the cycle
If for any reason you are not
satisfied with the cleaning results,
just repeat the cycle.
1. Press the SELECT
CLEAN pad and
choose the
desired clean
level of either Lo
(3 hours), S_d(4
hours), or Hi (5
hours) !f one ol
these is your
choice, go to step
3 and set the
delay start lime
(_ @ 2, ifyouwantfo
change the length
M_N of clean time,
press the HOURI
c ,,'d.",,;_ MIN UP and/or
DOWN arrow
pads
& Press the DELAY
START TIME pad
@ @ 4_ Press the HOUR!MIN UP and/or
DOWN arrow
pads to set the
time you prefer the
_"%_';'_ clean cycle to
start
5,, Press the
START pad
CAREAND CLEANING
CLEANING MATERIALS
• Dishwashing detergent
• Warm water
° Soft cloth
Do not use abrasive cleaners,
industrial cleaners or bleach.
Clean only as touch-up between clean
cycles Use dishwashing liquid, warm
water or a soap-filled pad Rinse well aiter
cleaning and dry
NEVER USE OVEN CLEANERS
IN OR AROUND ANY'PART OFTHE
OVEN.
When cleaning, be sure not to bend or
displace the temperature sensor located
on the back wal! of the oven
lIl_ Temperature Sensor
CLEANING MATERIALS
• Dishwashing detergent
° Warm water
° Soap-filled scouting pad
• Commercial oven cleaner
TO CLEAN
Allow fhe pan to soak Sprinkle the grid
with dishwashing detergent and cover
with a damp cloth or paper towel Scour
as needed Rinse and dry well You may
also place both the pan and grid in the
dishwasher
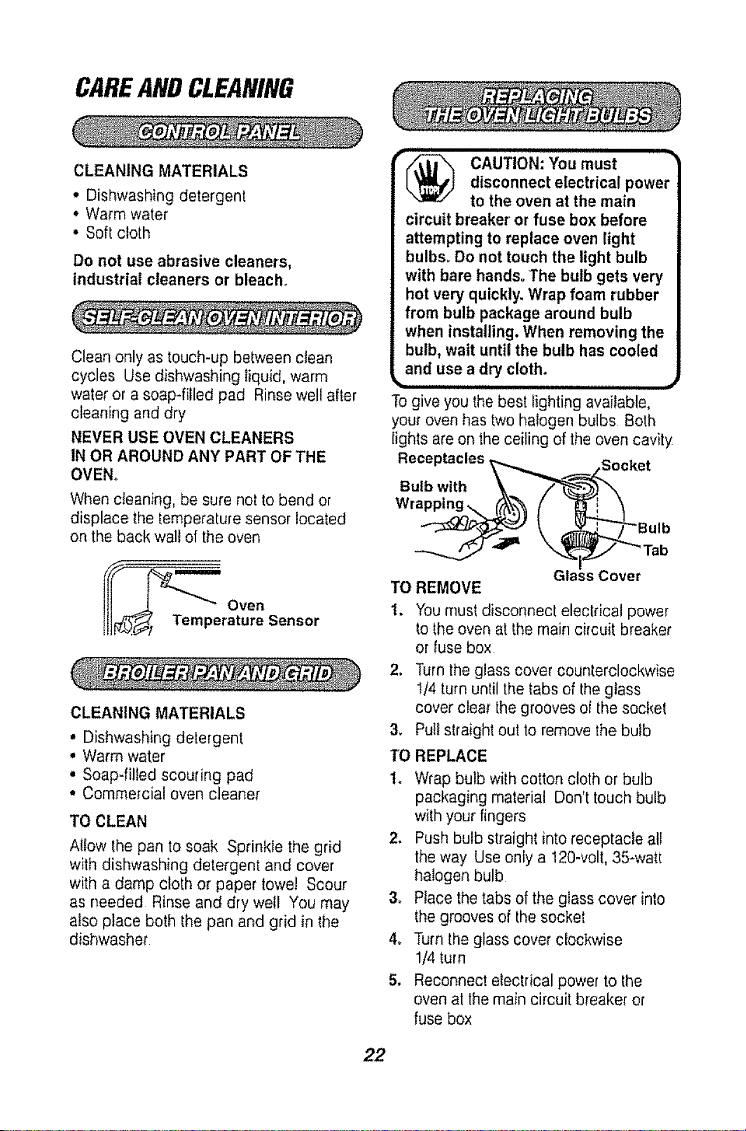
[_ CAUTION:You must "_disconnectelectrical power
to the oven at the main
circuit breakeror fuse box before
attempting to replace oven light
bulbs°Do not touch the light bulb
with barehands. The bulb gets very
hot very quickly,Wrap foam rubber
from bulb packagearound bulb
when installing.When removing the
bulb, wait until the bulb has cooled
and use a dry cloth.
L ..... d
To give you the best lighting available,
your oven has two halogen bulbs Both
lights are on the ceiling of lhe oven cavity
Receptacles_ _ike t
Bulb with _,_ _--
Wr_ (\,_ f_Tn_..=7"BuIb
Glass Cover
TO REMOVE
1. Youmust disconnect electrical power
to the oven at the main circuit breake_
or fusebox
2_ Turnthe glass cover counterclockwise
t/4 turnuntil the tabs of the glass
cover clea_the grooves of the sockel
3. Pull slraight out to remove the bulb
TO REPLACE
1o Wrap bulb with cotton cloth or bulb
packaging material Don't touch bulb
withyour fingers
2. Push bulb straight into receptacle all
the way Use only a 120-volt,35*watt
halogen bulb
3o Place the tabs of the glass cover into
the grooves of the socket
4_ Turn the glass cover clockwise
1/4turn
5. Reconnectelectrical power to the
oven at lhe main circuit breaker or
fusebox
22
CAREANDCLEANING
Removable Parts
CLEANING MATERIALS
• Dishwashing detergent
" Warm water
• Scouring pad or soap-filled pad
Bump tn I__
RaokGuide
Raised Back t-__
of the R_,
TO REMOVE
1, Pull the racks out to the stop lock
position
2. Pull up the front of the rack and
slide under the bump of the rack
guide
TO CLEAN
Clean with warm water and detergent
For hard to remove stains, gently scrub
with a scouring pad or a soap-filled
pad Rinse well
Gray porcelain-coated oven racks may
also be cleaned in the oven during the
self-clean cycle it is necessary to wipe
the edges of gray porcelain-coated
oven racks with a light coating of
vegetable oil alter cleaning This will
help maintain the ease of sliding the
racks in and out of theoven
TO REPLACE
1. Place the raised back of the rack
onto the rack guides
2. Lift the front of the rack until the
raised back slides under the bump
of the rack guides
3. Slide the rack all the way back
The door is very heavy, Be careful
when removing and lifting the door,
Do not lift the door by the handle.
TO REMOVE
1,
2.
Fully open the door
Pull the hinge locks _1 !_
down towardthe door .1/_ Sl°t
frame, to the unlockedt'_/_" _
position This may /_:\t_,_."_
require a flat-blade tt\ _'f_
screwdriver tll/_
HingeLock
Pull binge locks
down to unlock
3o Firmly grasp both
sides of the door
at the lop
4,, Close door to the
door removal
position, which is
hailway between
the broil stop and
fully closed
5, Lift door up
and out until the
TO
Removal Position
hinge arm is clear of
the slot
REPLACE
2,
Firmly grasp both
sides of the door
at the top
With the door at
lhe same angle
as the removal
position, seal the
indentalion of lhe
hinge arm into Indentation
the bottom edge of
the hinge slot, The
notch in the hinge arm
must be fully seated
into the bottom of the
stot
Hinge
Arm
Bottom
Edge of
Slot
23
CAREAND CLEANING
RemovableParts(cont.)
Removable Oven Door (conL)
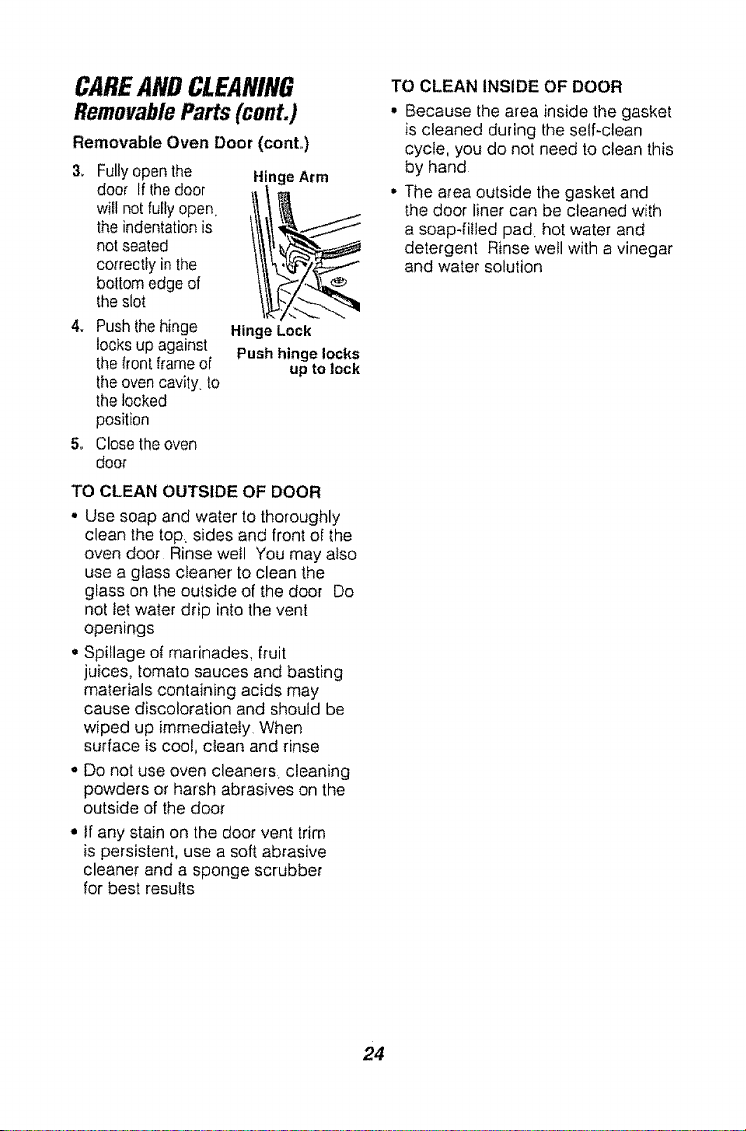
3. Fully open the HingeArm
door If the door _]_
will not fully open
the indentationis
not seated
correctly in the
bottom edge of
the slot
4. Push the hinge Hinge Lock
locks up against Push hinge locks
the Iront frame of up to lock
the oven cavity, to
the locked
position
5o Close the oven
door
TO CLEAN OUTSIDE OF DOOR
• Use soap and water to thoroughly
clean the top, sides and front of the
oven door Rinse well You may also
use a glass c_eaner to clean the
glass on the outside of the door Do
not let water drip into the vent
openings
• Spillage of marinades, fruit
juices, tomato sauces and basting
materials containing acids may
cause discoloration and should be
wiped up immediately When
surface is cool, clean and rinse
o Do not use oven cleaners_ cleaning
powders or harsh abrasives on the
outside of the door
,, If any stain on the door vent trim
is persistent, use a soft abrasive
cleaner and a sponge scrubber
for best results
TO CLEAN INSIDE OF DOOR
• Because the area inside the gasket
is cleaned during the self-clean
cycIe, you do not need to clean this
by hand
• The area outside the gasket and
the door liner can be cleaned with
a soap-filled pad, hot water and
detergent Rinse well with a vinegar
and water solution
24
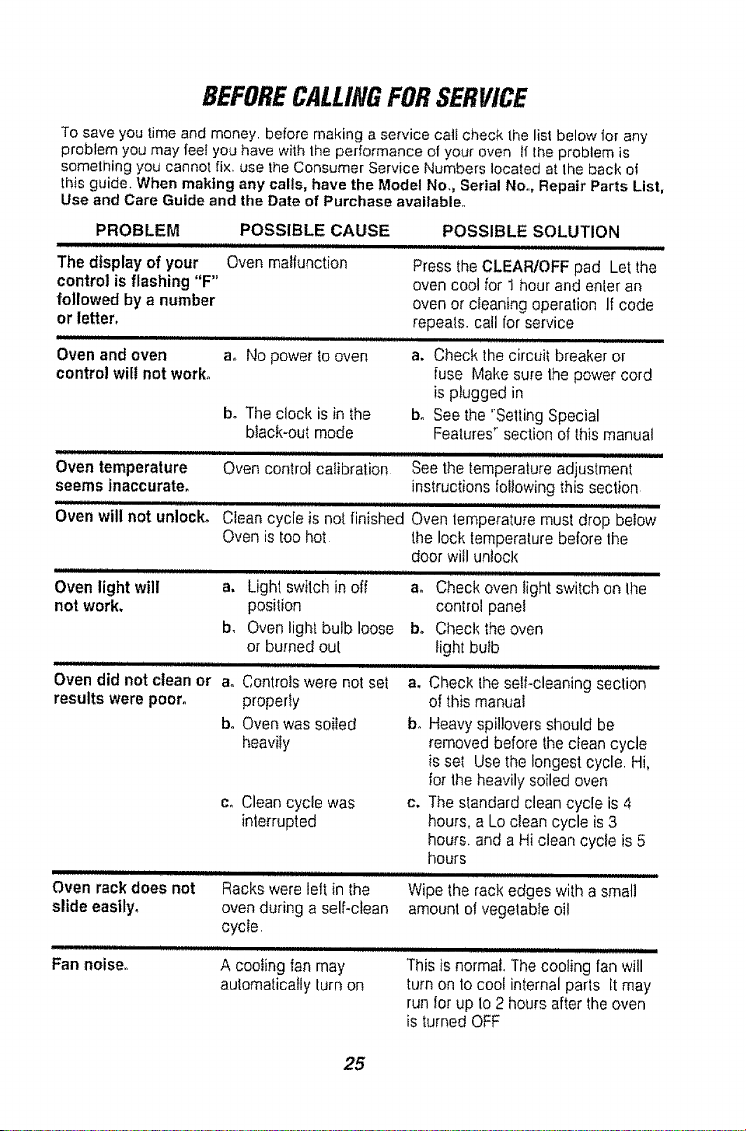
BEFORECALLINGFOR SERVICE
To save you time and money, before making a service calf check the list below for any
problem you may feet you have with the performance of your even If the problem is
something you cannot fix. use the Consumer Service Numbers located at lhe back oi
this guide. When making any calls, have the Model No., Serial No,., Repair Parts List,
Use and Care Guide and the Date of Purchase available,.
PROBLEM POSSIBLE CAUSE
The display of your Oven malfunction
control is flashing "F"
followed by a number
or letter.
POSSIBLE SOLUTION
Press the CLEAPJOFFpad Let the
oven cool for ! hour and enter an
oven or cleaning operation II code
repeats, call for service
Oven and oven
control wil! not work.
a,, No power to oven
bo The clock is in the
black-out mode
a, Check the circuit breaker or
fuse Make sure the power cord
is plugged in
bo See the "Selling Special
Features" section of this manual
Oven temperature Oven control calibration See the temperature adjustment
seems inaccurate, instructions following thissection
pl .........................................
Oven Willnot unlock. Clean cycle is not finished Oven temperaturemust drop beIow
Oven istoo hot the lock temperaturebefore lhe
door witl unlock
Oven light will a, Light switch in off ao Check oven light switch on the
not work, position control panel
b, Oven light bulb loose b° Check the oven
or burned out light butb
oven did not clean or a, controls were not set a, Check the self-cleaning section
results were poor° properly of this manual
bo Oven was soiled b, Heavy spiUoversshould be
heavily removed before the clean cycle
is set Use the longest cycle. Hi,
for the heavily soiled oven
co Clean cycle was c, The standard clean cycle is 4
interrupted hours, a Lo clean cycle is 3
hours, and a Hi clean cycle is 5
l_ours
oven rack does not Racks were lelt in the Wipe _,herack edges with a small
slide easily, oven during a self-clean amount of vegetable oil
cycle.
.................... ii iii 1== BiB i ii illlillilililiHiilllll II I I
Fan noise,, A cooling fan may This is normal, The cooling fan will
automatically turn on turn on to cool internal parts It may
run for up 1o2 tloufs after the oven
is turned OFF
25
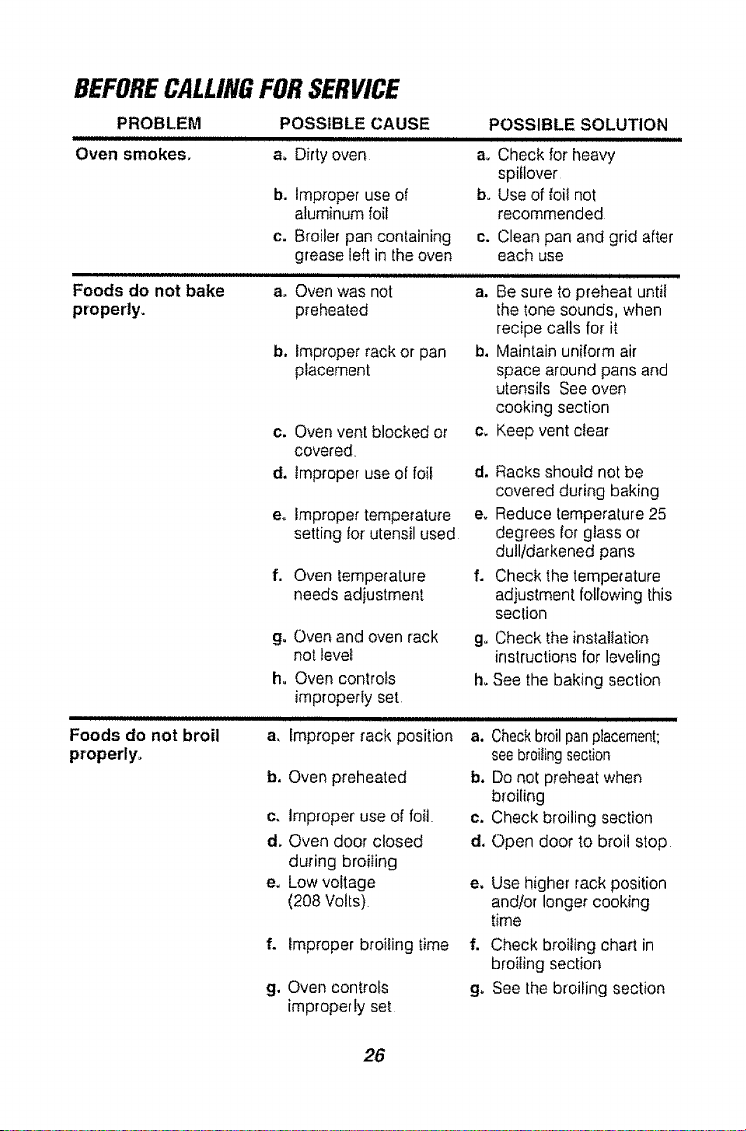
BEFORECALLINGFOR SERVICE
PROBLEM POSSIBLE CAUSE
Oven smokes, a_ Dirty oven
Foods do not bake ao
properly.
b. Improper use of
aluminum foil
c. Broiler pan containing c.
grease left in theoven
Oven was not a.
preheated
b, improper rack or pan b,
placement
c. Oven vent blocked or c,
covered=
d. tmproper use of foil d.
e. Improper temperature e,
setting for utensil used
iiiiinlllllllllll/llJlJll/l/
Foods do not broil
f, Oven temperature
needs adjustment
go Oven and oven rack
not level
h. Oven controls
impropertyset
a,
POSSIBLE SOLUTION
a, Check for heavy
spiHover
b_ Use of foil not
recommended
Clean pan and grid after
each use
Be sure to preheat until
the tone sounds, when
recipe calls for it
Maintain uniform air
space around pans and
utensils See oven
cooking section
Keep vent clear
Racks should not be
covered during baking
Reduce temperature 25
degrees for glass or
dull/darkened pans
f. Check the temperature
adjustment following this
section
go Check the installation
instructions fo_leveling
h, See the baking section
Improper rack position a. Checkbroil panplacement;
properly,
b. Oven preheated
c. Improper use of foil
d. Oven door closed
during broiling
e, Low voltage
(208 Volts)
f. Improper broiling time
g. Oven controls
improperly set
see broitingseclion
b, Do not preheat when
broiling
c. Check broiling section
d. Open door to broil stop
e, Use higher rack position
and!or longer cooking
time
f. Check broiling chart in
broiling section
g. See the broiling section
26
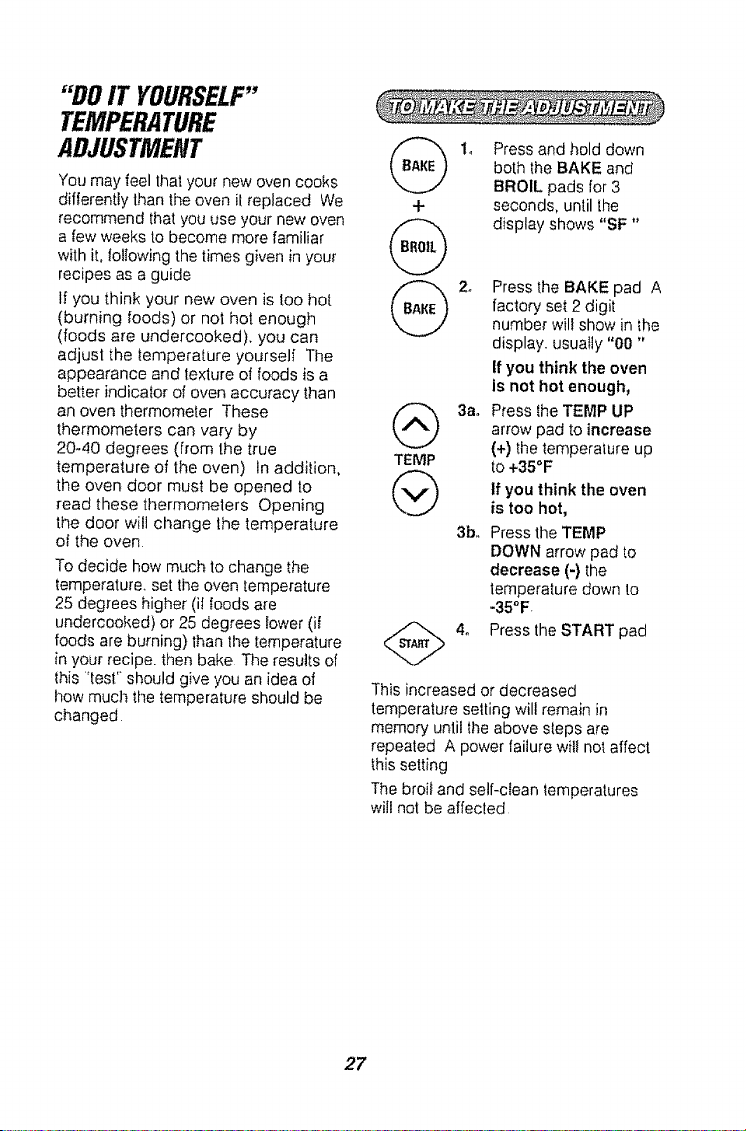
"DO IT YOURSELF"
TEMPERATURE
ADJUSTMENT
You may feel that your new oven cooks
differently than the oven it replaced We
recommend that you use your new oven
a few weeks to become more familiar
with iL lollowing the times given in your
recipes as a guide
If you think your new oven is too hot
(burning foods) or not hot enough
(foods are undercooked), you can
adjust the temperature yourself The
appearance and texture of foods is a
better indicator of oven accuracy than
an oven thermometer These
thermometers can vary by
20-40 degrees (from the true
temperature of the oven) In addition,
the oven door must be opened to
read these thermometers Opening
the door will change the temperature
oi the oven
To decide how much to change the
temperature, set the oven temperature
25 degrees higher (il Ioods are
underccoked) or 25 degrees lower (if
foods are burning) than the temperature
in your recipe, then bake The results of
this "test" should give you an idea of
how mucl_the temperature should be
changed.
4-
(_ 3a°
TEIVIP
@
3b,,
Press and hold down
both the BAKE and
BROIL pads for 3
seconds, until the
display shows "SF"
Press the BAKE pad A
factory set 2 digit
number will show in the
display, usually "00"
If you think the oven
is not hot enough,
Press the TEMP UP
arrow pad to increase
(+) the temperature up
to +35°F
If you think the oven
is too hot,
Press the TEMP
DOWN arrow pad to
decrease (-) the
temperaturedown to
-35°F.
Press the START pad
This increased or decreased
temperature selling will remain in
memory until the above steps are
repealed A power failure will not affect
this setting
The broil and self-clean temperatures
will not be affected
27

NOTES
28

NOTES
29

BUILT-IN
WALLOVENWARRANTY
GULL ONE-YEAR WARRANTY ON ALL PARTS
If, within one year from the date of installation, any part fails to function
properly due to a defect in material or workmanship. Sears will repair or
replace it at our option free of charge
Ffthis product is subjected to other than private family use, the above
warranty is effective for only 90 days
WARRANTY SERVICE tS AVAILABLE BY CALLING SEARS SERVICE AT
1-800.4-MY-HOME ®.
This warranty gives you specific legal rights, and you may also have other
rights which vary from state to state
Sears Roebuck and Co Dept 8t7 WA Hoffman Estates, lL 60179
Master ProtectionAgreements
Congratulations onmaking a smart
purchase Yournew Kenmore¢ appliance
is designed and manufactured for years of
dependable operation But like all
products, it may require preventive
maintenance or repair fromtime to time
That's when having a Master Protection
Agreement can save you money and
aggravation
Purchase a Master Protection
Agreement now and protect yourself from
unexpected hassle and expense
The Master Protection Agreement
also helps extend the life of your new
appliance Herds whats included
in the Agreement:
v' Expert service by our t2,000
professionalrepair specialists
V Unlimitedservice and no charge for
parts and labor on all covered repairs
v' "No4emon" guarantee- replacement
of your covered product if more than
threeproduct failures occur within
twelvemonlhs
Product replacement if your covered
product can't be fixed
v' Annual Preventive Maintenance
Check at your request- no extra
charge
v' Fast help by phone - non-technical
and instructional assistance on
products repaired in your home,plus
convenient repair scheduling
t," Power surge protection against
electrical damage due to power
ffuctualJons
v' Rental reimbursement if repair of your
covered product takeslonger than
promised
Once you purchase the Agreement, a
simple phone call is al! that it takesfor you
to schedule service Youcan call anytime
day or night, or schedule a service
appointment on*line
Sears hasover t2,000 professional repair
specialists, who have access to over 45
million quality parts and accessories
That's the kind of professionalismyou can
count on to help prolong the life of your
new purchase for years to come
Purchase your Master Protection
Agreement today!
Some limitations and exclusionsapply,
For prices and additional information,
call 1-800-827-665&
Sears Installation Service
For Seats guaranteed professional
installation of home appliances and items
like garage door openers and water
heaters, call 1-800-4-MY-HOME®
30
HORNODE 27" CONAUTOLIMPIEZA
Indice
Seguridad el uso
de la estufa 32-33
Carac[edsticas de su homo 34
Cdmo sacar la cin_a
de empaque 34
Controt de homo. reioi y
crondmetro , 35
Panel de control 36
Reloj _ 37
C_on6metro de la cocina 37
Tonos 38
C6digos F 38
Consejos pare cocinar en e!
homo 39-41
C6mo homear ,, 42
CSmo asar a Ia parrilla 43
Como seleccionar programas
especiales 44-48
EJcic!o de autolimpieza 49-50
Panel de control 51
Cacerota y parrilla para asar a la
parriIla 5!
interior del homo con
autolimpieza 51
Foco de la luz clel homo 51
Parriltas del homo .... 52
Pueda del homo 52-53
Antes de ttamar para
un servicio . 54-55
Ajustes a la lemperatura 56
Garantia 58
NOmeros para servieio 60
Para su conveniencfa y referencia futura, pot favor escriba el n(imero de modelo y
serie en el espacio que se provee.. Estos est_n Iocalizados en el panel lateral vertical,
cuando ta puerta es abierta.
Ntimero de modelo:
N(imero de serie:
© Sears Roebuck and Co
31
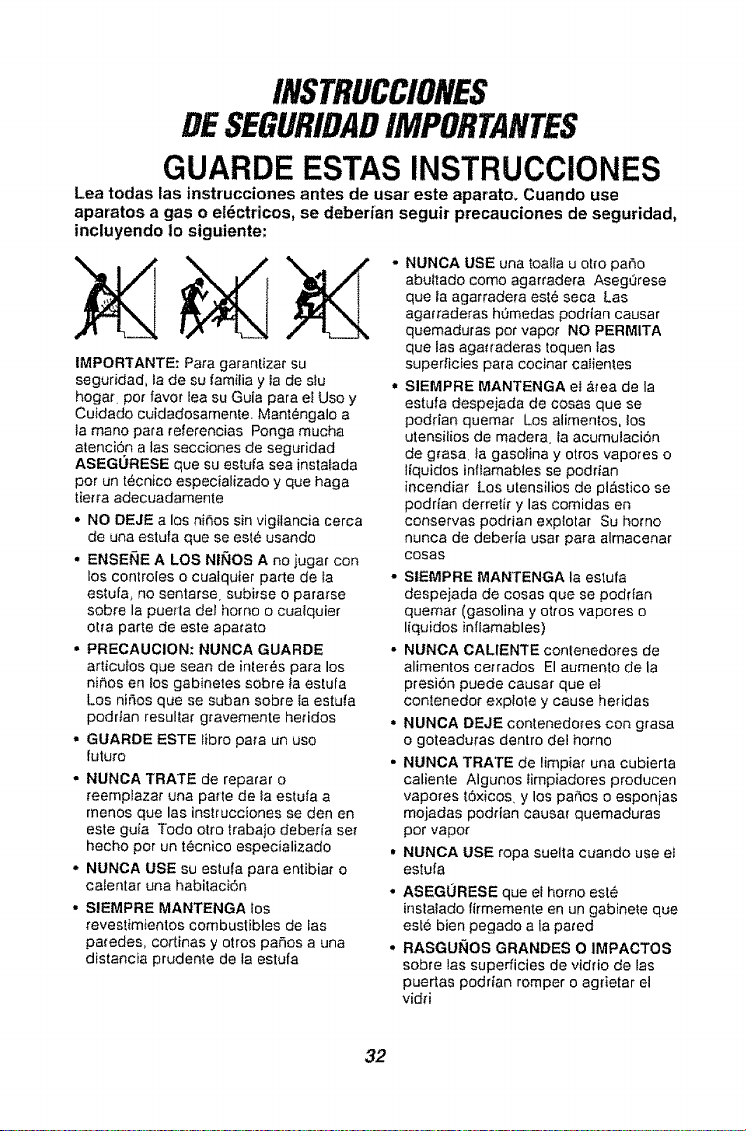
INSTRUCCIONES
DESEGURIDADIMPORTANTES
GUARDE ESTAS INSTRUCCIONES
Lea todas las instrucciones antes de usar este aparato, Cuando use
aparatos a gas o eldctricos, se deberfan seguir precauciones de seguridad,
incluyendo Io siguiente:
IMPORTANTE: Para garantizar su
seguridad, la de su famitia y la de sIu
begat, per favor lea su Guia para et Use y
Cuidado cuidadosamente. Mantengalo a
la mane para referencias Ponga mucha
atencion a lax secciones de seguridad
ASEGORESE que su estufa sea instalada
per un t_cnico especializado y que haga
tierra adecuadamente
• NO DEJE a los nichessin vigilancia cerca
de una estufa que se es_,_usando
• ENSEI_IE A LOS NII_OS A no jugar con
los controies o cualquier parte de Ia
estufa, no sentarse subirse o pararse
sobre la puer[a del homo o cualquier
ella parte de este apa_ato
,,,PRECAUCION: NUNCA GUARDE
articulos que sean de interes para los
ni,_os en los gabinetes sobre ta estufa
Los nitos que se suban sobre ia estuta
poddan resultar gravemente hetidos
• GUARDE ESTE iibro papa un use
future
• NUNCA TRATE de reparar o
reemplazar una patte de ia estufa a
rnenos que las instrucciones se den en
este guia Todo otro trabaio deberia se_
hecho per un t_cnico especializado
• NUNCA USE su estufa para entibiar o
caientar una habitaci6n
,, SlEMPRE MANTENGA los
revestimientos combustibles de las
paredes, cortinas y otros patios a una
distancia prudente de la estufa
NUNCA USE una toalla u otfo pa_o
abultado come agarradera Aseg_trese
que la agarradera este seca Las
agarraderas h0medas podrian causar
quemaduras per vapor NO PERMITA
que las aga_raderas toquen las
superlicies para cocinar calfenles
SIEMPRE MANTENGA el _tea de la
estufa despejada de cosas que se
poddan quemar Los alimen!os, los
utensiiios de madera, la acurnulaci6n
de g_asa ta gasolina y otros vapotes o
liquidos infiamabtes se podrian
incendiar Los utensilios de ph_stico se
poddan derrelir y las comidas en
conservas podrian explotar Su homo
nunca de deberia usar para almacenar
cosas
• SIEMPRE MANTENGA la es'_ufa
despejada de cosas que se poddan
quemar (gasolina y olros vapores o
liquidos inflamables)
,, NUNOA CALIENTE contenedores de
alimentos cerrados El aumer_to de la
presi6n puede causar que el
contenedor explore y cause heridas
° NUNCA DEJE contenedo[es con grasa
o goteaduras dentro del homo
• NUNCA TRATE de limpiar una cubierta
caliente Algunos Iimpiadores producen
vapofes t6xicos, y los paSos o esponias
mojadas podrian causa_ quemaduras
per vapor
,, NUNCA USE ropa suelta cuando use el
estufa
• ASEGORESE que el homo est,'
instalado firmemente en un gabine_e que
est6 bien pegado a la pared
, RASGUI_IOS GRANDES O IMPACTOS
sobre lax superficies de viddo de las
puertas podrian romper o agrietar el
vidd
32
INSTRUCCIONES
BESEGURIDAD
IMPORTANTES
• NOTOQUE las superficiespara calenlar.
las supedicies cercade elPasolas
superiiciesintedores Estaspoddanestar
suficientemen|ecaIientespara quemaraunque
sevean de cateroscu_'oDurantey despu_sdel
use.no toqueo permitaqua Ia ropa o
materialesinilamableshaganconlacto con las
superficiescalientesbasraque hayanlenido
[iempo de enfriarrse Lasarrassuprficiescerca
de las ven_anillasde venli_acidndel homo.
puertas,ventanasy tassuperiicies para cocinar
_ambi6npodrianestarsuficientementecalientes
para eausarquemaduras
° COLOQUELAS PARRILLASDEL HORNOen
la posiciSndeseada mientraset homoeat6 trio
Silas parrillasse debenmovermien[rasel
homoest& caliente,no permitaqua ]a
agarraderahaga contactocon elquemador
caliente del homo
• DESPUESDEASAR A LA PARRILLA siempre
saque la cacerolay ta parrittapara asar dot
homo y limpielas Lossobradosde grasa en la
caceroia para asarpoddan incendiarsela
pr6xima vez que usled use ei homo
. SIEMPflETENGACUIDADOcuando abra la
puerta del home Dejequa el aim calientey et
vapor escapenantesde moverlos alimonies
• NUNCA USEpapal de aluminioparalorrar
el Iondo dothomo Eluse inadecuadodel papal
de aluminiopodriaresultaren un
golpe de corrienteo en un ineendio
, NUNCA OBSTRUYA ia aberturade la
ventilaci6ndel homo
• LIMPIESOLAMENTElas partesque se tistan
en es¿emanuai Siga todas Iasinstrucciones
para ta limpieza
,' NUNCA FRIEGUE mueva, limpieo dai_e
el sellode la pueda en los homescon
autolimpieza Esesencial papaun buensellado
• NUNCATRATEde iimpiar los utenstlios,ollas.
parles removibieso la cacerolay la parfiltapara
asaren el ciclo de aulotimpieza
',' NOUSElimpiadoresparabarnes- No se
debedausarningunaclase de limpiaderpara
homesdentroo alrededorde cualquierparle del
homo
• $1 LA FUNClONDE AUTOLIMPtEZA
fall& apagueel homoy deseoneclela
electdcidad H,_galeun servieioper un [ecnico
calilicado
;ADVERTENCIA DE
SEGURIDAD IMPORTANTE!
California SafeDrinking Water and Toxic
EnforcementAct requierequeel gobernador
de Californiapubliqueuna lista de substancias
que el estadosepa qua producende!acresde
naeimlento u arrasdaSos reproducttvos y
requlerequa los hombresde negocios
advlertana sus clientesdel conlactopotenclal
a tales substanclasoEl atslantede fibra de
vtdrioen el homo conautoltmptezaemttir_una
muy pequeSacanttdaddemon6xlda de
carbonodurante el ciclode autolimpieza. El
contactose puedem[ntmizar ventflandocon
una puertao ventanaabierta o usando un
ventitadoro unacampanade ventt]aciSm
IMPORTANTE: La salud de algunos p_ijaros
es extremadamente sensitivaa
los vaporesproductdosper el ciclode
autolimpieza de cualquterhomo, Ponga
los p_jarosen otra habitacl6nqua est_
bienventliadao
;LEA Y COMPRENDA ESTA
INFORMACION AHORA!
Asegt._reseque todos ensu hogarsepanqu6
hacer encase de incendio_Nuncause agua
sabre un [neendlo de grasa, esto solamente
extender_las Ilamas_
FUEGO ENEL HORNO:
iNo tratede mover18caeerota!
1, Cierre la puerladel homo y apaguelos
controles
2,, Siei incendioconlinOa,cuidadosamenteabra
la puetla, arrojesoda para cocinarsabre e!
fuego, o use unextin,lorde quimico seco
espuma o "halon"
GUARDE ESTAS INSTRUCCIONES
33
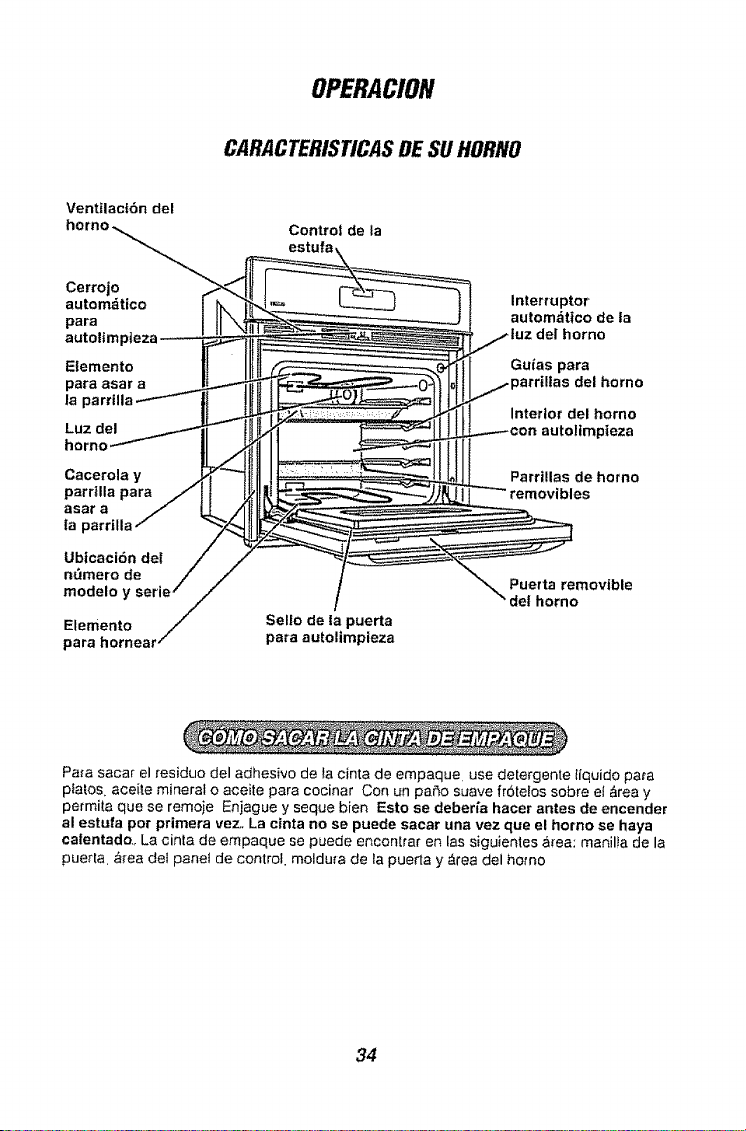
OPERACION
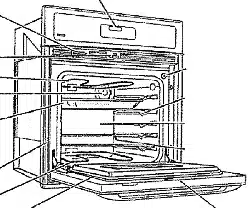
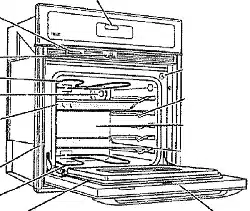
CARACTERISTICASDESUHORNO
Ventilaci6n del
Control de la
estufa
Cerrojo
autom_tico Interruptor
para autom&tico de la
autolim del homo
Elemento Guias para
para asar a _arrillas del homo
la
Luz del
homo
Interior del homo
Jteza
Cacerola y Parrillas de horno
parr|lla para removibles
asar a
fal
Ubtcacidn del
n_3mero de
modelo
Elemento Sello de |a puerta
para para autolimpieza
Puerta removtble
del homo
Pata sacar el residuo del adhesivo de la cinta de empaque use detergente tiquido para
ptatos, acei_,emineral o aceite para cocinar Con un patio suave fr6te!os sobre el area y
permita que se remoie Enjague y seque bien Esto se deber[a hacer antes de encender
al estufa pot primera vez,. La cinta no se puede sacar una vez que el horno se haya
calentado., La cinta de empaque se puede encontrar en [as siguientes ¢5_ea:manilia de la
puerta. ,_ea deI panel de control, moldura de la puerla y area del homo
34
OPERACION
Control Del Homo, Reloj Y CronSmetroDe La Cocina
Q ® ®® ®@@
Su nuevo control de homo a botones le permitira programar fas varias lunciones cos tacilidad M_s
abajo asian los diferentes tipos de funciones y la descfipci6n de cada uno
HORNEAR - Cocina los alimentos en ei homo
traditional a una temperatura qua varia de
170_Fa 550°F
ASAR A LA PARRILLA- Asa los atimentos
en ALTO a 550_Fo en BAJO a 450°F a calor
direct6 del etemento superior El asado a la
parriila se debe hacer con la puerla abierta en
ta posici6n de lope para asar a la parrilta
UMPIEZA - Limpia el _,feainterior del homo
per usled Cuando el cicio lermina, el homo se
apagara automaticament.e
NOTA: La puerla del homo se carfare,con
cerrojo autom_ticamente y el cerrojo sa abrir_
s6Iocuando el homo se haya enfilade
@
Programa ta cantidad de liempo
en que usted desea cocinar los
alimentos o en que el homo se
limpie El homo se apaga
aulom_ticamente a! final de
esta cantidad de fiempo
Seleccione la hera del dta en
la cuat desea qua et homo se
encienda El homo se encendera
autom,_ticamenle a la hera qua
usied haya seleccionado. Cuando
se use ]a HeRA DE COMIENZO
DEMORADO con el TIEMPO PARA
COClNAR EN EL HORNO.
el homo tambi_n se apagara
autom_ticamente al final de la
cantidad de tiempo para cocinar
®®
@
TEMP
@
@
@
Los bolones cos las flechas
para SUBIR y/o BAJAR las
HORASfMINUTOS programan
ta hera de! dia. ia cantidad de
tiempo para cocina_, la canlidad
de tiempo para limpiar, la hera
para un comienzo demorado, y
la hera del cron6metro de Ia
cocina
Los begones con las flechas
para SUBIR yio BAJAR la
TEMPERATURA seleccionan
la lemperatura para cocinar
El bot6n START debe
empuiarse para activar
cualquier lunci6n del homo
El boton CLEARtOFF se usa
para cancelar cuaiquier lunci6n
del homo y el tone de fin de
ciclo No cancelar& el Reloj o
el CronSmetro de la Cocina,,
El bolon KITCHEN TIMER se
usa para encender o apagar el
Cron6metro de la Cocina No
controlarb, ninguna otra tunci6n
del homo
El bot6n del RELOJ se usa para
poner la hera del die
Enciende y apaga la luz del
homo
35
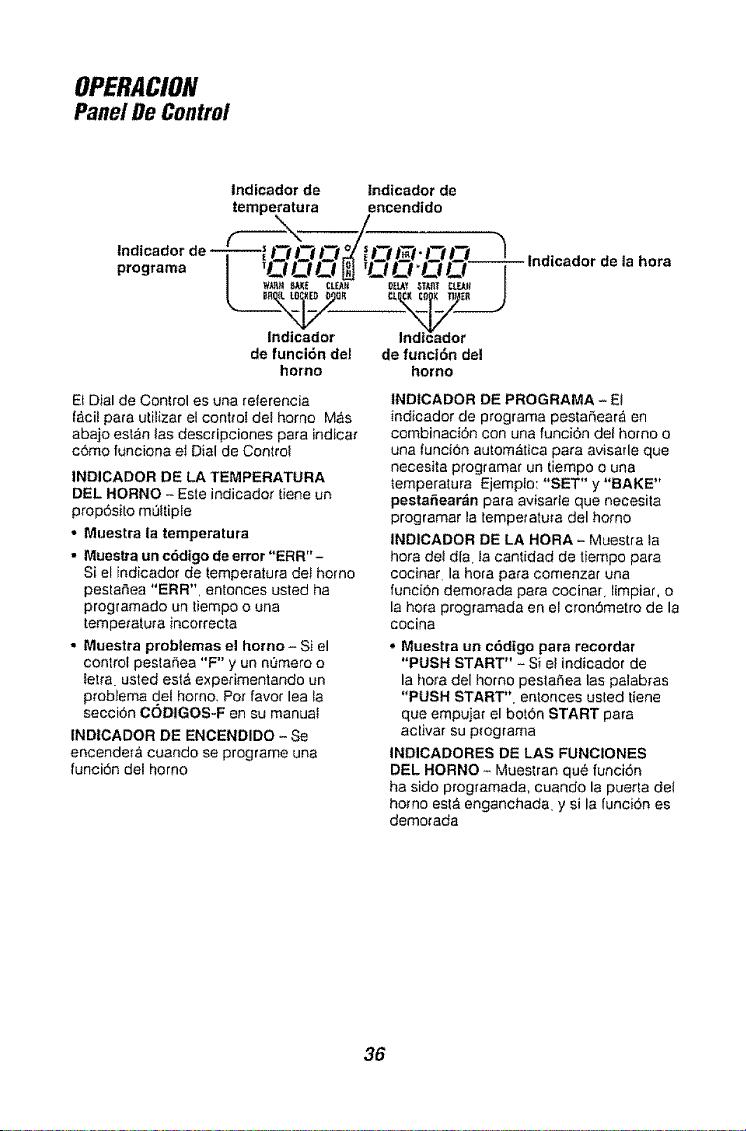
OPERACiON
PanelDeControl
tndicador de
temperatura
]ndicador de
encendido
Indicador de la hora
de funci6n de!
horno
Et Dial de Control es una referencia
faci! para utilizar el cont_oi de! homo M,is
abajo est,_n las descdpciones para indicar
c6mo funciona el Dial de Control
tNDICADOR DE LA TEMPERATURA
DEL HORNO - Este indicador tiene un
prop6sito m_ltiple
• Muestra la temperatura
- Muestra un c6digo de error "ERR"-
Si el indicador de temperatura del homo
pestar_ea "ERR". entonces usted ha
programado un tiempo o una
tempetatura incorrecta
o Muestra problemas el homo - Si el
control pestaSea "F" y un n_tmero o
Ietra usted est_ expedmentando un
probEema del homo. Pot favor lea ta
secciSn CODIGOS-F en su manual
INDIGADOR DE ENCENDIDO - Se
encende_ cuando se programe una
funci6n del homo
de funcl6n del
homo
tNDICADOR DE PROGRAMA - El
indicador de programa pestaf_eara en
combinacidn con una funcion del homo o
una iuncion automb, tica para avisarle que
necesita programar un dempo o una
temperatura Ejemplo: "SET" y "BAKE"
pestaSear_in para avisafle que necesita
programar la temperatura del homo
INDICADOR DE LA HORA - Muestra la
hora dei dla. la can_,idad de tiempo para
cocinar la hora para cornenza/una
funci6n demorada para cocinar. Iimpiar, o
la hora programada en el cron6metro de la
cocina
* Muestra un c6dtgo para recordar
"PUSH START" - Si el indicador de
la hora del homo pesta.fea las palabras
"PUSH START". entonces usted tiene
que empujar el bot6n START para
activar su p_ograma
INDICADORES DE LAS FUNOIONES
DEL HORNO - Muestran qu_a funci6n
ha sido programada, cuando la puerta del
homo est#,enganchada y si la funcidn es
demo_ada
36
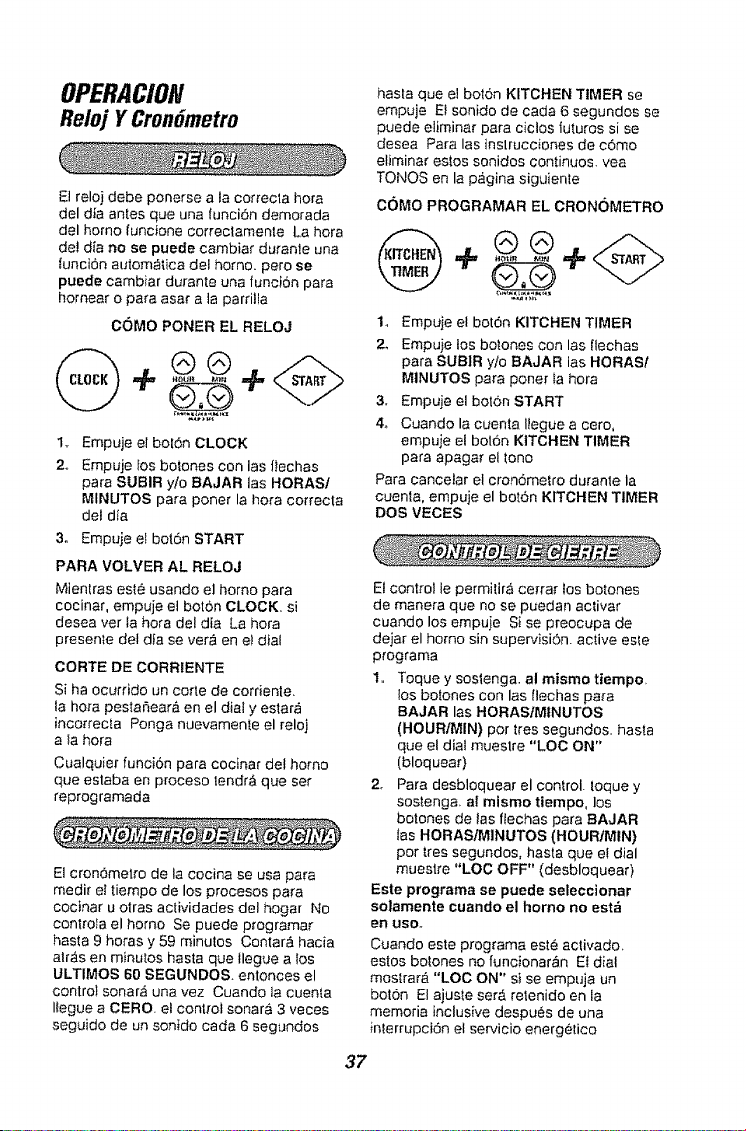
OPERACiON
Reloj YCronSmetro
E! reloj debe ponerse a la correcla hora
del dfa antes que una funci6n demorada
del homo funcione correclamenle La hora
det dia no se puede cambiar durante una
funci6n autom,_lica del homo. pero se
puede cambiar durante una funci6n para
homear o para asar a la parrilla
COMO PONER EL RELOJ
÷0 ÷
1.
2+,
Empuje el bol6n CLOCK
Empuje los botones con las llechas
para SUBIR y/o BAJAR las HORAS/
MINUTOS para poner la hora correcla
del dta
3. Empuje el boron START
PARA VOLVER AL RELOJ
Mientras este usando e! homo para
cocinar, empuje el botdn CLOCK. si
desea ver ta hora del dia La hora
presente del dia se ver,i en el dial
CORTE DE CORRIENTE
Si ha ocurrido un corte de corriente.
la hora pestarieara en el dial y estara
incotrecia Ponga nuevamenle el reloj
a la hora
Cualquier funci6n para cocinar del homo
que estaba en proceso tendr4, que set
reprogramada
='_> _' ....... " '_'_,!"_: _<_.... i <" __' _
El cron6metro de la cocina se usa para
medir el tiempo de los procesos para
cocinar u otras actividades del hogar No
controla el homo Se puede programar
hasta 9 horas y 59 minutes Contar& hacia
alr,'_sen minutos hasta que ilegue a los
ULTIMOS 60 SEGUNDOS enlonces el
control sonar_ una vez Cuando tacuenta
Ilegue a CERO el control sonata 3 veces
seguido de un sonido cada 6 segundos
hasla que el bot6n KITCHEN TIMER se
empuje El sonido de cada 6 segundos se
puede eliminar para ciclos luturos si se
desea Rata las instrucciones de c6mo
eliminar estos sonidos continuos, yea
TQNOS en la pagina siguiente
COMO PROGRAMAR EL CRONOMETRO
1. Empuje el bot6n KITCHEN TIMER
2. Empuje los botones con las flechas
para SUBIR y/o BAJAR ias HORASf
MINUTOS para poner la hora
3. Empuje el bot6n START
4o Cuando la cuenta Ilegue a cero,
empuie el bot6n KITCHEN TIMER
para apagar el tono
Rata cancelar el cron6melro duranie la
cuenta, empuje el bot6n KITCHEN TIMER
DOS VECES
El control ie permitira ce_rar los botones
de manera que no se puedan aclivar
cuando los empuje Si se preocupa de
dejar el homo sin supervision, active este
programa
1,, Toque y soslenga, al miemo tiempo.
los botones con las flechas pa{a
BAJAR las HORASIMtNUTOS
(HOURIMIN) por Ires segundos, hasta
que el dial muestre "LOC ON"
(bloquear)
2_ Para desbloquear el control, toque y
soslenga, al mismo tiempo, los
botones de las flechas para BAJAR
las HORAS/MINUTOS (HOUR/MIN)
por ires segundos, hasta que el dial
muestre "LOG OFF" (desbloquear)
Este programa se puede seleccionar
solamente cuando el homo no est=_
en uso.
Cuando este prog_ama est_ activado_
estos bolones no funcionaran El dial
mostrara "LOG ON" sise empuja un
boton El ajusle ser& relenido en la
memoria inclusive despues de una
inlerrupci6n el servicio energ.elieo
37
OPERACION
Control Del Homo, Reloj Y
CronSmetro
El nuevo control tiene una sede de tones
que sonar&n a liempos diferentes Estos
tones pueden sonar mientras usted
programa una funci6n del homo oal final
de una funci6n deI homo Tambien le
avisara si exisle un probfema con una de
tas funciones M_s abajo est&n los tipos
de lonos y una breve descfipci6n de coda
uric
TONOS MIENTRAS PROGRAMA EL
CONTROL - Cuando empuje un bOtCh
usted escuchar_1 un tone Este tone le her&
saber que aplic6 suficiente presi6n sobre
eI bot6n pare acLivarlo. (Los botones con
las [lechas no suenan )
TONe AL FINAL DE UN ClCLO
AUTOMATICO - Despues de una funci6n
pare cocinar automatica, usted escuchar,9.
tres tones codes seguidos per un tone
cada 6 segundos Et tone de cada 6
segundos seguka sonando haste que
empuje el bot6n CLEARfOFF ousted
decida seleccionat el prog_ama especial
pare canceler y evitar que el tone de 6
segundos suene al final de un ciclo future
COMe CANCELAR EL TONe DE
6 SEGUNDOS
1. Empuje y sujete los botches
BAKE y BROIL ala misma vez
po_ 3 segundos basra que e! dial
muestre "SF"
2o Empuie el bot6n KITCHEN TIMER
El dial mostrar_, "CON BEEP" (tone
continue)
3. Ernpuje el bol6n KITCHEN TIMER
nuevamente E! dial mostrar_ "BEEP"
(tone cancelado)
4. Empuje el botdn START, para
cancelar el tone y sali_ de este m6dulo
especial
Si desea regresar a los tones de 6
segundos, repita los pesos de arriba basra
que ei dial muestre su seleccidn y empuje
el bot6n pa[a e! comienzo (START)
TONe DE ATENCION - Este tone sonata
si hate un error u omite algo mient_as
programa una funcion del homo
Unos eiemplos sedan:
a. Programar un ciclo de I[mpieza y la
puerta de! heine no est_ bien cerrada
b. Programar una funci6n y no empujar eI
bot6n START
c. Empujar un bot6n papa una funcion
adicional sin programar prirnero la
temperatura o el tiempo
d,. ERR pestafiear_ si usted programa
una temperatura inv_lida Empuje el
botch CLEARtOFF pare porter el dial
en blanco y reprogramar la funciSn del
homo
Cualquiera de estos se puede identificar
r,:_pidamente con miter el dial
TONe DE PRECALENTAMIENTO-
Cuando usted setecciene un mode de
cocinado, ajuste ta [emperatura del homo
y presione el bot6n pare el comienzo
(START) pare que el homo comience a
ealenta[ Cuando la tempe_atu[a dentro
del homo itega ala temperature que usted
progtamo, sonar,_ un tone para avisarle
que el homo esta listo pare hornear
Si usted programa una funcion dei
homo y el control suena mientras el dial
hace pestar_ear una "F" y un nOmero o
letra tal come "F-4" o "FI" es posible que
exista un problema con el control
o con el homo. Simplemen[e empuje eI
bot6n CLEAR/OFF y espere una hera
Trate de programar esa funcidn
nuevamente. Si e! c6digo se repite,
escriba el c6digo que pestaSea y Ilame
papa un servicio Diga[e al tecnico que
cddigo estaba pestar_eando
38

OPERACiON
ConsejosPara Cocinar
En E1Homo
Es normal sentir un poco de olor cuando
use su homo pot primera vez Es[o es
causado por el calenlamiento de Ias
pares nuevas y del aislante. Para ayudar
a efiminar este olor, ventile la habttaci6n
abriendo una ventana q usando una
campana de ventilaci6n
Si abre la puerta irecuentemenle para
mirar los alimentos, causara una perdida
de catory ma!os resuitados cuando
hornee
Et precalentamiento es subir la
lemperatura de! homo a la lemperatura
que va a usar cuando hornee Pe_mila que
el homo se precaliente bien cuando las
recetas requieren precatenlamiento
IMPORTANTE: Nunca cubra el rondo del
homo o la pardlla del homo con papel de
aluminio El uso inadecuado puede causar
una maIa circuIaciSn del caIor, pobres
resuttados at hornear, y podria dafiar el
acabado del homo Para prevenir
manchas debido a derrames, usted podria
colocar un pedazo de papel de aluminio o
una bandeja para gatletas sobre la parfiHa
debajo de la comida que se podda
derramar
Para prolongar la vida del foco
de las iuces del homo. siga
estos consejos: Siempre apague
Ias luces cuando el homo no
est_ en uso 6 durante un ciclo de limpieza
Si la luz del homo se deja encendida por
un largo periodo de tiempo, el homo
estara libio cuando abra la puerla debido
al calor generado por e! foco de tas luces
del homo
La ventilaci6n deI homo esl& ubicada
debajo del panel de conlrot Esta area se
podria calentar mucho duranle el use det
homo Es normal que salga vapor de la
venlilacion yio que se produzca humedad
debajo cuando e! homo no esle en uso La
ventilaci6n es importante para la correcla
circulacion del aire Nunca obstruya la
ventilaci6n
.J.--_ Ventllacl6n
del homo
llI r_ _ =-"='_, III
En la parle lrasera del homo usled nolar#,
un pequefio tubo Eslo es un sensor de
calor que manliene la lemperalu_a del
homo Nunca mueva o doble esle tubo
_------_Sensor de
temperature del homo
La zona de lemperatura baja de
su homo (entre !70°F y 200"F) esta
disponible para mantener los alimentos
tibios Sin embargo, los alimentos no se
debedan manlener a eslas bajas
temperaluras pot m_s de 2 horas
39
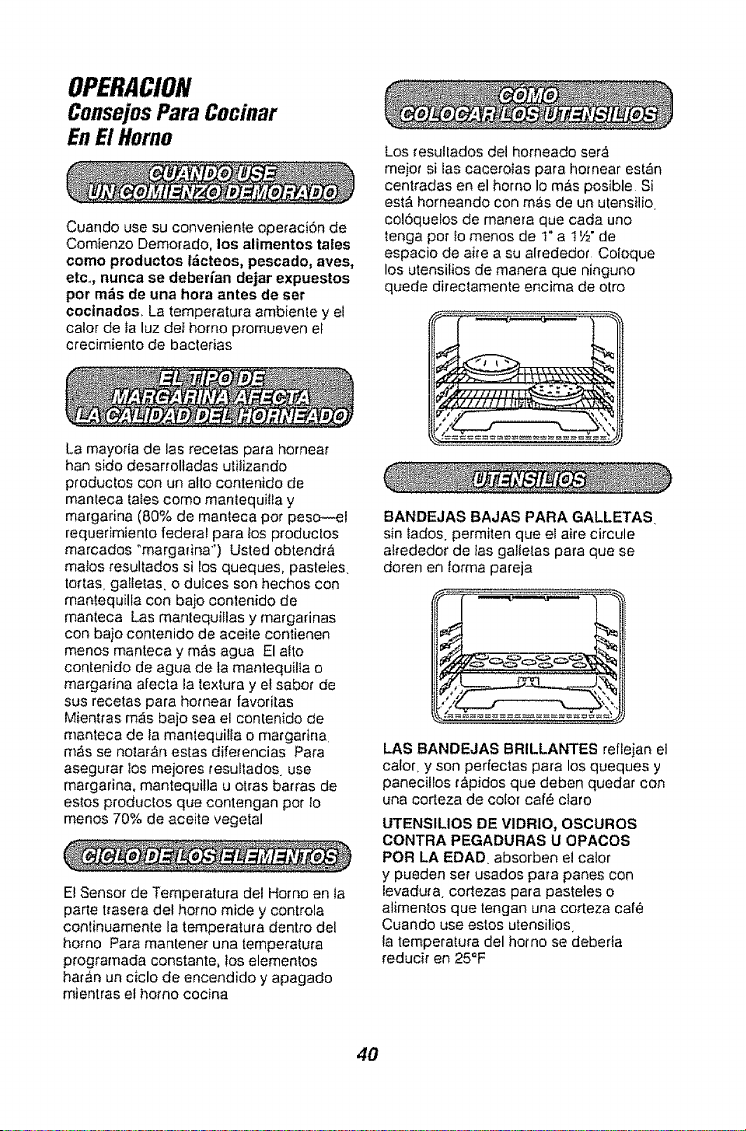
OPERACION
Consejos Para Cocinar
En El Homo
Cuando use su conveniente operaci6n de
Comienzo Demorado, los alimentos tales
como produetos t_icteos, pescado, ayes,
etc_, nunca se deberfan dejar expuestos
por m_s de una hora antes de ser
cocinados, La temperatura ambiente y el
calor de ta luz de_ homo promueven et
crecimiento de bactedas
Los resultados del homeado ser,_
mejor si las cacerotas para homear estAn
centradas en el homo Io mAs posible Si
est,. homeando con m_s de un utensilio
co!6quelos de manela que cada uno
tenga pot fo menos de t" a t W de
espacio de aire a su alrededor Coloque
los utensilios de manera que ninguno
quede directamente encima de otro
La mayoria de las recetas para hornear
hart sido desarrolladas utilizando
ptoductos con un alto contenido de
manteca tales como man[equitla y
margarina (80% de manteca pot peso,--el
requerimiento federal para los productos
marcados "margadna*) Usted obtendr_
malos resultados si los queques, pasteJes.
todas, galletas, o dulces son hechos con
man_,equilla con bajo contenido de
manteca Las mantequillas y margarinas
con baio conlenido de aoeile contienen
menos manteca y mas agua El afro
contenido de agua de la mantequilla o
margadna afecta la textura y e! saber de
sus recetas para homear favoritas
Mientras mAs bajo sea el contenido de
rnanteca de la mantequi!fa o margarina
m_s se nolar,_n estas diferencias Para
asegurar los mejores tesuEtados use
margarina, mantequilla u otras barras de
estos productos que contengan pot Io
menos 70% de aceite vegetal
El Sensor de Temperatura del Homo en la
parle trasera del homo mide y controla
continuamente la temperatura dentro del
homo Para mantene_" una temperatura
programada constante, los elementos
haran un ciolo de encendido y apagado
mientras el homo cocina
BANDEJAS BAJAS PARA GALLETAS,
sin fados permilen que eI aire circule
atrededor de las galletas para que se
doren en forma pareja
LAS BANDEJAS BRILLANTES reflejan el
ca!or, y son perfectas para los queques y
panecillos t_pidos que deben quedar con
una corteza de color care ctaro
UTENSILIOS DE VIDRIO, OSCUROS
CONTRA PEGADURAS U OPACOS
POR LA EDAD absorben el calor
y pueden set usados para panes con
levaduta, cortezas para pasteles o
alimentos que tengan una corleza care
Cuando use estos utensilios
fa temperatura del homo se deberta
reducir en 25°F
40
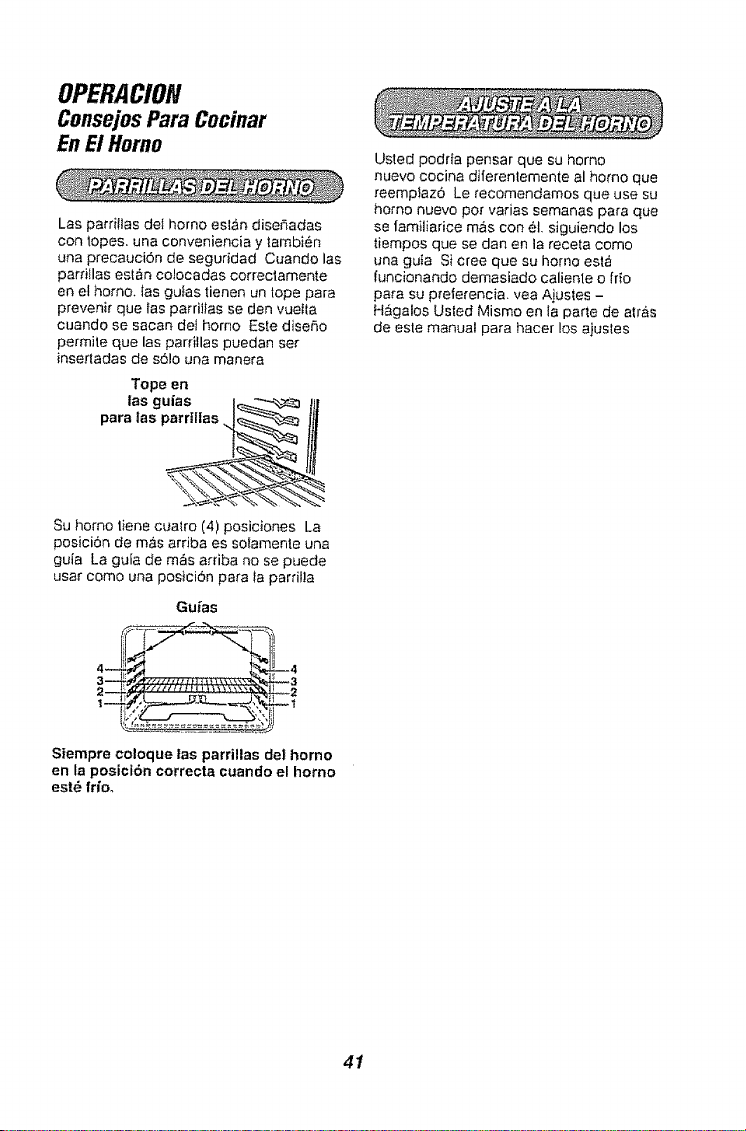
OPERACION
ConsejosPara Cocinar
En El Homo
Las parriilas det homo esl&n diser3adas
con lopes, una conveniencia y tambien
una precaucidn de seguridad Cuando las
parriflas estan colocadas correclamente
en el homo. las guias tienen un lope para
prevenir que fas parriifas se den vueIta
cuando se sacan dei homo Es[e disetSo
permile que las parrillas puedan set
insertadas de sd!o una manera
Tope en
tas gufas I_.__ t_1
para las _
Su homo tiene cuatro (4) posiciones La
posici6n de mas arfiba es solamente una
guia La guia de m_s arriba no se puede
usar come una posici6n para ta parfilla
Gu_s
4_ _4
I--7_1
Siempre coloque las parrillas del homo
en la posiel6n correcta cuando el homo
est_ fdoo
Usted podrta pensar que su homo
nuevo cocina diferenlemente al homo que
reemplaz6 Le recomendamos que use su
homo nuevo per vafias semanas para que
se familiarice m&s con el, siguiendo los
tiempos que se dan en la receta como
una guta Si cree que su homo esh9
funcionando demasiado calienle o frio
para su preferencia_ yea Ajustes -
Hagalos Usted Mismo en la parle de arras
de este manual para hacer los ajustes
41
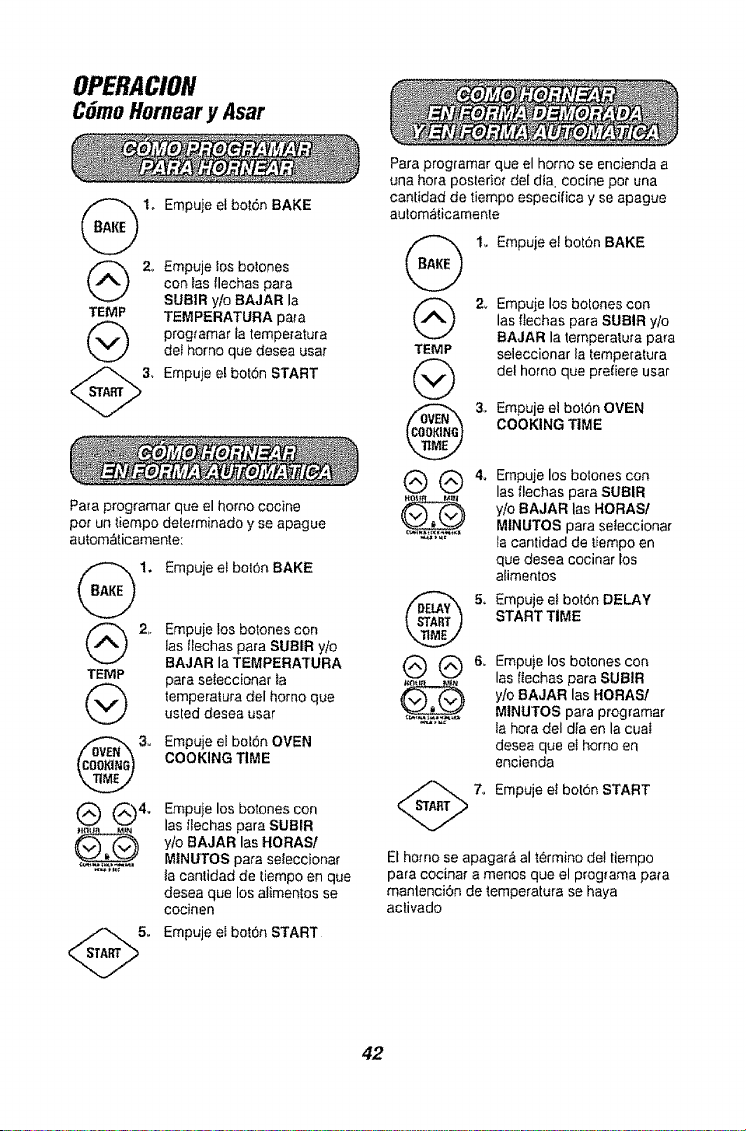
OPERACION
CSmoHorneary Asar
_1,, Empuie el bot6nBAKE
(_ 2o Empuje los botones
con las flechas para
SUBIR ylo BAJAR la
TEMP TEMPERATURA papa
progtamar ta temperatura
det homo que desea usar
<_3° Empuje el bot6n START
Para programar que el homo cocine
pot un _,iempodetetminado y se apague
autom_.ticamente:
_ 2,_
TEMP
@
3,,
Empuje el botOn BAKE
Empuje los botones con
las flechas para SUBIR yio
BAJAR la TEMPERATURA
para seiecc[onar ia
temperalura del homo que
usled desea usar
Empuje el bot6n OVEN
COOKING TIME
Empuje los botones con
las flechas para SUBIR
y/o BAJAR las HORASI
MINUTOB para seleccionar
la cantidad de [iempo en que
desea que los alimen_os se
cocirleri
Empuje et bot6t_ START
Para programar que el homo se encienda a
una hora posterior del dia. cocine pot una
cantidad de tiempo especifica y se apague
automaticamente
TEMP
@
3.
®®4,
5,
1, Empuje el bot6n BAKE
Empuje los botones con
las flechas para SUBIR y/o
BAJAR la temperalura para
seleccionar la temperatura
del homo que prdiere usar
Empuje el bolon OVEN
COOKING TIME
Empuje los botones con
las llechas para SUBIR
yio BAJAR las HORASt
MINUTOS para seleccionar
la cantidad de tiempo en
que desea cocinar Ios
alimentos
Empuje et bol6n DELAY
START TIME
Empuje los botones con
las ftechas para SUBIR
y!o BAJAR las HORASI
MINUTOS para programar
la hora del dla en la cuai
desea que el homo en
encienda
Empuje et bol:6n START
El homo se apagar_ al termino det tiempo
para cocinar a menos que el p_og_amapara
manlenci6n de temperatura se haya
activado
42
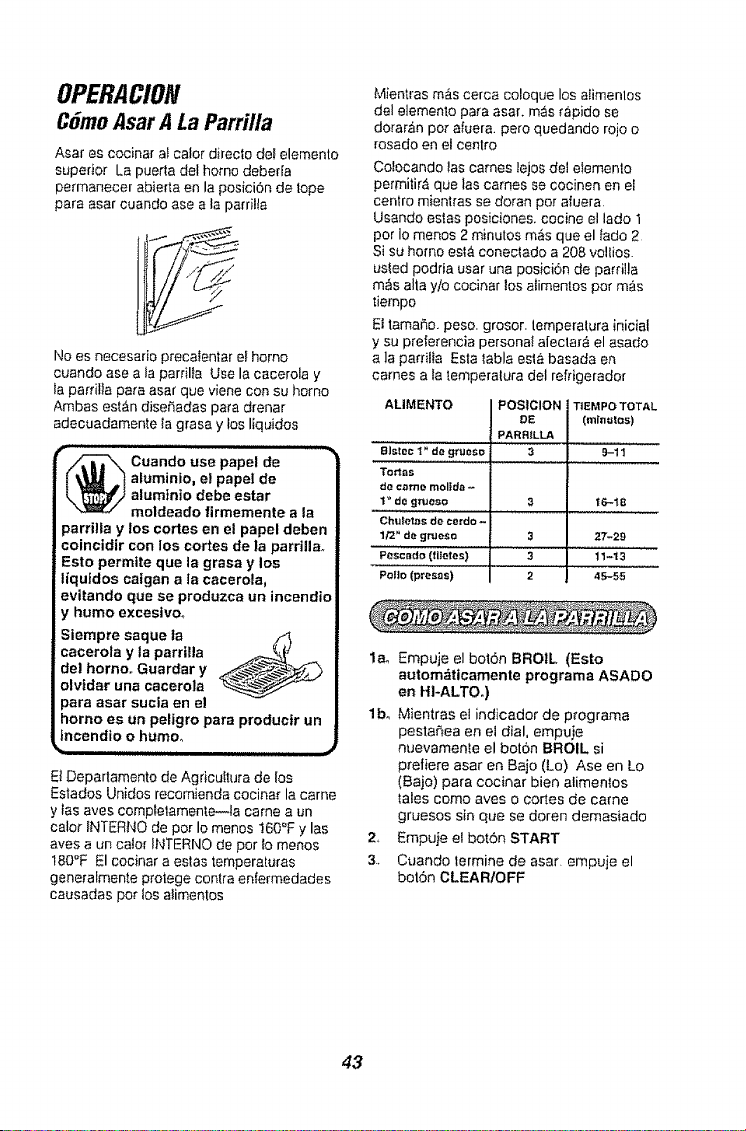
OPERACION
CSmoAsarALaParrilla
Asar es cocinar al calor directo dei elemento
superior La puerta del homo debeda
permanecer abierta en la posicion de lope
para asar cuando ase a la parrilla
No es necesario precalenlar el homo
cuando ase a la parrilia Use la cacerola y
la parrilla para asar que viene con su homo
Ambas estan diseSadas para drenar
adecuadamente ta grasa y los liquidos
Cuando use papel d'e...................
aluminio, el papei de
aluminio debe estar
moldeado firmemente a la
parrilla y los cortes en el papel deben
coincidir con los cortes de la parrilla.
Esto permtte que la grasa y los
Ifqutdos cafgan a la cacerola,
evitando que se produzea un incendio
y humo excestvo,
Siempre saque la
cacerola y la parrilla
de! homo° Guardar y
olvtdar una cacerola
para aear sucia en el
homo es un peligro para productr un
tncendio o humoo
ElDepartamento de AgricuItura de los
Estados Unidos recomienda cocinar la came
y tas aves compIetamente-.-la came a un
calor fNTERNO de pot Io menos 160°F y las
aves a un calor INTERNO de por lo menos
180°F El cocinar a estas temperaturas
generalmente protege contra erffermedades
causadas por los alimentos
Mientras m_.s cerca coloque los aiimenlos
del elemento para asar. m_s rapido se
dorar&n pot afuera, pero quedando rojo o
rosado en el centro
Colocando las cames lejos del elemenlo
permitir& que las cames se cocinen en el
centro mientras se doran pot afuera.
Usando eslas posiciones, cocine el lado 1
por Io menos 2 minutos masque el tado 2
Si su homo est,1 conectado a 208 vollios.
usled podria usar una posici6n de parrilla
m_s alia yio cocinar los afimentos pot mas
tiempo
El tamar_e,peso. grosor, temperatura inicial
y su preferencia persona! afectar8 el asado
a ]a parrilla Esta labia esta basada en
cames a Ia lemperalura del refdgerador
ALIMENTO
81stec 1" de grueso
Tortss
de came molida
I" de gnJoso
Chulotas de cerdo -
1/2" de afUoSo
Pescado (fliotes)
Polio (presas)
POSICION
DE
PARRILLA
3
3
3
3
2
TtEMPO TOTAL
(mln=i[=os)
9-11
t6-18
27-29
11'--13
45-55
la_ Empuje el bot6r) BROIL (Esto
automdticamente programa ASADO
en HI-ALTO.)
lbo Mientras el indicador de programa
pestaSea en el dial, empuie
nuevamente el boron BROIL si
prefiere asar er) Bajo (Lo) Ase en Lo
(Bajo) para cocir)ar bier) alimentos
_ales corno ayes o cortes de came
gruesos sir) que se doren demasiado
2, Empuje el botdn START
3, Cuando termine de asar. empuje el
bot6n CLEARtOFF
43
OPERACION
CSmoSeleccionar Programas
Especiales Del Control
El nuevo control a botones [iene
progtamas adicionales que usted puede
seleccionar Despues de hacer su
seleccion st desea cambiar esa posici6n
siga los pasos basra queet dial muestre
su seleccion
2. (a) Empuje los borons BROIL y OVEN
COOKING TIME al mtsmo ttempo El
dial del control mostrar_ el signo para
grado y "F"
(b) Empuje los bot6ns BROIL y OVEN
COOKING TIME al mtsmo ttempo
nuevamente Esto cambiara F°
(Fahrenheit) a C° (Cent[grado}
3. Empuje el bot6n START
El controt se progfama autom_ticamente
para apagarse despues de homear pot
12 horas o despu_s de asar a ta pa_dfla
por 3 horas en caso que se le olvide y
de]e el homo encendido Si desea eliminar
este programa:
1o Empuje y sujete al mtsmo ttempo,
el bot6n BAKE y BROIL por
3 segundos, hasta que el dial
muesl_e "SF"
2. Empu]e el boldn DELAY START
TIME El dial mueslra "12Shdn"
(apagado en 12 horas)
Empuje el botSn DELAY START TIME
nuevamente El dial mostrata "no
Shdn" (no apagado)
3. Empuje el botdn START
El control del homo esL_ programado
para la seleccion de temperaturas en
Fahrenheit La mayorla de las recetas se
dan usando la escaIa Fahrenheit Usted
puede cambiar esto y usar una seleceidn
en Centigrados
1.. Empuje y sujete, al mismo tiempo
los botones BAKE y BROIL por
3 segundos, hasta que el dial
muestre "SF"
Su control est,_ programado para usar et
reloj en t2 horas Si usled prefiere usar
Flora Mititar de 24 horas o poner e! dial en
blanco, se hace ast:
1. Empuje y suiete, a la mtsma vez
el bot6n BAKE y BROIL pot
3 segundo& hasta que el dial
muestre "SF"
2. (a) Empuje el bot6n CLOCK El
dial mostrar& "12hr" Si esta es su
seleccion, empuje el bot6n START
O
(b) Empuje el bot6n CLOCK
nuevamente. El dial mostrar& "24hr"
Ejemplo: 5:00 en el relo] de 12 horas
leer,_ t7:00 en et reloi de 24 horas
Empuje el bot6n START
(c) Empuje el bot6n CLOCK
nuevamente E[ dial ahora most[ar&
"OFF "Si 6sta es su setecci6n,
empuje el bot6n START La hora no
se mostrart_ en e! dial (La funci6n
delay start no funcionar_ )
44
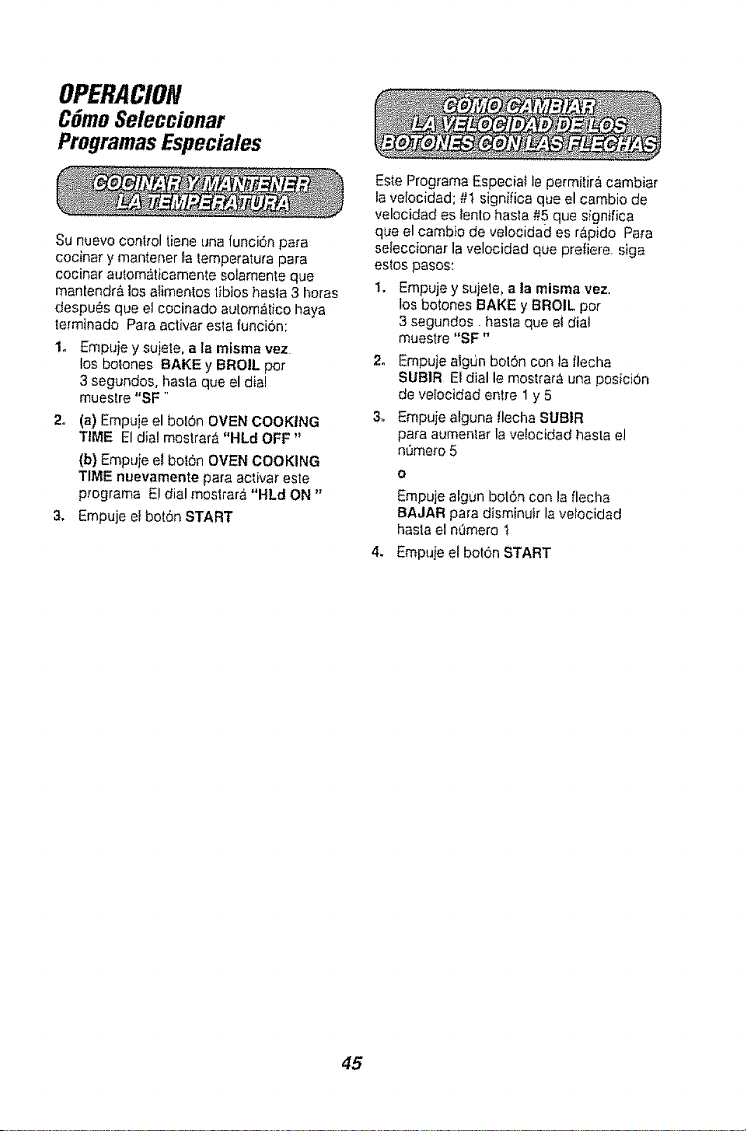
OPERACION
C6moSeleccionar
ProgramasEspeciales
Su nuevo control tiene una |unci6n para
cocinar y mantener la femperatura para
cocinar automaticamente solamente que
manlendra los alimentos libios basra 3 l_oras
despues que el cocinado aulomalico haya
le[minado Para activar esla funcion:
1. Empuje y suiete, a la misma vez
los botones BAKE y BROIL per
3 segundos, hasla que el dial
muestre "SF '
2,, (a) Empuje el bolSn OVEN COOKING
TIME El dial mostrar_ "HLd OFF"
(b) Empuje et boron OVEN COOKING
TIME nuevamente para acfivar este
programa E! dial moslrar& "HLd ON"
3. Empuje el bot6n START
Es_.ePrograma Especial le permitira cambiar
la velocidad; #t significa que el cambio de
velocidad es lento hasla #5 que significa
que el cambio de velocidad es rapido Papa
seteccionar la velocidad que pretiere siga
estos pasos:
I. Empuje y sujele, a la misma vez.
los botones BAKE y BROIL per
3 segundes, hasta queef dial
muestre "SF"
2o Empuje a_gQnbol6n con la flecha
SUBIR El dial le mostrar& una posicbn
de velocidad entre 1 y 5
3o Empuje alguna tlecha SUBIR
para aumentar la velocidad basra e!
nOmero 5
4_
Empuje algun bol6n con la flecha
BAJAR para disminuir la vetocidad
hasta el n'3mero 1
Empuje el bolon START
45
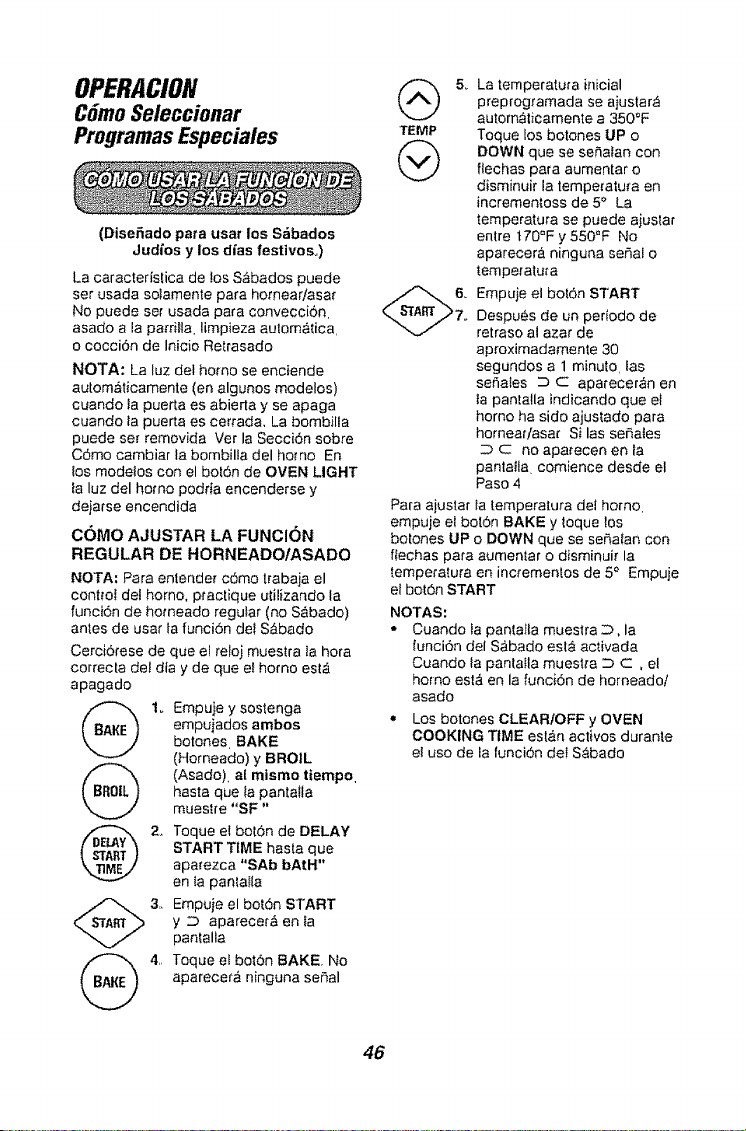
OPERACION
CSmoSeleccionar
ProgramasEspeciales
(Disefiado para usar los Sdbados
Judges y los dfas festivos_)
La caracteristica de los Sabados puede
set usada solamente para homear/asar
No puede sef usada para conveccidn.
asado a la parrilla, limpieza automatica.
o cocci6n de Inicio Retrasado
NOTA: La luz del homo se enciende
automaticamente (en algunos modelos)
cuando la puerla es abierta y se apaga
cuando la puerta es cerrada. La bombilla
puede set removida Vet la Secci6n sobre
C6mo cambiar la bombilla del homo En
los modelos con el bol6n de OVEN LIGHT
fa luz del homo podrfa encenderse y
dejatse encendida
COMe AJUSTAR LA FUNCION
REGULAR DE HORNEADO/ASADO
NOTA: Para entende_ c6me trabaja el
centtoI del horno, ptactique utilizando la
funcion de homeado regular (no S_bado)
antes de usar la funcion del S&bado
Cerci6rese de que el reloj muestra Ia hera
correcta del dfa y de que el homo est_
apagado
(_ 1_ Empuje y sostenga
empujados ambos
botones, BAKE
(Horneado) y BROIL
(_ (Asado[ al mismo tiempo
hasta que ta pantalla
muestre "SF "
2_ Toque el bol6n de DELAY
START TIME hasta que
apatezca "SAb bAtH"
en ia pantafia
(_3,, Empuje el bol6n START
y z3 aparecer_ en la
panlalla
(_ 4,, Teque el boron BAKE. No
aparecera ninguna seSal
(_ & La temperatura inicial
preprog_amada se ajustar_
autom_4icamente a 350°F
TEMP Toque los botones UP o
DOWN que se sefiaIan con
flechas para aumentar o
disminuir la temperatu_a en
incrementoss de 5_' La
temperatura se puede ajuslar
entre t70=F y 550_F No
aparecera ninguna serial o
temperatuta
Empuje el bot6n START
Despu6s de un periodo de
retraso al azar de
aproximadamente 30
segundos a 1 minute, las
seriales _ C aparecer_n en
ta pantalla indicando que el
homo ha side ajustado para
hornear!asar Si las senates
c no apatecen en la
pantalla comience desde el
Paso 4
Para ajustar ta lemperatura del horno
empuje el bol6n BAKE y toque los
bolones UP o DOWN que se seP,aian con
ftechas para aumenlar o disminuir la
temperatura en incrementos de 5" Empuje
el bot6n START
NOTAS:
• Cuando la pantalla muestra _, la
{unci6n del S&bado esl,_ aetivada
Cuando la panlatla muest_a ::3 c , el
homo esta en la funci6n de horneado/
asado
,, Los botones CLEARIOFF y OVEN
COOKING TIME estan activos durante
el use de ia funci6n deI S,_bado
46

OPERACION
CSmoSeleccionar
ProgramasEspeciales
COMO SELECCIONAR EL
HORNEADO/ASADO POR TIEMPO-
INIClO tNMEDIATO Y PARADA
AUTOMATICA
NOTA: Pare entender c6mo el control del
homo trebaja, practique utitizando las
funci6nes de Inicio Inmedialo y Parade
Aurora&rice regulates (no S&bado) antes
de usar la funcion del S_bado
Cerciorese de que el reloj muestra te hora
correcta deI dfa y de que el homo esta
apagado
I, Empuje y soslenga
empujados ambos
botones_ BAKE
(I-{omeado) y BROIL
(_ (Asado). a! mlsmo
tiempo, haste qua la
pantalla muestre "SF"
2, Toque el boron de DELAY
START TIME haste que
aparezca "SAb bAtH" en
ta pantalla
(_3.. Empuje el bot6n START
y ..'D aparecera en la
panlatla
4, Toque eI botdn OVEN
COOKING TIME No
aparecer& ninguna sepal
Q G & Empuje los bolones UP
o DOWN que so seSalan
con flechas pare entrar el
...._:i_,?._ tiempo de coccidn
deseado entre 1 minuto
y 9 horas y 59 minutos
El tiempo de cocctSn
seleccionado aparecera
en la pantal}a
Empuje el bot6n START
Toque el boron BAKE No
aparecer& ninguna seSal
@
TEMP
@
8,_
La temperature inicial
preprogramada se
colocara auiom_licamenle
en 350°F Toque los
botones LIP o DOWN que
se se_alen con tlechas
pare aumenlar o disminuir
ia temperatura en
incremen_os de 5° La
temperatura se puede
ajustar enVe 170°F y
550_F No aparecer&
ninguna serial o
temperatura
Empuje el bot6n START
Despu_s de un periodo
de retraso al azar de
aproximadamente 30
segundos a 1 minuto, las
seP_ates ::)c aparecer_n
en ia panlalla indicando
que el homo ha sido
ajustado pare homeari
asar. Si las sehales
c no aparecen en la
pantalla, com}ence desde
el Paso 7
Pare ajustar la temperature del homo.
empuje el bo16n BAKE y toque los
botones UP o DOWN qua se sefialan
con ftechas pare aumentar o disminuir
la temperatura en incrementos de 5°
Empuie et botdn START
NOTAS:
', Cuando Ia pantalla muestra :c, , la
funci6n del S_bado esta activada
Cuando la pantalla muestra ::3 c, el
homo est,€en la funcidn de homeadoi
asado
_, Cuando la cocci6n haya terminado, la
visualizacion en la pan',alia cambiar,'_
de :::) c: a :D y "0:00" aparecer&
indicando qua el homo se ha apagado
(OFF), pero que todavia est& enal
Iunci6n del S,_bado Remueva los
alimentos cocinados
47
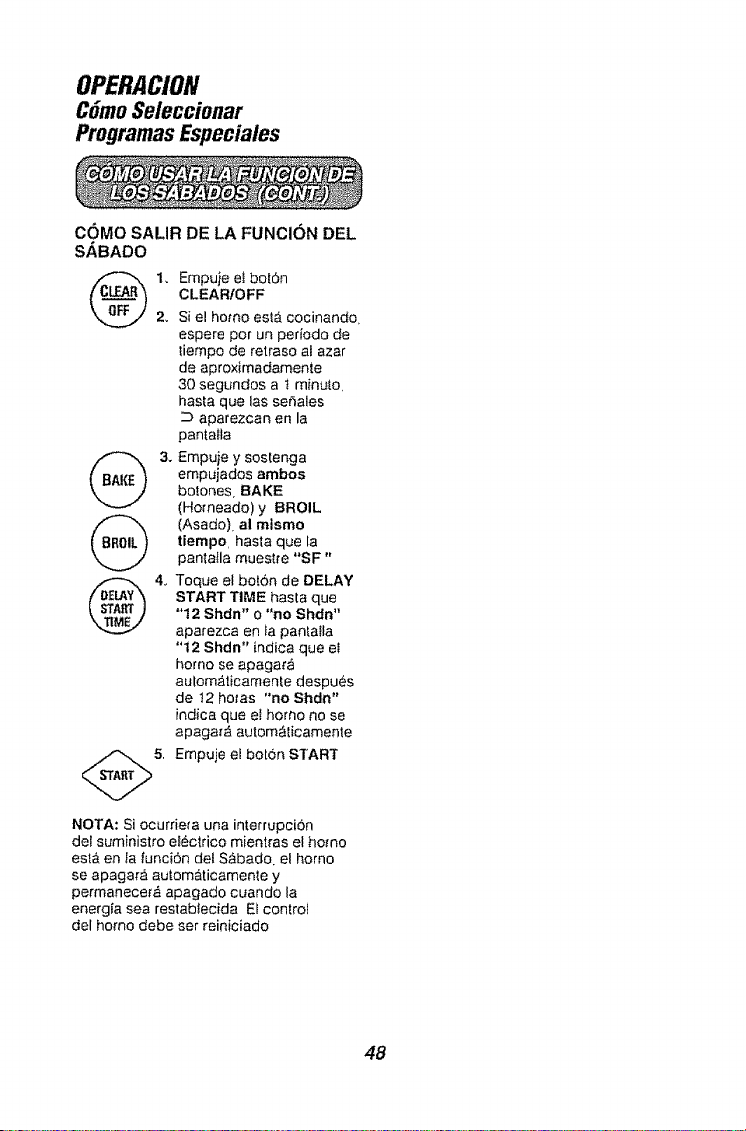
OPERACION
C6mo Seleccionar
Programas Especiales
COMO SALIR DE LA FUNCION DEL
SABADO
2.
Empu}e ei botSn
CLEAR/OFF
Si e! homo esla cocinando_
espere por un periodo de
liempo de retraso al azar
de aproximadamente
30 segundos a t minu_,o_
hasta que las seSales
aparezcan en la
pantaHa
Empuie y soslenga
empujados amfoos
botones. BAKE
(Homeado) y BROIL
(Asado), al mismo
tiempo, hasta que la
panta_la muestre "SF"
Toque el boron de DELAY
START TIME hasta que
"t2 Shdn" o "no Shdn"
aparezca en ia pantafla
"12 Shdn" indica que el
homo se apagar_
auloma*Jcamente despues
de t2 hotas "no Shdn"
indica que el homo no se
apagat_, autom_ticamente
Empuje el bot6n START
NOTA: Si ocurrie_a una intefrupci6n
del suministro el_,c|rico mientras el homo
est_ en Jafunci6n del Sb.bado el homo
se apagarb, aulom&ticamente y
permanecer& apagado cuando la
energia sea restablecida Ek control
del homo debe set reiniciado
48
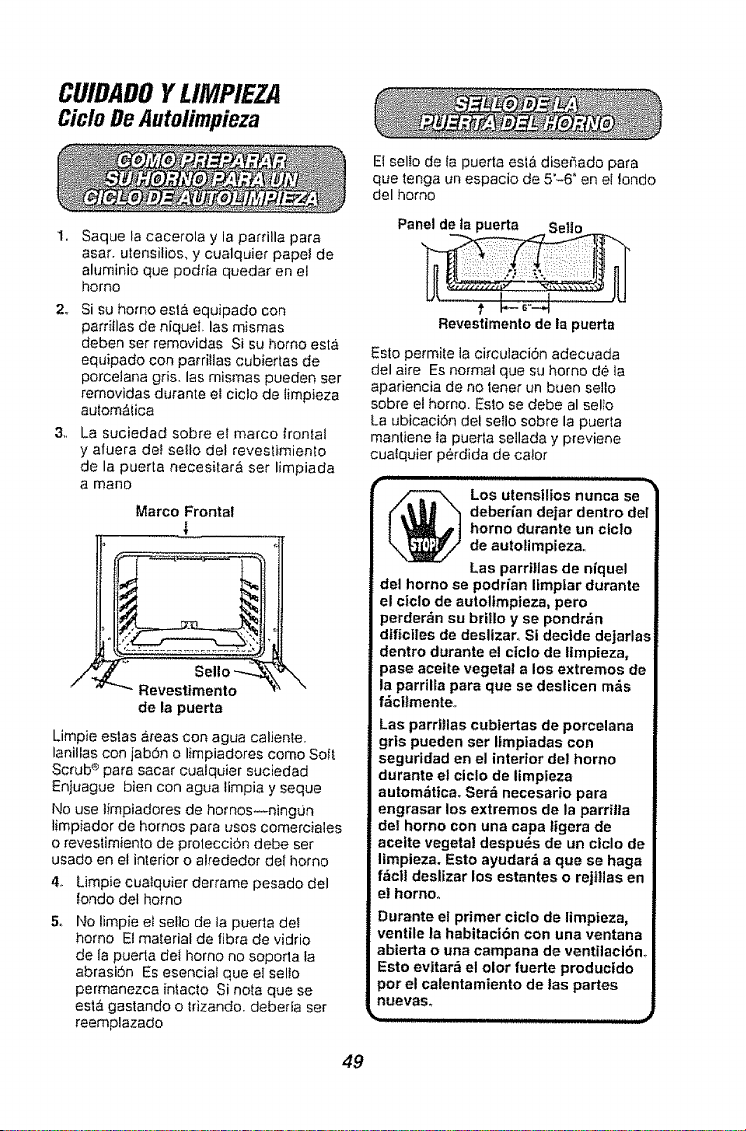
CUIDADOY LIMPIEZA
Ciclo De Jiutolimpieza
1,
Saque la cacerola y la parrilla para
asar. utensilios, y cualquier pape! de
aluminio que podria quedar en el
homo
2,, Si su homo esla equipado con
parritlas de niqueI, las mismas
deben set removidas Si su homo est_
equipado con parrillas cubiertas de
porcelana gds. las mismas pueden set
removidas durante el ciclo de limpieza
au{om_,ica
3,, La suciedad sobre el marco fronlat
y aiuera del se!lo del revestimienlo
de la puerta necesitarA set limpiada
a mane
Marco Frontal
/
_ Revestimento
de la puerta
\
Limpie estas areas con agua calienle.
lanillas con jab6n o limpiadores come So{t
Scrub ®para sacar cualquier suciedad
Enjuague bien con agua limpia y seque
No use limpiadores de hornos--ningUn
limpiador de homes para uses comerciales
o reveslimien!o de proleccidn debe set
usado en el interior o alrededor de! homo
4., Limpie cuatquier derrame pesado del
Iondo det homo
5,, No limpie et sel!o de ia puerta de!
homo El material de fibra de vidrio
de la puerla del homo no soporta la
abrasidn Es esencial que el sello
permanezca intacto Si nota que se
est,_ gastando o lrizando, debeda ser
reemplazado
El selIo de ta puerta esta diseSado para
que tenga un espacio de 5"-6" en el !ondo
del homo
f t-- _"-,4 .........
Revestimento de la puerta
Esto permife la circulaci6n adecuada
del aire Es normal que su homo de la
apariencia de no lener un buen sello
sobre el homo. Esto se debe al sello
La ubicaci6n del setlo sobre la puerta
manflene la puerta sellada y previene
cua{quier perdida de calor
r i, i mill!, i, i i J,u tluJiJ i _,_
Los utensilios nunca se
deberian dejar dentro del
homo durante un ctclo
de autolimpieza,,
Las parrillas de nfquel
del homo se podrian lfmpfar durante
el ciclo de autoltmpteza, pero
perderfin su brillo y se pondr,_n
difictles de deslizaro Si decide dejarlas
dentro durante el cielo de lfmpieza,
pase aceite vegetal a los extremes de
la parrilla pare que se deslicen m&s
f,_cllmente,
Las parrillas cubiertas de porcelana
grls pueden ser limptadas con
seguridad en el interior del homo
durante el ciclo de limpleza
automfitica, Serd necesario pare
engrasar los extremes de la parritla
del homo con una capa ligera de
aceite vegetal despuds de un ctclo de
llmpieza, Esto ayudarfi a que se haga
f,_cl! deslizar los estantes o rejilias en
el homo,
Durante el primer ctclo de limpieza,
ventile la habitack_n con una ventana
abierta o una campana de ventilaci6n,,
Esto evitar=_el olor fuerte producfdo
per el calentamiento de ]as partes
nuevas,
49
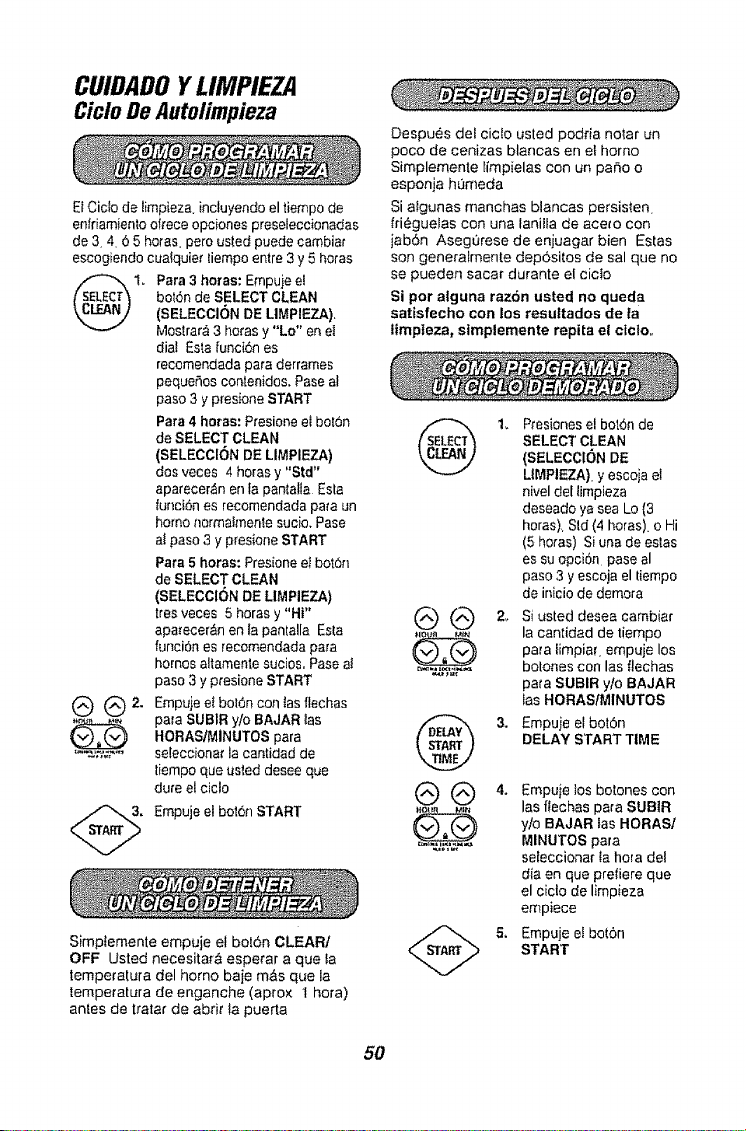
CUIDADO Y LIMPIEZA
Ciclo De Autolimpieza
ElCicto de limpieza +ncluyendoel tiempo de
enfdamiento of+'eceopciones preseleccionadas
de 3 4 6 5 horas, pero usted puede cambiat
escogiendo cuaiquier tiempo entre 3 y 5 horas
1_ ara 3 horas: Empuje e!
bot6n de SELECT CLEAN
(SELECCION DE LIMPIEZA),
Mostrar,I 3 horas y %0" en e[
dia! Esta funci6n es
recomendada para derrames
pequeSos conten+dos.Pase al
paso 3 y presione START
Para 4 haras: Presioneel bol0n
de SELECT CLEAN
(SELECCION DE LIMPIEZA)
dos veces 4 horas y "Std"
aparecer_n en la panlalla Esla
funciSnes recomendada pata un
homo normalmente sucio. Pase
al paso 3 y presione START
Para 5 horas: Presione el bot_n
de SELECT CLEAN
(SELECCION DE LIMPIEZA)
ires veces 5 horas y "Hi"
apa[ecer&n en la pantatla Esta
funciSn es recomendadapara
hornos altamente sucios. Paso aI
paso 3 y p_esioneSTART
@ (_) 2. Empuje et bol6n con tas flechas
para SUB1Ry/o BAJAR las
HORAStMINUTOS para
..... seleccionat la cantidad de
tiempo que usted desee que
dure el ciclo
, Empuje el bot6n START
Simplemente empuie el bot6n CLEAR/
OFF Usted necesitarA espetar a que ia
temperatura del homo baje m&s que la
temperatura de enganche (aprox 1 hora)
antes de tratar de abr# la puerta
Despues del ciclo usted podda notar un
poco de cenizas blancas en el homo
Simplemente _impielas con un paso o
esponja h0meda
Si a!gunas manchas blancas persisten
#i,_guelas con una ianiHa de aceto con
jab6n Aseg0rese de enjuagar bien Estas
son generalmenl:e dep6sitos de sal que no
se pueden sacar durante el cic+o
Si por atguna raz6n usted no qued a
satisfecho con los resultados de la
ttmpIeza, stmplemente repita el clclo,,
@
®@
@
®®
1+ P_esionesel bot6n de
SELECT CLEAN
(SELECCION DE
LtMPIEZA).y escoja e{
nivel del limpieza
deseado ya sea Lo (3
horas), Sld (4 horas), o Hi
(5 horas) Siuna de estas
es suopciSn pase al
paso 3 y escoja el tiempo
de inicio de demora
2+ Si usted desea cambiar
la cantidad de tiempo
para limpiar empuje los
botches con las flechas
para SUBIR y/o BAJAR
las HORAStMINUTOS
3. Empuje el bot6n
DELAY START TIME
4. Empuie los botones con
las flechas para SUB1R
y/o BAJAR las HORASt
MINUTOS para
seteccionar la hera del
dia en que prefiere que
el ciclo de limp+eza
empiece
5, Empuje et boron
START
5O
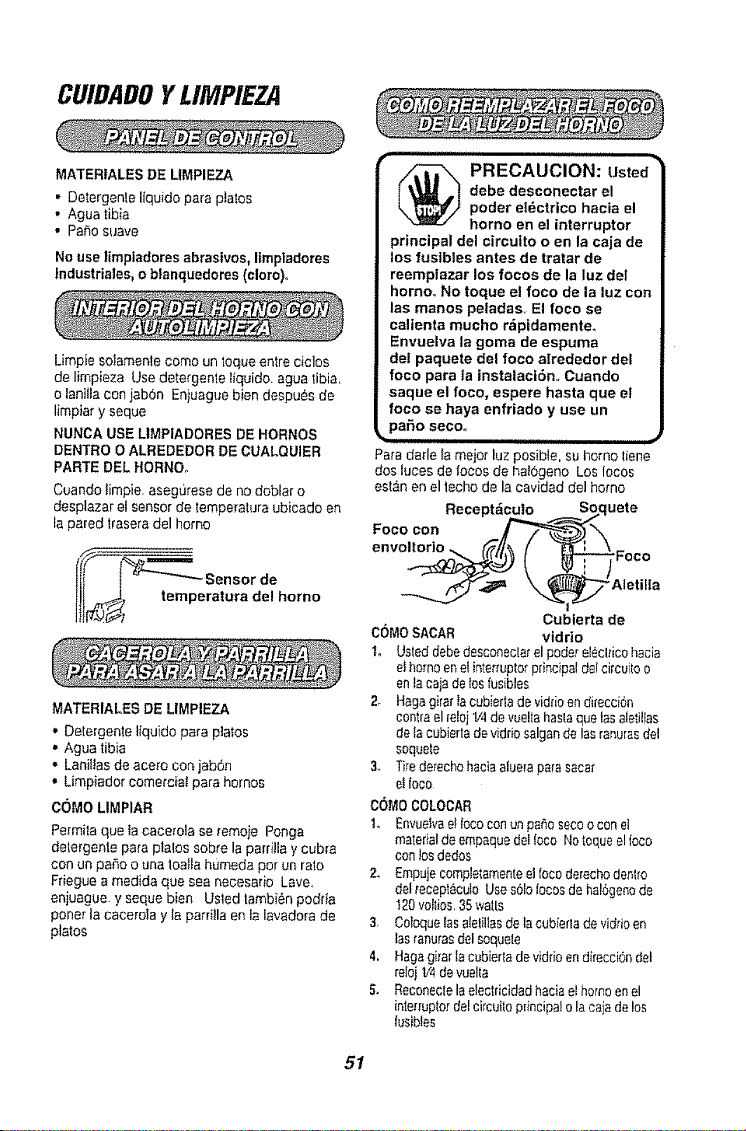
CUIDADOYLIMPIEZA
MATERIALES DE UMPIEZA
• De_ergenleI/quido para platos
• Ague tibia
• Patio suave
No use limpiadores abrasivos, ltmpladores
tndustriales, o blanquedores (cloro)o
Limpie solamente como un toque entre ciclos
de limpieza Use detefgente liquido, agua tibia,
o lanilla con iab6n Enjuague bien despu_£ de
limpiar y seque
NUNCA USE L1MPIADORESDE HORNOS
DENTRO O ALREDEDOR DE CUALQUIER
PARTE DEL HORNOo
Cuando iimpie asegurese de no doblar o
desplazar et sensor de temperature ubicado en
la pared trasera del homo
_j_ temperatura del homo
Ill
MATt=RIALESDE LIMPIEZA
• Detergente Ifquido para piatos
,, Ague tibia
• Lanitlas de acero con jab6n
• Limpiador comercial pare homos
COMO LIMPIAR
Permila que ta cacerola se remoje Ponga
detergente pare plates sob_'ela parri!ia y cubra
con on paso o una loalla humeda pot un rato
Friegue a medida que sea necesario Lave,
enjuague, y seque bien Usted tambi_n podda
poner la cacerola y la parrilla en la lavadora de
platos
_ RECAUCION: Usted
debe desconectar el
poder et_ctrico hacia el
homo en el interruptor
principal del circuito o en la caja de
los fustbles antes de tratar de
reemplazar los focos de la luz del
homo° No toque el foco de la luz con
las manos peladas. El foco se
caltenta mucho r,ipidamente.
Envuelva la goma de espuma
del paquete del foco alrededor del
foco para la instalaci6n.. Cuando
saque el foco, espere hasta que el
foco so haya enfriado y use un
Para darle la mejor luz posible, su homo tiene
dos luces de focos de haI6geno Los Iooos
estan en el techode la cavidad del homo
Foco con Recept ___.._ uete
envoltorIo- f'_'_!f_._ X
_!_z I . Foco
lettlla
Cubierta de
COMOSACAR vidrto
Io Usted debedesconecLarel pode"el_,cldcohacia
el homoenelintet'ruptorprincipa!delcircuitoo
en lacaja de losfusibles
2r HagagirarIa cubiedade viddoen direcci6n
contraelreloj_v_lde vueltahasiaquelas aletillas
de tacubiertade vidriosalgende las ranurasdel
soquete
3_ Tirederechohaciaalueraparesacar
el ioco
OOfllOCOLOCAR
I. Envuetvae!foco conunpa_osecoo con el
malerialde empaquedel(oco Notoquee! foco
conlosdedos
2. Empujecompletamenteel locoderechodentro
delreceptacuioUses61oIocosde hal6genode
!20 voltios,35wails
3, Co}oquelesalelillasdela cubferlade vidrioen
las_anurasdelsoquete
4. Hagag}rartacubiertadevidrioen direcciOndel
reloj1/4de vuelta
5o Reconectelaeleclricidadhaciael homoenel
inter_uplordel circuiteprincipalo lacaiade !os
lusibles
51
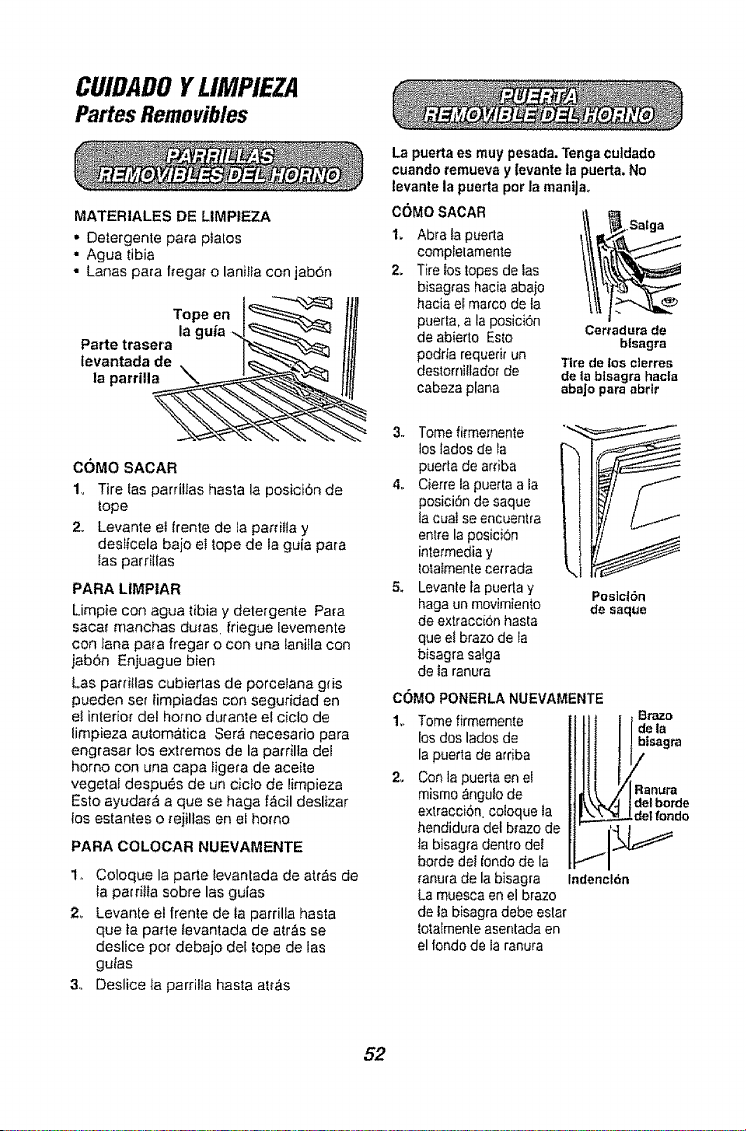
CUIDADOYLIMPIEZA
Partes Removibles
MATER1ALES DE LtMPIEZA
• Detergente para platos
• Agua tibia
• Lanas para ffegar o lani_la con jabdn
COMO SACAR
1o Tire {as parrilias hasta la posici6n de
tope
2. Levante el {rente de Ia pardlla y
deslfcela bajo eI tope de la guia para
las parriilas
PARA LtMPIAR
Limpie con agua tibia y detergente Pa+a
sacar manchas du+as {riegue levemente
con Iana papa fregar o con una tanilla con
jab6n Enjuague bien
Las pardtlas cubierlas de porcelana gds
pueden set limpiadas con seguridad en
el intedor del homo durante el ciclo de
limpieza automa_tica Sera necesario para
engrasar los extremos de la pardlla del
homo con una capa ligera de aceite
vegetal despu6s de un ciclo de limpieza
Esto ayudar_ a que se haga f_cil deslizar
los estantes o _eiillas en el homo
PARA COLOCAR NUEVAMENTE
1. Coloque la parle levantada de atr&s de
+aparriita sobre las guias
2+ Levante el frente de {a parrilla hasta
que ta parle {evantada de atr&s se
deslice pot debajo del tope de las
gutas
3. Deslice _aparrilla hasta att&s
La puerta es muy pesada. Tenga culdado
cuando temueva y levante la puerta+No
levante la puetta per la maniJa°
COMO SACAR /1 _.Satga
1. Abra la puerta ltt_"_
complelamente &'_--_,_
2, T}re Iostopes de las
bisagtas hacia abajo
hacia et marco de ta
puerta, a la posicbn
Certadura de
de abierto Esto btsagra
podria requerirun Ttre de los clerres
destorni/lador de de la btsagrahacta
cabeza plana abaJopara abrir
3. Tomefirmemente _,
los lados de la
puerta de arriba
4o C+errela puerta a la
posiciSn de saque
la cuaI se encuentra
entre la pesicion
intermedia y
tota+menfecerrada
5+ Levantela pueda y Posict6n
haga un movimiento de saque
de extraccion hasta
que el braze de la
bisagra salga
de ta ranura
COMO PONERLA NUEVAMENTE
1,, Tome firmemente
los dos lados de
la puerta de arriba
2+ Con la puerta en et
mismo _ngulo de
extracci6n, coloque la
hendidura del brazo de
la bisagra dentro det
horde del rondode la
ranura de la bisagra
La muesca en el brazo
Indencl6n
de la bisagra debe eslar
{o_,almenteasentada en
el for,do de la ranura
52
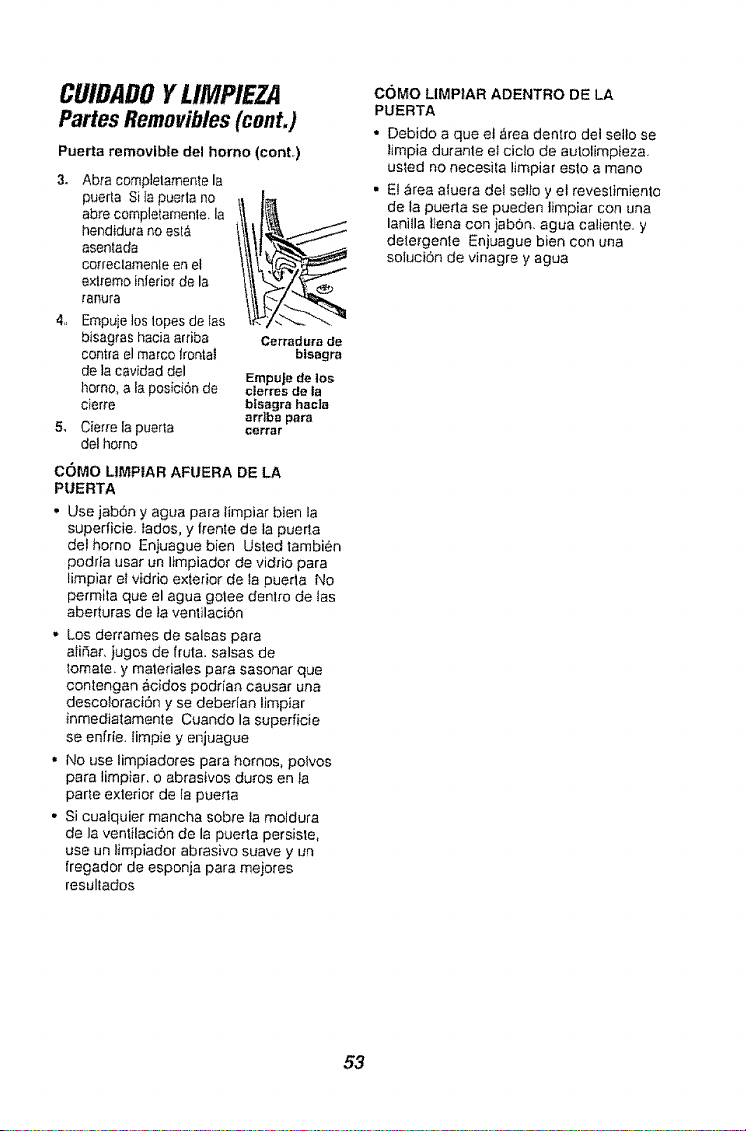
CUIDADO Y LIMPIEZA
Pa#esRemovibles(cont.)
Puerta removible del homo (cent,)
3_
4,,
Abra complelamente la
puerta Si la pue_la no _ I_
abre completamente, la
t_endidutano est_
asentada
co_reclamenleen el
extremo inferior de la
_'anura
Empuje los lopes de las -
bisagtas hacia arriba Cerradurade
contra el marco frontal blsagra
de la cavidad del EmpuJede tos
homo, a la posici6n de cierresde la
cierre blsagra hacla
arrlba para
Cierre la puerta cerrar
del homo
COMO LIMPIAR AFUERA DE LA
PUERTA
• Use jab6n y agua para iimpiar bien la
superficie. Iados, y frente de la puerta
del homo Enjuague bien Usted tambien
podrta usar un limpiador de viddo para
limpiar eI vidrio exterior de ta puerta No
permita que el agua golee denlro de Ias
aberturas de la venlilaciSn
,' Los derrames de salsas para
atiSar, iugos de fruta, salsas de
tomate, y materiales para sasonar que
contengan acidos podrian causar una
descotoraci6n y se debedan limpiar
inmediatamente Cuando la superficie
se enfrie, limpie y enjuague
, No use limpiadores para homos, polvos
para limpiar, o abrasivos duros en la
parle exterior de la puerta
, Si cualquier mancha sobre ta moldura
de la ventilaci6n de la puerta persiste,
use un iimpiador abrasivo suave y un
fregador de esponja para mejores
resultados
COMO LIMP|AR ADENTRO DE LA
PUERTA
• Debido a que et _rea dentro del seilo se
limpia durante et cic!o de autolimpieza.
usted no necesita limpiar esto a mano
° EJ,_rea afuera de! se!fo y el reveslimienlo
de la puerla se pueden timpiar con una
lanitla llena con jabOn, agua ca!iente, y
detergente Enjuague bien con una
soluei6n de vinagre y agua
53
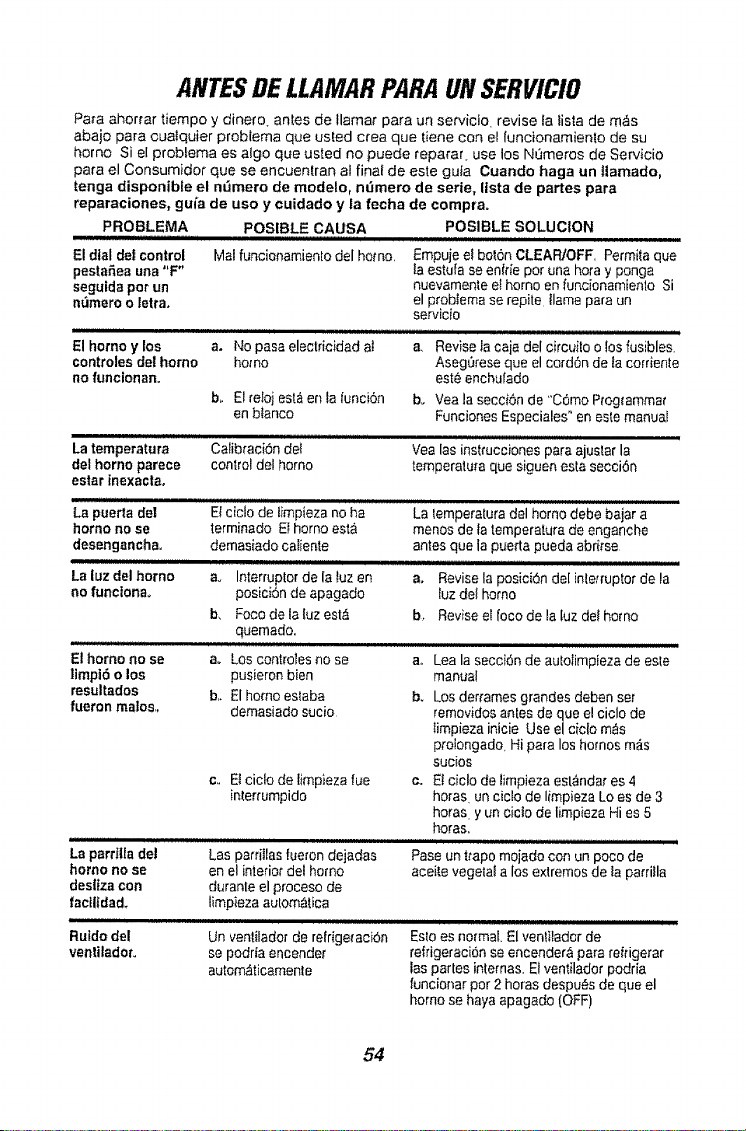
ANTES DE LLAMAR PARA UN SERVICIO
Papa ahorfar tiempo y dinero antes de llamar para un servicio, revise la lista de m_s
abajo para cua{quier problema qua ueted crea que tiene con el {uncionamiento de su
homo Si el problema es a{go que usted no puede reparar use los NOmeros de Servicio
para el Consumidor que se encuentran al final de este gula Cuando haga un |lamado,
tenga disponible el n_mero de modelo_ nt_mero de serie, Itsta de partes para
reparaciones, guia de use y cuidado y la fecha de compra.
PROBLEMA
El dial de! control
pesta_ea una "F"
seguida per un
ndmero o letrao
El homo y los
controles del homo
no funcionan.
La temperatura
del homo parece
estar lnexacta.
POSIBLE CAUSA
Malfuncionamiento del homo,
a. No pasa electdcidad aI
homo
b. El relojest_en ta funci6n
enblanco
Calibraci6n del
control del homo
POSIBLE SOLUCION
,,u,,nl inl,i i
Empuje e{boron CLEARIOFF Permila que
la estufa seenlrie per una hera y ponga
nuevamente e_homo en funcionamiento Si
el probtema se repite flamepara un
servicio
a. Revisela csia del circu]to o los fusible&
AsegOrese que el cord6n de la corriente
este enchulado
be Vea la secciOn de "C6mo Progtammar
FuncionesEspeciales" en este manual
Vea las inslrucciones pars ajustar la
temperatura que siguen esta seeei6n
La puerta de!
homo no se
desengancha.
La luz del homo
no funcfonao
El homo no se
limpt6 o los
resultados
fueron males,,
La parr|Us del
homo no se
des|lza con
facilidad,
Rutdodel
ventilador_
El ciclo de timpieza no ha
terminado Er homo esta
demasiado caliente
a. Interrupter de la tuz en
posicidn de apagado
b, Foco de Is luz est,_
quemsdo,
a_ Los controles no se
pusieron bien
b,, El homo estaba
demasiado sucio
c,. El ciclo de limpieza rue
interrumpido
Las pardflas fueron dejadas
en el interior del homo
durante el proceso de
limpieza aulom_ica
La lemperatura del homo debe bajar a
menos de ta temperatura de enganche
antes que la puerta pueda abrirse
ao Revise la posici6n de[ inle_ruptorde la
tuz del homo
b. Reviseel loco de Is luz del homo
n,i : uullllJllllJ
ar, Lea la seccidn de autolimpieza de este
manual
b. Los dertames grandes deben set
removidos antesde qua e! ciclo de
timpieza inicie Use el cielo m_ts
pt'olongado. Hi para los homes m;_s
sucios
c, E! ciclo de timpieza estgndar es 4
horas un ciclo de limpieza Loes de 3
horas y un cicto de limpieza Hi es 5
horas,
i i/i,,,,,,,,,,,,,,,,,,,,,,,,,, ,,,,,,,, ,,,
Pase un ttapo mojado con un poco de
aceite vegetal a los e×tremosde is parrilla
Un ventilador de reirige_acbn Eslo es normal. El ventilador de
se podrfa encende_' reffigersciOn seencender_ para refrigerar
autom_tticamente tas partes inlernas. El ventilador podds
funcionar per 2 horas despu_s de que el
homo se hays apagado (OFF)
54
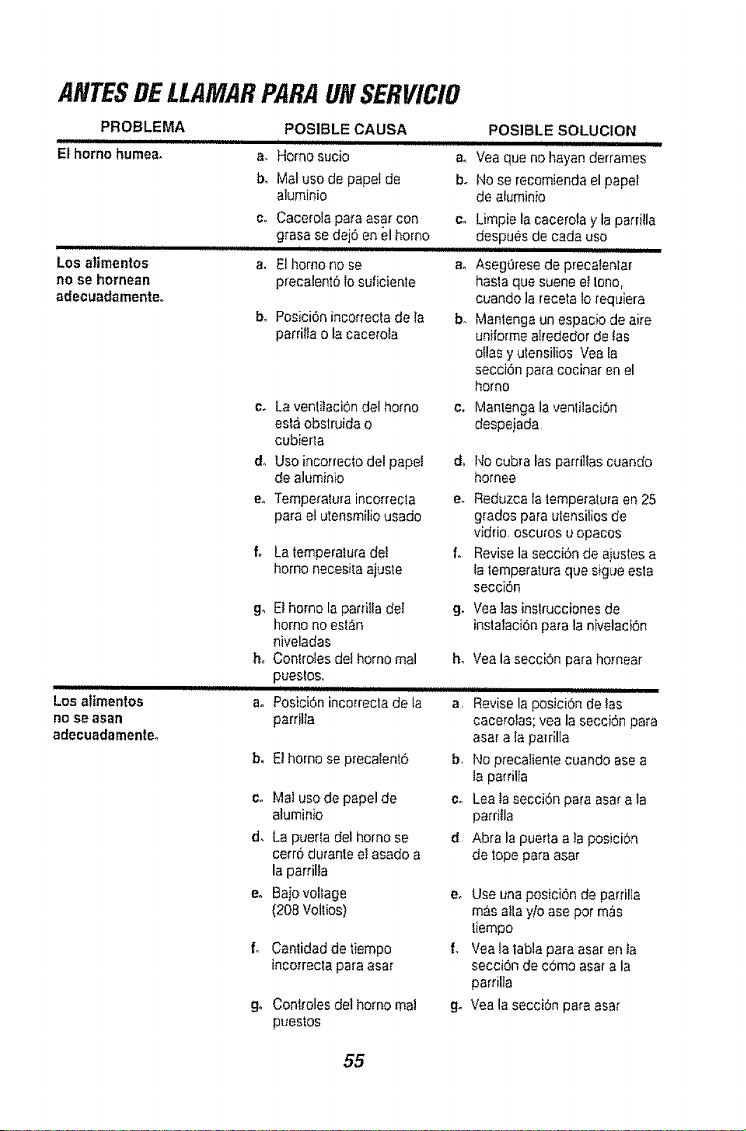
ANTES DE LLAMAR PARA UN SERVICIO
PROBLEMA
El homo humea,
Los alimentos
no se hornsan
sdecuadamente_,
POSIBLE CAUSA
ao Homo sucia
b, Mal usa de papelde
aluminia
c., Cacerata pastaasa[ can
grasa se dej6 en el homo
s. Elhomo no se
precabn161o suticiente
b., Posici6n incorrecta de Ia
parritta o la csce_'ola
c, La ventilaci6n del homa
POSIBLE SOLUCION
am Vea qua no hsyan derrames
b_ No se recamienda el papet
de aluminio
c, Limpie la cacefata y la parlilla
despues de cada use
so AsegOrese de precalenlar
hasla qua suene et tano,
cuando la recetato requiera
b_ Mantenga un espacio de aire
uniformealrededor de tas
alias y utensil[os Vea Is
seccibn para coeinar en el
homa
c. Mantenga la veniilaci6n
Los a|tmentos
asia obslruida o
cubierta
d..Use incorrec_odel pspeI
de aluminio
eo Temperatura incorrecta
para el utensmilio usado
L Latemperaturade!
homo necesita ajuste
g,, Ethomo la pardlla del g.
homo no est_.n
niveladas
he Cantrotesde_harna real h,
puestos.
despeiada
do No cubra las parrillas cuando
hornee
e, Reduzca fa lemperatura en 25
grades para utensitiosde
viddo, oscu_'osu opacas
f,, Revise la secci6n de aiustes a
la temperatura qua sigue esta
secciSn
Vea ]as instruccionee de
instalacion para ta nivelaci6n
Vea Is secci6n para hernear
i i, i ,,,/Ul i ul ,,,,,,,,,,,,,,,,,
ao POsici6n incarrecta de ta a, Revisela position de 1as
no se asan
adecusdamen[s_
parrilta cacero_as;yea la secciSn para
asar a la pai,rilla
b, E! horna se precalent6 b, Na precaliente cuando ase a
la pamlta
ca Mal use de papel de c,, Lea ta seccidn para asa_'a la
aluminio parrifla
d, La puerta del homo se d. Abra la puerta a la posici6n
cerr6 dufante el asado a de tope para asar
la pardlla
eo Baje valtage e, Use una pasici6n de parrilla
(208 Valtios) mas alia y/o ase per m_s
tiempa
f° Cantidad de tiempo f, Vea la tabla para asar en ta
inco:rreolapara asar seccion de come asaJ"a la
pardlla
g,, Con!_olesdel harno ma! g. Vea la secai6n para asar
puestoe
55
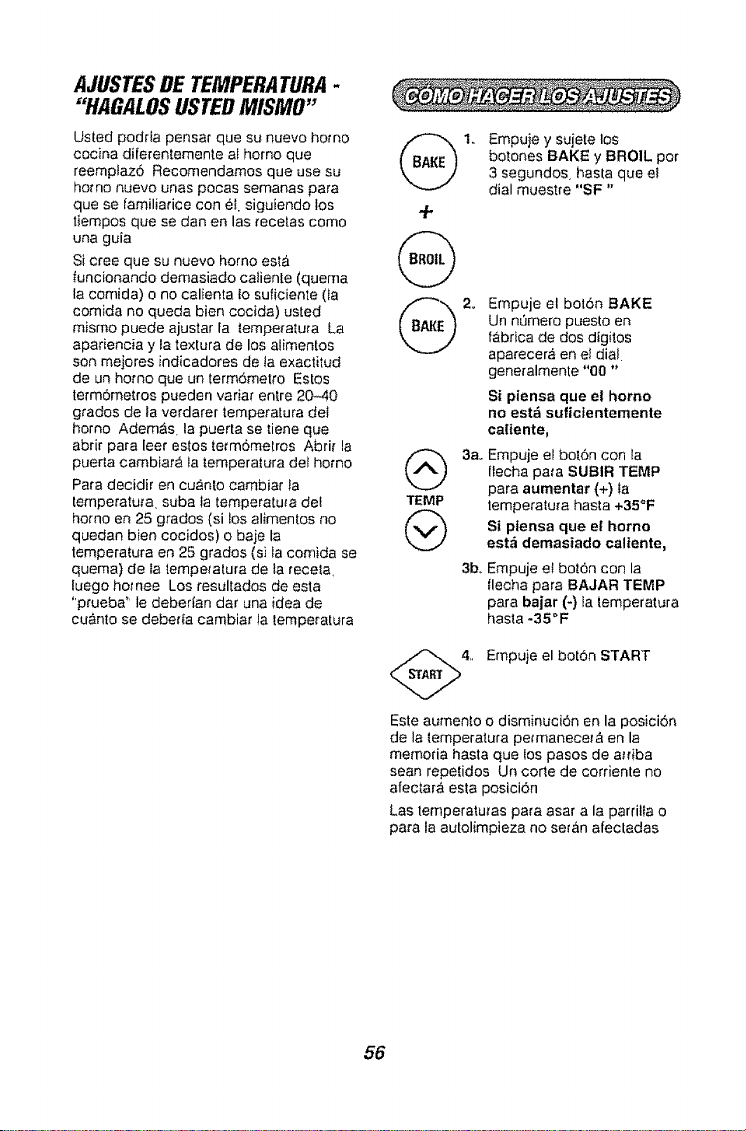
AJUSTESDE TEMPERATURA-
"HAGALOSUSTEDMISMO"
Usted podda pensar que su nuevo homo
cocina diferenlemente at homo que
reemptaz6 Recomendamos que use su
homo nuevo unas pocas semanas para
que se familiarice con el. siguiendo los
tiempos que se dan en las recetas come
una guia
Si cree que su nuevo homo esta
funcionando demasiado caliente (quema
la cernida) o no calienta to suficiente (ia
comida no queda bien cocida) usted
mismo puede ajustar la tempe_atuta La
apadencia y la texlura de los alimentos
son mejores indicadores de ta exactitud
de un homo que un term6met_'o Estos
term6me[ros pueden varia_ entre 20*40
grades de la verdarer temperatura de!
homo Adem_s la puerta se tiene que
abrir para leer estos letmomelros Abri_ la
puerta cambiar#, ta temperatura del homo
Para decidir en cuanlo cambiar la
lemperatu_a suba la temperalu_a del
homo en 25 grades (si los alimentos no
quedan bien cocidos) o baje ta
temperatura en 25 grades (si la comida se
quema) de Ia _,empetatura de la recela.
luego homee Los resultados de esta
"prueba" le debertan dar una idea de
cub.hie se debeda cambiar la temperatura
./.
@
TEMP
@
Empuie y sujete los
botones BAKE y BROIL per
3 segundos, hasta que el
dial muestre "SF"
Empuje el bot6n BAKE
Un n_mero puesto en
fabrica de dos dIgitos
aparecer,_ en el dial
generalmente "OO"
Si piensa que el homo
no est_ suficientemente
caliente,
3a. Empuje el bol.on con la
flecha para SUBIR TEMP
para aumentar (+) Ia
temperatu_a hasta +35°F
Si ptensa que et homo
estzi demasiade caltente,
3be Empuje et boton con la
flecha para BAJAR TEMP
para bajar (-) la ¿emperatura
hasta -35°F
/'_4,, Empuje el boron START
Este aumenlo e disminuci6n en la posicion
de la lemperatura pe_manecerA en la
mernoria hasta que los pasos de atdba
sean repetidos Un corle de cerriente no
afectara esta posici6n
Las temperatutas para asar a la parrilla o
para la autolimpieza no ser,_n afectadas
56

NOTAS
57
GARANTIADELHORNODE
PAREDEMPOTRADO
UN AI_O COMPLETO DE GARANTIA PARA TODAS LAS PARTES
Si dentro de un a_o de ta fecha de instalaci6n cualquier parte deja de
funcionar adecuadamente debido a un defecto en el material o la obra de
mano, Sears la reparar_ o [eemplazar,_ a nuestra opci6n sin costo
Si este producto es sometido a un uso que no sea el familiar privado_ ia
garantia de arriba es efectiva pot solamente 90 dtas
EL SERVIClO DE GARANTfA EST', DISPONIBLE AL LLAMAR A SEARS
SERVICE AL 1-800-4-MY-HOME ®.
Esta garantia _ebrinda derechos legales especificos, y usted tambien
podria tenet otros derechos que varian de estado a estado
Sears Roebuck and Co Dept 8t7 WA Hoffman Estates IL 60179
..,,,,
58
Contrato de protecci6n
maestra
Felicitaciones pot su compra
intefigente Su nuevo aparato
Kenmore ® esta diseSado y fabricado
para muchos aSos de operacion
confiable Sin embargo, al igual que
todos los productos, puede requerir
de mantenimiento o reparacion
prevenlivas en cualquier momento Es
ahi cuando el contrato de proteccidn
maestra le puede ahorrar dinero y
molestias
Adquiera un Contrato de proteccidn
maestra ahora mismo y prot#jase
contra inconvenientes y gastos
inesperados
Ei Contrato de proteccion maestra
tambien le ayuda a ampliar la vida de
su electrodomestico Lo siguiente es
Io que se incluye en el contrato:
v"Servicio experto por parte de
nuestros t2.000 especialistas
profesionates de reparaci6n
v'Servicio ilimitado sin costo por
partes y mano de obra en todas las
reparaciones cubiertas
v" Garantfa total - reposici6n de su
producto cubierto si ocurren mAs
de tres fallas det producto dentro
de doce meses
v _Reposici6n del producto si el
producto cubierto no se puede
reparar
v' Revisi6n anual de mantenimiento
preventivo a su soIicitud - sin
cargo adicional
v"Ayuda telef6nica r_pida -
asistencia no t6cnica y de
inslrucciones sobre los productos
reparados en su casa, adem_s
de una convenienle programaci6n
de reparaciones
v"Protecci6n contra descargas
el_ctricas para daSos debido a
fluctuaciones electricas
v" Reembotso por alquiler si la
reparaci6n dei producto cubJerto
toma m&s tiempo de! prometido
Una vez adquiera el contrato, solo
necesita una Ilamada telef6nica para
programar e! servicio Puede !lamar a
cualquier hora de! dfa o de la noct_e o
programar la cita del servicio por
lnternet
Sears cuenta con mas de 12,000
especialistas profesionales de
reparaci6n, quienes tienen acceso a
m_s de 4 5 millones de partes y
accesorios de calidad Este es el Iipo
de profesionalismo en el que puede
contra para ayudar a prolongar la
vida de su nueva compra para los
aSos venideros iAdquiera el Contrato
de protecci6n maestra hoy mismo!
Aplican ciertas limitaciones y
exclusiones_
Para precios e informaci6n
adicional, Ilame at 1-800-827-6655.
Servicio de instalaci6n de Sears
Para la instalaciSn profesional
garanhzada de Sears de
electrodomesticos y artfculos para el
t_ogar como dispositivos para abrir
puertas de garaie y catentadores de
agua, en los EE UU,.Name a}
1-800-4-MY-HOME _
59

Get it fixed, at your home or ours!
Your Home
For repair-in your home-of all major brand appliances,
_awnand garden equipment, or heating and cooling systems,
no matter who made it, no matter who sold it[
For the replacement parts, accessories and
owner's manuals that you need to do-it-yourself.
For Sears professionaf installation of home appliances
and items like garage door openers and water heaters=
1-800-4-MY-HOME ® (1-800-469-4663)
carl anytime,day or night(USA and Canada)
www.sears,,com www,saars,ca
Our Home
For repair of carry-in items like vacuums, lawn equipment,
and electronics, catl or go on-tine for the location of your nearest
Sears Parts & Repair Center.
1-800-488-1222
CalI anytime, day or night (U S A only)
WWW,SSars corn
To purchase a protection agreement (USA)
or maintenance agreement (Canada) on a product serviced by Sears:
1-800-827-6655 (u,s A ) 1-800-361-6665 (Canada)
Parapedir serviciode reparacion Au Canada pour serviceen fran_;ais:
a demicilio ypara ordenar piezas: 1-800-LE-FOYER _
1-888-SU-HOGAR _ 0-80o'533-6937)
(1-888-784-6427) www sears ca
S_ a_ R_£b_ck ar'4:lCo_
6O