0
Write the Serial Number here:
_______________________
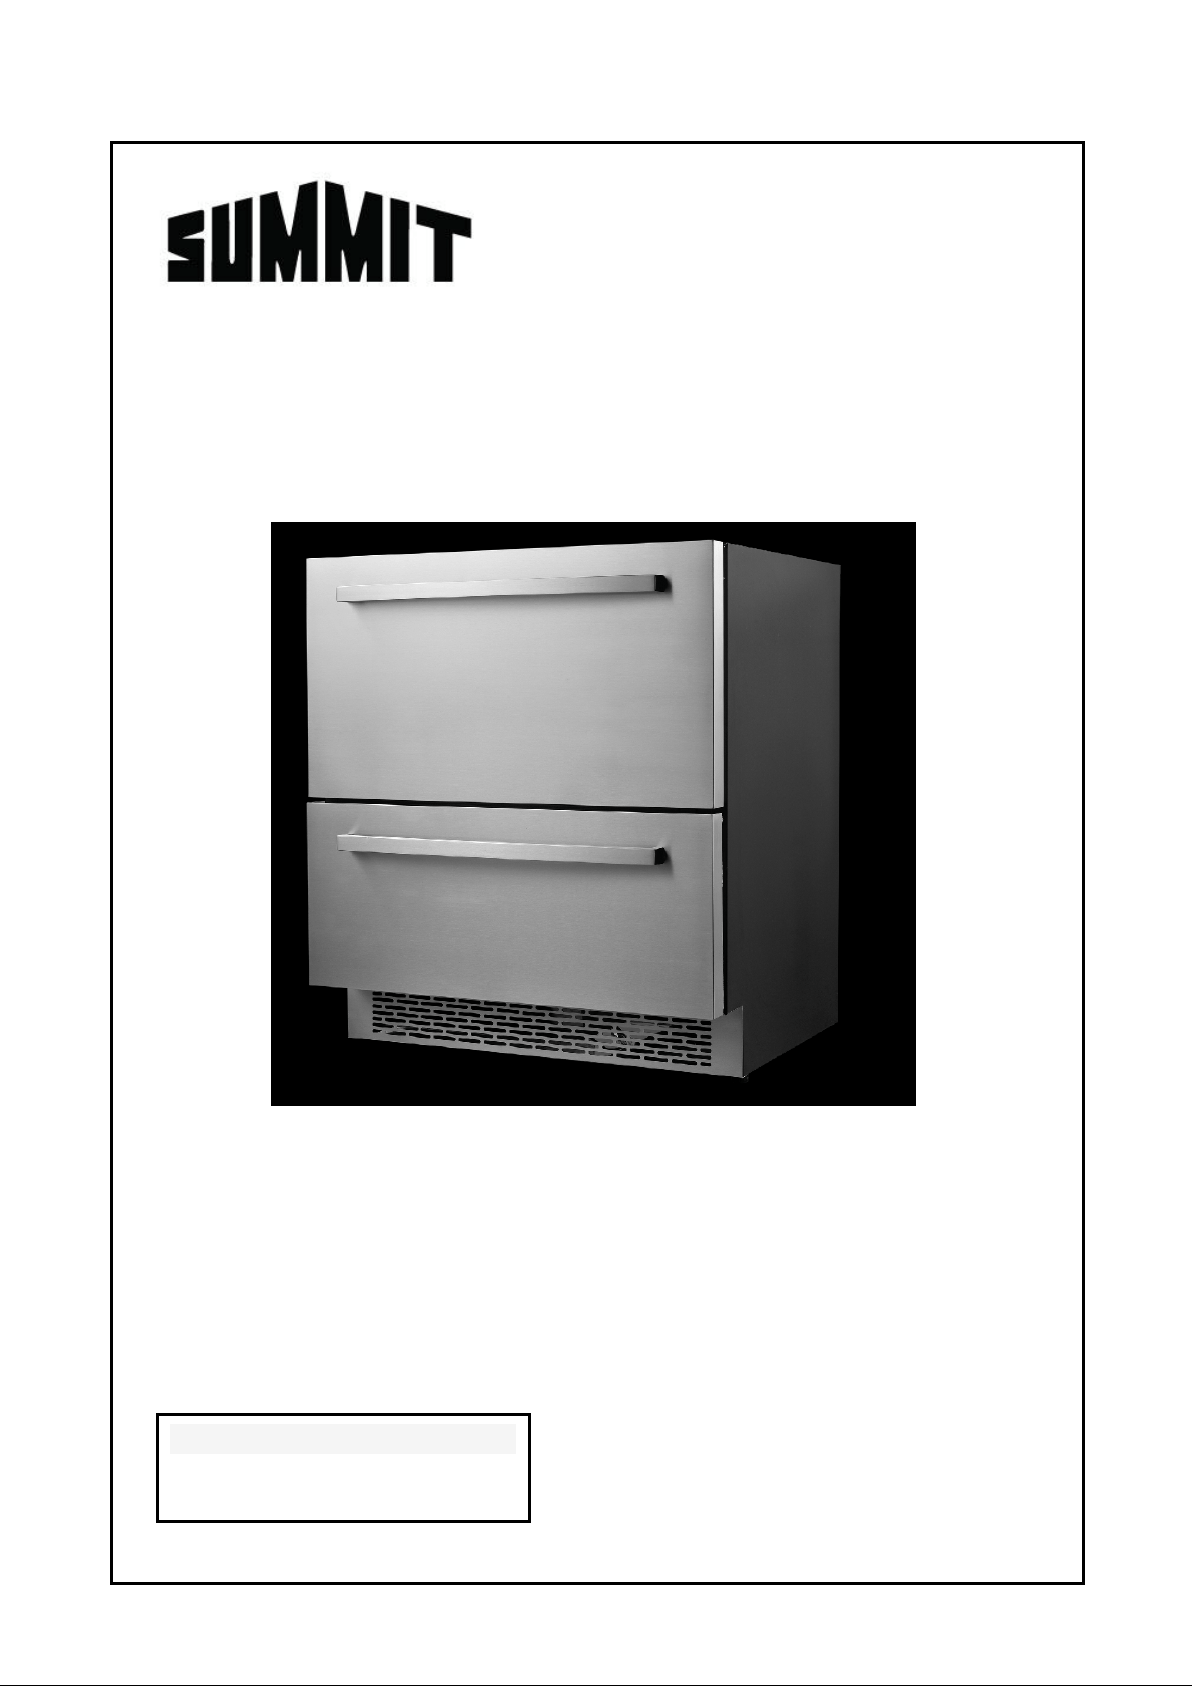
DRAWER REFRIGERATOR
Model: SP7D2
Owner’s Manual
BEFORE USE, PLEASE READ AND FOLLOW
ALL SAFETY RULES AND OPERATING INSTRUCTIONS
FELIX STORCH, INC.
Summit Appliance Division
770 Garrison Avenue
Bronx, NY 10474
www.summitappliance.com

1
TABLE OF CONTENTS
Important Safeguards ................................................................................ 2 - 3
Technical Information ...................................................................................... 4
Location of Parts .............................................................................................. 4
Installation Instructions .......................................................................... 5 - 12
Before Using Your Refrigerator .................................................................. 5
Installation of Your Refrigerator ............................................................ 5 - 6
Cutout Dimensions ....................................................................................... 7
Drawers .................................................................................................. 8 - 12
Operating Your Appliance ................................................................... 13 – 14
Control Panel ...............................................................................................13
Setting the Temperature Control ................................................................13
Defrosting .....................................................................................................14
Care and Maintenance ...........................................................................15 - 16
Cleaning Your Appliance ............................................................................15
Power Failure ..............................................................................................15
Vacation Time ..............................................................................................15
Transporting Your Appliance .....................................................................15
Energy-Saving Tips ....................................................................................16
Problems with Your Appliance ....................................................................17
Limited Warranty .............................................................................................19

2
IMPORTANT SAFEGUARDS
Before the appliance is used, it must be properly positioned and
installed as described in this manual, so read the manual carefully. To
reduce the risk of fire, electrical shock or injury when using the
appliance, follow basic precautions, including the following:
• Read all instructions before using the refrigerator.
• Plug into a grounded 3-prong outlet, do not remove grounding prong, do not use an
adapter, and do not use an extension cord.
• Replace all panels before operating.
• It is recommended that a separate circuit serving only your appliance be provided. Use
receptacles that cannot be turned off by a switch or pull chain.
• Never clean appliance parts with flammable fluids. These fumes can create a fire hazard
or explosion. And do not store or use gasoline or other flammable vapors and liquids in the
vicinity of this or any other appliance. The fumes can create a fire hazard or explosion.
• Do not connect or disconnect the electric plug when your hands are wet.
• Unplug the appliance or disconnect power before cleaning or servicing. Failure to do so
can result in electrical shock or death.
• Do not attempt to repair or replace any part of your appliance unless it is specifically
recommended in this manual. All other servicing should be referred to a qualified
technician.
• This appliance is CFC- and HFC-free and contains small quantities of Isobutane
(R600a) which is environmentally friendly, but flammable. It does not damage the
ozone layer, nor does it increase the greenhouse effect. Care must be taken during
transportation and setting up of the appliance that no parts of the cooling system are
damaged. Leaking coolant can ignite and may damage the eyes.
In the event of any damage:
- Avoid open flames and anything that creates a spark,
- Disconnect from the electrical power line,
- Air the room in which the appliance is located for several minutes, and
- Contact the Service Department for advice.
• The more coolant there is in an appliance, the larger the room it should be installed in.
In the event of a leakage, if the appliance is in a small room, there is the danger of
combustible gases building up. For every ounce of coolant at least 325 cubic feet of
room space is required. The amount of coolant in the appliance is stated on the data
plate on the back of the appliance. It is hazardous for anyone other than an Authorized
Service Person to carry out servicing or repairs to this appliance.
• Take serious care when handling, moving, and using the appliance to avoid either
damaging the refrigerant tubing or increasing the risk of a leak.

3
• Replacing component parts and servicing shall be done by factory authorized service
personnel so as to minimize the risk of possible ignition due to incorrect parts or
improper service.
DANGER: Risk of child entrapment!
Child entrapment and suffocation are not problems of the past. Junked or
abandoned appliances are still dangerous…even if they will “just sit in the
garage a few days”.
Before you throw away your old refrigerator or any appliance:
Remove the door.
Leave the shelves in place so that children may not easily climb inside.
FOLLOW WARNING CALLOUTS BELOW ONLY WHEN APPLICABLE TO YOUR MODEL
• Use two or more people to move and install appliance. Failure to do so can result in back
or other injury.
• To ensure proper ventilation for your appliance, the front of the unit must be completely
unobstructed. Choose a well-ventilated area with temperatures above 44°F (7°C) and
below 90°F (32°C).
• The appliance should not be located next to ovens, grills or other sources of high heat.
• The appliance must be installed with all electrical, water and drain connections in
accordance with state and local codes. A standard electrical supply (115 V AC only, 60 Hz),
properly grounded in accordance with the National Electrical Code and local codes and
ordinances, is required.
• Do not kink or pinch the power supply cord of the appliance.
• The size of the fuse (or circuit breaker) should be 15 amperes.
• It is important that the appliance be leveled in order to work properly. You may need to
make several adjustments to level it.
• All installations must be in accordance with local plumbing code requirements.
• Make certain that the pipes are not pinched, kinked or damaged during installation.
• Check for leaks after connection.
• Never allow children to operate, play with or crawl inside the appliance.
• Do not use solvent-based cleaning agents or abrasives on the interior. These cleaners
may damage or discolor the interior.
• Use this appliance only for its intended purpose as described in this Owner’s Manual.
• Keep fingers out of the “pinch point” areas. Clearances between the drawers and cabinet
are necessarily small. Be careful closing drawers when children are in the area.
• Technical specifications are subject to change without notice.
– SAVE THESE INSTRUCTIONS –
4
TECHNICAL INFORMATION
Model SP7D2
Type Drawer refrigerator
Color Black with SS drawers
Rated Voltage 115V / 60Hz
Rated Current 1.6A
Power Input 100W
Power of Heater 160W
Refrigerant R600a (1.52 oz.)
Defrost Type Automatic
Net Weight 117 lbs.
Unit Dimensions 29.5”W x 22.8”D x 33.5”H
Testing Agency ETL
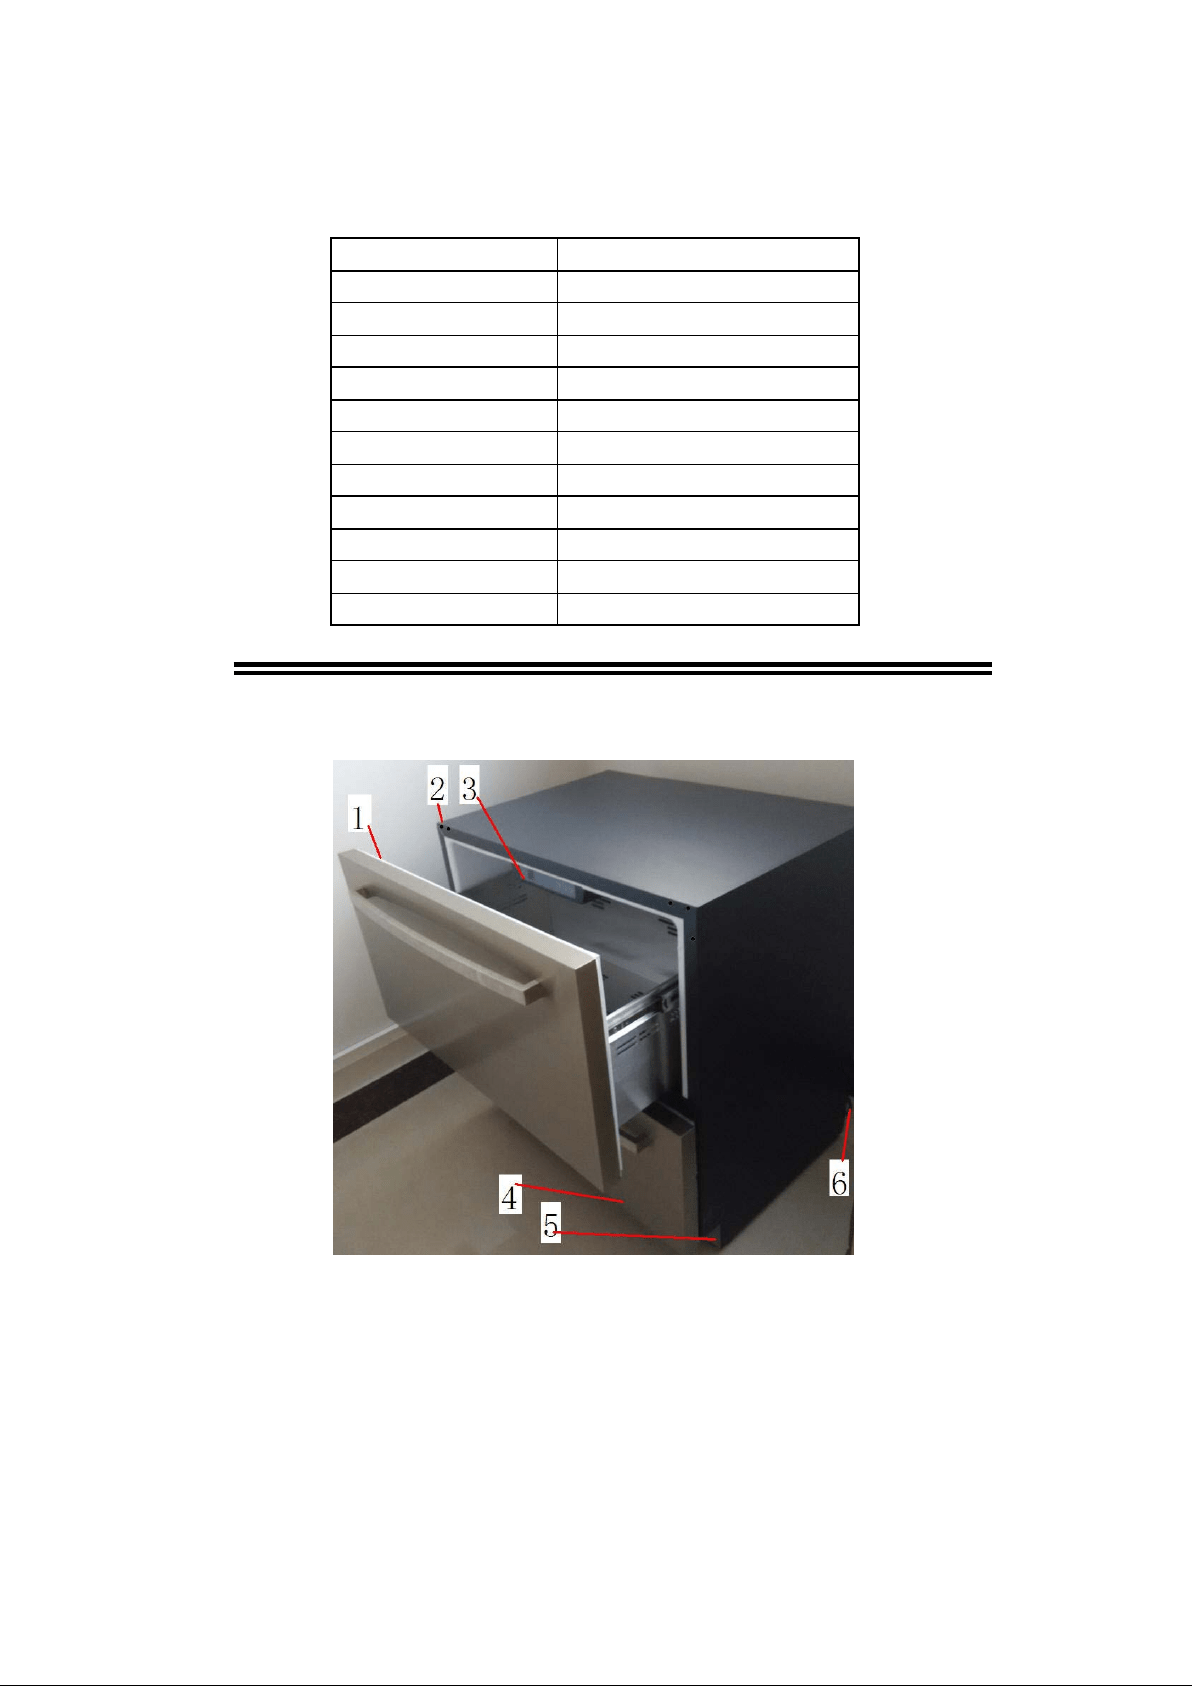
LOCATION OF PARTS
1. Upper drawer with stainless steel handle
2. Cabinet
3. Control Panel
4. Lower drawer with stainless steel handle
5. Ventilator
6. Compressor (back of unit)
5
INSTALLATION INSTRUCTIONS
Before Using Your Refrigerator
1. Remove the exterior and interior packing.
2.
CAUTION: After unpacking and before connecting the appliance to the power source,
you MUST allow this appliance to stand upright for at least 2 hours to allow the
lubricant and refrigerant to drain back into the compressor and stabilize. Failure to
do so may adversely affect performance and the lifetime of this unit
.
3. Clean the interior surfaces with lukewarm water using a soft cloth.
Installation of Your Refrigerator
This model is intended for indoor/interior applications only and is not to be used in
installations that are open or exposed to natural elements.
1. Install the anti-tip brackets (see below).
2. Plug in the electric cord.
3. Gently push the unit into position. Be careful not to entangle the electric cord.
4. Re-check the leveling, from front to back and side to side. Make any necessary
adjustments. The unit’s top surface should be approximately 1/8" (3 mm) below the
countertop.
5. Remove any tape and wipe the inside of the unit with a clean, water-dampened cloth.
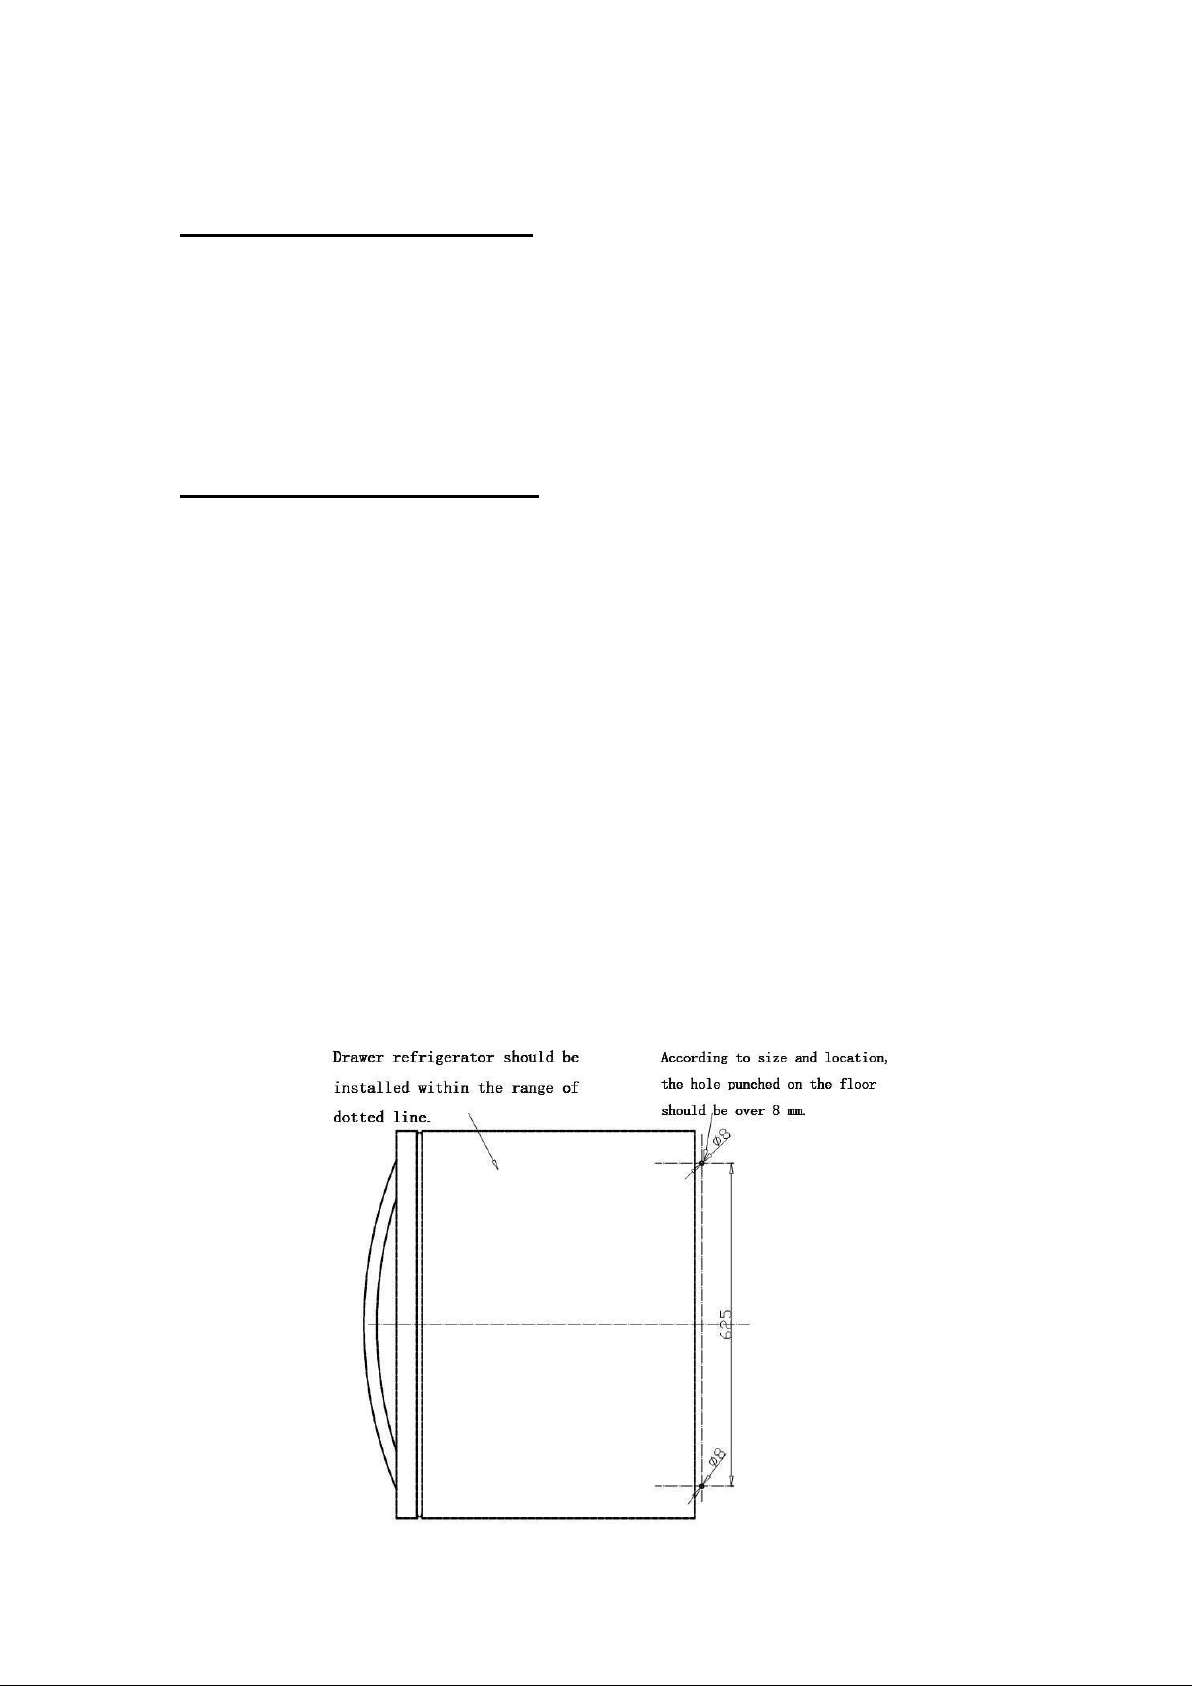
Installation of Anti-Tip Brackets
!! Warning!! To avoid the risk of serious personal injury or damage to the appliance due
to the instability of the appliance, it must be fixed to the floor with anti-tip brackets and
screws (supplied). Before installing, carefully read these instructions.
a. Take the fixing brackets (2 pcs) and screws (2 pcs) out of the instruction packet.
b. Drill holes into the floor according to the dimensions shown below. This will allow
you to fix the brackets to the floor.
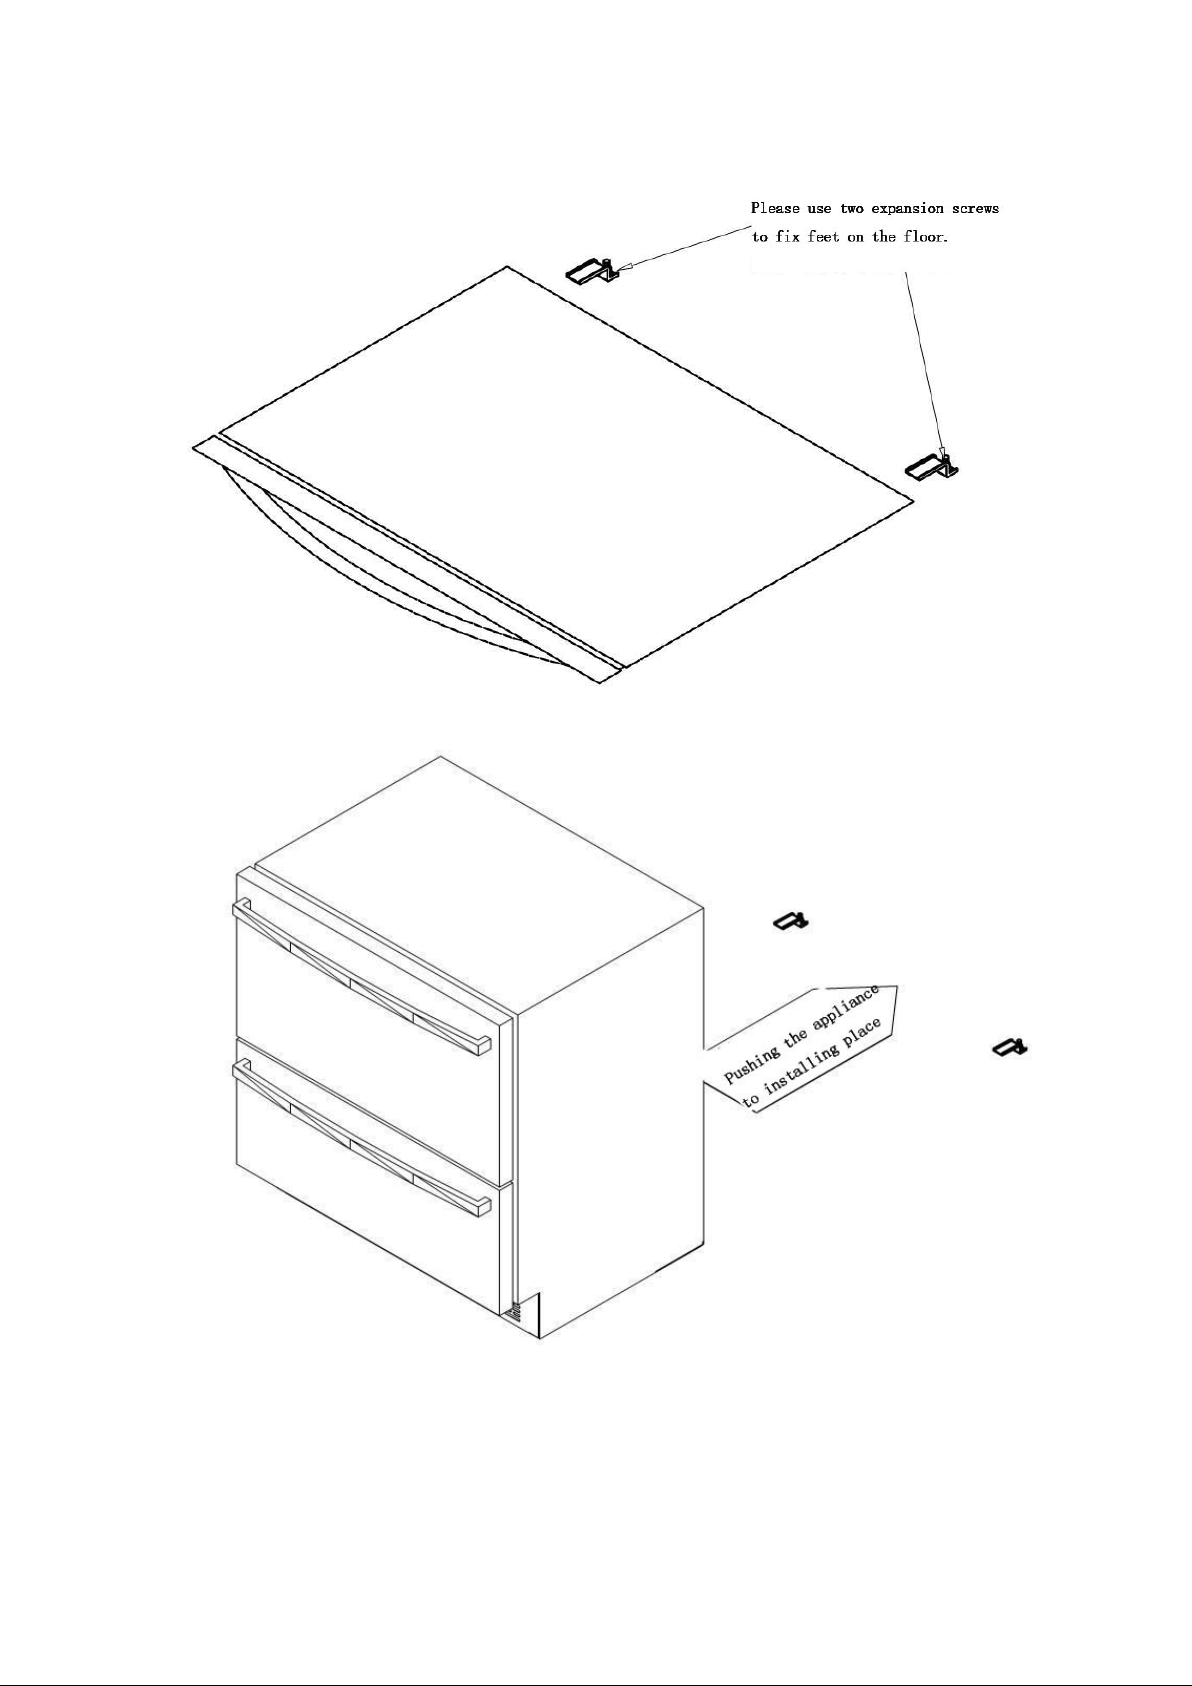
6
c. Push the appliance into its place of installation.
d. If the unit is not stable, pull out the appliance and repeat the previous step until the
unit is stable.
7
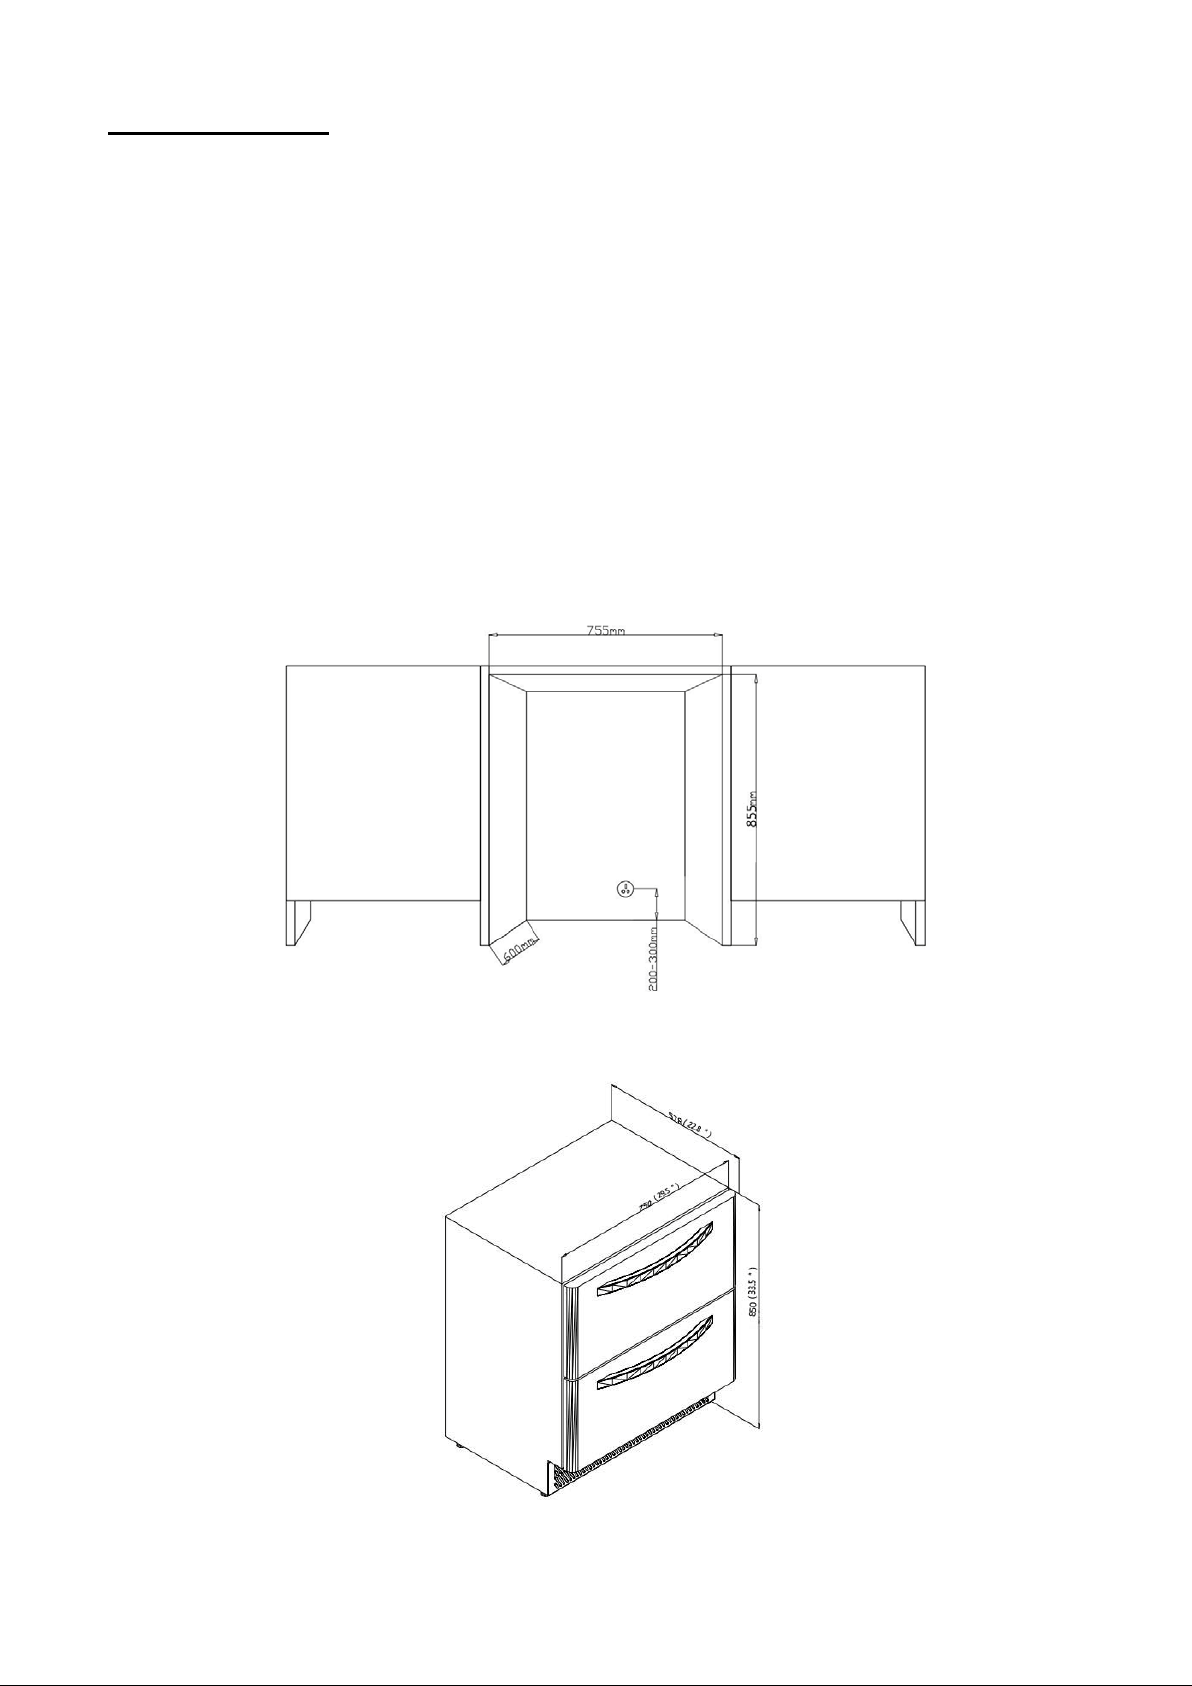
Cutout Dimensions
PREPARE SITE
Your product has been designed exclusively for a built-in installation. When built-in, your unit does not
require additional air space for top, sides, or rear. However, the front grille (ventilator slits at base) must
NOT be obstructed. The unit is engineered with a variety of adjustment features to help ensure a
seamless installation. Adjustable doors, leveling legs and grille will assist in fine tuning the installation.
CAUTION:
The unit CANNOT be installed behind a closed cabinet door. It is designed and manufactured to be
seamlessly installed in the specified cutout openings shown, and variance in the floors or cabinetry
must be accounted for in your installation.
CUTOUT DIMENSIONS (Dimensions of the recess)
Height of housing: 33.66” (855mm)
Depth of housing: 23.62” (600mm)
Width of housing: 29.72” (755mm)
PRUODUCT DIMENSIONS
8
Checking Drawer Alignment
The unit’s drawers are aligned at the factory before shipment. However, their alignment could have been
disturbed during shipment or during overlay panel installation. Check each drawer to confirm that it is
aligned:
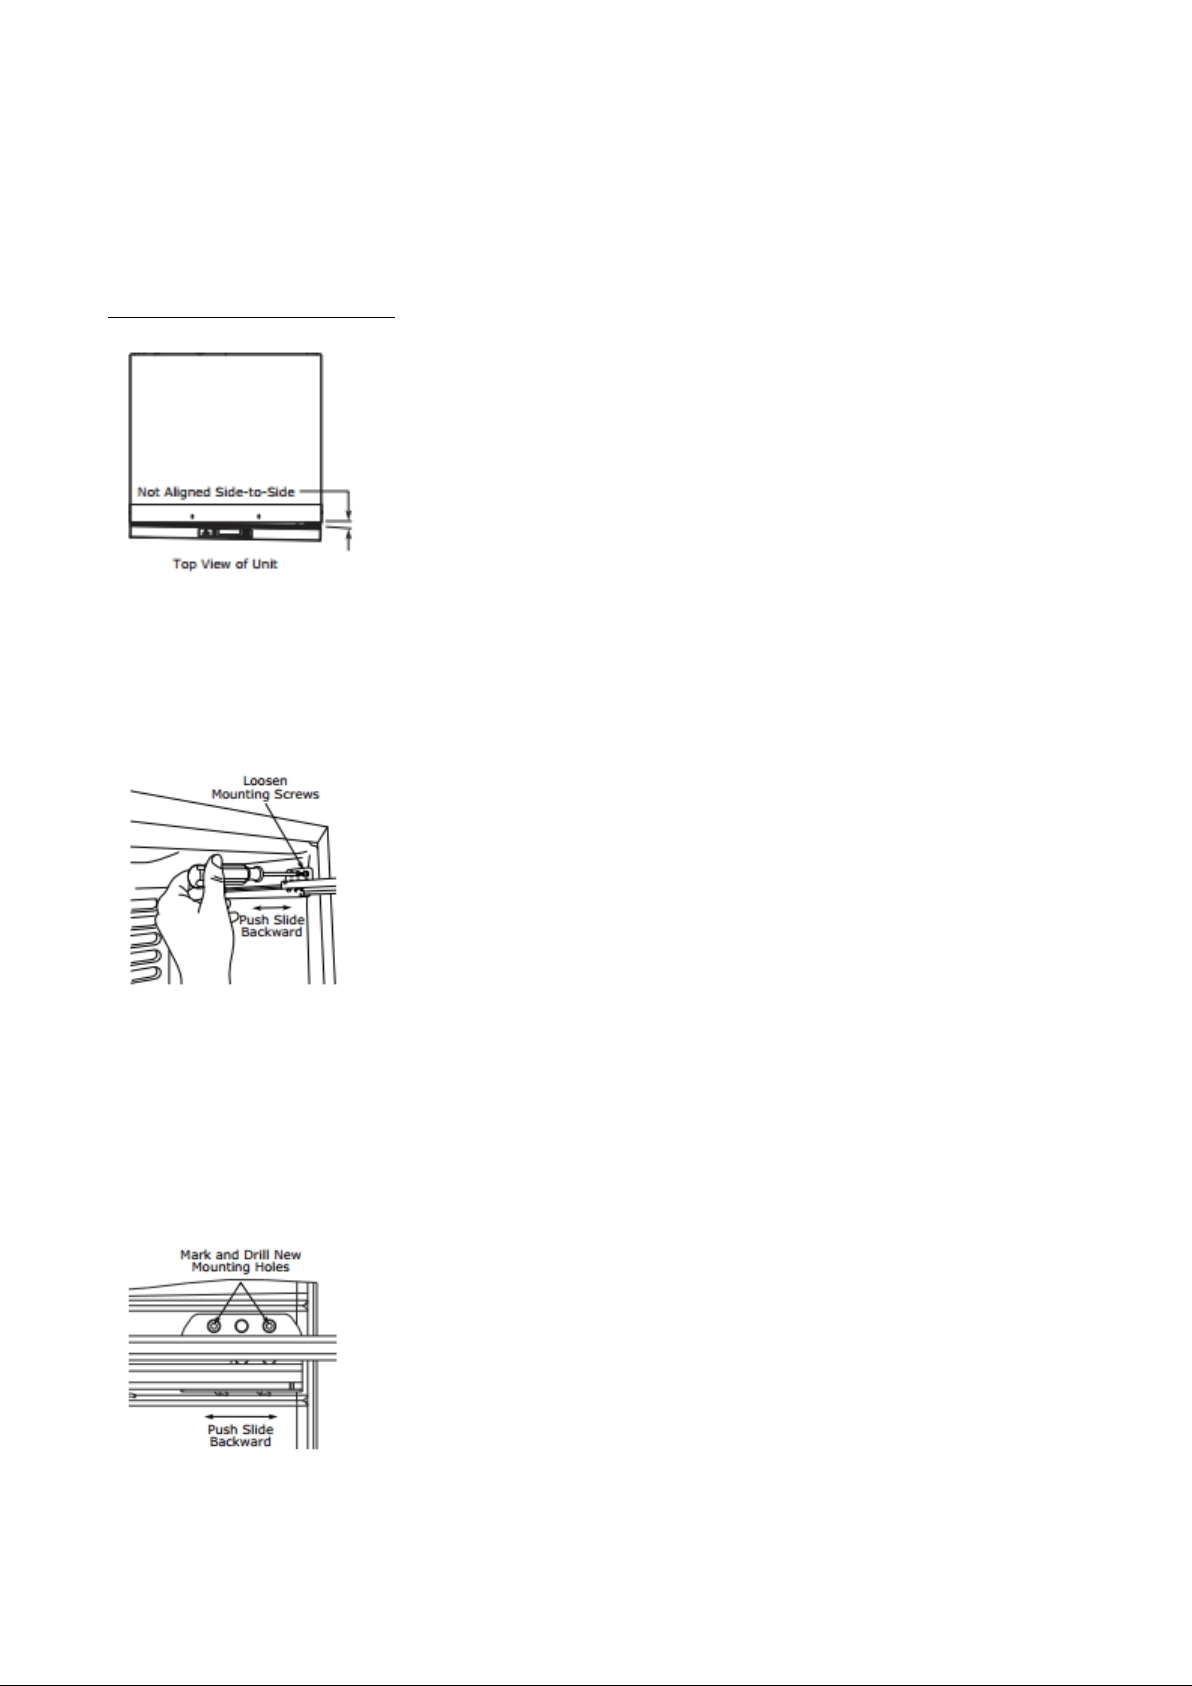
• Side-to-Side — When viewed from the top, the drawer front should be square with the sides of the
cabinet.
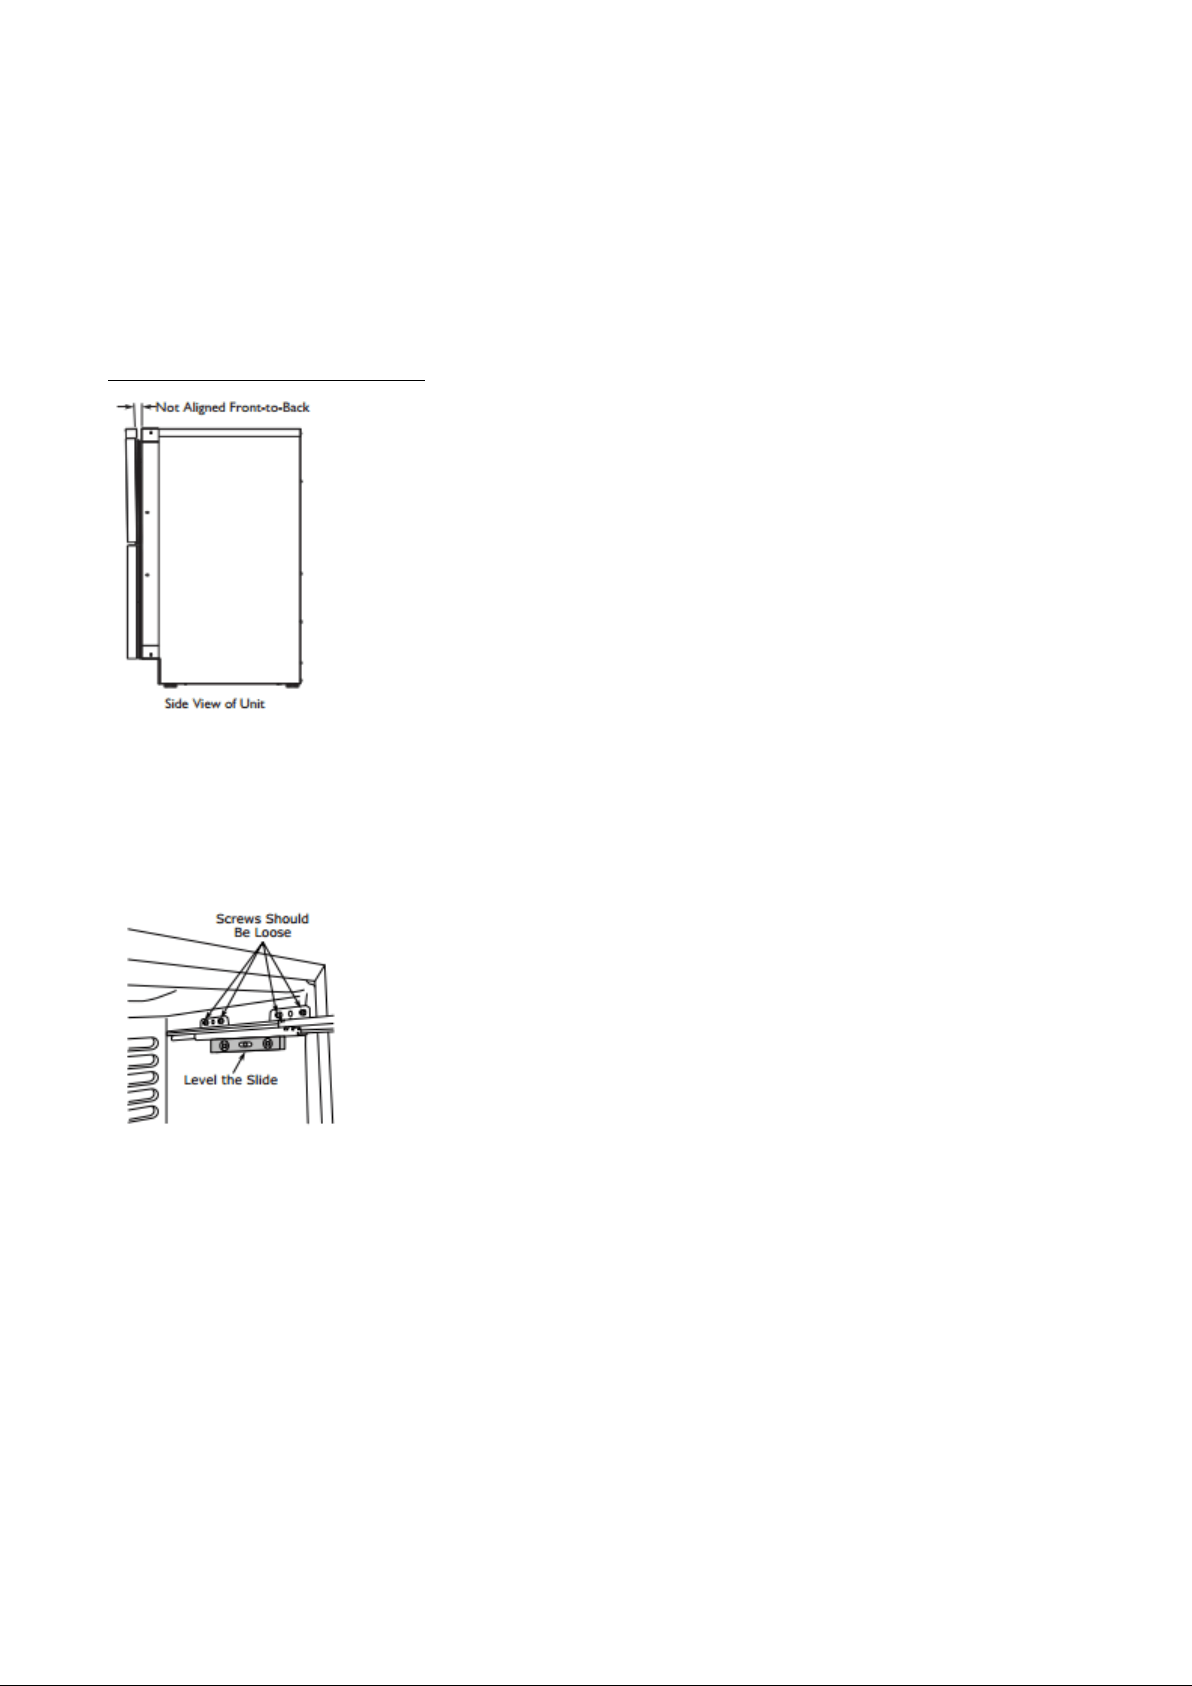
• Front-to-Back — When viewed from the side, the drawer front should be aligned with the cabinet, not
cocked forward or back.
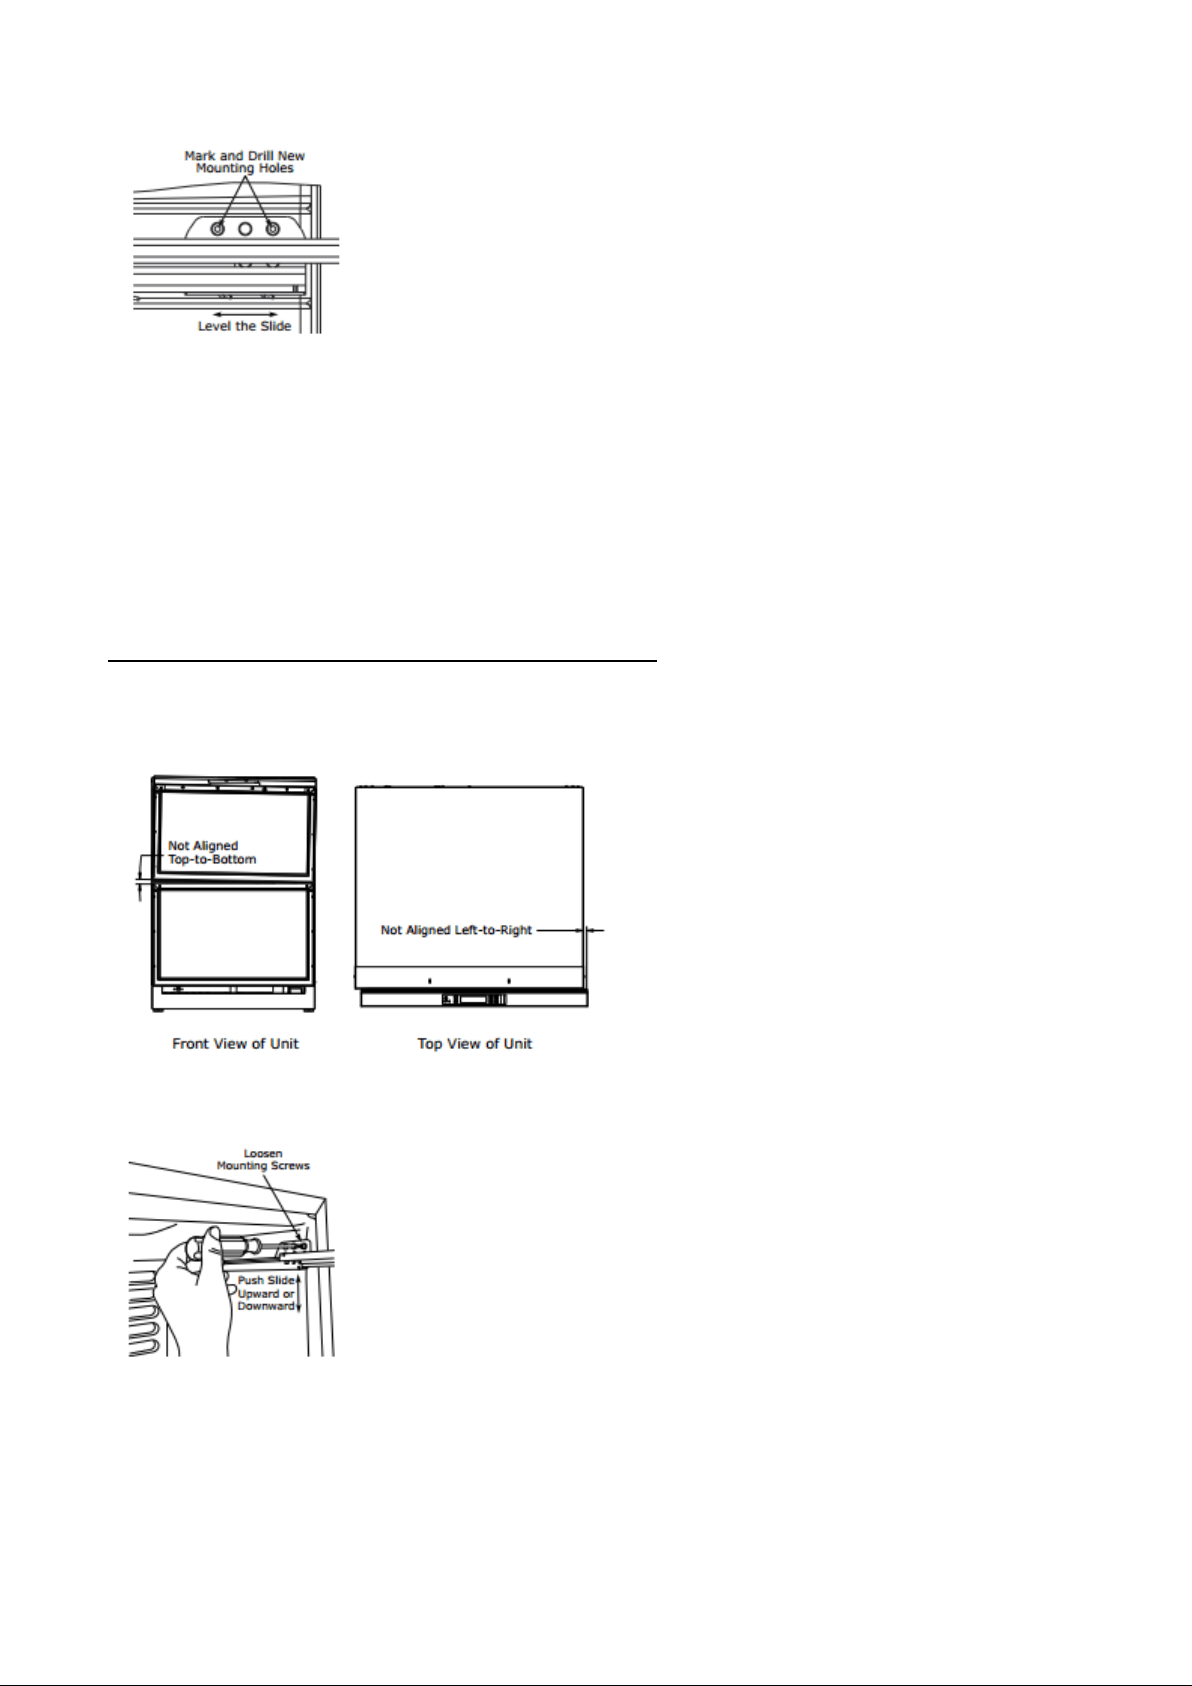
• Top-to-Bottom — When viewed from the front, the drawers should be level horizontally.
Adjusting Drawer Alignment
Warning – Shock Hazard !
The unit must be unplugged from the wall outlet
during drawer removal, adjustment and re-installation.
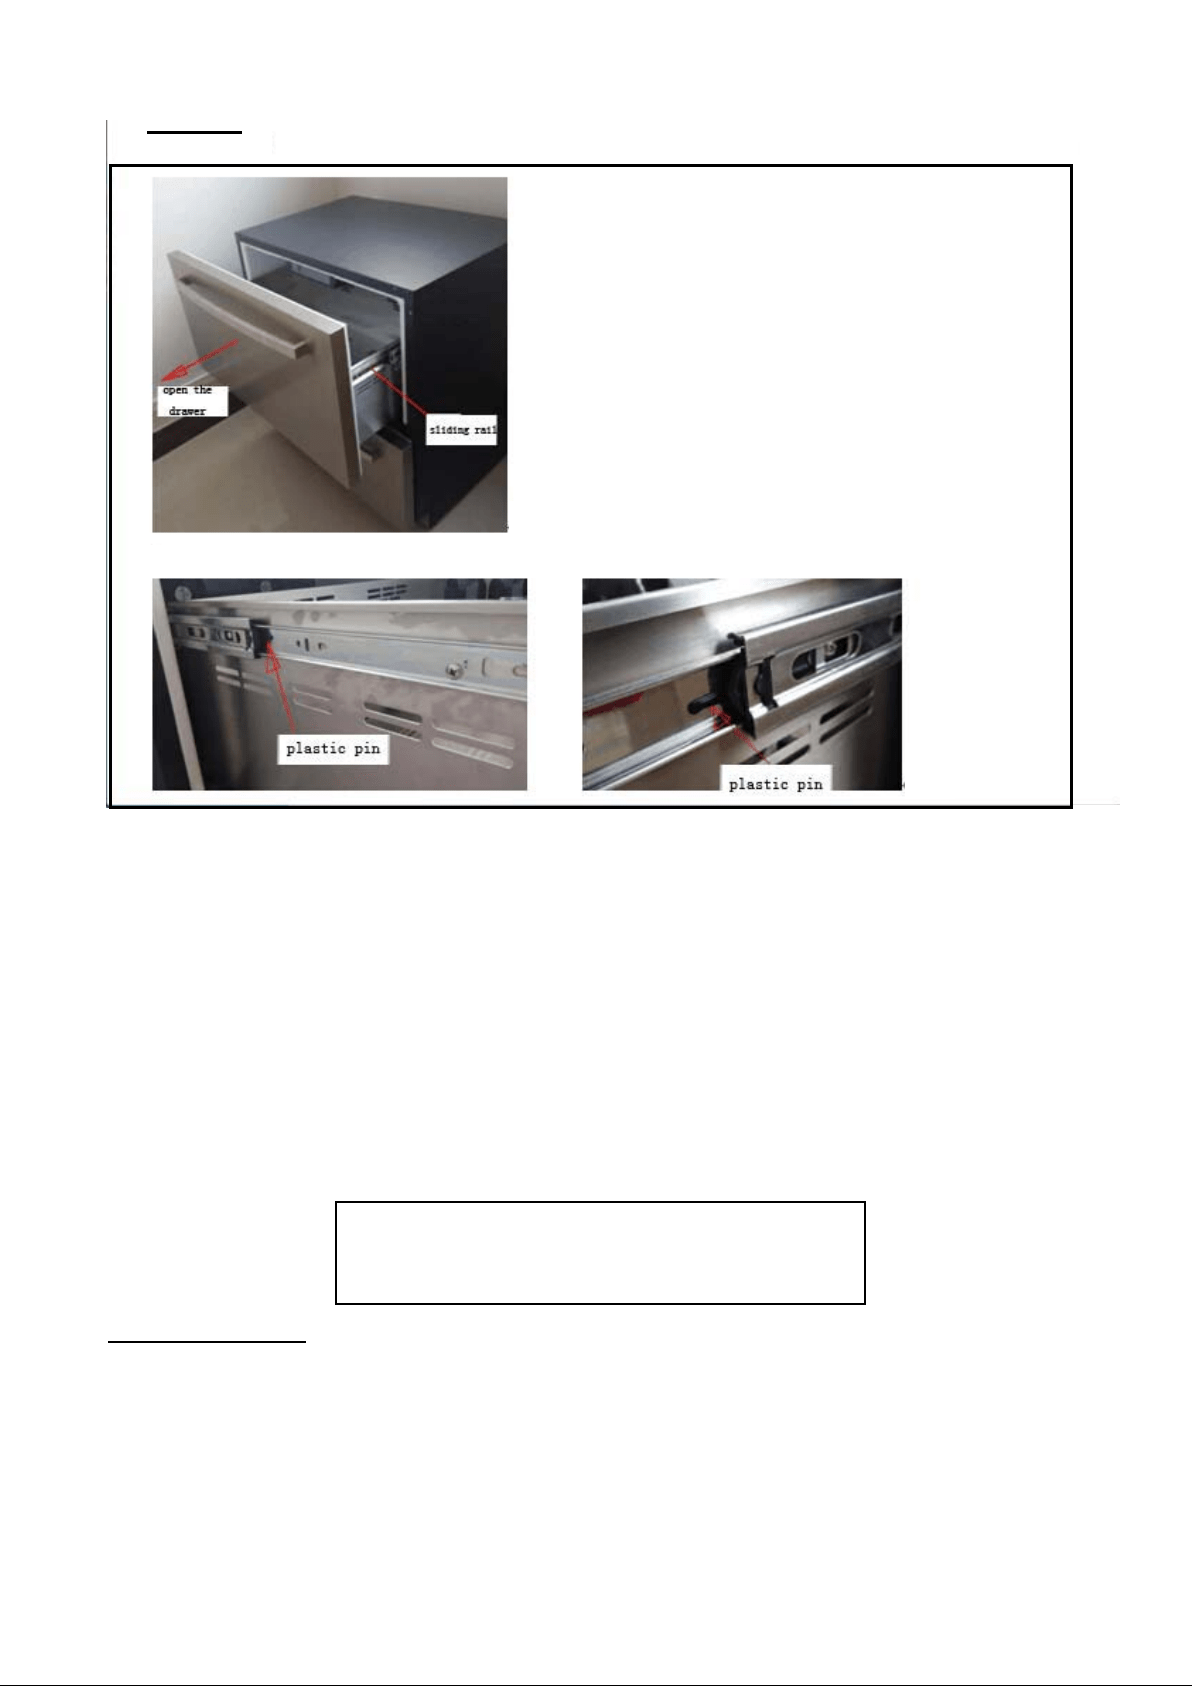
DRAWER REMOVAL
1. Confirm that the unit is unplugged from wall outlet.
2. Unplug the drawer’s connection wiring (top drawer only).
3. Remove the mounting screws.
4. Pull the drawer completely out of the unit.
Caution: Use care when handling the drawers. Drawer edges, drawer rails and the unit’s slide
may be sharp.
Drawers
9
Notice:
Drawer adjustments are made by moving the slide that carries the drawer’s rail. Minor
adjustments may be made by loosening one of the slide’s mounting screws, adjusting the slide
and retightening the screw. Major adjustments may be made by removing the slides’ mounting
screws, drilling new mounting holes and remounting the slide.
SIDE-TO-SIDE ADJUSTMENT
The drawer will need a Side to-Side Adjustment if, when viewed from the top, the drawer front is not
square with the sides of the cabinet. This is caused by one of the slides being mounted too far forward on
the unit’s liner.
Minor Adjustment:
Note: The mounting holes on the slide are slightly larger than the screws’ diameter.
1. Loosen the slide’s mounting screws.
2. Push the slide backward.
3. Retighten the screws.
Major Adjustment:
Note: The slides have extra mounting holes that may be used.
10
1. Remove the slide’s mounting screws.
2. Reposition the slide so it is the same distance from the front of the liner as the other slide. Measure to
confirm.
3. Mark new drilling holes using different sets of mounting holes on the slide.
Note: Front location holes are shown. Corresponding rear holes will also need to be marked.
4. Drill all the new holes with a #30 drill bit.
5. Remount the slide.
FRONT-TO-BACK ADJUSTMENT
The drawer will need a Front to-Back Adjustment if, when viewed from the side, the drawer front is cocked
forward or back. This is caused by the front slide mountings not being level with the rear slide mountings.
Minor Adjustment:
Note: The mounting holes on the slide are slightly larger than the screws’ diameter.
1. Loosen one slide’s mounting screws.
2. Level the slide.
3. Retighten the screws.
4. Repeat procedure for the other slide.
11
Major Adjustment:
Note: The slides have extra mounting holes that may be used.
1. Loosen one slide’s rear mounting screws.
2. Remove the slide’s front mounting screws.
3. Reposition the slide so it is level.
4. Mark new front drilling holes using a different set of mounting holes on the slide.
5. Drill the new holes with a #30 drill bit.
6. Remount the slide.
7. Repeat procedure for the other slide.
TOP-TO-BOTTOM (AND LEFT-TO-RIGHT) ADJUSTMENT
The drawer will need a Top-to-Bottom Adjustment if, when viewed from the front, the drawer is not level
horizontally. Viewed from the top, one side will protrude. This is caused by one of the slides being
mounted higher than the other slide on the unit’s liner.
Minor Adjustment:
Note: The mounting holes on the slide are slightly larger than the screws’ diameter.
1. Loosen one slide’s mounting screws.
2. Push the slide upward or downward to match the position of the other slide.
3. Retighten the screws.
4. Repeat the procedure with the other slide if necessary.
12
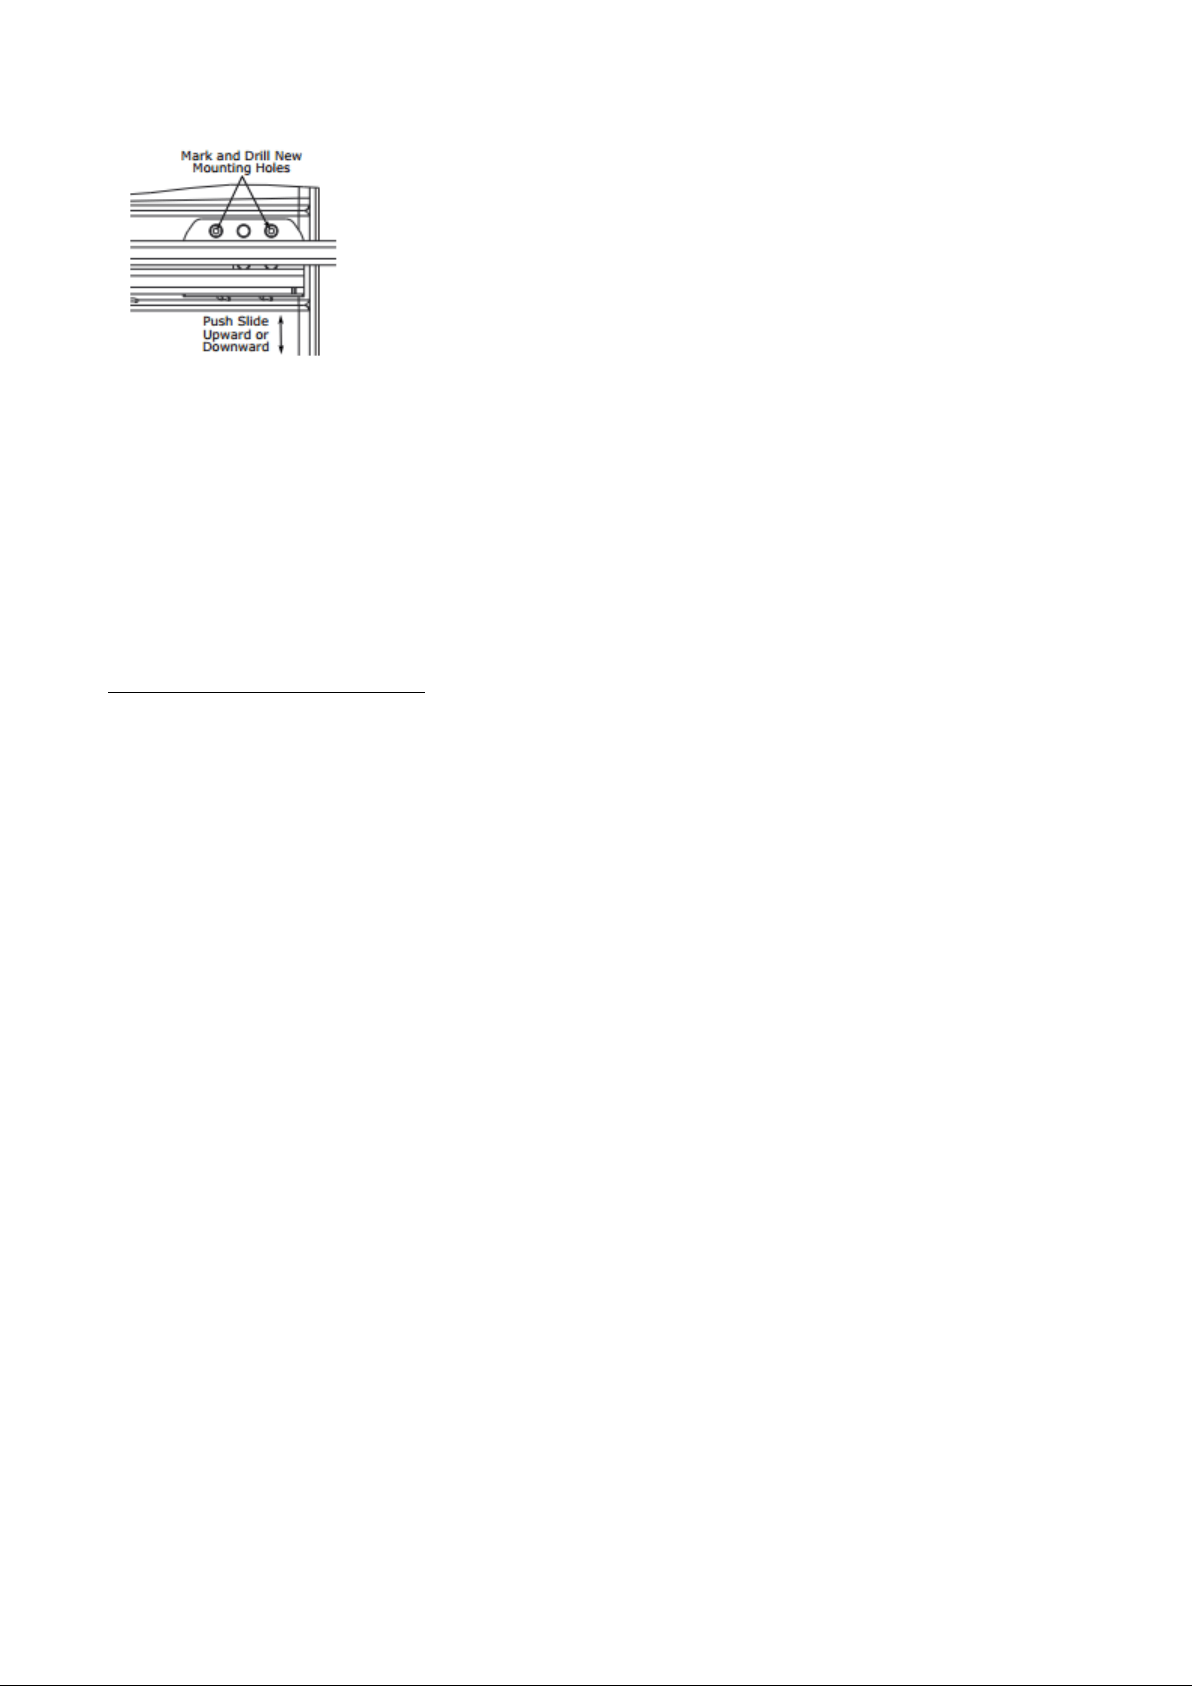
Major Adjustment:
Note: The slides have extra mounting holes that may be used.
1. Remove one slide’s mounting screws.
2. Reposition the slide so it is the same distance from the bottom of the liner as the other slide. Measure
to confirm.
3. Mark new drilling holes using different sets of mounting holes on the slide.
Note: Front location holes are shown. Corresponding rear holes will also need to be marked.
4. Drill all the new holes with a #30 drill bit.
5. Remount the slide.
RE-INSTALLATION OF DRAWER
Caution:
Use care when handling the drawer. Drawer edges, drawer rail and the unit’s slide may
be sharp.
1. Set the drawer’s rails onto the slides.
2. Re-install the rails’ mounting screws.
3. Plug in the drawer’s connection wiring
13
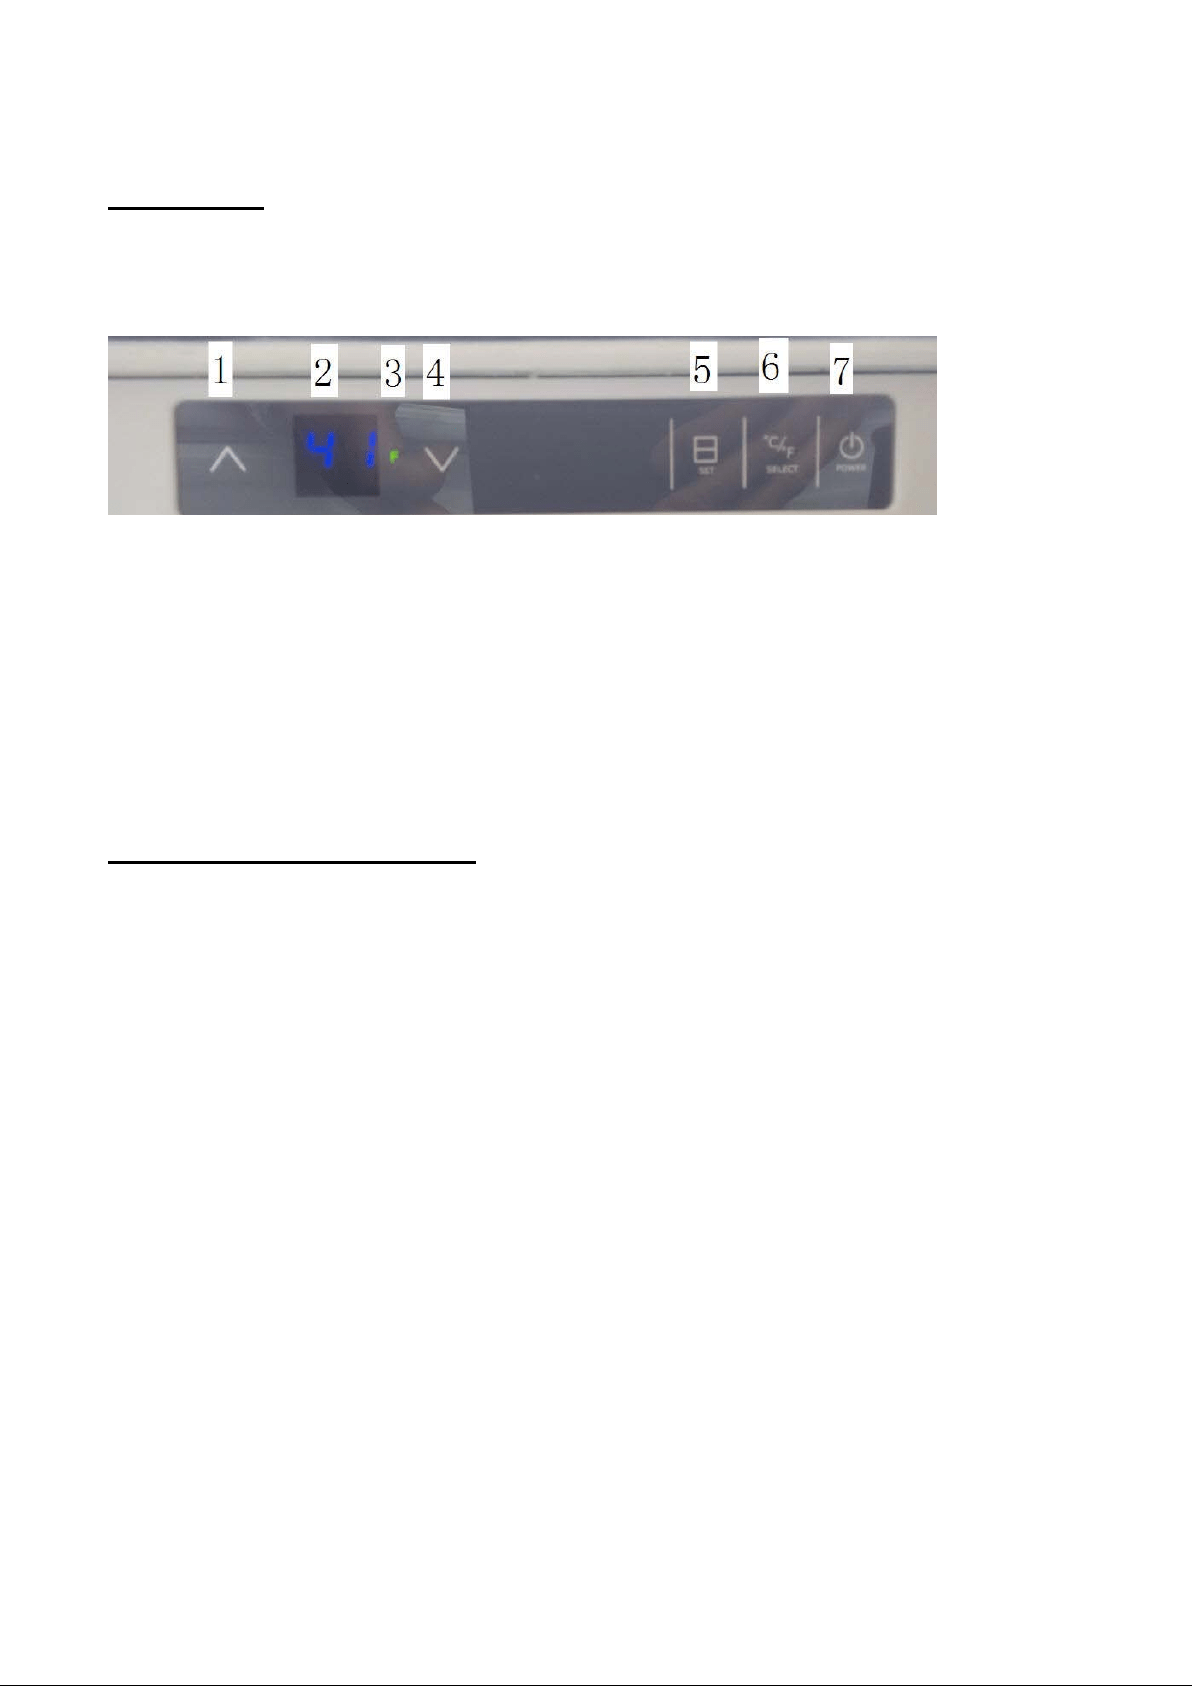
OPERATING YOUR APPLIANCE
Control Panel
The appliance should be placed where the ambient temperature is between 41 and 90°F (5 to 32°C). If
the ambient temperature is above or below this range, the performance of the unit may be affected. For
example, placing your unit in extremely cold or hot conditions may cause interior temperature to fluctuate.
1. Up ︿: Used to raise (warm) the set temperature by 1°C or 1°F.
2. Temperature Display: The display normally indicates the current operational temperature; when
blinking it shows the set temperature.
3. C/F: Shows temperature scale of current display, C (Celsius) or F (Fahrenheit).
4. Down ﹀: Used to lower (cool) the set temperature by 1°C or 1°F.
5. SET temperature: Press this button, then ︿ or ﹀ to set temperature.
6. °C/°F Selector: Changes display temperature from Celsius to Fahrenheit, and vice versa.
7. Power Button: Turns the appliance ON or OFF.
Setting the Temperature Control
1. Connect the power cord to a properly grounded outlet.
2. Set the desired cooling temperature by pressing the SET button first, then the corresponding
button ﹀ or ︿. Each depression of the buttons will raise or lower the temperature setting by 1
degree. The temperature selected will flash in the LED display for approximately 5 seconds, then
revert back to display the temperature of the interior cabinet.
NOTES:
• The temperature setting can be adjusted from 1°C to 8°C(from 34°F to 46°F).
• To view the “set” temperature anytime, press ﹀ or ︿ once. The “set” temperature will flash in the
LED display for 5 seconds.
• This unit has the option of displaying temperatures in either Celsius or Fahrenheit. To change the
setting, press the °C/°F button.
• The temperature inside the cabinet may vary slightly depending on whether stored items are located
in the upper or lower section.
• In the event of a power interruption, the appliance will save the “set” temperature data. When power
is turned on again, the previous “set” temperature will be in effect.

14
Defrosting
The appliance’s refrigeration system is equipped with an automatic defroster. During the process of
defrosting, the temperature display may be higher than the set temperature.
NOTES:
• If the unit is unplugged, turned off or if there is a power failure, you must wait 3 to 5 minutes
before restarting the unit. If you attempt to restart before this time delay, the refrigerator will not
work.
• When you use the refrigerator for the first time, or restart it after it has been shut off for a long time,
there could be a few degrees variation between the temperature you select and the one indicated
on the LED readout. This is normal and is due to the length of the inactivation time. Once the
refrigerator has been running for a few hours, everything should normalize.

15
CARE AND MAINTENANCE
Cleaning Your Appliance
For hygienic reasons the appliance’s interior, including interior accessories, should be cleaned regularly.
Warning!
• The appliance must not be connected to the power supply during cleaning. Danger of electrical
shock! Before cleaning switch the appliance off and disconnect the plug, or switch off or turn off
the circuit breaker or fuse.
• Never clean the appliance with a steam cleaner. Moisture could accumulate in electrical
components. Danger of electrical shock! Hot vapors can lead to the damage of plastic parts.
• The appliance must be dry before it is placed back into service.
1. Remove the food from the refrigerator. Store it in a cool place, well covered.
2. Switch the appliance off and disconnect the plug, or switch off or remove the circuit breaker or fuse.
3. Clean the appliance and the interior accessories with a clean, soft cloth and lukewarm water.
Commercially available dishwashing detergents may also be used.
4. After cleaning, wipe with fresh water and rub dry.
5. Accumulation of dust on the condenser coils increases energy consumption. For this reason carefully
clean the condenser at the back of the appliance once a year with a soft brush or a vacuum cleaner.
6. Check the water drain hole on the rear wall of the refrigerator.
7. Clear a blocked drain hole with the aid of a straw or pipe cleaner.
8. After everything is dry, place the appliance back into service.
Important!
Oils and organic solvents can attack plastic parts, e.g. lemon juice, butter, cleansers that contain
acetic acid. Do not allow such substances to come into contact with appliance parts.
Do not use any abrasive cleansers.
Power Failure
Most power failures are corrected within a few hours and should not affect the temperature
of your appliance if you minimize the number of times the door is opened. If your power is going
to be off for a longer period of time, you need to take the proper steps to protect the contents
of the appliance.
Vacation Time
Leave the appliance operating during vacations of less than three weeks. If you turn off the
appliance for an extended period, leave the door slightly ajar to prevent the buildup of odors.
Transporting Your Appliance
If you need to move your appliance once the box has been discarded:
1. Securely tape down all loose items (such as dividers) inside your appliance.
2. Turn the adjustable leg up to the base to avoid damage.
3. Tape the drawers shut.
4. Be sure the appliance stays secure in the upright position during transportation. Also protect the
outside of the appliance with a blanket or similar item.

16
Energy-Saving Tips
• Do not install the appliance near ovens, radiators or other sources of high heat. High ambient
temperatures cause longer, more frequent operation of the compressor.
• Ensure sufficient air circulation and exhaust at the appliance base and at the back wall of the
appliance. Never cover air vent openings.
• Do not place warm foods into the appliance. Allow them to cool first.
• Only leave drawers open as long as necessary.
• Do not set temperature any colder than necessary.
• Keep the heat-emitting condenser (the metal grille on the rear wall of the appliance) clean.
17
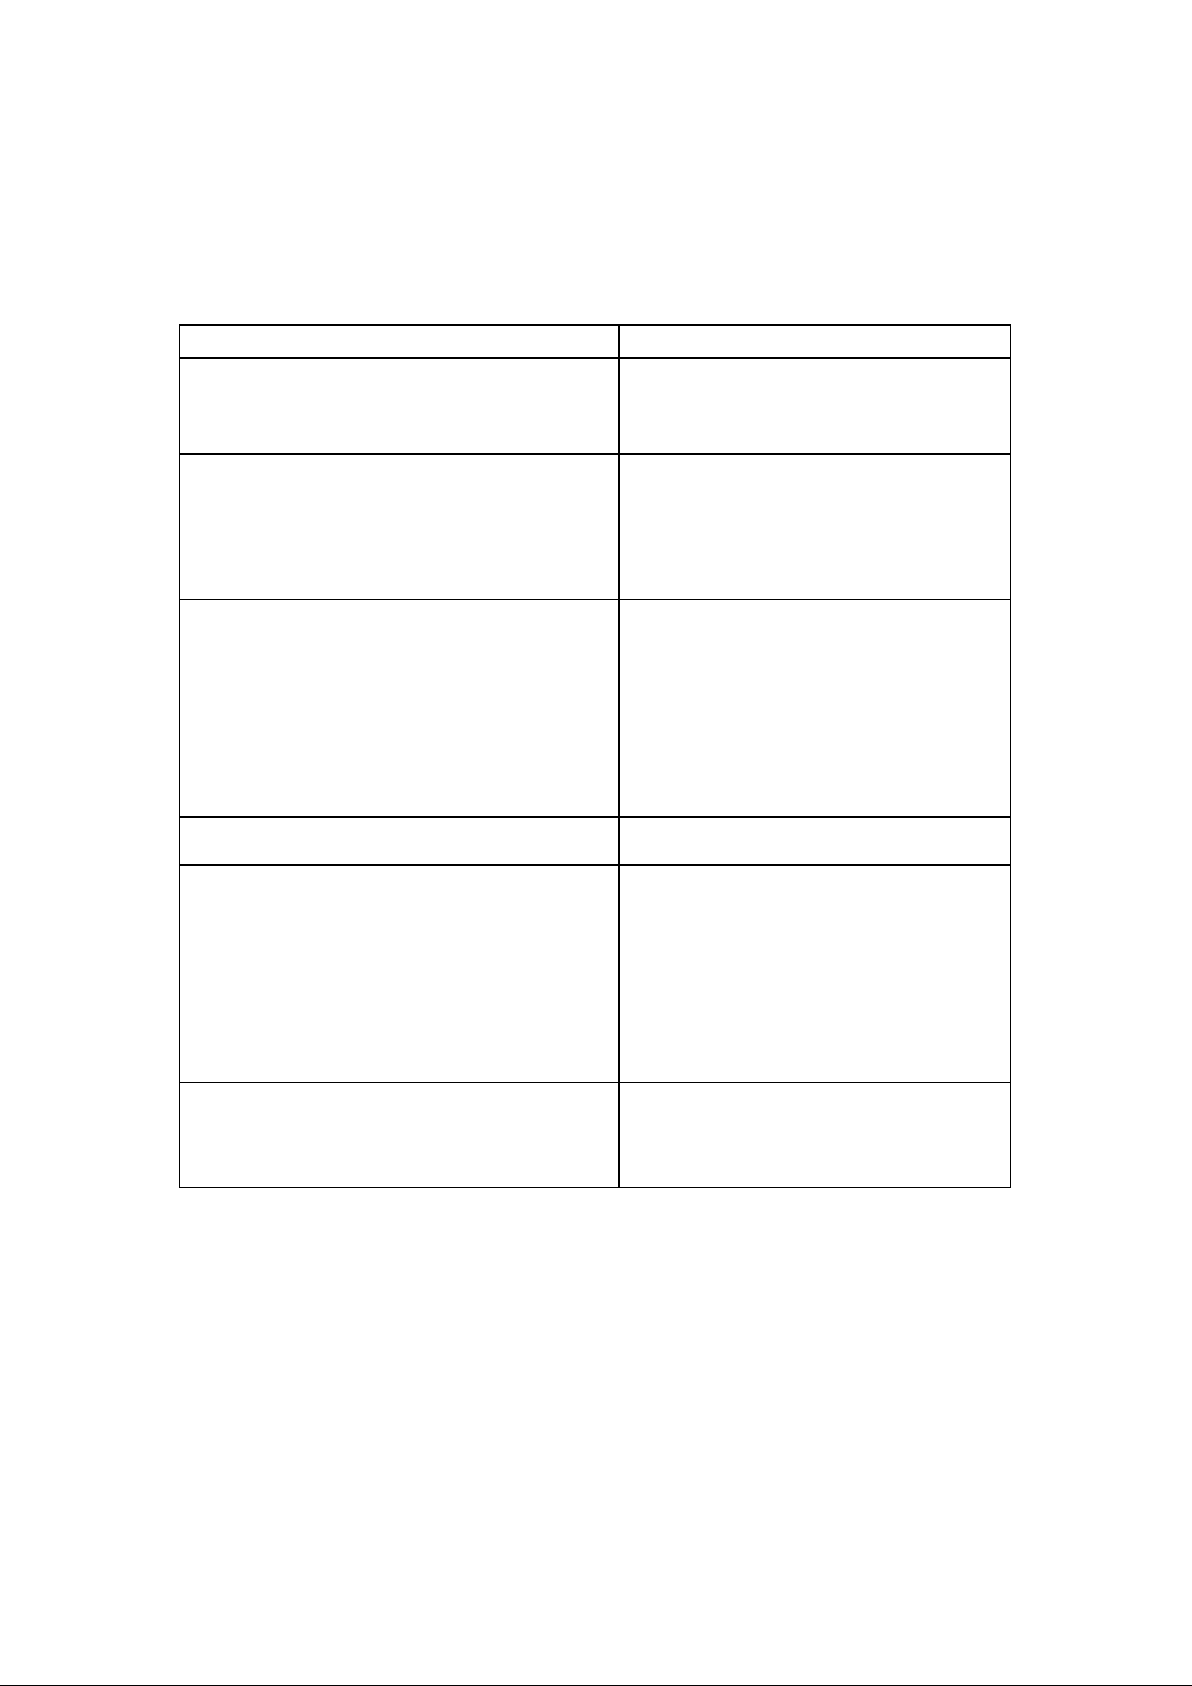
PROBLEMS WITH YOUR APPLIANCE
You can solve many common drawer refrigerator problems easily, saving you the cost of a
possible service call. Try the suggestions below to see if you can solve the problem before calling
the servicer.
TROUBLESHOOTING GUIDE
PROBLEM POSSIBLE CAUSE
Refrigerator does not operate.
Not plugged in.
The appliance is turned off.
The circuit breaker has tripped or a fuse
has blown.
Refrigerator is not cold enough.
Check the temperature control setting.
External environment may require a
higher setting.
Drawers are opened too often.
A drawer is not closed completely.
Drawer gaskets do not seal properly.
Turns on and off frequently.
The room temperature is warmer than
normal.
A large amount of contents has been
added to the refrigerator.
Drawers are opened too often.
A drawer is not closed completely.
Drawer gaskets do not seal properly.
The temperature control is not set
correctly.
Vibrations
Check to be sure that the refrigerator is
level.
Refrigerator seems to make too much noise.
Some noise may come from the flow of
the refrigerant, which is normal.
As each cycle ends, you may hear
gurgling sounds caused by the flow
of refrigerant in your refrigerator.
Contraction and expansion of the inside
walls may cause popping and
crackling noises.
The refrigerator is not level.
Drawers will not close properly.
The refrigerator is not level.
The drawers were adjusted and not
properly reinstalled.
The gaskets are dirty.

18
NOTES
19
LIMITED WARRANTY
ONE-YEAR LIMITED WARRANTY
Within the 48 contiguous United States, for one year from the date of purchase, when this appliance is operated and
maintained according to instructions attached to or furnished with the product, warrantor will pay for factory-specified parts
and repair labor to correct defects in materials or workmanship. Service must be provided by a designated service company.
Outside the 48 states, all parts are warranted for one year from manufacturing defects. Plastic parts, shelves and cabinets
are warranted to be manufactured to commercially acceptable standards, and are not covered from damage during
handling or breakage.
5-YEARS COMPRESSOR WARRANTY
1. The compressor is covered for 5 years.
2. Replacement does not include labor.
ITEMS WARRANTOR WILL NOT PAY FOR:
1. Service calls to correct the installation of your appliance, to instruct you how to use your appliance, to replace or repair
fuses or to correct wiring or plumbing.
2. Service calls to repair or replace appliance light bulbs or broken shelves. Consumable parts (such as filters) are
excluded from warranty coverage.
3. Damage resulting from accident, alteration, misuse, abuse, fire, flood, acts of God, improper installation, installation
not in accordance with electrical or plumbing codes, or use of products not approved by warrantor.
4. Replacement parts or repair labor costs for units operated outside the United States.
5. Repairs to parts or systems resulting from unauthorized modifications made to the appliance.
6. Expenses for travel and transportation for product service in remote locations.
7. The removal and reinstallation of your appliance if it is installed in an inaccessible location or is not installed in
accordance with published installation instructions.
DISCLAIMER OF IMPLIED WARRANTIES – LIMITATION OF REMEDIES
CUSTOMER'S SOLE AND EXCLUSIV E REMEDY UNDER THIS LIMITED WARRANTY SHALL BE PRODUCT REPAIR AS PROVIDED
HEREIN. IMPLIED WARRANTIES, INCLUDING WARRANTIES OF MERCHANTABILITY OR FITNESS FOR A PARTICULAR PURPOSE,
ARE LIMITED TO ONE YEAR. WARRANTOR SHALL NOT BE LIABLE FOR INCIDENTAL OR CONSEQUENTIAL DAMAGES. SOME
STATES DO NOT ALLOW THE EXCLUSION OR LIMITATION OF INCIDENTAL OR CONSEQUENTIAL DAMAGES, OR LIMITATIONS
ON THE DURATION OF IMPLIED WARRANTIES OF MERCHANTABILITY OR FITNESS, SO THESE EXCLUSIONS OR LIMITATIONS
MAY NOT APPLY TO YOU. THIS WARRANTY GIVES YOU SPECIFIC LEGAL RIGHTS AND YOU MAY ALSO HAVE OTHER RIGHTS,
WHICH VARY FROM STATE TO STATE.
Printed in China
For parts and accessory ordering,
troubleshooting and helpful hints, visit:
www.summitappliance.com/support
FELIX STORCH, INC.
770 Garrison Avenue
Bronx, NY 10474
Phone: (718) 893-3900
Fax: (844) 478-8799
www.summitappliance.com
WARNING! This product may contain chemicals known to the state of California to cause
cancer or birth defects or other reproductive harm. For more information, visit:
www.summitappliance.com/prop65
Chemicals known by the manufacturer to be present in this product in concentrations higher
than threshold limits: NONE.