
USE AND MAINTENANCE MANUAL
EN


3
IT
EN
INDEX
• GENERAL WARNINGS .................................................................................................... Pag. 4
• MANUFACTURER’S WARRANTY AND RESPONSIBILITIES ........................................ Pag. 8
• PACKING .......................................................................................................................... Pag. 8
• NAMEPLATES - CONFORMITY MARKINGS .................................................................. Pag. 10
• SUPPLIED ACCESSORIES ............................................................................................. Pag. 10
• TECHNICAL DESCRIPTION AND INTENDED USE ....................................................... Pag. 11
• MECHANICAL SAFETY DEVICES .................................................................................. Pag. 12
• MAIN TECHNICAL DATA ................................................................................................. Pag. 13
• SPACE REQUIREMENT .................................................................................................. Pag. 14
• MAIN COMPONENTS ...................................................................................................... Pag. 16
• INSTALLATION ADN PRELIMINARY CHECKS ............................................................... Pag. 18
• COMMANDS DESCRIPTION .......................................................................................... Pag. 21
• USING THE MACHINE .................................................................................................... Pag. 24
• SLICER CLEANING ......................................................................................................... Pag. 29
• MAINTENANCE ............................................................................................................... Pag. 33
• LUBRICATION .................................................................................................................. Pag. 34
• SHARPENING THE BLADE ............................................................................................. Pag. 37
• TAKING THE SLICER OUT OF SERVICE ....................................................................... Pag. 40
• TROUBLESHOOTING ..................................................................................................... Pag. 41
• SPARE PARTS
Mod. 300 VO .......................................................................................................... Pag. 44
Mod. 300 VO L ....................................................................................................... Pag. 52
• MOCA DECLARATION ..................................................................................................... Pag. 60
• DECLARATION OF CONFORMITY ................................................................................. Pag. 67

4
IT
EN
Meaning of warning signs found in booklet
DANGER: Indicates an imminently hazardous situation
which, if not avoided, could result in serious injury or
even death. The use of this term is limited to the most
extreme situations.
ATTENTION: Indicates a potentially hazardous situation
which, if not avoided, could result in serious injury
(and in extreme cases death).
WARNING: Indicates a potentially hazardous situation
which, if not avoided, may result in minor injuries to
personnel or damage to equipment. It also alerts the
user on incorrect operating modes.
- - - - - - - - - - - - - - - - - - - - - - - - - - - - - - - - - - - - - - - - - - - - - - - - - -
Safety warnings
indispensable before use
Carefully read the warnings contained herein since they
provide important information regarding safe installation,
use and maintenance of the slicer machines for use with
foodstuffs.
The purpose of this pubblication, simply dened ‘manual’ below, is to
allow the user, especially to the direct operator to take every measure
and to prepare all the necessary human and material resources for
a safe and durable use of the. This booklet MUST be kept for all the
slicer lifetime and in case of need (example: damage tamperising even
partially its consultation, etc.) the user must ask for a new copy to the
manufacturer.
☞
GENERAL WARNINGS

5
IT
EN
In case of sale of the slicer, deliver to the new owner this manual too.
☞
The installation must be performed following the instructions
of the manufacturer. A wrong installation can cause damages to
people, animals or things, in respect of which the manufacturer
cannot be considered responsable.
Children should not use the device as a toy and
should neither clean nor use the equipment.
The appliance must be used by adults adequately trained for
the purpose who have carefully red the content of this manual.
• The elements of the packing (plasti bags, expanded polystyrene, etc.)
must be kept out of reach of children as they are potential sources of
danger.
• The plate is on the bottom of the appliance.
•
After each use, always perform a thorough cleaning of all parts in contact with
food, as mentioned under “Cleaning”.
☞
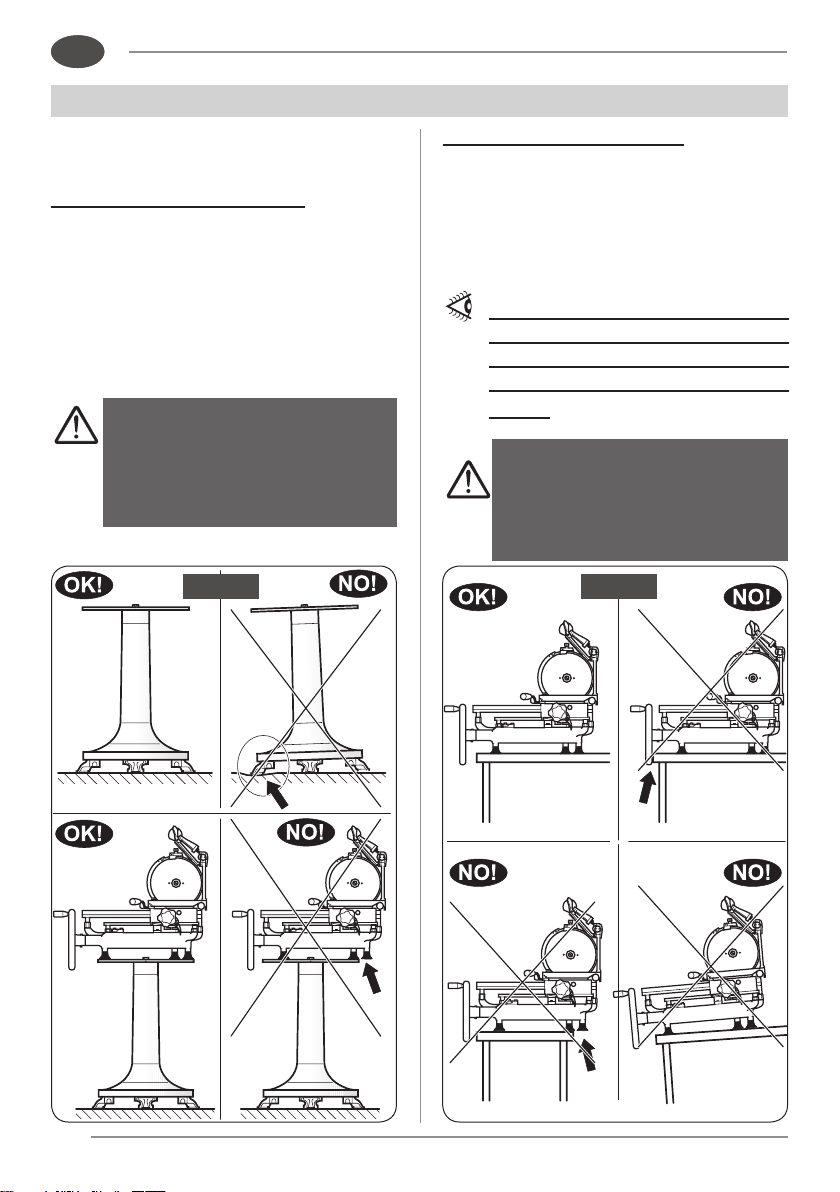
Placetheapplianceonahorizontalandrmsupportingplane,
whose surface is not sensitive (eg. Lacquered furniture,
tablecloths etc.). Make sure that the appliance is safely
supported.
☞
The blades are sharp; handle with care.
Do not use the appliance if the blades are damaged.
☞
Never immerse the appliance in water.
• This device is intended for domestic and professional use.
GENERAL WARNINGS

6
IT
EN
GENERAL WARNINGS
☞
This appliance must be used only for the purpose for which
it was designed, that is for slicing food products (see page
15) in respect to the directives and regulations reported in the
declaration of conformity (see next to last page).
Any other use is considered improper and dangerous.
The manufacturer can not be held responsible for any damage
caused by improper, erroneous and unreasonable use.
Do not remove the protections and do not modify or exclude
the mechanical protections.
☞
Always use protective scratchproof gloves for cleaning and
maintenance.
☞
Do not operate the empty appliance.
☞
In case of problems with the appliance, contact an authorized
service center.
Do not attempt to repair the device yourself.
Any repair work carried out on the device by
unauthorized personnel will void the warranty
even if its life had not come to an end.
☞
IIf you have any doubts regarding the contents of the user
guide or require additional information, please contact the
manufacturer or technical support immediately quoting the
clause number of the topic in question.
☞
No part of this publication shall be reproduced or transmitted
without written permission from the manufacturer.
☞
Use of the machine requires great concentration, PAY
ATTENTION AT ALL TIMES!
• Do not wear loose-tting clothes particularly with open sleeves; where
necessary use suitable headgear to cover hair.

7
IT
EN
GENERAL WARNINGS
• When slicing, do not allow anyone to approach the slicer, especially the
blade.
• Do not remove, cover or alter the rating plates tted to the machine body
and ensure their prompt replacement in case of damage.
• Ensure that the product tray, receiving tray, surrounding areas and oor
are kept clean and dry at all times.
• Do not use the slicer as a supporting surface or lay any object on it that
is extraneous to normal slicing operations.
• Place and remove the goods to be sliced on the sliding plate only with the
platter completely retracted (away from the blade) and the cart totally
towards the operator.
☞
DO NOT use slicing accessories that have not been supplied
by the slicer manufacturer.
• Do not damage the blade by cutting hard objects (bones, etc.).
• If the size of the food to be sliced are higher than those indicated under
“Working cut” in the table “Technical data”, reduce its size to work safely.
GUIDE TO THE TREATMENT OF WASTE EQUIPMENT
The crossed bin symbol on the appliance indicates that since the product must be handled
separately from household waste at the end of its useful life, it must be taken to a collection
point or taken back to the dealer when a new equivalent appliance is purchased.
The user is responsible for consigning the equipment to appropriate collection facilities at the end
of its working life or face the penalties provided for by current waste management legislation.
Separate collection for subsequent delivery of waste equipment to environmentally-compatible
recycling, treatment and disposal facilities to prevent possible negative impacts on the environment
and human health whilst encouraging recycling of the product’s components.
For further information regarding the available collection facilities, please contact your local refuse
collection service or the shop in which the purchase was made.
Manufacturers and/or importers fulfil their obligations concerning environmentally-compatible
recycling, treatment and disposal either directly or by joining a collective scheme.

8
IT
EN
MANUFACTURER’S WARRANTY AND RESPONSIBILITIES
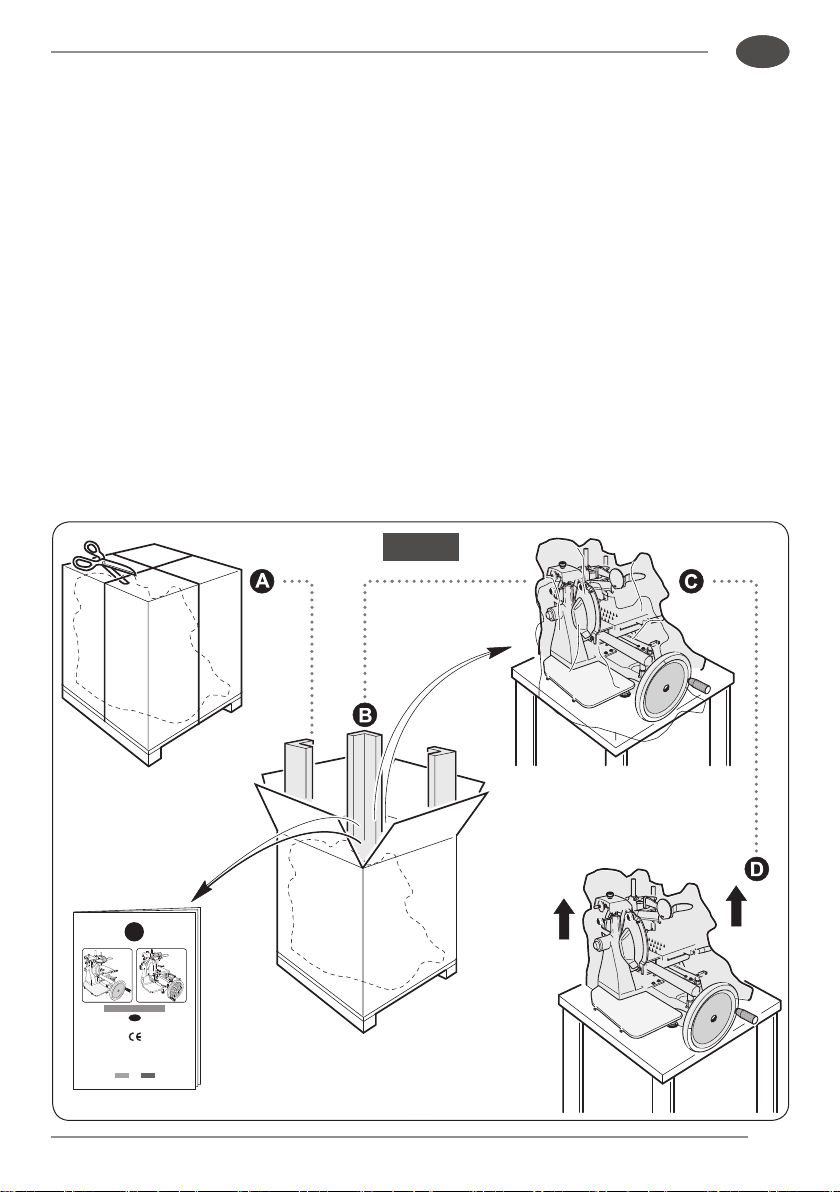
1.1 - UNPACKING
When taking delivery of the slicer, ensure that the packaging is fully intact; if this is not
the case, please advise the courier or local dealer immediately.
In order to remove the slicer from the packaging, please proceed as follows:
• Cut and remove the plastic bands.
• Open the box and take out the instruction booklet.
• Proceed as described hereafter.
- Remove the protective cardboard covers from inside the box.
- Lift the machine with great care and place on a solid surface.
- Remove the plastic bag in which the slicer is wrapped.
Check that all components specified in the delivery note and this instruction booklet
are present and fully intact.
PACKING
• This device is guaranteed for 24 months.
The purchase date must be proven with the relevant document.
In the absence of valid fiscal document, the warranty claim can not be exercised.
• In case of non-compliance the claim must be made in writing within two months from
the observation of the defect attaching the tax document, compiled in the act of buying,
with stamp and signature of the store.
Manufacturer’s warranty and responsibilities
• The guarantee of proper operation and full compliance of the machines to their intended
service depends on the correct application of the instructions contained in this manual.
• The manufacturer is not responsible directly and indirectly for any damage caused
by improper use of the device resulting from:
- failure to follow instructions contained in this manual
- use of untrained personnel;
- use not in accordance with specific regulations, in force in the country of installation;
- changes and / or unauthorized repair;
- use of accessories and unoriginal spare parts;
- misuse of the machine with different functionality from the one it has been built for.
- incorrect installation.
- insufcient or incomplete periodic maintenance.
- use by people under the age of 18.
- use by people whose physical, sensory or mental skills are reduced.
- exceeding the loading limits allowed by the machine
- use in environments different from the food one
- exeptional events.
9
xxxxxxx xxxxxxxx xxxxxxx
xxxxxx xxxxxx xxxxxx
xxxx xxxxxx xxxx
MADE IN ITALY
F300 VO - F300 VO L
Istruzioni per l’uso e la manutenzione
IT
Fig. 1
IT
EN
The packing components (
bands
,
cardboard
,
polystyrene
, etc.) are products assimila-
ble to the urban solid refusals.
DO NOT DUMP PACKAGING! DISPOSE OF WASTE
RESPONSIBLY!
☞
•
Should any faults be noted, such as:
- dents to the frame or guards;
- controls that are either not working or broken;
- missing items or other problems;
Please advise the courier, manufacturer and service centre immediately.
-
Carefully dispose of packaging components (bands, cardboard, polystyrene, poly-
thene bags, etc.) as reported below and in accordance with the standards of the
di
seguito ed in ottemperanza alle norme del Country of use.
10
XXXXX
Fig. 2
IT
EN
NAMEPLATES - CONFORMITY MARKINGS
The device described in this manual is
produced in accordance with the directives
in force, as amended. All component parts
are adapted to the requirements of the
Directive and the CE mark testifiying the
compliance.
The plate with the identification of the
manufacturer, the technical machine and
the CE marking is located on the base of
the slicer
(gura 2).
The plate must never be re-
moved and must always be
legible.
In case of wear or dama-
ge the user is required to
replace it.
SUPPLIED ACCESSORIES
Unless otherwise dened at the
moment of order, the machines are
supplied together with the following:
• EU conformity declaration;
• instructions manual for installation,
use and maintenance.

11
IT
EN
TECHNICAL DESCRIPTION
AND INTENDED USE
2.1 - General description
The machine is essentially made up from a base that supports a circular blade,
driven by a ywheel, which has the function of slicing foodstuffs and by a carriage
sliding on guides. The latter are positioned under the afore-mentioned base and, in
turn, support a product tray parallel to the edge of the blade.
The thickness of the slice can be adjusted thanks to a knob or via a lever positioned
at the side of the product tray, it can be moved by a value corresponding to the
thickness of the slice desired.
The product is fed (advancement towards the blade) via the product tray quick
advancement lever and plate advancement knob.
All machine components are in food-grade polished and anodised aluminium alloy,
in stainless steel and plastic.
The body of the machine is painted with food-grade paint.
Start-up and stop is manual via ywheel.
The machine incorporates a sharpener built for ease of use and safety.
2
.2 -
Environmental conditions of the machine use
• Temperature ..from -5 °C to + 40 °C
• Relative humidity max 95%
2
.3 -
Slicer correct use
The slicer is only designed to slice food of the type and within the dimensional limits
indicated in this instruction manuals
.
> > > >

12
IT
EN
2.3.a - Intended use
(sliceable products)
The following products may be sliced:
• All types of cold cuts (raw and cooked
ham, bacon).
• Boneless meat (cooked or raw at a
temperature of not less than +3°C).
• Bread and cheese (obviously the
sliceable type such as Gruyère,
Fontina, etc.).
2.3.b - Unexpected or improper use
(NOT sliceable products)
The following products CANNOT be sliced
as they are liable to cause serious harm
to the user and/or slicer itself:
• Frozen food.
• Deep-frozen food.
• Food with bones (meat and fish).
• Any other type of product specifically
excluded product is sliceable but not
intended to be eaten.
The mechanical safety devices taken are the following:
• Series of protections in aluminium or transparent plastic material on the product-
holder arm.
• Product-holder block system
• BLADE GUARD to be removed only during the cutting phase
Do not tamper, remove nor bypass, under no circumstances,
the safety devices installed on the equipment.
3
.1 -
Residual risks
During slicer use, cleaning and maintenance operations,
notwithstanding all the possible cautions taken during the design
and the construction of the machine, residual risks (cutting) still
exist during use or during cleaning or maintenance. Therefore be
careful and PAY THE UTMOST ATTENTION to what you are doing.
DO NOT use the machine if you are not in perfect psychological
and physical conditions.
DO NOT ALLOW anyone near the machine when it is in use.
ALWAYS wear gloves that can resist cuts or tears when cleaning,
lubricating or sharpening the blade.
MECHANICAL SAFETY DEVICES

13
F300 VO LF300 VO
IT
EN
• Blade diameter ........................................ mm 300 300
• Slice thickness ........................................ mm 0 ÷ 2,5 0 ÷ 2,5
• Effective slice
- Length ................................................... mm 230 230
- Height.................................................... mm 180 180
• Product holder stroke .............................. mm 250 250
• Weight
- Slicer ....................................................... kg 45,5 44
- Stand (optional)....................................... kg 46,7 46
(9 position)
F300 VO F300 VO L
(10 position)
MAIN TECHNICAL DATA
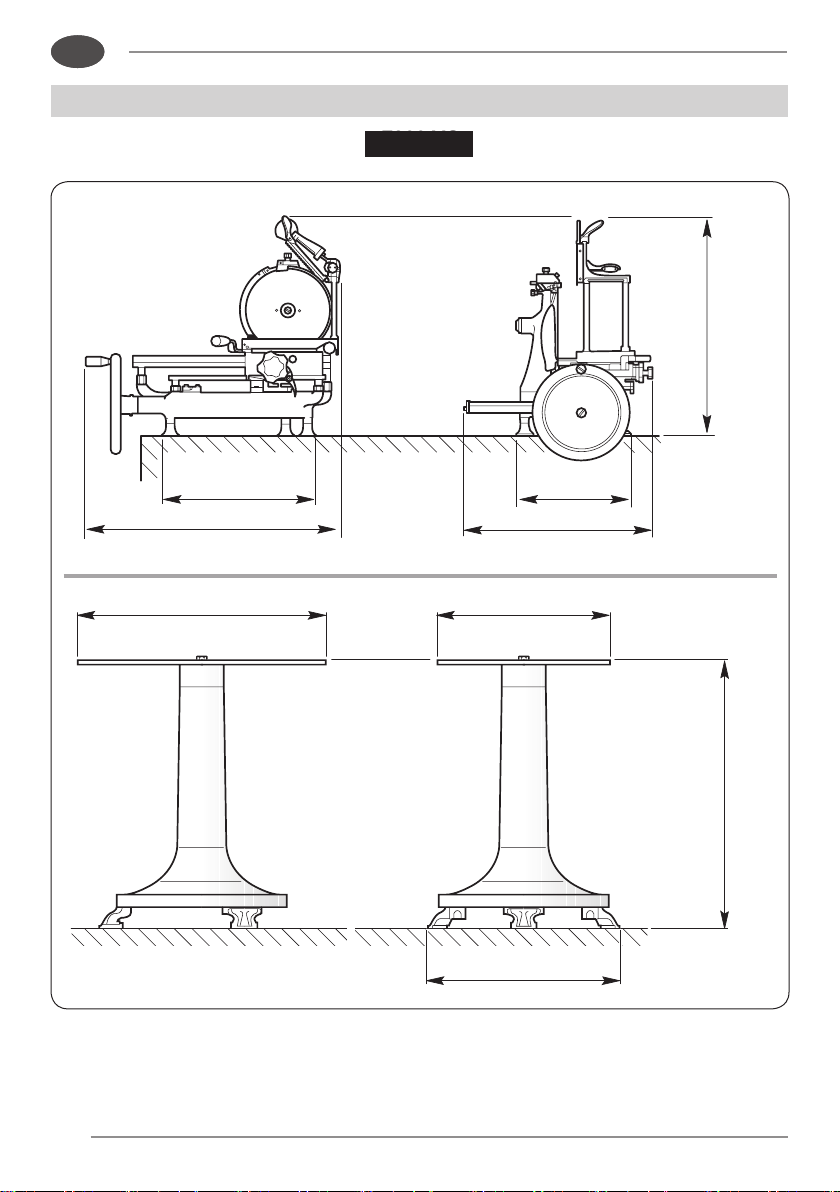
14
F300 VO
F300 VO
IT
EN
720mm
400mm
500mm
600mm
340mm
400mm
650mm
740mm
800mm
SPACE REQUIREMENT
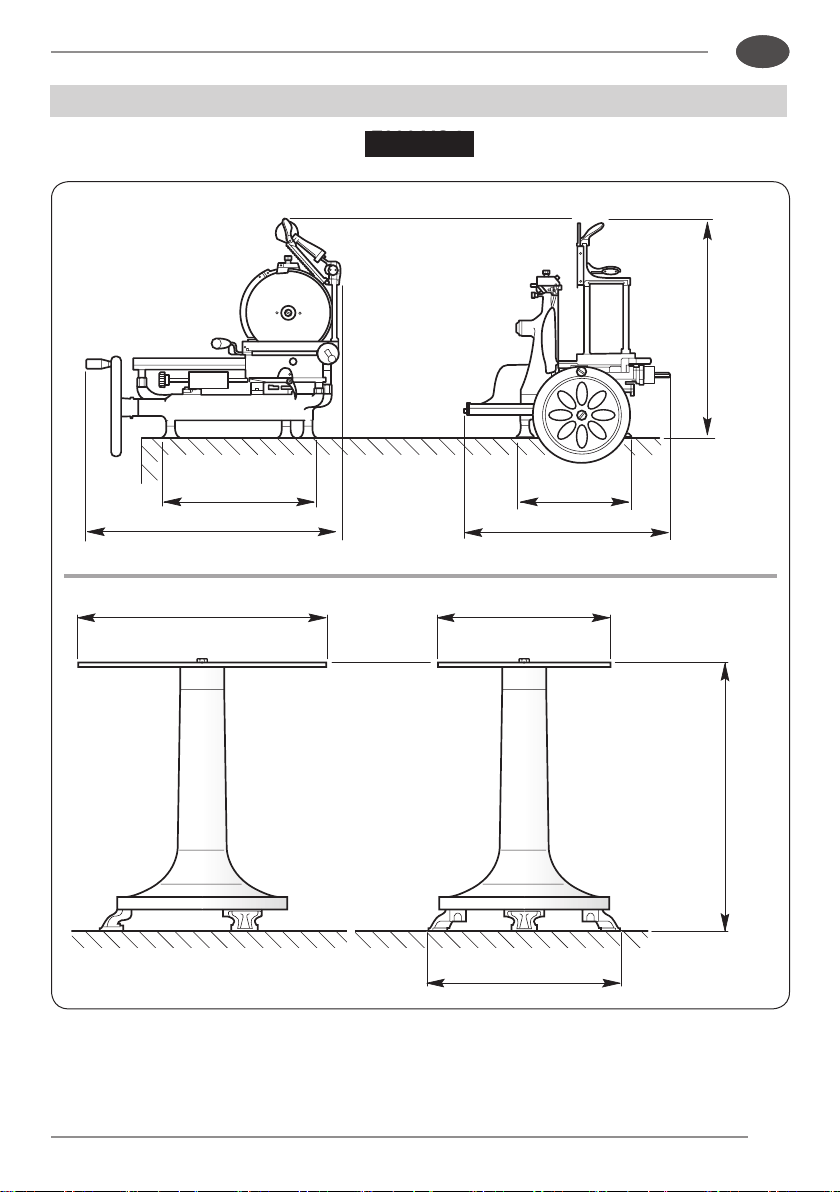
15
F300 VO L
F300 VO L
IT
EN
750mm
420mm
500mm
545mm
330mm
400mm
650mm
720mm
800mm
SPACE REQUIREMENT
16
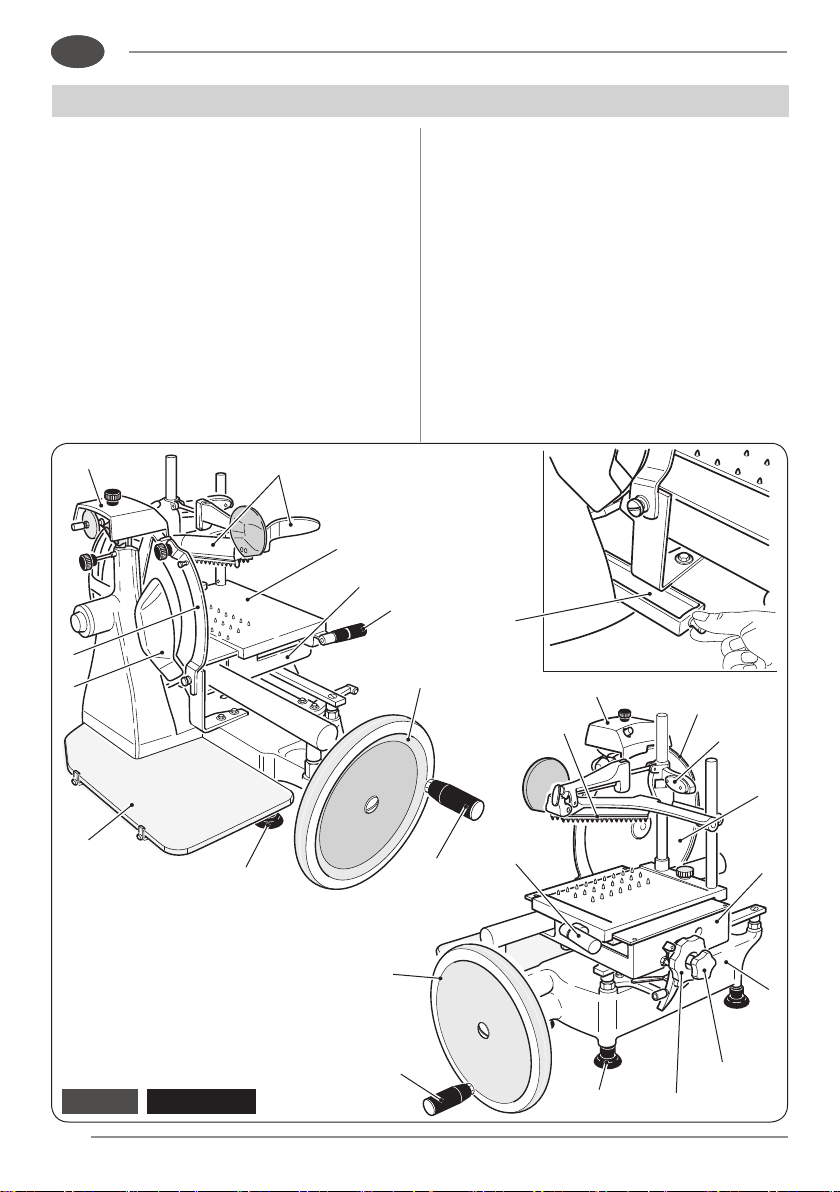
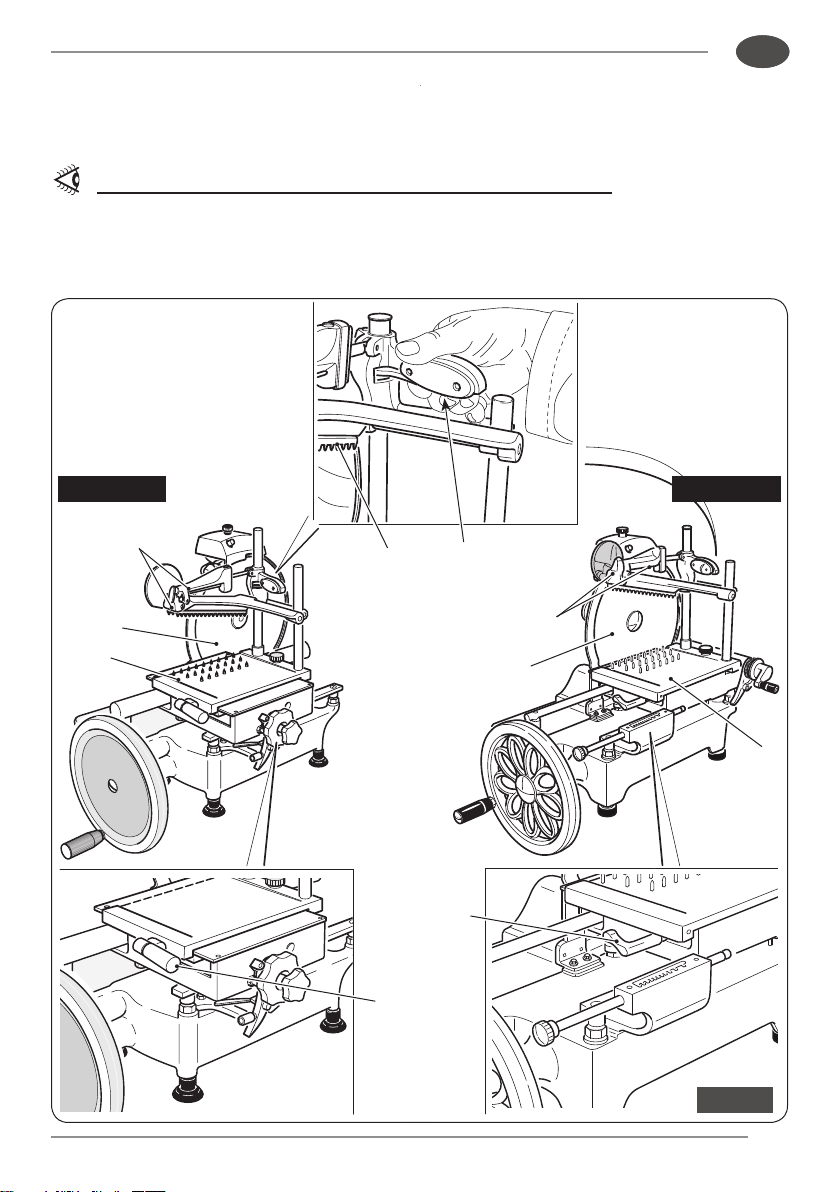
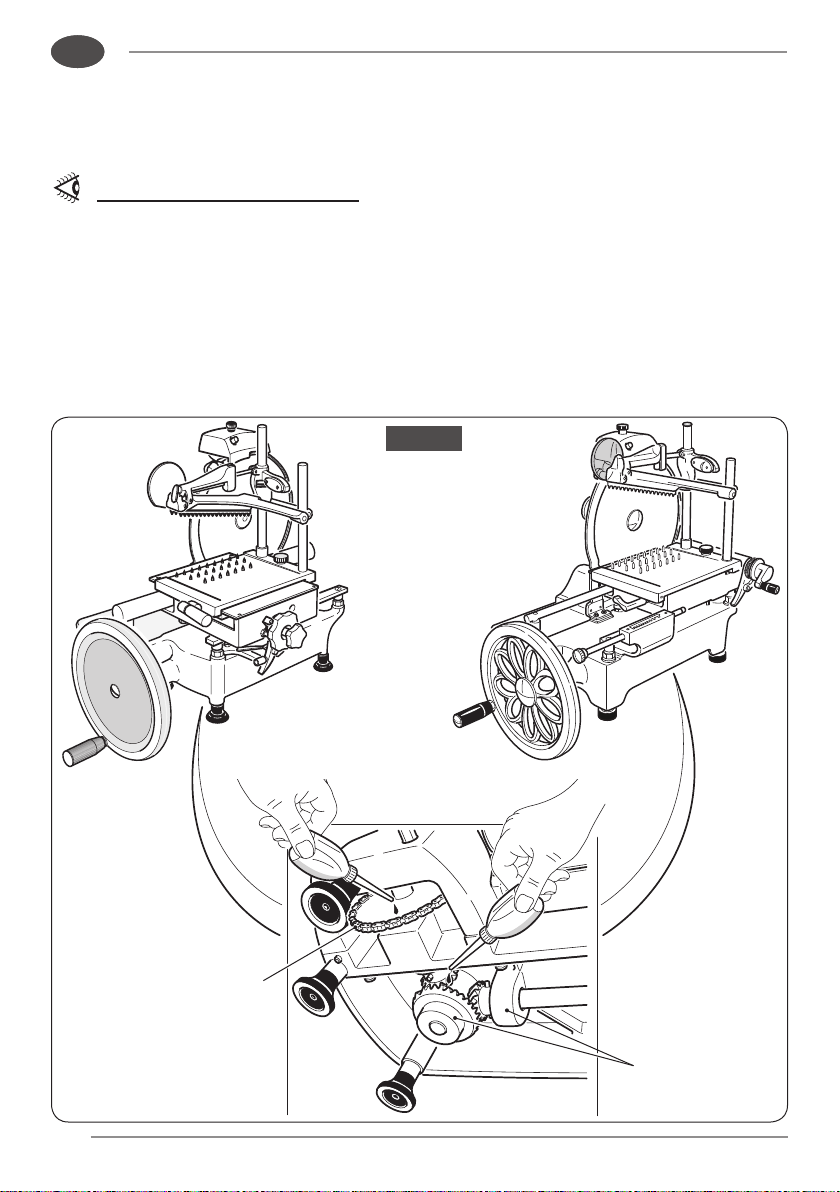
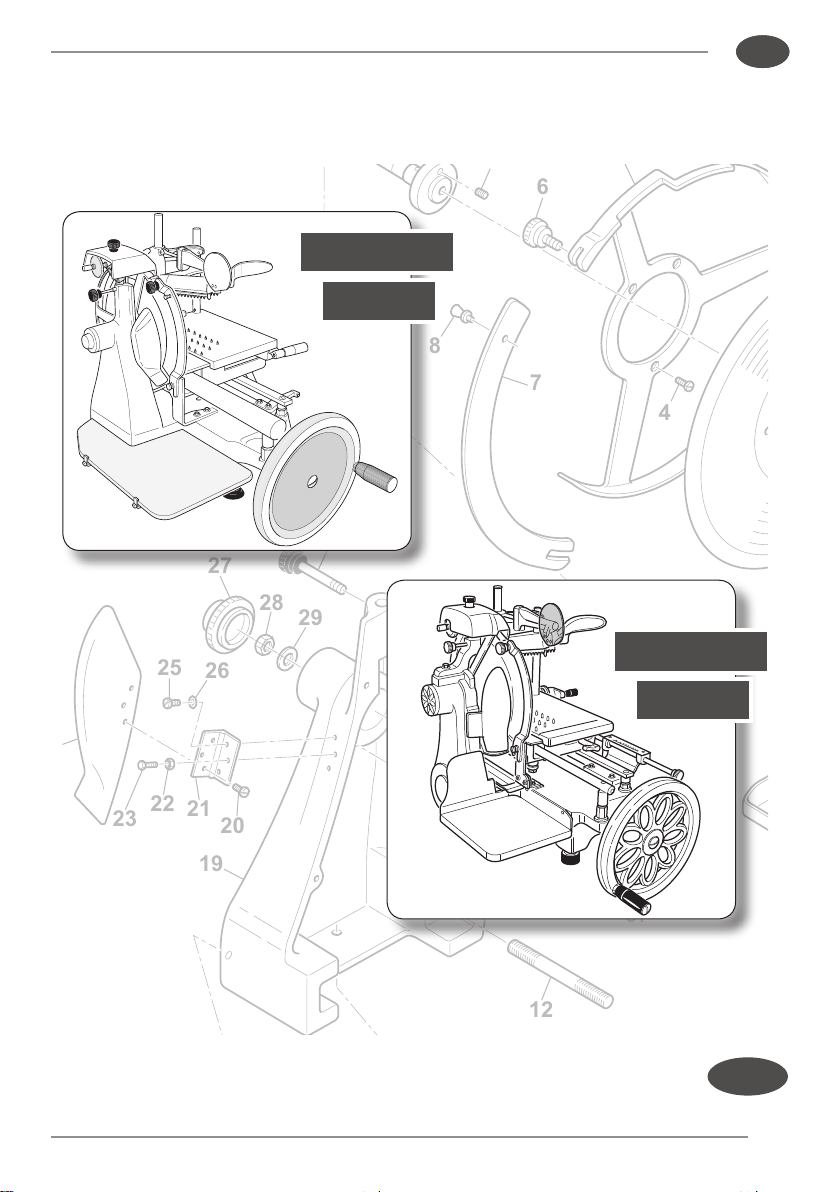
F300 VO
Fig. 3a
7
6
15
1
2
9
17
3
4
5
11
17
14
10
16
5
8
12
13
15
7
11
3
6
18
IT
EN
1. Slice receiving surface
2. Slice deector
3. Pusher
4. Sliding product holder
5. Carriage
6. Flywheel operating handle
7. Flywheel
8. Base
9. Blade guard
10. Pusher vertical slide lever
COMPONENTI PRINCIPALI
11. Sliding product holder fast forward lever
12. Sliding product holder operating knob
13. Slice thickness adjustment
14. Blade cover
15. Supporting foot
16. Blade
17. Sharpener and cover
18. Grease collection pan
19. Blade drive chain
20. Bevel gear
17
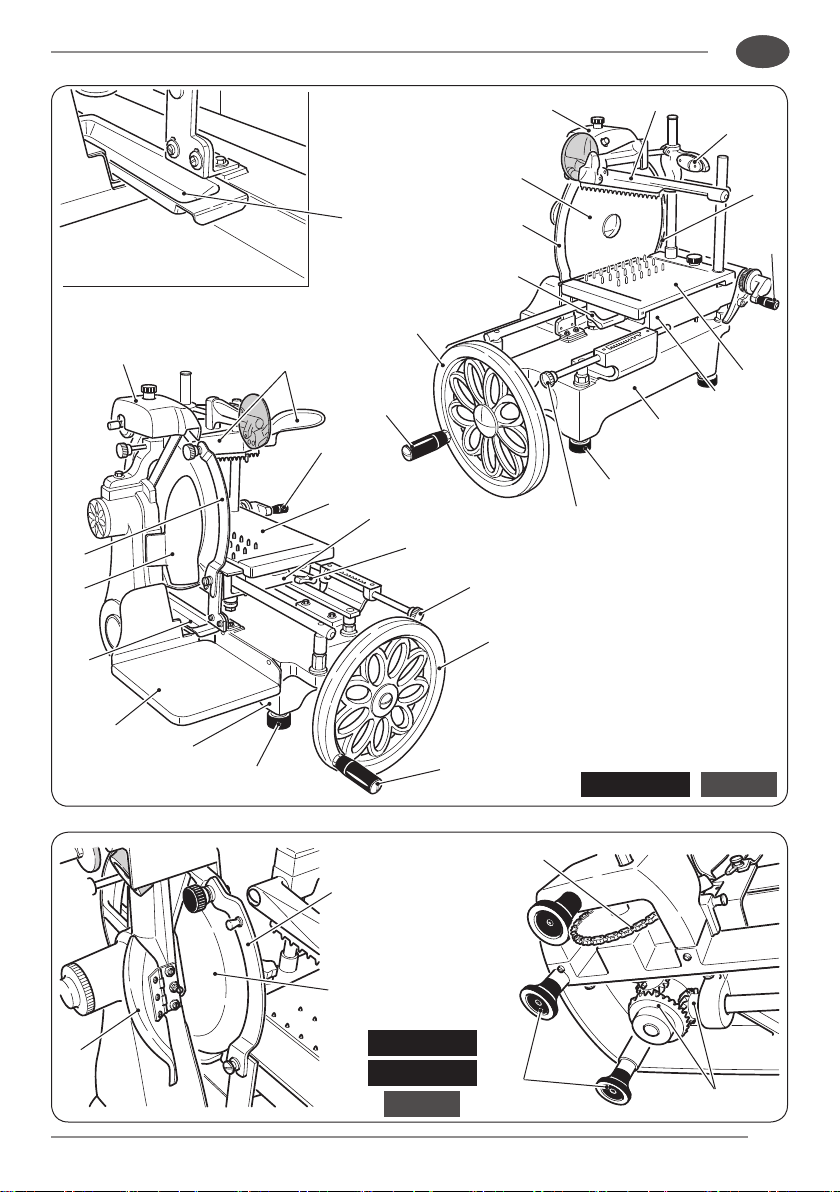
F300 VO L
Fig. 3b
F300 VO L
F300 VO
Fig. 3c
6
7
11
9
16
15
13
8
5
4
12
14
10
3
17
7
6
15
1
2
17
3
4
5
11
18
8
13
12
9
18
19
20
15
2
16
9
IT
EN
18
Fig. 5Fig. 4
IT
EN
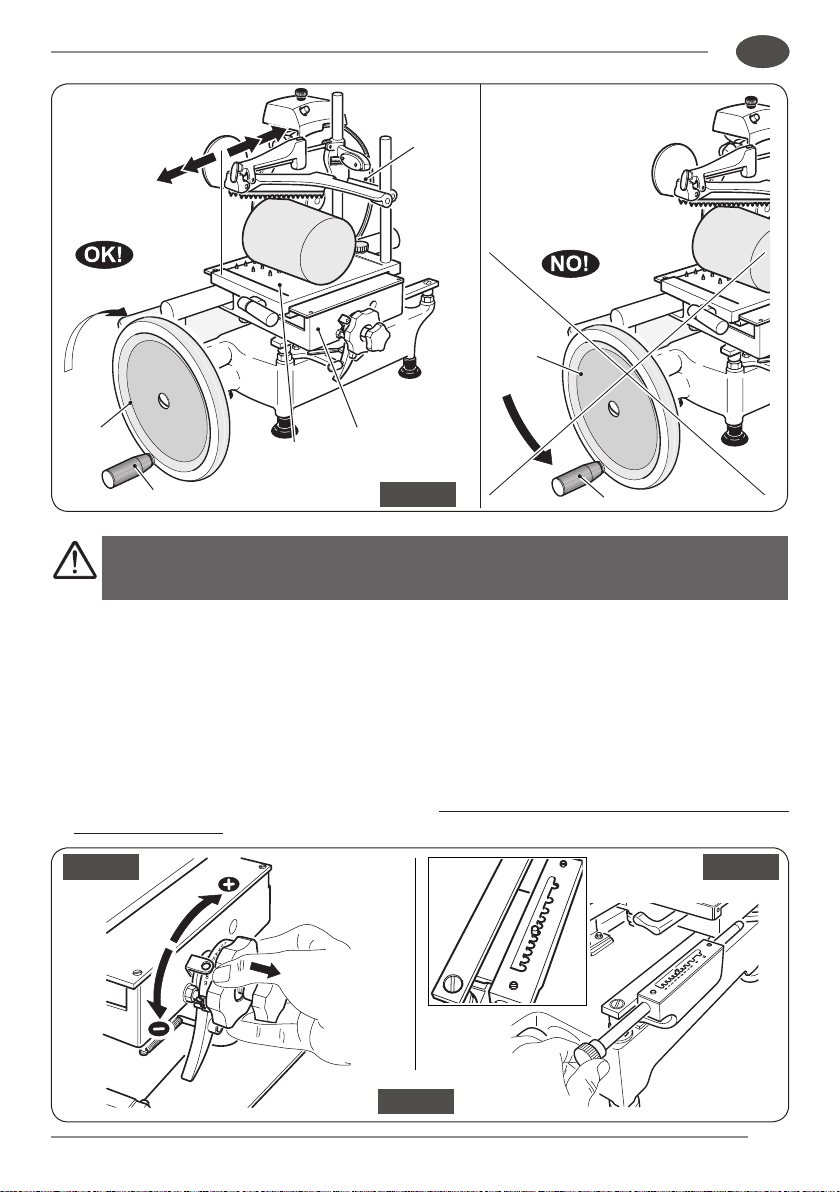
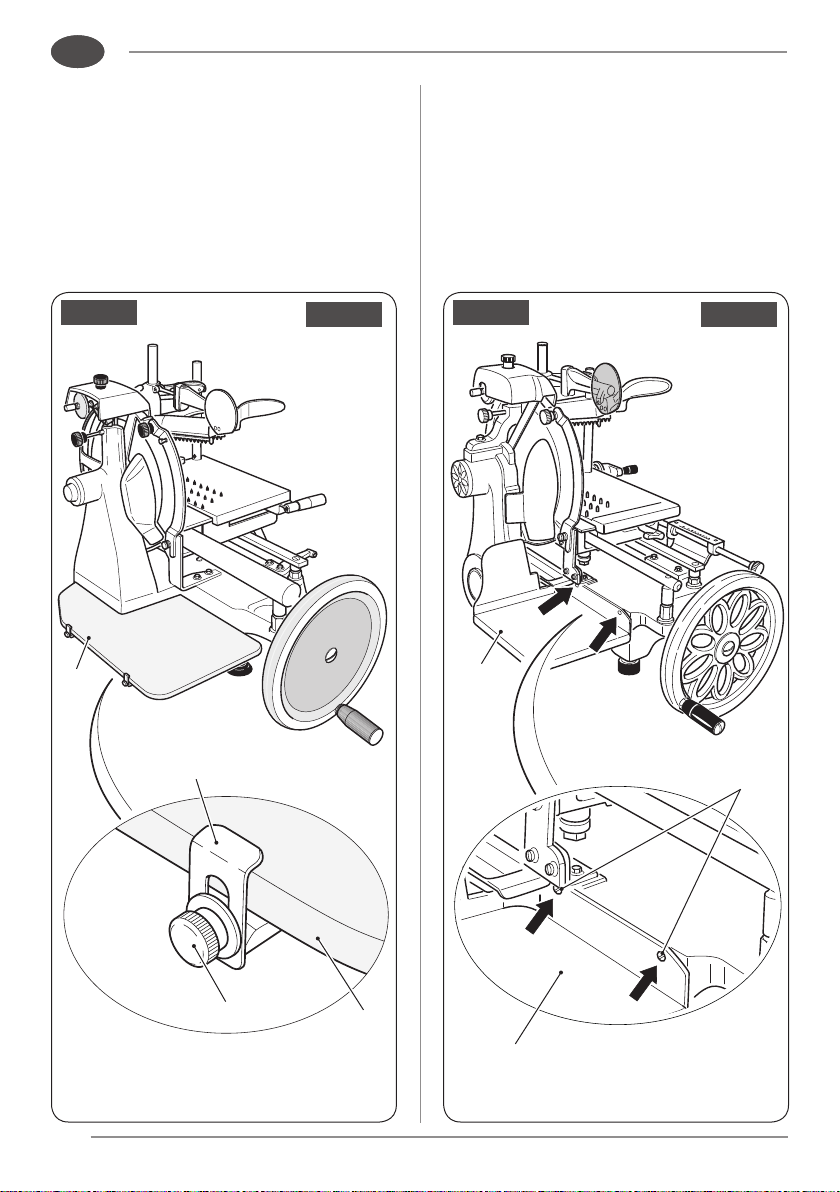
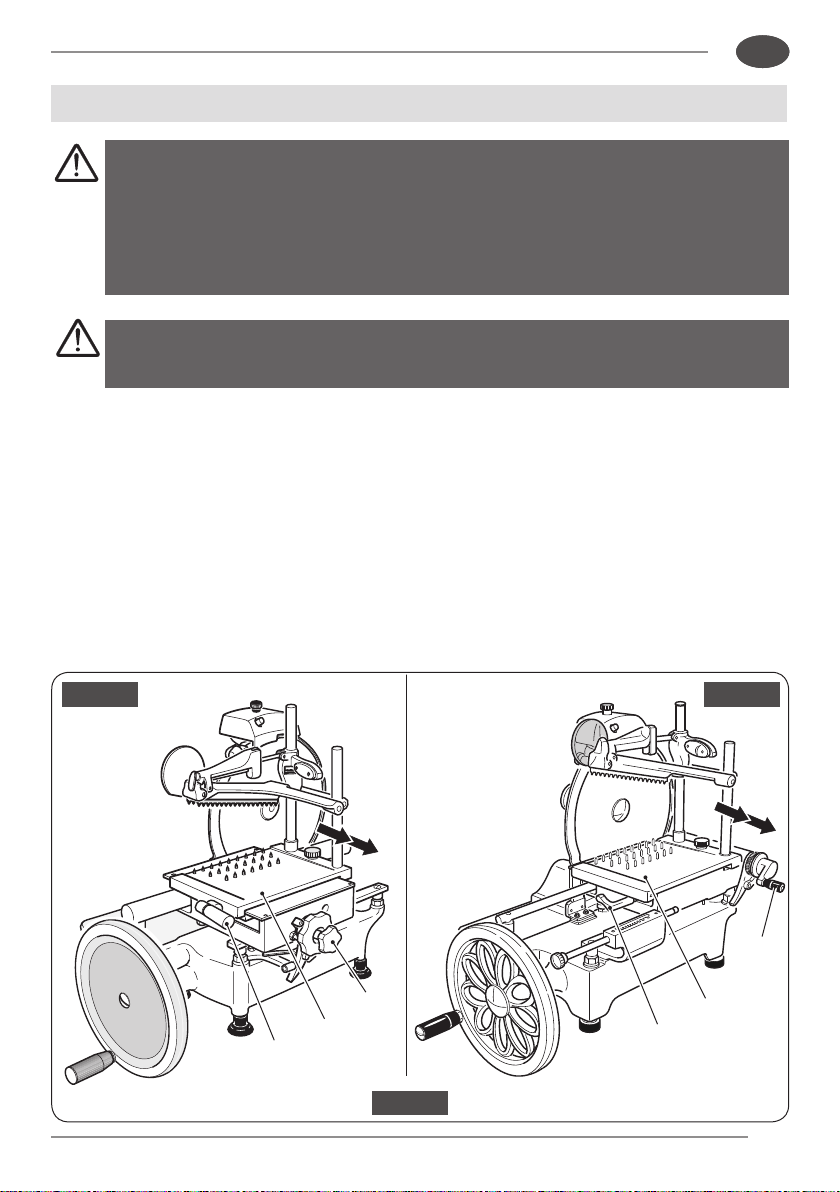
Positioningtheslicer(g.5)
• If not using the optional stand, carefully
lift the slicer and position on a level
surface (g. 5) that is dry and capable
of supporting the weight of both the
slicer and the product to be sliced (see
“Technical specications”).
Ensure that there are no
obstructions to the movement
of the ywheel, carriage stroke
and loading of the product to be
sliced.
Ensure that all slicer feet
are resting correctly on
the work surface.
• Position the slicer in its allocated
workplace.
Useofstand(optional)(g.4)
• If using the optional stand, this should be
positioned on the oor whilst checking
that it is level and that all three feet are
resting correctly on the ground.
• Carefully lift the slicer and position on the
stand.
Ensure that all slicer feet
are resting correctly on
top of the stand.
INSTALLATION AND PRELIMINARY CHECKS
19
Fig. 8
31
7
32
x
30
7
Fig. 7
31
32
30
Fig. 6
5
4
IT
EN
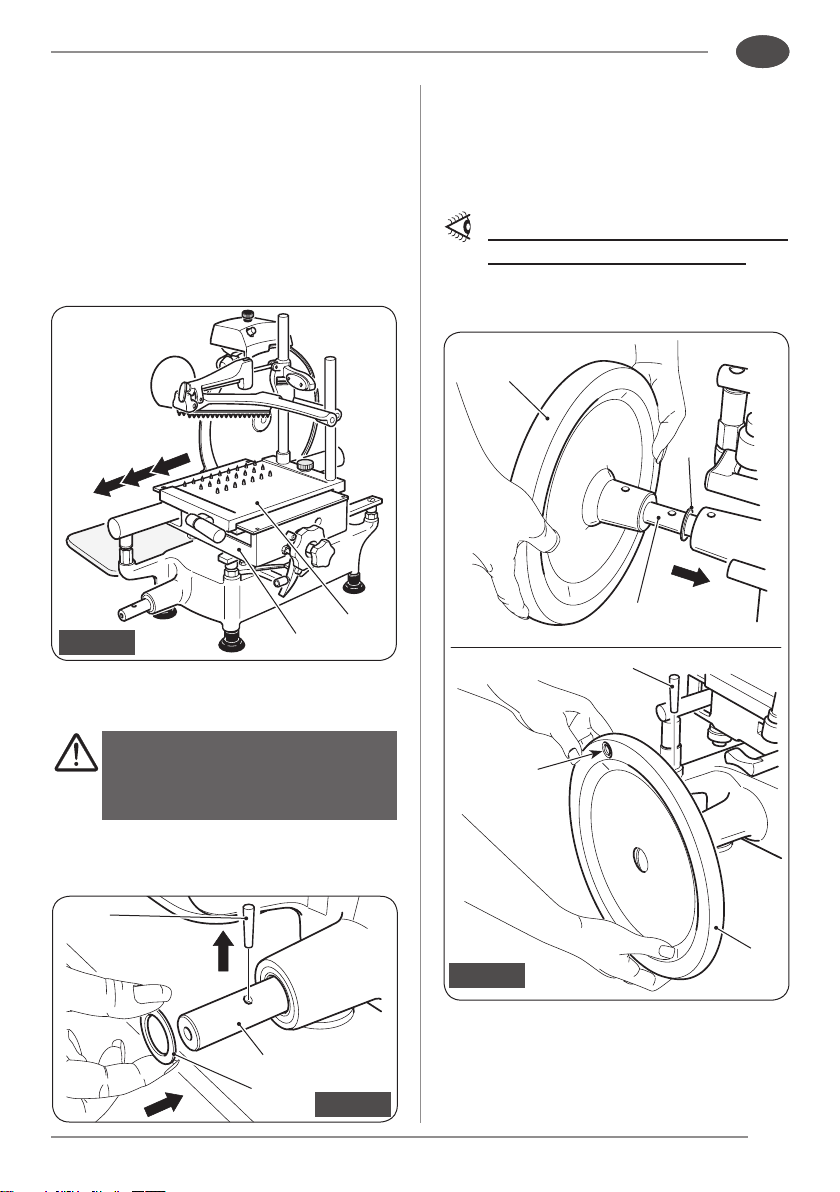
• Remove the taper pin (30) from the
ywheel shaft (31).
Use a hammer to hit the
taper pin (30) on its smaller
diameter.
• Fit the shim (32) to the ywheel shaft
(31).
• Insert the ywheel (7) so that the
operating handle (6) xing hole (x) is
positioned above and to the left of the
axis of the taper pin hole (g. 8).
Check that ywheel and shaft
holes are correctly aligned.
• Insert the taper pin (30) in the hole of the
sleeve
> > > > >
4.1- Fittingtheywheelandoper-
ating handle
For transport requirements, sometimes the
manoeuvre handle (6) and the ywheel (7)
can be removed.
In order to t components, please proceed as follows:
• Move the carriage (5) as near to the
operator as possible.
20
Fig. 9
Fig. 10
30
30
7
7
7a
1
2
Fig. 10a
35
35
36
7
7
36
3
4
Fig. 10b
37
35
6
IT
EN
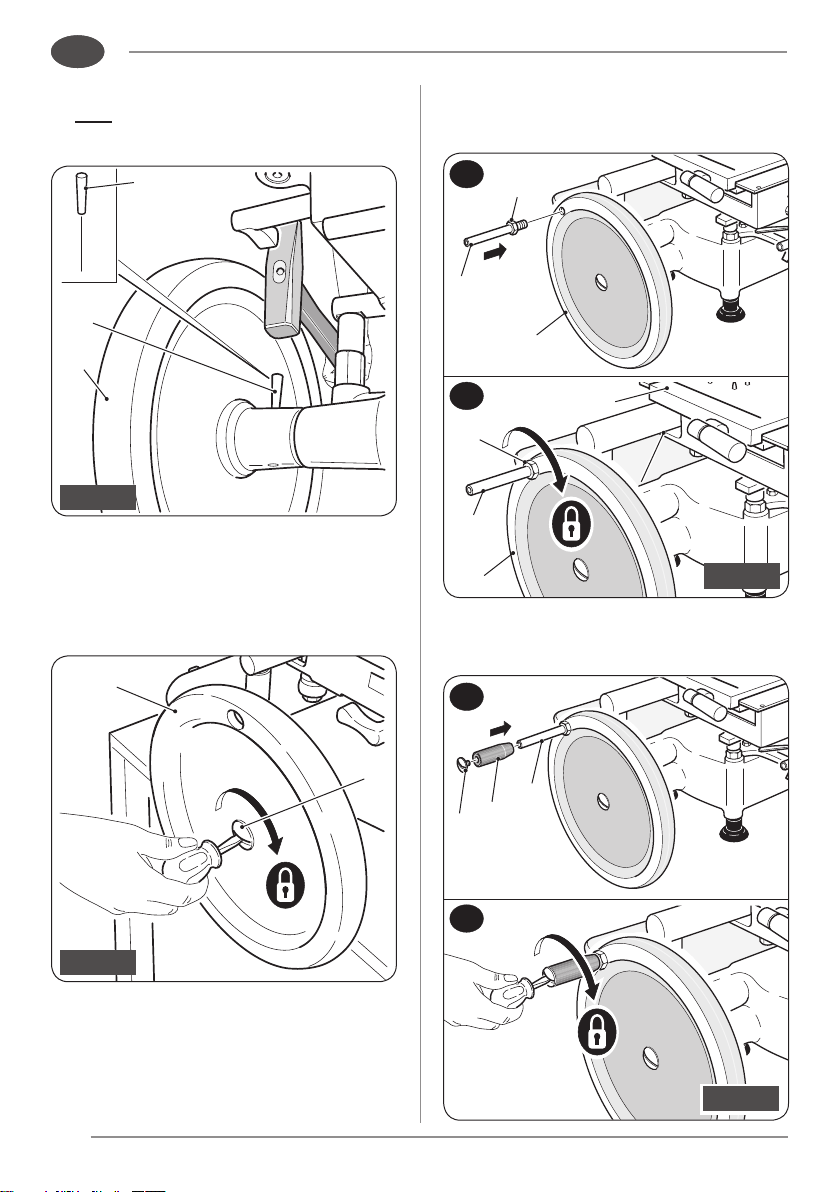
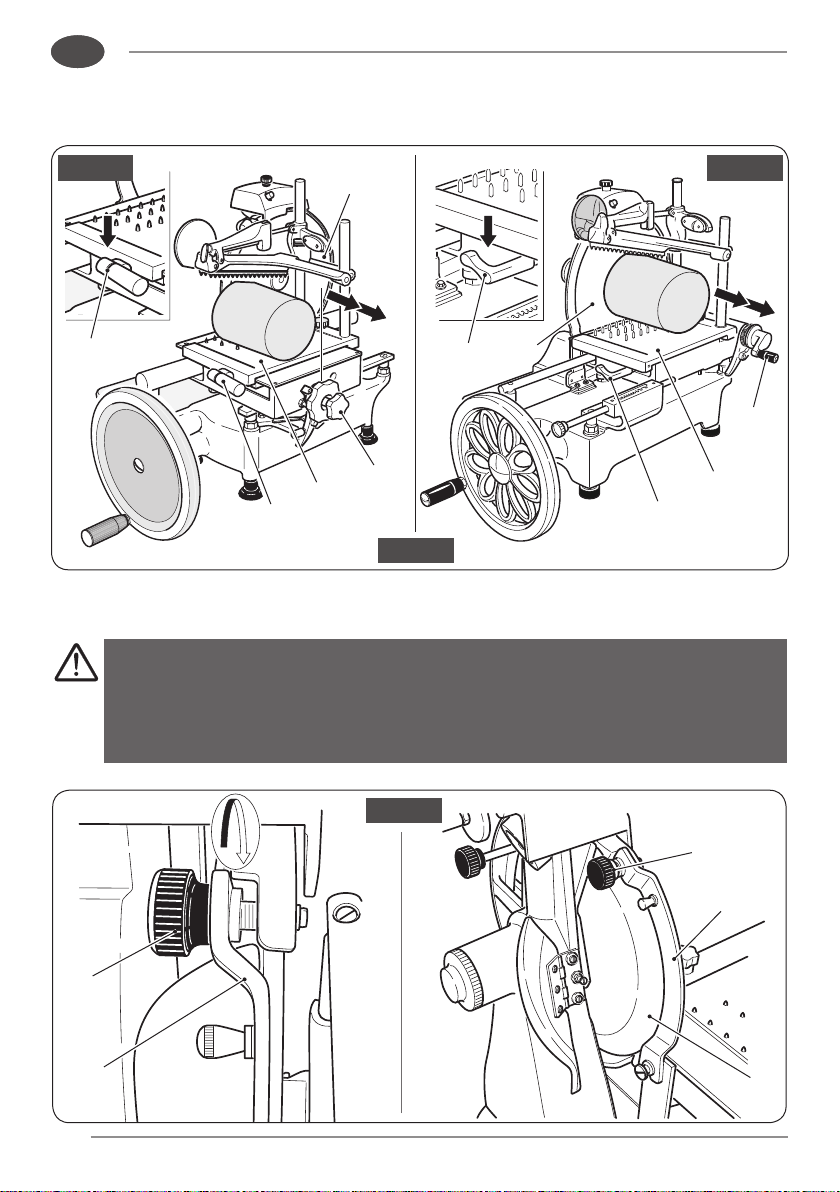
• Tighten the screw (7a).
• Screw pin (35) complete with nut (36)
onto ywheel (7); tighten nut (36).
• Insert handle (6) in pin (35) and tighten
screw (37).
• Use a hammer to insert the taper pin (30)
fully.
21
13
3
16
5
12
13
11
7
4
6
12
13
F300 VO
Fig. 11a
IT
EN
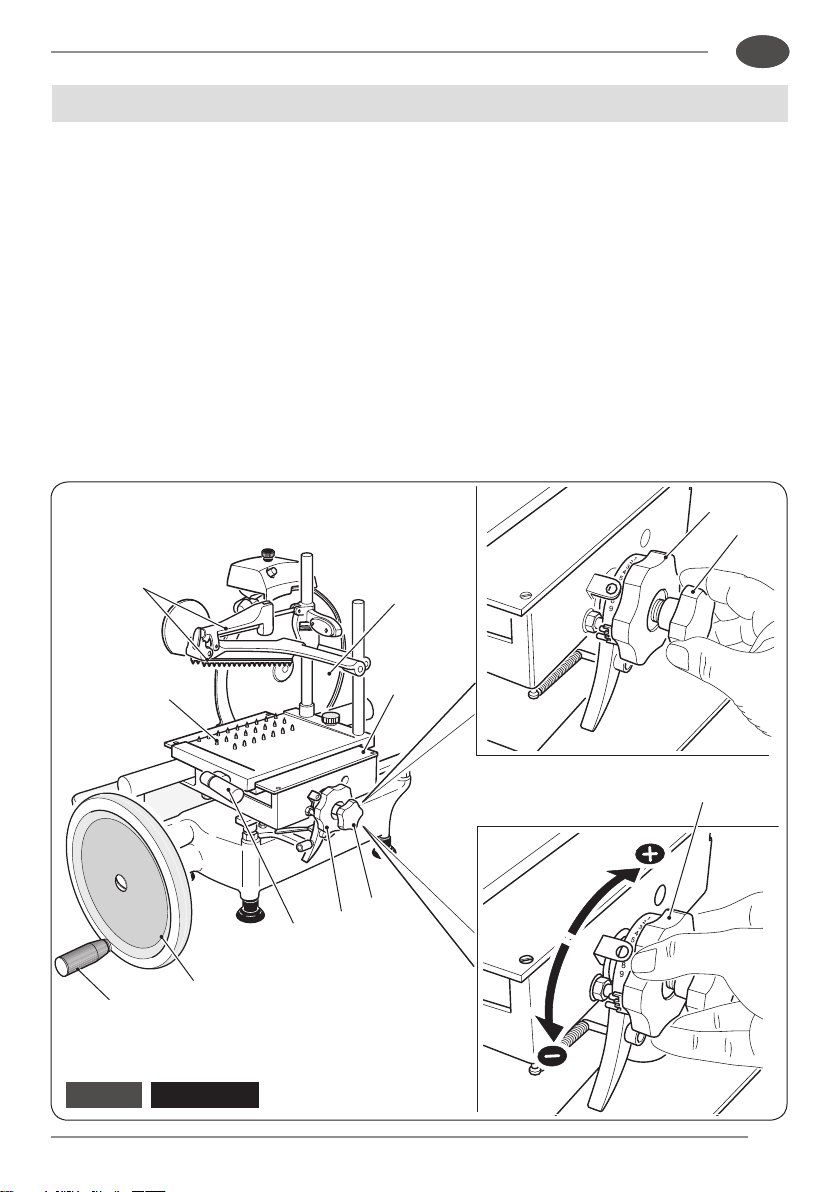
Flywheel
Clockwise rotation of the ywheel (7) using the handle (6) will move the carriage (5) with
product holder (4), whilst at the same time turning the blade (16).
Slice thickness control knob
F300 VO
Turn the knob (13) clockwise in order to obtain a thicker slice or anticlockwise for a thinner
one.
The knob (13) has a graduated scale ranging from “1” to “9” (thickness 2,5 mm).
Sliding product holder operating knob
F300 VO
The knob (12) allows you move the product holder (4) towards or away from the blade (16).
It can also be used to make slight movements of the product holder (4).
COMMANDS DESCRIPTION
22
0
1
2
3
4
5
6
7
8
9
10
F300 VO L
Fig. 11b
6
7
11
9
16
15
13
8
5
4
12
14
10
3
17
13
12
IT
EN
Slice thickness adjustment F300 VO L
The thickness of the slice is adjustable by making the lever (13) advance or retract on the
scale from 0 to 10
SlidingproducttrayadvancementywheelF300VOL
The ywheel(12) allows the product tray (4) to be moved towards or away from the blade
(16).
Can be used to make small movements of the product tray (4).
23
10
3
3
16
11
F300 VO F300 VO L
Fig. 11c
11
4
4
16
3
IT
EN
Sliding product holder fast forward lever
By lowering and holding in position the lever (11) you can quickly move the product holder
(4) towards or away from the blade (16) (with product).
The operation is quicker than when using the knob (12).
Pusher vertical slide lever
By keeping pressed the lever (10) you can quickly raise or lower the pusher (3).
24
5
7
Fig. 13
11
11
4
12
Fig. 12
F300 VO F300 VO L
11
11
4
12
IT
EN
WARNING:
• DO NOT use the slicer
if not fully physically
andmentallyt.
• DO NOT allow anyone to
come near to the slicer
whilst you are using it.
• Be extremely careful
whilst loading/
unloading the product
from the product holder
and whilst actually
slicing.
• PAY ATTENTION AT ALL
TIMES!
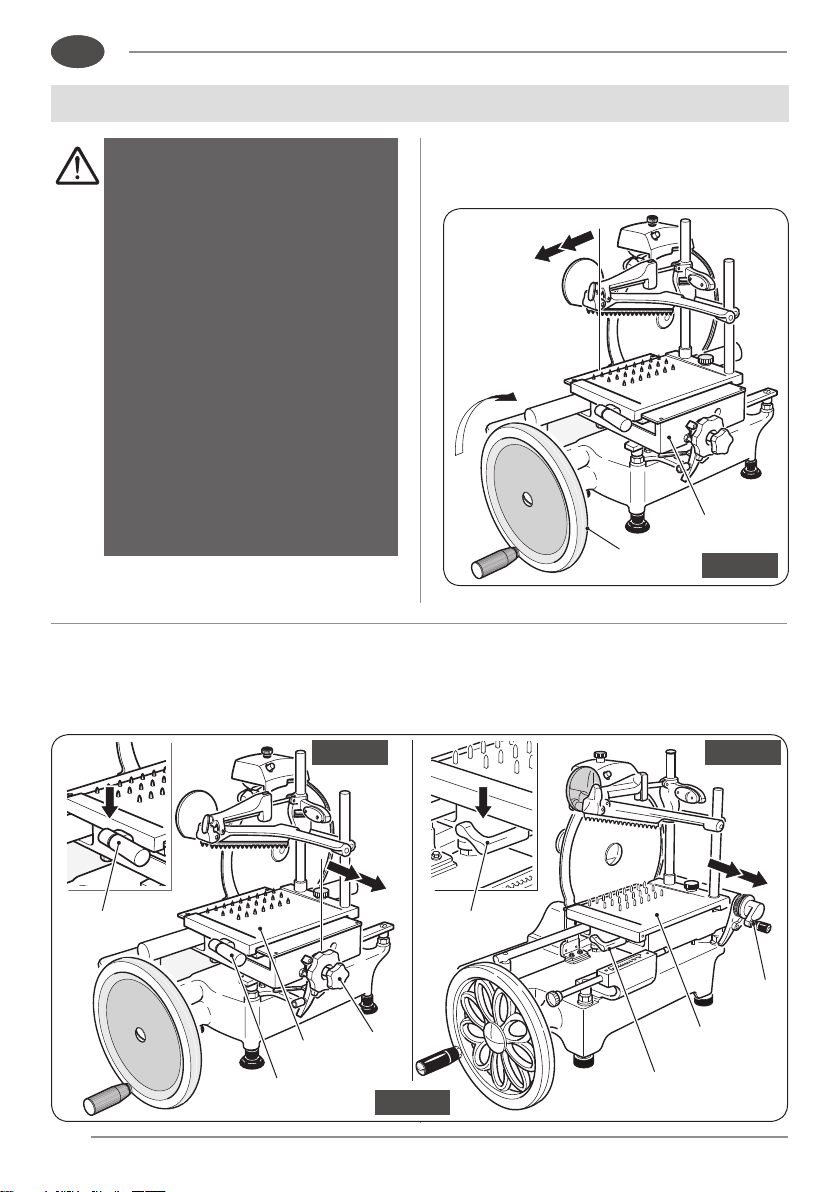
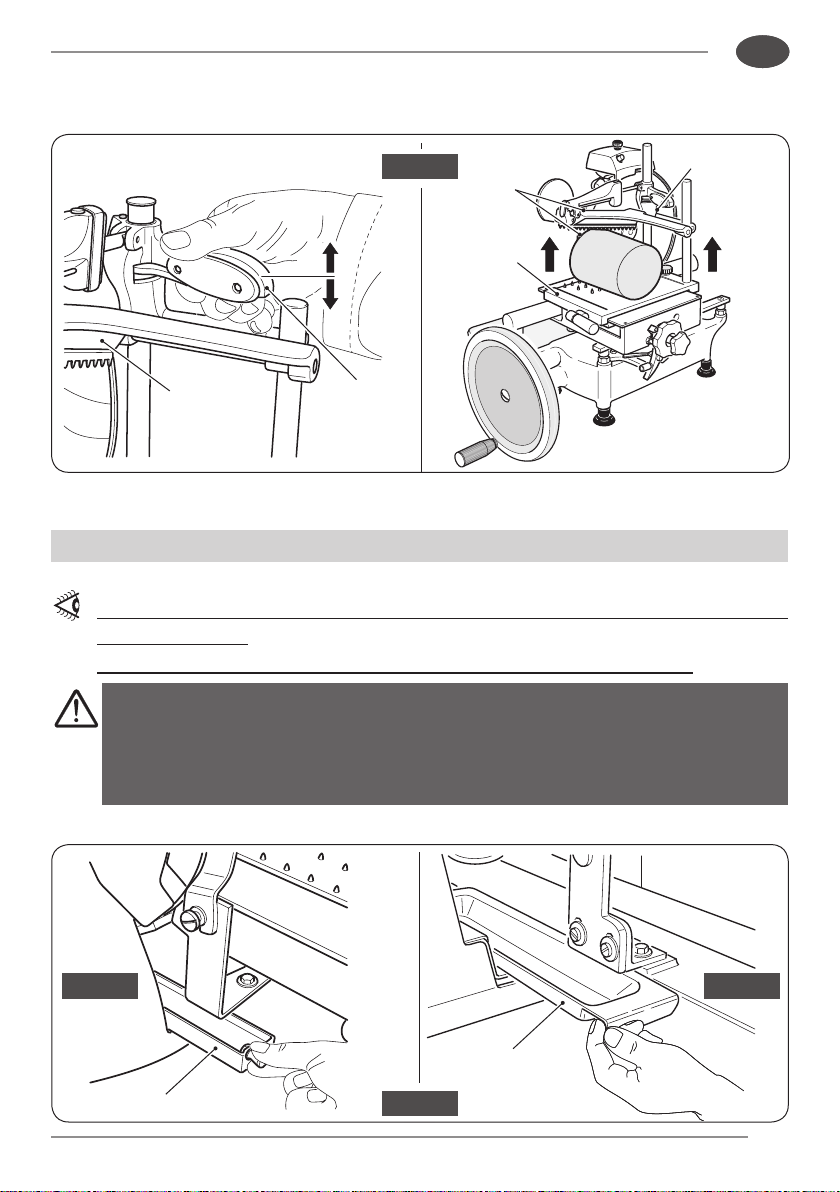
• Move the product holder (4) away as far as its limit of travel (furthest from the blade) using
either the knob (12) or the fast forward lever (11).
• Turn the ywheel (7) in order to move the carriage
(5) to its forward limit (towards the operator).
USING THE MACHINE
25
0
1
2
3
4
5
6
7
8
9
10
3
4
F300 VO
Fig. 14a
F300 VO L
13
F300 VO
Fig. 14b
F300 VO L
13
3
4
IT
EN
• Position the product to be sliced on the product holder (4) and hold in place with the pusher
(3) (so that it can’t move), whilst adjusting the height.
Failure to hold the product rmly in place on the product holder could cause
the machine to cut uneven slices.
• Set the thickness of the slice desired by turning the knob (13) (mod. F300 VO) or the lever
(13) with scale from 0 to 10 (mod. F300 VOL).
26
4
12
11
9a
9
16
9
16
Fig. 15
Fig. 16
F300 VO LF300 VO
9a
9
9a
11
4
12
IT
EN
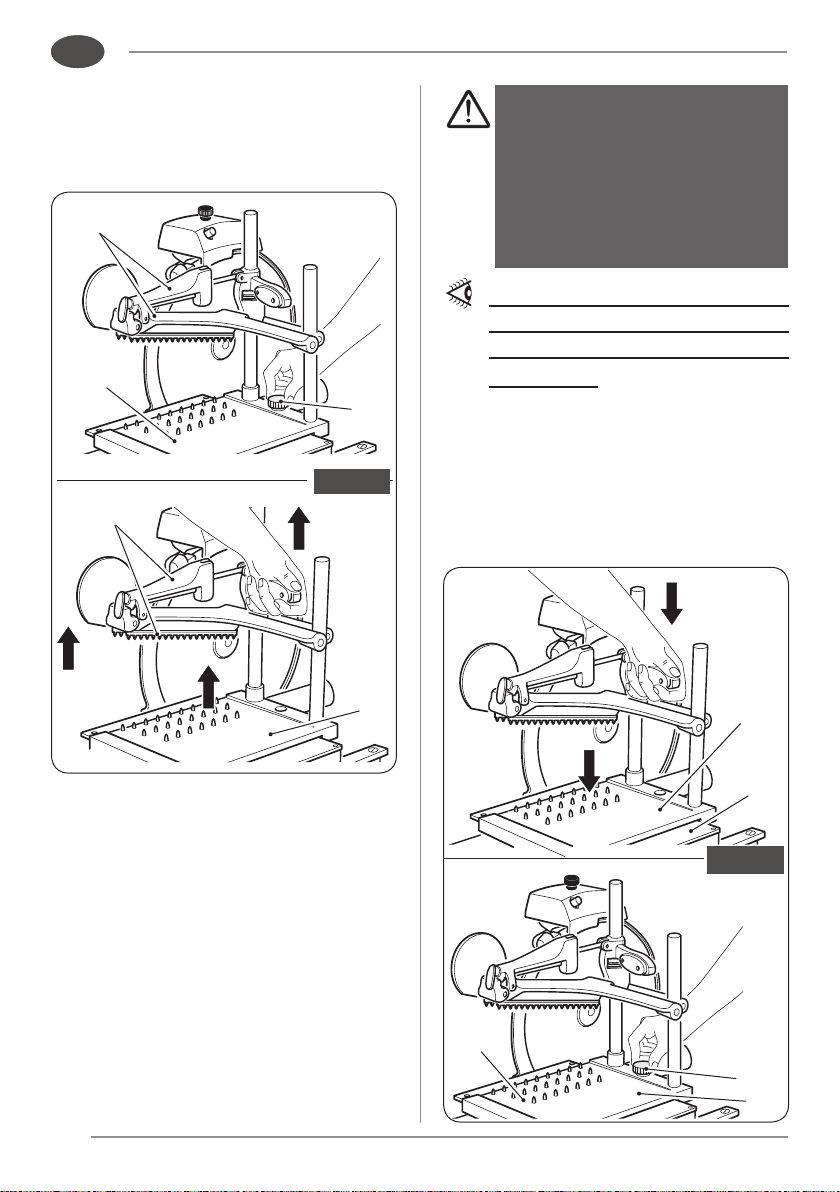
• Hold the handle (6) and turn the ywheel (7) clockwise in order to begin blade rotation and
the alternating movement of the product holder (4) (g. 17).
5
.1 - Slicing the product
• Move the blade guard (9) to the left by loosening the knob (9a).
WARNING:
Exercisegreatcautionifthebladeguard(9)isnottted;
the blade (16) is extremely sharp.
• Bring the product holder (4) (with the product) back from its limit of travel (towards the
blade) using either the knob (12) or the fast forward lever (11).
Draw the product holder (4) closer to the blade so as to leave a space
between the product to be sliced and the blade of between 0.5 cm and
1.0 cm.
27
0
1
2
3
4
5
6
7
8
9
10
7
6
4
5
7
6
16
Fig. 17
F300 VO LF300 VO
Fig. 17a
IT
EN
DONOTturntheywheel(7)anticlockwise.
Serious damage to the slicer could be caused.
• You will need to turn the ywheel (7) 4/5 times before the product touches the blade (16).
•
Whilst the carriage (5) moves forward (away from the operator), the blade (16) enters the product.
Guided by the deector (2), the slice is detached and drops onto the slice receiving surface (1).
• As the carriage (5) returns (towards the operator), a mechanical device is operated that
moves the product holder (4) sideways towards the blade (16).
The value of the transversal advancement is set:
- with the slice thickness adjustment knob (13) (model F300 VO);
- with the lever (13) (model F300 VO L).
• You should stop turning the ywheel (7) once the operation is complete; the blade will halt
its movement (16).
28
9a
9
9a
9
16
11
16
4
12
11
Fig. 18
F300 VO F300 VO L
11
4
11
16
12
Fig. 19
IT
EN
• Reposition the blade guard (9) by tightening the knob (9a) (g. 19).
WARNING:
Do not leave the slicer without the blade guard (9) in the
correct position.
Cutting hazard!
• Move the product holder (4) (with the remaining product) away from the blade (16) using
either the knob (12) or the fast forward lever (11).
29
3
10
10
3
4
F300 VO F300 VO L
Fig. 21
Fig. 20
18
18
IT
EN
• Press the lever (10) and lift the pusher (3).
• Remove the product from the table (4).
• Clean the slicer as described in the relevant section.
The slicer SHOULD be cleaned thoroughly at least once a day and more frequently
where necessary.
Clean the slicer before use if it has been out of service for some time.
WARNING:
Cutting hazard! Use protective cut- and tear-resistant gloves and
perform all operations with extreme care.
PAY ATTENTION AT ALL TIMES!
• Remove the receiving tray (18).
SLICER CLEANING
30
34
3
3
Fig. 22
4
4
Fig. 23
Fig. 23
5
5
34
4
4
Fig. 23
IT
EN
• Unscrew knob (34) and lift the sliding
product holder (4) complete with pusher
arm (3).
• Clean all dismantled parts and the
machine body just hot water (at a
temperature of not less than 30°C)
and a frothy biodegradable dishwasher
detergent.
Use a soft spongy cloth and, if necessary,
a nylon brush for the spiked areas of the
product holder (4) and pusher (3).
• Rinse in hot water only and dry with soft
spongy cloths.
WARNING:
DO NOT clean the machine
with water jets, steam
or similar methods or
in dishwashers using
corrosive detergents.
The base (8) and painted parts
can be cleaned with a soft cloth
avoiding the use of abrasive
detergents.
• Reposition the product holder (4) on the
carriage (5).
• Secure the product holder (4) to the
carriage (5) by tightening the knob (34).
31
Fig. 24
9
16
9
Fig. 25
14
9
16
IT
EN
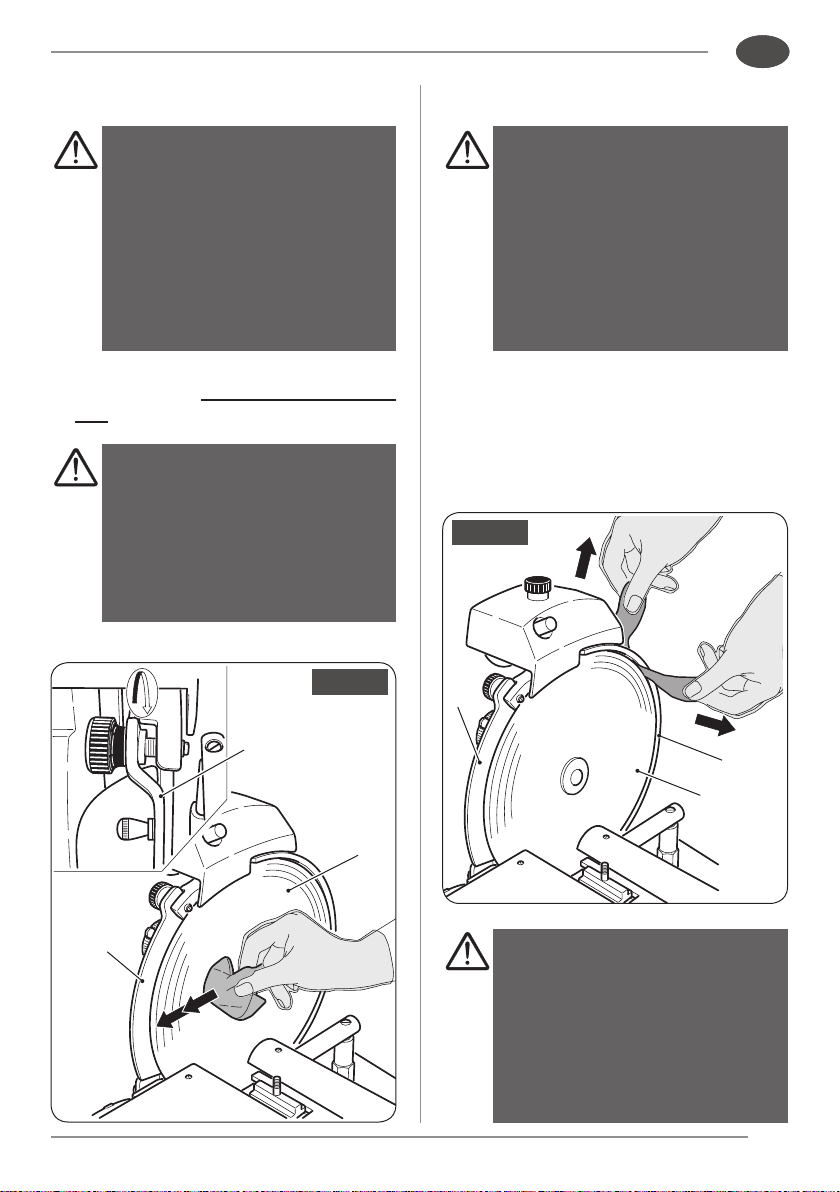
6.1 - Cleaning the blade
WARNING:
Cutting hazard! Use
protective cut- and tear-
resistant gloves and
perform all operations with
extreme care.
PAY ATTENTION AT ALL
TIMES!
• Press a damp cloth on the blade (16)
and rub slowly moving from inside to
out.
WARNING:
ALWAYS clean the knife
(16) with the blade guard
(9) tted behind it in the
safety position.
6.2 - Cleaning the blade cover
WARNING:
Cutting hazard! Use
protective cut- and tear-
resistant gloves and
perform all operations with
extreme care.
PAY ATTENTION AT ALL
TIMES!
• Damp a cloth in a solution of water and
alcohol.
• Place the damp cloth between the blade
cover (14) and blade (16).
• Take the two ends of the cloth between your
hands and slide it along the blade cover (14).
WARNING:
• ALWAYS clean the knife
(16) with the blade guard
(9)tted.
• Do not use detergents to
clean the blade (16).
32
Fig. 26a
1
1b
1
1
1a
Fig. 26b
1
1c
F300 VO F300 VO L
IT
EN
6.3 - Cleaning the slice receiving
surface
Mod. F300 VO
• Remove the slice receiving surface (1)
by loosening the two screws (1a) and
releasing from the retaining clips (1b).
• Wash the tray with water and normal
dishwasher detergent).
Mod. F300 VOL
• Clean the collection tray (1) on the
machine body or remove it by loosening
the two screws (1c).

33
IT
EN
In addition to the above-mentioned cleaning
operations, you should also perform routine
maintenance in order to guarantee the
slicer’s operating efciency over time.
The operator may perform the following
maintenance operations:
---------
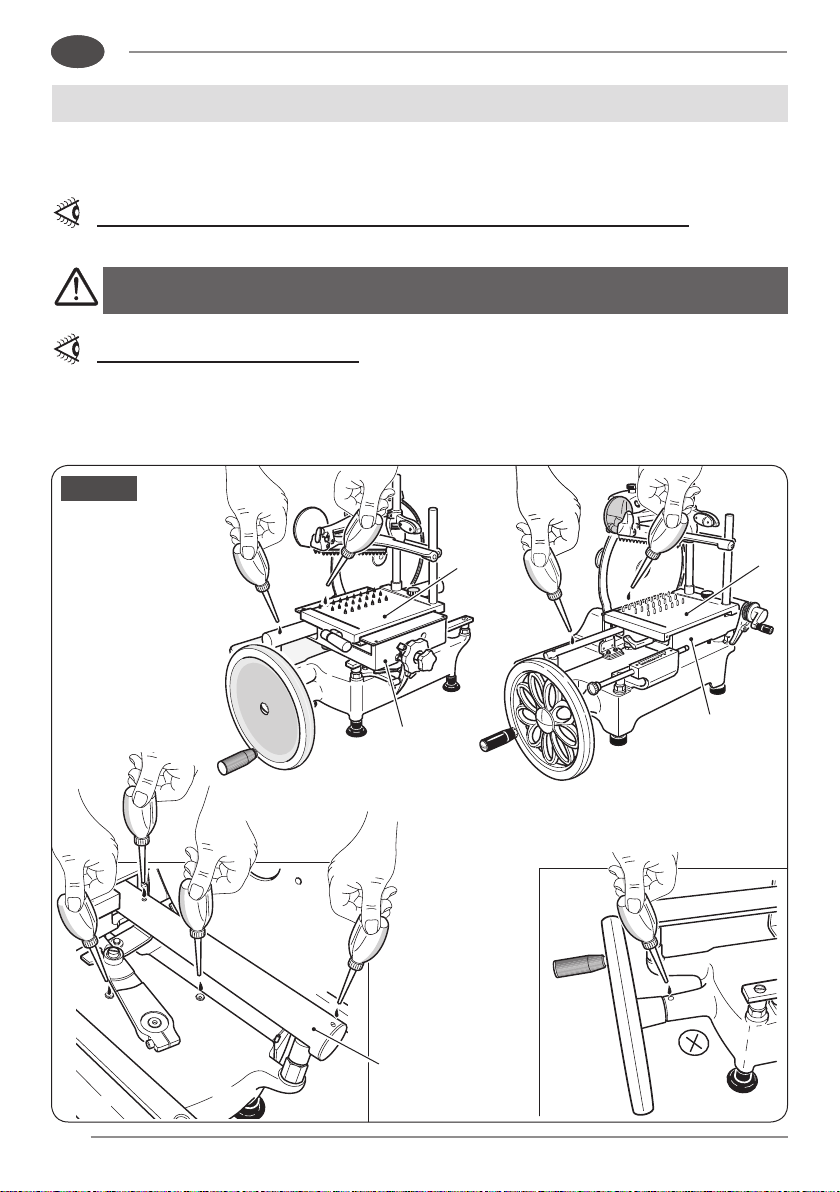
• Oiling carriage guide rail (5) and
product holder (4) and lubrication
points.
- Frequency: Weekly.
(see gure 34-35)
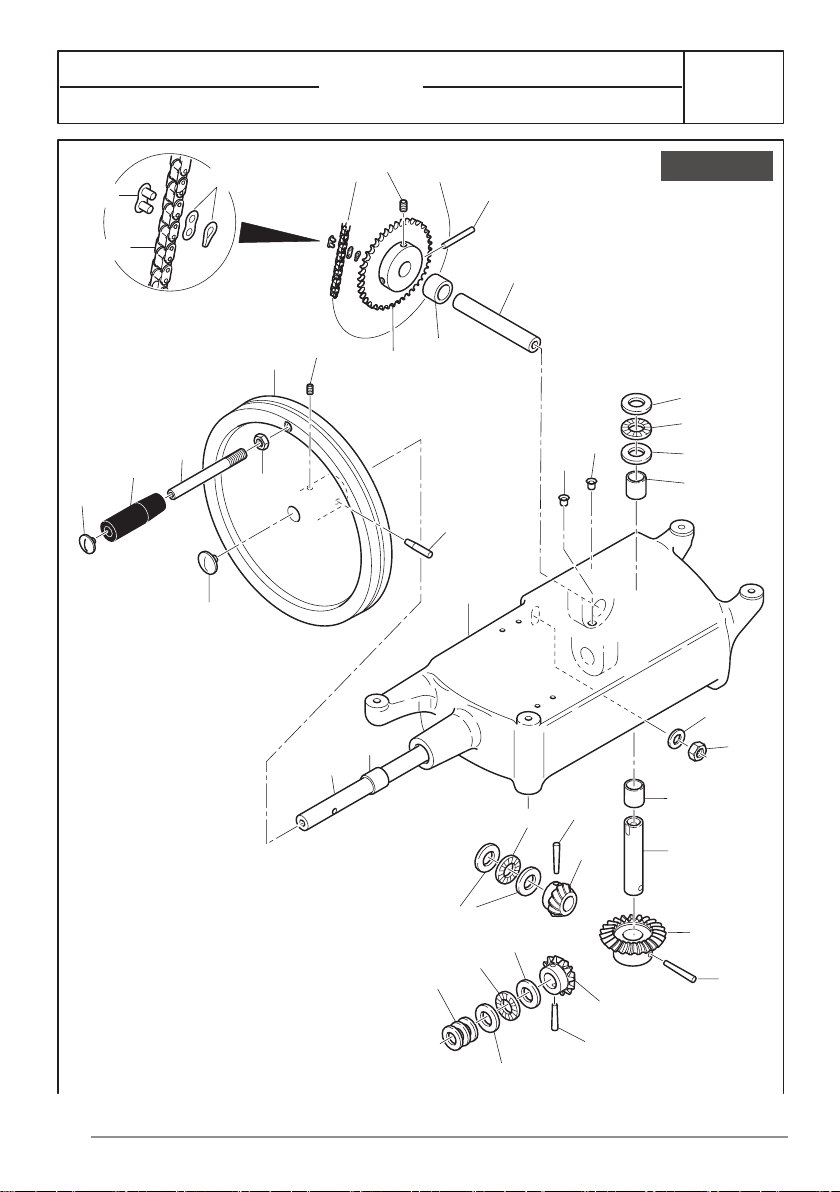
---------
• Oiling chain (19) and bevel gear (20).
- Frequency: Every 6 months.
(see page 36)
---------
• Blade sharpening
Periodically, or at least every 6 months,
sharpen the blade (16) as described on
page 37.
How often sharpening is
necessary and how long it lasts
depend on the type of use to
which the slicer is put (operating
times and processed product).
Being particularly complicated and hazardous
for the operator, other maintenance
operations SHOULD only be performed by
staff from an authorised service centre.
These operations are:
• Blade replacement.
• Sharpener grinding wheel replacement.
• Chain replacement.
• Repair of structural parts, repair and/
or replacement of components located
beneath the base.
6.4 - Machine reassembling
Proceed in the opposite direction to what
indicated in the previous operations.
6.5 - Store the slicer
• At the end of use, after having thoroughly
cleaned all components (as described in
the previous paragraphs), make sure the
graduated knob or the lever that adjusts
the thickness are taken back to “0” and
always re-position the blade guard (9).
• Is advised to cover the slicer with a towel
to protect it from dust.
If it is not intended to use the slicer for
some days, store it in a sepaired and dry
place.
MAINTENANCE
34
Fig. 27
36
4
5
4
5
IT
EN
• Every week use a few drops of the lubricant supplied to lubricate the points represented in
gures 27-28-29-30.
If you run out of the supplied lubricant, use white Vaseline oil.
Do not use vegetable oil.
Use the lubricant sparingly.
• Add a few drops of lubricant (maximum 3 or 4) onto the guides (36) of the carriage (5) and
of the product tray (4) and slide the relative units 3/4 times.
• Add 2/3 drops of lubricant in the points of lubrication.
LUBRICATION
35
Fig. 28
10
3
3
Fig. 29
12
F300 VO L
IT
EN
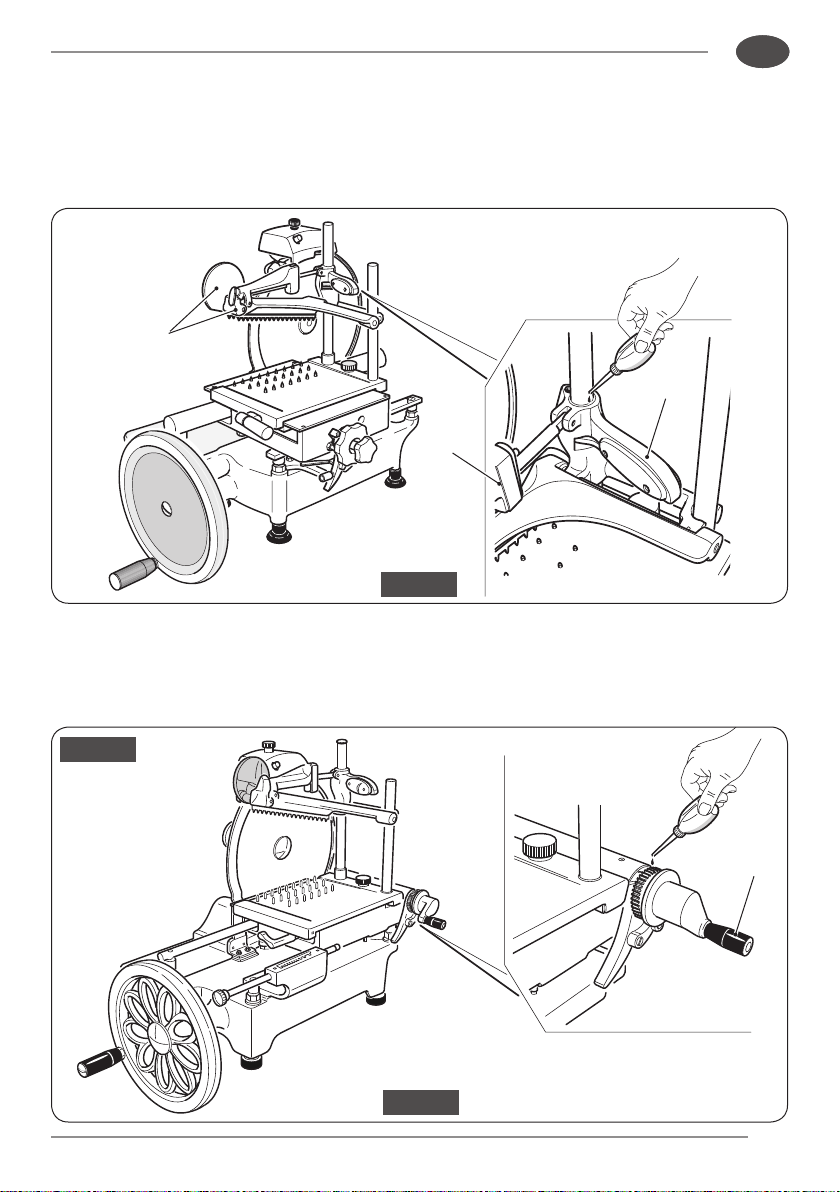
•
Use 2/3 drops of lubricant on the product holder (3) vertical running lever retainer (10).
• Slide the pusher (3) back and forth 3/4 times.
• Put a few drops of oil into the ywheel/slicer body joint (x Fig 27).
• Activate the ywheel briey.
Model 300 VO L
•
Use 3/4 drops of lubricant
to lubricate the notched belt and slice thickness adjustment joint
(12).
36
19
20
Fig. 30
IT
EN
Every 6 months:
• Lift the slicer and add 3/4 drops of the lubricant supplied onto the chain (19) and onto the
gears (20).
Use the lubricant sparingly.
• Use a paper cloth to clean any excess lubricant in all lubrication points.
37
Fig. 31
11
4
12
F300 VO F300 VO L
11
4
12
IT
EN
WARNING:
Cutting hazard!
Use protective cut- and tear-resistant gloves and perform all
operations with extreme care.
PAY ATTENTION AT ALL TIMES!
WARNING:
ALWAYSworkwiththebladeguard(9)tted.
Proceed as follows:
• Move the product holder (4) away as far as its limit of travel (furthest from the blade) using
either the knob (12) or the fast forward lever (11).
SHARPENING THE BLADE
38
0
1
2
3
4
5
6
7
8
9
10
“0”
Fig. 32
13
F300 VO F300 VO L
Fig. 33 Fig. 34
Fig. 35
Fig. 36
17
38
17
9
17
17
16
38
9
13
IT
EN
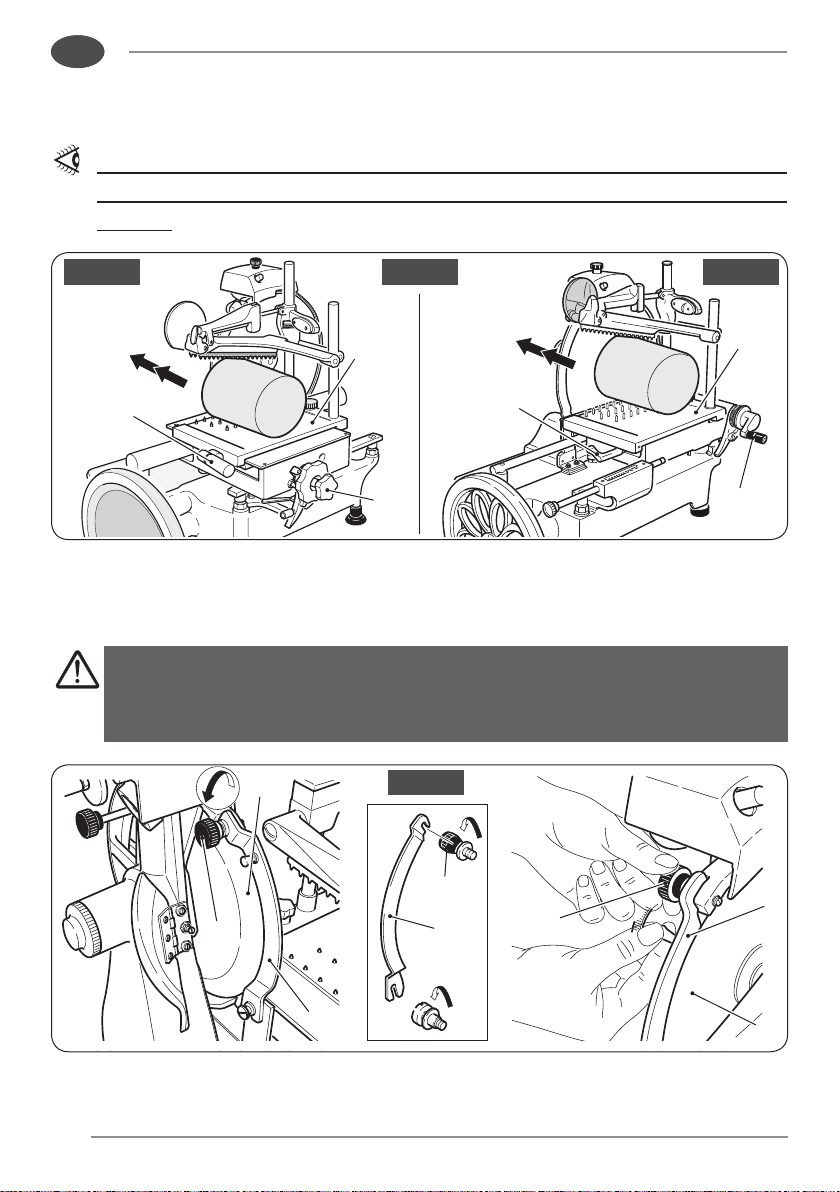
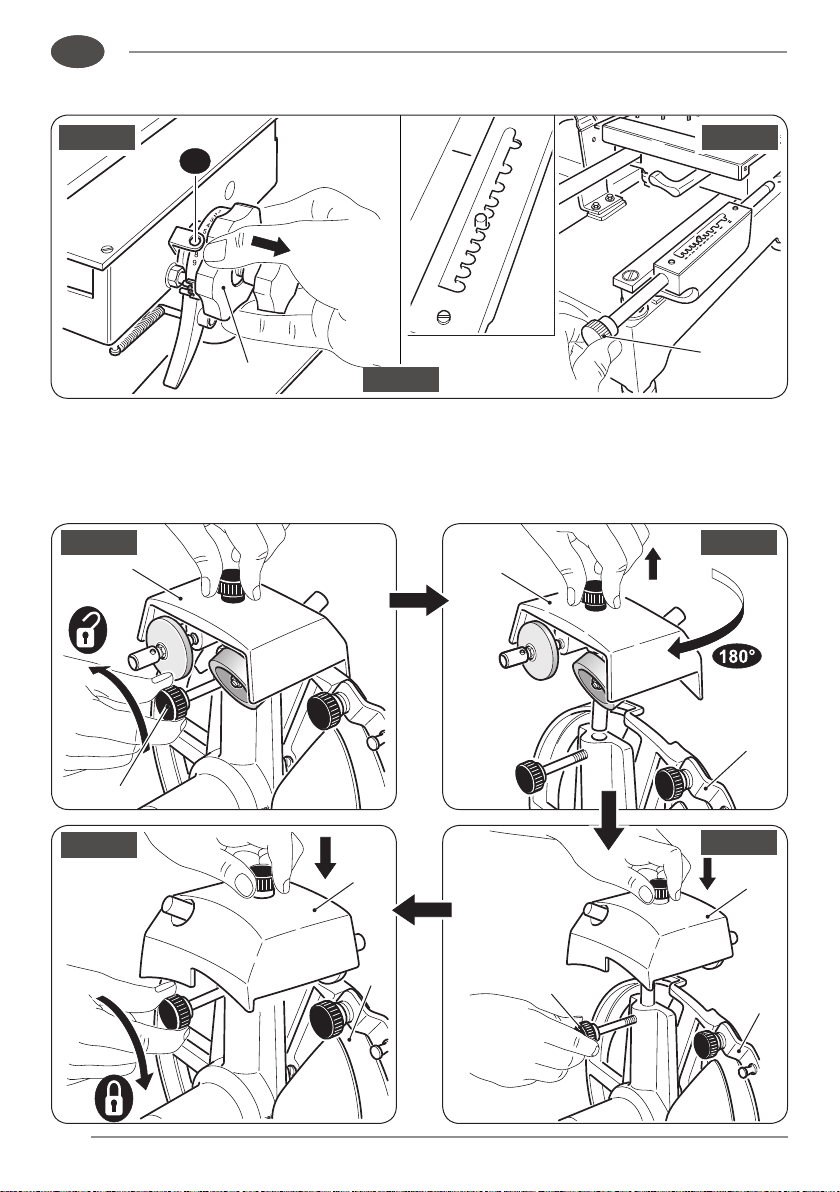
• Set the slice thickness control knob to “0” or the lever (13) on “0” (g.32).
• Loosen the knob (38) holding the sharpener (17) in place (g. 33).
• Lift the sharpener (17) and turn 180° (g. 34).
• Carefully lower the sharpener (17) again, the blade (16) will automatically be centred
between the two grinding wheels (g. 35).
• Tighten the knob (38) (g. 36).
39
Fig. 37
17
X
17
K
17
7
IT
EN
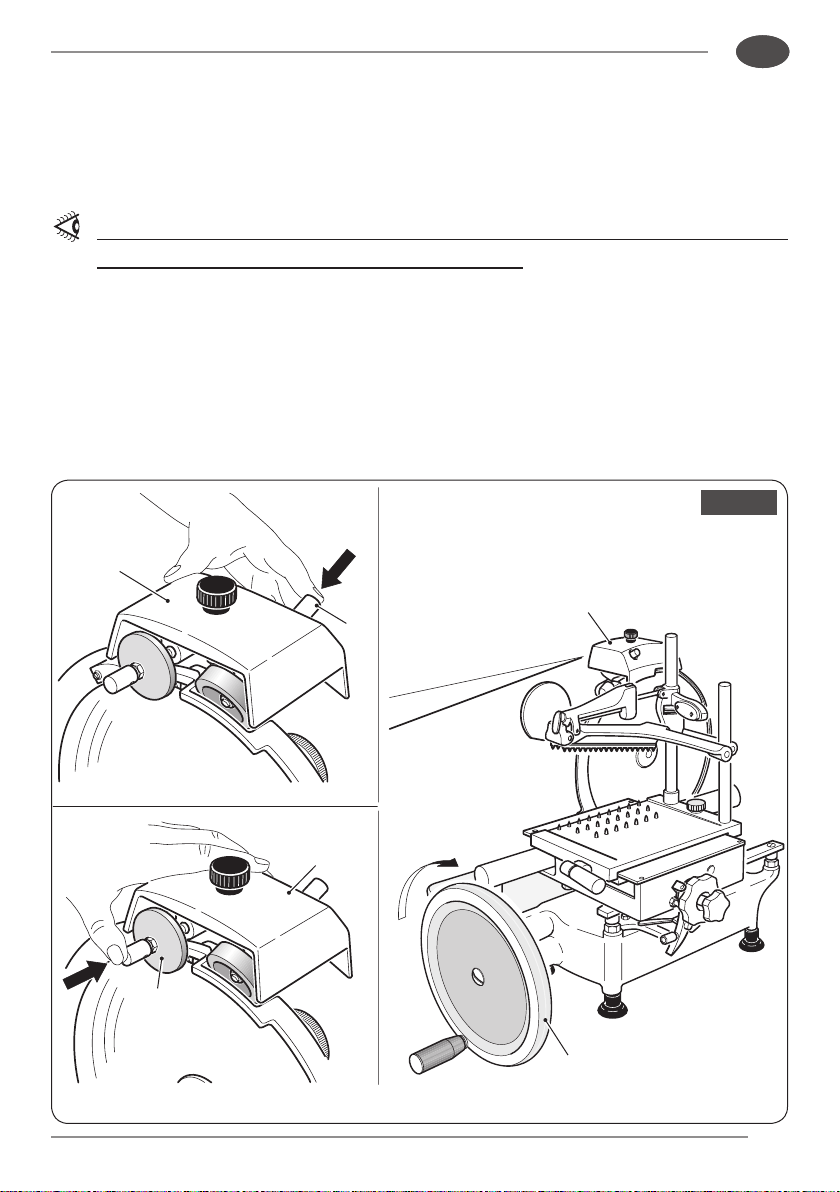
• Turn the ywheel (7) whilst pressing the “X” button and perform about 20/30 blade
revolutions.
• Stop rotation and use a pencil to check that a slight burr has formed on the blade edge.
• Turn the ywheel (7) again whilst pressing the “K” button and perform 1 or 2 blade
revolutions.
For safety reasons do not exceed 1 or 2 blade revolutions in order to
prevent the blade edge from springing back.
• After completing sharpening, we advise cleaning the wheels using a small brush soaked in
alcohol.
• WITH BLADE AT STANDSTILL ONLY return the sharpener to its original position after the
sharpening operation.
• Clean the machine and blade thoroughly as indicated in the previous paragraphs.

40
IT
EN
A machine comprises:
• Aluminium-alloy frame.
• Stainless-steel inserts and components.
• Plastics, etc.
When commissioning third parties to perform dismantling and demolition, only businesses
authorised to dispose of these materials should be employed.
When demolishing without outside assistance, sort the various types of material and hand over
to authorised businesses for disposal.
ALWAYS follow the regulations in force in the country of use of the slicer.
WARNING:
ALWAYS consult the manufacturer or authorised service
staff as regards removal and disposal of the blade (16) so
that this can take place in complete safety.
DO NOT DUMP SCRAP COMPO-NENTS AS THEY REPRESENT
A SERIOUS PERSONAL HAZARD, PARTICULARLY FOR
CHILDREN AND ANIMALS.
--------------------------
Consult the “Handling instructions at end of lifespan” paragraph on page 7
TAKING THE SLICER OUT OF SERVICE

41
IT
EN
TROUBLESHOOTING
PROBLEM
• Difculty in slicing;
excessive resistance
when the product is in
contact with the blade.
• Slices are of irregular
thickness.
• Slices come out as
“doorsteps”.
• Slices are empty in the
middle.
• Slices disintegrate into
several pieces; they are
not sliced cleanly.
PROBABLE CAUSE
• The blade is blunt.
• Product is overly mature
or too dry.
• Slicing begins with
product in contact with
the blade.
• The pusher fails to retain
the product correctly.
• The blade is blunt.
• The pusher fails to retain
the product correctly.
• The blade is blunt.
• The product is too soft
(not mature enough).
• The blade is blunt.
• Worn blade.
SOLUTION
• Sharpen the blade.
• Tenderise product
before slicing.
• Turn the ywheel
4/5 times before the
product touches the
blade.
• Reposition the pusher
in order to retain the
product correctly.
• Sharpen the blade.
• Reposition the pusher
in order to retain the
product correctly.
• Sharpen the blade.
• Press the pusher
harder.
• Sharpen the blade.
• Replace the blade

42
IT
EN
PAGE
INTENTIONALLY
LEFT BLANK
43
4
7
8
5
6
12
19
20
21
22
23
24
26
25
27
28
29
30
31
34
32
35
36
37
33
39
F300 VO
F300 VO L
pag. 44
pag. 52
IT
EN
Spare parts
EN
44
Ed. 06/2018
Fig. 1
1
2
3
6
7
15
17
14
18
16
19
19
20
21
20
22
4
5
9
10
11
8
21
20
27
28
25
26
29
31
30
20
21
20
33
23
24
13
12
12
32
F300 VO
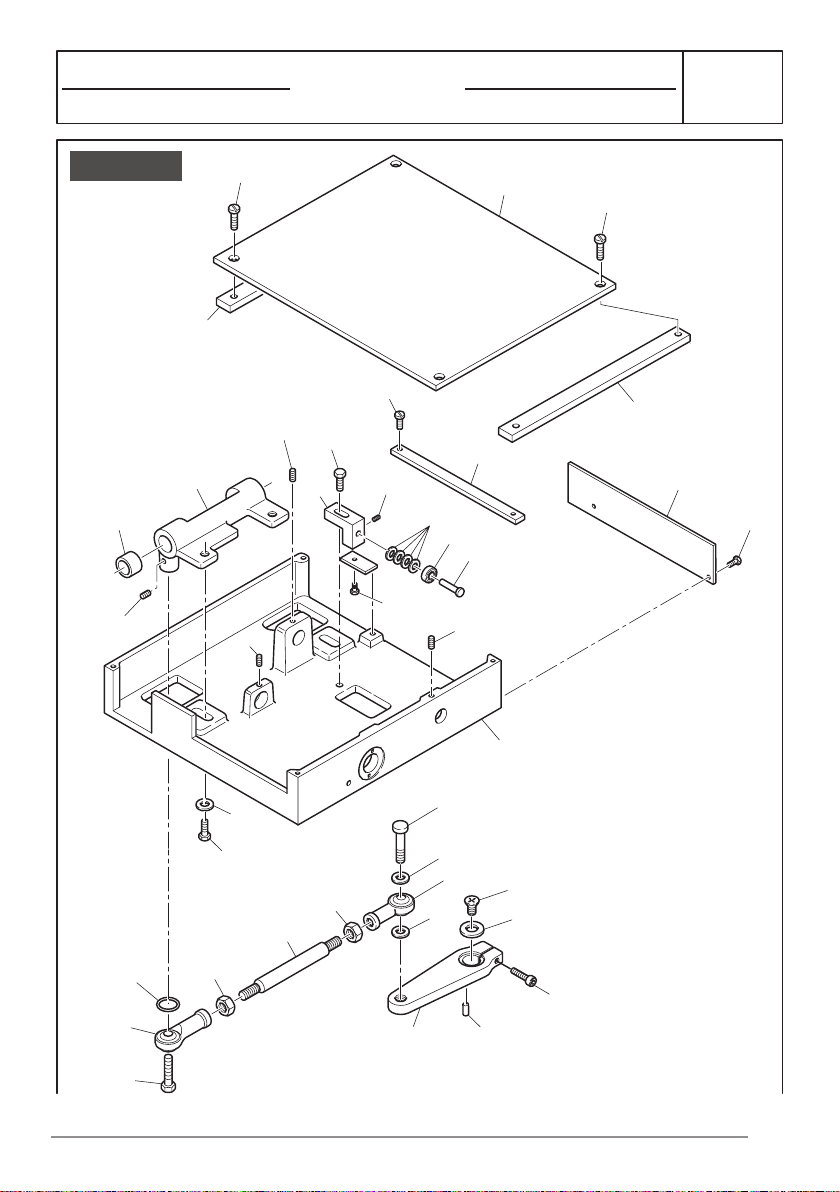
BASAMENTO
BASE
45
Ed. 06/2018
Fig. 2
2
1
3
4
5
6
7
9
8
10
11
12
13
14
15
16
17
18
19
19
21
20
22
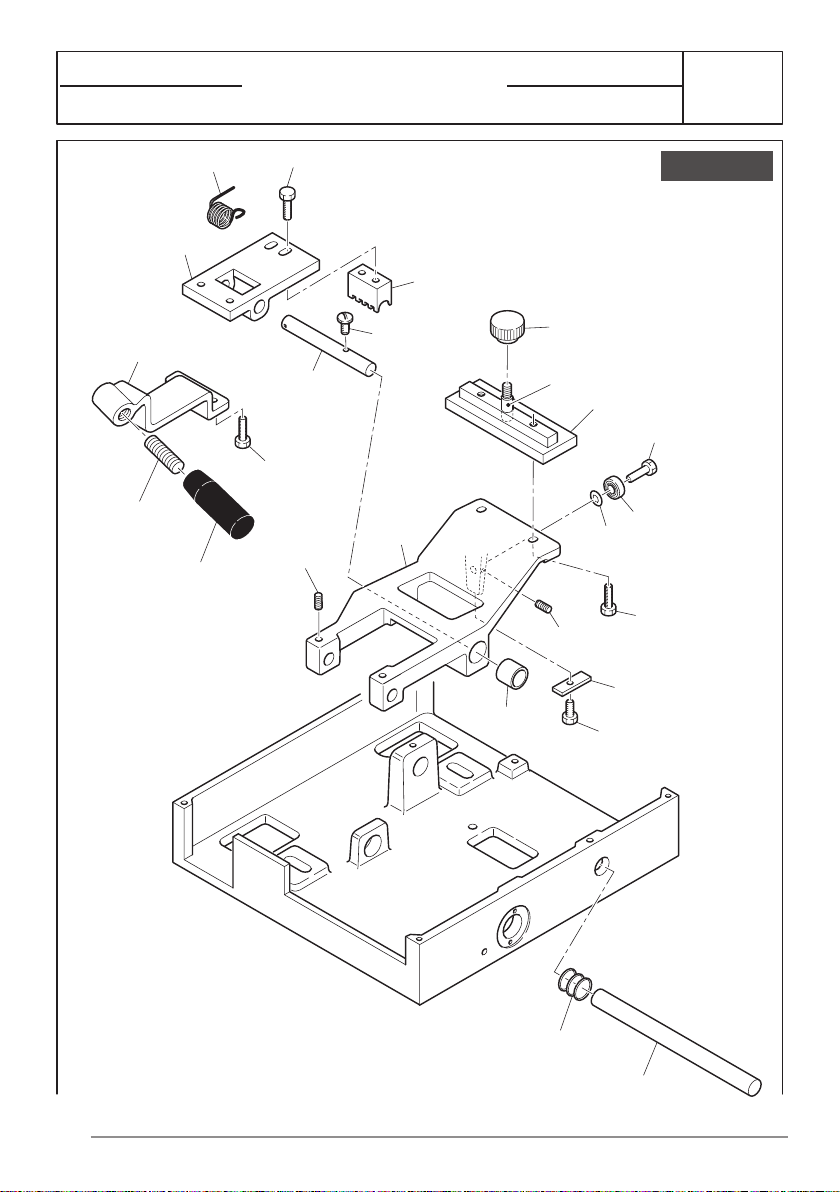
F300 VO
GUIDE
CARRIAGE GUIDE RAILS
46
Ed. 06/2018
3
4
7
8
5
6
9
9
10
10
11
12
13
14
15
16
17
18
19
20
21
22
23
24
26
25
27
28
30
31
34
32
35
36
37
33
38
39
40
41
42
1
2
29
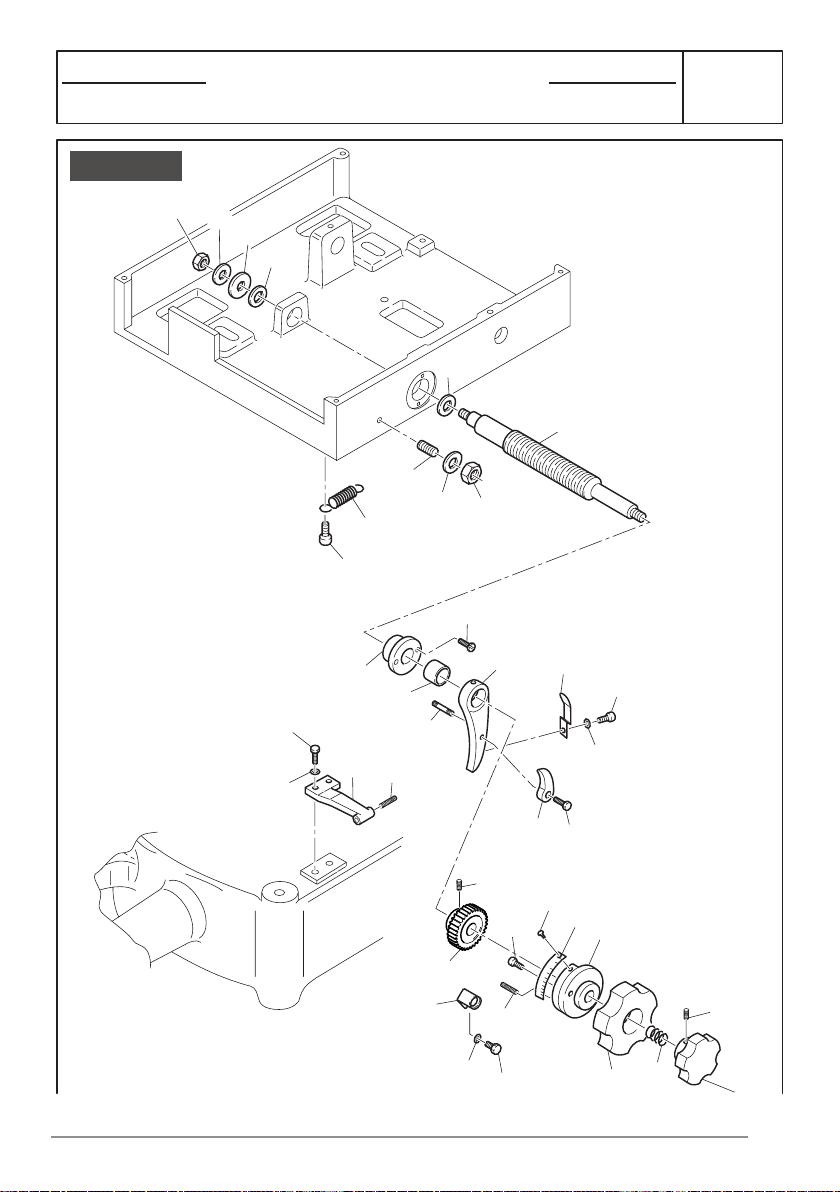
Fig. 3
F300 VO
LAMA
BLADE
47
Ed. 06/2018
24
23
22
29
25
30
26
33
34
35
28
36
21
15
31
32
37
20
19
18
21
17
16
14
12
13
12
11
10
8
9
6
5
4
3
2
1
7
27
24
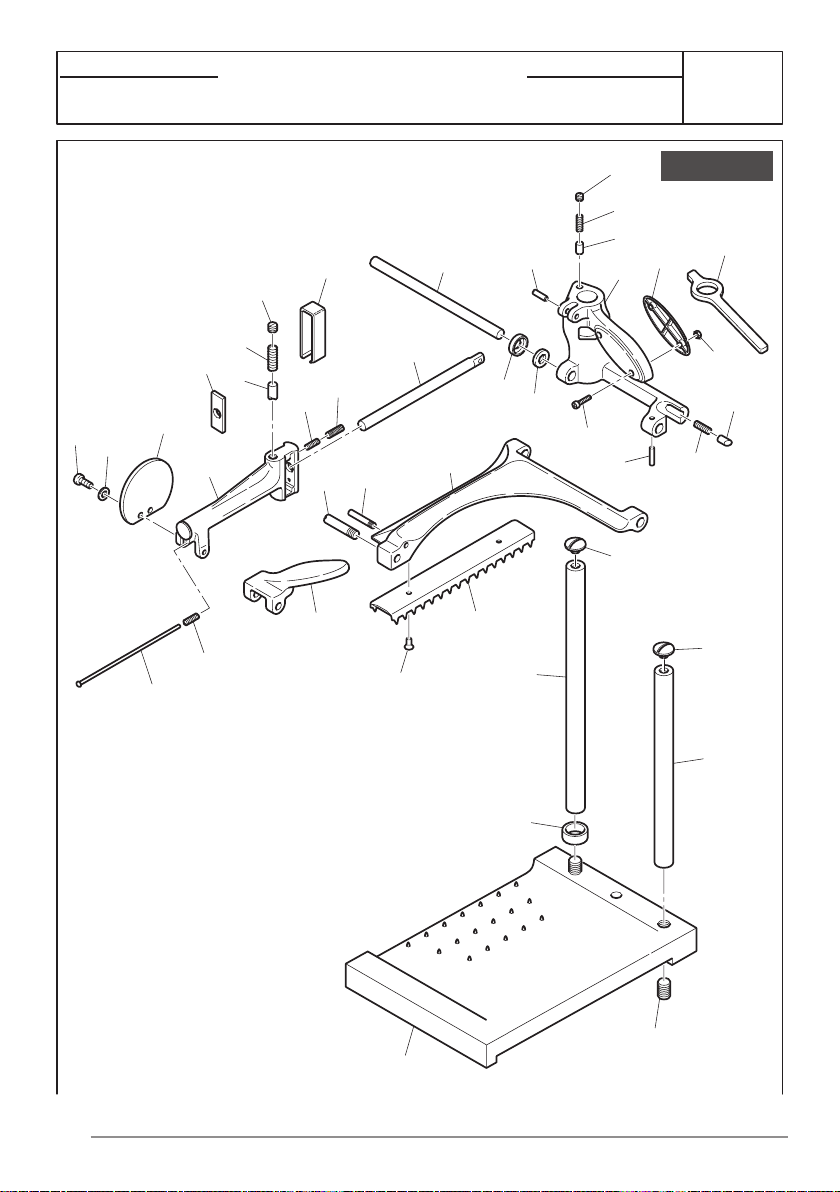
Fig. 4
F300 VO
CARRELLO
CARRIAGE
48
Ed. 06/2018
Fig. 5
1
2
3
4
5
6
8
7
9
10
11
12
13
17
16
15
14
18
21
20
19
22
23
24
25
F300 VO
AVVICINAMENTO RAPIDO
FAST FORWARD
49
Ed. 06/2018
Fig. 6
10
2
3
4
5
6
8
9
11
12
13
14
19
18
16
15
17
20
21
26
27
28
34
35
36
37
38
29
30
30
31
32
33
25
24
23
22
1
7
F300 VO
REGOLAZIONE SPESSORE
THICKNESS CONTROL
50
Ed. 06/2018
Fig. 7
18
19
16
20
21
17
15
26
24
23
25
28
27
29
30
14
11
10
9
8
7
5
6
4
3
1
2
33
32
31
34
36
37
39
40
41
38
12
13
22
36
35
F300 VO
PRESSAMERCE
PRODUCT HOLDER
51
Ed. 06/2018
Fig. 8
13
21
23
12
22
14
15
16
17
18
19
20
29
26
25
14
24
12
27
28
5
4
4
2
3
1
6
7
8
9
10
11
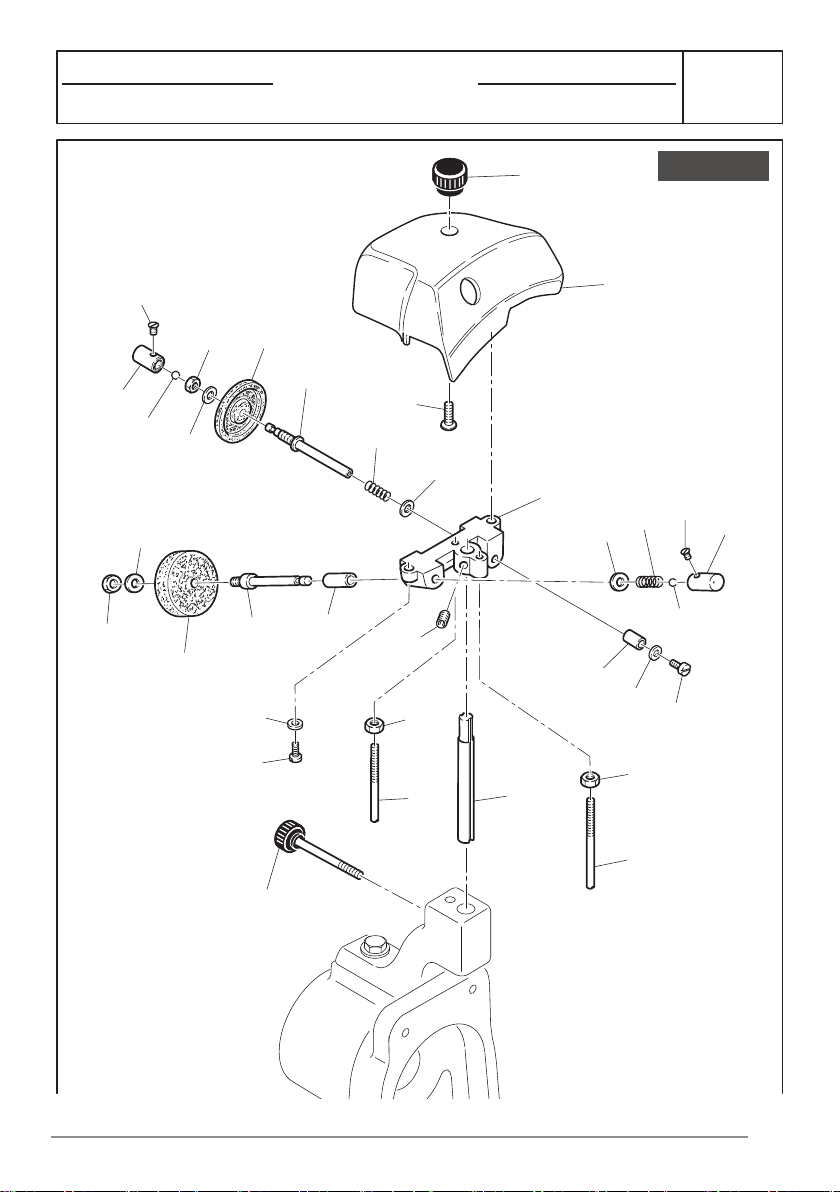
F300 VO
AFFILATOIO
SHARPENER
52
Ed. 06/2018
Fig. 1
9
10
11
13
14
15
16
17
18
19
20
21
22
22
23
24
26
27
28
29
30
31
32
12
33
22
22
23
22
23
22
32
25
12
5
7
6
8
1
2
3
4
Fig. 3
F300 VO L
VOLANO
FLYWHEEL
53
Ed. 06/2018
Fig. 2
2
24
16
25
25
24
2
1
3
4
5
6
7
8
9
10
11
13
15
19
20
21
22
23
26
26
17
18
12
14
26
F300 VO L
BASAMENTO
BASE
54
Ed. 06/2018
Fig. 3
16
15
27
8
9
10
11
12
13
14
1
2
3
4
5
6
25
26
28
29
30
31
32
7
17
21
22
23
24
36
35
38
34
18
19
33
39
40
33
F300 VO L
LAMA
BLADE
55
Ed. 06/2018
Fig. 4
1
2
3
3
2
5
6
7
8
10
11
12
13
15
14
16
17
18
4
19
20
21
22
23
24
25
26
28
29
29
9
27
34
36
37
38
32
33
35
31
30
F300 VO L
REGOLAZIONE SPESSORE
THICKNESS CONTROL
56
Ed. 06/2018
Fig. 5
1
2
3
4
5
6
7
8
9
10
11
12
14
15
16
17
18
19
20
21
22
23
24
25
34
6
6
28
24
26
27
29
30
31
31
33
13
35
F300 VO L
CARRELLO
CARRIAGE
57
Ed. 06/2018
Fig. 6
2
1
3
4
5
6
7
9
7
8
10
19
20
21
22
23
24
25
26
27
28
30
29
31
32
33
34
35
36
11
12
13
15
17
13
14
14
16
18
37
F300 VO L
AVANZAMENTO
FORWARD
58
Ed. 06/2018
Fig. 7
18
19
16
20
21
17
15
26
24
23
25
28
27
29
30
14
11
10
9
8
7
4
5
3
1
2
12
32
31
34
35
36
37
39
44
40
38
6
22
36
33
23
42
13
41
41
45
45
41
41
F300 VO L
PRESSAMERCE
PRODUCT HOLDER
59
Ed. 06/2018
Fig. 8
13
14
15
16
17
18
19
20
12
11
10
8
9
5
32
1
21
25
7
6
26
27
15
13
28
31
29
2
4
23
30
3
4
24
22
F300 VO L
AFFILATOIO
SHARPENER

60
MOCA DECLARATION
DECLARATION OF CONFORMITY OF THE MATERIALS AND OBJECTS
DESTINED TO COME INTO CONTACT WITH FOOD PRODUCTS
1. With this document, it is declared that the product/article/machinery:
VERTICAL GRAVITY SLICER WITH PAINTED STRUCTURE FLYWHEEL
supplied for prolonged contact with foodstuffs;
IS COMPLIANT
WITH THE FOLLOWING EUROPEAN COMMUNITY LEGISLATION:
• Regulation 1935/2004 EC
• Regulation 1895/2005 EC
• Regulation 10/2011 EC
AND THE FOLLOWING ITALIAN LEGISLATION:
• Ministerial Decree 21/03/1973 and as amended, including MD 140/2013
• Italian Presidential Decree 777/82 and as amended
2. The blade of the afore-mentioned slicer is manufactured with the following alloy:
• AISI 420, C45 _ All domestic CE models and models with blade diameter from 195 to 250
mm CE professional
• AISI 420, 100Cr6 models with blade diameter from 300 to 370 mm CE professional
FOODSTUFF SUITABILITY TEST
The material respects the overall migration and specific migration limits of nickel, chrome and
manganese in the test condition given by the producer supplier of the CHIARAVALLI GROUP
SPA AND SLAYER BLADE SRL blade;
The slicer coating material contains substances subjected to restrictions in the legislation stated:
NAME CAS Value detected QM(t) mg/kg
4,4’-methylene (phenylisocyanate)
cas 101-68-8 0,0120 1
ORIGINAL IS IN ITALIAN LANGUAGE

61
Since the value detected is lower than the QM(t) value, the slice is deemed compliant.
TEST CONDITIONS
MIGRATION IN WATER MIGRATION IN OIL
Met.: BS EN 1186:2006 Met.: BS EN 1186:2006
CONTACT CONDITIONS CONTACT CONDITIONS
Surface/volume ratio: ..................................0,4 Surface/volume ratio: ................................... 0,4
Time .......................................................30 min Time ....................................................... 30 min
Temperature .............................................40°C Temperature .............................................. 40°C
The simulants and test conditions are selected on the basis of the Directives 82/711/EEC and
85/572/EEC and as amended and Decree n.338 dated 22/07/1998. (See note at the end of the
document regarding art. 22 of Reg. (EU) n.10/2011 on Transitional Provisions).
The overall migration limit, along with the other restrictions/specific migrations to which the
monomers and/or additives present in the material are subjected, are respected in the conditions
of use mentioned above. The affirmation is supported by analytical tests performed in compliance
with the Directives 82/711/EEC, 85/572/EEC and 97/48/EC and with Italian Ministerial Decree
21/03/1973 or on the basis of the calculations carried out considering the content of the substances
subjected to migration limits. The calculations were made assuming that 1 kg foodstuff comes into
contact with 1 product.
The material contains substances governed by Regulations (EC) n. 1333/2008 and 1334/2008 and
as amended (substances called “dual use”).
According to experimental data and/or theoretical calculations, these substances are compliant
pursuant to art. 11 of Regulation (EU) n.10/2011 paragraph 3, letters a and b and of Italian Ministerial
Decree 21/03/73.
This declaration is valid from the date shown below and will be previously replaced if changes
are made to production/formulation of the material or if the references to legislation in point 1 are
modified and updated in a way to require a new verification to confirm conformity.
NOTE: this declaration is drawn-up pursuant to art. 22, paragraph 1: “Transitional Provisions”
and art. 23 “Coming into force and application” of the Regulation (EU) n.10/2011.
The following Test Reports relative to the migration tests performed are available on the website.
Test report n°8395-01 Bpsec S.r.l.
Test report n°8395-02 Bpsec S.r.l.
Test report n°8395-03 Bpsec S.r.l.
Test report n°8395-04 Bpsec S.r.l.
ORIGINAL IS IN ITALIAN LANGUAGE

62
For slicer models with details in olive wood, the following tests were performed:
Screening of inorganic compounds in materials in contact with the foodstuffs
with the purpose of detecting and quantifying the molecules extractable from the sample by contact
with 65% nitric acid at 120°C for 2 hours and detectable by plasma emission spectrometry (ICP/
OES).
Screening of volatile organic compounds in materials in contact with the foodstuffs
with the purpose of evaluating the transfer of volatile substances making up the material that can
migrate into the foodstuff by conditioning at a suitable temperature, extraction of the head space (via
30 minute contact at 125°C) and gas chromatographic analysis with mass detector.
Screening of semi-volatile organic and non-volatile compounds in materials in contact with the
foodstuffs
with the purpose of detecting and quantifying, conventionally in benzyl butyl phthalate (BBPd4),
the molecules extractable from the sample by contact with 95% ethanol at 60°C for 10 days and
detectable by gas chromatography equipped with mass detector (GC EI/MS).
The following Test Reports relative to the migration tests performed are available on the website.
Test report n°8395-05 Bpsec S.r.l.
Report – 8395-05 Bpsec S.r.l. Elements
Report – 8395-05 SVOC Bpsec S.r.l.
Report – 8395-05 VOC Bpsec S.r.l.
ORIGINAL IS IN ITALIAN LANGUAGE

63
MOCA DECLARATION
DECLARATION OF CONFORMITY OF THE MATERIALS AND OBJECTS
DESTINED TO COME INTO CONTACT WITH FOOD PRODUCTS
1. With this document, it is declared that the product/article/machinery:
VERTICAL GRAVITY SLICER WITH ANODISED ALUMINIUM STRUCTURE
supplied for prolonged contact with foodstuffs;
IS COMPLIANT
WITH THE FOLLOWING EUROPEAN COMMUNITY LEGISLATION:
• Regulation 1935/2004 EC
• Regulation 1895/2005 EC
• Regulation 10/2011 EC
AND THE FOLLOWING ITALIAN LEGISLATION:
• Ministerial Decree 21/03/1973 and as amended, including MD 140/2013
• Italian Presidential Decree 777/82 and as amended
2. The blade of the afore-mentioned slicer is manufactured with the following alloy:
• AISI 420, C45 _ All domestic CE models and models with blade diameter from 195 to 250
mm CE professional
• AISI 420, 100Cr6 models with blade diameter from 300 to 370 mm CE professional
FOODSTUFF SUITABILITY TEST
The material respects the overall migration and specific migration limits of nickel, chrome and
manganese in the test condition given by the producer supplier of the CHIARAVALLI GROUP
SPA AND SLAYER BLADE SRL blade;
The material used to manufacture the slicer and its surface treatment are subjected to restrictions
in the legislation stated:
- Regolamento (CE) n. 1935/2004 of the European Parliament and of the Council of 27
October 2004 on materials and articles intended to come into contact with food and repealing
Directives 80/590/EEC and 89/109/EEC
- Technical Document “Metals and alloys used in food contact materials and articles”
(Council of Europe, 2013)
- DIN 10531:2011 Food hygiene - Production and dispense of hot beverages from hot
beverage appliances - Hygiene requirements, migration test
ORIGINAL IS IN ITALIAN LANGUAGE

64
To perform the analysis, a specimen was put into contact with 5000 ml of water simulant for 2 hours
at 40°C at third contact.
Aluminium was searched for on the simulant coming from the contact using the ICP-MS technique.
Component Result Unit of Method Limit of release
measurement (mg/kg)
Aluminium < 0,010 mg/kg MP 1895 rev 0 2010 5
The simulants and test conditions are selected on the basis of the Directives 82/711/EEC and
85/572/EEC and as amended and Decree n.338 dated 22/07/1998. (See note at the end of the
document regarding art. 22 of Reg. (EU) n.10/2011 on Transitional Provisions).
The overall migration limit, along with the other restrictions/specific migrations to which the
monomers and/or additives present in the material are subjected, are respected in the conditions
of use mentioned above. The affirmation is supported by analytical tests performed in compliance
with the Directives 82/711/EEC, 85/572/EEC and 97/48/EC and with Italian Ministerial Decree
21/03/1973 or on the basis of the calculations carried out considering the content of the substances
subjected to migration limits. The calculations were made assuming that 1 kg foodstuff comes into
contact with 1 product.
The material contains substances governed by Regulations (EC) n. 1333/2008 and 1334/2008 and
as amended (substances called “dual use”).
According to experimental data and/or theoretical calculations, these substances are compliant
pursuant to art. 11 of Regulation (EU) n.10/2011 paragraph 3, letters a and b and of Italian Ministerial
Decree 21/03/73.
This declaration is valid from the date shown below and will be previously replaced if changes
are made to production/formulation of the material or if the references to legislation in point 1 are
modified and updated in a way to require a new verification to confirm conformity.
NOTE: this declaration is drawn-up pursuant to art. 22, paragraph 1: “Transitional Provisions”
and art. 23 “Coming into force and application” of the Regulation (EU) n.10/2011.
The following Test Reports relative to the migration tests performed are available on the website.
Test report n°7778-01 Bpsec S.r.l.
Test report n°7778-02 Bpsec S.r.l.
REPORT n°7778-01 Bpsec S.r.l.
REPORT n°7778-02 Bpsec S.r.l.
ORIGINAL IS IN ITALIAN LANGUAGE

65
For slicer models with details in olive wood, the following tests were performed:
Screening of inorganic compounds in materials in contact with the foodstuffs
with the purpose of detecting and quantifying the molecules extractable from the sample by contact
with 65% nitric acid at 120°C for 2 hours and detectable by plasma emission spectrometry (ICP/
OES).
Screening of volatile organic compounds in materials in contact with the foodstuffs
with the purpose of evaluating the transfer of volatile substances making up the material that can
migrate into the foodstuff by conditioning at a suitable temperature, extraction of the head space (via
30 minute contact at 125°C) and gas chromatographic analysis with mass detector.
Screening of semi-volatile organic and non-volatile compounds in materials in contact with the
foodstuffs
with the purpose of detecting and quantifying, conventionally in benzyl butyl phthalate (BBPd4),
the molecules extractable from the sample by contact with 95% ethanol at 60°C for 10 days and
detectable by gas chromatography equipped with mass detector (GC EI/MS).
The following Test Reports relative to the migration tests performed are available on the website.
Test report n°8395-05 Bpsec S.r.l.
Report – 8395-05 Bpsec S.r.l. Elements
Report – 8395-05 SVOC Bpsec S.r.l.
Report – 8395-05 VOC Bpsec S.r.l.
ORIGINAL IS IN ITALIAN LANGUAGE

PAGE INTENTIONALLY LEFT BLANK