Loading ...
Loading ...
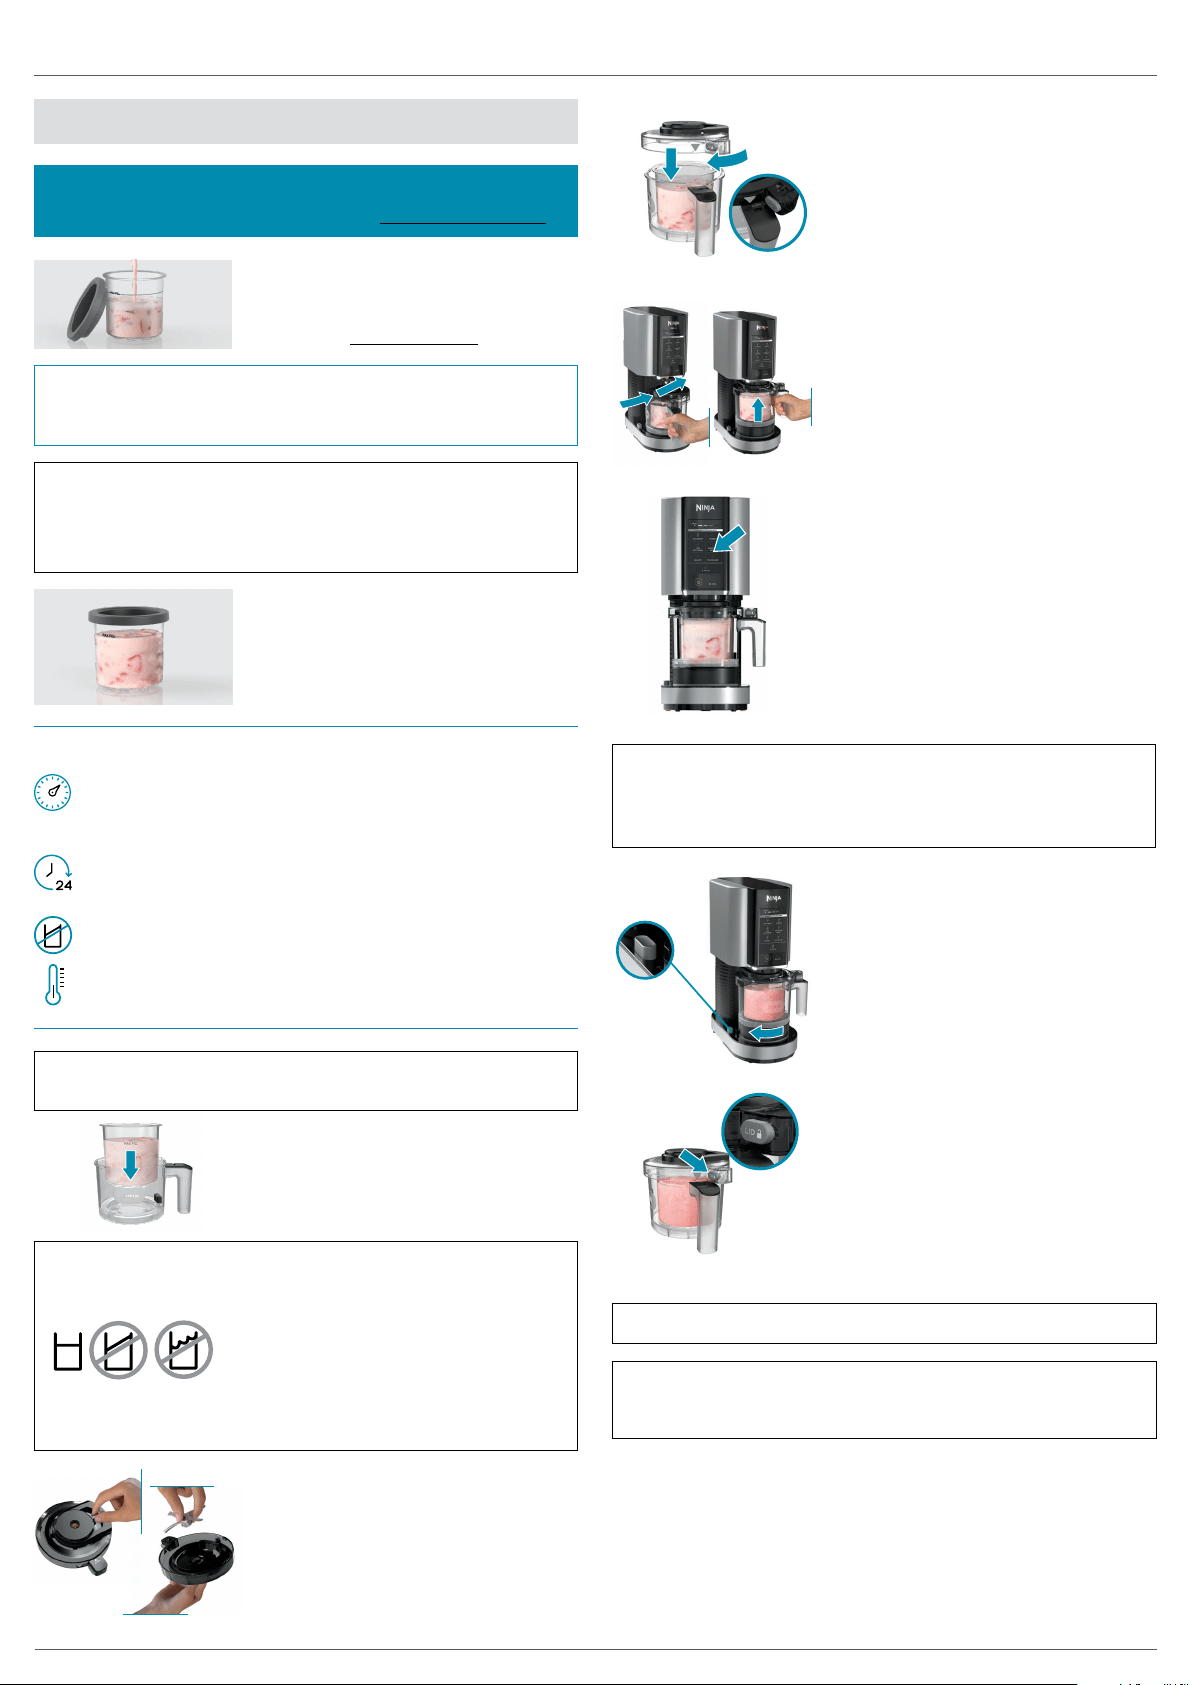
USING THE CREAMi™
1 Add ingredients to the CREAMi Pint.
DO NOT add ingredients past the MAX
FILL line on the pint. To find ingredients,
you can choose from hundreds of
recipes at ninjacreami.com.
NOTE: This is NOT a blender. DO NOT process a solid block of
ice or ice cubes. DO NOT make a smoothie or process hard,
loose ingredients, such as frozen fruit. Fruit must be crushed to
release its juice or combined with other ingredients and frozen
before processing.
NOTE: The unit must be plugged in before assembly. The unit will
not run if the outer bowl is installed before the unit is plugged in.
NOTE: If the install light is illuminated, the unit is not fully
assembled for use. If the light is blinking, make sure the bowl is
properly installed. If the light is solid, check that the paddle is
installed. Make sure to plug the unit in before installing the bowl.
IMPORTANT: Review all warnings on first page before proceeding.
If you'd rather watch how to use the CREAMi,
how-to videos can be found on ninjacreami.com.
2 If the recipe requires the ingredients to
be frozen, snap the lid on the pint and
freeze for at least 24 hours.
3 Plug in the unit and place on a clean,
dry, level surface such as a countertop
or table.
4 When the base is prepped or frozen,
remove the pint lid and place the pint
in the outer bowl.
6 Position the tab of the lid just slightly
to the right of the outer bowl handle
so the lines on the lid and handle align.
Rotate the lid clockwise to lock.
7 Make sure the unit is plugged in. Then,
place the outer bowl onto the motor
base with the handle centered below
the control panel. Twist the handle to
the right to raise the platform and lock
the bowl in place. You will hear a click
when the bowl is fully installed.
8 Press the power button to turn on
the unit. If the outer bowl is properly
installed, the One-Touch Programs will
illuminate and the unit will be ready
for use. Select the program that best
suits your recipe. The program will
automatically stop when complete.
NOTE: To avoid damaging the unit, DO NOT process the pint if
ingredients have been frozen at an angle or if the pint has been
scooped out of and then refrozen unevenly.
Always smooth-out the surface of a
processed treat before re-freezing in the
pint. If the pint is frozen unevenly, put
the pint in the fridge to allow the
ingredients to melt. Then whisk to make sure the ingredients
are combined. Refreeze, making sure to place the pint on a level
surface in the freezer.
9 When the program is complete,
remove the outer bowl by holding
the bowl release button on the left
side of the motor base and twisting
the handle back to the center. As the
handle is twisted, the platform will
lower the bowl. Lift bowl to remove.
10 To remove the lid, press the lid
unlock button and twist the lid
counterclockwise.
FREEZING TIPS
If adjustable, make sure your freezer’s temperature is set
properly. The unit is designed to process bases that are
between 9°F and -7°F. If your freezer is within this range, your
pint should reach the appropriate temperature.
Freeze the base for at least 24 hours. While it may be frozen,
the base needs to reach an even colder temperature before it
can be processed.
To avoid damaging your unit, DO NOT freeze the pint at angle.
Place the pint on a level surface in the freezer.
Upright freezers work best. We do not recommend using
a chest freezer, as they tend to reach extremely cold
temperatures.
5 Press and hold the paddle latch on
the top of the outer bowl lid, then
insert the Creamerizer™ Paddle in the
bottom of the lid. Release the latch to
secure the paddle. When fully installed,
the latch will be centered and the
paddle will be slightly loose.
NOTE: The unit does not allow One-Touch Programs to be run
back to back. Between programs, lower the bowl and check the
results before proceeding.
NOTE: DO NOT use the RE-SPIN program to process leftovers.
Don't want to wait 24 hours? Customize store-bought ice cream
with mix-ins or make a milkshake. To customize store-bought ice
cream, scoop the ice cream into a pint and skip to step 11a.
Loading ...
Loading ...