Owner's Manual
Vacuum Cleaner
Model 116.20212
116.20312
CAUTION:
Read and follow all
safety and operating
instructions before first
use of this product.
Sears, Roebuck and Co., Hoffman Estates, IL 60179 U.S.A.
www.sears.eom
Part No. CO1ZAXXIOU00-8175164 Printed in UoS.A

Before Using Your New Vacuum ...... 2
Kenmore Vacuum Cleaner Warranty • •, 2
Important Safety Instructions ........ 3
Parts and Features ................ 4-5
Assembly .......................... 6-7
Use ............................... 8
How to Start ......................... 8
Vacuuming Tips ...................... 9
Suggested Pile Height Settings ......... 9
Attachments ............................ 10
Attachment Use Chart .............. 10
Performance Features .................... 11
How Your Vacuum Works ............. 12
Canister Care ........................ 12
Bag Changing ................... 12
Cleaning Exterior and Attachments ......... 13
Motor Safety Fitter Changing .......... 13
Exhaust Filter Changing ................... t4
Power-Mate TM Care ................... 15
LightBulb Changing .................. 15
Belt Changing and Brush Cleaning 15-16
Brush Servicing ...................... 17
Brush Assembly ..................... 17
Troubleshooting .................... 1_
Requesting Assistance Or Service .o. 19
Please read this guide. It will help you assemble and operate your new Kenmore vacuum in
the safest and most effective way°
For more information about the care and operation, call your nearest Sears store. You will
need the complete model and serial numbers when requesting information. Your vacuum's
model and serial numbers are located on the Model and Serial Number Plate.
Use the space below to record the model number and serial number of your new Kenmore
vacuum..
Modef No
Serial No.
Date of Purchase
Keep this book and your sales check (receipt) in a safe place for future reference
LIMITED ONE YEAR WARRANTY ON KENMORE VACUUM CLEANER
This warranty is for one year from the date of purchase, and includes only private household
vacuum cleaner use. During the warranty year, when this vacuum cleaner is operated and
maintained according to the owner's manual instructions, Sears will repair any defects in
material or workmanship free of charge.
This warranty excludes vacuum bags, belts, light bulbs, and filters, which are expendable parts
and become worn during normal use.
For warranty service, return this vacuum cleaner to the nearest Sears Service Center in
the United States,
This warranty applies only while this product is in use in the United States. This warranty gives
you specific legal rights, and you may also have other rights which vary from state to state.
Sears, Roebuck and Co., D/817 WA, Hoffman Estates, IL 60179
WARNING
Your safety is important to us.To reduce the risk of fire, electrical shock, injury to
persons or damage when using your vacuum cleaner, follow basic safety precau-
tions including the following:
Read this manual before assembling or
using your vacuum cleaner.
Use your cleaner only as described in this
manual, Use only with Sears recommended
attachments.
To reduce the risk of electrical shock - Do
rtot use outdoors or on wet surfaces.
Disconnect electrical supply before servic-
ing or cleaning out brush area_ Failure to do
so could result in electricaf shock or brush
suddenly starting.
Always turn cleaner off before connecting or
disconnecting the hose or POWER-MATE T'_,
Always turn cleaner off before unplugging.
Do not unplug by puIling on cord. To unplug,
grasp the plug, not the cord,
Hold plug when rewinding onto cord reel.
Do not allow plug to whip when rewinding
Do not use with damaged cord or plug. If
cleaner is not working as it should, has been
dropped, damaged, ]eft outdoors, or dropped
intowater, return itto a Sears Service
Centre/Department.
Do not pull or carry by cord, use cord as a
handle, close door on cord, or pull cord
around sharp edges or corners. Do not run
cleaner over cord. Keep cord away from
heated surfaces.
Do not leave cleaner when plugged in.
Unplug from outlet when not in use and
before servicing.
Do not ailow to be used as a toy. C[ose
attention is necessary when used by or near
children.
Do not handle plug or cleaner with wet
hands.
Do not operate the cleaner with a punctured
hose. The hose contains electrical wires.
Replace if cut or worn. Avoid picking up
sharp objects.
Do not use with any opening blocked; keep
free of dust, lint, hair and anything that may
reduce air flow.
Keep hair, loose clothing, fingers, and all
parts of body away from openings and mov-
ing parts
Do not use cleaner without dust bag and/or
filters in place.
Always change the dust bag after vacuum-
ing carpet cleaners or freshener, powders
and fine dust, These products clog the bag,
reduce airflow and can cause the bag to
bursL Failure to change bag could cause
permanent damage to the cleaner.
Do not use the cleaner to pick up sharp hard
objects, small toys, pins, paper clips, etc.
They may damage the cleaner or dust bag.
Do not pick up anything that is burning or
smoking, such as cigarettes, matches, or hot
ashes.
Do not use cleaner to pick up flammable or
combustible liquids (gasoline, cleaning fluids,
perfumes, etc_),or use in areas where they
may be present. The fumes from these sub-
stances can create a fire hazard or explo-
sion
Use extra care when cleaning on stairs, Do
not put on chairs, tables, etc, Keep on floor.
You are responsible for making sure that
your vacuum cleaner is not used by anyone
unable to operate it properly.
Do not operate without exhaust filter or
exhaust filter cover installed.
Do not put any objects into openings.
SAVE THESE INSTRUCTIONS
Proper assembly and safe use of your vacuum cleaner are your responsibilities Your cleaner
is intended only for househofd use Read this Owner's Manual carefully for important use and
safety information. This guide contains safety statements under warning and caution symbols.
Please pay special attention to these boxes and follow any instructions given. WARNING
statements alert you to such dangers as fire, electrical shock, burns and personal injury. CAU-
TION statements alert you to such dangers as personal injury and/or property damage
, 1,1,, !1 I , ii=lllq=l,lll , i , ,,i ,,lll,,i,iiiiiiirll,,_ _

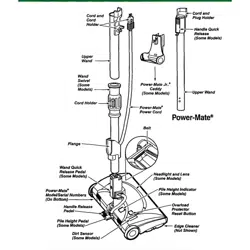
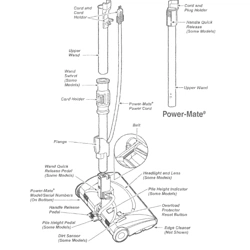
It is important to know your vacuum cleaner's parts and features to assure its proper and safe
use, Review these before using your cleaner,
Item Part No. Part Nee
In U.S. In Canada
Headlight Bulb 20-5240 596181
Belt 20-5285 40110
Wand Swivel
(Some Models)
Cord Holder
Cord and
Cord Holder
Upper
Wand
POWER-MATE TM
Power Cord
Cord and
Ii Plug
Holder
;-- Handle
Quick
Release
(Some
Models)
Belt
(Underneath)
FULL LIGHT
POWER-MATETM
Wand Quick
Release Pedal
(Some Models)
Pile Height Indicator
(Some Models)
HALF LIGHT
POWER.MATE"rM
(Some Models)
Light Cover
(Some Models)
Belt POWER.MATE TM
(Underneath) Mode!/Serial Numbers
k_ (On Bottom)
Light Cover
Wand Quic (Some Models) Handle
Release Pedal
Pedal Pile Height Pedal
(Some Models)
Cleaner
(Not Shown)
Overload Protector
(Reset Button)
POWER.MATE TM
Model/Serial
Numbers
Handle
Release Pile Height Pedal
Pedal (Some Models)
(Some Models)
Edge Cleaner (Not Shown)
Overload Protector
(Reset Button)
Pile Height Indicator
(Some Models)

HOSE
3-Way On/Off Switch
Off/Bare Floor/Carpet
(Some Models)
Speed
Control
(Some
Models)
Handle
Hose Swivel
ATTACHMENTS
Crevice
Tool
Combination
Brush
Floor
Brush
POWER.MATE TM Jr.
(Some Models)
HANDI.MATE TM Jr.
(Some Models)
NOTE: All models have one set of
attachments in the canister, Some
models have an additional set,
which can be kept in the accessory
bag for garage use.
CANISTER
Attachment
Storage
Canister
Cover
1
On/Off
Switch
Exhaust Filter Cover
(Exhaust Filter Inside)
Performance
Indicator
(Some Models)
Power
Cord
Hood
Re_ase
Bag Holder
Dust Bag
Motor Safety Filter
(Behind Dust Bag)

Before assembling vacuum, check the
PACKING LIST on the cover of the separate
Repair Parts List. Use this list to verify that
you have received all the components of
your new Kenmore vacuum.
....... lUll' n i......
WARNING
Electrical Shock Hazard
DO NOT plug into electrical supply
until assembly is complete. Failure
to do so could result in electrical
shock or injury,
WANDS
Slide wands
together until Button
wand button _,
into place° ,_r
snaps
Turn wand button
to the slotted ,_
area of the wand
swivel.
Wand
The swivel allows swivel -
you to turn the
handle to the left Cord
side to reach far- Holder /
ther under low
furniture.
POWER-MATE TM
1. insert wands into POWER-MATE TM until
the wand buttons snaps into place.
;ed
Area
2. Connect
POWER-MATE TM
plug and cord as
shown° DO NOT
force, Raised area
of plug must be
toward han&
3. Secure cord into
cord holder on
wand swivel.
To remove: Disconnect cord and step on
wand release pedal, then pull up on wands°
Hand_
Han_e
But_n
POWER-
MATE TM
Wand
Swivel
Wand
!_i Swivel
Wand Quick
Release Pedal

CANISTER
1. Open the canister hood,
2. Check to see that the dust bag is proper-
ly installed, See BAG CHANGING for
instructions.
3, Check to see that the motor safety filter is
properly instatle& See MOTOR SAFETY
FILTER CLEANING for instructions
HOOD
It is normal for the canister hood to come off
when opened further than needed, Line up
the hinges, insert them, and close the hood
to replace it.
HOSE
Tab _,
Not/h___
1, Line up the
hose latch tab
and notch in
canister hood
and insert hose
into canister until
it snaps in place,
To remove: lift
hose latch tab
upward and pull
up on hose.
Handle
2. Insert
handle into
wand until
lock button
snaps in
place. Be
sure hose
is not
twisted.
Handle To remove:
Quick press hart-
Release die release
(Some
Models) button and
pull up on
handle.
To store: Disconnect hose from wands and
canister to prevent stress on hose during
storage. Store hose in a loosely coiled
position so the hose covering is not
stressed,
Hose
/ Hose Cover
Latch Tab
Hood
Re_ase
Dust Bag
Attachment
Storage
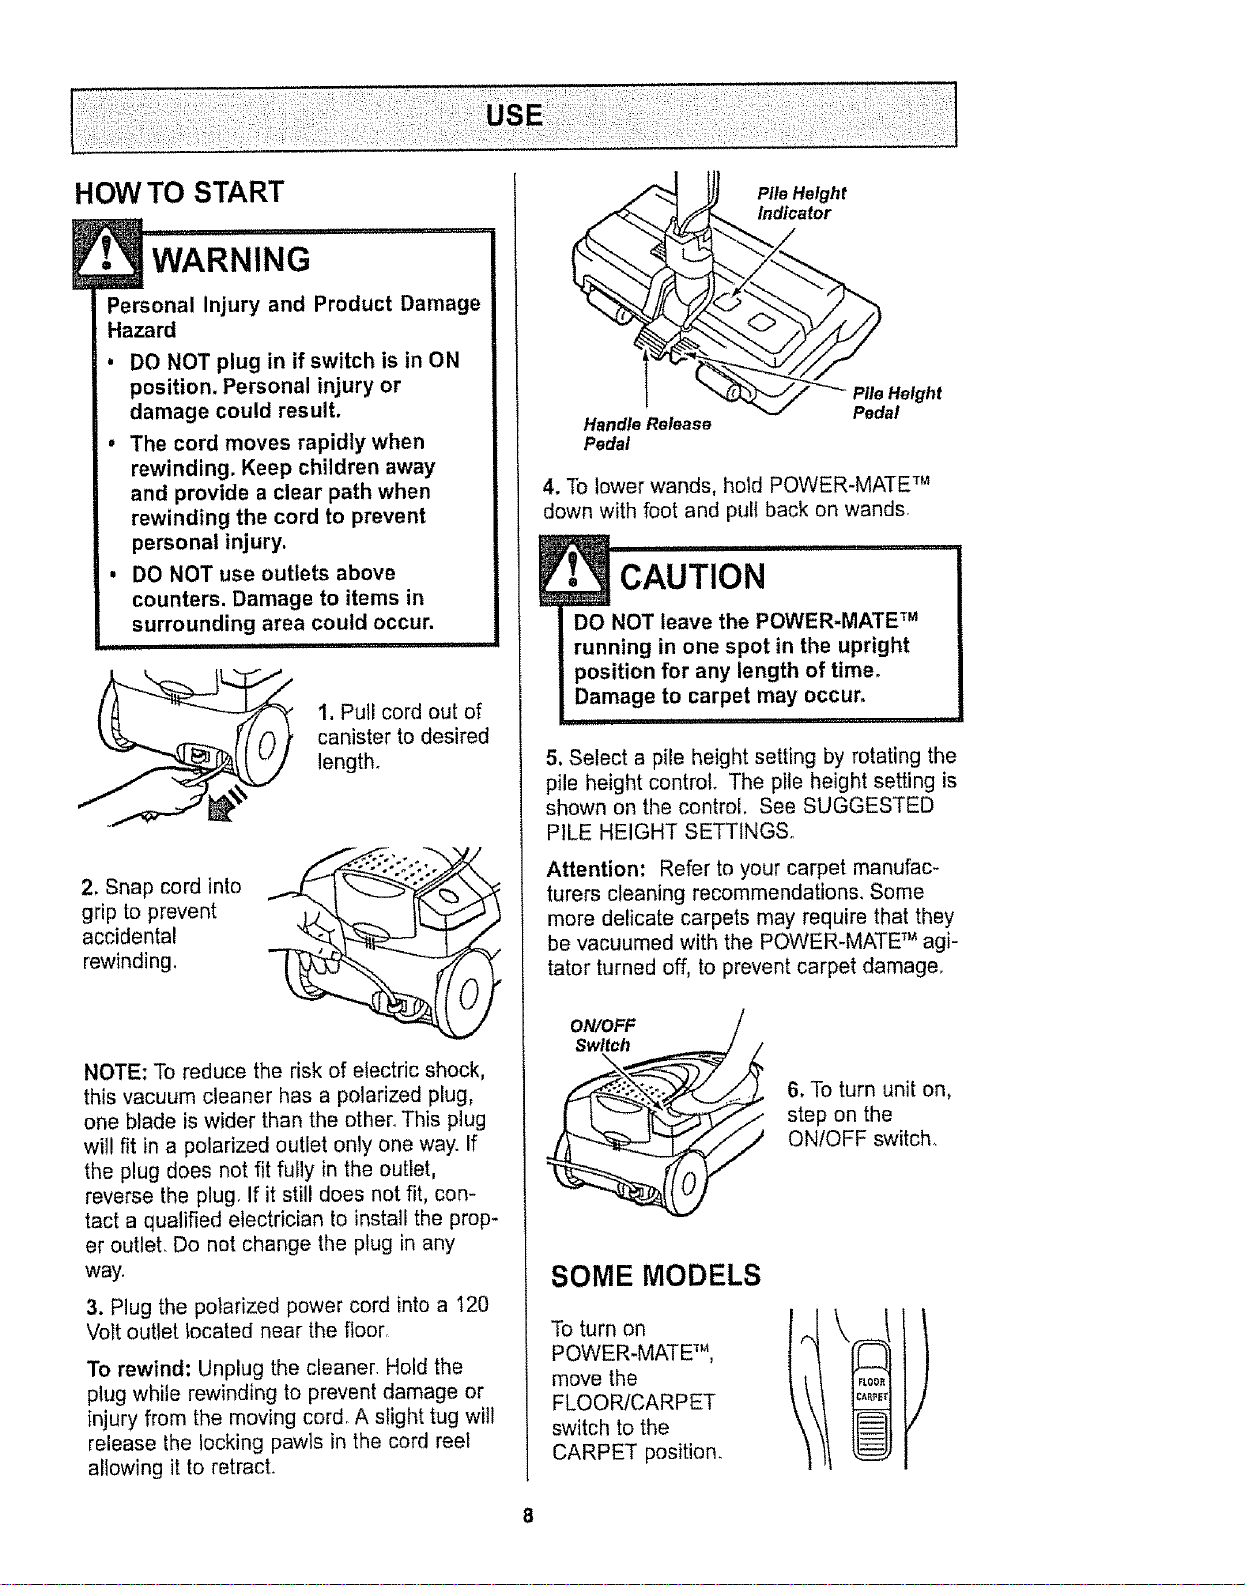
HOW TO START
E i,u,
WARNING
Personal injury and Product Damage
Hazard
. DO NOT plug in if switch is in ON
position. Personal injury or
damage could result.
• The cord moves rapidly when
rewinding. Keep children away
and provide a clear path when
rewinding the cord to prevent
persona! injury.
• DO NOT use outlets above
counters. Damage to items in
surrounding area could occur.
1. Pull cord out of
canister to desired
length+
2. Snap cord into
grip to prevent
accidental
rewinding.
NOTE; To reduce the risk of electric shock,
this vacuum cleaner has a potarized plug,
one blade is wider than the ether_ This plug
will fit in a polarized outlet only one way. If
the plug does not fit fuily in the outlet,
reverse the plug, If it still does not fit, con-
tact a qualified electrician to install the prop-
er outlet. Do not change the plug in any
way.
3. Plug the polarized power cord into a t20
Volt outlet located near the floor
To rewind: Unplug the cleaner Hold the
plug while rewinding to prevent damage or
injury from the moving cor& A slight tug will
release the locking pawls in the cord reet
allowing it to retract.
HandleRelease
Pedal
Pile Height
Indicator
Pile Height
Pedal
4. To lower wands, hold POWER-MATE Tm
down with foot and pull back on wands
..........................
DO NOT leave the POWER-MATE m
running in one spot in the upright
position for any length of time.
Damage to carpet may occur,
! i iJllll I i , ,111
5. Select a pile height setting by rotating the
pile height control+ The pile height setting is
shown on the control. See SUGGESTED
PILE HEIGHT SETTINGS.
Attention: Refer to your carpet manufac-
turers cleaning recommendations. Some
more delicate carpets may require that they
be vacuumed with the POWER-MATE '_agi-
tator turned off, to prevent carpet damage.
ON/OFF
Switch
\
6, To turn unit on,
step on the
ON/OFF switch+
SOME MODELS
To turn on
POWER+MATE m,
move the
FLOORICARPET
switch to the
CARPET position,
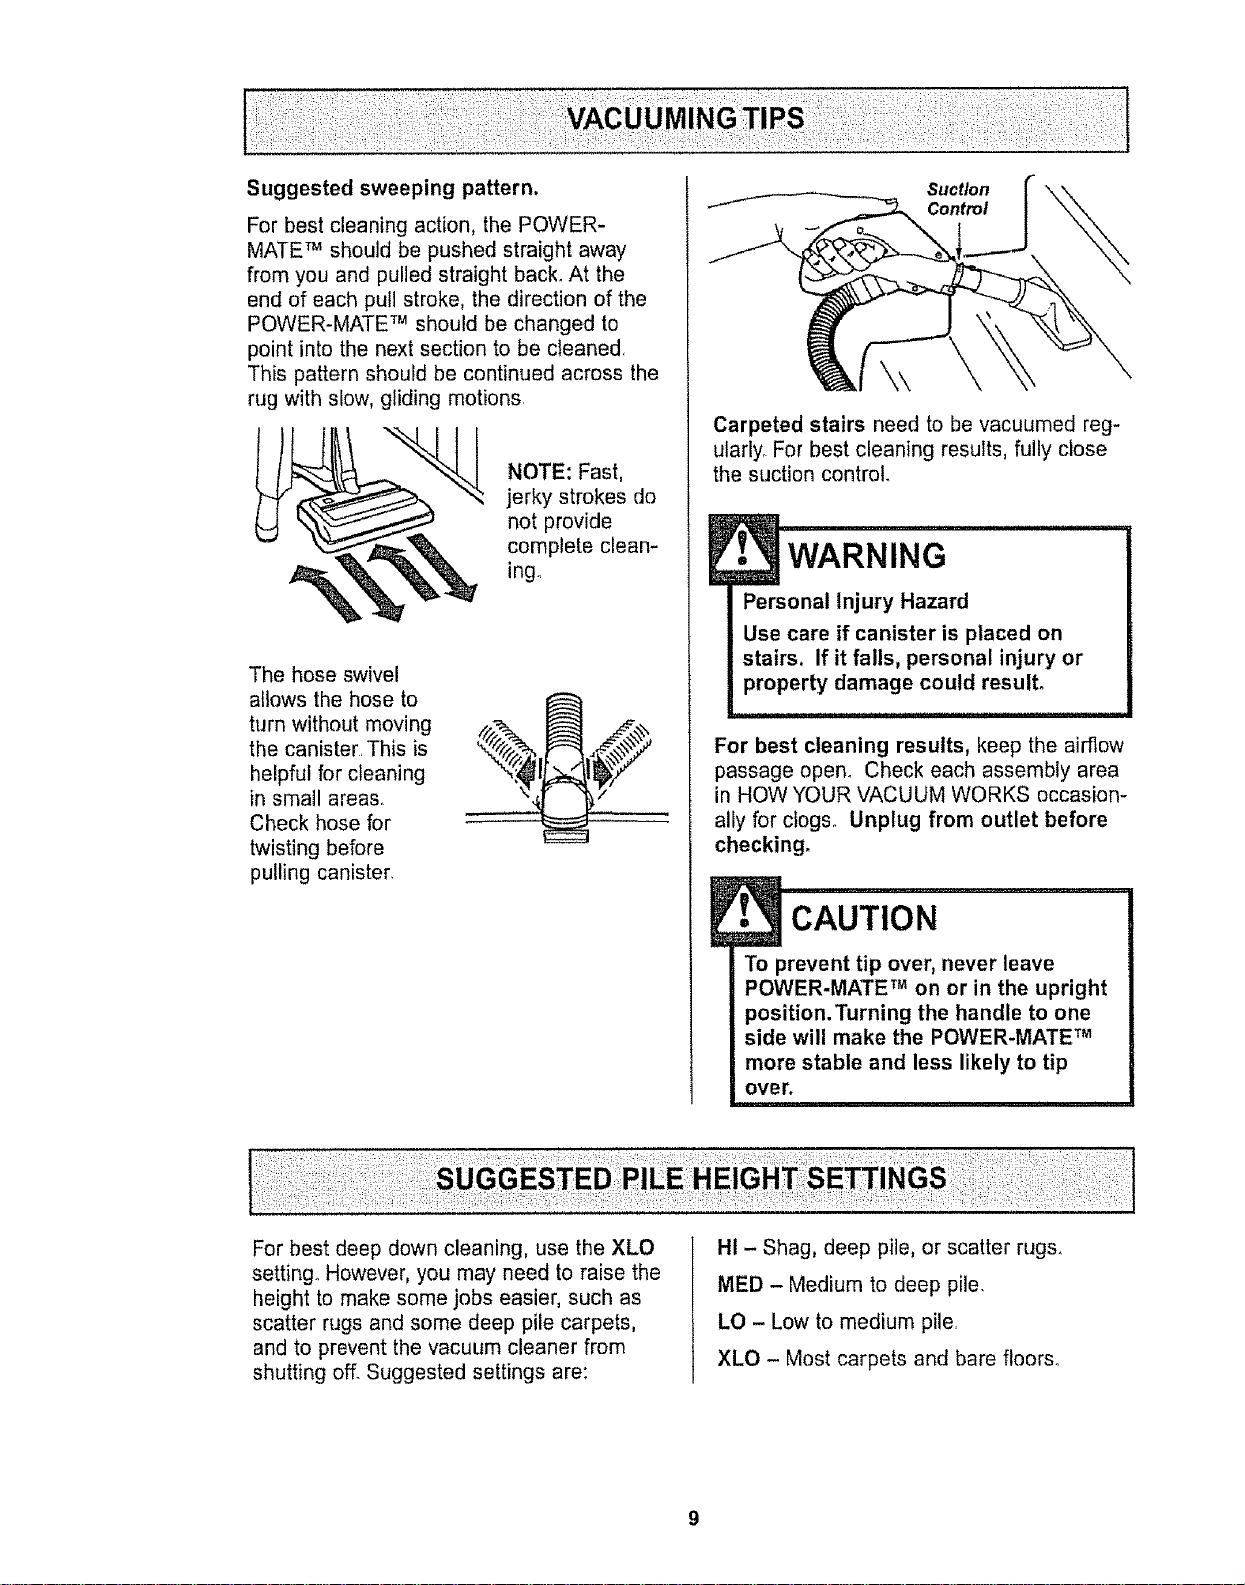
Forbestcleaningaction,thePOWER-
MATETM should be pushed straight away
from you and pulled straight back. At the
end of each pull stroke, the direction of the
POWER-MATE TM should be changed to
point into the next section to be cleaned
This pattern should be continued across the
rug with slow, gliding motions
NOTE: Fast,
jerky strokes do
not provide
complete clean-
ing.
The hose swivel
allows the hose to
turn without moving
the canister. This is
helpful for cleaning
in small areas.
Check hose for
twisting before
pulling canister.
Suct/on
Control
Carpeted stairs need to be vacuumed reg-
ularly. For best cleaning results, fully close
the suction control.
E• WARNING
Personal Injury Hazard
Use care if canister is placed on
stairs. If it falls, personal injury or
property damage could result°
For best cleaning results, keep the airflow
passage open° Check each assembly area
in HOW YOUR VACUUM WORKS occasion-
ally for clogs° Unplug from outlet before
checking.
CAUTION
To prevent tip over, never leave
POWER-MATE TM on or in the upright
position.Turning the handle to one
side will make the POWER-MATE TM
more stable and less likely to tip
over.
For best deep down cleaning, use the XLO
setting, However, you may need to raise the
height to make some jobs easier, such as
scatter rugs and some deep pile carpets,
and to prevent the vacuum cleaner from
shutting off_ Suggested settings are:
HI - Shag, deep pile, or scatter rugs.
MED - Medium to deep pile.
LO - Low to medium pile.
XLO - Most carpets and bare floors°
:_ i i::_:_i ¸::':_;_
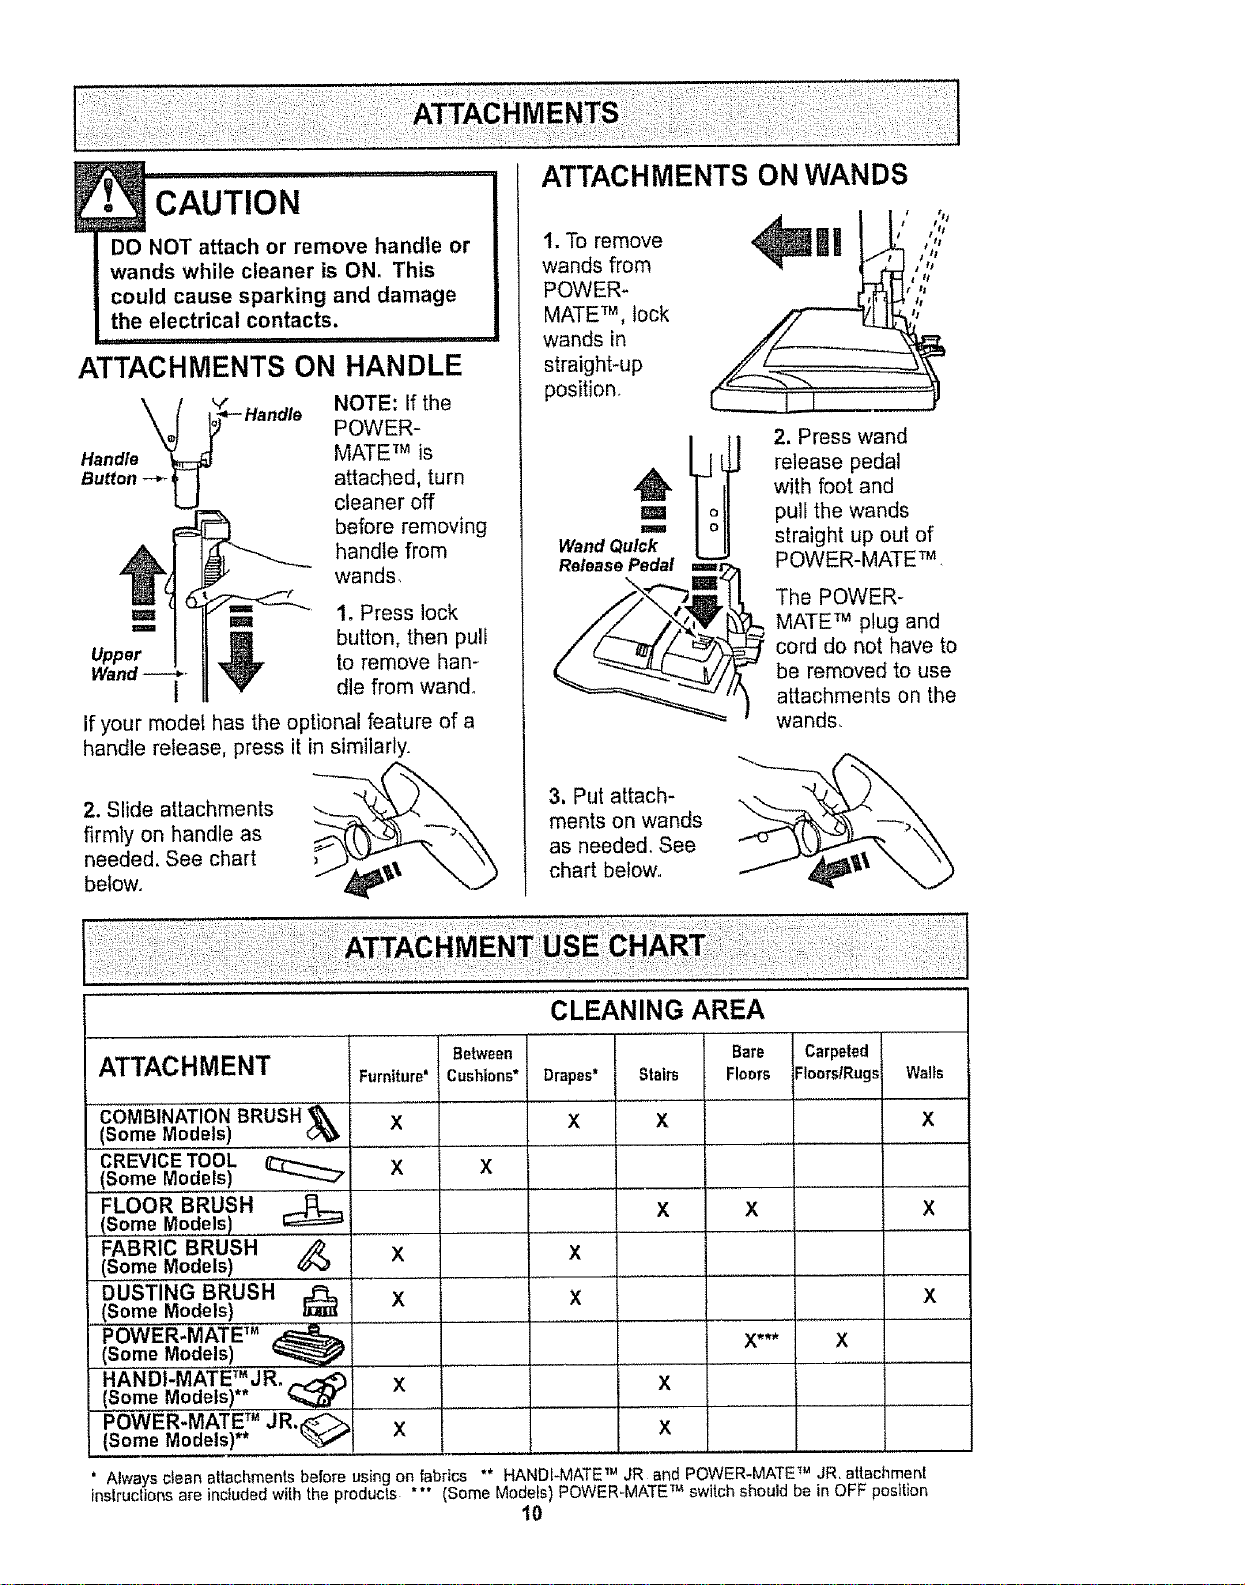
.'3CAUT,ON..........
DO NOT attach or remove handle or
wands while cleaner is ON. This
could cause sparking and damage
the electrical contacts.
ATTACHMENTS ON HANDLE
NOTE: if the
POWER-
Handle MATE TM is
Button .-_. attached, turn
cleaner off
before removing
handle from
wands,
Upper
=,= 1. Press lock
button, then puli
to remove han-
dle from wand°
If your model has the optional feature of a
handle release, press it in similarly.
2. Slide attachments
firmly on handle as
needed, See chart
befow. ,_'\
1. To remove
wands from
POWER-
MATE TM, lock
wands in
straight*up
position.
3. Put attach-
ments on wands
as needed, See
chart below.
ml ',",
L;#,:i:;;0
2, Press wand
release pedal
with foot and
pull the wands
straight up out of
POWER-MATE TM ,
The POWER-
MATE TM plug and
cord do not have to
be removed to use
attachments on the
wands,
ATTACHMENT Furniture'
COMBI'NATION BRus'H"'_
(Some Models) X
CREVICE TOOL .........
,(Some Models) X
FLOOR BRUSH
(Some Models)
FABRIC BRUSH
X
(Some Models)
DUSTING BRUSH'
X
(Some Models)
POWER-MATE TM _ .............
(Some Models) _ ........
HANDI-MATE TM JR.
(Some Models)** %,_br X ......
Between
Cushions* Drapes*
X
x
x
X
CLEANING AREA
Bare
Stairs FIoers
x
x
x
Carpeted
Floers/Rugs
x
X*** X
Walls
X
X
X
POWER-MATE TM JR,_:_
(Some Models)** _ X X
.......... = ..........
Always clean attachments before using on fabrics ** HANOI-MATE TM JR and POWER-MATE TM JR, attachment
instructions are included with the products "** (Some Models) POWER_MATE TM switch should be in OFF position
10

EDGE CLEANER
Active brush edge
cleaners are on both
sides of the POWER-
MATE TM, Guide either
side of the POWER-
MATE TM along base-
boards or next to
furniture to help
remove dirt trapped at
carpet edges
OVERLOAD PROTECTOR
The POWER-MATE TM has
built-in protection against
motor and belt damage
should the brush jam, If
the brush slows down or
stops, the overload
protector button pops up
and shuts off the POWER-
MATEm, The canister
motor will continue to run.
To correct problem: See
TROUBLESHOOTING,
To reset: Push in the overload protector
button.
SUCTION CONTROL
Oo°roo, :,oo,[,_,o
Suction _ Suct on
The suction
control allows
you to change
the vacuum
suction for
different fabric
and carpet weights. Opening the control
decreases suction for draperies and
lightweight rugs, while closing the control
increases suction for upholsteries and
carpets,
, '"'WARNING
Personal Injury Hazard
Always unplug the vacuum cleaner
before cleaning the brush area as
brush may suddenly restart, Failure
to do so can result in personal
injury.
PERFORMANCE INDICATOR
SOME MODELS
If the performance indi-
cator turns entirely red
check for a full dust bag,
or a clog in the vacuum,
See HOW YOUR VACUUM WORKS.
NOTE: The performance indicator may turn
red when using attachments or when clean-
ing new carpet, due to reduced airflow by
the attachments themselves or new carpet
fuzz filling the bag quickly.
POWER-MATE TM STORAGE
SOME MODELS
The lower wand has a "U" shaped flange in
the area where the power cord attaches.
The base has a "U" shaped slot near the
front caster
The flange allows the
wands and POWER-
MATE TM to be stored
with the canister to
conserve storage
space. The canister
must be stored on end
for this feature to be
used
The wand will slip out of the slot as it is lift-
ed up for use and will slide into the slot as it
is lowered for storage.
THERMAL PROTECTOR
This vacuum has a thermal protector which
automatically trips to protect the vacuum
from overheating The thermal protector
turns the motor off automatically to allow the
motor to cool in order to prevent possible
damage to the vacuum.
To reset: Turn off and unplug the vacuum
from the outlet to allow the vacuum to cool
Check for and remove any clogs, Also
check and replace any clogged filters.
Wait approximately 50 minutes and plug
the vacuum in and turn back on to see if
the thermal protector has reset. In some
cases, the unit may suddenly restart. DO
NOT leave unattended,
11

The vacuum cleaner creates suction that
picks up dirt. Rapidly moving air carries [ f(,,....---_..___
the dirt to the dust bag through the air- j_, _"--_._
flow passages° The dust bag lets the
air pass through, while it traps the ,_/_
dirto ,.ZT_//
For best cleaning results, keep ,z_.Y /
the airflow passage open. _y IJ
Check the starred areas _:t_"
occasionally for clogs, _}7
Unplug from outlet ,,_/'_
before
checking,
Motor
Safety
Filter Exhaust
BAG CHANGING 7. The red bag mount will flip forward after
For best cleaning results, the dust bag
should be changed often., The performance
indicator (some models) will specify when
the dust bag needs to be changed or the
airflow is blocked, NOTE: See PARTS AND
FEATURES for Bag #,
1. Unplug cord from
wall outlet.
2. Remove hose
from canister.
3. Pull hood release
out and up, then lift
canister hood.
4. Disengage
cardboard tab from
red bag mount away
and lifting up,
5. Pul bag out of
the red bag mount.
F,ter,. / //I / /l//
6. Check and
replace, if
necessary, the
motor safety
filter.
removing bag.
8, Rotate red bag
mount down and
install bag into
slots per
illustrations
pushing down until
the cardboard tab
locks into position
and the holes
align. Tuck the bag
securely into the bag cavity so that none of it
is able to be pinched by the hood.
9. Replace and latch canister hood.
10, Insert hose into canister°
11. Plug cord into wall outleL
I
• CAUTION
NEVER REUSE A DUST BAG. Very
fine materials, such as carpet fresh-
ener, face powder, fine dust, plaster,
soot, new carpet lint, etc. can clog
the bag and cause it to burst before
it is full= Change bag more often
when vacuuming these materials.
12

1_ Unplug cord from wall outleL DO NOT
drip water on cleaner.
2. Clean exterior using a clean, soft cloth
that has been dipped in a solution of mild
liquid detergent and water, then wrung dry
Wipe dry after cleaning.
3. To reduce static electricity and dust build-
up, wipe outer surface of cleaner and
attachments.
Check motor safety filter occasionally and
DO NOT USE ATTACHMENTS IFTHEY ARE
WET.
! CAUTION ...................
Attachments used in dirty areas,
such as under a refrigerator, should
not be used on other surfaces until
they are washed,They could leave
marks.
i iiiii1,1111
change when dirty
Electrical Shock Hazard
Unplug power cord from electrical
outlet, Do not operate the cleaner
without the motor safety filter. Be
sure the filter is dry and properly
installed to prevent motor failure
and/or electrical shock,
Remove the bag as outlined in the BAG
CHANGING section.
MOTOR SAFETY FILTER
ELECTROSTATIC
This white and grey filter must be replaced
when dirty, It should be replaced regularly
depending on use conditions° The filter
CANNOT be washed as it will lose its
dust trapping ability.
1. Lift the rubber
retainer and pull
out motor safety
filter as shown.
Rubber
Retainer
WYd///
2. Reptace the fil-
ter, white side out,
by sliding it back
into place under
the ribs in the bag
cavity. Tuck filter in
so that it fits com-
pletely under the
rubber retainer
3, Replace the bag as outlined in the BAG
CHANGING section.
13

!• wARNING
Fire and/or Electrical Shock Hazard
Do not operate with a clogged
exhaust filter or without the exhaust
filter or exhaust filter cover installed.
EXHAUST FILTER
ELECTROSTATIC
The electrostatic filter must be replaced
when dirty. Replace the filter when the
entire surface area is covered evenly° The
filter CANNOT be washed as it will lose
its dust trapping ability.
Replacement exhaust filters are available
through Sears Service Center under part
no. 8175258° See "Requesting Assistance
or Service"
1oPull out and up
on the exhaust filter
cover to remove
from the motor
cover and lay aside.
Exhaust_ _ _.......=
3. Place the new
filter into the motor
cover with the
white side down°
2. When the
exhaust filter
becomes dirty,
remove it by
pulling straight up,
Exhaust
4. Reinstall the
exhaust filter
cover by insert-
ing the tab into
the slot in the
motor cover°
Press firmly to
snap exhaust ill-
0_ ter into
cover
place,
14

Alwaysfollowallsafetyprecautionswhen
cleaningandservicingthePOWER-MATF_.
E•_ WARNIN .....................
G
Electrical Shock Or Personal Injury
Hazard
Disconnect electrical supply before
servicing or cleaning the unit,
Failure to do so could result in elec-
trical shock or personal injury from
cleaner suddenly starting.
HALF LIGHT POWER'MATE TM
1. Remove light
cover by lifting at
arrow as shown°
2. Push in and turn
bulb counterclock-
wise to remove°
3. Replace the
bulb_ Bulb must not
be higher than 15
Watts. Close light
cover until it snaps
in place_
P
/
/
_ Push tn
NOTE: See PARTS AND FEATURES for
Bulb #.
FULL LIGHT POWER-MATE TM
1, Remove light
cover by pressing
in and lifting both
sides as shown_
2. Push in and turn
bulb counterclock-
wise to remove°
3. Replace the
bulb Bulb must not
be higher than 15
Watts° Close light
cover until it snaps
in placer
Push In
And Turn
NOTE: See PARTS AND FEATURES for
Bulb #.
Disconnect cleaner from electrical outlet.
Check and remove hair, string and lint build-
up frequently in the POWER-MATE TM brush
and brush support areas. If build-up
becomes excessive, disconnect POWER-
MATE TM from wand and follow the steps
below_ instructions can also be found under
the light cover
TO REMOVE
BELT:
1. Remove light cover
and light bulb as
shown under LIGHT
BULB CHANGING.
2. Unscrew the
POWER-MATE TM
cover screws.
15

3.Turn
POWER-
MATETM over,
To remove
cover, insert
screwdriver at
cover tabson
both sides and
twist to
release tabs,
Quick
Release
5. Carefully
insert and
twist
screwdriver
at each
brush
support to
free brush
from base
6. Remove
worn bee
Brush
Support
4. Turn POWER-
MATE TM right
side up. Press
handle release
pedal and lower
the swivel.Tilt
cover forward
from back until
front snaps free..
7. Slide brush
supports off to
check and clean
brush support
areas° See
BRUSH
ASSEMBLY for
picture of
complete brush
assembly,
TO REPLACE BELT:
I. Slide washers and brush supports onto
brush assembly°
2. Install
new belt
over motor
drive, then
over brush
sprocket,
NOTE: See
PARTS AND
FEATURES
for Belt #.
I
Brush
Support
Motor
Drive
Brush
Brush Sprocket
3. Snap brush
supports into
place on base.
Be sure brush
supports are
not upside-
down.
4. Line up
front of cover
and base.
Rest cover
on front edge
of base as
shown.
Cover Bass
5. Tilt cover to
back. Press
cover firmly until
side labs snap
into place.
Replace cover
screws, light
bulb and light
cover.
16

WARNING
Electrical Shock Or Personal Injury
Hazard
Disconnect electrical supply before
servicing or cleaning the unit.
Failure to do so could result in elec-
trical shock or personal injury from
cleaner suddenly starting,
TO CHECK BRUSHES:
When brushes
are worn to the
level of the base
support bars,
replace the
brush dowel.
I. Remove POWER-MATE TM cover, belt and
brush assembly. See "To remove belt" in
BELT CHANGING AND BRUSH
CLEANING°
2. Remove brush supports, washers,
screws, end brush, brush sprocket pieces
from ends of brush assembly.
3. Reassemble brush assembly. To line up
screw holes in dowel, sprocket and end
brush, be sure the brush portion of end
brush lines up with brushes on brush dowel.
4. Replace belt, brush assembly, POWER-
MATE TM cover, light bulb and light cover. See
"To replace belt" in BELT CHANGING AND
BRUSH CLEANING
_Washer
End
Cap
Brush
Sprocket End
Flange Brush End
Screw Cap
Screw i
Agitator Unit Washer
Brush Sprocket
t7
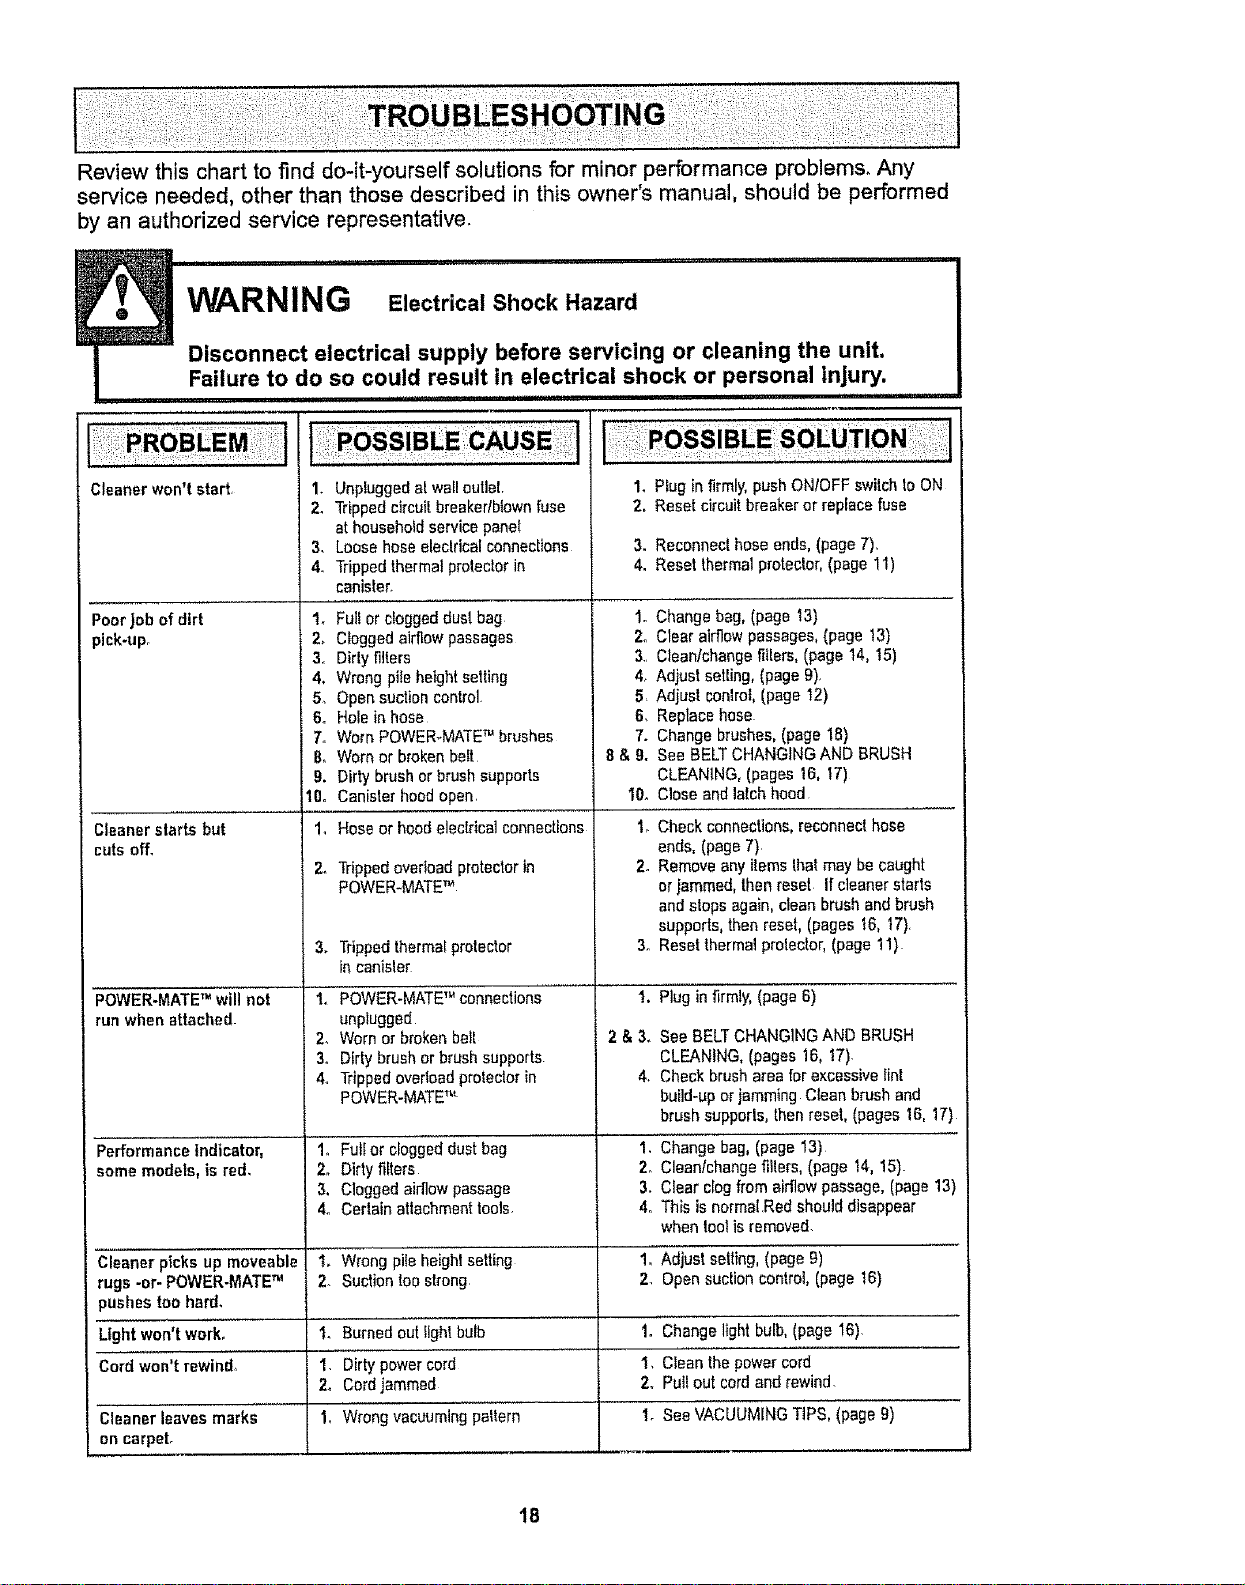
Review this chart to find do-it-yourself solutions for minor performance problems. Any
service needed, other than those described in this owner's manual, should be performed
by an authorized service representative.
W A , r'll ii lu
RNIN G Electrical Shock Hazard
Dmconnect electrical supply before servicing or clean,ng the unit.
Failure to do so could result in electncal shock or personal injury.
i ii ,i i i iiiillllllll,lll
Cleaner won't start,
3,
4.
Poorjob of dirt 1_
)ick-upr 2_
Cleanerstarts but
,uts off,
POWER-MATETM will not
run whenattached-
Performance indicator,
some models, is red,
Cleaner picks up moveable
rugs -or- POWER-MATETM
_ushes toohard,
Lightwon'tworL
Cord won't rewin&
Cleaner leaves marks
on carpet.
3.
4.
&
6o
7,
8,
9.
10o
24
3.
4.
Unpiuggedatwa_lout]eL
Trippedcircuit breaker/blownfuse
at householdservice panel
Loose hoseelectricalconnections
Trippedthermat protectorin
canister.
Fulfor cloggeddust bag 1.
Cloggedairflow passages 2o
Dirtyfilters 3..
Wrongpileheightsetting &
Opensuctioncontrol 5
Holein hose 6.
Worn POWER_MATETM brushes 7.
Wornor brokenbelt 8 & 9.
Dirty brush or brushsupports
Canister hoodopen. 10.
Hoseor hood electricalconnections
Trippedoverloadprotectorin
POWER-MATETM
Trippedthermalprotector
in canisler
POWER-MATETM connections
unplugged
Worn or brokenbelt
Dirtybrush or brush supports
Trippedoverloadprotectorin
POWER-MATETM
1° Fut[or cloggeddust bag
2. Dirtyfilters
3, Cloggedairflow passage
4, Certain attachmenttools.
1. wrong pite heightsetting'
2. Suctiontoostrong
I_ Burnedout light bulb
I. Dirty powercord
2. Cordjammed
1. Wrongvacuuming'peltern
1. Plug in firmly, push ONtOFF switch 10ON
2, Reset circuit breaker or replace fuse
3. Reconnecl hoseends,(page7).
4. Reset thermalprotector,(page 11)
Change bag,(page 'i3)
Clear airflowpassages,(page 13)
Clean/changefillers, (page 14, t5)
Adjust setting,(page 9).
Adjust con]rol,(page t2)
Replacehose
Change brushes,(page 18)
See BELTCHANGINGAND BRUSH
CLEANING, (pages16, 17)
Close and latch hood
1_Check connections,reconnecthose
ends, (page 7)
2. Removeanyitemsthat may be caught
orjammed,then reset Ifcleaner starts
andstops again, clean brushand brush
supports,then resel, (pages t6, 17).
3. Resetthermal protector,(page 11)
!. Plug infirmly, (page6)
2 & 3. See BELTCHANG1NGAND BRUSH
CLEANING,(pages !6, 17).
4. Cheekbrush areafor excessivelint
build-uporjamming Clean brush and
brushsupports, thenreset, (pages t6, 17)
1.Cl_ange bag,ipage 13)
2o Clean!changefillers, (page t4, 15)-
3. Clear clogfrom airflowpassage, (page 13)
4° This isnormal.Red shoulddisappear
when toolisremoved.
i, Adjustselling, (page g)
2_ Opensuctioncontrol, (page 16)
IoChangelight bulb,(page 16).
I, cIei thepoweri&i.....
2. Pullout cordandrewind
t. SeeVACUUMINGTIPS, 'ipag'eg)
18

For
repair of major brand appliances in your own home ...
no matter who made it, no matter who sold it!
1-800-4-MY-HOME ® Anytime, day or night
(1-800-469-4663) (USA and Canada)
www.sears.corn www.sears,ca
For repair of carry-in products like vacuums, lawn equipment, and
electronics, call for the nearest Sears Parts and Repair Center.
1-800-488-1222 Anytime, day or night (USA only)
www.sears.com
For the replacement parts, accessories and owner's manuals
that you need to do-it-yourself, cal! Sears PartsDirectSM!
1-800-366-PART
(1-800-366-7278)
6 am.- 11 pro., 7 days a week
(UoSoAonly)
www.sears.com!partsdirect
To purchase or inquire about a Sears Service Agreement
or Sears Maintenance Agreement:
1-800-827-6655 (US A. )
7 am - 5 p,m, CST, Mon - Sat
Para pedir servicio de reparaci6n a
domicilio, y para ordenar piezas:
1-888-SU-HOGAR sM
(1-888-784-6427)
1-800-361-6665 (Canada)
9&m -8pro EST, M- F,4 p.m Sat
Au Canada pour service en fran_ais:
1-800-LE-FOYER Mc
(1-800-533-6937)
WWW sears,ca
LH'°meCentral J : " "
@ Sears, Roebuck and Co.
TM
® Registered Trademark t Trademark / s_,{Service Mark of Sears, Roebuck and Co.
® Marca Registrada/rM Marco de Fb.brica I SMMarca de Servicio de Sears, Roebuck and Co
_u
McMarque de commerce / Marque d6pos6e de Sears, Roebuck and Co
19

Manual Del Propietario
Aspiradora
®
Modelo 116.20212
116.20312
CUIDADO:
Lea y sigue todas tas
instrucciones de operaci6n
y seguridad antes del uso de
este producto°
Sears, Roebuck and Co., Hoffman Estates, IL 60179 U.SoA.
www°sears.com
Pieza N° COIZAXX10UOO-8175 t64 Impreso en EUA
Antes de usar su aspiradora nueva ..... 2
Garantia de la aspiradora de Kenmore • 2
Instrucciones importantes de
seguridad .................. 3
Plazas y caracteristicas ............ 4-5
Armado ...................... 6-7
Use .............................. 8
Paracomenzar ..................... 8
Sugerencias para aspirar ................ 9
Sugerencias sobreel ajuste de nivelde
pale de la alfombra ................. 9
Accesorios .................. 10
Use do los accasodos ................. 10
Caracteristicas de rendimiento ........... 11
Funcionamiento de su aspiradora ...... 12
Cuidado del recept_culo ............ 12
Cambio de la boisa ................. 12
Limpieza del exterior y de los acceserios • •. 13
Cambio del filtro de seguridad del motor 13
Cambio deffiltro de escape ............. 14
Cuidado de la Power-Mate TM .......... 15
Cambio de la bombilta ............. t5
Cambio de ia correa y limpieza
del cepillo ...................... 15-16
Cuidadodel cepiflo ................ 17
Ensamble dei cepillo ................. 17
Reconocimiento de problemas ......... 18
Informaci6n de assistancia
o servicio .................... _9
Per favor tea esta guia qua le ayudara a assernblar y operar su aspiradora nuevade Kenmore en una manera
m_s seguray effectiva.
Para mas informaciSnacerca del cuidado y eperaciSnde esta aspirador, llama a su tienda Sears mas cercana.
Cuando prequnte per informaci6n usted necisitar_ el n0mero completede serie y modelo de la aspiradoraqua
est_ Iocado en la placa de los n0meros de modelo y serie
Use el espacio de abajo para registrar el numerode modeto y serie para su nueva aspiradorade Kenmore.
Numero de Modelo
NL_merode Serie
Fecha de Compra.
Matenga este tibroy su reciboen u }ugar seguro para referenciasfuturas.
GARANTiALIMITADADEUN ANO DELA ASPIRADORAKENMORE
Esta garantiaes per un afio desdela fecha de compra,e inckJyesofamenteel use de la aspiradoraen hogares
privados.Duranteel aSode garantia, cuandola aspiradoraes operada y mantenida de acuerdoal manualde
instruccionesdel dueSo,Searsreparar&cualquierdefecto en matedales o fabricaciSnfibrede cargo
Esta garantia exctuyelas balsas de colecciSn,correas,lamparillas,y filtros, las cuales son partes gastablesqua
se deteriorancon el use normal.
Para elservlclo de garantia,retorne esta aspiradoraal Centre deServtcio Sears m_s cercanoen los
Estados Unidos.
Esta garantfa seaplica solamentemientras este productoest_ en use en los Estados Unidos Esta garant[a le
da a usted detaches legales especificos,y usted puedetener tambi6n otros derechos los cuales vadan de
estado a estado
Sears, Roebuckand Co., D/817WA, Hoffman Estates,IL 60179

ADVERTENClA
Su segurtdades muy importante para nosotros. Parereducir el riesgo de lncendto, cheque
el_ctrico, lesi6ncorporal o dafiosal utilizer su aspiradora, actue de acuerdo con precauciones
b_sicas de seguridad,entre elias:
Lea estemanualantes de armoro utilizarsuaspire-
dora
Use suaspiradoraunicarnentaen faformadescrita
en estemanual Use L'micamentecon acceserios
recomendadosper Sears
Pare reduciratriesgodechequeelSctrico,no use
suaspiradoraal aire libreni sabresuperficiesmeja-
dos
Desconecteelcord6nel_ctricoantes decomponer
o tirnpiare!_readel cepillo.De1ocontrario,el cepillo
)odrfaarrancarde formirnprevistao pedrfa
_roducirseun chequeel_ctrico.
Siernpredebeapagarla aspiradoraantesde
conectaro desconectarla rnanguerade la POWER-
MATETM.
Siempre debe apagarsu aspiradoraantes de des-
conectarla
No desconectetaaspiradoratirandode!cord6n
et_ctrico Paredesconectarla,haleel enchufe,no el
cord6n.
Sujeteel enchufeconla maneafenroltaretcord6n
al_ctrico.Paradesconectarla,hale en enchufe,no el
cord6n
Nouse laaspiraderasi el cord6no el enchufeest&
dar_ado.Sila aspiradarano est,,funcionandoade-
cuadamenteo siseha dejadecaer,est_dar_ada,se
ha dejadoexpuestaala intemperiea se hadejado
caeren agua,devu_lvalaa un CentrolDepartarnento
de serviciodeSears
No hale nitransportela aspiradoraper el cord6n;no
use etcord6ncomamango;nocierrepuertassabre
el cordon;no haleel cord6nsabrerebordesagudes
niesquinas.Nopasola aspiradorasabreel cerd6n
Mantengaeteord6nalejadode superficiescalientes
No abandonetaaspiradoracuandoest6conectada.
Descon_ctelacuandono la est_ usandey antesde
darle servicio
No permitaque seautilizadacomejuguete.Se
requieretenormayorcuidadocuandoseautilizada
en la proxirnidadde nifios e perniSos
No toquela aspiradorani el enchufeconlos manes
mojadas.
GUARDE ESTAS
No usela aspiradorasila mangueraest_rata.La
mangueracontienealarnbresel_ctricos C6mbielasi
est&ratao desgastada Evite aspirerobjetos
agudos
No cofoqueobjetosen losaberturas
Noutilicelaaspiradorasialguna aberturaest_ blo-
queada;rnant_ngalafibrede polvo,pelusa,cabellos
y cualquieracase qua podrfadisminuirelflujo de
aire.
Mantengael cabello,rope suelta,dedosy todaslas
partesdel cuerpoalejadosde los aberturasy piezas
mec_nicas
No usela aspiradorasin tenorinstaladala balsa
parepoivoy/olosfiltros.
Gambleslernpre la balsapare poivodespu&sde
aspirerlirnpiadoresde alfombraso desodorantes,
talcesypelvesfines.Estos productosatascanla
balsa,reducenelflujo de airey puedencausarqua
esta serornpa Si nocambia la botsapodrlaocasio-
nardafio perrnanenteata aspiradora
Nousela aspiradorapara levantarobjetos agudos,
juguetespequefios,alfileres,sujetapapeles,etc
Podrfandafter la aspiradoraola balsapara polve
No levanteningunacasequa sa est&quemandao
ernitiendohurno,coma cigarriltos,cerillos0 cenizas
calientes.
No usela aspiradorapareaspirerliquidosinflama*
biaso combustibles(gasoline,lfquidosparelirn-
pieza,perfumes,etc.)ni la use enlugaresdonde
estospodrfanester presentesLosvaporesde estas
sustanciaspuedencreartin peligre deincendioe
explosi6n
Tengacuidadoespecial al utilizerla aspiradoraen
escalonesNota colequesabrestiles,mesas,etc
Mant_ngalaen el piso
Usted as responsabledeasegurarqua suaspirin
dorano seautilizadapar ningunapersonaqueno
puedamanejarlacorrectamente
No operasin el filtro de escapenila cubiertadel fit-
tro de escapeinstalados
INSTRUCClONES
El armaday usasegurode su aspiradorasonsu responsabilidad.Esta aspiradoraha sidedise_ada
exclusivarnentepara usedorn_stico La aspiradoradeber_ alrnacenarseen un lugar seco y en el interior.
Lea este Manual dotpropietariodetenidarnente,pues contiene inforrnaci6nirnportante sabre seguridady
usa. Estaquia contiene informaci6n sabreseguridad debajode simbelosde advertienciacuidado. Par
favor ponga atenci6nespecial a estasinstruccionesdadas. Advertencia: Este informaci6n le alertar&con
el poligro de fuego, cheques electricos,quernadasy lesiones. Cuidado: Este inforrnaci6nle aledara a
peligros cernolesionesy da_os de,propiedad. ,....
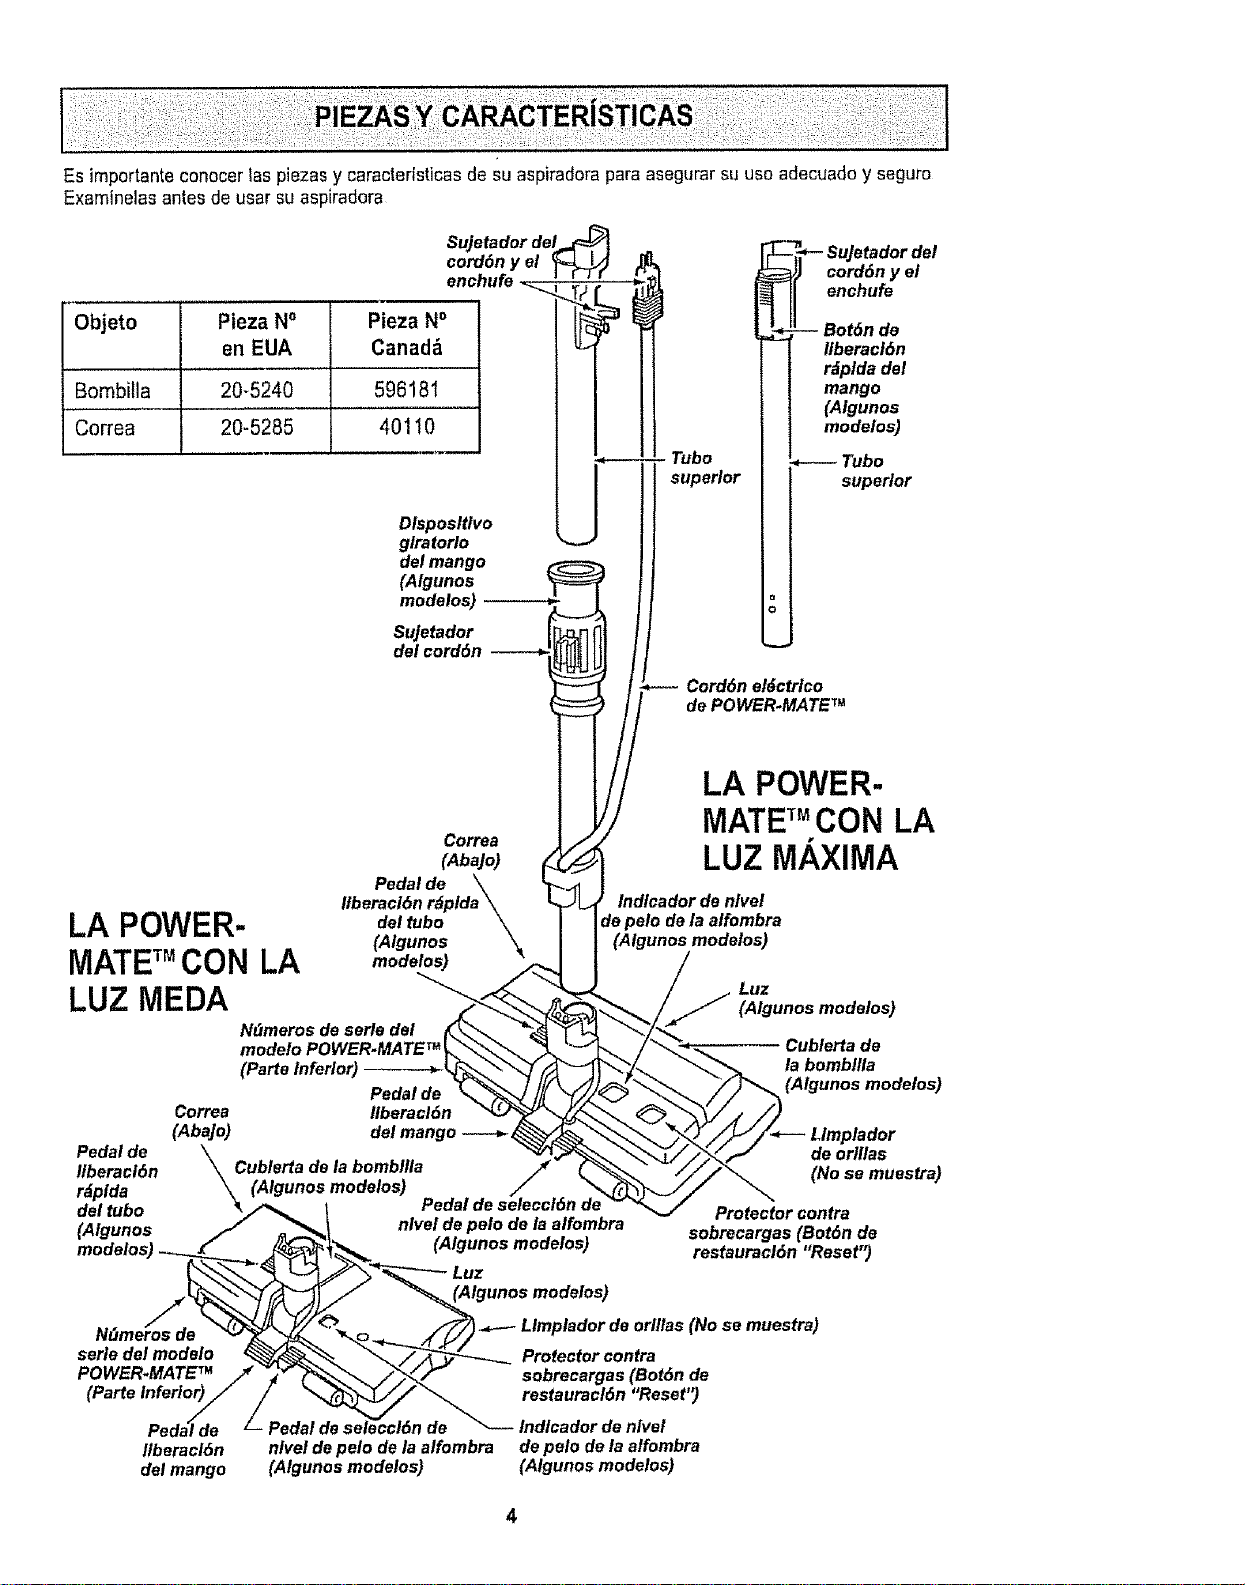
Es importante conocer las piezas y caracteristicas de su aspiradora para asegurar su uso adecuado y seguro
Examlnelas antes de usar su aspiradora
Objeto Pieza No
en EUA
Bombtla 20-5240 596181
Correa 20-5285 40110
Sujetador del,,_
cord6n y el _
enchufe _..._._T; _
1
Pieza N° ___P
Canad_
glratorloDlsposltlvomodelos)(Algunosdelmango_JT' Tubo
r
Sujetador
del cord6n
superior
Sujetador del
cord6n y el
enchufe
",l :rIor
Cord6n el6etrlco
de POWER-MATE TM
LA POWER-
MATETMCON LA
LUZ MEDA
Correa
(Aba]o)
Pedal de \
Itberaci6n r_plda \
del tubo \
(Algunos
modelos)
Pedal de
Ilberacl6n
r_plda
N_meros de serle del
modelo POWER-MATE TM
(Parte Inferior) _r
Pedal de
Correa Ilberacl6n
(Abajo) del mango ---_. _
Cublerta de la bombllla
(Algunos modelos) ..
Pedal de selecci6n de
LA POWER-
MATE_MCON LA
LUZ MAXIMA
Indlcador de nlvel
(Algunos modelos)
Luz
(Algunos modelos)
Cublerta de
la bombllla
(Algunos modelos)
de orlllas
(No se muestra)
del tubo %/_ 1 ....... Protector contra
(Algunos // _'_' nlvel,de pelo oe la.alromr_ra sobrecargas (eot6n de
modelos) _ _,X_" _. (Algunos mooelos) restauracl6n "Reset")
S ,=,,adordoor,ilao(No:emuo:,r:)
NFImeros de "_ _"_ __.(.i t
serle del modelo 4 ._Y=_'_, ___ Protector contra
POWER.MATE" /_ _ _'_ _/'_,_J sobrecargas (Bot6n de
(Parte inferlor)lil / _ __ restaliracl6n iReset ')
Peda_de Z Pedal de se_eccl6n de _ Indlcador de nivel
Ilberacl6n nlvel de pelo de la alfombra de pelo de la alfombra
del mango (Algunos modelos) (Algunos modelos)

MANGUERA
Interruptor de encendido/
apagado de tres posiciones
(Apagado/Piso expuesto/Alfombra)
(Algunos modelos)
Control de
velocidad
(Algunos
modelos
Mango
ACCESORIOS
POWER.MATE TM Jr.
Herramtenta (Algunos modelos)
para I
hendlduras----_ (__._,_,_
Ceplllo para [hl _%_ .J'_
Ceplllo para plsos
(Algunos modelos)--_ l
HANDI-MATE TM Jr.
(Algunos modelos)
Dispositivo
giratorio de
ta manguera
NOTA:Todos los modetoscuentan con
unjuego de accesorios en el recept_cu-
1oAlgunosmodelos cuentan con un jue-
go adicional que puede almacenarseen
la bolsa para accesodos de uso e en el
garaje.
RECEPTACULO
Almacenamlento
para accesorlos
Tapa del
recet
Cublerta
Interruptor
de encendldo/
apagado
Cublerta de la
flltro de escape
(FIItro est_ dentro)
Indicador de
rendlmlento
(algunos
modelos)
Cord6n
e#Jctrlco
Pestlllo
de la tapa
Sujetador
de la bolsa
F#tro de segurldad
del motor (Detr_s
de la bolsa para polvo)
Bolsa
para polvo
I En EUA #20.50558 ]
En Canada #20-50555

An[as de armar la aspiradora, chequee la LISTA
DE EMBALAJE en ta cubierta separada de ta Lista
de Partes para Reparaci6n, Use esta lis[a para veri-
ficar qua ha recibidotodas _ascomponentes de su
nueva aspiradoraKenmore
ADVERTENCIA
Petigrode choqueel6ctrtco
No conecte la aspiradora hasta quetermlne
de armarla.De Io contrario podrfacausar
un choqueel_ctrico o lesi6n corporal°
TUBOS
Una los tubos
desliz_ndolos Bot6n
hasta que el bot6n ='=
quede fi}o en pasi- V
ci6n, Gire el bot6n
deltubohaciala $ _zona ranurada det
dispositivo giratorio
de]tubo Dlsposltlve
glratorlo
El dispositivo gira- del mango -
torio le permite SuJetador
girar el mango del cord6n /"
hacia la izquierda
para limpiar meier
debajo de los mue-
biasbajos
POWER.MATE TM
1,tntroduzca los tubos en la POWER-MATETM
hasta qua el bot6n deftubo quede fijo en posiciOn,
/_rea
e/evada
arriba y
hacia
2, Conecte el enchufe
y cord6n de la
POWER_MATETM
como se muestra,NO
LO fuerce, El _raa elm
vada dei enchufetiene
que estar hacia la
mane.
3,Assgure ei cord6n
dentrodel sujetador
del cord6n en el girato-
rio de ta mango,
Pararetirar: Desconecteel cord6n y pise el pedal
de liberaci6n r&pidadel tubo y tire del tubos hacia
arriba,
mango
POWER-
- Dlsposltlvo
glratorlo
del mango
-- Tubo
MATE TM
a_ Bot6n del
J tubo
_ fsposlllvo
glratorlo
Pedal de
Ilberacl6n
rdplda del tubol
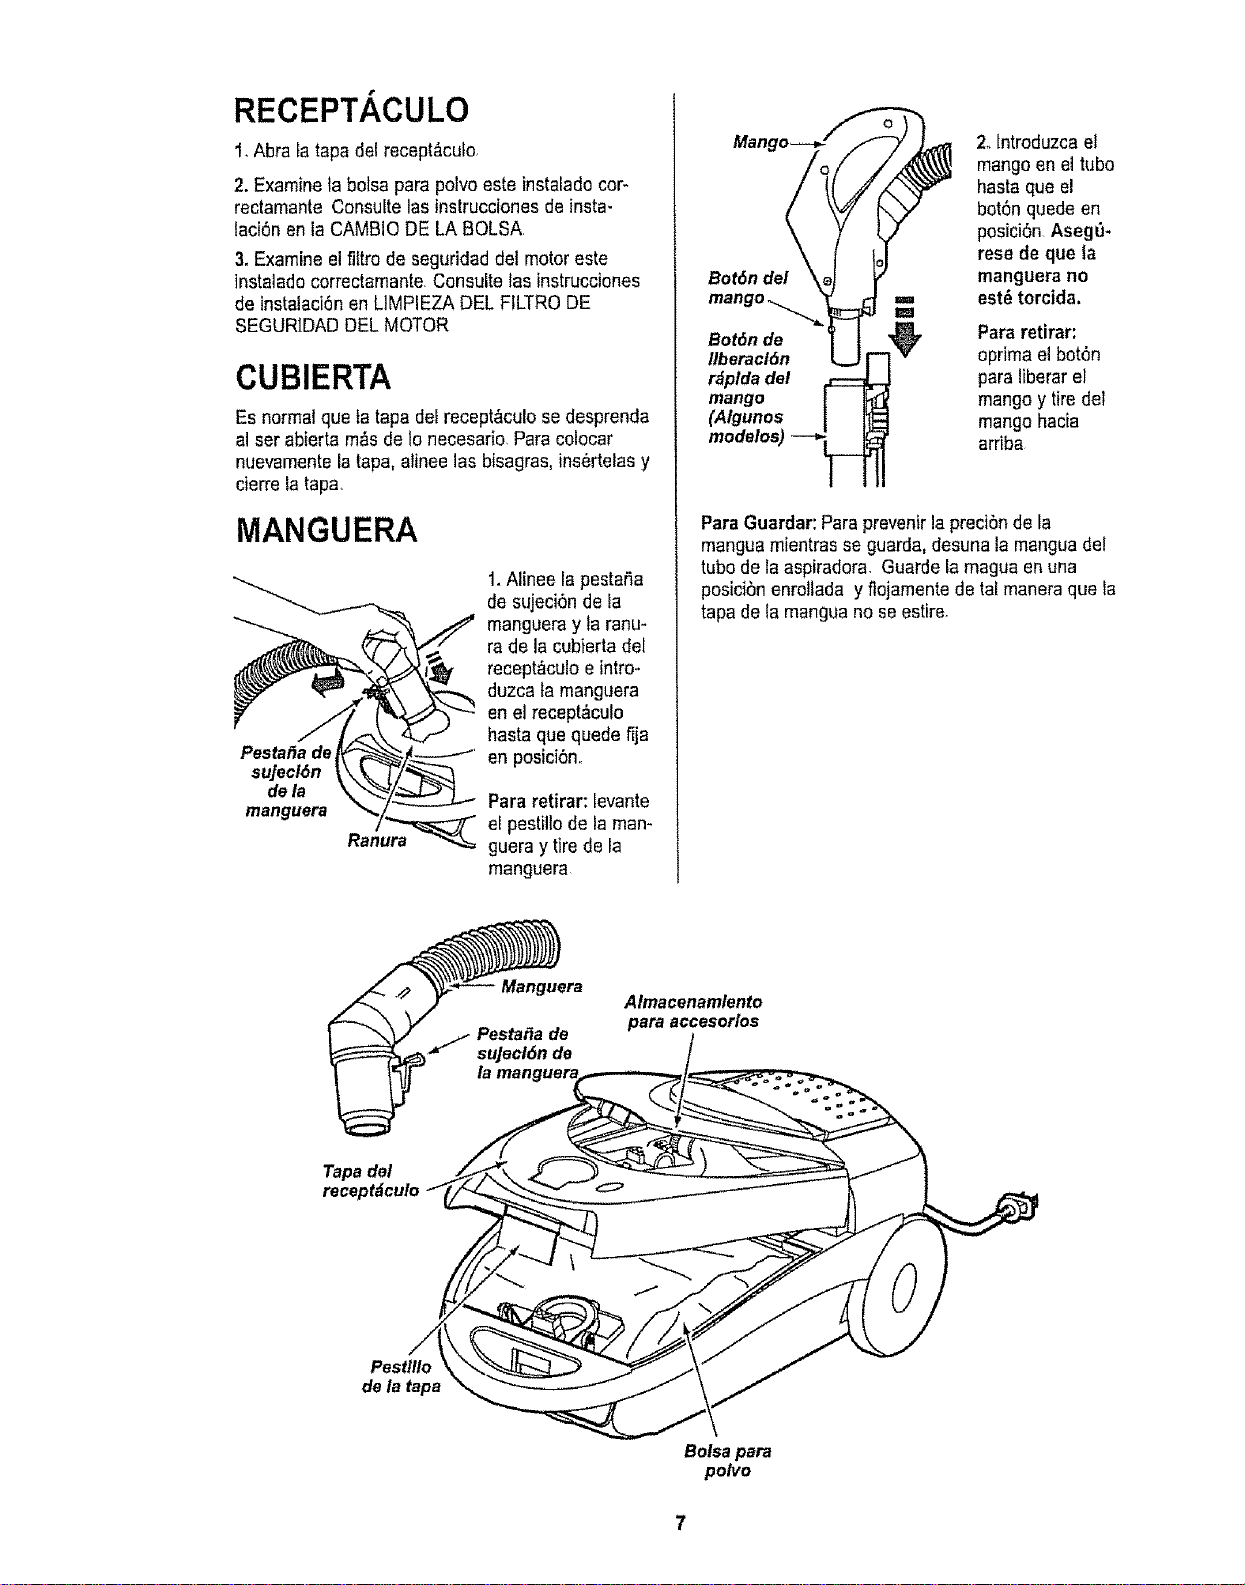
RECEPTACULO
1,Abra tatapa del recept_culo,
2. Examineta bolsa para polvo este instalado cor-
rectamante Consuite lasinstrucciones de insta-
taci6n en la CAMBIODE LA BOLSA
3. Examine el filtro de seguridad del motor este
instalade cerrectamante Consulte las instrucciones
de instalaci6nen LIMPIEZA DEL FILTRO DE
SEGURIDADDEL MOTOR
CUBIERTA
Es normalque ta tapa del recept_culose desprenda
al ser abierta m,_sde Ionecesario,Para celocar
ntJevamentela tapa, afineelas bisagras,ins_rtelas y
cierrela tapa,
MANGUERA
1.Alinee la pestafia
de sujeci6n deia
mangueray Iaranu-
ra de la cubierta det
_ _ reeept,cu,o e intro-
duzca famanguera
hasta que quede fija
Pesta_a de,_/-_'_ - _.___..t ....
+.o,+n o, po.,c,on,,
dela \\"_,
manguera '_ Pararetirar: Ievante
Ranu_ra',,_ el pestiltode laman-
guera y tire de la
manguera
Bot6n del
2olntroduzcael
mangoen eltube
hasta que el
boronquede en
posici6n Asege.
rese de que la
manguera no
est_ torcida.
Bot6n de Para retirar:
llberacl6n oprima el botdn
r_plda del paraliberar el
mango mango y tire del
(Algunos mangohacia
modelos) arriba
ParaGuardar:Para prevenirla preci0n de la
manguamientras se guarda,desuna tamanguadel
tube de la aspiradora. Guarde la magua en una
posici6nenrollada y _lojamentede tat maneraque la
tapa de la mangua no seestire+
Almacenamlento
para accesorlos
Tapa del
recept&culo
Pestlllo
dela tapa
Bolsa para
polvo

,,i
ADVERTENCIA
Peligrode lesi6n personal y daSoal
pmducto
, NOenchufe la aspiradora si et
interruptor est&en la posfci6nON.
Podr{acausar lesi6n personal o dafio
al producto.
• El cord6n el_ctrico se mueve
rbpidamentedurante el enrollamientoo
Mantengaalejados a los niSosy
asegureespacio ]ibre suficiente para
evitar lesiones personatesat enrollar
el cordbno
• NO use clavijas ubicadas arrtba de
mostradores, Podr{a causar da_o a
los objetos cercanos_
II ii i ,,, i
t, Tire del cordSn
para sacarlo del
recept_cutohaste
tener la Iongitud
deseada
2oDetenga el
cordSnun ,_
mementopara
interrumpir el "_
enroltamiento
NOTA:Parareducir el desgo de cheque el_ctrico,
esta aspiradoracuenta con una ctavUapofarizada,
uno de los contactoses m_s ancho que el otro La
clavija s61opuede introducirsede una maneraen el
enchufe Si la elavijano cabe bienen el enchufe.
invi_rtala Si at_nno cabe, Ilamea un electricista
para que instateun enchufecorrecto No attere la
clavija de ninguna manera
3. Conecteel cordSnel_ctricopolarizado en un
enchufede 120 voltiosque seencuentre cerca de1
piso
Pare enrollar: Deseonecteia aspiradora.Sujeteel
enchufe mientrasenrolle el cord6n pare impedir
daSoo lesi6ncorporal per el movimiento del cord6n,
Los sujetadoresdel carretedel cordSnse
desbloqueanconun tir6n leve,Io que perrniteque el
cordSnse enrolfe
Pedal de liberaci6n
del mango
lndicador de nivel
e pe!o de la alfombra
dehive/de pelo
de laalfombra
4oParebajar los tubes,tubes coloque el pie sobre ta
POWER-MATET" y tire de los tubes haciaatr_s
• CUIDAD 0 ...............
NO deje la POWER-MATE_ funcionando en
posici6n vertical en un lugar durante ningun
espacio de tiempo: se puede da_ar la
alfombra,
i , ,,i,,,i,1,,i,,,,i,i
5,Seleccione un nivel de pe[o de laltura girando el
control de nivel pelo de fa alfombra Este nivel se
muestraen el control, Consulte SUGERENClAS
SOBRE EL AJUSTE DE NIVEL DE PELO DE LA
ALFOMBRA
Atenci6n: Refi_rasealas recomendacionesdel fab-
dcante pare limpiar su alfombra AIgunas alfombras
m&sdelicadas puedenrequerir el use de laaspi-
radora con el agitador POWER-MATE"_ desconec-
lade pare prevenirque laalfombra sea dafiada.
Interrupfor
de encendido/
apagado
6_Para encender]a
unidad,pise la
interrupter de
encendidolapagado.
ALGUNOS MODELOS
Paraencender Ia
POWER-MATE_, mueva
e!interrupter de
FLOOR!CARPET ala
posici6n CARPET,

Estilo de ltmpieza sugerido,
Para obtener la mejoracci6n de limpieza se reco-
mienda empujarla POWER-MATETM en direcci6n
directamente opuesta a usted yjalada en llnea
recta N final de cada pasada de regreso,cambie ta
direcci6n de la POWER-MATETM haciala siguiente
secci6n a limpiar,Continoe as[ a trav_sde toda Ia
alfombra de una manera lentay deslizante
NOTA:las pasa-
das r_pidasy
jalonadas no
Iogranuna lim-
pieza completal
El dispositivo giratorio
de la manguerapermi-
te que _sta gire sin ne-
cesidad de moverel
recept&cu!o Esto es
muy utilpara limpiaren
_reas pequeSas.Ase-
gurese de que la man-
guera no est_ torcida
antes de jalar el recep-
t&culo,
Control de
asp/racl6n
Los escalones alfombradosrequieren ]impieza
ped6dica Cierrepor completo el controlde aspira-
ci6n para Iograrlos mejores resuRadosde timpieza,
E• ADVERTENcIA
Peligrode lesi6n personal
Tenga cuidadost coloca el recept_cuto
sobre escalones. Si se cae,podria causar
lesi6n personal o da5o a {apropiedad,
Mantenga el paso de aire abierto para tograrlos
mejores resultados de limpiezao Examinede vez
en cuandocada una de las &reasde uni6n en FUN-
CIONAMIENTODE SU ASPIRADORA para asegu-
rarse de que no est_n bloqueadas Desconecte la
aspiradora antes de revlsar.
CUIDADO
Paraevitar volcaduras,nunca deje la
POWER-MATETM encendtdao an posici6n
vertical, Girandoet mangoa un tado,la
POWER-MATETM se hallar&enuna posici6n
m_s estable y ser_ m_s dificil que se
vuelque,
Use el ajuste XLO (bajo) para obtener la mejor tim-
piezaa rondo.Porotra parte, quiz&sse requieraele-
var el ntvel para facilitar algunastareas, como por
ejempio cuando setrata de tapetes y algunas alfom-
bras de pelo fargo,y para tmpedirque la aspiradora
se apague. Se sugierenlos sigulentesajustes:
HI - Pelo muy largo y suelto,tape_.es,alfombras
muy acojinadas
MED- Pelo mediano a largo.
LO - Pelo corto a mediano
XLO - La mayorfade Iasalfombrasy pisos
descubiertos

uo!i!sod4,.40L
luaLuqoeIle'_
. CuIDADo ......
NO instale ni retire el mango ni los tubes
cuando la aspiradora estd encendida.
Esto podria causar chispas y daRar los
contactos el_ctricos.
ACCESORIOS DEL MANGO
NOTA:Si Uene
instalada]a
POWER-MATE"_,
apague {aaspira-
dora antes de qui-
tar et mangode
los tubes.
t, Oprima erbot6n
de bioqueo y
m
=== ml luego tiredel
Tube N_ mango pars qui-
superior I tarto del tube
Si su modefo cuenta con !acaracter[sticaadiciona!
de un dispositivo paraliberar el mango, oprlmalo
2. Deslice el accesorio
deseado con firmeza
sobre el mango Consults
el cuadro a continuacl6n
ACCESORIOS DEL TUBe
1. Pararetirar los
tubes de ta
POWER*
MATETM, col6-
quelos en la
posici6n vertical
de bIoqueo
L " 4'
Pedal de Ilbe_i_
r_plda del tube ===
2. Piss el peda! de
tiberaci6nr_pida del
tube y tire del tube
hacia arriba para
desprenderlode la
POWER-MATETM
No esnecesario
retirarel enchufe y
cord6nel_ctrico de
IaPOWER-MATETM
para usar los
accesodos del tube
3. Coloqueel
accesoriodese-
ado sobre el
tub& Consurte
el cuadro a con-
tinuaci6n,
AREA A LIMPIAR
Entre Piso-s Pfsos
ACCESORIO Meubles* cotines* Corttnas' EscalonesdescubisrtosalfornbradoslParedes
Alfombras
X X X
X X
X X X
x x
X X X
Xfc_r_
cepiii0parsCombinaci_n
(Algunos modelos)
Herramientaparshendiduras
(Algunos modelos)
Cepillo pars pisos
(Algunos modelos)
Cepillo para telas
(Algunos modelos)
Cepiltopars sacudir
(Algunos modelos)
Power.mateT,,
(Algunos modelos)
Handi-mateTM Jr.
(Algunos modelos)** t_
Power-mate'_Jr.
(Algunos modetos)** _
X
X
X
X
X
T_
• Siernprellmpie]esaccesoHosantesde usarsobre telas LsHANDI_MATE ,JRy ls POWER-MATETM JR.Induyensusproplsstnstrucclones
para usa de accesorlos "" (Algunes modeles) El Interrupter de POWER-MATE TM debe estar en Is pes_eI(_nOFF
10
X
X
X
X
S!leM _Bn_i/sJ_
pa|adJI
'sF
eql uo slueuJq:
esn o1 pa^otuE
o1 aAeq _ou op
pue 6hid _3
-_13MOd
jo ;no dn lql_
spueM aql
pue %ooj
lepad es_
pUSM SSe,:
SONVN

LIMPIADOR DE ORILLAS
Active loscepillos lim-
piadoresde oritlas a
cada lade de la
POWER-MATE"_,
Pasota POWER-
MATETM junto alas
paredes o juntoa los
muebtespara ayudar
a eliminar la tierra
acumutada en las ori-
tlas de la al[ombra.
PROTECTOR CONTRA
SOBRECARGAS
La POWER-MATETM cuenta
con protecci6nincorporada
centre dafio del motor y la
correa en case de atasca-
miento del cepillo. Si el cepi-
Itopierde velocidad o se de-
tiene,el bet6ndel protector
centre sobrecargasse activa
y apaga la POWER-MATETM,.
Et motor del recept_culo
continuar&funcionando
Parecerreglr el problema:Consulte el
RECONOCIMIENTODE PROBLEMAS
Para restablecer: Optima etbot6n def protector
centre sobrecarga.
CONTROL DE ASPIRAClON
El controlde
aspiraci6n fe
permite cam-
biar la poten-
asplrac/6n asplra¢16n cia de aspira-
ci6nde la as-
piradorade-
pendiendodel grosor de la tela o alfombra La aspk
raci6nse disminuye,pare limpiar cortinas y tapetes
ligeros,abriendo el control; pare aspirer mueblesy
atfombras,el control debe cerrerse para aumentar ta
aspiraci0n.
! ADVERTENClA
Peligrode lesiones personales
Desconectesiempre la asptradoraantes de
limpiar las _reas de los cepilios pues _stos
podrian arrancar de manera imprevlsta. El
he hacerlo, podria resultar en lesiones per-
sonales>
ii t'H'l m
INDlCADOR DE RENDIMIENTO
ALGUNOS MODELOS
Si el indicador de performance
se pone completamentere}o,
chequee per una boise tlena
de polvo, o un obst&cufoen el
vaclo. Consulte la FUN-
CIONAMIENTODE SU ASPIRADORA
NOTA: El indicador de performancepuede ponerse
rojo cuando se usan accesorios o cuando seiimpia
una alfombra nueve, debido a una reducci6n de la
corriente de aire per losaccesorios mismos,o la
pelueade la nuevaalfombra llenando la belsa r_pi-
damente
TAPAY ALMACENAMIENTO
PARA POWER-MATETM
ALGUNOS MODELOS
El tubeinferior tiene un reberde en forma de "U" en
la zone de fijaci6n det cord6nel_ctrico La basetie-
ne una ranura en forma de "U" cerca de la parte
frontal del recept_culo
El reborde permitealma-
cenar los tubesy la
POWER-MATETM con el
tube paraeconomizarel
espade requefido para su
almacenamiento.Pare
usar esta caracterlstica es
necesario atmacenar el
recept_tculoen forma ver-
tical
El tube se sale de la ranura al ser levantado pare
usario y se destiza dentrode _sta al bajarlo pare al-
macenarlo
PROTECTORTERMAL
Esta aspiradoratiene un protectortermal que se
ajusta automgticamentepare proteger a la
aspiradoradel sobrecalentamiento Etprotector
termal apaga el motor autom:_ticamentepare
permitirque el motor se enfr[e a fin de evitar
posiblesdafios ala aspiradora
Pare restablecer: Apague ia aspiradoray des-
enchufe el cord6n del tomacorriente para permitir
que la aspiradorase enfrte Busque y saquelas
obstrucciones,si es necesario. Examine tambi_n
y reemplace cualquler flttro obstruido. Espere
aproximadamente 50 minutes y enchufe la aspi-
radora y volt_ela para ver si el protector de!
motor se ha reajustadoo En algunos cases, [a
unidad puede volver a arrancar sebitamente, NO
LA DEJE desatend|da.
11

INCIONAMIEI
La aspiradoracrea succiSno aspiraci6n que fevanta
la tierra. La tierra es impulsada a trav{_sde las
vfas de flujo aire hasta la bolsa per una r&pida / ./.._....i._._..,.
corriente de aire.La boEsapara porvopermite el _. _..u.._--_<
flujo de aire, pero atrapa la tierra
Para Iograrlos mejores resultados de lim- /f/./
pieza, mantenga abiertas las vias de z_///"
aireoExamineped6dicamente las ,/_e_.z t
&reasindicadas con asteriscos para .f',Y I
asegurarse de que no est_n bio- /e_/" 1t
queadas.Desconectede[ recep- /,,_ \
t&cufode revisarlJ
Filtro de
segurldad
del motor Filtrode
_. POLVD* k .I
CAMBIO DE LA BOLSA
La bolsa debe cambiarse seguido para Iograrlos
mejores resuitadosde timpieza El indicadorde per-
formance(en afgunosmodelos) espeeificar_cu&ndo
la botsadel polvonecesita ser carnbiada o la corri-
ente de aire est&bfoqueada NOTA: Consuitela
PiEZASY CARACTERISTICASpara determinar el
Nc',de labols&
1, Desconecte el cordSn
e!6ctrico de taclavija de la
pare&
2. Quite la manguera de la
aspiradora.
3_Tire del pestillo de la tapa
haciafuera y hacia arriba;
luego levante ia tapa det
recept,_culo
4. Destrabela pestafia
de cart6n del montaje
rojo de labotsa empu-
jandohacia afueray
tirandohacia arriba.
5,Saque}a bolsade!
montajerojo,
Ftltrode .,,
seguridad/
delmotor,_
6, Revisey
cambie, cuando
sea necesario,el
filtro de seguridad
defmotor
7, El montajerojo de la bolsase inclinar_hacta
adelantedespu6s de que retirela bolsa,
& Gire hacia abajo el
sopode para labolsa
roja y parainsertar ta
boise enlasranuras
empuje hacia abajo
hasta que lasfeng_3etas
de cart6n encierren
seguramenteen las
posicionesapropiadas
cornse ve en el diagra-
ma
9. Reempiacey cierrecon cerrojo fatapa de[ tanque,
10,lntroduzca la mangueraen el recept_culo.
11,Conecteel cord6n ei_ctricoen la clavija de la
pared
• CUIDADO ......................
NUNCA REUTILICE UNA BOLSA PARA
POLVOoLos materiates muy fines, tales
coma desodorantes para alfombras, talco
facial, polvo fine, yeso, holltn, pelusa de
atfombras nuevas, etc., pueden atascar la
bolsa y causar que se rompa antes de que
est6 tlena. Gamble la belsa m_.sseguido
cuando aspire este tipo de materiales.
12
1. Desconecteel cord6n e!_clricode la ctavijade la
pared.NO choreeagua sobre la aspiradora.
2. Limpie elexterior con untrapo suave y limpio, que
ha side exprimidodespu_s de remojar en una solu-
ci6n de agua y detergenteltquido ligero.Seque el
exterior conun tropeseco despu_s de limpiar
3.,Limpiela superficieexterior detrecept&culoy de
los accesorios pardreducirla electricidad est&t[cay
la acumulaci6nde po[vo
NO USE LOS ACCESORtOSSI ESTANMOJA-
DOS.
E
CUIDADO
Los accesorios que se utilicen en _reas
sucias, debajo del refrigerador_no deben
usarse en otras superficies sin antes set
lavados. Podrlan dejar marcas.
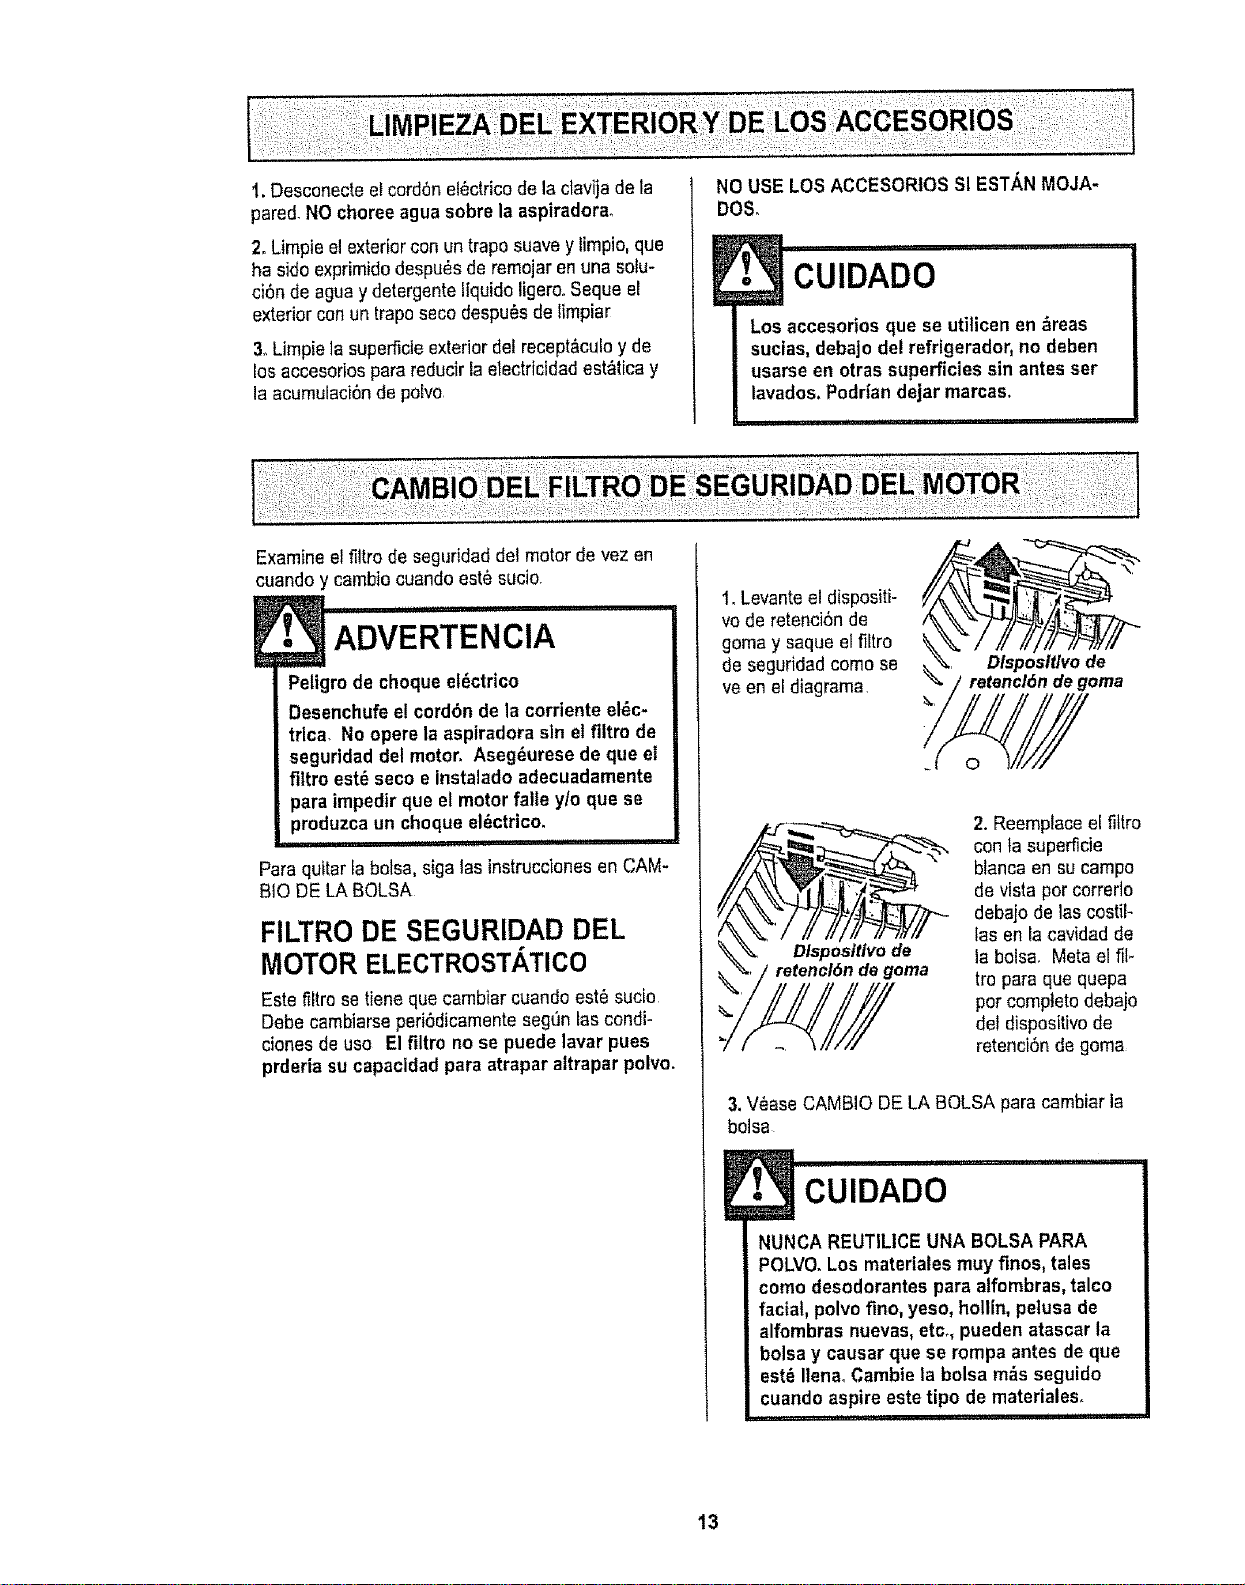
Examine el filtro de segufidad del motor de vez en
cuando y cambiecuando est_ sucio.
ADVERTENClA
Peligro de cheque el_ctrico
Desenchufee! cord6n de la corriente el_c-
trlca. No opere la aspiradora sin el filtro de
seguridad det motor. Aseg_urese de que el
filtro est_ seco e instalado adecuadamente
para impedir que el motor falle y/o que se
produzca un cheque el_ctrico.
i, !11 iiii , i1,11I,
Para quitar [abelsa, sigalos instruccionesen CAM-
BIO DE LA BOLSA
FILTRO DE SEGURIDAD DEL
MOTOR ELECTROSTATICO
Este filtrose tieneque cambiar cuando est_ suc[o
Debecambiarseperi6dicamente segt'Jntascondi-
clones de use El filtro no se puede lavar pues
prderia su capaoidadpara atrapar altrapar polvo.
1. Levanteel dispositi-
vo de retenci6nde
goma y saque elfiltro
de seguridad come se
ve en el diagrama
Dlsposlt/vode
retencl6ndegoma
_.,
Dlsposltlvo de
de goma
2. Reemplaceel fittro
con ta superficie
blanca en su campo
de vista per correflo
debaio de loscostik
los en facavidad de
la bolsa. Meta el fil-
tro pare que quepa
per comptetodebajo
del dispositivo de
retenci6n de goma
3, V_ase CAMBiO DELA BOLSA para cambiar la
bolsa
E_ I i i,ill
CUIDADO
NUNCA REUTILICE UNA BOLSA PARA
POLVO.Los materiales muy fines, tales
come desodorantes para alfombras, talco
facial, polvo fine, yeso, hollin, petusa de
alfombras nuevas, etc., pueden atascar la
bolsa y causar que se rompa antes de que
est_ Ilena. Cambieta bolsa m_s seguido
cuando aspire este tipo de materiales.
13
!i_ ADVERTENClA -
Peligrode cheque el_ctrico
No opere con un filtro de escapebloqueado
o sin el fi]trode escape e la cubierta del fit-
tro de escape instalados.
!, i1!, ,111,
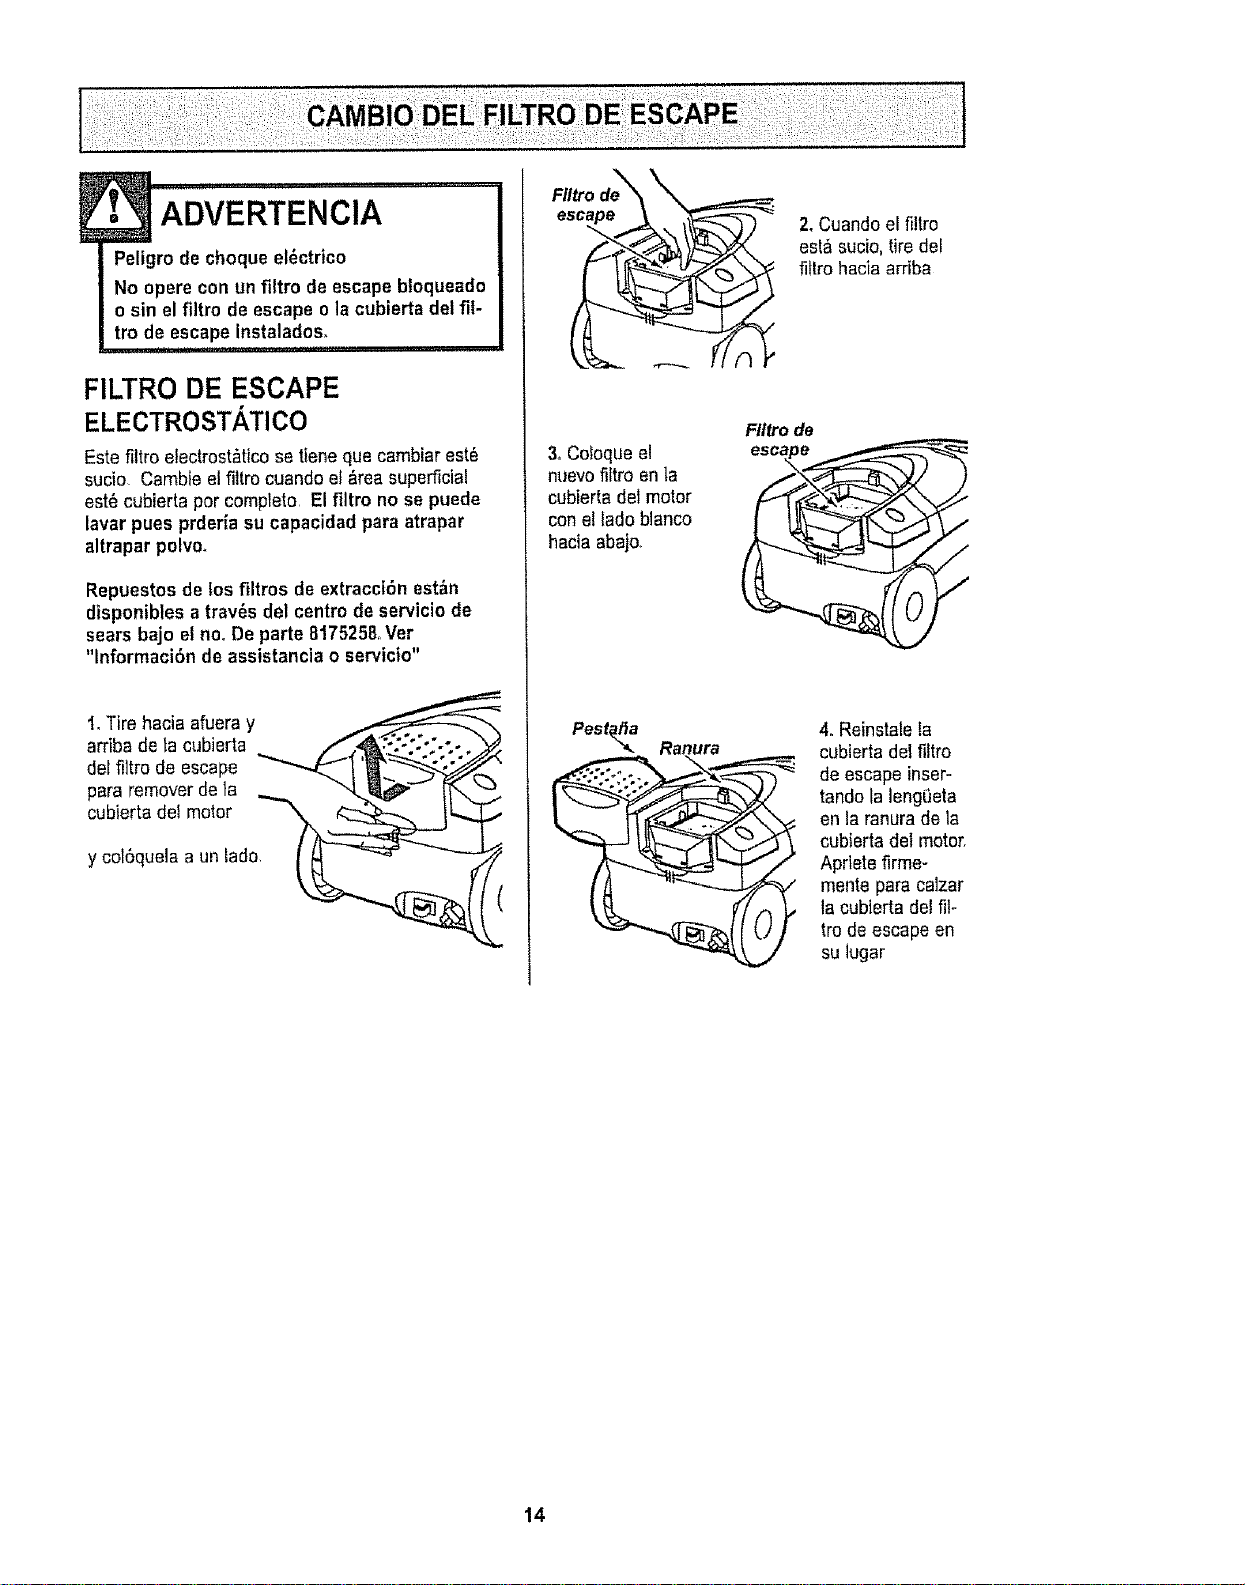
FILTRO DE ESCAPE
ELECTROSTATICO
Este filtro electrost_tico se tiene que cambiar est_
sucio Cambie el filtro cuando el &rea superficial
est_ cubierta per complete El filtro no se puede
lavar pues prderia su capacidadpara atrapar
altrapar polvo.
Repuestos de los filtros de extraccl6nest&n
disponibles a trav_s del centre de servicio de
sears bajo elno. De parte 817525&Ver
"lnformaci6nde assistancia o servicio"
I, Tire hacia afueray
arriba de la cubierta . .f 4_\'::.:.-:.;. o
lt,odee,cape
para remover de la ,_... "'_P-'_ _-..,,_
c ,,or,,Oo, o,o,
y col6quela a un tada I _ _ -"_--_
3, Coloque el
nuevofiltro en la
cubierta del motor
conel lade blanco
hacia abajo.
Pest_a Ranura
2. Cuandoel filtro
est& sucio,tire del
fittro haciaarriba
Flttrode
S
4. Reinstalela
cubierta del filtro
de escape inser-
tando la lengeeta
en la ranura de la
cubierta del motor.
Apriete firme-
mente para calzar
la cubterta del ill-
tro de escape en
su lugar
14
Sfempre deber_n seguirse todas las precau-
clones de segurtdad al limplar y dar servicio a
la POWER-MATEFMo
E• ADVERTENCIA
Petfgrode choque el_ctrico o lesi6n corpo-
ral
Desconecte la unidad antes de ltmpiarla o
darle servlcio.De 1ocontrario podrfa pro-
ducirse un choque el_ctrico ocausar
tesi6n corporal si la aspiradoraarranca de
manera imprevista.
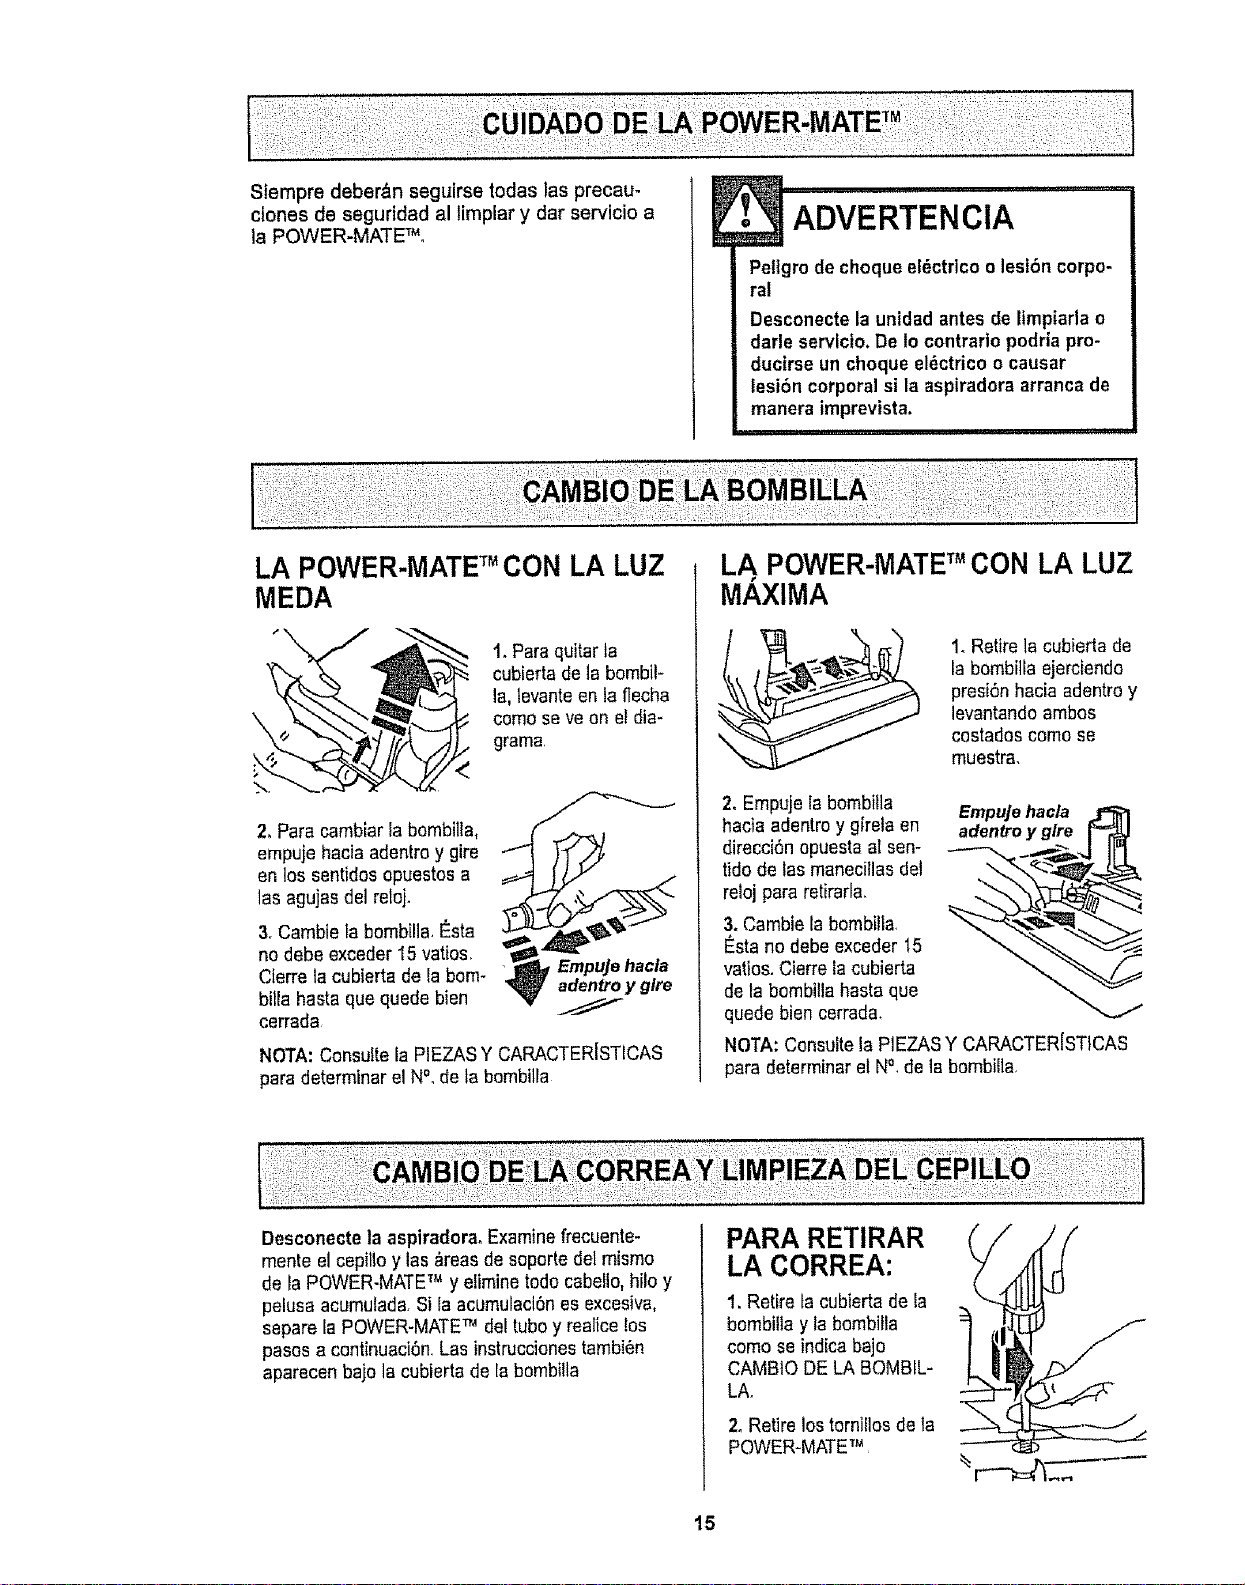
LA POWER-MATETM CON LA LUZ
MEDA
t. Para quitarla
cubiertade la bombil-
la, levanteen te flecha
como seve on el dia-
grama
<
">,.
2. Pare camblar la bombilla, /j_._j
empuje hacia adentro y gire
en los sentidos opuestos a
1asagujasdet reloj. ,_
3. Cambie ta bombilla.Esta
no debe exceder 15 vatios,
Empujehacla
Cierre la cubiertade laborn- _, adentroyglre
billa haste que quede bien //
cerrada
NOTA: Consulte la PIEZASY CARACTERISTICAS
pare determinar el N%de tabembiila
LA POWER-IVlATETM CON LA LUZ
MAXIMA
1_Retire la cubierta de
Is bombilla ejerciendo
presi6n hacia adentroy
levantando ambos
costados como se
muestra_
2, Empuje la bombilla Empujehacla
hacia adentroy girela en adentro y glre
direcci6n opuestaal sen-
tido de las manecillasdel
reioj pare retirarla, ""--
3. Cambie la bombilla
I_stano debe exceder 15
vatios. Cierre la cubierta
de la bombillahasta que
quede bien cerrada,
NOTA:Consulte la PIEZASY CARACTERJSTICAS
pare determinarel N°, de la bombi{la
Desconecte]a aspiradoraoExamine frecuente-
mente el cepillo y las &reasde soporte del mismo
de laPOWER-MATETM y elimine todo cabello,hilo y
pelusa acumulada.Si Ia acumulaci6nes excesiva,
separe la POWER-MATETM del tuboy realicelos
pesos a continuaci6n.Las instruccionestambi_n
aparecen bajo la cubierta de la bombilla
PARA RETIRAR
LA CORREA:
1. Retire tacubierta de la
bombilla y la bombilla
como se indicabajo
CAM810 DE LA BOMBIL-
LA.
2. Retire los tornillos de la
POWER-MATETM
/
15

3oVoReeta _.
POWER'MATET'_ _"'_!
Para quitar la
cubierta, inserte
el destornillador
en las pestanas
de la cubierta de
ambos costados
y gfrelo para lib-
erar las pes-
tafias
6n
Pestafia
4. Volteela
POWER-MATETM
hacia ardba
Oprimala gula de
iiberaci6ny baje
el dispositivogira-
torio tncline la
cubierta de atr_s
hacia adelante
hasta que se des-
prenda_
5,Inserte el
destomitlador
cuidadosamente
en cada soporte
del cepillo y
girelo para retirar
el cepiltode la
base.
6,Retire la
banda desgas-
tada.
Soporte
del ceplllo _=
Base
7, Retire los
soportes del cepi-
1to;examine y lira*
pie las _reasde
soporte del cepillo
En la ENSAMBLE
DELCEPILLO se
proporcionauna
ilustraci6ndo todo
el ensamble def
cepillo
PARA CAMBIAR LA CORREA:
@
1.Reinatale las arandelasy lossoportes del cepillo
en el ensamble
2. Instaleuna '_(',/_
correa nueva
sobre el
impulsor dei
motor y luego
sobre la rueda
dentada del
cepilto,
Cepltlo
Soporte Ruedadentada
delceptllo celceplllo
NOTA:ConsultetaP1EZASY CARACTER[STICAS
para determinar el N°. de correa.
3oInstalelos soportes
del cepillo sobre la
baserAseg_rese de
que los soportes no
est6n invertidos,
\
4. Alinee ta \
parte frontal de
\
ta cubierta con
tabase
Coioqueta
cubierta sobre
el borde
detanterode la
base como se
muestra
Cubterfa Base
5, Incline la cubierta
hacia atr_s Ejerza
presi6n firme sobre
la cubierta hasta que
1aspestafias lab
erales queden fijas
en posici6n Instale
los tornillosde la
cubierta, la bombilla
y la eubierta de la
bombilla
16

E ADVERTENCIA ...............
Peligro de cheque el_ctrico o tesl6n corpo-
ral
Desconecte la untdad antes de timpiarlao
darle servicio, De lo contrario podriapro-
ducirse un cheque el_ctrieo o causar
lesi6n corporal si la aspiradora arranca de
manera tmprevista.
!1 i i1!!, i,i 111 i,qll
PARA EXAMINAR EL CEPILLOS:
Barra de soporte
de }a base
Cambie rnazodel
cepillocuando
est_n desgastados
hasta el nivelde
las barrasde
soporte de la base
PARACAMBIAR MAZe DEL
CEPILLO:
1.Retire la cubierta, cerrea y ensamble del cepilLo
de taPOWER-MATETM Consulte "Pararetirar la cor-
rea"bajo CAMBIO DE LA CORREAY LIMPIEZA
DEL CEPILLO
2.Retire tasoporte del cepillo,arandelas, tornitlos,
topedeJcepilto,rueda dentadadel cepilfosla topes
de las ensamble del cepillo
3. Armeel ensarnbledel cepillo Paraalinear los ori-
ficios de Iostornillos del maze,tarueda dentada y el
tope del cepilfo,asegL_resede que la parte de la
cepitlodel tope del cepillo est_ alineada con las
cepillos del maze del cepitlo
4oCambie la correa, el ensamble del cepitlo,facu-
bierta de la POWER-MATETM, la bombiflay la eu-
bierta de la bombirla.Censulte"Para cambiar la
correa" bajoCAMBIO DELA CORREAY LIMPIEZA
DELCEPILLO
Arandela
0
Tapade/
extreme
Unldad del agltador
Brlda de la
ruedadentada Tapadel
delceptllo ceplllo Tapadel
Tornfllo extreme
Rueda dentada Arandela
del ceplllo
17
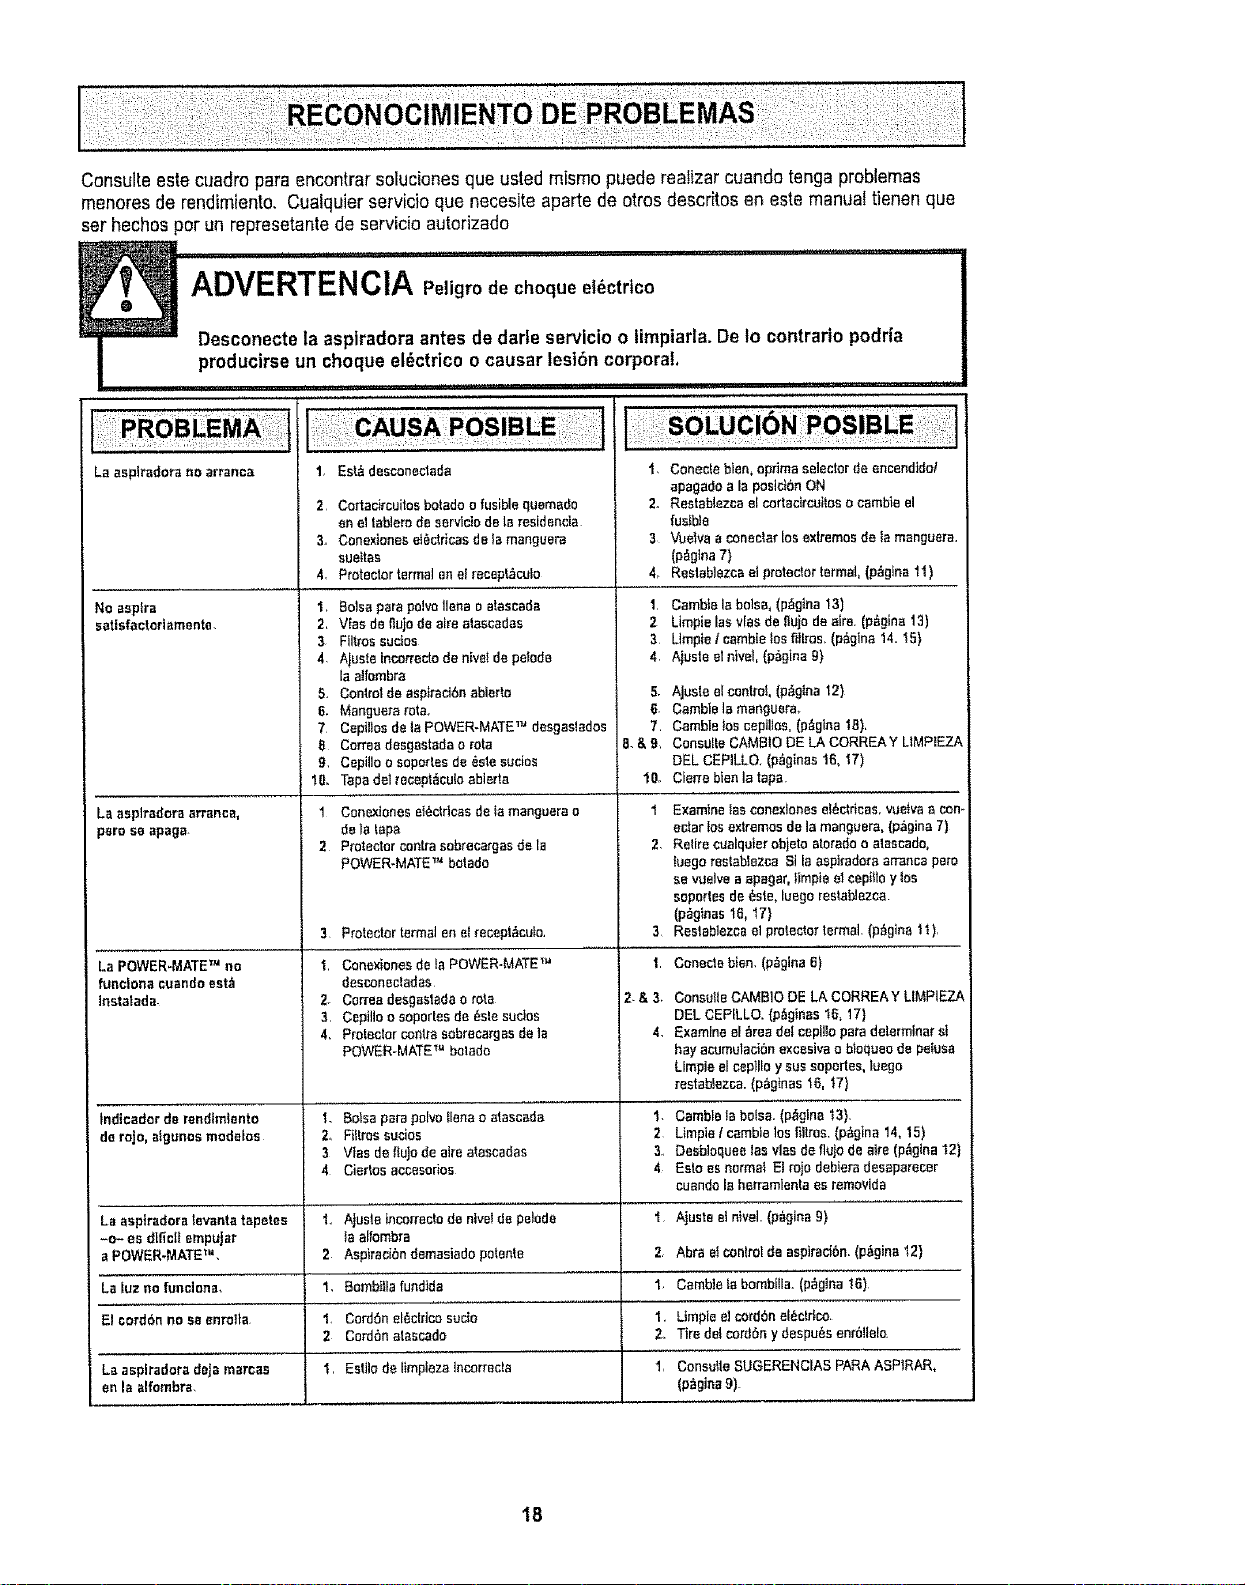
Consulte este cuadro pare encontrarsoluciones que usted mismopuede realizar cuandotenga problemas
menores de rendimiento, Cualquier servicio qua necesiteaparte de otros descritos en este manualtienen qua
set hechos per un represetantede servicio autorizado
_1 iiiii i1'1 I i i,r ,.., i u':u:',url,
ADVERTENCIA Peligrode ehoque et6ctrtco
=1I'II"= Desconeetela asplradora antes de darle servicio o limpiarlaoDe to contrario podria
producirseun cheque el_ctrico o causar lesi6n corporat.
..... ! ................. ii,, ,111ii,
La asplrado_a no arranca
No esptra
eatisfactorlamente
La asplradors arrance,
pare seapaga.
La POWER-MATE TM no
funclona cuande eet_
insta|ada_
Indlcadorde rendtmtento
derojo, _tgunosmodelos
La aspiradora tevanta tapetes
-o_ es d|fictt empuJer
a POWER.MATE"L
La luz ne funclena,
El oord6n no se enrolta
Le asplradoradeje mercae
en la alfombra.
t, Est&desconecteda
2 Cortecircuitosbotado ofusiblequemedo
enelteblerode servlctodeIs resldencIa
3_ Conexioneset_ctricesdeIsmenguera
eueffes
4, Protectorformalenel recept_',cu_o
t, Boise pare polvo liens e alaecada
2, Vies de nujo de airs a_escados
3 FUtros euctes
4, Ajuste incorrecto de nivet de petode
la atfombra
5. Controt de aspiraci6n ablerto
6. Manguera _'ota.
7 Ceptnos de ta POWER-MATE TM dosgesledos
B Cortes desgasteda o rote
9, CepiUo o soportes de _ste sucios
10. Tape del recept_cuto ablerta
1 Conextones et_ctrtcas de ta manguera e
de latape
2 Protector centre sebrecarges delB
POWER-MATE '_ botado
3
2_
3,
4.
Protector termal en el teceptAcuto.
Conexiones de la POWER-MATE TM
desconectadas
Cortes desgastada o rote
Cepillo o soportes de _ste sucios
Protector _nlra sobrecargss de Is
POWER-MATE TM betado
1. Betas psrB poIvo flees o atasceda
2. Fittms sucios
3 Vtas de ftuJode airs atascadas
4 Ciertos accesodos
1., AJuste tricot(acre de ntvel de pelode
ta effombra
2 Aspirecibn demasiado potente
1. Bomb_tla fund_de
1, CordSn el_clrtce sudo
2 Cerd6n atsscedo
1, Esfilo de limpleza Incorrecle
1 Conecteblen, optimaselectordeencendidol
epagado ala poslc}6nON
2. Restablezcael cortacircuiteso cembteel
fusIb3e
3 VoeSvaaconectarlosextremesde la menguere.
(p,tgtna7)
4, Reslablozcael protectortermal, (p_ginail)
1, Cambie la boisa_ (p,ig_na 13)
2 Limpie las vies de ttujo de sire. (p_gina 13)
3 Utopia tcambIe los filtros. (p_gina t4.15)
4, AIuste el nfvet, (p_gina 9)
5. AJustoelcontrol,(p,igtna 12)
6. CambleIo menguera÷
7 CambleIos cepiltoe,(p_glnaIS),
B.&9, ConsUltsCAMBtODE LA CORREAY L1MP_EZA
eEL CERLLO. (p_ginas1B,17)
10_ ClerrobienIa tape
1
3
I
2&3_
4,
2
4
Examlne Ias conexlones et_ctricas, vue_va a con°
actor los extremes de la manguera, (p_gina 7)
Retire cuelquier obiete aterado o atascado,
!uego restablezr_.a Sl la aepiradota arrance pete
se vuelve a apagar, limpie el cepitlo y tos
soportes de _ste, luego reslablezea.
(p_ginss t6, 17)
Restablezce el protector termaL (p_gina '_1),
Conecte bien. (p_gine fi)
Consuite GAMBle DE LA CORREA Y LIMPIEZA
DEL CEP{LLO. {p=fginas !_, 17)
Examine el _rea det cepllto para determiner st
hay acumulaci6n excesiva o btoqueo de pefusa
Limpie el cepIIIo y sue sopertes, luego
resteblezca. (pagtnas 16, _7}
Cambie ta bolsa. (p_glne t3).
Limpie /cambie los fillros. (p_gina 14, 15)
Desbloquee los vies de flu)o de a_e (p_gina 12)
Esto es normat El rojo debiers desaparecer
cuendo Ie herramienta es removide
Ajuste e_nivel. (p_gina 9)
2, Abra et controlde aspirac_.Sn.(p&gina "12)
I, C_mble Ia bombIIIa,"iP_glna I_)
I, LImpiee] cord6nel_cIdco
Z, Tire del cord6n y despots enr6Uel_
1, Consutte SUGERENCIAS PARA ASPIRAR,
(p_gine 9)
1B

For
repair of major brand appliances in your own home...
no matter who made it, no matter who sold it!
1.800-4-MY.HOME ® Anytime, day or night
(1-800-469-4663) (USA, and Canada)
www.sears.com www,searsoca
For repair of carry-in products like vacuums, lawn equipment, and
electronics, call for the nearest Sears Parts and Repair Center.
1-800-488-1222 Anytime, day or night (U S A only)
WWWoSears.com
For the replacement parts, accessories and owner's manuals
that you need to do-it-yourself, call Sears PartsDirectSM!
1-800-366-PART
(1-800-366-7278)
6 am - 11 p_m°. 7 days a week
(USA° only)
www.sears.com/partsdirect
To purchase or inquire about a Sears Service Agreement
or Sears Maintenance Agreement:
1-800-827-6655 (U,S.A,)
7 a.m. - 5 plm, CST, Mon.- Sat.
Para pedir servicio de reparaci6n a
domicilio, y para ordenar piezas:
t-888-SU.HOGAR sM
(I-888-784-6427)
1-800-361-6665 (Canada)
9 &m - 8 p.moEST, M - F, 4 p.moSat.
Au Canada pour service en fran_ais:
1-800-LE-FOYER _'Tc
(1-800_533-6937)
www.sears.ca
I.omeOO'Oentr O 01
© Sears, Roebuck and Co,
® Registered Trademark I TMTrademark f s_aService Mark of Sears, Roebuck and Co
® Marca Registrada / Ta Marca de F&brica I sM Marca de Servicio de Sears, Roebuck and Co
Mc Marque de commerce / MoMarque d_pos_e de Sears, Roebuck and Co
19