Dual Fuel Range
Slide-inmodels
Use& CareGuide
Estufa de fuel dual
Modelos deslizables
Manual de usoy cuidado
Models/Modelos 790.45712, 790.45714, 790.45719 I-
ra
-I,,
r"
_182oo86o(oio9)P,ev,B SearsRoebuckand Co,,Hoffman Estates,|L60179 U.S,A. ,._.sears.com
Table of Contents
Product Record ............................................................................ 2
Slide-in Range Warranty ............................................................ 2
iMPORTANT SAFETY INSTRUCTIONS ..................................... 3-5
Selecting Surface Cooking Utensils ...................................... :.... 6
Specialty Pans & Trivets ............................................................. 6
Canning Tips & information ....................................................... 7
Range Features ........................................................................... 8
Control Pad Functions ................................................................. 9
Temperature Conversion ........................................................... 9
Setting the Clock ........................................ ;.............................. 10
Uquefied Petroleum (Propane) Gas Conversion ..................... 11
Surface Cooking ................................................................... 11-12
• Flame Size................................................................................ 11
• Proper Burner Adjustment ....................................................... 11
• Placement of Burner Basesand Caps ....................................... 11
• Placement of Burner Grates ..................................................... 12
• Setting Surface Controls .......................................................... 12
Setting Warmer Drawer Controls (if equipped) ..................... 13
Oven Vent(s) and Racks ............................................................ 14'
CHanging Oven Ught ................................................................ 14
Setting Oven Controls ............................. _........................... 15-19
• ToSet or Change Temperature for Normal Baking ................... 15
• To Set Control for Continuous Bake
or 12 Hour Energy Saving ........................................................ I S
• To Set Control for Oven Lockout .............................................. 15
• Timed Bake Feature ................................................................. 16
• Oven Baking Information ........................................................ 17
• Air Circulation in the Oven ...................................................... 17
• To Broil ............................................................................... 18-19
Oven Cleaning ...................................................................... 20-21
General Cleaning ................................................................. 22-26
Recalibrating Your Oven Temperature ................................... 26
_void Service Checklist ....................................................... 27-28
Espa5ol ...................................................................................... 29
Note / Nota ......................................................................... 57-59
Sears Service ............................................................... Back Cover
Product Record
In this space below, record the date of purchase, model and serial number of your product. You will find the model and serial number
printed on an identification plate. The identification plate is located on the left side of the range and are visible when the oven door is
open or on the inside of the drawer along the side of the frame.
Model No. 790. Date of Purchase
Serial No.
Save these instructions and your sales receipt for reference.
Slide-in Range Warranty
FULLONE YEAR WARRANTY ON ALL PARTS
If, within one yearfrom the date of installation, any part failsto function properly due to a defect in material or
workmanship, Searswill repair or replace it, at our option, free of charge.
Your ceram cglasssmoothtop ts covered byan add Uonal 2nd through 5th year limitedwarranty. Thiswarranty
providesfor replacement for any defective surface heating element, deteriorated rubberized-siliconeseal,or glass
smoothtop that cracksdue to thermal breakage. Damage or breakage due to customer abuse isnot covered by
thiswarranty.
If the product issubjected to other than private residential use, the above warranty is effective for only 90 days.
WARRANTY SERVICEISAVAILAI_LEBY CONTACTING SEARSAT 1-800-4-MY-HOME®.
Thiswarranty gives you specificlegalrights, and you may also haveother rights which varyfrom state to state.
SearsRoebuck and Co., Dept. 817WA Hoffman Estates, II 60179
WE SERVICEWHAT WE SELL
Your purchase has added value because you can depend on Sears Home(_entral® for service. With over 12,000
trained repair specialists and accessto Over4.2 mil ion parts and accessories, we have the tools, parts, knowledge
and skills to ensure our pledge: We Service What We Sell.
Sears Maintenance Agreements
Your Kenmore appliance isdesigned: manufactured and tested to provide years of dependable operation. Yet any
major appliance may require service_from time to time. The Sears Maintenance Agreement offers you an
outstanding service program, affordably priced.
The SearsMaintenance Agreement
• Is your way to buy tomorrow's service at today's price.
• Eliminates repair bills resulting from normal wear and tear.
• Provides for non-technical and instructional assistance.
• Even if you don't need repairs, provides an annual Preventive Maintenance Check,
at your request, to ensure that your appliance isin proper running condition.
Some limitations apply. Formore information, call 1-800-827-6655.
For information concerning SearsCanada Maintenance Agreements, call 1-800-361-6665.
2
IMPORTANT SAFETY INSTRUCTIONS
Read all instructions before using this appliance.
Save these instructions for future reference.
This manual contains many important safety messages. Always read and obey all safety messages.
The safety alert symbol 11_ calls your attention to safety messages that inform you of hazardsthat can kill or hurt you or
others, or cause damage to the product.
Indicates an imminently hazardous situation which, if not avoided may result in death or serious injury.
Indicates an imminently hazardous situation which, if not avoided may result in minor or moderate injury, or
product damage.
All safety messages will identify the hazard, tell you how to reduce the chance of injury, and tell you what can happen if the
instructions are not followed.
If the information in this manual is not followed
exactly, a fire or explosion may result causing property damage,
)ersonal injury or death,
FOR YOUR SAFETY:
-- Do not store or use gasoline or other flammable vapors
and liquids in the vicinity of this or any other appliance.
-- WHAT TO DO IF YOU SMELL GAS:
• Do not try to light any appliance.
• Do not touch any electrical switch; do not use any phone
in your building.
• Immediately call your gas supplier from a neighbor's
phone. Follow the gas supplier's instructions.
• If you cannot reach your gas supplier, call the fire
department.
-- Installation and service must be performed by a qualified
installer, servicer or the gas supplier.
®
®
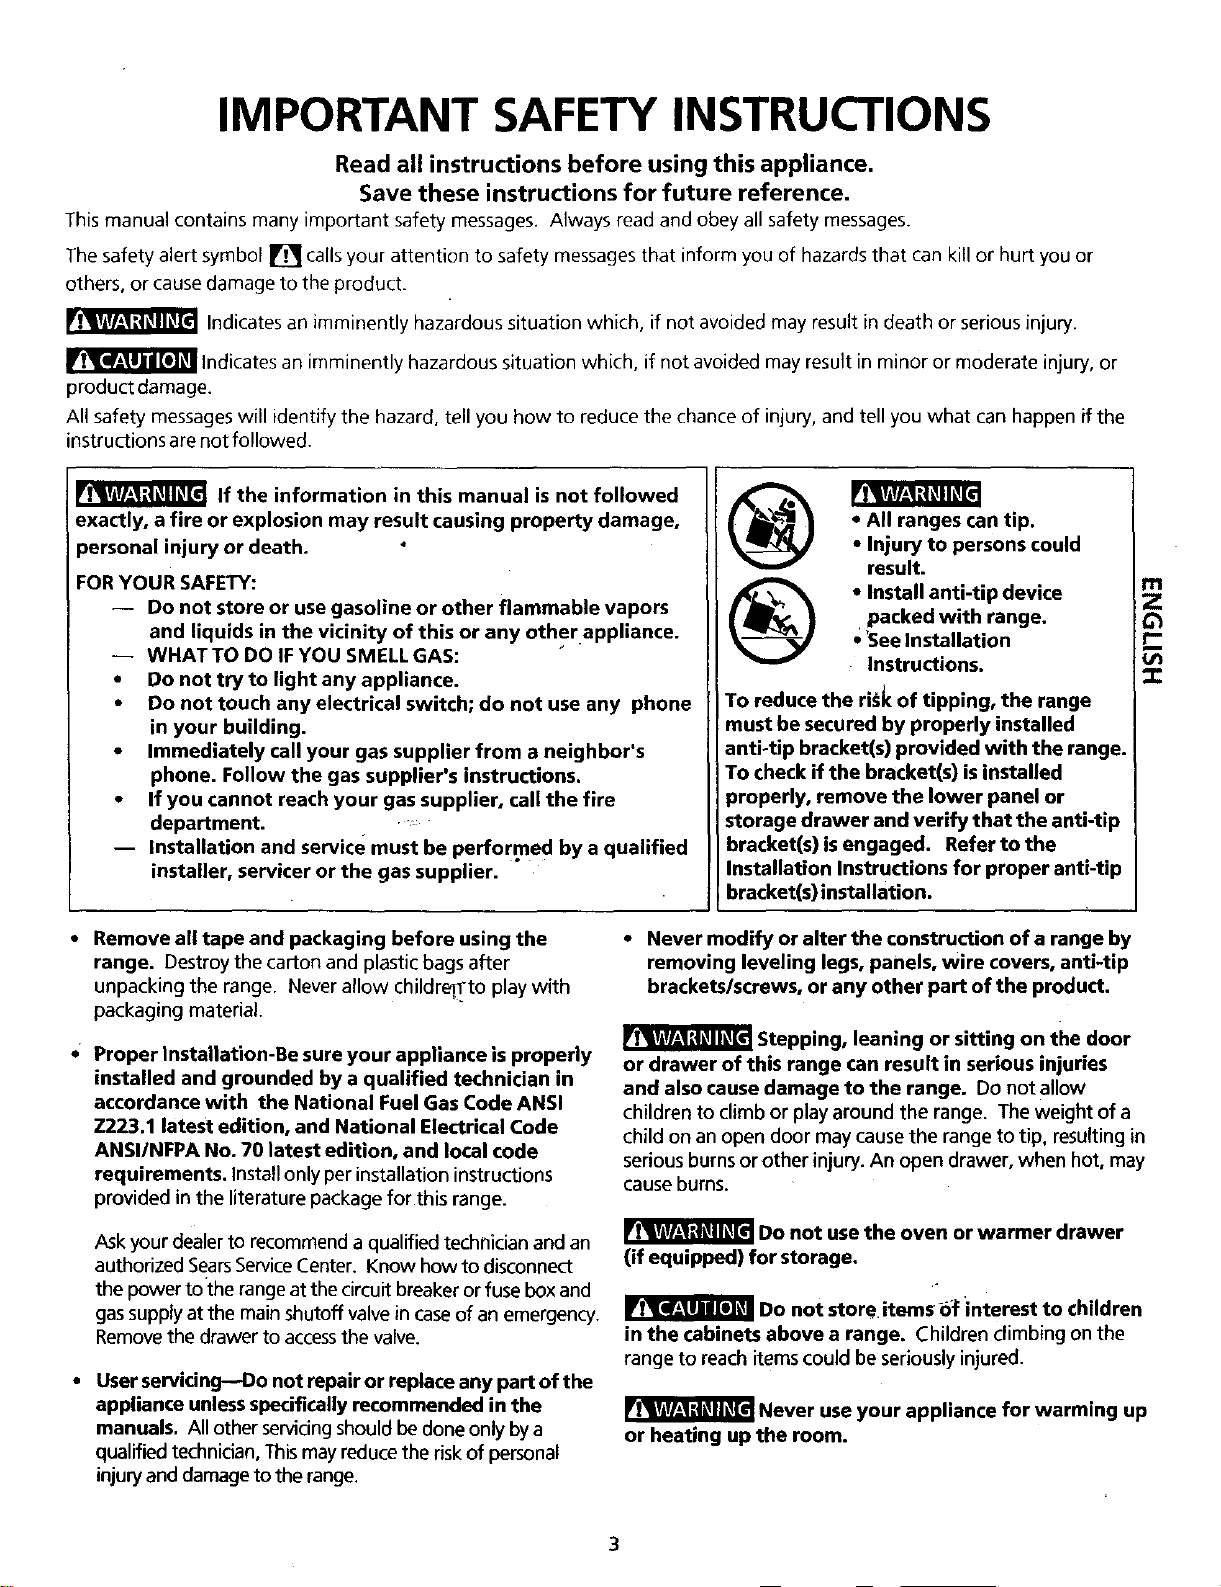
• All ranges can tip.
• Injury to persons could
result.
• Install anti-tip device
packed with range.
; 'SeeInstallation
Instructions.
To reduce the rii_ of tipping, the range
must be secured by properly installed
anti-tip bracket(s) provided with the range.
To check if the bracket(s) isinstalled
properly, remove the lower panel or
storage drawer and verify that the anti-tip
bracket(s) isengaged. Refer to the
Installation Instructions for proper anti-tip
bracket(s) installation.
q-
• Remove all tape and packaging before using the
range. Destroy the carton and plastic bags after
unpacking the range. Never allow childre_to play with
packaging material.
• Proper Installation-Be sure your appliance is propedy
installed and grounded by a qualified technician in
accordance with the National Fuel Gas Code ANSI
Z223.1 latest edition, and National Electrical Code
ANSI/NFPA No. 70 latest edition, and local code
requirements. Installonlyper installationinstructions
provided in the literature package for this range.
Ask your dealer to recommend a qualified technician and an
authorized SearsServiceCenter, Know how to disconnect
the power tothe range at the circuit breaker or fuse box and
gas supply at the main shutoff valve in caseof an emergency.
Removethe drawer to accessthe valve.
• User servidng--Oo not repair or replace any part of the
appliance unlessspecifically recommended in the
manuals. All other servicingshould be doneonlybya
qualified technician,This may reducethe riskof personal
injuryand damageto the range.
• Never modify or alter the construction of a range by
removing leveling legs, panels, wire covers, anti-tip
brackets/screws, or any other part of the product.
Stepping, leaning or sitting on the door
or drawer of this range can result in serious injuries
and also cause damage to the range. Do not allow
children to climb or playaround the range. The weight of a
child on an open door may cause the range to tip. resultingin
serious burnsorother injury. An open drawer, when hot, may
cause burns.
_Do not use the oven or warmer drawer
(if equipped) for storage.
Do not store items _f interest to children
in the cabinets above a range. Children climbing on the
range to reachitemscould be seriouslyinjured.
Never use your appliance for warming up
or heating up the room.
3
IMPORTANT SAFETY INSTRUCTIONS
• Storage in or on Appliance_Flammable materials should
not be stored in an oven, near surface burners or in the
drawer (if equipped). This includes paper, plastic and cloth
items, such as cookbooks, plasticware and towels, aswell as
flammable liquids. Do notstore explosives,suchasaerosolcans,
on or nearthe appliance. Flammablematerialsmayexplode and
result in fire or property damage.
• Do not leave children alone_Children should not be
left alone or unattended in the area where appliance
is in use. They should never be allowed to sit or stand on
any part of the appliance.
• DO NOTTOUCH SURFACEBURNERS, AREASNEAR
THESE BURNERS,OVEN HEATING ELEMENTSOR
INTERIOR SURFACESOFTHE OVEN ORWARMER
DRAWER (if equipped). Boths_Jrfaceburners and oven
heating elements may be hot even though they are dark in
color.Areas near surface burnersmay become hot enough
to causeburns. During and after use,do not touch, or let
clothing or other flammable materials touch these-areas
until they havehad sufficienttime to cool.Among these
areas are the cooktop, surfacesfacing the cooktop, the
oven vent openings and surfacesnear these openings,
oven door andwindow.
• Wear proper apparelmLoose-fitting or hanging
garments should never be wQrn while using the
appliance. Do not let clothing orother flammable
materials contact hot surfaces.
Use proper pan size---Adjust flame size
so it does not extend beyond the edge of the utensil.
The useof undersized utensilswill expose a portion of the
burner flame to direct contact and may result in ignition of
clothing. Proper relationship of utensilto flamewill also
improve efficiency.
Do not usestove top grills on the burner
grates of sealed gas burners. If you use a stove top g'rill on a
sealed gas burner, it will cause incomplete combustion and
can result in exposure to carbon monoxide levelsabove
allowable current standards. This can be hazardous te-your
health.
Electronic controllers can be damaged by
cold temperatures. When you use your appliance for the
first time, or if it has not been used for a long period of
time, make sure that it has been exposed to a
temperature above 0°(_/32°F for at least 3 hours before
connecting it to the power supply.
IMPORTANT INSTRUJCTIONS FOR USING YOUR
COOKTOP
• Know which knob controls each surface heating unit.
Always turn the knobto the LITEpositionwhen igniting
the burners.Visually checkthat burner haslit. Then adjust
the flame so itdoes not extend beyond the edge of the
utensil.
• Do not use water or flour on grease fires_Smother
the fire with a pan lid, or use baking soda, a dry
chemical or foam-type extinguisher.
• When heating fat or grease, watch it closely. Fator
grease may catch fire ifallowed to become too hot.
Use proper pan size. This appliance isequipped with one
or more surface burnersof different sizes.Selectutensils
having flat bottoms largeenough to coverthe surface
burner. The useof undersizedutensilswill exposea portion
of the surfaceburner to directcontact and may resultin
ignition of clothing. Properrelationshipof utensilto the
surface burner will also improve efficiency.
In case of fire or gas leak, be sure to turn
off the main gas shutoff valve.
• Use only dry potholders--Moist or damp potholders
on hot surfaces may result in burns from steam. Do
not let potholders touch hot heating elements. Do not use
a towel or other bulky cloth instead of a potholder.
• Do not heat unopened food containers--Buildup of
pressure may cause container to burst and result in
injury.
• Remove the oven door from any unused range if it is
to be stored or discarded.
IMPORTANT--Do not attempt to operate the oven
during a power failure. If the power fails, always turn
the oven off. If the oven isnot turned off and the power
resumes,the oven may begin to operate again (Food left
unattended could catch fire or spoil.)
Utensil handles should be turned inward and not
extend over adjacent surface burners. To reduce the
risk of burns, ignition of flammable materials, and spillage
due to unintentional contact with the utensil.
Never leave surface burners unattended at high heat
settings---Boilovers causesmokingand greasy
accumulations that may ignite, or a pan that hasboiled dry
may melt.
Protective liners_Do not (Jsealuminum foil to line oven
bottom or any other part of the appliance. Only use
aluminum foil as recommended for baking if usedas a
cover placedon the food. Any other useof protective
liners or aluminum foil may resultin a riskof electricshock
or fire or shortcircuit.
• Glazed cooking utensils_Only certain typesof glass,
glass/ceramic,ceramic, earthenware, or other glazed
utensils aresuitable for rangetop service without breaking
4
IMPORTANT SAFETY INSTRUCTIONS
due to the sudden change in temperature. Check the • Do not cover the broiler insert with aluminum foil.
manufacturer's recommendations for rangetop use. Exposed fat and grease could ignite.
• Do not use decorative surface burner covers. If a
burner isaccidentally turned on, the decorative cover will
become hot and possibly melt. Burns will occur if the hot
covers are touched. Damage may also be done to the
cooktop or burners because the covers may cause
overheating. -Air will be blocked from the burner and
cause combustion problems.
FOR GLASS COOKTOPS ONLY
• Do not clean or operate a broken cooktop_lf cooktop
should break, cleaning solutions and spillovers may
penetrate the broken cooktop and create a risk of electric
shock. Contact a qualified technician immediately.
• Clean cooktop glass with caution_lf a wet sponge or
cloth isusedto wipe spills on a hot cooking area, be
careful to avoid a steam burn. Some cleaners can produce
harmful fumes if applied to a hot surface.
• Do not place hot cookware on cold cooktop glass.
Thiscould cause glassto break.
• Avoid scratching the cooktop glass with sharp
objects.
IMPORTANT INSTRUCTIONS FOR USING YOUR
OVEN
• Use care when opening oven door or warmer _lrawer
(if equipped)--Stand to the sideof the range when
opening the door of a hot oven. Lethot air or steam
escape before you removeor replace food in the oven/
warmer drawer.
• Keep oven vent ducts unobstructed. The oven vent is
located at the rear of the cooktop. Touchingthe surfaces in
this area when the oven isoperating may cause severe
burns.Also,_do not placeplasticor heat-sensitiveitems on
or near the oven vent. Theseitems could melt or ignite.
• Placement of oven/warmer drawer (if equipped)
racks. Always place oven racksin desiredlocation while
oven/warmer drawer (if equipped) iscool. If rackmust be
moved while oven ishot useextreme caution. Use
potholders and graspthe rackwith both hands_to
reposition, Do not let potholderscontact the hot heating
elements in the oven/warmer drawer (if equipped).
Remove all utensilsfrom the rack before moving.
• Do not use the broiler pan without its insert. The
broiler pan and itsinsertallow dripping fat to drain and be
kept away from the high heat of the broiler.
• Do not touch a hot light bulb with a damp cloth.
Doing so could cause the bulb to break. Disconnect the
appliance or turn off the power to the appliance before
removing and replacing light bulb.
IMPORTANT INSTRUCTIONS FOR CLEANING
YOUR RANGE
• Clean the range regularly to keep all parts free of
grease that could catch fire. Exhaustfan ventilation
hoods and grease filters should be kept clean. Do not allow
grease to accumulate on hood or filter. Greasy deposits in
the fan could catch fire. When you are flaming food under
the hood, turn the fan on. Refer to the hood manufacturer's
instructions for cleaning.
• Kitchen cleaners and aerosols--Always follow the Ill
manufacturer's recommendeddirections for use. Beaware Z
that excessresiduefrom cleaners and aerosols may ignite
I'-
causing damage and injury:
:Z
SELF-CLEANING OVENS
• In the self-Cleaning cycle only clean the parts listed in
this Use and Care Guide. Before self-cleaning the oven,
remove the broiler pan and any utensils or foods from the
oven.
• Do not use oven cleaners--No commercial oven cleaner
or oven liner protective coating of any kind should be used
in or around any part of the oven.
• Do not clean door gasket--The door gasket isessential
for a good seal. Care shoutd be taken not to rub, damage
or move the gasket.
• Remove oven racks. Oven rackscolor will change if left in
the oven during a self-cleaning cycle.
The health of some birds is extremely
sensitive to the fumes given off during the self-deaning
cycle of the range. Move the birds to another well
ventilated room.
IMPORTANT SAFETY NOTICE
The California Safe Drinking Water and Toxic Enforcement Act
requires the Governor of California to.publiSh a list of substances
known to the state to cause cancer, birth defects or other
reproductive harm, and requires businesses to warn customers of
potential exposure to such substances.
SAVE THESE SAFETY INSTRUCTIONS
5
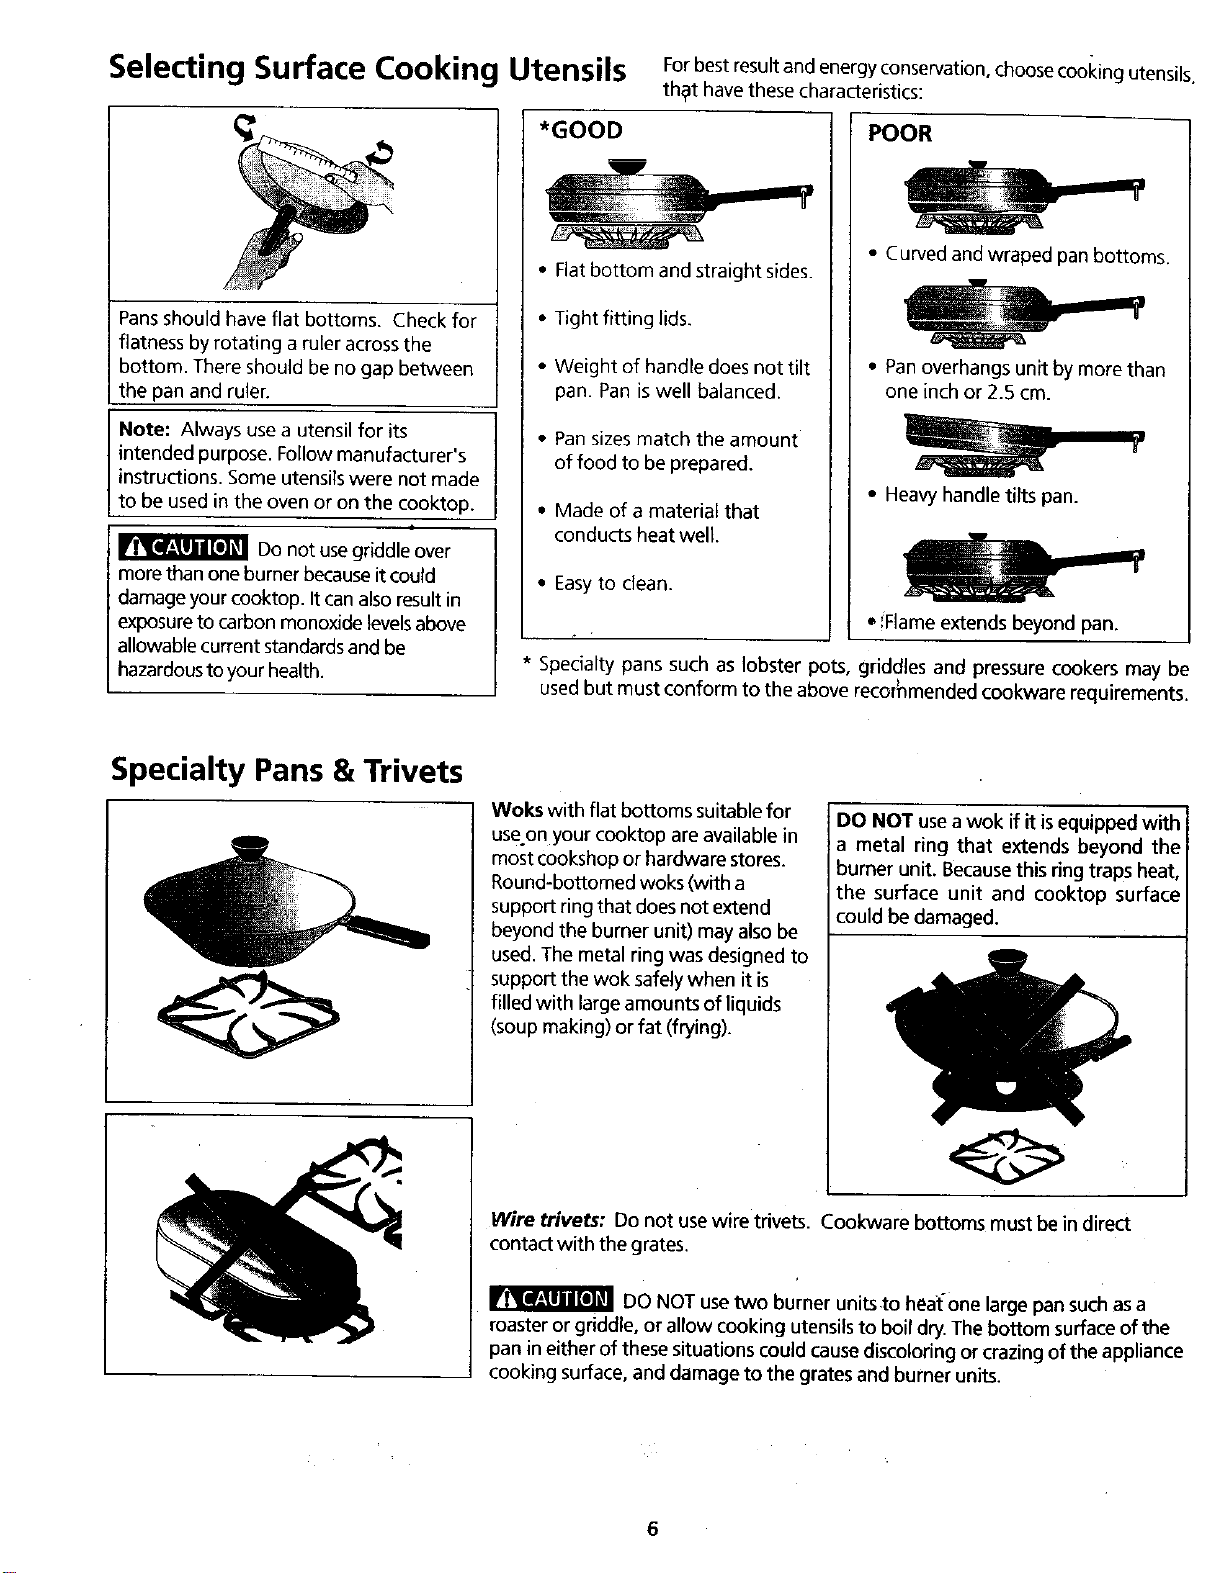
Selecting Surface Cooking Utensils Forbestresult and energy conservation, choose cool_ing utensils
thot havethese characteristics:
Pansshould have flat bottoms. Check for
flatness by rotating a ruler across the
bottom. There should be no gap between
the pan and ruler.
Note: Always use a utensil for its
intended purpose. Follow manufacturer's
instructions. Some utensils were not made
to be used in the oven or on the cooktop.
I
Do not use griddle over
more than one burner because it could
damage your cooktop. It can also result in
exposure to carbon monoxide levelsabove
allowable current standardsand be
hazardousto your health.
*GOOD
• Flat bottom and straight sides.
• Tight fitting lids.
• Weight of handle does not tilt
pan. Pan is well balanced.
• Pan sizes match the amount
of food to be prepared.
• Made of a material that
conducts heat well.
• Easyto clean.
POOR
• Curved and wraped pan bottoms.
• Pan overhangs unit by more than
one inch or 2.5 cm.
• Heavy handle tilts pan.
• ',Flameextends beyond pan.
* Specialty pans such as lobster pots, griddles and pressure cookers may be
usedbut must conform to the above recor_mended cookware requirements.
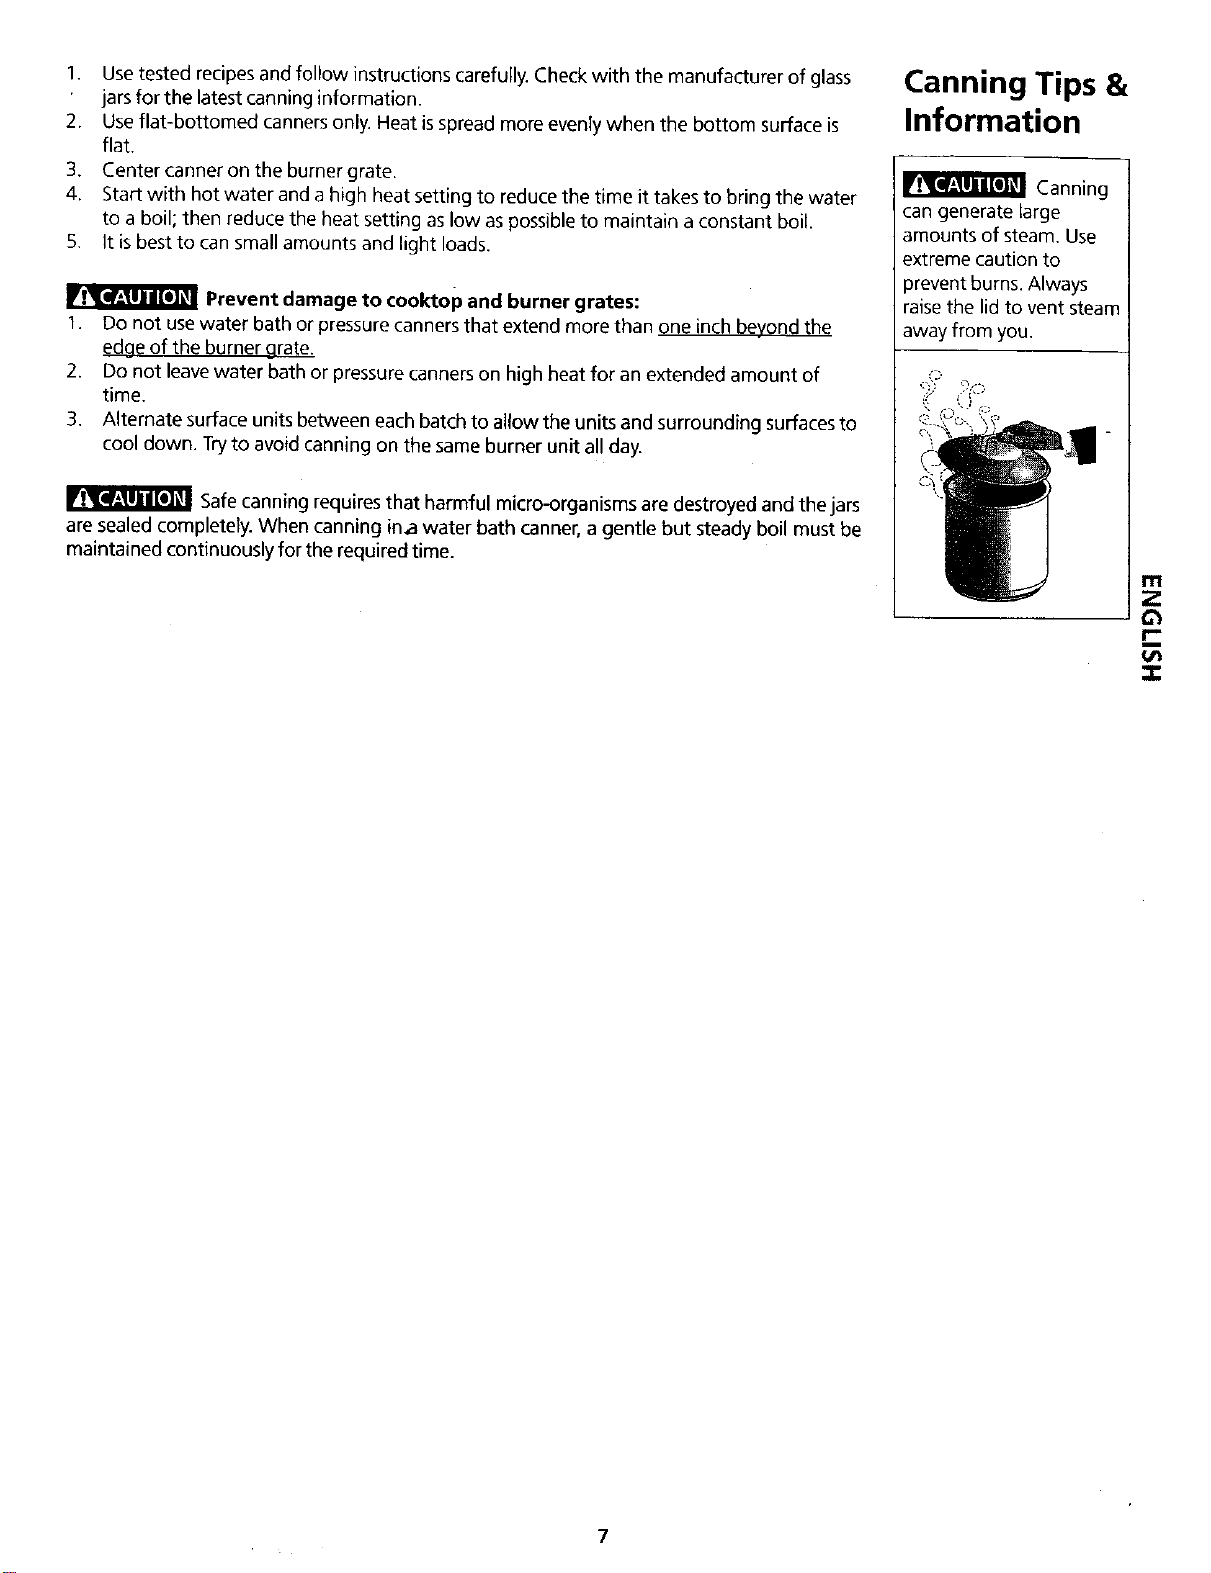
Specialty Pans & Trivets
Woks with flat bottoms suitable for
useon your cooktop are available in
most cookshop or hardware stores.
Round-bottomed woks (with a
support ring that does not extend
beyond the burner unit) may also be
used. The metal ring was designed to
support the wok safely when it is
filled with large amounts of liquids
(soup making) or fat (frying).
DO NOT usea wok if it isequipped with
a metal ring that extends beyond the
burner unit. Becausethis ring traps heat,
the surface unit and cooktop surface
could be damaged.
Wire trivets: Do not usewire trivets. Cookware bottoms must be in direct
contact with the grates.
DO NOT usetwo burner units to heat-one large pan such asa
roaster or griddle, or allow cooking utensils to boil dry. The bottom surface of the
pan in either of these situations could causediscoloring or crazing of the appliance
cooking surface, and damage to the grates and burner units.
6
I. Usetestedrecipesandfollowinstructionscarefully.Checkwiththemanufacturerofglass
jarsforthelatestcanninginformation.
2. Useflat-bottomedcannersonly.Heatisspreadmoreevenlywhenthebottomsurfaceis
flat.
3. Centercannerontheburnergrate.
4. Startwithhotwaterandahighheatsettingtoreducethetimeittakestobringthewater
toaboil;thenreducetheheatsettingaslowaspossibletomaintainaconstantboil.
5. Itisbesttocansmallamountsandlightloads.
Prevent damage to cooktop and burner grates:
1. Do not usewater bath or pressure canners that extend more than one inch beyond the
edge of the burner grate.
2. Do not leavewater bath or pressure canners on high heat for an extended amount of
time.
3. Alternate surface units between each batch to allow the units and surrounding surfaces to
cool down. Tryto avoid canning on the same burner unit all day.
Safecanning requires that harmful micro-organisms are destroyed and the jars
are sealed completely. When canning in,a water bath canner, a gentle but steady boil must be
maintained continuously for the required time.
Canning Tips &
Information
Canning
can generate large
amounts of steam. Use
extreme caution to
prevent burns. Always
raise the lid to vent steam
away from you.
7
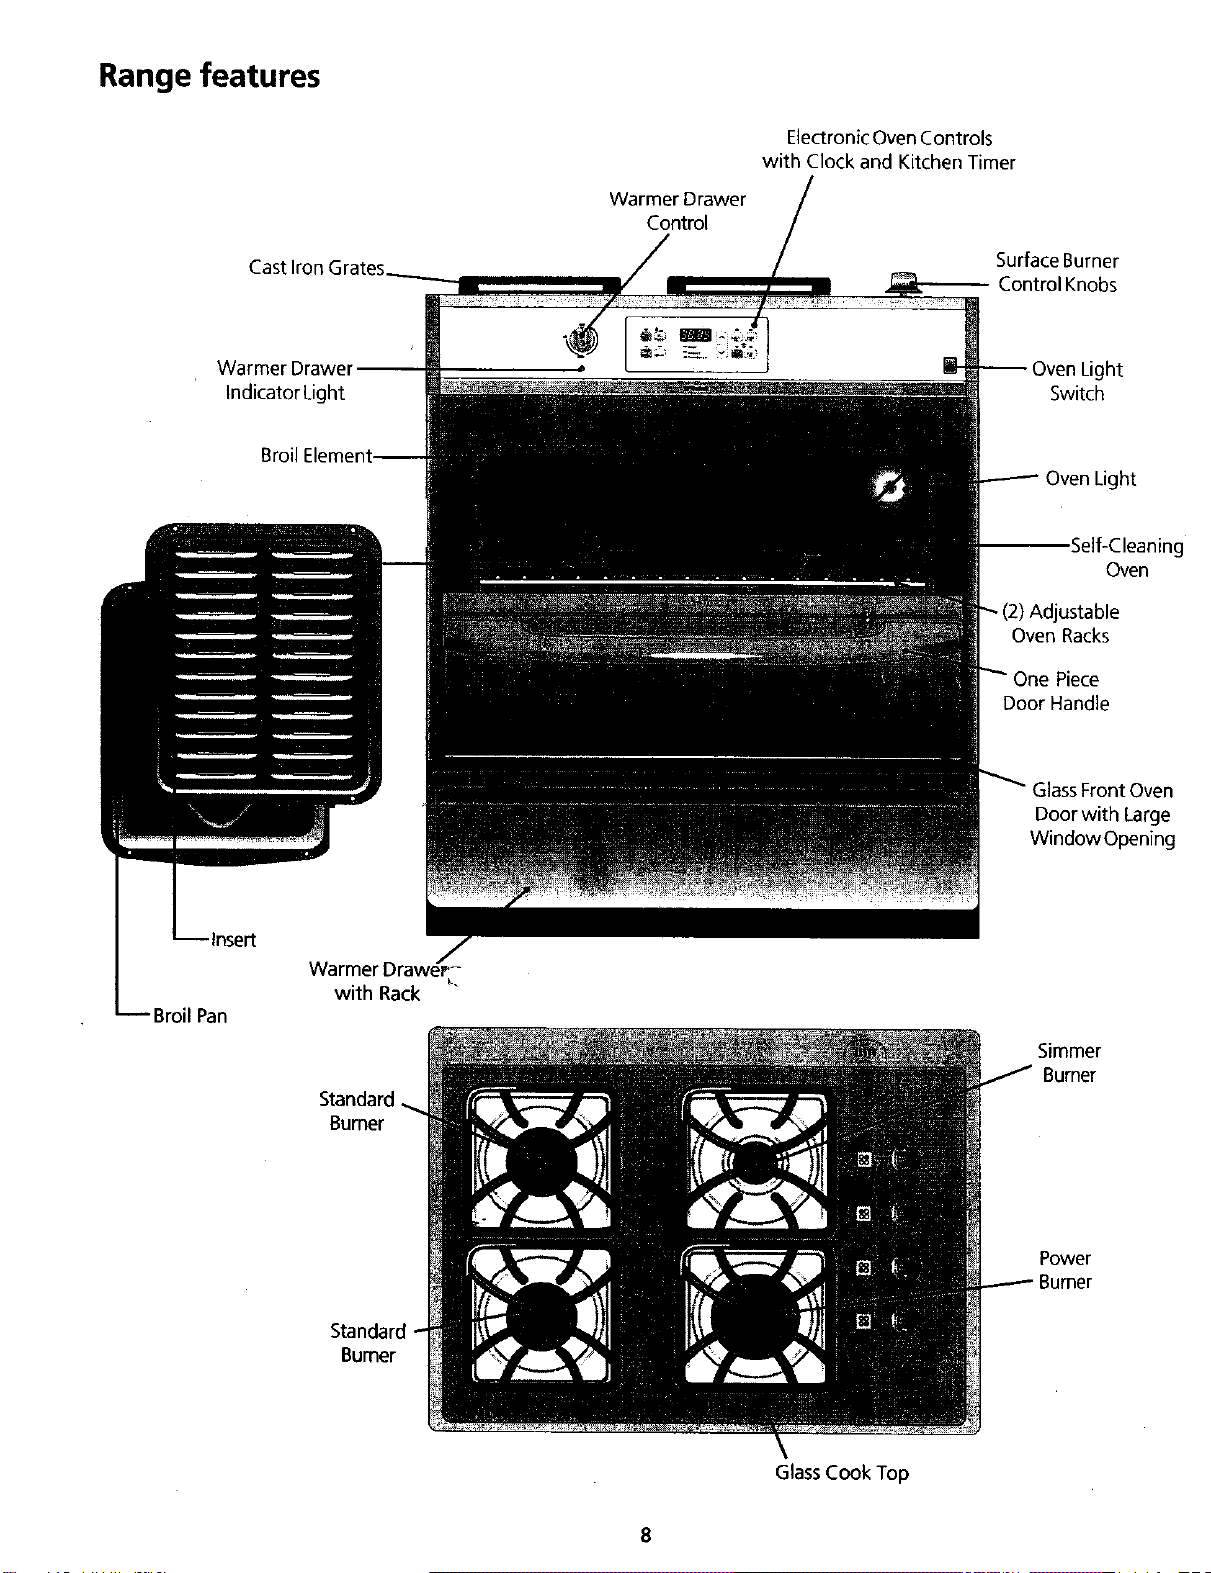
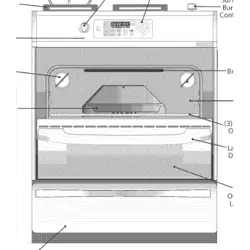
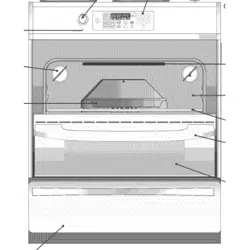
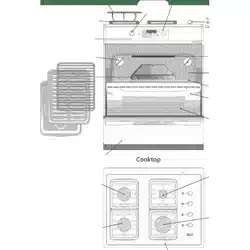
Range features
Cast Iron Grates
Warmer Drawer
Control
Electronic Oven Controls
with Clock and Kitchen Timer
Glass Cook Top
SuffaceBurner
_ControlKnobs
Indicator Light
ght
Switch
Light
-Self-Cleaning
Oven
(2)Adjustable
Oven Racks
Piece
Door Handle
Glass Front Oven
Door with Large
WindowOpening
BroilPan
Warmer Drawe_"-
with Rack
Stand_
Burner
Simmer
Burner
Power
Burner
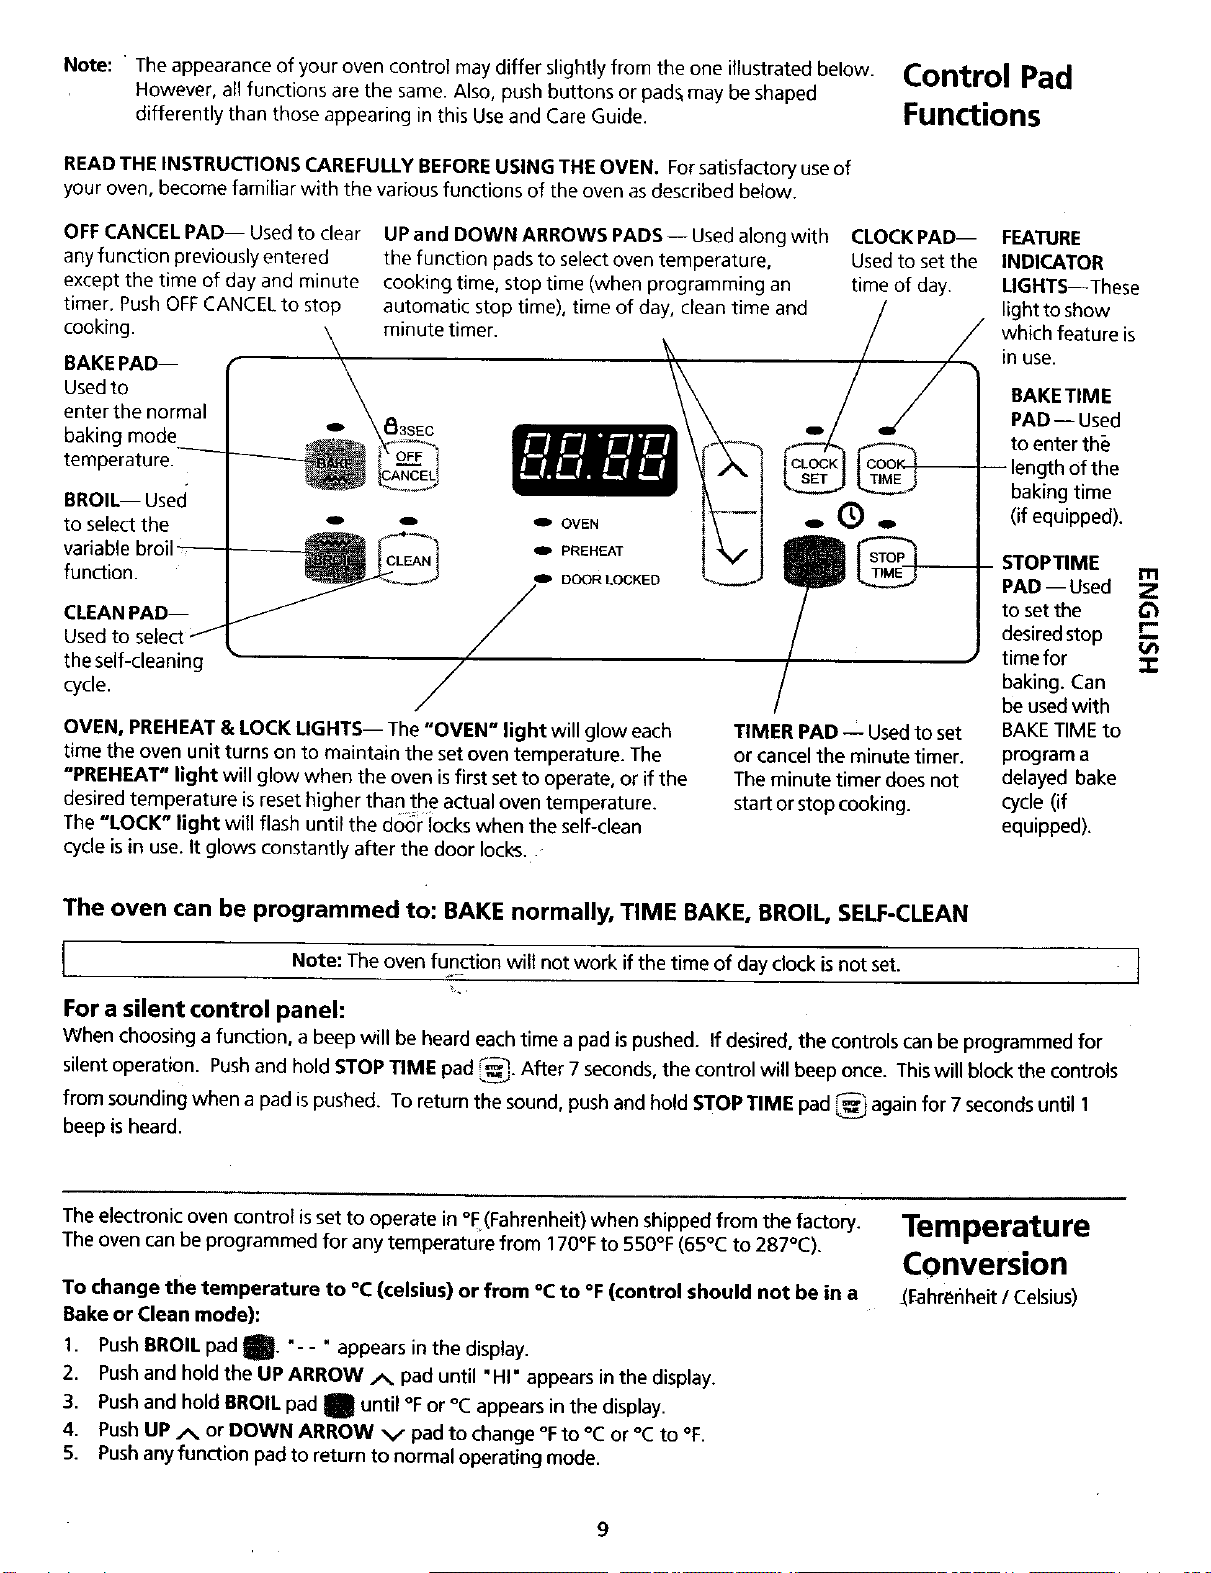
Note: ' The appearance of your oven control may differ slightly from the one illustrated below. Control Pad
However, all functions are the same. Also, push buttons or pads,may be shaped
differently than those appearing in this Use and Care Guide. Functions
READTHE INSTRUCTIONS CAREFULLY BEFOREUSING THE OVEN. Forsatisfactory useof
your oven, become familiar with the various functions of the oven asdescribedbelow.
baking mode
temperature.
BROIL-- Used'
to select the
OFF CANCEL PAD-- Used to clear
anyfunction previously entered
except the time of day and minute
timer. Push OFFCANCEL to stop
cooking. \
BAKEPAD-- o_
Used to
enter the normal _3SEC
iVo q
function.
CLEANPAD--
Used to
the self-cleaning
cycle.
UPand DOWN ARROWS PADS-- Used along with
the function pads to select oven temperature,
cooking time, stop time (when programming an
automatic stop time), time of day, clean time and
minute timer.
OVEN
PREHEAT
lID DOOR LOCKED
/
CLOCK PAD-- FEATURE
Used to setthe INDICATOR
time of day. LIGHTS--These
light to show
/ wh_ feature is
- / -./ I PAD--Used
____ _--4.._-. i toenterth_
[C_EO_K] fCOOE_ length ofthe
k--_J !-_M-._EJ i bakingtime
" P_ I (if equipped).
I _u_ STOPTIME
'm' I AD--Used..,
/ [ tOset the G_
/ I desired stop r-
[ J time for
baking. Can
be used with
BAKETIME to
/
OVEN, PREHEAT & LOCK LIGHTS-- The "OVEN" light will glow each
time the oven unit turnson to maintain the set oven temperature. The
"PREHEAT" light will glow when the oven isfirst set to operate, or if the
desired temperature isreset higherthan the actual oven temperature.
The "LOCK" light will flash until the d0or iocks when the self-clean
cycleisin use. It glows constantly after the door locks.
/
TIMER PAD -- Usedto set
or cancel the minute timer.
The minute timer does not
start orstop cooking.
program a
delayed bake
cycle (if
equipped).
The oven can be programmed to: BAKE normally, TIME BAKE, BROIL, SELF-CLEAN
I Note: The oven function wilt not work if the time of day clock is not set. " I
For a silent control panel:
When choosing a function, a beep will be heard each time a pad is pushed. If desired, the controls can be programmed for
silent operation. Pushand hold STOP TIME pad _. After 7 seconds, the control will beep once. This will block the controls
r"_ •
from sounding when a pad ispushed. To return the sound, push and hold STOPTIME pad _ again for 7 seconds until 1
beep is heard.
The electronic oven control is set to operate in °F(Fahrenheit) when shipped from the factory.
The oven can be programmed for any temperature from 170°Fto 550°F (65°C to 287°C).
To change the temperature to °C (celsius) or from °C to °F (control should not be in a
Bake or Clean mode):
1. Push BROIL pad t" "- - " appears in the display.
2. Push and hold the UP ARROW ,_, pad until "HI" appears in the display.
3. Push and hold BROIL pad t until °F or °C appears in the display.
4. Push UP/_. or DOWN ARROW v pad to change °F to °C or °C to °F.
5. Pushany function pad to return to normal operating mode.
Temperature
Conversion
_Fahrenheit / Celsius)
9
Setting the
Clock
FEATURE OVERVIEW
• To Set the Clock
• To Set the Minute Timer
NOTE: The oven function
will not work if the time of
day clock is not set.
o
O
83SEC
®
o o OVEN
! 91D PREHEAT
J _ DOOR LOCKED
I oven will not work if the time of day clock is not set.
Note: The
function
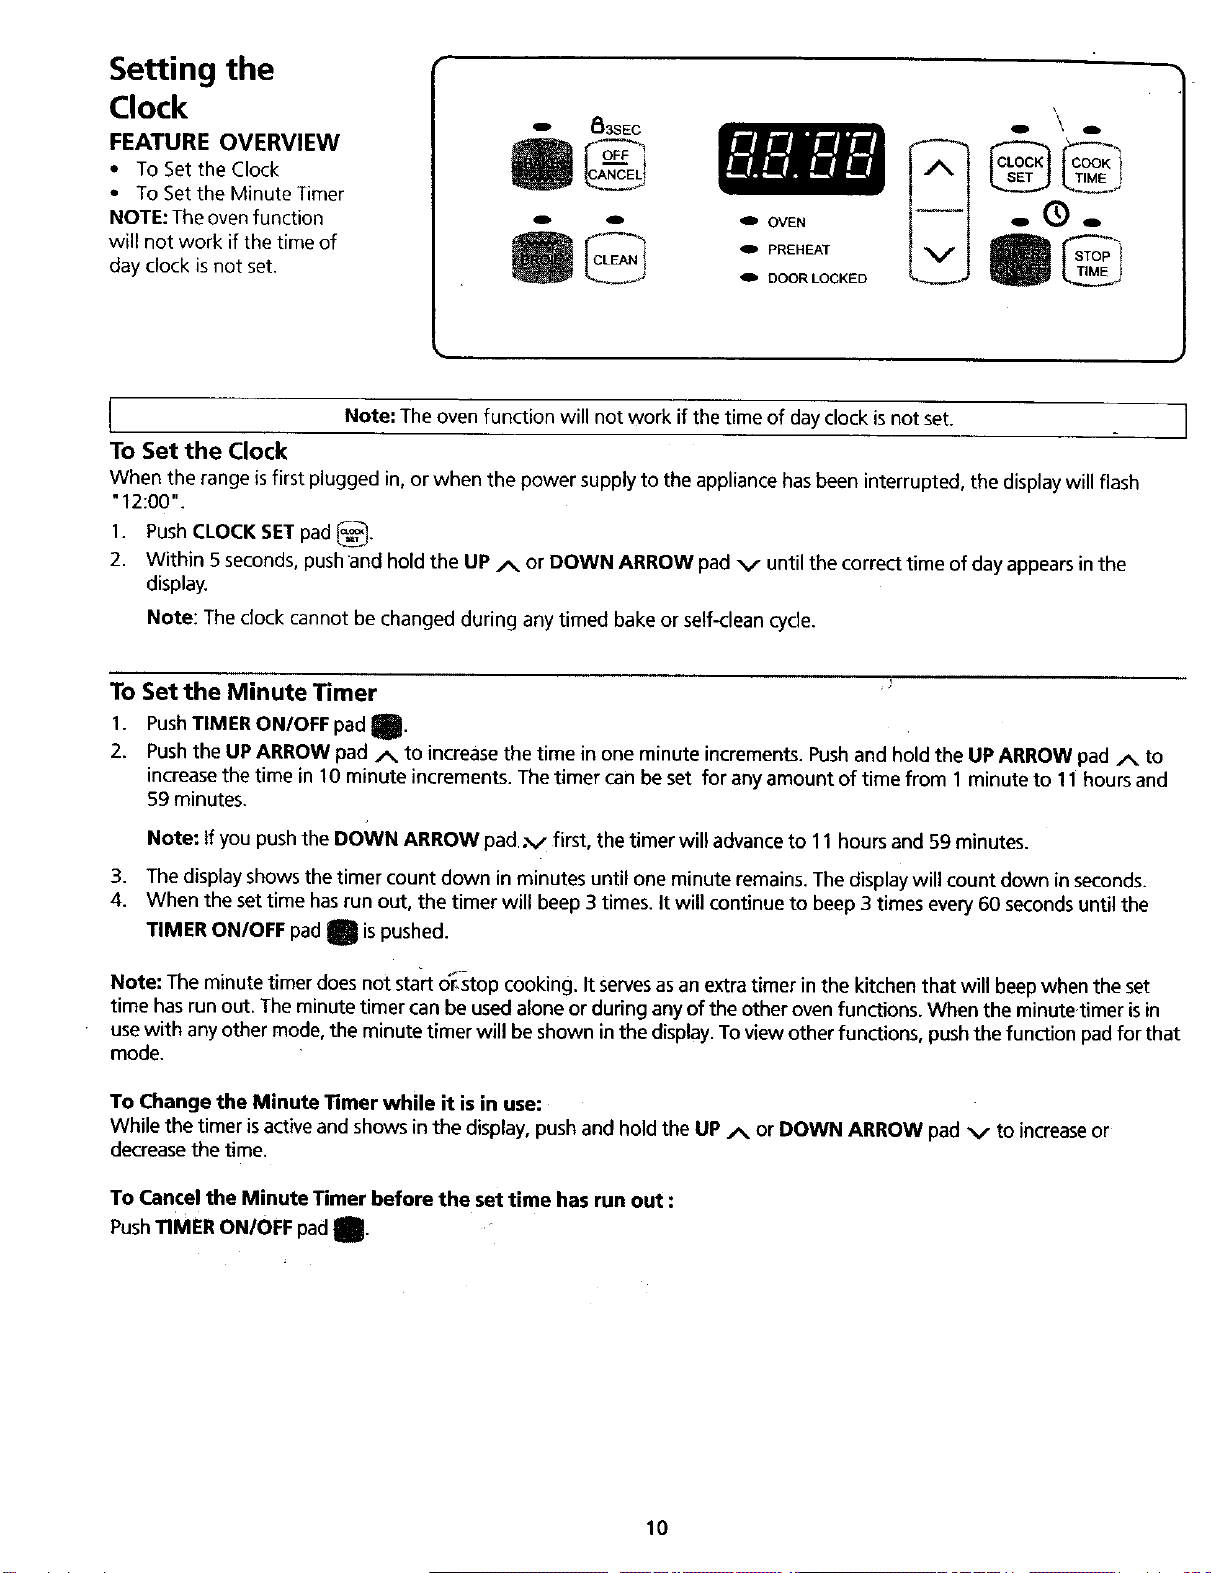
To Set the Clock
When the range isfirst plugged in, or when the power supply to the appliance has been interrupted, the display will flash
"12:00".
1. Push CLOCK SET pad _-_.
2. Within 5 seconds, pushand hold the UP A or DOWN ARROW pad v until the correct time of day appears in the
display.
Note: The clock cannot be changed during any timed bake or self-clean cycle.
To Set the Minute Timer
1.
2.
PushTIMER ON/OFF pad m"
Push the UPARROW pad A to increase the time in one minute increments.Pushand hold the UPARROW pad A to
increasethe time in 10 minute increments. The timer can be set for any amount of time from 1 minute to 11 hoursand
59 minutes.
Note: if you push the DOWN ARROW pad .v first, the timer will advance to 11 hours and 59 minutes.
3. The display shows the timer count down in minutes until one minute remains. The display will count down in seconds.
4. When the set time hasrun out, the timer will beep 3 times. It will continue to beep 3 times every 60 seconds until the
TIMER ON/OFF pad m is pushed.
Note The minute timer does not sta'rt c_._top cooking. It Servesas an extra timer in the kitchen that will beep when the set
time has run out. The minute timer can be used alone or during any of the other oven functions. Wt_en the minutetimer isin
use with any other mode, the minute timer will be shown in the display. To view other functions, push the function pad for that
mode.
To Change the Minute Timer while it is in use:
While the timer isactiveand showsin the display,pushand hold the UP/_ or DOWN ARROW pad _/to increaseor
decreasethe time,
To Cancel the Minute Timer before the set time has run out :
PushTIMER ON/OFF pad _.
IO
This appliance can be used with Natural Gas and Propane Gas_It isshipped from the factory for
use with natural gas.
If you wish to convert your range for usewith LP/Propane gas, usethe supplied fixed orifices
located in a bag containing the literature marked, "FOR LP/PROPANEGAS CONVERSION'.
Follow the instructions packaged with the orifices.
The conversion must be performed by a qualified service technician in accordance with the
installation instructions furnished with this range and all codes and requirements of the authority
having jurisdiction. Failure to follow instructions could result in serious injury or property
damage. The qualified agency performing this work assumes responsibility for the conversion.
Personal injury or death from electrical shock may occur if the range is not
installed by a qualified installer or electrician.
Any additions, changes or conversions required in order for this appliance to
satisfactorily meet the application needs must be made by an authorized SearsService Center.
Liquefied
Petroleum
(Propane) Gas
Conversion
Flame Size
Formost cooking, starton the highest control setting and then turn to a lower one to
complete the process. Use the chart below as a guide for determining proper flame sizefor
varioustypes of cooking. The sizeand type of utensilusedand the amount of food being
cooked will influencethe setting needed for cooking.
For deep fat frying, usea thermometer and adjust the surfacecontrol knob accordingly. If the
fat istoo cool, the food will absorb the fat and be greasy.Jf :thefat istoo hot, the food will
brown soquicklythat the center will be undercooked. Do not attempt to deep fat fry too much
food at once asthe food will neither brown nor cook properly.
*Flame Size Type of Cooking
High Flame Start most foods; bring water to aboil; pan broiling
Medium Flame Maintain a slow boil; thicken sauces,gravies; steam
Low Flame Keep foods cooking; poach; stew
*These settings are based on usingmedium-weight aluminum pans with lids. Settings
may vary when using other types of pans.
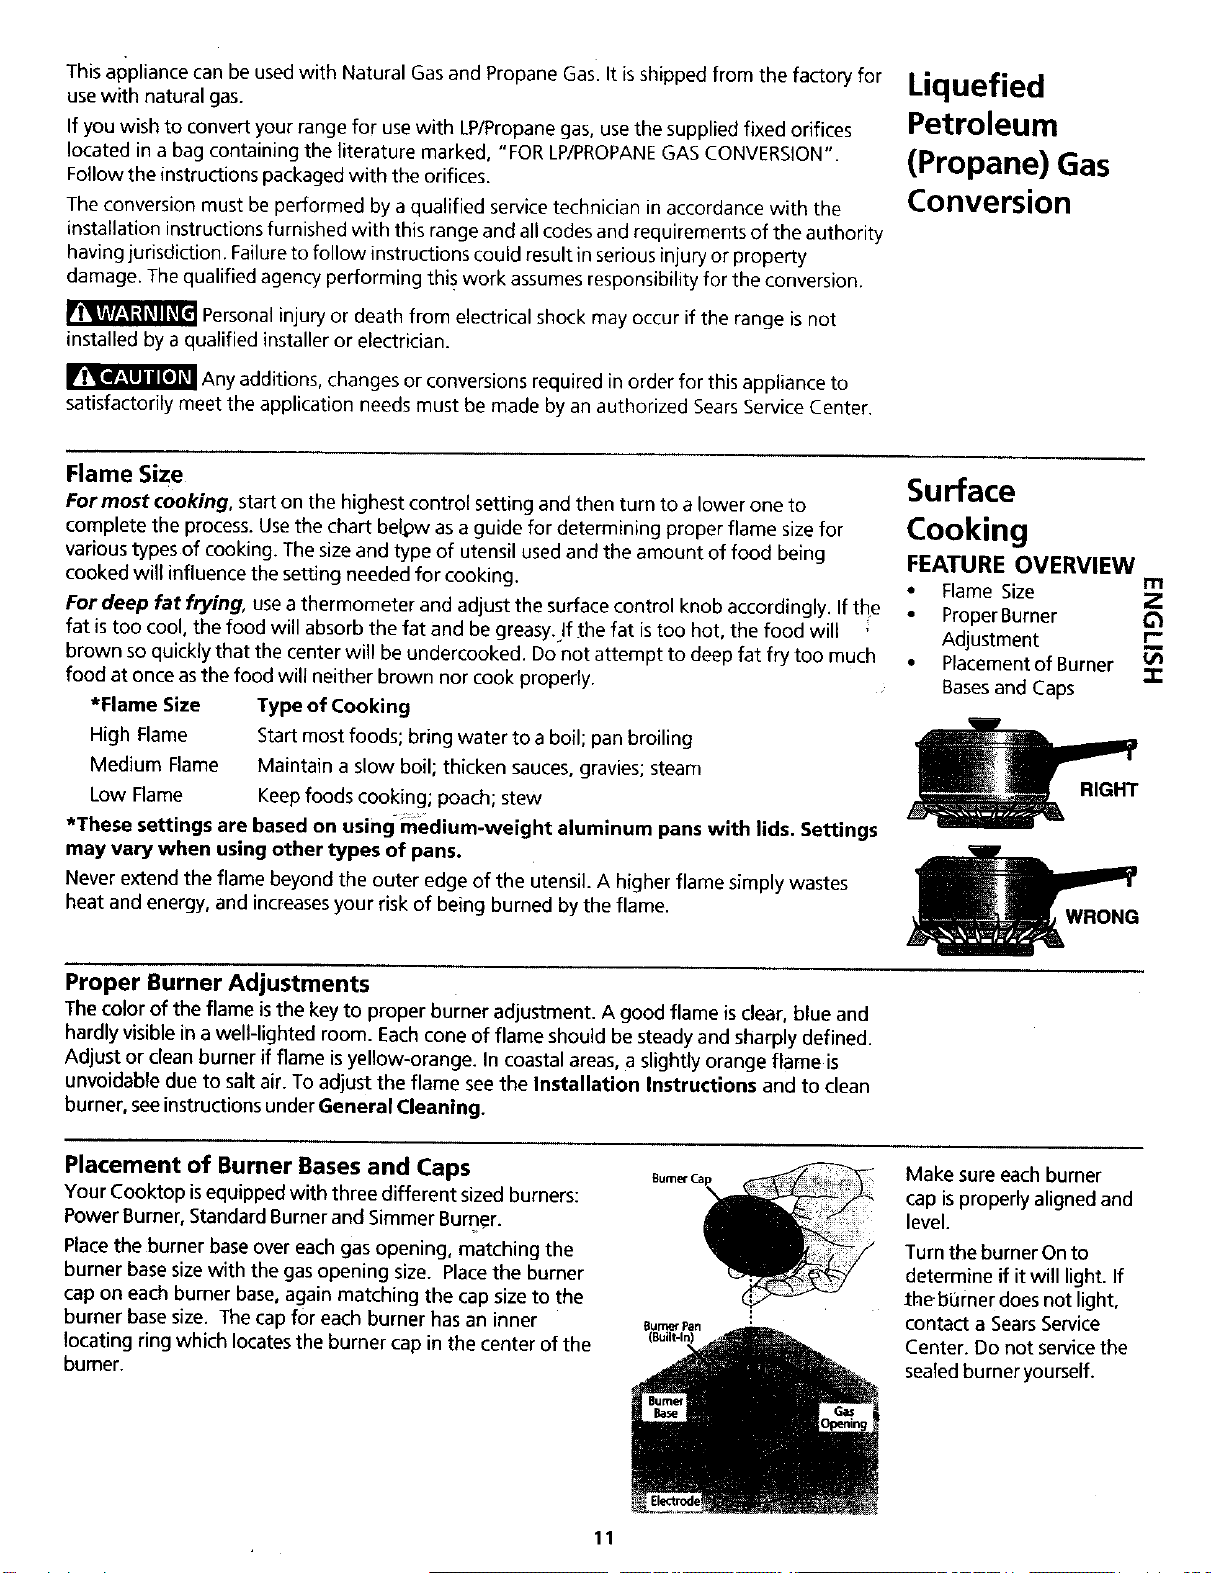
Never extend the flame beyond the outer edge of the utensil.A higherflame simply wastes
heat and energy, and increasesyour risk of being burned by the flame.
Surface
Cooking
FEATURE OVERVIEW
n'l
• Flame Size Z
• Proper Burner
Adjustment
• Placement of Burner
"I"
Bases and Caps
RIGHT
WRONG
Proper Burner Adjustments
The color of the flame isthe key to proper burner adjustment. A good flame isclear, blue and
hardly visiblein a well-lighted room. Eachcone of flame should be steady and sharply defined.
Adjust or clean burner if flame isyellow-orange. In coastal areas, a slightly orange flame is
unvoidabte due to salt air. To adjust the flame see the Installation Instructions and to clean
burner, see instructionsunder General Cleaning.
Placement of Burner Bases and Caps
Your Cooktop isequipped with three different sized burners:
Power Burner, Standard Burner and Simmer Burner.
Placethe burner base over each gas opening, matching the
burner base sizewith the gas opening size. Placethe burner
cap on each burner base, again matching the cap size to the
burner base size. The cap for each burner has an inner
locating ring which locates the burner cap in the center of the
burner.
Make sure each burner
cap is properly aligned and
level.
Turn the burner On to
determine if it will light. If
the. burner does not light,
contact a SearsService
Center. Do not servicethe
sealed burner yourself.
11
Surface
Cooking
FEATURE OVERVIEW
• PlacementofBurner
Grates
• Setting Surface Controls
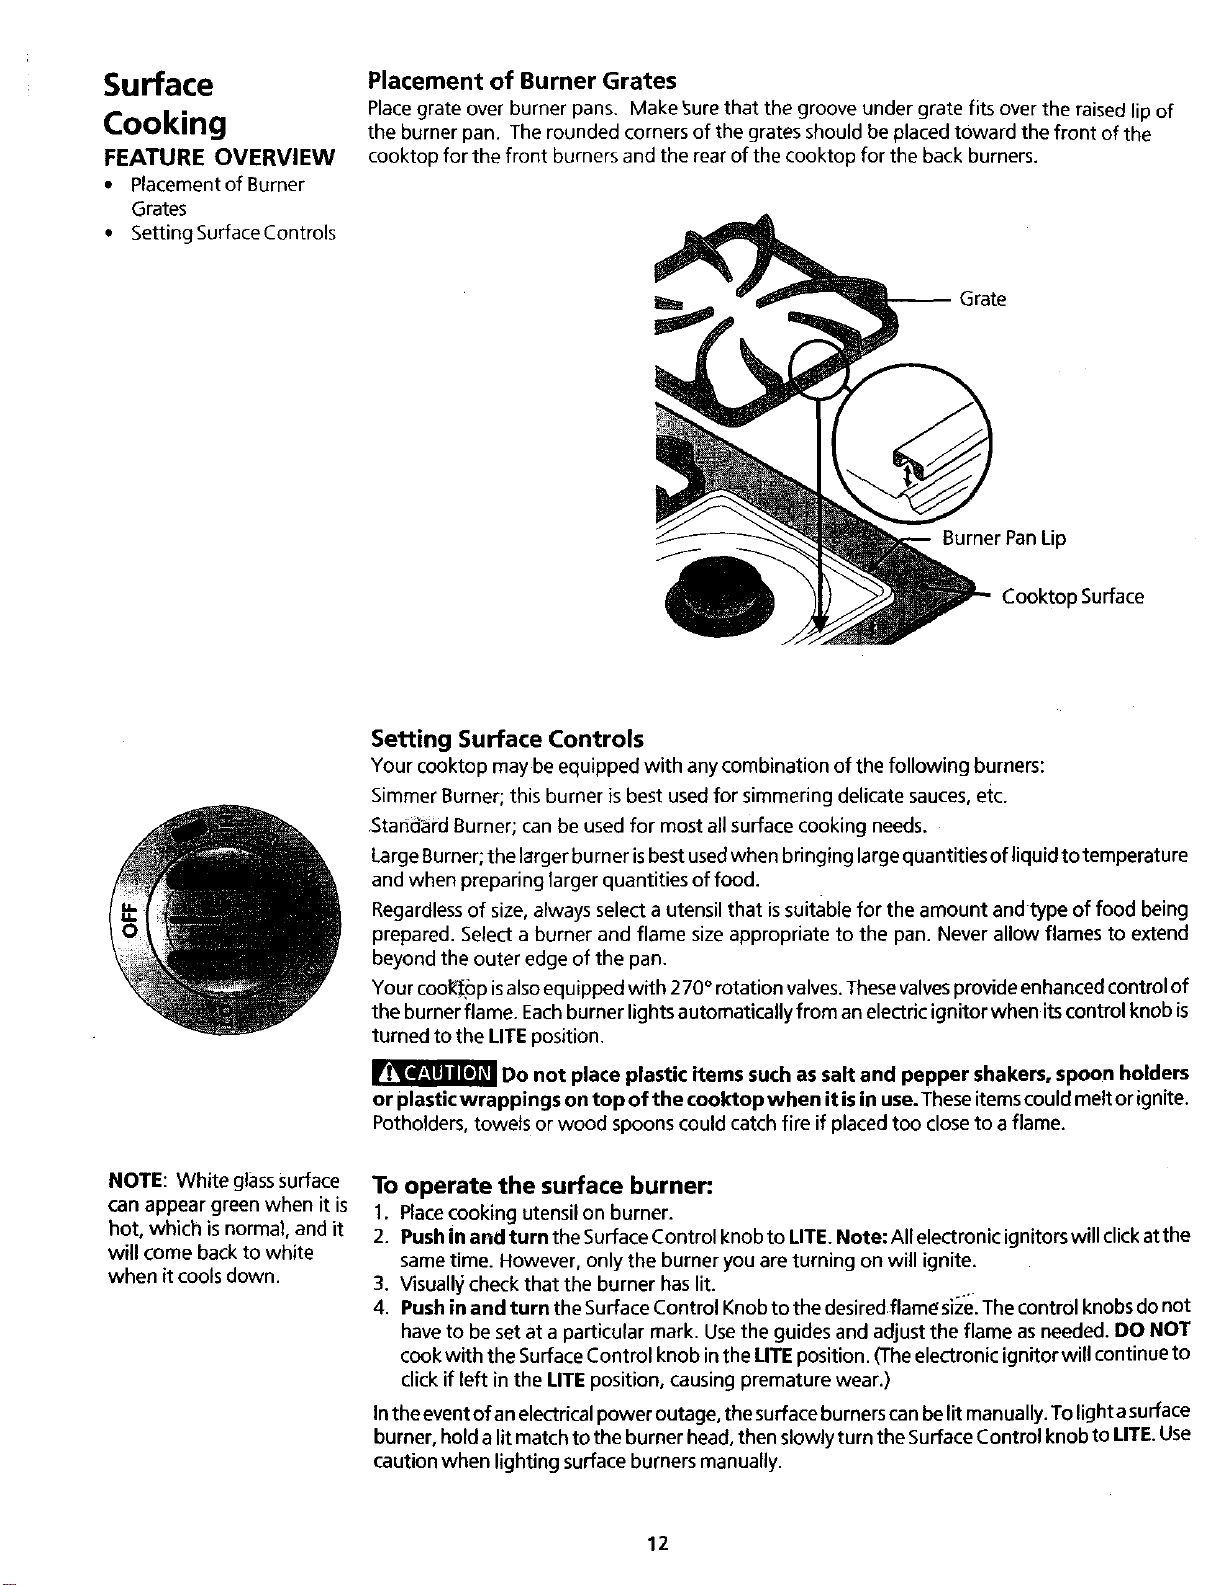
Placement of Burner Grates
Placegrate over burner pans. Make _ure that the groove under grate fits over the raised lip of
the burner pan. The rounded corners of the grates should be placed toward the front of the
cooktop for the front burners and the rear of the cooktop for the back burners.
Burner Pan Lip
Cooktop Surface
Setting Surface Controls
Your cooktop may be equipped with any combination of the following burners:
Simmer Burner; this burner is best used for simmering delicate sauces, etc.
,Staffdard Burner; can be used for most all surface cooking needs.
Large Burner; the larger burner isbest usedwhen bringing large quantities of liquid to temperature
and when preparing larger quantities of food.
Regardless of size, always select a utensil that issuitable for the amount and type of food being
prepared. Select a burner and flame size appropriate to the pan. Never allow flames to extend
beyond the outer edge of the pan.
Your cool_,op isalsoequipped with 270 ° rotation valves. These valvesprovide enhanced control of
the burner flame. Eachburner lights automatically from an electric ignitor when its control knob is
turned to the LITE position.
Do not place plastic items such as salt and pepper shakers, spoon holders
or plastic wrappings on top of the cool(top when it isin use.These itemscould melt orignite.
Potholders, towels or wood spoons could catch fire if placed too close to a flame.
NOTE: White glasssurface
can appear green when it is
hot, which is normal, and it
will come back to white
when it cools down.
To operate the surface burner:
1. Placecooking utensilon burner.
2. Push in and turn the Surface Control knob to LITE. Note: All electronic ignitorswillclickatthe
same time. However, onlythe burner you are turning on will ignite.
3. Visuall_ check that the burner has lit.
4. Push in and turn the Surface Control Knob to the desiredflamesiz'e.The control knobs do not
have to be set at a particular mark. Usethe guidesand adjustthe flame asneeded. DO NOT
cookwith the Surface Control knob inthe LITEposition. (Theelectronic ignitor willcontinue to
click if left in the LITE position, causing premature wear.)
Inthe eventofan electricalpower outage, the surface burnerscan belit manually. To lightasurface
burner, hold a lit match to the burnerhead, then slowly turnthe Surface Control knob to LITE.Use
caution when lighting surfaceburnersmanually.
12
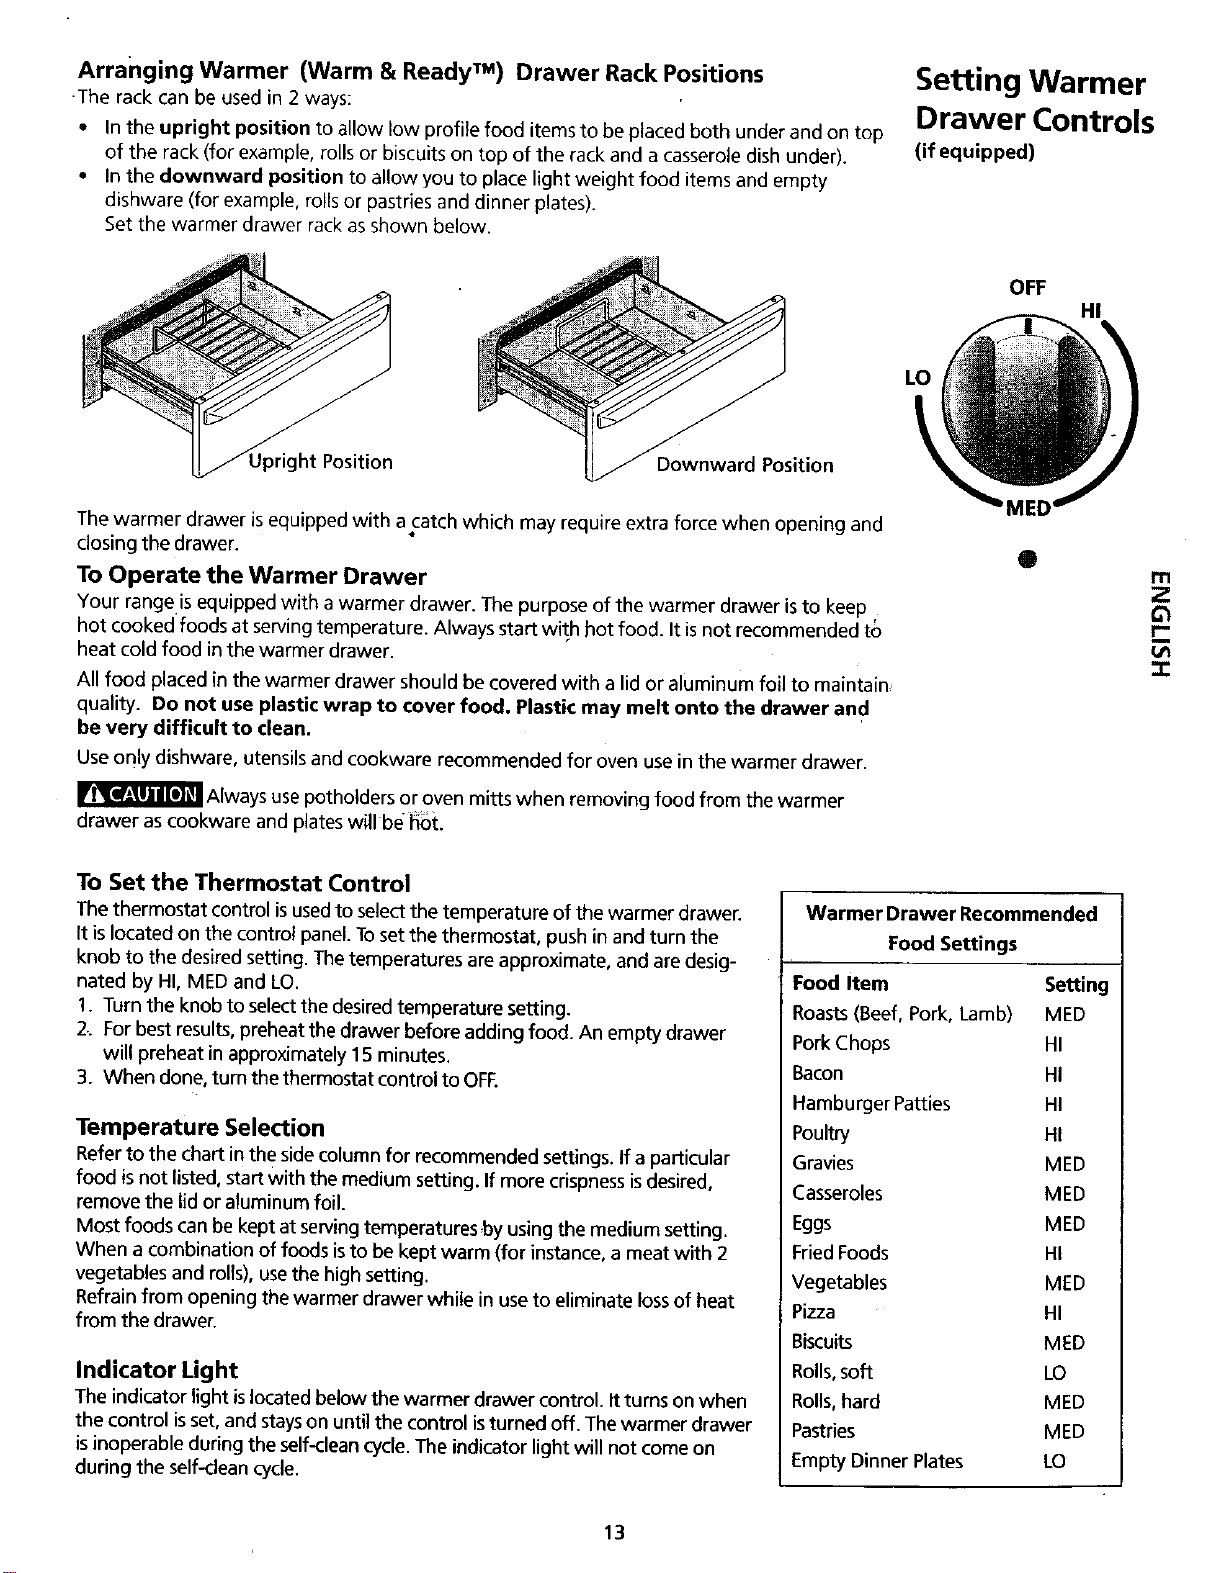
Arranging Warmer (Warm & Ready TM) Drawer Rack Positions
-The rack can be used in 2 ways:
• In the upright position to allow low profile food items to be placed both under and on top
of the rack (for example, rolls or biscuits on top of the rackand a casserole dish under).
• In the downward position to allow you to place light weight food items and empty
dishware (for example, rolls or pastries and dinner plates).
Set the warmer drawer rack as shown below.
Setting Warmer
Drawer Controls
(if equipped)
OFF
HI
LO
Position
Downward Position
The warmer drawer is equipped with acatch which may require extra force when opening and
closing the drawer.
To Operate the Warmer Drawer
Your range.is equipped with a warmer drawer. The purpose of the warmer drawer isto keep
hot cooked foods at serving temperature. Always start with hot food. It is not recommended t6
heat cold food in the warmer drawer.
All food placed in the warmer drawer should be covered with a lid or aluminum foil to maintain
quality. Do not use plastic wrap to cover food. Plastic may melt onto the drawer and
be very difficult to clean.
Useonly dishware, utensils and cookware recommended for oven usein the warmer drawer.
Always use potholders or oven mitts when removing food from the warmer
drawer as cookware and plates will be _ot.
O
m
Z
3:
To Set the Thermostat Control
The thermostat controlisusedto select the temperature of the warmer drawer.
It islocatedon the control panel. Toset the thermostat, pushin and turn the
knob to the desiredsetting. The temperatures are approximate, and are desig-
nated by HI, MED and LO.
1. Turn the knobto selectthe desiredtemperature setting.
2.. For bestresults,preheat thedrawer before addingfood. An empty drawer
will preheat in approximately15 minutes.
3. When done, turn the thermostatcontrolto OFF.
Temperature Selection
Referto the chart in the side column for recommended settings. If a particular
food is not listed,start with the medium setting. If more crispnessisdesired,
remove the lid or aluminumfoil.
Most foods can be kept at serving temperatures by using the medium setting.
When a combination of foods isto be kept warm (for instance, a meat with 2
vegetables and rolls), usethe high setting.
Refrain from opening the warmer drawer while in use to eliminate loss of heat
from the drawer.
Indicator Light
The indicatorlight islocated below the warmer drawer control. Itturns on when
the control isset, and stayson until the control isturned off. The warmer drawer
isinoperable duringthe self-clean cycle.The indicator lightwill not come on
during the self-clean cycle.
Warmer Drawer Recommended
Food Settings
Food Item Setting
Roasts(Beef, Pork, Lamb) MED
Pork Chops HI
Bacon HI
Hamburger Patties HI
Poultry HI
Gravies MED
Casseroles MED
Eggs MED
Fried Foods HI
Vegetables MED
Pizza HI
Biscuits MED
Rolls,soft LO
Rolls,hard MED
Pastries MED
Empty Dinner Plates LO
13
Oven Vent(s)
and Racks
Oven Vent
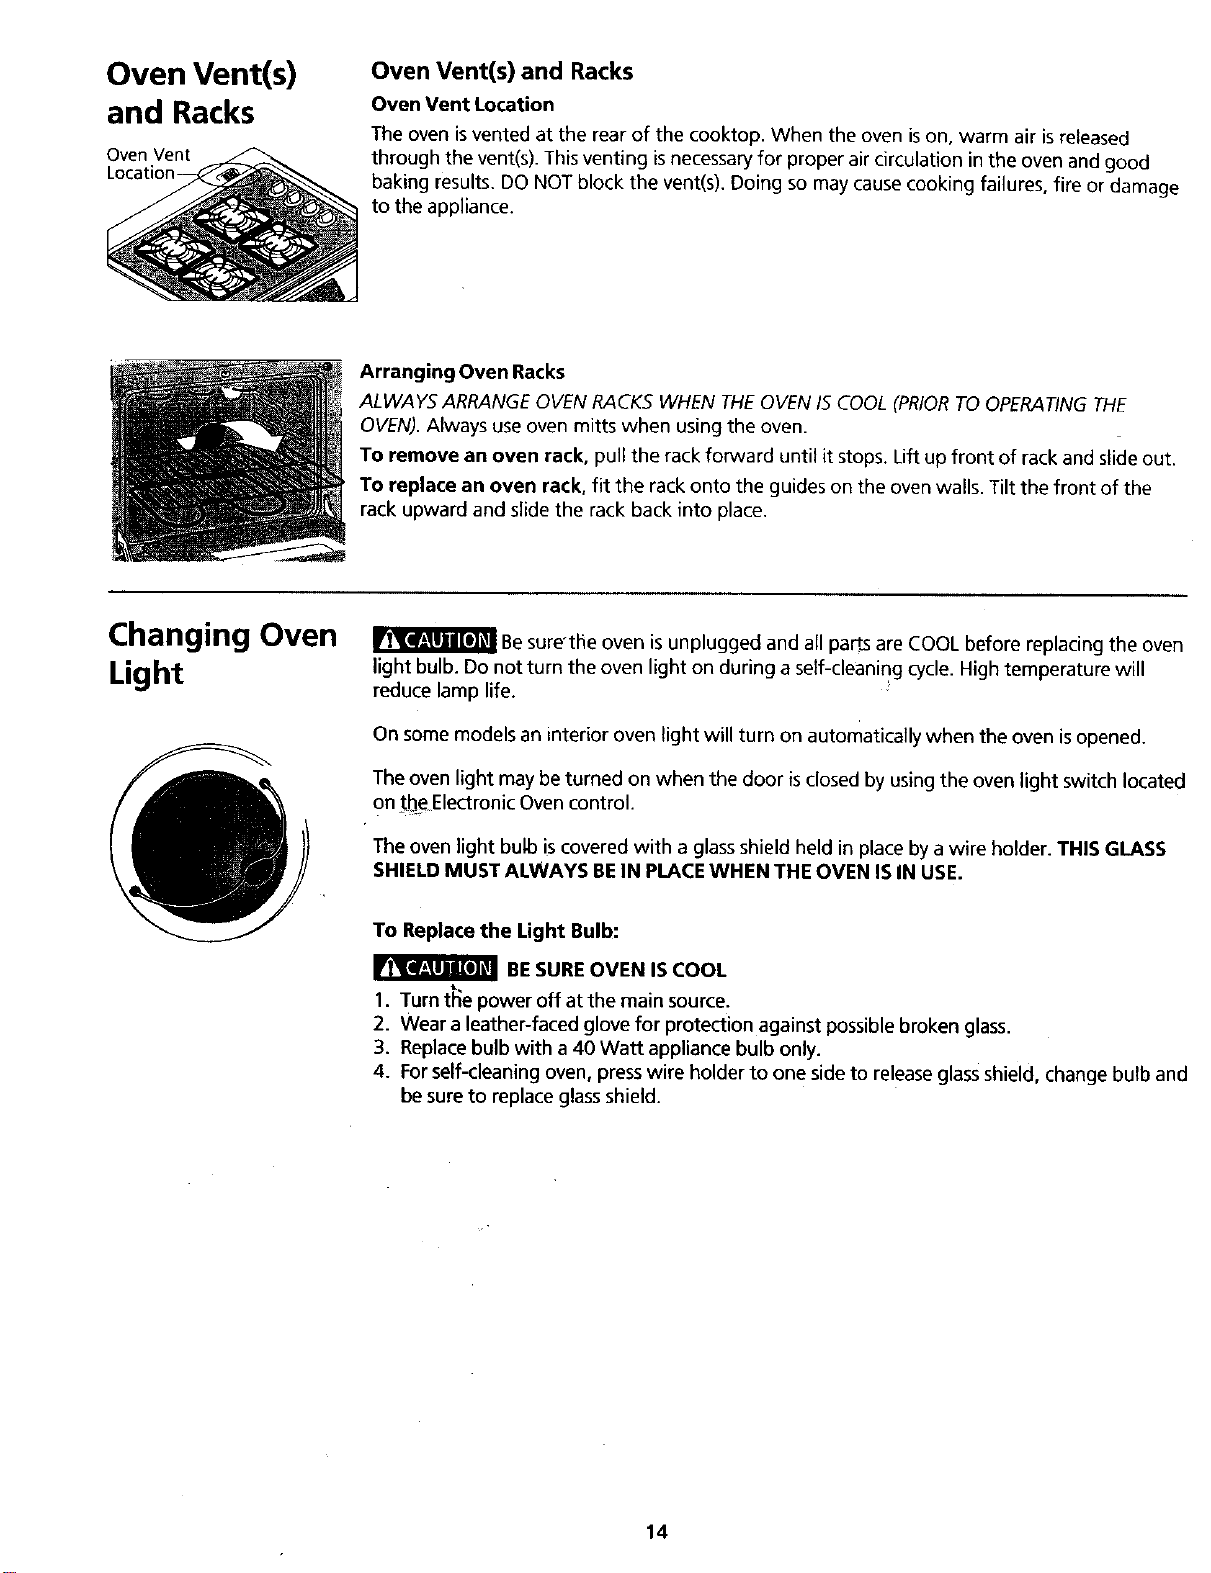
Oven Vent(s) and Racks
Oven Vent Location
The oven isvented at the rear of the cooktop. When the oven ison, warm air is released
through the vent(s). This venting is necessary for proper air circulation in the oven and good
baking results. DO NOT block the vent(s). Doing so may cause cooking failures, fire or damage
to the appliance.
Arranging Oven Racks
ALWAYS ARRANGE OVEN RACKS WHEN THE OVENIS COOL (PRIORTO OPERATINGTHE
OVEN). Always use oven mitts when using the oven.
To remove an oven rack, pull the rackforward until it stops.Lift up front of rack and slideout.
To replace an oven rack, fit the rackonto the guides on the oven walls. Tilt the front of the
rack upward and slide the rack back into place.
Changing Oven
Light
Besure'the oven isunplugged and all parts are COOL before replacingthe oven
light bulb. Do not turn the oven light on during a self-cleaning cycle. High temperature will
reduce lamp life.
On some models an interior oven light will turn on automatically when the oven isopened.
The oven light may be turned on when the door isclosed by using the oven light switch located
on the Electronic Oven control.
The oven light bulb is covered with a glassshield held in place by a wire holder. THIS GLASS
SHIELD MUST ALWAYS BEIN PLACEWHEN THE OVEN IS IN USE.
To Replace the Light Bulb:
BESURE OVEN IS COOL
1. Turn the power off at the main source.
2. Wear a leather-faced glove for protection againstpossible broken glass.
3. Replacebulb with a 40 Watt appliance bulb only.
4. Forself-cleaningoven, press wire holder to one side to releaseglassshield, change bulb and
be sure to replaceglassshield.
14
Q
O
A3SEC
!CA Ed
91 o OVEN
41D PREHEAT g
• ............. ' _ DOOR LOCKED _*_,,_. _ -
Q Q
!,^ , CLOC,,ET"
STOP
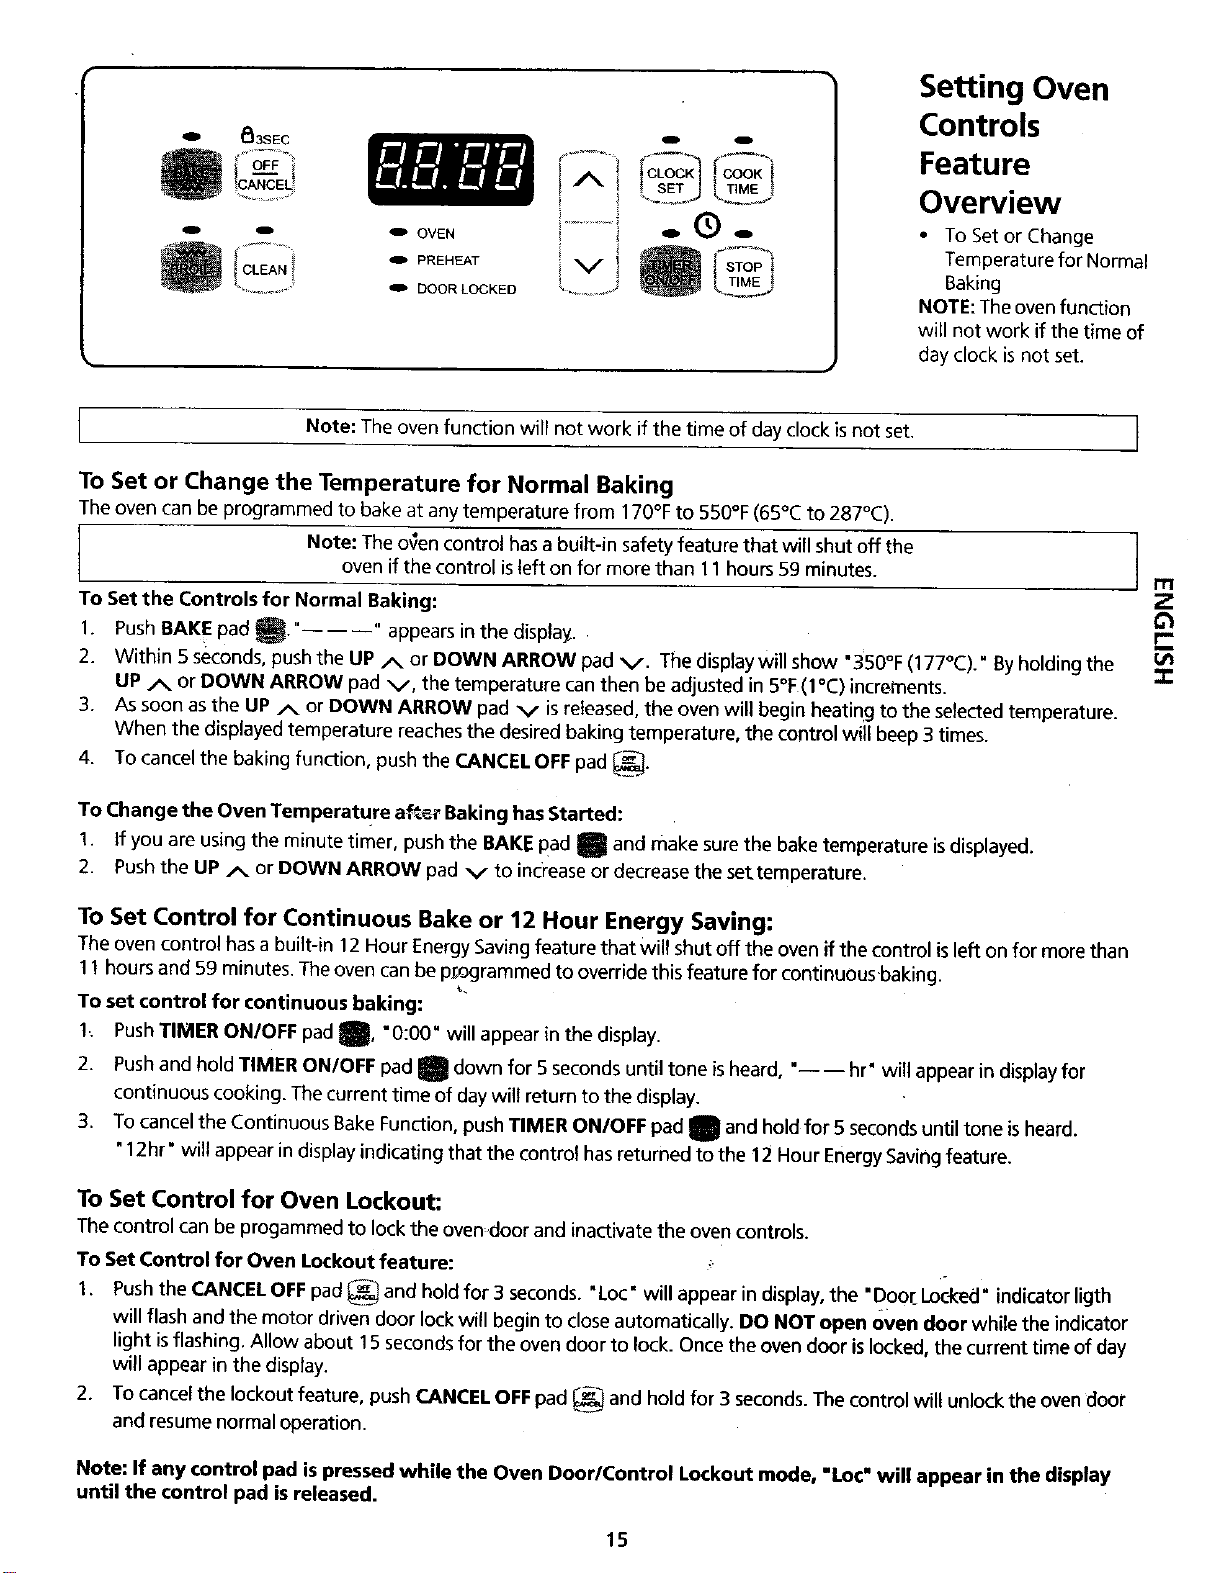
Setting Oven
Controls
Feature
Overview
• To Setor Change
Temperature for Normal
Baking
NOTE: The oven function
will not work if the time of
day clock is not set.
Note: The oven function will not work if the time of day clock isnot set. I
To Set or Change the Temperature for Normal Baking
The oven can be programmed to bake at any temperature from 170°F to 550°F (65°C to 287°C).
Note: The o_en control has a built-in safety feature that will shut off the
oven if the control isleft on for more than 11 hours 59 minutes.
To Set the Controls for Normal Baking:
I. Push BAKE pad _." " appears in the display•
2. Within 5 seconds, push the UP A or DOWN ARROW pad v. The display will show "350°F (177°C)." By holding the
UP A or DOWN ARROW pad v, the temperature can then be adjusted in 5°F (I°C) increments.
3. As soon as the UP A or DOWN ARROW pad v isreleased, the oven will begin heating to the selected temperature.
When the displayed temperature reaches the desired baking temperature, the control will beep 3 times.
4. To cancel the baking function, push the CANCEL OFF pad _.
To Change the Oven Temperature a_er Baking hasStarted:
1. tf you are using the minute timer, push the BAKE pad _ and make sure the bake temperature isdisplayed.
2. Pushthe UP A or DOWN ARROW pad v to increase or decrease the set.temperature.
To Set Control for Continuous Bake or 12 Hour Energy Saving:
The oven control hasa built-in 12 Hour EnergySaving feature that will shut off the oven if the control isleft on for more than
11 hours and 59 minutes. The oven can be p_grammed to override this feature for continuous-baking.
To set control for continuous baking:
!.. PushTIMER ON/OFF pad _, "0:00" will appear in the display.
2. Pushand hold TIMER ON/OFF pad _ down for 5 seconds until tone isheard, "---- hr" will appear in displayfor
continuous cooking. The current time of day will return to the display.
3. To cancel the Continuous Bake Function, push TIMER ONIOFF pad _ and hold for 5 seconds until tone is heard.
"1 " " " •
2hr w II appear n d_splaymdlcatmg that the contro has returned to the 12 Hour EnergySaving feature.
To Set Control for Oven Lockout:
The control can be progammed to lock the oven door and inactivate the oven controls.
To Set Control for Oven Lockout feature: _.
I. Push the CANCEL OFF pad _ and hold for 3 seconds. "Loc" will appear in display, the. Door_Locked. indicator ligth
will flash and the motor driven door lock will begin to close automatically. DO NOT open oven door while the indicator
light isflashing. Allow about 15 seconds for the oven door to lock. Once the oven door is locked, the current time of day
will appear in the display•
2. To cancel the lockout feature, push CANCEL OFF pad _ and hold for 3 seconds. The control will unlock the oven door
and resume normal operation•
Note: If any control pad is pressed while the Oven Door/Control Lockout mode, "Loc" will appear in the display
until the control pad isreleased.
rn
15
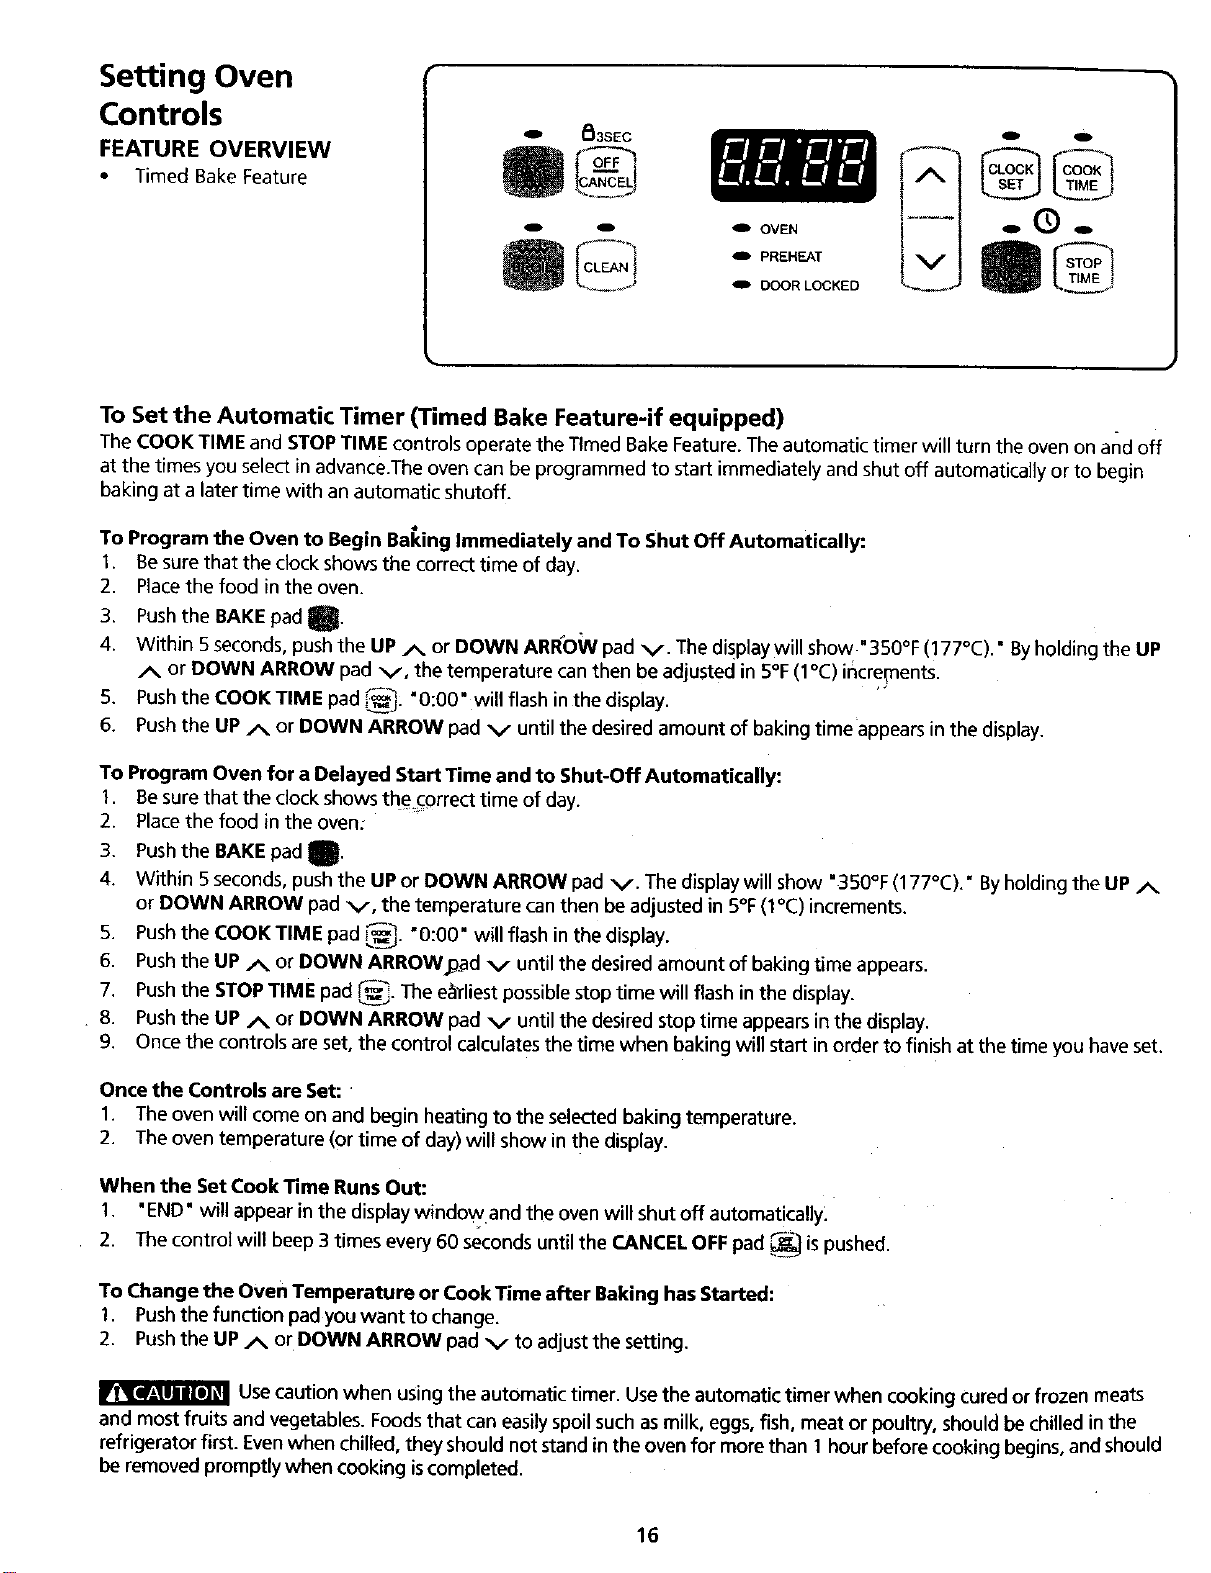
Setting Oven
Controls
FEATURE OVERVIEW
• Timed Bake Feature
1_3SEC
o -- OVEN
Or:: -
_._J II DOOR LOCKED
O Q
.(3).
To Set the Automatic Timer (Timed Bake Feature-if equipped)
The COOK TIME and STOPTIME controls operate the Timed BakeFeature.The automatic timer will turn the oven on and off
at the timesyou select in advance.Theoven can be programmed to start immediately and shut off automatically or to begin
baking at a latertime with an automatic shutoff.
To Program the Oven to Begin Bal(ing Immediately and To Shut Off Automatically:
1. Be sure that the clock shows the correct time of day.
2. Placethe food in the oven.
3. Pushthe BAKE padl.
4. Within 5 seconds, pushthe UP A or DOWN ARROW pad v. The displaywill show."350°F (177°C)." Byholding the UP
or DOWN ARROW pad v, the temperature can then be adjusted in 5°F(1°C) increments.
5. Pushthe COOK TIME pad _: "0:00" will flash in the display.
6. Pushthe UP _,_ or DOWN ARROW pad v until the desired amount of baking time appearsin the display.
To Program Oven for a Delayed Start Time and to Shut-Off Automatically:
1. Be sure that the clock shows the correct time of day.
2. Placethe food in the oven:
3. Pushthe BAKE pad I_.
4. _ithin 5 seconds_push the _P _r D_wN ARR_w pad v_ The disp_aywi_ sh_ _35_°F (177°C) _By h_ding the UP _
or DOWN ARROW pad v, the temperature can then be adjusted in 5°F (1°C) increments.
5. Pushthe COOK TIME pad _. "0:00" will flash in the display.
6. Pushthe UP _ or DOWN ARROWj_ad v until the desired amount of baking time appears.
7. Pushthe STOPTIME pad _. The e_diest possible stop time will flash in the display.
. 8. Pushthe UP A or DOWN ARROW pad v until the desired stop time appears in the display.
9. Once the controls are set, the control calculates the time when baking will start in order to finish at the time you have set.
Once the Controls are Set: '
1. The oven will come on and begin heating to the selected baking temperature.
2. The oven temperature (or time of day)will show in the display.
When the Set Cook Time Runs Out:
1, "END" will appear inthe displaywindow and the ovenwill shut off automat ca y
2. The control will beep 3 times every 60 seconds until the CANCEL OFF pad _ ispushed.
To Change the Oven Temperature or Cook Time after Baking has Started:
1. Pushthe function pad you want to change.
2. Pushthe UP/x or DOWN ARROW pad v to adjust the setting.
Use caution when using the automatic timer. Usethe automatic timer when cooking cured or frozen meats
and most fruits and vegetables. Foods that can easily spoil such asmilk, eggs, fish, meat or poultry, should be chilled in the
refrigerator first. Evenwhen chilled, they should not stand in the oven for more than 1 hour before cooking begins, and should
be removed promptly when cooking iscompleted.
16
oven Baking Informations
For best results, preheat the oven before baking cookies, breads, cakes, pies or pastnes, etc.
There is no need to preheat the oven for roasting meat or baking casseroles.
The cooking times and temperatures needed to bake a product may vary slightly from your
previously owned appliance• Refer to "Recalibrating Your Oven Temperature" section.
Setting Oven
Controls
FEATURE OVERVIEW
• OvenBakinglnformations
• Air Circulation in the
Oven
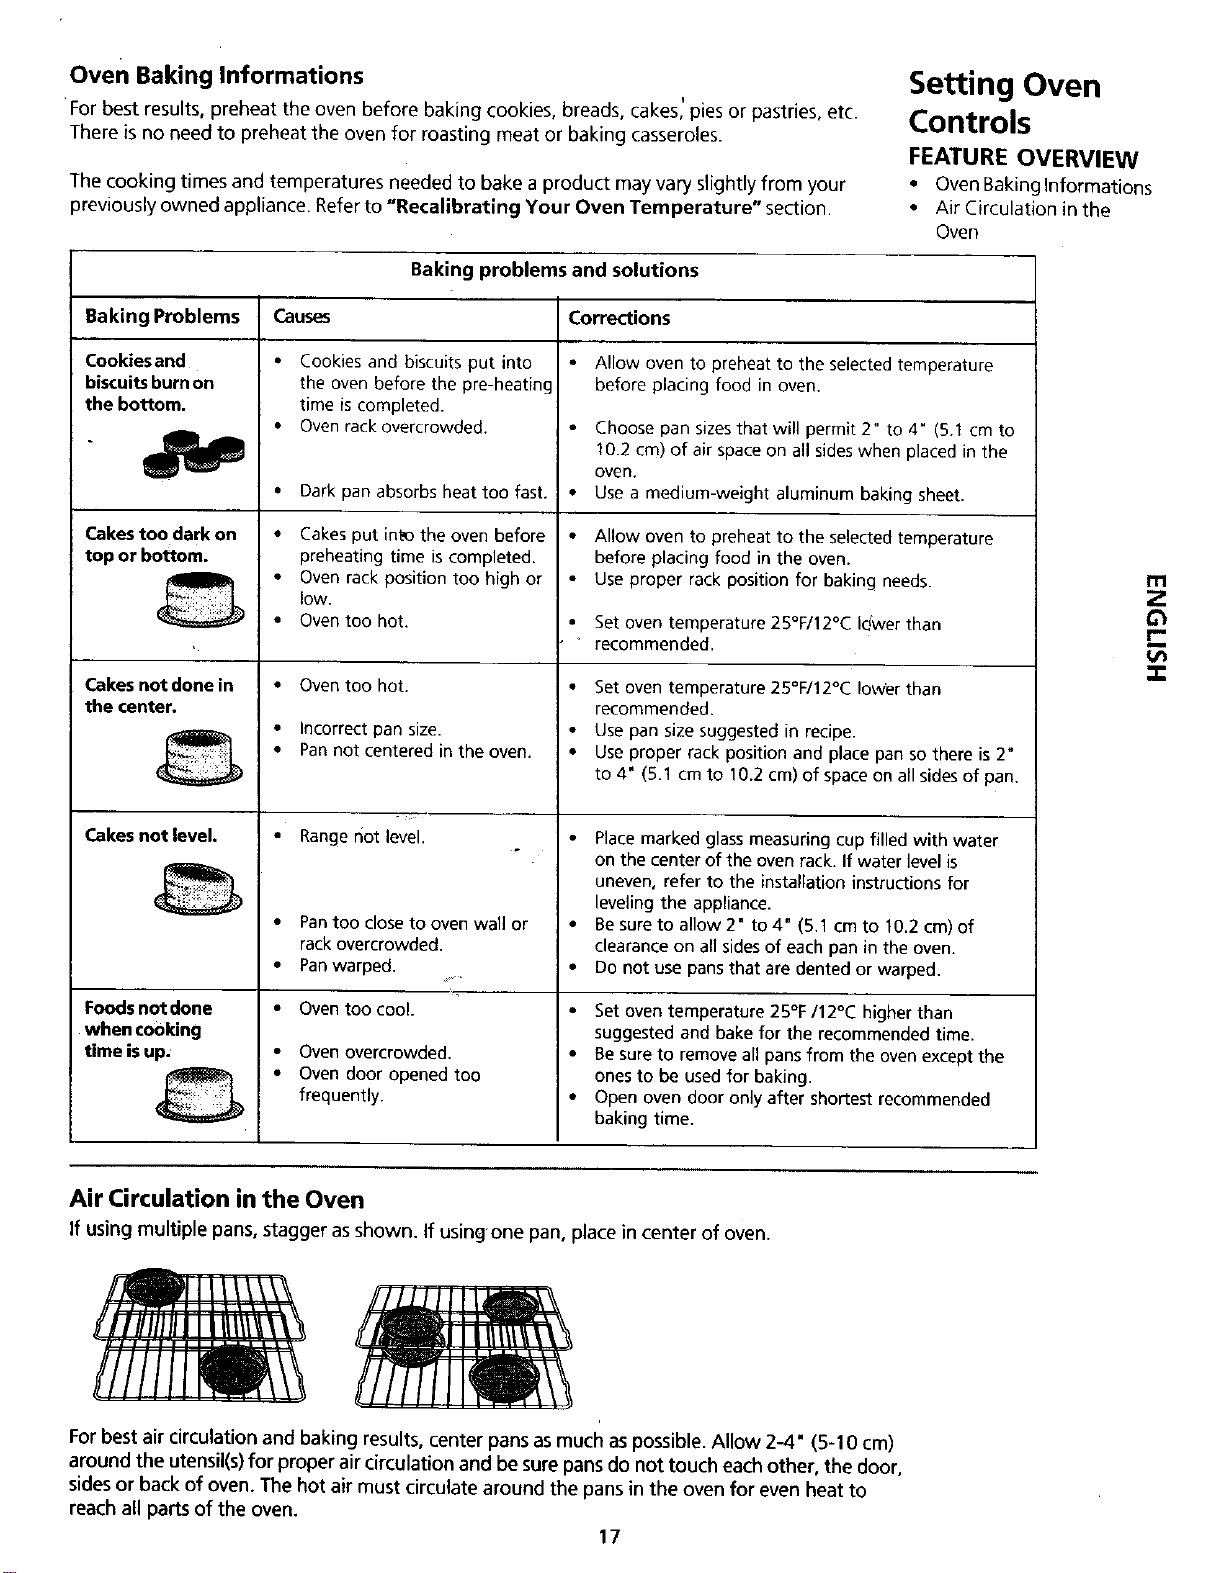
Baking problems and solutions
Baking Problems Causes Corrections
Cookies and
biscuits burn on
the bottom.
Cakes too dark on *
top or bottom.
Cakes not done in •
the center,
Cakes not level. *
Foods not done *
•when cooking
time is up. *
• Cookies and biscuits put into
the oven before the pre-heating
time is completed.
• Oven rack overcrowded.
Dark pan absorbs heat too fast.
Cakes put int_ the oven before
preheating time is completed.
Oven rack position too high or
low.
Oven too hot.
Oven too hot.
Incorrect pan size.
Pan not centered in the oven.
Range not level.
Pantoo close to oven wal] or
Allow oven to preheat to the selected temperature
before placing food in oven.
Choose pan sizes that will permit 2" to 4" (5.1 cm to
10.2 cm) of air space on all sides when placed in the
oven.
Use a medium-weight aluminum baking sheet.
• Allow oven to preheat to the selected temperature
before placing food in the oven.
Use proper rack position for baking needs.
• Set oven temperature 25°F/12°C Ic{wer than
" recommended.
• Set oven temperature 25°F/12°C Iov¢er than
recommended.
• Use pan size suggested in recipe.
• Use proper rack position and place pan so there is 2"
to 4" (5.1 cm to 10.2 cm) of space on all sides of pan,
• Place marked glass measuring cup filled with water
on the center of the oven rack. If water level is
uneven, refer to the installation instructions for
leveling the appliance.
• Be sure to allow 2" to 4" (5.1 cm to 10.2 cm) of
rack overcrowded, clearance on all sides of each pan in the oven.
Pan warped. * Do not use pans that are dented or warped.
Oven too cool. • Set oven temperature 25°F/12°C higher than
suggested and bake for the recommended time.
Oven overcrowded. • Be sure to remove all pans from the oven except the
Oven door opened too ones to be used for baking.
frequently. • Open oven door only after shortest recommended
baking time.
Ill
Z
F.
Air Circulation in the Oven
If using multiple pans, stagger as shown. If usingone pan, place in center of oven.
For best air circulation and baking results, center pans as much as possible Allow 2-4" (5-10 cm)
around the utensil(s) for proper air circulation and be sure pans do not touch each other, the door,
sides or back of oven. The hot air must circulate around the pans in the oven for even heat to
reach all parts of the oven.
17
Setting Oven
Controls
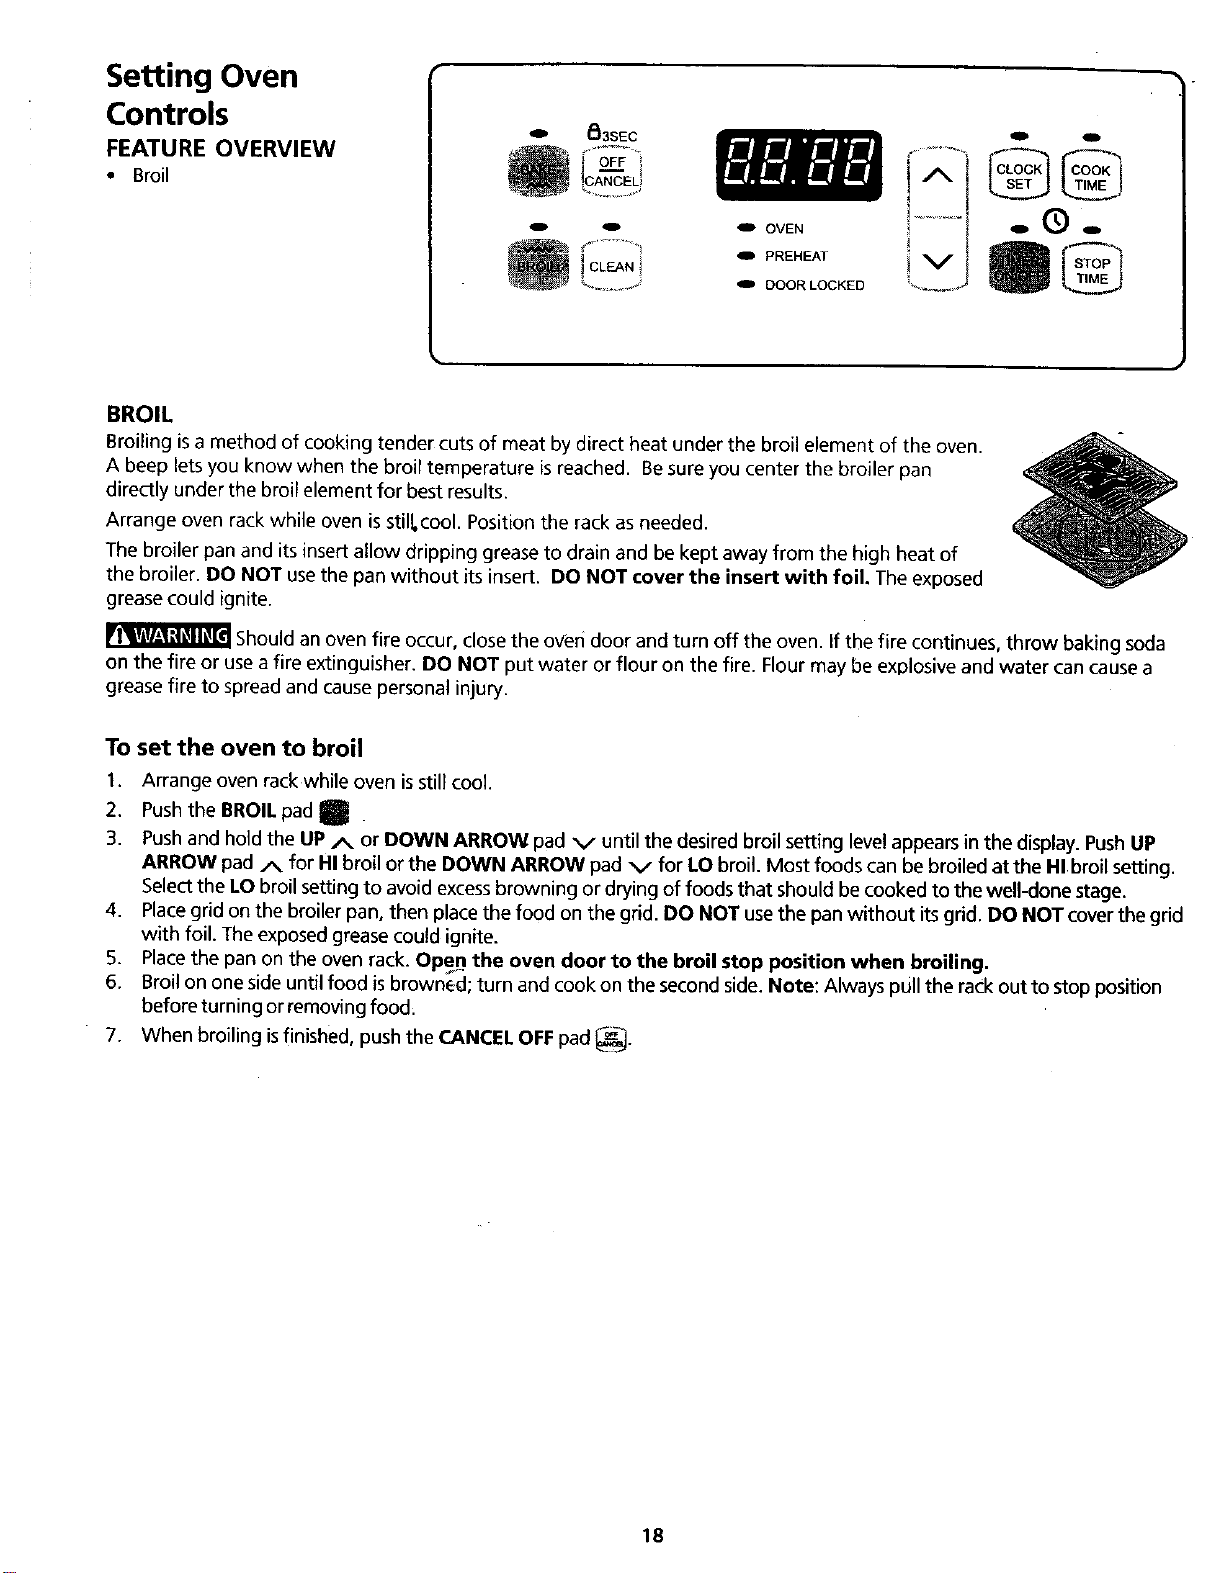
FEATURE OVERVIEW
• Broil
OVEN
PREHEAT
DOORLOCKED
BROIL
Broiling is a method of cooking tender cuts of meat by direct heat under the broil element of the oven.
A beep lets you know when the broil temperature isreached. Besure you center the broiler pan
directly under the broil element for best results.
Arrange oven rack while oven isstill, cool. Position the rack as needed.
The broiler pan and its insert allow dripping grease to drain and be kept away from the high heat of
the broiler. DO NOT use the pan without its insert. DO NOT cover the insert with foil. The exposed
grease could ignite.
Should an oven fire occur, close the oven door and turn off the oven. If the fire continues, throw baking soda
on the fire or use a fire extinguisher. DO NOT put water or flour on the fire. Flour may be explosive and water can cause a
grease fire to spread and cause personal injury.
To set the oven to broil
I. Arrange oven rack while oven is still cool.
2. Pushthe BROIL pad g
3. Pushand hold the UP A or DOWN ARROW pad v until the desired broil setting level appears in the display. Push UP
ARROW pad A for HI broil or the DOWN ARROW pad v for LO broil. Most foods can be broiled at the HI broil setting.
Select the LO broil setting to avoid excessbrowning or drying of foods that should be cooked to the well-done stage.
4. Placegrid on the broiler pan, then place the food on the grid. DO NOT usethe pan without its grid. DO NOT cover the grid
with foil. The exposed grease could ignite.
5. Placethe pan on the oven rack. Open. the oven door to the broil stop position when broiling.
6. Broil on one side until food is brownecl; turn and cook on the second side. Note: Always pull the rack out to stop position
before turning or removing food_
7. When broiling isfinished, push the CANCEL OFF pad _.
18
Broiling Information
Preheating
Preheating issuggested when searing rare steaks (remove the broiler pan before preheating.
Foods will stick if placed on hot metal.) To preheat, set the oven control(s) to BROILas
instructed in the "ELECTRONICOVEN CONTROLSECTION". Wait for the element to become
red-hot, usually about 2 minutes. Preheating is not necessary when broiling meats to well-done.
To Broil
Broil on one side until the food is browned; turn and cook on the second side, Season and
serve. Always pull rack out to the "stop" position before turning or removing food.
Determining Broiling Times
Broiling times vary, so watch the food closely. Time not only depends on the distance from the
element, but on the thickness and age of meat, fat content and doneness preferred. The first
side usually requires a few minutes longer than the second. Frozen meats also require
additional time.
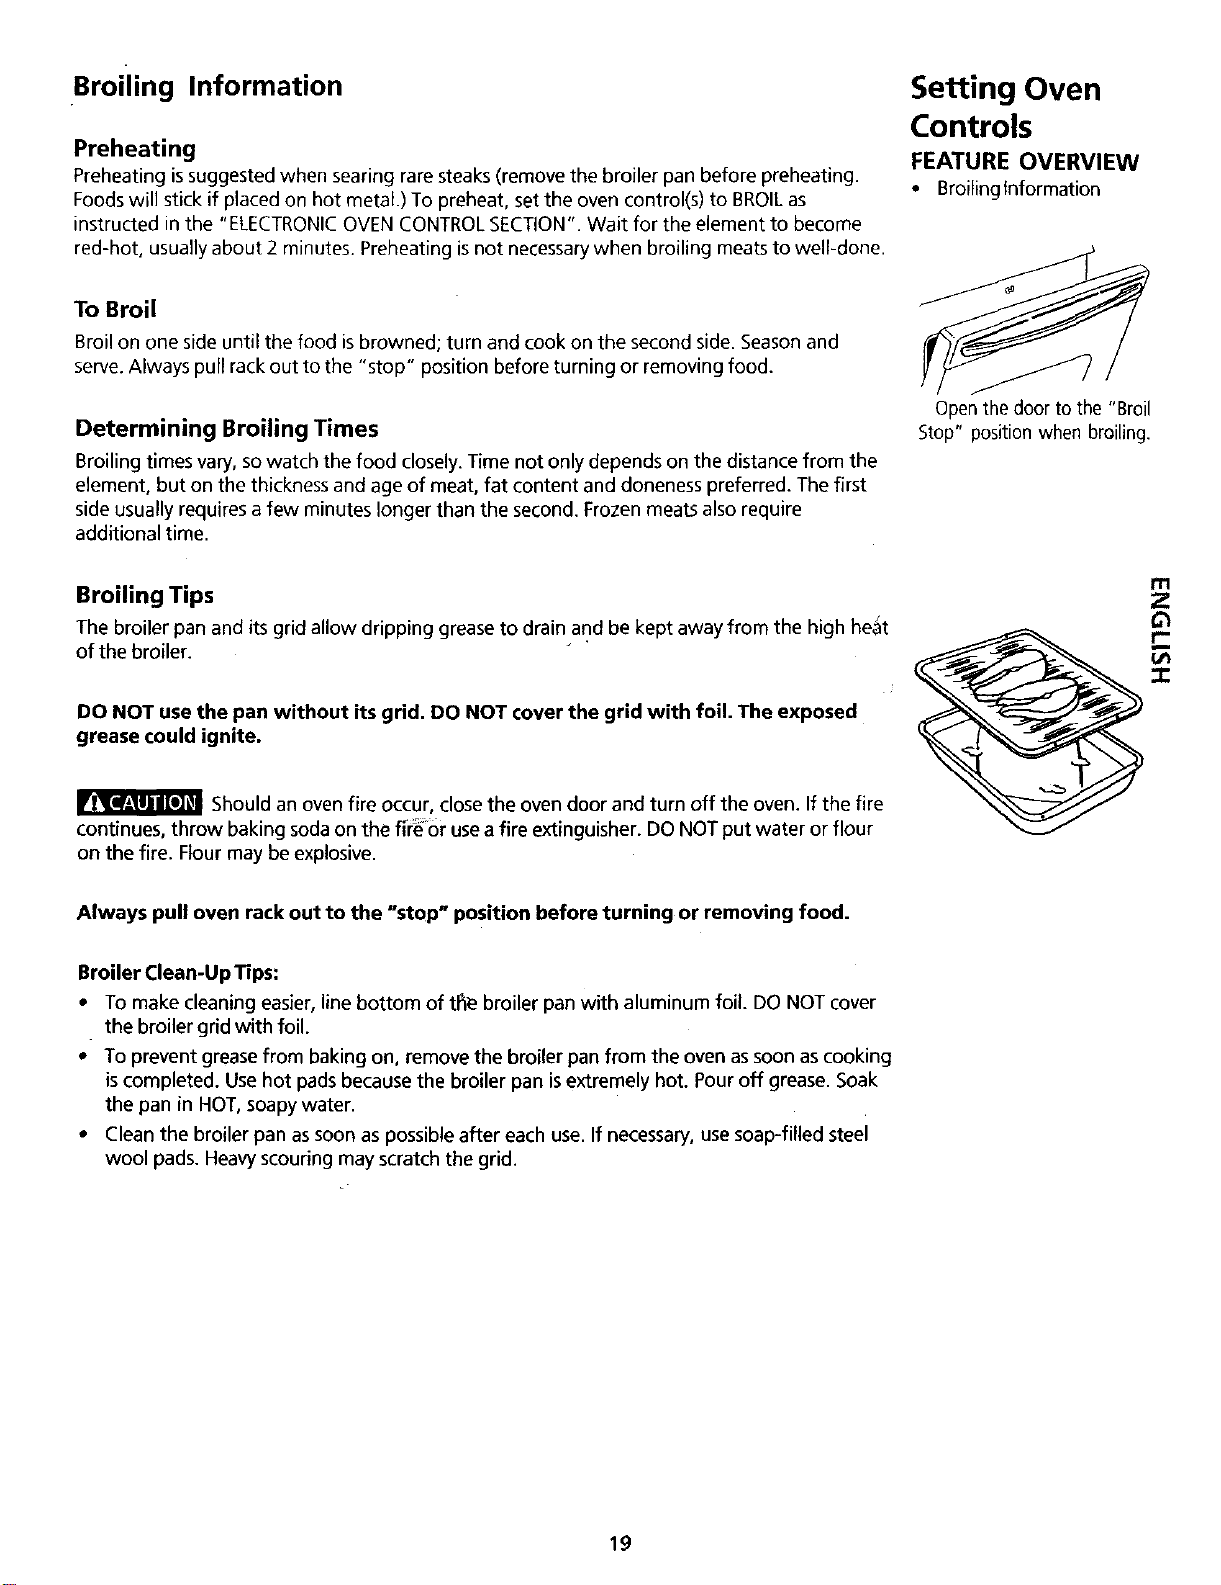
Setting Oven
Controls
FEATURE OVERVIEW
• Broiling fnformation
Openthe door tothe "Broil
Stop" positionwhen broiling.
Broiling Tips
The broiler pan and its grid allow dnppmg grease to drain and be kept away from the high heat
of the broiler.
DO NOT use the pan without its grid. DO NOT cover the grid with foil. The exposed
grease could ignite.
Should an oven fire occur, close the oven door and turn off the oven. If the fire
continues, throw baking soda on the fiOrdoruse afire extinguisher. DO NOT put water or flour
on the fire. Flour may be explosive.
ttl
Z
Always pull oven rack out to the "stop" position before turning or removing food.
Broiler Clean-Up Tips:
• To make cleaning easier, line bottom of tl_ broiler pan with aluminum foil. DO NOT cover
the broiler grid with foil.
• To prevent grease from baking on, remove the broiler pan from the oven assoon as cooking
is completed. Use hot pads because the broiler pan isextremely hot. Pour off grease. Soak
the pan in HOT, soapy water.
• Clean the broiler pan assoon as possible after each use. If necessary, use soap-filled steel
wool pads. Heavy scouring may scratch the grid.
19

Oven Cleaning
FEATURE OVERVIEW
• Adhere to the Following
Precautions
• Preparing the Oven for
Self-Cleaning
• Whatto Expectduring
Cleaning
DO HAND
CLEAN
FRAME
)O NOT HAND
DO HAND CLEAN SEAL
CLEAN DOOR
Self-Clean Oven Cycle
Adhere to the Following Precautions:
Allow the oven to cool before cleaning.
Wear rubber gloves when cleaning any exterior part of the oven manually.
During the self-clean cycle, the outside of the oven wall can become very hot
to touch. DO NOT leave small children unattended near the appliance.
Before cleaning any part of the oven, be sure the electronic oven control is
turned off or else push CANCEL pad. Wait until the oven iscool.
DO NOT use commercial oven cleaners or oven protective coatings in or around any part of the
self-cleaning oven. DO NOT clean the oven door gasket. The gasket on the oven door is
essential for a good seal. Care should be taken not to rub, damage or move the gasket.DO
NOT use aluminum foil to Linethe oven bottom. This may affect cooking, or the foil could melt
and damage the oven surface.
A self-cleaning oven cleans itself with high temperatures (well above cooking temperatures)
which" eliminate soil completely or reduce it to a fine powdered ash you can wash away w th
damp cloth.
Preparing the Oven for Self-Cleaning
1. Before starting the self-'clean cycle, remove excess spillovers in the oven cavity by using hot
soapy water and a cloth. Large spillovers can cause heavy smoke or fire when subjected to
high temperatures. DO NOT allow foo d spills with a high sugar or acid content (such as
tomatoes, sauerkraut, fruit juices or pie filling) to remain on the surface asthey may cause a
dull spot even after cleaning.
2. Clean any soil from the oven frame and the inner door (see illustration to left). These areas
heat sufficiently during self-cleaning cycle to burn soil on. Clean with soap and water. Do
- n6t_:lean door seal because doing so can permanently damage it.
3. Remove the broiler pan and insert, all utensils and any foil. These items do not withstand
high cleaning temperatures.
4. Remove racks from oven before self-cleaning. If they go through the clean cycle, their color
will turn slightly dull, and they will not glide easily in their slots. To make them glide easily,
wait until oven and racks are cool, then rub the racks or oven side walls with wax paper or
a cloth _-_o,,ntaining a small amount of baby or salad oil.
What to Expect During Cleaning
While the oven self-cleans, it heatsto temperatures much higherthan those used in normal
cooking, Soundsof metal expansion and contraction are normal Odor isalso normal asthe
food soil isbeing removed Smoke may appear through the oven vent, locatedon the top of
the control panel.
If heavy spillovers are not wiped up before cleaning, they may flame and cause more smoke
and odor than usual. Thisis normal and safe and should not cause alarm. If available, use an
exhaust fan during the self-cleaning cycle.
NOTE: A smoke eliminator in the oven vent converts the smoke from the self-cleaning process
into a colorless vapor.
The health of some birds isextremely sensitive to the fumes given off
during the self-cleaning cycle of any range. Move birds to another well ventilated
room.
2O
O
_3SEC
_CANCEL
o O
O OVEN
PREHEAT
O DOORLOCKED
O Q
_'÷_ _•l _"_--_CLOCKi i'*_COOK
i A [.,SET i I T,ME
vi
.®.
fstopi
LTiMEt
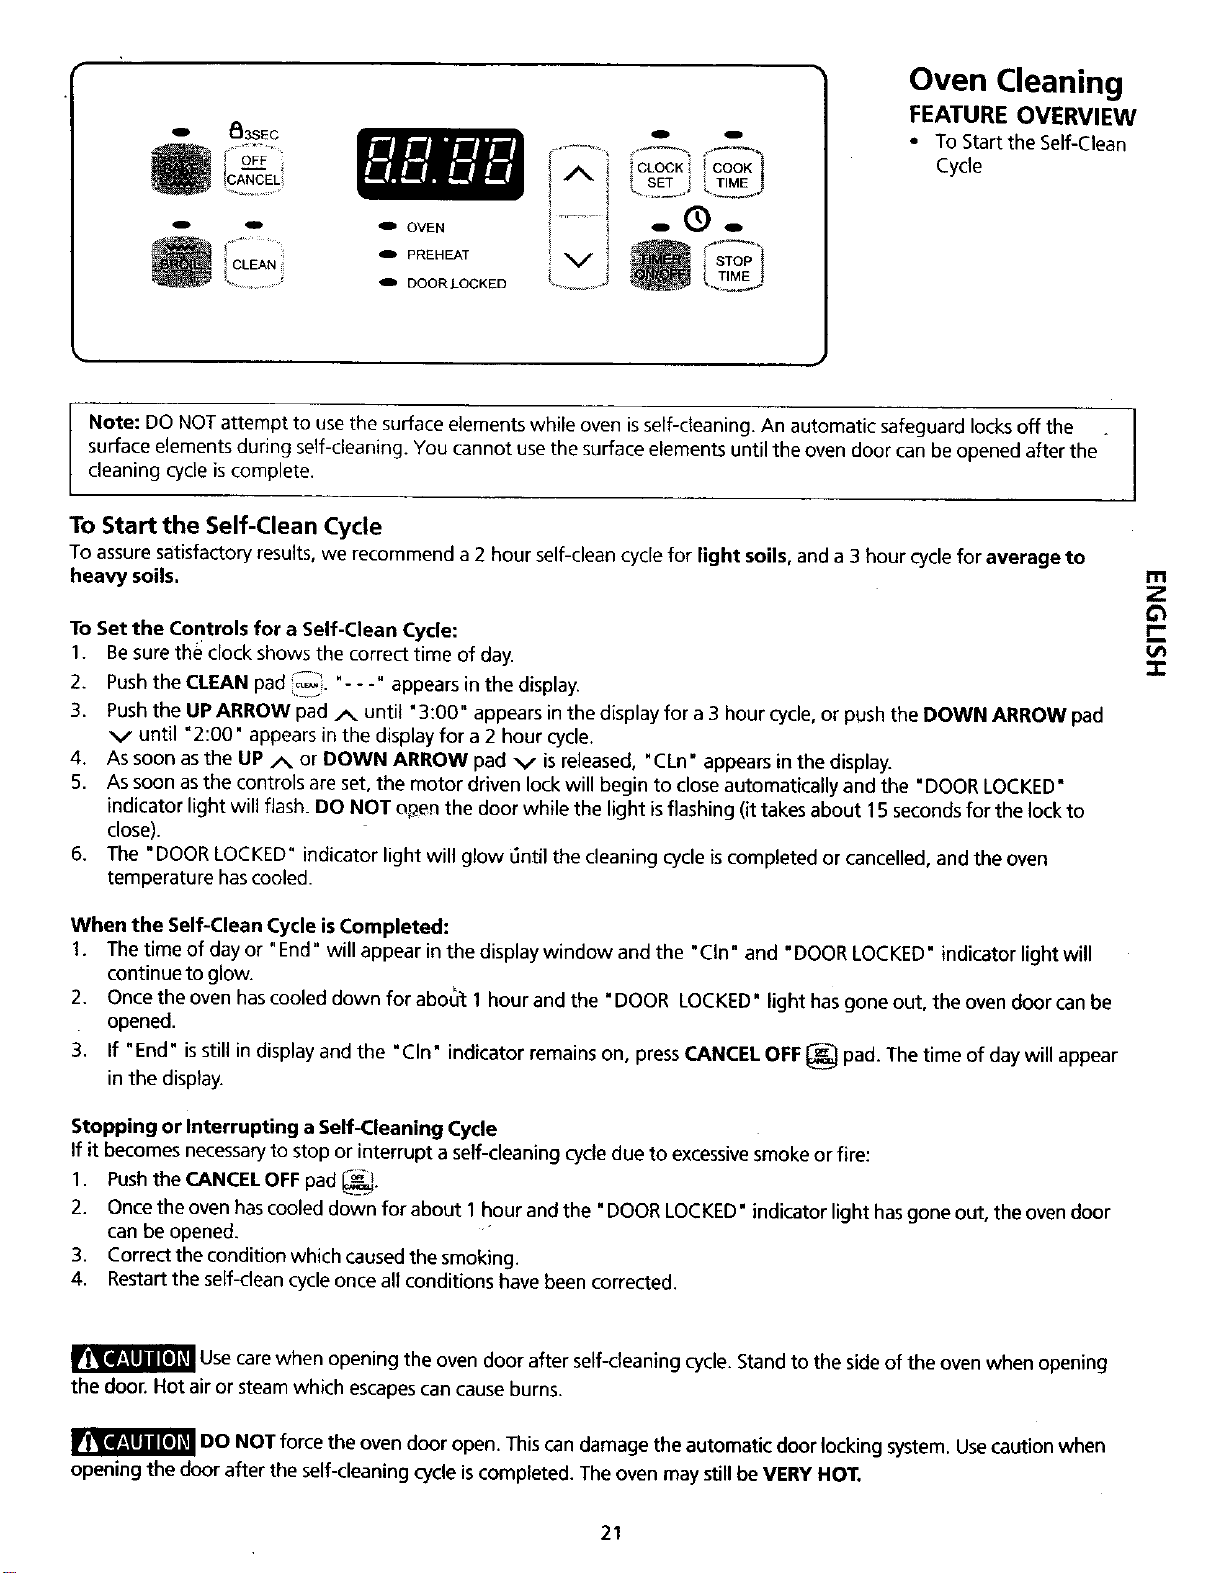
Oven Cleaning
FEATURE OVERVIEW
• To Start the Self-Clean
Cycle
Note: DO NOT attempt to usethe surface elements while oven isself-cleaning. An automatic safeguard locks off the
surface elements during self-cleaning. You cannot use the surface elements until the oven door can be opened after the
cleaning cycle is complete.
To Start the Self-Clean Cycle
To assure satisfactory results, we recommend a 2 hour self-clean cycle for light soils, and a 3 hour cycle for average to
heavy soils.
To Set the Controls for a Self-Clean Cycle:
1. Be sure the clock shows the correct time of day.
2. Pushthe CLEAN pad _:. "- - -" appears in the display.
3. Pushthe UPARROW pad/x until • 3:00" appears in the display for a 3 hour cycle,or push the DOWN ARROW pad
v until "2:00 • appears in the displayfor a 2 hour cycle.
4. As soon asthe UP/% or DOWN ARROW pad v isreleased, •CLn" appears in the display.
5. As soon asthe controlsare set,the motor driven lockwill begin to closeautomatically and the "DOOR LOCKED•
indicator light will flash. DO NOT open the door while the light isflashing (it takes about 15 secondsfor the lockto
close).
6. The "DOOR LOCKED" indicator light will glow 6ntil the cleaning cycle is completed or cancelled, and the oven
temperature hascooled.
When the Self-Clean Cycle isCompleted:
1. The time of day or "End" will appear inthe displaywindow and the "CIn" and "DOOR LOCKED" indicator light will
continueto glow.
2. Once the oven hascooleddown for abou_ 1 hour and the "DOOR LOCKED' light hasgone out, the oven door can be
opened.
3. If "End" isstill in displayand the "CIn" indicator remainson, pressCANCEL OFF _ pad. The time of daywill appear
in the display.
Stopping or Interrupting a Self-Cleaning Cycle
If it becomesnecessaryto stop or interrupt a self-cleaningcycle due to excessivesmokeor fire:
1. Pushthe CANCEL OFF pad _.
2. Oncethe oven hascooled down for about 1 hour and the "DOOR LOCKED" indicatorlight hasgone out, the ovendoor
can be opened.
3. Correct the conditionwhichcausedthe smoking.
4. Restartthe self-dean cycle once all conditionshave been corrected.
m
Z
r-
i
Use carewhen opening the oven door after self-cleaning cycle. Stand to the side of the oven when opening
the door. Hot air or steam which escapes can cause burns.
DO NOT force the oven door open. This can damage the automatic door locking system. Usecaution when
opening the door after the self-cleaning cycle is completed. The oven may still be VERY HOT.
21
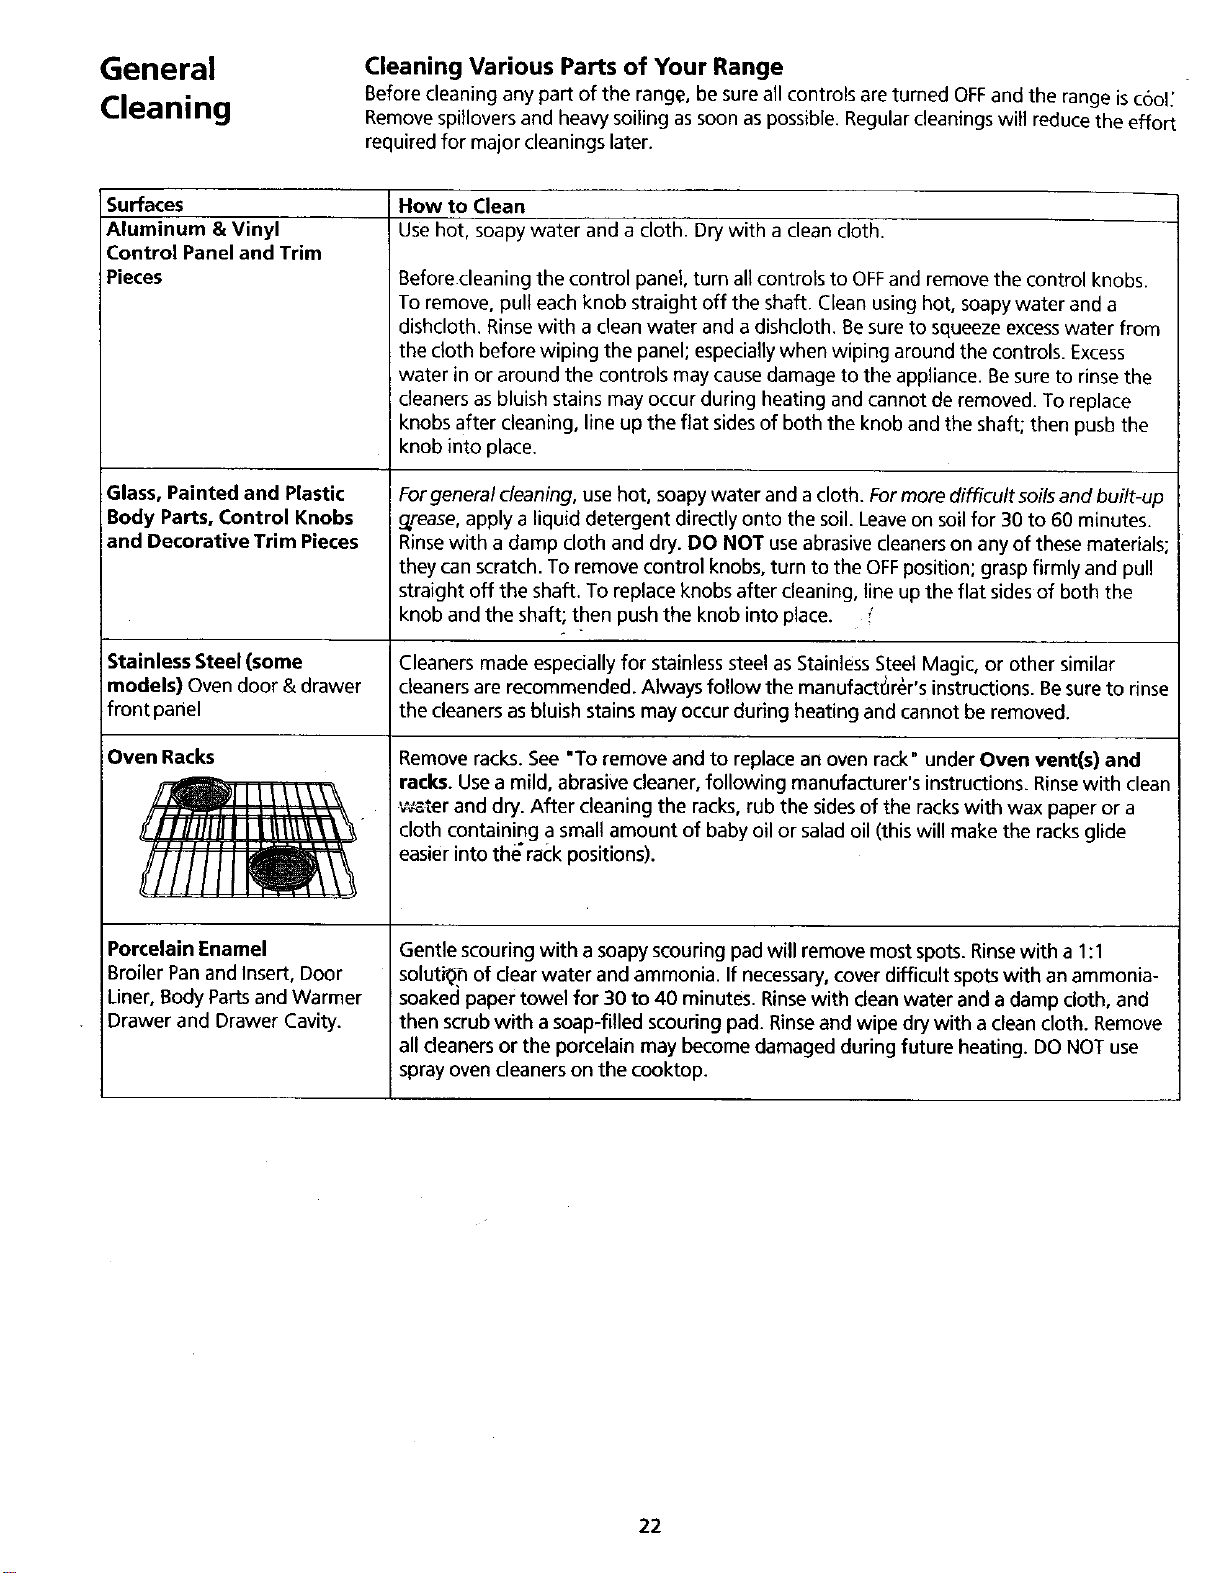
General
Cleaning
Cleaning Various Parts of Your Range
Before cleaning any part of the range, be sure all controls are turned OFFand the range iscool:
Remove spillovers and heavy soiling as soon as possible. Regular cleanings will reduce the effort
required for major cleanings later.
Surfaces
Aluminum & Vinyl
Control Panel and Trim
Pieces
Glass, Painted and Plastic
Body Parts, Control Knobs
and Decorative Trim Pieces
How to Clean
Use hot, soapy water and a cloth. Dry with a clean cloth.
Before cleaning the control panel, turn all controls to OFFand remove the control knobs.
To remove, pull each knob straight off the shaft. Clean using hot, soapy water and a
dishcloth. Rinse with a clean water and a dishcloth. Besure to squeeze excess water from
the cloth before wiping the panel; especially when wiping around the controls. Excess
water in or around the controls may cause damage to the appliance. Be sure to rinse the
cleaners as bluish stains may occur during heating and cannot de removed. To replace
knobs after cleaning, line up the flat sides of both the knob and the shaft; then pusb the
knob into place.
Forgeneral cleaning, use hot, soapy water and a cloth. For more difficult soils and built-up
grease, apply a liquid detergent directly onto the soil. Leaveon soilfor 30 to 60 minutes.
Rinse with a damp cloth and dry. DO NOT use abrasive cleaners on any of these materials;
they can scratch. To remove control knobs, turn to the OFFposition; grasp firmly and pull
straight off the shaft. To replace knobs after cleaning, line up the flat sides of both the
knob and the shaft; then push the knob into place.
Stainless Steel (some Cleaners made especially for stainless steel as Stainless Steel Magic, or other similar
models) Oven door & drawer cleaners are recommended. Always follow the manufact6r_r's instructions. Be sure to rinse
front panel the cleaners as bluish stains may occur during heating and cannot be removed.
Oven Racks
Porcelain Enamel
Broiler Pan and Insert, Door
Liner,Body Parts and Warmer
Drawer and Drawer Cavity.
Remove racks. See "To remove and to replace an oven rack" under Oven vent(s) and
racks. Usea mild, abrasivecleaner, following manufacturer's instructions.Rinse with clean
v_ter and dry. After cleaning the racks,rub the sides of the rackswith wax paper or a
cloth containing a small amount of baby oilor salad oil(thiswill make the racks glide
easier intothe"ra(:kpositions).
Gentle scouring with a soapy scouring pad will remove most spots. Rinsewith a I :I
soluti_h of clear water and ammonia. If necessary,cover difficult spots with an ammonia-
soaked paper towel for 30 to 40 minutes. Rinse with clean water and a damp cloth, and
then scrub with a soap-filled scouring pad. Rinse and wipe dry with a clean cloth. Remove
all cleaners or the porcelain may become damaged during future heating. DO NOT use
spray oven cleaners on the cooktop.
22
Cooktop Cleaning and Maintenance
General Cleaning
FEATURE OVERVIEW
• Cooktop Cleaning and
maintenance
• Cleaning
recommendations for the
Ceramic Glass Cooktop
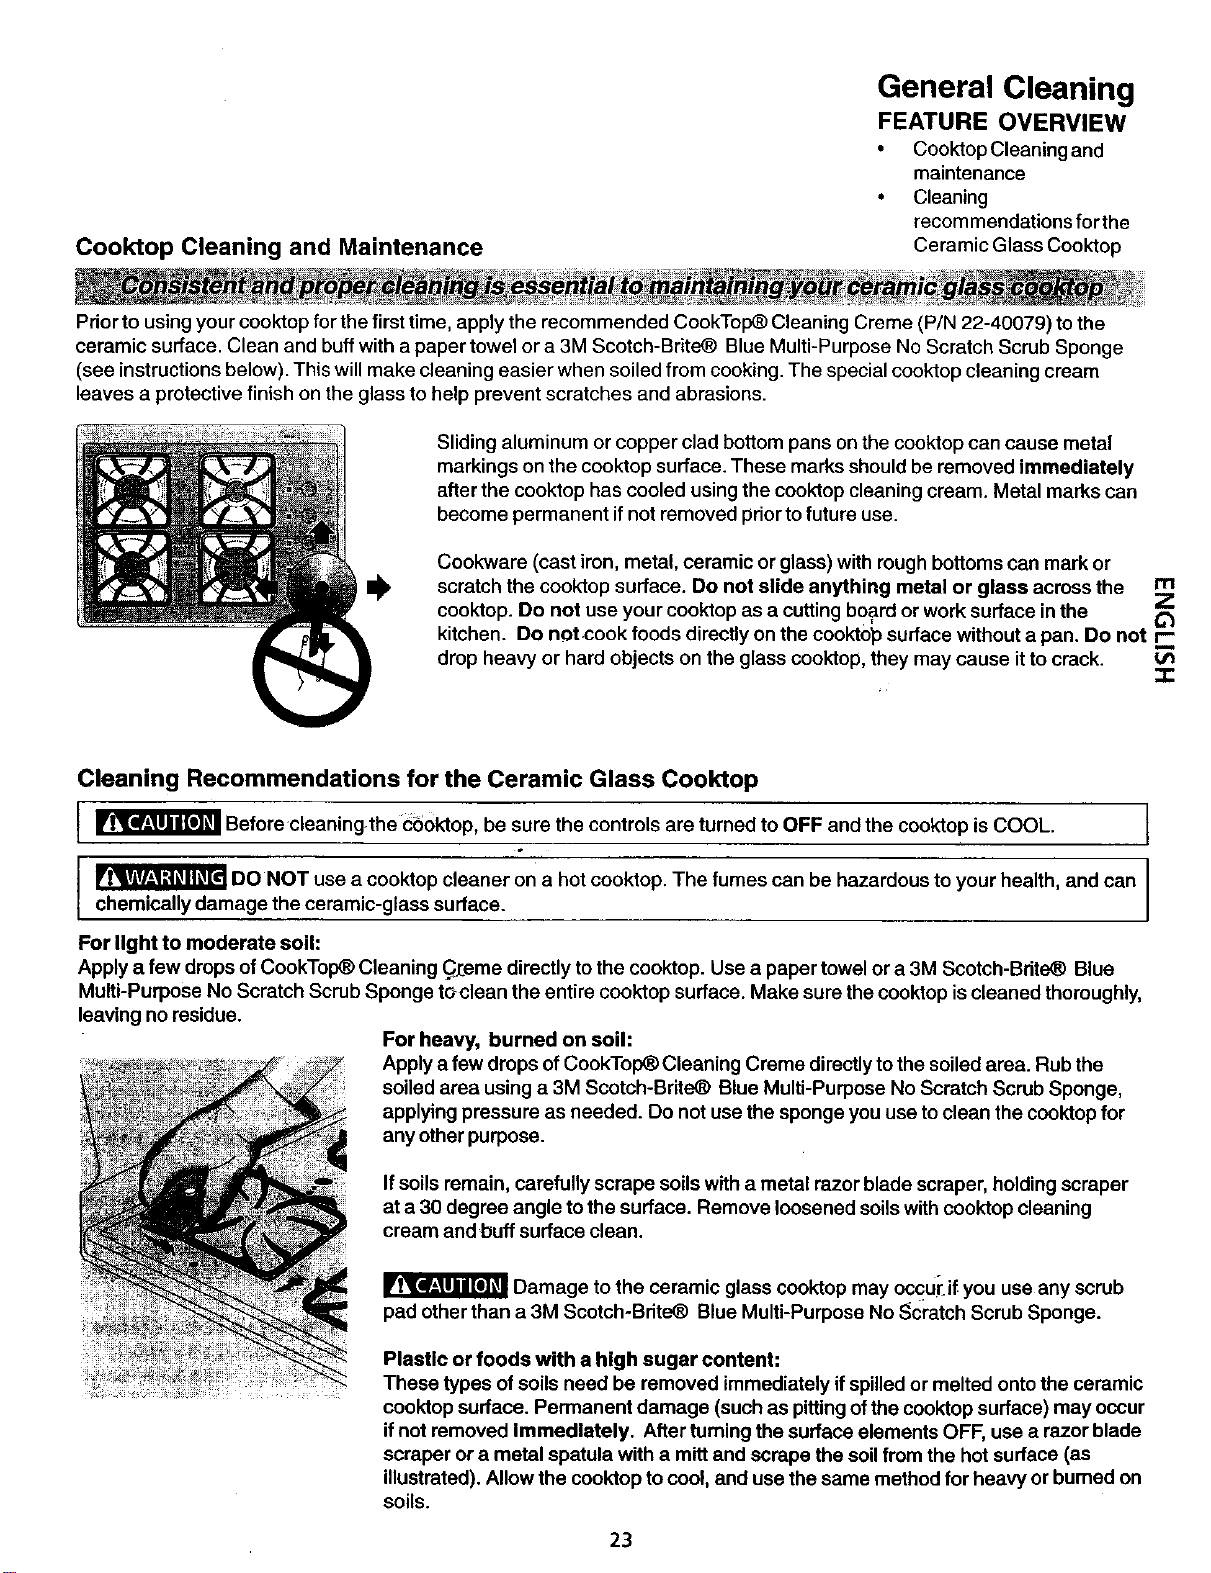
Prior to using your cooktop for the first time, apply the recommended CookTop_ Cleaning Creme (P/N 22-40079) to the
ceramic surface. Clean and buff with a paper towel or a 3M Scotch-Brite_ Blue Multi-Purpose No Scratch Scrub Sponge
(see instructions below). This will make cleaning easier when soiled from cooking. The special cooktop cleaning cream
leaves a protective finish on the glass to help prevent scratches and abrasions.
Sliding aluminum or copper clad bottom pans on the cooktop can cause metal
markings on the cooktop surface. These marks should be removed immediately
after the cooktop has cooled using the cooktop cleaning cream. Metal marks can
become permanent if not removed prior to future use.
Cookware (cast iron, metal, ceramic or glass) with rough bottoms can mark or
scratch the cooktop surface. Do not slide anything metal or glass across the r'n
cooktop. Do not use your cooktop as a cutting board or work surface in the Z
kitchen. Do not.cook foods directly on the cookt0_ surface without a pan. Do not
drop heavy or hard objects on the glass cooktop, they may cause it to crack.
"I"
Cleaning Recommendations for the Ceramic Glass Cooktop
Before cleaningthe Ce0ktop, be sure the controls are turned to OFF and the cooktop is COOL. I
DO NOT use a cooktop cleaner on a hot cooktop. The fumes can be hazardous to your health, and can
chemically damage the ceramic-glass surface.
For light to moderate soil:
Apply a few drops of CookTop_ Cleaning C_eme directly to the cooktop. Use a paper towel or a 3M Scotch-Bdte_ Blue
Multi-Purpose No Scratch Scrub Sponge toclean the entire cooktop surface. Make sure thecooktop is cleaned thoroughly,
leaving no residue.
For heavy, burned on soil:
Apply a few drops ofCookTol:_ Cleaning Creme directlyto the soiled area. Rub the
soiled area using a 3M Scotch-Brite_ Blue Multi-Purpose No Scratch Scrub Sponge,
applying pressure as needed. Do not usethe sponge you use toclean the cooktop for
any other purpose.
If soils remain, carefully scrape soils with a metal razor blade scraper, holding scraper
at a 30 degree angle to the surface. Remove loosened soils with cooktop cleaning
cream andbuff surface clean.
Damage to the ceramic glass cooktop may cccu_'_ifyou use any scrub
pad other than a 3M Scotch-Bdte_ Blue Multi-Purpose No Scratch Scrub Sponge.
Plastic or foods with a high sugar content:
These types ofsoils need be removed immediately if spilledor melted onto the ceramic
cooktop surface. Permanent damage (such as pittingof the cooktop surface) may occur
if not removed Immediately. After fuming the surface elements OFF, use a razor blade
scraper or a metal spatula with a mitt and scrape the soil from the hot surface (as
illustrated). Allow the cooktop to cool, and use the same methodfor heavy or burned on
soils.
23
General
Cleaning
FEATURE
OVERVIEW
• Cleaning
Recommendations
for Ceramic Glass
Cooktops (cont'd)
l_r_"_ Do not
use cleaners on a
heated surface. Fumes
could be hazardous.
Wait for area to cool
before cleaning. Do not
use cleaner cream to
clean porcelain, paint or
aluminum because it
can damage the
surface.
Do not use the following on the ceramic glass
cooktop:
• Do not use abrasive cleaners and scouring pads, such
as metal and some nylon pads. They may scratch the
cooktop, making it more difficult to clean.
• Do not use harsh cleaners, such as chlorine bleach,
ammonia or oven cleaners, as they may etch or dis-
color the cooktop.
• Do not use dirty sponges, cloths or paper towels, as
they can leave soil or lint on the cooktop which can
burn and cause discoloration.
00
Special Caution for Aluminum Foil and Aluminum Cooking Utensils
1) Aluminum foil
Useof aluminum foil will damage the cooktop. Do not use under any circumstances.
2) Aluminum utensils
The melting point of aluminum being much lower than that of other metals, care must be
taken when aluminum pots or pans are used. If allowed to boil dry, not only will the utensil
be,ruined, but also permanent damage in the form of breakage, fusing or marking may affect
the ceramic glass surface.
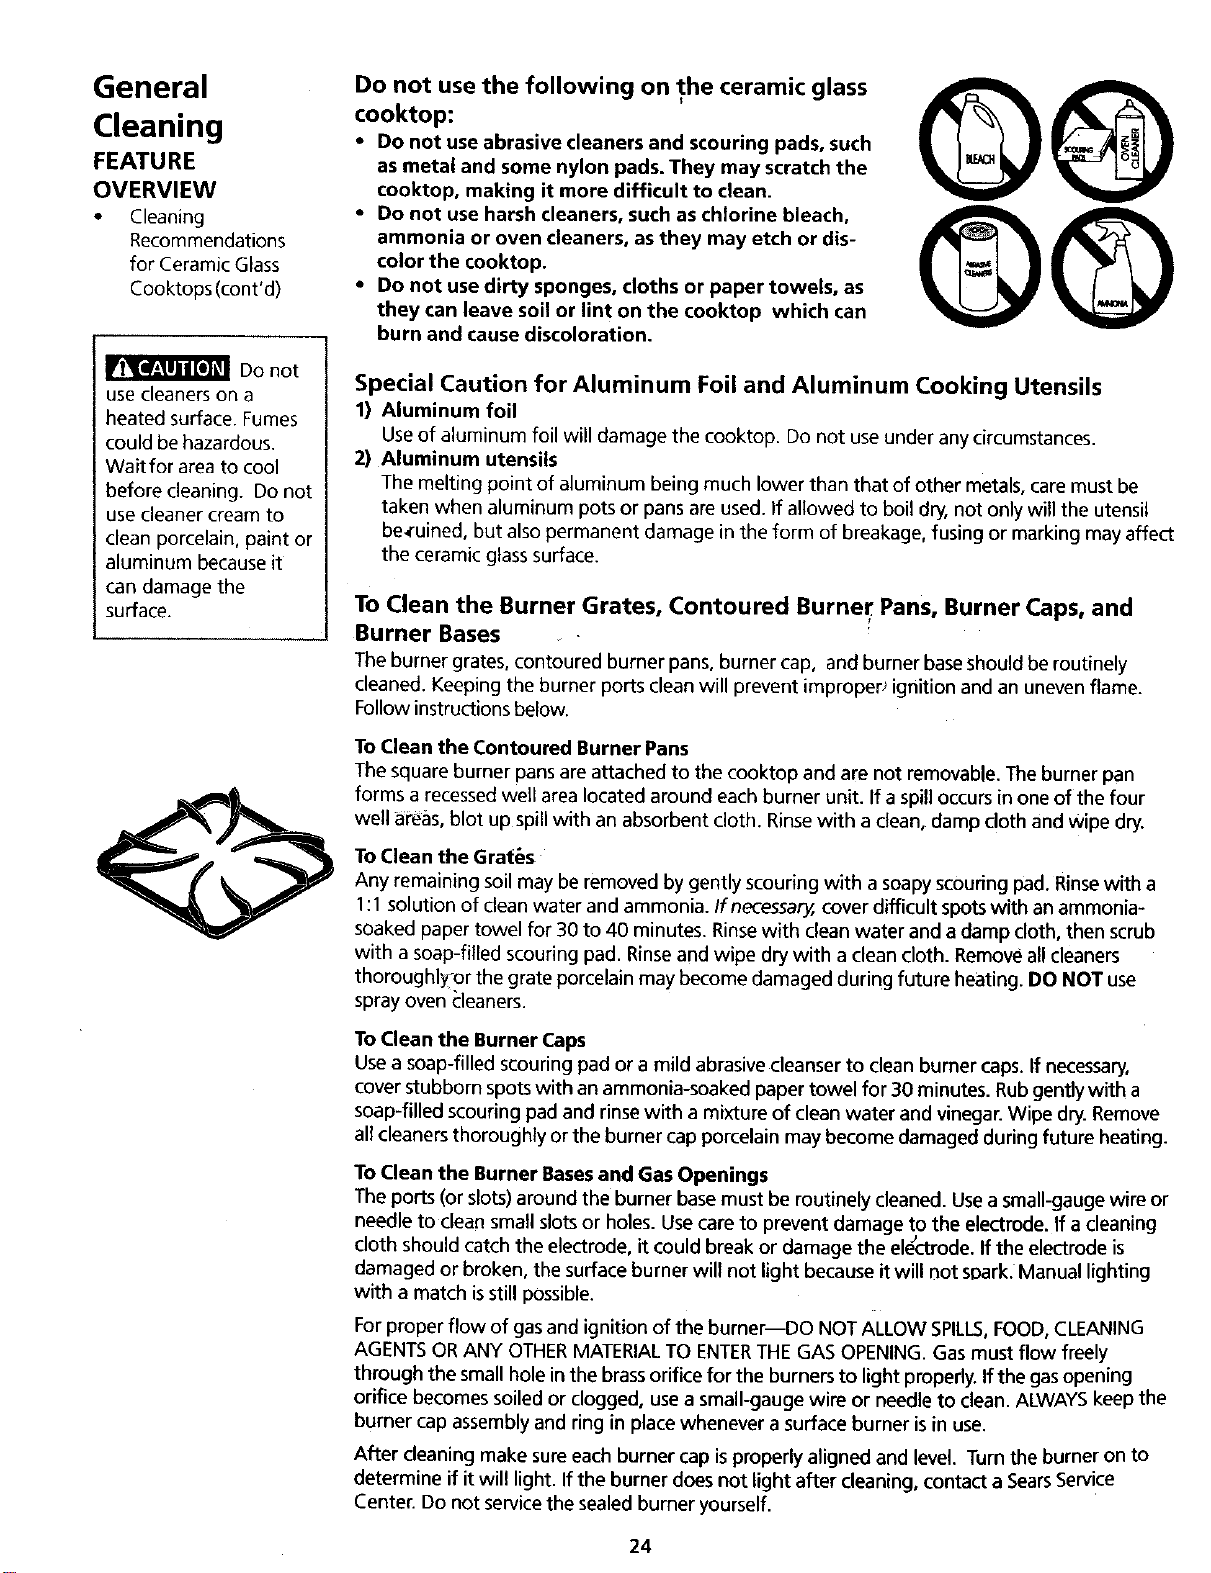
To Clean the Burner Grates, Contoured Burner, Pans, Burner Caps, and
Burner Bases
The burner grates, contoured burner pans, burner cap, and burner base should be routinely
cleaned. Keeping the burner ports clean will prevent improperJ ignition and an uneven flame.
Follow instructions below.
To Clean the Contoured Burner Pans
The square burner pans are attached to the cooktop and are not removable.The burner pan
forms a recessedwell area located around each burner unit. If a spill occursin one of the four
well areas, blot up spill with an absorbentcloth. Rinsewith a clean, damp cloth and Wipe dry.
To Clean the Grat_s
Any remaining soil may be removed by gently scouring with a soapy scoudng pad. Rinsewith a
I :I solution of clean water and ammonia. Ifnecessa_ cover difficult spats with an ammonia-
soaked paper towel for 30 to 40 minutes. Rinsewith clean water and a damp cloth, then scrub
with a soap-filled scouring pad. Rinseand wipe dry with a clean cloth. Remove all cleaners
thoroughIyor the grate porcelain may become damaged during future heating. DO NOT use
spray oven _:leaners.
To Clean the Burner Caps
Use a soap-filled scouring pad or a mild abrasive cleanser to clean burner caps. If necessary,
cover stubborn spots with an ammonia-soaked paper towel for 30 minutes. Rubgently with a
soap-filled scouring pad and rinse with a mixture of clean water and vinegar. Wipe dry. Remove
all cleaners thoroughly or the burner cap porcelain may become damaged during future heating.
To Clean the Burner Basesand Gas Openings
The ports (or slots) around the burner base must be routinely cleaned. Use a small-gauge wire or
needle to clean small slots or holes.Usecare to prevent damage to the electrode. If a cleaning
cloth should catch the electrode, it could break or damage the electrode. If the electrode is
damaged or broken, the surface burner will not light becauseitwill not st0ark. Manual lighting
with a match isstill possible.
Forproperflow of gasand ignition of the burner--DO NOT ALLOW SPILLS,FOOD,CLEANING
AGENTS ORANY OTHERMATERIALTO ENTERTHE GAS OPENING. Gas must flow freely
through the small hole inthe brassorifice for the burnersto light properly.Ifthe gas opening
orifice becomessoiled or clogged, usea small-gauge wire or needle to clean. ALWAYSkeep the
burner cap assemblyand ring in placewhenever a surface burner isin use.
After cleaning make sureeach burner cap is properlyaligned and level. Turn the burner on to
determine if it will light. If the burner does not light after cleaning, contact a SearsService
Center. Do not servicethe sealed burner yourself.
24
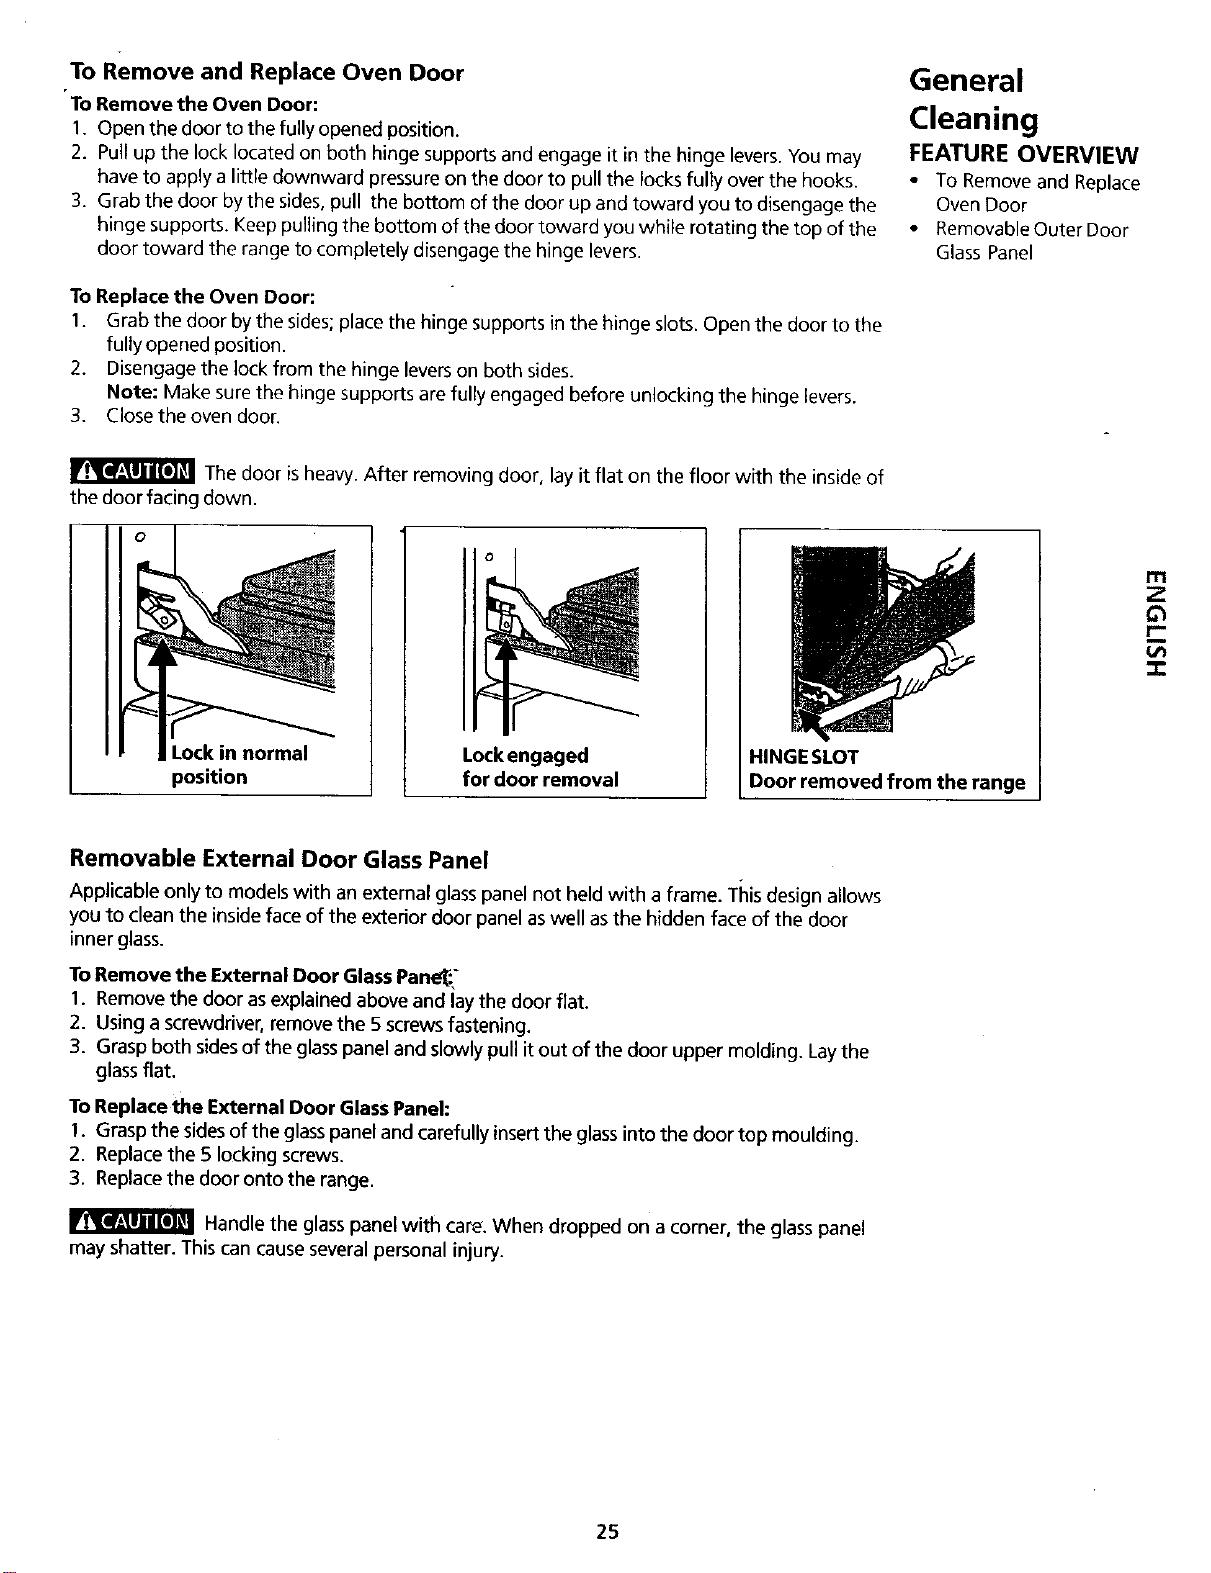
To Remove and Replace Oven Door
•To Remove the Oven Door:
I. Open the door to the fully opened position.
2. Pull up the lock located on both hinge supports and engage it in the hinge levers.You may
have to apply a little downward pressure on the door to pull the locks fully over the hooks.
3. Grab the door by the sides, pull the bottom of the door up and toward you to disengage the
hinge supports. Keep pulling the bottom of the door toward you while rotating the top of the
door toward the range to completely disengage the hinge levers.
To Replace the Oven Door:
I. Grab the door by the sides;place the hinge supports in the hinge slots. Open the door to the
fully opened position.
2. Disengage the lock from the hinge levers on both sides.
Note: Make sure the hinge supports are fully engaged before unlocking the hinge levers.
3. Close the oven door.
General
Cleaning
FEATURE OVERVIEW
• To Remove and Replace
Oven Door
• Removable Outer Door
Glass Panel
The door is heavy. After removing door, lay it flat on the floor with the inside of
the door facing down.
Lock in normal
position
Lockengaged
for door removal
HINGE SLOT
Door removed from the range
rll
Z
rm
m
Removable External Door Glass Panel
Applicable only to models with an externalglass panel not held with a frame. This design allows
you to clean the inside face of the exterior door panel aswell as the hidden face of the door
inner glass.
To Remove the External Door Glass Pane[:.."
1. Remove the door as explained above and lay the door flat.
2. Usinga screwdriver, remove the 5 screws fastening.
3. Graspboth sidesof the glasspanel and slowly pull itout of the door upper molding. Laythe
glassflat.
To Replace the External Door Glass Panel:
1. Grasp the sidesof the glasspanel and carefullyinsertthe glassintothe door top moulding.
2. Replacethe 5 lockingscrews.
3. Replacethe door onto the range.
Handle the glass panel with care. When dropped on a corner, the glass panel
may shatter. This can cause several personal injury.
25
General
Cleaning
FEATURE OVERVIEW
• To Remove and Replace
Warmer Drawer
Left Glide
Pull up latch
with finger
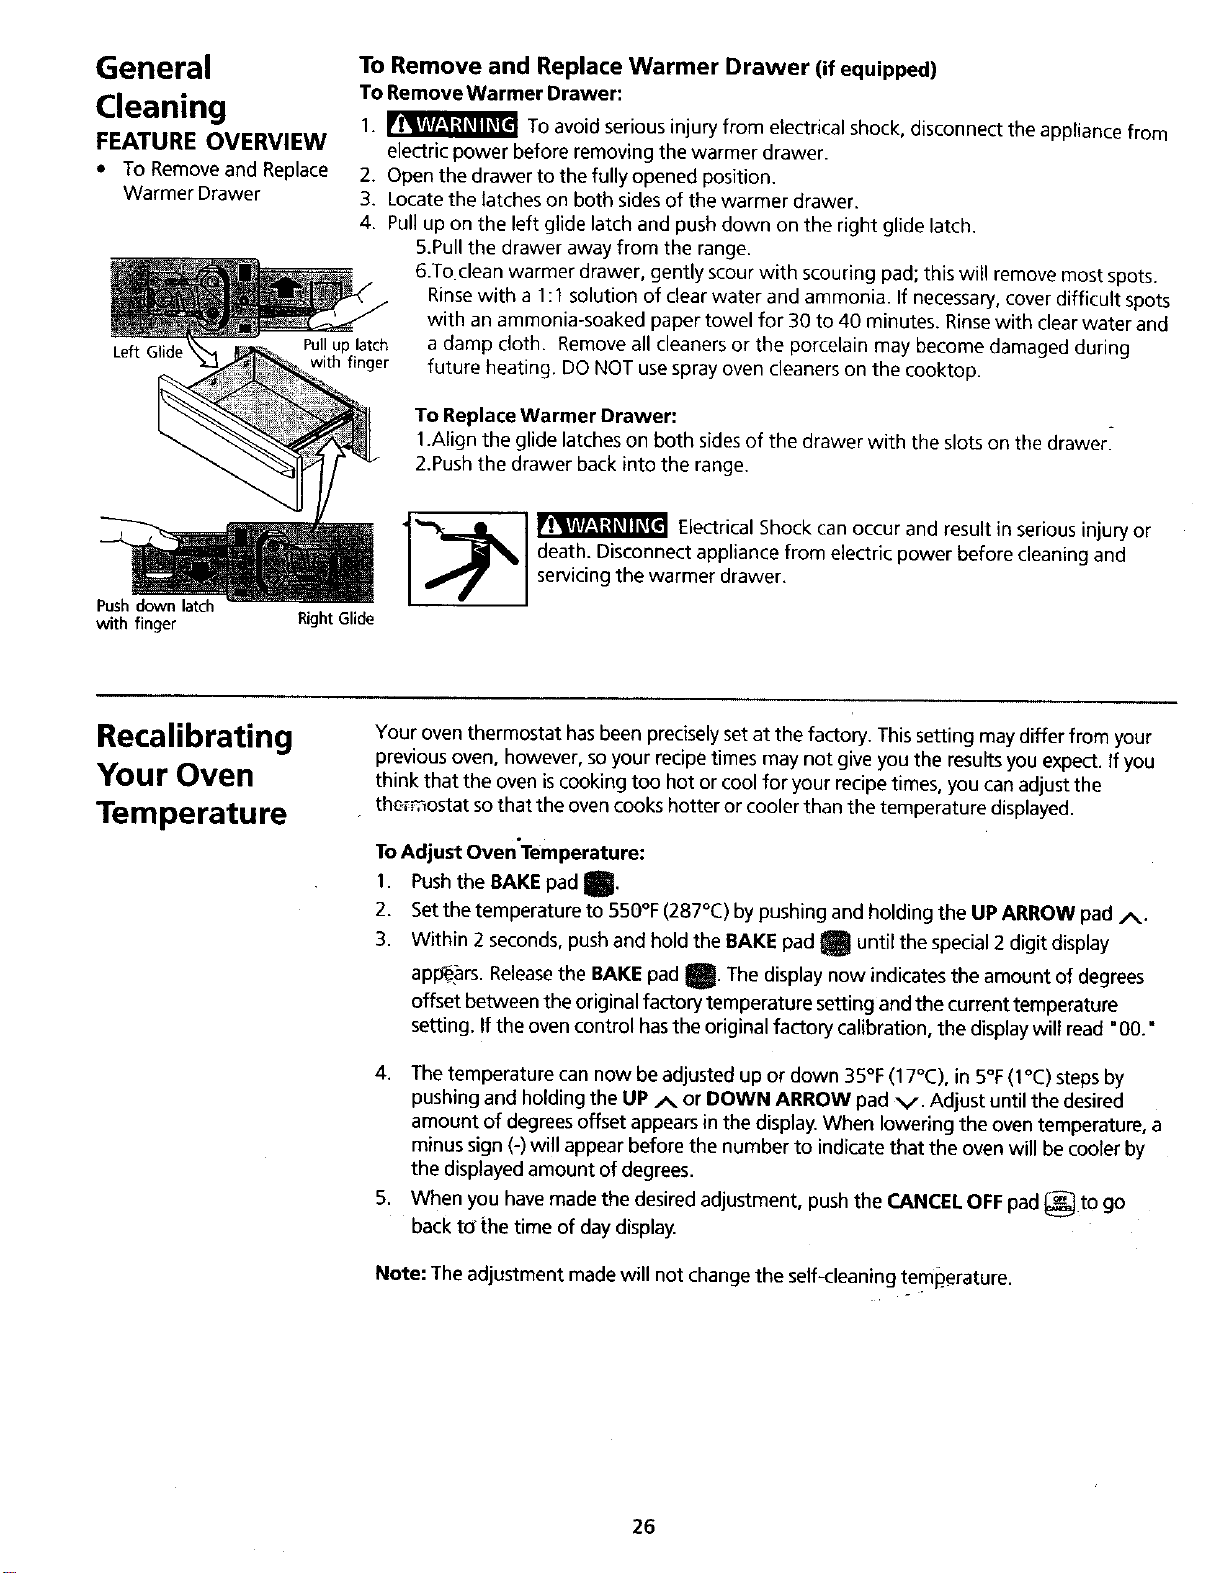
To Remove and Replace Warmer Drawer (if equipped)
To Remove Warmer Drawer:
1. _ TOavoid serious injury from electrical shock, disconnect the appliance from
electric power before removing the warmer drawer.
2. Open the drawer to the fully opened position.
3. Locate the latches on both sides of the warmer drawer.
4. Pull up on the left glide latch and push down on the right glide latch.
5.Pull the drawer away from the range.
6.To clean warmer drawer, gently scour with scouring pad; this will remove most spots.
Rinsewith a 1:1 solution of clear water and ammonia. If necessary, cover difficult spots
with an ammonia-soaked paper towel for 30 to 40 minutes. Rinse with clear water and
a damp cloth. Remove all cleaners or the porcelain may become damaged during
future heating. DO NOT usespray oven cleaners on the cooktop.
To Replace Warmer Drawer:
1.Align the glide latches on both sides of the drawer with the slots on the drawer.
2.Push the drawer back into the range.
Push down latch
with finger
Right Glide
Electrical Shock can occur and result in serious injury or
death. Disconnect appliance from electric power before cleaning and
servicing the warmer drawer_
Recalibrating
Your Oven
Temperature
Your oven thermostat hasbeen precisely set at the factory. This setting may differ from your
previous oven, however, so your recipe times may not give you the results you expect. If you
think that the oven iscooking too hot or cool for your recipe times, you can adjust the
thermostat so that the oven cooks hotter or cooler than the temperature displayed.
To Adjust Oven'Temperature:
1. Push the BAKEpad t'
2. Set the temperature to 550°F (287°C) by pushing and holding the Up ARROW pad A.
3. Within 2 seconds, push and hold the BAKE pad m until the special 2 digit display
appears. Releasethe BAKE pad I. The display now indicates the amount of degrees
offset between the original factory temperature setting and the current temperature
setting. If the oven control hasthe original factory calibration, the display will read "00."
4. The temperature can now be adjusted up or down 35°F (I 7°C), in 5°F(I°C) steps by
pushing and holding the UP A or DOWN ARROW pad v. Adjust until the desired
amount of degrees offset appears in the display. When lowering the oven temperature, a
minus sign (-) will appear before the number to indicate that the oven will becooler by
the displayed amount of degrees.
5. When you have made the desired adjustment, push the CANCEl OFF pad _e_ to go
back tc_the time of day display.
Note: The adjustment made will not change the self-cleaning temperature
26
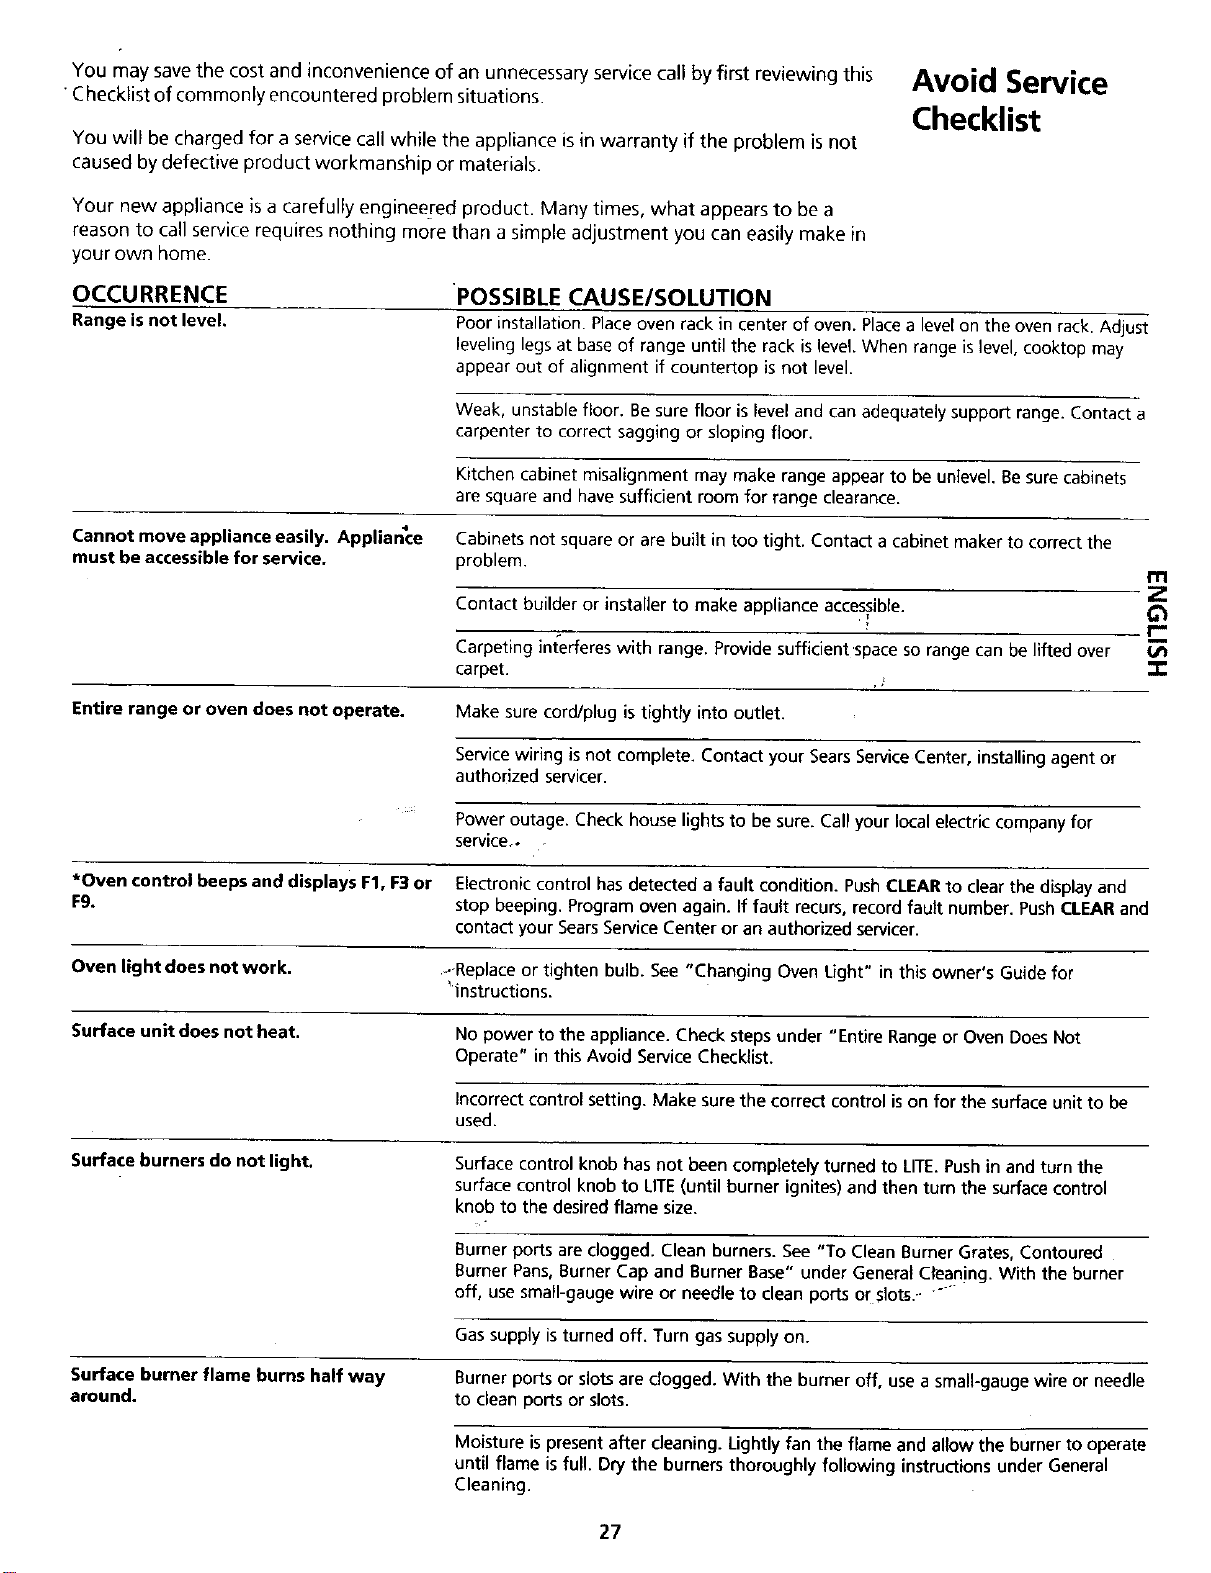
You may savethe cost and inconvenience of an unnecessary service call by first reviewing this
•Checklist of commonly encountered problem situations.
You will be charged for a service call while the appliance isin warranty if the problem is not
caused by defective product workmanship or materials.
Avoid Service
Checklist
Your new appliance is a carefully engineered product. Many times, what appears to be a
reason to call service requires nothing more than a simple adjustment you can easily make in
your own home.
OCCURRENCE
Range is not level.
POSSIBLE CAUSE/SOLUTION
Poor installation. Place oven rack in center of oven. Place a level on the oven rack. Adjust
leveling legs at base of range until the rack islevel. When range is level, cooktop may
appear out of alignment if countertop is not level.
Weak, unstable floor. Be sure floor is level and can adequately support range. Contact a
carpenter to correct sagging or sloping floor.
Kitchen cabinet misalignment may make range appear to be unlevel. Be sure cabinets
are square and have sufficient room for range clearance.
Cannot move appliance easily. Applian_ce Cabinets not square or are built in too tight. Contact a cabinet maker to correct the
must be accessible for service, problem.
Entire range or oven does not operate.
m
Contact builder or installer to make appliance accessible. Z
r-
Carpeting int_erfereswith range. Provide sufficient space so range can be lifted over
carpet. "t"
Make sure cord/plug is tightly into outlet•
Service wiring is not complete. Contact your Sears Service Center, installing agent or
authorized servicer.
Power outage. Check house lights to be sure. Call your local electric company for
service..
*Oven control beeps and displays F1, F3 or Electronic control has detected a fault condition. Push CLEAR to clear the display and
F9. stop beeping. Program oven again. If fault recurs, record fault number. Push CLEAR and
contact your SearsService Center or an authorized servicer.
Oven light does not work. _-Replace or tighten bulb. See "Changing Oven Light" in this owner's Guide for
'instructions.
Surface unit does not heat. No power to the appliance. Check steps under "Entire Range or Oven Does Not
Operate" in this Avoid Service Checklist.
Incorrect control setting. Make sure the correct control is on for the surface unit to be
used.
Surface burners do not light.
Surface control knob has not been completely turned to LITE.Push in and turn the
surface control knob to LITE(until burner ignites) and then turn the surface control
knob to the desired flame size.
Burner ports are clogged. Clean burners. See "To Clean Burner Grates, Contoured
Burner Pans, Burner Cap and Burner Base" under General Cleaning. With the burner
off, use small-gauge wire or needle to clean ports or Slots.-- "....
Surface burner flame burns half way
around.
Gas supply is turned off. Turn gas supply on.
Burner ports or slots are clogged. With the burner off, use a small-gauge wire or needle
to clean ports or slots.
Moisture is present after cleaning. Lightly fan the flame and allow the burner to operate
until flame is full. Dry the burners thoroughly following instructions under General
Cleaning.
27
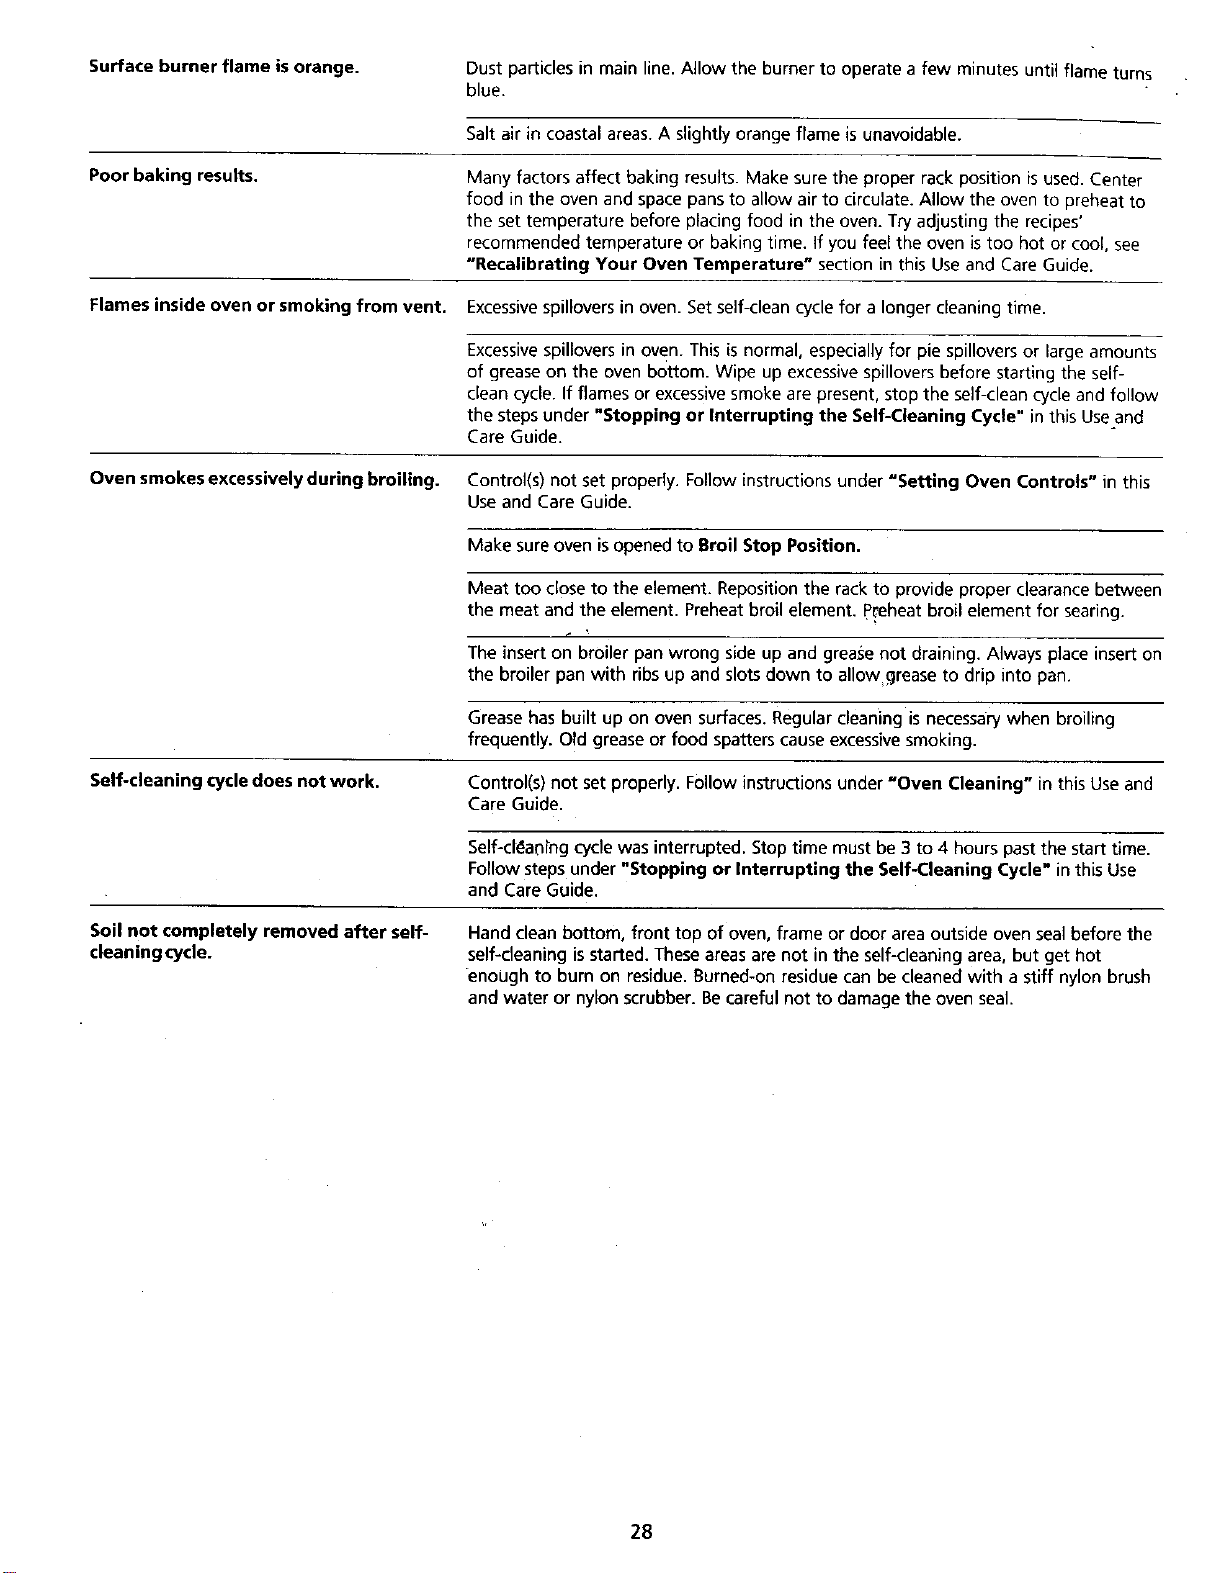
Surface burner flame is orange. Dust particles in main line. Allow the burner to operate a few minutes until flame turns
blue.
Salt air in coastal areas. A slightly orange flame is unavoidable.
Poor baking results.
Many factors affect baking results. Make sure the proper rack position is used. Center
food in the oven and space pans to allow air to circulate. Allow the oven to preheat to
the set temperature before placing food in the oven. Try adjusting the recipes'
recommended temperature or baking time. If you feel the oven is too hot or cool, see
"Recalibrating Your Oven Temperature" section in this Use and Care Guide.
Flames inside oven or smoking from vent. Excessive spillovers in oven. Set self-clean cycle for a longer cleaning time.
Excessive spillovers in oven. This is normal, especially for pie spillovers or large amounts
of grease on the oven bottom. Wipe up excessive spillovers before starting the self-
clean cycle. If flames or excessive smoke are present, stop the self-clean cycle and follow
the steps under "Stopping or Interrupting the Self-Cleaning Cycle" in this Use and
Care Guide.
Oven smokes excessively during broiling. Control(s) not set properly. Follow instructions under USetting Oven Controls" in this
Use and Care Guide.
Make sure oven is opened to Broil Stop Position.
Meat too close to the element. Reposition the rack to provide proper clearance between
the meat and the element. Preheat broil e[ement, preheat broil element for searing.
The insert on broiler pan wrong side up and grease not draining. Always place insert on
the broiler pan with ribsup and slotsdown to allow grease to drip into pan.
Grease has built up on oven surfaces. Regular cleaning is necessary when broiling
frequently. Old grease or food spatters cause excessive smoking.
Self-cleaning cycle does not work.
Control(s) not set properly. Follow instructions under nOven Cleaning" in this Use and
Care Guide.
Self-cl_ao_ng cycle was interrupted. Stop time must be 3 to 4 hours past the start time.
Follow steps under "Stopping or Interrupting the Self-Cleaning Cycle" in this Use
and Care Guide.
Soil not completely removed after self-
cleaning cycle.
Hand clean bottom, front top of oven, frame or door area outside oven seal before the
self-cleaning is started. These areas are not in the self-cleaning area, but get hot
enough to burn on residue. Burned-on residue can be cleaned with a stiff nylon brush
and water or nylon scrubber. Becareful not to damage the oven seal.
28