Use & Care Guide for KitchenAid KBSD708MPS
Table of Contents
- REFRIGERATOR SAFETY
- Refrigerator Safety
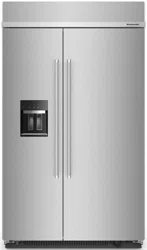
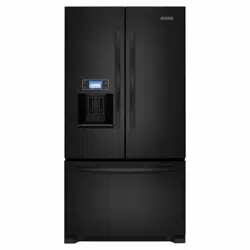
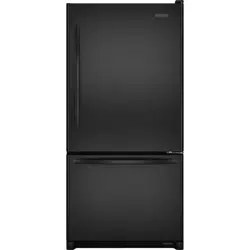
- MODEL
- Models
- MAINTENANCE AND CARE
- Cleaning
- Changing the LED Module
- Refrigeration Shelves and Door Bins
- Sabbath and Vacation Care
- INSTALLATION REQUIREMENTS
- Tools and Parts
- Location Requirements
- Electrical Requirements
- Water Supply Requirements
- Tipping Radius
- Product Dimensions
- Door Swing Dimensions
- Overlay Series Door Panel and Cabinetry Clearance
- Overlay Series Custom Panels and Handle Kits
- Stainless Series Custom Side Panels
- INSTALLATION INSTRUCTIONS
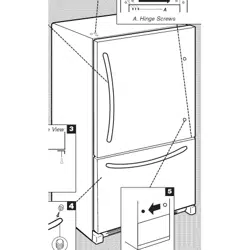
- Unpack the Refrigerator
- Connect the Water Supply
- Plug in Refrigerator
- Move Refrigerator to Final Location
- Level and Align Refrigerator
- Install Overlay Series Custom Panels
- Adjust Doors
- Install Side Panel
- Install Base Grille
- Install Odor Absorber (on some models)
- Complete Installation
- Water System Preparation
- REFRIGERATOR FEATURES
- Water and Ice Dispensers
- Ice Maker and Storage Bin
- Setting Liters and Ounces
- Measured Fill
- Water Filtration System
- Freezer Shelves
- PERFORMANCE DATA SHEET
- Performance Data Sheet
MAINTENANCE AND CARE
Cleaning
WARNING Explosion Hazard Risk of Fire or Explosion. Flammable Refrigerant Used. Do Not Use Mechanical Devices to Defrost Refrigerator. Do Not Puncture Refrigerant Tubing.
Both the refrigerator and freezer sections defrost automatically. However, clean both sections about once a month to avoid buildup of odors. Wipe up spills immediately.
To Clean Your Refrigerator:
1. Remove the top grille. See "Power On/Off Switch."
2. Press the power switch to OFF.
3. Remove all removable parts from inside, such as shelves, crispers, etc.
4. Hand wash, rinse, and dry removable parts and interior surfaces thoroughly. Use a clean sponge or soft cloth and a mild detergent in warm water.
- Do not use abrasive or harsh cleaners such as window sprays, scouring cleansers, flammable fluids, cleaning waxes, concentrated detergents, bleaches or cleansers containing petroleum products on plastic parts, interior and door liners or gaskets. Do not use paper towels, scouring pads, or other harsh cleaning tools. These can scratch or damage materials.
- To help remove odors, you can wash interior walls with a mixture of warm water and baking soda (2 tbs to 1 qt [26 g to 0.95 L] of water).
5. Wash stainless steel and painted metal exteriors with a clean sponge or soft cloth and a mild detergent in warm water. Do not use abrasive or harsh cleaners, or cleaners containing chlorine. Dry thoroughly with a soft cloth.
NOTE: To keep your Stainless Steel refrigerator looking like new and to remove minor scuffs or marks, it is suggested that you use the manufacturer’s approved Stainless Steel Cleaner and Polish.
IMPORTANT: This cleaner is for stainless steel parts only. Do not allow the Stainless Steel Cleaner and Polish to come into contact with any plastic parts such as the trim pieces, dispenser covers or door gaskets. If unintentional contact does occur, clean plastic part with a sponge and mild detergent in warm water. Dry thoroughly with a soft cloth. To order the cleaner, see "Accessories."
6. Press the power switch to ON.
7. Replace the top grille. See "Power On/Off Switch."
Condenser Cleaning
WARNING Explosion Hazard Risk of Fire or Explosion due to Puncture of Refrigerant Tubing; Follow Handling Instructions Carefully. Flammable Refrigerant Used.
There is no need for routine condenser cleaning in normal home operating environments. If the environment is particularly greasy or dusty or there is significant pet traffic in the home, the condenser should be cleaned every 6 months to ensure maximum efficiency.
1. Unplug refrigerator or disconnect power.
2. Remove the base grille.
3. Use a vacuum cleaner with a soft brush to clean the grille, the open areas behind the grille, and the front surface area of the condenser.
4. Replace the base grille when finished.
5. Plug in refrigerator or reconnect power.
NOTE: If you are unable to clean the condenser, please call for service.
Changing the LED Module
IMPORTANT: The lights in both the refrigerator and freezer compartments use LED technology that do not need to be replaced. If the lights do not illuminate when the door or drawer is opened, call for assistance or service. Refer to the Quick Start Guide for contact information. If an LED module(s) do not illuminate when the refrigerator and/or freezer door is opened, call for assistance or service.
Refrigeration Shelves and Door Bins
Important information to know about glass shelves and covers:
Do not clean glass shelves or covers with warm water when they are cold. Shelves and covers may break if exposed to sudden temperature changes or impact, such as bumping. Tempered glass is designed to shatter into many small, pebble-size pieces. This is normal. Glass shelves and covers are heavy. Use both hands when removing them to avoid dropping.
The shelves in your refrigerator are adjustable to match your individual storage needs.
Storing similar food items together in your refrigerator and adjusting the shelves to fit different heights of items will make finding the exact item you want easier. It will also reduce the amount of time the refrigerator door is open, and save energy
Top Door Bins
To remove and replace the door bins:
1. Remove the bin by lifting it up and pulling it out.
2. Replace the bin by sliding it in above the desired support and pushing it down until it stops.
3. Install the Top Door Bin in the top spot of the door.
4. Install remaining door bins. Shelves and Shelf Frames
To remove and replace a shelf/frame:
1. Remove the shelf/frame by tilting it up at the front and lifting it out of the shelf supports. Pull shelf straight out.
2. Replace the shelf/frame by guiding the rear shelf hooks in to the shelf supports. Tilt the front of the shelf up until the rear shelf hooks drop into the shelf supports.
3. Lower the front of the shelf and check that the shelf is in position.
Pull Out Tray
Remove and Replace:
1. Remove food from tray.
2. Pull drawer out about 4" (10.16 cm).
3. Reach under the tray with both hands and lift gently upward until front of shelf is free. Tilt the shelf at an angle and remove the shelf from the refrigerator.
4. Tilt the shelf at an angle and position it above the support rails.
5. Place shelf gently on support rails on side wall.
Marinating Pan
To remove and replace Marinating Pan:
1. Remove the marinating pan by lifting it up off the brackets. Press the right-hand side of the pan inward until it is free of its bracket. Lower the right-hand side slightly and disengage the left-hand side from its bracket.
2. Replace the marinating pan by inserting the left-hand side into its bracket. Press inward on the right-hand side until it will slide past the bracket edge and set it into its bracket.
NOTE: Remove everything that is below (pans/bucket) and above the Marinating Pan before removing it.
Remove and Replace the Top Drawer Cover
1. Remove food from Top drawer cover. Pull drawer out about 4" (10.16 cm). Reach under the glass shelf with both hands and lift gently upward until back of shelf is free. Tilt the shelf at an angle and remove the shelf from the refrigerator. Be sure not to bump the glass.
2. Replace the cover by holding the glass shelf firmly with both hands, tilt the shelf at an angle and position it above the support rails. Place shelf gently on support rails on side wall.
NOTE:
- Non Dispenser products have UI just above the drawer with cooling control.
- The UI for Dispenser products is in the door.
Meat Storage Guide
Store most meat in original wrapping as long as it is airtight and moisture-proof. Rewrap if necessary. See the following chart for storage times. When storing meat longer than the times given, freeze the meat.
- Fresh fish or shellfish......................... use same day as purchased
- Chicken, ground beef, variety meats (liver) ...................... 1-2 days
- Cold cuts, steaks/roasts .................................................. 3-5 days
- Cured meats................................................................... 7-10 days 7
Leftovers - Cover leftovers with plastic wrap, aluminum foil, or plastic containers with tight lids.
Crisper and Covers
To remove and replace the crisper:
1. Slide the crisper drawer straight out to the stop. Lift the front of the drawer with one hand while supporting the bottom with the other hand. Slide the drawer out the rest of the way.
2. To replace the crisper drawer, place the drawer onto slides and push the drawer back until securely in position.
3. Test the crisper drawer to make sure it has been replaced properly.
To clean crisper covers:
1. To clean the top crisper cover, remove the drawer located above it.
2. To clean the bottom crisper cover, first remove the top crisper drawer.
Door Bins
To remove and replace the door bins:
1. Remove the bin by lifting it up and pulling it out.
2. Replace the bin by sliding it in above the desired support and pushing it down until it stops.
3. Install the Top Door Bin in the top spot of the door.
4. Install remaining door bins.
Sabbath and Vacation Care
Sabbath Instructions
Your refrigerator is equipped with the Sabbath Mode feature, which is designed for those whose religious observances require turning off the lights and ice maker.
By selecting this feature:
- The temperature set points and Deli Pan settings remain unchanged.
- LEDs from the electronic controls will not display.
- The Sabbath button will be the only light displaying.
- Ice and Water will not dispense.
- No alarm will ring.
- Interior lights will turn off.
- The product will not change its behavior by opening the door.
For most efficient refrigerator operation, it is recommended to exit Sabbath mode when it is no longer required. To fully activate Sabbath Mode, you must follow the instructions below for the control panel.
IMPORTANT: If you do not activate Sabbath Mode in both ways listed below, some functions you wish to disable will remain active.
CONTROL PANEL
In Sabbath Mode, the temperature set points remain unchanged and the interior lights turn off.
1. To turn ON the Sabbath Mode, Press the SABBATH button on the dispensing or internal controls.
2. Turn OFF Ice Maker (Refer to the “Ice Maker and Storage Bin” section for further instructions on how to turn the icemaker ON or OFF).
3. Press the SABBATH button again for 3 seconds to turn OFF Sabbath Mode. Turn Ice Maker back ON.
NOTE: If a power outage occurs while in Sabbath Mode the appliance will remain in Sabbath Mode when power returns.
Vacation Care
Vacation
If You Choose to Leave the Refrigerator On While You are Away:
1. Use up any perishables and freeze other items.
2. If your refrigerator has an automatic ice maker, and is connected to the household water supply, turn off the water supply to the refrigerator. Property damage can occur if the water supply is not turned off.
3. If you have an automatic ice maker, turn off the ice maker.
- Refer to the “Ice Maker and Storage Bin” section for further instructions on how to turn the ice maker ON or OFF.
4. Empty the ice bin.
5. Set Vacation Mode.
For NON-dispensing units:
1. Press Vacation button to turn ON and light displays. Press again to turn OFF.
For dispensing units:
1. To turn ON Vacation mode, Hold (max freeze) and (Freezer) button for 3 seconds, the Vacation indicator shows 100% bright and blinks twice and remains ON.
2. To turn OFF Vacation mode, Hold (max freeze) and (Freezer) button for 3 seconds, the vacation indicator blinks twice and remains OFF.
NOTE: Activating Vacation mode does not turn off the ice maker.
If You Choose to Turn Off the Refrigerator Before You Leave:
1. Remove all food from the refrigerator.
2. If your refrigerator has an automatic ice maker:
- Turn off the water supply to the ice maker at least one day ahead of time.
- When the last load of ice drops, raise the wire shutoff arm to the Off (up) position or press the switch to Off, depending on your model.
3. Empty the ice bin.
4. Depending on your model, turn the Thermostat Control (or Refrigerator Control) to OFF. See “Using the Controls”.
5. Clean refrigerator, wipe it, and dry well.
6. Tape rubber or wood blocks to the tops of both doors to prop them open far enough for air to get in. This stops odor and mold from building up.