
#DSM100
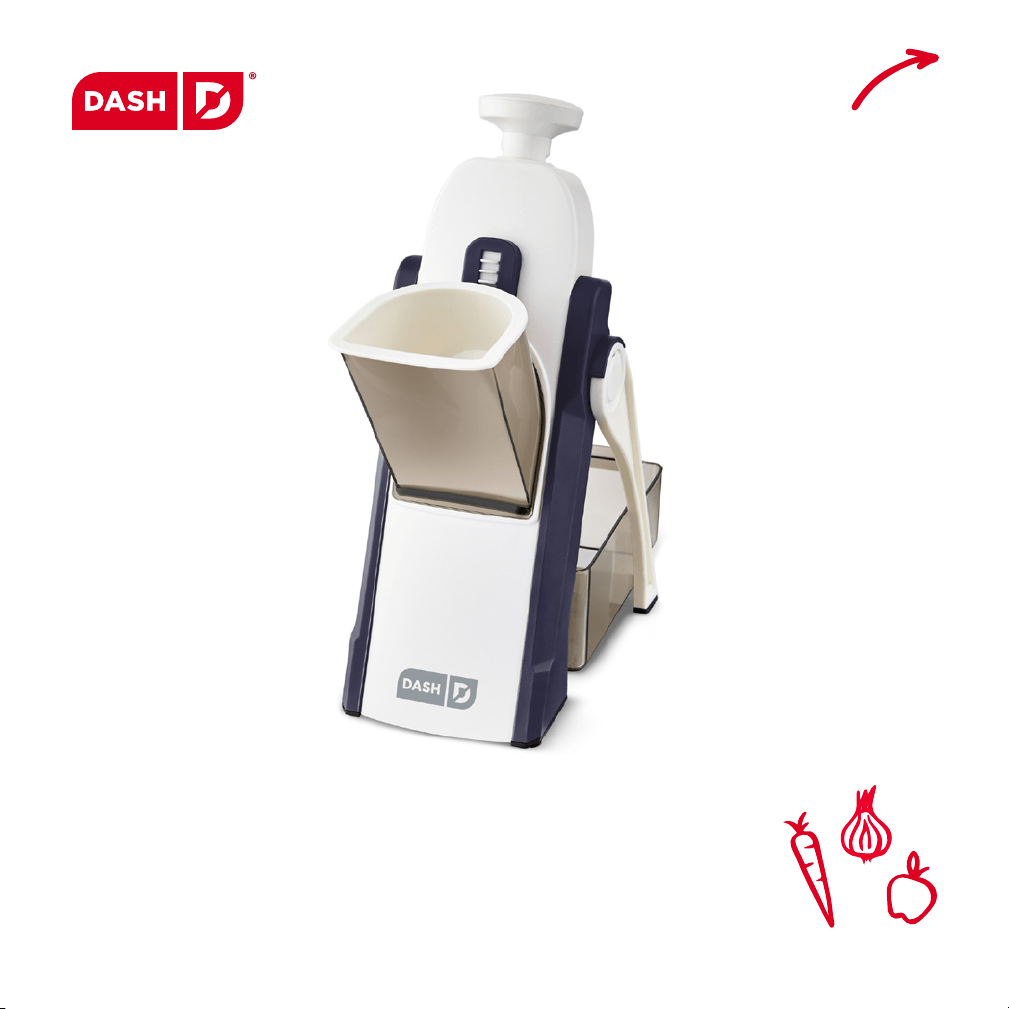
SafeSlice
™
MANDOLINE
Instruction Manual | Recipe Guide
r
e
c
i
p
e
s
i
n
s
i
d
e
!

SafeSlice
™
MANDOLINE
Important Safeguards ....................................................................4–5
Parts & Features ..............................................................................6–9
Before First Use .................................................................................10
Setting Up Your SafeSlice
™
Mandoline .................................... 12-13
Guide to Cuts & Slices ................................................................ 14-15
Slicing.. ................................................................................................16
Matchstick ....................................................................................18-19
Julienne ........................................................................................20-21
Dice................................................................................................22-23
Cleaning & Maintenance ................................................................ 24
Troubleshooting ............................................................................... 25
Recipes .........................................................................................27-37
Customer Support ........................................................................... 38
Warranty ............................................................................................ 39
t
h
e
d
a
s
h
t
e
a
m
!

• Read all instructions.
• Remove all bags and packaging from the Mandoline before use.
• Make sure the Mandoline is cleaned thoroughly before using.
• Never leave the Mandoline unattended when in use.
• Do not use the Mandoline for other than its intended use. For household use only. Do not use outdoors.
• Close supervision is necessary when any Mandoline is used by or near children.
• Never touch moving parts.
• This Mandoline uses sharp blades. Exercise extreme caution when using and cleaning the Mandoline
to avoid personal injury.
• Never touch the blades while in use.
• Never add ingredients while the Mandoline is operating.
• Never use hot ingredients.
• For maintenance other than cleaning, please contact StoreBound directly at 1-800-898-6970 from
6AM-6PM PT Monday-Friday or by email at support@bydash.com.
• Do not place the Mandoline on or near a hot gas burner, hot electric burner, or in a heated oven.
• This Mandoline is not intended for use by persons (including children) with reduced physical, sensory, or
mental capabilities, or lack of experience and knowledge unless they are provided with supervision and
instruction concerning use of the Mandoline by a person responsible for their safety.
• StoreBound shall not accept liability for damages caused by improper use of the Mandoline.
• Improper use of the Mandoline can result in property damage or personal injury.
• Lisez toutes les instructions.
• Retirez tous les sacs et emballages de la mandoline avant utilisation.
• Assurez-vous que la mandoline est soigneusement nettoyée avant de l’utiliser.
• Ne laissez jamais la mandoline sans surveillance lorsqu’elle est utilisée.
• N’utilisez pas la mandoline à d’autres ns que celles pour lesquelles elle a été conçue.
Pour usage domestique uniquement. Ne l’utilisez pas à l’extérieur.
• Une surveillance étroite est nécessaire lorsqu’une mandoline est utilisée par ou à proximité d’enfants.
• Ne touchez jamais les pièces mobiles.
• Cette mandoline utilise des lames tranchantes. Soyez extrêmement prudent lors de l’utilisation et
du nettoyage de la mandoline pour éviter les blessures.
• Ne touchez jamais les lames pendant l’utilisation.
• N’ajoutez jamais d’ingrédients pendant que la mandoline fonctionne.
• N’utilisez jamais d’ingrédients chauds.
• Pour l’entretien autre que le nettoyage, veuillez contacter StoreBound directement au 1-800-898-6970
à partir de 6h-18h PT du lundi au vendredi ou par e-mail à support@bydash.com.
• Ne placez pas la Mandoline sur ou à proximité d’un brûleur à gaz chaud, d’un brûleur électrique chaud
ou dans un four chauffé.
• Cette mandoline n’est pas destinée à être utilisée par des personnes (y compris des enfants) ayant des
capacités physiques, sensorielles ou mentales réduites, ou un manque d’expérience et de connaissances,
à moins qu’elles ne reçoivent une supervision et des instructions concernant l’utilisation de la mandoline
par une personne responsable de leur sécurité.
• StoreBound décline toute responsabilité pour les dommages causés par une mauvaise utilisation
de la mandoline.
• Une mauvaise utilisation de la mandoline peut entraîner des dommages matériels ou des blessures
corporelles.
IMPORTANT SAFEGUARDS
IMPORTANT SAFEGUARDS: PLEASE READ AND
SAVE THIS INSTRUCTION AND CARE MANUAL.
When using the SafeSlice
™
Mandoline, basic safety precautions should be followed, including:
GARANTIES IMPORTANTES
GARANTIES IMPORTANTES:
VEUILLEZ
LIRE
ATTEN-
TIVEMENT
CE
MANUEL
AVANT
D’UTILISER
L’APPAREIL.
Lors de l’utilisation la Mandoline, des précautions élémentaires de sécurité doivent être
respectées, notamment:
∙ 4 ∙ ∙ 5 ∙
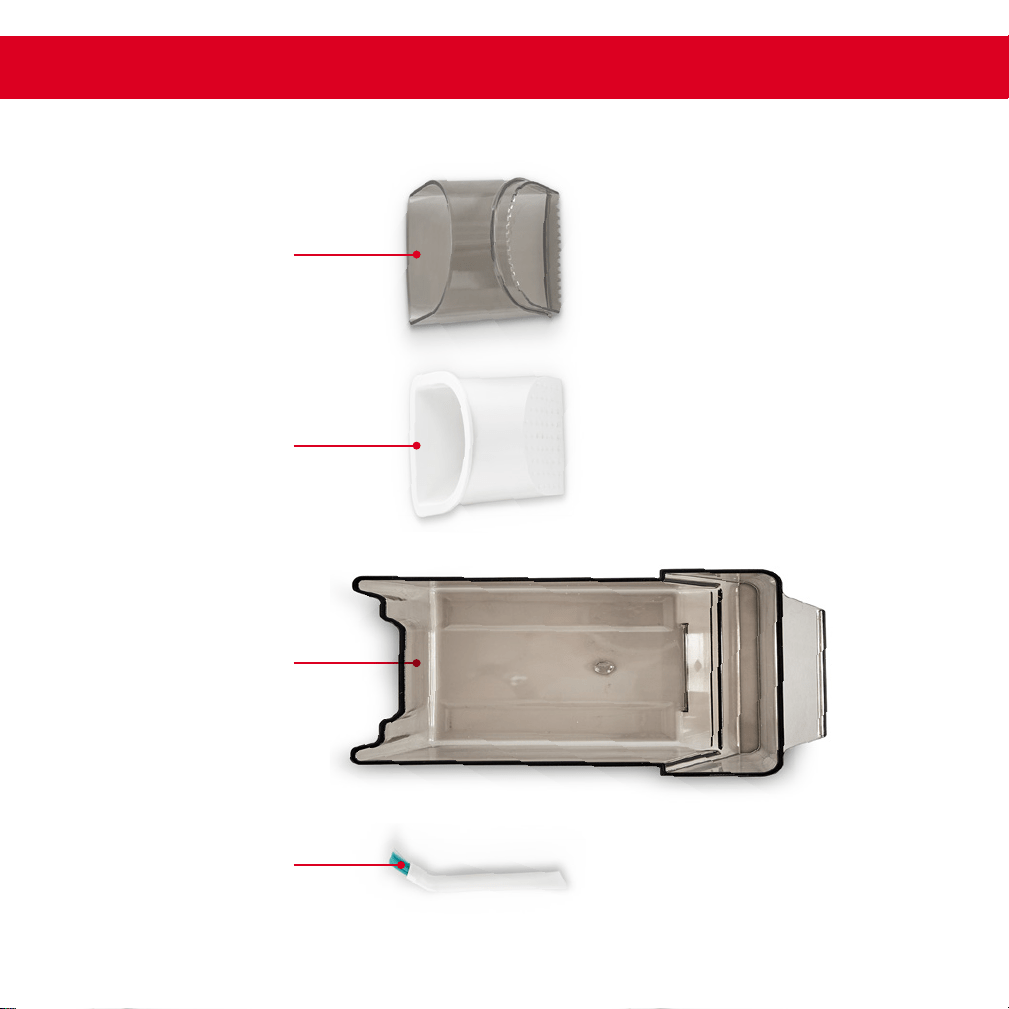
Ingredient Chute
Ingredient Container
Cleaning Brush
Ingredient Pusher
Main Stand
PARTS & FEATURES PARTS & FEATURES
NOTE: Make sure the Main Stand
is pulled all the way out or the
Ingredient Container will not
sit properly. Both sides of the stand
should click securely into place.
∙ 6 ∙ ∙ 7 ∙
Ingredient Chute
Ingredient Container
Cleaning Brush
Ingredient Pusher
Main Stand
PARTS & FEATURES PARTS & FEATURES
NOTE: Make sure the Main Stand
is pulled all the way out or the
Ingredient Container will not
sit properly. Both sides of the stand
should click securely into place.
∙ 6 ∙ ∙ 7 ∙
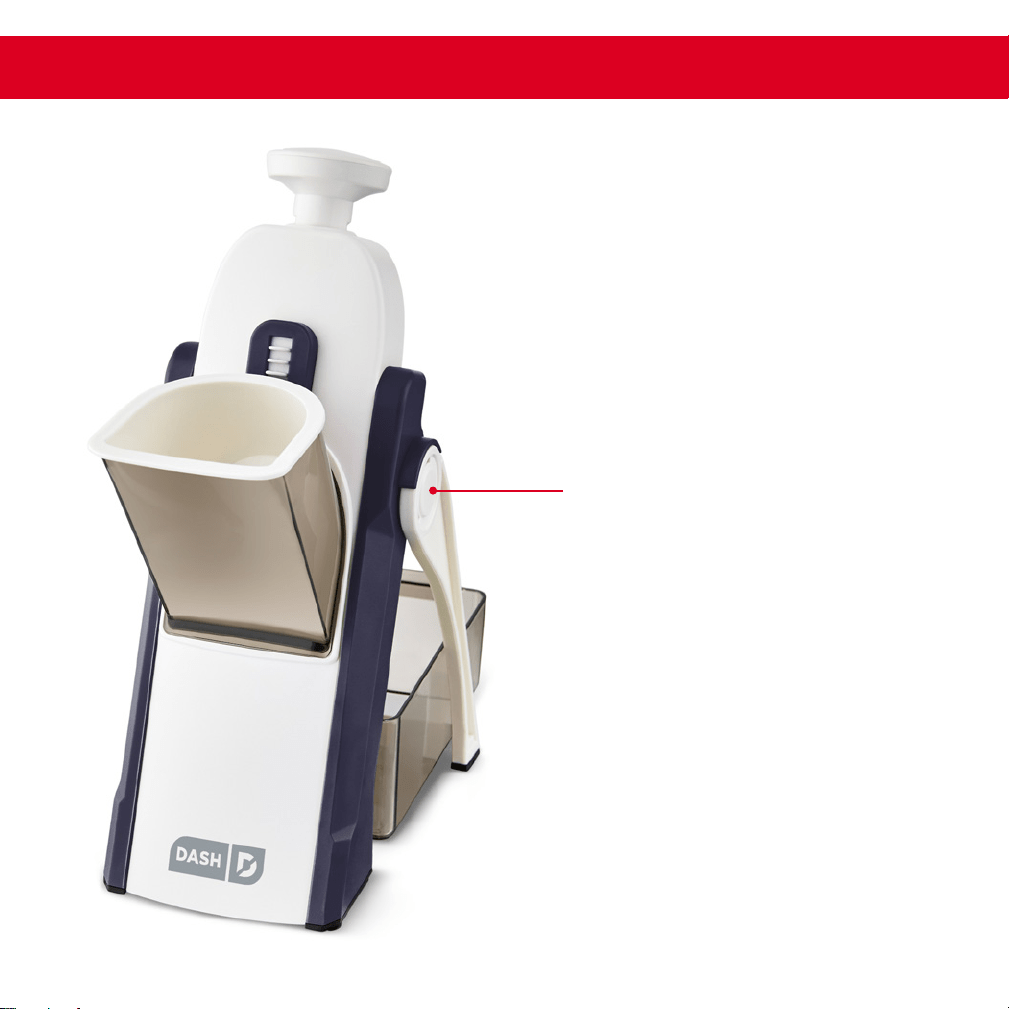
Handle
Non-Skid
Suction Feet
PARTS & FEATURES PARTS & FEATURES
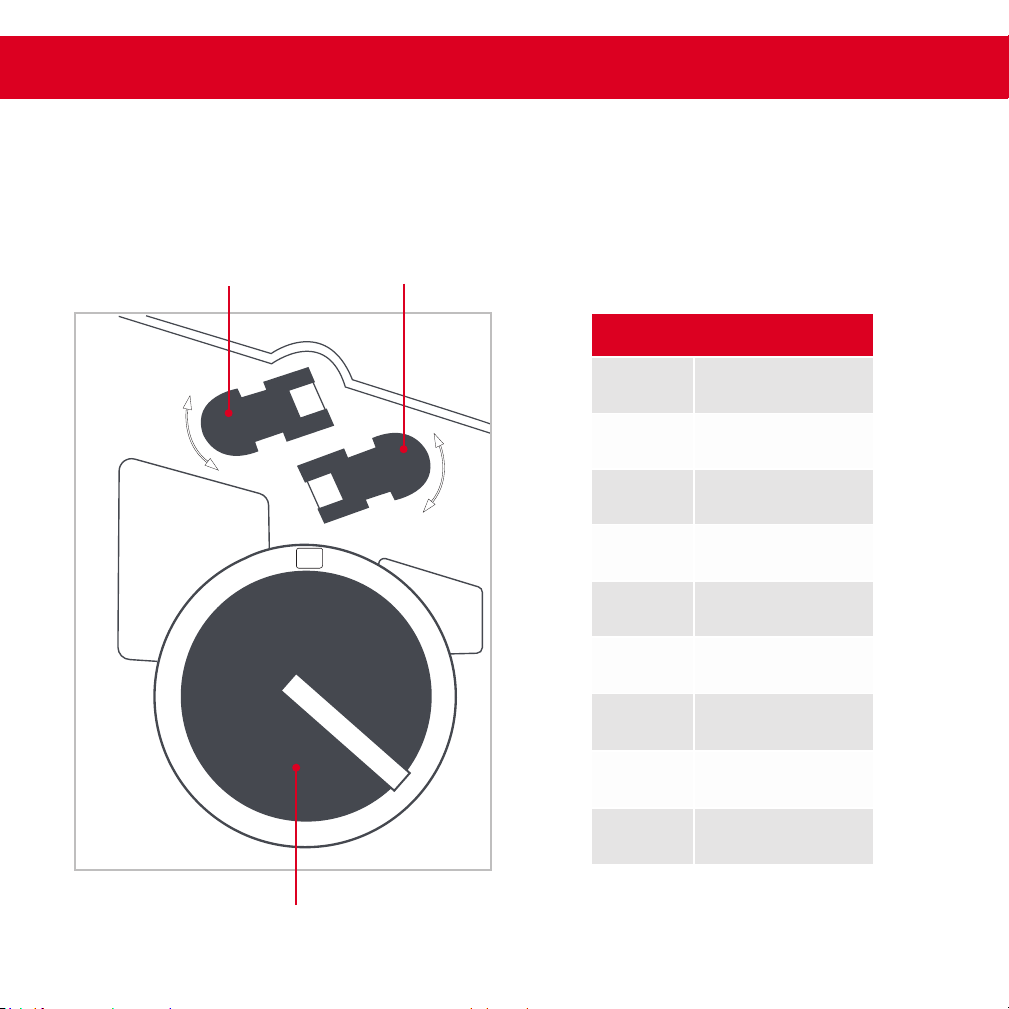
0
4
3
5
6
2
7
1
8
360
•
360
•
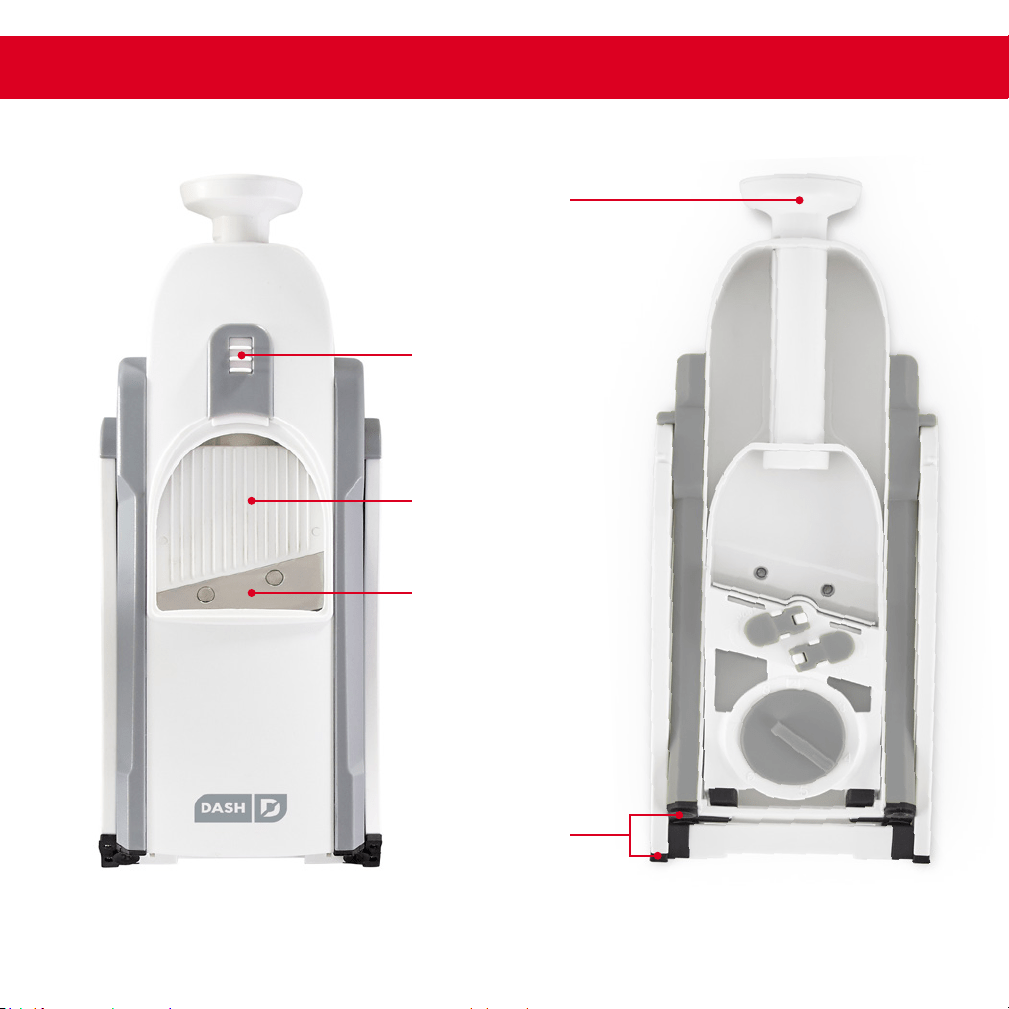
Blade Runway
Thickness Adjuster
Chute Release
Knob 1 Knob 2
Blade
THICKNESS ADJUSTMENT
The Thickness Adjuster ranges from 0-8 millimeters and makes thick/thin slices, julienne,
matchstick and dice cuts.
thickness chart
0 <1mm
1 1mm
2 2mm
3 ")
4 4mm
5 5mm
6 6mm (¼")
7 7mm
8 8mm
Handle
Non-Skid
Suction Feet
PARTS & FEATURES PARTS & FEATURES
0
4
3
5
6
2
7
1
8
360
•
360
•
Blade Runway
Thickness Adjuster
Chute Release
Knob 1 Knob 2
Blade
THICKNESS ADJUSTMENT
The Thickness Adjuster ranges from 0-8 millimeters and makes thick/thin slices, julienne,
matchstick and dice cuts.
thickness chart
0 <1mm
1 1mm
2 2mm
3 ")
4 4mm
5 5mm
6 6mm (¼")
7 7mm
8 8mm
a
p
p
l
e
t
a
r
t
o
n
p
a
g
e
3
0
!
BEFORE FIRST USE
∙ 10 ∙
A B
Before using your SafeSlice
™
Mandoline,
make sure the Main Stand is pulled all
the way out or the Ingredient Container
will not sit properly (photo A).
Both sides of the stand should
click securely into place (photo B).
1
“click”
2

a
p
p
l
e
t
a
r
t
o
n
p
a
g
e
3
0
!
BEFORE FIRST USE
∙ 10 ∙
A B
Before using your SafeSlice
™
Mandoline,
make sure the Main Stand is pulled all
the way out or the Ingredient Container
will not sit properly (photo A).
Both sides of the stand should
click securely into place (photo B).
1
“click”
2

Always place your Mandoline on a stable, at surface. The Non-Skid Suction Feet will be most
stable on a at kitchen surface.
NOTE: Some larger ingredients like sweet potatoes may require that you slice them in half
before placing in the Ingredient Chute.
setting up YOUR SafeSlice
™
Mandoline setting up YOUR SafeSlice
™
Mandoline
∙ 12 ∙ ∙ 13 ∙
A B C D
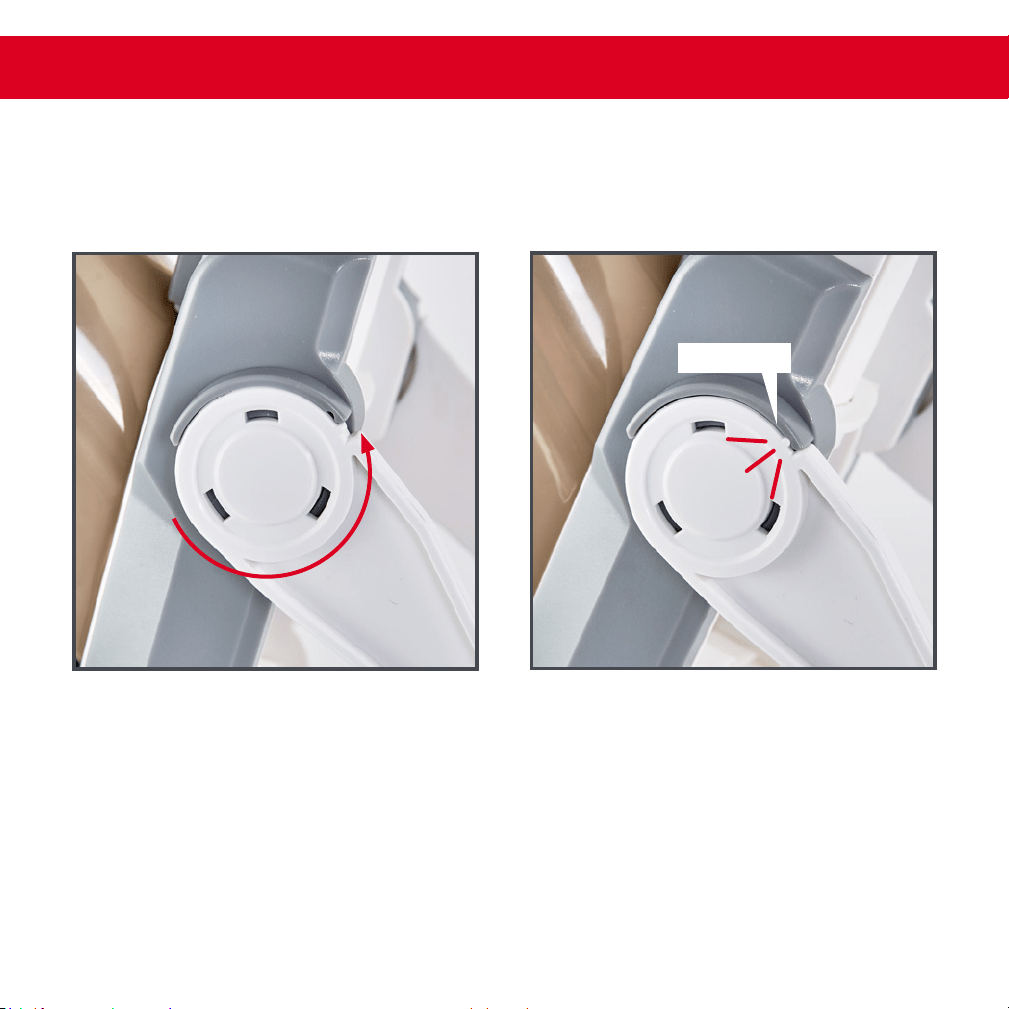
Insert the Ingredient Chute by rst
pressing upward on the three little white
bars that represent the tab that lifts the
Chute Release (photo A).
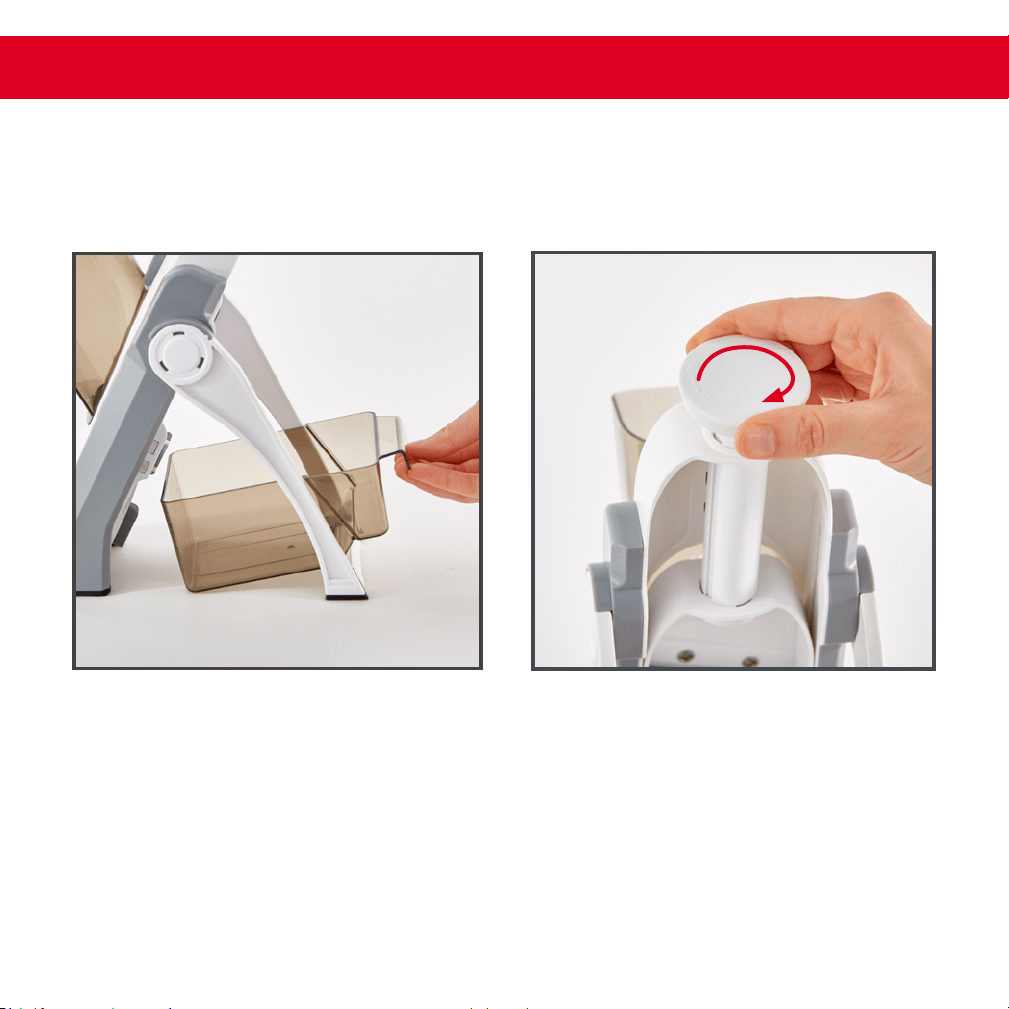
Rest the Ingredient Container beneath
your Mandoline so that the lip ts
securely on the lower bar of the
Main Stand (photo C).
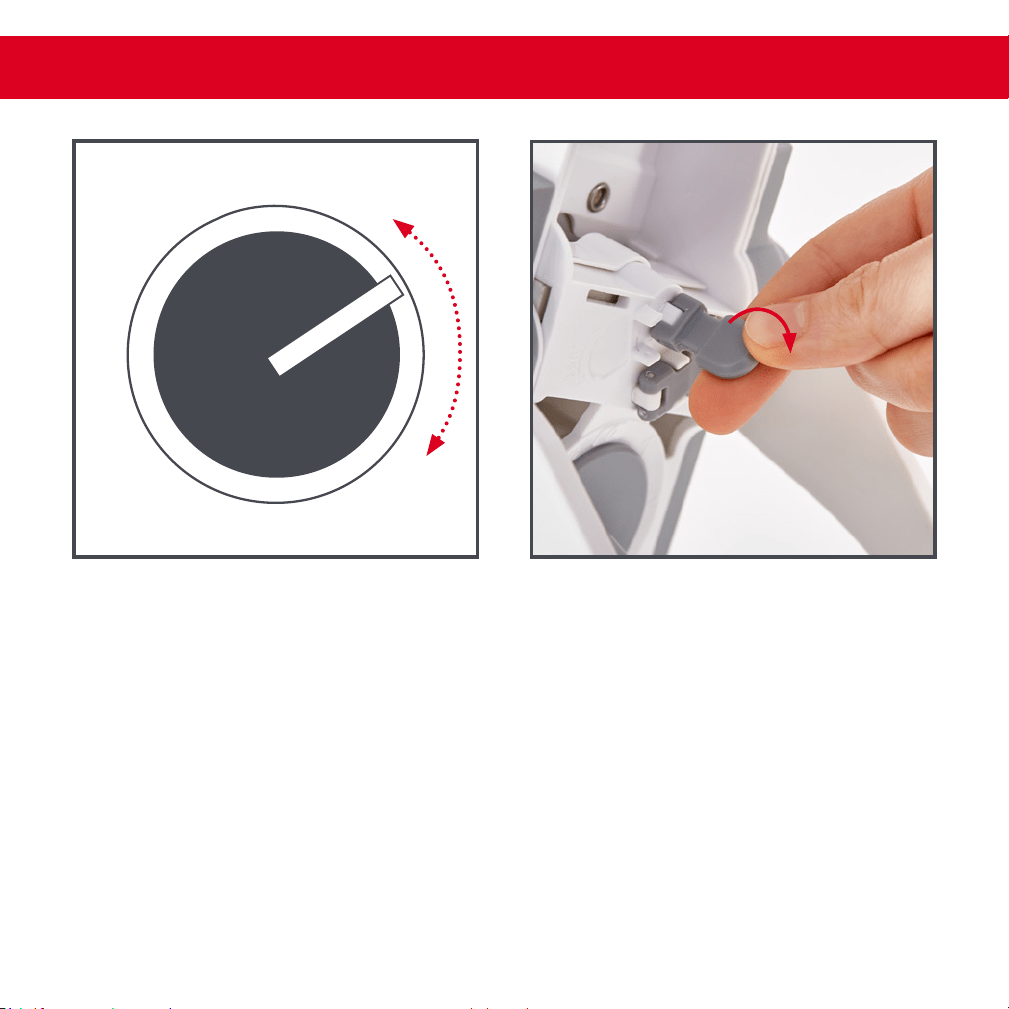
Your Mandoline Handle may be in the
locked position. To unlock the Handle
before using, simply twist the Handle
clockwise and it will release. Be careful
as the Handle is spring loaded and will
release quickly! (photo D)
With the Chute Release lifted, you can
insert the Ingredient Chute with the
rounded end closest to the
Chute Release. Always insert the
Ingredient Chute by rst aligning the
lower at end closest to the Blade
(photo B).
1 2 3 4
Always place your Mandoline on a stable, at surface. The Non-Skid Suction Feet will be most
stable on a at kitchen surface.
NOTE: Some larger ingredients like sweet potatoes may require that you slice them in half
before placing in the Ingredient Chute.
setting up YOUR SafeSlice
™
Mandoline setting up YOUR SafeSlice
™
Mandoline
∙ 12 ∙ ∙ 13 ∙
A B C D
Insert the Ingredient Chute by rst
pressing upward on the three little white
bars that represent the tab that lifts the
Chute Release (photo A).
Rest the Ingredient Container beneath
your Mandoline so that the lip ts
securely on the lower bar of the
Main Stand (photo C).
Your Mandoline Handle may be in the
locked position. To unlock the Handle
before using, simply twist the Handle
clockwise and it will release. Be careful
as the Handle is spring loaded and will
release quickly! (photo D)
With the Chute Release lifted, you can
insert the Ingredient Chute with the
rounded end closest to the
Chute Release. Always insert the
Ingredient Chute by rst aligning the
lower at end closest to the Blade
(photo B).
1 2 3 4
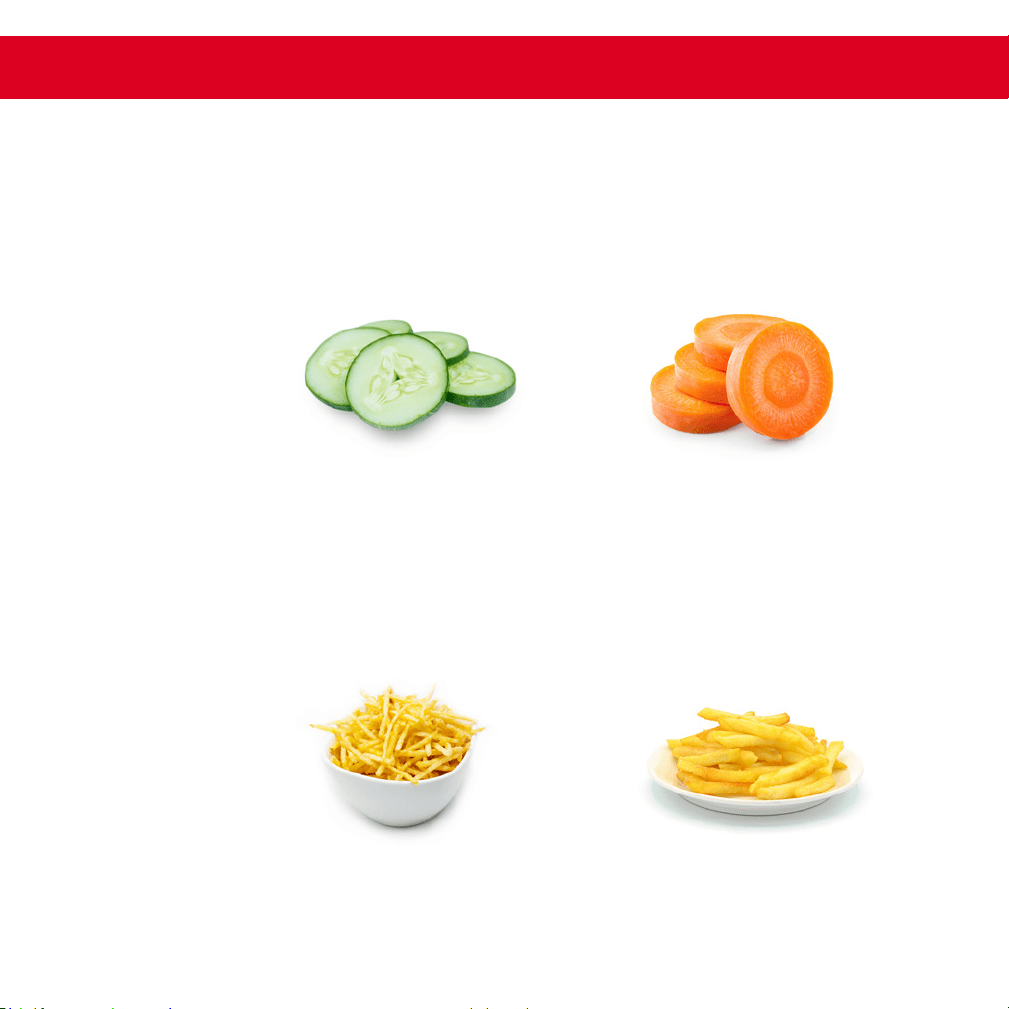
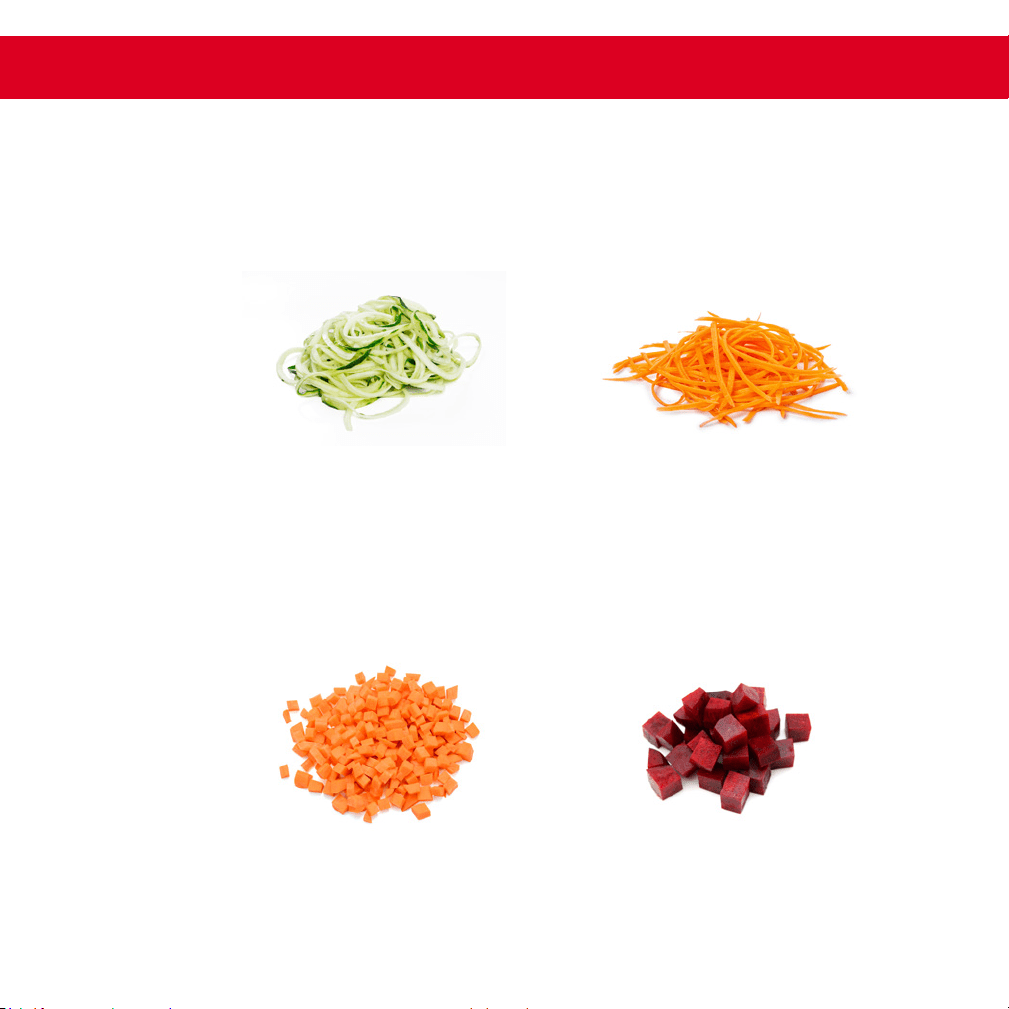
guide to cuts & slices
MATCHSTICK
JULIENNE
THIN & THICK
SLICES
DICE
guide to cuts & slices
The julienne cut involves cutting your ingredient into long thin
strips, similar to matchsticks. Common foods that are julienned
include carrots and zucchini.
The Thickness Adjuster ranges from 0-8 millimeters.
Slice fruits and vegetables for chopped salads, vegetarian lasagnas,
and more delicious recipes. Use the Thickness Adjuster on your
Mandoline to set how thick or thin you would like your slices.
Your SafeSlice
™
Mandoline is excellent for making homemade
french fries or sweet potato fries. Use the Thickness Adjuster on
your Mandoline to set how thick or thin you would like your fries.
Typical sizes for fries are as follows:
Dicing vegetables involves cutting your ingredient into small
blocks or “dice”. Dicing allows for better avor and texture when
you’re cooking. A small dice is usually about ¼" cube.
Thin: 1-2mmThin: 1-6mm
Shoestring: 3mm or ¹/8” square Small: 6mm
Thick: 3mmThick: 6-8mm
Classic: 6mm or ¼” square Larger: 7-8mm
∙ 14 ∙ ∙ 15 ∙
guide to cuts & slices
MATCHSTICK
JULIENNE
THIN & THICK
SLICES
DICE
guide to cuts & slices
The julienne cut involves cutting your ingredient into long thin
strips, similar to matchsticks. Common foods that are julienned
include carrots and zucchini.
The Thickness Adjuster ranges from 0-8 millimeters.
Slice fruits and vegetables for chopped salads, vegetarian lasagnas,
and more delicious recipes. Use the Thickness Adjuster on your
Mandoline to set how thick or thin you would like your slices.
Your SafeSlice
™
Mandoline is excellent for making homemade
french fries or sweet potato fries. Use the Thickness Adjuster on
your Mandoline to set how thick or thin you would like your fries.
Typical sizes for fries are as follows:
Dicing vegetables involves cutting your ingredient into small
blocks or “dice”. Dicing allows for better avor and texture when
you’re cooking. A small dice is usually about ¼" cube.
Thin: 1-2mmThin: 1-6mm
Shoestring: 3mm or ¹/8” square Small: 6mm
Thick: 3mmThick: 6-8mm
Classic: 6mm or ¼” square Larger: 7-8mm
∙ 14 ∙ ∙ 15 ∙
slicingslicing
0
4
3
5
6
2
7
1
8
slicing ∙ 15
slicing
∙ 16 ∙
A
B
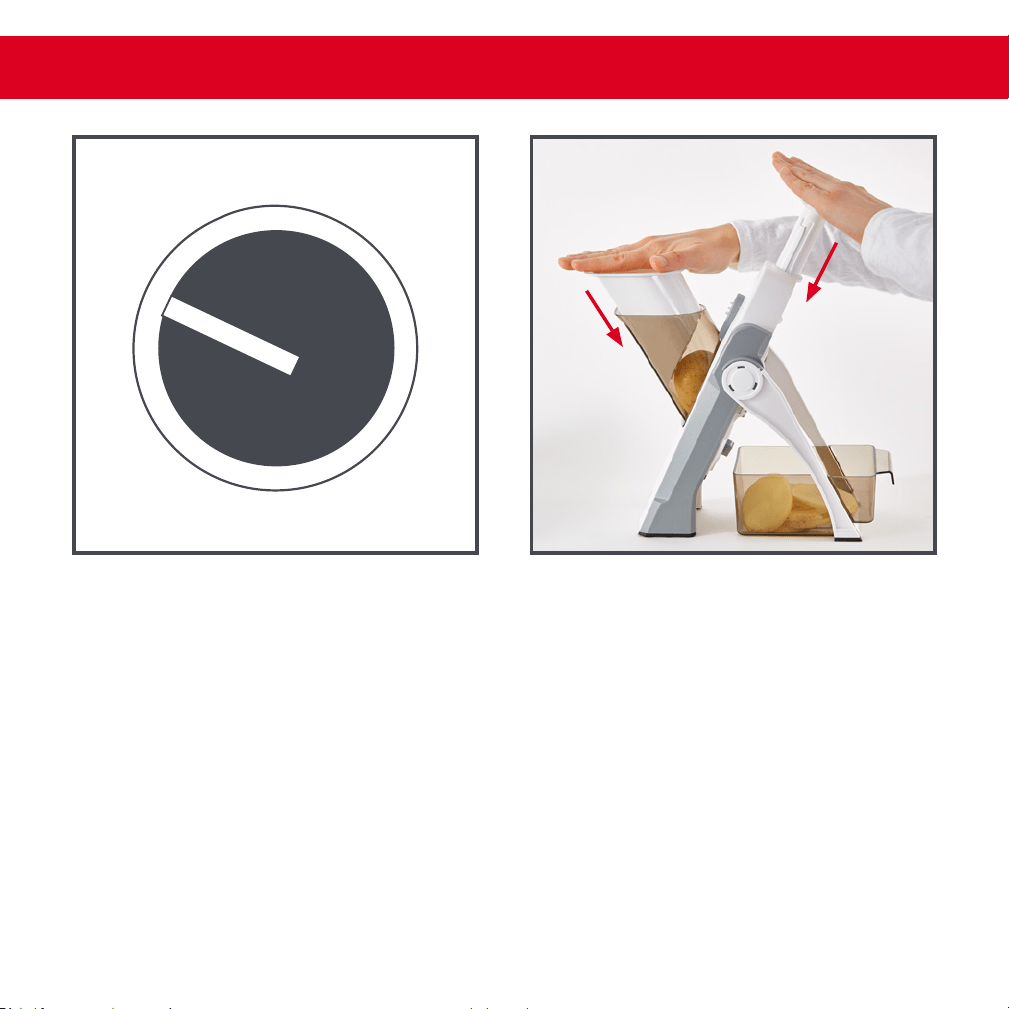
Start by setting up your
SafeSlice
™
Mandoline according to the
instructions on pages 10 to 13.
Set your Thickness Adjuster for your
preferred slice size. Higher numbers
correspond to thicker slices.
Place your chosen ingredient in the
Ingredient Chute and use the Ingredient
Pusher to push your ingredient against
the Blade. Push down on the Handle to
slice and then release (photo A).
Continue to use the Ingredient Pusher
to guide your ingredient against the
Blade while you press and release
the Handle to slice. Repeat until your
ingredients are sliced to your liking
(photo B).
1 2

slicingslicing
0
4
3
5
6
2
7
1
8
slicing ∙ 15
slicing
∙ 16 ∙
A
B
Start by setting up your
SafeSlice
™
Mandoline according to the
instructions on pages 10 to 13.
Set your Thickness Adjuster for your
preferred slice size. Higher numbers
correspond to thicker slices.
Place your chosen ingredient in the
Ingredient Chute and use the Ingredient
Pusher to push your ingredient against
the Blade. Push down on the Handle to
slice and then release (photo A).
Continue to use the Ingredient Pusher
to guide your ingredient against the
Blade while you press and release
the Handle to slice. Repeat until your
ingredients are sliced to your liking
(photo B).
1 2
matchstickmatchstick
0
4
3
5
6
2
7
1
8
matchstickmatchstick
B
∙ 18 ∙ ∙ 19 ∙
A B C D
Start by setting up your
SafeSlice
™
Mandoline according to the
instructions on pages 10 to 13.
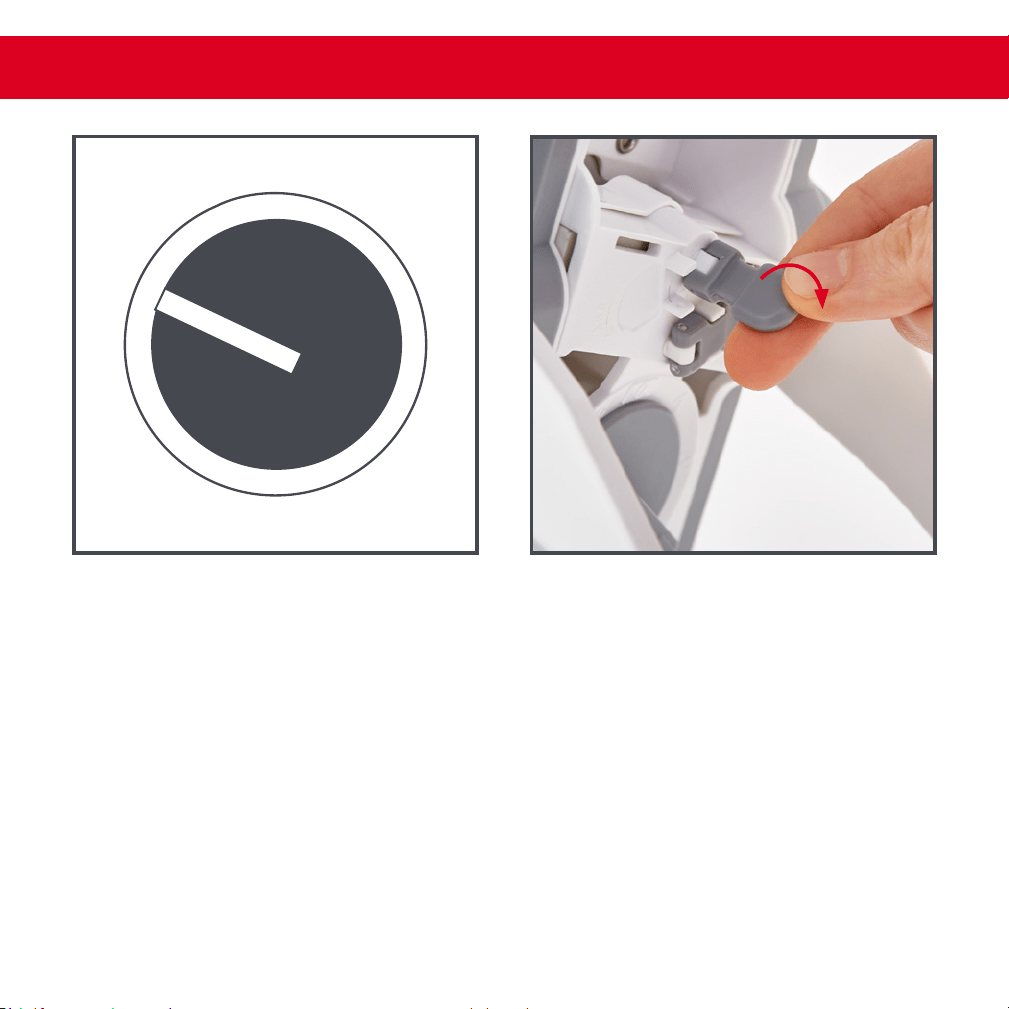
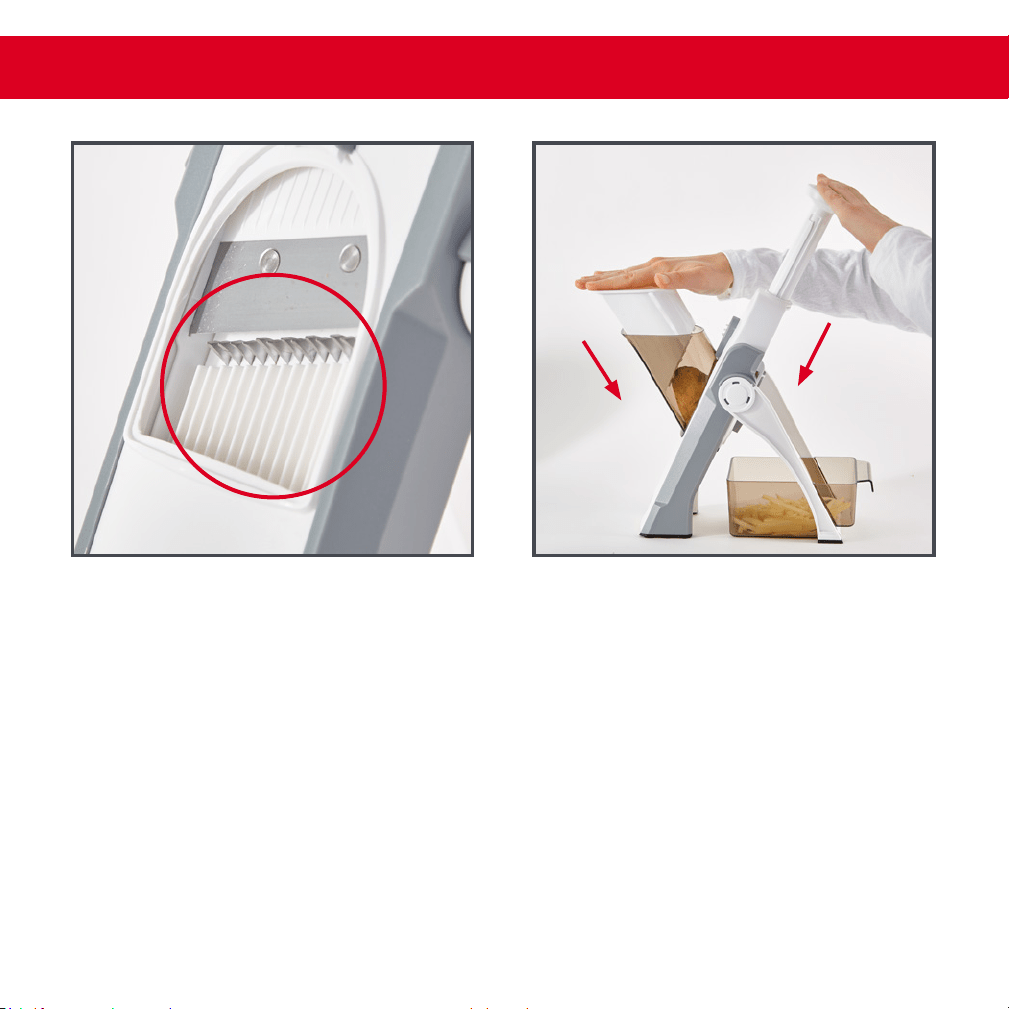
Set your Thickness Adjuster to 7
(photo A).
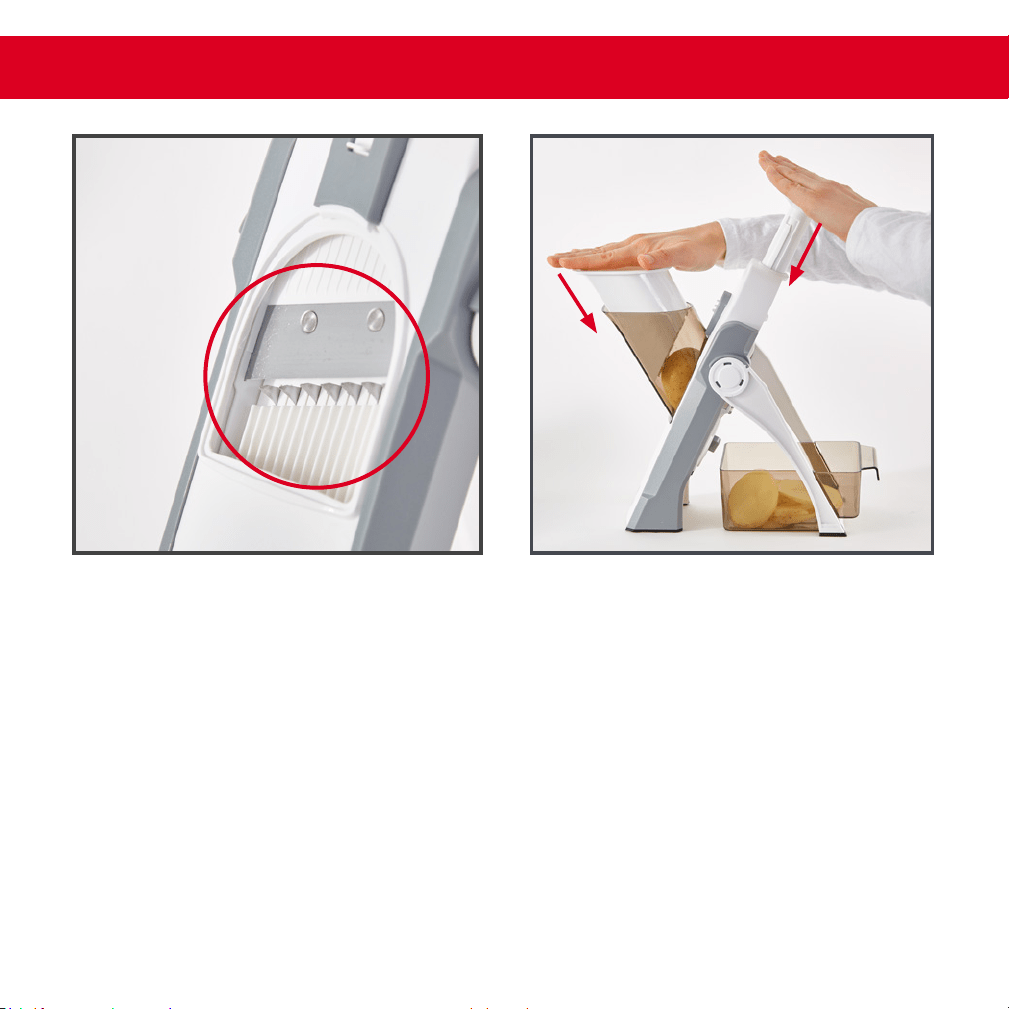
You should see a full set of blade “teeth”
come into place at the top of the
Blade Runway (photo C).
NOTE: Make sure to always insert the
Ingredient Chute before use.
Place your chosen ingredient in the
Ingredient Chute and use the Ingredient
Pusher to push your ingredient against
the Blade. Push down on the Handle to
slice and then release (photo D).
Continue to use the Ingredient Pusher to
guide your ingredient against the Blade
while you press and release the Handle
to slice. Repeat until your ingredients are
cut to your liking.
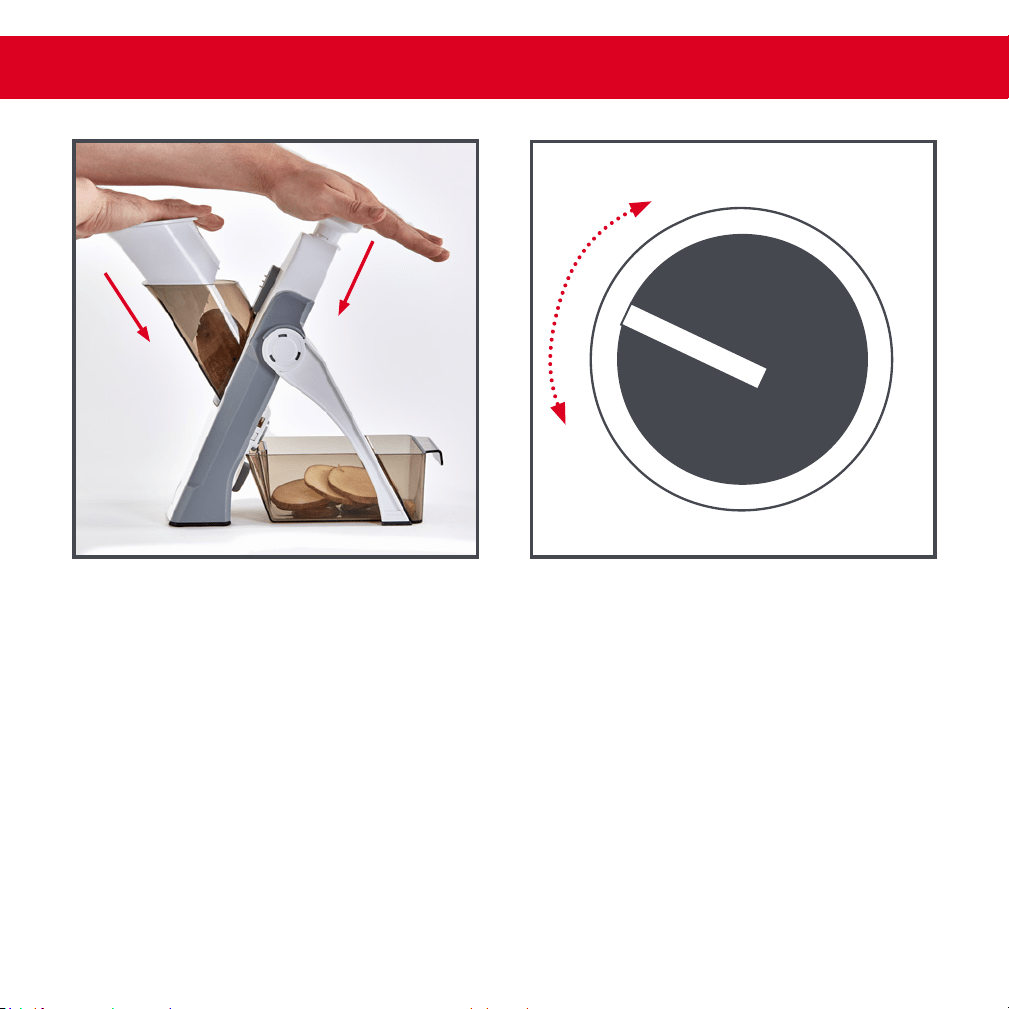
Unsnap Knob 1 (the Knob may stick)
and rotate the Knob a full 360°.
Snap the Knob back into place
(photo B).
1 2 3 4
matchstickmatchstick
0
4
3
5
6
2
7
1
8
matchstickmatchstick
B
∙ 18 ∙ ∙ 19 ∙
A B C D
Start by setting up your
SafeSlice
™
Mandoline according to the
instructions on pages 10 to 13.
Set your Thickness Adjuster to 7
(photo A).
You should see a full set of blade “teeth”
come into place at the top of the
Blade Runway (photo C).
NOTE: Make sure to always insert the
Ingredient Chute before use.
Place your chosen ingredient in the
Ingredient Chute and use the Ingredient
Pusher to push your ingredient against
the Blade. Push down on the Handle to
slice and then release (photo D).
Continue to use the Ingredient Pusher to
guide your ingredient against the Blade
while you press and release the Handle
to slice. Repeat until your ingredients are
cut to your liking.
Unsnap Knob 1 (the Knob may stick)
and rotate the Knob a full 360°.
Snap the Knob back into place
(photo B).
1 2 3 4
julienne
0
4
3
5
6
2
7
1
8
julienne
∙ 20 ∙ ∙ 21 ∙
Start by setting up your
SafeSlice
™
Mandoline according
to the instructions on pages 10-13.
Set Thickness Adjuster to from 1-3 mm
(photo A).
Snap the Knob back into place.
You should see a full set of blade “teeth”
come into place at the top of the Blade
Runway (photo C). Unsnap Knob 2 and
rotate the Knob a full 360°.
Snap the second Knob back into place.
You should see SECOND set of blade
“teeth” come into place at the top of the
Blade Runway.
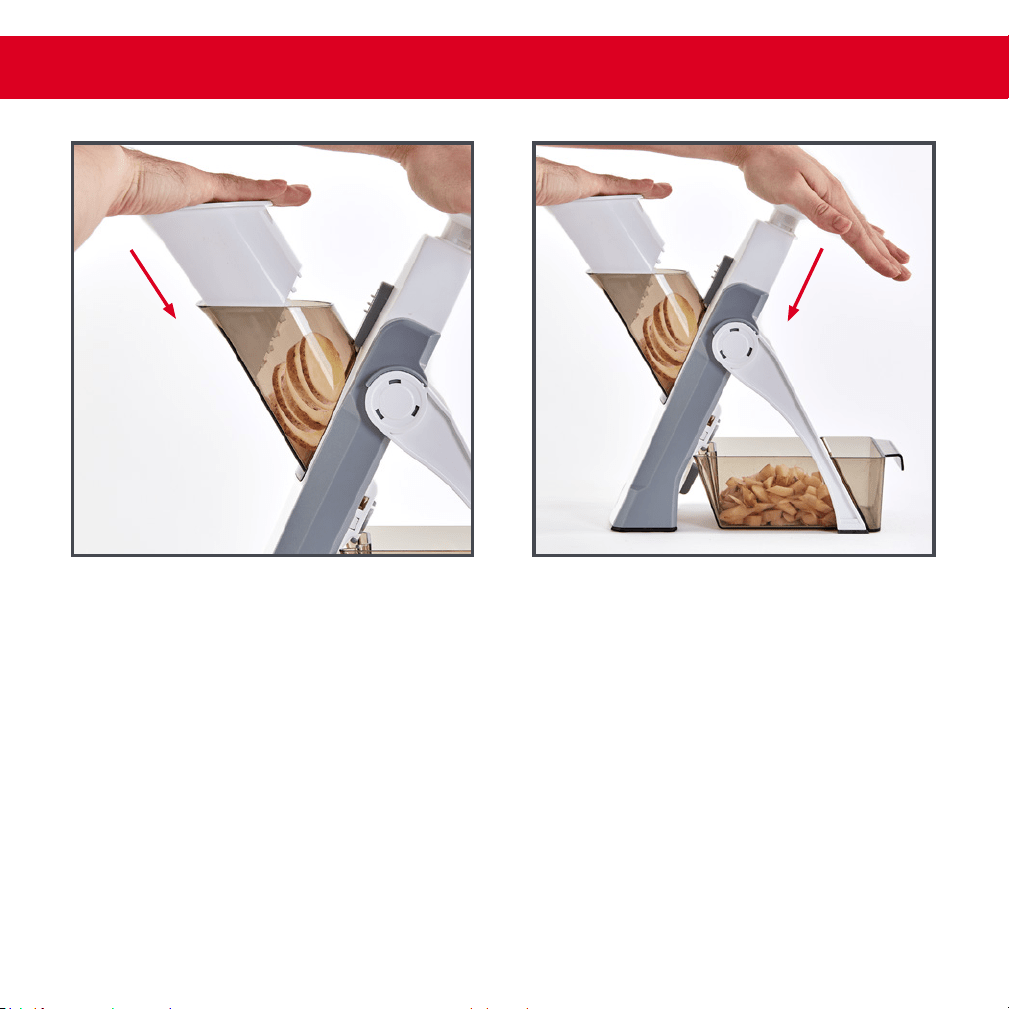
Place your chosen ingredient in the
Ingredient Chute and use the
Ingredient Pusher to push your
ingredient against the Blade. Push down
on the Handle to slice and then release
(photo D).
Continue to use the Ingredient Pusher to
guide your ingredient against the Blade
while you press and release the Handle
to slice. Repeat until your ingredients
are cut to your liking.
Unsnap Knob 1 (the Knob
may stick) and rotate the Knob
a full 360° (photo B).
1
2 3
4
A B C D B
julienne
0
4
3
5
6
2
7
1
8
julienne
∙ 20 ∙ ∙ 21 ∙
Start by setting up your
SafeSlice
™
Mandoline according
to the instructions on pages 10-13.
Set Thickness Adjuster to from 1-3 mm
(photo A).
Snap the Knob back into place.
You should see a full set of blade “teeth”
come into place at the top of the Blade
Runway (photo C). Unsnap Knob 2 and
rotate the Knob a full 360°.
Snap the second Knob back into place.
You should see SECOND set of blade
“teeth” come into place at the top of the
Blade Runway.
Place your chosen ingredient in the
Ingredient Chute and use the
Ingredient Pusher to push your
ingredient against the Blade. Push down
on the Handle to slice and then release
(photo D).
Continue to use the Ingredient Pusher to
guide your ingredient against the Blade
while you press and release the Handle
to slice. Repeat until your ingredients
are cut to your liking.
Unsnap Knob 1 (the Knob
may stick) and rotate the Knob
a full 360° (photo B).
1
2 3
4
A B C D B
small dice
Start by cutting at slices according to
the instructions for Slicing (page 16)
(photo A).
Unsnap and rotate one or both Knobs so
that the blades emerge, depending on
the desired thickness of your dice.
Place the medallion slices into the
Ingredient Chute vertically. Use the
Ingredient Pusher to push your slices
against the Blade (photo C).
Push down on the Handle to dice and
then release (photo D).
Repeat until your ingredients are diced
to your liking.
Set Thickness Adjuster from 6-8 mm
(photo B).
dice
A B
0
4
3
5
6
2
7
1
8
dice
∙ 22 ∙ ∙ 23 ∙
C D
1 2 3 4
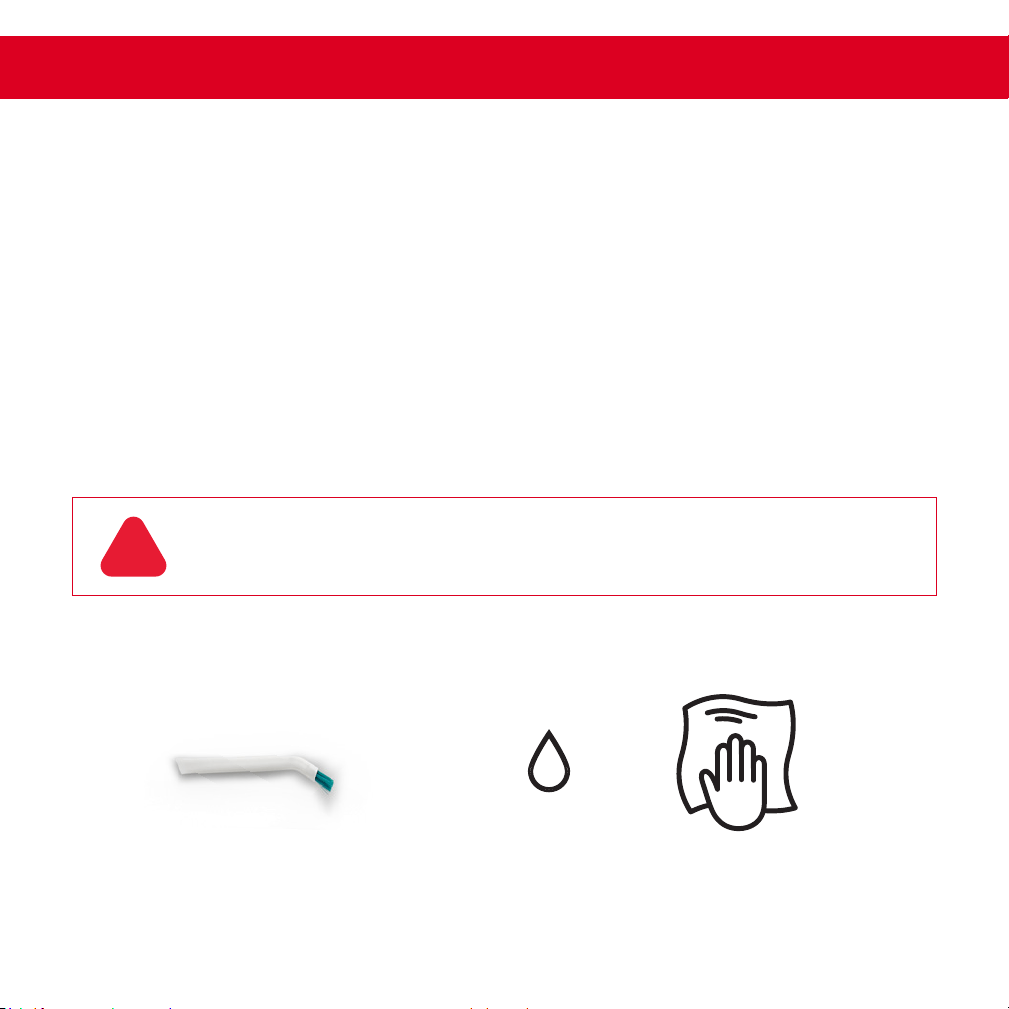
cleaning & maintenance
WARNING: NEVER insert your ngers in or near the Blade to dislodge food.
!
Wipe with oil to emove tains!Cleaning Bush
+
troubleshooting
ISSUE SOLUTION
My Mandoline isn’t properly
slicing my vegetables.
• Ensure that you have properly turned the
Knob 360° so that the blade teeth are
entirely exposed.
• Ensure that the Main Stand of your Mandoline
is pushed all the way out. You will feel the
Main Stand “click” into place.
My Mandoline keeps bumping
against the Ingredient Container
when I try to slice.
• Ensure that the Main Stand of your Mandoline
is pushed all the way out. You will feel the
Main Stand “click” into place.
My slices are falling off the back of
the Mandoline and onto the table.
• Use a cutting board beneath the Mandoline.
Release the handle slowly when chopping.
The Ingredient Container does
not t beneath the Mandoline.
• Make sure the legs of the Mandoline
are fully extended.
Your SafeSlice
™
Mandoline is top-rack dishwasher safe.
To clean the Blade of your Mandoline, use the included Cleaning Brush to dislodge
pieces of food. Use extreme caution when using the Cleaning Brush.
Always use the Cleaning Brush when you clean the appliance. Never put your ngers near
the Blade.
Colorful, juicy foods like beets may cause staining on the appliance. To clean, wipe down
gently with cooking oil to remove the stain.
Softer fruits and vegetables may not slice evenly and/or get stuck on the blades, making
the Mandoline difcult to clean. Use harder vegetables for more consistent slicing.
∙ 24 ∙ ∙ 25 ∙

RECIPE
GUIDE
Follow us!
@bydash | recipes, videos, & inspiration
@unprocessyourfood | veg & vegan-friendly meals

RECIPE
GUIDE
Follow us!
@bydash | recipes, videos, & inspiration
@unprocessyourfood | veg & vegan-friendly meals

Ingredients:
1 cup heavy cream
1 cup milk
3 lbs Yukon Gold potatoes
¼ lb Gruyère cheese grated
¼ lb Parmigiano-Reggiano cheese, grated
2 cloves garlic pressed or minced
potato
gr atin
Directions:
1. Preheat the oven to 400°F. In a large bowl, combine the heavy cream and milk.
2. Using your Mandoline, slice the potatoes very thinly. As you nish slicing each potato, place
it into the cream/milk mixture. When the potatoes are all sliced, add the Gruyère and
Parmigiano-Reggiano cheeses to the bowl, along with the garlic, the thyme leaves, salt, and a
few cracks of black pepper. Toss well.
3. Pour the potatoes and cream into a baking dish, then cover the dish tightly with aluminum foil.
Place the baking dish on a sheet pan, then bake for 1 hour.
4. Remove the foil and bake for 30 minutes more, until the potatoes are tender, bubbling, and
golden brown on top.
10 sprigs fresh thyme, leaves separated
2 tsp salt
black pepper
∙ 28 ∙

Pastry
2 cups all-purpose our
½ tsp kosher salt
1 tbsp sugar
12 tbsp cold, unsalted butter, diced (do not use
your Mandoline for this part)
½ cup ice water
1. For the pastry, place the our, salt, and sugar in the bowl of a food processor tted with the steel
blade. Pulse for a few seconds to combine. Add the butter and pulse 10 to 12 times, until the butter
is in small bits. With the motor running, pour the ice water down the feed tube and pulse just until
the dough starts to come together. Dump onto a oured board and knead quickly into a ball.
Wrap in plastic and refrigerate for at least 1 hour.
2. Preheat the oven to 400°F. Line a sheet pan with parchment paper. Roll the dough slightly larger
than 10x14". Using a ruler and a small knife, trim the edges. Place the dough on the prepared sheet
pan and refrigerate while you prepare the apples. Peel the apples and cut them in half through the
stem. Remove the stems and cores. Slice the apples thinly using your Mandoline. Place overlapping
slices of apples down the middle of the tart and continue making rows on both sides of the rst row
until the pastry is covered with apple slices.
3. Sprinkle with the ½ cup of sugar and dot with the butter. Bake for 45 minutes to 1 hour, until the
pastry is browned and the edges of the apples start to brown. Rotate the pan once during cooking.
If the pastry puffs up in one area, cut a little slit with a knife to let the air out. When the tart’s done,
heat the apricot jelly together with the water and brush the apples and the pastry completely with
the jelly mixture. Allow to cool and serve warm or at room temperature.
apple
tart
Ingredients:
Directions:
Apples
4 granny smith apples
½ cup sugar
3 tbsp (½ stick) cold unsalted butter, small diced
½ cup apricot jelly
2 tbsp water
Slaw
2 cups thinly sliced red cabbage
1 red bell pepper, julienned
1 cup carrots, julienned
1 bunch green onions, diced small
½ cup cilantro, chopped
1. In a medium bowl, whisk together the rice vinegar, oils, peanut butter, soy sauce, brown sugar,
ginger, and garlic.
2. In a large bowl, combine the coleslaw mix, red cabbage, red bell pepper, carrots, green onions,
and cilantro. Toss with the dressing just before serving.
asian
s l aw
Ingredients:
Directions:
Dressing
6 tbsp rice wine vinegar
3 tbsp vegetable oil
1 tbsp sesame oil
5 tbsp creamy peanut butter
3 tbsp soy sauce
3 tbsp brown sugar
2 tbsp fresh ginger root, peeled and minced
3-4 garlic cloves, minced
∙ 30 ∙ ∙ 31 ∙

1 ½ cups julienned zucchini - lightly packed - do not drain liquid
1 cup granulated sugar
¼ cup packed light brown sugar
½ cup unsweetened applesauce
cup vegetable oil, or your preferred cooking oil
2 large eggs
1 tsp vanilla extract
1 ½ cups all-purpose our
½ tsp baking powder
½ tsp baking soda
½ tsp salt
1. Preheat your oven to 350°F. Spray a 9x5" loaf pan with cooking spray. In a large bowl, add the
julienned zucchini, sugar, brown sugar, applesauce, oil, eggs, and vanilla. Whisk until well combined.
Add the our, baking powder, baking soda, and salt. Stir just until no dry our remains, trying not to
over mix.
2. Pour the batter into the loaf pan. Bake for 50 to 54 minutes. Cool in the pan for 10 minutes. Remove
from the pan and transfer to a wire cooling rack to cool completely before slicing. Store covered in
the refrigerator.
zucchini
bread
Ingredients:
Directions:
¹
³
/
∙ 33 ∙

Ingredients:
canola oil for deep-frying
2 lb Yukon Gold potatoes
salt & pepper
shoestring
potatoes
Directions:
1. Peel or wash the potatoes. Remove any dark spots and potato eyes and set the potatoes aside.
Heat 2-3 inches of oil in a heavy-bottomed, deep pot. Bring to 365°F. (It is important to use a
deep-fry thermometer.)
2. Fill a large bowl with water. Using your Mandoline, julienne the potatoes very thinly, then place
them in the water. Swish the potatoes around the water so any excess starch will be removed.
3. Take the potatoes out of the water and place on paper towels to dry. Pat the potatoes dry with more
paper towels. The potatoes should be as dry as possible before placing in the hot oil.
4. Place the potatoes in the oil very carefully and fry only a small amount of potatoes at a time.
(If too many potatoes are added at one time, the oil will bubble over the top of the pot).
Fry the potatoes until they are brown and crispy - stir often for approximately 4 minutes.
Scoop the potatoes from the hot oil with a slotted spoon and place them on a plate or pan covered
with paper towels. Salt and pepper the shoestring potatoes.
5. Check the thermometer often to make sure the oil stays around 360-365°F.
6. Repeat the process until all potatoes are fried.
2 eggplants
6 Roma tomatoes
2 yellow squashes
2 zucchinis
1. Preheat the oven for 375˚F.
2. Thinly slice the eggplant, tomatoes, squash, and zucchini into approximately (1-mm) rounds
(set your Thickness Adjuster from 1-3mm), then set aside.
3. Make the sauce: heat the olive oil in a 12” (30-cm) oven-safe pan over medium-high heat.
Sauté the onion, garlic, and bell peppers until soft, about 10 minutes. Season with salt and pepper,
then add the crushed tomatoes. Stir until the ingredients are fully incorporated.
Remove from heat, then add the basil. Stir once more, then smooth the surface of the sauce
with a spatula.
4. Arrange the sliced veggies in alternating patterns, (for example, tomato, eggplant, squash, zucchini)
on top of the sauce from the outer edge to the middle of the pan. Season with salt and pepper.
Cover the pan with foil and bake for 40 minutes. Uncover, then bake for another 20 minutes, until the
vegetables are softened. Mix herb seasoning ingredients and pour over the cooked ratatouille.
5. Serve while hot as a main dish or side. The ratatouille is also excellent the next day--cover with foil
and reheat in a 350˚F oven for 15 minutes, or simply microwave to desired temperature.
ratatouille
Ingredients:
Directions:
For the sauce
2 tbsp olive oil
1 onion, diced
4 cloves garlic, minced
salt, to taste
pepper, to taste
1 (28 oz) can crushed tomatoes
2 tbsp chopped fresh basil,
from 8-10 leaves
Herb seasoning
2 tbsp chopped fresh basil, from 8-10 leaves
1 tsp garlic, minced
2 tbsp chopped fresh parsley
2 tsp fresh thyme
salt, to taste
pepper, to taste
4 tbsp olive oil
∙ 34 ∙ ∙ 35 ∙

Ingredients:
canola oil for deep-frying
2 lb Yukon Gold potatoes
salt & pepper
shoestring
potatoes
Directions:
1. Peel or wash the potatoes. Remove any dark spots and potato eyes and set the potatoes aside.
Heat 2-3 inches of oil in a heavy-bottomed, deep pot. Bring to 365°F. (It is important to use a
deep-fry thermometer.)
2. Fill a large bowl with water. Using your Mandoline, julienne the potatoes very thinly, then place
them in the water. Swish the potatoes around the water so any excess starch will be removed.
3. Take the potatoes out of the water and place on paper towels to dry. Pat the potatoes dry with more
paper towels. The potatoes should be as dry as possible before placing in the hot oil.
4. Place the potatoes in the oil very carefully and fry only a small amount of potatoes at a time.
(If too many potatoes are added at one time, the oil will bubble over the top of the pot).
Fry the potatoes until they are brown and crispy - stir often for approximately 4 minutes.
Scoop the potatoes from the hot oil with a slotted spoon and place them on a plate or pan covered
with paper towels. Salt and pepper the shoestring potatoes.
5. Check the thermometer often to make sure the oil stays around 360-365°F.
6. Repeat the process until all potatoes are fried.
2 eggplants
6 Roma tomatoes
2 yellow squashes
2 zucchinis
1. Preheat the oven for 375˚F.
2. Thinly slice the eggplant, tomatoes, squash, and zucchini into approximately (1-mm) rounds
(set your Thickness Adjuster from 1-3mm), then set aside.
3. Make the sauce: heat the olive oil in a 12” (30-cm) oven-safe pan over medium-high heat.
Sauté the onion, garlic, and bell peppers until soft, about 10 minutes. Season with salt and pepper,
then add the crushed tomatoes. Stir until the ingredients are fully incorporated.
Remove from heat, then add the basil. Stir once more, then smooth the surface of the sauce
with a spatula.
4. Arrange the sliced veggies in alternating patterns, (for example, tomato, eggplant, squash, zucchini)
on top of the sauce from the outer edge to the middle of the pan. Season with salt and pepper.
Cover the pan with foil and bake for 40 minutes. Uncover, then bake for another 20 minutes, until the
vegetables are softened. Mix herb seasoning ingredients and pour over the cooked ratatouille.
5. Serve while hot as a main dish or side. The ratatouille is also excellent the next day--cover with foil
and reheat in a 350˚F oven for 15 minutes, or simply microwave to desired temperature.
ratatouille
Ingredients:
Directions:
For the sauce
2 tbsp olive oil
1 onion, diced
4 cloves garlic, minced
salt, to taste
pepper, to taste
1 (28 oz) can crushed tomatoes
2 tbsp chopped fresh basil,
from 8-10 leaves
Herb seasoning
2 tbsp chopped fresh basil, from 8-10 leaves
1 tsp garlic, minced
2 tbsp chopped fresh parsley
2 tsp fresh thyme
salt, to taste
pepper, to taste
4 tbsp olive oil
∙ 34 ∙ ∙ 35 ∙

6 tbsp olive oil, divided
3 medium onions, peeled & thinly sliced
1 tsp sugar
1 lb sliced portobello mushrooms
salt & pepper to taste
1 (1 lb) pizza dough (can be store-bought)
tuscan flatbread
with mushrooms
Ingredients:
1. Heat 3 tbsp of oil in a heavy skillet over medium low heat. Add the onions and sugar, and cook
until soft and golden brown, stirring often, about 15 minutes.
2. Remove the onions and set aside.
3. Add another 3 tbsp of oil to the skillet, then cook the mushrooms over medium heat until golden
brown, about 7 to 8 minutes. Preheat the oven to 425°F.
4. Divide the dough in half, and roll each half into an oval about ¼" thick.
5. Place each atbread onto a parchment lined baking sheet. Divide the mozzarella between each
atbread. Spread the onions over the atbreads, then arrange the mushrooms. Sprinkle the
atbreads with salt, pepper, and chopped thyme.
6. Top with the Gorgonzola crumbles, then bake until golden brown and bubbly, about 20 minutes.
Let cool 5 minutes, then use a pizza cutter to cut each atbread into 8 pieces.
Directions:
¾ cup sliced almonds
1 lb brussel sprouts
2 oz nely grated Pecorino Romano
¼ cup lemon juice
2½ tbsp extra-virgin olive oil
½ tsp kosher salt
1. Preheat oven or toaster oven to 350°F. Spread the almonds on a baking sheet and bake until golden
brown, about 8 minutes. Remove from heat and let cool.
2. Trim the bottom of the brussel sprouts and wash well. Use your Mandoline to slice them very thinly.
3. Put the brussel sprouts, almonds, Pecorino Romano, lemon juice, olive oil and salt into a large bowl
and toss well. Serve.
shaved brussel
sprouts salad
Ingredients:
Directions:
∙ 36 ∙ ∙ 37 ∙
1 tsp fresh thyme, chopped
1 cup grated mozzarella cheese
1 cup crumbled Gorgonzola cheese

CUSTOMER SUPPORT warranty
STOREBOUND, LLC — 1 YEAR LIMITED WARRANTY
Your StoreBound product is warranted to be free from defects in material and workmanship for a period of one
(1) year from the date of the original purchase when utilized for normal and intended household use. Should any
defect covered by the terms of the limited warranty be discovered within one (1) year, StoreBound, LLC will repair
or replace the defective part. To process a warranty claim, contact Customer Support at 1(800)898-6970 for
further assistance and instruction. A Customer Support agent will assist you by troubleshooting minor problems.
If troubleshooting fails to x the problem, a return authorization will be issued. Proof of purchase indicating the
date and place of purchase is required and should accompany the return. You must also include your full name,
shipping address, and telephone number. We are unable to ship returns to a PO box. StoreBound will not be
responsible for delays or unprocessed claims resulting from a purchaser’s failure to provide any or all of the
necessary information. Freight costs must be prepaid by the purchaser.
Send all inquiries to support@storebound.com.
There are no express warranties except as listed above.
REPAIR OR REPLACEMENT AS PROVIDED UNDER THIS WARRANTY IS THE EXCLUSIVE REMEDY OF THE
CUSTOMER. STOREBOUND SHALL NOT BE LIABLE FOR ANY INCIDENTAL OR CONSEQUENTIAL DAMAGES
OR FOR BREACH OF ANY EXPRESS OR IMPLIED WARRANTY ON THIS PRODUCT EXCEPT TO THE EXTENT
REQUIRED BY APPLICABLE LAW. ANY IMPLIED WARRANTY OF MERCHANTABILITY OR FITNESS FOR A
PARTICULAR PURPOSE ON THIS PRODUCT IS LIMITED IN DURATION TO THE DURATION OF THIS WARRANTY.
Some states do not allow the exclusion or limitation of incidental or consequential damages, or limitations
on how long an implied warranty lasts. Therefore, the above exclusions or limitations may not apply to you.
This warranty gives you specic legal rights and you may also have other rights, which vary from state to state.
TECHNICAL SPECIFICATIONS
Model: DSM100
Stock#: DSM100_20210915_v5
∙ 38 ∙ ∙ 39 ∙
6am
–
6pm
Dash values quality and workmanship and stands behind this
product with our Feel Good Guarantee
™
. To learn more about
our commitment to quality, visit bydash.com/feelgood.
7am
–
7pm
8am
–
8pm
9am
–
9pm
Hey Hawaii! You can reach our customer service team from 3AM to 3PM.
And also, Alaska, feel free to reach out from 5AM to 5PM.
feel good
guarantee
™
Our customer support teams in the US and Canada are at
your service Monday - Friday during the times below.
Contact us at 1 (800) 898-6970 or suppor[email protected]

CUSTOMER SUPPORT warranty
STOREBOUND, LLC — 1 YEAR LIMITED WARRANTY
Your StoreBound product is warranted to be free from defects in material and workmanship for a period of one
(1) year from the date of the original purchase when utilized for normal and intended household use. Should any
defect covered by the terms of the limited warranty be discovered within one (1) year, StoreBound, LLC will repair
or replace the defective part. To process a warranty claim, contact Customer Support at 1(800)898-6970 for
further assistance and instruction. A Customer Support agent will assist you by troubleshooting minor problems.
If troubleshooting fails to x the problem, a return authorization will be issued. Proof of purchase indicating the
date and place of purchase is required and should accompany the return. You must also include your full name,
shipping address, and telephone number. We are unable to ship returns to a PO box. StoreBound will not be
responsible for delays or unprocessed claims resulting from a purchaser’s failure to provide any or all of the
necessary information. Freight costs must be prepaid by the purchaser.
Send all inquiries to support@storebound.com.
There are no express warranties except as listed above.
REPAIR OR REPLACEMENT AS PROVIDED UNDER THIS WARRANTY IS THE EXCLUSIVE REMEDY OF THE
CUSTOMER. STOREBOUND SHALL NOT BE LIABLE FOR ANY INCIDENTAL OR CONSEQUENTIAL DAMAGES
OR FOR BREACH OF ANY EXPRESS OR IMPLIED WARRANTY ON THIS PRODUCT EXCEPT TO THE EXTENT
REQUIRED BY APPLICABLE LAW. ANY IMPLIED WARRANTY OF MERCHANTABILITY OR FITNESS FOR A
PARTICULAR PURPOSE ON THIS PRODUCT IS LIMITED IN DURATION TO THE DURATION OF THIS WARRANTY.
Some states do not allow the exclusion or limitation of incidental or consequential damages, or limitations
on how long an implied warranty lasts. Therefore, the above exclusions or limitations may not apply to you.
This warranty gives you specic legal rights and you may also have other rights, which vary from state to state.
TECHNICAL SPECIFICATIONS
Model: DSM100
Stock#: DSM100_20210915_v5
∙ 38 ∙ ∙ 39 ∙
6am
–
6pm
Dash values quality and workmanship and stands behind this
product with our Feel Good Guarantee
™
. To learn more about
our commitment to quality, visit bydash.com/feelgood.
7am
–
7pm
8am
–
8pm
9am
–
9pm
Hey Hawaii! You can reach our customer service team from 3AM to 3PM.
And also, Alaska, feel free to reach out from 5AM to 5PM.
feel good
guarantee
™
Our customer support teams in the US and Canada are at
your service Monday - Friday during the times below.

1-800-898-6970 | @unprocessyourfood | bydash.com