Operator's Manual
ICRAFTSMIIN°I
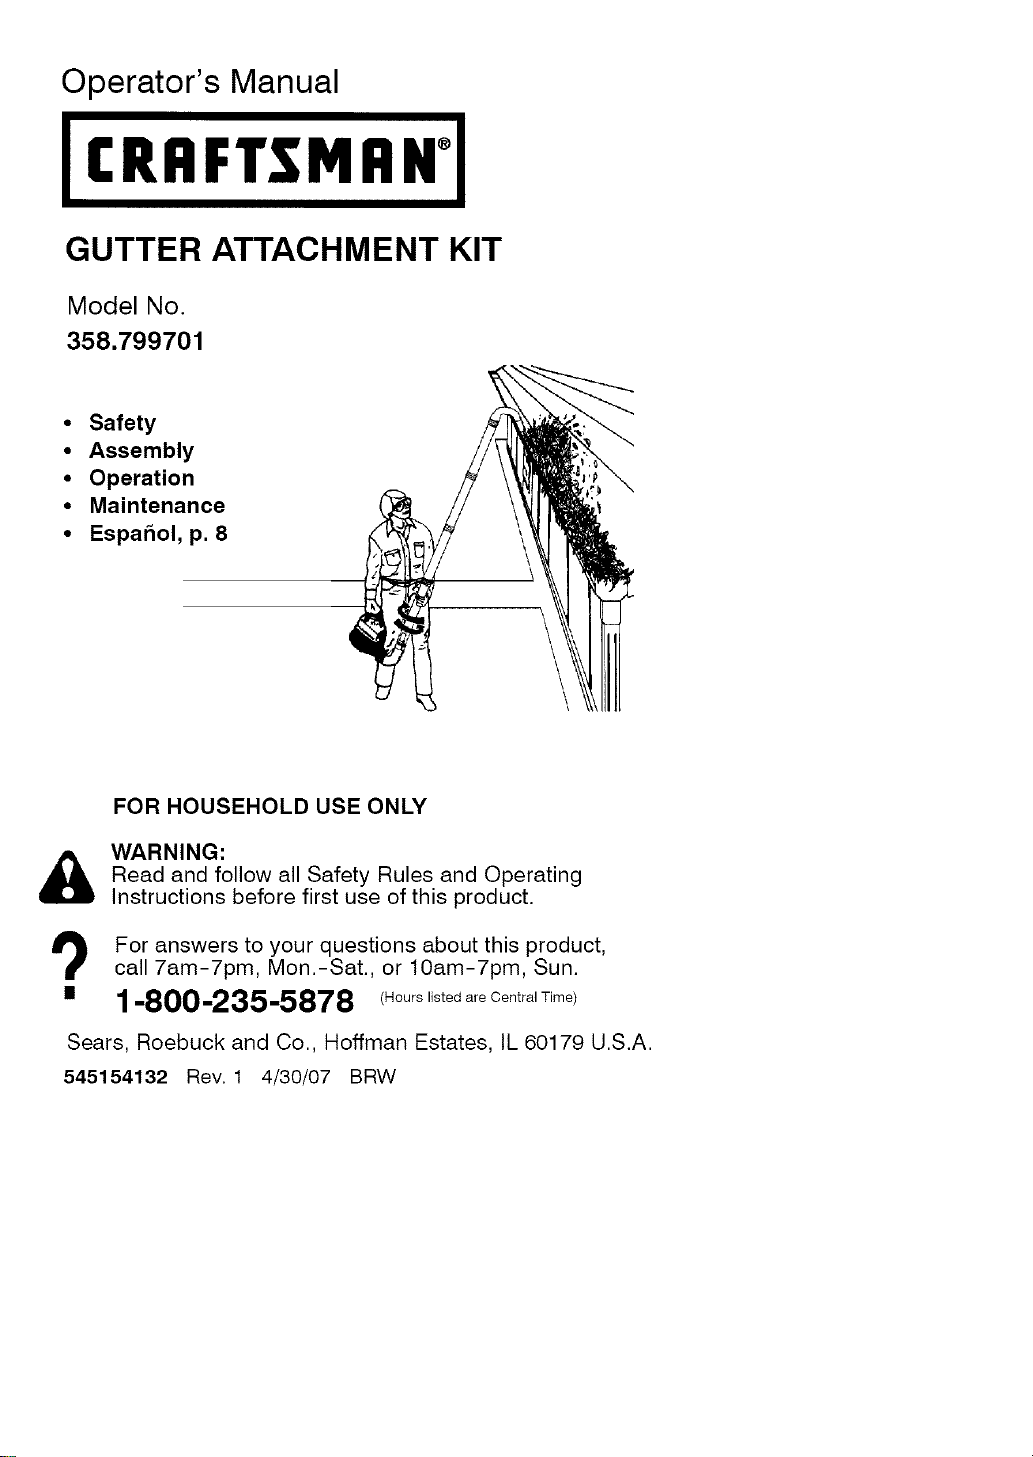
GUTTER ATTACHMENT KIT
Model No.
358.799701
• Safety
• Assembly
• Operation
• Maintenance
• Espar_ol, p. 8
\
\
FOR HOUSEHOLD USE ONLY
WARNING:
Read and follow all Safety Rules and Operating
Instructions before first use of this product.
1_ or answers to your questions about this product,
call 7am-7pm, Mon.-Sat., or lOam-7pm, Sun.
• 1-800-235-5878 (Hours listed are Central Time)
Sears, Roebuck and Co., Hoffman Estates, IL 60179 U.S.A.
545154132 Rev. 1 4/30/07 BRW
Safety Rules
Assembly
Operation
Maintenance
2
3
6
7
Storage 7
Spanish 8
Parts & Ordering Back Cover
z_
• llWARNING: Failure to follow all
Safety Rules and Precautions can re-
sult in serious injury.
KNOW YOUR UNIT
• Read your operator's manual for the
original tool. Make certain you com-
pletely understand and can follow all
warnings and safety rules in the manual
for the original tool and in this manual
before operating the tool with gutter at-
tachment installed.
• Restrict unit to users who understand
and will follow all warnings and safety
rules in the manual for the original tool
and in this manual.
_, WARNING: Inspect area before
starting unit. Remove all debris and
hard objects such as rocks, glass,
wire, etc. that can ricochet, be thrown,
or otherwise cause injury or damage
during operation.
PLAN AHEAD
• Always wear eye protection when oper-
ating, servicing or performing mainte-
nance on unit. Wearing eye protection
will help to prevent rocks or debris from
being blown or ricocheting into eyes and
face which can result in blindness orse-
rious injury. Eye protection should meet
the requirements of ANS! Z87.1.
• Always wear foot protection. Do not go
barefoot or wear short pants or sandals.
• Always wear a respirator or face mask
when working with the unit in dusty envi-
ronments.
• Secure hair above shoulder length. Se-
cure or remove loose clothing or cloth-
ing with loosely hanging straps, ties,
tassels, etc. They can be caught in
moving parts.
• Do not operate unit when you are tired,
ill, upset, or if you are under the influ-
ence of alcohol, drugs, or medication.
• Keep children, bystanders, and animals
away from work area a minimum of 30
feet (10 meters) when starting or operat-
ing unit. Do not point blower or gutter at-
tachment nozzle in the direction of
people or pets.
OPERATE YOUR UNIT SAFELY
• Inspect unit before each use for worn,
loose, missing or damaged parts. Do
not use until unit is in proper working or-
der.
• Do not set unit on any surface except a
clean, hard area while engine/motor is
running. Debris such as gravel, sand,
dust, grass, etc., could be picked up by
the air intake and thrown out through
discharge opening, damaging unit,
property, or causing serious injury to by-
standers or operator.
• Do not overreach or use from unstable
surfaces such as ladders, trees, steep
slopes, rooftops, etc. Keep firm footing
and balance at all times.
• Never place objects inside the tubes; al-
ways direct blowing debris away from
people, animals, glass, and solid ob-
jects such as trees, automobiles, walls,
etc. The force of air can cause rocks,
dirt, or sticks to be thrown or to ricochet
which can hurt people or animals, break
glass, or cause other damage.
• Never run unit without the proper equip-
ment attached. Always install all tubes
included in the gutter attachment kit.
• Check air intake opening and tubes fre-
quently, always with the engine/motor
stopped and spark plug/power supply
disconnected. Keep tubes free of debris
which can accumulate and restrict
proper air flow.
• Never place any object in air intake
opening as this could restrict proper air
flow and cause damage to the unit.
• Never use for spreading chemicals, fer-
tilizers, or other substances which may
contain toxic materials.
• To avoid spreading fires, do not use
near leaf or brush fires, fireplaces, bar-
becue pits, ashtrays, etc.
• Use only in daylight or good artificial
light.
• Use only for jobs explained in this
manual.
-2-
CARTON CONTENTS
Check carton contents against the fol-
lowing list. Refer to the illustrations in
the OPERATION section of this manual.
Model 358.799701
• Nozzle
• Elbow with spacer ring
• Extension Tube (4)
• Pivot Tube
• Adapter and collar - gas units
• Adapter - electric units with tube
release button
• Goggles
Examine parts for damage. Do not use
damaged parts.
If you need assistance or find parts
missing or damaged, please call
1-800-235-5878.
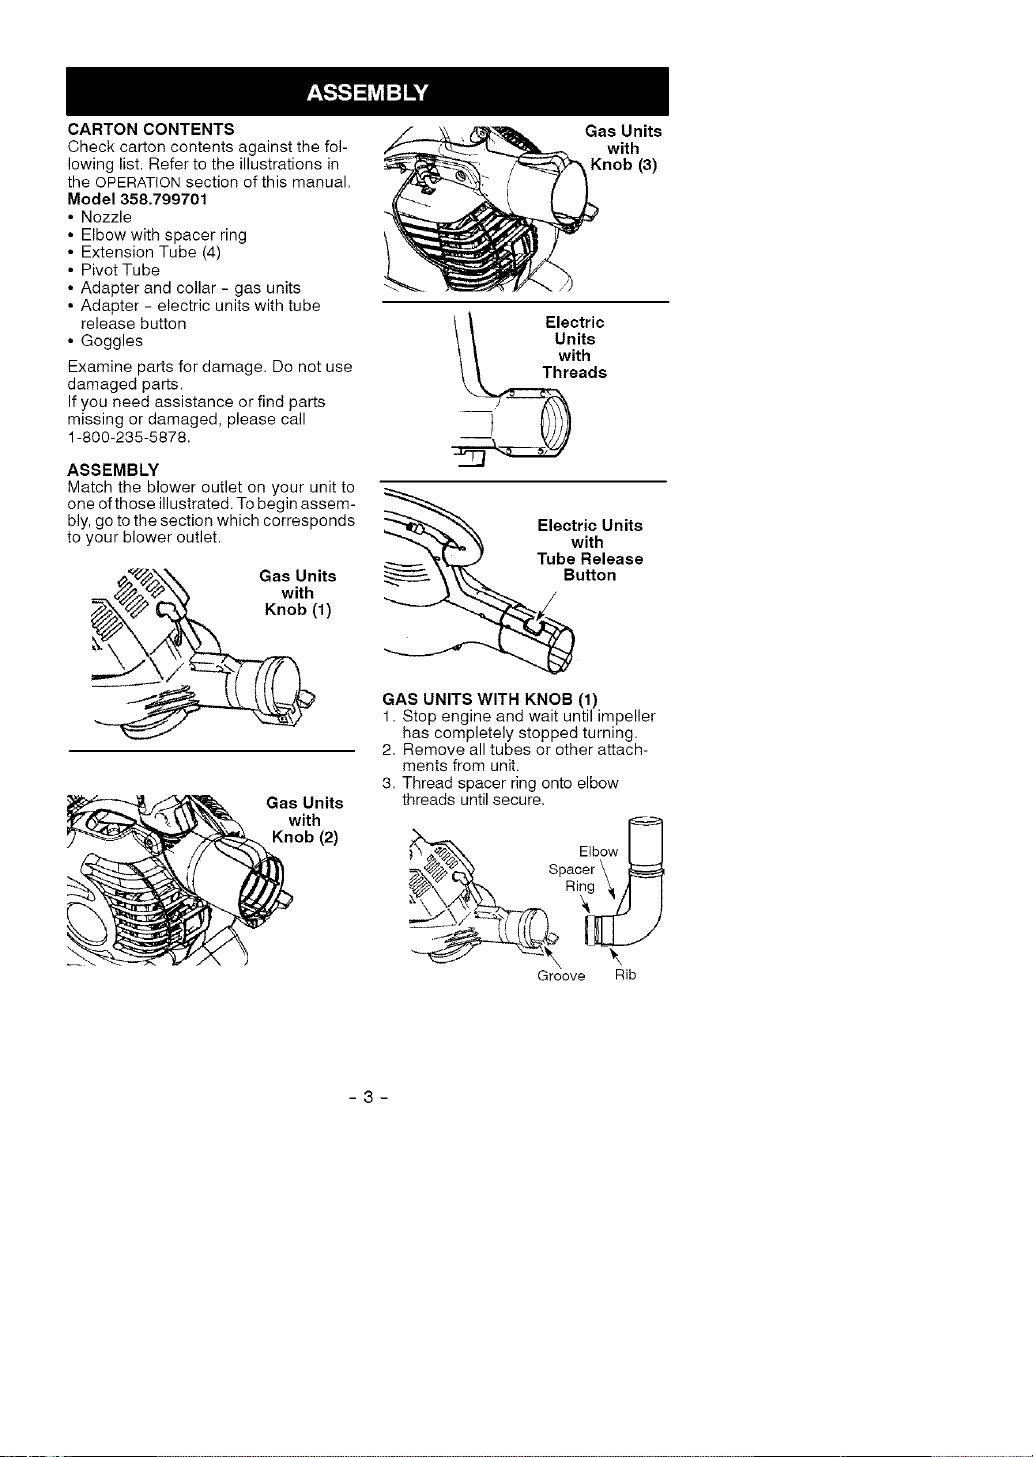
ASSEMBLY
Match the blower outlet on your unit to
one of those illustrated. To begin assem-
bly, go to the section which corresponds
to your blower outlet.
_'(._\\ Gas Units
"0
__ ,_._ 2_'_ with
/__ Knob (1)
Gas Units
with
Knob (2)
Gas Units
with
Knob (3)
Electric
Units
with
Threads
Electric Units
with
Tube Release
_._utton
GAS UNITS WITH KNOB (1)
1. Stop engine and wait until impeller
has completely stopped turning.
2. Remove all tubes or other attach-
meats from unit.
3. Thread spacer ring onto elbow
threads until secure.
Elbow
/=__'_..k_, Spacer \
_'X_ -_["_ Ring _ A I
Groove Rib
-3-
4. Align rib with groove and insert
elbow into blower outlet.
5. Secure the tubes by turning the
knob clockwise.
6. Proceed to ALL UNITS - TUBE AS-
SEMBLY.
GAS UNITS WITH KNOB (2)
1. Stop engine and wait until impeller
has completely stopped turning.
2. Remove all tubes or other attach-
ments from unit.
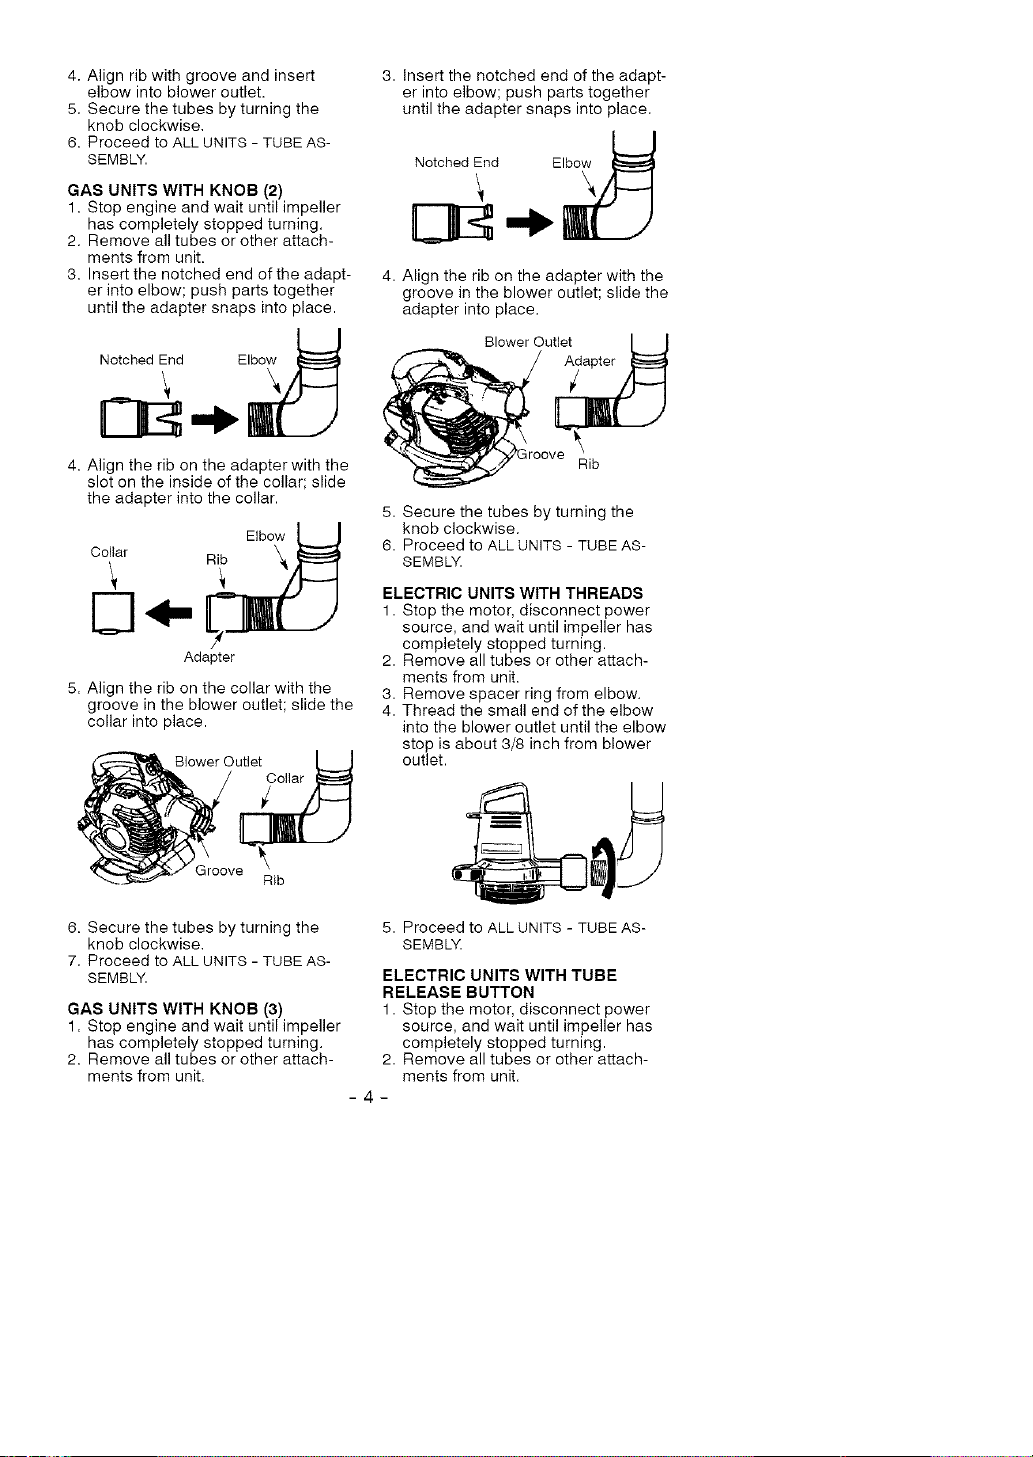
3. Insert the notched end of the adapt-
er into elbow; push parts together
until the adapter snaps into place.
Notched End Elbow
4. Align the rib on the adapter with the
slot on the inside of the collar; slide
the adapter into the collar.
Elbow
Collar
Rib
Adapter
5. Align the rib on the collar with the
groove in the blower outlet; slide the
collar into place.
Blower Outlet
Collar
/
Rib
6. Secure the tubes by turning the
knob clockwise.
7. Proceed to ALL UNITS - TUBE AS-
SEMBLY.
GAS UNITS WITH KNOB (3)
1. Stop engine and wait until impeller
has completely stopped turning.
2. Remove all tubes or other attach-
ments from unit.
3. Insert the notched end of the adapt-
er into elbow; push parts together
until the adapter snaps into place.
Notched End Elbow
4. Align the rib on the adapter with the
groove in the blower outlet; slide the
adapter into place.
Blower Outlet I I
.o:v
Rib
5. Secure the tubes by turning the
knob clockwise.
6. Proceed to ALL UNITS - TUBE AS-
SEMBL'Yt
ELECTRIC UNITS WITH THREADS
1. Stop the motor, disconnect power
source, and wait until impeller has
completely stopped turning.
2. Remove all tubes or other attach-
ments from unit.
3. Remove spacer ring from elbow.
4. Thread the small end of the elbow
into the blower outlet until the elbow
stop is about 3/8 inch from blower
outlet.
5. Proceed to ALL UNITS - TUBE AS-
SEMBL'Yt
ELECTRIC UNITS WITH TUBE
RELEASE BUTTON
1. Stop the motor, disconnect power
source, and wait until impeller has
completely stopped turning.
2. Remove all tubes or other attach-
ments from unit.
- 4 -
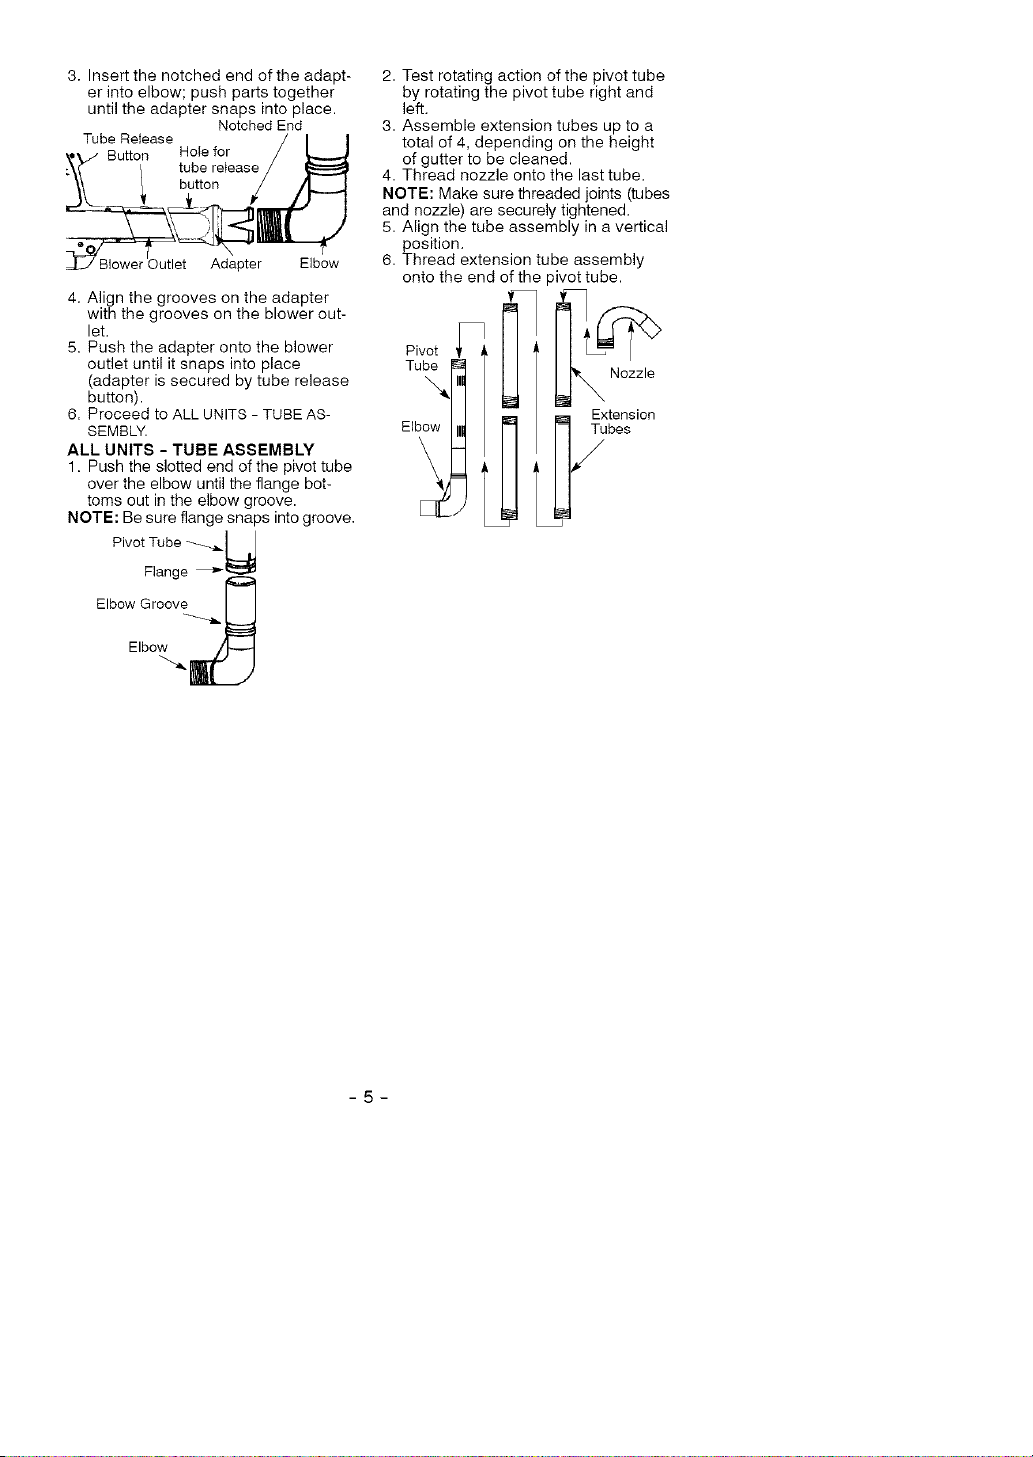
3. Insert the notched end of the adapt-
er into elbow; push parts together
until the adapter snaps into place.
Notched End
Tube Release / / /
\"V Button Hote for /
:\f / tube re_ease/
; button _/
_BIower_utlet Adapter
4. Align the grooves on the adapter
with the grooves on the blower out-
let.
5. Push the adapter onto the blower
outlet until it snaps into place
(adapter is secured by tube release
button).
6. Proceed to ALL UNITS - TUBE AS-
SEMBLY.
ALL UNITS - TUBE ASSEMBLY
1. Push the slotted end of the pivot tube
over the elbow until the flange bot-
toms out in the elbow groove.
NOTE: Be sure flange snaps into groove.
2. Test rotating action of the pivot tube
by rotating the pivot tube right and
left.
3. Assemble extension tubes up to a
total of 4, depending on the height
of gutter to be cleaned.
4. Thread nozzle onto the last tube.
NOTE: Make sure threaded joints (tubes
and nozzle) are securely tightened.
5. Align the tube assembly in a vertical
position.
6. Thread extension tube assembly
onto the end of the pivot tube.
Pivot
Flange
Elbow Groove
Elbow
-5-
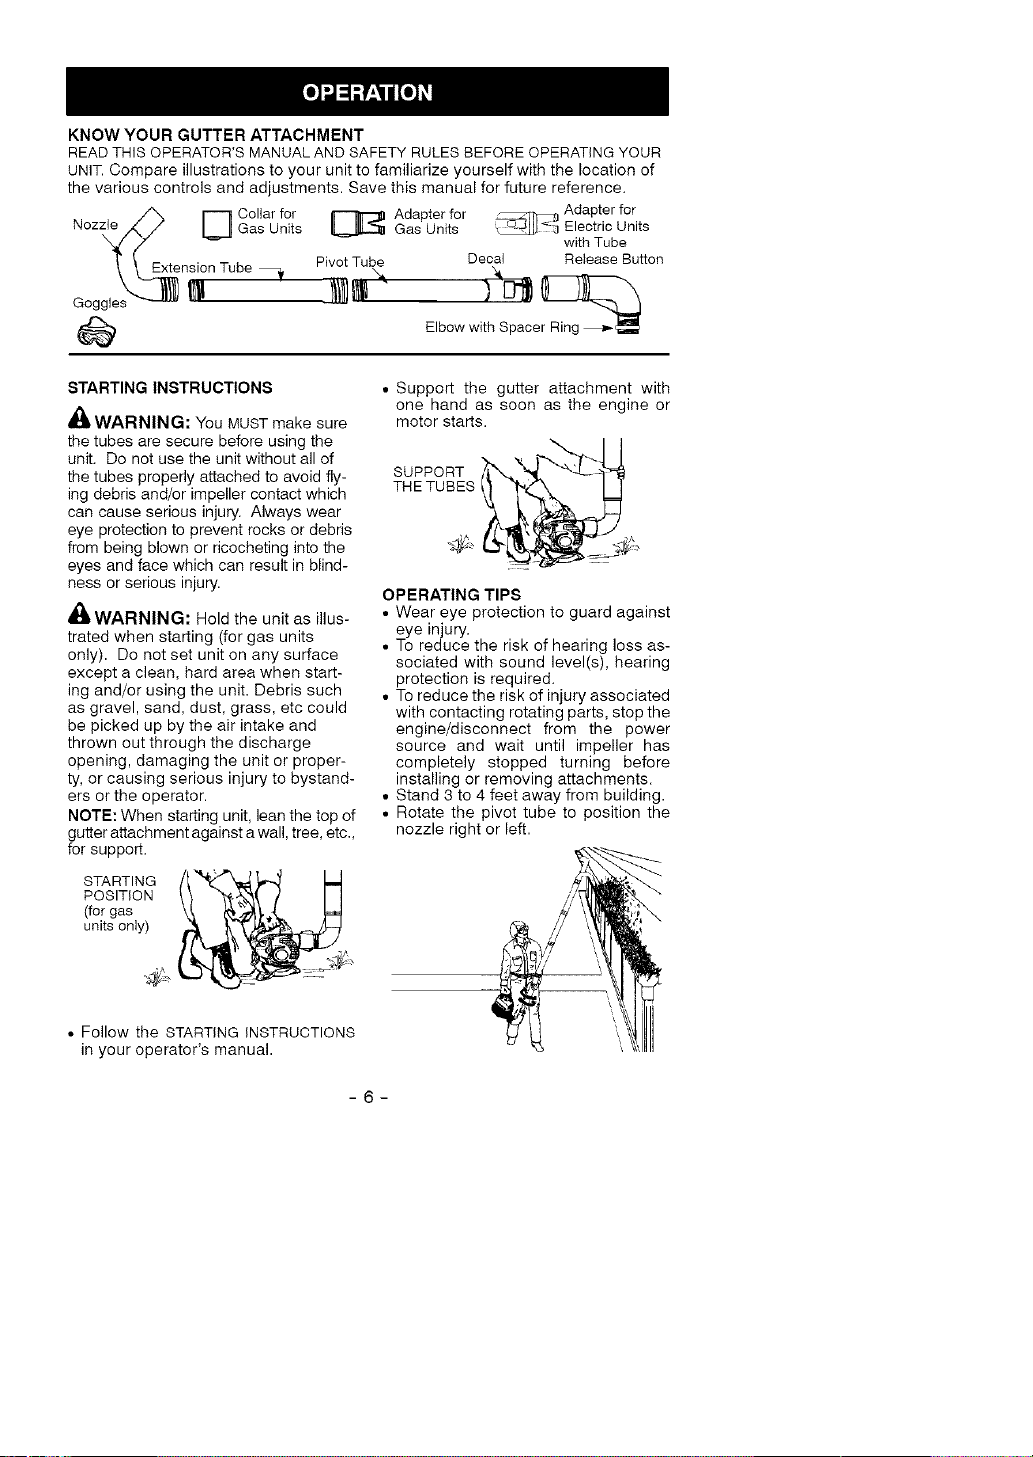
KNOW YOUR GUTTER ATTACHMENT
READ THIS OPERATOR'S MANUAL AND SAFETY RULES BEFORE OPERATING YOUR
UNIT. Compare illustrations to your unit to familiarize yourself with the location of
the various controls and adjustments. Save this manual for future reference.
_ Collar for Adapter for Adapter for
Nozz,_/ LJ Gas Units _ Gas Units _ ElectricUnitSwithTube
Pivot Tube
\ _E._nsion Tube _ Decal Release Button
Elbow with Spacer Ring _
STARTING INSTRUCTIONS
,_ WARNING: You MUST make sure
the tubes are secure before using the
unit. Do not use the unit without all of
the tubes properly attached to avoid fly-
ing debris and/or impeller contact which
can cause serious injury. Always wear
eye protection to prevent rocks or debris
from being blown or ricocheting into the
eyes and face which can result in blind-
ness or serious injury.
_l_ WARNING: Hold the unit as illus-
trated when starting (for gas units
only). Do not set unit on any surface
except a clean, hard area when start-
ing and/or using the unit. Debris such
as gravel, sand, dust, grass, etc could
be picked up by the air intake and
thrown out through the discharge
opening, damaging the unit or proper-
ty, or causing serious injury to bystand-
ers or the operator.
NOTE: When starting unit, lean the top of
gutter attachment against a wall, tree, etc.,
for support.
STARTING _,_
POSITION
(for gas
units only)
• Support the gutter attachment with
one hand as soon as the engine or
motor starts.
SUPPORT _S'
THE TUBES
>
OPERATING TIPS
• Wear eye protection to guard against
eye injury.
• To reduce the risk of hearing loss as-
sociated with sound level(s), hearing
protection is required.
• To reduce the risk of injury associated
with contacting rotating parts, stop the
engine/disconnect from the power
source and wait until impeller has
completely stopped turning before
installing or removing attachments.
• Stand 3 to 4 feet away from building.
• Rotate the pivot tube to position the
nozzle right or left.
• Follow the STARTING INSTRUCTIONS
in your operator's manual.
-6-
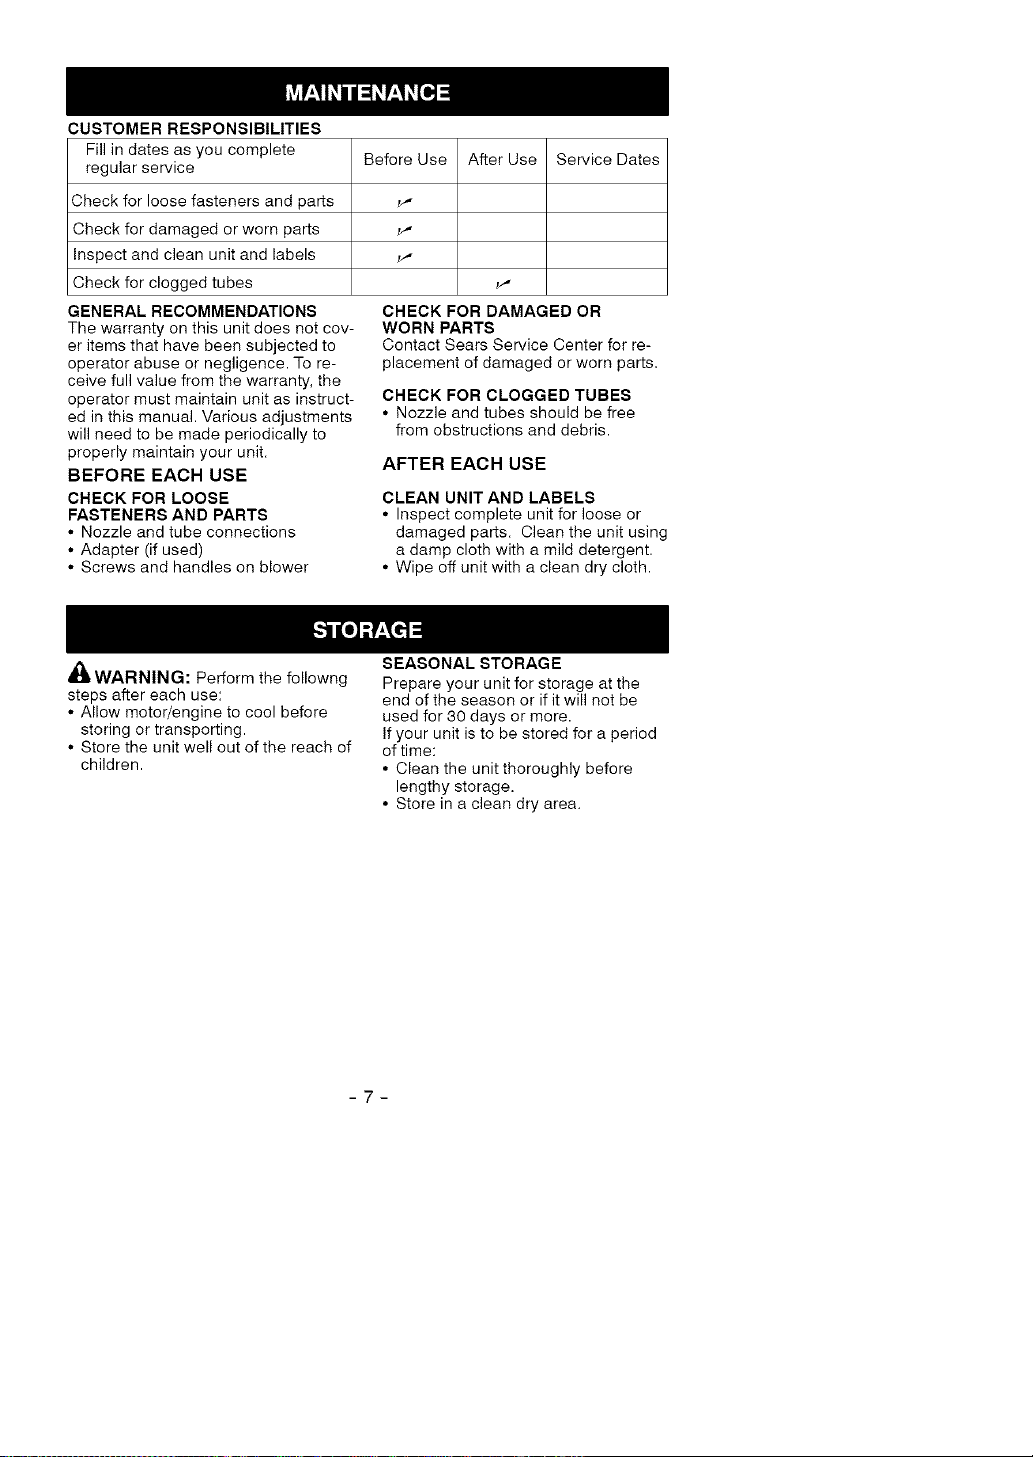
CUSTOMER RESPONSIBILITIES
Fill in dates as you complete
regular service
Check for loose fasteners and parts
Check for damaged or worn parts
Inspect and clean unit and labels
Check for clogged tubes
GENERAL RECOMMENDATIONS
The warranty on this unit does not cov-
er items that have been subjected to
operator abuse or negligence. To re-
ceive full value from the warranty, the
operator must maintain unit as instruct-
ed in this manual. Various adjustments
will need to be made periodically to
properly maintain your unit.
BEFORE EACH USE
CHECK FOR LOOSE
FASTENERS AND PARTS
• Nozzle and tube connections
• Adapter (if used)
• Screws and handles on blower
Before Use After Use Service Dates
v"
v"
v"
v,"
CHECK FOR DAMAGED OR
WORN PARTS
Contact Sears Service Center for re-
placement of damaged or worn parts=
CHECK FOR CLOGGED TUBES
• Nozzle and tubes should be free
from obstructions and debris.
AFTER EACH USE
CLEAN UNIT AND LABELS
• Inspect complete unit for loose or
damaged parts. Clean the unit using
a damp cloth with a mild detergent.
• Wipe off unit with a clean dry cloth.
,ti
4Bi WARNING: Perform the followng
steps after each use:
• Allow motor/engine to cool before
storing or transporting.
• Store the unit well out of the reach of
children.
SEASONAL STORAGE
Prepare your unit for storage at tile
end of the season or if it will not be
used for 30 days or more.
If your unit is to be stored for a period
of time:
• Clean the unit thoroughly before
lengthy storage.
• Store in a clean dry area.
-7-
Reglas de Seguridad 8
Montaje 9
Usa 12
Mantenimiento 13
Almacenaje 13
Piezas de Repuesto Contratapa
_IADVERTENClA: De no cumplir
con todas las Reglas y Precauciones
de Seguridad, correr& el riesgo de ac-
cidentes muy graves.
CONOZCA SU APARATO
• Lea el manual de instrucciones de la
herramienta original. Aseg_rese de
que comprenda completamente y siga
todas las advertencias e instrucciones
de seguridad en el manual de la her-
ramienta original yen este manual
antes de comenzar a manejar la her-
ramienta con este accesorio para la
limpieza de canales de techo.
• Limite el uso del aparato a aquellas
personas que comprendan todas las
advertencias e instrucciones de se-
guridad en el manual de la herra-
mienta original yen este manual.
_IADVERTENCIA: Inspeccione el
&tea antes de poner en marcha. Re-
mueva los escombros y objetos s61i-
dos tales como piedras, vidrio,
alambre, etc., que el aparato pueda
arrojar al aire o hacer rebotar causan-
do heridas de este o cualquier otro
modo durante el usa.
PIENSE ANTES DE PROCEDER
• Use siempre anteojos de seguridad
o similar de ojos al usar y al hacer
mantenimiento del aparato. El uso
de protecci6n de ojos puede ayudar
a la prevenci6n de ceguera u otras
heridas graves producidas per pie-
dras o desechos impelidos per el
aparato y arrojados en los ojos yen
la cara. La protecci6n para los ojos
debe satisfacer los Requisitos Nacio-
nales de Seguridad de ANSI Z87.1
• Use siempre protecci6n en los pies.
No use el aparato descalzo ni en
pantalones cortes o en sandalias.
• Use siempre mascarilla filtrante o
protectora al trabajar con el aparato
en ambientes polvorientos.
• Mantenga el cabello par encima de
los hombros, atandolo para tal efecto
si es necesario. Mantenga el cabel-
Io, ropa suelta, ropa con tiras, dedos
y otras partes del cuerpo alejados de
las aberturas y partes en movimien-
to. El cabello, ropa suelta o ropas
con tiras, borlas, corbatas, etc., pue-
den enredarse en las piezas
m6viles.
• No use el aparato cuando se en-
cuentre cansado, enfermo, agitado,
ni bajo la influencia del alcohol, de
drogas u otros medicamentos.
• Mantenga a ni_os, espectadores y
animales a una distancia minima de
10 metros (30 pies) al porter en mar-
cha o al usar el aparato. No se_iale la
boquilla del soplador o boquilla del ac-
cesorio para la limpieza de canales de
techo en la direcci6n de la personals o
de animales dom6sticos.
HAGA USO SEGURO DE SU APA-
RATO
• Verifique por inspecci6n, antes de
cada usa, que no haya piezas gasta-
das, sueltas, ni da_iadas o piezas
que falten. No use el aparato hasta
que este se encuentre en perfectas
condiciones de funcionamiento.
• No coloque el aparato en ninguna
superficie que no est6 limpia y que
sea s61ida mientras el aparato este
en funcionamiento. Escombros
como Io son la gavilla, arena, polvo,
hierba, etc., podrian ser recogidos
par la toma de aire y arrojados hacia
afuera a trav6s de la abertura de
descarga, daSando el aparato, la
propiedad o causando series acci-
dentes a espectadores o al usuario.
• No se incline demasiado o use en su-
perficies inestables come Io son las
escaleras, arboles, vertientes empina-
das, techos, etc. Mantenga un pie
firme y balance todo el tiempo.
• Nunca coloque objetos dentro de los
tubas del soplador; siempre dirija los
escombros en direcci6n contraria a
donde personas, animales, vidriera
su otros objetos s61idos tales come
&rboles, autom6viles, paredes, etc.,
se encuentran. La fuerza del aire
puede arrojar o hacer rebotar pie-
dras, tierra o ramas, heriendo a per-
sonas,oanimales,rompiendovi-
drierasocausandootrosdaSos.
• Nuncapongaelaparatoenmarcha
sinunirelequipoapropiado.Instale
siempretodoslostubosincluidosen
elkit.
• Inspeccionefrecuentementelaaber-
tufadeentradadeaireylostubos
siempreconelmotordetenidoyla
bujiaorecursodeenergiadesco-
nectada.Mantengalasaberturasde
ventilaci6nylostubosdedescarga
libresdeescombrosquesepueden
acumularylimitarlacirculaci6ndebi-
dadeaire.
• Nuncacoloqueobjetoalgunodentro
delaentradadeaireyaquedehac-
eriepodrialimitarlacirculaci6nd'aire
yda_arelaparato.
• Nuncauseelaparatoparaesparcir
substanciasquimicas,fertilizantesu
otrassubstanciasquepuedancon-
tenermaterialest6xicos.
• Paraevitarlapropagaci6ndeincen-
dios,nouseelaparatocercadeho-
guerasdehogassecasodemater-
rales,dehogaresdelena,de
parrillas,barbacoas,ceniceros,etc.
• Uses61oalaluzdeldiaoenbuena
luzartificial.
• Useelaparatoexclusivamentepara
losfinesdescritosenestemanual.
CONTENIDODELACAJA
Verifiqueelcontenidodelacajaencon-
tradelasiguientelieta.Vealaeilustra-
cionesen la secci6n de uso en este
manual.
Modelo 358.799701
• Boquilla
• Tubo en forma de codo con argolla
separadora
• Tubo de Extensi6n (4)
• Tubo Giratorio
• Adaptador y manga - aparatos a ga-
solina
• Adaptador - aparatoe el6ctricos con
bot6n para aflojar el tube
• Gafas
Verifique toda las piezas en case de
da_os. No use las piezas que se en-
cuentren da_adas.
AVlSO: Si usted necesita ayuda o en-
cuentra piezas perdidas o daSadas,
Ilame al nOmero 1-800-235-5878.
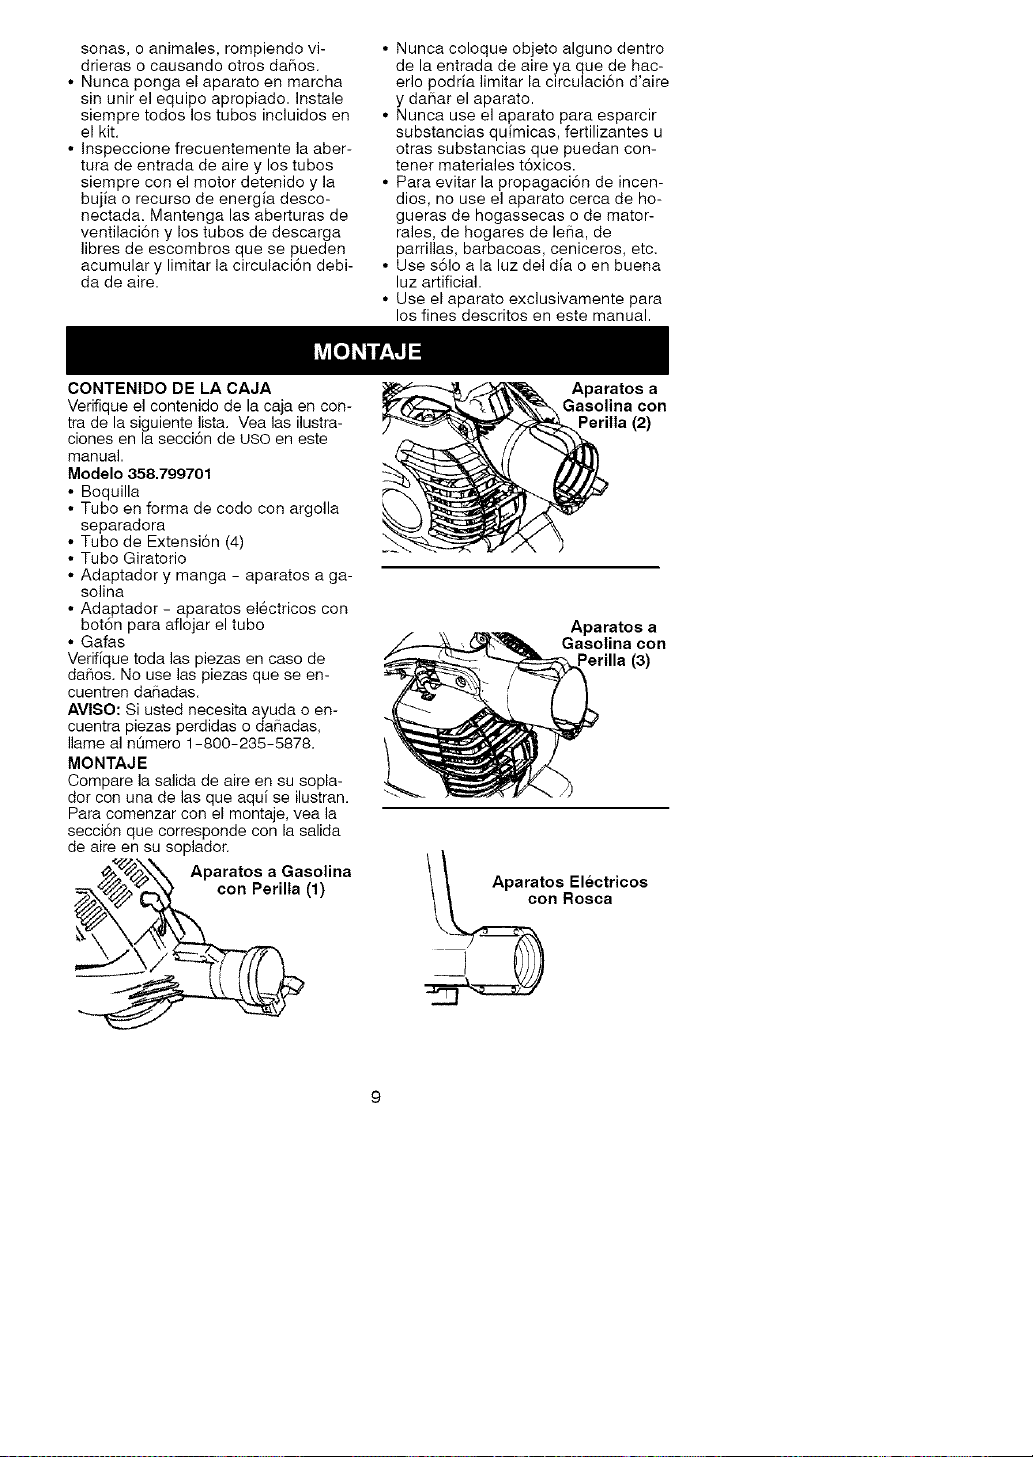
MONTAJE
Compare la salida de aire en su sepia-
dot con una de las que aqui se ilustran.
Rata comenzar con el montaje, vea la
secci6n que corresponde con la salida
de aire en su soplador.
Aparatos a Gasolina
con Perilla (1)
Aparatos a
Gasolina con
Perilla (2)
Aparatos a
Gasolina con
=erilla (3)
Aparatos Electricos
n Rosca
paratosElectricoscon
Botonpara
Aflojarel Tubo
APARATOS A GASOLINA CON
PERILLA (1)
1. Pare el motor y espere hasta que el
ventilador pare de girar por complete.
2. Remueva todos los tubos u otros
accesorios del aparato.
3. Enrosque la argolla separadora en
la rosca del tubo en forma de codo
hasta que quede segura.
tubo an _-_
Forma de Codo I I
_'_'_,,.. sArgp/'radora _/_
Ranura Moldura
Saliente
4. Alinee la moldura saliente con la
ranura e introduzca el tubo en for-
ma de codo en la salida de aire del
soplador.
5. AsegOrese de apretar el tubo
girando la perilla hacia la derecha.
6. Proceda con MONTAJE DELTUBO
PARA TODO TIPO DE APARATOS.
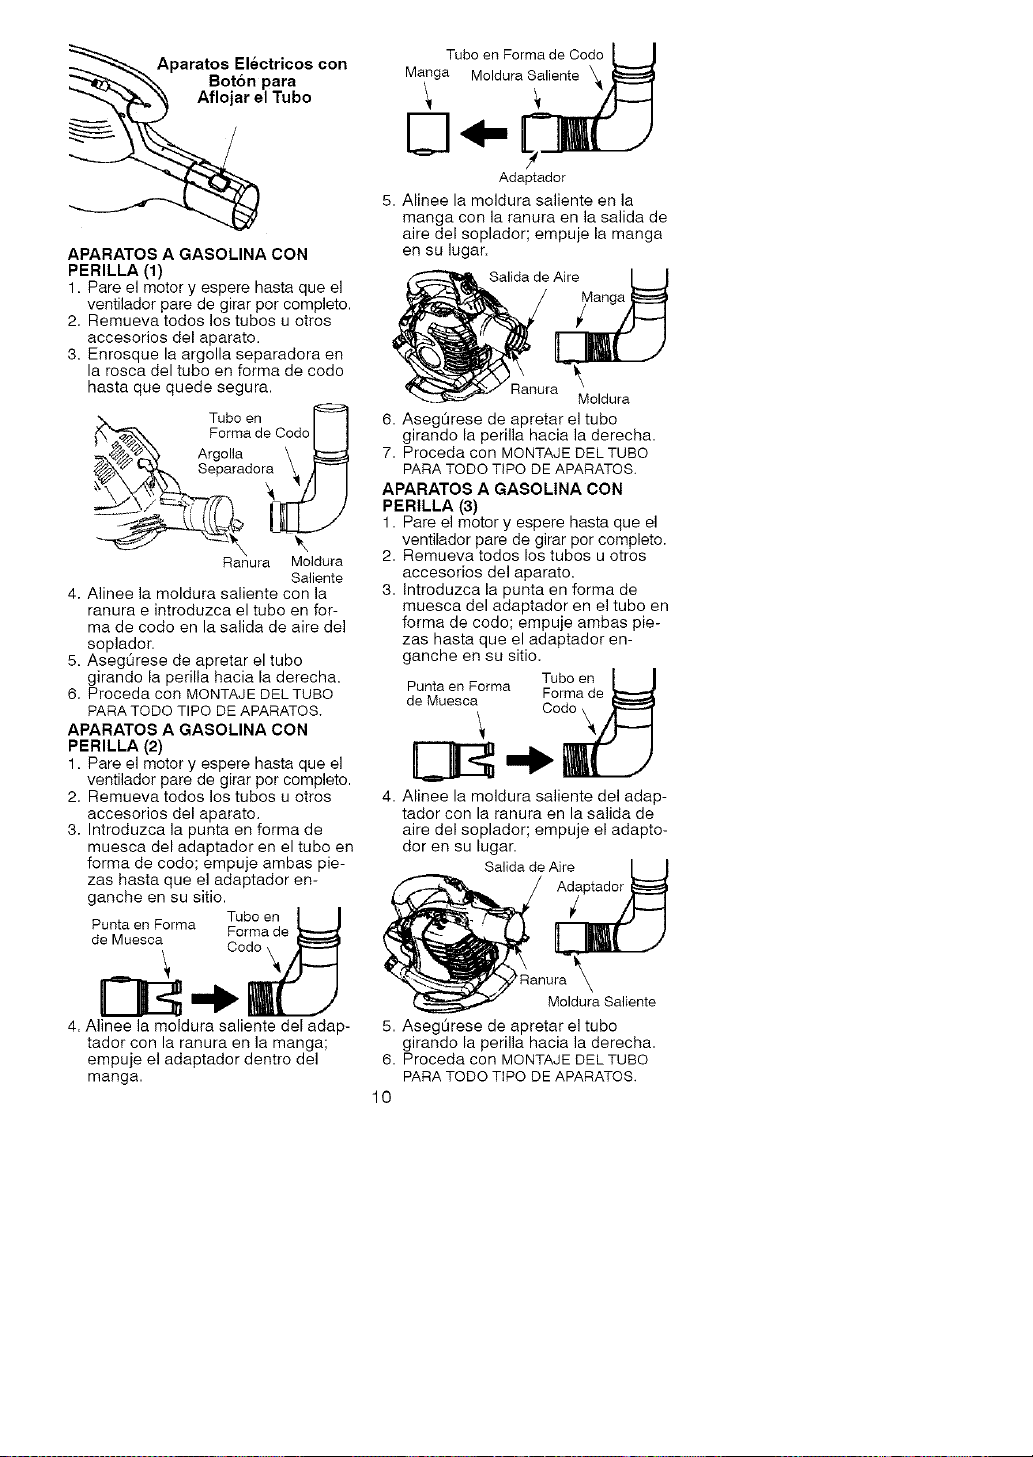
APARATOS A GASOLINA CON
PERILLA (2)
1. Pare el motor y espere hasta que el
ventilador pare de girar por complete.
2. Remueva todos los tubos u otros
accesorios del aparato.
3. Introduzca la punta en forma de
muesca del adaptador en el tubo en
forma de codo; empuje ambas pie-
zas hasta que el adaptador en-
ganche en su sitio.
Tubo en
Punta en Forma Forma de
de Muesca
Codo
4. Alinee la moldura saliente del adap-
tador con la ranura en la manga;
empuje el adaptador dentro del
manga.
Tubo en Forma de Codo
Manga Moldura Saliente
D4-
Adaptador
5. Alinee la moldura saliente en la
manga con la ranura en la salida de
aire del soplador; empuje la manga
en su lugar.
Salida de Aire I _
/ Manga I_
Moldura
6. Aseg0rese de apretar el tube
girando la perilla hacia la derecha.
7. Proceda con MONTAJE DELTUBO
PARA TODO TIPO DE APARATOS.
APARATOS A GASOLINA CON
PERILLA (3)
1. Pare el motor y espere hasta que el
ventilador pare de girar por completo.
2. Remueva todos los tubos u otros
accesorios del aparato.
3. Introduzca la punta en forma de
muesca del adaptador en el tubo en
forma de codo; empuje ambas pie-
zas hasta que el adaptador en-
ganche en su sitio.
Tubo en
Punta en Forma Forma de
de Muesca
oo o\
4. Alinee la moldura saliente del adap-
tador con la ranura en la salida de
aire del soplador; empuje el adapto-
dor en su lugar.
Salida de Aire
Moldura Saliente
5. Aseg0rese de apretar el tube
girando la perilla hacia la derecha.
6. Proceda con MONTAJE DELTUBO
PARA TODO TIPO DE APARATOS.
10
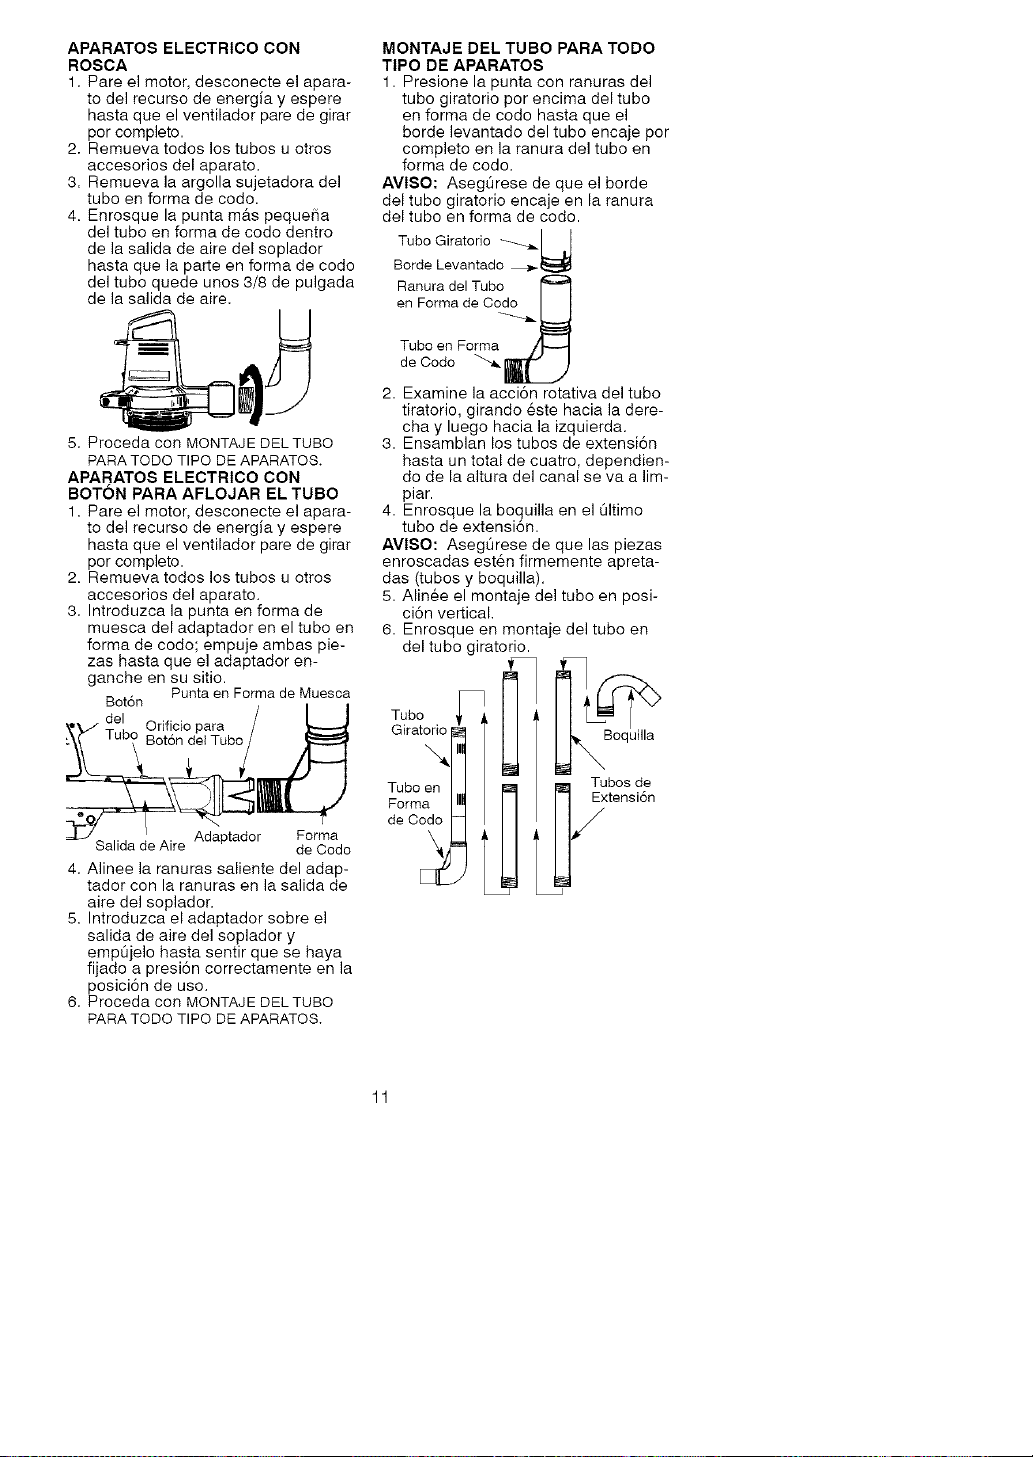
APARATOSELECTRICOCON
ROSCA
1.Pareel motor, deeconecte el apora-
to del recurso de energia y espere
hasta que el ventilador pare de girar
por completo.
2. Remueva todos los tubos u otros
accesorios del aparato.
3. Remueva la argolla sujetadora del
tubo en forma de codo.
4. Enrosque la punta m&s pequefla
del tubo en forma de codo dentro
de la salida de aire del soplador
hasta que la parte en forma de code
del tubo quede unos 3/8 de pulgada
de la salida de aire.
5. Proceda con MONTAJE DELTUBO
PARA TODO TIPO DE APARATOS.
APARATOS ELECTRICO CON
BOTON PARA AFLOJAR EL TUBO
1. Pare el motor, desconecte el apara-
to del recurso de energia y espere
hasta que el ventilador pare de girar
por completo.
2. Remueva todos los tubos u otros
accesorios del aparato.
3. Introduzca la punta en forma de
muesca del adaptador en el tubo en
forma de codo; empuje ambas pie-
zas hasta que el adaptador en-
ganche en su sitio.
Punta en Forma de Muesca
Boton
\,,\_/,, del Onflc}o'' ' para / L_
Adaptador
Salida de Aire de Codo
4. Alinee la ranuras saliente del adap-
tador con la ranuras en la salida de
aire del soplador.
5. Introduzca el adaptador sobre el
salida de aire del soplador y
emp0jelo hasta sentir que se haya
fijado a presi6n correctamente en la
posici6n de uso.
6. Proceda con MONTAJE DELTUBO
PARA TODO TIPO DE APARATOS.
MONTAJE DEL TUBO PARA TODO
TIPO DE APARATOS
1. Presione la punta con ranuras del
tubo giratorio por encima del tubo
en forma de codo hasta que el
borde levantado del tubo encaje per
completo en Io ranura del tubo en
forma de codo.
AVlSO: Aeeg0reee de que el borde
del tubo giratorio encaje en la ranura
del tubo en forma de codo.
Tubo Giratorio
Ranura del Tubo
en Forma de Codo
Tubo en Forma
de Codo
2. Examine la acci6n rotativa del tubo
tiratorio, girando 6ste hacia la dere-
cha y luego hacia la izquierda.
3. Ensamblan los tubos de extensi6n
hasta un total de cuatro, dependien-
do de la altura del canal se va a lim-
piar.
4. Enrosque la boquilla en el Qltimo
tube de extensi6n.
AVlSO: AsegOrese de que las piezas
enroscadas est6n firmemente apreta-
das (tubos y boquilla).
5. Alin6e el montaje del tubo en posi-
ci6n vertical.
6. Enrosque en montaje del tubo en
del tubo giratorio.
GIrat_l,r 9
Tubo en I,,J I_ Tubos de
Fe°r_a II1_o_ _2 xtensidn
11
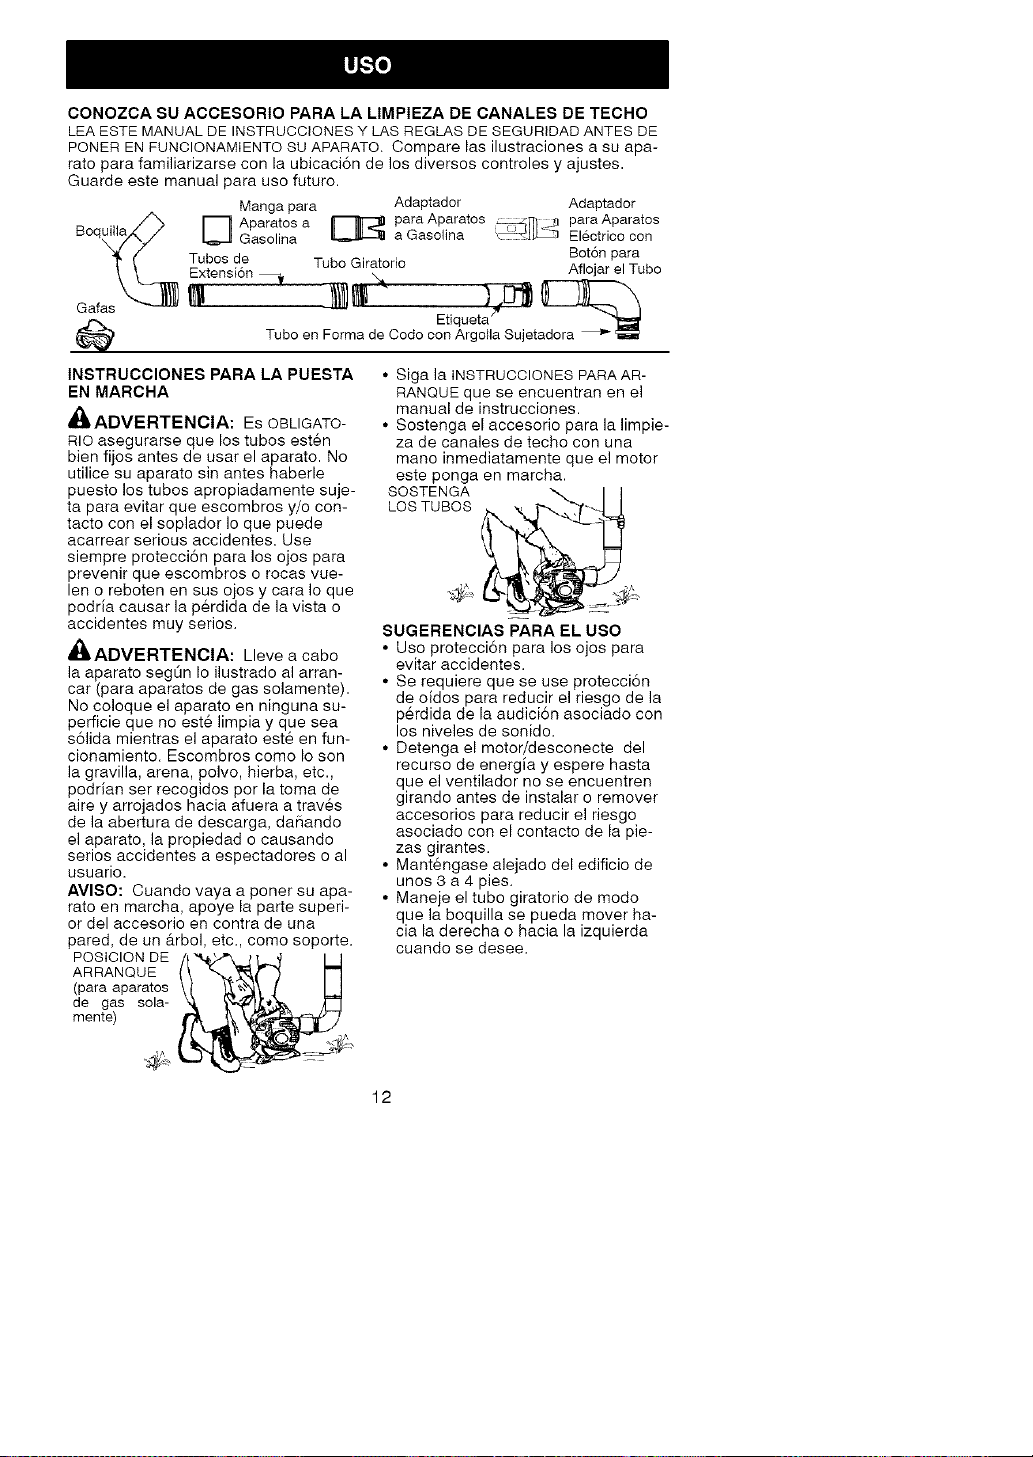
CONOZCA SU ACCESORIO PARA LA LIMPIEZA DE CANALES DE TECHO
LEA ESTE MANUAL DE INSTRUCCIONES Y LAS REGLAS DE SEGURIDAD ANTES DE
PONER EN FUNCIONAMIENTO SU APARATO. Compare las ilustraciones a su apa-
rato para familiarizarse con la ubicaci6n de los diversos controles y ajustes.
Guarde este manual para uso futuro.
Manga para Adaptador Adaptador
[_ Aparatos a _ paraAparatos ,
a Gasolina _J_
para Aparatos
Boq _ Gasolina -- Electrico con
Botch para
Tubos de Tubo Giratorio .......
G afas _l_Extensi°n _ _} I1_ N_, Etiquet }a_[_ __Tl°jar el .UDO
Tubo en Forma de Codo con Argolla Sujetadora _
INSTRUCCIONES PARA LA PUESTA
EN MARCHA
'_ADVERTENCIA: Es OBLIGATO-
RIO asegurarse que los tubos est6n
bien fijos antes de usar el aparato. No
utilice su aparato sin antes haberle
puesto los tubos apropiadamente suje-
ta para evitar que escombros y/o con-
tacto con el soplador Io que puede
acarrear serious accidentes. Use
siempre protecci6n para los ojos para
prevenir que escombros o rocas vue-
len o reboten en sus ojos y cara Io que
podria causar la p6rdida de la vista o
accidentes muy serios.
,_ADVERTENCIA: Lleve a cabo
la aparato segOn Io ilustrado al arran-
car (para aparatos de gas solamente).
No coloque el aparato en ninguna su-
perficie que no este limpia y que sea
s61ida mientras el aparato est6 en fun-
cionamiento. Escombros como Io son
la gravilla, arena, polvo, hierba, etc.,
podrian ser recogidos por la toma de
aire y arrojados hacia afuera a traves
de la abertura de descarga, daSando
el aparato, la propiedad o causando
serios accidentes a espectadores o al
usuario.
AVlSO: Cuando vaya a poner su apa-
rato en marcha, apoye la parte superi-
or del accesorio en contra de una
pared, de un &rbol, etc., como soporte.
POSICIQN DE _,_
ARRANQUE
(para aparatos
de gas sola-
mente)
• Siga la INSTRUCCIONES PARA AR-
RANQUE que se encuentran en el
manual de instrucciones.
• Sostenga el accesorio para la limpie-
za de canales de techo con una
mano inmediatamente que el motor
este ponga en marcha.
SOSTENGA
LOS TUBOS
SUGERENCIAS PARA EL USO
• Uso protecci6n para los ojos para
evitar accidentes.
• Se requiere que se use protecci6n
de oidos para reducir el riesgo de la
perdida de la audici6n asociado con
los niveles de sonido.
• Detenga el motor/desconecte del
recurso de energia y espere hasta
que el ventilador no se encuentren
girando antes de instalar o remover
accesorios para reducir el riesgo
asociado con el contacto de la pie-
zas girantes.
• Mant6ngase alejado del edificio de
unos 3 a 4 pies.
• Maneje el tubo giratorio de modo
que la boquilla se pueda mover ha-
cia la derecha o hacia la izquierda
cuando se desee.
12
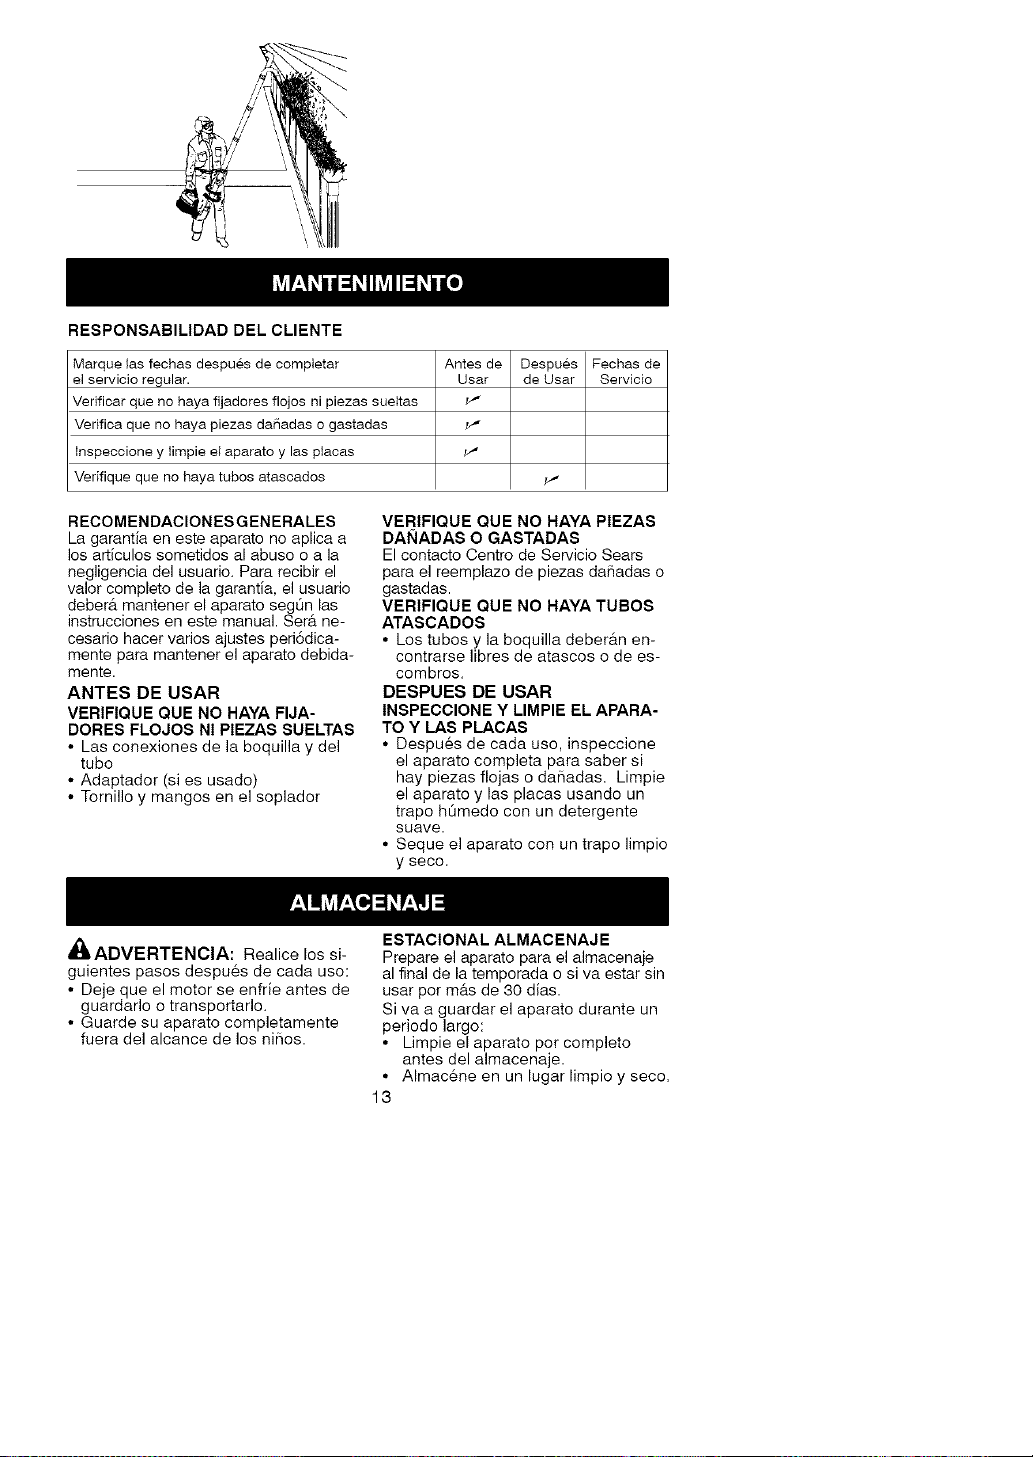
RESPONSABILIDAD DEL CLIENTE
Marque las fechas despues de compietar Antes de
el servicio regular. Usar
Verificar que no haya fijadores flojos ni piezas sueltas V'*
Verifica que no haya piezas dai_adas o gastadas _"
Inspeccione y limpie el aparato y las piacas _'
Verifique que no haya tubos atascados
Despues Fechas de
de Usar Servicio
RECOMENDACIONES GENERALES
La garantia en este aparato no aplica a
los articulos sometidos al abuso o a la
negligencia del usuario. Para recibir el
valor completo de la garantia, el usuario
deberb, mantener el aparato segQn las
instrucciones en este manual. Ser& ne-
cesario hacer varios ajustes peri6dica-
mente para mantener el aparato debida-
mente.
ANTES DE USAR
VERIFIQUE QUE NO HAYA FIJA-
DORES FLOJOS NI PIEZAS SUELTAS
• Las conexiones de la boquilla y del
tubo
• Adaptador (si es usado)
• Tornillo y mangos en el soplador
VERIFIQUE QUE NO HAYA PIEZAS
DAI_IADAS O GASTADAS
El contacto Centro de Servicio Sears
para el reemplazo de piezas daSadas o
gastadas.
VERIFIQUE QUE NO HAYA TUBOS
ATASCADOS
• Los tubos y la boquilla deber&n en-
contrarse libres de atascos o de es-
combros.
DESPUES DE USAR
INSPECCIONE Y LIMPIE EL APARA-
TO Y LAS PLACAS
• Despu6s de cada uso, inspeccione
el aparato completa para saber si
hay piezas flojas o daSadas. Limpie
el aparato y las placas usando un
trapo h0medo con un detergente
suave.
• Seque el aparato con un trapo limpio
y seco.
_ADVERTENCIA: Realice los si-
guientes pasos despu6s de cada uso:
• Deje que el motor se enfrie antes de
guardarlo o transportarlo.
• Guarde su aparato completamente
fuera del alcance de los niSos.
ESTACIONAL ALMACENAJE
Prepare el aparato para el almacenaje
al final de la temporada o siva estar sin
usar por m&s de 30 dias.
Si va a guardar el aparato durante un
periodo largo:
• Limpie el aparato pot completo
antes del almacenaje.
• Almac_ne en un lugar limpio y seco.
13

