Specifications
Indexed Terms: Side-by-Side Refrigerator, Side By Side Refrigerator
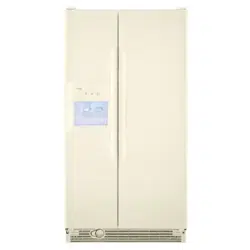
Kenmore 36358067891 Questions and Answers

Table of Contents
At first, set the freezer and fresh food controls at the center of the "INITIAL SETTING" ranger
Two controls let you regulate the temperature in the fresh food and freezer compartments.. At first, set the Fresh Food and Freezer controls at the center of the "iNITIAL SETTING" range.. Allow 24 hours for the temperature to stabilize, whether you are setting the controls for the first time or adjusting them later. Then, if you want colder or warmer temperatures in either compartment, adjust the controls one setting at a time.
NOTE: Turning the Fresh Food control to OFF turns off cooling in both compartments--fresh food and freezer-- but does not shut off power to the refrigerator.
HOW TO TEST TEMPERATURES
To test the fresh food compartment place a bulb-type thermometer into a jar of water on the top shelf° Check it one day later.
To test the freezer compartment put a bulbtype thermometer between two or three frozen packages in the center of the freezer. Check it one day later
Fresh Food Storage Tips
To store unfrozen meats, fish and poultry;
• Always remove store wrappings.
• Rewrap in foil, plastic wrap, wax paper or plastic storage bags and refrigerate immediateiy
• Store raw meat, poultry and seafood on the bottom shelf of the refrigerator so juices won't drip onto other foods, To store cheese, wrap well with wax paper or aluminum foil, or put in a plastic storage bag,.
• Carefully wrap to expel air and help prevent mold.
• Pre-packaged cheese can be stored in its own wrapping.
To store vegetables, use the vegetable drawers-- they've been designed to preserve the natural moisture and freshness of produce.
• Covering vegetables with a moist towel helps maintain crispness.
• As a further aid to freshness, pre-packaged vegetables can be stored in their original wrapping.
• Do not wash prior to storage
TIPS ON FREEZING FOODS .
To store ice cream--Fine-quality ice cream, with high cream content, will normally require slightly lower temperatures than more "airy" already-packaged brands with low cream content, .
To freeze meat, fish and poultry, wrap welt in freezer-weight foil (or other heavy-duty wrapping material) forming it carefully to the shape of the contents. This expels air Fold and crimp ends of the package to provide a good, lasting seat,
Do not refreeze meat that has completely thawed; meat, whether raw or cooked, can be frozen successfully only once.
SUGGESTED STORAGE TIMES
Meats, fish and poultry purchased from the store vary in quality and age; consequently, safe storage times in your refrigerator will vary, For meat and poultry information, call the UoS. Dept, of Agriculture at 800-535-455
New techniques are constantly being developed Consult the College or County Extension Service or your local Utility Company for the latest information on freezing and storing foods
The Kenmore Filtration System _9905 cartridge is located in the upper right-hand corner of the fresh food compartment, right below the temperature controls
The filter cartridge should be replaced every six months or earlier if the flow of water to the water dispenser or icemaker decreases.
INSTALLING THE FILTER CARTRIDGE
1. If you are replacing the cartridge, first remove the old one by slowly turning it to the leA, DO NOT pull down on the cartridge, A small amount of water may drip down.
2. Remove and discard the plastic cap from the new cartridge.
3. Fill the replacement cartridge with water from the tap°
4. Apply the month and year sticker to the cartridge to remind you to replace the filter in six months
5. Place the top of the cartridge up inside the cartridge holder,, DO NOT push it up into the holder.
6. Slowly turn it to the dght until the filter cartridge stops. DO NOT OVERTIGHTEN. As you turn the cartridge, it wil! automatically raise itself into position.
7. Run water from the dispenser for 2 minutes (about one gallon) to clear the system and prevent sputtering.
NOTE: A newly-installed water filter cartridge may cause water to spurt from the dispenser
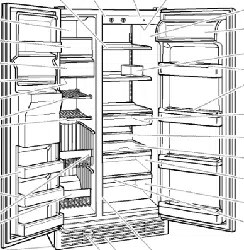
ADJUSTABLE SHELVES
You can adjust the shelves in both the fresh food and freezer compartments. Wire and glass shelves adjust in the same way. Handle glass shelves carefully. Bumping tempered glass may cause it to shatter. Do not clean glass shelves and glass storage drawer cover with warm or hot water when they are cold because the extreme temperature difference may cause them to break.
REMOVABLE DOOR BINS (on some models)
Door bins can be relocated on the doors and removed for cleaning
DIVIDERS
Dividers help keep small items in place, To move the divider, place your index finger and middle finger on either side of it near the front and move it back and forth.
MULTI-POSITION FREEZER SHELVES (on some models)
Shelves in the freezer are adjustable.
To move the shelves:
When replacing the shelves on models with locking tabs, make sure the shelf is securely locked into position
REMOVABLE WINE RACK (on some models)
The wine rack holds a bottle on its side and will fit on any shelf. To move it, pull it straight out, position its lip over either edge of the shelf, and push it all the way in
HANDI-SHELF SWING DOWN SHELF (on some models)
This swing-down shelf provides extra shelf space when needed
When you want to use it, pull the shelf forward as far as it goes, then lower it Be careful not to force it down before it is pulled out all the way,
To raise it back into position, pull the shelf forward, push it up and slide it back fully until it stops.
REMOVABLE FREEZER BASKET SHELVES (on some models)
Shelves in the freezer will stop before coming all the way out to help prevent contents from spilling onto the floor. They can be removed easily by lifting up slightiy and pulling past the "stop" location..
HANDY DISHES (on some models)
Cooking-serving-storage dishes with durable seethrough lids fit into a rack that hangs on the fresh food or freezer compartment door,. Dishes can be removed from and returned to the rack as needed, and the rack can be removed and relocated on either door in the same manner as the door bins. Dishes and lids are safe for use in microwave ovens, refrigerators, freezers, and are dishwasher-safe The dishes should not be used for cooking high-fat foods such as bacon and high-sugar foods such as candy and syrup. The high temperatures of the fat and sugar can cause bubbles to form on the inside of the dish
CAUTION: Dishes and lids are not designed for use in the regular oven, on the range-top or in the broiler. Such use can be hazardous.
DELl PAN (on some models)
The Dell Pan can be moved within the refrigerator, The sealed drawer keeps high humidity for storage of lunch meats, cheese, hors d'oeuvres, spreads and snacks.
TEMPERATURE CONTROLLED MEATS DRAWER (on some models)
The Temperature Controlled Meats Drawer has its own cold air duct to allow a stream of cold air from the freezer compartment to flow around the drawer The variable temperature control regulates the air flow from the freezer compartment. Set control lever down to the coldest setting to store fresh meats, tf lever is left in meat position for a long period of time, some frost may form on the inside of the drawer. Set control lever up to convert the drawer to normal refrigerator temperature and provide extra vegetable storage space. Cold air duct is turned off. Variable settings between these extremes can be selected..
STORAGE BIN (onsome models)
This removable tilt-out bin can be located on the fresh food or freezer compartment door.
To open, push the latch up and pull the bin handle forward.
To avoid damaging the refrigerator, make sure the bin is closed and latched before closing the refrigerator door°
To remove the bin, lift it up and out of the bin housing.
To remove the Storage Bin unit, lift the bin housing up and out of the slots on the door,
To replace it, Iower the hooks on the housing into the slots on the door: You do not have to remove the bin from the housing when moving the Storage Bin unit.
ADJUSTABLE HUMIDITY DRAWERS on some modets)
These drawers have individual, adjustable humidity controls that let you control the amount of cold air entering the drawers
Slide the controls all the way to HIGH setting and the drawer provides higher humidity levels recommended for most leafy vegetables,
Slide the controls all the way to LOW setting and the drawer provides lower humidity levels recommended for most fruits.
TO REMOVE STORAGE DRAWERS
Drawers wilt stop before coming all the way out of the refrigerator to help prevent contents from spilling onto the floor.
Drawers can easily be removed by tilting up slightly and pulling past stop" location.
On some models you may need to remove the door bins from the fresh food door before removing the drawers. f the door prevents you from taking out the drawers, the refrigerator wil! need to be rolled forward until the door opens enough to slide the drawers out. In some cases when you roll the refrigerator out you will need to move the refrigerator to the left as you roll it out.