Use Et Care Guide
French Door Bottom Freezer/Refrigerator
Guia de Uso y Cuidado
Refrigerador con congelador inferior de puerta doble
Guide d'utilisation et d'entretien
R_frig_rateur 5 portes frangaises/Cong_lateur en has
Electrolux ICON ®
iiiliii!i!!!iiiiiiiili!ilif!!ililiil!iiiiiliiiilliiiiiiliiliii!ilili!iiii!iiiiiii!iiii!ililliiiiiiiiiili!!iiiii!iiiliilili!!iiiii!ililiilili!!iiiii!ililiiliii!!iiiii!iliiiiiili!!iiili!iiiliiiili!!iiiii!iliiiilili!!iiiii!iliiiiiiii!!iiiii!iliiiiiiii!!iliii!iiiiiiiili!!iiili!iiiliilili!!iiiii!iliiiiiiii!!iilii!iliiiiiili!!iiili!iiiliiiili!!iiili!iiiliilili!!iilii!iiiiiiiiii!!iiiii!iliiiiiili!!iiili!iiiliiiili!!iiiii!iliiiilili!!iiiii!iliiiiiiii!!iiiii!iliiiiiiii!!iliii!iiiiiiiili!!iiili!iiiliilili!!iiiii!iliiiiiiii!!iilii!iliiiiiili!!iiili!iiiliiiili!!iiili!iiiliilili!!iilii!iiiiiiiiii!!iiiii!iliiiiiili!!iiili!iiiliiiili!!iiiii!iliiiilili!!iiiii!iliiiiiiii!!iiiii!iliiiiiiii!!iliii!iiiiiiiili!!iiili!iiiliilili!!iiiii!iliiiiiiii!!iilii!iliiiiiili!!iiili!iiiliiiili!!iiili!iiiliilili!!iilii!iiiiiiiiii!!iiiii!iliiiiiili!!iiili!iiili!iiiiliiii_!i!_!i!_!i_i_i!ilii!!_!illi!iiiii!iiili!ili!!!ili!iili_!ii_!iii_!_illi!i!ilil_!i_i!i!ili!i!_!iii!i!iif!i!iil!!!iii!i!ii!!i!iiii!!i!i!i!i!i!i!ili!i!ii!iiiii!i!iii!i!ii!!i!ii!i!!iii!i!iii!i!ii!!i!ii!i!!iil!i!iii!i!ii!!i!ii!i!iiiiiiilliiliii!!i!ii!i!!iil!i!iii!i!ii!!i!ii!i!!iilii!iiiii!iii!i!ii!i!!iil!i!iiiii!iii!i!ii!i!!iil!i!iiiii!iii!i!ii!i!!iil!i!iiiii!iii!i!ii!i!!iil!i!iiiii!iii!i!ii!i!!iil!i!iiiii!iii!i!ii!i!!iil!i!iiiii!iii!i!ii!i!!iil!i!iiiii!iii!i!ii!i!!iil!i!iiiii!iii!i!ii!i!!iil!i!iiiii!iii!i!ii!i!!iil!i!iiiii!iii!i!ii!i!!iil!i!iiiii!iii!i!ii!i!!iil!i!iiiii!iii!i!ii!i!!iil!i!iiiii!iii!i!ii!i!!iil!i!iiiii!iii!i!ii!i!!iil!i!iiiii!iii!i!ii!i!!iil!i!iiiii!iii!i!ii!i!!iil!i!iiiii!iii!i!ii!i!!iil!i!iiiii!iii!i!ii!i!!iil!i!iiiii!iii!i!ii!i!!iil!i!iiiii!iii!i!ii!i!!iil!i!iiiii!iii!i!ii!i!!iil!i!iiiii!iii!i!ii!i!!iil!i!iiiii!iii!i!ii!i!!iil!i!iiiii!iii!i!ii!i!!iil!i!iiiii!iii!i!ii!i!!iil!i!iiiii!iii!i!ii!i!!iil!i!iiiil!ii!!i!i!!ill
_i:_i_ii_i_!_!_i@!_!:ii!_!:ii!_!_!ii_!_ii_i!_!!_!i_ii_i!ii_iii@_i_i_i_iii_ii
Finding information
Please read and save this guide Tabmeof contents
Thank you forchoos ng E ectro ux our new prem um Fin in Inf rm i n 2
(J g 0 at 0 ..............................................
brand in home appliances.This Use & Care Guide is
part of our comm tment to customer sat sfact on and f
Sa ety ............................................................... 3
product quality throughout the service life of your new
app ance
• FeatureOverview................................................. 5
;;; Keep a record for quick reference .
mslaliaflon .........................................................
Co..ecting the Water Supply.................................. 12
__ Controls ........................................................... 13
Aut0maticlce&WaterlVlaker/Dispenser.................... 15
Electroluxserial number
StorageFeatures ................................................ 16
..........................
Changingthe Water andAir Filters........................... 22
i!_!_i!i_ii_!i!_!_i!i_ii_!i!_!_i!i_ii_!i!_!_i!i_ii_!i!_!_i!i_ii_!i!_!_i!i_ii_!i!_!_i!i_ii_!i!_!_i@ii_i
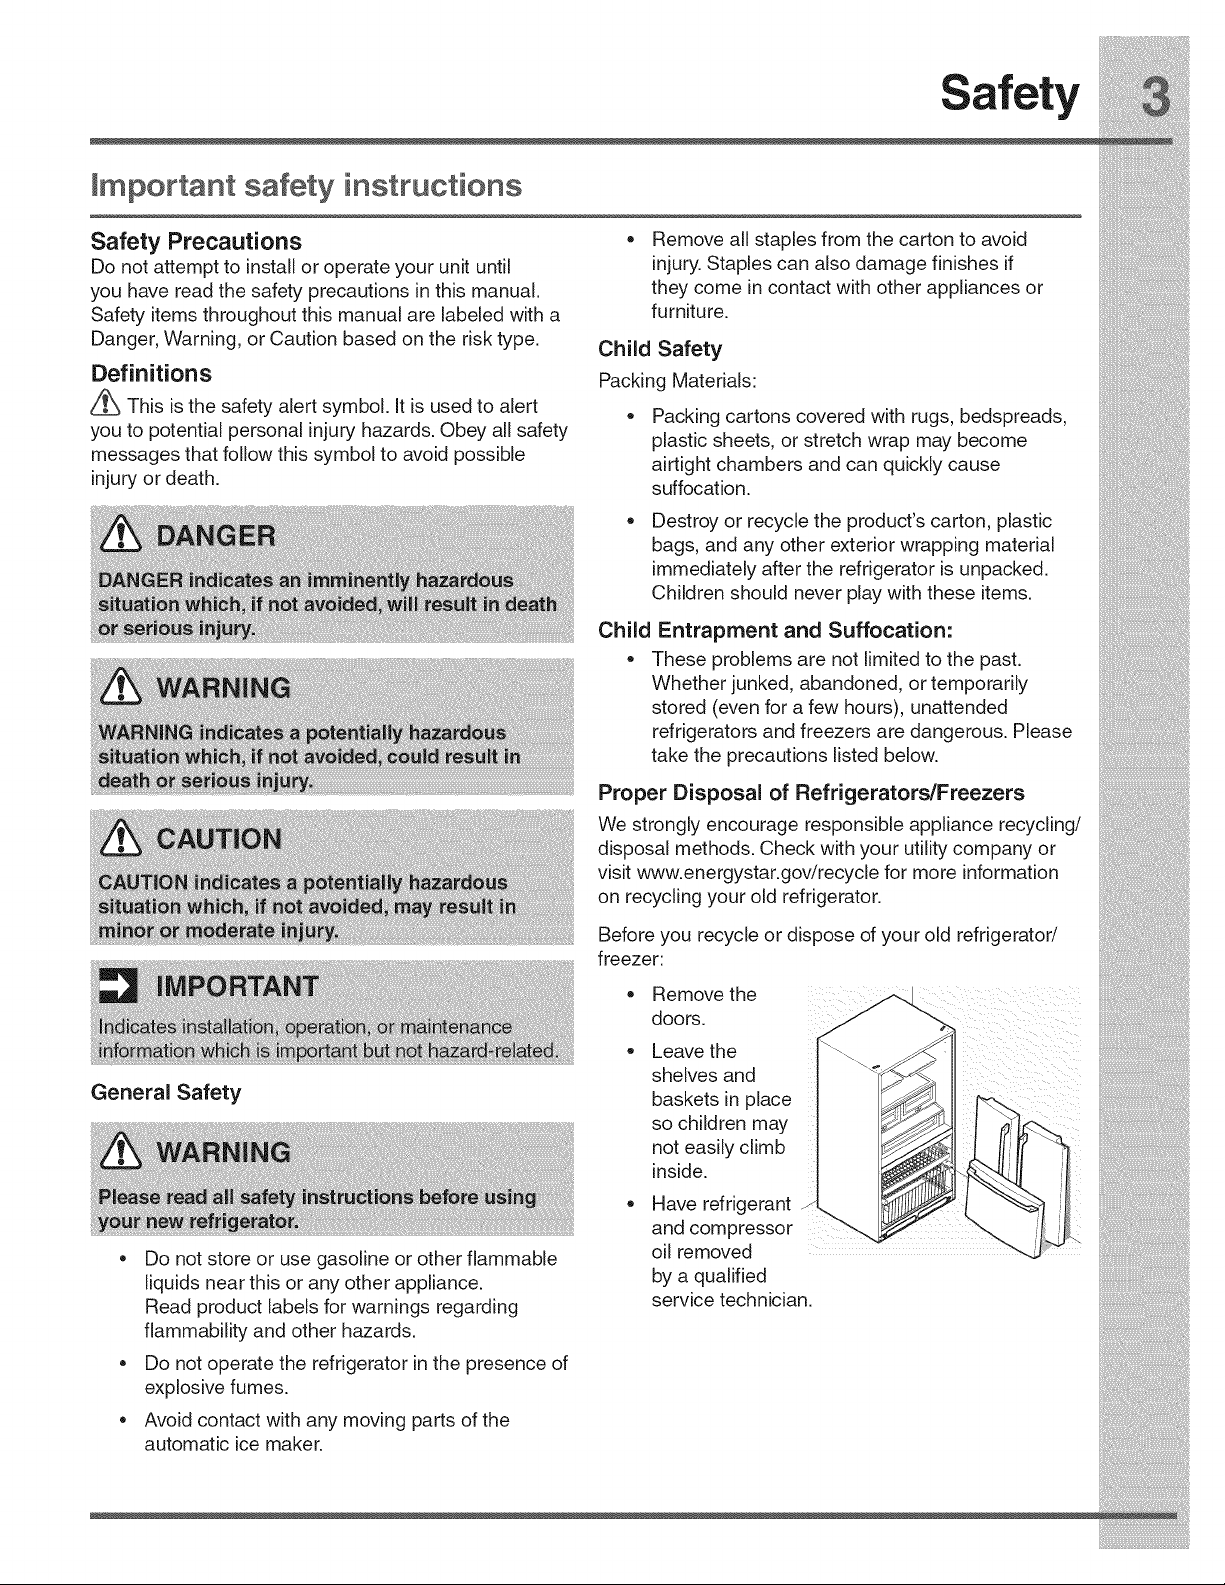
take the precautions listed below.
Proper Disposal of Refrigerators/Freezers
i_i!_!_i!i_ii_!i!_!_i!i_ii_!i!_!_i!i_ii_!i!_!_i!i_ii_!i!_!_i!i_ii_!i!_!_i!i_ii_!i!_!_i!i_ii_!i!_!_i!i_ii_!i!_!_i!i_ii_!i!_!_iii_
Safety
Emectrical information
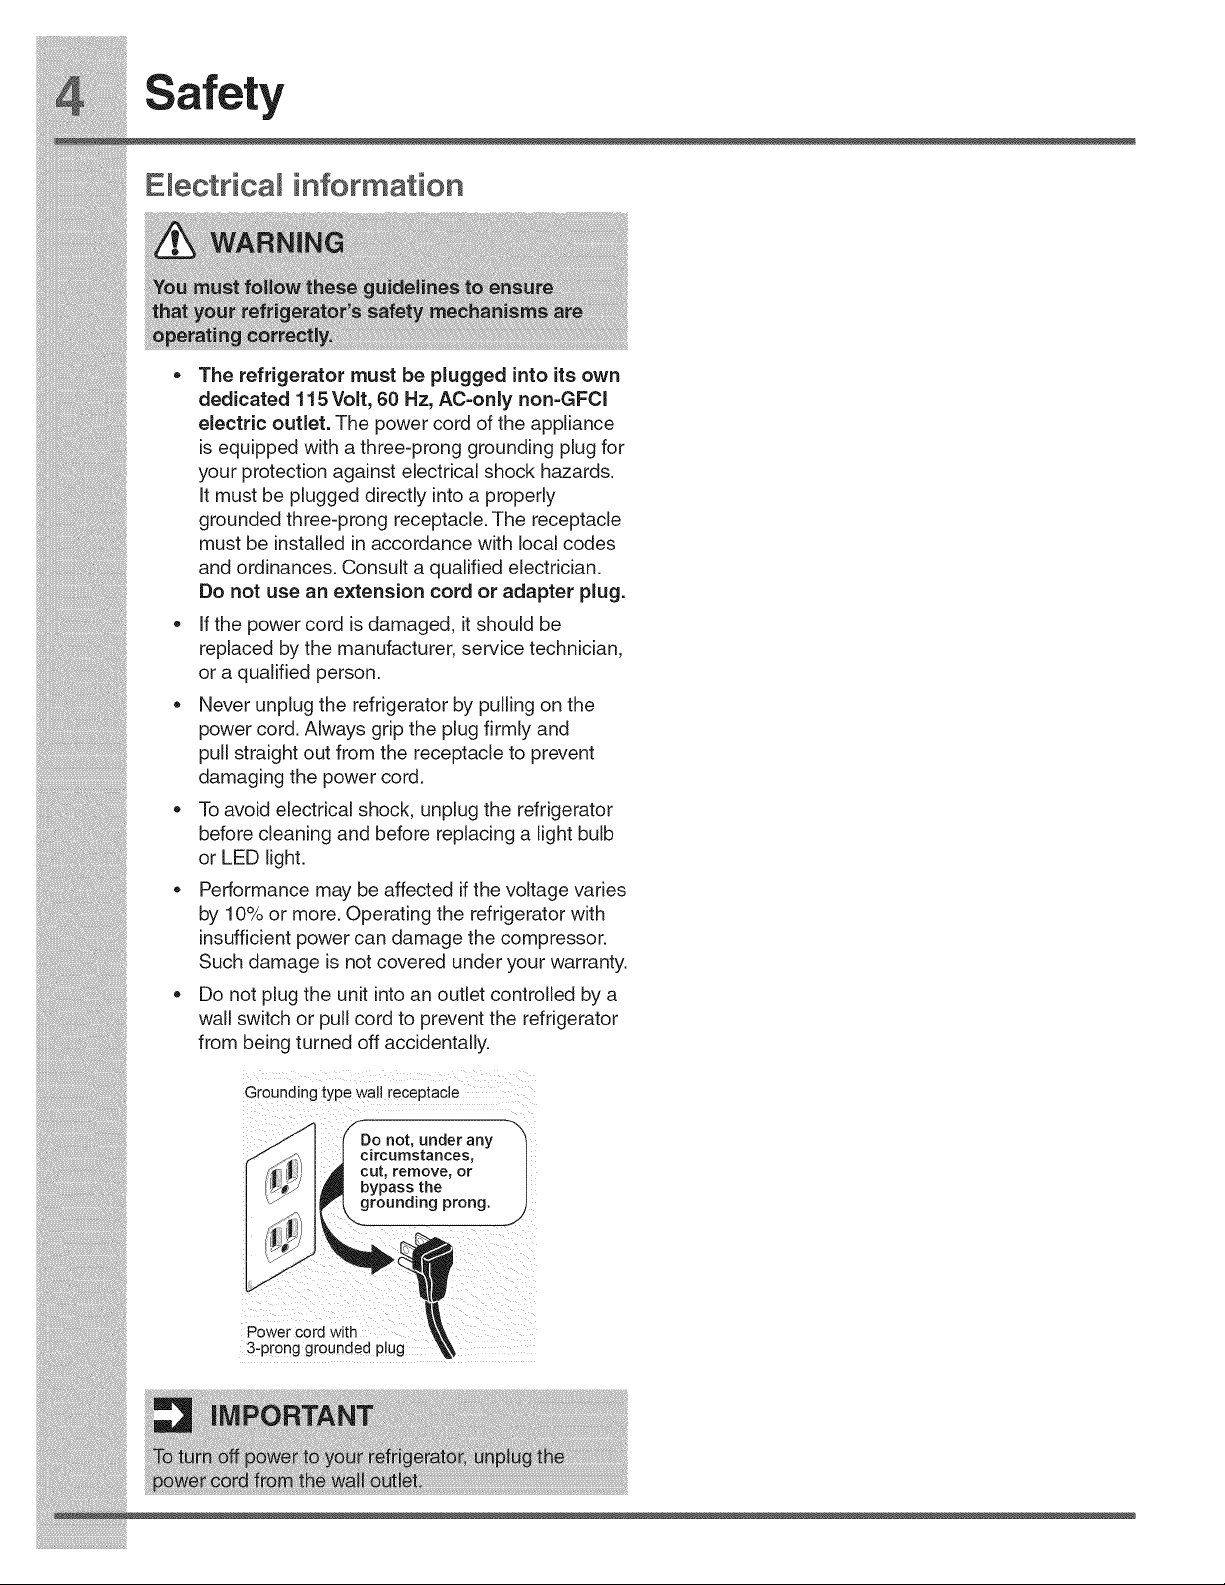
* The refrigerator must be plugged into its own
dedicated 115 Volt, 60 Hz, AC-only non-GFCl
electric outlet. The power cord of the appliance
is equipped with a three-prong grounding plug for
your protection against electrical shock hazards.
It must be plugged directly into a properly
grounded three-prong receptacle. The receptacle
must be installed in accordance with local codes
and ordinances. Consult a qualified electrician.
Do not use an extension cord or adapter plug.
, If the power cord is damaged, it should be
replaced by the manufacturer, service technician,
or a qualified person,
= Never unplug the refrigerator by pulling on the
power cord, Always grip the plug firmly and
pull straight out from the receptacle to prevent
damaging the power cord,
. Toavoide ectr calshock,unplugtherefrigerator
beforecleaningand beforereplacinga lightbulb
, or LED light.
Performance may be affected if the voltage varies
by 10% or more. Operating the refrigerator with
insufficientpower can damage the compressor.
Such damage is not covered under your warranty.
, Do not plug the unit intoan outlet controlled by a
wall switch or pull cord to prevent the refrigerator
from being turned off accidentally.
: G roun dingtyp e Wall iece ptacid
Power Cord With _I_
3-prong grounded plug
:
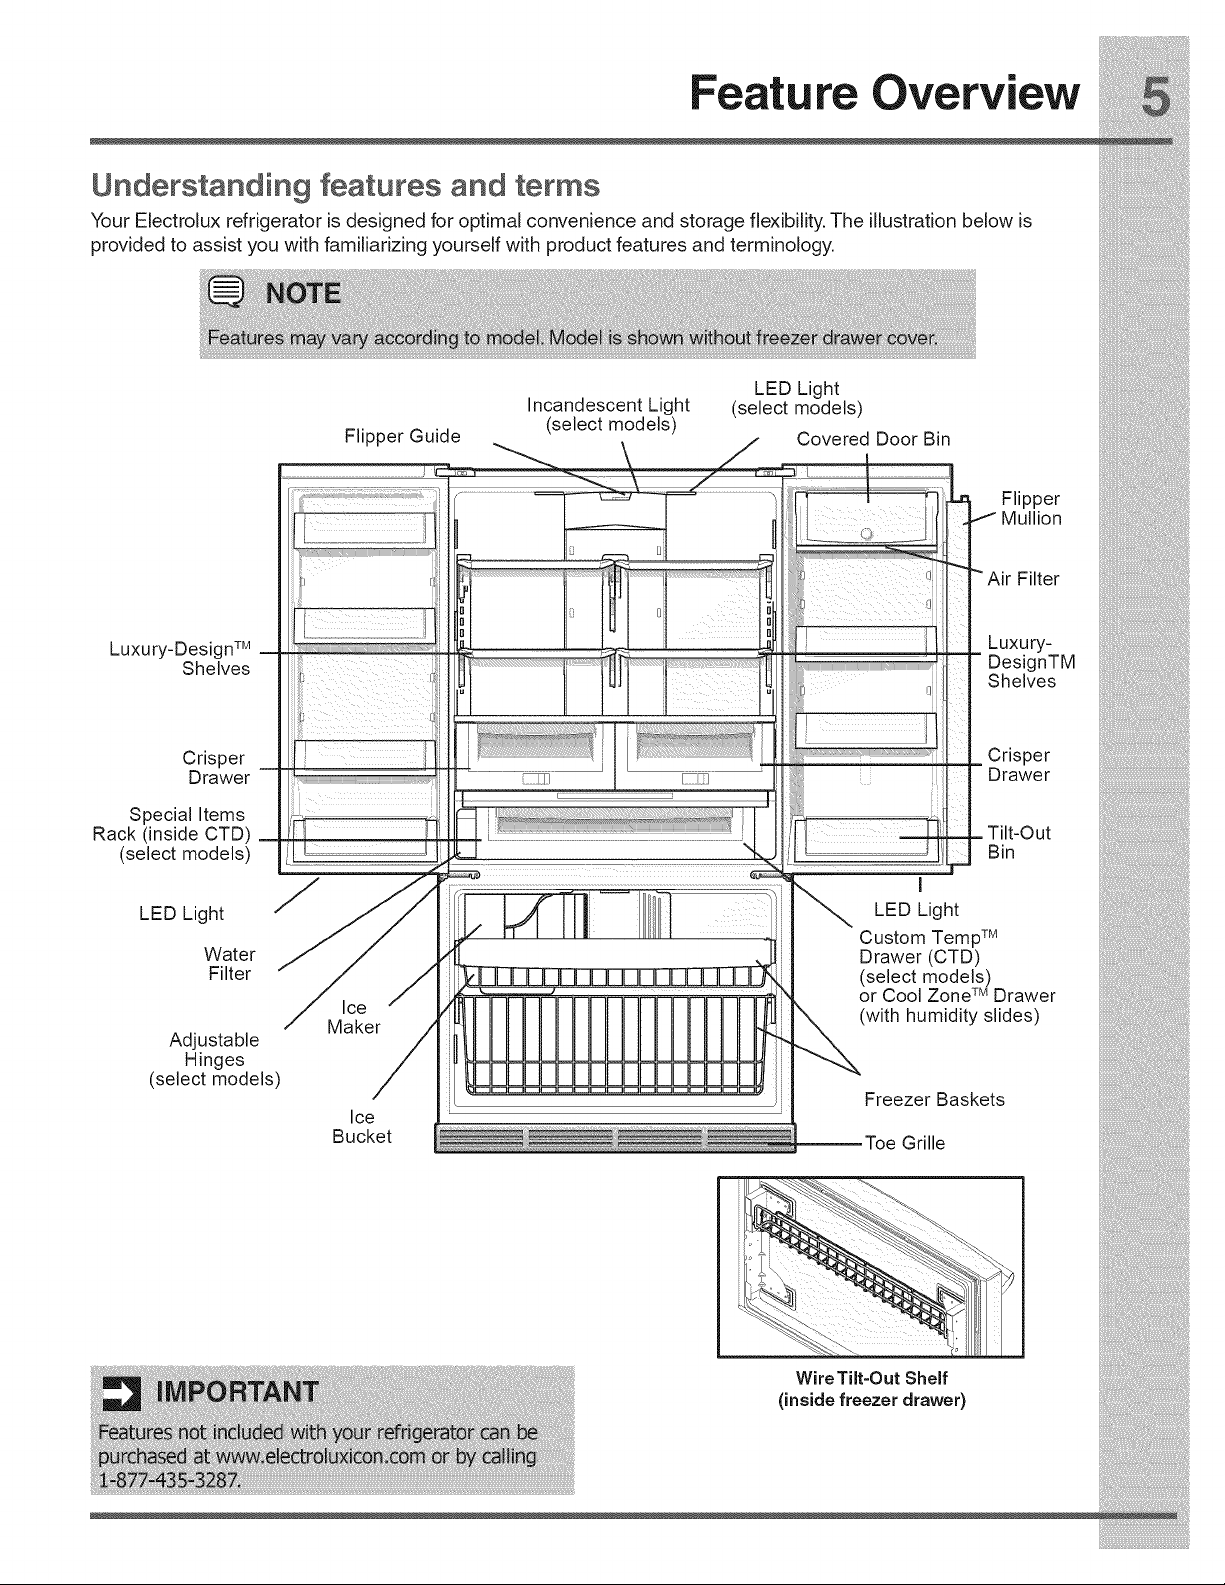
Crisper
Drawer
Special Items
Rack (inside CTD)
(select models)
LED Light
Water
Filter
Adjustable
Hinges
(select models)
Maker
Ice
Bucket
Drawer
Tilt-Out
Bin
I
LED Light
Custom Temp TM
Drawer (CTD)
(select models)
or Cool Zone TM Drawer
(with humidity slides)
Freezer Baskets
Grille
WireTilt-Out Shelf
(inside freezer drawer)
i_i!_!_i!i_ii_!i!_!_i!i_ii_!i!_!_i!i_ii_!i!_!_i!i_ii_!i!_!_i!i_ii_!i!_!_i!i_ii_!i!_!_i!i_ii_!i!_!_i!i_ii_!i!_!_i!i_ii_!i!_!_iii_:_
i!_!_i!i_ii_!i!_!_i!i_ii_!i!_!_i!i_ii_!i!_!_i!i_ii_!i!_!_i!i_ii_!i!_!_i!i_ii_!i!_!_i!i_ii_!i!_!_i!i_ii_!i#i!_!_ii_i
Installation
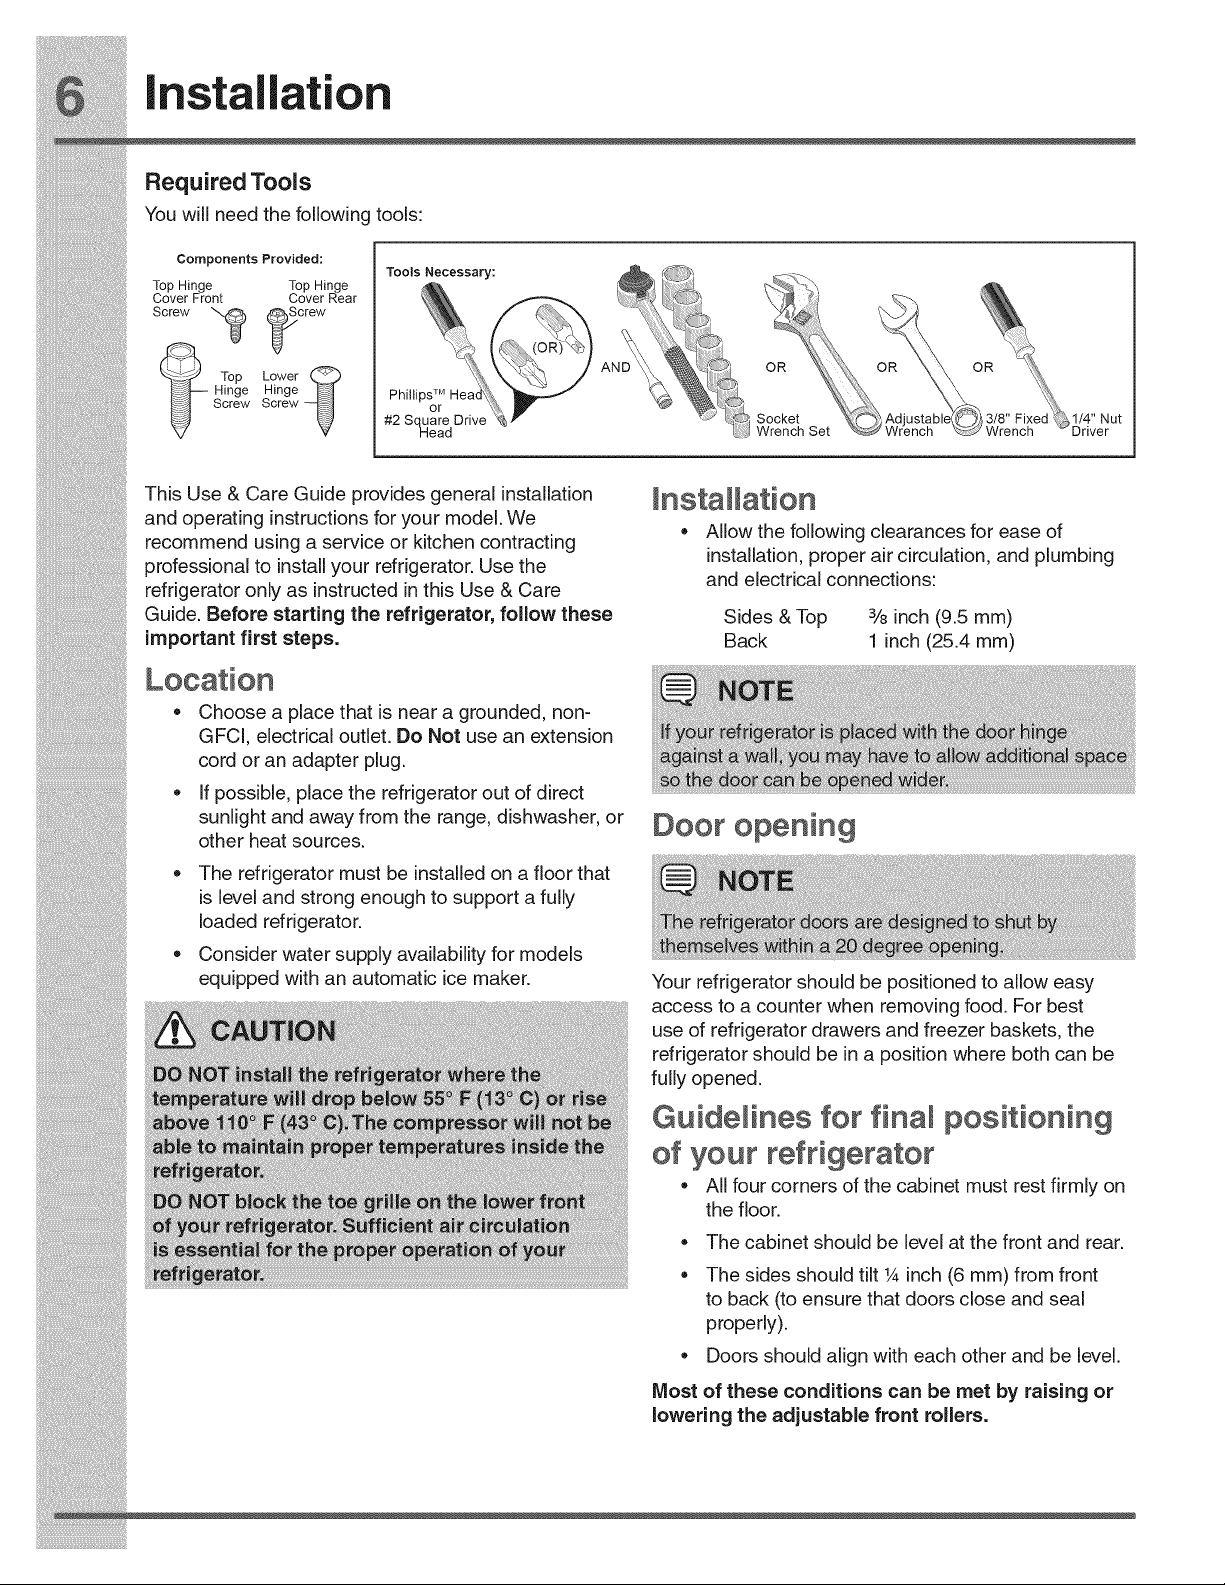
Required Tools
You wiii need the following tools:
Components Provided:
Top Hinge Top Hinge
Cover Front Cover Rear
Screw _ _crew
Hinge Hinge
Screw Screw
Tools Necessary:
OR
This Use & Care Guide provides general installation
and operating instructionsfor your model. We
recommend using a service or kitchen contracting
professional to installyour refrigerator. Use the
refrigerator only as instructed inthis Use & Care
Guide. Before starting the refrigerator, follow these
important first steps.
Allow the following clearances for ease of
installation,proper air circulation, and plumbing
and electrical connections:
Sides & Top 3/8inch (9.5 mm)
Back 1 inch (25.4 mm)
• Choose a place that is near a grounded, non-
GFCI, electrical outlet. Do Not use an extension
cord or an adapter plug.
i!_!_i!i_ii_!i!_!_i!i_ii_!i!_!_i!i_ii_!i!_!_i!i_ii_!i!_!_i!i_ii_!i!_!_i!i_ii_!i!_!_i!i_ii_!i!_!_i!i_ii_!i#i!_!_ii_i
i!_!_i!i_ii_!i!_!_i!i_ii_!i!_!_i!i_ii_!i!_!_i!i_ii_!i!_!_i!i_ii_!i!_!_i!i_ii_!i!_!_i!i_ii_!i!_!_i!i_ii_!i!_!_i!i_ii_!i!_!_ii_i
Installation
To adjust the door stop:
Door stop is adjustable between 85 to 145 degrees.
Door
1
2
Adjustable Door Stop
Open door to provide access to screw.
Loosen screw.
5 Re-tighten screw.
Rotate
Re-tighten
Screw
Re=tightenScrew
6 Ensure door stops in desired location before
resuming normal use.
To level the doors using the adjustable lower hinge
(select models):
1 Remove all food items from door bins on door
being adjusted.
2 Open doors to 90 degrees.
i!_!_i!i_ii_!i!_!_i!i_ii_!i!_!_i!i_ii_!i!_!_i!i_ii_!i!_!_i!i_ii_!i!_!_i!i_ii_!i!_!_i!i_ii_!i!_!_i!i_ii_!i!_!_i!i_ii_!i!_!_ii_i
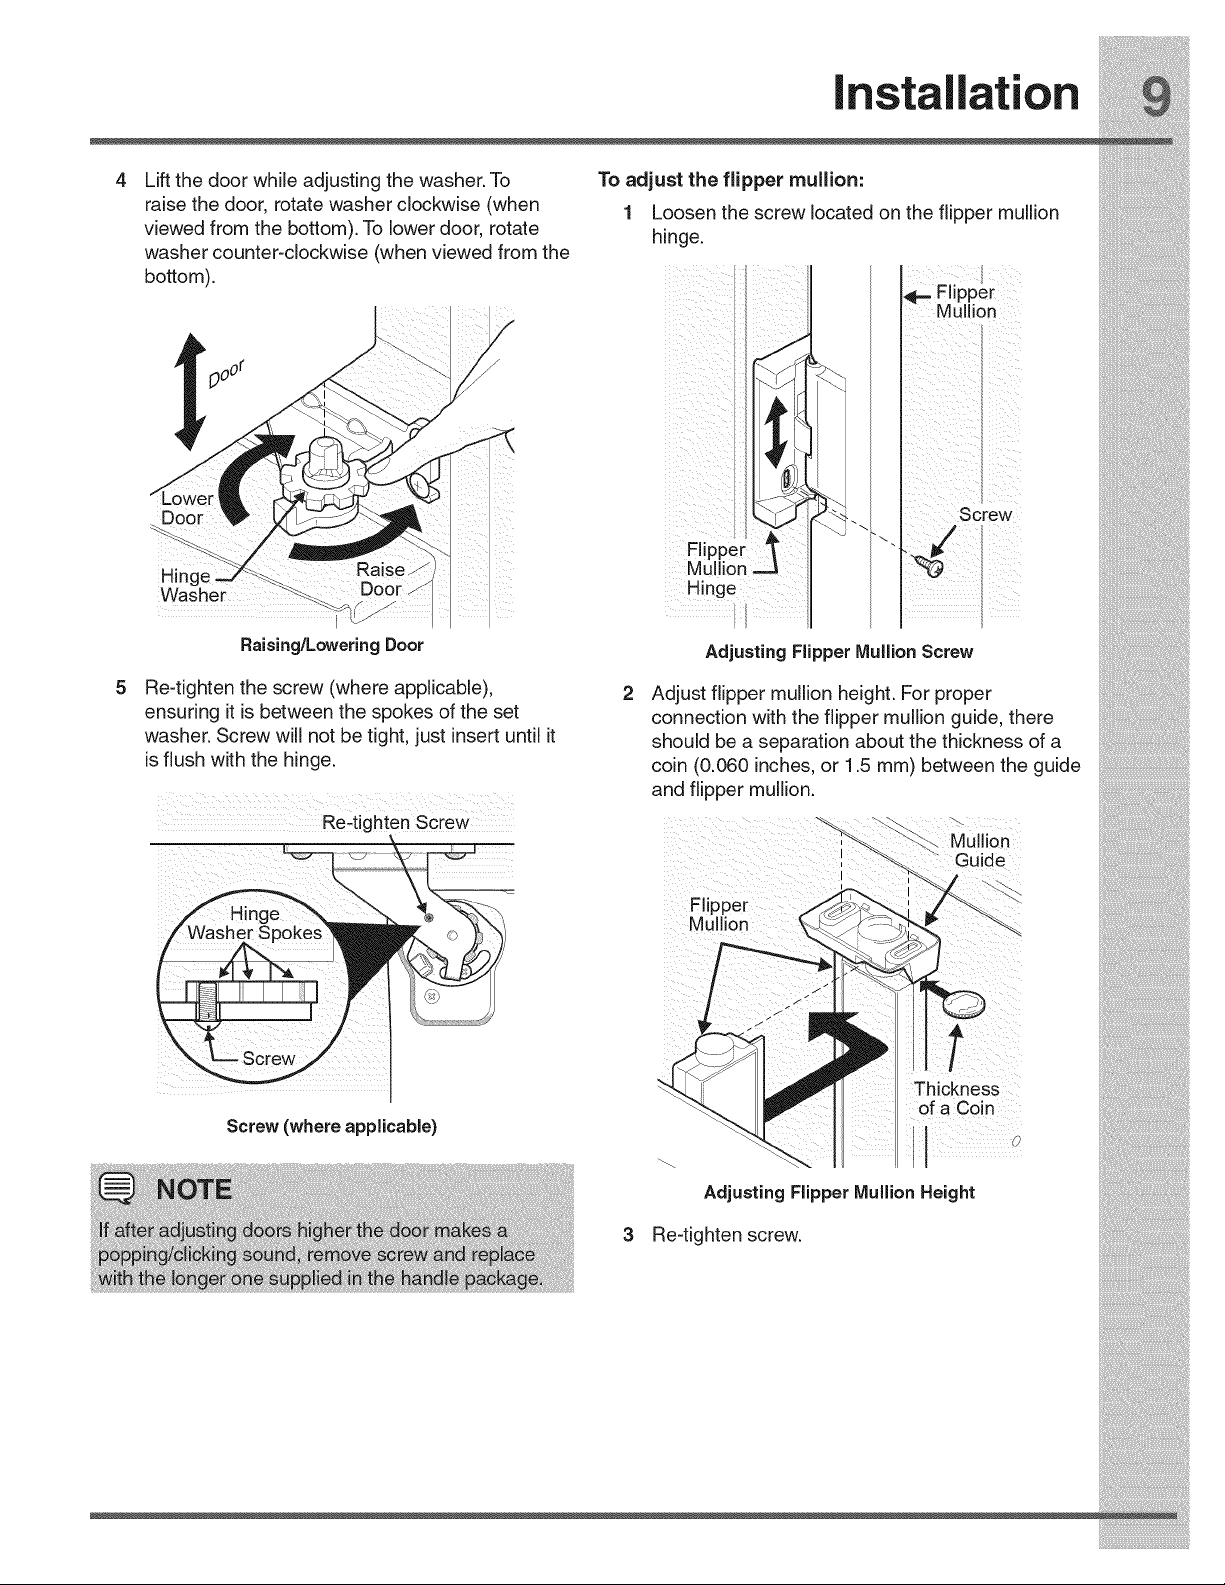
isflushwiththehinge.
.............
andflippermullion.
i_i!_!_i!i_ii_!i!_!_i!i_ii_!i!_!_i!i_ii_!i!_!_i!i_ii_!i!_!_i!i_ii_!i!_!_i!i_ii_!i!_!_i!i_ii_!i!_!_i!i_ii_!i!_!_i!i_ii_!i!_!_iii_
!iiiii!i!!!_iiiiiiii_iii!i!!i!i!;ii!i_i!ii!i!i_iiii_iiii_!_;_ii_i_i_i_i_i;!_i_!_!_!_;_i!_i!_i_!_!_i_i_!!i!_!_!i_!_!_!_!i_!_i_i_
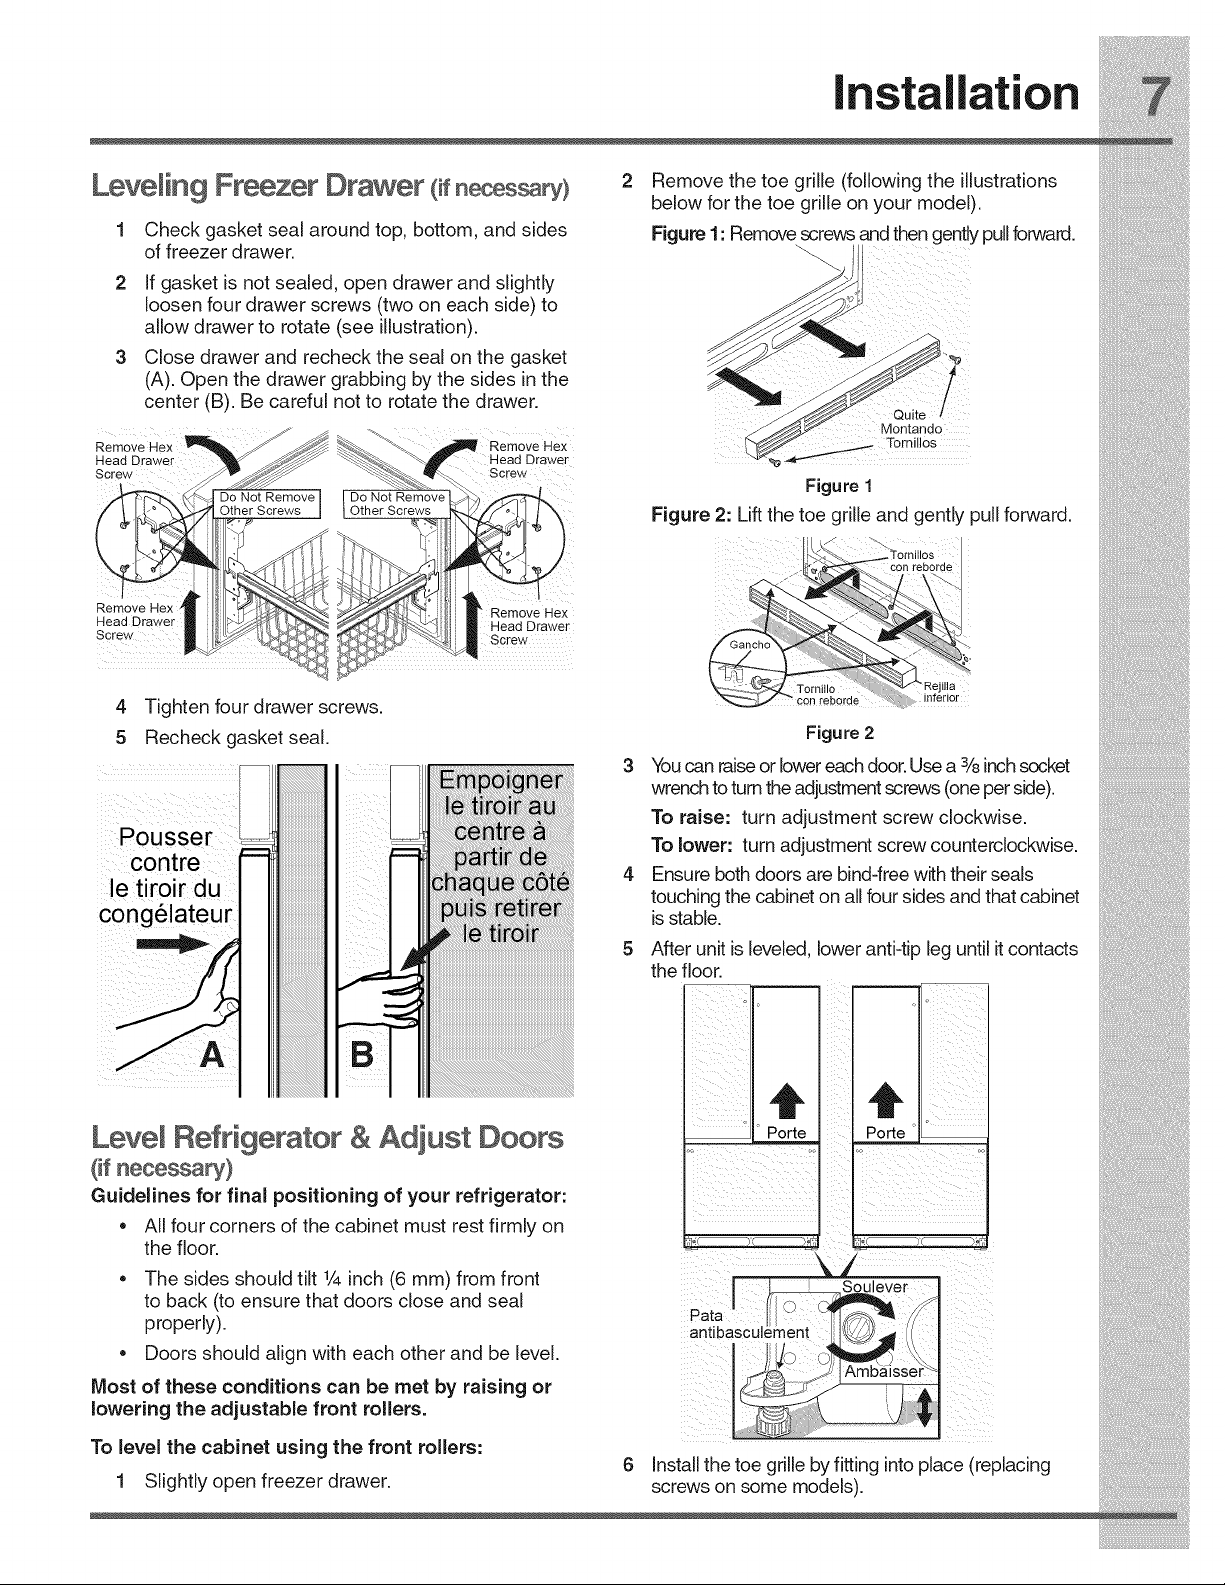
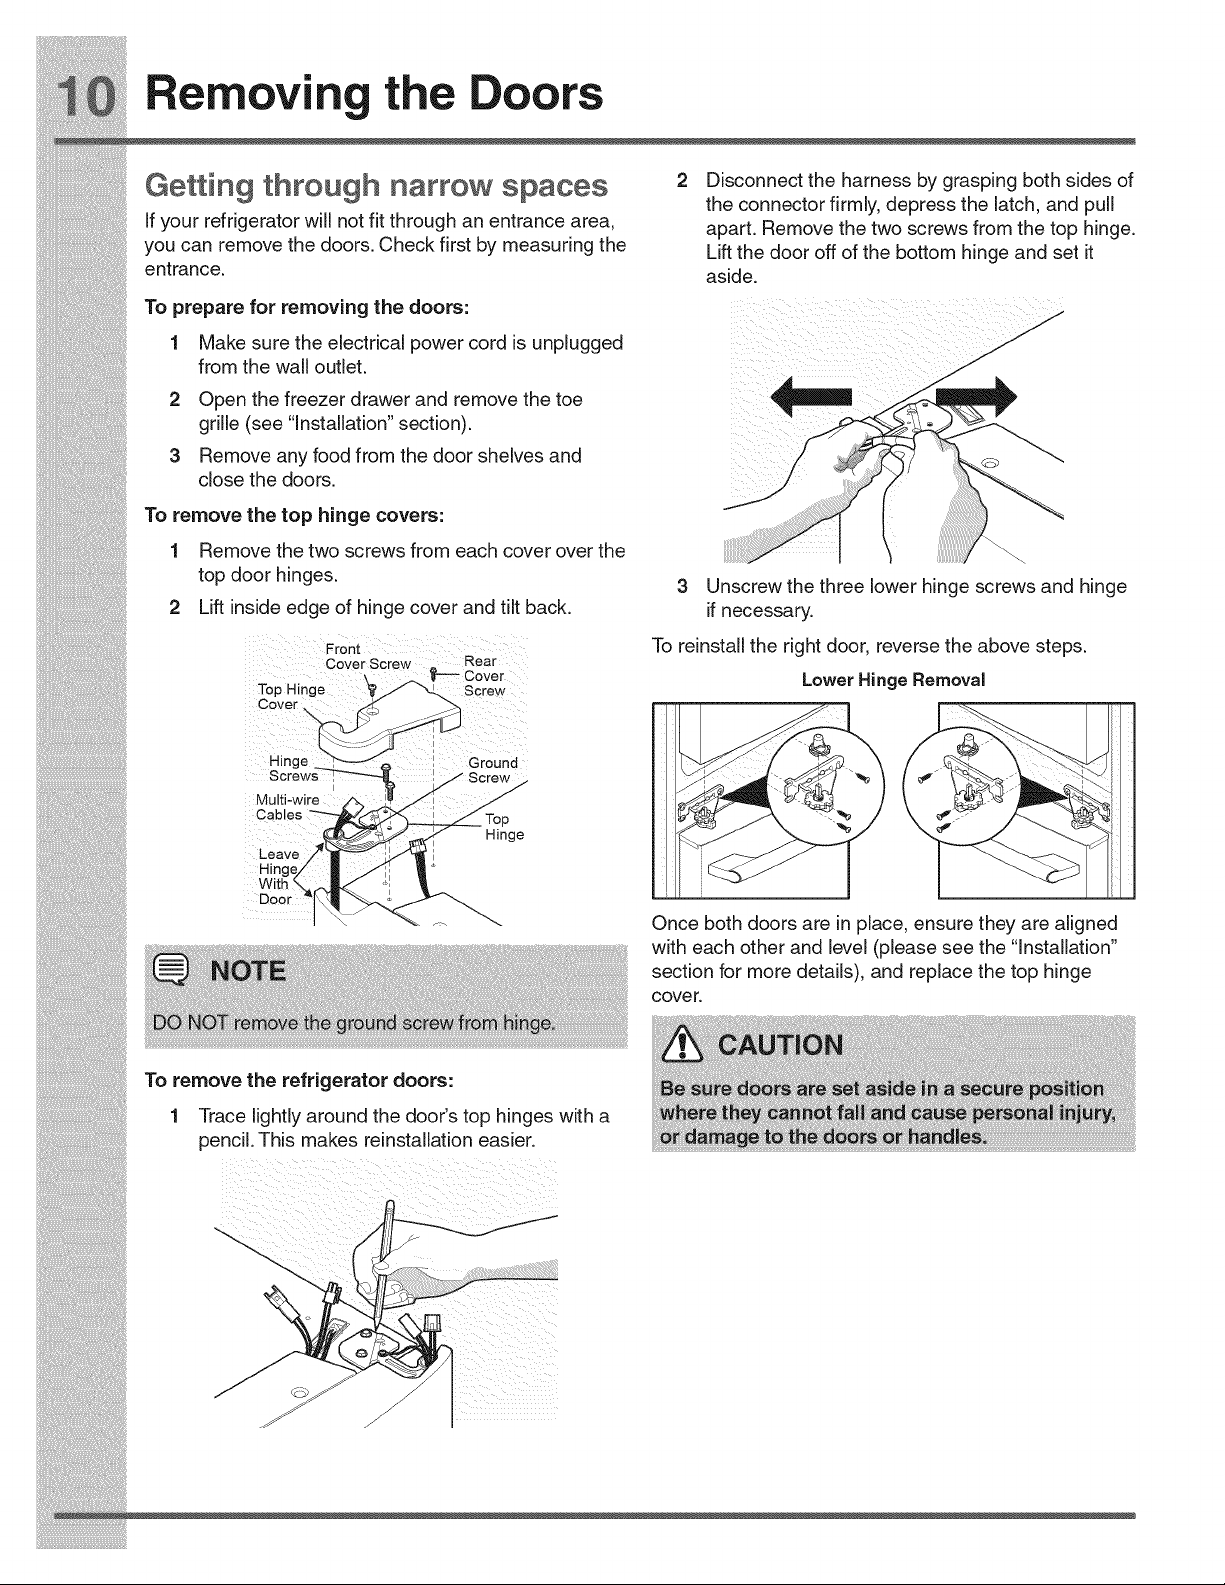
ttin thr h n rr w 2 D sconnect the harness by graspng both sdes of
G@ q OUq a O SpaO@S
. . _ . _. . the connector firmly depress the latch and pull
Tyour reTrgerator w not Tt througn an entrance area apart. Remove the two screws from the top h nge.
you can remove the doors Check f rst by measur ng the Lift the door off of the bottom hinge and set it
entrance, aside.
Top_p,,_fo__ov_g th_doo_s:
I Make suretheelectricalpower cordisunplugged
fromthewalloutlet.
2 Open thefreezerdrawerand remove thetoe
grille (see "Installation" section).
3 Remove any food from the door shelves and
close the doors. #
Toromovot.otop.iogocovors:
1 Removethetwoscrewsfromeachcoveroverthe
top door h nges
::::: .... 3 Unscrew the three lower hinge screws and hinge
2 Lift inside edge of hinge cover and tilt back. if necessary.
To reinstall the right door, reverse the above steps.
Cover Screw rKear
' _..__ '_m Cover Lower Hinge Removal
lop Mlnge ./" _. Screw
Coyer, .....
' Ground
i!_!_i!i_ii_!i!_!_i!i_ii_!i!_!_i!i_ii_!i!_!_i!i_ii_!i!_!_i!i_ii_!i!_!_i!i_ii_!i!_!_i!i_ii_!i!_!_i!i_ii_!i!_!_i!i_ii_!i!_!_ii_i
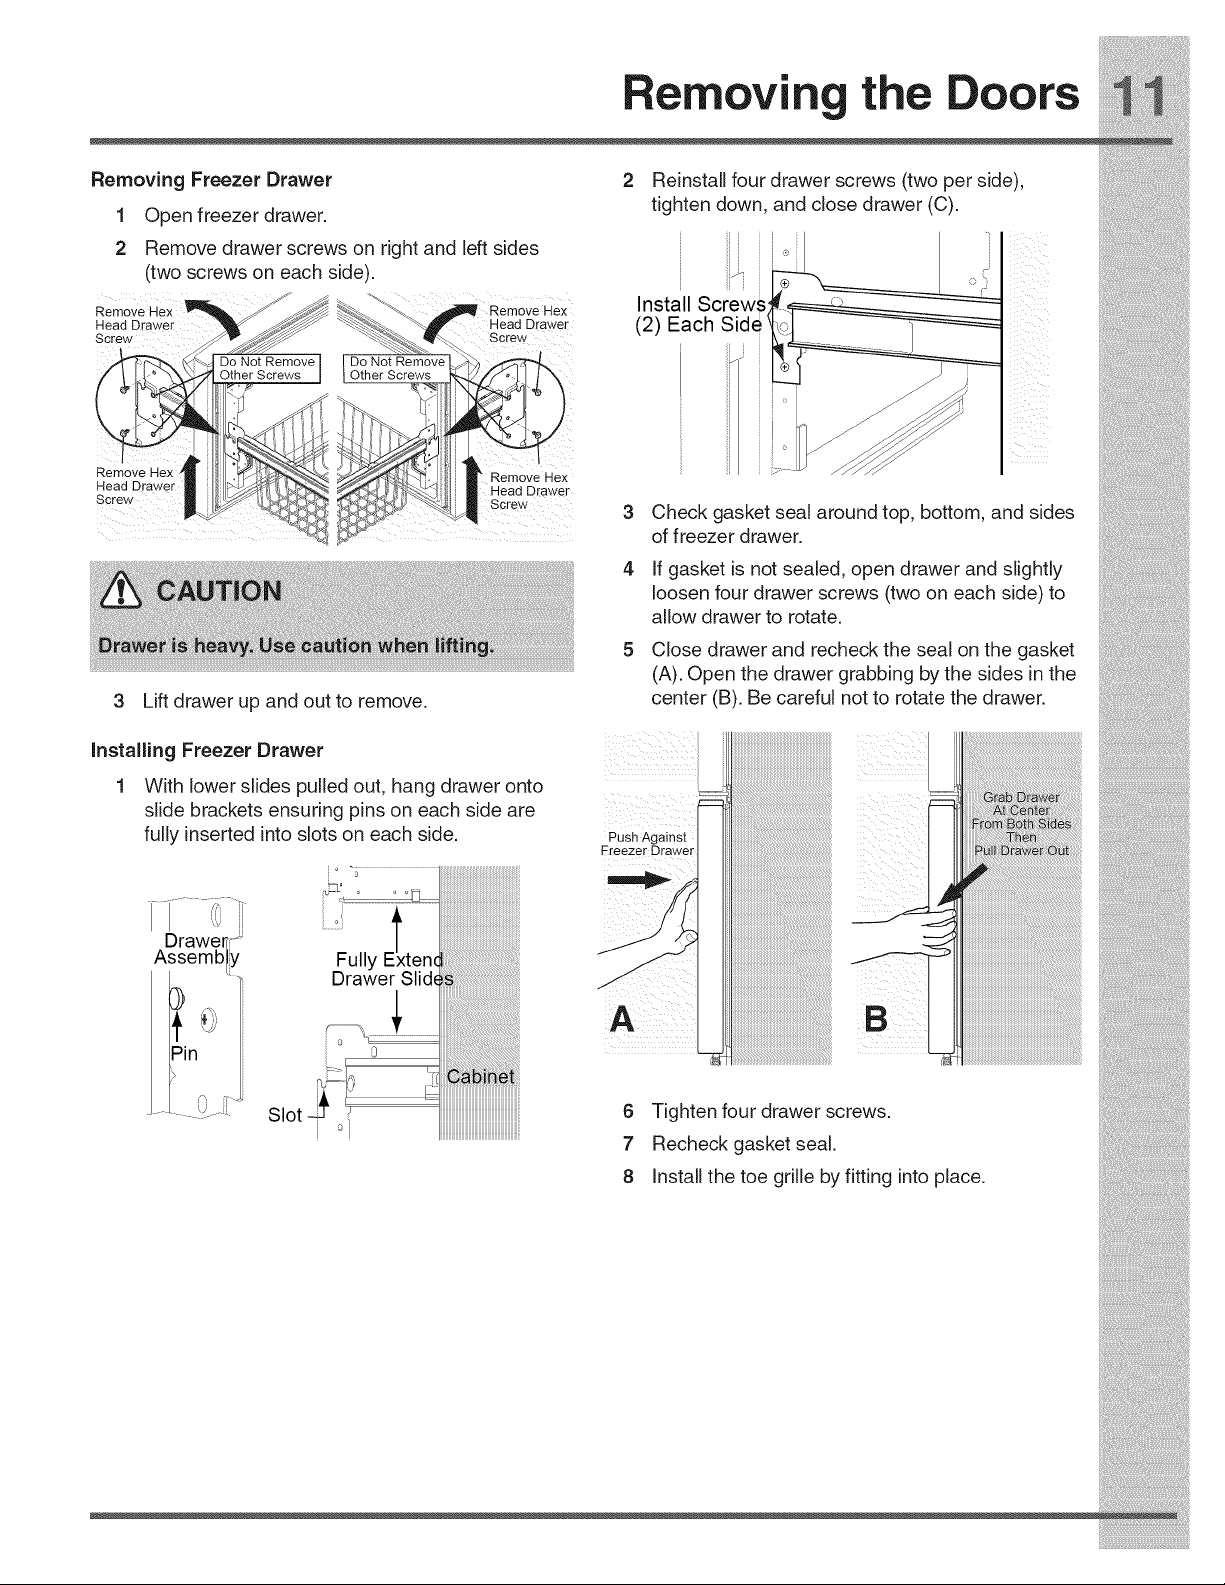
InstallingFreezerDrawer
1 Withlowerslidespulledout,hangdraweronto
slidebracketsensuringpinsoneachsideare
fullyinsertedintoslotsoneachside.
................. _[ ....
Drawe_,_
Assembly
<_qt _..... iiiiiiiiiiiiiiiiiiiiiiiiiiiiiiiiiiiiiiiiiiiiiiiiiiiiiiiiiiiiiiiiiiiiiiiiiiiiiiiiiiiiiiiiiiiiiiiiiiiiiiiiiii
/ _iiiiiiiiiiiiiiiiiiiiiiiiiiiiiiiiiiiiiiiiiiiiiiiiiiiiiiii
s,ot 0 !!!!!!!!!!!!!!!!!!!!
Push Against
Ereezer Drawer
6 Tighten four drawer screws.
7 Recheck gasket seal.
8 Install the toe grille by fitting into place.
_i:iiiii_ii_!i_iiii!i_iii_ii!i_i!iilSi_%!ii%!iiiiiiijiii
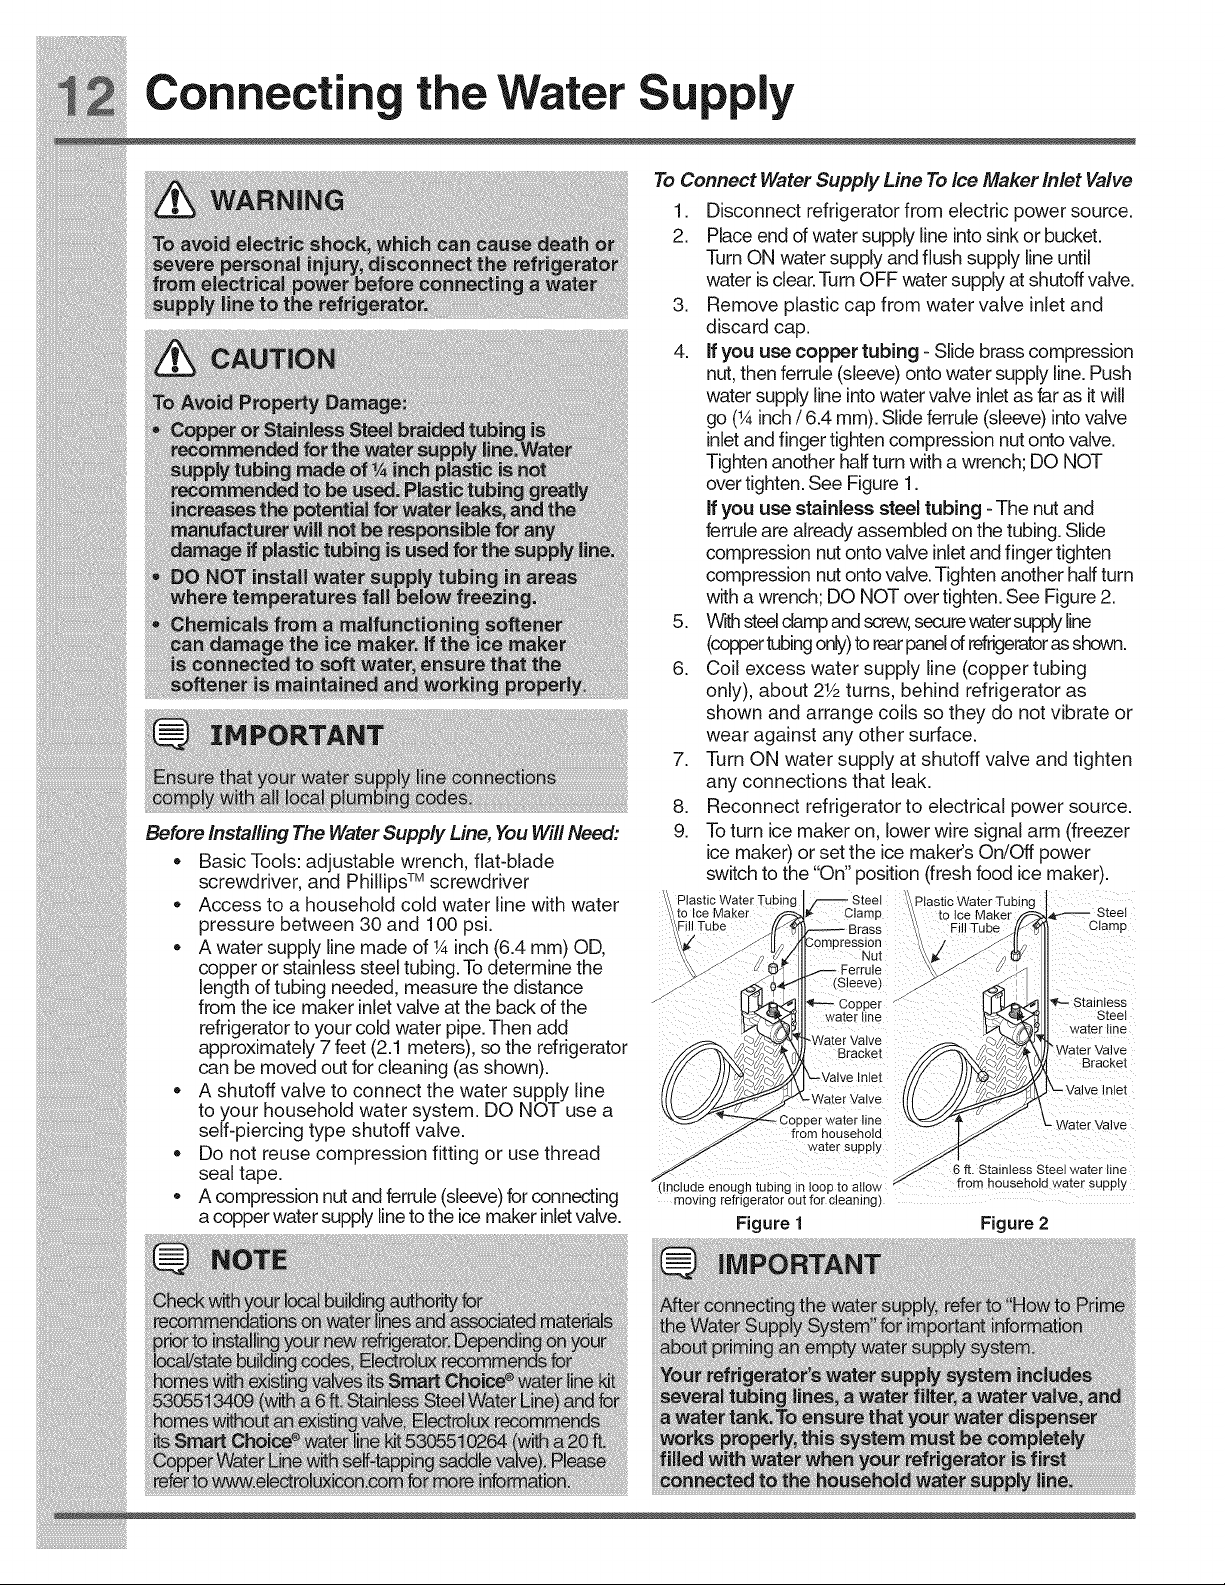
Connectin theWater upply
To Connect Water Supply Line To Ice Maker Inlet Valve
1. Disconnect refrigerator from electric power source.
2. Placeeneofwatersupplyineintosinkorbucket.
TurnOawatersupplyandflushsupplyineuntil
waterisclear.TurnOFFwatersupplyatshutoffvalve.
3. Removeplasticcapfromwatervalveinletand
discardcap.
4. ffyouusecoppertubing-Sidebrasscompression
nut,thenferrule(sleeve) ontowatersupplyine. Push
watersupplyineintowatervalveinletasfarasitwil
go(_A inch/6.4mm).Sldeferrule(sleeve) intovalve
inletandfingertightencompressionnutontovalve.
Tightenanotherhalfturnwlhawrench;UONOT
overtighten.SeeFigure 1.
Ifyouusestainlesssteeltubing-Thenutand
:::::i ferrulearealreadyassembledonthetubing. Slde
compression nutontovalveinletandfingertighten
compression nutontovalve.Tightenanotherhalfturn
withawrench;DONOTovertighten.SeeFigure2.
5. Wthsteelclampandscrew, securewatersupplyine
(coppertubingonly)torearpanelofrefrigeratorasshown.
6. Colexcesswatersupplylne(coppertubing
only), about 2V2turns, behind refrigeratoras
shown and arrangecoils sotheydo notvibrateor
wearagainstanyothersurface.
7. Turn ON water supply at shutoff valve and tighten
any connections that leak.
i!iiiiii!iiiiii!iiiiii!iiiiii!iiiiii!iiiiii!iiiiii!iiiiii!iiiiii!_!iiii
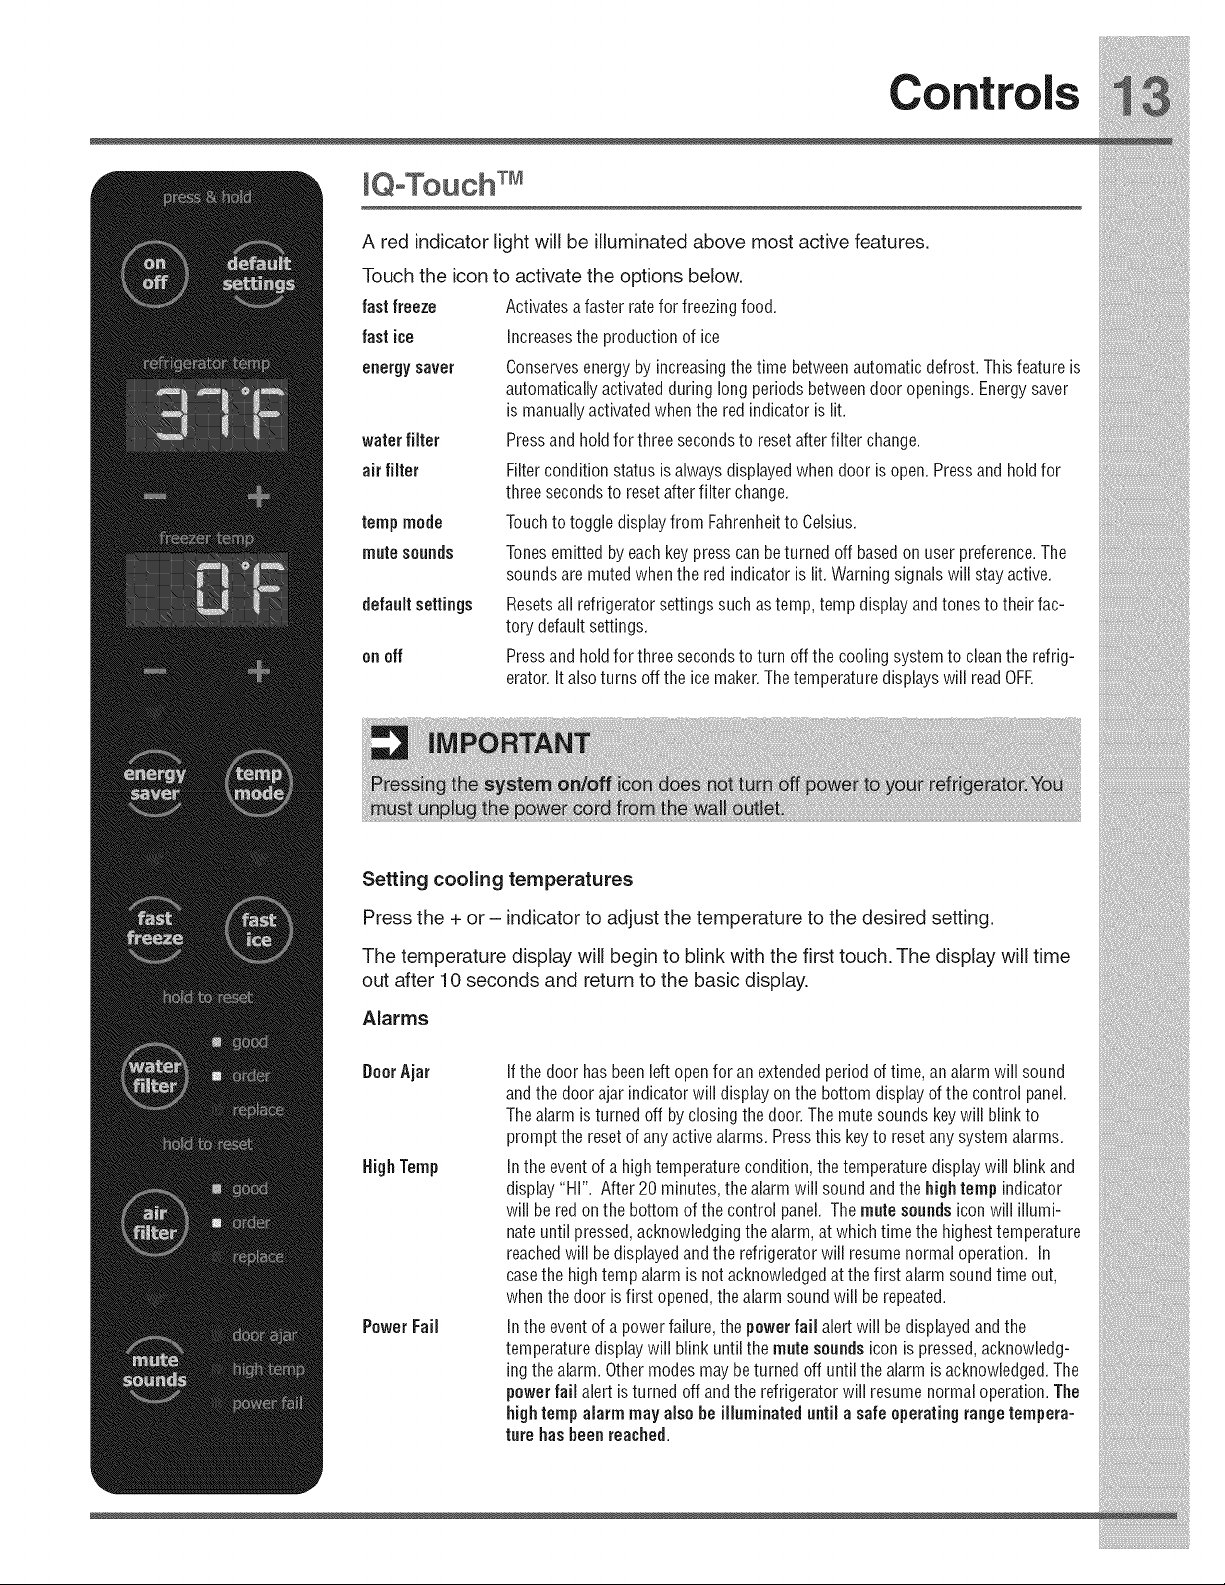
Controls
A red indicator light will be illuminated above most active features.
Touch the icon to activate the options below.
fast freeze Activates a faster rate for freezing food.
fast ice Increasesthe production of ice
energysaver Conservesenergy by increasingthe time betweenautomatic defrost. This featureis
automatically activated during long periods betweendoor openings. Energysaver
is manually activated whenthe red indicator is lit.
water filter Pressand hold for three seconds to reset after filter change.
air filter Filter condition status is always displayedwhen door is open.Press and hold for
three seconds to resetafter filter change.
temp mode Touchto toggle display from Fahrenheitto Celsius.
mute sounds Tonesemitted by eachkey press can beturned off based on user preference.The
sounds are mutedwhen the red indicatoris lit. Warning signals will stay active.
defaultsettings Resetsall refrigerator settings such as temp, temp display andtones to their fac-
tory default settings.
on off Pressand hold for three seconds to turn offthe cooling system to clean the refrig-
erator.It also turns off the ice maker.The temperature displays will read OFE
IQoTouch TM Sabbath Node"
TheSabbathModeafeaturethatd sab esportions
of the refn erator and its controls for [Q-TouchTM in
accordan_ with observance of the weekly Sabbath
and relig!ous holidays within the Orthodox Jewish
communt_y.
Sabbath Mode s turned ON and OFF b ress n and
, ,, Y P g
holding the freezer temp - and the refrigerator temp,,
"+" indicators for five seconds. The display shows "Sb
while in Sabbath mode.
In the Sabbath Mode, the High Temp alarm is active
for health reasons. If a high temperature alarm is
activated during this time, for example due to a door left
ajar, the alarm will sound intermittently for about two
minutes. The alarm will then silence on its own and a
red high temperature icon will display. The high temp
icon will continue to display, even if the door is closed,
until the Sabbath mode is exited and the icon reset.
The refrigerator will function normally once the door is
closed, without any violation of the Sabbath/Holidays.
For further assistance, guidelines for proper
._ usage and a complete list of models with the
],_ Sabbath feature, please visit the web at
i!_!_i!i_ii_!i!_!_i!i_ii_!i!_!_i!i_ii_!i!_!_i!i_ii_!i!_!_i!i_ii_!i!_!_i!i_ii_!i!_!_i!i_ii_!i!_!_i!i_ii_!i!_!_i!i_ii_!i!_!_ii_i
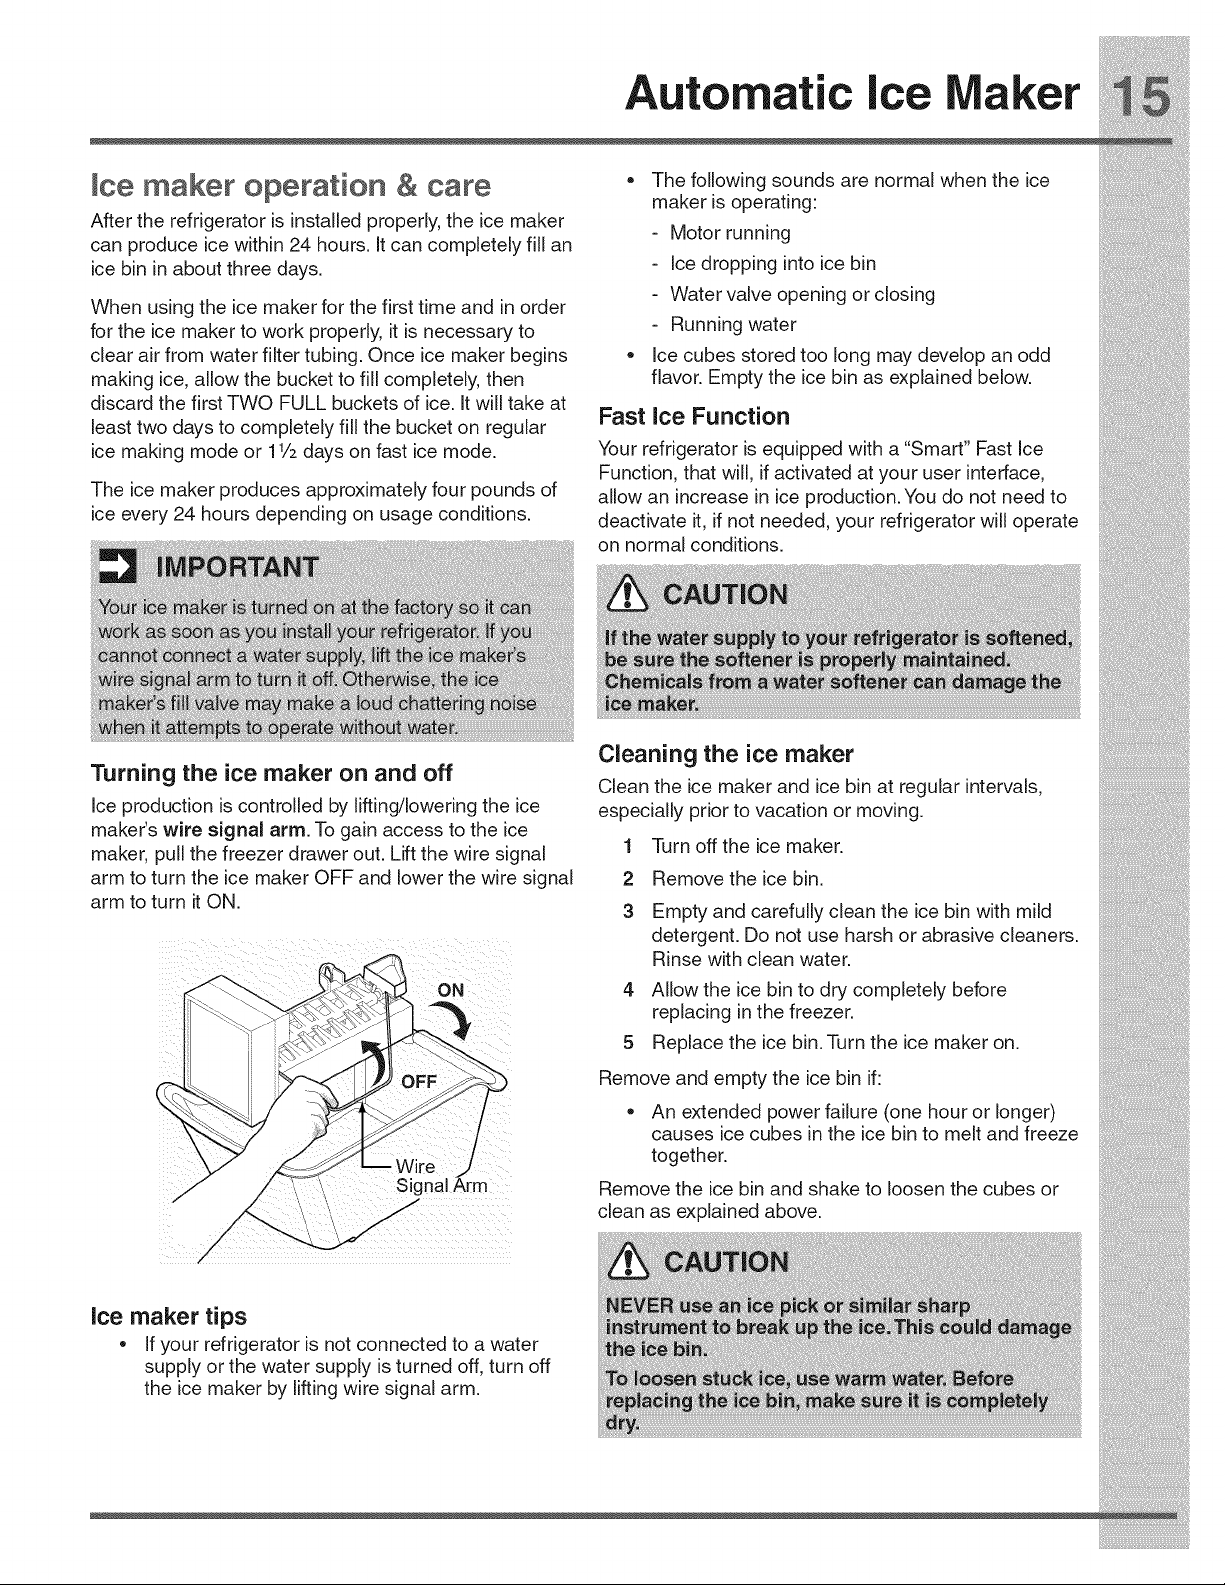
Turning the ice maker on and off
Ice production is controlled by lifting/lowering the ice
maker's wire signal arm. To gain access to the ice
maker, pull the freezer drawer out. Lift the wire signal
arm to turn the ice maker OFF and lower the wire signal
arm to turn it ON.
Signal Arm
Ice maker tips
= If your refrigerator is not connected to a water
supply or the water supply is turned off, turn off
the ice maker by lifting wire signal arm.
Cleaning the ice maker
Clean the ice maker and ice bin at regular intervals,
especially prior to vacation or moving.
1 Turn off the ice maker.
2 Remove the ice bin.
3 Empty and carefully clean the ice bin with mild
detergent. Do not use harsh or abrasive cleaners.
Rinse with clean water.
4 Allow the ice bin to dry completely before
replacing in the freezer.
5 Replace the ice bin. Turn the ice maker on.
Remove and empty the ice bin if:
* An extended power failure (one hour or longer)
causes ice cubes in the ice bin to melt and freeze
together.
Remove the ice bin and shake to loosen the cubes or
clean as explained above.
i_i!_!_i!i_ii_!i!_!_i!i_ii_!i!_!_i!i_ii_!i!_!_i!i_ii_!i!_!_i!i_ii_!i!_!_i!i_ii_!i!_!_i!i_ii_!i!_!_i!i_ii_!i!_!_i!i_ii_!i!_!_iii_
Storage Features
Shemffeatures
Your refrigerator includes a variety of storage drawers.
These drawers are located in fixed positions at the
bottom of the fresh food compartment.
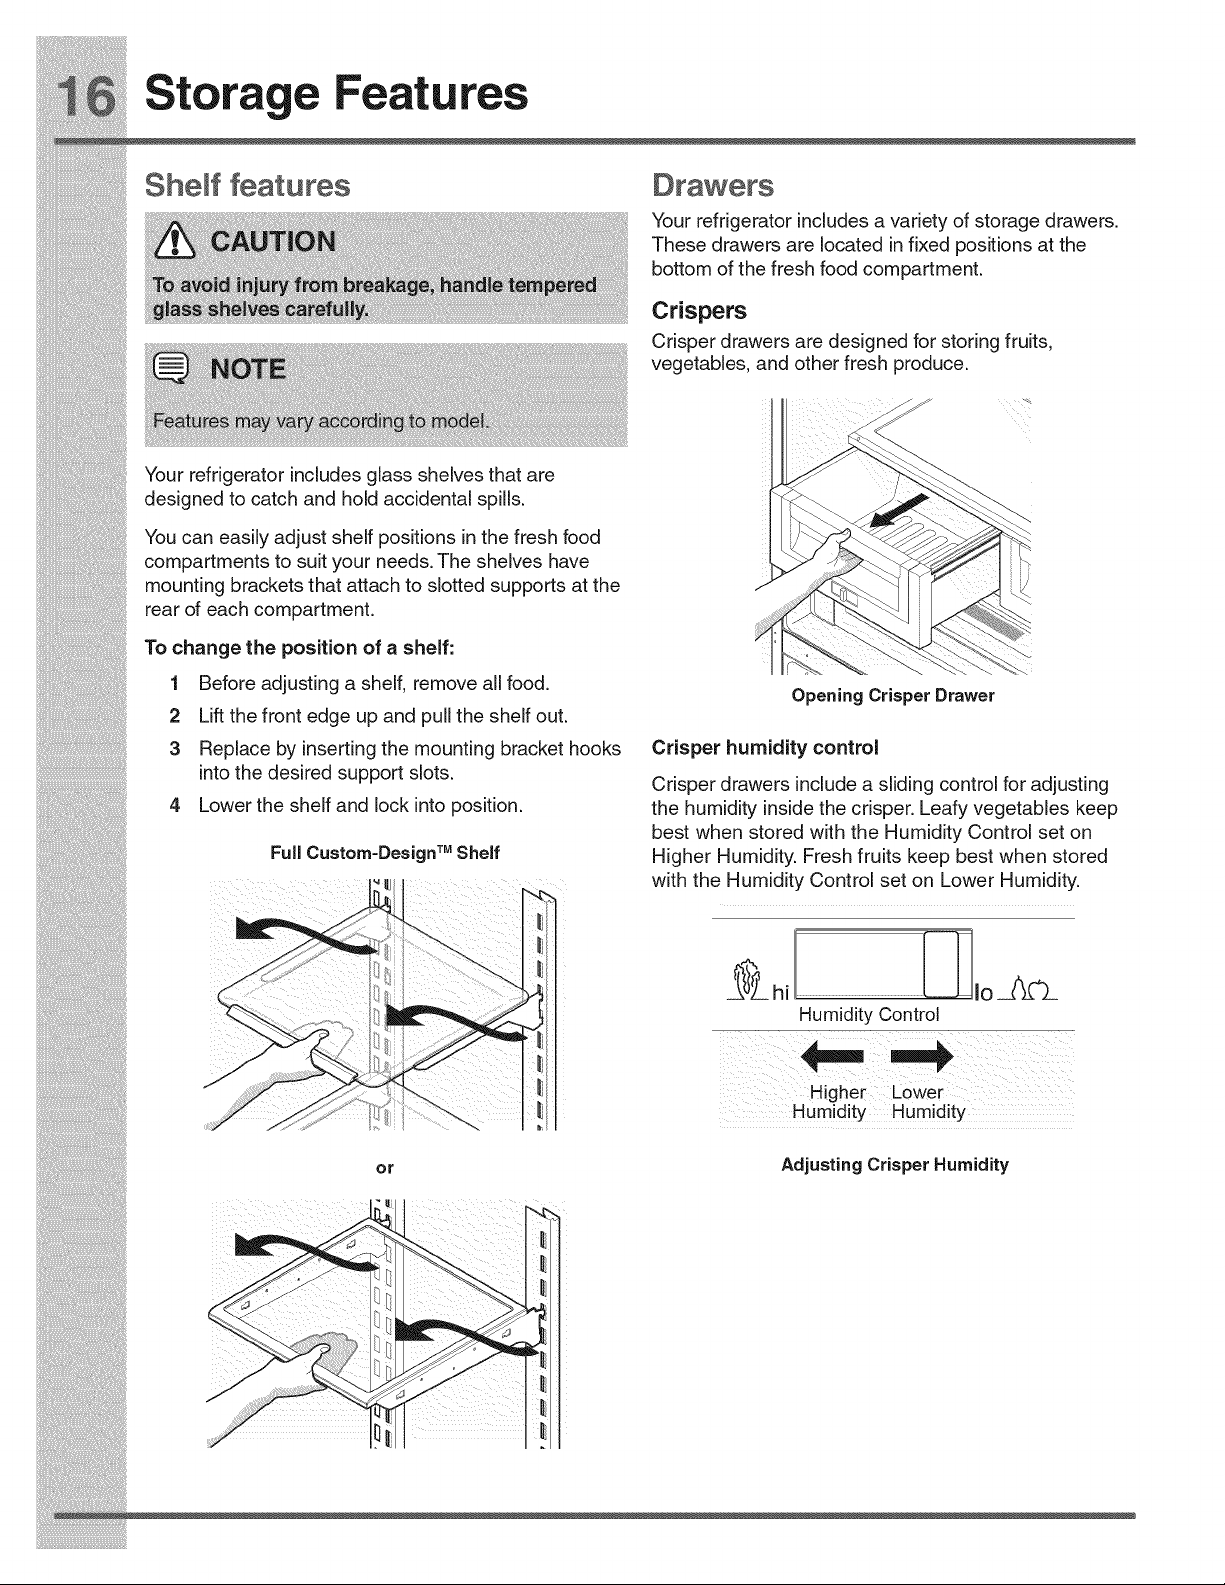
Crispers
Crisper drawers are designed for storing fruits,
vegetables, and other fresh produce.
Your refrigerator includes glass shelves that are
designed to catch and hold accidental spills.
You can easily adjust shelf positions in the fresh food
compartments to suit your needs. The shelves have
mounting brackets that attach to slotted supports at the
rear of each compartment.
Opening Crisper Drawer
To change the position of a shelf:
1 Before adjusting a shelf, remove all food.
2 Lift the front edge up and pull the shelf out.
3 Replace by insertingthe mounting bracket hooks Crisper humidity control
into the desired support slots.
Crisper drawers include a sliding control for adjusting
4 Lower the shelf and lock into position, the humidity inside the crisper. Leafy vegetables keep
best when stored with the Humidity Control set on
Full Custom-Design TM Sheff Higher Humidity. Fresh fruits keep best when stored
I;_l_ with the Humidity Control set on Lower Humidity.
, I
__VL hi Io
Humidity Control
gher Lower
........ _i Humdty Humdty
or Adjusting Crisper Humidity
Storage Features
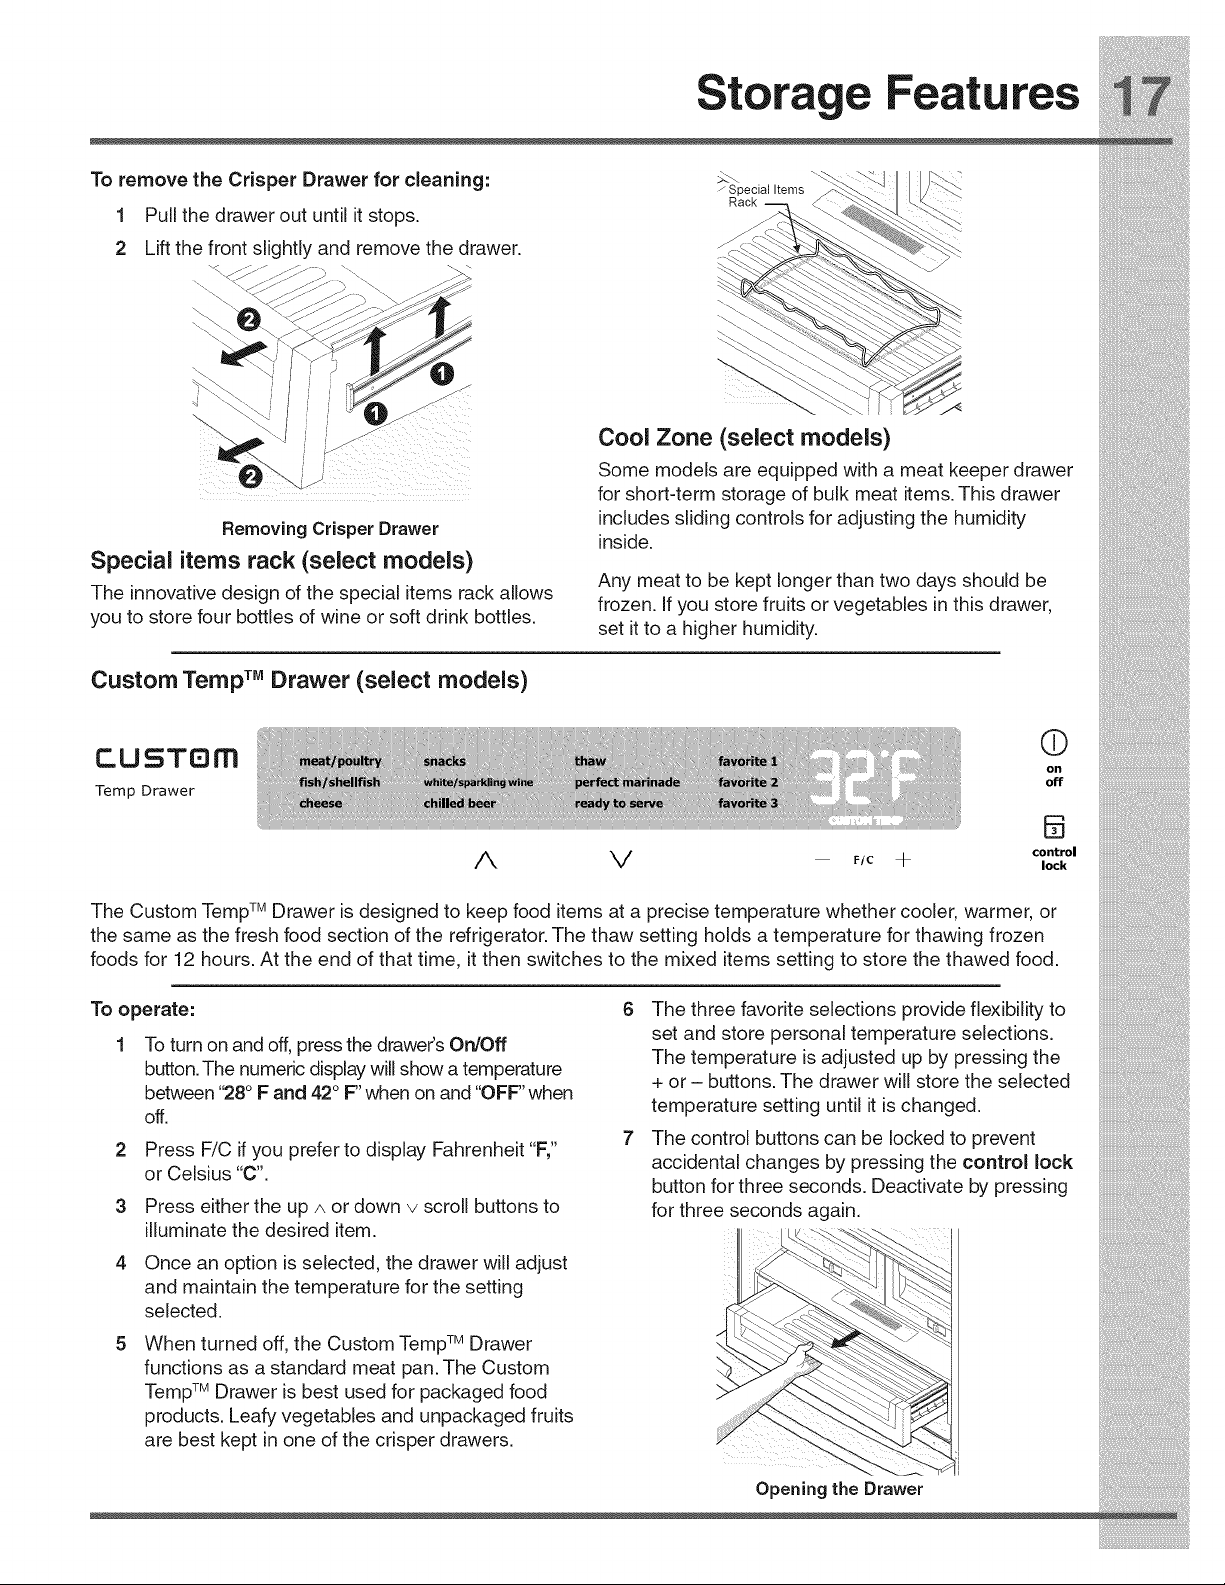
To remove the Crisper Drawer for cleaning:
1 Pull the drawer out until it stops.
2 Lift the front slightly and remove the drawer,
!: ¸¸¸¸0
Removing Crisper Drawer
Special items rack (select models)
The innovative design of the special items rack allows
you to store four bottles of wine or soft drink bottles,
z Special Items
Rack
,/<
Cool Zone (select models)
Some models are equipped with a meat keeper drawer
for short-term storage of bulk meat items, This drawer
includes sliding controls for adjusting the humidity
inside,
Any meat to be kept longer than two days should be
frozen, If you store fruits or vegetables in this drawer,
set it to a higher humidity,
Custom Temp TMDrawer (select models)
_,;_ii_;;¸___:;i¸;_;_;_;_;_i¸;_I¸_'i!_!_!_i¸_:____ii;_i¸;_i¸;_:i_
sto,.goFo.t.,o. .o .ooo,.oo.,,,oo
g p " ofanadiustab_edoorb_n:
1 Before adjusting a bin, remove all food.
2 Gr thebnfrm " " "
p y with both hands and hftit upward.
_ w!_H_i _ # _sti !_rs '¢v'i_ !_ ......
, Hemove,neon.
4 Place the bin just above desired position.
5 Lower the b n onto supports unt ocked npace
I
To remove the Custom Temp TM Drawer for cleaning"
_o,,he_--,co,oo,,,_
- Adjustable Door Bin
°
Accessories (v_ries by _odel)
T_canbms
.......................................................... The can bins allow you to efficiently and securely store
up to eight 12-ounce canned beverages.
i!_!_i!i_ii_!i!_!_i!i_ii_!i!_!_i!i_ii_!i!_!_i!i_ii_!i!_!_i!i_ii_!i!_!_i!i_ii_!i!_!_i!i_ii_!i!_!_i!i_ii_!i!_!_i!i_ii_!i!_!_ii_i
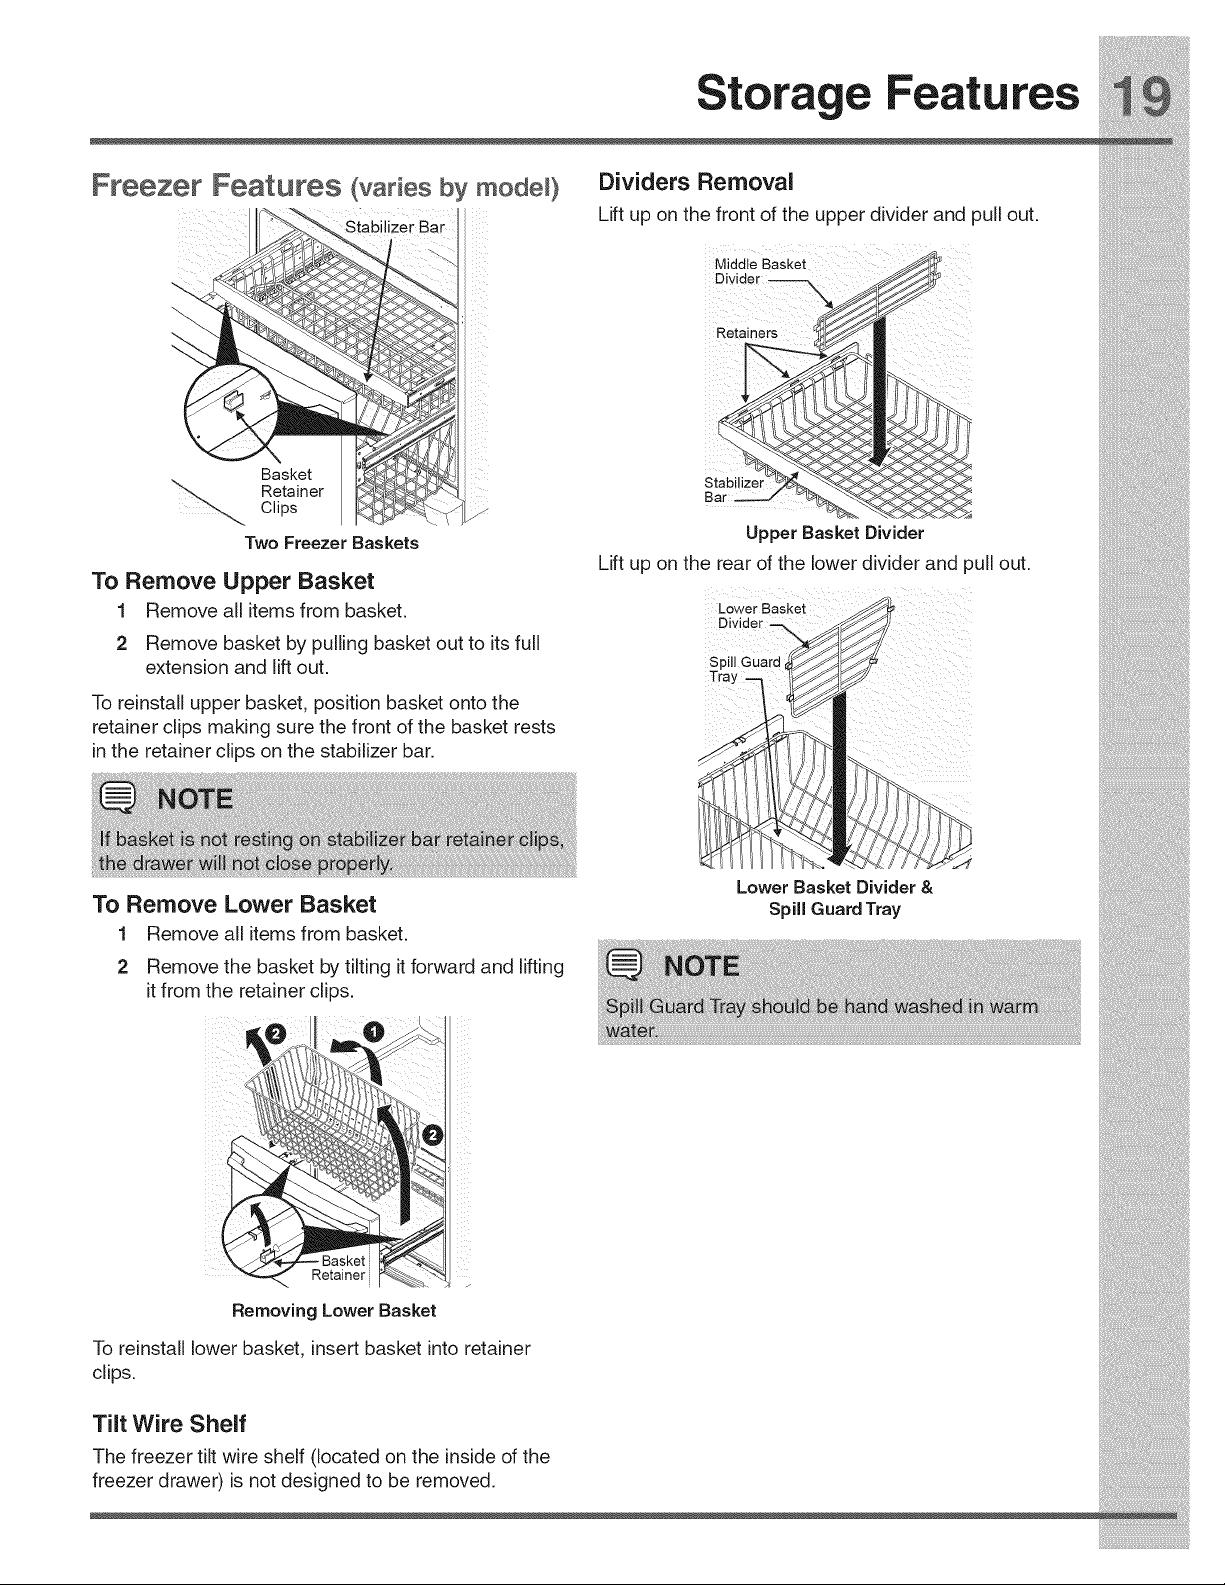
Toreinstallupperbasket,positionbasketontothe
retainerclipsmakingsurethefrontofthebasketrests
intheretainerclipsonthestabilizerbar.
i_i!_!_i!i_ii_!i!_!_i!i_ii_!i!_!_i!i_ii_!i!_!_i!i_ii_!i!_!_i!i_ii_!i!_!_i!i_ii_!i!_!_i!i_ii_!i!_!_i!i_ii_!i!_!_i!i_ii_!i!_!_iii_
i!_!_i!i_ii_!i!_!_i!i_ii_!i!_!_i!i_ii_!i!_!_i!i_ii_!i!_!_i!i_ii_!i!_!_i!i_ii_!i!_!_i!i_ii_!i!_!_i!i_ii_!i!_!_i!i_ii_!i!_!_ii_idays should be frozen.
• Refer to the "Controls" section for procedures on
temperature settings,
i!_!_i!i_ii_!i!_!_i!i_ii_!i!_!_i!i_ii_!i!_!_i!i_ii_!i!_!_i!i_ii_!i!_!_i!i_ii_!i!_!_i!i_ii_!i!_!_i!i_ii_!i!_!_i!i_ii_!i!_!_ii_i
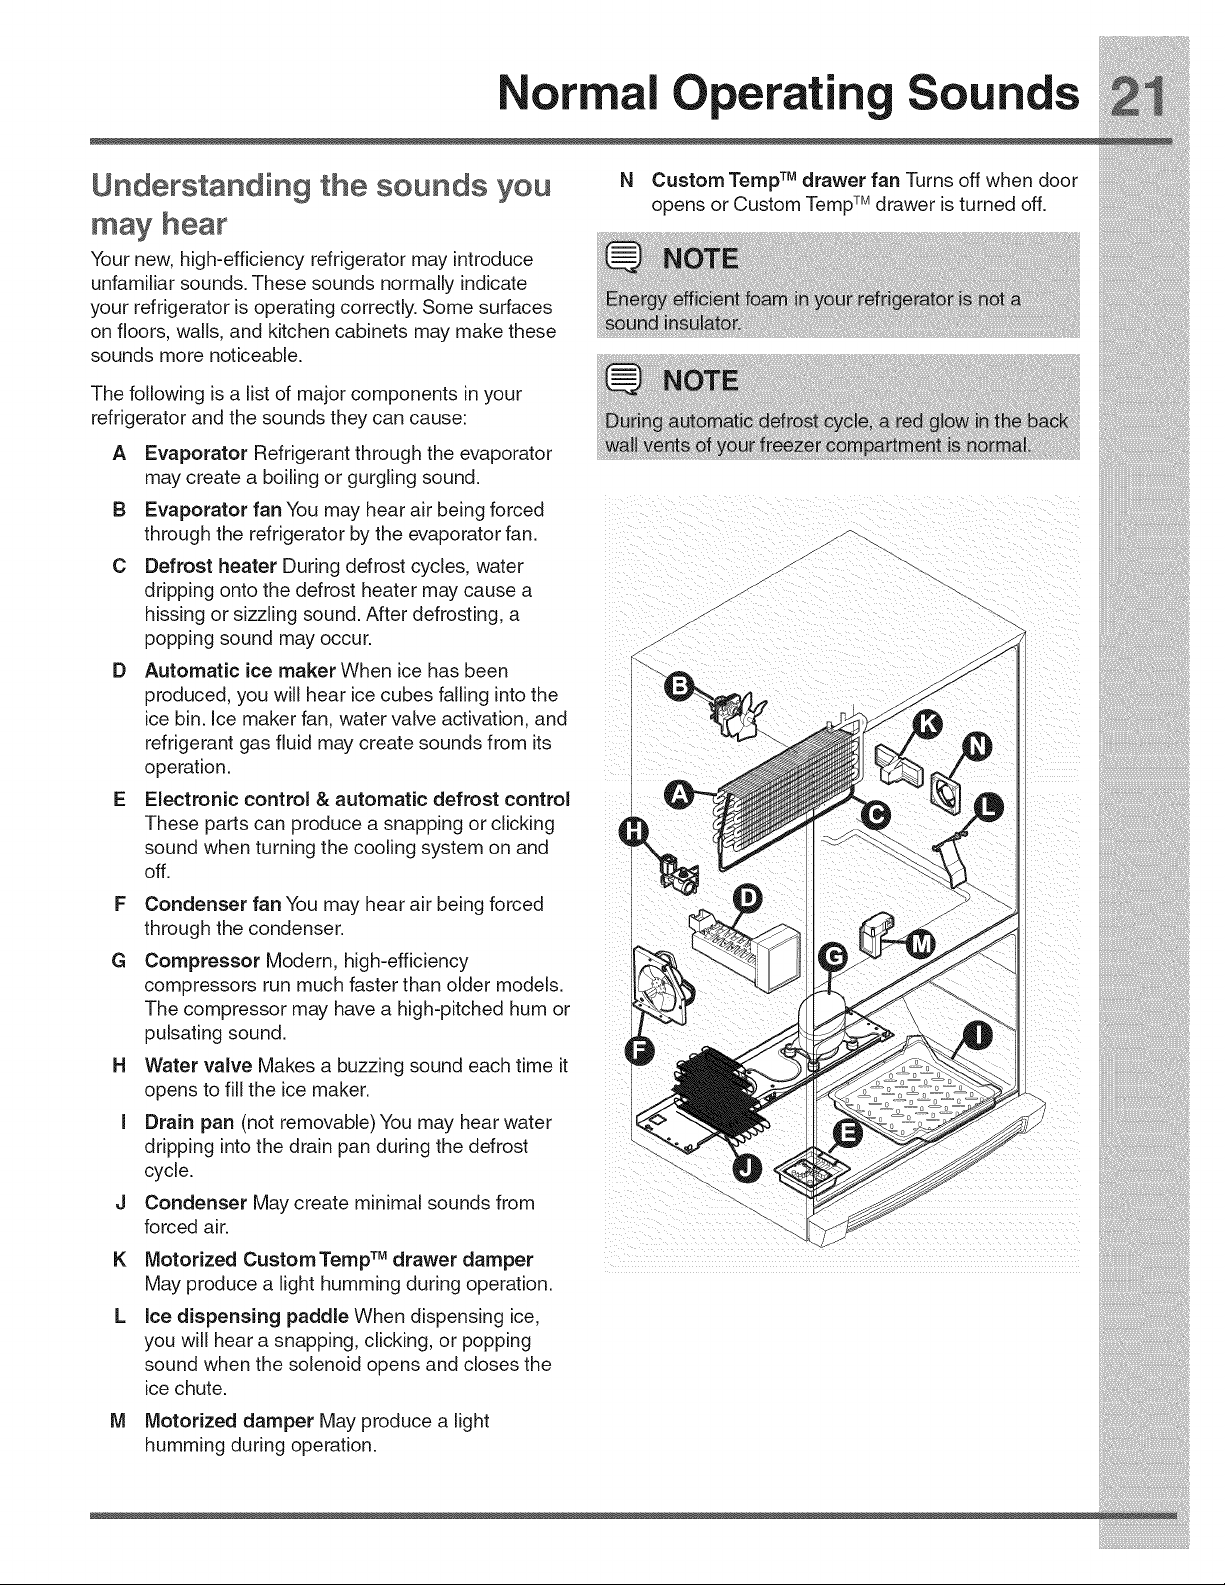
Normal
perating Sounds
Understanding the sounds you
may hear
Your new, high-efficiency refrigerator may introduce
unfamiliar sounds. These sounds normally indicate
your refrigerator is operating correctly. Some surfaces
on floors, walls, and kitchen cabinets may make these
sounds more noticeable.
N
Custom Temp TM drawer fan Turns off when door
opens or Custom TempTM drawer is turned off.
The following is a list of major components in your
refrigerator and the sounds they can cause:
A
Evaporator Refrigerant through the evaporator
may create a boiling or gurgling sound.
B Evaporator fan You may hear air being forced
through the refrigerator by the evaporator fan.
C Defrost heater During defrost cycles, water
dripping onto the defrost heater may cause a
hissing or sizzling sound. After defrosting, a
popping sound may occur.
D Automatic ice maker When ice has been
produced, you will hear ice cubes falling into the
ice bin. Ice maker fan, water valve activation, and
refrigerant gas fluid may create sounds from its
operation.
E Electronic control & automatic defrost control
These parts can produce a snapping or clicking
sound when turning the cooling system on and
off.
F Condenser fan You may hear air being forced
through the condenser.
G Compressor Modern, high-efficiency
compressors run much faster than older models.
The compressor may have a high-pitched hum or
pulsating sound.
H Water valve Makes a buzzing sound each time it
opens to fill the ice maker.
I Drain pan (not removable)You may hear water
dripping into the drain pan during the defrost
cycle.
J Condenser May create minimal sounds from
forced air.
K
Motorized Custom Temp TM drawer damper
May produce a light humming during operation.
Ice dispensing paddle When dispensing ice,
you will hear a snapping, clicking, or popping
sound when the solenoid opens and closes the
ice chute.
M Motorized damper May produce a light
humming during operation.
/-
z
J --.
J
/-
-.,..
/i:iiiiiii;!iii!iiiiiii!iiiiiiiiiiii!;iii!i!iiiii!i
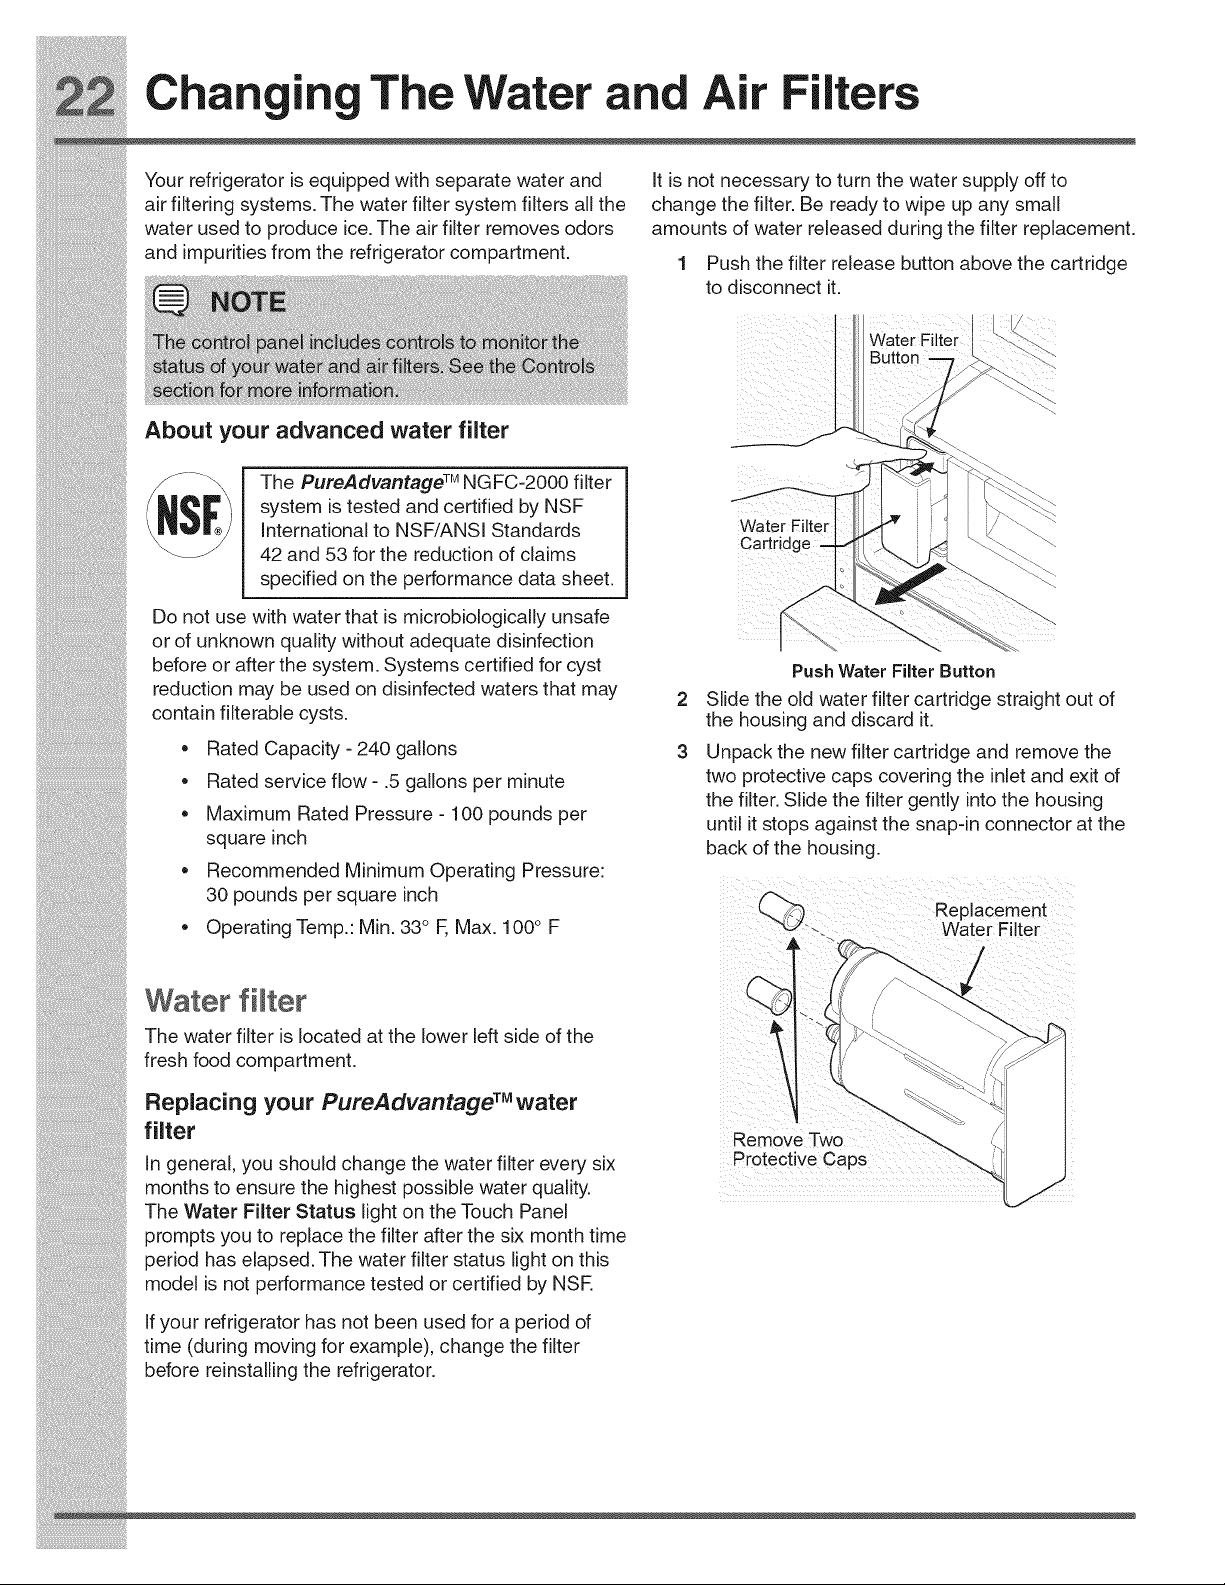
Changin TheWater and Air Filters
Your refrigerator is equipped with separate water and It is not necessary to turn the water supply off to
air filtering systems. The water filter system filters all the change the filter. Be ready to wipe up any small
water used to produce ice. The air filter removes odors amounts of water released during the filter replacement.
and mpur t es from the refr gerator compartment
' 1 Push the filter release button above the cartridge
to disconnect it.
/ I|tk_P I system is tested and certified by NSF
N_®i J I__/ANSI Standards Water Fitte[l _ 1 _/ "\_"
_ . . Cartridge _.\ "_.
I 42 and _eduction of claims
specfed on the performance data sheet _-_
Do not use with water that is microbiologicaly unsafe
or of unknown quality without adequate disinfection
before or after the system. Systems certified for cyst Push Water Filter Button
reduclon may be used on dts_nfected waters that may
2 S de the o d water f ter cartr dge stra ght out of
contain filterable cysts, the housing and discard it.
:: ;;: • Rated Capacity- 240 gallons 3 Un ack the new filter cartrid e and remove the
P g
• Rated service flow- .5 gallons per minute two protective caps covering the inlet and exit of
the filter, Slide the filter gently into the housing
1
i!iiiiii!iiiiii!iiiiii!iiiiii!iiiiii!iiiiii!iiiiii!iiiiii!iiiiii!_!iiii
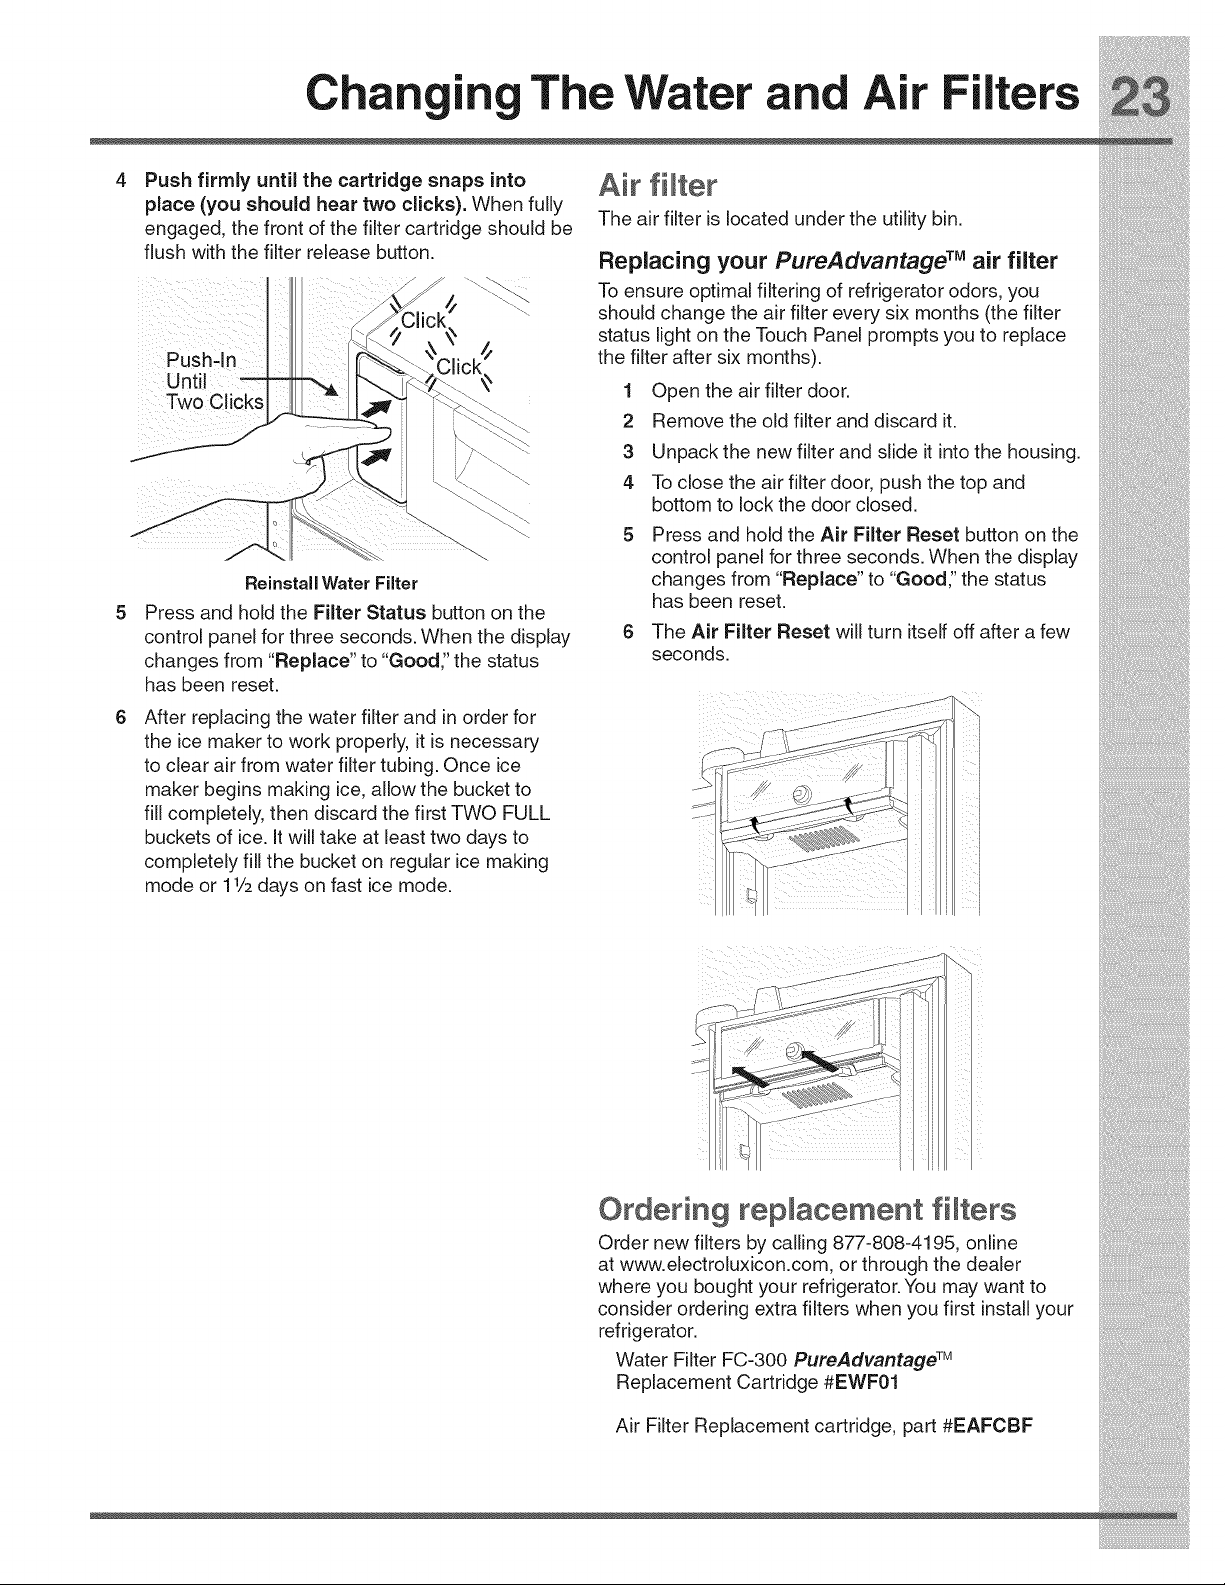
theicemakertoworkproperly,itisnecessary
toclearairfromwaterfiltertubing.Onceice
makerbeginsmakingice,allowthebucketto
i_i!_!_i!i_ii_!i!_!_i!i_ii_!i!_!_i!i_ii_!i!_!_i!i_ii_!i!_!_i!i_ii_!i!_!_i!i_ii_!i!_!_i!i_ii_!i!_!_i!i_ii_!i!_!_i!i_ii_!i!_!_iii_
i!_!_i!i_ii_!i!_!_i!i_ii_!i!_!_i!i_ii_!i!_!_i!i_ii_!i!_!_i!i_ii_!i!_!_i!i_ii_!i!_!_i!i_ii_!i!_!_i!i_ii_!i!_!_i!i_ii_!i!_!_ii_i
the floor from being damaged.
i!_!_i!i_ii_!i!_!_i!i_ii_!i!_!_i!i_ii_!i!_!_i!i_ii_!i!_!_i!i_ii_!i!_!_i!i_ii_!i!_!_i!i_ii_!i!_!_i!i_ii_!i!_!_i!i_ii_!i!_!_ii_i
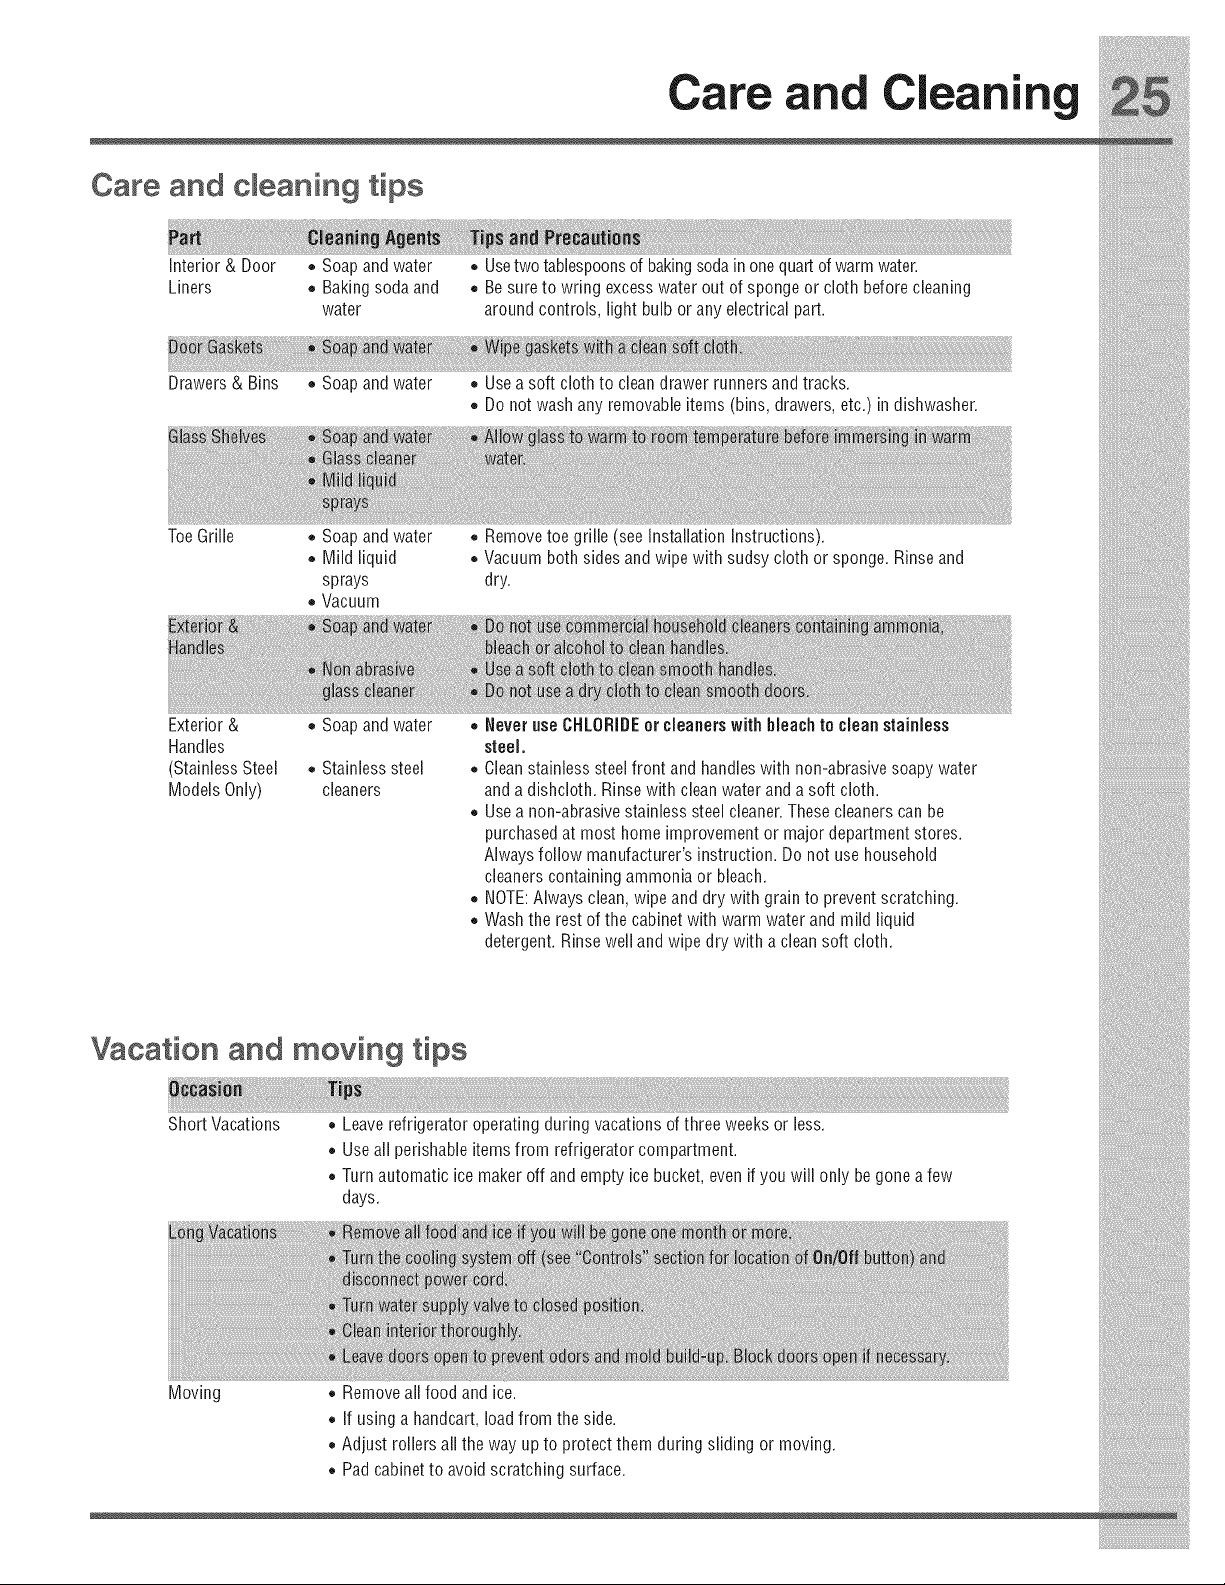
Handles
(Stainless Steel
Models Only)
• Stainlesssteel
cleaners
steel.
• Clean stainless steel front and handleswith non-abrasive soapy water
and a dishcloth. Rinse with cleanwater and a soft cloth.
i_i!_!_i!i_ii_!i!_!_i!i_ii_!i!_!_i!i_ii_!i!_!_i!i_ii_!i!_!_i!i_ii_!i!_!_i!i_ii_!i!_!_i!i_ii_!i!_!_i!i_ii_!i!_!_i!i_ii_!i!_!_iii_
v,v,v,v,v,v,v,v,v,v,v,v,v,v¸
Care and C nin
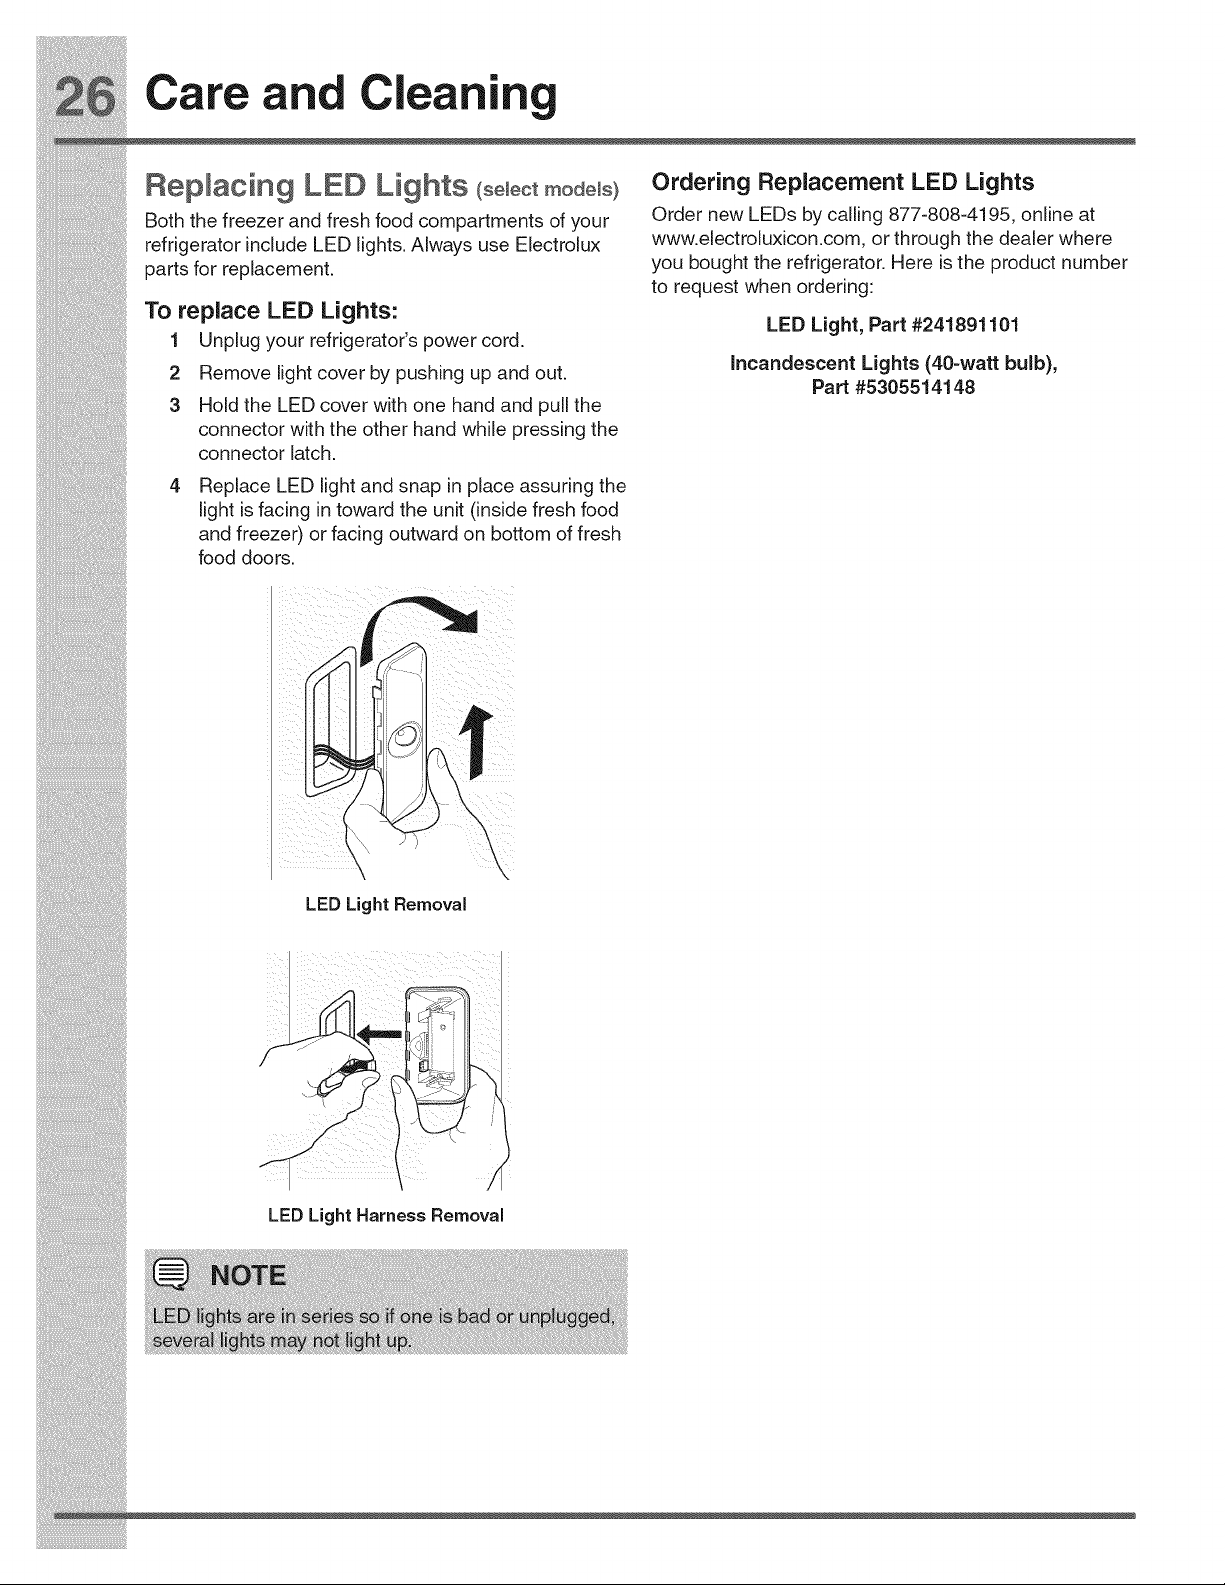
Replacing LED Lights (s÷ ÷otmod÷ s)
Both the freezer and fresh food compartments of your
refrigerator include LED lights. Always use Electrolux
parts for replacement.
To replace LED Lights:
1 Unplug your refrigerator's power cord.
2 Remove light cover by pushing up and out.
3 Hold the LED cover with one hand and pull the
connector with the other hand while pressing the
connector latch.
Replace LED light and snap in place assuring the
light is facing in toward the unit (inside fresh food
and freezer) or facing outward on bottom of fresh
food doors.
Ordering Replacement LED Lights
Order new LEDs by calling 877-808-4195, online at
www.electroluxicon.com, or through the dealer where
you bought the refrigerator. Here is the product number
to request when ordering:
LED Light, Part #241891101
Incandescent Lights (40=watt bulb),
Part #5305514148
LED Light Removal _"
restricted by foreign material. that valve is nota self-piercingsaddlevalve.Cleanvalve.
Replacevalve if necessary.
i_i!_!_i!i_ii_!i!_!_i!i_ii_!i!_!_i!i_ii_!i!_!_i!i_ii_!i!_!_i!i_ii_!i!_!_i!i_ii_!i!_!_i!i_ii_!i!_!_i!i_ii_!i!_!_i!i_ii_!i!_!_iii_

::;iiii:iil;ii!iliiiiiii!!iil;i_iii_i¸i_!_!_7i!i!_ii!i_!;!i_i_i;ii_i;i_;_i_!i!ii_i!i!iiii_i_!i!iii!i_;_;i_!ii:i!_:_i_;_!!!_i:!!!i_!_!!i_!i_i
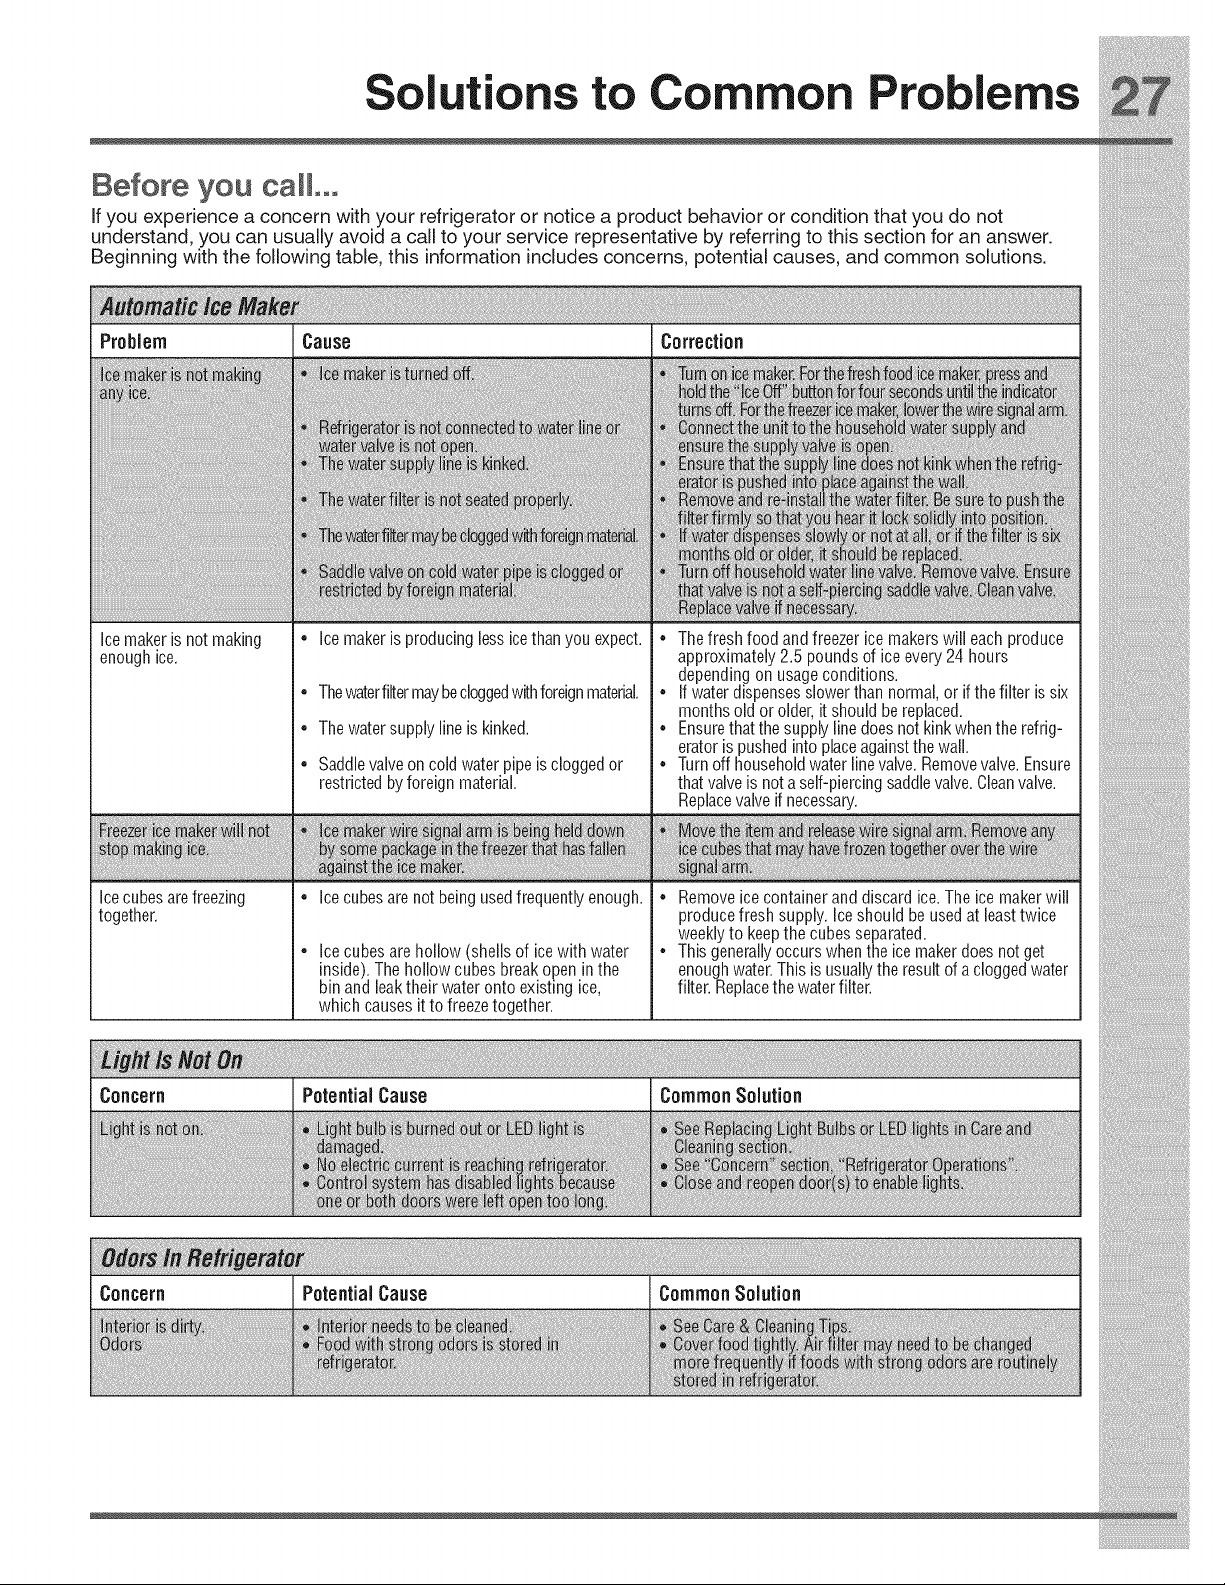
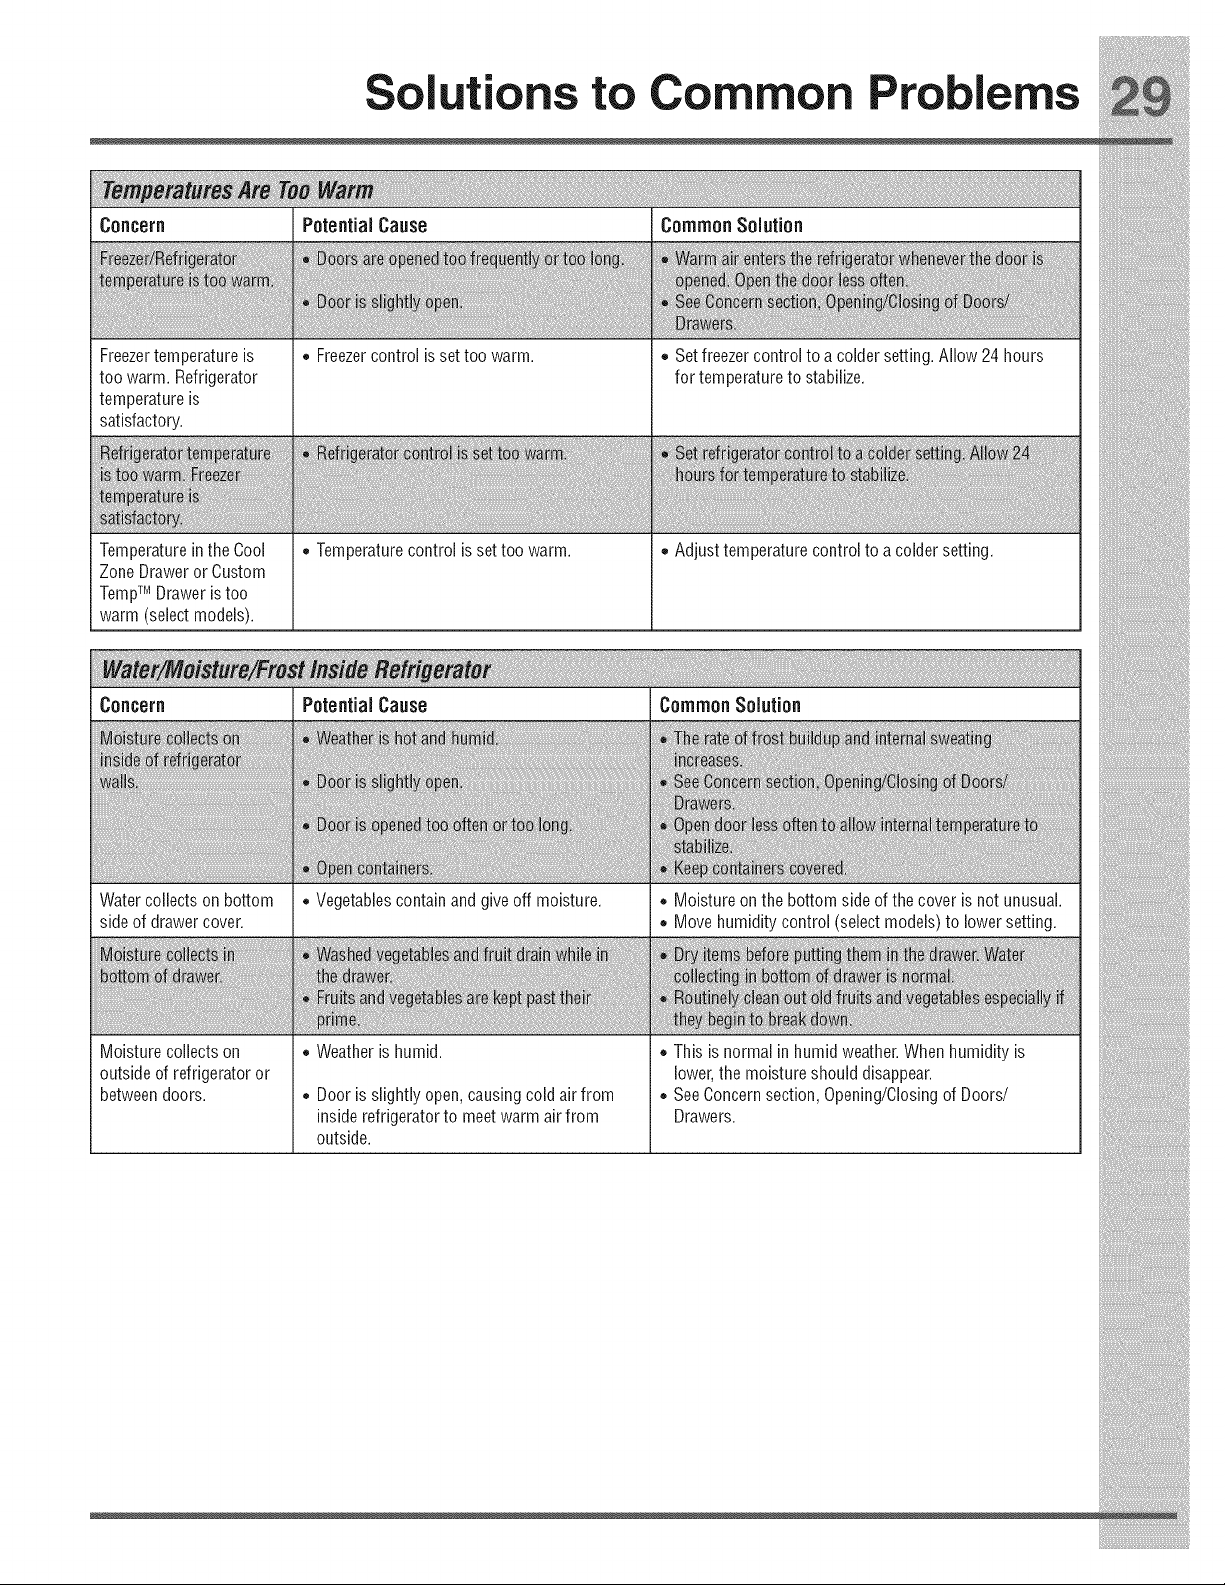
Solutions to Common Problems
Concern Potential Cause Common Solution
_h__ _et
Drawers are difficult to • Food is touching shelf on top of drawer. • Keeplessfood in drawer.
move. • Drawer is overloaded • Removeor redistributefood.
Concern _ PotentialCause Common Solution
;d _;o
_ef _at
_at ii _leti d t et
_ay_
_ _r. :::: _rek_
}: efi_rat at: _ _ at ::
Refrigeratorruns too • Room or outside weather is hot. • It's normal for the refrigeratorto work longer under
much or too long. these conditions.
• Refrigerator has recently beendisconnected • It takes8-12 hours for the refrigeratorto cool down
for a period of time. completely.
.......................................................... • Automatic ice maker is operating. • Icemakeroperationcausesrefrigeratorto run slightlymore.
• Boors are openedtoo frequently or too long. • Warm air entering the refrigerator causesit to run more.
i!_!_i!i_ii_!i!_!_i!i_ii_!i!_!_i!i_ii_!i!_!_i!i_ii_!i!_!_i!i_ii_!i!_!_i!i_ii_!i!_!_i!i_ii_!i!_!_i!i_ii_!i!_!_i!i_ii_!i!_!_ii_i
Warranty
Major Appliance Warranty Information
Your appliance is covered by a one year limited warranty. For one year from your original date of purchase, Electrolux will
repair or replace any parts of this appliance that prove to be defective in materials or workmanship when such appliance
is installed, used, and maintained in accordance with the provided instructions. In addition, the cabinet liner and sealed
refrigeration system (compressor, condenser, evaporator, dryer or tubing) of your appliance is covered by a two through five
year limited warranty. During the 2nd through 5th years from your original date of purchase, Electrolux will repair or replace
any parts in the cabinet liner and sealed refrigeration system which prove to be defective in materials or workmanship when
such appliance is installed, used, and maintained in accordance with the provided instructions.
Exclusions
This warranty does not cover the following:
1. Products with original serial numbers that have been removed, altered or cannot be readily determined.
2. Product that has been transferred from its original owner to another party or removed outside the USA or Canada.
3. Rust on the interior or exterior of the unit.
4. Products purchased "as-is" are not covered by this warranty.
5. Food loss due to any refrigerator or freezer failures.
6. Products used in a commercial setting.
7. Service calls which do not involve malfunction or defects in materials or workmanship, or for appliances not in
ordinary household use or used other than in accordance with the provided instructions.
8. Service calls to correct the installation of your appliance or to instruct you how to use your appliance.
9. Expenses for making the appliance accessible for servicing, such as removal of trim, cupboards, shelves, etc.,
which are not a part of the appliance when it is shipped from the factory.
10. Service calls to repair or replace appliance light bulbs, air filters, water filters, other consumables, or knobs,
handles, or other cosmetic parts.
11. Pickup and delivery costs; your appliance is designed to be repaired in the home.
12. Surcharges including, but not limited to, any after hour, weekend, or holiday service calls, tolls, ferry trip charges, or
mileage expense for service calls to remote areas, including the state of Alaska.
13. Damages to the finish of appliance or home incurred during transportation or installation, including but not limited to
floors, cabinets, walls, etc.
14. Damages caused by: services performed by unauthorized service companies; use of parts other than genuine
Electrolux parts or parts obtained from persons other than authorized service companies; or external causes such
as abuse, misuse, inadequate power supply, accidents, fires, or acts of God.
DISCLAIMER OF IMPLIED WARRANTIES; LIMITATION OF REMEDIES
CUSTOMER'S SOLE AND EXCLUSIVE REMEDY UNDER THIS LIMITED WARRANTY SHALL BE REPAIR OR
REPLACEMENT AS PROVIDED HEREIN. CLAIMS BASED ON IMPLIED WARRANTIES, INCLUDING WARRANTIES
OF MERCHANTABILITY OR FITNESS FOR A PARTICULAR PURPOSE, ARE LIMITED TO ONE YEAR OR THE
SHORTEST PERIOD ALLOWED BY LAW BUT NOT LESS THAN ONE YEAR. ELECTROLUX SHALL NOT BE LIABLE
FOR CONSEQUENTIAL OR INCIDENTAL DAMAGES SUCH AS PROPERTY DAMAGE AND INCIDENTAL EXPENSES
RESULTING FROM ANY BREACH OF THIS WRITTEN LIMITED WARRANTY OR ANY IMPLIED WARRANTY. SOME
STATES AND PROVINCES DO NOT ALLOW THE EXCLUSION OR LIMITATION OF INCIDENTAL OR CONSEQUENTIAL
DAMAGES OR LIMITATIONS ON THE DURATION OF IMPLIED WARRANTIES SO THESE LIMITATIONS OR EXCLUSIONS
MAY NOT APPLY TO YOU. THIS WRITTEN WARRANTY GIVES YOU SPECIFIC LEGAL RIGHTS. YOU MAY ALSO HAVE
OTHER RIGHTS THAT VARY FROM STATE TO STATE.
If You Need Service
Keep your receipt, delivery slip, or some other appropriate payment record to establish the warranty period should service
be required. If service is performed, it is in your best interest to obtain and keep all receipts. Service under this warranty
must be obtained by contacting Electrolux at the addresses or phone numbers below.
This warranty only applies in the USA, Puerto Rico and Canada. In the USA and Puerto Rico, your appliance is warranted
by Electrolux Major Appliances North America, a division of Electrolux Home Products, Inc. In Canada, your appliance
is warranted by Electrolux Canada Corp. Electrolux authorizes no person to change or add to any obligations under this
warranty. Obligations for service and parts under this warranty must be performed by Electrolux or an authorized service
company. Product features or specifications as described or illustrated are subject to change without notice.
USA Canada
1-877-435-3287 1-800-265-8352
Electrolux Major Appliances Electrolux Canada Corp.
North America 5855 Terry Fox Way
10200 David Taylor Drive Uississauga, Ontario,
Charlotte, NC 28262 Canada L5V 3E4


