
User Manual
Exctly wht
you need
Model Code/s:
EFLW500
EFLW600
Online:
esatto.house
Product:
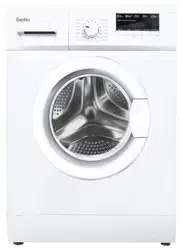
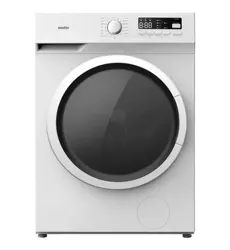
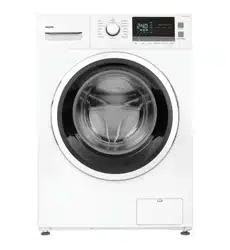
5kg Front Load Washing Machine
6kg Front Load Washing Machine
Version:
V1.2 0521

Congratulations on purchasing your washing machine. The Esatto brand is proudly
distributed within Australia by Residentia Group Pty Ltd.
Please refer to the warranty card at the rear of this manual for information regarding
your product’s parts and labour warranty, or visit us online at: www.residentia.group
At Residentia Group, we are customer obsessed and our Support Team are there to
ensure you get the most out of your appliance. Should you want to learn more about
your washing machine such as the various washing modes or importantly taking care
of the appliance, our Support Team are here to help.
You can use our online Support Centre at anytime by visiting:
http://support.residentiagroup.com.au
Or you can contact us via phone by dialing: 1300 11 HELP (4357).
It is important that you read through the following use and care manual thoroughly to
familiarise yourself with the installation and operation requirements of your appliance
to ensure optimum performance.
Again, thank you for choosing an Esatto appliance and we look forward to being of
service to you.
Kind Regards,
The Residentia Team
Residentia Group
—
Head Office
165 Barkly Avenue
Burnley, Victoria
Australia 3121
—
ACN
600 546 656
—
Online
residentia.group
www.esatto.house
@esatto.house
—
Postage
PO Box 5177
Burnley, Victoria
Australia 3121
—
Telephone
1300 11 4357
Welcome

Page:
3
User Manual:
Contents: Page:
Safety Instructions 4
Your Washing Machine 6
Installation 7
Operating Instructions 10
Cleaning & Maintenance 18
Troubleshooting 20
Technical Specications 22
Your Receipt 24
Purchase Details 25
Warranty Information 26

Page:
4
User Manual:
For your safety, the information in this manual must be
followed to minimise the risk of re or explosion, electric
shock, or to prevent property damage, personal injury or
loss of life.
• This appliance is not intended for use by
persons(including children) with reduced physical,
sensory or mental capabilities or lack of experience and
knowledge unless they have been given supervision or
instruction concerning the use of the appliance by a
person responsible for their safety.
• Children should be supervised to ensure that they do
not play with the appliance.
• If the supply cord is damaged, it must be replaced by
the manufacturer, its service agent or similarly qualied
persons in order to avoid a hazard.
• The new hose-sets supplied with the appliance are to be
used and the old hose-sets should not be reused.
• The openings must not be obstructed by a carpet.
Model
Washing
Capacity
Water
Pressure
EFLW500 5.0kg 0.05-1MPa
EFLW600 6.0kg 0.05-1MPa
Explanation of the following signal words:
WARNING!
This signal word indicates a potentially dangerous situation
which may result in death or serious injuries unless it’s
avoided.
CAUTION!
This signal word indicates a potentially dangerous situation
which may result in slight or minor injuries or damage to
property and the environment.
NOTE!
This signal word indicates a potentially dangerous situation
which may result in slight or minor injuries.
WARNING!
POTENTIAL ELECTRIC SHOCK
• This appliance is for indoor & domestic use only.
• Do not position washing machine in a humid location.
• If the supply cord is damaged, it must be replaced by
the manufacturer, its service agent or similarly qualied
persons in order to avoid a hazard.
• Damage due to improper use or repairs made by
unqualied personnel will void your warranty. The
producer will assume no liability for any eventual
damages caused by misuse of the product or
noncompliance with these instructions.
• The new hose-sets supplied with the appliance are
to be used and the old hose-sets should not be reused.
• Before performing any maintenance on the device,
unplug the appliance from the mains.
• Always unplug the machine and turn o the water
supply after use. The max. inlet water pressure, in
pascals. The min. inlet water pressure, in pascals.
• To ensure your safety, power plug must be inserted into
an earthed three-pole socket. Check carefully and make
sure that your socket is properly and reliably earthed.
• Make sure that the water and electrical devices must
be connected by a qualied technician in accordance
with the manufacturer's instructions and local safety
regulations.
Safety Instructions

Page:
5
User Manual:
RISK TO CHILDREN
• This appliance is not intended for use by persons
(including children) with reduced physical, sensory or
mental capabilities or lack of experience and knowledge
unless they have been given supervision or instruction
concerning the use of the appliance by a person
responsible for their safety.
• Children of less than 3 years of age should be supervised
to ensure they do not play with the appliance.
• The glass door may be very hot during the operation.
Keep kids and pets far away from the machine during
the operation very wet rooms as well as in the rooms
with explosive or caustic gas.
• Remove all packaging and transport bolts before using
the appliance. Otherwise, serious damage may result.
• Plug must be accessible after installation.
RISK OF EXPLOSION
• Do not wash or dry articles that have been cleaned in,
washed in, soaked in, or dabbed with combustible or
explosive substances( such as wax, oil, paint, gasoline,
degreasers, dry-cleaning solvents, kerosene, etc.)
This may result in re or explosion.
• Before hand, thoroughly rinse items of washing by hand.
RISK OF DAMAGING THE APPLIANCE
• Your product is only for home use and is only designed
for the textiles suitable for machine washing.
• Do not climb up and sit on top cover of the machine.
• Do not lean against machine door.
• Cautions during Handling Machine:
1. Transport bolts shall be reinstalled to the machine
by a specialised person.
2. The accumulated water shall be drained out
of the machine.
3. Handle the machine carefully. Never hold each
protruded part on the machine while lifting.
Machine door can not be used as the handle
during the conveyance.
4. This appliance is heavy. Transport with care.
• Do not close the door with excessive force. If it is
dicult to close the door, check if there are clothes
obstructing the seal.
• Do not wash carpets.
OPERATING THE APPLIANCE
• Before washing the clothes at rst time, the product
should be operated in one round of the whole
procedures without the clothes inside.
• Do not wash ammable and explosive or toxic solvents.
• Do not use gasoline and alcohol etc. as detergents.
Please only select the detergents suitable for machine
washing, especially for drum.
• Make sure that all pockets are emptied. Sharp and rigid
items such as coins, screws or stone etc. may cause
serious damages to this machine.
• Please check whether the water inside the drum has
been drained before opening its door. Please do not
open the door if there is any water visible.
• Be careful of burning when the product drains hot
washing water.
• Never rell the water by hand during washing.
• After the program is completed, please wait for two
minutes to open the door.
DISPOSAL
Do not dispose this product as unsorted municipal waste.
Collection of such waste separately for special treatment is
necessary.
By ensuring this product is disposed correctly, you will
help prevent potential negative consequences for the
environment and human health, which could otherwise be
caused by inappropriate waste handling of this product.
The symbol on the product indicates that this product
may not be treated as household waste. Instead it shall
be handed over to the applicable collection point for the
recycling of electrical and electronic equipment. Disposal
must be carried out in accordance with local environmental
regulations for waste disposal. For more detailed information
about treatment, recovery and recycling of this product,
please contact your local city oce, your household waste
disposal service or the shop where you purchased the
product
• Make sure that all pockets are emptied. Sharp and rigid
items such as coin,brooch,nail,screw or stone etc. may
cause serious damages to this machine.
• Please check whether the water inside the drum has
been drained before opening its door.Please do not open
the door if there is any water visible.
• Be careful of burning when the product drains hot
washing water.
• Never refill the water by hand during washing.
• After the program is completed, Please wait for two
minutes to open the door.
This marking indicates that this product should not be
disposed with other household wastes thr
oughout the
EU.To prevent possible harm to the environment or
human health from uncontrolled waste disposal,recycle
it responsibly to promote the sustainable reuse of
material resources.To return your used device, please use
the collection systems or contact the retailer where the
product was purchased. They return and can take this
product for environmental safe recycling.
Packaging/Old appliance
SAFETY INSTRUCTIONS
6
Page:
6
User Manual:
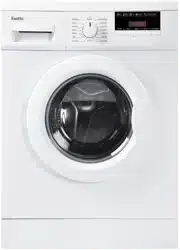
PRODUCT DESCRIPTION
NOTE!
The images in this user manual are for reference only. Your appliance may appear dierently.
ACCESSORIES
NOTE!
If the drain hose is already installed on the machine, then there is no spring clamper and drain hose in the accessories.
Your Washing Machine
Detergent dispenser
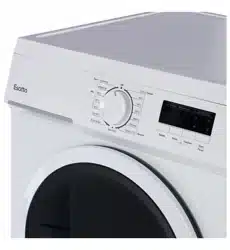
Control Panel
Power supply cord
Service lter
Drain hose
Top cover
Transport hole plugs Cold water supply hose User manual
Drum
Water supply hose
Door
Adjustable feet
Accessories
Product Description
Transport
plughole
Supply hose hot
water (optional)
Supply hose
cold water
Drain hose
(optional
support
)
• The product line chart is for reference only, please refer to real product as
standard.
Note!
Drum
Power supply cord
Control panel
Detergent dispenser
Service filter
Door
Water supply hose
Top cover
Drain hose
Owner’s manual
INSTALLATION
7
Page:
7
User Manual:
Installation
INSTALLATION INSTRUCTIONS
IMPORTANT!
If the power cord is damaged, it must be replaced by Residentia Group or one of
it’s authorised service representatives. Please contact 1300 11 HELP (4357) and
ensure the appliance is completely disconnected from the power supply.
WARNING!
• Stability is important to prevent the product from moving!
• Make sure that the product should not stand on the power cord.
Before installing the machine, the location must be:
1. Rigid, dry, and a level surface
2. Avoiding direct sunlight
3. Sucient ventilation
4. Room temperature is above 0 °C
5. Kept far away from the heat resources such as coal or gas.
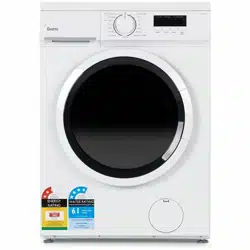
UNPACKING THE WASHING MACHINE
WARNING!
• Packaging material (e.g. Films, Styrofoam) can be dangerous for children.
• There is a risk of suocation! Keep all packaging well away from children.
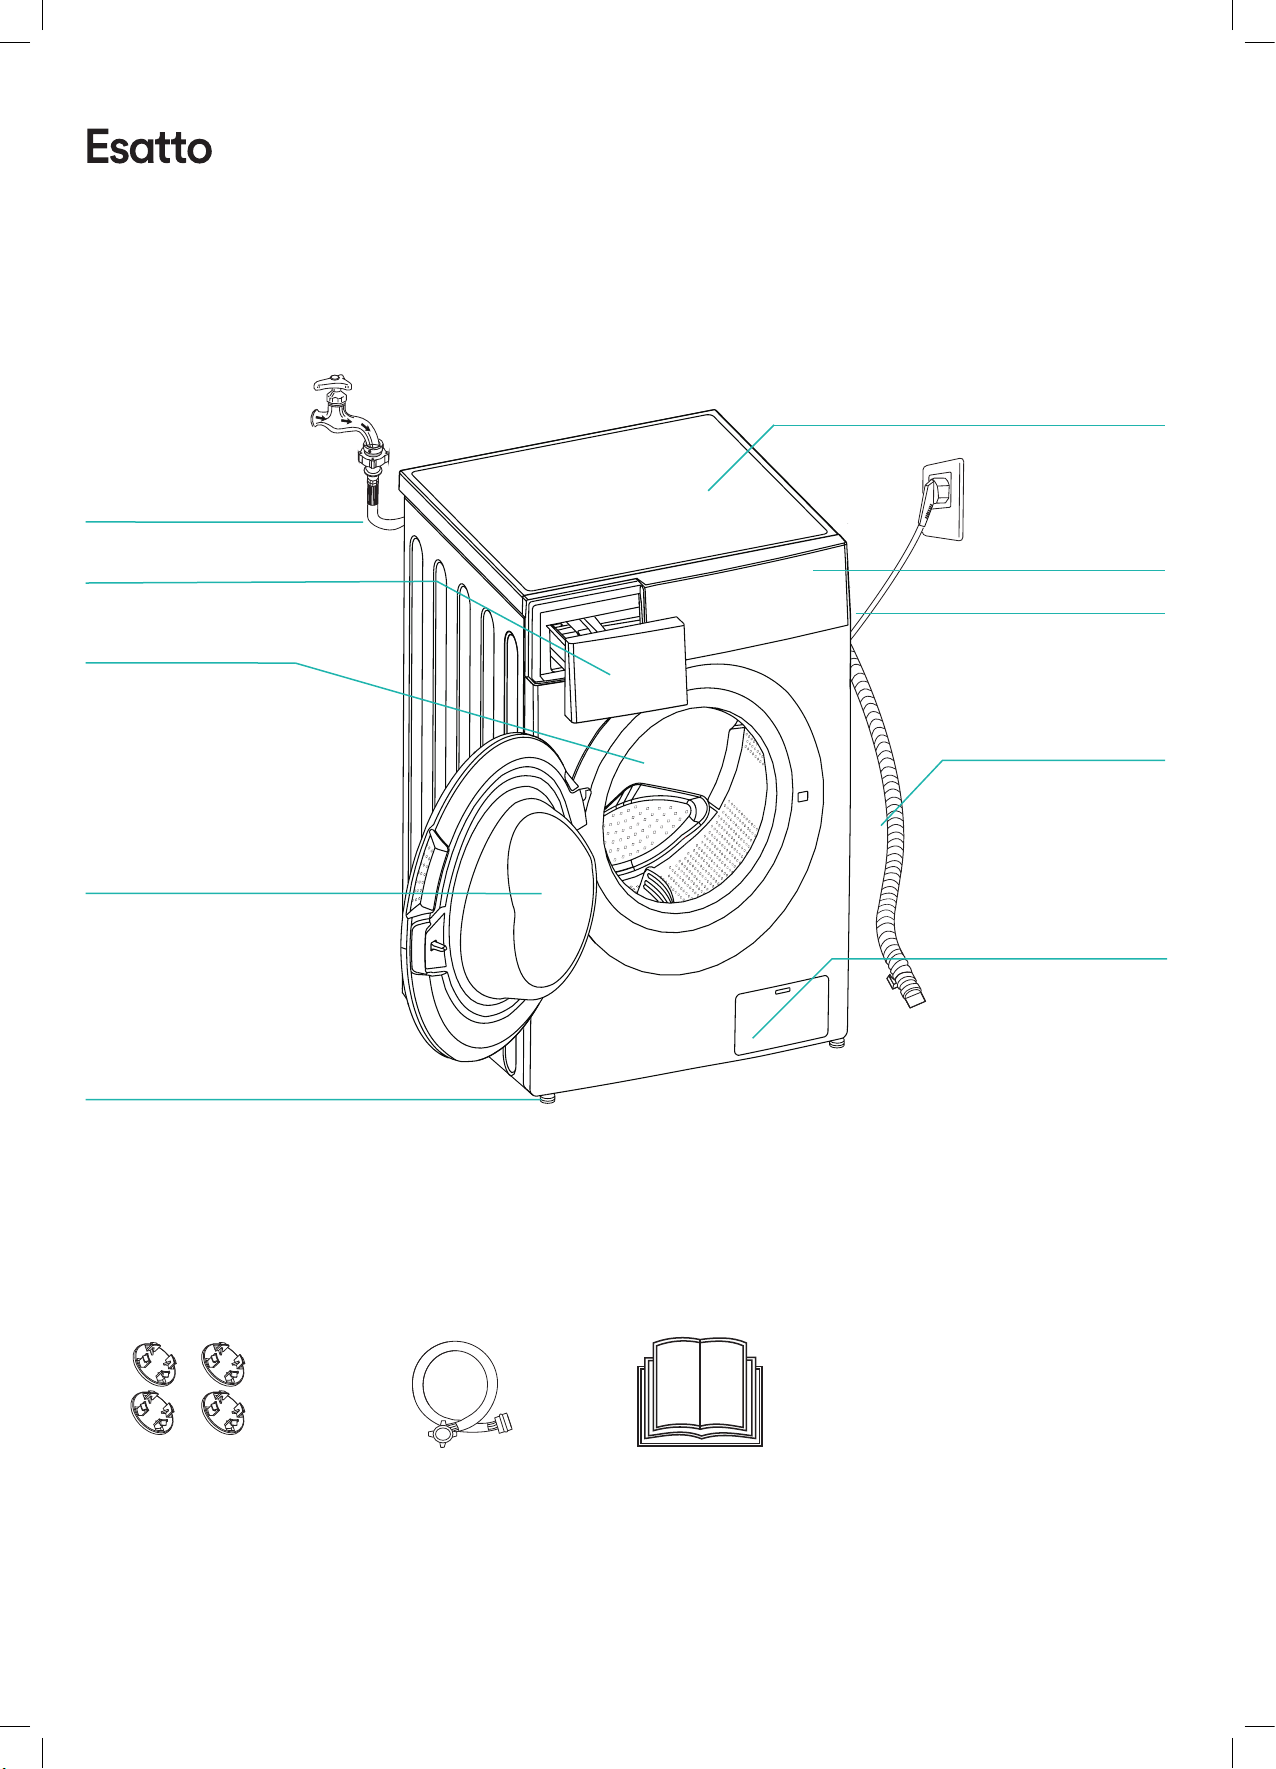
1. Remove the cardboard box and styrofoam packaging.
2. Lift the washing machine and remove the base packing.
Ensure the small triangle foam at the base of the machine is removed.
If not, lay the unit down on its side surface, then remove the small foam
from the unit bottom manually.
3. Remove the tape securing the power supply cord and drain hose.
4. Remove the inlet hose from the drum.
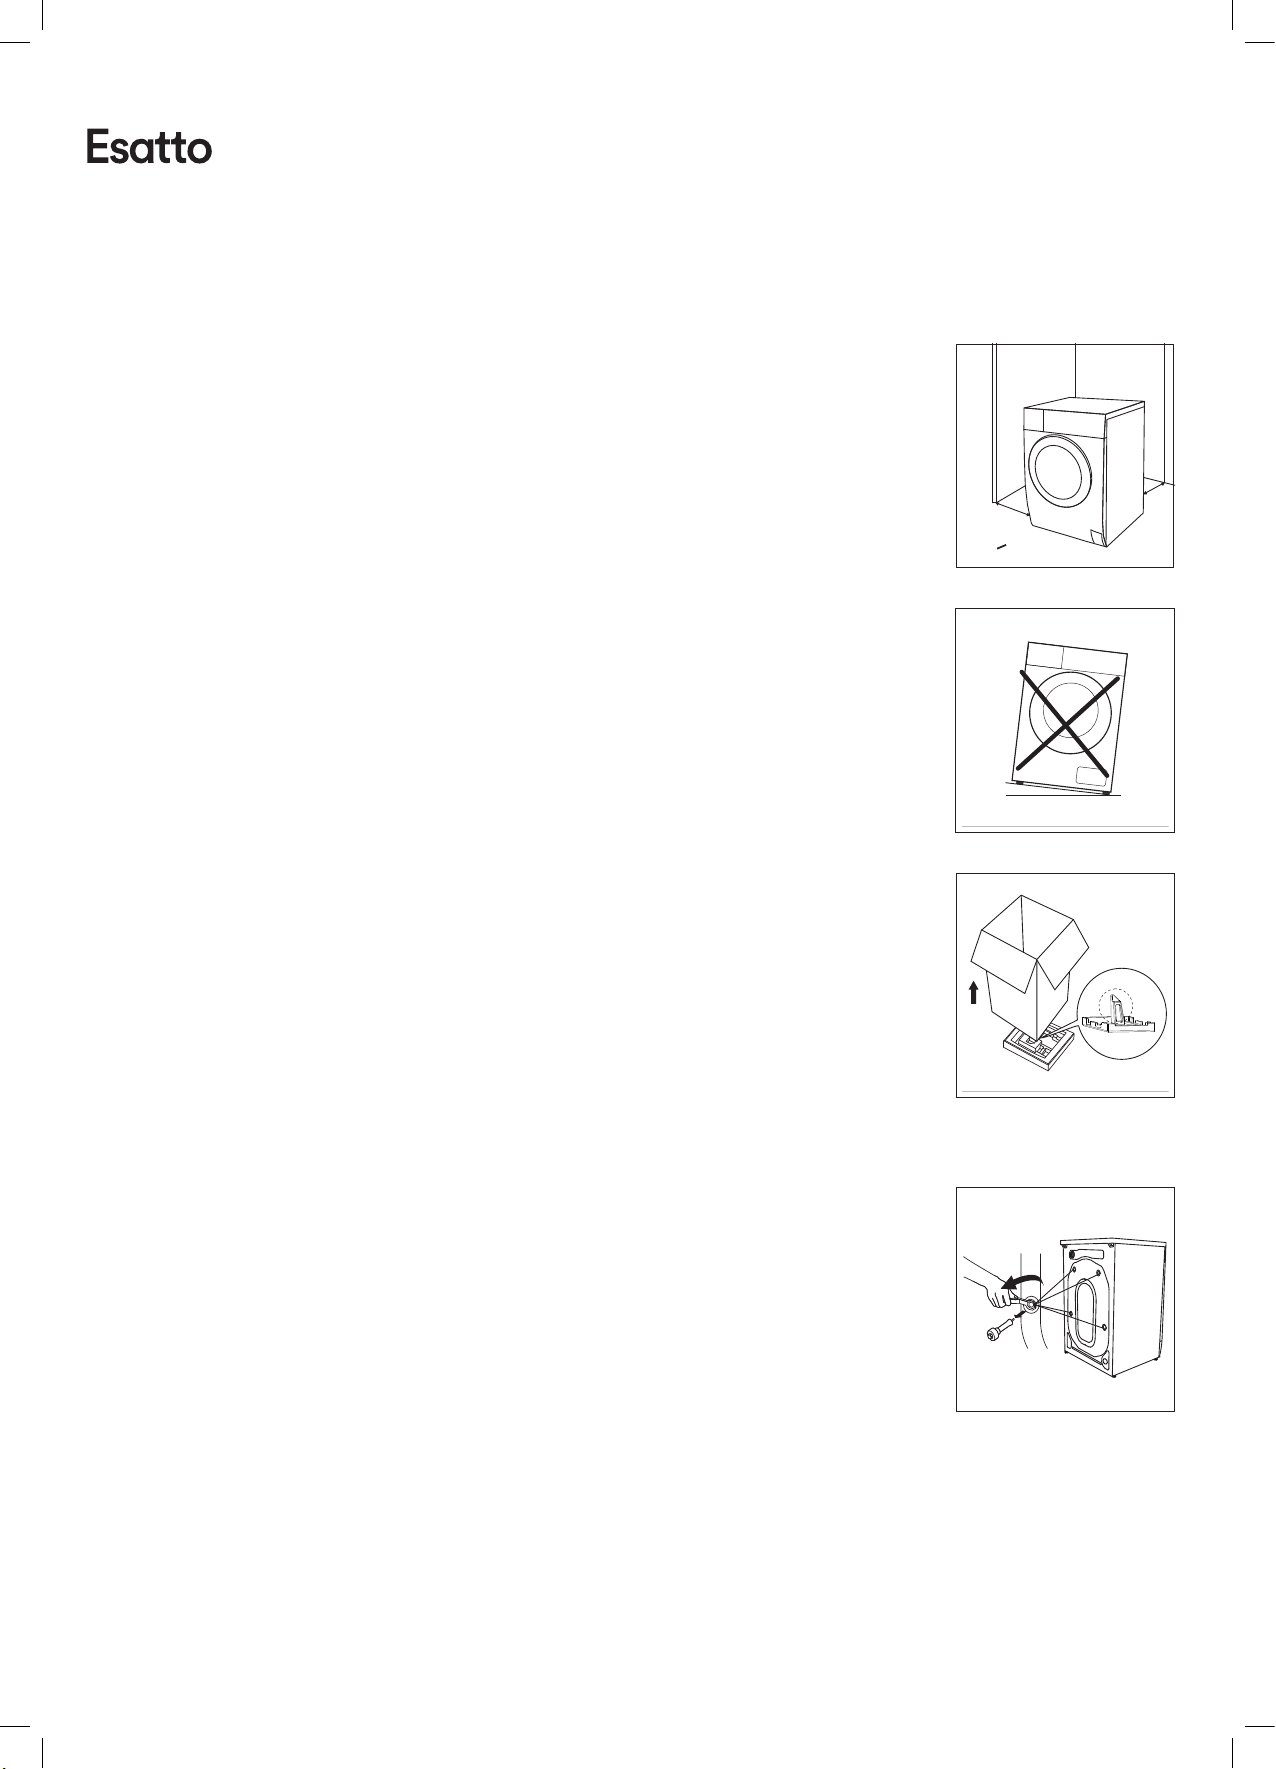
5. Remove the transportation bolts.
WARNING!
• You must remove the transport bolts from the rear of the machine operating
the appliance
• You’ll need the transport bolts again if you move the appliance, so ensure
that they are kept in a safe place.
Please take the following steps to remove the bolts:
1. Loosen 4 bolts with spanner and then remove them.
2. Stop the holes with transport hole plugs.
3. Keep the transport bolts properly for future use.
Installation
Before installing the machine, the location characterized
follows shall be selected:
1.Rigid, dry, and level surface
2.Avoid direct sunlight
3.Sufficient ventilation
4.Room temperature is above 0℃
5.Keep far away from the heat resources such as coal or gas.
as
Unpacking the washing machine
1. Remove the cardboard box and styrofoam packing.
2. Lift the washing machine and remove the base packing.
3. Remove the tape securing the power supply cord and drain hose.
4. Remove the inlet hose from the drum.
Make sure the small triangle
foam is removed with the bottom one together. If not, lay the unit down with side
surface, then remove the small foam from the unit bottom manually.
Please take the following steps to remove the bolts:
1.Loosen 4 bolts with spanner and then remove them.
2.Stop the holes with transport hole plugs.
3.Keep the transport bolts properly for future use.
Remove transport bolts
•
•
Stability is important to prevent the product from
wandering!
Make sure that the product should not stand on
the power cord.
Warning!
!!
•
•
Packaging material (e.g. Films, Styrofoam) can be
dangerous for children.
There is a risk of suffocation ! Keep all packaging
well away from children.
Warning!
!!
•
• product
you
You must remove the transport bolts from the backside before using the product.
You’ll need the transport bolts again if you move the , so make sure
keep them in a safe place.
Warning!
!!
INSTALLATION
w
w
W
>
20mm
Installation area
8
Installation
Before installing the machine, the location characterized
follows shall be selected:
1.Rigid, dry, and level surface
2.Avoid direct sunlight
3.Sufficient ventilation
4.Room temperature is above 0℃
5.Keep far away from the heat resources such as coal or gas.
as
Unpacking the washing machine
1. Remove the cardboard box and styrofoam packing.
2. Lift the washing machine and remove the base packing.
3. Remove the tape securing the power supply cord and drain hose.
4. Remove the inlet hose from the drum.
Make sure the small triangle
foam is removed with the bottom one together. If not, lay the unit down with side
surface, then remove the small foam from the unit bottom manually.
Please take the following steps to remove the bolts:
1.Loosen 4 bolts with spanner and then remove them.
2.Stop the holes with transport hole plugs.
3.Keep the transport bolts properly for future use.
Remove transport bolts
•
•
Stability is important to prevent the product from
wandering!
Make sure that the product should not stand on
the power cord.
Warning!
!!
•
•
Packaging material (e.g. Films, Styrofoam) can be
dangerous for children.
There is a risk of suffocation ! Keep all packaging
well away from children.
Warning!
!!
•
• product
you
You must remove the transport bolts from the backside before using the product.
You’ll need the transport bolts again if you move the , so make sure
keep them in a safe place.
Warning!
!!
INSTALLATION
w
w
W> 20mm
Installation area
8

Page:
8
User Manual:
Installation (Continued)
LEVELLING THE WASHING MACHINE
WARNING!
The lock nuts on all four feet must be screwed tightly against the housing
1. Check if the legs are closely attached to the cabinet.
If not, please turn them to their original positions tighten the nuts.
2. Loosen the lock nut turn the feet until it is closely in contacts with the oor.
3. Adjust the legs and lock them with a spanner.
Make sure the machine is steady.
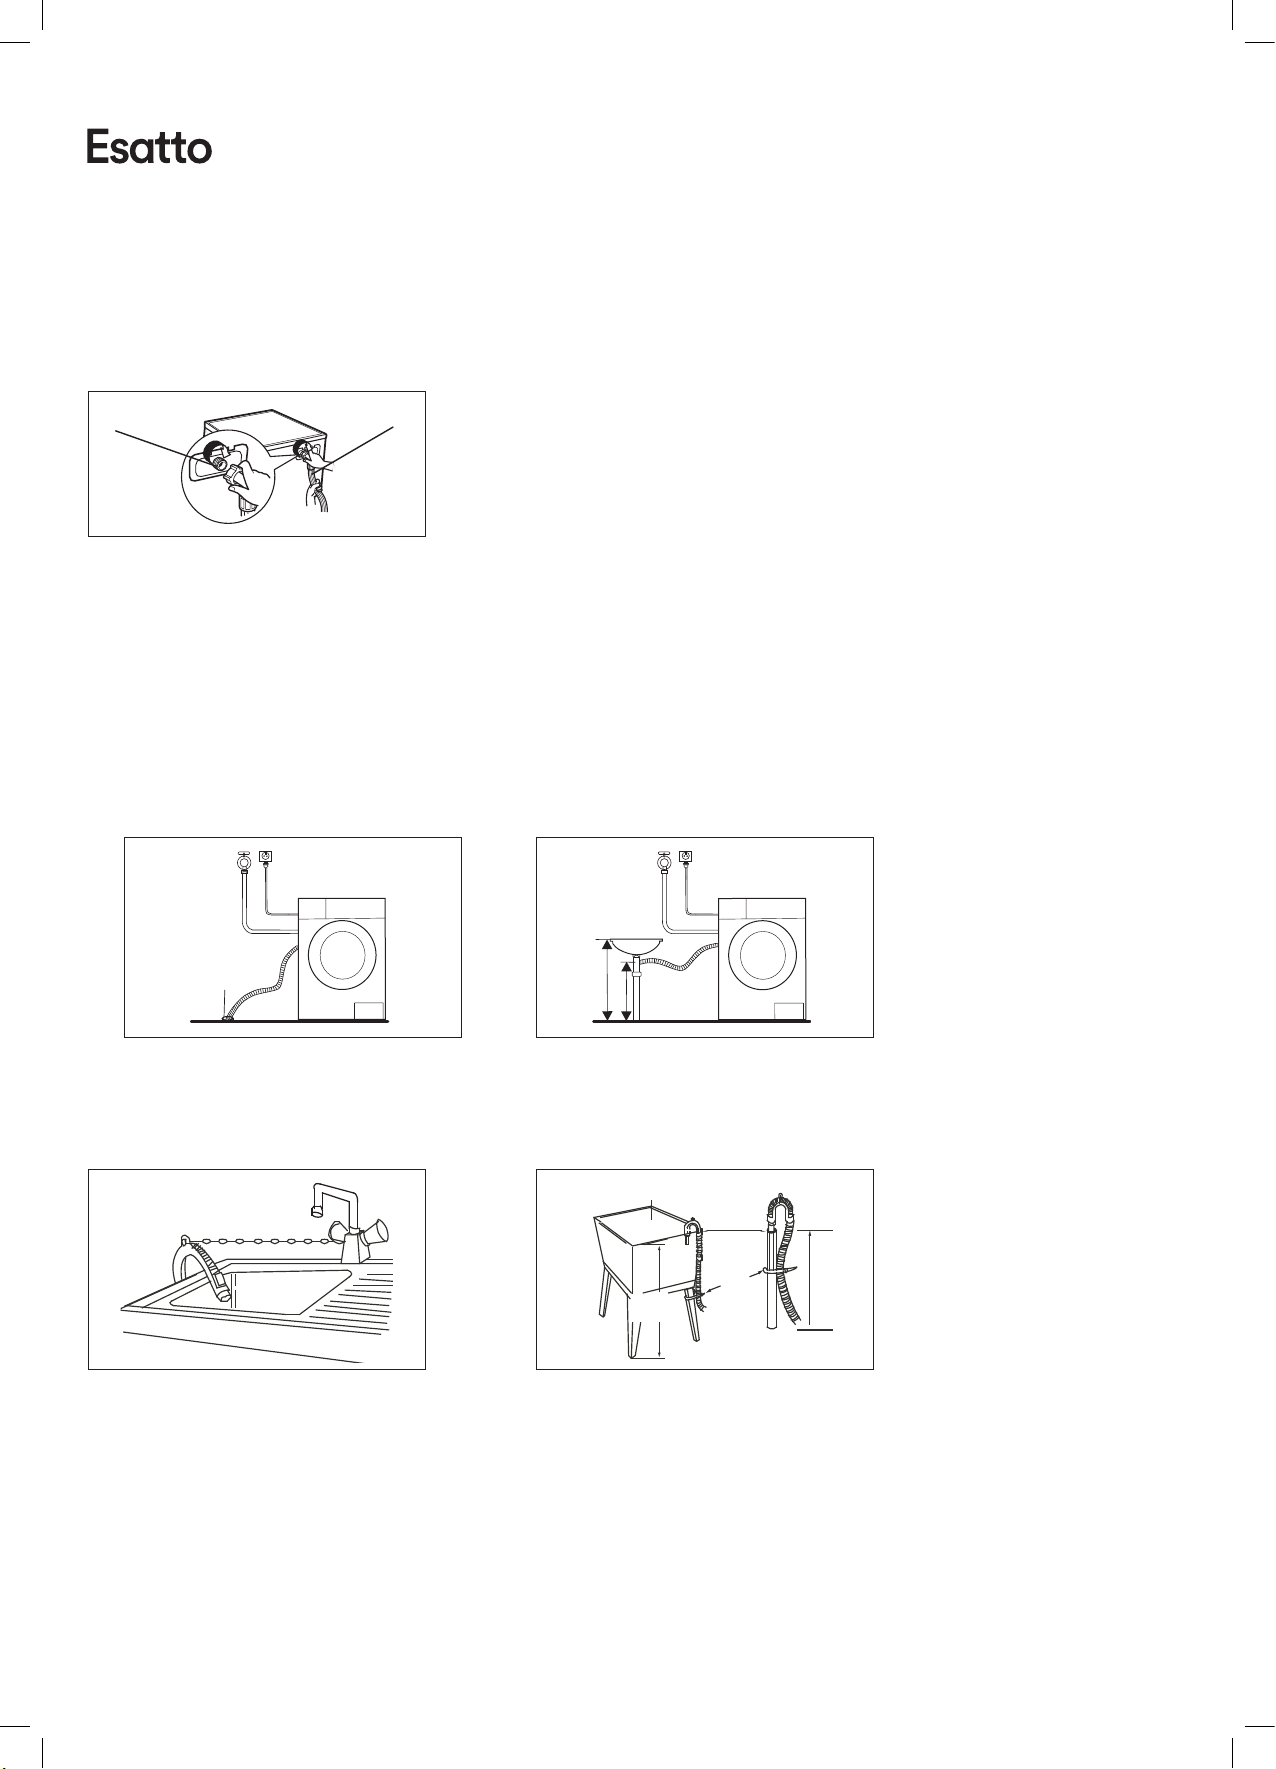
CONNECT WATER SUPPLY HOSE
WARNING!
• To prevent leakage or water damage, follow the instructions in this chapter.
• Do not kink, crush, modify or sever the water inlet hose.
• For the model equipped with a hot valve, connect it to a hot water tap with
a hot water supply hose. Energy consumption will decrease automatically for
some programs.
Connect the inlet pipe as indicated, There are two ways to connect the inlet pipe.
1. Connection between ordinary tap and inlet hose.
2. Connection between screw tap and inlet hose.
9
9
1.Check if the legs are closely attached to the cabinet. If not, please turn them to
their original positions tighten the nuts.
2.Loosen the lock nut turn the feet until it closely contacts with the floor.
3.Adjust the legs and lock them with a spanner, make sure the machine is steady.
Levelling the washing machine
• The lock nuts on all four feet must be screwed tightly against the housing.
Connect Water Supply Hose
Connect the inlet pipe as indicated, There are two ways to connect the inlet pipe.
1.Connection between ordinary tap and inlet hose.
• To prevent leaka
ge or water damage, follow the instructions in this chapter
Do not kink, crush, modify or sever .
!
• water inlet hose
• For the model equips hot valve,connect it to hot water tap with hot water supply
hose. Energy consumption will decrease automatically for some program.
2
3
4
1
Raise
Lower
Lock nut
foot
Warning!
!!
Warning!
!!
INSTALLATION
Loosen clamp nut and
four bolts
Tighten clamp nut Press slide bushing,
insert inlet hose into
connecting base
slide bushing
2
3
41
Connection finished
clamp nut
Tap with threads and inlet hose
Special tap for washing machine
2.Connection between screw tap and inlet hose.
slide bushing
9
9
9
1.Check if the legs are closely attached to the cabinet. If not, please turn them to
their original positions tighten the nuts.
2.Loosen the lock nut turn the feet until it closely contacts with the floor.
3.Adjust the legs and lock them with a spanner, make sure the machine is steady.
Levelling the washing machine
• The lock nuts on all four feet must be screwed tightly against the housing.
Connect Water Supply Hose
Connect the inlet pipe as indicated, There are two ways to connect the inlet pipe.
1.Connection between ordinary tap and inlet hose.
• To prevent leaka
ge or water damage, follow the instructions in this chapter
Do not kink, crush, modify or sever .
!
• water inlet hose
• For the model equips hot valve,connect it to hot water tap with hot water supply
hose. Energy consumption will decrease automatically for some program.
2
3
4
1
Raise
Lower
Lock nut
foot
Warning!
!!
Warning!
!!
INSTALLATION
Loosen clamp nut and
four bolts
Tighten clamp nut Press slide bushing,
insert inlet hose into
connecting base
slide bushing
2
3
41
Connection finished
clamp nut
Tap with threads and inlet hose
Special tap for washing machine
2.Connection between screw tap and inlet hose.
slide bushing
9
a) Loosen clamp nut
and four bolts
b) Tighten clamp nut d) Connection nishedc) Press slide bushing,
insert inlet hose into
connecting base
9
9
1.Check if the legs are closely attached to the cabinet. If not, please turn them to
their original positions tighten the nuts.
2.Loosen the lock nut turn the feet until it closely contacts with the floor.
3.Adjust the legs and lock them with a spanner, make sure the machine is steady.
Levelling the washing machine
• The lock nuts on all four feet must be screwed tightly against the housing.
Connect Water Supply Hose
Connect the inlet pipe as indicated, There are two ways to connect the inlet pipe.
1.Connection between ordinary tap and inlet hose.
• To prevent leaka
ge or water damage, follow the instructions in this chapter
Do not kink, crush, modify or sever .
!
• water inlet hose
• For the model equips hot valve,connect it to hot water tap with hot water supply
hose. Energy consumption will decrease automatically for some program.
2
3
4
1
Raise
Lower
Lock nut
foot
Warning!
!!
Warning!
!!
INSTALLATION
Loosen clamp nut and
four bolts
Tighten clamp nut Press slide bushing,
insert inlet hose into
connecting base
slide bushing
2
3
41
Connection finished
clamp nut
Tap with threads and inlet hose
Special tap for washing machine
2.Connection between screw tap and inlet hose.
slide bushing
9
9
9
1.Check if the legs are closely attached to the cabinet. If not, please turn them to
their original positions tighten the nuts.
2.Loosen the lock nut turn the feet until it closely contacts with the floor.
3.Adjust the legs and lock them with a spanner, make sure the machine is steady.
Levelling the washing machine
• The lock nuts on all four feet must be screwed tightly against the housing.
Connect Water Supply Hose
Connect the inlet pipe as indicated, There are two ways to connect the inlet pipe.
1.Connection between ordinary tap and inlet hose.
• To prevent leaka
ge or water damage, follow the instructions in this chapter
Do not kink, crush, modify or sever .
!
• water inlet hose
• For the model equips hot valve,connect it to hot water tap with hot water supply
hose. Energy consumption will decrease automatically for some program.
2
3
4
1
Raise
Lower
Lock nut
foot
Warning!
!!
Warning!
!!
INSTALLATION
Loosen clamp nut and
four bolts
Tighten clamp nut Press slide bushing,
insert inlet hose into
connecting base
slide bushing
2
3
41
Connection finished
clamp nut
Tap with threads and inlet hose
Special tap for washing machine
2.Connection between screw tap and inlet hose.
slide bushing
9
Tap with threads and inlet hose Special tap for washing machine
Page:
9
User Manual:
Connect the other end of inlet pipe to the inlet valve at the backside of product
and fasten the pipe tightly clockwise.
DRAIN HOSE
WARNING!
• Do not kink, crush, modify, sever or protract the drain hose.
• Position drain hose properly, otherwise damage might result of water leakage.
There are two ways to place the end of drain hose:
NOTE!
If the machine has drain hose support, please install it like the following:
WARNING!
• When installing drain hose, x it properly with a cable tie.
• If drain hose is too long, do not force it into washing machine as it will cause abnormal noises.
1. Put it into the water trough. 2. Connect it to the branch drain pipe of the trough.
Warning!
!!
Drain Hose
There are two ways to place the end of drain hose:
1.Put it into the water trough. 2.Connect it to the branch drain pipe of
the trough.
•
• If drain hose is too long, do not force it into washing machine as it will cause
abnormal noises.
When installing drain hose, fix it properly with a rope.
•
• Position drain hose properly ,otherwise damage might result of water leakage.
Do not kink or protract the drain hose.
Water
trough
Min.60cm
100cm
Max.
Trough
Hose Retainer
Bind
Max.100cm
Min.60cm
Min.60cm
Max.100cm
If the machine has • drain hose support, please install it like the following .
Warning!
!!
Warning!
!!
Note!
INSTALLATION
water supply hose
water Inlet valve
Connect the other end of inlet pipe to the inlet valve at the backside of product
and fasten the pipe tightly clockwise.
10
Warning!
!!
Drain Hose
There are two ways to place the end of drain hose:
1.Put it into the water trough. 2.Connect it to the branch drain pipe of
the trough.
•
• If drain hose is too long, do not force it into washing machine as it will cause
abnormal noises.
When installing drain hose, fix it properly with a rope.
•
• Position drain hose properly ,otherwise damage might result of water leakage.
Do not kink or protract the drain hose.
Water
trough
Min.60cm
100cm
Max.
Trough
Hose Retainer
Bind
Max.100cm
Min.60cm
Min.60cm
Max.100cm
If the machine has • drain hose support, please install it like the following .
Warning!
!!
Warning!
!!
Note!
INSTALLATION
water supply hose
water Inlet valve
Connect the other end of inlet pipe to the inlet valve at the backside of product
and fasten the pipe tightly clockwise.
10
Page:
10
User Manual:
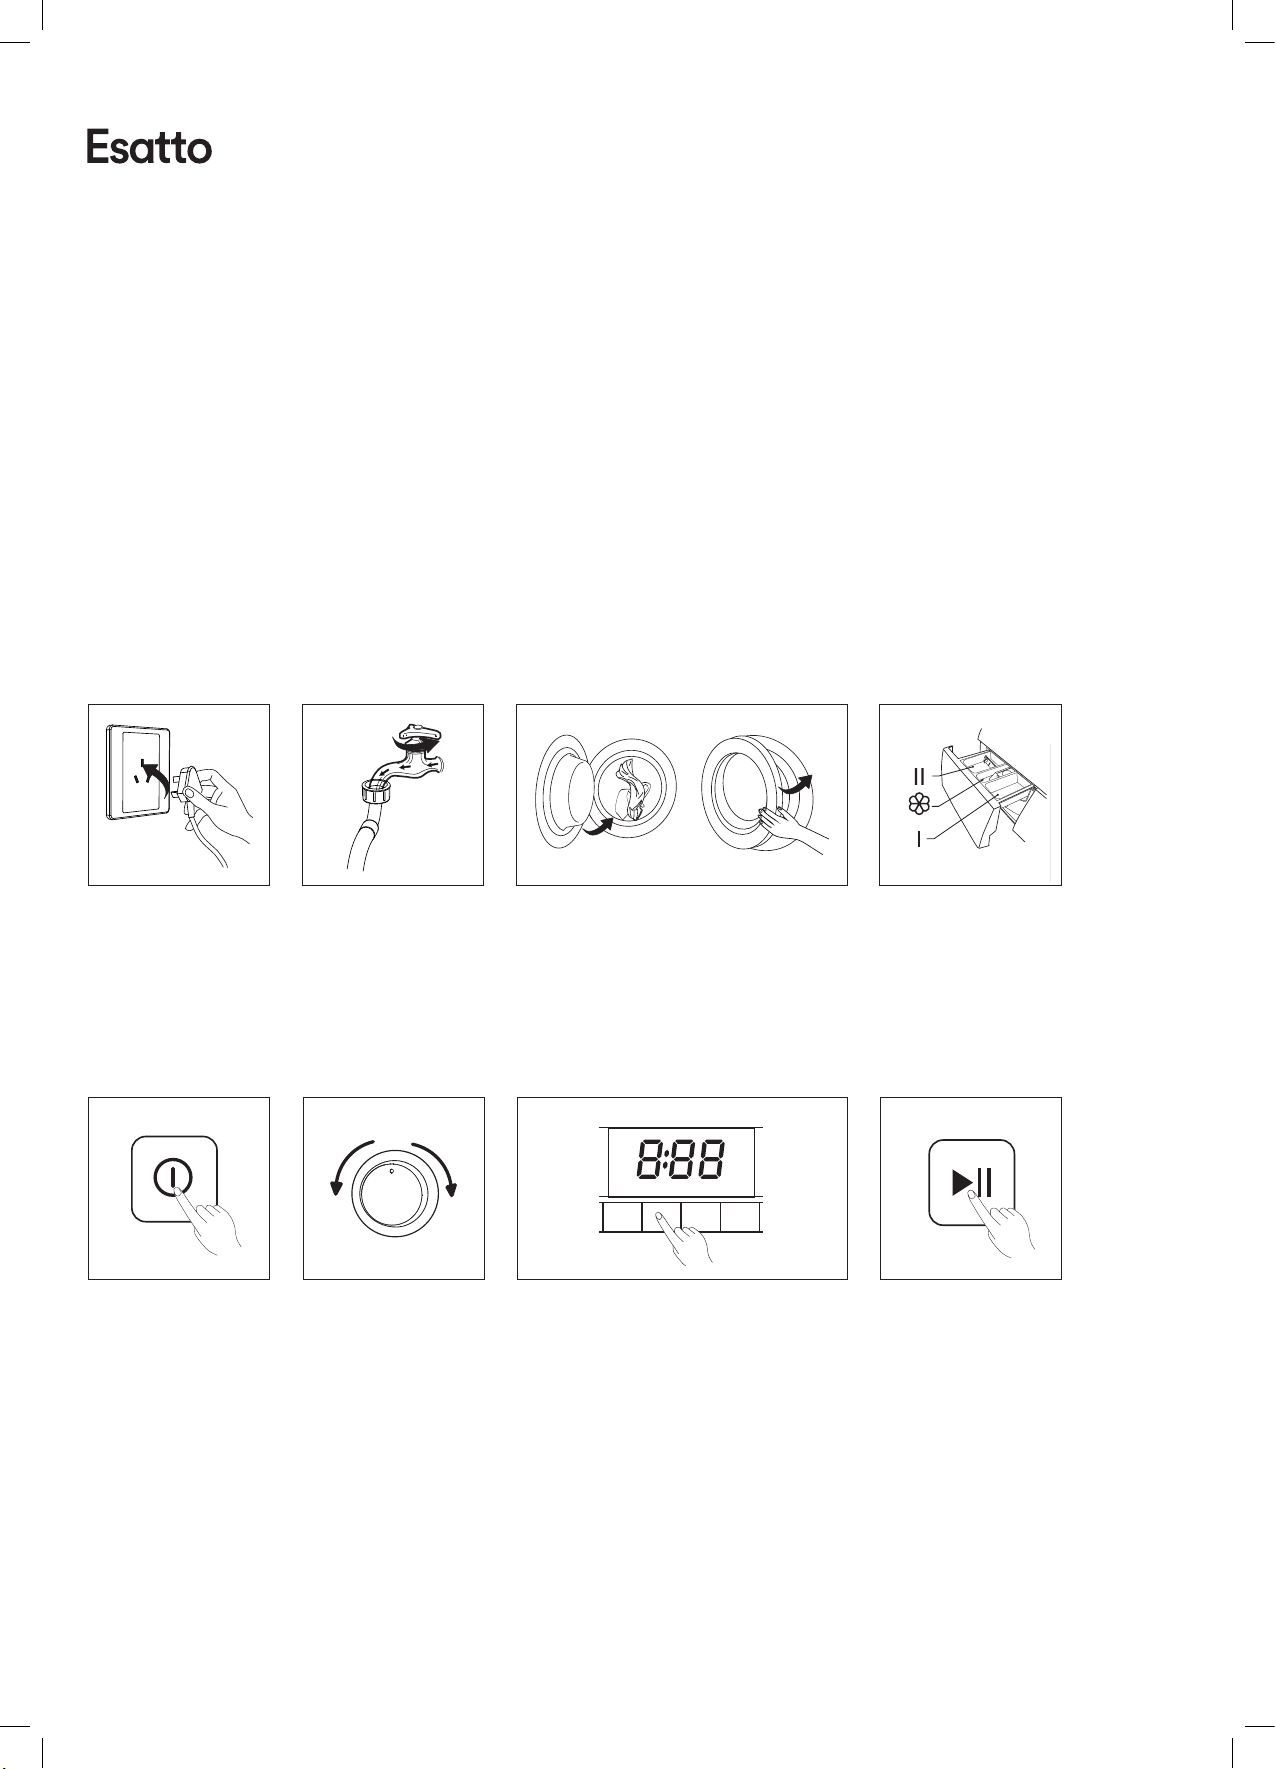
FIRST TIME USE
CAUTION!
• Prior to using the washing machine, ensure that it is correctly installed.
Before rst use, the washing machine must perform one cycle without any clothes inside using the following steps:
1. Connect the power source and water.
2. Insert a small amount of detergent into the detergent drawer and close it.
3. Turn the Program dial to select any program. ‘Cotton 60° C’ program is recommended.
4. Press the “Start/Pause” button on the appliance.
5. Allow the program to complete its full cycle.
6. Your machine is now ready for use.
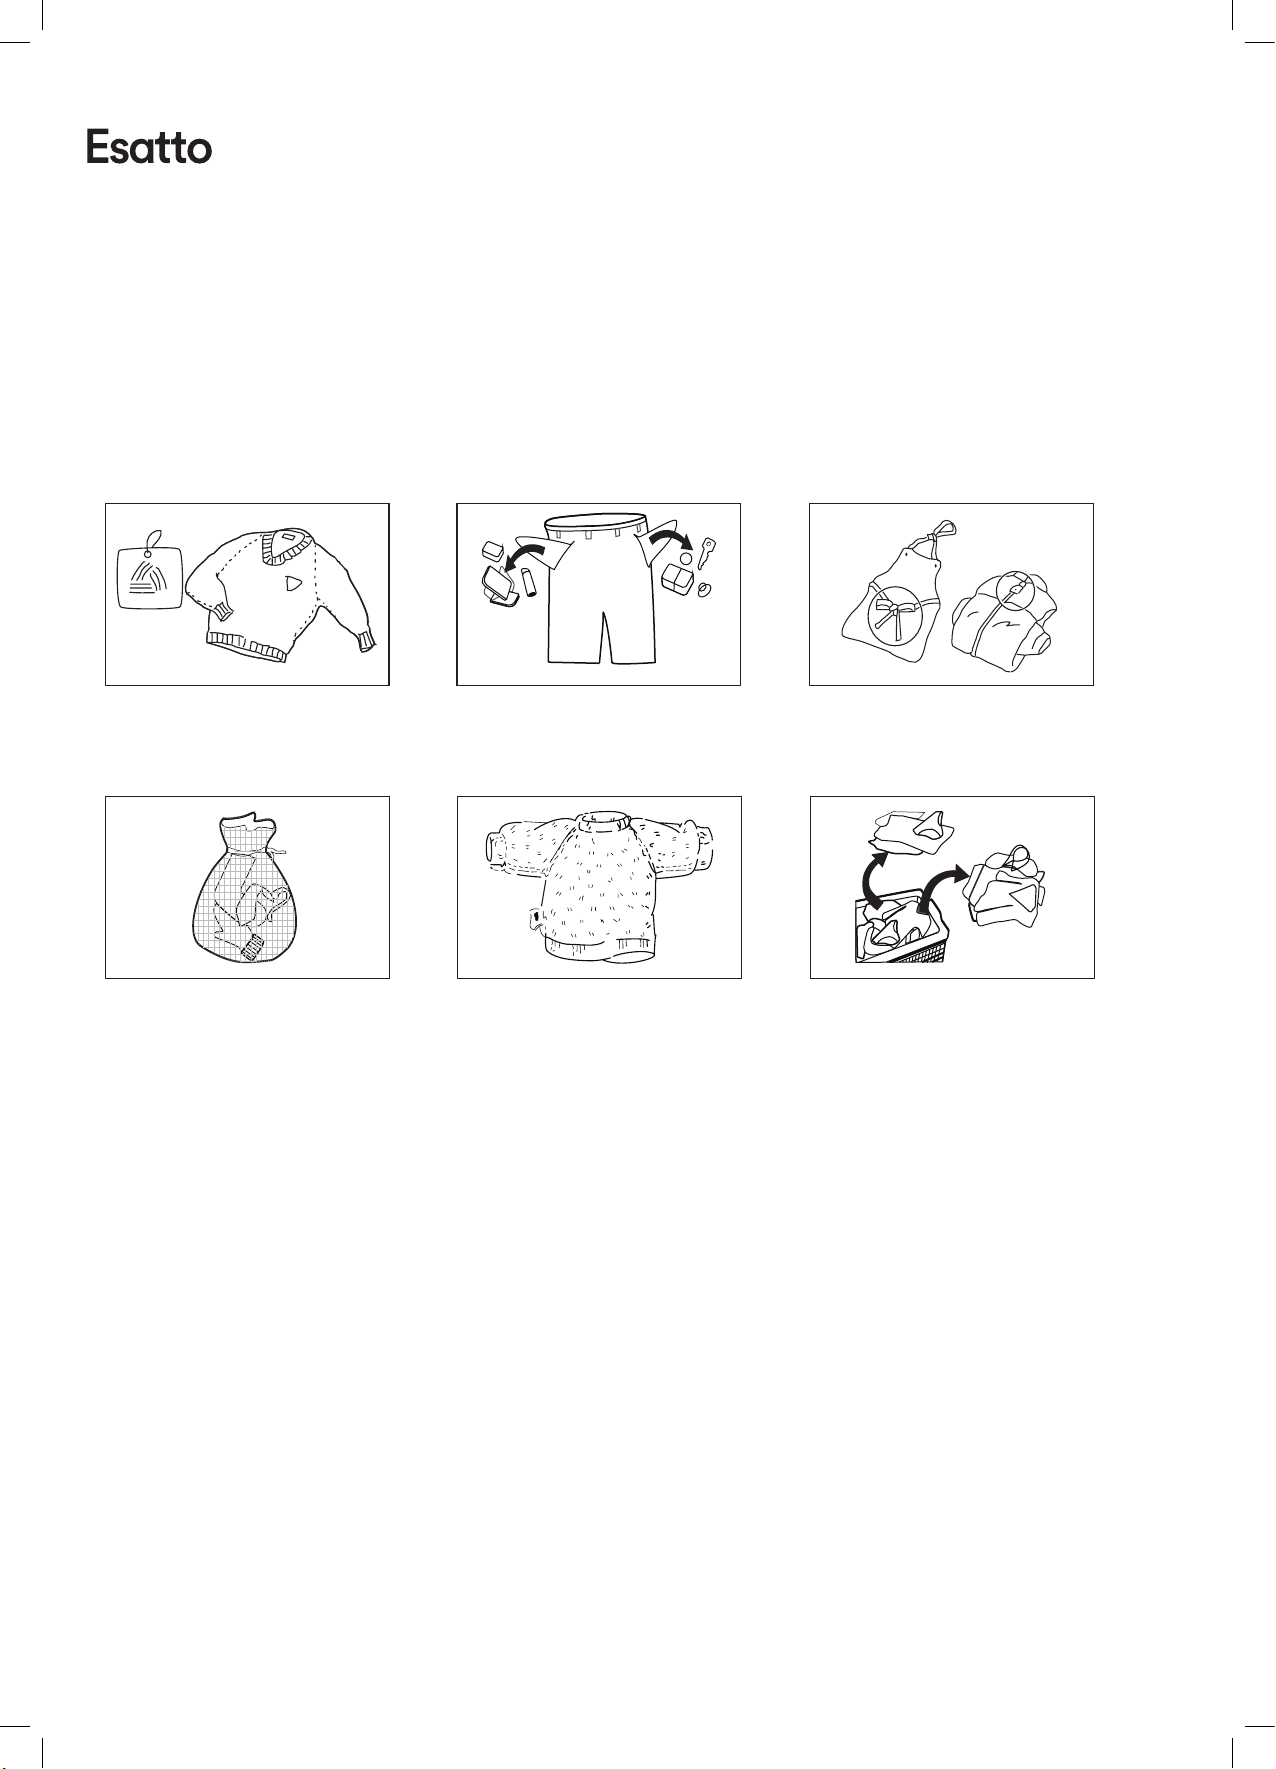
PREPARATION PROCEDURE FOR WASHING YOUR LAUNDRY
NOTE!
Detergent only need to be added in "Case I" after selecting pre-washing for machines with this function.
WASHING
NOTE!
The images in this user manual are for reference only. Your appliance may appear dierently.
AFTER WASHING
The appliance will sound an alert and the display with show "End" after washing cycle is complete.
and the power supply will be powered o automatically. Then unload your laundry.
Operating Instructions
Plug in
Power On Start upSelect Program Select any additional functions
or leave for default settings
Open tap Add detergentLoad laundry and close door
Before washing, please make sure it’s installed properly.
Before washing at first time, the washing machine shall be operated in one
of the whole procedures without clothes in as follows.
•
•
round
1. Before Washing
Buzzer beep or “End” on display.
Open tap
Load
Close door
Plug in
Add detergent
Quick Start
3. After Washing
• Detergent only need to be added in "case I "after selecting pre-washing for
machines with this function.
11 22 33 44 55
2. Washing
Power On
Select Programme
Select function or
default
Start up
1 2 3 4
• 1.
The function button line chart is for reference only, please refer to real product
as standard.
If default is selected, step 3 can be skipped.
2.
Note!
Note!
Caution!
OPERATIONS
Main
wash
Prewash
Softener
11
Page:
11
User Manual:
WASHING CONSIDERATIONS
• The working condition of the washer should be (0-40)°C. If used under 0°C, the inlet valve and draining system
may be damaged. If the machine is placed under condition of 0°C or less, then it should be transferred to
normal ambient temperature to ensure the water supply hose and drain hose are not frozen before use.
• Please check the labels and the explanation of using detergent before wash. Use non-foaming or less-foaming
detergent suitable for machine washing properly.
NOTE!
When washing a single item, we recommend adding one or two more laundry items to your load to avoid the
machine from being unbalanced, allowing for a smooth undisrupted cycle and a smooth draining process.
WARNING!
Do not wash clothes that have come into contact with kerosene, gasoline, alcohol and other ammable materials.
THE USAGE OF DETERGENT AND WASHING POWDER
• Before machine washing powder or fabric softener is poured into the detergent box, we recommend that you
use some water for dilution to prevent the inlet of the detergent box from being blocked and overowing while
lling water.
• Please choose suitable type of detergent for the various washing temperature to get the best washing
performance with less water and energy consumption.
Check the label
for washing advice
Put small clothes
into a wash bag
Take items out of
the pockets
Turn easy-pilling and
long-pile fabric inside out
Knot long strings
or ribbons, close zippers,
and do up buttons
Separate clothes with
dierent textures
Page:
12
User Manual:
Operating Instructions (Continued)
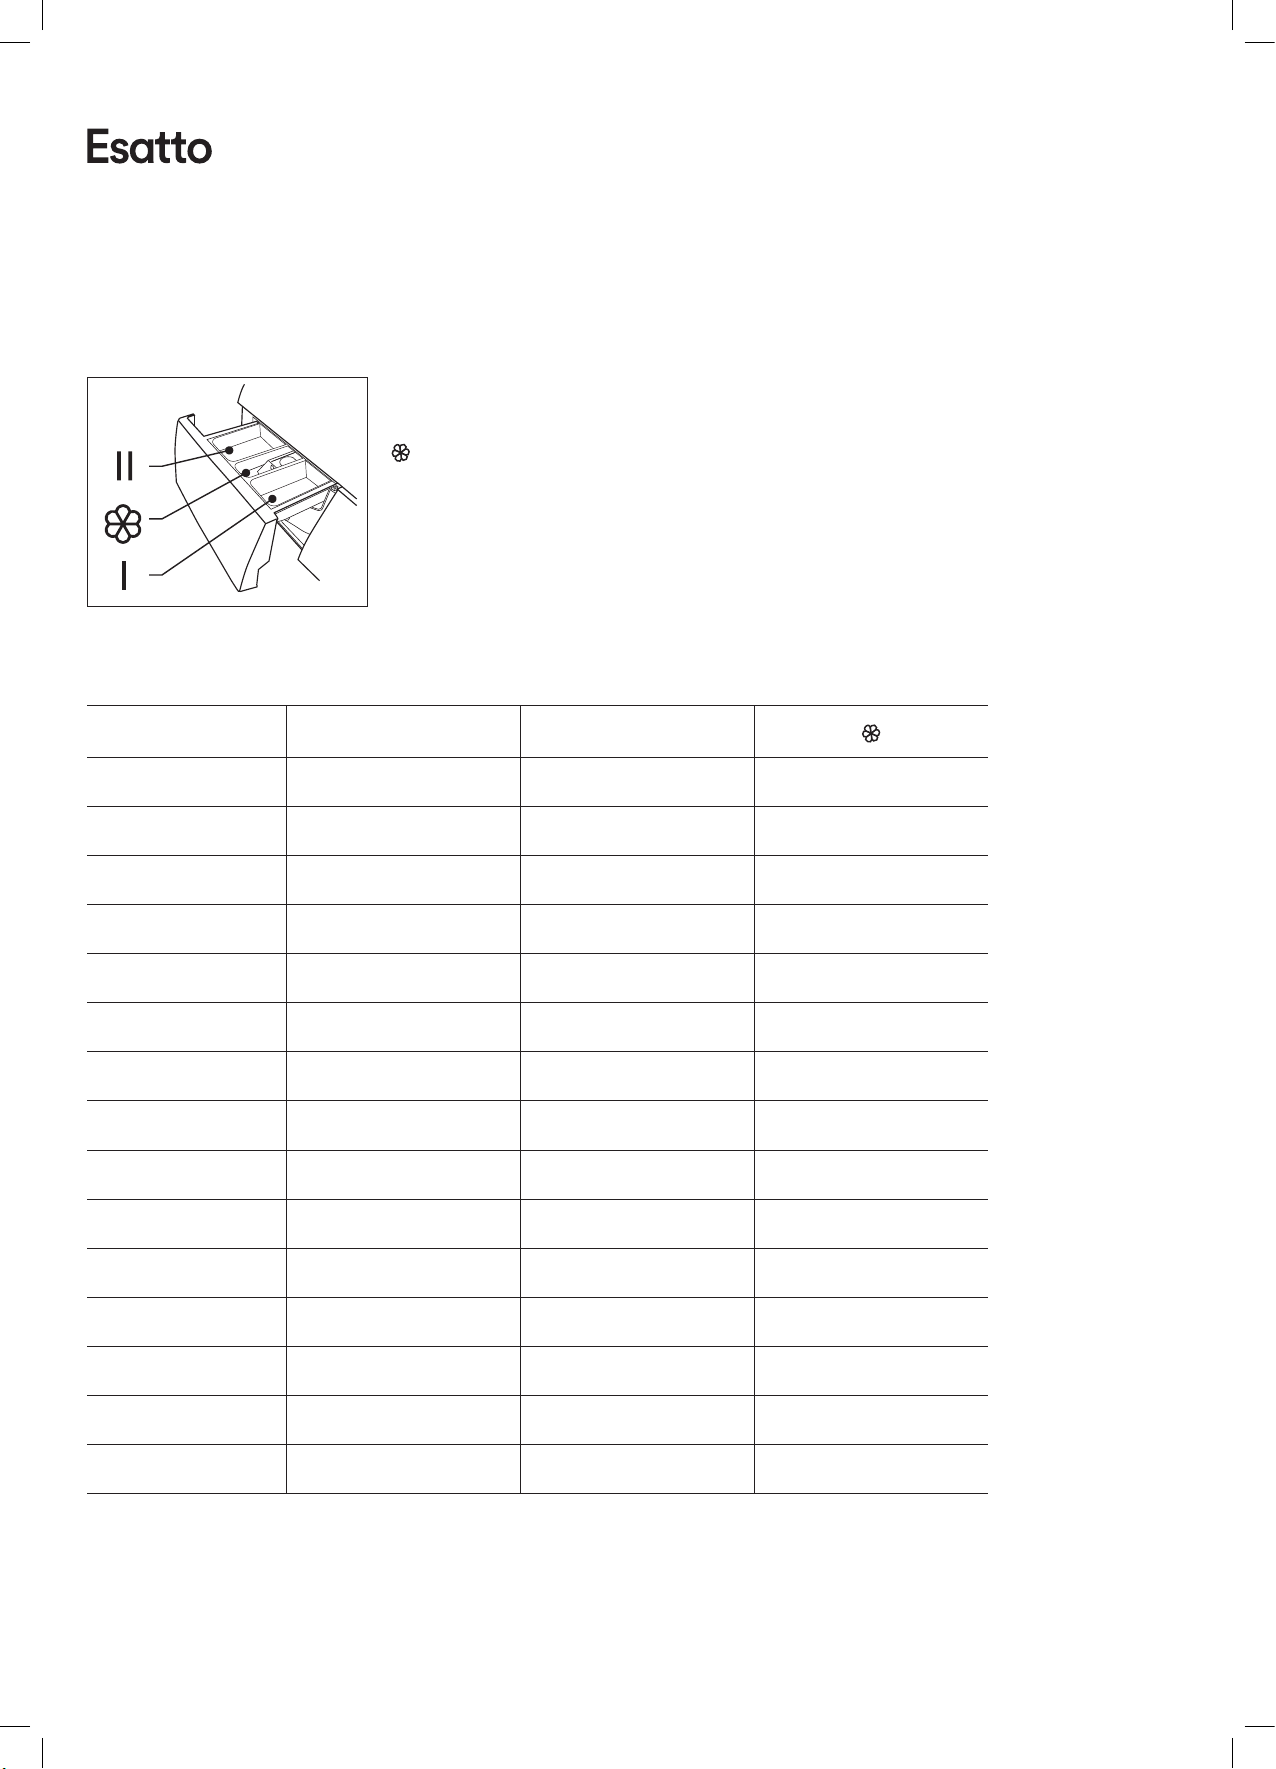
THE DETERGENT DISPENSER
CAUTION!
Detergent only need to be added in "Case I" after selecting pre-washing for machines with this function.
PROGRAM I II
Caution!
• Detergent only need to be added in "case I “after selecting pre-washing
for machines with this function.
Detergent Dispenser
Pre wash detergent
Main wash detergent
Softener
II
I
Pull out the dispenser
Caution!
OPERATIONS
Means must ○ Means optional
• As for the agglomerated or ropy detergent or additive, before they are
poured the detergent box, it is suggested to use some water for
dilution to prevent inlet of detergent box from being blocked and
overflowing while filling water.
•
into
the
Please choose suitable type of detergent for the various washing
temperature to get the best washing performance with less water and
energy consumption.
Note!
Programme
Cotton(Cold)
Cotton (20℃)
Cotton (40℃)
Cotton( 60℃)
Jeans
Delicate
Cotton ECO
Spin Only
Programme
Rinse&Spin
Heat Wash 90℃
Mix( 60℃)
Mix( 40℃)
Mix( 20℃)
Rapid 45’
Quick 15’
13
Cotton (Cold) Detergent optional Detergent required Softener optional
Cotton (20°C) Detergent optional Detergent required Softener optional
Cotton (40°C) Detergent optional Detergent required Softener optional
Cotton(60°C) Detergent optional Detergent required Softener optional
Jeans Detergent optional Detergent required Softener optional
Delicate — Detergent required Softener optional
Cotton ECO — Detergent required Softener optional
Spin Only
— — —
Rinse & Spin — — Softener optional
Hot 90°C Detergent optional Detergent required Softener optional
Mix(60°C) Detergent optional Detergent required Softener optional
Mix(40°C) Detergent optional Detergent required Softener optional
Mix(20°C) Detergent optional Detergent required Softener optional
Rapid 45 Detergent optional Detergent required Softener optional
Quick 15 — Detergent required Softener optional
THE USAGE OF DETERGENT AND WASHING POWDER
• Before machine washing powder or fabric softener is poured into the detergent box, we recommend that you
use some water for dilution to prevent the inlet of the detergent box from being blocked and overowing while
lling water.
• Please choose suitable type of detergent for the various washing temperature to get the best washing
performance with less water and energy consumption.
Caution!
• Detergent only need to be added in "case I “after selecting pre-washing
for machines with this function.
Detergent Dispenser
Pre wash detergent
Main wash detergent
Softener
II
I
Pull out the dispenser
Caution!
OPERATIONS
Means must ○ Means optional
• As for the agglomerated or ropy detergent or additive, before they are
poured the detergent box, it is suggested to use some water for
dilution to prevent inlet of detergent box from being blocked and
overflowing while filling water.
•
into
the
Please choose suitable type of detergent for the various washing
temperature to get the best washing performance with less water and
energy consumption.
Note!
Programme
Cotton(Cold)
Cotton (20℃)
Cotton (40℃)
Cotton( 60℃)
Jeans
Delicate
Cotton ECO
Spin Only
Programme
Rinse&Spin
Heat Wash 90℃
Mix( 60℃)
Mix( 40℃)
Mix( 20℃)
Rapid 45’
Quick 15’
13
Pre wash detergent
Caution!
• Detergent only need to be added in "case I “after selecting pre-washing
for machines with this function.
Detergent Dispenser
Pre wash detergent
Main wash detergent
Softener
II
I
Pull out the dispenser
Caution!
OPERATIONS
Means must ○ Means optional
• As for the agglomerated or ropy detergent or additive, before they are
poured the detergent box, it is suggested to use some water for
dilution to prevent inlet of detergent box from being blocked and
overflowing while filling water.
•
into
the
Please choose suitable type of detergent for the various washing
temperature to get the best washing performance with less water and
energy consumption.
Note!
Programme
Cotton(Cold)
Cotton (20℃)
Cotton (40℃)
Cotton( 60℃)
Jeans
Delicate
Cotton ECO
Spin Only
Programme
Rinse&Spin
Heat Wash 90℃
Mix( 60℃)
Mix( 40℃)
Mix( 20℃)
Rapid 45’
Quick 15’
13
Main wash detergent
Caution!
• Detergent only need to be added in "case I “after selecting pre-washing
for machines with this function.
Detergent Dispenser
Pre wash detergent
Main wash detergent
Softener
II
I
Pull out the dispenser
Caution!
OPERATIONS
Means must ○ Means optional
• As for the agglomerated or ropy detergent or additive, before they are
poured the detergent box, it is suggested to use some water for
dilution to prevent inlet of detergent box from being blocked and
overflowing while filling water.
•
into
the
Please choose suitable type of detergent for the various washing
temperature to get the best washing performance with less water and
energy consumption.
Note!
Programme
Cotton(Cold)
Cotton (20℃)
Cotton (40℃)
Cotton( 60℃)
Jeans
Delicate
Cotton ECO
Spin Only
Programme
Rinse&Spin
Heat Wash 90℃
Mix( 60℃)
Mix( 40℃)
Mix( 20℃)
Rapid 45’
Quick 15’
13
Softener
Caution!
• Detergent only need to be added in "case I “after selecting pre-washing
for machines with this function.
Detergent Dispenser
Pre wash detergent
Main wash detergent
Softener
II
I
Pull out the dispenser
Caution!
OPERATIONS
Means must ○ Means optional
• As for the agglomerated or ropy detergent or additive, before they are
poured the detergent box, it is suggested to use some water for
dilution to prevent inlet of detergent box from being blocked and
overflowing while filling water.
•
into
the
Please choose suitable type of detergent for the various washing
temperature to get the best washing performance with less water and
energy consumption.
Note!
Programme
Cotton(Cold)
Cotton (20℃)
Cotton (40℃)
Cotton( 60℃)
Jeans
Delicate
Cotton ECO
Spin Only
Programme
Rinse&Spin
Heat Wash 90℃
Mix( 60℃)
Mix( 40℃)
Mix( 20℃)
Rapid 45’
Quick 15’
13
Page:
13
User Manual:
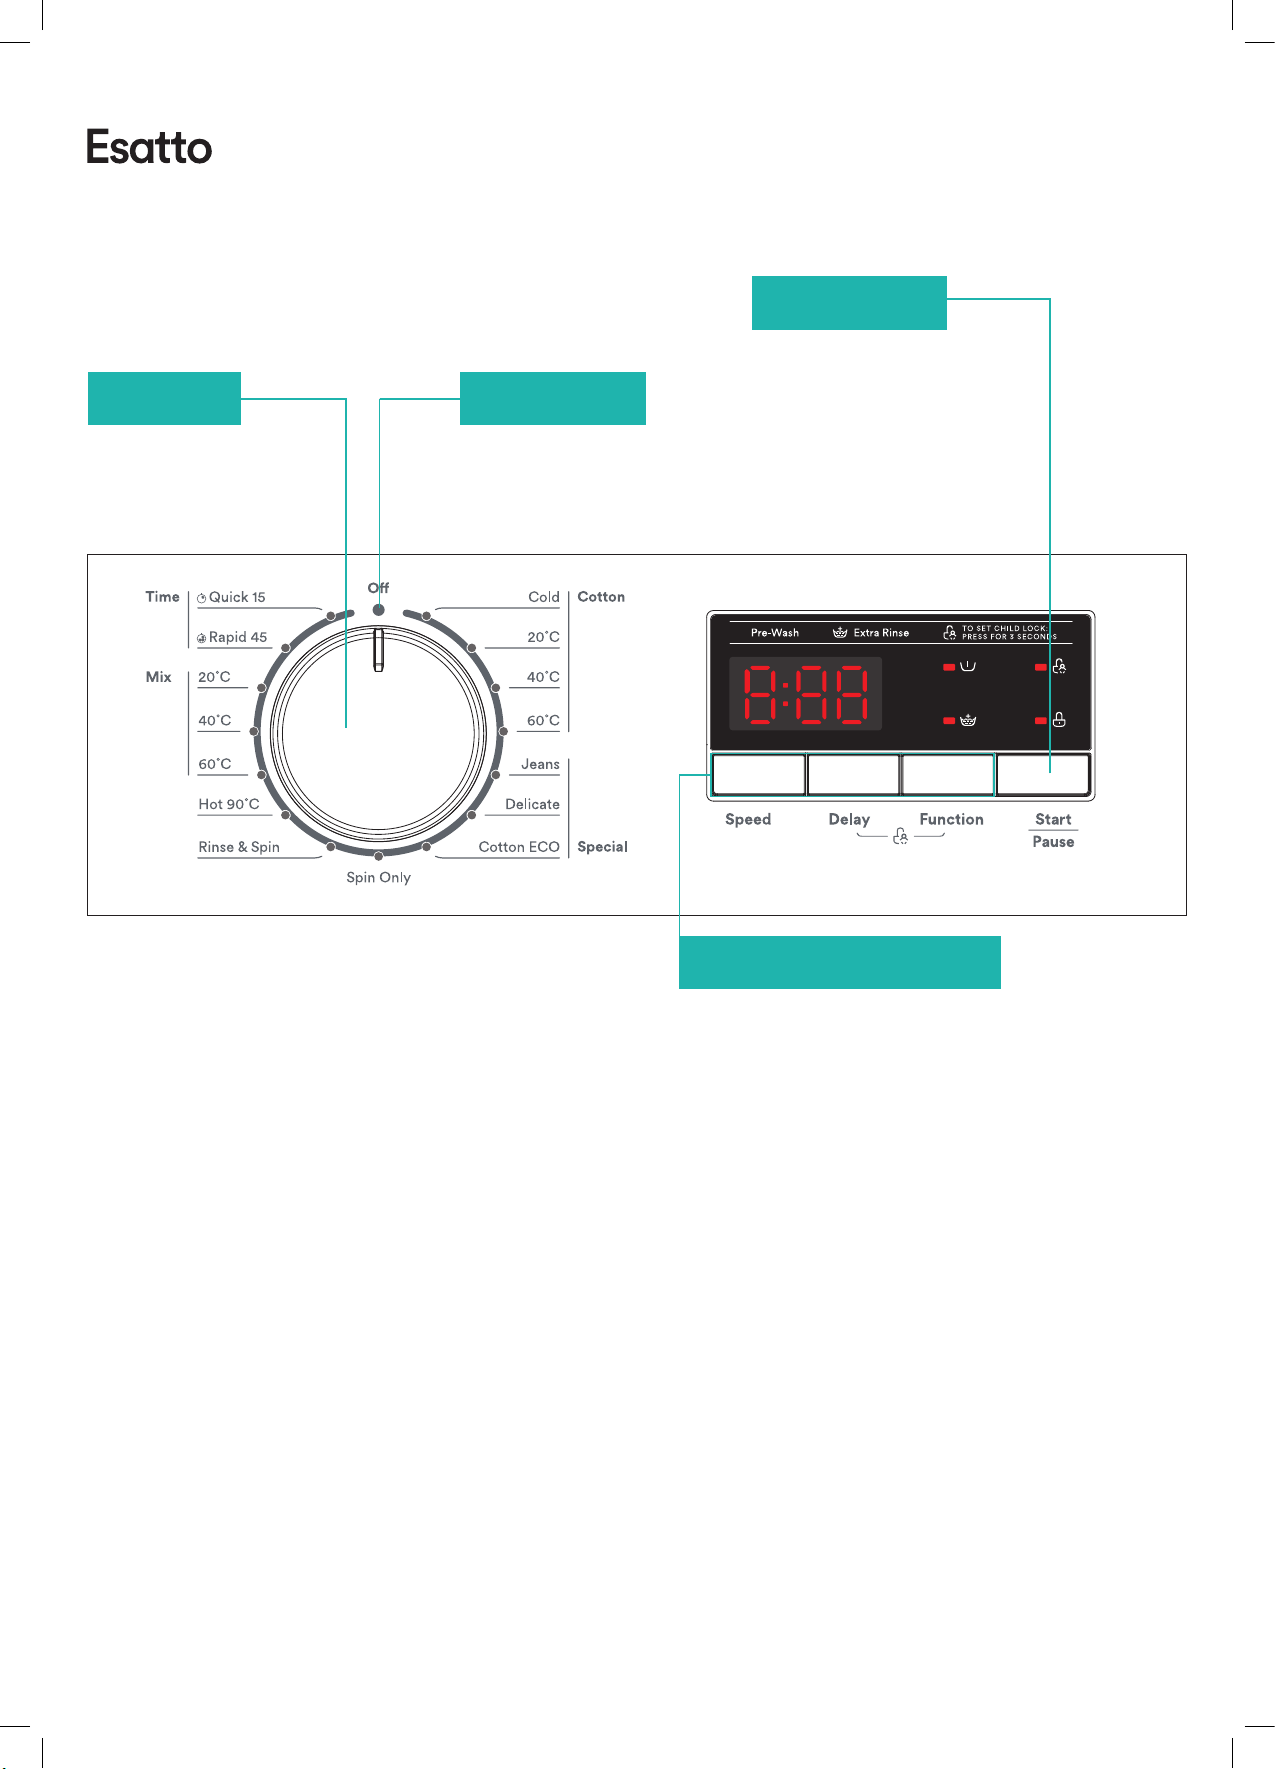
THE CONTROL PANEL
NOTE!
The images in this user manual are for reference only.
Your appliance may appear dierently.
14
Turn the Program dial
to select your wash
program type.
PROGRAM
After selecting your desired
wash settings, press this button
to start your wash cycle.
You can also use this button
to pause the washing machine
during operation.
START / PAUSE
The washing machine
is powered o.
OFF POSITION
You can choose the optional program
buttons to set your desired speed, delay
time and additional functions according
to your laundry needs.
OPTIONAL PROGRAMS

Page:
14
User Manual:
WASHING PROGRAMS
• COTTON
The cotton washing programs are suitable to wash
durable, heat-resistant textiles made of cotton or linen.
• JEANS
Suitable for washing all types of denim.
• DELICATE
This program has a gentle water ow. Suitable for
delicate, washable textiles such as silk, satin, synthetic
bres or blended fabrics.
• COTTON ECO
This program uses lower temperatures and less water
over a longer time than the standard Cotton program.
By using less energy over an extended period makes it
more economical.
• SPIN ONLY
This program spins the load at the selected spin speed
chosen. This setting can be used after a wash to remove
excess water. However, the clothing will not be fully dry.
• RINSE & SPIN
This program simply rinses the load and then spins it.
This setting doesn’t use any form of detergent and isn’t
used as a form of deep cleaning. It rinses the clothing
with clean water and then spins at a fast speed to
remove any moisture from the load.
Suppose you have allergies or sensitive skin that can be
irritated by washing detergent. In that case, this form of
rinse can be helpful to run after a wash to remove any
detergent residue left on clothing.
• HOT 90°C
This program should be reserved for brightening whites,
removing stubborn stains on cotton or linen, killing
bacteria on heavily soiled items or performing a routine
drum clean maintenance wash on your machine.
CAUTION! Hot water can shrink and damage clothes,
even causing the colours to fade with some fabrics.
To prevent this damage to your laundry, please read the
labels on your clothing to see if they are suitable for high
temperatures before choosing this program.
• MIX
This program is suited for mixed fabric loads that require
a more intense cleaning cycle. Ensure label warnings on
garments are conformed to.
• RAPID 45
Suitable to wash lightly dirty clothes quickly.
• QUICK 15
Suitable for light loads with light soiling of which you
would like to be cleaned quickly. This setting performs
better when loaded lightly, as it is a fast spin. This
setting is perfect if you have a washing emergency and
need a piece of clothing as quickly as possible. This is a
cold wash, therefore energy-ecient.
Operating Instructions (Continued)

Page:
15
User Manual:
OPTIONAL WASHING PROGRAMS
• SPEED
Press this button to select your desired amount of times
to spin.
• DELAY
After choosing your wash settings, press the Delay
button to choose a delayed start time of up to 24 hours.
• PRE-WASH
This program provides an extra cycle for heavily or
excessively soiled clothing on a low temperature before
the primary wash cycle begins. This will give a deeper
wash of your clothing.
NOTE! You need to put detergent into the Case (I)
when it is selected
• EXTRA RINSE
This function adds an extra rinse cycle to your program.
It is ideal for large loads and garments belonging to
people with sensitive skin. But you should be aware that
this function will increase water consumption.
• CHILD LOCK
Simultaneously press the Delay and Function buttons
for 3 seconds until you hear 3 beeps to activate the child
lock. Repeat this process to deactivate the child lock.
When you program has nished, "END" and "CL" will
ash alternatively on your display.

Page:
16
User Manual:
MODEL: EFLW500
PROGRAM LOAD TEMP. (°C) DEFAULT TIME
DEFAULT SPEED
(RPM)
DELAY EXTRA RINSE PRE-WASH
Cotton (Cold) 5.0 Cold 2:20 1000 Optional Optional Optional
Cotton (20°C) 5.0 20 2:20 1000 Optional Optional Optional
Cotton (40°C) 5.0 40 2:40 1000 Optional Optional Optional
Cotton (60°C) 5.0 60 2:45 1000 Optional Optional Optional
Jeans 5.0 60 1:45 1000 Optional Optional Optional
Delicate 2.5 30 0:50 600 Optional Optional —
Cotton ECO 5.0 60 6:15 1000 Optional — —
Spin Only 5.0 — 0:12 1000 Optional — —
Rinse & Spin 5.0 — 0:20 1000 Optional Optional —
Hot 90°C 5.0 90 2:17 1000 Optional Optional Optional
Mix (60°C) 5.0 60 1:30 1000 Optional Optional Optional
Mix (40°C) 5.0 40 1:20 1000 Optional Optional Optional
Mix (20°C) 5.0 20 1:00 1000 Optional Optional Optional
Rapid 45 2.0 40 0:45 800 Optional Optional Optional
Quick 15 2.0 — 0:15 800 Optional — —
Energy test program: Cotton ECO.
Speed: the highest speed; Other as the default.
Half load for 5.0Kg machine: 2.5KG.
"Cotton ECO" is the standard washing programs to which the information in the label and the che relates, and they are
suitable to clean normally soiled cotton laundry and that they are the most ecient programmes in terms of combined
energy and water consumptions for washing that type of cotton laundry, that the actual water temperature may dier from
the declared cycle temperature.
NOTE!
• The parameters in this table are only for user's reference. The actual parameters maybe dierent with the parameters in
above mentioned table.
• Some models have intelligent weighing function, please refer to the actual product.
Operating Instructions (Continued)

Page:
17
User Manual:
MODEL: EFLW600
PROGRAM LOAD TEMP. (°C) DEFAULT TIME
DEFAULT SPEED
(RPM)
DELAY EXTRA RINSE PRE-WASH
Cotton (Cold) 6.0 Cold 2:20 1000 Optional Optional Optional
Cotton (20°C) 6.0 20 2:20 1000 Optional Optional Optional
Cotton (40°C) 6.0 40 2:40 1000 Optional Optional Optional
Cotton (60°C) 6.0 60 2:45 1000 Optional Optional Optional
Jeans 6.0 60 1:45 1000 Optional Optional Optional
Delicate 3.0 30 0:50 600 Optional Optional —
Cotton ECO 6.0 30 6:00 800 Optional — —
Spin Only 6.0 — 0:12 1000 Optional — —
Rinse & Spin 6.0 — 0:20 1000 Optional Optional —
Hot 90°C 6.0 90 2:17 1000 Optional Optional Optional
Mix (60°C) 6.0 60 1:30 1000 Optional Optional Optional
Mix (40°C) 6.0 40 1:20 1000 Optional Optional Optional
Mix (20°C) 6.0 20 1:00 1000 Optional Optional Optional
Rapid 45 2.0 40 0:45 800 Optional Optional Optional
Quick 15 2.0 — 0:15 800 Optional — —
Energy test program: Cotton ECO.
Speed: the highest speed; Other as the default.
Half load for 6.0Kg machine: 3.0KG.
"Cotton ECO" is the standard washing programs to which the information in the label and the che relates, and they are
suitable to clean normally soiled cotton laundry and that they are the most ecient programmes in terms of combined
energy and water consumptions for washing that type of cotton laundry, that the actual water temperature may dier from
the declared cycle temperature.
NOTE!
• The parameters in this table are only for user's reference. The actual parameters maybe dierent with the parameters
in above mentioned table.
• Some models have intelligent weighing function, please refer to the actual product.
Page:
18
User Manual:
Cleaning & Maintenance
CLEANING AND CARE
WARNING!
Before you begin maintenance, please unplug the machine and close the tap.
CLEANING THE CABINET
Proper maintenance on the washing machine can extend its working life. The surface can be cleaned
with diluted non-abrasive neutral detergents when necessary. If there is any water overow, use the
wet cloth to wipe it o immediately. No sharp items are allowed.
NOTE!
Formic acid and its diluted solvents or equivalent are forbidden, such as alcohol, solvents or chemical
products, etc.
CLEANING THE DRUM
The rusts left inside the drum by the metal articles shall be removed immediately with chlorine-free
detergents. Never use steel wool.
NOTE!
Don’t put laundry in the washing machine during the drum cleaning.
CLEANING THE DOOR SEAL AND GLASS
Wipe the glass and seal after each wash to remove lint and stains. If lint builds up it can cause leaks.
Remove any coins, buttons and other foreign objects from the seal after each wash.
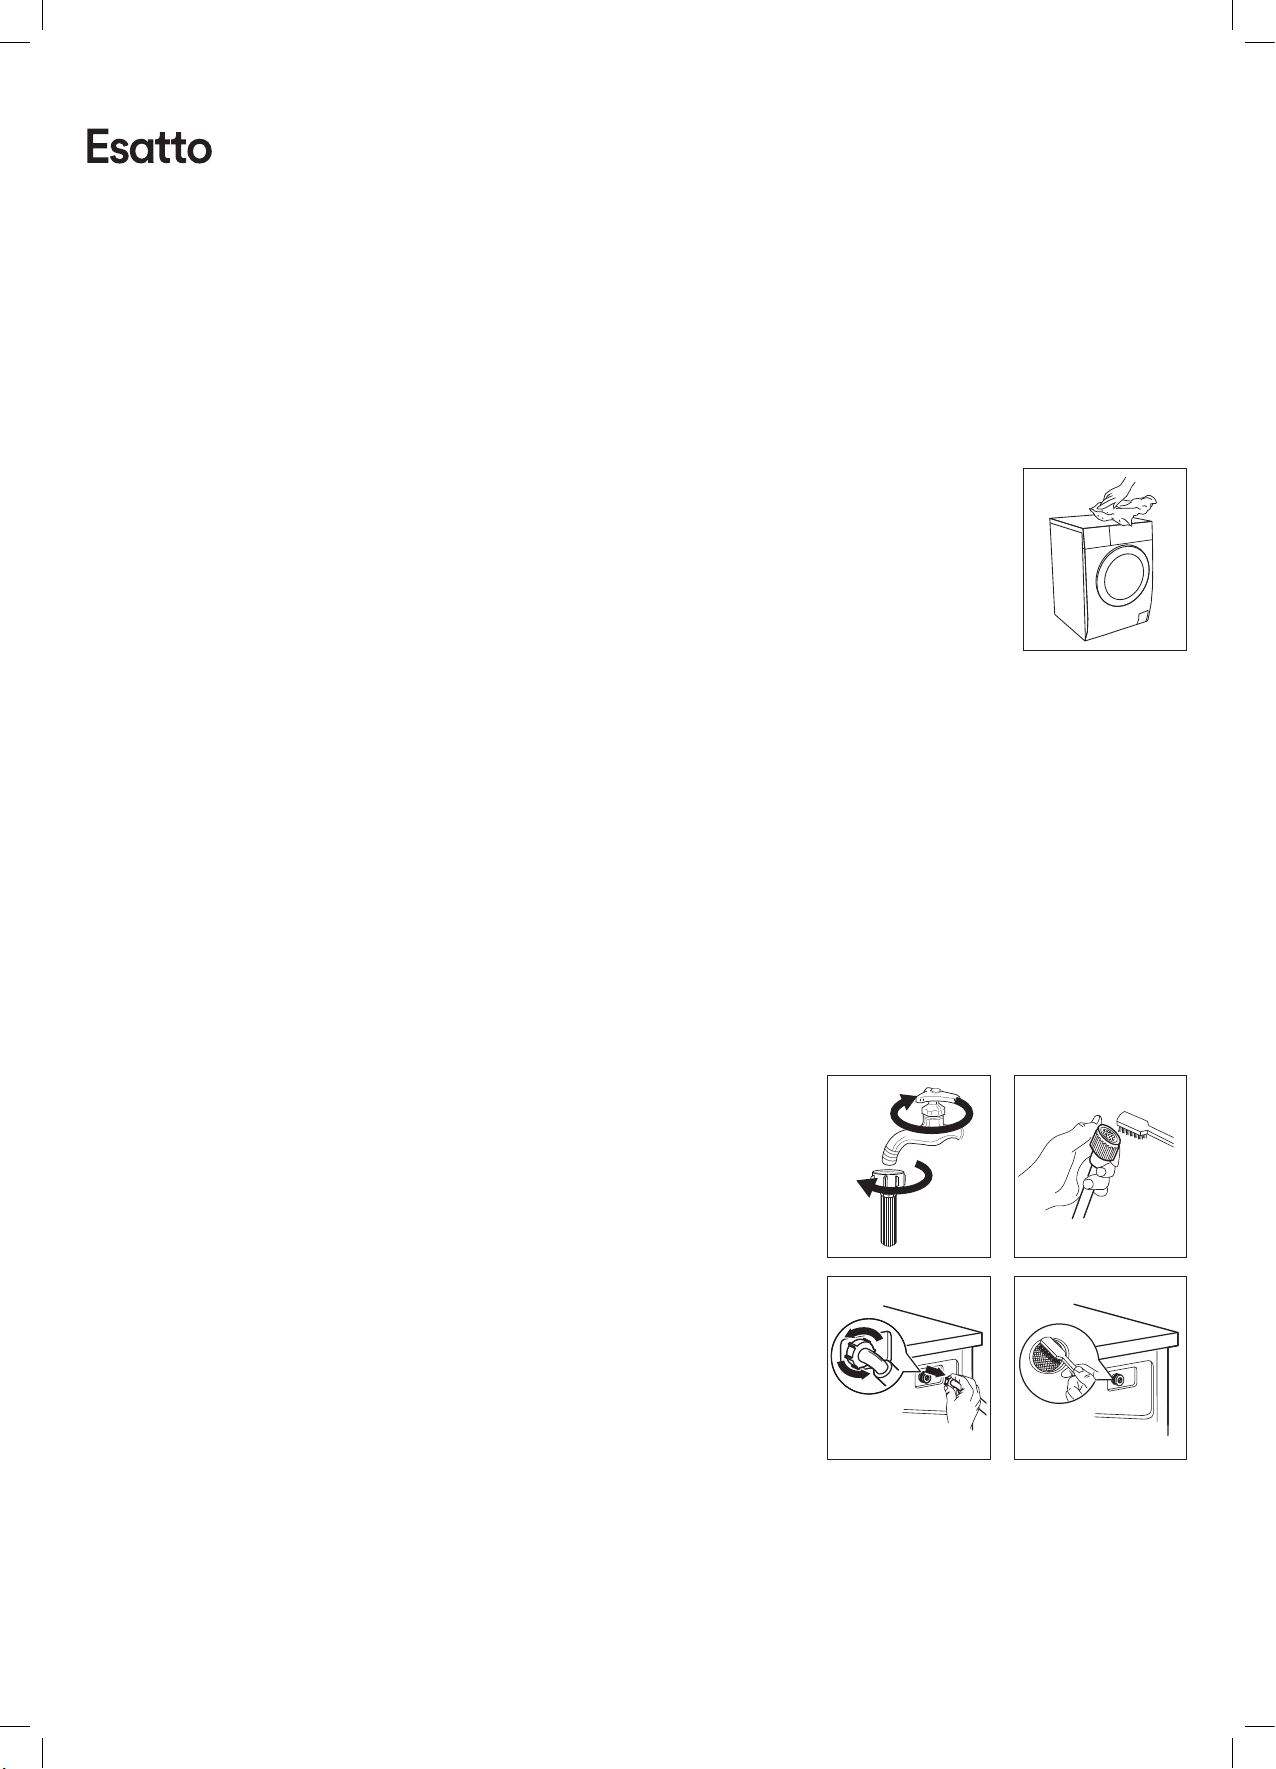
CLEANING THE INLET FILTER
NOTE!
Inlet lter must be cleaned if there is less water.
Washing the lter in the tap:
1. Close the tap.
2. Remove the water supply hose from the tap.
3. Clean the lter.
4. Reconnect the water supply hose.
Washing the lter in washing machine:
1. Screw o the inlet pipe from the rear of the machine.
2. Pull out the lter with long pliers.
3. Use a brush to clean the lter.
4. Reconnect the inlet pipe.
NOTE!
• If the brush is not clean, you can pull out the lter washed separately.
• Reconnect, turn on the tap.
• Before your maintenance starts, please unplug the machine and close the tap.
Cleaning The Cabinet
Cleaning The Drum
Formic acid and its diluted solvents or equivalent are forbidden, such as
solvents or chemical products,etc.
•
alcohol,
• Don’t put laundry in the washing machine during the drum cleaning.
Cleaning The Door Seal And Glass
Warning!
!!
Note!
Note!
Cleaning And Care
The rusts left inside the drum by the metal articles shall be removed immediately
with chlorine-free detergents.
Never use steel wool.
Proper maintenance on the washing machine can extend its
working life. The surface can be cleaned with diluted
non-abrasive neutral detergents when necessary. If there is
any water overflow, use the wet cloth to wipe it off immediately.
No sharp items are allowed.
Wipe the glass and seal after each wash
to remove lint and stains. If lint builds up it
can cause leaks.
Remove any coins, buttons an
d other objects
from the seal after each wash.
MAINTENANCES
21
Washing the filter in the tap
1.Close the tap.
2.Remove the water supply hose from the tap.
3.clean the filter.
4.Reconnect the .water supply hose
Cleaning The Inlet Filter
• Inlet filter must be cleaned if there is less water.
• If the brush is not clean, you can pull out the filter washed separately;
• Reconnect, turn on the tap.
Washing the filter in washing machine:
1.
Screw off the inlet pipe from the backside
of the machine.
2.Pull out the filter with long nose pliers
and reinstall it back after being washed.
3.Use to clean the filter.
4.Reconnect the inlet pipe.
the brush
Clean The Detergent Dispenser
Do not use alcohol,solvents or chemical products to clean the machine.•
A
Pull out the dispenser
drawer with press the A
Clean the dispenser
drawer under water
Clean inside the recess
with an old toothbrush
Insert the dispenser
drawer
1
2
3
4
Note!
Note!
Note!
1.Press down the arrow location on softener cover inside the dispenser drawer.
2.Lift the clip up and take out softener cover and wash all grooves with water.
3.Restore the softener cover and push the drawer into position.
MAINTENANCES
22
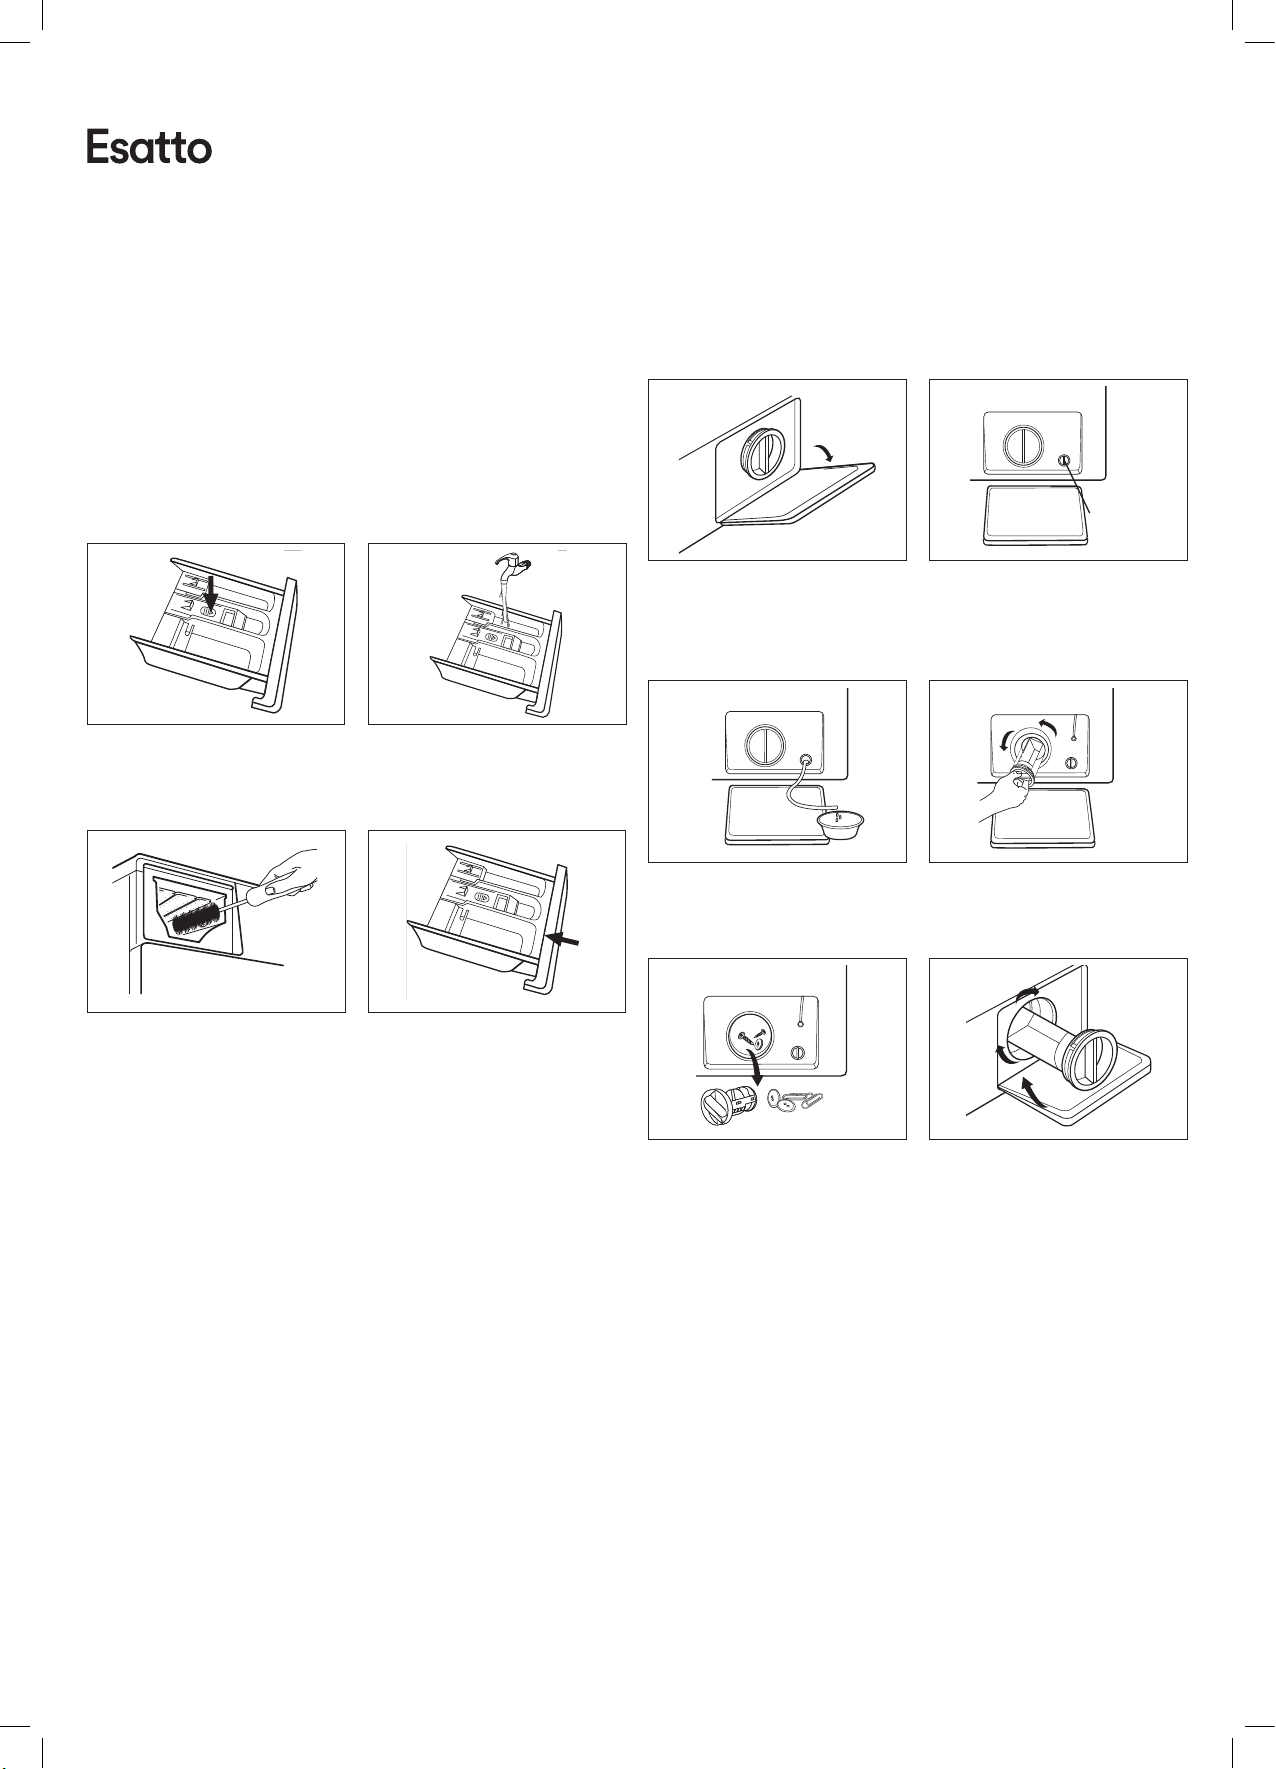
Page:
19
User Manual:
CLEAN THE DETERGENT DISPENSER
1. Press down the arrow location on softener cover inside
the dispenser drawer.
2. Lift the clip up and take out softener cover and wash all
grooves with water.
3. Restore the softener cover and push the drawer into
position.
NOTE!
Do not use alcohol, solvents or chemical products to clean
the machine.
CLEANING THE DRAIN PUMP FILTER
WARNING!
• Be careful of the hot water!
• Allow detergent solution to cool down.
• Unplug the machine to avoid electrical shock before
washing.
• Drain pump lter can lter the yarns and small foreign
matters from the washing.
• Clean the lter periodically to ensure the normal
operation of washing machine.
CLEANING THE DRAIN PUMP FILTER CONT.
CAUTION!
• Make sure that valve cap and emergency drain hose
are reinstalled properly, cap plates should be inserted
aligning to hole plates otherwise water may leak;
• Some machines don’t have emergency drain hose, so
step 2 and step 3 can be skipped.
Rotate lower cover cap directly to make water run into
basin.
• When the appliance is in use and depending on the
program selected there can be hot water in the pump.
Never remove the pump cover during a wash cycle,
always wait until the appliance has nished the cycle,
and is empty. When replacing the cover, ensure it is
securely re-tightened.
1) Pull out the dispenser
drawer with press the A
1) Open the lower
cover cap
2) Clean the dispenser
drawer under water
2) Rotate 90°C and pull
out the emergency
drain hose, and take
o the hose cap
3) Clean inside the recess
with an old toothbrush
3) After water runs out,
reset the drain hose
5) Remove foreign objects
4) Reinsert the
dispenser drawer
4) Open the lter
by turning it
counter clockwise
6) Close the lower
cover cap
Washing the filter in the tap
1.Close the tap.
2.Remove the water supply hose from the tap.
3.clean the filter.
4.Reconnect the .water supply hose
Cleaning The Inlet Filter
• Inlet filter must be cleaned if there is less water.
• If the brush is not clean, you can pull out the filter washed separately;
• Reconnect, turn on the tap.
Washing the filter in washing machine:
1.
Screw off the inlet pipe from the backside
of the machine.
2.Pull out the filter with long nose pliers
and reinstall it back after being washed.
3.Use to clean the filter.
4.Reconnect the inlet pipe.
the brush
Clean The Detergent Dispenser
Do not use alcohol,solvents or chemical products to clean the machine.•
A
Pull out the dispenser
drawer with press the A
Clean the dispenser
drawer under water
Clean inside the recess
with an old toothbrush
Insert the dispenser
drawer
1
2
3
4
Note!
Note!
Note!
1.Press down the arrow location on softener cover inside the dispenser drawer.
2.Lift the clip up and take out softener cover and wash all grooves with water.
3.Restore the softener cover and push the drawer into position.
MAINTENANCES
22
• Make sure that valve cap and emergency drain hose are reinstalled properly, cap
plates should be inserted aligning to hole plates otherwise water may leak.
• Some machines don’t have emergency drain hose, so step 2 and step 3 can be skipped.
Rotate lower cover cap directly to make water run into basin.
• When the appliance is in use and depending on the programme selected there can
be hot water in the pump. Never remove the pump cover during a wash cycle, always
wait until the appli
ance has finished the cycle, and is empty. When replacing the
cover, ensure it is securely re-tightened.
Cleaning The Drain Pump Filter
Be careful of the hot water!
Allow detergent solution to cool down.
•
•
• Unplug the machine to avoid electrical shock before washing.
• Drain pump filter can filter the yarns and small foreign matters from the
washing.
• Clean the filter periodically to ensure the normal operation of washing
machine.
Open the lower cover cap
Rotate 90°C and pull out
the emergency drain hose,
and take off the hose cap
Open the filter by turning
to the counter clockwise
Remove extraneous matter
1
2
3
Close the lower cover cap
6
5
4
Emergenc
y
drain hose
After water runs out,reset
the drain hose
Warning!
!!
Caution!
MAINTENANCES
23
• Make sure that valve cap and emergency drain hose are reinstalled properly, cap
plates should be inserted aligning to hole plates otherwise water may leak.
• Some machines don’t have emergency drain hose, so step 2 and step 3 can be skipped.
Rotate lower cover cap directly to make water run into basin.
• When the appliance is in use and depending on the programme selected there can
be hot water in the pump. Never remove the pump cover during a wash cycle, always
wait until the appli
ance has finished the cycle, and is empty. When replacing the
cover, ensure it is securely re-tightened.
Cleaning The Drain Pump Filter
Be careful of the hot water!
Allow detergent solution to cool down.
•
•
• Unplug the machine to avoid electrical shock before washing.
• Drain pump filter can filter the yarns and small foreign matters from the
washing.
• Clean the filter periodically to ensure the normal operation of washing
machine.
Open the lower cover cap
Rotate 90°C and pull out
the emergency drain hose,
and take off the hose cap
Open the filter by turning
to the counter clockwise
Remove extraneous matter
1
2
3
Close the lower cover cap
6
5
4
Emergency
drain hose
After water runs out,reset
the drain hose
Warning!
!!
Caution!
MAINTENANCES
23
Page:
20
User Manual:
Troubleshooting
OPERATION IN CASE OF EMERGENCY
In the event of an emergency you should:
• Switch o all controls.
• Switch the washing machine o at the power point or at the fuse box.
• Call the Residentia Support Team on 1300 11 HELP (4357).
Some minor faults can be xed by referring to the instructions given in the Troubleshooting section
below. There is also a self-help section online at https://support.residentiagroup.com.au/
DESCRIPTION POTENTIAL CAUSE SOLUTION
Washing machine
does not start up
Door is not closed properly
Check if the clothes is stuck.
Restart after the door is closed.
Door can’t be opened
Washer's safety protection design
is in operation
Disconnect the power, restart
the product
Water leakage
The connection between inlet
pipe or outlet hose is not tight
Check and fasten water pipes
Clean up outlet hose
Detergent residues
in the box
Detergent is dampened
or agglomerated
Clean and wipe the detergent box
Indicator or display
does not light
Disconnect the power
PC board or harness has
connection problem
Check if the power is shut
down and the power plug is
connected correctly
Abnormal noise
Transport bolts might still be tted
or machine is not on a solid surface
Check if the transport bolts have
been removed or if the machine is
installed on a solid and level oor

Page:
21
User Manual:
When the washing machine experiences a fault, please contact the Residentia Group support team on:
Telephone: 1300 11 HELP (4357).
WARNING! Never dismantle the washing machine.
ERROR MESSAGES AND SOLUTIONS
INDICATION REASON SOLUTION
"E30" displays Door is not closed properly
Check if the clothes is stuck.
Restart after the door is closed.
"E10" displays
Water injecting problem
while washing
Check if the water pressure
is too low
Straighten the water pipe
Check if the inlet valve lter
is blocked
"E21" displays Overtime water draining Check if the drain hose is blocked
"E12" displays Water overow Restart the washer
Other
If problems still occur, please contact the support team
with the number at the top of this page.

Page:
22
User Manual:
Technical Specications
Below outlines the technical specications for your Esatto Washing Machine.
Model EFLW500 EFLW600
Size 595w 400d 850h (mm) 595w 400d 850h (mm)
Net Weight
52kg 55kg
Rated Input Power
2050W 2050W
Maximum Current
10A 10A
Rated Capacity
of Wash and Spin
5.0kg
(dry clothes)
6.0kg
(dry clothes)
Rated Voltage
220–240V~ 220–240V~
Rated Frequency
50Hz 50Hz
Standard Water
Pressure
0.05MPa – 1MPa 0.05MPa – 1MPa

Page:
23
User Manual:
TESTING METHODS
EFLW500
ADDITIONAL INFORMATION FOR Standard performance
TESTING:(AS/NZS 2040.1:2005+Amdt1-2007+Amdt2-2009)
• Water connections: Cold & hot water connection
• Water supply pressure: 320 kPa
• Warm wash Program: Cotton ECO Display:6:15
Cold wash program: Cotton Cold (no temperature
display is cold wash)
• Detergent type: Drum detergent
• Detergent quantity: Default
• Adding detergent:
The detergent is dissolved and added as Paragraph B7.3
of AS/NZS 2040.1
The detergent shall be dissolved in 1L of water
• Anti-sudsing agent: Max
• Test load mass: 5.0kg
• Water consumption: 51L
• Test Voltage:220-240V~,50Hz
NOTE!
This product is subject to continuous improvement,
specication are subject to change without prior notice.
EFLW600
ADDITIONAL INFORMATION FOR Standard performance
TESTING:(AS/NZS 2040.1:2005+Amdt1-2007+Amdt2-2009)
• Water connections: Cold & hot water connection
• Water supply pressure: 320 kPa
• Warm wash Program: Cotton ECO Display:6:00
Cold wash program: Cotton Cold (no temperature
display is cold wash)
• Detergent type: Drum detergent
• Detergent quantity: Default
• Adding detergent:
The detergent is dissolved and added as Paragraph B7.3
of AS/NZS 2040.1
The detergent shall be dissolved in 1L of water
• Anti-sudsing agent: Max
• Test load mass: 6.0kg
• Water consumption: 61L
• Test Voltage:220-240V~,50Hz

Page:
24
User Manual:
Attach your receipt
to this page
Page:
25
User Manual:
Purchase Details
For future reference, please record the following information which can be found
on the rating plate and the date of purchase which can be found on your sales invoice.
STORE DETAILS
STORE NAME
|
ADDRESS
|
TELEPHONE
|
PURCHASE DATE
|
PRODUCT DETAILS
MODEL NO.
|
SERIAL NO.*
|

Page:
26
User Manual:
AUSTRALIA WARRANTY TERMS & CONDITIONS
LAUNDRY APPLIANCES
This document sets out the terms and conditions of the
product warranties for Residentia Group Appliances. It is
an important document. Please keep it with your proof of
purchase documents in a safe place for future reference
should you require service for your Appliance.
1. IN THIS WARRANTY
(a) ‘acceptable quality’ as referred to in clause 10 of this
warranty has the same meaning referred to in the ACL;
(b) ‘ACL’ means Trade Practices Amendment (Australian
Consumer Law) Act (No.2) 2010;
(c) ‘Appliance’ means any Residentia Group product
purchased by you accompanied by this document;
(d) ‘ASR’ means Residentia Group authorised service
representative;
(e) ‘Residentia Group’ means Residentia Group Pty Ltd
of 165 Barkly Ave, Burnley VIC 3121, ACN 600 546 656
in respect of Appliances purchased in Australia;
(f ) ‘major failure’ as referred to in clause 10 of this
warranty has the same meaning referred to in the ACL
and includes a situation when an Appliance cannot
be repaired or it is uneconomic for Residentia Group,
at its discretion, to repair an Appliance during the
Warranty Period;
(g) ‘Warranty Period’ means:
(i) where the Appliance is used for personal,
domestic or household use (i.e. normal
single family use) as set out in the instruction
manual, the Appliance is warranted against
manufacturing defects for 24 months, following
the date of original purchase of the Appliance;
(h) ‘you’ means the purchaser of the Appliance not having
purchased the Appliance for re-sale, and ‘your’ has a
corresponding meaning.
2. This warranty only applies to Appliances purchased
and used in Australia and is in addition to (and does
not exclude, restrict, or modify in any way) any
non-excludable statutory warranties in Australia.
3. During the Warranty Period Residentia Group or its
ASR will, at no extra charge if your Appliance is readily
accessible for service, without special equipment and
subject to these terms and conditions, repair or replace
any parts which it considers to be defective. Residentia
Group or its ASR may use remanufactured parts to
repair your Appliance. You agree that any replaced
Appliances or parts become the property of Residentia
Group. This warranty does not apply to light globes,
batteries, lters or similar perishable parts.
4. Parts and Appliances not supplied by Residentia Group
are not covered by this warranty.
Warranty Information

Page:
27
User Manual:
5. You will bear the cost of transportation, travel and
delivery of the Appliance to and from Residentia Group
or its ASR. If you reside outside of the service area,
you will bear the cost of:
(a) travel of an authorised representative;
(b) transportation and delivery of the Appliance to and
from Residentia Group or its ASR, in all instances,
unless the Appliance is transported by Residentia
Group or its ASR, the Appliance is transported at
the owner’s cost and risk while in transit to and from
Residentia Group or its ASR.
6. Proof of purchase is required before you can make
a claim under this warranty.
7. You may not make a claim under this warranty unless
the defect claimed is due to faulty or defective parts
or workmanship. Residentia Group is not liable in the
following situations (which are not exhaustive):
(a) the Appliance is damaged by:
(i) accident
(ii) misuse or abuse, including failure to properly
maintain or service
(iii) normal wear and tear
(iv) power surges, electrical storm damage or
incorrect power supply
(v) incomplete or improper installation
(vi) incorrect, improper or inappropriate operation
(vii) insect or vermin infestation
(viii) failure to comply with any additional instructions
supplied with the Appliance;
(b) the Appliance is modied without authority from
Residentia Group in writing;
(c) the Appliance’s serial number or warranty seal has
been removed or defaced;
(d) the Appliance was serviced or repaired by anyone
other than Residentia Group, an authorised repairer
or ASR.
8. This warranty, the contract to which it relates and the
relationship between you and Residentia Group are
governed by the law applicable where the Appliance
was purchased.
9. To the extent permitted by law, Residentia Group
excludes all warranties and liabilities (other than as
contained in this document) including liability for any
loss or damage whether direct or indirect arising from
your purchase, use or non use of the Appliance.
10. For Appliances and services provided by Residentia
Group in Australia, the Appliances come with a
guarantee by Residentia Group that cannot be
excluded under the Australian Consumer Law. You
are entitled to a replacement or refund for a major
failure and for compensation for any other reasonably
foreseeable loss or damage. You are also entitled
to have the Appliance repaired or replaced if the
Appliance fails to be of acceptable quality and the
failure does not amount to a major failure. The benets
to you given by this warranty are in addition to your
other rights and remedies under a law in relation to the
Appliances or services to which the warranty relates.
11. At all times during the Warranty Period, Residentia
Group shall, at its discretion, determine whether repair,
replacement or refund will apply if an Appliance has a
valid warranty claim applicable to it.
12. Missing parts are not covered by warranty. Residentia
Group reserves the right to assess each request for
missing parts in a case by case basis. Any parts
that are not reported missing in the first week after
purchase will not provide free of charge.
13. To enquire about claiming under this warranty, please
follow these steps:
(a) carefully check the operating instructions, user manual
and the terms of this warranty;
(b) have the model and serial number of the Appliance
available;
(c) have the proof of purchase (e.g. an invoice) available;
(d) telephone the numbers shown below.
14. You accept that if you make a warranty claim,
Residentia Group and its ASR may exchange
information in relation to you to enable Residentia
Group to meet its obligations under this warranty.
IMPORTANT
Before calling for service, please ensure that the steps
in point 13 have been followed.
→ Service: Please call 1300 11 HELP (4357)
→ Spare parts: Please call 1300 11 SPARE (7727)
The Australian Consumer Law requires the inclusion of the following statement with this warranty: Our goods come with guarantees that cannot
be excluded under the Australian Consumer Law. You are entitled to a replacement or refund for a major failure and for compensation for any other
reasonably foreseeable loss or damage. You are also entitled to have the goods repaired or replaced if the goods fail to be of acceptable quality and the
failure does not amount to a major failure.

This page
is intentionally
left blank
Appliances
Exctly wht
you need
A RESIDENTIA
GROUP INITIATIVE