795.7410#
MFL68680490
Rev.00_042318

2
TABLE OF CONTENTS
Warranty..................................................................3
Product Record
....................................................... 4
Important Safety Instructions
........................ 5-7
Electrical & Grounding Requirements ............ 7
Parts and Features
.............................................. 8
Refrigerator Installation
..............................9-18
Unpacking Your Refrigerator
..........................9
Installation
.......................................................10
Removing/Replacing Handles, Doors, and
Drawers.........................................................11-17
Leveling and Door Alignment
......................18
Using Your Refrigerator
............................19-33
Setting the Controls
..................................19-20
Smart Features
...............................................21
Instructions for Smart Grid
......................22-23
Automatic Icemaker
......................................24
Food Storage Guide ........................................25
Refrigerator Shelves
........................................26
Humidity Controlled Crisper
........................27
Temperature Controlled Pantry Drawer .......27
Door Bin
............................................................ 27
Air Filter
..................................................... 28
Freezer Section
28.................................................... niB ecI artxE
Durabase ........................................................29
29............................................. rediviD esabaruD
29............................................. Pullout Drawers
Water Filter ................................................30-33
Care and Cleaning 43-33.....................................
33................................... spiT gninaelC lareneG
Exterior ..........................................................33
Inside Walls ...................................................33
33................................. steksaG dna reniL rooD
Plastic Parts ....................................................33
33.............................................. slioC resnedn
oC
Light Bulb Replacement .................................34
Power Interruptions ......................................34
43.......................... noitacaV nO oG uoY nehW
When You Move ..........................................34
Connecting the Water Line 37-35........................
Troubleshooting Guide 38-43............
..................
Diagnostics ........................................................ 44
3
WARRANTY
REFRIGERATOR WARRANTY
KENMORE ELITE LIMITED WARRANTY
WITH PROOF OF SALE, the following warranty coverage applies when this appliance is correctly installed, operated and
maintained according to all supplied instructions.
One Year on Appliance
FOR ONE YEAR from the date of sale this appliance is warranted against defects in material or workmanship. A defective
appliance will receive free repair. If the appliance cannot be repaired it will be replaced free of charge. This warranty coverage
applies for only 90 days from the sale date if the appliance is ever used for other than private household purposes.
Five Years on Sealed Refrigerant System
FOR FIVE YEARS from the date of sale, the sealed refrigerant system of this appliance is warranted against defects in material
or workmanship.* If a system part is defective within the first year, a new part will be supplied and installed at no charge.
If a system part is defective after the first year, a new part will be supplied but not installed at no charge. You are responsible
for the labor cost of part installation after the first year from the date of sale. This warranty coverage applies for only one year
from the sale date if the appliance is ever used for other than private household purposes.
*Defects must be verified by a Sears authorized service representative.
Ten Years on Linear Compressor
FOR TEN YEARS from the date of sale, the linear compressor of this appliance is warranted against defects in material or
workmanship.* If the compressor is defective within the first year, a new one will be supplied and installed at no charge.
If the compressor is defective after the first year, a new one will be supplied but not installed at no charge.
You are responsible for the labor cost of part installation after the first year from the date of sale. This warranty coverage
applies for only two years from the sale date if the appliance is ever used for other than private household purposes.
*Defects must be verified by a Sears authorized service representative.
Lifetime on Storage Bins
FOR AS LONG AS IT IS USED from the date of sale, a free replacement will be supplied for a defective refrigerator or
freezer compartment storage bin.* If the defect appears within the first year, a new bin will be installed at no charge. If the
defect appears after the first year, a new bin will be supplied but not installed at no charge. This Lifetime warranty covers only
storage bins, and does not apply to any other related component or mechanism. You are responsible for the labor cost of bin
installation after the first year from the date of sale. This warranty coverage applies for only 90 days from the date of sale if
the appliance is ever used for other than private household purposes. *Warranty coverage applies to door bins, drawer bins
and basket bins. Defects must be verified by a Sears authorized service representative.
For warranty coverage details to obtain free repair or replacement, visit the web page: www.kenmore.com/warranty
This warranty covers ONLY defects in material and workmanship, and will NOT pay for:
1. Expendable items that can wear out from normal use, including but not limited to filters, belts, bags or screw-in base light bulbs.
2. A service technician to clean or maintain this appliance, or to instruct the user in correct appliance installation, operation and
maintenance.
3. Service calls to correct appliance installation not performed by Sears authorized service agents, or to repair problems with
house fuses, circuit breakers, house wiring, and plumbing or gas supply systems resulting from such installation.
4. Damage to or failure of this appliance resulting from installation not performed by Sears authorized service agents, including
installation that was not in accord with electrical, gas or plumbing codes.
5. Damage to or failure of this appliance, including discoloration or surface rust, if it is not correctly operated and maintained
according to all supplied instructions.
6. Damage to or failure of this appliance, including discoloration or surface rust, resulting from accident, alteration, abuse, misuse
or use for other than its intended purpose.
7. Damage to or failure of this appliance, including discoloration or surface rust, caused by the use of detergents, cleaners,
chemicals or utensils other than those recommended in all instructions supplied with the product.
8. Damage to or failure of parts or systems resulting from unauthorized modifications made to this appliance.
9. Service to an appliance if the model and serial plate is missing, altered, or cannot easily be determined to have the
appropriate certification logo.
Disclaimer of implied warranties; limitation of remedies
Customer’s sole and exclusive remedy under this limited warranty shall be product repair or replacement as provided herein.
Implied warranties, including warranties of merchantability or fitness for a particular purpose, are limited to one year on the
appliance, five years on the sealed refrigerant system, ten years on the linear compressor, and for as long as used on the storage
bins, or the shortest period allowed by law. Seller shall not be liable for incidental or consequential damages. Some states do not
allow the exclusion or limitation of incidental or consequential damages, or limitation on the duration of implied warranties of
merchantability or fitness, so these exclusions or limitations may not apply to you.
This warranty applies only while this appliance is used in the United States.
This warranty gives you specific legal rights, and you may also have other rights which vary from state to state.
Sears Brands Management Corporation, Hoffman Estates, IL 60179

4
PRODUCT RECORD
In the space below, record the date of purchase, model and serial number of your product. You will find the model and
serial number printed on an identification label located on the interior liner of the refrigerator compartment. Have these
items of information available whenever you contact Sears concerning your product.
Model No.___________________ Date of Purchase ___________________
Serial No.___________________
Save these instructions and attach your sales receipt for future reference.
6
WARNING
DANGER: RISK OF CHILD ENTRAPMENT
SAVE THESE INSTRUCTIONS
Before replacing a burned-out or broken light bulb, •
unplug the refrigerator or turn off power at the circuit
breaker or fuse box in order to avoid contact with a live
wire filament. (A burned-out light bulb may break when
being replaced exposing the wire filament.)
NOTE: Some models have LED interior lighting and
service should be performed by a qualified technician.
WARNING: Setting either or both controls to the OFF
position does not remove power to the light circuit.
When you are finished, reconnect the refrigerator to •
the electrical source and reset the controls (Thermostat,
Refrigerator Control, and or Freezer Control, depending
on the model) to the desired setting.
This refrigerator must be properly installed in •
accordance with the Attention Installer Instructions that
were taped to the front of the refrigerator.
After your refrigerator is in operation, do not touch the •
cold surfaces in the freezer compartment when hands
are damp or wet. Skin may adhere to the extremely cold
surfaces.
Junked or abandoned refrigerators are dangerous, even
if they are sitting for only a few days. If you are getting
rid of your old refrigerator, please follow the instructions
at right to help prevent accidents (child entrapment and
suffocation).
DO NOT touch the automatic ice making mechanism •
while the refrigerator is plugged in.
DO NOT refreeze frozen foods which have thawed •
completely. The United States Department of
Agriculture in Home and Garden Bulletin No. 69 says:
…You may safely refreeze frozen foods that have
thawed if they still contain ice crystals or if they are
still cold—below 39°F (4°C).
…Thawed ground meats, poultry or fish that have any
off-odor or off-color should not be refrozen and should
not be eaten. Thawed ice cream should be discarded.
If the odor or color of any food is poor or questionable,
dispose of it. The food may be dangerous to eat.
Even partial thawing and refreezing reduces the
eating quality of foods, particularly fruits, vegetables
and prepared foods. The eating quality of red meats
is affected less than that of many other foods. Use
refrozen foods as soon as possible to save as much of
their quality as you can.
BEFORE YOU THROW AWAY
YOUR OLD REFRIGERATOR
OR FREEZER:
Take off the doors.•
Leave the shelves in place so that •
children may not easily climb inside
.
7
ELECTRICAL & GROUNDING REQUIREMENTS
WARNING
Your old refrigerator may have a cooling system
that used CFCs or HCFCs (chlorofluorocarbons or
hydrochlorofluorocarbons). CFCs and HCFCs are
believed to harm stratospheric ozone if released to the
atmosphere. Other refrigerants may also cause harm to
the environment if released to the atmosphere.
IMPORTANT: Please read carefully.
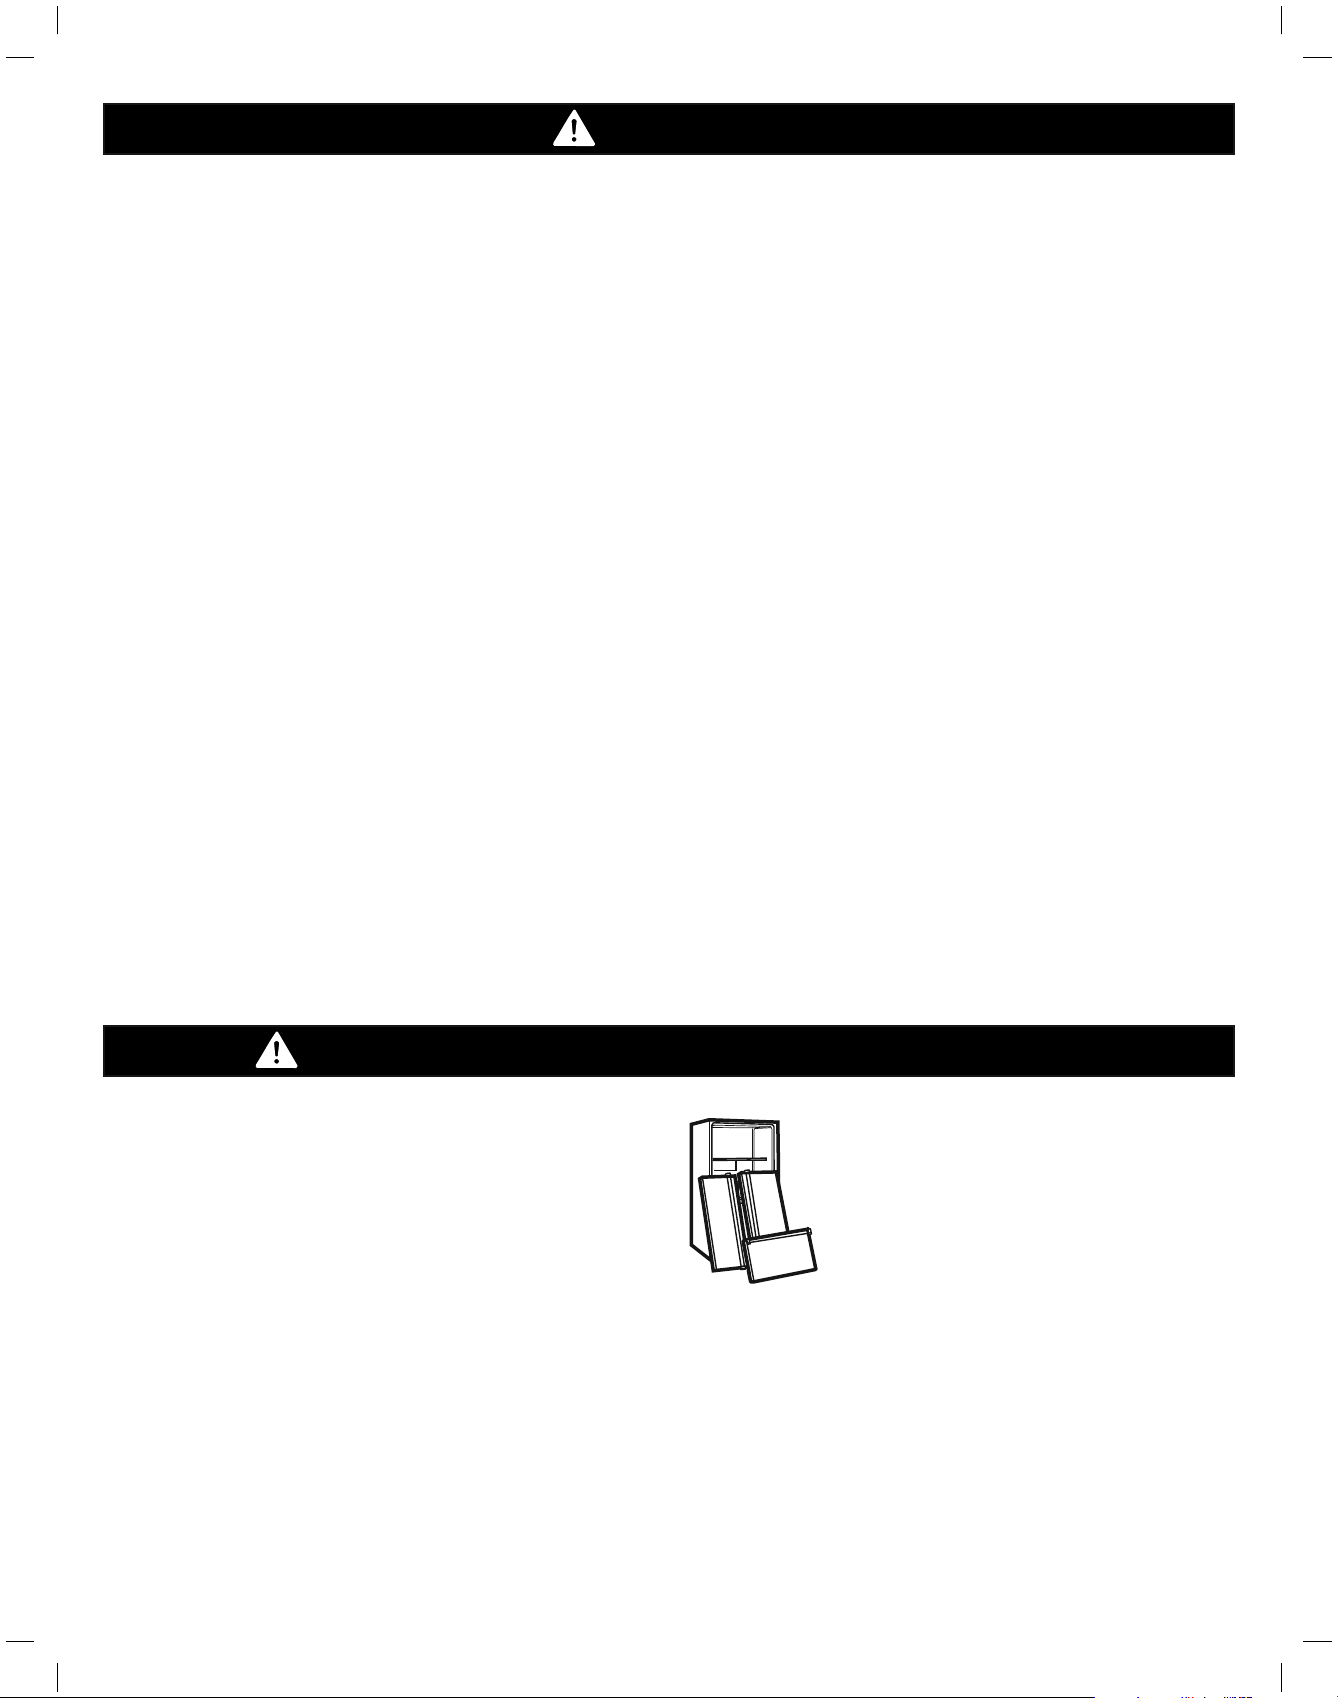
TO CONNECT ELECTRICITY
RECOMMENDED GROUNDING METHOD
The refrigerator should always be plugged into its own
individual properly grounded electrical outlet rated for
115 Volts, 60 Hz, AC only, and fused at 15 or 20 amperes.
This provides the best performance and also prevents
overloading house wiring circuits which could cause a fire
hazard from overheated wires. It is recommended that a
separate circuit serving only this appliance be provided.
Use a receptacle that cannot be turned off with a switch
or pull chain. Do not use an extension cord.
Where a standard two-prong wall outlet is encountered,
it is your personal responsibility and obligation to have
it replaced with a properly grounded three-prong wall
outlet.
Electrical Shock Hazard
FOR PERSONAL SAFETY, this appliance must be
properly grounded. Have the wall outlet and the circuit
checked by a qualified electrician to make sure the
outlet is properly grounded.
If you are throwing away your old refrigerator, make
sure the refrigerant is removed for proper disposal
by a qualified technician. If you intentionally release
refrigerant, you may be subject to fines and imprisonment
under provisions of environmental legislation.
USE OF EXTENSION CORDS
Because of potential safety hazards under certain conditions,
the use of an extension cord is not recommended. However,
if you still elect to use an extension cord, it is absolutely
necessary that it be a UL-listed (USA), 3-wire grounding type
appliance extension cord having a grounding type plug and
outlet, and that the electrical rating of the cord be 15 amperes
(minimum) and 120 volts.
Use of an extension cord will increase the clearance needed
for the back of the refrigerator.
3-prong
grounding
plug
3-prong
grounding type
wall receptacle
Ensure proper
ground exists
before use.
CFC/HCFC DISPOSAL

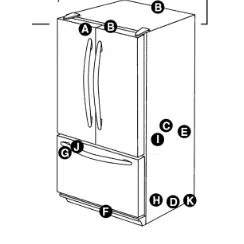
A
Refrigerator Light
B
Water Filter
C
D
E
F
G
H
I
J
Diagnostics Speaker
K
Refrigerator Shelves
L
Air Filter
M
Durabase
Door Bins
Pullout Drawer
Icemaker / Ice Bin
Articulating Mullion
Crisper
Pantry Drawer
Durabase Divider
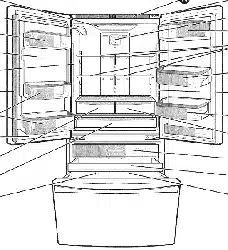
PARTS AND FEATURES
Use this page to become more familiar with the parts and features of your refrigerator.
NOTE: This guide covers several different models. The refrigerator you have purchased may have some
or all of the items listed below. The locations of the features shown below may not match your model.
A
E
F
G
H
I
J
K
L
M
C
D
B
C
10
REFRIGERATOR INSTALLATION
1. To avoid noise and vibration, the unit must be leveled
and installed on a solidly constructed ÁRRU. If required,
adjust the leveling legs to compensate for unevenness
of the ÁRRU. The front should be slightly higher than
the rear to aid in door closing. Leveling legs can be
turned easily by tipping the cabinet slightly. Turn the
leveling legs to the left to raise the unit or to the right to
lower it. (See LEVELING AND DOOR ALIGNMENT.)
NOTE: Installing on carpeting, soft tile surfaces,
a platform or weakly supported structure is not
recommended.
2. Install this appliance in an area where the temperature
is between 55°F (13°C) and 110°F (43°C). If the
temperature around the appliance is too low or high,
cooling ability may be adversely affected.
3. Select a place where a water supply can be easily
connected for the automatic icemaker.
NOTE: The water pressure must be from 20-120 psi or
138-827 kPa or 1.4-8.4 kgf/cm². If the refrigerator is
installed in an area with low water pressure (below 20
psi), you can install a booster pump to compensate for
the low pressure.
4. Too small of a distance from adjacent items may
result in lowered freezing capability and increased
electricity consumption charges. Allow at least 24
inches (61 cm) in front of the refrigerator to open the
doors and at least 2 inches (5.08 cm) between the
back of the refrigerator and the wall.
INSTALLATION
The refrigerator should always be plugged into its own
individual properly grounded electrical outlet rated for
115 Volts, 60 Hz, AC only, and fused at 15 or 20 amperes.
This provides the best performance and also prevents
overloading house wiring circuits which could cause a ÀUe
hazard from overheated wires. It is recommended that a
separate circuit serving only this appliance be provided.
REFRIGERATOR INSTALLATION
2" (5.08 cm)
Shock Hazard:
7RUHGXFHWKHULVNRIHOHFWULFVKRFNGRQRWLQVWDOOWKH
UHIULJHUDWRULQDZHWRUGDPSDUHD
WARNING
This appliance is intended to be used in household and
VLPLODUDSSOLFDWLRQVVXFKDVVWDIINLWFKHQDUHDVLQVKRSV
RIILFHVDQGRWKHUZRUNLQJHQYLURQPHQWVIDUPKRXVHV
and by clients in hotels, motels and other residential
W\SHHQYLURQPHQWVEHGDQGEUHDNIDVWW\SH
HQYLURQPHQWVFDWHULQJDQGVLPLODUQRQUHWDLODSSOLFDWLRQV
PRIOR TO USE
&OHDQ\RXUUHIULJHUDWRUWKRURXJKO\DQGZLSHRIIDOO
GXVWWKDWDFFXPXODWHGGXULQJVKLSSLQJ
,QVWDOODFFHVVRULHVVXFKDVLFHFXEHELQGUDZHUV
VKHOYHVHWFLQWKHLUSURSHUSODFHV7KH\DUHSDFNHG
WRJHWKHUWRSUHYHQWSRVVLEOHGDPDJHGXULQJVKLSPHQW
$OORZ\RXUUHIULJHUDWRUWRUXQIRUDWOHDVWWZRWRWKUHH
KRXUVEHIRUHSXWWLQJIRRGLQLW&KHFNWKHÁRZRI
FROGDLULQWKHIUHH]HUFRPSDUWPHQWWRHQVXUHSURSHU
FRROLQJ<RXUUHIULJHUDWRULVQRZUHDG\IRUXVH
11
REFRIGERATOR INSTALLATION
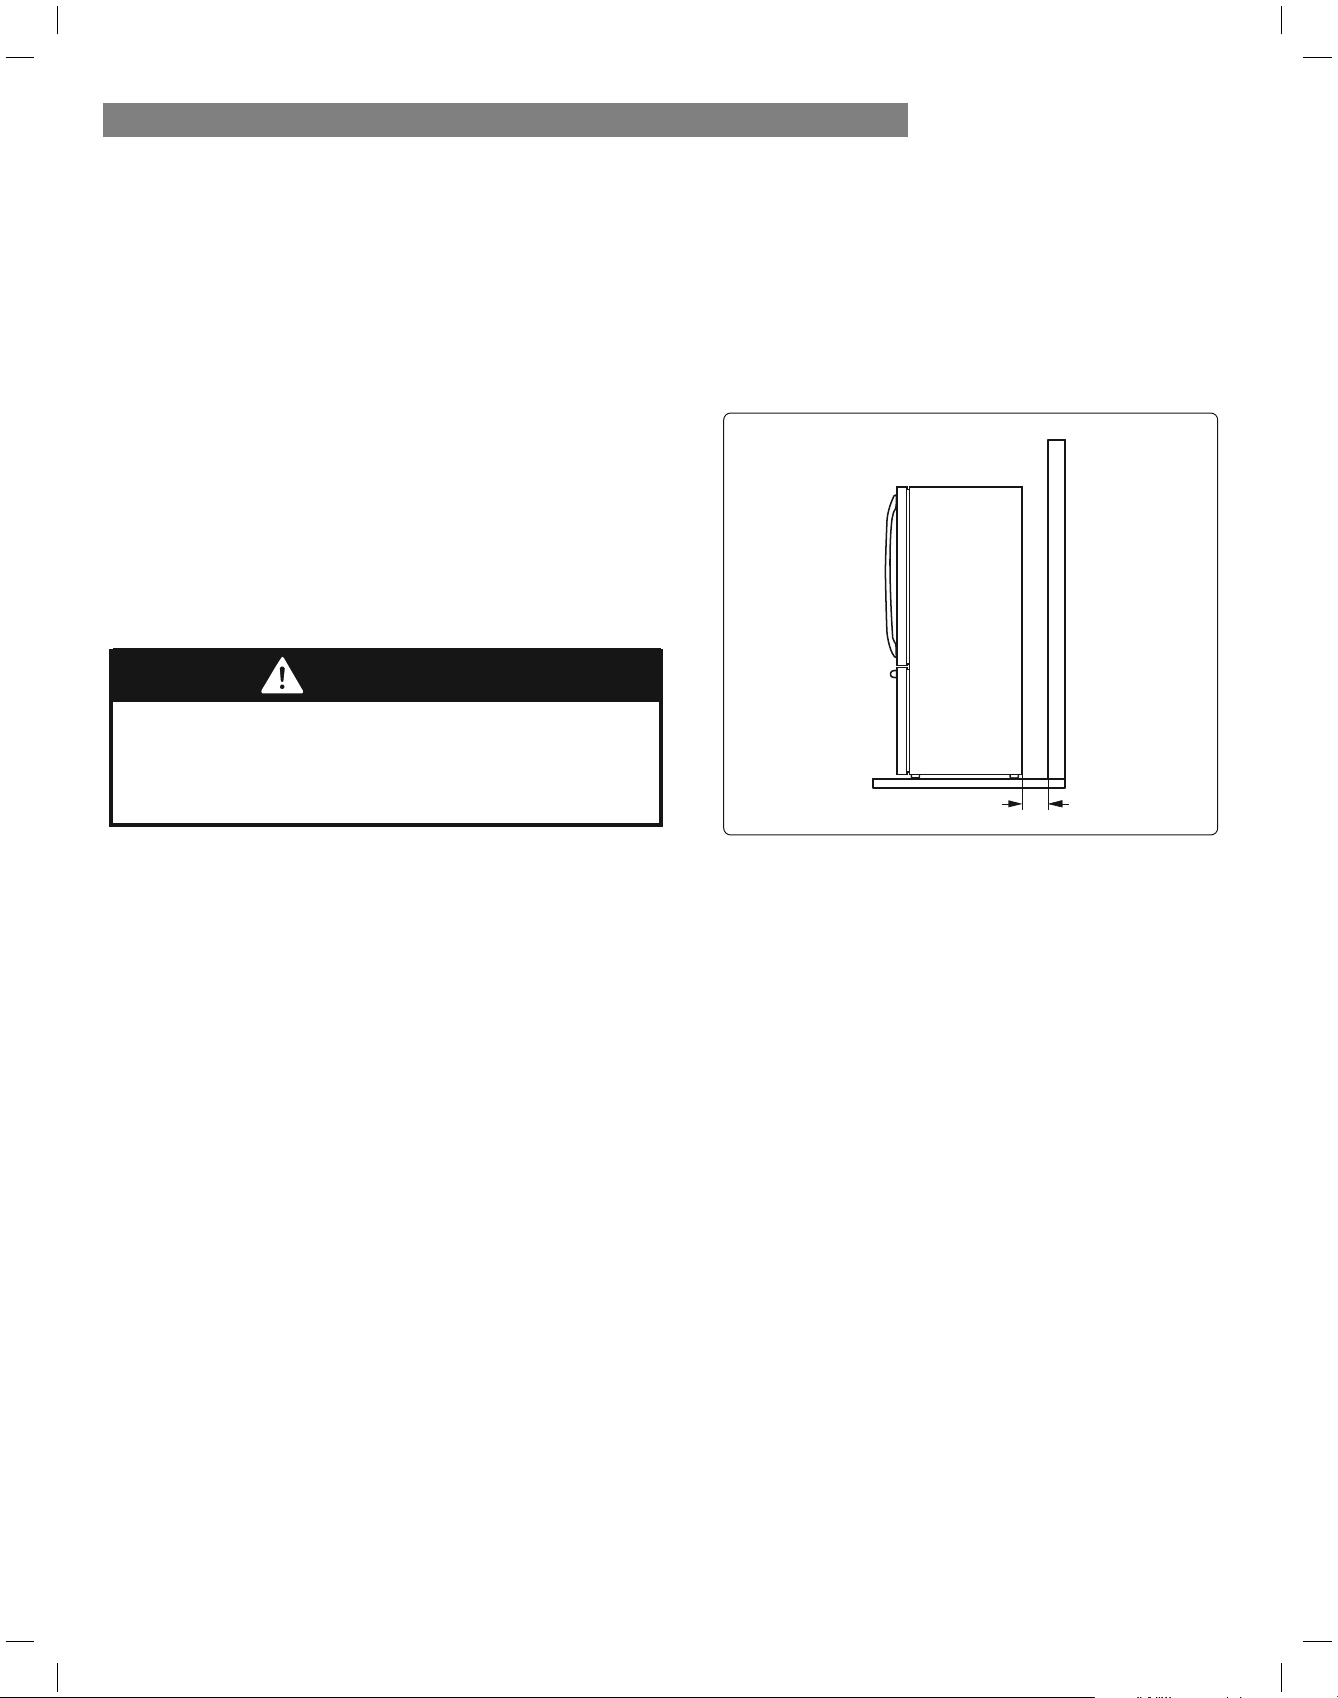
REMOVING AND REPLACING HANDLES
NOTE:Handle appearance may vary from the
illustrations on this page.
Removing Refrigerator Handle
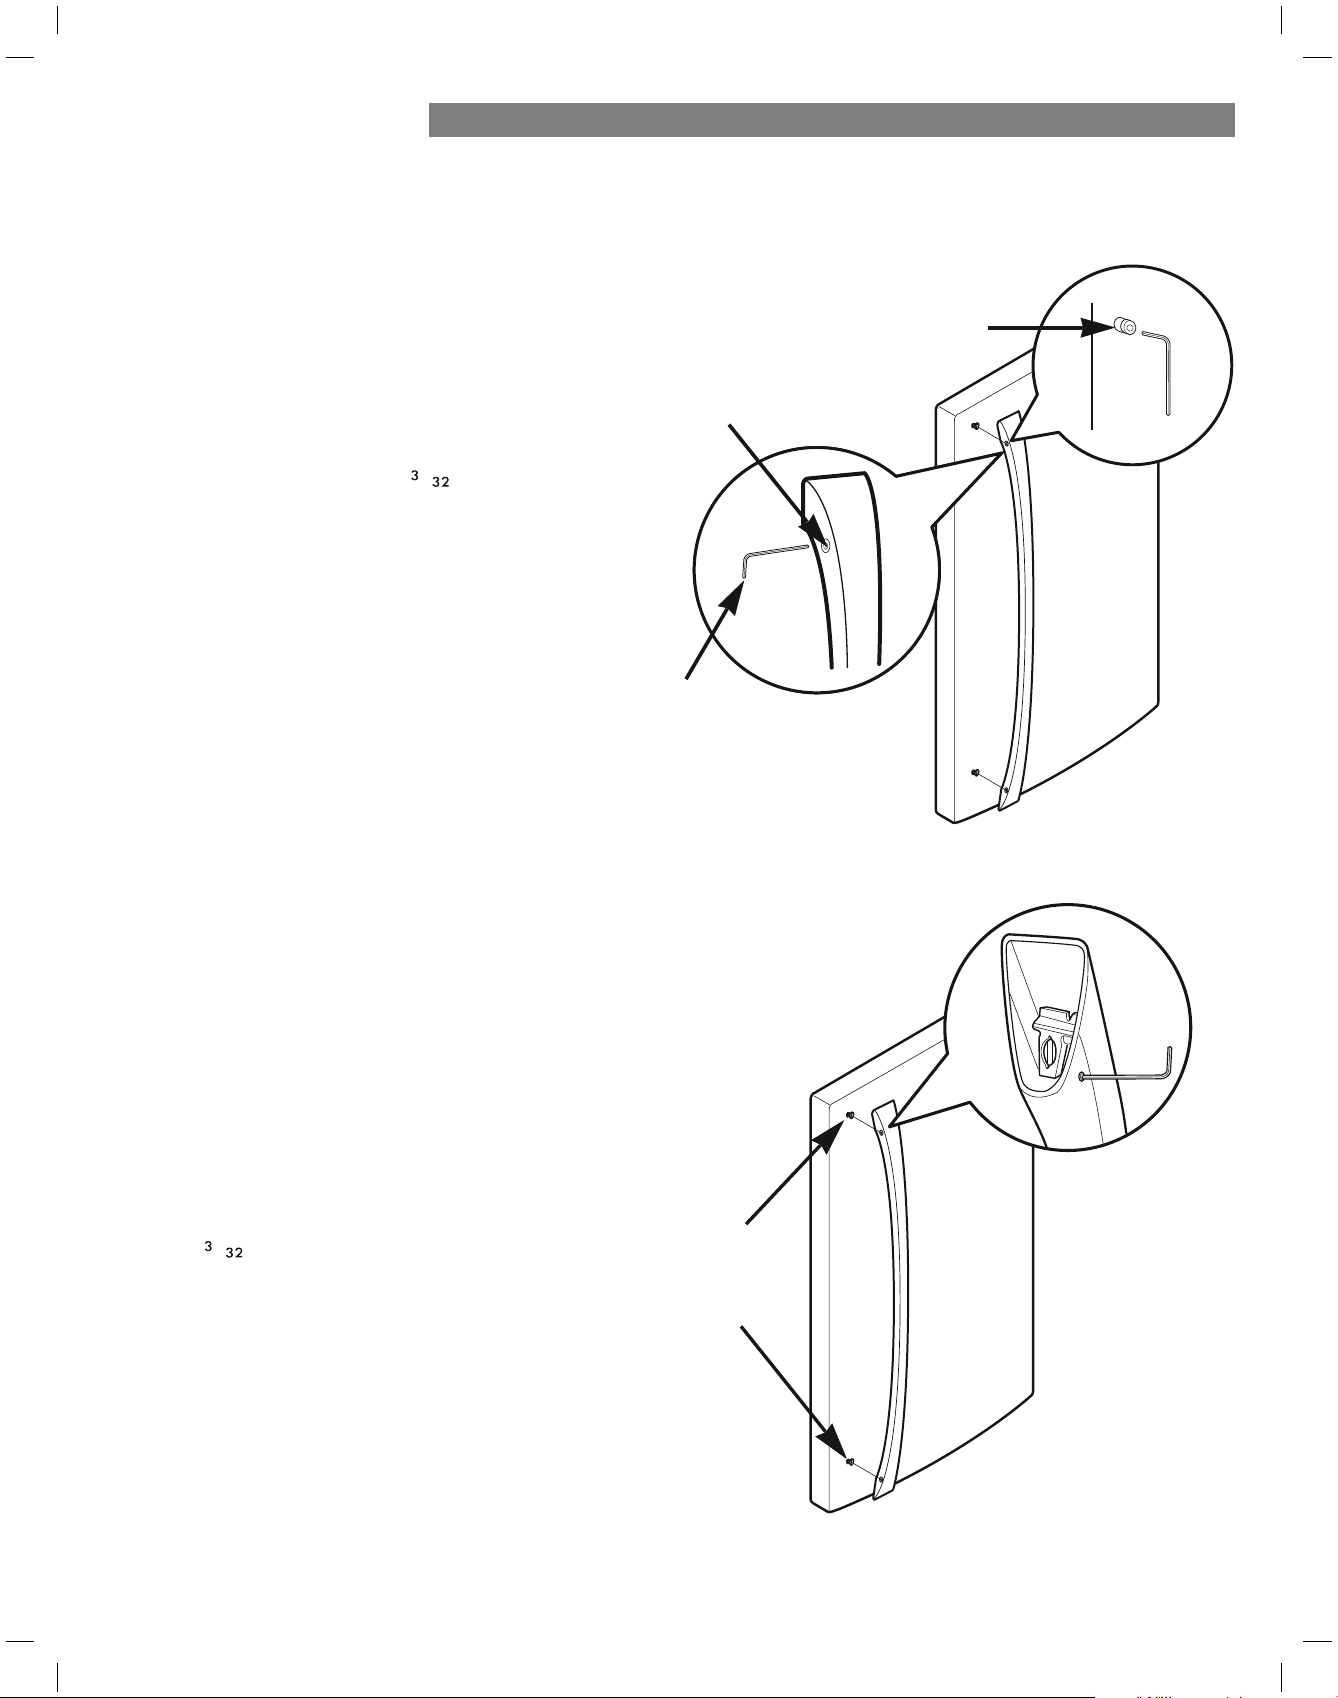
Replacing Refrigerator Handle
Loosen the set screws with a / in. Allen
wrench and remove the handle.
NOTE: If the handle mounting fasteners need
to be tightened or removed, use a ¼ in. Allen
wrench.
NOTE: Removing the doors is always recommended when it is necessary to move the refrigerator through a narrow
opening. If it is necessary to remove the handles, follow the directions below.
3ODFHWKHKDQGOHRQWKHGRRUE\ÀWWLQJ
the handle footprints over the mounting
fasteners and tightening the set screws
with a
/ in Allen wrench.
NOTE: If the handle mounting fasteners
need to be tightened or removed, use a
¼ in. Allen wrench.
Mounting
Fasteners
Set Screw
Allen
Wrench
Mounting
Fasteners
12
When assembling or disassembling the handles:
*UDVSWKHKDQGOHÀUPO\WRHQVXUHLWZLOOQRWGURSRU
FDXVHLQMXU\
3UHYHQWWKHKDQGOHIURPVZLQJLQJWRZDUGQHDUE\
SHRSOHRUDQLPDOV
Insert the bracket hole of the handle into the stopper
EROWRIWKHGRRUH[DFWO\WKHQDVVHPEOHWKHVHWVFUHZV
WRÀ[WKHKDQGOHLQSODFH
&KHFNIRUDQ\JDSEHWZHHQWKHGRRUDQGKDQGOH
DIWHUWKHKDQGOHLVÀ[HGLQSODFH
WARNING
REFRIGERATOR INSTALLATION
Replacing Freezer Drawer Handle
3ODFHWKHKDQGOHRQWKHGRRUE\ÀWWLQJWKHKDQGOH
IRRWSULQWVRYHUWKHPRXQWLQJIDVWHQHUVDQGWLJKWHQLQJ
WKHVHWVFUHZVZLWKDLQ$OOHQZUHQFK
NOTE:,IWKHKDQGOHPRXQWLQJIDVWHQHUVQHHGWREH
WLJKWHQHGRUUHPRYHGXVHDôLQ$OOHQZUHQFK
REMOVING AND REPLACING HANDLES (CONTINUED)
NOTE:+DQGOHDSSHDUDQFHPD\YDU\IURPWKHLOOXVWUDWLRQV
RQWKLVSDJH
Removing Freezer Drawer Handle
/RRVHQWKHVHWVFUHZVORFDWHGRQWKHORZHUVLGHRI
eht eYoPer dna hcnerZ nell$ nLa htLZ eldnah eht
KDQGOH
NOTE: ,IWKHKDQGOHPRXQWLQJIDVWHQHUVQHHGWREH
WLJKWHQHGRUUHPRYHGXVHDôLQ$OOHQZUHQFK
NOTE:5HPRYLQJWKHGRRUVLVDOZD\VUHFRPPHQGHGZKHQLtLVQHFHVVDU\WRPRYHWKHUHIULJHUDWRUWKURXJKDQDUURZ
RSHQLQJ,ILWLVQHFHVVDU\WRUHPRYHWKHKDQGOHVIROORZWKHGLUHFWLRQVEHORZ
13
REFRIGERATOR INSTALLATION
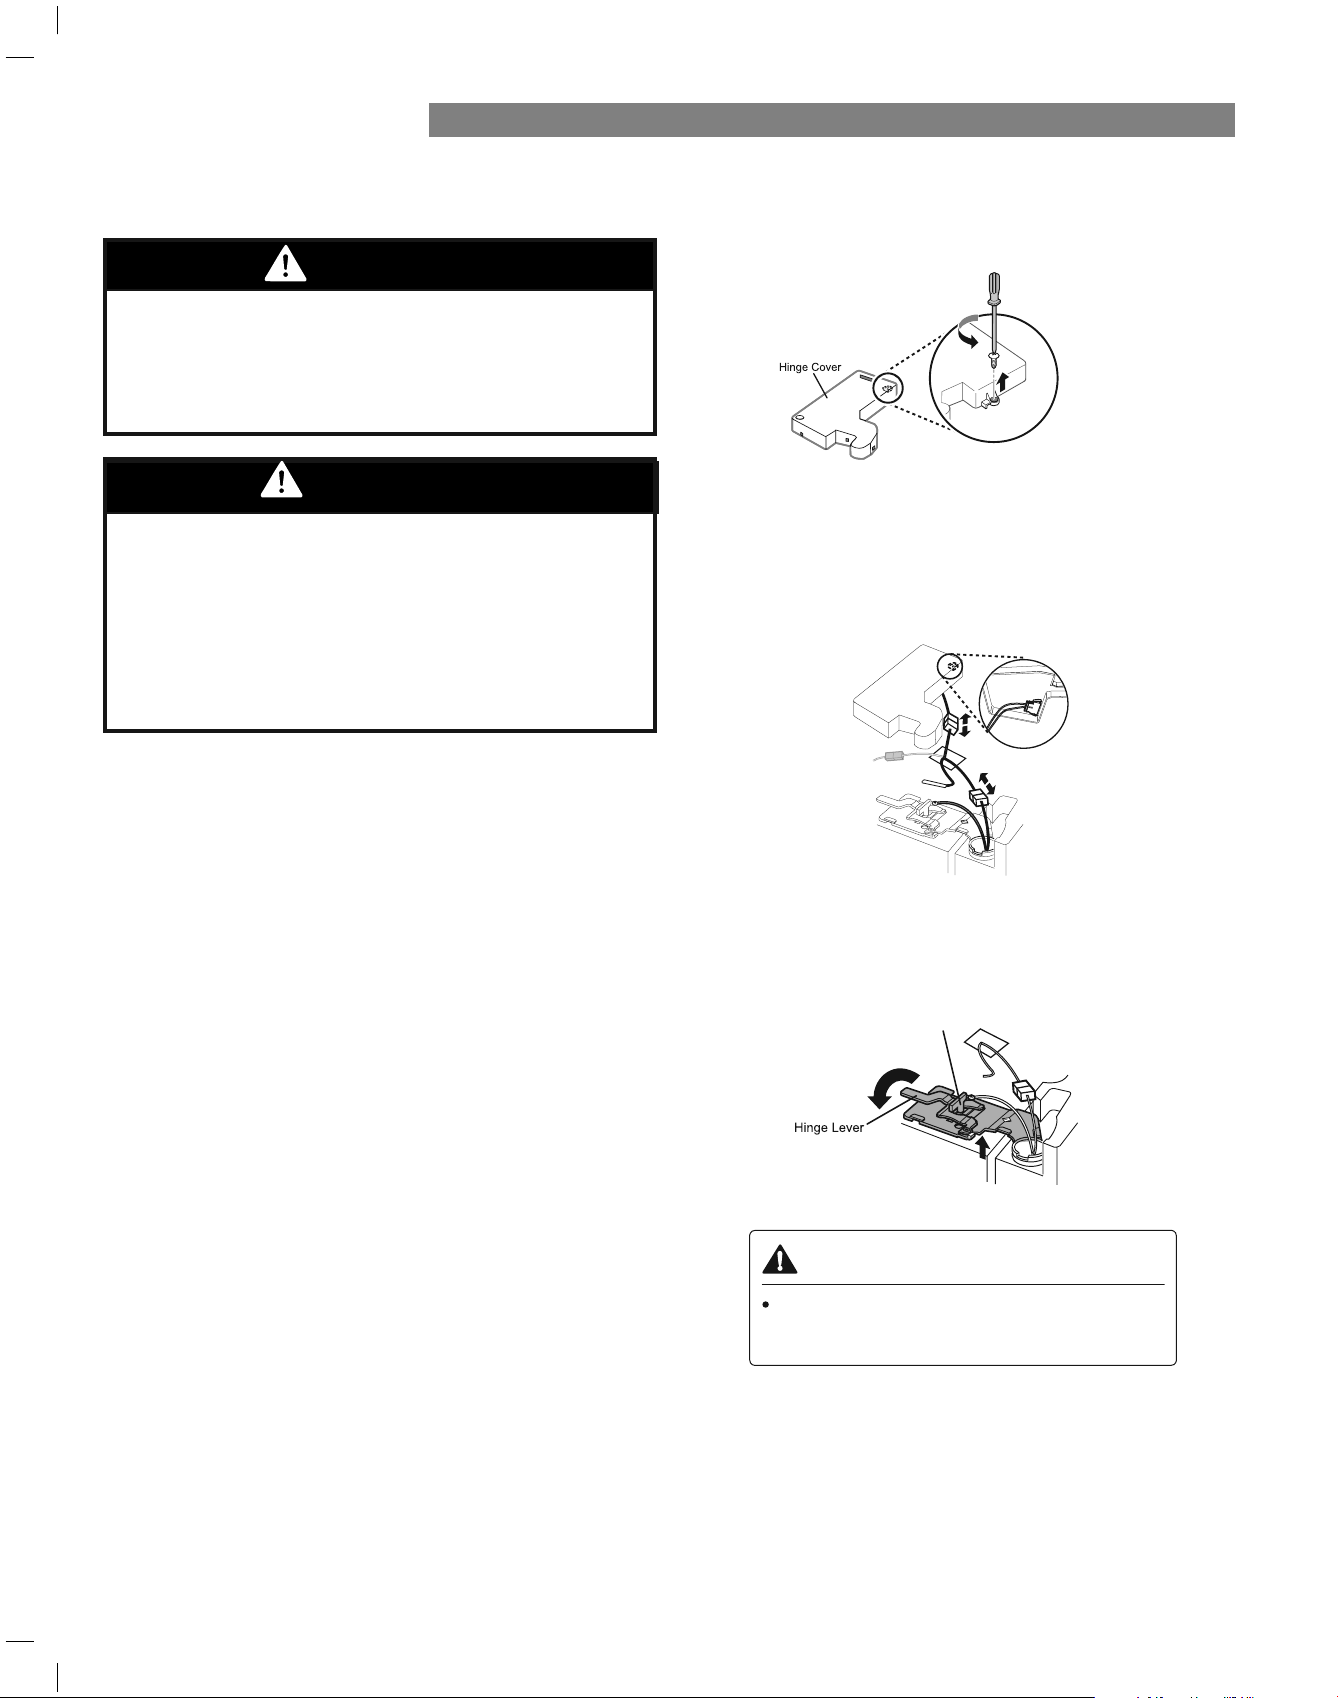
Removing the Left Door
1
2
Open the door. Remove the top hinge cover screw
Disconnect all the wire harnesses.
and the hinge cover.
WARNING
Electrical Shock Hazard
Disconnect the electrical supply to the refrigerator
before installing. Failure to do so could result in
serious injury or death.
Do not put hands, feet or other objects into the air
vents or bottom of the refrigerator. You may be
injured or receive an electrical shock.
REMOVING AND REPLACING
REFRIGERATOR DOORS
WARNING
Excessive Weight Hazard:
Use two or more people to remove and install the
refrigerator doors. Failure to do so can result in
back or other injury.
3
Rotate the hinge lever counterclockwise (1). Lift
the top hinge (2) free of the hinge lever latch.
Hinge Lever Latch
CAUTION
When lifting the hinge free of the latch,
be careful that the door does not fall
forward.
(1)
(2)
14
REFRIGERATOR INSTALLATION
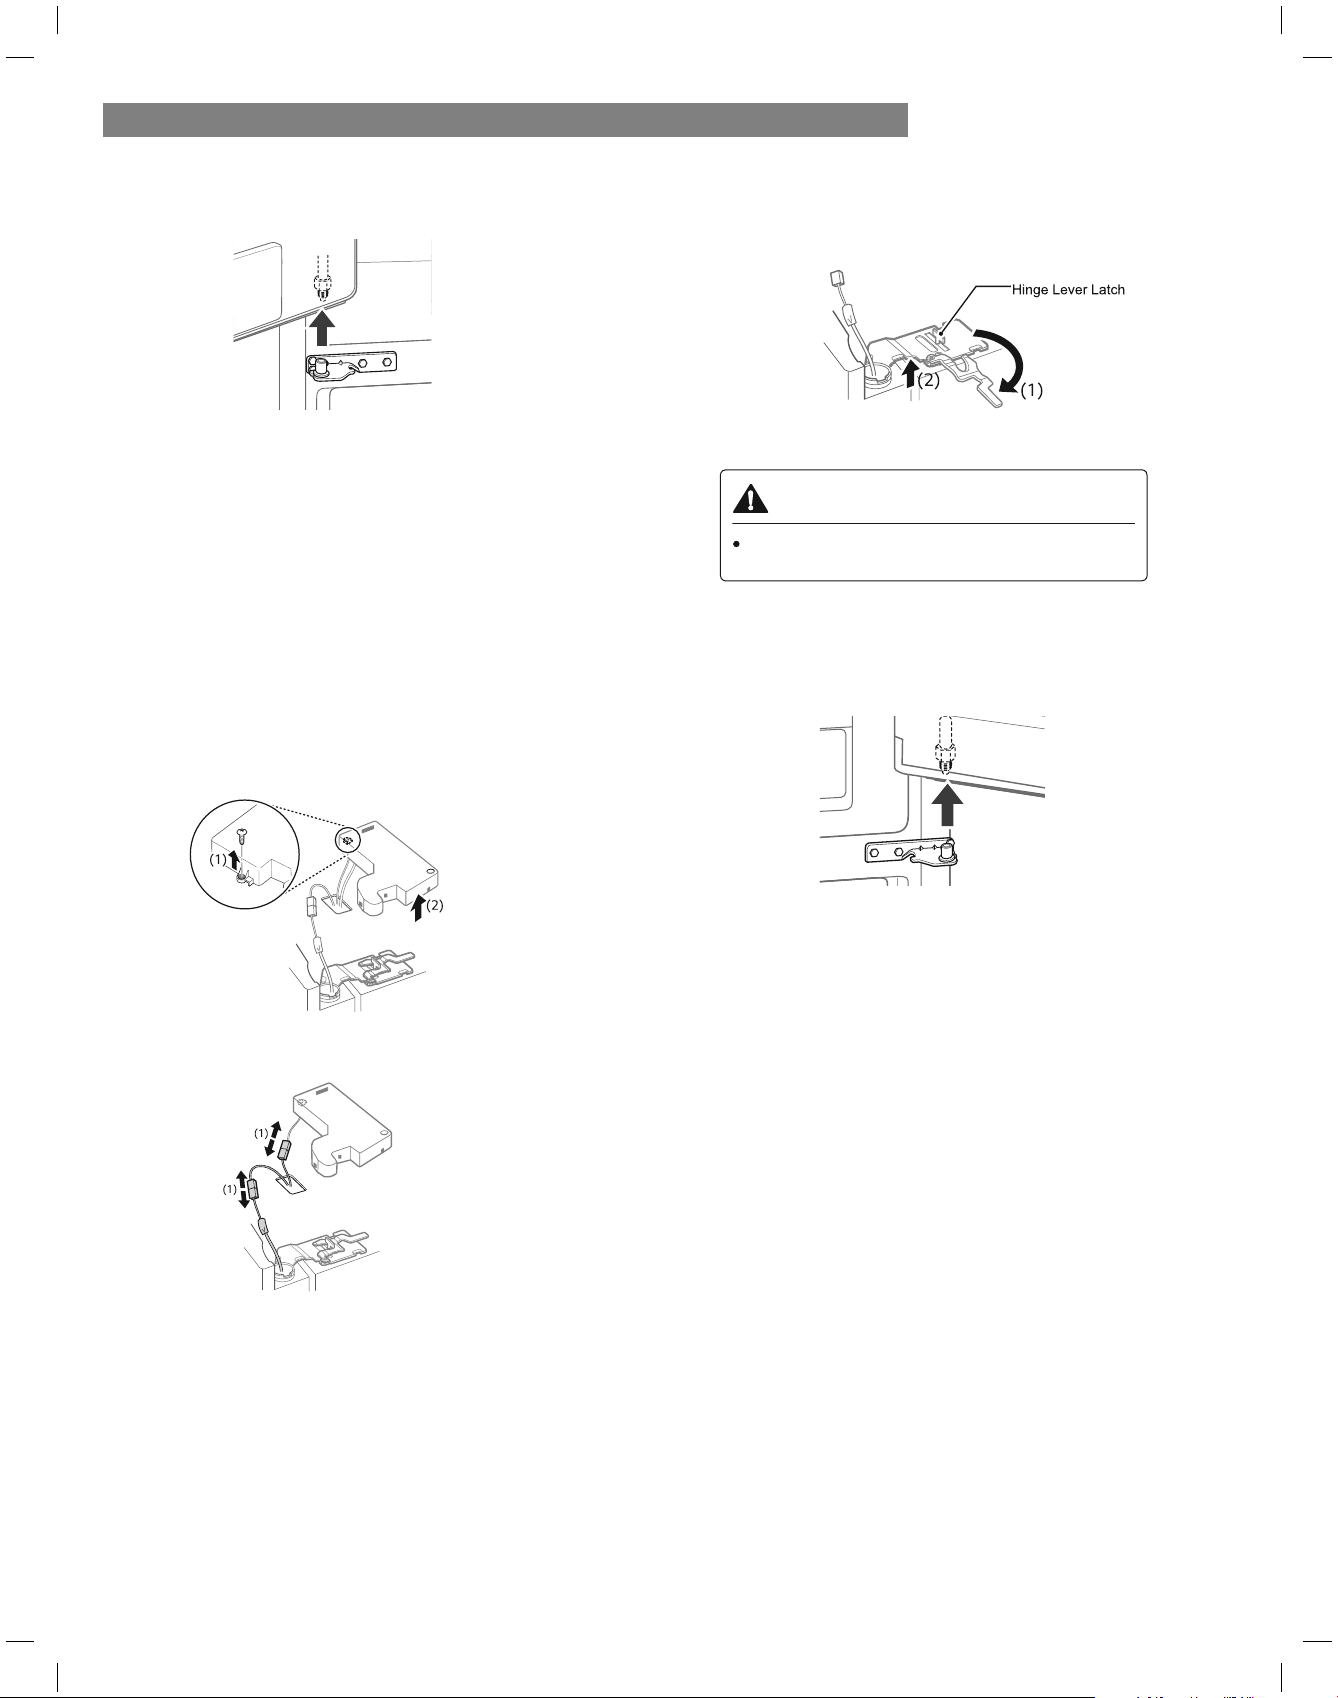
Removing the Right Door
1
Remove the top hinge cover screw (1). Lift
the hook (not visible), located at the bottom of
screwdriver.
the front side of the cover (2), with a flat-head
2
Detach the wire harness (1).
3
Rotate the hinge lever (1) clockwise. Lift the top
hinge (2) free of the hinge lever latch.
CAUTION
When lifting the hinge free of the latch, be
careful that the door does not fall forward.
4
Lift the door from the middle hinge pin and
remove the door.
NOTE: Place the door, inside facing up,
on a nonscratching surface.
4
Lift the door from the middle hinge pin and
remove the door.
NOTE: Place the door, inside facing up, on a
nonscratching surface.
15
REFRIGERATOR INSTALLATION
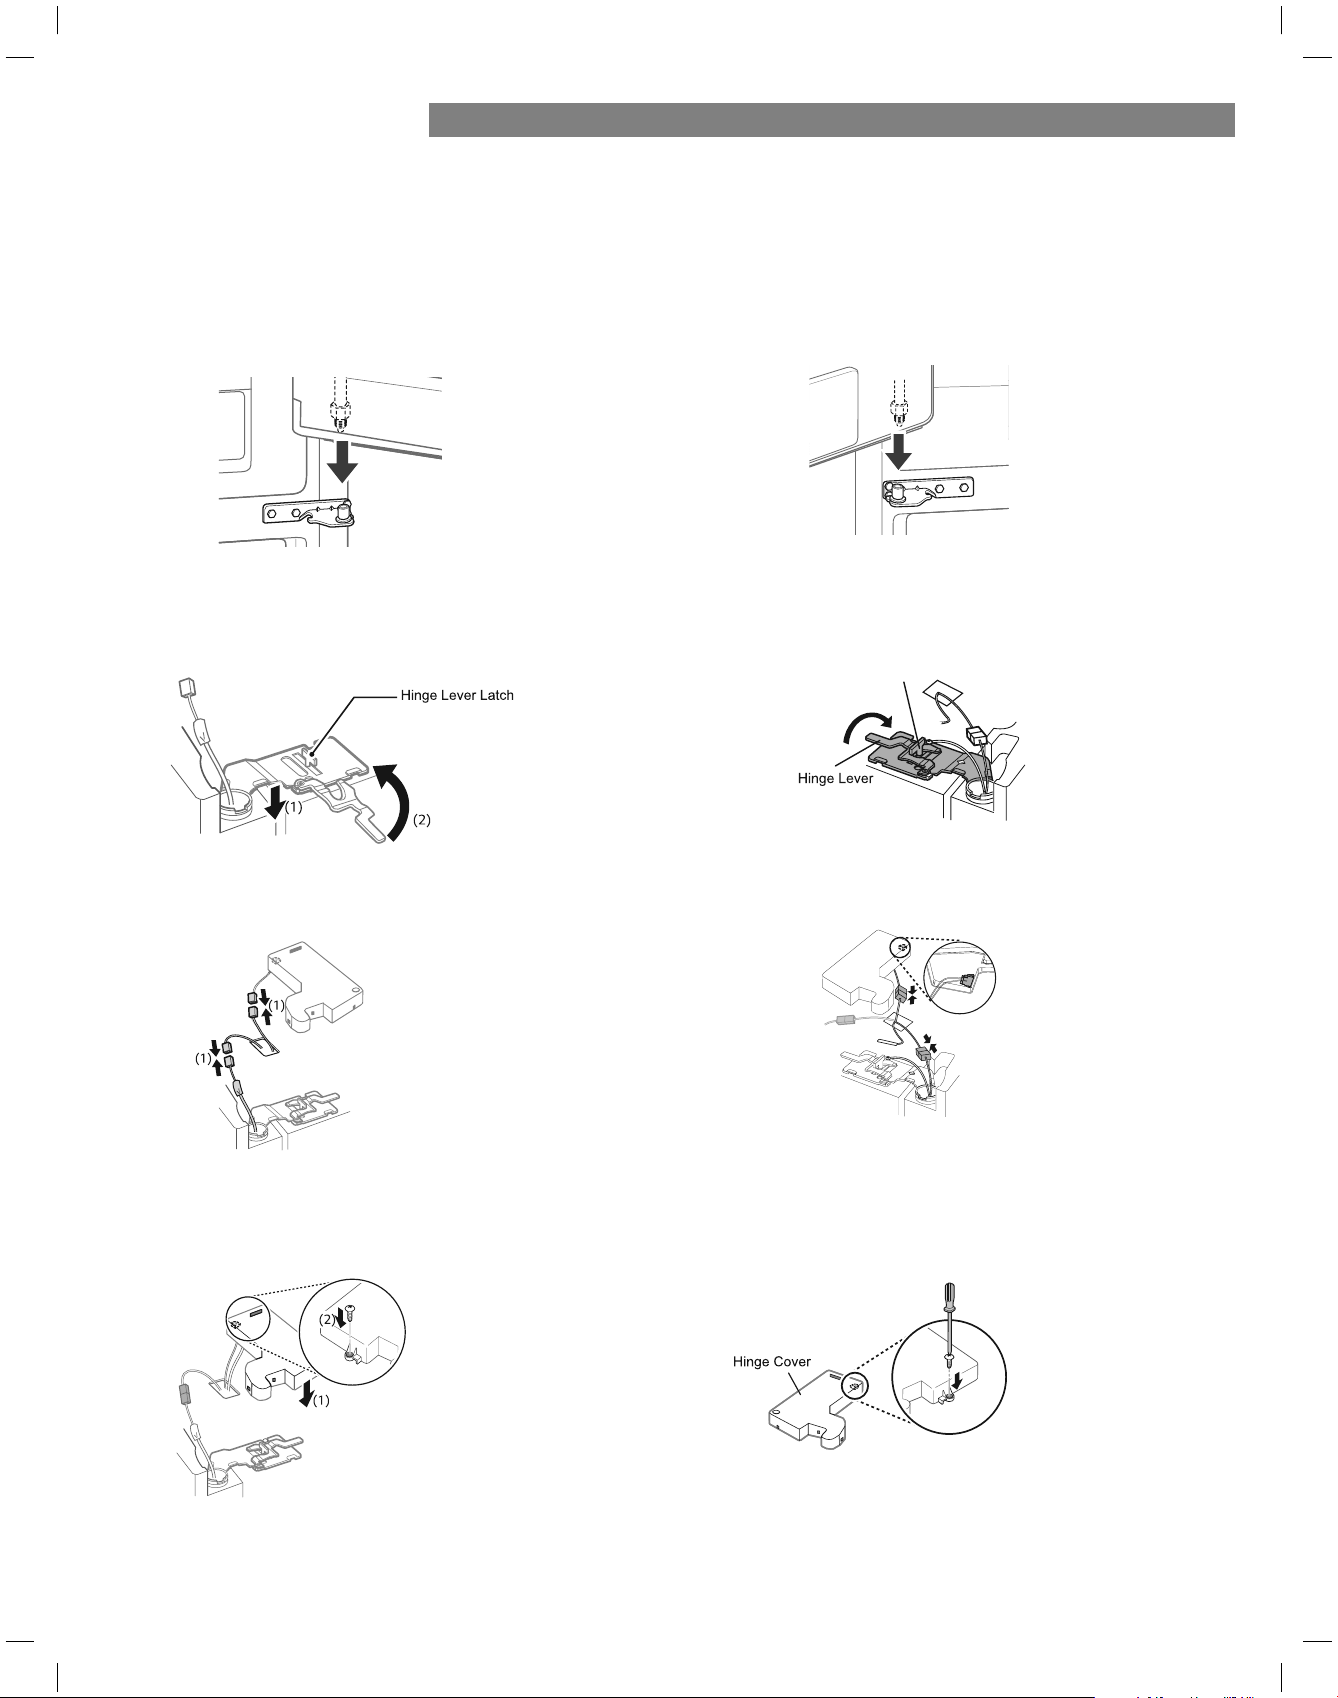
Replacing the Left Door
Install the left refrigerator door after the right door is
installed.
1
Make sure that the plastic sleeve is inserted in
the bottom of the door. Install the refrigerator door
onto the middle hinge.
2
Rotate the hinge lever clockwise. Lift the top hinge
free of the hinge lever latch.
Hinge Lever Latch
3
Connect all the wire harnesses.
4
Place the cover in place. Insert and tighten the
cover screw.
Install the right-side door first.
Replacing the Right Door
1
Make sure that the plastic sleeve is inserted in
the bottom of the door. Lower the door onto
the middle hinge pin as shown in the figure.
2
Fit the hinge (1) over the hinge lever latch
and slot it into place. Rotate the lever (2)
counterclockwise to secure the hinge.
3
Connect the wire harness (1).
4
Place the cover (1) in its place. Insert and tighten
the cover screw (2).
16
REFRIGERATOR INSTALLATION
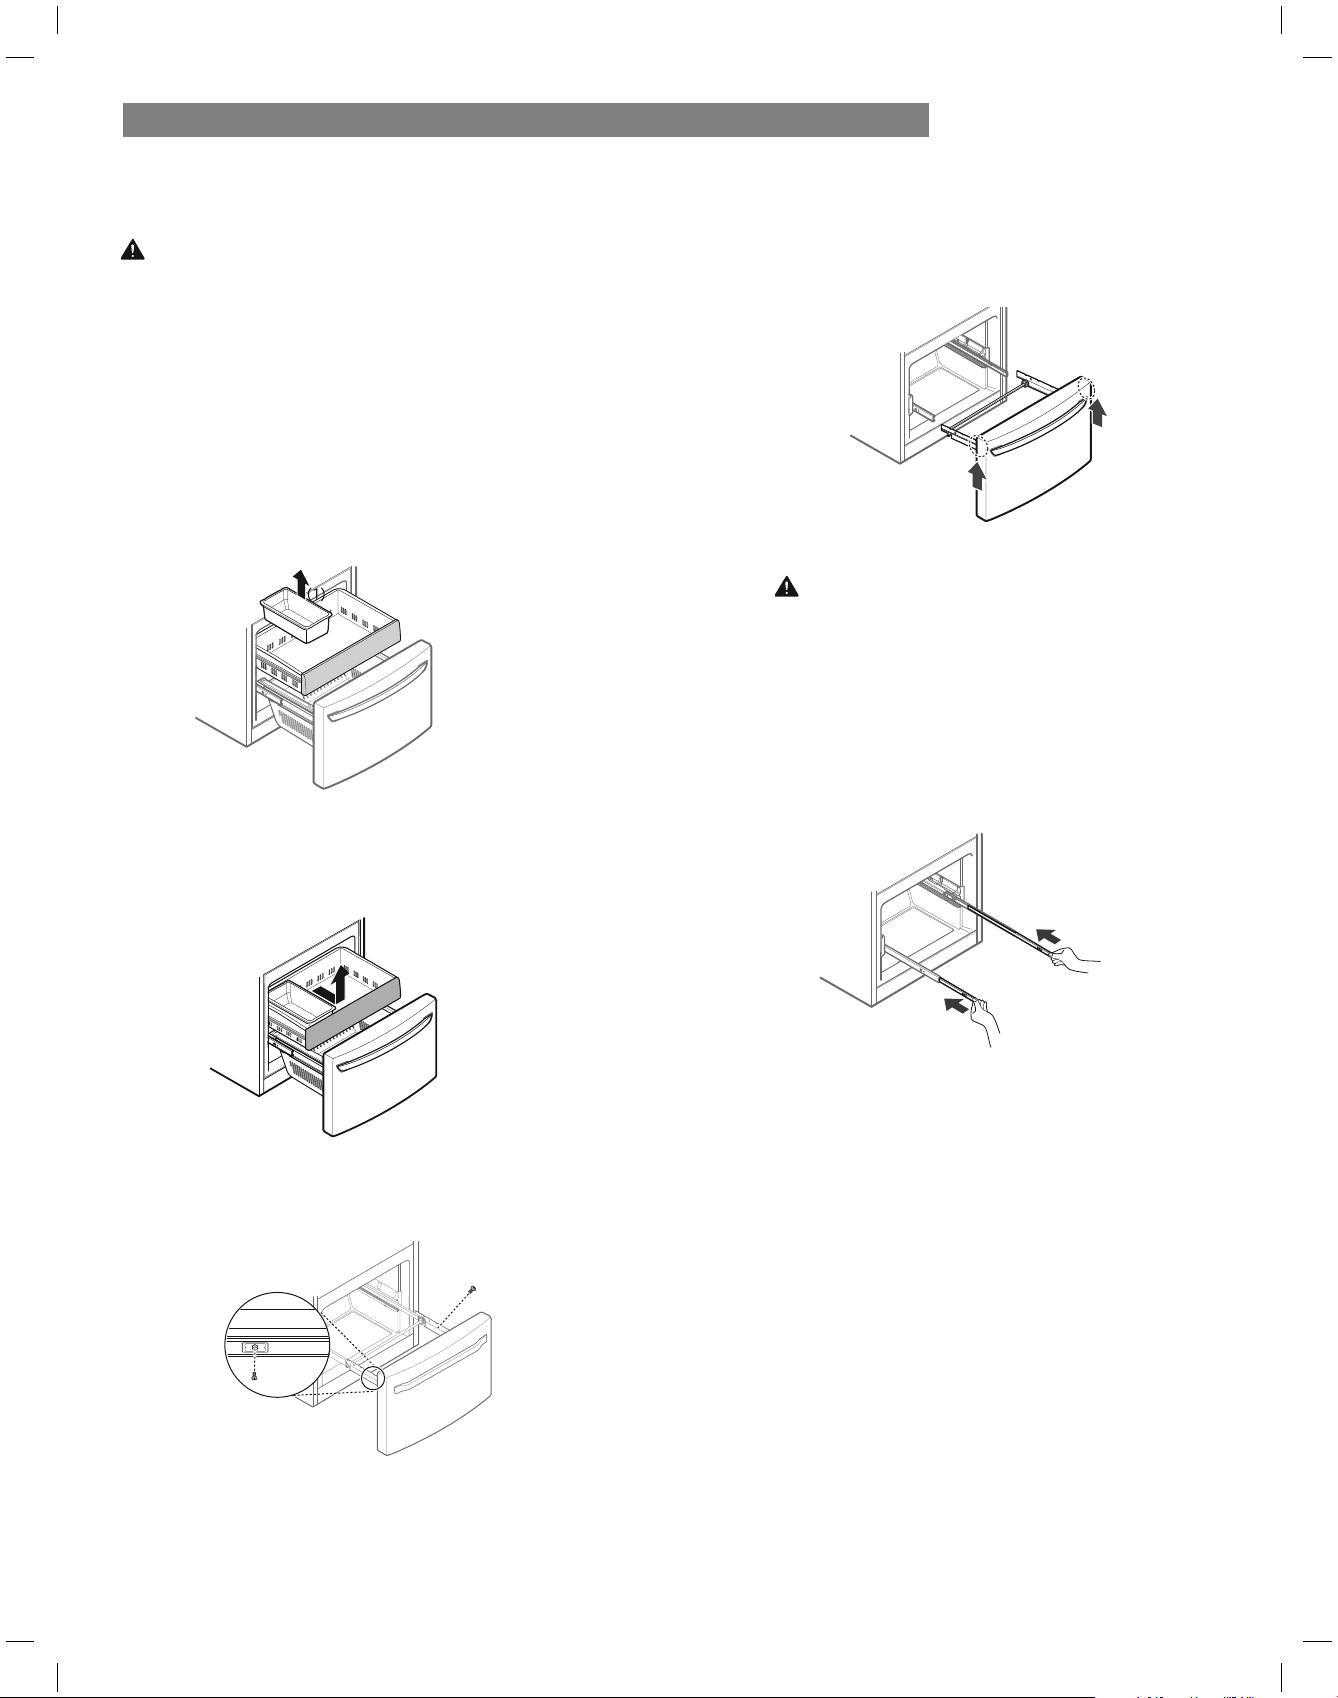
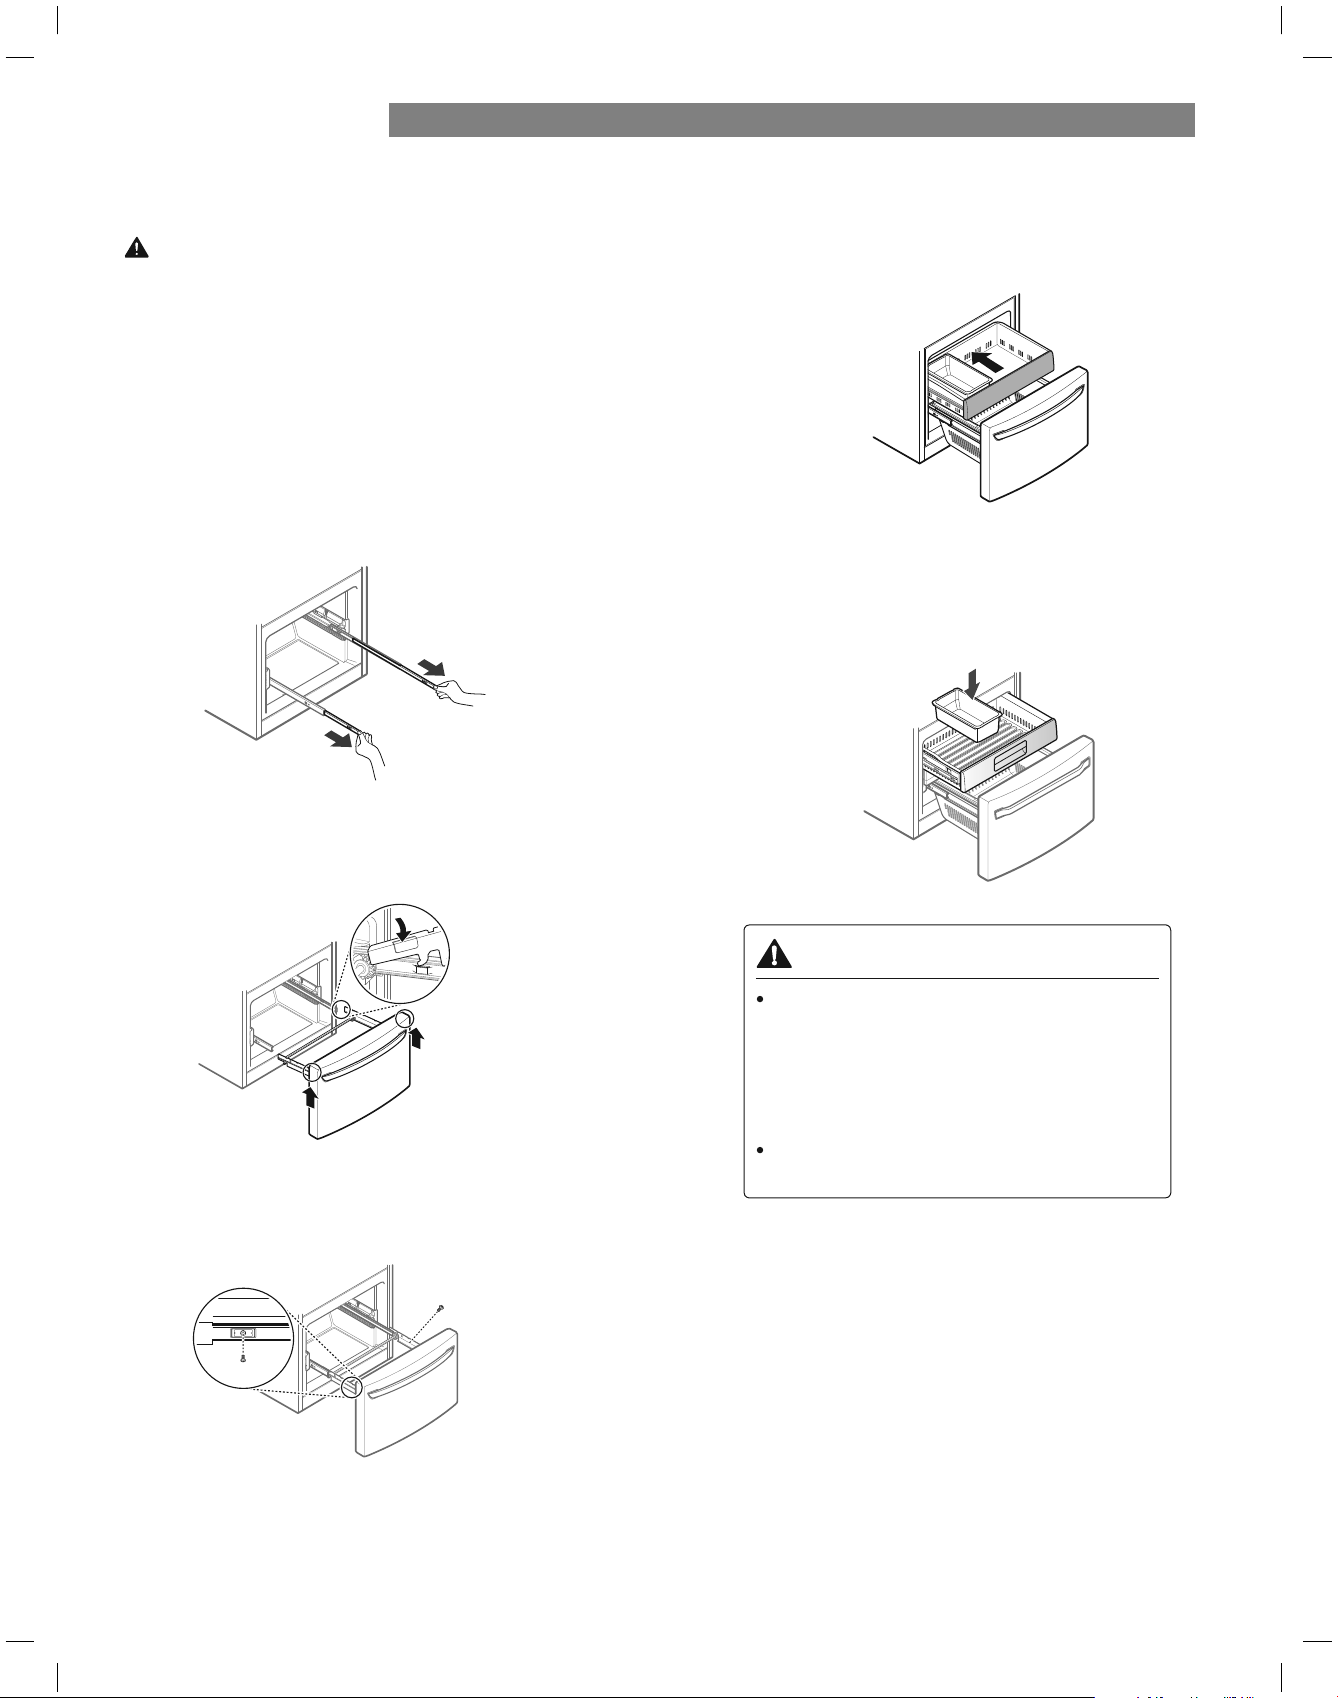
REMOVING FREEZER DRAWERS
Removing The Freezer Drawer
WARNING:
Use two or more people to remove and
install the freezer drawer. Failure to do so can result in
back or other injury.
NOTE: In the following images, the Pullout Drawer
located above the freezer drawer is not shown for clarity.
Pull the drawer open to full extension.
Gently lift and pull out the ice bin.
Lift the front of the drawer up, then pull it straight out.
Hold both rails and push them in simultaneously.
CAUTION:
When you remove the freezer drawer, do not hold
the handle. The handle may come off and it could
cause personal injury.
Remove the Durabase basket from the rails.
Remove the screws from the rails at both ends.
Grip both sides of the drawer and pull it up to
remove it from the rails.
17
REFRIGERATOR INSTALLATION
REFRIGERATOR INSTALLATION
REPLACING FREEZER DRAWERS
Replacing The Freezer Drawer
Pull out both rails simultaneously, until they are fully
extended.
WARNING
If the Durabase divider is removed, there
is enough open space for children or pets
to crawl inside. To prevent accidental
child and pet entrapment or suffocation
risk, DO NOT allow them to touch or go
near the freezer drawer.
DO NOT step or sit down on the freezer
drawer.
Grasp the drawer on each side and hook the
drawer supports into the rail tabs located on both
sides.
tighten the screws located on both sides.
Lower the door into its final position and
Insert the drawer and push it back until it
clicks into place.
Replace the ice bin in the drawer. Insert the
Durabase basket in the rail assembly.
WARNING:
Use two or more people to remove and
install the freezer drawer. Failure to do so can result in
back or other injury.
NOTE: In the following images, the Pullout Drawer
located above the freezer drawer is not shown for clarity.

18
screwdriver.
1. Turn the leveling leg to the left to raise that side of
the refrigerator or to the right to lower it. It may take
several turns of the leveling leg to adjust the tilt of the
refrigerator.
NOTE: Having someone push backward against the top of
the refrigerator takes some weight off of the leveling legs.
This makes it easier to adjust the legs.
2. Open both doors again and check to make sure that
they close easily. If the doors do not close easily, tilt
the refrigerator slightly more to the rear by turning
both leveling legs to the left. It may take several more
turns, and you should turn both leveling legs the same
amount.
NOTE: Your refrigerator is uniquely designed with
two fresh food doors. Either door can be opened or
closed independently of the other. You may have to
exert slight pressure on the doors to get them to close
completely.
REFRIGERATOR INSTALLATION
LEVELING AND DOOR ALIGNMENT
Leveling
After installing, plug the refrigerator’s power cord into a
3-prong grounded outlet and push the refrigerator into the
ÀQDOSRVLWLRQ
Your refrigerator has two front leveling legs—one on the
right and one on the left. Adjust the legs to alter the tilt
from front-to-back or side-to-side. If your refrigerator
seems unsteady, or you want the doors to close more
easily, adjust the refrigerator’s tilt using the instructions
below:
NOTE: Tools Required:
/
Door Alignment
Both the left and right refrigerator doors have an
adjustable nut, located on the bottom hinge, to raise
and lower them to align properly.
If the space between the doors is uneven, follow the
instructions below to align the doors evenly:
Use the wrench (included with the owner's manual)
to turn the nut in the door hinge to adjust the height.
Turn the nut to the right to raise the door or to the left
to lower it.
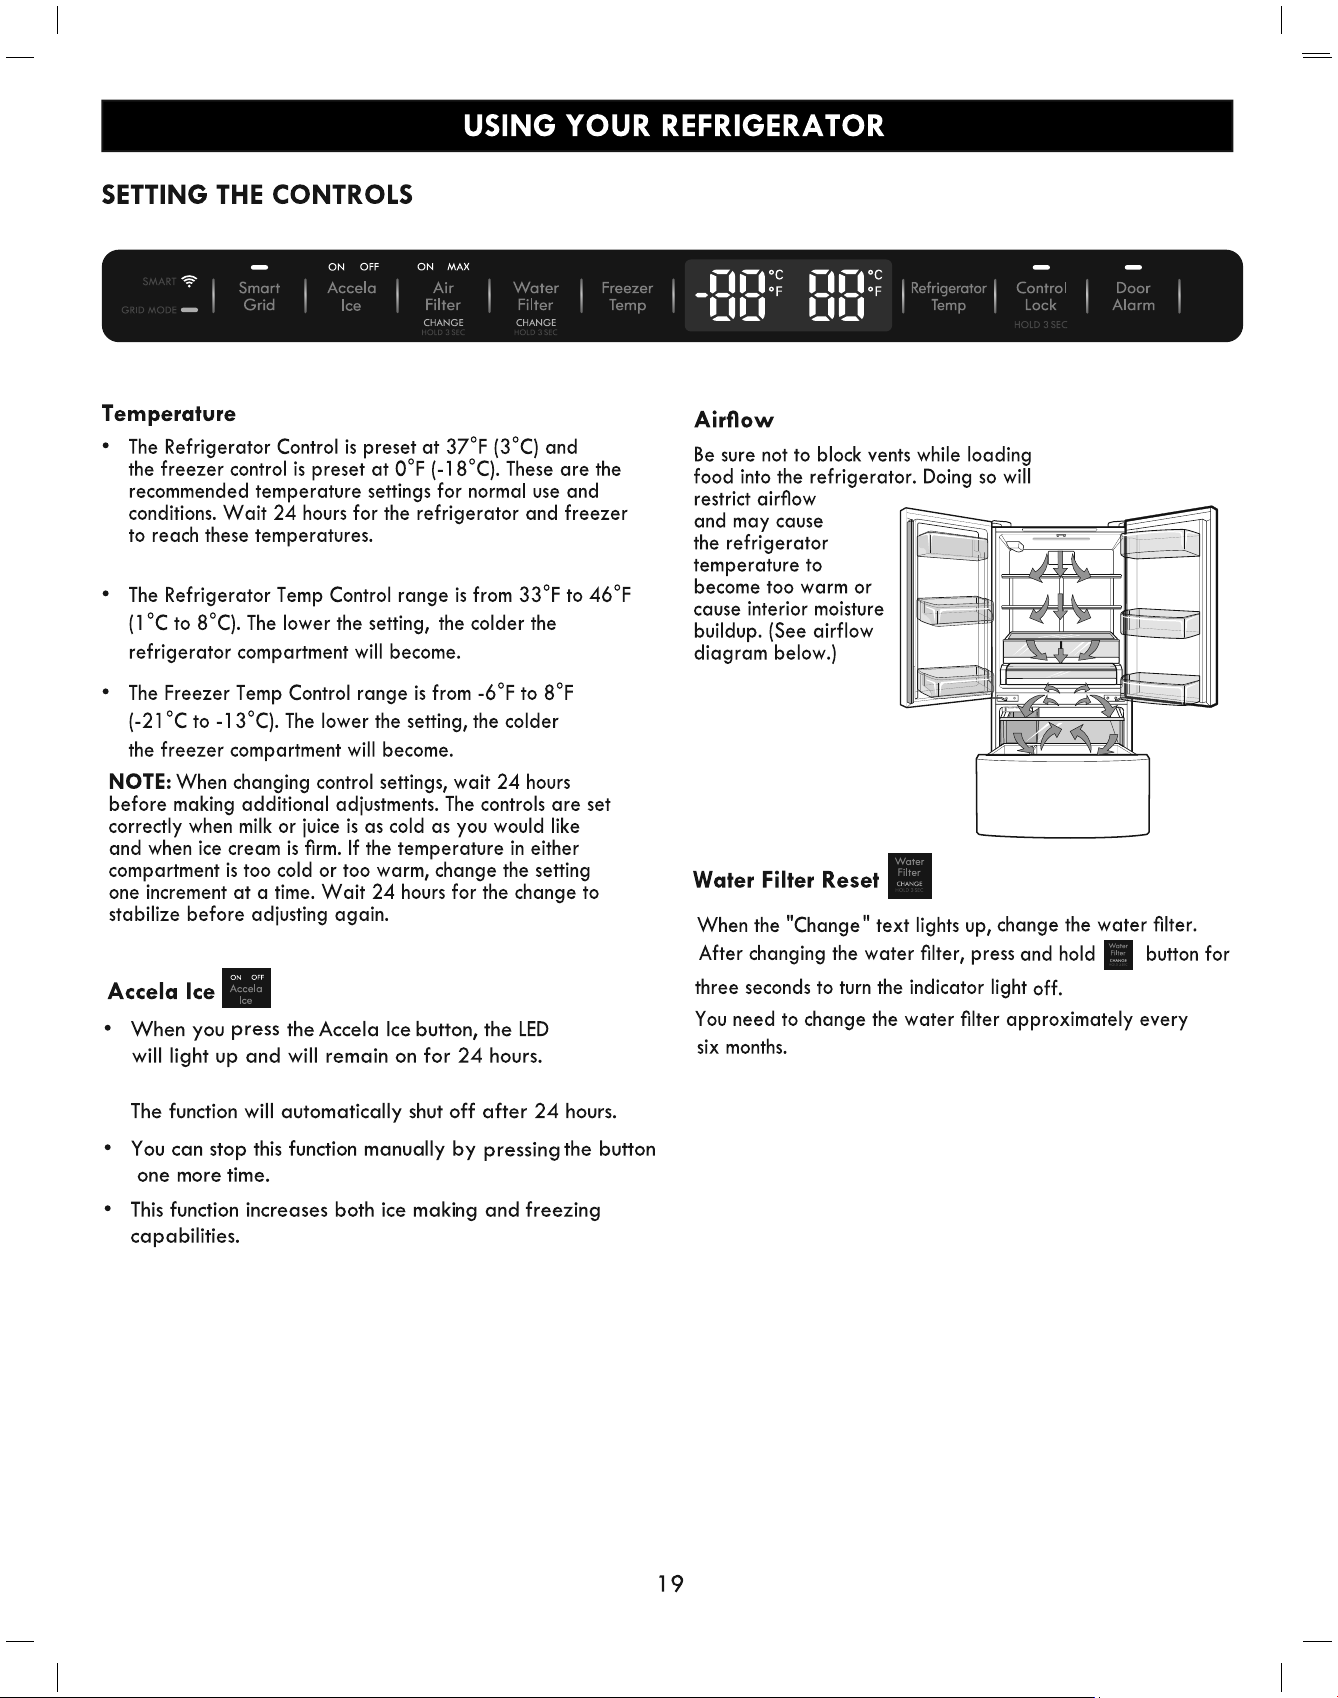
USING YOUR REFRIGERATOR
CAUTION
To reduce the risk of scratching
the door or breaking the door
mullion, make sure that the
refrigerator door mullion is
always folded in.
Articulating Mullion
This feature is a metal strip attached to the left door
that articulates (rotates) 90 degrees as the door is
closed, forming a mullion (base) for the left and right
door gaskets to seal against.
Air Filter
The Air Filter helps remove odors from the
refrigerator. The Air Filter has two settings, Auto and
MAX. In Auto mode, the Air Filter will cycle on and
off in increments of ten minutes on and 110 minutes
off. If set to the MAX mode, the Air Filter will stay
on continuously for four hours, cycling on and off in
increments of ten minutes on and Àve minutes off.
After four hours, the Air Filter will switch to Auto
mode.
Auto mode is the default mode. (Max LED off)
Press the
Air Filter button once for Max mode.
(Max LED on)
Air Filter Reset
Control Lock
Door Alarm
When the “CHANGE” icon turns on, the air filter needs
to be replaced. After replacing the air filter, press
and hold the Air Filter button for three seconds to turn
the icon light off. Change the air filter approximately
every 6 months.
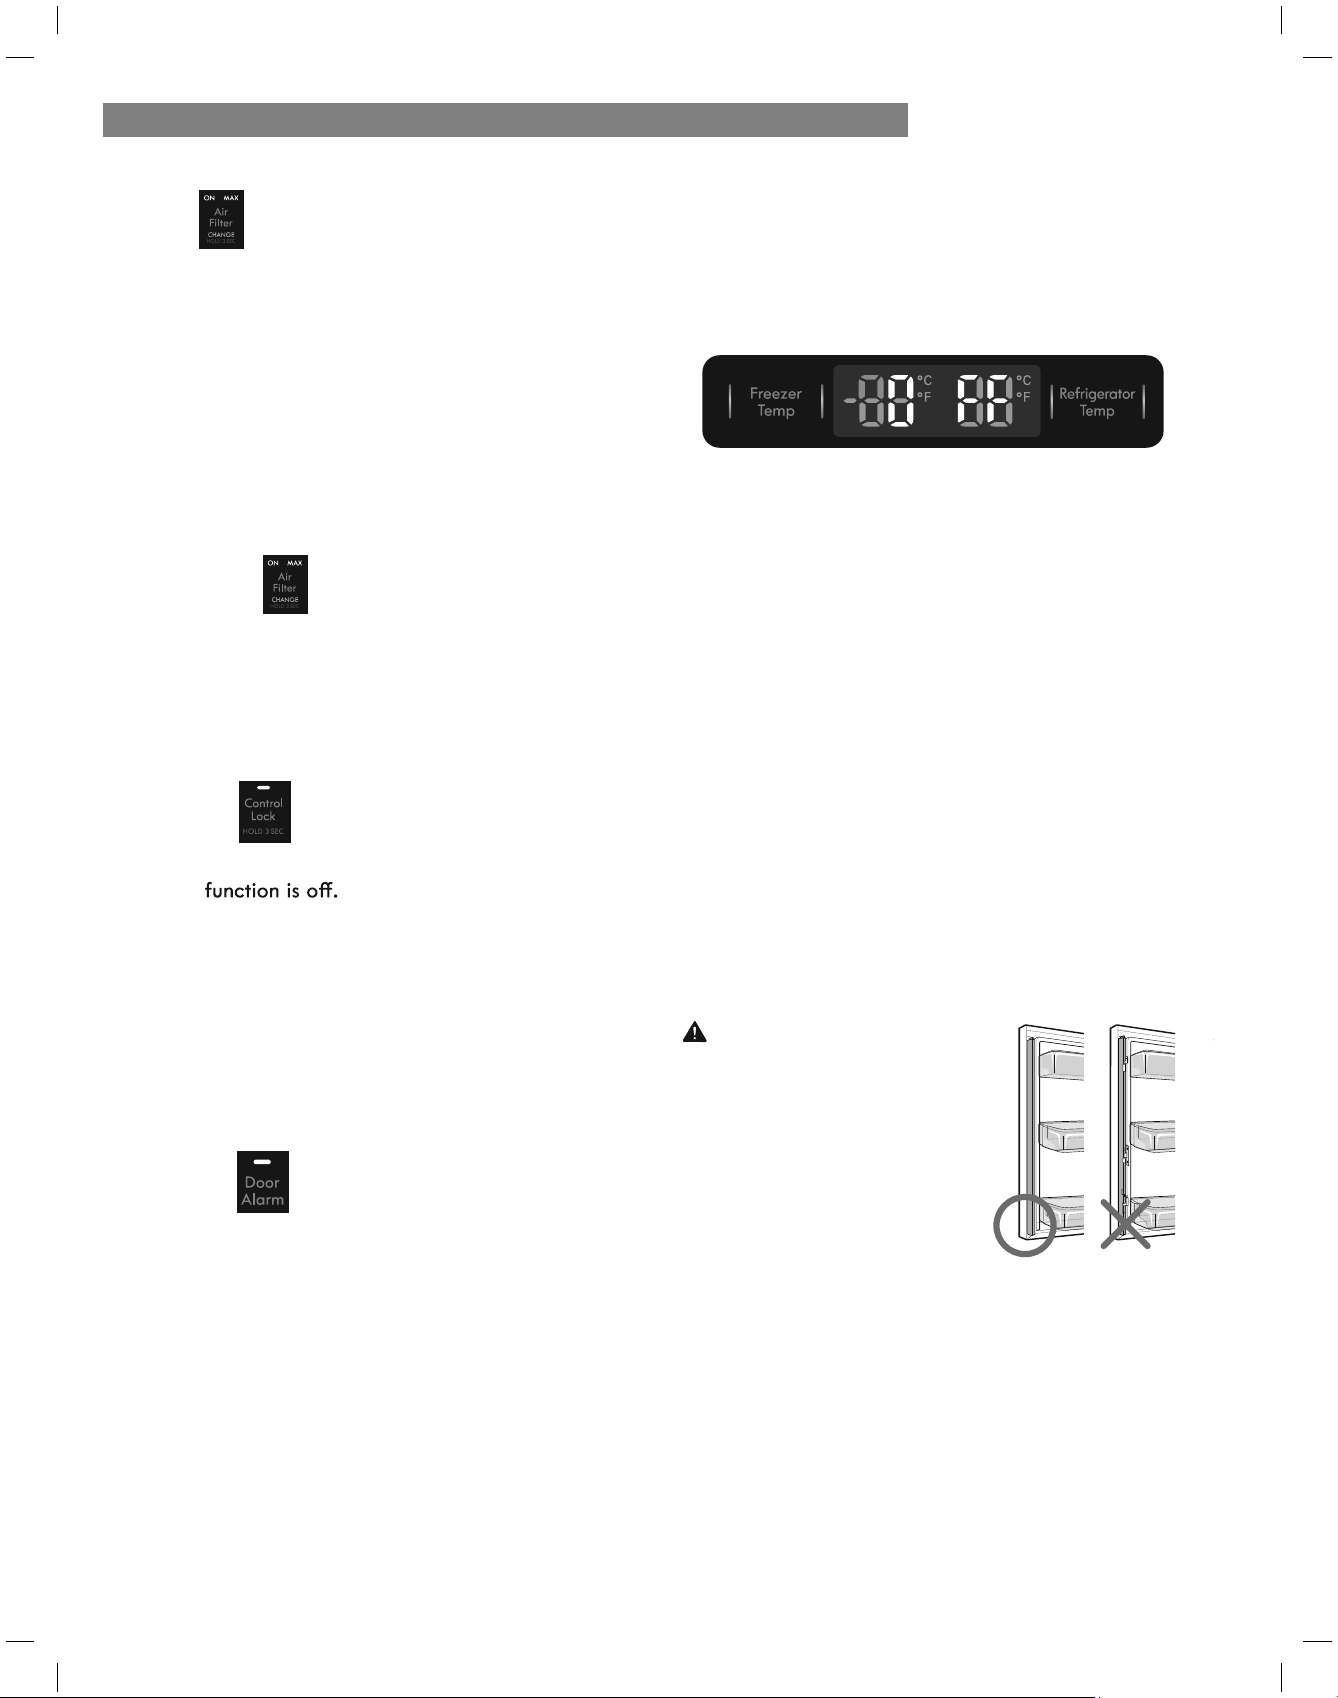
Temperature Mode Switch Function (°F <->°C)
To convert °F to °C or vice versa, press and hold the Freezer
Temp and Refrigerator Temp buttons at the same time for
approximately five seconds.
Demo Mode (For Store Use Only)
To Deactivate Demo Mode:
With either refrigerator door opened, press and hold the
Refrigerator Temp and
Accela Ice
buttons at the same
time for Àve seconds. The control panel will beep and the
temperature settings will display to conÀrm that Demo
Mode is deactivated. Use the same procedure to activate
the Demo Mode .
The Demo Mode disables all cooling in the refrigerator
and freezer sections to conserve energy while on display
in a retail store. When activated, OFF will display on the
control panel.
20
Ь When power is initially connected to the refrigerator,
the Lock
Ь To lock the controls, press and hold the Control Lock
button for three seconds until the LED illuminates and
the function is enabled.
Ь When the Lock function is activated, no other buttons
will work.
Ь To disable the Lock function, press and hold the Control
Lock button for approximately three seconds.
When power is connected to the refrigerator, the door
alarm is initially set to ON. To deactivate the Door
Alarm function, press the Door Alarm button.
(The LED turns off.)
When either the refrigerator or the freezer door is left
open for more than 60 seconds, the alarm tone will
sound to let you know that the door is open.
Close the doors to stop the alarm.

21
USING YOUR REFRIGERATOR
SMART LED (white):
DEFINTIONS
1RWLÀHVWKHXVHUWKDWWKHDSSlLDQFHLVFRQQHFWHGWRWKH
LQWHUQHW
6PDUW*ULG/ED (white):
1RWLÀHVWKHXVHUWKDWWKHDSSlLDQFHLVFDSDElHRIUHFHLYLQJ
DVLJQDONQRZQDVDDHPDQGRHVSRQVHHYHQWIURPDXWLOLW\
FRPSDQ\·VHQHUJ\PDQDJePHQWV\VWHP
*5,'02'(/('UHG
1RWLÀHVWKHXVHUWKDWWKHDSSlLDQFHLVUHGXFLQJRUGHOD\LQJ
HQHUJ\XVHEDVHGRQWKHVLJQDOUHFHLYHGfURPDXWLOLW\
FRPSDQ\HQHUJ\PDQDJePHQWV\VWHP7KH/('ZLOOUHPDLQ
LOOXPLQDWHGGXULQJFULWLFDOSHDNSULFLQJ&33DQGUHDOWLPH
SULFLQJ573RUGXULQJDKLJKGHPDQGIRUHOHFWULFLW\
GETTING CONNECTED
CONNECTING THE REFRIGERATOR
<RXQHHGWKHIROORZLQJGeYLFHVDQGDSSlLFDWLRQWRXVHWKH
6PDUW*ULGDQGRWKHUVPDUWIHDWXUHVRQ\RXUUHIULJHUDWRU
5HTXLUHG'HYLFHV: $ZLUHOHVVURXWHU.HQPRUH6PDUW
5HIULJHUDWRUDQGDPRELOHGHYLFH
5HTXLUHG$SSOLFDWLRQ
5HIHUWRWKH4XLFN6WDUW*XLGHWKDWFDPHZLWK\RXUVPDUW
DSSlLDQFHIRUGHWDLOHGLQVWUXFWLRQVRQFUHDWLQJD.eQPRUH
DFFRXQWDQGVHWWLQJXSWKHDSSlLDQFHIRUFRQQHFWHGRSHUDWLRQ
IURP\RXUPRELOHGHYLFH)RUDGGiWLRQDODVVLVWDQFH
YLVLWKWWSZZZNHQPRUHFRPVPDUW
NOTE:
:KHQVXFFHVVIXOO\FRQQHFWHGWRWKHLQWHUQHWWKH
60$57LFRQ/('RQWKHXQLWFRQWUROSDQHOZLOOWXUQ21
: .HQPRUH6PDUW$SS
SMART FEATURES
OVERVIEW
.HQPRUH6PDUWFRQQHFWLYLW\WUDQVIRUPV\RXUUHODWLRQVKLSZLWK
\RXUKRPH<RXFDQSHUVRQDOL]HWKHZD\.HQPRUH6PDUW
SURGXFWVRSHUDWHEDVHGRQ\RXUVFKHGXOHDQGGDiO\URXWLQHV
PDNLQJOLIHHDVLHUDQGSURYLGLQJJUHDWHUSHDFHRIPLQG
7KLVDSSlLDQFHLVDFRQQHFWHGUHDG\DSSlLDQFHDOORZLQJ\RX
WRUHPRWHO\PRQLWRUDQGFRQWUROLWIURP\RXUVPDUWSKRQHYLD
SSD ™tUDmS eUomQe. eht
7RJHWVWDUWHG\RXZLOOQHHGWKHIROORZLQJ
.HQPRUH6PDUW$SSOLDQFH
:L)LKRPHURXWHUFRQQHFWHGWRWKHLQWHUQHW
6PDUWSKRQH
.HQPRUH6PDUWDSS
)RUPRUHLQIRUPDWLRQDEoXW\RXU.HQPRUH6PDUW
DSSlLDQFHSOHDVHYLVLWZZZ.HQPRUHFRPVPDUW
7KH6PDUW*ULGIXQFWLRQFRQWUROVHQHUJ\XVDJeZKLFKKHOSV
\RXVDYHHQHUJ\GXULQJSeDNXVDJeSHULRGV<RXFDQRYHUULGH
WKH60$57*5,'IXQFWLRQDWDQ\WLPHXVLQJWKH6PDUW*ULG
EXWWRQRUDSSlLFDWLRQ
6PDUW*ULGUHVSRQGVWRQRWLÀFDWLRQHYHQWVIURP\RXU
XWLOLW\FRPSDQ\WRUXQKLJKHQHUJ\FRQVXPLQJWDVNVRQO\
GXULQJRIISHDNWLPHVZKHQHOHFWULFDOGHPDQGLVORZHU
7KHVHQRWLÀFDWLRQHYHQWVDUHNQRZQDV'HPDQG5HVSRQVH
'5VLJQDOV,IWKHUHIULJHUDWRUUHFHLYHVD'5VLJQDOIURP
WKHXWLOLW\FRPSDQ\WKHUHIULJHUDWRUZLOOWXUQRQWKH*5,'
02'(/('RQWKHUHIULJHUDWRUFRQWUROSDQHODQGUHJXODWH
SRZHUFRQVXPSWLRQDFFRUGLQJWRWKHVLJQDOUHFHLYHG7KH
UHIULJHUDWRUZLOOUHVSRQGWRWKHVLJQDOVUHFHLYHGIURPWKH
XWLOLW\FRPSDQ\DVORQJDVWKHDSSlLDQFHLVFRQQHFWHGWRWKH
LQWHUQHWDQG6PDUW*ULGLVHQDEOHG

USING YOUR REFRIGERATOR
INSTRUCTIONS FOR SMART GRID
IMPORTANT:
You must connect your Kenmore Smart appliance to the
internet and then register the appliance to your account
in order to use the Smart Grid function.
Consult the Quick Start Guide supplied with the
appliance for instructions on how to register your
appliance using the Kenmore Smart™ application (app).
The Smart Grid Button serves two purposes:
1) internet connection or disconnection, 2) enable or
disable/override the appliance Demand Response
capability.
NOTE:
This appliance is a connected-ready appliance,
allowing you to remotely monitor and control it from your
smart phone via the Kenmore Smart™ app.
To connect the refrigerator to the Internet:
Refer to the Quick Start Guide that came with your smart
appliance for detailed instructions on creating a Kenmore
account and setting up your appliance for connected
operation from your smart phone. This Use & Care Guide
contains information and instructions for operating
your appliance from the appliance control panel. For
additional assistance, visit http://www.kenmore.com/
smart
NOTE:
If no connection is madeDIWHUÀYHPLQXWHVWKH
blinking SMART GRID button LED will turn off.
Smart Grid Operation:
Once connected and registered, the appliance is capable
of accepting a signal from your electrical company. The
signal, known as a Demand Response (DR) signal, will adjust
refrigerator operation to reduce power consumption for
a period of time ranging from a few minutes up to a
maximum of 4 hours. Ice making will be delayed during
this time. Opening the refrigerator door may cancel
certain DR signals.
The Grid Mode LED (red) will be steadily lit when the
signal is in effect. To disable the signal and prevent
further signal acceptance, press and release the Smart
Grid button. Both the Grid Mode and Smart Grid LED
will turn off. Press and release the Smart Grid button
again to enable DR signal acceptance capability. The
Smart Grid button LED will relight. The Grid Mode LED
will light when another DR signal is sent.
22

USING YOUR REFRIGERATOR
FCC Notice
(For transmitter module contained in this product)
This equipment has been tested and found to comply with
the limits for a Class B digital device, pursuant to Part 15
of the FCC Rules. These limits are designed to provide
reasonable protection against harmful interference in a
residential installation. This equipment generates, uses, and
can radiate radio frequency energy and, if not installed and
used in accordance with the instructions, may cause harmful
interference to radio communications. However, there is no
guarantee that interference will not occur in a particular
installation. If this equipment does cause harmful interference
to radio or television reception, which can be determined
by turning the equipment off and on, the user is encouraged
to try to correct the interference by one or more of the
following measures:
- Reorient or relocate the receiving antenna.
- Increase the separation between the equipment
and the receiver.
- Connect the equipment to an outlet on a circuit
different from that to which the receiver is connected.
- Consult the dealer or an experienced radio/TV
technician for help.
This device complies with part 15 of the FCC Rules.
Operation is subject to the following two conditions:
1) this device may not cause harmful interference and
2) this device must accept any interference received,
including interference that may cause undesired
operation of the device.
Any changes or modiÀFDWions in construction of this device
which are not expressly approved by the party responsible
for compliance could void the user’s authority to operate the
equipment.
Open Source Software Notice
To obtain the source code that is contained in this product
under LGPL and other open source licenses, visit http://
kenmore.com/opensource. In addition to the source code, all
referred license terms, warranty disclaimers, and copyright
notices are available for download.
FCC RF Radiation Exposure Statement
This equipment complies with FCC radiation exposure limits
set forth for an uncontrolled environment. This transmitter
must not be co-located or operating in conjunction with any
other antenna or transmitter.
This equipment should be installed and operated with a
minimum distance of 20 cm (7.8 inches) between the antenna
and your body. Users must follow the speciÀFRSHrating
instructions for satisfying RF exposure compliance.
Wireless LAN Module Specifications
Model
2AHU4-KMTD17
Frequency Range
2412 to 2462 MHz
Output Power
(Max)
IEEE 802.11 b : 18.26 dBm
IEEE 802.11 g : 20.10 dBm
IEEE 802.11 n : 20.07 dBm
23
USING YOUR REFRIGERATOR
24
Turning the Automatic Icemaker On or Off
When you should set the icemaker power switch
to off (O)
To turn off the automatic icemaker, set the icemaker
switch to
OFF (O) . To turn on the automatic icemaker,
set the switch to
ON (I).
Normal Sounds You May Hear
x Keeping the power turned on to the icemaker
When the water supply will be shut off for several
hours.
When the ice storage bin is removed for more than
a minute or two.
When the refrigerator will not be used for several
days.
before the water line is connected can damage the
icemaker.
x The icemaker water valve will buzz as the icemaker
fills with water. If the power switch is in the
ON (I)
position, it will buzz even if it has not yet been
hooked up to water . To stop the buzzing, move the
power switch to
OFF (O) .
x
You will hear the sound of cubes dropping into the
bin and water running in the pipes as the icemaker
refills.
Preparing for Vacation
Set the icemaker power switch to
OFF (O) and shut
off the water supply to the refrigerator.
NOTE
x The ice bin should be emptied any time the
icemaker on/off switch is turned to the
OFF (O)
position.
If the ambient temperature will drop below freezing,
system to prevent serious property damage due
have a qualified technician drain the water supply
to flooding caused by ruptured water lines or
connections.
Operation Instructions
Personal Injury Hazard
DO NOT place fingers or hands on the automatic ice
making mechanism while the refrigerator is plugged
in.
A newly-installed refrigerator may take 12 to 24
hours to begin making ice.
Auto shutoff Arm Power Switch
If the refrigerator is used before the water
connection is made to the icemaker, set the power
switch to Off (O).
The icemaker will produce 12 cubes per cycle-
approximately 100 cubes in a 24 hour period,
depending on freezer compartment temperature,
room temperature, number of door openings and
other operating conditions.
Discard the first few batches of ice to allow the
water line to clear.
The icemaker will fill with water when it cools to
freezing. A newly-installed refrigerator may take
12 to 24 hours to begin making ice cubes.
When the refrigerator has been connected to the
water supply, set the power switch to On (I).
Be sure nothing interferes with the sweep of the
automatic shutoff arm.
When the bin fills to the level of the automatic
shutoff arm, the icemaker will stop producing ice.
It is normal for several cubes to be stuck together.
If ice is not used frequently, old ice cubes will
become cloudy, taste stale,and shrink.
The water pressure must be between 20
and 120 psi (138 and 827 kPa) on models
without a water filter and between 40 and
120 psi (276 and 827 kPa) on models with
a water filter.
NOTE

FOOD STORAGE GUIDE
Wrap or store food in the refrigerator in airtight and
moisture-proof material unless otherwise noted. This
prevents food odor and taste transfer throughout the
refrigerator. For dated products, check date code to
ensure freshness.
STORING FROZEN FOOD
NOTE: Check a freezer guide or a reliable cookbook
for further information about preparing food for
freezing or food storage times.
Freezing
Your freezer will not quick-freeze a large quantity of
food. Do not put more unfrozen food into the freezer
than will freeze within 24 hours (no more than 2 to 3
lbs. of food per cubic foot of freezer space). Leave
enough space in the freezer for air to circulate around
packages. Be careful to leave enough room at the
front so the door can close tightly.
Storage times will vary according to the quality and
type of food, the type of packaging or wrap used
(how airtight and moisture-proof) and the storage
temperature. Ice crystals inside a sealed package are
normal. This simply means that moisture in the food
and air inside the package have condensed, creating
ice crystals.
NOTE: Allow hot foods to cool at room temperature
for 30 minutes, then package and freeze. Cooling hot
foods before freezing saves energy.
Packaging
Successful freezing depends on correct packaging.
When you close and seal the package, it must not
allow air or moisture in or out. If it does, you could
have food odor and taste transfer throughout the
refrigerator and could also dry out frozen food.
Packaging recommendations:
Rigid plastic containers with tight-fitting lids•
Straight-sided canning/freezing jars•
Heavy-duty aluminum foil•
Plastic-coated paper•
Non-permeable plastic wraps•
Specified freezer-grade self-sealing plastic bags•
Follow package or container instructions for proper
freezing methods.
Do not use
Bread wrappers•
Non-polyethylene plastic containers•
Containers without tight lids•
Wax paper or wax-coated freezer wrap•
Thin, semi-permeable wrap•
CAUTION: Do not keep beverage cans or plastic
food containers in the freezer compartment. They
may break or burst if they freeze.
Items How to
Butter or
margarine
Cheese
Milk
Eggs
Fruit
Leafy
vegetables
Vegetables
with skins
(carrots, peppers)
Fish
Leftovers
Keep opened butter in a covered
dish or closed compartment.
When storing an extra supply,
wrap in freezer packaging and
freeze.
Store in the original wrapping
until you are ready to use it. Once
opened, rewrap tightly in plastic
wrap or aluminum foil.
Wipe milk cartons. For best
storage, place milk on interior
shelf, not on door shelf.
Store in original carton on interior
shelf, not on door shelf.
Do not wash or hull the fruit
until it is ready to be used. Sort
and keep fruit in its original
container, in a crisper, or store in a
completely closed paper bag on a
refrigerator shelf.
Remove store wrapping and trim
or tear off bruised and discolored
areas. Wash in cold water and
drain. Place in plastic bag or
plastic container and store in
crisper.
Place in plastic bags or plastic
container and store in crisper.
Store fresh fish and shellfish in
the freezer section if they are not
being consumed the same day of
purchase. It is recommended to
consume fresh fish and shellfish the
same day purchased.
Cover leftovers with plastic wrap
or aluminum foil, or store in plastic
containers with tight lids.
25
USING YOUR REFRIGERATOR
USING YOUR REFRIGERATOR
26
REFRIGERATOR SHELVES
The shelves in your refrigerator are adjustable to meet
your individual storage needs. Your model may have glass
or wire shelves.
$GMXVWLQJWKHVKHOYHVWRÀWLWHPVRIGLIIHUHQWKHLJKWVZLOO
PDNHÀQGLQJWKHH[DFWLWHP\RXZDQWHDVLHU'RLQJVRZLOO
DOVRUHGXFHWKHDPRXQWRIWLPHWKHUHIULJHUDWRUGRRULV
RSHQZKLFKZLOOVDYHHQHUJ\
IMPORTANT:'RQRWFOHDQJODVVVKHOYHVZLWKZDUPZDWHU
ZKLOHWKH\DUHFROG6KHOYHVPD\EUHDNLIH[SRVHGWR
VXGGHQWHPSHUDWXUHFKDQJHVRULPSDFW
CAUTION:*ODVVVKHOYHVDUHKHDY\8VHVSHFLDOFDUH
when removing them.
Detaching the Shelf (Half Shelf Type)
Folding Shelf (on some models)
<RXFDQVWRUHWDOOHULWHPVVXFKDVDJDOORQFRQWDLQHU
RUERWWOHVE\VLPSO\SXVKLQJWKHIURQWKDOIRIWKHVKHOI
XQGHUQHDWKWKHEDFNKDOIRIWKHVKHOI3XOOWKHIURQWRIWKH
shelf toward you to return to a full shelf.
CAUTION: Make sure that shelves are level from one
side to the other. Failure to do so may result in the shelf
falling or food spilling.
1
Tilt up the front of the shelf and then
lift the shelf straight up.
2
3XOOWKHVKHOIRXW
1
Tilt the front of the shelf up and guide
the shelf hooks into the slots at a
desired height.
2
Lower the front of the shelf so that the
hooks drop into the slots.
Assembling the Shelf (Half Shelf Type)

27
HUMIDITY CONTROLLED CRISPER
The crispers provide fresher tasting fruit and vegetables by
letting you easily control humidity inside the drawer.
You can control the amount of humidity in the moisture-
sealed crispers by adjusting the control to any setting
between VEGETABLES and FRUIT
.
VEGETABLES
keeps moist air in
the crisper for best
storage of fresh,
leafy vegetables.
FRUIT lets moist air
out of the crisper for
best storage of fruit.
DOOR BIN
The door bins are removable for easy cleaning and
adjustment.
1. To remove the bin, simply lift the bin up and pull
straight out.
2. To replace the bin, slide it in above the desired support
and push down until it snaps into place.
REMOVING THE CRISPER OR PANTRY DRAWER
1
To remove, pull out the crisper (1) or drawer
(2) to full extension, lift the front up,
and pull straight out.
2
To install, slightly tilt up the front, insert the crisper
or drawer into the frame and push it back into
place.
Crisper Cover
To remove, lift the front of the cover up until it
detaches from the back wall of the cabinet, then pull
it out.
FRUIT VEGETABLES
FRUIT VEGETABLES
TEMPERATURE CONTROLLED PANTRY DRAWER
The Temperature Controlled Pantry Drawer provides storage
space with a variable temperature control that can keep the
compartment at a slightly different temperature than
the refrigerator section. This drawer can be used for
large party trays, deli items and beverages. (This
drawer should not be used to store vegetables that
require high humidity.)
Press the
Select
button to choose between
Produce
(Cold),
Deli
(Colder) and
Meat
(Coldest).
Do not store glass bottles in the pantry.
If they are frozen, they can break and cause personal injury.
CAUTION:
CAUTION
Regularly detach and wash the storage bins and shelves;
they can become easily contaminated by food.
Do not apply excessive force while detaching or
assembling the storage bins.
Do not use the dishwasher to clean the storage
bins and shelves.
86,1*<2855()5,*(5$725

USING YOUR REFRIGERATOR
28
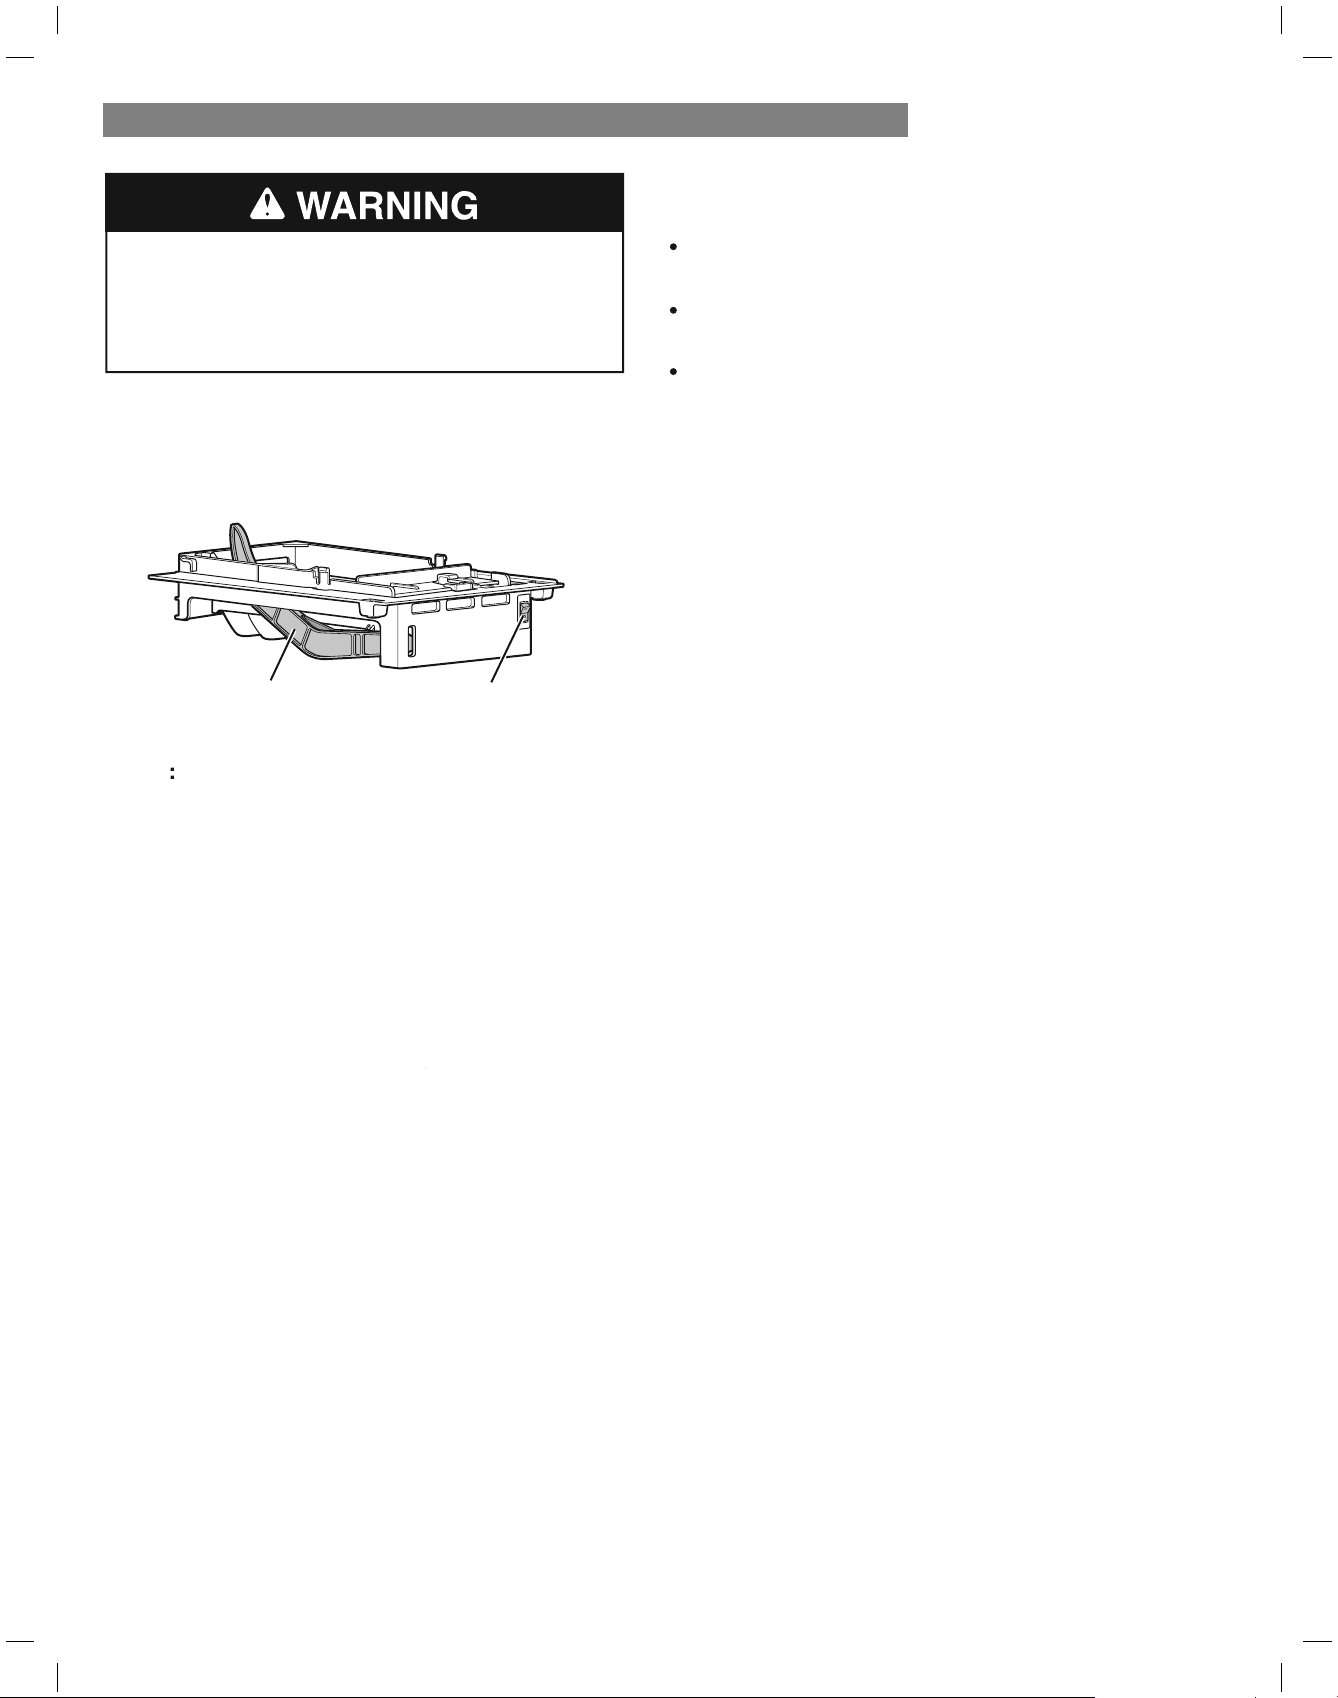
FREEZER SECTION
ICE BIN
1. Pull the freezer drawer and the top pullout drawer out
as far as possible to remove the ice bin.
2. Gently lift and pull out the ice bin.
3. To replace, pull both drawers out as far as possible,
and set the bin in its correct position in the pullout drawer.
Close the pullout drawer and the freezer drawer.
CAUTION: Pinch hazard! Keep hands and feet
clear of the bottom of the freezer drawer when
opening and closing.
NOTE: To purchase a rHSODFHPHQWDLUÀOWHU
call 1-844-553-6667.
Replacing the Air Filter
,WLVUHFRPPHQGHGWKDW\RXUHSODFHWKHDLUÀOWHU
Approximately every six months.
When the CHANGE light turns on.
3ODFHWKHQHZÀOWHULQVLGHRIWKHFRYHUZLWK
3. Turn the filter cover to the right to attach
it to the refrigerator wall.
the side that says “Front” facing outward.
2. Install a New Air Filter.
1.Remove the Old Filter
7XUQWKHÀOWHUFRYHUWRWKHOHIWWRGHWDFKLW
IURPWKHUHIULJHUDWRUZDOO7KHÀOWHULV
ORFDWHGRQWKHLQVLGHRIWKHÀOWHUFRYHU
4. Press and hold the Air Filter button for
three seconds to reset the filter sensor.
Ice Bin
Pullout Drawer

29
USING YOUR REFRIGERATOR
PULLOUT DRAWERS
1. To remove, pull the drawer out to full extension.
Lift the front of the drawer up, then pull it straight
out.
2. To install, slightly tilt up the front and insert the
drawer into the frame and push it back into place.
DURABASE
1. To remove the Durabase, push it to the back as much
as possible. Tilt up the front of the Durabase and pull
straight out.
2. To replace, insert the Durabase in the rail assembly.
WARNING:
If the Durabase divider is removed, there is
enough open space for children or pets to crawl inside.
To prevent accidental child and pet entrapment or
suffocation risk, DO NOT allow children or pets to
touch or go near the drawer.
DURABASE DIVIDER
The Durabase divider allows you to organize the
Durabase area into sections.
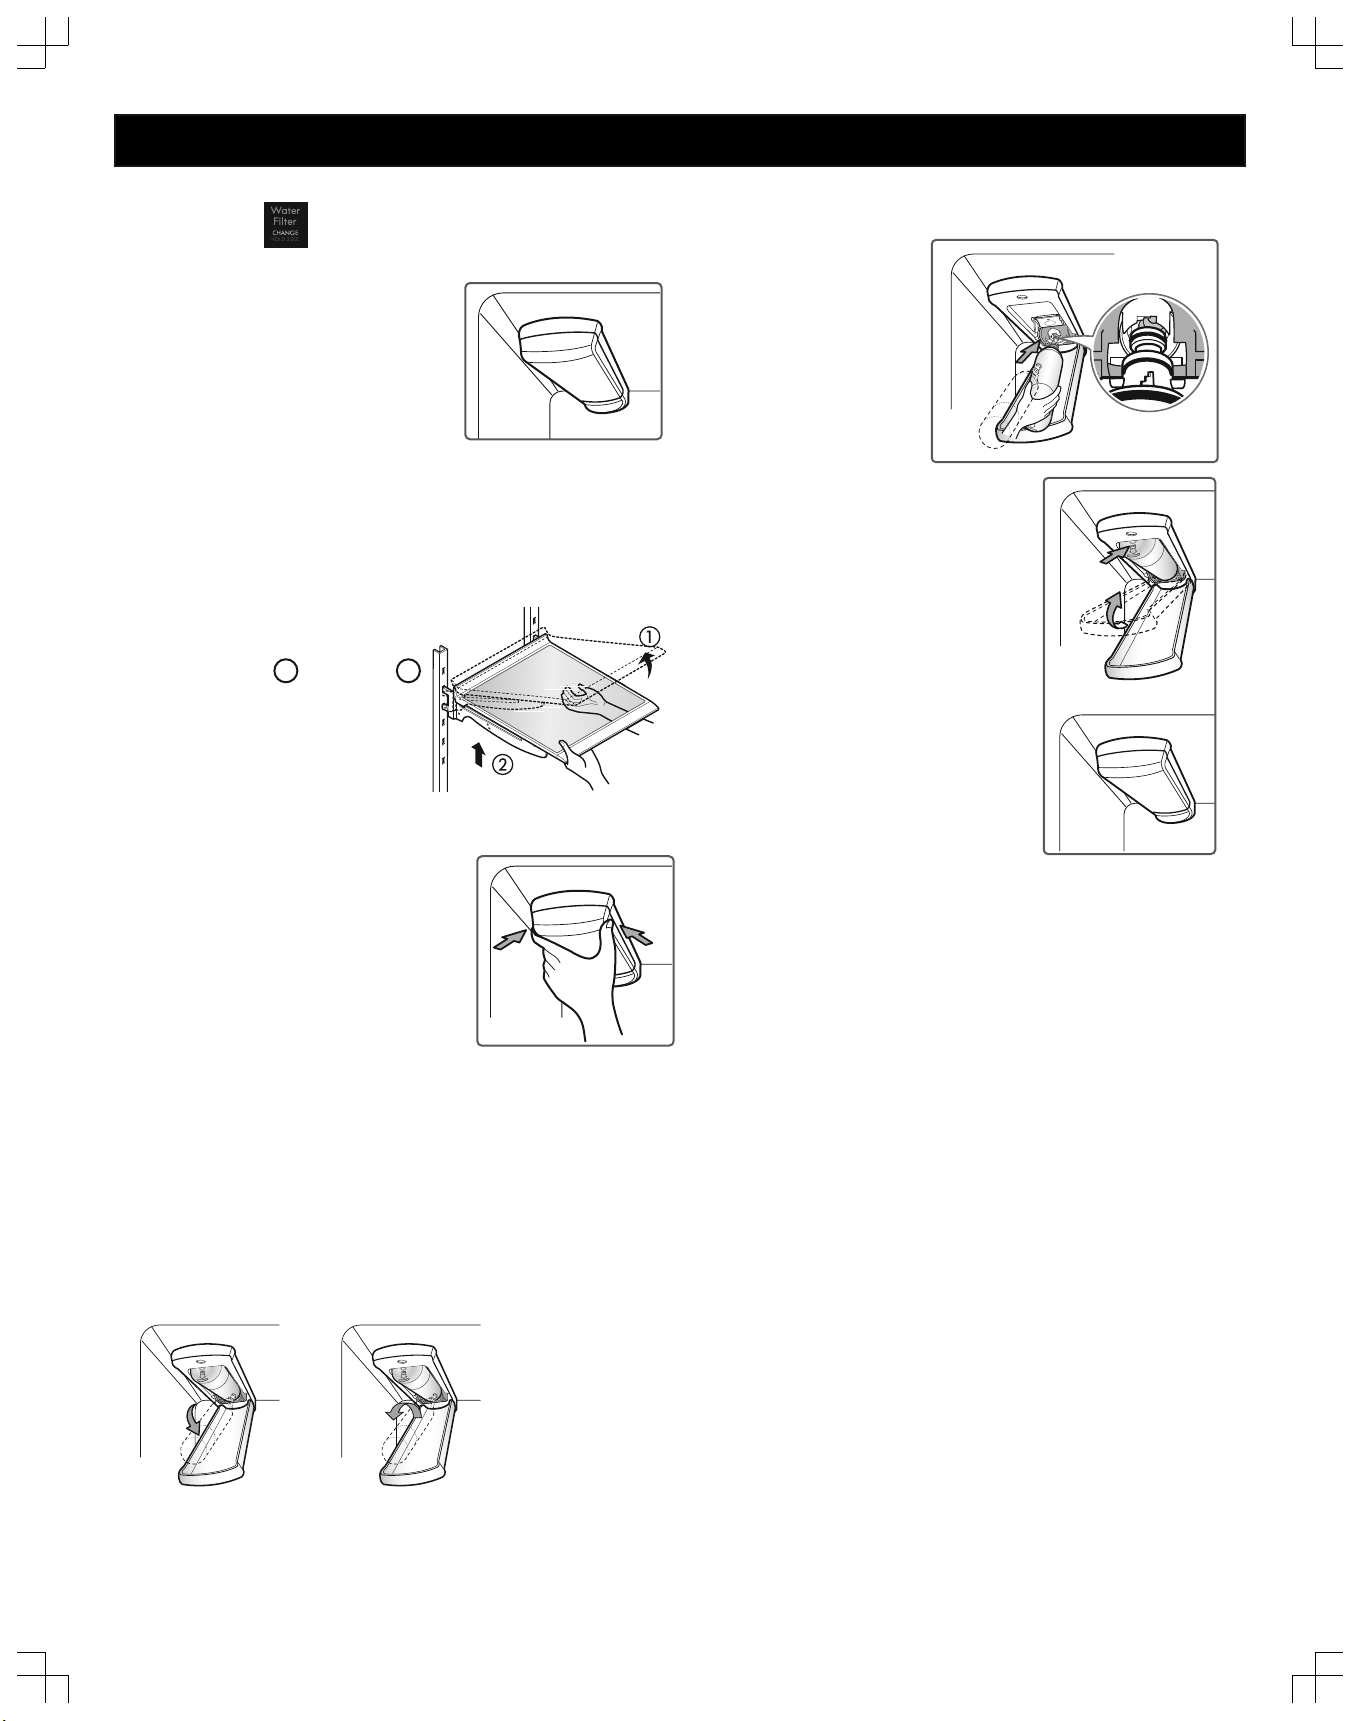
WATER FILTER
WATER FILTER
It is recommended that you replace the water filter:
Approximately every six months.
•
When the water filter indicator
turns on.
•
When the ice cubes are smaller
•
than normal.
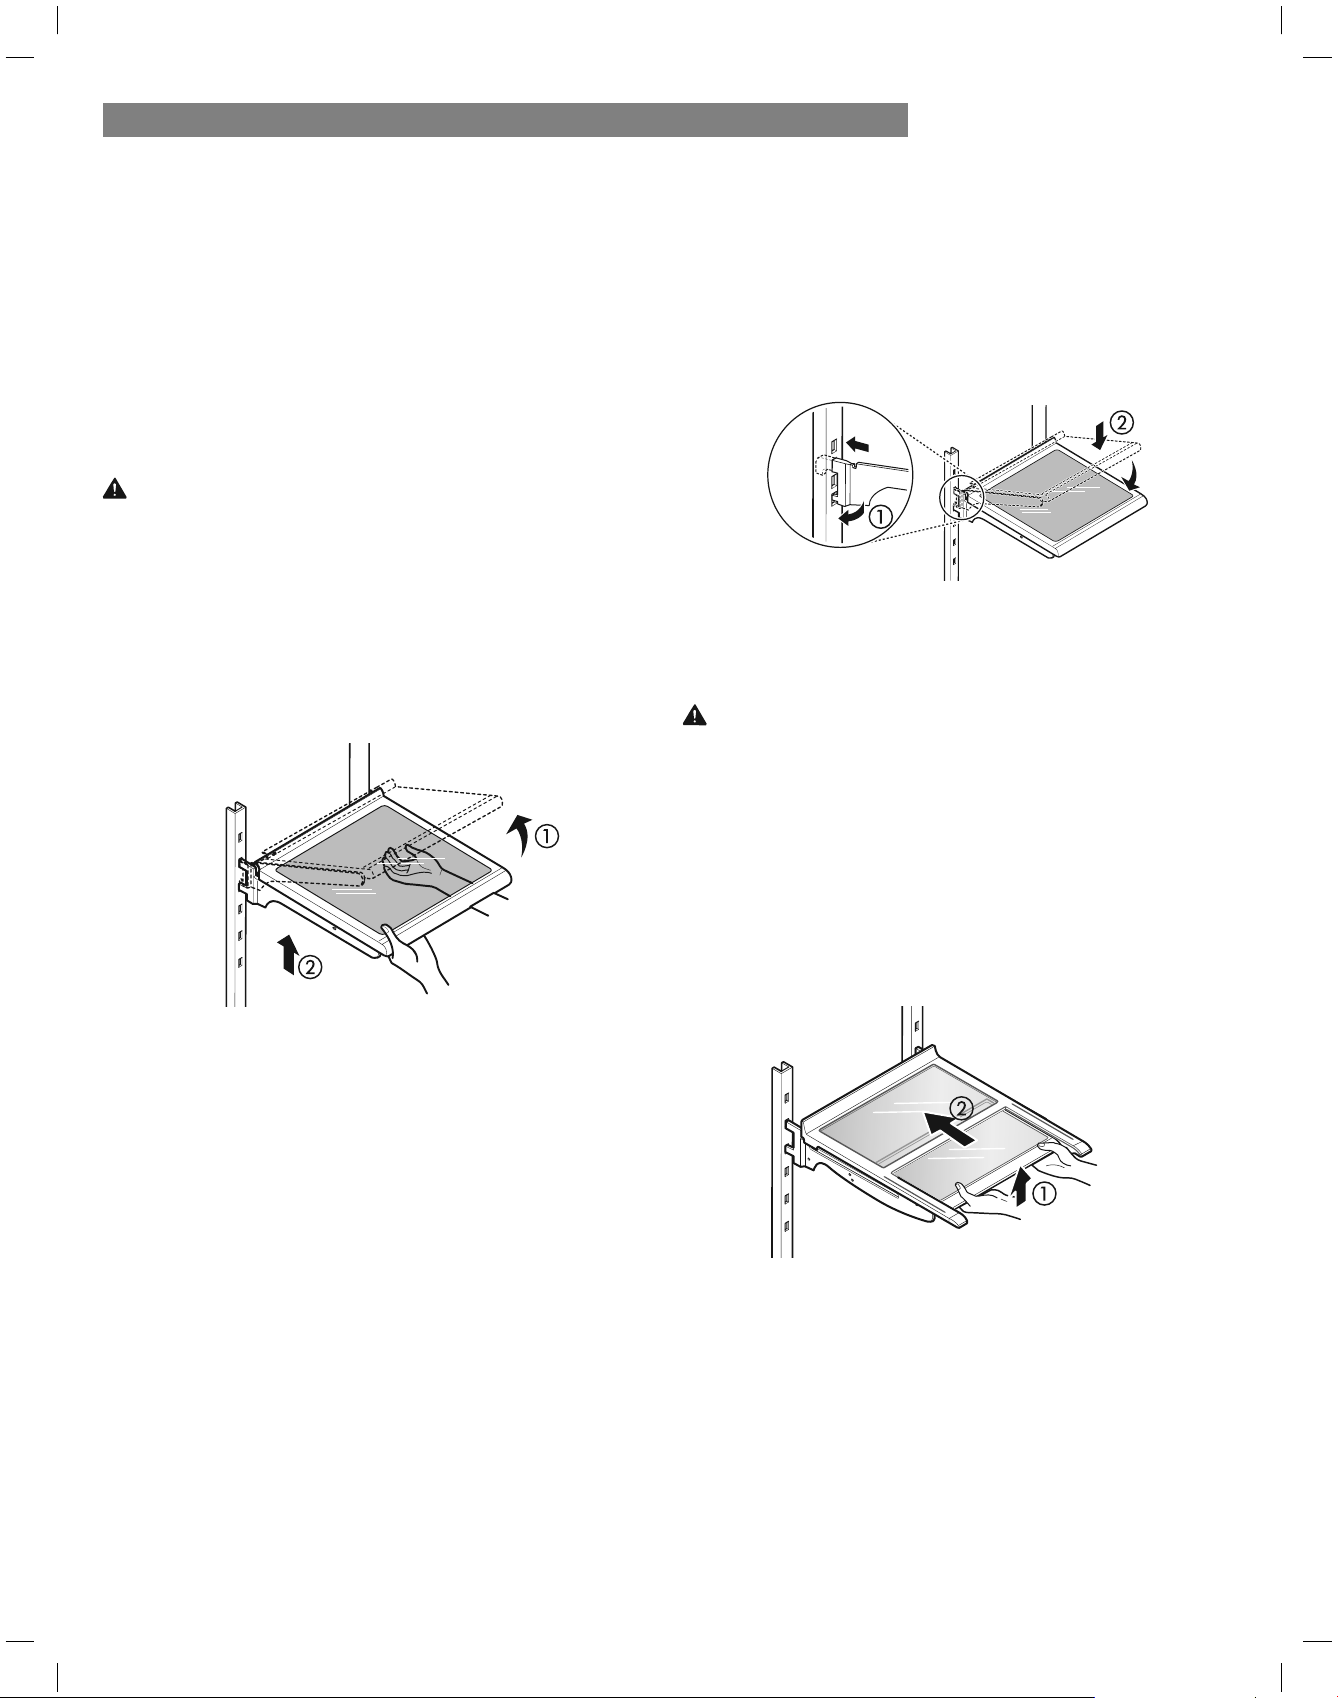
1. Remove the old water filter.
Lower or remove the top left shelf
•
to allow the water filter to rotate
all the way down.
Pinch the sides to open the •
water filter cover.
NOTE: Replacing the water filter
causes a small amount of water
(around 1 oz. or 25 cc) to drain. Place
DFORWKDURXQGWKHIURQWHQGRIWKHZDWHUÀOWHUFRYHUWRFROOHFW
any leaking water. Hold the water filter upright, once it is
removed, to prevent any remaining water from spilling out of
the water filter.
Make sure to rotate the filter down completely before
•
pulling it out of the manifold hole.
Pull the water filter downward and turn it counter-
•
clockwise.
Before Replacing the Water Filter:
If the top shelf, located below the water filter, is in the
highest position, it will need to be removed prior to
replacing the water filter.
To remove any shelf–Tilt up the
front of the shelf
1
and lift it
2
.
Pull the shelf out.
2. Replace with a new water filter.
Take the new •
water filter out
of its packing
and remove the
protective cover
from the o-rings.
With the water filter tabs in
•
the horizontal position, push
the new water filter into the
manifold hole and turn it
clockwise.
Rotate the wDWHUÀOWHUXSLQWR
SRVLWLRQDQGFORVHWKHFover.
TKHFovHUZLOOFOLFNZKHQ
FORVeGFRUreFWOy.
•
3. After the water filter is replaced, dispense 2.5
gallons of water (flush for approximately 5 minutes)
to remove trapped air and contaminants from
the system. Do not dispense the entire 2.5 gallon
amount continuously. Depress and release the
dispenser pad for cycles of 30 seconds ON and 60
seconds OFF.
NOTE:7RSXUFKDVHDUHSODFHPHQWÀOWHUYLVLW\RXUORFDO
6HDUVVWRUHRUFDOO5536667<RXPD\DOVRSXUFKDVH
RQOLQHDWZZZNHQPRUHFRP
30
31
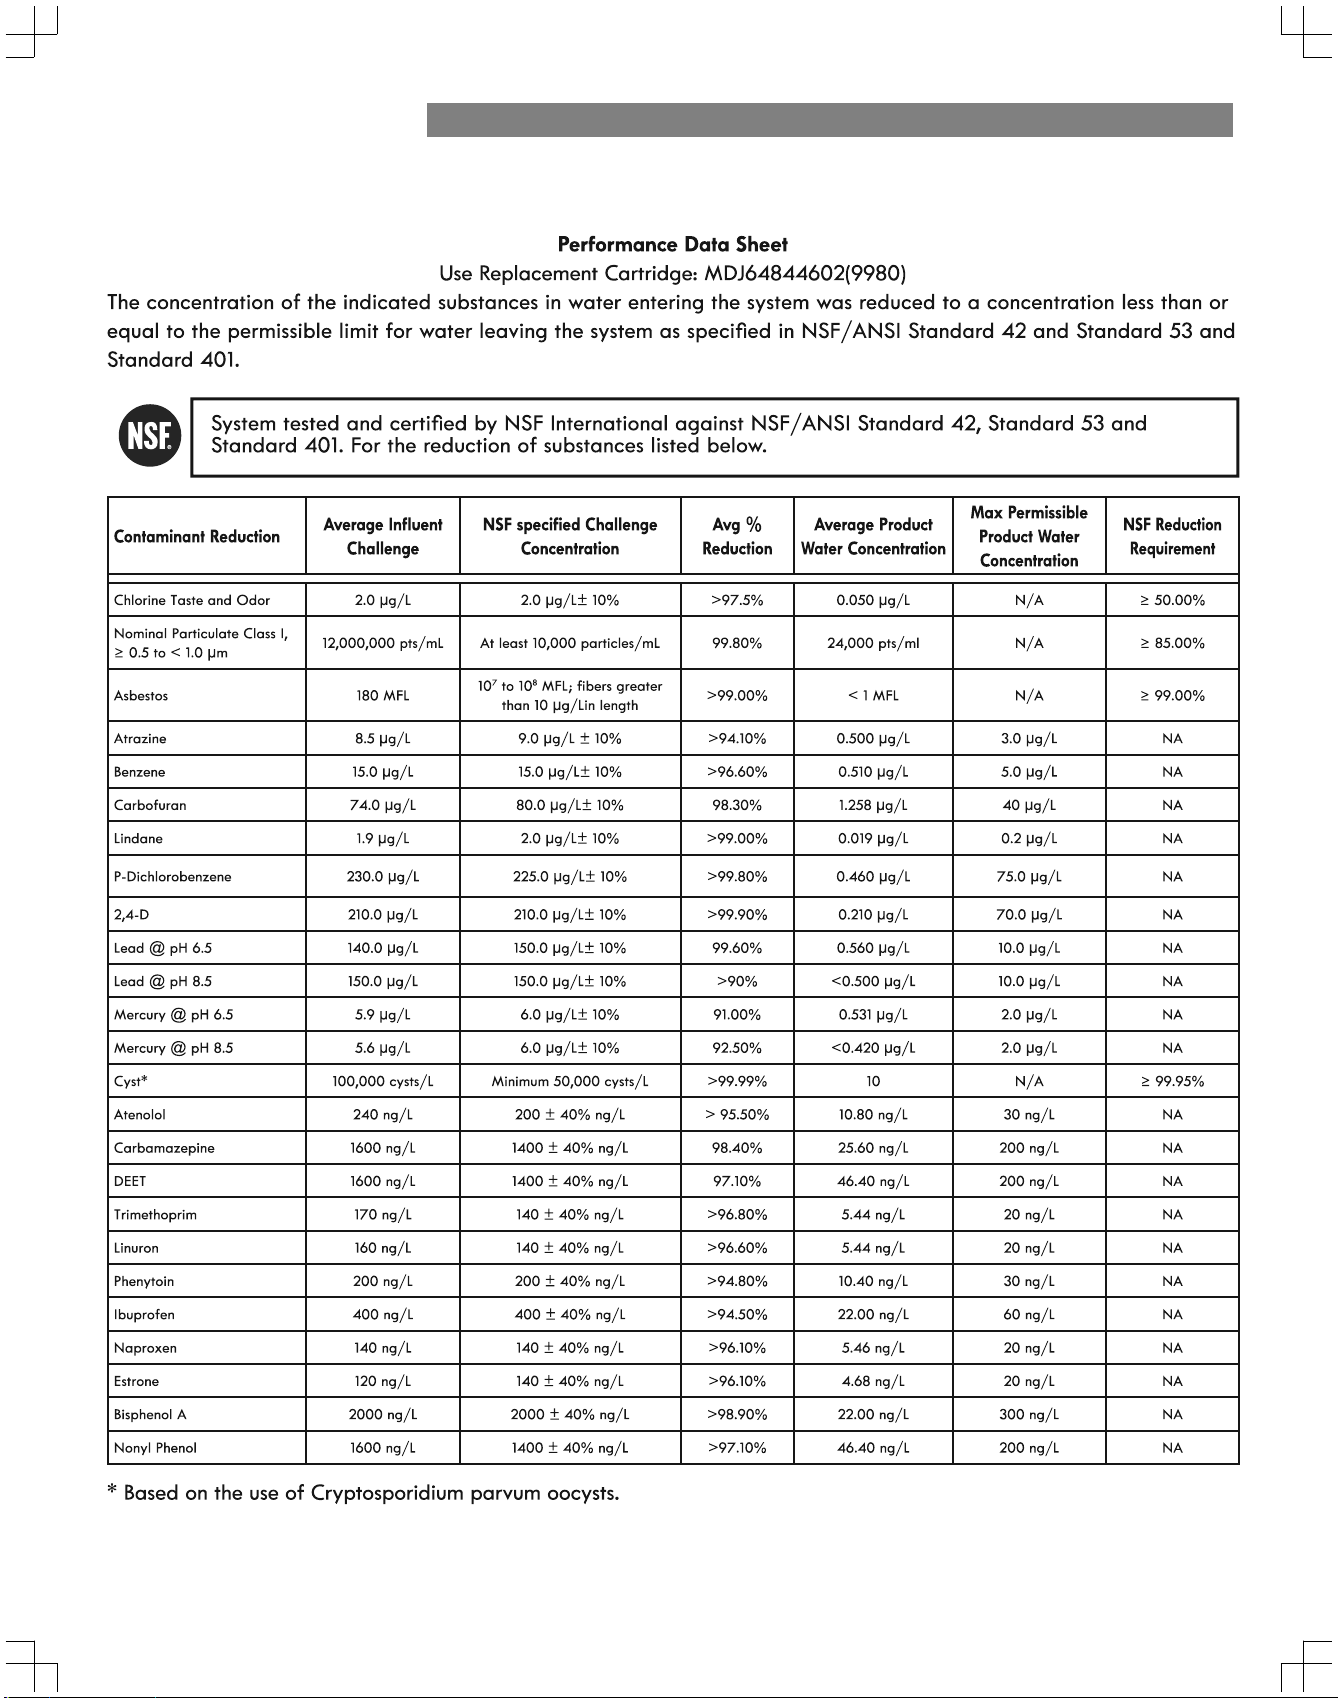
WATER FILTER
It is essential that the manufacturer’s recommended
installation, maintenance and water filter replacement
requirements be carried out for the product to perform as
advertised.
NOTE: While the testing was performed under standard
laboratory conditions, actual performance may vary.
NOTE: To purchase a rHSODFHPHQWÀOWHUYLVLW\RXUORFDO
6HDUVVWRUHRUFDOO5536667.
<RXPD\DOVRSXUFKDVHRQOLQHDWZZZNHQPRUHFRP
Product distributed in the United States by Sears Brands
Management Corporation, Hoffman Estates, IL 60179.
NSF is a trademark of NSF International.
WARNING
CAUTION
To reduce the risk associated with ingestion of
contaminants: Do not use with water that is
microbiologically unsafe or of unknown quality
without adequate disinfection before and after the
system. Systems certified for cyst reduction may be
used on disinfected water that may contain filterable
cysts. EPA Establishment Number 10350-MN-005
To reduce the risk associated with property damage
due to water leakage:
Read and follow • the Water Filter instructions before
installation and use of this system.
Installation and use • MUST comply with all state and
local plumbing codes.
Do not• install if water pressure exceeds 120 psi (827
kPa). Contact a plumbing professional if you are
uncertain of how to check your water pressure.
Do not• install where water hammer conditions may
occur. If water hammer conditions exist, you must
install a water hammer arrester. Contact a plumbing
professional if you are uncertain of how to check for
this condition.
Do not• install on hot water supply lines.
The maximum operating water temperature of this
water filter system is 100°F (38°C).
Protect water filter from freezing. • Do not operate
refrigerator in ambient conditions below 55°F
(12.7°C). Drain water filter when storing unit in
temperatures below 40°F (4.4°C).
The disposable water filter must be replaced every •
six months, at the rated capacity, or if a noticeable
reduction in flow rate occurs.
Application Guidelines/Water Supply Parameters
Service Flow 0.5 gpm (1.9 lpm)
Water Supply Potable Water
Water Pressure 20-120 psi (138 - 827 kPa)
Water Temperature 33°F - 100°F (0.6°C - 38°C)
32
WATER FILTERWATER FILTER

removal
more easily
The water pressure must be between 20 and 120 psi.
If the refrigerator is installed in an area with low water
pressure (below 20 psi), you can install a booster pump
to compensate for the low pressure.
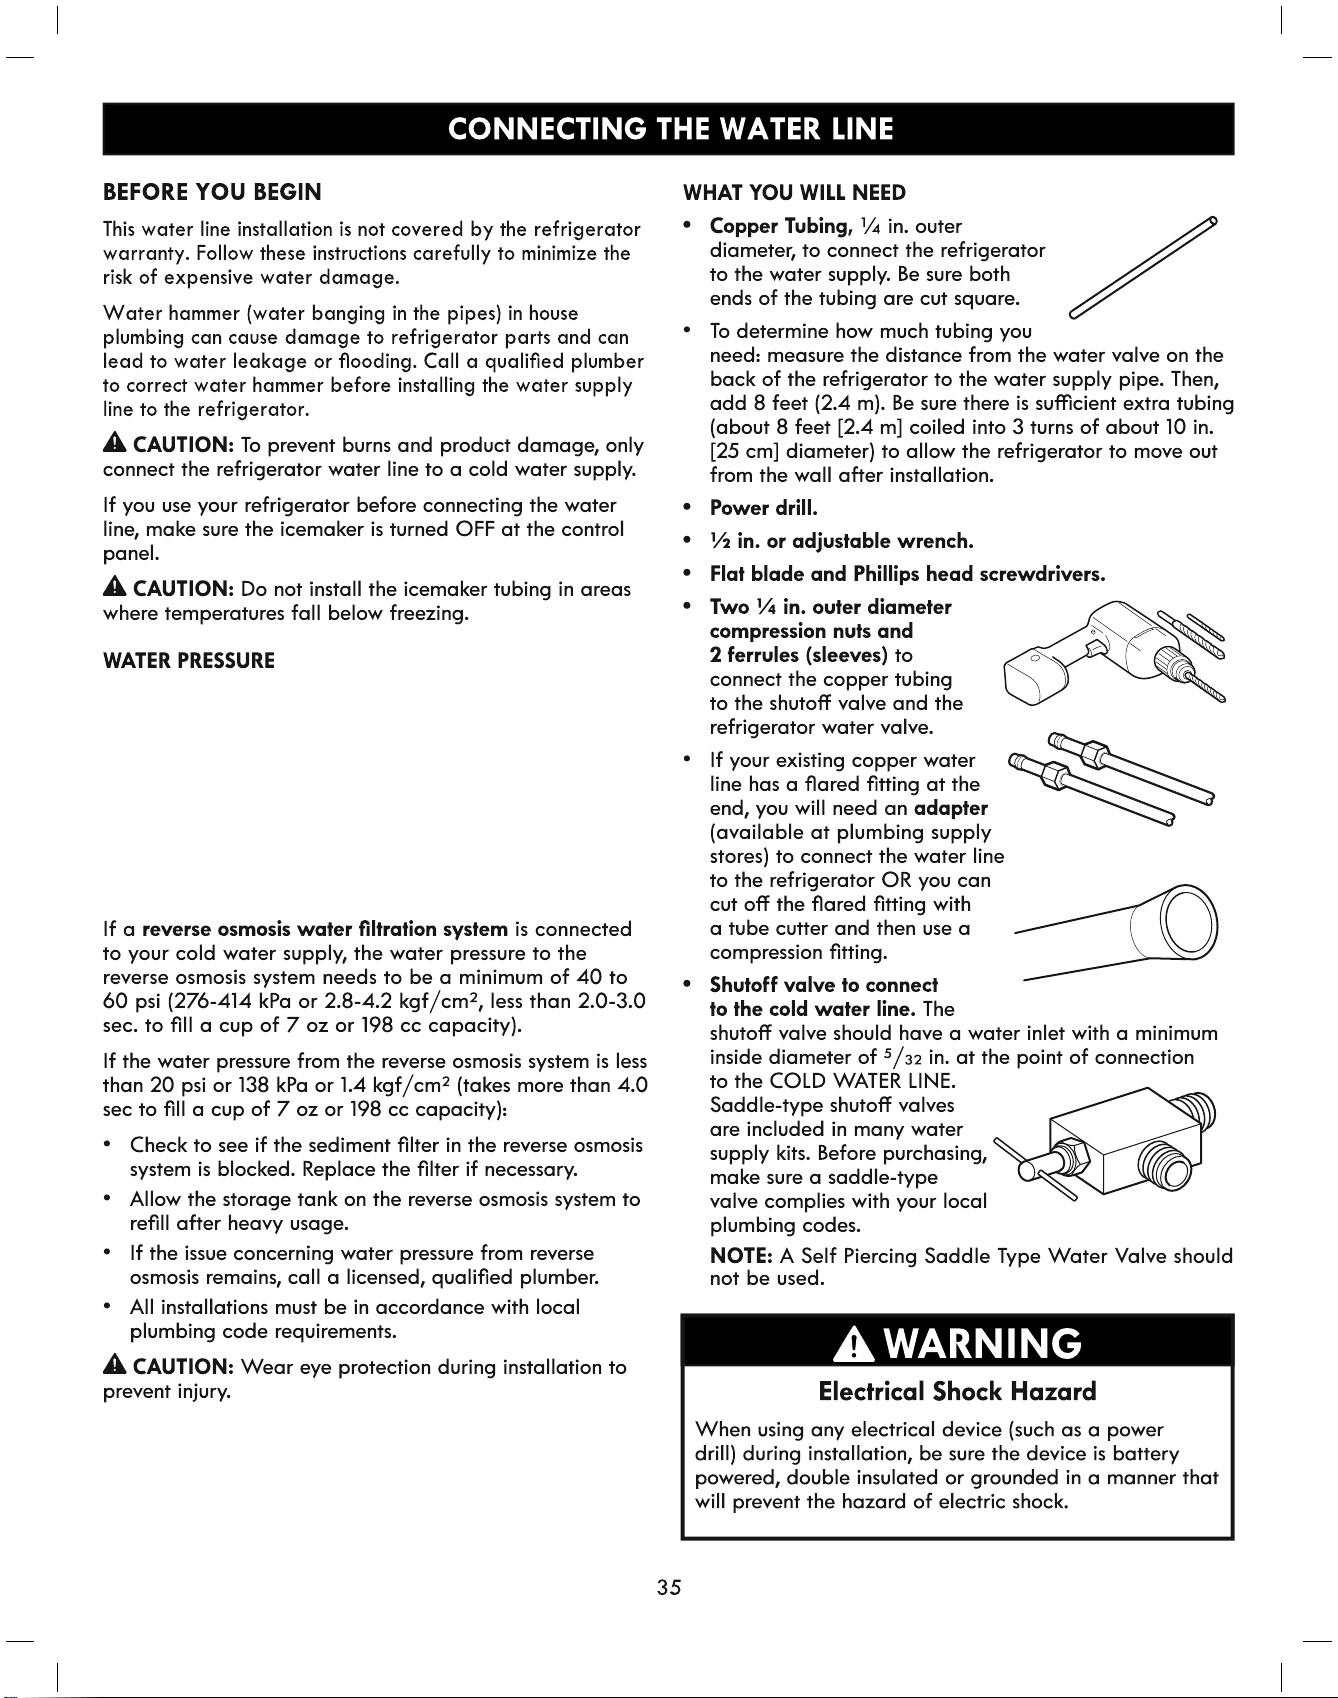
If a rHYHUVHRVPRVLVZDWHUÀOWUDWLRQV\VWHP is connected
to your cold water supply, this water line installation is not
covered by the refrigerator warranty. Follow the instructions
carefully to minimize the risk of expensive water damage.
CONNECTING THE WATER LINE
INSTALLATION INSTRUCTIONS
Install the shutoff valve on the nearest frequently used
drinking water line.
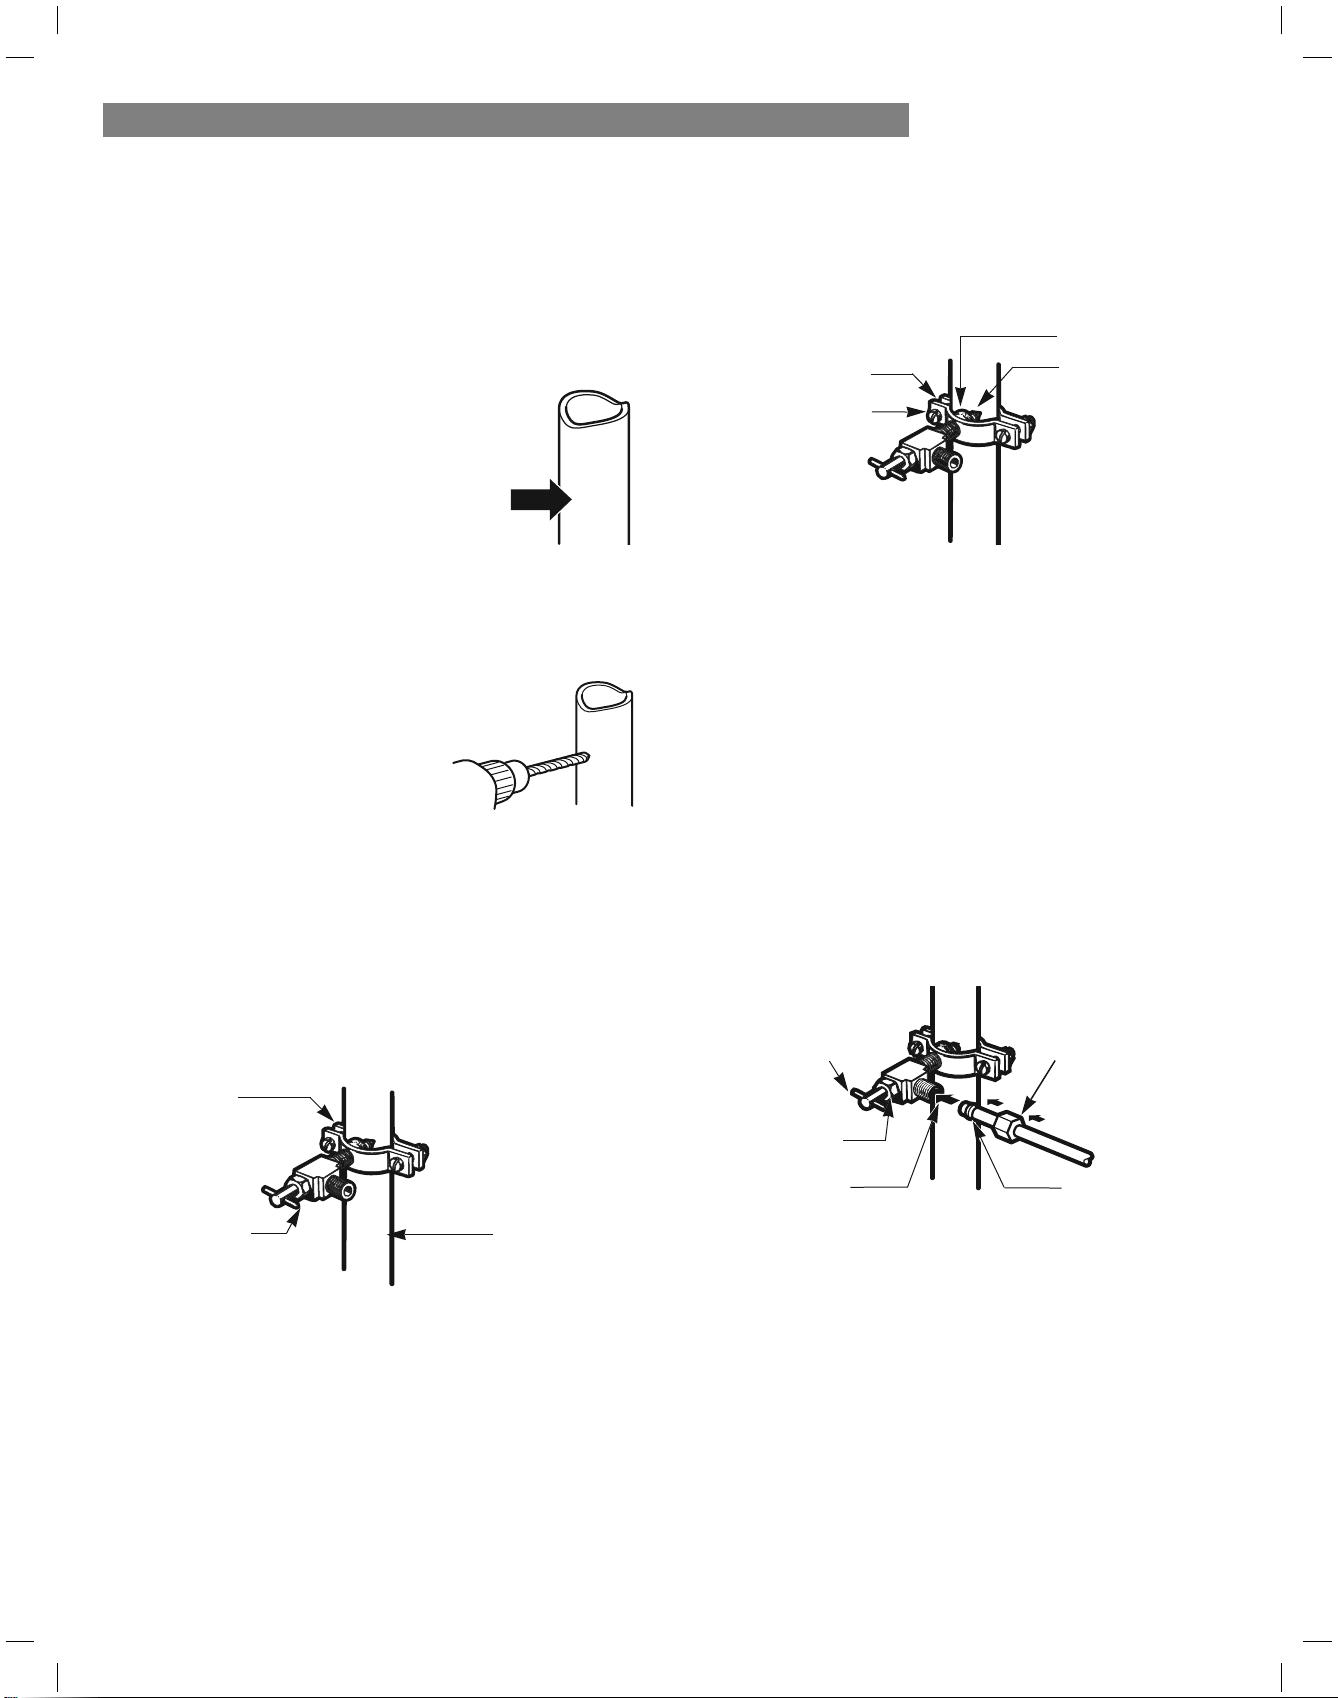
1. SHUT OFF THE MAIN WATER SUPPLY
Turn on the nearest faucet to relieve the pressure on the
line.
2. CHOOSE THE VALVE LOCATION
Choose a location for the valve that is
easily accessible. It is best to connect
into the side of a vertical water pipe.
When it is necessary to connect into
a horizontal water pipe, make the
connection to the top or side, rather
than at the bottom, to avoid drawing
off any sediment from the water pipe.
3. DRILL THE HOLE FOR THE VALVE
Drill a ¼ in. hole in the water pipe using a sharp bit.
Remove any burrs resulting from
drilling the hole in the pipe. Be
careful not to allow water to
drain into the drill. Failure to
drill a ¼ in. hole may result
in reduced ice production or
smaller cubes.
36
NOTE: The hookup line cannot be white, plastic
tubing. Licensed plumbers must use only copper
tubing (NDA tubing #49595 or #49599) or Cross Link
Polyethylene (PEX) tubing.
4. FASTEN THE SHUTOFF VALVE
Fasten the shutoff valve to the cold water pipe with
the pipe clamp.
NOTE: Commonwealth of Massachusetts Plumbing
Codes 248CMR shall be adhered to. Saddle valves are
illegal and use is not permitted in Massachusetts.
Consult with your licensed plumber.
5. TIGHTEN THE PIPE CLAMP
Tighten the clamp screws until the sealing washer
begins to swell.
NOTE: Do not overtighten clamp or you may crush the
tubing.
6. ROUTE THE TUBING
Route the tubing between the cold water line and the
refrigerator.
Route the tubing through a hole drilled in the wall or
floor (behind the refrigerator or adjacent base cabinet)
as close to the wall as possible.
NOTE: Be sure there is sufficient extra tubing (about
8 feet coiled into 3 turns of about 10 in. diameter) to
allow the refrigerator to move out from the wall after
installation.
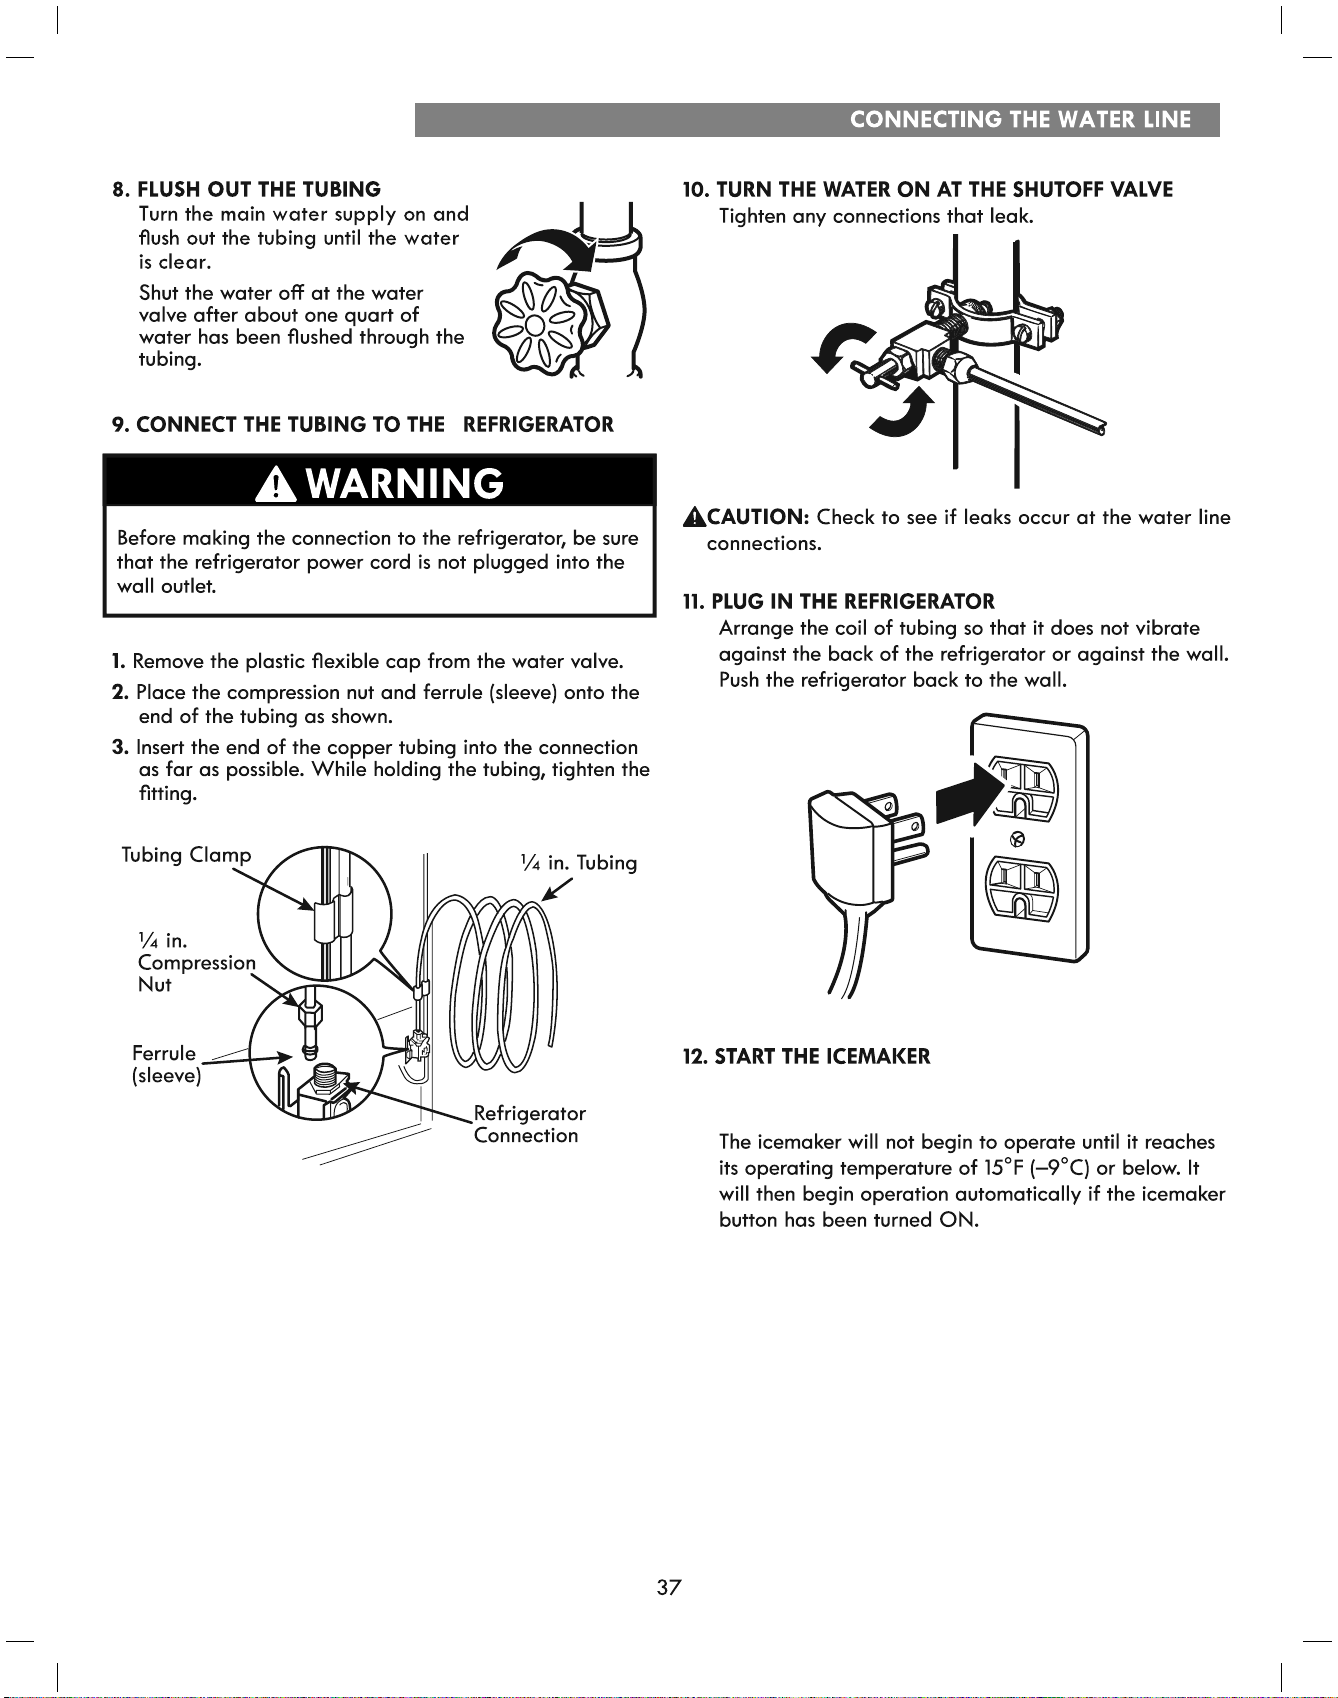
7. CONNECT THE TUBING TO THE VALVE
Place the compression nut and ferrule (sleeve) for
copper tubing onto the end of the tubing and connect
it to the shutoff valve. Make sure the tubing is fully
inserted into the valve. Tighten the compression nut
securely.
NOTE: Commonwealth of Massachusetts Plumbing
Codes 248CMR shall be adhered to. Saddle valves are
illegal and their use is not permitted in
Massachusetts. Consult with your licensed plumber.
Pipe Clamp
Saddle-Type
Shutoff Valve
Vertical Cold
Water Pipe
Pipe Clamp
Clamp Screw
Washer
Inlet End
Saddle-Type
Shutoff Valve
Packing Nut
Outlet Valve
Compression Nut
Ferrule (sleeve)
Set the icemaker power switch to the On (I) position.
NOTE: A newly installed refrigerator may take several
hours to start producing ice.
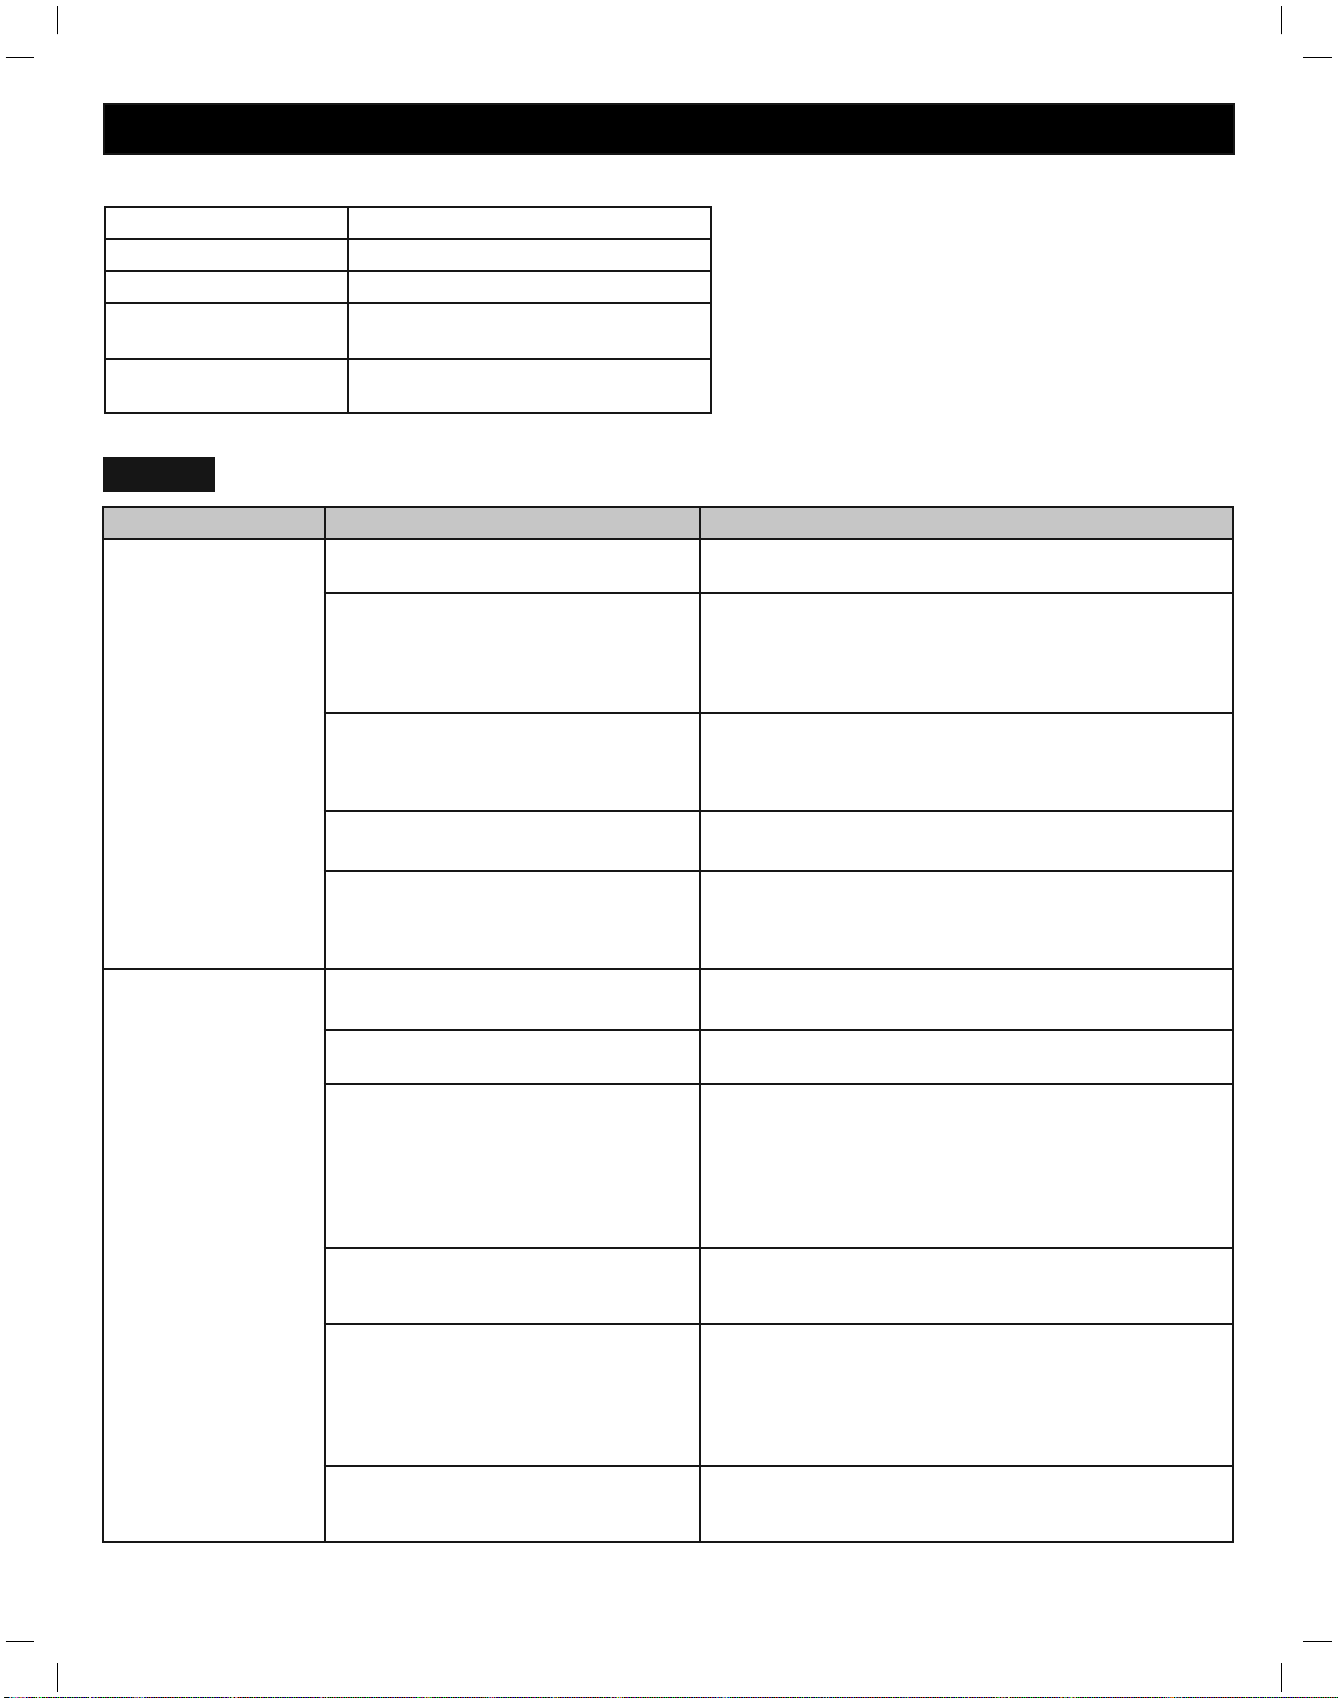
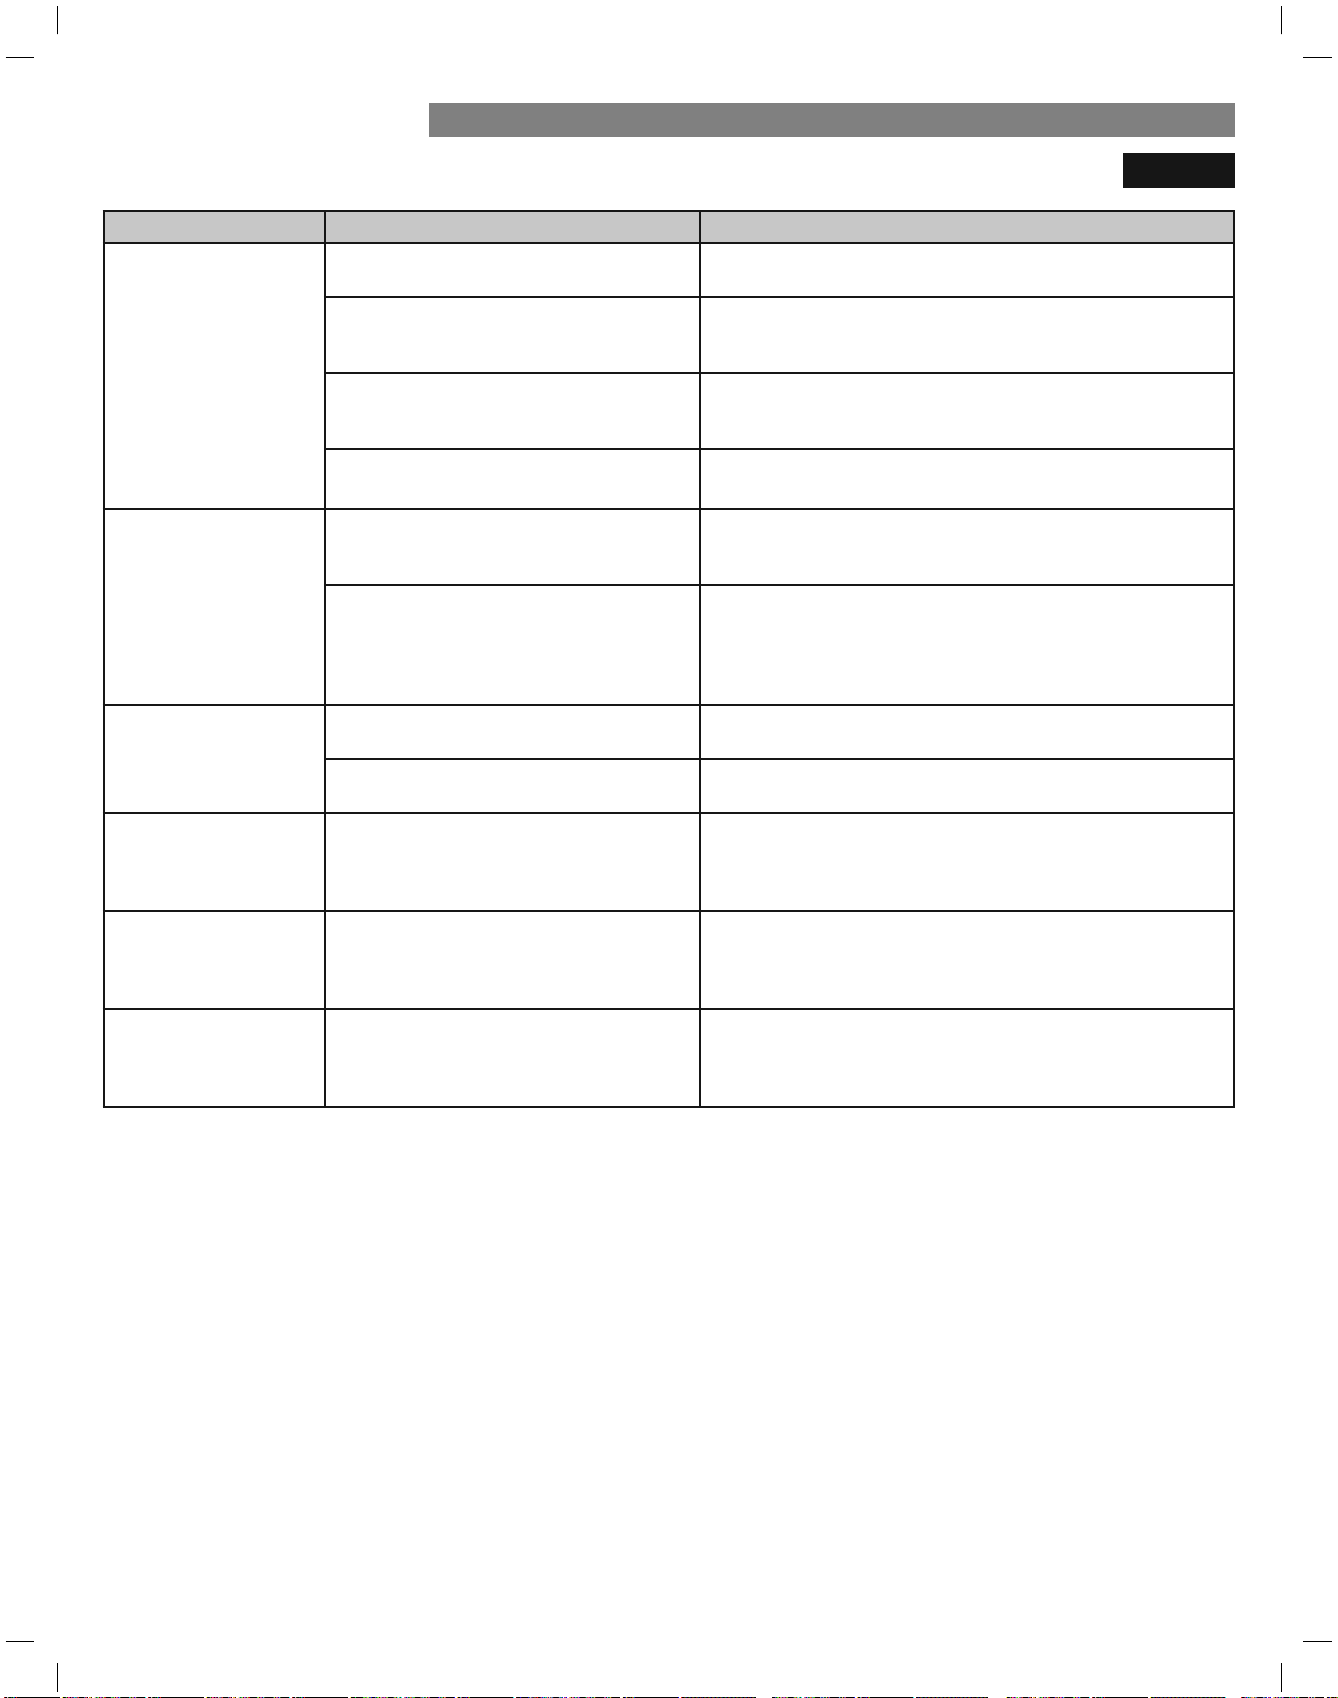
TROUBLESHOOTING GUIDE
38
Problem Possible Causes Solutions
Refrigerator and
Freezer section are
not cooling.
The refrigerator control is set to OFF
(some models).
Turn the control ON. Refer to the Setting the Controls
section for proper temperature settings.
Refrigerator is set to demo mode. Demo Mode allows the lights and control display to
work normally while disabling cooling to save energy
while on the showroom Áoor. Refer to the Setting the
Controls section for instructions on how to disable
Demo Mode.
Refrigerator is in the defrost cycle. During the defrost cycle, the temperature of each
compartment may rise slightly. Wait 30 minutes and
conÀrm the proper temperature has been restored
once the defrost cycle has completed.
Refrigerator was recently installed. It may take up to 24 hours for each compartment to
reach the desired temperature.
Refrigerator was recently relocated. If the refrigerator was stored for a long period of time
or moved on its side, it is necessary for the refrigerator
to stand upright for 24 hours before connecting it to
power.
Cooling system runs
too much.
Refrigerator is replacing an older
model.
Modern refrigerators require more operating time but
use less energy due to more effcient technology.
Refrigerator was recently plugged in
or power restored.
The refrigerator will take up to 24 hours to cool
completely.
Door opened often or a large amount
of food / hot food was added.
Adding food and opening the door warms the
refrigerator, requiring the compressor to run longer in
order to cool the refrigerator back down. In order to
conserve energy, try to get everything you need out of
the refrigerator at once, keep food organized so it is
easy to Ànd, and close the door as soon as the food is
removed. (Refer to the Food Storage Guide.)
Doors are not closed completely. Firmly push the doors shut. If they will not shut all the
way, see the "Doors will not close completely or pop
open" section in Parts & Features Troubleshooting.
Refrigerator is installed in a hot
location.
The compressor will run longer under warm conditions.
At normal room temperatures (70°F) expect your
compressor to run about 40% to 80% of the time.
Under warmer conditions, expect it to run even more
often. The refrigerator should not be operated above
110°F.
Condenser / back cover is clogged. Use a vacuum cleaner with an attachment to clean the
condenser cover and vents. Do not remove the panel
covering the condenser coil area.
Before conducting troubleshooting, make sure that the following basic requirements are met:
COOLING
Service Flow 0.5 gpm (1.9 lpm)
Water Supply Potable Water
Water Pressure 20-120 psi (138 - 827 kPa)
Operating Ambient
Temperature Limits
55°F - 110°F
Electrical Ratings
115 Volts, 60 Hz, AC only, and fused
at 15 or 20 amperes.
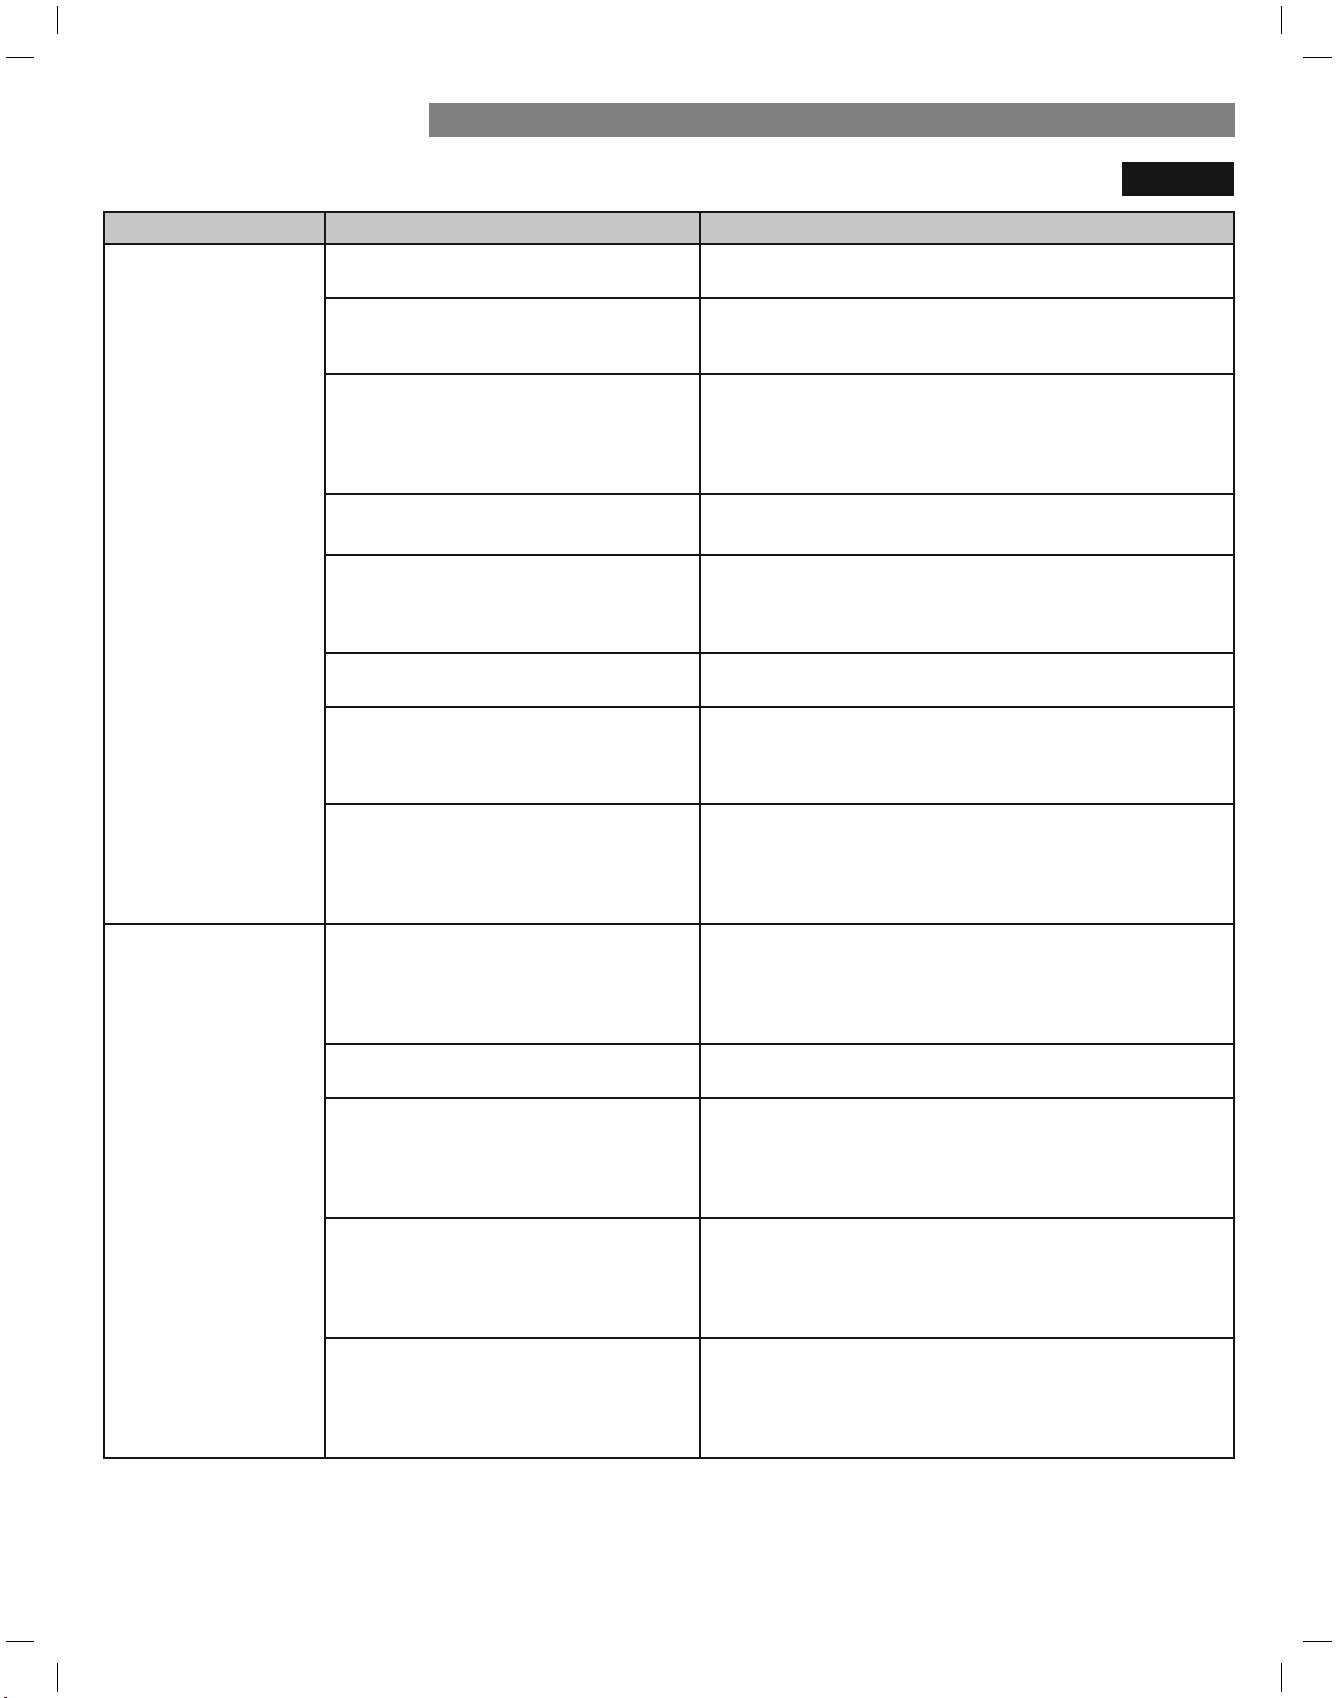
Problem Possible Causes Solutions
Refrigerator or
Freezer section is too
warm.
Refrigerator was recently installed. It may take up to 24 hours for each compartment to
reach the desired temperature.
Air vents are blocked. Rearrange items to allow air to ÁRw throughout the
compartment. Refer to the AirÁRw diagram in the
Using Your Refrigerator section.
Doors are opened often or for long
periods of time.
When the doors are opened often or for long periods
of time, warm, humid air enters the compartment.
This raises the temperature and moisture level within
the compartment. To lessen the effect, reduce the
frequency and duration of door openings.
Unit is installed in a hot location. The refrigerator should not be operated in
temperatures above 110°F.
A large amount of food or hot food
was added to either compartment.
Adding food warms the compartment requiring the
cooling system to run. Allowing hot food to cool to
room temperature before putting it in the refrigerator
will reduce this effect.
Doors not closed correctly. See the "Doors will not close correctly or pop open"
section in Parts & Features Troubleshooting.
Temperature control is not set
correctly.
If the temperature is too warm, adjust the control one
increment at a time and wait for the temperature to
stabilize. Refer to the Setting the Controls section for
more information.
Defrost cycle has recently completed. During the defrost cycle, the temperature of each
compartment may rise slightly and condensation may
form on the back wall. Wait 30 minutes and conÀrm
the proper temperature has been restored once the
defrost cycle has completed.
Interior moisture
buildup.
Doors are opened often or for long
periods of time.
When the doors are opened often or for long periods
of time, warm, humid air enters the compartment.
This raises the temperature and moisture level within
the compartment. To lessen the effect, reduce the
frequency and duration of door openings.
Doors not closed correctly. See the "Doors will not close correctly" section in the
Troubleshooting section.
Weather is humid. Humid weather allows additional moisture to enter the
compartments when the doors are opened leading to
condensation or frost. Maintaining a reasonable level
of humidity in the home will help to control the amount
of moisture that can enter the compartments.
Defrost cycle recently completed. During the defrost cycle, the temperature of each
compartment may rise slightly and condensation may
form on the back wall. Wait 30 minutes and conÀrm
that the proper temperature has been restored once
the defrost cycle has completed.
Food stored uncovered or unwrapped, and damp
Food is not packaged correctly.
containers can lead to moisture accumulation within
each compartment. Wipe all containers dry and store
food in sealed packaging to prevent condensation and
frost.
39
TROUBLESHOOTING GUIDE
COOLING
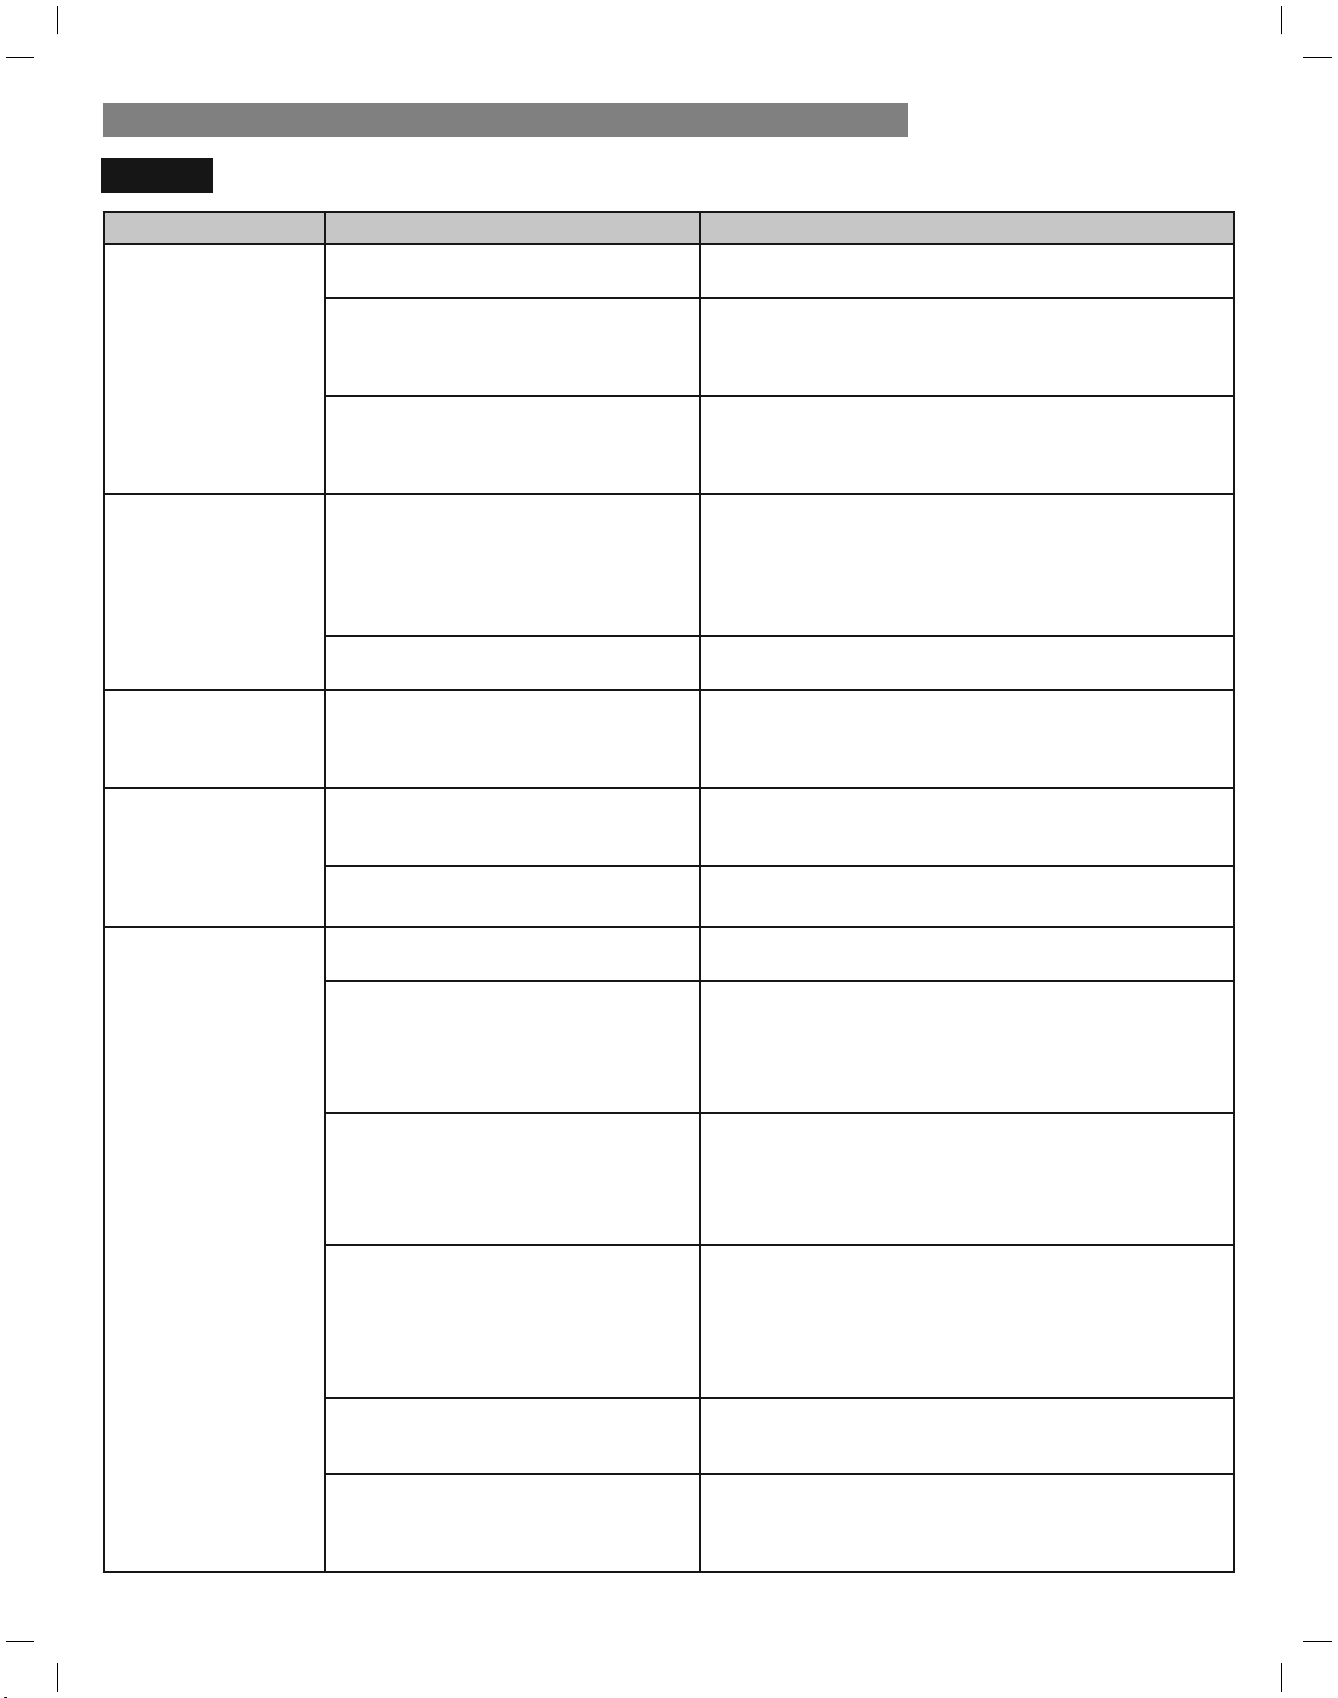
Problem Possible Causes Solutions
Food is freezing
in the refrigerator
compartment.
Food with high water content was
placed near an air vent.
Rearrange items with high water content away from air
vents.
Refrigerator temperature control is set
incorrectly.
If the temperature is too cold, adjust the control one
increment at a time and wait for the temperature to
rof noitces slortnoC eht gnitteS eht ot refeR .ezilibats
more information.
Refrigerator is installed in a cold
location.
When the refrigerator is operated in temperatures
below 41°F (5°C), food can freeze in the refrigerator
compartment. The refrigerator should not be operated
in temperatures below 55°F (13°C).
Frost or ice crystals
form on frozen food
(outside of package).
Door is opened frequently or for long
periods of time.
When the doors are opened often or for long periods
of time, warm, humid air enters the compartment. This
raises the temperature and moisture level within the
compartment. Increased moisture will lead to frost and
condensation. To lessen the effect, reduce the frequency
and duration of door openings.
"nepo pop ro yltce
rroc esolc ton lliw srooD"eht ot refeR.ylreporp gnisolc ton si rooD
section in the Troubleshooting section.
If the temperature is too cold, adjust the control one
Refrigerator or
Freezer section is too
cold.
Incorrect temperature control settings.
increment at a time and wait for the temperature to
stabilize. Refer to the Setting the Controls section for
more information.
Frost or ice crystals
on frozen food
(inside of sealed
package).
Condensation from food with a high
water content has frozen inside of the
food package.
This is normal for food items with a high water content.
Food has been left in the freezer for a
long period of time.
Do not store food items with high water content in the
freezer for a long period of time.
The icemaker will produce approximately 70-182
Icemaker is not
making enough ice.
Demand exceeds ice storage capacity.
cubes in a 24 hour period.
House water supply is not connected,
valve is not turned on fully, or valve is
clogged.
Connect the refrigerator to a cold water supply with
adequate pressure and turn the water shutoff valve
fully open.
If the problem persists, it may be necessary to contact a
It is recommended that you replace the water ÀOWHU:
plumber.
Water ÀOWHU
has been exhausted.
Approximately every six months.
:KHQWKHZDWHUÀOWHULQGLFDWRUWXUQVRQ
Ь
When the water dispenser output decreases.
Ь
When the ice cubes are smaller than normal.
Ь
/R
w house water supply pressure.
on models without a water ÀOWHU and between 40 and
The water pressure must be between 20 and 120 psi
120 psi on models with a water ÀOWHU
If the problem persists, it may be necessary to contact
a plumber or install a booster pump to compensate for
the low pressure.
Reverse osmosis ÀOWUation system is
used.
Reverse osmosis ÀOWUation systems can reduce the water
pressure below the minimum amount and result in
icemaker issues. (Refer to Water Pressure section.)
Tubing connecting refrigerator to
house supply valve is kinked.
The tubing can kink when the refrigerator is moved
during installation or cleaning resulting in reduced
ZDWHUÁRZ6WUDLJKWHQRUUHSDLUWKHZDWHUVXSSO\OLQH
and arrange it to prevent future kinks.
COOLING/ICE & WATER
40
TROUBLESHOOTING GUIDE

Problem Possible Causes Solutions
Icemaker is not
making enough ice
(continued).
Doors are opened often or for long
periods of time.
If the doors of the unit are opened often, ambient
air will warm the refrigerator which will prevent the
unit from maintaining the set temperature. Lowering
the refrigerator temperature can help, as well as not
opening the doors as frequently.
Doors are not closed completely. If the doors are not properly closed, ice production
will be affected. See the"Doors will not close
completely or pop open"section in Parts & Features
Troubleshooting for more information.
The temperature setting for the
freezer is too warm.
The recommended temperature for the freezer
compartment for normal ice production is 0°F. If the
freezer temperature is warmer, ice production will be
affected.
ICE & WATER
41
Icemaker is not
making ice.
Refrigerator was recently installed or
icemaker recently connected.
It may take up to 24 hours for each compartment to
reach the desired temperature and for the icemaker to
begin making ice.
Icemaker not turned on. Locate the icemaker ON/OFFEXWWRQDQGFRQÀUPWKDW
it is turned ON.
The refrigerator is not connected to
a water supply or the supply shutoff
valve is not turned on.
Connect refrigerator to the water supply and turn the
water shutoff valve fully open.
Icemaker shutoff (feeler arm)
obstructed.
If your icemaker is equipped with an ice shutoff arm,
make sure that the arm moves freely.
5HYHUVHRVPRVLVZDWHUÀOWUDWLRQ
system is connected to your cold
water supply.
5HYHUVHRVPRVLVÀOWUDWLRQV\VWHPVFDQUHGXFHWKH
water pressure below the minimum amount and result
in icemaker issues. (Refer to the Water Pressure
section.)
Ice has bad taste or
odor.
Water supply contains minerals such
as sulfur.
$ZDWHUÀOWHUPD\QHHGWREHLQVWDOOHGWRHOLPLQDWH
taste and odor problems.
NOTE: ,QVRPHFDVHVDÀOWHUPD\QRWKHOS,WPD\QRW
be possible to remove all minerals / odor / taste in all
water supplies.
Icemaker was recently installed. 'LVFDUGWKHÀUVWIHZEDWFKHVRILFHWRDYRLGGLVFRORUHG
or bad tasting ice.
Ice has been stored for too long. Ice that has been stored for too long will shrink,
become cloudy, and may develop a stale taste. Throw
away old ice and make a new supply.
The food has not been stored
properly in either compartment.
Rewrap the food. Odors may migrate to the ice if
food is not wrapped properly.
The interior of the refrigerator needs
to be cleaned.
See the Care and Cleaning section for more
information.
The ice storage bin needs to be
cleaned.
Empty and wash the bin (discard old cubes). Make
sure that the bin is completely dry before reinstalling
it.
Icemaker is making
too much ice.
Icemaker shutoff (feeler arm) is
obstructed.
Empty the ice bin. If your icemaker is equipped with
an ice shutoff arm, make sure that the arm moves
freely. Reinstall the ice bin and wait 24 hours to
FRQÀUPSURSHURSHUDWLRQ
TROUBLESHOOTING GUIDE
42
Problem Possible Causes Solutions
Clicking The defrost control will click when
the automatic defrost cycle begins
and ends. The thermostat control (or
refrigerator control on some models)
will also click when cycling on and
off.
Normal Operation
Rattling Rattling noises may come from the
flow of refrigerant, the water line on
the back of the unit, or items stored
on top of or around the refrigerator.
Normal Operation
Refrigerator is not resting solidly on
the floor.
Floor is weak or uneven or leveling legs need to be
adjusted. See the Door Alignment section.
Refrigerator with linear compressor
was jarred while running.
Normal Operation
Whooshing Evaporator fan motor is circulating
air through the refrigerator and
freezer compartments.
Normal Operation
Air is being forced over the condenser
by the condenser fan.
Normal Operation
Gurgling Refrigerant flowing through the
cooling system.
Normal Operation
Popping Contraction and expansion of the
inside walls due to changes in
temperature.
Normal Operation
Sizzling Water dripping on the defrost heater
during a defrost cycle.
Normal Operation
Vibrating If the side or back of the refrigerator
is touching a cabinet or wall, some of
the normal vibrations may make an
audible sound.
To eliminate the noise, make sure that the sides and
back cannot vibrate against any wall or cabinet.
Dripping Water running into the drain pan
during the defrost cycle.
Normal Operation
Pulsating or High-
Pitched Sound
Your refrigerator is designed to run
more efficiently to keep your food
items at the desired temperature. The
high efficiency compressor may cause
your new refrigerator to run longer
than your old one, but it is still more
energy efficient than previous models.
While the refrigerator is running, it is
normal to hear a pulsating or high-
pitched sound.
Normal Operation
NOISE
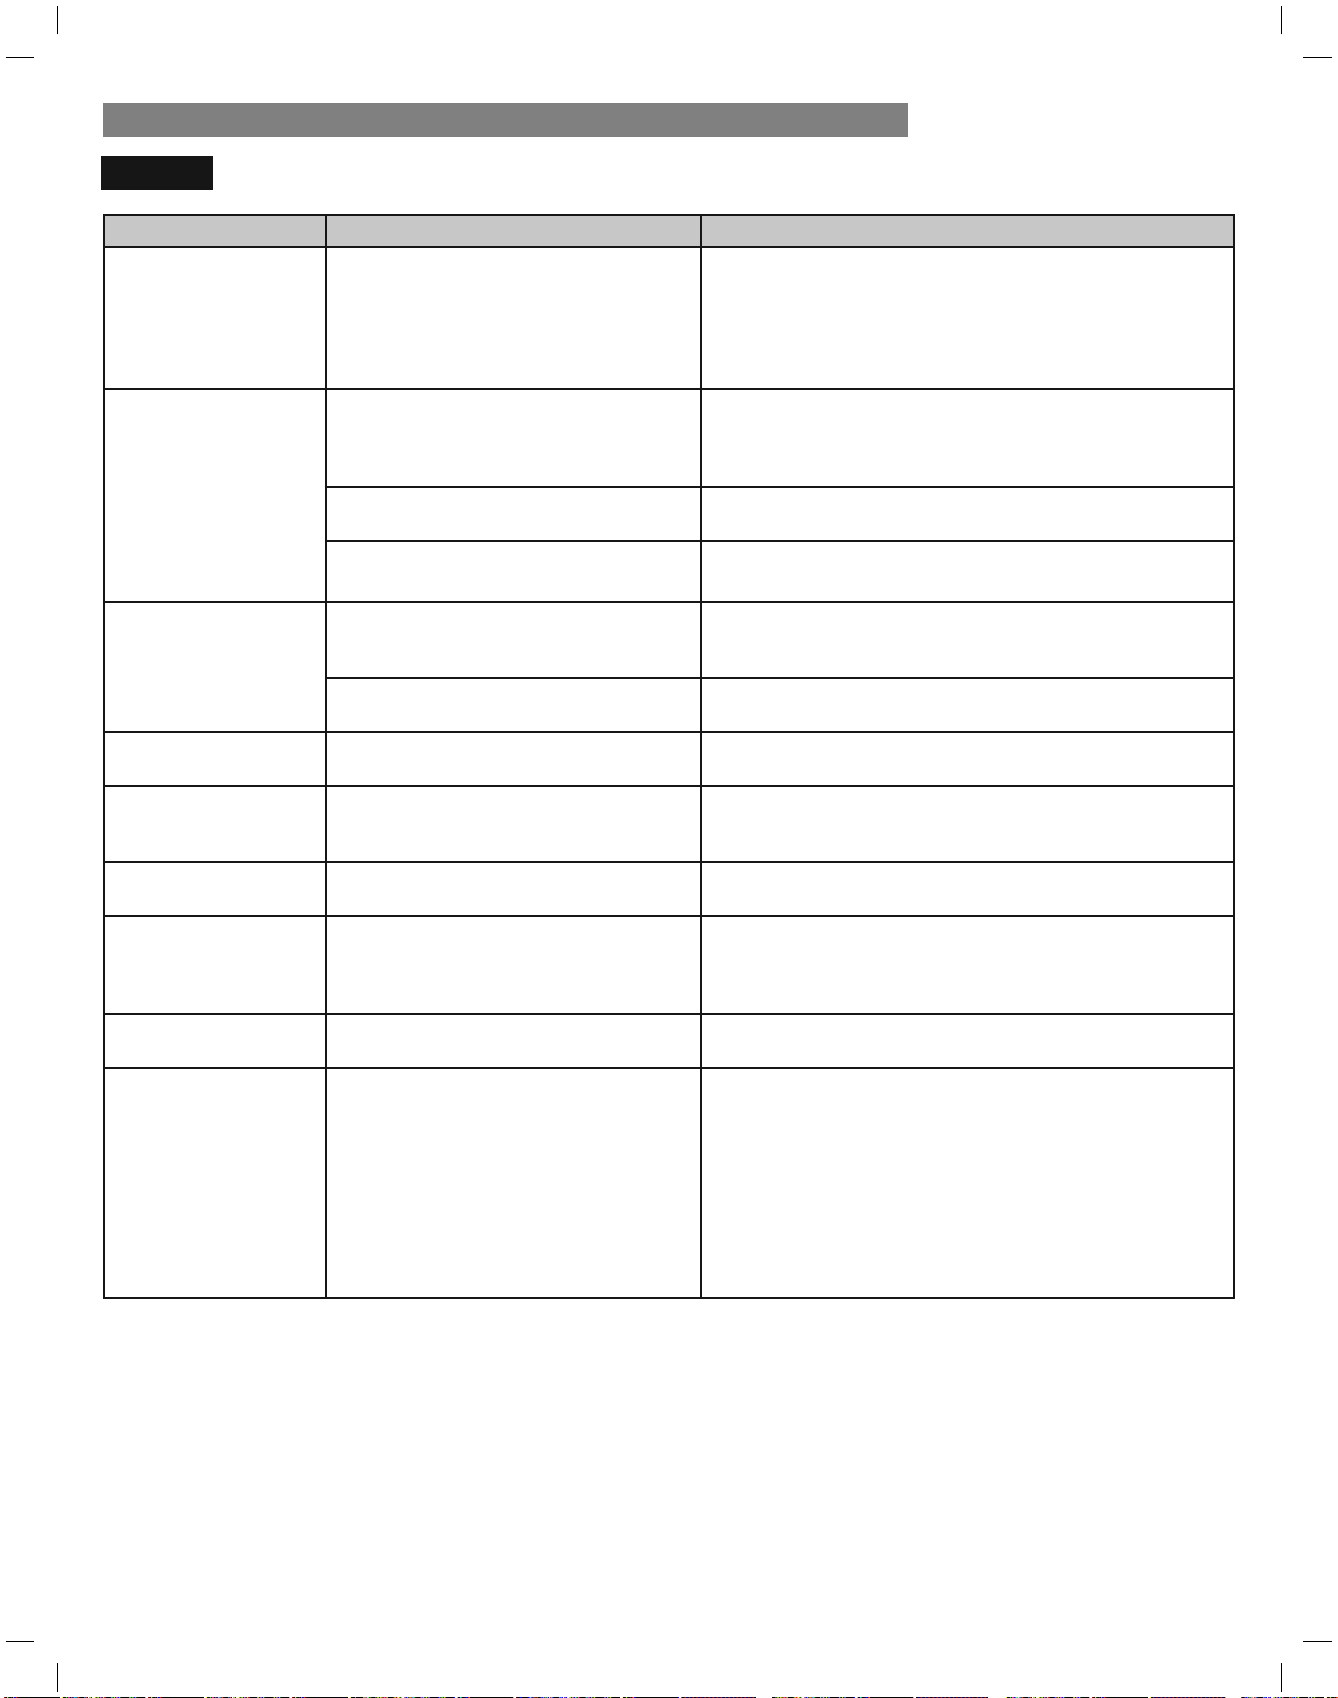
TROUBLESHOOTING GUIDE
43
Problem Possible Causes Solutions
Doors will not close
correctly or pop
open.
Food packages are blocking the door
open.
Rearrange food containers to clear the door and door
shelves.
Ice bin, crisper cover, pans, shelves,
door bins, or drawers are out of
position.
Push bins all the way in and put crisper cover, pans,
shelves and drawers into their correct positions. See
the Using Your Refrigerator section for more information.
The doors were removed during
product installation and not properly
replaced.
Remove and replace the doors according to the
Removing and Replacing Refrigerator Handles and
Doors section.
Refrigerator is not leveled properly. Door Alignment in the Refrigeration Installation
section to level refrigerator.
See
Clean the gaskets and the surfaces that they touch.
Doors are diffcult to
open.
The gaskets are dirty or sticky.
Rub a thin coat of appliance polish or kitchen wax on
the gaskets after cleaning.
Door was recently closed.
LED interior lighting failure.
When you open the door, warmer air enters the
refrigerator. As the warm air cools, it can create a
vacuum. If the door is hard to open, wait one minute
to allow the air pressure to equalize, then see if it
opens more easily.
Refrigerator wobbles
or seems unstable.
Leveling legs are not adjusted
properly.
Refer to the Leveling and Door Alignment section.
Floor is not level. It may be necessary to add shims under the leveling
legs or rollers to complete installation.
Lights do not work.
lighting, and service should be performed by
The refrigerator compartment lamp is LED interior
DTXDOLÀHGWHFKQLFLDQ5HIHUWRWKHLight Bulb
Replacement section.
Refrigerator has an
unusual odor.
The Air Filter may need to be set to
the MAX setting or replaced.
Set the Air Filter to the MAX setting. If the odor does
not go away within 24 hours, the filter may need to be
replaced. See the Replacing the Air Filter section for
replacement instructions.
The interior of
the refrigerator is
covered with dust or
soot.
The refrigerator is located near a fire
source, such as a fireplace, chimney
or candle.
Make sure that the refrigerator is not located near a
fire source, such as a fireplace, chimney or candle.
PARTS & FEATURES
TROUBLESHOOTING GUIDE
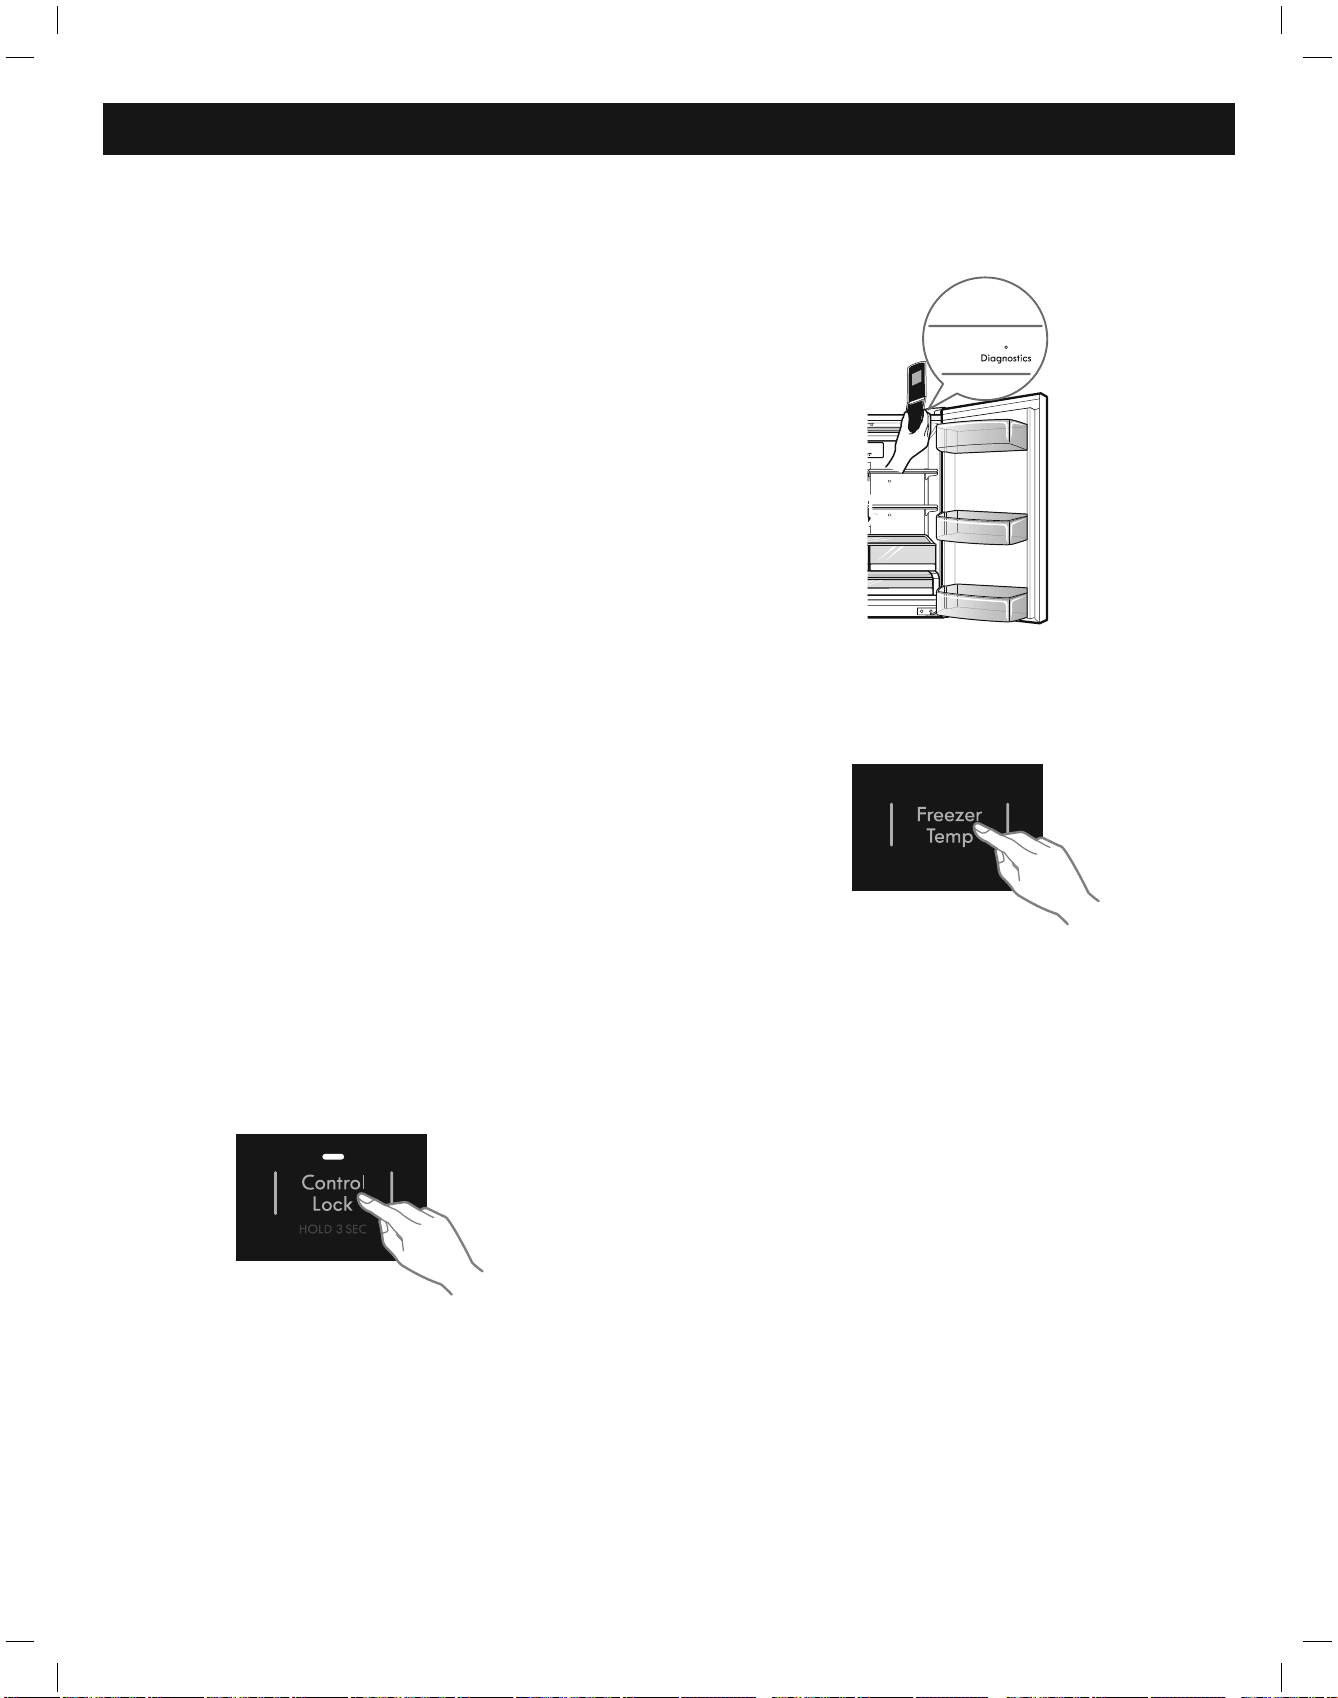
DIAGNOSTICS
Diagnostics
Should you experience any problems with your
refrigerator, it has the capability of transmitting data via
your telephone to the Diagnostics Team. This gives you the
capability of speaking directly to our trained specialists.
The specialist records the data transmitted from your
machine and uses it to analyze the issue, providing a fast,
effective diagnosis.
If you experience problems with your refrigerator,
call 1-844-553-6667.
Only use the Diagnostics feature when instructed
to do so by the Diagnostics Team agent.
The transmission sounds that you will hear are normal
and sound similar to a fax machine.
Diagnostics cannot be activated unless your refrigerator
is connected to power. If your refrigerator is unable to
turn on, then troubleshooting must be done without using
Diagnostics.
Using Diagnostics
First, call 1-844-553-6667. If the number of the phone
\RXDUHXVLQJLVRQÀOHDQGLVDVVRFLDWHGZLWK\RXU
refrigerator, you will be quickly relayed to a Diagnostics
team agent. Only use the Diagnostics feature when
instructed to do so by the Diagnostics Team agent.
1. Lock the display. To lock the display, press and hold
the Control Lock button for three seconds. (If the
GLVSOD\KDVEHHQORFNHGIRURYHUÀYHPLQXWHV\RXPXVW
deactivate the lock and then reactivate it.)
eht fo tnorf ni enohp ruoy fo eceiphtuom eht dloH .3
speaker that is located on the right hinge of the
refrigerator door, when instructed to do so by the call
center.
eerht rof nottub pmeT rezeerF eh
t dloh dna sserP .4
seconds while continuing to hold your phone to the
speaker.
pmeT rezeerF eht esaeler ,speeb eerht raeh uoy retfA .5
button.
sah noissimsnart enot eht litnu ecalp ni enohp eht peeK .6
ÀQLVKHG7KHGLVSOD\ZLOOFRXQWGRZQWKHWLPH2QFH
the countdown is over and the tones have stopped,
resume your conversation with the specialist, who will
then be able to assist you in using the information
transmitted for analysis.
NOTE:
senot eht elihw enohp eht evom ton od ,stluser tseb roF -
are being transmitted.
etarucca na teg ot elba ton si tnega retnec llac eht fI -
recording of the data, you may be asked to try again.
2. Open the right refrigerator door.
44

ÍNDICE
Garantía ................................................................. 46
Registro del producto ........................................ 47
Instrucciones de seguridad importantes
...... 48-50
Requisitos eléctricos y de conexión a tierra
05
52
....
Componentes y características 15............................
Instalación del refrigerador .................................
Desembalaje del refrigerador 25..........................
Instalación
...........................................................53
Desmontaje y colocación de las
manijas y puertas del congelador
........... 45 -60
Nivelación y alineación de las puertas 16.............
Uso del refrigerador .....................................62-73
Ajuste de los controles ...............................62-63
Funciones inteligentes .......................................64
Instrucciones de Smart Grid .....................65-66
Depósito de hielo del interior
de la puerta
.........................................................67
Instrucciones de operación .................................... 68
Guía para el almacenamiento
de alimentos
......................................................69
Sección refrigerador
Estantes del refrigerador
................................70
Cajón con control de humedad 71.........................
Cajón despensero con control
de temperatura
................................................. 71
Bandejas de puerta .........................................71
Filtro de aire
.......................................................72
Sección congelador
Depósito de hielo 72............................. lanoicida
Durabase .............................................................73
Divisor Durabase ...............................................73
Cajón Extraíble .....................................................73
Filtro de agua ...............................................74-76
Cuidado y limpieza ......................................77-78
Sugerencias generales de limp 77.................. zeia
Exterior .................................................................77
Paredes interiores .............................................77
Revestimiento de las puertas y jun 77............. sta
Piezas deplástico ............................................... 77
Bobinas del condensador .................................. 77
Sustitución de la bombilla ..................................78
Interrupciones de alimentación ...........................78
Cuando se va de vacaciones .............................78
Cuando se muda .................................................. 78
Conexión de la tubería de agua ...........79-81-
Guía para la solución de problemas ........ 28 -87
Diagnostics (Diagnósticos) ............................ 88
45

46
GARANTÍA
GARANTÍA DEL REFRIGERADOR
GARANTÍA LIMITADA KENMORE ELITE
Con el COMPROBANTE DE COMPRA, la siguiente cobertura de garantía aplica cuando este electrodoméstico se instala, opera y
mantiene correctamente, de acuerdo con todas las instrucciones proporcionadas.
Un Año de Garantía en el Electrodoméstico
Este aparato tiene garantía por defectos en el material o mano de obra DURANTE UN AÑO a partir de la fecha de venta.
Si el aparato está defectuoso, recibirá la reparación sin costo. Si el aparato está defectuoso, recibirá la reparación sin costo.
Si el aparato no puede ser reparado, este será remplazado sin costo. La cobertura de garantía completa aplica solamente por
90 días a partir de la fecha de venta si el electrodoméstico se usa con fines distintos del uso doméstico.
Cinco Años de Garantía en el Sistema Refrigerante Sellado
El sistema refrigerante sellado tiene garantía por defectos en el material o mano de obra DURANTE CINCO AÑOS a partir de la fecha de venta.
* Si aparecen defectos en alguna pieza del sistema dentro del primer año, se le proporcionará e instalará una nueva sin costo. Si aparece un
defecto en una pieza del sistema después del primer año, se le proporcionará una pieza nueva, pero no se le instalará sin costo. Usted será
responsable del costo del trabajo que implica la instalación de la pieza después del primer año a partir de la fecha de venta. La cobertura de
garantía completa aplica solamente por un año a partir de la fecha de venta si el electrodoméstico se usa con fines distintos del uso doméstico.
*Los defectos debe ser verificadas por un representante de servicio autorizado de Sears.
Diez Años en el Compresor Lineal
Garantía de por Vida en Cajones de Almacenamiento
Esta garantía SOLO cubre defectos en el material y la mano de obra y NO cubrirá lo siguiente:
Aviso de garantías implícitas, limitación de recursos
Sears Brands Management Corporation, Hoffman Estates, IL 60179
1. Elementos prescindibles que pueden desgastarse por el uso normal y que incluyen, entre otros, filtros, correas, bolsas o focos con base de rosca.
2. Un técnico de servicio limpiará o le dará mantenimiento al electrodoméstico, o le indicará al usuario la forma correcta de instalarlo, operarlo o
darle mantenimiento.
3. Llamadas de servicio para corregir la instalación del electrodoméstico no realizada por agentes de servicio autorizados de Sears o para
reparar problemas con fusibles del hogar, interruptores, cableado doméstico y sistemas de suministro de agua o gas provocados por dicha
instalación.
4. Daño o falla de este electrodoméstico causado por la instalación no realizada por agentes de servicio autorizado de Sears, que incluye el hecho
de que la instalación no se haya realizado según los códigos eléctricos, de gas o de plomería.
5. Daño o falla de este electrodoméstico, que incluya cambio de color o corrosión de la superficie si no se opera o se le da mantenimiento de
acuerdo con todas las instrucciones proporcionadas.
6. Daño o falla de este electrodoméstico, que incluya cambio de color o corrosión de la superficie provocados por un accidente, alteración, abuso,
mal uso o el uso contrario al previsto.
7. Daño o falla de este electrodoméstico, que incluya cambio de color o corrosión de la superficie causado por el uso de detergentes, limpiadores,
productos químicos o utensilios distintos de los recomendados en todas las instrucciones proporcionadas con el producto.
8. Daño o falla de las partes o sistemas provocado por modificaciones no autorizadas al electrodoméstico.
9. Servicio brindado a un electrodoméstico si faltan el modelo y la placa del número de serie, están alterados o no se puede determinar fácilmente
si tienen el logotipo de certificación apropiado.
El compresor lineal de este electrodoméstico tiene garantía por defectos en el material o mano de obra DURANTE DIEZ AÑOS a partir de la
fecha de venta.* Si aparecen defectos en el compresor dentro del primer año, se le proporcionará e instalará uno nuevo sin costo. Si aparece
un defecto en el compresor después del primer año, se le proporcionará uno nuevo, pero no se le instalará sin costo. Usted será responsable
del costo del trabajo que implica la instalación de la pieza después del primer año a partir de la fecha de venta. La cobertura de garantía
completa aplica solamente por dos años a partir de la fecha de venta si el electrodoméstico se usa con fines distintos del uso doméstico.
*Los defectos debe ser verificadas por un representante de servicio autorizado de Sears.
DURANTE EL TIEMPO QUE SE USE desde la fecha de venta, se proporcionará el cambio sin costo por un cajón de almacenamiento o compartimiento
defectuoso del refrigerador o congelador.* Si aparece un defecto dentro del primer año, se le instalará sin costo un nuevo contenedor para la
puerta. Si aparece un defecto después del primer año, se le proporcionará un nuevo contenedor, pero no se le instalará sin costo. Esta garantía de
por vida solo cubre los contenedores y no aplica a ningún otro componente o mecanismo relacionado. Usted será responsable del costo del trabajo
que implica la instalación del contenedor después del primer año a partir de la fecha de venta. La cobertura de garantía aplica solamente por 90
días a partir de la fecha de venta si este electrodoméstico se usa con fines distintos del uso doméstico. *La cobertura de la garantía se aplica a los
compartimentos de la puerta, los compartimentos del cajón y las cestas. Los defectos debe ser verificadas por un representante de servicio
autorizado de Sears.
Para conocer los detalles de cobertura de la garantía y obtener reparación o cambio sin costo, visite el sitio web: www.kenmore.com/warranty
El único y exclusivo recurso del cliente según esta garantía limitada será la reparación o el cambio del producto según se establece en el presente.
Las garantías implícitas, que incluyen las garantías de comerciabilidad o aptitud para un fin en particular están limitadas a un año en el
electrodoméstico, cinco años en el sistema refrigerante sellado, diez años en el compresor lineal, y el tiempo que se use en los contenedores de
almacenamiento, o el periodo más corto permitido por ley. Los vendedores no pueden ser responsables de daños incidentales o consecuenciales.
Algunos estados no permiten la exclusión o limitación de daños incidentales o consecuenciales, o las limitaciones sobre la duración de una garantía
implícita, de modo que estas exclusiones o limitaciones pueden no aplicarle a usted.
Esta garantía aplica solamente cuando el electrodoméstico se utilice en los Estados Unidos.
Esta garantía le otorga derechos legales específicos y usted también puede tener otros derechos que varían de un estado a otro.

REGISTRO DEL PRODUCTO
En el espacio siguiente, anote la fecha de la compra, el modelo y el número de serie del producto. Encontrará el modelo
y el número de serie impreso en la placa de identificación situada en el revestimiento interior del compartimiento del
refrigerador. Tenga esta información a mano siempre que se ponga en contacto con Sears en relación con su producto.
N.º de modelo___________________ Fecha de compra ___________________
N.º de serie.___________________
Guarde estas instrucciones y su ticket de compra para futuras consultas.
47
48
Este artefacto no ha sido diseñado para ser utilizado por
personas con capacidades físicas, sensoriales o mentales
disminuidas (incluidos niños) o que no cuenten con la
experiencia o los conocimientos necesarios para operarlo,
salvo que una persona responsable de su seguridad les brinde
la supervisión o la instrucción pertinente en cuanto al uso
del artefacto.
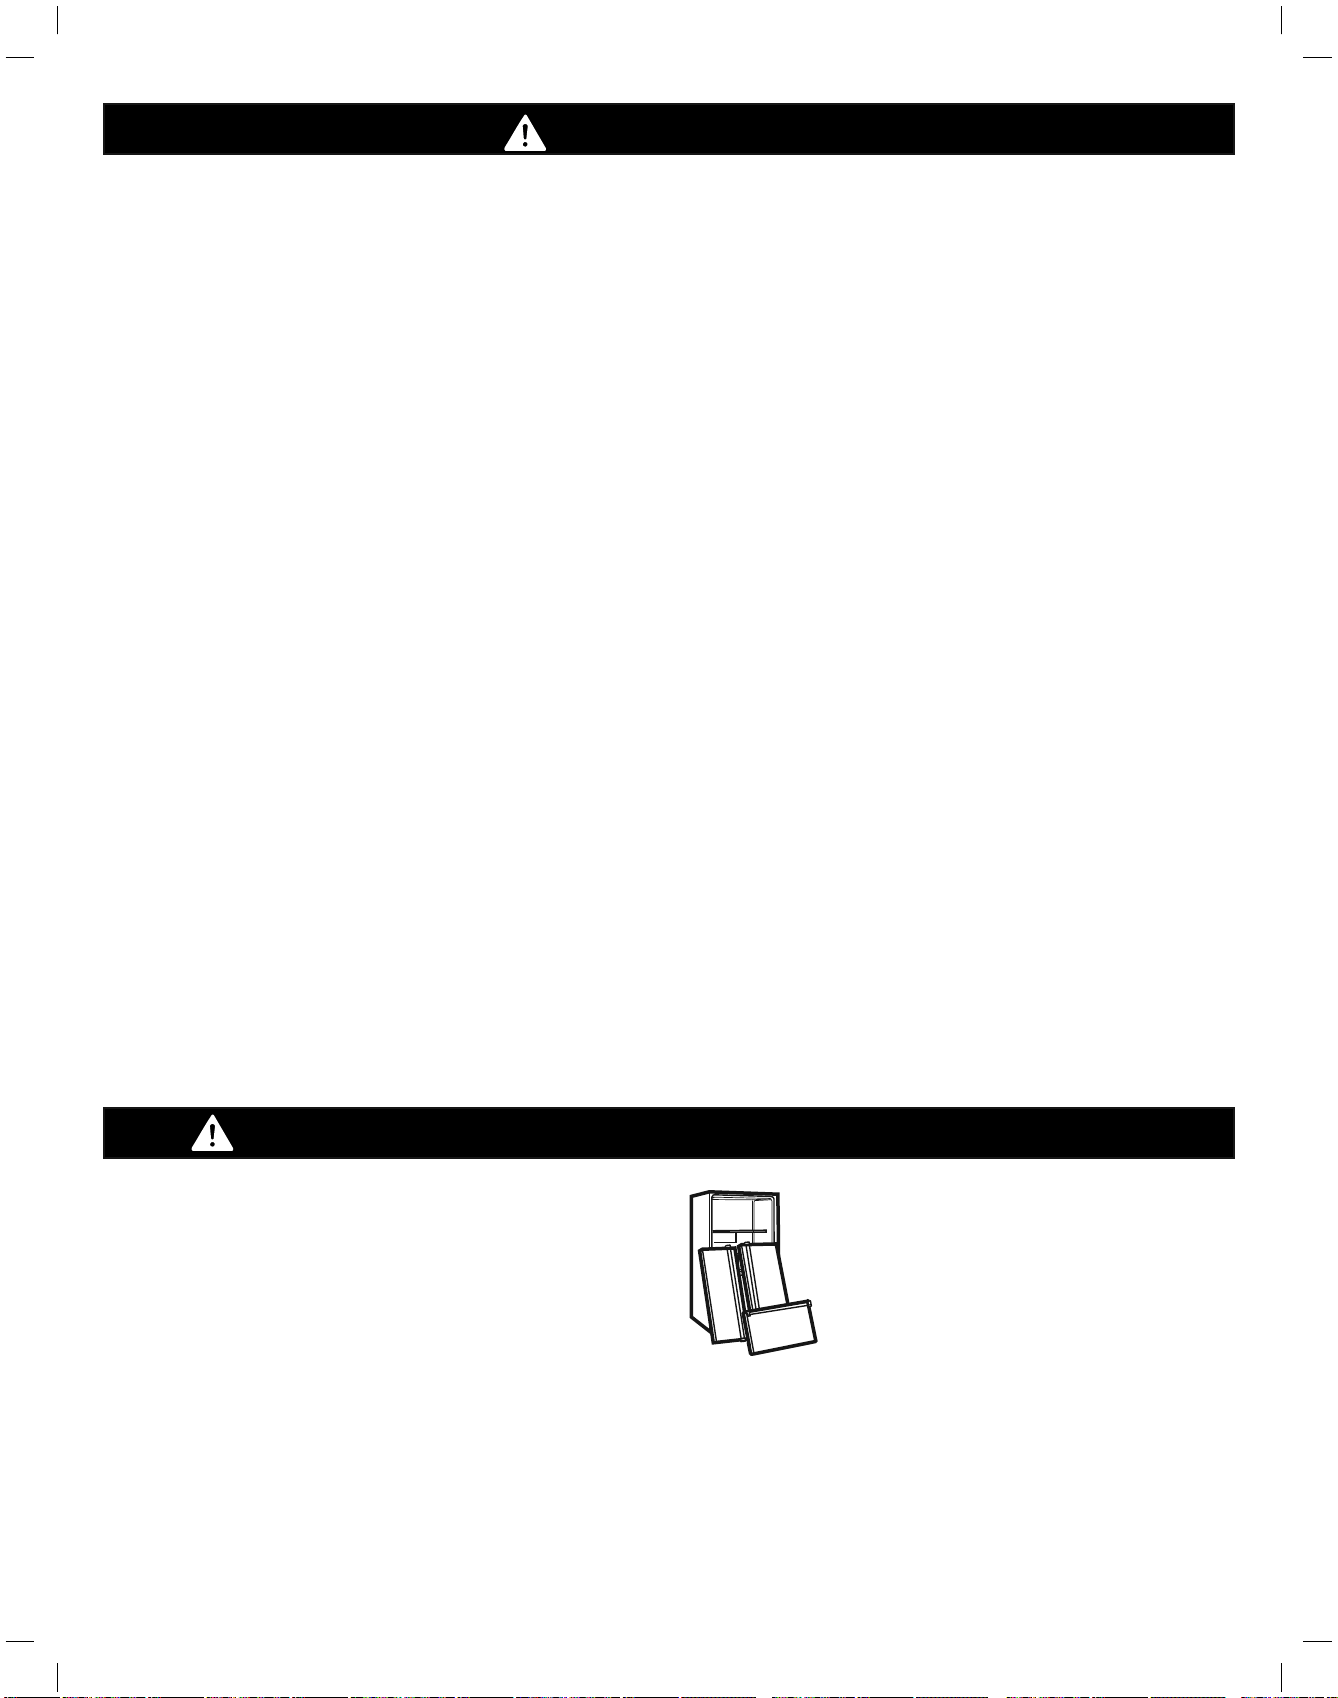
ADVERTENCIA
PELIGRO: RIESGO DE ATRAPAMIENTO DE NIÑOS
GUARDE ESTAS INSTRUCCIONES
Antes de sustituir una bombilla fundida o rota, •
desenchufe el refrigerador o corte la corriente en
el disyuntor o caja de fusibles con el fin de evitar el
contacto con un cable con corriente. (Una bombilla
fundida puede romperse en el momento de cambiarla,
por lo que queda expuesto un cable con corriente).
NOTA: Algunos modelos disponen de iluminación interior
mediante LED, por lo que el mantenimiento deberá ser
realizado por un técnico cualificado.
ADVERTENCIA: Poner uno o ambos controles en posición
de apagado (OFF) no corta la alimentación de circuito
de iluminación.
Cuando haya terminado, vuelva a conectar el •
refrigerador a la red eléctrica y restablezca los controles
(Termostato, Control del refrigerador y/o Control del
congelador, en función del modelo) al ajuste deseado.
Este refrigerador se debe instalar correctamente de •
acuerdo con las instrucciones importantes para el
instalador incluidas en la hoja adhesiva pegada al
frontal del refrigerador.
Cuando el refrigerador esté en funcionamiento, no toque •
las superficies frías del compartimiento del congelador
con las manos húmedas o mojadas. La piel se podría
adherir a las superficies extremadamente frías.
Los refrigeradores desechados o abandonados son
peligrosos, incluso si sólo es por unos pocos días. Si va a
deshacerse de su antiguo refrigerador, le recomendamos
que siga las instrucciones que encontrará a la derecha para
evitar posibles accidentes (atrapamiento de niños y asfixia).
NO toque el mecanismo de fabricación automática •
de hielo mientras esté el refrigerador enchufado.
NO vuelva a congelar alimentos congelados que se •
hayan descongelado completamente. El Departamento
de Agricultura de Estados Unidos, en el boletín n.º 69
deCasa y jardín, dice:
…Se pueden volver a congelar con seguridad alimentos
congelados que se hayan descongelado si aún contienen
cristales de hielo o si aún siguen fríos: por debajo de los
4 °C.
…La carne picada, la carne de ave o el pescado
descongelados cuyo olor o color indiquen mal estado
no deberían volver a congelarse ni deberían comerse.
El helado descongelado se debe desechar. Si el olor o
el color de cualquier alimento ha perdido frescura o es
cuestionable, deséchelo. Comer este tipo de alimentos
puede ser peligroso.
Incluso si se descongela parcialmente un alimento y se
vuelve a congelar, su calidad alimenticia se ve reducida,
particularmente si se trata de frutas, verduras y comida
preparada. La calidad alimenticia de las carnes rojas se
ve menos afectada que la de la mayoría de alimentos.
Utilice los alimentos recongelados lo antes posible para
salvaguardar el máximo de calidad.
ANTES DE DESECHAR SU ANTIGUO
REFRIGERADOR O CONGELADOR:
Desmonte las puertas.•
Deje los estantes en su sitio para que los •
niños no puedan trepar con facilidad al
interior
.
49
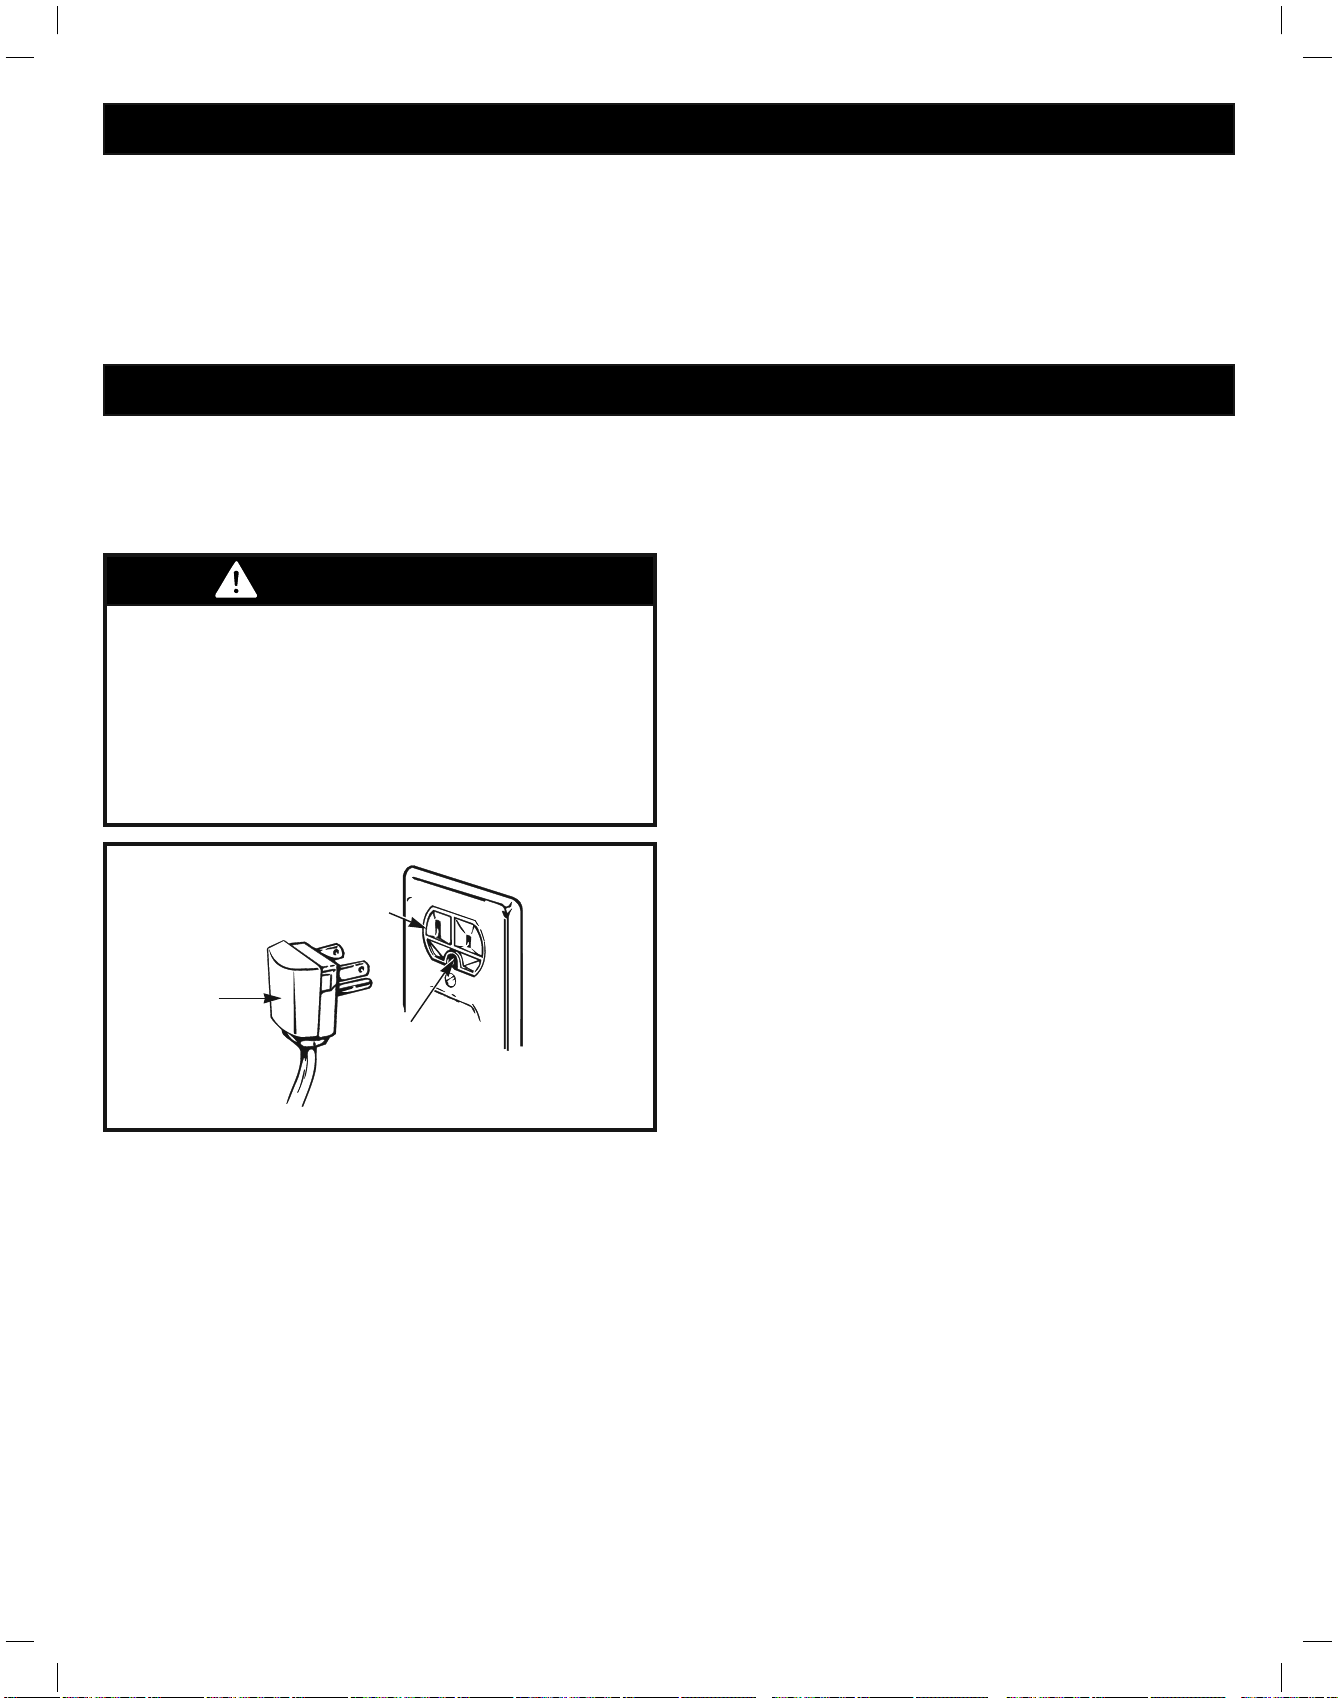
REQUISITOS ELÉCTRICOS Y DE CONEXIÓN A TIERRA
ADVERTENCIA
Es posible que su antiguo refrigerador tenga un sistema de
refrigeración que use CFC (clorofluorocarbonos). Se cree que
los CFC son perjudiciales para el ozono estratosférico.
IMPORTANTE: Lea atentamente la siguiente
información.
PARA CONECTAR LA ELECTRICIDAD
MÉTODO DE CONEXIÓN A TIERRA
RECOMENDADO
El refrigerador debe estar siempre enchufado a su toma
de corriente individual conectada a tierra adecuadamente
con una tensión nominal de 115 voltios, 60 Hz, sólo CA,
y protegida mediante fusible a 15 ó 20 amperios. Esta
configuración proporciona el mejor rendimiento y, al mismo
tiempo, evita la sobrecarga de la instalación eléctrica de la
casa que podría provocar un peligro de incendio debido a un
sobrecalentamiento de los cables. Se recomienda disponer de
un circuito independiente para la exclusiva alimentación de este
electrodoméstico.
Use un receptáculo que no se pueda apagar con un interruptor o
una cadena de tracción. No utilice un alargador de corriente.
Si únicamente se dispone de una toma de corriente de 2 clavijas,
será responsabilidad y obligación suya sustituirla por otra de 3
clavijas con una conexión a tierra adecuada.
USO DE CABLES ALARGADORES
Debido a los posibles peligros de seguridad que se pueden
producir bajo ciertas condiciones, no se recomienda el
uso de un cable alargador. Sin embargo, si a pesar de ello
elige usar un cable alargador, es absolutamente necesario
que sea un cable alargador para electrodomésticos de 3
clavijas con conexión a tierra y clasificación UL (EE. UU.),
que disponga de un enchufe y una toma de corriente con
conexión a tierra, y que la clasificación eléctrica del cable
sea de 15 amperios (mínimo) y 120 voltios.
El uso de un cable alargador aumentará la separación
necesaria para la parte posterior del refrigerador.
Riesgo de descargas eléctricas
POR MOTIVOS DE SEGURIDAD PERSONAL, este
electrodoméstico debe estar conectado a tierra
adecuadamente. Solicite a un electricista cualificado que
compruebe la toma de corriente y el circuito eléctrico
para asegurarse de que la toma de corriente está
correctamente conectada a tierra.
Si va a desechar su antiguo refrigerador, asegúrese de que
un técnico cualificado se encargue de retirar el refrigerante
de CFC para su adecuada eliminación. Si de forma
intencionada libera este refrigerante de CFC, podría estar
sujeto a multas y penas de prisión según lo previsto en la
legislación medioambiental.
Enchufe
de conexión
a tierra de
3 clavijas
Toma de pared
con conexión a
tierra de 3 clavijas
Antes de usar el
electrodoméstico, asegúrese
de disponer de una conexión a
tierra adecuada.
ELIMINACIÓN DE CFC
50
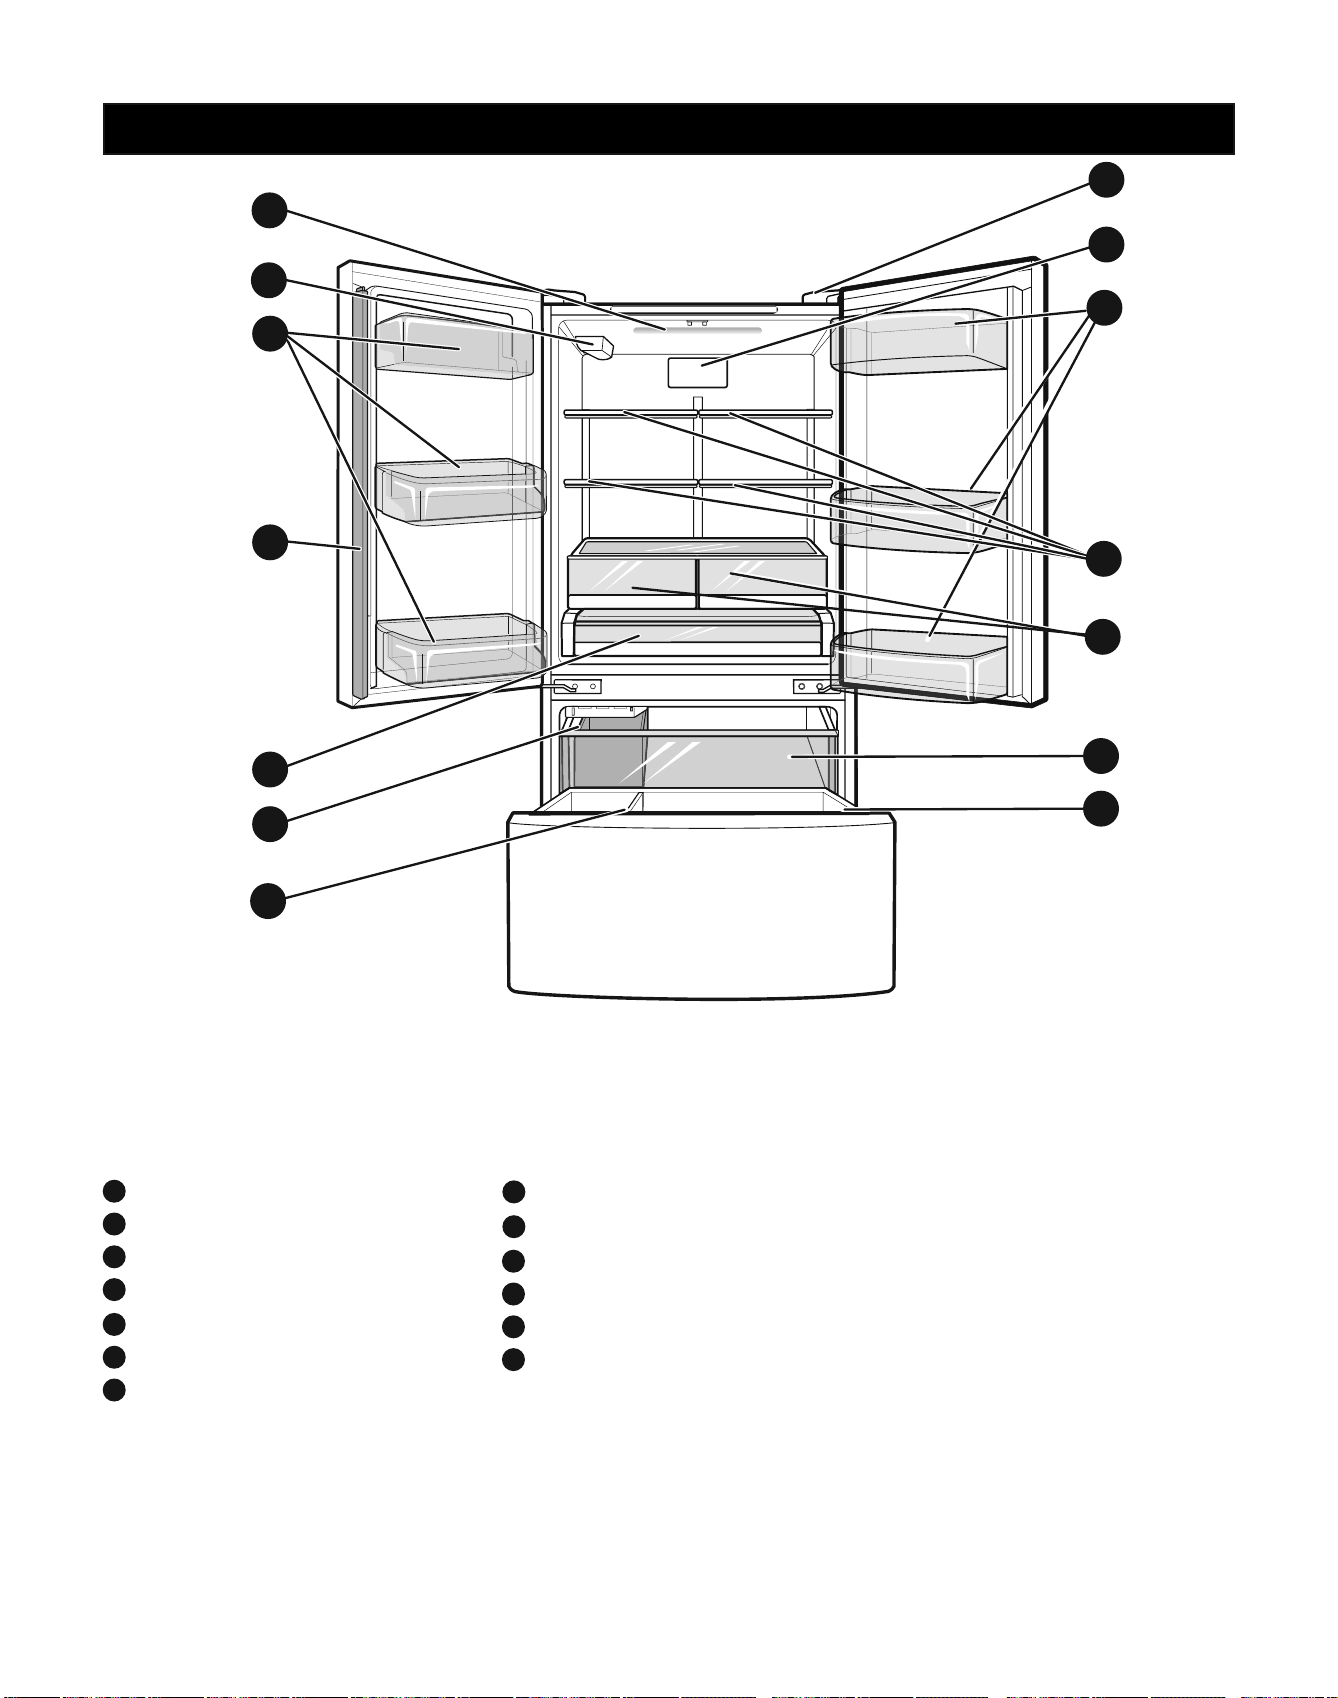
51
COMPONENTES Y CARACTERíSTICAS
Use esta página para familiarizarse con los componentes y características del refrigerador. Para su comodidad, se incluyen
referencias a las páginas.
NOTA: Esta guía cubre varios modelos distintos. El refrigerador que ha adquirido puede tener algunos o todos los componentes
que se enumeran a continuación. Es posible que las ubicaciones de las características que se indican no coincidan con su modelo.
J
K
Altavoz de diagnósticos
L
Filtro de aire
M
Estantes del refrigerador
Cajón extraíble
Durabase
'
A
Luz del refrigerador
B
Filtro de agua
C
Charolas de la puerta
E
Depósito de hielo
F
Parteluz articulado
G
Cajón
H
Cajón despensa
I
Divisor Durabase
D
A
E
F
G
H
I
J
K
L
M
C
D
B
C
INSTALACIÓN DEL REFRIGERADOR
ADVERTENCIA ADVERTENCIA
ADVERTENCIA
DESEMBALAJE DEL REFRIGERADOR
Antes de su uso, retire la cinta adhesiva y todas las etiquetas
temporales del refrigerador. No retire las etiquetas que
indican advertencias, la etiqueta de modelo y número de
serie ni la Hoja técnica que está ubicada debajo del frontal
del refrigerador, detrás de la rejilla de la base.
Para retirar los restos de pegamento o cinta adhesiva,
frote enérgicamente el área con el pulgar. Los residuos de
pegamento o cinta adhesiva también se pueden retirar
fácilmente frotando con los dedos una pequeña cantidad
de lavavajillas líquido sobre el adhesivo. Aclare con agua
templada y seque el área.
No utilice instrumentos afilados, alcohol desinfectante,
líquidos inflamables ni limpiadores abrasivos para retirar
la cinta adhesiva o el pegamento. Estos productos pueden
dañar la superficie del refrigerador.
Los estantes del refrigerador están instalados en la posición
de transporte. Vuelva a colocar los estantes de acuerdo con
sus necesidades personales de almacenamiento.
Riesgo de peso excesivo:
El desplazamiento e instalación del refrigerador deben
realizarse entre dos o más personas. Si no se respeta esta
advertencia, se podrán producir lesiones en la espalda o
de otro tipo.
Riesgo de peso excesivo:
Su refrigerador es muy pesado. Al desplazarlo para su
limpieza o mantenimiento, asegúrese de proteger el suelo.
Siempre debe tirar del refrigerador en línea recta cuando
los desplace. No menee ni zigzaguee el refrigerador al
tratar de desplazarlo, ya que esto puede dañar el suelo.
Riesgo de explosión:
Mantenga los materiales o vapores inflamables, como
la gasolina, lejos del refrigerador. Si no se respeta esta
advertencia, existe peligro de explosión, incendio o muerte.
52
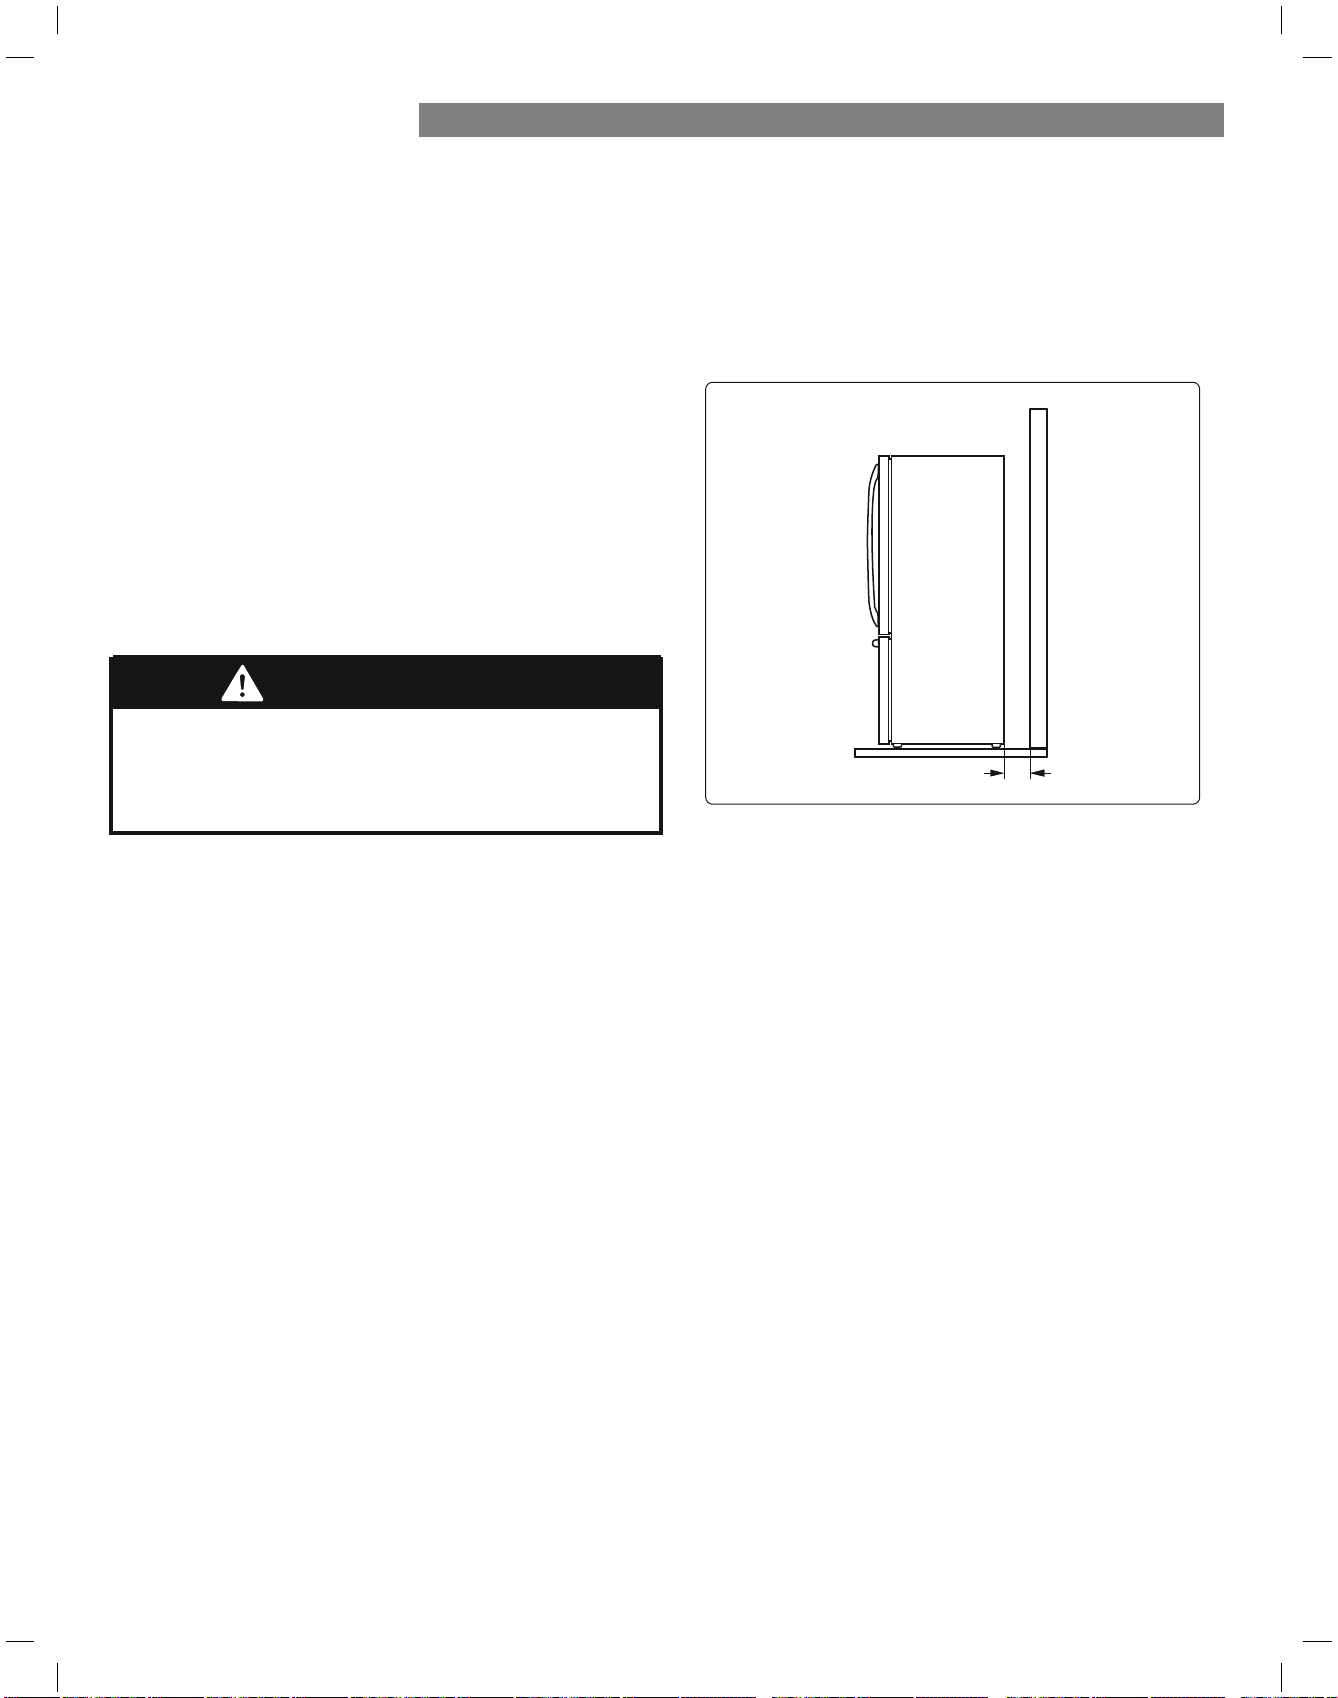
INSTALACIÓN DEL REFRIGERADOR
1. Para evitar el ruido y la vibración, es necesario
nivelar la unidad e instalarla en un suelo sólidamente
construido. Si es necesario, ajuste los pies de nivelación
para compensar los desniveles del suelo. La parte
delantera debe estar ligeramente más elevada que la
posterior para ayudar al cierre de la puerta. Los pies
de nivelación se pueden girar con facilidad inclinando
ligeramente el aparato. Gire los pies de nivelación
en sentido horario para elevar la unidad y en sentido
antihorario para bajarla. (Consulte NIVELACIÓN Y
ALIN EACIÓN DE LAS PUERTAS).
NOTA: No se recomienda realizar la instalación
VREUHPRTXHWDVXSHUÀFLHVGHEDOGRVDVÁH[LEOHVXQD
plataforma o en una estructura con soporte inestable.
2. Instale este electrodoméstico en una zona donde la
temperatura esté entre 13 °C (55 °F) y 43 °C (110 °F).
Si la temperatura alrededor del electrodoméstico es
demasiado baja o demasiado alta, la capacidad de
refrigeración se verá gravemente afectada.
3. Seleccione un lugar en el que se pueda conectar
fácilmente el suministro de agua para la máquina
de hielo automática.
NOTA: La presión del agua debe ser 20-120 psi o 138-
827 kPa o 1,4-8,4 kgf/cm². If the refrigerator is installed
in an area with low water pressure (below 20 psi), you
can install a booster pump to compensate for the low
pressure.
4. /DGLVWDQFLDGHPDVLDGRSHTXHxDGHVXSHUÀFLHV
adyacentes puede minimizar la capacidad de
congelación y aumentar los cargos de consumo
eléctrico. Deje una distancia de 24 pulgadas (61 cm.)
como mínimo al frente del refrigerador para poder abrir
las puertas, y de al menos 2 pulgadas (5,08 cm.) entre
la parte trasera del refrigerador y la pared.
ANTES DE USAR
1. Limpie el refrigerador a fondo y quite todo el polvo
acumulado durante el transporte.
2. Instale los accesorios como el depósito de cubito de
hielo, los cajones, los estantes, etc., en su sitio. Están
empaquetados juntos para evitar posibles daños durante
el transporte.
3. Deje que el refrigerador esté en funcionamiento durante
al menos dos o tres horas antes de almacenar comida
dentro de él. CRPSUXHEHHOÁXMRGHDLre frío en el
compartimiento del congelador para asegurarse de que
la refrigeración sea la adecuada. Su refrigerador ya
está listo para su uso.
INSTALACIÓN
El refrigerador debe estar siempre enchufado a su toma
de corriente individual conectada a tierra adecuadamente
con una tensión nominal de 115 voltios, 60 Hz, sólo CA,
y protegida mediante fusible a 15 ó 20 amperios. Esta
FRQÀJXración proporciona el mejor rendimiento y, al mismo
tiempo, evita la sobrecarga de la instalación eléctrica de
la casa que podría provocar un peligro de incendio debido
a un sobrecalentamiento de los cables. Se recomienda
disponer de un circuito independiente para la e[clusiva
alimentación de este electrodoméstico.
2" (5.08 cm)
Riesgo de descarga:
Para reducir el riesgo de descarga eléctrica, no instale
el refrigerador en un área húmeda ni mojada.
ADVERTENCIA
53
Este aparato ha sido diseñado para aplicaciones
domésticas y similares, como áreas de cocina para el
personal en comercios, oficinas y otros entornos de
trabajo; granjas y clientes en hoteles, moteles y otros
entornos de tipo residencial; entornos de tipo
“bed and breakfast”; catering y aplicaciones similares
no minoristas.
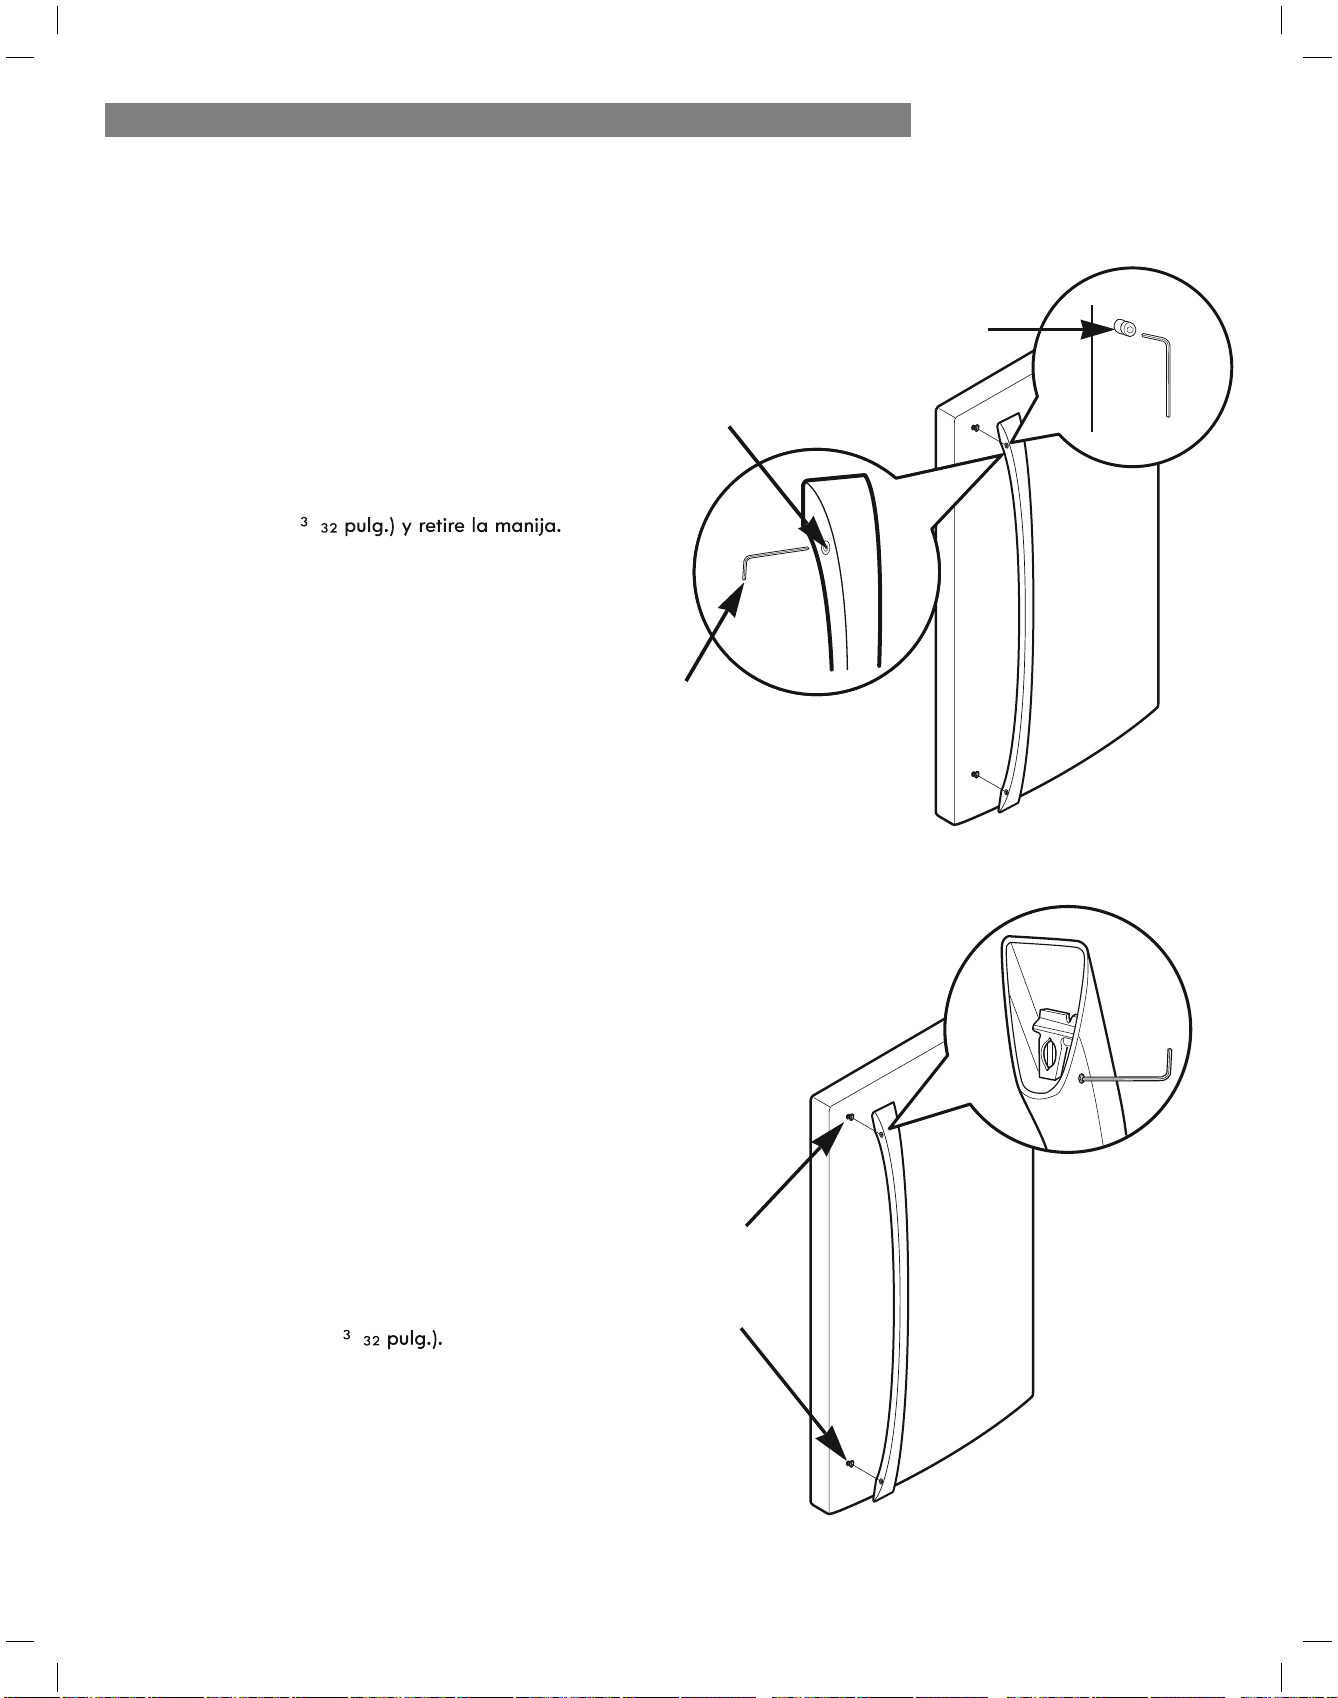
/
NOTA: Si es necesario apretar o retirar los
sujetadores de montaje de la manija, use una
llave Allen de 6,4 mm (¼ pulg.).
NOTA: Siempre se recomienda desmontar las puertas cuando sea necesario desplazar el refrigerador a través de un espacio
estrecho. Si es necesario desmontar las manijas, siga las instrucciones que se indican a continuación.
Sustitución de la manija del refrigerador
Coloque la manija en la puerta ajustando
las zonas de contacto de la manija
coincidan sobre los sujetadores de montaje
y apretando los tornillos de presión con una
llave Allen de 2,5 cm (
/
NOTA: Si es necesario apretar o retirar
los sujetadores de montaje de la manija,
use una llave Allen de 6,4 mm (¼ pulg.).
6HW6FUHZ
Sujetadores
de montaje
Tornillo de
presión
Llave Allen
Sujetadores
de
montaje
54
INSTALACIÓN DEL REFRIGERADOR
CÓMO DESMONTAR Y SUSTITUIR LAS
MANIJAS
NOTA: El aspecto de la manija puede ser distinto
del que aparece en las
ilustraciones de esta página.
Desmontaje de la manija del refrigerador
$ÁRMHORVWRUQLOORVGHSUHVLyQFRQXQDOODYH
Allen de 2,5 mm (
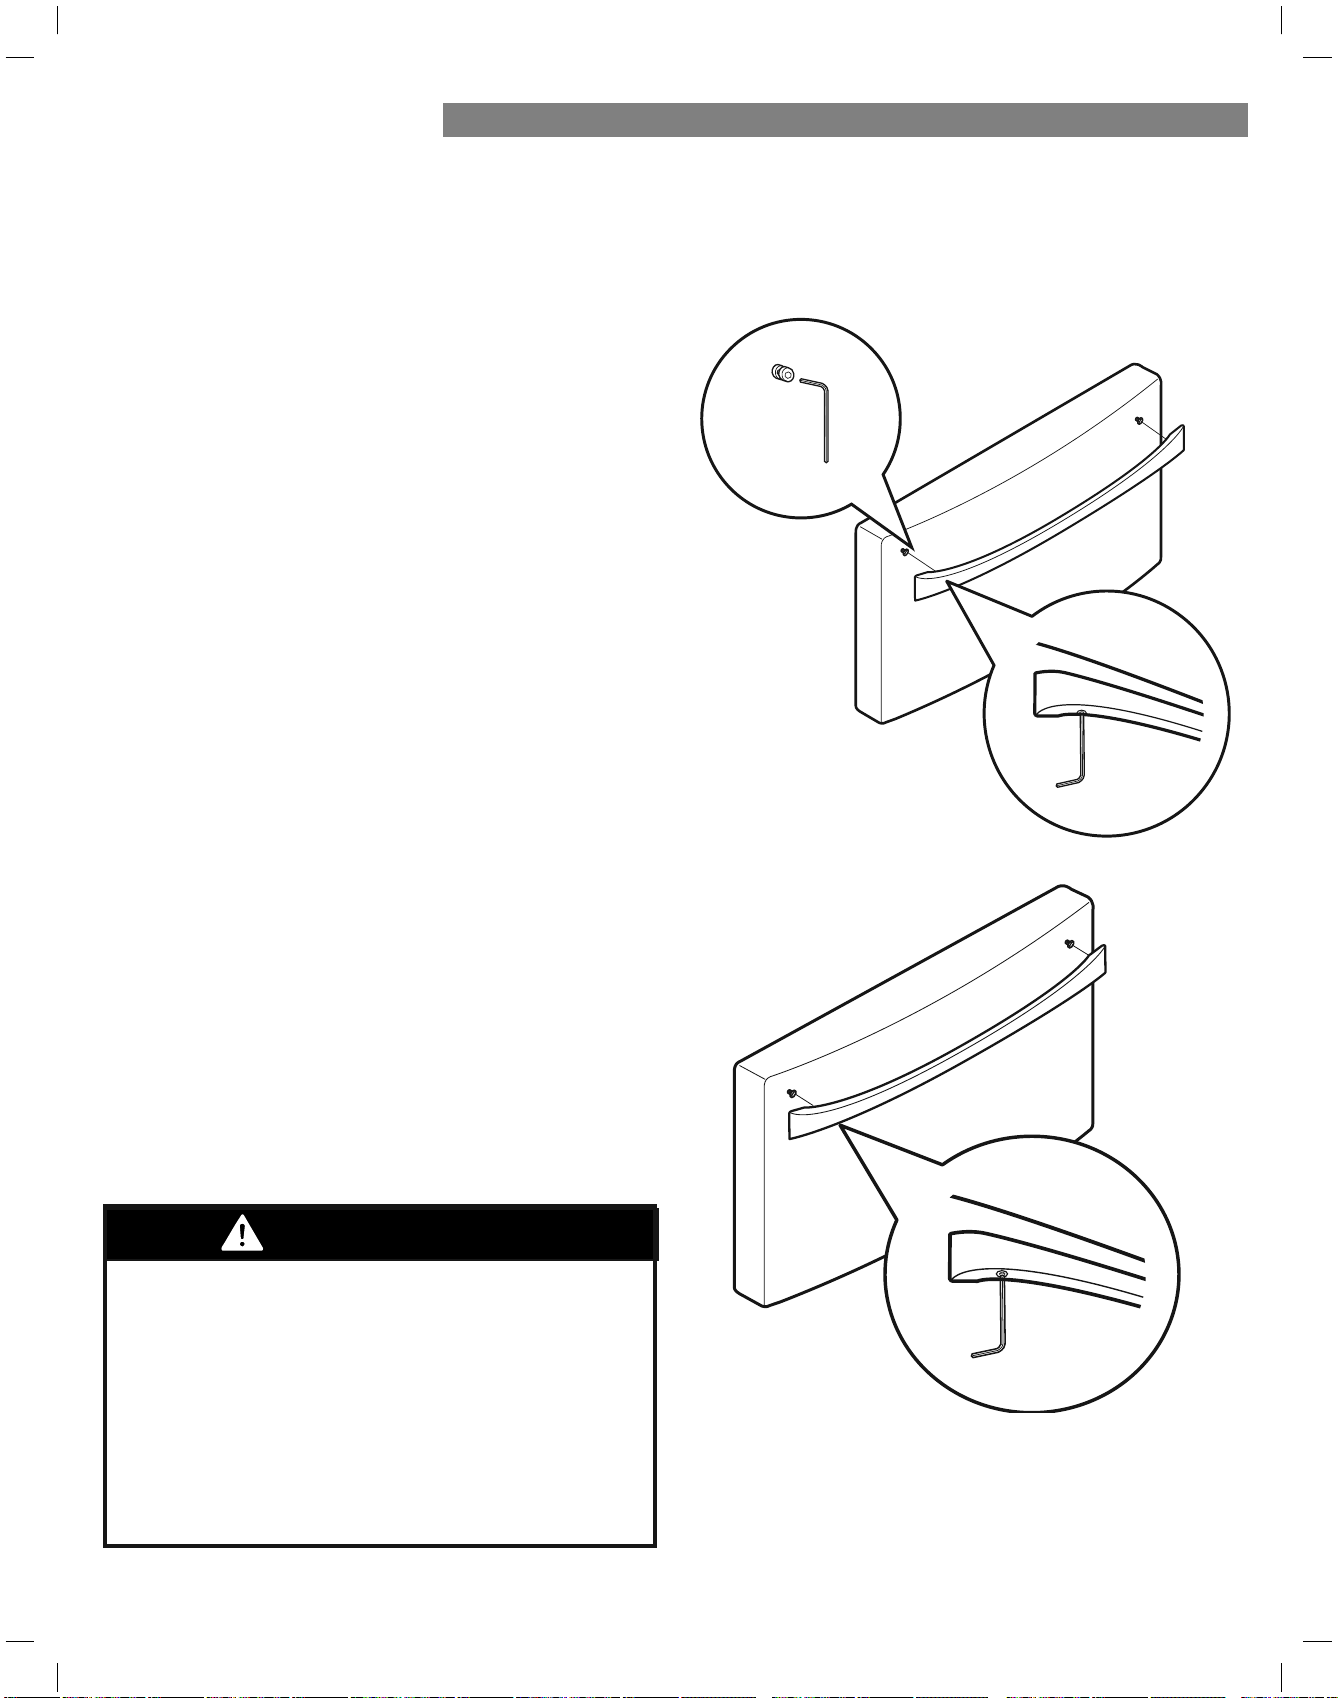
INSTALACIÓN DEL REFRIGERADOR
Sustitución de la manija del cajón del congelador
Coloque la manija en la puerta ajustando las zonas de
contacto de la manija coincidan sobre los sujetadores
de montaje y apr etando los tornillos de presión con una
llave Allen de 3,1 mm .
Desmontaje de la manija del cajón del congelador
$ÁRMHORVWRUQLOORVGHSUHVLyQXELFDGRVHQODSDUWHLQIHULRU
de la manija con una llave Allen de 3,1 mm (¼ pulg.).
y retire la manija.
NOTA: Si es necesario apretar o retirar los sujetadores
de montaje de la manija, use una llave Allen de 6,4 mm
(¼ pulg.).
NOTA: 6LHPSUHVHUHFRPLHQGDGHVPRQWDUODVSXHUWDVFXDQGRVHDQHFHVDULRGHVSOD]DUHOUHIULJHUDGRUDWUDYpVGHXQHVSDFLR
estrecho. Si es necesario desmontar las manijas, siga las instrucciones que se indican a continuación.
ADVERTENCIA
Para el montaje o desmontaje de los tiradores:
6XMHWHHOWLUDGRUFRQIXHU]DSDUDHYLWDUTXHVHFDLJDR
Ь
le cause lesiones.
Evite que el tirador oscile cerca de personas o animales.
Ь
,QVHUWHHORULÀFLRGHVRSRUWHGHOWLUDGRUHQODWRUQLOORGH
Ь
topoe de la puerta exactamente, y coloque los tornillos
GHVXMHFLyQSDUDÀMDUHOWLUDGRUHQVXSRVLFLyQ
Compruebe que no haya ningún espacio entre la puerta
Ь
\HOWLUDGRUWUDVFRORFDUpVWHHQVXSRVLFLyQ
55
NOTA: Si es necesario apretar o retirar los sujetadores
de montaje de la manija, use una llave Allen de 6,4 mm
(¼ pulg.).
CÓMO DESMONTAR Y SUSTITUIR LAS
MANIJAS (CONTINUACIÓN)
NOTA: El aspecto de la manija puede ser distinto del que
aparece en las ilustraciones de esta página.
(¼ pulg.).

INSTALACIÓN DEL REFRIGERADOR
Removiendo la Puerta Izquierda del Refrigerador
Riesgo de descargas eléctricas
Desenchufe el suministro eléctrico al refrigerador
antes de realizar la instalación. Si no se respeta
esta advertencia, pueden producirse lesiones
graves e incluso la muerte.
No ponga las manos, pies ni ningún otro objeto en
las rejillas de ventilación de aire, la rejilla de la
base o debajo del refrigerador. Podría sufrir
lesiones o recibir una descarga eléctrica.
DESMONTAJE Y SUSTITUCIÓNDE
LAS PUERTAS DEL REFRIGERADOR
ADVERTENCIA
Riesgo de peso excesivo:
El desplazamiento e instalación de las puertas del
refrigerador deben realizarse entre dos o más
personas. Si no se respeta esta advertencia, se
podrán producir lesiones en la espalda o de otro tipo.
1
Abra la puerta. Remueva el tornillo de la cubierta de la
bisagra superior y la cubierta de la bisagra.
2
Desconecte todos los arneses de cables.
3
Rote la palanca de la bisagra hacia la izquierda.
Libere la bisagra superior del enganche de la palanca
de la bisagra.
PRECAUCIÓN
Al liberar la bisagra del picaporte, tenga
cuidado de que la puerta no se caiga hacia
adelante.
ADVERTENCIA
Tapa de la bisagra
Palanca de
la bisagra
Picaporte de la Manija
de la Bisagra.
56
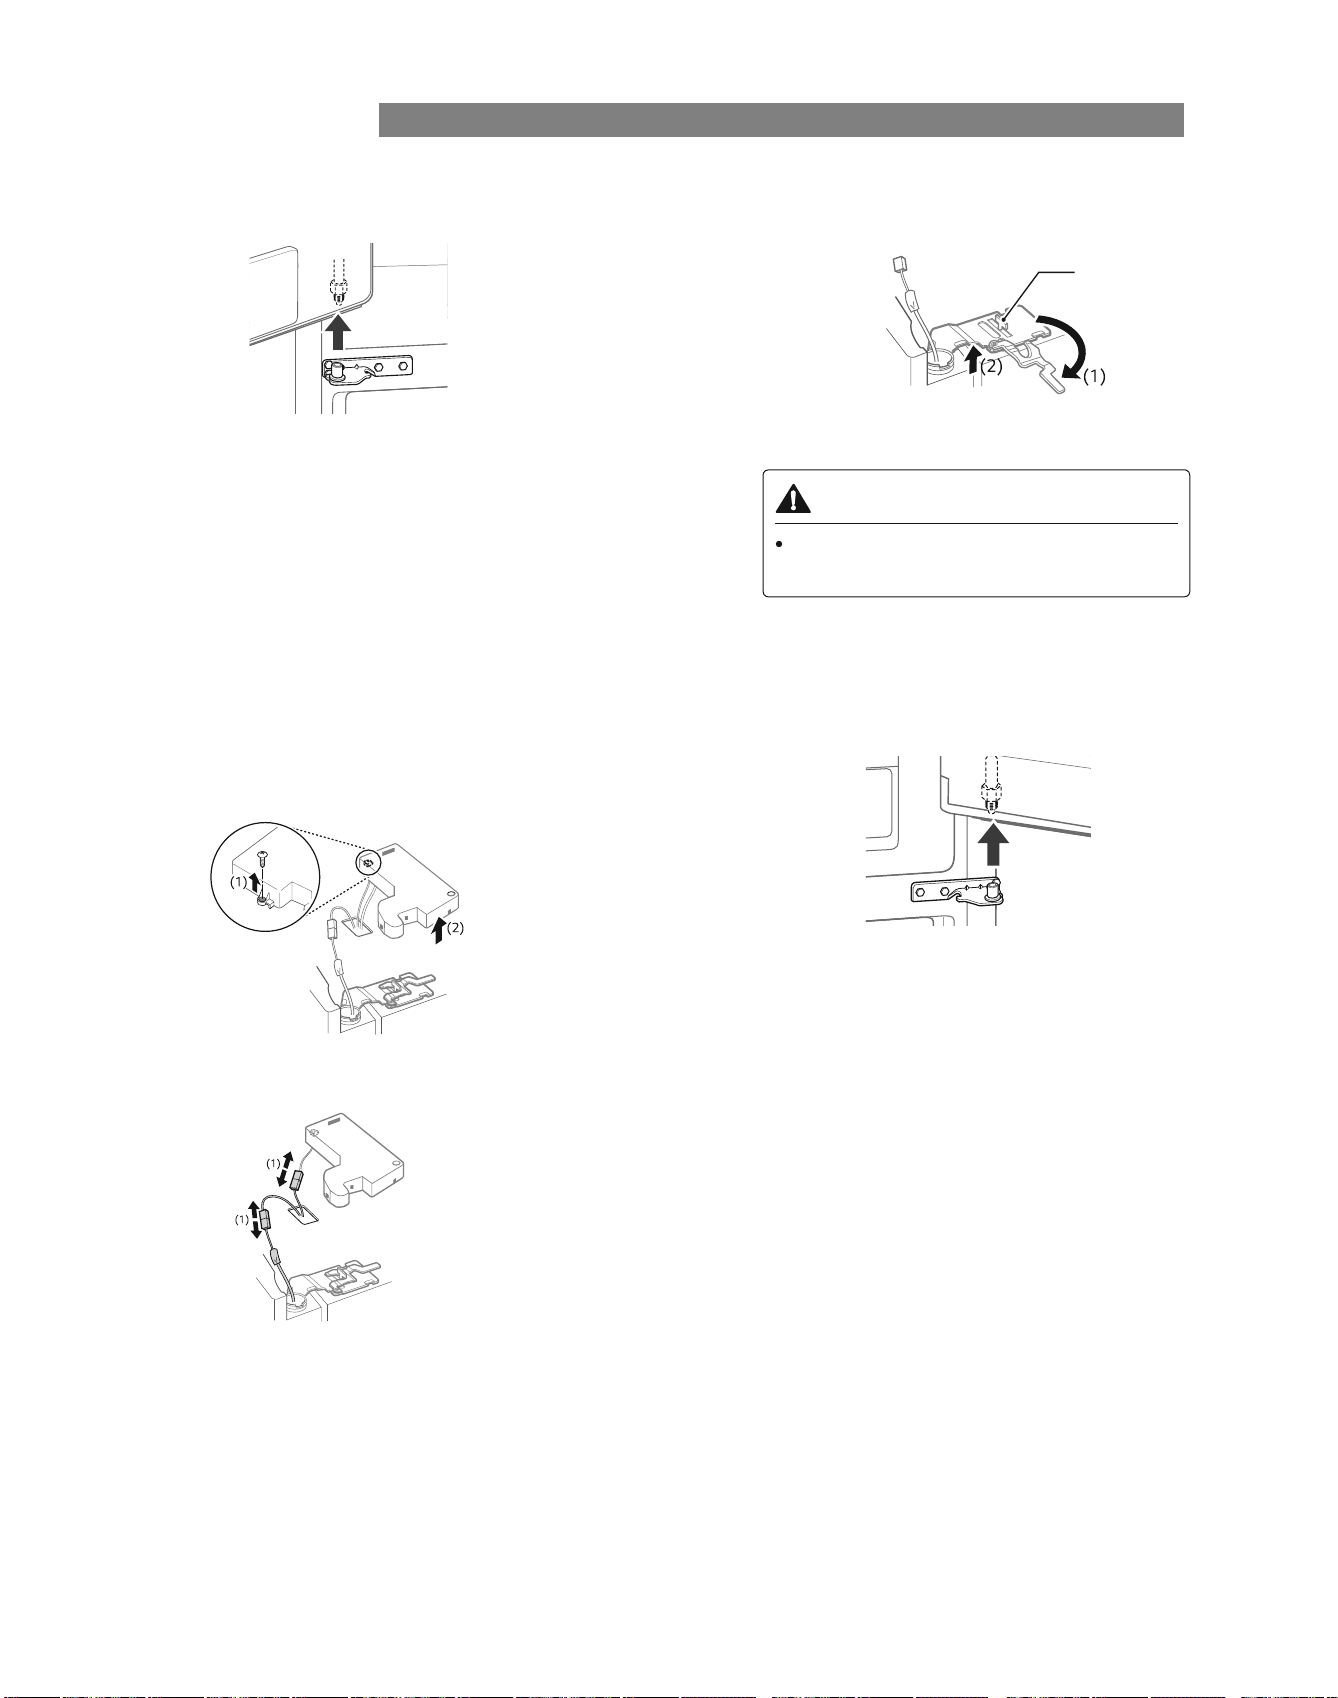
Removiendo la Puerta Derecha del Refrigerador
1
Remueva el tornillo de la cubierta superior de la bisagra
(1). Levante el gancho (no visible), ubicado en la parte
inferior del lado delantero de la cubierta (2) con un
destornillador plano.
2
Remueva el arnés del cable (1).
3
Rote la manija de la bisagra hacia la izquierda (1).
Levante la bisagra superior (2) libre del picaporte de
la manija de la bisagra.
Picaporte de la Manija
de la Bisagra.
PRECAUCIÓN
Al liberar la bisagra del picaporte, tenga
cuidado de que la puerta no se caiga hacia
adelante.
4
Levante la puerta del centro del perno de
la bisagra y remuévala.
NOTA: Coloque la puerta, de adentro hacia afuera,
HQXQDVXSHUÀFLHTXHQRODUD\H
INSTALACIÓN DEL REFRIGERADOR
57
NOTA:
Coloque la puerta, de adentro hacia afuera,
en una superficie que no la raye
4
Levante la puerta del centro del perno de
la bisagra y remuévala.
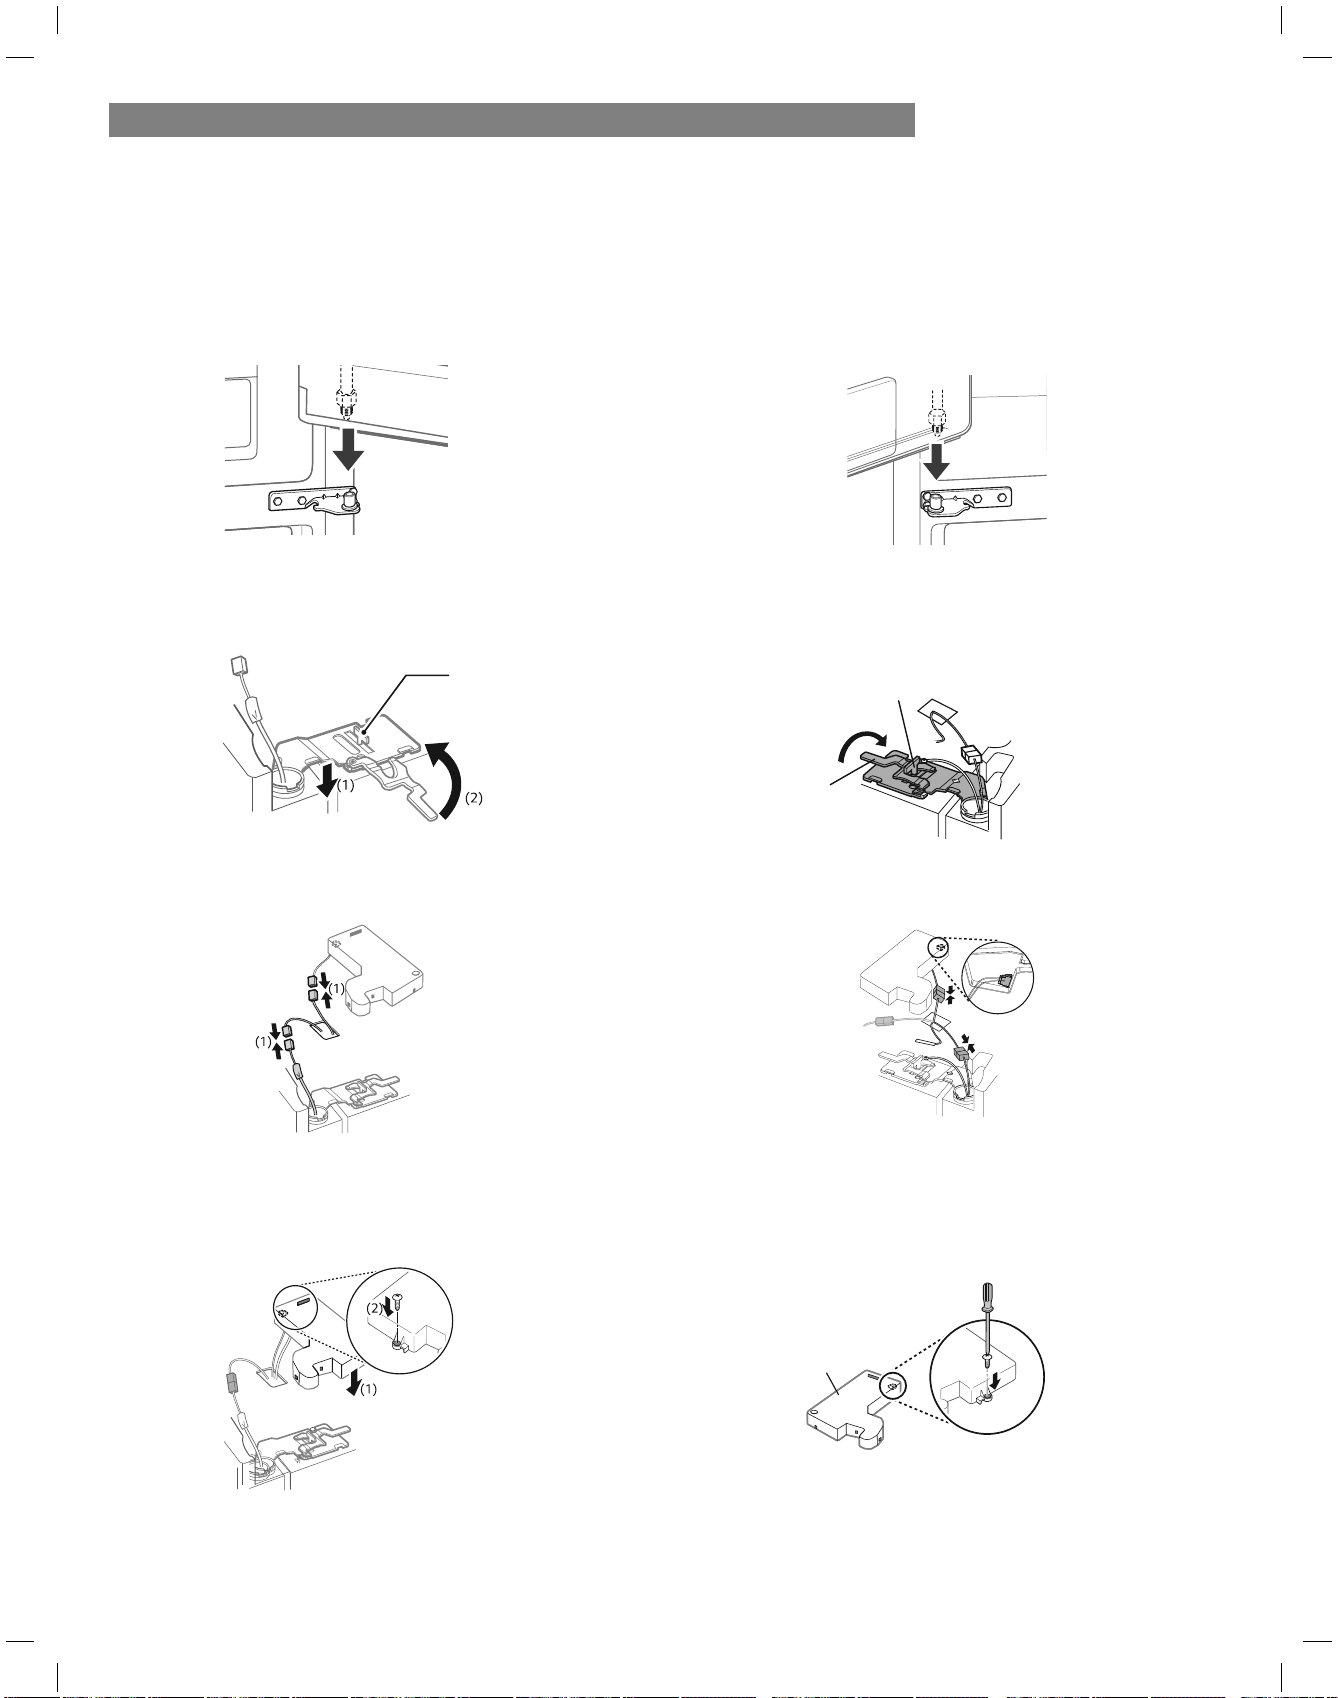
Ensamblando la Puerta Izquierda del Refrigerador
Instale la puerta izquierda del refrigerador luego de
haber instalado la puerta derecha.
1
Asegúrese de que la funda de plástico esté insertada al al
fondo de la puerta. Instale la puerta del refrigerador en la
bisagra del medio.
INSTALACIÓN DEL REFRIGERADOR
58
2
Rote la palanca de la bisagra hacia la derecha.
Libere la bisagra superior del picaporte de la manija
de la bisagra.
3
Conecte todos los arneses de cables.
4
Coloque la cubierta de la bisagra en su lugar.
Introduzca y apriete el tornillo de la cubierta.
Palanca de la
bisagra
Picaporte de
la Manija de la Bisagra.
Tapa de la bisagra
Instale la puerta del lado derecho primero.
Ensamblando la Puerta Derecha del Refrigerador
1
Asegúrese de que la funda de plástico esté insertada
al fondo de la puerta. Baje la puerta al centro del
SHUQRGHODELVDJUDFRPRVHPXHVWUDHQODÀJXUD
2
Ajuste la bisagra (1) sobre el picaporte de la manija
de la bisagra y encájela en su lugar. Rote la manija (2)
hacia la izquierda para asegurar la bisagra.
Picaporte de la Manija
de la Bisagra.
3
Conecte el arnés del cable (1).
4
Coloque la cubierta (1) en su lugar. Inserte y asegure el tornillo
de la cubierta (2).
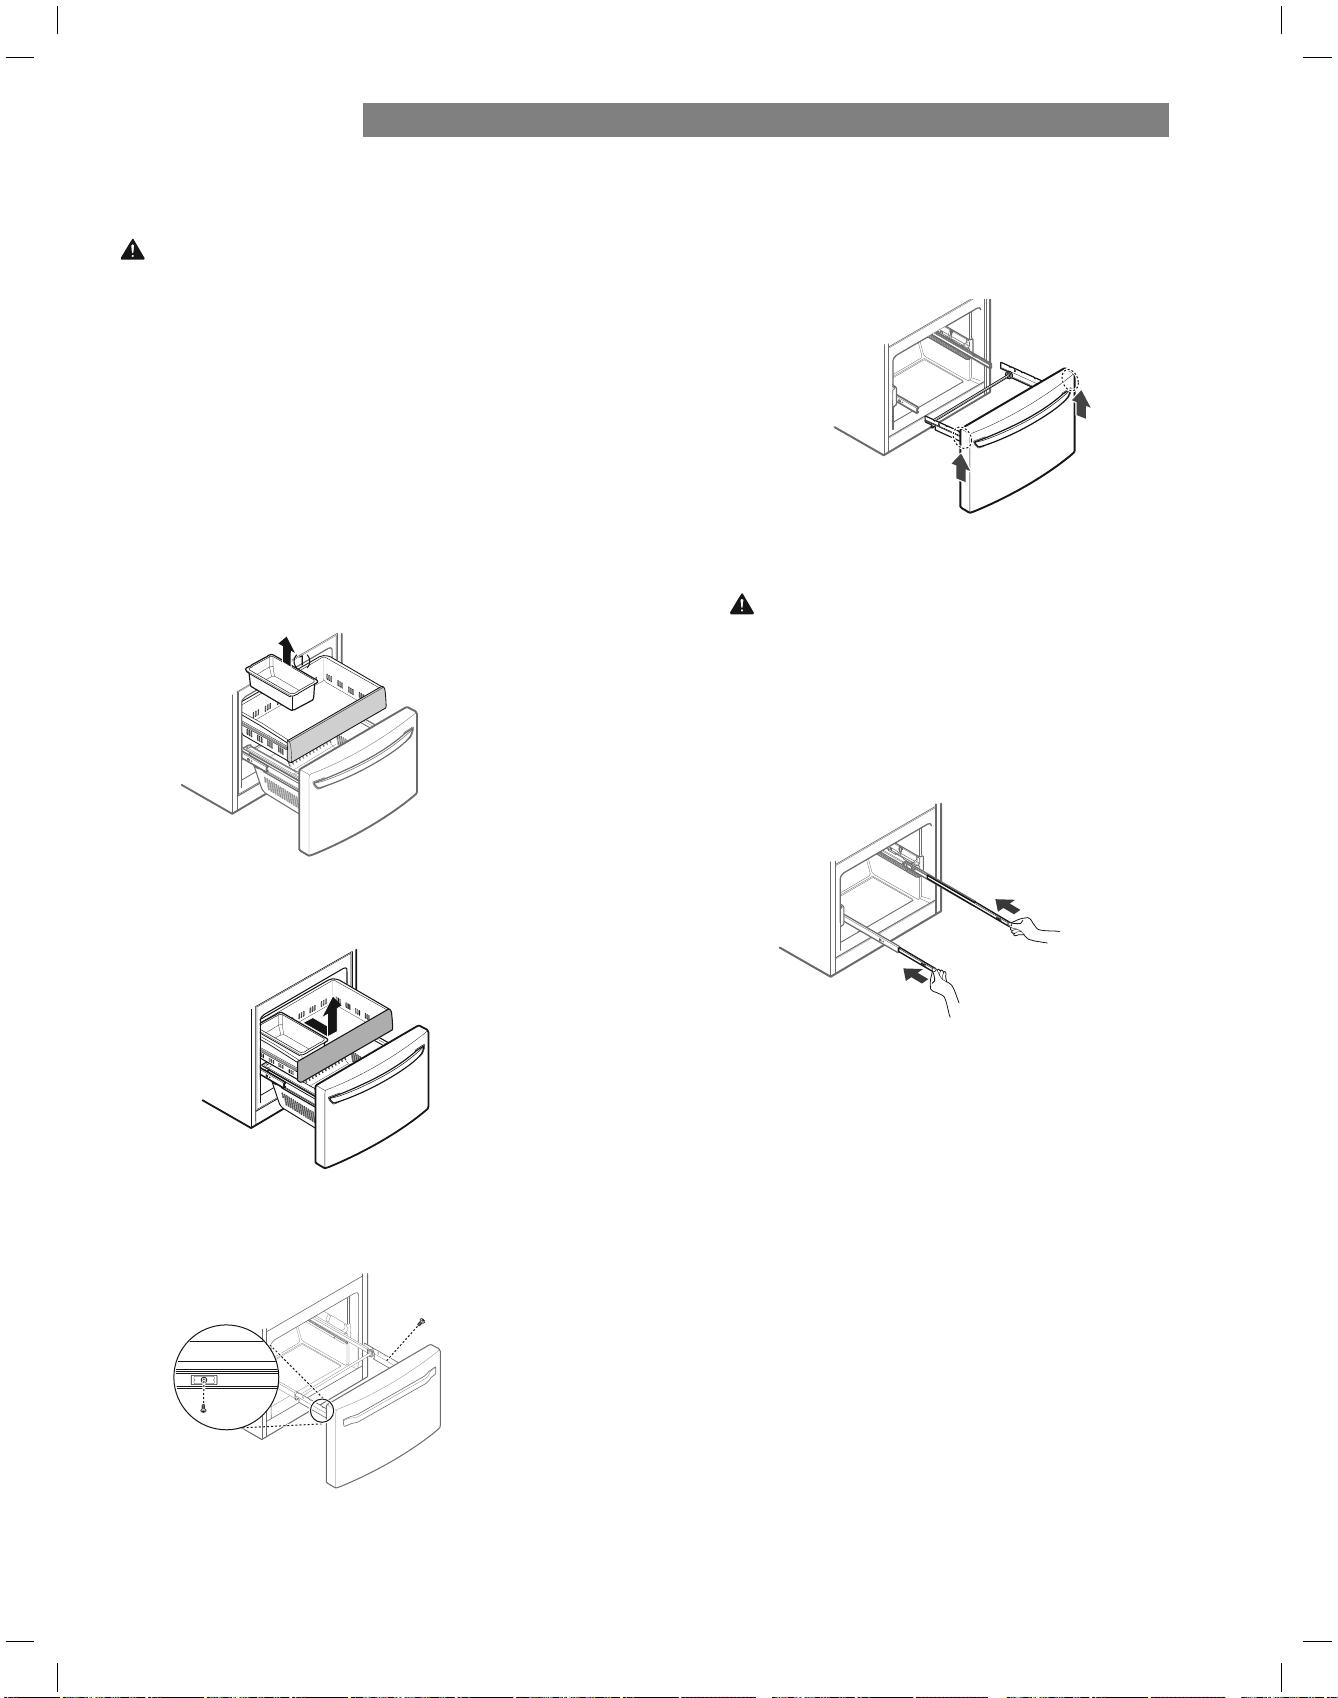
CÓMO DESMONTAR LOS CAJÓNES DEL CONGELADOR
Removiendo los Estantes del Congelador
ADVERTENCIA:
El desplazamiento e instalación
del cajón del congelador deben realizarse entre dos
o más personas. Si no se respeta esta advertencia, se
podrán producir lesiones en la espalda o de otro tipo.
NOTA: En las figuras siguientes, no se muestra el cajón
extraíble situado por encima del cajón del congelador
para que la imagen sea más clara.
INSTALACIÓN DEL REFRIGERADOR
59
Despliegue el estante para extenderlo
completamente.
Levante y retire gentilmente el recipiente de hielo.
Levante la parte frontal del cajón hacia arriba y
retírela.
Remueva los tornillos de los rieles en ambos
extremos.
Agarre ambos lados del estante y levántelo para
removerlo de los rieles.
Sujete ambos rieles y empújelos dentro
simultáneamente.
PRECAUCIÓN: Cuando haya retirado el
cajón de congelador, no lo sujete del tirador.
Podría soltarse el tirador y causarle lesiones.
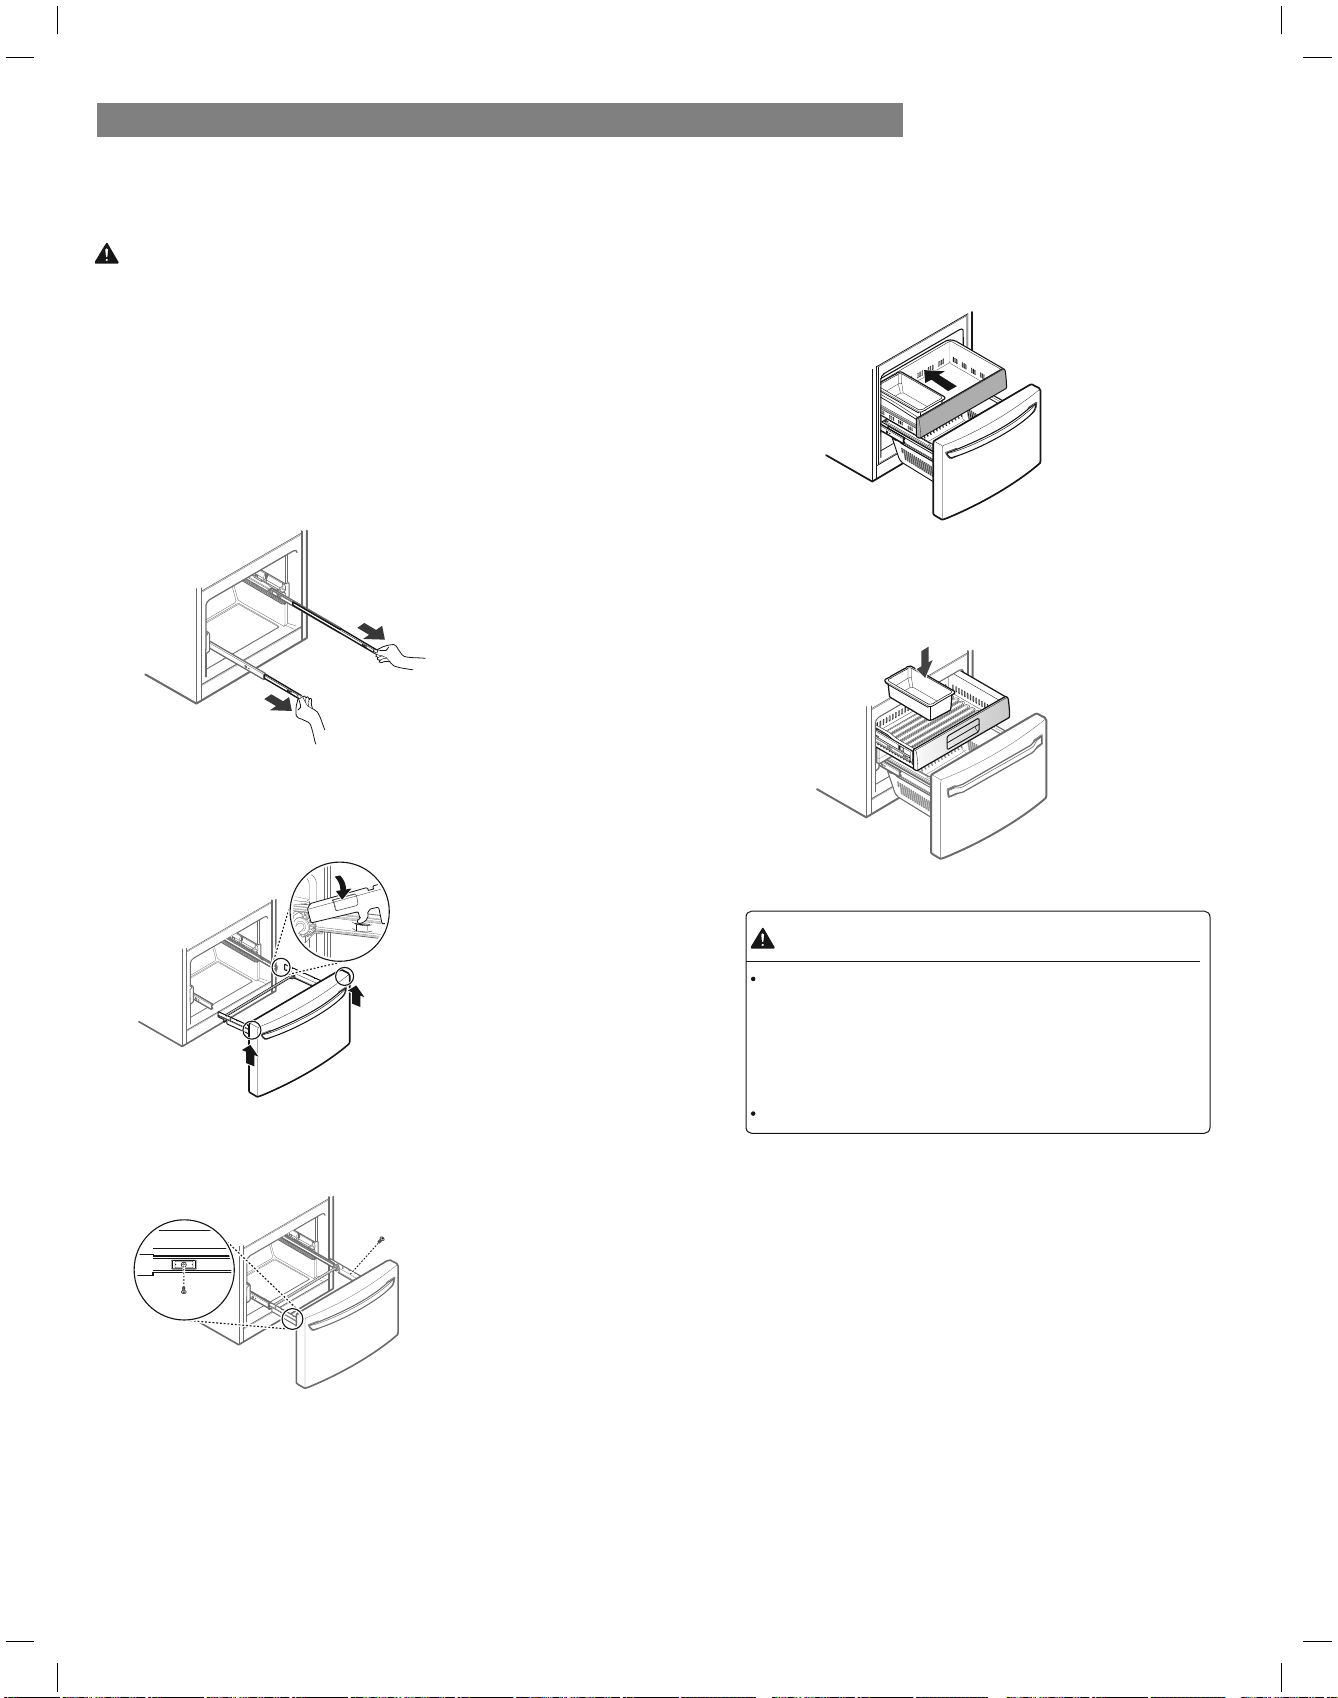
60
CÓMO INSTALAR LOS CAJÓNES DEL CONGELADOR
INSTALACIÓN DEL REFRIGERADOR
ADVERTENCIA
Retire ambos rieles simultaneámente hasta que estos
se hayan extendido completamente.
Agarre el estante a cada lado y enganche los
soportes del mismo a las pestañas ubicadas a ambos
lados de los rieles.
Ensamblando el Estante del Congelador.
tornillos localizados en ambos lados.
Baje la puerta a su posici
ón final y asegure los
Empuje el cajón hacia atrás hasta que haga click en
su lugar.
Vuelva a colocar el recipiente de hielo en el estante.
Introduzca la canasta Durabase en el montaje del
riel.
Si se retira el divisor Durabase, habrá suficiente espacio
abierto paa que un niño o una mascota puedan gatear
hasta el interior. Para evitar el atrapamiento accidental
de un niño o na mascota, y el posible riesgo de asfixia,
NO permita que niños ymascotas toquen ni se acerquen
al cajón del congelador.
NO pise ni se siente en el cajón del congelador.
ADVERTENCIA:
El desplazamiento e instalación
del cajón del congelador deben realizarse entre dos
o más personas. Si no se respeta esta advertencia, se
podrán producir lesiones en la espalda o de otro tipo.
NOTA: En las figuras siguientes, no se muestra el cajón
extraíble situado por encima del cajón del congelador
para que la imagen sea más clara.
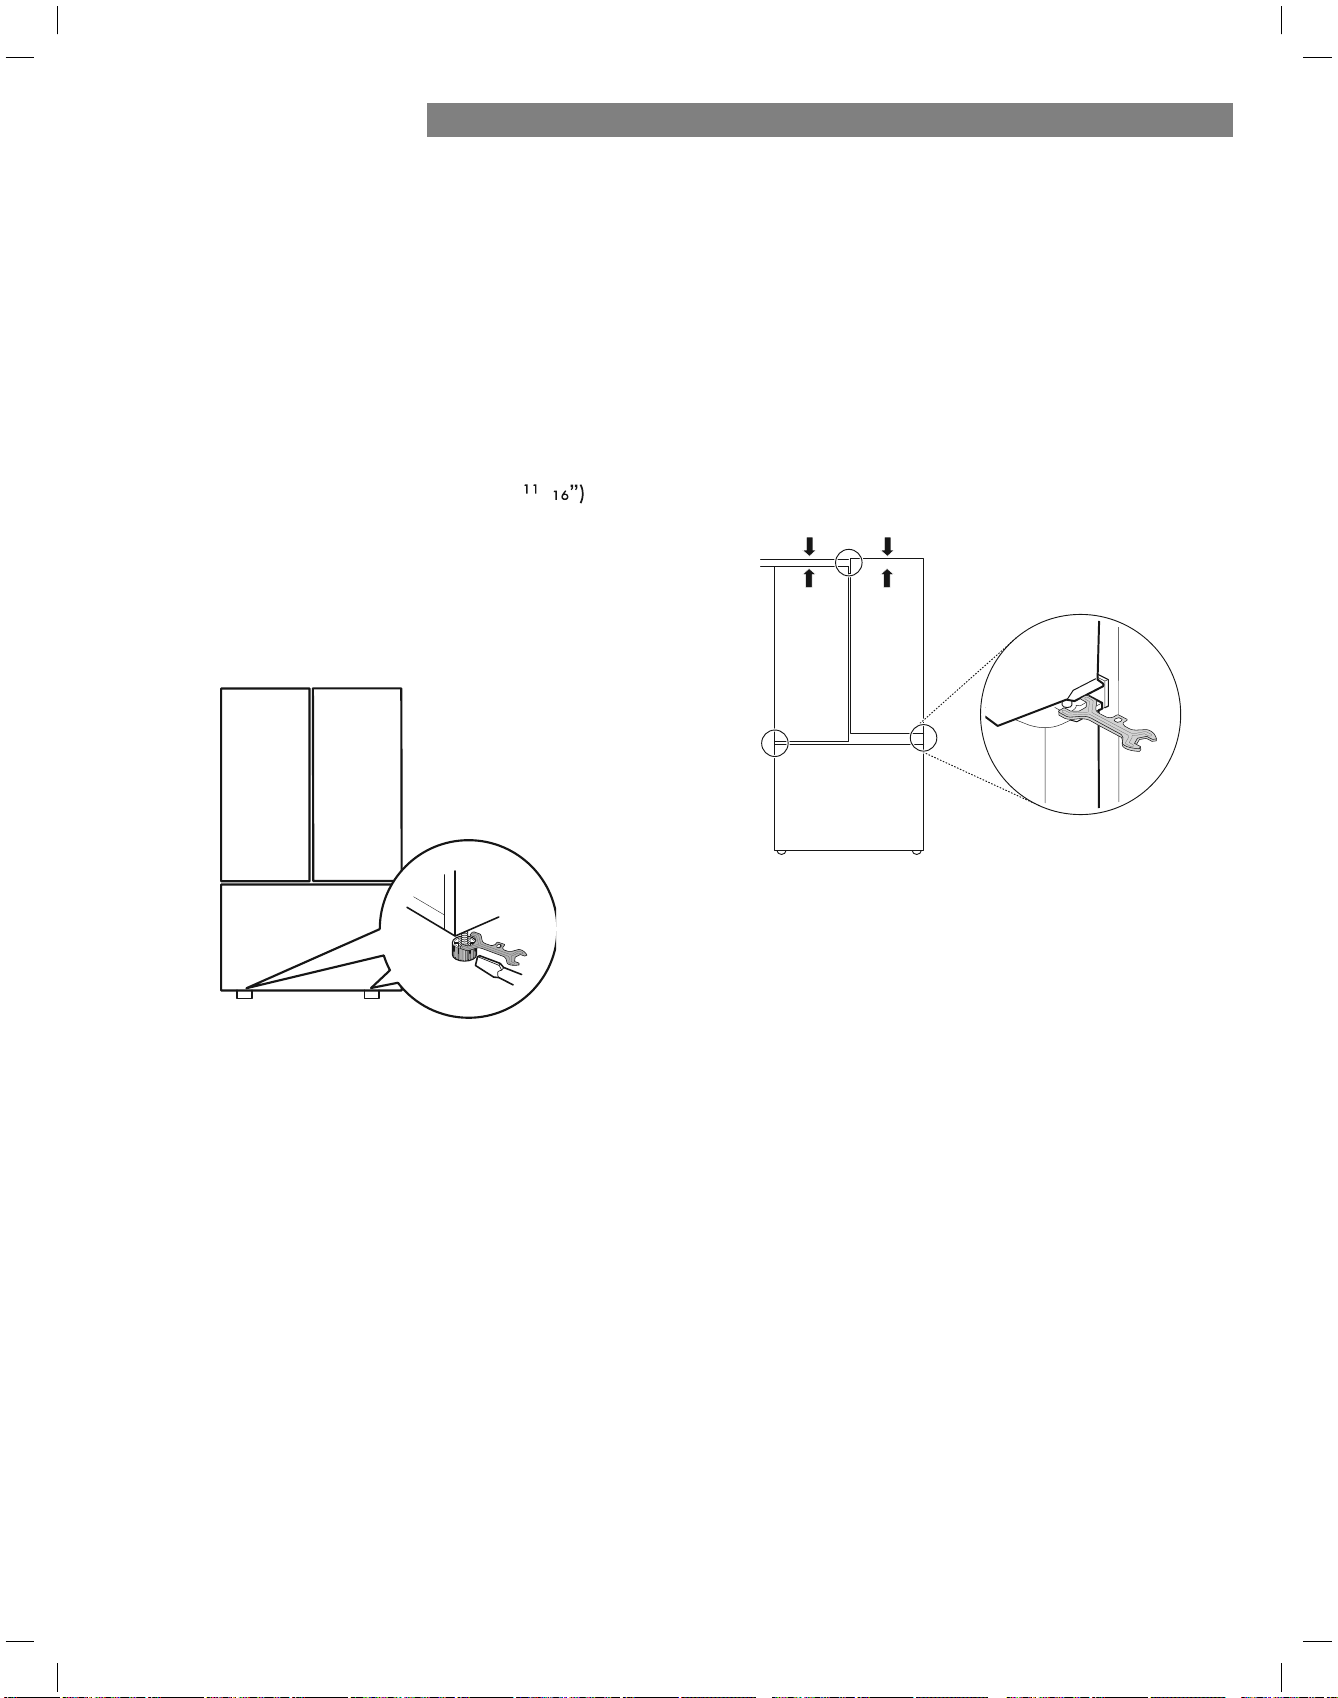
NIVELACIÓN Y ALINEACIÓN DE LAS PUERTAS
Nivelación
Tras la instalación, enchufe el cable de alimentación del
refrigerador en una toma de corriente de 3 clavijas con conexión
a tierra y empuje el refrigerador hasta su posiciyQGHÀQitiva.
Su refrigerador tiene dos pies de nivelación delanteros:
uno a la derecha y otro a la izquierda. Ajuste los pies para
modiÀFDr la inclinación de delante hacia atrás o de lado a
lado. Si el refrigerador parece inestable o si desea que las
puertas se cierren más fácilmente, ajuste la inclinación del
refrigerador mediante las siguientes instrucciones:
NOTA: Herramientas necesarias: Llave de 18 mm (
INSTALACIÓN DEL REFRIGERADOR
/
o un destornillador plano.
1. Gire los pies de nivelación en sentido antihorario para
levantar esa parte del refrigerador o en sentido horario
para bajarla. Puede que sean necesarios varios giros
del pie de nivelación para ajustar la inclinación del
refrigerador.
NOTA: Si una persona empuja hacia atrás la parte superior
del refrigerador, descargará parte del peso de los pies de
nivelación. Esta operación facilitará el ajuste de los pies.
2. Vuelva a abrir ambas puertas y compruebe que se
cierran con facilidad. Si no es así, incline el refrigerador
ligeramente hacia atrás girando ambos pies de
nivelación en sentido antihorario. Puede que sean
necesarios varios giros y debería girar ambos pies
de nivelación el mismo número de giros.
NOTA: Su refrigerador tiene un diseño exclusivo con dos
puertas para alimentos frescos. Cada una de las puertas
se puede abrir o cerrar de forma independiente de la
otra. Puede que deba ejercer una ligera presión en las
puertas para cerrarlas completamente.
Alineación de las puertas
Tanto la puerta izquierda como la derecha del
refrigerador tienen una tuerca ajustable en la
bisagra inferior para levantarlas o bajarlas a
manera de alinearlas apropiadamente.
Si el espacio entre las puertas es desigual,
siga las instrucciones a continuación para alinear
las puertas de manera pareja.
Use la llave (Incluida con el manual del usuario)
para girar la tuerca en la bisagra de la puerta
y así ajustar su altura. Gire la tuerca hacia la
derecha para levantar la puerta o hacia la
izquierda para bajarla.
61
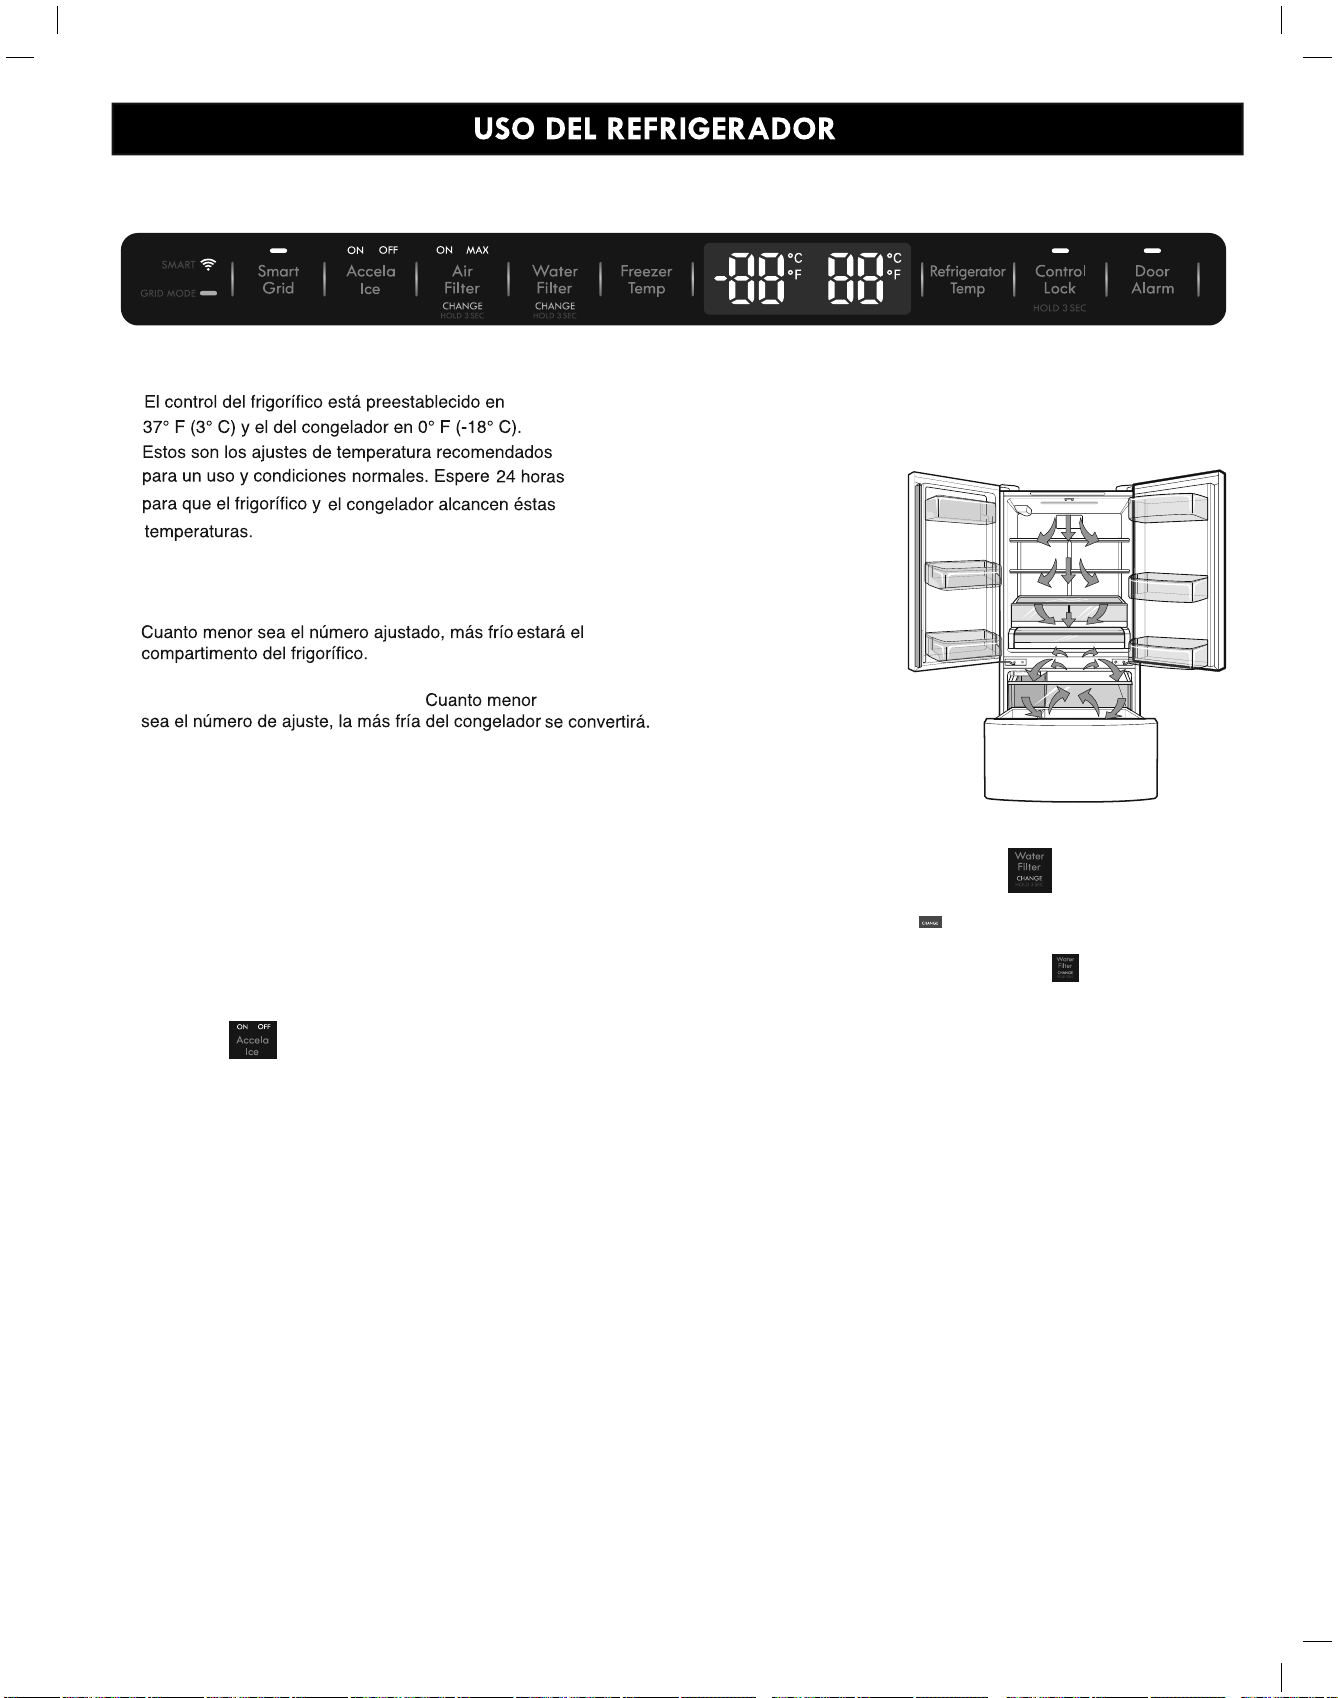
AJUSTE DE LOS CONTROLES
NOTA:
Cada vez que cambie los ajustes de los controles,
debe esperar 24 horas antes de realizar ajustes adicionales.
Los controles están correctamente ajustados cuando la leche
o el zumo están a la temperatura fría de su gusto y el
helado está firme. Si la tempeatura es demasiado fría o
demasiado caliente en alguno de los compartimientos,
cambie el ajuste en incrementos de un grado cada vez.
Espere 24 horas a que se estabilice la temperatura antes
de volver a ajustarla.
Temperatura
Flujo de aire
Asegúrese de no bloquear respiraderos
mientras coloca alimentos en el refrigerador.
De lo contrario, restringirá
el fujo de aire y puede
que la temperatura del
refrigerador suba
demasiado o que se
acumule humedad en su
interior. (Consulte el
siguiente diagrama de
fujo de aire).
Accela Ice
Cuando usted toca el botón del hielo de Accela.
el indicador se encenderá pararriba en la
exhibición y quedará orientado por 24 horas.
O puede cesar manual mente la función presionando el
botón una vez más.
Esta función incrementa las capacidades de congelación y
elaboración de hielo
Restablecimiento del filtro de agua
Cuando se enciende el ícono indica que es
necesario cambiar el filtro de agua. Una vez cambiado
el filtro de agua, mantenga pulsado el botón
durante tres segundos para apagar la luz del indicador.
El filtro de agua se debe cambiar aproximadamente
cada seis meses.
62
El rango del control de temperatura del refrigerador
de 1 °C a 8 °C (33°F a 46°F).
El rango del control de temperatura del congelador es
de -21 °C a -13 °C (-6 °F a 8 °F).
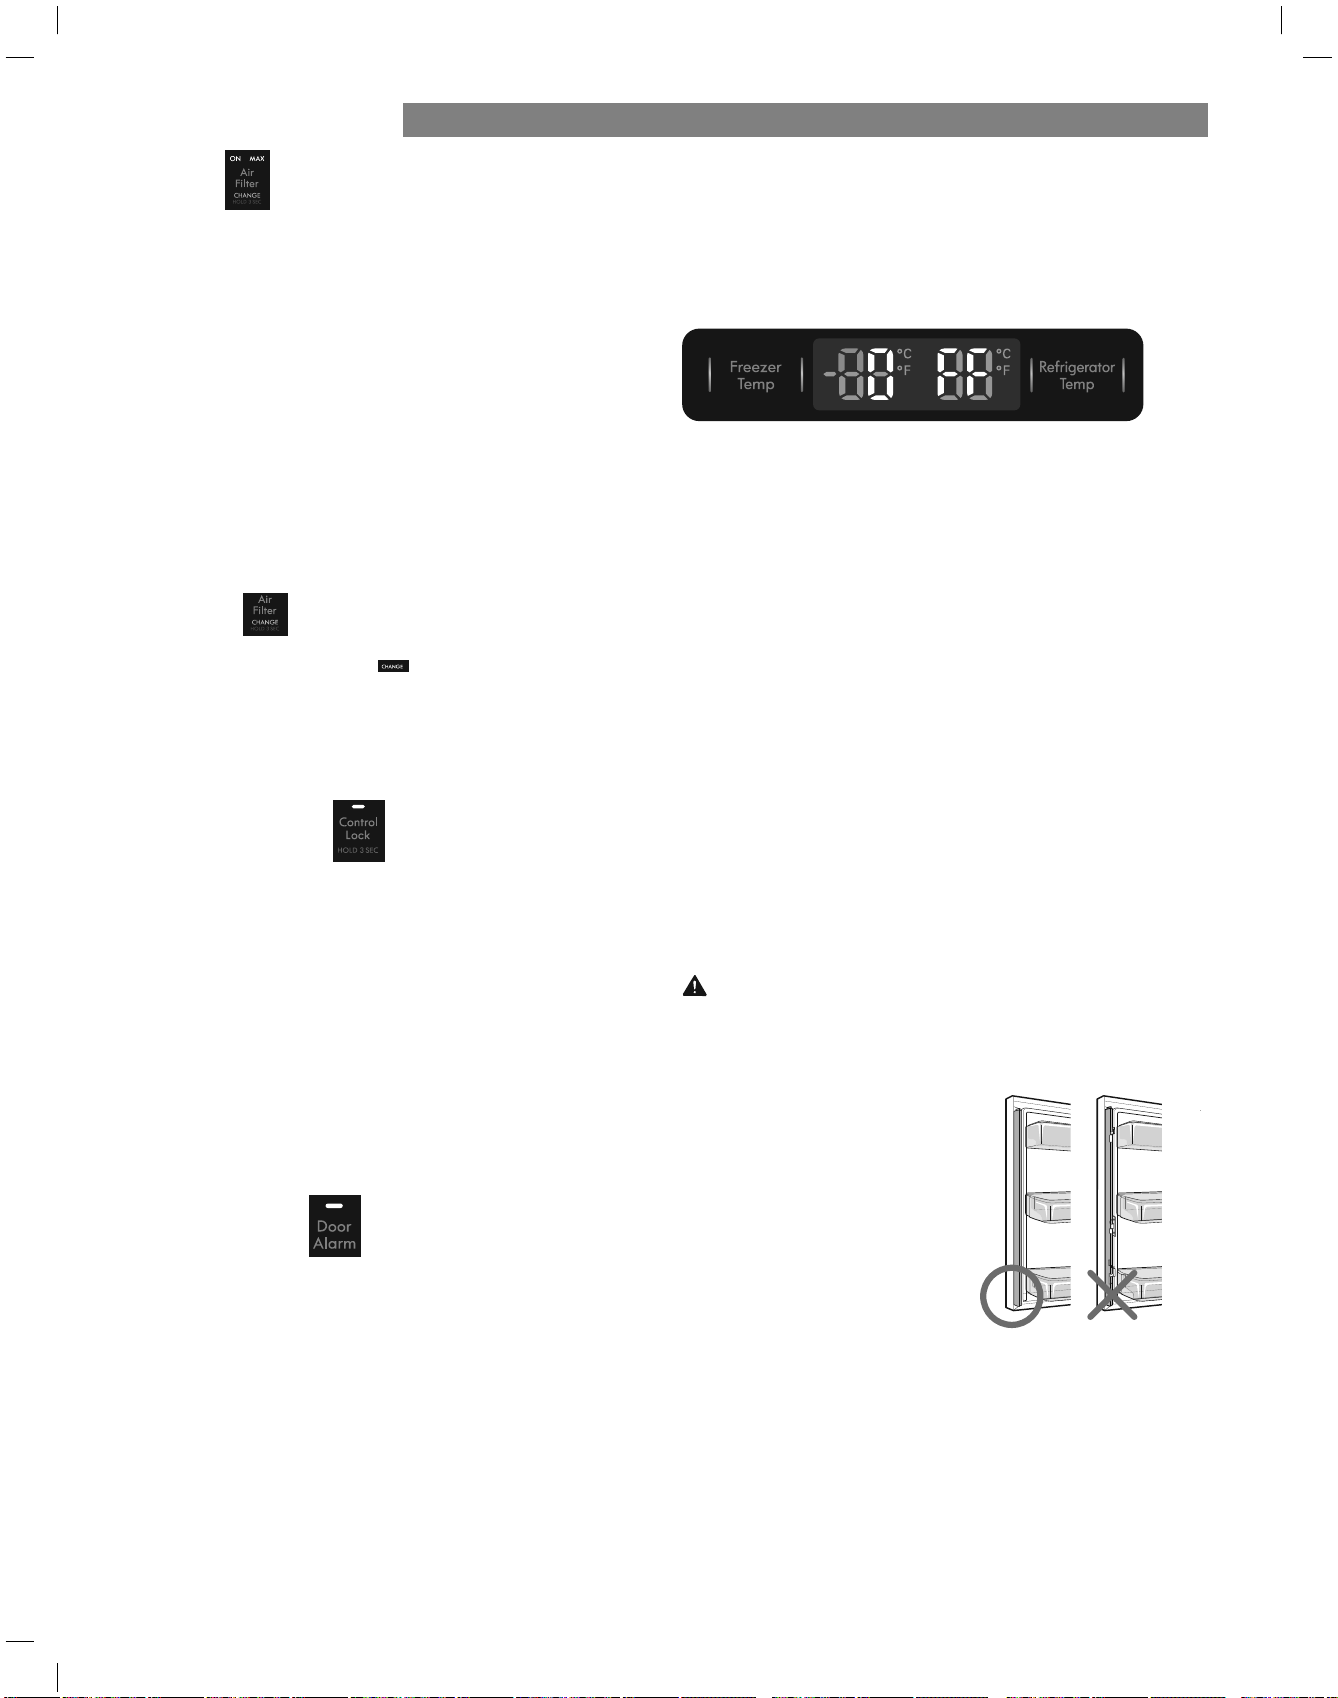
USO DEL REFRIGERADOR
Si desea convertir °F a °C o viceversa, mantenga presionados
Para desactivar el modo de demostración:
Con cualquiera de las puertas del refrigerador abiertas,
mantenga presionado los botones de Refrigerator Temp y
Accela Ice al mismo tiempo por cinco segundos.
El panel de control emitirá un pitido y la configuración de
temperatura se mostrará para confirmar el modo está
desactivado. Use el mismo procedimiento para activar el
modo de demostración.
los botones Freezer Temp y Refrigerator Temp al mismo tiempo
durante aproximadamente cinco segundos.
63
PRECAUCIÓN
Para reducir el riesgo de rayar la puerta o romper el parteluz,
asegúrese de que el parteluz de la puerta del refrigerador esté
siempre plegado.
Parteluz articulado
Esta característica es una tira de metal situada en la
puerta izquierda que se articula (gira) 90 grados al
cerrarse la puerta y forma un parteluz (base) para
que se sellen las juntas de las puertas izquierda y
derecha.
Filtro de aire
El filtro de aire ayuda a eliminar olores del refrigerador.
El modo demostración desactiva toda la refrigeración en las
secciones refrigerador y congelador para ahorrar energía
mientras está en exposición en una tienda. Cuando se activa,
en el panel de control aparece la palabra OFF.
El filtro de aire tiene dos configuaciones: Auto y MAx. En el
modo Auto, el Filtro de Aire llevará a cabo ciclos de
encendido y apagado en incrementos de diez minutos
para encendido y de 60 minutos para apagado. Si se
configua en el modo MAX, el filtro de aire permanecerá
encendido de forma continua durante cuatro horas,
apagándose y encendiéndose en un ciclo de diez minutos
para el encendido y cinco minutos para el apagado.
Después de cuatro horas, el filtro de aire pasará al modo
Auto.
El modo Auto es el modo predeterminado.(Max LED off)
Presione el botón del filtro de aire una vez para
entrar en modo Max.(Max LED on)
Air Filter Reset
Bloqueo de los controles
Cuando se enciende el ícono
esto significaque el
filtro de aire debe ser reemplazado. Luego de reemplazar
el filtro de aire, mantenga pulsado el botón durante
tres segundos para apagar la luz del ícono. Cambie el
filtrode aire cada 6 meses aproximadamente.
Función para cambiar el modo de temperatura (°F <->°C)
Modo demostración (sólo para uso en tienda)
Ь Cuando se conecta el refrigerador a la corriente, la
alarma de la puerta está inicialmente activada. Si pulsa
el botón Door Alarm , la pantalla cambiará a OFF y la
función de alarma de la puerta se desactivará.
Ь Si la puerta del refrigerador o del congelador se deja
abierta durante más de 60 segundos, sonará el tono de
la alarma para avisarle de que la puerta está abierta.
Ь Cuando se cierre la puerta, la alarma de la puerta dejará
de sonar.
Alarma de la puerta
Ь
Cuando se conecta inicialmente el refrigerador a la
corriente, la función de bloqueo Lock está desactivada.
Ь Si desea activar la función Lock para bloquear los
demás botones, mantenga pulsado el botón Control Lock
durante tres segundos como mínimo.
Iluminar y la función de bloqueo está activado.
Ь Cuando se activa la función Lock , no funciona ningún
otro botón.
Ь Para desactivar la función Lock , mantenga presionado
el botón Control Lock durante aproximadamente
WUHV¬VHJXQGRV

64
DEFINICIONES
LED inteligente (Blanco):
1RWLÀFDDOXVXDULRTXHHOHOHFWURGRPpVWLFRHVWiFRQHFWDGRDO
LQWHUQHW
LE'6PDUW*ULG%ODQFR
1RWLÀFDDOXVXDULRTXHHODSDUDWRHVFDSD]GHUHFLELUXQD
VHxDOFRQRFLGDFRPRHYHQWRGHUHVSXHVWDDODGHPDQGDGH
XQVLVWHPDGHDGPLQLVWUDFLyQGHHQHUJtDGHODFRPSDxtDGH
HOHFWULFLGDG
LE'0RGR*ULGURMR
1RWLÀFDDOXVXDULRTXHHODSDUDWRHVWiUHGXFLHQGRR
GHPRUDQGRHOFRQVXPRGHHQHUJtDGHELGRDODVHxDOTXH
UHFLELyGHOVLVWHPDGHDGPLQLVWUDFLyQGHHQHUJtDGHOD
FRPSDxtDGHHOHFWULFLGDG(O/('SHUPDQHFHLOXPLQDGRGXUDQWH
SHUtRGRVFUtWLFRVGHSUHFLRV\SUHFLRVHQWLHPSRUHDORGXUDQWe
XQSHUtRGRGHDOWDGHPDQGDGHHOHFWULFLGDG
LLEVANDO A CABO LA CONEXIÓN
CONEXIÓN DEL REFRIGERADOR
&RQVXOWHOD*XtDGH,QLFLR5iSLGRLQFOXLGDFRQVXDSDUDto
LQWHOLJHQWHSDUDREWHQHULQVWUXFFLRQHVGHWDOODGDVDFHUFDGH
ODFUHDFiyQGHXQDFXHQWD.HQPRUH\GHODFRQILJXUDFLyQ
GHODSDUDtRSDUDODRSHUDFiyQGHVGHVXGLVSRVLWLYRPyYLO
3DUDDVLVWHQFLDDGLFLRQDOYLVLWH
KWWSZZZNHQPRUHFRPVPDUW
NOTA : &XDQGRVHKD\DFRQHFWDGRFRQp[LWRD,QWHUQHWVH
HQFHQGHUiHO/('GHOtFRQR60$57GHOSDQHOGHFRQWURO
1HFHVLWDORVVLJXLHQWHVGLVSRVLWLYRV\ODVLJXLHQWHDSOLFDFiyQ
SDUDXWLOL]DUHO6PDUW*ULG5HG,QWHOLJHQWH\RWUDVIXQFLRQHV
LQWHOLJHQWHVHQVXUHIULJHUDGRU
DLVSoVLtiYoV 5eTXHULGoV: 5oXWHU,naliPEULco 5eIULgHUaGRU
.enPRUH SPaUW \ Xn GLVSoVLtiYo PyYLO
$Slicaciyn 5eTXHULGa: .enPRUH SPaUW$SS
FUNCIONES INTELIGENTES
DESCRIPCIÓN GENERAL
/DFRQHFWLYLGDG.HQPRUH6PDUWWUDQVIRUPDVXUHODFLyQFRQ
VXKRJDU3XHGHSHUVRQDOL]DUODPDQHUDHQTXHORVSURGXFWRV
.HQPRUH6PDUWRSHUDQEDVDQGRVHHQVXKRUDULR\UXWLQDGLDULD
KDFLHQGRODYLGDPiVIiFLO\SURSRUFLRQDQGRXQDPD\RU
WUDQTXLOLGDG
(VWHHVXQHOHFWURGRPpVWLFRGHFRQH[LyQOLVWDSHUPLWLpQGROH
PRQLWRUHDUOR\FRQWURODUORUHPRWDPHQWHGHVGHVXWHOpIRQR
LQWHOLJHQWHPHGLDQWHODDSOLFDFLyQWKH.HQPRUH6PDUW
3DUDLQLFLDUQHFHVLWDUiORVLJXLHQWH
USO DEL REFRIGERADOR
(OHFWURGRPpVWLFR.HQPRUH6PDUW
(QUXWDGRU5RXWHU:L)LGHFDVDFRQHFWDGRDLQWHUQHW
7HOpIRQRLQWHOLJHQWH
$SOLFDFLyQ.HQPRUH6PDUW
3DUDPiVLQIRUPDFLyQDFHUFDGHVXHOHFWURGRPpVWLFR
.HQPRUH6PDUWSRUIDYRUYLVLWHZZZ.HQPRUHFRPVPDrt.
/DIXQFLyQ6PDUW*ULGFRQWURODHOXVRGHHQHUJtDORTXHOH
D\XGDUiDDKRUUDUHQHUJtDGXUDQWHSHUtRGRVGHXVRSLFR3XHGH
VXVSHQGHUODIXQFLyQ60$57*5,'HQFXDOTXLHUPRPHQWR
XVDQGRODDSOLFDFLyQRHOERWyQ6PDUW*ULG
6PDUW*ULGUHVSRQGHDODVQRWLÀFDFLRQHVGHVXFRPSDxtD
GHHOHFWULFLGDGSDUDHMHFXWDUWDUHDVGHDOWRFRQVXPRGH
HQHUJtDVRODPHQWHIXHUDGHORVKRUDULRVSLFRVGHXVRFXDQGR
ODGHPDQGDGHHOHFWULFLGDGHVPHQRU(VWDVQRWLÀFDFLRQHV
VHFRQRFHQFRPRVHxDOHVGHUHVSXHVWDDODGHPDQGD6LHO
UHIULJHUDGRUUHFLEHXQDVHxDOGHUHVSXHVWDDODGHPDQGDGHOD
FRPSDxtDGHHOHFWULFLGDGHVWHHQFHQGHUiHO/('GHO02'2
*5,'HQHOSDQHOGHFRQWURO\UHJXODUiHOFRQVXPRGHHQHUJtD
FRQIRUPHDODVHxDOUHFLELGD(OUHIULJHUDGRUUHVSRQGHUiDODV
VHxDOHVUHFLELGDVGHODFRPSDxtDGHHOHFWULFLGDGVLHPSUHTXH
HODSDUDWRHVWpFRQHFWDGRD,QWHUQHW\ODIXQFLyQ6PDUW*ULG
HVWpDFWLYDGD

USO DEL REFRIGERADOR
INSTRUCCIONES DE SMART GRID
IMPORTANTE:
Debe conectar su electrodoméstico Kenmore Smart al internet
y luego registrarlo en su cuenta a manera de usar la función
Smart Grid.
Consulte la Guía de inicio rápido suministrada con el dispositivo
para obtener instrucciones sobre cómo registrar su aparato
utilizando la aplicación de Kenmore Smart™ (app).
(OERWyQ6PDUW*ULGVLUYHSDUDGRVÀQHV
1) conectar o desconectar de Internet, 2) activar o desactivar/
suspender la capacidad de respuesta a la demanda del
aparato.
127$ Este es un electrodoméstico de conexión-lista,
permitiéndole monitorearlo y controlarlo remotamente desde su
teléfono inteligente mediante la aplicación Kenmore Smart™.
3DUDFRQHFWDUHOUHIULJHUDGRUD,QWHUQHW
Haga referencia a la Guía de Inicio Rápido que vino con su
electrodoméstico inteligente para instrucciones detalladas
sobre la creación de una cuenta Kenmore y el ajuste de su
electrodoméstico para operaciones conectadas desde su
teléfono inteligente.
Esta Guía de Uso y Cuidado contiene información e
instrucciones para operar su electrodoméstico desde el panel de
FRQWUROGHOPLVPR3DUDDVLVWHQFLDDGLFLRQDOYLVLWHKWWSZZZ
kenmore.com/smart
127$ Si ninguna conexión es llevada a cabo después de cinco
minutos el botón SMART GRID parpadeante se apagará.
Funcionamiento de Smart Grid:
Una vez conectado y registrado, el aparato es capaz de aceptar
una señal de su compañía de electricidad. La señal, conocida
como “respuesta a la demanda”, ajustará el funcionamiento
del refrigerador para reducir el consumo de energía durante
un período que puede ir desde unos pocos minutos hasta un
máximo de 4 horas. La fábrica de hielo también se suspenderá
durante este tiempo. Al abrirse la puerta del refrigerador se
pueden cancelar ciertas señales de respuesta a la demanda.
(O/('GHOPRGR*ULGURMRTXHGDUiLOXPLQDGRGHIRUPDÀMD
cuando se esté recibiendo esta señal. Para desactivar la señal y
evitar que esta se siga aceptando en el futuro, presione y suelte
el botón Smart Grid. Tanto el modo Grid como el LED de Smart
Grid se apagarán. Presione y suelte el botón Smart Grid de
nuevo para activar la aceptación de la señal de respuesta a la
demanda. El LED del botón Smart Grid se volverá a iluminar. El
LED del modo Grid se iluminará cuando se envíe otra señal de
respuesta a la demanda.
65

862'(/5()5,*(5$'25
Aviso de la FCC
(para el módulo transmisor contenido en este producto)
Este equipo fue probado y se determinó que cumple con
los límites para los dispositivos digitales de Clase B, en
conformidad con la parte 15 de las normas de la FCC.
Estos límites están diseñados para ofrecer una protección
razonable contra interferencias dañinas en una instalación
residencial. Este equipo genera, usa y puede emitir energía
de radiofrecuencia y, si no se instala y utiliza de acuerdo
con las instrucciones, podría causar interferencias dañinas a
las comunicaciones por radio. Sin embargo, no se garantiza
que dicha interferencia no pueda ocurrir en instalaciones
particulares. Si este equipo causa interferencia dañina a la
recepción de radio o televisión, que se puede determinar
encendiendo y apagando el equipo, se aconseja al usuario
intentar corregir la interferencia realizando alguna de las
siguientes acciones:
- Reoriente o reubique la antena receptora.
- Aumente la separación entre el equipo y el receptor.
- Conecte el equipo a una toma de corriente en un circuito
diferente del utilizado por el receptor.
- Solicite ayuda a su vendedor o a un técnico especialista en
radio o TV.
Este dispositivo cumple con la parte 15 de las normas
de la FCC. La operación está sujeta a las dos siguientes
condiciones:
1) este dispositivo no debe causar interferencia dañina, y
2) este dispositivo debe aceptar cualquier interferencia
recibida, incluso aquellas que pudieran causar un
funcionamiento no deseado del dispositivo.
Cualquier cambio o modiÀcación en la construcción de
este dispositivo que no cuente con la aprobación expresa
de la parte responsable del cumplimiento puede anular la
autorización del usuario para operar este equipo.
Aviso de Software de Fuente Abierta
Para obtener el código fuente contenido en este producto
bajo LGPL y otras licencias de fuente abierta, visite http://
kenmore.com/opensource. Adicional al código fuente, todos
los términos referidos de licencia, exenciones de garantía,
y avisos de derechos de autor están disponibles para
descarga.
Declaración sobre exposición a la radiación de RF de la
FCC
Este equipo cumple con los límites de exposición a la
radiación de la FCC establecidos para entornos no
controlados. Este transmisor no se debe ubicar ni opera junto
con ninguna otra antena ni transmisor.
El equipo se debe instalar y operar con una distancia mínima
de 20 cm (7.8 pulg.) entre la antena y su cuerpo Los usuarios
deben seguir las instrucciones de operació especíÀcas de
manera tal de cumplir con las normas de exposición a la RF.
NOTA:
EL FABRICANTE NO SE HACE RESPONSABLE
DE CUALQUIER INTERFERENCIA DE TV O RADIO
CAUSADA POR MODIFICACIONES NO AUTORIZADAS
A ESTE EQUIPO. TALES MODIFICACIONES PODRÍAN
ANULAR LA AUTORIDAD DEL USUARIO PARA PONER
EL EQUIPO EN FUNCIONAMIENTO.
(VSHFLÀFDFLones módulo LAN inalámbrico
Model 2AHU4-KMTD17
Rango de Frecuencia 2412 à 2462 MHz
Potencia de Salida (Máx)
IEEE 802.11b: 18.26 dBm
IEEE 802.11g: 20.10 dBm
IEEE 802.11n: 20.07 dBm
66
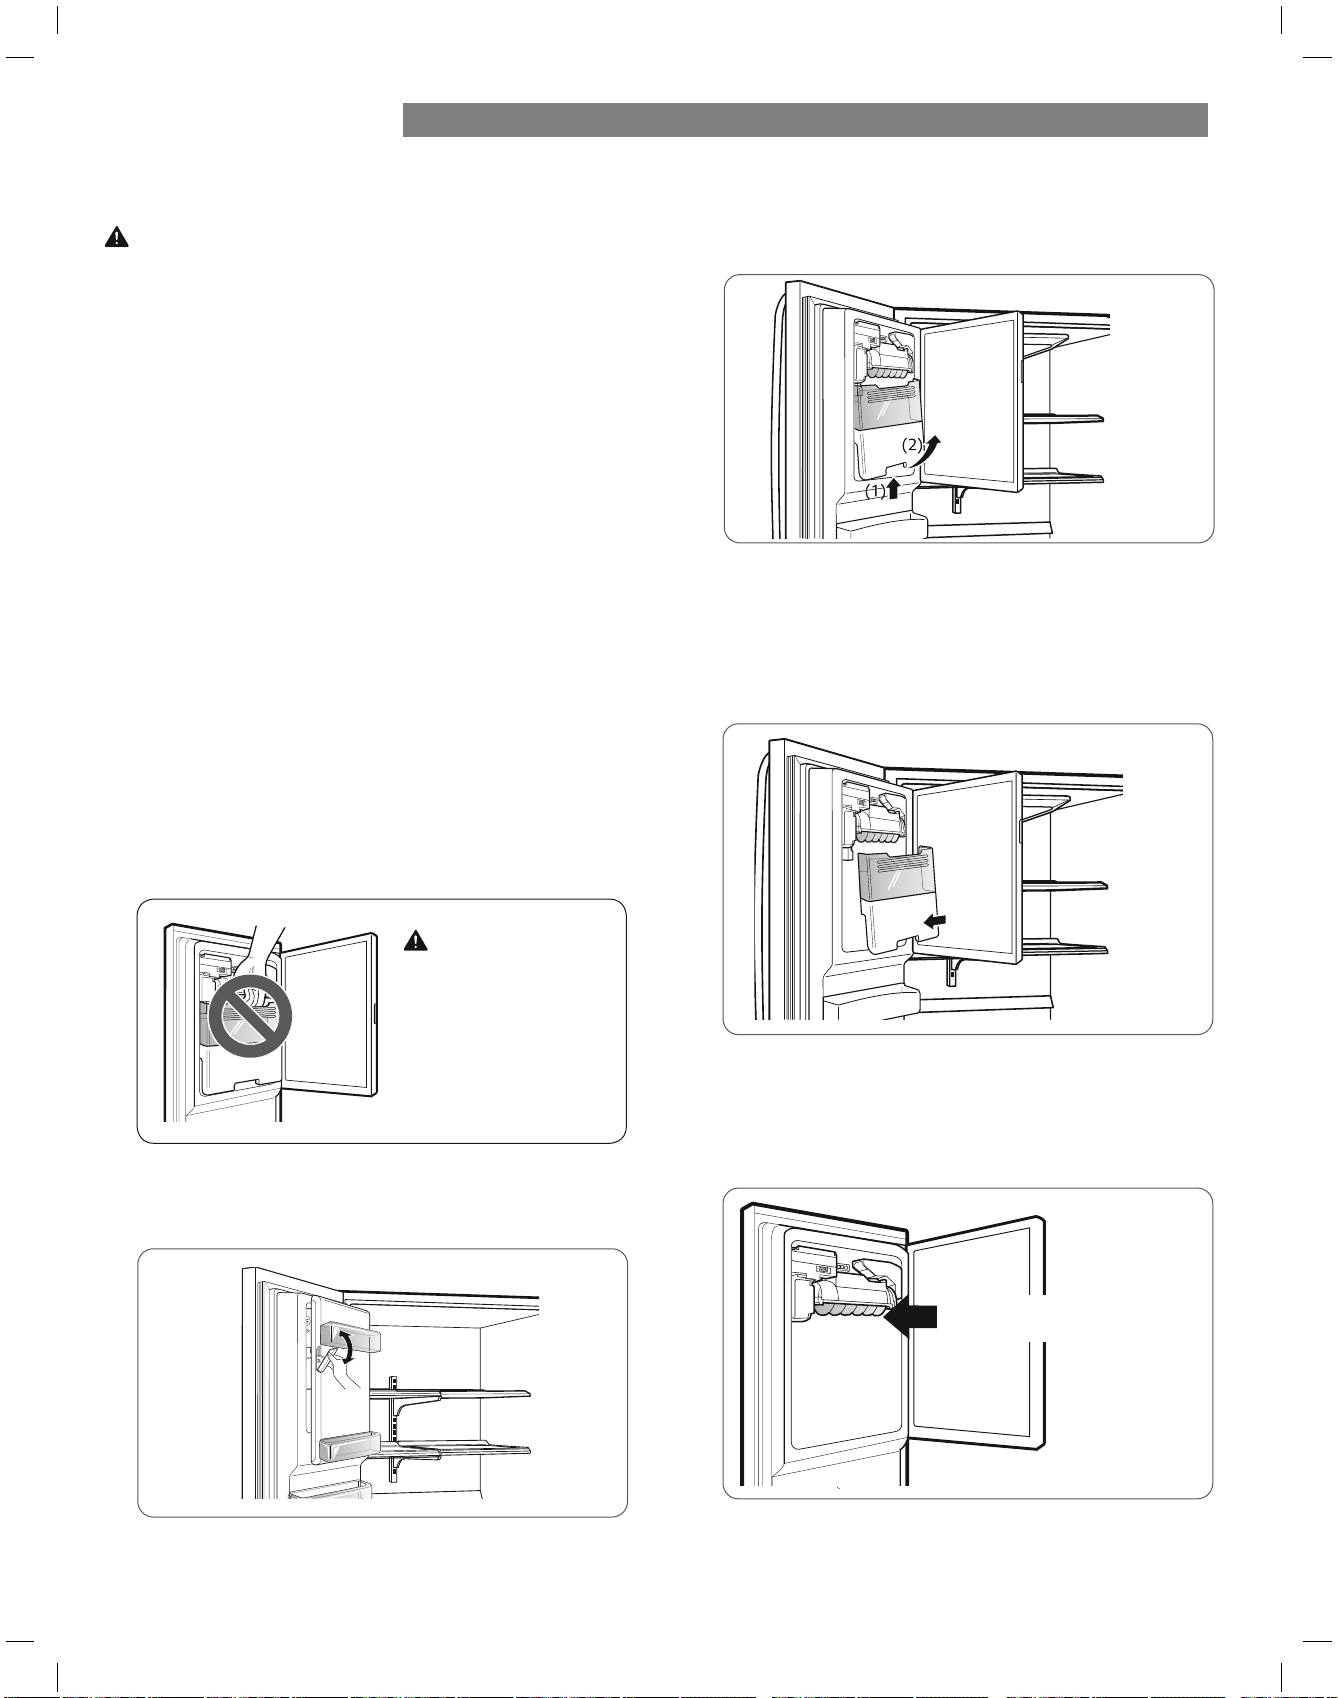
USO DEL REFRIGERADOR
DEPÓSITO DE HIELO DEL INTERIOR DE LA PUERTA
PRECAUCIÓN
Mantenga manos y herramientas fuera del compartimiento
de hielo de la puerta y del conducto del dispensador. Si no
se respeta esta advertencia, podrían producirse daños o
lesiones personales.
La máquina de hielo dejará de fabricar hielo cuando
el depósito de hielo del interior de la puerta esté lleno.
Si necesita más hielo, vacíe el depósito de hielo en el
depósito de hielo adicional ubicado en el compartimiento
del congelador. Durante el uso, el hielo puede caer de
forma irregular lo que puede provocar una lectura errónea
del nivel de cubitos de hielo y detener la elaboración de
cubitos. Agitar el depósito de hielo para nivelar los cubitos
que contiene puede reducir este problema.
NOTA: Almacenar latas u otros elementos en el depósito
de hielo podría dañar la máquina de hielo.
Mantenga la puerta del compartimiento de hielo
herméticamente cerrada. Si no se cierra herméticamente,
el aire frío del depósito de hielo congelará los alimentos
del compartimiento del refrigerador. Esto también podría
provocar que la máquina deje de fabricar hielo.
NOTA: Se recomienda vaciar el recipiente para el hielo si el
botón ON/OFF de la máquina de hielo del panel de control
ha permanecido en la posición OFF durante un periodo
prolongado de tiempo.
1. Tire o empuje de la manija de la puerta para abrir o
cerrar el compartimiento de hielo.
2. Para sacar el depósito de hielo del interior de la puerta,
agarre la manija delantera, levante ligeramente la parte
inferior y despacio saque el depósito tal como se muestra.
3. Para volver a instalar el depósito de hielo del interior
de la puerta, incline ligeramente el depósito al volver
a colocarlo en su sitio para evitar el contacto con la
máquina de hielo.
4. Evite tocar el apagado automático (brazo palpador)
al colocar el recipiente del hielo. Consulte la etiqueta
que hay en la puerta del compartimiento de hielo para
obtener información más detallada.
PRECAUCIÓN
Mientras manipule
el depósito de hielo,
mantenga las manos
lejos del área de la
bandeja de la máquina
de hielo para evitar
lesiones personales.
Apagado automático
(brazo palpador).
67
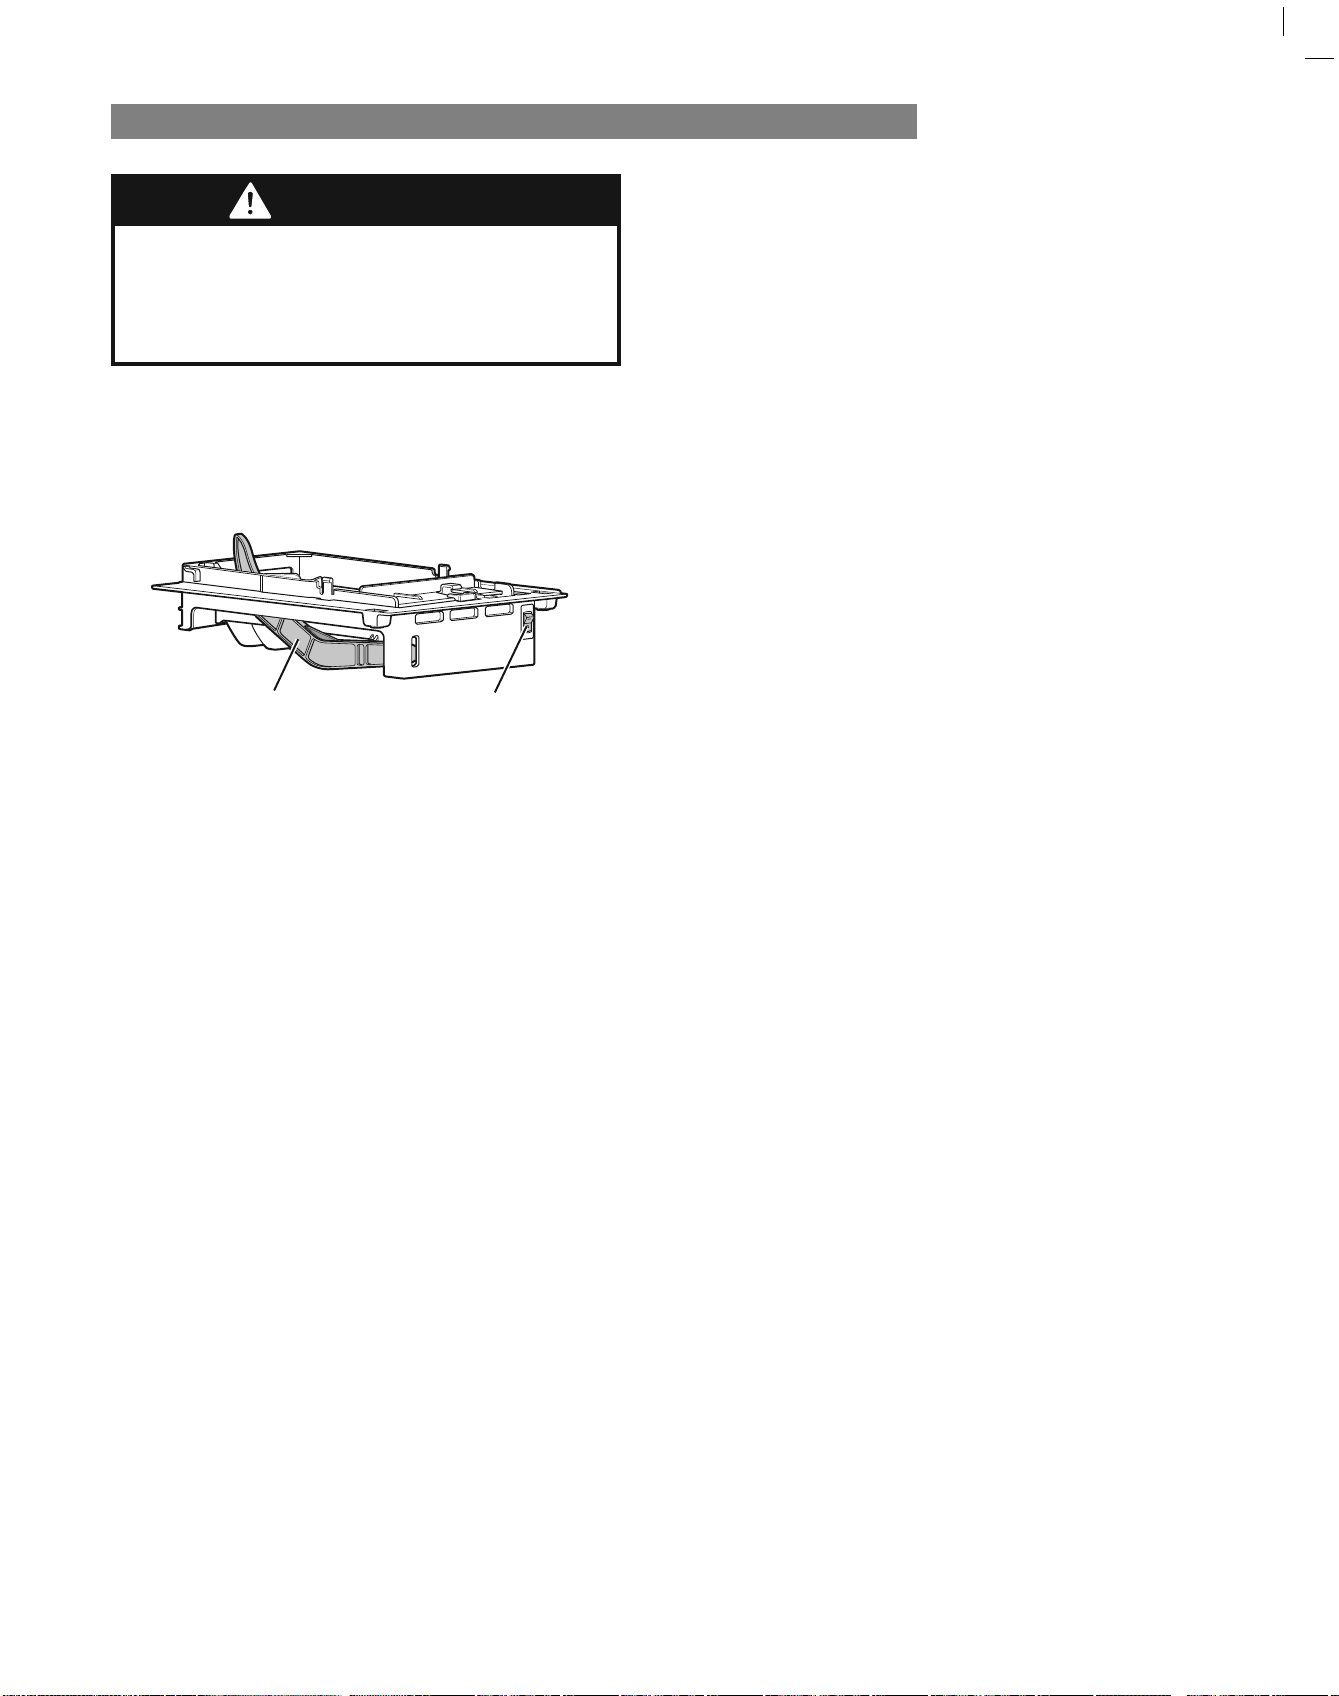
USO DEL REFRIGERADOR
68
INSTRUCCIONES DE OPERACIÓN
Un refrigerador nuevamente instalado se
puede tomar de 12 a 24 horas para comenzar
a hacer hielo
NOTA: La presión del agua debe situarse entre 20 y
120 psi en modelos sin filtro de agua y entre 40 y
120 psi en los modelos con filtro de agua para
producir la cantidad y tamaño de cubitos normales.
El hielo se hace en la cubitera automática y se envía
al dispensador. La máquina de hielo producirá 12
cubitos por ciclo; aproximadamente 100 en un
periodo de 24 horas, dependiendo de la temperatura
del compartimento del congelador, la temperatura de
la habitación, el número de aperturas de la puerta y
otras condiciones de funcionamiento.
Si el refrigerador es usado antes de que la conexión
del agua sea efectuada con el fabricante de hielo,
ajuste el conmutador de energía a Off (O).
Cuando el refrigerador haya sido conectado al
suministro de agua, ajuste el conmutador de energía
a On (I).
La fábrica de hielo se llenará con agua cuando se
enfríe a una temperatura de congelación. Un
refrigerador recién instalado puede requerir de 12 a
24 horas para comenzar a hacer cubos de hielo.
Desechar los primeros lotes de hielo para limpiar la
línea de agua.
Asegúrese de que nada interfiera con el barrido del
brazo del sensor.
Es normal que varios cubos de hielo se atoren.
Si el hielo no se usa frecuentemente, los cubos de
hielo viejo se volverán nubosos, de mal sabor y más
pequeños.
CUANDO DEBERÍA AJUSTAR EL
CONMUTADOR DE ENCENDIDO DE LA
FÁBRICA DE HIELO A OFF (O)
&XDQGRHOVXPLQLVWURGHDJXDVHUiFRUWDGRSRU
varias horas.
&XDQGRHOUHFLSLHQWHGHDOPDFHQDPLHQWRGHKLHOR
sea retirado por más de uno o dos minutos.
&XDQGRHOUHIULJHUDGRUQRVHUiXVDGRSRUYDULRV
días.
SONIDOS NORMALES QUE USTED PUEDE
ESCUCHAR
/DYiOYXODGHODIiEULFDGHKLHORSURGXFLUiXQ
zumbido mientras el productor de hielo se llene con
agua.
NOTA: Si el suministro de agua de la vivienda
(agua fría) no está conectado o abierto
completamente, ponga la máquina de hielo en la
posición de apagada (O) para evitar ruidos y
posibles años. No encienda la máquina de hielo (I)
hasta que se haya realizado la correcta conexión
del suministro de agua.
8VWHGHVFXFKDUiHOVRQLGRGHORVFXERVFD\HQGR
en el recipiente y el agua corriendo en los tubos
conforme la fábrica de hielo se recargue.
PREPARÁNDOSE PARA SALIR DE
VACACIONES
Ponga el conmutador de energía de la fábrica de
hielo en Off (O) y corte el suministro de agua al
refrigerador.
Si la temperatura ambiente baja más allá del punto
de congelación, haga que un técnico de servicio
calificado drene el sistema de suministro de agua
para prevenir serios daños a la propiedad debido a
la inundación desde líneas o conexiones de agua
rotas.
Interruptor
Brazo Sensor
ADVERTENCIA
Riesgo de lesiones personales
NO introduzca los dedos o las manos en el
mecanismo de fabricación automática de hielo con
el refrigerador enchufado.
Cuando el compartimiento se llene a nivel del brazo
del sensor, la máquina fábrica de hielo dejará de
producir hielo.
USO DEL REFRIGERADOR
GUÍA PARA EL ALMACENAMIENTO DE ALIMENTOS
Envuelva o almacene los alimentos en el refrigerador dentro
de materiales herméticos y antihumedad, a menos que se
indique lo contrario. Esto evitará que el olor y sabor de
los alimentos se transfiera por todo el refrigerador. Para
productos con fecha de caducidad, compruebe el código
de fecha para garantizar la frescura.
ALMACENAMIENTO DE ALIMENTOS CONGELADOS
NOTA: Consulte una guía de congelación o un libro de
cocina fiable para obtener más información sobre la
forma de preparar los alimentos para su congelación o
sobre los tiempos de almacenamiento de los alimentos
congelados.
Congelación
El congelador no congelará rápidamente una gran
cantidad de alimentos. No coloque más alimentos sin
congelar en el congelador que los que se congelarán
en 24 horas (no más de 1 o 1,5 kg de alimento por cada
30 litros de espacio en el congelador). Deje suficiente
espacio en el congelador para que el aire pueda circular
entre los paquetes. Tenga cuidado de dejar suficiente
espacio en la parte delantera para que se pueda cerrar
la puerta herméticamente.
Los tiempos de almacenamiento variarán en función
de la calidad y el tipo de alimento, el tipo de envase o
envoltorio utilizado (si son herméticos y antihumedad)
y la temperatura de almacenamiento. La aparición
de cristales de hielo dentro de un paquete sellado es
normal. Esto sólo significa que la humedad del alimento
y del aire del interior del paquete se ha condensado,
creando cristales de hielo.
NOTA: Deje que los alimentos calientes se enfríen
a temperatura ambiente durante 30 minutos y, a
continuación, empaquételos y congélelos. Enfriar
alimentos calientes antes de congelarlos ahorra energía.
Empaquetamiento
Una congelación correcta depende de un
empaquetamiento adecuado. Cuando se cierra y sella
el paquete, no debe dejar que entre ni salga aire ni
humedad. Si eso sucede, es posible que el olor y el sabor
de los alimentos se transfieran por todo el refrigerador y
también se podrían resecar los alimentos congelados.
Recomendaciones de empaquetamiento:
Contenedores de plástico rígido con tapas herméticas•
Tarros de congelación / enlatado con lados rectos•
Papel de aluminio grueso•
Papel con revestimiento plástico•
Envoltorios plásticos no permeables•
Bolsas de plástico con autosellado y calidad •
específica apta para congelador
Siga las instrucciones del contenedor o paquete para
unos métodos de congelación adecuados.
No usar
Envoltorios de pan•
Contenedores de plástico que no sean de polietileno•
Contenedores sin tapas herméticas•
Papel de cera o envoltorio para congelador revestidos •
de cera
Envoltorio fino y semipermeable•
PRECAUCIÓN: No almacene latas de bebidas
o contenedores de comida de plástico en el
compartimiento del congelador. Podrían romperse
o estallar al congelarse.
Elementos Cómo
Mantequilla o
margarina
Queso
Leche
Huevos
Fruta
Verdura
con hoja
Vegetales con
piel (zanahorias,
pimientos)
Pescado
Sobras
Conserve la mantequilla abierta
en un plato cubierto o en un
compartimiento cerrado. Cuando
se almacena una cantidad extra,
envuélvala en una bolsa para
congelar y congélela.
Almacene en el envoltorio original
hasta que esté listo para consumirlo.
Una vez abierto, vuelva a envolverlo
herméticamente en un envoltorio
plástico o en papel de aluminio.
Limpie los cartones de leche. Para
un mejor almacenamiento, coloque
la leche en los estantes interiores y
no en los estantes de la puerta.
Almacénelos en el cartón original
en un estante interior, no en un
estante de la puerta.
No lave ni pele la fruta hasta
que ésta vaya a ser utilizada.
Organice la fruta y consérvela en
su contenedor original, en un cajón,
o bien almacénela en una bolsa de
papel completamente cerrada sobre
un estante del refrigerador.
Retire el envoltorio comercial
y corte o arranque las zonas
magulladas o decoloradas. Lave en
agua fría y deje escurrir. Colóquela
en una bolsa o un contenedor de
plástico, y almacénela en el cajón
para verduras.
Colóquelos en una bolsa o
un contenedor de plástico, y
almacénelos en el cajón para
verduras.
Almacene el pescado y los mariscos
frescos en el congelador si no van
a ser consumidos el mismo día en
que se los adquirió. Se recomienda
consumir pescados y mariscos frescos
el mismo día de haberlos adquirido.
Cubra las sobras con un envoltorio
plástico, papel de aluminio o dentro
de contenedores de plástico con
tapas herméticas.
69
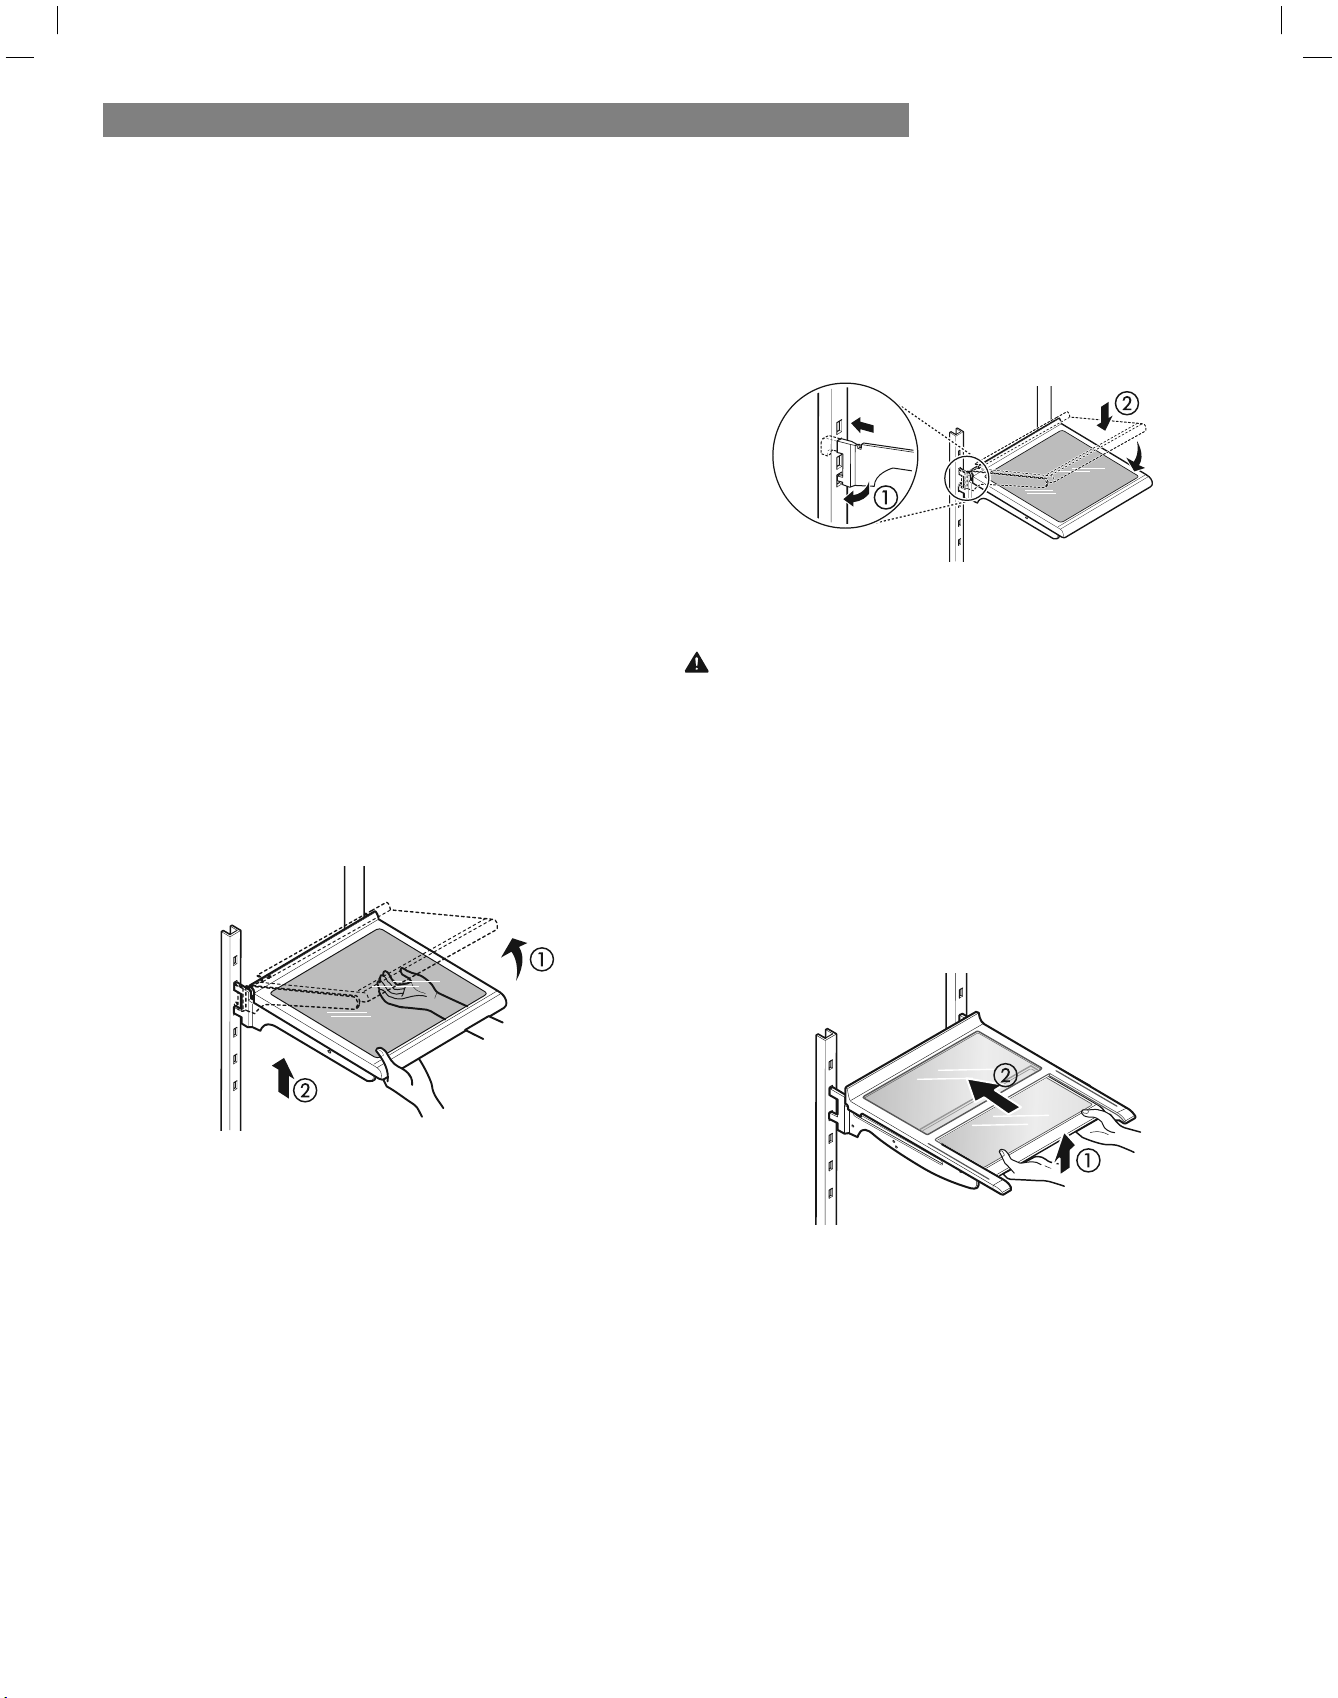
USO DEL REFRIGERADOR
ESTANTES DEL REFRIGERADOR
SECCIÓN REFRIGERADOR
Los estantes del refrigerador son ajustables para satisfacer
sus necesidades personales de almacenamiento. En función
del modelo, los estantes pueden ser de vidrio o de rejilla
metálica.
Organizar los estantes para que se ajusten a las diferentes
alturas de los artículos hará que le resulte más fácil encontrar
lo que busca. Con ello también reducirá el tiempo que
permanece la puerta del refrigerador abierta y ahorrará
energía.
IMPORTANTE: No limpie los estantes de vidrio con agua
templada mientras aún están fríos. Los estantes podrían
romperse si se ven expuestos a cambios repentinos de
temperatura o a impactos.
NOTA: Los estantes de vidrio son pesados. Tenga especial
cuidado en el momento de retirarlos.
Desprendiendo el Estante (Tipo de Media Gaveta)
1 Incline hacia arriba la parte frontal del estante lue go
levántelo.
2 Retire el estante.
Ensamblando el Estante (Tipo de Media Gaveta)
1. Incline el frente del estante hacia arriba y guíe los
ganchos hacia dentro de las ranuras a la altura
deseada.
Usando el Estante plegable (slo para uso en tienda)
Almacene artículos más altos, como un contenedor de galón o botellas,
empujando la mitad frontal del estante debajo de la mitad trasera
de mismo. Jale la mitad del estante hacia adelante para regresarlo
a un estante completo.
PRECAUCIÓN: Asegúrese de que los estantes tienen
ambos lados nivelados. De lo contrario, podría caerse
el estante o derramarse los alimentos.
70
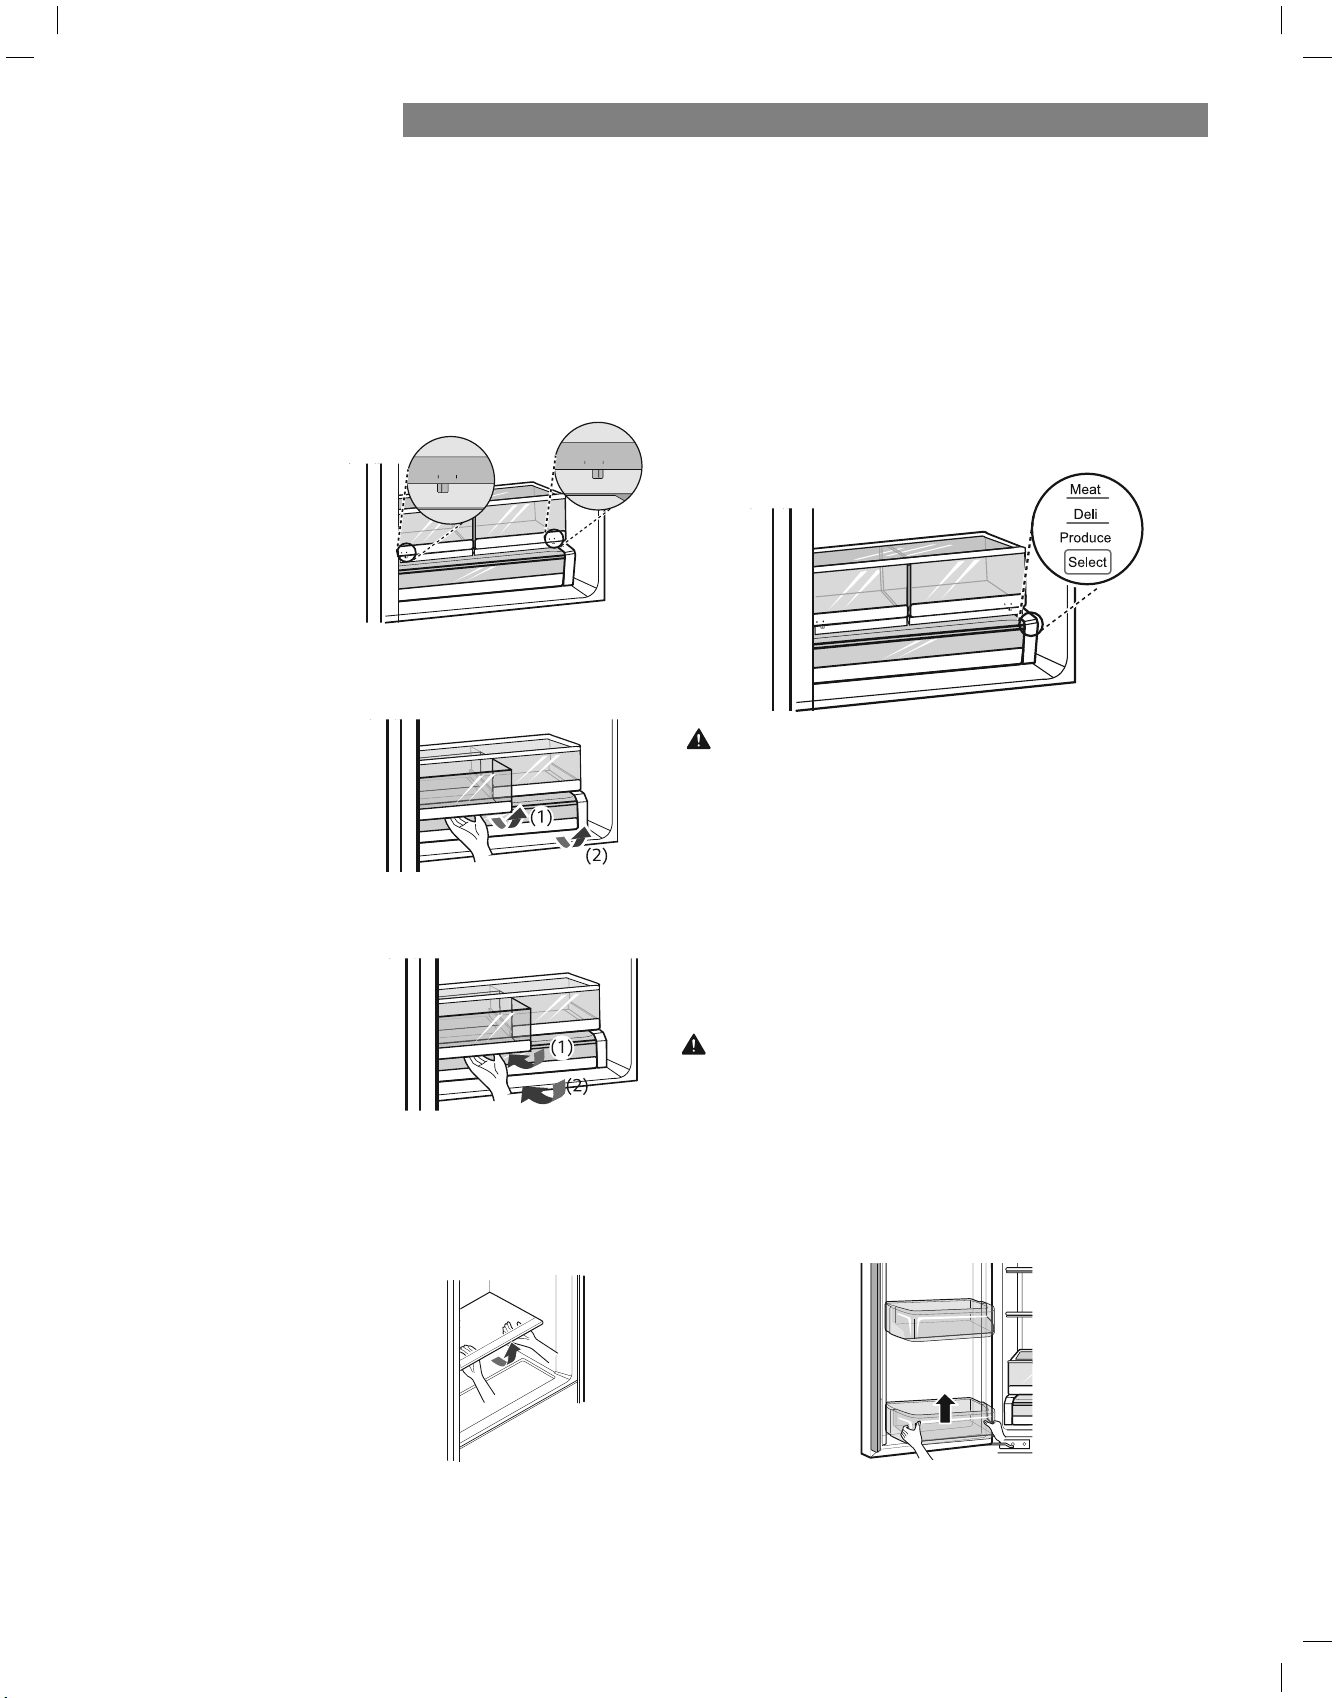
USO DEL REFRIGERADOR
CAJÓN CON CONTROL DE HUMEDAD
Los cajones para verduras mantienen el sabor y la frescura
de la fruta y la verdura al permitir controlar fácilmente la
humedad dentro del cajón.
Para controlar la cantidad de humedad en los cajones para
verduras con sellado antihumedad, ajuste el control en
cualquier posición entre VEGETABLES y FRUIT.
VEGETABLES mantiene un aire húmedo en el cajón
para un mejor
almacenamiento de
las verduras frescas y
de hoja.
FRUIT
PRECAUCIÓN
mantiene
el aire húmedo
fuera del cajón
para un mejor
almacenamiento de
la fruta.
Cubierta del recipiente para verduras
Para removerla, levante la parte frontal
de la cubierta hasta que ésta se separe
de la pared trasera del gabinete, luego
retírela.
CAJÓN DESPENSERO CONCONTROL DE TEMPERATURA
El Cajón despensero con control de temperatura
proporciona espacio de almacenamiento con un control
de temperatura variable que permite mantener el
compartimiento más frío que la sección del refrigerador.
Este cajón se puede usar para grandes bandejas de Àesta,
artículos de charcutería y bebidas. (Este cajón no se
debe usar para verduras que requieran un alto nivel de
humedad).
Pulse el botón para elegir entre Meat (carne), Deli (char-
cutería) y Produce (Productos cocinados).
DESMONTAJE DEL CAJÓN CON
CONTROL DE HUMEDAD
1.
BANDEJAS DE LA PUERTA
Las bandejas de la puerta son extraíbles para facilitar su
Desprenda regularmente y lave los recipientes y estantes
de almacenamiento; estos pueden contaminarse fácilmente por
los alimentos.
No aplique fuerza en exceso mientras desprende o ensambla
los recipientes de almacenamiento.
No use lava platos para limpiar los recipientes y estantes de
almacenamiento.
limpieza y ajuste.
1. Para desmontar la bandeja, simplemente levántela hacia
arriba y tire de ella hacia fuera.
2. Para volver a colocar la bandeja, deslícela por encima
del soporte deseado y empuje hacia abajo hasta que
encaje en su sitio.
Para remover el recipiente de
humedad controlada para
verduras y el cajón despensa,
extensión, levante la parte
frontal, y retírelo
completamente.
2.
Para instalar, incline el frente
el marco y empújelo hacia atrás
en su lugar.
PRECAUCIÓN: No guarde botellas de vidrio en la
despensa. Si se congelan, pueden romperse y
causarle lesiones.
FRUIT VEGETABLES
FRUIT VEGETABLES
71
extraiga el recipiente (1) o el
cajón despensa (2) a su máximo
levemente hacia arriba, inserte el
cajón para verduras o estante en

USO DEL REFRIGERADOR
72
SECCIÓN CONGELADOR
DEPÓSITO DE HIELO
1. Tire del cajón congelador y el cajón extraíble lo máximo
posible para retirar el depósito de hielo.
2. Con cuidado levante y saque el depósito de hielo.
3. Para volver a colocarlo, tire de los dos cajones lo máximo posible
y ponga el depósito en su posición correcta en el cajón extraíble.
Cierre el cajón extraíble y, después, el cajón del congelador.
PRECAUCIÓN: Peligro de pinzamiento. Mantenga las
manos y pies lejos de la parte inferior del cajón del
congelador al abrir y al cerrar.
Depósito de
hielo adicional
NOTA:
Para comprar un fltro de agua de repuesto,
REEMPLAZO DEL FILTRO DE AIRE
6HUHFRPLHQGDUHHPSOD]DUHOÀOWURGHDLUH
Aproximadamente cada seis meses.
Cua ndo se encienda la luz
“CHANGE” AIR FILTER (Cambiar
Àltro de aire).
([WUDLJDHOÀOWURYLHMR
Coloque un Àltro nuevo dentro de la tapa con el lateral
que dice “Frente” mirando hacia afuera.
,QVWDOHXQQXHYRÀOWURGHDLUH
Gire la tapa del Àltro hacia la izquierda para separarlo
de la pared del refrigerador. El Àltro se ubica en la parte
interior de la tapa del Àltro. Quite el Àltro de la tapa y
reemplácelo con uno nuevo.
Cajón extraíble
llame 1-884-553-6667.
Àltro de aire
3.
sujetarla a la pared del refrigerador.
Gir la cubierta del filtro hacia la derecha para
4.
Mantenga presionado el boton Air Filter
por tres segundos para reiniciar el sensor del Àltro.
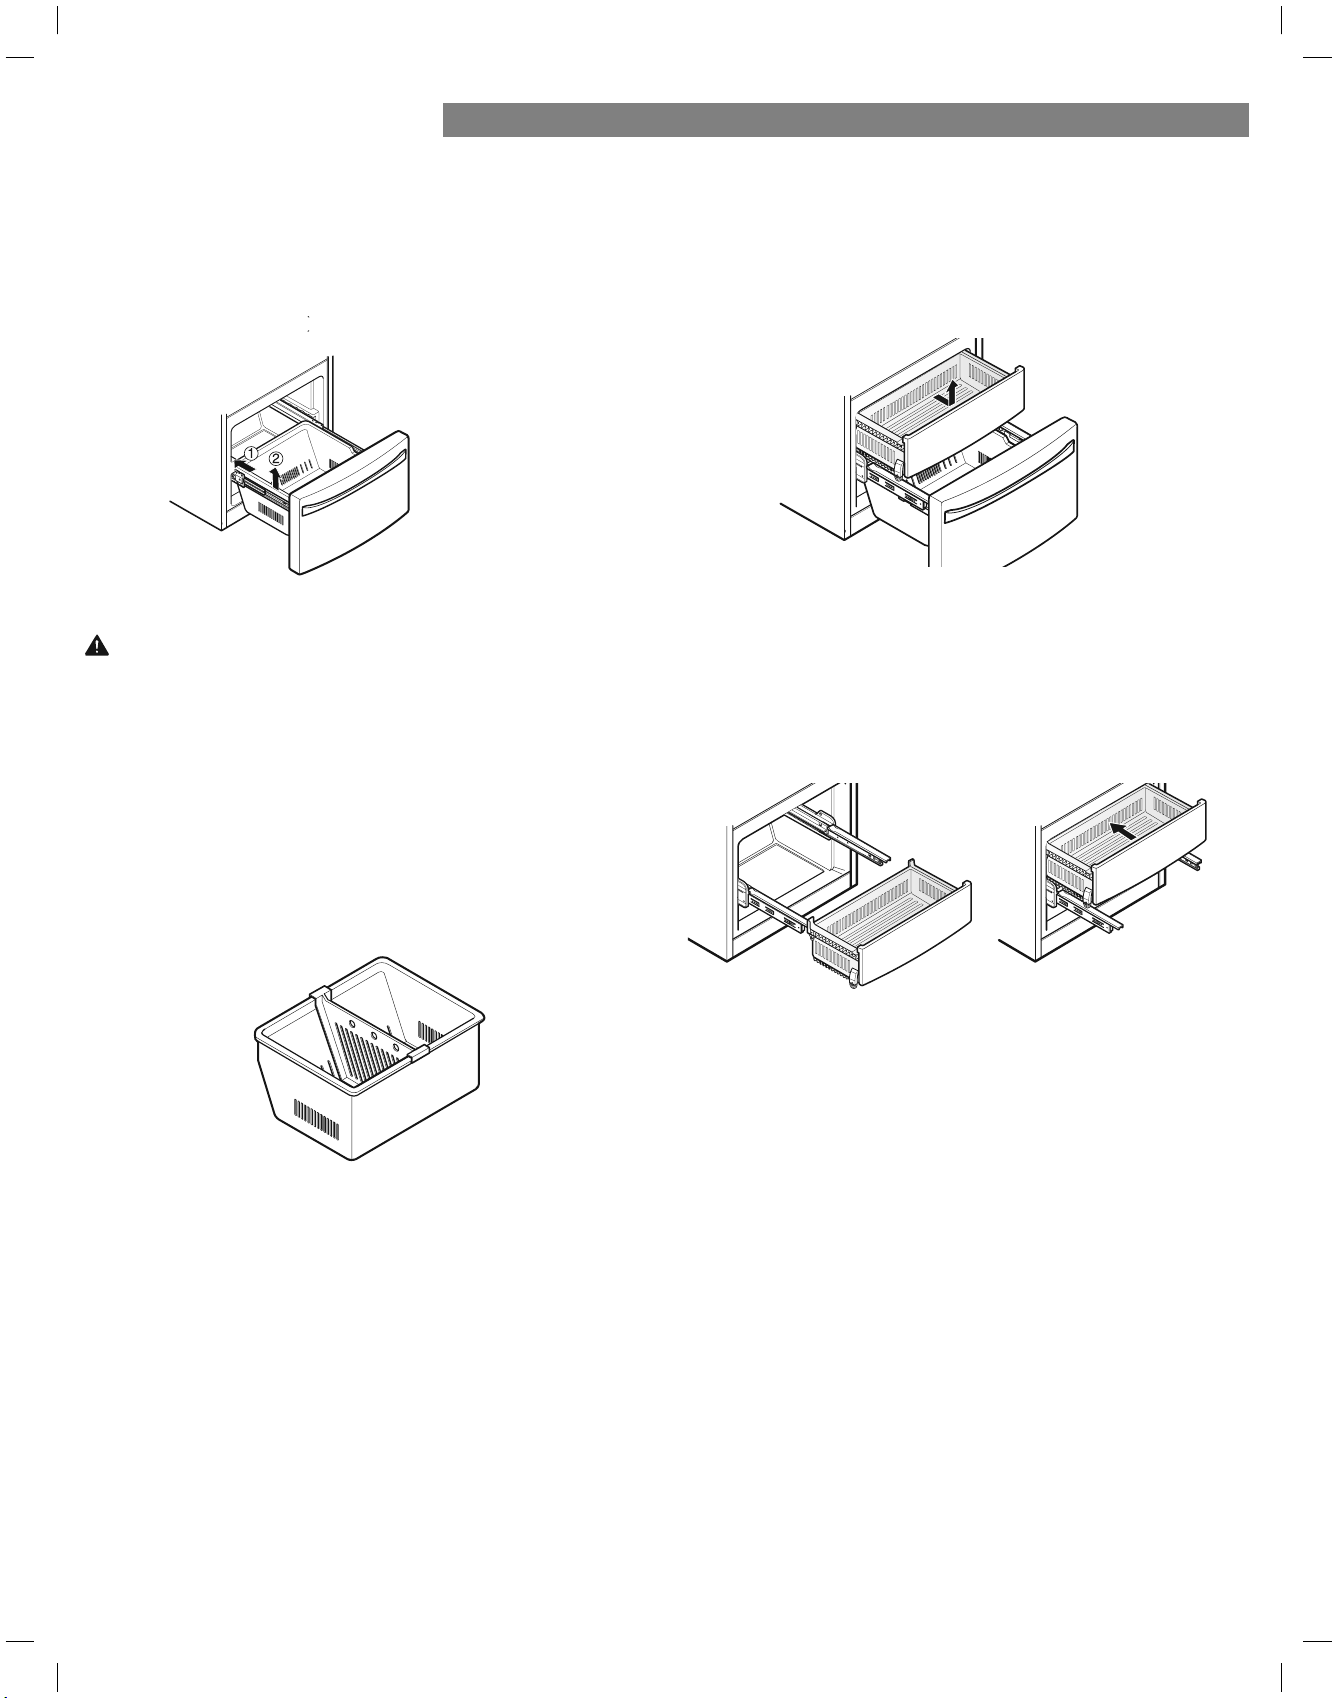
USO DEL REFRIGERADOR
73
DURABASE CAJÓN EXTRAÍBLE
Para desmontar el Durabase , empújelo hacia atrás todo 1. Para retirar, jale el cajón hacia fuera a toda su extensión.
Levante el frente del cajón, luego jálelo y tire hacia fuera.
2. Para instalar, incline hacia arriba ligeramente el frente
e inserte el cajón en el bastidor y empuje hacia atrás
para que quede en su lugar.
lo posible. Incline hacia arriba la parte delantera del
Durabase y tire de él hacia fuera.
Para volver a colocarlo, inserte el Durabase en la
estructura de rieles.
DIVISOR DURABASE
El divisor Durabase le permite organizar el área Durabase
en secciones.
ADVERTENCIA: Si se retira el divisor Durabase, habrá
VXÀFLHQWHHVSDFLRDELHUWRSDUDTXHXQQLxRRXQD
mascota puedan gate ar hasta el interior.
Para evitar el atrapamiento acciGHQWDOGHXQQLxRRXQD
PDVFRWD\HOSRVLEOHULHVJRGHDVÀ[LD12SHUPLWDTXH
QLxRV\PDVFRWDVWRTXHQQLVHDFHUTXHQDOFDMyQ
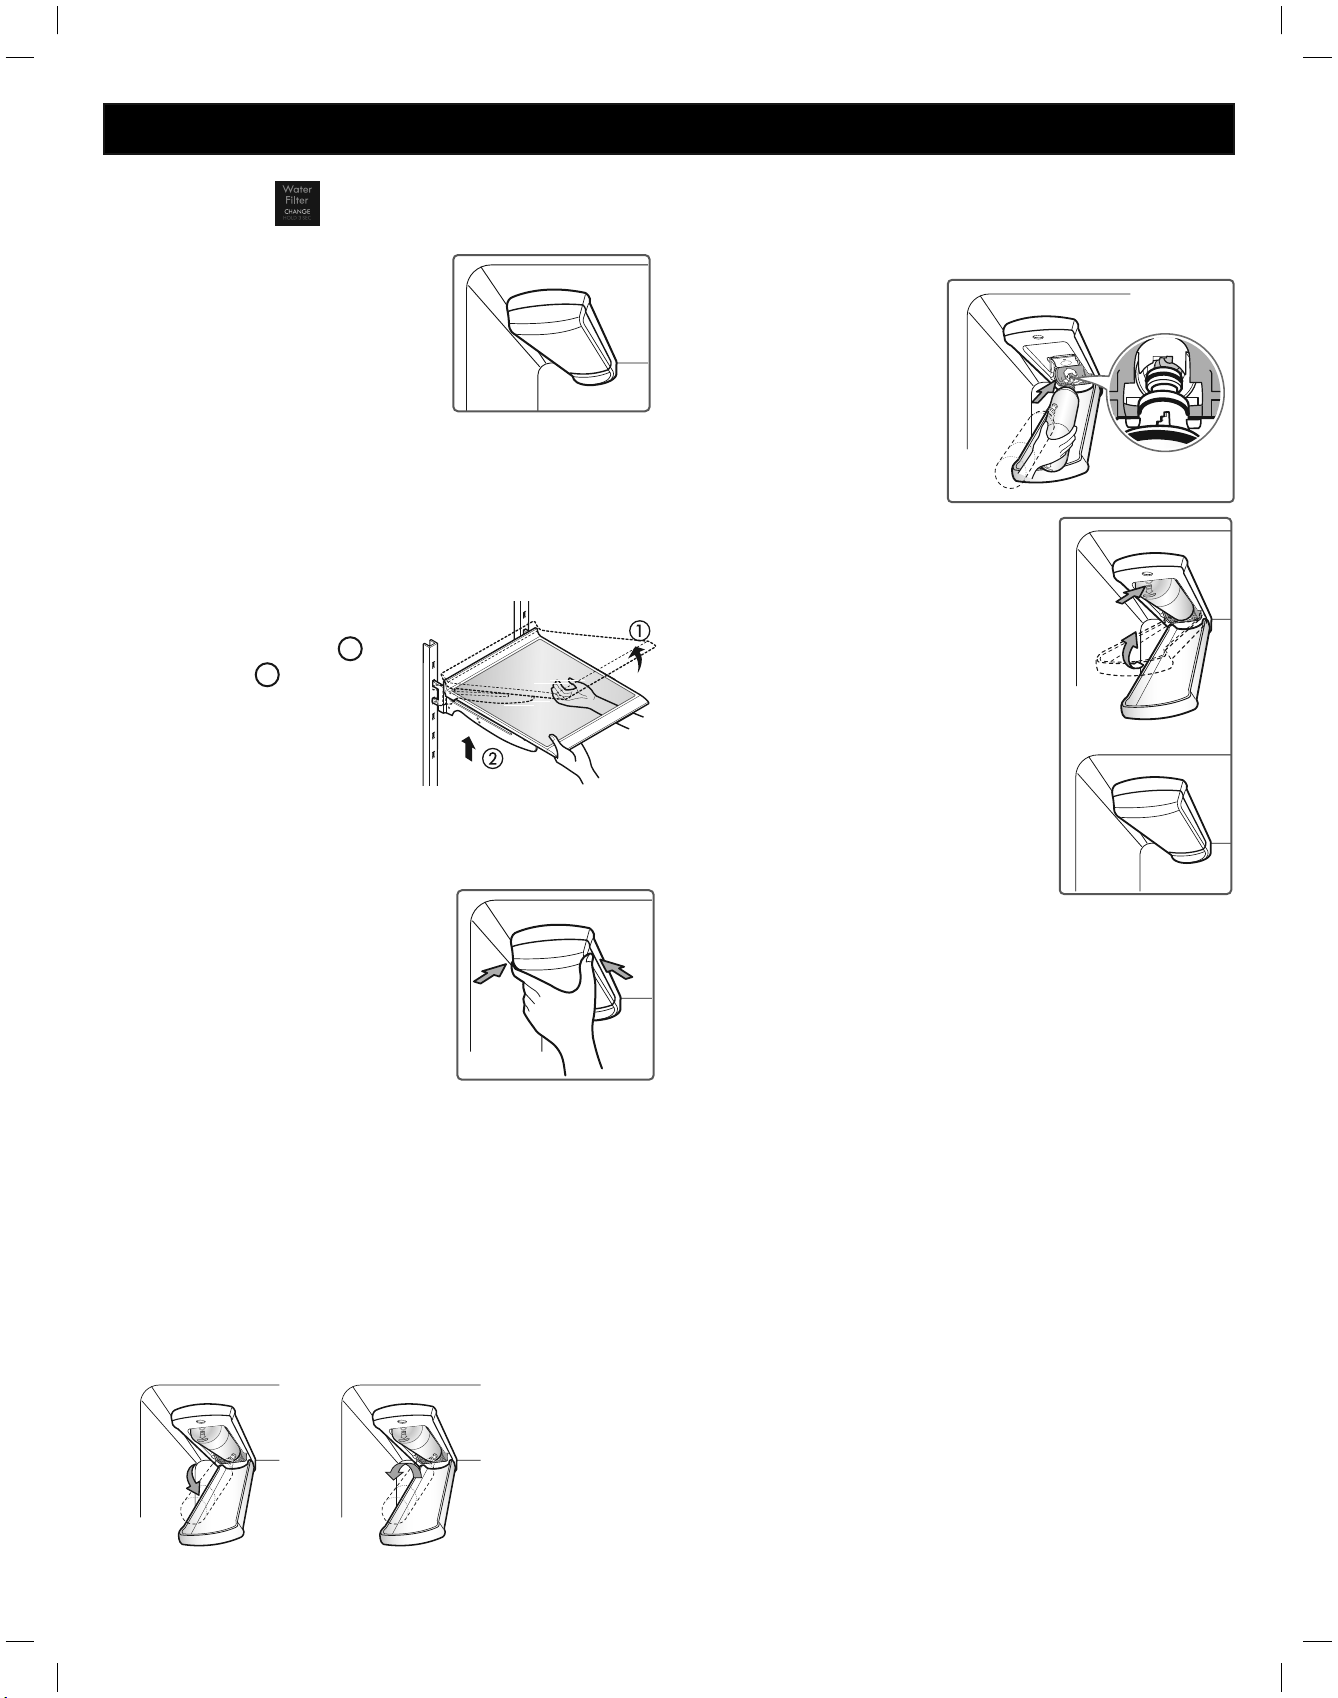
74
FILTRO DE AGUA
FILTRO DE AGUA
6HUHFRPLHQGDUHHPSOD]DUHOÀOWURGHDJXD
Aproximadamente cada 6 meses.
Cuando el indicador del Àltro del
agua se encienda.
Cuando los cubitos de hielo sean
más pequeños de lo normal.
Gire el Àltro de agua hacia arriba
hasta colocarlo en su sitio y cierre
la tapa. La tapa hará "clic" cuando
se cierre correctamente.
3. 'HVSXpVGHUHHPSOD]DUHOÀOWURGHDJXDGLVSHQVH
9 litros de agua (deje correr el agua durante unos
5 minutos) para purgar el aire atrapado y los
contaminantes del sistema; no dispense los 9 litros
de agua de manera continua. Pulse y suelte el botón
del dispensador en ciclos de 30 segundos ON y
60 segundos OFF.
127$ara comprar un filtro de agua de repuesto,
2. 5HHPSOiFHORFRQXQÀOWURGHDJXDQXHYR
Saque el nuevo Àltro de agua de su
envoltorio y retire la tapa protectora de las
juntas tóricas.
1. 4XLWHHODQWLJXRÀOWURGHDJXD
Baje o desmonte el estante
superior izquierdo para permitir
que el Àltro de agua pueda girar
hacia abajo totalmente.
Pulse el botón de presión para
abrir la tapa del Àltro de agua.
127$Al reemplazar el Àltro de
agua se drena una pequeña cantidad
de agua (unos 25 cc). Colocar un paño
alrededor de la parte delantera
de la tapa del Àltro de agua para
recoger el agua que se escape.
Sostenga el Àltro de agua en posición
vertical, una vez retirado, para evitar
que el agua residual se salga del
Àltro de agua.
Asegúrese de rotar el filtro completamente hacia
abajo previo a retirarlo de la cabeza del mismo.
Tire del filtro de agua hacia abajo y rótelo hacia
l izquierda.
$QWHVGHVXVWLWXLUHOÀOWURGHDJXD
Si el estante superior, situado debajo del Àltro de agua,
está en la posición más alta, se necesitará retirar el mismo
antes de sustituir el Àltro de agua.
Para retirar cualquier estante -
Levante el frente del estante
y tire hacia arriba
. Saque el
estante.
Con las pestañas del filtro de agua en
posición horizontal,empuje el nueco filtro
de agua en la cabeza de éste y rótelo
hacia la derecha.
llame 1-884-553-6667.
También puede comprar en línea en: www.kenmore.com

75
FILTRO DE AGUA
FILTRO DE AGUA
76
ADVERTENCIA
PRECAUCIÓN
Para reducir el riesgo asociado a la ingestión de
contaminantes: No utilice agua que no sea segura
microbiológicamente o cuya calidad se desconozca sin
una desinfección adecuada antes o después del sistema.
Los sistemas certificados para la reducción de quistes
puede utilizarse en aguas desinfectadas que puedan
contener quistes filtrables. Número de establecimiento de
10350-MN-005
Para reducir el riesgo asociado con daños materiales
debidos a fugas de agua:
Lea y cumpla • las instrucciones de uso del filtro de
agua antes de la instalación y uso de este sistema.
La instalación y uso • DEBE cumplir con todas las
normativas de fontanería estatales y locales.
No • instalar si la presión del agua excede los 120 psi
(827 kPa). Póngase en contacto con un fontanero
profesional si no está seguro de cómo comprobar la
presión del agua.
No • instalar en sistemas donde se pueda producir el
efecto de golpe de ariete. Si existe una situación de
golpe de ariete en la instalación, debe instalar un
amortiguador de golpe de ariete. Póngase en contacto
con un fontanero profesional si no está seguro de
cómo comprobar esta situación.
No • instalar en tuberías de suministro de agua caliente.
La temperatura máxima de funcionamiento del agua de
este sistema de filtrado de agua es de 38 °C (100 °F).
Proteja el filtro de agua de la congelación. • No use
el frigorífico en condiciones ambientales por debajo
de los 13 ºC (55 °F). Drene el filtro de agua cuando
almacene la unidad en temperaturas inferiores a los
4,4 °C (40 °F).
El filtro de agua desechable se debe reemplazar cada •
seis meses, a la capacidad nominal, o si se produce
una significativa reducción del flujo.
Es esencial respetar los requisitos recomendados por el
fabricante para la instalación, mantenimiento y reemplazo
del filtro de agua para que el producto se comporte de la
forma indicada.
NOTA: Las pruebas se realizan en condiciones estándar de
laboratorio, por lo que el rendimiento real puede variar.
NOTA: Para comprDUXQÀOWro de agua de rHSXHVWoYLVLWDU
VXWLHQGDORFDOGH6earsROODPH
También puede comprDUHQOtQeDHQZZZNHQPRUHFRP
Producto distribuido en los Estados Unidos de América por
Sears Brands Management Corporation, Hoffman Estates, IL
60179.
NSF es una marca comercial de NSF International.
Directrices de aplicación/Parámetros del suministro de
agua
Flujo de servicio 1,9 lpm (0,5 gpm)
Suministro de agua Agua potable
Presión del agua 138 - 827 kPa (20-120 psi)
Temperatura del agua 0,6 °C - 38 °C (33 ºF - 100 °F)
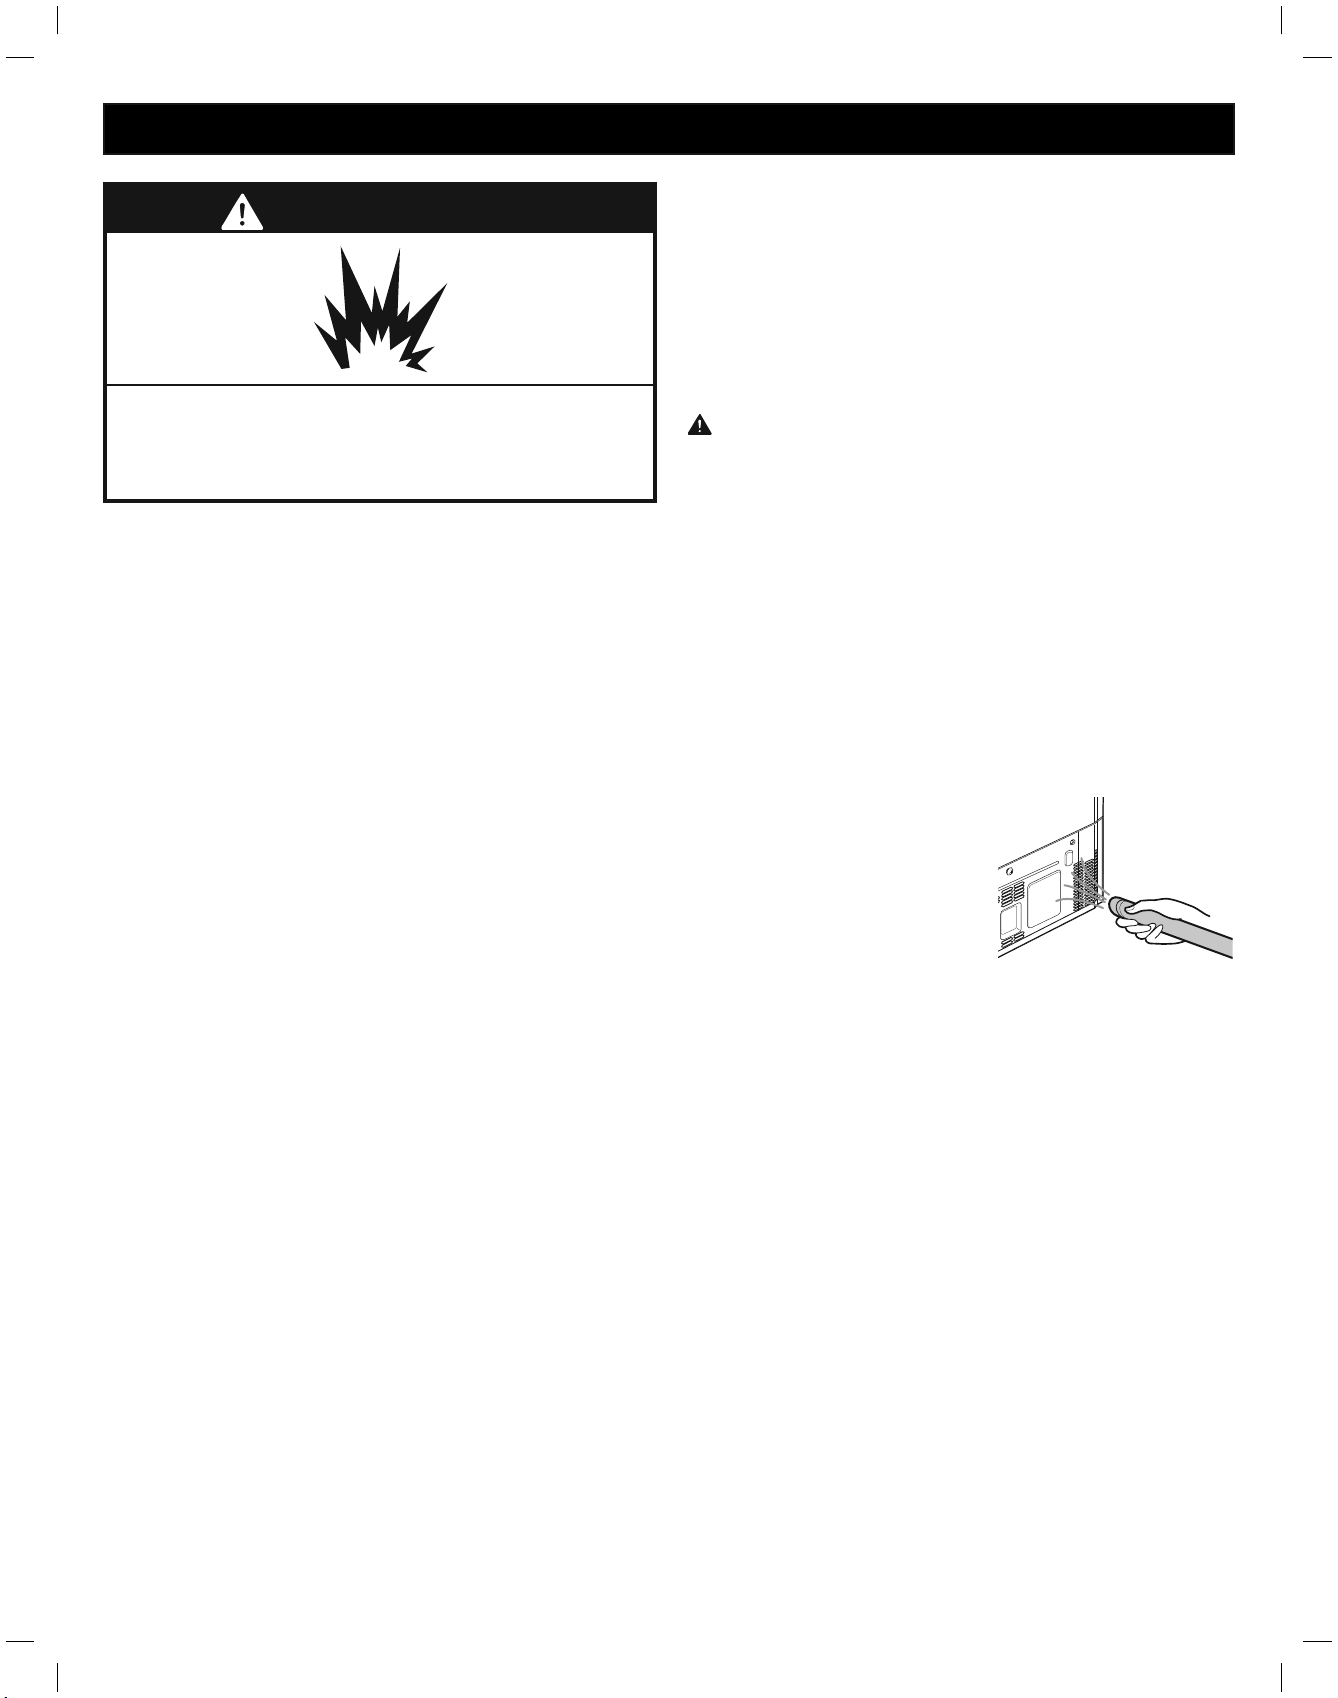
CUIDADO Y LIMPIEZA
ADVERTENCIA
Riesgo de explosión
Use un limpiador no inflamable. Si no se respeta esta
advertencia, existe peligro de explosión, incendio o
muerte.
Tanto las secciones refrigerador como congelador se
descongelan de forma automática; sin embargo, se
recomienda limpiar ambas secciones una vez al mes
para evitar la aparición de olores. Seque los derrames
inmediatamente.
SUGERENCIAS GENERALES DE LIMPIEZA
Desenchufe el refrigerador o desconecte la alimentación.•
Retire todos los componentes extraíbles, como estantes, •
cajones, etc. Consulte las secciones en Uso del refrigerador
para obtener instrucciones acerca del desmontaje.
Use una esponja limpia o un trapo suave, junto con •
un detergente suave en agua templada. No utilice
limpiadores abrasivos o agresivos.
Lave a mano, aclare y seque todas las superficies a fondo.•
Enchufe el refrigerador o vuelva a conectar la corriente.•
EXTERIOR
El encerado de las superficies metálicas pintadas externas
proporciona una protección contra el óxido. No encere las
piezas de plástico. Encere las superficies metálicas pintadas
al menos dos veces al año con cera para electrodomésticos
(o cera en pasta para coches). Aplique la cera con un trapo
suave y limpio.
Para productos con un exterior en acero inoxidable, use una
esponja limpia o un trapo suave, junto con un detergente
suave en agua templada. No utilice limpiadores abrasivos o
agresivos. Seque a fondo con un trapo suave.
PAREDES INTERIORES (deje que el congelador se caliente
para que el trapo no se quede pegado)
Para ayudarle a eliminar los olores, puede lavar el interior
del refrigerador con una mezcla de bicarbonato sódico
y agua templada. Mezcle 2 cucharadas soperas de
bicarbonato sódico (unos 26 g) en 1 litro de agua. Asegúrese
de que el bicarbonato sódico esté completamente disuelto
para que no raye las superficies del refrigerador.
REVESTIMIENTO DE LAS PUERTAS Y JUNTAS
Use una esponja limpia o un trapo suave, junto con un
detergente suave en agua templada. No utilice ceras de
limpieza, detergentes concentrados, lejías ni limpiadores que
contengan petróleo en las piezas del refrigerador que son
de plástico.
PIEZAS DE PLÁSTICO (tapas y paneles)
Use una esponja limpia o un trapo suave, junto con un
detergente suave en agua templada. No utilice sprays para
ventanas, limpiadores abrasivos ni líquidos inflamables, ya
que pueden arañar o dañar el material.
BOBINAS DEL CONDENSADOR
Use un aspirador con un
accesorio para limpiar las
bobinas del condensador
y las rejillas de ventilación.
No retire el panel que cubre
el área de las bobinas
del condensador.
PRECAUCIÓN: Cuando esté limpiando el interior, no
pulverice agua.
77

CUIDADO Y LIMPIEZA
SUSTITUCIÓN DE LA BOMBILLA
$'9(57(1&,$
Riesgo de descargas eléctricas
Antes de reemplazar la bombilla de un compartimento,
desenchufe el refrigerado o corte la corriente en el
disyuntor o en la caja de fusibles.
CUANDO SE MUDA
Cuando vaya a trasladar su refrigerador a una nueva casa,
siga estos pasos para prepararlo para la mudanza.
1.
Saque todos los alimentos del refrigerador y empaquete
todos los alimentos congelados en hielo seco.
2. Desenchufe el refriger ador.
3. Lávelo y séquelo a fondo.
4. Retire todos los componentes extraíbles, envuélvalos bien
y, con cinta adhesiva, embálelos juntos para que no se
muevan ni traqueteen durante la mudanza. Consulte la
sección Uso del refrigerador para obtener instrucciones
sobre componentes extraíbles.
5. En función del modelo, levante la parte delantera del
refrigerador para que ruede con más facilidad O BIEN
atornille los pies de nivelación para que no rayen el
suelo. Consulte la sección Cierre de las puertas .
6. Use cinta adhesiva para mantener las puertas cerradas
y para pegar el cable de alimentación al cuerpo del
refrigerador.
Cuando llegue a su nueva casa, vuelva a colocar todo en su
sitio y consulte la sección Instalación del refrigerador para
obtener las instrucciones de preparación.
NOTA: La lámpara del compartimiento del refrigerador
es una iluminación interior mediante LEDs por lo que
el mantenimiento deberá ser realizado por un técnico
FXDOLÀFDGR
INTERRUPCIONES DE ALIMENTACIÓN
1. Si la interrupción de la corriente durará 24 horas o
menos, mantenga todas las puertas del refrigerador
cerradas para que los alimentos permanezcan fríos y
congelados.
2. Si la interrupción de la corriente durará más de 24 horas,
saque todos los alimentos congelados y almacénelos en
un arcón congelador.
CUANDO SE VA DE VACACIONES
Si decide dejar encendido el refrigerador mientras está
fuera, siga estos pasos para preparar el refrigerador antes de
irse.
1. Consuma los alimentos perecederos y congele los demás.
2. Apague la máquina de hielo y vacíe el depósito de hielo.
Si decide apagar el refrigerador antes de partir, siga estos
pasos.
1. Saque todos los alimentos del refrigerador.
2. En función del modelo, ajuste el control del termostato
(control del refrigerador) en OFF. Consulte la sección
Ajuste de los controles .
3. Limpie el refrigerador y séquelo a fondo.
4. Con cinta adhesiva, coloque bloques de madera o goma
en la parte superior de ambas puertas para mantenerlas
ORVXÀFLHQWHPHQWHDELHUWDVSDUDTXHSXHGDSDVDUHODLUH
Esto evitará la aparición de moho y malos olores.
ADVERTENCIA
78

79
CONEXIÓN DE LA TUBERÍA DE AGUA
ANTES DE EMPEZAR
Esta instalación de la tubería de agua no está cubierta por
la garantía del refrigerador. Siga estas instrucciones con
cuidado para minimizar el riesgo de costosos daños debidos
al agua.
El golpe de ariete (golpeteo del agua en las tuberías) en
la fontanería de la casa podría dañar componentes del
refrigerador y provocar una fuga o una inundación de agua.
/ODPHDXQIRQWDQHURFXDOLÀFDGRSDUDUHVROYHUHOJROSHGH
ariete antes de instalar la tubería de suministro de agua en
el refrigerador.
PRECAUCIÓN: Para evitar quemaduras y daños en
el producto, conecte sólamente el tubo de agua del
refrigerador a un suministro de agua fría.
Si utiliza el refrigerador antes de la conexión al suministro
de agua, asegúrese de apagar la máquina de hielo en el
panel de control.
PRECAUCIÓN: No instale la tubería de la máquina
de hielo en zonas donde las temperaturas descienden por
debajo del punto de congelación.
PRESIÓN DEL AGUA
Un suministro de agua fría. La presión del agua debe estar
entre los 20 y los 120 psi. Si el refrigerador se instala en un
área con baja presión de agua (menos de 20 psi), se puede
instalar una bomba de carga para compensar la baja
presión.
Si se conecta un sistema de filtración de agua de ósmosis
inversa al suministro de agua fría, esta instalación de
la tubería de agua no está cubierta por la garantía del
refrigerador. Siga estas instrucciones con cuidado para
minimizar el riesgo de costosos daños debidos al agua.
Si se conecta un sistema de filtración de agua de ósmosis
inversa al suministro de agua fría, la presión de agua al
sistema de ósmosis inversa debe ser como mínimo de entre
40 y 60 psi (276-414 kPa o 2,8-4,2 kgf/cm², menos de
2-3 s para llenar un vaso de 7 oz o 198 cc de capacidad).
Si la presión del agua del sistema de ósmosis inversa es
inferior a 20 psi o 138 kPa o 1,4 kgf/cm² (se necesitan más
de 4 se para llenar un vaso de 7 oz o 198 cc de capacidad):
Compruebe si el filtro de sedimentos del sistema de ósmosis •
inversa está bloqueado. Reemplace el filtro si es necesario.
Después de un uso intensivo, déle tiempo al depósito de •
almacenamiento del sistema de ósmosis inversa para que
se llene.
Si el problema relacionado con la presión de agua •
procedente de la ósmosis inversa persiste, llame a un
fontanero cualificado.
Todas las instalaciones deben realizarse conforme a los •
requisitos de los códigos locales de fontanería.
PRECAUCIÓN: Use gafas protectoras durante la
instalación para evitar lesiones.
QUÉ NECESITARÁ
Tubería de cobre, • de ¼ de pulgada
de diámetro, para conectar el
refrigerador al suministro de agua.
Asegúrese de que ambos extremos de
la tubería están cortados a escuadra.
Para determinar la cantidad de tubería que necesita: mida •
la distancia desde la válvula de agua situada en la parte
posterior del refrigerador a la tubería del suministro de
agua. A continuación, súmele 2,4 metros (8 pies). Asegúrese
de que haya suficiente tubería adicional (aproximadamente
2,4 metros [8 pies] enrollada en 3 vueltas de unos 25 cm
[10 pulg.] de diámetro) para permitir que se pueda despegar
el refrigerador de la pared después de la instalación.
Taladro eléctrico.•
Llave de ½ pulg. o una llave inglesa.•
Destornilladores de punta plana y de estrella.•
Dos tuercas de compresión •
con un diámetro exterior de
¼ de pulg. y 2 abrazaderas
para unir el tubo de cobre a la
válvula de corte y a la válvula
de agua del refrigerador.
Si la tubería de agua de cobre •
existente tiene una conexión
abocinada en el extremo,
necesitará un adaptador
(disponible en cualquier ferretería)
para conectar la tubería de agua
al refrigerador O puede cortar
la conexión abocinada con un
cortatubos y, a continuación, usar
una tuerca de unión.
Una válvula de corte para conectar a la tubería de agua •
fría. La válvula de corte debería tener una entrada de
agua con un diámetro interior mínimo de / pulg. en el
punto de conexión con la TUBERÍA DE AGUA FRÍA. Las
válvulas de corte de montura se incluyen en muchos kits
de suministros de agua. Antes de
comprarla, asegúrese de que la
válvula de montura cumple con
los códigos locales de fontanería.
NOTA: No se debe usar una
válvula de agua de tipo de montura autoperforante.
ADVERTENCIA
Riesgo de descargas eléctricas
Si usa un dispositivo eléctrico (como un taladro) durante
la instalación, asegúrese de que esté alimentado por
batería y que tenga doble aislamiento o que esté
correctamente conectado a tierra de manera que evite
el riesgo de una descarga eléctrica.
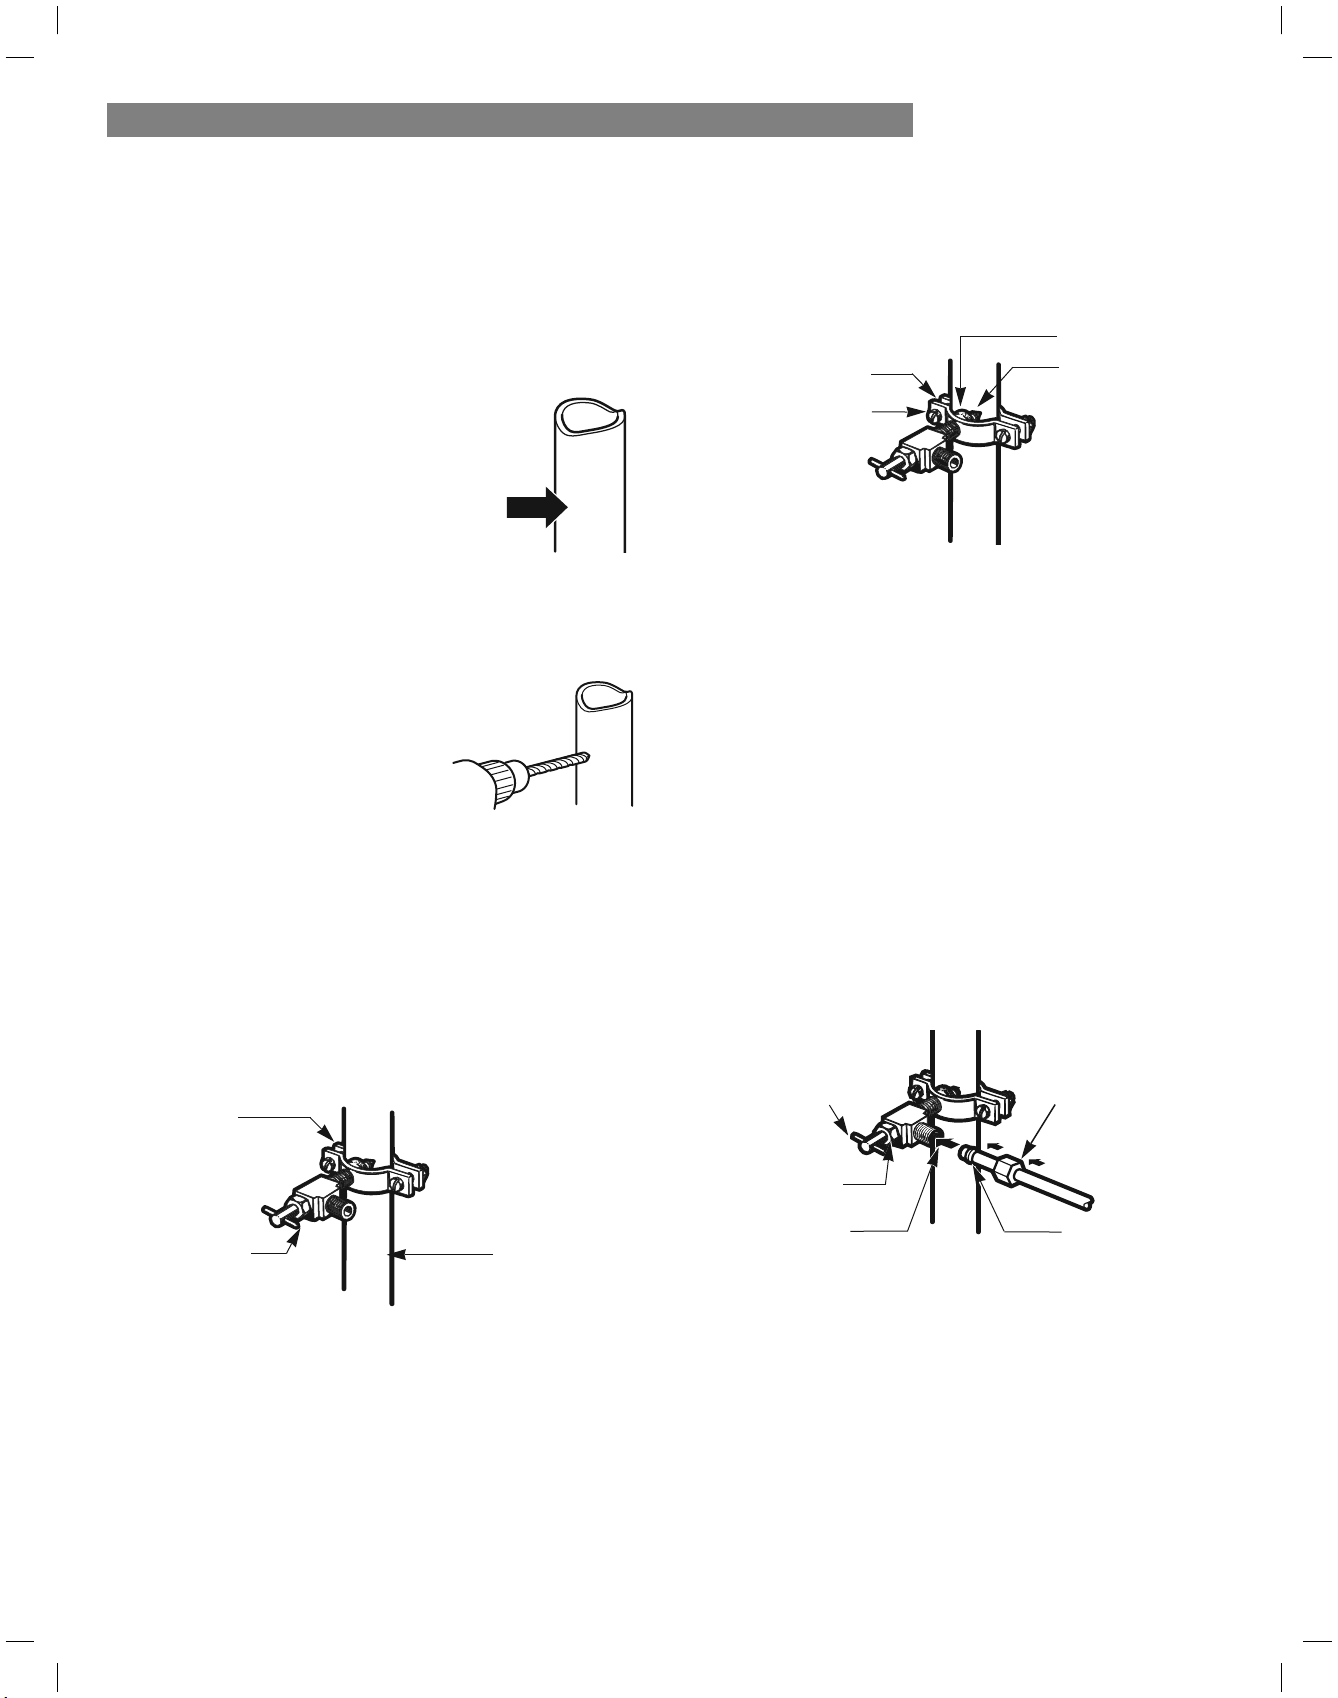
CONEXIÓN DE LA TUBERÍA DE AGUA
INSTRUCCIONES DE INSTALACIÓN
Instale la válvula de corte cerca de la tubería de agua
potable que más se usa.
1.
80
CORTE EL SUMINISTRO DE AGUA PRINCIPAL
Abra el grifo más cercano para liberar la presión
de la línea.
2. ELIJA LA UBICACIÓN DE LA VÁLVULA
Elija una ubicación para la válvula a
la que se pueda acceder fácilmente.
Es mejor conectarla en el lateral de
una tubería de agua vertical. Cuando
sea necesario conectarla en una
tubería de agua horizontal, realice la
conexión en la parte superior o lateral,
en lugar de conectarla a la parte inferior, para evitar
la acumulación de sedimentos de la tubería de agua.
3. TALADRE EL ORIFICIO PARA LA VÁLVULA
Taladre un orificio de ¼ pulg. en
la tubería de agua mediante una
punta afilada. Quite todas las
rebabas resultantes de taladrar
el orificio en la tubería. Tenga
cuidado de que no caiga agua
en el taladro. Si no se taladra un
orificio de ¼ de pulg., podría
verse reducida la producción de hielo y el tamaño
de los cubitos.
NOTA: La tubería de conexión no puede ser una tubería
blanca de plástico. Los fontaneros profesionales solo
pueden utilizar tuberías de cobre (tuberías NDA #49595
o #49599) o tuberías de Polietileno Reticular (PEX).
4. FIJE LA VÁLVULA DE CORTE
Fije la válvula de corte a la tubería de agua fría con la
abrazadera para tubos.
NOTA: Se deben cumplir los códigos de fontanería
248CMR del Estado de Massachusetts. Las válvulas
de montura son ilegales y no se permite su uso en
Massachusetts. Consulte a su fontanero autorizado.
5. APRIETE LA ABRAZADERA PARA TUBOS
Apriete los tornillos de la abrazadera hasta que
la arandela de sellado comience a hincharse.
NOTA: Tenga cuidado de no sobreapretar la
abrazadera, ya que podría romper la tubería.
6. ENCAMINE LA TUBERÍA
Encamine la tubería entre la tubería de agua fría y el
refrigerador.
Encamine la tubería a través de un orificio taladrado
en la pared o suelo (detrás del refrigerador o junto a
la base del aparato) lo más cerca de la pared que sea
posible.
NOTA: Asegúrese de que haya suficiente tubería
adicional (aproximadamente 2,4 metros enrollada en
3 vueltas de unos 25 cm diámetro) para permitir que se
pueda despegar el refrigerador de la pared después de
la instalación.
7. CONECTE LA TUBERÍA A LA VÁLVULA
Coloque la tuerca de compresión y la abrazadera
para la tubería de cobre en el extremo de la tubería y
conéctela a la válvula de corte. Asegúrese de que la
tubería está completamente insertada en la válvula.
Apriete la tuerca de compresión con fuerza.
NOTA: Se deben cumplir los códigos de fontanería
248CMR del Estado de Massachusetts. Las válvulas de
montura son ilegales y no se permite su uso en
Massachusetts. Consulte a su fontanero autorizado.
Abrazadera
para tubos
Válvula de
corte de
montura
Tubería de
agua fría
vertical
Abrazadera
para tubos
Tornillo de la
abrazadera
Arandela
Extremo de
entrada
Válvula de
corte de
montura
Tuerca
prensaestopas
Válvula de
salida
Tuerca de
compresión
Guarnición
(manguito)
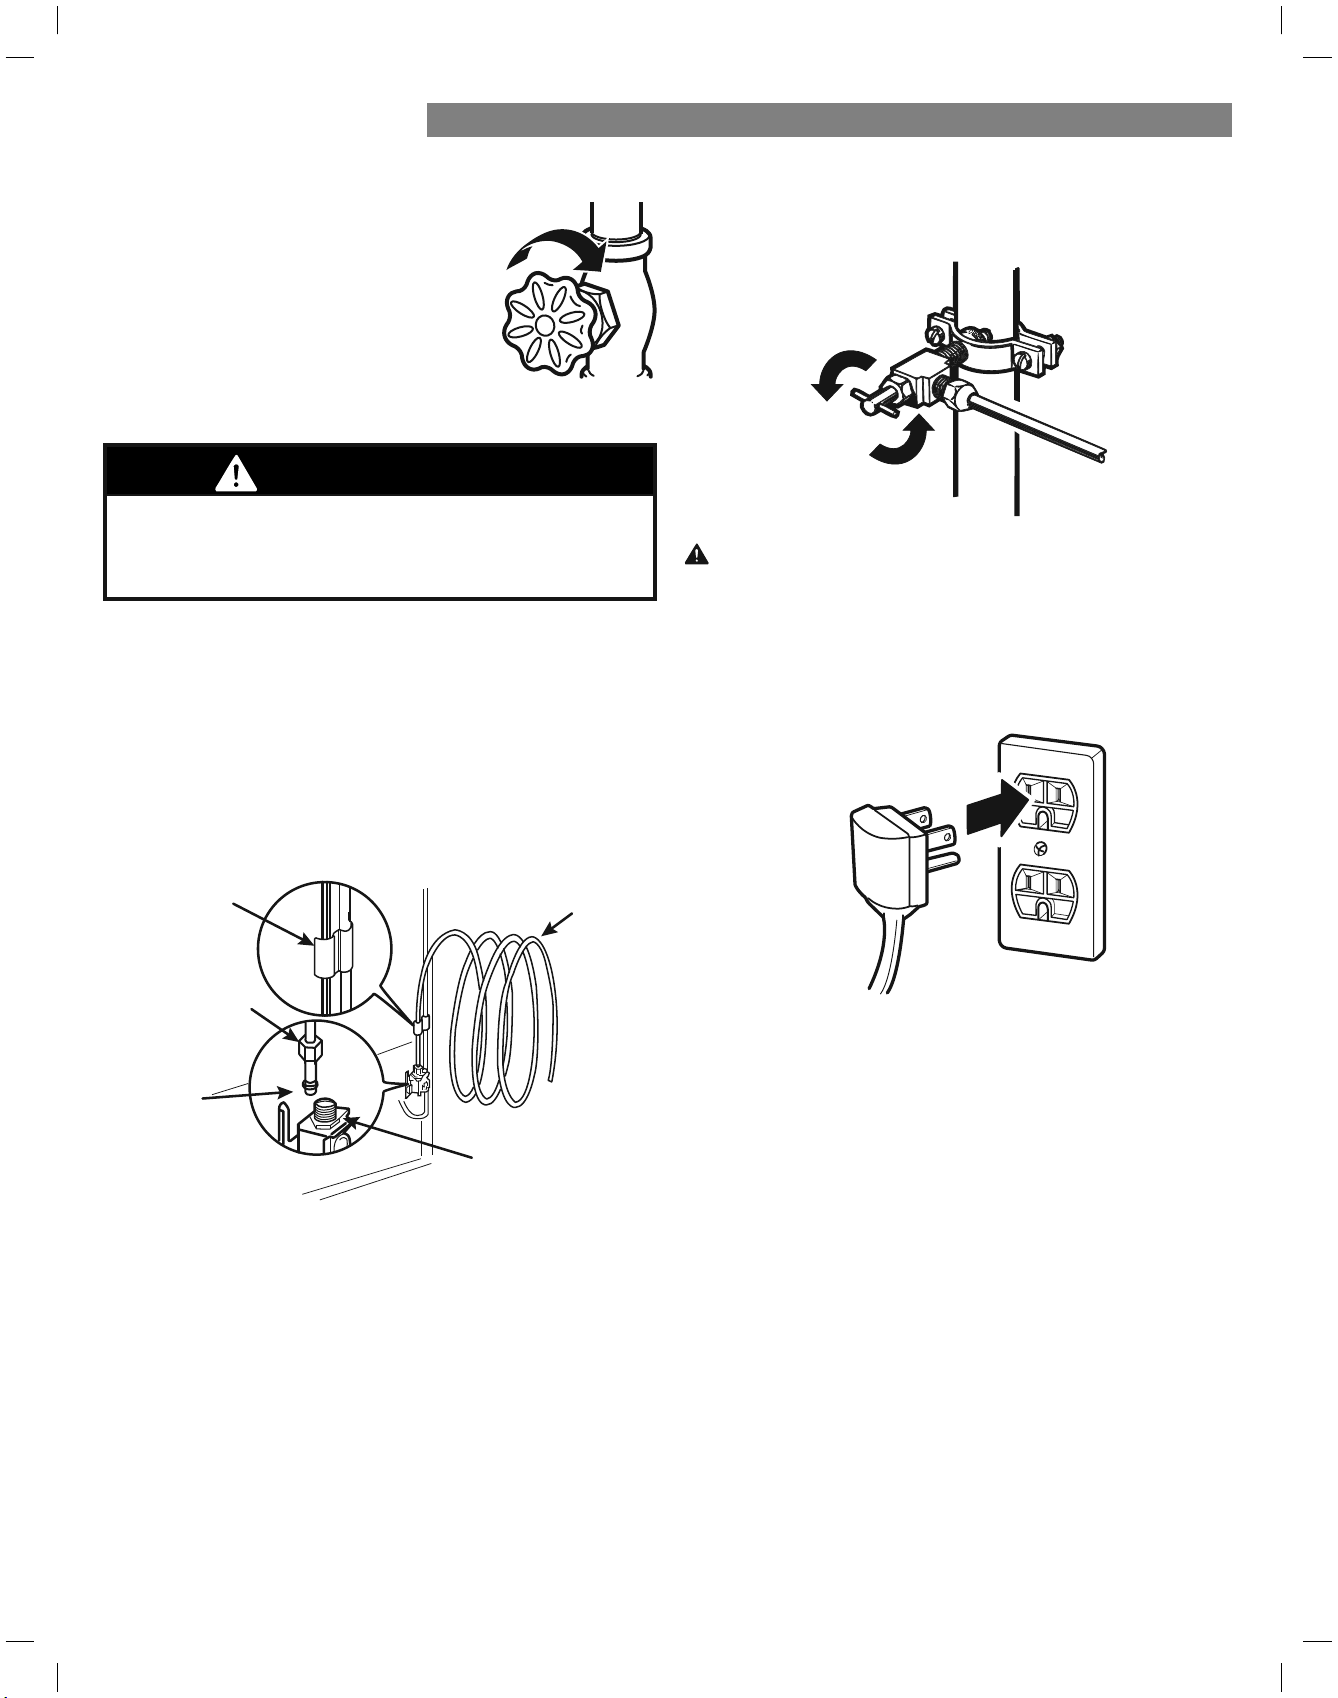
CONEXIÓN DE LA TUBERÍA DE AGUA
8.
81
ACLARE EL INTERIOR DE LA TUBERÍA
Active el suministro de agua principal
y deje correr el agua por la tubería
hasta que salga agua limpia.
Corte la válvula de agua después de
que haya pasado aproximadamente
un litro de agua a través de la
tubería.
9. CONECTE LA TUBERÍA AL REFRIGERADOR
1. Retire la tapa de plástico flexible de la válvula de agua.
2. Coloque la tuerca de compresión y la guarnición
(manguito) en el extremo del tubo tal como se muestra
en la imagen.
3. Inserte el extremo de la tubería de cobre en la conexión
todo lo que pueda. Mientras sujeta la tubería, apriete el
adaptador.
10. ABRA EL PASO DE AGUA EN LA VÁLVULA DE CORTE
Apriete las conexiones que goteen.
11. ENCHUFE EL REFRIGERADOR
Disponga la bobina de tubería de tal manera que no
vibr
e contra la parte posterior del refrigerador ni contra
la pared. Empuje el refrigerador hacia la pared.
12.
ENCIENDA LA MÁQUINA DE HIELO
La máquina de hielo no comenzará a funcionar hasta
que no alcance su temperatura de funcionamiento de
–9 °C (15 °F) o menos. Se pondrá en funcionamiento
automáticamente si se ha puesto en ON el botón de la
máquina de hielo.
Abrazadera de
tubería
Tubería de
¼ de pulg.
Tuerca de
compresión de
¼ de pulg.
Conexión del
refrigerador
Guarnición
(manguito)
PRECAUCIÓN: Compruebe si hay fugas en las
conexiones de las tuberías de agua.
ADVERTENCIA
Antes de realizar la conexión al refrigerador, asegúrese
de que el cable de alimentación del refrigerador no está
enchufado a la toma de corriente.
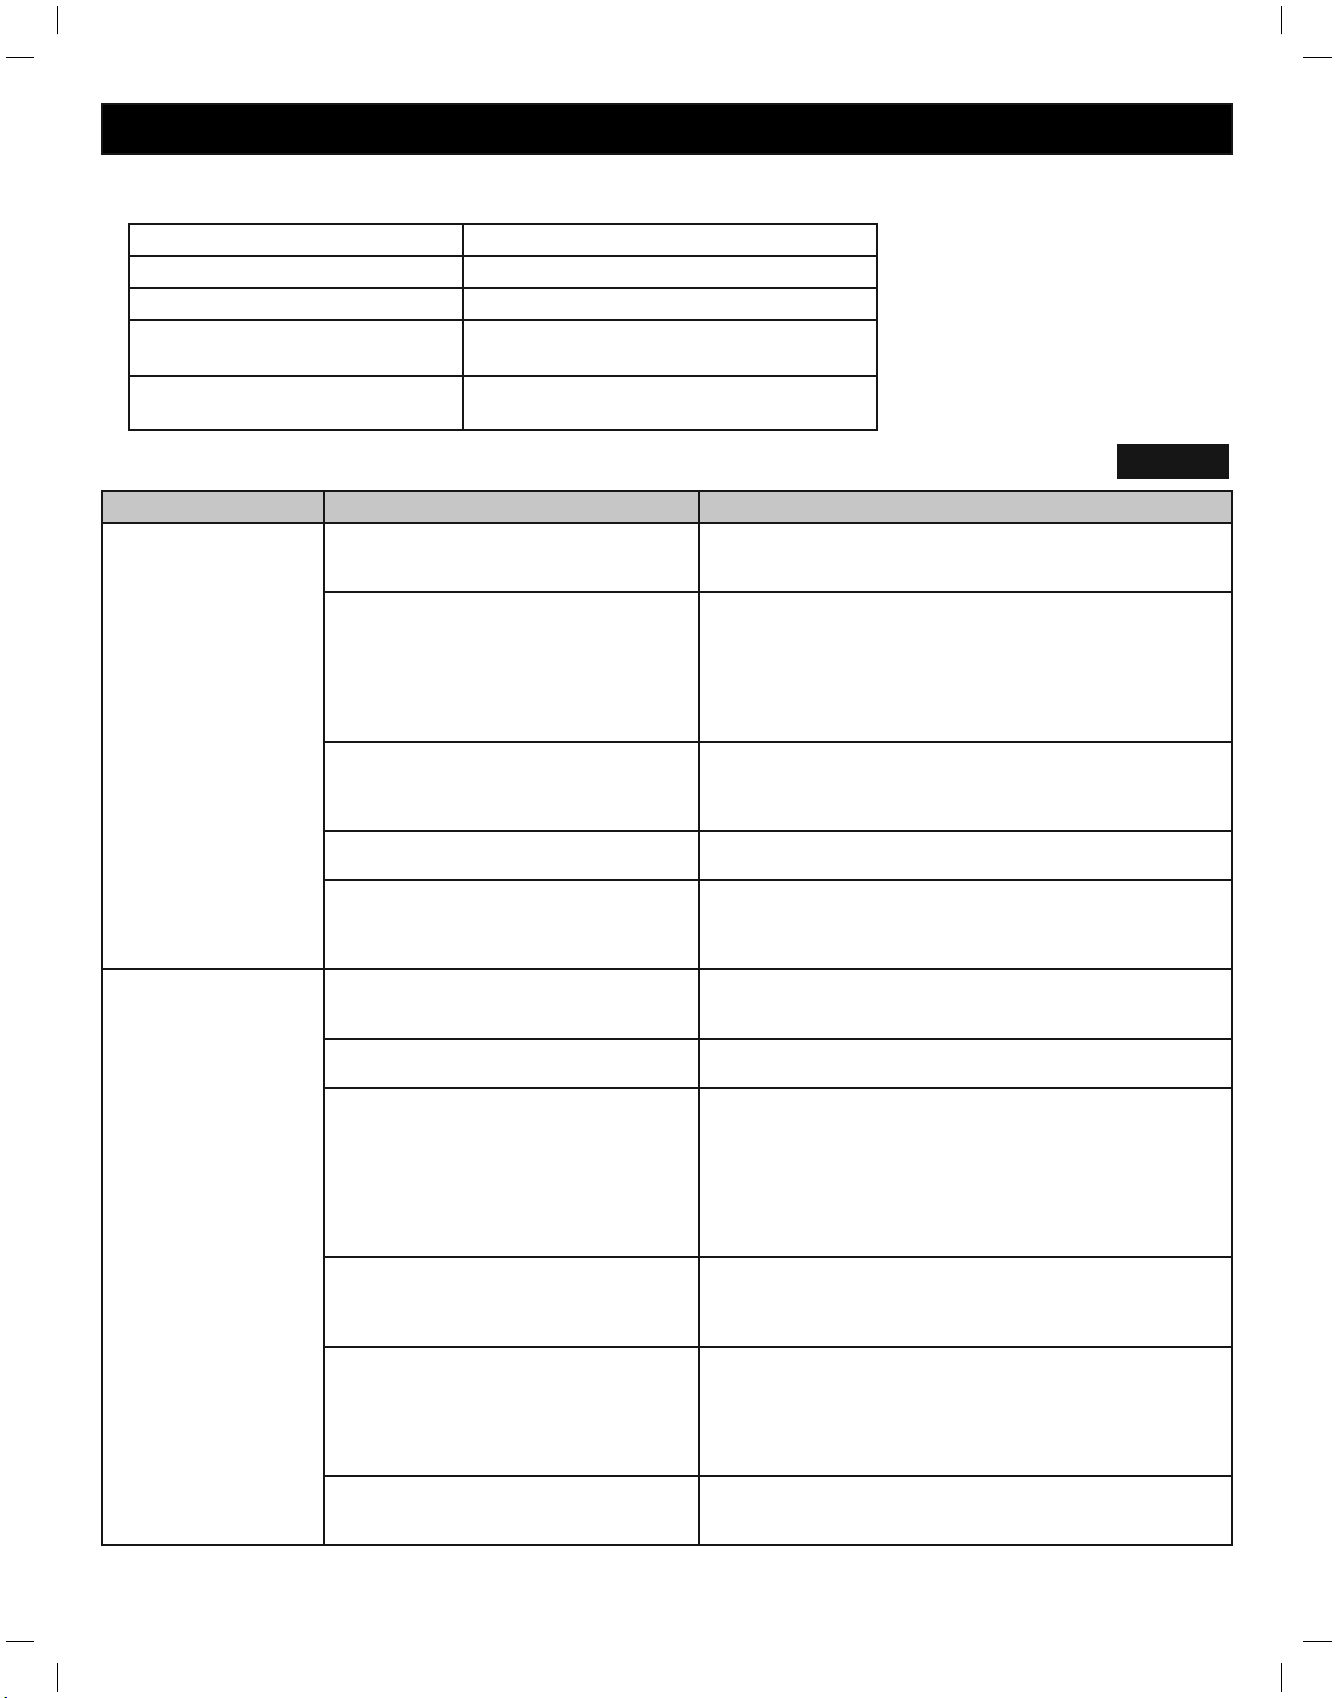
82
GUÍA DE SOLUCIÓN DE PROBLEMAS
Problema Causas posibles
Solutions
Las secciones del
refrigerador y del
congelador no enfrían.
El control del refrigerador está en la posición
OFF (en algunos modelos).
Encienda el control. Consulte la sección Ajuste de los controles
para obtener información acerca de los ajustes correctos de
temperatura.
El refrigerador está en Demo Mode (Modo
Demostración).
El Modo demostración permite que las luces y la pantalla
de control funcionen con normalidad, si bien el sistema de
refrigeración está deshabilitado para ahorrar energía, mientras
el electrodoméstico está en la planta de exposición del
establecimiento comercial. Consulte la sección Ajuste de los
controles para obtener instrucciones sobre cómo desactivar el
Modo Demostración.
El refrigerador está en el ciclo de
descongelación.
Durante el ciclo de descongelación, la temperatura de cada
compartimiento puede aumentar ligeramente. Espere 30 minutos
y una vez que se haya completado el ciclo de descongelación,
veriÀTXHTXH la temperatura correcta se haya restablecido.
El refrigerador se instaló recientemente. Puede tomar hasta 24 horas para que cada compartimiento
alcance la temperatura deseada.
El refrigerador se trasladó recientemente. Si el refrigerador estuvo fuera de uso por mucho tiempo, o si
estuvo guardado de costado, es necesario que se lo posiciones
de manera vertical por 24 horas antes de conectarlo a la energía
eléctrica.
El sistema de enfriado
funciona por demasiado
tiempo.
El refrigerador ha reemplazado a un modelo
más antiguo.
Los refrigeradores modernos requieren más tiempo de
funcionamiento pero consumen menos energía gracias a una
tecnología másHÀciente.
El refrigerador se acaba de enchufar o la
electricidad se acaba de restablecer.
El refrigerador puede tardar hasta 24 horas en enfriarse
completamente.
La puerta se abre a menudo o se acaba de
introducir una gran cantidad de alimentos/
alimentos calientes.
Cuando se introducen alimentos o se abren las puertas, aumenta
la tem
peratura del refrigerador, lo que obliga al compresor a
funcionar por más tiempo para volver a enfriar el refrigerador.
Para ahorrar energía, intente sacar todo lo que necesite
del refrigerador de una sola vez, mantenga los alimentos
organizados para que resulte fácil encontrarlos, y cierre la
puerta en cuanto saque el alimento. (Consulte la Guía para el
almacenamiento de alimentos).
Las puertas no están completamente
cerradas.
Empuje Àrmemente para cerrar las puertas. Si éstas no se cierran
por completo, consulte el apartado “Las puertas no se cierran
completamente o quedan abiertas en la sección Componentes y
Ca
racterísticas de la Guía de resolución de problemas.
El refrigerador está instalado en un lugar
caluroso.
El compresor funcionará por más tiempo en condiciones
calurosas. A temperaturas ambiente normales (21 °C), el
compresor debería funcionar entre el 40% y el 80% del tiempo.
En condiciones más calurosas, sería esperable que funcionara
incluso más a menudo. No se debería usar el refrigerador si la
temperatura supera los 43°C.
La tapa posterior/ el condensador está
obstruida/o.
Use un aspirador con un accesorio para limpiar las bobinas del
condensador y las rejillas de ventilación. No retire el panel que
cubre el área de las bobinas del condensador.
ENFRIADO
Antes de llevar a cabo los pasos necesarios para detectar y solucionar problemas, asegúrese de que se cumpla con los
siguientes requisitos básicos:
Flujo de servicio 1,9 lpm (0,5 gpm)
Suministro de agua Agua potable
Presión del agua 138 - 827 kPa (20-120 psi)
Límites de temperatura ambiente
para el funcionamiento
55°F - 110°F
EspeciÀFDFiones eléctricas
115 voltios, 60 Hz, AC únicamente, y
fusionado a 15 o 20 amperios.
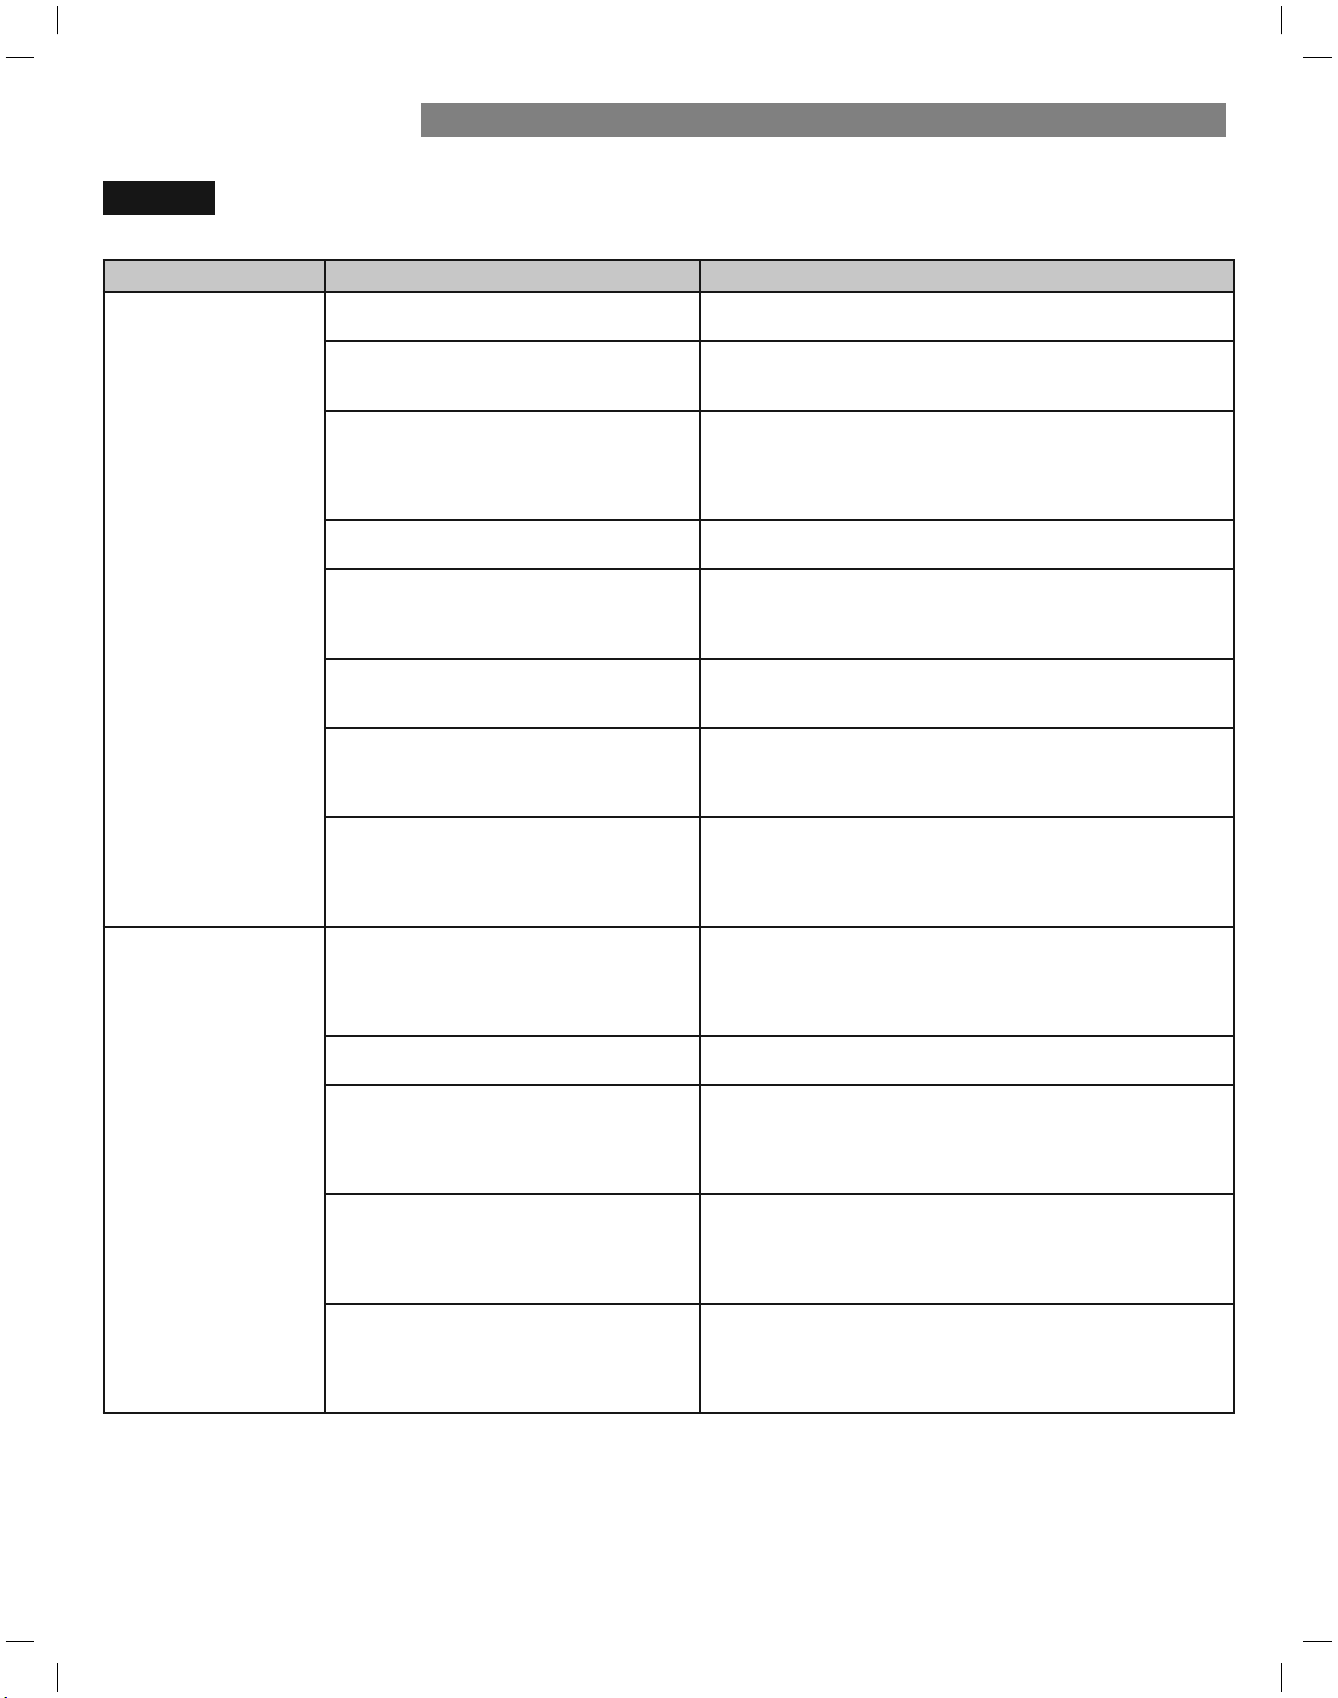
Problema Causas posibles
Solutions
La sección del
REFRIGERADOR o del
CONGELADOR está
demasiado caliente.
El refrigerador se instaló recientemente. Puede tomar hasta 24 horas para que cada compartimiento
alcance la temperatura deseada.
Los conductos de ventilación del aire están
bloqueados.
Reorganice los artículos dentro del electrodoméstico para
permitir que el aire fluya a través del compartimiento. Consulte el
diagrama de Flujo de aire en la sección Uso del refrigerador.
Las puertas se abren a menudo o por largos
períodos de tiempo.
Cada vez que las puertas se abren a menudo o por largos
períodos de tiempo, ingresa aire caliente y húmedo al
compartimiento. Esto aumenta la temperatura y el nivel de
humedad dentro de compartimiento. Para disminuir el efecto,
reduzca la frecuencia y duración de apertura de la puerta.
La unidad está instalada en un lugar
caluroso.
No se debería usar el refrigerador si la temperatura supera los
43°C (110°F).
Se agregó una gran cantidad de alimentos
o alimentos calientes al alguno de los
compartimientos.
Agregar alimentos calienta el compartimiento, con lo cual se
necesita que el sistema de enfriado comience a funcionar. Dejar
que la comida caliente se enfríe a temperatura ambiente antes
de ponerla en el refrigerador reducirá dicho efecto.
Las puertas no cierran correctamente. Consulte el apartado “Las puertas no se cierran completamente o
quedan abiertas” en la sección Componentes y Características de
la Guía de resolución de problemas.
El control de temperatura no es el adecuado. Si la temperatura no está lo suficientemente fría, ajuste el
control de a un punto a la vez y espere a que la temperatura
se estabilice. Consulte la sección Ajuste de los controles para
obtener mayor información.
El ciclo de descongelación se ha completado
recientemente.
Durante el ciclo de descongelación, la temperatura de cada
compartimiento puede aumentar ligeramente y se puede formar
condensación en la pared trasera. Espere 30 minutos y una vez
que se haya completado el ciclo de descongelación, verifique
que la temperatura correcta se haya restablecido.
Acumulación de
humedad en el interior
Las puertas se abren seguido o por largos
períodos de tiempo.
Cada vez que las puertas se abren seguido o por largos períodos
de tiempo, ingresa aire caliente y húmedo al compartimiento.
Esto aumenta la temperatura y el nivel de humedad dentro de
compartimiento. Para disminuir el efecto, reduzca la frecuencia y
duración de apertura de la puerta.
Las puertas no cierran correctamente. Consulte el apartado “Las puertas no se cierran correctamente”
en la sección Guía para la solución de problemas.
El clima es húmedo. El clima húmedo hace que más humedad ingrese a los
compartimientos cuando se abren las puertas, provocando
condensación o congelación. Mantener un nivel razonable
de humedad en el hogar ayudará a controlar la cantidad de
humedad que ingresa en los compartimientos.
El ciclo de descongelación se acaba de
completar.
Durante el ciclo de descongelación, la temperatura de cada
compartimiento puede aumentar ligeramente y se puede formar
condensación en la pared trasera. Espere 30 minutos y una vez
que se haya completado el ciclo de descongelación, verifique
que la temperatura correcta se haya restablecido.
Los alimentos no están empaquetados
correctamente.
Los alimentos destapados o desenvueltos y los envases húmedos
pueden provocar la acumulación de humedad dentro de cada
compartimiento. Limpie y seque todos los envases, y almacene los
alimentos en empaques sellados para prevenir la condensación y
la congelación.
ENFRIADO
83
GUÍA DE SOLUCIÓN DE PROBLEMAS
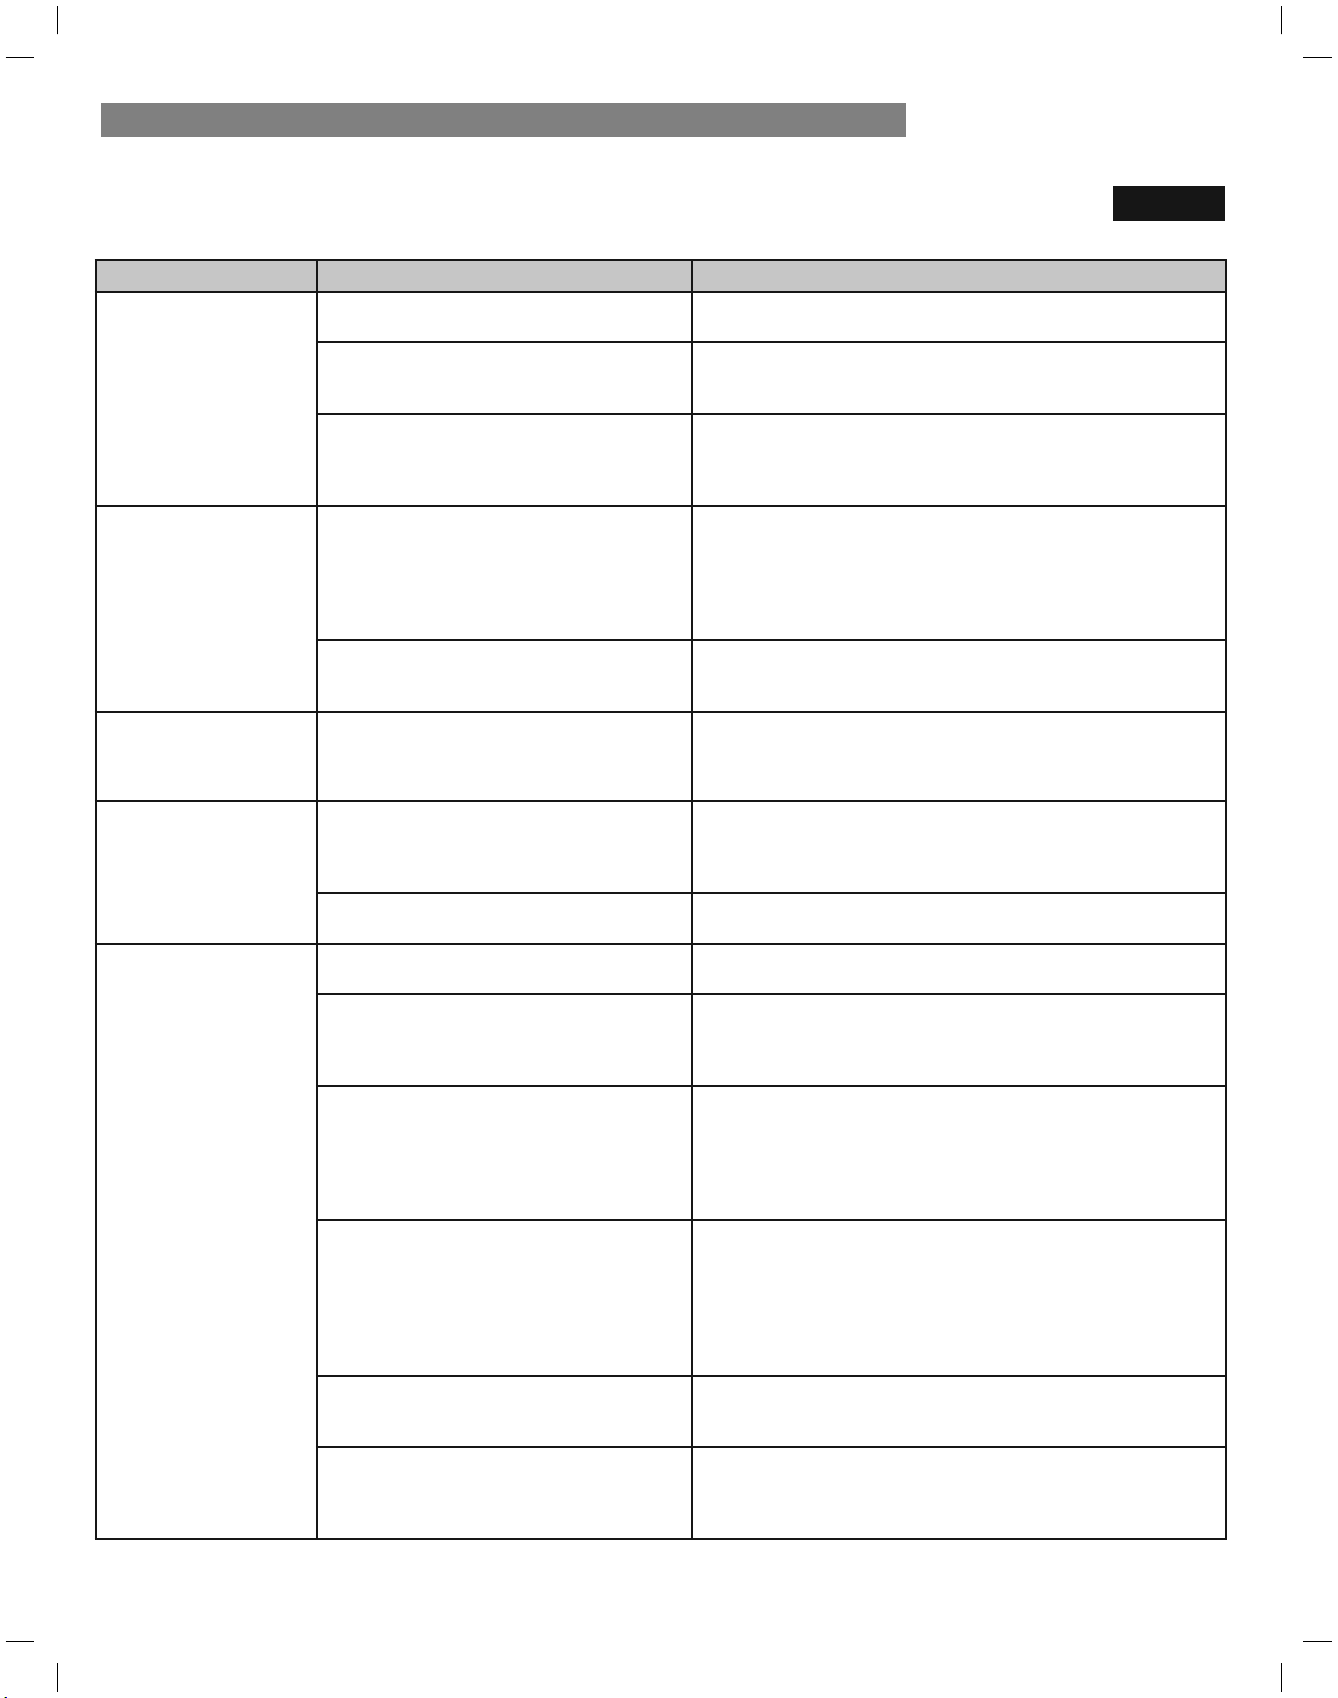
84
Problema Causas posibles
Solutions
Los alimentos se congelan
en el compartimiento del
refrigerador.
Alimentos con alto contenido de agua fueron
colocados cerca de la ventilación de aire.
Reubique los alimentos con alto contenido de agua lejos de las
ventilaciones de aire.
El control de temperatura del refrigerador
está incorrectamente ajustado.
Si la temperatura está demasiado fría, ajuste el control de a un punto
a la vez y espere a que la temperatura se estabilice. Consulte la
sección Ajuste de los controles para obtener mayor información.
El refrigerador está instalado en un lugar frío.
Cuando el refrigerador funciona a una temperatura menor a los 5°C
(41°F), los alimentos pueden congelarse en el compartimiento del
refrigerador. No se debería usar el refrigerador si la temperatura es
inferior a los 13°C (55°F).
Se forman cristales de
hielo o escarcha en los
alimentos congelados
(fuera de los paquetes).
La puerta se abre seguido o por largos
períodos de tiempo.
Cada vez que las puertas se abren a menudo o por largos períodos
de tiempo, ingresa aire caliente y húmedo al compartimiento.
Esto aumenta la temperatura y el nivel de humedad dentro de
compartimiento. La humedad produce congelación y condensación.
Para disminuir el efecto, reduzca la frecuencia y duración de
apertura de la puerta.
La puerta no se cierra correctamente. Consulte el apartado “Las puertas no se cierran completamente
o quedan abiertas” en la sección de la Guía de resolución de
problemas.
La sección del
REFRIGERADOR o del
CONGELADOR está
demasiado fría.
Los ajustes de control de temperatura son
incorrectos.
Si la temperatura está demasiado fría, ajuste el control de a un punto
a la vez y espere a que la temperatura se estabilice. Consulte la
sección Ajuste de los controles para obtener mayor información.
Se forman cristales de
hielo o escarcha en los
alimentos congelados
(dentro de paquetes
sellados).
La condensación proveniente de los alimentos
con alto contenido de agua provoca la
congelación en el interior del paquete del
alimento.
Esto es normal en alimentos con alto contenido de agua.
Los alimentos se han dejado en el congelador
por un largo tiempo.
No almacene alimentos con alto contenido de agua en el
congelador durante mucho tiempo.
La máquina de hielo no
hace sXÀciente hielo.
La necesidad de hielo excede la capacidad
de almacenamiento de hielo.
La máquina de hielo fabricará aproximadamente 70-182
cubitos en un período de 24 horas.
El suministro de agua del hogar no está
conectado, la válvula no está completamente
encendida, o la válvula está obstruida.
Conecte el refrigerador al suministro de agua fría con adecuada
presión y abra completamente la válvula de corte de agua.
Si el problema persiste, puede ser necesario contactar a un plomero.
El Àltro de agua está agotado. Se recomienda reemplazar el Àltro de agua:
Aproximadamente cada seis meses.
Cuando se encienda el indicador del Àltro del agua.
Cuando disminuya el caudal del dispensador de agua.
Cuando los cubitos de hielo sean más pequeños de lo normal.
Baja presión de suministro de agua en el hogar.
La presión del agua debe estar entre los 20 y los 120 psi en modelos
sin Àltro de agua, y entre los 40 y 120 psi en modelos con Àltro de
agua.
Si el problema continúa, puede ser necesaria la ayuda de un
fontanero o la instalación de una bomba de carga para compensar
la baja presión del agua.
Se utilizar un sistema de Àltración de agua de
ósmosis inversa.
Los sistemas de Àltración de agua de ósmosis inversa pueden reducir
la presión de agua por debajo del mínimo y provocar problemas en
la máquina de hielo. (Consulte la sección Presión del agua).
La tubería que conecta el refrigerador al
suministro del hogar está retorcida.
La tubería se puede retorcer cuando el refrigerador se mueve durante
la instalación o limpieza, lo que provoca un Áujo de agua reducido.
Enderece o repare el conducto de suministro del agua y arréglelo a
Àn de prevenir futuras torceduras.
ENFRIADO/ HIELO Y AGUA
GUÍA DE SOLUCIÓN DE PROBLEMAS
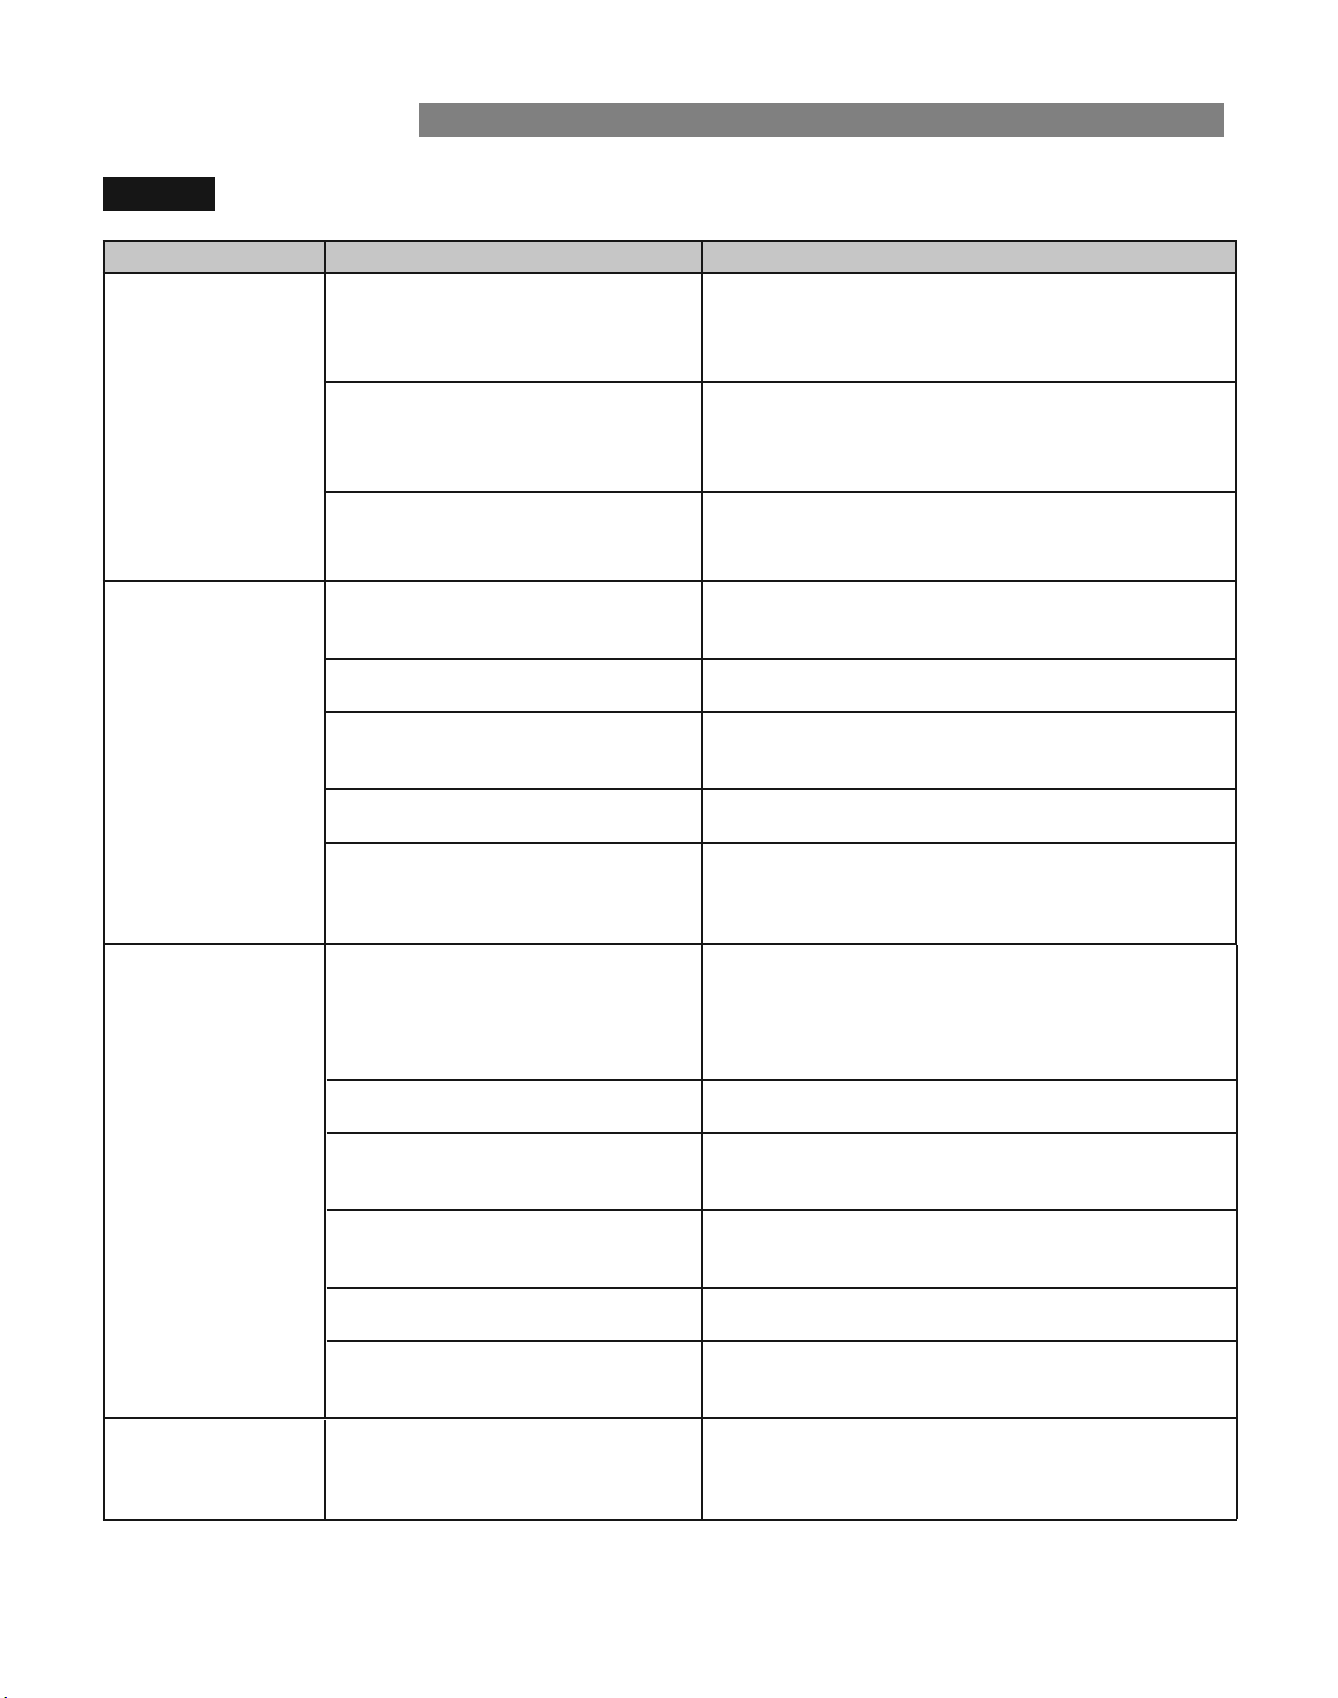
Problema Causas posibles
Solutions
La máquina de hielo
QRKDFHVXÀFLHQWHKLHOR
FRQWLQXDFLyQ
/DVSXHUWDVVHDEUHQVHJXLGRRSRUODUJRV
SHUtRGRVGHWLHPSR
6LODVSXHUWDVGHODXQLGDGVHDEUHQDPHQXGRHODLUHDPELHQWDO
FDOHQWDUiHOUHIULJHUDGRUHLPSHGLUiTXHODXQLGDGSXHGD
PDQWHQHUODWHPSHUDWXUDHVWDEOHFLGD3DUDD\XGDUDUHVROYHU
HVWHSUREOHPDSXHGHEDMDUODWHPSHUDWXUDGHOUHIULJHUDGRU
DGHPiVGHQRDEULUODSXHUWDFRQWDQWDIUHFXHQFLD
/DVSXHUWDVQRHVWiQFRPSOHWDPHQWH
FHUUDGDV
6LODVSXHUWDVQRVHFLHUUDQFRUUHFWDPHQWHODIDEULFDFLyQGHKLHOR
VHYHUiDIHFWDGD3DUDREWHQHUPD\RULQIRUPDFLyQFRQVXOWHHO
DSDUWDGR´/DVSXHUWDVQRVHFLHUUDQFRPSOHWDPHQWHRTXHGDQ
DELHUWDVµHQODVHFFLyQ&RPSRQHQWHV\&DUDFWHUtVWLFDVGHOD*XtD
GHUHVROXFLyQGHSUREOHPDV
(ODMXVWHGHWHPSHUDWXUDGHOFRQJHODGRUHV
GHPDVLDGRFiOLGR
/DWHPSHUDWXUDUHFRPHQGDGDSDUDHOFRPSDUWLPHQWRGHO
FRQJHODGRUSDUDXQDIDEULFDFLyQQRUPDOGHKLHORHVGH²&
)6LODWHPSHUDWXUDGHOFRQJHODGRUHVVXSHULRUOD
IDEULFDFLyQGHKLHORVHYHUiDIHFWDGD
HIELO Y AGUA
85
La máquina de hielo no
KDFHKLHOR
(OUHIULJHUDGRUVHLQVWDOyUHFLHQWHPHQWHROD
PiTXLQDGHKLHORVHFRQHFWyUHFLHQWHPHQWH
3XHGHWRPDUKDVWDKRUDVSDUDTXHFDGDFRPSDUWLPLHQWR
DOFDQFHODWHPSHUDWXUDGHVHDGD\SDUDTXHODPiTXLQDGHKLHOR
FRPLHQFHDIDEULFDUKLHOR
/DPiTXLQDGHKLHORQRHVWiHQFHQGLda /RFDOLFHHOLQWHUUXSWRU212))HQFHQGLGRDSDJDGRGHOD
PiTXLQDGHKLHOR\FRQÀUPHTXHHVWiHQODSRVLFLyQ21
(OUHIULJHUDGRUQRHVWiFRQHFWDGRDXQ
VXPLQLVWURGHDJXDRODYiOYXODGHFRUWHdel
VXPLQLVWURQRHVWiDELHUWD
&RQHFWHHOUHIULJHUDGRUDOVXPLQLVWURGHDJXD\DEUD
FRPSOHWDPHQWHODYiOYXODGHFRUWHGHDJXD
$SDJDGRGHODPiTXLQDGHKLHOREUD]R
SDOSDGRUREVWUXLGR
6LVXPiTXLQDGHKLHORYLHQHHTXLSDGDFRQXQEUD]RGHFRUWHGH
KLHORDVHJ~UHVHGHTXHHOEUD]RVHPXHYDOLEUHPHQWH
7LHQHFRQHFWDGRXQVLVWHPDGHÀOWUDFLyQGe
DJXDGHyVPRVLVLQYHUVDDOVXPLQLVWURGH
DJXDIUtD
/RVVLVWHPDVGHÀOWUDFLyQGHDJXDGHyVPRVLVLQYHUVDSXHGHQ
UHGXFLUODSUHVLyQGHDJXDSRUGHEDMRGHOPtQLPR\SURYRFDU
SUREOHPDVHQODPiTXLQDGHKLHOR&RQVXOWHODVHFFLyQ3UHVLyQ
GHODJXD
(OKLHORKXHOHRVDEHPDO (OVXPLQLVWrRGHDJXDFRQWLHQHPLQHrales
WDOHVFRPRHOD]XIrH
(VSRVLEOHTXHGHEDreHPSOD]DUHOÀOWrRGHDJXDSDra eliminar
los prREOHPDVGHRORU\VDERr
12TA: (QDOJXQRVFDVRsXQÀOWrRSRGUtDQRVHUGHD\XGD3Xede
no rHVXOWDUSRVLEOHTXLWDUWRGRPLQHrDORORUVDERUHQWRGRVORV
VXPLQLVWrRVGHDJXD
/DPiTXLQDGHKLHORVHLQVWDOyKDFHSRFR
WLHPSo
Deseche las primerDVWDQGDV de hielo para eYLWDUKLHORPDQFKDGR
RFRQPDOVDERr
(OKLHORKDHVWDGRDOPDFHQDGRSRU
GHPDVLDGRWLHPSo
(OKLHORDOPDFHQDGRSRUGHPDVLDGRWLHPSRVHDFKLFDriVH
YolYeriWXUELo\SXede desarrROODUXQVDERUrancio'HVeche el
KLHORDQWLJXR\IDEULTXHXQQXeYRVXPLQLVWro
/RVDOLPHQWRVQRVHKDQDOPDFHQDGR
correFWDPHQWHHQORVFRPSDUWLPHQWRV
VuelYa a enYolYHUORVDOLPHQWRVVuelYa a enYolYHUORVDOLPHQWRV
\a queVLQRHVWiQFRUreFWDPHQWHHnYXHOWRsORVRORres podrían
PLJrDUKDVWDHOKLHOo
(OLQWHULRUGHOrHIULJHrador ne
FHVLWDXQD
OLPSLH]D
&RQVXOWHODVeFFLyQ&XLGDGR\OLPSLH]DSDrDREWHQHUPiV
LQIRUPDFLyQ
(OGHSyVLWRGHKLHORQeFHVLWDXQDOLPSLH]D VDFtH\OLPSLHHOGHSyVLWRGHVeFKHORVFXELWRVGHKLHORYLHMRV
AseJ~rHVHGHTXHHOGHSyVLWRHVWiFRPSOHWDPHQWHVeFRDQWHVGH
rHLQVWDODUOo
La máquina de hielo hace
GHPDVLDGRKLHOR
$SDJDGRGHODPiTXLQDGHKLHOREUD]R
SDOSDGRUREVWUXLGR
9DFtHHOUHFLSLHQWHGHKLHOR6LODPiTXLQDGHKLHORLQFRUSRUDXQ
EUD]RGHDSDJDGRDVHJ~UHVHGHTXHVHPXHYDOLEUHPHQWH
9XHOYDDLQVWDODUHOUHFLSLHQWHGHKLHOR\HVSHUHKRUDVSDUD
FRPSUREDUVXFRUUHFWRIXQFLRQDPLHQWR
GUÍA DE SOLUCIÓN DE PROBLEMAS
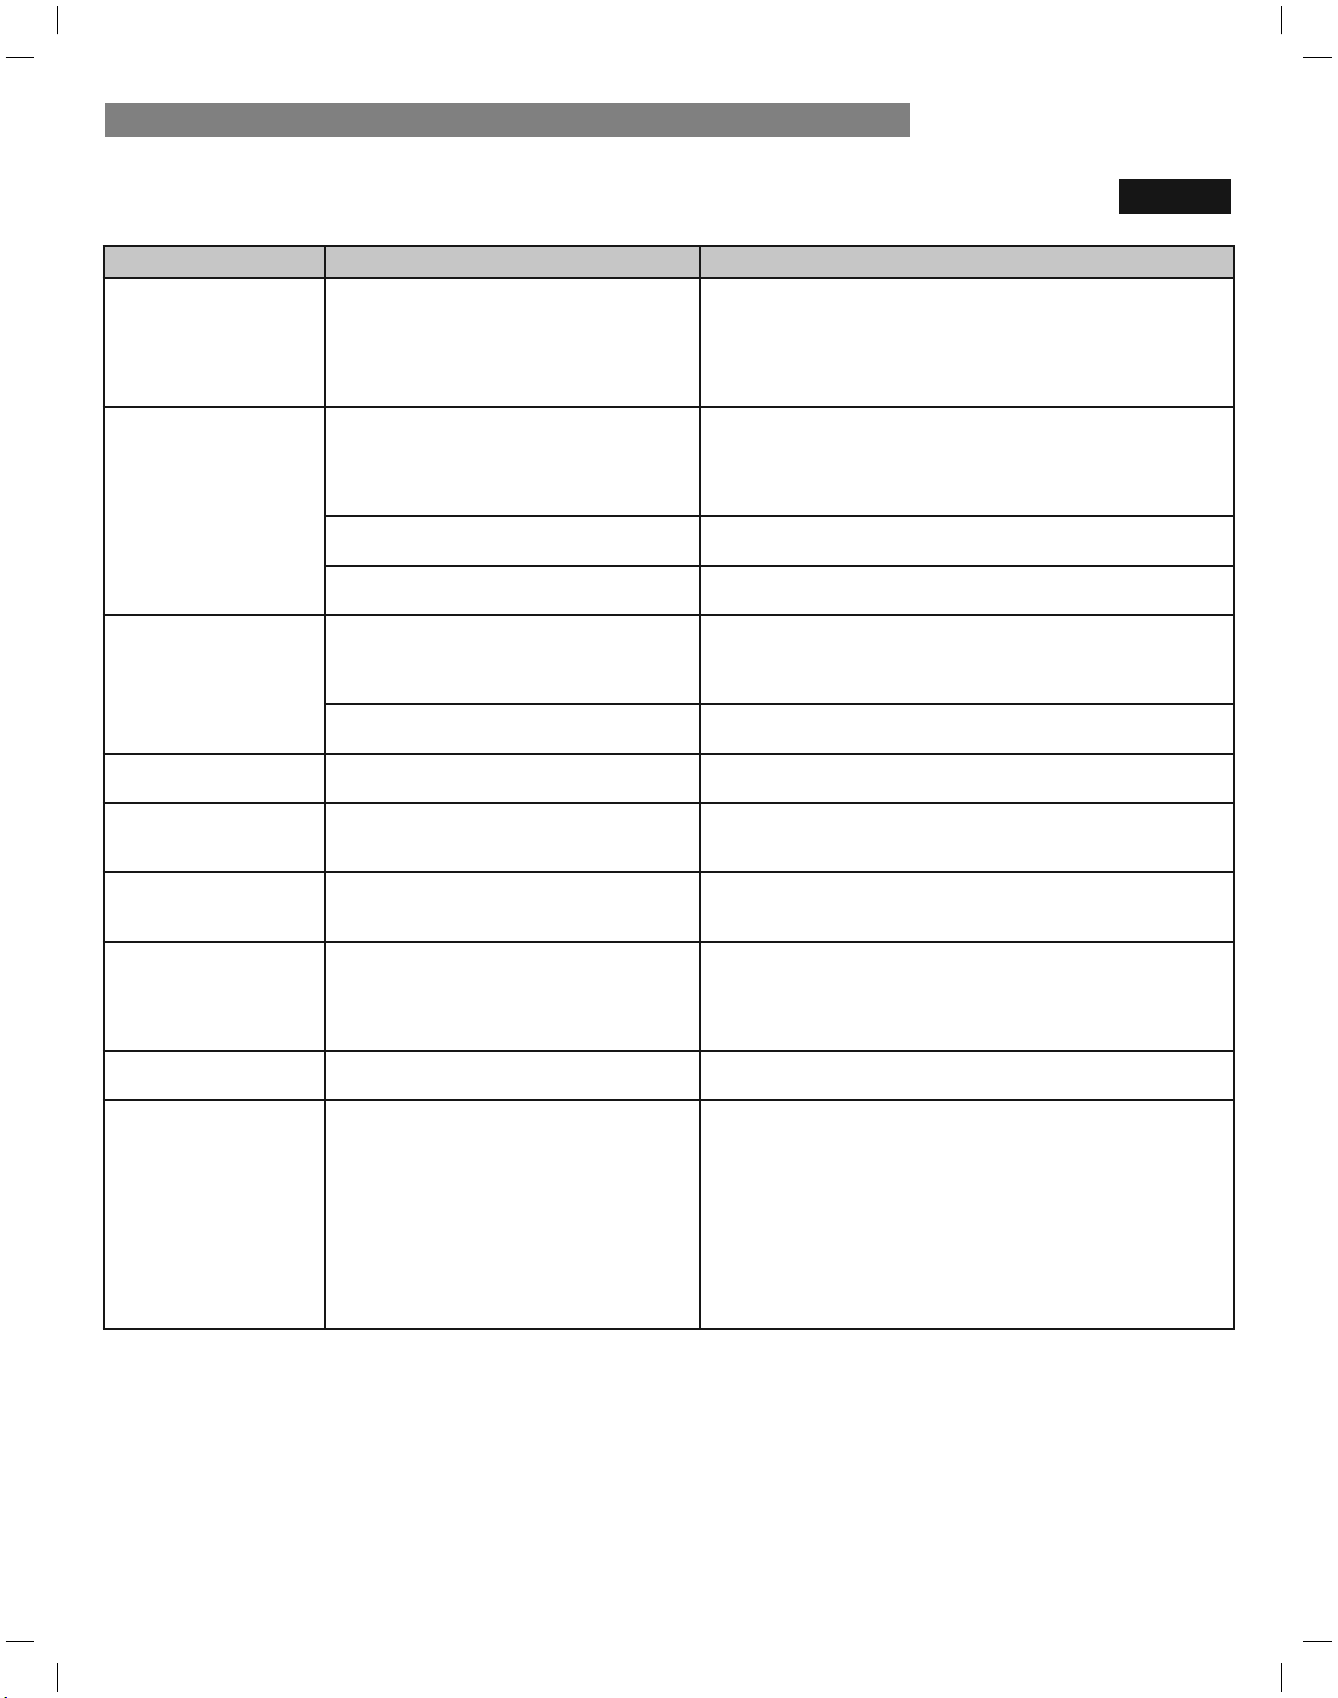
86
Problema Causas posibles
Solutions
Clics
El control de descongelación emitirá un
´FOLFµDOFRPHQ]DU\DOÀQDOL]DUHOFLFORGH
descongelación. El control del termostato (o
control del refrigerador en algunos modelos)
WDPELpQHPLWLUiXQ´FOLFµDOLQLFLDURÀQDOL]DU
un ciclo.
Funcionamiento normal.
Traqueteo
Los ruidos de traqueteos pueden proceder
GHOÁXMRGHOUHIULJHUDQWHGHODWXEHUtDGH
DJXDHQODSDUWHSRVWHULRUGHODXQLGDGRGH
DUWtFXORVDOPDFHQDGRVHQFLPDRDOUHGHGRU
del refrigerador.
Funcionamiento normal.
El refrigerador no está sólidamente
apoyado en el suelo.
(OVXHORHVSRFRVyOLGRRLUUHJXODURHVQHFHVDULRDMXVWDUORV pies
de nivelación. Consulte la sección Alineación de las puertas.
El refrigerador con compresor lineal se
sacudió mientras estaba funcionando.
Funcionamiento normal.
Ruido de aspas
El motor del ventilador del evaporador
está moviendo el aire a través de los
compartimentos del refrigerador y del
congelador.
Funcionamiento normal.
El ventilador del condensador está forzando
el paso de aire a través del condensador.
Funcionamiento normal.
Borboteo
5HIULJHUDQWHHVWiÁX\HQGRDWUDYpVGHO
sistema de enfriamiento.
Funcionamiento normal.
&UXMLGR
6HSURGXMRODFRQWUDFFLyQ\H[SDQVLyQGH
las paredes internas debido a cambios en la
temperatura.
Funcionamiento normal.
Crepitación
El agua cayendo en el calentador de
descongelación durante un ciclo de
descongelación.
Funcionamiento normal.
Vibración
Si el lateral o la parte posterior del
refrigerador están en contacto con un
PXHEOHRXQDSDUHGDOJXQDVGHODV
vibraciones normales pueden producir un
sonido audible.
3DUDHOLPLQDUHOUXLGRDVHJ~UHVHGHTXHORVODWHUDOHV\ODSDUte
posterior no puedan vibrar contra las paredes o los muebles.
Goteo
(ODJXDFD\HQGRHQODEDWHDGHGUHQDMH
durante el ciclo de descongelación.
Funcionamiento normal.
Sonido de pulsación o
agudo
Su refrigerador está diseñado para funcionar
GHIRUPDPiVHÀFLHQWHSDUDFRQVHUYDUORV
alimentos a la temperatura deseada. El
FRPSUHVRUGHDOWDHÀFLHQFLDSXHGHKDFHU
que su nuevo refrigerador funcione durante
PiVWLHPSRTXHVXDQWLJXRUHIULJHUDGRU\
DXQDVtVHUiPiVHÀFLHQWHHQHUJpWLFDPHQWH
que los modelos anteriores. Mientras el
UHIULJHUDGRUHVWiHQIXQFLRQDPLHQWRHV
QRUPDOHVFXFKDUXQVRQLGRGHSXOVDFLyQR
agudo.
Funcionamiento normal.
RUIDO
GUÍA DE SOLUCIÓN DE PROBLEMAS
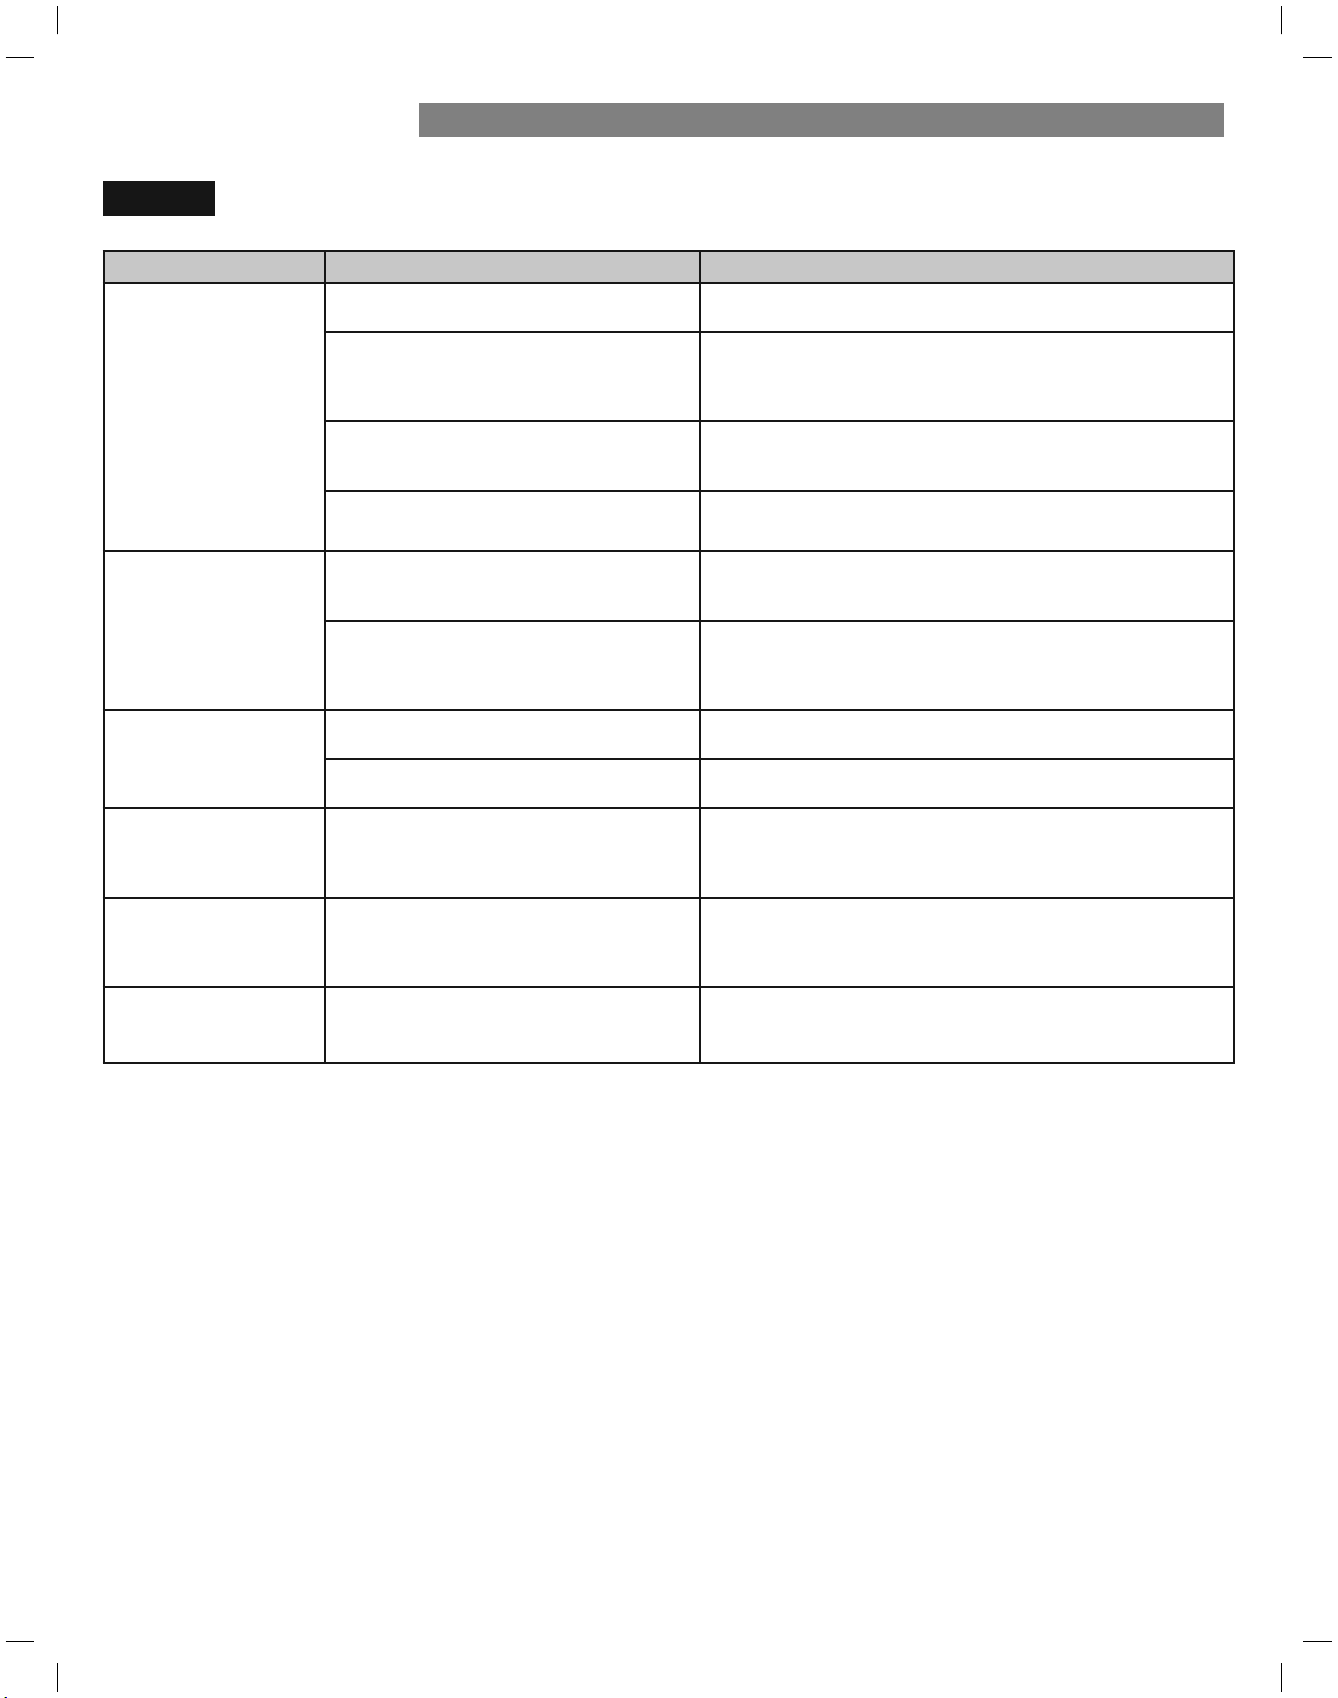
Problema Causas posibles
Solutions
Las puertas no se cierran
completamente o quedan
abiertas.
Hay paquetes de alimentos bloqueando la
puerta que impiden que se cierre.
Reorganice los envases de alimentos para liberar la puerta y los
estantes de la puerta.
El depósito de hielo, la tapa del cajón
para verduras, las bateas, los estantes, las
bandejas de las puertas o las cestas no están
en su sitio.
Coloque correctamente las bandejas, la tapa del cajón para
verduras, las bateas, los estantes y las cestas. Consulte la sección
Uso del refrigerador Uso del refrigerador.
Las puertas se desmontaron durante la
instalación del producto y no se volvieron a
colocar correctamente.
Desmonte y vuelva a colocar las puertas siguiendo las
instrucciones de la sección Desmontaje y sustitución de las
manijas y puertas del refrigerador.
La puerta no está correctamente nivelada. Consulte el apartado Alineación de las puertas en la sección
Instalación del refrigerador para nivelar el refrigerador.
Las puertas se abren con
gran dificultad.
Las juntas están sucias o pegajosas. Limpie las juntas y las superficies de contacto. Aplique una fina
capa de cera para electrodomésticos o cera de cocina en las
juntas después de limpiarlas.
La puerta se acaba de cerrar. Cuando abre la puerta, aire más caliente entra al refrigerador.
Al enfriarse, crea el vacío. Si le cuesta abrir la puerta, espere
un minuto para permitir que la presión del aire se ecualice y, a
continuación, compruebe si se abre con más facilidad.
El refrigerador se
bambolea o parece
inestable.
Las patas niveladoras no están
correctamente ajustadas.
Consulte la sección Nivelación y alineación de las puertas.
El piso no está nivelado. Puede ser necesario agregar calibradores debajo de las patas o
rodillos de nivelación o para completar el proceso de instalación.
Las luces no funcionan. Falla de iluminación interior LED. La lámpara del compartimiento del refrigerador es una
iluminación interior mediante LED, por lo que el mantenimiento
deberá ser realizado por un técnico cualificado. Consulte la
sección Sustitución de la bombilla.
Le refrigerador tiene un
olor inusual.
El filtro de aire puede necesitar ser ajustado
a MAX (máximo) o ser reemplazado.
Ajuste el filtro de aire a MAX. Si no desaparece el olor dentro de
las 24 horas, el filtro puede necesitar ser cambiado. Consulte la
sección Sustitución del filtro de aire para obtener instrucciones
acerca del reemplazo.
El interior del frigorífico
está cubierto de polvo u
hollín.
El frigorífico se encuentra cerca de un fuego,
por ejemplo, una chimenea o similar.
Asegúrese de que el frigorífico no se encuentre cerca de un
fuego, por ejemplo, una chimenea o similar.
COMPONENTES Y CARACTERÍSTICAS
87
GUÍA DE SOLUCIÓN DE PROBLEMAS
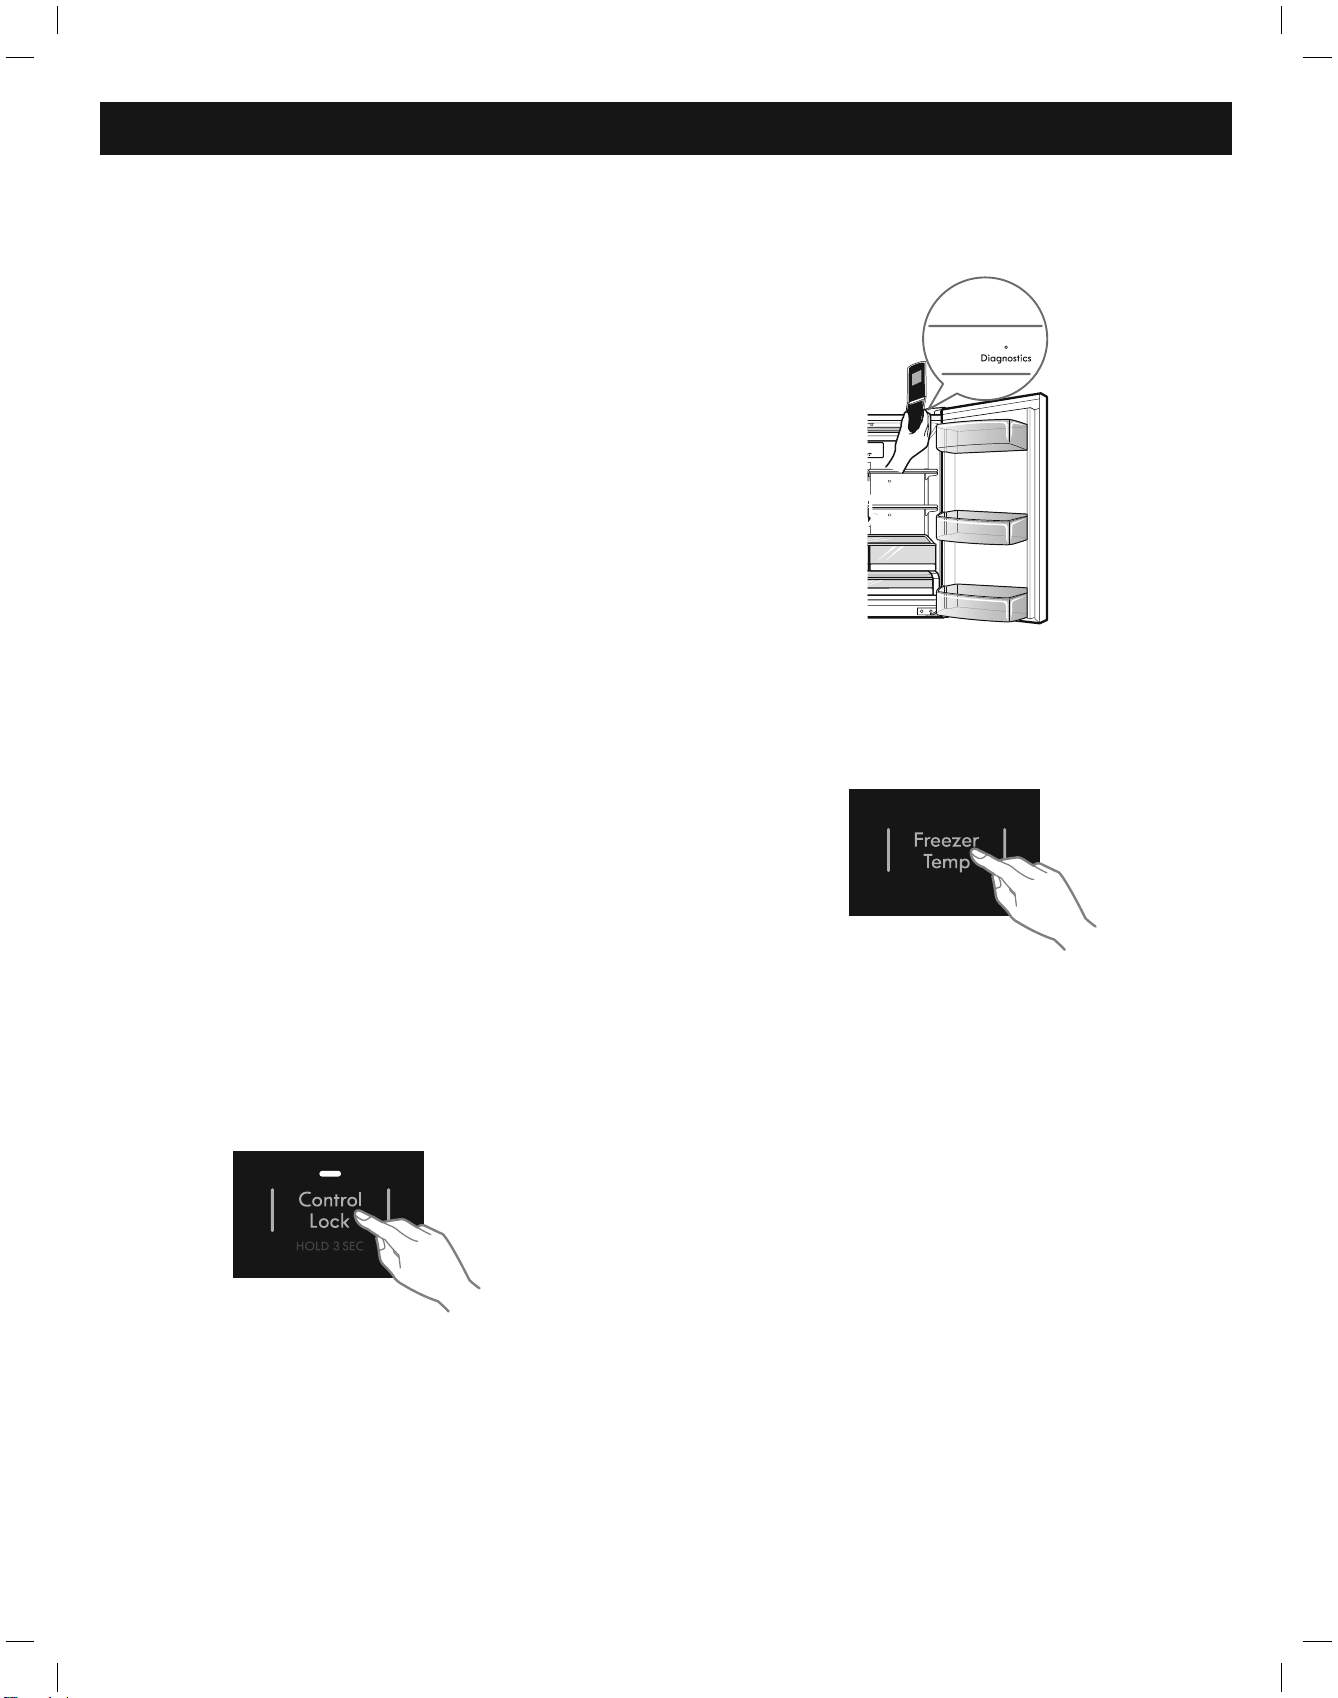
88
Diagnostics (Diagnósticos)
Diagnósticos (En algunos modelos)
Si experimenta algún problema en el refrigerador,
puede transmitir datos a través de su teléfono al equipo
Diagnósticos. Esto le da la posibilidad de hablar
directamente con nuestros especialistas cualiÀFDGos. El
especialista graba los datos transmitidos por su máquina
y los utiliza para analizar el problema, suministrando un
diagnóstico rápido y efectivo.
Si experimenta problemas con su refrigerador,
llamar al 1-844-553-6667.
Utilice la función Diagnósticos solo cuando así se lo indique
el agente del equipo Diagnósticos. Los sonidos de transmisión
que oirá son normales y suenan como un fax.
Diagnósticos no se puede activar si su refrigerador no
está conectado a la alimentación eléctrica.
Si su refrigerador no se enciende, la localización y
resolución de problemas debe hacerse sin utilizar
Diagnósticos.
Uso de Diagnósticos
En primer lugar, llame al 1-844-553-6667.
Si el número de teléfono que está usando ya está
registrado y asociado con su refrigerador, podrá
contactar rápidamente con un agente del equipo
Diagnósticos.
Utilice la función Diagnósticos solo cuando así se lo
indique el agente del equipo Diagnósticos.
lB .1 oquee la pantalla. Para bloquear la pantalla,
mantenga pulsado el botón de bloqueo Control Lock
durante tres segundos (Si la pantalla está bloqueada,
reactívela)
etejuS .3 el auricular del teléfono delante del altavoz
situado sobre la bisagra derecha de la puerta del
refrigerador, cuando así se lo indique el centro de
atención.
M .4 antenga pulsado el botón de temperatura del
congelador Freezer Temp durante tres segundos con el
teléfono junto al altavoz.
5. Tras oír tres pitidos, suelte el botón de temperatura del
congelador Freezer Temp.
6. Mantenga el teléfono en posición hasWDTXHÀQalice
el tono de transmisión. La pantalla mostrará el tiempo
transcurrido. AlÀQalizar la cuenta atrás y detenerse
los tonos, reanude su conversación con el especialista,
quien estará entonces en medida de asistirle utilizando
la información transmitida para su análisis.
NOTA:
- Para lograr los mejores resultados, no mueva el teléfono
mientras se transmiten los tonos.
- Si el agente del servicio telefónico de atención al cliente
no puede grabar los datos con precisión, se le pedirá
volver a intentarlo.
2. Abra la puerta derecha del refrigerador.
Kenmore ®
Customer Care Hotline
To schedule in-home repair service
or order replacement parts
Para pedir servicio de reparación
a domicilio, y ordenar piezas
1-844-553-6667
www. kenmore. com
®