
Loading ...
Loading ...
Loading ...
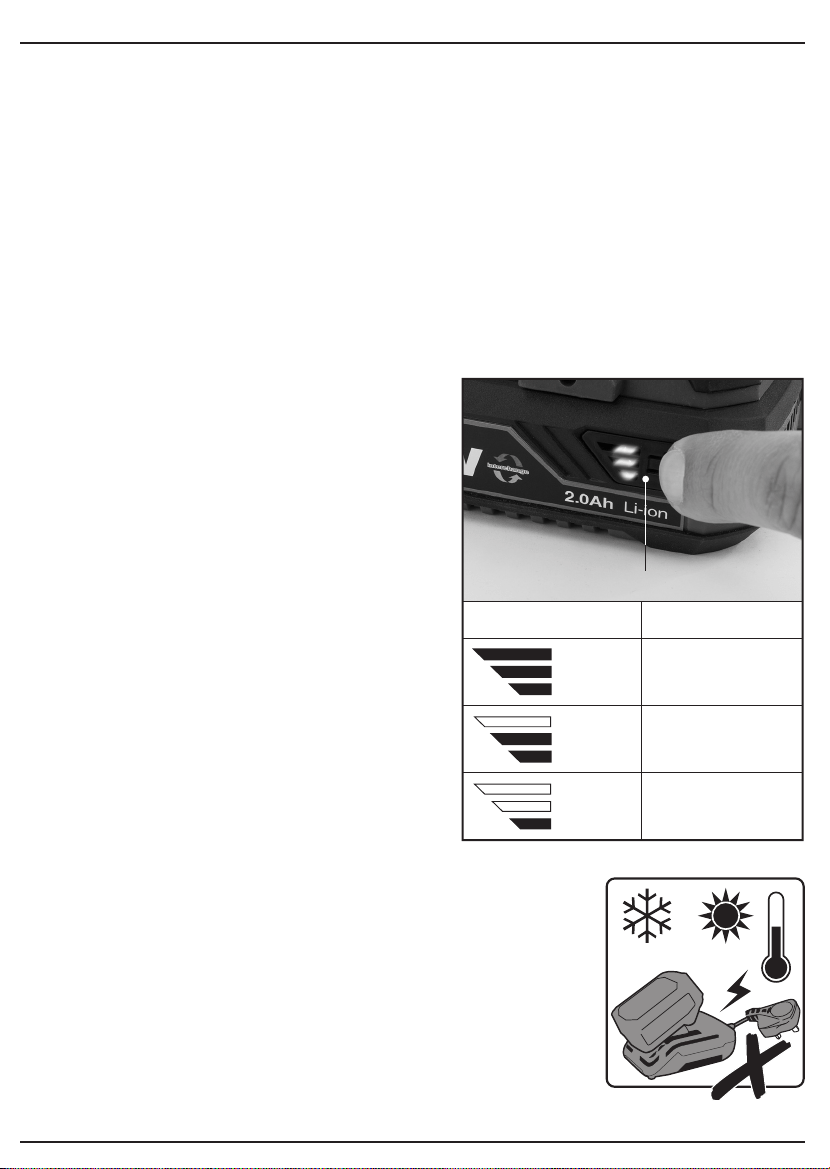
75 – 100%
25 – 50%
10 – 25%
Charge level indicator Charge remaining
GREEN
ORANGE
RED
ORANGE
RED
RED
5. HEALTH AND SAFETY INFORMATION
– Ensure the anvil ring is correctly maintained and if damaged or missing, is replaced immediately
before work commences. Missing or damaged anvil rings may lead to sockets detaching from the
wrench while rotating at high speed.
– Only use accessories specifically hardened for impact use. Do not use standard chrome type hand
tool sockets as they will shatter and splinter causing injury.
– Do not modify this impact wrench in any way.
– When starting or finishing the removal and installation of fasteners there is a risk of crushing
between the tool and the workpiece due to sudden movement or reaction forces.
5.3 RESIDUAL RISK
Important: Although the safety instructions and operating manuals for our tools contain extensive
instructions of safe working with power tools, every power tool involves a certain residual risk which
can not be completely excluded by safety mechanisms. Power tools must therefore always be
operated with caution!
5.4 SAFETY INSTRUCTIONS FOR MAINS POWERED BATTERY PACKS AND
CHARGERS (sold separately)
Chargers
– The charger is for indoor use only.
– Prior to plugging the charger in to the supply, check that the plug and the cable are in good repair. If
either are damaged, have the defective item replaced immediately by a suitably qualified person. If
the casing of the battery charger is damaged, it is good policy to have the charger checked over by
a suitably qualified person.
– Only use a correctly rated mains outlet to provide power, do not plug into site generators, attach to
engine generators or D.C. sources. Do not use a mains socket outlet that is not switched.
– Use the correct Draper charger in conjunction with it’s corresponding battery pack (see the table
on page 11 for information).
– Do not charge any other batteries with Draper chargers. Any other application is considered misuse.
– Do not attempt to charge battery packs that are too hot (over 30ºC) or too cold (under 5ºC); if these
conditions apply set the battery pack aside to “normalise” before proceeding with the charging
operation.
– Set up the charger and cable in a safe place where it won’t be knocked, tripped over, stepped on,
etc. and where it is well ventilated; make sure the ventilation slots in the charger case are not
obstructed, plug the charger into the socket outlet.
– Inspect the battery pack for damage; if it is undamaged, plug it into the charger, ensuring the
correct orientation. (Most chargers and batteries have ‘keys’ etc, to make sure the battery pack is
not inserted incorrectly, if you are having to ‘force’ the battery pack into the charger, the chances are
you have it the wrong way round, check and try again.)
– Switch the charger on and check that the correct indicators illuminate, allow the battery pack to
charge (see the specific instructions for your charger). Once charging is complete, switch the
charger off, remove the battery pack and store, repeat the procedure if you have more than one
battery pack to charge.
Caution: When the battery charger has been continuously used, the battery charger will be hot. Once
the charging has been completed, give 15 minutes rest until the next charge.
– After charging is complete, unplug the charger from the socket outlet by pulling on the plug. Do not
pull on the cable. Store the charger in a dry secure place.
– If, when the charger was switched on, the correct indications did not occur, leave for two or three
minutes to allow the charger to stabilise; if the correct indications occur, allow the charging cycle to
proceed as normal.–
- 8 -
- 13 -
8. PREPARING THE IMPACT WRENCH
Completing the charging cycle:
– Disconnect battery charger from the power supply.
Caution: Do not pull the plug out of the power supply by pulling on the cord.
● Make sure to grasp the plug when removing from power supply to avoid damaging the cord.
– Remove the battery pack from the battery charger.
● Supporting the battery charger with hand, pull out the battery pack from the battery charger
Caution: When the battery charger has been continuously used, the battery charger will be hot.
Once the charging has been completed, give 15 minutes rest until the next charge.
If the battery pack is charged when it is warm due to battery use or exposure to sunlight, the
battery pack will not be recharged. In such a case, let the battery pack cool before charge.
If the red indicator flickers rapidly at 0.2 - second intervals, check for and take out any foreign
objects in the charger’s battery slot. If there are no foreign objects, it is probable that the battery
pack or charger is malfunctioning. Allow battery/charger to normalise and try again. If a fault
remains after trying this then contact Draper Tools.
8.2 BATTERY PACK CHARGE STATUS
– FIG.3
To display the amount of charge left in the battery
pack press the charge level indicator button
.
8.3 BATTERY PACK EFFICIENCY AND
CHARGING ADVICE
– Recharge the battery packs before they become
completely exhausted.
– When you feel that the power of the tool
becomes weaker, stop using the tool and
recharge the battery packs. If you continue to
use the tool and exhaust the electric current, the
battery pack may become damaged.
– Avoid recharging at high temperatures. A
rechargeable battery pack will be hot
immediately after use. If such a battery pack is
recharged immediately after use, its internal
chemical substance will deteriorate, and the
battery life will be shortened. Leave the battery
pack and recharge it after it has cooled for a
while.
– The battery pack should only be used and/or
charged when battery pack temperature is
between 5°C and 30°C.
– The battery pack needs to be warmed-up or cooled down in order to
prevent damage to the batteries internal components.
Note: Failure to warm up or cool down a battery pack could result in
serious damage to the battery, charger and user.
FIG.3
<
5ºC >
30ºC
Loading ...
Loading ...
Loading ...