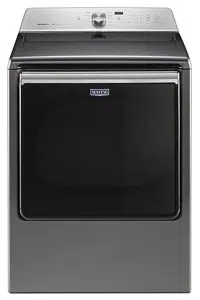
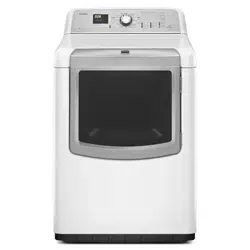
User Manual Maytag MEDB835DC4 Dryer
Table Of Contens
- DRYER SAFETY
- CHECK YOUR VENT SYSTEM FOR GOOD AIR FLOW
- CONTROL PANEL AND FEATURES
- CYCLE GUIDE
- USING YOUR DRYER
- ADDITIONAL FEATURES
- DRYER CARE
- TROUBLESHOOTING
- WARRANTY
- ASSISTANCE OR SERVICE
DRYER SAFETY
Your Safety and the Safety of others are very important
We have provided many important safety messages in this manual and your appliance. Always read and obey all safety messages.
This is the safety alert symbol.
This symbol alerts you to potential hazards that can kill or hurt you and others.
All safety messages will folow the safety alert symbol and either the word "DANGER" or "WARNING." These words mean:
You can be killed or seriously injured if you don't immediately ADANGER follow instructions.
You can be killed or seriously injured if you don't follow instructions.
All safety messages will tell you what the potential hazard is, tll you how to reduce the chancoGt injury, and tel you what can happen if the instructions are not followed.
WARNING : " RISK OF FIRE "
-Clothes dryer installation must be performed by a qualified installer.
-Install the clothes dryer according to the manufacturer's instructions and local codes.
- Do not install a clothes dryer with flexible plastic venting materials or flexible metal (foil type) duct. If flexible metal duct is installed, it must be of a specific type identified by the appliance manufacturer as suitable for use with clothes dryers. Flexible venting materials are known to collapse, be easily crushed, and trap lint. These conditions will obstruct clothes dryer airflow and increase the risk of fire.
-To reduce the risk of severe injury or death, follow all installation instructions.
-Save these instructions.
IMPORTANT SAFETY INSTRUCTIONS
WARNING: To reduce the risk of fire, electric shock, or injury to persons when using the dryer, follow basic precautions, including the following: repair replace any part of the dryer or attempt
- Read all instructions before using the dryer.
- Do not place items exposed to cooking oils in your dryer.
- Items contaminated with cooking oils may contribute to a chemical reaction that could cause a load to catch fire.
- Do not dry articles that have been previously cleaned in, washed in, soaked in, or spotted with gasoline, dry- cleaning solvents, or other flammable or explosive substances as they give off vapors that could ignite or explode.
- Do not allow children to play on or in the dryer. Close supervision of children is necessary when the dryer is used near children.
- Before the dryer is removed from service or discarded, remove the door to the drying compartment.
- Do not reach into the dryer if the drum is moving.
- Do not install or store the dryer where it will be exposed to the weather.
- Do not tamper with controls.
- Do not repair or replace any part of the dryer or attempt any servicing unless specifically recommended in this Use and Care Guide or in published user-repair instructions that you understand and have the skills to carry out.
- Do not use fabric softeners or products to eliminate static unless recommended by the manufacturer of the fabric softener or product.
- Do not use heat to dry articles containing foam rubber or similarly textured rubber-like materials.
- Clean lint screen before or after each load.
- Keep area around the exhaust opening and adjacent Surrounding areas free from the accumulation of lint, dust. and dirt.
- The interior of the dryer and exhaust vent should be cleaned periodically by qualified service personnel.
- See "Electrical Requirements" located in the installation instructions for grounding instructions.
WARNING:
FIRE OR EXPLOSION HAZARD
Failure to follow safety warnings exactly could result in serious injury, death, or property damage.
- Do not store or use gasoline or other flammable vapors and liquids in the vicinity of this or any other appliance. –
- WHAT TO DO IF YOU SMELL GAS:
- Do not try to light any appliance.
- Do not touch any electrical switch; do not use any phone in your building.
- Immediately call your gas supplier from a neighbor’s phone. Follow the gas supplier’s instructions.
- If you cannot reach your gas supplier, call the fire department.
- Installation and service must be performed by a qualified installer, service agency, or the gas supplier.
CHECK YOUR VENT SYSTEM FOR GOOD AIR FLOW
Good air flow
Along with heat, dryers require good air flow to efficiently dry laundry. Proper venting will reduce your drying times and improve your energy savings. See Installation Instructions. The venting system attached to the dryer plays a big role in good air flow. Blocked or crushed vents as well as improper venting installation will reduce air flow and dryer performance. Service calls caused by improper venting are not covered by the warranty and will be paid by the customer, regardless of who installed the dryer. To clean or repair venting, contact a venting specialist.
Maintain good air flow by:
- Cleaning your lint screen before each load.
- Replace plastic or foil vent material with 4" (102 mm) diameter heavy, rigid vent material.
- Use the shortest length of vent possible.
- Use no more than four 90° elbows in a vent system; each bend and curve reduces air flow.
- Remove lint and debris from the exhaust hood.
- Remove lint from the entire length of the vent system at least every 2 years. When cleaning is complete, be sure to follow the Installation Instructions supplied with your dryer for final product check.
- Clear away items from the front of the dryer
Energy Saver
Touch to activate the Energy Saver option, which allows you to increase your energy savings by using a slightly lower heat level. For automatic cycles, Energy Saver will increase drying times by approximately 40 minutes; the LED Display will reflect this time.
Energy Saver will default on for Normal. For optimal energy, turn on the Energy Saver option. For optimal time, turn off the Energy Saver option.
NOTE: Energy savings may vary across loads and cycles
Use Sensor cycles for better fabric care and energy savings
Use the Sensor Cycles to provide the most energy savings and enhanced fabric care from the dryer. During Sensor Cycles, drying air temperature and moisture level are sensed in the load. This sensing occurs throughout the drying cycle and the dryer shuts off when the load reaches the selected dryness. Use the NORMAL dryness level to provide optimal energy savings. With Timed Dry, the dryer runs the amount of time set and sometimes results in shrinkage, wrinkling, and static due to over-drying. Use Timed Dry for the occasional damp load that needs a little more drying time or when using the drying rack.
Tips for getting the best performance from your steam dryer
- Results may vary depending on fabric. 100% cotton garments with wrinkle-free finish may yield better results than those without. 100% cotton items may require additional touching up after cycles that use steam.
- Use of fabric softener sheet is not recommended with cycles that use steam. It may cause temporary staining on clothes.
- Cycles that use steam are not recommended for items that have been starched. Wash any starched or new garments prior to using cycles that use steam.
- The Steam Refresh cycle is best for reducing light wrinkles from loads left in the dryer too long.
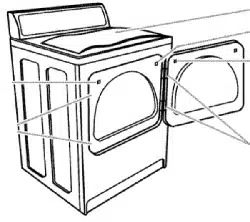
CONTROL PANEL AND FEATURES
POWER
Touch to turn the dryer on and off. Touch to stop/cancel a cycle at any time.
CYCLE CONTROL KNOB
Use your dryer’s cycle control knob to select available cycles on your dryer. Turn the knob to select a cycle for your laundry load. See “Cycle Guide” for detailed descriptions of cycles.
START/PAUSE
Touch and hold until the LED comes on to start a cycle or touch once while a cycle is in process to pause it.
TIMED DRY ADJUST
Use “+” and “–” with Timed Cycles to increase or decrease the length of a Timed Dry or Rapid Dry cycle.
LED DISPLAY AND SETTINGS
When you select a cycle, its default settings will light up and the Estimated Time Remaining (for Sensor Cycles) or actual time remaining (for Timed Cycles) will be displayed.
Touch the setting names next to the display to adjust settings. See “Cycle Guide” for available settings on each cycle. Not all settings are available with all cycles.
Temperature
When using Timed Cycles, you may select a dry temperature based on the type of load you are drying.
Use the warmest setting safe for the garments in the load.
Follow garment label instructions.
NOTE: Sensor Cycles allow temperature adjustment. At most, 3 of available temperatures (not including Air Only) are allowed.
Dry Level
You may adjust the Dry Level on Sensor Cycles (except for the Sanitize cycle), if desired.
NOTE: Dryness level is for use with Sensor Cycles only.
Wrinkle Prevent
If you will be unable to remove a load immediately, touch
Wrinkle Prevent to add up to 150 minutes of periodic tumbling to help reduce wrinkling. On some cycles, you may select the “With Steam” setting to add a short steam cycle after 60 minutes to help smooth out wrinkles.
NOTE: If you open the dryer door prior to the end of the
Wrinkle Prevent, the dryer will go into Pause mode. You will need to touch Power to turn off or touch Start/Pause to continue Wrinkle Prevent.
OPTIONS
Use to select available options for your dryer. Not all cycles and options are available on all models.
Energy Saver
Activate the ENERGY SAVER setting to increase your energy savings. This setting uses a lower heat level and extends cycle time. Turn on for optimal energy savings.
Turn off for optimal cycle times. ENERGY SAVER will default on for Normal.
Static Reduce (on some models)
Touch to add the Static Reduce option to selected Sensor cycles (see “Cycle Guide”). The dryer will automatically tumble, pause, and introduce a small amount of moisture into the load to help reduce static. This option adds approximately 8 minutes to the total cycle time.
Damp Dry Signal
Touch to select the Damp Dry Signal to Low, High, or
Off. When selected, a series of beeps will sound when the load is damp, but not completely dry. This will allow you to take clothes out of the load that do not need to dry completely. This option is not available on Sanitize, Steam Refresh, and the Timed Dry cycles.
Audio Level
Touch AUDIO LEVEL to change end beep and button sounds simultaneously to Low, High, or Off.
CYCLE STATUS LIGHTS
The indicator bar on the right side of the control will let you know what stage of the drying cycle is in process. For more information on each stage, see “Cycle Status Indicators.”
Sensing
The Sensing indicator will light during Sensor Cycles to indicate that the moisture sensor on the dryer is operating. This indicator will not light during Timed
Cycles or options such as Wrinkle Prevent.
Check Vent
The Check Vent indicator will light if there is a blocked vent or low airflow.
Good Airflow
This indicator will light if there is no major vent blockage.
Steam
This indicator will light when a steam function is active.
NOTE: Steam is not available on all models or on all cycles.
Done
This will indicate that the selected cycle has ended and the load may be removed from the dryer. If
Wrinkle Prevent has been selected, the dryer may continue to tumble the load, even if the Done indicator is lit.
Check Lint Screen
The Check Lint Screen indicator light will flash as a reminder to clean the lint screen. It will flash until the door is opened or a cycle is started. It will turn off when the dryer is turned off.
CYCLE GUIDE — TIMED CYCLES
Settings and options shown in bold are default settings for that cycle. Not all features and cycles are available on all models. Not all settings and options are available on each cycle
Adjusting drying time on Timed Cycles
When you select a Timed Cycle, the default time appears in the display. Use the “+” and “–” buttons to increase or decrease the time in 1-minute increments. Touch and hold to change the time in 5-minute increments. The maximum dry time is 150 minutes.
Selecting the Temperature
A High heat setting may be used for drying heavyweight items such as towels and work clothes.
A Low to Medium heat setting may be used for drying mediumweight items such as sheets, blouses, dresses, underwear, permanent press fabrics, and some knits.
Use a no heat (air dry) setting for foam, rubber, plastic, or heat-sensitive fabrics.
Line dry bonded or laminated fabrics.
NOTE: If you have questions about drying temperatures for various loads, refer to the care label directions
You may select the “Wrinkle Prevent with Steam” setting to add a short steam cycle after 60 minutes. This is available only with High and Medium Temperature settings. Depending on settings, steam option may be disabled to protect clothing and optimize performance
CYCLE GUIDE — STEAM CYCLES
Settings and options shown in bold are default settings for that cycle. Not all settings and options are available on each cycle. Steam cycles are designed for use with dry loads to loosen wrinkles, reduce odors, and refresh fabrics
You may select the “Wrinkle Prevent with Steam” setting to add a short steam cycle after 60 minutes.
Load Size Recommendations
For best results, follow the load size recommendations noted for each cycle.
- Small load: Fill the dryer drum with 3–4 items, not more than full.
- Medium load: Fill the dryer drum up to about 1/2 full.
- Large load: Fill the dryer drum up to about 3/4 full. Do not overload. Items need to tumble freely
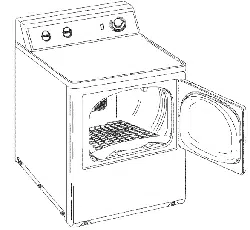
USING YOUR DRYER
1. Clean the lint screen
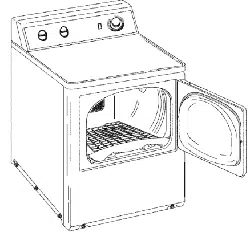
Clean the lint screen before each load. Pull the lint screen straight up and out. Press tab down on front to open lint screen. Roll lint off the screen with your fingers. Do not rinse or wash screen to remove lint. Wet lint is hard to remove. Close lint screen and push the lint screen firmly back into place. For additional cleaning information, see “Dryer Care.”
2. Load the dryer
Open the door by pulling on the handle. Place laundry in the dryer. Add a dryer sheet to wet load, if desired. Close the door.
IMPORTANT: Do not tightly pack the dryer. Items need to tumble freely. Tightly packing can lead to poor drying performance and may increase wrinkling and tangling.
3. Touch POWER
Touch POWER to turn on the dryer.
4. Select the desired cycle
Select the desired cycle for your load. See the “Cycle Guide” for more information about each cycle. Not all cycles are on all models.
Steam Refresh: Reduces light wrinkles and odors from a few garments at a time. Do not add dryer sheets.
5. Adjust cycle settings, if desired
You may adjust different settings, depending on whether you have selected a Sensor Cycle, Timed Cycle, or Steam Refresh Cycle. See the “Cycle Guide” for detailed information.
NOTE: Not all options and settings are available with all cycles. Not all cycles are on all models.
Sensor Cycles:
You can select a different dryness level, depending on your load, by touching DRY LEVEL to scroll to More, Normal, or Less. Selecting More, Normal, or Less automatically adjusts the dryness level at which the dryer will shut off. Dry Level can be changed in the first 5-8 minutes of the cycle.
Sensor cycles give the best drying in the shortest time. Drying time varies based on fabric type, load size, and dryness setting.
Timed Cycles:
When you select a Timed Cycle, the default time appears in the display. Touch “+” and “–” to increase or decrease the time in 1-minute increments. Touch and hold to change the time in 5-minute increments. The default temperature may be changed by touching Temperature until the desired dry temperature is lit.
6. Select any additional options
Add additional options such as Energy Saver or Static Reduce by touching that option. If you will be unable to remove the load promptly, select the Wrinkle Prevent options before touching START.
NOTE: Not all options and settings are available with all cycles.
7. Touch and hold START to begin cycle
Touch and hold START to begin the cycle
8. Remove garments promptly after cycle is finished
Promptly remove garments after cycle has completed to reduce wrinkling. If you will be unable to remove the load promptly, select the Wrinkle Prevent option.
Changing the Sensor Cycle settings to increase drying time
If all your loads on all Sensor Cycles are consistently not as dry as you would like, you may change the default settings to increase or decrease the default dryness level.
Your sensor drying settings can be adjusted to adapt to different installations, environmental conditions, or personal preference. This change is retained and will affect all of your Sensor cycles, not just the current cycle/load. There are five drying settings, which are displayed using the time display:
0 Much wetter clothes, 30% less drying time.
1 Slightly wetter clothes, 15% less drying time.
2 Factory preset dryness level.
3 Slightly drier clothes, 15% more drying time.
4 Much drier clothes, 30% more drying time.
To change the drying settings:
NOTE: The settings cannot be changed while the dryer is running or paused. The dryer must be in standby mode (power is off) to adjust the default settings.
- Before starting a cycle, touch and hold DRY LEVEL for seconds.
- Touch DRY LEVEL to select the dryness level shown in the time display: 0, 1, 2, 3, or 4.
- Touch START to save the new dryness level setting.
ADDITIONAL FEATURES
USING THE DRYING RACK
To obtain a drying rack for your dryer, order by calling
You will need your model and serial number and the purchase date. Remove and discard any packing material before use.
Use the Drying Rack for items that you do not want to tumble dry, such as sweaters and tennis shoes. When you use the drying rack, the drum continues to turn, but the rack remains stationary.
The drying rack is intended for use with the Timed Dry cycles only. The drying rack cannot be used with Automatic cycles.
To use the drying rack:
IMPORTANT: Do not remove the lint screen.
1. Open dryer door.
2. Align the two hooks on the front of the drying rack with the holes in the dryer door opening and press down fully into holes. Rest the rear support on the dryer back ledge.
3. Place wet items on top of the drying rack. Allow space around items for air to circulate. The drying rack does not move, but the drum will rotate; be sure to leave adequate clearance between items and the inside of the dryer drum. Make sure items do not hang over the edges or between drying rack grille.
4. Close the door.
5. Select a Timed Dry/Air Only, or Low Temperature cycle. Items containing foam, rubber, or plastic must be dried on a clothesline or by using the Air Only setting.
6. When the cycle is selected, the Estimated Time Remaining display shows the default time. You can change the actual time in the cycle by increasing or decreasing the cycle time.
7. Start the dryer.
NOTE: Check the lint screen and remove any lint accumulated from items dried on the drying rack after the cycle is finished.
DRYER CARE
CLEANING THE DRYER LOCATION
Keep dryer area clear and free from items that would block the air flow for proper dryer operation. This includes clearing piles of laundry in front of the dryer.
CLEANING THE DRYER INTERIOR
To clean dryer drum
1. Use a mild hand dish detergent mixed at a low concentration with very warm water, and rub with a soft cloth.
2. Rinse well with a wet sponge or towel.
3. Tumble a load of clean clothes or towels to dry drum OR Use a microfiber cloth and hot water in a spray bottle to clean the drum and a second microfiber towel to dry
NOTE: Garments that contain unstable dyes, such as denim blue jeans or brightly colored cotton items, may discolor the rear of the dryer interior. These stains are not harmful to your dryer and will not stain future loads of clothes. Dry unstable dye items inside out to avoid transfer of dye.
REMOVING ACCUMULATED LINT
From Inside the Dryer Cabinet
Lint should be removed every 2 years, or more often, depending on dryer usage. Cleaning should be done by a qualified appliance servicer or ventilation system cleaner.
From the Exhaust Vent
Lint should be removed every 2 years, or more often, depending on dryer usage.
CLEANING THE LINT SCREEN
Every load cleaning
The lint screen is located in the door opening of the dryer. The control panel has an indicator light to remind you to clean the lint screen after each load. A screen blocked by lint can increase drying time.
To clean:
- Pull the lint screen straight up and out. Press tab down on front and open lint screen. Roll lint off the screen with your fingers. Do not rinse or wash screen to remove lint. Wet lint is hard to remove.
- Push the lint screen firmly back into place.
As needed cleaning
Laundry detergent and fabric softener residue can build up on the lint screen. This buildup can cause longer drying times for your clothes, or cause the dryer to stop before your load is completely dry. The screen is probably clogged if lint falls off while the screen is in the dryer. Clean the lint screen with a nylon brush every 6 months, or more frequently, if it becomes clogged due to a residue buildup
To wash:
- Roll lint off the screen with your fingers.
- Wet both sides of lint screen with hot water.
- Wet a nylon brush with hot water and liquid detergent. Scrub lint screen with the brush to remove residue buildup.
- Rinse screen with hot water.
- Thoroughly dry lint screen with a clean towel. Reinstall screen in dryer.
NON-USE, STORAGE, AND MOVING CARE
Steam models only: Install and store your dryer where it will not freeze. Because some water may stay in the hose, freezing can damage your dryer. If storing or moving your dryer during freezing weather, winterize it.
Non-Use or Storage Care
Operate your dryer only when you are at home. If you will be on vacation or not using your dryer for an extended period of time, you should:
- Unplug dryer or disconnect power.
- Clean lint screen. See “Cleaning the Lint Screen.”
- Turn off the water supply to the dryer. This helps to avoid unintended flooding (due to a water pressure surge) while you are away.
Moving Care
For power supply cord-connected dryers:
- Unplug the power supply cord.
- Gas models only: Close shut-off valve in gas supply line.
- Gas models only: Disconnect gas supply line pipe and remove fittings attached to dryer pipe.
- Gas models only: Cap the open fuel supply line.
- Steam models only: Shut off water faucet.
- Steam models only: Disconnect the water inlet hose from faucet, then drain the hose. Transport hose separately.
- Make sure leveling legs are secure in dryer base.
- Use tape to secure dryer door.
For direct-wired dryers:
- Disconnect power.
- Disconnect wiring from dryer and secure wire ends.
- Steam models only: Shut off water faucet.
- Steam models only: Disconnect the water inlet hose from faucet; then drain the hose. Transport hose separately.
- Make sure leveling legs are secure in dryer base.
- Use tape to secure dryer door.
Reinstalling the Dryer
Follow the Installation Instructions to locate, level, and connect the dryer.
SPECIAL INSTRUCTIONS FOR STEAM MODELS
Water Inlet Hose
Replace inlet hose and hose screen after 5 years of use to reduce the risk of hose failure. Periodically inspect and replace inlet hose if bulges, kinks, cuts, wear, or leaks are found. When replacing your inlet hose, record the date of replacement.
To Winterize the Dryer
- Unplug dryer or disconnect power.
- Shut off water faucet.
- Disconnect water inlet hose from faucet and drain.
To Use the Dryer Again
- Flush water pipes. Reconnect water inlet hose to faucet.Turn on water faucet.
- Plug in dryer or reconnect power as described in the Installation Instructions.
IF YOU NEED SERVICE:
- Before contacting us to arrange service, please determine whether your product requires repair. Some questions can be addressed without service. Please take a few minutes to review the Troubleshooting or Problem Solver section of the Use and Care Guide, scan the QR code on the right to access additional resources, or visit https://www.maytag.com/product_help.
- All warranty service is provided exclusively by our authorized Maytag Service Providers. In the U.S. and Canada, direct all requests for warranty service to: Maytag Customer eXperience Center In the U.S.A. call 1-800-688-9900. In Canada call 1-800-807-6777. If outside the 50 United States and Canada, contact your authorized Maytag dealer to determine if another warranty applies.