Loading ...
Loading ...
Loading ...
S
L
F
R
P
G
Fig. 8C
Fig. 8B
A
L
F
RL F
P
G
Fig. 8
Fig. 8 A
I
R
G
M
H
11
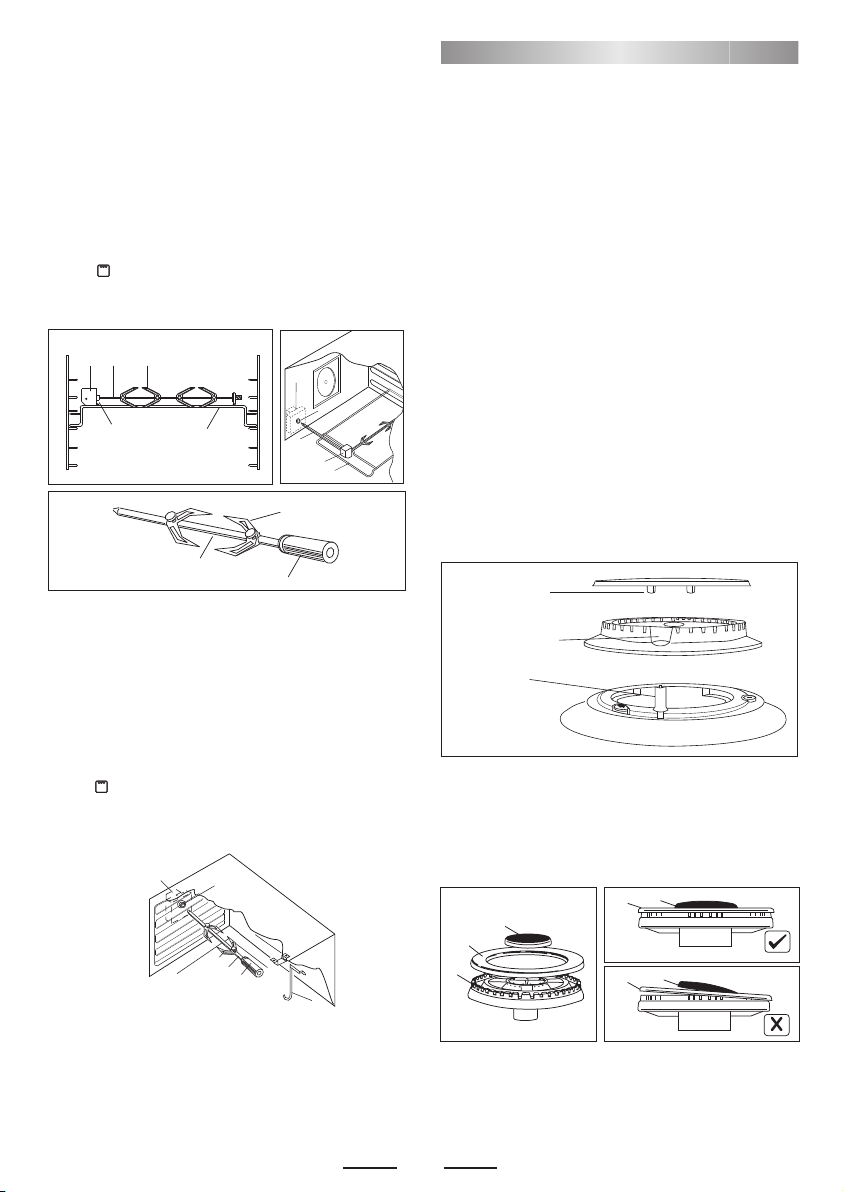
Pan supports and burners
The burner heads can be removed for cleaning.
NB Do not drop hot burner caps in cold water.
Because of the rapid cooling they might get damaged.
Lift off and soak for about 10 minutes in hot water with a little
detergent. After having cleaned and washed them, dry them
carefully.
Make sure that no burner holes are clogged.
Clean the burners once a week or more frequently if necessary.
Make sure you have reassembled the burners correctly.
Pan supports can be washed by hand or in a dishwasher.
Remember to remove rubber feet (if fitted) prior to washing.
Refit them afterwards.
Do not use harsh abrasive cleaners or sharp metal scrapers to
clean the o
ven door glass since they can scratch the surface,
which may result in shattering of the glass.
Before cleaning the appliance, close the gas stopcock and unplug
appliance or disconnect po
wer at the main circuit breaker of the
electrical system.
Do not clean the appliance surfaces when still hot.
Always clean off spillage as quickly as possible to prevent burning
on which will make removal more difficult. Wash with a clean cloth
soaked in hot soapy water, rinse and dry with a soft cloth.
DO NOT USE ABRASIVES. CAUSTIC PASTES OR SPRAYS.
COARSE CLEANING PADS OR POWDERS. DO NOT USE
EXCESSIVE WATER WHEN CLEANING YOUR OVEN IN ORDER
TO AVOID WATER PRESSING THROUGH CLEFTS INTO THE
BACK OF CONTROLS PANEL OR OF THE UNIT.
CLEANING
burner cap
locating pegs
notch for electrode
in burner head
electrode
B
A
C
B
A
B
A
Fig. N
Fig. P
NOTE: A steam cleaner is not to be used for cleaning this
appliance .
For a triple crown burner, make sure head “C” and covers “A” and
“B”
are properly placed on their seats as figure N and not off-
centered as in figure P.
TURNSPIT multilpe (optional )
For utilization of the turnspit follow the instructions described.
-Thread the chicken or the cubes of meat for roasting on the
spit L , ensuring that it is gripped safely between the two forks
F and balancing it properly to avoid unnecessary strain on the
trasmission R (fig 8).
-Put the spit on the support G, after having introduced its
opposite end in the socket P of the transmission R (fig 8)
-Put the support G completely into the oven so that the bar I
goes into the socket H of the turnspit motor M (fig 8A).
-Place the drip-tray with some water under the turnspit, on the
lowest level
-when removing the spit, wear oven mitts, pull out support G
and use the handgrip A operating in the contrary way (fig 8B).
The turnspit can be operated turning thr knob clockwise on
position .
TURNSPIT single (optional)
For utilization of the turnspit follow the instructions described.
-Put the food in spit L (see fig.
8C), paying attention to block it
within the two forks F and to balance it, in order to avoid any
unnecessary effort in motor R.
- Put the spit on support G, after having put its opposite end into
hole P of motor R.
- Place the drip-tray with a little water under the spit.
- Start up motor R and turn the grill on.
-To remote the spit, operate in the opposite direction using knob
S and protecting glove in isolating wool (fig.8C).
The turnspit can be operated turning thr knob clockwise on
position .
Loading ...
Loading ...
Loading ...