Loading ...
Loading ...
Loading ...
5. HEALTH AND SAFETY INFORMATION
Carefully select an extension lead. Some machines are not suitable for use with extension
leads. When using an extended lead, select one capable of handling the current (amps) drawn by
the machine in use. Fully extend the lead regardless of the distance between the power supply
and the tool. Excess current (amps) and a coiled extension lead will both cause the cable to heat
up and can result in fire.
Concentrate and stay alert. Distractions are likely to cause an accident. Never operate a power
tool if you are under the influence of drugs (prescription or otherwise), including alcohol or if you
are feeling tired. Being disorientated will result in an accident.
Have this tool repaired by a qualified person. This tool is designed to conform to the relevant
international and local standards and as such should be maintained and repaired by someone
qualified; using only original parts supplied by the manufacturer: This will ensure the tool remains
safe to use.
5.2 ADDITIONAL SAFETY INSTRUCTIONS FOR FANS
Warning: Please read the following instructions carefully, failure to do so could lead to serious
personal injury.
Draper Tools Ltd., recommends that this fan not be modified or used for any application other than
that for which is was designed. If you are unsure of its relative applications, do not hesitate to
contact us in writing and we will advise you.
• Keep out of the reach of children.
• Ensure fan is situated and used in an area free from loose furnishings, clothing, curtains etc
that could get sucked in to the fan air inlet, or could block the fan blades.
• Do not leave the fan running unattended.
• Remove the plug from the socket before carrying out adjustment, servicing or maintenance.
• Complete any assembly procedures prior to connection to the power supply.
• Never insert fingers, pencils, or any other object through the protective grille, while the fan is
running.
• Disconnect the fan from the power supply when moving it from one location to the other.
• Ensure the fan is switched off from the mains supply before removing the grille.
• Always complete the assembly of the fan before switching it on after cleaning.
• Always ensure the fan is secure on a firm and secure surface before operating.
• Do not use the fan near an open window, as rain can create an electrical hazard.
• If the power supply cable becomes damaged, it should be replaced immediately.
• If replacement of the supply cord is necessary, this should be carried out by the manufacturer
or appropriate agent in order to avoid a safety hazard.
• Do not use this fan with a separate speed control device.
5.3 CONNECTION TO THE POWER SUPPLY
Make sure the power supply information on the machine’s rating plate are compatible with the
Power supply you intent to connect it to.
This fan comes supplied with a UK standard 3 pin plug. It is designed for connection to a
Domestic power supply rated at 230V AC.
It is Class 2 (double insulated); is designed for connection to a power supply matching that detailed
on the rating label and compatible with the plug fitted.
If an extension lead is required, use an approved and compatible lead rated for this appliance.
Follow all the instructions supplied with the extension lead. If using an extension lead, follow the
instructions that came with your lead regarding maximum load while cable is wound, if in doubt
ensure that the entire cable is unwound. Using a coiled extension lead will generate heat which
could melt the lead and cause a fire.
This product requires no earth connection as supplementary insulation is applied to the basic
insulation to protect against electric shock in the event of failure to the basic insulation.
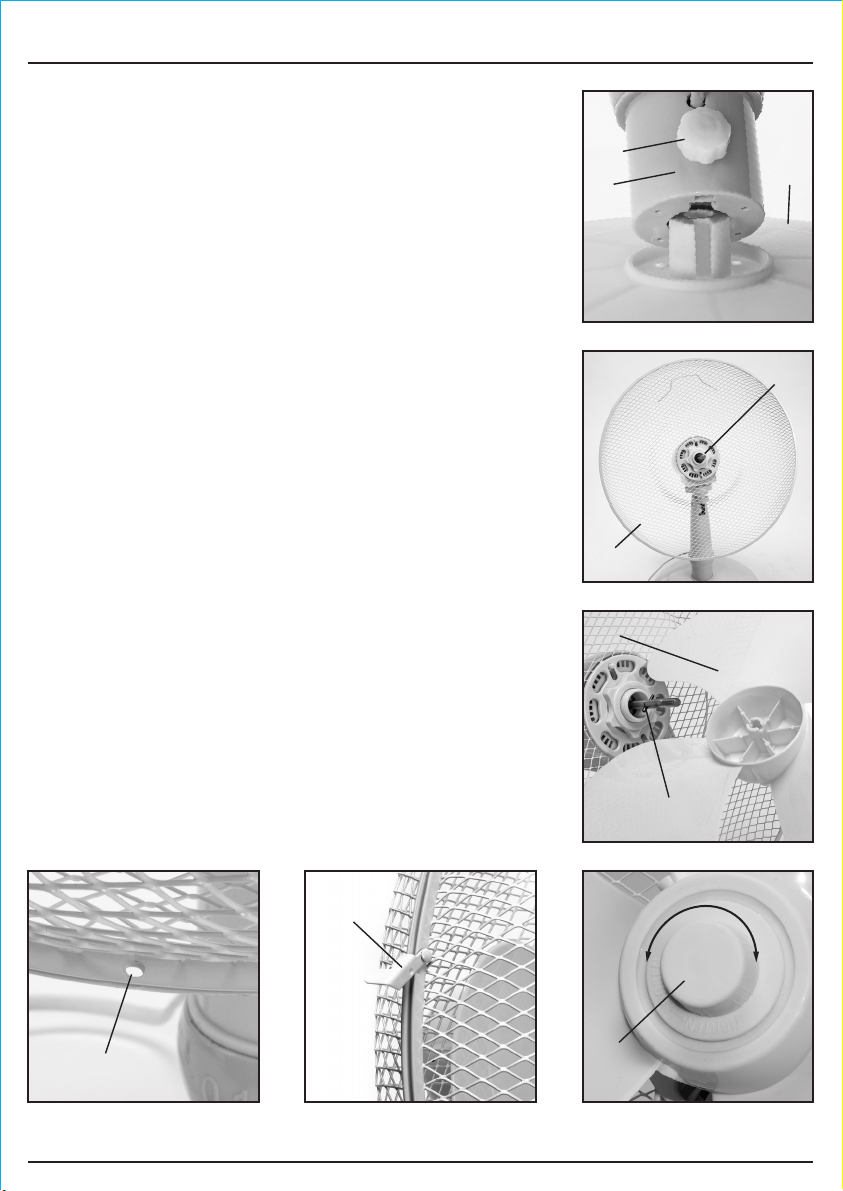
8. ASSEMBLING THE FAN
8.1 ASSEMBLING THE BASE
1. Align the fan body with the base of the fan ensuring the
groove and nut are aligned.
2. To secure, using the threaded nut on the fan body, tighten
the assembled parts together.
8.2 ASSEMBLING THE PROTECTIVE BLADE
GRILLES
1. Remove plastic clamp nut from motor.
2. Locate the rear grille in the correct position (handle at
top).
3. Tighten the plastic clamp nut to secure the rear grille.
4. Discard the PVC sleeve on the motor shaft.
5. Slide the fan blade onto the motor shaft
until it reaches and aligns with the retaining pin.
5. Screw the clamp nut to secure fan blade onto the motor
shaft in an anticlockwise direction (reverse thread).
6. Undo the locking screw mounted on the rear grille.
Mount the front grille onto the rear grille ensuring that
the small round hole on the bottom aligns with the hole on the
rear grille.
7. Fix both grilles together with the clips and then tighten the
locking screw. Ensure all fixings are safe and secure
BEFORE operating fan.
- 7 -- 10 -
Tighten Loosen
Loading ...
Loading ...
Loading ...