
MCB 94.. / MCB 96..
7080 402-00
Use and
Care Manual
For Fully Integrated NoFrost
Combined Refrigerator-Freezers
2
Table of Contents Page
Please Read and Follow these Instructions.................. 2
California Proposition 65 ............................................... 3
Disposal of Old Appliance ............................................. 3
Disposal of this Appliance ............................................. 3
Disposal of Packaging Material ..................................... 3
Important Safety Information ......................................... 4
R600a Refrigerant ......................................................... 5
Electrical Safety ............................................................. 6
Safety Regulations ......................................................... 6
Description of the Appliance ......................................... 7
Control Panel ................................................................. 8
Switching the Appliance On .......................................... 8
Main Menu ..................................................................... 9
Setting the Temperature ...............................................10
Setting the Temperature
(Refrigerator Compartment) .........................................10
Setting the Temperature
(Freezer Compartment) ................................................11
Setting the Temperature
(BioFresh-Plus Compartment) .....................................11
SuperCool .....................................................................12
SuperFrost ....................................................................13
Freezing and Storage ...................................................13
Safety Instructions and Warnings for the Ice Maker
... 14
Ice Maker Description ...................................................14
Switching the IceMaker on ...........................................14
Switching the Ice Maker Off .........................................15
Switching the IceMaker to Maximum Ice Production ..15
PartyMode .....................................................................16
HolidayMode .................................................................16
SabbathMode................................................................17
Switching the Appliance Off .........................................17
Maintenance Message .................................................18
Maintenance Confirmation............................................18
Setup Menu ...................................................................19
SmartDeviceBox (Not Supplied in All Countries) ....... 21
Description of the SmartDevice Displays.................... 22
Alarm Messages .......................................................... 22
Equipment .................................................................... 25
Water Dispenser .......................................................... 26
BioFresh-Plus Compartment ....................................... 26
Cleaning ....................................................................... 27
Maintenance Menu ...................................................... 28
Maintenance ................................................................ 29
Additional Functions .................................................... 33
Troubleshooting ........................................................... 39
Customer Service ........................................................ 39
Appliance Information .................................................. 39
T
able
of
C
onTenTs
IMPORTANT
All types and models are subject to continuous
improvement. The manufacturer reserves the right
to make modifications to the shape, equipment, and
technology.
Please Read and Follow these
Instructions
These instructions contain Danger, Warning, and
Caution notes.
This information is important for safe and efficient
installation and operation.
Always read and comply with all Danger, Warning, and
Caution notes!
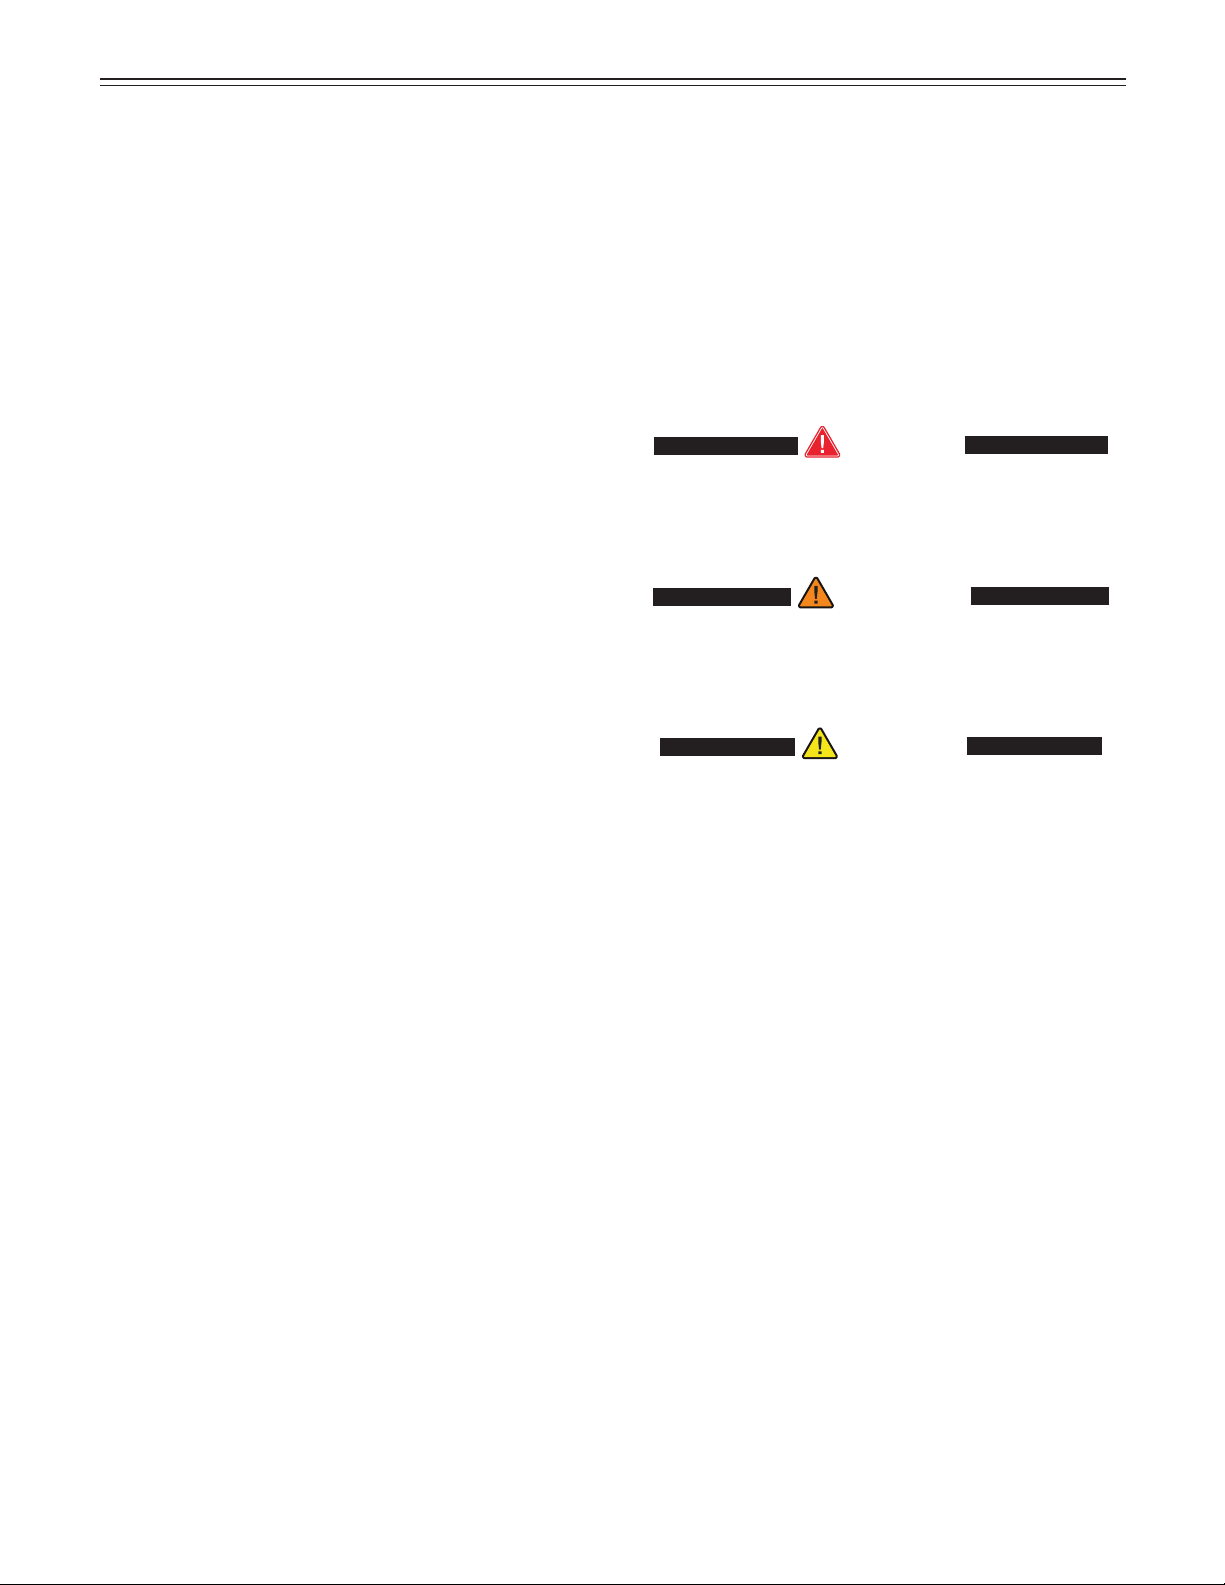
DANGERDANGER!
Danger indicates a hazard which
will cause serious injury or death if
precautions are not followed.
WARNING!WARNING!
Warning indicates a potentially hazardous
situation which, if not avoided, could
result in death or serious injury.
CAUTION!CAUTION!
Caution indicates a potentially hazardous
situation which, if not avoided, may result
in minor or moderate injury.
IMPORTANT
This indicates information that is especially relevant
to a problem-free installation and operation.
3
s
afeTy
Disposal of Packaging Material
The packaging is designed to protect the appliance and
individual components during transport and is made of
recyclable materials.
WARNING!WARNING!
Keep packaging materials away from
children. Polythene sheets and bags can
cause suffocation!
If possible, please recycle packaging material at a recy-
cling facility.
Disposal of Old Appliance
DANGERDANGER!
Risk of child entrapment.
Child entrapment and suffocation are not problems of
the past.
Junked or abandoned refrigerators are still dangerous –
even if they will sit for “just a few days.”
If you are getting rid of your old refrigerator, please
follow these instructions to help prevent accidents.
Before you discard old appliances:
• Take off the doors.
• Leave the shelves in place so that children
may not easily climb inside.
• Cut off the power cord from the discarded
appliance. Discard separately from the
appliance.
• Be sure to follow your local requirements for
disposal of appliances.
Contact the trash collection agency in
your area for additional information.
California Proposition 65
- This product contains chemicals known to the state
of California to cause cancer or reproductive harm.
- This product can expose you to chemicals including
Diisononyl Phthalate (DINP) which is known to the
State of California to cause cancer. For more infor-
mation go to www.P65Warnings.ca.gov.
- This product can expose you to chemicals includ-
ing Diisodecyl Phthalate (DIDP) which is known to
the State of California to cause birth defects or other
reproductive harm. For more information go to
www.P65Warnings.ca.gov.
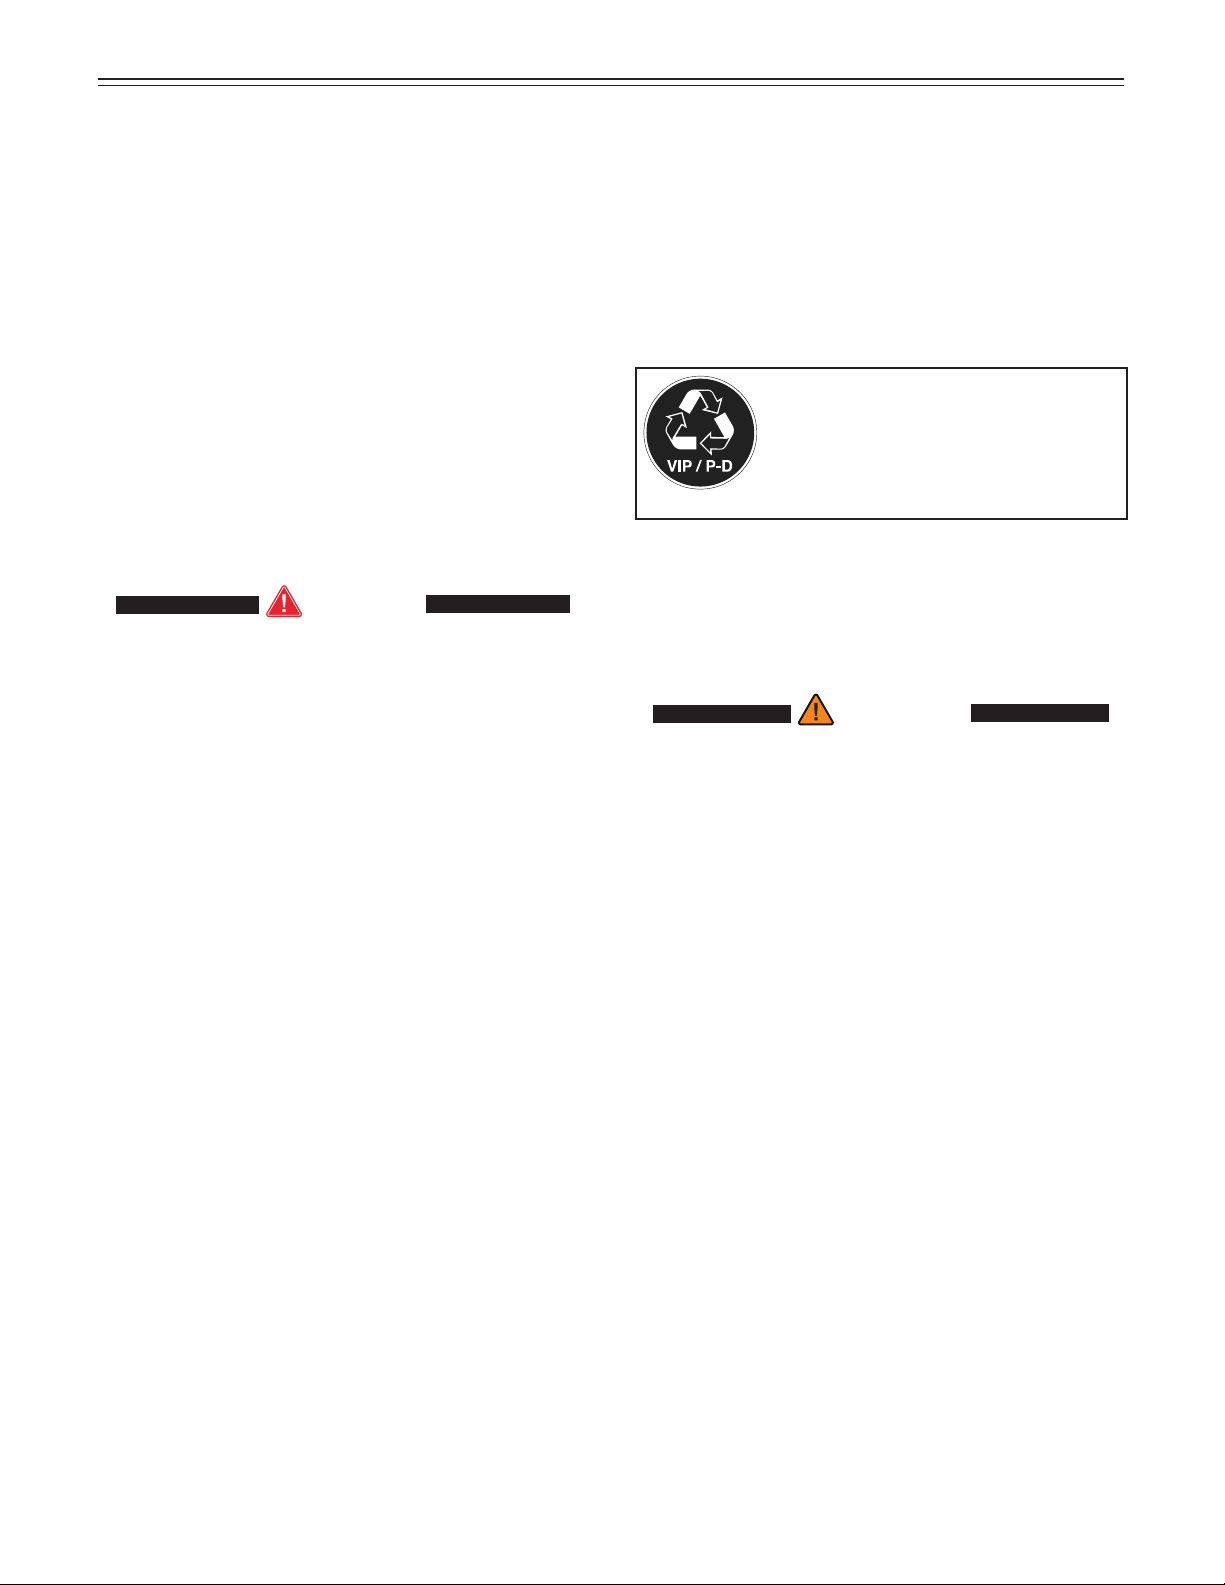
Disposal of this Appliance
This appliance contains flammable gases within
the refrigeration circuit and insulation foam.
Contact the municipality or disposal company
in your area for information on approved
recycling or disposal.
This label or a similar one can be
located on the rear of the appli-
ance. It refers to the foamed-in
panels in the door and/or the hous-
ing. This notice only applies for
recycling. Do not remove the label.

4
s
afeTy
Important Safety Information
• WARNING: Keep ventilation openings, in the
appliance enclosure or in the built-in struc-
ture, clear of obstruction.
• WARNING: Do not use mechanical devices
or other means to accelerate the defrosting
process, other than those recommended by
the manufacturer.
• WARNING: Do not damage the refrigerant
circuit.
• WARNING: The power cord must not be
damaged while installing the appliance.
• WARNING: Multi-sockets or distributor strips
and other electronic devices (such as halo-
gen transformers) must not be positioned
and operated at the rear of appliances.
• WARNING: Danger of injury through electric
shock! There are live parts under the cover.
Only have the interior LED light replaced or
repaired by customer service staff or trained
personnel.
• WARNING: Risk of injury from the LED
lamp. The light intensity of the LED light
complies with risk group RG 2. If the cover
is defective, do not look directly at the light
through optical lenses from close distance.
This may damage your eyes.
• WARNING: This appliance must be secured
as described in the Use and Care Manual
(Installation Instructions) to rule out any
potential risks due to its instability.
• WARNING: Do not use electrical appliances
inside the food storage compartments of the
appliance, unless they are of the type rec-
ommended by the manufacturer.
• Any repairs and work on the appliance
should only be performed by the customer
service department. Unauthorized work may
be dangerous to the user. The power source
cable should only be changed or replaced
by the customer service department.
Component parts and power cords shall be
replaced with like components performed by
factory authorized service personnel only.
• Do not stand on the toe kick, drawers or
doors or use them to support anything else.
• This appliance is not intended for use by
persons (including children) with reduced
physical, sensory or mental capabilities or
lack of experience and knowledge unless
they have been given initial supervision or
instruction concerning use of the appliance
by a person responsible for their safety.
Children should be supervised to ensure that
they do not play with the appliance.
• Do not store explosive substances such as
aerosol cans with a flammable propellant in
this appliance.
• To prevent injury and damage to property,
the appliance should only be installed by
four people.
• Check the appliance for signs of damage
after unpacking. Contact the supplier if it is
damaged. Do not connect the appliance to
the mains power supply.
• Avoid prolonged skin contact with cold sur-
faces (e.g., chilled/frozen products). If neces-
sary, take safety action (e.g., gloves).
• Do not consume food which has been stored
for too long; it could cause food poisoning.

5
s
afeTy
• Any repairs and work on the appliance
should only be performed by the customer
service department or other trained person-
nel. The same applies to changing the power
cord.
• Only perform repair and other work on the
appliance when the plug has visibly been
disconnected.
• Only install, connect, and dispose of the
appliance as described in this Use and Care
Manual.
• In the event of a fault, pull out the plug or
switch off the fuse.
• When disconnecting the appliance from the
power source, pull it out by the plug, never
pull on the cable.
• If you have a lockable appliance, do not
keep the key near the appliance or within
reach of children.
• The appliance is designed for use in
enclosed rooms. Do not operate the appli-
ance outdoors or in areas where there is
moisture or splashing water.
• Do not use the interior LED light to light the
room. The interior LED light is only designed
to illuminate the interior of the appliance.
• Do not allow naked flames or ignition sourc-
es to enter the appliance.
• Alcoholic drinks or other vessels containing
alcohol should be sealed tightly for storage.
R600a Refrigerant
WARNINGWARNING
The refrigerant R600a contained within the
appliance is environmentally friendly, but
flammable. Leaking refrigerant can ignite.
6
s
afeTy
Safety Regulations
This appliance is intended to be used in household and
similar applications.
This includes, for example, use
- in staff kitchenettes, bed and breakfast establish-
ments,
- by guests in cottages, hotels, motels and other forms
of accommodation,
- in catering and similar services in the wholesale
trade.
IMPORTANT
The appliance is not intended for outdoor use.
The appliance is manufactured to operate within spe-
cific ambient temperature limits according to its climate
rating.
The climate rating indicates the ambient temperature
at which the appliance may be operated in order to
achieve full refrigeration performance.
Climate Rating Ambient Temperature
SN-T 50°F to 109°F (10°C to 43°C)
IMPORTANT
Do not operate the appliance outside the
specified ambient temperature range.
- The refrigerant circuit has been tested for leaks.
- The appliance complies with current safety regula-
tions
CAN/CSA C22.2 No. 60335-2-24 / UL 60335-2-24
CAN/CSA C22.2 No. 60335-1 / UL 60335-1
We recommend cleaning the appliance before turning it
on for the first time. See „Cleaning“.
Turn on the appliance several hours before loading it.
WARNING!WARNING!
Do not allow children to play with the
appliance. Children must not climb, sit or
stand on the shelves or door.
Failure to follow these instructions may
result in death or serious injury.
Electrical Safety
Connect this appliance to a 15 amp or 20 amp, 110-
120 VAC, circuit which is grounded and protected by a
circuit breaker or fuse.
We recommend using a dedicated circuit for this appli-
ance to prevent circuit overload and the chance of
interruption to the appliance.
This appliance is equipped with a three-prong (ground-
ing) polarized plug for your protection against possible
shock hazards.
Where a two-prong wall receptacle is encountered,
contact a qualified electrician and have it replaced with
a properly grounded three-prong receptacle in accor-
dance with all local codes and ordinances.
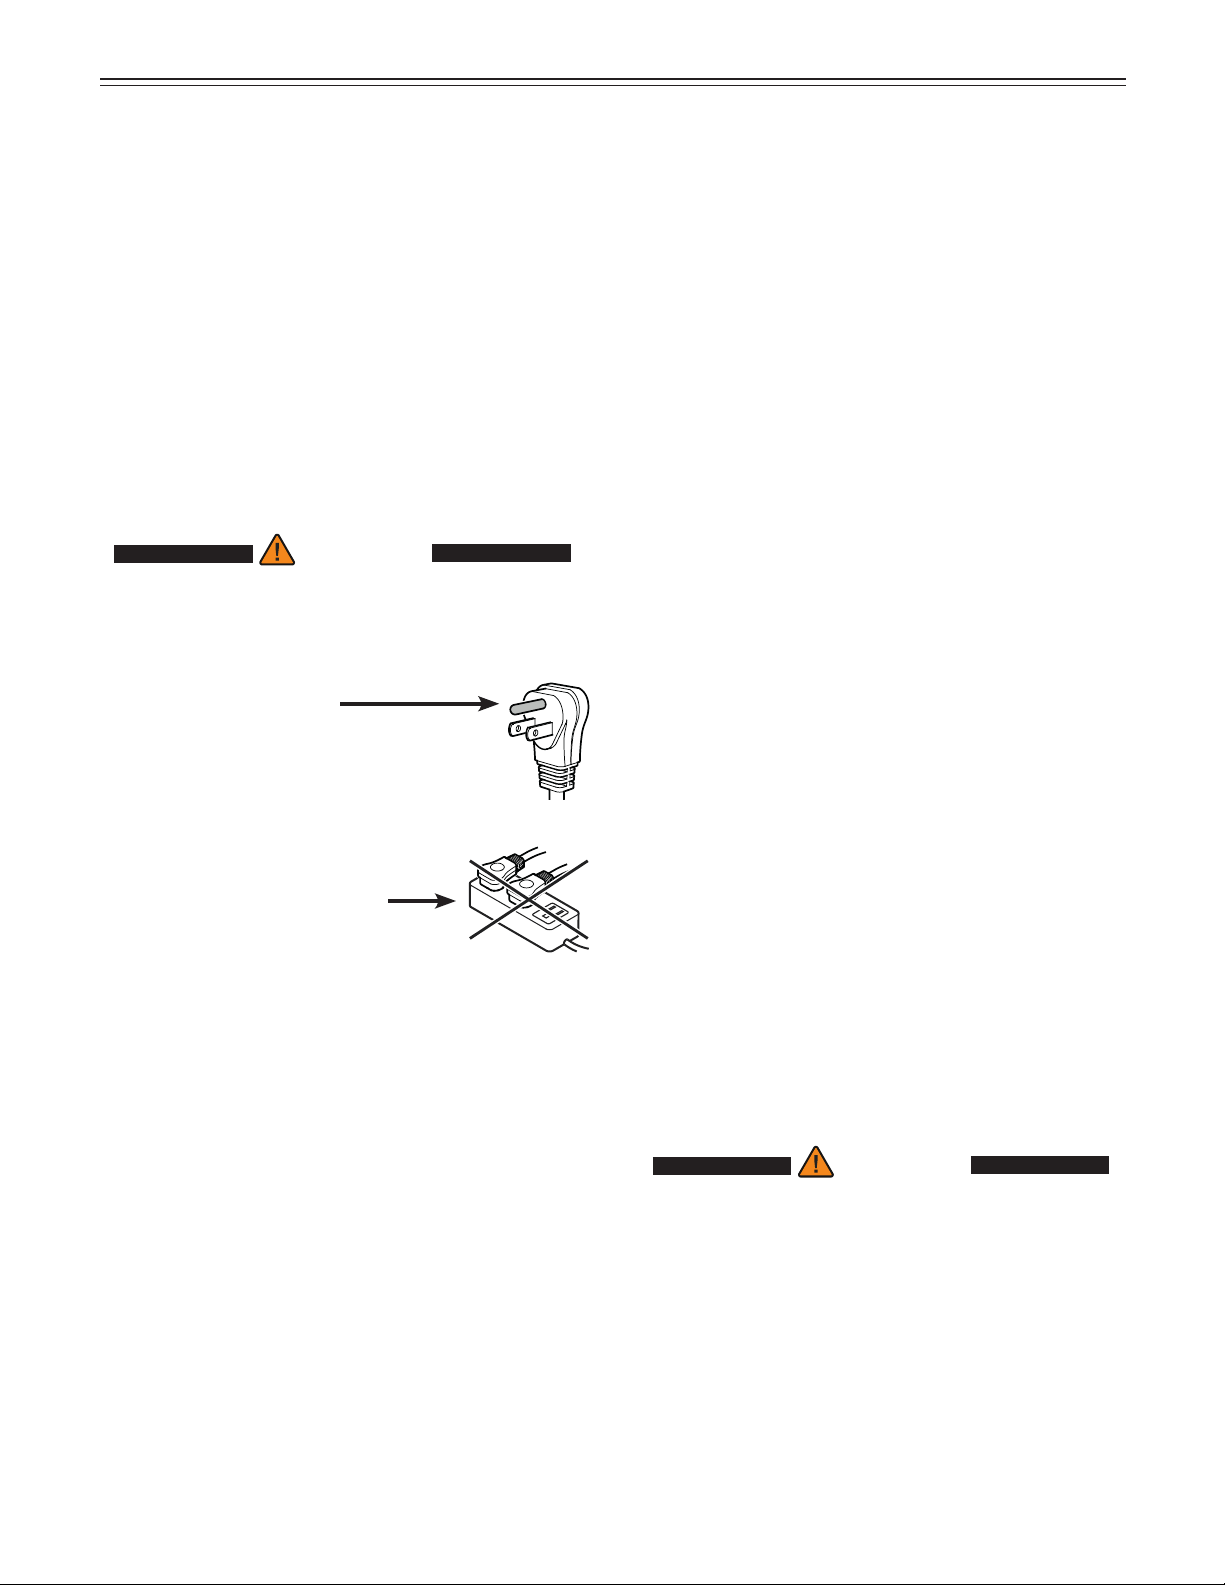
WARNING!WARNING!
Electrocution hazard.
Electrical grounding required.
•
Do not remove the round grounding
prong from the plug.
•
Do not use extension cords or
ungrounded (two prong) adapters.
• Do not use a power cord that is
frayed or damaged.
•
Do not use a power strip.
Failure to follow these instructions may
result in fire, electrical shock or death.
7
f
eaTures
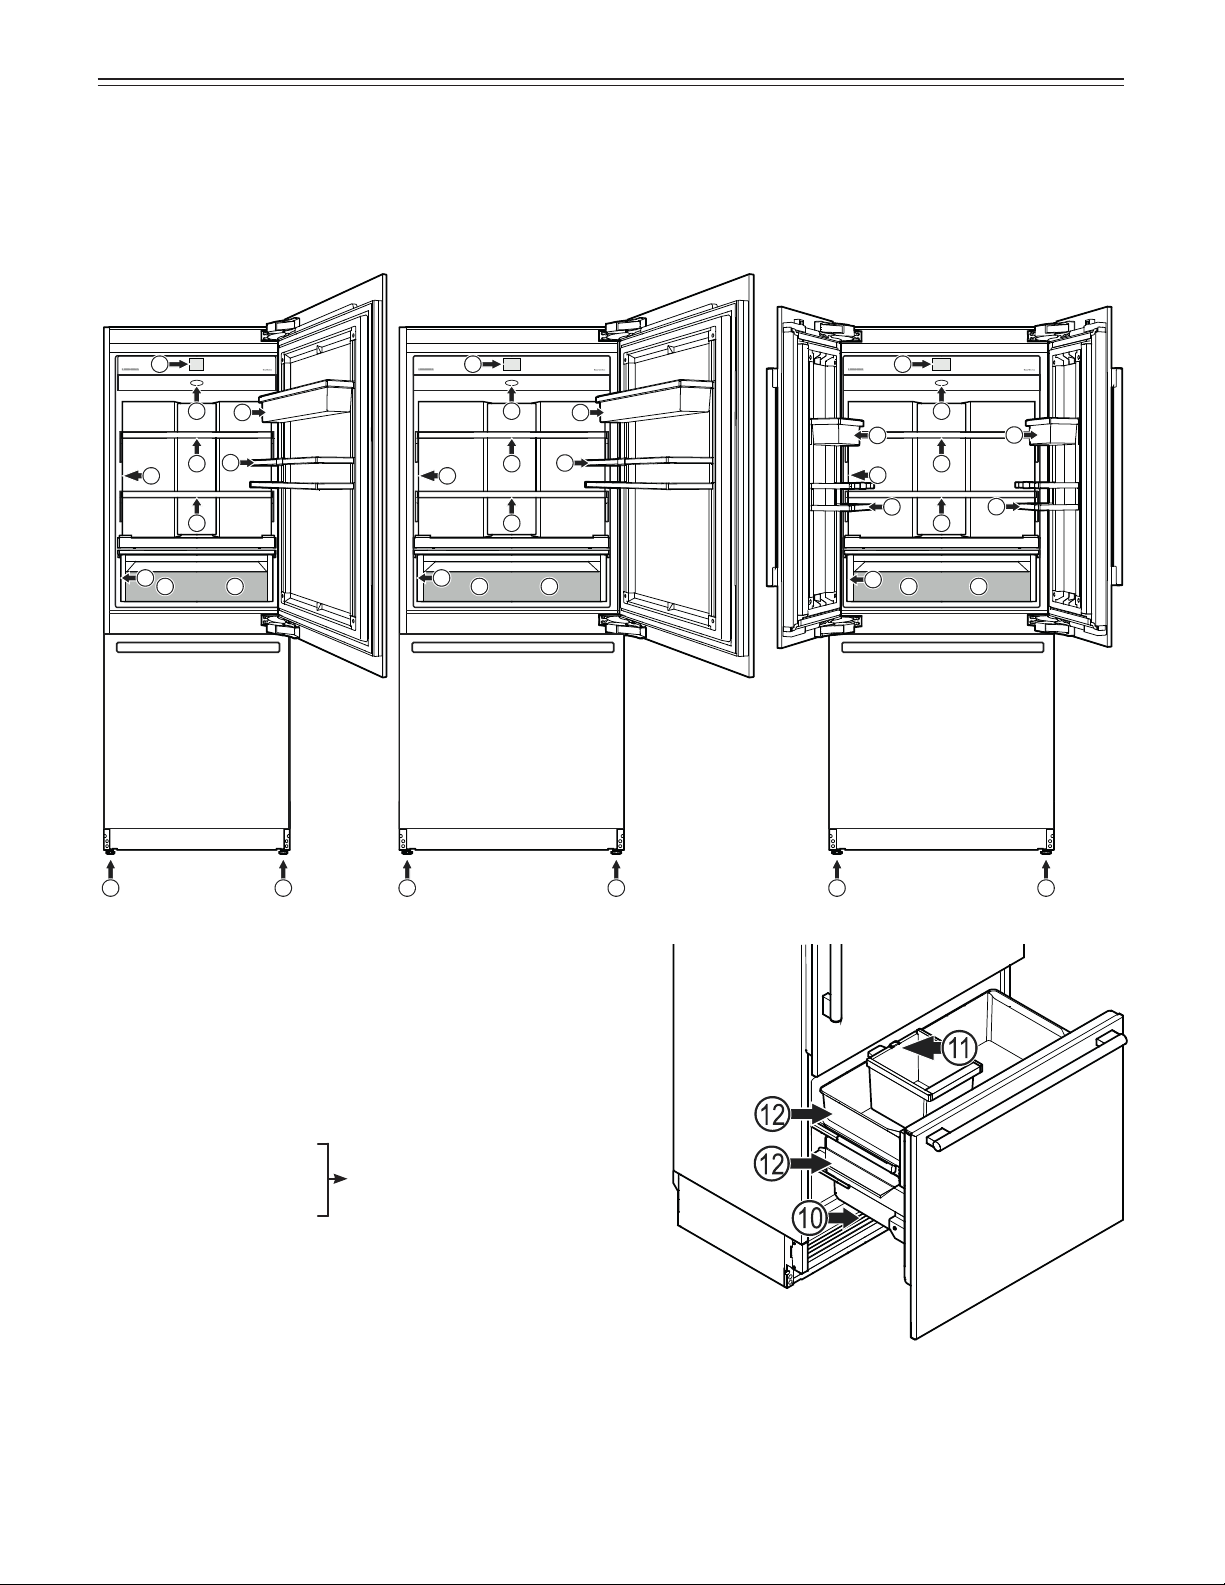
Description of the Appliance
(1) Control panel
(2) Air filter
(3) Adjustable shelves (max. 44 lbs (20 kg))
(4a/b) BioFresh-Plus drawer. For storing food at a
temperature of either 32°F or 28°F.
(5) Adjustable-height feet
(6) Water dispenser
(7) Adjustable door rack
(8) Gallon rack
(9) Model plate (behind
the drawer on the left-hand side)
(10) Water filter (behind the ventilation grille)
(11) Ice maker (inside the drawer) and removable ice
cube bin
(12) Freezer drawer
1
3
5 5
6
7
8
9
2
5 55 5
11
22
3
3
3
3
3
4a
66
7
7
7
8
8
8
99
4b 4a 4a4b 4b
MCB 3050 MCB 3650 MCB 3652
MCB 3000 (max. 55 lbs (25 kg))
MCB 3650 (max. 66 lbs (30 kg))
MCB 3652 (max. 33+33 lbs (15+15 kg))
8
o
peraTion
Control Panel
Three different actions to operate the control panel.
Touch
Touch to activate functions.
Press
Press for approx. 2 seconds to
activate functions.
Slide
Slide to right or left to navigate in
the menu or to search for values.
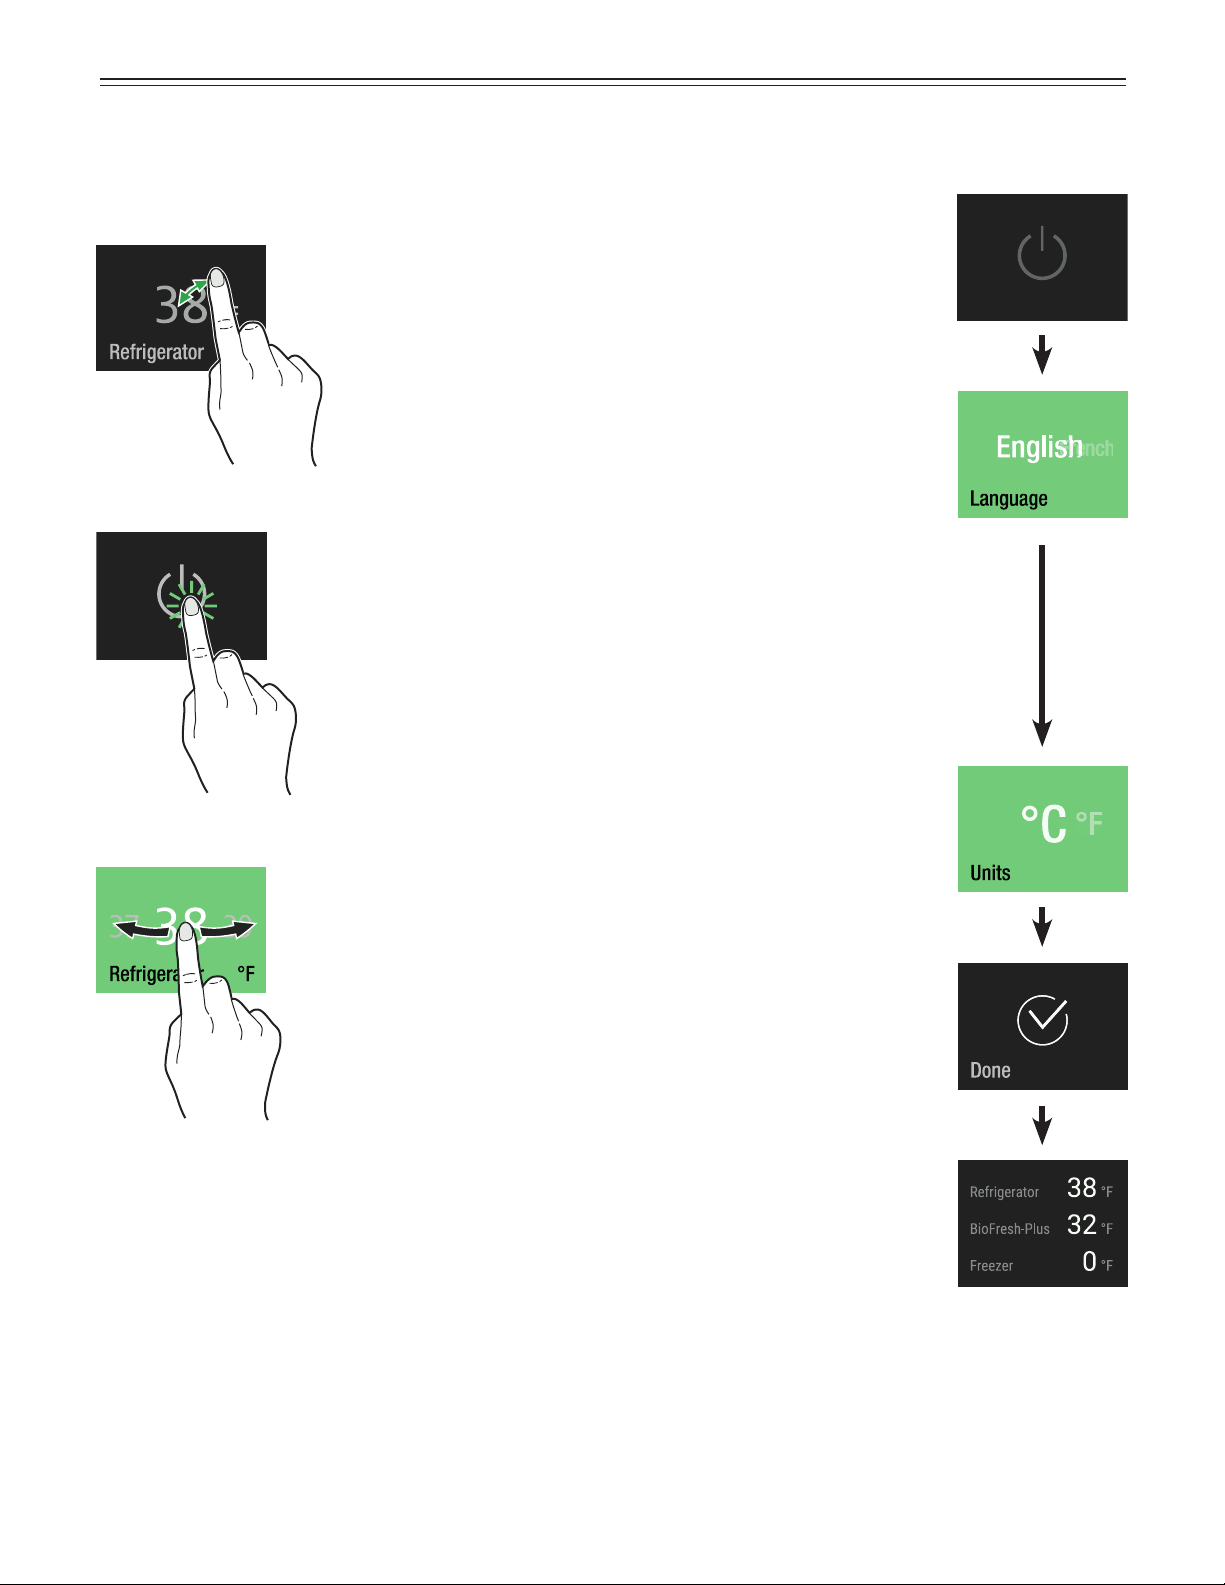
Switching the Appliance On
Touch
Slide to your language and touch
Slide to the desired temperature
unit and touch
Touch to confirm
or
slide to the right to change the
previous settings again.
Available languages:
• German
• Portuguese (Brazil)
• French
• Spanish
• Italian
• English (GB)
• English (US)
• Chinese
• Russian
9
o
peraTion
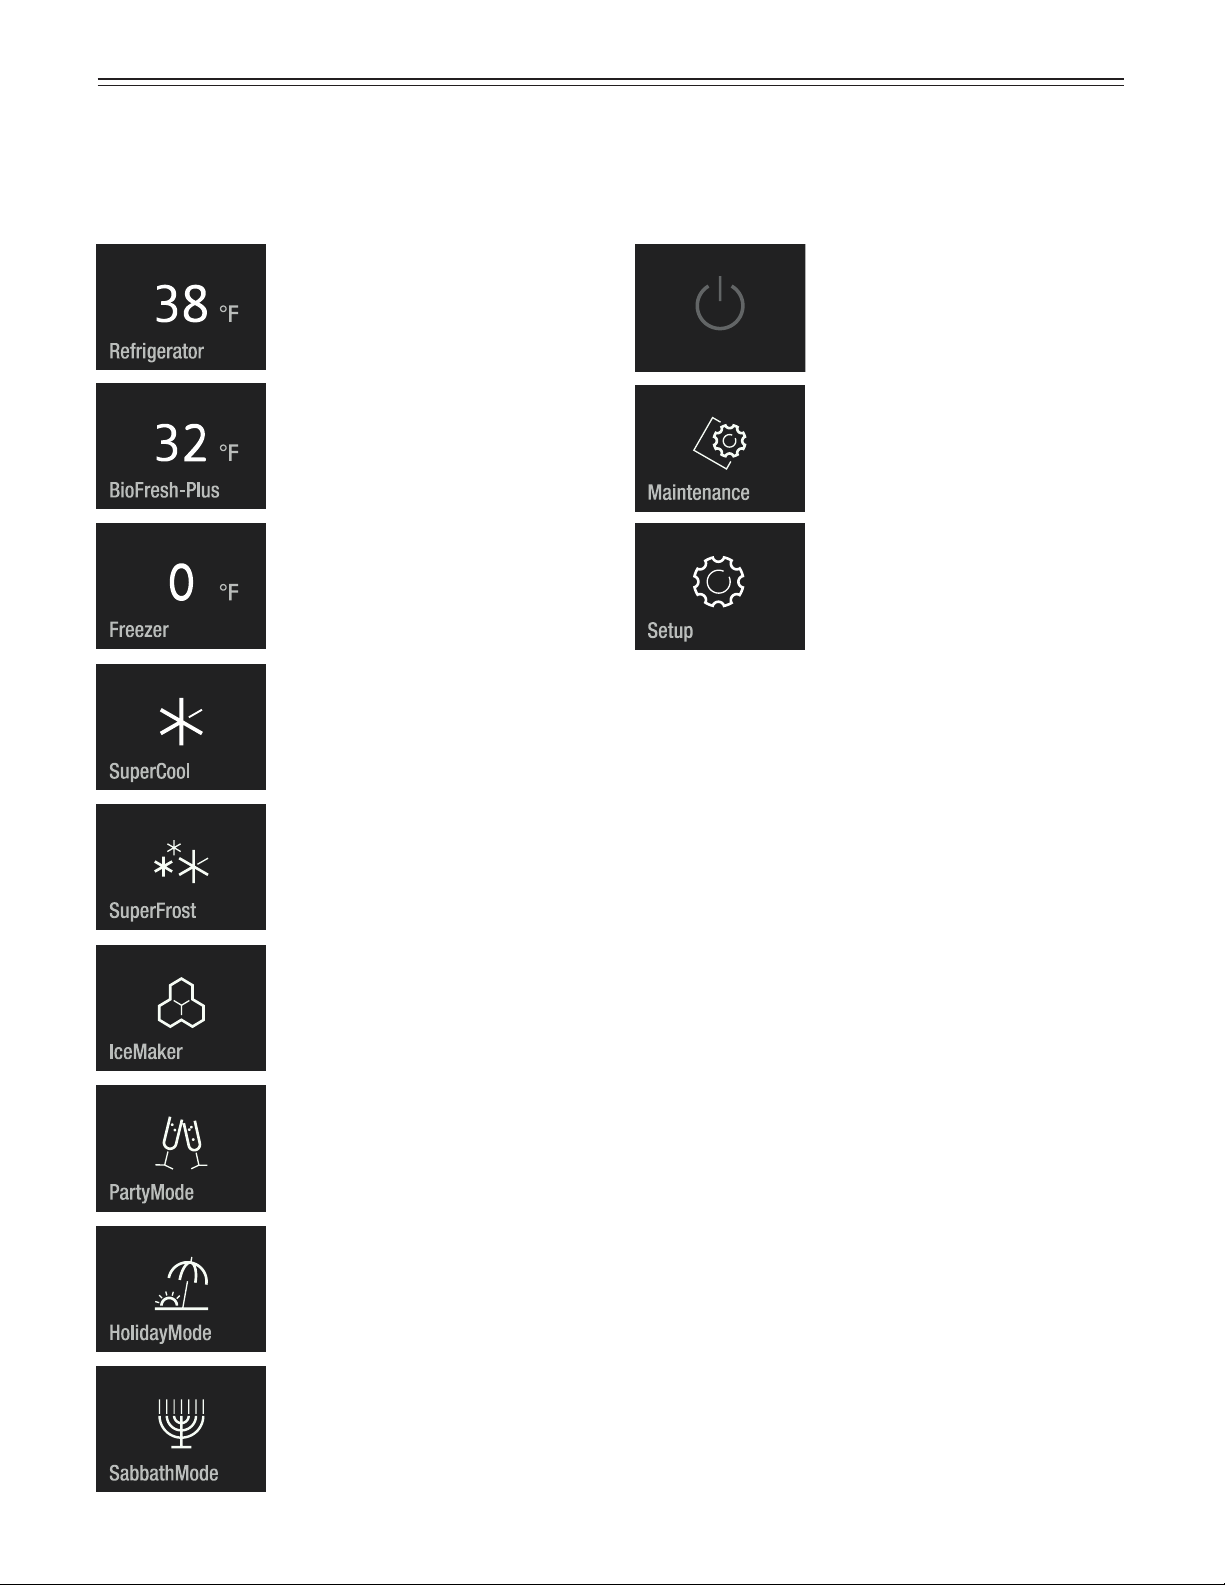
Main Menu
Slide through the main menu. The following functions
are available.
Refrigerator compartment
temperature display and
temperature setting.
BioFresh-Plus compartment
temperature display and
temperature setting.
For permanent maximum cooling.
Appliance operating mode for
Sabbath and holidays. Complies
with STAR-K Kosher Certification.
Switching the appliance on or off.
Describes how to change the
filters and clean the water
dispenser and dust filter.
Allows the adjustment of display
brightness and includes the
appliance information (service
number, model name, serial
number).
Switches the appliance to an
energy-saving operating mode;
the temperature in the refrigerator
compartment is increased to 59°F.
For maximum cooling with time
limit and automatic return to
normal operating mode.
Freezer compartment temperature
display and temperature setting.
To freeze fresh food as rapidly
as possible to ensure that the
nutritional value, appearance and
flavor of the food remains intact.
To switch the IceMaker on or off
and to maximum ice production.
IMPORTANT
The temperature in the appliance’s compartments
may rise significantly if the door is left open for a
lengthy period.
10
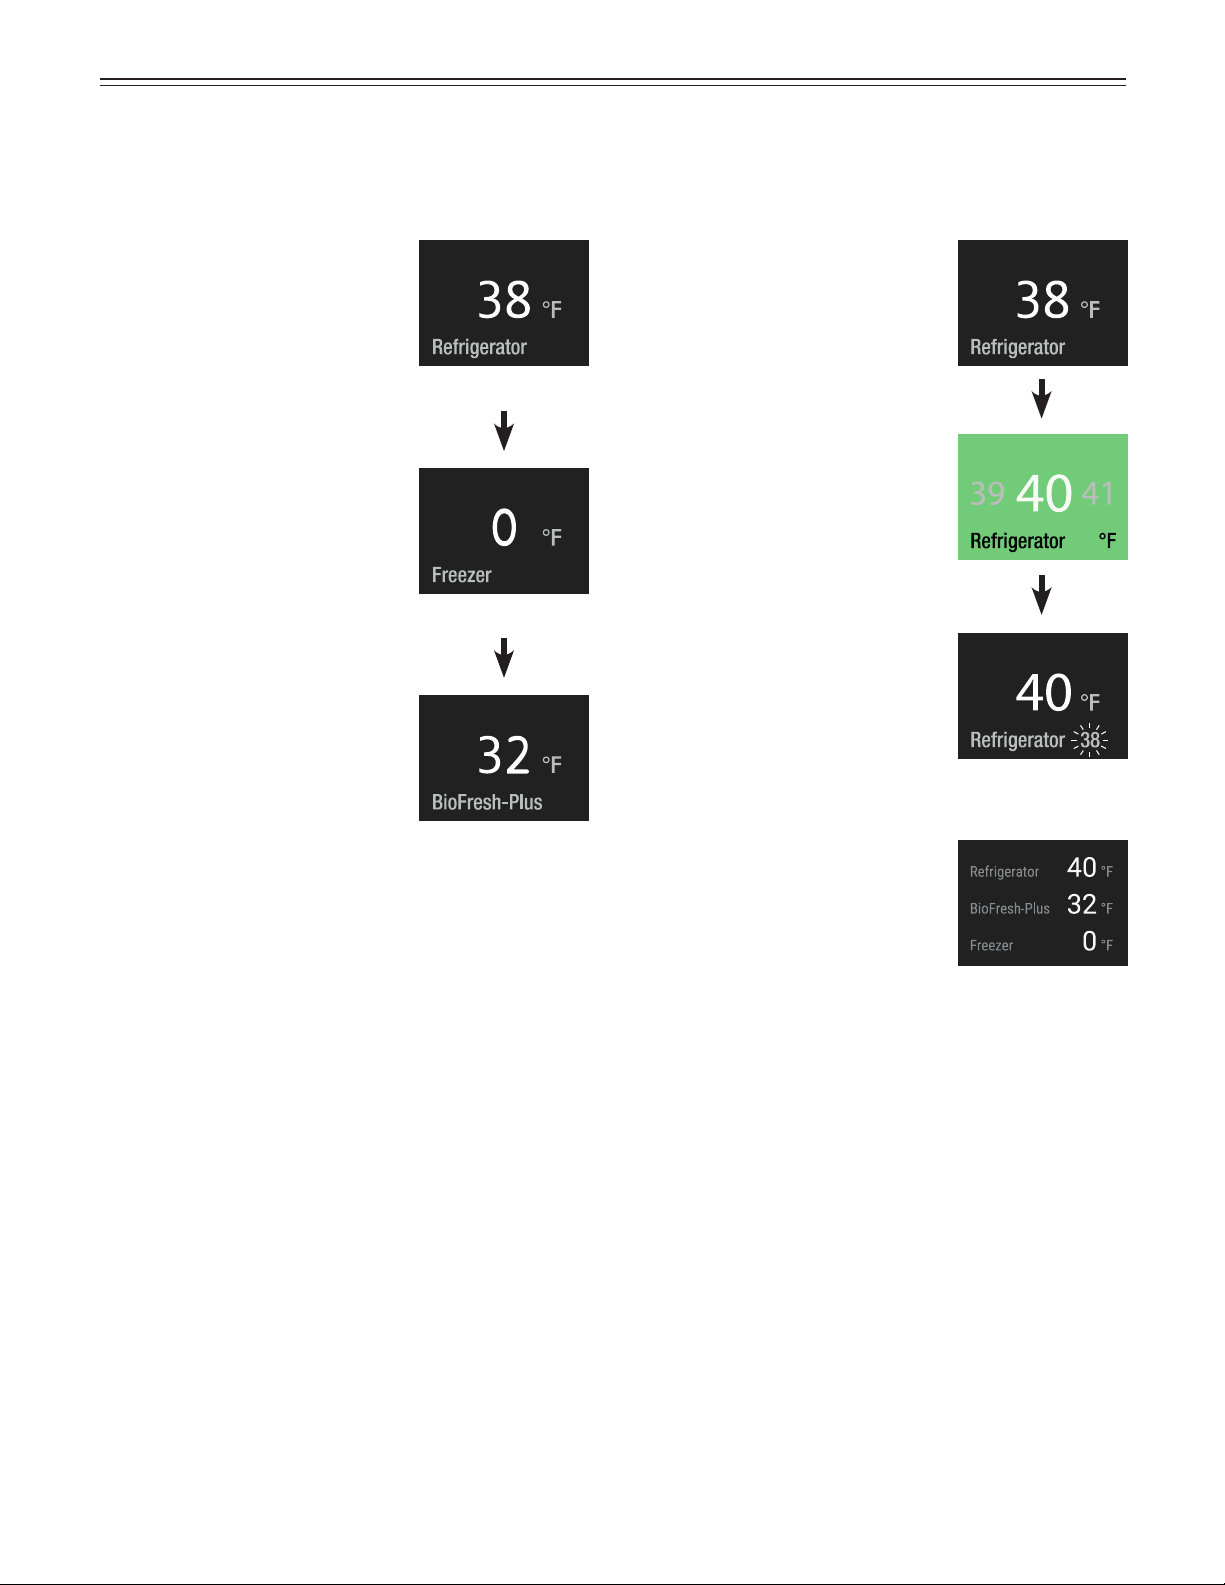
Setting the Temperature
Slide to the required zone.
Touch
or
or
IMPORTANT
The temperature in the warmest section of the
appliance may be higher than the set value.
Setting the Temperature
(Refrigerator Compartment)
Standard setting is 38°F.
Touch
Slide to the desired target
temperature and touch
The number flashing at the bottom
right shows the actual interior
temperature. It disappears when
the target temperature is reached.
Display when the door is opened
again.
Close the appliance door.
The refrigerator temperature display flashes if the actual
refrigerator temperature is different to the target tem-
perature. It stops flashing when the target temperature
is reached.
The temperature can be set at between 36°F and 45°F
(2°C and 7°C).
o
peraTion
11
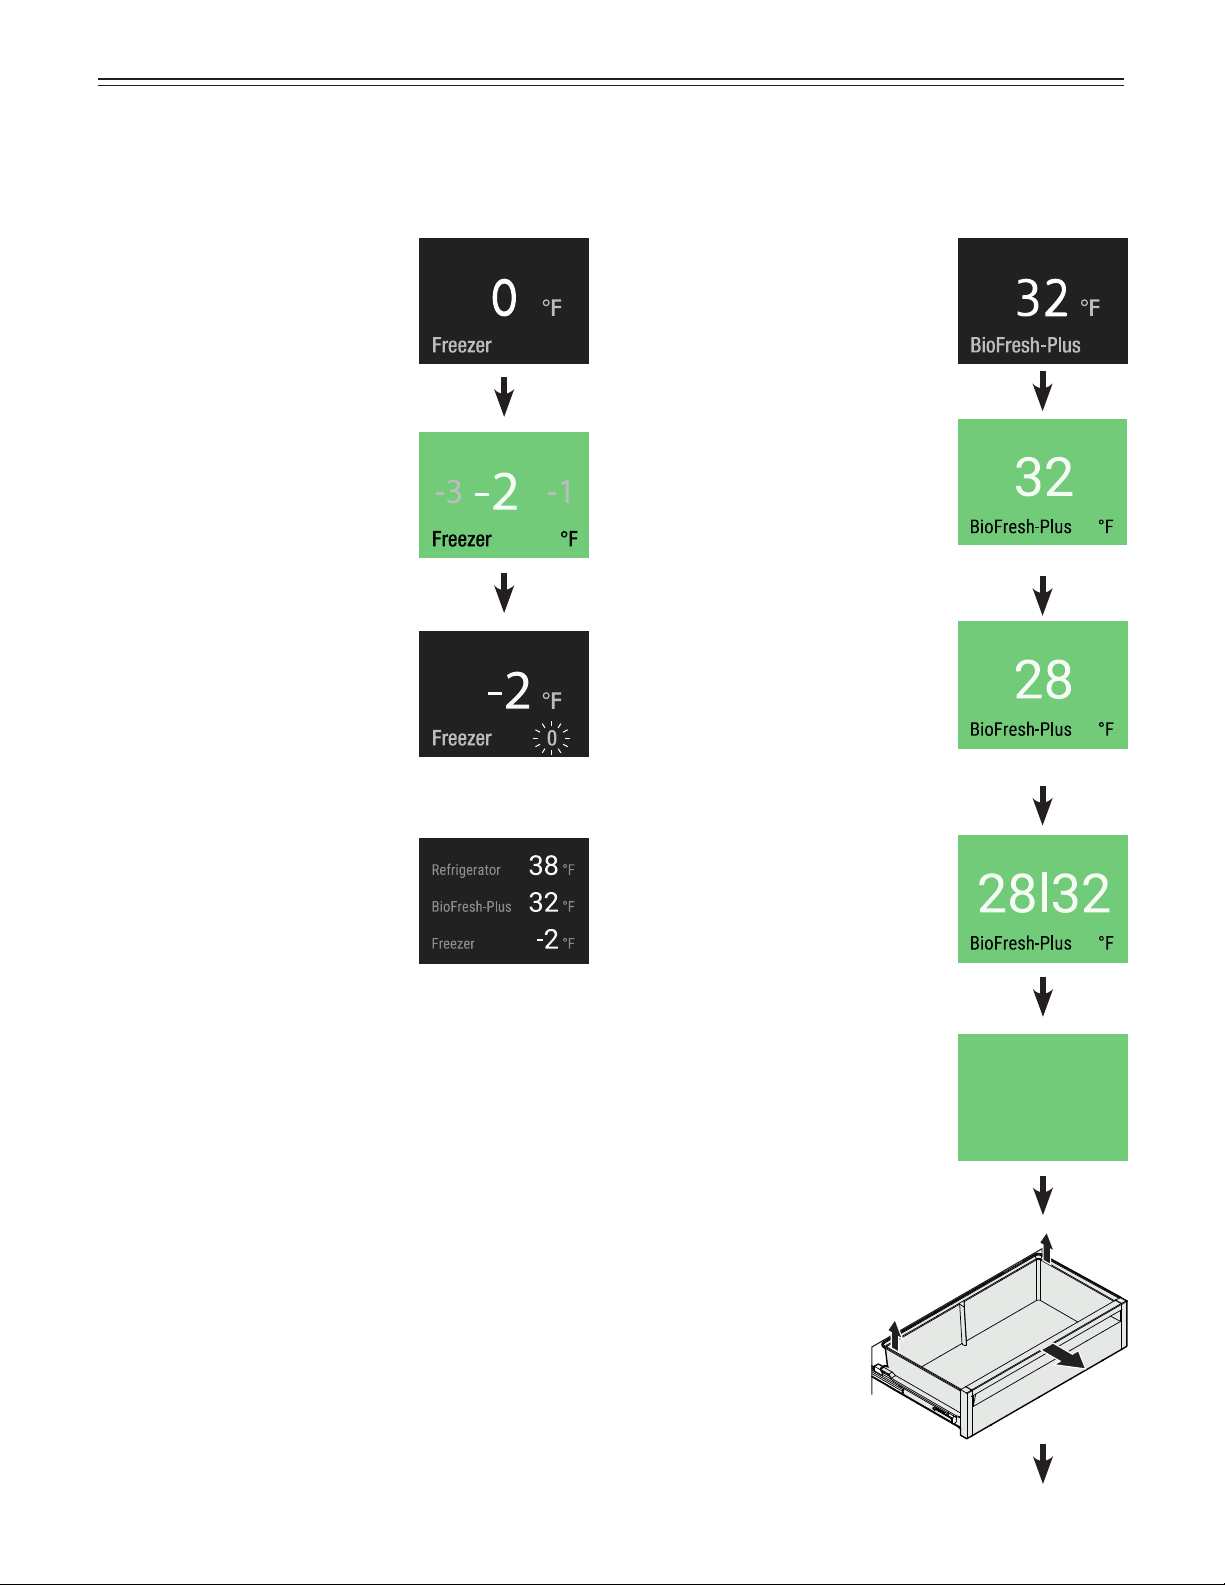
Setting the Temperature
(BioFresh-Plus Compartment)
Standard setting is 32°F.
Touch
Slide to the desired target
temperature and touch
An additional drawer divider must
be inserted to select 28°F / 32°F.
Temperature range on the left-
hand side of the drawer: 28°F
Temperature range on the right-
hand side of the drawer: 32°F
Pull the drawer straight
out, grip at the back and
lift out.
Setting the Temperature
(Freezer Compartment)
Standard setting is 0°F.
Touch
Slide to the desired target
temperature and touch
The number flashing at the bottom
right shows the actual interior
temperature. It disappears when
the target temperature is reached.
Display when the door is opened
again.
Close the appliance door.
The temperature display blinks if the actual interior tem-
perature is different to the target temperature. It stops
blinking when the target temperature is reached.
The temperature can be set at between 7°F and -15°F
(-14°C and -27°C).
or
or
For dual temperature
please ensure
the drawer divider
is inserted.
IMPORTANT
There is no need to remove
the drawer divider for setting to
32°F or 28°F. The temperature
will be adjusted in both
compartments of the drawer.
o
peraTion
12
o
peraTion
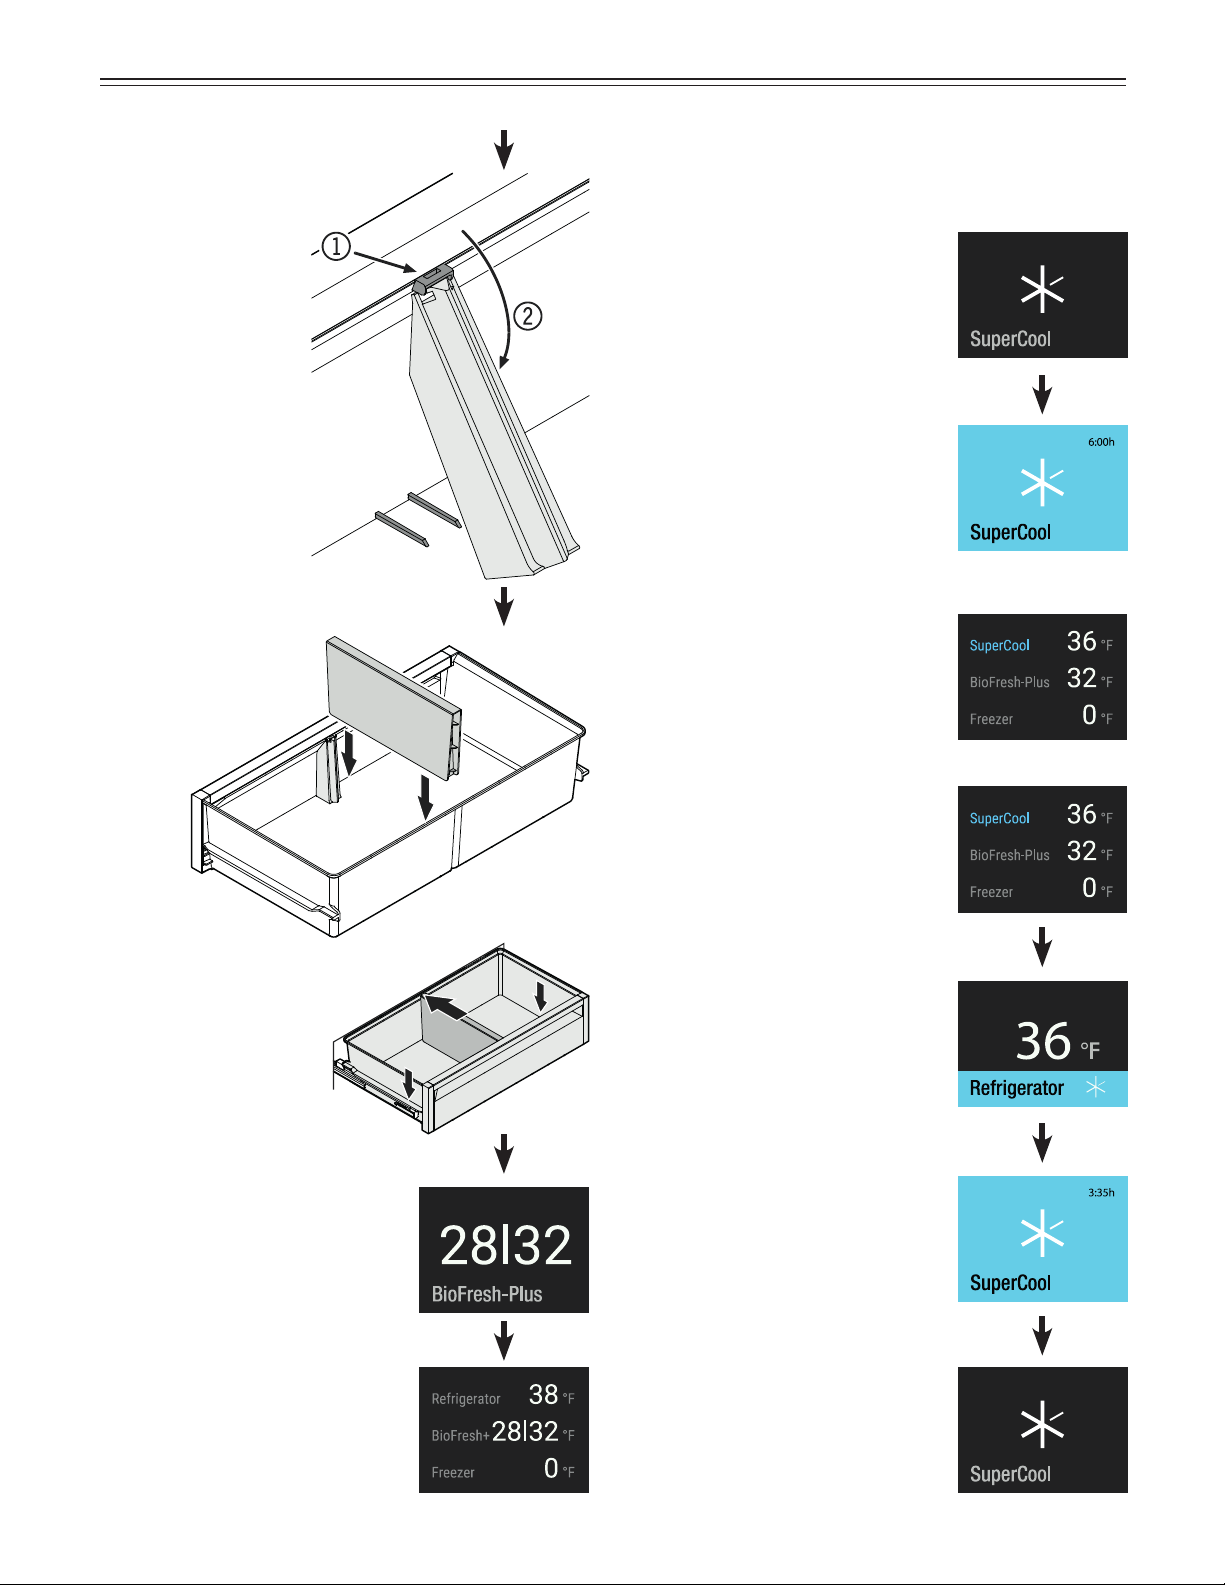
SuperCool
Activate SuperCool if you wish to cool large quantities
of food rapidly. The set temperature is 36°F.
Touch
SuperCool is activated.
At top right, the remaining run
time of 6 hours is visible. When
this time is up, the appliance
switches back to normal
operation.
SuperCool is deactivated.
Display when the door is opened
again.
Close the appliance door.
To change the temperature,
SuperCool must be deactivated.
Touch the display.
Touch
Touch
Close the appliance door.
Display when the door is opened
again.
Attach the holder at
the top (1) and turn
it (2).
Insert the drawer
divider.
Place the drawer on
the rails. The rails must
be fully extended and
aligned with the front
of the drawer. Slide the
drawer in.
13
o
peraTion
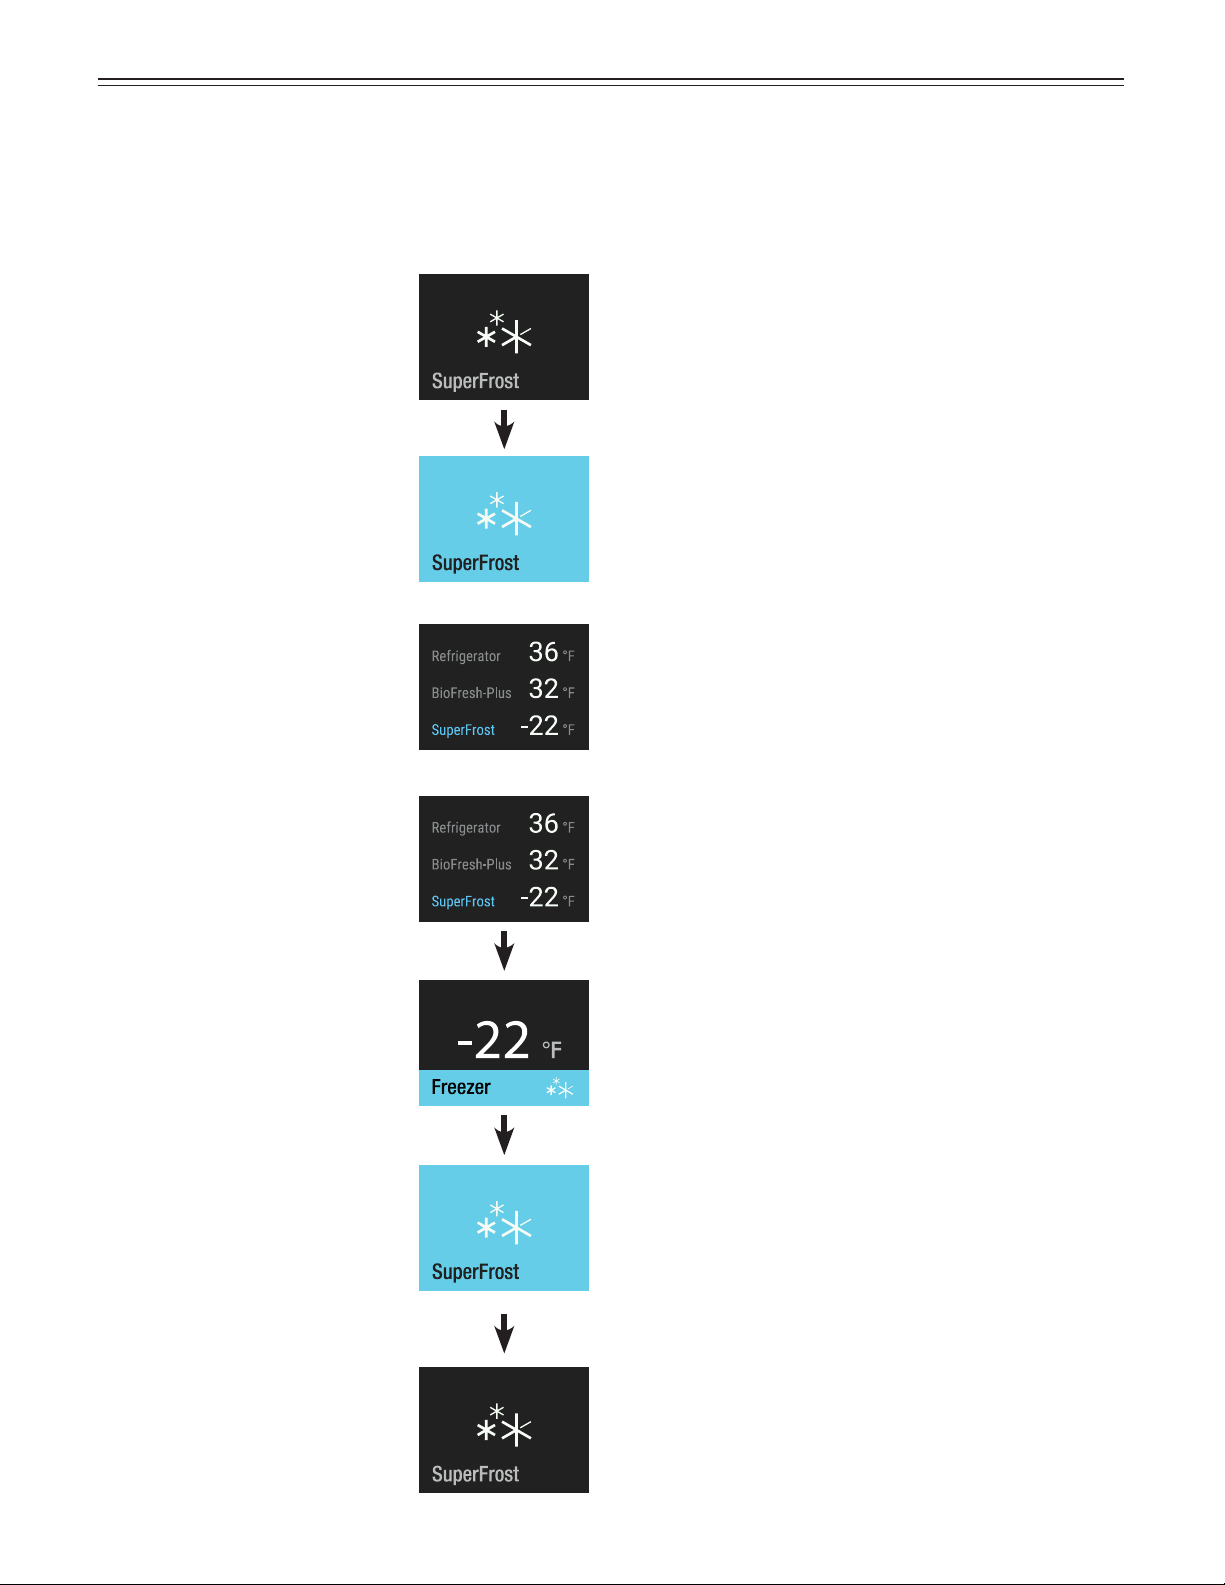
SuperFrost
Fresh food should be frozen completely and as rapidly
as possible. This is provided by the SuperFrost feature
and ensures that the nutritional value, appearance and
flavor of the food remains intact.
Touch
SuperFrost is activated.
Wait 24 hours. Then place
the food inside and close the
appliance door.
SuperFrost is deactivated.
Display when the door is opened
again.
The SuperFrost function turns off
automatically between 30 and
65 hours depending on the
quantity of food placed inside.
To deactivate SuperFrost earlier,
touch the display.
Touch
Touch
Freezing and Storage
• Pack frozen food in standard freezer bags or reusable
plastic, metal or aluminum containers.
• Do not allow fresh food which is to be frozen to come
into contact with food already frozen. Always keep
packages dry in order to avoid them sticking together.
• Always write the date and contents on the package
and do not exceed the stated storage time for the
food. This prevents spoiling.
• Pack food which you are freezing yourself in
quantities right for your household. To ensure the food
freezes right through quickly, the following quantities
should not be exceeded per package:
- fruit, vegetables: up to 2-1/4 lbs (1 kg);
- meat: up to 5-1/2 lbs (2.5 kg).
• Do not freeze bottles and cans which contain
carbonated drinks as they might burst. Drinks can be
cooled down quickly, but take the bottles out of the
freezer compartment after an hour at the most.
• Only take out as much food as needed for thawing.
Cook food which has been thawed as quickly as
possible.
Frozen food can be thawed in the following ways:
- in a microwave oven
- in the refrigerator: the safer way to thaw food because
there is less chance of bacteria growth. Use this
method for high density food such as roasts or
poultry.
14
o
peraTion
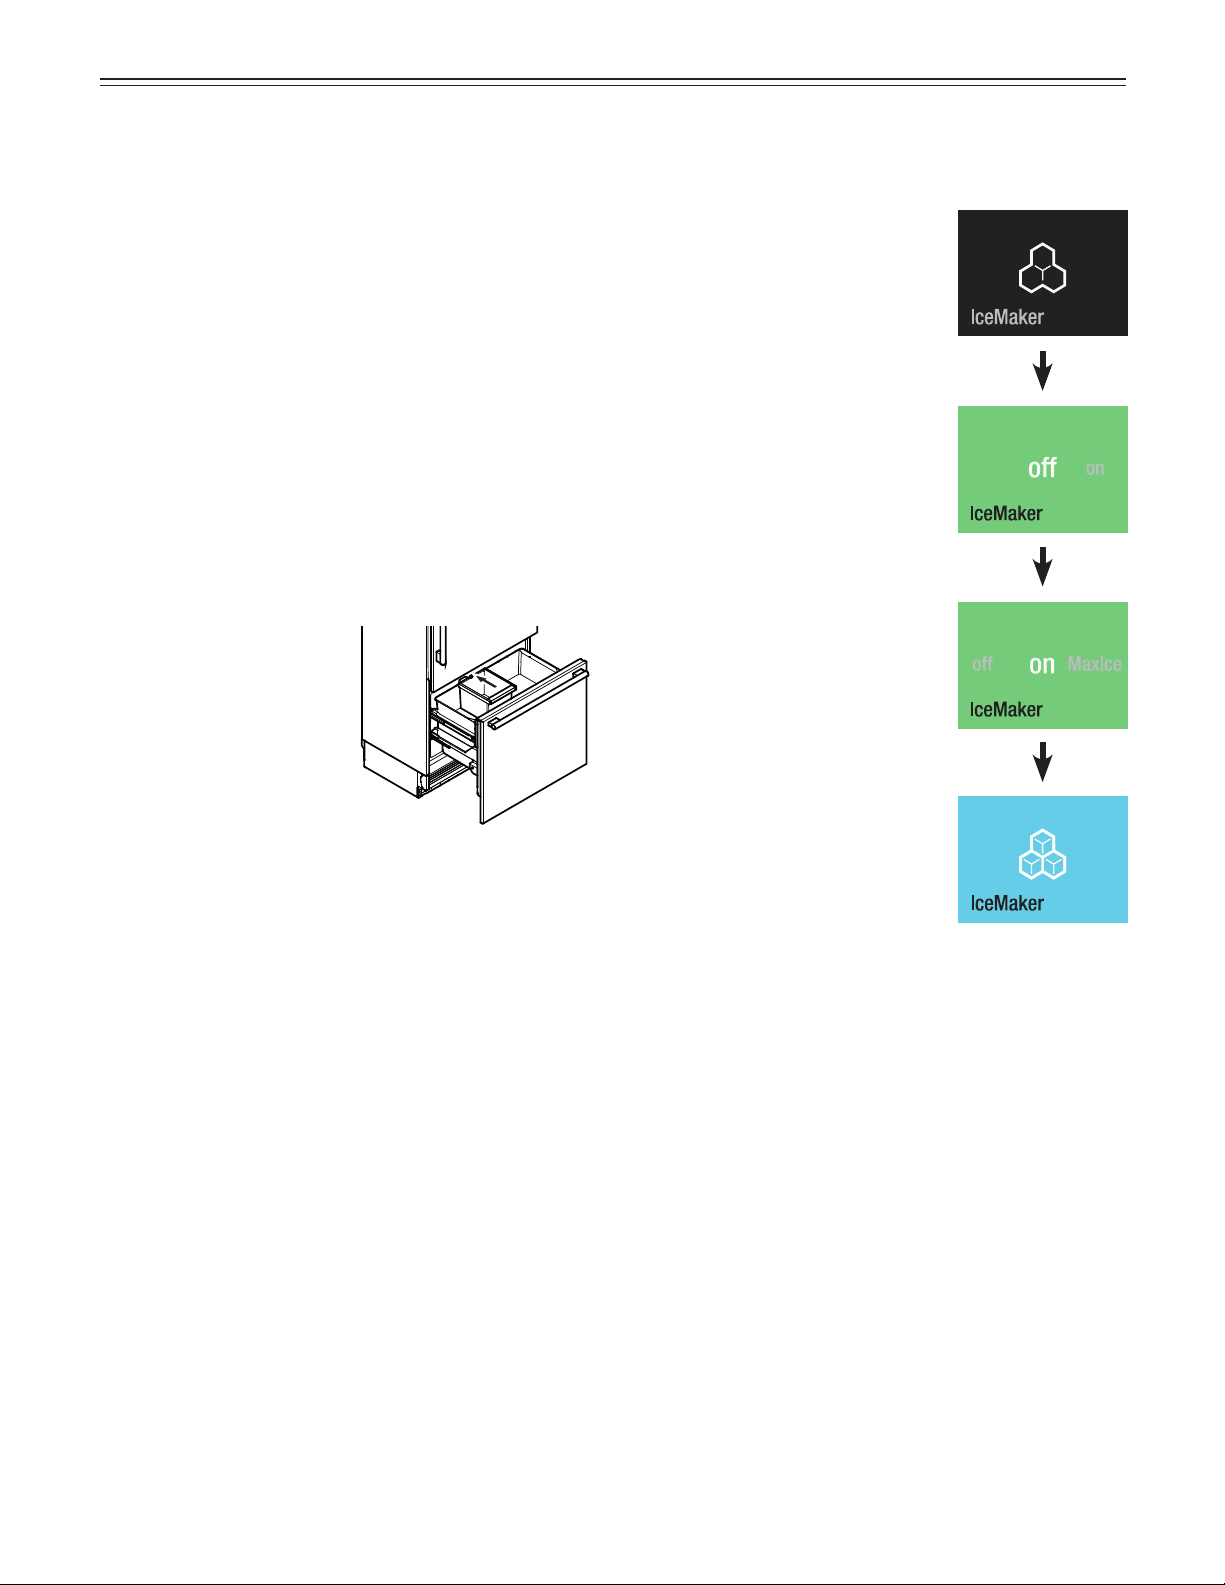
Ice Maker Description
The IceMaker is in the top
drawer of the appliance.
The ice cubes fall out of the
ice maker into the drawer.
When the ice reaches a cer-
tain level in the drawer, the
appliance stops producing
ice automatically.
After you start the ice maker for the first time, it may
take up to 24 hours before the first ice cubes are ready.
IMPORTANT
The first three batches of ice must not be consumed
or used.
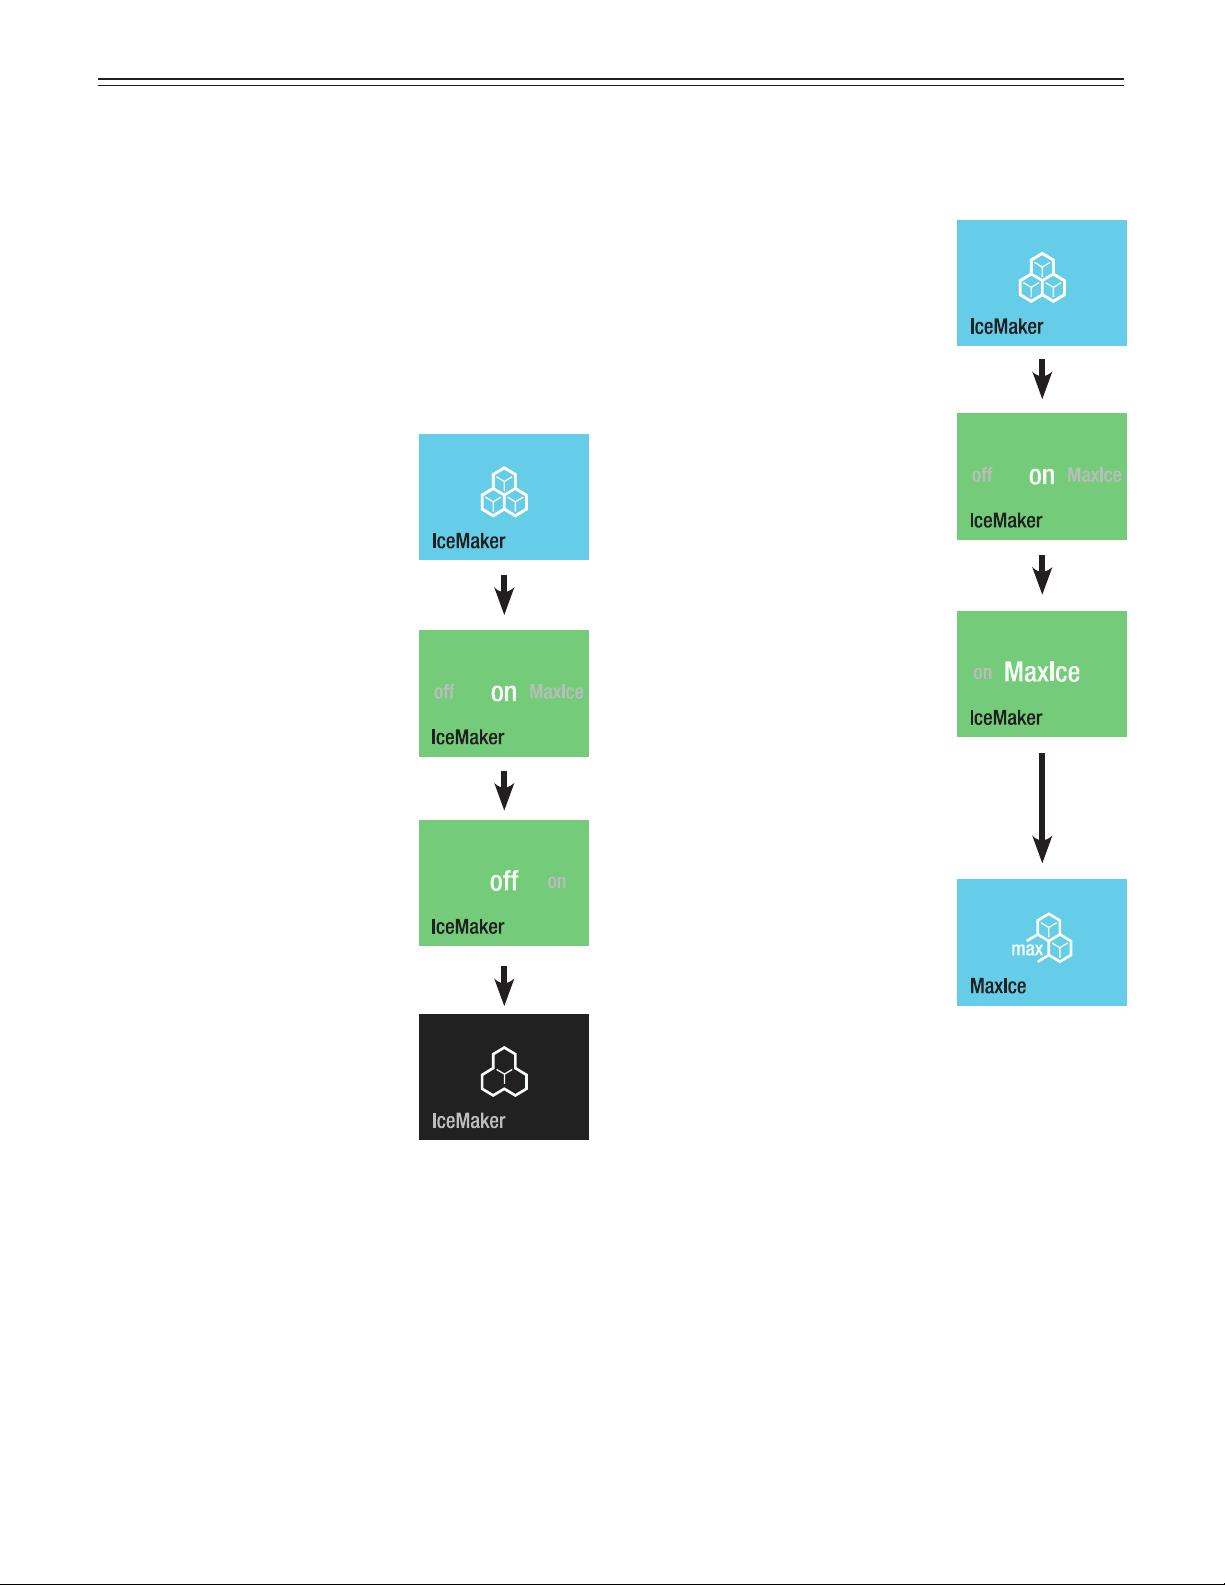
Switching the IceMaker on
Touch
Slide to the left.
Touch
Safety Instructions and
Warnings for the Ice Maker
• The ice maker is designed exclusively to make ice
cubes in quantities needed by a household.
• All repairs and work on the ice maker may only be
done by customer service personnel or other appro-
priately trained personnel.
• Do not consume or use the first three batches
of ice. This applies both to using the appliance
for the first time and also using it after it has not
been used for a long period of time.
• The manufacturer cannot accept liability for
damage caused by equipment or water lines
between the solenoid valve and the water supply.
The production capacity is 100 - 120 ice cubes in
24 hours at a temperature of 0°F (-18°C) inside the
freezer compartment.
The IceMaker is switched on.
15
Switching the Ice Maker Off
Touch
Slide to the right.
Touch
The IceMaker is switched off.
IMPORTANT
Additional steps required to decommission the
appliance or for a lengthy absence.
• Switch off the water supply.
• Wait for 24 hours or until the water alarm appears.
• Disable the ice maker.
The production capacity is approx. 150 ice cubes in
24 hours.
Be aware that this increases the energy consump-
tion slightly.
Switching the IceMaker to
Maximum Ice Production
Touch
Slide to the left.
Touch
The MaxIce function is activated.
IMPORTANT
Maximum ice production is switched off after
36 hours.
IMPORTANT
The temperature in the
freezer compartment is set
to the perfect level for ice
production.
o
peraTion
16
o
peraTion
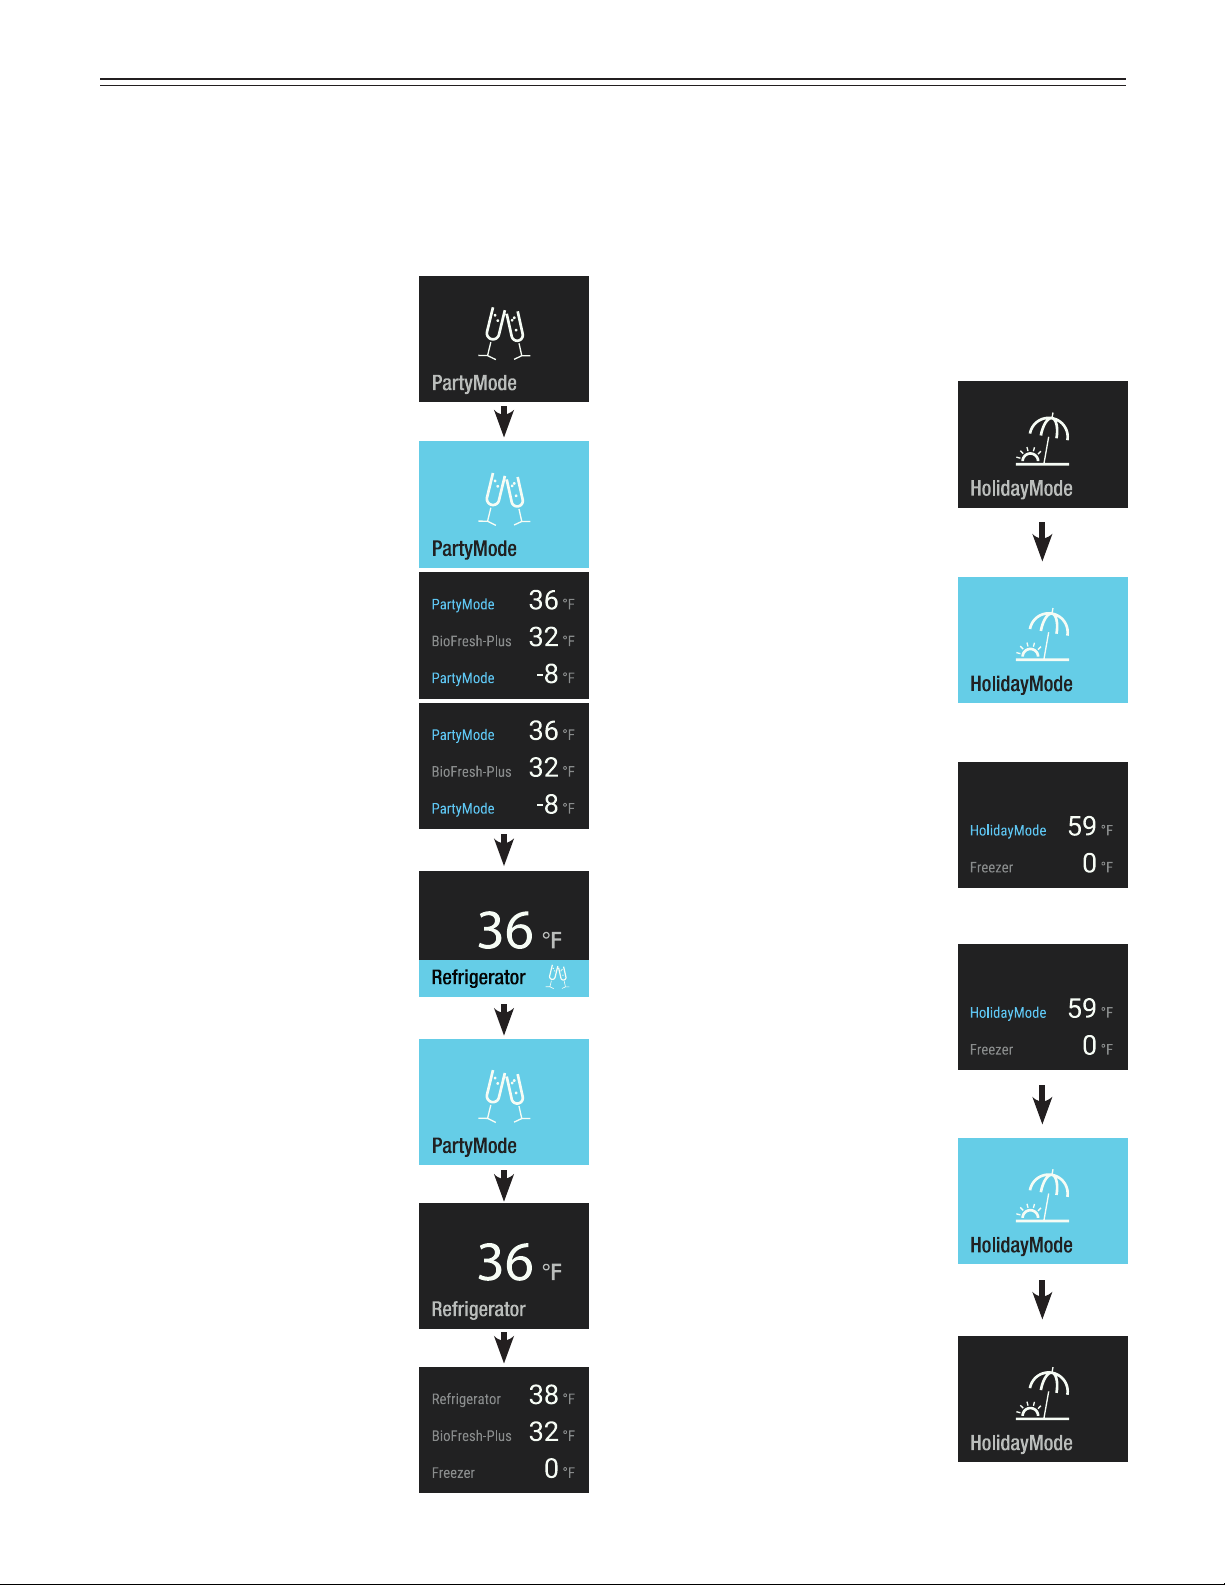
Touch
PartyMode is activated.
It must be deactivated manually.
Close the appliance door.
Display when the door is opened
again. Refrigerator temperature
display flashes.
To change the temperature,
PartyMode must be deactivated.
Touch the display.
Touch
Touch
PartyMode
When a large amount of cold food or beverages is needed:
Place all the food and beverages in the appliance one day
before and activate PartyMode. SuperCool is activated in
the refrigerator compartment and maximum ice production
in the freezer compartment.
Display when the door is opened
again.
Close the appliance door.
HolidayMode
Before a lengthy absence, use up all the food in the
refrigerator compartment and activate HolidayMode.
This ensures that no unpleasant odors develop inside
the appliance, even if the appliance door is closed.
(The temperature in the refrigerator compartment is
increased to 59°F.) The current cycle for ice cubes will
be completed in the freezer compartment and the ice
maker will be disabled.
Touch
HolidayMode is activated.
Close the appliance door.
Display when the door is
opened again. The diplay shows
the actual temperature in the
refrigerator compartment.
Touch
If you want to deactivate
HolidayMode, touch the display.
HolidayMode is deactivated.
17
o
peraTion
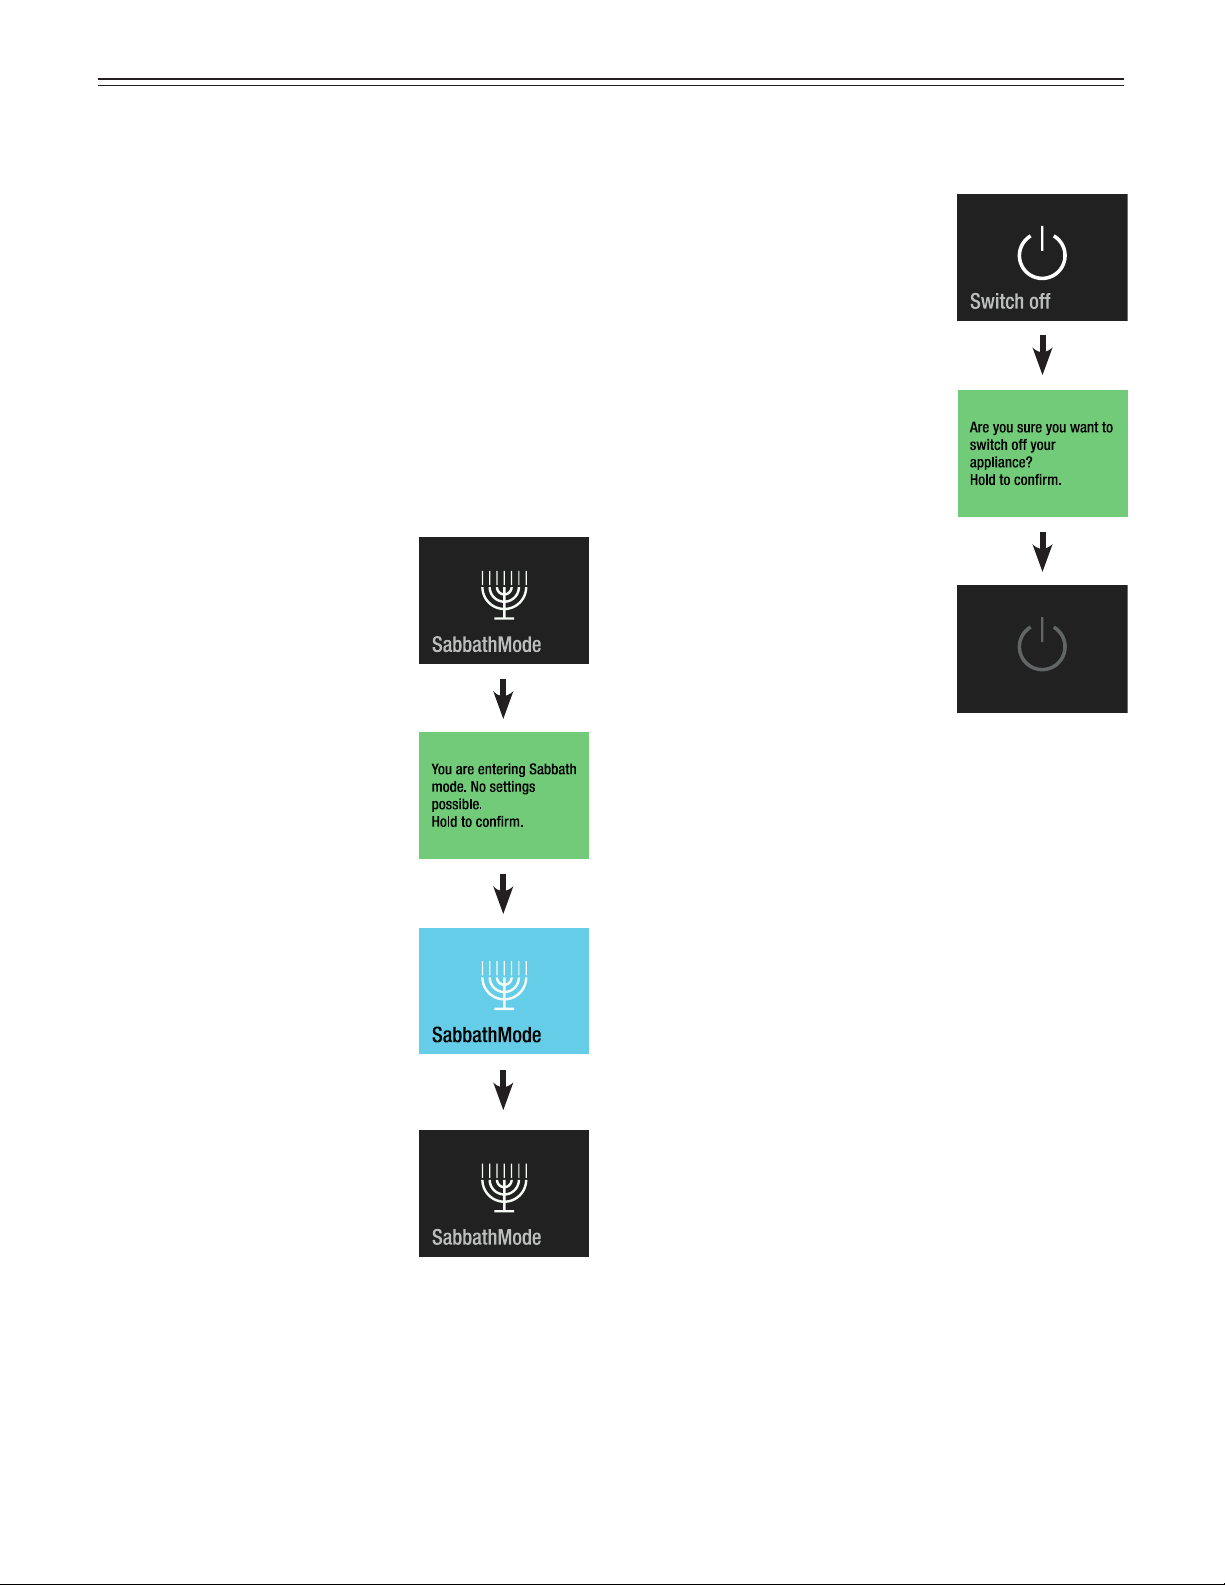
SabbathMode
When SabbathMode is active, some functions of the
electronic features are switched off to comply with
STAR-K Kosher Certification.
• The lighting remains off.
• The cooling fan remains in its actual state: If it is on,
it remains on, if it is off, it remains off.
• There is no door alarm.
• There is no temperature alarm.
• Defrost cycles are independent of the number of
times and length of door openings.
• The unit will return to SabbathMode after a power
failure.
Touch
Press for approx. 2 sec. to switch
off the appliance
or
touch to return to normal
operating mode.
SabbathMode is activated.
SabbathMode switches off
automatically after 120 hours.
To deactivate SabbathMode
earlier, touch again.
SabbathMode is deactivated.
Switching the Appliance Off
Touch
The appliance is switched off.
Press for approx. 2 sec. to switch
off the appliance
or
touch to return to normal
operating mode.
18
o
peraTion
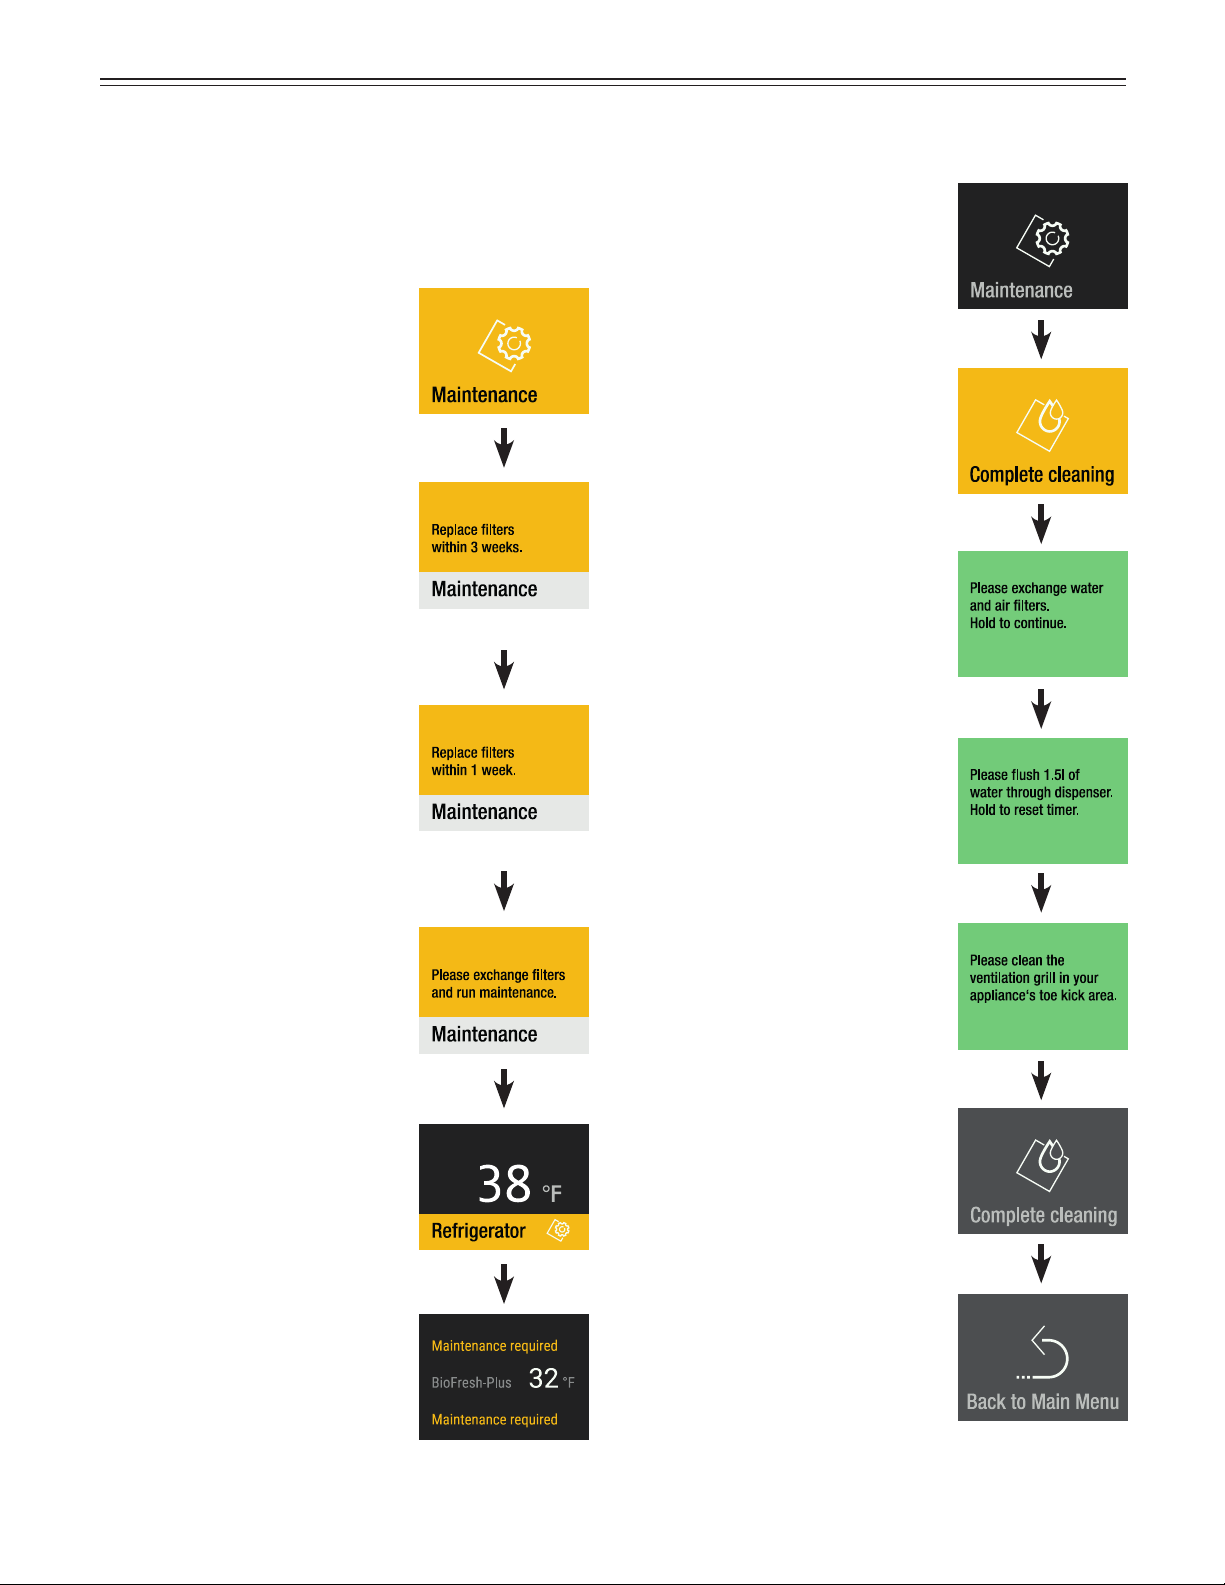
Maintenance Message
In regular intervals of operation of the appliance, the
maintenance message comes on (6 months). Filters
need to be changed. The water disperser needs to be
flushed. The dust filter needs to be cleaned.
Touch
or
or
Touch
Close the appliance door.
Display when the appliance door
is opened again.
Obtain water filter and air filter from your dealer and
complete the maintenance procedure.
Maintenance Confirmation
Touch
Touch
Change water filter and air
filter as described in chapter
„Maintenance“.
Subsequently press to continue.
Flush water dispenser
as described in chapter
„Maintenance“.
Subsequently press to continue.
Clean the dust filter as described
in chapter „Maintenance“.
Subsequently press to finalize
maintenance.
Slide to the right.
Touch to exit maintenance.
19
o
peraTion
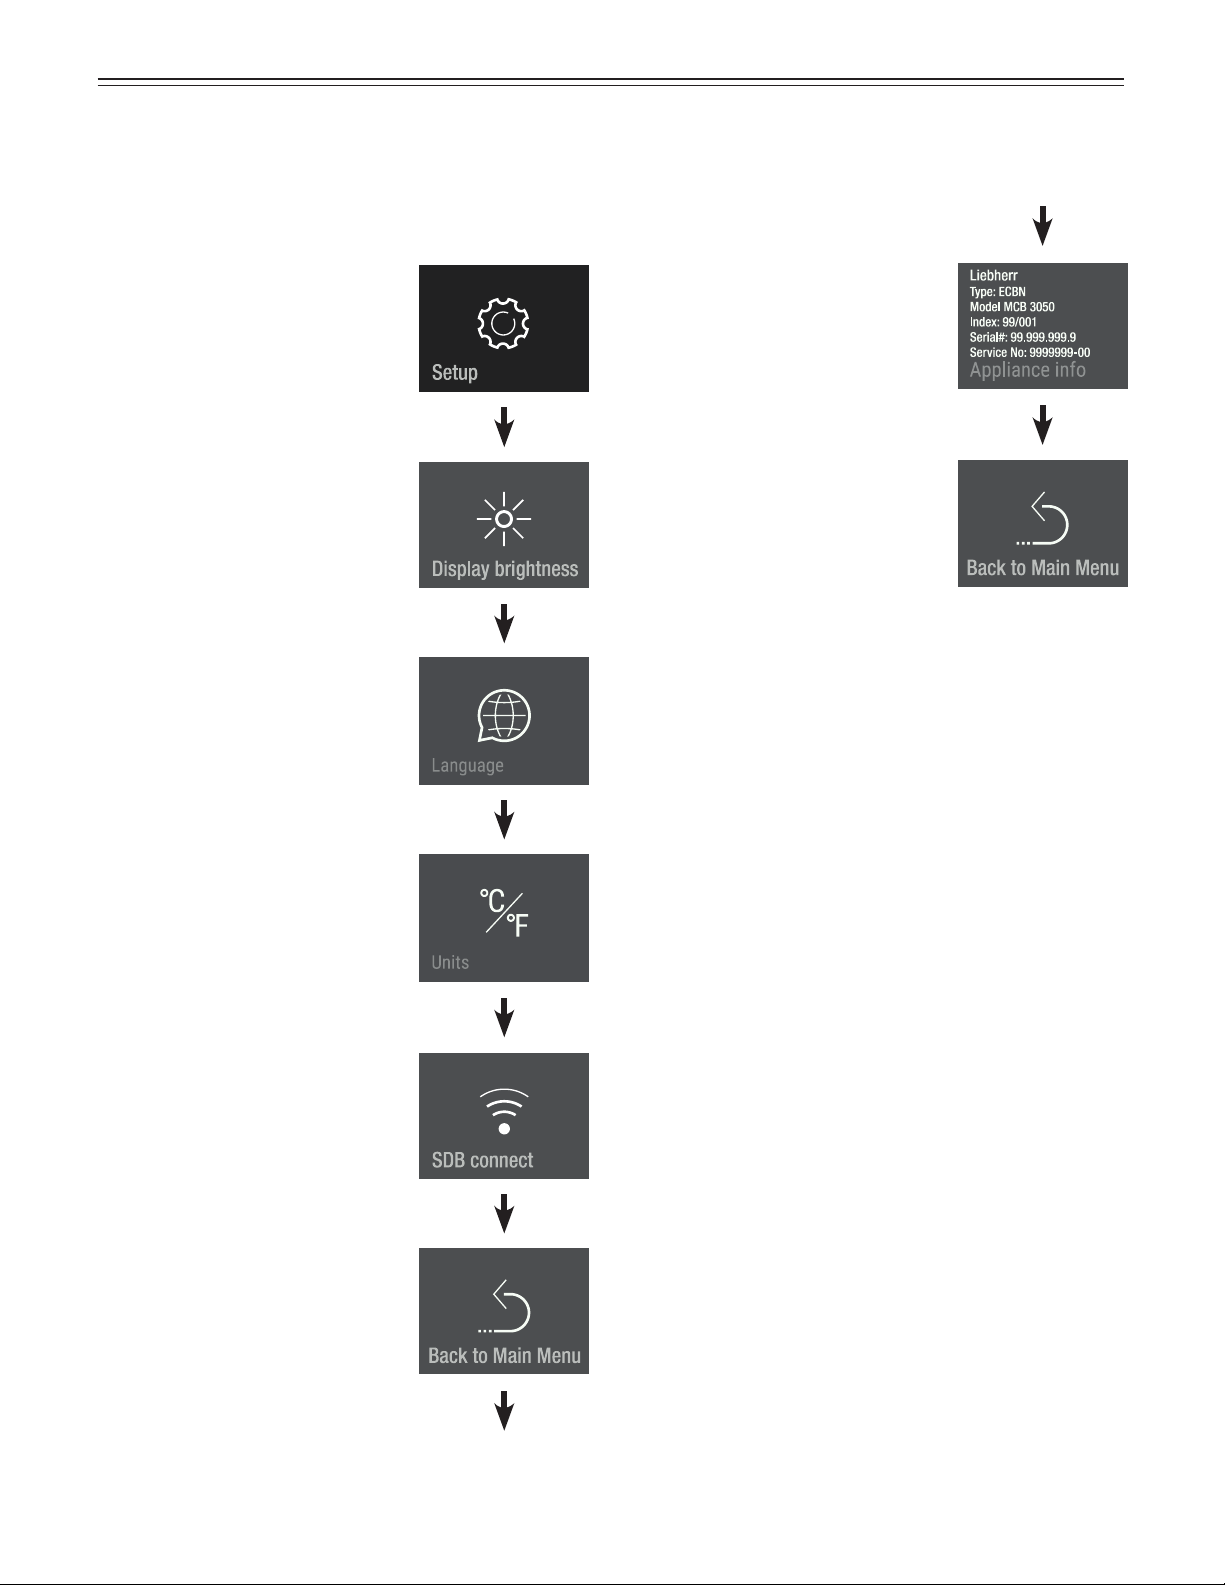
Touch
Setup Menu
Includes the adjustment for display brightness, lan-
guage, units, activation of the SmartDeviceBox and the
device information.
Slide to the left.
Slide to the left.
Slide to the left.
(Only visible when the
SmartDeviceBox is fitted.)
Slide to the left.
Slide to the left.
Display shows the device
information.
Slide to the right.
Touch to exit.
20
o
peraTion
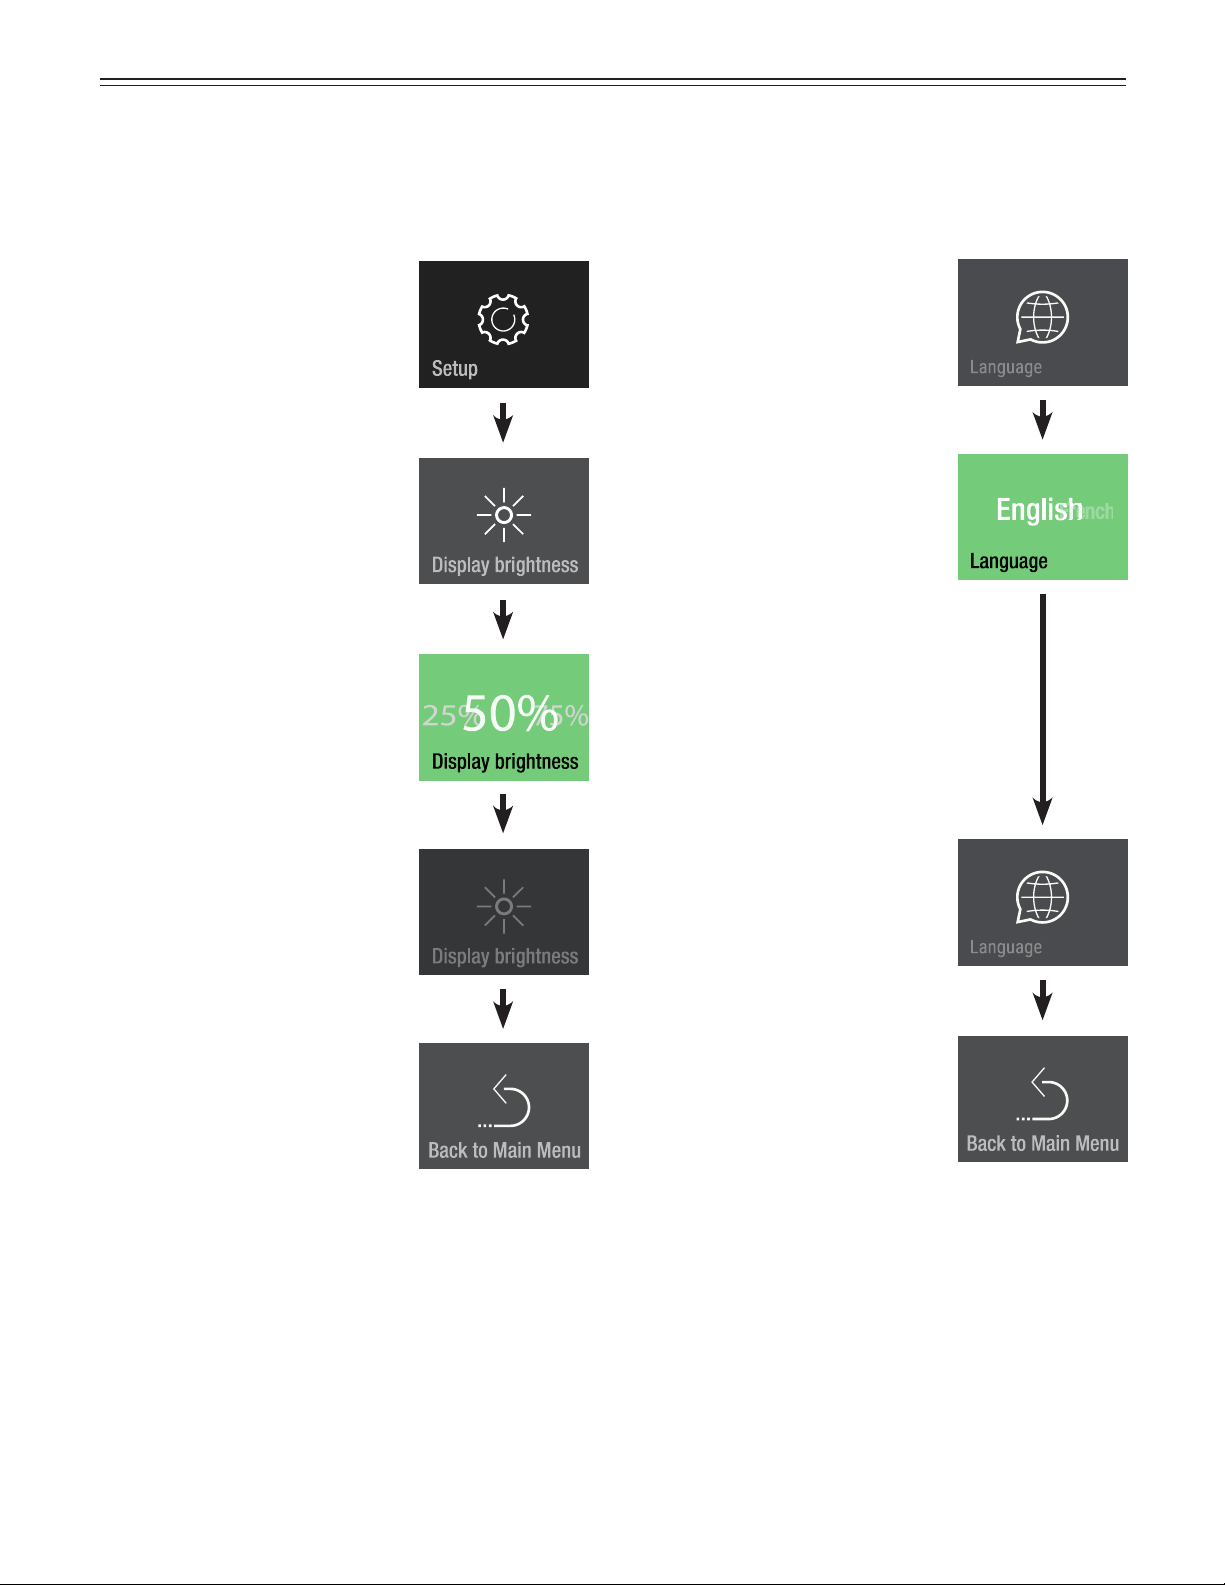
Touch
Touch
Display Brightness
100% = maximum brightness.
25% = lowest brightness.
Slide to the desired value and
touch.
Slide to the left.
Touch to exit.
Touch
Slide to your language and touch
Touch to exit.
Available languages:
• German
• Portuguese (Brazil)
• French
• Spanish
• Italian
• English (GB)
• English (US)
• Chinese
• Russian
Language
Slide twice to the left.
21
o
peraTion
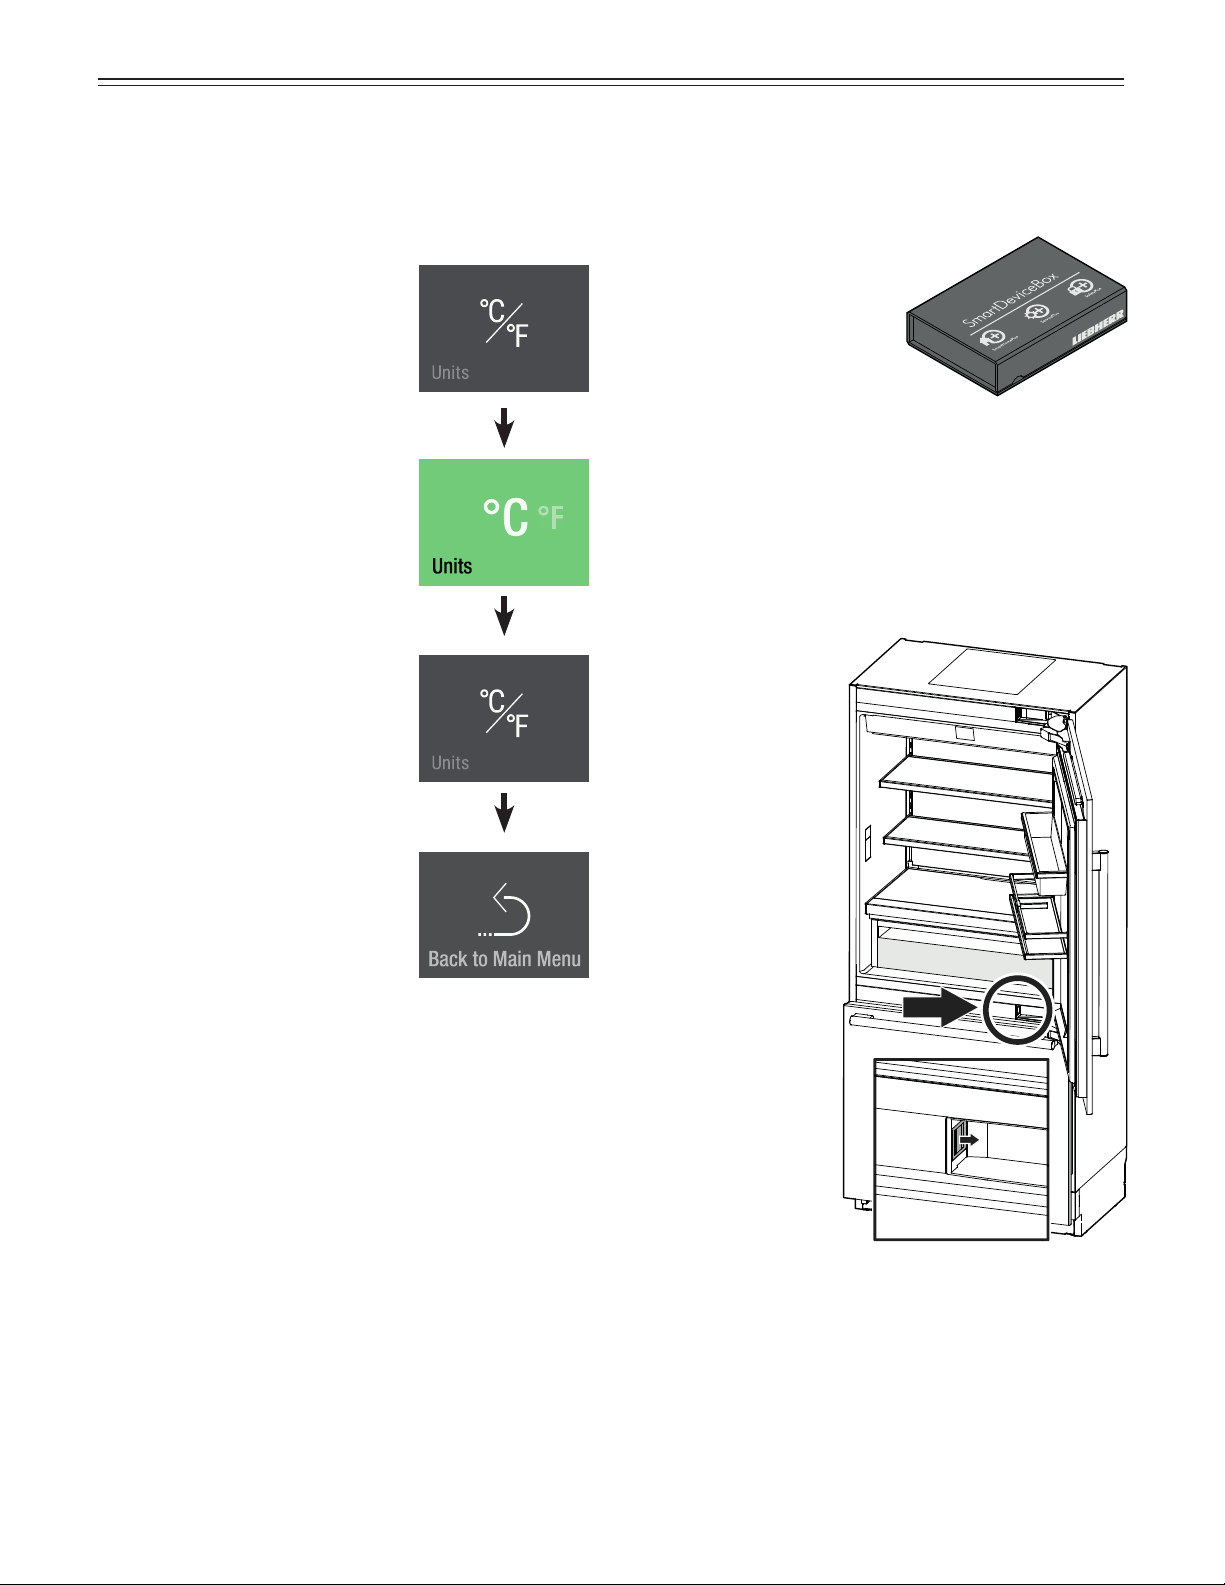
Touch
Units
Slide to the left.
Touch to exit.
Slide to the desired temperature
unit and touch
SmartDeviceBox (Not Supplied
in All Countries)
The appliance is ready for
integration into a smart home
and for extended services.
Other options can be select-
ed with a SmartDeviceBox.
This is activated via the
MyLiebherr customer portal.
You will find more information about availability and
prerequisites and the individual options on the website
www.smartdevice.liebherr.com/info.
Download the “SmartDevice App” to your smartphone.
Start the app on your smartphone and follow the
instructions.
SmartDevice
functions are not
available in all
countries.
22
o
peraTion
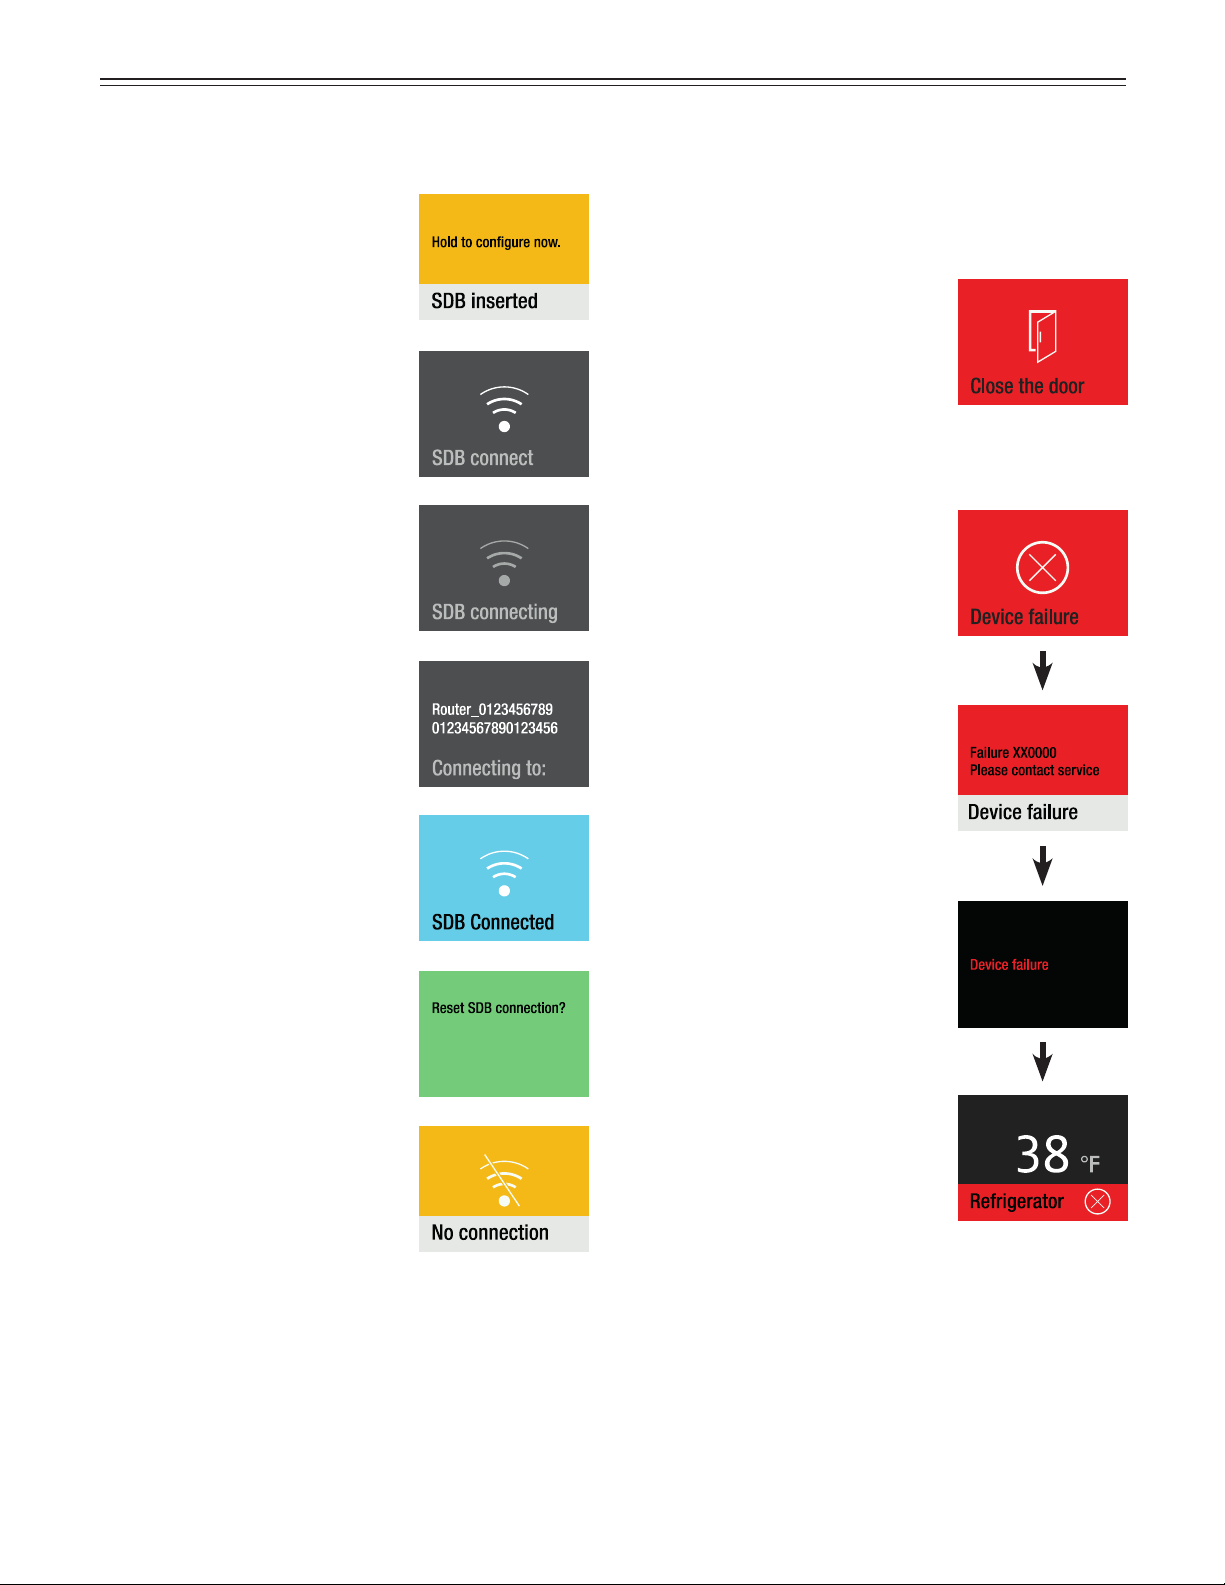
Description of the SmartDevice
Displays
Display to start the WLAN
connection.
The symbol flashes.
Connection to WLAN is in
progress.
The router credentials are
displayed.
Appliance is connected to WLAN.
SmartDeviceBox is inserted.
Connection reset
This message informs you of any
router or Internet problems.
Alarm Messages
Door has been left open for
longer than about 180 seconds.
Action
Close the appliance door.
Electronic fault.
Touch
Action
Contact service, stating the
failure code displayed.
Touch
Door Open Alarm
Electronic Fault Alarm
Touch
Press
Press for approx. 2 seconds to
read failure number again.
23
o
peraTion
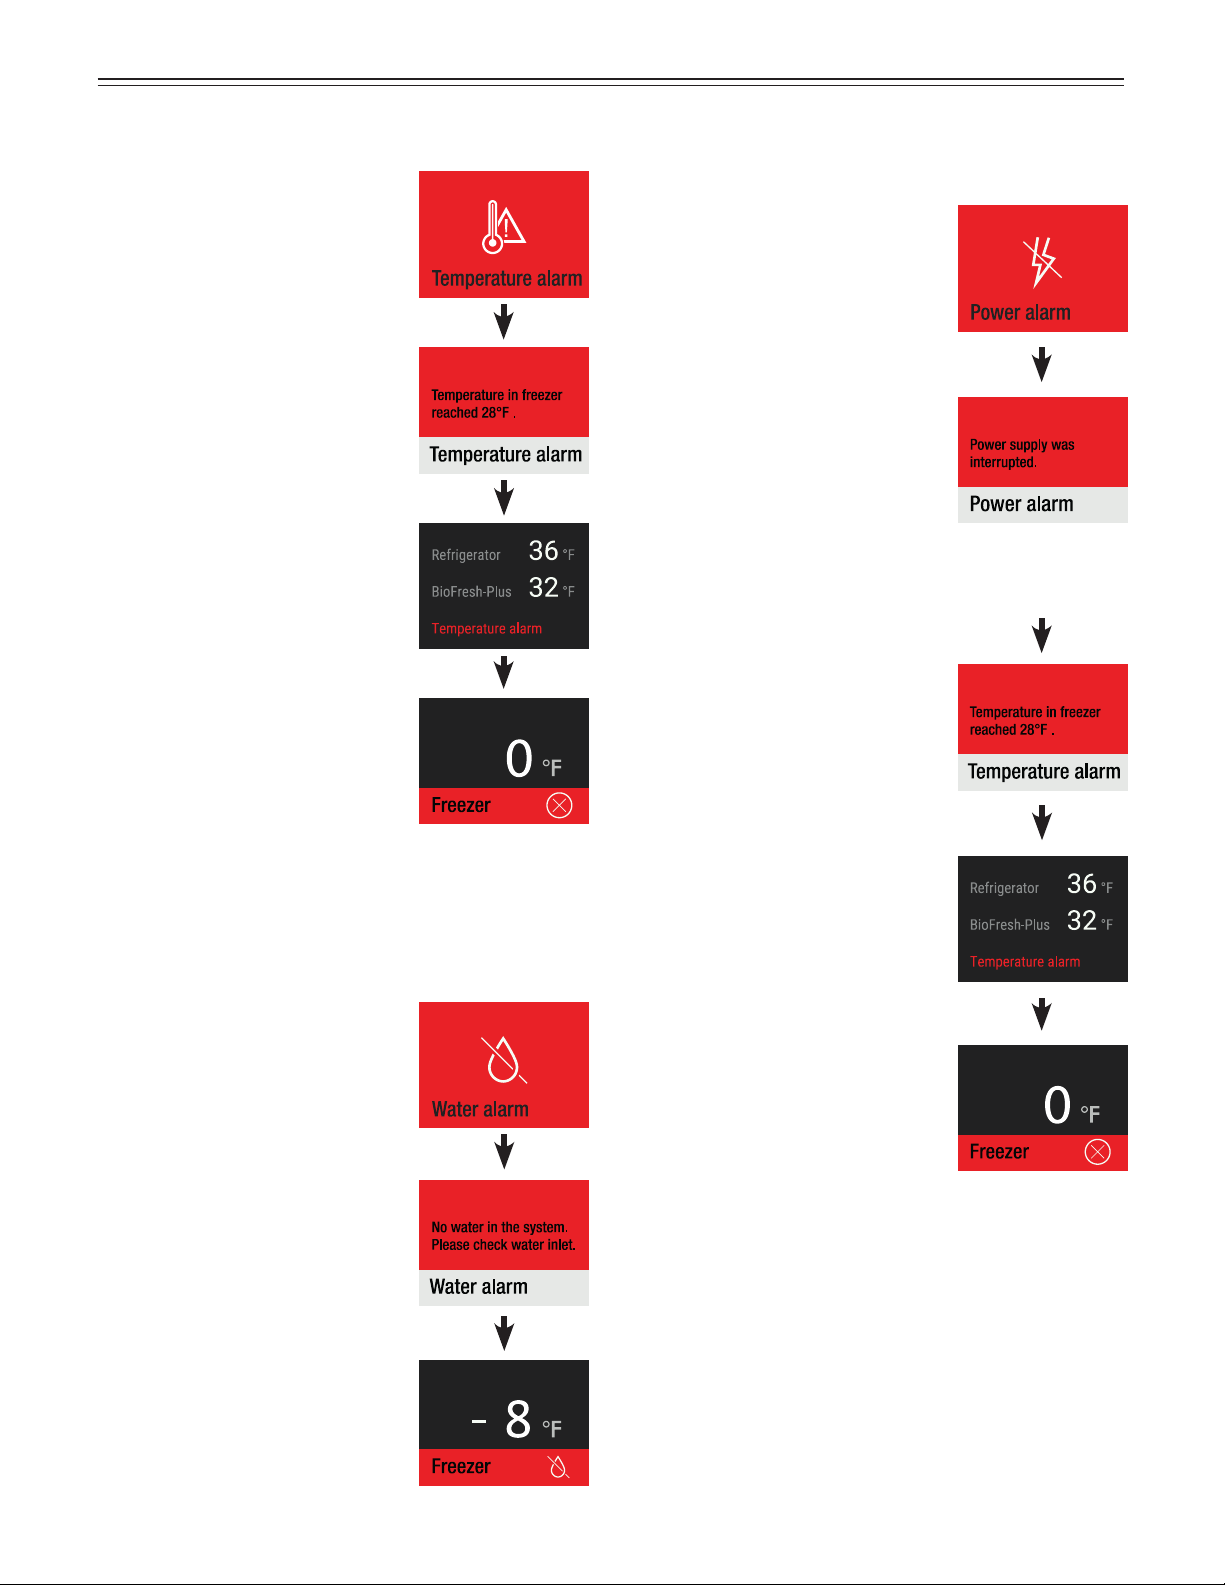
Touch
Temperature Alarm
The inside temperature was too
high.
Touch
Action
Check the quality of the stored
food.
The alarm display disappears as
soon as the set temperature is
reached.
Touch
Water alarm
Touch
No water in the system.
Touch
No water in the system.
Action
Open the water supply shut-off
valve.
Touch
Power Alarm
The power supply was
interrupted.
Touch
If the interior
temperature was
too high:
Touch
Touch
Action
Check the quality of the stored
items in the appliance.
The alarm display will go out as
soon as the set temperature has
been reached.
24
o
peraTion
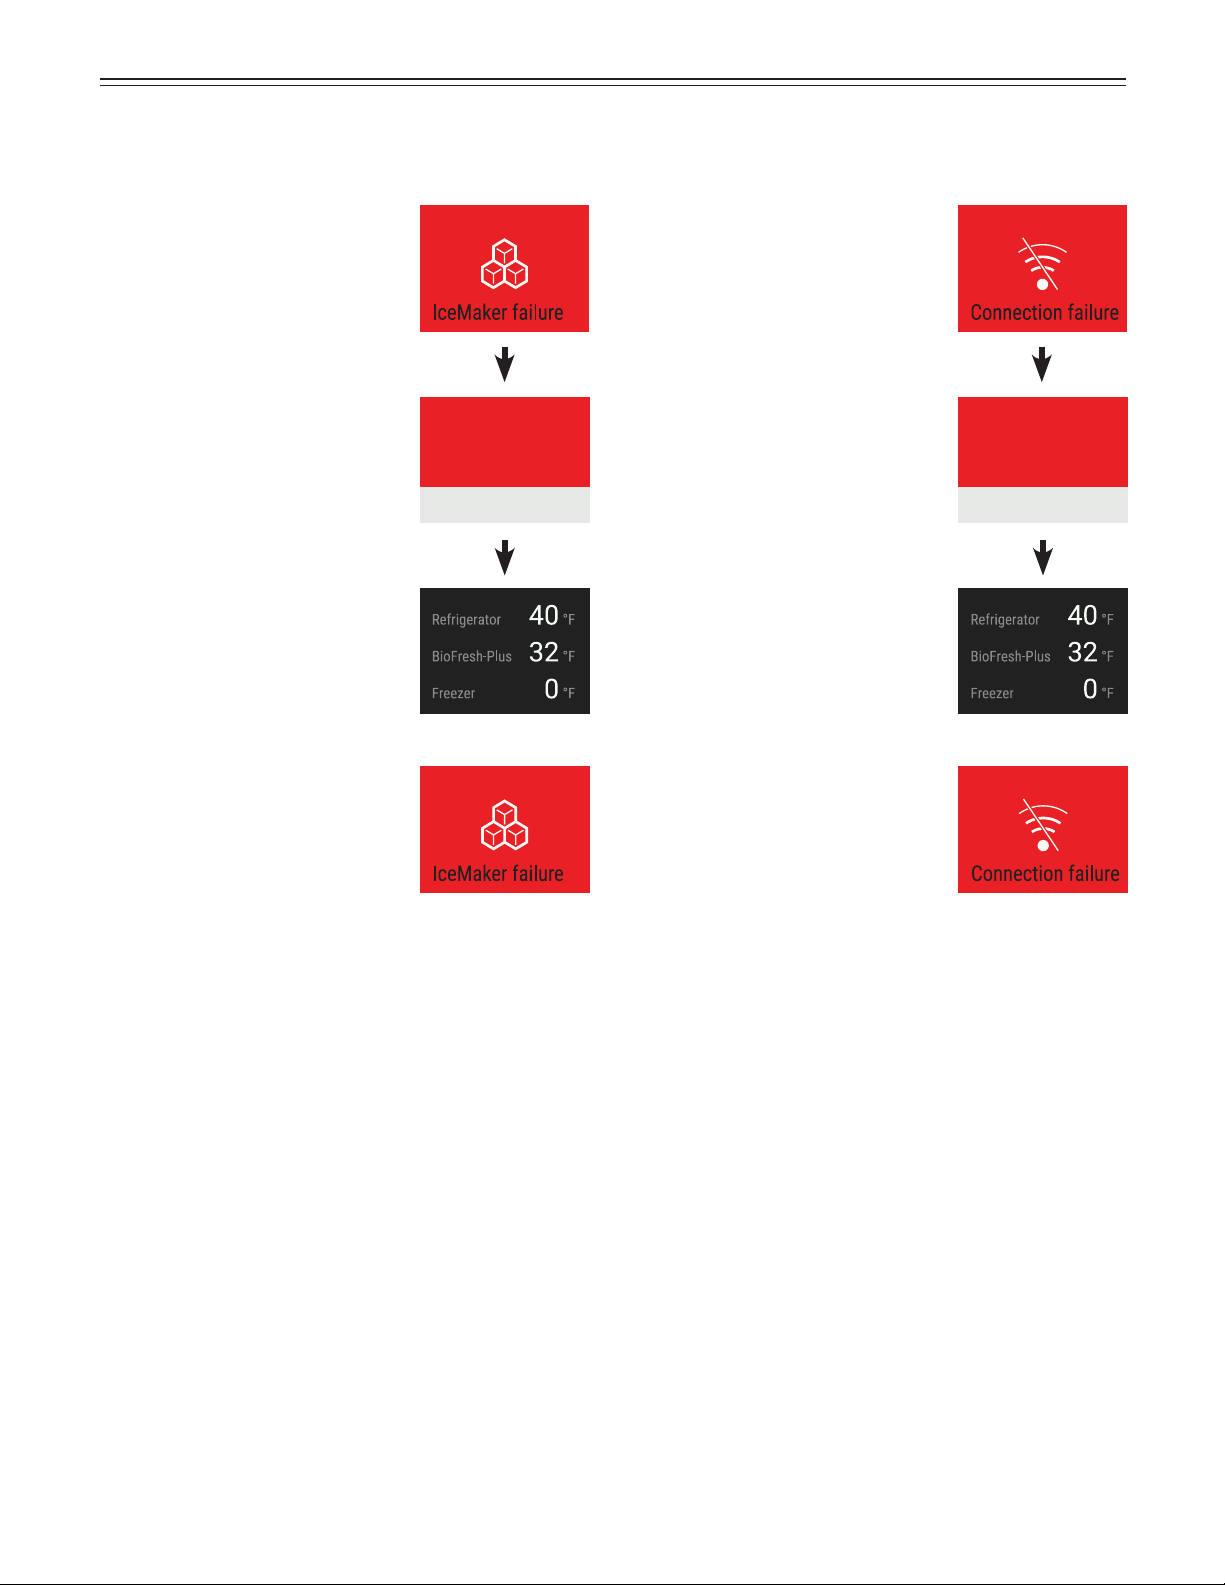
Touch
Ice Maker Alarm
IceMaker failure
Failure XX0000
Please contact service.
IceMaker is off
Action
Contact service, stating the failure
code displayed.
Touch
The ice maker is disabled.
There is no need to move any
items to another appliance.
The menu will continue to show
the “IceMaker failure” error until it
has been rectified by the service
team.
Connection Failure
Touch
Action
Contact service, stating the failure
code displayed.
Touch
Connection failure
Failure XX0000
Please contact service.
The connection is disabled.
There is no need to move any
items to another appliance.
The menu will continue to show
the “Connection failure” error
until it has been rectified by the
customer service team.
25
e
quipmenT
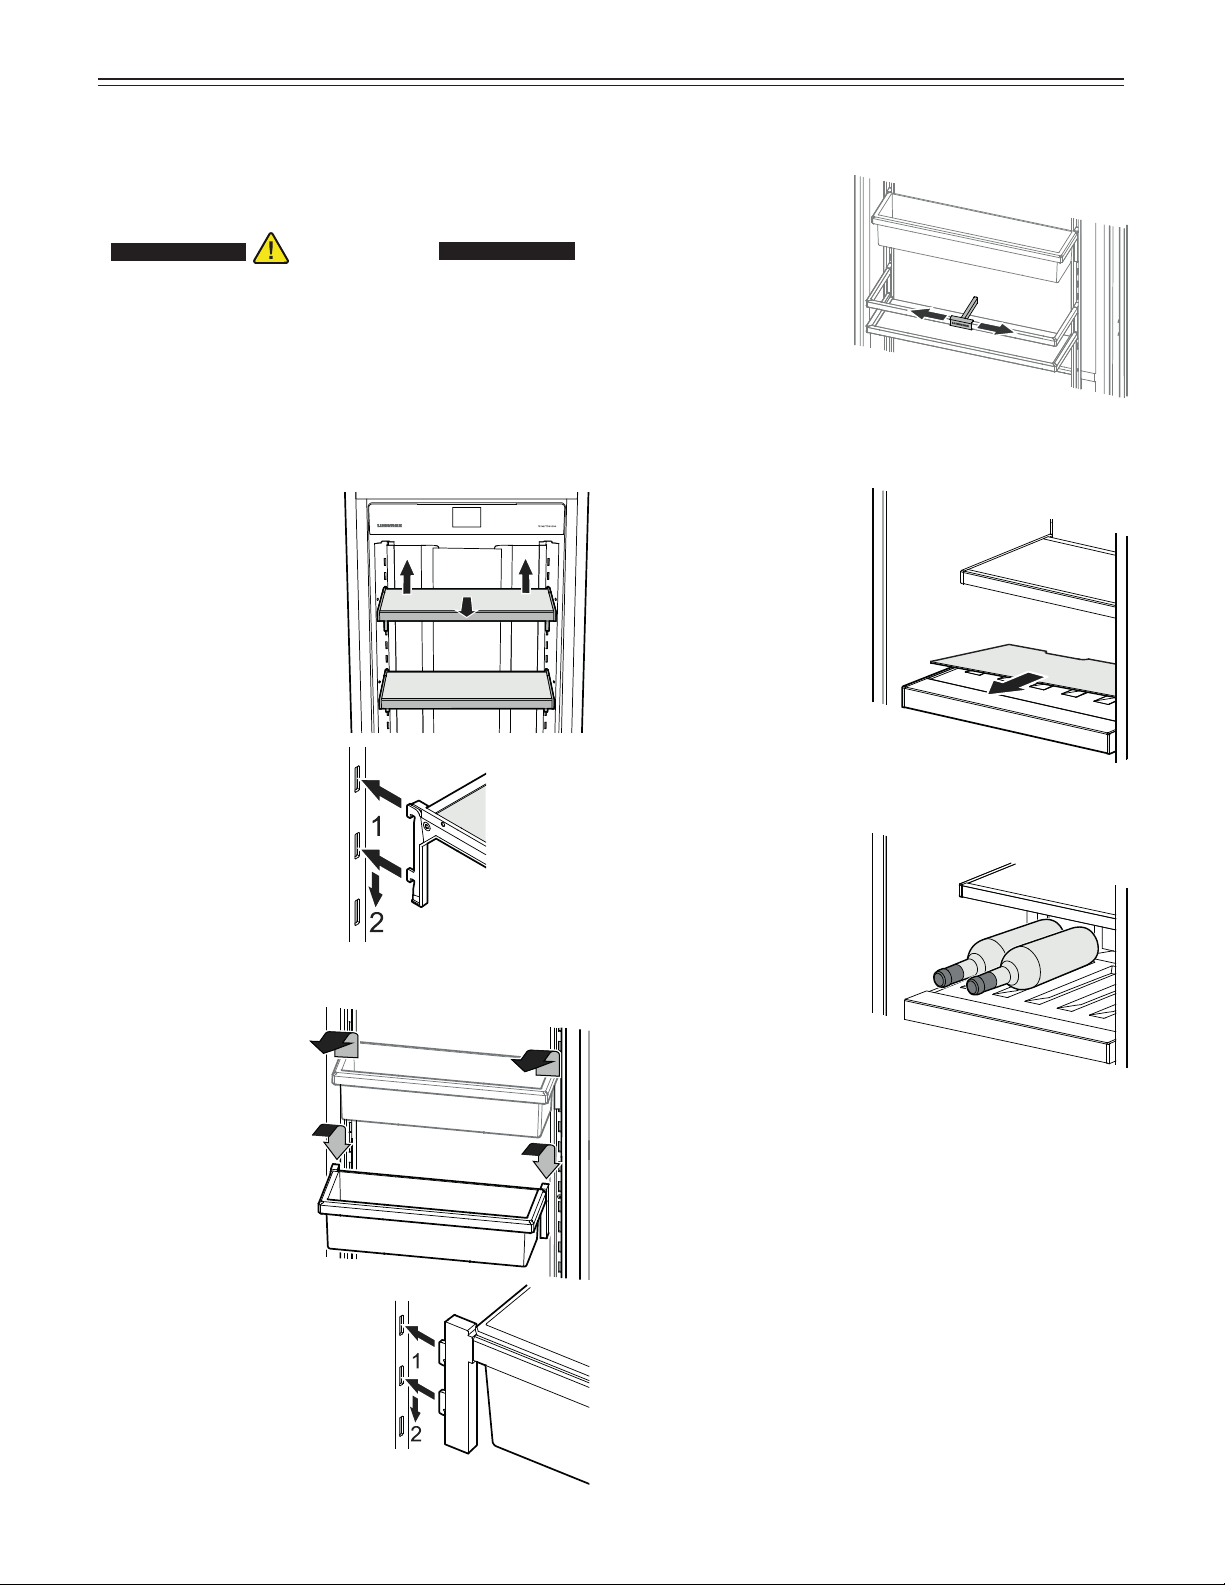
Repositioning the
shelves
Removing
Lift the shelf up and move
out toward you.
Installing
Insert the hooks of the
shelf into the openings
of the clip-in strip at the
desired height and push
down.
Equipment
You can rearrange the height of the shelves and door
racks as required.
CAUTION!CAUTION!
Risk of injury and damage.
Do not attempt to adjust a shelf or door
rack with food on it.
Only adjust an empty shelf or door rack.
Repositioning the door racks
Removing
Lift the rack up and
move out toward you.
Installing
Insert the hooks of the
rack into the openings
of the clip-in strip at
the desired height and
push down.
Gallon rack bottle
holder
You can protect the
bottles from falling
over when the door is
opened and closed.
Move the bottle holder
to the desired position.
Always hold at the front
when moving.
Bottle tray
The tray above the
BioFresh compartment
can be used for storing
bottles horizontally.
Remove glass plate.
IMPORTANT
When storing tall
bottles (higher
than 9 inches), the
gallon rack must be
relocated to a higher
position to avoid
collision between the
gallon rack and the
bottles.

26
b
io
f
resh
-p
lus
C
omparTmenT
Water Dispenser
Press a drinking glass
against the bottom part of
the dispenser. The top part
moves out and the water
flows into the glass.
(max. time 2 min
waiting
time before reuse 4 min)
IMPORTANT
The water temperature depends on the temperature
in the BioFresh-Plus compartment and the
frequency with which water is dispensed.
Notes
• The humidity in the compartment depends on the
moisture content of the food and the frequency with
which a drawer is opened.
• The fresher the product and the higher its quality, the
longer the storage life.
• Unwrapped food should be stored separately. Wrap
food if there is not enough space in the drawers.
To avoid bacterial spoilage, different types of meat
should not come into contact with each other. Keep
meat packed separately.
• The following products should not be stored in the
BioFresh-Plus Compartment: hard cheese, potatoes,
cold-sensitive vegetables such as cucumber, egg-
plant, avocados, semi-ripe tomatoes, zucchini, and all
cold-sensitive tropical fruits.
BioFresh-Plus Compartment
Set the temperature of the
BioFresh-Plus compartment
in accordance with the type
of stored food. See chapter
„Setting the Temperature
(BioFresh-Plus
Compartment)“
.
Set to 32°F (factory setting) for
storing fruit, vegetables, meat,
cold meats or dairy products.
Set to 28°F
for storing of
fish
or seafood. Storage time is
3 days at the most.
27
• Clean the inside of the appliance and equipment
parts with lukewarm water and a little detergent.
IMPORTANT
Do not use abrasive or scouring pads or sponges.
Do not use concentrated cleaning agents. Never
use abrasive or acid-based cleaners or chemical
solvents.
• Clean the pull-out
rails with a slightly
dampened cloth
only.
IMPORTANT
No cleaning water
must be allowed to
get into the pull-out
rail guides.
• Dry all parts well
with a cloth.
• Do not damage or remove the model plate on the
inside of the appliance. It is very important for servic-
ing your appliance.
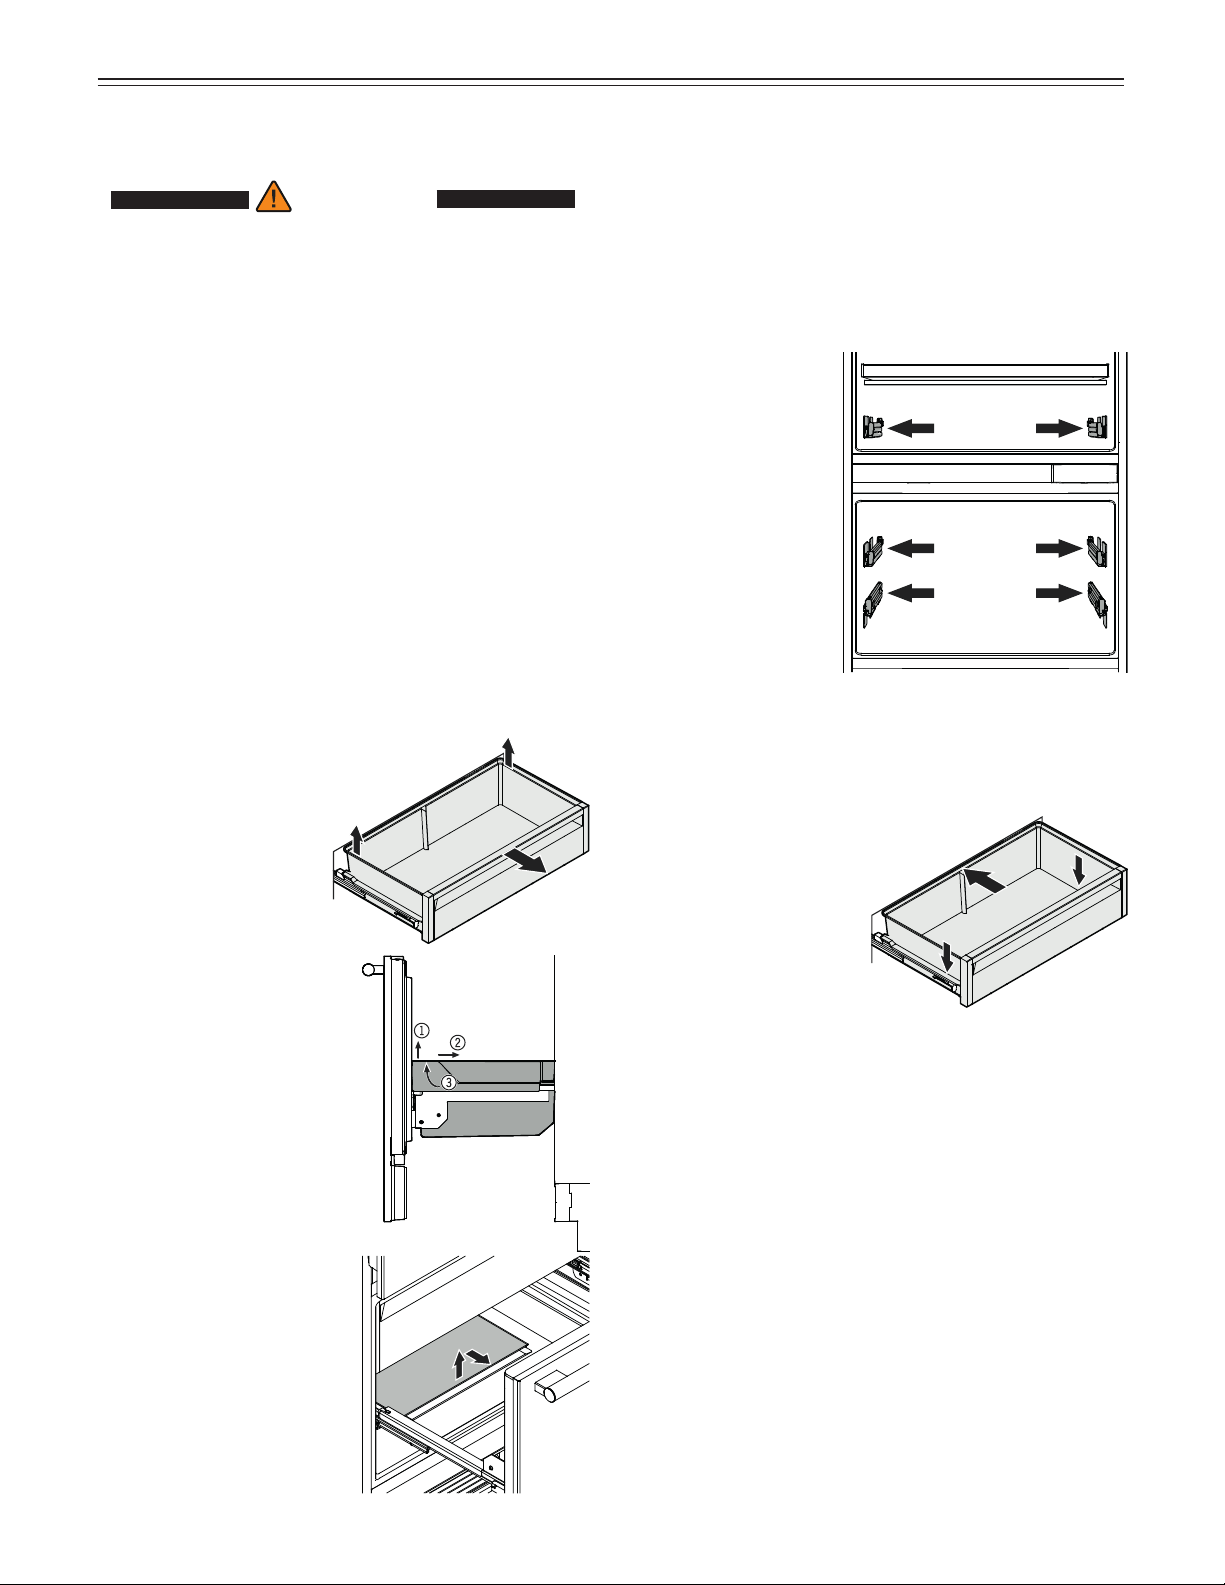
• Install the drawers.
Place the drawer on
the rails. The rails
must be fully extended
and aligned with the
front of the drawer.
Slide the drawer in.
• Install all equipment parts and replace the food in the
appliance. Refer to chapter „Equipment“.
• Turn the appliance on.
Cleaning
WARNING!WARNING!
• To prevent possible injury due to an electric
shock, be sure to disconnect the power cord
or turn off the circuit breaker before cleaning
the appliance.
• To avoid injury or damage, do not use steam
cleaning equipment to clean the appliance.
• To avoid short-circuits, ensure no cleaning
water penetrates into the electrical
components when cleaning the appliance.
Do not use a sponge or cloth that is overly
wet.
• Take food out of the appliance and store it in a cool
place.
• Rinse or flush the water system after 5 days if it has
not been used, see „Maintenance Menu“.
• Remove the glass shelves and door racks. Refer to
chapter „Equipment“.
• Remove the drawers.
Pull the drawer
straight out, grip at the
back and lift out.
• Pull the freezer drawer
upwards by its right and
left bottom corners (1).
Push the container
backwards (2). Set the
container to an angle and
remove it (3).
• The bottommost freezer
drawer must be removed
to clean the glass plate in
the freezer compartment.
C
leaning

28
m
ainTenanCe
Maintenance can be car-
ried out independently of
the specified regular inter-
vals. The maintenace menu
includes the following steps.
Maintenance Menu
Complete cleaning
For complete maintenance of
the appliance.
Dispenser cleaning
To interrupt the water supply
for cleaning the dispenser
outlet.
New water filter
To flush and reset
maintenance timer.
New air filter
To reset maintenance timer.
Flush cleaning
To flush the water dispenser
when the dispenser has
not been used for a longer
period of time.
To return to the main menu.
29
m
ainTenanCe
Maintenance
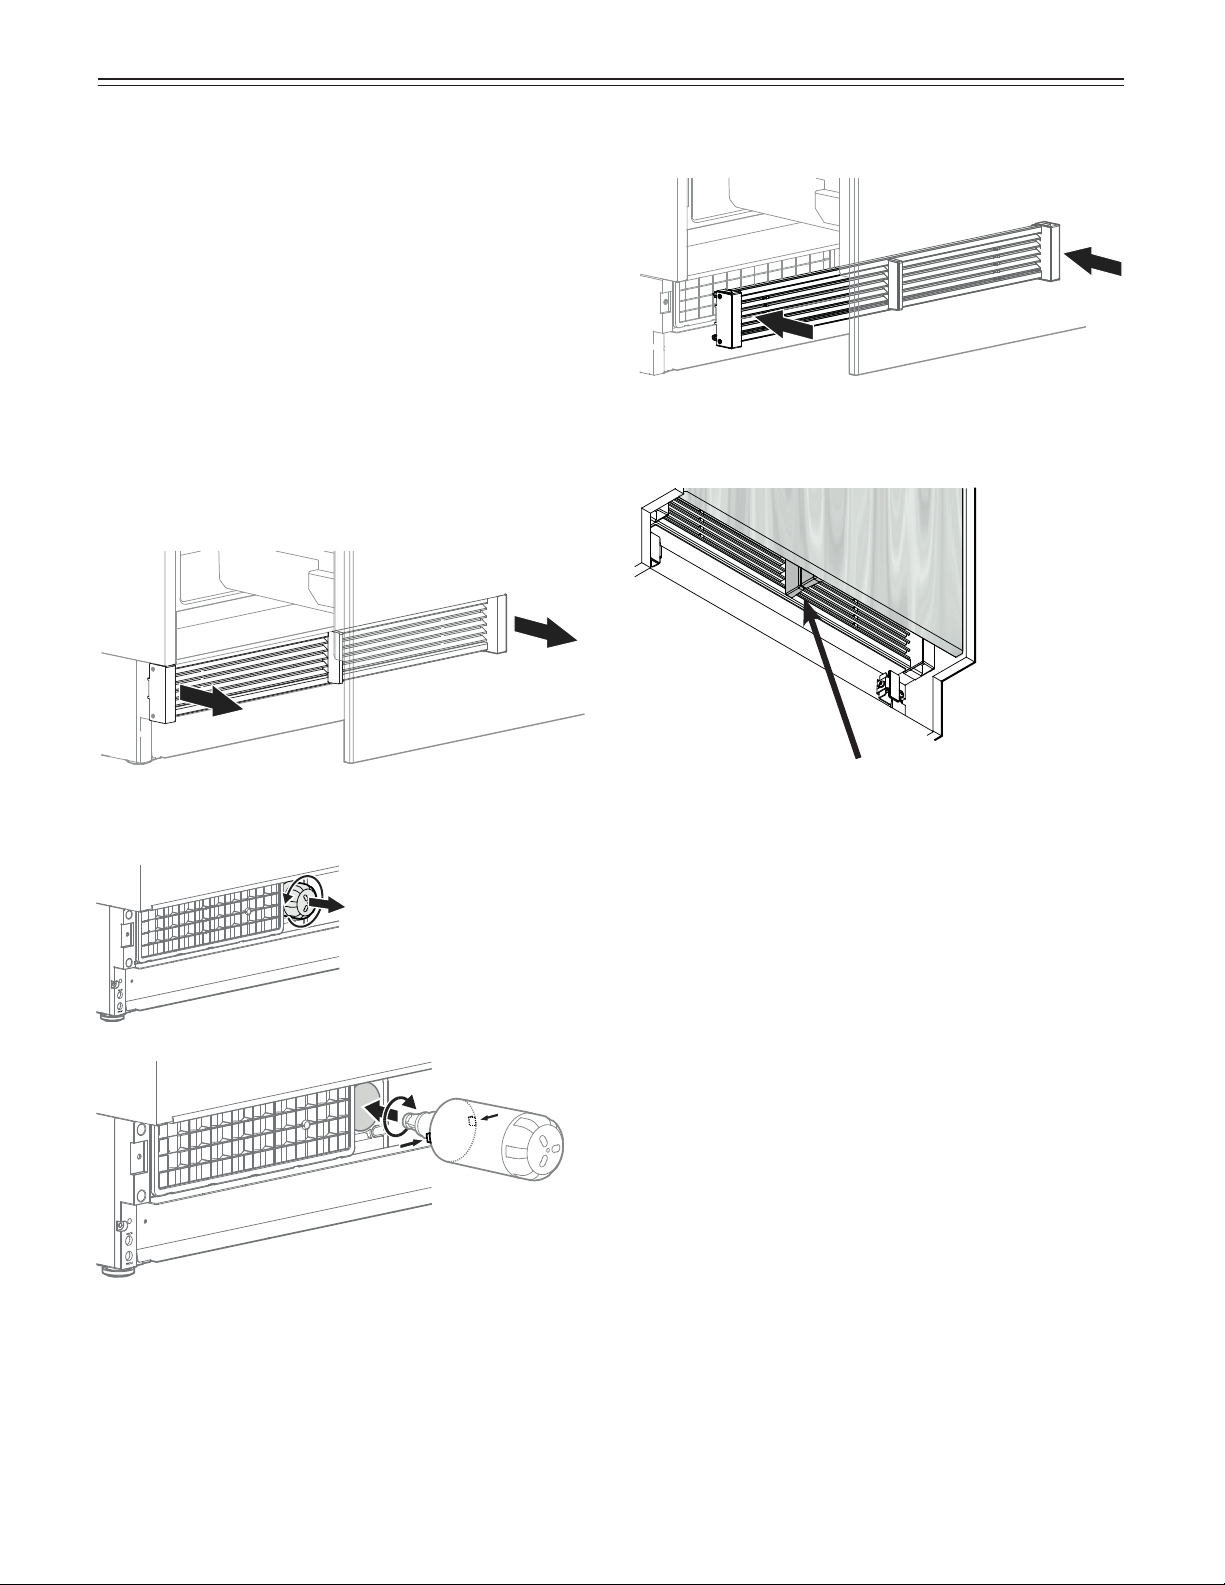
New water filter
The inserted water filter absorbs deposits in the water
and reduces the taste of chlorine.
IMPORTANT
To avoid reduction of the water flow rate of the
dispenser, the water filter should be changed at
least at the indicated maintenance intervals.
If noticeable water flow reduction occurs, the water
filter should be changed sooner.
Note
It is not necessary to turn off the water supply when
removing or inserting the filter.
Remove the ventilation grille.
Turn the water filter
counterclockwise and
remove.
Insert the water filter - with the knobs at the front in a
horizontal position - as far as it will go, and turn clock-
wise until it snaps in.
Mount the ventilation grille.
Check that there is no gap between the appliance air
divider and the door air divider.
IMPORTANT
There will be a gap if the ventilation grille is fitted
incorrectly.
30
m
ainTenanCe
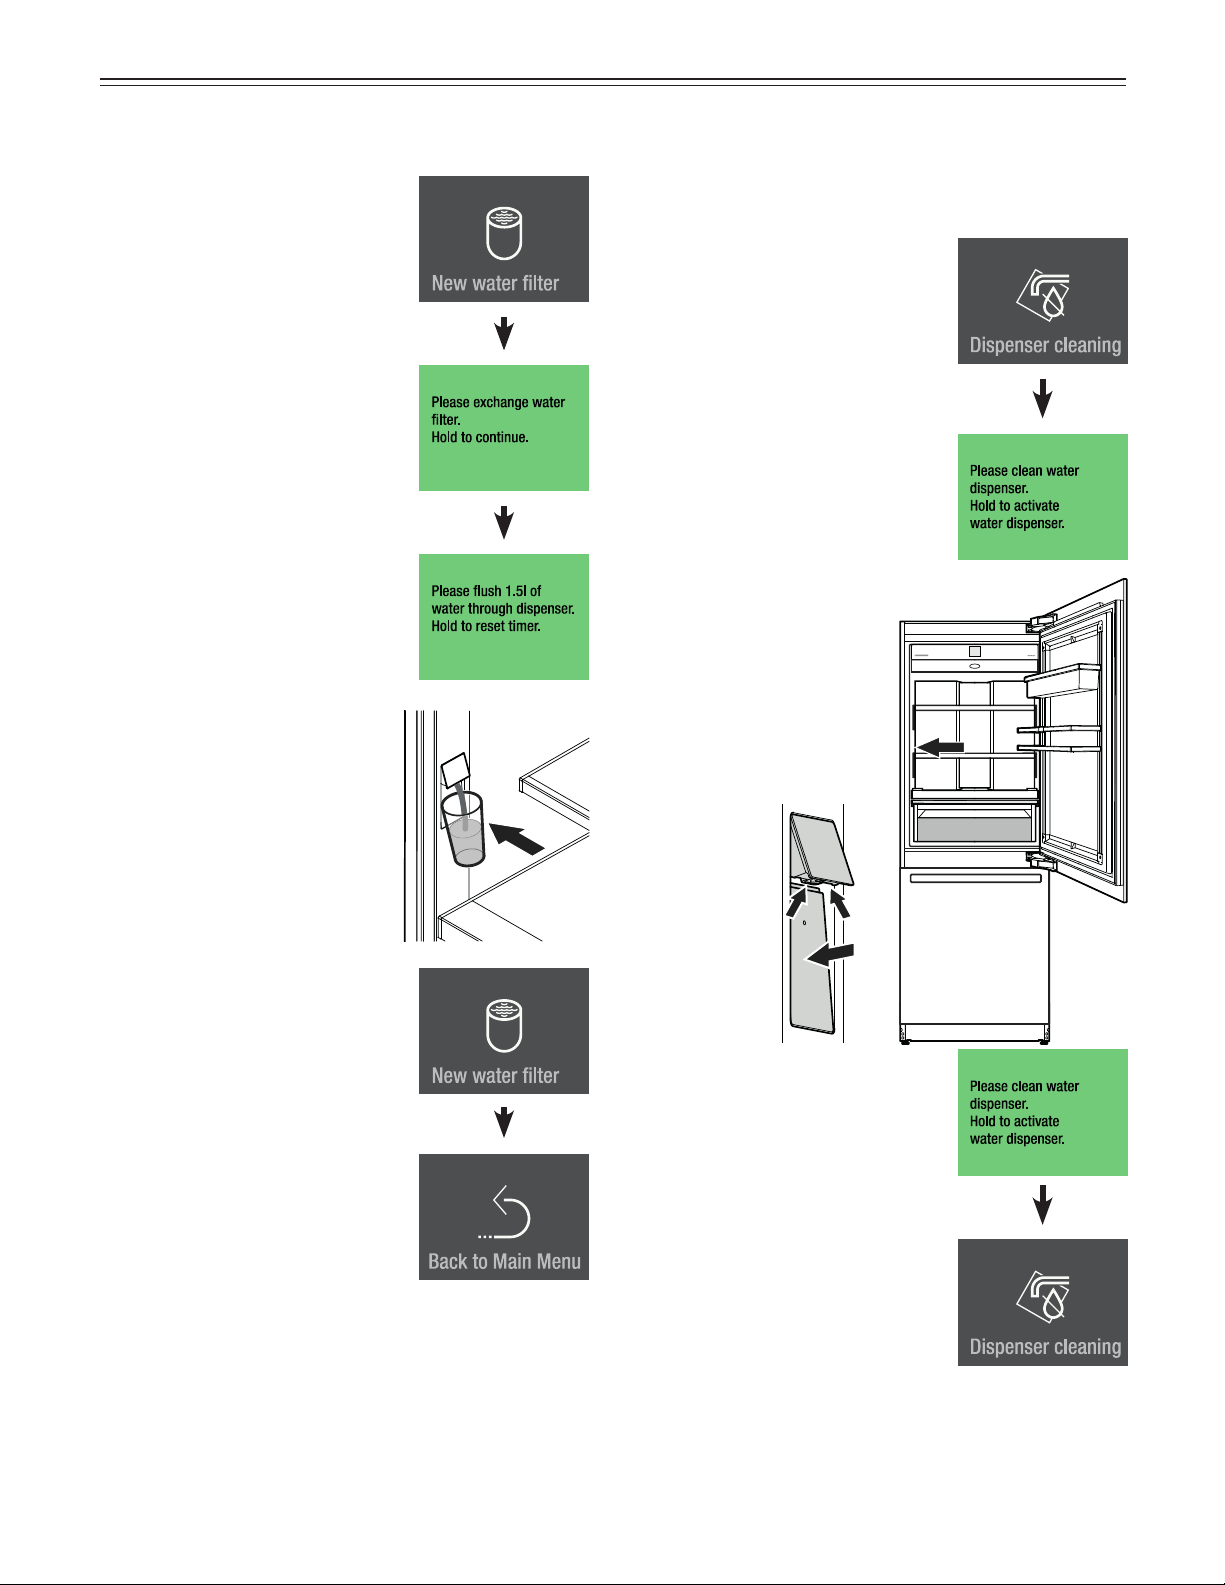
Touch
Press for approx. 2 seconds
Press for approx. 2 seconds
Flush approx. 1.5 quarts of
water through the dispenser and
discard.
The timer for water filter change
is reset.
Slide 3 times to the left.
Touch to exit.
Touch
Dispenser cleaning
The dispenser outlet and the surrounding area can be
cleaned without disconnecting the appliance from the
electrical power supply.
Message
The water supply is stopped now.
• Press in the bottom part
of the dispenser so that
the top part moves out.
• Clean the water outlet
and the surrounding area.
• Release the bottom part
of the dispenser.
Press for approx. 2 seconds
The water dispenser is ready for
use again.
If the water flow is no longer even, the aerator must
be replaced (see contact details on the back of this
manual).

31
m
ainTenanCe
New air filter
The air filter absorbs odors from the appliance
interior. It should be changed at least at the indicated
maintenance intervals.
Touch
Message
Turn the cover counterclockwise and remove.
Turn the air filter
counterclockwise and
remove.
Insert the new air filter
and turn clockwise until
it snaps in.
Insert the cover and turn clockwise until it snaps in.
Press for approx. 2 seconds
The maintenance timer for air filter
change is reset.
Slide two times to the left.
Touch to exit.
32
m
ainTenanCe
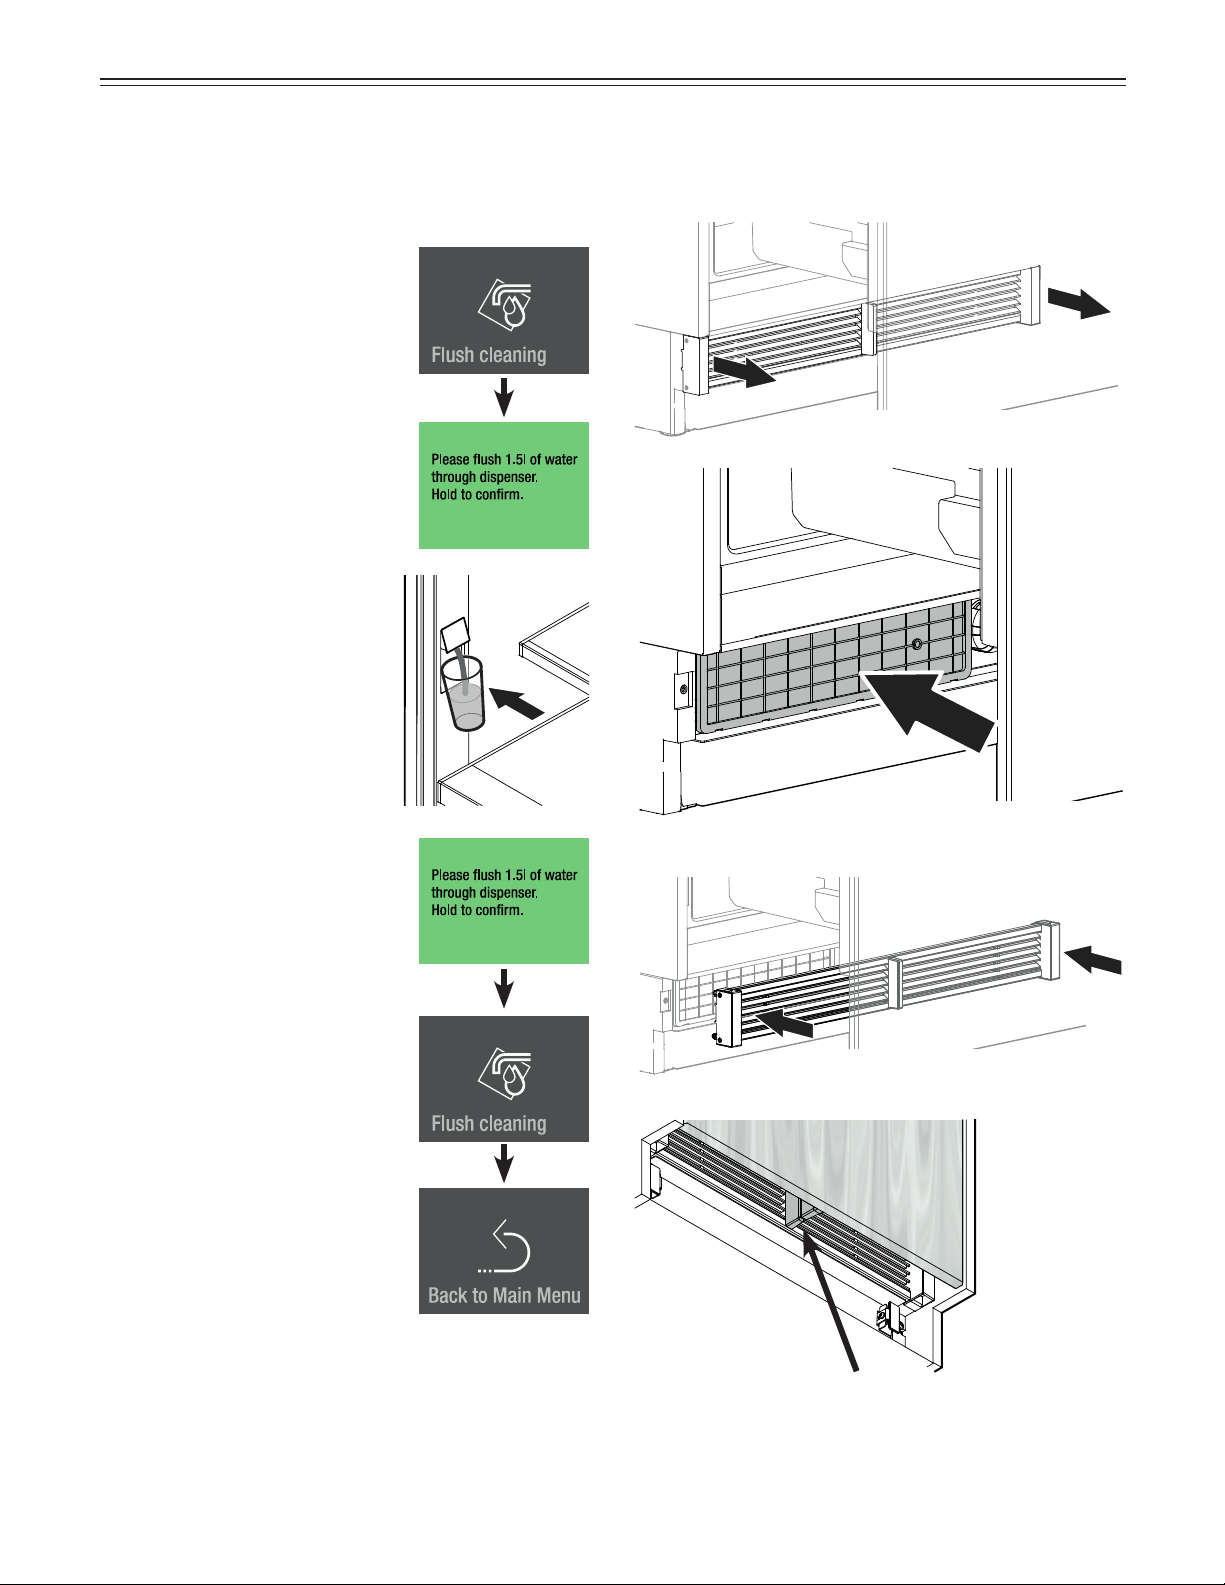
Flush cleaning
When the water dispenser has not been used for one
week or more, flush the pipeline.
Touch
Message
Flush approx. 1.5 quarts of
water through the dispenser and
discard.
Press for approx. 2 seconds
Slide to the left.
Touch to exit.
Cleaning the Dust Filter
Clean the dust filter in the toe kick area in at least the
specified maintenance intervals.
Clean the dust filter using a vacuum
cleaner.
Check that there is no gap between the appliance air
divider and the door air divider.
IMPORTANT
There will be a gap if the ventilation grille is fitted
incorrectly.
Remove the ventilation grille.
Fit the ventilation grille.

33
a
ddiTional
f
unCTions
Additional Functions
Touch
Slide to the right.
Press
BioFresh temperature adjustment
BioFresh-Plus temperature adjustment
Water pressure adjustment
Heating control (MCB 3652 only)
Activating the defrost function manually
Reset to factory setting
DemoMode
Slide to left or right.
Enter code 151.
If a wrong code is entered, the
display switches back to the
device information.
Slide through the menu.
BioFresh temperature adjustment (Right-hand Side
of the Drawer)
The temperature in the drawer is kept at a constant
value of around 32°F. It can be adjusted to slightly
warmer or colder.
Touch
Slide to the right to choose
between value B4 - B1 (colder).
Slide to the left to choose
between value B6 - B9 (warmer).
Touch at the desired value.
CAUTION!CAUTION!
For values B4 - B1, the temperature in the
drawers can drop to below 32°F. Food may
freeze.
IMPORTANT
Do not increase or reduce it by more than one step.
Check the temperature in the BioFresh-Plus
compartment during the next few days. If it is still not
at the required temperature, increase or reduce the
value again by one step.
34
a
ddiTional
f
unCTions
Slide to the right
to
Touch
Slide to the right.
Touch to exit.
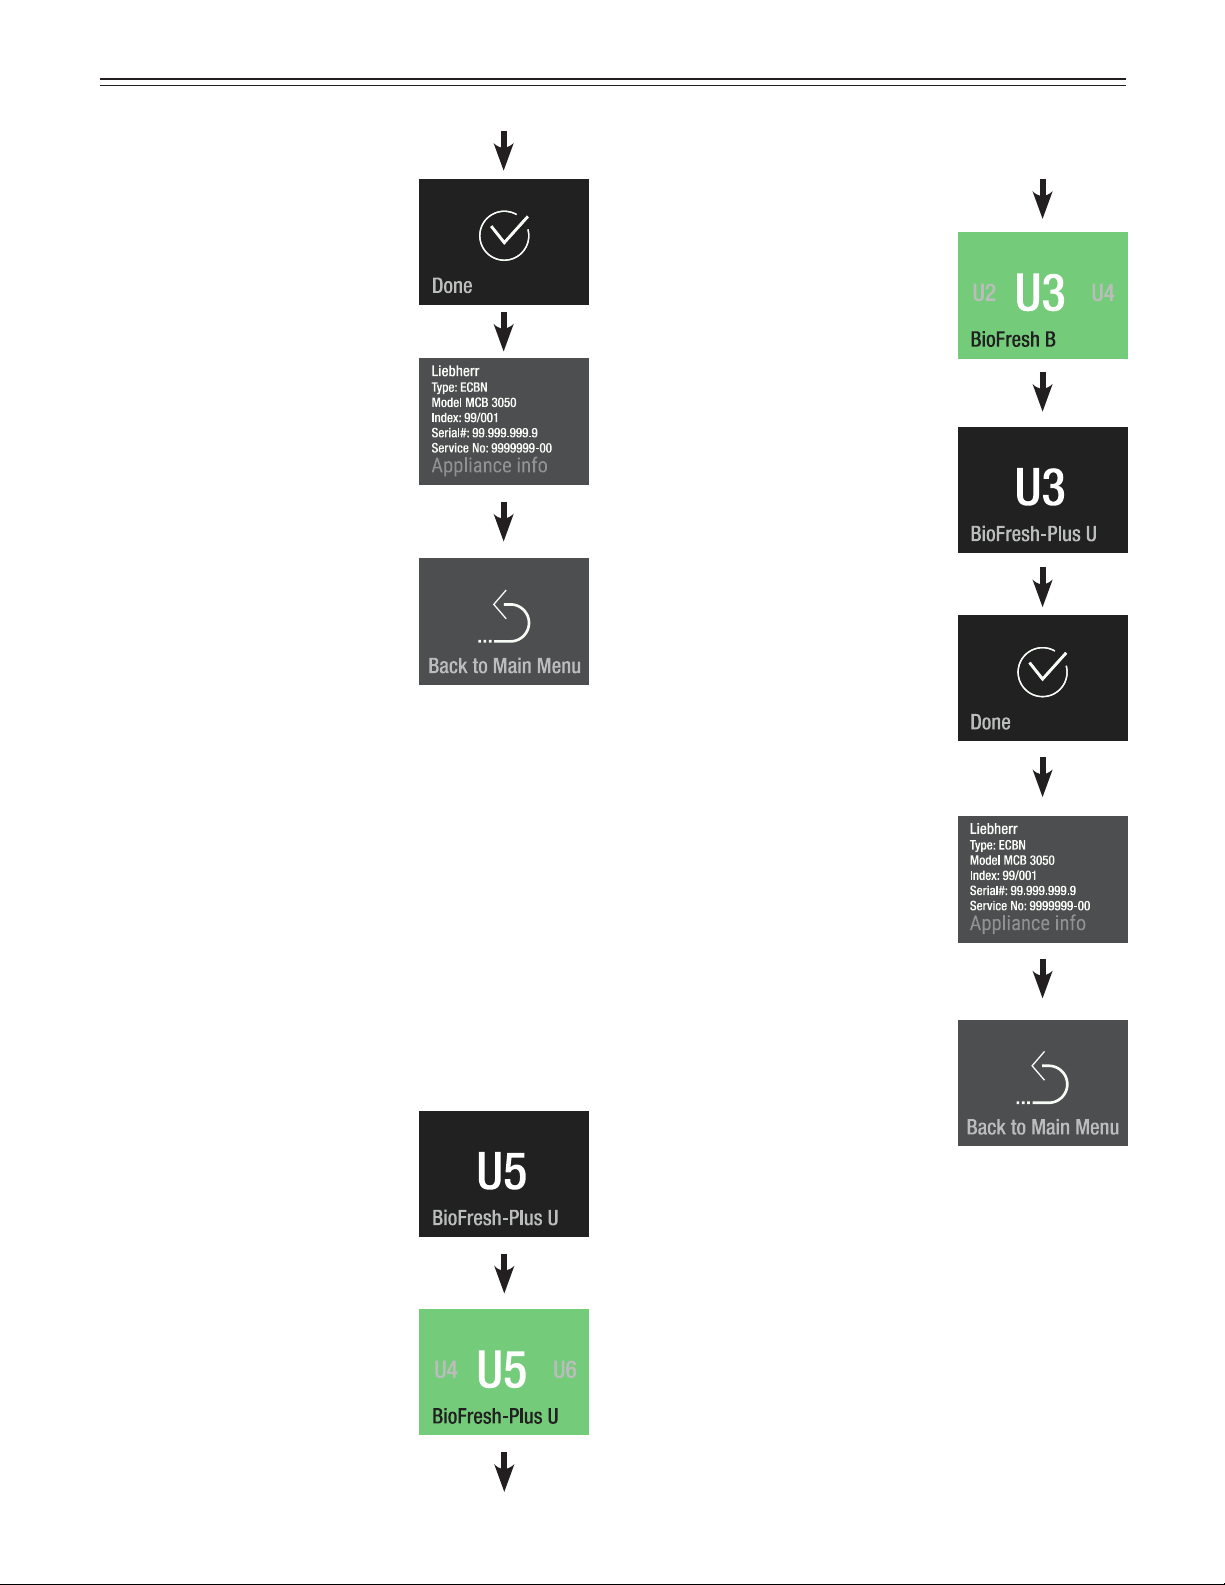
BioFresh-Plus temperature adjustment (Left-hand
Side of the Drawer)
The temperature in the drawer can be set to 32°F or
28°F. Both fixed temperature settings can be adjusted
respectively to slightly warmer or colder.
Touch
Slide to the right to choose
between value U4 - U1 (colder).
Slide to the left to choose
between value U6 - U9 (warmer).
Touch at the desired value.
Slide to the right
to
Touch
Slide to the right.
Touch to exit.
IMPORTANT
Do not increase or reduce it by more than one step.
Check the temperature in the BioFresh-Plus
compartment during the next few days. If it is still not
at the required temperature, increase or reduce the
value again by one step.
35
Touch at the desired value.
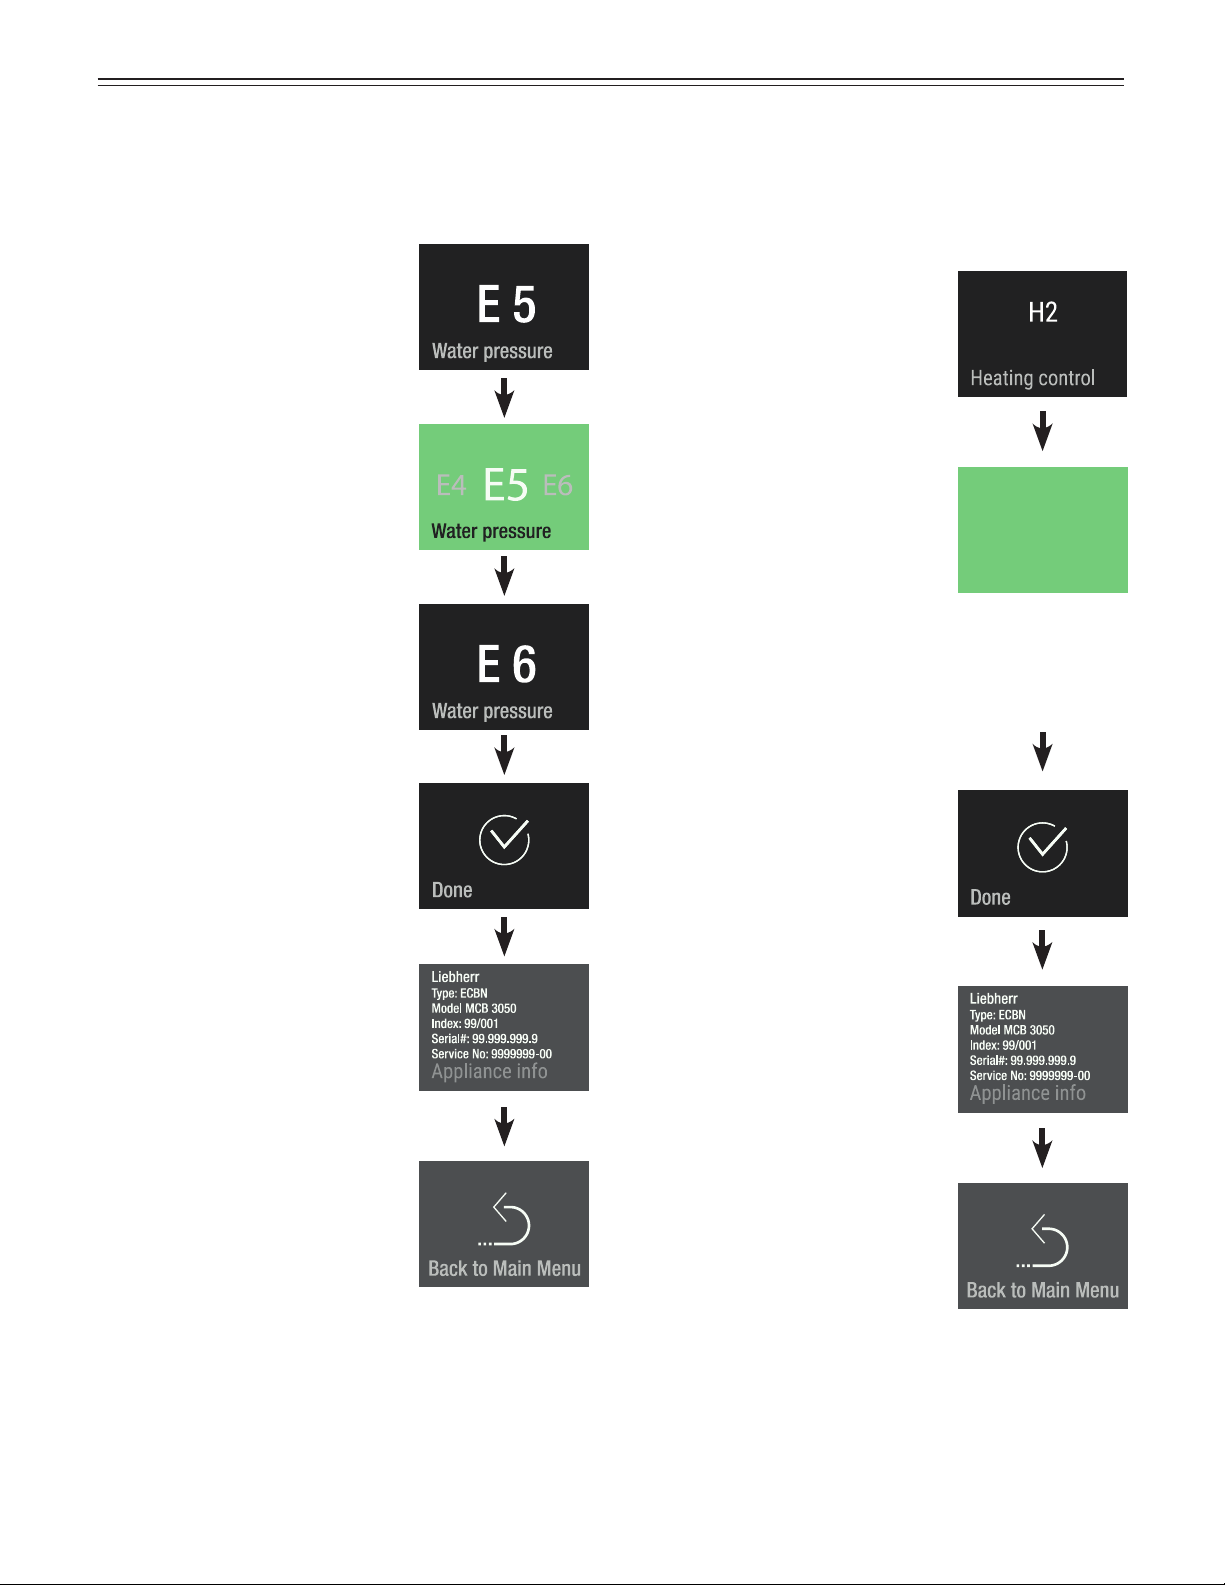
Water pressure
If the ice cubes produced by the ice maker are too small
(the first few batches are always smaller), the inflowing
water quantity can be adjusted.
Heating control (MCB 3652 only)
If condensation forms on the seal on the refrigerator
doors, this can be rectified by activating the seal heat-
ing system.
IMPORTANT
Do not increase for more than one step. If the
adjusted value is too high, the ice cube tray of the
ice maker could overflow.
Check the ice cube size within the next days. If the ice
cubes are still smaller than desired, increase the value
for one step again.
Touch
Touch
Slide to the left or right
Touch E4 for smaller ice cubes
Touch E6 for larger ice cubes
Slide to the right.
Slide to the right.
Touch to exit.
Touch to exit.
Slide to the right
to
Touch
Slide to the right
to
Touch
Heating control
H2
H1
H1 Heating off
H2 If the seal suffers slight condensation
(factory setting)
a
ddiTional
f
unCTions
36
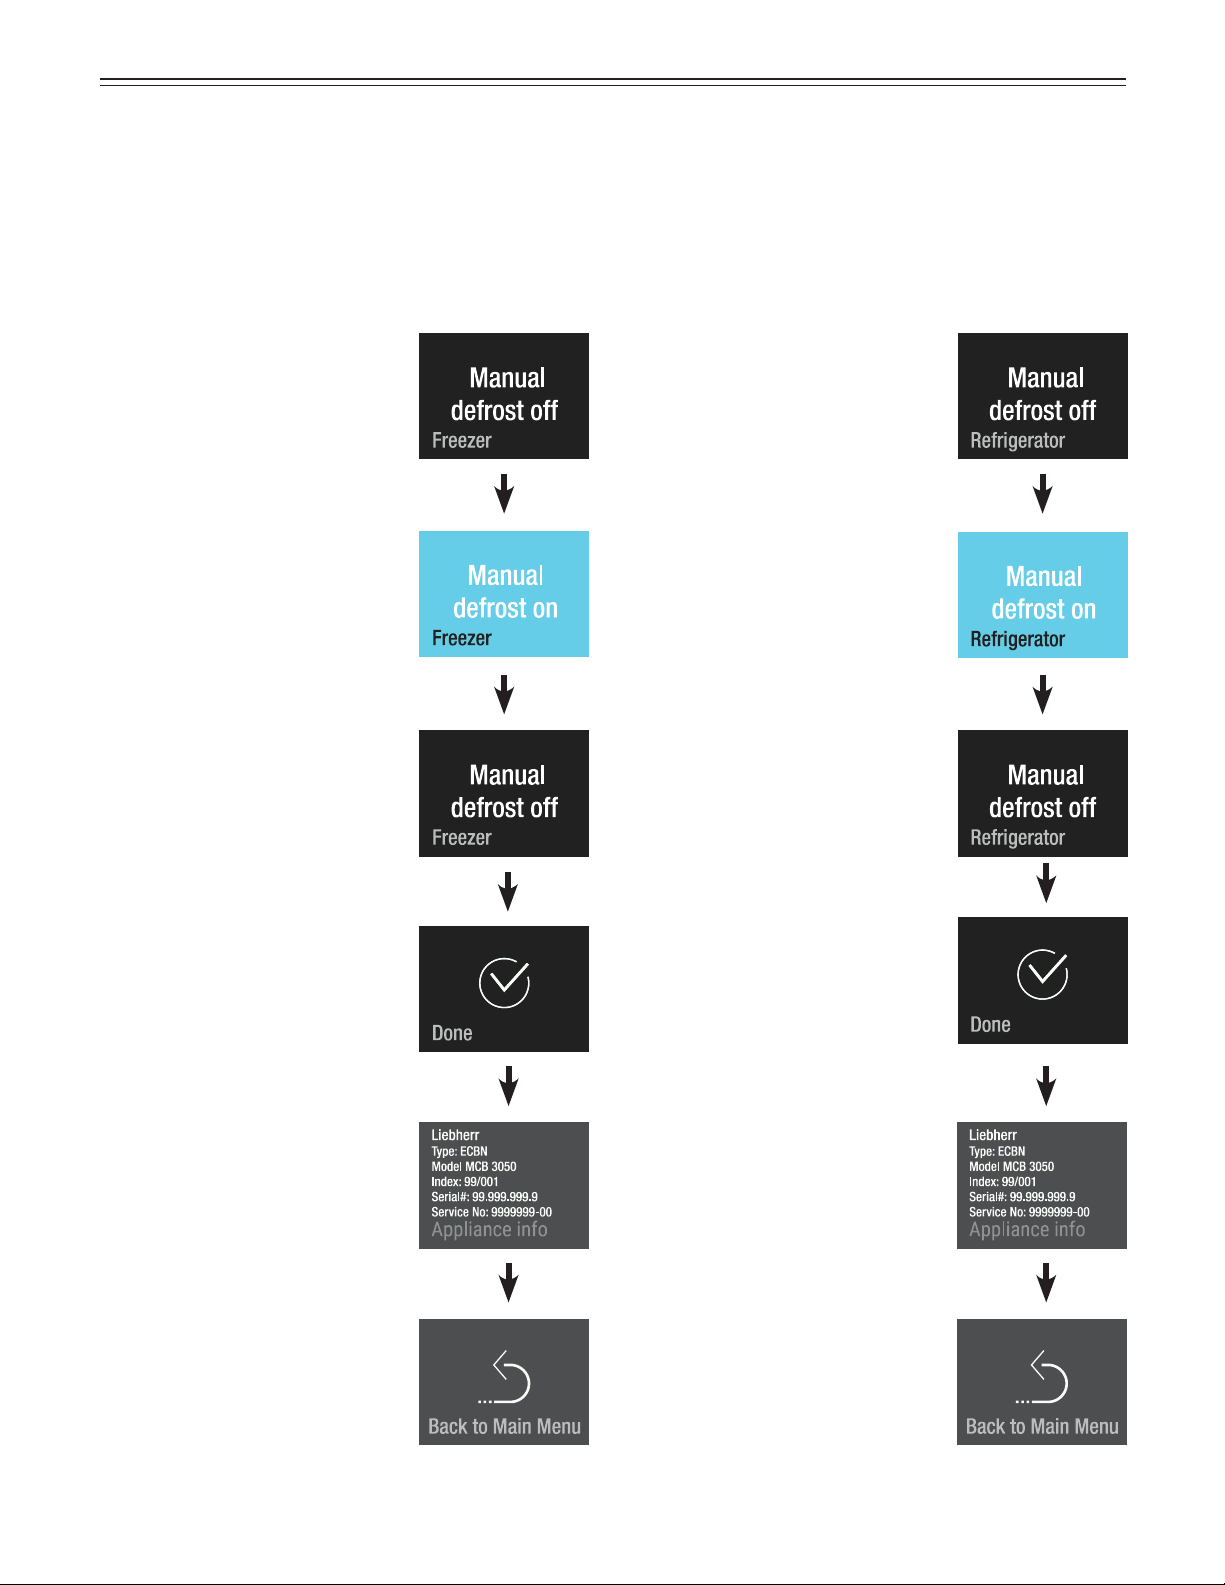
Refrigerator CompartmentFreezer Compartment
Manual defrost
The appliance defrosts automatically. The defrost func-
tion can be activated manually for service applications.
TouchTouch
The appliance switches back
to normal operation when the
evaporator is defrosted.
The appliance switches back
to normal operation when the
evaporator is defrosted.
Slide to the right
to
Touch
Slide to the right
to
Touch
Slide twice to the right.
Touch to exit.
Slide twice to the right.
Touch to exit.
a
ddiTional
f
unCTions
37
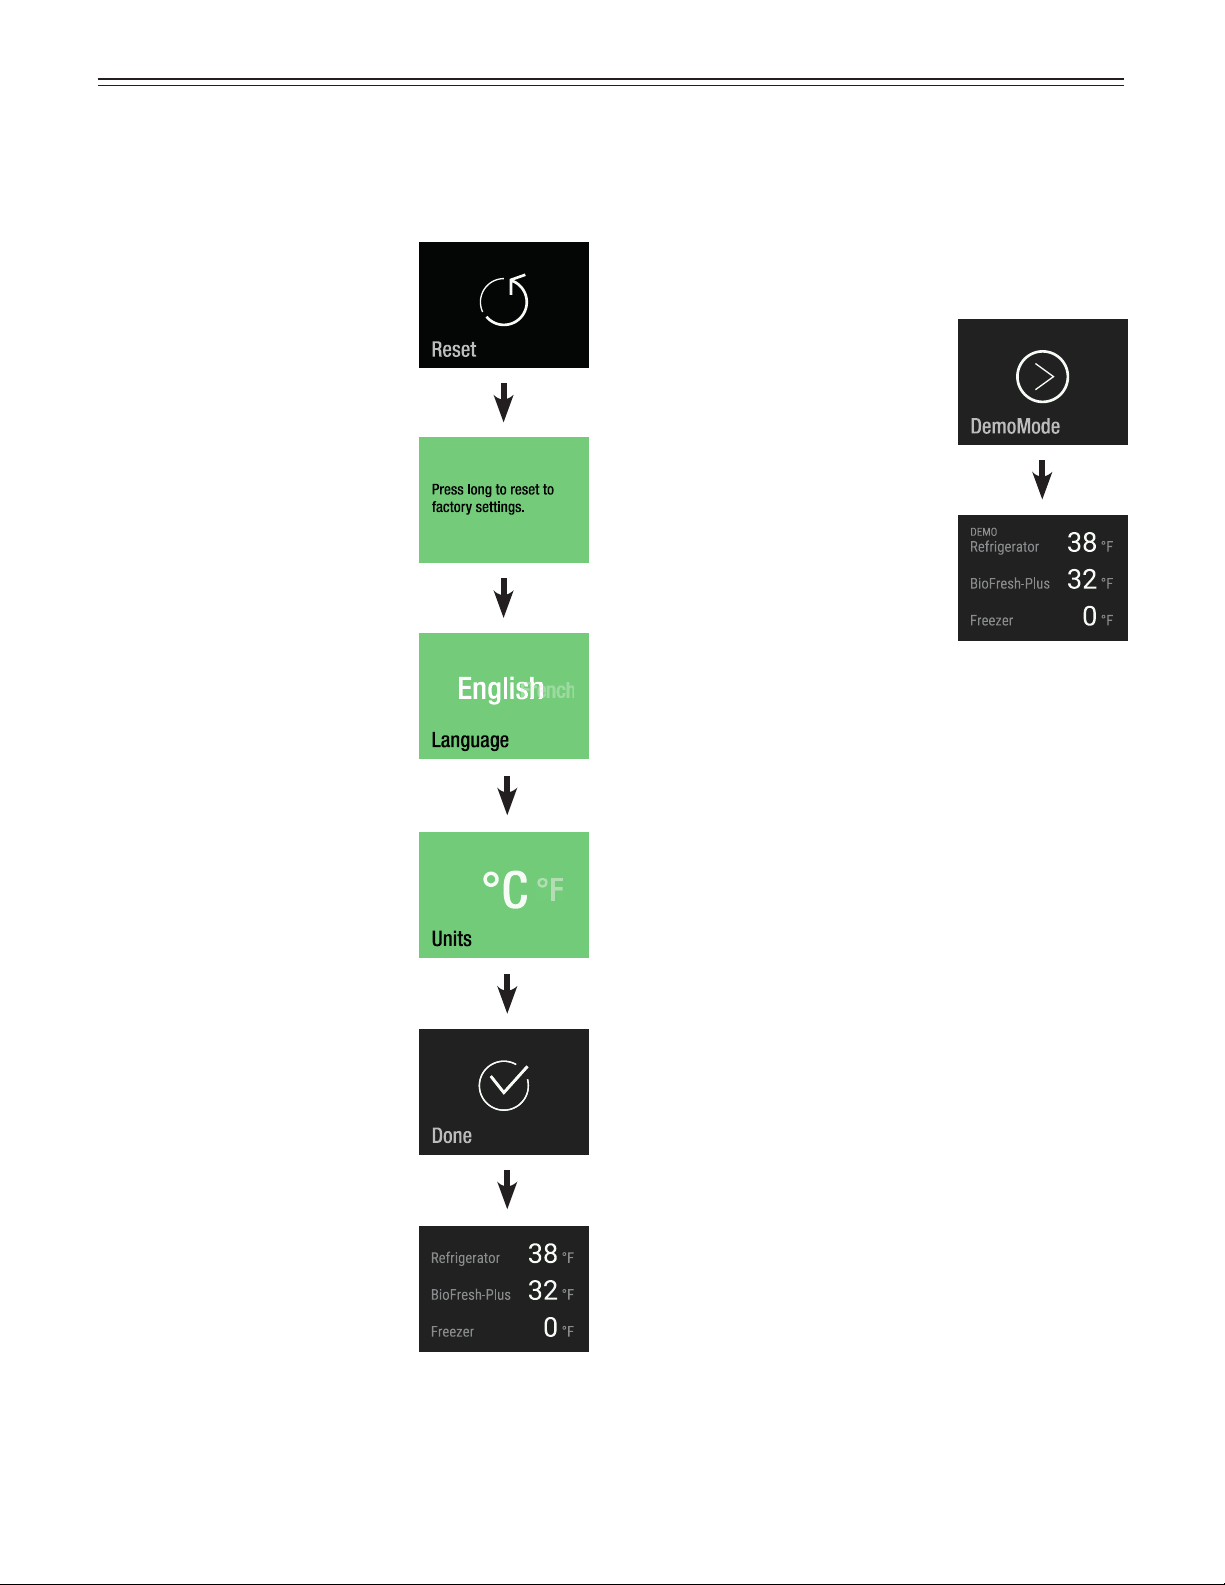
Reset
The electronic control can be reset to factory settings
using this function.
Touch
Press for approx. 2 seconds
Slide to your language and touch
Slide to the desired temperature
unit and touch
Touch
The appliance is in normal
operation.
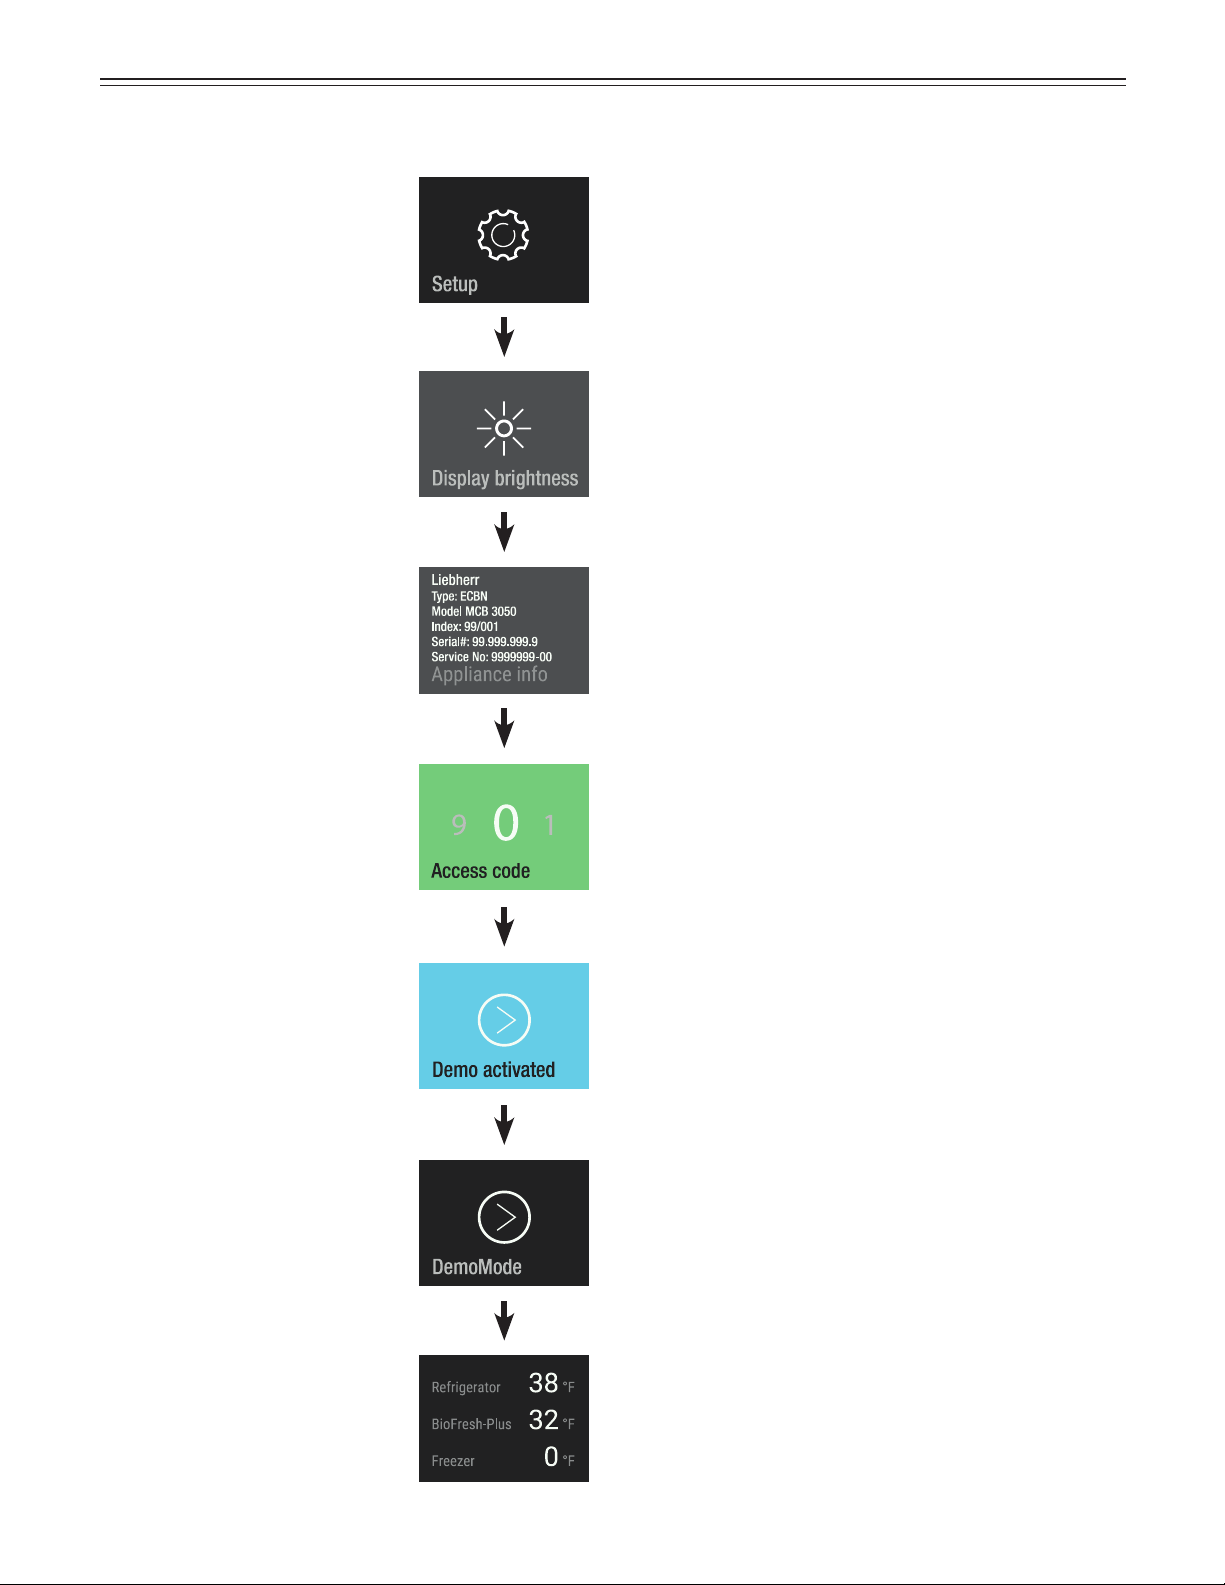
DemoMode
DemoMode can be activated for presenting the appli-
ance at exhibitions or in showrooms as if it were in nor-
mal operating mode.
Touch
Activating DemoMode
DemoMode is activated.
The cooling circuit is switched
off!
a
ddiTional
f
unCTions
38
Deactivating DemoMode
Touch
Slide to the right.
Press for approx. 2 seconds
Slide to left or right.
Enter code 151.
Press for approx. 2 seconds
DemoMode is deactivated.
After 1 second, the screen shows
a
ddiTional
f
unCTions
39
T
roubleshooTing
Customer Service
If none of the above possible causes apply, and you
can not rectify the fault yourself, contact your nearest
customer service representative.
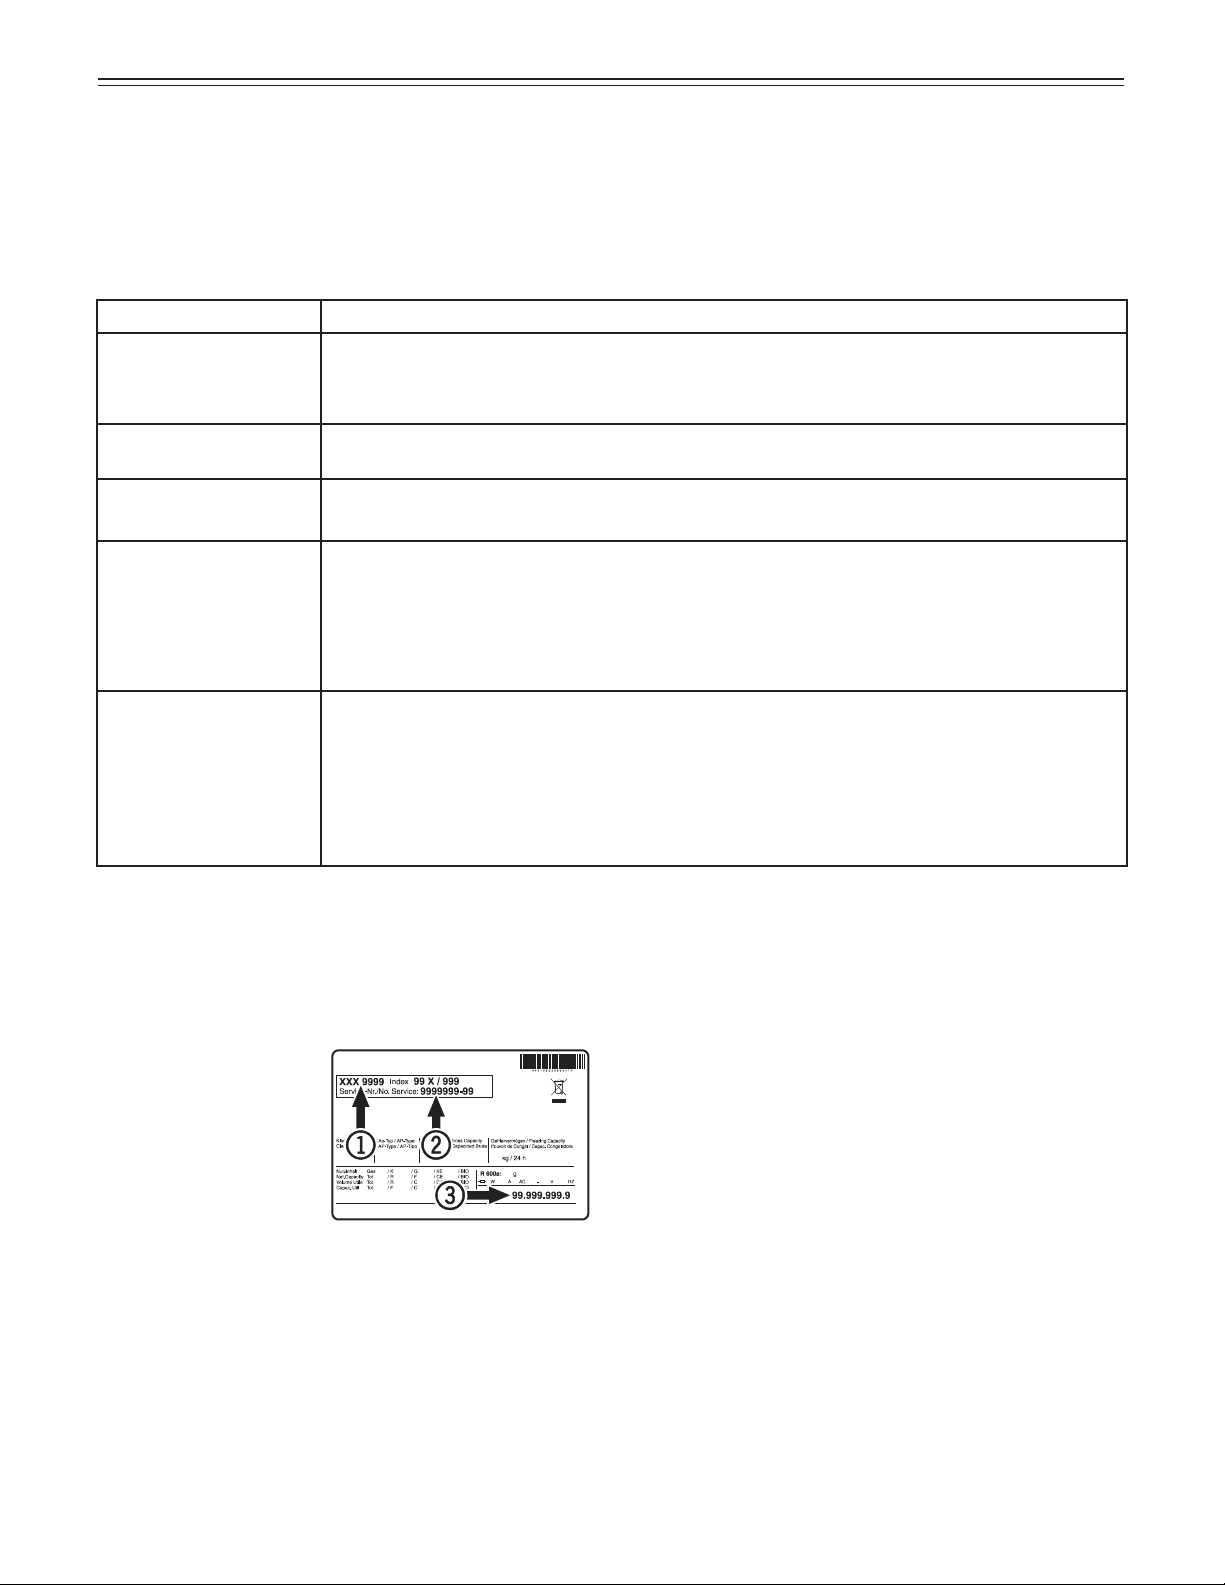
Indicate the type (1)
of appliance, service
number (2) and the
appliance/serial num-
ber (3) as indicated on
the model plate or in the
device information in the
setup menu of the elec-
tronic control system.
The position of the model plate is shown in the section
entitled „Description of the Appliance“.
Appliance Information
Record this information when the appliance is installed.
Type Designation: _____________________________
Service Number: ______________________________
Appliance/Serial Number: _______________________
Date of Purchase: _____________________________
Where Purchased: ____________________________
Problem Possible Cause and Remedy
Appliance does not
work, display is off.
- Is the appliance turned on properly?
- Is the power cord properly inserted in the outlet?
- Is the circuit breaker or fuse in operating condition?
The interior light does
not come on.
- Is the appliance turned on?
Motor seems to
run too long.
- Is the ambient temperature too high? See „Important Safety Information“.
- Has the appliance been opened too often or left open too long?
The temperature is
not cold enough.
- Is the temperature setting correct? See „Setting the Temperature“.
- Has an excessive amount of wine been placed in the appliance?
- Does a separately installed thermometer show the correct reading?
- Is the ventilation system working properly?
- Is the appliance set up too close to a heat source?
The fans inside the
appliance are run-
ning even though the
fan function has been
deactivated and the
compressor (refrigera-
tion unit) is idle.
- This is a normal operating state depending on the set interior temperature and ambient
temperature at the place of installation.
Troubleshooting
If a problem occurs during operation, check whether it is due to an operating error. Please note that even during the
warranty period, some repair costs may be your responsibility.
You may be able to correct the following faults by checking the possible causes yourself:

For Service in the U.S.
Liebherr Service Center
Toll Free: 1-866-LIEBHER or 1-866-543-2437
Email: Service-appliances.us@liebherr.com
PlusOne Solutions, Inc.
3501 Quadrangle Blvd, Suite 120
Orlando, FL 32817
For Service in Canada
Liebherr Service Center
Toll Free: 1-888-LIEBHER or 1-888-543-2437
www.euro-parts.ca
EURO-PARTS CANADA
39822 Belgrave Road
Belgrave, Ontario, N0G 1E0
Phone: (519) 357-3320
Fax: (519) 357-1326
www.liebherr-appliances.com
*708040200*
