Loading ...
Loading ...
Loading ...
8
Food Processing Hints
WARNING: Do not operate the motor continuously for more than 1 minute at a time.
Allow motor to rest for 3 minutes before continuing.
• For best results, solid foods should not be larger than 1-inch pieces. Cut or tear food into pieces
approximately equal in size before processing.
User Maintenance Instructions
This appliance requires little maintenance. It contains no user-serviceable parts. Any servicing requiring
Care & Cleaning Instructions
CAUTION: Never immerse the motor base, plug or cord in water or any other liquid.
1. Always unplug the Rocket Blender before cleaning.
2. Whenever possible, rinse parts immediately after processing to make cleanup easier.
3. Always handle blade using the blade collar.
CAUTION:
The blade is very sharp and can cause injury if touched.
4. If necessary, use any small nylon bristle brush to remove processed food from the blade and
the blade area.
5.
times until clean. Rinse thoroughly.
6. Remove cup ring after use to clean. Wash lid and cup ring in warm soapy water.
Rinse and dry thoroughly.
CAUTION: Never use rough scouring pads or abrasive cleansers on any plastic or metal parts as the
surface may be damaged.
7. Processing blade, processing cups and lids are all top-rack dishwasher safe.
IMPORTANT: After dishwashing, always check to make sure the gasket s
eal in the base of the blade
collar is properly in place, as the heat from some dishwashers may cause them to become loose.
8. The motor base may be wiped with a damp cloth or sponge. Dry thoroughly.
WARNING: DO NOT IMMERSE THE MOTOR BASE IN WATER.
Gasket Ring Replacement
• If the gasket ring breaks or visibly deteriorates, remove the old
gasket ring from the base of the blade of your Rocket blender.
• Remove the replacement gasket ring from the bag and wash it
with warm soapy water, then pat it dry. Make sure the seal ring
is completely dry before replacing it.
•
facing downward; while the rounded side of the replacement seal
is facing upwards.
• WARNING: Be careful to not touch the blades. Press the seal
the blade.
Storing Instructions
1. Unplug and clean unit.
2. Store in original box or in a clean, dry place.
3. Never store Rocket Blender while it is hot or plugged in.
4. Never wrap cord tightly around the appliance. Never place any stress on cord, especially where the
cord enters the unit, as this could cause the cord to fray and break.
Gasket ring
Flat side needs to face the bottom
14523_17246_17247_Bella ROCKET BLENDER IM_R5.indd 8 2020-11-10 10:40 AM
13
PRECAUCIÓN:
manteles individuales NO PLÁSTICOS entre el electrodoméstico y el acabado de
la encimera
manchas o marcas permanentes.
Energía eléctrica
Si el circuito eléctrico está sobrecargado con otros artefactos, su
electrodoméstico puede dejar de funcionar correctamente. El electrodoméstico
debe funcionar en un circuito eléctrico separado de otros artefactos.
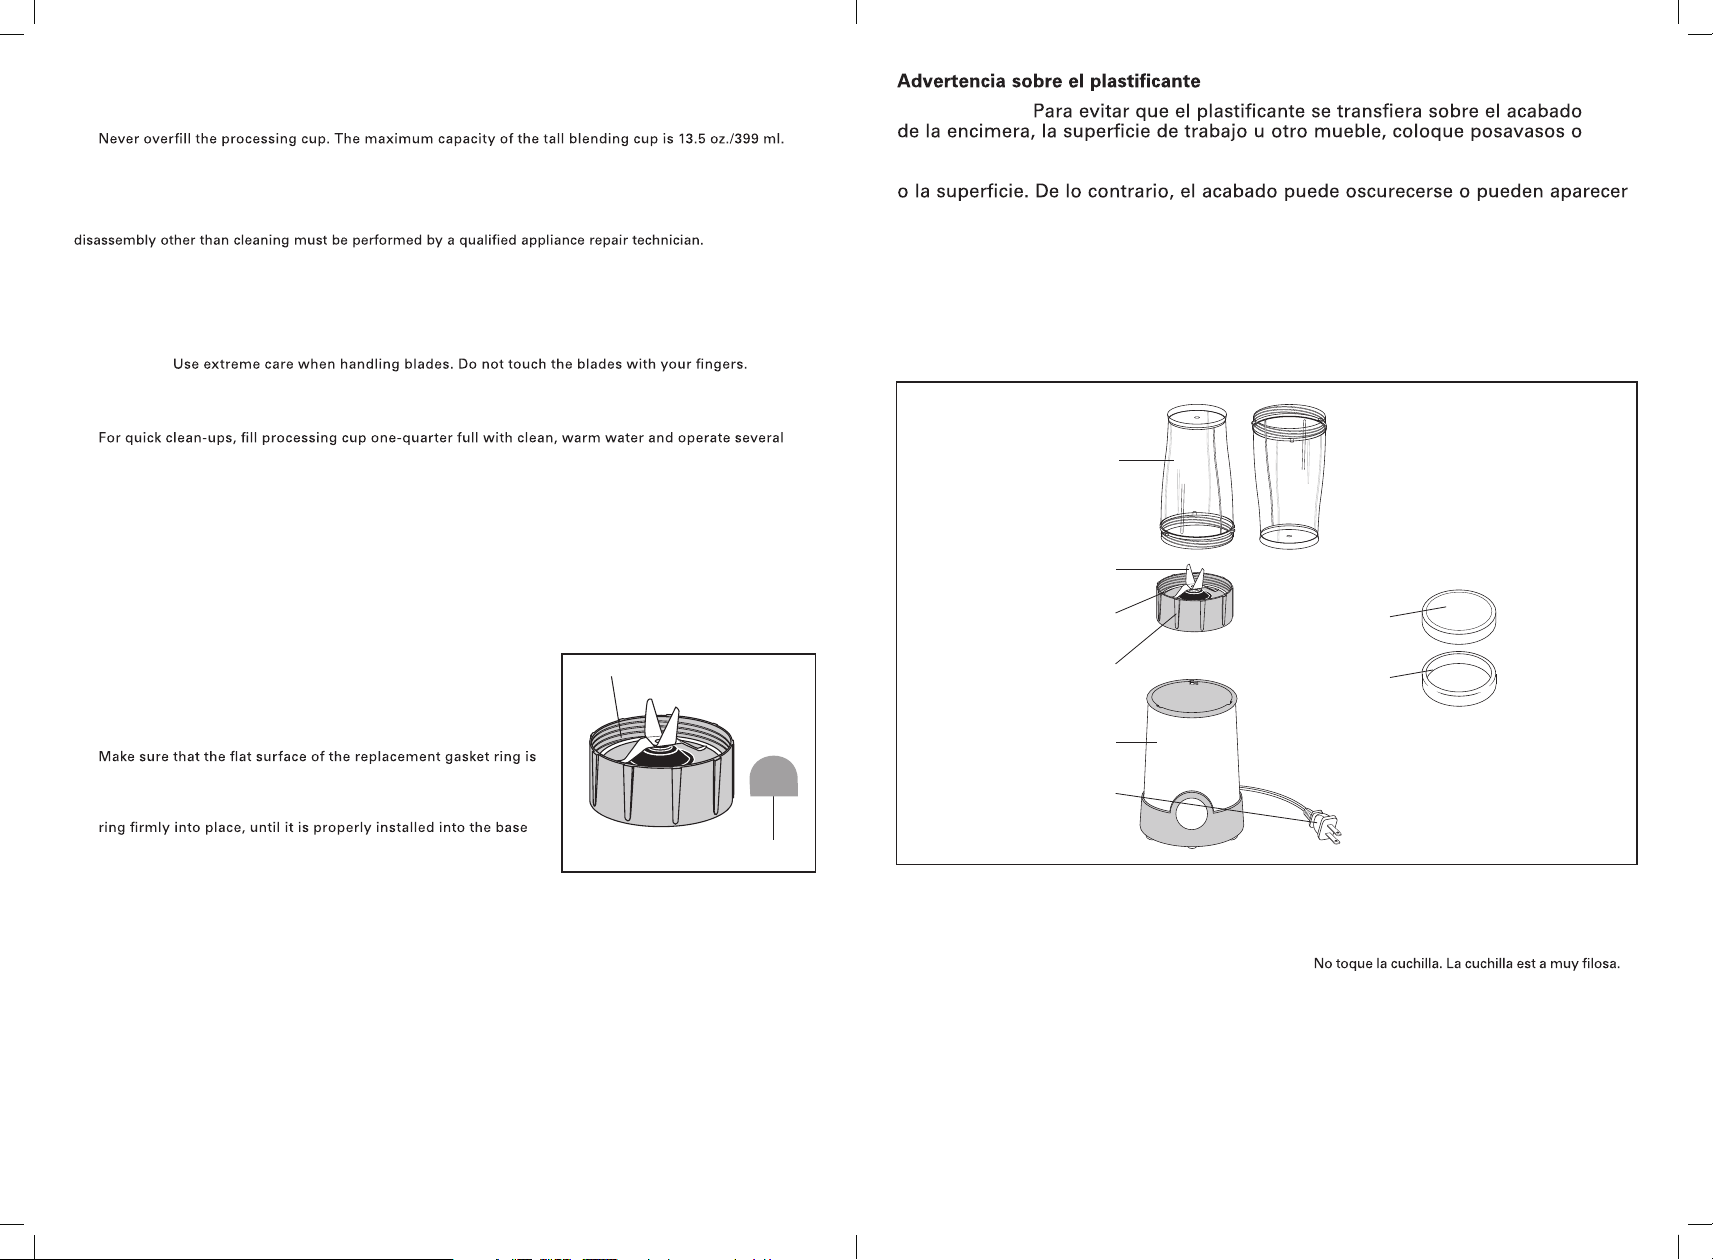
Conozca su licuadora rocket de 6 Piezas
El producto puede diferir levemente de la ilustración
Antes del primer uso
1. Retire con cuidado la licuadora Rocket y todos los materiales del embalaje. Controle los contenidos
para asegurarse de que todas las piezas y todos los accesorios estén incluidos y de que se hayan
recibido en buenas condiciones.
2. Sujete la cuchilla para licuar sólo por la base. ADVERTENCIA:
Tenga mucho cuidado al manipularlas. De lo contrario, se pueden ocasionar lesiones personales.
3. Lave todas las tapas con agua tibia y jabón. Enjuague y seque completamente.
4. Lave todos los vasos antes de utilizarlos por primera vez. Llene un cuarto del vaso con agua tibia y
limpia. Siguiendo los pasos descritos en las Instrucciones de funcionamiento, pulse varias veces, con la
cuchilla para licuar. Enjuague c
ompletamente.
5. La base del motor se puede limpiar con un paño húmedo.
ADVERTENCIA: NO SUMERJA LA BASE DEL MOTOR EN AGUA.
Vaso
mezcladore alto
Anillo de vaso
Tapas sólida
Cuchilla para licuar
(cuchilla en cruz)
Junta de la cuchilla
para licuar
Base de la cuchilla
para licuar
Base del motor
Enchufe polarizado
14523_17246_17247_Bella ROCKET BLENDER IM_R5.indd 13 2020-11-10 10:40 AM
Loading ...
Loading ...