
Version 1.02 | 07/16/2020
User Manual
DWM-312
4G LTE M2M Router
iD-Link DWM-312 User Manual
D-Link reserves the right to revise this publication and to make changes in the content hereof without obligation to notify any
person or organization of such revisions or changes.
Manual Revisions
Trademarks
D-Link and the D-Link logo are trademarks or registered trademarks of D-Link Corporation or its subsidiaries in the United
States or other countries. All other company or product names mentioned herein are trademarks or registered trademarks of
their respective companies.
Copyright © 2020 by D-Link Corporation.
All rights reserved. This publication may not be reproduced, in whole or in part, without prior expressed written permission
from D-Link Corporation.
Revision Date Description
1.01 July 26, 2018 • Initial release
1.02 July 16, 2020 • Minor changes
Preface
ErP Power Usage
This device is an Energy Related Product (ErP) that automatically switches to a power-saving Network Standby mode within 1 minute of no
packets being transmitted. If it is not needed during certain periods of time, it can be unplugged to save energy.
Network Standby: 5 watts

iiD-Link DWM-312 User Manual
Table of Contents
Product Overview ..............................................................1
Package Contents .........................................................................1
System Requirements .................................................................1
Introduction ................................................................................... 2
Hardware Overview .....................................................................3
Front View ................................................................................3
Top Panel .................................................................................4
Rear Panel ................................................................................ 5
Installation ......................................................................... 6
Before You Begin ...........................................................................6
Attaching the External Antennas............................................7
Installing the SIM card(s) ............................................................8
Conguration .....................................................................9
Getting Started ..............................................................................9
Internet ...........................................................................................10
WAN Service .........................................................................10
Preferred SIM Card ......................................................... 10
SIMA/SIMB .............................................................................11
Network Status ...............................................................11
APN Settings ....................................................................12
APN Conguration ........................................................13
Connection Settings .....................................................15
SIM Card Settings ...........................................................16
IPv4 and IPv6 info ..........................................................17
Device Mode ....................................................................18
Router Mode .................................................................... 19
LAN ..................................................................................................20
IPv4 ..........................................................................................20
LAN Settings ....................................................................20
Dynamic Route ...............................................................21
DHCP ..................................................................................22
IPv6 ..........................................................................................23
IPv6 Cong .......................................................................23
Internet Connection Type ...........................................24
VPN ..................................................................................................25
IPSec ........................................................................................25
VPN Settings ....................................................................25
XAUTH Account ..............................................................28
PPTP .........................................................................................29
PPTP Server ......................................................................29
PPTP Server ......................................................................30
PPTP Client .......................................................................31
L2TP .........................................................................................33
L2TP Server ......................................................................33
L2TP Client .......................................................................35
GRE ...........................................................................................37
Advanced ......................................................................................38
DNS ..........................................................................................38
DNS .....................................................................................38
DNS Redirect....................................................................39
Firewall ...................................................................................40
Table of Contents

iiiD-Link DWM-312 User Manual
Table of Contents
Outbound Filter ..............................................................40
Inbound Filter ..................................................................41
URL Filter ...........................................................................42
MAC Address Filter ........................................................43
DMZ .........................................................................................44
QoS...........................................................................................45
SNMP .......................................................................................46
Virtual Server ........................................................................48
UPnP ........................................................................................49
Network Scan .......................................................................50
Email Settings ......................................................................51
System ............................................................................................52
Administration .....................................................................52
Password Settings .........................................................52
Remote Login Settings .....................................................54
Conguration Backup ..................................................55
SMS ..........................................................................................56
SMS Inbox .........................................................................56
Compose SMS .................................................................57
Message Settings ...........................................................58
Time Settings .......................................................................60
Firmware Upgrade ..............................................................61
Device Upgrade ..............................................................61
System Log ............................................................................62
Schedules ..............................................................................63
Add New Rule ..................................................................63
Reboot and Reset ...............................................................64
Reboot the Device .........................................................64
Connection Reset ...............................................................65
Command Script .................................................................66
SSH/Telnet .............................................................................67
D-Link Edge Cloud System remote management .........69
Troubleshooting ..............................................................71
Networking Basics ...........................................................75
Check your IP address ...............................................................75
Statically Assign an IP address ...............................................76
Technical Specications ..................................................77
Regulatory Information ..................................................79

1D-Link DWM-312 User Manual
Section 1 - Product Overview
Product Overview
Package Contents
If any of the above items are missing or damaged, please contact your reseller.
System Requirements
* Subject to services and service terms available from your carrier.
• A compatible micro-SIM/UICC card with service.*
• Computer with Windows, Mac OS, or Linux-based operating system with an installed Ethernet
adapter.
• Java-enabled browser such as Internet Explorer 6, Safari 4.0, Chrome 20.0, or Firefox 7 or above
(for conguration).
Power Adapter
DWM-312 4G LTE M2M Router
2x 3G/4G Antennas
RJ-45 Cable

2D-Link DWM-312 User Manual
Section 1 - Product Overview
Introduction
The D-Link DWM-312 4G LTE M2M Router is an easy-to-deploy, high-performance 3G/4G router. It features a dedicated Fast
Ethernet port and dual-SIM 4G LTE mobile broadband for maximum redundancy and exibility for intense
Machine-to-Machine (M2M) applications. Powerful VPN tools and advanced remote management combined with ease of
use make the DWM-312 ideal for both large-scale and individual deployments.
Easily connect to your high-speed 3G/4G LTE mobile connection with the DWM-312 4G LTE M2M Router, and enjoy fast
downlink speeds of up to 150 Mbps
1
and uplink speeds up to 50 Mbps
1
, giving you the speed you need for fast, responsive
Internet access. Deploy it in a remote location to access IP cameras and systems remotely. The blazing fast LTE connection
allows multiple users to access e-mail and stream music and video on the go. Congurable dual-SIM fallback provides
reliability and exibility in mixed network environments.
The DWM-312 4G LTE M2M Router’s integrated VPN Client and Server support almost any VPN policy. The router’s hardware
engine can support and manage multiple VPN congurations. It supports IPSec, PPTP, L2TPv2, and GRE protocols in Server
mode, and handles pass-through trac as well. Advanced VPN conguration options include multiple encryption options,
key management, negotiation modes, and VPN authentication using an internal user database.
The industrial-grade casing means the DWM-312 provides reliable high-speed connectivity in extreme conditions. The
corrosion-resistant zinc-plated steel case and wide operating temperature and humidity tolerance mean that the DWM-312
is ready for the most demanding M2M applications in virtually any environment. Wall mounts allow the DWM-312 to be
mounted virtually anywhere for optimal connectivity. Flexible power input allows the router to be powered by any
convenient power source.
1
Data rates are theoretical. Data transfer rate depends on network capacity, signal strength, and environmental factors.
3D-Link DWM-312 User Manual
Section 1 - Product Overview
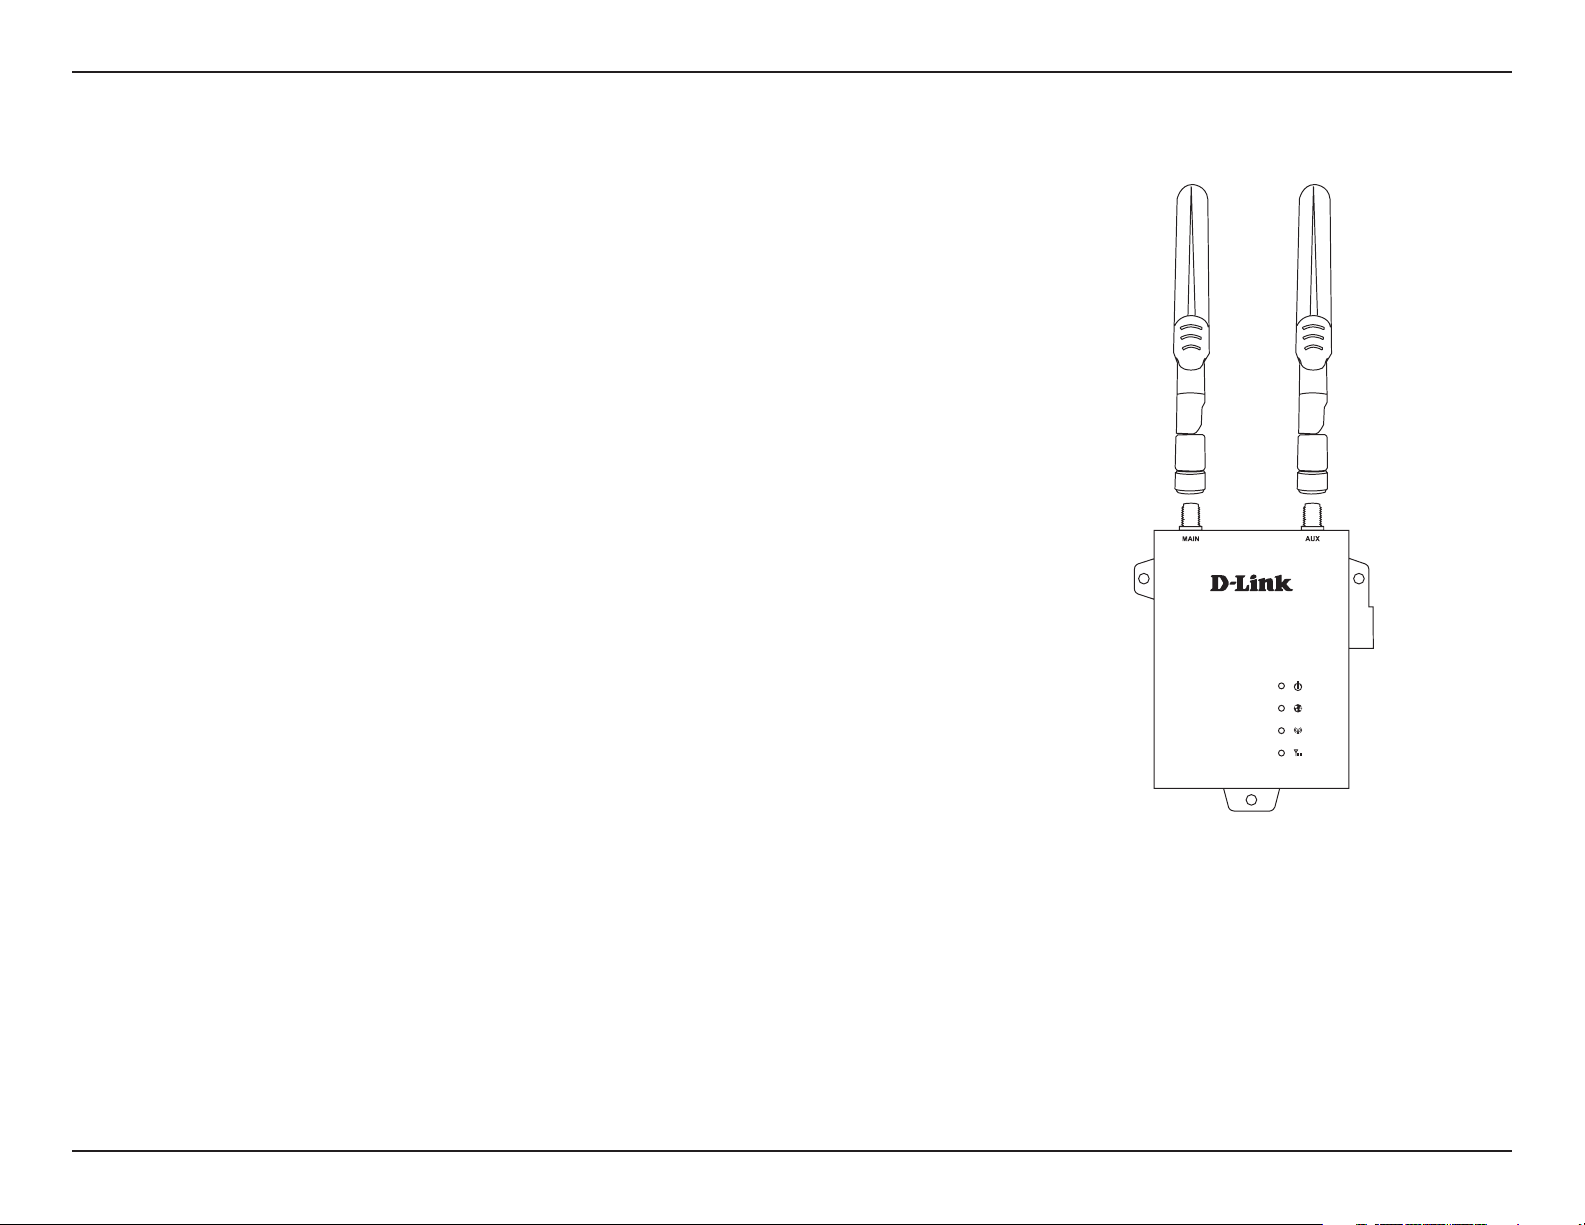
Hardware Overview
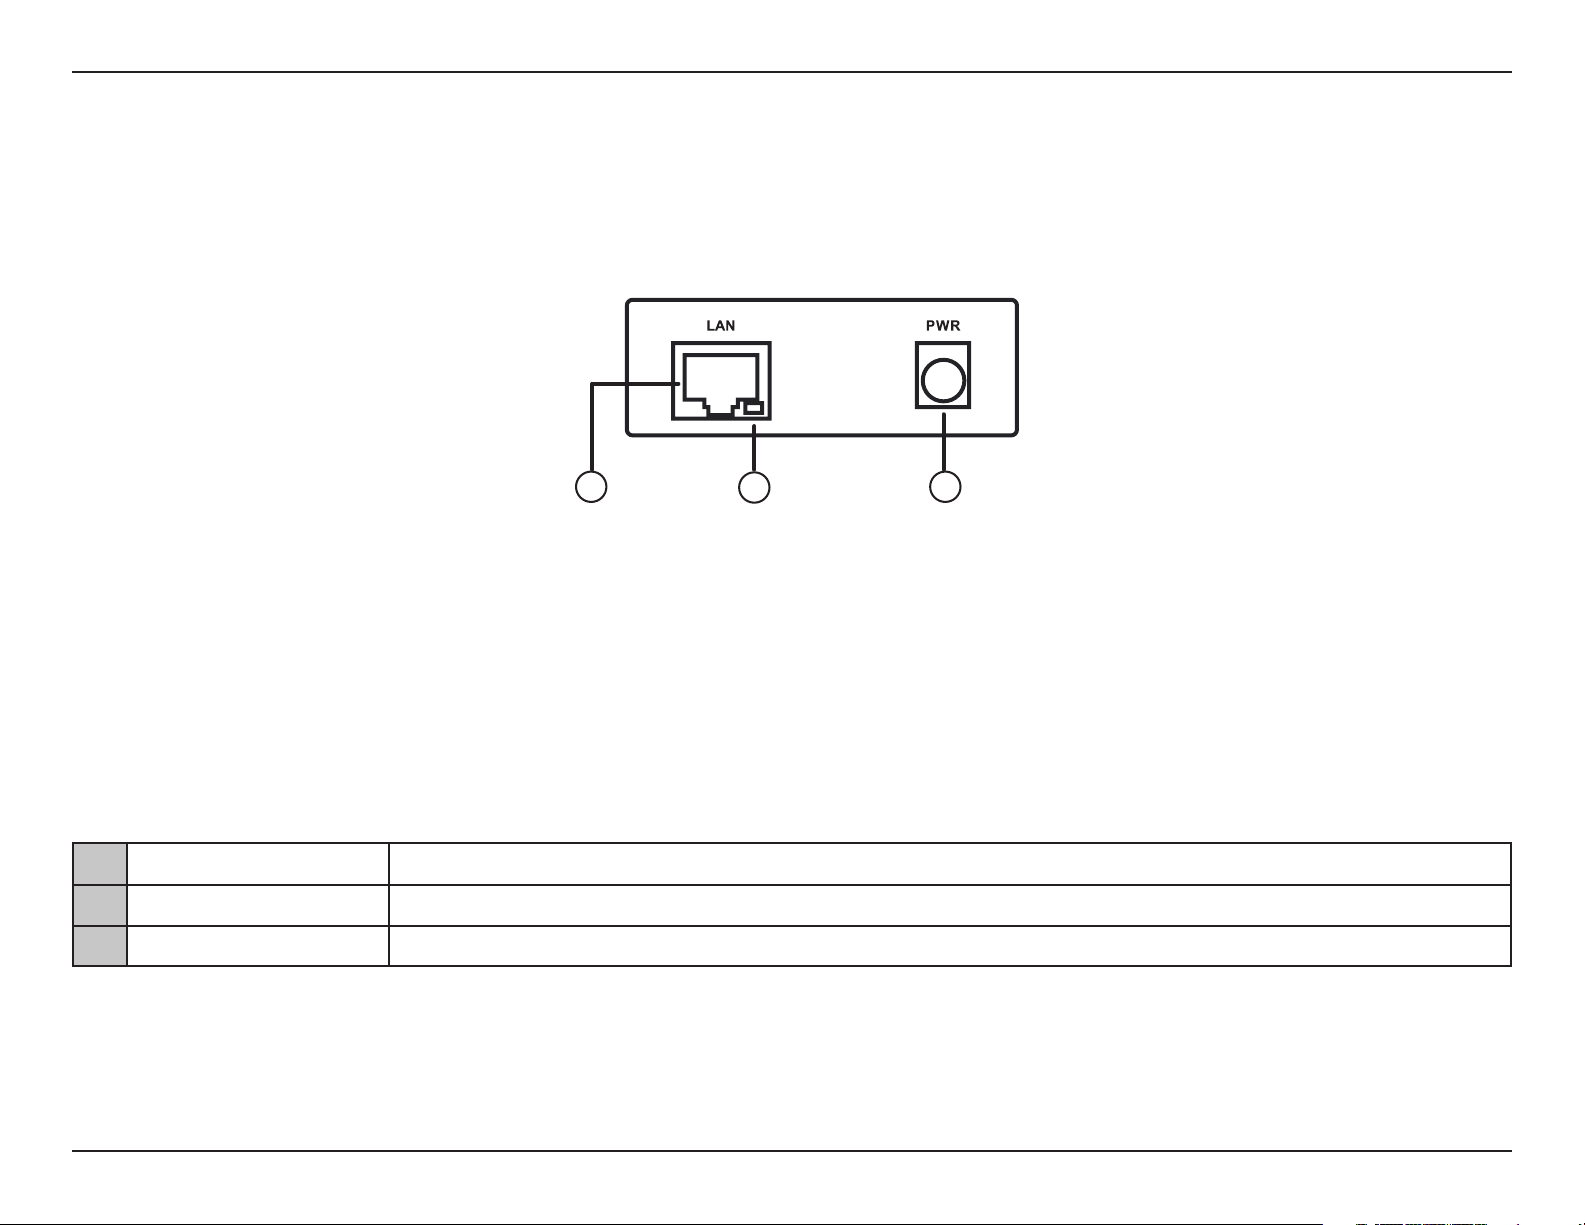
Front View
1 Ethernet Port
This is a standard 10/100 Mbps Ethernet port to connect any device via Cat 5/5e/6 RJ-45 cables.
2 Ethernet Activity Flashes green when there is Ethernet trac.
3 DC Power Input
5.5 mm barrel connector for power.
2
1
3
4D-Link DWM-312 User Manual
Section 1 - Product Overview
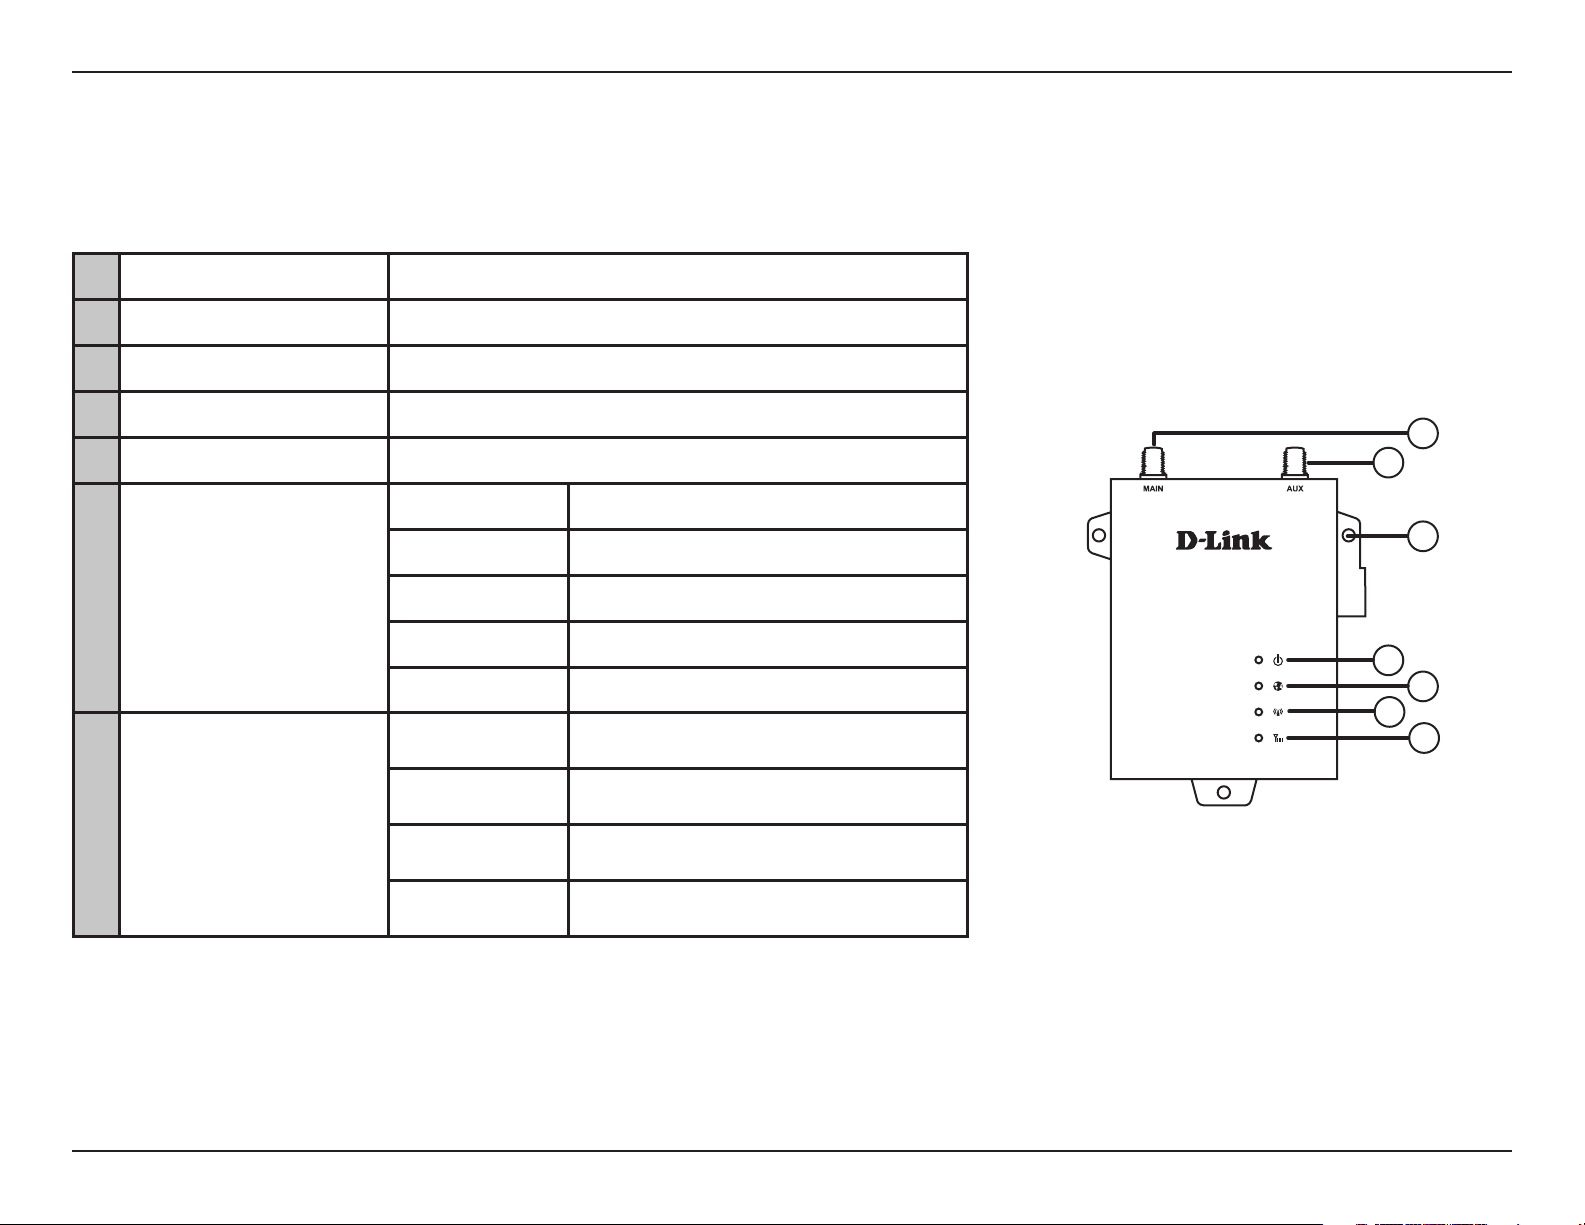
Top Panel
1 SMA Connector Main SMA female connector - Primary antenna.
2 SMA Connector AUX SMA female connector - Auxiliary Antenna.
3 Wall Mounts Wall mounts for standard 8 gauge (4 mm) screws.
4 Power A green LED indicates the DWM-312 is receiving power.
5 Internet A green LED indicates Internet connectivity.
6 Network
Solid Green Connected to SIM A LTE Network.
Flashing Green Fallback to SIM A 3G/2G network.
Solid Blue Connected to SIM B LTE Network.
Flashing Blue Fallback to SIM B 3G/2G network.
O No Service/SIM Error/APN Error.
7
Signal
Green Indicates strong signal.
Amber Indicates fair signal.
Red Indicates weak signal.
O Indicates no signal.
1
2
3
4
6
5
7
5D-Link DWM-312 User Manual
Section 1 - Product Overview
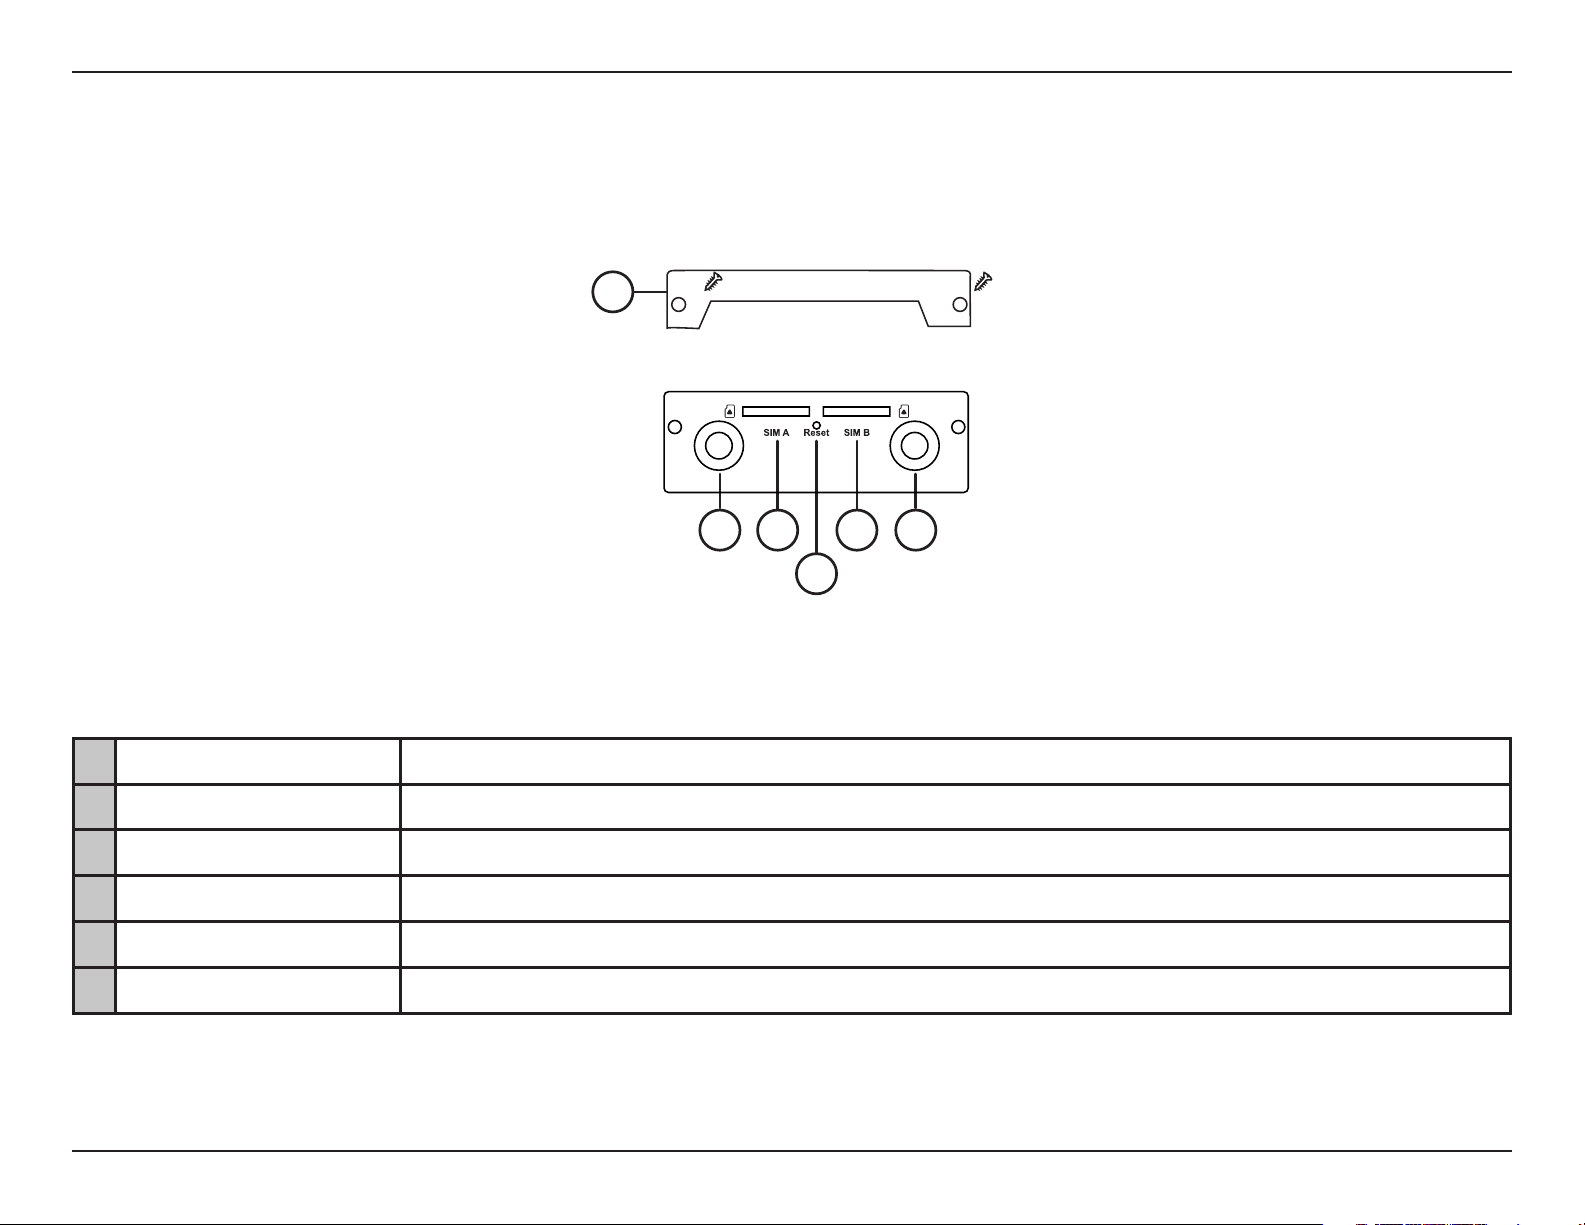
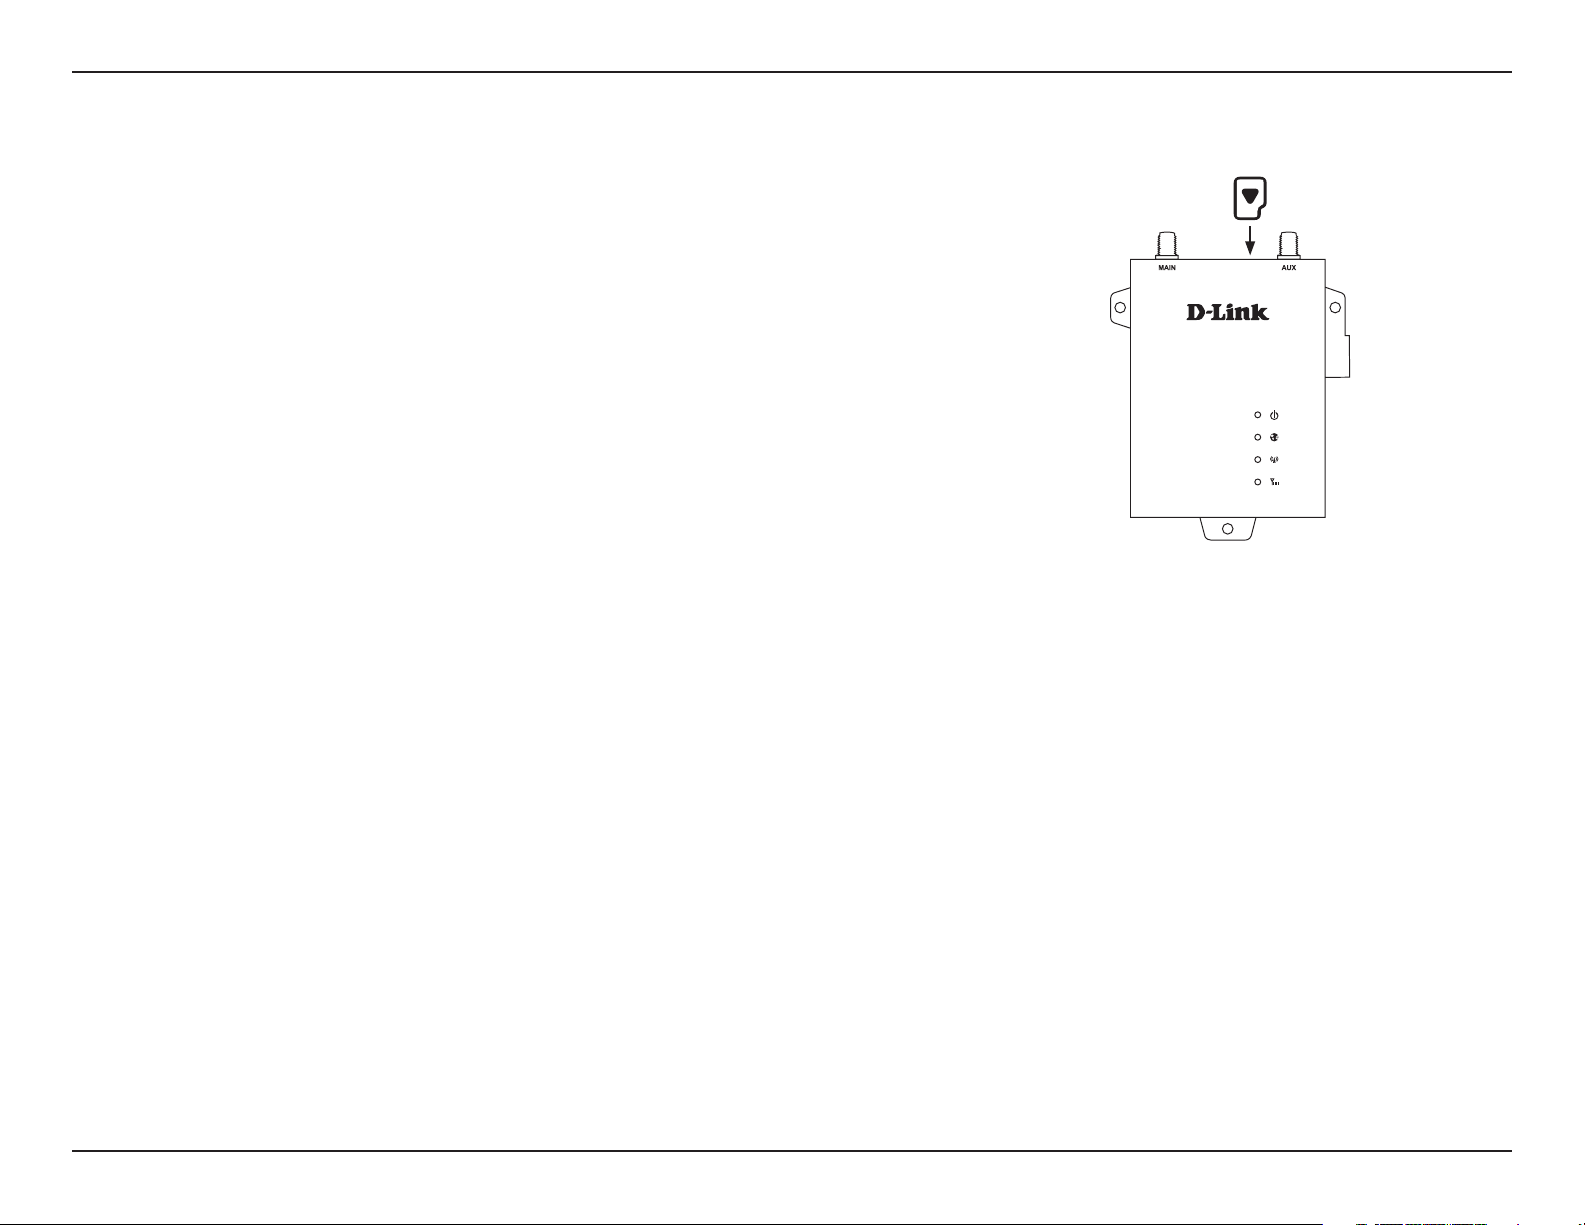
Rear Panel
1 Security Plate Security plate covering the SIM card slots containing two screw holes.
2 SMA Connector AUX SMA female connector - Auxiliary Antenna.
3 SIM A Primary SIM card slot.
4 Reset Press and hold for 3 seconds to reset.
5 SIM B Secondary SIM card.
6 SMA Connector Main SMA female connector - Primary antenna.
1
2 3 5
4
6

6D-Link DWM-312 User Manual
Section 2 - Installation
Before You Begin
Installation
This section will guide you through the installation process. Placement of the router is very important. Do not place the router in an enclosed area
such as a closet, cabinet, or in an attic or garage.
Observe the following precautions to help prevent shutdowns, equipment failures, and personal injury:
• Install the DWM-312 in a cool and dry place. Refer to the technical specications in the user
manual for the acceptable operating temperature and humidity ranges.
• Install the router in a site free from strong electromagnetic sources, vibration, dust, excessive moisture, and direct sunlight.
• Place antennas in an unobstructed area with clear mobile signal. Avoid metal boxes, brick walls, and other dense
materials. It is recommended to use the web interface to conrm signal strength before permanent installation.
• Visually inspect the power connector and make sure that it is fully secure.
• Do not stack any devices on top of the router.
7D-Link DWM-312 User Manual
Section 2 - Installation
Attaching the External Antennas
The DWM-312 requires two external antennas to function correctly. The included
antennas are interchangeable, but third party antennas may require connection
to specic ports.
1. Attach the antennas to the SMA connectors labelled “MAIN” and “AUX” on the
back of the router Turn clockwise to fasten the antenna.
2. Position the router where it will recieve optimal signal. Arrange the antennas
so they point upward.
Note: The included antennas are interchangeable. Third party antennas may
require connection to specic ports.
8D-Link DWM-312 User Manual
Section 2 - Installation
Installing the SIM card(s)
The DWM-312 is equipped with dual-SIM slots. At least one active SIM card with
Internet access is required for proper operation.
1. Insert a micro-SIM card into the slot labelled SIM A with the contacts facing
down. If you wish to install a second SIM card, insert it into the slot labelled
SIM B.
2. Gently press the micro-SIM into the slot until it locks into place. To remove,
press again and the SIM card will be ejected.
Note: SIM behavior must be configured from the web UI before an Internet
connection can be established.
9D-Link DWM-312 User Manual
Section 4 - Conguration
Conguration
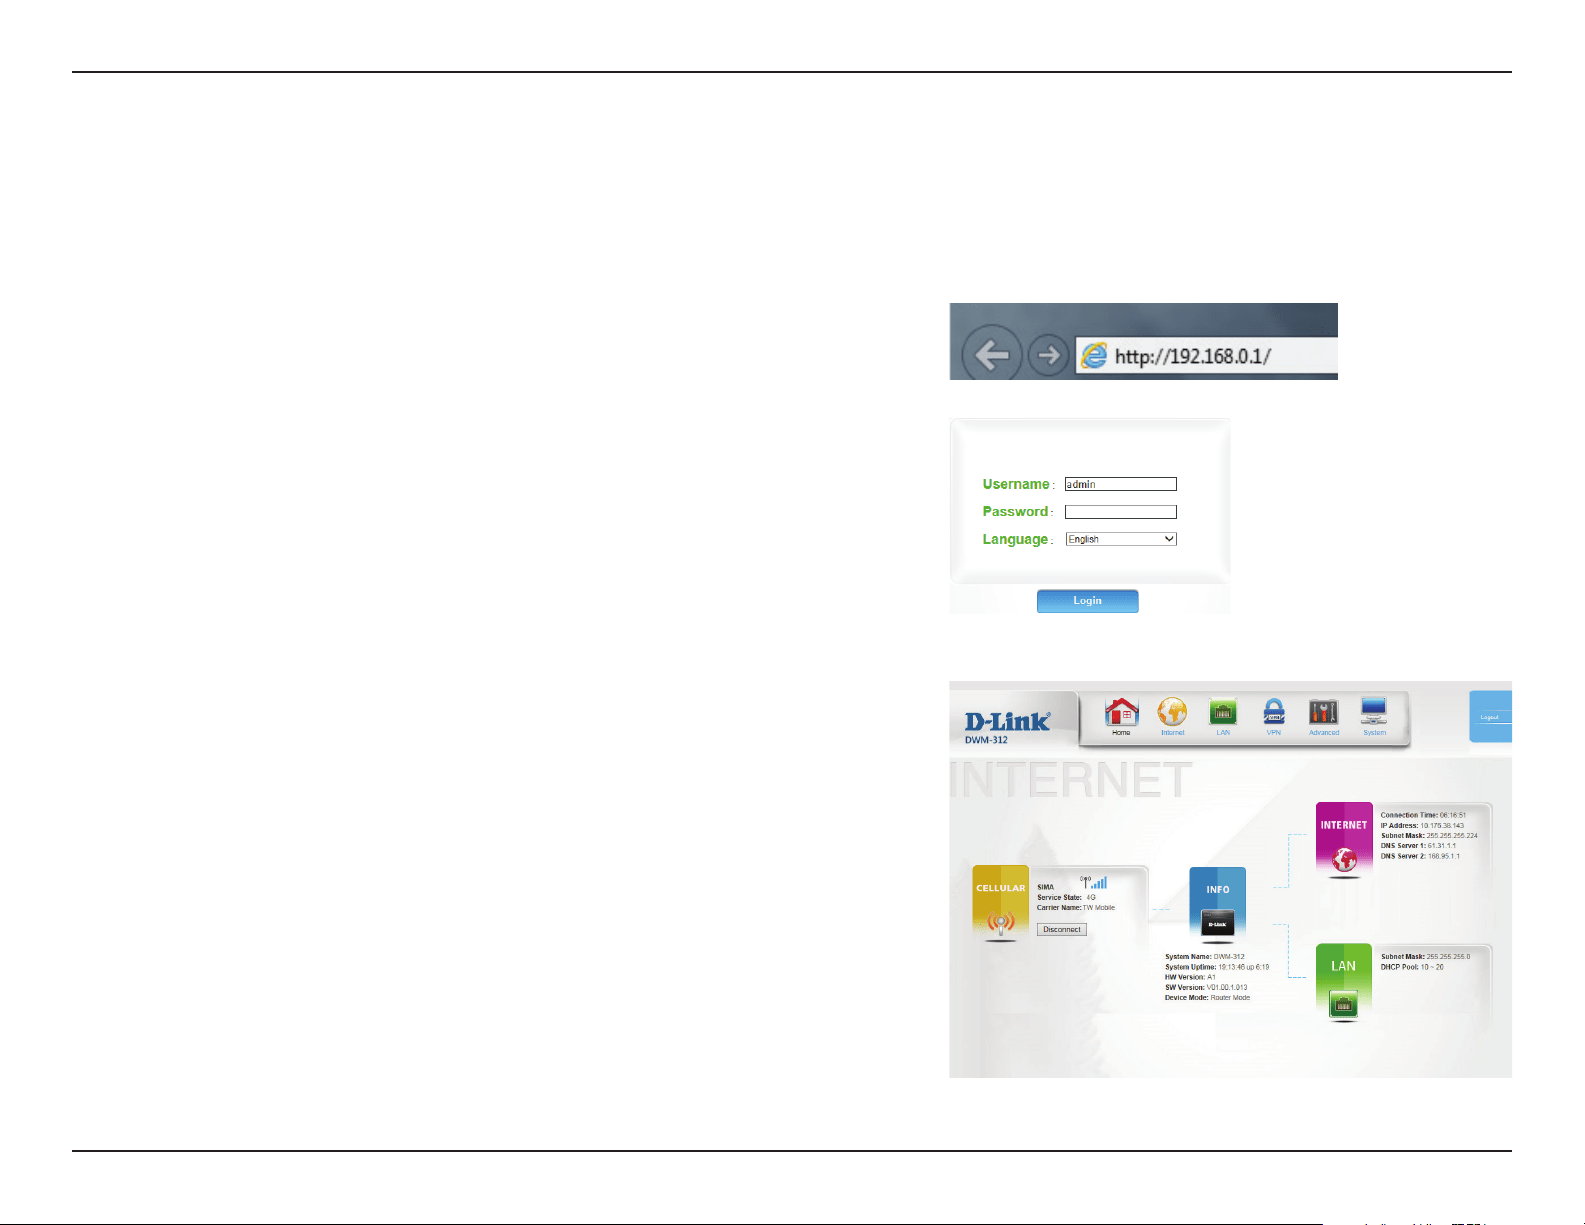
To access the conguration utility, open a web browser such as Internet Explorer and
enter the address of the router (192.168.0.1 by default).
To log in to the conguration utility, enter the default username admin and the
default password admin.
Note: If you get a Page Cannot be Displayed error, please refer to the Troubleshooting
section for assistance.
Once you have successfully logged in, you will see the Home page. On this page
you can view information about your Internet connection, the wireless/LAN status,
and system information.
At the top of the page is a menu. Clicking on one of these icons will take you to the
appropriate conguration section.
On each page, ll out the desired settings and click Apply when you are done or
Refresh to revert to the old settings.
Getting Started
10D-Link DWM-312 User Manual
Section 4 - Conguration
Internet
On this page you can congure your Internet connection. If you are not sure which settings to use, please contact your Internet Service Provider
(ISP). Note that the DWM-312 requires a SIM card and active cellular internet service to connect to the Internet.
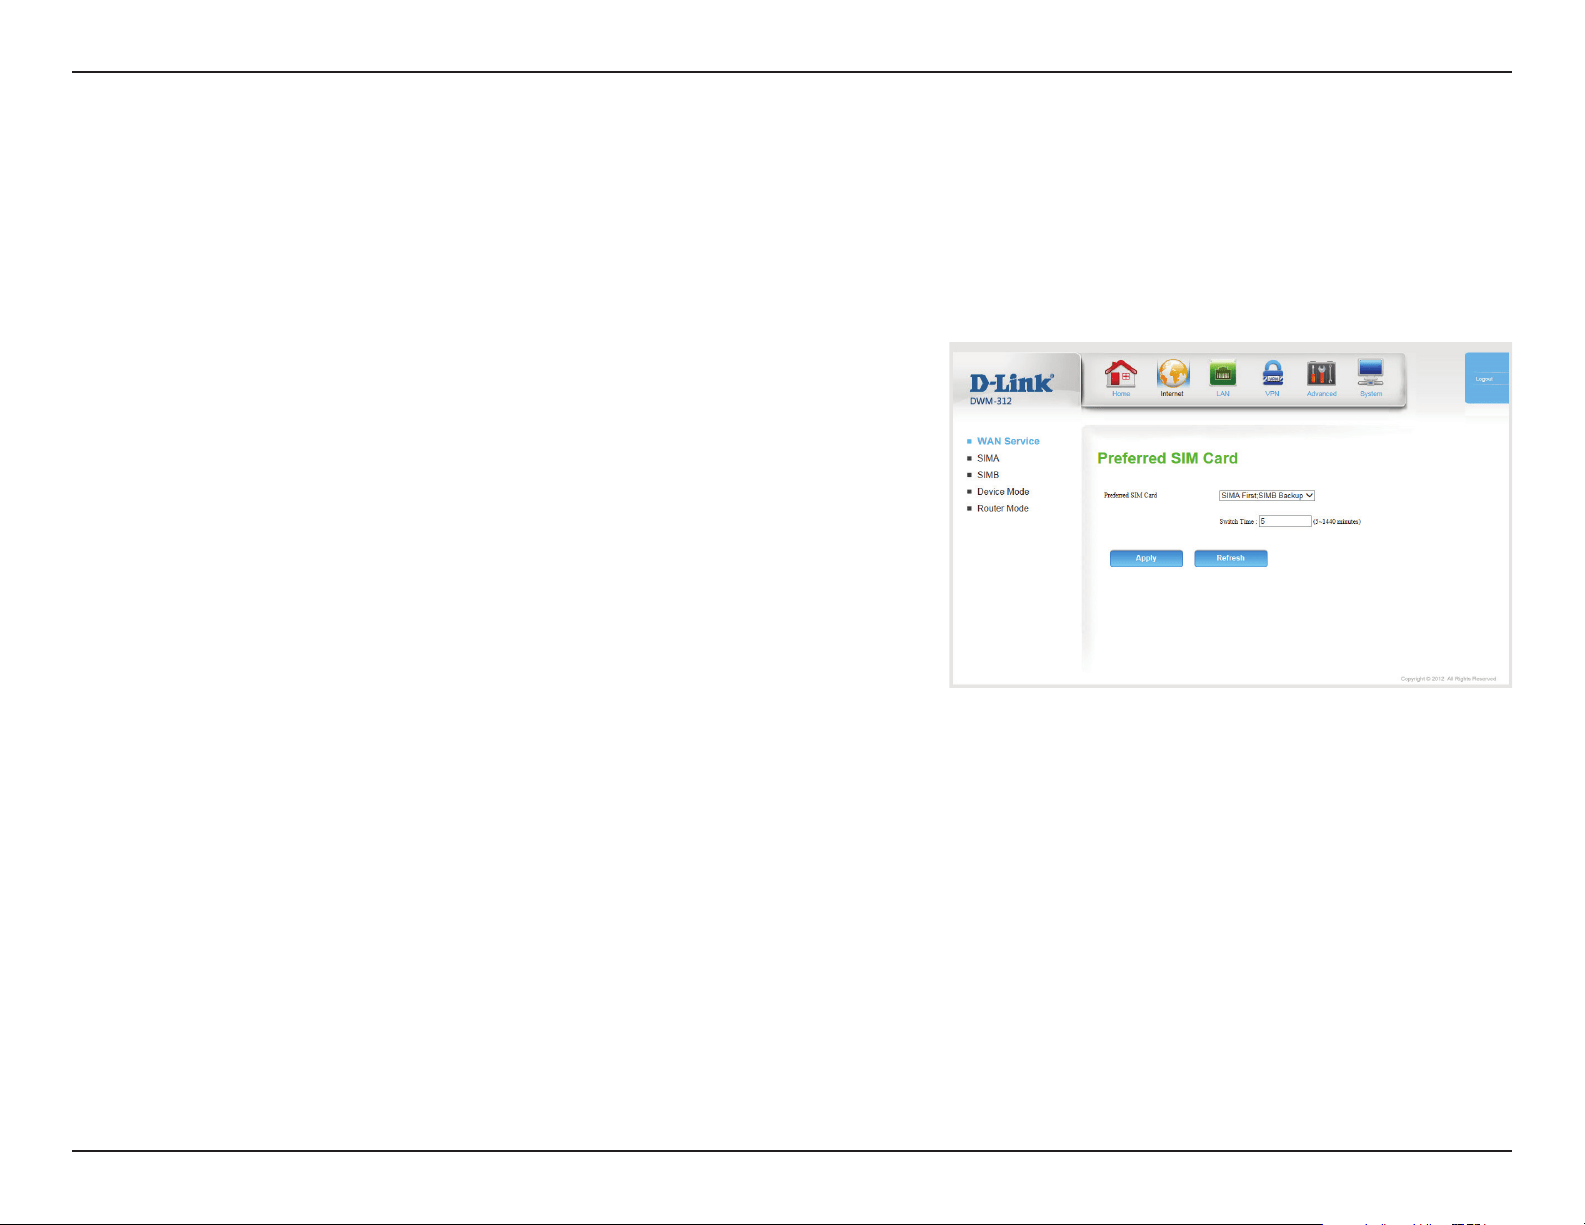
Preferred SIM Card
Select SIMA, SIMB, SIMA First, SIMB Backup, or SIMB First; SIMA
Backup.
Selecting a single SIM card, either SIMA or SIMB will connect over
a single SIM only. Selecting a backup option will change cause the
connection to switch to the specied backup if the primary SIM
cannot connect after the specied time.
Selecting SIM cards will cause the menu options to display
according to active SIM cards, either showing SIMA, SIMB, or
SIMA and SIMB. The conguration options for each are the same.
Select the amount of time in minutes for the router to attempt
to reconnect to the primary SIM. If this time elapses, it will
automatically switch to the backup.
Click Apply to save your settings, or Refresh to revert to your
previous settings.
Prefered SIM
Card:
Switch Time:
WAN Service
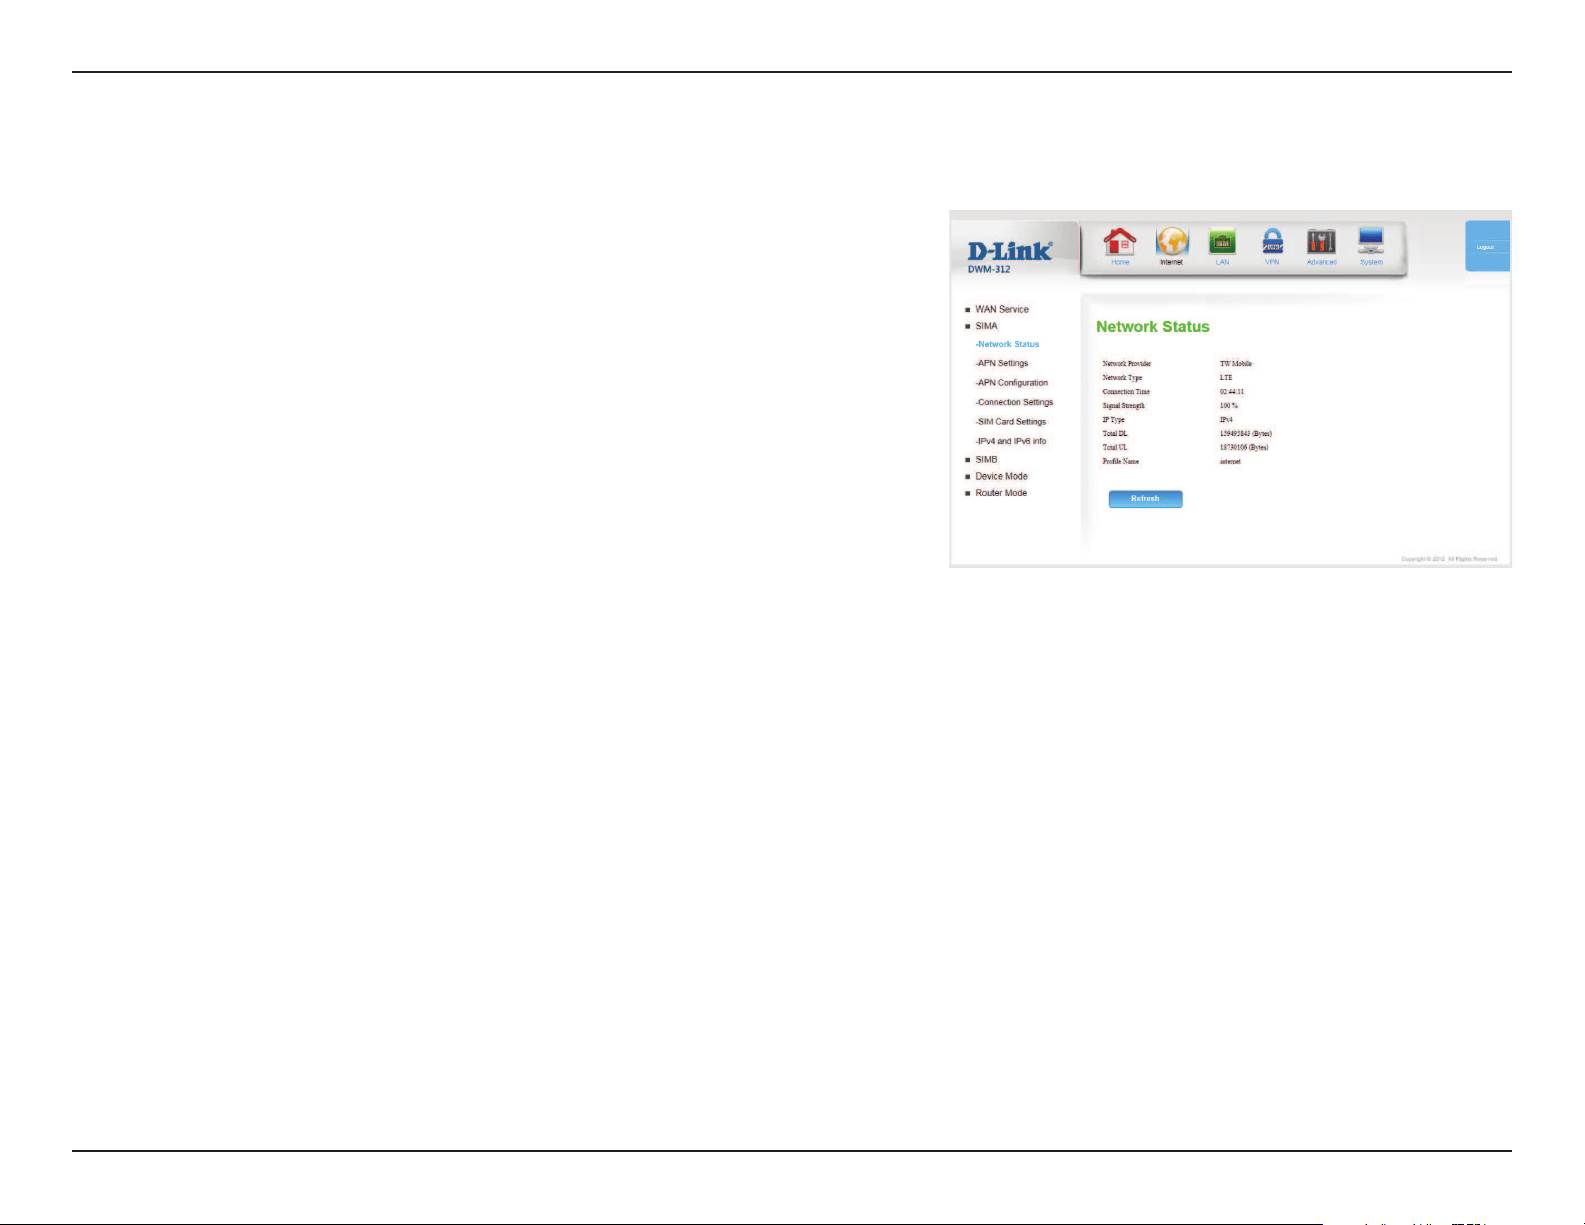
11D-Link DWM-312 User Manual
Section 4 - Conguration
Shows the name of the current network provider.
Species the current network type. Indicates LT E , 3G, or 2G.
Indicates the amount of time the network has been up.
Shows cellular signal strength as a percentage.
Shows whether the router is assigned an IPv4 or an IPv6 address.
Shows total downloaded bytes since last reboot.
Shows total uploaded bytes since last reboot.
Indicates the name of the APN prole.
Click Refresh to update the page.
Network
Provider:
Network Type:
Connection
Time:
Signal Strength:
IP Type:
Total DL:
Total UL:
Prole Name:
SIMA/SIMB
Network Status

12D-Link DWM-312 User Manual
Section 4 - Conguration
APN Settings
Select Auto-Detection to have the router automatically detect the
settings for your connection. Select Manual to enter the details of
your connection manually. Select Selection to choose several pre-
congured proles, congurable in APN Conguration on page
13.
If you select Manual, the following options will appear:
Select your country and service provider to automatically ll in
some of the required settings.
Fill in only if requested by ISP (optional).
Fill in only if requested by ISP (optional).
Enter the number to be dialed.
Select PAP, CHAP, or Auto detection. The default authentication
method is Auto.
Enter the APN information (optional).
Enter the PIN associated with your SIM card.
Fill in if provided by your ISP. If not, keep the default value
(optional).
Fill in if provided by your ISP. If not, keep the default value
(optional).
Click Apply to save your settings, or Refresh to revert to your
previous settings.
Dial Up Prole:
Country/
Telecom:
Username:
Password:
Dialed Number:
Authentication:
APN:
PIN Code:
Primary DNS
Server:
Secondary DNS
Server:
13D-Link DWM-312 User Manual
Section 4 - Conguration
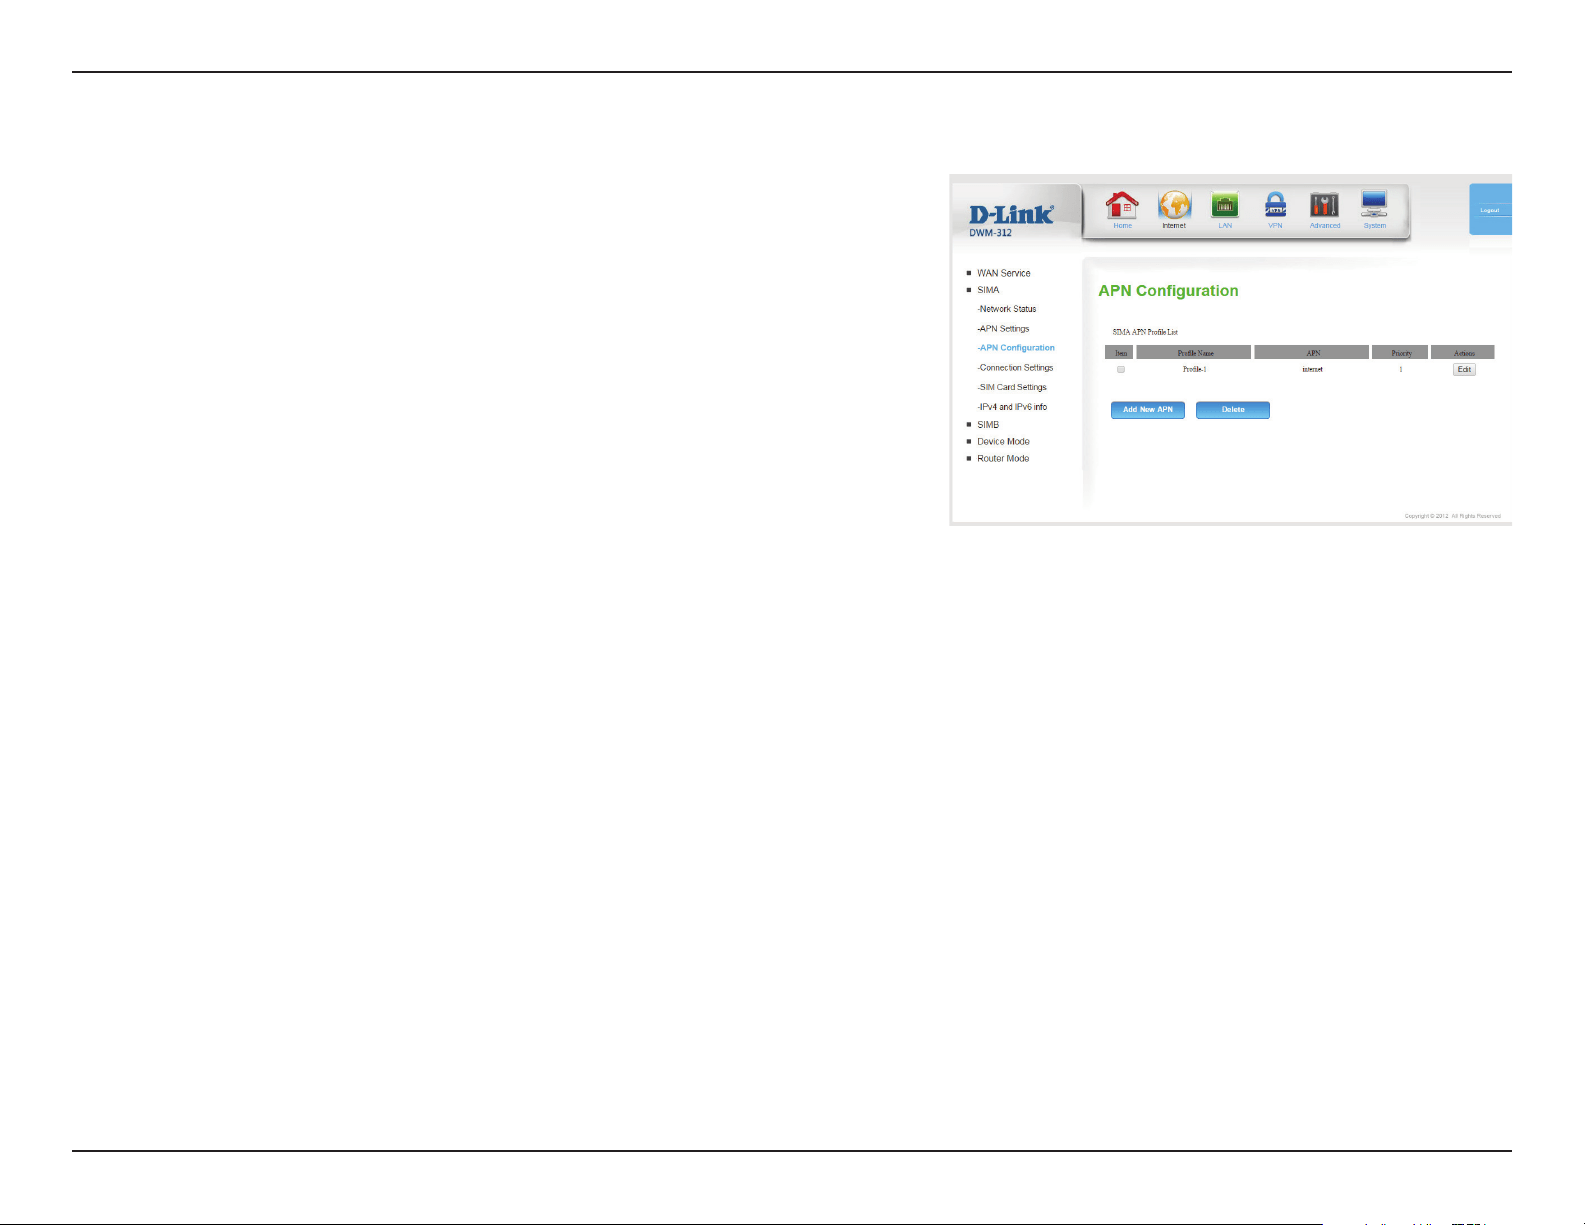
APN Conguration
This check box allows you to select one or more APN proles.
Indicates the name of the prole.
Indicates the access point name (APN) in use by the selected
prole.
APN proles are prioritized by number. If one prole does not lead
to an active Internet connection, the router will automatically
switch to the next prole in the queue.
Click Edit to edit the corresponding prole, described in New/Edit
APN Prole on page 14.
Click Add New APN to create a new APN, described in New/Edit
APN Prole on page 14.
Click Delete to all proles selected in the Item column.
Item:
Prole Name:
APN:
Priority:
Actions:
Add New APN:
Delete:
14D-Link DWM-312 User Manual
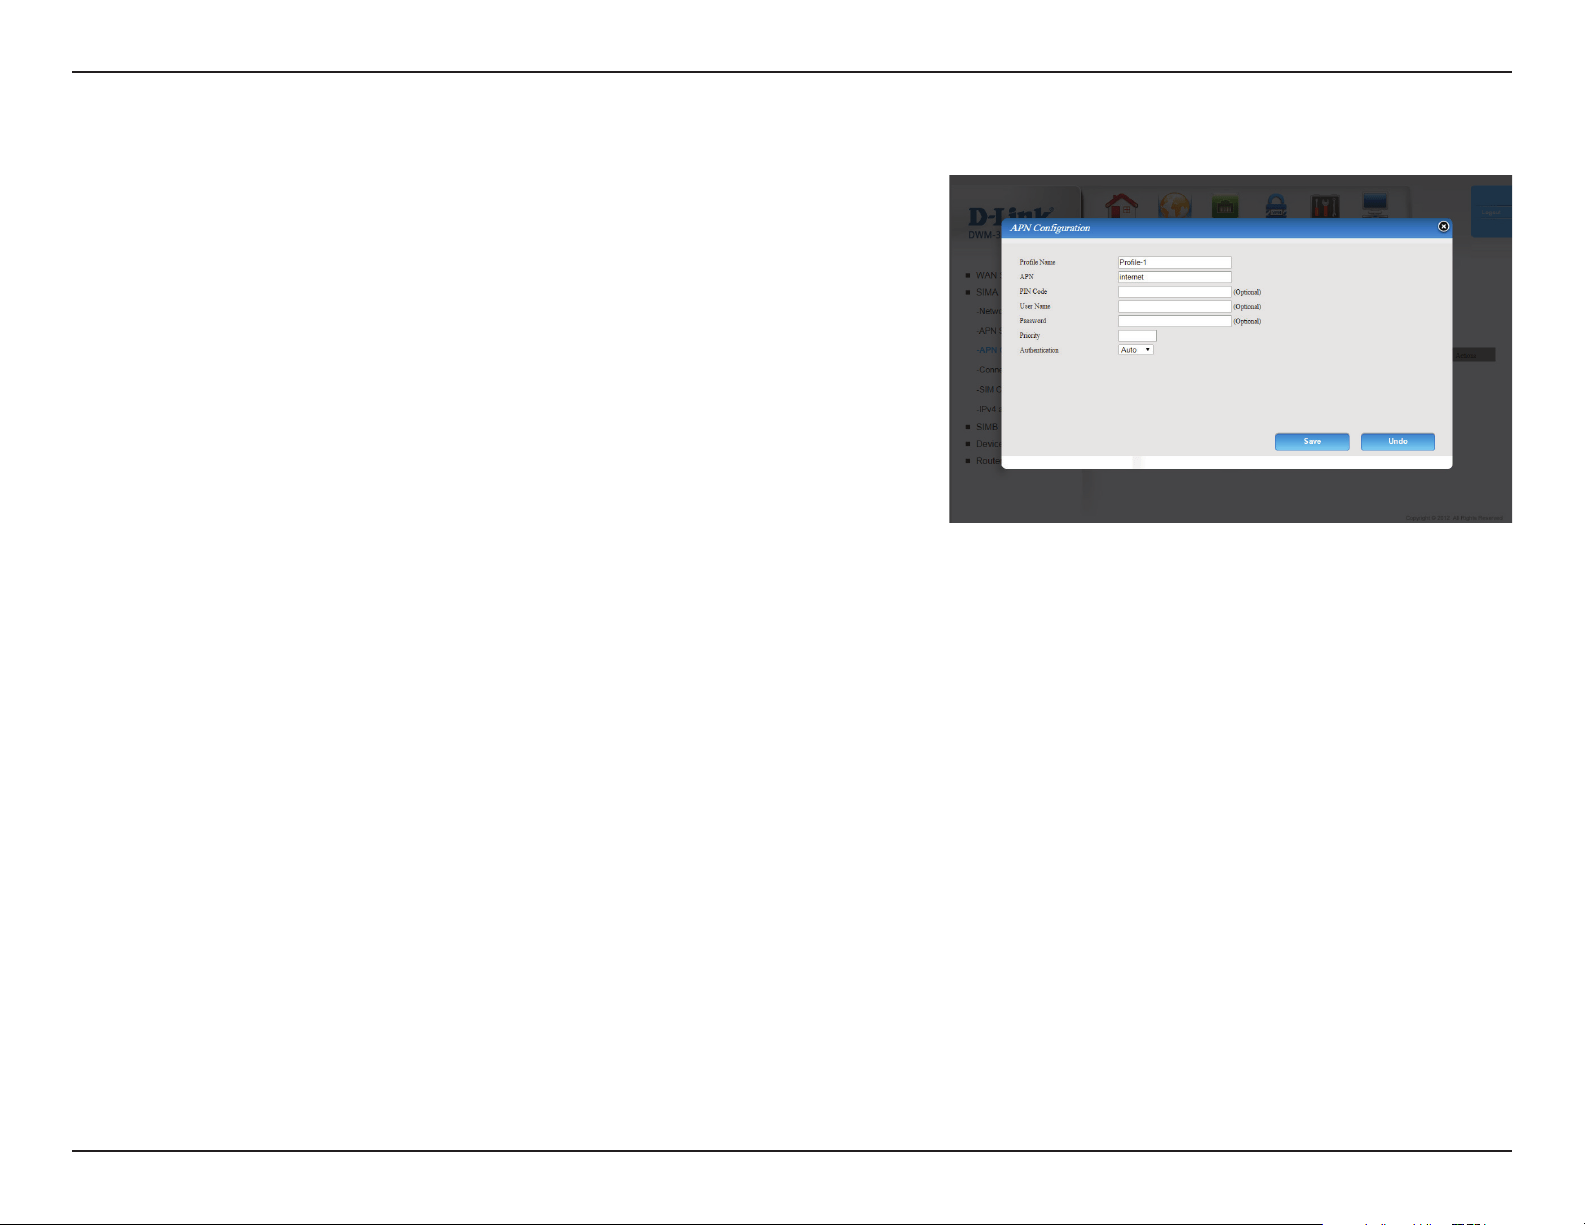
Section 4 - Conguration
New/Edit APN Prole
Enter a name for the prole.
Enter the APN to be used. This information should be provided by
your ISP.
If your SIM uses a PIN, enter it here.
If your mobile connection requires a username, enter it here.
If your mobile connection requires a password, enter it here.
Enter a priority between 1 and 4, with 1 being highest priority and
4 being lowest.
Select the authentication type used by your ISP.
Prole Name:
APN:
PIN Code:
User Name:
Password:
Priority:
Authentication:
Click Save to save your settings, or Undo to revert to your
previous settings.
15D-Link DWM-312 User Manual
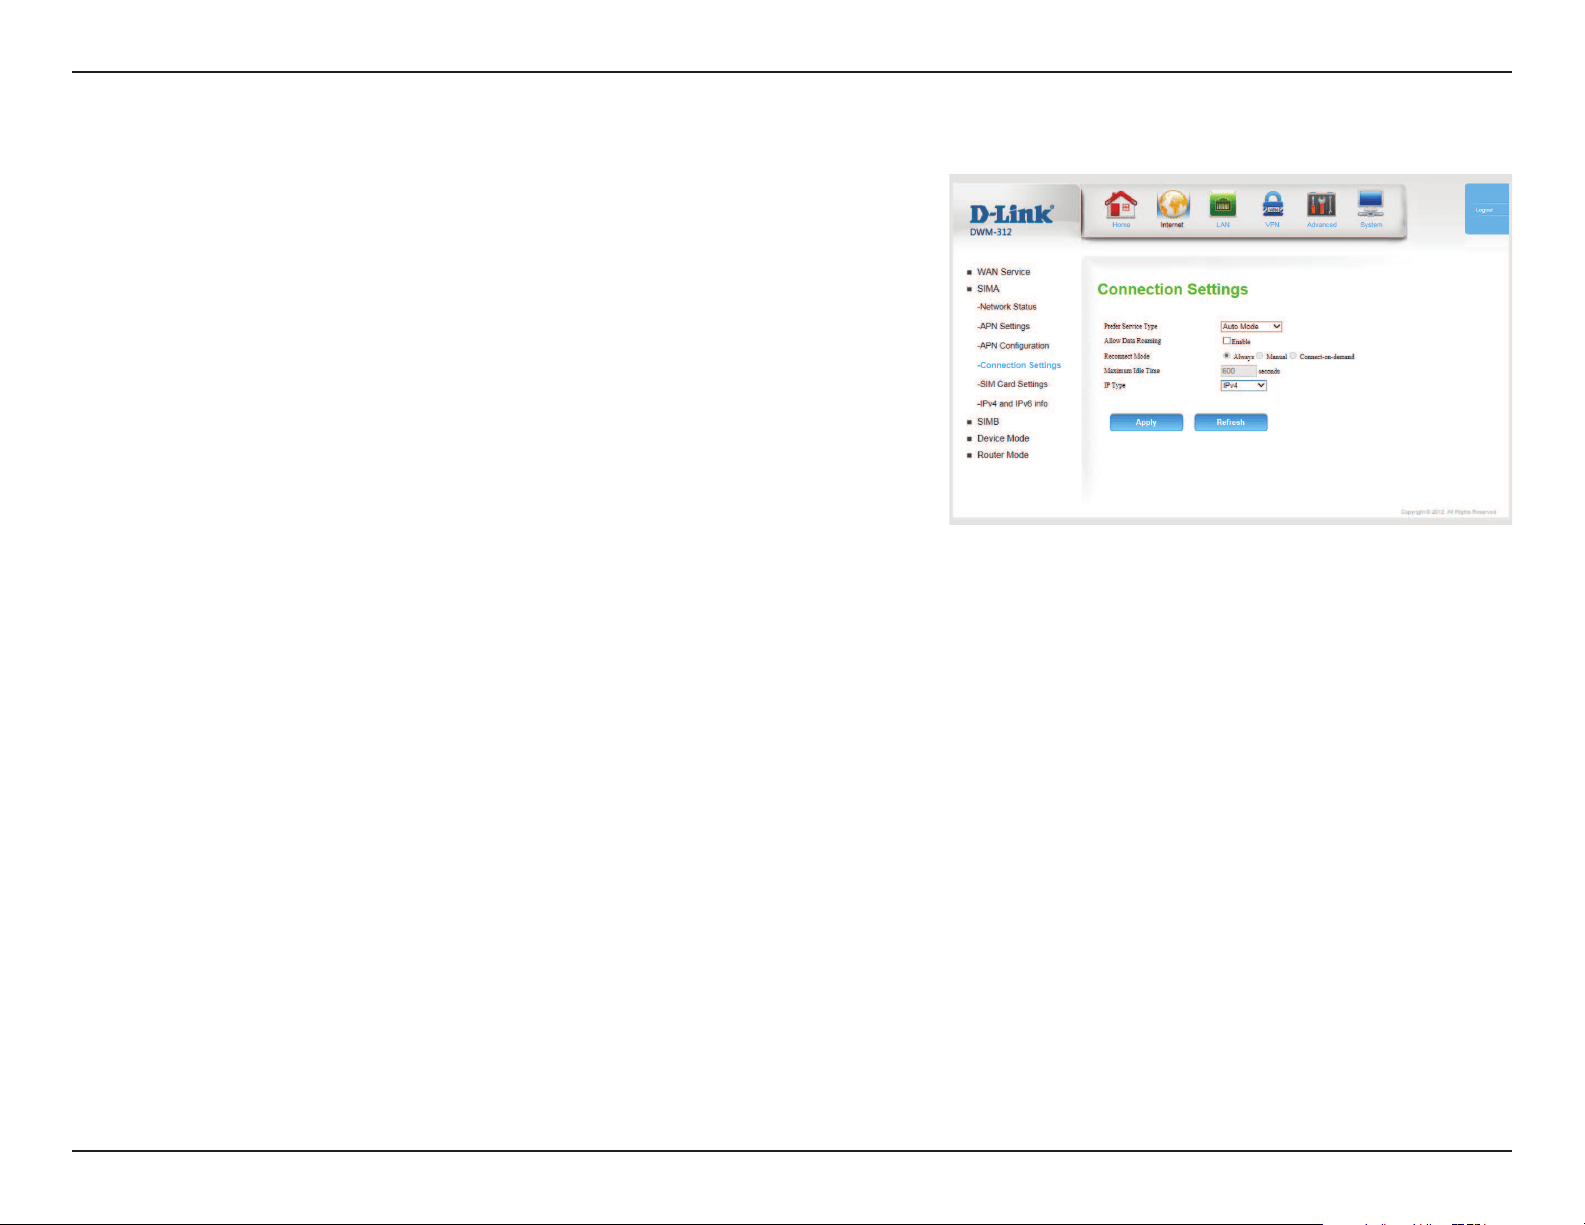
Section 4 - Conguration
Choose whether the DWM-312 should only use 4G networks, 3G
networks, 2G networks, or use Auto Mode to automatically select
a network.
Enabling this option will allow you to connect when roaming
outside your carrier’s home coverage.
Note: Roaming connections may incur additional fees from your
service provider.
Choose Always when you want to establish mobile connection all
the time. Choose Manual to only connect when you click Connect
on the home screen. If you choose Connect-on-demand, the
device will establish a mobile connection when local users want to
connect to the Internet, and disconnect if there is no trac after
the time period dened by the Maximum Idle Time setting.
Note: These options are only available if SIMA Only has been
selected in WAN Service on page 10.
If you have chosen Connect-on-demand, enter the maximum idle
time before disconnection in seconds.
Specify IPv4, IPv6, or IPv4/IPv6 to determine what type of IP
address will be allocated by your ISP. This information should be
provided by your ISP.
Click Apply to save your settings, or Refresh to revert to your
previous settings.
Prefer Service
Type:
Allow Data
Roaming:
Reconnect
Mode:
Maximum Idle
Time:
IP Type:
Connection Settings
16D-Link DWM-312 User Manual
Section 4 - Conguration
Indicates which SIM is currently active.
Enable this if you wish to set a PIN for your SIM.
If you have selected Enable for the above feature, enter your new
PIN here.
Shows the number of attempts remaining before the SIM is
locked. SIM cards generally allow three attempts, after which
they can only be unlocked by a PUK code provided by the ISP. For
information on the conguration of your SIM card, consult your
ISP or carrier.
Click Apply to save your settings, or Refresh to revert to your
previous settings.
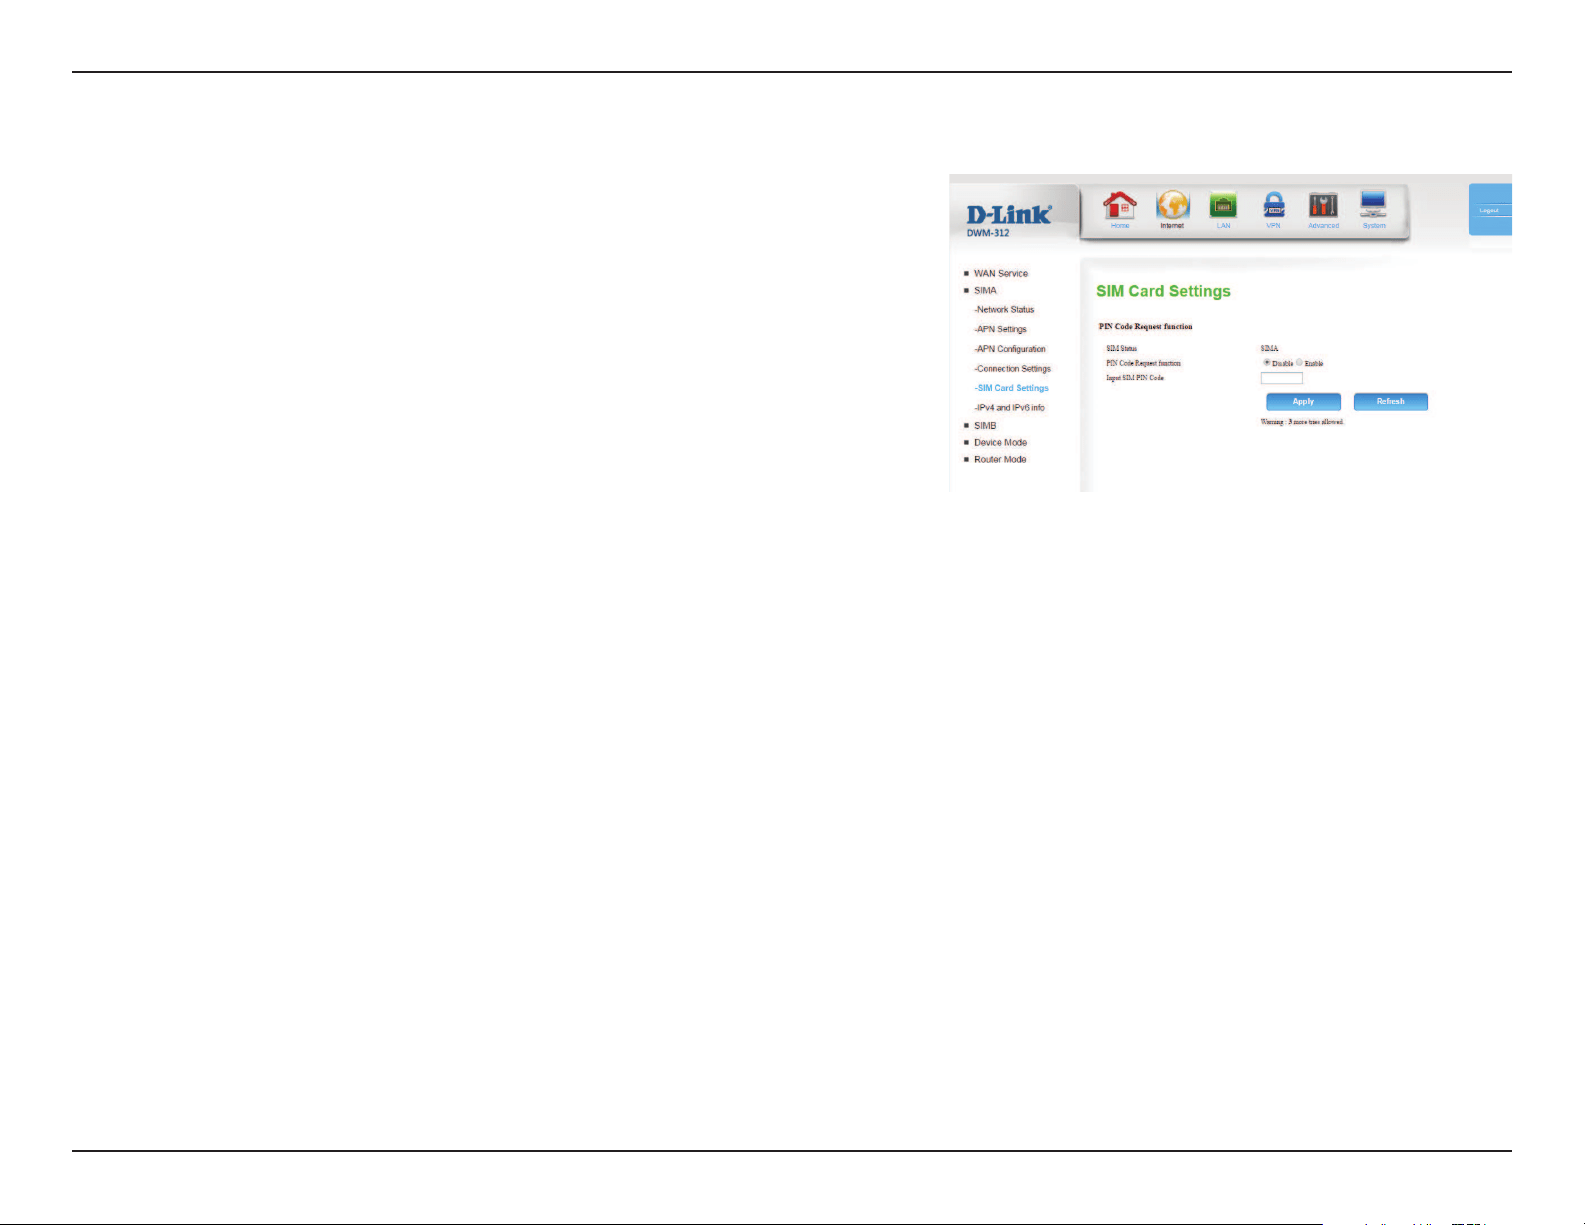
SIM Status:
PIN Code
Request
function:
Input SIM PIN
Code:
PIN Attempts:
SIM Card Settings
17D-Link DWM-312 User Manual
Section 4 - Conguration
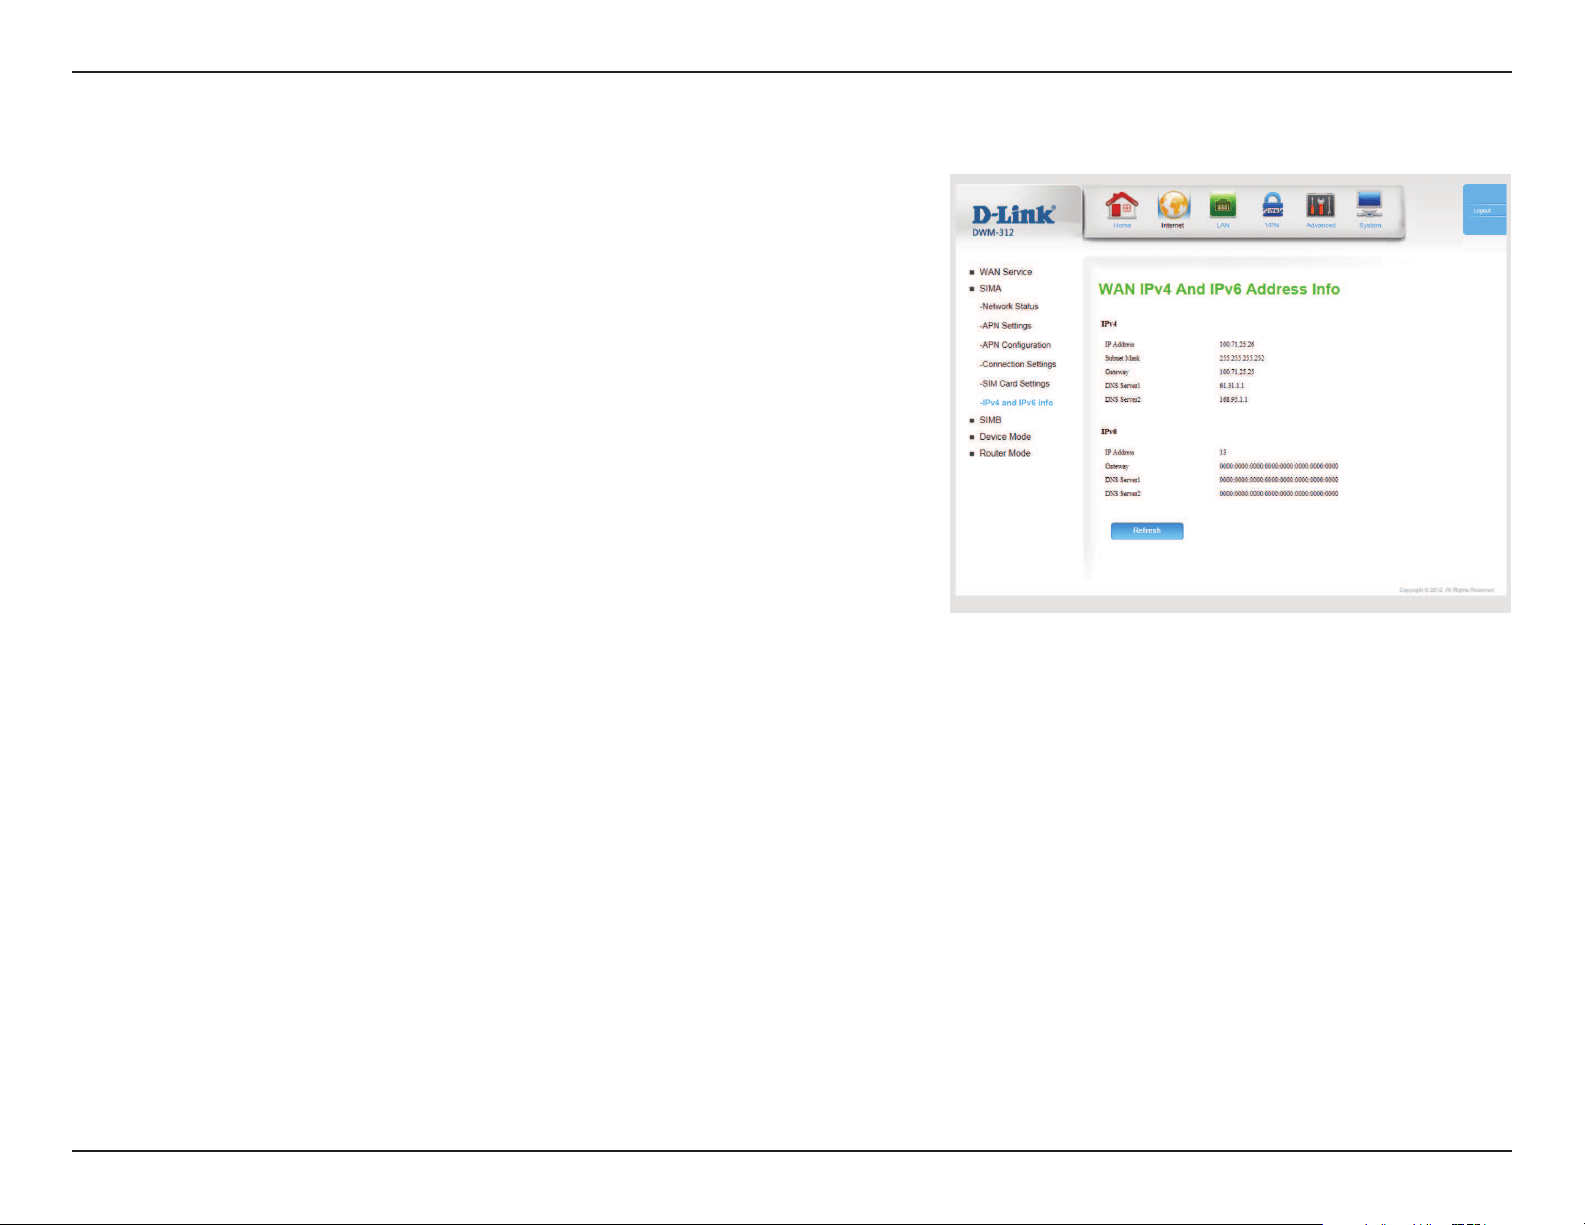
Shows the IPv4 address of the current SIM card.
Shows the subnet mask of the current SIM card.
Shows the gateway used by the current SIM card.
Indicates the IP address of the primary DNS server.
Indicates the IP address of the secondary DNS server.
IP Address:
Subnet Mask
Gateway:
DNS Server1:
DNS Server2:
Shows the IPv4 address of the current SIM card.
Shows the gateway used by the current SIM card.
Indicates the IP address of the primary DNS server.
Indicates the IP address of the secondary DNS server.
Click Refresh to update this page.
IP Address:
Gateway:
DNS Server1:
DNS Server2:
IPv4 and IPv6 info
IPv4
IPv6
18D-Link DWM-312 User Manual
Section 4 - Conguration
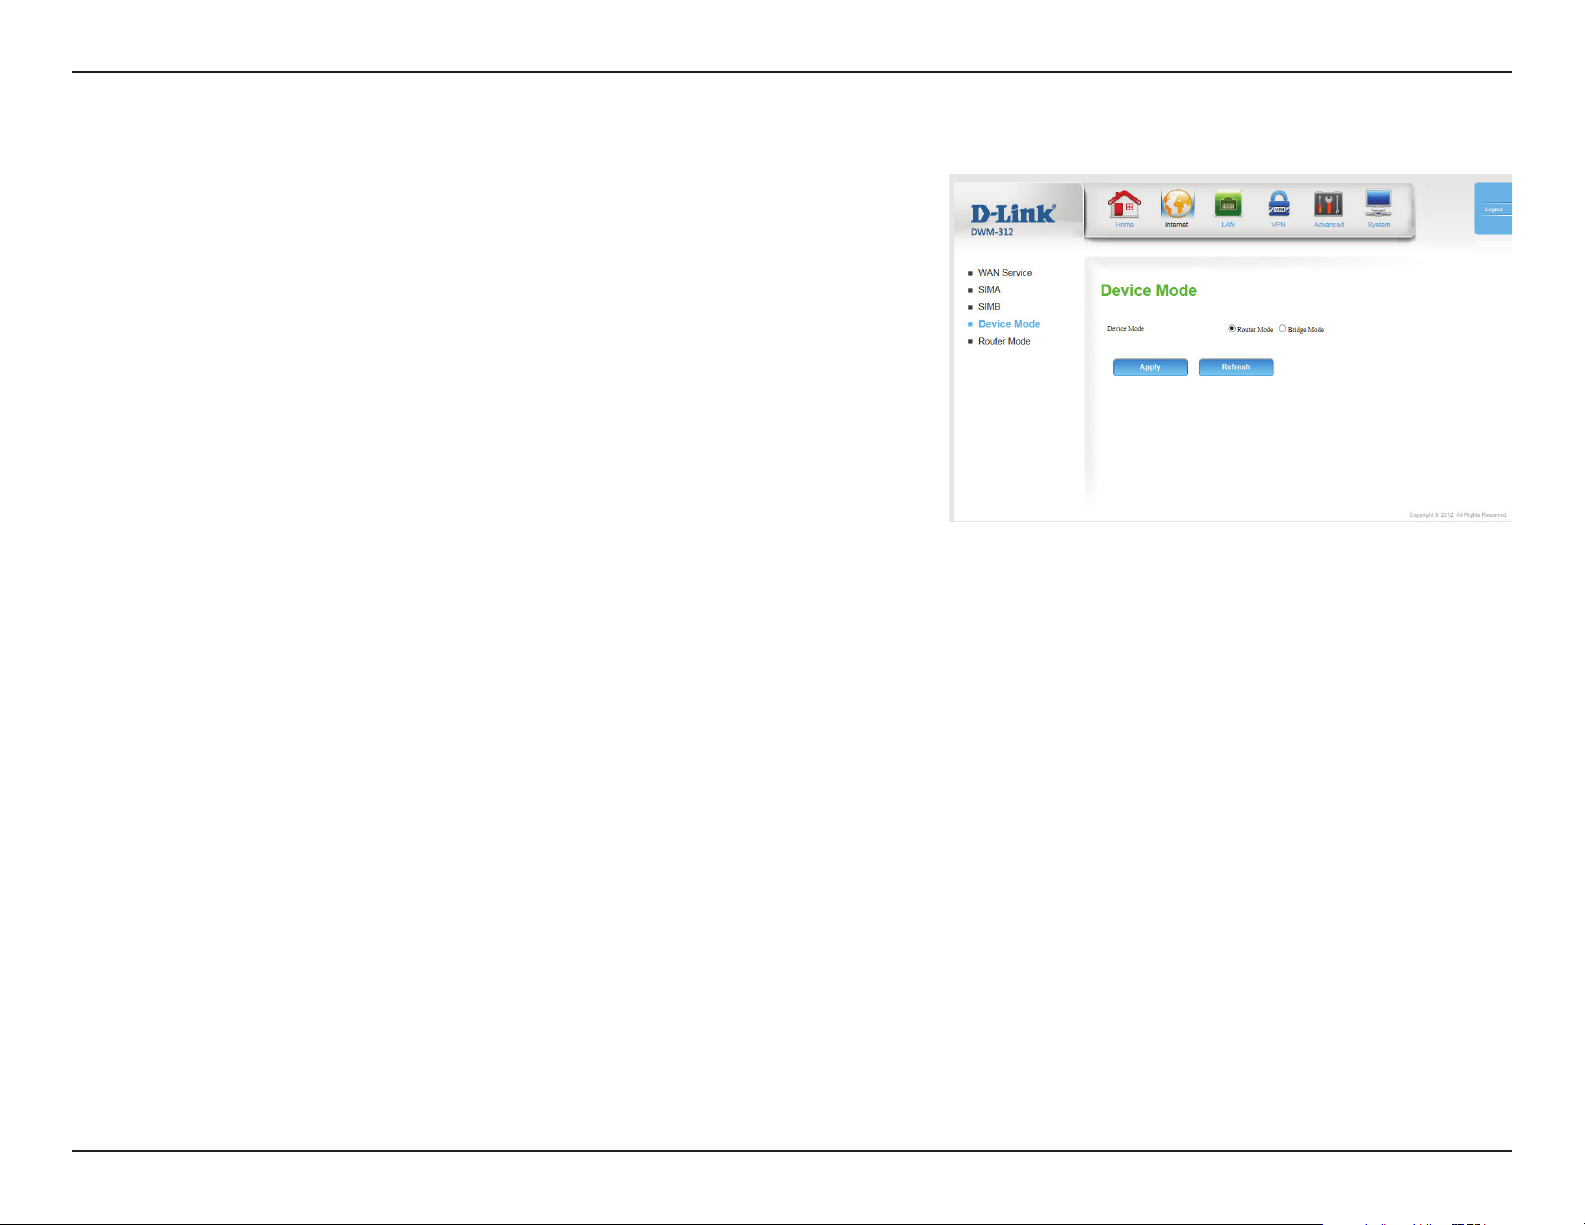
Router Mode is the default mode, which enables NAT and DHCP.
In this conguration, the DWM-312 gets an IP from the ISP, and
then creates its own subnet with a private IP range.
Bridge Mode disables all DHCP, NAT, and routing functions. In this
mode, the DWM-312 acts as a simple modem, and IPs are assigned
directly by the ISP.
Click Apply to save your settings, or Refresh to revert to your
previous settings.
Device Mode:
Device Mode
19D-Link DWM-312 User Manual
Section 4 - Conguration
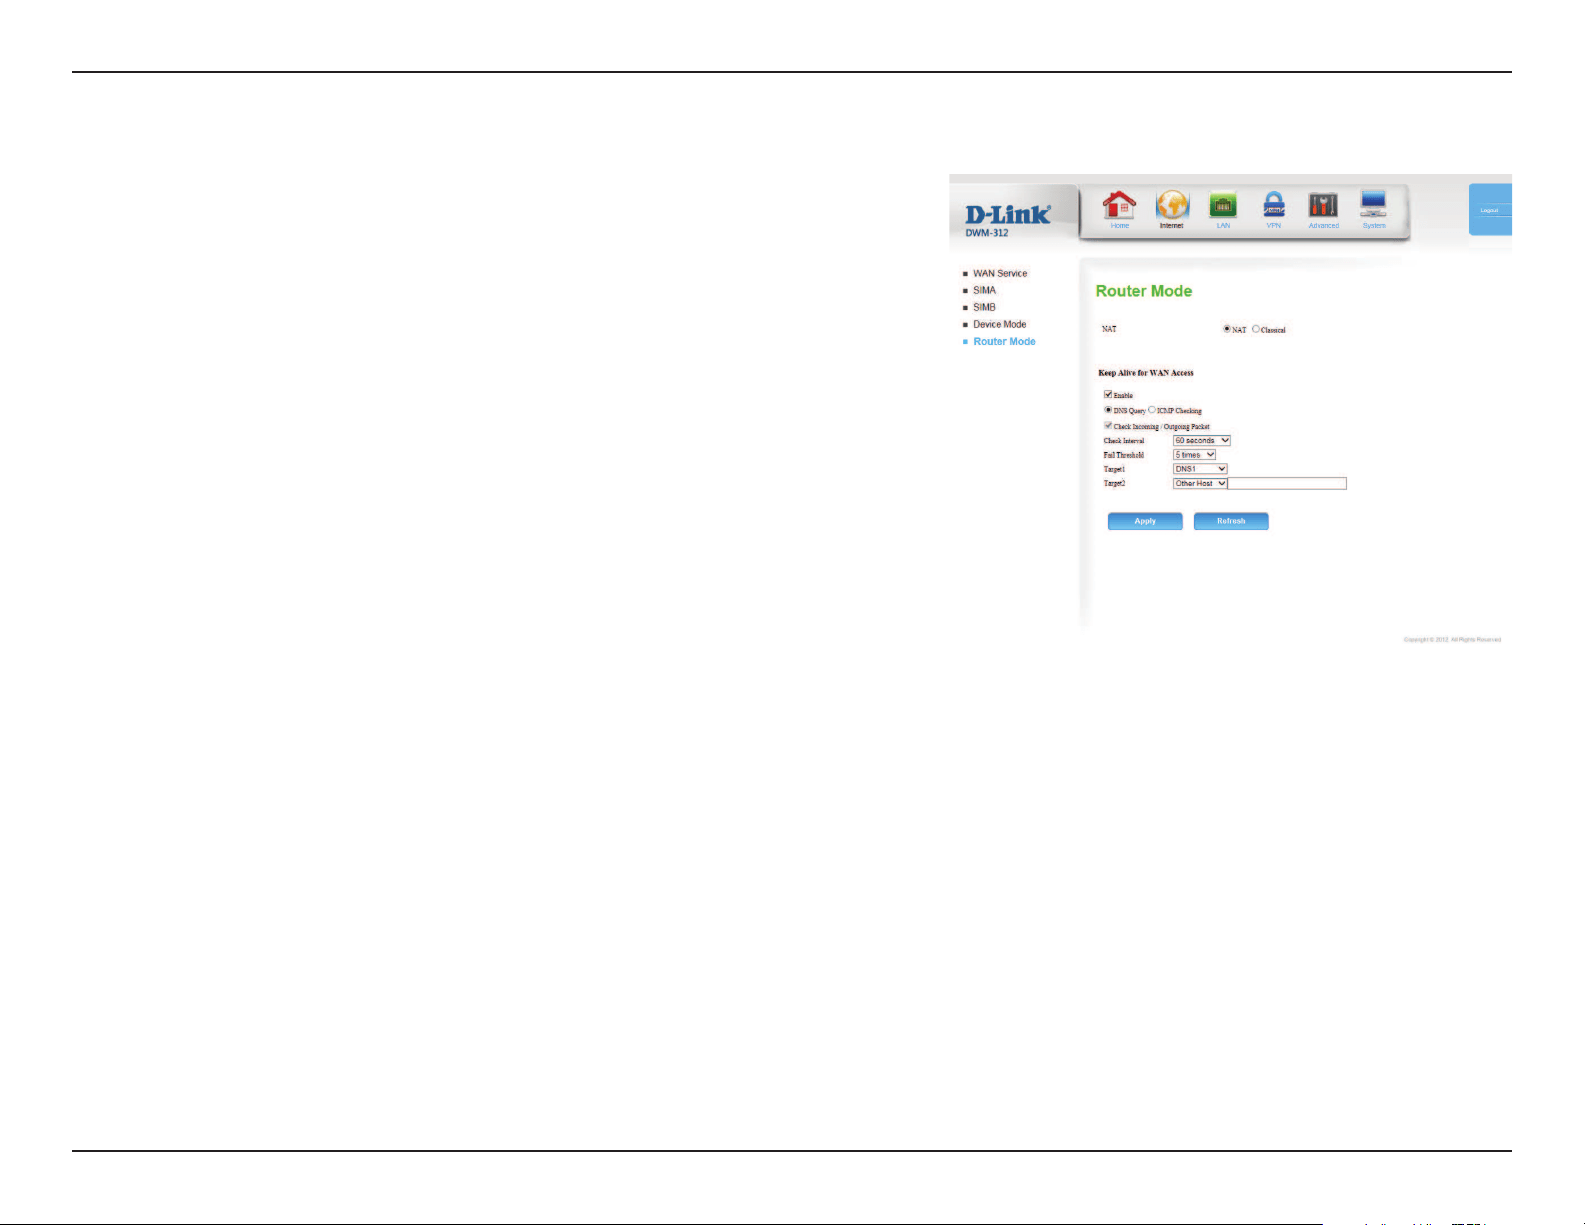
Select NAT or Classical. The Classical option disables the NAT
rewall.
Select Enable to enable WAN keep alive. This may be useful if your
provider automatically disconnects you after an idle period.
Specify the method for keep-alive. Choose between DNS Query
or ICMP Checking.
This option cannot be changed.
Select either 60 seconds or 120 seconds to set the interval at
which the router will check for a connection.
The Failure Threshold species the number of retries before the
WAN is assumed to be down.
Specify a target of the DNS queries or ICMP checks. Options
include DNS1, DNS2, Gateway, NTP Server which automatically
use this information from other settings, or your can manually
specify an address after selecting Other Host. The default is
DNS1.
In addition to the options available for Target1, you can also
select None to use only the host selected in Target1.
Click Apply to save your settings, or Refresh to revert to your
previous settings.
NAT:
Enable:
DNS Query /
ICMP Checking:
Check Incoming/
Outgoing
packet:
Check interval:
Fail Threshold:
Target 1:
Target 2:
Router Mode
20D-Link DWM-312 User Manual
Section 4 - Conguration
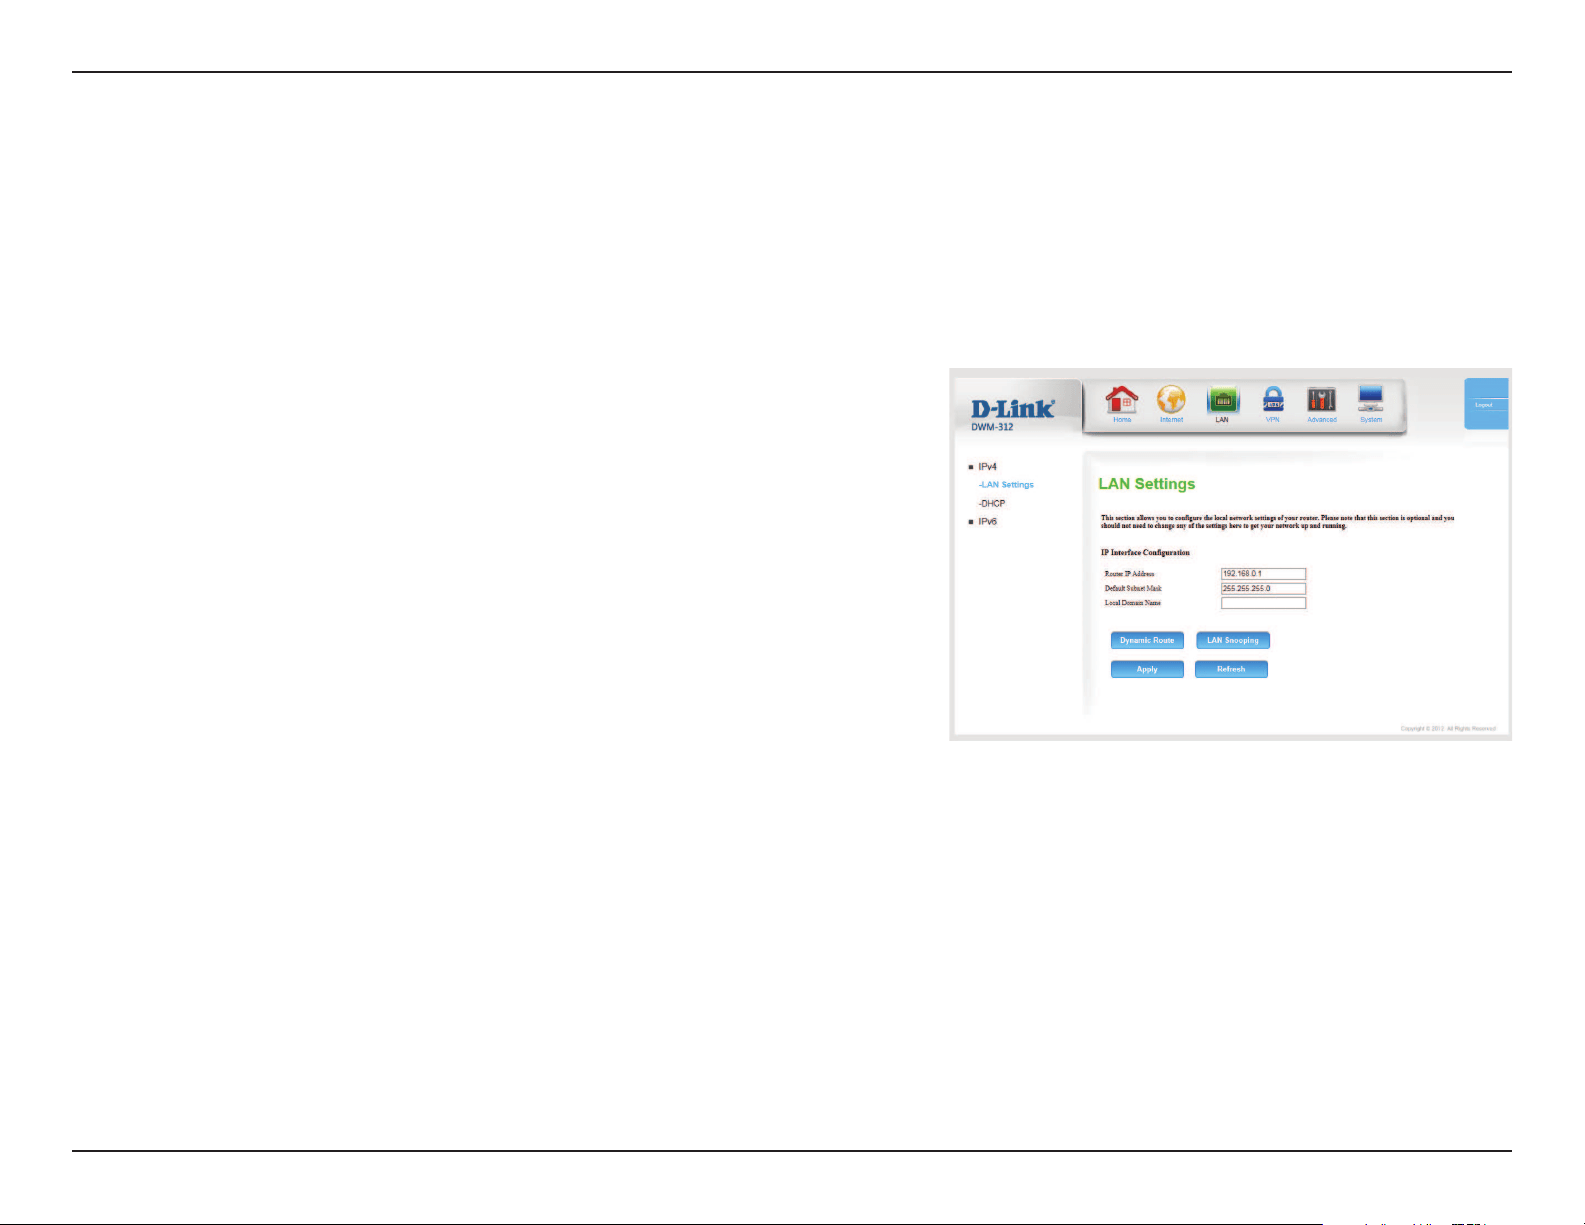
LAN
IPv4
LAN Settings
Enter the IP address you want to use for the router. The default
IP address is 192.168.0.1. If you change the IP address, you will
need to enter the new IP address in your browser to get into the
conguration utility.
Enter the subnet mask of the router. The default subnet mask is
255.255.255.0.
Enter the local domain name for your network.
Click this to congure the Router Information Protocol (RIP),
described on the following page.
Click this to toggle LAN snooping, described on the following
page.
Click Apply to save your settings, or Refresh to revert to your
previous settings.
Router IP Address:
Default Subnet
Mask:
Local Domain
Name:
Dynamic Route:
LAN Snooping:
This section allows you to change the local network settings of your router and to congure the DHCP Server settings. IPv4 and IPv6 are congured
seperately.
21D-Link DWM-312 User Manual
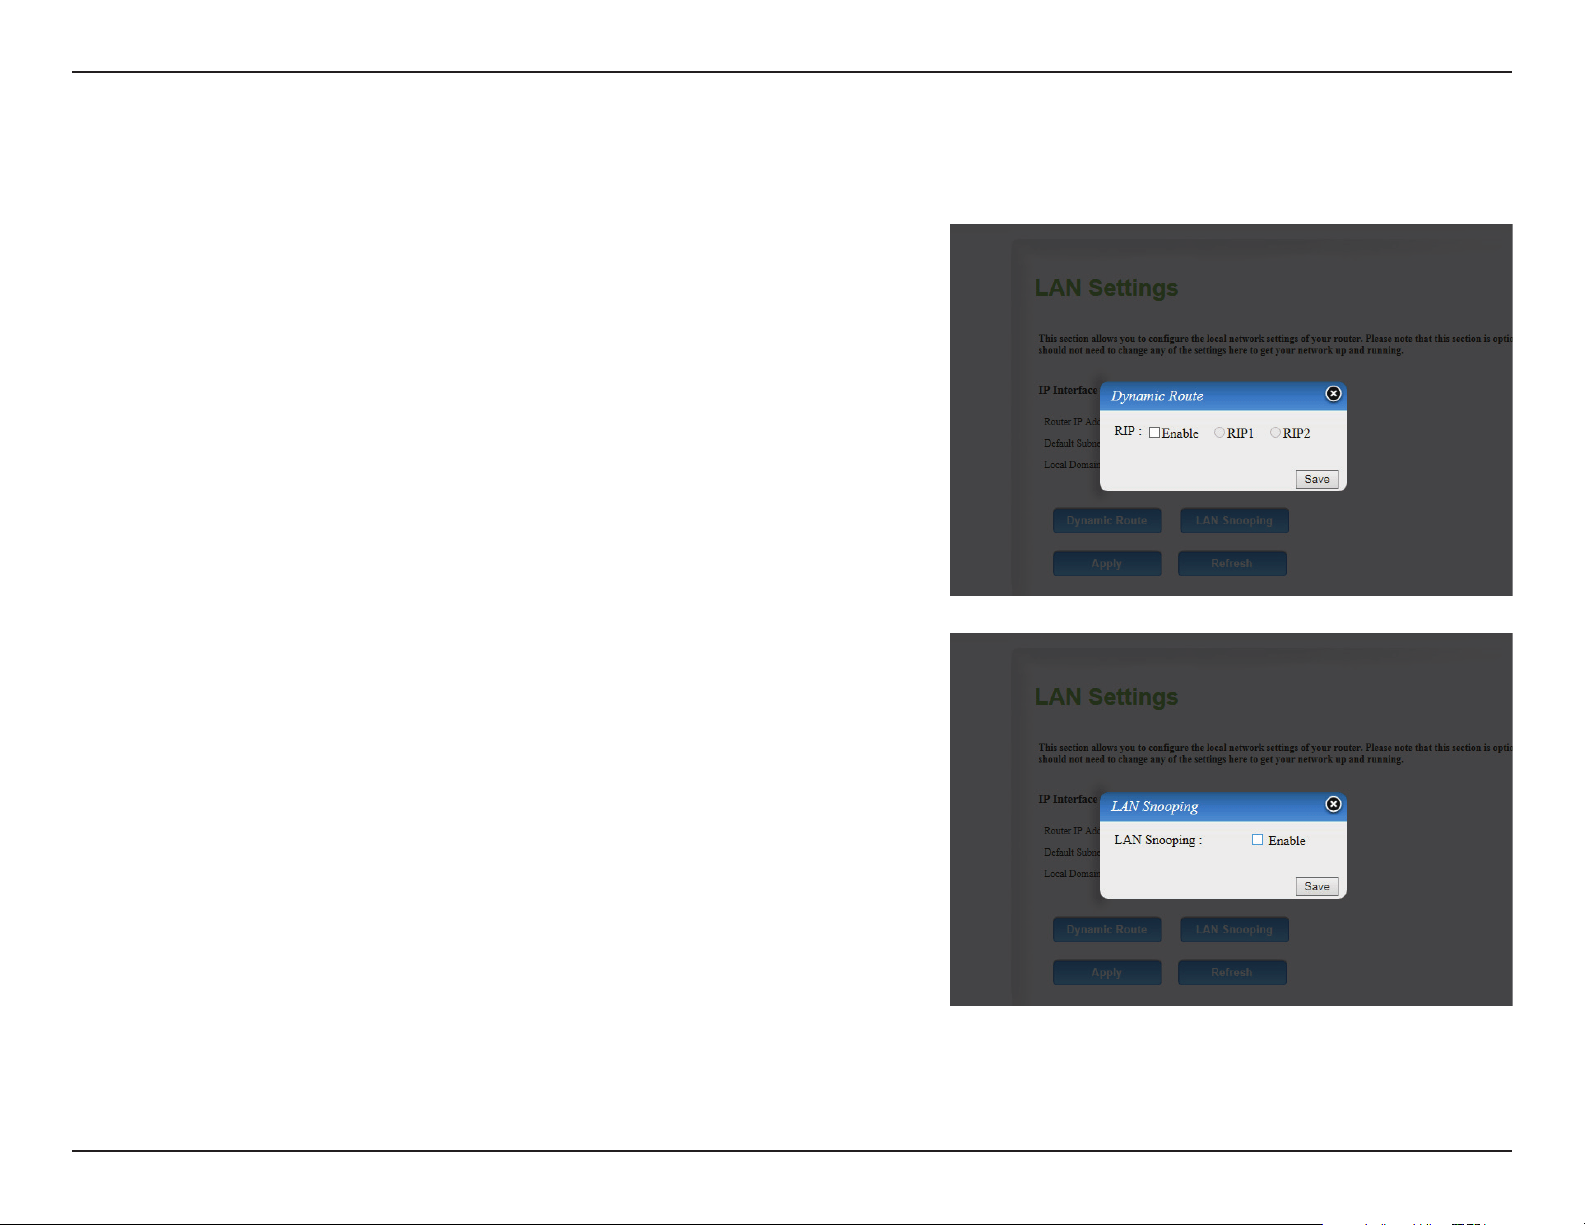
Section 4 - Conguration
Dynamic Route
Click Enable to toggle the Router Identication Protocol (RIP). If
enabled, choose RIP1 or RIP2.
Click Save to save your settings, or the X button to revert to your
previous settings.
Check Enable to enable LAN snooping.
Click Save to save your settings, or the X button to revert to your
previous settings.
RIP:
LAN Snooping:
22D-Link DWM-312 User Manual
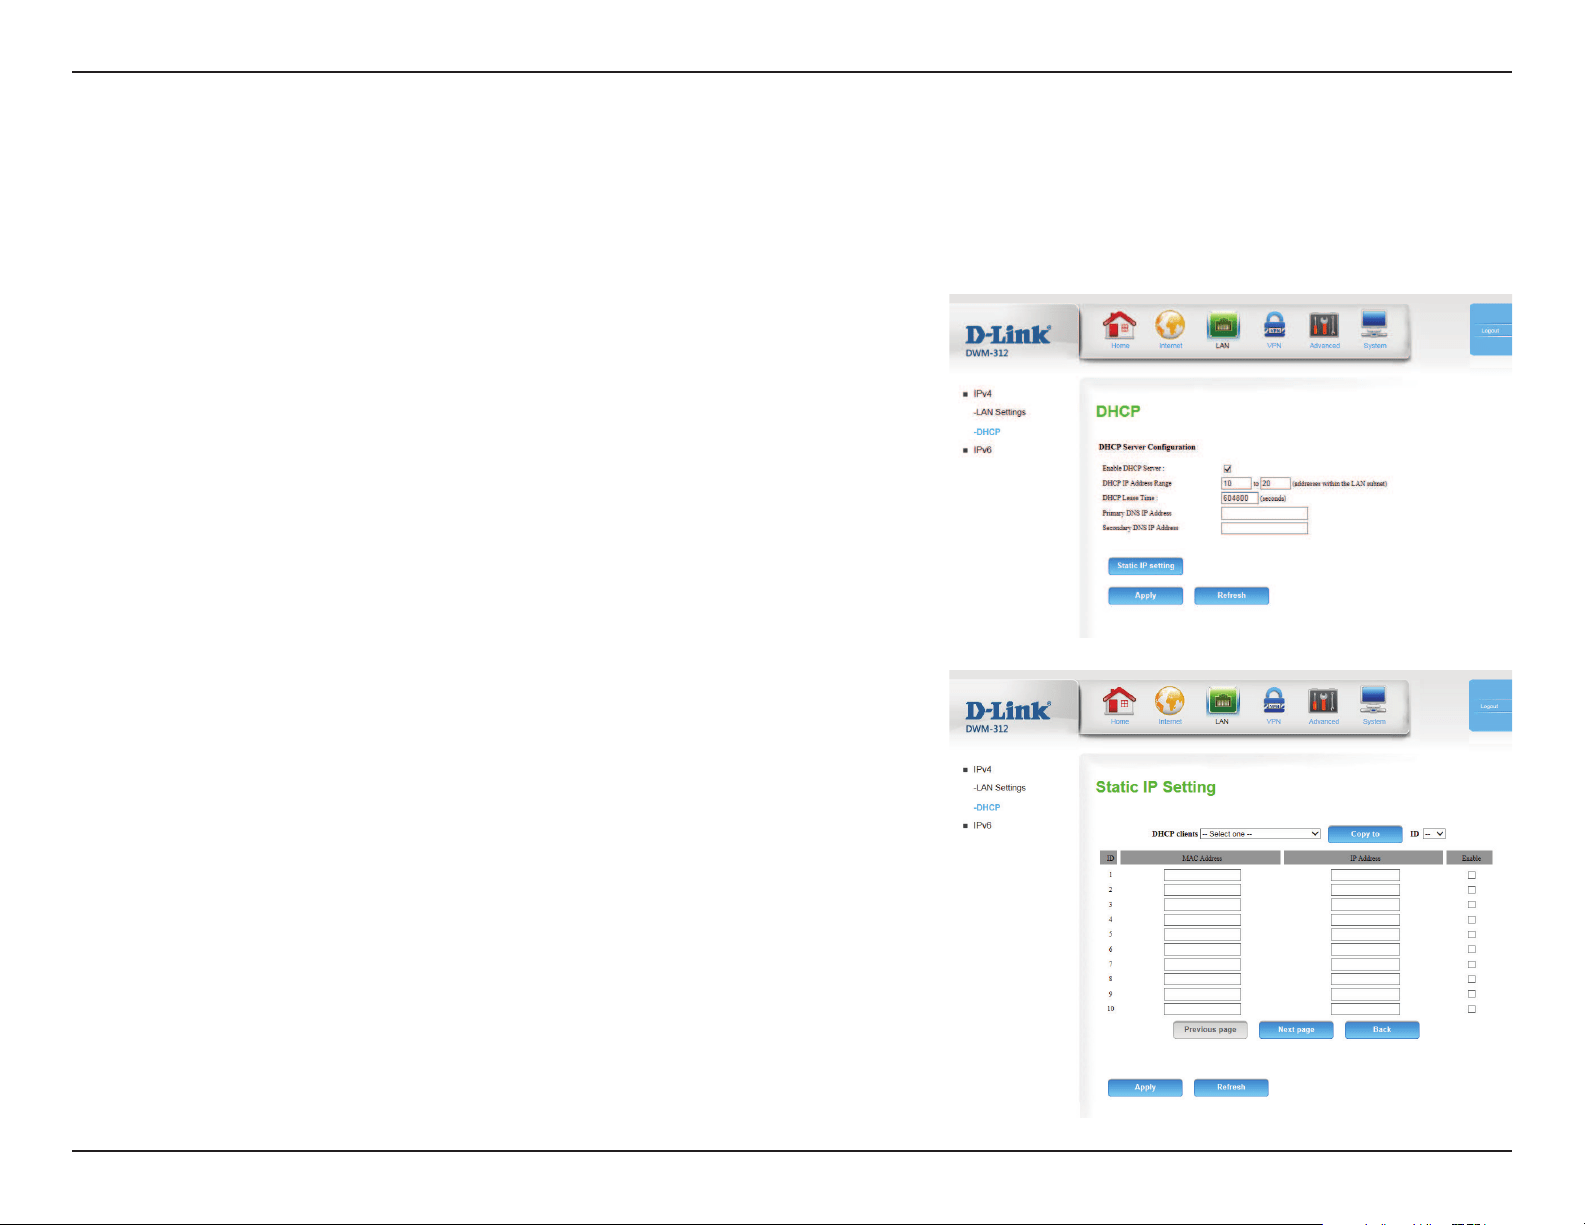
Section 4 - Conguration
DHCP
Select this box to enable the DHCP server on your router.
Enter the range of IPs for the DHCP server to use to assign IP
addresses to devices on your network. These values will represent
the last octet of the IP addresses in the pool.
Enter the lease time for IP address assignments.
Enter the primary DNS IP address that will be assigned to DHCP
clients.
Enter the secondary DNS IP address that will be assigned to DHCP
clients.
Click Static IP Setting to assign a dedicated IP to a specied MAC
address to be saved by the DHCP server.
Select a DHCP client and click Copy to, or enter the MAC address
and IP address manually, to assign the IP address to the MAC
address. Click Enable to enable the rule.
Click Apply to save your settings, or Refresh to revert to your
previous settings.
Enable DHCP
Server:
DHCP IP Address
Range:
DHCP Lease Time:
Primary DNS IP
Address:
Secondary DNS IP
Address:
Static IP Setting:
The DWM-312 has a built-in DHCP (Dynamic Host Conguration Protocol) server. The DHCP server assigns IP addresses to devices on the network
that request them. By default, the DHCP server is enabled on the device. The DHCP address pool contains a range of IP addresses, which are
automatically assigned to the clients on the network.
23D-Link DWM-312 User Manual
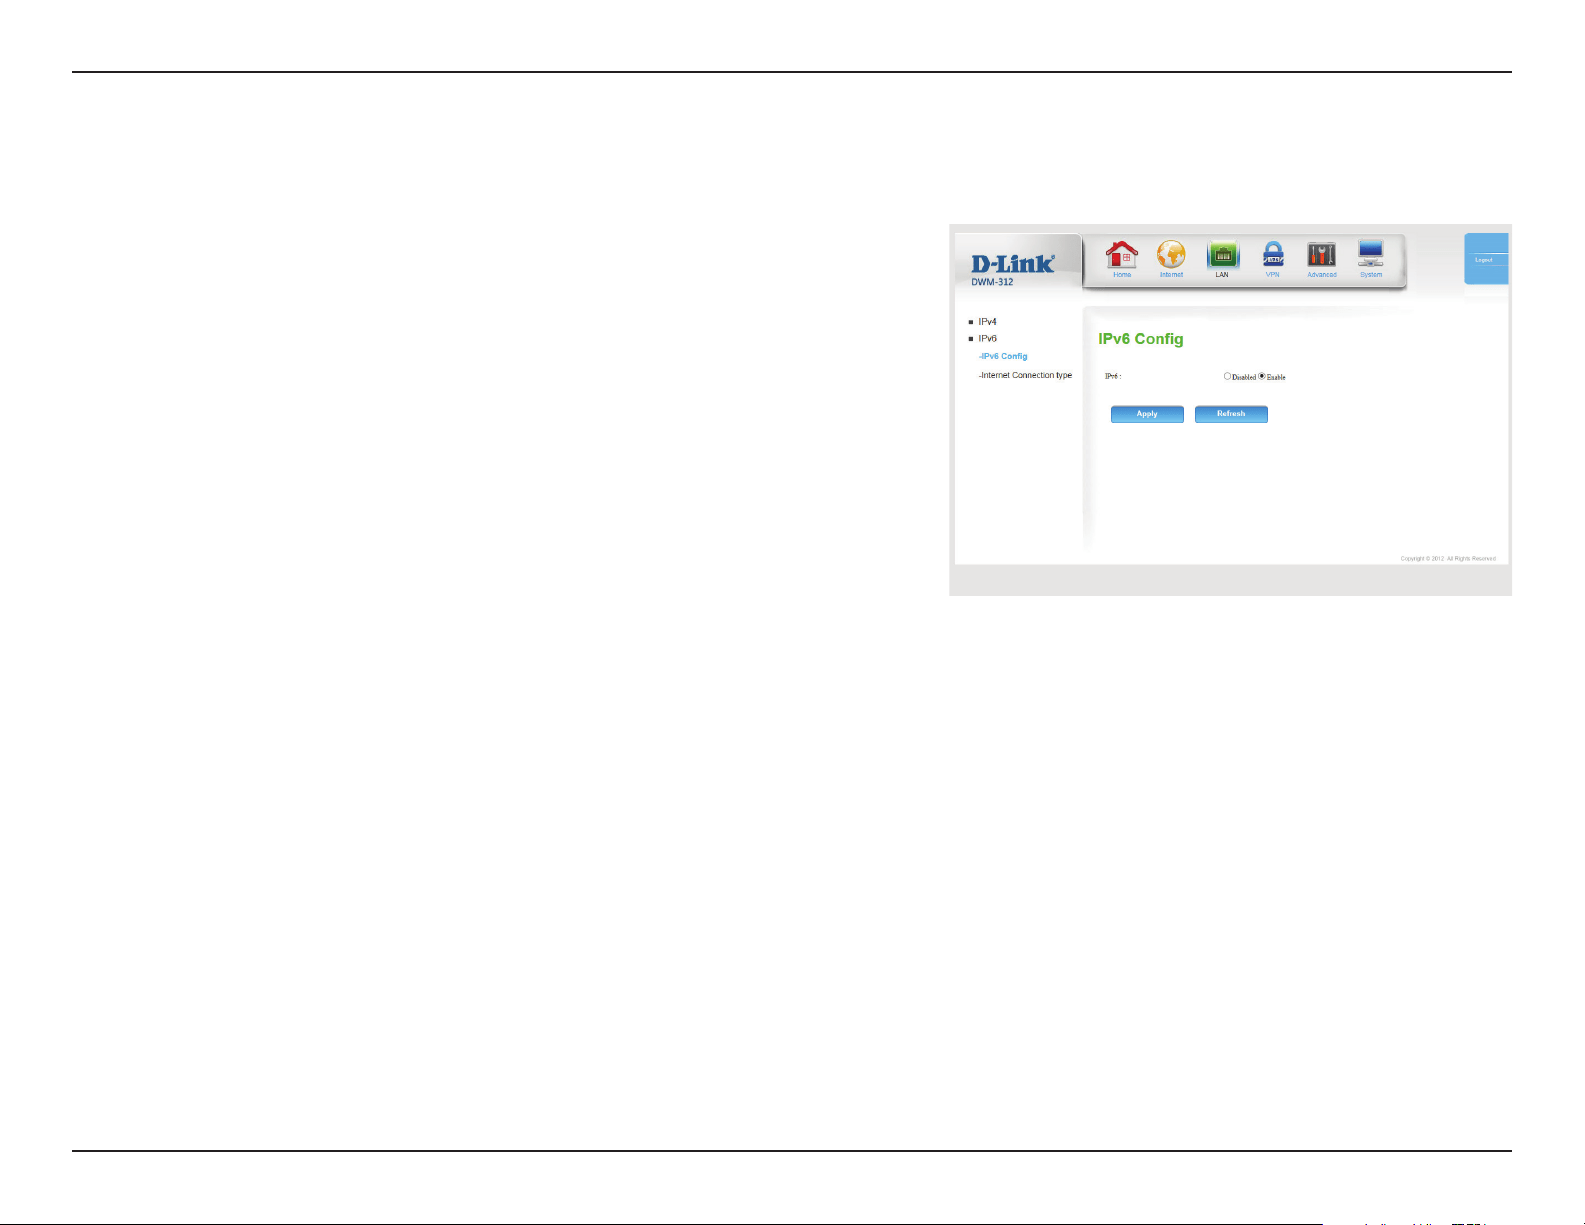
Section 4 - Conguration
IPv6
IPv6 Cong
Select Enable to enable IPv6, otherwise select Disable.
IPv6 settings are congured on the next page.
Click Apply to save your settings, or Refresh to revert to your
previous settings.
IPv6:
24D-Link DWM-312 User Manual
Section 4 - Conguration
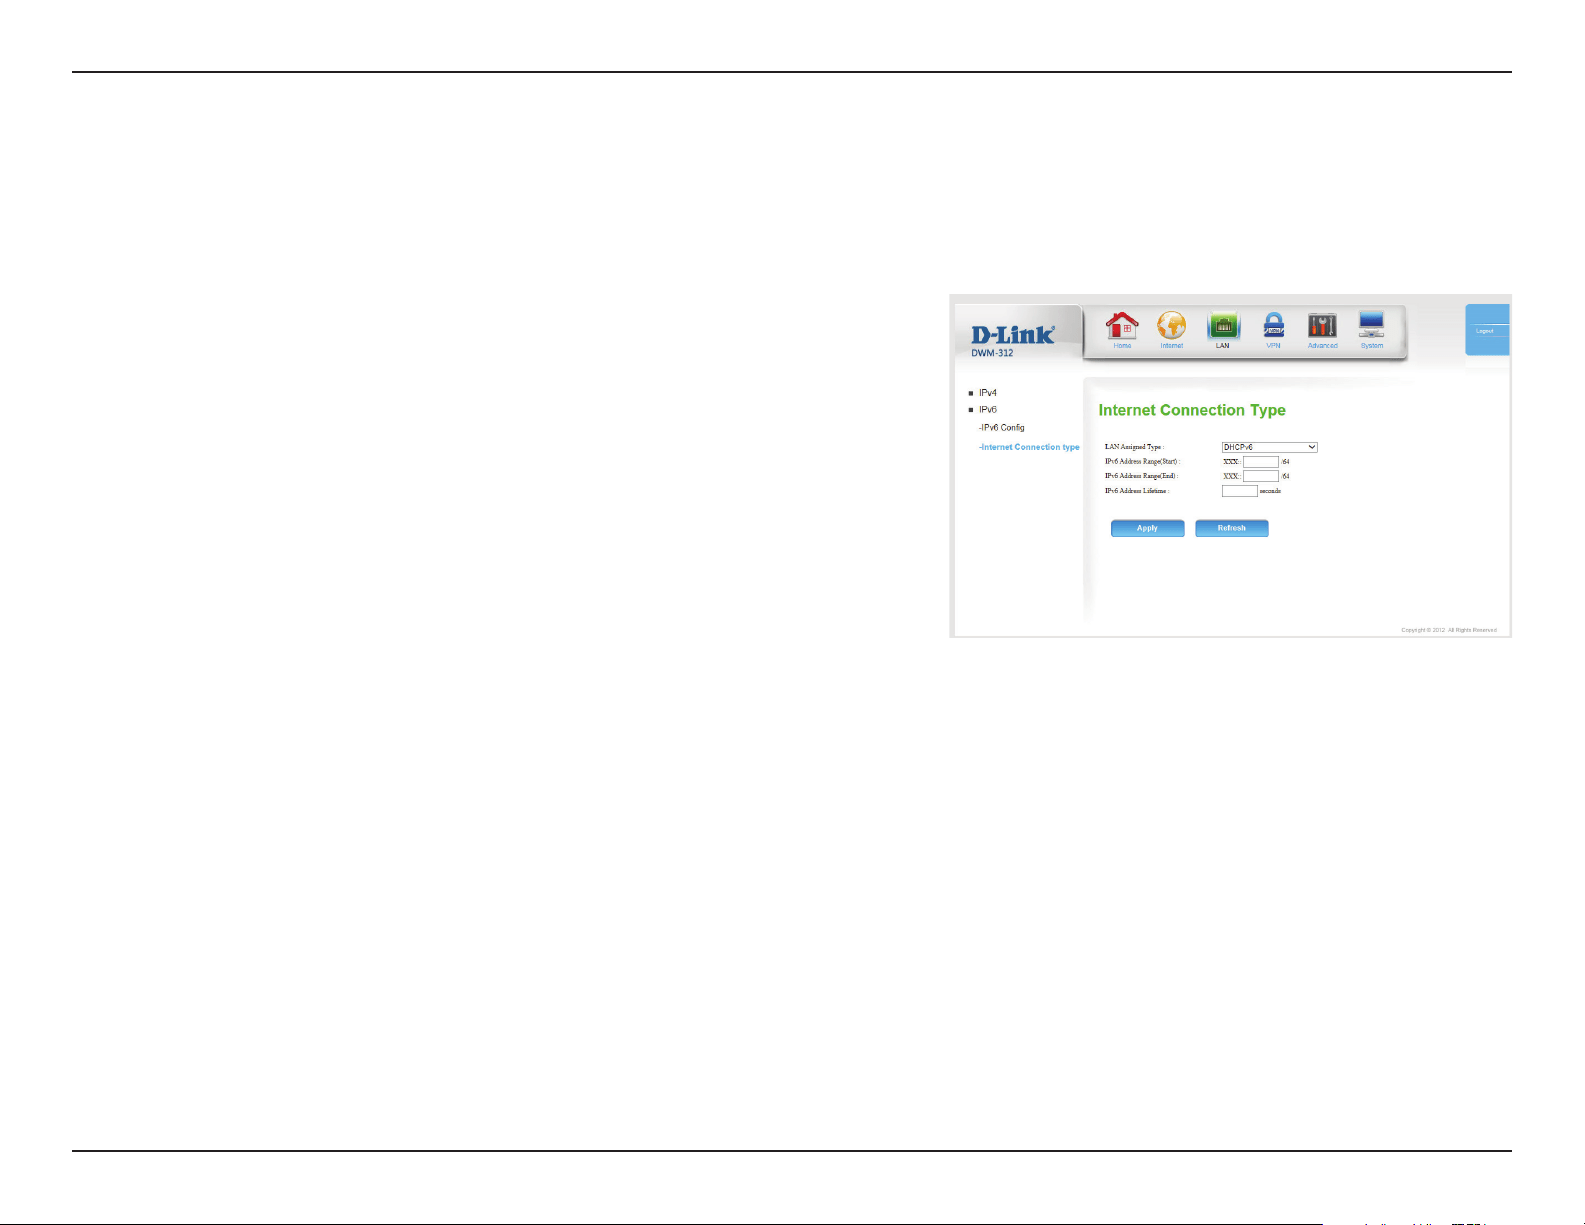
Internet Connection Type
Select DHCPv6, SLAAC+Stateless DHCP or SLAAC+RDNSS.
If you selected DHCPv6, the following options will appear:
Enter the starting IPv6 address for the DHCP server’s IPv6
assignment.
Enter the ending IPv6 address for the DHCP server’s IPv6
assignment.
Enter the IPv6 address lifetime (in seconds).
Click Apply to save your settings, or Refresh to revert to your
previous settings.
LAN Assigned
Type:
IPv6 Address
Range(Start):
IPv6 Address
Range (End):
IPv6 Address
Lifetime:
The DWM-312 supports both SLAAC and DHCP IPv6 conguration options. Which one is used will depend on your service provider and network
conguration.
25D-Link DWM-312 User Manual
Section 4 - Conguration
VPN
IPSec
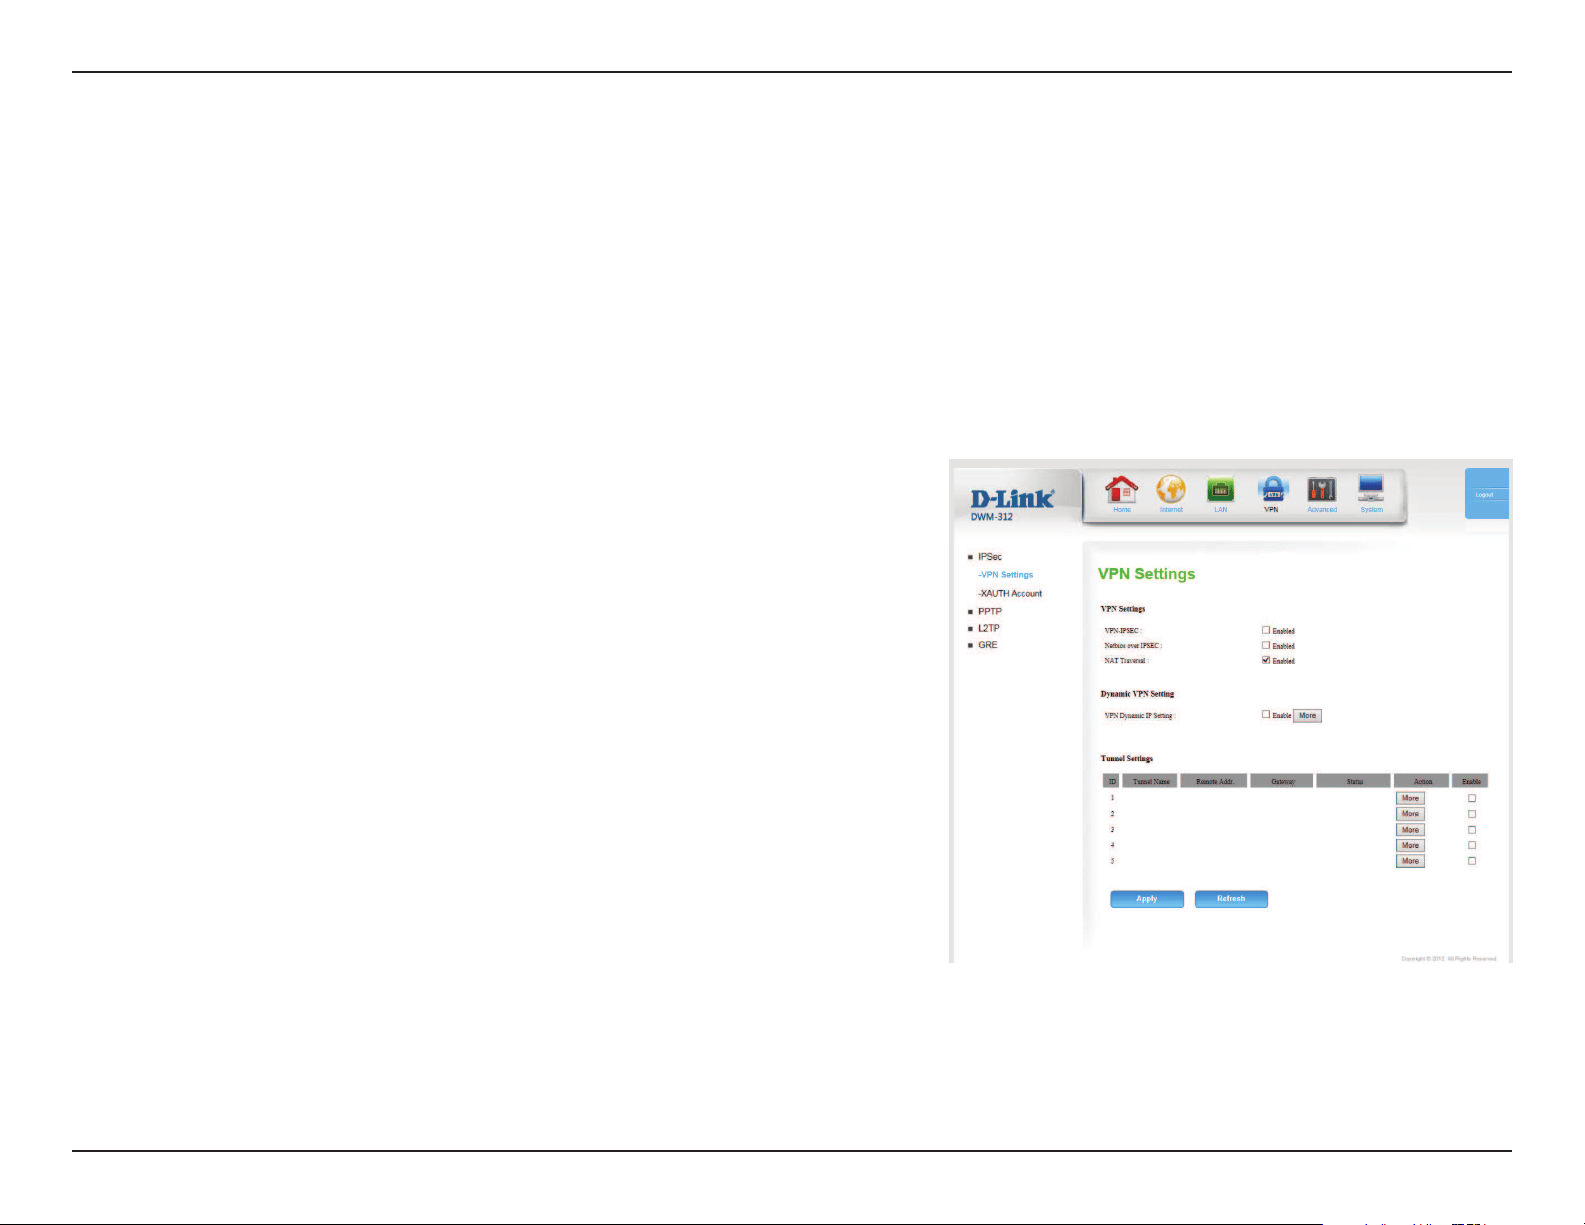
VPN Settings
Tick this box to enable the IPSec VPN function.
Tick this box to receive Netbios from Network Neighborhood.
Some NAT routers and ISPs will block IPSec packets if they don’t
support IPSec passthrough. If you connect to another NAT router
which doesn’t support IPSec passthrough on the WAN side, you
need to activate this option.
Tick this box to enable this feature and click More to congure
VPN Dynamic IP on a separate page. Please see the next page for
more details.
Tunnel details are displayed here. Click More to congure a
new tunnel or click Disconnect to disconnect from an existing
tunnel. Select the Enable checkbox to activate this rule. In tunnel
settings page, you can click More under Action for detailed tunnel
settings.
Click Apply to save your settings, or Refresh to revert to your
previous settings.
VPN-IPSEC:
Netbios over
IPSEC:
NAT Traversal:
Dynamic VPN:
Tunnel Settings:
The DWM-312 supports a number of virtual private network (VPN) protocols. VPNs are used to create virtual private tunnels to remote VPN
gateways. The tunnel technology supports data condentiality, data origin authentication, and data integrity of network information by utilizing
encapsulation protocols, encryption algorithms, and hashing algorithms. Supported protocols as a client include: IPSec, PPTP, L2TP, and GRE.
Supported protocols as a server include PPTP and L2TP.
26D-Link DWM-312 User Manual
Section 4 - Conguration
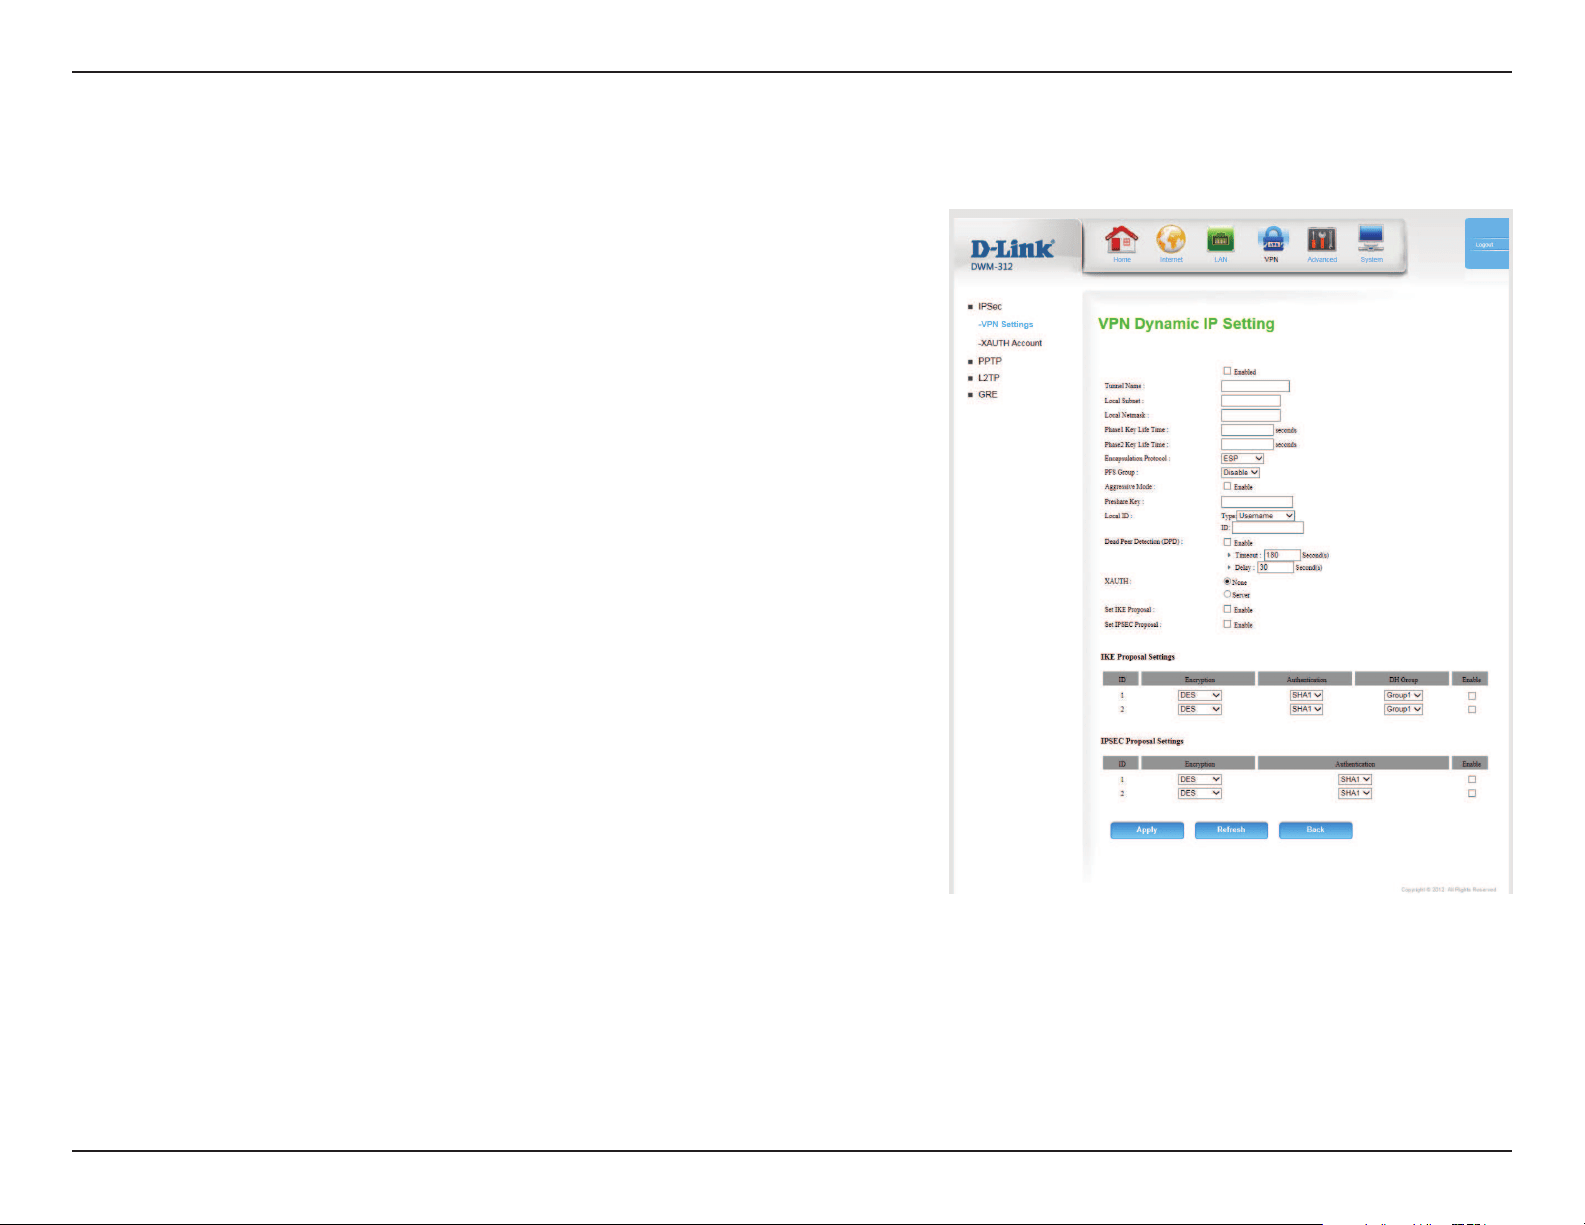
Dynamic VPN Settings
Tick this box to enable this feature and click More to congure
VPN Dynamic IP on a separate page. Please see the next page
for more details.
Enter a name for your VPN.
Enter the local (LAN) subnet. (ex. 192.168.0.0)
Enter the local (LAN) subnet mask. (ex. 255.255.255.0)
Enter the amount of time in seconds that the Phase 1 key should
last.
Enter the amount of time in seconds that the Phase 2 key should
last.
Choose either ESP, AH or ESP+AH from the drop-down menu.
Enable or Disable the PFS Group option using the drop-down
menu. PFS is an additional security protocol.
Check this box to enable aggressive mode.
Enter an ASCII passphrase in the box.
Choose from Username, FQDN, User@FQDN, or Key ID using
the drop-down menu and then enter an ID in the box.
Enabled:
Tunnel Name:
Local Subnet:
Local Netmask:
Pase1 Key Life
Time:
Phase2 Key Life
Time:
Encapsulation
protocol:
PFS Group:
Aggressive Mode:
Preshare Key:
Local ID:

27D-Link DWM-312 User Manual
Section 4 - Conguration
Dynamic VPN Settings (Cont)
Tick this box to enable Dead Peer Detection, then enter the time
in seconds after which a peer is determined to be no longer active.
You may also enter a delay period in seconds.
Select Server or None. If Server has been selected, set up XAUTH
user accounts in XAUTH Account on page 27.
Check this box to enable IKE Proposal.
Check this box to enable IPSec Proposal.
Use this area to Enable IKE Proposals. Then choose the
Encryption and Authentication types, as well as the DH Group
from the drop-down menus
Use this area to Enable IPSec Proposals. Then choose the
Encryption and Authentication types from the drop-down
menus.
Click Apply to save your settings, or Refresh to revert to your
previous settings.
Dead Peer
Detection (DPD):
XAUTH:
Set IKE Proposal:
Set IPSEC
Proposal:
IKE Proposal
Settings:
IPSEC Proposal
Settings:
28D-Link DWM-312 User Manual
Section 4 - Conguration
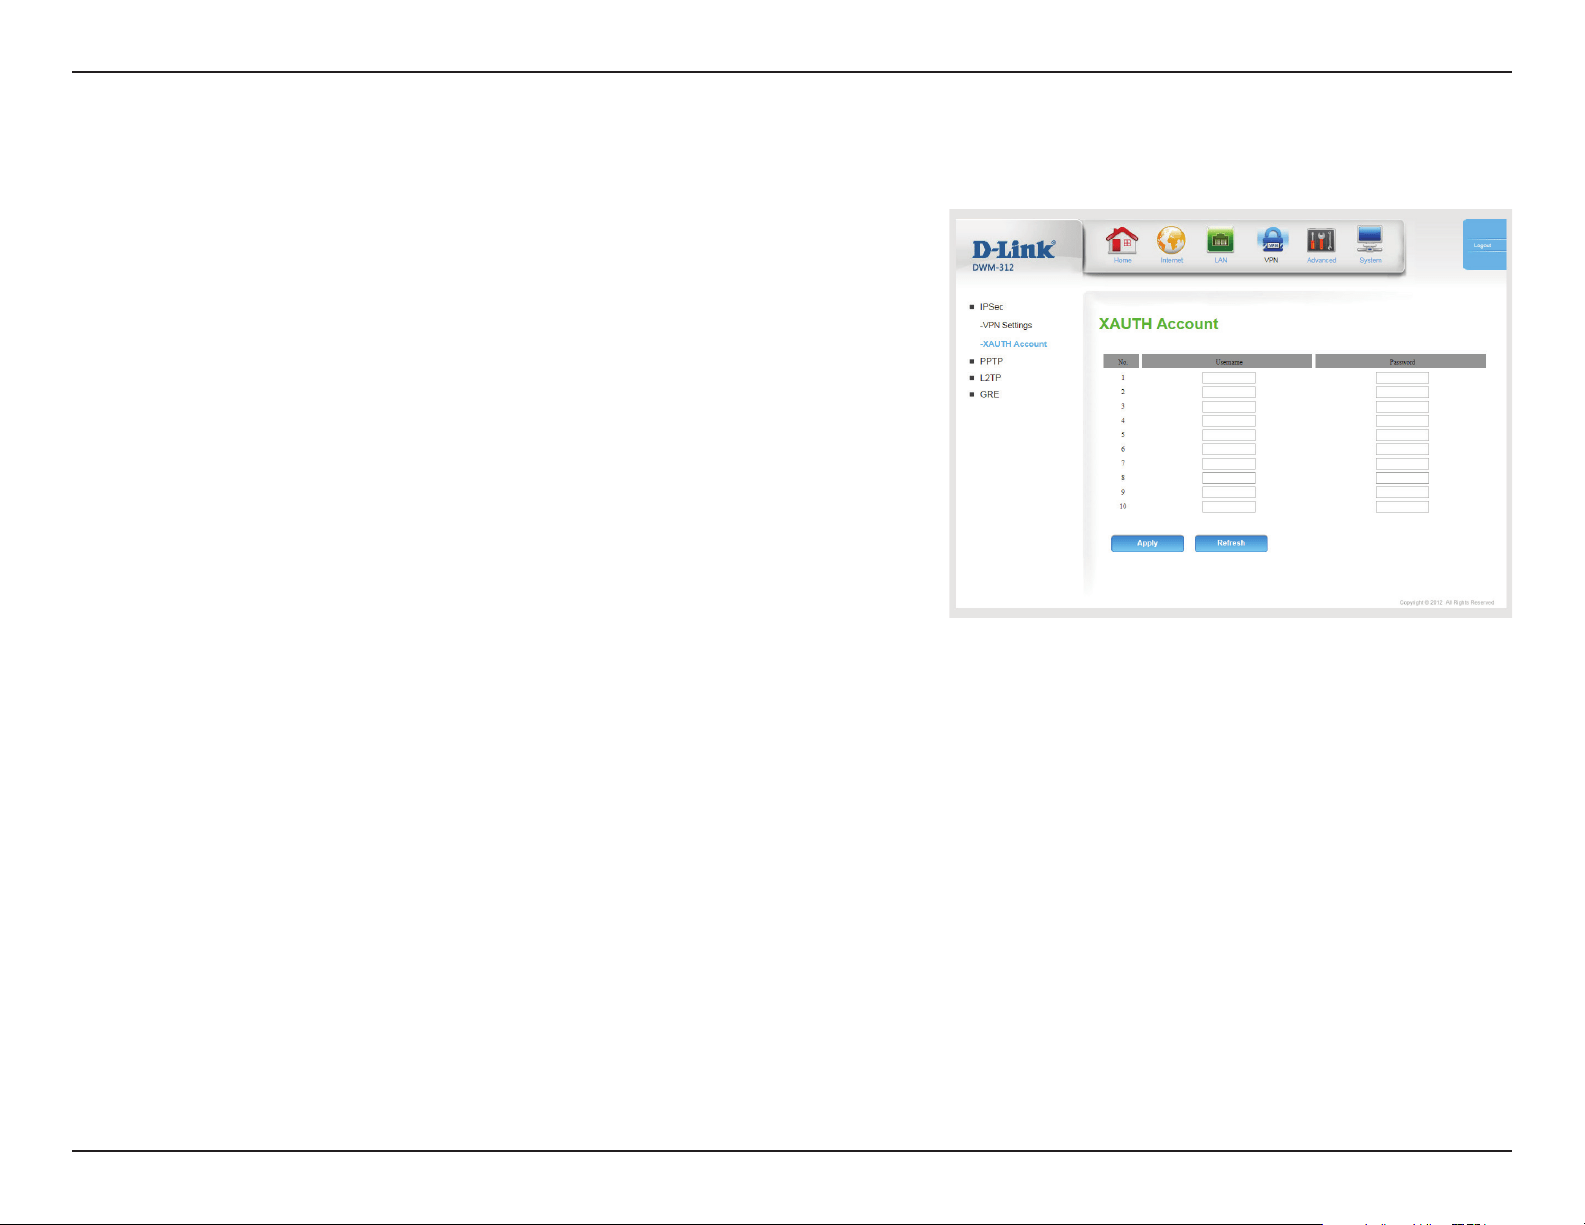
XAUTH Account
If you have congured an IPSec server on the previous page, enter
XAUTH account information for clients here.
Enter an XAUTH username for users to connect to your IPSec
server.
Enter a password corresponding to the username for users to
connect to your IPSec server.
Click Apply to save your settings, or Refresh to revert to your
previous settings.
Username:
Password:
29D-Link DWM-312 User Manual
Section 4 - Conguration
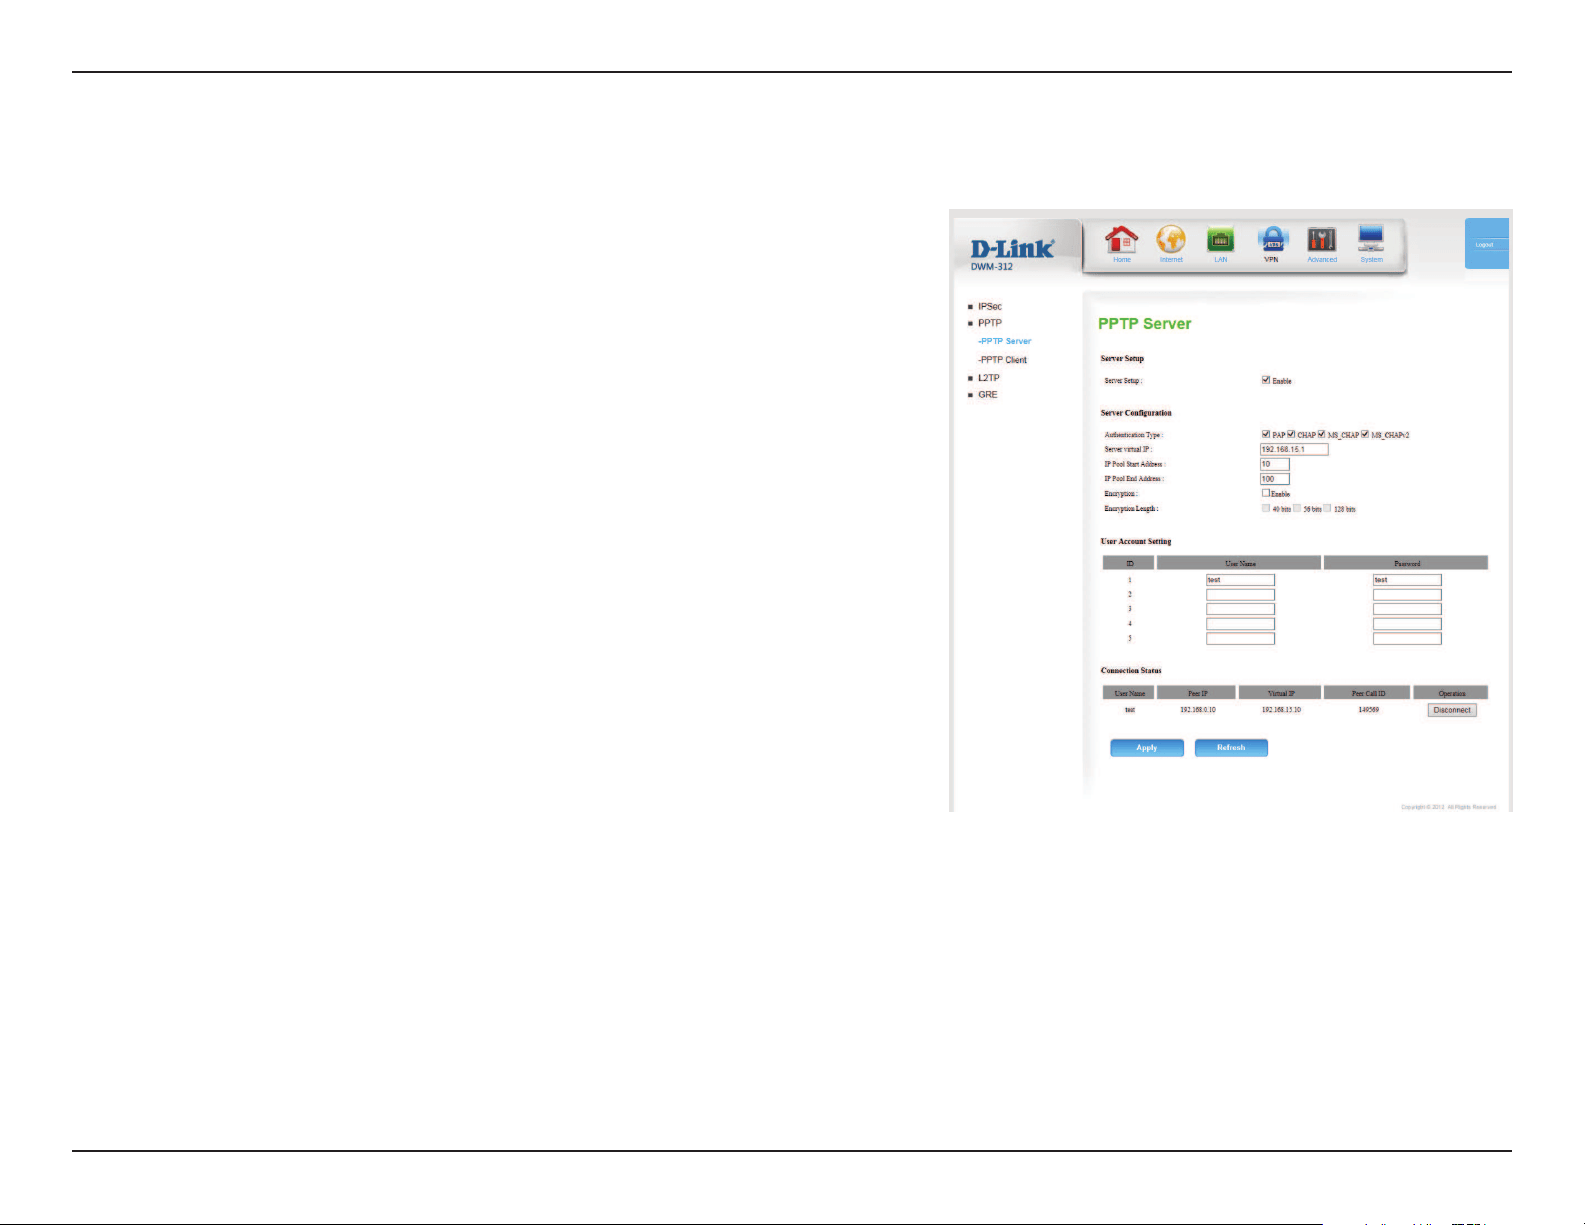
PPTP
PPTP Server
Check this box to enable the DWM-312’s internal PPTP server. If
enabled, the following options will appear:
Select one or more authetication types for the server, either PAP,
CHAP, MS_CHAP, or MS_CHAP2. Note that PAP and CHAP are
not compatible with encryption.
Enter the address assigned to the server within the VPN. This will
dictate the IP pool for clients.
Input the starting address for the server’s IP pool, from 1 to 254.
Input the end address for the server’s IP pool from 1 to 254. Note
that this number must be higher than the start address.
Check this box to enable PPTP encryption.
Specify the length of the encryption key.
Up to 5 user accounts can be created for VPN access. Specify the
user names and passwords that will be used to connect to the
VPN server. Note that user names and passwords are visible to any
adminstrator.
Server Seup:
Authentication
Type:
Server Virtual IP:
IP Pool Start
Address:
IP Pool End
Address:
Encryption:
Encryption
Length:
User Account
Setting:

30D-Link DWM-312 User Manual
Section 4 - Conguration
PPTP Server
This table describes the connection status of each client, displayed
in detail below.
User Name: The user name that the client has used to connect to
the VPN network.
Peer IP: The “real” IP of the client.
Virtual IP: The client’s IP address within the virtual network.
Peer Call ID: Used to identify and associate a tunnel with a packet.
Operation: Click Disconnect to disconnect a specic client.
Click Apply to save your settings, or Refresh to revert to your
previous settings.
Connection
Status:
31D-Link DWM-312 User Manual
Section 4 - Conguration
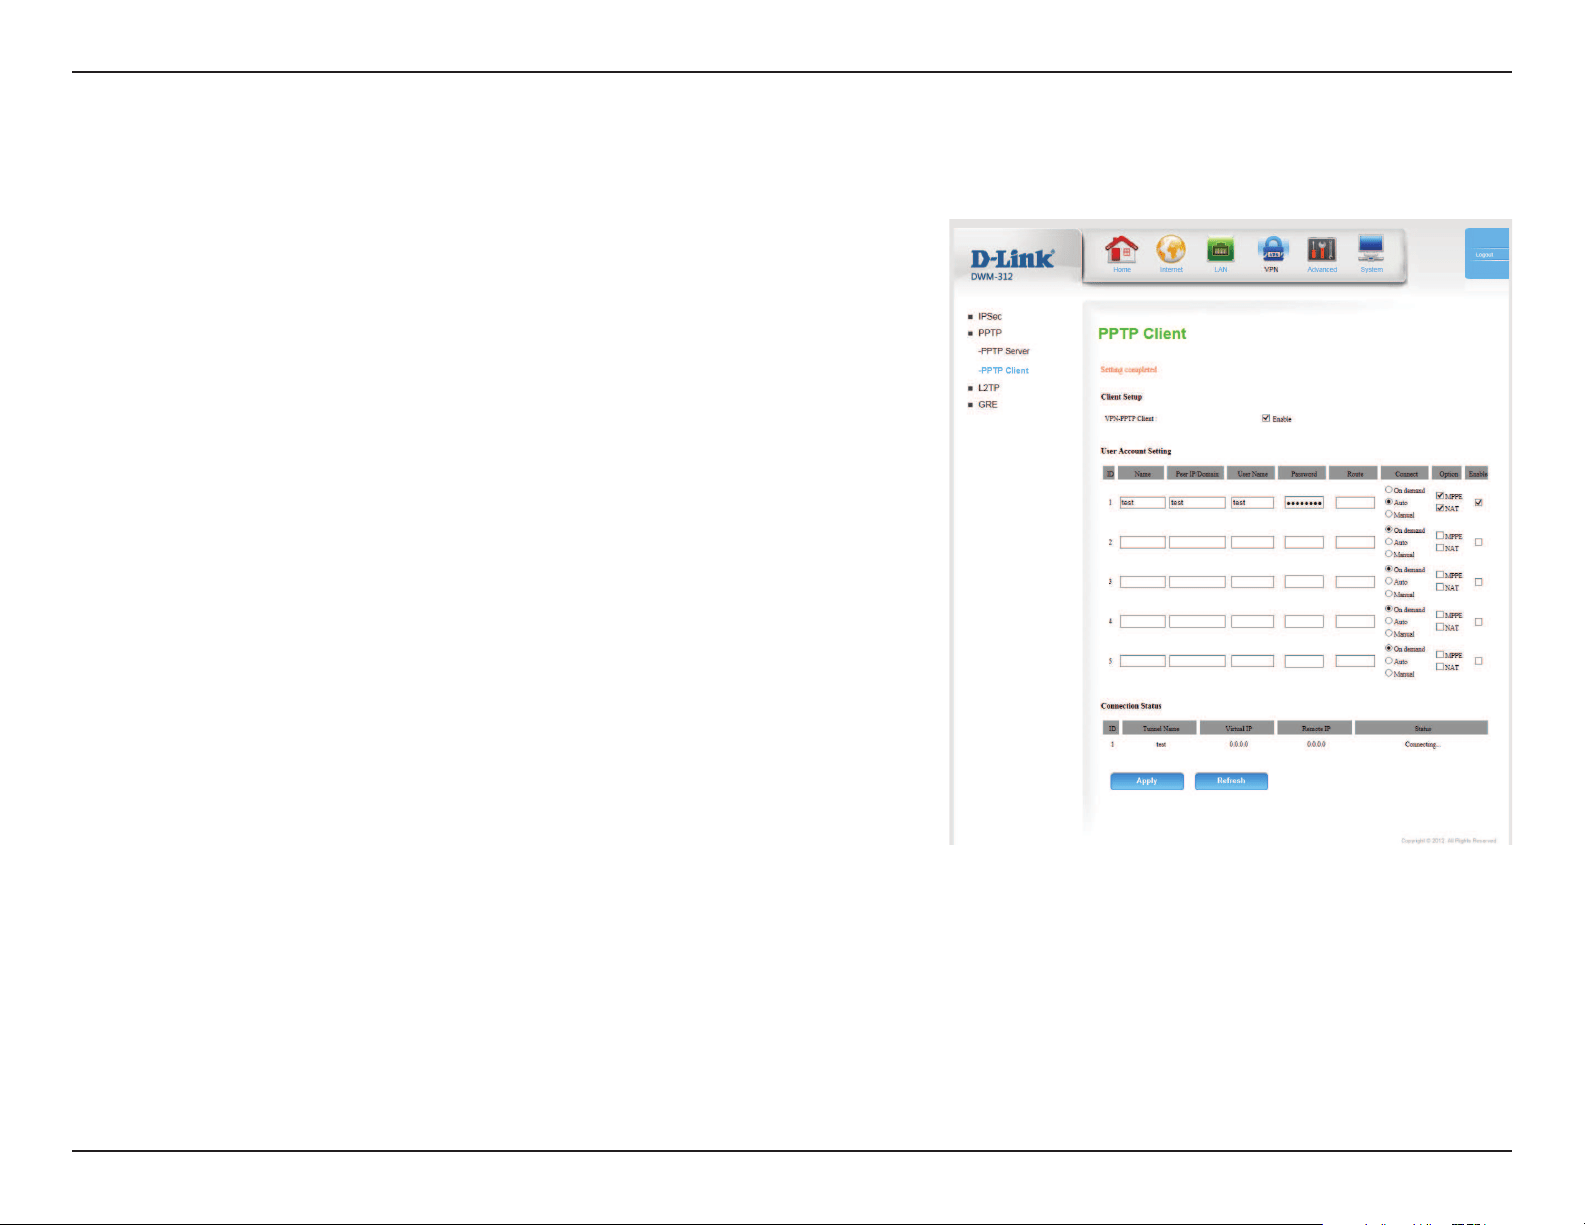
PPTP Client
Check Enable to enable the router to act as a PPTP client. If
enabled, the following options will appear:
Indicates the internal ID of the PPTP account for reference in the
Connection Status table.
Specify a name for the PPTP account for reference in the
Connection Status table. This name is for reference only and does
not aect functionality.
Enter the IP address or domain of your VPN server.
Enter the user name provided to you by your VPN operator.
Enter the password provided to you by your VPN operator.
Enter the route to which to bind the VPN tunnel.
Select On Demand, Auto, or Manual.
Check the appropriate boxes to support Microsoft Point-to-Point
Encryption (MPPE) and Network Address Translation (NAT).
Check this box to enable the VPN client.
VPN-PPTP Client:
ID:
Name:
Peer IP/Domain:
User Name:
Password:
Route:
Connect:
Option:
Enable:

32D-Link DWM-312 User Manual
Section 4 - Conguration
PPTP Client (Cont)
This table displays information about currently active tunnels.
ID: Displays the numeric ID of the tunnel.
Tunnel Name: Displays the name of the tunnel.
Virtual IP: Lists the IP assigned by the tunnel.
Remote IP: Lists the IP of the VPN server.
Status: Displays the current connection status of the VPN tunnel.
Click Apply to save your settings, or Refresh to revert to your
previous settings.
Connection Status

33D-Link DWM-312 User Manual
Section 4 - Conguration
L2TP
L2TP Server
Check this box to enable the DWM-312’s internal L2TP server. If
enabled, the following options will appear:
Select one or more authentication types for the server, either PAP,
CHAP, MS_CHAP, or MS_CHAP2. Note that PAP and CHAP are
not compatible with encryption.
Enter the address assigned to the server within the VPN. This will
dictate the IP pool for clients.
Input the starting address for the server’s IP pool, from 1 to 254.
Input the end address for the server’s IP pool from 1 to 254. Note
that this number must be higher than the start address.
Check this box to enable L2TP encryption.
Specify the length of the encryption key.
Up to 5 user accounts can be created for VPN access. Specify the
user names and passwords that will be used to connect to the
VPN server. Note that user names and passwords are visible to any
administrator.
Server Setup:
Authentication
Type:
Server Virtual IP:
IP Pool Start
Address:
IP Pool End
Address:
Encryption:
Encryption
Length:
User Account
Setting:
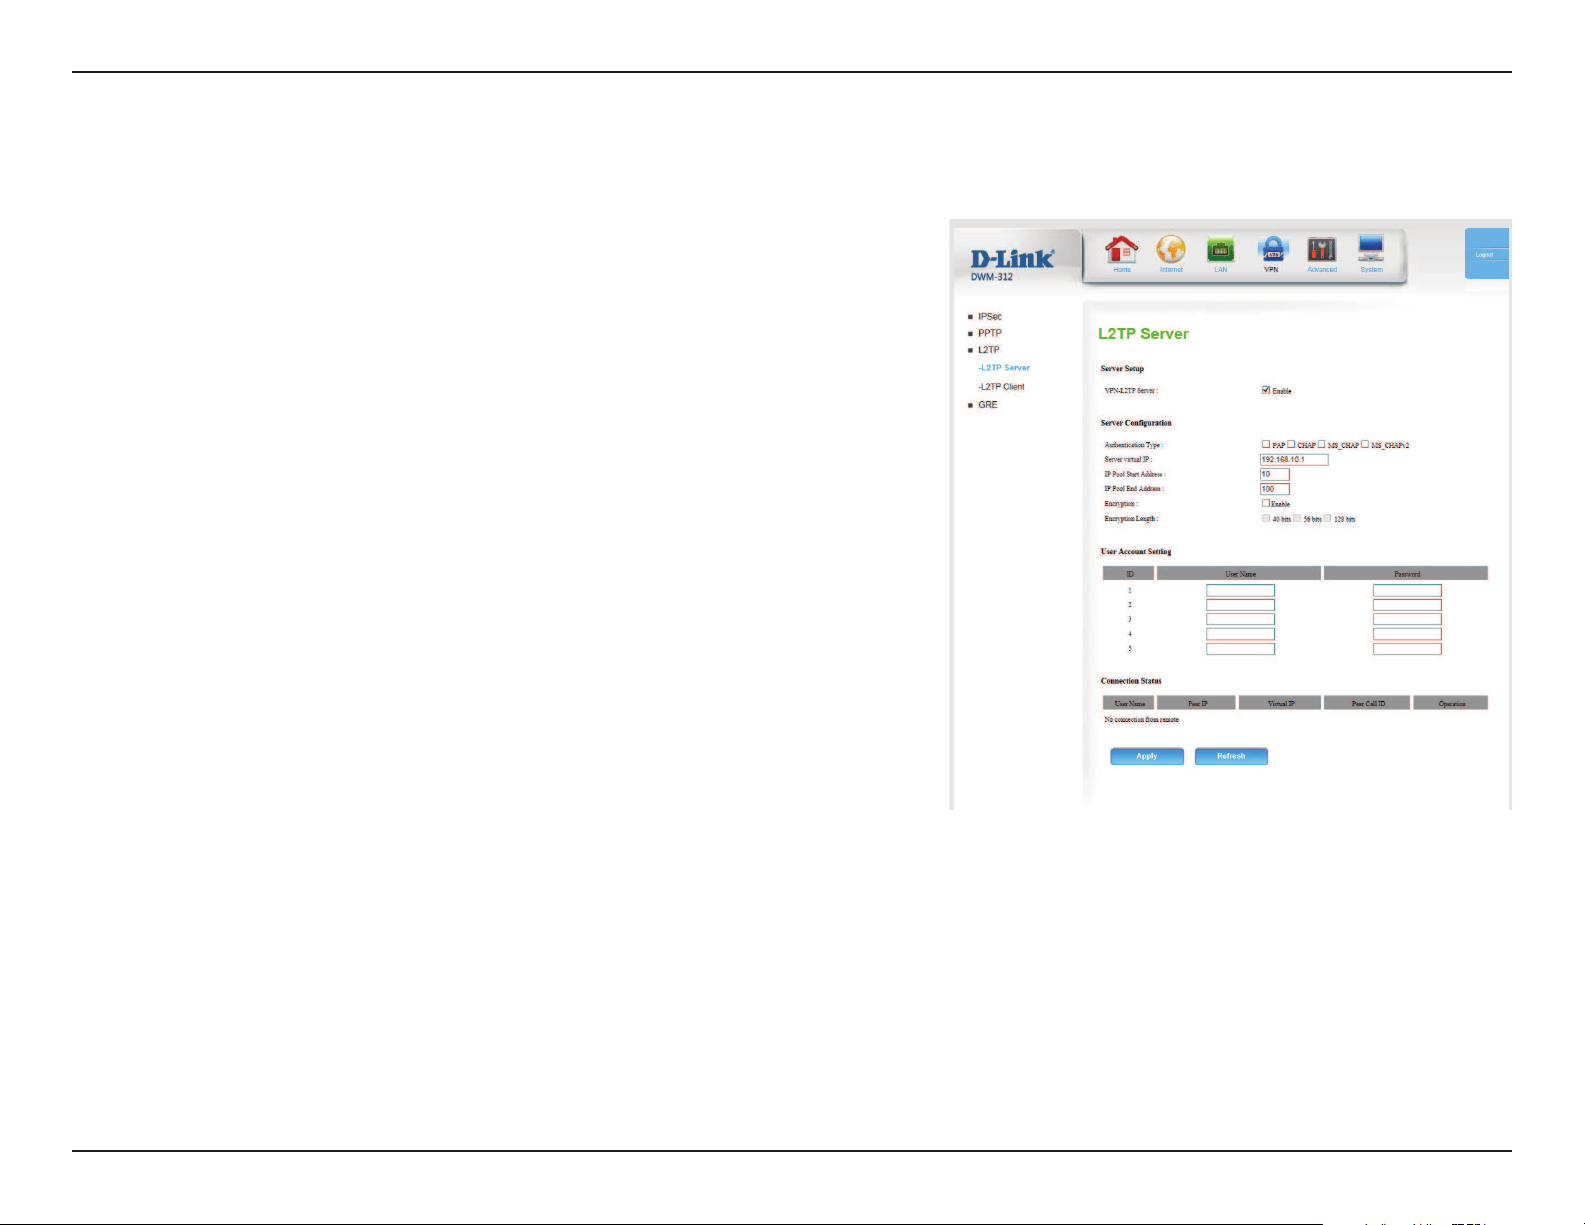
34D-Link DWM-312 User Manual
Section 4 - Conguration
L2TP Server (Cont)
This table describes the connection status of each client, displayed
in detail below.
User Name: The user name that the client has used to connect to
the VPN network.
Peer IP: The “real” IP of the client.
Virtual IP: The client’s IP address within the virtual network.
Peer Call ID: Used to identify and associate a tunnel with a packt.
Operation: Click Disconnect to disconnect a specic client.
Click Apply to save your settings, or Refresh to revert to your
previous settings.
Connection
Status:

35D-Link DWM-312 User Manual
Section 4 - Conguration
L2TP Client
Check Enable to enable the router to act as a L2TP client. If
enabled, the following options will appear:
Indicates the internal ID of the L2TP account for reference in the
Connection Status table.
Specify a name for the L2TP account for reference in the
Connection Status table. This name is for reference only and does
not aect functionality.
Enter the IP address or domain of your VPN server.
Enter the user name provided to you by your VPN operator.
Enter the password provided to you by your VPN operator.
Enter the route to which to bind the the VPN tunnel.
Select On Demand, Auto, or Manual.
Check the appropriate boxes to support Microsoft Point-to-Point
Encryption (MPPE) and Network Address Translation (NAT)
Check this box to enable the VPN client.
VPN-PPTP Client:
ID:
Name:
Peer IP/Domain:
User Name:
Password:
Route:
Connect:
Option:
Enable:

36D-Link DWM-312 User Manual
Section 4 - Conguration
L2TP Client (cont)
This table displays information about currently active tunnels.
ID: Displays the numeric ID of the tunnel.
Tunnel Name: Displays the name of the tunnel.
Virtual IP: Lists the IP assigned by the tunnel.
Remote IP: Lists the IP of the VPN server.
Status: Displays the current connection status of the VPN tunnel.
Click Apply to save your settings, or Refresh to revert to your
previous settings.
Connection Status

37D-Link DWM-312 User Manual
Section 4 - Conguration
GRE
Displays the numeric ID of the tunnel.
Enter the name of the IP tunnel for reference.
Enter the IP used to connect to the tunnel (optional).
Enter the remote IP of the GRE gateway. This is normally a public IP
address.
Enter a key for the GRE connection.
Species the time to live in number of hops, up to 255.
Specify a gateway to reach the GRE server. Specify a subnet (e.g.
10.0.0.2/24).
Check this box to enable the GRE tunnel.
Select a default gateway from the drop down list.
This table displays information about currently active tunnels.
ID: Displays the numeric ID of the tunnel
Transmitted Packets: Displays the number of packets sent.
Transmitted Bytes: Displays the number of bytes sent.
Received Packets: Displays the number of packets received.
Received Bytes: Displays the number of bytes received.
Click Apply to save your settings, or Refresh to revert to your
previous settings.
The Generic Routing Encapsulation protocol (GRE) can be used to create tunnels
to compatible servers similar to IPSec.
ID:
Name:
Tunnel IP:
Peer IP:
Key:
TTL:
Subnet:
Enable:
Default Gateway:
Tunnels
Information:
38D-Link DWM-312 User Manual
Section 4 - Conguration
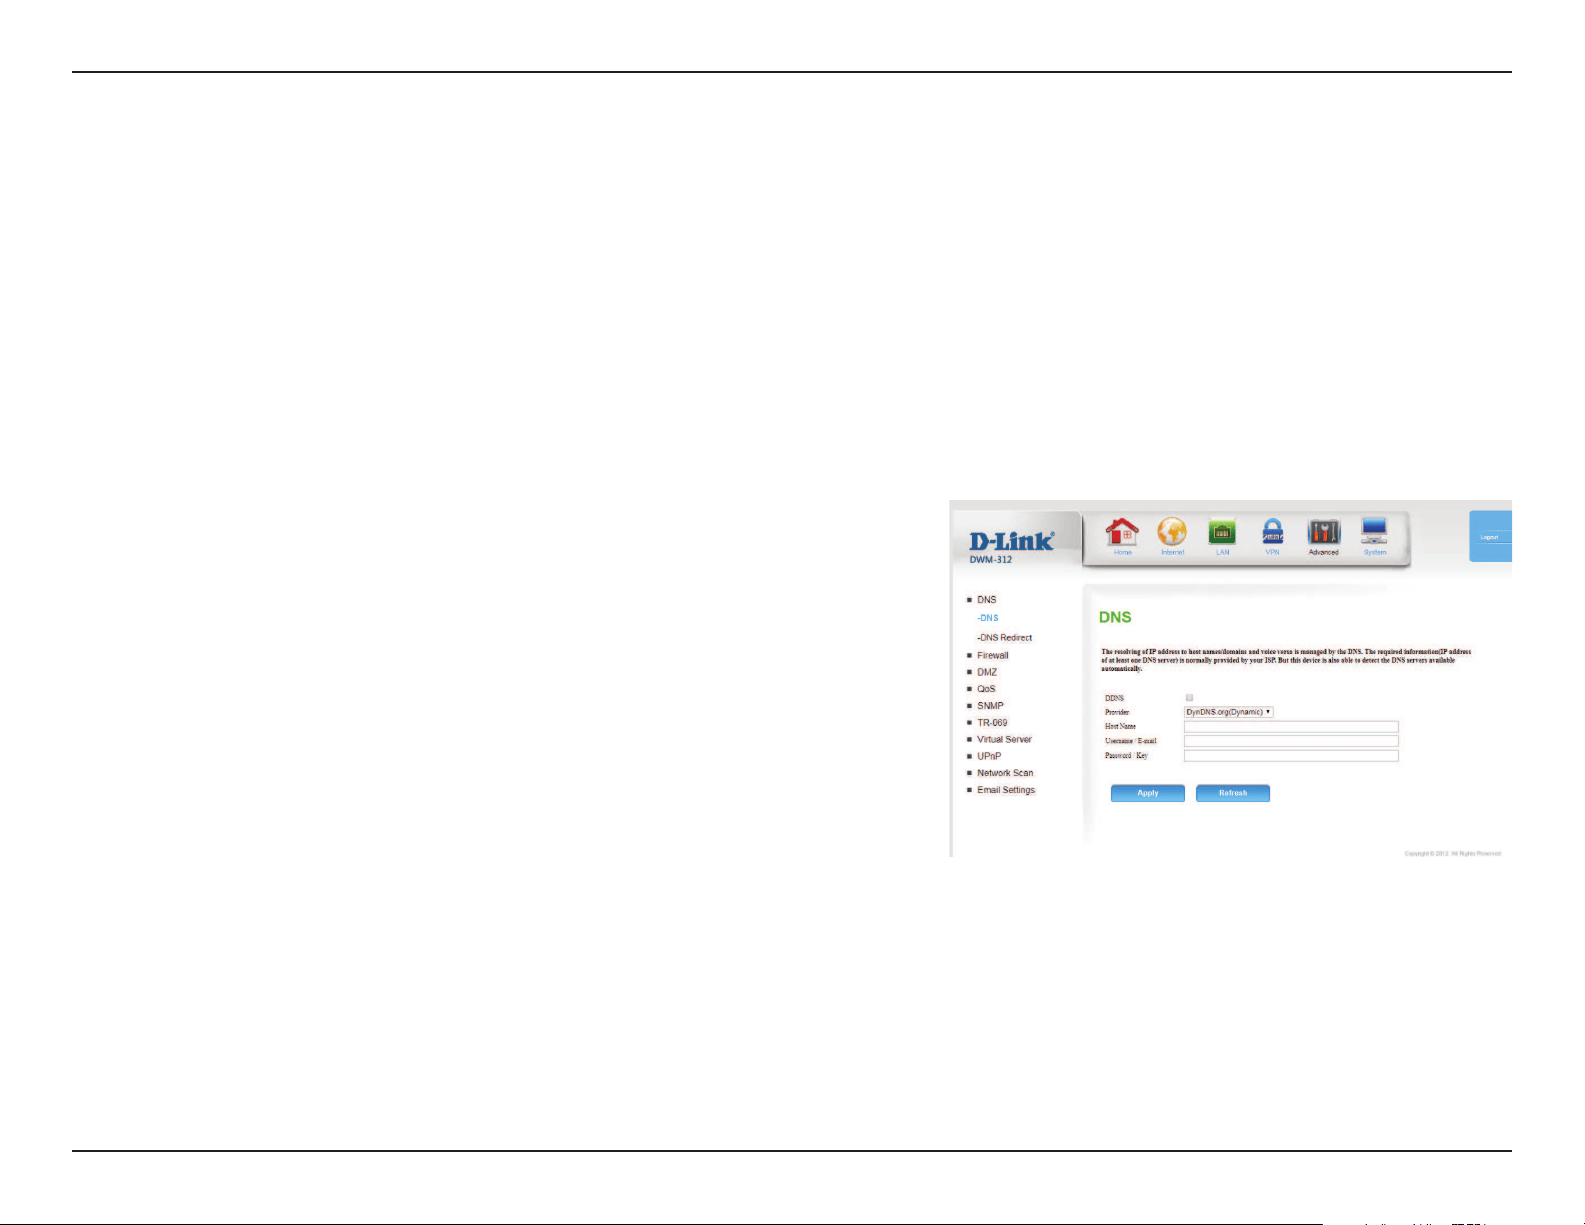
Advanced
DNS
DNS
Tick this check box to enable the DDNS feature.
Select a DDNS service provider to use.
Enter the Host Name that you registered with your DDNS service
provider.
Enter the Username for your DDNS account.
Enter the Password for your DDNS account.
Click Apply to save your settings, or Refresh to revert to your
previous settings.
DDNS:
Provider:
Host Name:
Username /
E-mail:
Password / Key:
On this page you can congure the Domain Name System (DNS) server, which manages the resolution of host/domain names to IP addresses.
This page allows you to congure Dynamic DNS (DDNS) services to more easily gain remote access to your router.
39D-Link DWM-312 User Manual
Section 4 - Conguration
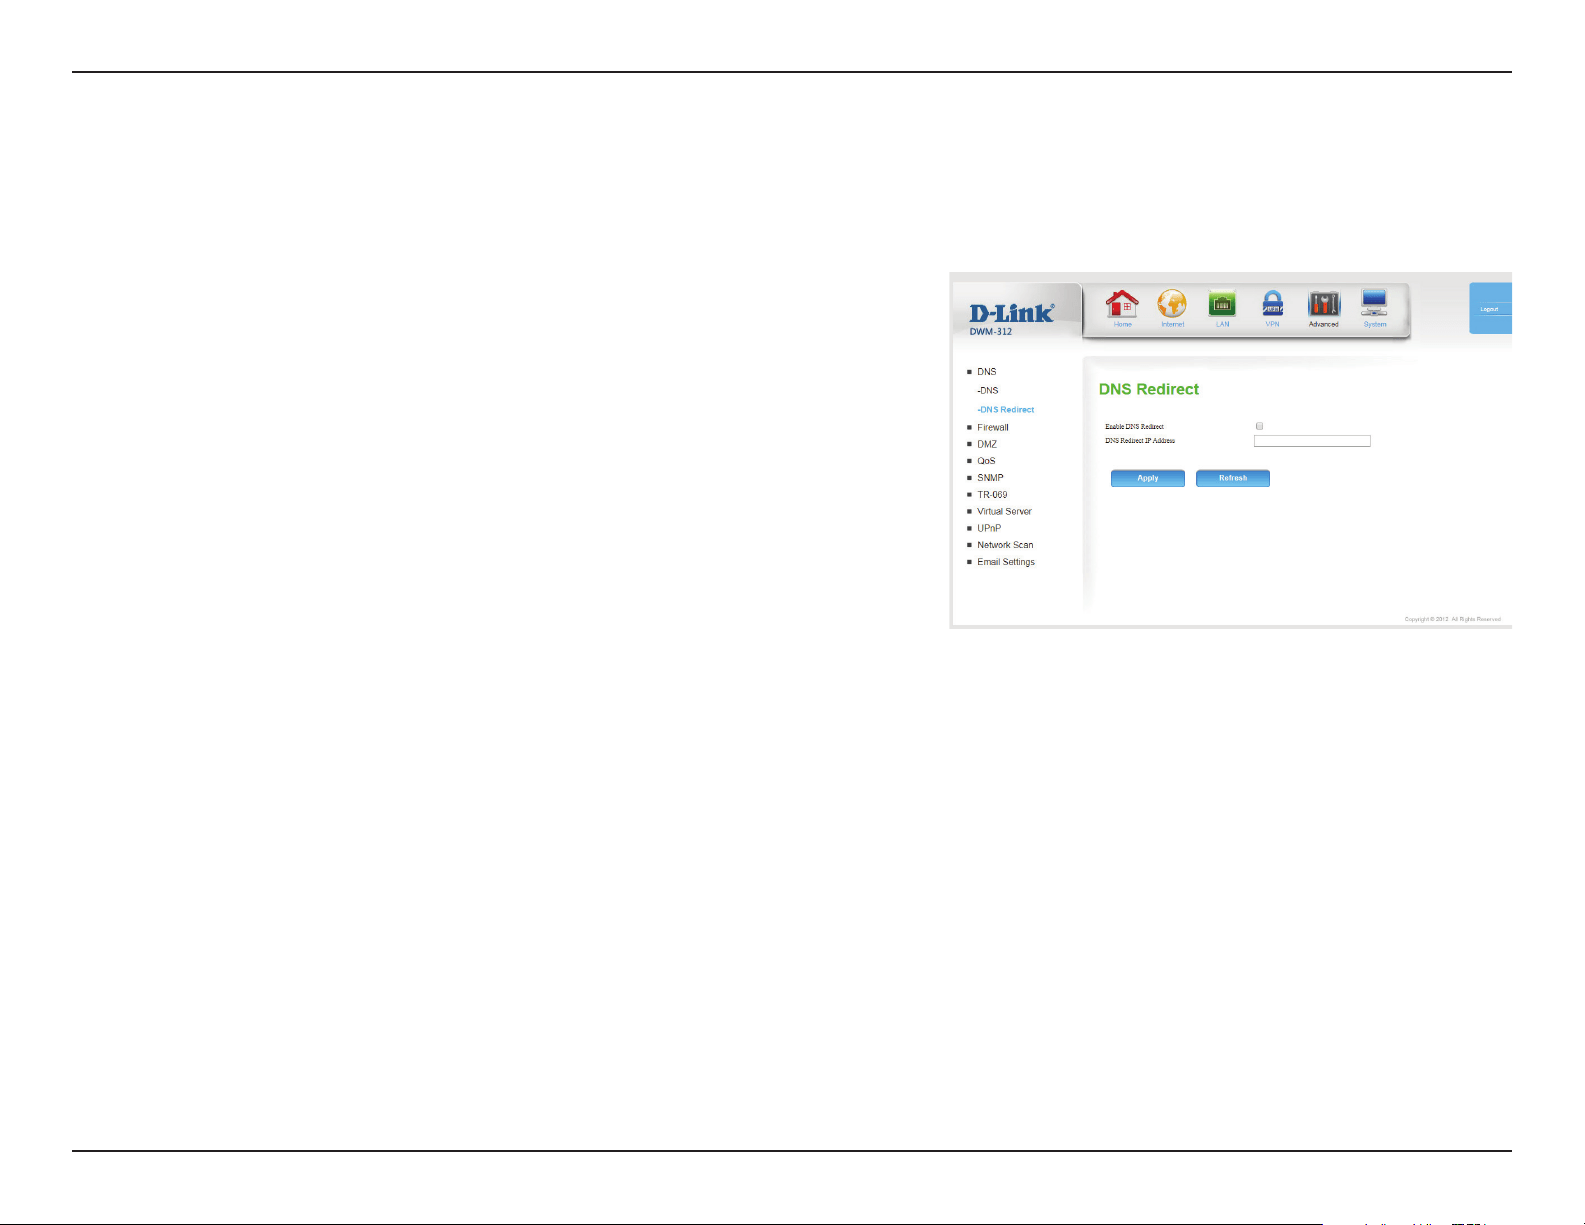
DNS Redirect
Select Enable to enable DNS redirect.
Enter the IP that should be returned whenever a DNS request is
sent to the router. All URLs queried through the router’s DNS will
redirect to the same location.
Click Apply to save your settings, or Refresh to revert to your
previous settings.
Enable DNS
Redirect:
DNS Redirect IP
Address:
DNS Redirect causes all DNS requests to reply with a single address, resulting in all trac using the local DNS resolver to be redirected to a single
location.
40D-Link DWM-312 User Manual
Section 4 - Conguration
Select this box to enable outbound ltering.
Select a schedule to use and copy to the specied rule ID when
you click the Copy to button. You may select Always On or use
a specic schedule that you have dened. To create and edit
schedules, please refer to Schedules on page 63.
OUTBOUND FILTER RULES LIST
Here, you can select whether to Allow or Deny all outgoing trac
except for trac that matches the listed rules.
This identies the rule.
Specify the local IP address and then specify the port after the
colon.
Specify the remote IP address and then the port after the colon.
Check the box to enable the specied rule.
Specify the schedule rule number. Click on the Add New Rule
button to create a new schedule rule.
Click to go back to the previous lter page.
Click to advance to the next lter page.
Click Apply to save your settings, or Refresh to revert to your
previous settings.
Outbound Filter:
Use Schedule Rule:
ID:
Source IP : Ports:
Destination IP :
Ports:
Enable:
Schedule Rule #:
Previous Page:
Next Page:
Outbound Filter enables you to control what packets are allowed to be sent out to the Internet. The outbound lter applies to all outbound packets.
Firewall
Outbound Filter
41D-Link DWM-312 User Manual
Section 4 - Conguration
Select this box to enable the lter.
Select a schedule to use and copy to the specied rule ID when
you click the Copy to button. You may select Always On or use
a specic schedule that you have dened. To create and edit
schedules, please refer to Schedules on page 63.
INBOUND FILTER RULES LIST
Here, you can select whether to Allow or Deny all incoming trac
except for trac that matches the listed rules.
This identies the rule.
Specify the local IP address and then specify the port after the
colon.
Specify the remote IP address and then the port after the colon.
Check the box to enable the specied rule.
Specify the schedule rule number. Click on the Add New Rule
button to create a new schedule rule.
Go back to the previous lter page.
Advance to the next lter page.
Click Apply to save your settings, or Refresh to revert to your
previous settings.
Inbound Filter:
Use Schedule
Rule:
ID:
Source IP : Ports:
Destination IP :
Ports:
Enable:
Schedule Rule #:
Previous Page:
Next Page:
Inbound Filter enables you to control what packets are allowed to come in to your network from the Internet. The inbound lter only applies to
packets that are destined for Virtual Servers or DMZ hosts.
Inbound Filter
42D-Link DWM-312 User Manual
Section 4 - Conguration
Check the box to enable URL Filtering.
URL FILTERING RULES
This identies the rule.
Enter a URL that you would like to block. All URLs that begin with
this string will be blocked.
Check the box to enable the specied rule.
Click Apply to save your settings, or Refresh to revert to your
previous settings.
URL Filter allows you to set up a list of websites that will be blocked from users on your network.
URL Filtering:
ID:
URL:
Enable:
URL Filter
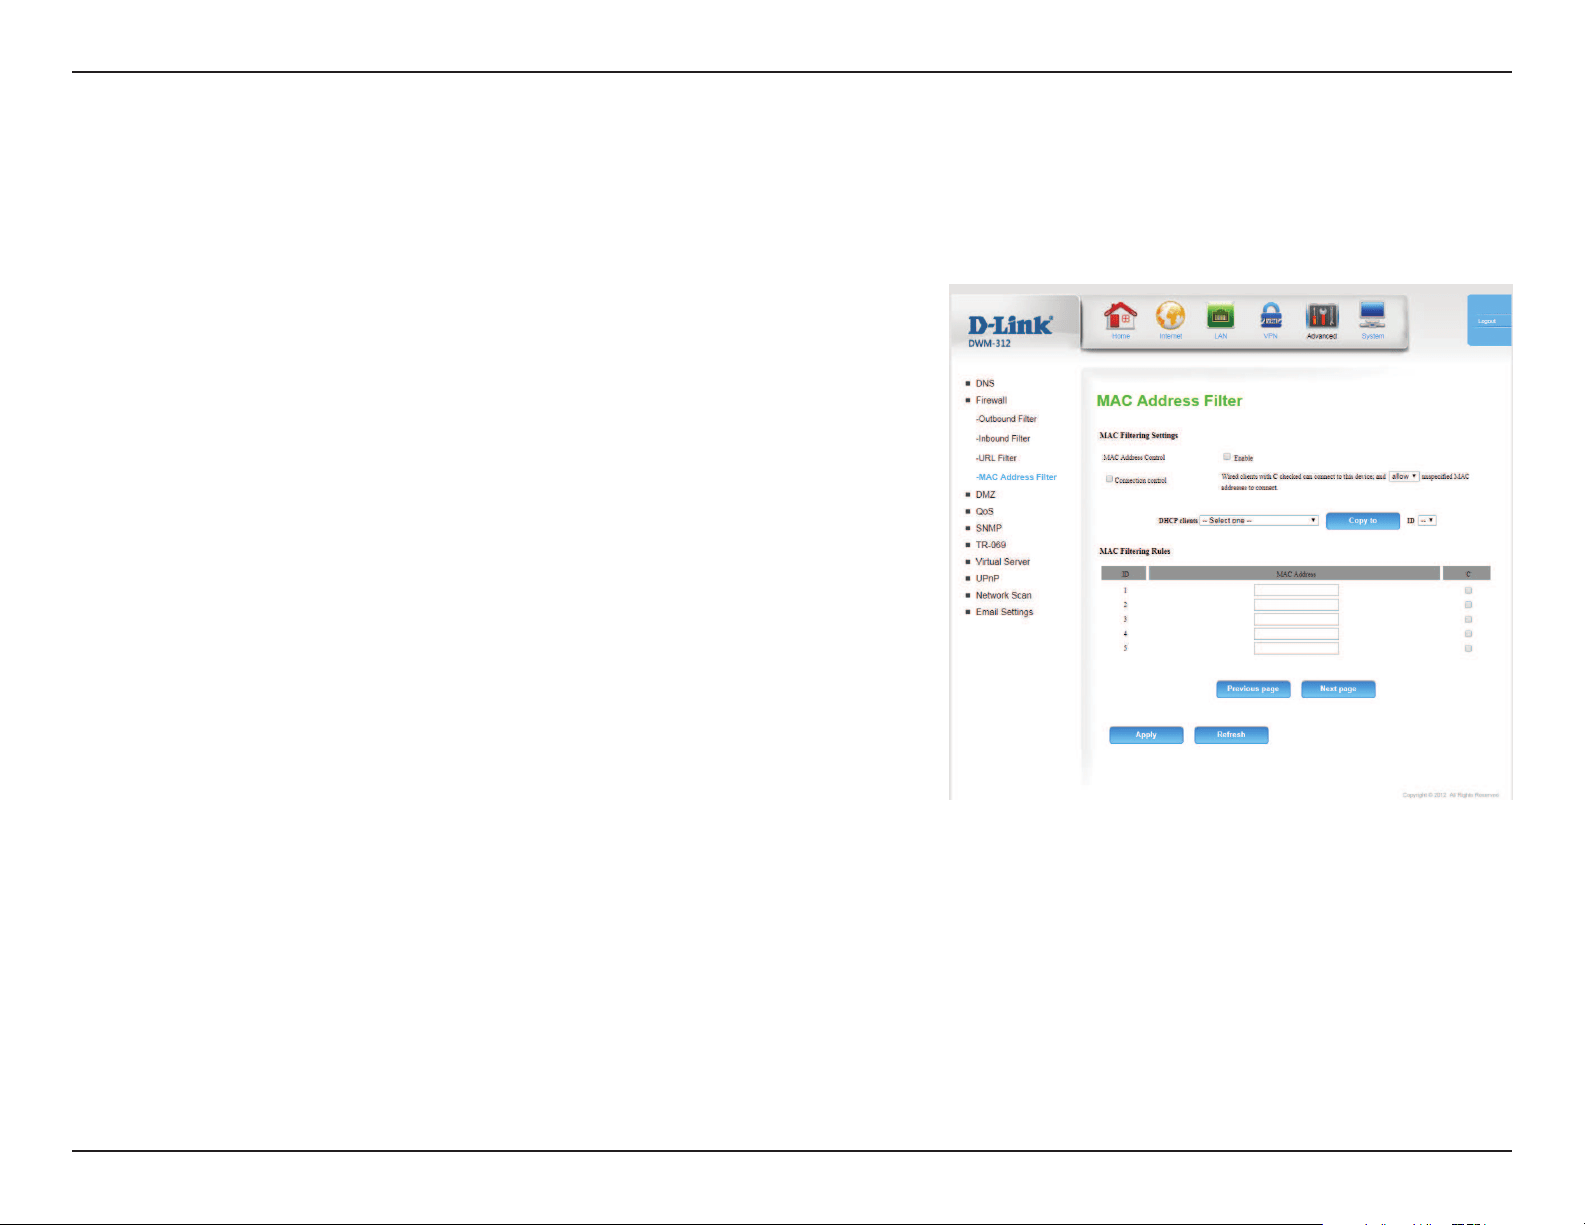
43D-Link DWM-312 User Manual
Section 4 - Conguration
Tick this box to enable MAC Filtering.
Check the box to allow wireless and wired clients with C selected
to connect to this device. You can also select to allow or deny
connections from unspecied MAC addresses.
MAC FILTERING RULES
This identies the rule.
Specify the MAC address of the computer to be ltered.
If this box is ticked, the rule will follow the connection control
setting specied in MAC ltering settings specied above.
Click Apply to save your settings, or Refresh to revert to your
previous settings.
MAC Address
Control:
Connection
Control:
ID:
MAC Address:
C:
The MAC (Media Access Controller) Address Filter option is used to control network access based on the MAC address of the network adapter.
A MAC address is a unique ID assigned by the manufacturer of the network adapter. This feature can be congured to ALLOW or DENY network/
Internet access.
MAC Address Filter
44D-Link DWM-312 User Manual
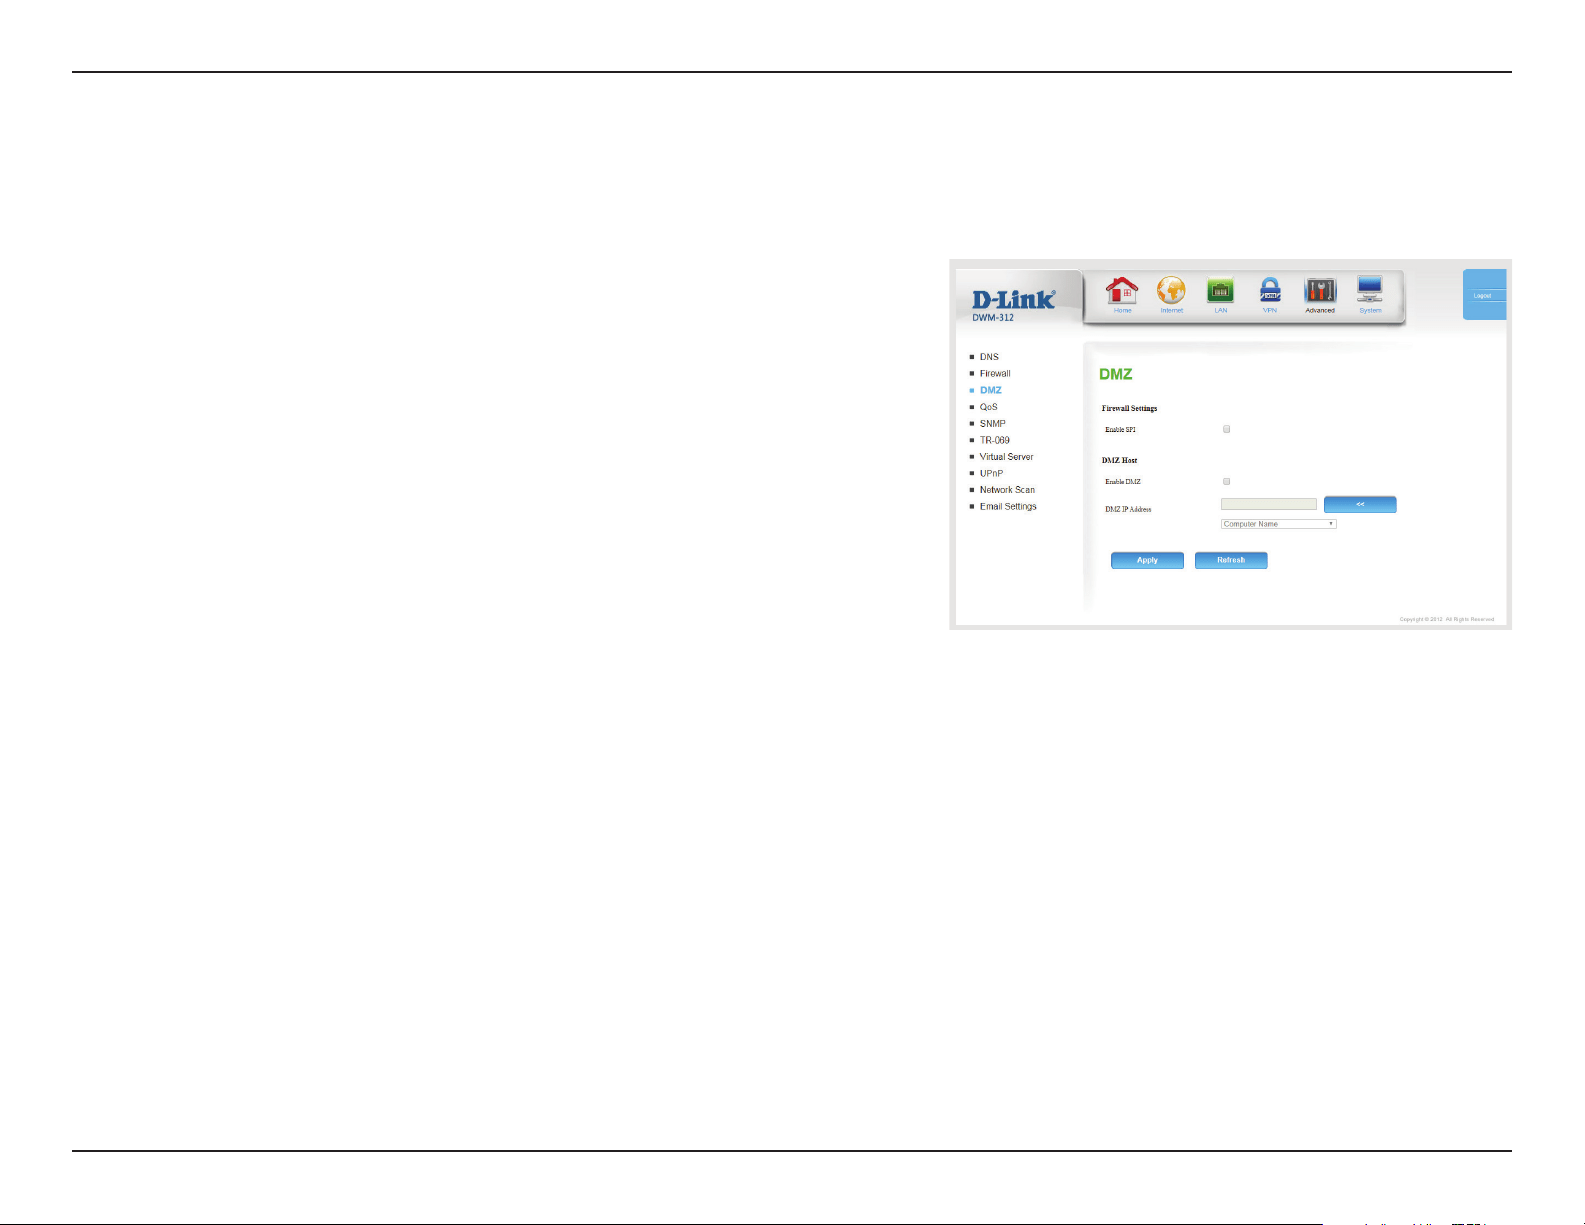
Section 4 - Conguration
A Demilitarized Zone (DMZ) directly exposes a single client device to the outside world for certain types of applications. If you choose to expose a
computer, you can enable a DMZ.
Enabling Stateful Packet Inspection (SPI) helps to prevent cyber
attacks by validating that the trac passing through the session
conforms to the protocol.
If an application has trouble working from behind the router, you
can expose one computer to the Internet and run the application
on that computer.
Note: Placing a computer in the DMZ may expose that computer
to a variety of security risks. Use of this option is recommended for
advanced users only.
Specify the IP address of the computer on the LAN that you want
to have unrestricted Internet communication. If this computer
obtains its IP address automatically using DHCP, be sure to make a
static reservation on the Setup > Network Settings page so that
the IP address of the DMZ machine does not change.
Click Apply to save your settings, or Refresh to revert to your
previous settings.
Enable SPI:
Enable DMZ:
DMZ IP Address:
DMZ
45D-Link DWM-312 User Manual
Section 4 - Conguration
Select this box to enable the QoS feature.
Specify the maximum upstream bandwidth here (e.g. 400 Kbps).
Select a schedule to use and copy to the specied rule ID when
you click the Copy to button. You may select Always On or use
a specic schedule that you have dened. To create and edit
schedules, please refer to Schedules on page 45.
QOS RULES
This identies the rule.
Specify the local IP address(es) and port(s) for the rule to aect.
Specify the remote IP address(es) and port(s) for the rule to aect.
Select what priority level to use for trac aected by the rule:
Low, Normal, or High.
Check the box to enable the specied rule.
Specify the schedule rule number. To create a new schedule,
click on the Add New Rule button. For more information about
schedules, please refer to Schedules on page 63.
Click Apply to save your settings, or Refresh to revert to your
previous settings.
Enable QoS
Packet Filter:
Upstream
Bandwidth:
Use Schedule
Rule:
ID:
Local IP : Ports:
Remote IP : Ports:
QoS Priority:
Enable:
Use Rule #:
The QoS Engine improve the performance of certain bandwidth or latency-sensitive applications by ensuring that your such trac is prioritized
over other network trac, such as FTP or web. For best performance, use the Automatic Classication option to automatically set the priority for
your applications.
QoS
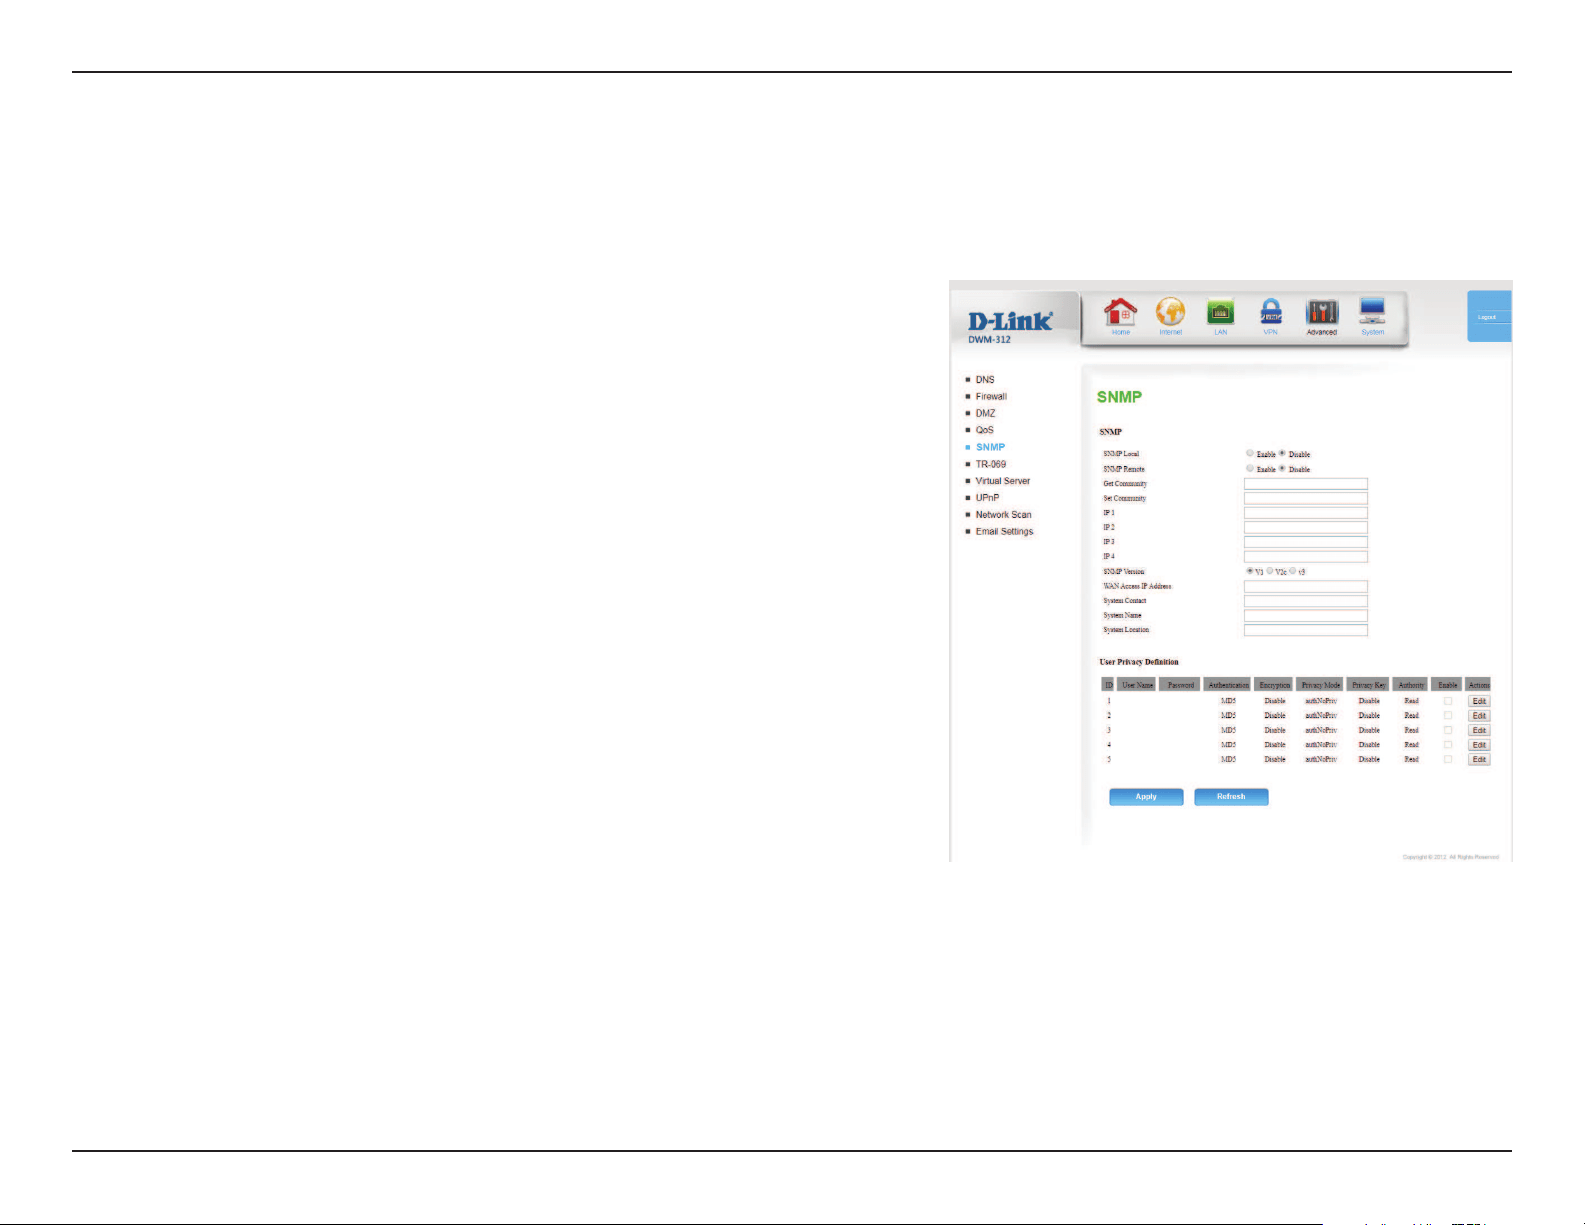
46D-Link DWM-312 User Manual
Section 4 - Conguration
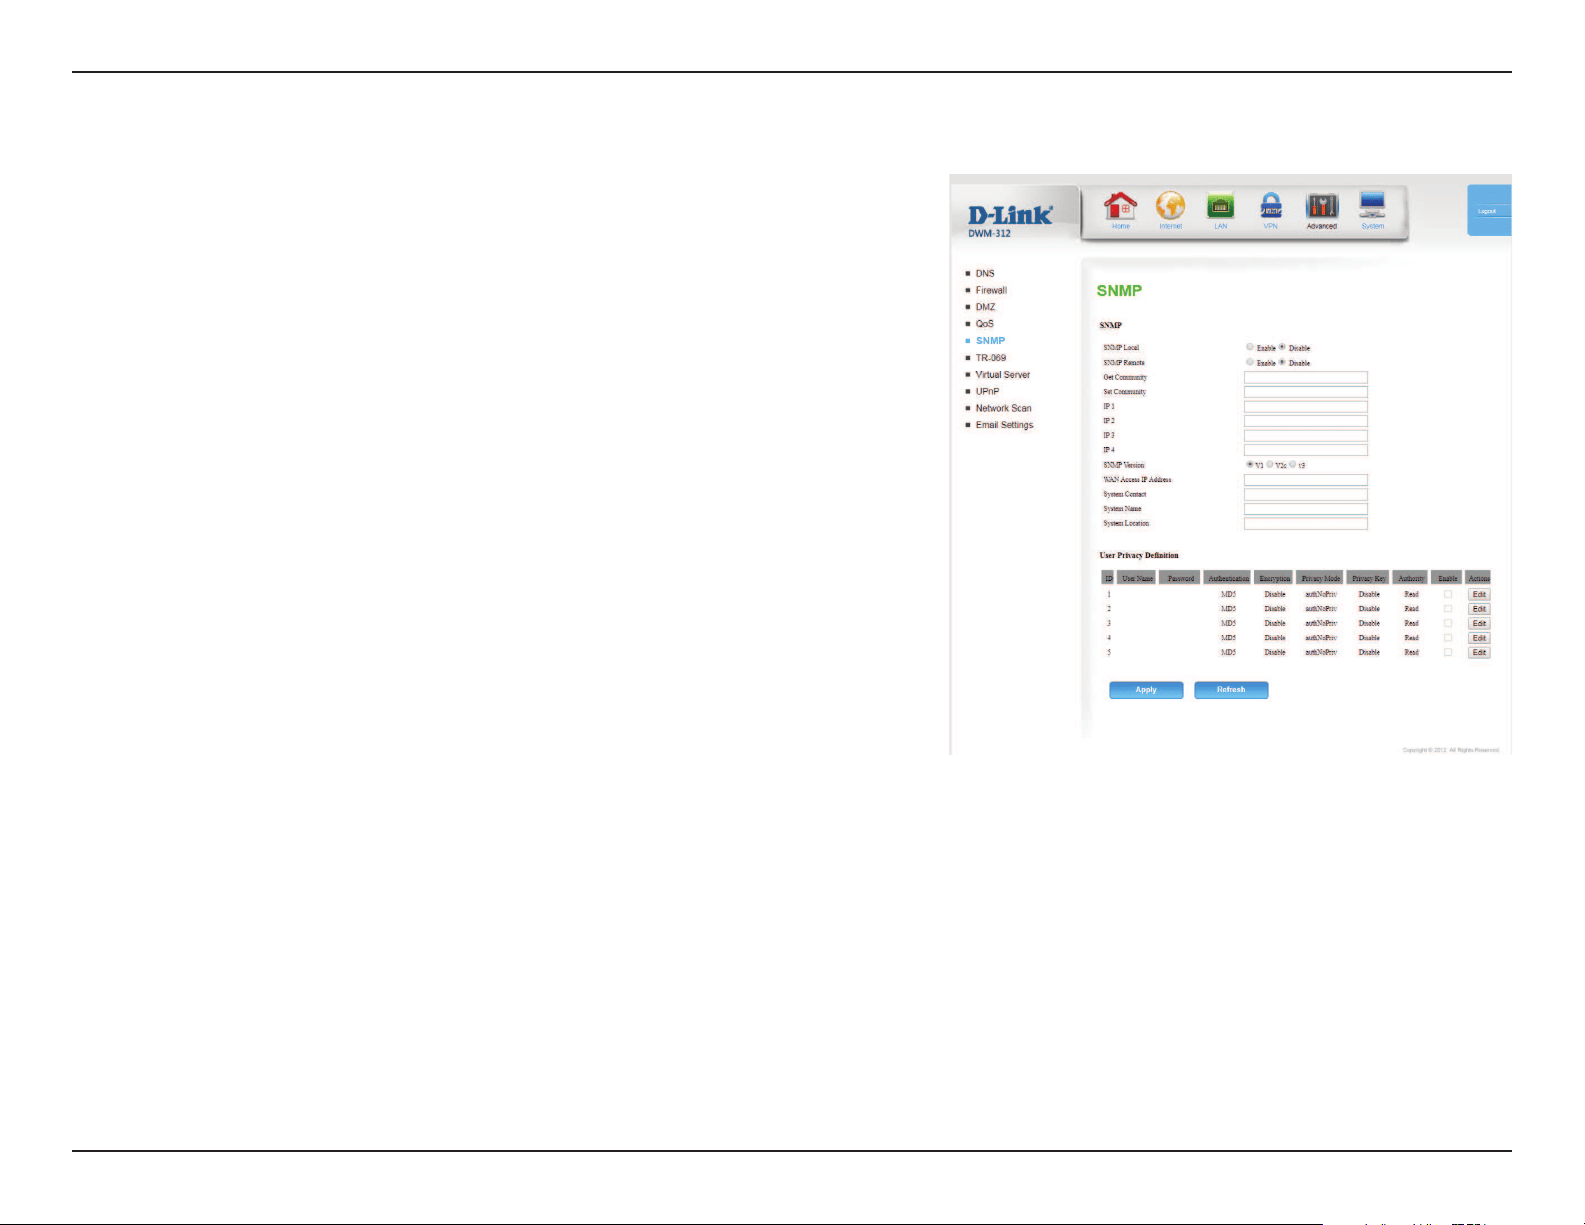
Select whether to Enable or Disable local SNMP administration.
Select whether to Enable or Disable remote SNMP administration.
Enter the password public in this eld to allow read-only access
to network administration using SNMP. You can view the network,
but no conguration is possible with this setting.
Enter the password private in this eld to enable read/write
access to the network using SNMP.
Enter up to 4 IP addresses to use as trap targets for your network.
Select the SNMP version of your system.
If you want to limit remote access SNMP access, enter the IP
address of the remote computer you will use to access this device;
all other IP addresses will be denied remote SNMP access.
Enter a contact point for the system for reference.
Enter the system name for reference.
Enter the system location for reference.
User Privacy Denition
User accounts can be dened for SNMP remote access. Click Edit
to change settings. Up to ve users can be added.
SNMP Local:
SNMP Remote:
Get Community:
Set Community:
IP 1/IP 2/IP 3/IP 4:
SNMP Version:
WAN Access IP
Address:
System Contact:
System Name:
System Location:
SNMP (Simple Network Management Protocol) is a widely used network monitoring and control protocol that reports activity on each network
device to the administrator of the network. SNMP can be used to monitor trac and statistics of the DWM-312. The DWM-312 supports SNMP v1,
v2c, and v3. D-View software uses the SNMP protocol. For details on managing your device with D-View, see the D-View Manual.
SNMP
47D-Link DWM-312 User Manual
Section 4 - Conguration
Indicates the ID of the user account.
Enter the user name of the account.
Enter the password of the account.
Note: Passwords are stored in plaintext and are visible to anyone
with access to the web UI.
If authNoPriv or authPriv is selected under Privacy Mode,
choose SHA1 or MD5 authentication.
If authPriv is selected under Privacy Mode, DES encryption is
available.
Select NoauthNoPriv for no authentication and no encryption,
authNoPriv for authentication only, and authPriv to use both
authentication and encryption.
If encryption is enabled, enter a key between 8 and 27 ASCII
characters in length.
Select Read to allow this user read-only access to conguration, or
Read/Write to enable full read-write access.
Check Enable to activate the user account. Uncheck to disable the
user account.
Click Edit to make changes to the corresponding account.
Click Apply to save your settings, or Refresh to revert to your
previous settings.
ID:
User Name:
Password:
Authentication:
Encryption:
Privacy Mode:
Privacy Key:
Authority:
Enable:
Actions:
SNMP (Cont)
48D-Link DWM-312 User Manual
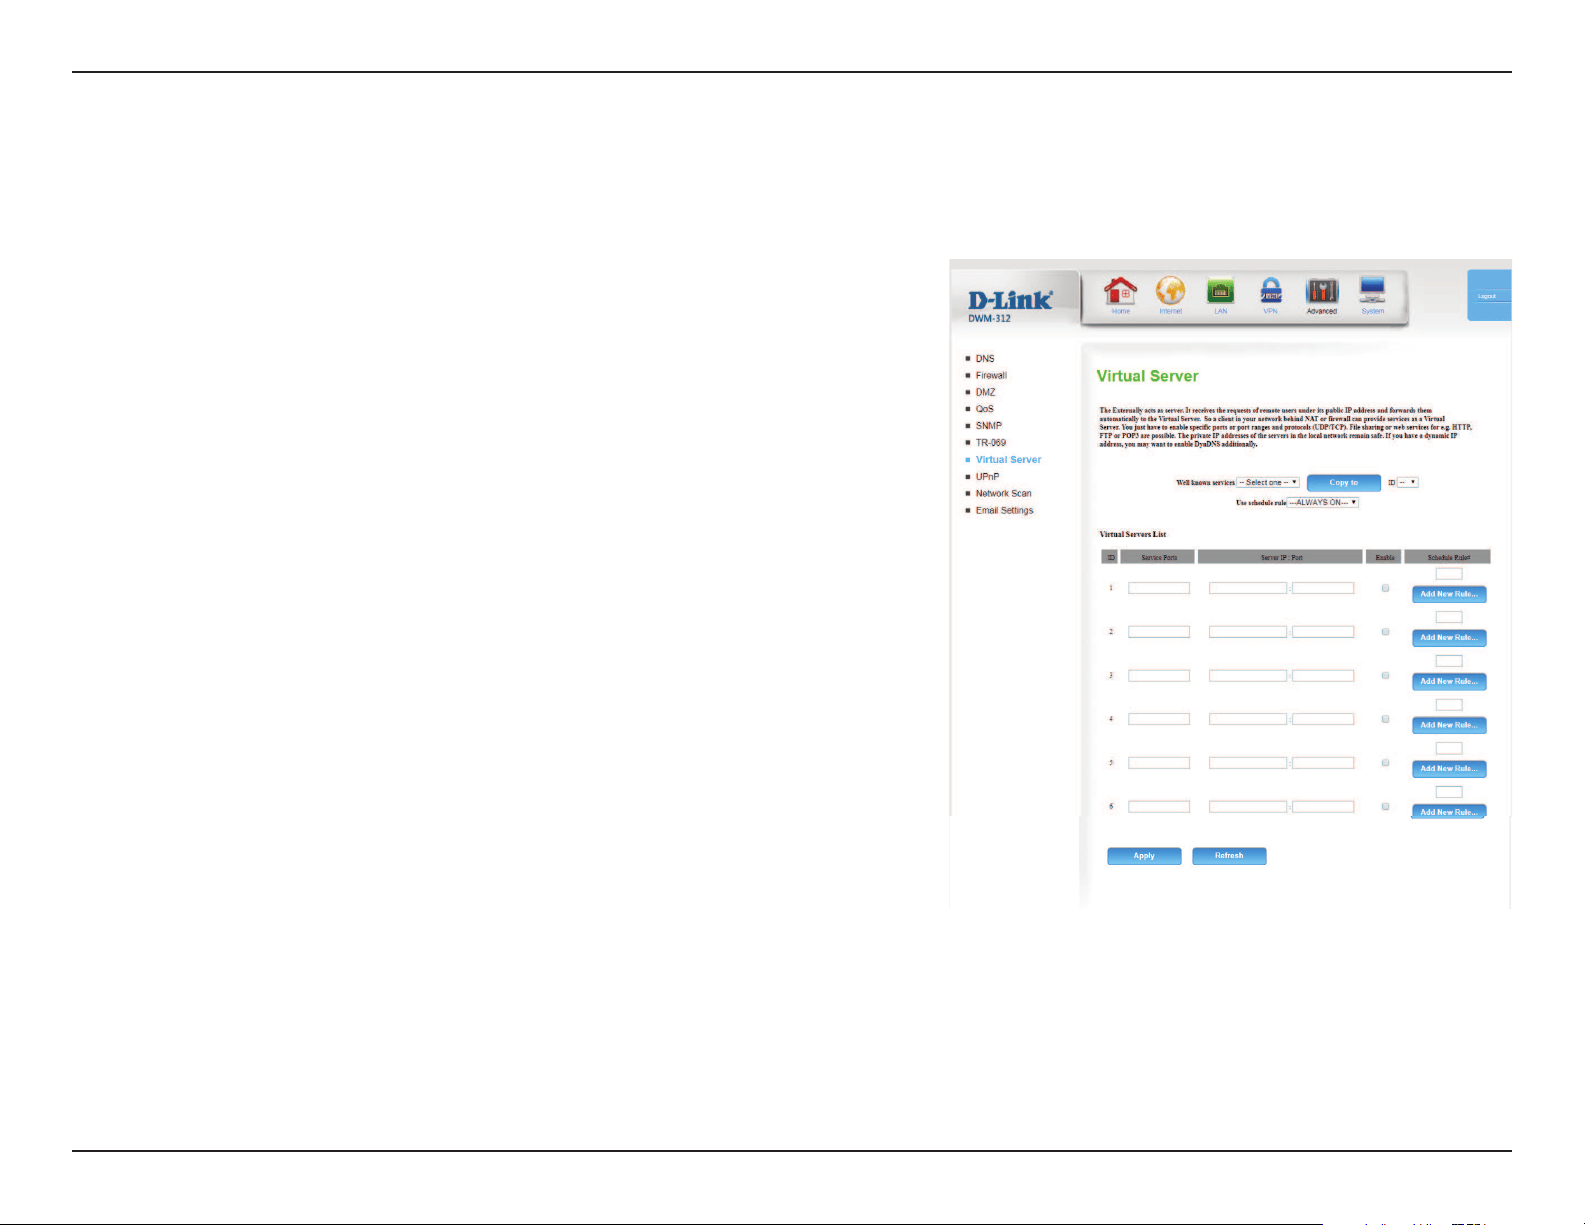
Section 4 - Conguration
The device can be congured as a virtual server so that users can access services such as Web or FTP via the public (WAN) IP address of the router.
You can also allow the settings to run on a specied schedule.
This contains a list of pre-dened services. You can select a service,
select a rule ID, then click the Copy to button to copy the default
settings for that service to the specied rule ID.
Species which rule to copy the selected Well known service
settings to when you click the Copy to button.
Select a schedule to use and copy to the specied rule ID when
you click the Copy to button. You may select Always On or use
a specic schedule that you have dened. To create and edit
schedules, please refer to Schedules on page 48.
Well-known
Services:
ID:
Use schedule
rule:
VIRTUAL SERVERS LIST
This identies the rule.
Enter the public port(s) you want to open.
Enter the IP address and port of the computer on your local
network that you want to forward the Service Ports to.
Check the box to enable the specied rule.
Specify the schedule rule number. To create schedules, click on
the Add New Rule button. For further information on schedules,
please refer to Schedules on page 48.
Click Apply to save your settings, or Refresh to revert to your
previous settings.
ID:
Service Ports
Server IP: Port:
Enable:
Schedule Rule #:
Virtual Server
49D-Link DWM-312 User Manual
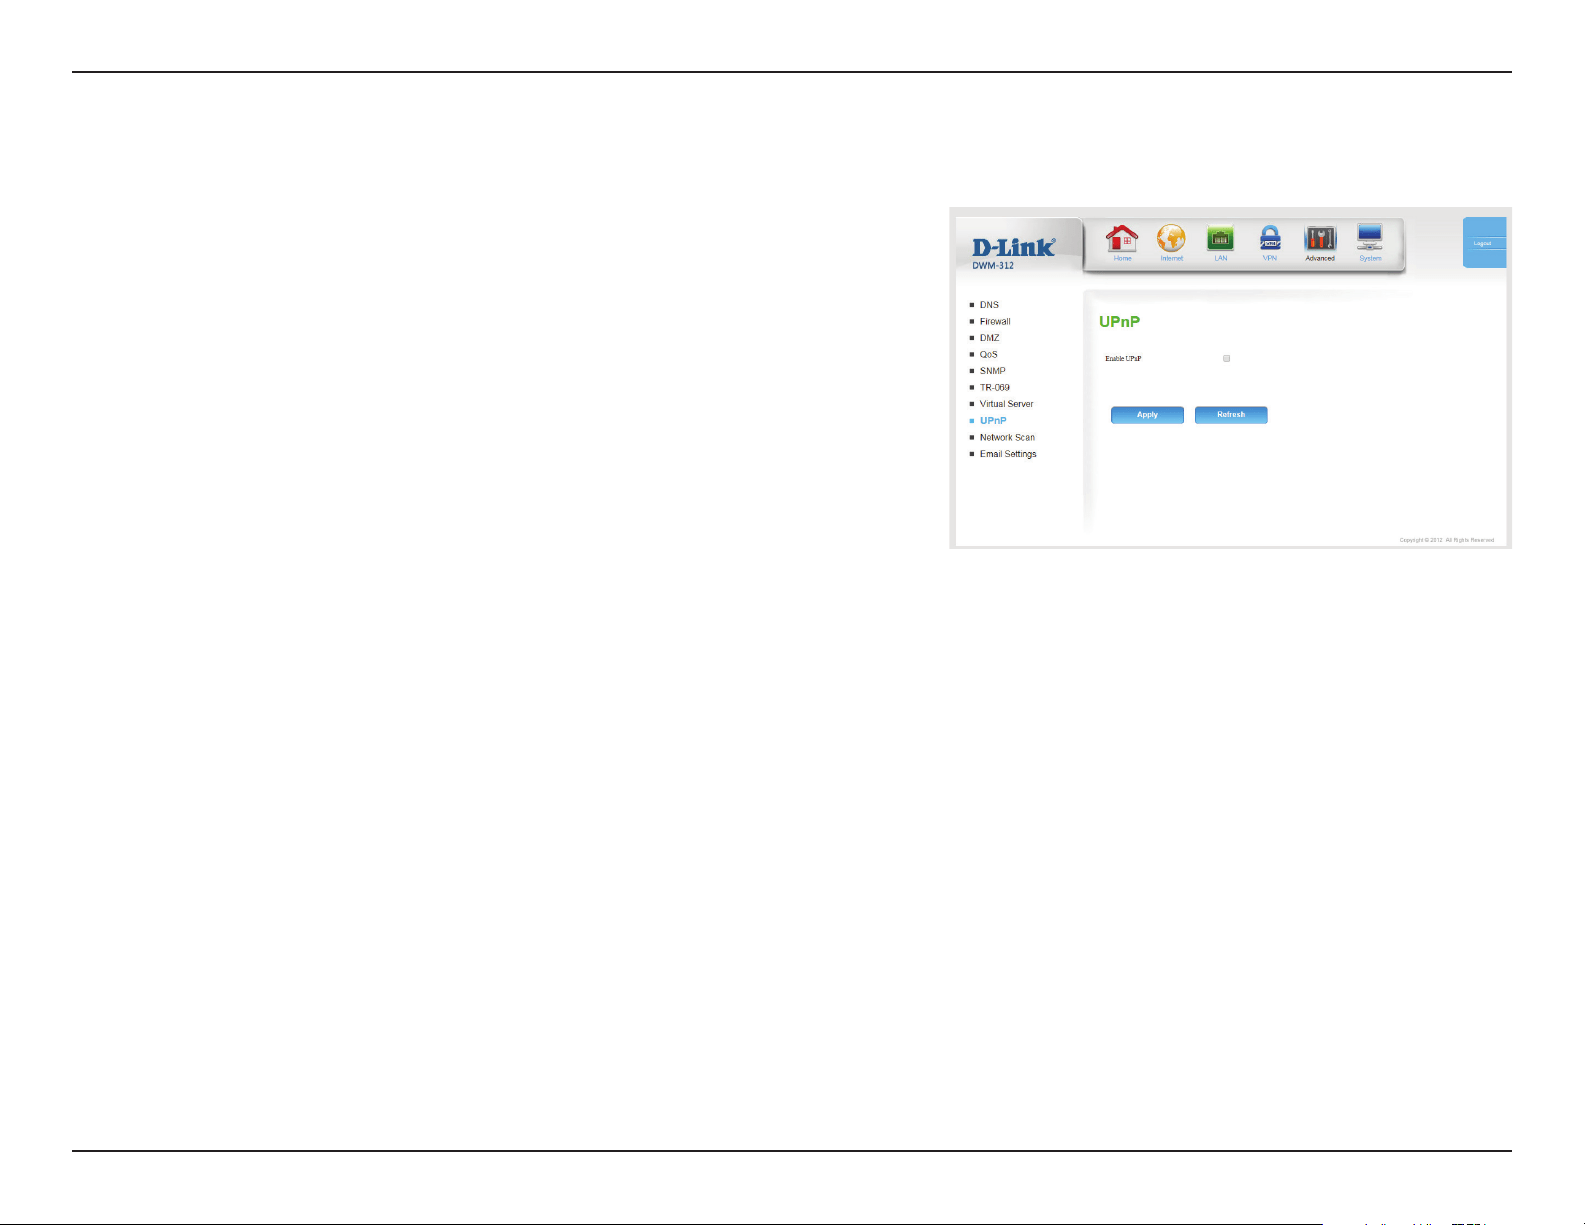
Section 4 - Conguration
Check the box to enable the Universal Plug and Play (UPnP™)
feature. UPNP provides compatibility with various networking
equipment, software, and peripherals.
Click Apply to save your settings, or Refresh to revert to your
previous settings.
Enable UPnP:
UPnP
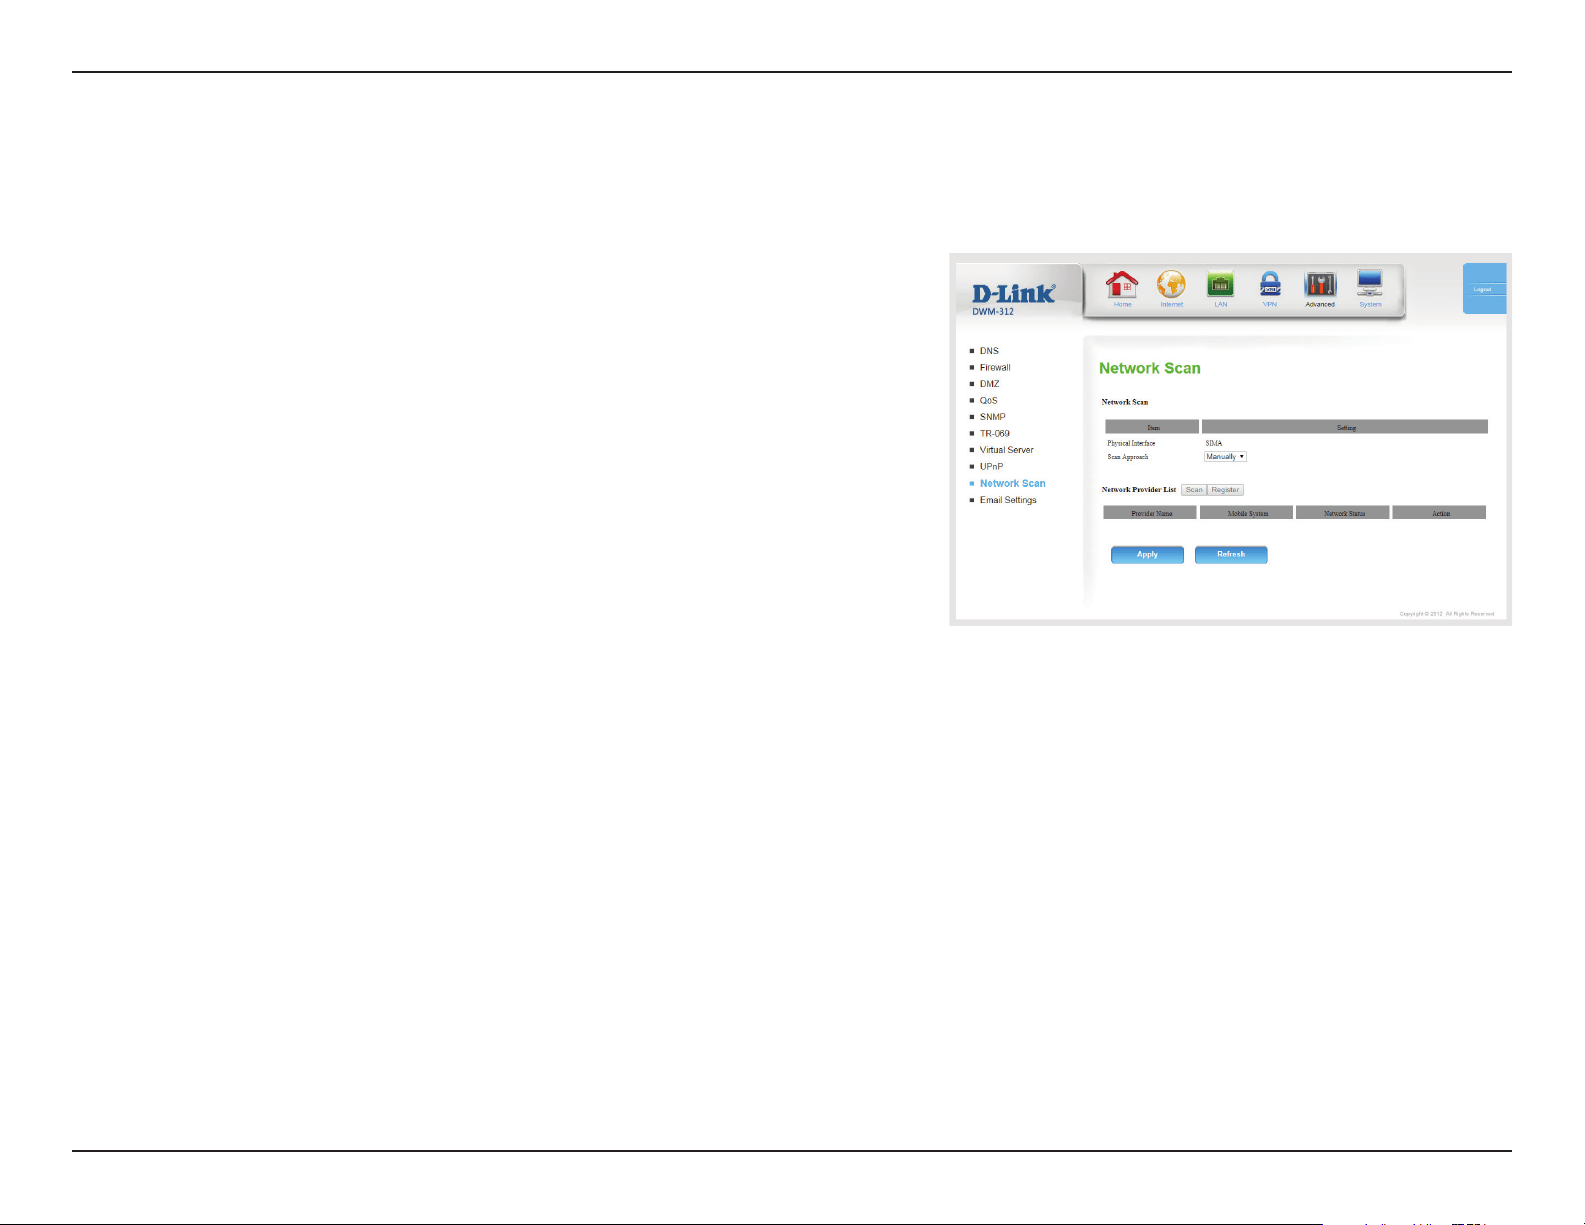
50D-Link DWM-312 User Manual
Section 4 - Conguration
Leave this setting on Auto to allow the DWM-312 to automatically
select a cellular network to connect to. If you need to select a
network manually, select Manual, and the following options will
appear:
Network Provider List
Click Scan to load the list of network providers.
Allows you to register on the selected network.
The name of the detected cellular carrier.
Indicates whether the network is using 2G, 3G, or 4G technology.
Indicates the status of the network.
Check the box corresponding to the network you wish to register
on, and then click Register.
Click Apply to save your settings, or Refresh to revert to your
previous settings.
Note: You will only be able to scan for networks if the device is set
to single SIM mode in WAN Service on page 10, as well as having
Reconnect Mode set to Manual in Connection Settings on page
50.
This page lets you set whether to allow the DWM-312 to automatically select a 3G/4G network based on the inserted SIM card, or allows you to
manually scan for networks and select one to connect to.
Scan Approach:
Scan:
Register:
Provider Name:
Mobile System:
Network Status:
Action:
Network Scan
51D-Link DWM-312 User Manual
Section 3 - Conguration
Email Settings
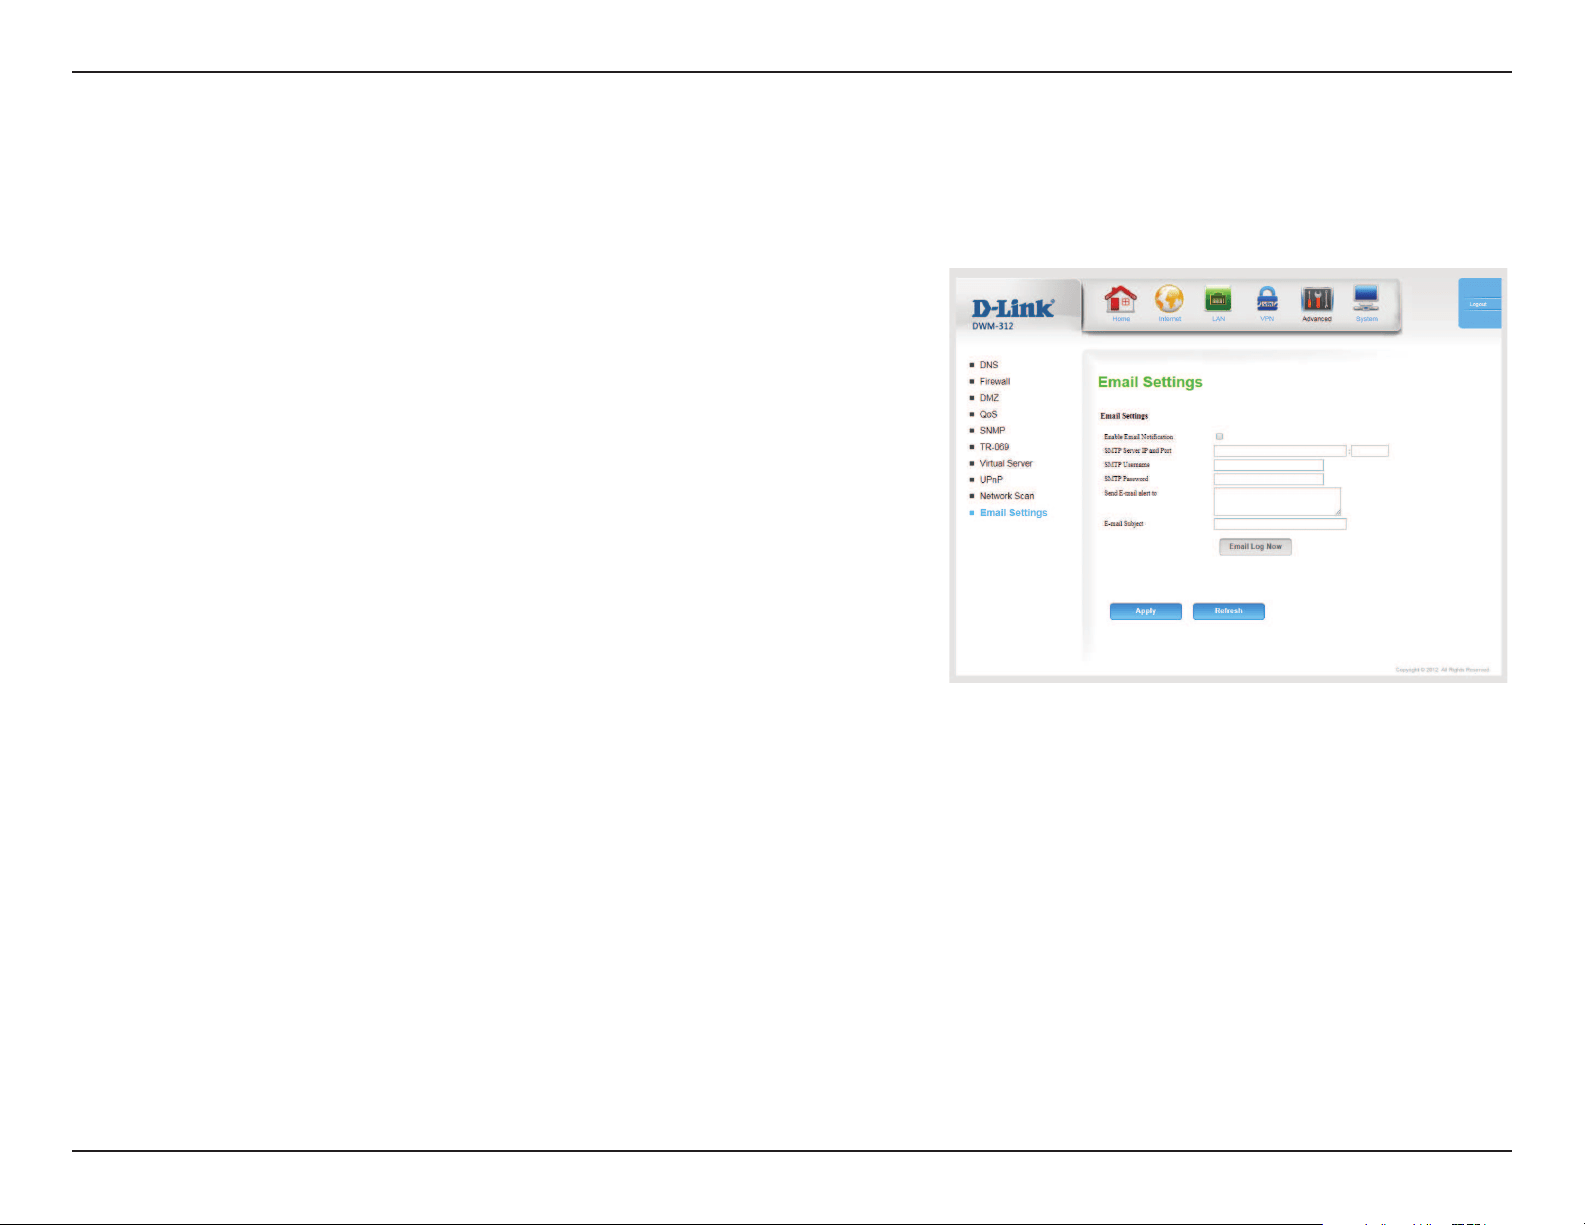
When this option is enabled, router activity logs will be
e-mailed to the specied e-mail address.
Enter the SMTP server IP address the router will use to send
e-mails. Enter the complete IP address followed by a colon(:)
and the port number. (e.g. 123.123.123.1:25).
Enter the username for the SMTP account.
Enter the password for the SMTP account.
Enter the email address where you would like the router to
send e-mails to.
Enter a subject for the e-mail.
Click this button to send the current logs to the specied
e-mail address.
Click Apply to save your settings, or Refresh to revert to your
previous settings.
Enable Email
Notication:
SMTP Sever IP and
Port:
SMTP Username:
SMTP Password:
Send Email alert
to:
Email Subject:
Email Log Now:
Email Settings allow you to send the system log les, router alert messages, and rmware update notications to an e-mail address.
52D-Link DWM-312 User Manual
Section 4 - Conguration
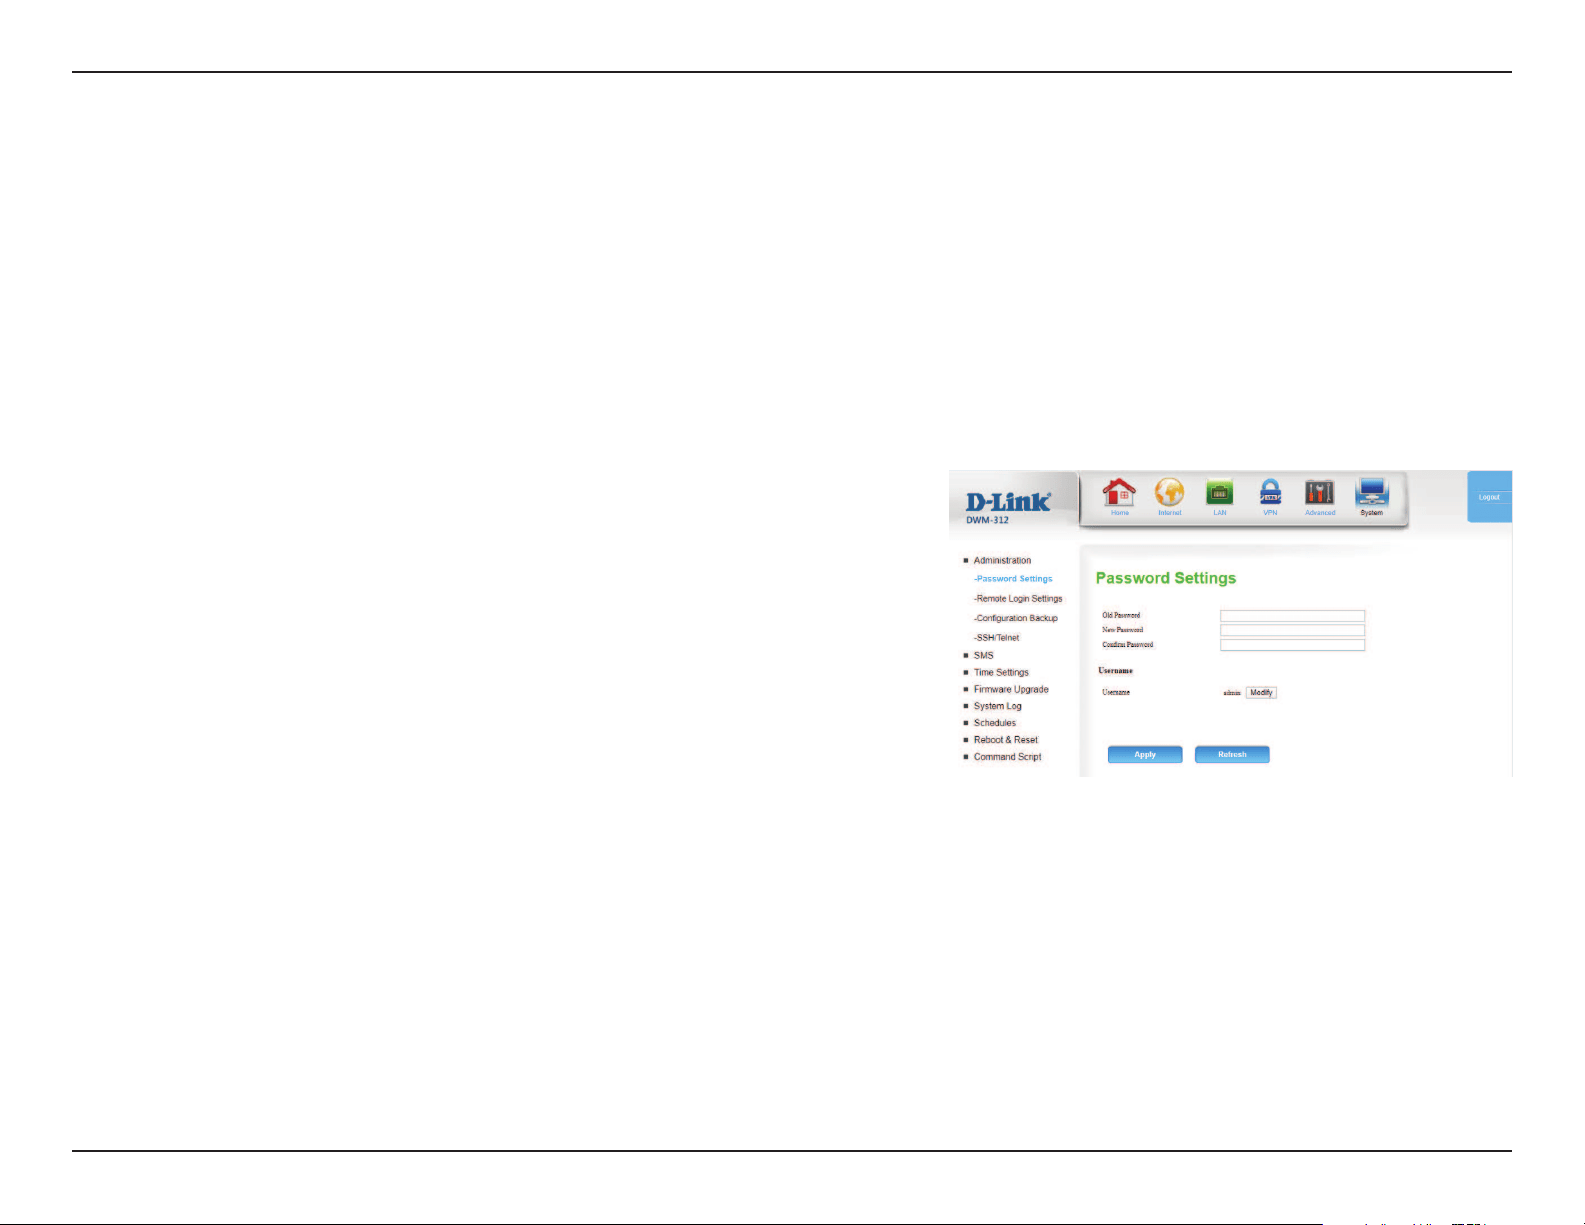
Enter the current admin password.
Enter the new admin password.
Reenter the new password to conrm.
Click Apply to save your settings, or Refresh to revert to your
previous settings.
The Admin page allows you to change the Administrator password and enable Remote Management. The admin has read/write access while users
only have read-only access. Only the admin has the ability to change both admin and user account passwords.
Old Password:
New Password:
Conrm Password:
Administration
Password Settings
System

53D-Link DWM-312 User Manual
Section 4 - Conguration
The Username section allows network administrator to change the web-based MMI login account to access gateway. Click the Modify button and
provide the new username setting.
Display the current MMI login account (Username).
Enter new Username to replace the current setting.
Enter current password to verify if you have the permission to
change the username setting.
Click Save button to save the settings
Click Undo button to cancel the settings
Username:
New Username:
Password:
Save:
Undo:
54D-Link DWM-312 User Manual
Section 4 - Conguration
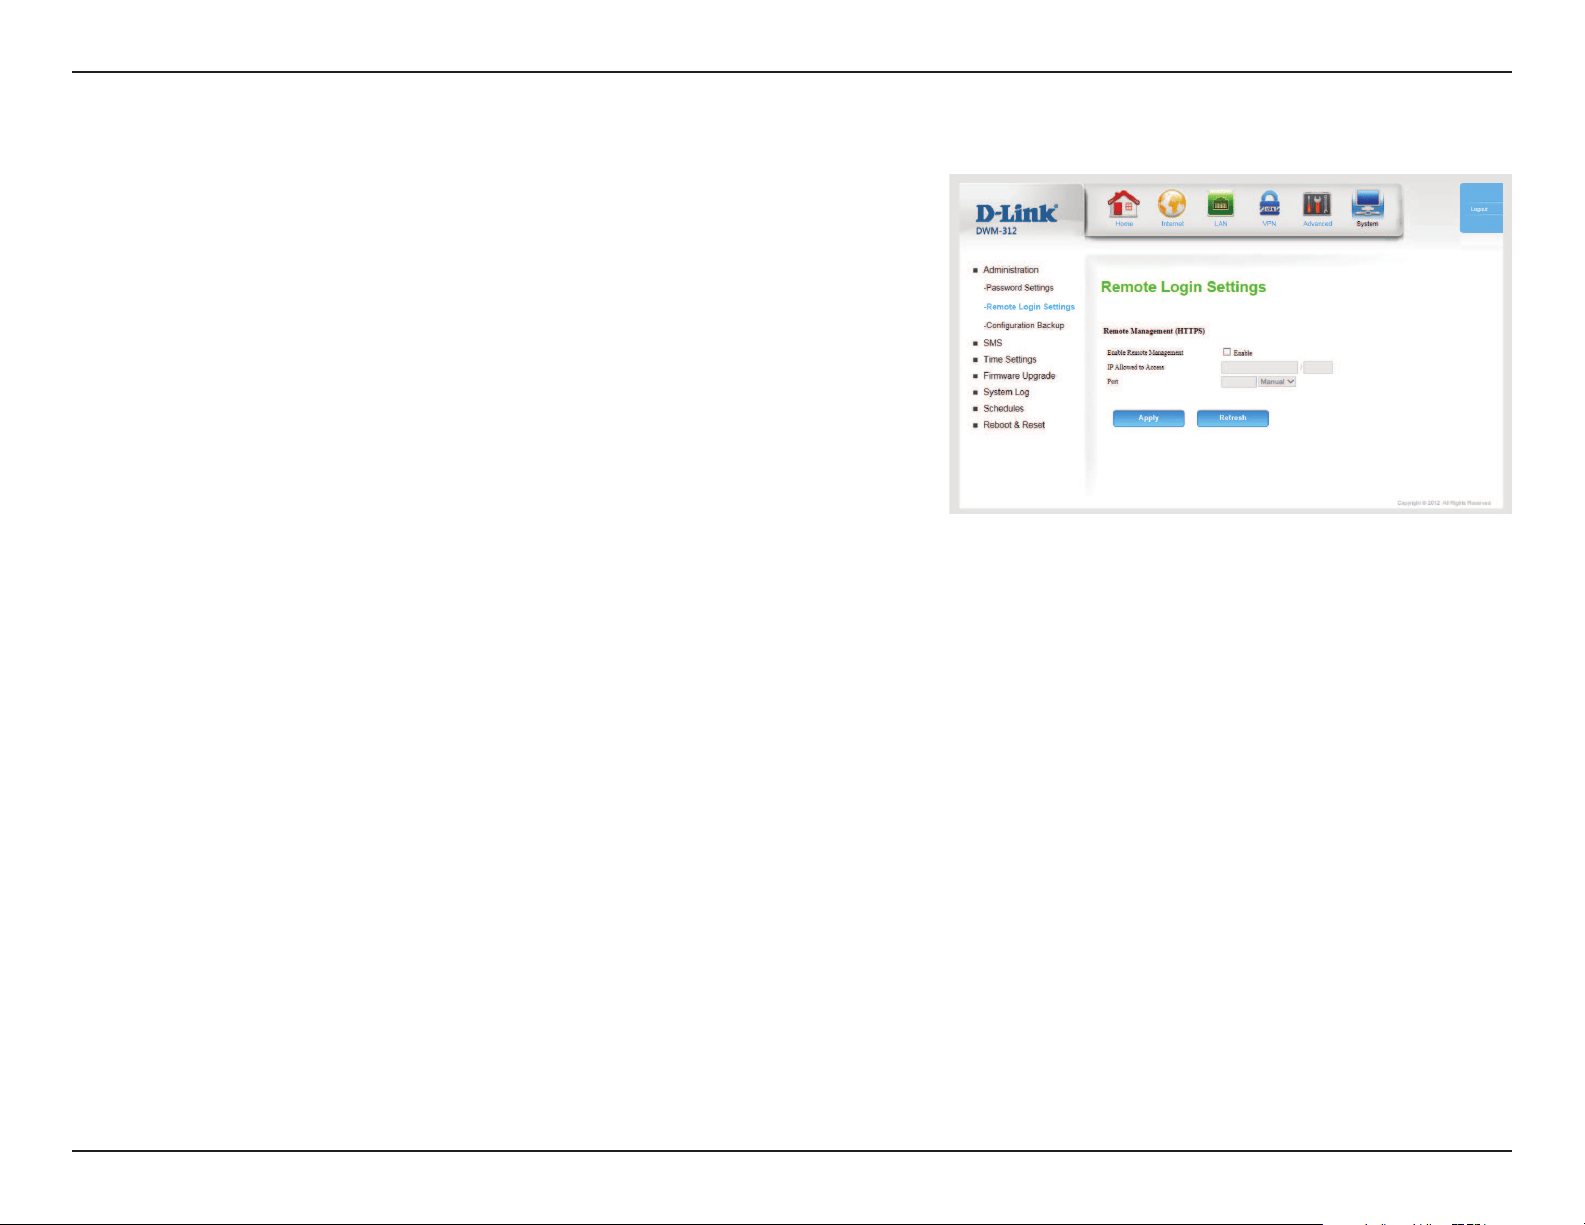
Tick this check box to enable remote management. Remote
management allows the DWM-312 to be congured over the
Internet through a web browser. A username and password will
still be required to access the web-management interface.
Enter the Internet IP address of the PC that has access to the
broadband router. If you enter an asterisk (*) in this eld, then
anyone will be able to access the router. Adding an asterisk (*) into
this eld could present a security risk and is not recommended.
This is the port number used to access the router. 443 is the port
usually used for the HTTPS web-management interface. Select
443, 88, 1080, or Manual to enter one manually.
Click Apply to save your settings, or Refresh to revert to your
previous settings.
Enable Remote
Management:
IP Allowed to
Access:
Port:
Remote Login Settings
55D-Link DWM-312 User Manual
Section 4 - Conguration
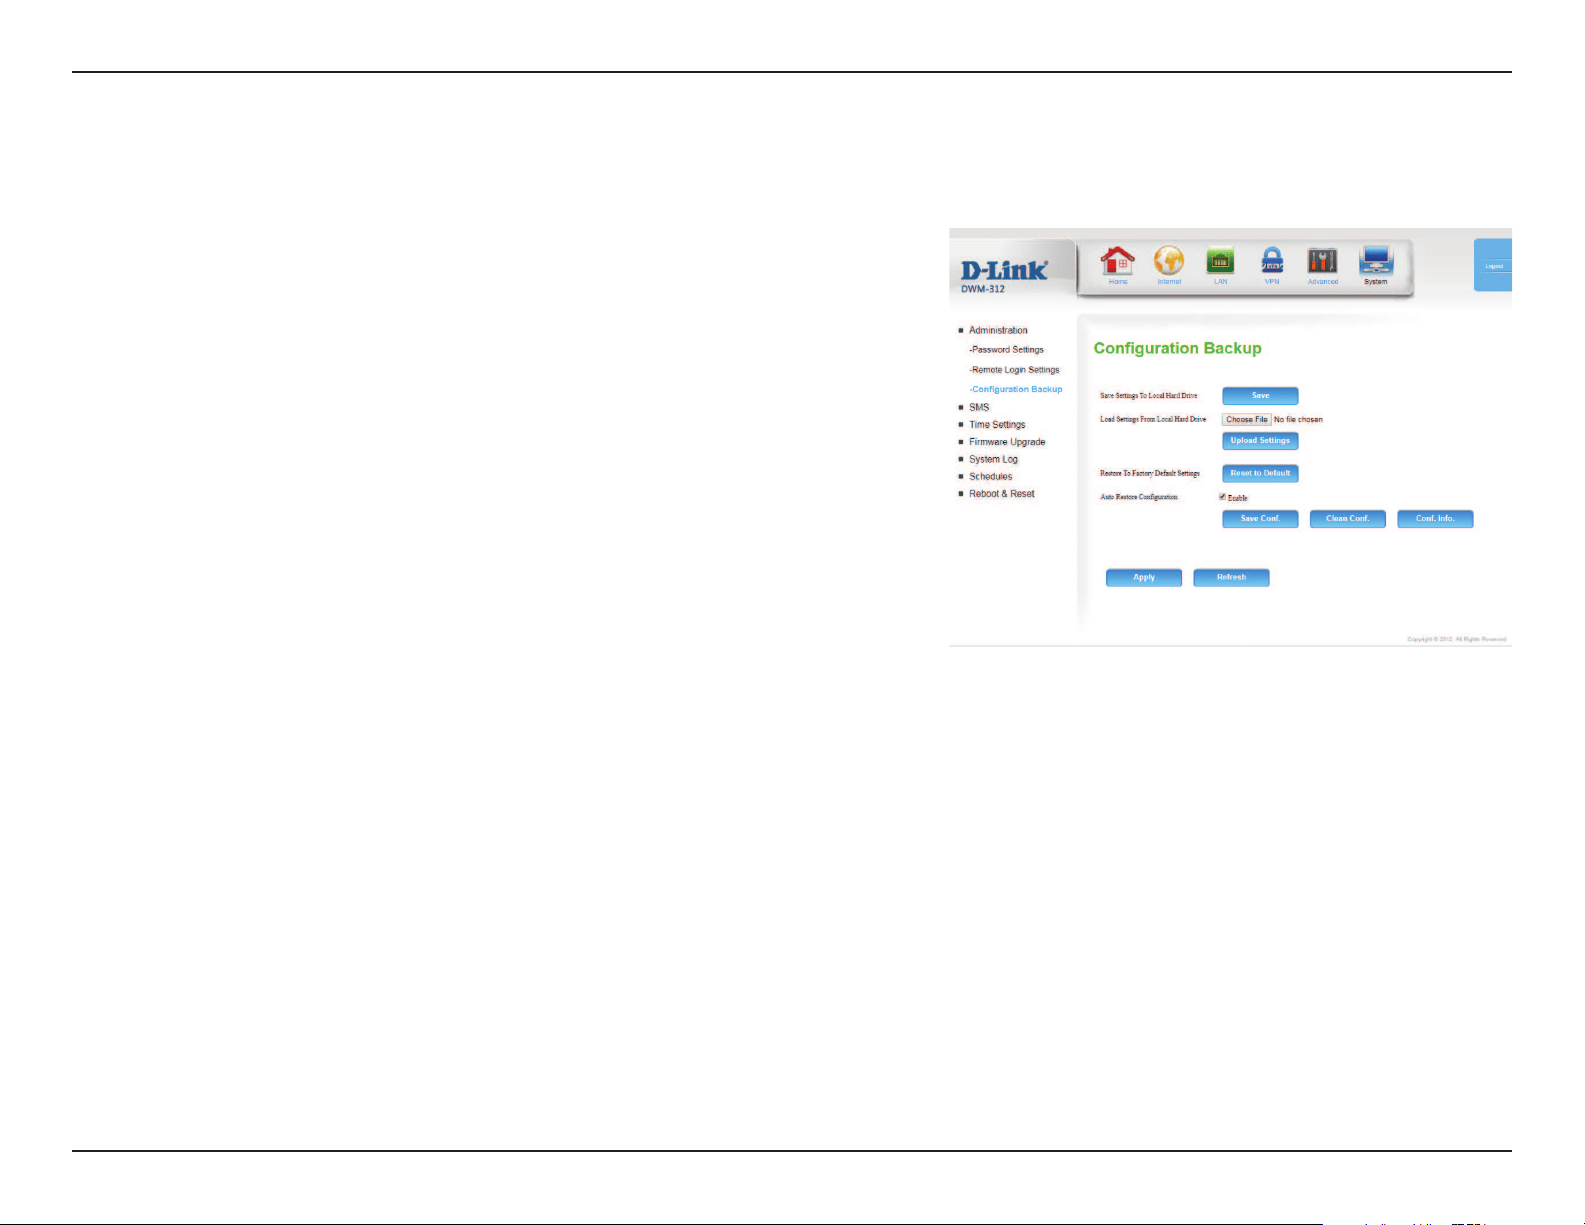
Use this option to save your current router conguration settings
to a le. Click Save to open a le dialog, and then select a location
and le name for the settings.
Use this option to load previously saved router conguration
settings. Click Browse... and select the saved le and then click
the Upload Settings button to upload the settings to the router.
This option will restore all settings back to their defaults. Any
settings that have not been backed up will be lost, including any
rules that you have created.
Check this box to enable the saving of new default settings that
will take eect when the device is reset. To save a new default
based on the current conguration, click Save Conf. To clear user-
set defaults, click Clean Conf. To see the date and time the current
user-set defaults were established, click Conf. Info.
Click Apply to save your settings, or Refresh to revert to your
previous settings.
Save Settings To
Local Hard Drive:
Load Settings
From Local Hard
Drive:
Restore To Factory
Default Settings:
Auto Restore
Conguration:
Here, you can save the current system settings to a local hard drive.
Conguration Backup
56D-Link DWM-312 User Manual
Section 4 - Conguration
Deletes the selected SMS message(s).
Opens a Create Message window to reply to the selected SMS
message.
Opens a Create Message windows to forward the selected SMS
message to another recipient.
Click this button to check for new messages.
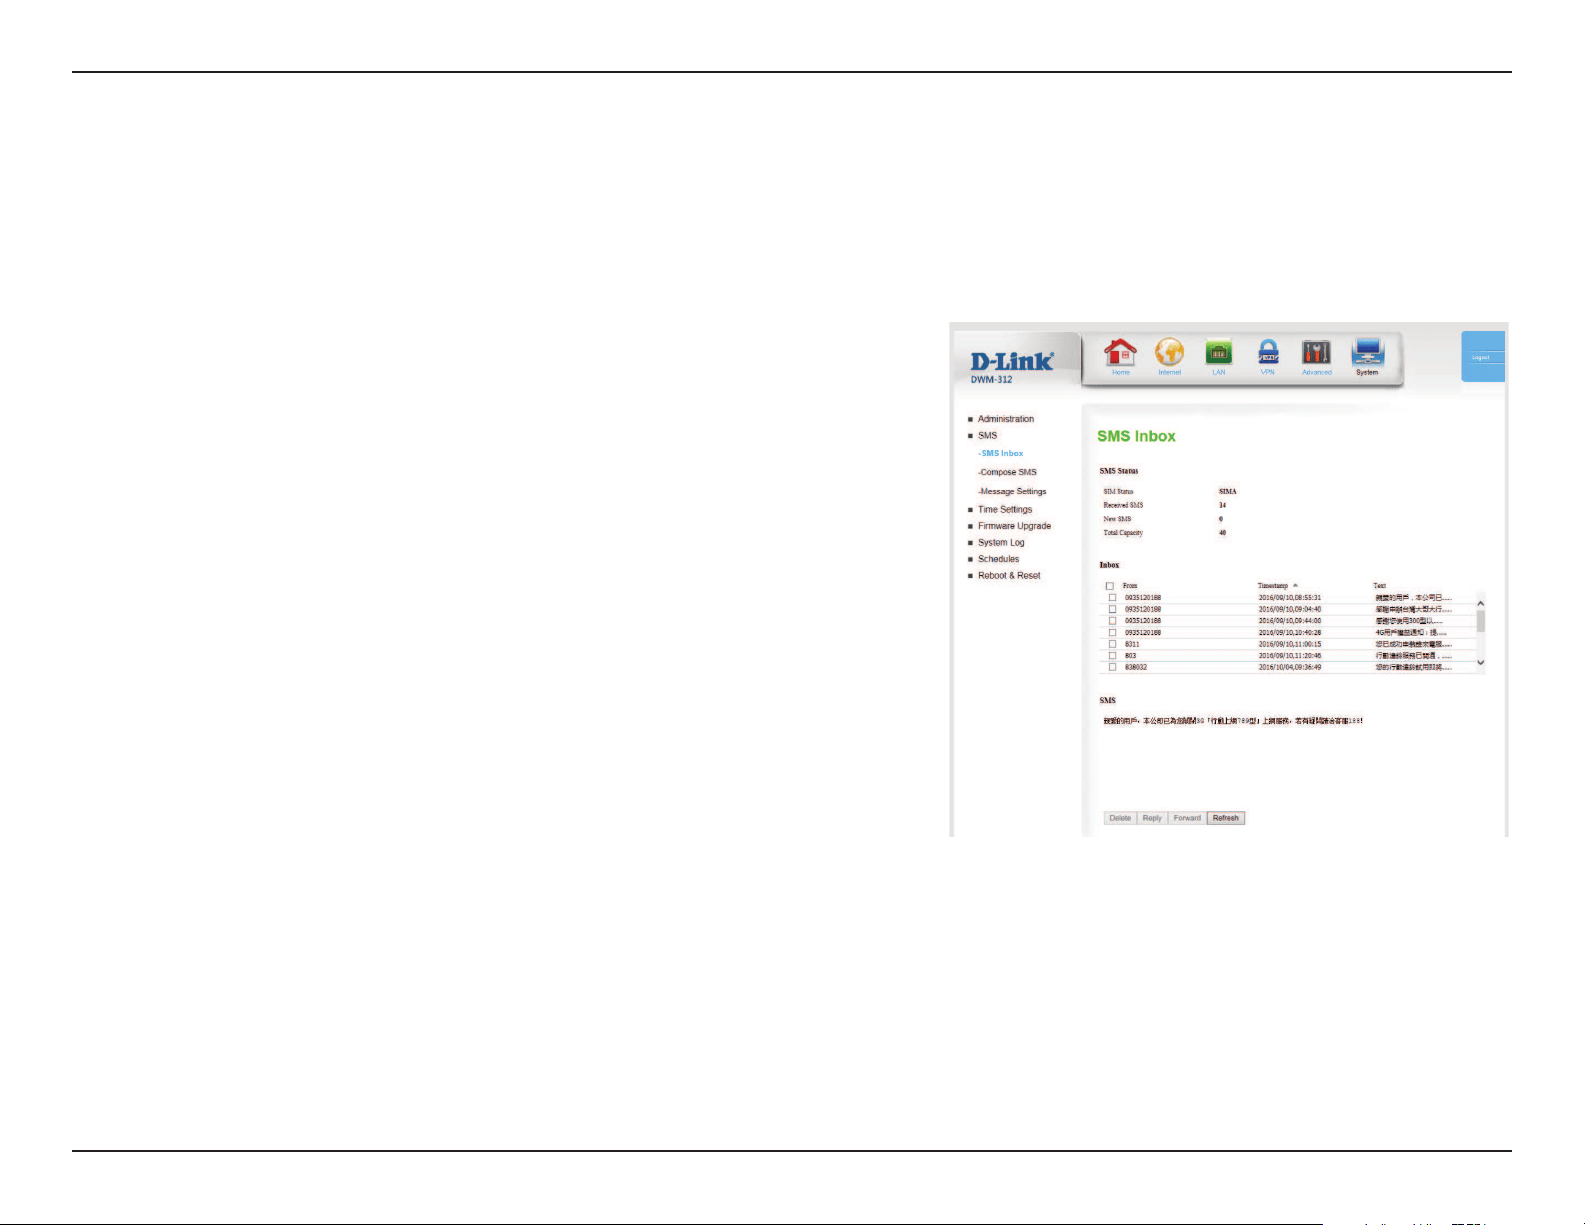
This page shows all messages that are stored on the SIM card. Select a message to display its contents in the SMS window. After you read it, you
can delete it, or reply to the sender. Click the Refresh button to update the list.
Delete:
Reply:
Forward:
Refresh:
SMS
SMS Inbox
57D-Link DWM-312 User Manual
Section 4 - Conguration
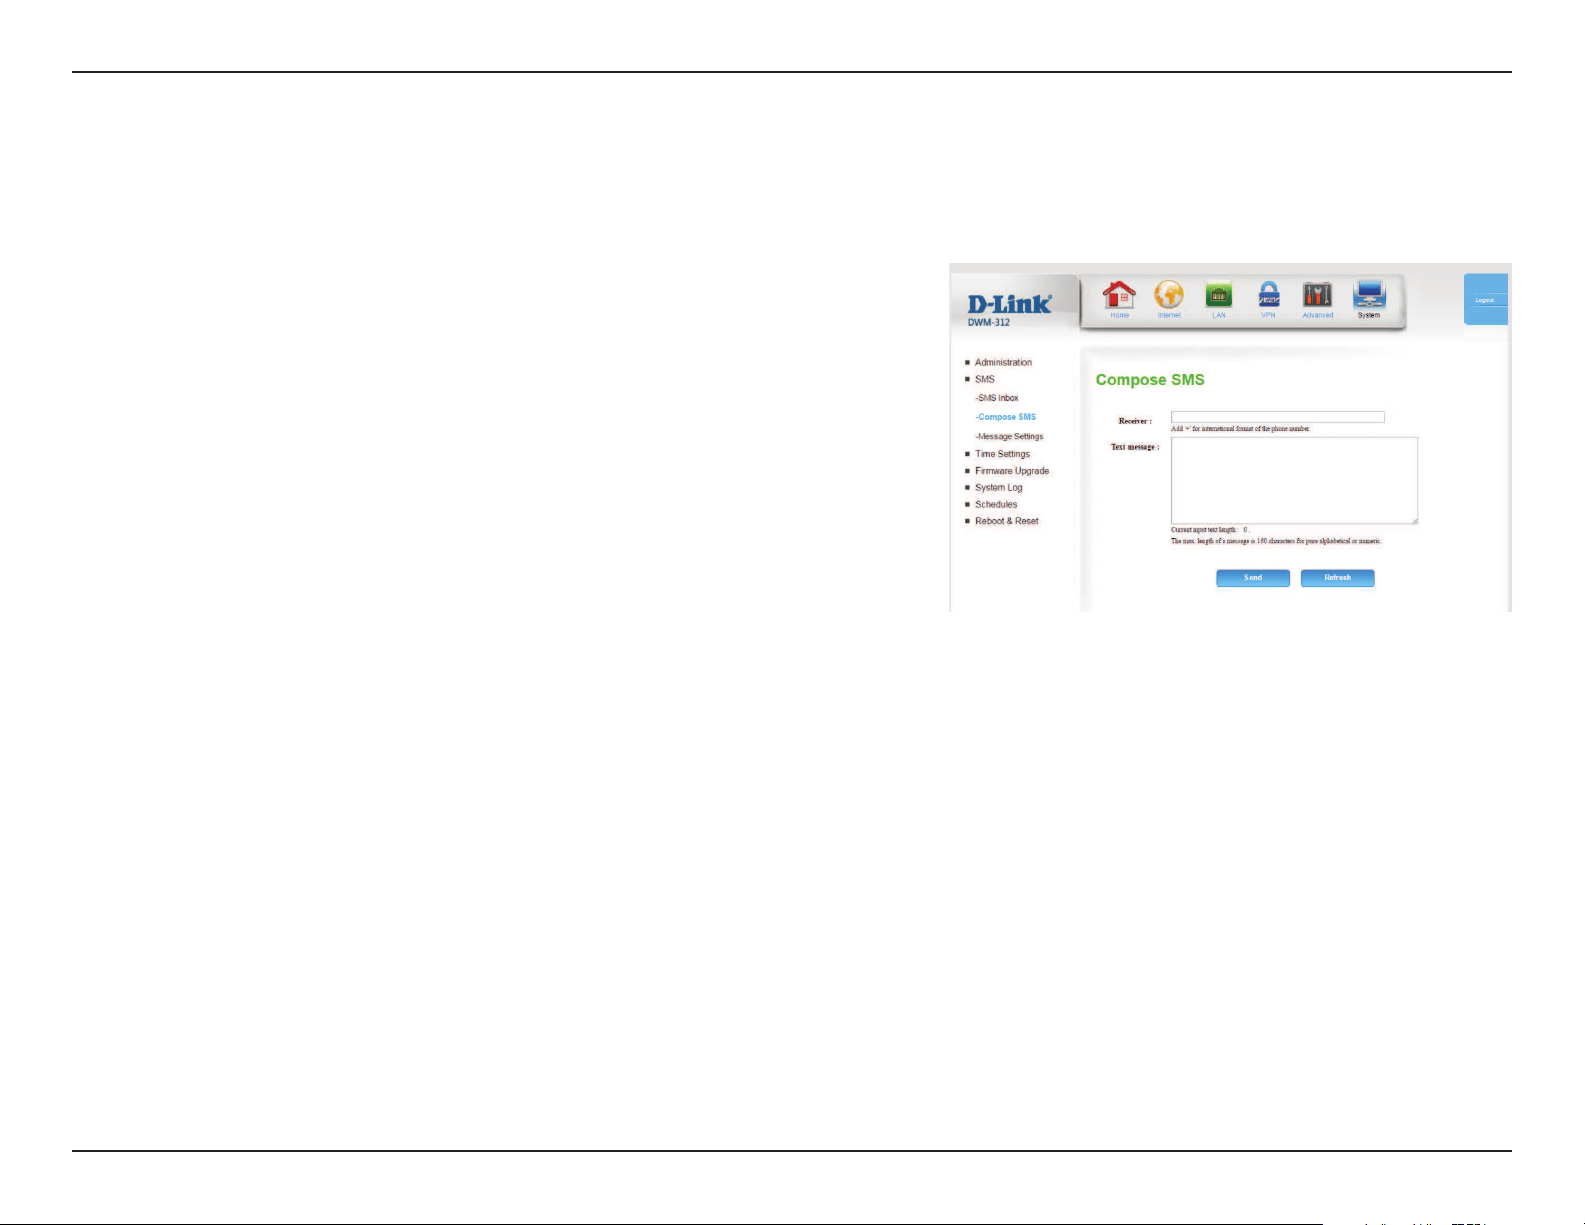
Type the phone number of the recipient.
Type the message that you would like to send.
Click Send to send your message, or Refresh to clear the message.
This page allows you to send an SMS message. Enter the phone number of the recipient, and type the content of message. Then click the Send
Message button to send this message. To add more than one recipient, put a semicolon (;) between each of the phone numbers.
Receiver:
Text Message:
Compose SMS
58D-Link DWM-312 User Manual
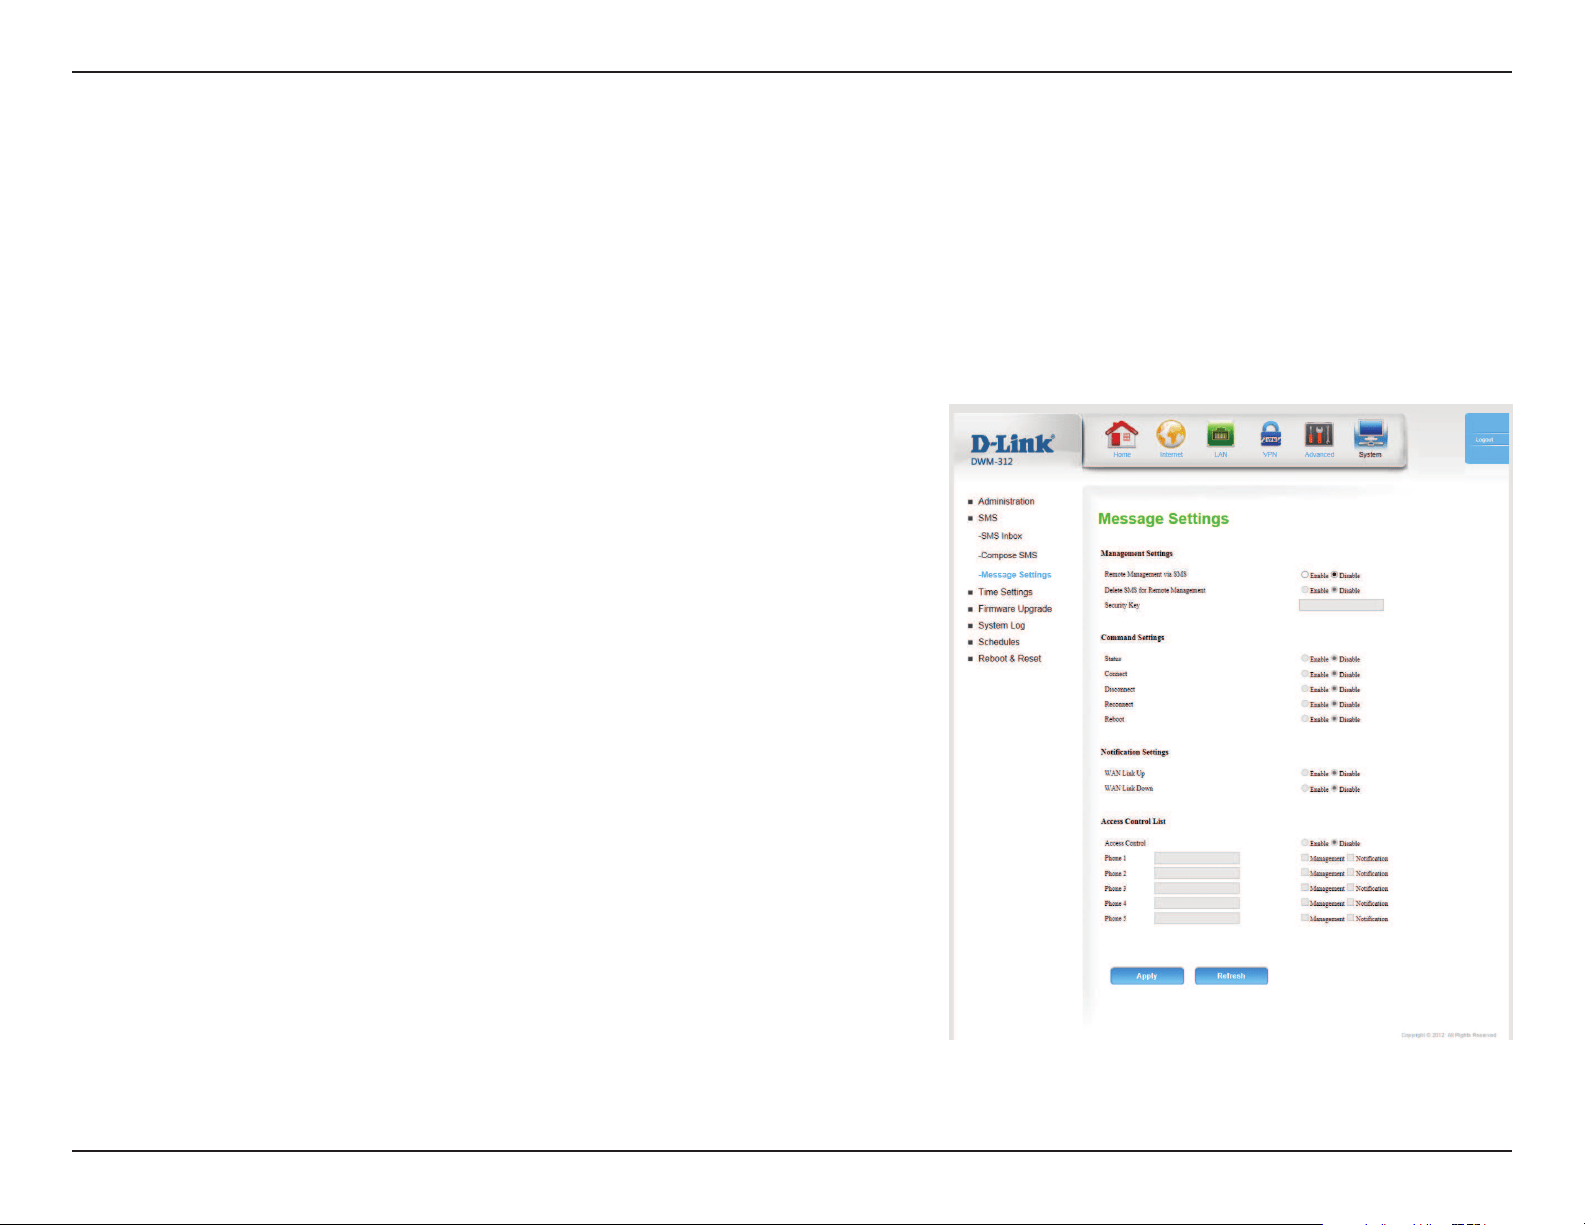
Section 4 - Conguration
Select Enable to enable SMS remote management. The default is
Disable.
Select Enable to delete SMS messages related to remote
management from the inbox once they are processed. The default
is Disable.
If you have enabled Remote Management via SMS, you will have
the option to add a security key, which is sent at the beginning of
the message. The key is case-sensitive.
Note: The security key is not encrypted, and all messages to and
from the router are sent in plaintext.
Command Settings
Select Enable and send the Status command over SMS to receive
a message with the WAN IP, current networks, and connection
time.
Select Enable to use the Connect command to have the router
connect to the mobile network.
The DWM-312 can be managed remotely over SMS. Get status updates, manage connections, and reboot remotely with a single text. Receive
continuous updates about connectivity status. Access control lists and security keys can help protect your router from unwanted remote
management. Once remote management is congured, you can send SMS messages to the router’s phone number in the following format:
<security Key> <command>. For example, if your security key were “12345” and you wanted to reboot the router, you would send an SMS to the
router’s phone number with the contents 12345 reboot. Note that commands must be either lower case, upper case, or with only the rst letter
capitalized.
Note: SMS messages may incur fees from your operator.
Remote
Management via
SMS:
Delete SMS
for Remote
management:
Security Key:
Status:
Connect:
Message Settings
59D-Link DWM-312 User Manual
Section 4 - Conguration
Select Enable to use the Disconnect command to have the router
disconnect from the mobile network.
Select Enable to use the Reconnect command to have the router
cycle the mobile connection o and then back on again.
Select Enable to use the Reboot command to have the router
initiate a reboot.
Notication Settings
Select Enable to receive SMS notications when the WAN Link is
up. These notications will be sent to numbers specied in the
access control list.
Select Enable to receive SMS notications when the WAN Link is
down.
Access Control Settings
Select Enable to input phone numbers. When enabled, the router
will accept SMS commands only from those phone numbers
which have the Management option selected. Additionally, the
router will send any notication messages to any numbers with
the Notication option selected.
Note: The access control settings rely on caller-ID information
provided by the phone system, and contain no additional
authentication or encryption tools.
Click Apply to save your settings, or Refresh to revert to your
previous settings.
Disconnect:
Reconnect:
Reboot:
WAN Link Up:
WAN Link Down:
Access Control:
Message Settings (Cont)
60D-Link DWM-312 User Manual
Section 4 - Conguration
Select the appropriate time zone from the drop-down box.
Check the box to allow for daylight saving adjustments. Use the
drop-down boxes to specify a start date and end date for daylight
saving time adjustments.
Check the box to allow the router to use an NTP server to update
the router’s internal clock.
Enter an NTP server to use for time synchronization, or use the
drop-down box to select one. Click the Update Now button to
synchronize the time with the NTP server.
Click Apply to save your settings, or Refresh to revert to your
previous settings.
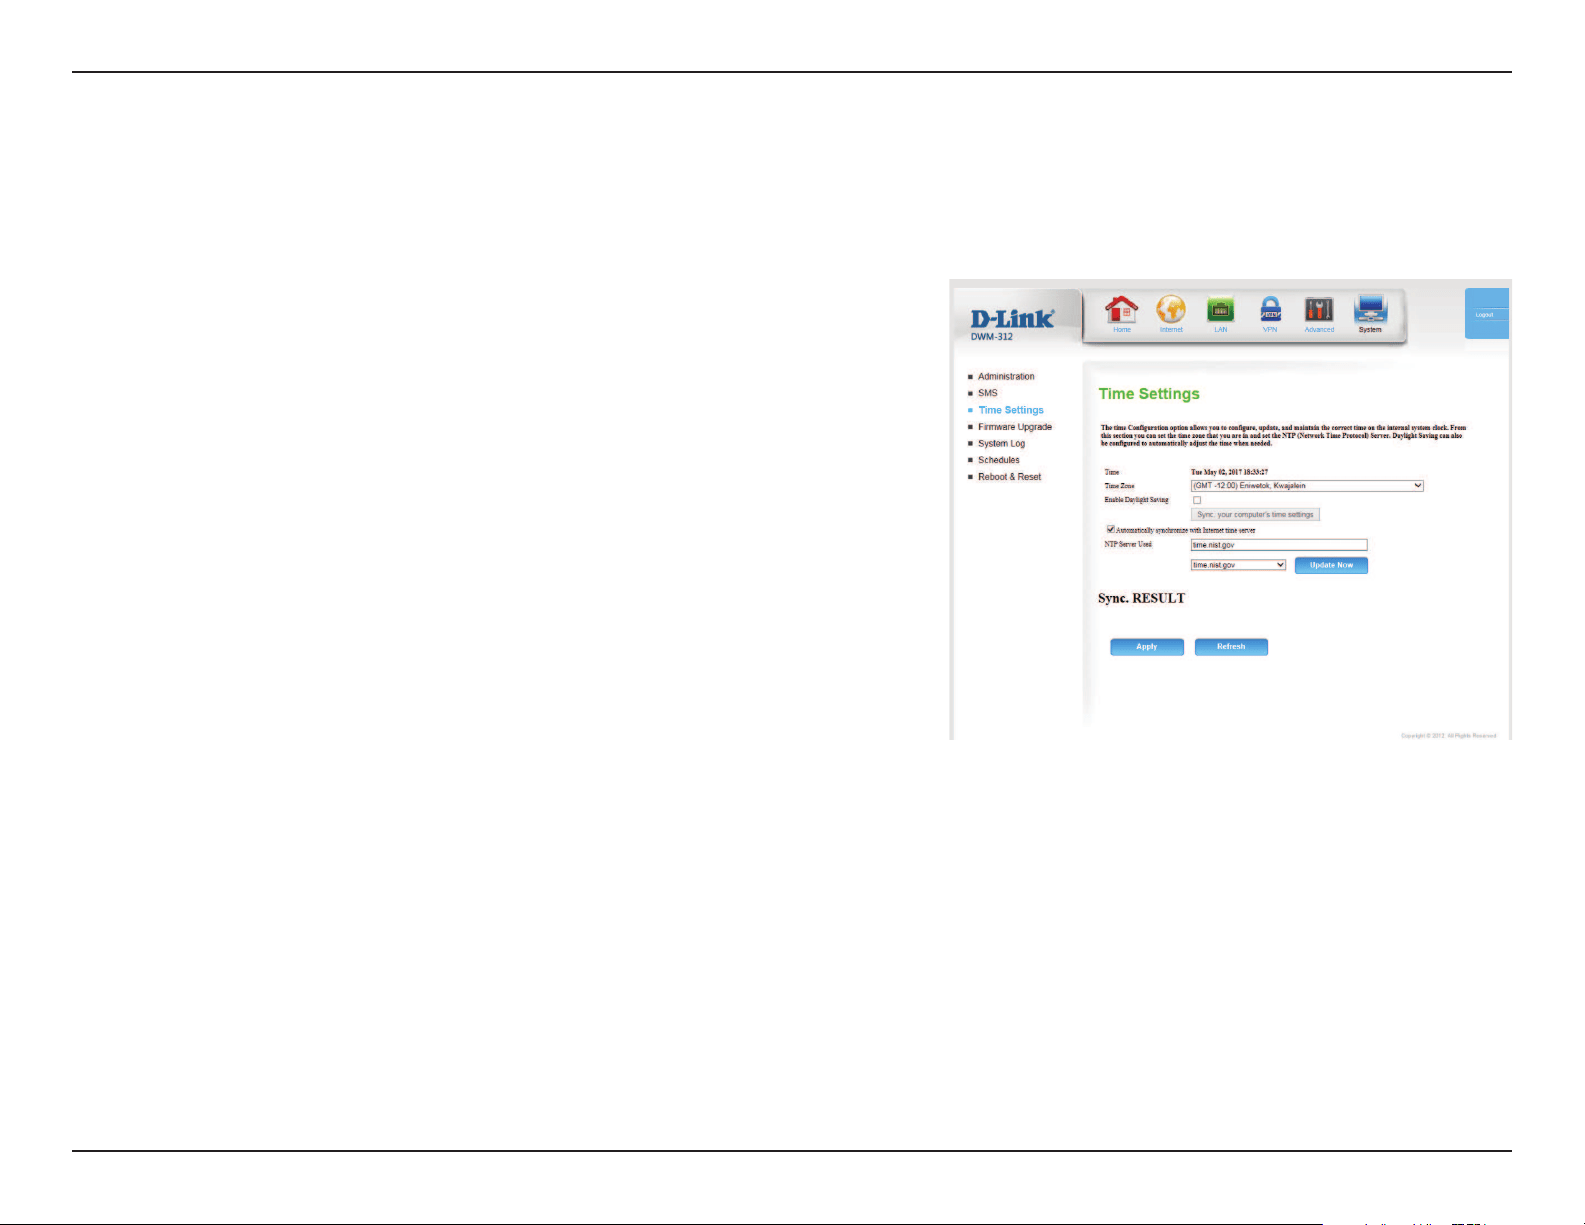
This section will help you set the time zone that you are in and an NTP (Network Time Protocol) server to use. Daylight Saving can also be congured
to adjust the time when needed.
Time Zone:
Enable Daylight
Saving:
Automatically
synchronize with
Internet time
server:
NTP Server Used:
Time Settings
61D-Link DWM-312 User Manual
Section 4 - Conguration
Displays your current rmware’s version.
Queries the remote server to check for a rmware update over the
Internet. If one is available, it will be displayed below.
This button will appear if Check File nds new rmware. Click this
button to begin the update process.
Warning: Do not unplug or power o the device while the update
is in progress.
Displays your current rmware’s release date.
Use this option if you wish to manually install rmware. After you
have downloaded a new rmware le, click Browse to locate
the rmware on your computer, then click Upgrade to start the
rmware upgrade.
If the rmware you want to install is not an ocial D-Link release,
you will need to check this box.
Warning: Unocial rmware is not supported, and may cause
damage to your device. Use of unocial rmware is at
your own risk.
Here, you can upgrade the rmware of your router. The DWM-312 provides support for both Firmware Over the Air and for manual upgrades. For
a manual upgrade, make sure the rmware you want to use is on the local hard drive of the computer and then click Browse to upload the le.
You can check for and download rmware updates at the D-Link support site at
http://support.dlink.com.
Current Firmware
Version:
Check File:
Update:
Current Firmware
Date:
Upgrade:
Accept unocial
Firmware:
Firmware Upgrade
Device Upgrade
62D-Link DWM-312 User Manual
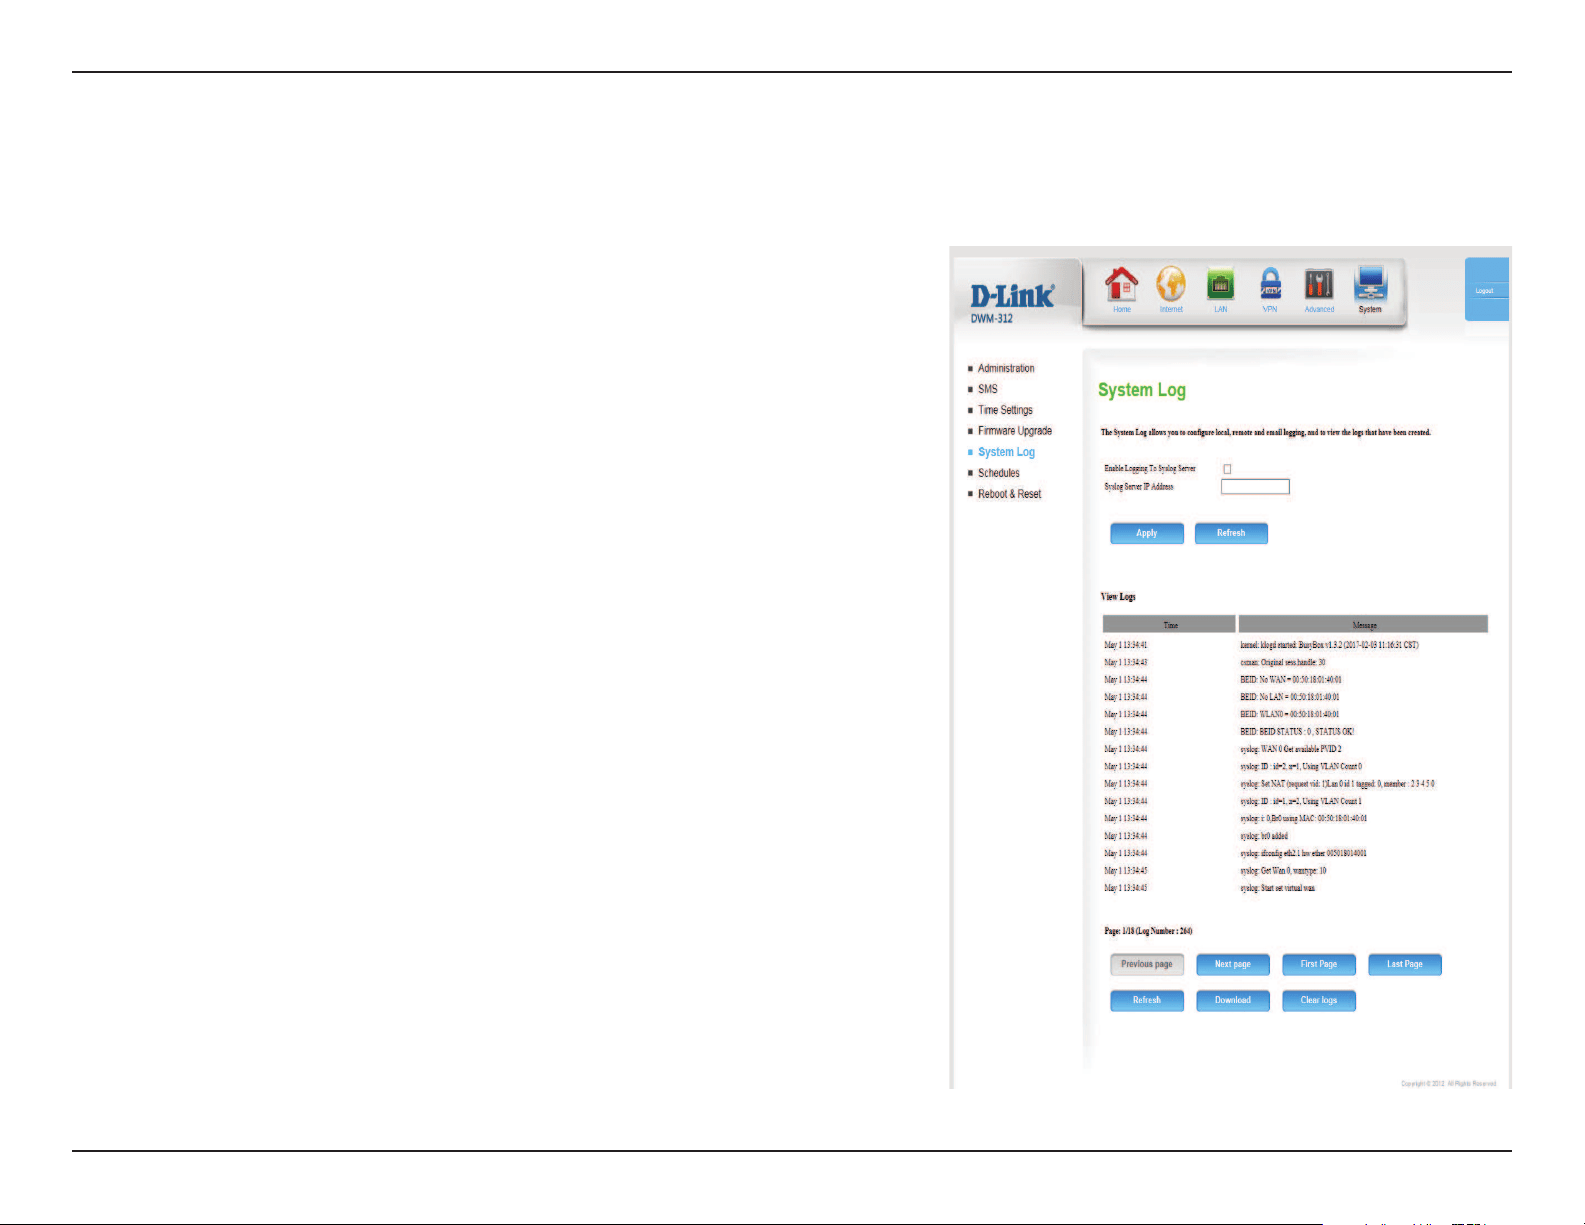
Section 4 - Conguration
Check the box to send the router logs to a Syslog server.
Enter the IP address of the Syslog server that the router will send
the logs to.
View Logs
Click to go to the previous page of logs.
Click to go to the next page of logs.
Click to go to the rst page of logs.
Click to go to the last page of logs.
Click to refresh the page.
Click to download a text le with all log entries.
Click this button to clear all logs.
Click Apply to save your settings, or Refresh to revert to your
previous settings.
The DWM-312 keeps a running log of events and activities occurring on the router. You may send these logs to a Syslog server on your network.
Enable Logging to
Syslog Server:
Syslog Server IP
Address:
Previous Page:
Next Page:
First Page:
Last Page:
Refresh:
Download:
Clear logs:
System Log
63D-Link DWM-312 User Manual
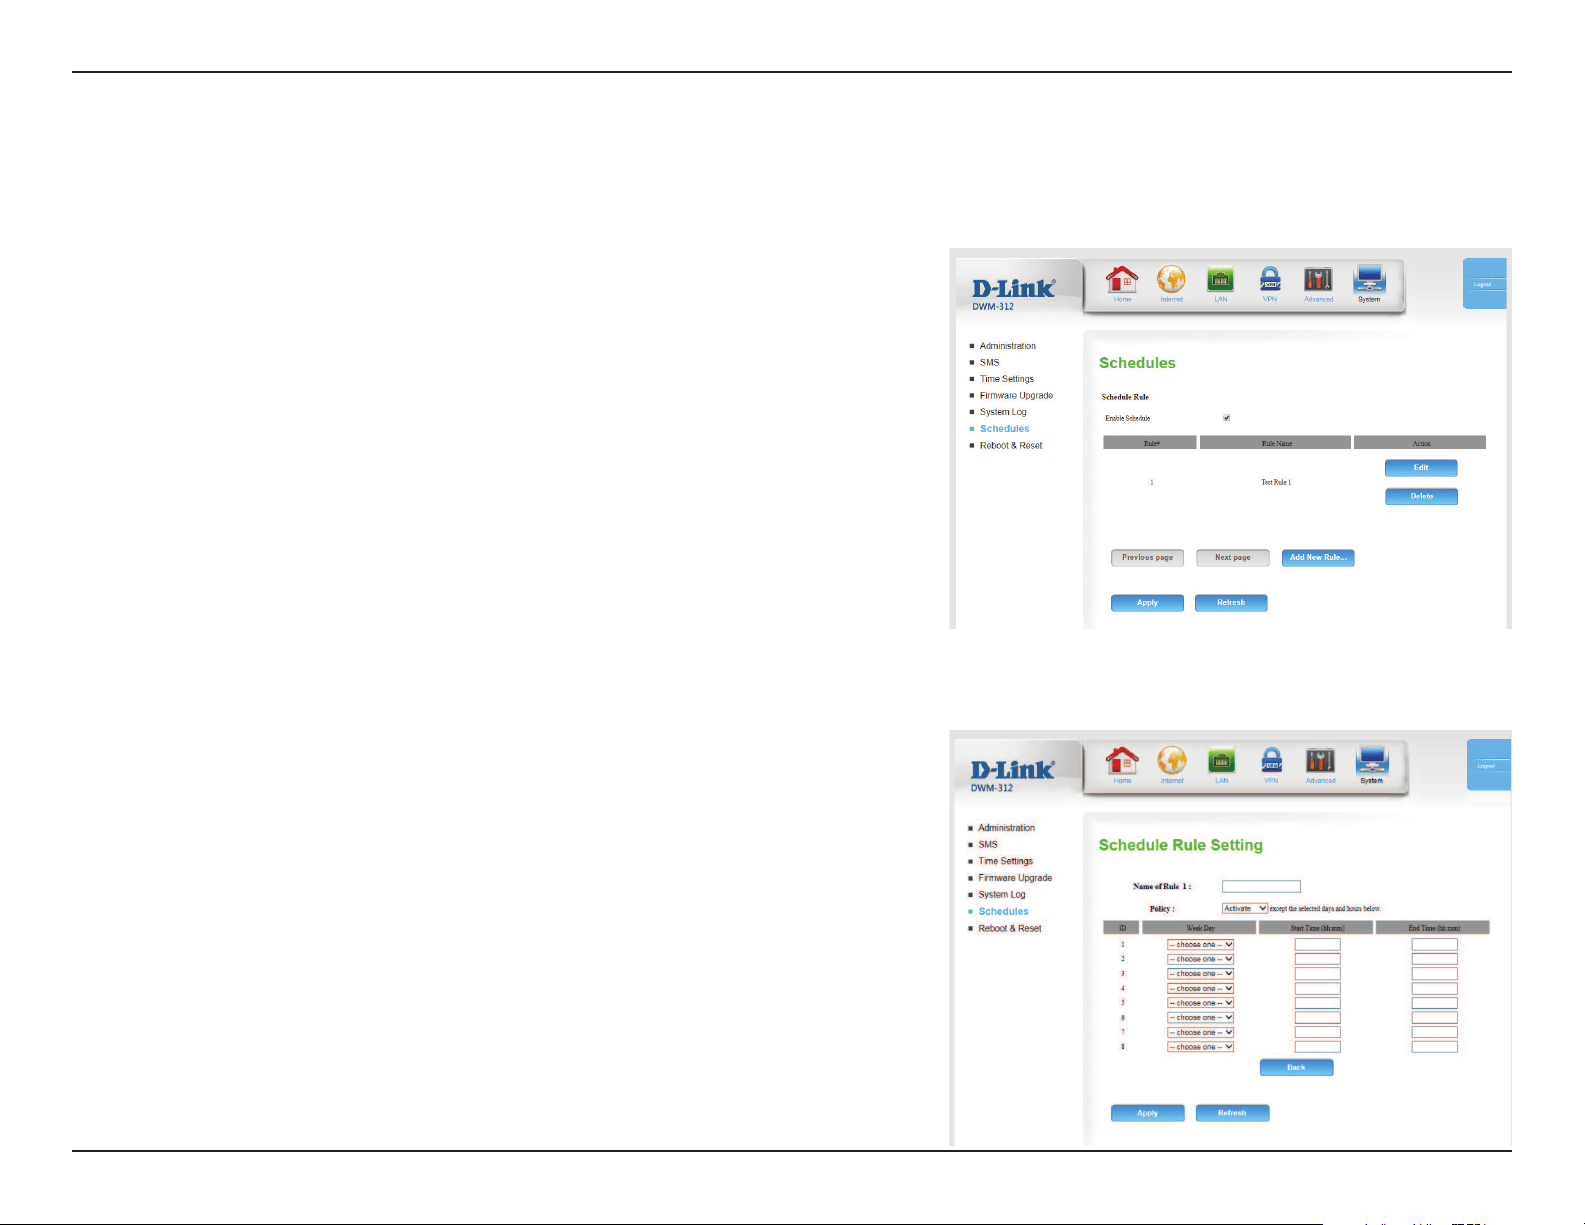
Section 4 - Conguration
Check this box to enable schedules.
Click this icon to edit the selected rule. (see below)
Click this icon to delete the selected rule.
Click this button to go to the previous page of rules.
Click this button to go to the next page of rules.
Click this button to specify the start time, end time, and name of
the rule.
Click this button to create a new rule. (see below)
This section allows you to manage schedule rules for various rewall and parental control features. Click Apply to save your settings, or Refresh to
revert to your previous settings.
Enable Schedule:
Edit:
Delete:
Previous Page:
Next Page:
Add New Rule..:
Enter a name for your new schedule.
Select Activate or Inactivate to decide whether features that use
the schedule should be active or inactive except during the times
specied.
Select a day of the week for the start time and end time.
Enter the time at which you would like the schedule to become
active.
Select the time at which you would like the schedule to become
inactive.
Name of Rule #:
Policy:
Week Day:
Start Time
(hh:mm):
End Time
(hh:mm):
Schedules
Add New Rule
64D-Link DWM-312 User Manual
Section 4 - Conguration
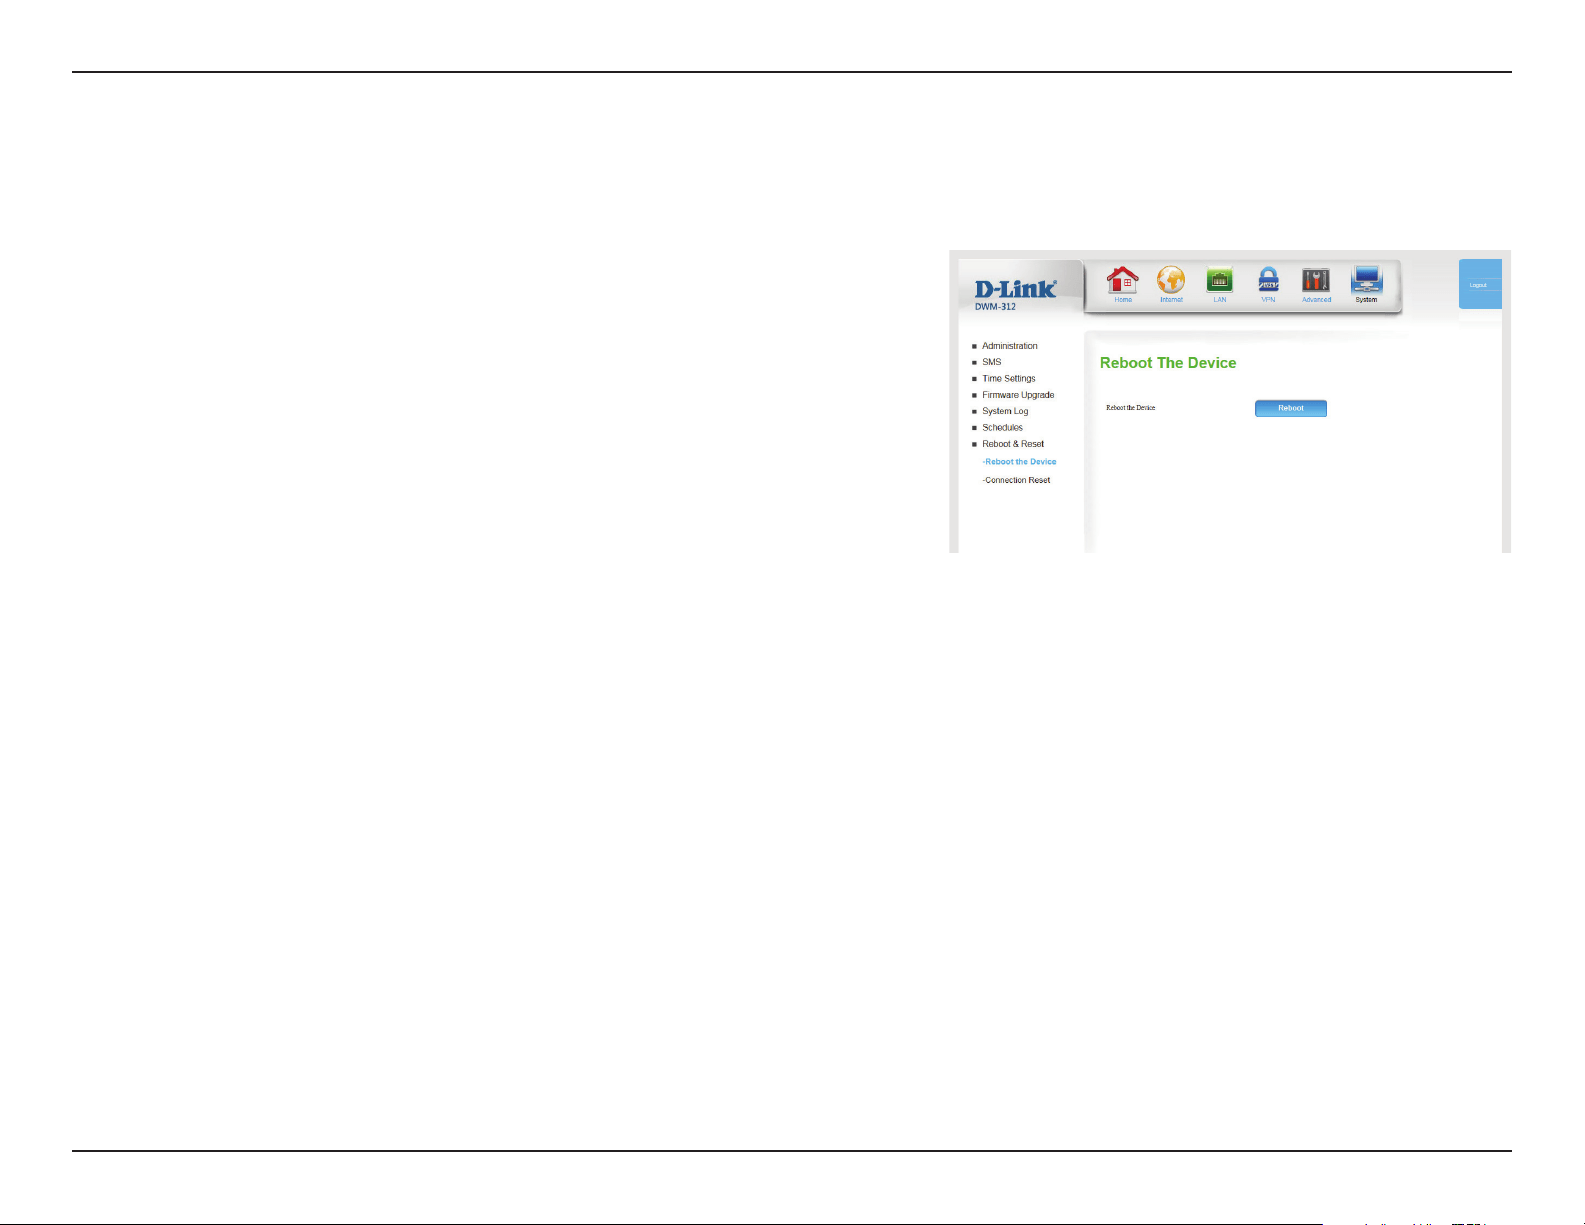
Click Reboot to reboot the device.Reboot the
Device:
Reboot the Device
Reboot and Reset
65D-Link DWM-312 User Manual
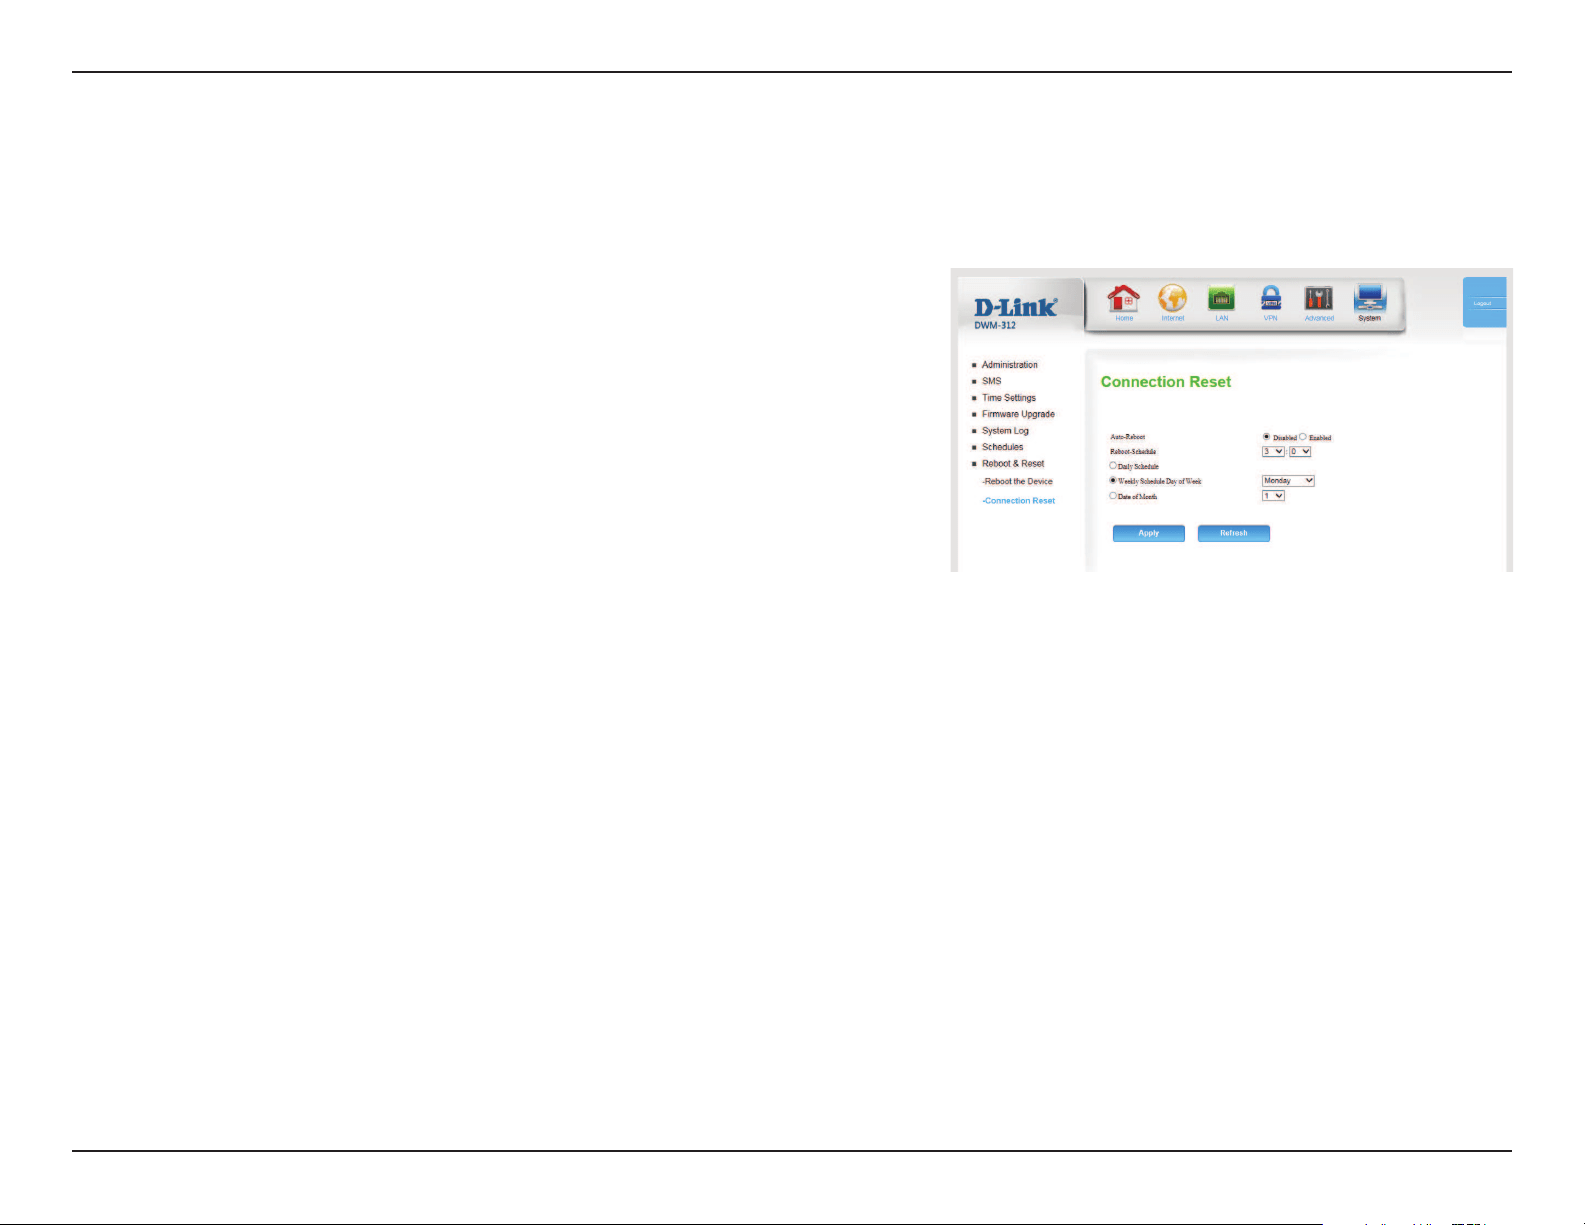
Section 4 - Conguration
Select whether the connection reset feature should be enabled or
disabled.
If the connection reset feature is enabled, select the hour and
minute it should be triggered using the dropdown boxes.
Select this option if you want the connection reset feature to
activate on a daily schedule.
Select this option if you want the connection reset feature to
activate only on a certain day of the week.
Select this option if you want the connection reset feature to
activate only on a certain day of the month.
Click Apply to save your settings, or Refresh to revert to your
previous settings.
This feature allows you to reset the Internet connection on your router by periodically resetting the connection. You can choose to have this happen
on a predetermined schedule by conguring the options on this page.
Auto-Reboot:
Reboot-Schedule:
Daily Schedule:
Weekly Schedule
Day of Week:
Date of Month:
Connection Reset
66D-Link DWM-312 User Manual
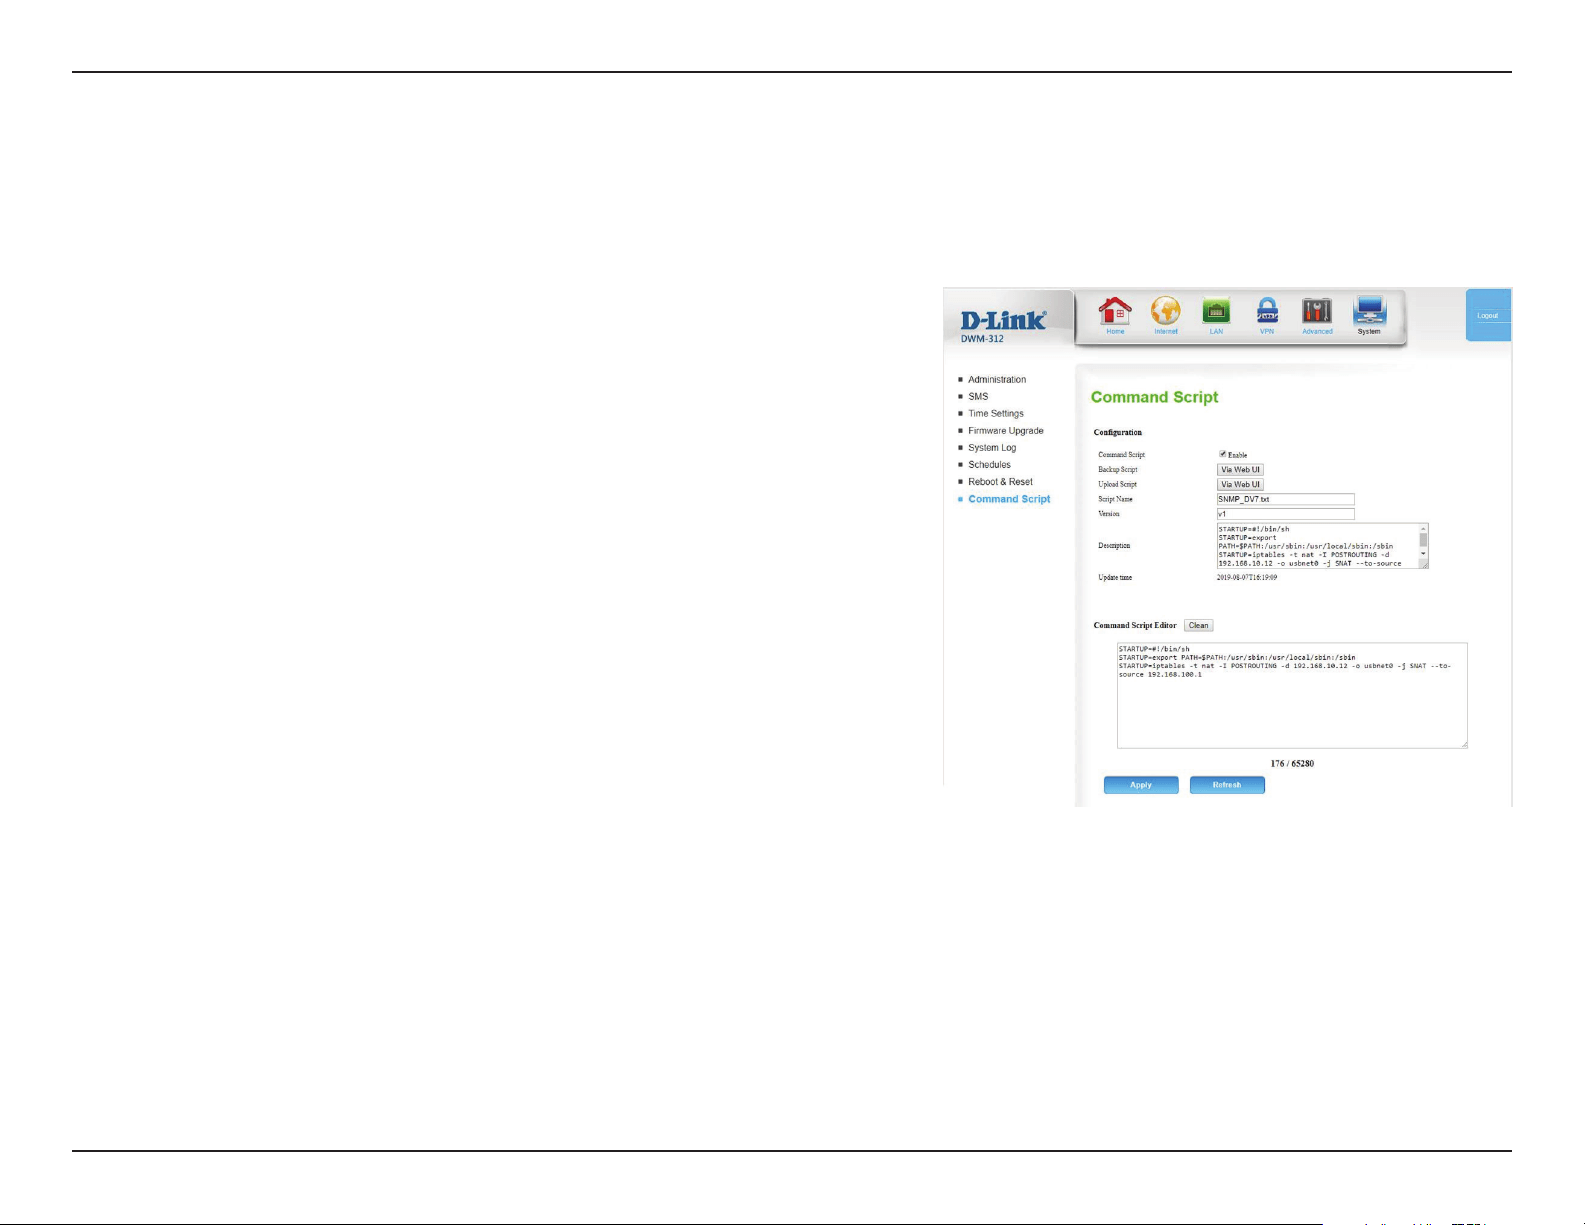
Section 4 - Conguration
Command script conguration is the application that allows administrator to setup the pre-dened conguration in plain text
style and apply conguration on startup.
Command Script
Enable Command Script Conguration
Check the Enable box to activate the Command Script function.
Click the Via Web UI or Via Storage button to backup the existed
command script in a .txt le. You can specify the script le name in
Script Name below.
Click the Via Web UI or Via Storage button to Upload the existed
command script from a specied .txt le.
Specify a script le name for script backup, or display the selected
upload script le name.
Value Range: 0 ~ 32 characters.
Specify the version number for the applied Command script.
Value Range: 0 ~ 32 characters.
Enter a short description for the applied Command script.
It records the upload time for last commad script upload.
Command Script:
Backup Script:
Upload Script:
Script Name:
Version:
Description:
Update time:
67D-Link DWM-312 User Manual
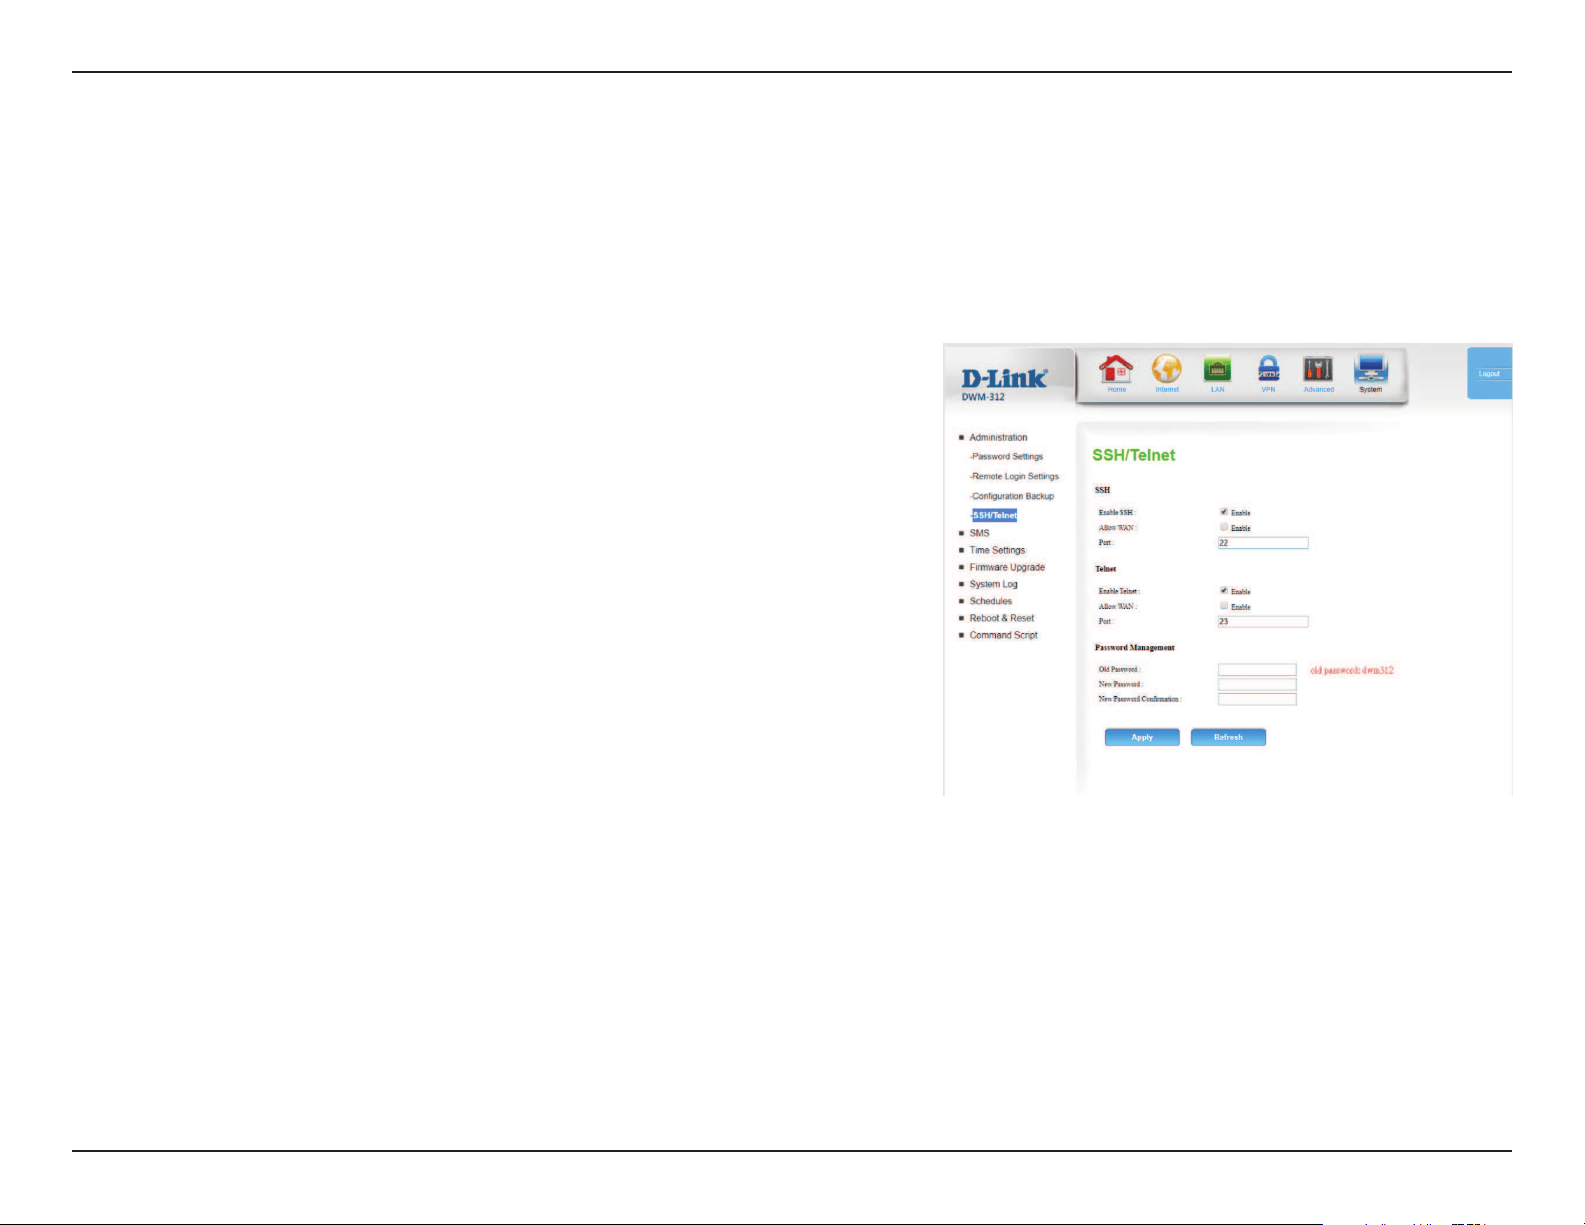
Section 4 - Conguration
The SSH/Telnet setting allows administrator to access this device through the traditional Telnet or SSH Telnet program. Before
you can telnet (login) to the device, please congure the related settings and password with care. The password management
part allows you to set root password for logging telnet and SSH.
SSH/Telnet
SSH
Check the Enable box to activate the SSH function from LAN
interfaces. The LAN Enable box is checked by default.
Check the Enable box to activate the SSH function from the WAN
interface.
You can set which number of Service Port you want to provide for
the corresponding service. By default Service Port is 22.
Value Range: 1 ~65535.
Enable SSH:
Allow WAN:
Port:
Telnet
Check the Enable box to activate the Telnet function from LAN
interfaces. The LAN Enable box is checked by default.
Check the Enable box to activate the Telnet function from the
WAN interface.
You can set which number of Service Port you want to provide for
the corresponding service. By default Service Port is 23.
Value Range: 1 ~65535.
Enable Telnet:
Allow WAN:
Port:

68D-Link DWM-312 User Manual
Section 4 - Conguration
Password Management
Enter the current admin password. The Default password is
dwm312.
Enter the new admin password.
Reenter the new password to conrm.
Click Apply to save your settings, or Refresh to revert to your
previous settings.
Old Password:
New Password:
New Password
Conrmation:

69D-Link DWM-312 User Manual
Section 4 - Conguration
D-Link Edge Cloud System remote management
DECS (D-Link Edge Cloud System) allows users to manage the DWM-312 device.
To Enable Remote DECS Service:
1. Select “Use Remote Service for Management” or access via webpage https://us7-nv3-web.decs.dlink.com/web/index.jsp to
enable this feature.
3. Login using your ID and password.
70D-Link DWM-312 User Manual
Section 4 - Conguration
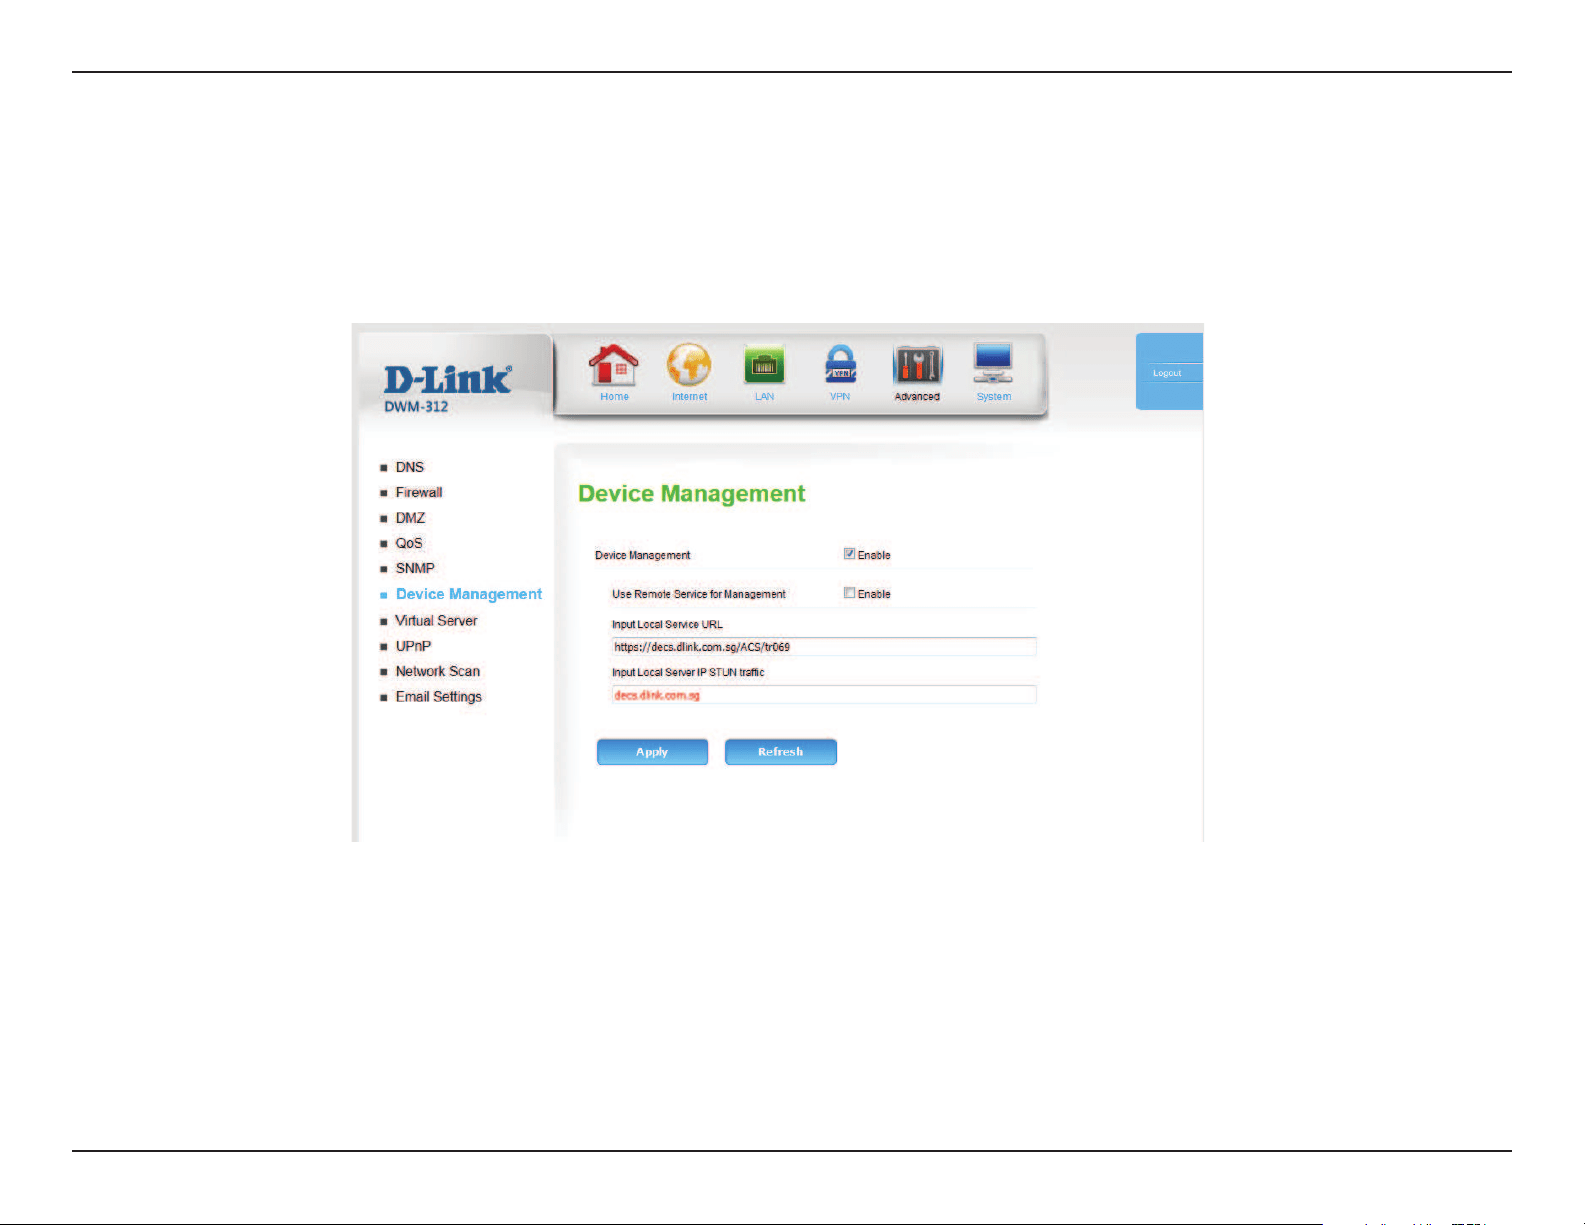
To enable Local DECS service:
1. Disable “Use Remote Service for Management”
2. Input your Local Service URL. For example: https://decs.dlink.com.sg/ACS/tr069
3. Input your Local Service IP STUN trac. For example: decs.dlink.com.sg

71D-Link DWM-312 User Manual
Section 6 - Troubleshooting
Troubleshooting
This chapter provides solutions to problems that can occur during the installation and operation of the DWM-312. Read the
following descriptions if you are having problems. The examples below are illustrated in Windows® XP. If you have a dierent
operating system, the screenshots on your computer will look similar to these examples.
1. Why can’t I access the web-based conguration utility?
When entering the IP address of the D-Link router (192.168.0.1 for example), you are not connecting to a website, nor do you
have to be connected to the Internet. The device has the utility built-in to a ROM chip in the device itself. Your computer must
be on the same IP subnet to connect to the web-based utility.
• Make sure you have an updated Java-enabled web browser. We recommend the following:
- Microsoft Internet Explorer® 7 or higher
- Mozilla Firefox 3.5 or higher
- Google™ Chrome 8 or higher
- Apple Safari 4 or higher
• Verify physical connectivity by checking for solid link lights on the device. If you do not get a solid link light, try using a
dierent cable, or connect to a dierent port on the device if possible. If the computer is turned o, the link light may not
be on.
• Disable any Internet security software running on the computer. Software rewalls such as ZoneAlarm, BlackICE, Sygate,
Norton Personal Firewall, and Windows
®
XP rewall may block access to the conguration pages. Check the help les included
with your rewall software for more information on disabling or conguring it.

72D-Link DWM-312 User Manual
Section 6 - Troubleshooting
• Congure your Internet settings:
• Go to Start > Settings > Control Panel. Double-click the Internet Options Icon. From the Security tab, click
the button to restore the settings to their defaults.
• Click the Connection tab and set the dial-up option to Never Dial a Connection. Click the LAN Settings button.
Make sure nothing is checked. Click OK.
• Go to the Advanced tab and click the button to restore these settings to their defaults. Click OK three times.
• Close your web browser (if open) and open it.
• Access the web management. Open your web browser and enter the IP address of your D-Link router in the address bar. This
should open the login page for your web management.
• If you still cannot access the conguration, unplug the power to the router for 10 seconds and plug back in. Wait about 30
seconds and try accessing the conguration. If you have multiple computers, try connecting using a dierent computer.
2. What can I do if I forgot my password?
If you forgot your password, you must reset your router. This process will change all your settings back to the factory defaults.
To reset the router, locate the reset button (hole) on the rear panel of the unit. With the router powered on, use a paperclip
to hold the button down for 10 seconds. Release the button and the router will go through its reboot process. Wait about 30
seconds to access the router. The default IP address is 192.168.0.1. When logging in, leave the password box empty.
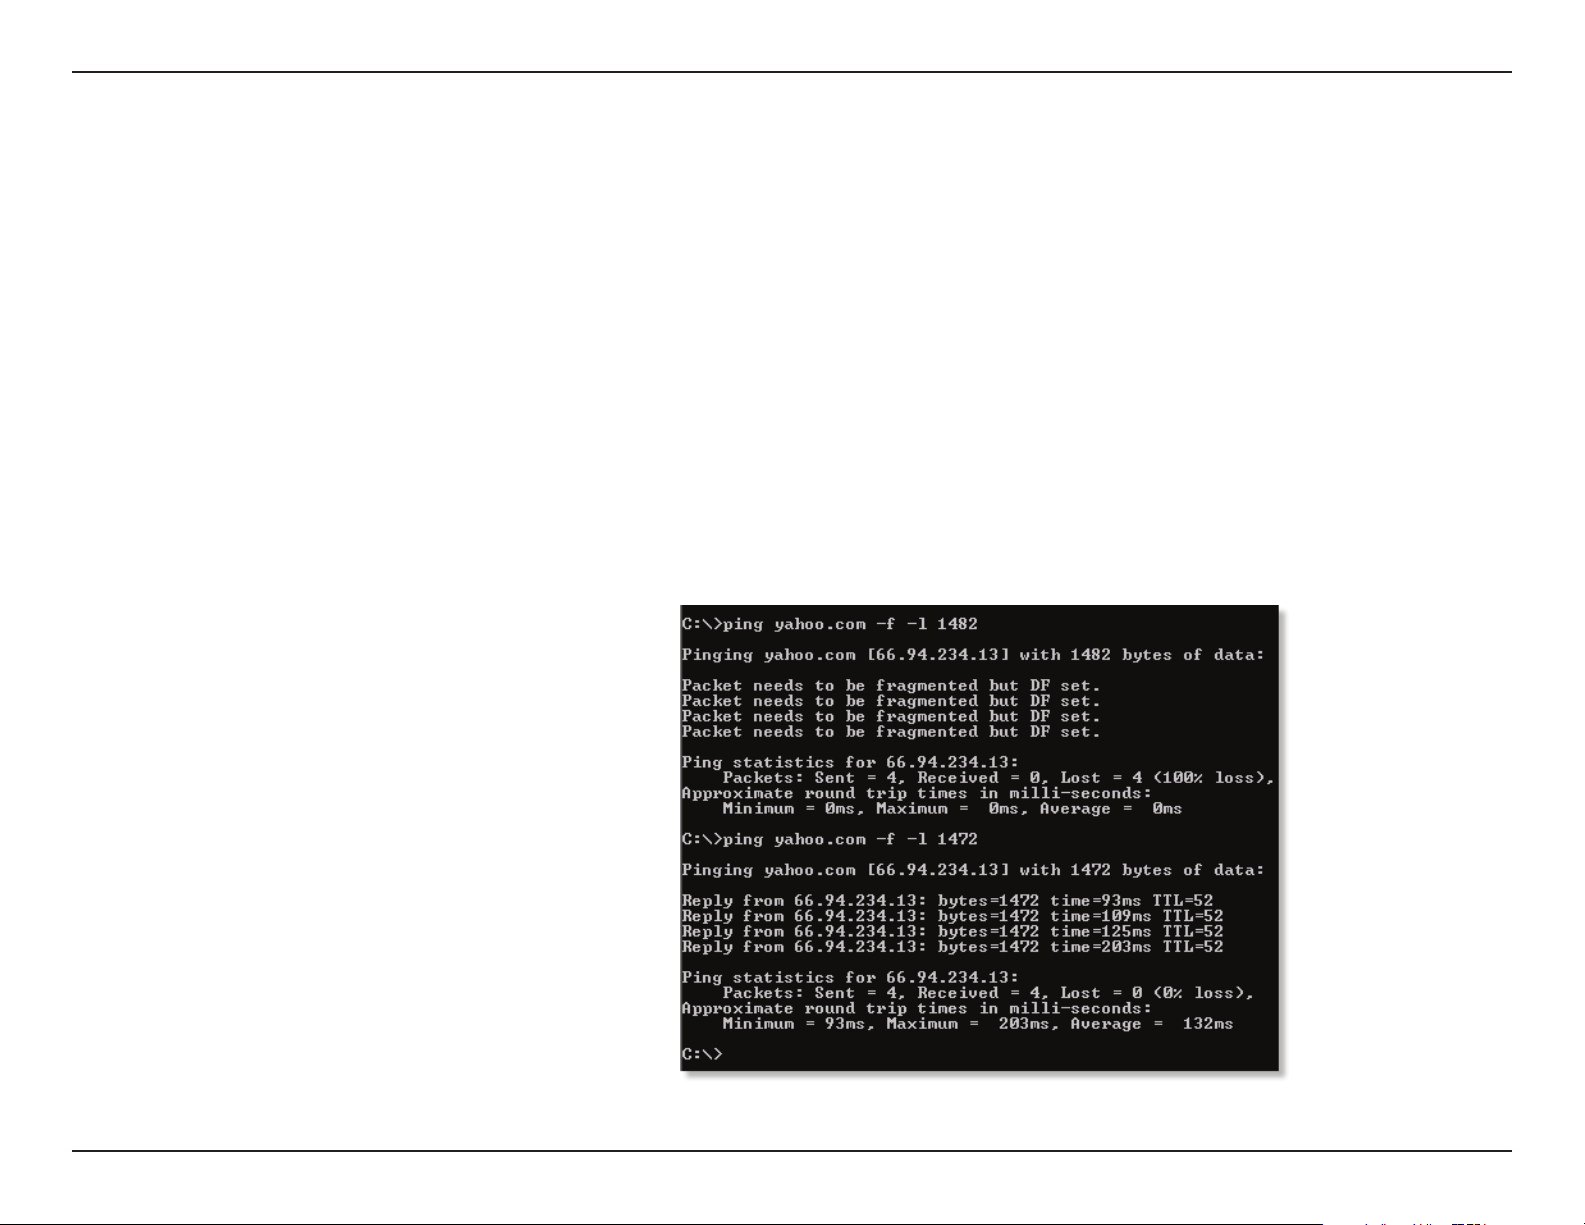
73D-Link DWM-312 User Manual
Section 6 - Troubleshooting
3. Why can’t I connect to certain sites or send and receive emails when connecting through my router?
If you are having a problem sending or receiving email, or connecting to secure sites such as eBay, banking sites, and Hotmail,
we suggest lowering the MTU in increments of ten (Ex. 1492, 1482, 1472, etc).
To nd the proper MTU Size, you’ll have to do a special ping of the destination you’re trying to go to. A destination could be
another computer, or a URL.
• Click on Start and then click Run.
• Windows® 95, 98, and Me users type in command (Windows® NT, 2000, XP, Vista®, and 7 users type in cmd) and
press Enter (or click OK).
• Once the window opens, you’ll need to do a special ping. Use the following syntax:
ping [url] [-f] [-l] [MTU value]
Example: ping yahoo.com -f -l 1472

74D-Link DWM-312 User Manual
Section 6 - Troubleshooting
You should start at 1472 and work your way down by 10 each time. Once you get a reply, go up by 2 until you get a fragmented
packet. Take that value and add 28 to the value to account for the various TCP/IP headers. For example, lets say that 1452 was the
proper value, the actual MTU size would be 1480, which is the optimum for the network we’re working with (1452+28=1480).
Once you nd your MTU, you can now congure your router with the proper MTU size.
To change the MTU rate on your router follow the steps below:
• Navigate to the Internet conguration page (see Internet on page 69 for details).
• To change the MTU, enter the number in the MTU eld and click Apply to save your settings.
• Test your email. If changing the MTU does not resolve the problem, continue changing the MTU in increments
of ten.
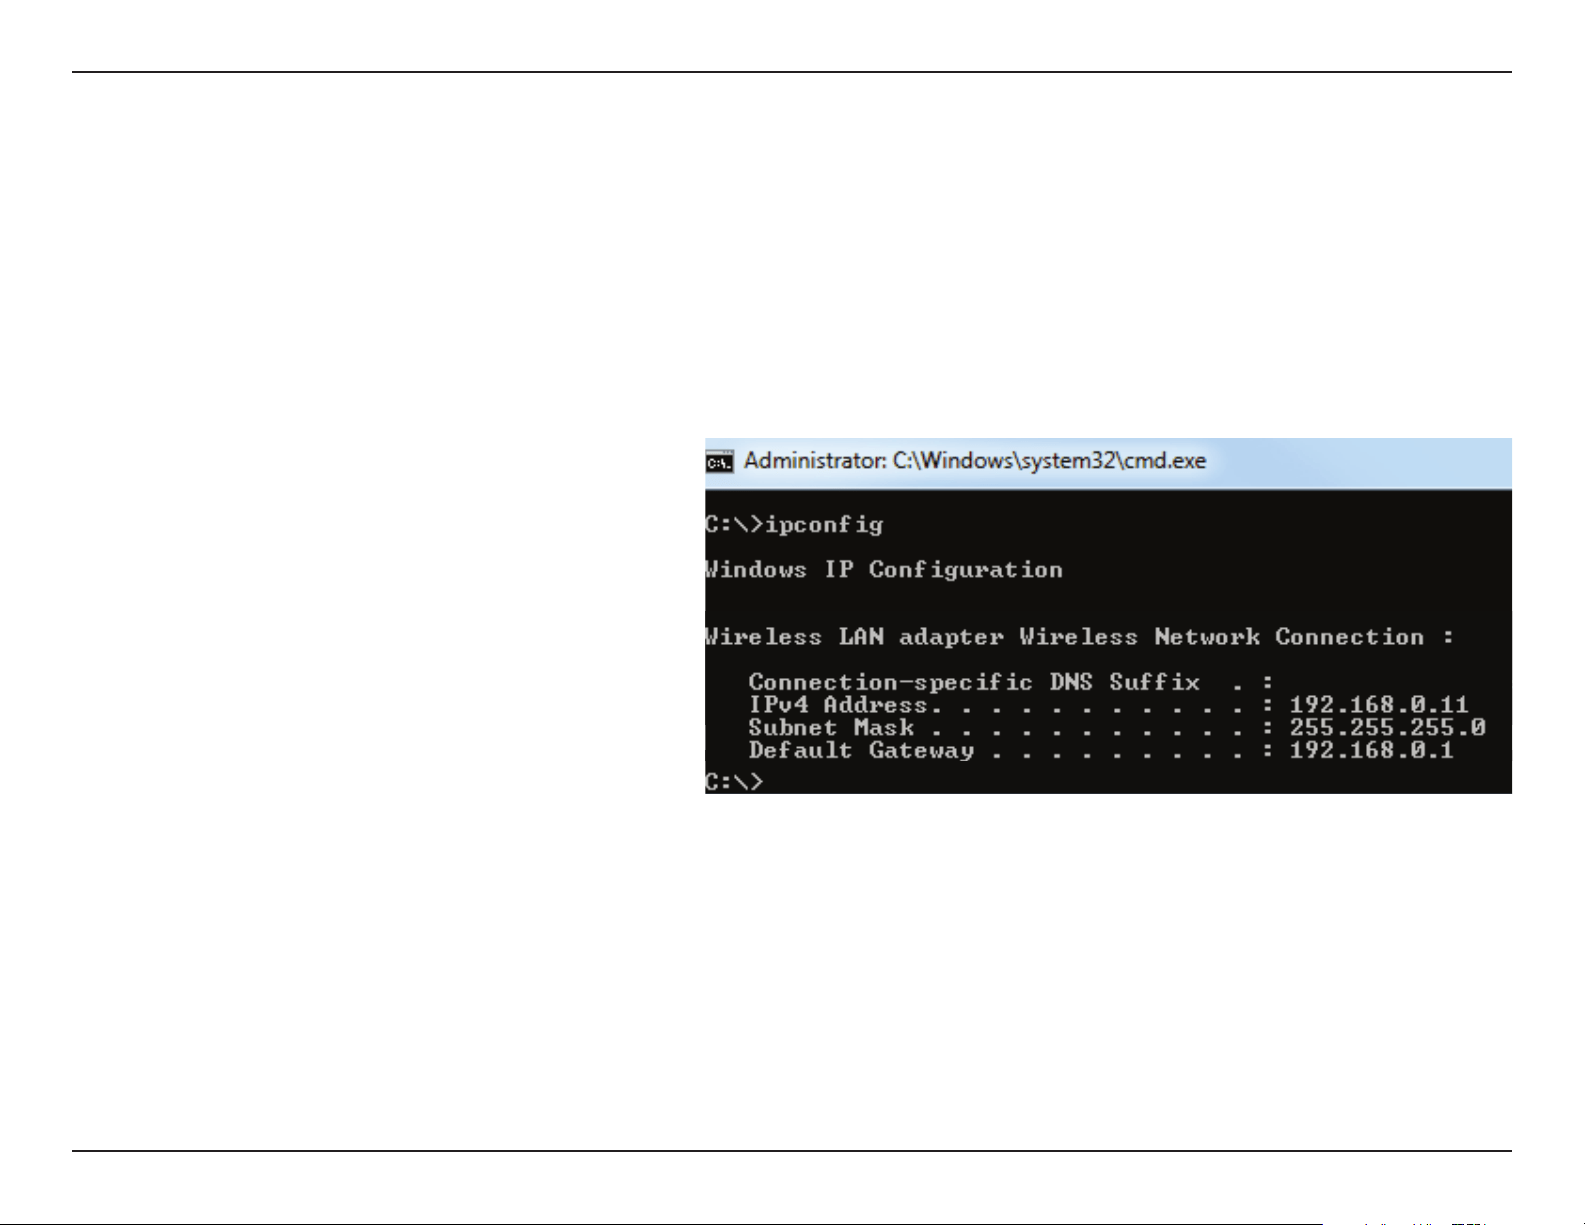
75D-Link DWM-312 User Manual
Appendix A - Networking Basics
Networking Basics
Check your IP address
After you install your new D-Link adapter, by default, the TCP/IP settings should be set to obtain an IP address from a DHCP
server (i.e. wireless router) automatically. To verify your IP address, please follow the steps below.
Click on Start > Run. In the run box type cmd and click OK. (Windows® 7/Vista® users type cmd in the Start Search box.)
At the prompt, type ipcong and press Enter.
This will display the IP address, subnet mask, and the
default gateway of your adapter.
If the address is 0.0.0.0, check your adapter installation,
security settings, and the settings on your router.
Some rewall software programs may block a DHCP
request on newly installed adapters.
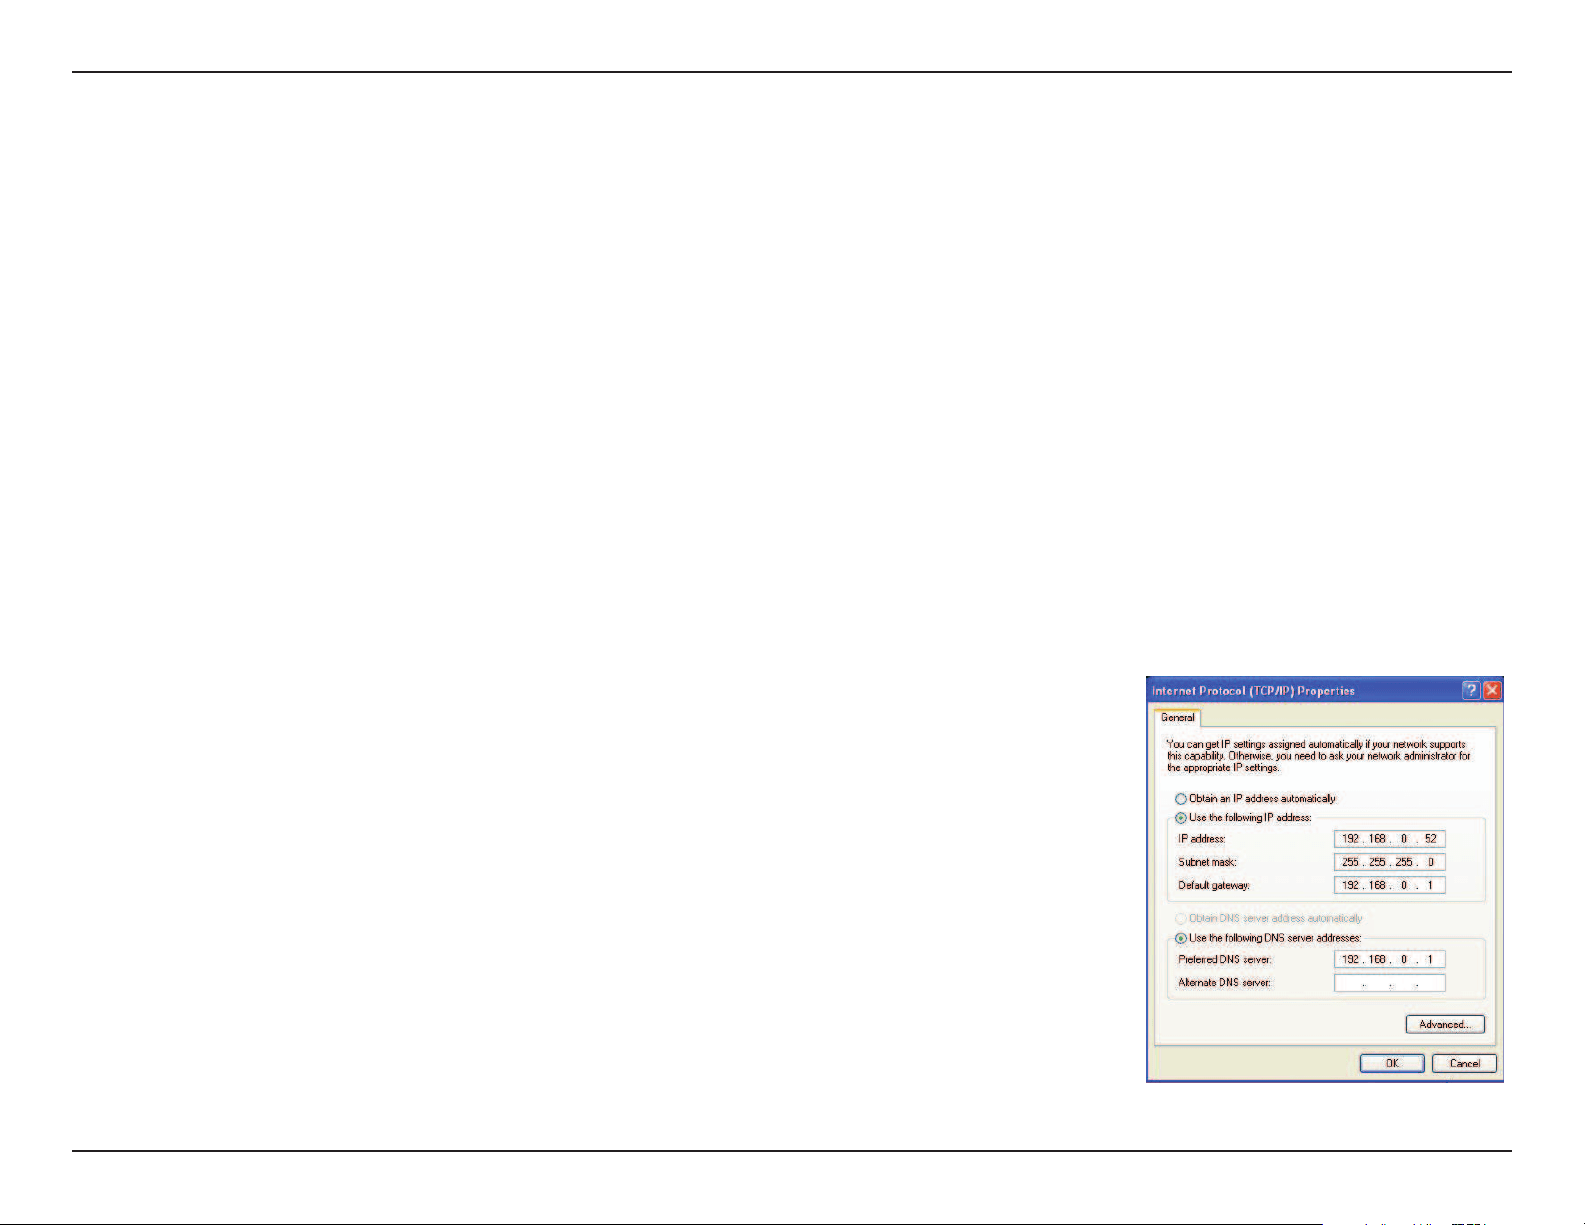
76D-Link DWM-312 User Manual
Appendix A - Networking Basics
Statically Assign an IP address
If you are not using a DHCP capable gateway/router, or you need to assign a static IP address, please follow the steps below:
Step 1
Windows® 7 - Click on Start > Control Panel > Network and Internet > Network and Sharing Center.
Windows Vista® - Click on Start > Control Panel > Network and Internet > Network and Sharing Center > Manage Network
Connections.
Windows® XP - Click on Start > Control Panel > Network Connections.
Windows® 2000 - From the desktop, right-click My Network Places > Properties.
Step 2
Right-click on the Local Area Connection which represents your network adapter and select Properties.
Step 3
Highlight Internet Protocol Version 4 (TCP/IPv4) and click Properties.
Step 4
Click Use the following IP address and enter an IP address that is on the same subnet as
your network or the LAN IP address on your router.
Example: If the router´s LAN IP address is 192.168.0.1, make your IP address 192.168.1.X
where X is a number between 2 and 99. Make sure that the number you choose is not in
use on the network. Set the Default Gateway the same as the LAN IP address of your router
(I.E. 192.168.0.1).
Set Primary DNS the same as the LAN IP address of your router (192.168.0.1). The Alternate
DNS is not needed or you may enter a DNS server from your ISP.
Step 5
Click OK twice to save your settings.
77D-Link DWM-312 User Manual
Appendix B - Technical Specications
Technical Specications
Technical Specications
General
Mobile Network Support
2
• SKU 1 (E)
• LTE Cat. 4 Bands 1/3/5/7/8/20/38/40/41
• UMTS/HSPA B1/B5/B8, 850/900/2100 MHz
• GSM/GPRS/EDGE: 900/1800 MHz
• SKU 4 (AU)
• LTE Cat. 4 Bands 1/2/3/4/5/7/8/28/40
• UMTS/HSPA B1/B2/B5/B8, 850/900/1900/2100 MHz
• GSM/GPRS/EDGE: 850/900/1800/1900 MHz
• SKU 6 (EU)
• LTE Cat. 4 Bands 1/3/7/8/20/28A/38/40/41
• UMTS/HSPA B1/B8, 900/2100 MHz
• GSM/GPRS/EDGE 900/1800 MHz
• SKU 5 (J)
• LTE Cat. 4 Bands 1/3/8/18/19/26/41
• UMTS/HSPA 1/6/8/19, 800/900/2100 MHz
Data Throughput
1
• LTE Throughput
• FDD LTE: Up to 150 Mbps down/50 Mbps Up
• TDD LTE: Up to 130 Mbps down/35 Mbps Up
• WCDMA: 384 Kbps (DL ) / 384 Kbps (UL)
• EDGE: 296 Kbps (DL) /236.8 Kbps (UL)
• GPRS: 107 Kbps (DL) / 85.6 Kbps (UL)
Device Interfaces • One 10/100 Ethernet LAN port
• One 5.5 mm DC input
• 2 x SMA (antenna connectors)
• Dual Micro-SIM slots
Standards • IEEE 802.3i • IEEE 802.3u
Advanced Features • QoS engine (Quality of Service)
• L2TP/PPTP/IPSec VPN Client/Server modes
• SNMP and SNMP Support
• Firmware over the air (FOTA) upgrades
• Web-based UI
• DECS
• Remote Management of UPS
• Remote Management of Devices
Physical
LED Status Indicators • Power
• Internet Connectivity
• Network Status
• Signal Strength
• Ethernet
Power • 5V/2A adapter • Flexible input: DC 5V/2A ~ 18V/0.7A
Enclosure • Corrosion-resistant zinc-plated steel
Dimensions • 93 x 70 x 23.6 mm (3.66 x 2.76 x 0.92 in)
Weight • 210 g (7.41 oz)
Temperature • Operating: -20 to 60 ˚C (-4 to 140 ˚F)
3
• Storage : -40 to 85 ˚C (-40 to 185 ˚F)
3
Humidity • Operating: 5% to 85% non-condensing • Storage: 0% to 95% non-condensing
Certifications • CE
78D-Link DWM-312 User Manual
Appendix B - Technical Specications
Order Information
Part Number Description
DWM-312 4G LTE M2M Router
1
Data rates are theoretical. Data transfer rate depends on network capacity, signal strength, and environmental factors.
2
Available frequencies and speeds vary and may not be available in all regions.
3
Default power adaptor operating temperature range limited to 0 to 40 ˚C (32 to 104 ˚F). An optional power adaptor supports 20 to 60 ˚C (-4 to 140 ˚F).
Updated 2020/07/16

Appendix C - Regulatory Information
79
D-Link DWM-312 User Manual
Regulatory Information
CE EMI Class A Warning
This equipment is compliant with Class A of CISPR 32. In a residential environment this equipment may cause radio interference.
European Community Declaration of Conformity:
Česky [Czech]
Tímto D-Link Corporation prohlašuje, že tento produkt, jeho příslušenství a software jsou v souladu se směrnicí
2014/53/EU. Celý text ES prohlášení o shodě vydaného EU a o rmwaru produktu lze stáhnout na stránkách k
produktu www.dlink.com.
Dansk [Danish]
D-Link Corporation erklærer herved, at dette produkt, tilbehør og software er i overensstemmelse med direktiv
2014/53/EU. Den fulde tekst i EU-overensstemmelseserklæringen og produktrmware kan wnloades fra
produktsiden hos www.dlink.com.
Deutsch [German]
Hiermit erklärt die D-Link Corporation, dass dieses Produkt, das Zubehör und die Software der Richtlinie 2014/53/
EU entsprechen. Der vollständige Text der Konformitätserklärung der Europäischen Gemeinschaft sowie die
Firmware zum Produkt stehen Ihnen zum Herunterladen von der Produktseite im Internet auf www.dlink.com zur
Verfügung.
Eesti [Estonian]
Käesolevaga kinnitab D-Link Corporation, et see toode, tarvikud ja tarkvara on kooskõlas direktiiviga 2014/53/EL.
Euroopa Liidu vastavusdeklaratsiooni täistekst ja toote püsivara on allalaadimiseks saadaval tootelehel www.dlink.
com.
English
Hereby, D-Link Corporation, declares that this product, accessories, and software are in compliance with directive
2014/53/EU. The full text of the EU Declaration of Conformity and product rmware are available for download
from the product page at www.dlink.com
Español [Spanish]
Por la presente, D-Link Corporation declara que este producto, accesorios y software cumplen con las directivas
2014/53/UE. El texto completo de la declaración de conformidad de la UE y el rmware del producto están
disponibles y se pueden descargar desde la página del producto en www.dlink.com.
Ελληνική [Greek]
Με την παρούσα, η D-Link Corporation δηλώνει ότι αυτό το προϊόν, τα αξεσουάρ και το λογισμικό
συμμορφώνονται με την Οδηγία 2014/53/ΕΕ. Το πλήρες κείμενο της δήλωσης συμμόρφωσης της ΕΕ και το
υλικολογισμικό του προϊόντος είναι διαθέσιμα για λήψη από τη σελίδα του προϊόντος στην τοποθεσία www.dlink.
com.

Appendix C - Regulatory Information
80
D-Link DWM-312 User Manual
Français [French]
Par les présentes, D-Link Corporation déclare que ce produit, ces accessoires et ce logiciel sont conformes aux
directives 2014/53/UE.Le texte complet de la déclaration de conformité de l'UE et le icroprogramme du produit
sont disponibles au téléchargement sur la page des produits à www.dlink.com.
Italiano [Italian]
Con la presente, D-Link Corporation dichiara che questo prodotto, i relativi accessori e il software sono conformi
alla direttiva 2014/53/UE. Il testo completo della dichiarazione di conformità UE e il rmware del prodotto sono
disponibili per il download dalla pagina del prodotto su www.dlink.com.
Latviski [Latvian]
Ar šo uzņēmums D-Link Corporation apliecina, ka šis produkts, piederumi un programmatūra atbilst direktīvai
2014/53/ES. ES atbilstības deklarācijas pilno tekstu un produkta aparātprogrammatūru var lejupielādēt attiecīgā
produkta lapā vietnē www.dlink.com.
Lietuvių [Lithuanian]
Šiuo dokumentu „D-Link Corporation“ pareiškia, kad šis gaminys, priedai ir programinė įranga atitinka direktyvą
2014/53/ES. Visą ES atitikties deklaracijos tekstą ir gaminio programinę aparatinę įrangą galima atsisiųsti iš gaminio
puslapio adresu www.dlink.com.
Nederlands [Dutch]
Hierbij verklaart D-Link Corporation dat dit product, accessoires en software voldoen aan de richtlijnen 2014/53/
EU. De volledige tekst van de EU conformiteitsverklaring en productrmware is beschikbaar voor download van de
productpagina op www.dlink.com.
Malti [Maltese]
Bil-preżenti, D-Link Corporation tiddikjara li dan il-prodott, l-aċċessorji, u s-software huma konformi mad-Direttiva
2014/53/UE. Tista’ tniżżel it-test sħiħ tad-dikjarazzjoni ta’ konformità tal-UE u l-rmware tal-prodott mill-paġna tal-
prodott fuq www.dlink.com.
Magyar [Hungarian]
Ezennel a D-Link Corporation kijelenti, hogy a jelen termék, annak tartozékai és szoftvere megfelelnek a 2014/53/
EU sz. rendeletek rendelkezéseinek. Az EU Megfelelőségi nyilatkozat teljes szövege és a termék rmware a termék
oldaláról tölthető le a www.dlink.com címen.
Polski [Polish]
D-Link Corporation niniejszym oświadcza, że ten produkt, akcesoria oraz oprogramowanie są zgodne z
dyrektywami 2014/53/EU. Pełen tekst deklaracji zgodności UE oraz oprogramowanie sprzętowe do produktu
można pobrać na stronie produktu w witrynie www.dlink.com.
Português [Portuguese]
Desta forma, a D-Link Corporation declara que este produto, os acessórios e o software estão em conformidade
com a diretiva 2014/53/UE. O texto completo da declaração de conformidade da UE e do rmware
Slovensko[Slovenian]
Podjetje D-Link Corporation s tem izjavlja, da so ta izdelek, dodatna oprema in programnska oprema skladni z
direktivami 2014/53/EU. Celotno besedilo izjave o skladnosti EU in vdelana programska oprema sta na voljo za
prenos na strani izdelka na www.dlink.com.

Appendix C - Regulatory Information
81
D-Link DWM-312 User Manual
Slovensky [Slovak]
Spoločnosť D-Link týmto vyhlasuje, že tento produkt, príslušenstvo a softvér sú v súlade so smernicou 214/53/
EÚ. Úplné znenie vyhlásenia EÚ o zhode a rmvéri produktu sú k dispozícii na prevzatie zo stránky produktu www.
dlink.com.
Suomi [Finnish]
D-Link Corporation täten vakuuttaa, että tämä tuote, lisävarusteet ja ohjelmisto ovat direktiivin 2014/53/EU
vaatimusten mukaisia. Täydellinen EU-vaatimustenmukaisuusvakuutus samoin kuin tuotteen laiteohjelmisto ovat
ladattavissa osoitteesta www.dlink.com.
Svenska[Swedish]
D-Link Corporation försäkrar härmed att denna produkt, tillbehör och programvara överensstämmer med
direktiv 2014/53/EU. Hela texten med EU-försäkran om överensstämmelse och produkt-rmware kan hämtas från
produktsidan på www.dlink.com.
Íslenska [Icelandic]
Hér með lýsir D-Link Corporation því yr að þessi vara, fylgihlutir og hugbúnaður eru í samræmi við tilskipun
2014/53/EB. Sækja má ESB-samræmisyrlýsinguna í heild sinni og fastbúnað vörunnar af vefsíðu vörunnar á www.
dlink.com.
Norsk [Norwegian]
Herved erklærer D-Link Corporation at dette produktet, tilbehøret og programvaren er i samsvar med direktivet
2014/53/EU. Den fullstendige teksten i EU-erklæring om samsvar og produktets fastvare er tilgjengelig for
nedlasting fra produktsiden på www.dlink.com.
Warning Statement:
The power outlet should be near the device and easily accessible.

Appendix C - Regulatory Information
82
D-Link DWM-312 User Manual
NOTICE OF WIRELESS RADIO LAN USAGE IN THE EUROPEAN COMMUNITY FOR WIRELESS PRODUCT ONLY:
• This device is restricted to indoor use when operated in the European Community using channels in the 5.15-5.35 GHz band to reduce the
potential for interference.
• This device is a 2.4 GHz wideband transmission system (transceiver), intended for use in all EU member states and EFTA countries. This
equipment may be operated in AL, AD, BE, BG, DK, DE, FI, FR, GR, GW, IS, IT, HR, LI, LU, MT, MK, MD, MC, NL, NO, AT, PL, PT, RO, SM, SE, RS, SK, ES,
CI, HU, and CY.
Usage Notes:
• To remain in conformance with European National spectrum usage regulations, frequency and channel limitations will be applied on the
products according to the country where the equipment will be deployed.
• This device is restricted from functioning in Ad-hoc mode while operating in 5 GHz. Ad-hoc mode is direct peer-to-peer communication
between two client devices without an Access Point.
• Access points will support DFS (Dynamic Frequency Selection) and TPC (Transmit Power Control) functionality as required when operating in
5 GHz band within the EU.
• Please refer to the product manual or datasheet to check whether your product uses 2.4 GHz and/or 5 GHz wireless.
HINWEIS ZUR VERWENDUNG VON DRAHTLOS-NETZWERK (WLAN) IN DER EUROPÄISCHEN GEMEINSCHAFT ( NUR FÜR
EIN DRAHTLOSES PRODUKT )
• Der Betrieb dieses Geräts in der Europäischen Gemeinschaft bei Nutzung von Kanälen im 5,15-5,35 GHz Frequenzband ist ausschließlich auf
Innenräume beschränkt, um das Interferenzpotential zu reduzieren.
• Bei diesem Gerät handelt es sich um ein zum Einsatz in allen EU-Mitgliedsstaaten und in EFTA-Ländern - ausgenommen Frankreich. Der
Betrieb dieses Geräts ist in den folgenden Ländern erlaubt: AL, AD, BE, BG, DK, DE, FI, FR, GR, GW, IS, IT, HR, LI, LU, MT, MK, MD, MC, NL, NO, AT,
PL, PT, RO, SM, SE, RS, SK, ES, CI, HU, CY
Gebrauchshinweise:
• Um den in Europa geltenden nationalen Vorschriften zum Nutzen des Funkspektrums weiterhin zu entsprechen, werden Frequenz und
Kanalbeschränkungen, dem jeweiligen Land, in dem das Gerät zum Einsatz kommt, entsprechend, auf die Produkte angewandt.
• Die Funktionalität im Ad-hoc-Modus bei Betrieb auf 5 GHz ist für dieses Gerät eingeschränkt. Bei dem Ad-hoc-Modus handelt es sich um eine
Peer-to-Peer-Kommunikation zwischen zwei Client-Geräten ohneeinen Access Point.
• Access Points unterstützen die Funktionen DFS (Dynamic Frequency Selection) und TPC (Transmit Power Control) wie erforderlich bei Betrieb
auf 5 GHz innerhalb der EU.
• Bitte schlagen Sie im Handbuch oder Datenblatt nach nach, ob Ihr Gerät eine 2,4 GHz und / oder 5 GHz Verbindung nutzt.

Appendix C - Regulatory Information
83
D-Link DWM-312 User Manual
AVIS CONCERNANT L'UTILISATION DE LA RADIO SANS FIL LAN DANS LA COMMUNAUTÉ EUROPÉENNE (UNIQUEMENT
POUR LES PRODUITS SANS FIL)
• Cet appareil est limité à un usage intérieur lorsqu'il est utilisé dans la Communauté européenne sur les canaux de la bande de 5,15 à 5,35 GHz
an de réduire les risques d'interférences.
• Cet appareil est un système de transmission à large bande (émetteur-récepteur) de 2,4 GHz, destiné à être utilisé dans tous les États-
membres de l'UE et les pays de l'AELE. Cet équipement peut être utilisé dans les pays suivants : AL, AD, BE , BG, DK, DE, FI, FR, GR, GW, IS, IT,
HR, LI, LU, MT , MK, MD, MC, NL, NO, AT, PL, PT, RO, SM, SE, RS, SK, ES, CI, HU, CY
Notes d'utilisation:
• Pour rester en conformité avec la réglementation nationale européenne en matière d'utilisation du spectre, des limites de fréquence et de
canal seront appliquées aux produits selon le pays où l'équipement sera déployé.
• Cet appareil ne peut pas utiliser le mode Ad-hoc lorsqu'il fonctionne dans la bande de 5 GHz. Le mode Adhoc fournit une communication
directe pair à pair entre deux périphériques clients sans point d'accès.
• Les points d'accès prendront en charge les fonctionnalités DFS (Dynamic Frequency Selection) et TPC (Transmit Power Control) au besoin lors
du fonctionnement dans la bande de 5 GHz au sein de l'UE.
• Merci de vous référer au guide d'utilisation ou de la che technique an de vérier si votre produit utilise 2.4 GHz et/ou 5 GHz sans l.
AVISO DE USO DE LA LAN DE RADIO INALÁMBRICA EN LA COMUNIDAD EUROPEA (SOLO PARA EL PRODUCTO
INALÁMBRICO)
• El uso de este dispositivo está restringido a interiores cuando funciona en la Comunidad Europea utilizando canales en la banda de 5,15-5,35
GHz, para reducir la posibilidad de interferencias.
• Este dispositivo es un sistema de transmisión (transceptor) de banda ancha de 2,4 GHz, pensado para su uso en todos los estados miembros
de la UE y en los países de la AELC. Este equipo se puede utilizar en AL, AD, BE, BG, DK, DE, FI, FR, GR, GW, IS, IT, HR, LI, LU, MT, MK, MD, MC, NL,
NO, AT, PL, PT, RO, SM, SE, RS, SK, ES, CI, HU, CY
Notas de uso:
• Para seguir cumpliendo las normas europeas de uso del espectro nacional, se aplicarán limitaciones de frecuencia y canal en los productos
en función del país en el que se pondrá en funcionamiento el equipo.
• Este dispositivo tiene restringido el funcionamiento en modo Ad-hoc mientras funcione a 5 Ghz. El modo Ad-hoc es la comunicación directa
de igual a igual entre dos dispositivos cliente sin un punto de acceso.
• Los puntos de acceso admitirán la funcionalidad DFS (Selección de frecuencia dinámica) y TPC (Control de la potencia de transmisión) si es
necesario cuando funcionan a 5 Ghz dentro de la UE.
• Por favor compruebe el manual o la cha de producto para comprobar si el producto utiliza las bandas inalámbricas de 2.4 GHz y/o la de 5
GHz.

Appendix C - Regulatory Information
84
D-Link DWM-312 User Manual
AVVISO PER L’USO DI LAN RADIO WIRELESS NELLA COMUNITÀ EUROPEA (SOLO PER PRODOTTI WIRELESS)
• Nella Comunità europea, l’uso di questo dispositivo è limitato esclusivamente agli ambienti interni sui canali compresi nella banda da 5,15 a
5,35 GHz al ne di ridurre potenziali interferenze. Questo dispositivo è un sistema di trasmissione a banda larga a 2,4 GHz (ricetrasmittente),
destinato all’uso in tutti gli stati membri dell’Unione europea e nei paesi EFTA.
• Questo dispositivo può essere utilizzato in AL, AD, BE, BG, DK, DE, FI, FR, GR, GW, IS, IT, HR, LI, LU, MT, MK, MD, MC, NL, NO, AT, PL, PT, RO, SM,
SE, RS, SK, ES, CI, HU, CY
Note per l’uso
• Al ne di mantenere la conformità alle normative nazionali europee per l’uso dello spettro di frequenze, saranno applicate limitazioni sulle
frequenze e sui canali per il prodotto in conformità alle normative del paese in cui il dispositivo viene utilizzato.
• Questo dispositivo non può essere attivato in modalità Ad-hoc durante il funzionamento a 5 Ghz. La modalità Ad-hoc è una comunicazione
diretta peer-to-peer fra due dispositivi client senza un punto di accesso.
• I punti di accesso supportano le funzionalità DFS (Dynamic Frequency Selection) e TPC (Transmit Power Control) richieste per operare a 5 Ghz
nell’Unione europea.
• Ti invitiamo a fare riferimento al manuale del prodotto o alla scheda tecnica per vericare se il tuo prodotto utilizza le frequenze 2,4 GHz e/o
5 GHz.
KENNISGEVING VAN DRAADLOOS RADIO LAN-GEBRUIK IN DE EUROPESE GEMEENSCHAP (ALLEEN VOOR
DRAADLOOS PRODUCT)
• Dit toestel is beperkt tot gebruik binnenshuis wanneer het wordt gebruikt in de Europese Gemeenschap gebruik makend van kanalen in de
5.15-5.35 GHz band om de kans op interferentie te beperken.
• Dit toestel is een 2.4 GHz breedband transmissiesysteem (transceiver) dat bedoeld is voor gebruik in alle EU lidstaten en EFTA landen. Deze
uitrusting mag gebruikt worden in AL, AD, BE, BG, DK, DE, FI, FR, GR, GW, IS, IT, HR, LI, LU, MT, MK, MD, MC, NL, NO, AT, PL, PT, RO, SM, SE, RS, SK,
ES, CI, HU, CY
Gebruiksaanwijzingen:
• Om de gebruiksvoorschriften van het Europese Nationale spectrum na te leven, zullen frequentie- en kanaalbeperkingen worden toegepast
op de producten volgens het land waar de uitrusting gebruikt zal worden.
• Dit toestel kan niet functioneren in Ad-hoc mode wanneer het gebruikt wordt in 5 GHz. Ad-hoc mode is directe peer-to-peer communicatie
tussen twee klantenapparaten zonder een toegangspunt.
• Toegangspunten ondersteunen DFS (Dynamic Frequency Selection) en TPC (Transmit Power Control) functionaliteit zoals vereist bij gebruik
in 5 GHz binnen de EU.
• Raadpleeg de handleiding of de datasheet om te controleren of uw product gebruik maakt van 2.4 GHz en/of 5 GHz.

Appendix C - Regulatory Information
85
D-Link DWM-312 User Manual
SAFETY INSTRUCTIONS
The following general safety guidelines are provided to help ensure your own personal safety and protect your product from potential damage.
Remember to consult the product user instructions for more details.
• Static electricity can be harmful to electronic components. Discharge static electricity from your body (i.e. touching grounded bare metal)
before touching the product.
• Do not attempt to service the product and never disassemble the product. For some products with a user replaceable battery, please read
and follow the instructions in the user manual.
• Do not spill food or liquid on your product and never push any objects into the openings of your product.
• Do not use this product near water, areas with high humidity, or condensation unless the product is specically rated for outdoor application.
• Keep the product away from radiators and other heat sources.
• Always unplug the product from mains power before cleaning and use a dry lint free cloth only.
SICHERHEITSVORSCHRIFTEN
Die folgenden allgemeinen Sicherheitsvorschriften dienen als Hilfe zur Gewährleistung Ihrer eigenen Sicherheit und zum Schutz Ihres Produkts.
Weitere Details nden Sie in den Benutzeranleitungen zum Produkt.
• Statische Elektrizität kann elektronischen Komponenten schaden. Um Schäden durch statische Auadung zu vermeiden, leiten Sie
elektrostatische Ladungen von Ihrem Körper ab,
(z. B. durch Berühren eines geerdeten blanken Metallteils), bevor Sie das Produkt berühren.
• Unterlassen Sie jeden Versuch, das Produkt zu warten, und versuchen Sie nicht, es in seine Bestandteile zu zerlegen. Für einige Produkte mit
austauschbaren Akkus lesen Sie bitte das Benutzerhandbuch und befolgen Sie die dort beschriebenen Anleitungen.
• Vermeiden Sie, dass Speisen oder Flüssigkeiten auf Ihr Produkt gelangen, und stecken Sie keine Gegenstände in die Gehäuseschlitze oder
-önungen Ihres Produkts.
• Verwenden Sie dieses Produkt nicht in unmittelbarer Nähe von Wasser und nicht in Bereichen mit hoher Luftfeuchtigkeit oder Kondensation,
es sei denn, es ist speziell zur Nutzung in Außenbereichen vorgesehen und eingestuft.
• Halten Sie das Produkt von Heizkörpern und anderen Quellen fern, die Wärme erzeugen.
• Trennen Sie das Produkt immer von der Stromzufuhr, bevor Sie es reinigen und verwenden Sie dazu ausschließlich ein trockenes fusselfreies
Tuch.

Appendix C - Regulatory Information
86
D-Link DWM-312 User Manual
CONSIGNES DE SÉCURITÉ
Les consignes générales de sécurité ci-après sont fournies an d’assurer votre sécurité personnelle et de protéger le produit d’éventuels
dommages. Veuillez consulter les consignes d’utilisation du produit pour plus de détails.
• L’électricité statique peut endommager les composants électroniques. Déchargez l’électricité statique de votre corps (en touchant un objet
en métal relié à la terre par exemple) avant de toucher le produit.
• N’essayez pas d’intervenir sur le produit et ne le démontez jamais. Pour certains produits contenant une batterie remplaçable par l’utilisateur,
veuillez lire et suivre les consignes contenues dans le manuel d’utilisation.
• Ne renversez pas d’aliments ou de liquide sur le produit et n’insérez jamais d’objets dans les orices.
• N’utilisez pas ce produit à proximité d’un point d’eau, de zones très humides ou de condensation sauf si le produit a été spéciquement
conçu pour une application extérieure.
• Éloignez le produit des radiateurs et autres sources de chaleur.
• Débranchez toujours le produit de l’alimentation avant de le nettoyer et utilisez uniquement un chion sec non pelucheux.
INSTRUCCIONES DE SEGURIDAD
Las siguientes directrices de seguridad general se facilitan para ayudarle a garantizar su propia seguridad personal y para proteger el producto
frente a posibles daños. No olvide consultar las instrucciones del usuario del producto para obtener más información.
• La electricidad estática puede resultar nociva para los componentes electrónicos. Descargue la electricidad estática de su cuerpo (p. ej.,
tocando algún metal sin revestimiento conectado a tierra) antes de tocar el producto.
• No intente realizar el mantenimiento del producto ni lo desmonte nunca. Para algunos productos con batería reemplazable por el usuario,
lea y siga las instrucciones del manual de usuario.
• No derrame comida o líquidos sobre el producto y nunca deje que caigan objetos en las aberturas del mismo.
• No utilice este producto cerca del agua, en zonas con humedad o condensación elevadas a menos que el producto esté clasicado
especícamente para aplicación en exteriores.
• Mantenga el producto alejado de los radiadores y de otras fuentes de calor.
• Desenchufe siempre el producto de la alimentación de red antes de limpiarlo y utilice solo un paño seco sin pelusa.

Appendix C - Regulatory Information
87
D-Link DWM-312 User Manual
ISTRUZIONI PER LA SICUREZZA
Le seguenti linee guida sulla sicurezza sono fornite per contribuire a garantire la sicurezza personale degli utenti e a proteggere il prodotto da
potenziali danni. Per maggiori dettagli, consultare le istruzioni per l’utente del prodotto.
• L’elettricità statica può essere pericolosa per i componenti elettronici. Scaricare l’elettricità statica dal corpo (ad esempio toccando una parte
metallica collegata a terra) prima di toccare il prodotto.
• Non cercare di riparare il prodotto e non smontarlo mai. Per alcuni prodotti dotati di batteria sostituibile dall’utente, leggere e seguire le
istruzioni riportate nel manuale dell’utente.
• Non versare cibi o liquidi sul prodotto e non spingere mai alcun oggetto nelle aperture del prodotto.
• Non usare questo prodotto vicino all’acqua, in aree con elevato grado di umidità o soggette a condensa a meno che il prodotto non sia
specicatamente approvato per uso in ambienti esterni.
• Tenere il prodotto lontano da caloriferi e altre fonti di calore.
• Scollegare sempre il prodotto dalla presa elettrica prima di pulirlo e usare solo un panno asciutto che non lasci lacce.
VEILIGHEIDSINFORMATIE
De volgende algemene veiligheidsinformatie werd verstrekt om uw eigen persoonlijke veiligheid te waarborgen en uw product te beschermen
tegen mogelijke schade. Denk eraan om de gebruikersinstructies van het product te raadplegen voor meer informatie.
• Statische elektriciteit kan schadelijk zijn voor elektronische componenten. Ontlaad de statische elektriciteit van uw lichaam (d.w.z. het
aanraken van geaard bloot metaal) voordat uhet product aanraakt.
• U mag nooit proberen het product te onderhouden en u mag het product nooit demonteren. Voor sommige producten met door de
gebruiker te vervangen batterij, dient u de instructies in de gebruikershandleiding te lezen en te volgen.
• Mors geen voedsel of vloeistof op uw product en u mag nooit voorwerpen in de openingen van uw product duwen.
• Gebruik dit product niet in de buurt van water, gebieden met hoge vochtigheid of condensatie, tenzij het product speciek geclassiceerd is
voor gebruik buitenshuis.
• Houd het product uit de buurt van radiators en andere warmtebronnen.
• U dient het product steeds los te koppelen van de stroom voordat u het reinigt en gebruik uitsluitend een droge pluisvrije doek.
Appendix C - Regulatory Information
88
D-Link DWM-312 User Manual
Disposing of and Recycling Your Product
ENGLISH EN
This symbol on the product or packaging means that according to local laws and regulations this product should be not be disposed
of in household waste but sent for recycling. Please take it to a collection point designated by your local authorities once it has
reached the end of its life, some will accept products for free. By recycling the product and its packaging in this manner you help to
conserve the environment and protect human health.
D-Link and the Environment
At D-Link, we understand and are committed to reducing any impact our operations and products may have on the environment. To minimise
this impact D-Link designs and builds its products to be as environmentally friendly as possible, by using recyclable, low toxic materials in both
products and packaging.
D-Link recommends that you always switch o or unplug your D-Link products when they are not in use. By doing so you will help to save energy
and reduce CO2 emissions.
To learn more about our environmentally responsible products and packaging please visit www.dlinkgreen.com.
DEUTSCH DE
Dieses Symbol auf dem Produkt oder der Verpackung weist darauf hin, dass dieses Produkt gemäß bestehender örtlicher Gesetze
und Vorschriften nicht über den normalen Hausmüll entsorgt werden sollte, sondern einer Wiederverwertung zuzuführen ist. Bringen
Sie es bitte zu einer von Ihrer Kommunalbehörde entsprechend amtlich ausgewiesenen Sammelstelle, sobald das Produkt das Ende
seiner Nutzungsdauer erreicht hat. Für die Annahme solcher Produkte erheben einige dieser Stellen keine Gebühren. Durch ein auf
diese Weise durchgeführtes Recycling des Produkts und seiner Verpackung helfen Sie, die Umwelt zu schonen und die menschliche
Gesundheit zu schützen.
D-Link und die Umwelt
D-Link ist sich den möglichen Auswirkungen seiner Geschäftstätigkeiten und seiner Produkte auf die Umwelt bewusst und fühlt sich verpichtet,
diese entsprechend zu mindern. Zu diesem Zweck entwickelt und stellt D-Link seine Produkte mit dem Ziel größtmöglicher Umweltfreundlichkeit
her und verwendet wiederverwertbare, schadstoarme Materialien bei Produktherstellung und Verpackung.
D-Link empehlt, Ihre Produkte von D-Link, wenn nicht in Gebrauch, immer auszuschalten oder vom Netz zu nehmen. Auf diese Weise helfen
Sie, Energie zu sparen und CO2-Emissionen zu reduzieren.
Wenn Sie mehr über unsere umweltgerechten Produkte und Verpackungen wissen möchten, nden Sie entsprechende Informationen im Internet
unter www.dlinkgreen.com.

Appendix C - Regulatory Information
89
D-Link DWM-312 User Manual
FRANÇAIS FR
Ce symbole apposé sur le produit ou son emballage signie que, conformément aux lois et règlementations locales, ce produit ne
doit pas être éliminé avec les déchets domestiques mais recyclé. Veuillez le rapporter à un point de collecte prévu à cet eet par les
autorités locales; certains accepteront vos produits gratuitement. En recyclant le produit et son emballage de cette manière, vous
aidez à préserver l’environnement et à protéger la santé de l’homme.
D-Link et l’environnement
Chez D-Link, nous sommes conscients de l'impact de nos opérations et produits sur l'environnement et nous engageons à le réduire. Pour limiter
cet impact, D-Link conçoit et fabrique ses produits de manière aussi écologique que possible, en utilisant des matériaux recyclables et faiblement
toxiques, tant dans ses produits que ses emballages.
D-Link recommande de toujours éteindre ou débrancher vos produits D-Link lorsque vous ne les utilisez pas. Vous réaliserez ainsi des économies
d’énergie et réduirez vos émissions de CO2.
Pour en savoir plus sur les produits et emballages respectueux de l’environnement, veuillez consulter le www.dlinkgreen.com.
ESPAÑOL ES
Este símbolo en el producto o el embalaje signica que, de acuerdo con la legislación y la normativa local, este producto no se debe
desechar en la basura doméstica sino que se debe reciclar. Llévelo a un punto de recogida designado por las autoridades locales una
vez que ha llegado al n de su vida útil; algunos de ellos aceptan recogerlos de forma gratuita. Al reciclar el producto y su embalaje
de esta forma, contribuye a preservar el medio ambiente y a proteger la salud de los seres humanos.
D-Link y el medio ambiente
En D-Link, comprendemos y estamos comprometidos con la reducción del impacto que puedan tener nuestras actividades y nuestros productos
en el medio ambiente. Para reducir este impacto, D-Link diseña y fabrica sus productos para que sean lo más ecológicos posible, utilizando
materiales reciclables y de baja toxicidad tanto en los productos como en el embalaje.
D-Link recomienda apagar o desenchufar los productos D-Link cuando no se estén utilizando. Al hacerlo, contribuirá a ahorrar energía y a reducir
las emisiones de CO2.
Para obtener más información acerca de nuestros productos y embalajes ecológicos, visite el sitio www.dlinkgreen.com.

Appendix C - Regulatory Information
90
D-Link DWM-312 User Manual
ITALIANO IT
La presenza di questo simbolo sul prodotto o sulla confezione del prodotto indica che, in conformità alle leggi e alle normative locali,
questo prodotto non deve essere smaltito nei riuti domestici, ma avviato al riciclo. Una volta terminato il ciclo di vita utile, portare il
prodotto presso un punto di raccolta indicato dalle autorità locali. Alcuni questi punti di raccolta accettano gratuitamente i prodotti
da riciclare. Scegliendo di riciclare il prodotto e il relativo imballaggio, si contribuirà a preservare l'ambiente e a salvaguardare la
salute umana.
D-Link e l'ambiente
D-Link cerca da sempre di ridurre l'impatto ambientale dei propri stabilimenti e dei propri prodotti. Allo scopo di ridurre al minimo tale impatto,
D-Link progetta e realizza i propri prodotti in modo che rispettino il più possibile l'ambiente, utilizzando materiali riciclabili a basso tasso di
tossicità sia per i prodotti che per gli imballaggi.
D-Link raccomanda di spegnere sempre i prodotti D-Link o di scollegarne la spina quando non vengono utilizzati. In questo modo si contribuirà
a risparmiare energia e a ridurre le emissioni di anidride carbonica.
Per ulteriori informazioni sui prodotti e sugli imballaggi D-Link a ridotto impatto ambientale, visitate il sito all'indirizzo www.dlinkgreen.com.
NEDERLANDS NL
Dit symbool op het product of de verpakking betekent dat dit product volgens de plaatselijke wetgeving niet mag worden weggegooid
met het huishoudelijk afval, maar voor recyclage moeten worden ingeleverd. Zodra het product het einde van de levensduur heeft
bereikt, dient u het naar een inzamelpunt te brengen dat hiertoe werd aangeduid door uw plaatselijke autoriteiten, sommige
autoriteiten accepteren producten zonder dat u hiervoor dient te betalen. Door het product en de verpakking op deze manier te
recyclen helpt u het milieu en de gezondheid van de mens te beschermen.
D-Link en het milieu
Bij D-Link spannen we ons in om de impact van onze handelingen en producten op het milieu te beperken. Om deze impact te beperken, ontwerpt
en bouwt D-Link zijn producten zo milieuvriendelijk mogelijk, door het gebruik van recycleerbare producten met lage toxiciteit in product en
verpakking.
D-Link raadt aan om steeds uw D-Link producten uit te schakelen of uit de stekker te halen wanneer u ze niet gebruikt. Door dit te doen bespaart
u energie en beperkt u de CO2-emissies.
Breng een bezoek aan www.dlinkgreen.com voor meer informatie over onze milieuverantwoorde producten en verpakkingen.
Appendix C - Regulatory Information
91
D-Link DWM-312 User Manual
POLSKI PL
Ten symbol umieszczony na produkcie lub opakowaniu oznacza, że zgodnie z miejscowym prawem i lokalnymi przepisami
niniejszego produktu nie wolno wyrzucać jak odpady czy śmieci z gospodarstwa domowego, lecz należy go poddać procesowi
recyklingu. Po zakończeniu użytkowania produktu, niektóre odpowiednie do tego celu podmioty przyjmą takie produkty
nieodpłatnie, dlatego prosimy dostarczyć go do punktu zbiórki wskazanego przez lokalne władze. Poprzez proces recyklingu i
dzięki takiemu postępowaniu z produktem oraz jego opakowaniem, pomogą Państwo chronić środowisko naturalne i dbać o
ludzkie zdrowie.
D-Link i środowisko
D-Link podchodzimy w sposób świadomy do ochrony otoczenia oraz jesteśmy zaangażowani w zmniejszanie wpływu naszych działań i produktów
na środowisko naturalne. W celu zminimalizowania takiego wpływu rma D-Link konstruuje i wytwarza swoje produkty w taki sposób, aby były
one jak najbardziej przyjazne środowisku, stosując do tych celów materiały nadające się do powtórnego wykorzystania, charakteryzujące się
małą toksycznością zarówno w przypadku samych produktów jak i opakowań.
Firma D-Link zaleca, aby Państwo zawsze prawidłowo wyłączali z użytku swoje produkty D-Link, gdy nie są one wykorzystywane. Postępując w
ten sposób pozwalają Państwo oszczędzać energię i zmniejszać emisje CO2.
Aby dowiedzieć się więcej na temat produktów i opakowań mających wpływ na środowisko prosimy zapoznać się ze stroną Internetową www.
dlinkgreen.com.
ČESKY CZ
Tento symbol na výrobku nebo jeho obalu znamená, že podle místně platných předpisů se výrobek nesmí vyhazovat do komunálního
odpadu, ale odeslat k recyklaci. Až výrobek doslouží, odneste jej prosím na sběrné místo určené místními úřady k tomuto účelu.
Některá sběrná místa přijímají výrobky zdarma. Recyklací výrobku i obalu pomáháte chránit životní prostředí i lidské zdraví.
D-Link a životní prostředí
Ve společnosti D-Link jsme si vědomi vlivu našich provozů a výrobků na životní prostředí a snažíme se o minimalizaci těchto vlivů. Proto své
výrobky navrhujeme a vyrábíme tak, aby byly co nejekologičtější, a ve výrobcích i obalech používáme recyklovatelné a nízkotoxické materiály.
Společnost D-Link doporučuje, abyste své výrobky značky D-Link vypnuli nebo vytáhli ze zásuvky vždy, když je nepoužíváte. Pomůžete tak šetřit
energii a snížit emise CO2.
Více informací o našich ekologických výrobcích a obalech najdete na adrese www.dlinkgreen.com.

Appendix C - Regulatory Information
92
D-Link DWM-312 User Manual
MAGYAR HU
Ez a szimbólum a terméken vagy a csomagoláson azt jelenti, hogy a helyi törvényeknek és szabályoknak megfelelően ez a termék
nem semmisíthető meg a háztartási hulladékkal együtt, hanem újrahasznosításra kell küldeni. Kérjük, hogy a termék élettartamának
elteltét követően vigye azt a helyi hatóság által kijelölt gyűjtőhelyre. A termékek egyes helyeken ingyen elhelyezhetők. A termék és
a csomagolás újrahasznosításával segíti védeni a környezetet és az emberek egészségét.
A D-Link és a környezet
A D-Linknél megértjük és elkötelezettek vagyunk a műveleteink és termékeink környezetre gyakorolt hatásainak csökkentésére. Az ezen hatás
csökkentése érdekében a D-Link a lehető leginkább környezetbarát termékeket tervez és gyárt azáltal, hogy újrahasznosítható, alacsony károsanyag-
tartalmú termékeket gyárt és csomagolásokat alkalmaz.
A D-Link azt javasolja, hogy mindig kapcsolja ki vagy húzza ki a D-Link termékeket a tápforrásból, ha nem használja azokat. Ezzel segít az energia
megtakarításában és a széndioxid kibocsátásának csökkentésében.
Környezetbarát termékeinkről és csomagolásainkról további információkat a www.dlinkgreen.com weboldalon tudhat meg.
NORSK NO
Dette symbolet på produktet eller forpakningen betyr at dette produktet ifølge lokale lover og forskrifter ikke skal kastes sammen
med husholdningsavfall, men leveres inn til gjenvinning. Vennligst ta det til et innsamlingssted anvist av lokale myndigheter når
det er kommet til slutten av levetiden. Noen steder aksepteres produkter uten avgift. Ved på denne måten å gjenvinne produktet
og forpakningen hjelper du å verne miljøet og beskytte folks helse.
D-Link og miljøet
Hos D-Link forstår vi oss på og er forpliktet til å minske innvirkningen som vår drift og våre produkter kan ha på miljøet. For å minimalisere denne
innvirkningen designer og lager D-Link produkter som er så miljøvennlig som mulig, ved å bruke resirkulerbare, lav-toksiske materialer både i
produktene og forpakningen.
D-Link anbefaler at du alltid slår av eller frakobler D-Link-produkter når de ikke er i bruk. Ved å gjøre dette hjelper du å spare energi og å redusere
CO2-utslipp.
For mer informasjon angående våre miljøansvarlige produkter og forpakninger kan du gå til www.dlinkgreen.com.
Appendix C - Regulatory Information
93
D-Link DWM-312 User Manual
DANSK DK
Dette symbol på produktet eller emballagen betyder, at dette produkt i henhold til lokale love og regler ikke må bortskaes som
husholdningsaald, mens skal sendes til genbrug. Indlever produktet til et indsamlingssted som angivet af de lokale myndigheder,
når det er nået til slutningen af dets levetid. I nogle tilfælde vil produktet blive modtaget gratis. Ved at indlevere produktet og dets
emballage til genbrug på denne måde bidrager du til at beskytte miljøet og den menneskelige sundhed.
D-Link og miljøet
Hos D-Link forstår vi og bestræber os på at reducere enhver indvirkning, som vores aktiviteter og produkter kan have på miljøet. For at minimere
denne indvirkning designer og producerer D-Link sine produkter, så de er så miljøvenlige som muligt, ved at bruge genanvendelige materialer
med lavt giftighedsniveau i både produkter og emballage.
D-Link anbefaler, at du altid slukker eller frakobler dine D-Link-produkter, når de ikke er i brug. Ved at gøre det bidrager du til at spare energi og
reducere CO2-udledningerne.
Du kan nde ere oplysninger om vores miljømæssigt ansvarlige produkter og emballage på www.dlinkgreen.com.
SUOMI FI
Tämä symboli tuotteen pakkauksessa tarkoittaa, että paikallisten lakien ja säännösten mukaisesti tätä tuotetta ei pidä hävittää
yleisen kotitalousjätteen seassa vaan se tulee toimittaa kierrätettäväksi. Kun tuote on elinkaarensa päässä, toimita se lähimpään
viranomaisten hyväksymään kierrätyspisteeseen. Kierrättämällä käytetyn tuotteen ja sen pakkauksen autat tukemaan sekä ympäristön
että ihmisten terveyttä ja hyvinvointia.
D-Link ja ympäristö
D-Link ymmärtää ympäristönsuojelun tärkeyden ja on sitoutunut vähentämään tuotteistaan ja niiden valmistuksesta ympäristölle mahdollisesti
aiheutuvia haittavaikutuksia. Nämä negatiiviset vaikutukset minimoidakseen D-Link suunnittelee ja valmistaa tuotteensa mahdollisimman
ympäristöystävällisiksi käyttämällä kierrätettäviä, alhaisia pitoisuuksia haitallisia aineita sisältäviä materiaaleja sekä tuotteissaan että niiden
pakkauksissa.
Suosittelemme, että irrotat D-Link-tuotteesi virtalähteestä tai sammutat ne aina, kun ne eivät ole käytössä. Toimimalla näin autat säästämään
energiaa ja vähentämään hiilidioksiidipäästöjä.
Lue lisää ympäristöystävällisistä D-Link-tuotteista ja pakkauksistamme osoitteesta www.dlinkgreen.com.

Appendix C - Regulatory Information
94
D-Link DWM-312 User Manual
SVENSKA SE
Den här symbolen på produkten eller förpackningen betyder att produkten enligt lokala lagar och föreskrifter inte skall kastas i
hushållssoporna utan i stället återvinnas. Ta den vid slutet av dess livslängd till en av din lokala myndighet utsedd uppsamlingsplats,
vissa accepterar produkter utan kostnad. Genom att på detta sätt återvinna produkten och förpackningen hjälper du till att bevara
miljön och skydda människors hälsa.
D-Link och miljön
På D-Link förstår vi och är fast beslutna att minska den påverkan våra verksamheter och produkter kan ha på miljön. För att minska denna påverkan
utformar och bygger D-Link sina produkter för att de ska vara så miljövänliga som möjligt, genom att använda återvinningsbara material med
låg gifthalt i både produkter och förpackningar.
D-Link rekommenderar att du alltid stänger av eller kopplar ur dina D-Link produkter när du inte använder dem. Genom att göra detta hjälper
du till att spara energi och minska utsläpp av koldioxid.
För mer information om våra miljöansvariga produkter och förpackningar www.dlinkgreen.com.
PORTUGUÊS PT
Este símbolo no produto ou embalagem signica que, de acordo com as leis e regulamentações locais, este produto não deverá ser
eliminado juntamente com o lixo doméstico mas enviado para a reciclagem. Transporte-o para um ponto de recolha designado pelas
suas autoridades locais quando este tiver atingido o m da sua vida útil, alguns destes pontos aceitam produtos gratuitamente. Ao
reciclar o produto e respectiva embalagem desta forma, ajuda a preservar o ambiente e protege a saúde humana.
A D-Link e o ambiente
Na D-Link compreendemos e comprometemo-nos com a redução do impacto que as nossas operações e produtos possam ter no ambiente.
Para minimizar este impacto a D-Link concebe e constrói os seus produtos para que estes sejam o mais inofensivos para o ambiente possível,
utilizando meteriais recicláveis e não tóxicos tanto nos produtos como nas embalagens.
A D-Link recomenda que desligue os seus produtos D-Link quando estes não se encontrarem em utilização. Com esta acção ajudará a poupar
energia e reduzir as emissões de CO2.
Para saber mais sobre os nossos produtos e embalagens responsáveis a nível ambiental visite www.dlinkgreen.com.