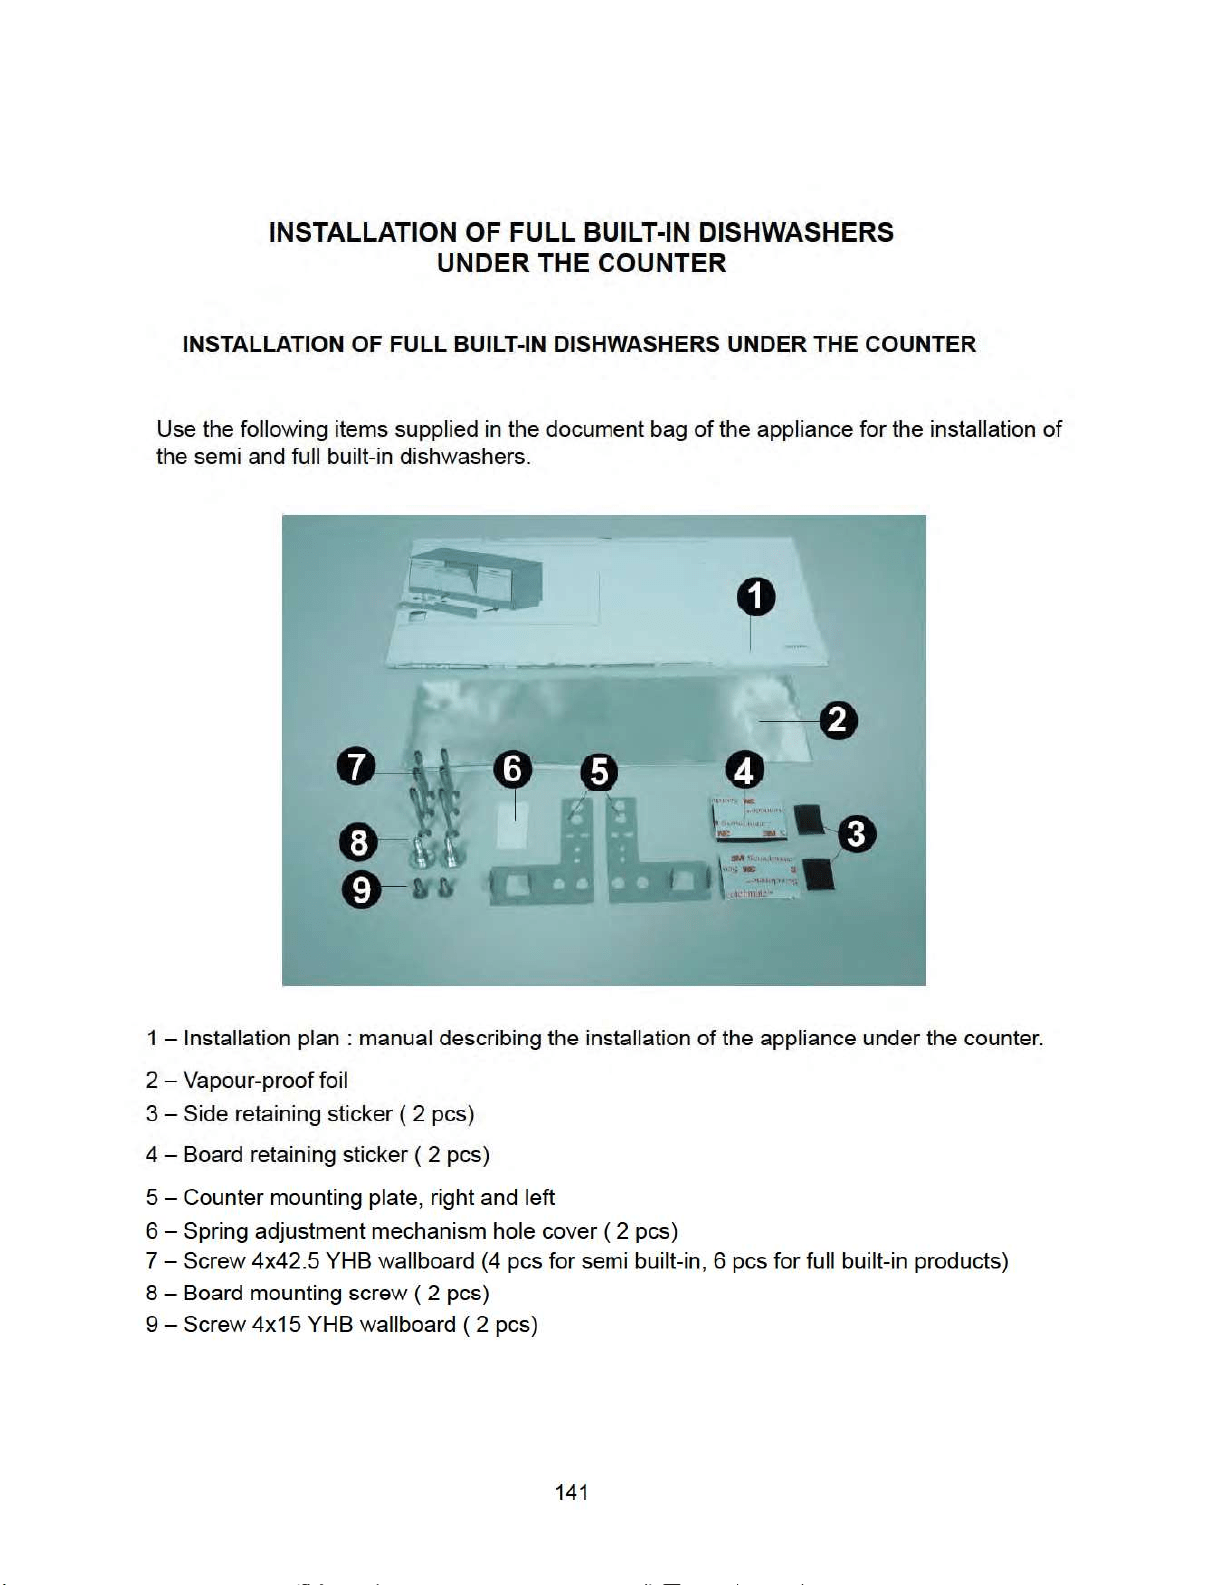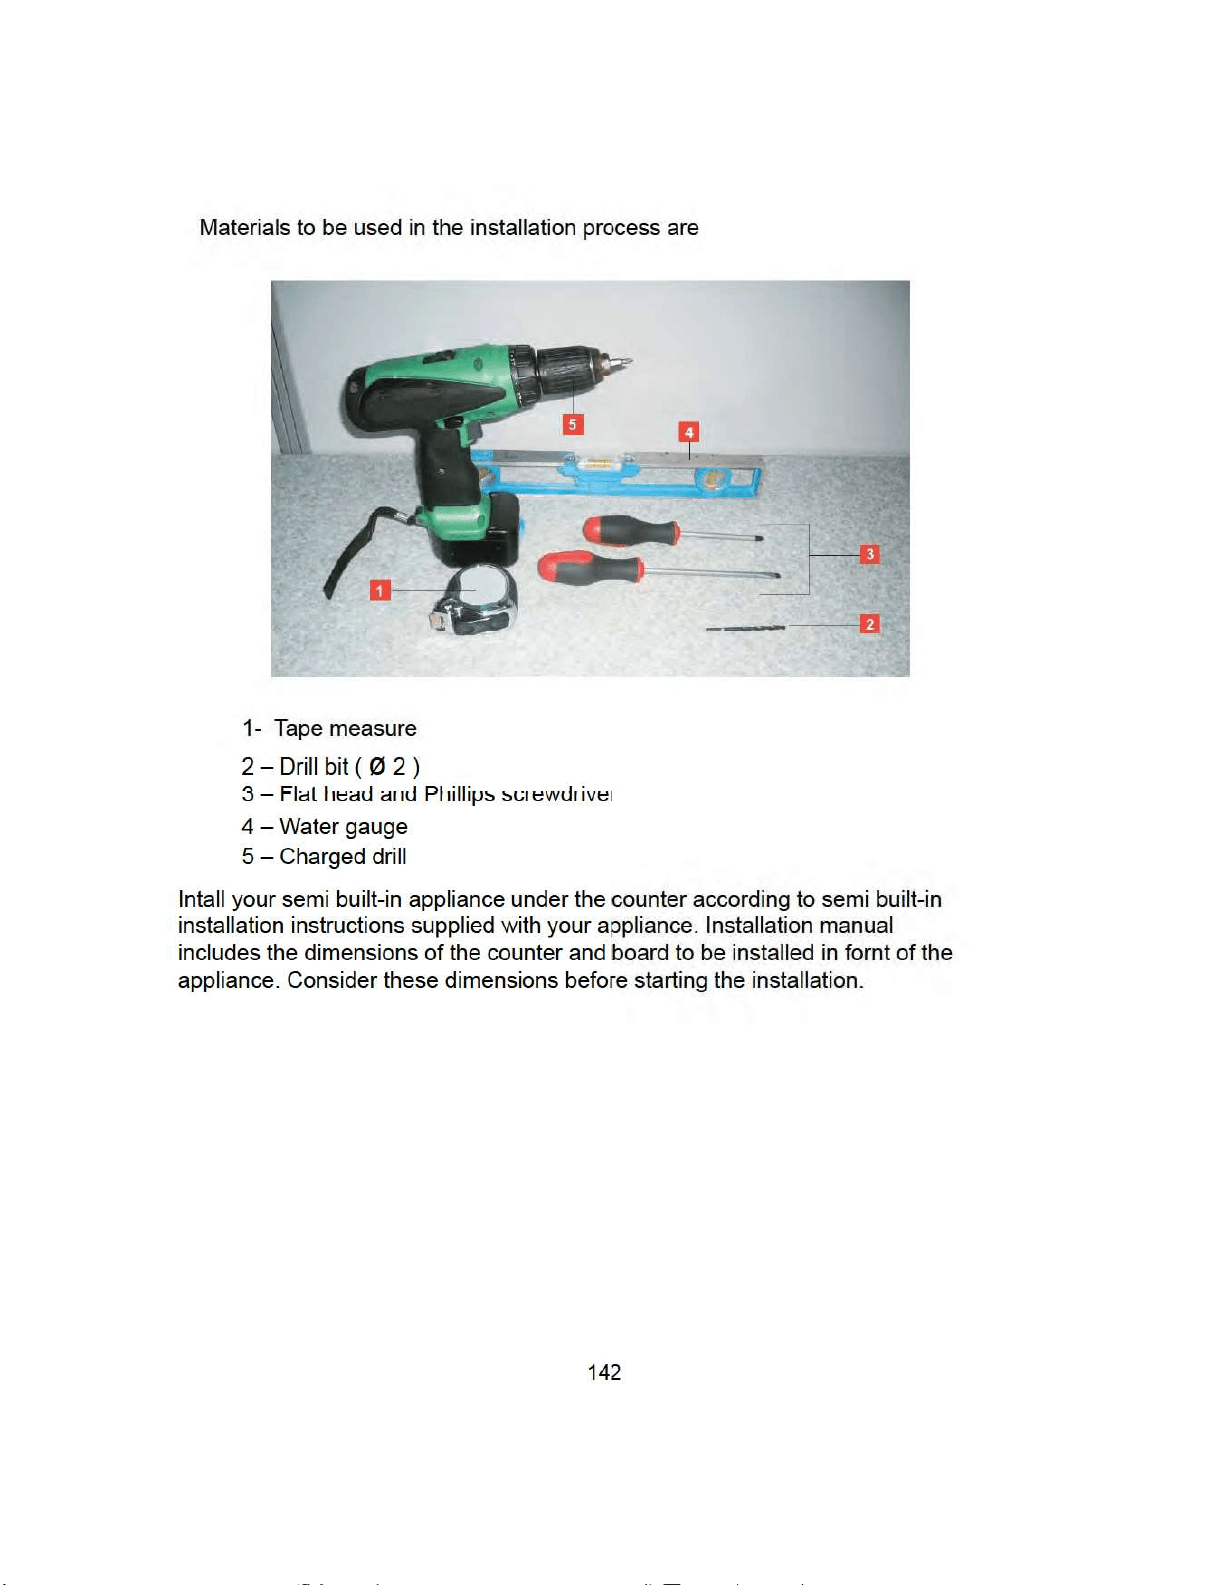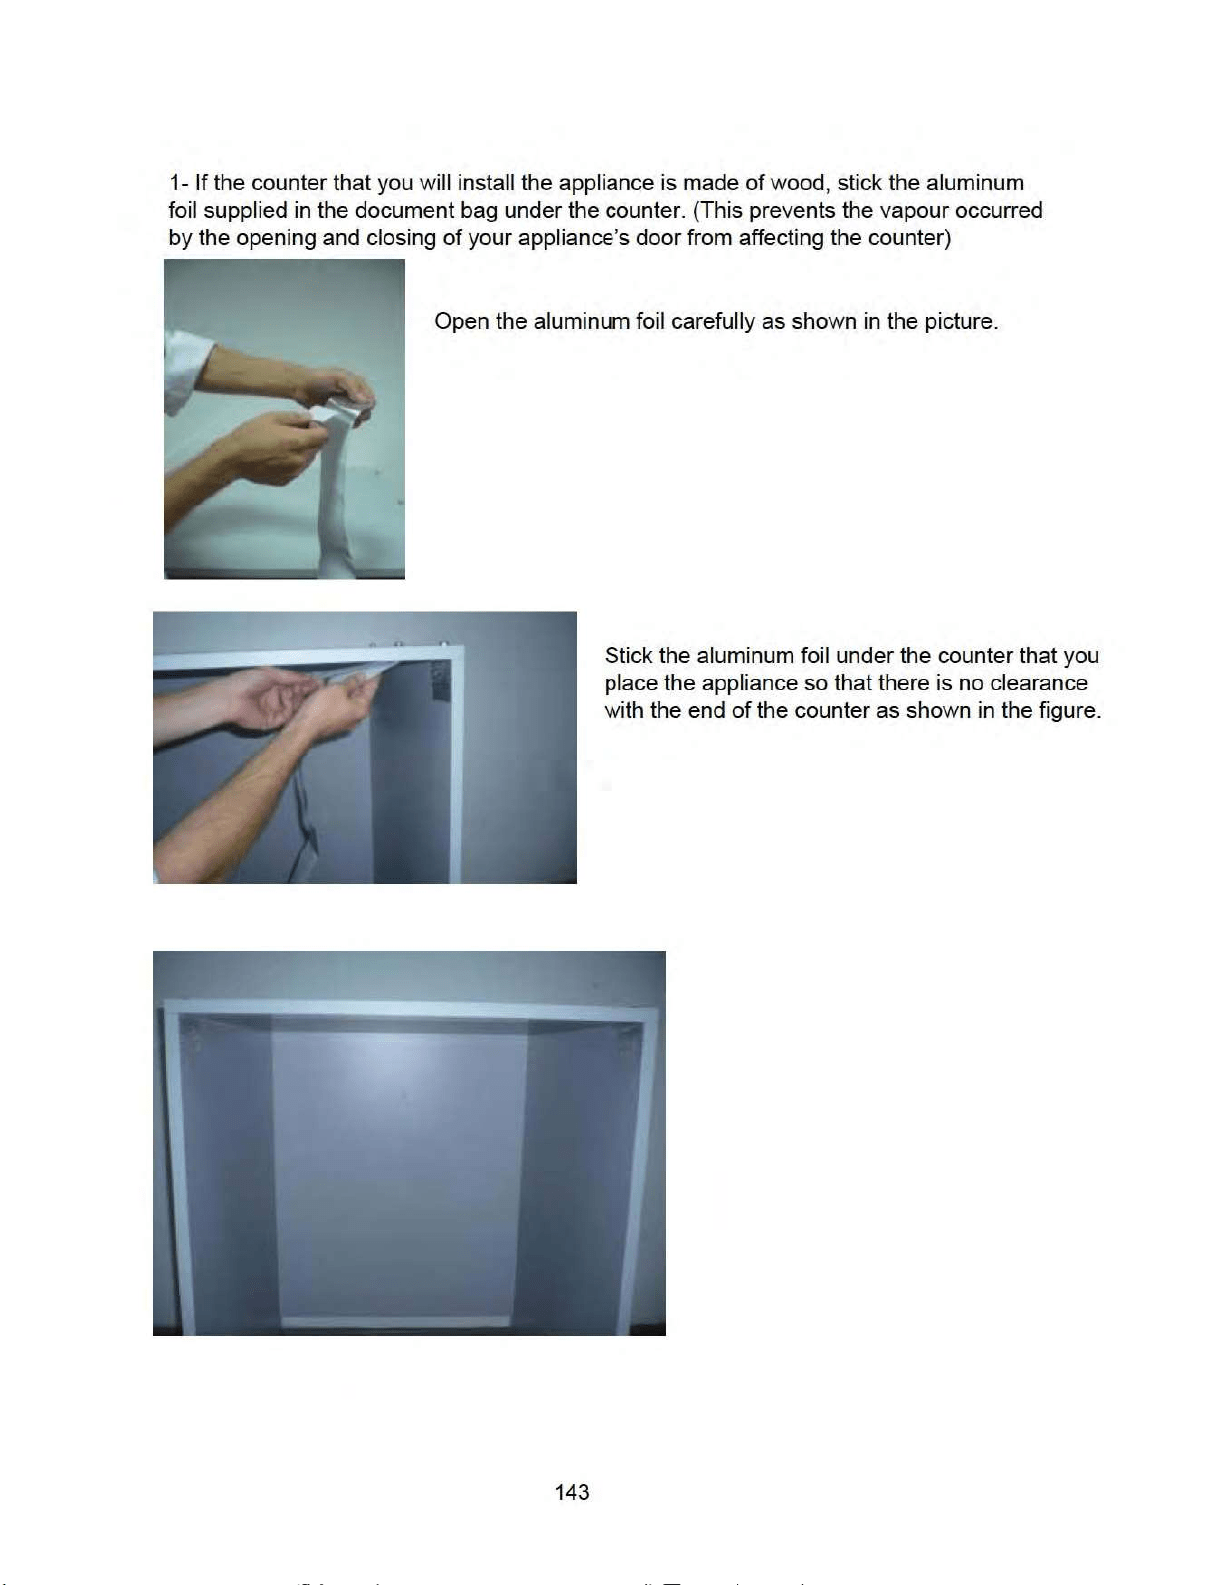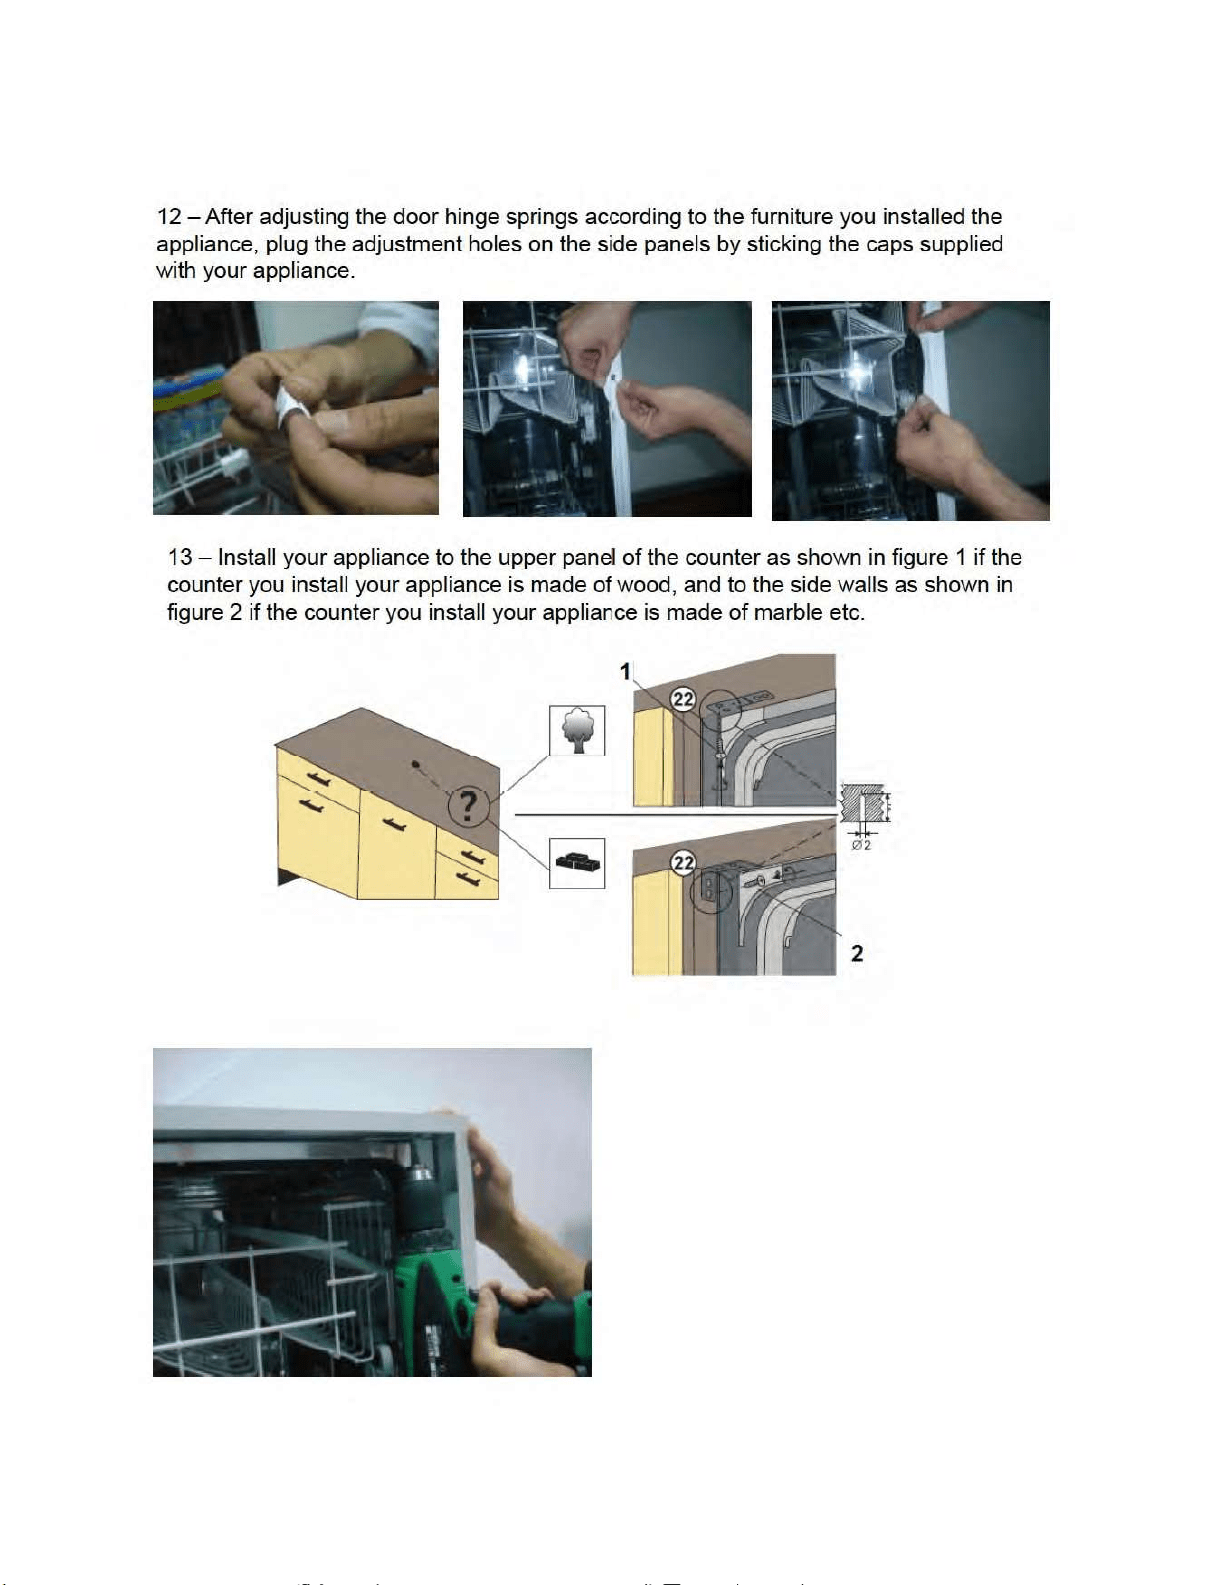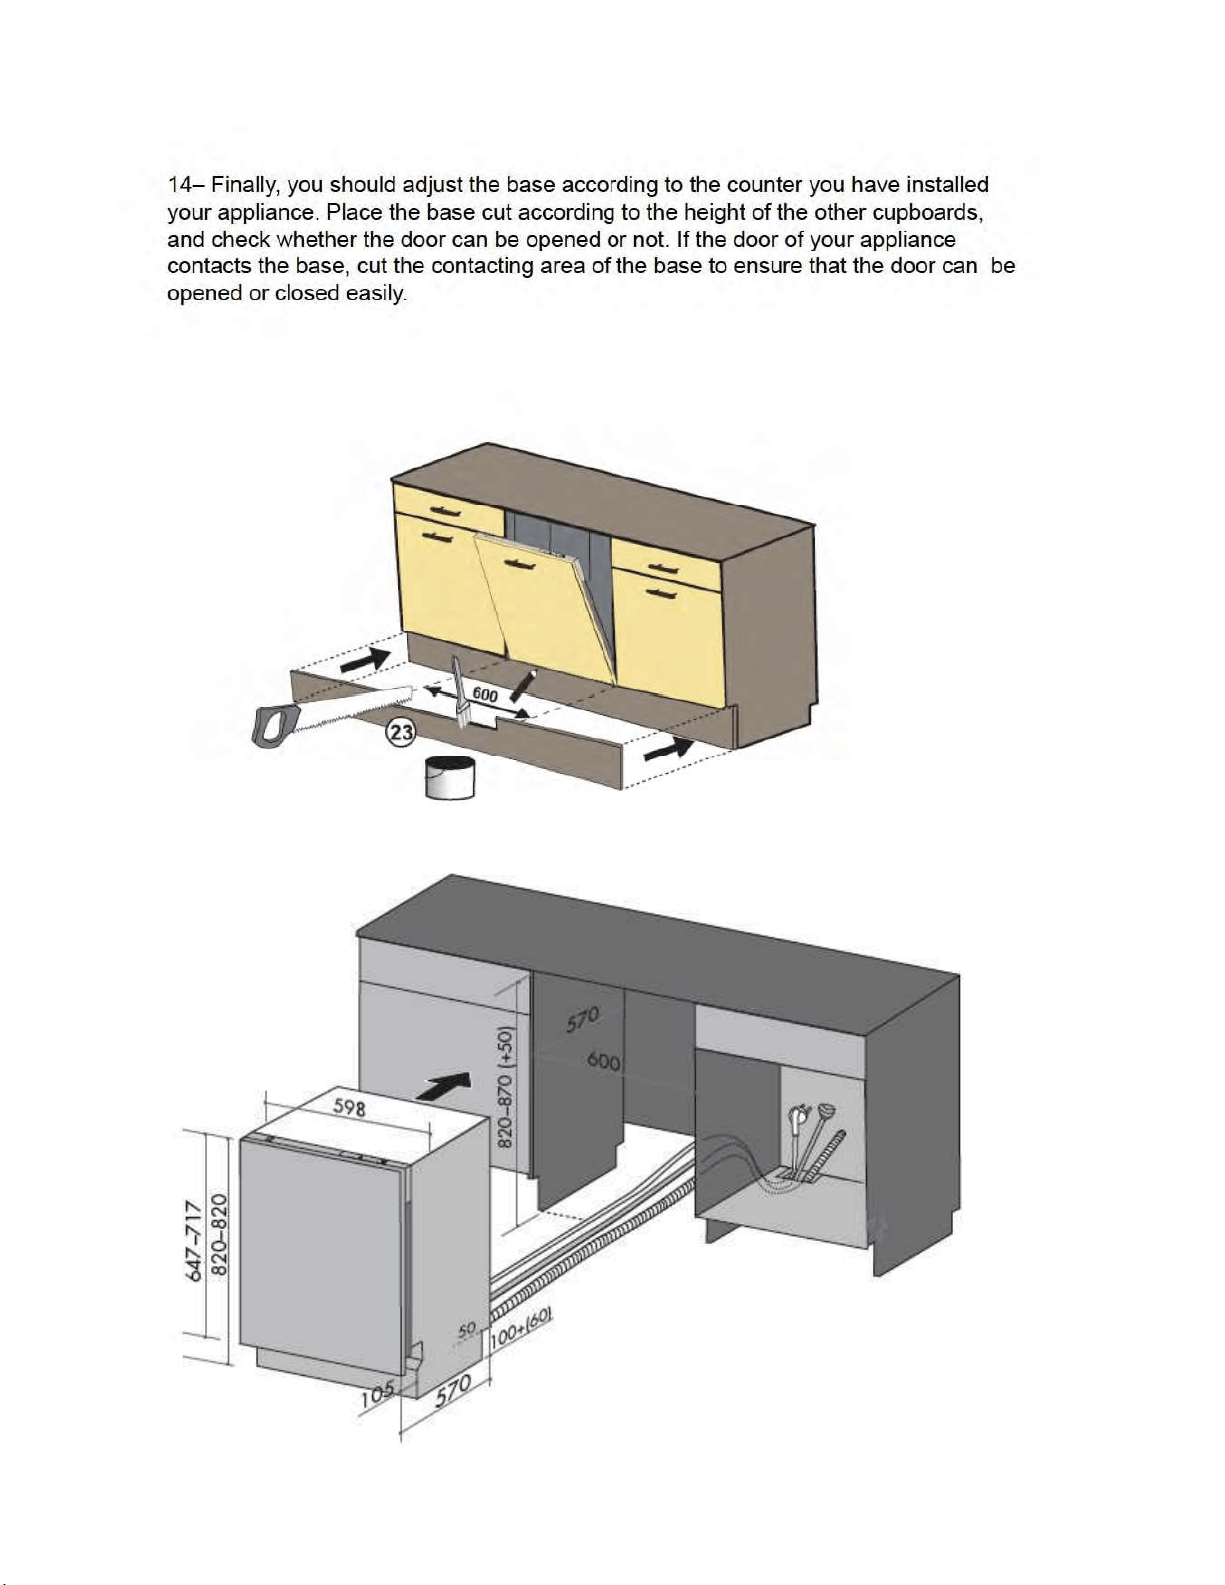

&217(176
7HFKQLFDOVSHFLILFDWLRQV«««««««««««««««
6DIHW\LQIRUPDWLRQDQG5HFRPPHQGDWLRQV««««««««
,QVWDOOLQJWKHPDFKLQH««««««««««««««««
3UHSDULQJWKHPDFKLQHIRUXVH«««««««««««««
/RDGLQJ\RXUGLVKZDVKHU«««««««««««««««
3URJUDPPHGHVFULSWLRQV«««««««««««««««
*HWWLQJIDPLOLDUZLWK\RXUPDFKLQH

0DLQWHQDQFHDQG&OHDQLQJ
)DLOXUHFRGHVDQGZKDWWRGRLQFDVHRIIDLOXUH««««««
3UDFWLFDODQGXVHIXOLQIRUPDWLRQ««
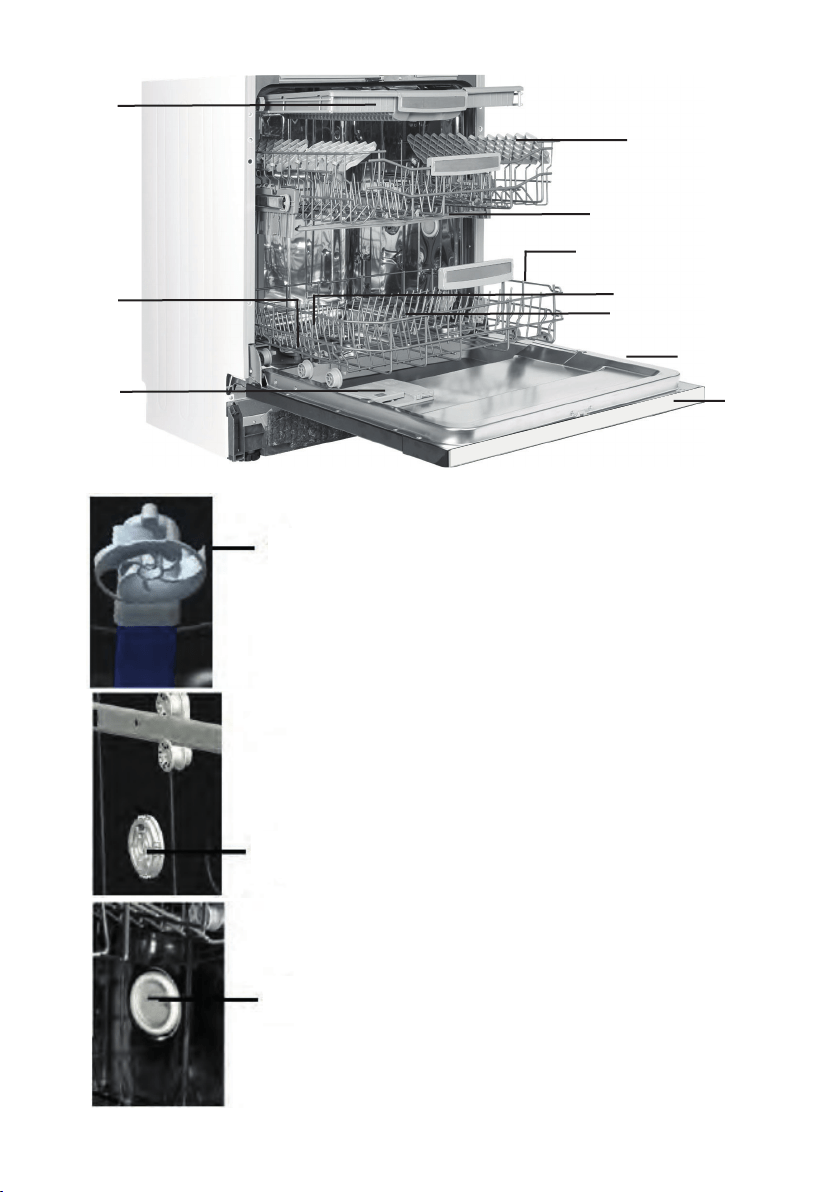
1. Upper basket with racks
2. Upper spray arm
3. Lower basket
4. Lower spray arm
5. Filters
6. Rating plate
7. Control Panel
8. Detergent and rinse-aid dispenser
9. Upper basket track latch
10. Upper Cutlery Basket
11. Ceiling Spray Arm: It provides a better
wash for the dishes in the upper basket.
12. Turbo Drying Unit: This system provides
a better drying performance for the dishes.
13. Interior light : Provides illumination to give
a better view when placing dishes in the unit.
Capacity 15 place settings
Height 820 mm - 870 mm
Width 598 mm
Depth 550 mm
Net Weight 38 kg
Electricity input 220-240 V, 50 Hz
Total Power 1900 W
Heating Power 1800 W
Pump Power 100 W
Drain Pump Power 30 W
Water supply pressure 0.03 MPa (0,3 bar)-1 MPa (10 bar)
Current 10 A
Technical specifications

SAFETY INFORMATION AND RECOMMENDATIONS
Recycling
• Recyclable materials are used in certain components and
packaging.
• Plastic parts are marked with international abbreviations:
(>PE< , >PS< , >POM<, >PP<, )
• Cardboard parts have been produced from recycled paper
which should be disposed of into waste paper collection
containers for recycling.
• Such materials are not suitable for garbage bins. They
should be delivered to recycling centres instead.
• Contact the relevant centre in order to obtain information on
methods and points of disposal.
6DIHW\,QIRUPDWLRQ
:KHQ\RXWDNHGHOLYHU\RI\RXUPDFKLQH
• If you see any damage on your machine’s packaging, please
notify your retailer.
• Unwrap the packaging materials as indicated and dispose
of them in accordance with the rules.
3RLQWVWRSD\DWWHQWLRQWRGXULQJPDFKLQH
LQVWDOODWLRQ
• Choose a suitable, safe and level place to install your
machine.
• Carry out the installation and connection of your machine by
following the instructions.
• We recommend that the machine is installed by an authorised
installer, and should only be serviced by an approved
technician.
• Only original spare parts should be used with the machine.
• Before installing, be sure that the machine is unplugged.
• Check whether the indoor electrical fuse system is connected
according to regulations.
• All electrical connections must match values on the rating

plate.
• Be sure that the machine does not stand on the electricity
supply cable.
• Never use an extension cord or a multiple socket for making
a connection. The plug should be comfortably accessible
after installation.
• After installation, run it unloaded for the first time.
,QGDLO\XVH
• This machine is for domestic use; do not use it for any other
purpose. Commercial usage of the dishwasher see warranty
card.
• Do not get up, sit or place a load on the open door of
thedishwasher, it may fall over.
• Never put into the detergent and rinse aid dispensers of
your machine anything other than those detergents and rinse
aids which are produced specifically for dishwashers. Our
company will not be responsible for any damage that might
occur in your machine otherwise.
• The water in the machine's washing section is no drinking
water do not drink it.
Warning: Some dishwasher detergents are strongly alkaline.
They can be extremely dangerous if swallowed. Avoid contact
with the skin and eyes and keep children away from the
dishwasher when the door is open. Check that the detergent
receptacle is empty after completion of the wash cycle.
• Due to danger of explosion, do not put into the
machine’swashing section any chemical dissolving agents
such as solvents.
• Check whether plastic items are heat-resistant before
washing them in the machine.
• This appliance is not intended for use by persons (including
children) with reduced physical, sensory or mental capabilities,
or lack of experience and knowledge, unless they have

been given supervision or instruction concerning use of the
appliance by a person responsible for their safety.
• Children should be supervised to ensure that they do not
play with the appliance.
• Do not put into your machine those items which are not
suitable for dishwashing. Also, do not fill any basket above its
capacity.Our company will not be responsible for any scratch
or rust to form on the inner frame of your machine due to
basket movements otherwise.
• Especially because hot water may flow out, the machine
door should not be opened under any circumstances while
the machine is in operation. In any case, a safety devices
ensures that the machine stops if the door is opened.
• Do not leave the dishwasher's door in the open position
since this could present a tripping hazard.
Warning: Knives and other utensils with sharp points must
be loaded in the basket with their points down or placed in a
horizontal position.
• If the supply cord is damaged, it must be replaced by
themanufacturer, its service agent or similarly qualified
persons in order to avoid a hazard.
• If EnergySave option is selected as “Yes”, The door will
be opened at the end of the program. Do not force the door
closed to avoid harm to the auto door mechanism for one
minute. The door must be open for 30 minutes to get effective
drying.( in models with auto door opening system )
Warning: Do not stand in front of the door after the signal
sounds belonging auto-open.
For your children’s safety
• After removing the machine’s packaging, make sure that the
packaging material is out of reach of children.
• Do not allow children to play with or start the machine.
• Keep children away from detergents and rinse aids.

• Keep children away from the machine while it is open
because there may still be residues of cleaning substances
inside the machine.
• Be sure that your old machine does not pose any threat to
your children. Children have been known to get themselves
locked in old machines. To prevent such a situation, break
your machine’s door lock and tear off the electrical cables.
In case of malfunctioning
• Any repairing performed by anyone other than authorized
service personnel will invalidate your warranty.
• Prior to any repair work on the machine, be sure that the
machine is isolated from the mains. Switch off the fuse or
unplug the machine.Do not pull by the cable when unplugging.
Make sure to turn off the water tap.
Recommendations
• For energy and water saving, remove coarse residues on
your dishes before placing the dishes into the machine. Start
your machine after having fully loaded it.
• Use the pre-wash programme only when necessary.
• Place such hollow items as bowls, glasses and pots into
the machine in such a way that they will face down.
• You are not recommended to overload your machine or
load it in a way other than that which is indicated.
Items not suitable for dishwashing:
• Cigarette ashes, candle leftovers, polish, paint, chemical
substances, iron-alloy materials;
• Forks, spoons and knives with wooden or bone, or ivory
or nacre-coated handles; glued items,items soiled with
abrasive, acidic or base chemicals.
• Plastic items that are not heat-resistant, copper or tin-
coated containers.
• Aluminium and silver objects (they may discolour, become
dull).

• Certain delicate glass types, porcelains with ornamental
printed patterns as they fade even after the first wash;
certain crystal items as they lose their transparency over
time, adhered cutlery that is not heat-resistant, lead crystal
glasses, cutting boards, items manufactured with synthetic
fibre;
• Absorbent items as sponges or kitchen rags are not
suitable for dishwashing.
Warning:Take care to buy dishwasher-proof sets in your
future purchases.
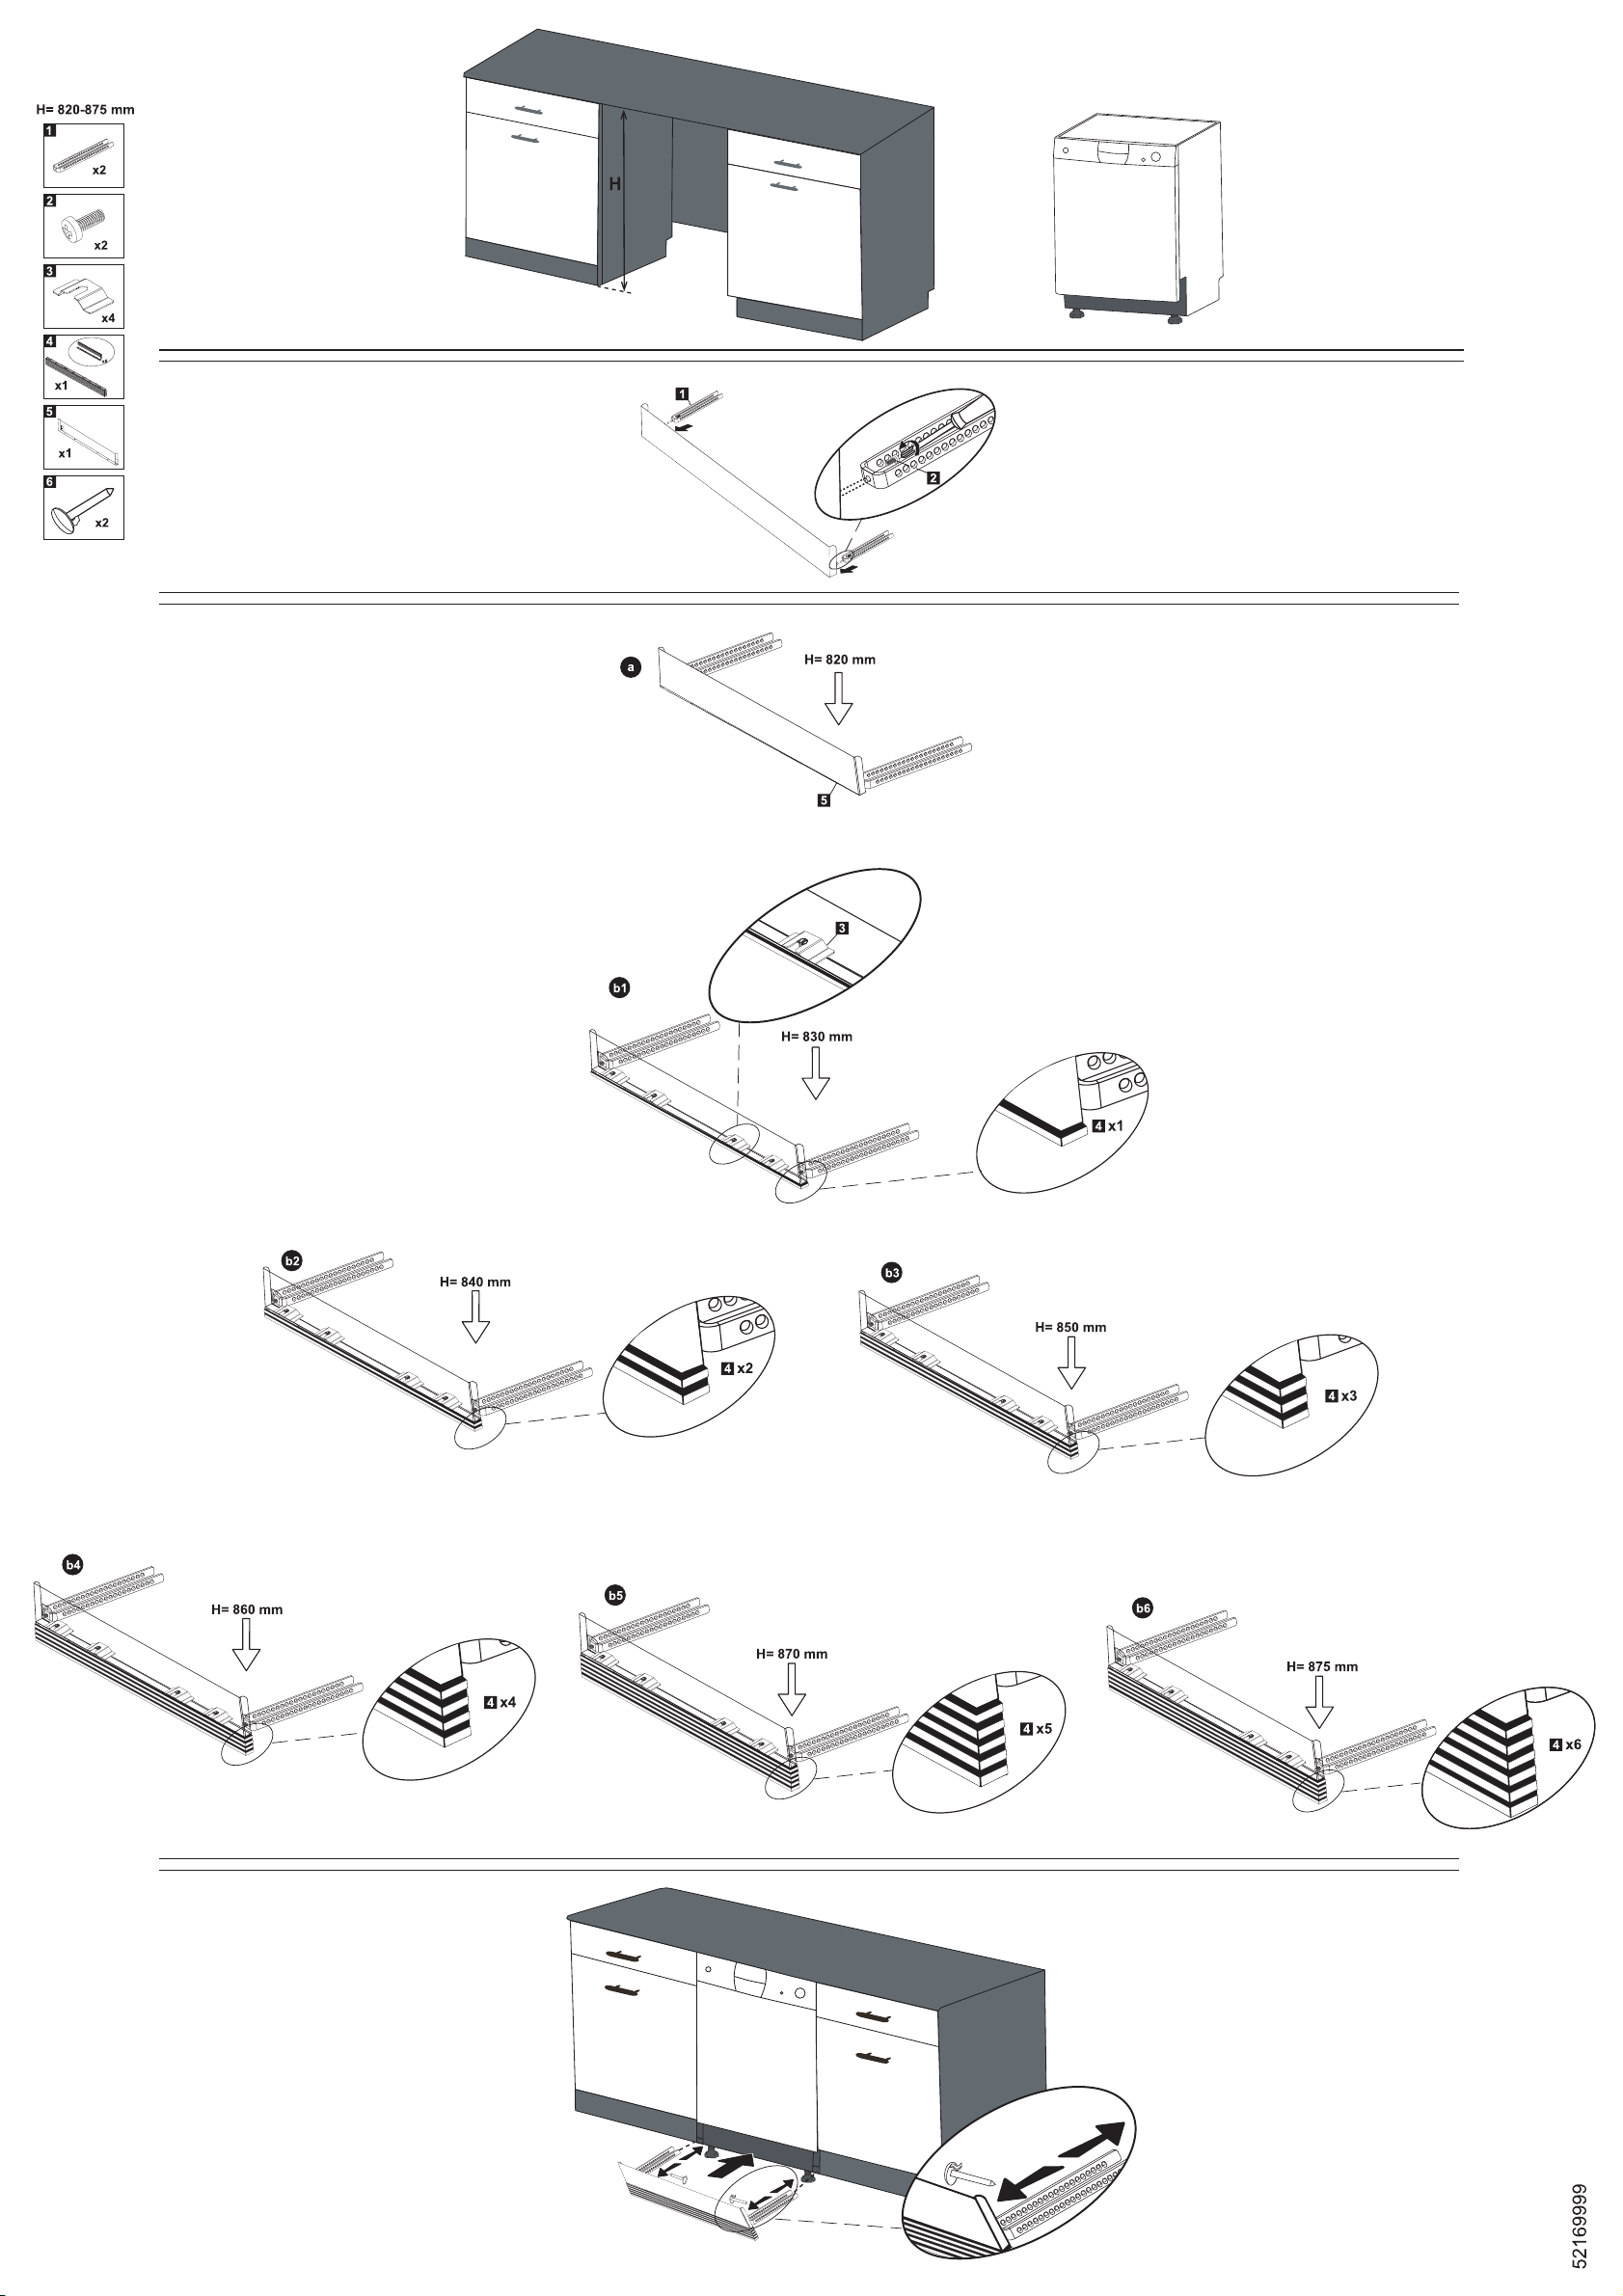
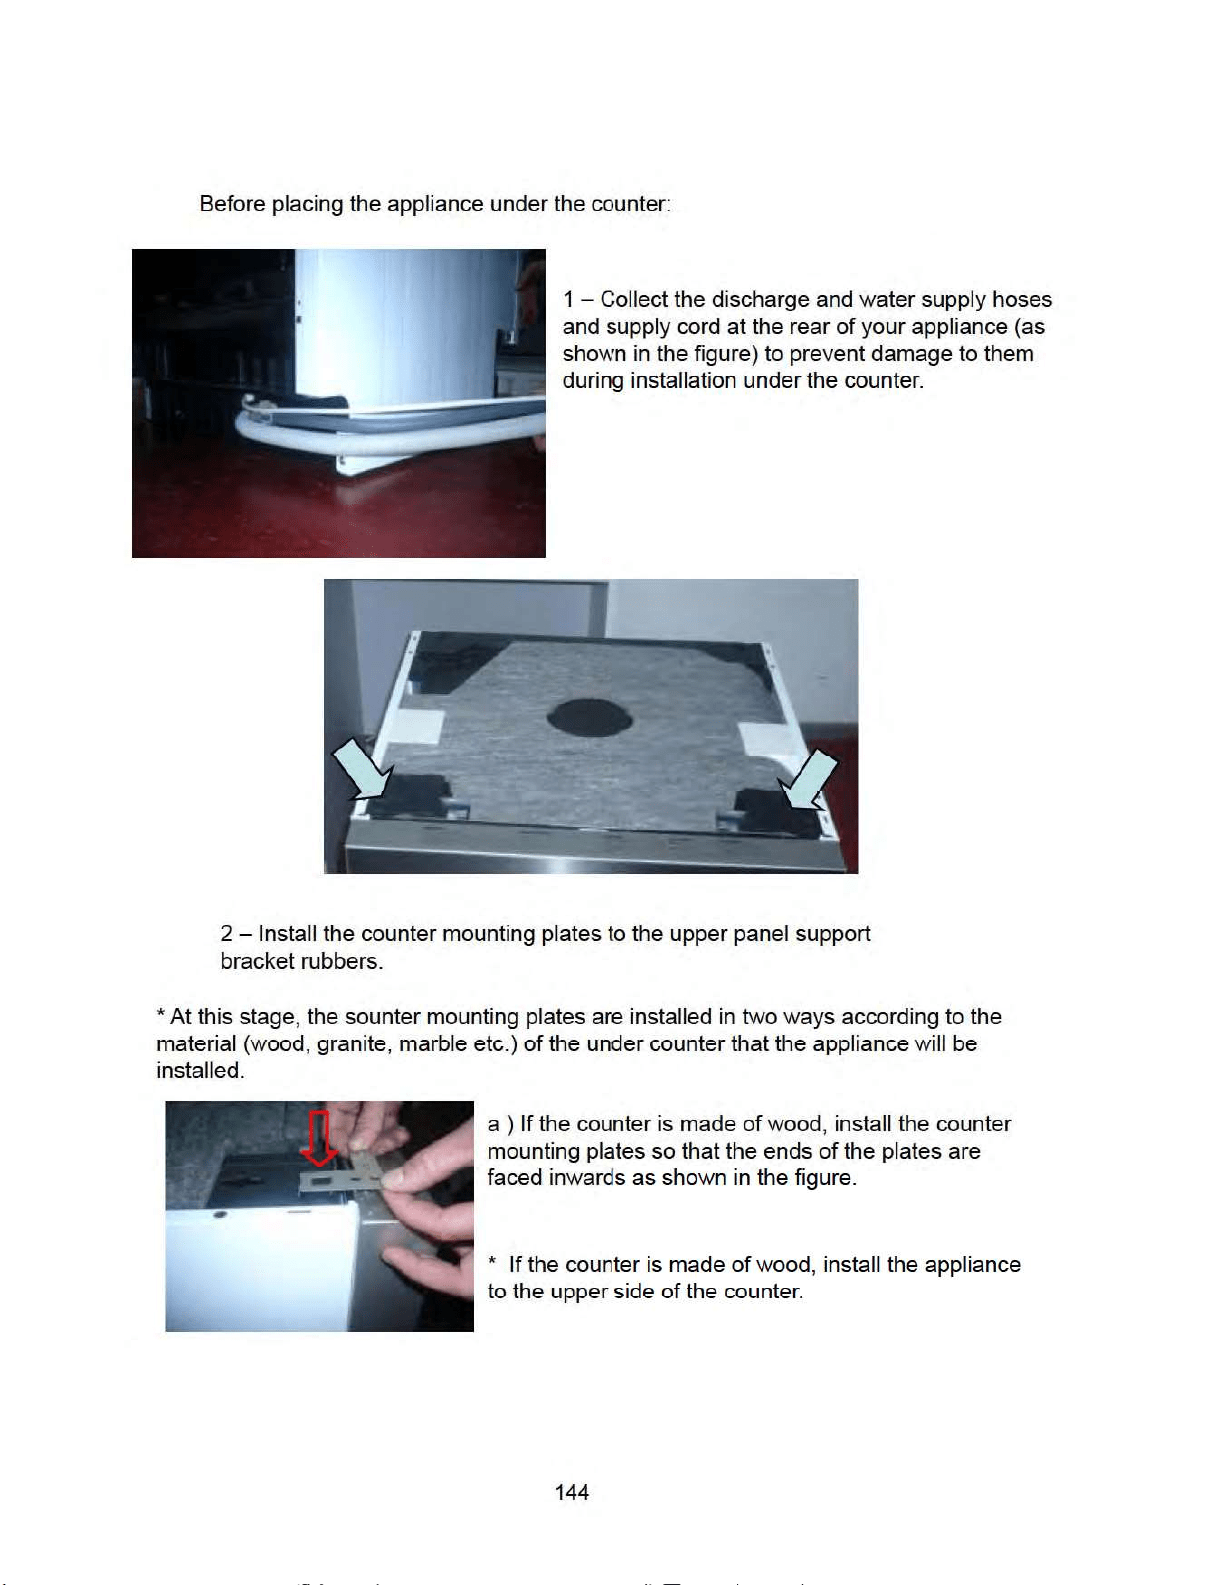
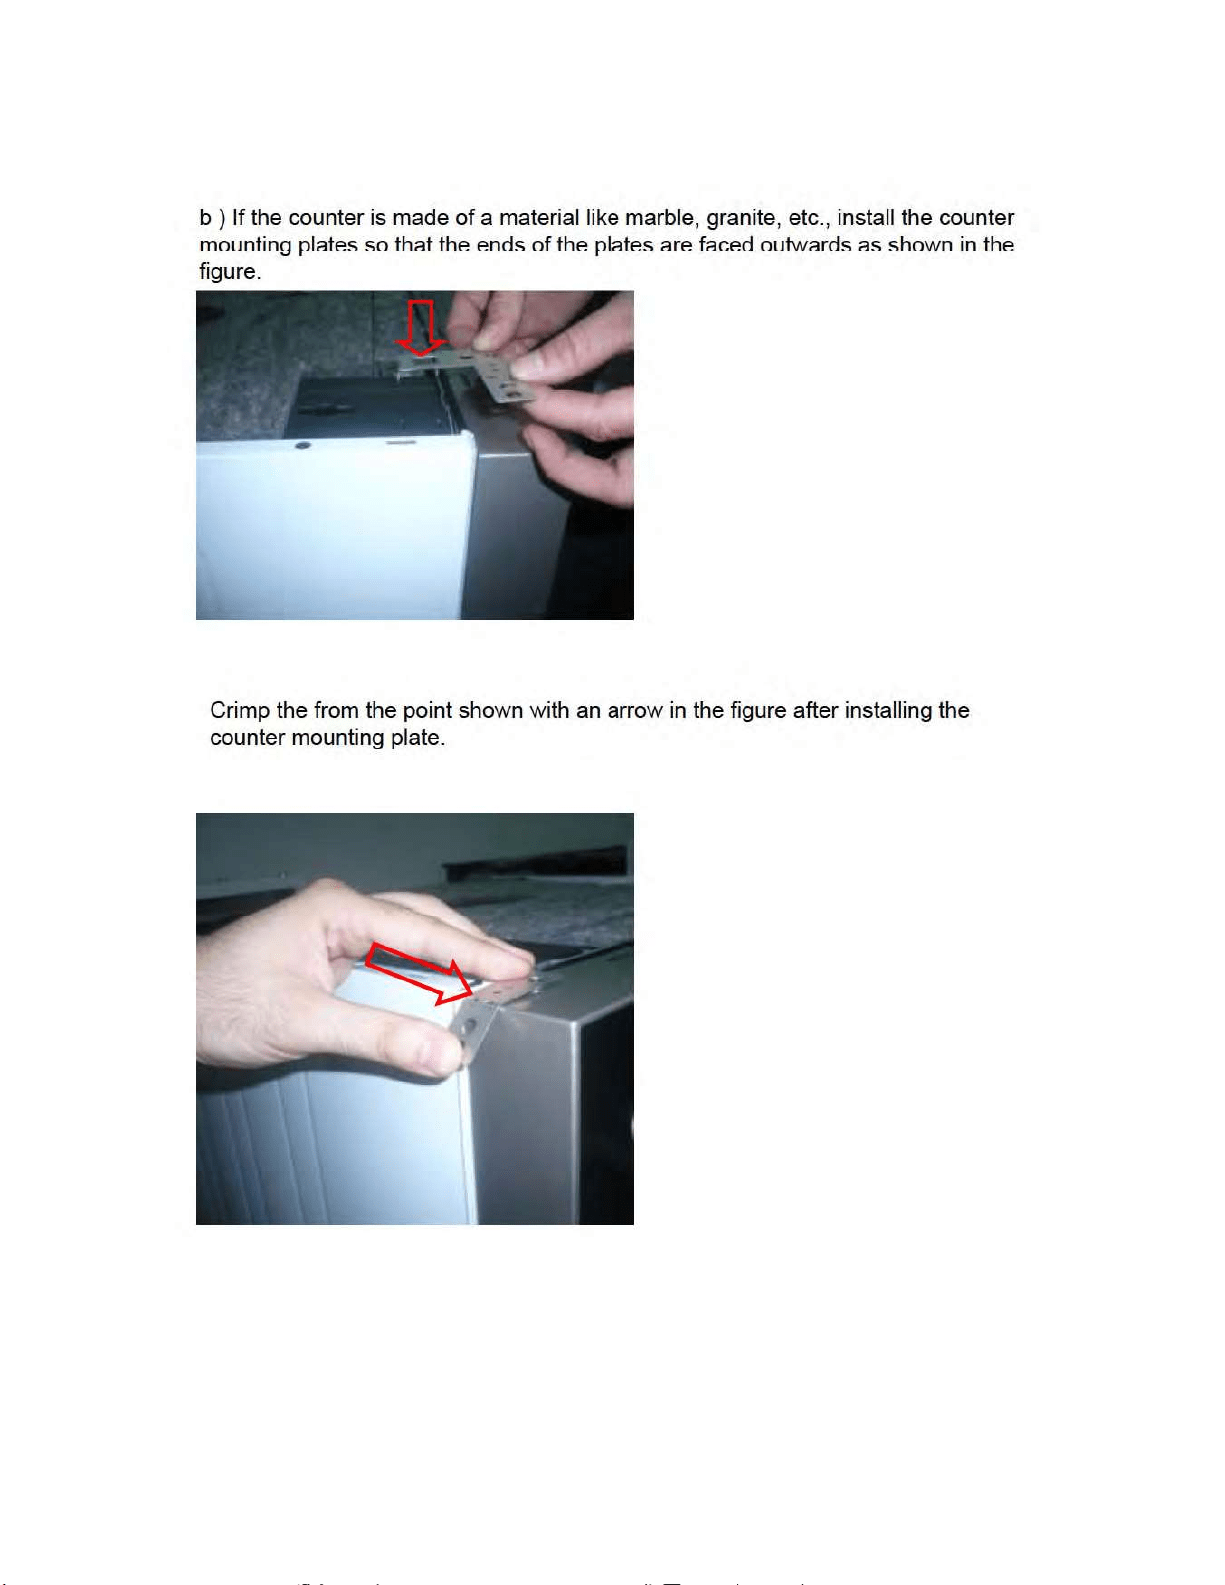
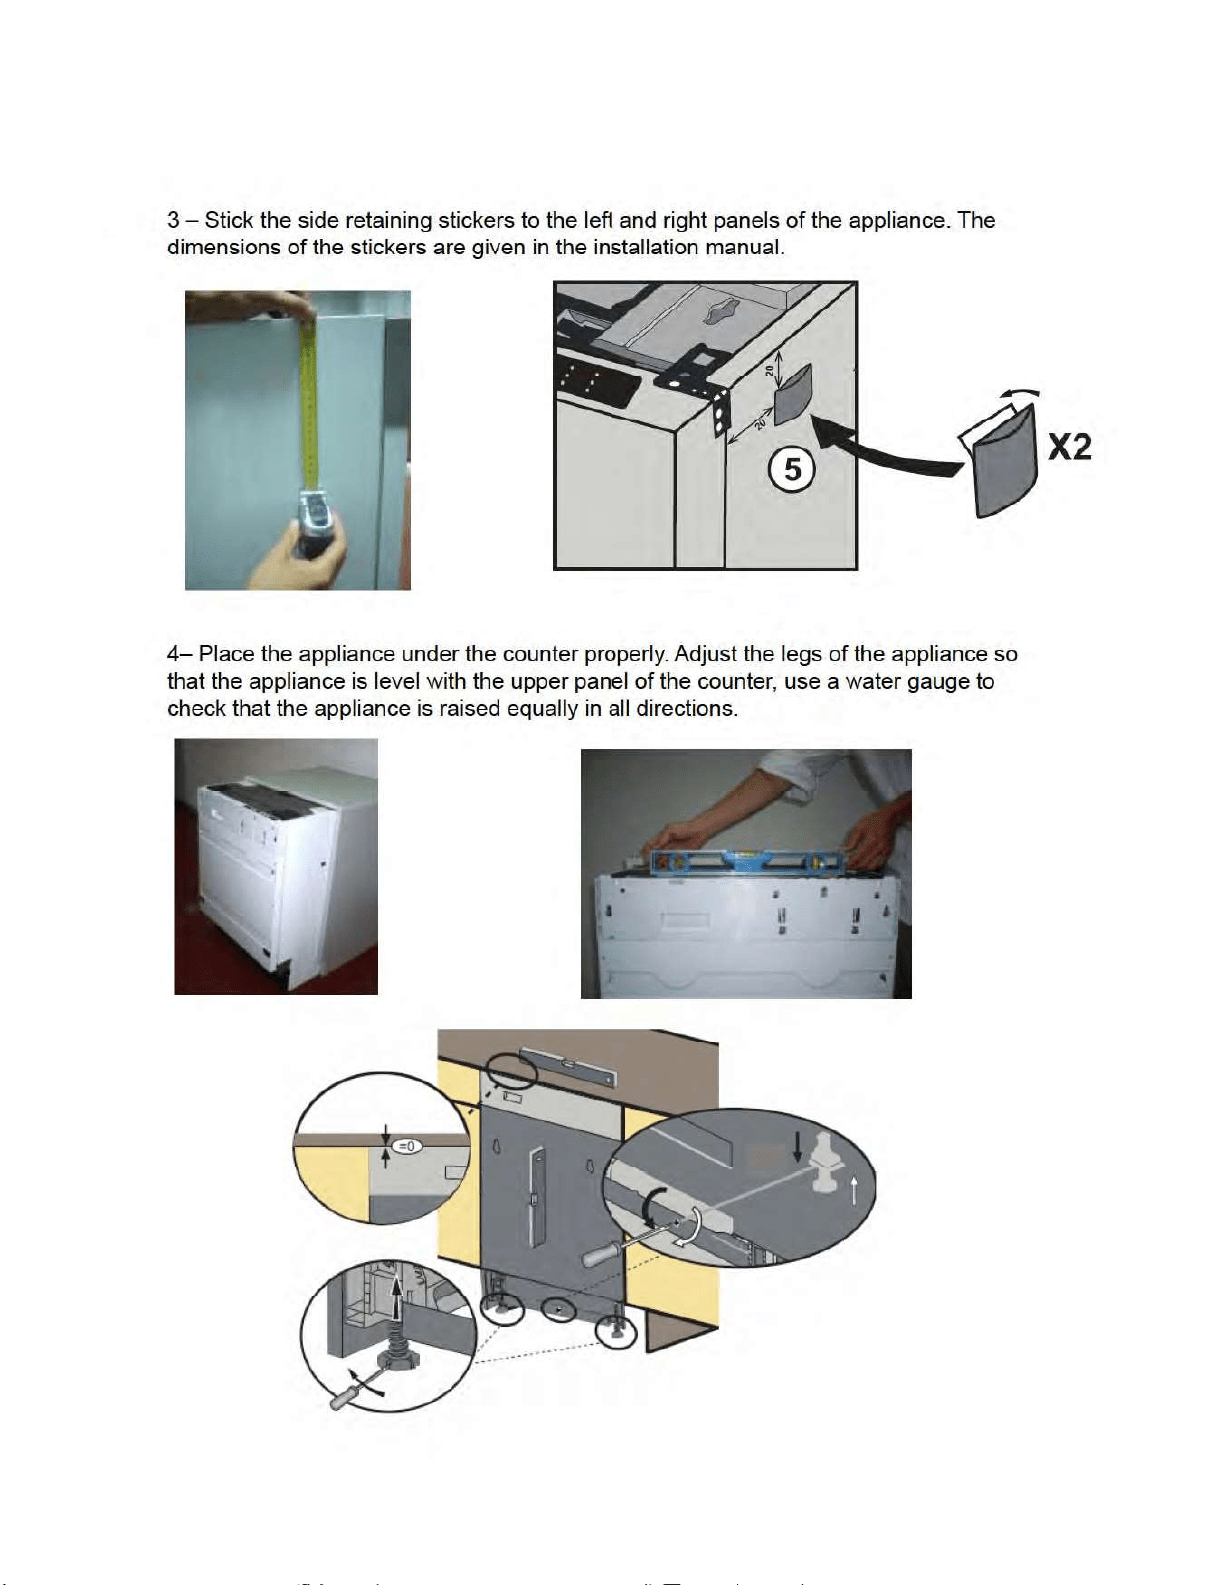
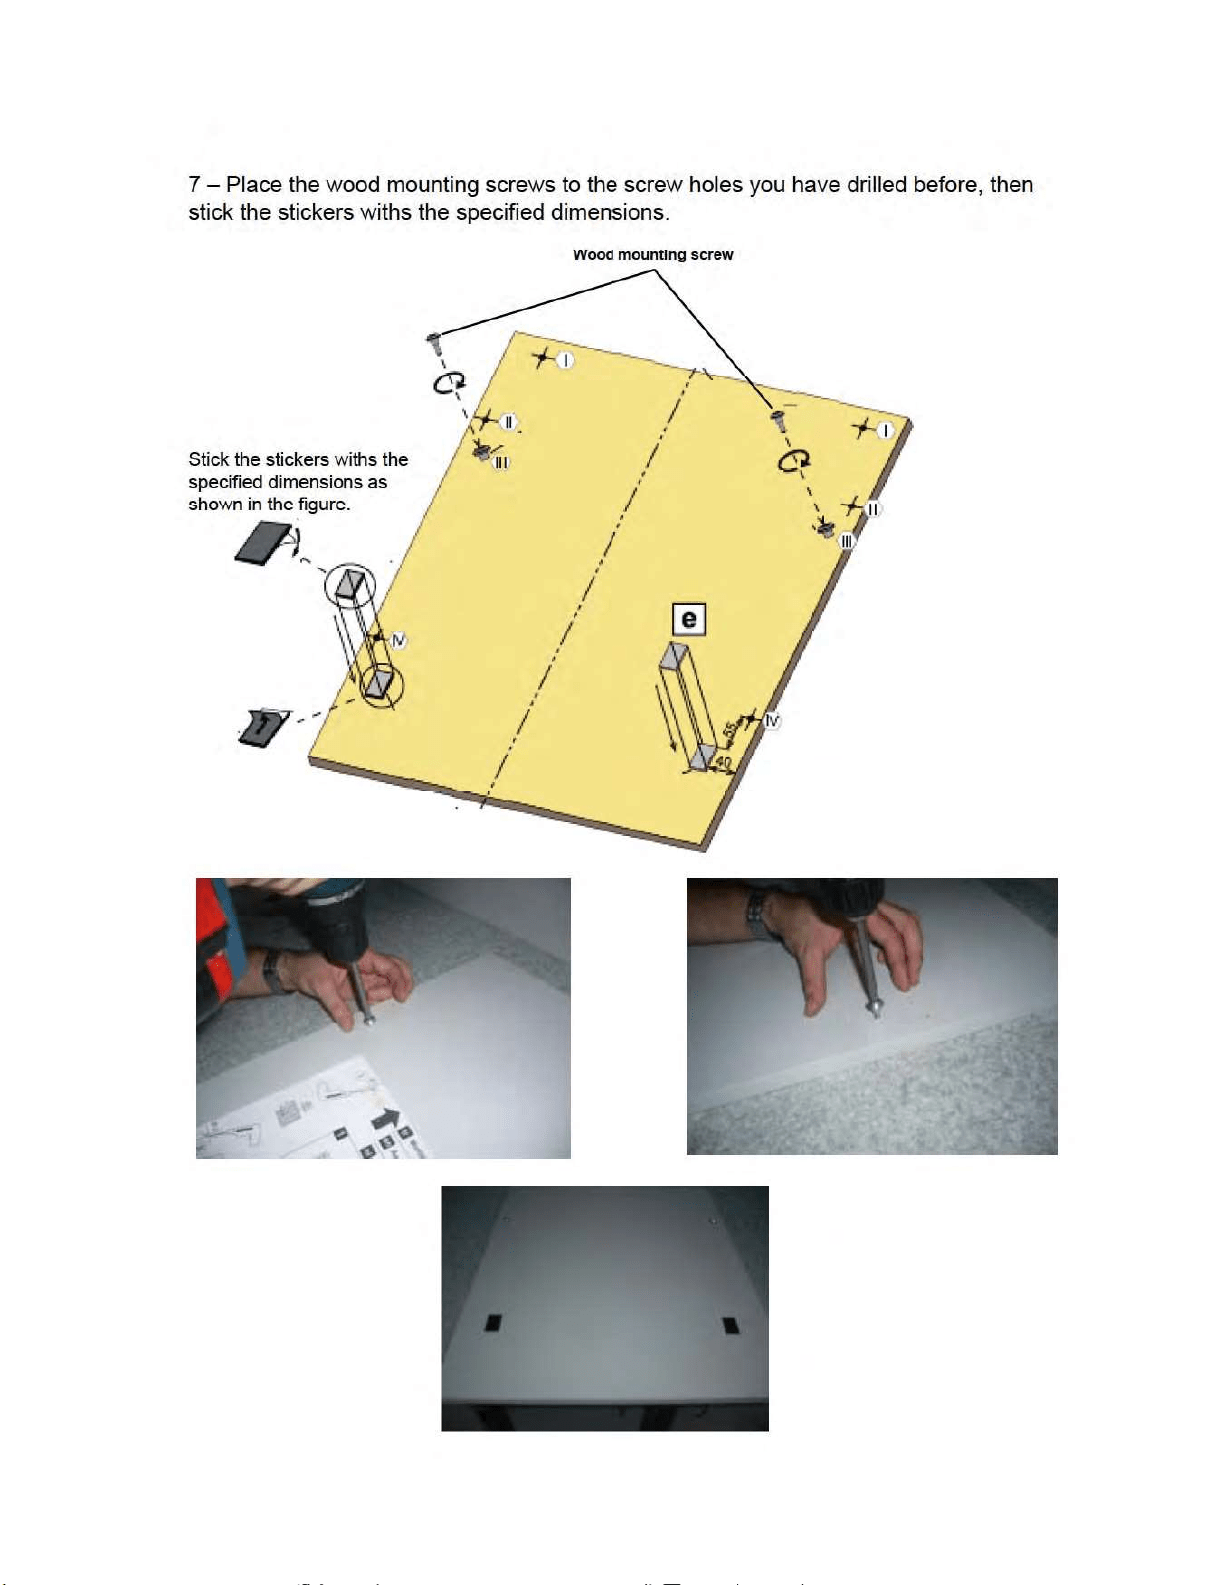
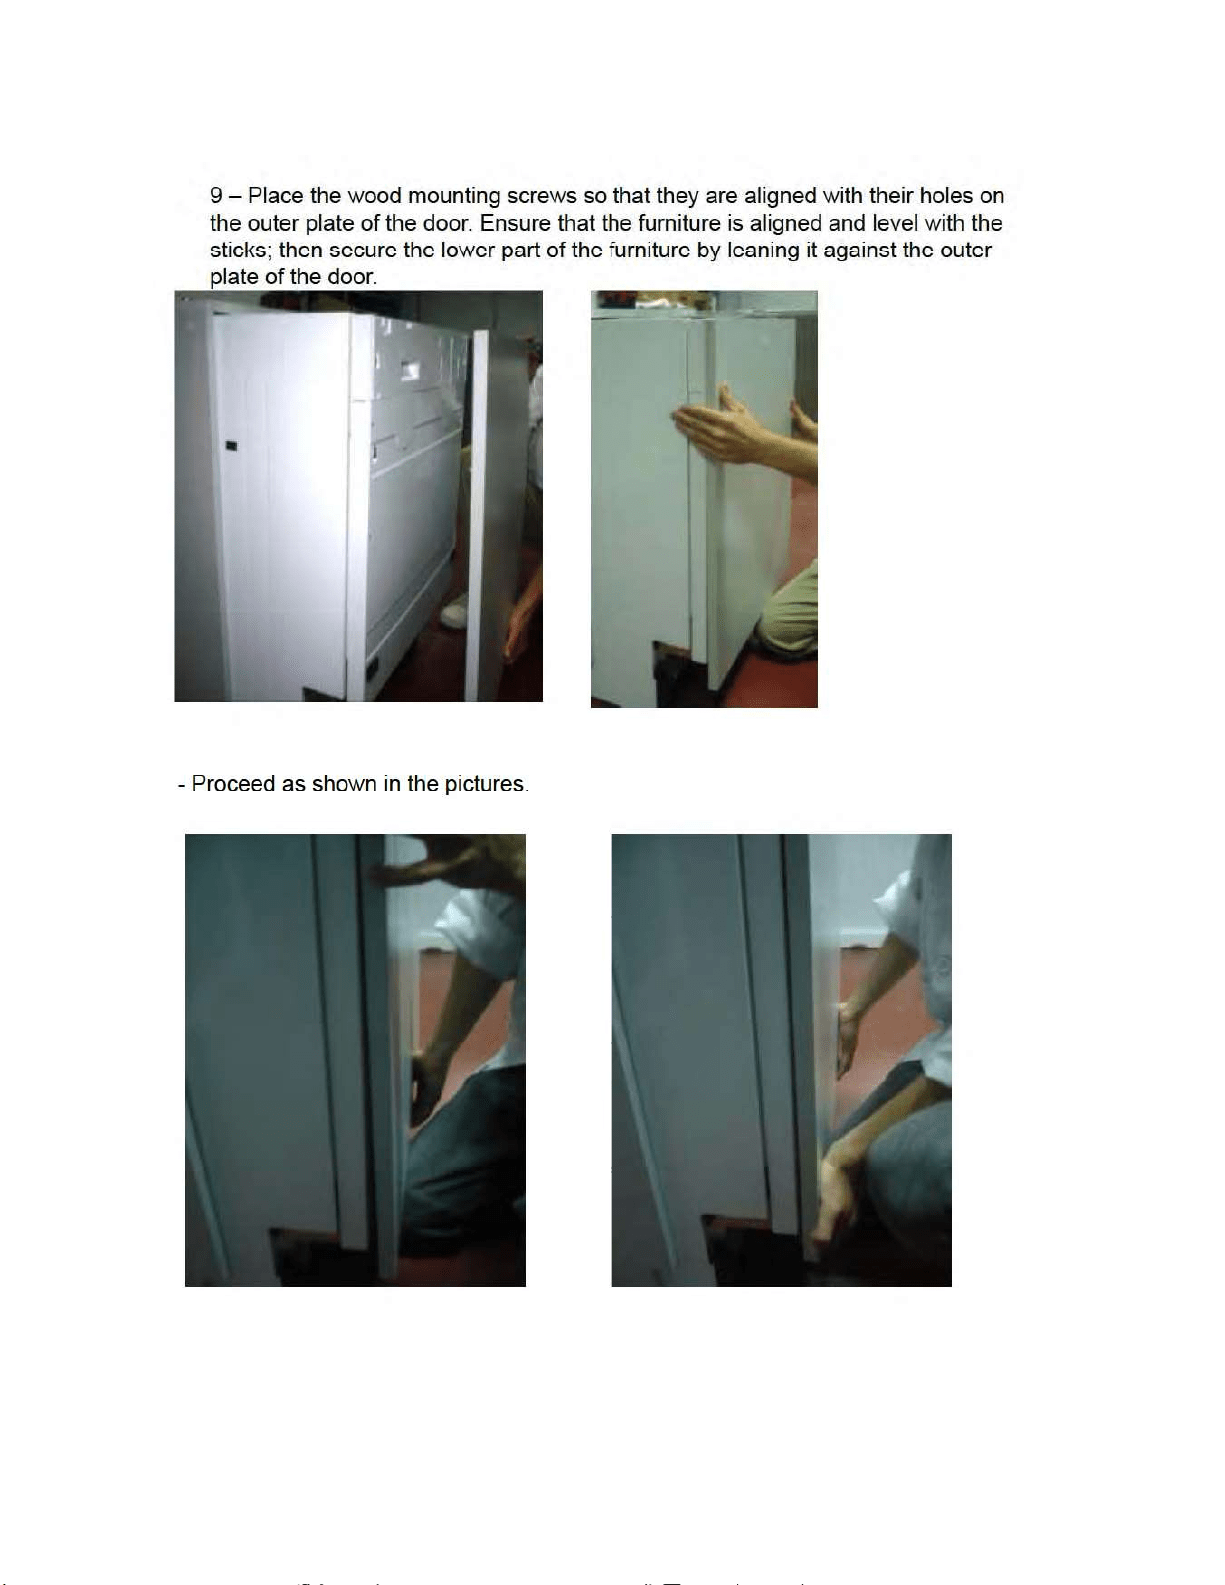
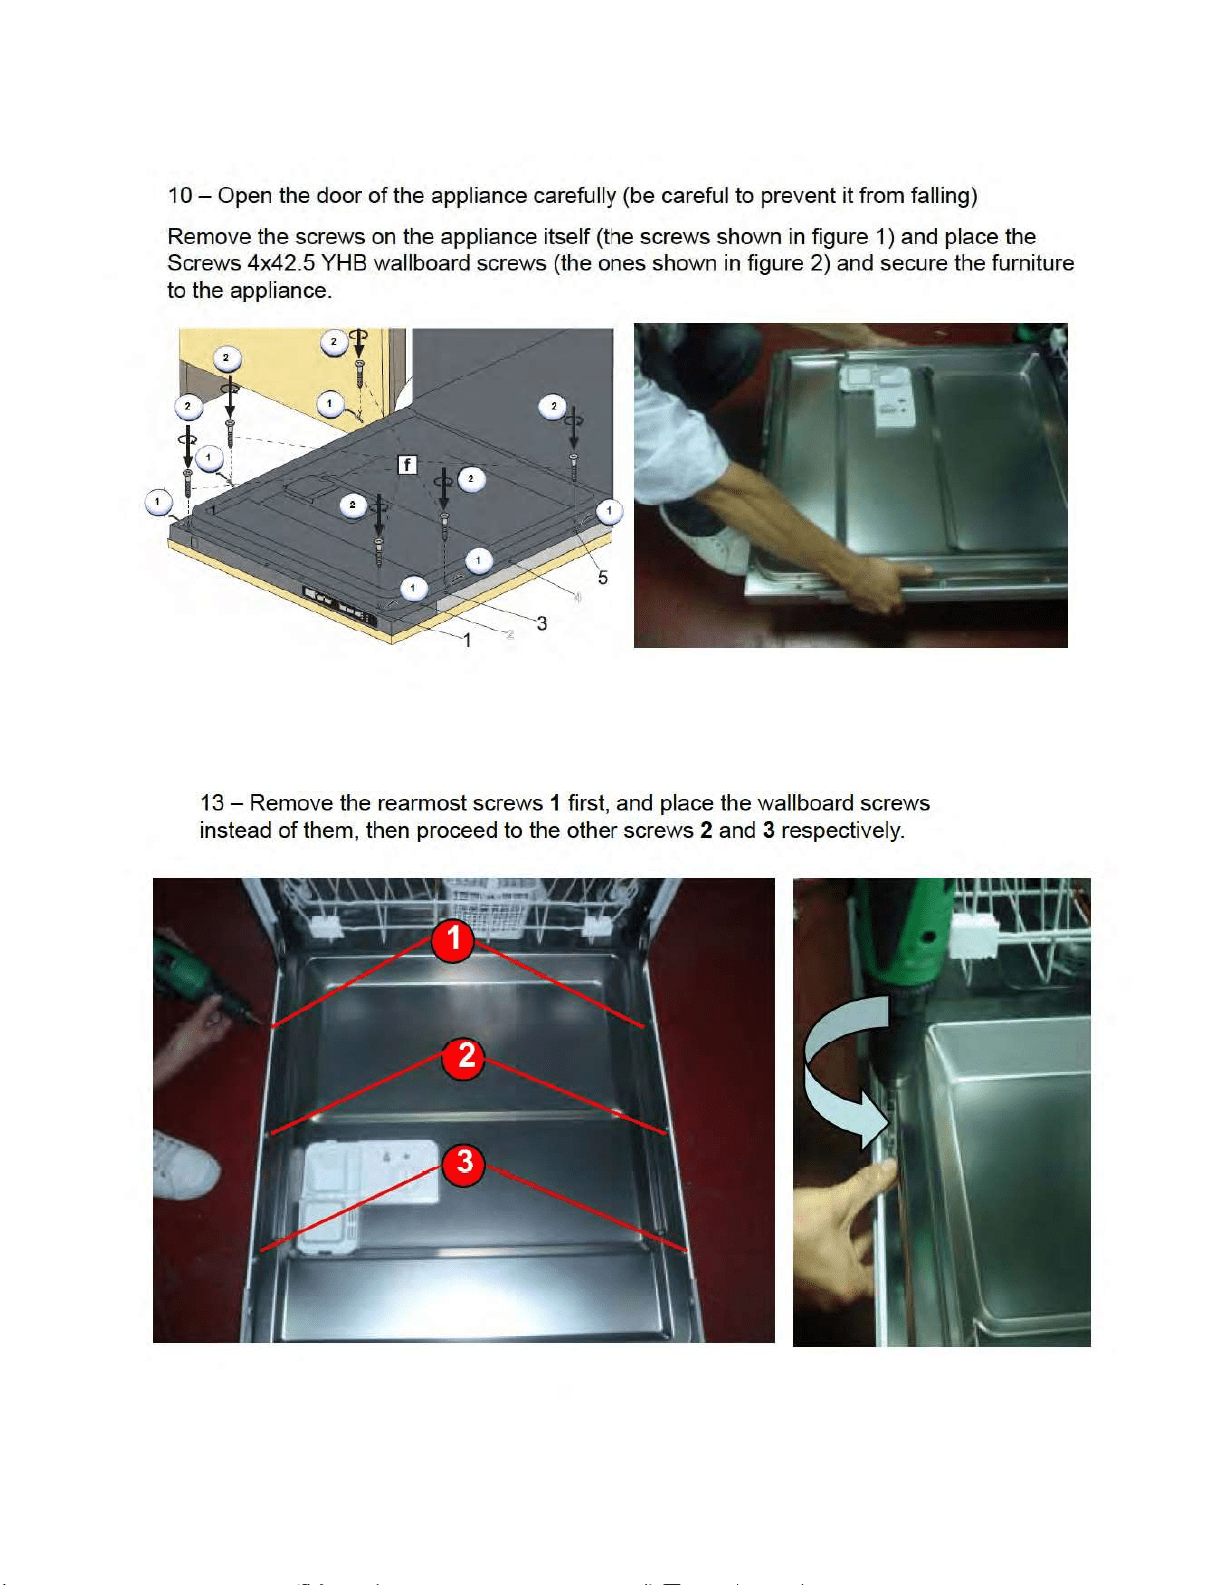
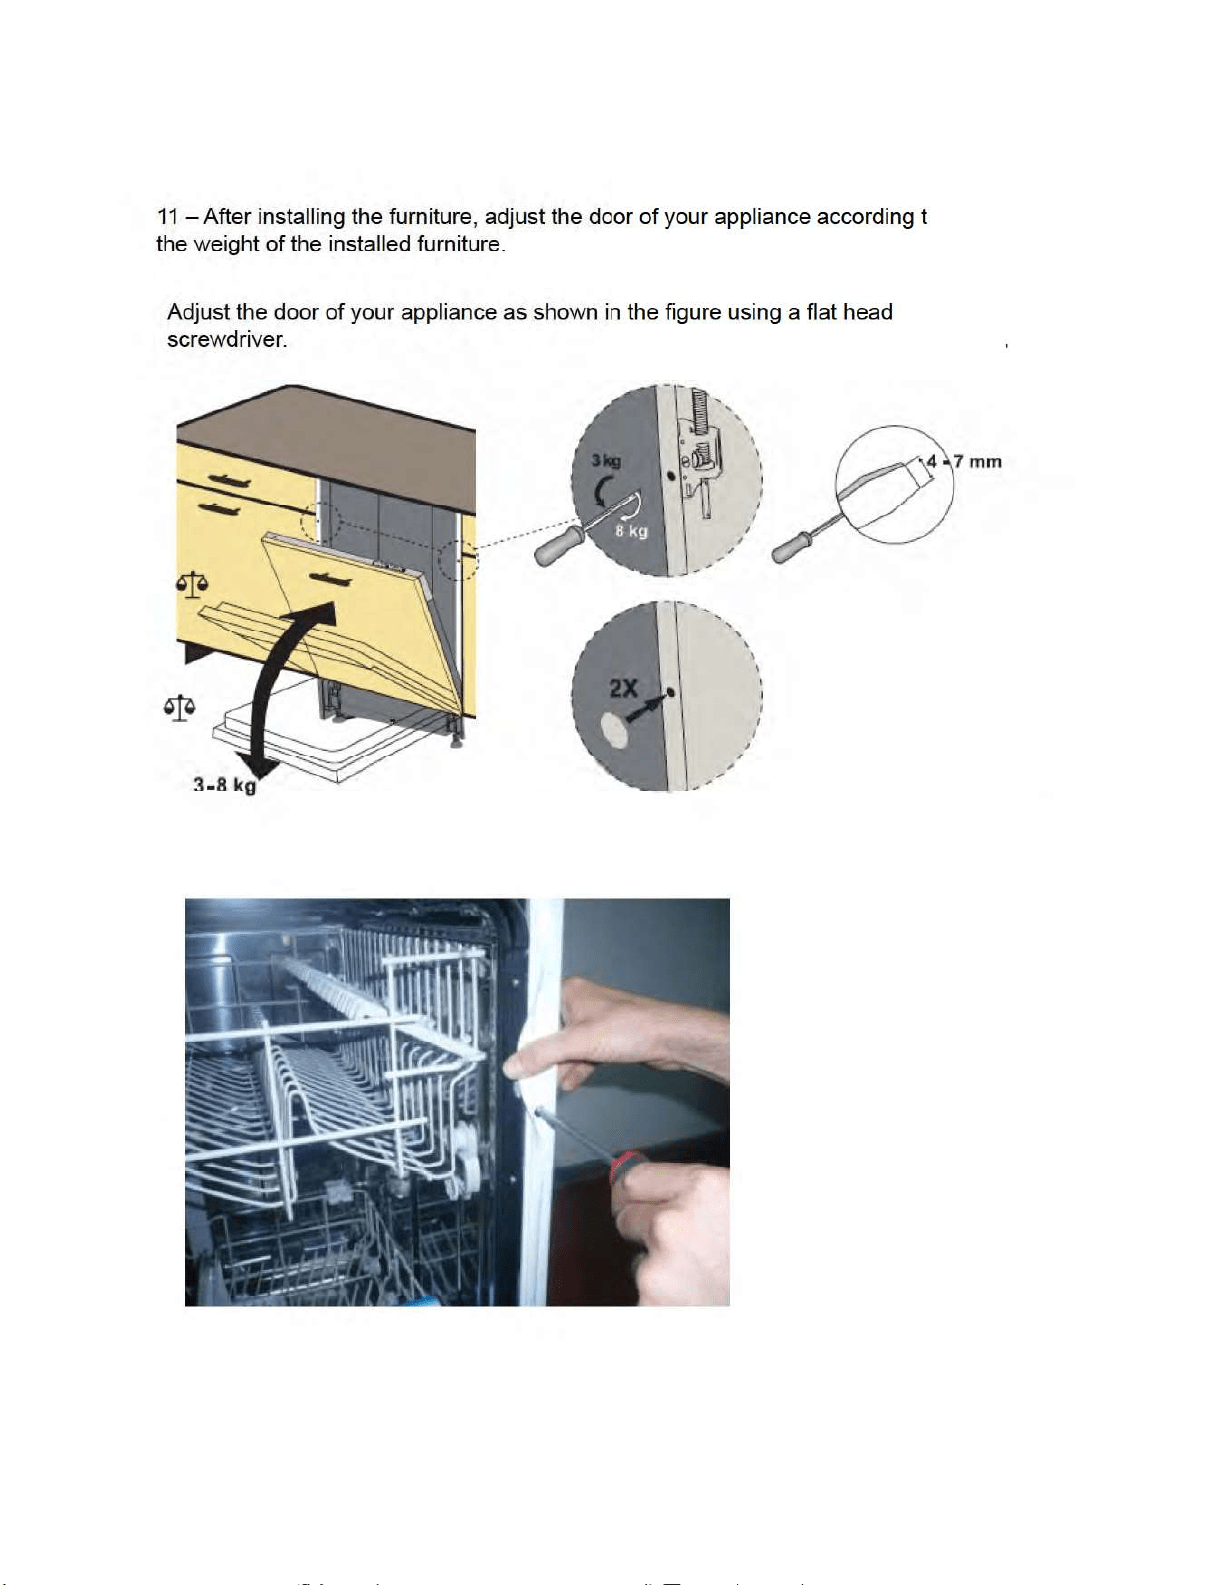
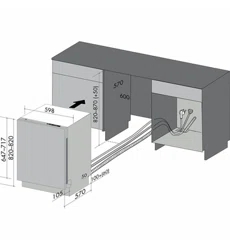
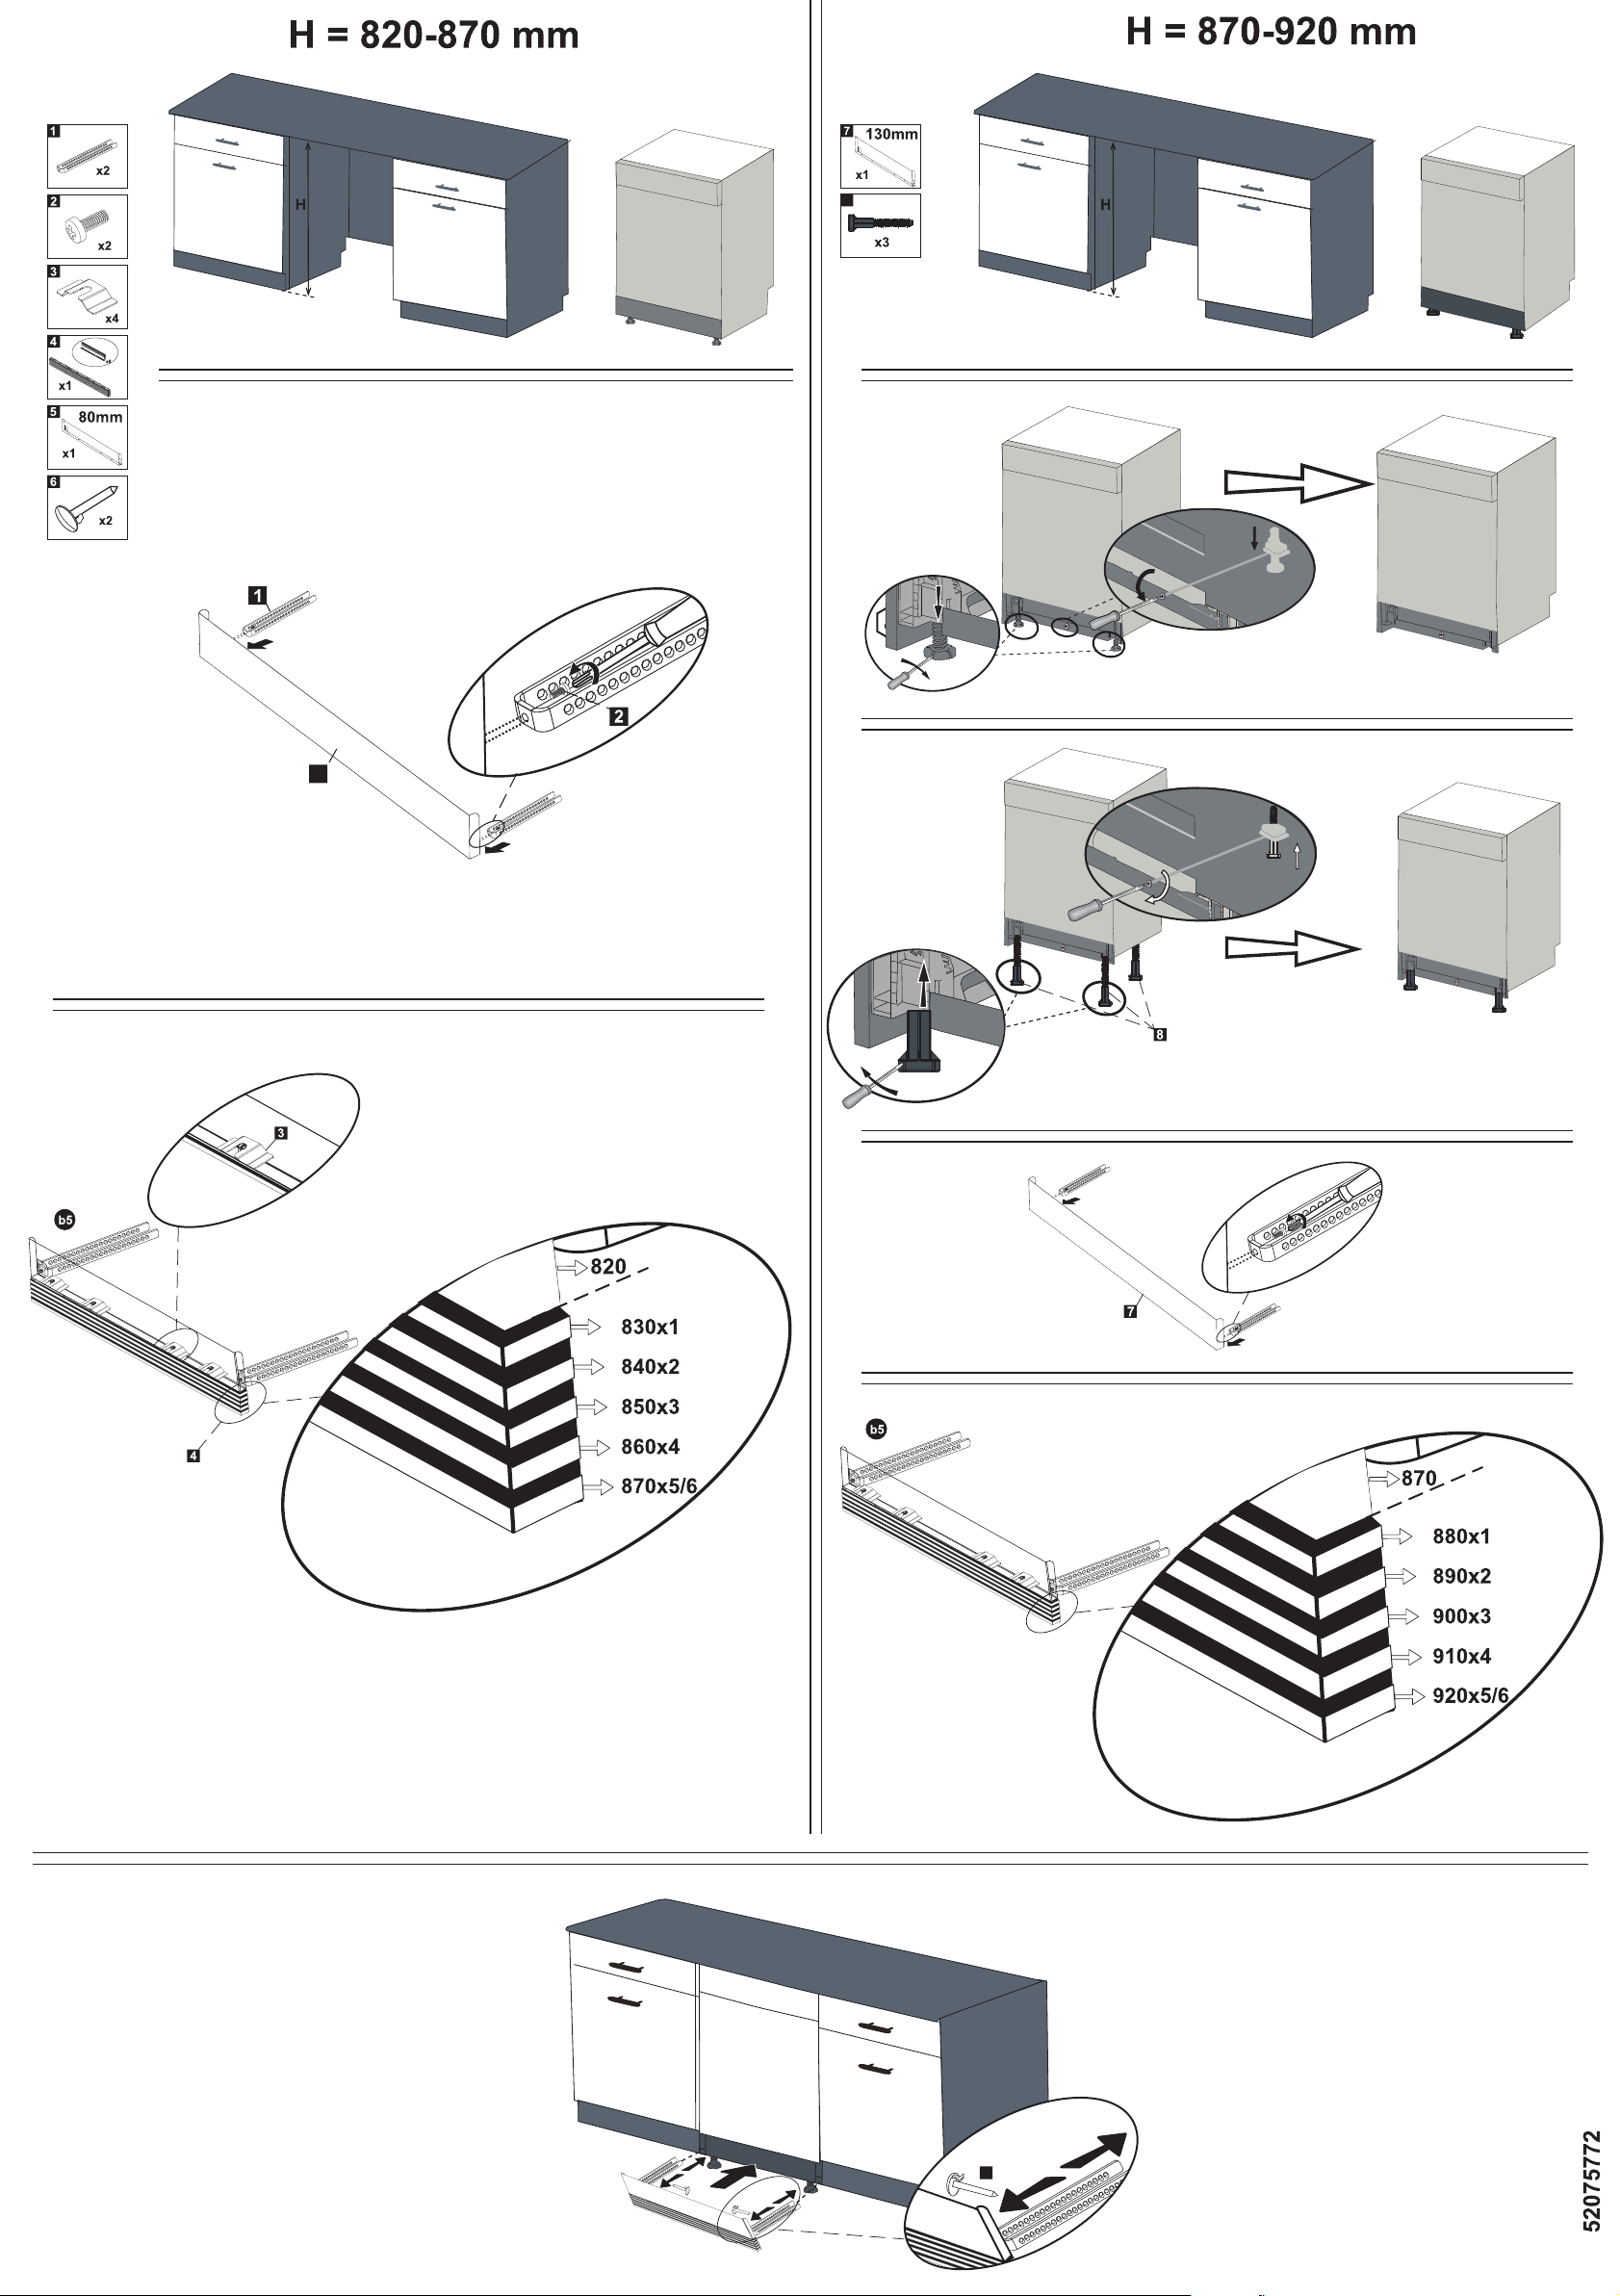
INSTALLING THE MACHINE
Positioning the machine
When determining the installation place, choose an
accessible place for easy loading and unloading of the
dishes.
Do not put your machine in any location where there is the
probability for the room temperature to fall below 0°C.
Before positioning, take the machine out of its packaging by
following the warnings located on the package.
Position the machine close to a water tap or drain. You
need to site your machine, taking into consideration that its
connections will not be altered once they are made.
Do not grip the machine by its door or panel in order to
move it.
Take care to leave a certain clearance from all sides of
the machine for moving comfortably back and forth during
cleaning.
Make sure that the water inlet and outlet hoses do not get
squeezed while positioning the machine. Also, make sure
that the machine does not stand on the electrical cable.
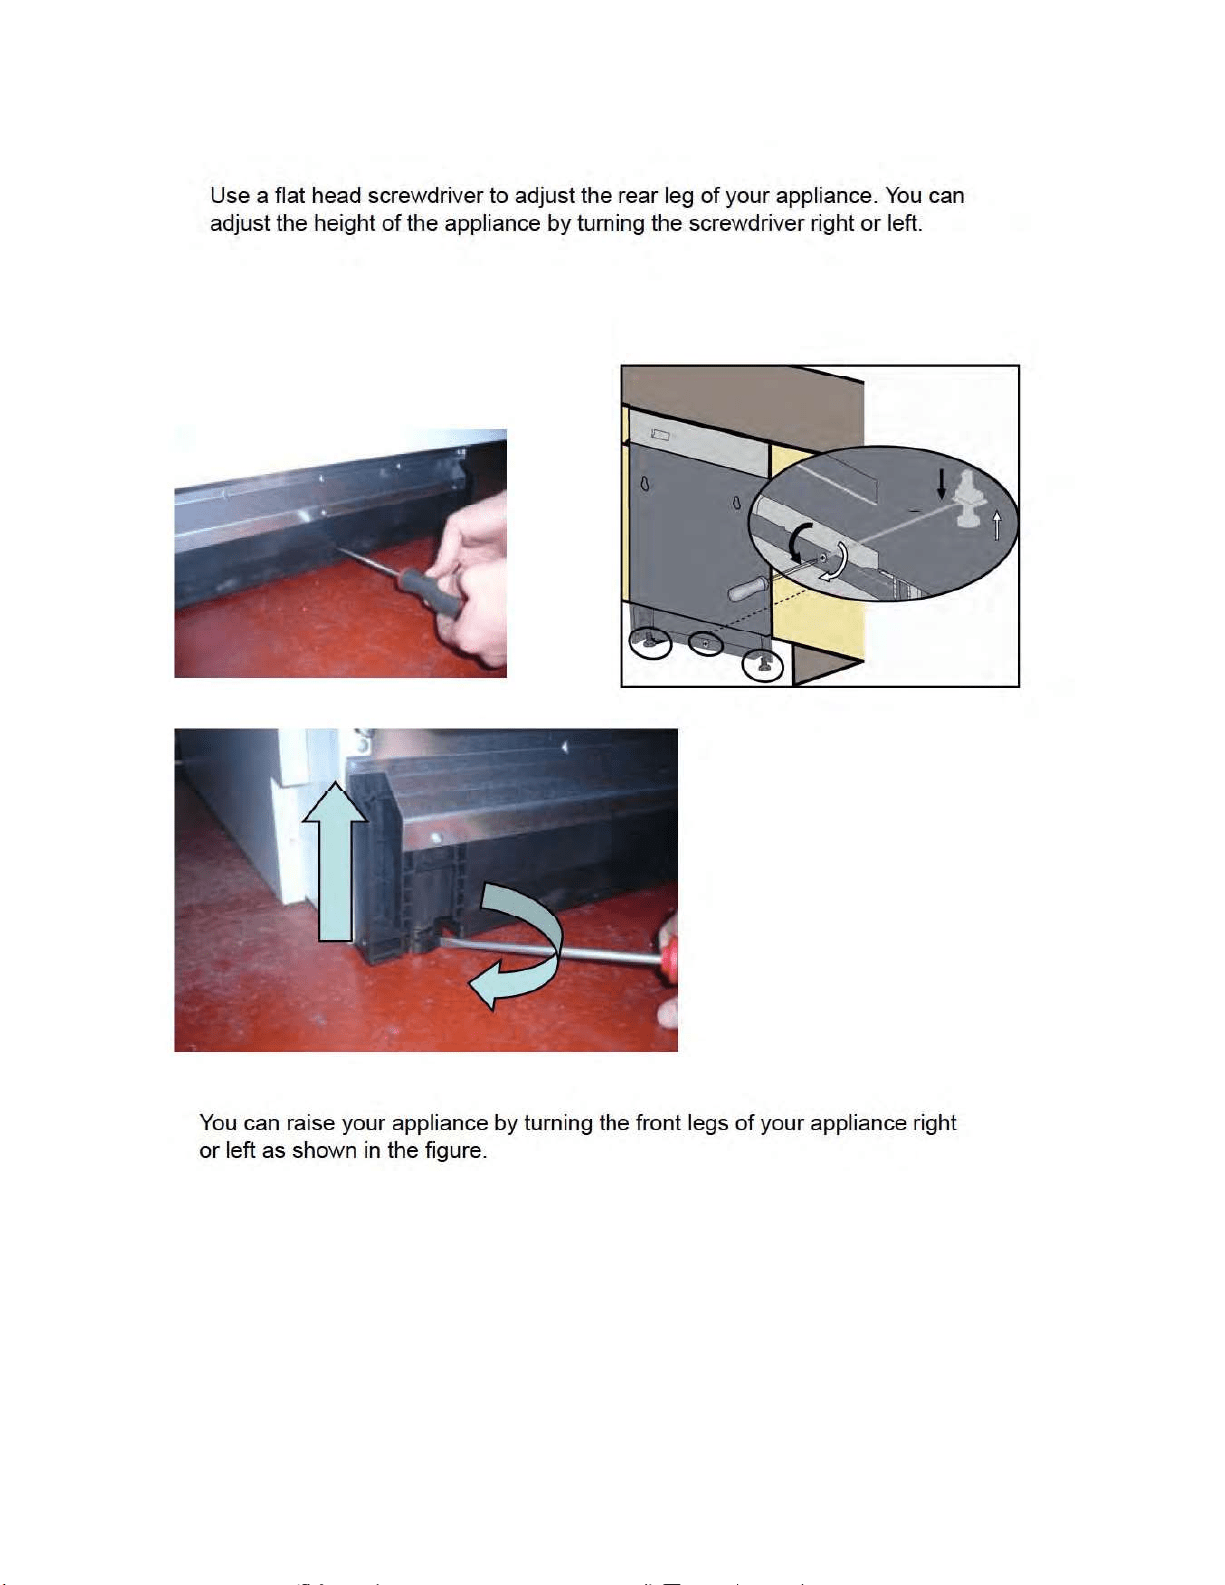
Adjust the machine’s adjustable feet so that it can stand
level and balanced. Proper positioning of the machine

ensures problem-free opening and closing of the door.
If the door of machine does not close properly, check if the
machine is stable on the floor; if not, adjust the feet and
ensure its stable position.
Water connection
Indoor plumbing must be suitable for installing a dishwasher.
Also, we recommend that you fit a filter at the entrance of
your place or apartment so as to avoid any damage to your
machine because of any contamination (sand, clay, rust
etc.) that might be occasionally carried in through the mains
water supply or the indoor plumbing, and to prevent such
complaints as yellowing and formation of deposits after
washing.
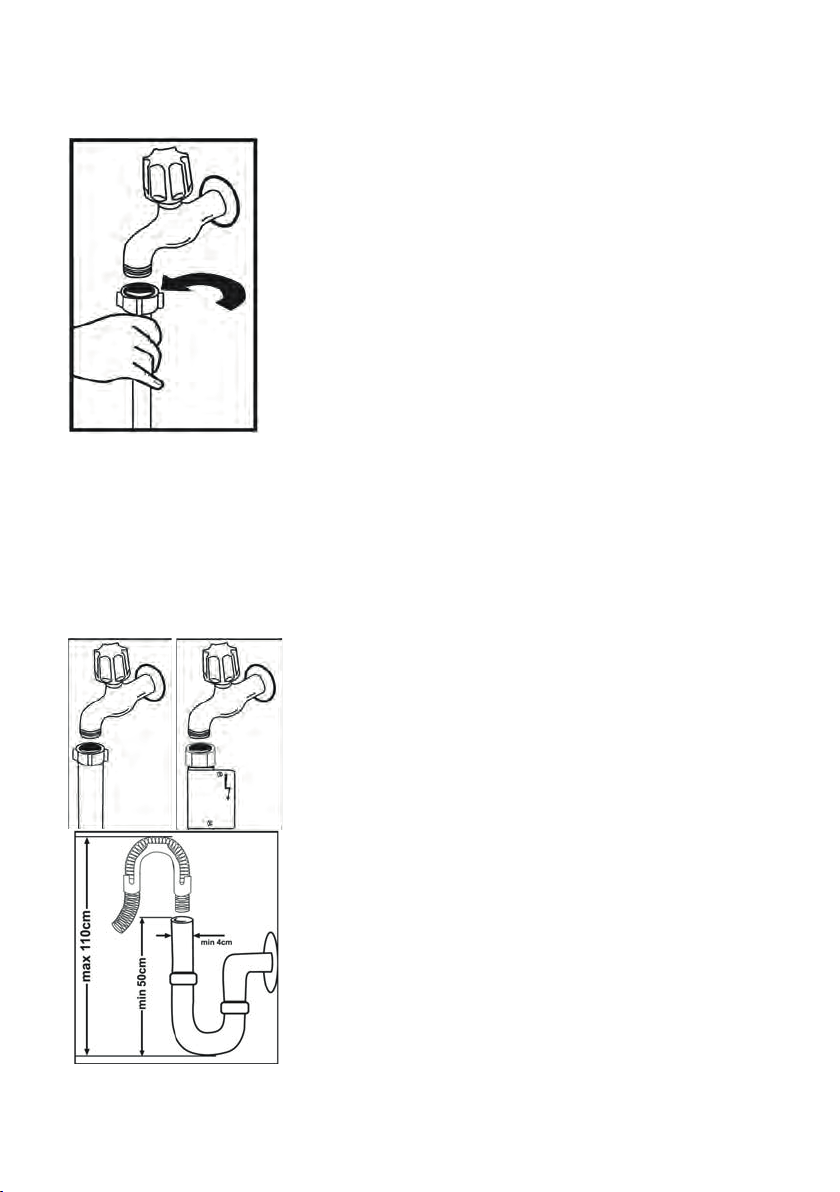
Water inlet hose
Do not use the water inlet hose of your old
machine. Use the new one supplied with
your machine instead. If you will connect a
new or long - unused water inlet hose to your
machine ,run water through it for a while
before making the connection. Connect the
water inlet hose directly to the water inlet
tap. The pressure supplied by the tap should
be at a minimum of 0.03 Mpa and and at a
maximum of 1 Mpa.If the water pressure is
above 1 Mpa,a pressure-relief valve should
be fitted inbetween.
After making connections, the tap should be turned on fully and
checked for water tightness.For the safety of machine, turn
off the water inlet tap after finishing each wash programme.
NOTE: Aquastop water etc. spout is
used in some models. In case of using
Aquastop, a dangerous tension exists.
Do not cut the Aquastop water spout. Do
not let it get folded or twisted.
Water outlet hose
The water drain hose can be connected
either directly to the water drain hole or
to the sink outlet spigot. Using a special
bent pipe (if available), the water can be
drained directly into the sink via hooking
the bent pipe over the edge of the sink.
This connection should be between 50
and 110 cm from the floor plane.
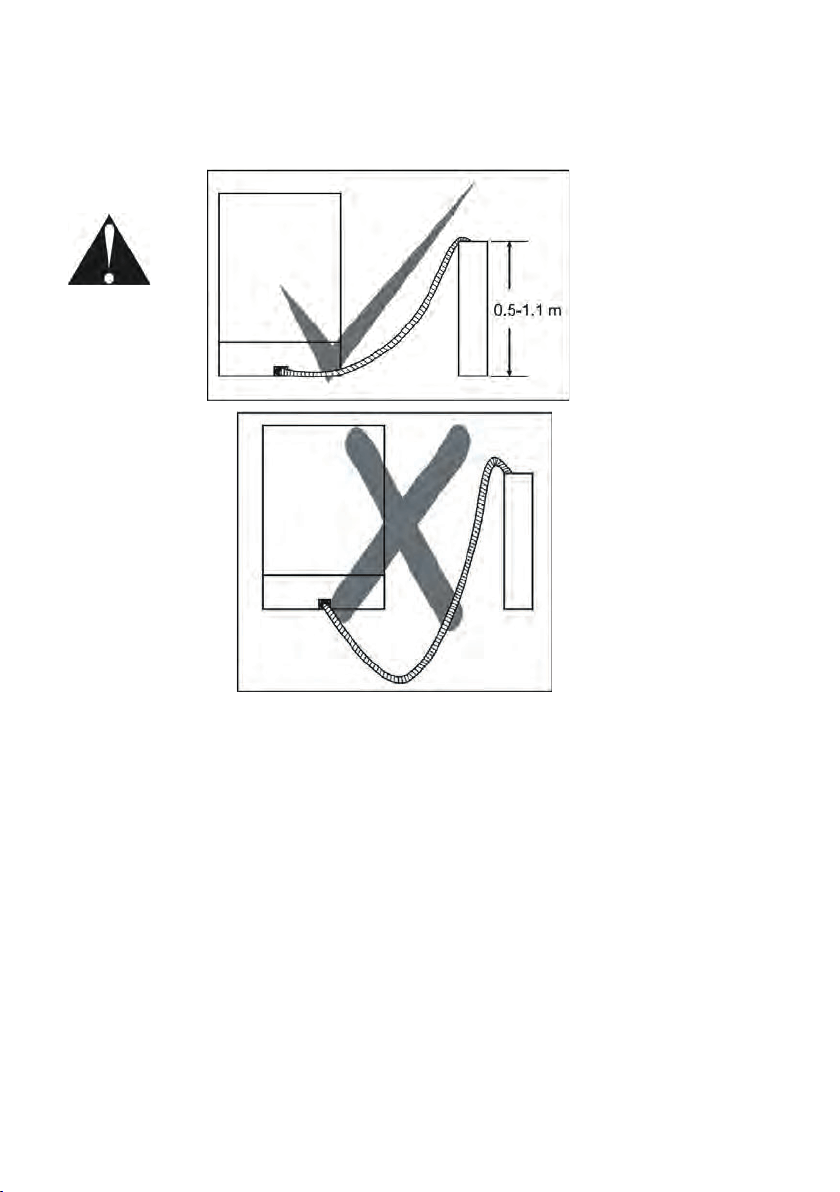
:DUQLQJWhen a drain hose longer than 4 m is used, the
dishes might remain dirty. In that case, our company will not
accept responsibility.
Electrical connection
The earthed plug of your machine should be connected to
an earthed outlet supplied by suitable voltage and current. If
there is no earthing installation, have a competent electrician
to carry out it. In case of usage without earthing installed, our
company will not be responsible for any loss of usage that
might occur.
The indoor fuse current value should be 10-16 A.
Your machine is set according to 220-240 V.The machine
should not be plugged in during positioning.
Always use the coated plug supplied with your machine.
Running in low voltage will cause a decline in washing quality.
The machine’s electrical cable should be replaced by an

authorised service or an authorised electrician only. Failure
to do so may lead to accidents.
For safety purposes, always make sure to disconnect the
plug when a wash In order not to cause an electric shock, do
not unplug when your hands are wet.
When disconnecting your machine from the mains supply,
always pull from the plug. Never pull the cord itself.
Prior to using the machine for the first time
• Check whether the electricity and supply water specifications match the values indicated by the
installation instructions for the machine.
• Remove all packaging materials inside the mac
hine.
• Fill the rinse aid compartment.
Detergent usage
Use a detergent specifically designed for use in domestic dishwashers.
You can find powder,gel,and tablet detergents in the market that have been designed for
household dishwashers.
Detergent should be put into the compartment prior to starting the machine. Keep your
detergents in cool, dry places out of reach of your children.
Do not fill detergent into the detergent compartment more than required; otherwise it may cause
scratches on your glasses as well as lead to a poorly dissolved detergent.
Should you need more information concerning the detergent you will use, contact detergent
manufacturers directly.
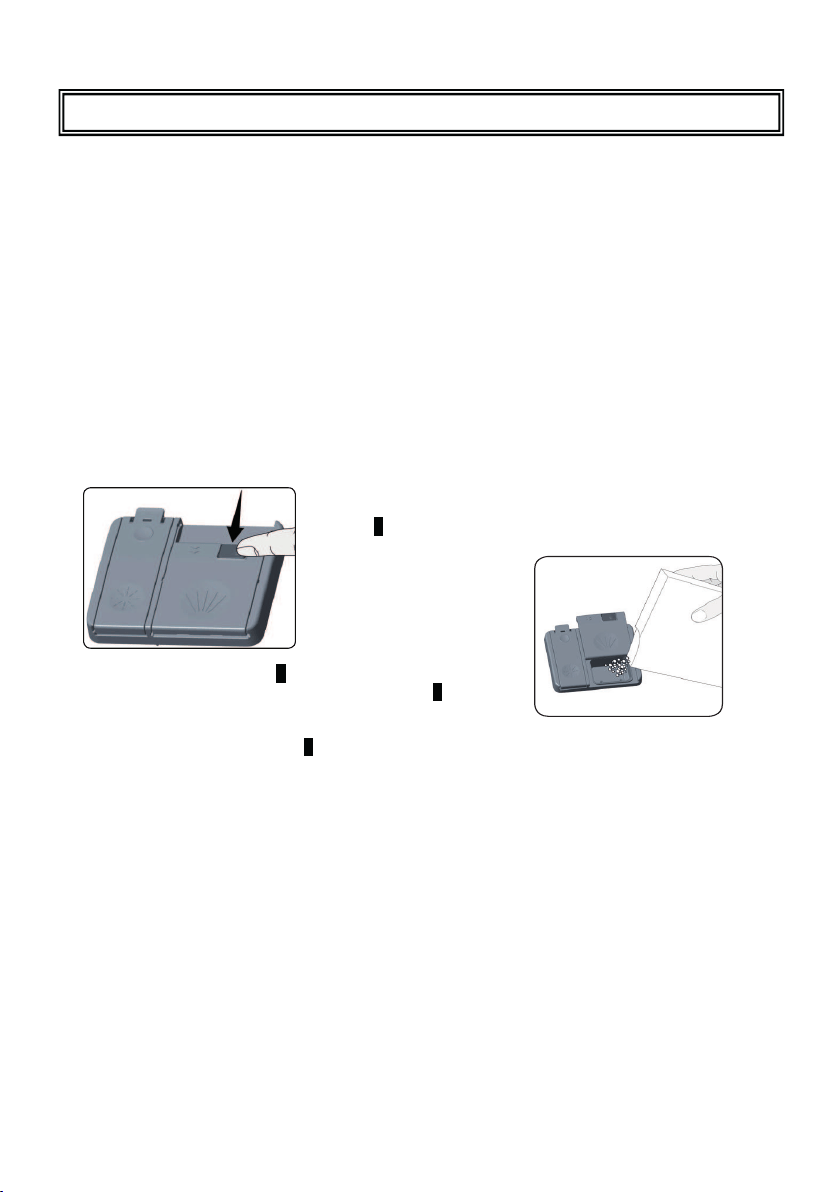
Filling the detergent compartment
Push the latch to open the detergent container as shown in the
image.
1 Detergent pod has level lines inside. It is possible to
measure the right
detergent amount using
these lines. Detergent
pod can take totally 40
cm
3
detergent.
Open the dishwasher
detergent and pour into
the larger compartment b 25 cm
3
if your dishes are
heavily soiled or 15 cm
3
if they are less soiled.
2 If your
dishes have been kept dirty for a very long time, if there
are dried food wastes on them, and if you have overly
loaded the dishwasher, pour a 5 cm
3
detergent into the pre-wash compartment and start your
machine.
You may have to add more detergent into your machine, depending on the degr
ee of soil and
on the water hardness level in your area.
Combined detergent
Detergent manufacturers also produce combined detergents called “2 in 1”, “3 in 1” or “5 in 1”
etc.
“2 in 1” detergents contain detergent + or rinse aid. When using “2 in 1” detergents make sure
to check the specifications of the tablet.
Other tablet detergents contain detergent + rinse aid + varlous extra functions.
Generally, combined detergents produce sufficient results under certain usage conditions only.
Such detergents contain rinse aid and/or in preset amounts
PREPARING THE MACHINE FOR USE
DETERGENT
:KHQ\RXVWRSXVLQJFRPELQHGGHWHUJHQWV
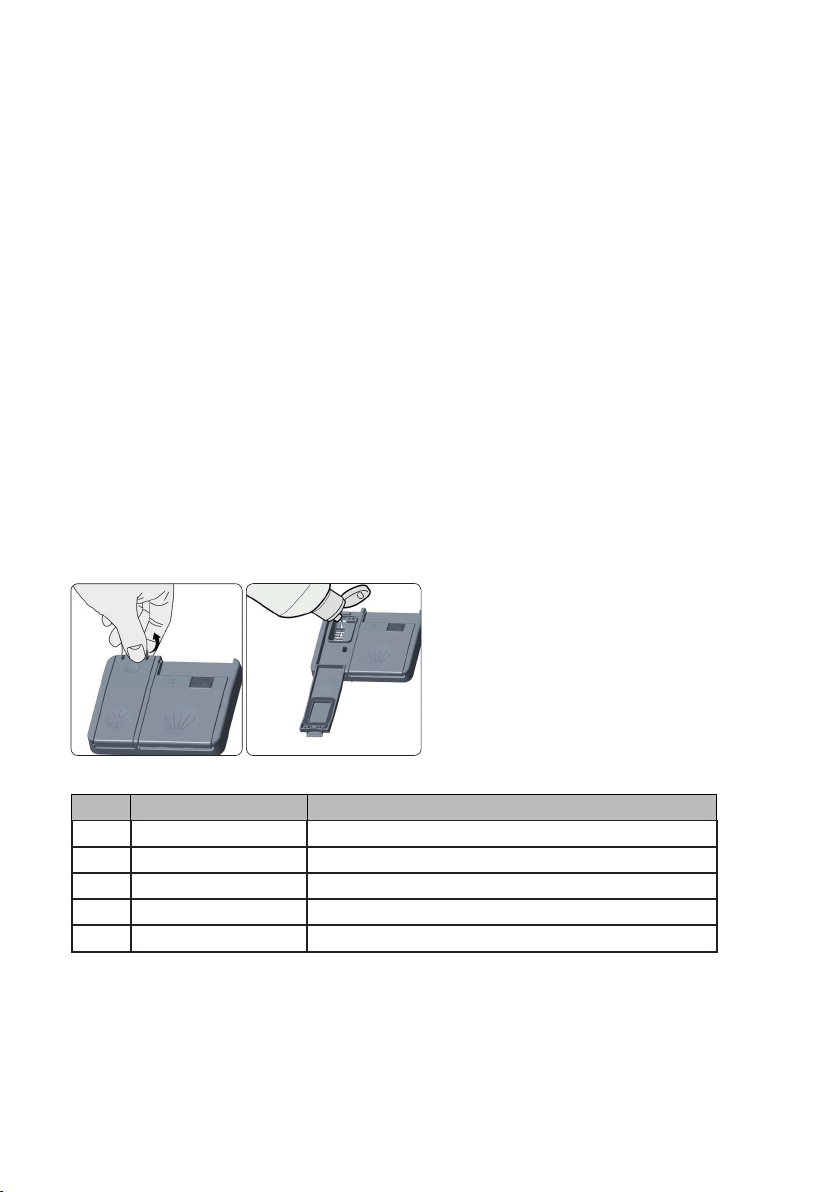
)LOOLQJWKHULQVHDLGDQGVHWWLQJ
,QRUGHUWRFKDQJHWKHULQVHDLGOHYHOIROORZWKHEHORZVWHSVEHIRUHWXUQLQJRQWKH
PDFKLQH
/HYHO%ULJKWHQHU'RVH,QGLFDWRU
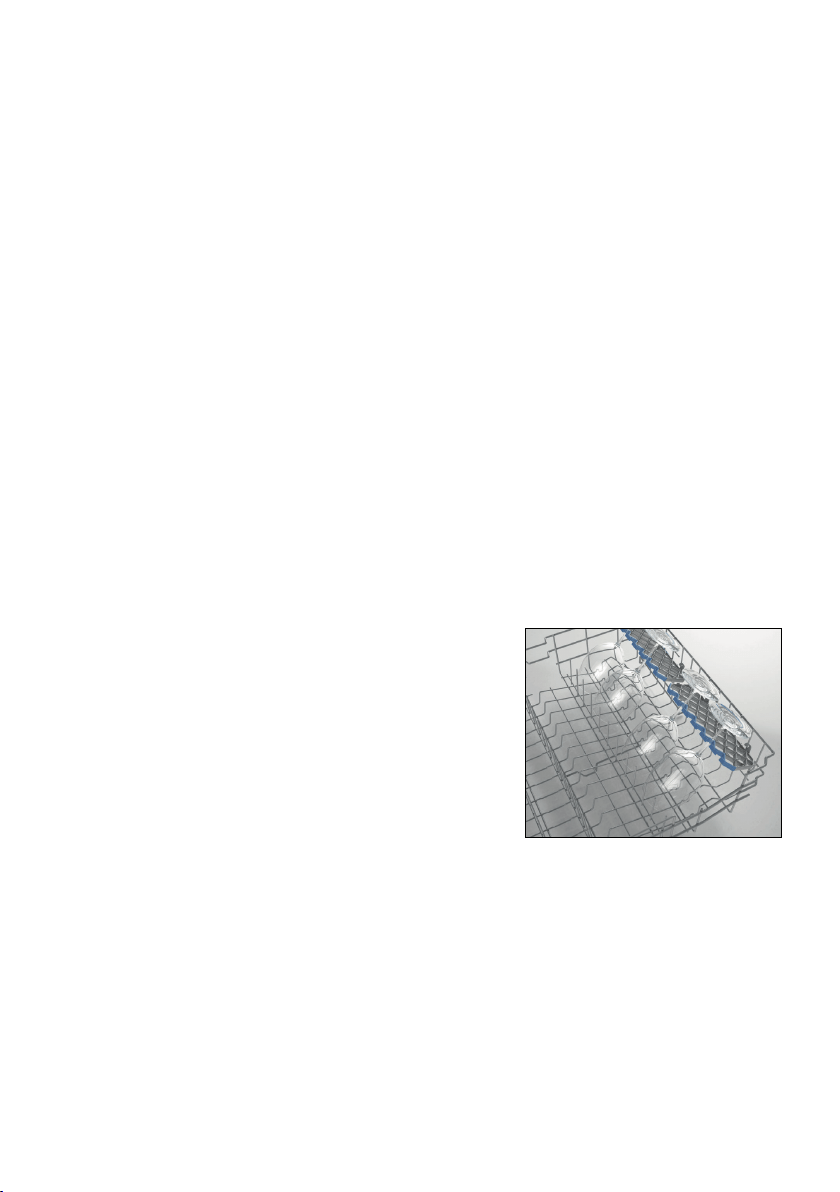
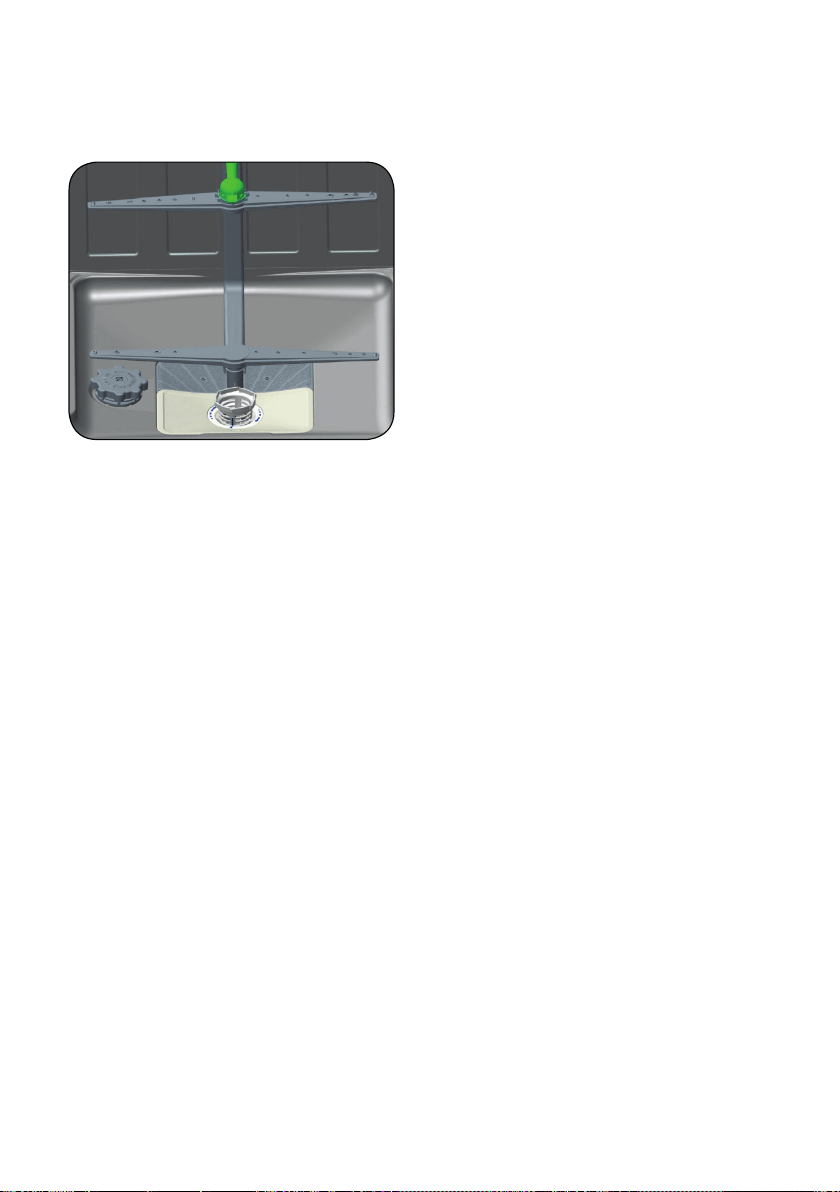
/2$',1*<285',6+:$6+(5
62)7728&+
7RSEDVNHW
+HLJKW$GMXVWDEOH5DFN
SODFHWKH¿QHVWHPPHGJODVV
7RSEDVNHWKHLJKWDGMXVWPHQWZKLOHLWLVIXOO
Katlanabilir raflar
Üst sepetteki katlanabilir raflar; ten-
cereler, tavalar vb. büyük mutfak
gereçlerini makineye daha kolay
yerleştirebilmeniz için tasarlanmıştır.
İsterseniz her parçayı ayrı ayrı veya
beraber katlayıp daha fazla alan elde
edebilirsiniz. Katlanabilir rafları yukarı
doğru kaldırarak veya katlayarak kul-
lanabilirsiniz.
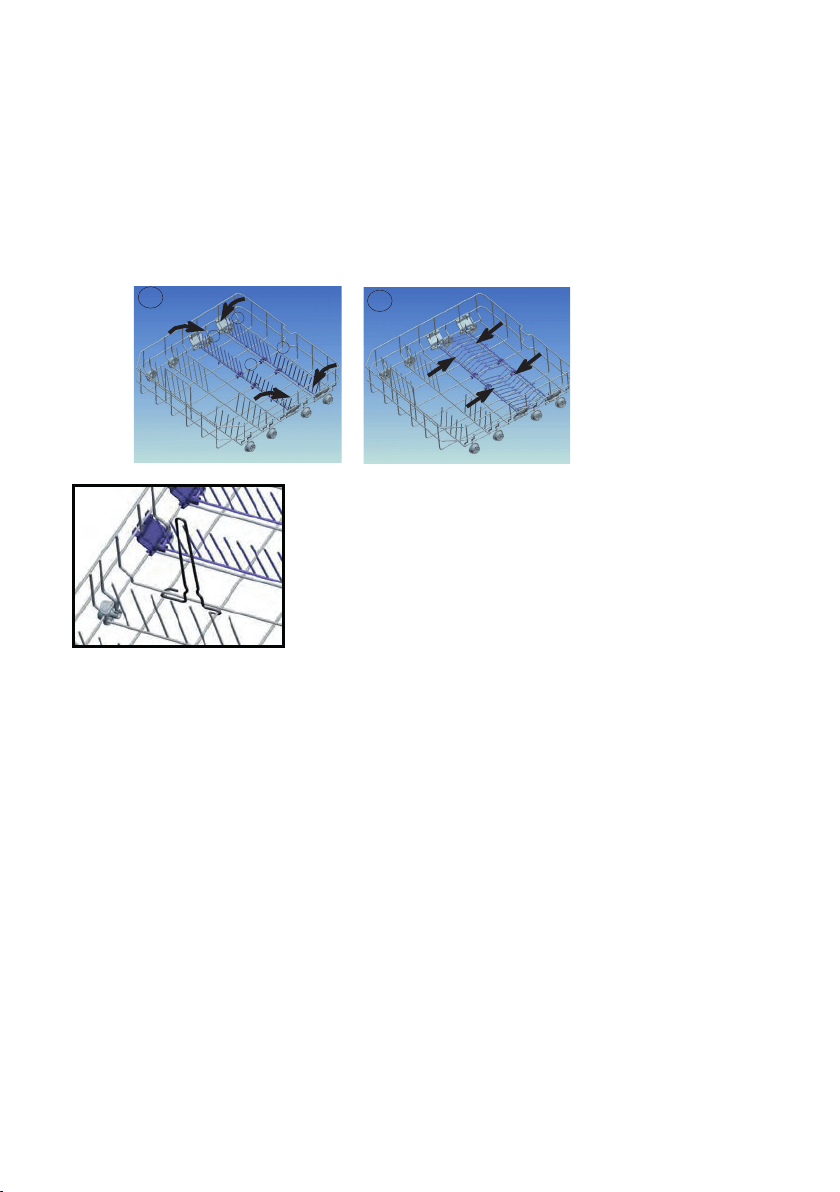
/RZHU%DVNHW
)ROGLQJ5DFNV
%RWWOH5DFN
a
b
c
d
1
2
0XOWLIXQFWLRQDO5DFN6\VWHP
DE
F
GH
GH
I
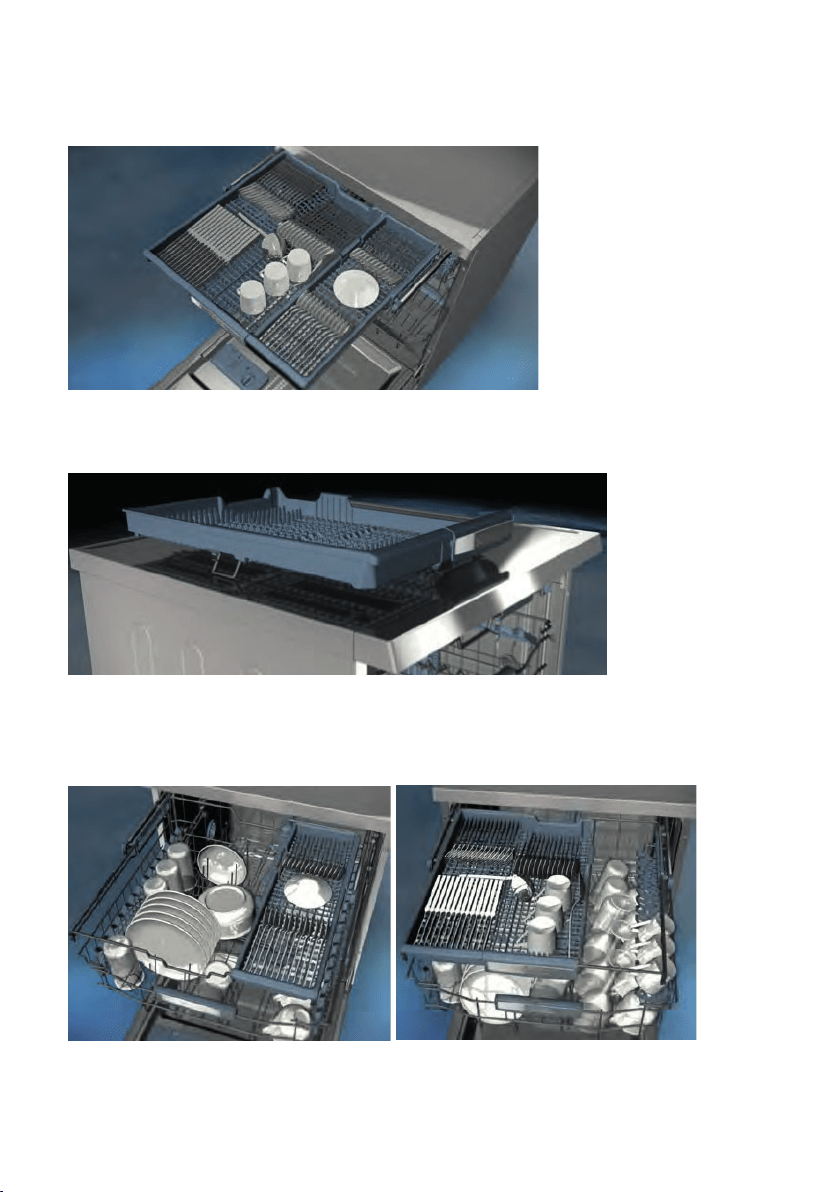
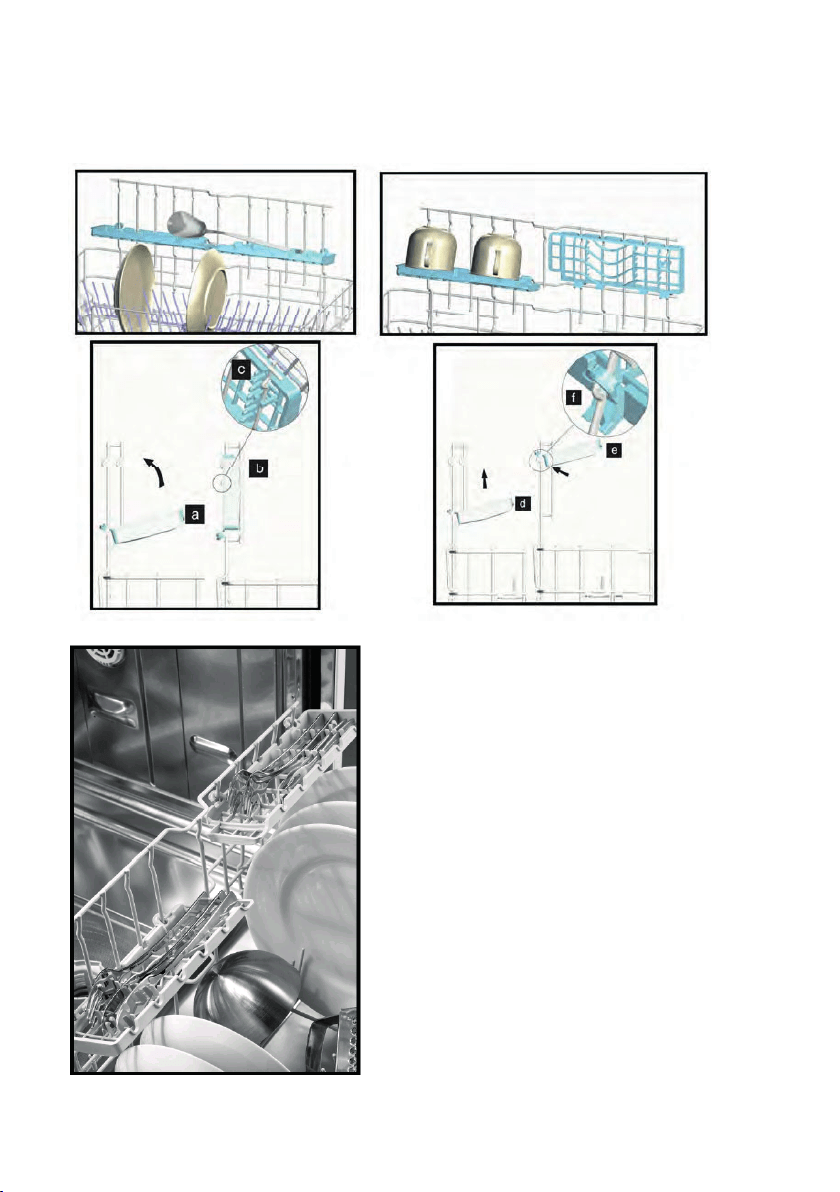
8SSHU&XWOHU\%DVNHW
:DUQLQJ
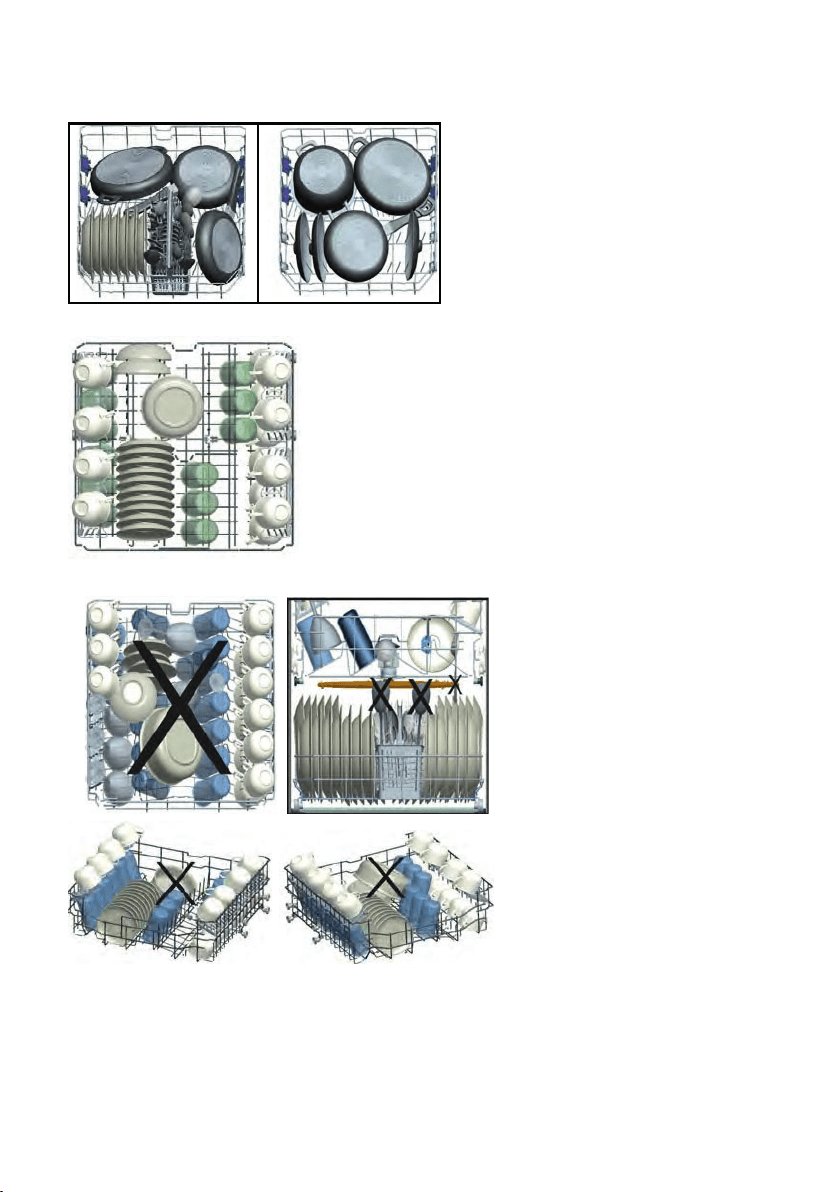
$OWHUQDWLYHEDVNHWORDGV
/RZHU%DVNHW
7RSEDVNHW
)DXOW\ORDGV

3URJUDPLWHPV
:DUQLQJ
:DUQLQJ
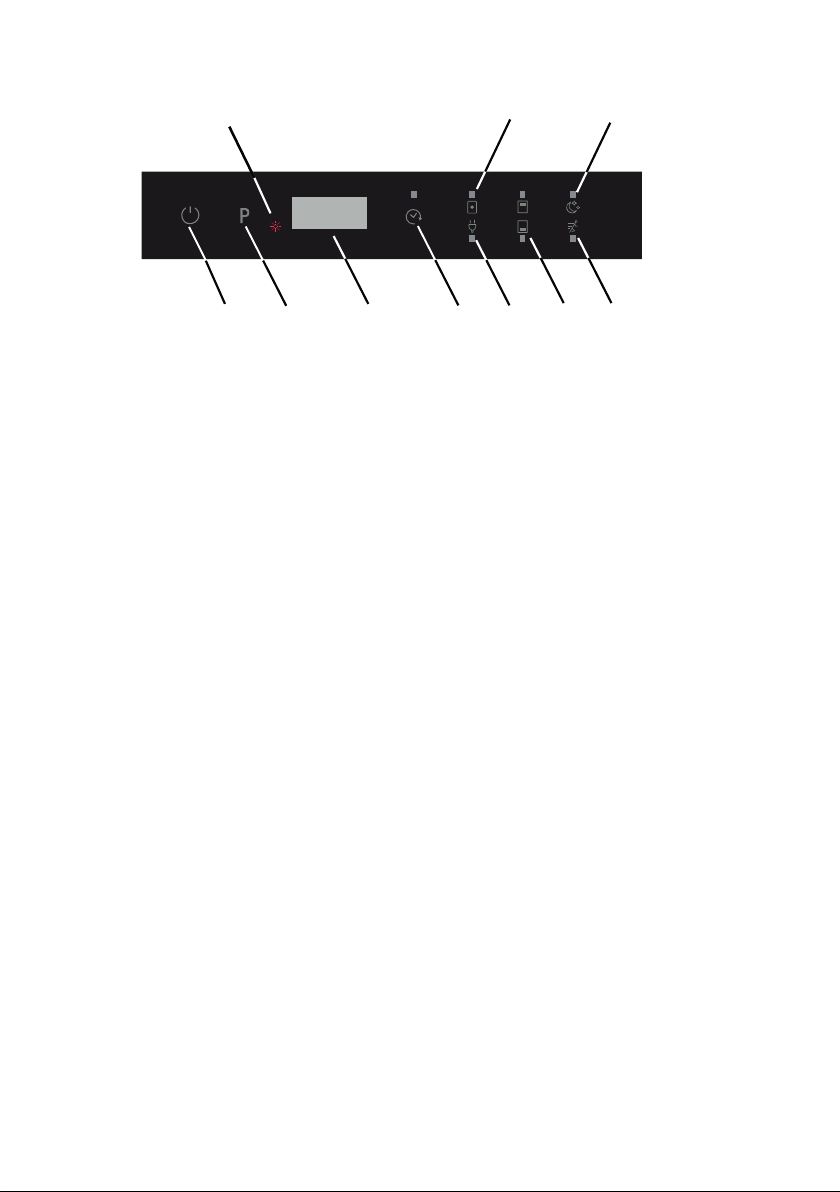
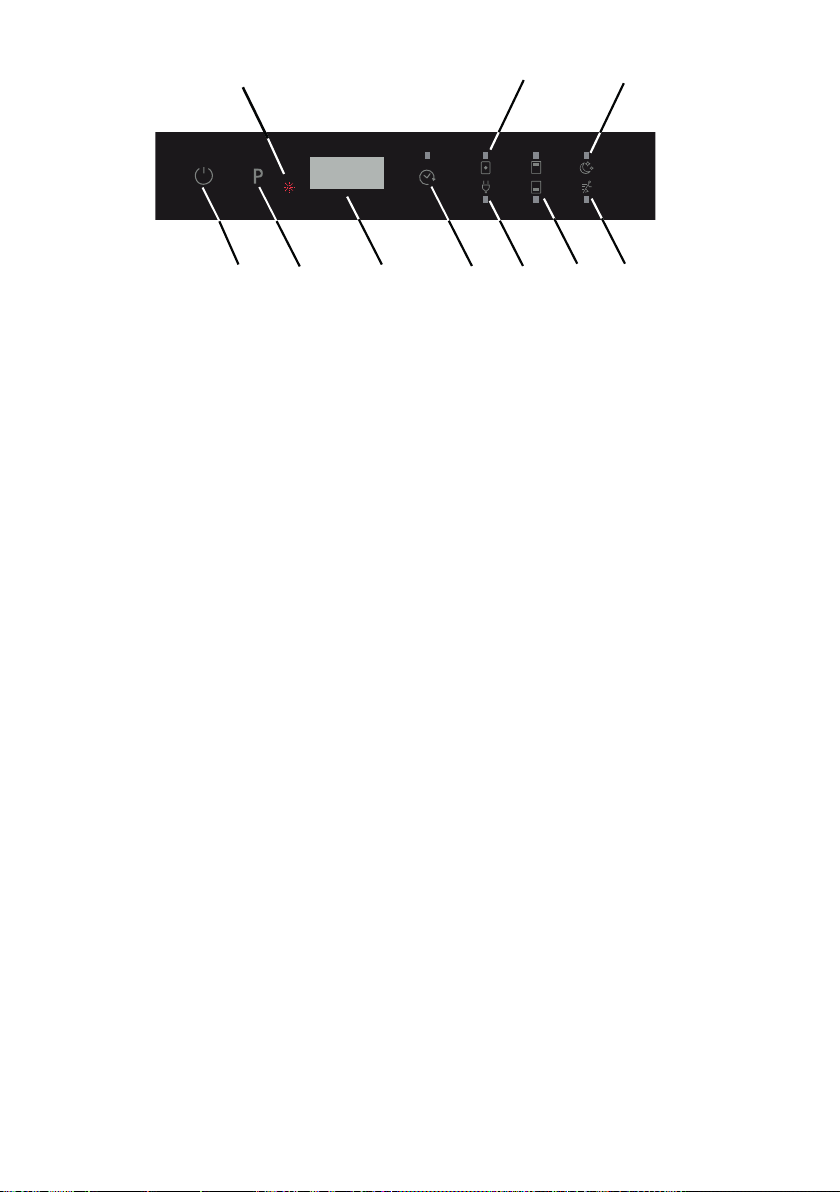
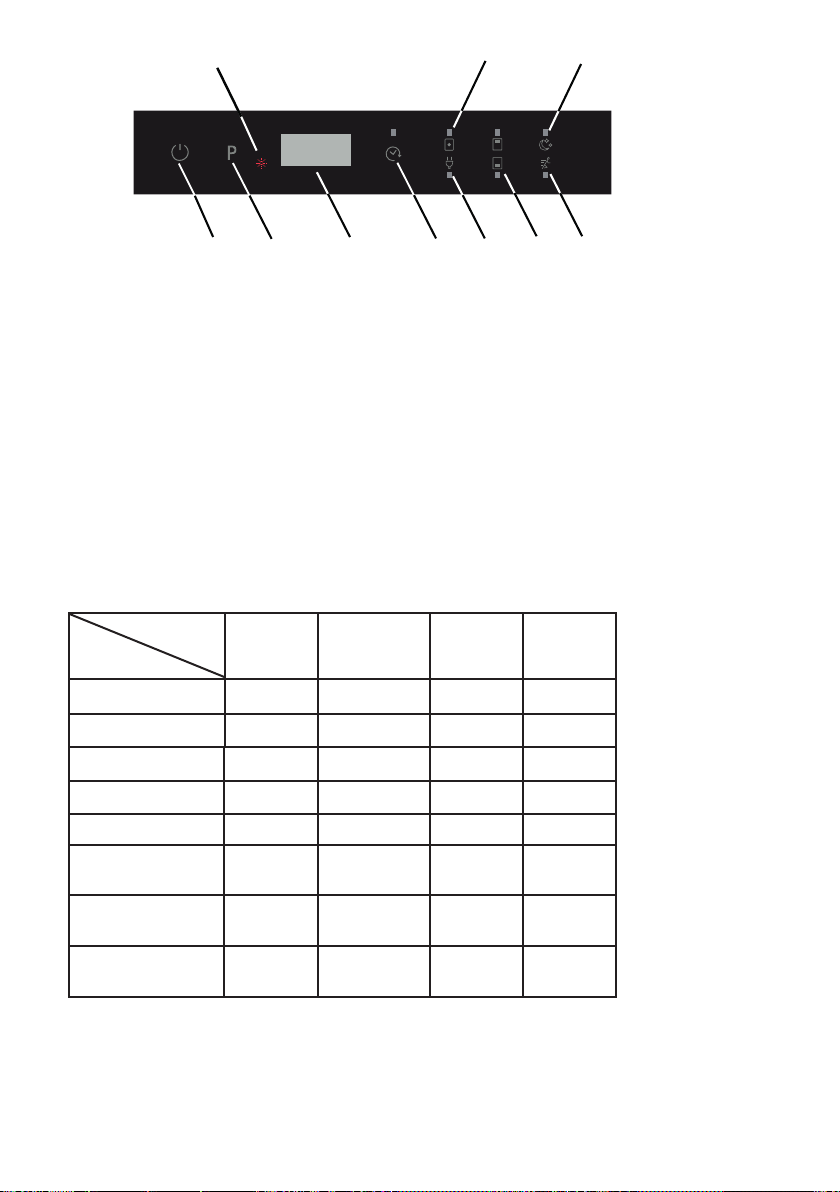
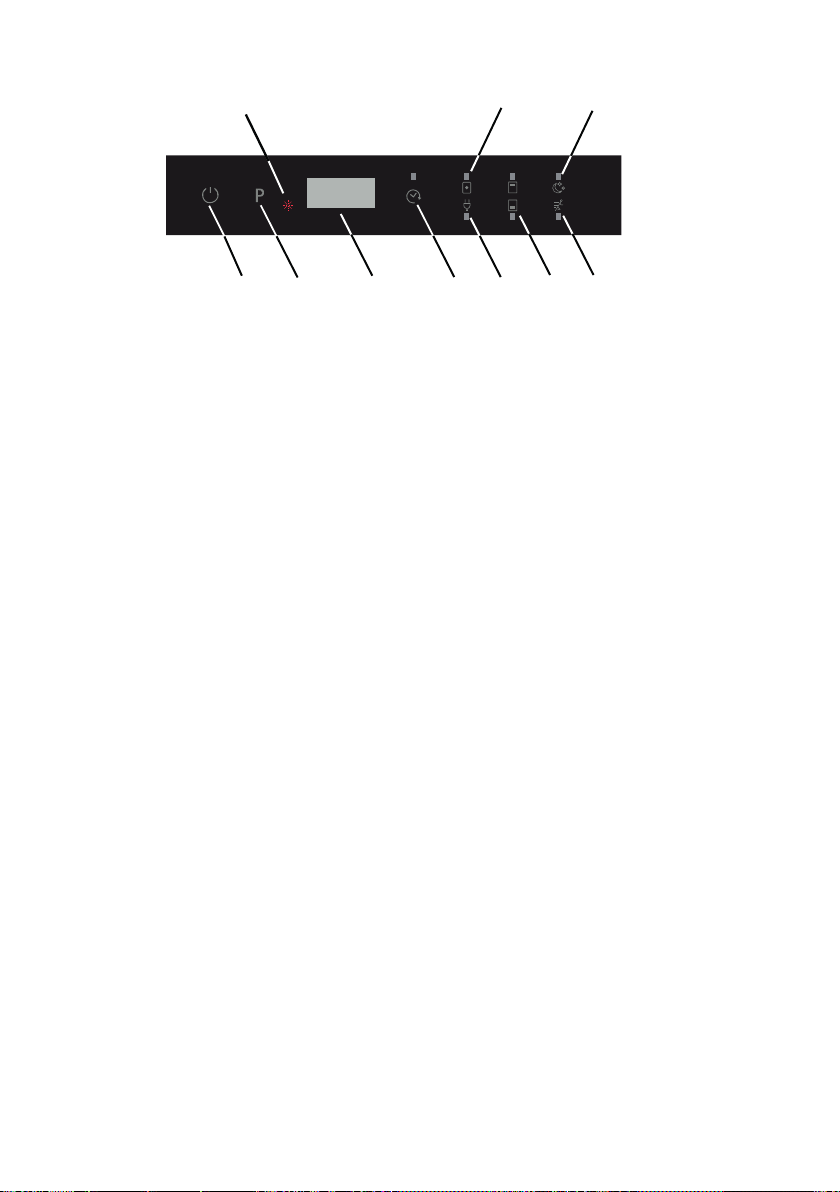
Getting familiar with your machine
3RZHU2Q2II7RXFK%XWWRQ
3URJUDP7RXFK%XWWRQ
3URJUDP'LVSOD\
'HOD\HG6WDUW7RXFK%XWWRQ
(8)
(6)
(7)
(9)
(5)
(4)
(4)
(3)
(2)
(1)
(10)
(QHUJ\6DYH7RXFK%XWWRQ
ò+DOI/RDG7RXFK%XWWRQ
1RWH
([WUD)DVW7RXFK%XWWRQ
1RWH
([WUD6LOHQW7RXFK%XWWRQ
1RWH

1RWH
7DEOHW'HWHUJHQW7RXFK%XWWRQLQEXWWRQ
5LQVHDLG:DUQLQJ,QGLFDWRU
(QGRI3URJUDP
1RWH
6ZLWFKLQJRQWKHPDFKLQH
1RWH
3URJUDPIROORZXS
(8)
(6) (7)
(9)
(5)
(4)
(4)
(3)
(2)
(1)
(10)

&KDQJLQJDSURJUDP
1RWH
&KDQJLQJDSURJUDPZLWKUHVHWWLQJ
1RWH
6ZLWFKLQJWKHPDFKLQHRII
1RWH
1RWH
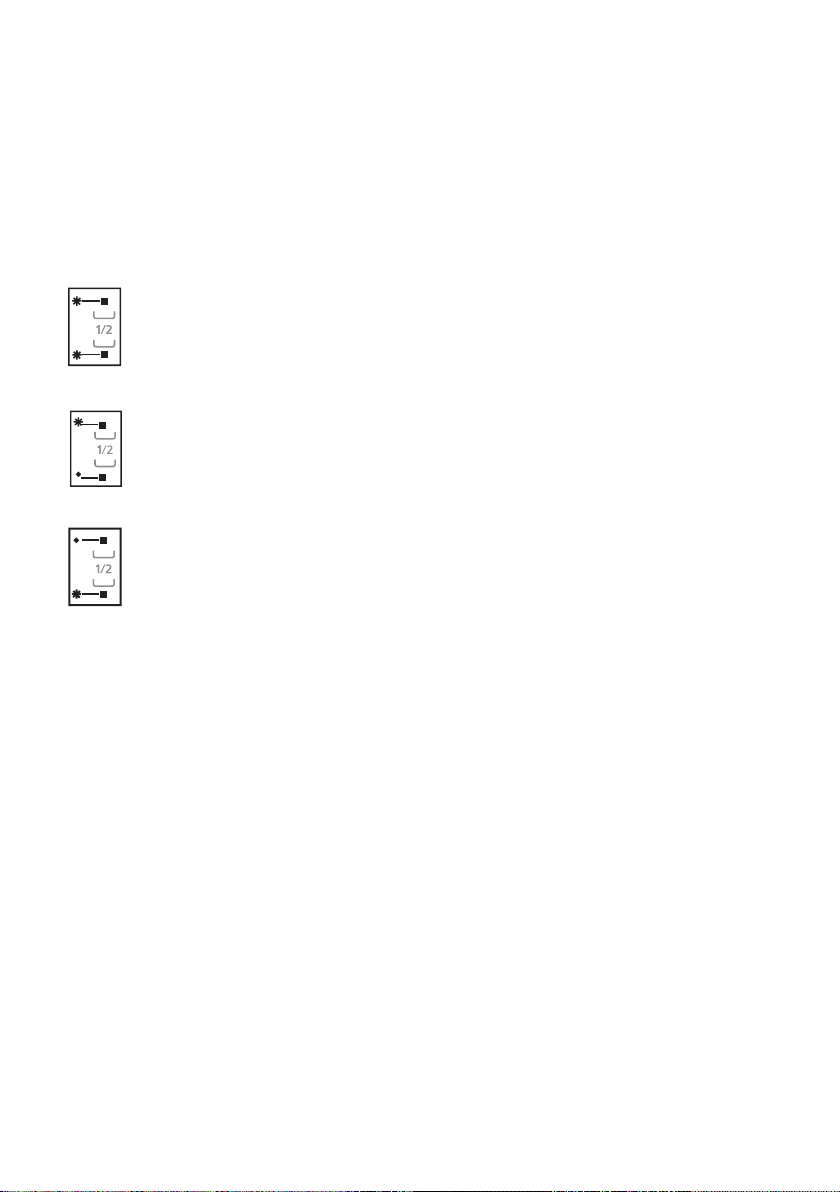
3URJUDPRSWLRQFRPSDULELOLW\
237,216
352*5$06
'HOD\HG
6WDUW
+DOIORDG
PRGHV
7DEOHW([WUDULQVH
(8)
(6) (7)
(9)
(5)
(4)
(4)
(3)
(2)
(1)
(10)

Turning on the Inner Light Option
Open the dishwasher door and press the Power On/Off touch button to turn
on the machine.
Press and hold both the ‘’Tablet/Energy Save’’and "Delayed start" touch
buttons simultaneously for 5 seconds
“IL0” will be shown on the display for 2 seconds to indicate that the “Normal
Mode” has been selected for the inner light option.
Once “Normal Mode” is selected, the inner light will be ON when the machine
is powered on and the door is open.
Turning off the Inner Light Option
Open the dishwasher door and press the Power On/Off touch button to turn
on the machine.
Press and hold both the ‘’Tablet/Energy Save’’and "Delayed start" touch
buttons simultaneously for 5 seconds.
“IL1” will be shown on the display for 2 seconds to indicate that the “Eco
Mode” has been selected for the inner light option. Also the inner light turns OFF
and ON again (blinks momentarily) to indicate that this selection is activated.
Once “Eco Mode” has been selected, the inner light will be ON for 4min and
then turns OFF. If any user intervention occurs such as pressing touch buttons,
Eco Mode cycle starts from beginning (inner light is ON for 4min and then turns
OFF again)
1RWHFrom the Factory the setting for the inner light is set to ‘’IL1’’.
%X]]HUVRXQGVHWXS
6
6
1RWH
(8)
(6)
(7)
(9)
(5)
(4)
(4)
(3)
(2)
(1)
(10)
Cleaning the machine in regular intervals prolongs the machine’s service life.
Oil and lime may accumulate in the machine’s washing section. In case of such accumulation
-Fill the detergent compartment without loading any dishes into the machine, select a programme that
runs at high temperature, and start the machine. In case of insufficiency, use special cleansing
material available in the market. (Cleansing material produced special to machines by detergent
producers.)
Cleaning the seals in the machine door
-To clean any accumulated residues in the door seals, wipe the seals regularly by using a dampened
cloth.
Cleaning the machine
Clean the filters and spray arms at least once a week.
Unplug your machine and turn off its tap before starting the cleaning.
Do not use hard materials when cleaning your machine. Wipe with a fine cleaning material and a
dampened cloth.
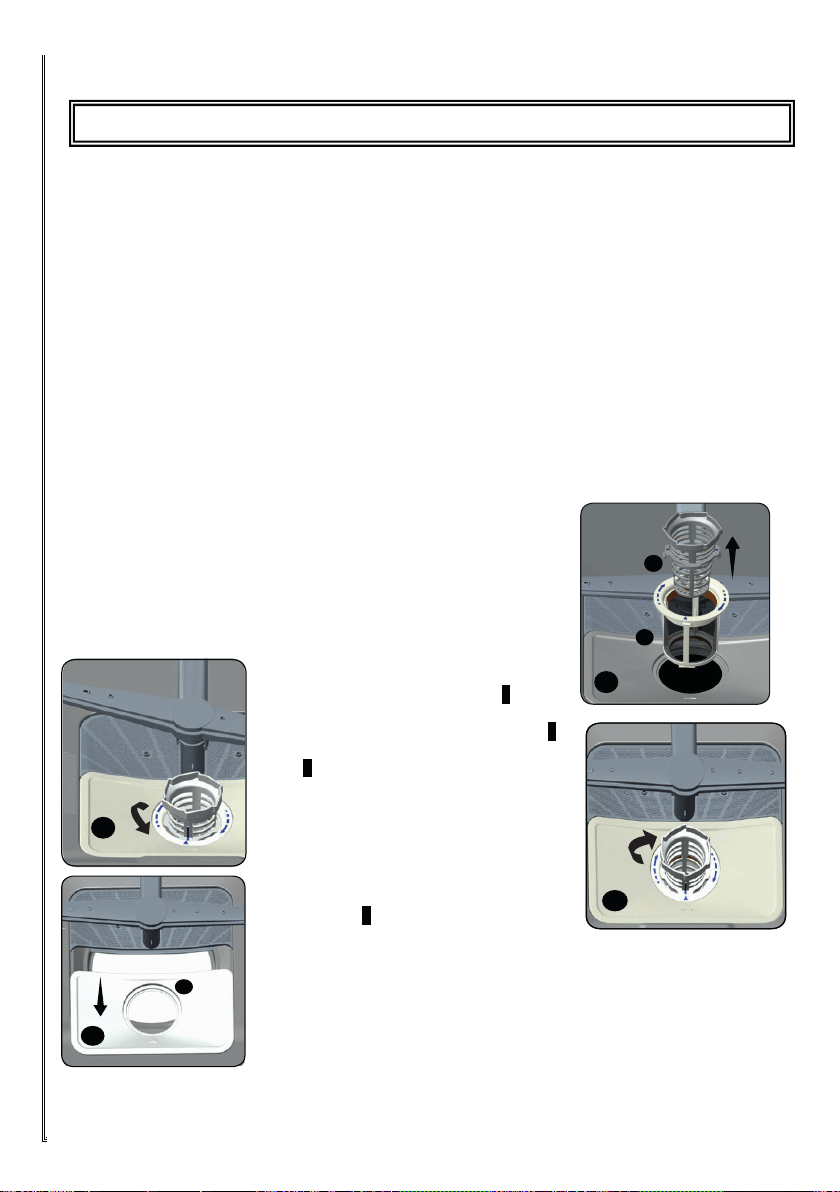
Filters
Check if any food wastes have remained on the coarse and fine filters.
If any food wastes are left, remove the filters and clean them
thoroughly under the water tap.
a. Micro Filter
b. Coarse Filter
c. Metal/Plastic Filter
To remove and clean the filter
combination, turn it counter clockwise
and take it out by lifting upwards.
1
Pull and remove the metal/plastic filter.
3
Then pull the coarse filter out of the micro
filter.
2 Rinse it with lots of water under
the tap. Refit the metal/plastic filter. Insert
the coarse filter into the micro filter in a
way that the marks will correspond to one
another. Attach micro filter into the
metal/plastic filter and turn to the
direction of arrow and it is locked when
the arrow on micro filter can be seen
from across.
4
• Never use your dishwasher without any filter.
• Incorrect fitting of the filter will reduce the washing effectiveness.
• Clean filters are very important in terms of the proper running of the
machine.
MAINTENANCE AND CLEANING
F
E
D
Spray arms
Check whether or not the holes for the upper and
lower spray arms are clogged. If there is any
clogging, remove the spray arms and clean them
under water.
You can remove the lower spray arm by pulling it
upwards, while the upper spray arm nut can be
removed by turning the nut to the left.
Be sure that the nut is perfectly tightened when
refitting the upper spray arm.
Hose filter
Water is prevented by the inlet hose filter so as to avoid any damage to your machine because of any
contamination (sand, clay, rust etc.) that might be occasionally carried in through the mains water
supply or the indoor plumbing, and to forestall such complaints as yellowing and formation of deposits
after washing. Check the filter and the hose from time to time and clean them if necessary. To clean
the filter, first turn off your tap and then remove the hose. After removing the filter from the hose, clean
it under the tap. Insert the cleaned filter back into its place inside the hose. Refit the hose.
FAILURE CODES AND WHAT TO DO IN CASE OF FAILURE
ERROR CODE ERROR DESCRIPTION CONTROL
F5
Inadequate water supply
• Make sure the water input tap is totally open and that there is no water cut.
• Close the water input tap, separate the water input hose from the tap and clean the filter at
the connection end of the hose.
• Restart your machine, contact the service if the error resumes.
F3
Error of continuous water input
• Close the tap.
• Contact the service.
F2
The waste water in the machine cannot be
discharged.
• Water discharge hose is clogged.
• The filters of your machine might be clogged.
• Power off-on your machine and activate the program cancellation command.
• If the error continues, contact the service.
F8
Heater error
Contact the service.
F1
Alarm is active against water overflow
• Power off your machine and close the tap.
• Contact the service.
FE
Faulty electronic card
Contact the service.
F7
Overheating error (temperature in the machine is
too high)
Contact the service.
F9
Divisor position error
Contact the service.
F6
Faulty heater sensor
Contact the service.

,IRQHRISURJUDPPRQLWRUOLJKWVLVRQDQGVWDUW3DXVHOLJKWLV
RQDQGRII
,IWKHSURJUDPPHZRQ¶WVWDUW
,IWKHFRQWUROODPSVZRQ¶WJRRXWDIWHUDZDVKRSHUDWLRQ
,IGHWHUJHQWUHVLGXHVDUHOHIWLQWKHGHWHUJHQWFRPSDUWPHQW
,IZDWHULVOHIWLQVLGHWKHPDFKLQHDWWKHHQGRIWKHSURJUDPPH
,IWKHPDFKLQHVWRSVGXULQJDZDVKRSHUDWLRQ
,IVKDNLQJDQGKLWWLQJQRLVHVDUHKHDUGGXULQJDZDVKRSHUDWLRQ

,IWKHUHDUHSDUWLDOIRRGZDVWHVOHIWRQWKHGLVKHV
,IWKHUHDUHZKLWLVKVWDLQVRQWKHGLVKHV
,IWKHGLVKHVZRQWGU\XS
,IWKHUHDUHUXVWVWDLQVRQWKHGLVKHV
&DOODQDXWKRULVHGVHUYLFHLIWKHSUREOHPVWLOOSHUVLVWVDIWHUWKH
FRQWUROVRULQFDVHRIDQ\PDOIXQFWLRQQRWGHVFULEHGDERYH

35$&7,&$/$1'86()8/,1)250$7,21

ILVE LIMITED WARRANTY
Eurolinx Pty Limited A.B.N. 50 001 473 347 trading
as ILVE (“ILVE”)
Oce: 48-50 Moore Street, Leichhardt N.S.W 2040
Post: Locked Bag 3000, Annandale, N.S.W 2038
P: 1300 MY ILVE (694 583)
WARRANTY REGISTRATION
Your ongoing satisfaction with your ILVE product is
important to us. We ask that you complete the enclosed
Warranty Registration Card and return it to us so that
we have a record of the ILVE products you purchased.
Alternatively you can register on line (see registration
card for details)
PRIVACY
ILVE respects your privacy and is committed to
handling your personal information in accordance with
the National Privacy Principles and the Privacy Act 1988
(Cth). A copy of the ILVE Privacy Policy is available at
www.ilve.com.au. ILVE will not disclose any personal
information set out in the Warranty Registration Card
(“Personal Information”) without your consent unless
required by:
1. law;
2. any ILVE related company;
3. any service provider which provide services to ILVE
or assist ILVE in providing services (including repair
and warranty services) to customers. Our purpose in
collecting the Personal Information is
to keep a record of the ILVE product purchased by you,
in order to provide a better warranty service to you in
the unlikely event that there is a problem with your ILVE
product. ILVE may contact you at any one or more of
the address, email address or telephone numbers set
out in the Warranty Registration Card. Please contact
ILVE on 1300 694 583 should you not wish to be
contacted by ILVE.
WARRANTY
1. Warranty
ILVE warrants that each ILVE product will remain, for
a period of twenty four (24) months computed from
the date of purchase of the ILVE product, free from
defects arising in the manufacture of the ILVE product
(“Warranty”). Except for consumer guarantees set
out in the Competition and Consumer Act 2010 (Cth)
(“Act”), ILVE does not make any further warranties or
representations in relation to ILVE products.
2. What is not Covered by the Warranty.
The Warranty does not apply if an ILVE product is
defective by a factor other than a defect arising in the
manufacture of the ILVE product, including but not
limited to:
(a) damage through misuse (including failure to
maintain, service or use with proper care), neglect,
accident or ordinary wear and tear (including
deterioration of parts and accessories and glass
breakage);
(b) use for purpose for which the ILVE product was not
sold or designed;
(c) use or installation which is not in accordance with
any specied instructions for use or installation;
(d) use or operation after a defect has occurred or been
discovered;
(e) damage through freight, transportation or handling in
transit (other than when ILVE is responsible);
(f ) damage through exposure to chemicals, dusts,
residues, excessive voltage, heat, atmospheric
conditions or other forces or environmental factors
outside the control or ILVE;
(g) repair, modication or tampering by the purchaser or
any person other than ILVE, an employee of ILVE or an
authorised ILVE service contractor;
(h) use of parts, components or accessories which have
not been supplied or specically approved by ILVE.
(i) damage to surface coatings caused by cleaning or
maintenance using products not recommended in the
ILVE product handbook provided to the purchaser upon
purchase of the ILVE product;
(j) damage to the base of an electric oven due to items
having been placed on the base of the oven cavity or
covering the base, such as aluminium foil (this impedes
the transfer of heat from the element to the oven cavity
and can result in irreparable damage); or
(k) damages, dents or other cosmetic imperfections not
aecting the performance of the ILVE in respect of an
ILVE product purchased as a “factory second” or from
display. The Warranty does not extend to light globes
used in ILVE products.
3. Domestic Use
Each ILVE product is made for domestic use. This
Warranty may not extend to ILVE products used for
commercial purposes; under those circumstances the
warranty period is limited to 3 month.
4. Time for Claim under the Warranty
You must make any claim under this Warranty within
twenty eight (28) days after the occurrence of an event
which gives rise to a claim pursuant to the Warranty, by
booking a service call on the telephone number below.
5. Proof of Purchase
Customers must retain proof of purchase in order to be
eligible to make a warranty claim in respect of an ILVE
product.
Continued over...
ILVE Warranty 01.06.2016 WITH TEAR OFF.indd 1 3/1/17 11:03 am
6. Claiming under the Warranty
Customers will bear the cost of claiming under this
Warranty unless ILVE determines the expenses are
reasonable, in which case the customer must claim
those expenses by providing written evidence of
each expense to ILVE at the address on the Warranty
Registration Card.
7. Statutory Rights
(a) These terms and conditions do not a ect your
statutory rights.
(b) The limitations on the Warranty set out in this
document do not exclude or limit the application of the
consumer guarantees set out in the Act or any other
equivalent or corresponding legislation in the relevant
jurisdiction where to do so would:
(i) contravene the law of the relevant jurisdiction; or
(ii) cause any part of the Warranty to be void.
(c) ILVE excludes indirect or consequential loss of any
kind (including, without limitation, loss of use of the
ILVE product) and (other than expressly provided for in
these terms and conditions) subject to all terms,
conditions and warranties implied by custom, the
general law, the Act or other statute.
(d) The liability of ILVE to you for a breach of any
express or non-excludable implied term, condition or
warranty is limited at the option of ILVE to:
(i) replacing or repairing the defective part of the ILVE
product;
(ii) paying the cost of replacing or repairing the defective
part of the ILVE product;
(iii) replacing the ILVE product; or
(iv) paying the cost of replacing the ILVE product.
(e) Our goods come with guarantees that cannot be
excluded under the Australian Consumer Law.
You are entitled to a replacement or refund for a major
failure and for compensation for any other reasonably
foreseeable loss or damage. You are also entitled to
have the goods repaired or replaced if the goods fail
to be of acceptable quality and the failure does not
amount to a major failure.
8. Defects
Any part of an ILVE product deemed to be defective and
replaced by ILVE is the property of ILVE. ILVE reserves
the right to inspect and test ILVE products in order to
determine the extent of any defect and the validity of a
claim under the Warranty.
*To locate your closest ILVE authorised service agent
please contact ILVE on 1300 694 583,
[email protected] or visit
http://ilve.com.au/support/service/
IMPORTANT!
All warranty service calls must be booked via
the customer care department. The team can
be contacted on 1 300 85 64 11 option 1 or
customercare@eurolinx.com.au
Service is delivered through a network of Service
Agents. If the Appliance is located outside our
normal Service Area of our agents you, t he
Customer will need to bear the cost of travel outside
that area.
If you are unable to provide proof of purchase, the
fault is not covered under warranty or the product
is found to be working to specication you may be
required to bear the full cost of the service visit
08042016
ILVE LIMITED WARRANTY
Please complete and send to ilve at: REPLY PAID 83617
LEICHHARDT NSW
2040
Last Name: First Name:
Address:
State: Postcode: Email:
Home Phone: Mobile:
Purchase Date: / / (Please attach proof of purchase to validate warranty)
MODEL NUMBER
SERIAL NUMBER
(if you cannot locate the serial number please call ILVE on 1300 85 64 11)
1
2
3
4
WARRANTY REGISTRATION CARD
08042016
ILVE Warranty 01.06.2016 WITH TEAR OFF.indd 2 3/1/17 11:03 am

6
5
8