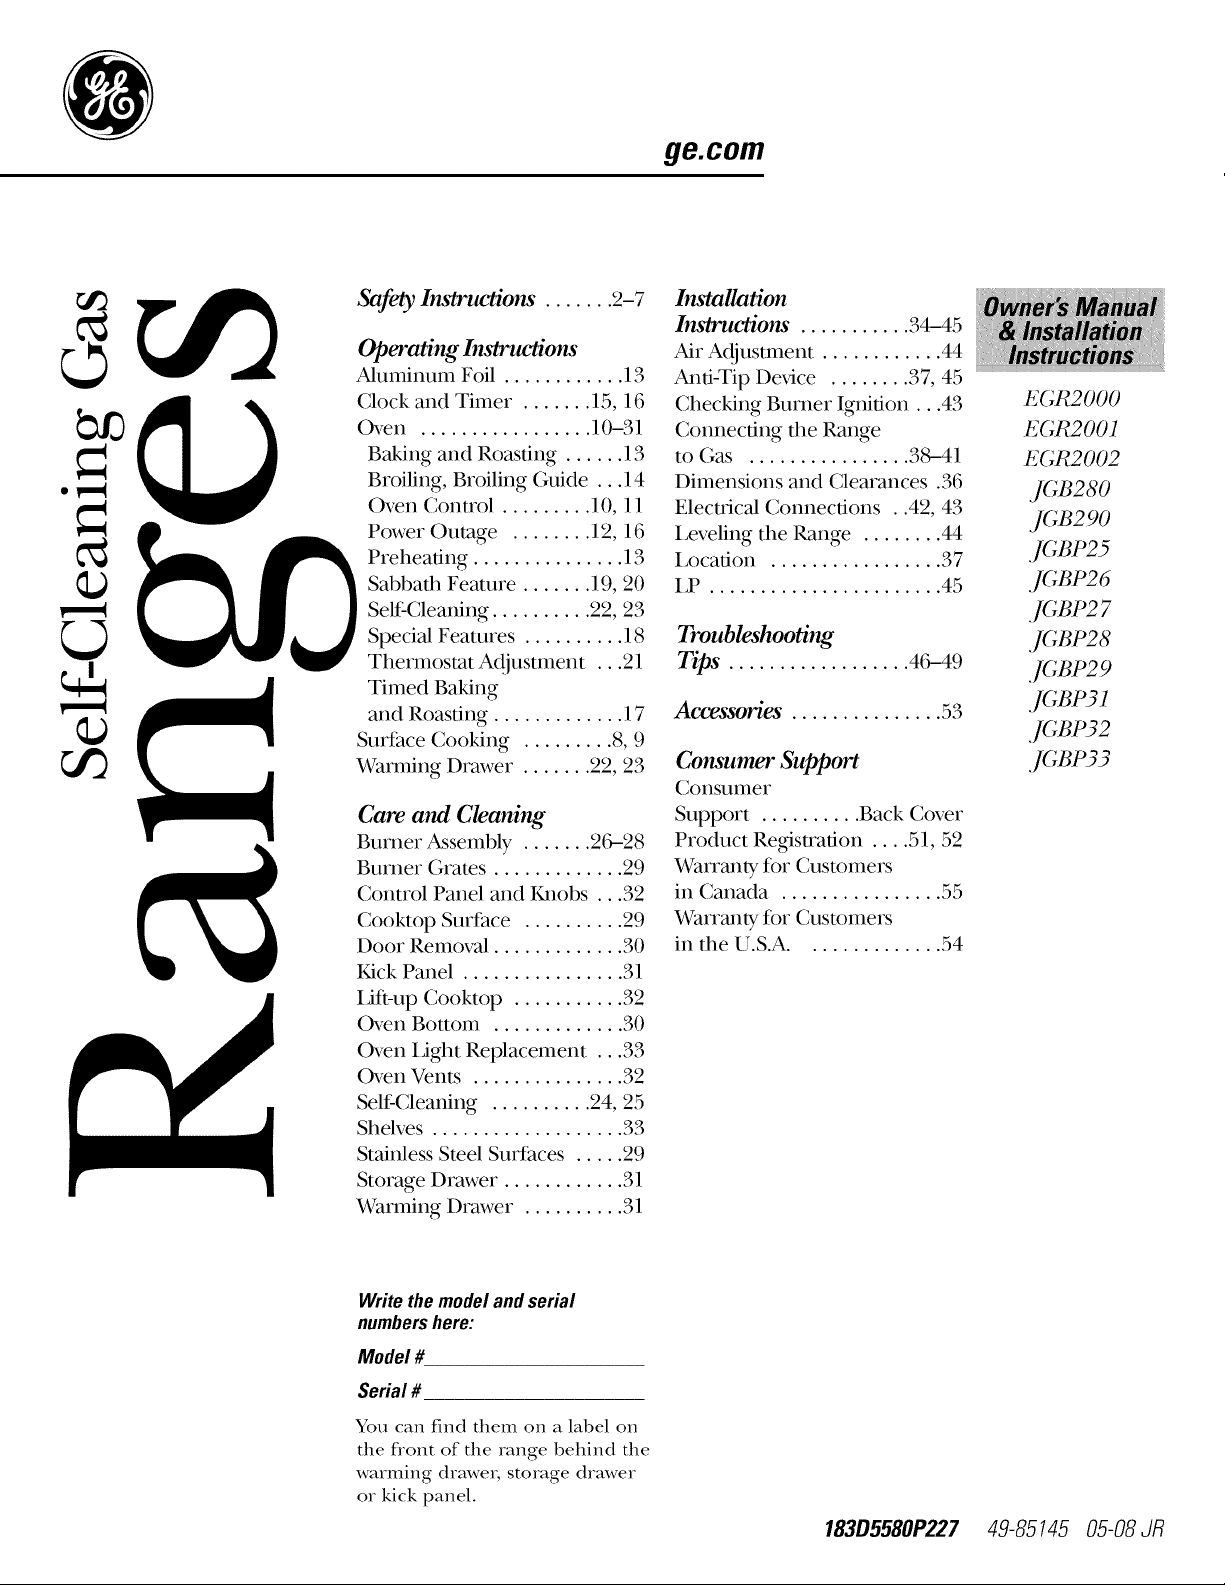
ge.com
Safety Ins_rtwtions. ...... 2-7
Operating InsO'uaiom"
Aluminum Foil ............ 13
Clock and Timer ....... 15, 16
Oven ................. 10-31
Baking and Roasting ...... 13
Broiling, Broiling Guide ... 14
Oven Control ......... 10, 11
Power Outage ........ 12, 16
Preheating ............... 13
Sabbath Feature ....... 19, 20
Self Cleaning .......... 22, 23
Special Features .......... 18
Thermostat Adjustment ...21
Timed Baking
and Roasting ............. 17
Surfhce Cooking ......... 8, 9
Warming Drawer ....... 22, 23
Care and Cleaning
Burner Assembly ....... 2C_28
Burner (;rates ............. 29
Control Panel and Knobs ...32
Cooktop Surface .......... 29
Door Removal ............. 30
Kick Panel ................ 31
i,ifi-up Cooktop ........... 32
Oven Bottom ............. 30
Oven Light Replacement ...33
Oven Vents ............... 32
Self Cleaning .......... 24, 25
Shelves ................... 33
Stainless Steel Surfaces ..... 29
Storage Drawer ............ 31
Warming Drawer .......... 31
Installation
Ins/rue/ions . .......... 34-45
Air Adjustment ............ 44
Anti-Tip Dex,Jce ........ 37, 45
Checking Burner Ignition...43
Connecting the Range
to (;as ................ 38--41
Dimensions and Clearances .36
Electrical Connections . .42, 43
Leveling the Range ........ 44
Location ................. 37
LP ....................... 45
Troubleshooting
Tips". ................. 46-49
Accessories". .............. 53
Consumer Support
Consunler
Support .......... Back Cover
Product Re_stration .... 51, 52
Warranty for Customers
in Canada ................ 55
Warrmlty for Customers
in the U.S.A .............. 54
E(;R2000
E(;R2001
E(;R2002
,](;B280
,](;B290
,](;BP25
,](;BP26
,]CBP2 7
,](;BP28
,](;BP2 9
,](;BP31
,](;BP32
,](;BP33
Write the model and serial
numbers here:
Model #
Serial #
You can find them on a label on
the front of the range behind the
warming drawe_, storage drawer
or kick panel.
183D5580P227 49-85145 05-08 JR
IMPORTANTSAFETYINFORMATION.
READALLINSTRUCTIONSBEFOREUSING.
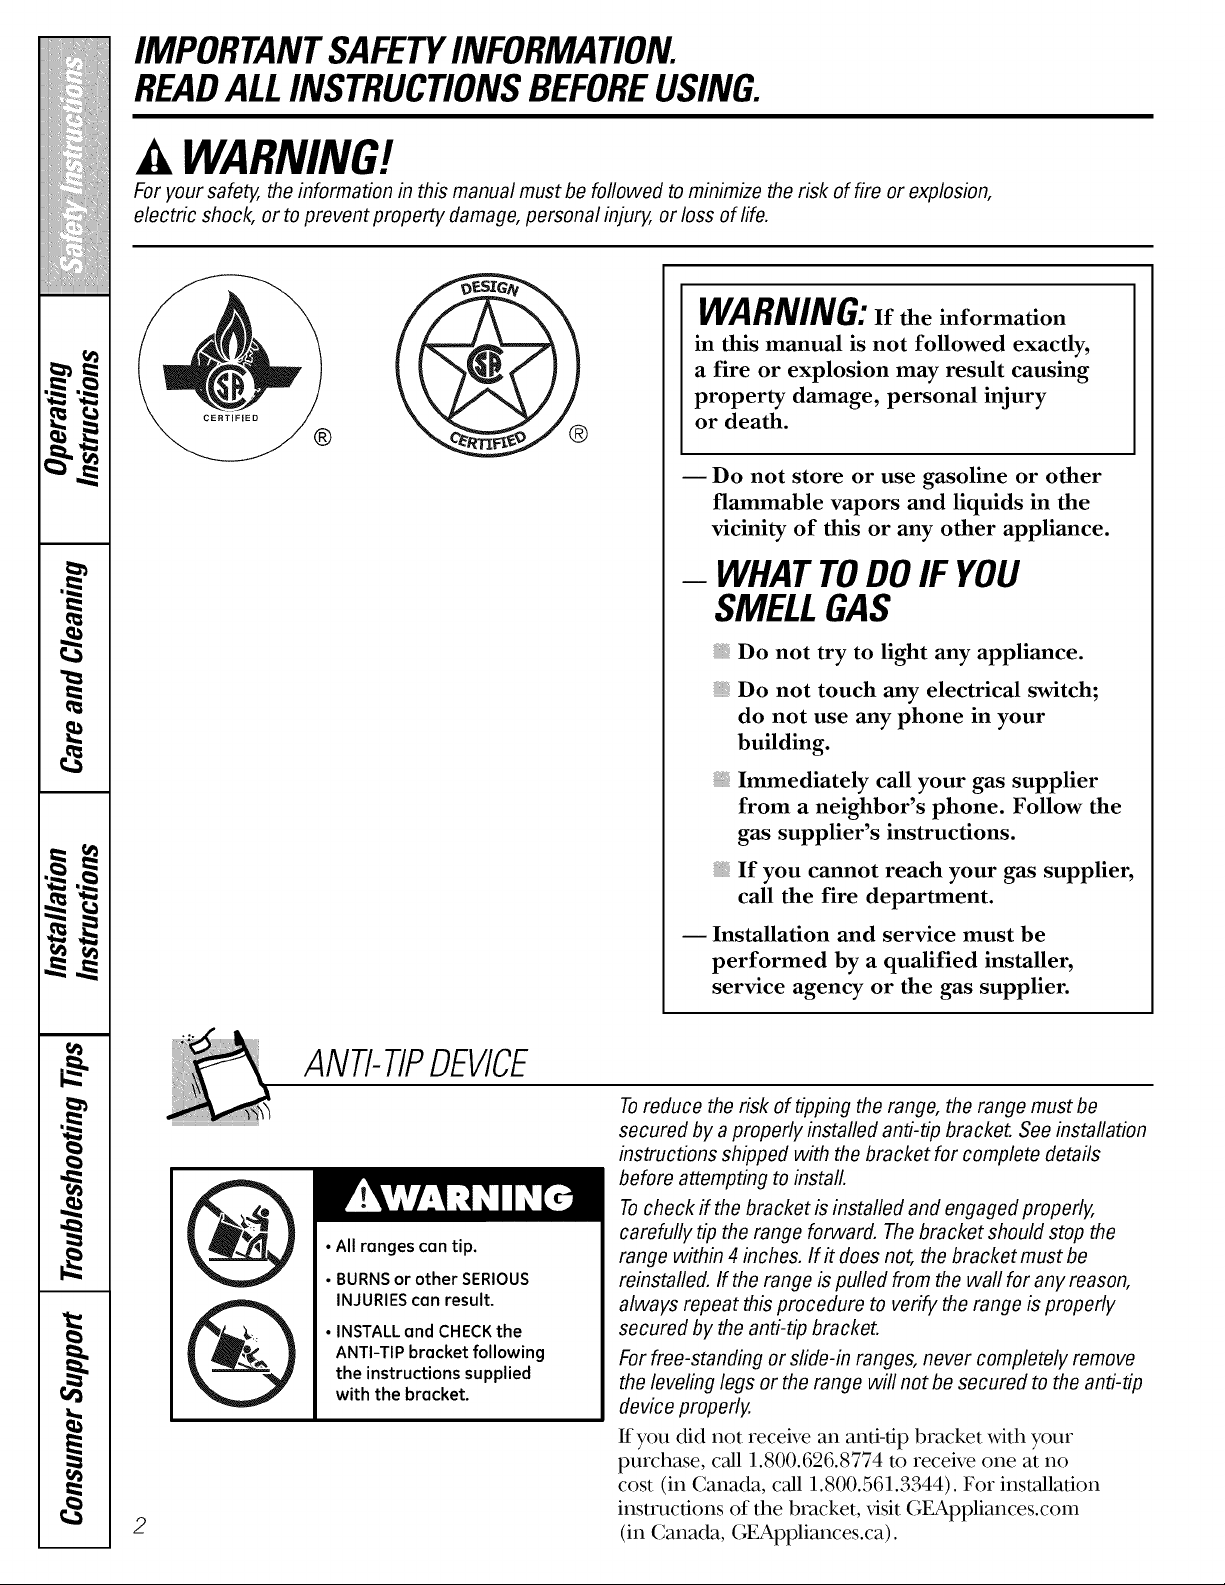
WARNING'!
For your safety, the information in this manual must be followed to minimize the risk of fire or explosion,
electric shock, or to prevent property damage, personal injury, or loss of life.
®
WARNING:if theinformation
in this manual is not followed exactly,
a fire or explosion may result causing
property damage, personal injury
or death.
-- Do not store or use gasoline or other
flammable vapors and liquids in the
vicinity of this or any other appliance.
- WHAT TODO IF YOU
SMELLGAS
Do not try to light any appliance.
Do not touch any electrical switch;
do not use any phone in your
building.
Immediately call your gas supplier
from a neighbor's phone. Follow the
gas supplier's instructions.
If you cannot reach your gas supplier,
call the fire department.
-- Installation and service must be
performed by a qualified installer,
service agency or the gas supplier.
2
ANTI-TIPDEVICE
•All ranges can tip.
• BURNS or other SERIOUS
INJURIES can result.
• INSTALL and CHECK the
ANTI-TIP bracket following
the instructions supplied
with the bracket.
Toreduce the risk of tipping the range, the range must be
secured by a properly installed anti-tip bracket. See installation
instructions shipped with the bracket for complete details
before attempting to install.
Tocheck if the bracket is installed and engaged properly,
carefully tip the range forward. The bracket should stop the
range within 4 inches. If it does not, the bracket must be
reinstalled. If the range is pulled from the wall for any reason,
always repeat this procedure to verify the range is properly
secured by the anti-tip bracket.
For free-standing or slide-in ranges, never completely remove
the leveling legs or the range will not be secured to the anti-tip
device properly.
If you did not receive an anti-tip bracket with your
purchase, call 1.800.626.8774 m receive one at no
cost (in Canada, call 1.800.561.3344). For installation
instructions of the bracket, visit GEAppliances.com
(in Canada, GEAppliances.ca).
ge.com
WARNING!
IMPORTANTSAFETYNOTICE
The California Safe Drinking Water and Toxic Enforcement Act requires the Governor of California to
publish a list of substances known to the state to cause birth defects or other reproductive harm, and
requires businesses to warn customers of potential exposure to such substances.
Gas appliances can cause minor exposure to four of these substances, namely benzene, carbon
monoxide, formaldehyde and soot, caused primarily by the incomplete combustion of natural gas or
LP fuels. Properly adjusted burners, indicated by a bluish rather than a yellow flame, will minimize
incomplete combustion. Exposure to these substances can be minimized by venting with an open
window or using a ventilation fan or hood.
SAFETYPRECAUTIONS
Have the installer show you the location of the range gas shut-off valve and how to shut it off if necessary.
Have your range installed and properly
grounded by a qualified installe_, in
accordance with the Installation Instructions.
Any ad,justment and ser\,ice should be
performed only by qualified gas range
installers or ser\,ice technicians.
Do not atmmpt to repair or replace any
part of your range unless it is specifically
recommended in this manual. All other
serx,ice should be referred m a qualified
technician.
Plug your range into a 190woh grounded
outlet only. Do not remove the round
grounding prong f_om the plug. If in doubt
about the grounding of the home electrical
system, it is your personal responsibility and
obligation to have an ungrounded outlet
replaced with a properly grounded,
three-prong outlet in accordance with
the National Electrical Code. Do not use
an exmnsion cord with this appliance.
3

IMPORTANTSAFETYINFORMATION.
READALLINSTRUCTIONSBEFOREUSING.
4
SAFETYPRECAUTIONS
i,ocate the range out of kitchen tr_tic path
and out of dr_ty locations to prevent poor
air circulation.
Be sure 'allpacka_ng materials are removed
from the range befk)re operating it m
prevent fire or smoke damage should the
packa_ng material ignite.
Be sure your range is correctly adjusted by
a qualified ser\,ice technician or installer fk)r
the type of gas (natural or LP) that is m be
used. Your range can be converted fk)r use
with either type of gas. See the Installation
of therange section.
WARNING:These a(tiustments must
be made by a qualified ser\,ice technician
in accordance xdth the manufhcturer's
instructions and all codes and requirements {
of the authority hax,ingjurisdicdon. Failure
to follow these instructions could result in
serious in,ju U or property damage. The
qualified agency perf_)rming this work
assumes responsibility for the converskm.
After prolonged use of a range, high foor
temperatures may result and many floor
coverings xdll not xdthstand this kind of use.
Never install the range over x,inyl die or
linoleum that cannot withstand such type
of use. Never install it directly over interior
kitchen carpeting.
Do not leave children alone or unattended
where a range is hot or in operation. They
could be seriously burned.
Do not allow anyone to climb, stand or hang
on the oven door, storage drawer, warming
drm_,er or cooktop. They could damage the
range and even tip it over; causing severe
personal in,jm T.
CAUTION:,te,nsofi.terestto
children should not be stored in cabinets
above a range or on the backsplash of a
range--children climbing on the range
to reach items could be seriously in,jured.
A WARNING:NEVERusethis
appliance as a space hearer m heat or
warm the room. Doing so may result
in carbon monoxide poisoning and
overheating of the oven.
iiiiiiiiiiiii!
Never wear loose fitting or han_ng garments
while using the appliance. Be careful when
reaching for imms stored in cabinets over the
range. Flammable material could be i_dted
if brought in contact with flame or hot oven
surfaces and may cause severe burns.
Do not store flammable materials in an
oven, a range storage drawer, a warming
drm_,er or near a cooktop.
Do not store or use combustible mamrials,
gasoline or other flammable vapors and
liquids in the x,icinity of this or any other
appliance.
Do not let cooking grease or other
flammable materials accumulate in or
near the range.
Do not use water on _ease fires. Never pick
up a flaming pan. Turn the controls oil
Smother a flaming pan on a surface burner
by covering the pan completely with a
well-fitting lid, cookie sheet or flat tray.
Use a multi-purpose d U chemical or
foam-type fire extinguisher:
Flaming grease outside a pan can be put
out by covering it with baking soda or,
if available, by using a muhi-purpose dU
chemical or fkmm-type fire extinguisher.
Flame in the oven or warming drawer can be
smothered completely by closing the oven
door and turning the control m off or by
using a multi-purpose d U chemical or fkmm-
type fire extinguisher
Let the burner grates and other surfaces
cool befk)re touching them or leax,ing them
where children can reach them.
Never block the vents (air openings) of
the range. They pro\,ide the air inlet and
outlet that are necessa U fk)r the range to
operate properly with correct combustion.
Air openings are located at the rear of
the cooktop, at the top and bottom of the
oven door, and at the bottom of the range
under the warming drawer, kick panel or
storage drawer
Large scratches or impacts to glass doors can
lead to broken or shattered glass.
ge.com
WARNING!
SURFACEBURNERS
Use proper pan size--avoid pans that are unstable or easily tipped. Select cookware having flat bottoms
large enough to cover burner grates. Toavoid spillovers, make sure cookware is large enough to contain
the food properly. This will both save cleaning time and prevent hazardous accumulations of food, since
heavy spattering or spillovers left on range can ignite. Use pans with handles that can be easily grasped
and remain cool
Always use the LITE position when igniting
the top burners and make sure the burners
have i_lited.
Never leave the surface burners unattended
at high flame settings. Boilovers cause
smoking and _easy spillovers that may
catch on fire.
Adjust the mp burner flame size so it
does not exmnd beyond the edge of the
cookware. Excessive flame is hazardous.
Use only d U pot holders--moist or damp
pot holders on hot surfhces may result in
burns fiom steam. Do not let pot holders
come near open flames when lifting
cookware. Do not use a towel or other
bulky cloth in place of a pot holder
When using glass cookware, make sure it
is designed for top-of range cooking.
To minimize the possibility of burns,
ignition of flammable materials and spillage,
turn cookware handles reward the side or
back of the range without exmnding over
adjacent burners.
Carefully watch foods being flied at a high
flame setting.
Always heat fat slowly, and watch as it heats.
Do not leave any items on the cooktop. The
hot air fiom the vent may i_fite flammable
imms and will increase pressure in closed
containers, which may cause them m burst.
If a combination of oils or fats will be used in
flying, stir together before heating or as fats
meh slowly.
Use a deep fht thermometer whenever
possible to prevent overheating fat beyond
the smoking point.
Use the least possible amount of fat f_)r
effective shallow or deep-fat flying. Filling
the pan too full of fat can cause spillovers
when food is added.
Do not flame f_)ods on the cooktop. Kyou do
flame fk)ods under the hood, turn the fro1 on.
Do not use a wok on the cooking surface
if the wok has a round metal ring that is
placed over the burner _ate to support
the wok. This ring acts as a heat trap,
which may damage the burner grate and
burner head. Also, it may cause the burner
to work improperly. This may cause a
carbon monoxide level above that
allowed by current standards, resulting
in a health hazard.
Foods for flying should be as d U as possible.
Frost on fiozen foods or moisture on fiesh
foods can cause hot fat to bubble up and
over the sides of the pan.
Never t U to move a pan of hot fat, especially
a deep fat flyer Wait until the fht is cool.
Do not leave plastic items on the cooktop--
they may melt if left too close to the vent.
Keep all plastics away from the surface
burners.
To avoid the possibility of a burn, always be
certain that the controls fbr all burners are
at the OFF position and 'all _ates are cool
befbre attempting to remove them.
If range is located near a window, do not
hang long curtains that could blow over the
surface burners and create a fire hazard.
If you smell gas, turn off the gas to the range
and call a qualified serx,ice technician. Never
use an open flame to locam a leak.
Always turn the surface burner controls off
before remox,Jng cookware.
Do not lift the cookmp on sealed burner
models. Lifting the cookmp can lead
to damage and improper operation of
the range.
5
IMPORTANTSAFETYINFORMATION.
READALLINSTRUCTIONSBEFOREUSING.
COOKMEATANDPOULTRYTHOROUGHLY...
Cook meat and poultry thoroughly--meat to at least an INTERNAL temperature of 160°Fand poultry to
at least an INTERNAL temperature of 180°E Cooking to these temperatures usually protects against
foodbome illness.
|1
OVEN
Stand away from the range when opening the door of a hot oven. The hot air and steam that escape
can cause bums to hands, face and eyes.
Do not use the oven f()r a storage area.
Items stored in the oven can ignite.
Keep the oven f_ee f_om grease buildup.
Place the oven shelves in the desired
position while the oven is cool.
Pulling out the shelf to the stop-lock is a
convenience in lifting hem T foods. It is 'also
a precaution against burns from touching
hot surfaces of the door or oven walls. The
lowest position is not designed to slide.
Do not heat unopened food containers.
Pressure could build up and the container
could burst, causing an in,ju U.
II, WARNING:NEVERcover
any slots, holes or passages in the oven
bottom or cover an entire shelf with
mamrials such as aluminum fk_il.Doing
so blocks air flow through the oven and
may cause carbon monoxide poisoning.
Aluminum fk_illinings may also trap
heat, causing a fire hazard.
Do not use aluminum foil anywhere in the
oven except as described in this manual.
Misuse could result in a fire hazard or
damage to the range.
When using cooking or roasting bags in the
oven, follow the manufacturer's directions.
Do not use your oven to d_T newspapers.
If overheated, they can catch fire.
Use only glass cookware that is
recommended for use in gas ovens.
Always remove any broiler pan f_om range
as soon as you finish broiling. Grease left in
the pan can catch fire if oven is used without
remox,ing the _ease flom the broiler pan.
When broiling, if meat is too close to the
flame, the fat may ignite. Trim excess fat to
prevent excessive flare-ups.
iiiiiiiiiiiii!
iiiiiiiiiiiii!
Make sure any broiler pan is in place
correctly to reduce the possibility of
grease fires.
If you should have a _ease fire in a broiler
pan, touch the Clear/Offpad, and keep
the oven door closed to contain fire until
it burns out.
For s_ety and proper cooking perfk_rmance,
always bake and broil xdth the oven door
closed.
6
ge.com
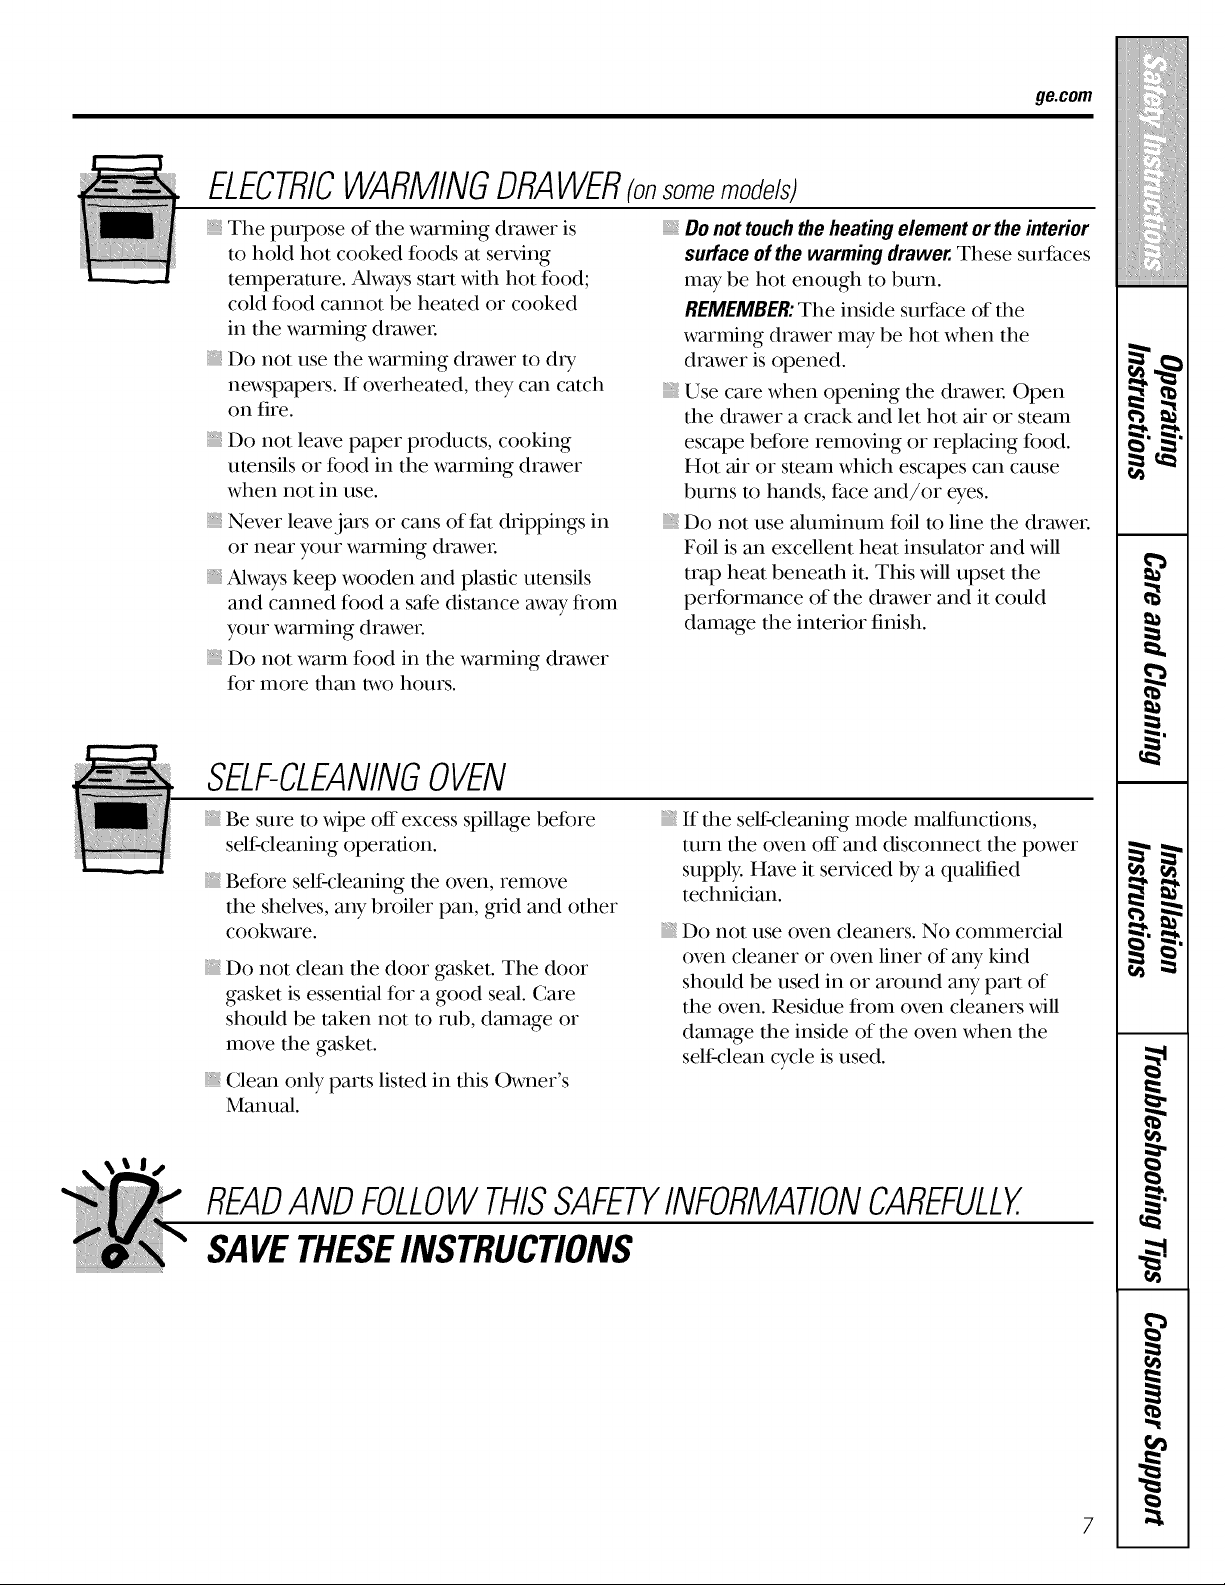
ELECTRICWARMINGDRAWER¢onsomemode/s)
The purpose of the warming drawer is
to hold hot cooked foods at ser\,ing
temperature. Always start with hot food;
cold food cannot be heated or cooked
in the warming drm_,er
{ Do not use the warming drawer to d U
newspapers. If overheated, they can catch
on fire.
Do not leave paper products, cooking
utensils or food in the warming drm_,er
when not in use.
Never leave jars or cans of fht drippings in
or near your warming drm_,er.
Always keep wooden and plastic utensils
and canned food a s_e distance m_,ayflom
your warming drm_,er.
{ Do not warm food in the warming drm_,er
for more than two hours.
Do not touch the heating element or the interior
surface of the warming drawer. These surfaces
may be hot enough to burn.
I:IEMEMBEFI:The inside surface of the
warming drm_,er may be hot when the
drm_,er is opened.
{ Use care when opening the drawer. Open
the drawer a crack and let hot air or steam
escape before remox,ing or replacing food.
Hot air or steam which escapes can cause
bums to hands, face and/or eyes.
Do not use aluminum foil to line the drawer
Foil is an excellent heat insulator and xdll
trap heat beneath it. This xdll upset the
performance of the drm_,er and it could
damage the interior finish.
SELF-CLEANINGOVEN
Be sure to xdpe off excess spillage before
self cleaning operation.
Before self cleaning the oven, remove
the shelves, any broiler pan, _-id and other
cookware.
iiiiiiiiiiiii!
If the self cleaning mode malfunctions,
turn the oven off and disconnect the power
supply. Have it ser\,iced by a qualified
technician.
iiiiiiiiiDo not use oven cleaners. No commercial
Do not clean the door gasket. The door
gasket is essential for a good seal. Care
should be taken not m rub, damage or
move the gasket.
iiiiiiiiiClean only parts listed in this Owner's
Manual.
oven cleaner or oven liner of any kind
should be used in or around any part of
the oven. Residue flom oven cleaners will
damage the inside of the oven when the
self clean cycle is used.
READANDFOLLOWTHISSAFETYINFORMATIONCAREFULLY.
SAVETHESEINSTRUCTIONS
7
,0
m
m
-- ..
m
w
m _
m
m
m
w
Usingthegas surface burners.
Throughout this manual, features and appearance may vary from your model
Before Lighting a Gas Burner
Drip pans are supplied widl your range;
they should be used at all dines.
Make sure all burners are in place.
Make sure all grams on the range are
properly placed before using any burne_.
After Lighting a Gas Burner
Do not opelv_te file burner for an
exmnded peliod of time wifllout
cookwme on the glv_te. Tile finish on
tile g_am m W chip widlout cookwme
m absorb tile heat.
Be sure die burners and grams are cool
before you place your hand, a pot holdeL
cleaning cloths or odler mamrials
OI1 thelI1.
Push the control knob in and turn it
to the LifE oosition.
How to Light a Gas Surface Burner
Make sure all tile surface bmnei_ are
placed in their respective positions.
Push tile conUol knob in and mrn it
m tile tirE position.
You will hear a little clicking noise--
the sound of the electric spark ignidng
tile burnei.
Turn tile knob to adjust tile flame size.
If tile knob stays at flEE, it will continue
to click.
When one burner is turned to tirE,
all file buineis spark. Do not atmmpt to
disassemble or clean around any burner
while another burner is on. :MI elecuic
shock mW result, which could cause you
m knock over hot cookwme.
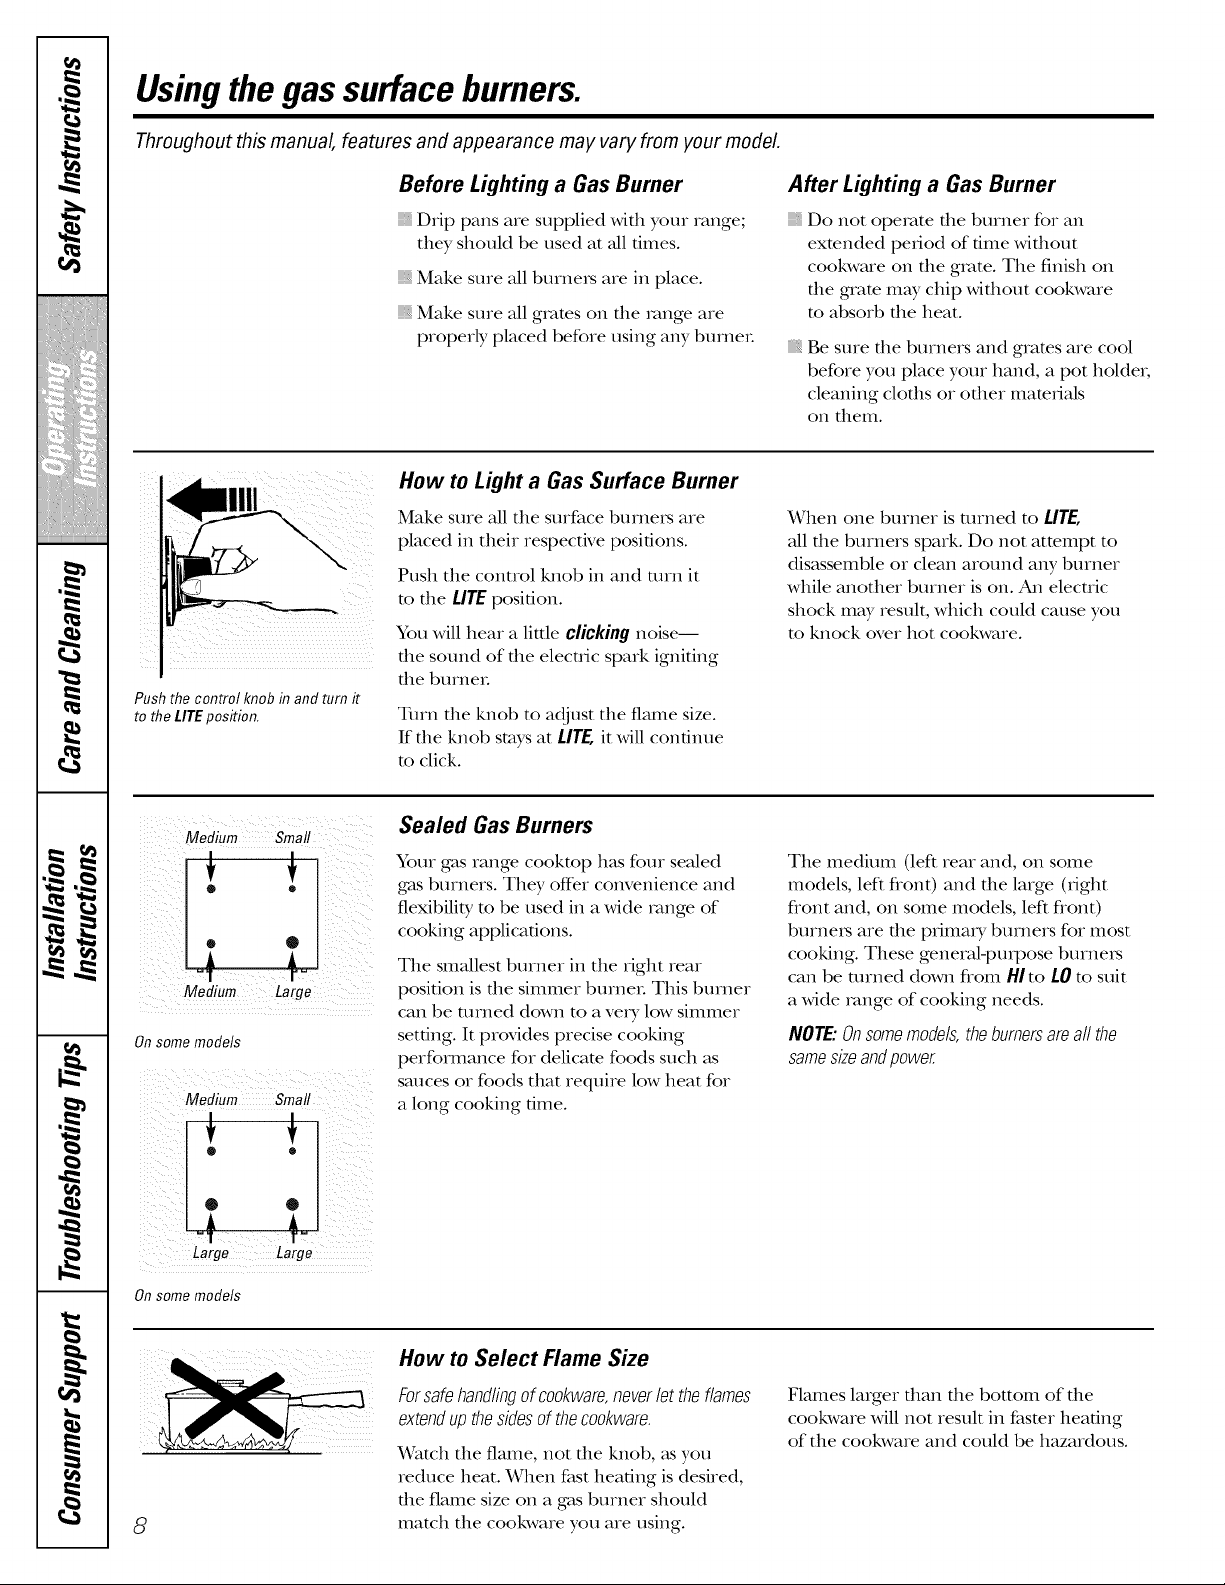
Medium Small
Onsome models
Medium Small
®
o
Large Large
On some models
Sealed Gas Burners
Your gas range cooktop has four sealed
gas burners. Tile), offer convenience and
flexibility to be used in a wide _vmge of
cooking applications.
Tile smallest burner in tile right rear
posidon is tile simmer burnei. This burner
can be turned down to a veiy low simmer
setting. It provides precise cooking
performance for delicate foods such as
sauces or foods that require low heat for
a long cooking time.
Tile medium (left rear and, on some
models, left flont) and file large (right
flont and, on some models, left flont)
burnei_ are tile plimai y burners for most
cooking. These general-pux]oose burnexs
can be turned down flom HIto LOm suit
a wide xvmge of cooking needs.
NOTE:Onsomemodels,theburnersareall the
samesizeandpower.
8
How to Select Flame Size
Forsafehandlingof cookware,neverlet theflames
extendupthesidesof thecookware.
Watch tile flame, not file knob, _tsyou
reduce heat. When fast heating is desired,
the flame size on a gas burner should
match tile cookware you are using.
Flames laiger dlan tile bottom of tile
cookware will not result in faster heating
of tile cookware and could be hazardous.
ge.com
Top-of-Range Cookware
Aluminum: Medium-weight cookware is
recommended because it heats quickly
and evenly. Most foods brown evenly ill an
ahlnlintlnl skillet. Use saucepans with fight-
fitting lids when cooking with minimunl
amounts of wateI.
Cast-Iron:If heated slowly, most skillets will
give satisfactory results.
Enamelware:Under some conditions,
file enamel of some cookware may melt.
Follow cookware manufacturer's
recommendations for cooking mefllods.
Glass:There are two types of glass
cookware--fllose for oven use only and
ttlose for tel>of-range cooking (saucepans,
coffbe and teapots). Glass conducts heat
x'e_y slowly:
HeatproofGlassCeramic:Can be used for
eifller surface or oven cooking. It conducts
heat very slowly and cools veIy dowly. Check
cookware manufacturer's directions m be
sure it can be used oil gas ranges.
Stainless Steel: This metal Mone has poor
heating properties and is usually combined
with coppe_; aluminunl or other metals for
improved heat disuibufion. Combination
metal skillets usually work satisfactorily if
dley are used with medimn heat as tile
IIlanuf}lct tlIeI iecolillilen ds.
Stove Top Grills (onmodels with sealed burners)
Do not use stove top grills oil your seMed
g_tsburneis. If you use die stove mp grill
on tile sealed gas burner; it will cause
incomplem combustion and can result
ill exposure m carbon monoxide levels
above allowable current standards.
Thiscanbehazardoustoyourhealth.
Use a flat-bottomed wok,
Wok This Way (on models with sealedburners)
Werecommendthatyouusea 14" orsmaller
fiat-bottomedwok.Makesurethewokbottom
sits flaton thegrate.Theyareavailableat your
localretailstore.
Only a flatd)ottomed wok should be used.
Do not use a fiat-bottomed wok on a
support ring. Placing tile ring over tile
burner or gram in W cause tile burner
m work improperly, resulting ill carbon
monoxide levels above allowable standards.
This could be dangerous to your heMth.
In Case of Power Failure
In case of a power failure, you can light
tile gas surface burnels on your range wkh
a match. Hold a lit match m tile burnei;
dlen push in and turn tile conUol lmob
m the tirE position. Use exueme caution
when lighting burners tllis way.
Surface burners ill use when an electrical
power failure occuls will continue to
operate normalb,.
9
w
r_
tmZ=ll,
m
w
m w
m
g
!
m
=
m
!
!
Usingthe ovencontrols.
Throughout this manual, features and appearance may vary from your model
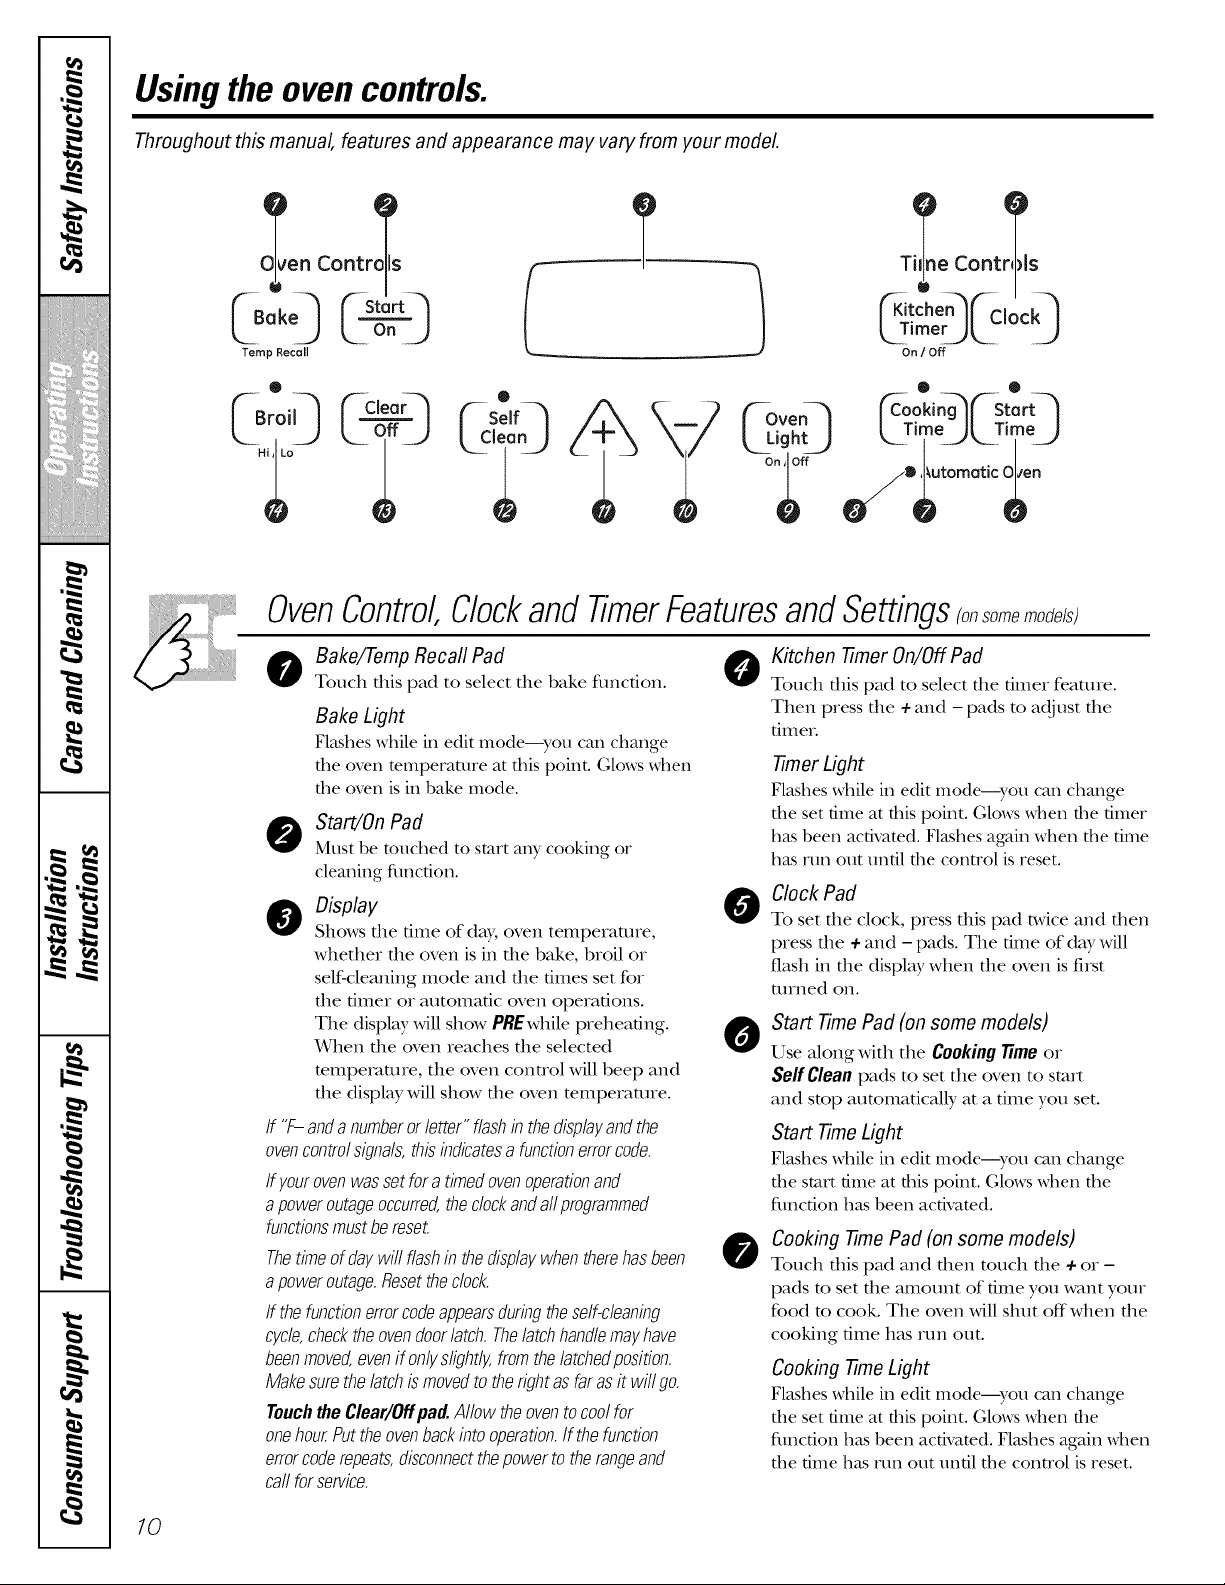
en Contro_ls
73 L°nJ
Temp Recall
0
()o,3 r_ ,oor-
T
Coot:s
('Kitcheq _'-C,ockq
kSrim k2 .....2)
On / Off
Kovo 0o:,n q s&q
L Tim L TimU
_--Lig h_--_ / O_uto matic_e nn_
OvenControl Clockand TimerFeaturesand Settings somemode/s;
o ake/Temp Recall Pad 0
Touch this pad to select the bake fimcfion.
Bake Light
Flashes while in edit mode---yell can change
tile oven temperature at tt/is point. Glows when
tlle oven is in bake mode.
O Start/OnPad
Must be touched to start any cooking or
cleaning flmction.
o isplay
Shows tile time of day, oven tempeiature,
whethei tile oven is in tile bake, broil o,
self-cleaning mode and the times set for
tile timer or automatic oven openlfions.
Tile display will show PREwhile preheating.
When tile oven reaches the selected
mmpeivlmre, tile oven control will beep and
tile display will show tile oven mmpe_am_e.
If "F- anda numberor letter"flashin thedisplayandthe
ovencontrolsignals,this indicatesa functionerrorcode.
/f yourovenwasset fora timedovenoperationand
apoweroutageoccurred,thedockanda//programmed
functionsmustbe reset.
Thetimeof daywill flashinthedisplaywhentherehasbeen
apoweroutage.Resetthecbck.
/f thefunctionerrorcodeappearsduringtheself-cleaning
c/c/e,checktheovendoorlatch.Thelatchhandlemayhave
beenmoved,evenif on//slightly,fromthe/atchedposition.
Makesurethe latchis movedto therightasfar asit wi//go.
TouchtheClear/Offpad.Allow theovento coolfor
onehour.Puttheovenbackintooperation,ff thefunction
errorcoderepeats,disconnectthepowerto therangeand
call forservice.
0
0
@
Kitchen -timer On/Off Pad
Touch this pad to select tile fimeI feature.
Then press tile +and -pads to adjust tile
tilIleI.
-timer Light
Flashes Mille in edit modeiyo/l can change
tile set time at tllis point. Glows when the timer
has been activated. Flashes again Mien tile time
has run out until the control is reset.
Clock Pad
To set die clock, press dis pad t_,viceand then
wess the ÷ and - pads. The time of day will
flash ill tile display when tile oven is first
turned on.
Start Time Pad (on some models)
Use along with tile Cookingtime or
Self Cleanpads to set tile oven to start
and stop automatically at a dine you set.
Start Time Light
Flashes Mille in edit Hlode---yotl can change
tile start time at this point. Glows when tile
fQnction has been activated.
Cooking -time Pad (on some models)
Touch this pad and then touch the + or -
pads to set tile amount of time you want your
food to cook. Tile oven will shut off when tile
cooking time has mn out.
Cooking -timeLight
Flashes \_hile in edit mode--you can change
tile set time at this point. Glows when the
fimcfion has been activated. Flashes again when
the time has rtm out until the control is reset.
10

ge.com
OvenControl Clockand TimerFeaturesand Settings somemo e/s
0
0
0
Automatic Oven Light (on some models)
This lights anytime the oven has been
programmed using tile CookingTimeor
Start Timefimctions.
Oven Light On/Off Pad
Touch this pad to turn tile oven light on or off:
- Pad
Short taps to tiffs pad will decrease file time
or temperature by small amounts. Touch
and hold file pad to decrease the time or
temperature by linger amounts.
+ Pad
Short taps to tiffs pad will increase file time
or mmperature by small amounts. Touch
and hold the pad m increase the time or
mmpemture by linger amounts.
Self Clean Pad
Touch riffs pad to select file self-cleaning
flmcfion. See the Usingthe self-cleaningoven
section.
Clean Light
Flashes while in edit modei-yotl can change
the length of time for the self-deal wcle at this
point. Glows _d]en the oven is in the self-deal
cycle. After file self-clem] wcle, the light will
mm off: Unlatch the doon
O lear/OffPad
Touch this pad to cancel ALL oven operations
except tile clock and fimeL
Broil Hi/Lo Pad
Touch this pad to select tile broil fimcfion.
Broil Light
Flashes while in edit modei-yotl can s_dtch
from Hi to LoBroilat tiffs point. (;loxxs when the
oven isin broil mode.
Indicator Lights (on some pads)
EDITmode lasts several seconds after the last
pad press. Start Timemid Cooking Timewill be
the only pads lit if either of these options is
selected. (Exmnple: Start Timeis selected with
Bake--the Start Timepad will remain lit until
the clock reaches the programmed time, at
_dfich point it _dll turn off mad the Bake/Temp
Recall pad light ,rill light up).
OvenTemperatureKnob ome
OVEN
Appearance may var_
Turn tile OVENTEMPknob to tile setting you want.
Tile oven cycling light comes on during cooking.
11
w
-g.
r_
m
m _
w _
m w
m _
g
!
m
m
!
!
Usingthe oven.
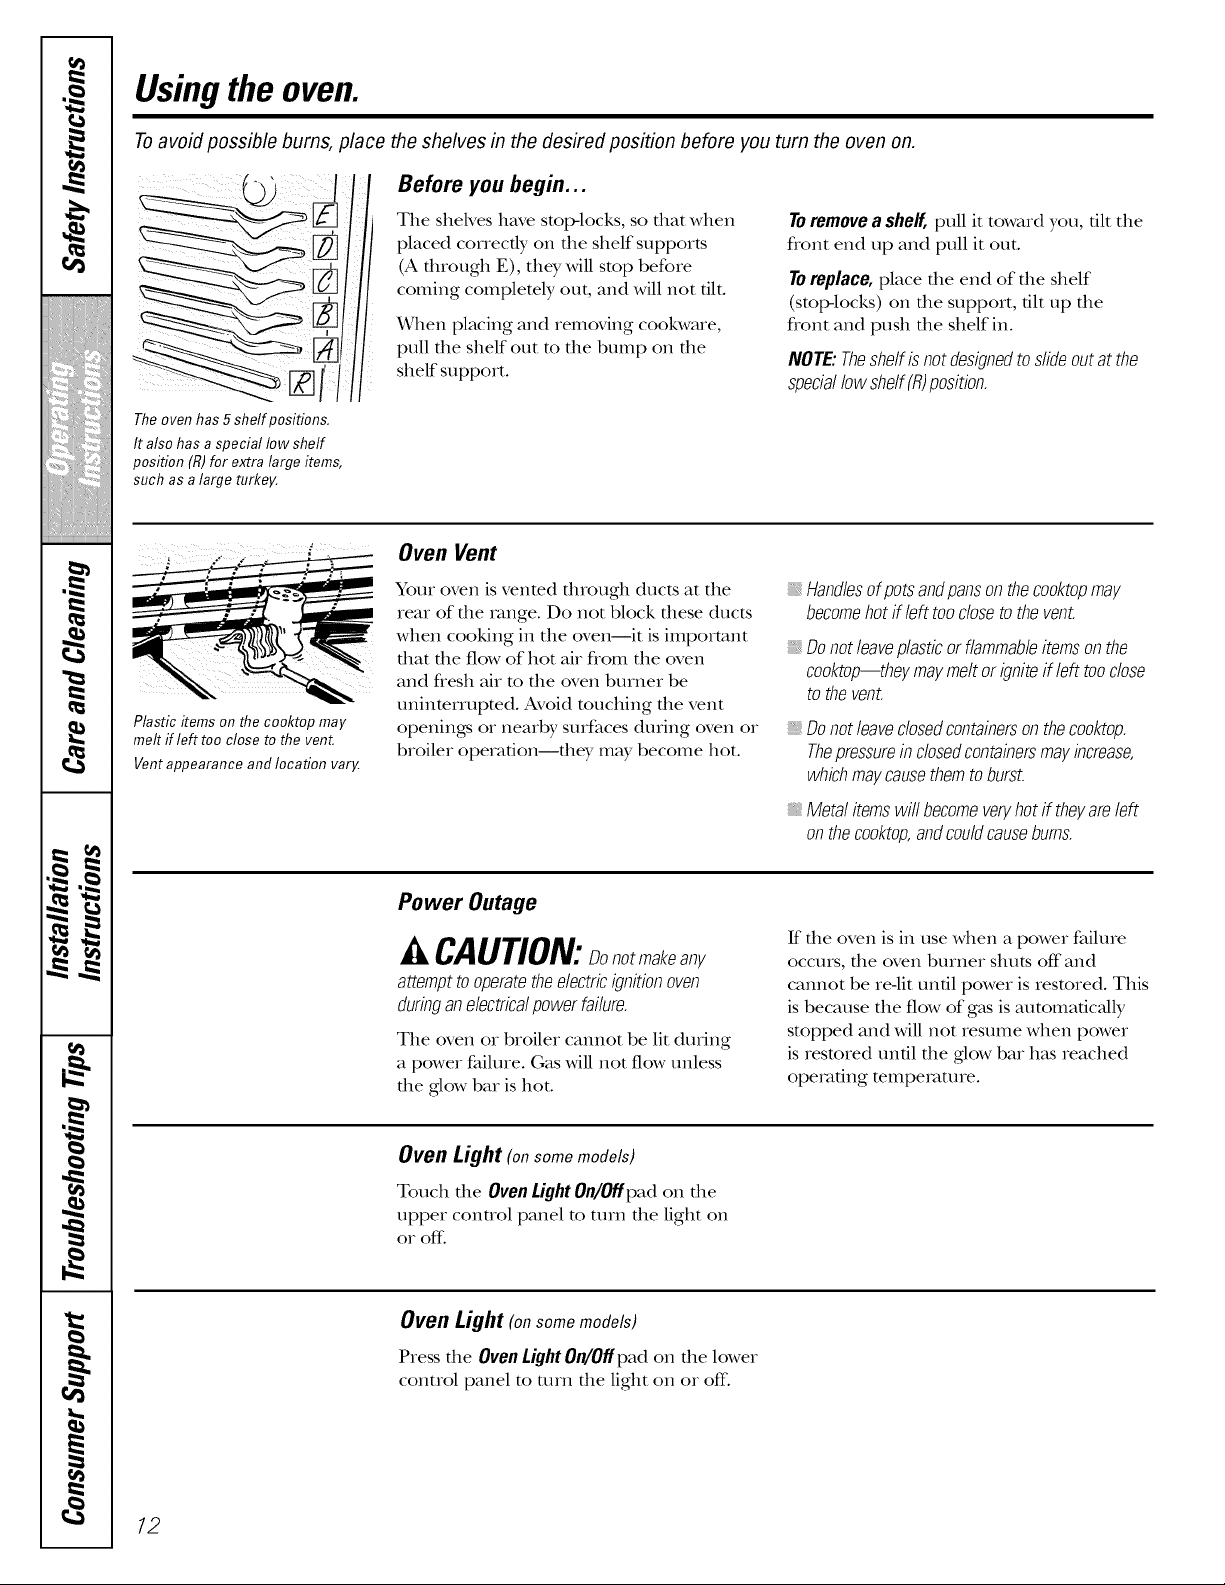
Toavoid possible bums, place the shelves in the desired position before you turn the oven on.
Before you begin...
The sheNes have stop-locks, so fllat when
placed correctly on file shelf supports
(A fllrougb E), they Mll stop before
coming completely out, and Mll not flit.
When placing and removing cookware,
pull the shelf out to the bump on the
shelf support.
To remove a shelf, pull it toward you, fllt the
flont end up and pull it out.
To replace, place the end of the shelf
(stop-locks) on the support, flit up the
flont and push the shelf in.
NOTE:Theshelfis notdesignedtoslideoutat the
speciallowshelf(R)position.
The oven has 5 shelf positions.
It also has a special low shelf
position (R)for extra large items,
such as a large turkey.
Plastic items on the cooktop may
melt if left too close to the vent.
Vent appearance and location vary.
Oven Vent
Your oven is vented fllrougb ducts at the
rear of file range. Do not block fllese ducts
when cooking in the oven--it is important
that the flow of hot air from the oven
aim flesh air m the oven burner be
uninmrrupmd. Avoid touching the vent
openings or nearby surfaces during oven or
broiler operaflon--tbey may become hot.
_,Handlesofpotsandpansontheco&topmay
becomehotif left toocloseto thevent.
Donot leaveplasticorflammableitemsonthe
cooktop_theymaymeltor igniteif left tooclose
to thevent.
_,Donot leaveclosedcontainersonthecooktop.
Thepressureinclosedcontainersmayincrease,
whichmaycausethemto burst.
Metal itemswill becomeveryhotif theyareleft
onthecooktop,andcouldcausebums.
Power Outage
A CAUTION:Donotmakeany
attempt to operate the electric ignition oven
during an electricalpower failure.
The oven or broiler cannot be lit during
a power failure. Gas will not flow unless
the glow bar is hot.
ff file oven is in use when a power failure
occurs, file oven burner struts off and
cannot be reqit unfll power is restored. This
is because the flow of gas is automaficMly
stopped and Mll not resume when power
is restored until file ,glow bar has reached
opemflng temperature.
Oven Light (onsomemodels)
Touch the Oven Light On/Offpad on the
upper control panel to ttlin the light on
0I" off.
Oven Light (on some models)
Press the Oven Light On/Off pad on the lower
control panel to turn the light on or off:
12
ge.com
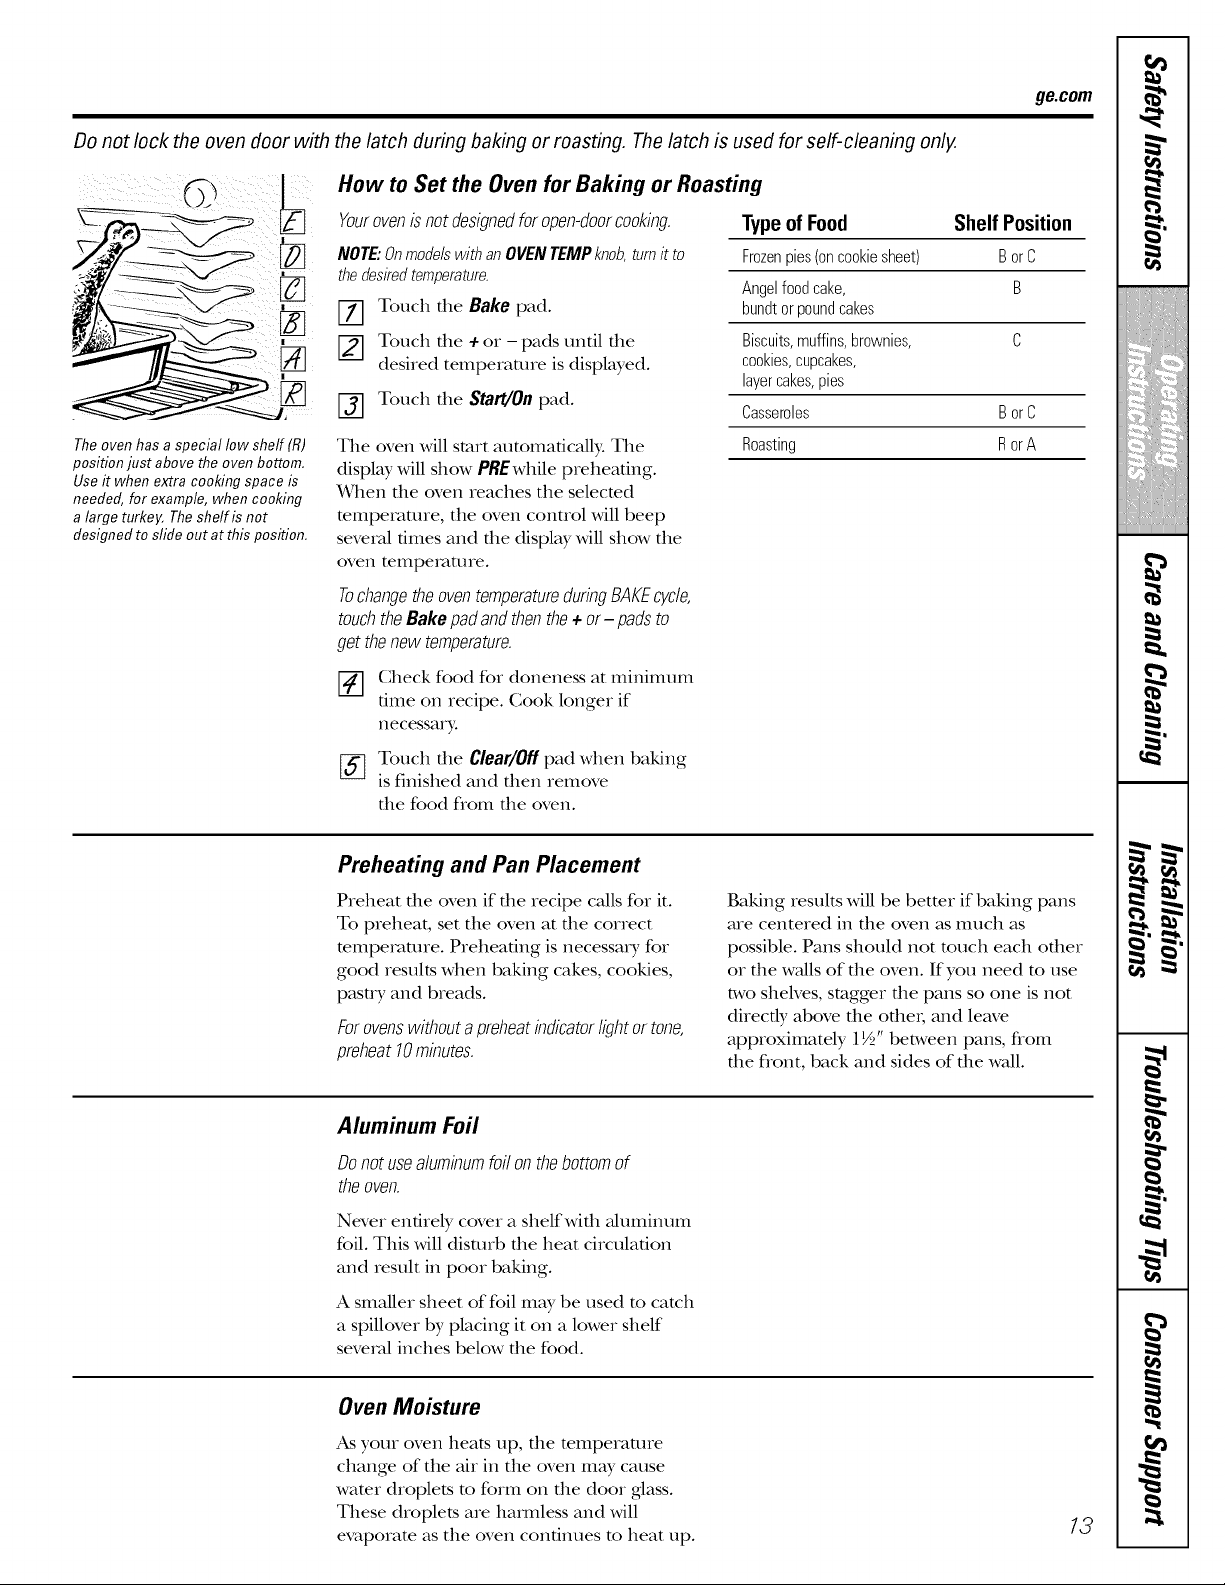
Do not lock the oven door with
The oven has a special low sheff (R)
position just above the oven bottom.
Use it when extra cooking space is
needed, for example, when cooking
a large turkey. The shelf is not
designed to slide out at this position.
the latch during baking or roasting. The latch is used for self-cleaning only.
How to Set the Oven for Baking or Roasting
Yourovenis not designed for open-doorcooking.
NOTE."Onmodelswithan OVENTEMPknob,turnit to
thedesiredtemperature.
Touch the Bake pad.
Touch the + or - pads until the
desired temperature is displayed.
f_] Touch the Start/On pad.
The oven will start automatically. The
display will show PREwhile preheating.
_rben tile oven reaches tile selected
mmperamre, tile oven control will beep
several times and tile display will show tile
oven telIlpeI_lt/lIe.
TochangetheoventemperatureduringBAKEcycle,
touchtheBakepadandthenthe+ or- padsto
get thenewtemperature.
[]
%
Check food for doneness at minimum
ume on recipe. Cook longer if
necessary;
Touch tile Clear/Offpad when baking
is finished and then remove
tile food flom tile oven.
Typeof Food Shelf Position
Frozenpies(oncookiesheet) BorC
Angelfoodcake, B
bundtor poundcakes
Biscuits,muffins,brownies, C
cookies,cupcakes,
layercakes,pies
Casseroles BorC
Roasting R orA
Preheating and Pan Placement
Preheat file oven if file recipe calls for it.
To preheat, set tile oven at tile correct
mmpemmre. Preheating is necessa_ y for
good results when baking cakes, cookies,
pasu y and breads.
Forovenswithoutapreheatindicatorlightor tone,
preheat10minutes.
Baking results will be bettor if baking pans
are centered in tile oven as much as
possible. Pans should not much each other
or tile walls of tile oven. If you need m use
two shelves, stagger tile pans so one is not
directly above tile otbeI; and lem'e
approximately 1½" between pans, from
the flont, back and sides of the wall.
Aluminum Foil
Donotusealuminumfoil onthebottomof
theoven.
Never entirely cover a shelf with aluminum
foil. This will disturb tile heat circulation
and result in poor baking.
A smaller sheet of foil may be used to catch
a spillover by placing it on a lower shelf
several inches below tile food.
Oven Moisture
As your oven heats up, file mmperature
change of tile air in tile oven may cause
wamr droplets m form on tile door glass.
These droplets are hamfless and will
evaporam as tile oven continues m heat up.
13
w
-g.
q
m
m
w
m w
m
g
!
m
m
",1
!
!
,0
m
m
m
w
m
m
m
m
w
Usingthe oven.
Do not lock the oven door with the latch during broiling. The latch is used for self-cleaning only.
Close the door Always broil with
the door closed.
How to Set the Oven for Broiling
NOTE."Onmodels with an OVEN TEMP knob,turn it to
BROIL
[_] Place the meat or fish on a broiler grid
in a broiler pan.
[-_ Follow suggested shelf positions in the
Broiling Guide.
The oven door must be closed during
broiling.
[_] Touch the Broil Hi/Lo pad once for
Hi Broil.
Touch the Start/On pad.
X_rhen broiling is finished, touch the
Clear/Off pad.
Serve the food immediatel); and leave the
pan outside the oven to cool during the
meal for easiest cleaning.
Use Lo Broil to cook foods such as poultry
or thick cuts of meat thoroughly without
over-browning them.
To change to Lo Broil, touch the
Broil Hi/Lo pad again.
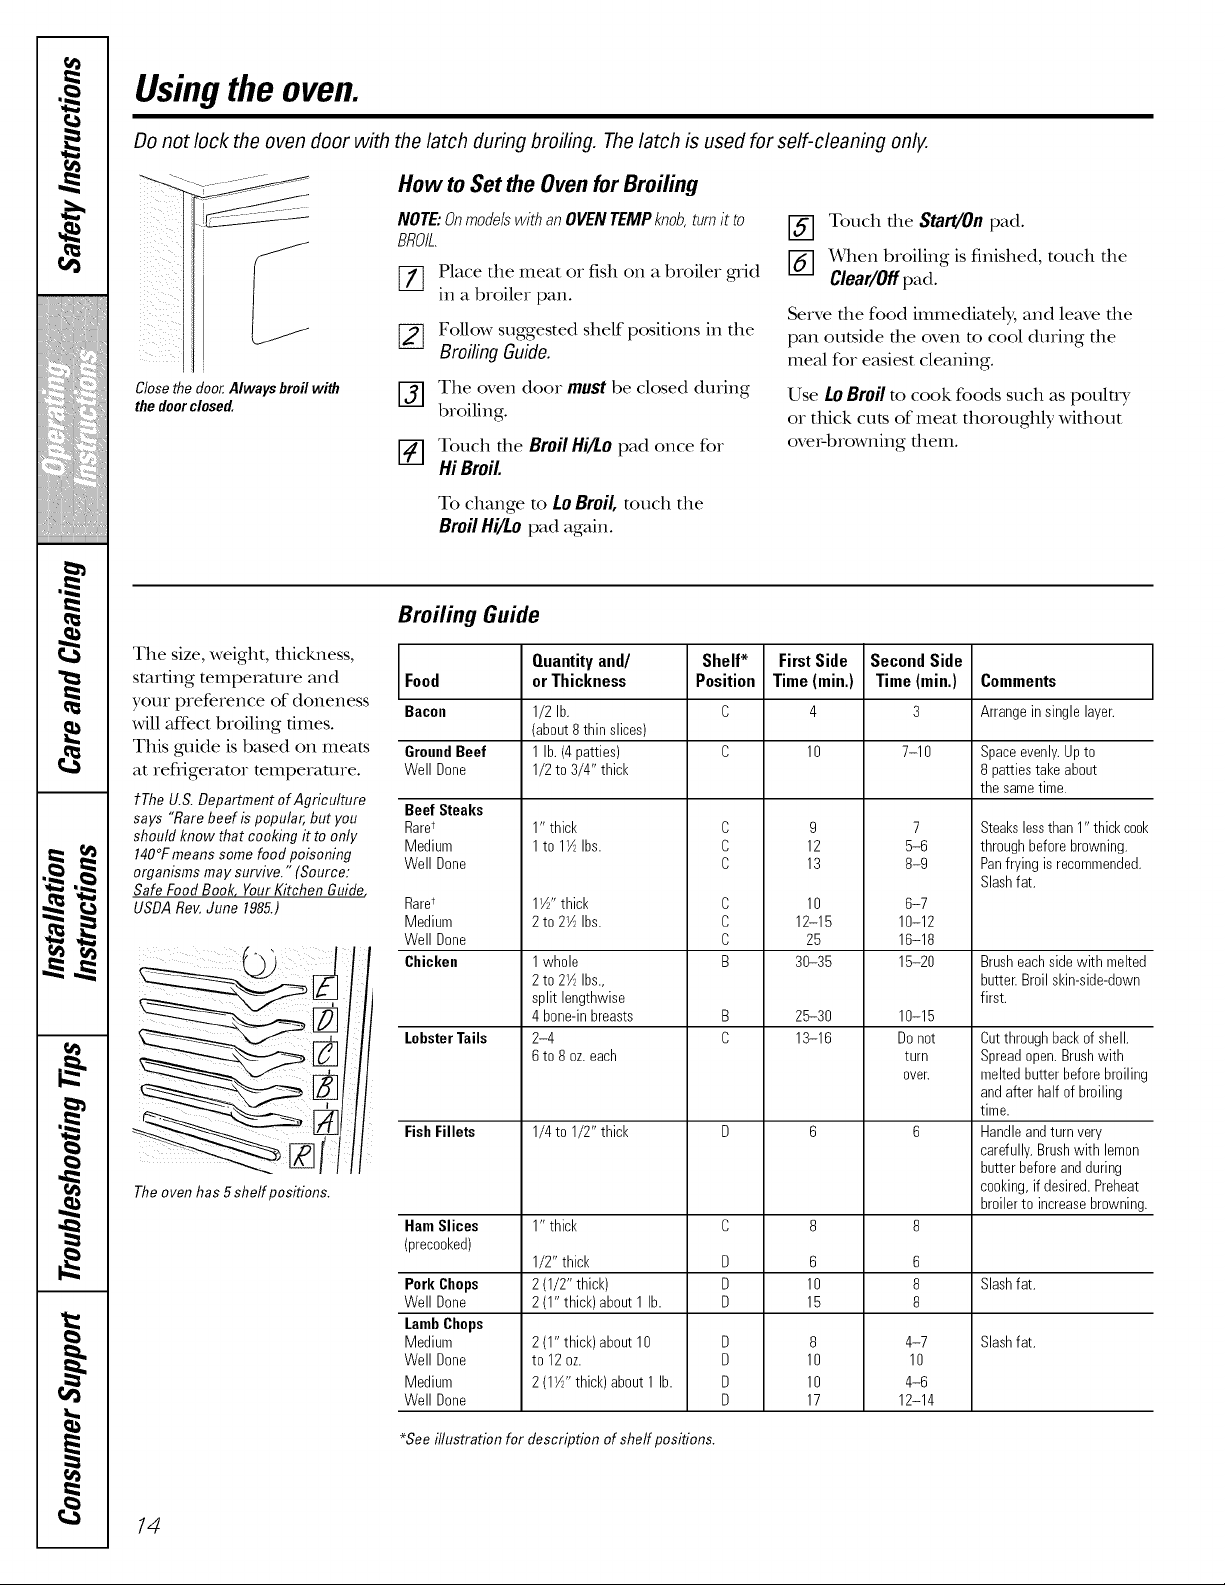
Broiling Guide
The size, weight, thickness,
starting temperature and Food
yotlr preference of aloneness Bacon
will aftbct broiling times.
This guide is based on meats
at refrigerator mmpemmre.
t The U.S. Department of Agriculture Beef Steaks
says "Rare beef is popular, but you Raret
should know that cooking it to only Medium
140°Fmeans some food poisoning Well Done
organisms may survive." (Source:
Safe Food Book Your Kitchen Guifle_
USDA Rev.June 1985.)
The oven has 5 shelf positions.
GroundBeef
Well Done
Rare*
Medium
Well Done
Chicken
LobsterTails
FishFillets
Ham Slices
(precooked)
Pork Chops
Well Done
LambChops
Medium
Well Done
Medium
Well Done
Quantityand/
or Thickness
1/2 lb.
(about 8 thin slices)
1 lb. (4 patties)
1/2 to 3/4" thick
1" thick
1 to 17_Ibs.
1W' thick
2 to 27_Ibs.
1 whole
2 to 27_Ibs.,
split lengthwise
4 bone-inbreasts
2-4
6 to 8 oz.each
1/4 to 1/2" thick
1" thick
1/2" thick
2 (1/2" thick)
2 (1" thick) about 1 lb.
2 (1" thick)about 10
to 12oz.
2 (1_/_" thick) about 1 lb.
Shelf*
Position
C
C
C
C
C
C
B
B
C
D
D
D
D
D
D
D
FirstSide
Time (rain.)
10
9
12
13
10
12-15
25
30-35
25-30
13-16
6
10
15
8
10
10
17
SecondSide
Time (min.)
7-10
7
5-6
8-9
6-7
10-12
16-18
15-20
10-15
Do not
turn
oveE
6
8
8
4-7
10
4-6
12-14
Comments
Arrangein single layer.
Spaceevenly.Up to
8 patties takeabout
the sametime.
Steakslessthan 1" thickcook
through beforebrowning.
Panfrying is recommended.
Slashfat.
Brusheach side with melted
butter.Broil skin-side-down
first.
Cutthrough backof shell.
Spreadopen.Brushwith
melted butter before broiling
andafter half of broiling
time.
Handleandturn very
carefully.Brushwith lemon
butter beforeand during
cooking,if desired. Preheat
broilerto increasebrowning.
Slashfat.
Slashfat.
*See illustration for description of shelf positions.
14
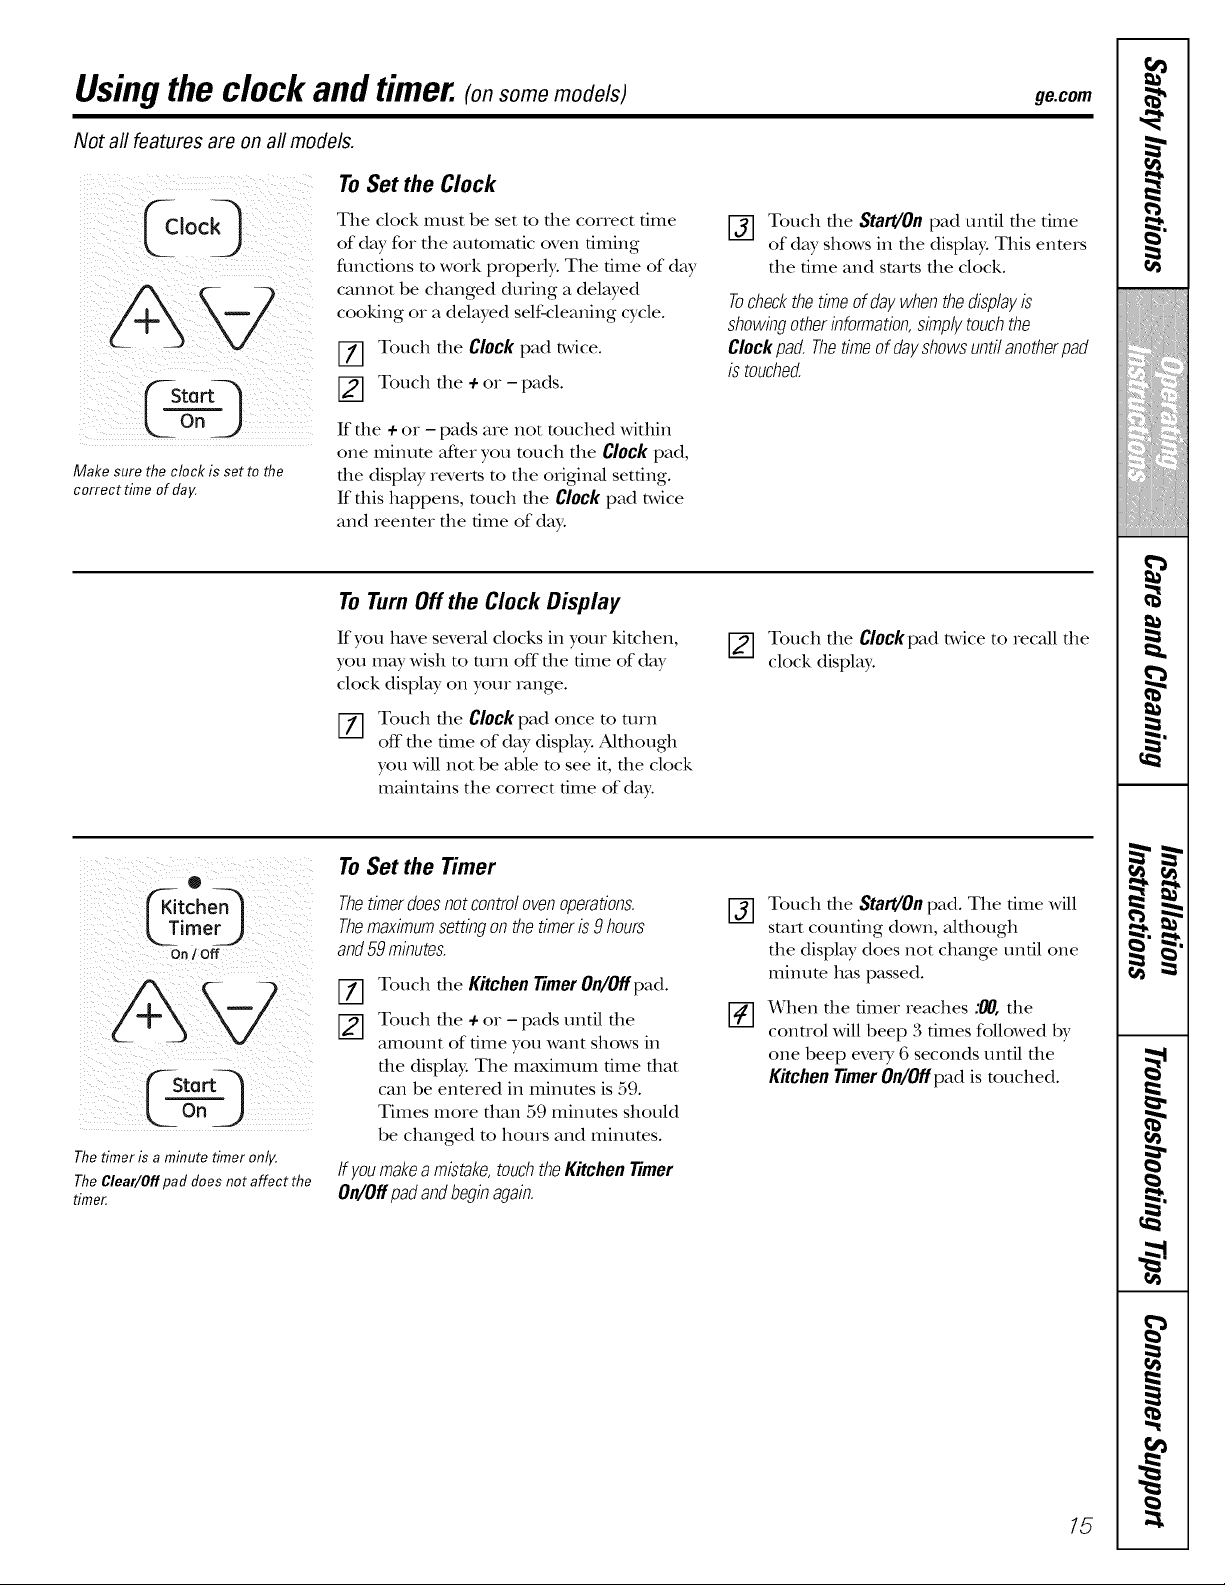
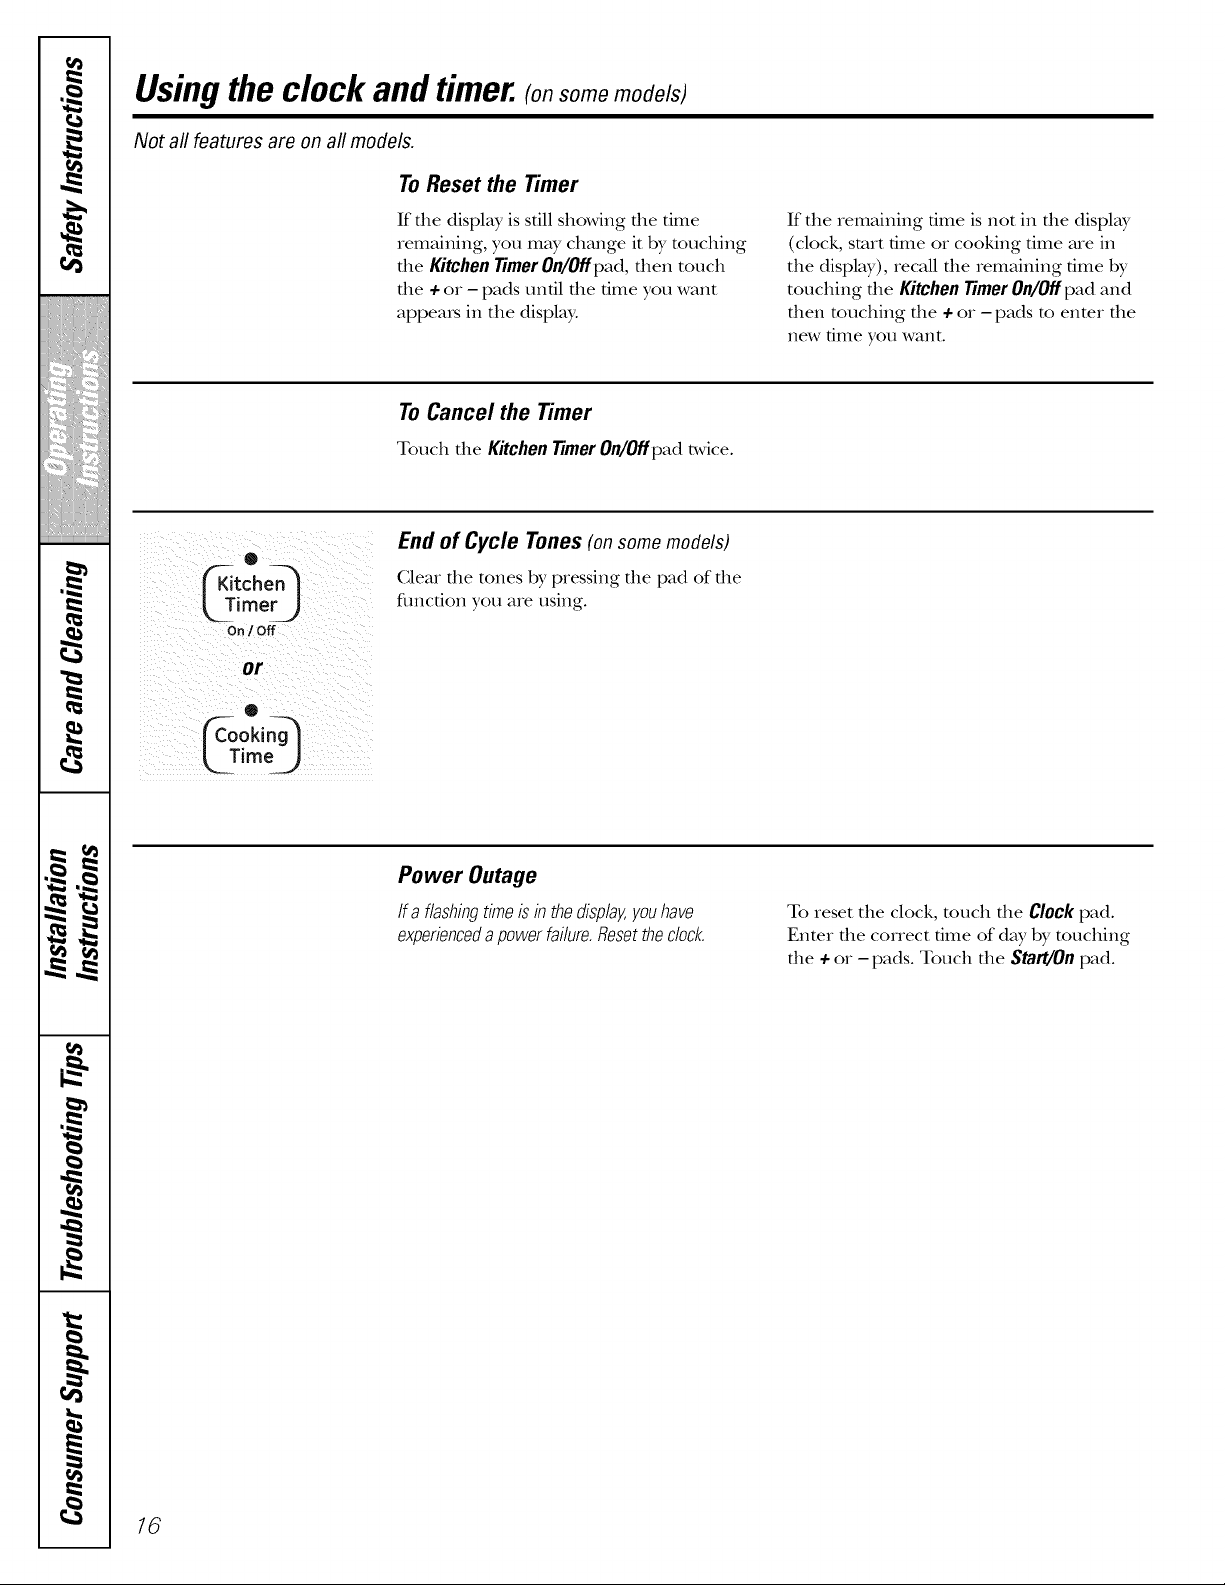
Usingthe clock and timer.(o,son on odols; ge.com
Not all features are on all models.
Make sure the clock is set to the
correct time of day.
To Set the Clock
The clock must be set to tile correct time
of day for the automatic oven timing
flmctions to work properly. The time of day
cannot be changed during a delayed
cooking or a delayed self-cleaning cycle.
[Z] Touch the Clock pad twice.
[] Touch the ÷ or - pads.
If die + or - pads are not touched within
one minum after you much the Clockpad,
the display reverts m the original set6ng.
If this happens, much the Clockpad t_,vice
and reenmr the time of day.
[_] Touch the Start/Onpad until the time
of day shows in tile display. This enters
the time and starts the clock.
Tocheckthetime ofdaywhenthedisplayis
showingotherinformation,simplytouchthe
Clockpad. Thetimeof dayshowsuntilanotherpad
is touched.
To Turn Off the Clock Display
If you have several clocks in your kitchen,
you may wish to mrn off tile time of day
clock display on your range.
%
Touch tlle Clockpad once to turn
off tile time of day display: Akhough
you will not be able to see it, the clock
maintains the correct time of day.
[] Touch tile Clockpad twice to recall tile
clock display:
®
imer)
On / Off
The timer is a minute timer only.
The Clear/Off pad does not affect the
timer.
To Set the Timer
Thetimerdoesnotcontrolovenoperations.
Themaximumsettingonthetimeris 9 hours
and59minutes.
Ffl
Touch tile Kitchen Timer On/Off pad.
Touch the ÷ or - pads until the
amount of time you want shows in
the display. The maximum time that
can be enmred in minums is 59.
Times more than 59 minutes should
be changed m hours and minums.
If youmakea mistake,touchtheKitchenTimer
On/Offpadandbeginagain.
@
Touch die Start/Onpad. The dine will
start coun6ng down, aldlough
the displ W does not change un61 one
minum has passed.
When tile timer reaches :00, tlle
control will beep 3 times followed by
one beep eveD, 6 seconds until tile
Kitchen Timer 0n/0fipad is touched.
15
Using the clock and timer.(o,sonden od s)
Not all features are on all models.
To Reset the Timer
If file display is sdll showing die dine
remaining, you may change it by touching
die KitchenTimerOn/Offpad, alien touch
die + or - pads until die time you want
appems in the displ W.
If the remaining dine is not in die display
(clock, start time or cooking time are in
die display), recall die remaining time by
touching die Kitchen Timer On/Off pad and
then touching die + or - pads to enter die
new time you want.
To Cancel the Timer
Touch the KitchenTimerOn/Offpad t_,vice.
o
On/ Off
or
®
ime)
End of Cycle Tones(onsomemodels)
Clear die tones by pressing die pad of die
fimcdon you are using.
Power Outage
If a flashingtimeis in thedisplay,youhave
experienceda powerfailure.Resetthedock.
To reset the clock, much die Clockpad.
Enmr die correct time of day by touching
die + or - pads. Touch die Start/On pad.
16
Usingthe timed baking and masting features.(onson on odo/s) ge.oom
Do not lock the oven door with the latch during timed cooking. The latch is used for self-cleaning only.
NOTE: Foods that spoil easily--such as milk, eggs, fish, stuffings, poultry and pork--should not be allowed to sit for
more than 1hour before or after cooking. Room temperature promotes the growth of harmful bacteria. Be sure that
the oven light is off because heat from the bulb will speed harmful bacteria growth.
@
! ?i ok 5 /;
5¸¸¸¸¸¸ :
/ :L-6g-J ¸¸¸ ¸¸¸¸/
i i ILII _ ii
i i
off_)
How to Set an Immediate Start and Automatic Stop
Theovenwill turnon immediatelyandcookfora
selectedlengthof time.At theendof thecooking
time,theovenwill turnoffautomatically
V-_ Touch tile Bake pad.
[] Touch tile + or - pads to set tile
oven temperature.
[] Touch tile Cooking Time pad.
NOTE:Ifyourreciperequirespreheating,youmay
needtoaddadditionaltimeto thelengthof the
cookingtime.
_-] Touch the + or - pads to set tile
baking time.
The cooking dine dlat you entered will be
displayed. (If you select Cooking Time first
and then adjust the Bake Temperature, the
oven mmpemmre will be displayed insmad).
[_] Touch tile Start/On pad.
The display shows either die oven
mmperamre dmt you set or die cooking
time countdown. (The displ W starts with
PREif showing the oven temperature.)
The oven will continue to cook for tile
programmed amount of time, dlen turn
off automatically.
[_] Touch the Clear/Off pad to clear
the display if necessary.
Removethefoodfromtheoven.Remember,even
thoughtheovenshutsoff automatically,foods
continuecookingaftercontrolsareoff.
®
Temp Recetl
O
L Jim%)
Fstort_l
UTirne )
L_ o"J
How to Set a Delayed Start and Automatic Stop
Theovenwill turnon at thetime ofdayyouset,
cookfor aspecificlengthof timeandthenturnoff
automatically
Make sure tile clock shows tile correct
time of day:
Z] Touch tile Bake pad.
Touch tlle 4-or - pads to set tile
oven temperature.
NOTE:If you would like m check die times
you have set, much file Start Timepad m
check the start time you have set or touch
the Cooking Timepad m check the length
of cooking time you have set.
When tile oven turns on at the time of day
you have set, the display will show PRE until
it reaches the selected temperature, then it
will display the oven temperature.
Touch tile Cooking Time pad.
Touch the 4-or - pads to set the
desired length of cooking time.
Touch tile Start Time pad.
_-] Touch tile 4-or - pads to set the time
of day you want tile oven to turn on
and start cooking.
_-] Touch tile Start/On pad.
At dm end of cooking time, tile oven
will turn off and tile end of cycle tone
will sound.
[_] Touch tile Clear/Off pad to clear
the display if necessary.
Removethefoodfromtheoven.Remember,even
thoughtheovenshutsoff automatically,foods
continuecookingaftercontrolsareoff,
NOTE:Anattentiontonewill soundif youare using
timedbakinganddo not touchtheStart/Onpad.
17
,0
m
m
m
w
m _
m
m
m
w
Special features of youroven control (o,somemodels;
Yournew touch pad control has additional features that you may choose to use. The following are the features and
how you may activate them.
The special feature modes can only be activated while the display is showing the time of day. They remain in the
control's memory until the steps are repeated.
When the display shows your choice, touch the Start/Onpad. The special features will remain in memory after
a power failure.
NOTE: The Sabbath feature and the Thermostat Adjustment feature are also Special Features, but they are addressed
separately in the following sections.
(oo'Q
Temp Recall Hi / Lo
ffStartq
L--¢a-j
12 Hour Shut-Off
Withthisfeature,shouldyouforgetandleavethe
ovenon,thecontrolwill automaticallyturnoff the
ovenafter 12hoursduringbakingfunctionsorafter
3 hoursduringa broil function.
If you wish to mrn OFFthis feature, follow
the steps below.
Touch the Bake and BroilHi/Lo pads
at the same time for 3 seconds until
the display shows SF.
[2-1
%
Touch the Clock pad. The display will
show ON (112hour shut-off). Touch the
Clock pad repeatedly until the display
shows OFF(no shut-off).
Touch the Start/Oil pad to activate the
no shut-off and leave the control set in
this special features mode.
18
Usingthe SabbathFeature.(onsomen ode s)
(Designed for use on the Jewish Sabbath and Hofidays) ge.com
The Sabbath feature can be used for baking/roasting only. It cannot be used for broiling, self-cleaning or
Delay Start cooking.
NOTE: The oven light comes on automatically (on some models) when the door is opened and goes off when the
door is closed. The bulb may be removed. See the Oven Light Replacement section. Onmodels with a light switch
on the control panel, the oven light may be turned on and left on.
Temp Recall
FStortq
o.
When the display shows D the
oven is set in Sabbath. When the
display shows D C the oven is
baking/roasting.
How to Set for Regular Baking/Roasting
NOTE."To understand how the oven control works,
practice using regular baking (non-Sabbath)before
entering Sabbath mode.
Make sure the clock shows the correct time of day
and the oven is off
[] Touch and hold both the Bake and
Broil Hi/Lo pads, at the same time,
tmtl tile display sho_vs SF.
_--] Tap tile Clock pad untl SAb appears
in the display.
[_] ouch the Start/On pad and D will
appear in the display.
[_ ouch tlle Bake pad. No signal will
be given.
[_] he preset startng tempelature will
automaticall) be set to 350.° Tap tlle+
or - pads to increase or decrease tile
temperature in 25 ° increments. The
tempeFature can be set between 170 °
and 5502 No signal or mmpemture
will be given.
[_] Touch the Start/On pad.
[_] After a random dela} period of
approximatel} 30 seconds to 1 minute,
D C will appear in tile display indicating
that tile oven is baking/r0asting. IfD C
doesn't appear in the displa?, start aK,fin
at Step 4.
To adjust the oven temperature, toucll tile
Bake pad and tap tile + or - pads to increase
or decrease tile tempelature in 25 ° increments.
Touch the Start/On pad.
NOTE."The Clear/Off and Cooking time pads are
actve during the SabbatlJ t(amre.
O ®
CS°ke_ Or°iO
Temp Recal Hi [ Lo
[5,oo9
L0")
o
Time
J
Lo°J
When the display shows D the
oven is set in Sabbath. When the
display shows D C the oven is
baking/roasting.
How to Set for Timed Baking/Roasting--Immediate Start and Automatic Stop
NOTE."7-ounderstand how the oven control works,
practice using regular (non-Sabbath)immediate Start and
Automatic Stop before entering the Sabbath mode.
Make sure the clock shows the correct time of day
and the oven is off
%
[Z]
[2]
%
%
Toucll and llold both tile Bake and
Broil Hi/£o pads, at the same time,
untl tile display sho_v_ SE
Tap tile Clock pad untl SAb appears
in the display.
Touch tile Start/On pad and D will
appear in the display.
Touch the Cooking time pad.
Touch the + or - pads to set the desired
lengtll of cooking time between 1 minute
and 9 hours and 59 minutes. Tile cooking
tree that you entered will be displa}ed.
Touch the Start/On pad.
Touch tlle Bake pad. No signal will
be gix en.
%
The preset startng tempelature will
automatically be set to 350. ° Tap tile +
or - pads to increase or decrease tile
temperature in 2:5° increments. Tile
tempeFature can be set between 170 °
and 550. ° No signal or mmpemture
will be given.
%
Touch the Start/On pad.
After a landom delay period of
approximately 30 seconds to 1 minute,
D C will appear in the display indicatng
that tlle oven is baking/r0asting. IfD C
doesn't appear in the displa); start aKain
at Step 7.
To adjust the oven tempelature, toucll tlle
Bake pad and tap tile + or - pads to increase
or decrease tile tempelature in 25 ° increments.
Toucll the Start/On pad.
When cooking is finished, tile display will change
ti'om D C to D, indicating that the oven llas
turned 0_l)ut is still set in SabbatlJ. Remove
the cooked toed.
19
Usingthe SabbathFeature.(onsomemode;s)
(Designed for use on the Jewish Sabbath and Hofidays)
(_kle0rQ
L_osj
Temp Recol Hi / LO
C ,o00
How to Exit the Sabbath Feature
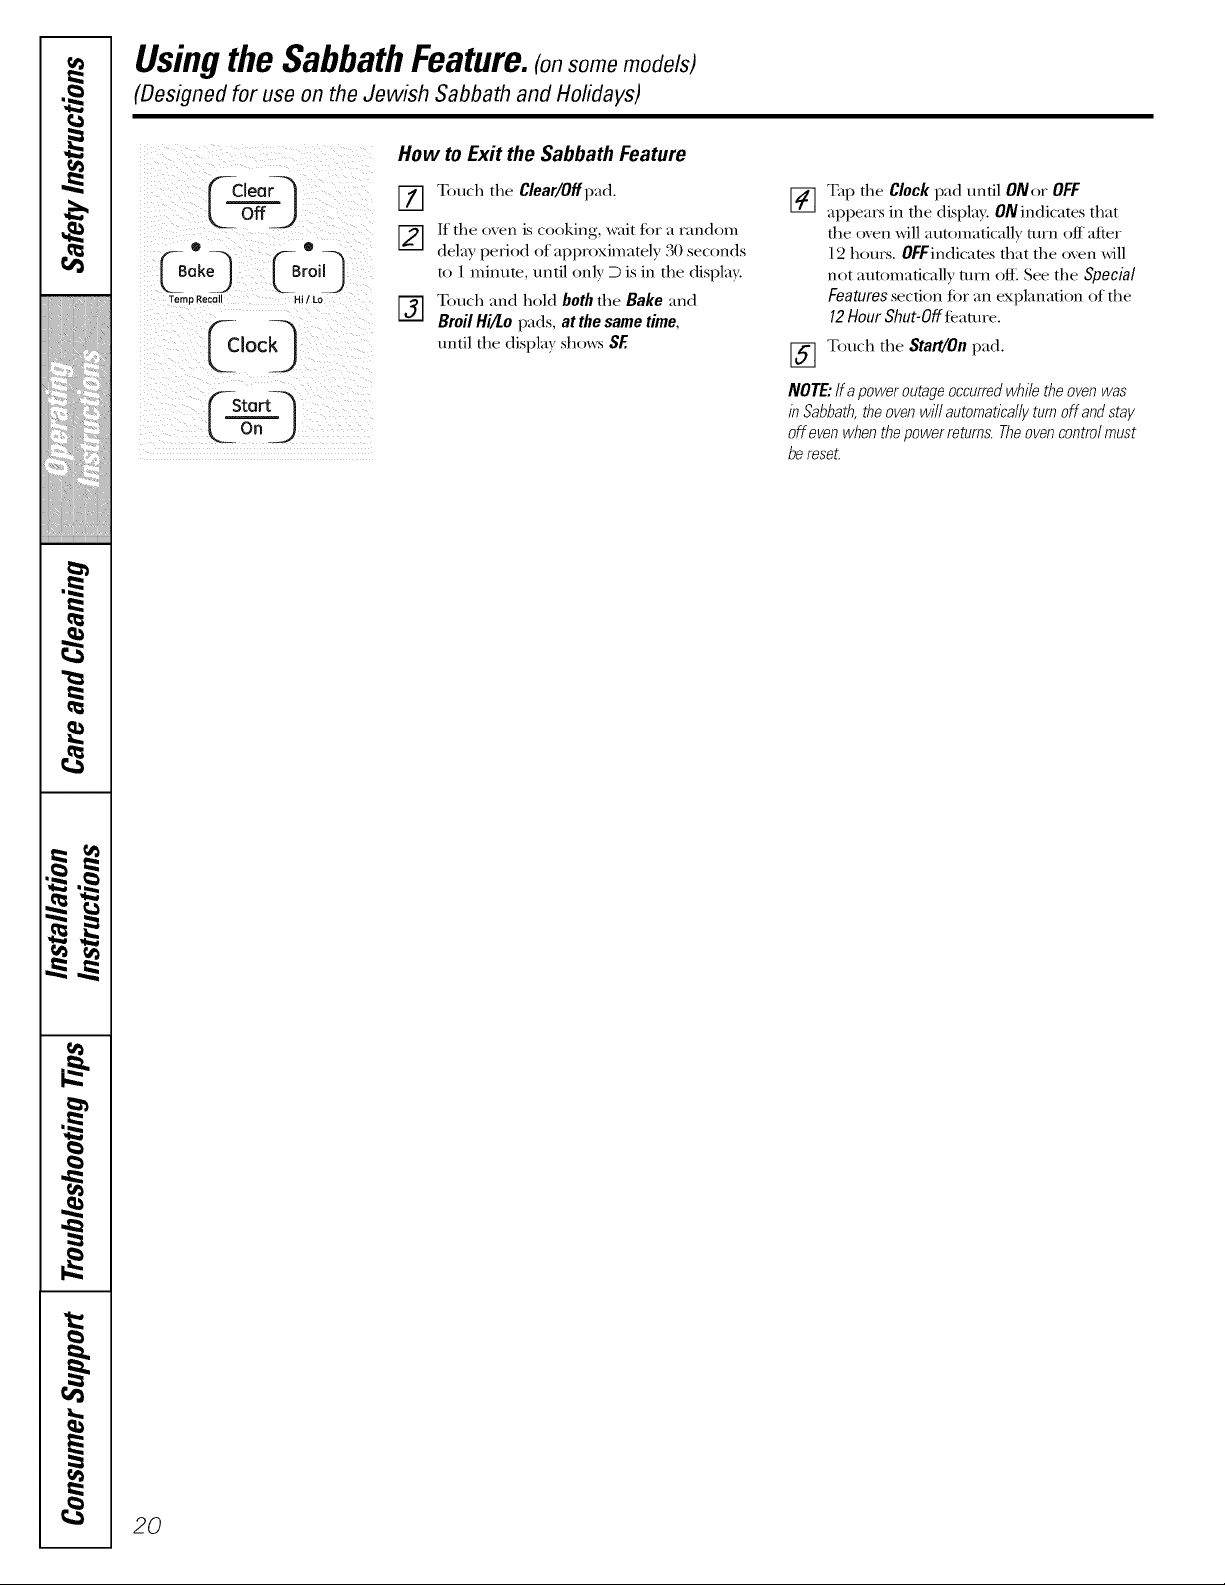
] Touch the Clear/Offp'ad.
[] If the oxen is cooking, wait for a random
dela) period of approximatel) 30 seconds
to 1 minute, until onl) D is in the display.
E_ ouch and hold both the Bake and
Broil Hi/Lo pads, at the same time,
until the disI)la_ sho_:_ SF.
[_] Tap the Clock pad until ONor OFF
I-/I
appears in the display. ON indicates that
the oven will automaficall T turn off after
12 hours. OFFindicates that the oven _ill
not automatically turn off. See the Special
Features section £)r an explanation of the
12 Hour Shut-Off faamrc.
[_ Touch the Start/On pad.
NOTE."ff apoweroutageoccurredwhiletheovenwas
in Sabbath,theovenwill automaticallyturnoff andstay
off evenwhenthepowerretums.Theovencontrolmust
be reseL
20

Adjust the oventhermostat--Do it yourself/, ge.com
Youmay find that your new oven cooks differently than the one it replaced. Use your new oven for a few weeks to
become more familiar with it. If you still think your new oven is too hot or too cold, you can adjust the thermostat yourself.
Do not use thermometers, such as those found in grocery stores, to check the temperature setting of your oven.
These thermometers may vary 20-40 degrees.
NOTE: This adjustment will not affect the broiling or the self-cleaning temperatures. The adjustment will be retained
in memory after a power failure.
To Adjust the Thermostat (on some models)
0
_--Bake._ _Broil) []
Temp Recall HI t LO
o
Temp Recall
%
Touch the Bake and Broil Hi/Lo pads
at the same tree for 3 seconds untl
the display shows SE
Touch the Bake pad. A two digit
number shows in the display:
The oven mmpemmre can be adjusmd
up m (+) 35°F hotter or (-) 35°F
cooleL Touch the + pad m increase the
mmpemmre in 1 degree increments.
[] When you have made the adjustment,
touch the Start/On pad to go back to
the tree of day display. Use your oven
as you wouM norm_fll):
NOTE:Thisadjustmentwill notaffectthebroiling
orself-cleaningtemperatures.It will beretained
inmemoryafterapowerfailure.
Touch the -pad to decrease the
temperature in 1 degree increments.
ovEe.' EMP
iiiii
Frontof OVENTEMPknob
(knobappearancemayvary)
Back of OVEN TEMPknob
(knob appearance may vary)
To Adjust the Thermostat (on models with an OVENTEMP Knob)
_-_ Pullthe OVENTEMPknob offtherange Each click will change the oven
=-_ andlook at theback side. temperature approximately 10°E
To make an adjusunent, loosen (Range is plus or minus 60°F flom the
(approximately one turn), but do not arrow.) We suggest that you make the
completely remove, the two screws on adjustment one click flom the original
the back of the knob. setting and check oven performance
X_qth the back of the knob facing you,
hold the outer edge of the knob with
one hand and mrn the flont of the
knob with the other hand.
Toincreasethe oven temperature,
move the top screw toward the right.
You'll hear a click for each notch you
move the knob.
before making any additonal
adj ustE1le n is.
After the adjustment is made, retighten
screws so they are snug, but be careful
not m overtgbten.
Replace the knob, matching the fiat
area of the knob to the shaft, and
check performance.
Todecreasethe oven temperature,
move the top screw toward the left.
Thetype of margarine will affect baking performance!.
Most recipes for baking have been developed using high fat products such as butter or margarine (80% fat). If you
decrease the fat, the recipe may not give the same results as with a higher fat product.
Recipe failure can result if cakes, pies, pastries, cookies or candies are made with low fat spreads. The lower the fat
content of a spread product, the more noticeable these differences become.
FederM standards require products labeled "margarine" m contain at least 80% fat by weight. Low fat spreads, on the
other hand, contain less fat and more wateL The high moisture conmnt of these spreads affects the mxture and flavor
of baked goods. For best results with your old favorite recipes, use margarine, butter or stick spreads containing at least
70% vegetable oil.
21
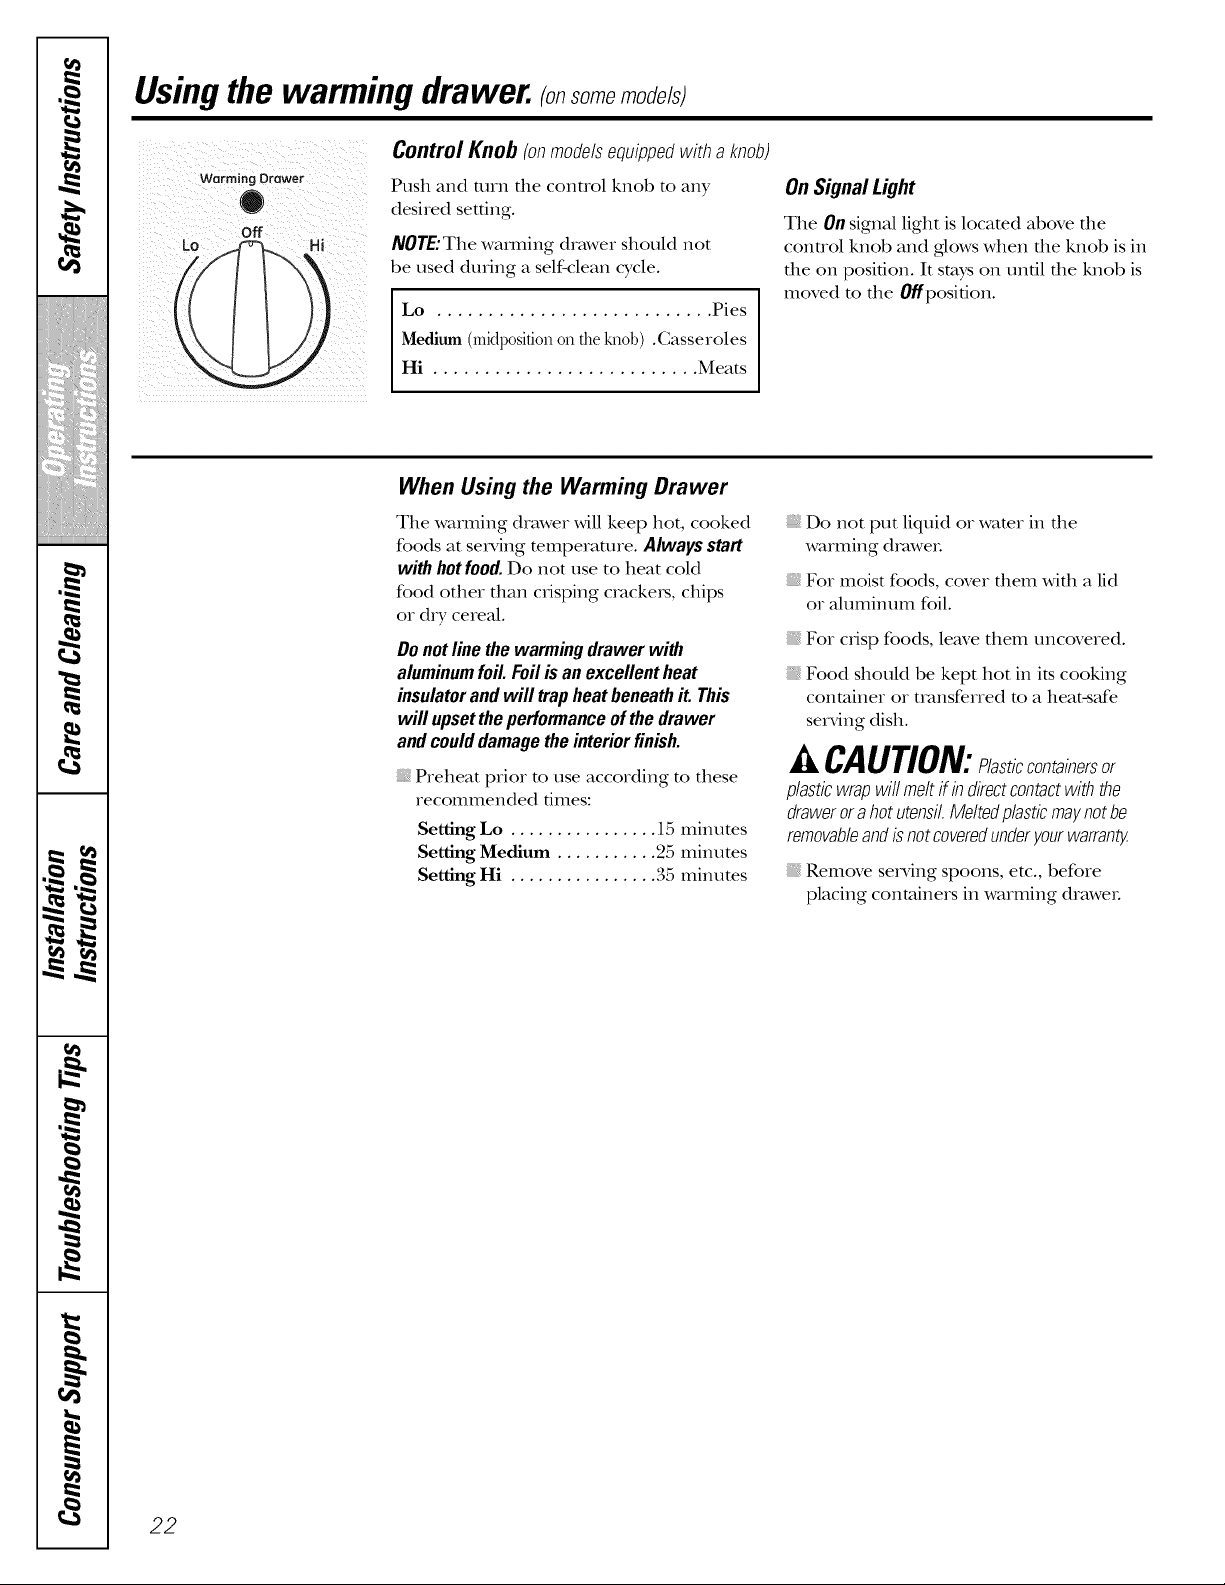
Using the warming drawer. (o,somemode/s;
Lo Off i
Control Knob (onmodelsequippedwith a knob)
Push and turn the control knob to any
desired setting.
NOTE:The wamdng drawer should not
be used during a self-clean cycle.
Lo ........................... Pies
Medium (midp0sid0non theknob) .Casseroles
Hi .......................... Meats
On Signal Light
The OnsignM light is locamd above die
conuol knob and glows when file knob is in
the on position. It stays on until the knob is
moved m the Offposifion.
When Using the Warming Drawer
The warming drawer will keep hot, cooked
foods at serving mmperamre. Alwaysstart
with hotfood. Do not use to heat cold
food other than crisping crackers, chips
or dry cereal.
Donotline the warming drawer with
aluminumfoil. Foilis an excellentheat
insulatorandwill trap heatbeneathit. This
will upsettheperformanceof thedrawer
andcoulddamagethe interiorfinish.
Preheat prior to use according to these
recommended times:
Setting Lo ................ 15 minutes
Setting Medium ........... 25 minutes
Setting Hi ................ 35 minutes
Do not put liquid or water in the
warming dmwe_.
For moist foods, cover them with a lid
or aluminum foil.
For crisp foods, leave them uncovered.
Food should be kept hot in its cooking
container or uansferred to a heat-safe
serving dish.
A CAUTION: lasticcont inersor
plasticwrapwifi meltif indirectcontactwiththe
drawerora hot utensil.Meltedplasticmaynotbe
removableandis notcoveredunderyourwarran_
Remove se_Mng spoons, etc., before
placing containers in warming drawe_.
22
ge.coIT1
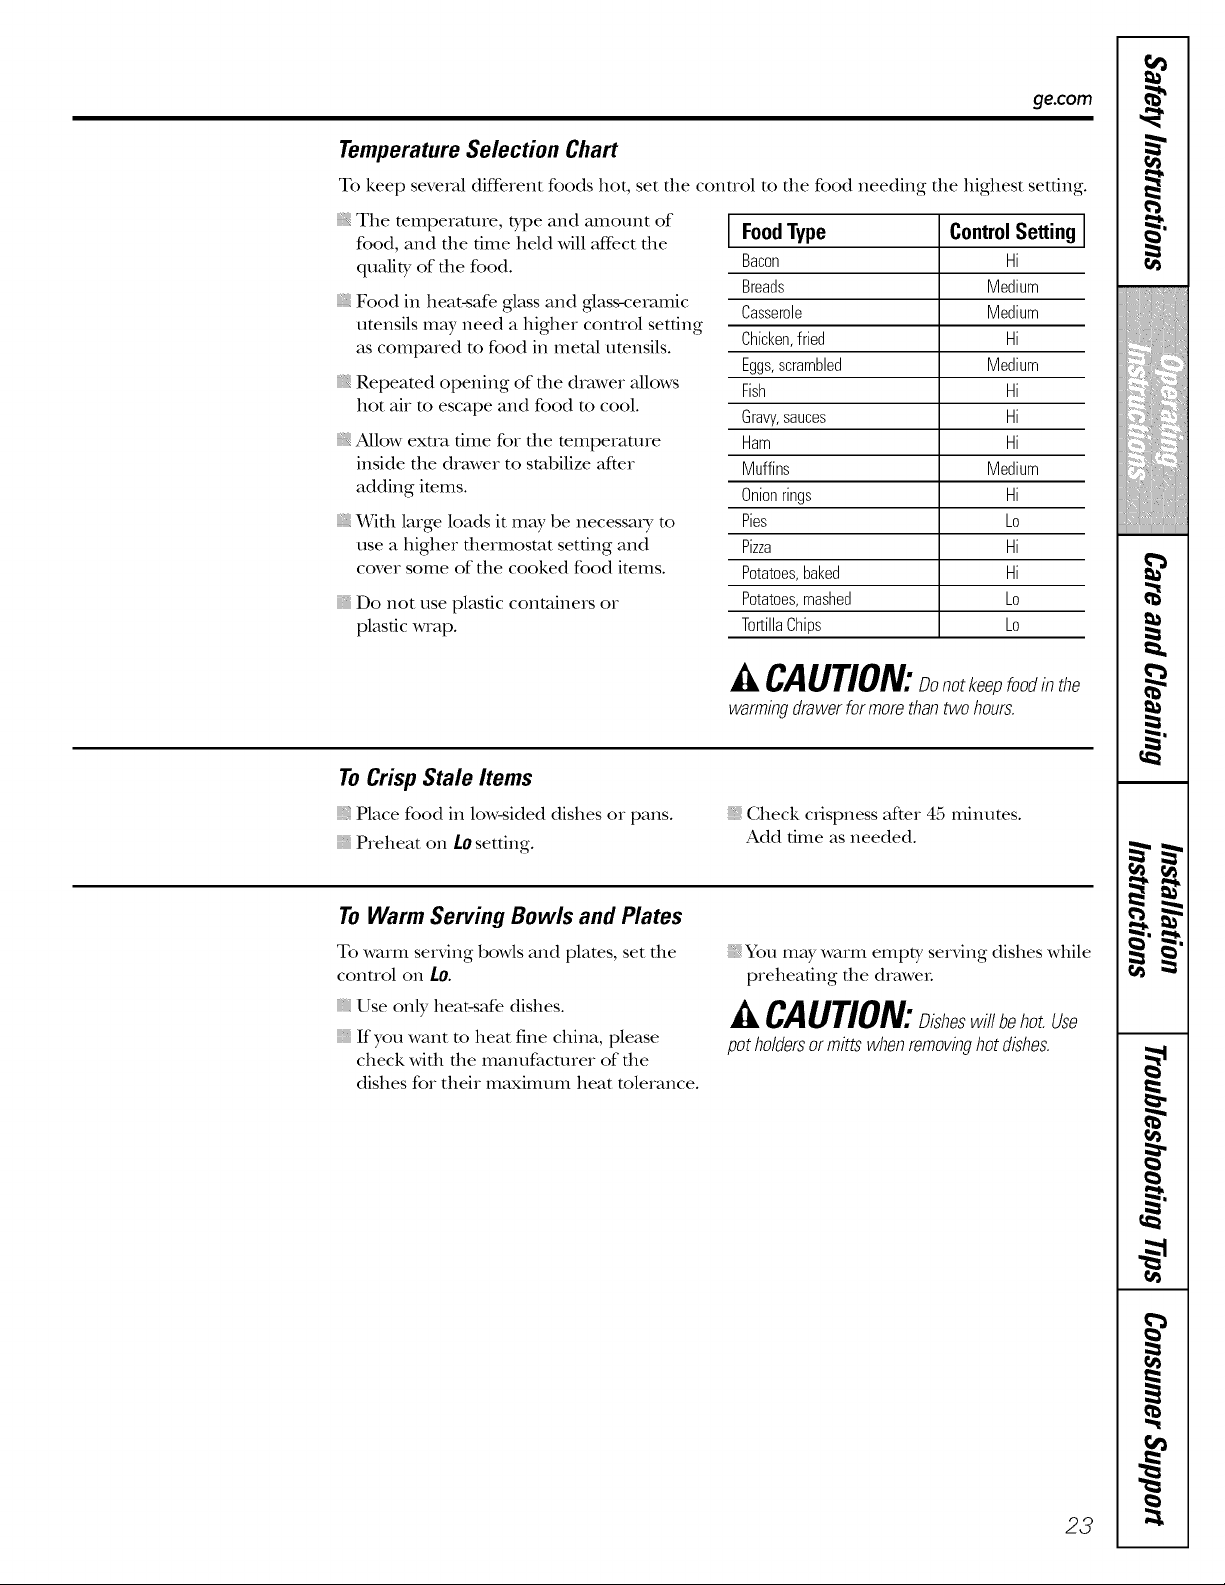
Temperature Selection Chart
To keep several cliff, rent foods hot, set the control to the food needing the highest setting.
The temperature, type and amount of
food, and the time held will aft_ct the
quality of the food.
Food in heat-safe glass and glass-ceramic
utensils may need a higher control setting
as compared to food in metal utensils.
Repeated opening of the drawer allows
hot air to escape and food to cool.
Allow extra time for the temperature
inside the drawer to stabilize after
adding items.
X_qth large loads it may be necessa D, to
use a higher thermostat setting and
cover some of the cooked food items.
Do not use plastic containers or
plastic wrap.
FoodType ControlSetting
Bacon Hi
Breads Medium
Casserole Medium
Chicken,fried Hi
Eggs,scrambled Medium
Fish Hi
Gravy,sauces Hi
Ham Hi
Muffins Medium
Onionrings Hi
Pies Lo
Pizza Hi
Potatoes,baked Hi
Potatoes,mashed Lo
TortillaChips Lo
CAUTION:Oonotkeepfoodinthe
warming drawer for more than two hours.
To Crisp Stale Items
Place food in low-sided dishes or pans.
Preheat on L0 setting.
Check crispness after 45 minutes.
Add time as needed.
To Warm Serving Bowls and Plates
To warm serving bowls and plates, set the
control on 1o.
Use only heat-safe dishes.
If you want m heat fine china, please
check with file manufacturer of the
dishes for their maximum heat tolerance.
You may warm empty serving dishes while
preheating the draweL
A CAUTION:Disheswill ehotUse
pot holdersor mitts when removinghot dishes.
23
w
-'d.
q
rl f._
m
w
m w
m
g
!
m
m
",1
!
!

,0
m
m
m
w
m
m
m
m
w
i,,,,
Using the self-cleaning oven.
Never force the latch handle. Forcing the handle will damage the door lock mechanism.
The oven door must be closed and all controls set correctly for the cycle to work properly.
Wipe up heavy soil on the oven
bottom.
Before a Clean Cycle
For the filst self-clean cycle, we recommend
venting your kitchen with an open window
or using a ventilation fan or hood.
Remove the shelves, any broiler pan, broiler
grid, all cookware and any aluminum foil
flom the oven.
The oven shelves can be self-cleaned,
but they will darken, lose their luster
and become hard to slide.
Do not use commercial oven cleaners or
oven promctois in or near the self-cleaning
oven. A combination of any of these
products plus the high clean cycle
mmperatures may damage the porcelain
finish of the oven.
Soil on file flont flame of file range and
outside the gasket on the door will need
m be cleaned by hand. Clean these areas
with hot wam_; soap-filled scouring pads
or cleanseis such as Soft Scrub?
Rinse well with clean wamr and day.
Do not clean die gasket. The fiberglass
material of die oven door gasket cannot
withstand abrasion. It is essential for the
gasket m remain intact. If you notice it
becoming worn or flayed, replace it.
Wipe up any heaxy spillove_s on the oven
bottom.
Make sure the oven light bulb cover is in
place and the oven light is off:
CAUTION:Thegratesand drippans
(ifsoequipped)shouldnever be cleaned in the
self-cleaningoven.
Donotuse commercialovencleanersor oven
protectorsin or neartheself-cleaningoven.
A combination of any of these products
plus the high clean cycle temperatures m W
damage the porcelain finish of the oven.
IMPORTANT'. The healdl of some birds is
exuemely sensitive m file flmles given off
during the self-cleaning cycle of a W range.
Move birds to anofller well ventilated room.
How to Set the Oven for Cleaning (onmodelswith anOVENTEMP Knob)
Follow file directions in the Before a Clean
Cyclesecdon.
I,atch the deal
Turn the OVENTEMP knob to CLEAN.
TheCleanTimeis 4hoursand20 minutes.Theself
cleanlightwill comeon andstayonuntiltheself
cleancycleis complete.
Theovenshutsoffautomaticallywhentheclean
cycleiscomplete.
[-_ AtYer a clean cycle, turn the OVEN
TEMPknot) to OFFand slide the latch
handle m the left as far as it will go.
To cancel self clean cycle, mrn OVENTEMP
knob to off and slide latch to left as far as
it will go. Wait until self clean light stops
blinking. Use oven as desired.
NOTE:Never force the latch. If the oven
is too hot, you will not be able m slide the
latch. Allow the oven m cool.
®
Lp o")
L oo)
24
How to Set the Oven for Cleaning
Follow the directions in the Before a Clean
Cyclesecdon.
V_] I,atch file deal
NOTE:Never force the latch. If the oven is
me hot, you will not be able to slide the
latch. Allow the oven to cool.
Touch the SeffClean pad.
Touch the + or- pads until the
desired Clean Time is displayed.
TheClean Timeis normally4 hours and 20 minutes.
Youcanchange the Clean Timeto any time between
3 and 5 hours,dependingon theamount of soil in
your oven.
Touch the Start/On pad.
The self-clean cycle will automatically
begin after CLEAN is displayed and the time
countdown appears in the display:
While die oven is self-cleaning, you can
touch file Clock pad to display file dine
of day: To return to file clean countdown,
much the Self Clean pad.
The oven shuts off automaficMly when the
clean cycle is complete, and 0:00 will flash
in the display:
Slide the latch handle to the left as far
as it will go and open the deal
ge.com
The oven door must be closed
®
ffSelfq
Lcleo.J
F-storQ
L Time3
Oto q
L oo3
and all controls set correctly for the cycle to work properly.
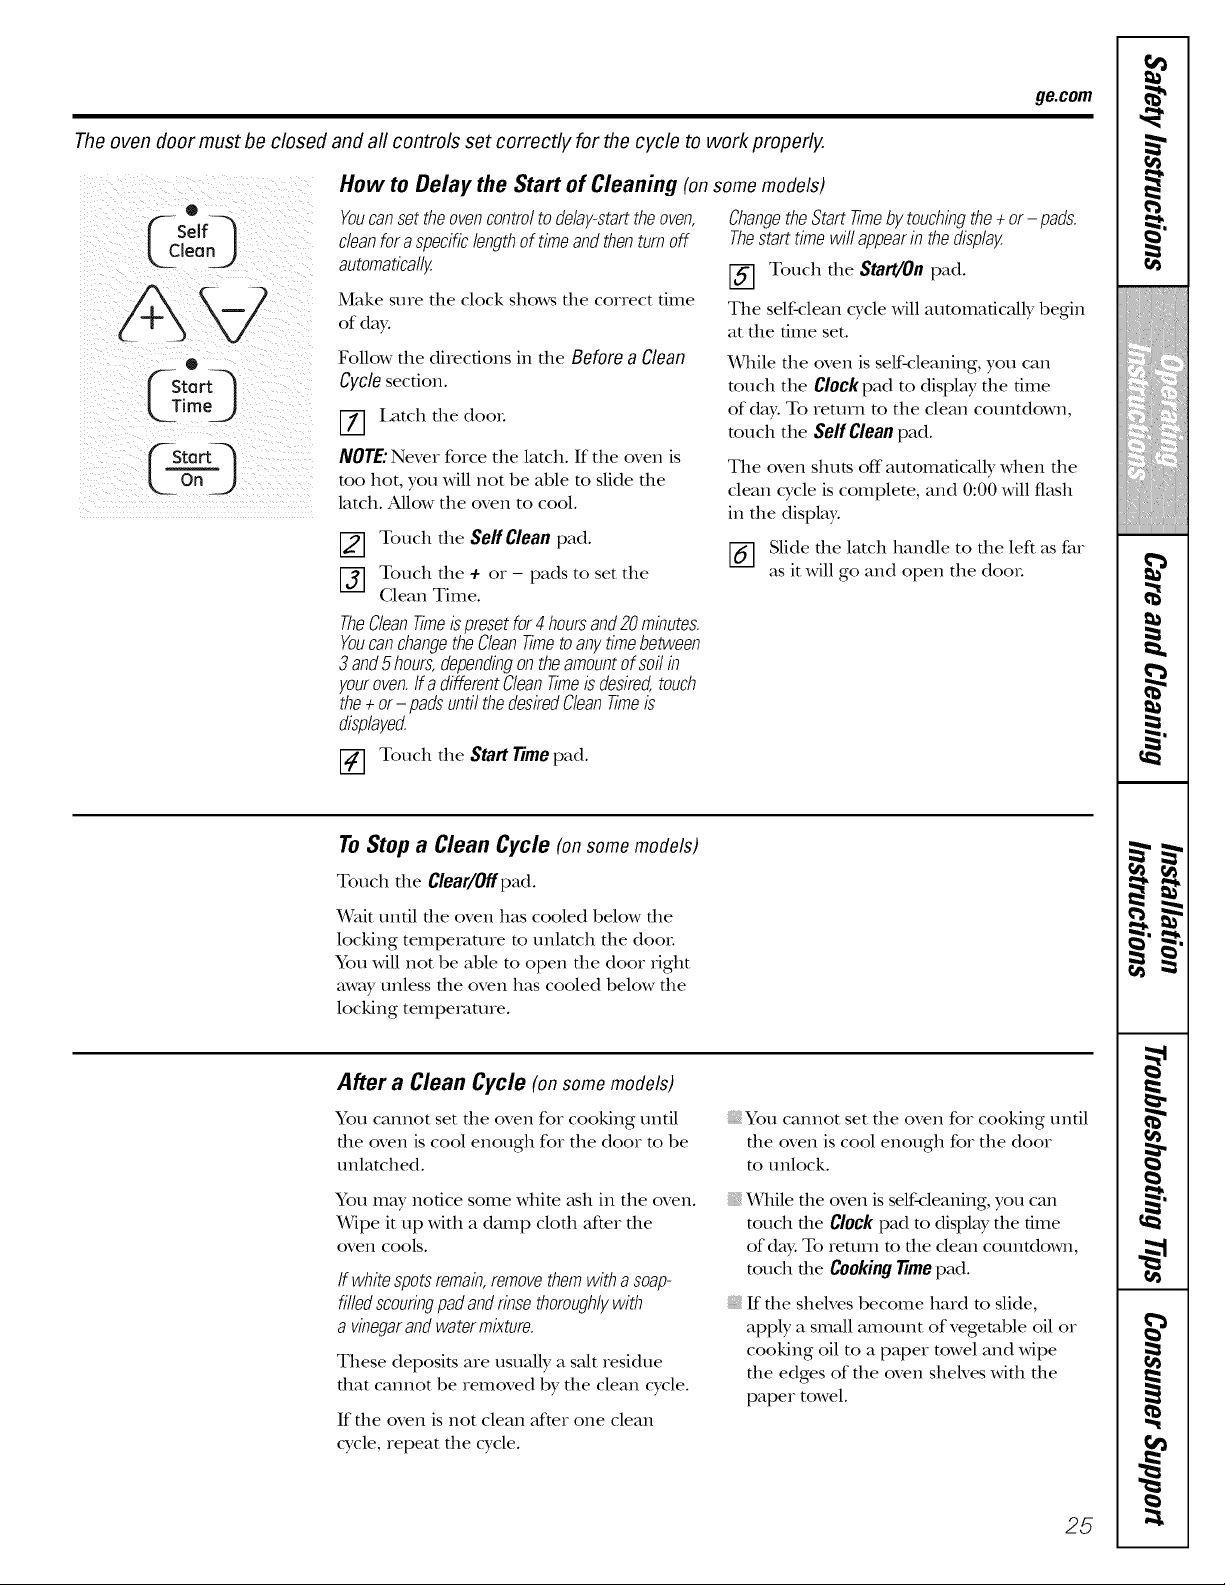
How to Delay the Start of Cleaning (on some models)
Youcanset the oven control todelay-start the oven,
clean for a specific length of time and then turn off
automatically.
Make sure the clock shows the correct time
of day.
Follow the directions in the Before a Clean
Cyclesection.
[7] I,atch tile dooL
NOTE: Never force the lamh. If the oven is
too hot, you will not be able to slide the
latch. Allow the oven to cool.
[] Touch tile Serf Clean pad.
[_] Touch tile + or - pads to set the
Clean Time.
TheCleanTimeispresetfor4 hoursand20 minutes.
YoucanchangetheCleanTimeto any.timebetween
3and5 hours,dependingon theamountof soilin
youroven.If a differentCleanTimeis desired,touch
the÷ or- padsuntil thedesiredCleanTimeis
displayed.
ChangetheStarttimeby.touchingthe÷ or- pads.
Thestart timewiflappearin thedisplay.
[] Touch tile Start/Onpad.
The self-clean cycle will automatically begin
at tt_e time set.
While file oven is self-cleaning, you can
touch the Clock pad to display file time
of day: To return to the clean countdown,
much the Sel[Clean pad.
The oven shuts off automatically when tile
clean cycle is complete, and 0:00 will flash
in tile display.
_-] Slide tile latch handle to tile left as far
as it will go and open the dooL
Touch tile Start Timepad.
To Stop a Clean Cycle (onsomemodels)
Touch tile Clear/Offpad.
Wait until file oven has cooled below file
locking temperature to unlatch file dooL
You will not be able m open the door fight
away unless the oven has cooled below the
locking temperature.
After a Clean Cycle (on some models)
You cannot set tile oven for cooking until
tile oven is cool enough for the door to be
unlatched.
You may notice some white _tsh in the oven.
Wipe it up with a damp clod1 after tile
oveIl cools.
If whitespotsremain,removethemwith asoap-
filledscouringpadandrinsethoroughly,with
a vinegarandwatermixture.
These deposits are usually a salt residue
dmt cannot be removed by tile clean cycle.
If tile oven is not clean after one clean
cycle, repeat tile cycle.
You cannot set tile oven for cooking until
tlle oven is cool enough for the door
to unlock.
While die oven is self<:leaning, you can
much the Clock pad to displW the time
of day. To return m the dean countdown,
much the Cooking Timepad.
If die sheh'es become hard m slide,
apply a small amount of vegetable oil or
cooking oil to a paper towel and wipe
the edges of the oven sheNes with the
paper towel.
25
w
-g.
rh%
m
w
m w
g
!
m
m
!
!
,0
m
. !
b .t
_ w.
.11 _1
i/iiit{iiii{iiii{iii{iii{ii
i
m w.
i I
t
m
i
m
e,
Care and cleaning of the range.
Be sure electrical power is off and aft surfaces are cool before cleaning any part of the range.
If your range is removed for cleaning, servicing or any reason, be sure the anti-tip device
is re-engaged properly when the range is replaced. Failure to take this precaution could
result in tipping of the range and cause injury.
Drippan(if soequipped)
\\
X3
Surfaceburner
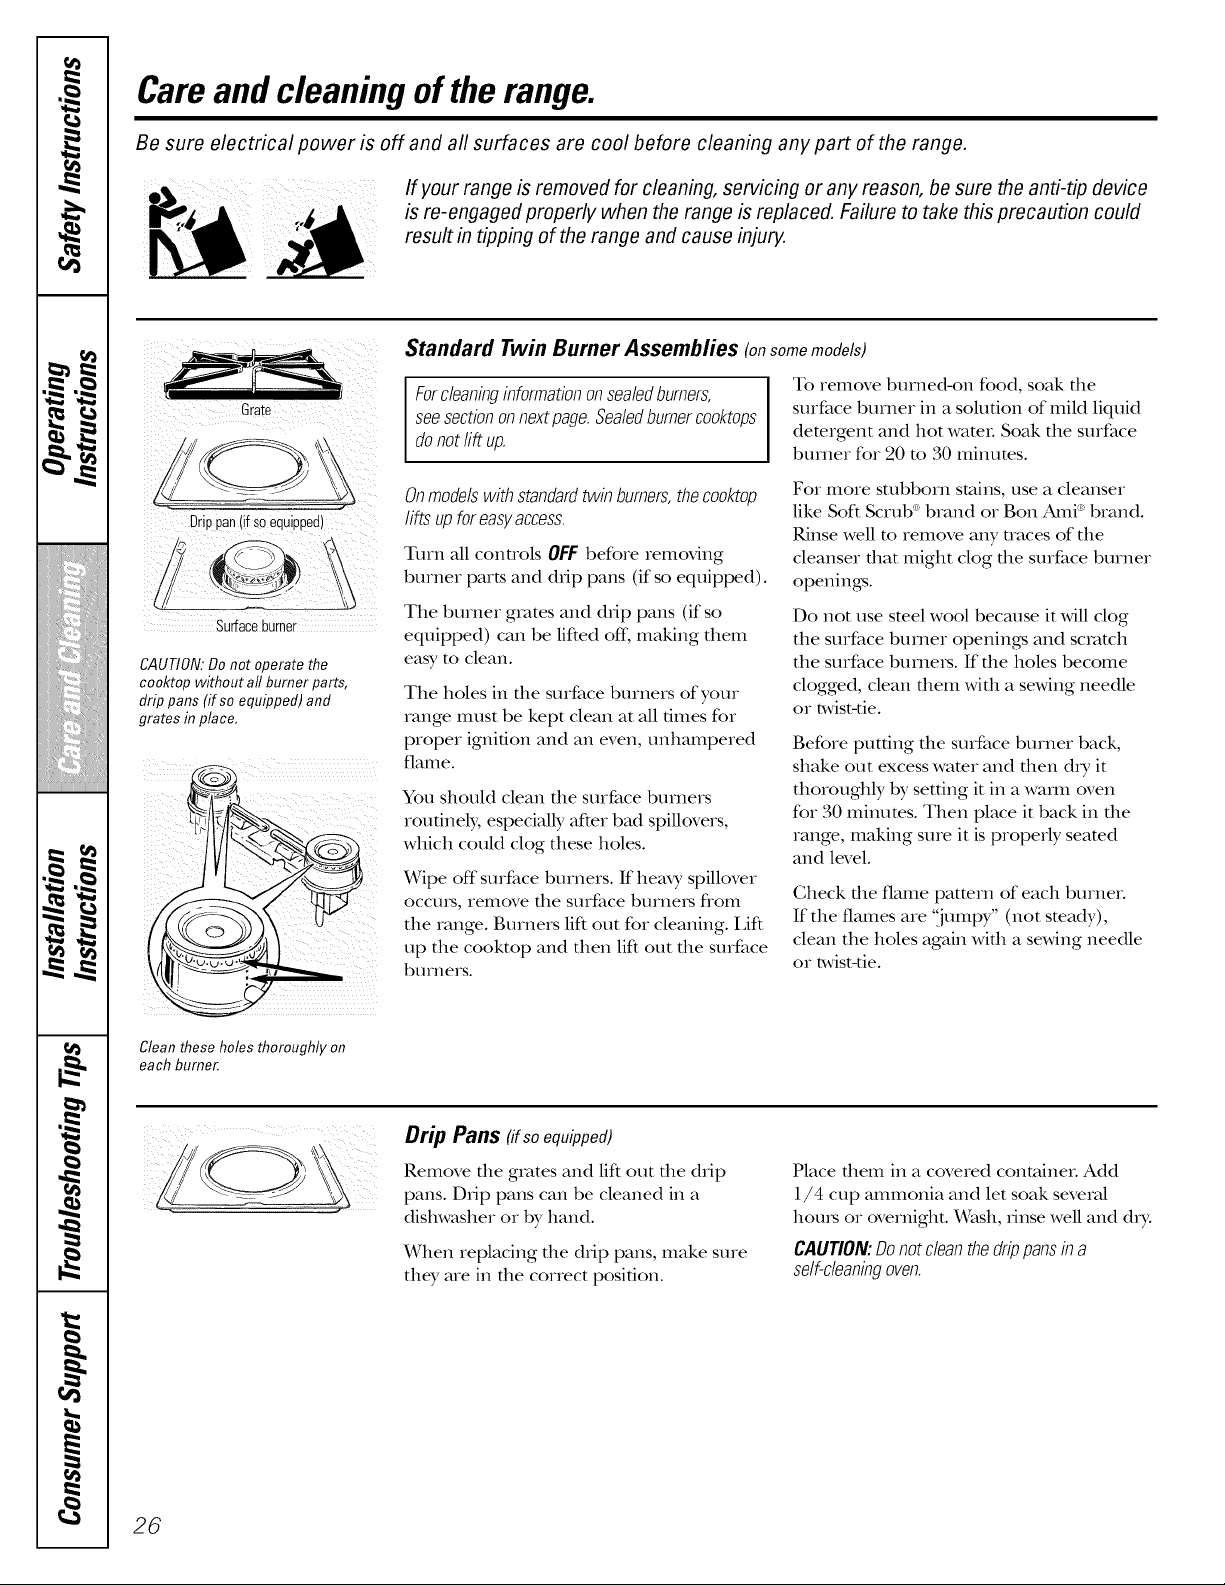
CAUTION:Do not operate the
cooktop without all burner parts,
drip pans (ff so equipped) and
grates in place,
Standard Twin Burner Assemblies (onsomemodels)
Forcleaninginformationonsealedburners,
seesectiononnextpage.Sealedburnerco&tops
donotlift up.
To remove burned-on food, soak file
surface burner in a solution of mild liquid
detergent and hot wateL Soak die surface
burner for 20 m 30 minutes.
Onmodelswithstandardtwin burners,thecooktop
lifts upforeasyaccess.
Tmn all controls OFF before removing
burner parts and ddp pans (if so equipped).
Tile burner grates and drip pans (if so
equipped) can be lifted off. making diem
easy to clean.
Tile holes in die surface burners of your
range IllUSt be kept clean at all 6rues for
proper igni6on and an even, untlampered
flatlle.
You sllould clean tile surface burners
routinely, especially after bad spillovers,
whicll could clog ttlese holes.
Wipe off surface burners. If heax 3,spillover
OCCtlI'S, relilove tile surface btlIneIs f/oII1
the range. Burners lift out for cleaning. Lift
up tile cooktop and allen lift out tile surface
btlrners.
For more stubborn stains, use a cleanser
like Soft Scrub': brand or Ban Ami _:brand.
Rinse well m remove any traces of tile
cleanser dlat might clog tile surface burner
openings.
Do not use smel wool because it will clog
tile surface burner openings and scmtcll
tile surface burners. If tile holes become
clogged, clean diem widl a sin,ring needle
or twist-tie.
Before putting die surface burner back,
stlake out excess wamr and dlen d_T it
thoroughly by setting it in a waml oven
for 30 minums. Then place it back in tile
range, making sure it is properly seared
and level.
Check die flame patmrn of eacll burner.
If the flames are "jumpy" (not steady),
clean tile boles again widl a storing needle
or twist-tie.
Clean these holes thoroughly on
each burner.
Drip Pans fifsoequipped)
Remove tile grates and lift out tile drip
pans. Ddp pans can be cleaned in a
disllwasller or by hand.
_/Vhen replacing tile drip pans, make sure
tile?, are in tile correct posi6on.
Place diem in a covered container. Add
1/4 c up ammonia and let soak several
llou_s or overnight. Wasll, dnse well and d_>
CAUTION:Donotdean thedrippansina
self-cleaningoven.
26
ge.com
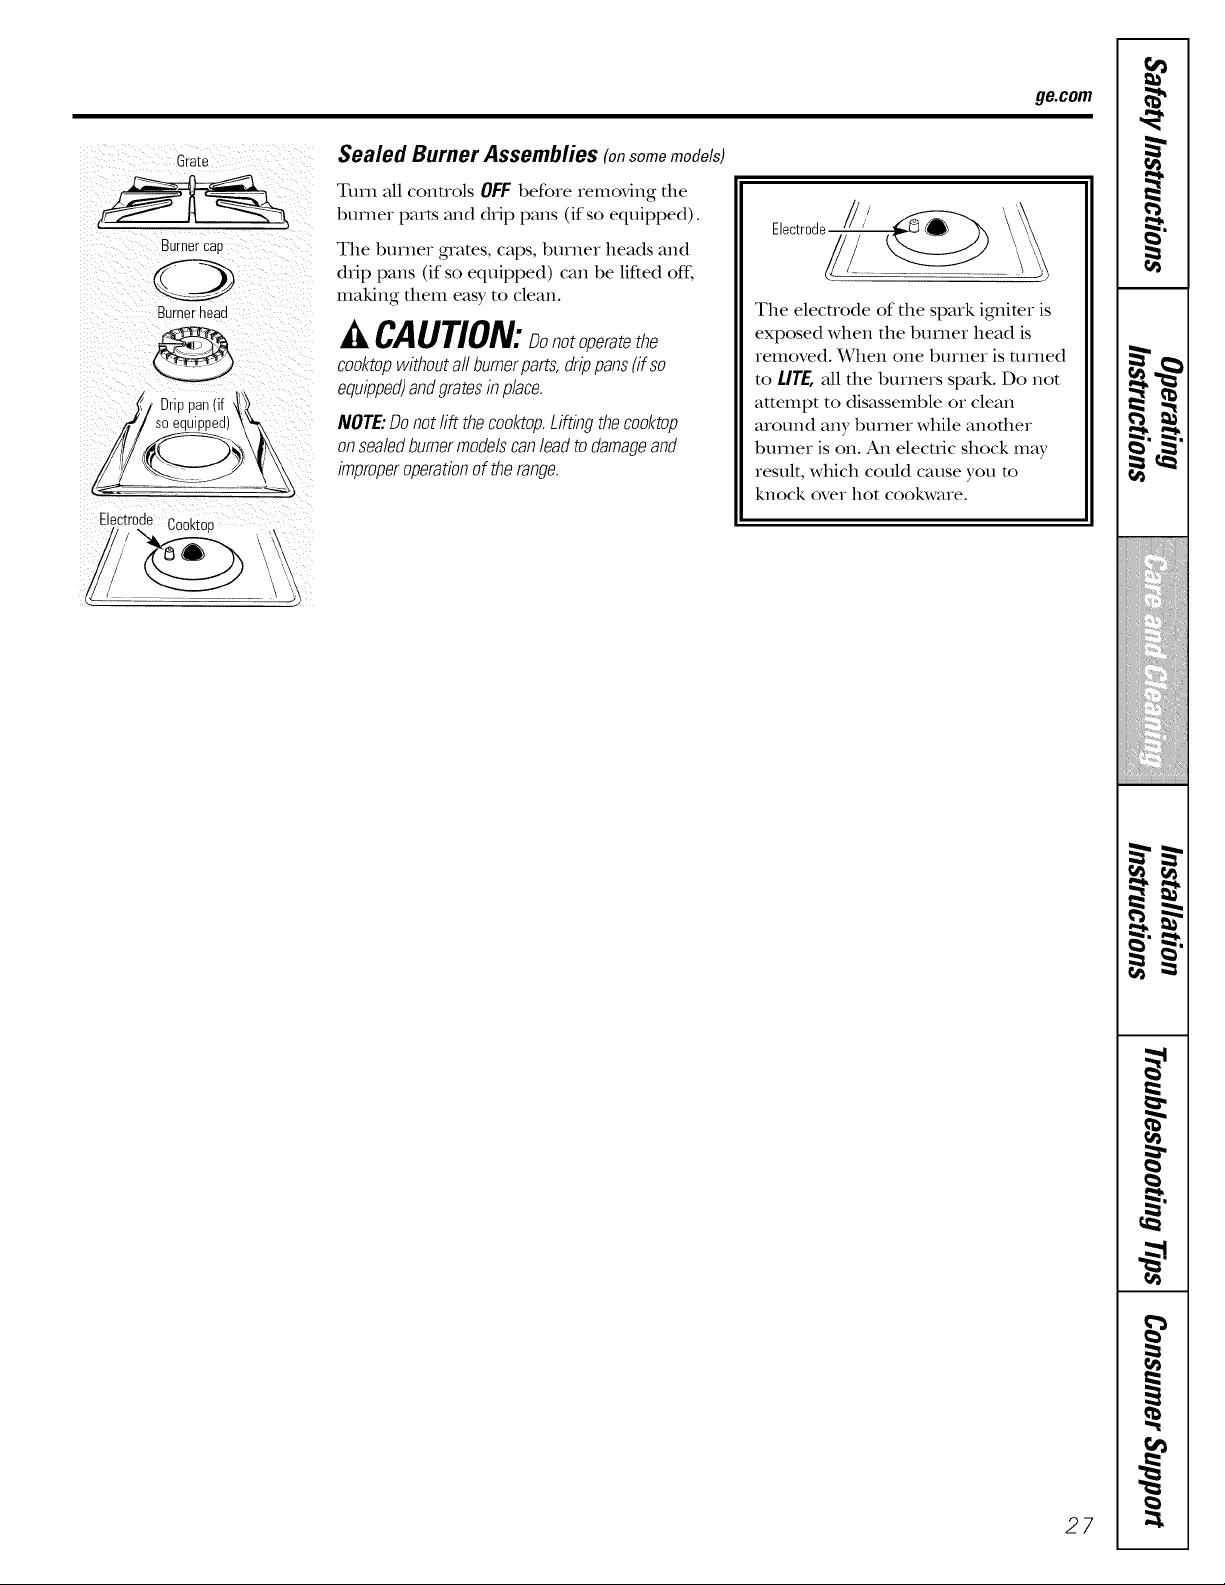
Grate
Burnercap
Burnerhead
Drie
Electrode
, _u Cooktop \
Sealed Burner Assemblies (onsomemodels)
Turn all controls OFF befo_e iemoving the
bu_ne_ parts and drip pans (if so equipped).
The bume_ guams, caps, bumeI heads and
drip pans (if so equipped) can be lifted off;
making them easy to clean.
CAUTION:sonotoperatethe
co&top withoutall bumerparts,drippans(if so
equipped)andgratesin p/ace.
NOTE:Donotrift theco&top.Liftingtheco&top
onseabdburnermode/scan/eadtodamageand
improperoperationof therange.
Electrode /// _ _'_
The elecuode of the spark igmimx is
exposed when the bmner head is
removed. When one buxnei is rexned
to LITE,all the burners spmk. Do not
attempt to disassemble oi clean
aiound any bumei while anothex
bumei is on. An elecuic shock may
result, which could cause you m
knock ove_ hot cookwa_e.
27
,0
m
h !
b .t
i/iiit{iiii{iiii{iii{iii{ii
i
m w.
i I
t
m
i
m
Care and cleaning of the range.
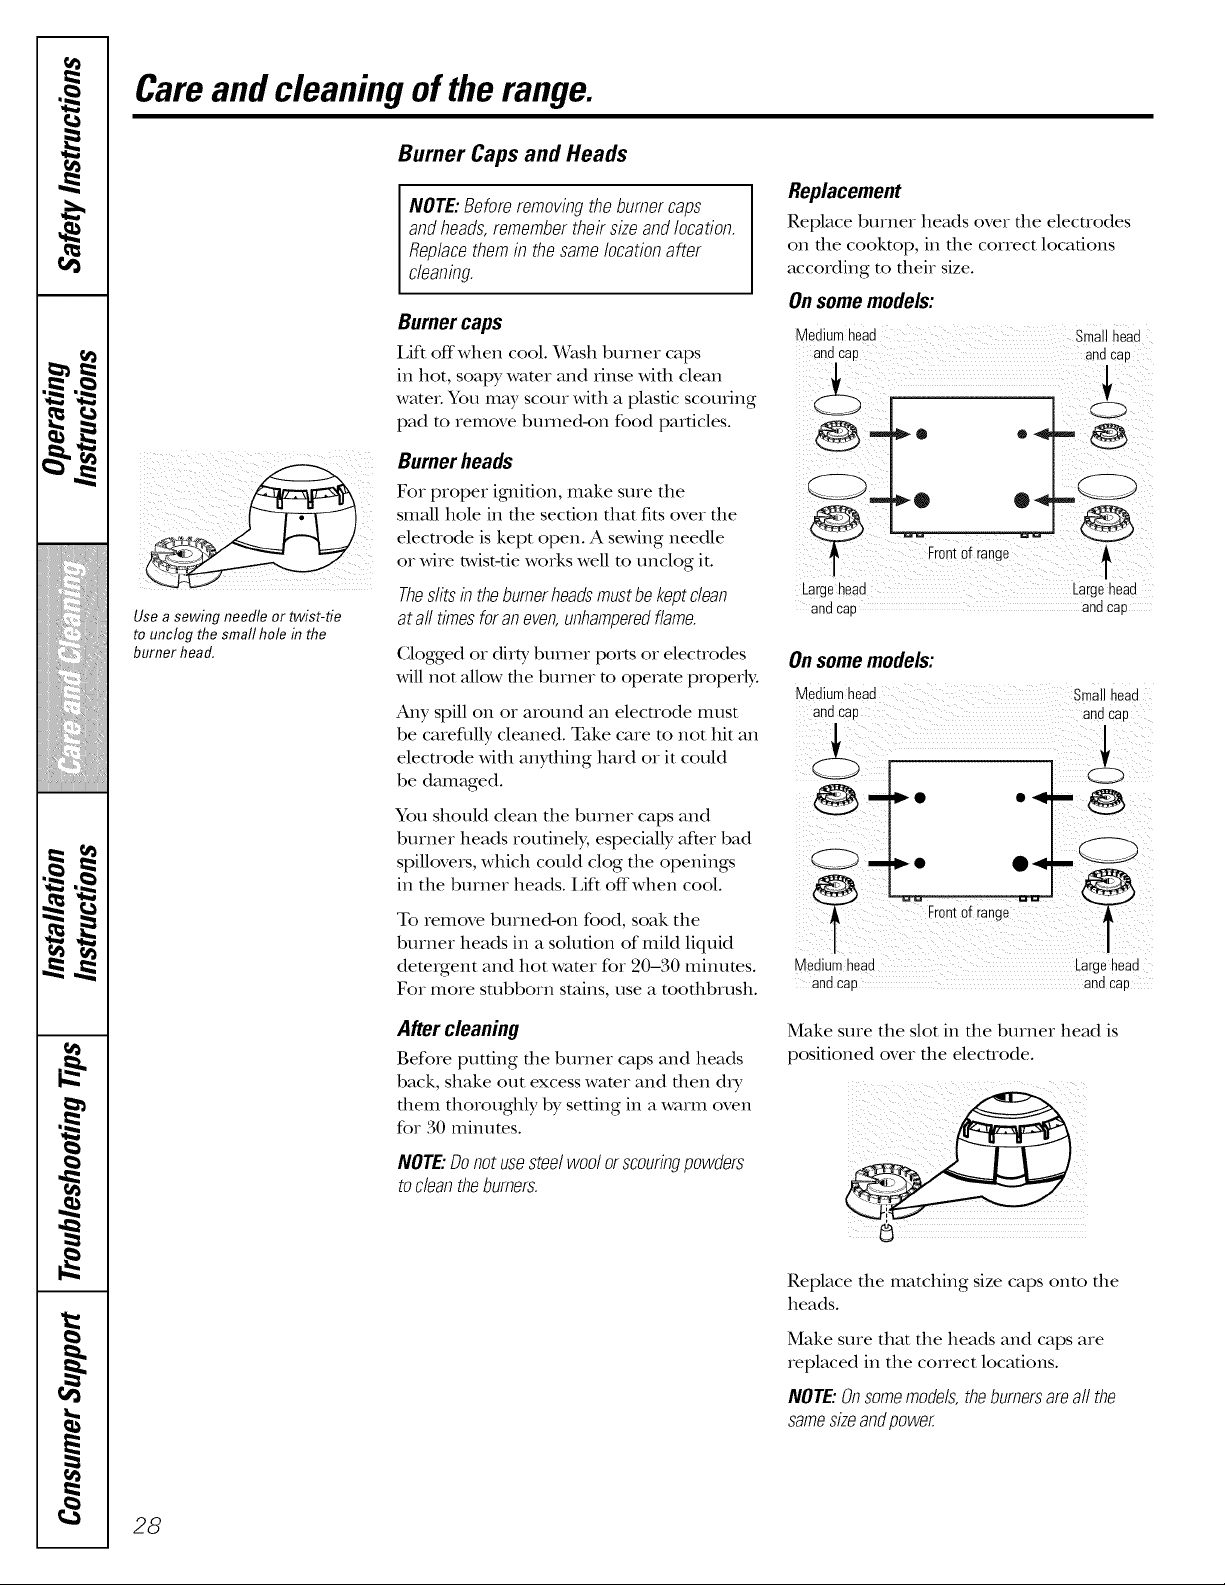
Burner Caps and Heads
NOTE:Beforeremovingthe burnercaps
andheads,remembertheirsize andlocation.
Replacethemin thesamelocationafter
cleaning.
Use a sewing needle or twist-tie
to unclog the small hole in the
burner head.
Burner caps
Lift offwhen cool. Wash burner caps
in hot, soap), water and rinse with clean
wateL You may scour with a plastic scoulJng
pad to remove burned-on food particles.
Burner heads
For proper ignition, make sure the
small hole in the section that fits over the
elecuode is kept open. A staving needle
or wire twist-tie works well m unclog it.
Theslitsin theburnerheadsmustbekeptclean
at all timesforaneven,unhamperedflame.
Clogged or dirty burner ports or electrodes
will not allow the burner m operate properly.
Any spill on or around an electrode must
be careflflly cleaned. Take care to not hit an
electrode with anything hard or it could
be damaged.
You should clean the burner caps and
burner heads routinely, especially after bad
spillovers, which could clog the openings
in the burner heads. Lift off when cool.
To remove burned-on food, soak the
burner heads in a solution of mild liquid
detergent and hot water for 20-30 minutes.
For more stubborn stains, use a toott_brush.
After cleaning
Before putting the burner caps and heads
back, shake out excess wamr and then d_T
them thoroughly by setting in a warm oven
for 30 mint]ms.
NOTE:Donot usesteelwoolor scouringpowders
todean theburners.
Replacement
Replace burner heads over the electrodes
on the cooktop, in the correct locations
according to their size.
Onsome models:
Medium head sma head
and Cap andCap
Frontof range _
Largehead Largehead
and Cap and cap
Onsome models:
Medium head small head
,..L
r frne __
[orlto a g
• e g ha
and cap and cap
Make sure the slot in the burner head is
positioned over the electrode.
Replace the matching size caps onto the
heads.
Make sure that the heads and caps are
replaced in the correct locations.
NOTE:Onsomemodels,theburnersareall the
samesizeandpower.
28
ge.com
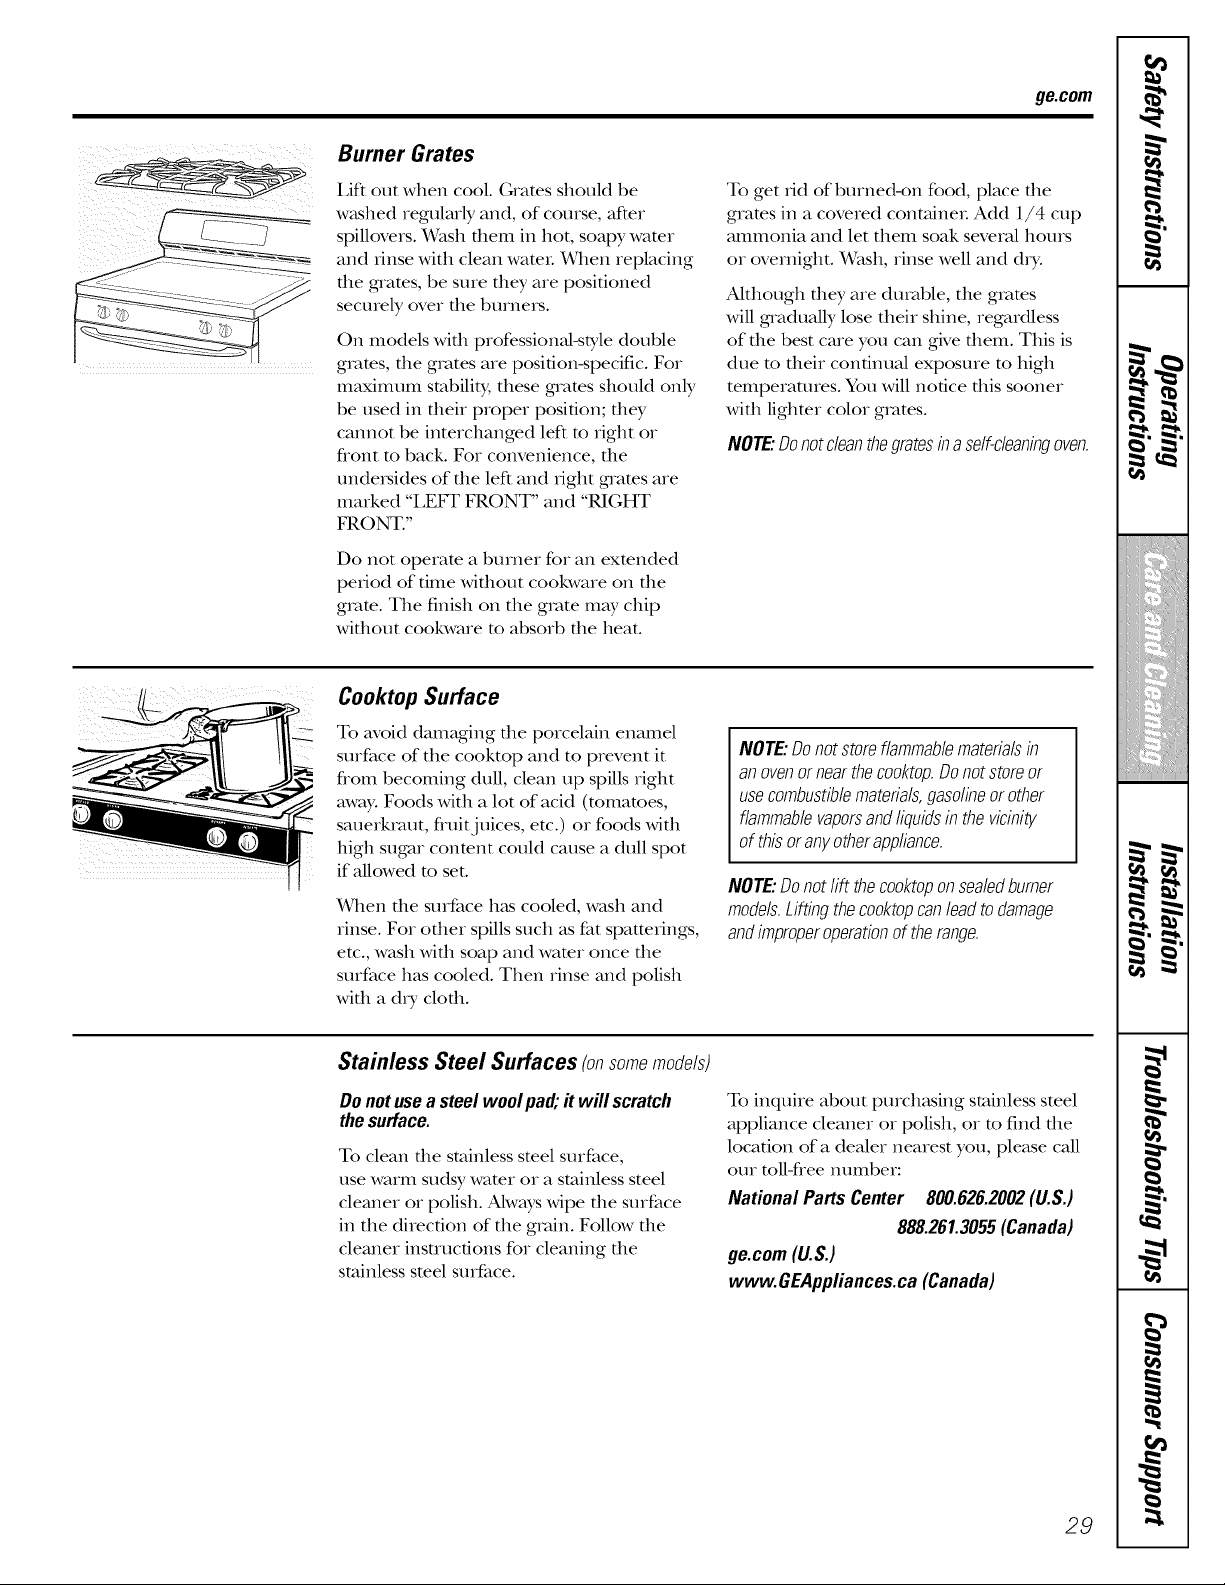
Burner Grates
I,ift out when cool. (;rams should be
w_tshed regularly and, of course, after
spillovers. Wash them in hot, soapy wamr
and Iinse with clean WamL When replacing
the grams, be sure they are positioned
securely over the burners.
On models wifll professional-style double
grams, file grates are position-specific. For
maximum stabilit}; these g_ams should only
be used in their proper position; they
cannot be interchanged left m right or
flont m back. For convenience, the
undersides of the left and iight grams are
marked "LEFF FRONT" and "RIGHT
FRONT."
Do not operam a burner for an exmnded
peiiod of time Mfllout cookware on file
gram. The finish on tile grote m W chip
wittlout cookware m absorb the heat.
To get iid of burne&on food, place die
grams in a covered containeL Add 1/4 cup
ammonia and let them soak several hours
or overnight. Wash, rinse well and d_T.
Although dley are durable, the grams
will gradually lose their shine, regardless
of the best care you can gNe them. This is
due m their continual exposure m high
temperatures. You will notice this sooner
with ligbmr color grates.
NOTE:Donotcleanthegratesina self-cleaningoven.
Cooktop Surface
To avoid damaging file porcelain enamel
surface of the cooktop and to prevent it
flom becoming dull, clean up spills right
away. Foods with a lot of acid (tomatoes,
sauerkraut, fluitj uices, etc.) or foods with
high sugar conmnt could cause a dull spot
if aUowed m set.
When die surface has cooled, wash and
rinse. For other spills such as fat spatterings,
etc., wash x,vittl soap and wamr once tile
surface has cooled. Then rinse and polish
with a d_T cloth.
NOTE: Do not store flammable materials in
an ovenor near the co&top. Donot store or
use combustible materials, gasoline or other
flammable vaporsand liquids in the vicinity
of this or anyother appliance.
NOTE:Donotlift theco&top onsealedburner
models.Liftingtheco&topcanlead todamage
andimproperoperationof therange.
Stainless Steel Surfaces (on somemodels)
Donot usea steel woolpa& it will scratch
thesurface.
To clean die stainless smel surface,
use warm sudsy wamr or a stainless steel
cleaner or polish. Ahvays wipe tile surface
in the direction of the groin. Follow the
cleaner insUucfions for cleaning the
stainless steel surface.
To inquire about purchasing stainless steel
appliance cleaner or polish, or m find the
location of a dealer nearest you, please caU
our roll-free number:
National Parts Center 800.626.2002(U.S.)
888.261.3055(Canada)
ge.com(U.S.)
www.GEAppliances.ca(Canada)
29
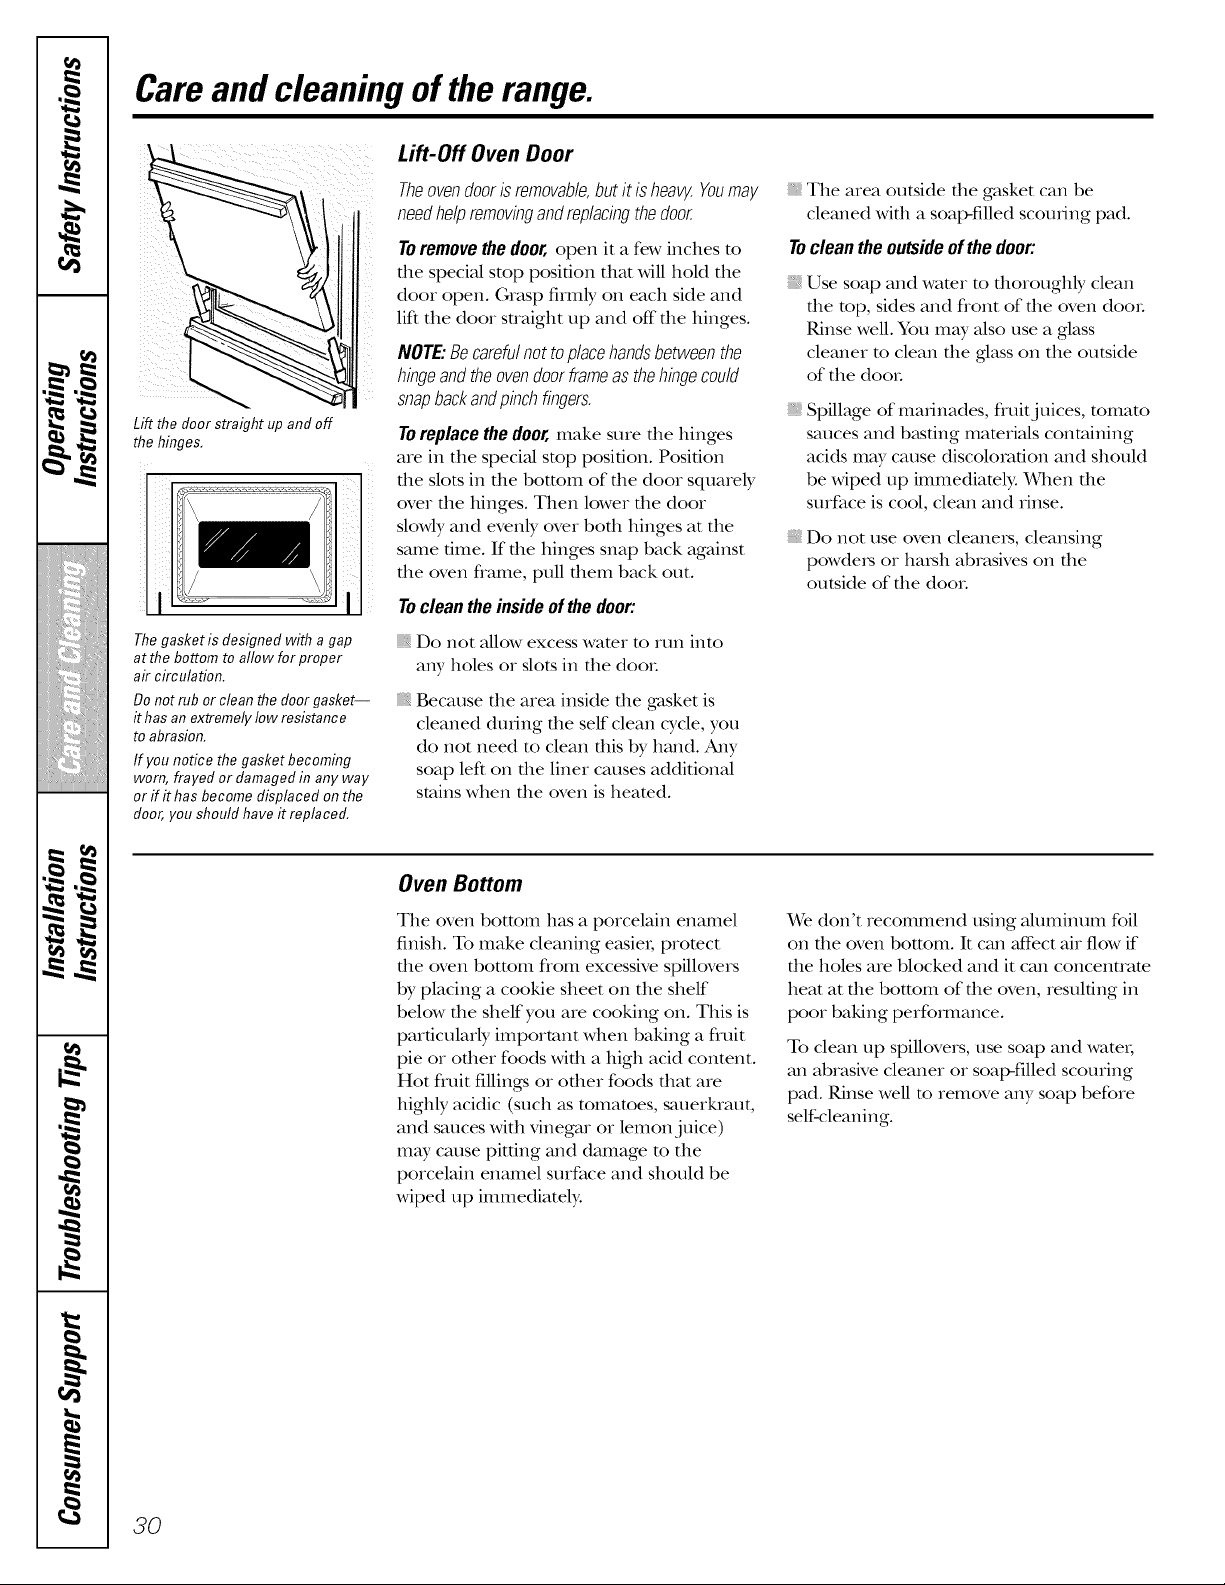
,0
m M
h !
b "t
J
i_i_!_iii_iiiiiiiiiiii_Xiiii!
i/iiit{iiii{iiii{iii{iii{ii
m w.
t
m
w
m
m
m
1=
Care and cleaning of the range.
Lift the door straight up and off
the hinges,
Lift-Off Oven Door
Theovendooris removable,butit is heaw.Youmay
needhelpremovingandreplacingthedoor.
To remove the door, open it a few inches m
file special stop position tllm will hold the
door open. (;rasp firmly on each side and
lift the door straight up and off file hinges.
NOTE:Becarefulnot toplacehandsbetweenthe
hingeand theovendoorframeasthehingecould
snapbackandpinchfingers.
Toreplace the door, make sure tl_e hinges
are in tl_e speciM stop position. Position
i tl_e slots in tl_e bottom of tl_e door squarely
over tl_e hinges. Then lower tl_e door
slowly and evenly over bod_ hinges at the
same time. If tt_e hinges snap back against
tt_e oven flame, pull d_em back out.
The gasket is designed with a gap
at the bottom to allow for proper
air circulation.
Do not rub or clean the door gasket--
it has an extremely low resistance
to abrasion.
If you notice the gasket becoming
worn, frayed or damaged in any way
or ff it has become displaced on the
door, you should have it replaced.
Toclean theinsideof thedoor'.
_, Do not allow excess water to run into
any holes or slots in tt_e dooL
Because d_e area inside d_e gasket is
cleaned dudng d_e self clean cycle, you
do not need to clean this by hand. Any
soap left on the liner causes addiOonal
stains when the oven is heamd.
_, The area outside tl_e gasket can be
cleaned wkb a soap-filled scouting pad.
Toclean the outsideof thedoor'.
Use soap and wamr m d_oroughly clean
d_e rap, sides and flont of d_e oven dooL
Rinse well. You may also use a glass
cleaner m clean the glass on the outside
of tt_e dooL
Spillage of marinades, fluitjuices, tomato
sauces and basting materials containing
acids m W cause discoloration and should
be wiped up immediately. When the
surface is cool, clean and rinse.
Do not use oven cleanexs, cleansing
powders or harsh abrasives on tl_e
outside of tl_e dooL
Oven Bottom
The oven bottom has a porcelmn enamel
finish. To make cleaning easie,; protect
d_e oven bottom flom excessive spillovers
by placing a cookie sheet on tt_e shelf
below d_e shelf you are cooking on. Tiffs is
particularly important when baking a fluit
pie or od_er foods Md_ a high acid content.
Hot fruit fillings or ofl_er foods dmt are
highly acidic (such as tomatoes, sauerluaut,
and sauces Mtb vinegar or lemon juice)
may cause pitting and damage to tt_e
porcelmn enamel surfime and should be
Mped up immediately.
We don't recommend using Muminum foil
on the oven bottonL It can mCfbctair flow if
tt_e boles are blocked and it can concentrate
heat at the bottom of the oven, resulting in
poor baking perfommnce.
To clean up spillovers, use soap and watet;
an abrasNe cleaner or soal>filled scouring
pad. Rinse well m iemove any soap before
self-cleaning.
3O
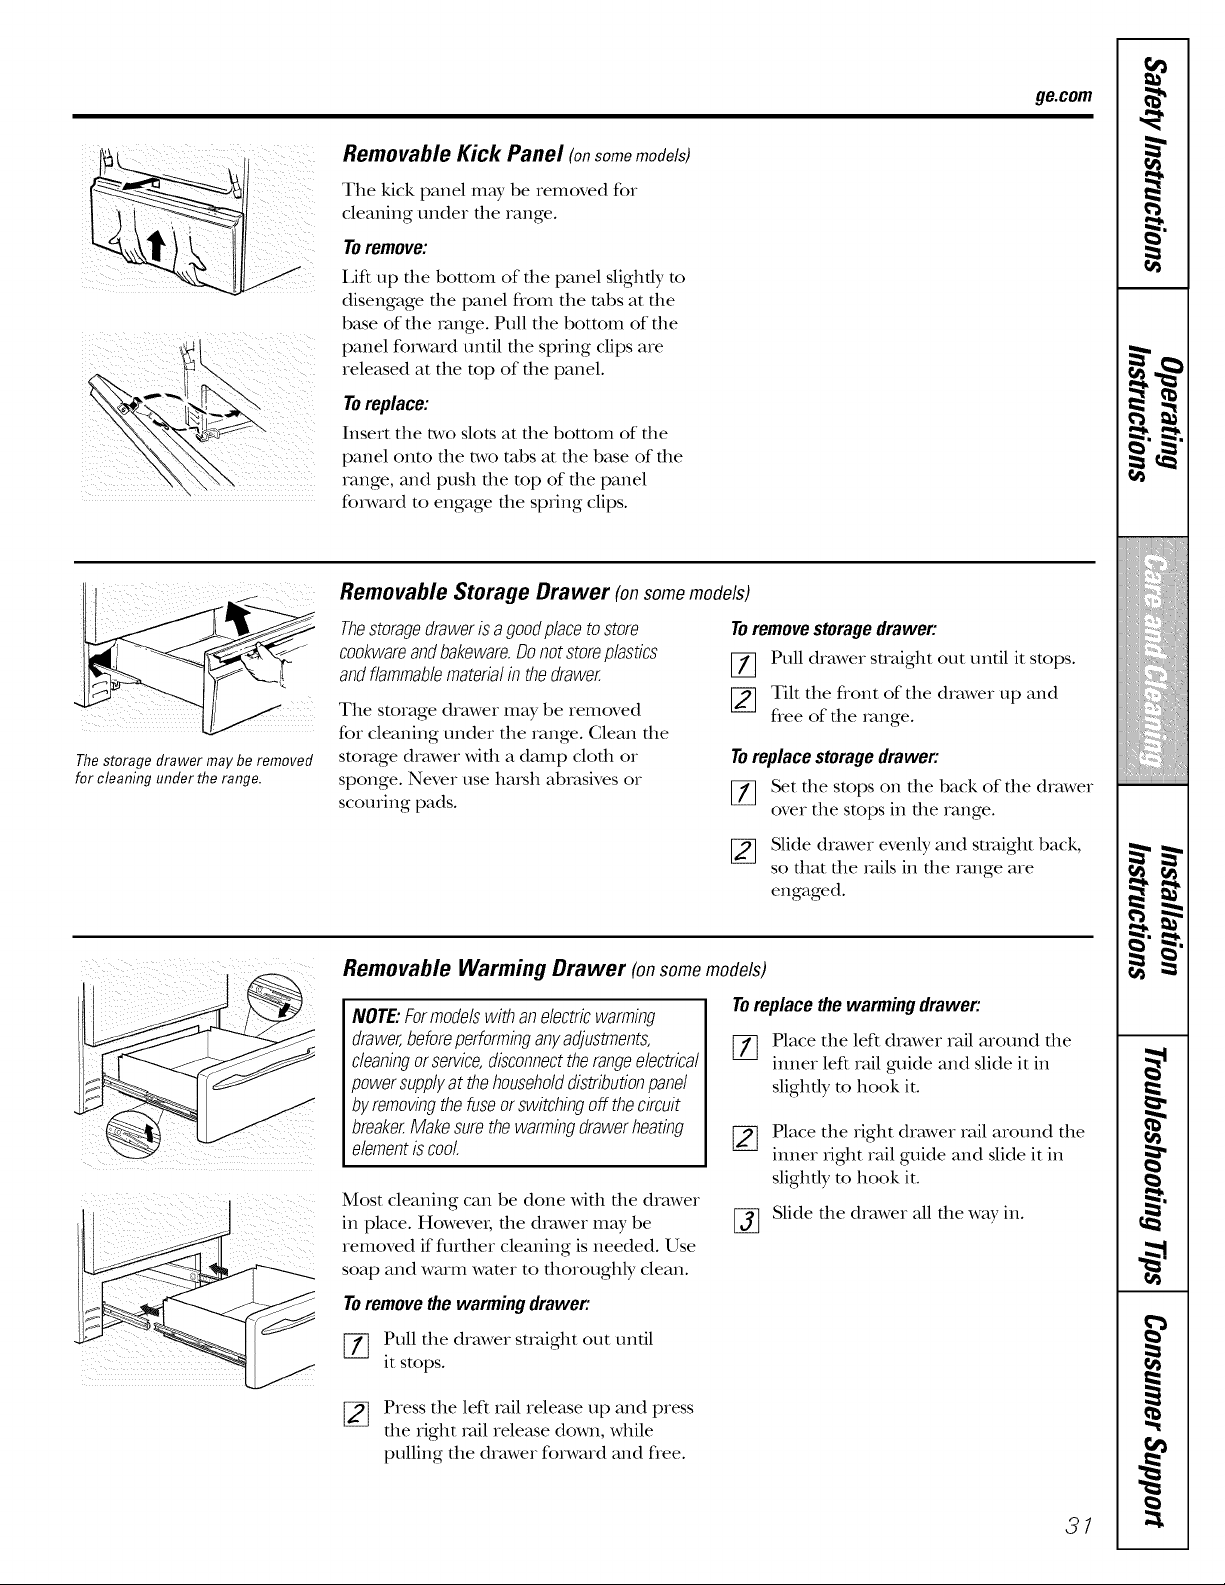
ge.com
Removable Kick Panel (onsomemodels)
Tile kick panel may be removed for
cleaning under the range.
Toremove:
I,ift up file bottom of file panel slightly m
disengage file panel flom the tabs at file
base of the range. Pull the bottom of the
panel f(nward until the spring clips are
released at the mp of the panel.
Toreplace:
Insert the two slots at the bottom of the
panel onto the two tabs at the base of the
range, and push the mp of the panel
forward to engage the spring clips.
The storage drawer may be removed
for cleaning under the range.
Removable Storage Drawer (on somemodels)
Thestoragedrawerisa goodplacetostore
cookwareandbakeware.Donotstoreplastics
andflammablematerialin thedrawer.
The storage drawer may be removed
for cleaning under the range. Glean the
storage drawer with a damp cloth or
sponge. Never use harsh able,sires or
scouring pads.
To remove storage drawer:
[7] Pull drawer straight out until it stops.
[_ Tilt the flont of the drawer lap and
flee of the _vmge.
Toreplace storage drawer:
[_ Set the stops on the back of the drawer
over the stops in the range.
[_ Slide drawer evenly and straight back,
so that the _vfilsin the range are
engaged.
NOTE:Formodelswith anelectricwarming
drawer,beforeperforminganyadjustments,
cleaningorservice,disconnecttherangeelectrical
powersupplyat thehouseholddistributionpanel
by removingthefuseorswitchingoff thecircuit
breaker.Make surethewarmingdrawerheating
elementiscool
Removable Warming Drawer (onsome models)
Toreplace the warming drawer:
[_ Place the left drawer rail around file
inner left rail guide and slide it in
slightly m hook it.
Most cleaning can be done with the drawer
in place. HoweveI; the drawer may be
removed if fltrther cleaning is needed. Use
soap and warm water to thoroughly clean.
%
Place the right drawer rail around the
inner fight rail guide and slide it in
slightly to hook it.
Slide the drawer all the way in.
Toremovethe warming drawer:
[-_ Pull the drawer smfight out until
it stops.
[_ Press the left rail release up and press
the right _vdlrelease down, while
pulling the drawer forward and flee.
31

,0
m
h !
b .t
_ w.
2F,;2]i_
i_i_!_iii_iJiiiiiiiiii_xiiii!
{/iiii{iiii{iiii{iii{iii{ii
i
m w.
i I
t
m
i
m
1=
Care and cleaning of the range.
i i;i
Some models have dual support
rods that will hold the cooktop up
while you clean underneath it.
Lift-Up Cooktop (onmodelswithstandardtwinburners)
Clean the area under the cooktop often. Clean under dm cooktop wid_ hot, soap},
Built-up soil, especially grease, may catch water and a clean clod1. If you removed
on fire. your surface burners while cleaning,
To make cleaning easier; tl_e cooktop may make sure d_ey are properly seated when
be lifted up. replacing d_em.
After cleaning, lower the cookmp (be
NOTE:Donotlift thecooktoponsealedburner
careful not to pinch your finge_).
models.Liftingthecooktopcanleadto damage
andimproperoperationof therange.
Toraise thecooktop:
Be sure the burners are turned off:
Remove the grates.
Grasp the two flont burner wells and
lift up.
Vent appearance and location vary.
Oven A# Vents
Never block tl_e vents (air openings) of tl_e
range. They provide the air inlet and outlet
dmt are necessary for tl_e range to operate
properly with correct combustion.
Air openings are locamd at d_e rear of
d_e cookmp, at d_e top and bottom of fl_e
oven doo_, and at the bottom of the range,
under the warming drawe_, storage drawer
or kick panel (depending on the model).
I
Pull the knob straight off the stem.
Lower Control Panel (Front Manifold Panel) and Knobs
It's a good idea to Mpe die connol panel
after each use of d_e oven. Use a damp
cloda to clean or rinse. For cleaning, use
mild soap and water or a 50/50 solution of
vinegar and wamL For rinsing, use clean
wamL Polish d_y with a soft cloth.
Do not use abrasive cleansers, strong liquid
cleaners, plastic scoudng pads or oven
cleaners on the conuol panel--they will
damage the finish.
Do not bend knobs by pulling them tap or
down or by hanging a towel or od_er such
loads. This can damage tt_e gas valve shaft.
The control knobs may be removed for
easier cleaning.
Make sure the knobs are in the Off
positions and pull them straight off the
stems for cleaning.
The knobs can be cleaned in a dishwasher
or they m W also be washed with soap and
wateL Make sure the insides of the knobs are
d_y before replacing.
Replace tlae knobs in tlae 0//position
to ensure proper placement.
Metal parts can be cleaned Mda soap and
wamL Do not use smel wool, abrasives,
ammonia, acids or commercial oven
cleaners. D_y with a soft cloth.
32
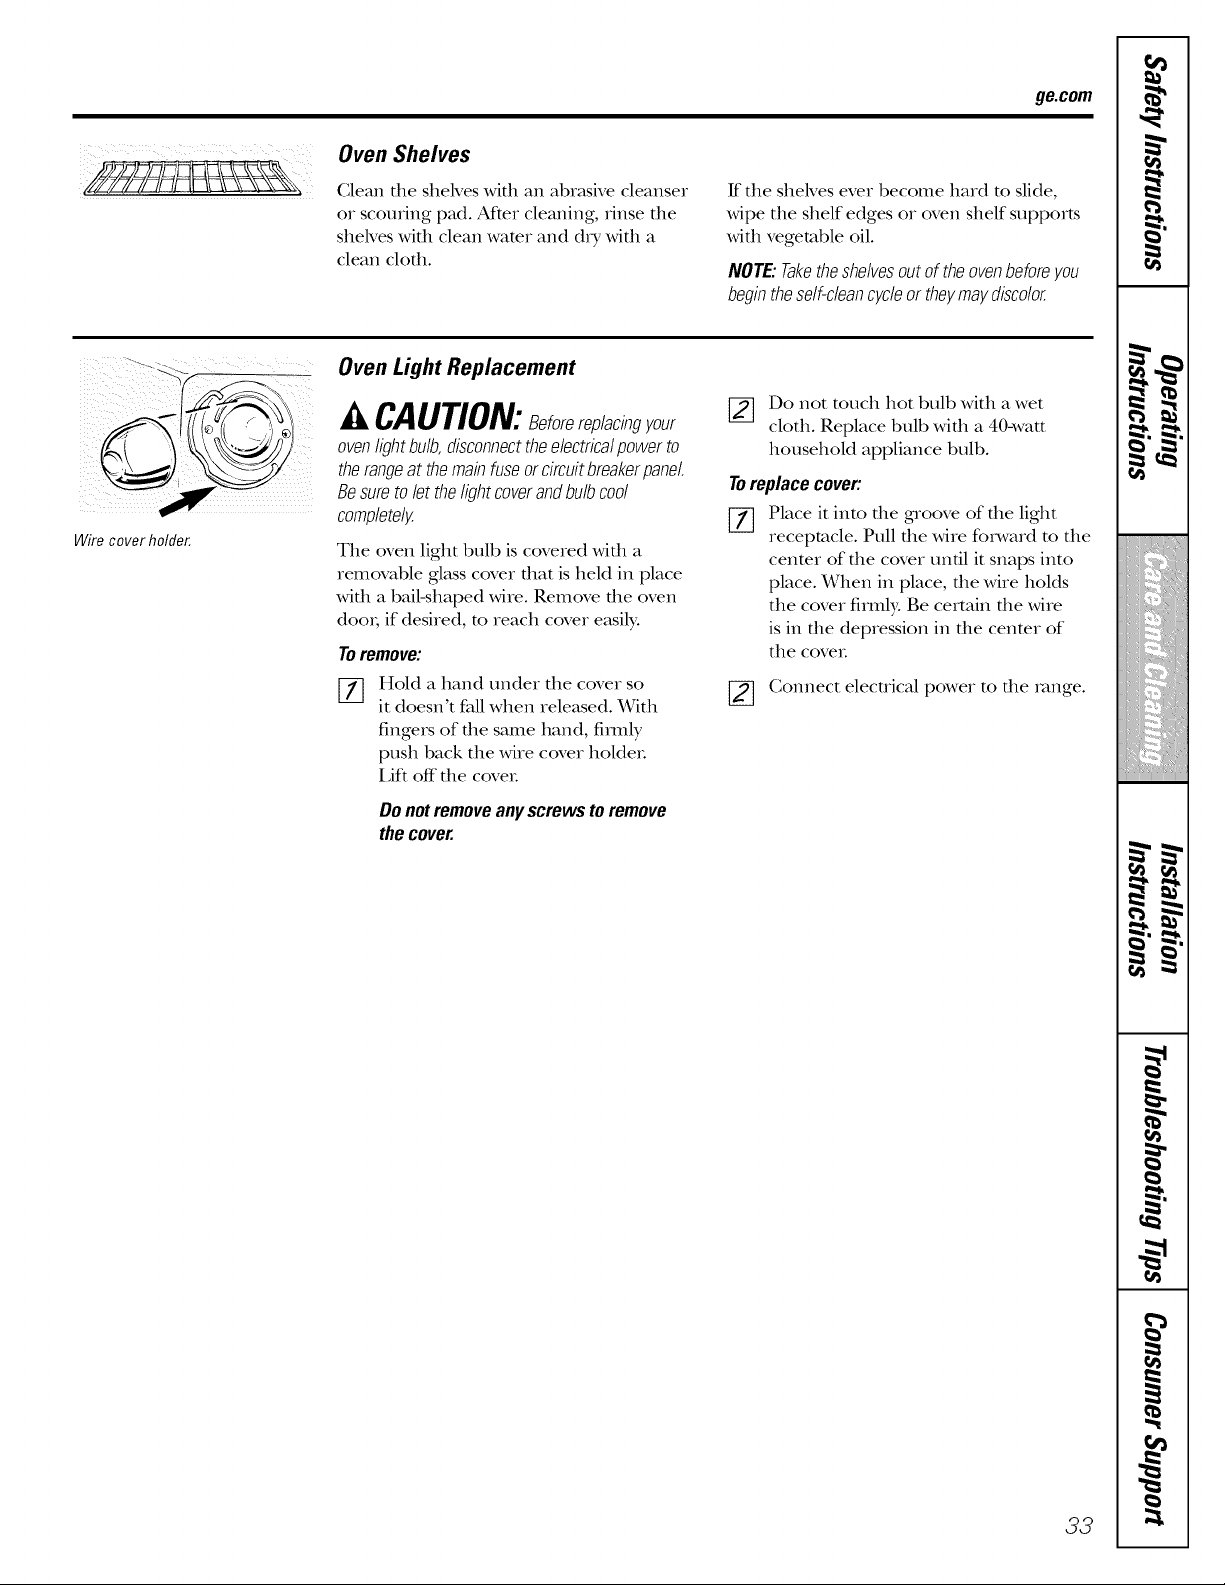
ge.com
Oven Shelves
Clean file shelves Mill an abr_tsive cleanser
or scouring pM. At_er cleaning, rinse file
sheh'es wifll clean water and d_y wifll a
clean cleft1.
ff the shelves ever become hard to slide,
wipe the shelf edges or oven shelf supports
with vegetable oil.
NOTE:Taketheshelvesoutof theovenbeforeyou
begintheself-cleancycleortheymaydiscolor.
Wire cover holder.
Oven Light Replacement
A CAUTION:8eforereplacingyour
oven light bulb, disconnectthe electrical power to
therange at the main fuse or circuit breakerpanel.
Be sure to let the light coverand bulb cool
completely.
The oven light bulb is covered wifll a
removable glass cover fllat is held in place
Mill a bMMhaped wire. Remove file oven
doo_; if desired, to reach cover easily:
Toremove:
Hold a hand under the cover so
it doesn't fall when released. With
fingers of the same hand, firefly
push back the wire cover holdeL
I Jft off" the coveL
Do not remove any screws to remove
the cover.
[_] Do not touch hot bulb with a wet
cloth. Replace bull) with a 40-watt
household appliance bull).
Toreplace cover:
[_ Place it into the groove of the light
receptacle. Pull the wire foIward m the
cenmr of the cover until it snaps into
place. When in place, the wire holds
the cover firmly. Be certain the wire
is in the depression in the cenmr of
the coveL
[_ Connect electrical power to the _vmge.
33
Installation Instructions
Range
I ff you have questions, call 1.800.GE.CARES or visit our Website at: ge.com I
In the Commonwealth of Massachusetts:
• This product must be installed by a licensed plumber
or gas fitter.
• When using ball-type gas strut-off valves, they shall be
tim T-handle type.
• A flexible gas connector; when used, must not exceed
3 feet.
BEFORE YOU BEGIN
Read these instructions completely and carefully.
Installation of this range must conform with local
codes, or in the absence of local codes, with the
National Fuel Gas Code, ANSI Z223.1/NFPA.54,
latest edition. In Canada, installation must conform
with the current Natural Gas Installation Code,
CAN/CGA-B 149.1 or the current Propane Installation
Code, CAN/CGA-B149.2, and with local codes where
applicable. This range has been design-certified by
CSA International according to ANSI Z21.1, latest
edition and Canadian Gas Association according to
CAN/CGA-I.1 latest edition.
As with any appliance using gas and generating heat,
there are certain safety precautions you should follow.
You will find these precautions in the Important Safoty
Information section in the front of this manual. Read
them careflflly.
• IMPORTANT - S ,vetheseinstructions
for loc}d electrical inspector's use.
• IMPORTANT - Obsei eallgoverning
codes and ordinances.
• Note to Installer - Be sure to leave these
instructions with the ConsumeL
• Note to Consumer - Keep these instructions for
flmne reference.
• Note - This appliance must be properly grounded.
• Servicer - The electrical diagram is in an envelope
attached to the back of the range.
• Skill level - Installation of tiffs appliance requires basic
mechanical skills.
• Proper installation is the responsibility of the insmlleL
• Product failure due to improper installation is not
r
covered under the X_armnty.
PART INCLUDED
Anti-Tip bracket kit
FOR YOUR SAFETY
Do not store or use combustible materials, gasoline or
other flammable vapors and liquids in the vicinity of this
or any other appliance.
If you smell gas:
Open windows.
O Don't much electrical switches.
Extinguish any open flame.
hmnediately call your gas supplieL
TOOLS YOU WILL NEED
Phillipsscrewdriver
Flat-blade screwdriver Open-end or
adjustable wrench
Pencil and ruler
Level
Pipe wrenches (2)
(one for backup) Drill, awl or nail
MATERIALS YOU MAY NEED
• Gas line stmt-offvalve.
• Pipe joint sealant or UL-approved pipe flnead tape
with Teflon* that resists action of natural and LP gases.
• Flexible metal appliance comlecmr (1/2" I.D.)
A 5-foot length is recommended for ease of installation
but other lengths are acceptable. Never use an old
comlecmr when inst_flling a new range.
• Flare union adaptor for connection m gas supply line
(3/4" or 1/2" NPT x 1/2" I.D.)
• Flare union adaptor for connection m pressure
regulator on range (1/2" NPT x 1/2" I.D.)
• Liquid leak demcmr or soapy wamL
• Lag bolt or 1/2" O.D. sleeve anchor (for concrete
floors only).
*Teflon: Regismred trademark of DuPont
34
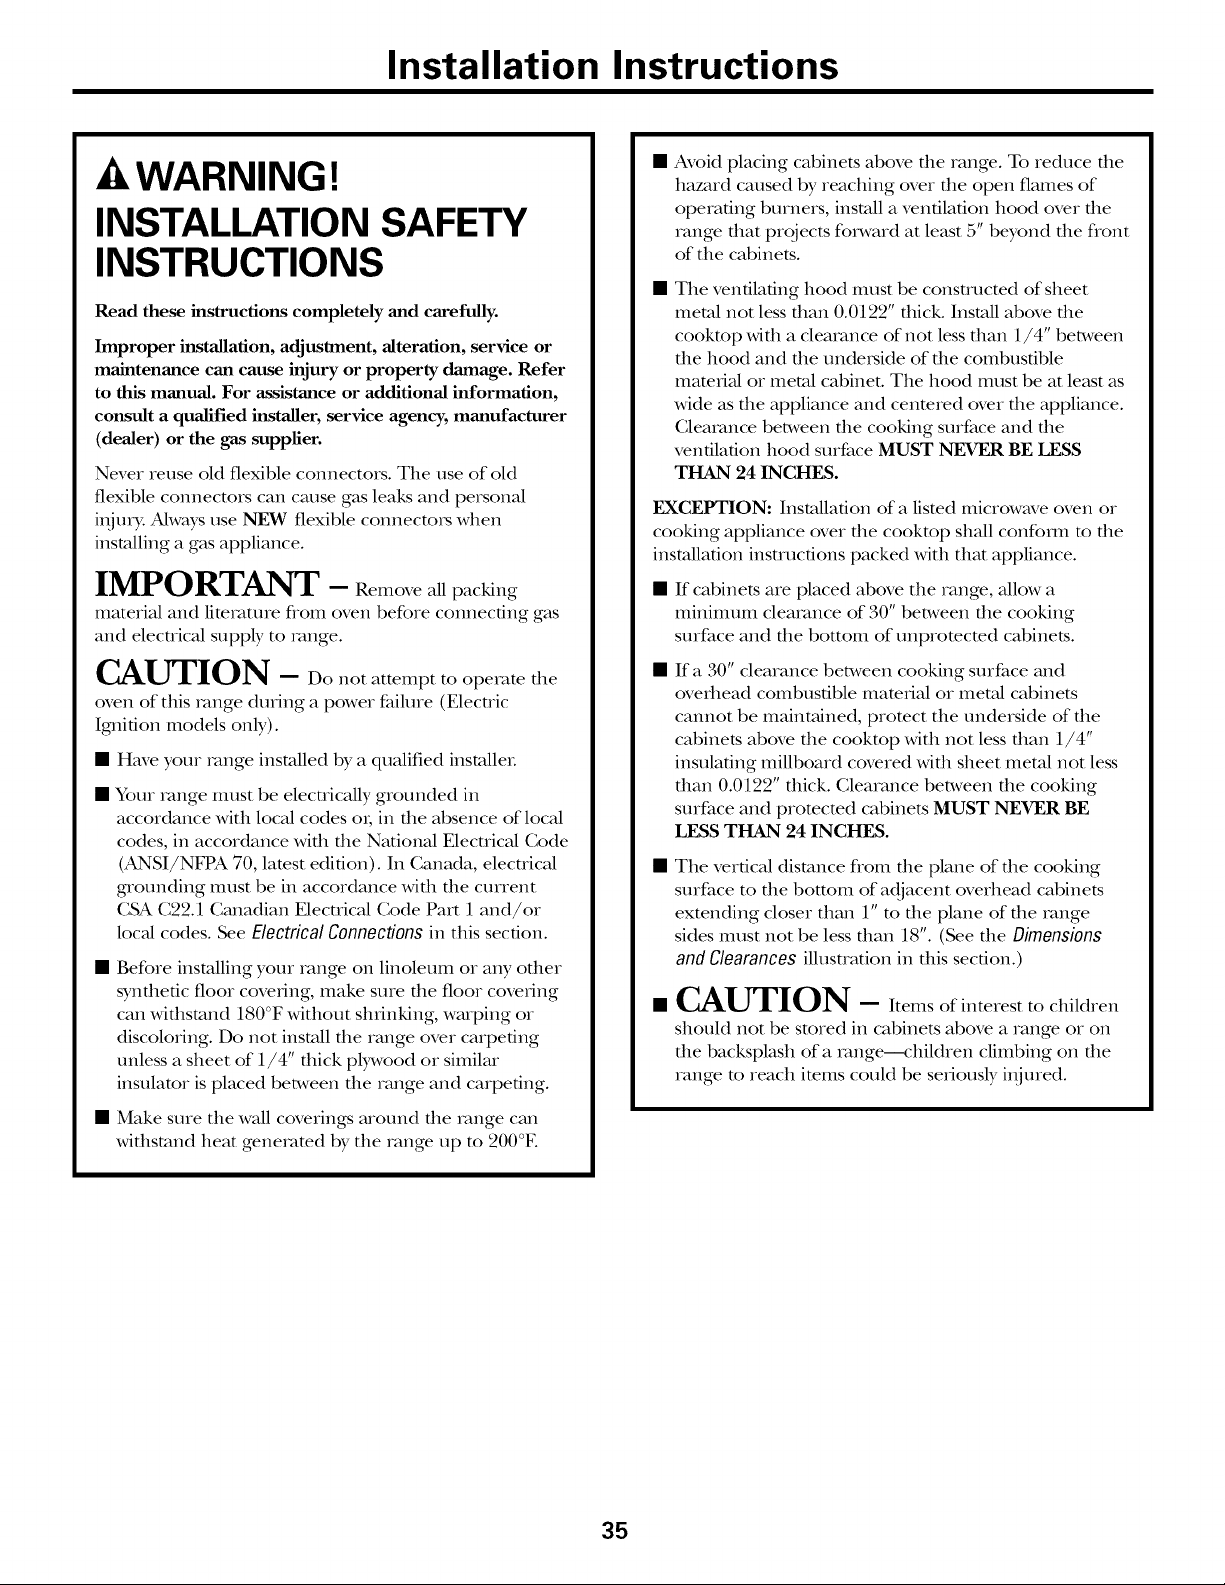
Installation Instructions
-AWARNING!
INSTALLATION SAFETY
INSTRUCTIONS
Read these instructions completely and carefully.
Improper installation, adjustment, alteration, service or
maintenance can cause injury or property damage. Refer
to this manual. For assistance or additional information,
consult a qualified installer, service agency, manufacturer
(dealer) or the gas supplier.
Never reuse old flexible connectors. Tile use of old
flexible connectors can cause gas leaks and personal
i_jury: Always use NEW flexible connectops when
insudling a gas appliance.
IMPORTANT - Removeallpacking
material and literature flom oven before comlecting gas
and elecuical supply to range.
CAUTION - Do.atattempt to operate tile
oven of this range during a power failure (Electric
Igmifion models only).
• Have your range installed by a qualified installer.
• Your range must be electricMly grounded in
accordance with local codes at, in file absence of local
codes, in accordance wifll file National Electrical Code
(ANSI/NFPA 70, latest edition). In Canada, electrical
gaounding must be in accordance wifll file current
CSA C22.1 Canadian Elecuical Code Part 1 and/or
local codes. See ElectricalConnectionsin this section.
• Before installing your range on linoleum oi any adler
synthetic floor covering, make sure tile floor covering
can withstand 180°F without stMnking, warping or
discoloring. Do not install the range over carpeting
unless a sheet of 1/4" thick plywood or similar
insulator is placed between the range and carpeting.
• Make sure tile wall coverings around tile range can
withstand heat generated by tile range up to 200°E
Avoid placing cabinets above file range. To reduce file
hazard caused by reaching over file open flames of
operating burners, insudl a ventilation hood over file
range fllat projects foIward at least 5" beyond file flont
of tile cabinets.
Tile ventilating hood must be consmtcmd of sheet
metal not less than 0.0122" dfick. Install above tile
cooktop with a clearance of not less than 1/4" between
the hood and tile underside of the combustible
matei-ial at metal cabinet. Tile hood must be at least as
wide as tile appliance and cenmred over tile appliance.
Clearance between tile cooking surface and the
ventilation hood surface MUST NEVER BE LESS
THAN 24 INCHES.
EXCEPTION: Installation of a listed microwave oven or
cooking appliance over tile cooktop shall confoml to tile
installation instructions packed with that appliance.
If cabinets are placed above tile range, allow a
minimum clearance of 30" between tile cooking
surface and tile bottom of unprotected cabinets.
If a 30" clearance between cooking surface and
overhead combustible mamrial oi metal cabinets
cannot be maintained, promct tile underside of the
cabinets above tile cookmp with not less than 1/4"
insulating millboard covered with sheet metal not less
than 0.0122" thick. (;learance between the cooking
surface and protecmd cabinets MUST NEVER BE
LESS THAN 24 INCHES.
Tile verficM distance flom file plane of file cooking
surface to file bottom of adjacent overhead cabinets
extending closet than 1" to file plane of file range
sides must not be less fllan 18". (See file Dimensions
and Clearances illusuation in dlis section.)
CAUTION - Items of interest to children
should not be stored in cabinets above a range or on
tile backsplash of a range---chiMren climbing on tile
range to reach items couM be seriously injured.
35
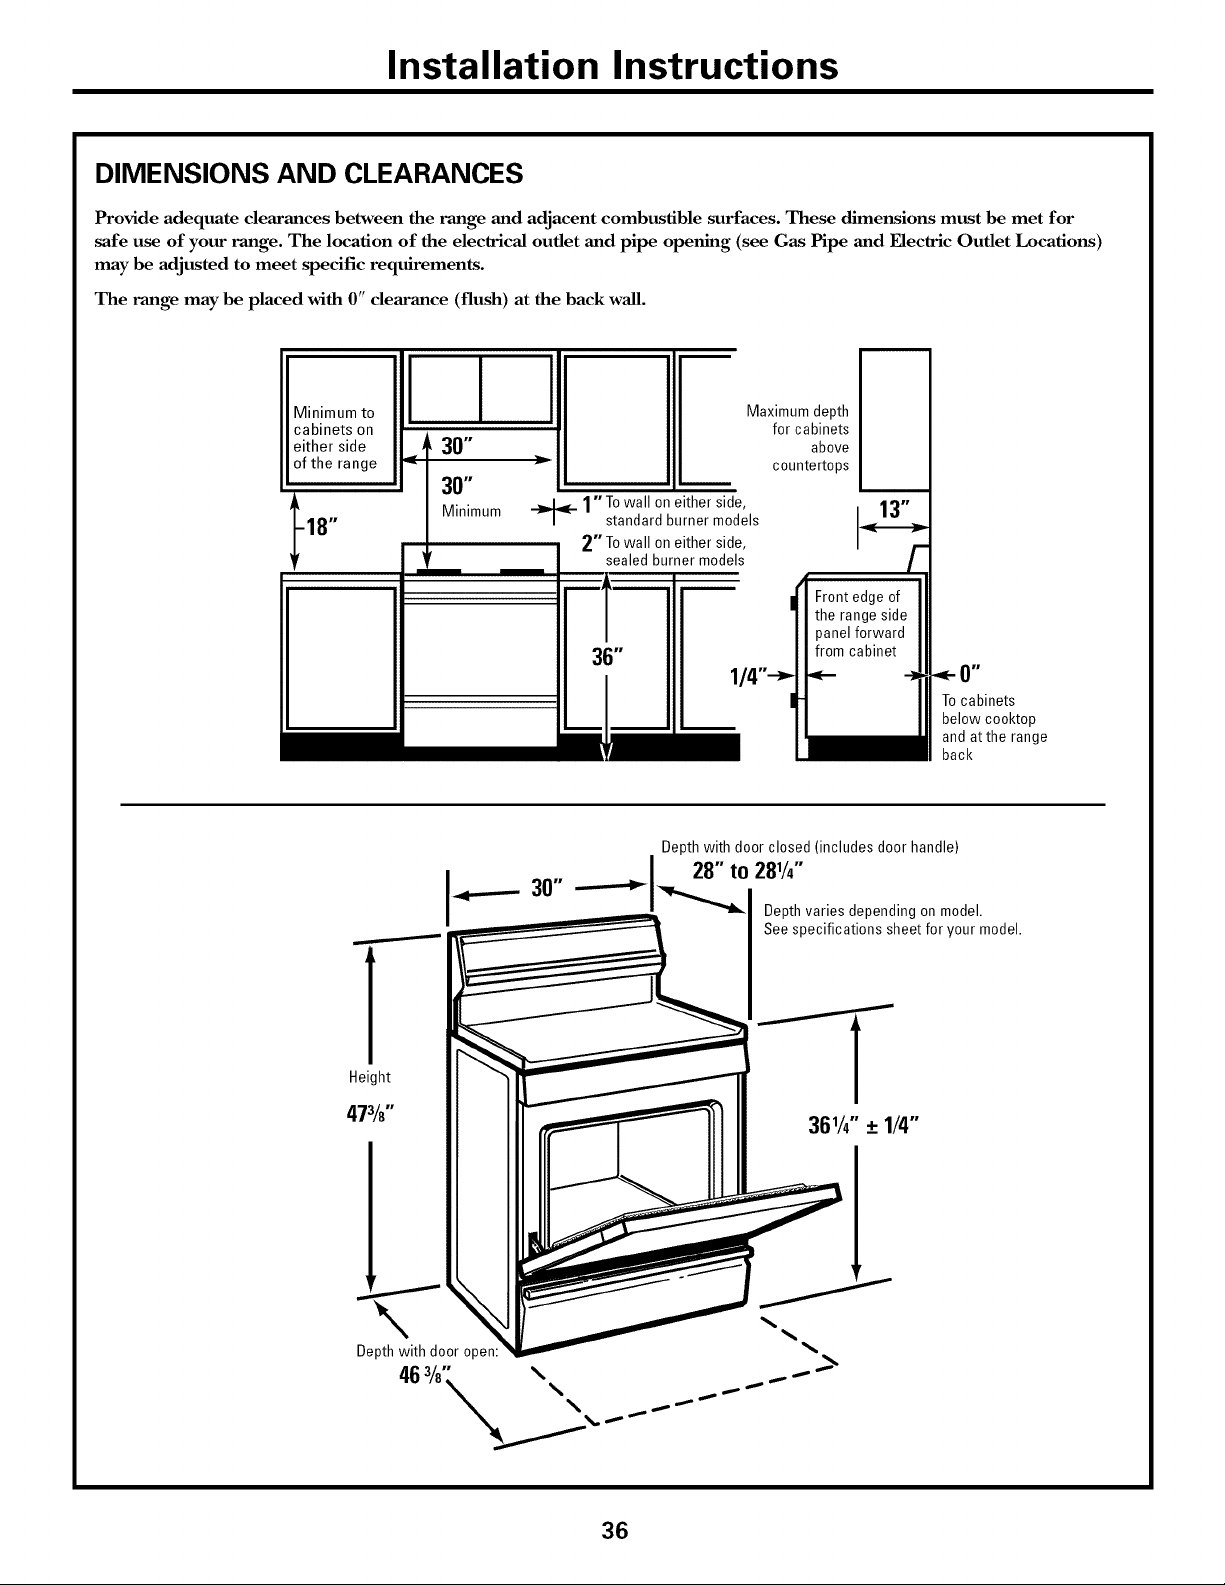
Installation Instructions
DIMENSIONS AND CLEARANCES
Provide adequate clearances between the range and adjacent combustible surfaces. These dimensions must be met for
safe use of your range. The location of the electrical outlet and pipe opening (see Gas Pipe and Electric Outlet Locations)
may be adjusted to meet specific requirements.
The range may be placed with 0" clearance (flush) at the back wall.
Minimum to
cabinets on
either side
of the range
-18"
I I I
__ 30"
30"
Minimum
Maximum depth
for cabinets
above
countertops
_- 1"To wall on either side,
standard burner models
2"To wall on either side,
sealed burner models
To cabinets
below cooktop
and atthe range
back
r
1
Height
473/8"
Depth with door closed (includes door handle)
30" ------_1-_ ° 281/4"
Depth varies depending on model.
See specifications sheet for your model.
Depth with door oper
46 =/8. _,\\ _._
36
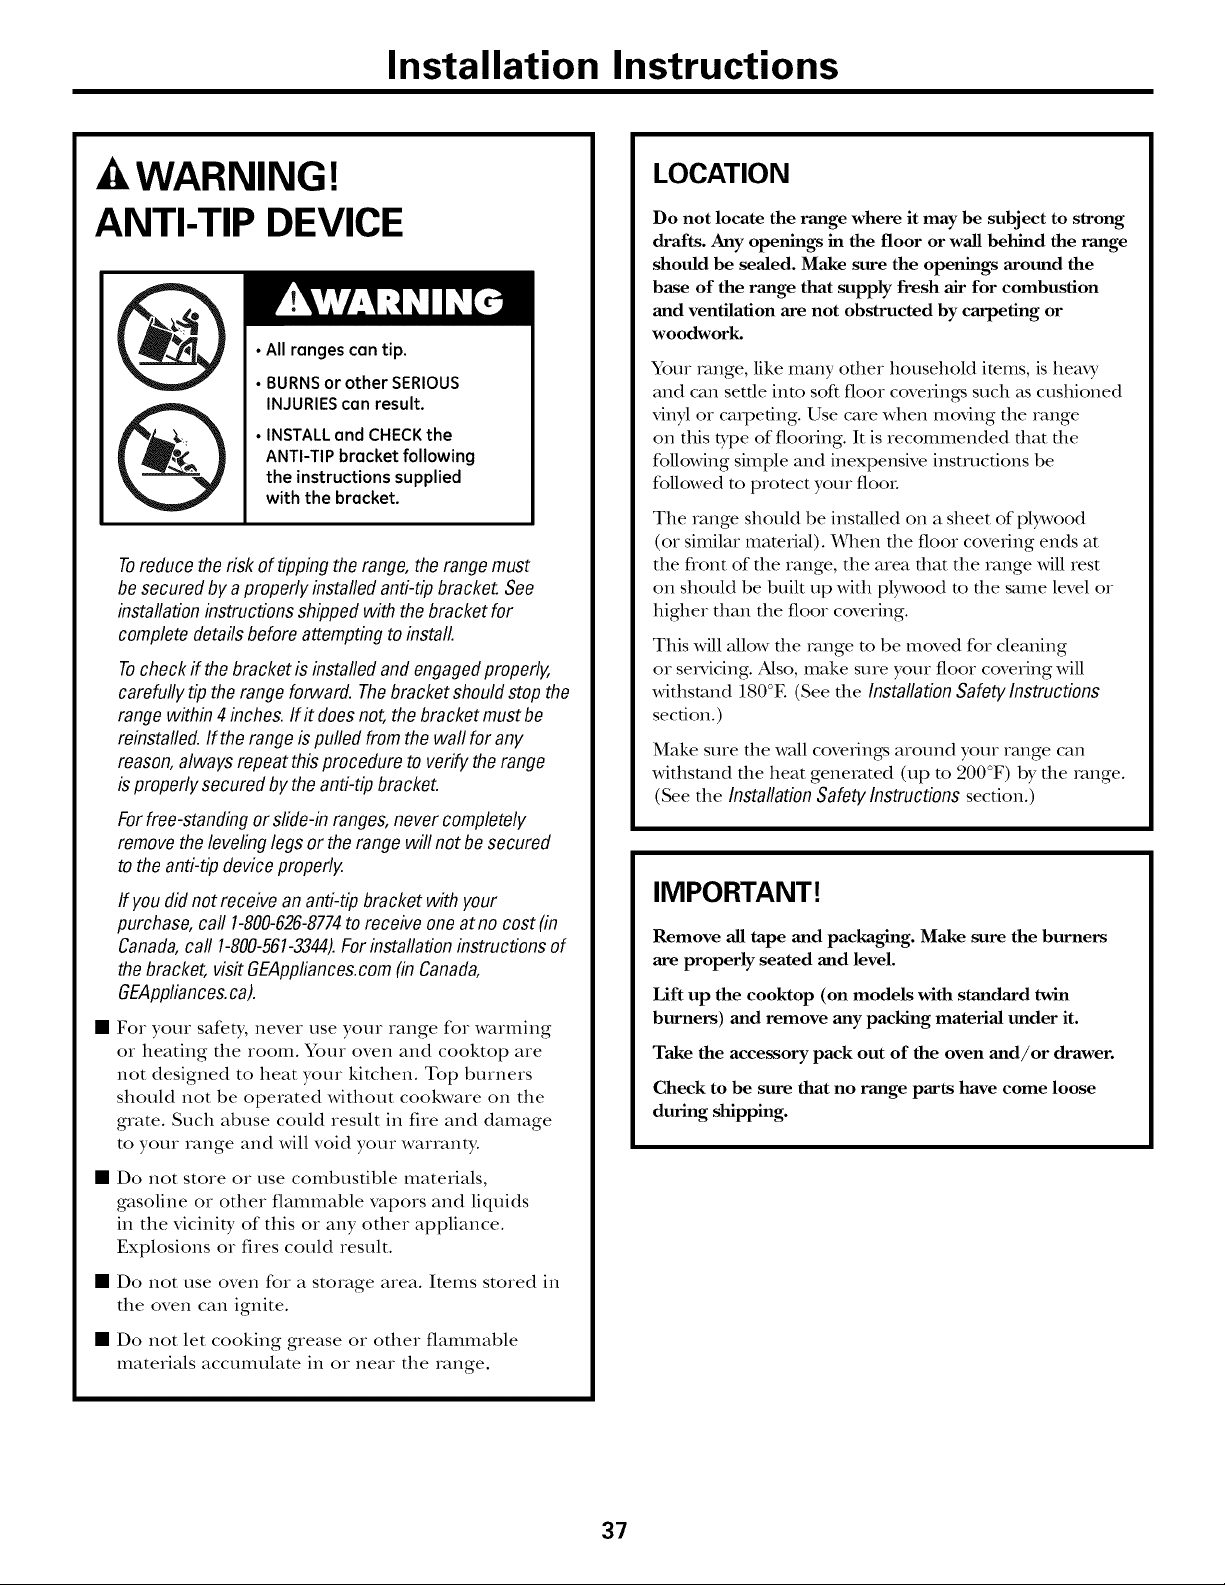
Installation Instructions
-AWARNING!
ANTI-TIP DEVICE
• All ranges can tip.
• BURNSor other SERIOUS
INJURIEScan result.
• INSTALL and CHECKthe
ANTI-TIP bracket following
the instructions supplied
with the bracket.
Toreduce the risk of tipping the range, the rangemust
besecured by aproperly installedanti-tip bracket. See
installation instructionsshipped with the bracket for
completedetails before attemptingto install.
Tocheck ff the bracket is installed and engagedproperly,
carefully tip the rangeforward. Thebracket shouldstop the
range within 4inches. If f does not,the bracket must be
reinstalled.If the rangeis pulled from the wall for any
reason,always repeat this procedure to verify the range
is properly secured by the anti-tipbracket.
For free-standingor slide-in ranges,never completely
removethe leveling legs or the rangewill not besecured
to the anti-tip device properly.
ff you didnot receivean anti-tip bracket with your
purchase, call 1-800-626-8774to receive one at no cost(in
Canada,call 1-800-561-3344).Forinstallation instructions of
the bracket,visit GEAppliances.com(in Canada,
GEAppliances.ca).
• For your safety, never use your range for warming
or heating the room. Your oven and cooktop are
not designed to heat your kitchen. Top burners
should not be operated without cookwaze on the
grate. Such abuse could result in fire and damage
to your range and will void your warranty.
• Do not store or use combustible materials,
gasoline or other flammable vapors and liquids
in the vicinity of this or any other appliance.
Explosions or fires could result.
• Do not use oven for a storage area. Items stored in
the oven can ignite.
• Do not let cooking grease or other flammable
matezials accumulate in oz neaz the zange.
LOCATION
Do not locate the range where it may be subject to strong
drafts. Any openings in the floor or wall behind the range
should be sealed. Make sure the openings around the
base of the range that supply fresh air for combustion
and ventilation are not obstructed by carpeting or
woodwork.
Your zvmge, like many adler household items, is heaxy
and can settle into soft floor coverings such as cushioned
vinyl or cazpefing. Use care when moving the range
on this type of flooring. It is recommended that the
following simple and inexpensive insmzcfions be
followed to promct your tool
The range should be installed on a sheet of plywood
(or similar material). When the floor covering ends at
the flont of the range, the area that the range will rest
on should be built up with plywood m the same level or
higher than the floor covering.
This will allow file zvmge m be moved for cleaning
or sezMcing. Also, make sure your floor covering will
withstand 180°E (See the Installation Safetylnstructions
section.)
Make sure die wall coverings around your range can
withstand the heat generated (up m 200°F) by the zvmge.
(See the InstallationSafetyInstructionssection.)
IMPORTANT[
Remove all tape and packaging. Make sure the burners
are properly seated and level.
Lift up the cooktop (on models with standard twin
burners) and remove any packing material under it.
Take the accessory pack out of the oven and/or drawer.
Check to be sure that no range parts have come loose
during shipping.
37
Installation Instructions
IT] PROVIDE ADEQUATE
GAS SUPPLY
Your range is designed to operate at a pressure of 4" of
water column on natural gas or, if designed for LP gas
(propane or butane), 10" of water colmnn.
Make sure you are supplying your range widl die type
of gas for which it is designed.
This range is convertible for use on natural or
propane gas. If you decide to use dlis range on I,P gas,
conversion must be made by a qualified LP installer
before attempting to operate the range on dmt gas.
For proper operation, die pressure of natural gas
supplied to the regulator must be between 4" and 13"
of water cohmm.
For LP gas, die pressure supplied must be between 10"
and 13" of water cohmm.
_4qlen checking for proper operation of die regulator,
tile inlet pressure must be at least 1" greater dmn tile
operating (manifold) pressure as given above.
The pressure regulator located at the inlet of die range
manifold must remain in the supply line regardless of
whedler naumd or LP gas is being used.
A flexible metal appliance connector used to connect die
range to the gas supply line should have an I.D. of 1/2"
and be 5 feet in length for ease of installaOon. In Canada,
flexible connectors must be single wall metal connectors
no longer than 6 feet in length.
CONNECT THE RANGE TO GAS
Shut off the main gas supply valve before disconnecting
the old range and leave it off until the new hookup has
been completed. Don't forget to relight the pilot on other
gas appliances when you turn the gas back on.
Because hard piping restricts movement of the range,
the use of a CSA Inmrnafional-cerfified flexible metal
appliance connector is recommended unless local codes
require a hard-piped connection.
Never use an old connector when installing a new range.
If the hard piping method is used, you must carefidly
align the pipe; the range cannot be moved after the
connection is made.
To prevent gas leaks, put pipe joint compound on, or
wrap pipe thread tape with Teflon* around, all male
(exmrnal) pipe threads.
A. Install a manual gas line stmt-offvalve in the gas line in
an easily accessed location outside of the range. Make
sure everyone operating the range knows where and
how m shut off" the gas supply m the range.
B. Install male 1/2" flare union adapter to the 1/2" NPT
inmrnal thread at inlet of regulator. Use a backup
wrench on the regulator fitting m avoid damage.
When installing die range flom die flont, remove die
90 ° elbow for easier installation.
C. Install male 1/2" or 3/4" flare union adapter m die
NPT inmrnal dnead of the manual shut-off valve,
raking care m back-up the strut-off valve m keep it
flom arming.
D. Connect flexible metal appliance connector to the
adapter on the range. Position range m permit
connection at the strut-off valve.
E.
When all connections have been made, make sure
all range controls are in die offposifion and turn on
die mMn gas supply valve. Use a liquid leak detector
at all joints and connections to check for leaks in
die system.
WARNING: DO NOT USE A FLAME
TO CHECK FOR GAS LEAKS.
When using test pressures greater than 1/2 psig to
pressure test tile gas supply system of tile residence,
disconnect the range and individual strut-off valve
flom the gas supply piping. When using test pressures
of 1/2 psig or less to test the gas supply system, simply
isolate the range flom the gas supply system by closing
the individual shut-off vane.
*Teflon: Registered trademark of DuPont
38
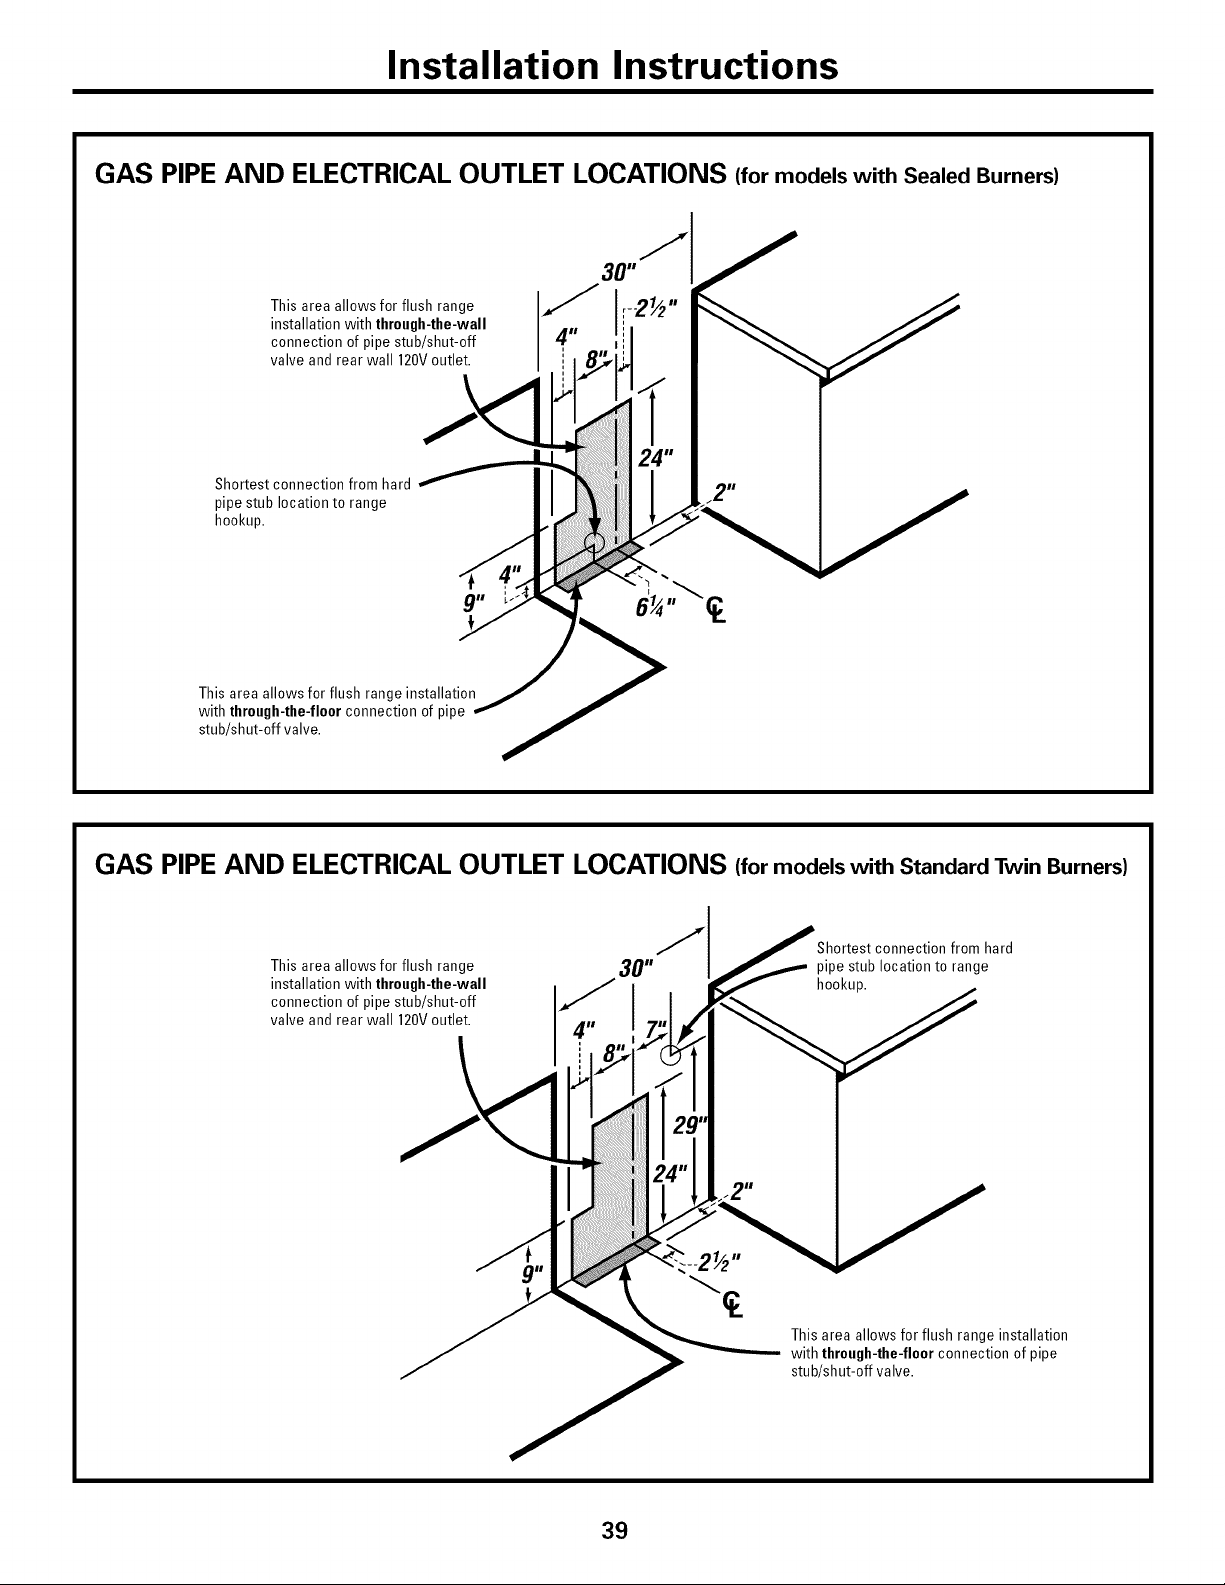
Installation Instructions
GAS PIPE AND ELECTRICAL OUTLET LOCATIONS (for models with Sealed Burners)
This area allows for flush range
installation with through-the-wall
connection of pipe stub/shut-off
valve and rear wall 120Voutlet.
\
Shortest connection from hard
pipe stub location to range
hookup.
g" E
This area allows for flush range installation
with through-the-floor connection of pipe
stub/shut-off valve.
GAS PIPE AND ELECTRICAL OUTLET LOCATIONS (for models with Standard Twin Burners)
This area allows for flush range
installation with through-the-wall
connection of pipe stub/shut-off
valve and rear wall 120Voutlet.
from hard
pipe stub location to range
hookup.
This area allows for flush range installation
with through-the-floor connection of pipe
stub/shut-off valve.
39
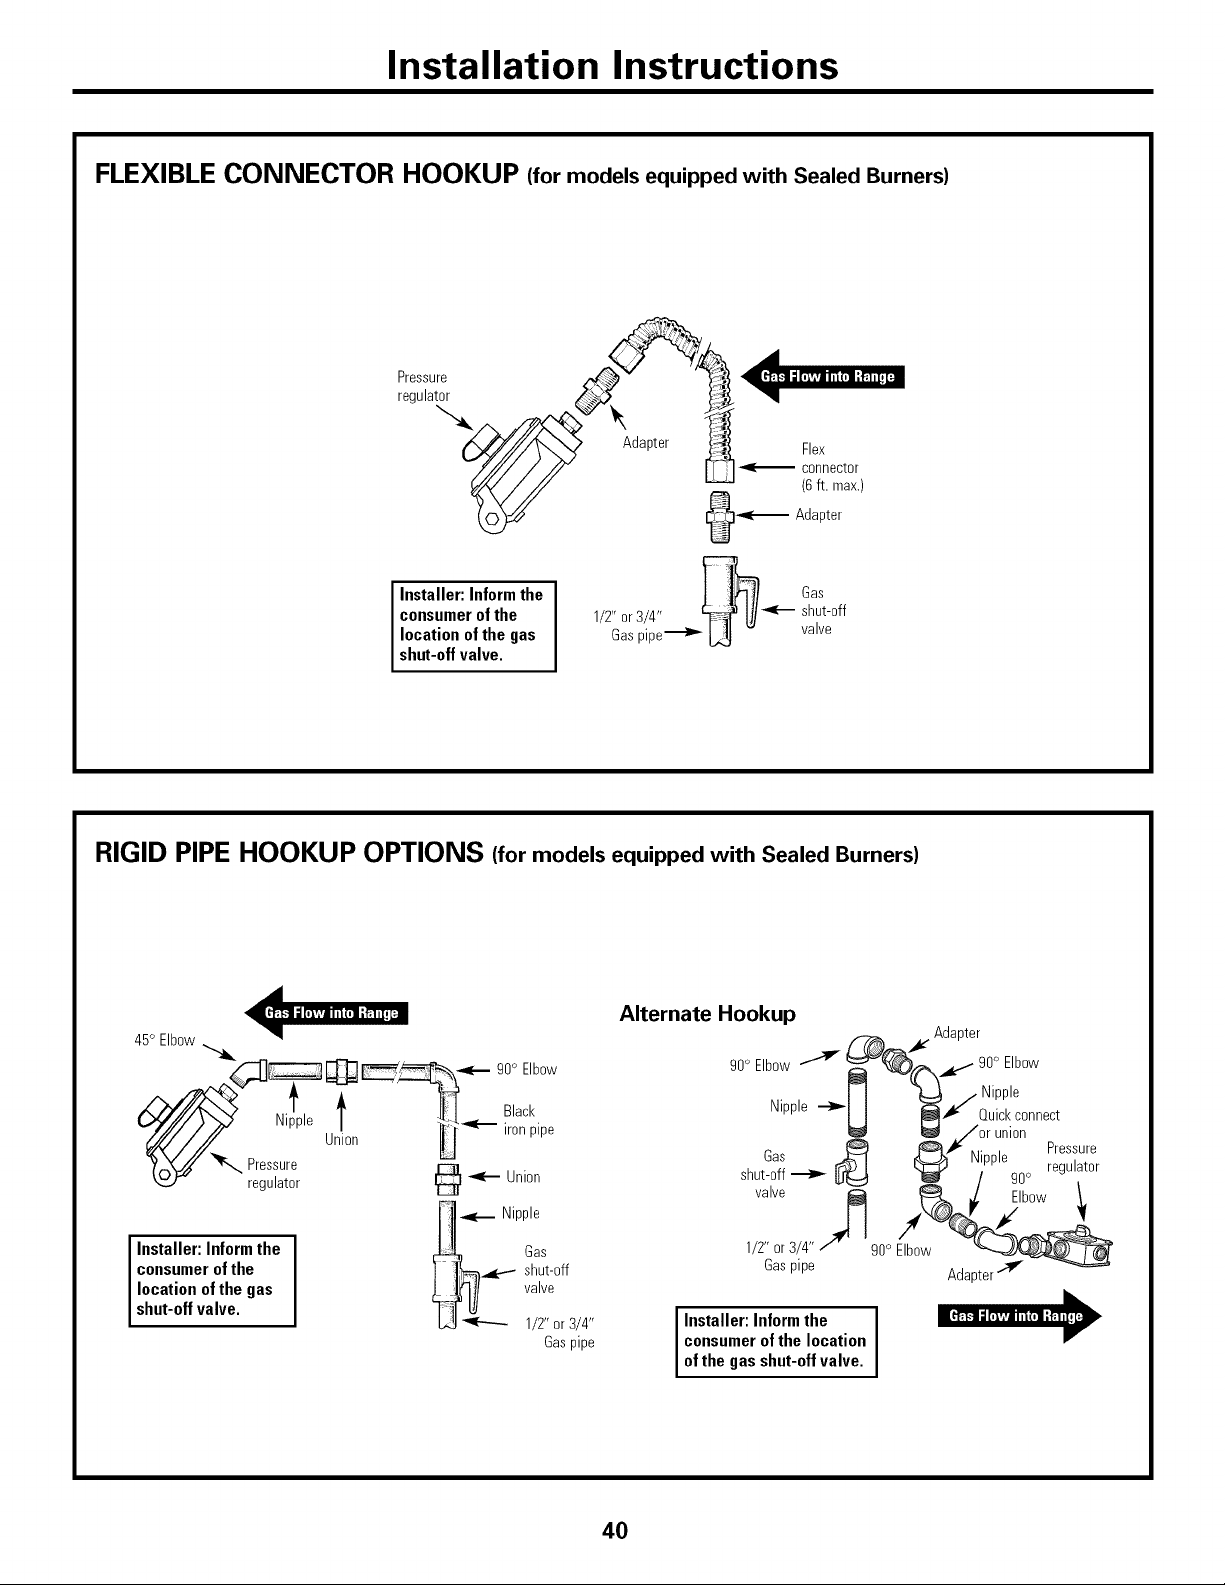
Installation Instructions
FLEXIBLE CONNECTOR HOOKUP (for models equipped with Sealed Burners)
Installer: Informthe
consumerofthe
location ofthe gas
shut-offvalve.
Gas
1/2" or 3/4" _--- shut-off
Gaspipe_ L_ - valve
RIGID PIPE HOOKUP OPTIONS (for models equipped with Sealed Burners)
45° Elbow
___ 90° Elbow
_iiePle Ul!°n __'_ _Ckpipe
r :;Ltor @*--On,on
.<._ Nipple
Installer: Inform the _ Gas
consumer of the I ]_q._.-.-- shut-off
location of the gas ! J_I/ valve
shut-off valve. "T_ _ 1/2" or 3/4"
Gaspipe
Alternate Hookup
Adapter
90o Elbow --"_ __ _..,- 90° Elbow
Nipple --_
H _/ Quickconnect
_ /or union
_ _1€ ,,. Pressure
was Nipple
shut-off _ _ I_ 90° regulator
valve /_ Elbow 1
1/2" or 3/4"
90° Elbow
Gaspipe
i Installer:Informthe i
consumerofthe location
ofthe gas shut-offvalve.
Adapter
40
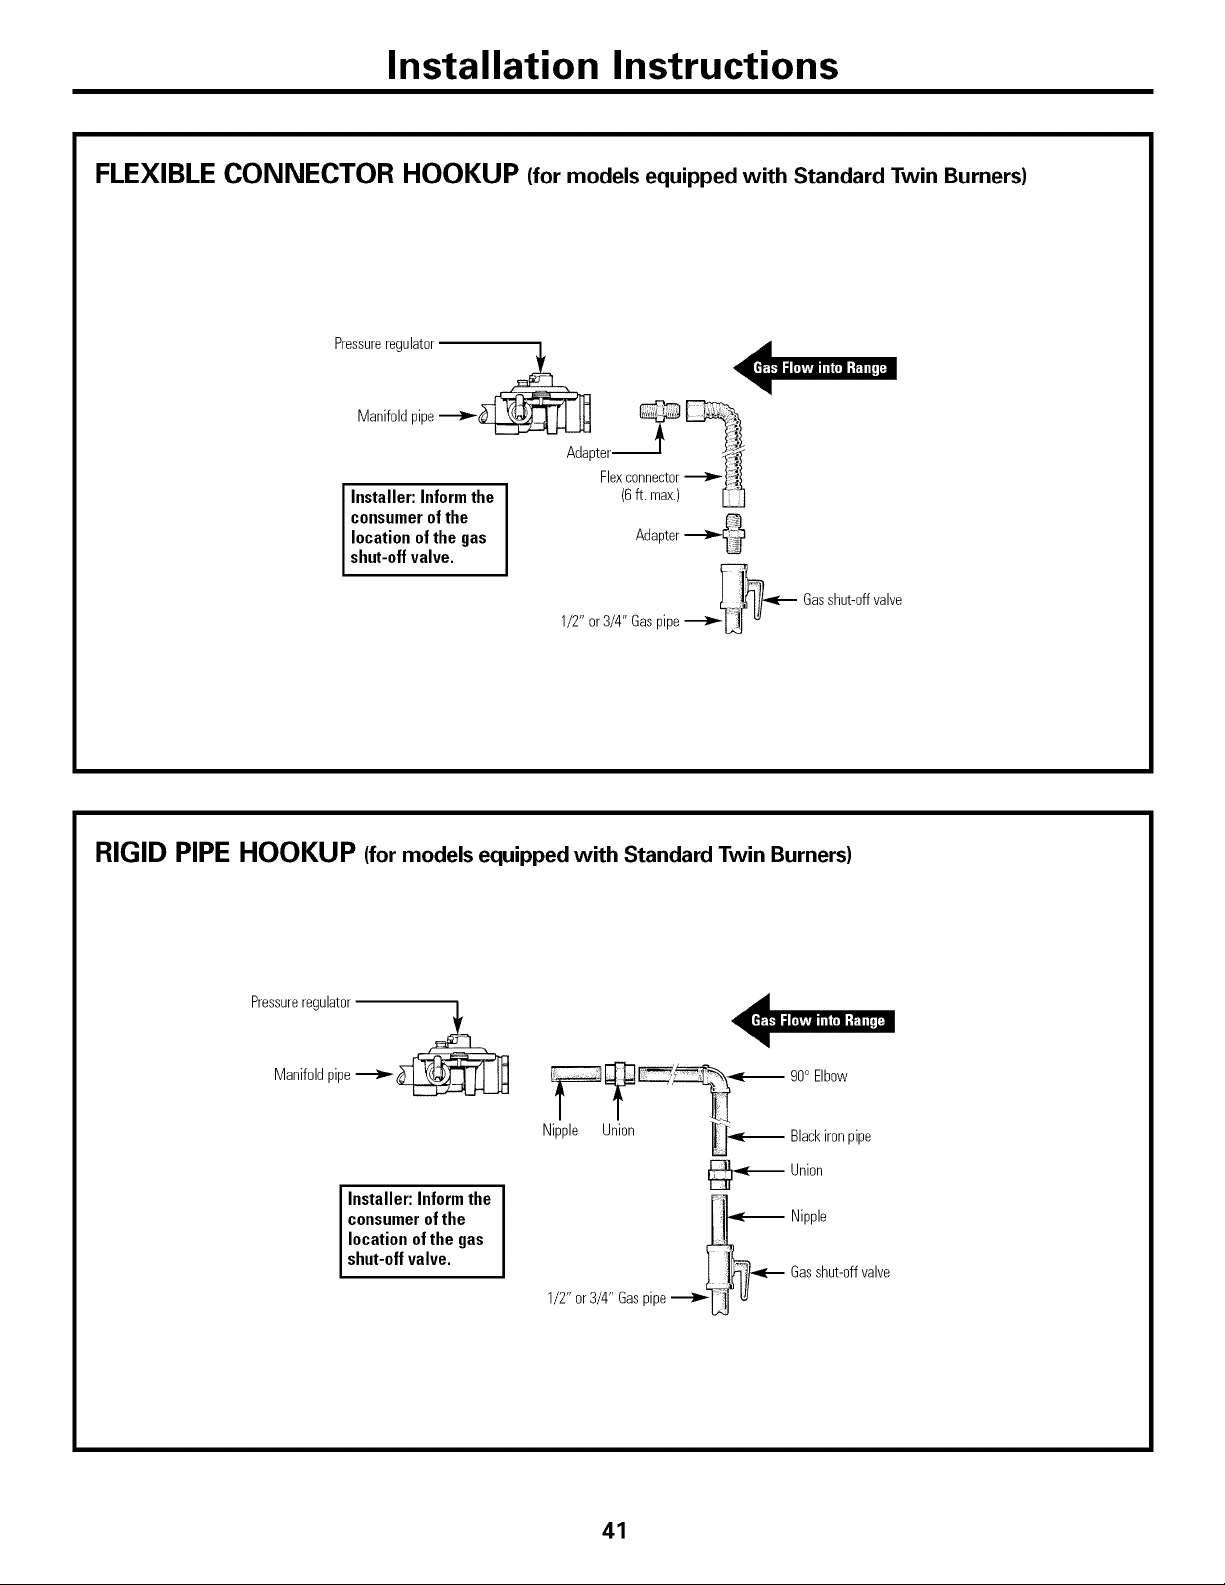
Installation Instructions
FLEXIBLE CONNECTOR HOOKUP (for models equipped with Standard Twin Burners)
Pressureregulator
Manifoldpipe __
Adapter ? _Flexconnector
Installer: Inform the (6ft. max.)
consumer of the
location of the gas Adapter
shut-off valve.
1/2" or3/4" Gaspipe__ Gasshut-offvalve
RIGID PIPE HOOKUP (for models equipped with Standard Twin Burners)
Pressureregulator
Manifoldpipe __
Installer:Inform the
consumerofthe
location of the gas
shut-offvalve.
_ 90° Elbow
Nipple Union _ Blackironpipe
_ Union
_ Nipple
_l_(--- Gasshut-offvalve
1/2" or3/4" Gaspipe _U t_
41
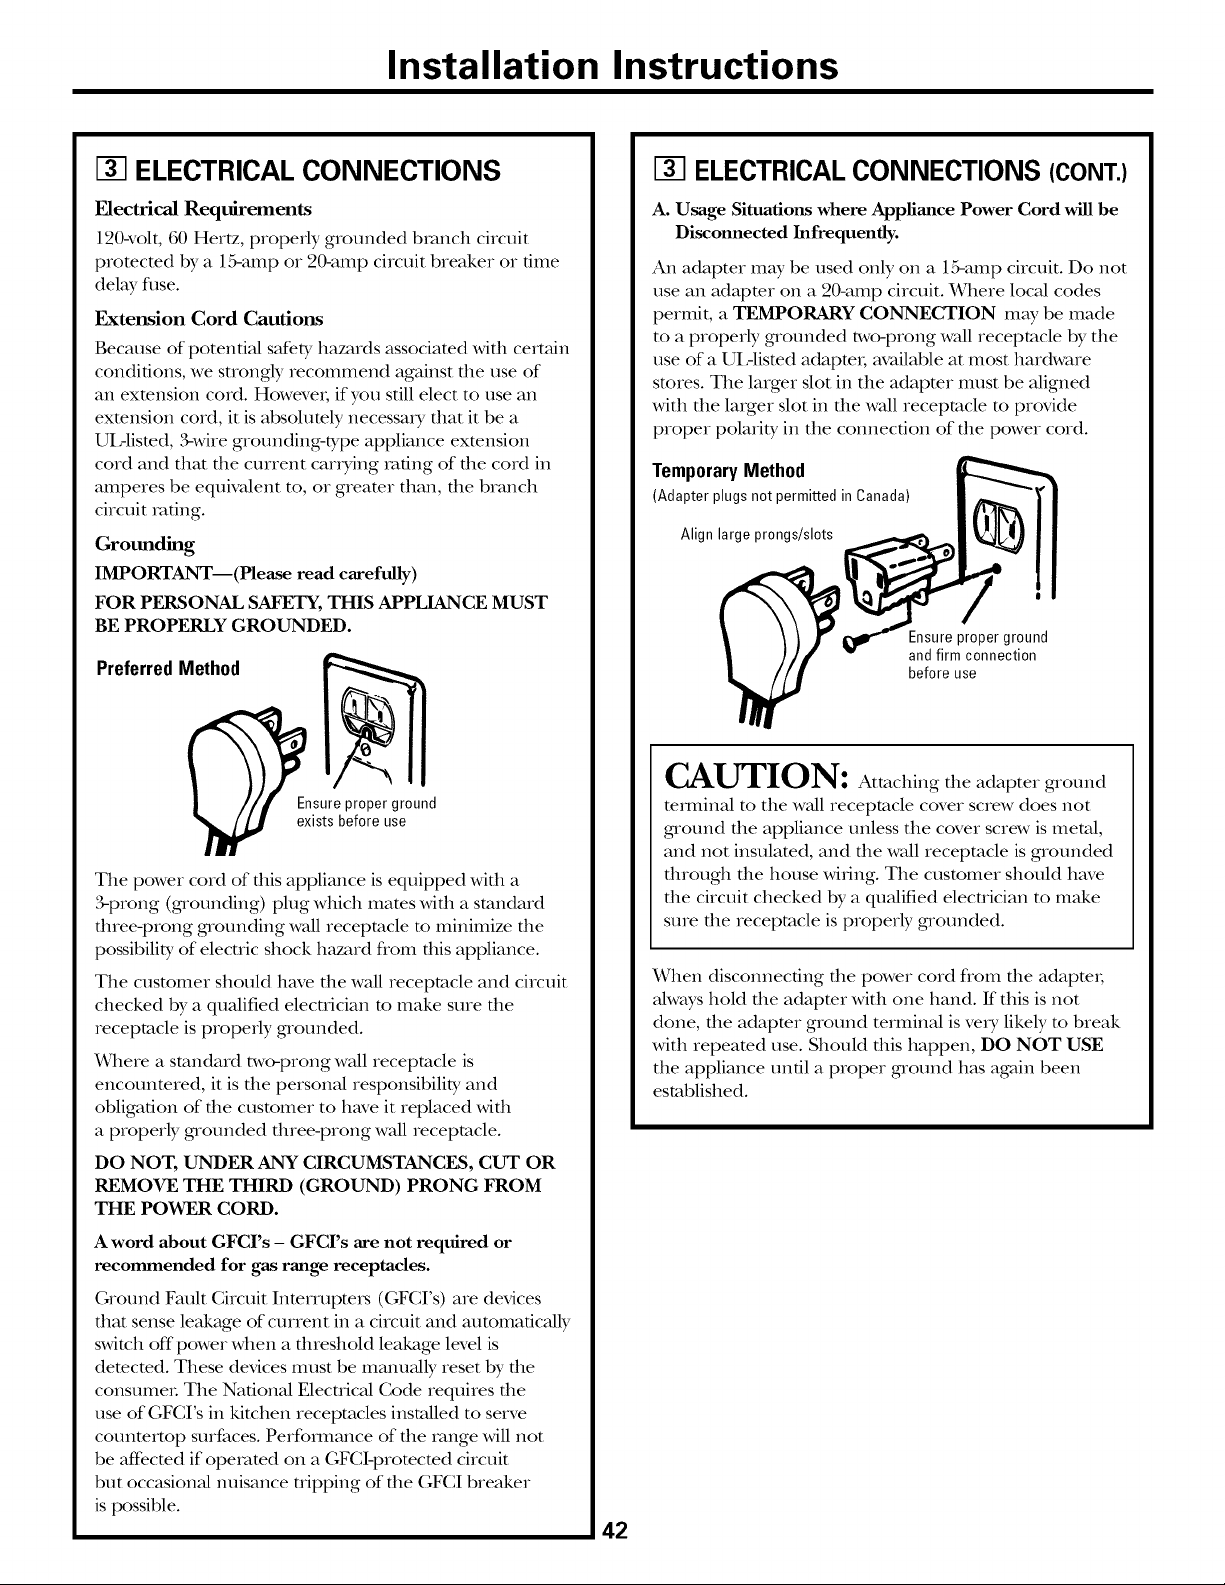
Installation Instructions
ELECTRICAL CONNECTIONS
Electrical Requirements
120wolt, 60 Hertz, properly grounded bianch circuit
promcmd by a 15-amp or 20-amp circuit breaker or time
delay fllse.
ExtertsJon Cord Cautiorts
Because of poten0al safer T hazards associamd wifll certain
condiOons, we suongly recommend against tile use of
an exmnsion cord. HoweveI; if you s011 elect to use an
exmnsion cord, it is absolumly necessai T that it be a
UIAismd, 3-wire grounding-type appliance extension
cord and that tile current canting raOng of the cord in
amperes be equivalent to, or greamr than, tile branch
circuit m0ng.
Grounding
IMPORTANT--(Please read carefully)
FOR PERSONAL SAFETY, THIS APPLIANCE MUST
BE PROPERLY GROUNDED.
PreferredMethod
E_lsureproper ground
exists before use
Tile power cord of fllis appliance is equipped wifll a
3-prong (grounding) plug which mares with a standard
three-prong grounding wall receptacle m minimize tile
possibility of elecuic shock hazard flom this appliance.
Tile customer should have tile wall receptacle and circuit
checked by a qualified elecuician m make sure the
receptacle is properly grounded.
Where a standard t_,vo-prong wall receptacle is
encotmmred, it is the personal responsibility and
obligation of the customer to have it replaced with
a properly grounded three-prong wall receptacle.
DO NOT, UNDER ANY CIRCUMSTANCES, CUT OR
REMOVE THE THIRD (GROUND) PRONG FROM
THE POWER CORD.
A word about GFCI's - GFCI's are not required or
recommended for gas range receptacles.
Ground Fault Circuit InterrupteI_ (GFCI's) are devices
that sense leakage of current in a circuit and automaOcally
switch off"power when a dneshold leakage level is
demcmd. These devices must be manually reset by the
consumeL Tile National Elecuical Code requires tile
use of GFCI's in kitchen receptacles installed to serve
cotmmrmp surfaces. Perfommnce of the range will not
be aft_cmd if opemmd oil a GFCl-promcmd circuit
but occasional nuisance uipping of the GFCI breaker
is possible.
42
ELECTRICAL CONNECTIONS (CONT.)
A. Usage Situations where Appliance Power Cord will be
Disconnected Infrequently.
An adapter may be used only on a 15-amp circuit. Do not
use an adaptor oil a 20-amp circuit. Where local codes
permit, a TEMPORARY CONNECTION may be made
to a properly grounded two-prong wall receptacle by tile
use of a UIAismd adapmI; available at most hardware
stores. Tile larger slot in tile adaptor must be aligned
with tile laiger slot in the wall receptacle m provide
proper polarity in tile connection of tile power cord.
TemporaryMethod
(Adapter plugs not permitted in Canada)
Align large prongs/slots
Ensure proper ground
and firm connection
before use
CAUTION: Attaching the adapter g_ound
mmfinal to tile wall receptacle cover screw does not
ground the appliance unless the cover screw is metal,
and not insulamd, and the wall receptacle is grounded
dnougb tile house wiring. Tile customer should have
the circuit checked by a qualified elecnician to make
sure the receptacle is properly grounded.
When disconnecting die power cord flom file adapmI;
always hold tile adapter with one hand. If ttlis is not
done, the adaptor ground terminal is veiT likely m break
with repeated use. Should this happen, DO NOT USE
tile appliance unOl a proper ground has again been
established.
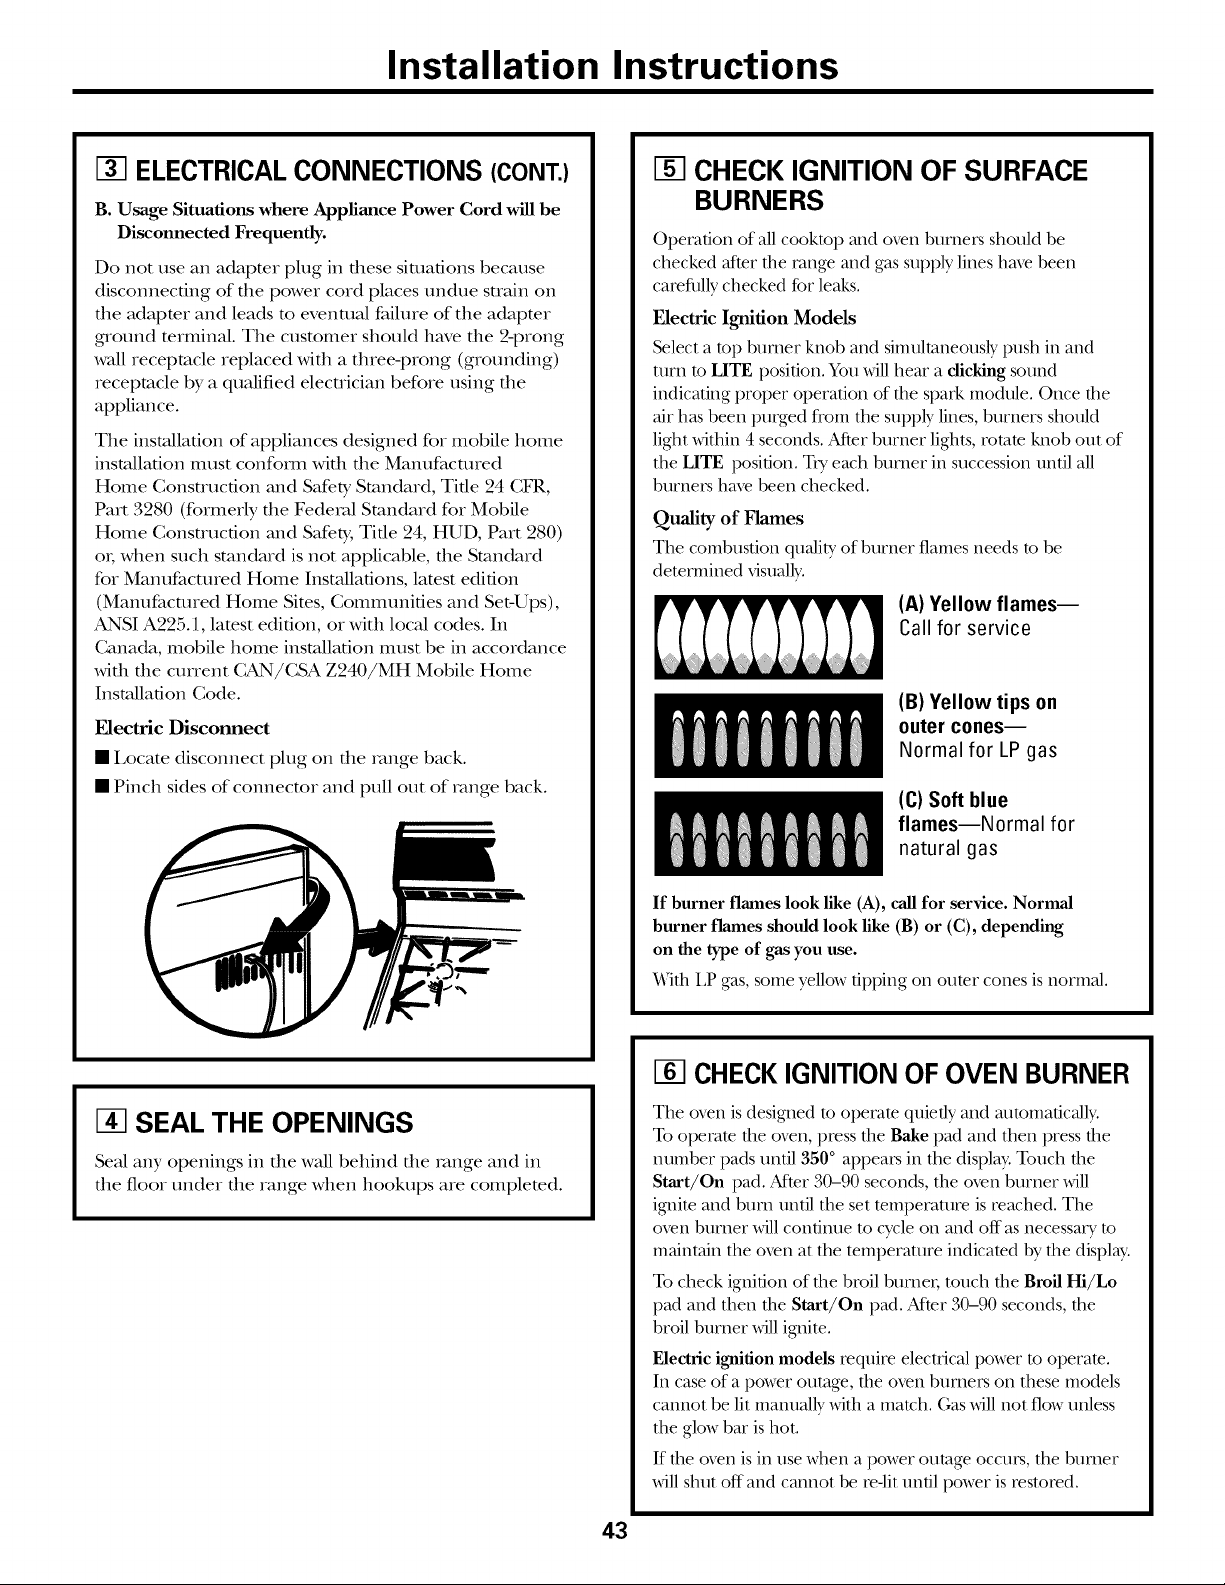
Installation Instructions
ELECTRICAL CONNECTIONS (CONT.)
B. Usage Situations where Appliance Power Cord will be
Disconnected Frequently.
Do not use an adaptor plug in dlese siulafions because
disconnecting of the power cord places undue suain on
the adaptor and leads m evenulal failure of the adaptor
g_ound mrminal. The customer should have the 2-prong
wall receptacle replaced with a three-l)rong (grounding)
receptacle by a qualified elecuician before using the
appliance.
The installation of appliances designed for mobile home
installation must confoIm with the Manufactured
Home Consn-ucfion and SaferT Standard, Tire 24 CFR,
Part 3280 (formerly the Federal Standard for Mobile
Home Consn-ucfion and SaferT, Tire 24, HUD, Part 280)
oI; when such standard is not applicable, the Standard
for Manufactured Home Installations, lamst edition
(Manufactured Home Sites, Communities and Set-Ups),
ANSI A225.1, latest edition, or with local codes. In
Ganada, mobile home installation must be in accordance
with the current CAN/CSA Z240/MH Mobile Home
Installation (;ode.
Electric Disconnect
• Locate disconnect plug on file _vmge back.
• Pinch sides of connector and pull out of i_mge back.
I3-]SEAL THE OPENINGS
Sealany openings in the wall behind the range and in
the floor under the range when hookups are completed.
CHECK IGNITION OF SURFACE
BURNERS
Operation of all cooktop and o_en burners should be
checked after the rang_ and gas supply lines have been
carefully checked fbr leaks.
Electric Ignition Models
Select a top burner knob and simultaneously push in and
own to LITE position. You will hear a dicldng sound
indicating proper operation of the spark module. Once the
air has been purged from the supply lines, burners should
light within 4 seconds. After burner lights, rotam knob out of
the LITE position. TU each burner in succession until all
burners have been checked.
Quality of Flames
The combustion qu_di/y of burner flames needs to be
determined visually,
(A) Yellow flames--
Call for service
(B) Yellow tips on
outer cones--
Normal for LP gas
(C) Soft blue
flames--Normal for
natural gas
If burner flames look like (A), call for service. Normal
burner flames should look like (B) or (C), depending
on the type of gas you use.
Wifll 12 gas, some yellow tipping on outer cones is normal.
CHECK IGNITION OF OVEN BURNER
The o_n is designed to operate quietly and mltomafic_flly.
To operam the o_n, I)Iess the Bake pad and then press the
number pads urt6l 350 ° appears in the display; Touch the
Start/On pad. MteI" 30-90 seconds, file oven burner will
ignim and b/u'n until the set temperature is reached. The
oven burner will continue to cycle on and off as necessary to
maintain file oven at file temperanu'e indicated by file display.
To check ignition of file broil burnei, touch file Broil Hi/Lo
pad and fllen file Start/On pad. MteI" 30-90 seconds, file
broil burner will ignite.
Electric ignition models require electrical power to operate.
In case of a power outage, file o_en burners on fllese models
cannot be lit niarnlally wifll a match. (;as _v]ll not flow unless
file glow bar is hot.
If file oven is in use when a power outage occurs, file burner
will shut off and cannot be ie-lit/Infil power is iesmied.
43
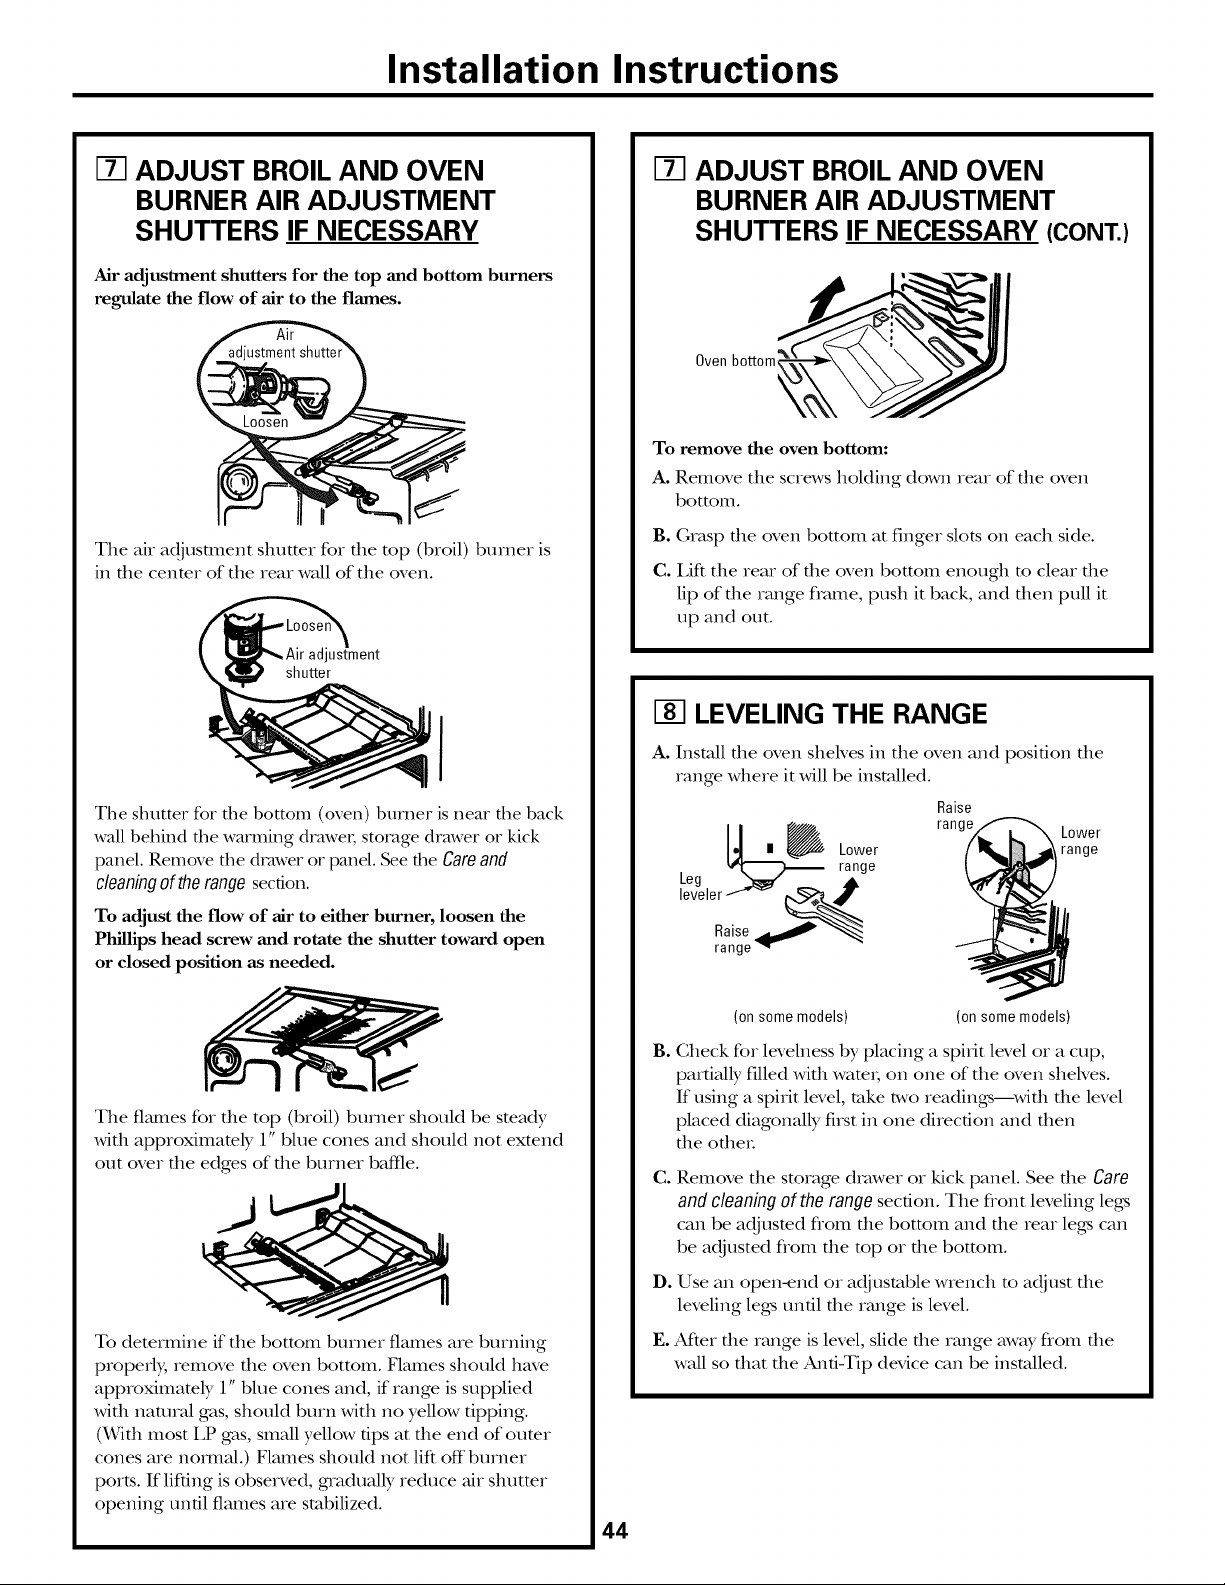
Installation Instructions
IT] ADJUST BROIL AND OVEN
BURNER AIR ADJUSTMENT
SHUTTERS IF NECESSARY
Air adjustment shutters for the top and bottom burners
regulate the flow of air to the flames.
The air adjustment shutter for the top (broil) burner is
in the center of the rear wall of the oven.
ustment
shutter
I
The shutter %r the bottom (oven) burner is near the back
wall behind the warming drawe_; storage drawer or kick
panel. Remove the drawer or panel. See the Careand
cleaningof therange section.
To adjust the flow of air to either burner, loosen the
Phillips head screw and rotate the shutter toward open
or closed position as needed.
The fl_unes for the top (broil) burner should be steady
with approximately 1" blue cones and should not extend
out over the edges of the burner baffle.
To determine if the bottom burner flames are burning
properly, remove the oven bottom. Flames should have
approximamly 1" blue cones and, if range is supplied
with natural gas, should burn with no yellow tipping.
(With most LP gas, small yellow tips at the end of oumr
cones are hernial.) Flames should not lift off"burner
ports. If lifting is observed, gradually reduce air shutmr
opening until flames are stabilized.
44
IT1 ADJUST BROIL AND OVEN
BURNER AIR ADJUSTMENT
SHUTTERS IF NECESSARY (CONT.)
Oven bottom
To remove the oven bottom:
A. Remove the screws holding down rear of the oven
bottom.
B. Grasp the oven bottom at finger slots on each side.
C. Lift the rear of the oven bottom enough to clear the
lip of the range flvmle, push it back, and then pull it
up and out.
I-8-1LEVELING THE RANGE
A. Install the oven sheh'es in the oven and position the
range where it _11 be installed.
Raise
_1 _ range Lower
Lower range
, _ _ range
Leg _
leveler--"'_
Raise_"_
range_
(on some models) (on some models)
B.
Check for levelness by placing a spirit level or a cup,
partially flled with wam_, on one of the oven shelves.
If using a spirit level, rake two readings---with the level
placed diagonally first in one direction and then
the ethel
C.
D.
t.
Remove the storage drawer or kick panel. See die Care
and cleaning of the range section. The fiont leveling legs
can be adjusmd flom the bottom and the rear legs can
be adjusted flom the mp or the bottom.
Use an open-end or adjustable wrench to adjust the
leveling legs undl the range is level.
At_er the range is level, slide the range away flom the
wall so that the And-Tip device can be installed.
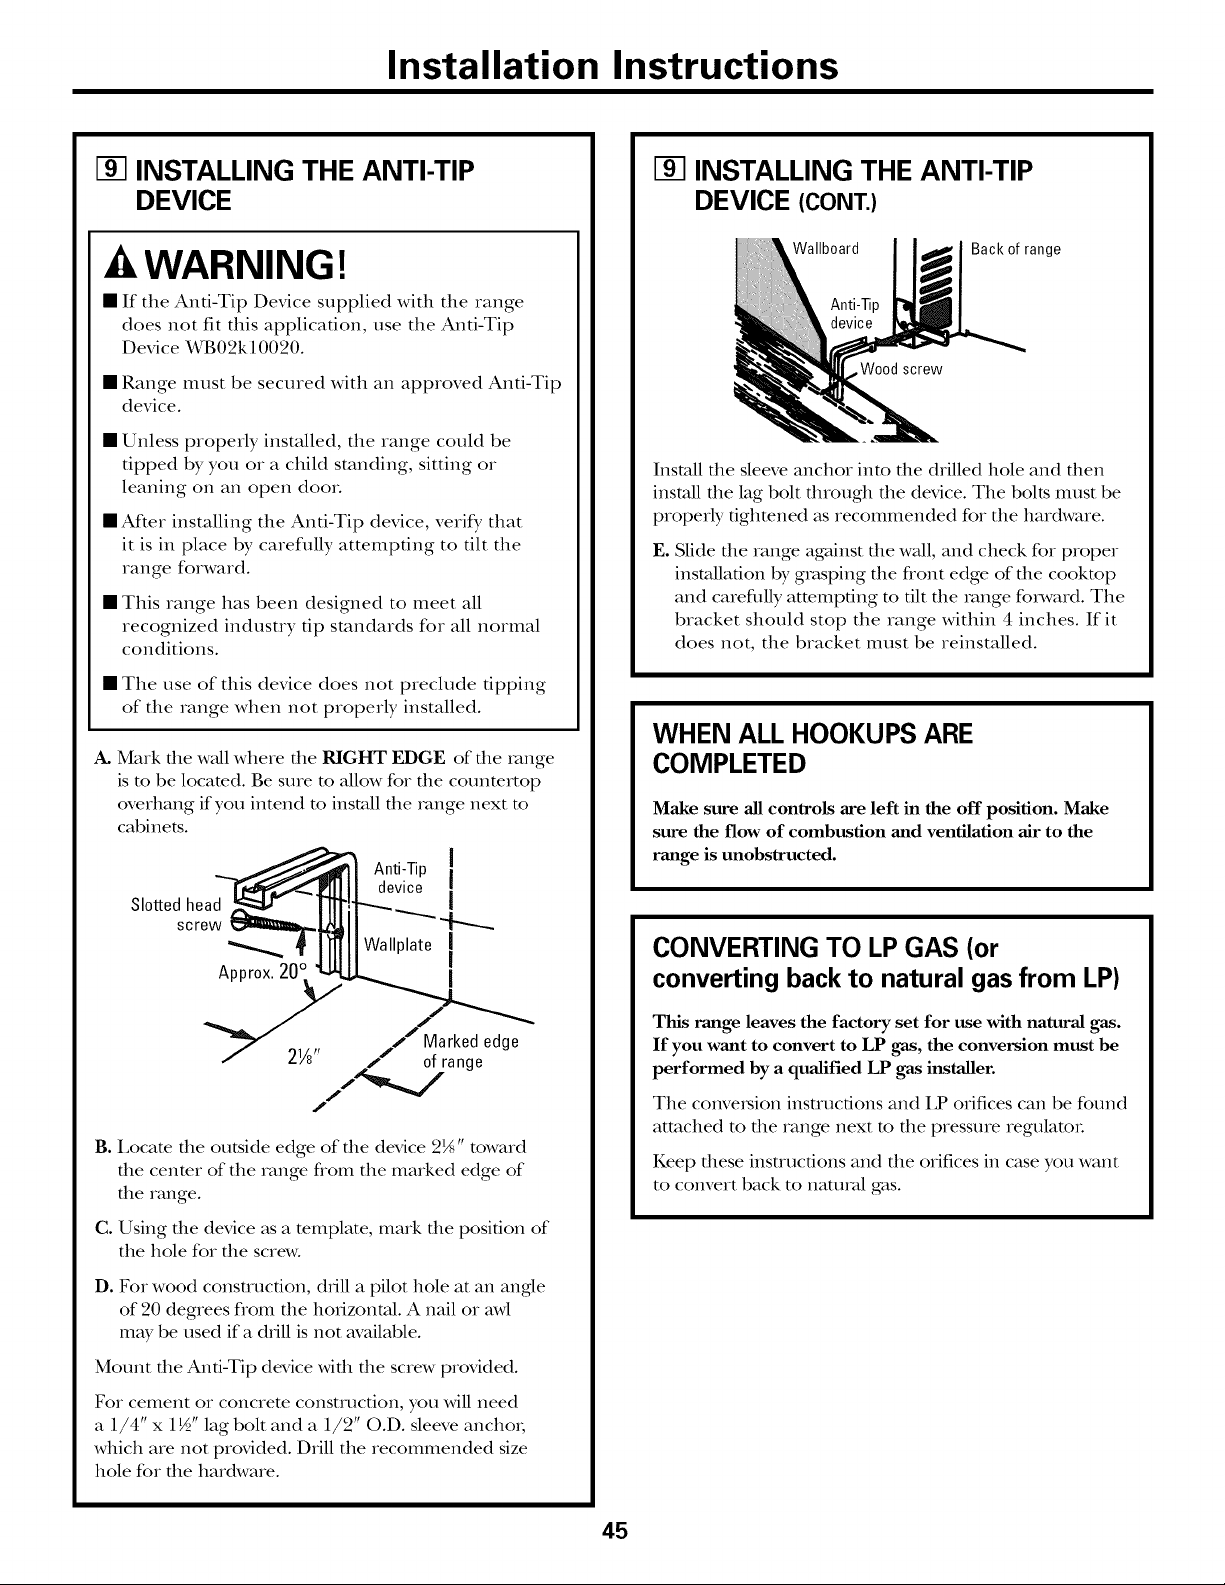
Installation Instructions
I-_ INSTALLING THE ANTI-TIP
DEVICE
-&WARNING!
• If the Anti-Tip Device supplied with the range
does not fit this application, use the Anti-Tip
Device X_B02k 10020.
• Range must be secured with an approved Anti-Tip
device.
• Unless properly installed, the range could be
tipped by you or a child standing, sitting or
leaning on an open dooL
• After installing the Anti-Tip device, verify that
it is in place by carefl_lly attempting to tilt the
range forward.
• This range has been designed to meet all
recognized industry tip standards for all normal
conditions.
• The use of this device does not preclude tipping
of the range when not properly installed.
A. Mark file wall where file RIGHT EDGE of file xange
is m be locamd. Be sure m allow for the counmrtop
overhang if you intend to install file x_mge next to
cabinets.
Slotted head
screw
Approx.20c
Anti-Tip [
device [
!
Wallplate I
I
Marked edge
2W' ,. of range
/
B. I,ocate the outside edge of the device 2_" toward
the center of the range fiom the marked edge of
the range.
C. Using the device as a template, mark the position of
the hole for the screw.
D. Fox wood construction, chill a pilot hole at an angle
of 20 degrees flom the hoxizontal. A nail or awl
may be used if a chill is not available.
Mount the And-Tip device with the screw provided.
Fox cement or concrete construction, you will need
a 1/4" x 1½" lag bolt and a 1/2" O.D. sleeve anchox;
which are not provided. Drill the recommended size
hole for the hardware.
INSTALLING THE ANTI-TIP
DEVICE (CONT.)
Wallboard
Wood screw
Back of range
Install the sleeve anchor into the drilled hole and then
install the lag bolt through the device. The bolts I_Qtlst be
properly tightened as recommended for the hardware.
E. Slide the range against die wall, and check for proper
installation by grasping the flont edge of the cookmp
and carefillly atmmpfing m flit the range foxavard. The
bracket should stop the range within 4 inches. If it
does not, the bracket must be reinstalled.
WHEN ALL HOOKUPS ARE
COMPLETED
Make sure all controls are left in the off position. Make
sure the flow of combustion and ventilation air to the
range is unobstructed.
CONVERTING TO LP GAS (or
converting back to natural gas from LP)
This range leaves the factory set for use with natural gas.
If you want to convert to LP gas, the conversion must be
performed by a qualified LP gas installer.
The convexMon instructions and IP orifices can be found
attached to the range next to the pressure regulatoL
Keep these instructions and the orifices in case you want
to convert back to nattm_l gas.
45
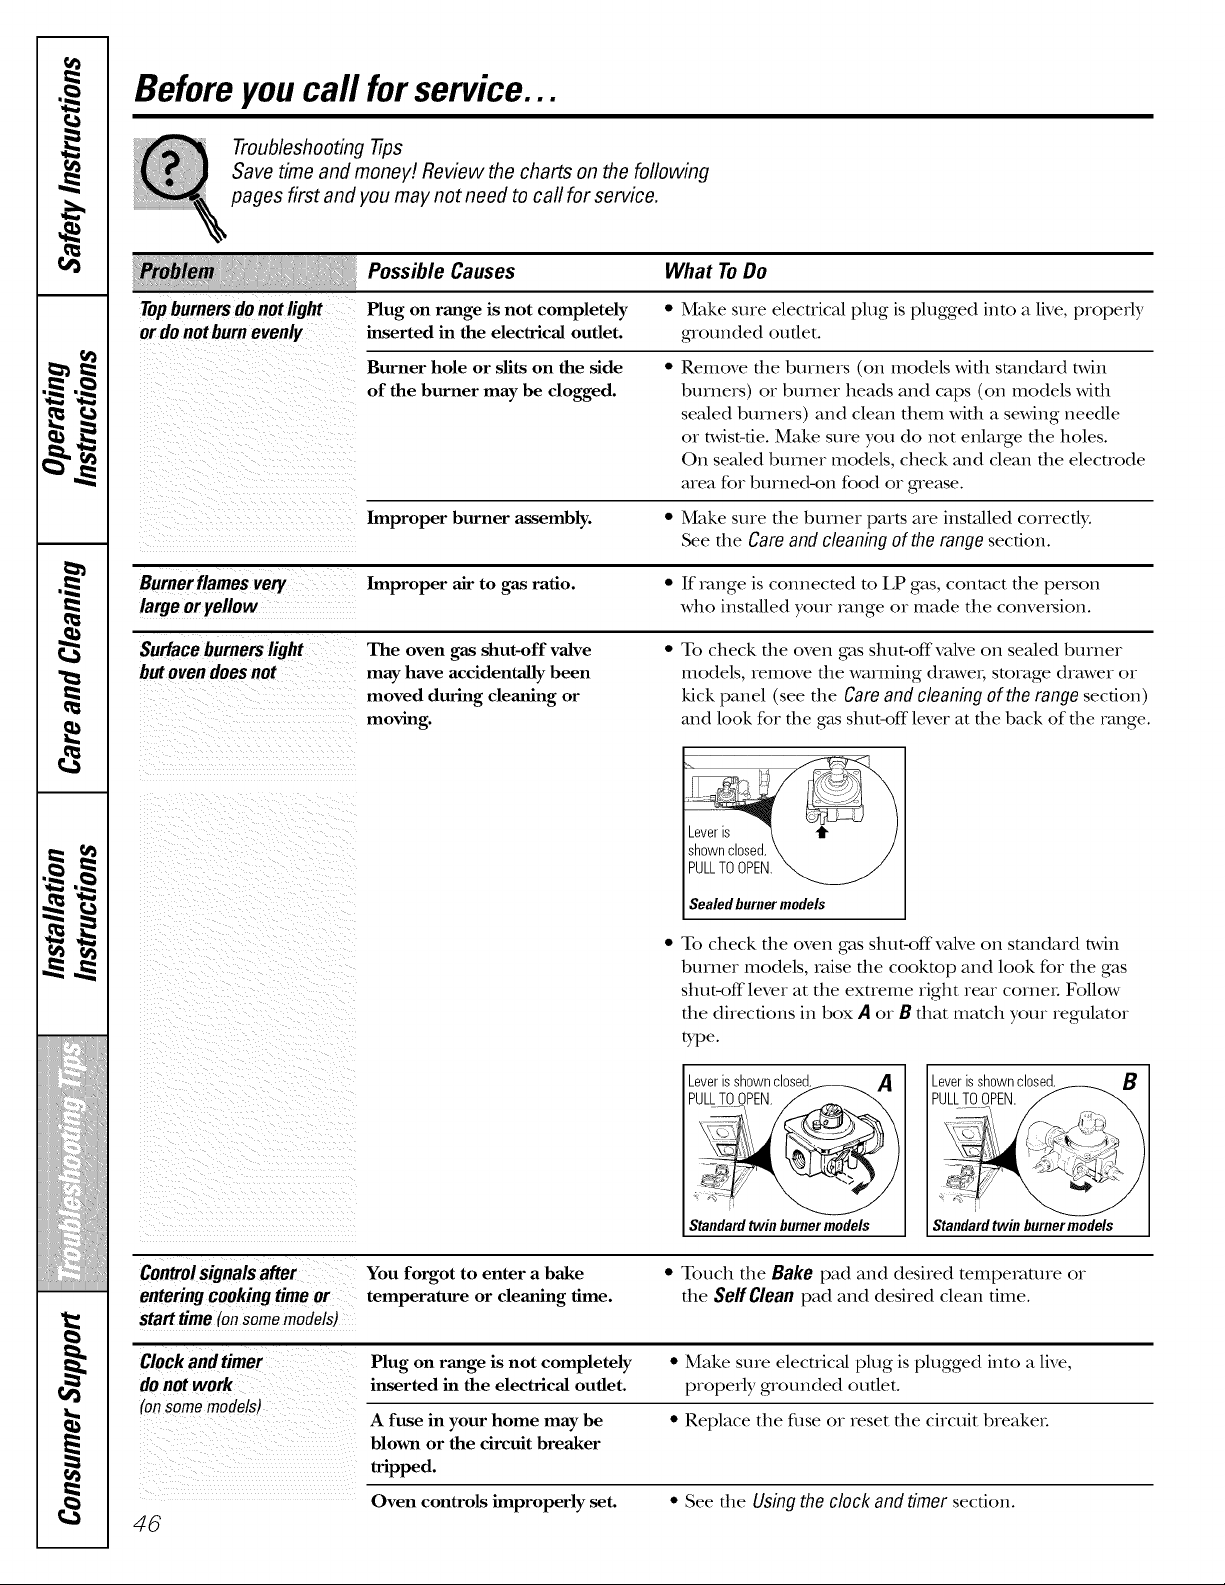
,O
m _
w
m _
i)iii!_iiiiiiii)ii)i_ii_ii_)_iii
JJ)L)J)L)J)L<J)L)J)L)J)L)
q_
Before you call forservice...
Troubleshooting -tips
Save time and money! Review the charts on the following
pages first and you may not need to call for service.
Topburnersdonotlight
ordo notburnevenly
Possible Causes What ToDo
Plug on range is not completely "
inserted in the electrical outlet.
Burner hole or slits on the side
of the burner may be clogged.
Make sure electrical plug is plugged into a live, properly
g_ounded outlet.
Remove fl_e burners (on models wifl_ smnda_d t_dn
buvne_s) or burney heads and caps (on models with
sealed burners) and clean them with a staving needle
or twist-tie. Make sure you do not enlarge the holes.
On sealed buvne_ models, check and dean the elecuode
area fo_ bushe&on food o_ grease.
Improper burner assembly. • Make sme the burney parts ave instaUed coHectly.
See the Care and cleaning of the range section.
Burnerflamesvery Improper air to gas ratio. • If _vmge is connected to LP gas, contact the pe_son
large oryellow who installed yore _mge ov made the conve_ion.
Surface burners light The oven gas shut-off valve * To check the oven gas shut-off valve on sealed bmne_
but oven does not may have accidentally been models, remove the wamaing dvaweh storage (hawex o_
moved during cleaning or kick panel (see fl_e Careand cleaning of the range section)
moving, mad look for the gas shut-off lever at the back of the range.
Controlsignals after
entering cooking time or
start time (onsome models)
Leveris
shownclosed
PULLTOOPEN.
Sealed burner models
• To check fl_e oven gas shut-offvalve on standa_d twin
burney models, valse the cookmp and look for the gas
shut-off lever at the extFeme right _eav cornel Follow
the directions in box A o, B that match your regulator
tTpe.
_eU_L_LriT_Os__ cI°_A
Standardtwin burnermodels
You forgot to enter a bake
temperature or cleaning time.
Standardtwin burnermodels
• Touch the Bake pad and desired tempe_m_ve ov
the Self Clean pad and desired clean time.
Clock and timer Plug on range is not completely * Make sure electrical plug is plugged into a live,
inserted in the electrical outlet, properly grounded oudet.
(on some models)
A fuse in your home may be • Replace the fuse o_ _eset the circuit b_eake_.
blown or the circuit breaker
tripped.
Oven controls improperly set. • See the Using the clock and timer secdon.
46
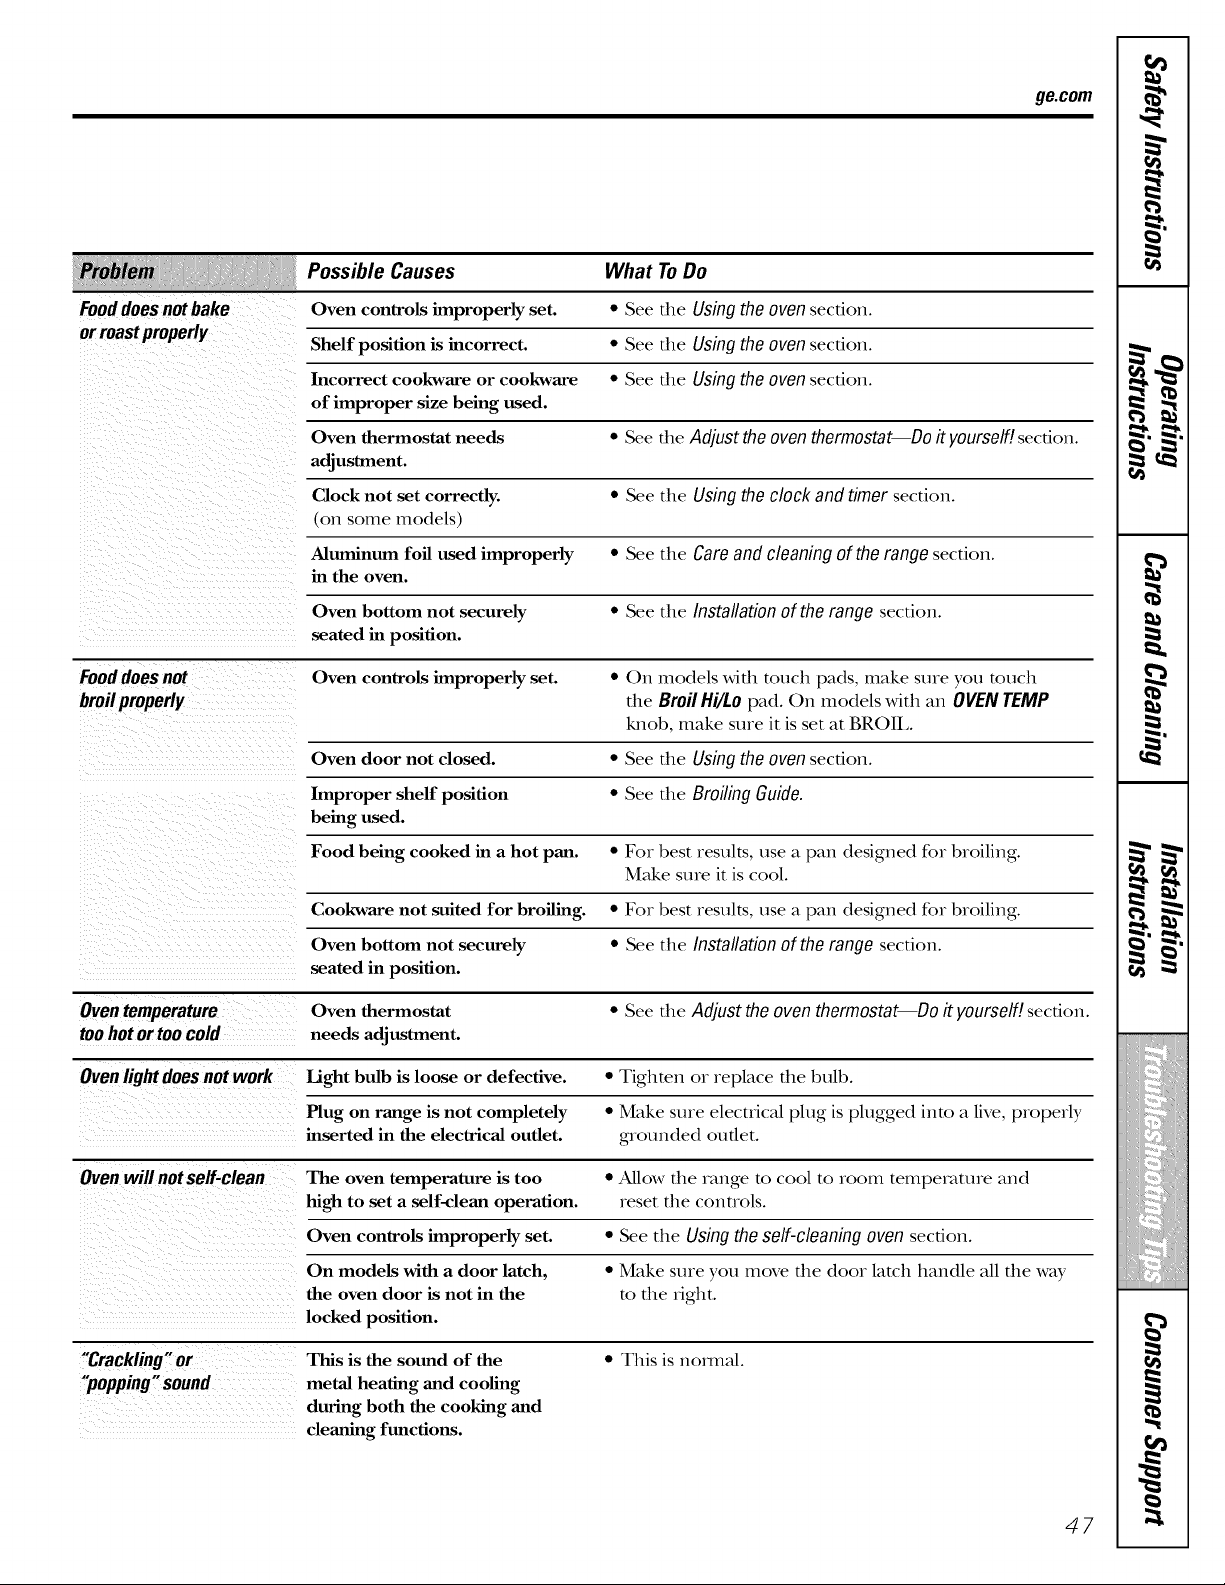
Fooddoesnotbake
orroastproperly
ge.com
Possible Causes
Oven controls improperly set.
Shelf position is incorrect.
Incorrect cookware or cookware
of improper size being used.
Oven thermostat needs
adjustment.
Clock not set correctly.
(on some models)
Aluminum foil used improperly
in the oven.
Oven bottom not securely
seated in position.
What ToDo
* See the Using the oven section.
• See file Using the oven section.
• See file Using the oven section.
• See file Adjust the oven thermostat--Do it yourself/, secdon.
• See the Using the clock and timer secdon.
• See the Care and cleaning of the range secdon.
• See the Installation of the range secdon.
Food does not Oven controls improperly set. • On models with touch pads, make sure you touch
broil properly the Broil Hi/Lo pad. On models with an OVEN TEMP
knob, make sure it is set at BROIL
Oven door not closed. • See the Using the oven section.
Improper shelf position • See the Broiling Guide.
being used.
Food being cooked in a hot pan. • Fox best results, use a pan designed for broiling.
Make sure it is cool.
Cookware not suited for broiling. • Fox best results, use a pan designed for broiling.
Oven bottom not securely • See the Installation of the range section.
seated in position.
Oven temperature Oven thermostat • See the Adjust the oven thermostat--Do it yourself/, section.
too hot or too cold needs adjustment.
Oven light does not work Light bulb is loose or defective. • Tighten or replace the bulb.
Plug on range is not completely • Make sure electrical plug is plugged into a live, properly
inserted in the electrical outlet, grounded outer.
Oven will not self-clean The oven temperature is too • Allow the range to cool to room teinpemture and
high to set a self-clean operation, reset the controls.
Oven controls improperly set. • See the Using the self-cleaning oven section.
On models with a door latch, • Make sure you move the door latch handle all the way
the oven door is not in the to the fight.
locked position.
"Crackling"or This is the sound of the • This is hernial.
"popping" sound metal heating and cooling
during both the cooking and
cleaning functions.
47
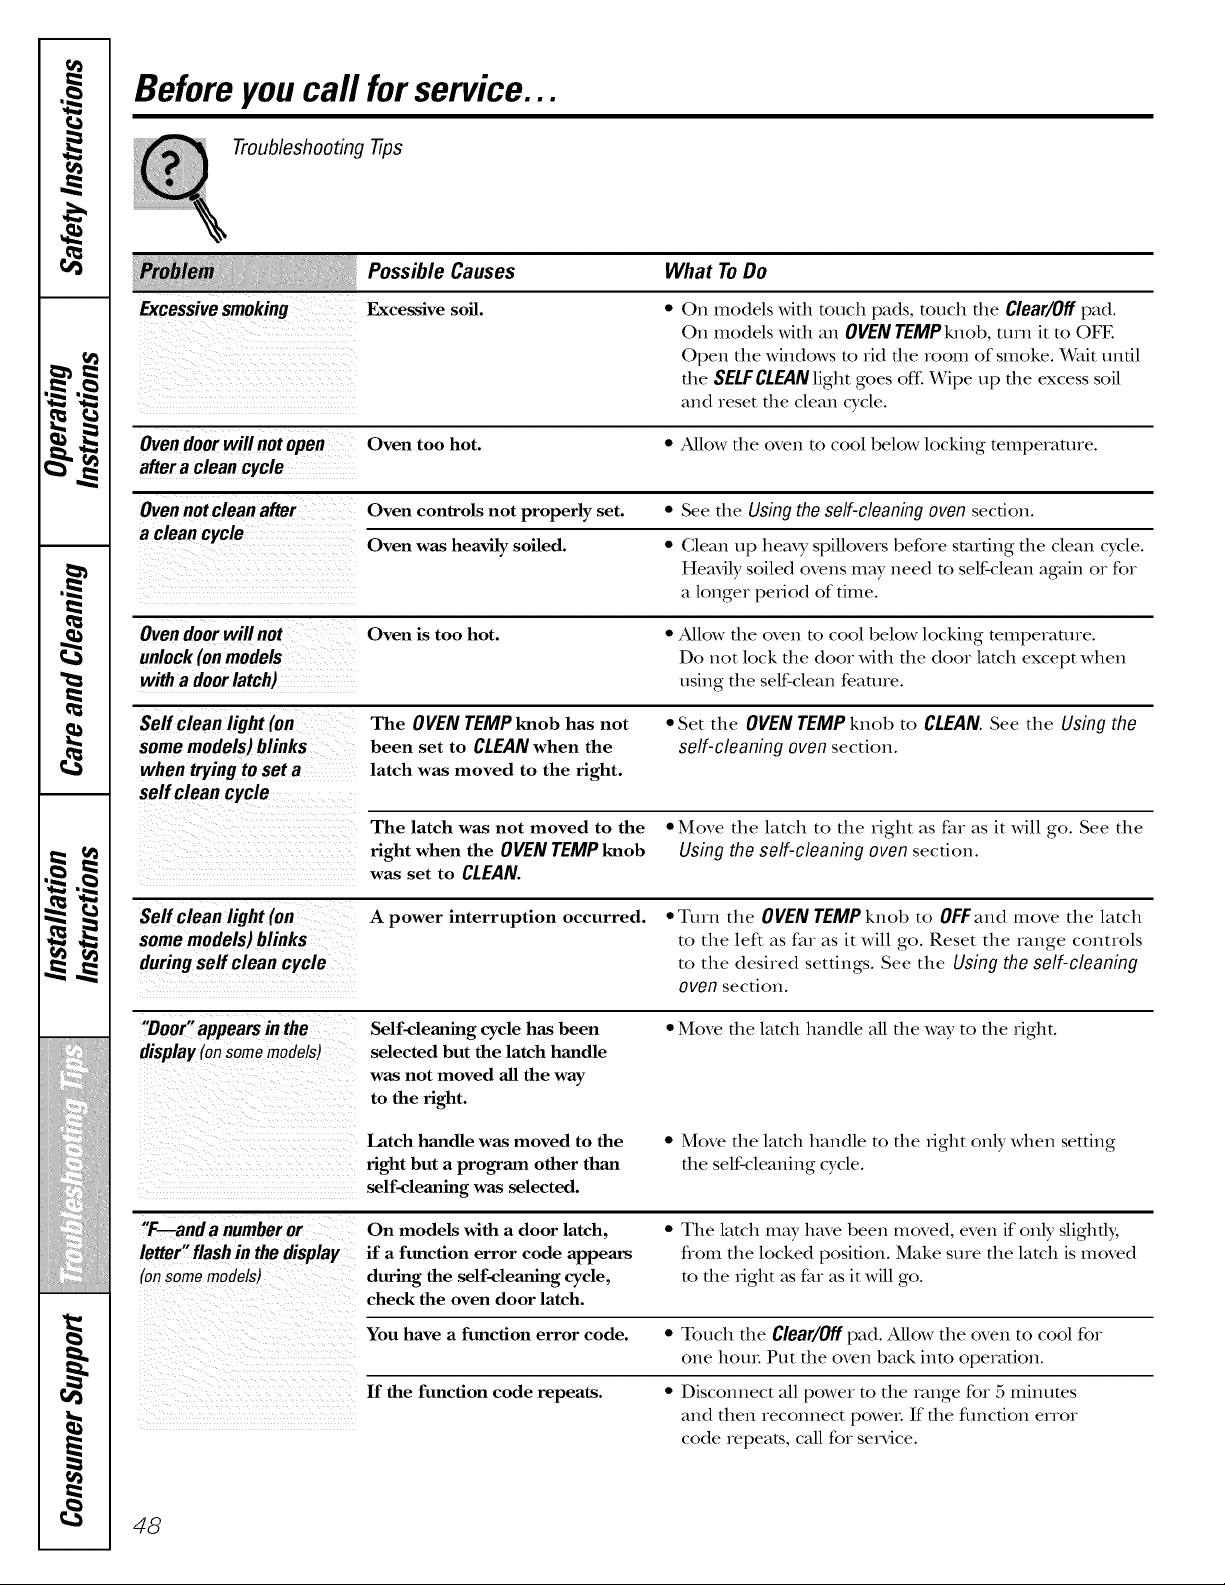
Before you call forservice...
Troubleshooting -tips
Excessivesmoking
iiii i
Possible Causes What ToDo
Excessive soil.
• On models wifll touch pads, touch file Clear/Off pad.
On models with an OVEN TEMPknob, mrn it to OFE
Open the windows m rid the room of smoke. Wait until
the SELFCLEAN light goes of£ Wipe up the excess soil
and reset the clean cycle.
Oven door will not open Oven too hot. * Allow the oven to cool below locking temperature.
after a clean cycle
Oven not clean after Oven controls not properly set. * See the Using the self-cleaning oven section.
a clean cycle
Oven was heavily soiled. * Clean up hemy spillovers before starting the clean cycle.
Heavily soiled ovens may need to self-clean again or for
a longer period of time.
Oven door will not Oven is too hot. • Allow the oven to cool below locking temperature.
Do not lock the door with the door latch except when
with a door latch) using the self-clean feature.
Self clean light (on The OVEN TEMP knob has not * Set the OVEN TEMP knob to CLEAN. See the Using the
some models)blinks been set to CLEAN when the self-cleaning oven section.
when trying to set a latch was moved to the fight.
self clean cycle
The latch was not moved to the • Move the latch to the right as far as it will go. See the
fight when the OVEN TEMP knob Using the self-cleaning oven section.
was set to CLEAN.
Self clean light (on A power interruption occurred. * Turn the OVEN TEMP knob to OFFand move the latch
some models) blinks to the left as far as it will go. Reset the range controls
during self clean cycle to the desired settings. See the Using the self-cleaning
oven section.
"Door" appears in the
display (onsome models)
Self-cleaning cycle has been
selected but the latch handle
was not moved all the way
to the fight.
• Move the latch handle all the way to the right.
Latch handle was moved to the
fight but a program other than
self-cleaning was selected.
• Move the latch handle to the fight on b, when setting
the self-cleaning cycle.
"F---anda numberor
letter"flashin thedisplay
(onsomemodels)
On models with a door latch,
if a function error code appears
during the self-cleaning cycle,
check the oven door latch.
• The latch may have been moved, even if only slighfl);
flom the locked position. Make sure the latch is moved
to the fight as far as it will go.
You have a function error code. • Touch file Clear/Off pad. Allow the oven to cool for
one houL Put the oven back into operation.
If the function code repeats. • Disconnect all power m the range for 5 minums
and then reconnect poweL If the flmcfion error
code repeats, call for se_Mce.
48
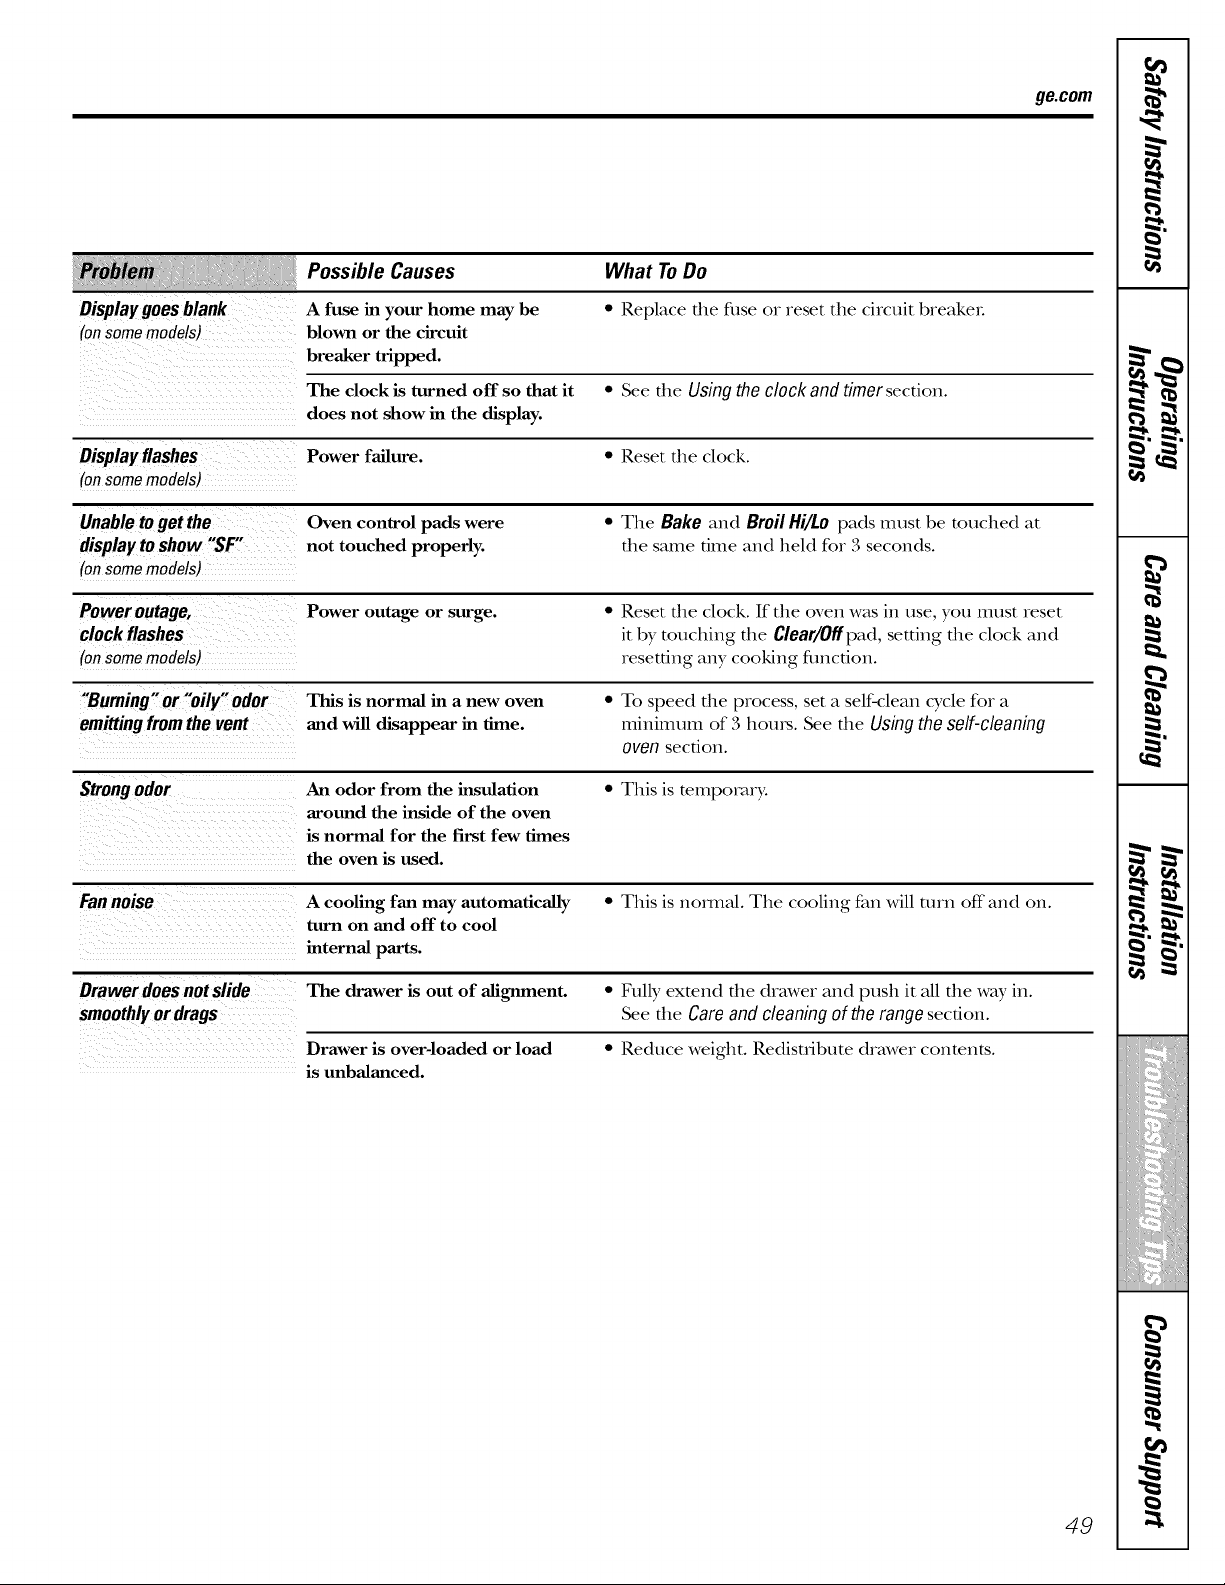
Display goes blank
(onsomemodels)
ge.com
Possible Causes What ToDo
A fuse in your home may be
blown or the circuit
breaker tripped.
• Replace the filse or reset the circuit breaker.
The clock is turned off so that it • See the Using the clock and timer section.
does not show in the display.
Displayflashes Power failure. * Reset the clock.
(onsomemodels)
Unable to get the Oven control pads were • The Bake and Broil Hi/Lo pads must be touched at
display to show "SF" not touched properly, the same time and held for 3 seconds.
(on some models)
Power outage, Power outage or surge. • Reset the clock. If the oven was in use, you must reset
clock flashes it by touching the Clear/Offpad, setting the clock and
(onsomemodels) resetting any cooking fimction.
"Burning" or "oily" odor This is normal in a new oven • To speed the process, set a self-clean cycle for a
emitting from the vent and will disappear in time. minimum of 3 hours. See the Using the self-cleaning
oven secdon.
Strong odor An odor from the insulation • This is temporary.
arotmd the inside of the oven
is normal for the first few times
the oven is used.
Fan noise A cooling fan may automatically • This is nomml. The cooling fan will turn off and on.
turn on and off to cool
internal parts.
Drawer does not slide The drawer is out of alignment. • Fully extend the drawer and push it all the way in.
smoothly or drags See the Care and cleaning of the range secdon.
Drawer is over-loaded or load • Reduce weight. Redisuibute drawer contents.
is unbalanced.
49
0"
m
€
L P
i
£
m
L
• p
€
l[_!iii[i_iiiiiiii_iiii
';;_i',_Siiiif
_ii!iii_iiijiiil
._ Notes.
m
m
.wire..wire.
L
m
_r_ fJ_
1=
m
w
50
GE Service Protection Plus TM
GE, a name recognized worldwide tbr quality and dependability, offers you
Service Protection Plus'_--comprehensive protection on all your appliances--
No Matter What Brand!
Benefits Include:
* Backed by GE
* All brands covered
* Unlimited service calls
* All parts and labor costs included
* No out-of-pocket expenses
* No hidden deductibles
* One 800 number to call
We71 CoverAny Appfiance.
Anywhere. Anytime.*
You will be completely satisfied with our service protection or you may request your money back
on the remaining value of your contract. No questions asked. It's that simple.
Protect your refligerato_; dishwasher, washer and dryer, range, TV, VCR and much more--any brand!
Plus there's no exua charge for emergency service and low monthly financing is available. Even icemaker
coverage and food spoilage protection is off>red. You can rest easy, knowing that all your valuable
household products are protected against expensive repairs.
Place your confidence in GE and call us in the U.S. toll-free at 800.626.2224
for more information.
_%11brands cover_ d, up lo 20 years old, in lhe conlinenlal U.S.
...... _-:_£_2_:_,.............
Please place in envelopeand mail to:
General Electric Company
Warranty Registration Department
EO. Box 32150
Louisville, KY 40232-2150
51
Consumer Product Ownership Registration
Dear Customer:
Thank you for purchasing our product and thank you for placing your confidence in us.
We are proud to have you as a customer!
Follow these three steps to protect your new appliance investment:
Complete and mail
your Consumer
Product Ownership
Registration today.
Have the peace of
mind of knowing we
can contact }Oil ill
the unlikely event of a
satet} modification.
After mailing the
registration belcm,
store this document
in a sate place. It
contains intormation
)ou will need should
)ou require service.
Our service nmnber is
800. GE. (;ARE S
(800.432.2737).
Read }our ()_aler's
Mamml carefull)
h will help )ou
operate }otlr ilew
appliance properly.
Model Number
,,,,,, , , , , , I I
Serial Number
I I I I I I
Important: If you did not get a registration card with your
product, detach and return the form below to
ensure that your product is registered, or register
online at ge.com.
._,,_ Cut here
Consumer Product Ownership Registration
Model Number Serial Number
Mr. Ms. ] Mrs. ::i! Miss::i !
First
Name I I I I I I I I
I,ast ]
Name I I I I I I I I I I I I
Street
Address
I I I I I I I I I I I I I I I I I I I I I I I
ap_.#l I I I I I I I I >maUAc_c_ress*
Zip
{:i_l i , , I , I I Ill, iI I Sm_el, 1 {oce
i I I
I)alc Pla( cd
i,,_([' ] Da,I, I _arl, I P,_one
N.mberlI. I-I.. I-I . .
Month
52
GE Consumer & Industrial
Appliances
General Electric Company
Louisville, KV40225
ge£om
* Please provide )our e-mail address to receive, via e-mail, discotmts, special offers and other
important commtmications fi'om GE Appliances (GEA).
Check here if )ou do not _m]t to receive commtmications fl'om GEA's careftdl) selected
partners.
FAILURE TO COMPLETE AND RETURN THIS CARD DOES NOT DIMINISH YOUR
WARRANTY RIGHTS.
For infi)rmation about C,EA's privac) and clam usage policy, go to ge.com and click on "Privac)
Polic)" or call 800.626.2224.
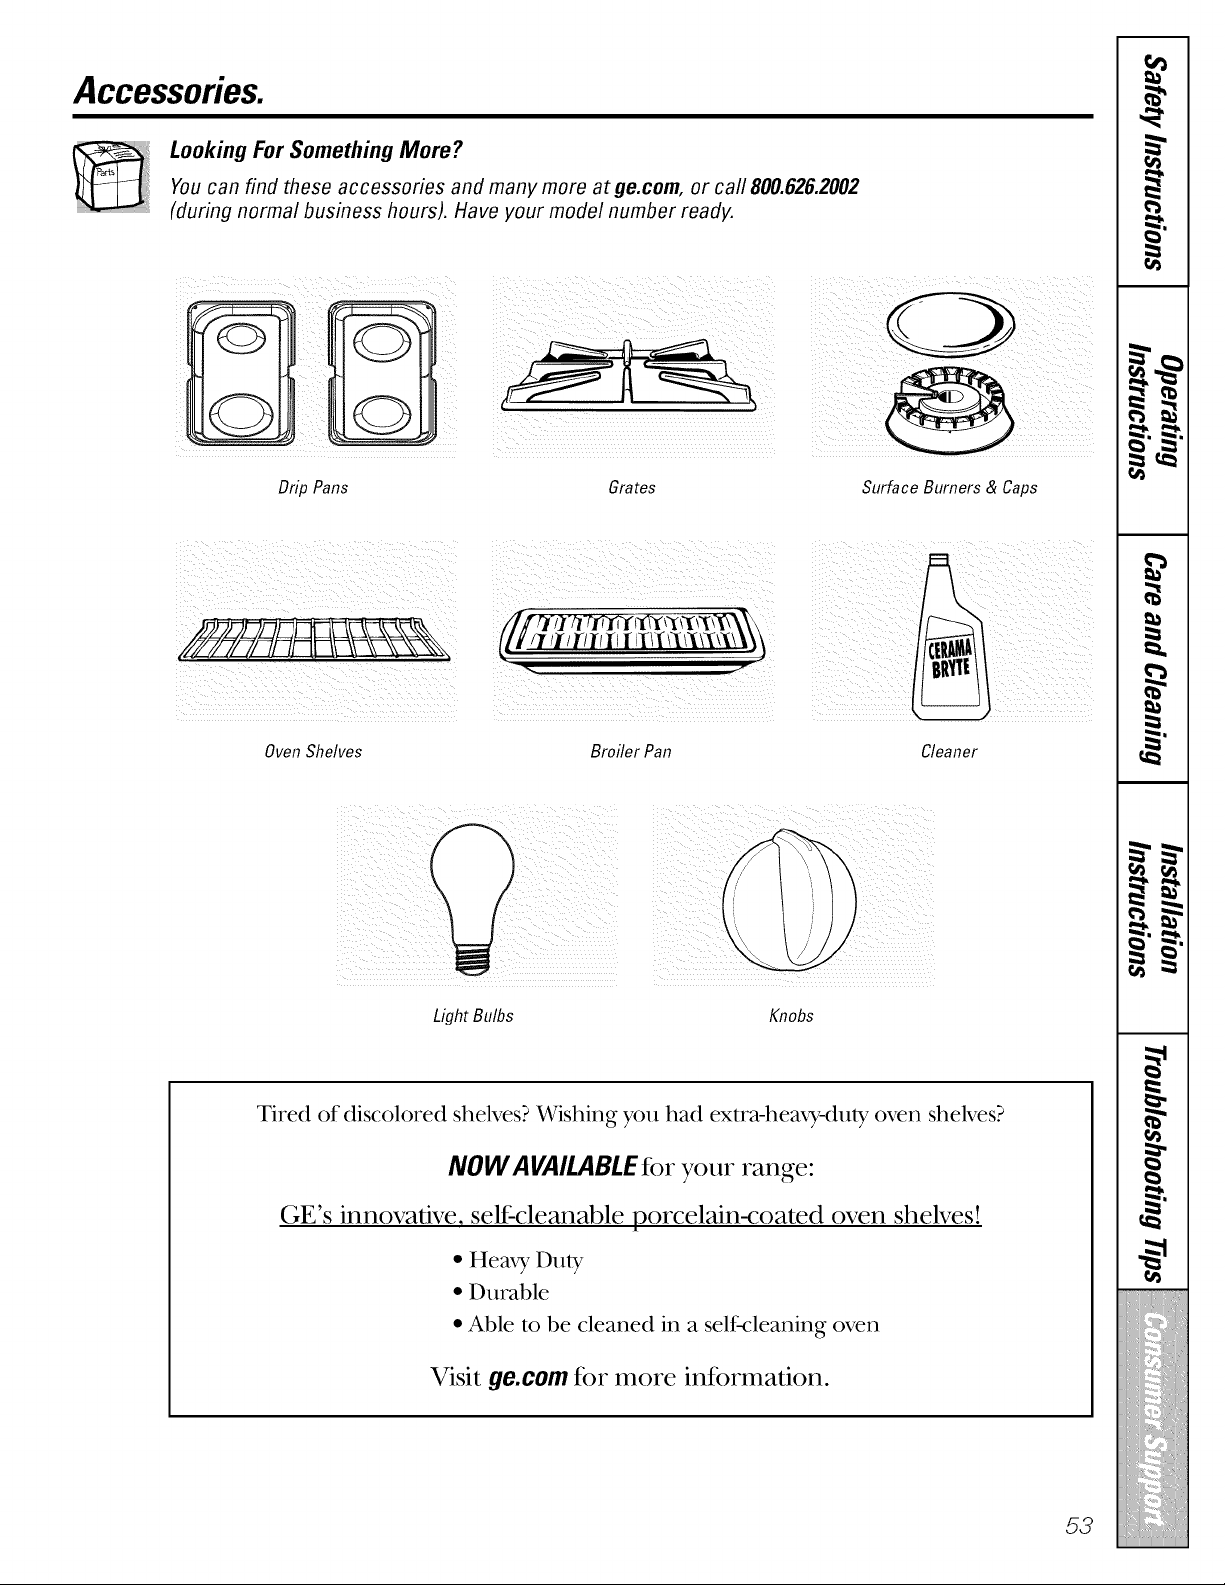
Accessories.
Looking For Something More ?You can find these accessories and many more at ge.com, or call 800.626.2002
(during normal business hours). Have your model number ready.
Drip Pans Grates Surface Burners & Caps
OvenShelves Broiler Pan Cleaner
Light Bulbs Knobs
Tired of discolored shelves? Wishing you had extra-heaxy-duly oven shelves?
NOWA VAIl.ABLEtier your range:
GE's innovative, selI=cleanable porcelain-coated oven shelves!
• Hem f Du W
• Durable
• Able to be cleaned in a self-cleaning oven
Visit ge.com t_r more int_mnation.
53
GEGas Range Warranty.(For customers in the United States)
Aft warranty service provided by our Factory Service Centers,
or an authorized Customer Care® technician. To schedule service,
on-line, visit us at ge.com, or carl 800.GE.CARES (800.432.2737).
Please have serial number and model number available when calling
for service.
Staple your receipt here.
Proof of the original purchase
date is needed to obtain service
under the warranty.
GE Will Replace:
OneYear Anypartof the r_mge which fails due to a defect in materials or workmanship. During this
Fromthe date of the limited one-yearwarranty, GE will also provide, free of charge, all labor and in-home sex_ice
origina!PUrchase to replace the defective part.
Service trips to your home to teach you how to use
the product.
Improper installation, delivery or maintenance.
Failure of the product if it is abused, misused,
or used for other than the intended purpose or
used commercially.
Replacement of house fuses or resetting of circuit
breakers.
Damage to the product caused by accident, fire, floods
or acts of God.
Incidental or consequential damage caused by possible
defects with this appliance.
Damage caused after delivery.
Product not accessible to provide required service.
EXCLUSION OF IMPLIED WARRANTIES--Your sole and exclusive remedy is product repair as provided
in this Limited Warranty. Any implied warranties, including the implied warranties of merchantability
or fitness for a particular purpose, are limited to one year or the shortest period allowed by law.
This warranty is extended to the original purchaser and any succeeding owner for products purchased for home
use within the USA. If the product is located in an area where service by a GE Authorized Servicer is not available,
you may be responsible for a trip charge or you may be required to bring the product to an Authorized GE Service
Location for service. In Alaska, the warranty excludes the cost of shipping or service calls to your home.
Some states do not allow the exclusion or limitation of incidental or consequential damages. This warranty gives
you specific legal rights, and you may also have other rights which vary from state to state. To know what your
legal rights are, consult your local or state consumer affairs office or your state's Attorney General
Warrantoc General Electric Company.Louisville, KY 40225
54

GEGas
Range Warranty.(For customers in Canada)
Aft warranty service provided by our Factory Service Centres Staple your receipt here.
or an authorized Customer Care® technician. For service, Proof of the original purchase
carl 1.800.561.3344.Please have serial number and model date is needed to obtain service
number available when calling for service, under the warranty.
Mabe Will Replace:
OneYear Any part of dle range which fails due to a defect in materials or workmanship. During dlis
Fromthe date of the limited one-yearwarranty,Mabe will also provide, free ofcharge,all labor and in-home se_Mce
originalpurchase to replace the defective part.
Service trips to your home to teach you how to use
the product.
Replacement of house fuses or resetting of circuit
breakers.
Improper installation, delivery or maintenance.
Failure of the product if it is abused, misused,
or used for other than the intended purpose or
used commercially.
Damage to the product caused by accident, fire, floods
or acts of God.
Incidental or consequential damage caused by possible
defects with this appliance.
Damage caused after delivery.
Product not accessible to provide required service.
EXCLUSION OF IMPLIED WARRANTIES--Your sole and exclusive remedy is product repa# as provided
in this Limited Warranty. Any implied warranties, including the implied warranties of merchantability
or fitness for a particular purpose, are limited to one year or the shortest period allowed by law.
[ WM_I_NTOR IS NOT RESPONSIBLE FOR CONSEQUENTIM. DAMAGES. [
I Warrantor:MABECANADAINC. I
55
ConsumerSupport.
GEAppliancesWebsite
ge.com
Have a question ov need assistance widl your appliance? TD_the GE Appliances Website 24 hours a day,
any day of tile year! Fox greater convenience and fi,tster service, you can now download Owner's Manuals,
order parts ox even schedule sex_qce on-line.
ScheduleService
Expert GE repair sepdce is only one step away flom your dooL Get on4ine and schedule your service at
your convenience 24 houxs any day of tlle year! Or c_fll800.GE.CARES 800.432.2737) during nox_nal
business hours. In Canada, call 11.800.5611.3344.
ge.com
RealLife DesignStudio
ge.com
GE supports the Universal Design concept--products, services and envuonments that can be used by
people of aU ages, sizes and capabilities. We vecogmize the need m design for a wide range of physical and
mental abilities and impaixments. Fox details of GE's Univexsal Desigm applications, including kitchen
design ideas for people with disabilities, check out our Website today. Fox the hearing impaired, please call
800.TDD.GEAG (800.833.4322). In Canada, contact: Managex; Consumer Relations, Mabe Canada Inc.,
1 FacmxT Lane, Suite 310, Moncmn, N.B., E1C 9M3.
ExtendedWarranties
ge.com
Purchase a GE extended warranty and learn about special discounts that ave available while your warranty
is still in effect. You can purchase it on-line anytime, or call 800.626.2224 during nomml business houxs.
GE (;onsumer Home Sex_ices will still be there meter your warranty expi_es. In Canada, call 1.800.4611.3636.
PartsandAccessories
ge.com
IndMduals qualified to service dleir own appliances can have parts or accessox-ies sent direcdy to dleir
homes (VISA, MasterCard and Discover cards ave accepted). Order on-line today, 24 houxs every day or
by phone at 800.626.2002 during normal business hours.
Instructionscontainedin thismanualcoverprocedurestobeperformedbyanyuser.Otherservicing generally
shouldbe referredto qualifiedservicepersonnel Cautionmustbe exercised,sinceimproperservicingmaycause
unsafeoperation.In Canada,pleaseconsultyouryellow pagesforyourlocal Mabe number.
ContactUs
ge.com
If you a_e not satisfed wit1 die sexMce you receive flom GE, contact us on our Website wit1 all file details
including your phone numbex; or wx-imm: (;enex_d Manager, Gustomer Relations, GE Appliances,
Appliance Park, Louisville, KY 40225. In Canada, to: Managex; Consumer Relations, Mabe Canada Inc.,
1 Facmxy Lane, Suite 310, Moncmn, N.B., E1C 9M3.
RegisterYourAppliance
Register your new appliance on-line--at your convenience! Timely product vegism_tion will allow for
enhanced communication and prompt sexa_iceunder tlle temls of your warranty, should tile need arise.
You may also mail in tile we-printed regism_tion card included in tile packing matex-ial.
ge.com
Printed in Mexico
This book is printed on recycled paper.