Use & Care Guide
ManuaJ de Uso Y Cuidado
English / Espa_ol
.... _ _ _ _ Hq_," _ q_ k _:_s ¸-_-_
,_/ ss c£ _ x s ,
i};_ ( S(
_t zase Idee(<:,'t:, ::_. ;:_.......:,is .........'_:.....
< ' ' '' ......... t' '...............
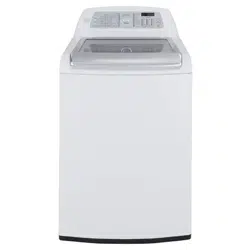
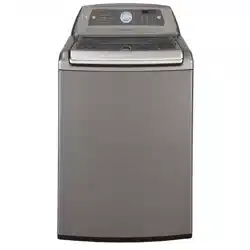
Model/Modelo: 796.3152#21#
ore Elite.
oad
_C c
@
QU_£OmQ _CQ de
ca a
@
P/N MFL39760237
Sears Brand Management Corporation
Hoffman Estates, IL 60179 U.S.A.
www.kenmore.com
www.sears.com
iMPORTANT SAFETY iNSTRUCTiONS ..................... 3-5
GROUNDING REQUIREMENTS .................................... 5
FEATURES AND BENEFITS
ey Parts and Components ......................................... 6
ptional Accessories .................................................... 6
Included Accessories .................................................... 6
INSTALLATION REQUIREMENTS
Key Dimensions and Specifications ........................... 7
Choose the Proper Location ....................................... 7
Flooring ......................................................................... 7
Clearances ................................................................... 7
INSTALLATION INSTRUCTIONS
npacking and Removing Shipping Material .......... 8
onnecting the Water Lines ....................................... 9
onnecting the Drain Hose ....................................... 10
Connect to the Power Supply .................................... 10
Leveling the Washer ................................................... 11
HOW TO USE
Control Panel Features ................................................ 12
Operating the Washer ................................................. 13
Cycle Guide ............................................................ 14-15
borting Wash Loads ................................................... 16
About the Dispensers .................................................. 17
Detergent and Dispenser Use .................................... 18
Time and Status Disptay ............................................ 19
Cycle Modifier Buttons .............................................. 20
Option Buttons ....................................................... 21-23
Stain Treat ................................................................. 21
Save Energy .............................................................. 21
Extra Rinse ................................................................ 21
Water Plus ................................................................ 21
Add a Garment ........................................................ 21
Chime ......................................................................... 21
Cleon Washer .......................................................... 22
Fabric Softener ........................................................ 22
My Cycle ................................................................... 22
Soak ........................................................................... 22
Delay Wash .............................................................. 23
Drain & Spin ............................................................. 23
Lontrot Lock ............................................................. 23
Special Drain Feature ................................................ 23
CARE AND CLEANING
Regular Cleaning ..................................................... 24
Maintenance ............................................................ 25
Cleaning the Washer ............................................. 26
KENMORE CONNECT TM SYSTEM .............................. 27
Using the Kenmore Connect TM System .................... 27
TROUBLESHOOTING GUIDE
Normal Sounds You May Hear ................................ 28
Before Calling for Service ................................... 28-33
Error Codes ............................................................ 32-33
WARRANTY ................................................................... 34
SERVICE ........................................................... Back Cover
In the space below, record the date of purchase, model,
and serial number of your product. You will find the
model and serial number printed on an identification
plate located inside the washer lid. Have these items of
information available whenever you contact Sears
concerning your product.
Model No.
Date of Purchase
Serial No.
Save these instructions and your sales receipt for future
reference.
Master Protection Agreements
Congratulations on making a smart purchase. Your new
Kenmore ® product is designed and manufactured for
years of dependable operation. But like all products, it
may require preventive maintenance or repair from time
to time. That's when having a Master Protection
Agreement can save you money and aggravation.
The Master Protection Agreement also helps extend the
life of your new product. Here's what the
Agreement s includes:
* Parts and labor needed to help keep products operating
properly under normal use, not just defects. Our coverage
goes well beyond the product warranty. No deductible, no
functional failure excluded from coverage - real protection.
* Expert service by a force of more than 10,000 authorized
Sears service technicians, which means someone you can
trust will be working on your product.
* Unlimited service calls and nationwide service, as often as
you want us, whenever you want us.
" "No-lemon" guarantee - replacement of your covered
product if four or more product failures occur within twelve
months.
* Product replacement if your covered product can not
be fixed.
* Annual Preventive Maintenance Check at your request - no
extra charge.
* Fast help by phone = we call it Rapid Resolution. Phone
support from a Sears representative on all products. Think of us
as a "talking owner's manual."
* Power surge protection against electric damage due to
power fluctuations.
* $250 food loss protection annually for any food spoilage
that is the result of mechanical failure of any covered
refrigerator or freezer.
* Rental reimbursement if repair of your covered product
takes longer than promised.
* 10°/0 discount off the regular price of any non-covered repair
service and related installed parts.
Once you purchase the Agreement, a simple phone
call is all that it takes for you to schedule service. You
can call at any time day or night or schedule a service
appointment online.
The Master Protection Agreement is a risk-free purchase.
If you cancel for any reason during the product
warranty period, we will provide a full refund, or a
prorated refund any time after the product warranty
period expires. Purchase your Master Protection
Agreement today!
Some limitations and exclusions apply.
For prices and additional information in the U.S.A.
call 1-800-827-6655.
_Coverage in Canada varies on some items.
For full details call Sears Canada at 1-800-361-6665.
Sears Installation Service
For Sears professional installation of home appliances,
garage door openers, water heaters, and other major
home items, in the U.S.A. or Canada call:
1-800-4-MY-HOME ®.
Thereare manyimportantsafety messages in this manual and on your appliance. Always read and obey
all safety messages.
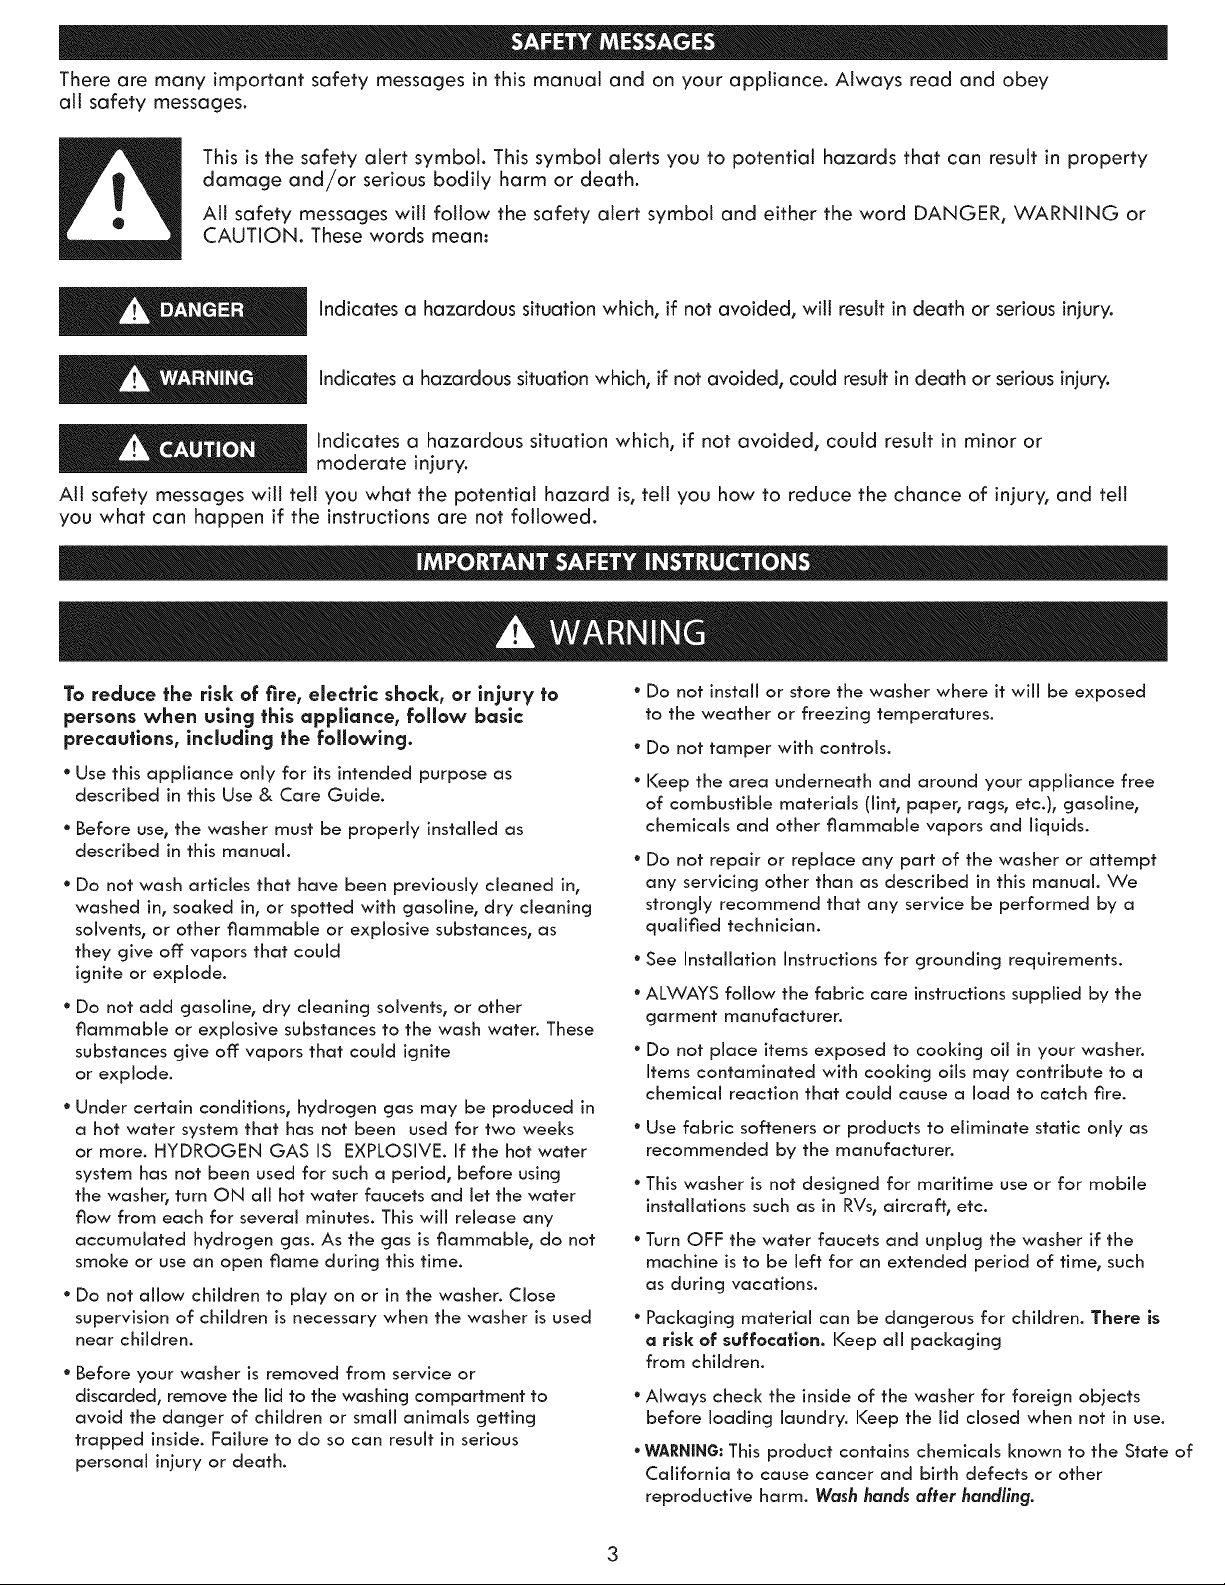
This is the safety alert symbol. This symbol alerts you to potential hazards that can result in property
damage and/or serious bodily harm or death.
All safety messages win follow the safety alert symbol and either the word DANGER, WARNING or
CAUTION. These words mean:
Indicates a hazardous situation which, if not avoided, will result in death or serious injury.
Indicates a hazardous situation which, if not avoided, could result in death or serious injury.
Indicates a hazardous situation which, if not avoided, could result in minor or
moderate injury.
AN safety messages will tell you what the potential hazard is, tell you how to reduce the chance of injury, and tell
you what can happen if the instructions are not followed.
To reduce the risk of fire, electric shock, or injury to
persons when using this appliance, follow basic
precautions, including the following.
° Use this appliance only for its intended purpose as
described in this Use & Care Guide.
* Before use, the washer must be properly installed as
described in this manual.
• Do not wash articles that have been previously cleaned in,
washed in, soaked in, or spotted with gasoline, dry cleaning
solvents, or other flammable or explosive substances, as
they give of]: vapors that could
ignite or explode.
* Do not add gasoline, dry cleaning solvents, or other
flammable or explosive substances to the wash water. These
substances give off: vapors that could ignite
or explode.
* Under certain conditions, hydrogen gas may be produced in
a hot water system that has not been used for two weeks
or more. HYDROGEN GAS IS EXPLOSIVE. If the hot water
system has not been used for such a period, before using
the washer, turn ON aii hot water faucets and let the water
flow from each for several minutes. This win release any
accumulated hydrogen gas. As the gas is flammable, do not
smoke or use an open flame during this time.
* Do not allow children to play on or in the washer. Close
supervision of children is necessary when the washer is used
near children.
* Before your washer is removed from service or
discarded, remove the lid to the washing compartment to
avoid the danger of children or smaN animals getting
trapped inside. Failure to do so can result in serious
personal injury or death.
* Do not install or store the washer where it win be exposed
to the weather or freezing temperatures.
* Do not tamper with controls.
* Keep the area underneath and around your appliance free
of combustible materials (lint, paper, rags, etc.), gasoline,
chemicals and other flammable vapors and liquids.
* Do not repair or replace any part of the washer or attempt
any servicing other than as described in this manual. We
strongly recommend that any service be performed by a
qualified technician.
* See Installation Instructions for grounding requirements.
* ALWAYS follow the fabric care instructions supplied by the
garment manufacturer.
* Do not place items exposed to cooking oil in your washer.
Items contaminated with cooking oils may contribute to a
chemical reaction that could cause a load to catch fire.
* Use fabric softeners or products to eliminate static only as
recommended by the manufacturer.
* This washer is not designed for maritime use or for mobile
installations such as in RVs, aircraft, etc.
* Turn OFF the water faucets and unplug the washer if the
machine is to be left for an extended period of time, such
as during vacations.
* Packaging material can be dangerous for children. There is
a risk of suffocation. Keep aii packaging
from children.
* Always check the inside of the washer for foreign objects
before loading laundry. Keep the lid closed when not in use.
* WARNING:This product contains chemicals known to the State of
California to cause cancer and birth defects or other
reproductive harm. Wash hands a#er hand#ing.
To reduce the risk of fire, electrlc shock, or injury to
persons when using this appllance, follow basic
precautions, including the following.
° Unplug the washer before cleaning to avoid the risk of
electric shock.
° Never use harsh chemicals, abrasive cleaners, or solvents
to clean the washer. They will damage
the finish.
° Do not put oily or greasy rags or clothlng on top of the
washer. These substances give off: vapors that could ignite
the materials.
° Do not wash items that are soiled with vegetable or
cooking oll. These items may contain some oil after
laundering and may catch fire.
° Disconnect this appliance from the power supply before
attempting any user maintenance. Turning the controls to
the OFF position does not disconnect this appllance from
the power supply. Failure to follow this warning can
cause serious injury, fire, electric shock,
or death.
* Do not combine detergents, fabric softeners, and/or other
laundry products from different manufacturers for use in a
load, unless specified on the label.
° Do not mix chlorine bleach with ammonia or acids such
as vinegar. Follow package directions when using laundry
products. Incorrect usage can produce poisonous gas,
resulting in serious injury or death.
° Do not reach into the washer while parts are moving.
Before Ioadlng, unloadlng, or adding items, push in the
cycle selector knob and allow the tub to coast to a complete
stop before reaching inside. Failure to follow this warning
can cause serious injury, fire, electric shock or death.
° Do not, under any circumstances, cut or remove the third
(ground) prong from the power cord. Failure to follow this
warning can cause serious injury, fire, electric shock, or death.
• For personal safety, this appfiance must be properly
grounded. Failure to follow this warning can cause serious
injury, fire, electric shock, or death.
• The power cord of this appffance is equipped with a
3-prong (groundlng) plug which mates with a standard
3-prong (grounding) waft outlet to minimize the possibility of
electric shock hazard from this appliance.
° This washer must be plugged into a |20VAC, 60Hz
grounded outlet. Failure to follow this warning can cause
serious injury, fire, electric shock, or death.
° Have the wall outlet and circuit checked by a qualified
electrlclan to make sure the outlet is properly grounded.
Failure to follow this warning can cause serious injury, fire,
electric shock, or death.
° Where a standard 2-prong wall outlet is encountered, it
is your personal responsibility and obligation to have it
replaced with a properly grounded 3-prong wall outlet.
Failure to follow this warning can cause serious injury, fire,
electric shock, or death.
floor. Failure to follow this warning can cause serious leak
damage.
° Do not remove grounding prong. Do not use an adapter
or extension cord. Plug into a grounded 3-prong outlet.
Failure to follow these warnings can cause serious injury, fire,
electric shock, or death.
° Refer to INSTALLATUON INSTRUCTIONS for detailed
grounding procedures. Installation instructions are packed
in the washer for the installer's reference. If the washer is
moved to a new location, have it checked and reinstalled by
a qualified service technician. Failure to follow this warning
can cause serious injury, fire, electric shock, or death.
• Do not, under any clrcumstances, cut or remove the third
(ground) prong from the power cord. Failure to follow this
warning can cause serious iniury, fire, electric shock, or death.
° For personal safety, this appffance must be properly
grounded. Failure to follow this warning can cause serious
injury, fire, electric shock, or death.
° The power cord of this appliance is equipped with a
3-prong (grounding) plug which mates with a standard
3-prong (grounding) wall outlet to minimize the possibility of
electric shock hazard from this appliance.
° This washer must be plugged into a |20VAC, 60Hz
grounded outlet. Failure to follow this warning can cause
serious injury, fire, electric shock, or death.
° Have the wall outlet and circuit checked by a quafffied
electrician to make sure the outlet is properly grounded.
Failure to follow this warning can cause serious injury, fire,
electric shock, or death.
• Where a standard 2-prong waft outlet is encountered, it
is your personal responsibility and obligation to have it
replaced with a properly grounded 3-prong wall outlet.
Failure to follow this warning can cause serious injury, fire,
electric shock, or death.
° Do not install on carpet. Instaff the washer on a solid
floor. Failure to follow this warning can cause serious leak
damage.
• Do not remove grounding prong. Do not use an adapter
or extension cord. Plug into a grounded 3-prong outlet.
Failure to follow these warnings can cause serious injury, fire,
electric shock, or death.
° Never attempt to operate this appliance if it is damaged,
malfunctioning, partially disassembled or has missing or
broken parts, including a damaged cord or plug.
° To minimize the possibility of electric shock, unplug this
appliance from the power supply or disconnect the washer
at the household distribution panel by removing the fuse
or switching off: the circuit breaker before attempting any
maintenance or cleaning.
° Do not install on carpet. Install the washer on a solid
4
° Do not allow children to play on or in the washer. Close
supervision of children is necessary when the washer is used
near children. As children grow, teach them the proper, safe
use of all appliances. Failure to comply with these warnings
could result in serious personal injury.
° Destroy the carton, plastic bag, and other packing materials
after the washer is unpacked. Children might use them for
play. Cartons covered with rugs, bedspreads, or plastic sheets
can become airtight chambers. Failure to comply with these
warnings could result in serious personal injury.
° Keep laundry products out of children's reach. To prevent
personal injury, observe all warnings on product labels.
Failure to comply with these warnings could result in serious
personal injury.
° Before your washer is removed from service or
discarded, remove the lid to the washing compartment to
avoid the danger of children or small animals getting
trapped inside. Failure to do so can result in serious
personal injury or death.
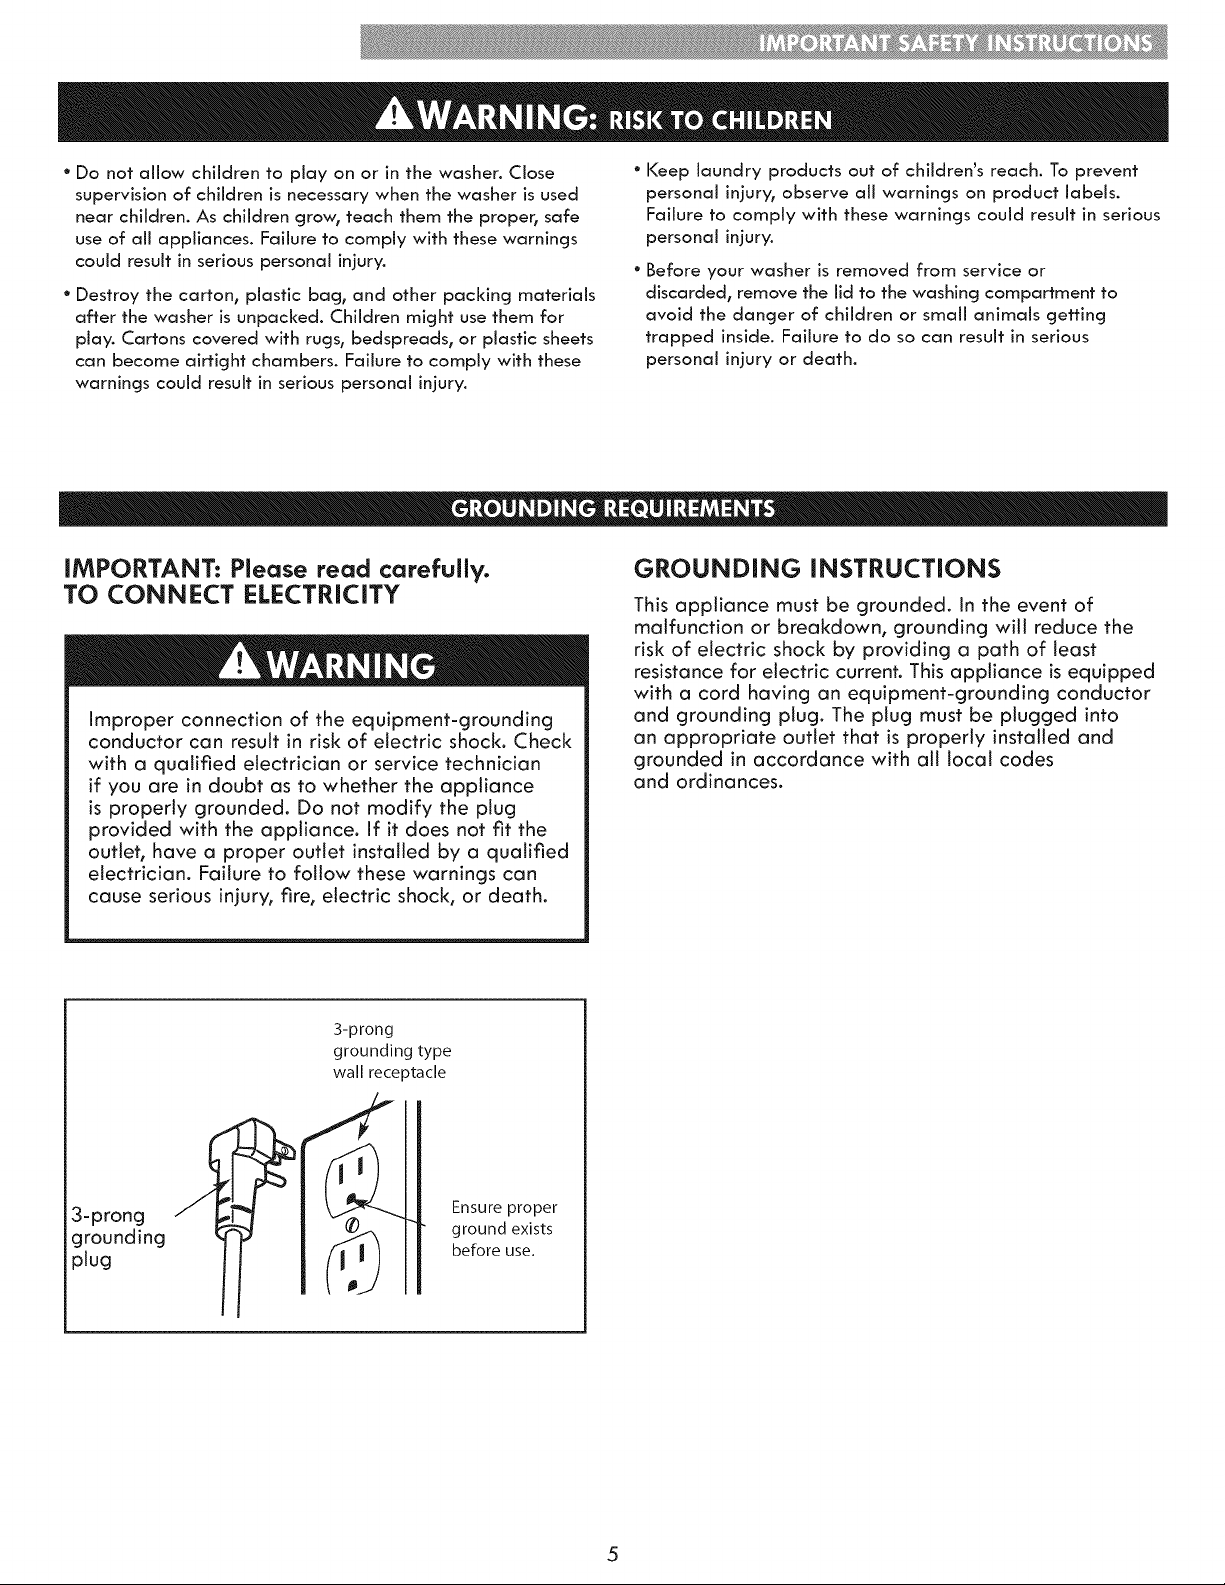
IMPORTANT: Please read carefully.
TO CONNECT ELECTRICITY
improper connection of the equipment-grounding
conductor can result in risk of electric shock. Check
with a qualified electrician or service technician
if you are in doubt as to whether the appliance
is properly grounded. Do not modify the plug
provided with the appliance, if it does not fit the
outlet, have a proper outlet installed by a qualified
electrician. Failure to follow these warnings can
cause serious injury, fire, electric shock, or death.
GROUNDING INSTRUCTIONS
This appliance must be grounded. In the event of
malfunction or breakdown, grounding will reduce the
risk of electric shock by providing a path of least
resistance for electric current. This appliance is equipped
with a cord having an equipment-grounding conductor
and grounding plug. The plug must be plugged into
an appropriate outlet that is properly installed and
grounded in accordance with all local codes
and ordinances.
3-prong
grounding
plug
3-prong
grounding type
wall receptacle
Ensure proper
ground exists
before use.
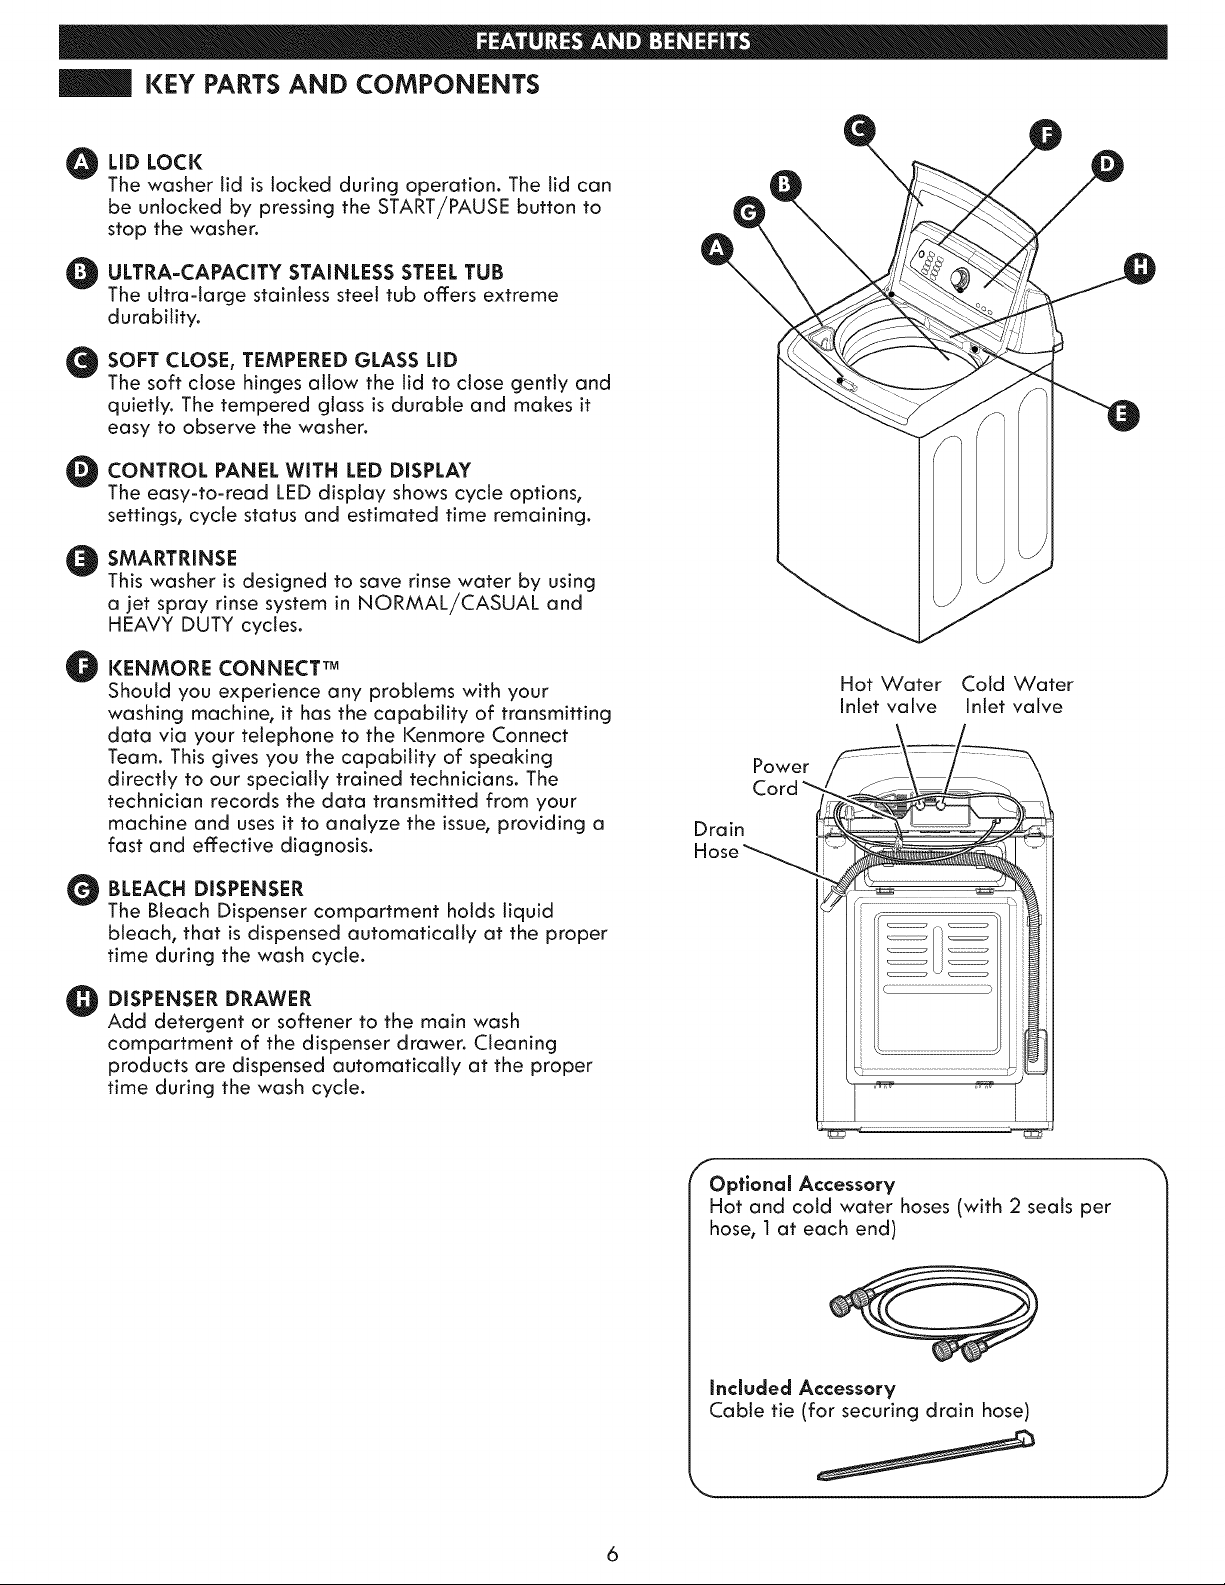
KEY PARTS AND COMPONENTS
O ID LOCI(
The washer lid is locked during operation. The lid can
be unlocked by pressing the START/PAUSE button to
stop the washer.
O LTRA-CAPACITY STAINLESS STEEL TUB
The ultra-large stainless steel tub offers extreme
durability.
O
SOFT CLOSE, TEMPERED GLASS LID
The soft close hinges allow the lid to close gently and
quietly. The tempered glass is durable and makes it
easy to observe the washer.
O ONTROL PANEL WITH LED DISPLAY
The easy-to-read LED display shows cycle options,
settings, cycle status and estimated time remaining.
@
@
O
O
SMARTRINSE
This washer is designed to save rinse water by using
a jet spray rinse system in NORMAL/CASUAL and
HEAVY DUTY cycles.
KENMORE CONNECT TM
Should you experience any problems with your
washing machine, it has the capability of transmitting
data via your telephone to the Kenmore Connect
Team. This gives you the capability of speaking
directly to our specially trained technicians. The
technician records the data transmitted from your
machine and uses it to analyze the issue, providing a
fast and effective diagnosis.
BLEACH DISPENSER
The Bleach Dispenser compartment holds liquid
bleach, that is dispensed automatically at the proper
time during the wash cycle.
DISPENSER DRAWER
Add detergent or softener to the main wash
compartment of the dispenser drawer. Cleaning
products are dispensed automatically at the proper
time during the wash cycle.
Power
Cord _
Drain
Hose_
Hot Water Cold Water
Inlet valve Inlet valve
fOptlonal Accessory
Hot and cold water hoses (with 2 seals per
hose, 1 at each end)
Included Accessory
Cable tie (for securing drain hose)
J
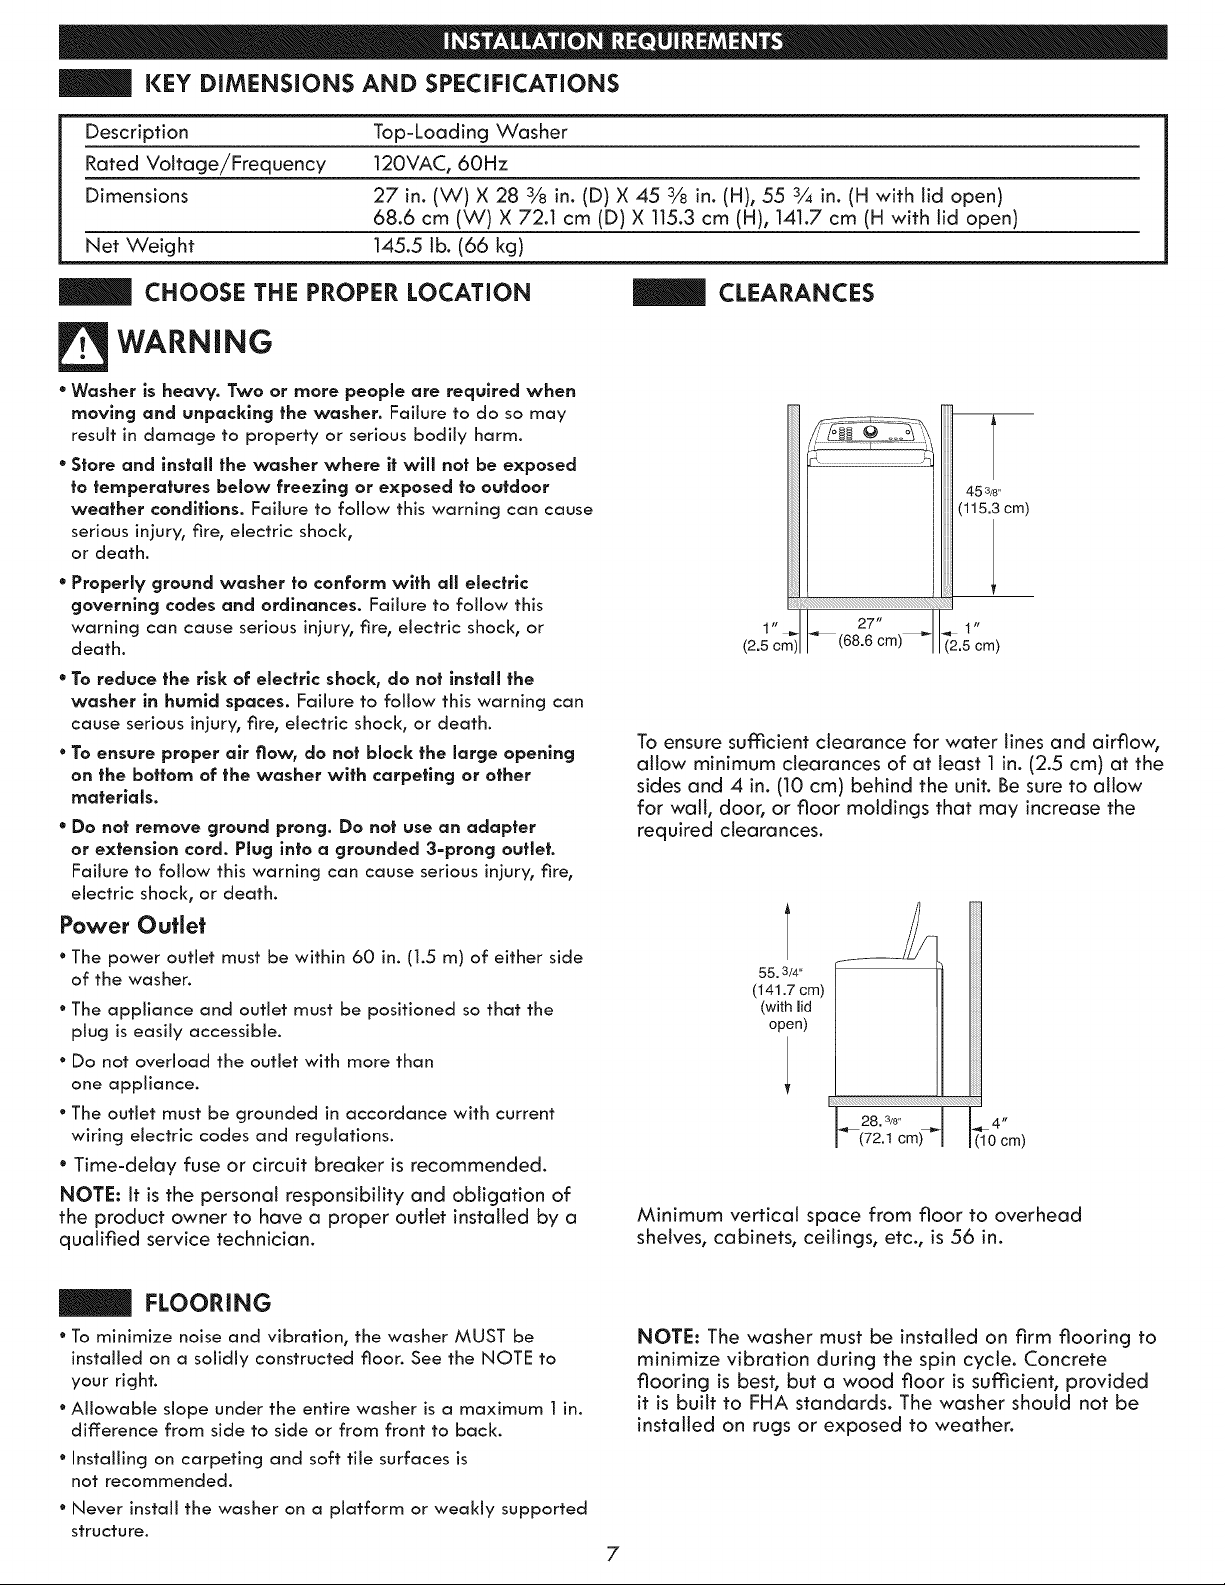
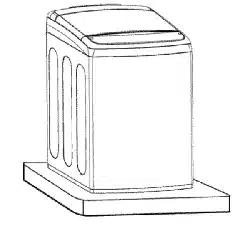
KEY DiMENSiONS AND SPECiFiCATiONS
Description Top-Loading Washer
Rated Voltage/Frequency 120VAC, 60Hz
Dimensions 27 in. (W) X 28 3/8 in. (D) X 45 3/8 in. (H), 55 3,4 in. (H with lid open)
68.6 cm (W) X 72.1 cm (D) X 115.3 cm (H), 141.7 cm (H with lid open)
Net Weight 145.5 lb. (66 kg)
CHOOSE THE PROPER LOCATION CLEARANCES
WARNING
* Washer is heavy. Two or more people are required when
moving and unpacking the washer. Failure to do so may
result in damage to property or serious bodily harm.
* Store and install the washer where it will not be exposed
to temperatures below freezing or exposed to outdoor
weather conditions. Failure to follow this warning can cause
serious injury, fire, electric shock,
or death.
* Properly ground washer to conform wlth all electric
governing codes and ordinances. Failure to follow this
warning can cause serious injury, fire, electric shock, or
death.
* To reduce the risk of electric shock, do not install the
washer in humid spaces. Failure to follow this warning can
cause serious injury, fire, electric shock, or death.
* To ensure proper air flow, do not block the large opening
on the bottom of the washer wlfh carpeting or other
materials.
* Do not remove ground prong. Do not use an adapter
or extension cord. Plug into a grounded 3=prong ouflefo
Failure to follow this warning can cause serious injury, fire,
electric shock, or death.
Power Outlet
° The power outlet must be within 60 in. (1.5 m) of either side
of the washer.
* The appliance and outlet must be positioned so that the
plug is easily accessible.
° Do not overload the outlet with more than
one appliance.
° The outlet must be grounded in accordance with current
wiring electric codes and regulations.
* Time-delay fuse or circuit breaker is recommended.
NOTE: It is the personal responsibility and obligation of
the product owner to have a proper outlet installed by a
qualified service technician.
4 5 3/8'
(115.3 cm)
(2.5 cm)
27" 1"
cm)_ (2.5 cm)
To ensure sufficient clearance for water lines and airflow,
allow minimum clearances of at least 1 in. (2.5 cm) at the
sides and 4 in. (10 cm) behind the unit. Be sure to allow
for wall, door, or floor moldings that may increase the
required clearances.
55.3/4"
(444.7cm)
(with mid
open)
28.3/8.
_(72.1 cm)_
4 rr
(10cm)
Minimum vertical space from floor to overhead
shelves, cabinets, ceilings, etc., is 56 in.
FLOORING
° To minimize noise and vibration, the washer MUST be
installed on a solidly constructed floor. See the NOTE to
your right.
° Allowable slope under the entire washer is a maximum 1 in.
difference from side to side or from front to back.
° Installing on carpeting and soft tile surfaces is
not recommended.
° Never install the washer on a platform or weakly supported
structure.
NOTE: The washer must be installed on firm flooring to
minimize vibration during the spin cycle. Concrete
flooring is best, but a wood floor is sufficient, provided
it is built to FHA standards. The washer should not be
installed on rugs or exposed to weather.
7
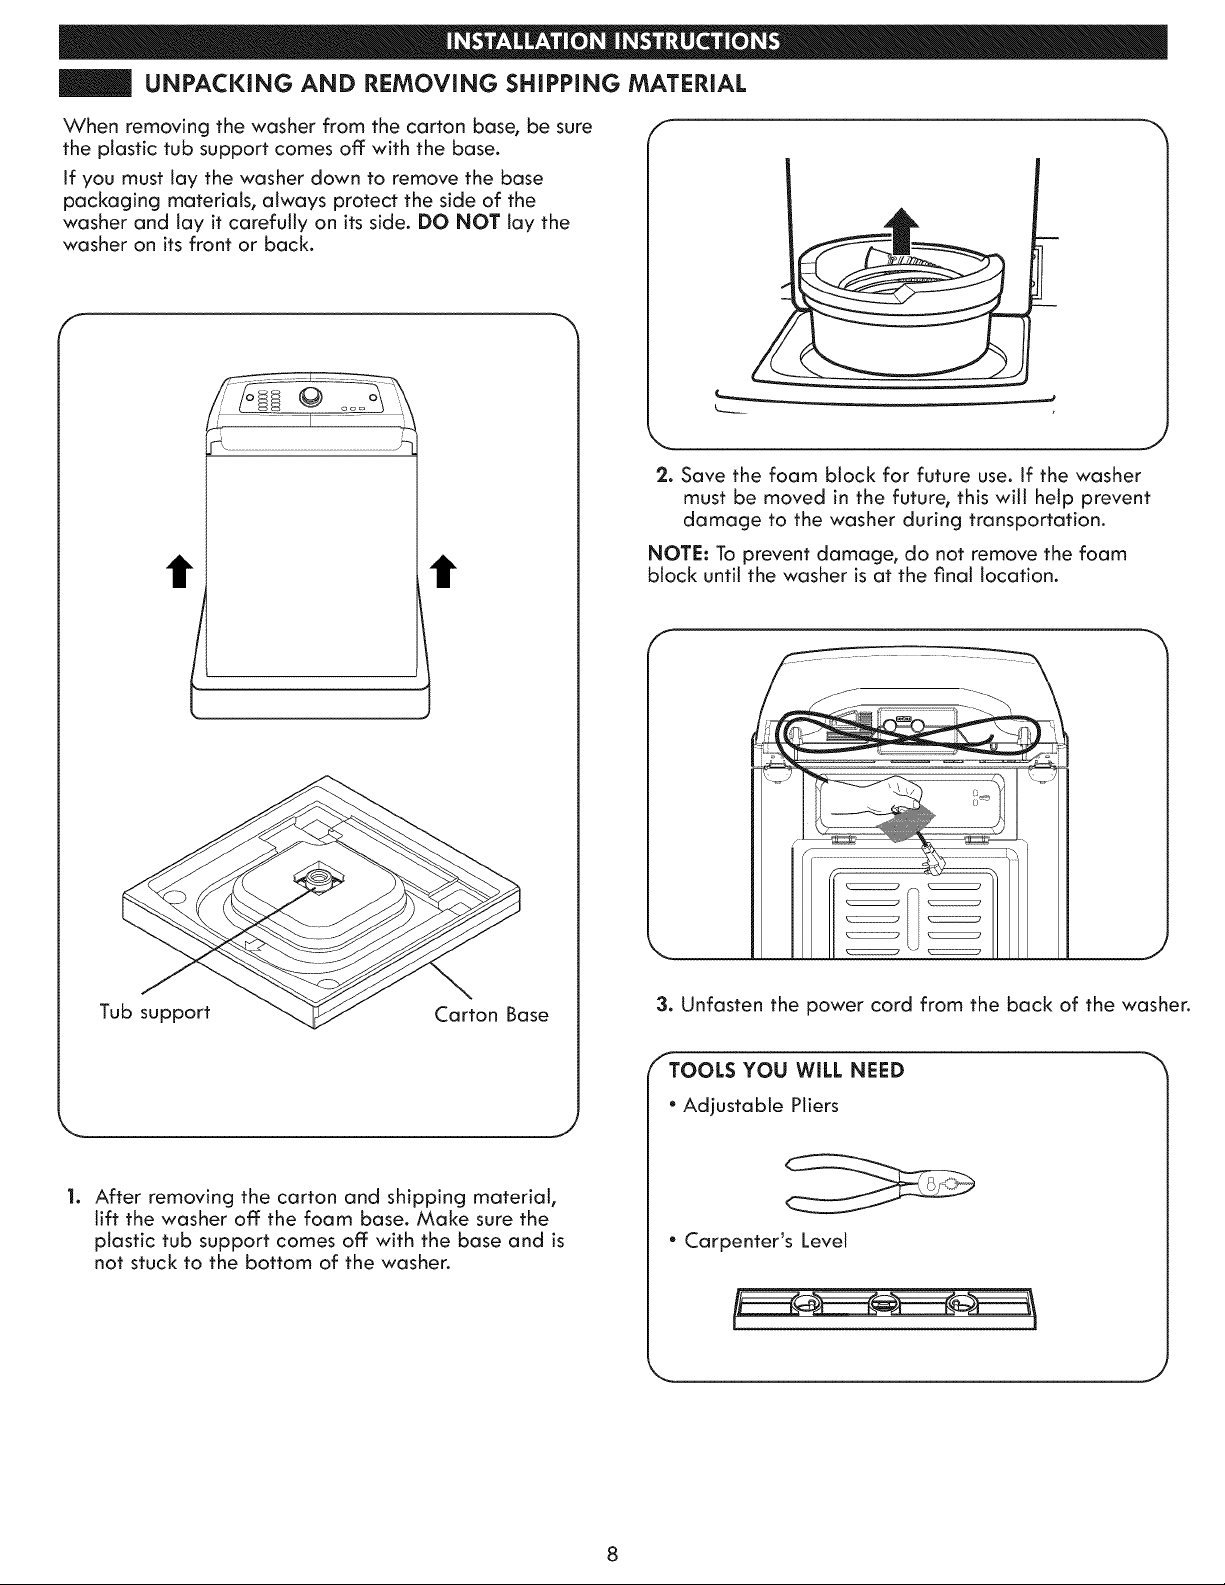
UNPACKING AND REMOVING SHiPPiNG MATERIAL
When removing the washer from the carton base, be sure
the plastic tub support comes off: with the base.
if you must lay the washer down to remove the base
packaging materials, always protect the side of the
washer and lay it carefully on its side. DO NOT lay the
washer on its front or back.
t t
Tub support Carton Base
lo
After removing the carton and shipping material,
lift the washer off: the foam base. Make sure the
plastic tub support comes off: with the base and is
not stuck to the bottom of the washer.
f
J
2. Save the foam block for future use. If the washer
must be moved in the future, this will help prevent
damage to the washer during transportation.
NOTE: To prevent damage, do not remove the foam
block until the washer is at the final location.
f
\
3. Unfasten the power cord from the back of the washer.
fTOOLS YOU WILL NEED
• Adjustable Pliers
• Carpenter's Level
J
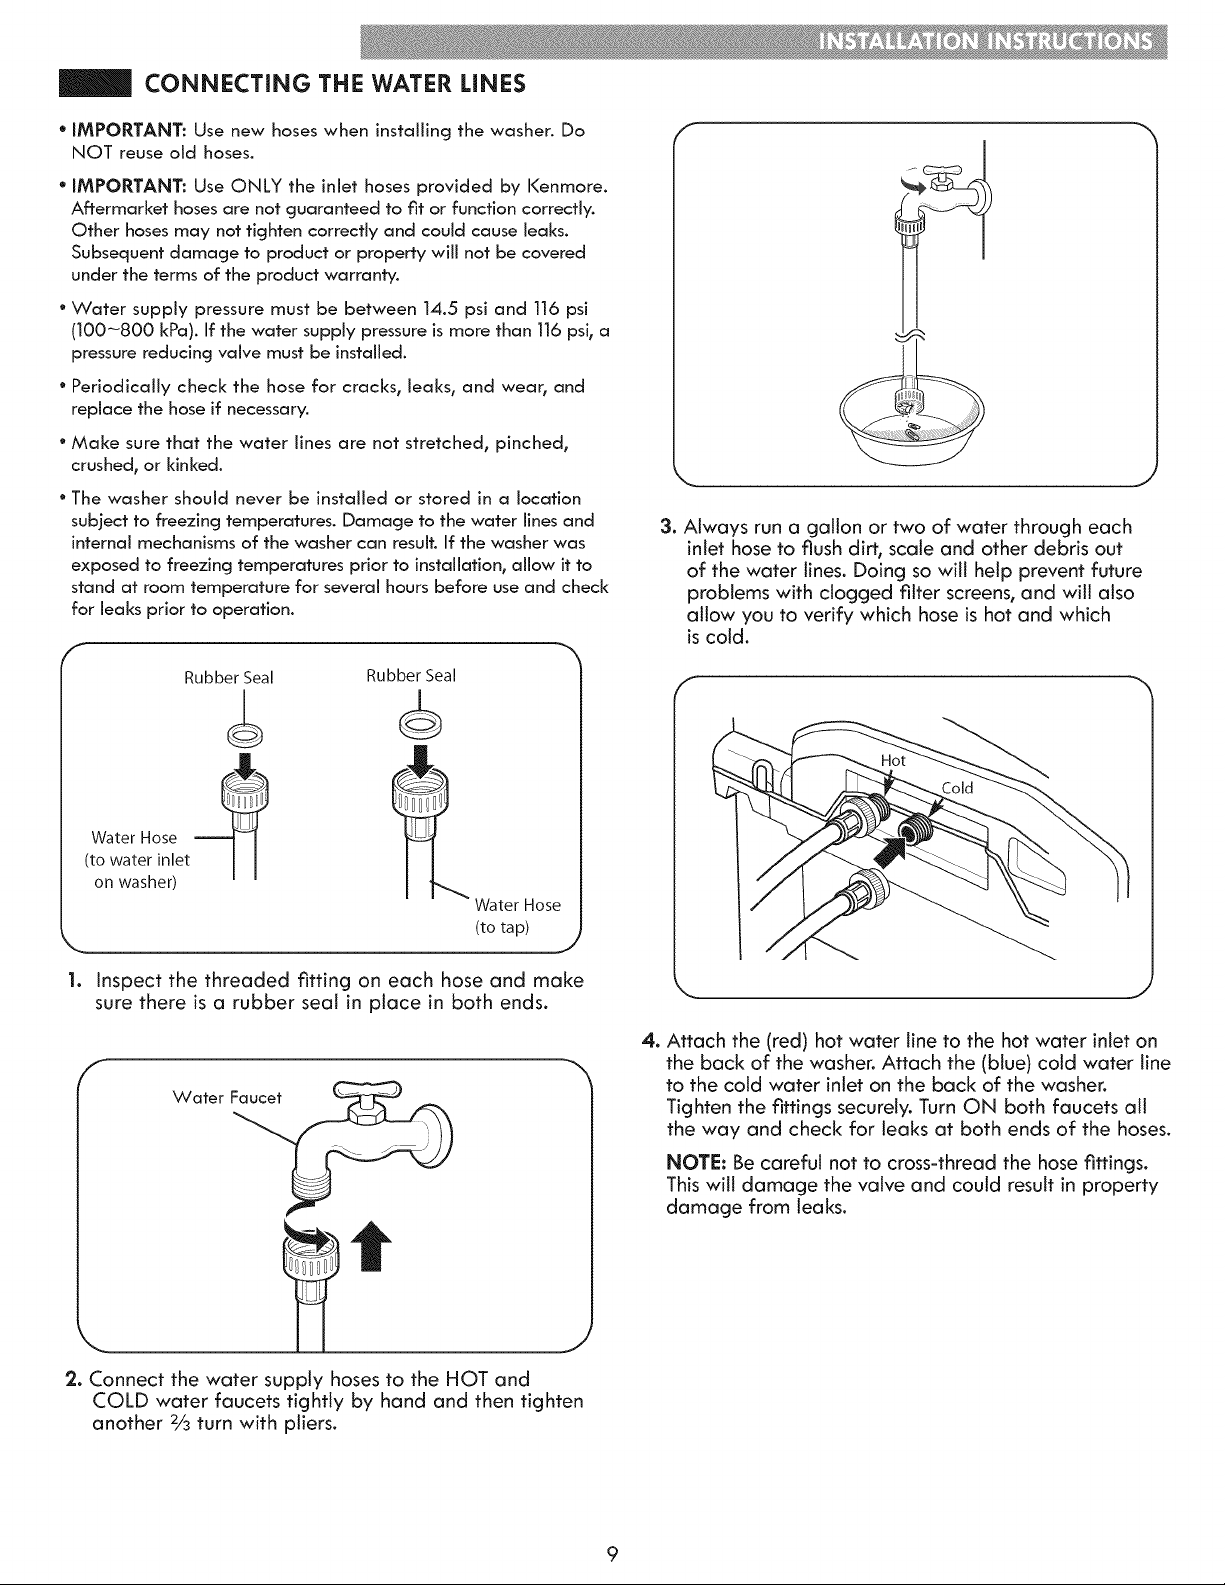
CONNECTING THE WATER LINES
• IMPORTANT: Use new hoses when installing the washer. Do
NOT reuse old hoses.
* IMPORTANT: Use ONLY the inlet hoses provided by Kenmore.
Aftermarket hoses are not guaranteed to fit or function correctly.
Other hoses may not tighten correctly and could cause leaks.
Subsequent damage to product or property will not be covered
under the terms of the product warranty.
° Water supply pressure must be between 14.5 psi and 116 psi
(100-800 kPa). If the water supply pressure is more than 116 psi° a
pressure reducing valve must be installed.
° Periodically check the hose for cracks, leaks, and wear_ and
replace the hose if necessary.
° Make sure that the water lines are not stretched_ pinched_
crushed_ or kinked.
° The washer should never be installed or stored in a location
subject to freezing temperatures. Damage to the water lines and
internal mechanisms of the washer can result. If the washer was
exposed to freezing temperatures prior to installation, allow it to
stand at room temperature for several hours before use and check
for leaks prior to operation.
1.
Rubber Seal
Water Hose t
(to water inlet
on washer)
Rubber Seal
Water Hose
(to tap)
J
inspect the threaded fitting on each hose and make
sure there is a rubber seal in place in both ends.
Water
2° Connect the water supply hoses to the HOT and
COLD water faucets tightly by hand and then tighten
another 2/3turn with pliers.
3. Always run a gallon or two of water through each
inlet hose to flush dirt, scale and other debris out
of the water lines. Doing so will help prevent future
problems with clogged filter screens, and will also
allow you to verify which hose is hot and which
is cold.
Hot
4. Attach the (red) hot water line to the hot water inlet on
the back of the washer. Attach the (blue) cold water line
to the cold water inlet on the back of the washer.
Tighten the fittings securely. Turn ON both faucets all
the way and check for leaks at both ends of the hoses.
NOTE: Be careful not to cross-thread the hose fittings.
This will damage the valve and could result in property
damage from leaks.
CONNECTING THE DRAIN HOSE
° The drain hose should always be properly secured. Failure
to properly secure the drain hose can result in flooding and
property damage.
° The drain must be installed in accordance with any
applicable local codes and regulations.
° Make sure that the drain hose is not stretched, pinched,
crushed, or kinked.
Option 1: Standpipe
f
Drain Line
I
I
Standpipe
35"_47"
(0.9_ 1.2 m)
Bend the outlet end of the drain hose to form a U
shape. Inset the end of the drain hose into the drain. If
the drain is large enough for the flange on the hose to
fit inside, then do not insert the flange more than 1-2
inches into the drain. Use the tie strap included with the
installation materials in the foam block in the tub to
secure the drain hose to the drain.
Option 2: Laundry Tub
Tie Strap
Drain Hose
Bend the end of the drain hose to the desired shape and
support it on the edge of the laundry tub. Use a tie strap
to secure the drain hose in place.
CONNECT TO THE POWER SUPPLY
Washer should be plugged into a 120-VAC, 60-Hz
grounded 3-prong outlet. Plug in the washer.
J
Cable Tie
If the water valves and drain are built into the walt,
fasten the drain hose to one of the water hoses with the
cable tie (ribbed side on inside).
35'~47"
(0,9~i2rn)t
Cable Tie
If your drain is a standpipe, fasten the drain hose to the
standpipe with the cable tie provided.
NOTE:
° Normal height of the end of the hose should be
approximately 35"-47" (0.9-1.2 m) from the floor.
° Do not install the end of the drain hose higher than 96 in.
(243.8 cm) above the bottom of the washer or more than 60
in. (152.4 cm) away from the washer.
° Never seal the drain hose to the drain. If no air gap is
present, water can be siphoned out of the tub resulting in
poor wash/rinse performance or clothing damage.
Improper connection of the equipment-grounding
conductor can result in risk of electric shock. Check
with a qualified electrician or service technician
if you are in doubt as to whether the appliance
is properly grounded. Do not modify the plug
provided with the appliance. If it does not fit the
outlet, have a proper outlet installed by a qualified
electrician. Failure to follow these warnings can
cause serious injury, fire, electrical shock, or death.
10
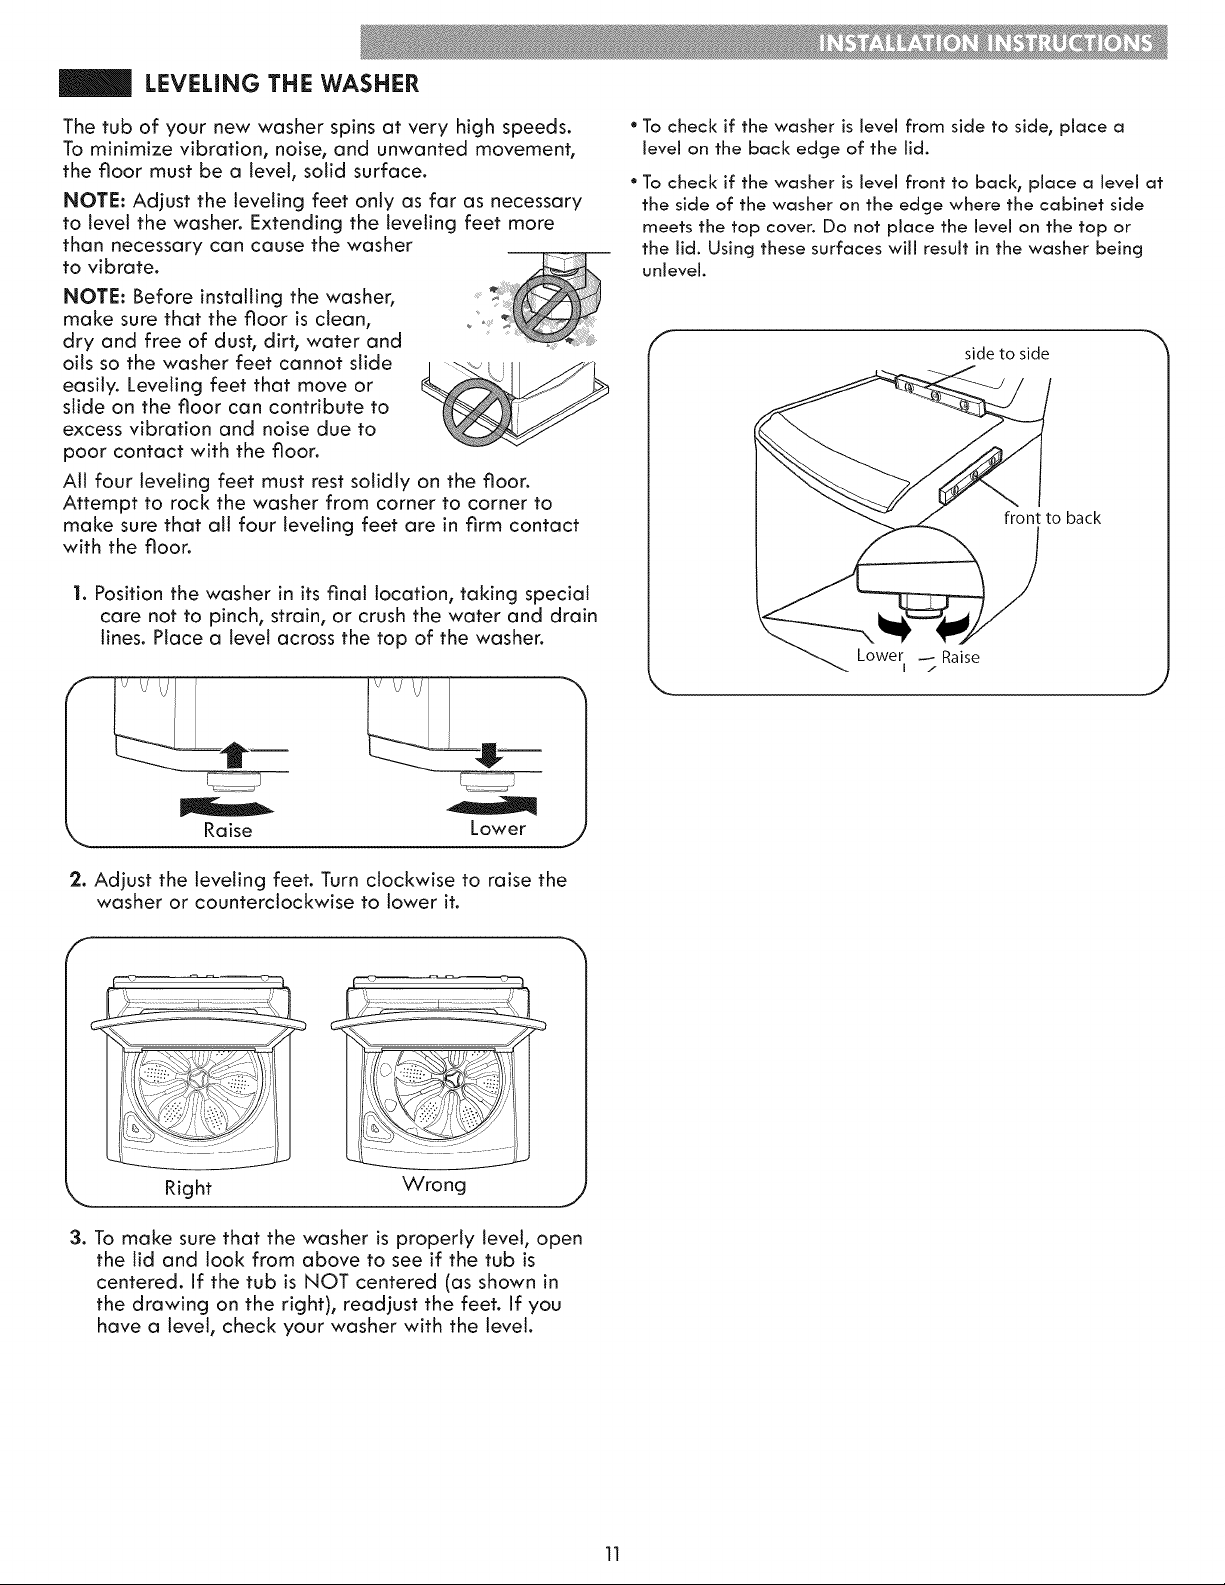
LEVELING THE WASHER
The tub of your new washer spins at very high speeds.
To minimize vibration, noise, and unwanted movement,
the floor must be a level, solid surface.
NOTE: Adjust the leveling feet only as far as necessary
to level the washer. Extending the leveling feet more
than necessary can cause the washer
to vibrate.
NOTE: Before installing the washer,
make sure that the floor is clean,
dry and free of dust, dirt, water and
oils so the washer feet cannot slide
easily. Leveling feet that move or
slide on the floor can contribute to
excess vibration and noise due to
poor contact with the floor.
Alt four leveling feet must rest solidly on the floor.
Attempt to rock the washer from corner to corner to
make sure that all four leveling feet are in firm contact
with the floor.
1. Position the washer in its final location, taking special
care not to pinch, strain, or crush the water and drain
lines. Place a level across the top of the washer.
2. Adjust the leveling feet. Turn clockwise to raise the
washer or counterclockwise to lower it.
f
° To check if the washer is level from side to side, place a
level on the back edge of the lid.
° To check if the washer is level front to back, place a level at
the side of the washer on the edge where the cabinet side
meets the top coven Do not place the level on the top or
the lid. Using these surfaces will result in the washer being
unievei.
side to side
front to back
_oLower I
Raise
/
J
\
Right Wrong
3. To make sure that the washer is properly level, open
the lid and look from above to see if the tub is
centered. If the tub is NOT centered (as shown in
the drawing on the right), readjust the feet. If you
have a level, check your washer with the level.
11
WARNING: Toreducetheriskofnre,electrlcshock,oriniurytopersons,readandfo,owthis
entire Use & Care Guide, including the Important Safety Instructions, before operating this washer.
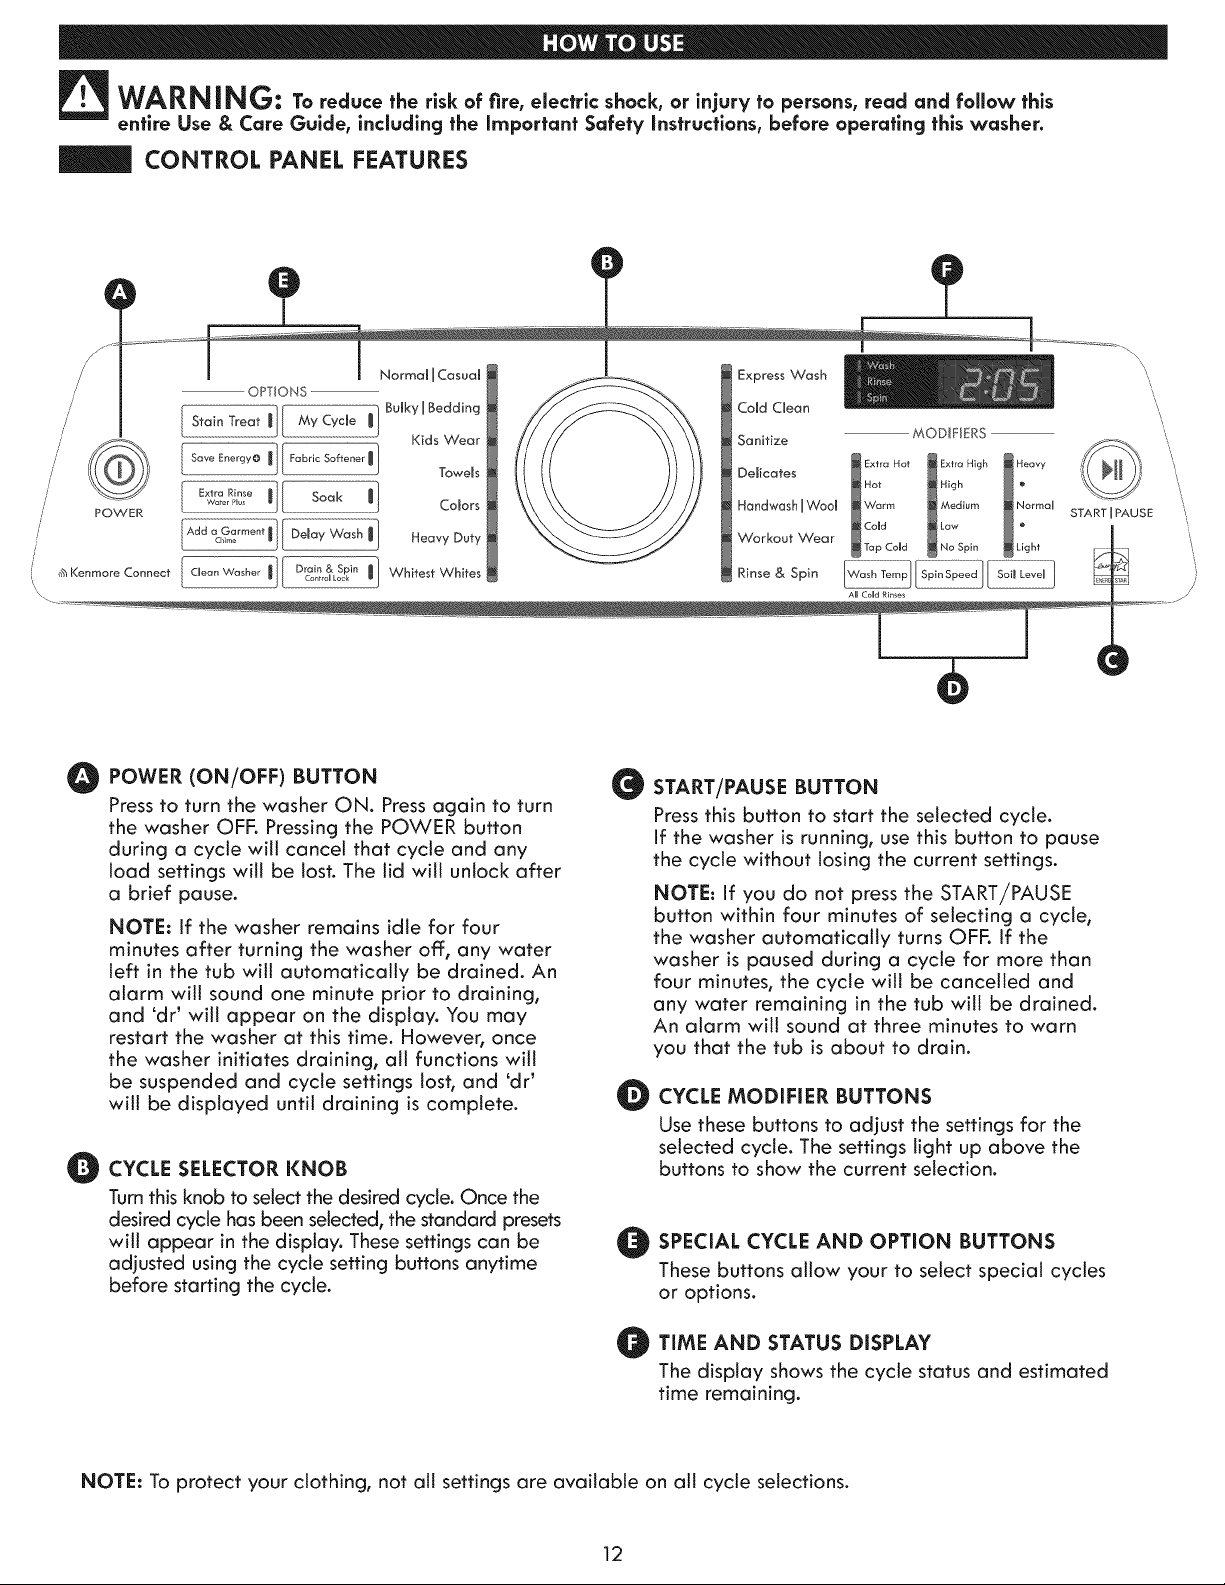
CONTROL PANEL FEATURES
/
/
POWER
_h Kenmore Connect
OPTIONS
StainTreat]_][ MyCycJe |}BuJkylBedding ComdCmean
Kids Wear Sanitize MODIFIERS
Fabric Sof ..... ' ] Towe's De,icates _:x:a Hot _:_:: High _ Heavy
Soakmj Co ors .o0dwoshlWoo od,om
AddaG ..... t'B'[ ] _Co/d _Low N ,....
c,_m_ "// Heavy Duty Workout 'vMeor _ Tap Cold _ No Spin _ Light
[ Drcairnrc_LoSpin|] Whitest Whites Rinse& Spin
START PAUSE
\
\
O
POWER (ON/OFF) BUTTON
Press to turn the washer ON. Press again to turn
the washer OFF. Pressing the POWER button
during a cycle will cancel that cycle and any
load settings will be lost. The lid will unlock after
a brief pause.
NOTE: If the washer remains idle for four
minutes after turning the washer off, any water
left in the tub will automatically be drained. An
alarm will sound one minute prior to draining,
and 'dr' will appear on the display. You may
restart the washer at this time. However, once
the washer initiates draining, all functions will
be suspended and cycle settings lost, and 'dr '
will be displayed until draining is complete.
O CYCLE SELECTOR KNOB
Turn this knob to select the desired cycle. Once the
desired cycle has been selected, the standard presets
will appear in the display. These settings can be
adjusted using the cycle setting buttons anytime
before starting the cycle.
G
O
START/PAUSE BUTTON
Press this button to start the selected cycle.
If the washer is running, use this button to pause
the cycle without losing the current settings.
NOTE: If you do not press the START/PAUSE
button within four minutes of selecting a cycle,
the washer automatically turns OFF. If the
washer is paused during a cycle for more than
four minutes, the cycle will be cancelled and
any water remaining in the tub will be drained.
An alarm will sound at three minutes to warn
you that the tub is about to drain.
CYCLE MODIFIER BUTTONS
Use these buttons to adjust the settings for the
selected cycle. The settings light up above the
buttons to show the current selection.
O PECIAL CYCLE AND OPTION BUTTONS
These buttons allow your to select special cycles
or options.
O TIME STATUS DISPLAY
AND
The display shows the cycle status and estimated
time remaining.
NOTE: To protect your clothing, not all settings are available on all cycle selections.
12
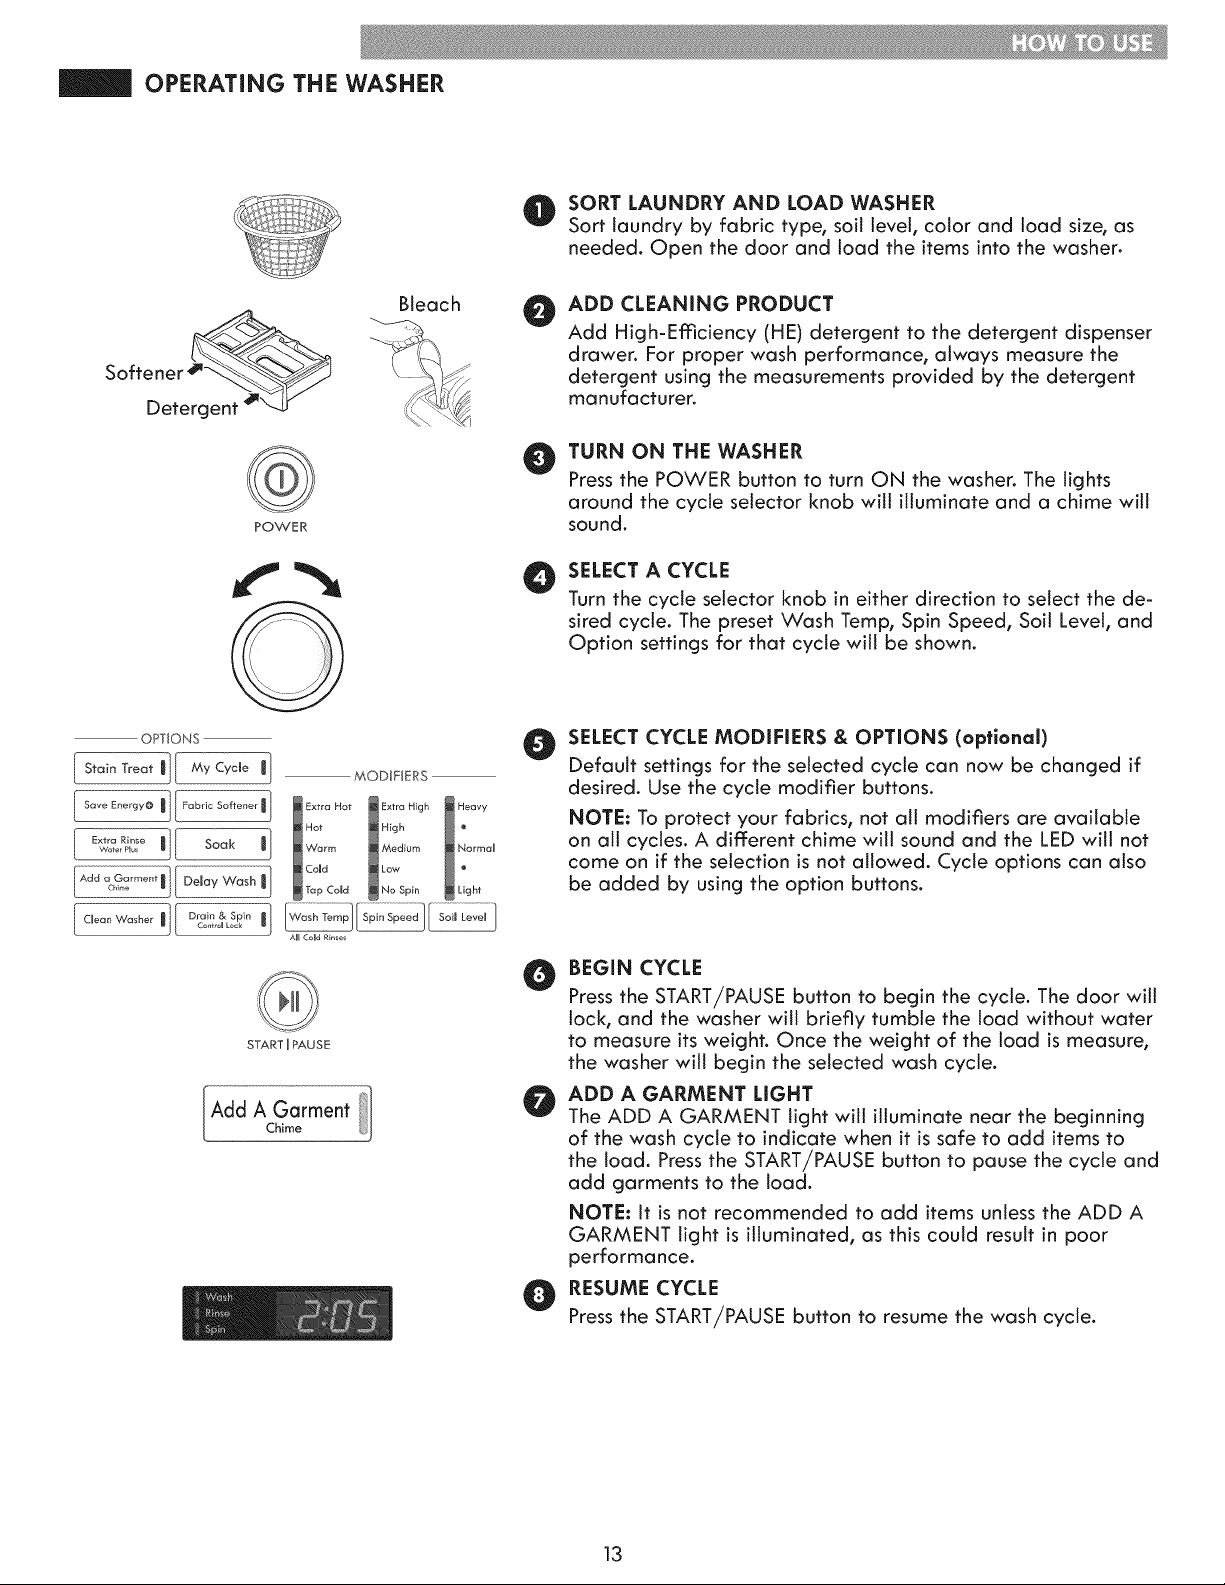
OPERATING THE WASHER
O ORT LAUNDRY AND LOAD WASHER
Sort laundry by fabric type, soil level, color and load size, as
needed. Open the door and load the items into the washer.
Bleach
POWER
Q
OPTIONS
[AddoG......."m-ICh_,o _// Demay Wash J.]
[ C,ear, Washe_ i- / bl'cOoi_,_Lo_cPin Jl
MODIFIERS
1 ExtIa Hot _ Extra High Heavy
Hot _ High
Warm _ Medium Normal
Cored _ Low
Tap Cold _ No Spin Light
AUl CoUdRinses
START I PAUSE
Add A Garment
Chime
O
O
O
O
O
@
ADD CLEANING PRODUCT
Add High-Emciency (HE) detergent to the detergent dispenser
drawer. For proper wash performance, always measure the
detergent using the measurements provided by the detergent
manufacturer.
TURN ON THE WASHER
Press the POWER button to turn ON the washer. The lights
around the cycle selector knob will illuminate and a chime will
sound.
SELECT A CYCLE
Turn the cycle selector knob in either direction to select the de=
sired cycle. The preset Wash Temp, Spin Speed, Soil Level, and
Option settings for that cycle will be shown.
SELECT CYCLE MODIFIERS & OPTIONS (optional)
Default settings for the selected cycle can now be changed if
desired. Use the cycle modifier buttons.
NOTE: To protect your fabrics, not all modifiers are available
on all cycles. A different chime will sound and the LED will not
come on if the selection is not allowed. Cycle options can also
be added by using the option buttons.
BEGIN CYCLE
Press the START/PAUSE button to begin the cycle. The door will
lock, and the washer will briefly tumble the toad without water
to measure its weight. Once the weight of the load is measure,
the washer will begin the selected wash cycle.
ADD A GARMENT LIGHT
The ADD A GARMENT light will illuminate near the beginning
of the wash cycle to indicate when it is safe to add items to
the load. Press the START/PAUSE button to pause the cycle and
add garments to the load.
NOTE: It is not recommended to add items unless the ADD A
GARMENT light is illuminated, as this could result in poor
performance.
O RESUME CYCLE
Press the START/PAUSE button to resume the wash cycle.
13
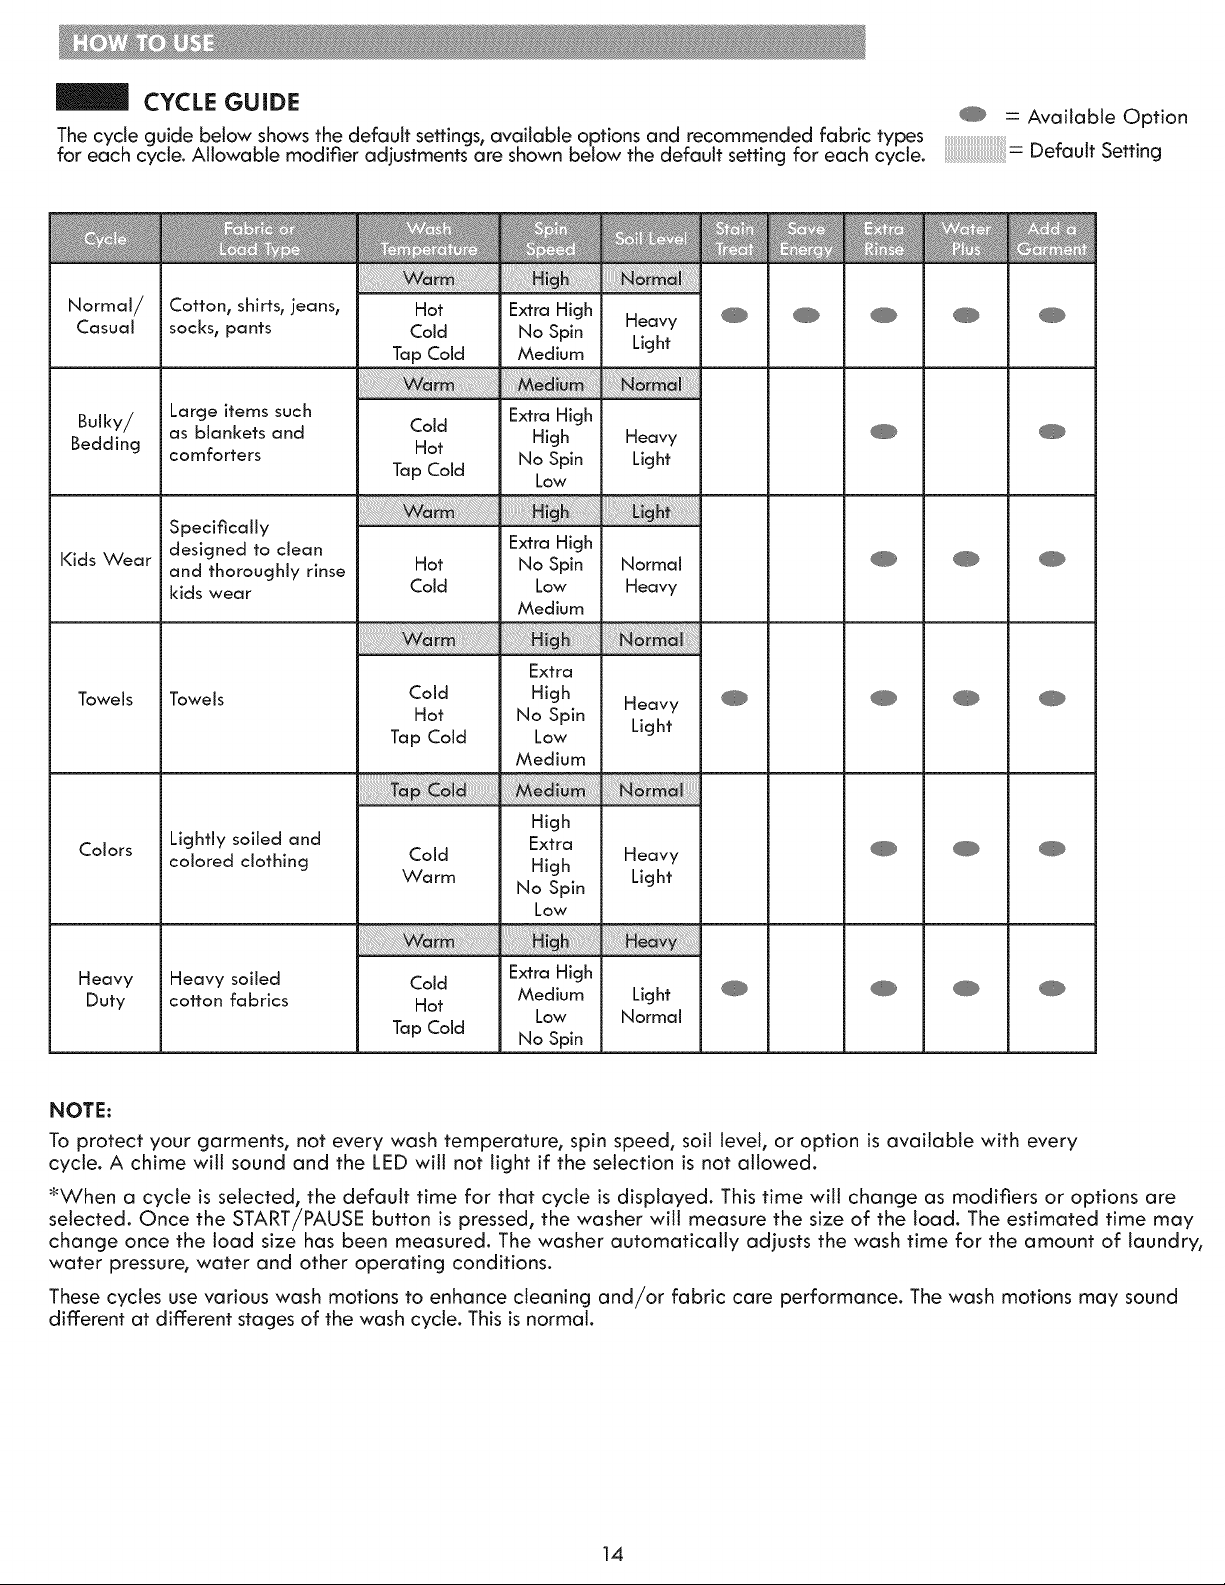
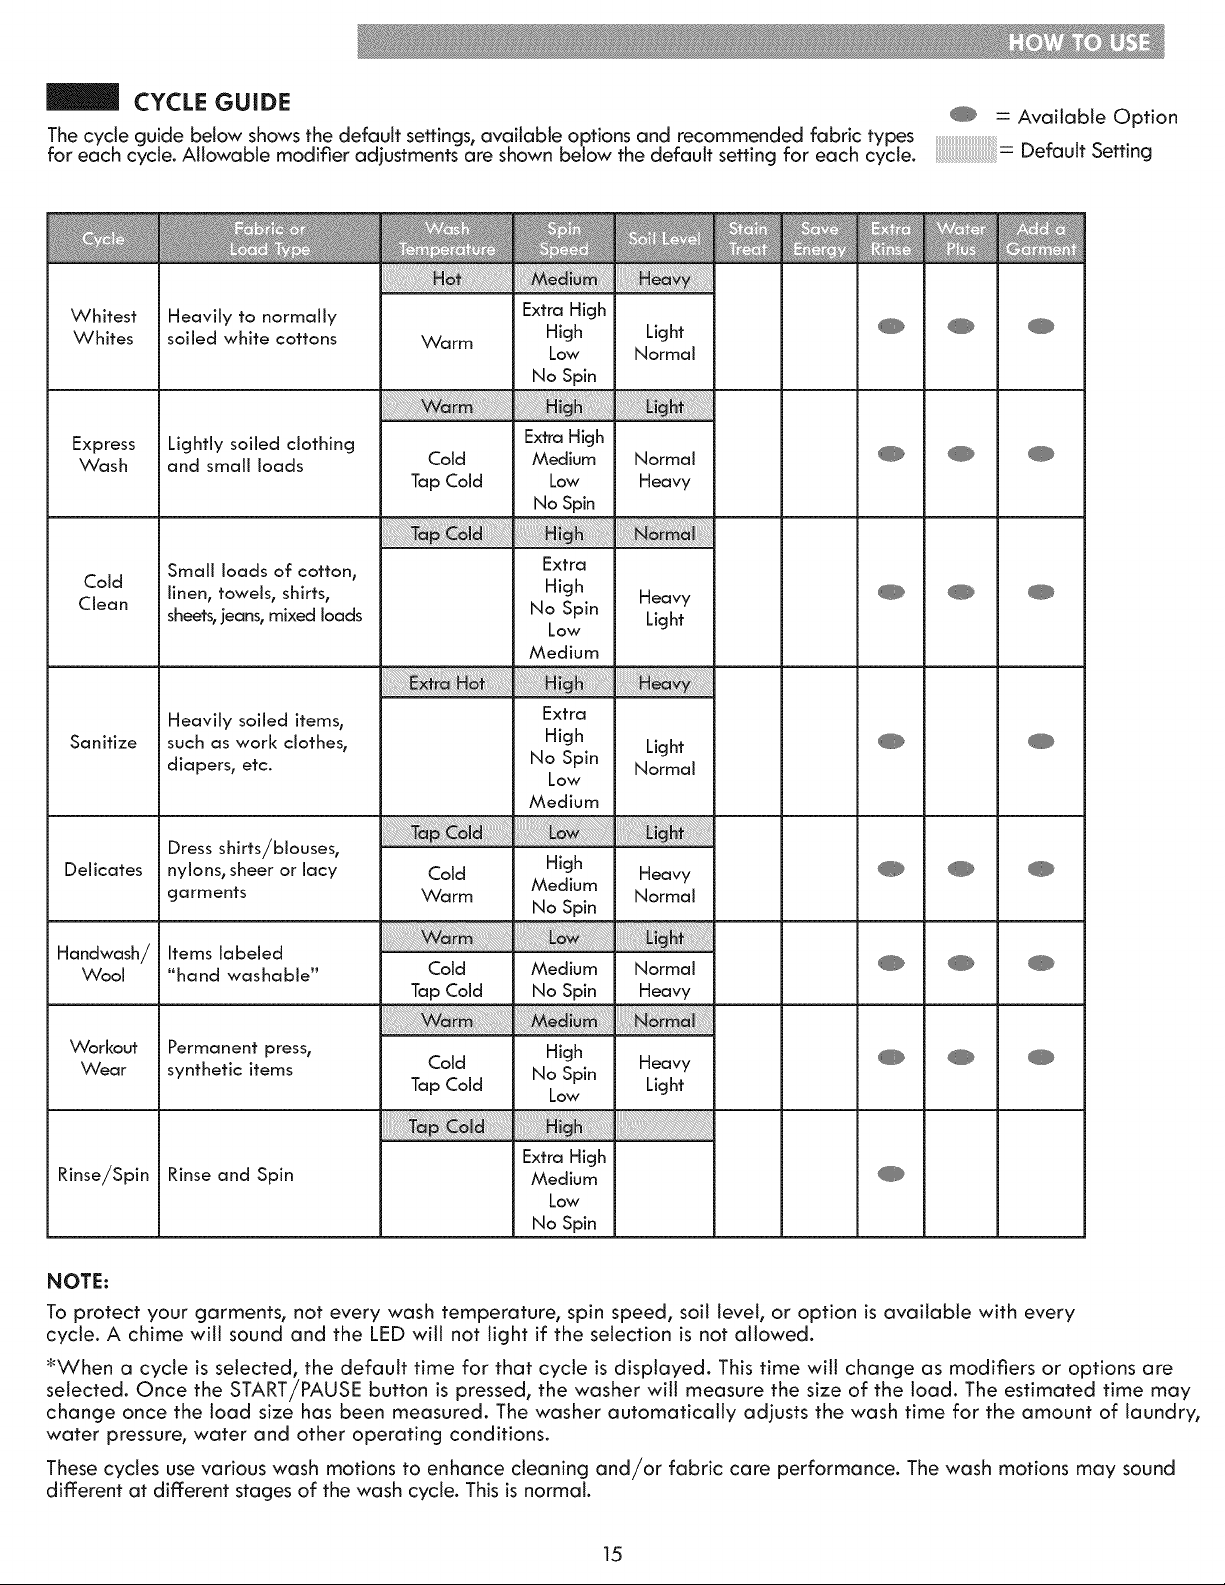
CYCLE GUIDE
The cycle guide below shows the default settings, available options and recommended fabric types
for each cycle. Allowable modifier adjustments are shown below the default setting for each cycle.
@ = Available Option
: Default Setting
Normal/
Casual
Bulky/
Bedding
Kids Wear
Towe i s
Colors
Heavy
Duty
¸
Cotton, shirts, jeans, Hot Extra High Heavy @ @ @
socks, pants Cold No Spin Light
Tap Cold Medium
Large items such Extra High
as blankets and Cold
High Heavy
Hot No Spin Light
comforters Tap Cold Low
Specifically
designed to clean Extra High
and thoroughly rinse Hot No Spin Normal
kids wear Cold Low Heavy
Medium
Extra
Towels Cold High Heavy @ @ _
Hot No Spin
Tap Cold Low Light
Medium
High
Lightly soiled and Extra Heavy @ @ @
colored clothing Cold High Light
Warm No Spin
Low
Extra High
Heavy soiled Cold
Medium Light @ @ @ @
cotton fabrics Hot
Low Normal
Tap Cold
No Spin
NOTE:
To protect your garments, not every wash temperature, spin speed, soil level, or option is available with every
cycle. A chime witl sound and the LED witl not light if the selection is not allowed.
_When a cycle is selected, the default time for that cycle is displayed. This time will change as modifiers or options are
selected. Once the START/PAUSE button is pressed, the washer will measure the size of the load. The estimated time may
change once the load size has been measured. The washer automatically adjusts the wash time for the amount of laundry,
water pressure, water and other operating conditions.
These cycles use various wash motions to enhance cleaning and/or fabric care performance. The wash motions may sound
different at different stages of the wash cycle. This is normal.
14
CYCLE GUIDE
The cycle guide below shows the default settings, available options and recommended fabric types
for each cycle. Allowable modifier adjustments are shown below the default setting for each cycle.
= Available Option
: Default Setting
Whitest
Whites
Express
Wash
Cold
Clean
Sanitize
Deiicates
Handwash/
Wool
Workout
Wear
Rinse/Spin
Heavily to normally Extra High
soiled white cottons Warm High Light
Low Normal
No Spin
Lightly soiled clothing Extra High
and small loads Cold Medium Normal
Tap Cold Low Heavy
No Spin
Small loads of cotton,
linen, towels, shirts,
sheets,jeans, mixed loads
Extra
High Heavy
No Spin
Low Light
Medium
Heavily soiled items, Extra
such as work clothes, High Light
diapers, etc. No Spin Normal
Low
Medium
Dress shirts/blouses,
High Heavy
nylons, sheer or lacy Cold Medium
garments Warm Normal
No Spin
Items labeled
"hand washable" Cold Medium Normal @
Tap Cold No Spin Heavy
High Heavy @'
Permanent press, Cold No Spin
synthetic items Tap Cold Low Light
Extra High
Rinse and Spin Medium @
Low
No Spin
NOTE:
To protect your garments, not every wash temperature, spin speed, soil level, or option is available with every
cycle. A chime will sound and the LED will not light if the selection is not allowed.
'*When a cycle is selected, the default time for that cycle is displayed. This time will change as modifiers or options are
selected. Once the START/PAUSE button is pressed, the washer will measure the size of the load. The estimated time may
change once the load size has been measured. The washer automatically adjusts the wash time for the amount of laundry,
water pressure, water and other operating conditions.
These cycles use various wash motions to enhance cleaning and/or fabric care performance. The wash motions may sound
different at different stages of the wash cycle. This is normal.
15
SORTING WASH LOADS
,_ CAUTION
° Do not load items higher than the top edge of the tub.
Failure to follow this caution can result in leakage or
damage to fabrics.
° Use the BULKY/BEDDING cycle for buoyant or
nonabsorbent items such as pillows or comforters. Failure to
follow this caution can result in leakage.
* Do not wash or spin any item labeled or known to be
water-proof or water-reslstant, even if the product care
label on the item permits machine washing. Failure to
follow these instructions could result in severe damage to
your laundry, your washer and/or property damage as a
result of abnormal vibration of the washer.
- Examples of water-proof or water-resistant items include
certain mattress pads, mattress covers, rain gear, camping
gear, skiing apparel, outdoor gear and similar items.
Grouping Similar Items
For the best washing results, and to reduce the possibility of
damage to clothing, care should be taken to sort the
clothing into loads that are made up of similar items.
Mixing different fabric types and/or soil levels can result
in poor wash performance, color transfer or discoloration,
fabric damage or linting. Fabrics should be sorted into
groups as described below.
Co_or$
Sort articles by colon Wash dark clothes together in a
separate load from light colors or whites. Mixing dark
clothes with light clothes can result in dye transfer or
discoloration of the lighter clothes.
Soll Level
Wash heavily soiled clothing together. Washing lightly
soiled clothing in the same toad with heavily soiled
clothing could result in poor wash performance for the
lightly soiled clothing.
Fabric Type
Delicate artictes should not be mixed with heavier or
sturdier fabric types. Washing delicates in a toad with
heavy fabrics can result in damage to the more delicate
fabrics. Washing heavier fabrics in a delicate load can
result in poor wash performance for the heavier fabrics
and possible damage to the delicates.
Lint Type
Some fabrics attract and bind tint to them while others
give off tint in the laundry process. Avoid mixing these
lint collectors and lint producers in the same load. Mixing
these fabrics will result in pilling and linting on the lint
collectors. (For example, lint collector - knit sweater; lint
producer - terrycloth towels.)
I
Sort Laundry...
by Colors
Whites
Lights
Darks
by Soil
Heavy
Normal
Light
by Fabric
Delicates
Easy Care
Sturdy
by Lint
Lint Producer
Lint Collector
Fabric Care Labels
Many articles of ctothing include a fabric care tabel.
Using the chart below, adjust the cycle and option
selections to care for your clothing according to the
manufacturer's recommendations.
f Fabric Care Labels
Machine
wash_, _ _ _
cycle Normal Permanent 13ress/ Gentle/
wrinkle resFstant delicate
H h Do not wash Do not wring
Water • • • • 0 •
temperature Hot Warm Cold/cool
Bleach
symbo,s A _ -_
Any bleach Only non-chlorine bleach 0o not bleach
(when needed) (when needed)
Loading the Washer
° Check all pockets to make sure that they are empty. Items
such as clips, matches, pens, coins, and keys can damage
both your washer and your clothes.
° Close zippers, hooks, and drawstrings to prevent these items
from snagging or tangling on other clothes.
° Pretreat heavily stained areas for best results.
* Combine large and small items in a load. Load large items
first.
" Large items should not be more than half of the total wash
load.
• The washer can be fully loaded, but the tub should not be
tightly packed with items. The lid of the washer should close
easily.
° To prevent an out-of-balance load, do not wash single
items. Add one or two similar items to the load. Large, bulky
items, such as a blanket, comforter, or bedspread, should be
washed individually.
° The washer wiii not fiii or operate with the lid open.
NOT£: Use the BULl<Y/BEDDING cycle for large or
bulky items such as poly-fitted jackets, comforters,
pillows, etc. These items may not be as absorbent
as other laundry items and should be sorted into a
separate wash load for optimal results.
Bulky items should be placed as far down in the tub as
possible for optimal results. Always place buoyant items
at the bottom of the tub.
The washer will automatically detect the load size.
Because of the high-efficiency wash system, the water
level may not completely cover the load.
16
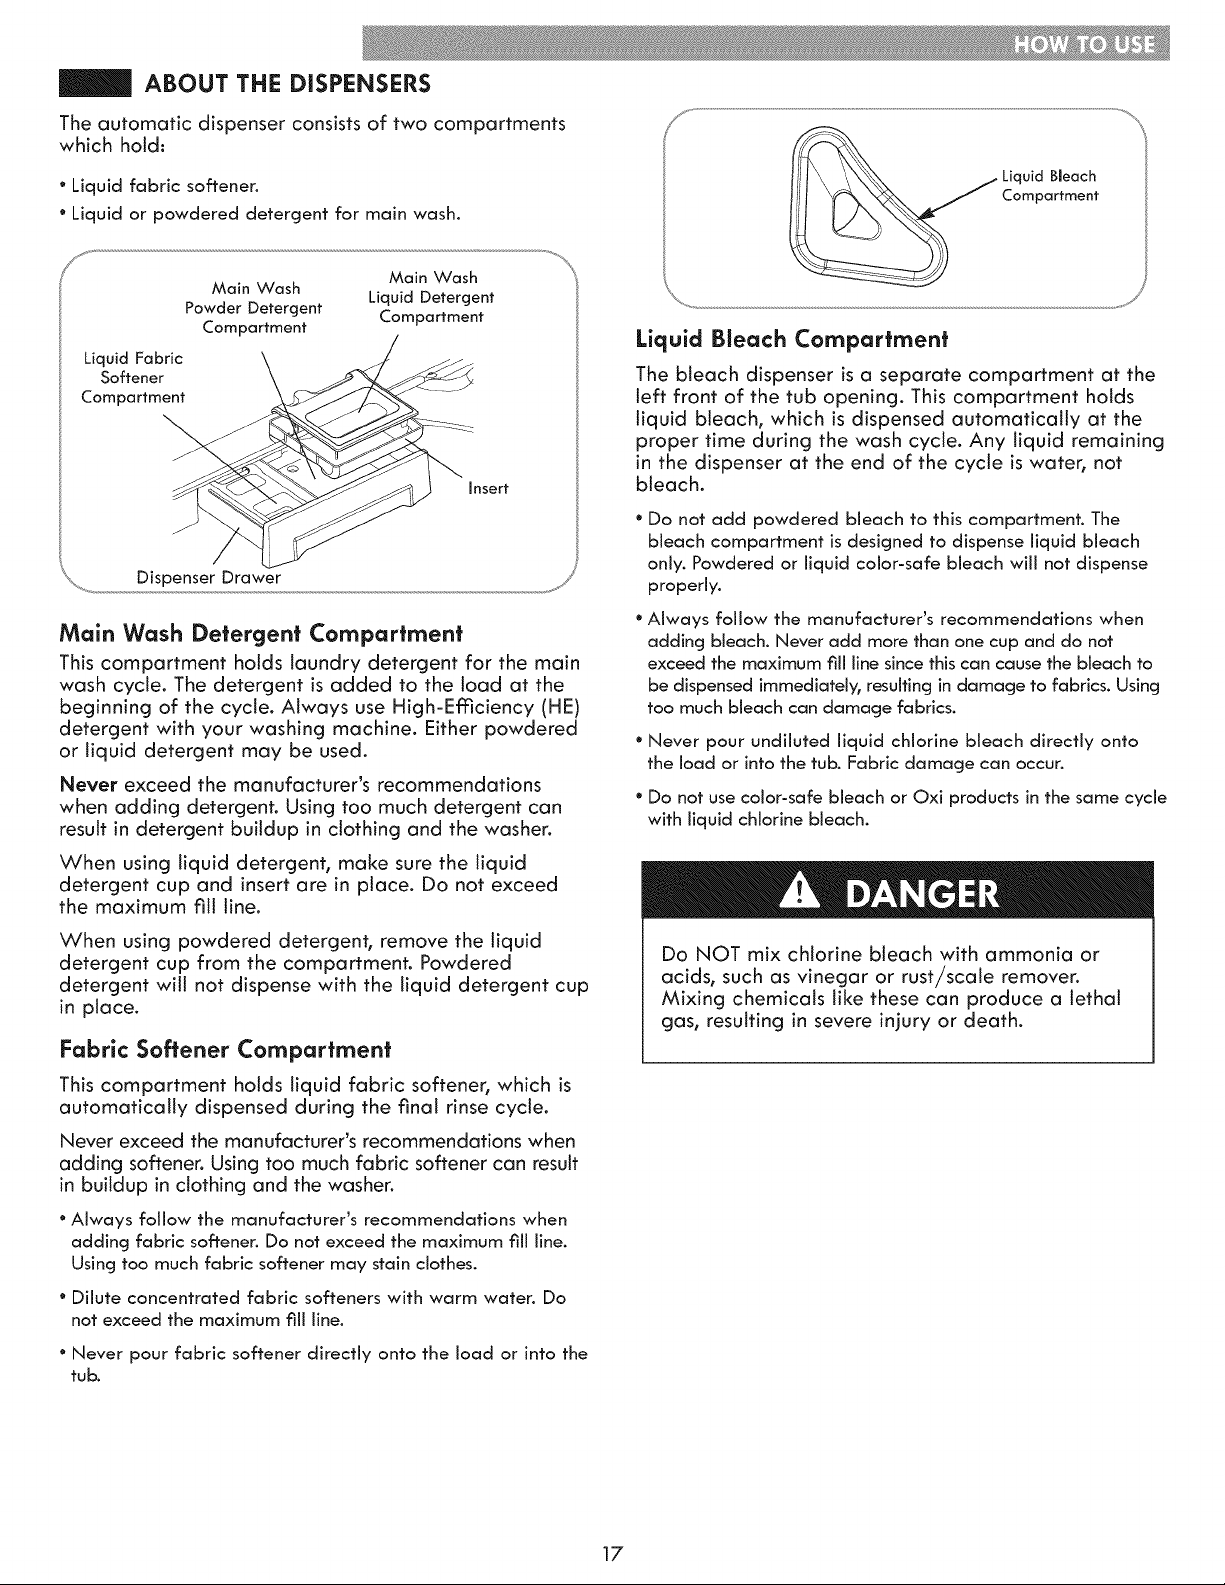
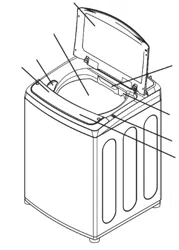
ABOUT THE DISPENSERS
The automatic dispenser consistsof two compartments
which hold:
° Liquid fabric softener.
° Liquid or powdered detergent for main wash.
Main Wash
Main Wash
Liquid Detergent
Powder Detergent Compartment
Compartment
Liquid Fabric
Softener
Compartment
Insert
Dispenser Drawer
Main Wash Detergent Compartment
This compartment holds laundry detergent for the main
wash cycte. The detergent is added to the load at the
beginning of the cycle. Always use High-Efflciency (HE)
detergent with your washing machine. Either powdered
or liquid detergent may be used.
Never exceed the manufacturer's recommendations
when adding detergent. Using too much detergent can
result in detergent buildup in clothing and the washer.
When using liquid detergent, make sure the liquid
detergent cup and insert are in place. Do not exceed
the maximum fill line.
When using powdered detergent, remove the liquid
detergent cup from the compartment. Powdered
detergent will not dispense with the liquid detergent cup
in place.
Fabric Softener Compartment
This compartment holds liquid fabric softener, which is
automatically dispensed during the flnal rinse cycle.
Never exceed the manufacturer's recommendations when
adding softener. Using too much fabric softener can result
in buildup in clothing and the washer.
° Always follow the manufacturer's recommendations when
adding fabric softener. Do not exceed the maximum fill line.
Using too much fabric softener may stain clothes.
° Dilute concentrated fabric softeners with warm water. Do
not exceed the maximum fill line.
° Never pour fabric softener directly onto the load or into the
tub.
_ Liquid Bleach
Compartment
j_
Liquid Bleach Compartment
The bleach dispenser is a separate compartment at the
left front of the tub opening. This compartment holds
liquid bleach, which is dispensed automatically at the
proper time during the wash cycle. Any liquid remaining
in the dispenser at the end of the cycle is water, not
bleach.
° Do not add powdered bleach to this compartment. The
bleach compartment is designed to dispense liquid bleach
only. Powdered or liquid color-safe bleach will not dispense
properly.
° Always follow the manufacturer's recommendations when
adding bleach. Never add more than one cup and do not
exceed the maximum fili line since this can cause the bleach to
be dispensed immediately, resulting in damage to fabrics. Using
too much bleach can damage fabrics.
° Never pour undiluted liquid chlorine bleach directly onto
the load or into the tub. Fabric damage can occur.
° Do not use color-safe bleach or Oxi products in the same cycle
with liquid chlorine bleach.
Do NOT mix chlorine bleach with ammonia or
acids, such as vinegar or rust/scale remover.
Mixing chemicals tike these can produce a lethal
gas, resulting in severe injury or death.
17
DETERGENT AND DISPENSER USE
A Word About Detergents
High-Efficiency (HE) detergents produce fewer suds,
dissolve more efficiently to improve washing and rinsing
performance, and help to keep the interior of your
washer clean. Using detergent that is not HE may cause
oversudsing and unsatisfactory performance which
could result in error codes, cycle failure, and
machine damage.
Maximum __j[_N
ormal Load Amount_zZZ J
Liquid Powdered
Detergent Detergent
For proper wash performance, always measure the
detergent using the measurements provided by the
detergent manufacturer.
The normal amount of HE detergent needed, for average
loads, is tess than 1/2of the recommended maximum.
Use less detergent for soft water, light soil or smaller
loads. Never use more than the maximum amount
recommended by the detergent manufacturer.
Using the Softener and Detergent Dispenser
To add detergent, bleach, and fabric softener to the
automatic dispenser:
O Open the dispenser drawer.
O Load the laundry products into the
appropriate compartments.
O Ctose the drawer before starting the cycle.
NOTE: It is normal for a small amount of water to
remain in the bleach and softener compartments at the
end of the cycle.
IMPORTANT: Do not place or store laundry products,
such as detergent, bleach, or liquid fabric softener, on top
of your washer or dryer. Wipe up any spills immediately.
These products can damage the finish and controls.
Using the Liquid Bleach Dispenser
The bleach dispenser automatically dilutes and
dispenses liquid bleach at the proper time in the
wash cycle.
Designed to use onl V
High-Efficiency (HE) detergent
IMPORTANT: Your washing machine is designed for use
with only High-Efficiency (HE) detergents. HE detergents
are formulated specifically for High-Efficiency washers
and contain suds-reducing agents. Always look for the
HE symbol when purchasing detergent.
IMPORTANT: Not all detergents are the same. Pay
careful attention to the amount of detergent used to avoid
overusing, poor rinsing and detergent buildup in clothing,
and residue buildup that can contribute to odors in the
machine. NEVER use a cup or scoop other than the one
supplied by the manufacturer of the detergent you
are using. Never use more than the maximum amount of
detergent recommended by the manufacturer.
Always measure the detergent amount. While HE
detergents are designed for this type of washing
machine, be careful when measuring the detergent. For
most normal loads, no more than 1/4 to 1/2 of cap or
scoop of HE detergent should be used.
NOTE: Extra care must be exercised when using 2X and
3X concentrated detergents because even a little bit extra
can contribute to the problems mentioned above.
NOTE: Detergents designated as HE compatible may not
provide optimal results.
O
e
e
e
e
Check clothing care labels for special instructions.
Measure liquid bleach carefully, following
instructions on the bottle. High-efficiency washers
use less water, so less bleach is needed. One half
cup is enough for most loads.
Carefully pour the pre-measured amount of bleach
directly into the bleach dispenser. If you are using
powdered bleach of any kind, pour it directly into
the tub before adding the laundry. Never add
powdered bleach to the liquid bleach dispenser.
Never pour undiluted liquid chlorine bleach directly onto
clothes or into the tub.
Do not pour powdered bleach into bleach dispenser.
Do not place laundry items on top of the bleach
dispenser when loading and unloading the washer.
Always measure and pour bleach carefully. Avoid
overfilling or splashing when adding bleach to the
dispenser. The maximum capacity of the bleach
dispenser is one cup of bleach per wash cycle.
Overfilling could result in bleach being dispensed
immediately.
18
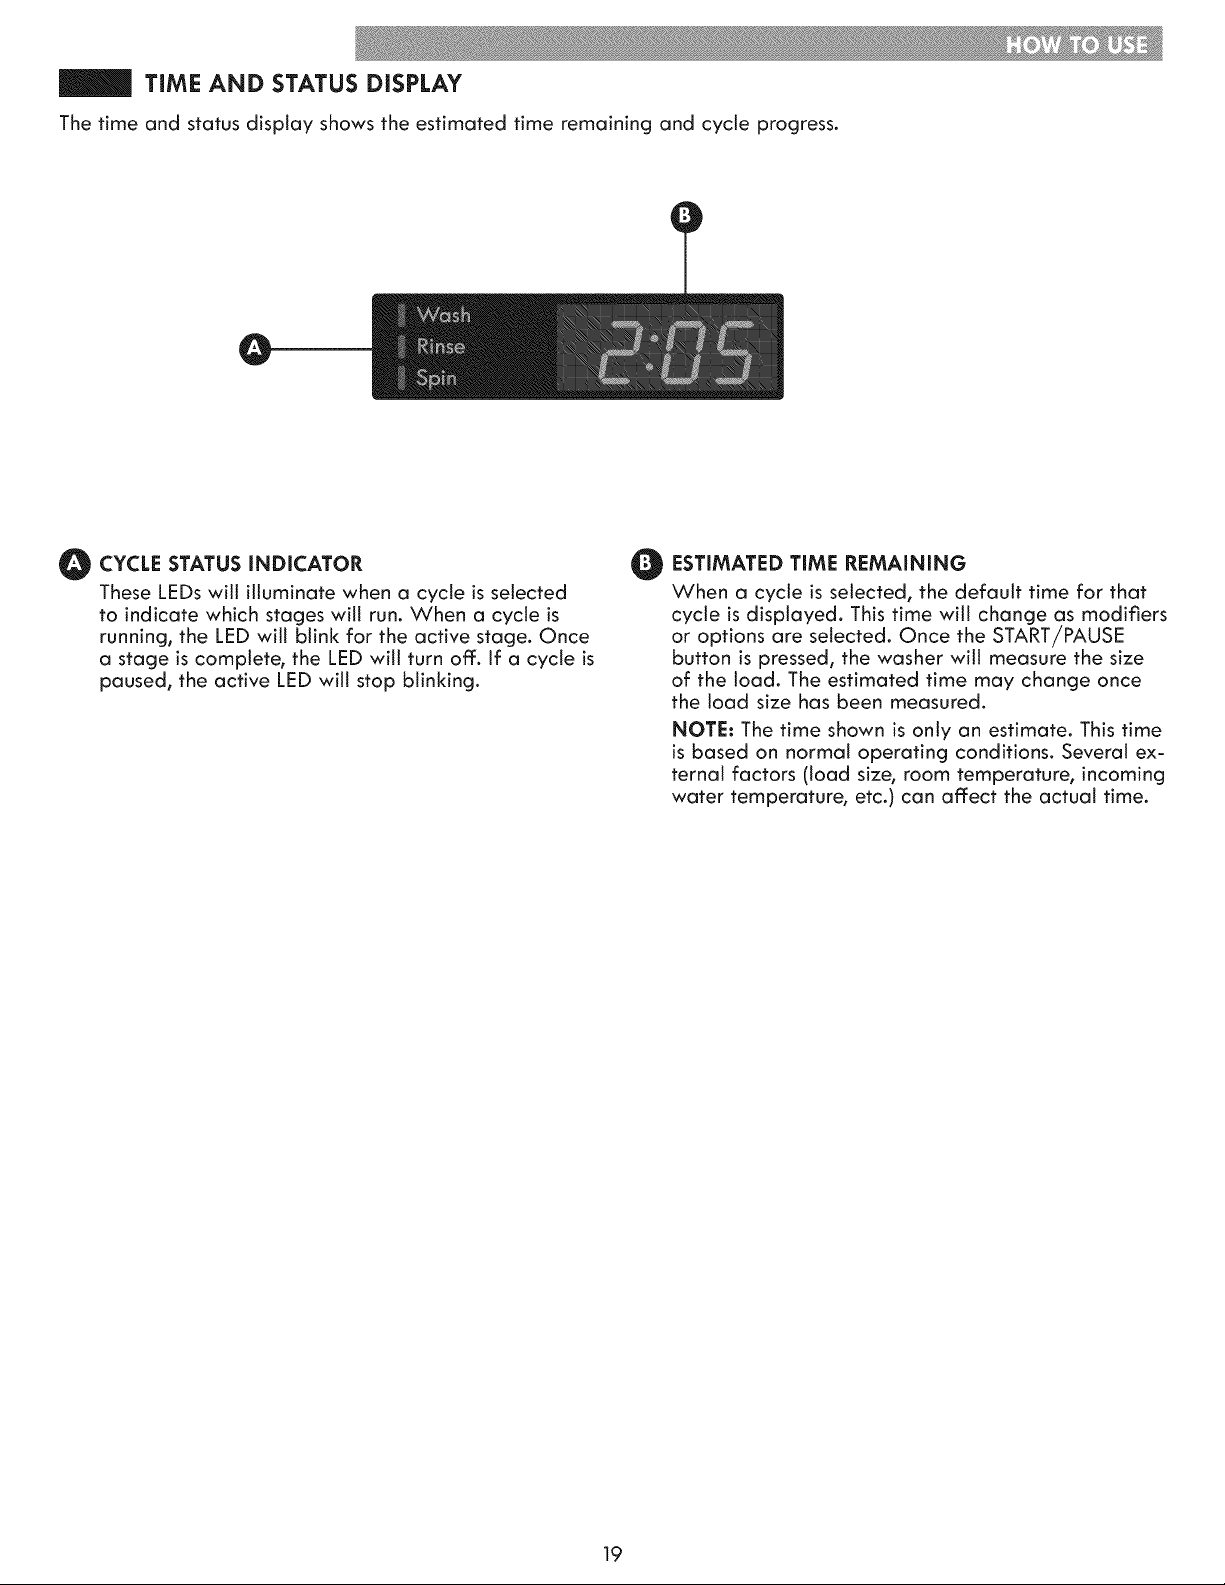
TIME AND STATUS DISPLAY
The time and status display shows the estimated time remaining and cycle progress.
O
O YCLE STATUS INDICATOR
These LEDs will illuminate when a cycle is selected
to indicate which stages will run. When a cycle is
running, the LED will blink for the active stage. Once
a stage is complete, the LED will turn off. If a cycle is
paused, the active LED will stop bNnking.
O
ESTIMATED TIME REMAINING
When a cycle is selected, the default time for that
cycle is displayed. This time will change as modifiers
or options are selected. Once the START/PAUSE
button is pressed, the washer will measure the size
of the load. The estimated time may change once
the load size has been measured.
NOTE: The time shown is only an estimate. This time
is based on normal operating conditions. Several ex-
ternal factors (load size, room temperature, incoming
water temperature, etc.) can affect the actual time.
19

CYCLE MODiFiER BUTTONS
Each cycle has default settings that are selected
automatically. You may also customize these settings
using the cycle modifier buttons. Press the button for the
desired modifier until the indicator light for the desired
setting is lit. The washer automatically adjusts the water
level for the type and size of wash toad for best results
and maximum emciency. Due to the high-efficiency
nature of this product, water levels may be much lower
than expected. This is normal and cleaning/rinsing
performance will not be compromised.
NOTE: To protect your garments, not every wash/rinse
temperature, spin speed, soil level, or option is available
with every cycle. A chime will sound and the LED will not
light if a selection is not allowed.
Extra Hot Extra High
Hot h
Warm Medium
Cold
Tap Cored Spin
Heavy
o
Normam
o
Light
Soil LeveH 1
o
O WASN TEMP
WASH TEMP selects the wash and rinse temperature
combination for the selected cycte. Press the WASH
TEMP button until the indicator light for the desired
setting is lit.
° Select the wash temperature suitable for the type of
load you are washing. Follow the garment fabric care
labels for best results.
° Coicl rinses use less energy. The actual cold rinse
temperature depends on the temperature of the cold
water at the faucet.
O
O
SPIN SPEED
Higher spin speeds extract more water from clothes,
reducing drying time and saving energy.
Press the SPIN SPEED button until the desired speed
is selected. Some fabrics, such as delicates, require
a slower spin speed. To protect your clothing, not all
spin speeds are available for all cycles.
SOIL LEVEL
Adjusting the soil level setting witl modify the cycle
times and/or wash actions. Press the SOIL LEVEL
button until the desired soil level is selected.
2O
OPTION BUTTONS
Your washing machine features several additional cycle
options that customize cycles to meet your individual needs.
O Turn ON the washer and turn the cycle selector knob to
select the desired cycle. If the cycle selection is changed
after the options have been selected, all settings will be
changed to the default settings for the new cycle.
Use the cycle modifier buttons to adjust the settings for
that cycle.
Pressthe cycle option button(s) for the option(s) you
would like to add. The button will light when that option
is selected. If the selected option is not allowed for the
selected cycle, the chime will sound twice to inform alert
you and the LED will not illuminate.
O ressthe START/PAUSE button to start the cycle. After a
brief delay, the lid will lock and the cycle will begin.
NOTE:
° To protect your garments, not every option is available with
every cycle.
* If the START/PAUSE button is not pressed within four minutes
to start the cycle° the control will shut off and all settings will be
lost.
STAIN TREAT
I Use this option to wash loads with
StainTreat multiple types of soils. With this option,
the water temperature is raised in
three steps to optimize cleaning performance. During
the final wash step, the water is heated and maintained
at the highest temperature for that cycle for 10 minutes.
NOTE: Best results are obtained with smaller loads (tess
than 6 lbs.)
SAVE ENERGY O
[ i] This°pti°nsavesenergybyusingc°°ler
Save Energy@ water while increasing the wash and rinse
times to maintain wash performance.
This feature is only available with the NORMAL/CASUAL
and HEAVY DUTY cycles as listed below.
* NORMAL/CASUAL Hot becomes Cold
° NORMAL/CASUAL Cold becomes Tap Cold
° HEAVY DUTY Hot becomes Cold
EXTRA RINSE
I Extra Rinse This option will add an extra rinse to theWo,o_P_os selected cycle. Use this option to help
ensure the removal of detergent or
bleach residue from fabrics. Liquid fabric softener, if used,
is always dispensed in the final rinse.
NOTE: You cannot select the EXTRA RINSE option with
the DRAIN & SPIN cycle.
WATER PLUS
Press and hold the EXTRA RINSE
Extra Rinse button for 3 seconds to activate
Water Plus
WATER PLUS. Use this option if you
wish to add more water to your wash load.
ADD A GARMENT
The ADD A GARMENT light will illuminate during
IAdd A Garment the early stage of the wash cycle to
Ch_mo indicate that it is safe to pause the
cycle to add more items. Do not press
the button, as the light is controlled by the washen
Pressing the ADD A GARMENT button will only change
the chime setting.
Once the ADD A GARMENT light goes out, additional
laundry should not be added to the load. Doing so may
result in unsatisfactory performance because the washer
will not compensate for the additional garments.
Do not press the ADD A GARMENT button. Press the
_IJSTART/PAUSE button to pause the washer.
Open the lid after it unlocks.
Add your additional items.
o Ctose the lid.
Press the START/PAUSE button. The cycle will resume
O after the lid locks.
CHIME
[_ The volume of the chime is adjusted
AGarment using the ADD A GARMENT button. Do
Chime
not press the button to add garments
to a wash load. Press repeatedly to adjust the volume of
the chime. The chime will sound at the new volume with
each press of the button. When no chime is heard, the
chime is off. The volume settings are LOW - HIGH - OFF.
The chime volume can be adjusted at any time as long as
the washer is turned ON.
21

OPTION BUTTONS
CLEAN WASHER
[Clean Washer Ill Some environmental and usage conditions
can cause a residue to build up in the tub
over time and can lead to a mildewy or
musty smell. The CLEAN WASHER cycle is specially de-
signed to remove this buildup using bleach or another cleaner
designed specifically for cleaning top load washers. Run the
CLEAN WASHER cycle once a month, or more often un-
der heavy use conditions or if odor is present. See complete
instructions in the CARE AND CLEANING section.
Pressthe CLEAN WASHER button.
Fill the bleach the MAX line with
dispenser
to
liquid
chlorine bleach. Do not overfill the bleach dispenser.
Overfilling will cause the bleach to dispense immediately.
NOTE: For other tub clearing products, follow
the cleaner manufacturer's instructions and
recommendations. For powdered cleaning products,
add the cleaner to the main wash compartment of
the dispenser drawer. Place tablet cleaners directly
into the tub.
Press the START/PAUSE button to start the cycle.
After the cycle ends, open the lid and allow the tub
interior to dry completely.
NOTE: Do NOT use this cycle with clothes, and do
NOT add detergent or fabric softener.
FABRIC SOFTENER
I _/ Fabric softener is dispensed in the
FabricSoftener_/ final rinse. This washer is designed to
save rinse water by using a jet spray
rinse system (SMARTRINSE) in NORMAL/CASUAL and
HEAVY DUTY cycles. Press the FABRIC SOFTENER
button to change the final rinse from spray rinse to
regular rinse so that the fabric softener is most effective.
NOTE: Select the FABRIC SOFTENER option or
EXTRA RINSE option if liquid fabric softener is used in
NORMAL/CASUAL and HEAVY DUTY cycles. Failure
to select one of these options will greatly reduce the
effectiveness of the softener.
MY CYCLE
i MY CYCLE allows you to store a
My Cycle customized wash cycle for future use. It
allows you to save favorite temperature,
spin speed, soil level, and other options for a cycle, and then
recall them at the touch of a button.
NOTE: You can only save one cycle at a time. Pressing
and holding the MY CYCLE button will overwrite any pre-
viously saved cycle.
To save a MY CYCLE:
Press the POWER button to turn on the washer.
OTurn the cycle selector knob to select the desired cycle.
OPress the CYCLE MODIFIER button to change the desired setting.
OPress the CYCLE OPTION button to add the desired options.
OPress and hold the MY CYCLEbutton.
To recall a MY CYCLE:
Pressthe POWER button the washer.
to turn
on
O Pressthe MY CYCLEbutton. The stored will be
settings
displayed.
O Press the START/PAUSE button to start the cycle.
NOTE: MY CYCLE can be adjusted the same as any
other cycle. However, once any other button is pressed,
the MY CYCLE button LED will turn off indicating that
the settings are no longer those of your saved cycle.
SOAK
i This option provides a 30 minute
Soak presoak prior to the start of the select-
ed cycle. Use the SOAK option to
presoak garments to help remove difficult spots or stains
on fabrics. At the end of the presoak time, the selected
cycle will begin with the same water used for the soak.
22
OPTION BUTTONS
DELAY WASH
Once you have selected the cycle and
Delay Wash other settings, press this button to delay
the start of the wash cycle. Each press
of the button increases the delay time by one hour, for
up to 19 hours. Once the desired delay time is set, press
the START/PAUSE button to start the delay time.
NOTE: If the START/PAUSE button is not pressed to
begin the delay time, the washer will automatically shut
off: after four minutes.
DRAIN & SPIN
Use this option to drain the water from
Drain & Spin the tub and spin out the clothes. This
Control Lock
can be used, for example, if the wash
cycle is interrupted by a power failure. The spin speed
can be adjusted by pressing the DRAIN & SPIN button.
i_ Press the START/PAUSE button to turn on the washer.
O Press the DRAIN & SPIN button.
O Press the SPIN SPEED button to select the desired
spin speed. Selecting NO SPIN is not allowed.
O Press the START/PAUSE button.
CONTROL LOCK
Use this option to disable the controls. The
Draincootro_&LockSpin washer can only be locked during a cycle.
This feature can prevent children from
changing cycles or operating the machine. Once the control
lock is set, it must be deactivated before any controls, except
the power button, can be used. Once the washer has shut off:,
the power button will allow the machine to be turned ON, but
the controls will still be locked. When the controls are locked,
LL will display alternately with the estimated time remaining.
Pressand hold the DRAIN & SPIN button for five seconds to
activate or deactivate CONTROL LOCI<.
SPECIAL DRAIN FEATURE
This washer is equipped with a special feature that is
designed to make your washer as safe as possible, if
the washer is paused or shut off: while there is still water
in the tub, the water will drain after four minutes. This
helps keep children safe by reducing the possibility of
water remaining in the tub. if the washer is shut off: for
three minutes, while there is still water in the tub, an
alarm will sound to notify you that the washer is about
to drain the water from the tub. The washer can be
restarted any time before the drain begins, if the washer
is paused for four minutes, the display will shut off: and
all cycle settings will be lost. Three minutes after the
control shuts off:, the alarm wili sound to notify you that
the washer is about to drain the water from the tub. The
washer can be turned on and another cycle may be
started before the drain begins.
if no action is taken, the d_- error code will display
and the water will drain from the tub. Once the washer
begins draining the water, the controls are disabled and
the drain process cannot be interrupted. Once the water
is completely drained, the washer will shut off:.
NOTE: In the unlikely event that the washer experiences
a problem that causes an error code to be displayed,
the washer will still sound the alarm after three minutes
and drain after four minutes. However, only the original
error code will be displayed.
23
WARNING: Toreducetheriskofnre,electricshock,oriniurVtopersons,readandfollowthis
entire Use & Care Guide, including the Important Safety Insfrucflons, before aperaflng this washer.
* Unplug the washer before cleanlng to avoid the risk of elecfrlc shock. Failure to follow this warning can
cause serious injury, fire, electric shock, or death.
* Never use harsh chemicals, abrasive cleaners, or solvents to clean the washer. They witl damage the finish.
REGULAR CLEANING
Cleaning the Exterior
Proper care of your washer can extend its life. The outside of
the machine can be cleaned with warm water and a mild,
nonabrasive household detergent.
Immediately wipe off: any spills with a soft, damp cloth.
IMPORTANT: Do not use solvents, cleaning alcohols, or
similar products. Never use steel wool or abrasive cleaners
because they can damage the surface.
Care and Cleaning of the Interior
Use a towel or soft cloth to wipe around the washer lid
opening and lid glass.
Always remove items from the washer as soon as the cycle
is complete. Leaving damp items in the washer can cause
wrinkling, color transfer, and odor. Run the CLEAN WASHER
cycle once a month, or more often if needed, to remove
detergent buildup and other residue.
Clean Washer Cycle
0 Remove any clothing in the tub.
0 Add liquid chlorine bleach or another tub
cleaner designed specifically for cleaning washers.
- If using liquid chlorine bleach
Add liquid chlorine bleach to the bleach
compartment.
NOTE: Add one cup of liquid bleach. Do not exceed the
maximum fill line and do not pour undiluted liquid bleach
directly into the tub.
- If using powdered cleaners
Remove the liquid detergent cup and add powder
cleaner to the main wash compartment of the
dispenser drawer.
- If using a tablet cleaner
Put the tablet directly into the tub.
NOTE:
° Do not add tablet cleaner to the
dispenser drawen
° Do not add any laundry detergent or fabric softener to the
dispenser drawer when using CLEAN WASHER.
0 Close the lid and press the POWER button to turn the
washer ON. Pressthe CLEAN WASHER button, then
pressthe START/PAUSE button to begin the cycle.
Selecting any other cycle after CLEAN WASHER has
been selected will cause the CLEAN WASHER cycle to
be cancelled.
O After the cycle ends, open the lid and allow the
tub interior to dry completely.
NOTE: Run the CLEAN WASHER cycle once a month. If a
mildewy or musty smell is present, run the clean washer
cycle once a week for three consecutive weeks.
Storing the Washer
If the washer will not be used for an extended period of time
and is in an area that could be exposed to freezing
temperatures, perform the following steps to protect the
washer from damage.
Turn OFF the water supply.
Disconnect hosesfrom water supply and drain water
from hoses.
O Plug the cord into a properly grounded
power
electrical outlet.
O dd I gallon of nontoxic recreational vehicle (RV)
antifreeze to the empty tub and close the lid. NEVER use
automotive antifreeze.
0 Press the POWER button, then press the DRAIN & SPIN
button. Press the START/PAUSE button to activate
the drain pump. Allow the drain pump to run for one
minute, then press the POWER button to shut off:
the washen This will expel some of the antifreeze,
leaving enough to protect the washer from damage.
Unplug the power cord, dry the tub interior with a soft
cloth, and close the lid.
O
Remove the inserts from the dispenser. Drain any water in
the compartments and let them dry.
Store the washer in an upright position.
To remove the antifreeze from the washer after
storage, run a complete EXPRESSWASH cycle using
detergent. Do not add laundry to this cycle.
Removing Mineral Buildup
If you tive in an area with hard water, mineral scale can
form on internal components of the washer. Use of a
water softener is recommended in areas with hard water.
Use a descater, such as Washer Magic ®, to remove
visible mineral buildup. After descating, always run the
CLEAN WASHER cycle before washing clothing.
Mineral scale and other spots may be removed from the
stainless steet tub using a stainless steel cleaner. Do NOT
use steel wool or abrasive cleaners.
Leave the Lid Open
If the washer will not be used for several days, leave the
lid open overnight to allow the tub to dry.
24

MAINTENANCE
Cleaning the Water inlet Filters
If the washer does not fill properly, an error message will
show on the display. The inlet valve filter screens coutd
be plugged by hard water scale, sediment in the water
supply, or other debris.
NOTE: The inlet screens protect the delicate parts of the
inlet valve from being damaged by particles that could
enter the valves with the water supply. Operating the
washer with these filters removed could cause a valve to
stick open resulting in flooding and/or property damage.
@
Inlet Filter
Turn OFF both water faucets completely. Unscrew the
hot and cold water lines from the back of the washer.
IMPORTANT: Only use inlet hoses provided by KENMORE.
Aftermarket hoses are not guaranteed to fit or func-
tion correctly. Other hoses may not tighten correctly
and could cause leaks. Subsequent damage to prod-
uct or property will not be covered under the terms of
the product warranty. Hoses can be ordered by calling
1-800-4-MY-HOME _.
Carefully remove the filters from the water valves
and soak them in white vinegar or a lime scale
remover, following the manufacturer's instructions. Be
careful not to damage the filters while cleaning.
Rinse before Pressthe filters
thoroughly reinstalling.
back into place.
O Before the flush the hoses and
reattaching hoses,
water lines by running several gallons of water into a
bucket or drain.
25
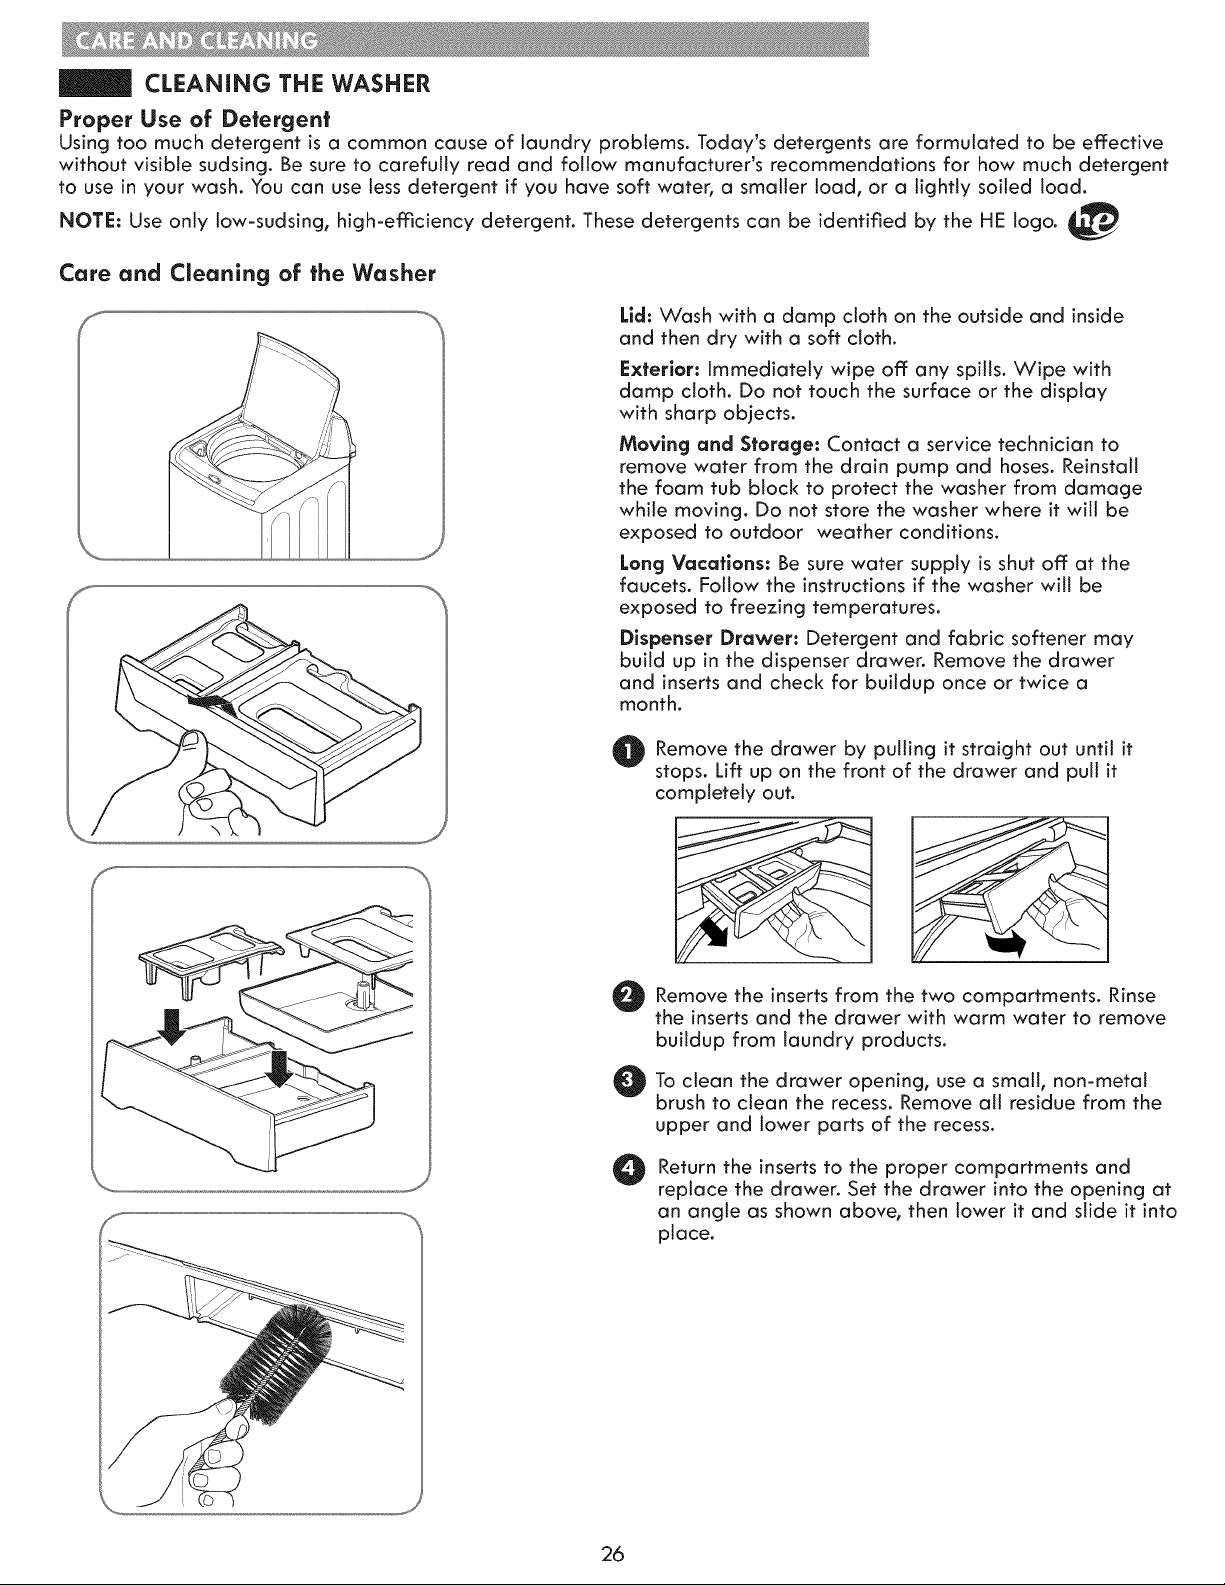
CLEANING THE WASHER
Proper Use of Detergent
Using too much detergent is a common cause of laundry problems. Today's detergents are formulated to be effective
without visible sudsing. Be sure to carefully read and follow manufacturer's recommendations for how much detergent
to use in your wash. You can use less detergent if you have soft water, a smaller load, or a lightly soiled load.
only low-sudsing, high-efflciency detergent. These detergents can be identified by the HE logo.
NOTE: Use
Core and Cleaning of the Washer
Lid: Wash with a damp cloth on the outside and inside
and then dry with a soft cloth.
Exterior: Immediately wipe off any spills. Wipe with
damp cloth. Do not touch the surface or the display
with sharp objects.
Moving and Storage: Contact a service technician to
remove water from the drain pump and hoses. Reinstall
the foam tub block to protect the washer from damage
while moving. Do not store the washer where it will be
exposed to outdoor weather conditions.
Long Vacations: Be sure water supply is shut off at the
faucets. Follow the instructions if the washer will be
exposed to freezing temperatures.
Dispenser Drawer: Detergent and fabric softener may
build up in the dispenser drawer. Remove the drawer
and inserts and check for buildup once or twice a
month.
Remove the drawer by pulling it straight out until it
stops. Lift up on the front of the drawer and putt it
cam _tetety out.
O Remove the inserts from the Rinse
two
compartments.
the inserts and the drawer with warm water to remove
buildup from laundry products.
O To opening, use a small,
clean the drawer non=metal
brush to clean the recess. Remove all residue from the
upper and lower parts of the recess.
O
Return the inserts to the proper compartments and
replace the drawer. Set the drawer into the opening at
an angle as shown above, then lower it and slide it into
place.
26
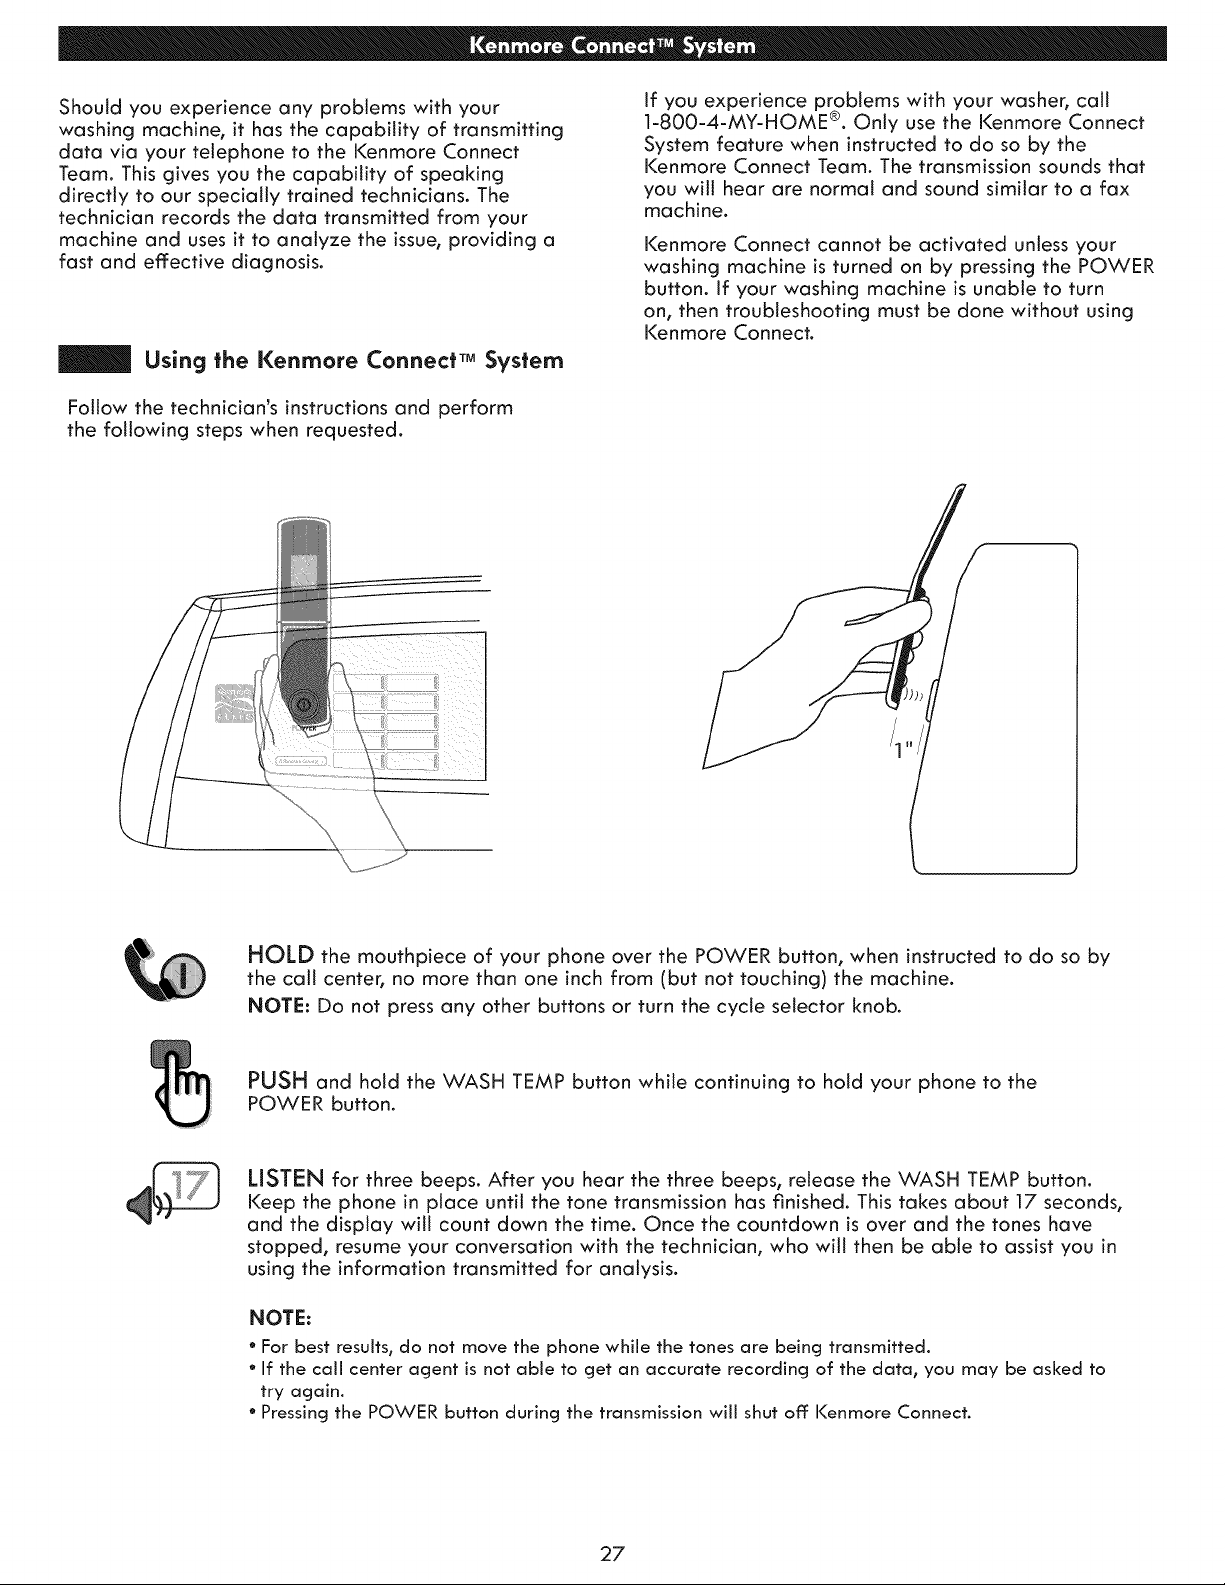
Should you experience any problems with your
washing machine, it has the capability of transmitting
data via your telephone to the Kenmore Connect
Team. This gives you the capability of speaking
directly to our specially trained technicians. The
technician records the data transmitted from your
machine and uses it to analyze the issue, providing a
fast and effective diagnosis.
Using the I<enmore Connect TM System
Follow the technician's instructions and perform
the following steps when requested.
If you experience problems with your washer, call
1-800-4-MY-HOME ®. Only use the Kenmore Connect
System feature when instructed to do so by the
Kenmore Connect Team. The transmission sounds that
you will hear are normal and sound similar to a fax
machine.
Kenmore Connect cannot be activated unless your
washing machine is turned on by pressing the POWER
button. If your washing machine is unable to turn
on, then troubleshooting must be done without using
Kenmore Connect.
J)h
HOLD the mouthpiece of your phone over the POWER button, when instructed to do so by
the call center, no more than one inch from (but not touching) the machine.
NOTE: Do not press any other buttons or turn the cycle selector knob.
PUSH and hold the WASH TEMP button while continuing to hold your phone to the
POWER button.
LISTEN for three beeps. After you hear the three beeps, release the WASH TEMP button.
Keep the phone in place until the tone transmission has finished. This takes about 17 seconds,
and the display will count down the time. Once the countdown is over and the tones have
stopped, resume your conversation with the technician, who will then be able to assist you in
using the information transmitted for analysis.
NOTE:
° For best results_ do not move the phone while the tones are being transmitted.
° If the can center agent is not able to get an accurate recording of the data_ you may be asked to
try again.
° Pressingthe POWER button during the transmission will shut off: Kenmore Connect.
27
NORMAL SOUNDS YOU MAY HEAR
The following sounds may be heard while the washer is
operating. They are normal.
Clicking:
Lid lock relay when the lid locks and unlocks.
Spraying or hissing:
Water spraying or circulating during the cycle.
Humming or gurgling:
Drain pump is pumping water from the washer at times
during a cycle.
BEFORE CALLING FOR SERVICE
Your washing machine is equipped with an automatic error-monitoring system to detect and diagnose problems at an
early stage. If your washer does not function properly or does not function at all, check the following before you call
for service:
Rattling and Foreign objects, such as keys,coins, or safety pins, Stop washer, check tub and drain filter for foreign objects. If
clanklng naise may be in tub or pump. noise continues after washer is restarted, call for service.
Thumping sound
Vibrating noise
Water leaklng
Wrinkling
Heavy wash loads may produce a
thumping sound.
Washer load may be out of balance.
Packaging materials were not removed.
Wash load may be unevenly distributed in
the tub.
Not all leveling feet are resting firmly and
evenly on the floor.
Floor not rigid enough.
inlet hose connection is loose at faucet
or washer.
House drain pipes are clogged.
Drain hose has come out of drain or
is not inserted far enough.
A large item such as a pillow or blanket is
above the top of the tub.
Washer not unloaded promptly.
Washer overloaded.
Hot and cold water inlet hoses are reversed.
This is normal. If sound continues, washer is probably
out of balance. Stop and redistribute wash load.
Pause the cycle and redistribute the load after the lid
unlocks.
See the UNPACKING AND REMOVING SHIPPING MATE-
RiAL section in the installation requirements.
Pausethe cycle and redistribute the load after the lid un-
locks.
See Leveling the Washer in the installation instructions.
Make sure that the floor is solid and does not flex. See
Flooring in the Installation Requirements.
Check hoses for leaks, cracks and splits.
Check and tighten hose
connections.
The washer pumps out water very rapidly. Check for
water backing up out of the drain pipe during drain. If
water is seen coming out of the drain, check for proper
drain hose installation and check for restrictions in the
drain. Contact a plumber to repair drain pipe.
Tie drain hose to inlet hose or standpipe to prevent it
from coming out during drain. For smaller drain pipes,
insert the drain hose into the pipe as far as the drain
hose flange. For larger drain pipes, insert the drain hose
into the pipe 1-2 inches past the flange.
Use the BULKY/BEDDING cycle for large or bulky
items Use extra care and never wash more than half a
load of items that float such as pillows.
Stop the washer and check the load. Make sure the
load does not crest above the top edge of the tub.
Always remove items from the washer as soon as the
cycle is complete.
The washer can be fully loaded, but the tub should not
be tightly packed with items. The lid of the washer
should close easily.
Hot water rinse can set wrinkles in garments. Check
the inlet hose connections
28
BEFORE CALLING FOR SERVICE (continued)
Excessive sudsing
Staining
Washer will not turn ON
NOTE: If the washer stopped
during a cycle due to a loss of
power, the washer will resume the
cycle where it stopped when the
power is restored.
Wash c_le time is longer than usual
Musty or mlldewy odor in washer
Water leaks
Too much detergent or incorrect
detergent.
Bleach or softener dispensed
too soon.
Bleach or softener was added
directly to the wash load in the tub.
Washer was not unloaded promptly.
Clothes were not properly sorted.
Power cord is not properly plugged in.
House fuse is blown, circuit breaker
has tripped, or power outage has oc-
curred.
House fuse is blown, circuit breaker
has tripped, due to multiple
appliances on one outlet.
The washer automatically adjusts the
wash time for the amount of laundry,
water pressure and other operating
conditions.
Incorrect or too much detergent has
been used.
Inside of tub was not cleaned properly.
Oversudsing of detergent.
HE detergents are formulated specifically for
High-Efficiency washers and contain suds-reduc-
ing agents. Only use detergent with the High-
Efficiency (HE) logo. For detergent quantities
refer to the How to Use section.
Dispenser compartment is overfitled causing
bleach or softener to dispense immediately.
ALWAYS measure bleach to prevent overfilling
- one cup maximum.
Dispenser drawer closed too quickly causing
softener to dispense immediately.
Always use the dispensers to ensure that laun-
dry products are properly dispensed at the
right time in the cycle.
Always remove items from the washer as soon
as possible after the cycle is complete.
Always wash dark colors separately from light
colors and whites to prevent discoloration.
Never wash heavily soiled items washed with
lightly soiled items.
Make sure that the plug is plugged securely
into a grounded, 3-prong, 120-VAC, 60-Hz
outlet.
Reset circuit breaker or replace fuse. Do not in-
crease fuse capacity. If the problem is a circuit
overload, have it corrected by a qualified
electrician.
Reset circuit breaker or replace fuse. If more
than one appliance is connected to the outlet,
call an electrician to have an additional circuit
installed.
This isnormal. The washer adjusts cycle time auto-
matically to provide optimal results for the selected
cycle. The time remaining shown in the display is
only an estimate. Actual time may vary.
Use only High-Efficiency (HE) detergent in
accordance with the manufacturer s instruc-
tions.
Run the CLEAN WASHER cycle regularly.
Oversudsing may create leaks, and may be
caused by the type and amount of detergent
used. High-Efficiency detergent is the only
detergent recommended. Make sure that
detergent and any additives are put into the
correct dispenser compartments. The normal
amount of detergent to use is 1/4to 1/2 of
the maximum amount recommended by the
detergent manufacturer. Always reduce the
amount of detergent if the load is small or
lightly soiled, or if your water is very soft.
Never use more than the maximum amount
recommended by the detergent manufacturer.
29
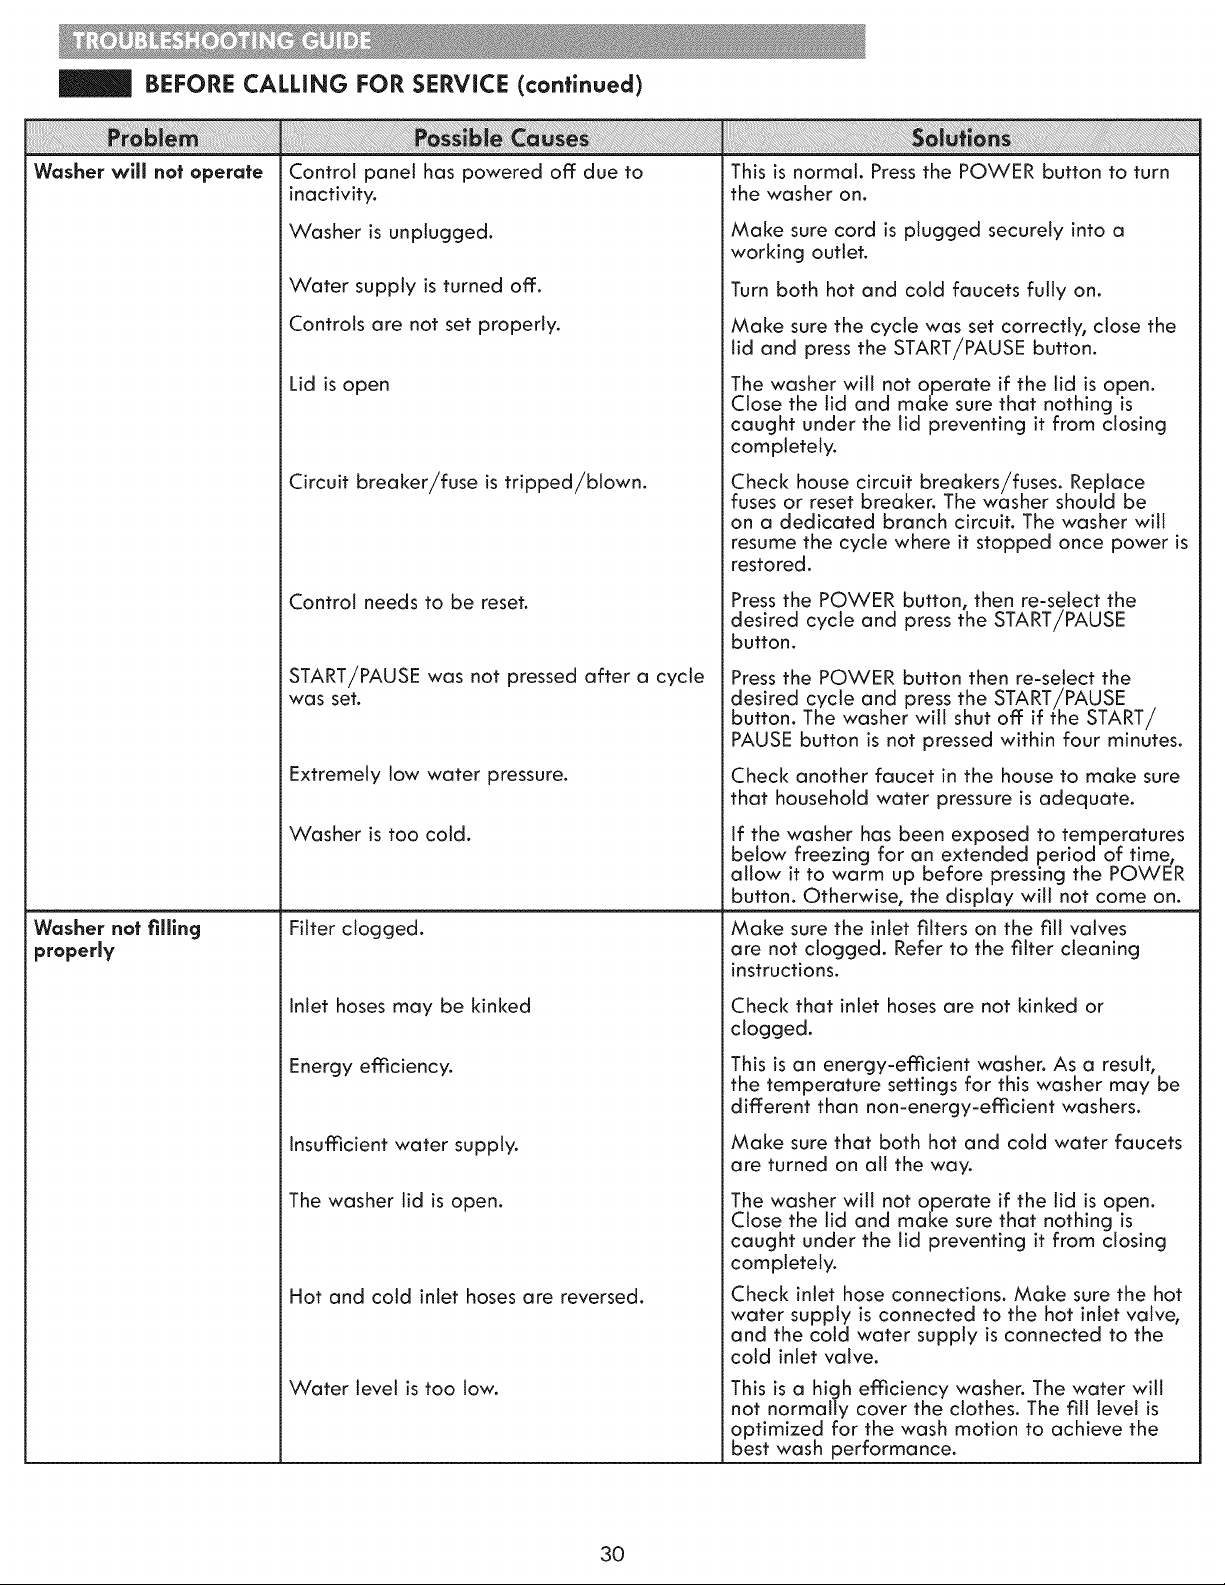
BEFORE CALLING FOR SERVICE (continued)
Washer will nat operate
Washer nat filllng
properly
Control panel has powered off due to
inactivity.
Washer is unplugged.
Water supply is turned off.
Controls are not set properly.
Lid is open
Circuit breaker/fuse is tripped/blown.
Control needs to be reset.
START/PAUSE was not pressed after a cycle
was set.
Extremely low water pressure.
Washer is too cold.
Filter clogged.
Inlet hoses may be kinked
Energy efficiency.
Insufficient water supply.
The washer lid is open.
Hot and cold inlet hoses are reversed.
Water level is too low.
Make sure cord is plugged securely into a
working outlet.
Turn both hot and cold faucets fully on.
Make sure the cycle was set correctly, close the
lid and press the START/PAUSE button.
The washer will not operate if the lid is open.
Close the lid and make sure that nothing is
caught under the lid preventing it from closing
completely.
Check house circuit breakers/fuses. Replace
fuses or reset breaker. The washer should be
on a dedicated branch circuit. The washer will
resume the cycle where it stopped once power is
restored.
Press the POWER button, then re-select the
desired cycle and press the START/PAUSE
button.
Press the POWER button then re-select the
desired cycle and press the START!PAUSE ,
button. The washer will shut off if the START/
PAUSE button is not pressed within four minutes.
Check another faucet in the house to make sure
that household water pressure is adequate.
If the washer has been exposed to temperatures
below freezing for an extended period of time,
allow it to warm up before pressing the POWER
button. Otherwise, the display will not come on.
Make sure the inlet filters on the fill valves
are not clogged. Refer to the filter cleaning
instructions.
Check that inlet hoses are not kinked or
clogged.
This is an energy-efficient washer. As a result,
the temperature settings for this washer may be
different than non-energy-efficient washers.
Make sure that both hot and cold water faucets
are turned on all the way.
The washer will not operate if the tid is open.
Close the tid and make sure that nothing is
caught under the lid preventing it from closing
completely.
Check inlet hose connections. Make sure the hot
water supply is connected to the hot inlet valve,
and the cold water supply is connected to the
cold inlet valve.
This is a high efficiency washer. The water will
not normally cover the clothes. The fitt level is
optimized for the wash motion to achieve the
best wash performance.
3O
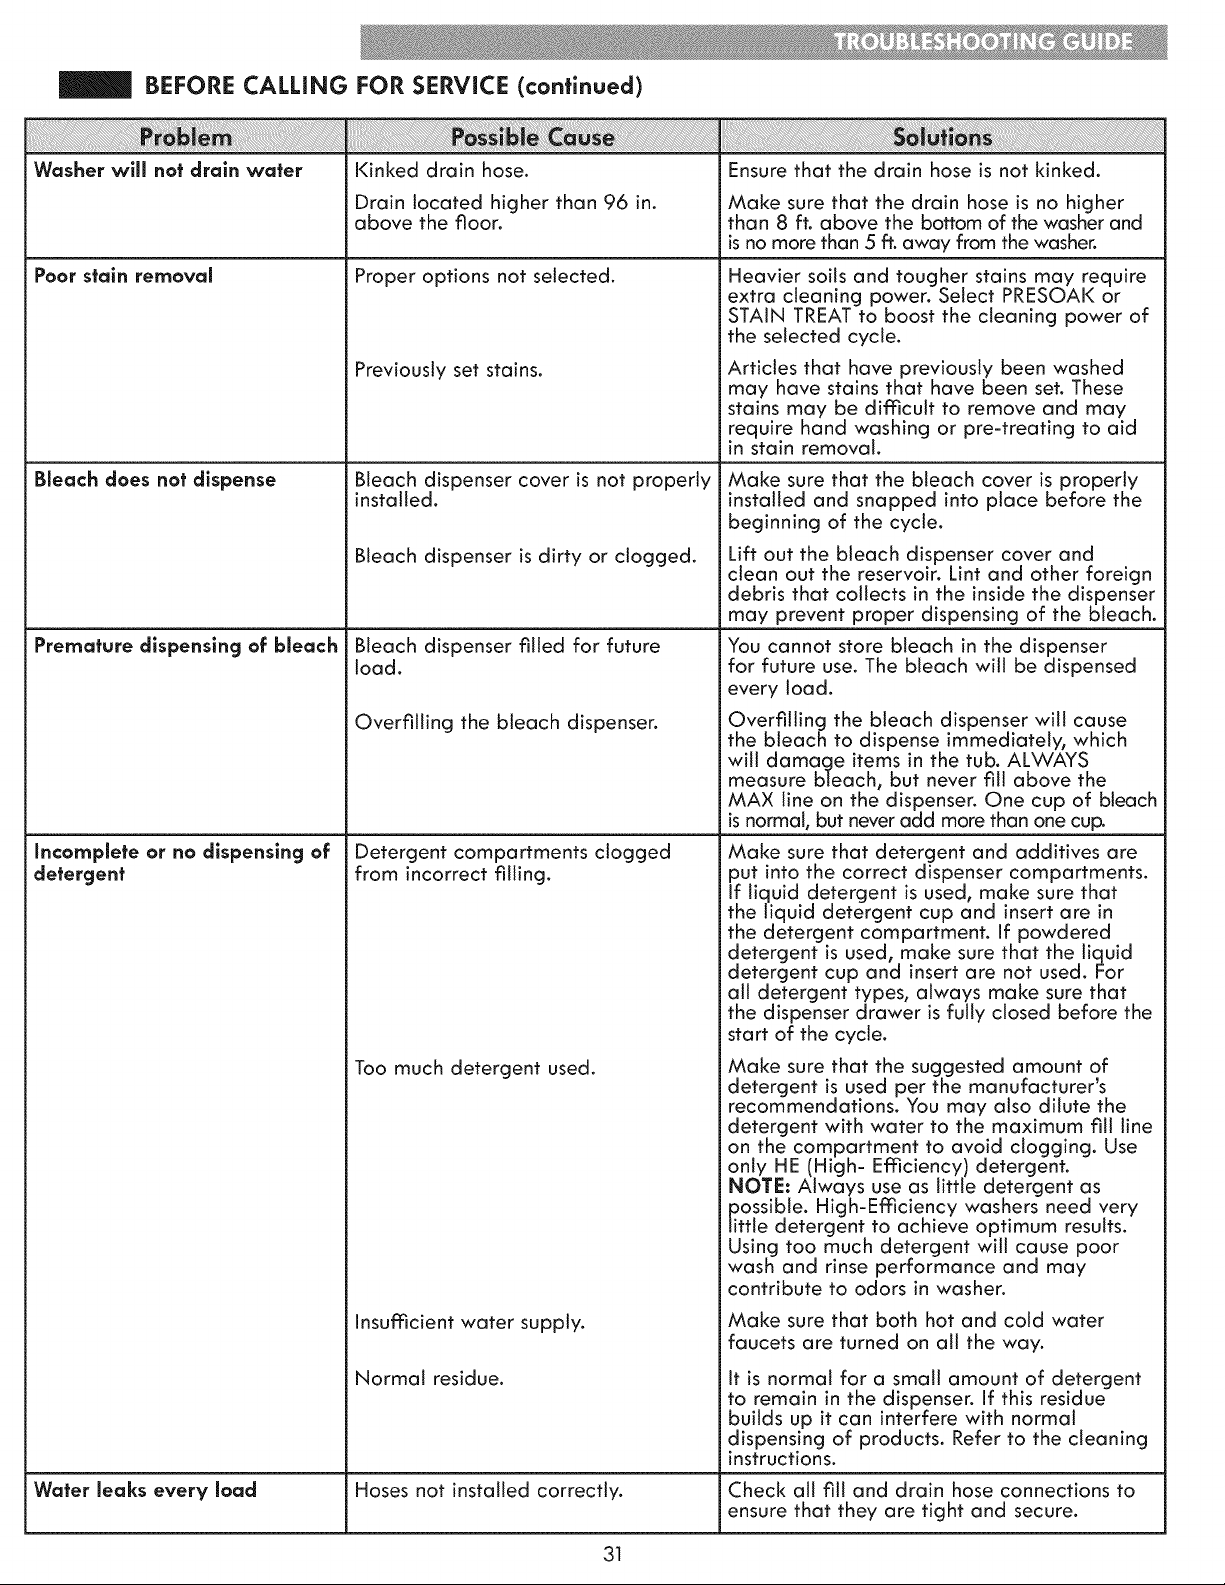
BEFORE CALLING FOR SERVICE (continued)
Washer will nat drain water Kinked drain hose. Ensure that the drain hose is not kinked.
Drain located higher than 96 in. Make sure that the drain hose is no higher
above the floor, than 8 ft. above the bottom of the washer and
is no more than 5 ft. away from the washer.
Poor stain removal Proper options not selected.
Previously set stains.
Bleach dispenser cover is not properly
installed.
Bleach dispenser is dirty or clogged.
Bleach does nat dispense
Premature dispensing of bleach
incomplete or no dispensing of
detergent
Bteach dispenser filled for future
load.
Overfilling the bleach dispenser.
Detergent compartments clogged
from incorrect filling.
Too much detergent used.
Insufficient water supply.
Normal residue.
Heavier soils and tougher stains may require
extra cleaning power. Select PRESOAK or
STAIN TREAT to boost the cleaning power of
the selected cycle.
Articles that have previously been washed
may have stains that have been set. These
stains may be difficult to remove and may
require hand washing or pre-treating to aid
in stain removal.
Make sure that the bleach cover is properly
installed and snapped into place before the
beginning of the cycle.
Lift out the bleach dispenser cover and
clean out the reservoir. Lint and other foreign
debris that collects in the inside the dispenser
may prevent proper dispensing of the bleach.
You cannot store bleach in the dispenser
for future use. The bleach will be dispensed
every load.
Overfilling the bleach dispenser will cause
the bleach to dispense immediately, which
will damage items in the tub. ALWAYS
measure bleach, but never fill above the
MAX line on the dispenser. One cup of bleach
is normal, but never add more than one cup.
Make sure that detergent and additives are
put into the correct dispenser compartments.
If liquid detergent is used, make sure that
the liquid detergent cup and insert are in
the detergent compartment. If powdered
detergent is used, make sure that the liquid
detergent cup and insert are not used. For
all detergent types, always make sure that
the dispenser drawer is fully closed before the
start of the cycle.
Make sure that the suggested amount of
detergent is used per the manufacturer's
recommendations. You may also dilute the
detergent with water to the maximum fill line
on the compartment to avoid clogging. Use
only HE (High- Efficiency) detergent.
NOTE: Always use as tittle detergent as
_tossibte. High-Efficiency washers need very
tie detergent to achieve optimum results.
Using too much detergent will cause poor
wash and rinse performance and may
contribute to odors in washer.
Make sure that both hot and cold water
faucets are turned on all the way.
it is normal for a small amount of detergent
to remain in the dispenser. If this residue
builds up it can interfere with normal
dispensing of products. Refer to the cleaning
instructions.
Water leaks every load Hoses not installed correctly. Check att fill and drain hose connections to
ensure that they are tight and secure.
31

BEFORE CALLING FOR SERVICE (continued)
Error Codes
The dlsplay shows: ! II-,:,0:|
The dlsplav shows: I Ip,:,-|
The dlsplav shows: I i,2,-|
Washer Nlls with water slowly
or not at all, or the display
i! !!! ii ii ii ii iiii!iiiiiiiiiiiiiii!i iiii iiiii iii ! iiiiiii iiii iiiiiiiiiiiiiiiiiiiiiiiiiiiiiiiiiiiiiiiiiiiiiiiiiiiiiii iiiiiiiiiiiiiiiiiiiiiiiiiiiiiiiiiii!i!i!i!i!i!iiiiiiiiiiiiiiiiiiiiiiiiiiiiiiiiiiiiii!i!!!!!i!i!i!i!iii!i!i ! i ! i i i !i!i!i! !i! ! i ii6! !ij! ! ! ! !! i! !!i ii! i ! ! ! ! !i illi i i i i i i i i i ii iiiiiiiiiiiiiiiiiiiiiiiiiiiiiiiiiiiiiiiiiiiiiiiiiiiiiiiiiiiiiiiiiiiiiiiiiiiiiiiiiiiiiiiiiiiiiiiiiiiiiiiiiiiiiiiiiiiiiiiiiiiiiiiiiiiiiiiiiiiiiiiiiiiiiiiiiiiiiiiiiiiiiiiiiiiiiiiiiiiiiiiiiiiiiiiiiiiiiiiiiiiiiiiiiiiiiiiiii! i i
The lid is not closed properly.
Lid lock switch error.
Special Drain Feature.
Water supply faucets are not fully open.
Water line hoses are kinked, pinched, or
crushed.
Water inlet filters are clogged.
Water supply pressure to faucet or house is
too low.
Water supply connected with leak-
limiting hoses.
i !! i!J ii !i !i! i! ii i! ii i iii!ii!iiiiiiiiiiiiii iiiiiiiiiiiii!i !!!!i!!! ! ! !!!!!!!!!!i!!!i!i!i!ii!i!!!!!!iiiiiiiiiiiiiiiiiiiii i ! ! ! !!!!!!!!!!i!i!iiiiiiiiiiiiiiiiiiiiiiiiiiiiiiiiiiiiiiiiiiiiiiiiiiiiiiiiiiiiiiiiiiiiiiiiiiiiiiiiiiiiiiiiiiiiiiiiiiiiiiiiiiii i! !!!!!!!!!!i!i!iii!i!ii!iiiiiiiiiiiiiiiiiiiiiiiiii ! ! ! ! i ! ii i ! !! !! ! i!i !!!!! ! !iii!i!ii!iiiiiiiiiiiiiiii i i !i! ! !i! ! !i! ! i i i i ii i ii iiiiiiiiiiiiiiiiiiiiiiiiiiiiiiiiiiiiiiiiiiiiiiiiiiiiiiiiiiiiiiiiiiiiiiiiiiiiiiiiiiiiiiiiiiiiiiiiiiiiiiiiiiiiiiiiiiiiiiiiiiiiiiiiiiiiiiiiiiiiiiiiiiiiiiiiiiiiiiiiii!iiiiiiiiiiiiiiiiiiiiiiiiiiiiiiiiiiiiiiiiiiiiiiiiiiiiiiiiiiiiiiiiiiiiiiiiiiiiiiii!i
Make sure that the lid is closed properly
and press the START/PAUSE button.
After starting a cycle, it may take a few
moments before the tub begins to turn or
spin. The washer will not spin unless the lid
is locked.
If the lid is closed and the lid lock error
message is displayed, call for service.
Make sure that the lid is closed properly
and press the START/PAUSE button. The
washer will not operate unless the lid is
locked.
Make sure that nothing is caught under the
lid, including shipping material or clothing.
Make sure that the latch mechanism is fully
retracted.
If the lid is closed and the lid lock error
message is displayed, call for service.
If the washer is paused during a cycle for
more than four minutes, the cycle will be
cancelled and any water remaining in the
tub will be drained. An alarm will sound at
three minutes to warn you that the tub is
about to drain.
Make sure that the water faucets are fully
open.
Make sure the hoses are not kinked or
pinched. Be carefut when moving the
washer during cleaning and maintenance.
Clean the inlet filters. See Maintenance in
the Care and Cleaning section.
Check another faucet in the house to
make sure that household water pressure is
adequate and flow is not restricted. Discon-
nect the inlet hose from the washer and run
a few gallons of water through the hose to
flush the water supply lines. If flow is too
low, contact a plumber to have the water
lines repaired.
Hoses designed to limit leaks can trip
falsely and prevent the washer from filling.
The use of leak limiting hoses is not recom-
mended.
NOTE: If an error message is displayed for four minutes, the water in the tub will automatically drain. An alarm will sound
one minute prior to draining and the original error code will continue to be displayed.
32
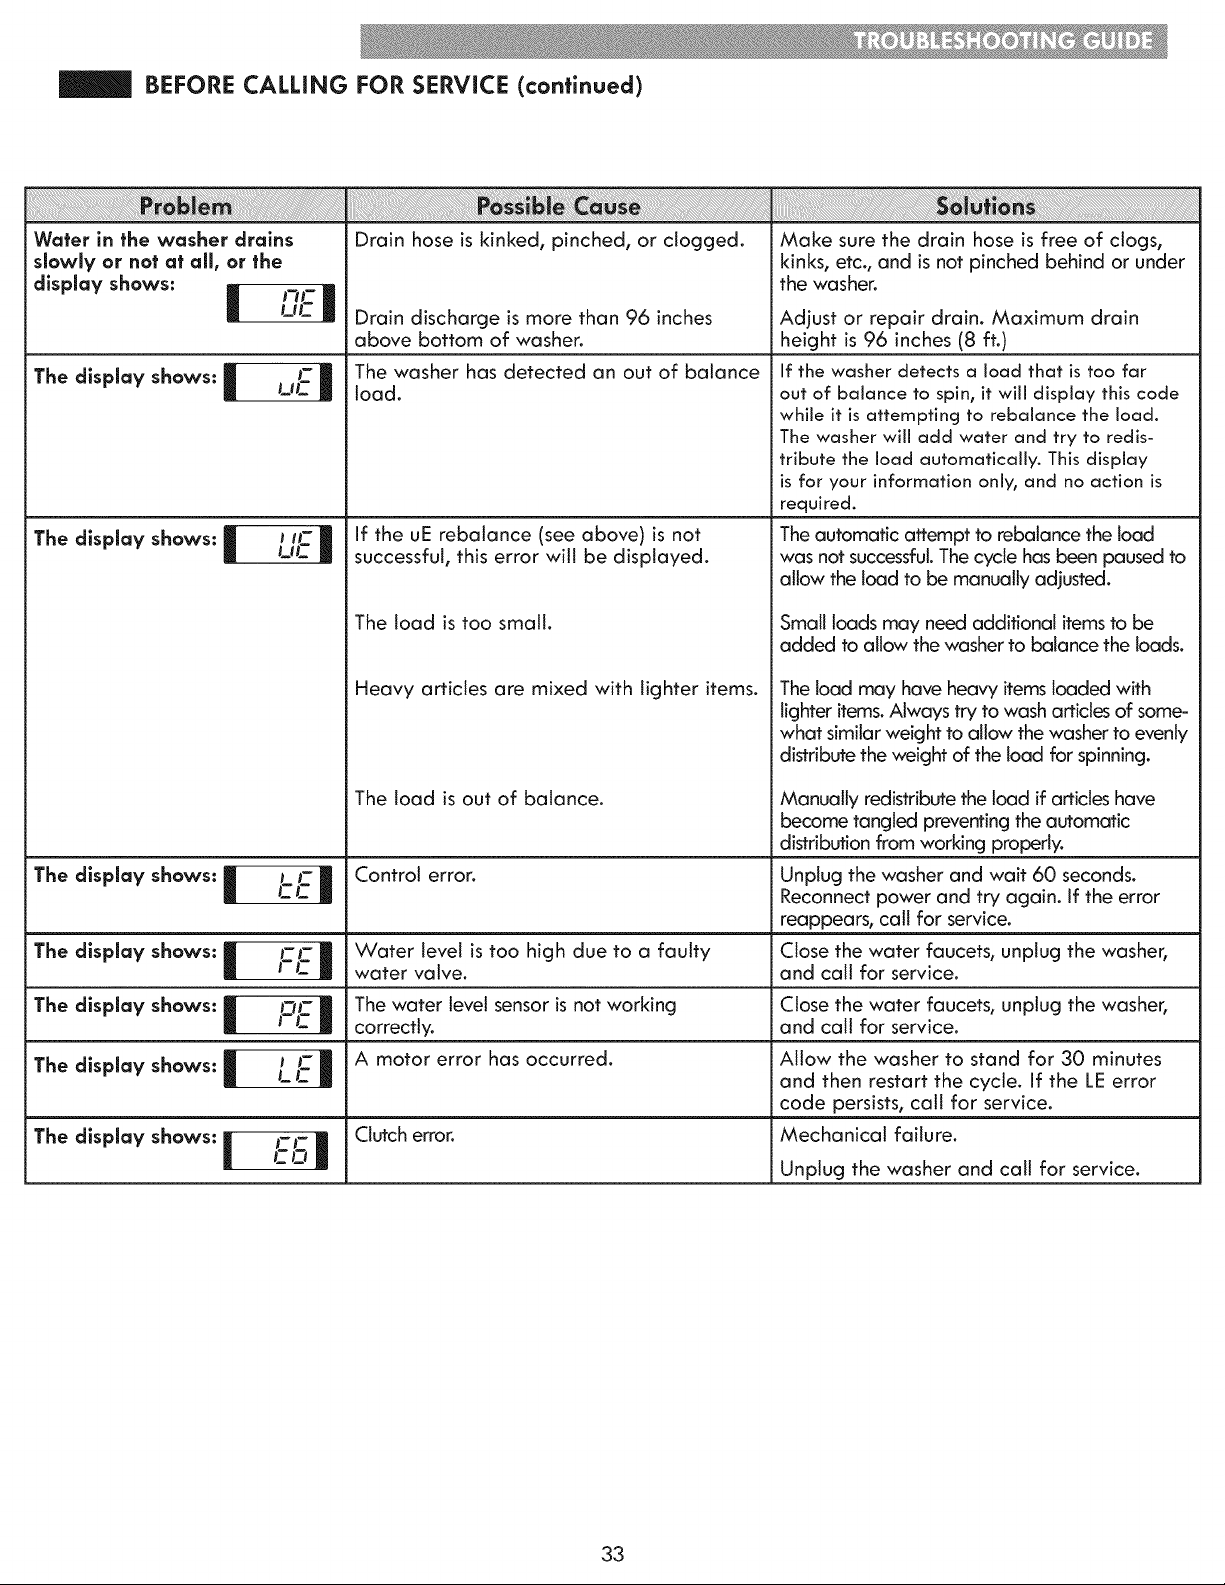
BEFORE CALLING FOR SERVICE (continued)
Water in the washer drains
slowly or nat at all, or the
display shaws: I
The display shaws: I
UC
I-
UC I
The dlsplay shows: I I ll-UC I
The display shaws: I rrrl=|
The display shows: I I_l-i-c|
I I-
The display shaws: I I_ C I
The display shaws: _ i-i-
r_o-_,|
Drain hose is kinked, pinched, or clogged.
Drain discharge is more than 96 inches
above bottom of washer.
The washer has detected an out of balance
load.
If the uE rebatance (see above) is not
successful, this error will be displayed.
The load is too small.
Heavy articles are mixed with lighter items.
The load is out of balance.
Control error.
Water level is too high due to a faulty
water valve.
The water level sensor is not working
correctly.
A motor error has occurred.
Clutch error.
Make sure the drain hose is free of clogs,
kinks, etc., and is not pinched behind or under
the washer.
Adjust or repair drain. Maximum drain
height is 96 inches (8 ft.)
If the washer detects a load that is too far
out of balance to spin_ it will display this code
while it is attempting to rebalance the load.
The washer will add water and try to redis-
tribute the load automatically. This display
is for your information only_ and no action is
required.
The automatic affempt to rebalance the load
was not successful.The cycle has been paused to
allow the load to be manually adjusted.
Small loads may need additional itemsto be
added to allow the washer to balance the loads.
The toad may have heavy itemsloaded with
lighter items. Always try to wash articles of some-
what similar weight to allow the washer to evenly
distribute the weight of the load for spinning.
Manually redistribute the load if articles have
become tangled preventing the automatic
distribution from working properly.
Unplug the washer and wait 60 seconds.
Reconnect power and try again, if the error
reappears, call for service.
Close the water faucets, unplug the washer,
and call for service.
Close the water faucets, unplug the washer,
and call for service.
Allow the washer to stand for 30 minutes
and then restart the cycle. If the LE error
code persists, call for service.
Mechanical failure.
Unplug the washer and call for service.
33
Kenmore Elite Limited Warrantv
When installed, operated and maintained according to all instructions supplied with the product, if this
appliance fails due to a defect in material and workmanship within one year from the date of purchase, call
1-800-4-MY-HOME ® to arrange for free repair.
If this appliance is ever used for other than private family purposes, this warranty applies for only 90 days
from the date of purchase.
This warranty covers only defects in material and workmanship. Sears will NOT pav for:
1. Expendable items that can wear out from normal use, including but not limited to filters, belts, light bulbs,
and bags.
2. A service technician to instruct the user in correct product installation, operation or maintenance.
3. A service technician to clean or maintain this product.
4. Damage to or failure of this product if it is not installed, operated or maintained according to all the
instructions supplied with the product.
5. Damage to or failure of this product resulting from accident, abuse, misuse or use for other than its
intended purpose.
6. Damage to or failure of this product caused by the use of detergents, cleaners, chemicals or utensils
other than those recommended in all instructions supplied with the product.
Z Damage to or failure of parts or systems resulting from unauthorized modifications made to this product.
Disclaimer of implied warranties; limitation of remedies
Customer's sole and exclusive remedy under this limited warranty shall be product repair as provided herein.
Implied warranties, including warranties of merchantability or fitness for a particular purpose, are limited to
one year or the shortest period allowed by law. Sears shall not be liable for incidental or consequential
damages. Some states and provinces do not allow the exclusion or limitation of incidental or consequential
damages, or limitation on the duration of implied warranties of merchantability or fitness, so these exclusions
or limitations may not apply to you.
This warranty applies only while this appliance is used in the United States or Canada.
This warranty gives you specific legal rights, and you may also have other rights which vary from state to state.
Sears Brands Management Corporation, Hoffman Estates, IL 60179
Sears Canada Inc., Toronto, Ontario, Canada M5B 2C3
34
INSTRUCCIONES IMPORTANTES
SOBRE SEGURIDAD .......... , ............................................. 36-38
REQUISaTOS DE CONEXION A TIERRA ............................ 38
FUNCIONES Y VENTAJAS
Piezas y componenfes clave ............................................ 39
Accesorio Opcional ............................................................ 39
Accesorios incluidos ............ ;.............................................. 39
REQUISITOS DE INSTALACION
Dimenslones y especificaclones clave ........................... 40
Escoja el lucjar adecuado ................................................. 40
Tipo de piso ......................................................................... 40
Espacios de instalaci6n ..................................................... 40
INSTRUCCIONES PARA LA INSTALACI6N
Desempaquetado y desembalaie del material
de fransporte ........................................................................ 41
Conexi6n de las tuberias de acjua ................................... 42
Conexi6n de la mancjuera de drenaje ............................ 43
Conexi6n del suminisfro el_ctrico .................................... 43
Nivelaci6n de la lavadora ................................................ 44
INSTRUCCIONES DE USO
Funclones del panel de control ....................................... 45
Manejo de la lavadora ...................................................... 46
Guia de ciclos .............................................................. 47=48
Clasificaci6n de las carcjas de lavado ............................ 49
Acerca de los dispensadores ............................................ 50
Uso del defercjente y del dispensador ............................. 51
Pantalla de tiempo y estado ............................................. 52
Botones modificadores de ciclo ....................................... 53
Botones de opci6n ........................................................ 54-56
Tratamienfo de manchas mejorado ............................. 54
Ahorrar enercjia ............................................................... 54
Enjuacjue extra ................................................................ 54
Acjrecjue el acjua ............................................................. 54
Acjjrecjar una prenda ..................................................... 54
Aviso sonoro ..................................................................... 54
Limpiar la lavadora ........................................................ 55
Suavizante ....................................................................... 55
Mi ciclo ............................................................................. 55
Remojo .............................................................................. 55
Lavado demorado .......................................................... 56
Drenaje y centrifucjado .................................................. 56
BIoqueo de los confroles ................................................ 56
Funci6n de drenaje especial ............................................. 56
CUIDADO Y LIMPIEZA
Limpieza recjular ................................................................. 57
Mantenimiento .................................................................... 58
Limpieza de la lavadora ................................................... 59
SISTEMA KENMORE CONNECT TM ..................................... 60
Uso del sistema/<enmore Connect TM .............................. 60
GUJA DE SOLUCiON DE PROBLEMAS
Sonldos normales que se pueden escuchar ................... 61
Antes de solicitar asistencia t_cnica ........................... 61-66
C6dicjos de error ........................................................... 65-66
GARANTJA._ ............................................................................ 67
Si:RVICIO Ti:CNICO ........................................ Confraporfada
En el espacio de abajo, recjistre ia fecha de la compra,
ei modeio y n6mero de serie dei producto. Usted encontrar6
el n6mero de modelo y de serie impreso en una placa de
identificaci6n ubicada dentro de ia tapa de la iavadora.
Tencja esta informaci6n disponible cuando se comunique
con Sears con reiaci6n a su producto.
N. ° de modeJo
Fecha de compra
N. ° de serie
Guarde estas insfrucciones y su recibo de venta para
referencia futura.
35
Acuerdos maestros de protecci6n
Felicidades por haber realizado una compra inteligente.
Su nuevo producto Kenmore ® esf6 dise_ado y fabricado
para brindar a_os de funcionamienfo fiable. No obsfanfe,
al icjual que cualquier ofro producfo, es posible que requiera
un manfenimienfo preventivo o alcjuna reparaci6n cada
cierto fiempo. Ahi es cuando confar con un Acuerdo maestro
de profecci6n puede ayudarle a ahorrar tiempo y dinero.
El acuerdo maestro de protecci6n tambi_n Io ayuda a
extender la vida 6til de su nuevo producto. El Acuerdo _
incluye los sicjuienfes punfos:
* Piezas y mano de obra necesarlas para manfener los
producfos en buen funclonamlenfo bajo un uso normal, no
_nlcamenfe los defectos de fabrlcaci6n. Nuestra cobertura
va mucho mas allc] de la cjaranfia del producfo. No hay
nlnguna falla funclonal deducible que se excluya de la
cobertura: se trafa de una protecci6n real
* Servlclo experfo medlanfe un grupo de m6s de 10.000
t_cnlcos autorlzados de Sears, Io que slgnlfica que algulen
en qulen puede confiar va a trabajar en su producfo.
* Vlslfas a su domlcillo illmltadas y servlclo en todo el pais
todas las veces que nos neceslte, cuando nos neceslfe.
"GarantJa por defecfos de fabrlcaci6n: reemplazo de su
producto si se producen cuatro o m6s fallas dentro de los
dace meses.
° Reemplazo del producfo: si _ste no puede repararse.
* Control de mantenlmlento preventlvo anual a pedldo, sin
cargos extra.
* Ayuda r6plda pot tel_fono: Io Ilamamos resoluci6n r6plda.
Soporte telef6nlco de un represenfanfe de Sears sobre
todos los productos. Piense en nosolros como un "manual
de usuarlo que habla".
° Protecci6n de plcos de tensi6n contra da_os el_ctrlcos
debldos a fluctuaclones de la energia.
* Protecci6n anual de $250 pot p_rdlda de comlda que
se haya producldo como resultado una falla mec6nlca
cualquler refrlcjerador o concjelador cublerto.
* Relntegro pot alquiler sl la reparaci6n de su producto
tarda m6s de Io prometldo.
* 10°/0 de descuenfo del preclo normal de cualquler servlclo de
reparaci6n no cublerto y de plezas relaclonadas instaladas.
Una vez que adquiera eI Acuerdo, s6Io tiene que hacer un
Iiamado teief6nico para procjramar eI servicio. Puede Iiamar
en cualquier momenfo de dia o de noche, o coordinar un
servicio t_cnico online.
El Acuerdo maestro de protecci6n es una compra sin riescjos.
Si usfed Io cancela por cualquier raz6n duranfe el periodo
de cjaranfia del producfo, le devolveremos la tofalidad del
dinero, o una devoluci6n prorrafeada en cualquier momento
despu_s de que expire el periodo de cjaranfia. Adquiera hoy
mismo su Acuerdo maestro de profecci6n.
Se apllcan alcjunas llmlfaclones y excluslones.
Para consultar preclos y e informaci6n adlclonal en los EE. UU.
flame al 1=800=827=6655.
La cobertura en Canad6 var_a en algunos aspectos.
Para m6s detalles, Ilame a Sears Canad6 a 1=800=361=6665.
Servlclo de instalaci6n de Sears
Para solicitar la insfalaci6n profesional de Sears de
elecfrodom_sficos, disposifivos para aperfura de puertas
de cjaraje, calenfadores de acjua y otros elecfrodom_sficos,
Ilame en los EE. UU. o Canad6 a:I-800-4-MY-HOME ®.
Enestemanualyen suelectrodomSsticofiguranmuchosmensajesimportantesdeseguridad.Leay cumpiasiempre
contodoslosmensajesdeseguridad.
F:stees el simbolo de aierta de seguridad. Este simbolo io aierta sobre posibies riesgos que pueden resuitar
en da_os sobre ia propiedad y/o iesiones fisicas graves o ia muerte.
Todos los mensajes de seguridad estar6n a continuaci6n dei simbolo de alerta de seguridad y de las
palabras de sepal de PELIGRO, ADVERTENCIA o PRECAUCK_N. Estas paiabras significan:
Indica una situaci6n peligrosa que, si no se evita, puede producir iesiones graves o ia muerte.
Indica una situaci6n peligrosa que, si no se evita, podria provocar iesiones graves o ia muerte.
Indica una situaci6n peligrosa que, si no se evita, puede producir una iesi6n menor o moderada.
Todos los mensajes de seguridad ie indicar6n cu6i es ei posible peligro, io que debe hacer para reducir ia probabilidad de
iesiones y io que puede ocurririe si no se siguen ias instrucciones.
Para reduclr el rlesgo de incendlo, descarga el_ctrlca o
leslones personales al utillzar este electrodom_sfico, slga estas
precauclones b6slcas, entre las que se incluyen las slgulentes:
° Utiiice este electrodomestico solo paras los fines paros los
que rue disenado, segun io descrito en este manual dei
usuario. N'utilisez votre iaveuse qu/aux fins prevues decrites
dans ce manuel du proprietaire.
° Antes de utiiizar la iavadora, es necesario instaiaria
correctamente, seg(Jn se describe en este manual.
° No lave articulos que previamente hayan sido iimpiados,
iavados, sumergidos o saipicados con gasoiina, disoiventes
de iimpieza en seco o cuaiquier otra sustancia infiamabie o
explosiva, ya que pueden desprender vapores que podrian
incendiarse o explotar.
° No agregue gasoiina, disoiventes de iimpieza en seco
u otras sustancias explosivas ai agua de iavado. Estas
sustancias emanan vapores que podrian encenderse o
explotar.
° Bajo ciertas condiciones, se puede producir gas hidr6geno
en un sistema de agua caiiente que no se haya usado
por un piazo de 2 semanas o m6s. EL GAS HIDROGENO
ES EXPLOSIVO. Si no se ha usado ei sistema de agua
caiiente durante tai periodo, antes de utiiizar ia iavadora,
abra todas ias iiaves de agua caiiente y de]e que ei agua
fiuya durante aigunos minutos. Esto iiberar6 cuaiquier gas
hidr6geno acumulado. Ya que ei gas es infiamable, no fume
ni use ninguna llama abierta durante este periodo.
° No deje que los ni_os jueguen en ia iavadora o dentro
de ella. Cuando se usa ia iavadora cerca de los ni_os se
necesita supervisi6n minuciosa.
° Antes de poner la iavadora fuera de servicio o
de tiraria, quite ia tapa dei compartimiento de iavado para
evitar ei peiigro que ni_os o peque_os animaies se queden
atrapados en ei interior. Si no se respeta esta advertencia,
pueden producirse iesiones graves e inciuso ia muerte.
36
° No instale ni guarde ia iavadora cuando est8 expuesta
a ia intemperie o temperaturas de congelamiento.
° Mantenga ei area airededor y bajo ei dispositivo iibre
de materiaies combustibles, como pelusa, papei, trapos,
productos quimicos, etc.
° No toquetee los controies.
° No repare ni cambie ninguna pieza de ia iavadora
ni intente dar un mantenimiento diferente ai descrito
en este manual. Recomendamos enf6ticamente que ei
mantenimiento io brinde una persona caiificada.
• Vea ias Instrucciones para ia instaiaci6n para referirse
a los requisitos de conexi6n a tierra.
° Siga SiEMPRE ias instrucciones de cuidado de ia prenda
provistas por ei fabricante de ias prendas.
° No coloque prendas expuestas a aceite comestible en su
iavadora. Las prendas contaminadas con aceites comestibles
podrian contribuir a ia formaci6n de una reacci6n quimica
que cause que una carga de iavado se incendie.
° Use suavizantes o productos para eliminar est6tica
(Jnicamente dei modo recomendado por ei fabricante.
° Esta iavadora no esta dise_ada para uso marino o
instalaciones m6viies tales como vehiculos recreativos,
aeronaves_ etc.
" Cierre las Ilaves de agua y desenchufe la iavadora si va a
dejar la lavadora sin funcionar par un periodo prolongado
de tiempo, como durante ias vacaciones.
° Ei material de embalaje podria resuitar peiigroso para
los ni_os. Exlste riesgo de asfixla. Mantenga todos los
elementos de embalaje fuera del alcance de los ni_os.
° Antes de cargar ia iavadora, siempre revise que no haya
objetos extra_os en su interior. Mantenga ia puerta cerrada
cuando no se use.
• ADVERTENCIA: Este producto contiene quimicos conocidos por eJ
Estado de California de causar c_ncer. /I_vese _$ Bl_nO$ despue$
de manipularo
Pare reduclr el rlesgo de incendlo, descarga el_ctrlca o
leslones personales al utillzar este electrodom_stlco, slga estas
precauciones b6slcas, entre las que se induyen las slgulentes:
" Desenchufe la lavadora antes de proceder a su limpieza
para evitar posibles descargas eE_ctricas.
* No utlllce nunca productos quimlcos fuertes, llmpladores
abraslvos o dlsolventes pare llmplar la lavadora. Da_ar6n el
acabado.
* No coloque trapos grasosos o aceltosos sabre la lavadora.
Estas sustancias despiden vapores que podrian prender fuego
a los materiales.
®No lave prendas que est_n suclas con acelte vegetal o de
coclna. Las mismas pueden quedar con alga de aceite luego
del lavado y prenderse fuego.
* Desconecfe este electrodam_stlco de la tome de corrlente
antes de reallzar cualquler funci6n de mantenlmlento. Colocar
los controles en la poslci6n OFF (apagado) no desconecta el
elecfrodom_stlco de la fame de corrlenfe. Si no se cumpEe con
esta advertencia se podr6n producir lesiones graves, incendios,
descargas el_ctricas o muerte.
" No combine detergentes, suavlzantes y arras productos de
lavanderia de dlferentes fabrlcantes en una mlsma carga, a
menos que as/se especlflque en la etlqueta.
* No mezde blanqueador con dora can amonlaco o 6cldos, come
vlnagre. Siga las dlrecclones del paquete al user productos de
lavanderia. Un usa indebido puede producir gases venenosos, Io
que puede resultar en heridas graves o la muerte.
* No coloque las manos dentro de la lavadora cuando sus
partes est_n en movlmlento. Antes de cergar, descargar o
agregar prendas, preslone la perilla selectora de clclos y
espere haste que la tlna se detenga totalmente antes de
meter las manos dentro. Si no se cumple con esta advertencia
se podr6n producir lesiones graves, incendios, descargas
el_ctricas o muerte.
" Consulte las INSTRUCCIONES DE INSTALACI6N pare obtener
informaci6n detaffada de los procedlmlentos de conexi6n a
tlerra. Junto con la lavadora se encuentran las instrucciones de
instalaci6n coma referencia. Si ¢ambiara de lugar la lavadora,
contrate a una persona del servicio ¢alificada pare que la
controle y reinstale. Si no se cumple con esta advertencia se
podr6n producir lesiones graves, incendios, descargas el6ctricas
o muerte.
" Bajo nlnguna clrcunstancla, carte o quite la tercera clavlja
(de conexi6n a tlerra) del cable el_ctrlca. Si no se cumple con
esta advertencia se podr6n producir lesiones graves, incendios,
descargas el6ctricas o muerte.
• Par motlvos de segurldad personal, este electrodom_stlco
debe ester conectado a tlerra adecuadamente. Si no se
cumple con esta advertencia se podr6n producir lesiones
graves, incendios, descargas el6ctricas o muerte.
• El cable de afimentaci6n de este electrodom_stlco est6
equlpado con un enchufe de ires clavljas (de conexi6n
a tlerra) que coincide con una tome de corrlente pare
tres clavljas (de canexi6n a tlerra) pare asf minimizar la
posibilidad de descarga el6ctrica de este electrodom6stico.
• Esta lavadora debe ester enchufada a una fame de corrlente
de 120 V de CA, 60 Hz y con conexi6n a tlerra. Si no se
cumple con esta advertencia se podr6n producir lesiones
graves, incendios, descargas el6ctricas o muerte.
• Sollclte a un electrlclsta callficado que controle la tome de
corrlente y el clrculto el_ctrlco pare asegurarse de que la
tome de corrlente est6 correctamente canecfada a tlerra.
Si no se cumple con esta advertencia se podr6n producir
lesiones graves, incendios, descargas el6ctricas o muerte.
* Si 6nlcamente se dlspone de una tome de corrlente de
2 clavljas, ser6 responsabffldad y obllgaci6n suya sustltulrlo par
otra de 3 clavljas, de conexi6n a tlerra, y adecuada pare este
usa. Si no se cumple con esta advertencia se podr6n producir
lesiones graves, incendios, descargas el6ctricas o muerte.
" No instalar sabre alfombra. Instale la lavadora sabre plso
Nrme. Si no se cumple con esta advertencia, se podr6n
producir da_os par filtraciones.
" No ellmlne el cable de canexi6n a tlerra. No use un
adaptador o prolongador. Enchufe en una tome de carrlente
con conexi6n a tlerra de 3 clavljas. Si no se cumple con estas
advertencJas se podr6n producir lesiones graves, incendios,
descargas el6ctricas o muerte.
" La lavadora deberia ester slempre conectada a un enchufe
individual con un indlce de voltaje equlvalente al que figure
en su etlqueta de caracteristlcas t_cnlcas. Esto garantiza el
mejor funcionamiento y adem6s previene la sobrecarga de
los circuitos del hogar, Io cual podrfa ocasionar riesgos de
incendio debido al recalentamiento de cables.
* Nunca desenchufe su lavadora jalando del cable de
corrlente. Siempre tome su enchufe firmemente y ja[e del
mJsmo hacia fuera pare retirado. Si no se cumple con esta
advertencia se podr6n producir lesiones graves, incendios,
descargas el6ctricas o muerte.
®Repare o reemplace de inmedlato todos los cables de corrlente
pelados o con cualquler tlpo de da_o. No use un cable con
cortaduras o abrasi6n sabre su extensi6n o extremos. Consulte a
una persona calificada del servicio t6cnico. Si no se cumpie con
esta advertencia, se podr6n producir lesiones graves, incendios,
descargas el6ctricas o muerte.
* AI instalar o camblar de lugar la lavadora, evlte todo tlpo de
cortes u arras da_os en el cable de corrlente. Si no se cumple
con esta advertencia, se podr6n producir lesiones graves,
incendios, descargas el6ctricas o muerte.
®La lavadora debeser instalada y conectada a tlerra par
una persona especlallzada del servlclo t_cnlco cumpllenda
con los c6dlgos locales pare prevenir riesgos de descargas
y asegurar la estabilidad durante el funcionamiento.
®La lavadora es pesada. Se necesltan dos o m6s personas
pare instalar y trasladar el electrodom_stlco. Si no se cumple
esta advertencia, se podr6n producir da_os en la propiedad
y graves lesiones personales.
®No almacene nl instale la lavadora en lugares expuestos
a temperatures de congelaci6n nl a inclemenclas
meteorol6glcas. Si no se cumple con esta advertencia, se
podr6n producir da_os par filtraciones.
" Con el fin de reduclr el rlesgo de descargas el_ctrlcas no
instale la lavadora en espaclos hOmedos. Si no se cumple
con esta advertencia, se podr6n producir lesiones graves,
incendios, descargas el6ctricas o muerte.
• Nunca intente utilizer este electromodomestico si esta danado,
tiene una falla, esta parcialmente desarmado, tiene partes
danadas ole faltan partes, incluido un cable o un enchufe
danado.
• Pare minimizer la posibilidad de que ocurra una descarga
electrica, antes de reaNzar cualquier tarea de mantenimiento
o limpieza desconecte este electrodomestico del suministro
electrico o desconecte la lavadora del panel de distribucion
de la case quitando el fusible o desconectando el disyuntor.
37
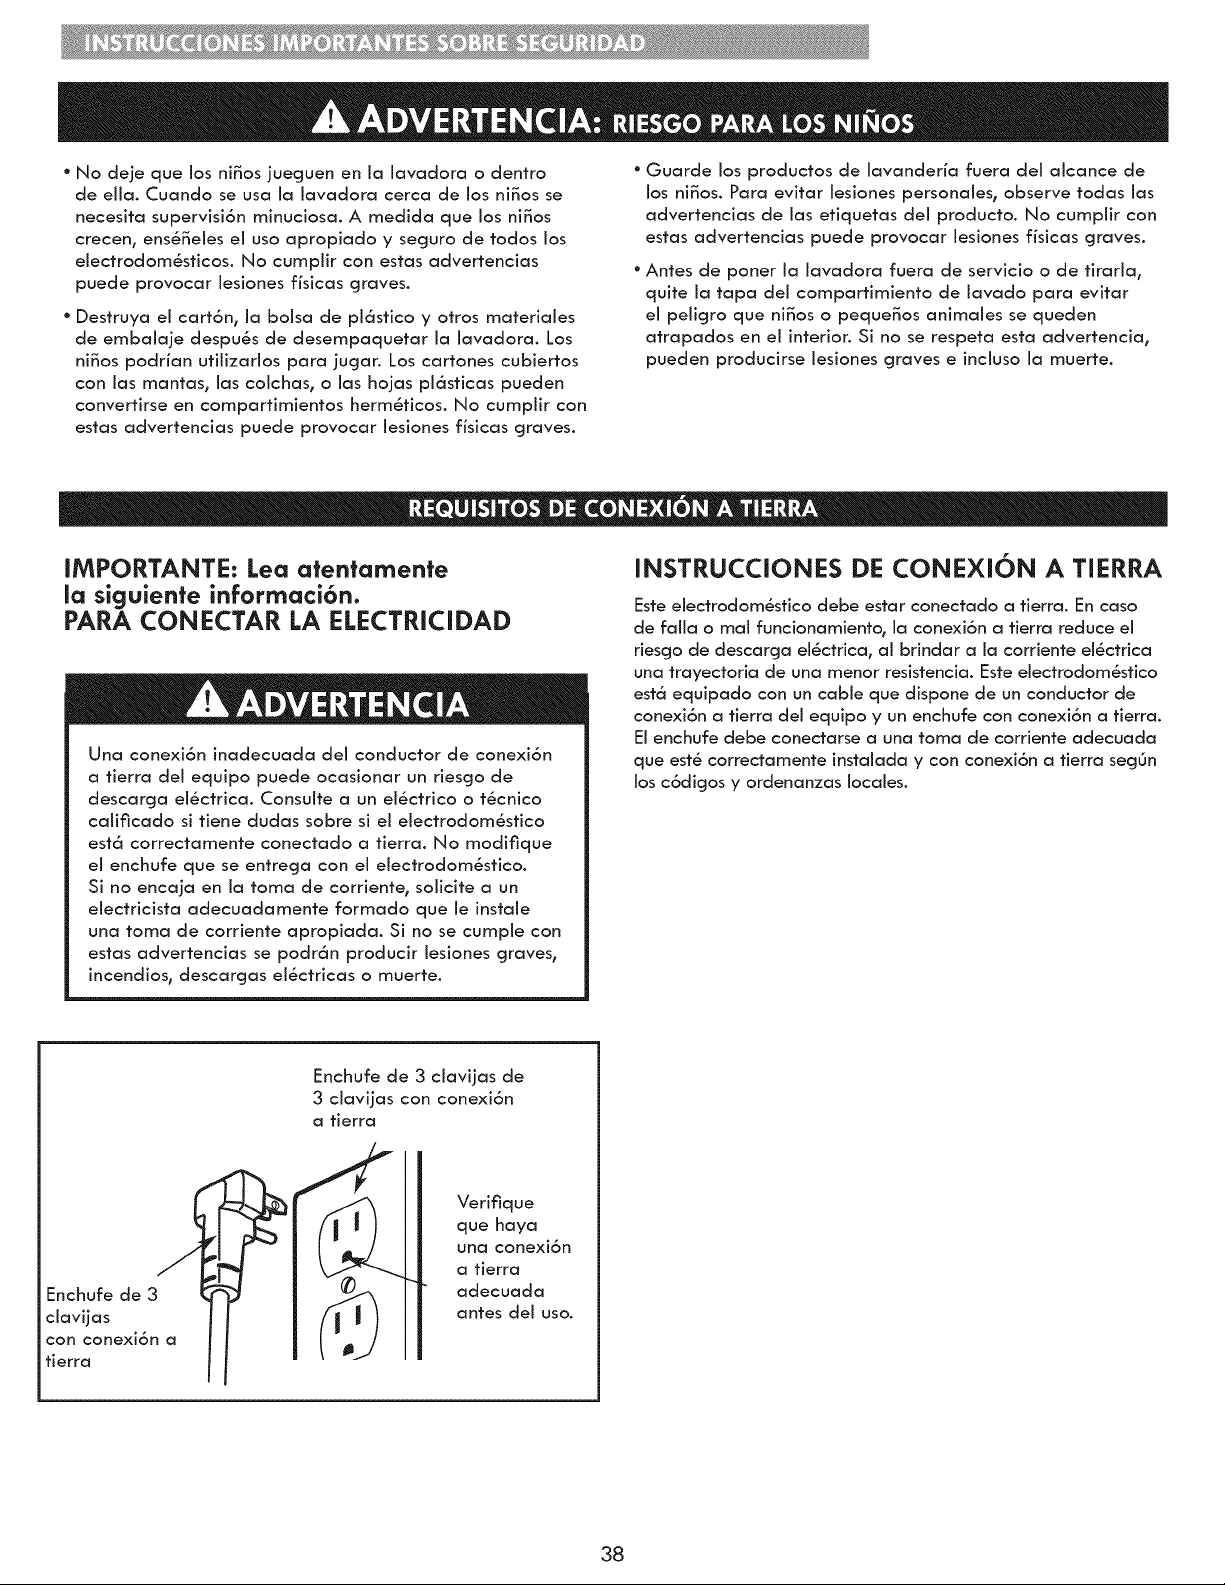
° No deje que Jos ni_os juecjuen en ia iavadora o dentro
de ella. Cuando se usa ia iavadora cerca de los ni_os se
necesita supervisi6n minuciosa. A medida que los ni_os
crecen, ens6_eies ei uso apropiado y secjuro de todos los
electrodom6sticos. No cumpiir con estas advertencias
puede provocar iesiones fisicas graves.
° Destruya ei cart6n, la bolsa de pi6stico y otros materiaies
de embalaje despu_s de desempaquetar la lavadora. Los
ni_os podrian utilizarios para jucjar. Los cartones cubiertos
con ias mantas, ias coichas, o ias hojas pl6sticas pueden
convertirse en compartimientos hermSticos. No cumpiir con
estas advertencias puede provocar iesiones fisicas graves.
° Guarde los productos de lavanderia fuera del alcance de
los ni_os. Para evitar iesiones personales, observe todas ias
advertencias de ias etiquetas del producto. No cumpiir con
estas advertencias puede provocar iesiones fisicas graves.
° Antes de poner la lavadora fuera de servicio o de tiraria,
quite ia tapa dei compartimiento de iavado para evitar
ei pelicjro que ni_os o peque_os animales se queden
atrapados en ei interior. Si no se respeta esta advertencia,
pueden producirse iesiones graves e inciuso ia muerte.
IMPORTANTE: Lea atentamente
la siguiente informaci6n.
PARA CONECTAR LA ELECTRICIDAD
Una conexi6n inadecuada dei conductor de conexi6n
a tierra dei equipo puede ocasionar un riescjo de
descarcja ei_ctrica. Consuite a un ei_ctrico o t_cnico
calificado si tiene dudas sobre si ei eiectrodomSstico
est6 correctamente conectado a tierra. No modifique
el enchufe que se entrecja con ei electrodomSstico.
Si no encaja en ia toma de corriente, solicite a un
eiectricista adecuadamente formado que le instaie
una toma de corriente apropiada. Si no se cumpie con
estas advertencias se podr6n producir iesiones cjraves,
incendios, descarcjas eiSctricas o muerte.
INSTRUCCIONES DE CONEXION A TIERRA
Este electrodom_stico debe estar conectado a tierra. En caso
de faiia o mai funcionamiento, ia conexi6n a tierra reduce ei
riescjo de descarcja eiSctrica, ai brindar a ia corriente elSctrica
una trayectoria de una menor resistencia. Este eiectrodom6stico
est6 equipado con un cable que dispone de un conductor de
conexi6n a tierra del equipo y un enchufe con conexi6n a tierra.
Ei enchufe debe conectarse a una toma de corriente adecuada
que est_ correctamente instaiada y con conexi6n a tierra secjOn
los c6dicjos y ordenanzas locales.
Enchufe de 3
claviias
con conexi6n a
tierra
Enchufe de 3 ciaviias de
3 ciaviias con conexi6n
a tierra
Verifique
que haya
una conexi6n
a tierra
adecuada
antes del uso.
38
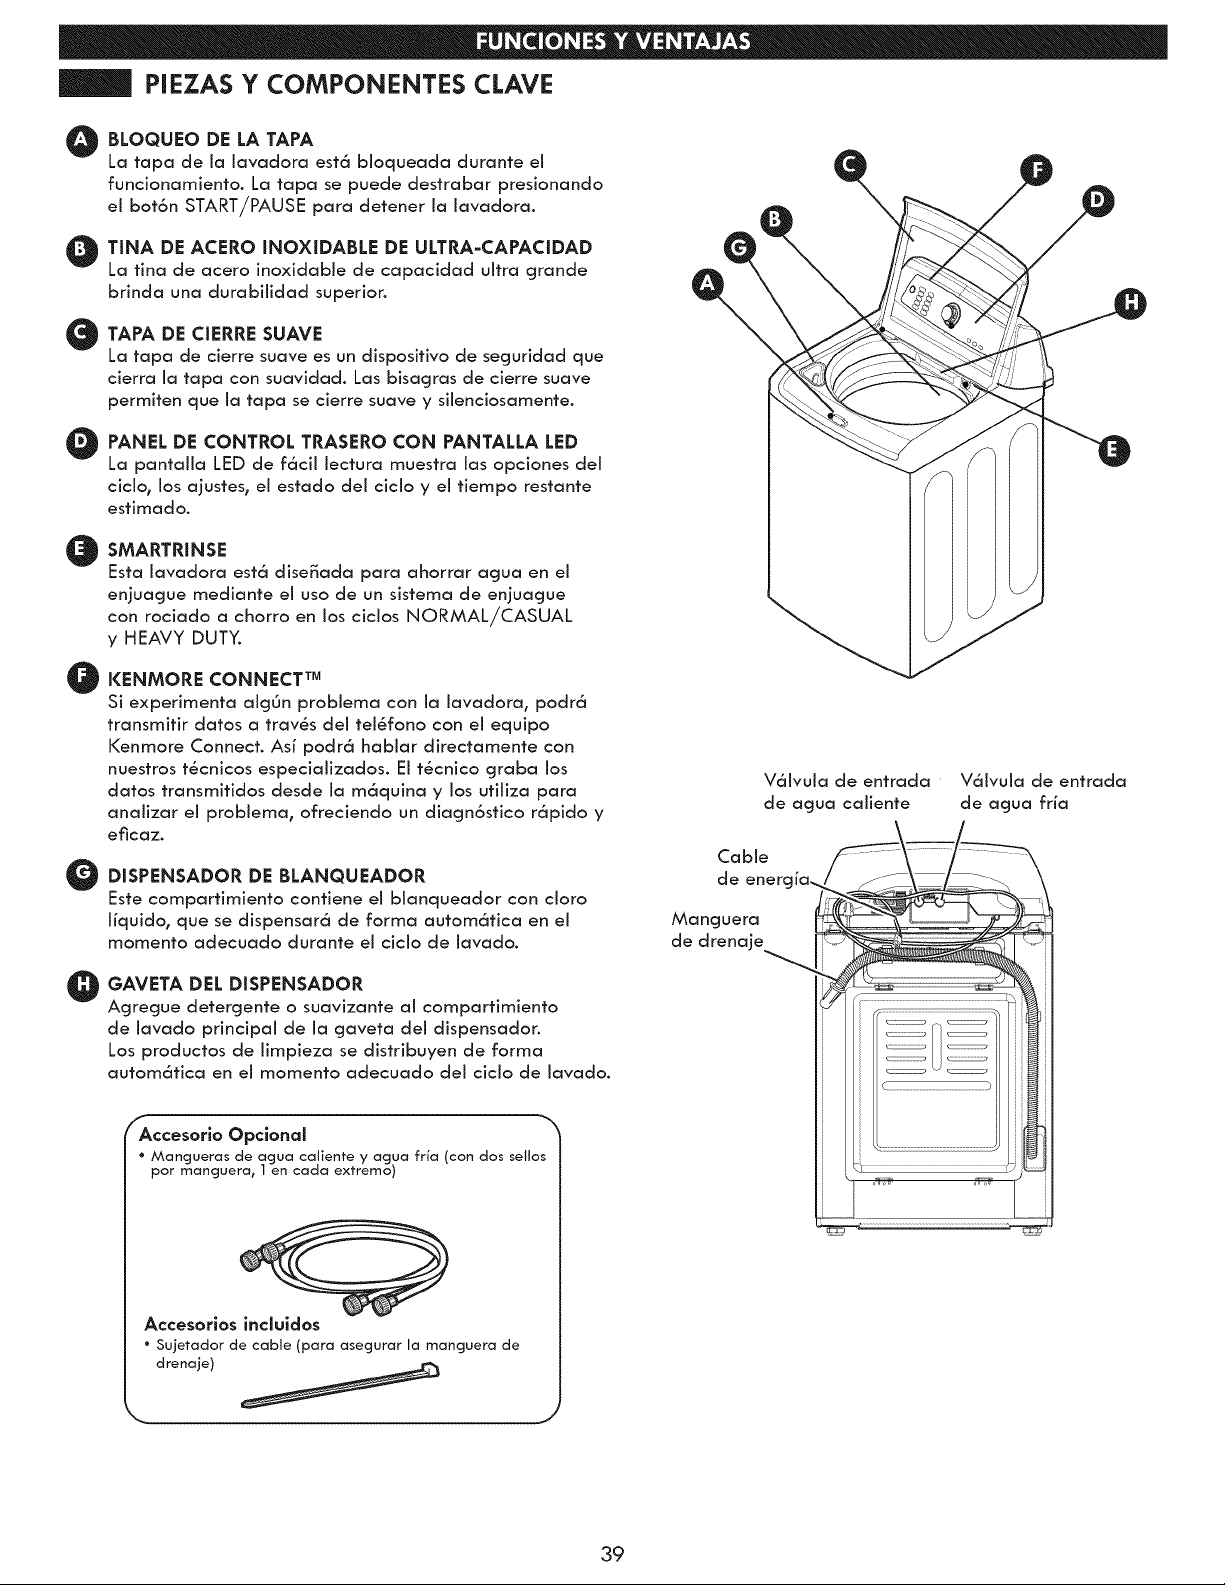
PIEZA$ Y COMPONENTE$ CLAVE
O
BLOQUEO DE LA TAPA
La tapa de ia iavadora est6 bioqueada durante ei
funcionamiento. La tapa se puede destrabar presionando
ei bot6n START/PAUSE para detener ia iavadora.
TINA DE ACERO INOXIDABLE DE ULTRA=CAPACIDAD
La tina de acero inoxidable de capacidad ultra cjrande
brinda una durabilidad superior.
@
@
@
@
O
O
TAPA DE CIERRE SUAVE
La tapa de cierre suave es un dispositivo de seguridad que
cierra ia tapa con suavidad. Las bisacjras de cierre suave
permiten que ia tapa se cierre suave y silenciosamente.
PANEL DE CONTROL TRASERO CON PANTALLA LED
La pantaiia LED de f6cii lectura muestra ias opciones dei
cicio, los ajustes, ei estado dei cicio y ei tiempo restante
estimado.
SMARTRINSE
Esta iavadora est6 diseKada para ahorrar agua en ei
enjuague rnediante el uso de un sistema de enjuague
con rociado a chorro en los cicios NORMAL/CASUAL
y HEAVY DUTY.
KENMORE CONNECT TM
Si experimenta aigOn probiema con ia iavadora_ podr6
transmitir datos a travSs dei teiSfono con ei equipo
Kenmore Connect. Asi podr6 habiar directamente con
nuestros tScnicos especializados. Ei tScnico graba los
datos transmitidos desde ia m6quina y los utiiiza para
anaiizar ei probiema, ofreciendo un diagn6stico r6pido y
eficaz.
DISPENSADOR DE BLANQUEADOR
Este compartimiento contiene el blanqueador con clara
liquido, que se dispensar6 de forma autom6tica en el
momento adecuado durante el ciclo de lavado.
GAVETA DEL DISPENSADOR
Agregue detergente o suavizante al comloartimiento
de lavado principal de la gaveta del dispensador.
Los productos de limloieza se distribuyen de forma
autom6fica en el momento adecuado del ciclo de lavado.
V61vula de entrada
de acjua caliente
Cable
de enercjia...
Mancjuera
de drenaje
V61vula de entrada
de agua fria
r
Accesorlo Opclonal
* Mangueras de agua catiente y acjua frfa (con dos setlos
pot mancjuera, 1 en cada extremo)
Accesorlos incluldos
* Sujetador de cable (para asecjurar la mancjuera de
drenaje) _
39
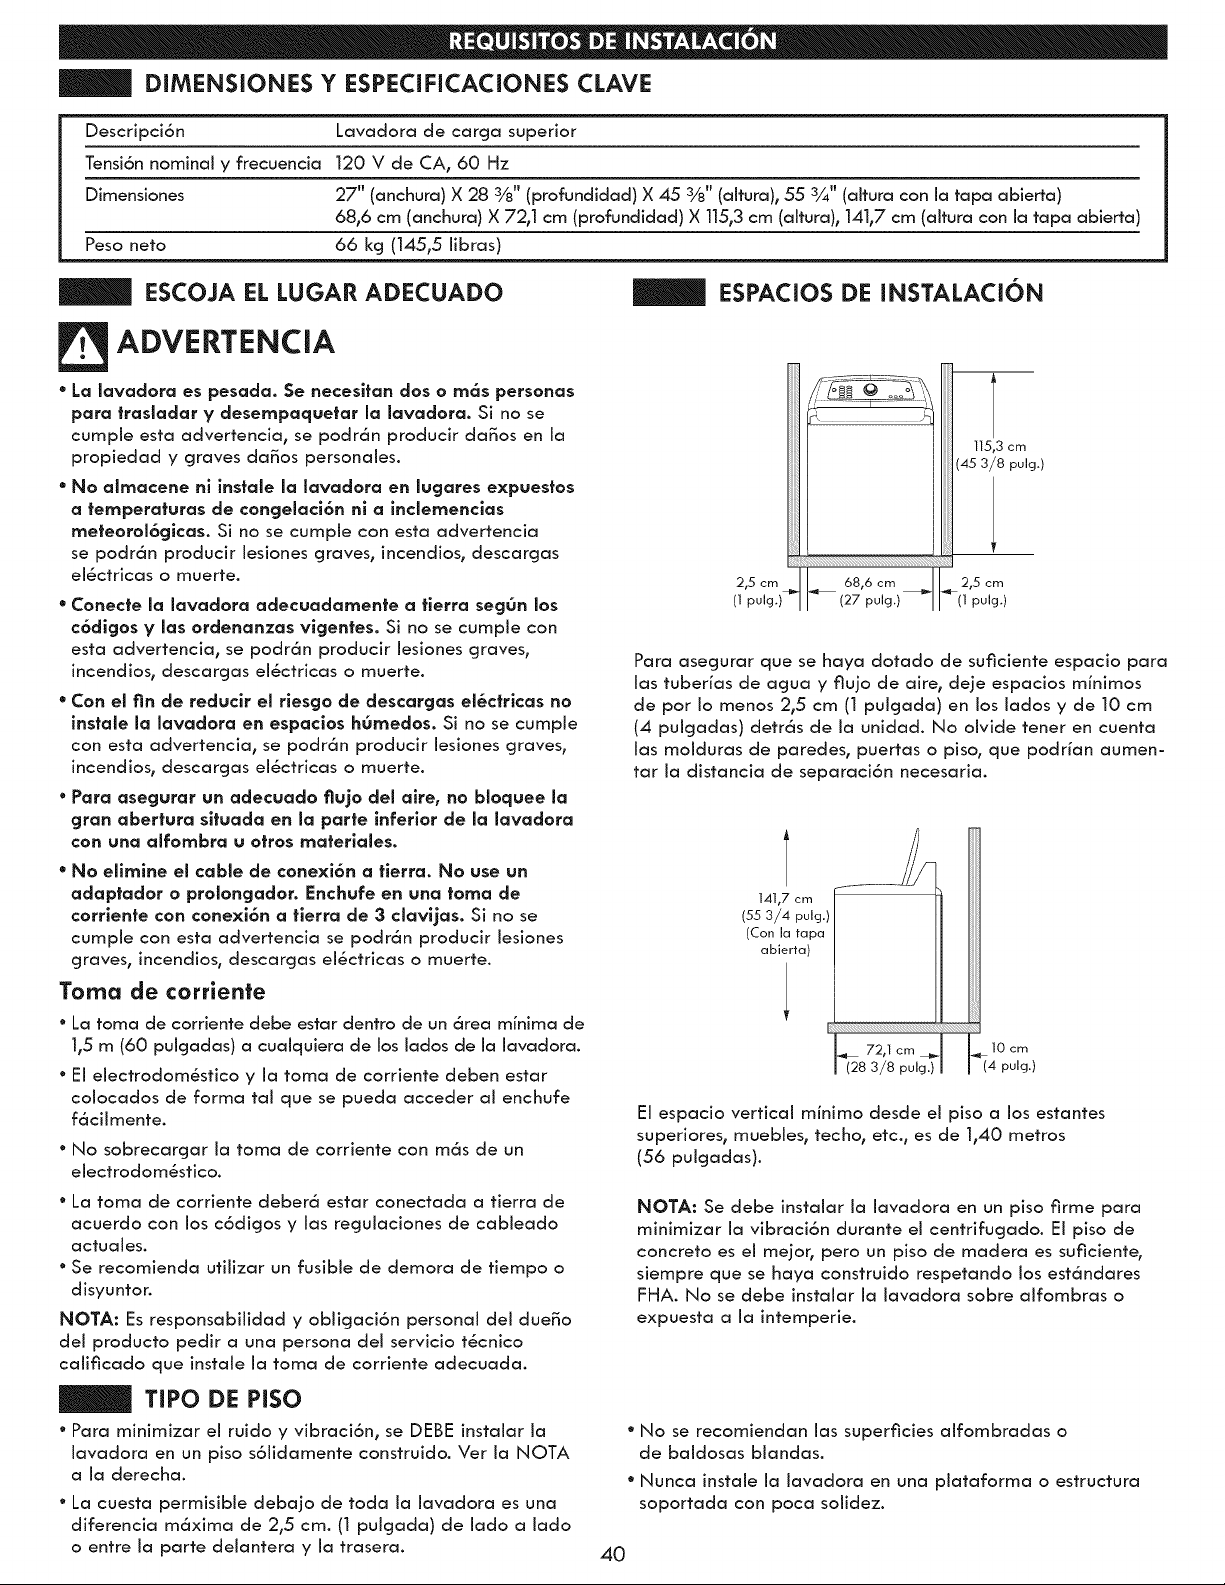
DiMENSIONES Y ESPECIFiCACIONES CLAVE
Descripci6n Lavadora de carcja superior
Tensi6n nominal y frecuencia 120 V de CA, 60 Hz
Dimensiones 27" (anchura) X 28 3/8" (profundidad) X 45 3/8" (aitura), 55 3¼" (aitura con ia tapa abierta)
68,6 cm (anchura) X 72,1 cm (profundidad) X 115,3 cm (aitura), 141,7 cm (aitura con ia tapa abierta)
Peso nero 66 kcj (145,5 iibras)
ESCOJA EL LUGAR ADECUADO ESPACIOS DE INSTALACION
ADVERTENCIA
* La Javadora es pesada. Se necesltan dos o mc_spersonas
para trasJadar ¥ desempaquetar la lavadora. Si no se
cumpie esta advertencia, se podr6n producir da_os en ia
propiedad y cjraves da_os personales.
* No aJmacene ni instale la lavadora en Jugares expuestos
a temperaturas de congelaci6n nl a inclemenclas
meteorol6glcaso Si no se cumpie con esta advertencia
se podr6n producir lesiones cjraves, incendios, descarcjas
el6ctricas o muerte.
* Conecte la lavadora adecuadamente a tlerra segOn los
c6dlgos y las ordenanzas vlgentes. Si no se cumpie con
esta advertencia, se podr6n producir lesiones cjraves,
incendios, descarcjas el6ctricas o muerte.
* Con el fin de redvclr el rlesgo de descargas el6ctrlcas no
instale la Javadora en espaclos h_medos. Si no se cumpie
con esta advertencia, se podr6n producir iesiones cjraves,
incendios, descarcjas ei6ctricas o muerte.
" Para asegurar un adecuado flujo del alre, no bloquee la
gran abertura sltuada en la parte inferior de la Javadora
con una alfombra u otros materlales.
* No ellmlne el cable de conexi6n a tlerra. No use un
adaptador o prolongador. Enchufe en vna toma de
corrlente con conexi6n a fierra de 3 davljas. Si no se
cumpie con esta advertencia se podr6n producir iesiones
cjraves, incendios, descarcjas ei6ctricas o muerte.
Torna de corriente
° La toma de corriente debe estar dentro de un 6rea minima de
1,5 m (60 pulcjadas) a cualquiera de los lados de la lavadora.
° El electrodom6stico y la toma de corriente deben estar
colocados de forma tal que se pueda acceder al enchufe
f6ciimente.
° No sobrecarcjar ia toma de corriente con m6s de un
electrodom6stico.
° La toma de corriente deber6 estar conectada a tierra de
acuerdo con los c6dicjos y las recjulaciones de cableado
actuales.
° Se recomienda utiiizar un fusible de demora de tiempo o
disyuntor.
NOTA: Es responsabilidad y oblicjaci6n personal del due_o
dei producto pedir a una persona del servicio t6cnico
calificado que instaie ia toma de corriente adecuada.
TIPO DE PISO
° Para minimizar ei ruido y vibraci6n, se DEBE instaiar la
iavadora en un piso s6iidamente construido. Ver ia NOTA
a la derecha.
° La cuesta permisibie debajo de toda ia lavadora es una
diferencia m6xima de 2,5 cm. (1 puJcjada) de lado a lado
o entre ia parte deiantera y ia trasera.
215 cm / / 6816 cm
(1pulg.l_lI_ (2zpulg.l
115,3 ¢m
(45 3/8 pulg.)
215 ¢m
_(1 pulg.)
Para asecjurar que se haya dorado de suficiente espacio para
las tuberias de acjua y fiujo de aire, deje espacios minimos
de por Io menos 2,5 cm (1 puicjada) en los lados y de 10 cm
(4 puicjadas) detr6s de la unidad. No oivide tener en cuenta
ias moiduras de paredes, puertas o piso, que podrian aumen-
tar la distancia de separaci6n necesaria.
1
141,7 cm
(55 3/4 pulg.)
(Con la tapa
abierta)
72,1 cm _..
(28 3/8 pulg.)
10 cm
_(4 pulg.)
EI espacio vertical minimo desde ei piso a los estantes
superiores, muebies, techo, etc., es de 1,40 metros
(56 puicjadas ).
NOTA: Se debe instaiar la iavadora en un piso firme para
minimizar ia vibraci6n durante el centrifucjado. El piso de
concreto es el mejor, pero un piso de madera es suficiente,
siempre que se haya construido respetando los est6ndares
FHA. No se debe instalar la lavadora sobre aifombras o
expuesta a la intemperie.
° No se recomiendan ias superficies aifombradas o
de baidosas biandas.
° Nunca instaie la lavadora en una plataforma o estructura
soportada con poca solidez.
40
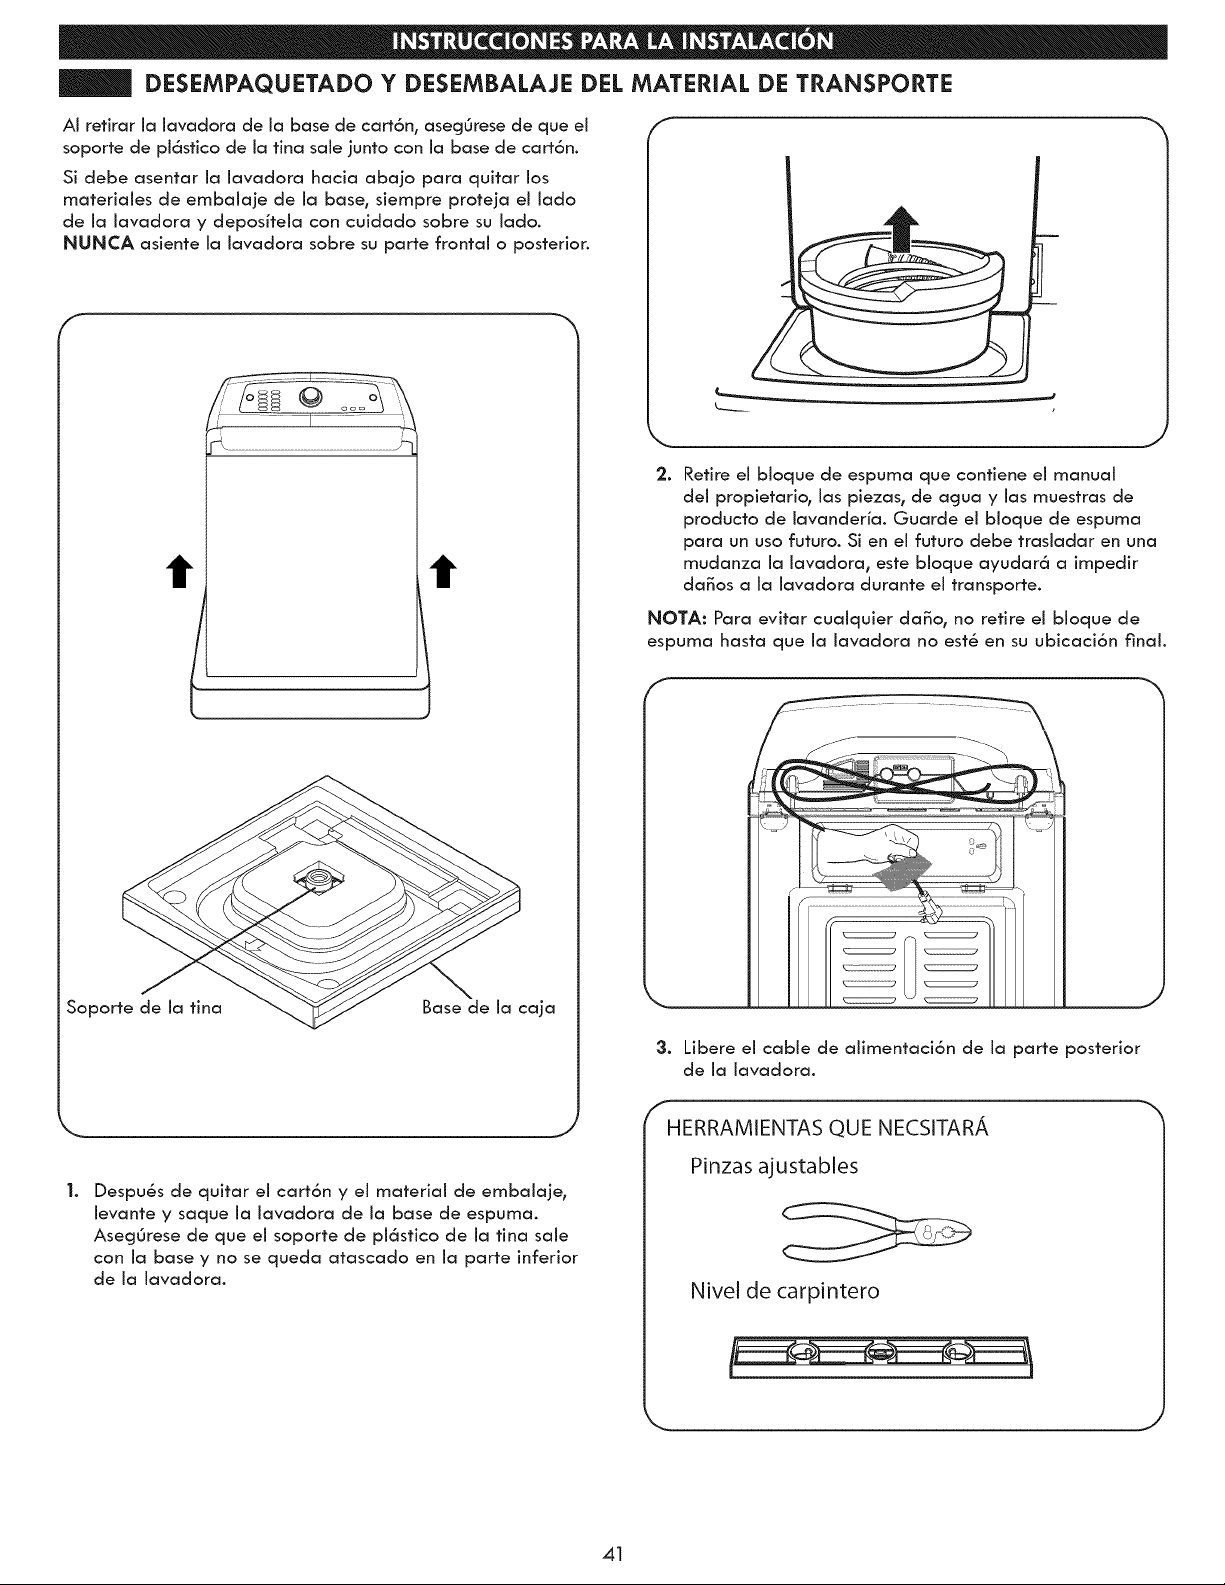
DESEMPAQUETADO Y DESEMBALAJE DEL MATERIAL DE TRANSPORTE
AI retirar ia iavadora de ia base de cart6n, aseg0rese de que el
soporte de pi6stico de ia tina sale junto con ia base de cart6n.
Si debe asentar ia iavadora hacia abajo para quitar los
materiales de embalaje de la base, siempre proteja el lado
de la lavadora y depositela con cuidado sobre su lado.
NUNCA asiente ia iavadora sobre su parte frontal o posterior.
tt
Soporte de la tina Base de ia caja
J
2. Retire ei bloque de espuma que contiene ei manual
dei propietario, ias piezas, de acjua y ias muestras de
producto de lavanderia. Guarde el bioque de espuma
para un uso futuro. Si en ei futuro debe trasiadar en una
mudanza ia iavadora, este bloque ayudar6 a impedir
da_os a ia iavadora durante ei transporte.
NOTA: Para evitar cuaiquier daSo, no retire ei bioque de
espuma hasta que ia iavadora no est8 en su ubicaci6n final.
f
Libere ei cable de aiimentaci6n de ia parte posterior
de la lavadora.
Despu_s de quitar el cart6n y el material de embalaje,
ievante y saque ia iavadora de ia base de espuma.
Aseg0rese de que ei soporte de pl6stico de ia tina sale
con ia base y no se queda atascado en ia parte inferior
de la lavadora.
fHERRAMIENTAS QUE NECSITARA
Pinzas ajustables
Nivel de carpintero
\
41
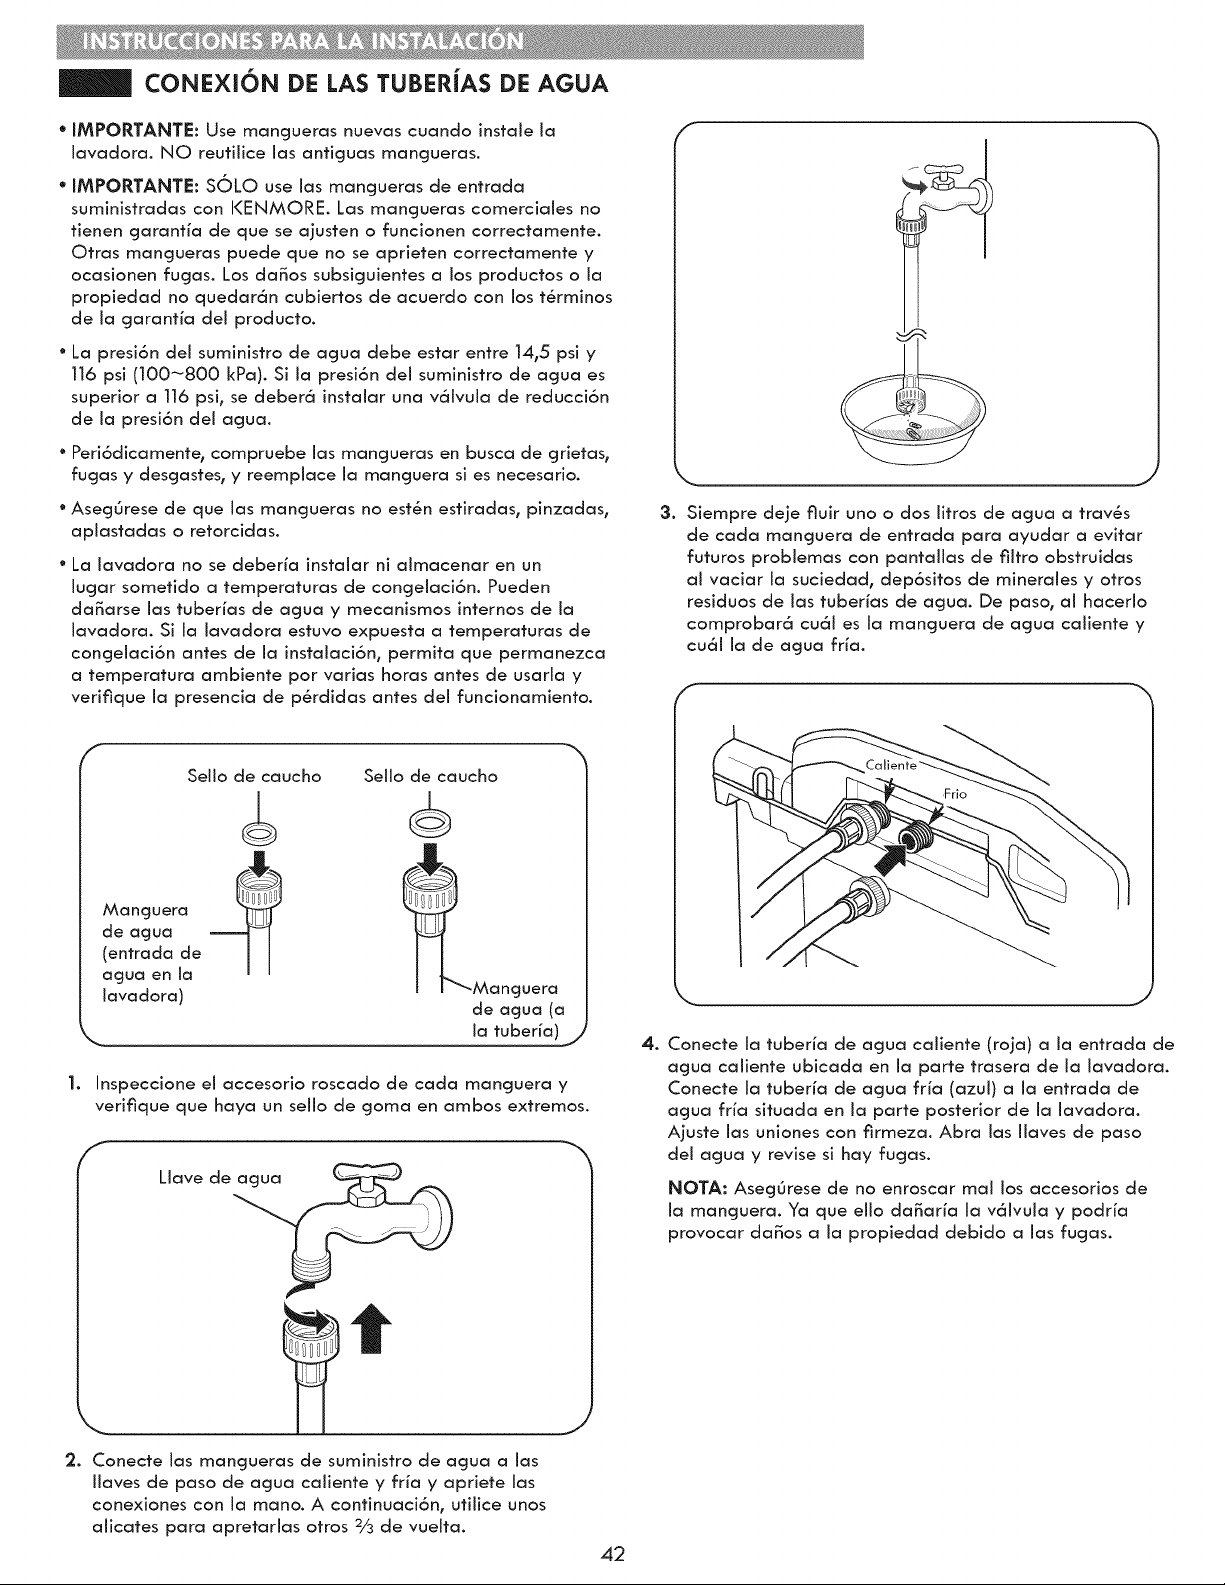
CONEXION DE LAS TUBERiAS DE AGUA
* IMPORTANTE: Use mangueras nuevas cuando instale ia
lavadora. NO reufilice las anticjuas mangueras.
* IMPORTANTE: SOLO use las mancjueras de entrada
suministradas con KENMORE. Las rnancjueras comerciales no
fienen cjaranfia de que se aiusten o funcionen correctamente.
Otras mancjueras puede que no se aprieten correctamente y
ocasionen fucjas. Los da_os subsiguientes a los productos o la
propiedad no quedar6n cubiertos de acuerdo con los t6rminos
de la cjaranfia del producto.
° La presi6n dei suministro de acjua debe estar entre 14,5 psi y
116 psi (100-800 kPa). Si la presi6n del suministro de acjua es
superior a 116 psi, se deber6 instalar una v61vula de reducci6n
de la presi6n del acjua.
° Peri6dicamente, compruebe ias mangueras en busca de grietas,
fugas y desgastes, y reempiace ia manguera si es necesario.
* Aseg0rese de que ias mangueras no est6n estiradas, pinzadas,
apiastadas o retorcidas.
* La iavadora no se deberia instalar ni aimacenar en un
iugar sometido a temperaturas de congelaci6n. Pueden
da_arse ias tuberias de agua y mecanismos infernos de ia
iavadora. Si ia iavadora estuvo expuesta a temperaturas de
congeiaci6n antes de ia instalaci6n, permita que permanezca
a temperatura ambiente por varias horas antes de usaria y
verifique ia presencia de p6rdidas antes dei funcionamiento.
'_ _;_iii_!! !ii!iliiiiiiiiili!i!i_;'
\ J
3. Siempre deje fluir uno o dos iitros de agua a trav_s
de cada mancjuera de entrada para ayudar a evitar
futuros probiemas con pantallas de filtro obstruidas
al vaciar la suciedad, dep6sitos de minerales y otros
residuos de las tuberias de acjua. De paso, al hacerlo
comprobar6 cu61 es la mancjuera de acjua caliente y
cu61 la de acjua fria.
f
1,
,
Manguera
de agua
(entrada de
agua en la
lavadora)
Sel[o de caucho Se[lo de caucho
_Manguera
de agua (a
Inspeccione ei accesorio roscado de cada manguera y
verifique que haya un sello de cjoma en ambos extremos.
f
Liave de_
.1
Conecte las mangueras de suministro de agua a las
iiaves de paso de agua caliente y fria y apriete ias
conexiones con ia mano. A continuaci6n, utiiice unos
alicates para apretarias otros 2/3 de vueita.
4. Conecte la tuberia de agua caiiente (roja) a la entrada de
acjua caJiente ubicada en la parte trasera de la lavadora.
Conecte la tuberia de acjua fria (azui) a la entrada de
acjua fria situada en la parte posterior de la lavadora.
Ajuste las uniones con firmeza. Abra las llaves de paso
del acjua y revise si hay fucjas.
NOTA: Aseg0rese de no enroscar mai los accesorios de
ia manguera. Ya que elio daSaria ia v61vula y podria
provocar da_os a la propiedad debido alas fugas.
42
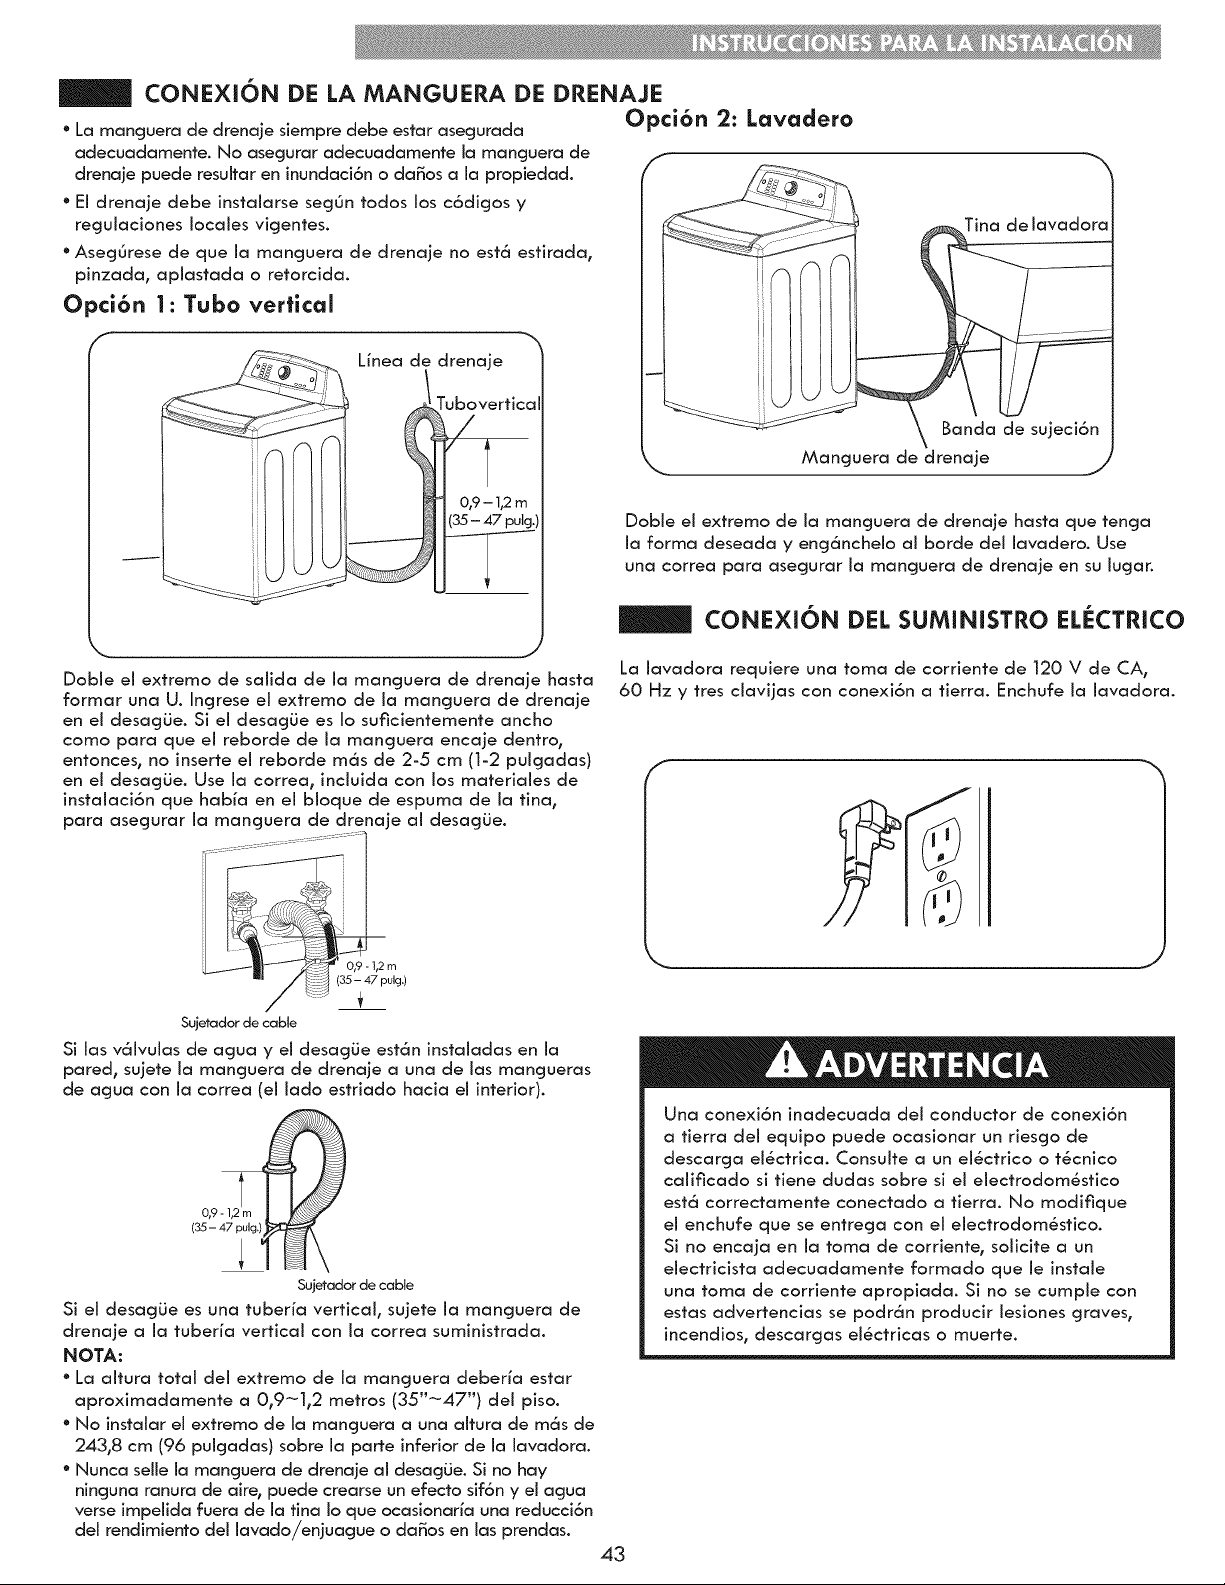
CONEXION DE LA MANGUERA DE DRENAJE
• La manguera de drenaje siempre debe estar asegurada Opci6n 2: Lavadero
adecuadamente. No asegurar adecuadamente la mancjuera de
drenaje puede resuitar en inundaci6n o da_os a ia propiedad.
° Ei drenaje debe instaiarse segOn todos los c6digos y
recjulaciones locales vigentes.
° AsegOrese de que ia manguera de drenaje no est6 estirada,
pinzada, apiastada o retorcida.
Opci6n 1: Tubo vertical
Linea de drenaje
I
I
II
Manguera de drenaje
Dobie ei extremo de ia manguera de drenaje hasta que tenga
ia forma deseada y eng6nchelo ai borde dei iavadero. Use
una correa para asegurar ia manguera de drenaje en su iugar.
CONE×ION DEL SUMINISTRO EL_:CTRICO
Dobie el extremo de salida de la manguera de drenaje hasta
formar una U. Ingrese el extremo de la mancjuera de drenaje
en ei desagiJe. Si ei desagLie es io suficientemente ancho
como para que el reborde de la manguera encaje dentro,
entonces, no inserte ei reborde m6s de 2-5 cm (1-2 puigadas)
en ei desagLie. Use ia correa, inciuida con los materiaies de
instaiaci6n que habia en ei bioque de espuma de la tina,
para asegurar ia manguera de drenaje ai desagLie.
Sujetador de cable
Si las vdlvulas de agua y el desacjiJe estdn instaladas en la
pared, sujete ia manguera de drenaje a una de ias mangueras
de agua con ia correa ei iado estriado hacia ei interior).
0,9 - 1,2 m
(35 - 47 pulg.)
$
Sujetador de cable
Si el desagLie es una tuberia vertical, sujete la manguera de
drenaje a ia tuberia vertical con ia correa suministrada.
NOTA:
° La aitura total dei extremo de ia manguera deberia estar
aproximadamente a 0,9-1,2 metros (35"-47") dei piso.
° No instaiar el extremo de ia manguera a una aitura de m6s de
243,8 cm (96 puicjadas) sobre ia parte inferior de ia iavadora.
° Nunca selie ia manguera de drenaje al desacjiJe. Si no hay
ninguna ranura de aire, puede crearse un efecto sif6n y el agua
verse impeiida fuera de ia tina Io que ocasionaria una reducci6n
del rendimiento del lavado/enjuague o da_os en las prendas.
La lavadora requiere una toma de corriente de 120 V de CA,
60 Hz y tres ciavijas con conexi6n a tierra. Enchufe ia iavadora.
J
Una conexi6n inadecuada del conductor de conexi6n
a tierra dei equipo puede ocasionar un riesgo de
descarga ei_ctrica. Consuite a un ei_ctrico o t_cnico
calificado si tiene dudas sobre si ei eiectrodom6stico
est6 correctamente conectado a tierra. No modifique
el enchufe que se entrega con ei electrodom_stico.
Si no encaja en ia toma de corriente, solicite a un
eiectricista adecuadamente formado que le instaie
una toma de corriente apropiada. Si no se cumpie con
estas advertencias se podr6n producir iesiones graves,
incendios, descargas eiSctricas o muerte.
43
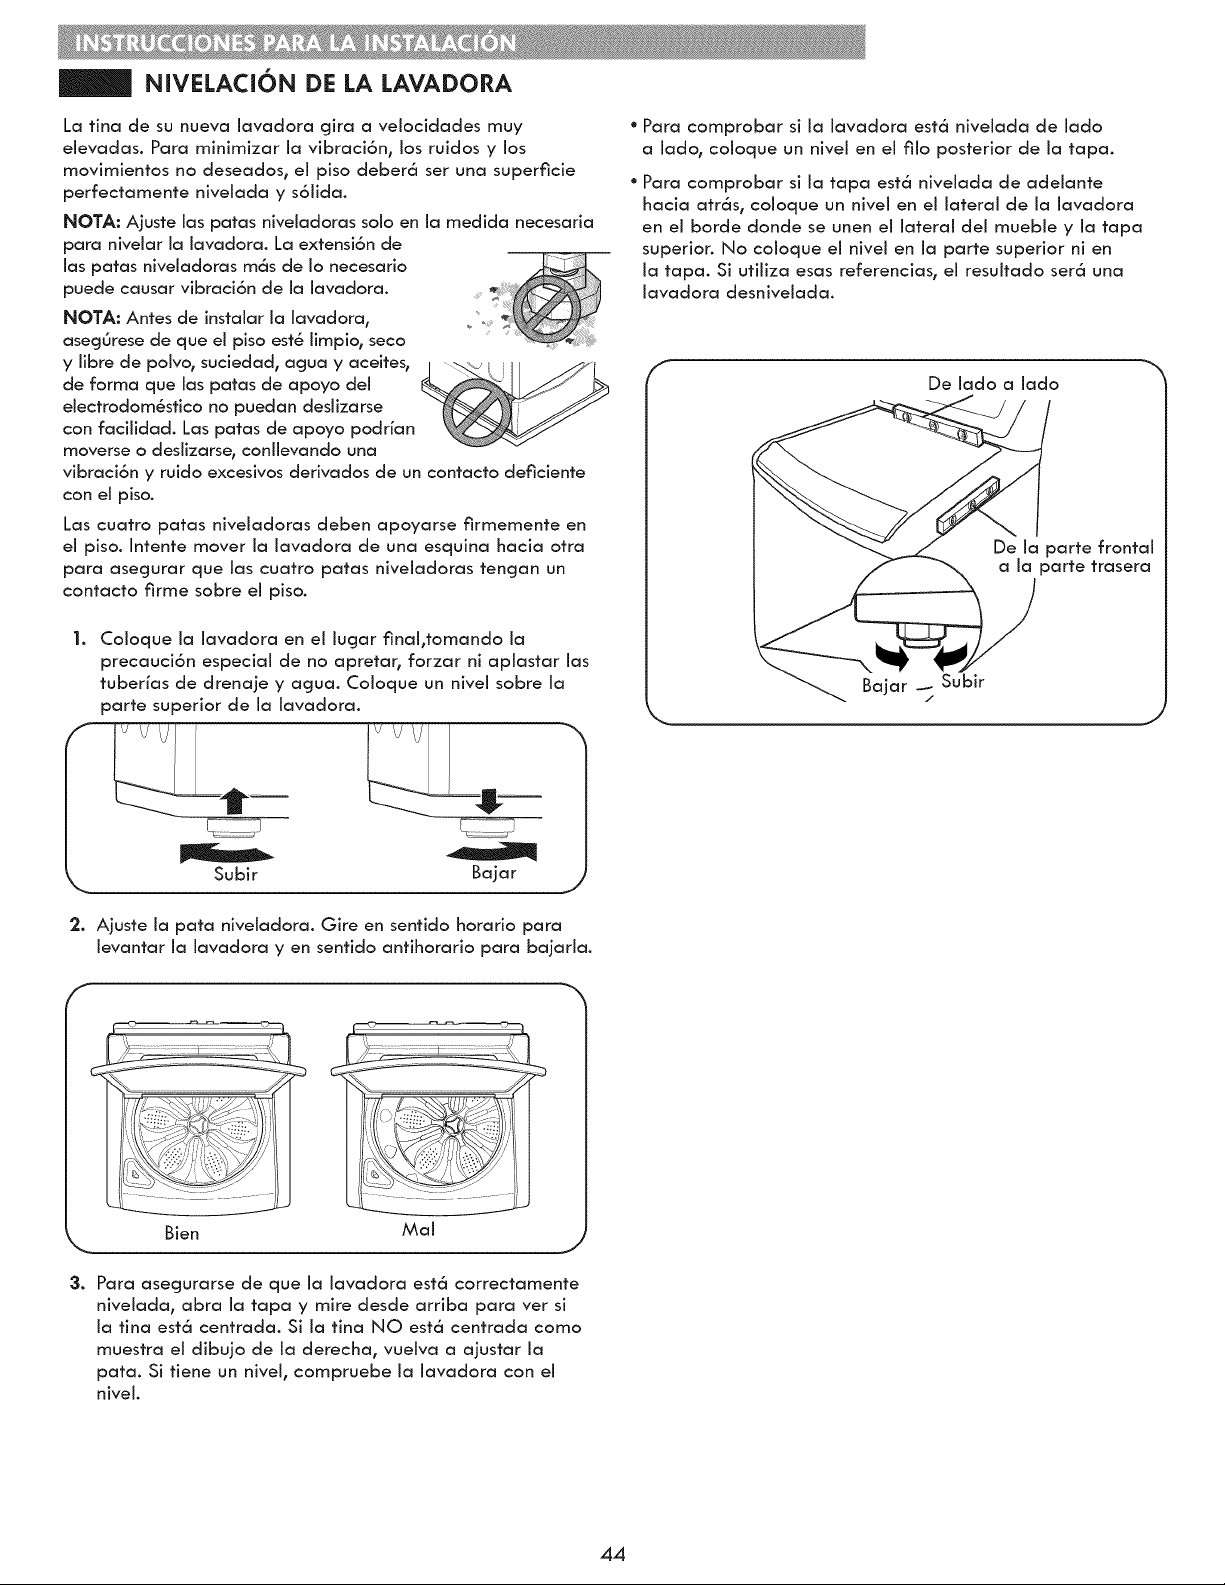
NiVELACION DE LA LAVADORA
La tina de su nueva lavadora cjira a velocidades muy
elevadas. Para minirnizar la vibraci6n, los ruidos y los
rnovimientos no deseados, el piso deber6 ser una superficie
perfectarnente nivelada y s61ida.
NOTA: Ajuste las patas niveladoras solo en la rnedida necesaria
para nivelar la lavadora. La extensi6n de
las patas niveladoras m6s de Io necesario
puede causar vibraci6n de la lavadora.
NOTA: Antes de instalar la lavadora,
asecj0rese de que el piso est_ limpio, seco
y libre de polvo0 suciedad, acjua y aceites0
de forrna que las patas de apoyo del
electrodorn_stico no puedan deslizarse
con facilidad. Las patas de apoyo podrian
rnoverse o deslizarse, conllevando una
vibraci6n y ruido excesivos derivados de un contacto deficiente
con el piso.
Las cuatro patas niveladoras deben apoyarse firrnernente en
el piso. Intente mover la lavadora de una esquina hacia otra
para asecjurar que las cuatro patas niveladoras tencjan un
contacto firrne sobre el piso.
1.
Subir
\
Coloque ia iavadora en ei lugar finai,tornando ia
precauci6n especial de no apretar, forzar ni aplastar ias
tuberias de drenaje y acjua. Coioque un nivei sobre ia
parte superior de ia iavadora.
Bajar
2. Ajuste ia pata niveiadora. Gire en sentido horario para
ievantar la lavadora yen sentido antihorario para bajaria.
f
° Para cornprobar si ia iavadora est6 niveiada de iado
a iado° coioque un nivei en ei filo posterior de ia tapa.
° Para comprobar si ia tapa est6 niveiada de adeiante
hacia atr6s, coloque un nivel en el lateral de la lavadora
en el borde donde se unen el lateral del rnuebie y la tapa
superior. No coloque el nivel en la parte superior ni en
la tapa. Si utiliza esas referencias, el resuitado ser6 una
lavadora desnivelada.
f
De lado a lado
De Ja parte frontal
a Ja parte trasera
Bajar _ Subir
J
\
3.
Bien Mal
Para asegurarse de que la lavadora est6 correctarnente
nivelada, abra la tapa y mire desde arriba para ver si
la tina est6 centrada. Si la tina NO est6 centrada corno
rnuestra el dibujo de la derecha, vuelva a ajustar la
pata. Si tiene un nivel° cornpruebe la lavadora con el
nivel.
44
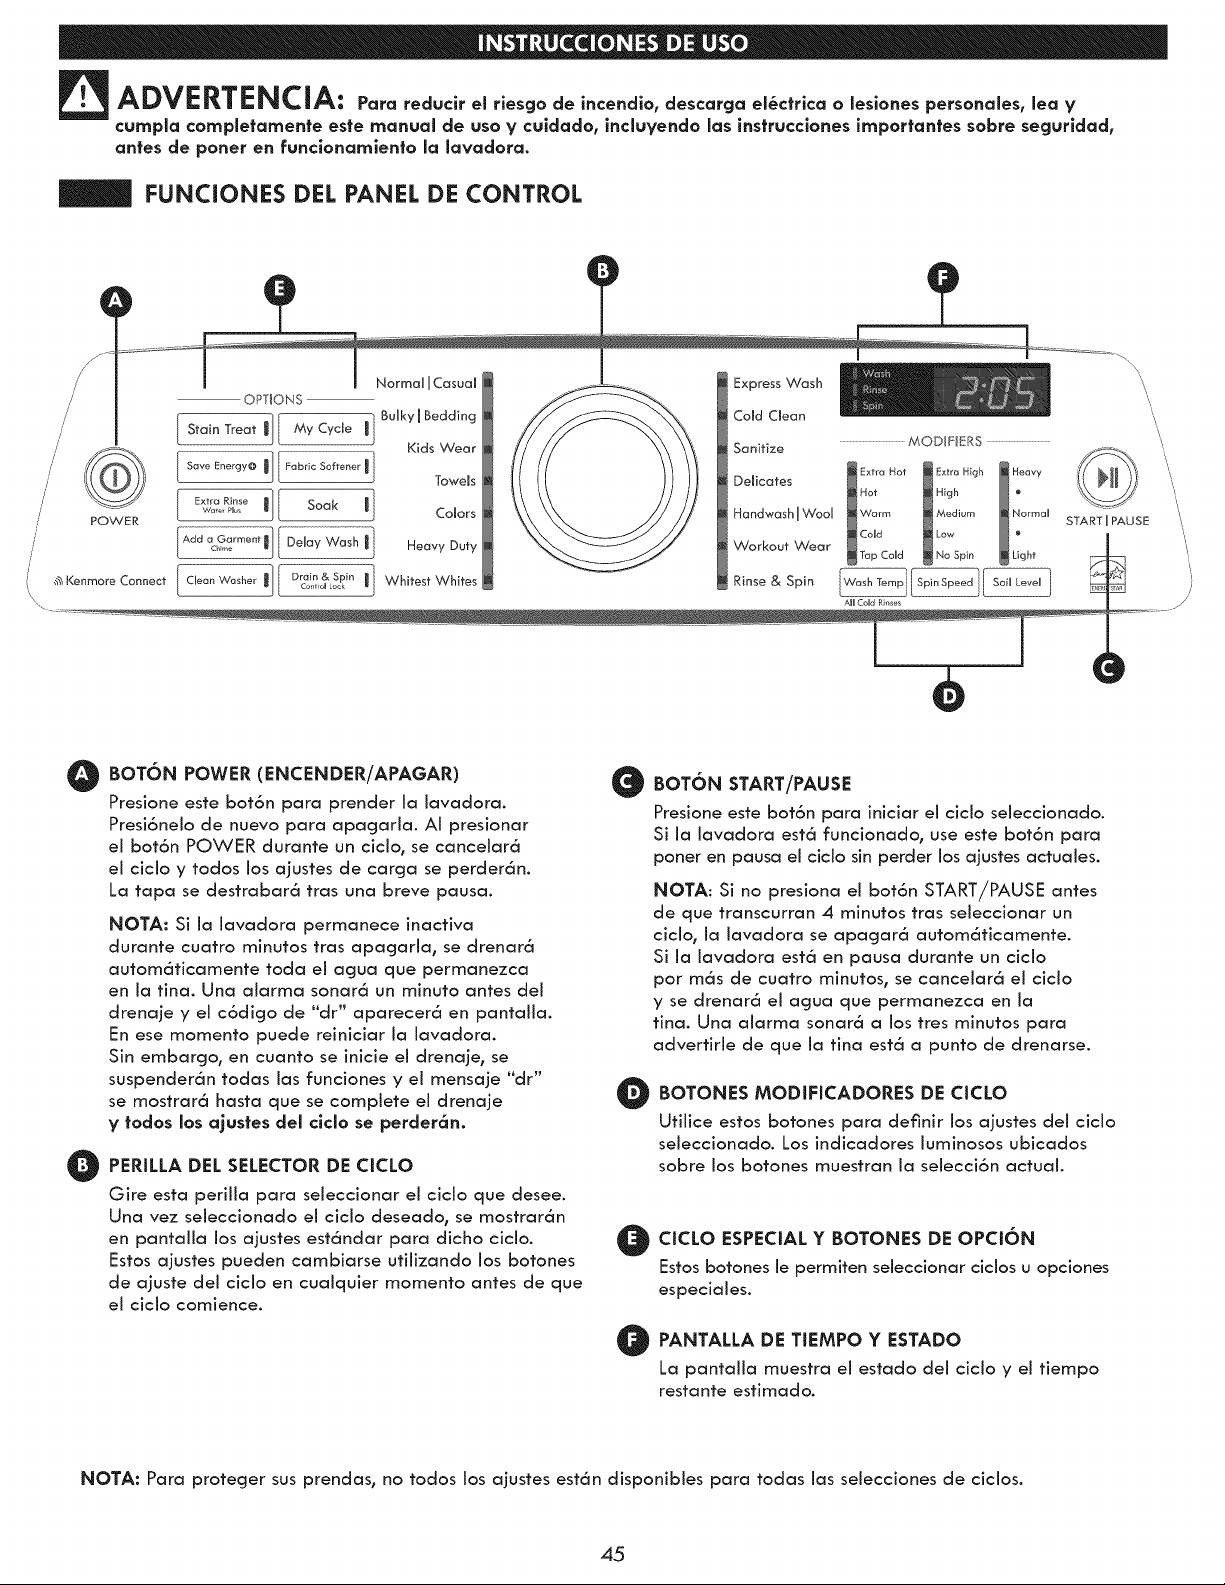
ADVERTENCIA: P=a educi el iesgadeincendJa,des =gael ¢t icaoleslanespe sanales,leaV
cumpJa completamente es|e manual de usa y culdado, incluyendo las instrucclones importantes sabre segurldad,
antes de poner en funclonamlento la lavadora.
FUNCIONES DEL PANEL DE CONTROL
POWER
OPTIONS
[Stain Treat_[ MyCycJe m BuHky,Bedding CoJdaean
MODIFIERS
[ Save Energy@ .i.-] Fabric Softener ..i. ] Kids WearTowems DeJicatesSanitize _E .... Hot _ Extra High _ H_eavy
EXtvrg_,_,n:e Soak J Colors Handwash IWad _ Warrn Medium _N .... "
Tap Cold No Spin Light
STARTIPAUSE
Add Dday !] Heavy Duty Workout Wear
Garment l'j
D
a
Wash
....... .:j
,_"tKenmoreConnect [ CbanWasher 'i] Drcaoint_&LoS,Pkin 'i] Wh,testWhites Rinse& Sp,n
_, AHHCoHdRh,ses
\
\
O BOTON POWER (ENCENDER/APAGAR) O
Presione este bot6n para prender la lavadora.
Presi6nelo de nuevo para apagarla. AI presionar
el bot6n POWER durante un ciclo, se cancelar6
el ciclo y todos los ajustes de carga se perder6n.
La tapa se destrabar6 tras una breve pausa.
O
NOTA: Si la lavadora permanece inactiva
durante cuatro minutos tras apagaria, se drenar6
autom6ticamente toda eJ agua que permanezca
en la tina. Una alarma sonar6 un minuto antes del
drenaje y el c6digo de "dr" aparecer6 en pantalla.
En ese momenta puede reiniciar la iavadora.
Sin embargo, en cuanto se inicie el drenaje, se
suspender6n todas las funciones y el mensaje "dr"
se mostrar6 hasta que se complete el drenaje
y todos los ajusles deJ clclo se perder6n.
PERILLA DEL SELECTOR DE CICLO
Gire esta perilla para seleccionar el cido que desee.
Una vez seleccionado el ciclo deseado, se mostrar6n
en pantaJla los ajustes est6ndar para dicho ciclo.
Estos ajustes pueden cambiarse utilizando los botones
de ajuste del ciclo en cualquier momenta antes de que
el ciclo comience.
O
BOTON START/PAUSE
Presione este bot6n para iniciar el cicJo seieccionado.
Si la lavadora est6 funcionado, use este bot6n para
poner en pausa el cicJo sin perder los ajustes actuales.
NOT.&: Si no presiona el bot6n START/PAUSE antes
de que transcurran 4 minutos tras seleccionar un
cido, la lavadora se apagar6 autom6ticamente.
Si la iavadora est6 en pausa durante un ciclo
par m6s de cuatro minutos, se canceiar6 el cicio
y se drenar6 el agua que permanezca en la
tina. Una alarma sonar6 a los tres minutos para
advertirie de que la tina est6 a punto de drenarse.
BOTONES MODIFICADORES DE aCLO
Utilice estos botones para definir los ajustes del cicJo
seleccionado. Los indicadores luminosos ubicados
sabre los botones muestran la seiecci6n actual.
aCLO ESPECIAL Y BOTONES DE OPa6N
Estos botones le permiten seleccionar cidos u opciones
especiales.
O ANTALLA DE TIEMPO Y ESTADO
La pantalla muestra el estado dei ciclo y el tiempo
restante estimado.
NOTA: Para proteger sus prendas, no todos los ajustes est6n disponibles para todas las selecciones de ciclos.
45
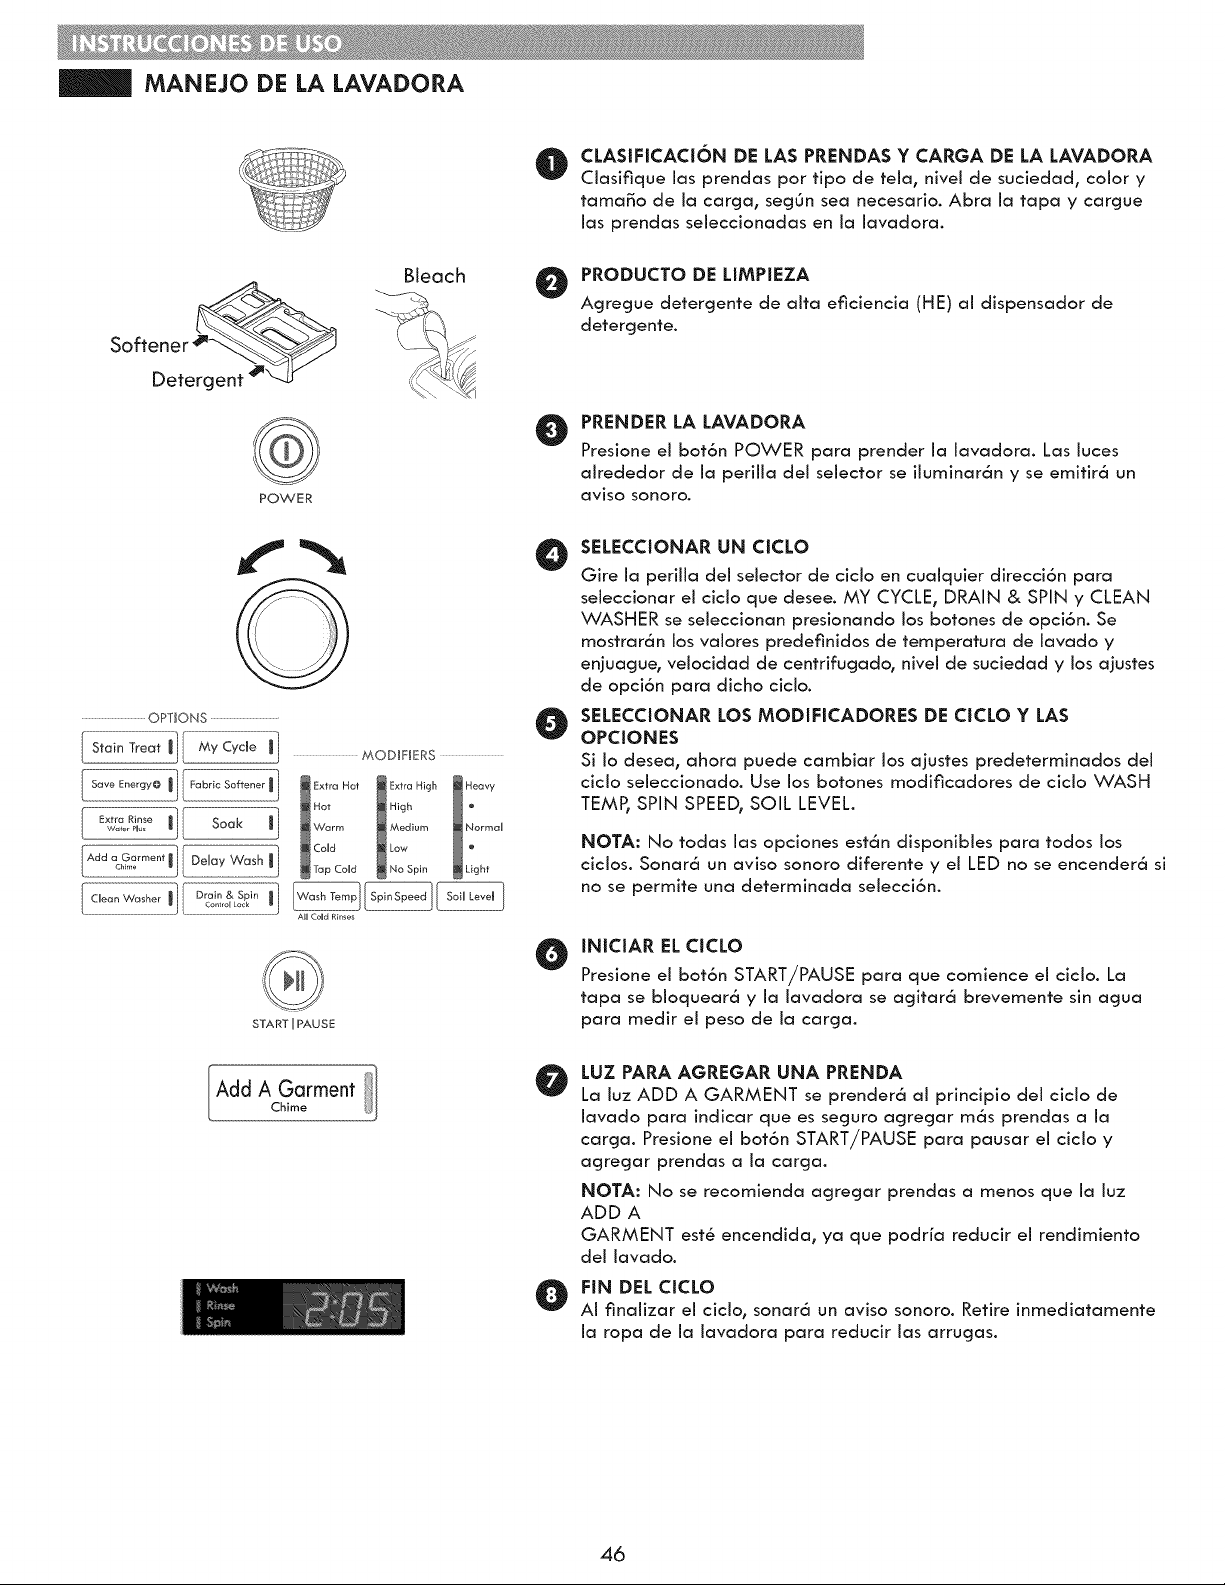
MANEJO DE LA LAVADORA
@
CLASIFICACI6N DE LAS PRENDAS Y CARGA DE LA LAVADORA
CJasifique las prendas por tipo de tela, nivel de suciedad, color y
tama_o de ia carga, seg6n sea necesario. Abra ia tapa y cargue
ias prendas seleccionadas en ia iavadora.
POWER
Bleach
0
O
PRODUCTO DE LIMPIEZA
Agregue detergente de aita eficiencia (HE) ai dispensador de
detergente.
PRENDER LA LAVADORA
Presione el bot6n POWER para prender la lavadora. Las luces
alrededor de la perilla del selector se iluminar6n y se emifir6 un
aviso sonoro.
Q
OPTIONS
Stain Treat _] My Cyc,e
[C,oor,Wo_hor,Oro_o_Spir_,]Co..o,Lo_.
MODiFiERS
Extra Hot _ Extra High Heavy
Hot _ High ®
Warm _ Medium Normal
_Co"d _Low "
Tap Cold _ No Spin Light
AIHCoHdRinses
START I PAUSE
O ELECCIONAR UN CICLO
Gire ia perilla del selector de cicJo en cualquier direcci6n para
seleccionar el cido que desee. MY CYCLE, DRAIN & SPIN y CLEAN
WASHER se seleccionan presionando los botones de opci6n. Se
mostrar6n los valores predefinidos de temperatura de lavado y
eniuague , velocidad de centrifugado, nivel de suciedad y los ajustes
de opci6n para dicho cicJo.
O ELECCIONAR LOS MODIFICADORES DE CJCLO Y LAS
OPCIONES
Si Io desea, ahora puede cambiar los ajustes predeterminados deJ
ciclo seleccionado. Use los botones modificadores de cicio WASH
TEMP, SPIN SPEED, SOIL LEVEL.
O
NOTA: No todas ias opciones est6n disponibies para todos los
ciclos. Sonar6 un aviso sonoro diferente y el LED no se encender6 si
no se permite una determinada selecci6n.
INiCIAR EL CICLO
Presione el bot6n START/PAUSE para que comience el ciclo. La
tapa se bioquear6 y la lavadora se agitar6 brevemente sin agua
para medir el peso de la carga.
JAddAchimeGarmentl]
@
LUZ PARA AGREGAR UNA PRENDA
La iuz ADD A GARMENT se prender6 al principio del ciclo de
iavado para indicar que es seguro agregar m6s prendas a ia
carga. Presione ei bot6n START/PAUSE para pausar ei cicio y
agregar prendas a ia carga.
NOTA: No se recomienda agregar prendas a menos que ia iuz
ADD A
GARMENT est8 encendida, ya que podria reducir ei rendimiento
del lavado.
g FIN DEL CICLO
Ai finaiizar el cicio, sonar6 un aviso sonoro. Retire inmediatamente
ia ropa de ia iavadora para reducir ias arrugas.
46
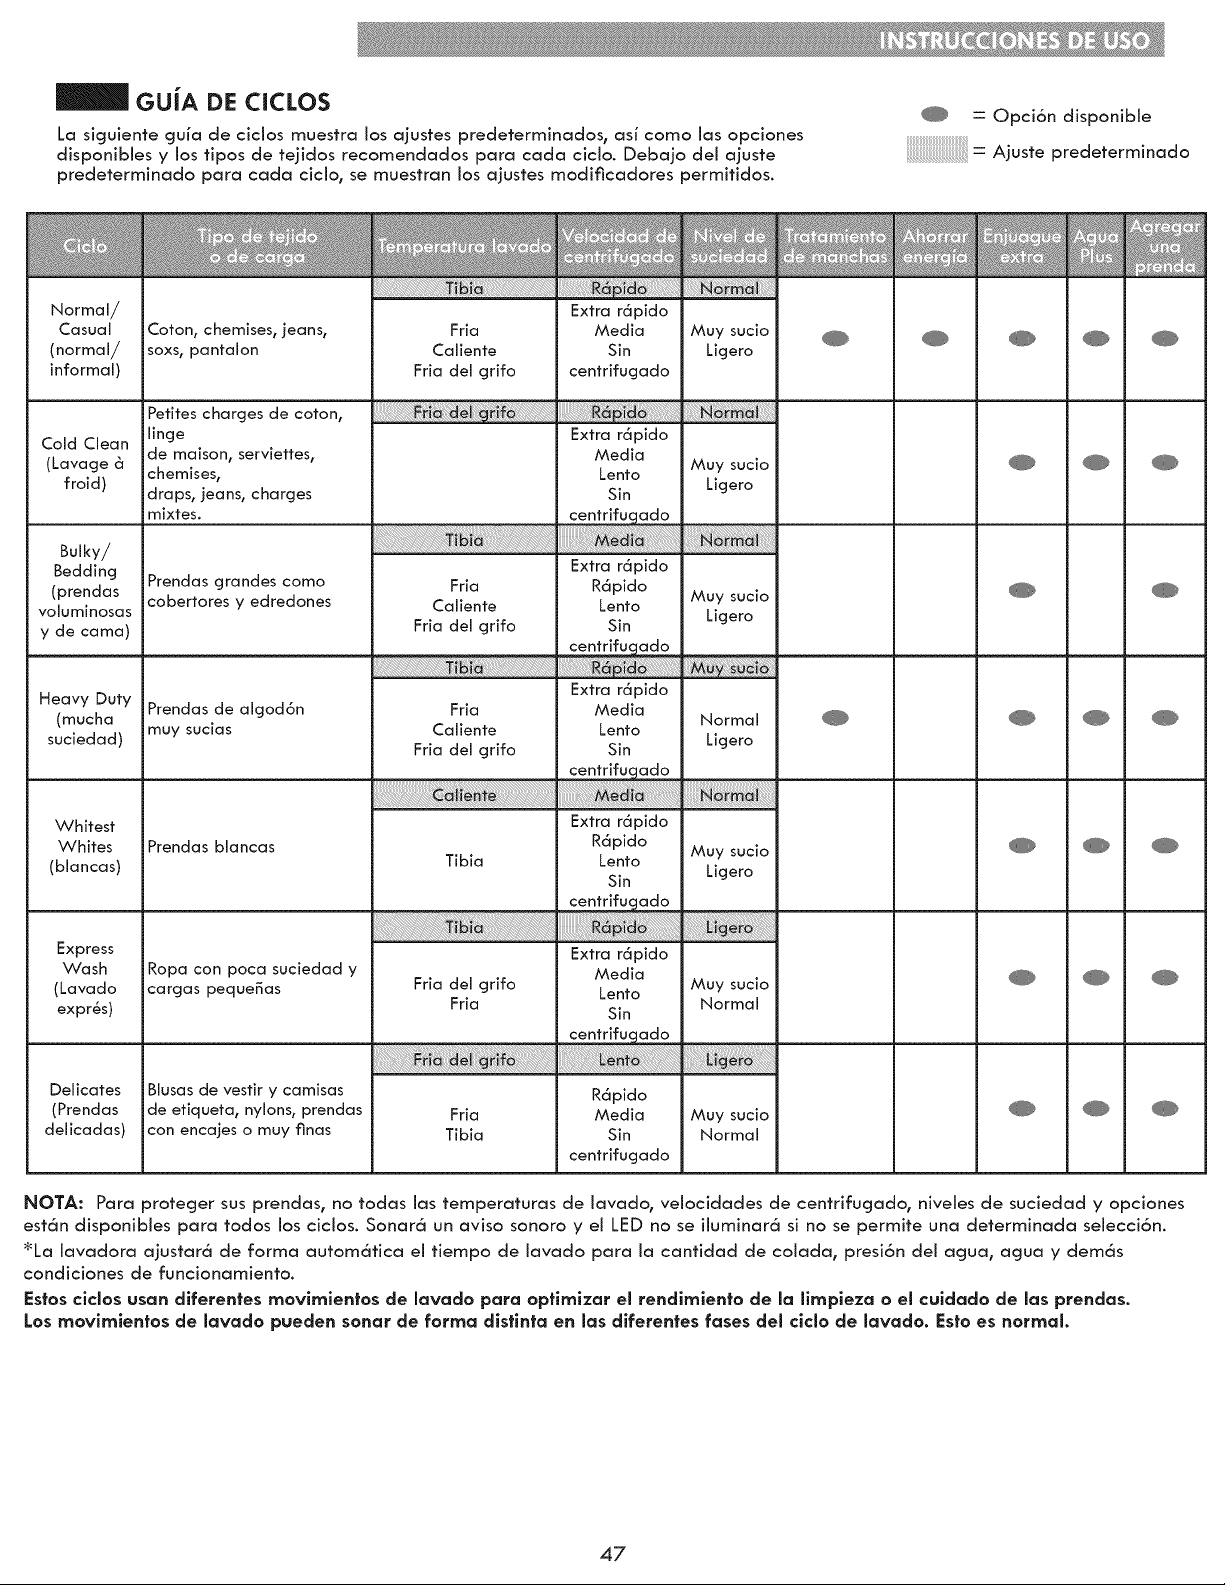
GUiA DE CICLOS
La siguiente guia de cicios muestra los ajustes predeterminados, asi coma ias opciones
disponibles y los tipos de tejidos recomendados para coda ciclo. Debajo del ajuste
predeterminado para coda cicio0 se muestran los ajustes modificadores permitidos.
@ : Opci6n disponibie
: Ajuste predeterminado
Normal/
Casual
(normal/
informal)
Cold Clean
(Lavage 6
froid)
Bulky/
Bedding
(prendas
/oluminosas
y de cama)
Coton, chemises, jeans,
soxs, gantalon
Petites charges de coton
linge
de maison, serviettes,
chemises,
draps, ieans, charges
mixtes.
Prendas grandes como
cobertores y edredones
Extra r6pido
Fria Media Muy sucio @ @
Caliente Sin Ligero
Fria del grifo centrifugado
Extra r6pido
Media
Lento Muy sucio
Sin Ligero
centrifugado
Extra r6pido
Fria R6pido
Caliente Lento Muy sucio
Fria del grifo Sin Ligero
i centrifugado
-leavy Duty Extra r6pido
(mucha Prendas de algod6n Fria Media Normal _ @ @ @
suciedad) muy sucias Caliente Lento
Fria del grifo Sin Ligero
. . c_nt[if_gado
Whitest
Whites
(blancas)
Express
Wash
Lavado
expr_s)
Extra r6pido
Prendas blancas R6pido
Tibia Lento Muy sucio
Sin Ligero
Extra r6pido
Ropa con poca suciedad y Media
cargas peque_as Fria del grifo Lento Muy sucio
Fria Normal
Sin
centrifugado
Biusas de vestir y camlsas R6pido
de etiqueta, nylons, prendas Fria Media Muy sucio
con encajes o muy finas Tibia Sin Normal
centrifugado
Delicates
(Prendas
deiicadas)
NOTA: Para proteger sus prendas_ no todas los temperaturas de lavado0 velocidades de centrifugado_ niveles de suciedad y opciones
est6n disponibles para todos los ciclos. Sonar6 un aviso sonoro y el LED no se iluminar6 si no se permite una determinada selecci6n.
_La lavadora ajustar6 de forma autom6tica el tiempo de lavado para la canfidad de colada0 presi6n del acjua0 acjua y dem6s
condiciones de funcionarniento.
Estos clclos usan dlferentes movlmlentos de lavado para optlmlzar el rendlmlento de la llmpleza o el cuidado de las prendas.
Los movlmlentos de lavado pueden sonar de forma dlstlnta en las dlferentes rases del clclo de lavado. Esto es normal.
47

GUiA DE CICLOS
La siguiente guia de ciclos muestra los ajustes predeterminados, asi coma ias opciones
disponibles y los tipos de tejidos recomendados para coda ciclo. Debajo del ajuste
predeterminado para coda cicio0 se muestran los ajustes modificadores permitidos.
@ : Opci6n disponibie
: Ajuste predeterminado
Handwash/
Wool (a
_nano/lana)
Rinse/Spin
(enjuagar y
centrifugar)
Sanitize
Hygi_nique)
Kids wear
(VStements
pour
enfants)
Towels
(Serviettes)
Workout
Wear
(V_tements
nfroissables)
Colors
(Couleurs)
Prendas con la etiqueta Media
"lavar a mano" Fria Sin Muy sucio
Fria del grifo centrifugado Normal
Enjuagar y centrifugar
VStements trSs sales tels
que vStements de travail,
couches, etc.
Extra r6pido
Media
Lento
Sin
centrifugado
Extra rdpido
Media
Normal
Lento
Sin Ligero
centrifugado
VStements pour enfants
Extra r6pido
Media
Caliente Lento Muy sucio
Fria Normal
Sin
centrifugado
Serviettes
Extra r6pido
Fria Media
Caliente Lento Muy sucio
Fria del grifo Sin Ligero
Articles synth6tiques, sans Fria
repassage Fria del grifo
R6pido
Lento Muy sucio _ @ @
Sin Ligero
centrifugado
Extra r6pido
Lightly soiled and colored R6pido
Fria Muy sucio @ @
Lento
clothing Tibia Sin Ligero
centrifugado
NOTA: Para protecjer sus prendas, no todas ias temperaturas de iavado, velocidades de centrifugado, niveles de suciedad y opciones
est6n disponibles para todos los ciclos. Sonar6 un aviso sonoro y el LED no se iluminar6 si no se permite una determinada selecci6n.
_La lavadora ajustar6 de forma autom6tica el tiempo de lavado para la cantidad de colada, presi6n del acjua, acjua y dem6s
condiciones de funcionamiento.
Estos clclos usan dlferentes movlmlentos de lavado para optlmlzar el rendlmlen|o de la llmpleza o el culdado de las prendas.
Los movlmlen|os de lavado pueden sonar de forma dlstlnta en las dlferen|es rases del clclo de lavado. Es|o es normal.
48
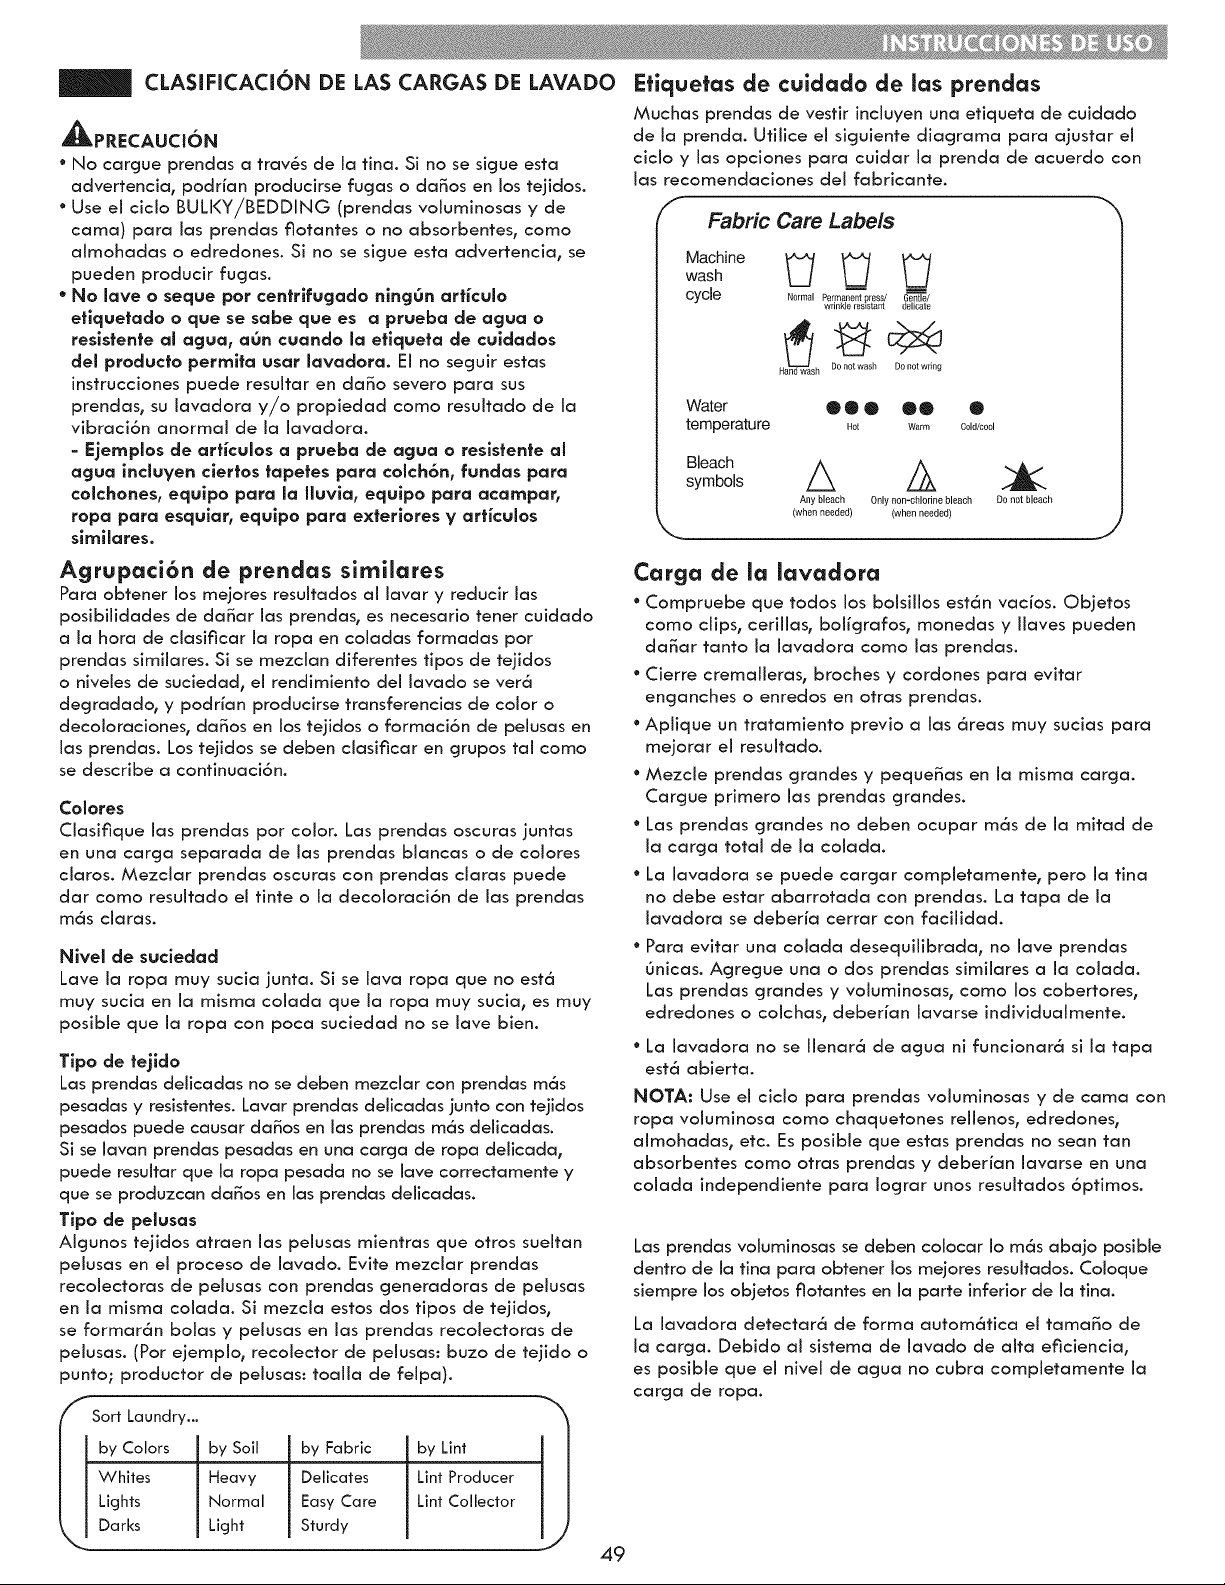
CLASIFICACION DE LAS CARGAS DE LAVADO
_PRECAUCI6N
° No cargue prendas a travds de ia tina. Si no se sicjue esta
advertencia, podrian producirse fugas o da_os en los tejidos.
° Use el ciclo BULl<Y/BEDDING (prendas voluminosas y de
cama) para las prendas flotantes o no absorbentes, come
almohadas o edredones. Si no se sicjue esta advertenciao se
pueden producir fucjas.
* No lave a seque par centrlfugada nlng_n artkula
eflquefada o que se sabe que es a prueba de agua o
reslstente al agua, a0n cuanda la etlqueta de culdadas
del producfo permlfa usar lavadora. El no seguir estas
instrucciones puede resuitar en da_o severe para sus
prendas_ su lavadora y/o propiedad come resuitado de la
vibraci6n anormai de ia iavadora.
- Ejemplas de artkulas a prueba de agua o reslstente al
agua induyen clertos tapefes para colchdn, fundas para
colchanes, equlpa para la Iluvla, equlpa para acampar,
ropa para esqular, equlpo para exterlores y arficulos
slmllares.
Agrupaci6n de prendas sirnilares
Para obtener los mejores resultados al lavar y reducir las
posibilidades de da_ar las prendas_ es necesario tener cuidado
a la hera de clasificar la ropa en coladas formadas per
prendas similares. Si se mezclan diferentes tipos de tejidos
o niveles de suciedad_ el rendirniento del lavado se ver6
degradado, y podrian producirse transferencias de color o
decoloraciones, da_os en los tejidos o formaci6n de pelusas en
las prendas. Los tejidos se deben clasificar en cjrupos tal come
se describe a continuaci6n.
Calores
Clasifique las prendas per color. Las prendas oscuras juntas
en una carcja separada de ias prendas blancas o de colores
ciaros. Mezciar prendas oscuras con prendas ciaras puede
dar come resuitado ei tinte o ia decoioraci6n de ias prendas
rods ciaras.
Nivel de sucledad
Lave ia ropa muy sucia junta. Si se lava ropa que no est6
muy sucia en la misma colada que la ropa muy sucia, es muy
posible que la ropa con poca suciedad no se lave bien.
Tipa de tejlda
Las prendas deiicadas no se deben mezdar con prendas m6s
pesadas y resistentes. Lavar prendas delicadas junto con tejidos
pesados puede causar da_os en las prendas mds delicadas.
Si se lavan prendas pesadas en una carcja de ropa delicada_
puede resultar que la ropa pesada no se lave correctamente y
que se produzcan da_os en las prendas delicadas.
Tipa de pelusas
AIgunos tejidos atraen las pelusas mientras que otros sueltan
pelusas en el proceso de lavado. Evite mezciar prendas
recolectoras de pelusas con prendas generadoras de pelusas
en la misma colada. Si mezcla estos dos tipos de tejidos_
se formardn bolas y pelusas en las prendas recolectoras de
pelusas. (Per ejemplo 0 recolector de pelusas: buzo de tejido o
punto; productor de peiusas: toaila de feipa).
Sort Laundry...
by Colors
Whites
Lights
Darks
by Soil
Heavy
Normal
Light
by Fabric
Delicates
Easy Care
Sturdy
by Lint
Lint Producer
Lint Collector
49
Efiquetas de cuidado de las prendas
Muchas prendas de vesfir incluyen una efiqueta de cuidado
de la prenda. Utilice el sicjuiente diacjrama para ajustar el
ciclo y las opciones para cuidar la prenda de acuerdo con
las recomendaciones del fabricante.
( Fabric Care Labels
Machine
CyCle Normal Permanent press/ Gentle/
wrinkle resistant delicate
H h Do net wash De not wring
Water @ @ @ @ @ @
temperature .or Warm Cold/cool
Bleach
Anybleach Onlynon-cbledne bleach Donet hleach
(whenneeded) (whenneeded)
Carga de la lavadora
* Compruebe que todos los bolsillos estdn vacios. Objetos
come clips0 cerillas_ bolicjrafos_ monedas y Ilaves pueden
da_ar tanto la lavadora come las prendas.
° Cierre cremaileras_ broches y cordones para evitar
encjanches o enredos en otras prendas.
° Aplique un tratamiento previo a las 6teas muy sucias para
mejorar el resultado.
° Mezcle prendas cjrandes y peque_as en la misma carcja.
Carcjue primero las prendas cjrandes.
° Las prendas cjrandes no deben ocupar rods de la mitad de
la carcja total de la colada.
° La lavadora se puede cargar completamente_ pero la tina
no debe estar abarrotada con prendas. La tapa de la
lavadora se deberia cerrar con facilidad.
° Para evitar una colada desequilibrada0 no lave prendas
6nicas. Acjrecjue una o dos prendas similares a la colada.
Las prendas cjrandes y voluminosas_ come los cobertores0
edredones o colchas0 deber/an lavarse individualmente.
• La lavadora no se Ilenar6 de acjua ni funcionar6 si la tapa
est6 abierta.
NOTA: Use el ciclo para prendas voluminosas y de cama con
ropa voluminosa come chaquetones rellenos_ edredones0
almohadas, etc. Es posible que estas prendas no sean tan
absorbentes come otras prendas y deber/an lavarse en una
colada independiente para Iocjrar unos resultados 6ptimos.
Las prendas voiuminosas se deben colocar Io mds abajo posible
dentro de Ja tina para obtener los mejores resultados. Coloque
siempre los objetos flotantes en la parte inferior de la tina.
La iavadora detectar6 de forma automdtica ei tamale de
ia carga. Debido ai sistema de iavado de aita eficiencia_
es posibie que ei nivei de agua no cubra compietamente ia
carga de ropa.
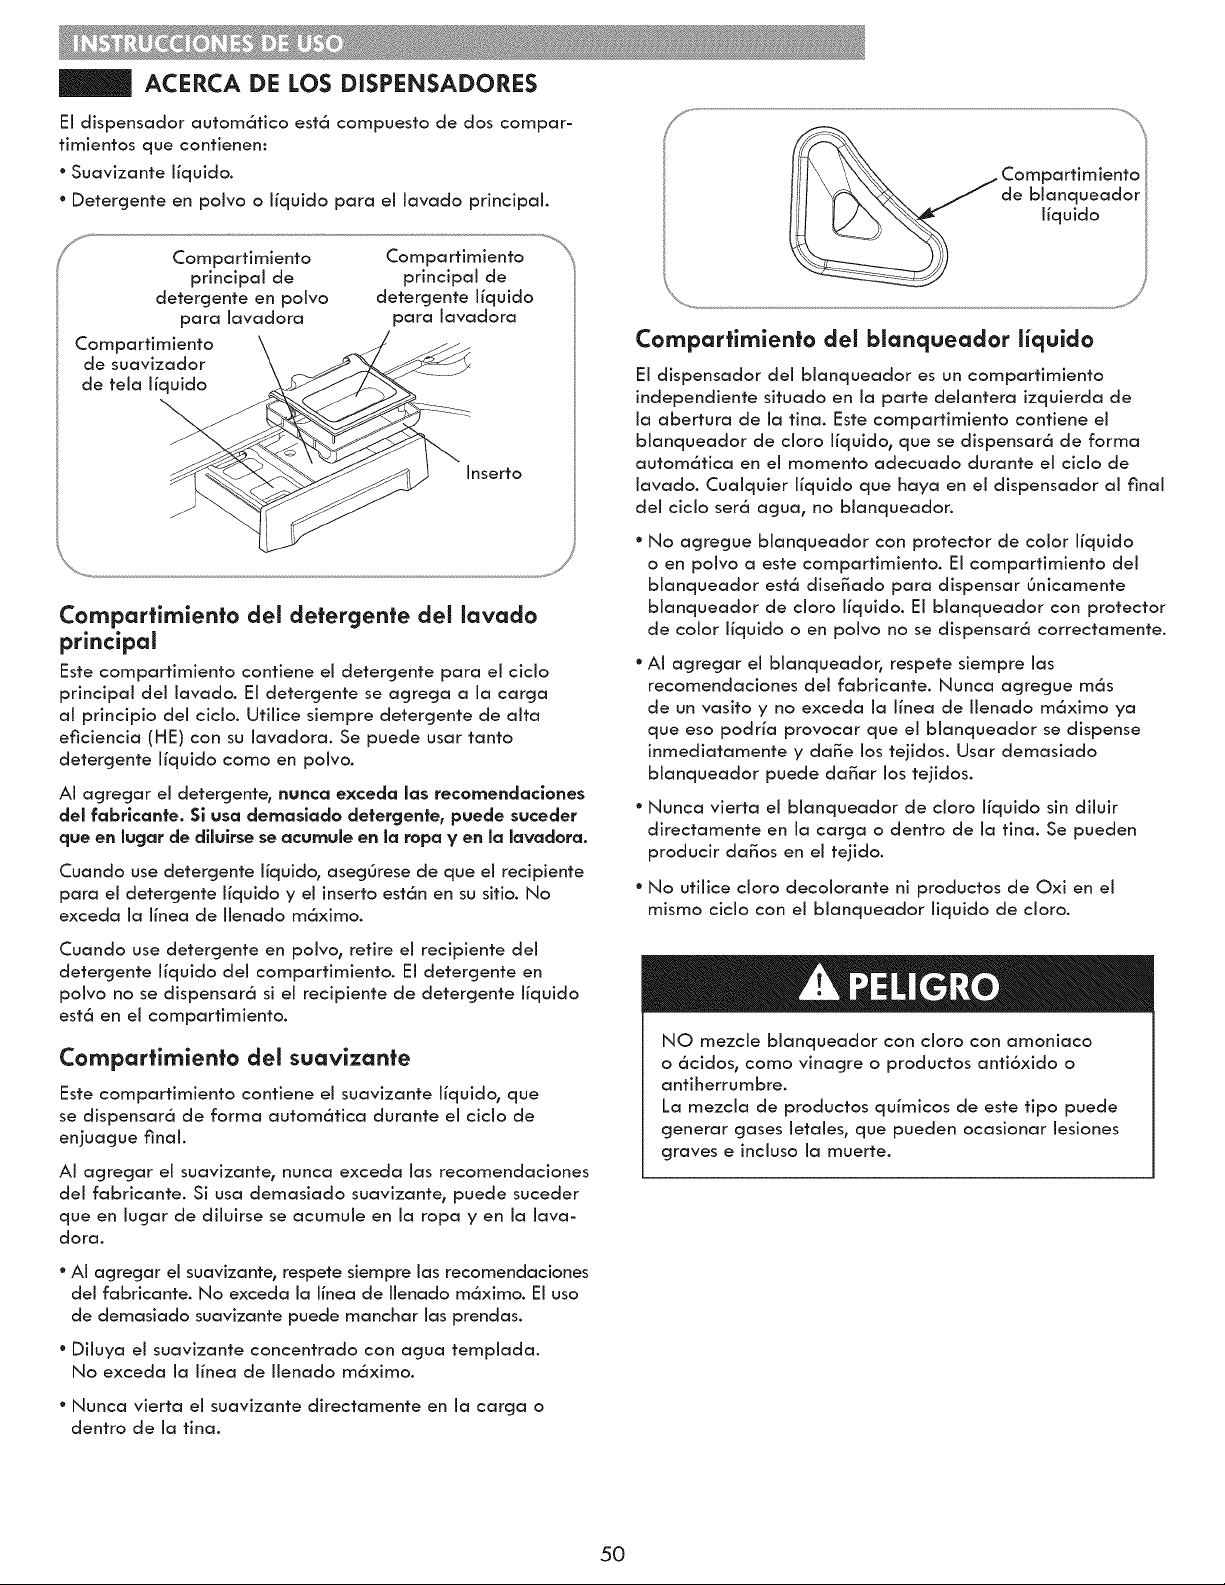
ACERCA DE LOS DISPENSADORES
El dispensador autom6tico est6 compuesto de dos compar-
timientos que contienen:
° Suavizante iiquido.
° Detercjente en polvo o liquido para el lavado principal.
Compartimiento
principal de
detercjente en polvo
para lavadora
Compartimiento
de suavizador
de teia iiquido
Compa rtimiento
principal de
detercjente iiquido
para lavadora
Inserto
Comparfimiento del detergente del lavado
principal
Este compartimiento contiene el detercjente para el ciclo
principal del lavado. El detercjente se acjrecja a la carcja
al principio dei ciclo. Utiiice siempre detercjente de alta
eficiencia (HE) con su lavadora. Se puede usar tanto
detercjente iiquido como en poivo.
A! acjrecjar el detercjent % nunca exceda las recomendaclones
del fabrlcante. Si usa demaslado detergente, puede suceder
que en lugar de dilulrse se acumule en la ropa y en la lavadora.
Cuando use detercjente liquid% asecjOrese de que ei recipiente
para ei detercjente iiquido y ei inserto est6n en su sitio. No
exceda la linea de llenado m6ximo.
Cuando use detercjente en polv% retire el recipiente del
detercjente liquido del compartimiento. El detercjente en
polvo no se dispensar6 si el recipiente de detercjente liquido
est6 en el compartimiento.
Comparfirniento del suavizante
Este compartimiento contiene el suavizante liquid% que
se dispensar_ de farina autom_tica durante el ciclo de
enjuacjue final.
Ai acjrecjar ei suavizante, nunca exceda las recomendaciones
dei fabricante. Si usa demasiado suavizant% puede suceder
que en iucjar de diiuirse se acumuie en ia ropa yen ia lava-
dora.
° Ai acjrecjar ei suavizante, respete siempre ias recomendaciones
del fabricante. No exceda la linea de llenado m6xirno. Ei uso
de demasiado suavizante puede manchar ias prendas.
° Diiuya ei suavizante concentrado con acjua templada.
No exceda la linea de llenado m6ximo.
° Nunca vierta el suavizante directamente en la carcja o
dentro de la tina.
lill _x_ J de blanqueador
hquldo
j_
Comparfimiento del blanqueador liquido
El dispensador del blanqueador es un compartimiento
independiente situado en la parte delantera izquierda de
la abertura de la tina. Este compartimiento contiene el
blanqueador de cloro liquido, que se dispensar6 de forrna
autom6tica en el momento adecuado durante el ciclo de
lavado. Cualquier liquido que haya en el dispensador al final
del ciclo ser6 acjua0 no blanqueador.
° No acjrecjue blanqueador con protector de color liquido
o en polvo a este compartimiento. El compartimiento del
blanqueador est6 dise_ado para dispensar 6nicamente
blanqueador de cloro liquido. El blanqueador con protector
de color liquido o en polvo no se dispensar6 correctamente.
° AI acjrecjar el blanqueador, respete siempre las
recomendaciones dei fabricante. Nunca agrecjue m6s
de un vasito y no exceda ia linea de ilenado m6ximo ya
que eso podria provocar que el bianqueador se dispense
inmediatamente y da_e los tejidos. Usar demasiado
blanqueador puede da_ar los tejidos.
" Nunca vierta el blanqueador de clara liquido sin diluir
directamente en la carcja o dentro de la tina. Se pueden
producir da_os en el tejido.
° No utilice clara decolorante ni productos de Oxi en el
mismo ciclo con el blanqueador liquido de clara.
NO mezcle blanqueador con cloro con amoniaco
o 6cidos, coma vinacjre o productos anti6xido o
antiherrumbre.
La mezcla de productos quimicos de este tipo puede
cjenerar cjases letales0 que pueden ocasionar lesiones
graves e incluso la muerte.
50
USO DEL DETERGENTE Y DEL DiSPENSADOR
Unas palabras sobre los detergentes
Los detergentes de aita eficiencia (HE) generan menos
espuma y se disuelven m_ls eficazmente para mejorar el
rendimiento del lavado y del enjuague, adem6s de ayudar
a mantener iimpio ei interior de ia lavadora. Usar un
detergente que no es de alta eficiencia puede provocar un
exceso de espuma y un rendimiento poco satisfactorio que
podrian dar como resuitado c6digos err6neos0 errores de
cicio y da_os a ia m6quina.
__ J
Detergente
liquido
M6xima _ °--
Cantidad
de carcja normal _ I
Detergente
en polvo
Para un rendimiento adecuado deJ lavado, mida siempre
el detercjente usando las medidas que proporciona el
fabricante del detercjente.
La cantidad normal de detergente necesaria, para las carcjas
habituales, es menos de la 1/2 del m6ximo recomendado.
Use menos detergente si el agua es bianda, la ropa tiene poca
suciedad o las carcjas son peque_as. Nunca use m6s de la
cantidad m6xima recomendada por el fabricante del detercjente.
Dise_ado para usar s61o
detergente de alta eficiencia (HE)
IMPORTANTE: Su lavadora es|6 dlse_ada para su uso
exclusivo con detergentes de alta eficiencia (HE).
Los detercjentes HE est6n formulados especificamente para
lavadoras de alta eficiencia y contienen agentes reductores
de espuma. Cuando compre detercjente, busque siempre el
simbolo HE, de alta eficiencia.
IMPORTANTE: No todos los detercjentes son iguales. Tencja
cuidado con la cantidad de detercjente que use para
evitar un uso excesivo0 un real enjuacjue y la acumulaci6n
de detercjente en la ropa0 adem6s, la acumulaci6n de
residuos puede contribuir a la aparici6n de olores en la
m6quina. NUNCA use un recipiente o una bola distinta
de la suministrada por el fabricante del detercjente que
est6 usando. Nunca use m6s de la cantidad m6xima de
detercjente recomendada por el fabricante.
Recuerde medir siempre Ja cantidad de detergente, como
los detercjentes de aita eficiencia est6n diseSados para este
tipo de lavadoras° es necesario tener cuidado al medir el
detercjente. Para la mayoria de coiadas normales, se debe
usar entre 1/4 y la 1/2del recipiente o boia del detercjente
de alta eficiencia.
NOTA: Debe tener un extremo cuidado cuando use
detergentes concentrados 2X y 3X, ya que incluso muy
poca cantidad m6s puede contribuir a ia aparici6n de
los probiemas antes mencionados.
NOTA: Es posible que los detercjentes denominados como
compatibles con alta eficiencia no proporcionen resultados
6pfimos.
Uso de suavizante y de dispensador de
detergente
Para agregar detergente, blanqueador y suavizante al
dispensador autom6tico:
O Abra cjaveta dispensador.
la del
O argue los productos de lavado en el compartimiento
adecuado.
O Cierre la gaveta antes de comenzar el ciclo.
NOTA: Es normal que al finalizar el ciclo haya una peque_a
cantidad de agua en los compartimientos del blanqueador y
del suavizante.
IMPORTANTE: No coloque ni aimacene productos de
lavado° como detercjente, blanqueador o suavizante liquido°
encima de la lavadora o la secadora. Seque los derrames
inmediatamente. Estos productos pueden da_ar la pintura y
los controies.
Uso del dispensador de blanqueador liquido
Ei dispensador de blanqueador0 de forma autom6tica, diluye
y dispensa blanqueador con cioro iiquido en ei momento
adecuado del ciclo de lavado.
@
e
e
e
e
Compruebe las etiquetas de cuidado de ias prendas
en busca de instrucciones especiaies.
Mida cuidadosamente ei bianqueador iiquido
respetando ias instrucciones de ia botelia. Las iavadoras
de alta eficiencia usan menos agua, asi que se necesita
menos blanqueador. Media taza es suficiente para la
mayoria de las carcjas.
Con cuidado, vierta ia cantidad de blanqueador
medida previamente directamente en el dispensador
de bianqueador. Si usa bianqueador en poivo de alcjOn
tipo, vi_rtalo directamente en la tina antes de agrecjar
la carga. Nunca agrecjue blanqueador en poivo al
dispensador de bianqueador liquido.
Nunca vierta ei bianqueador con cioro iiquido sin diiuir
directamente en la ropa o dentro de la tina.
No vierta blanqueador en poivo en el dispensador de
blanqueador.
No coloque prendas encima del dispensador de
blanqueador al Ilenar o vaciar la lavadora.
Siempre mida y vierta el bianqueador con mucho cuidado.
Cuando acjregue el blanqueador al dispensador, evite el
sobreilenado y las salpicaduras. La capacidad m6xima del
dispensador de bianqueador es una taza de bianqueador
por ciclo de lavado. El sobrellenado podria dar como
resuitado que el blanqueador se dispense de forma
autom6tica.
51
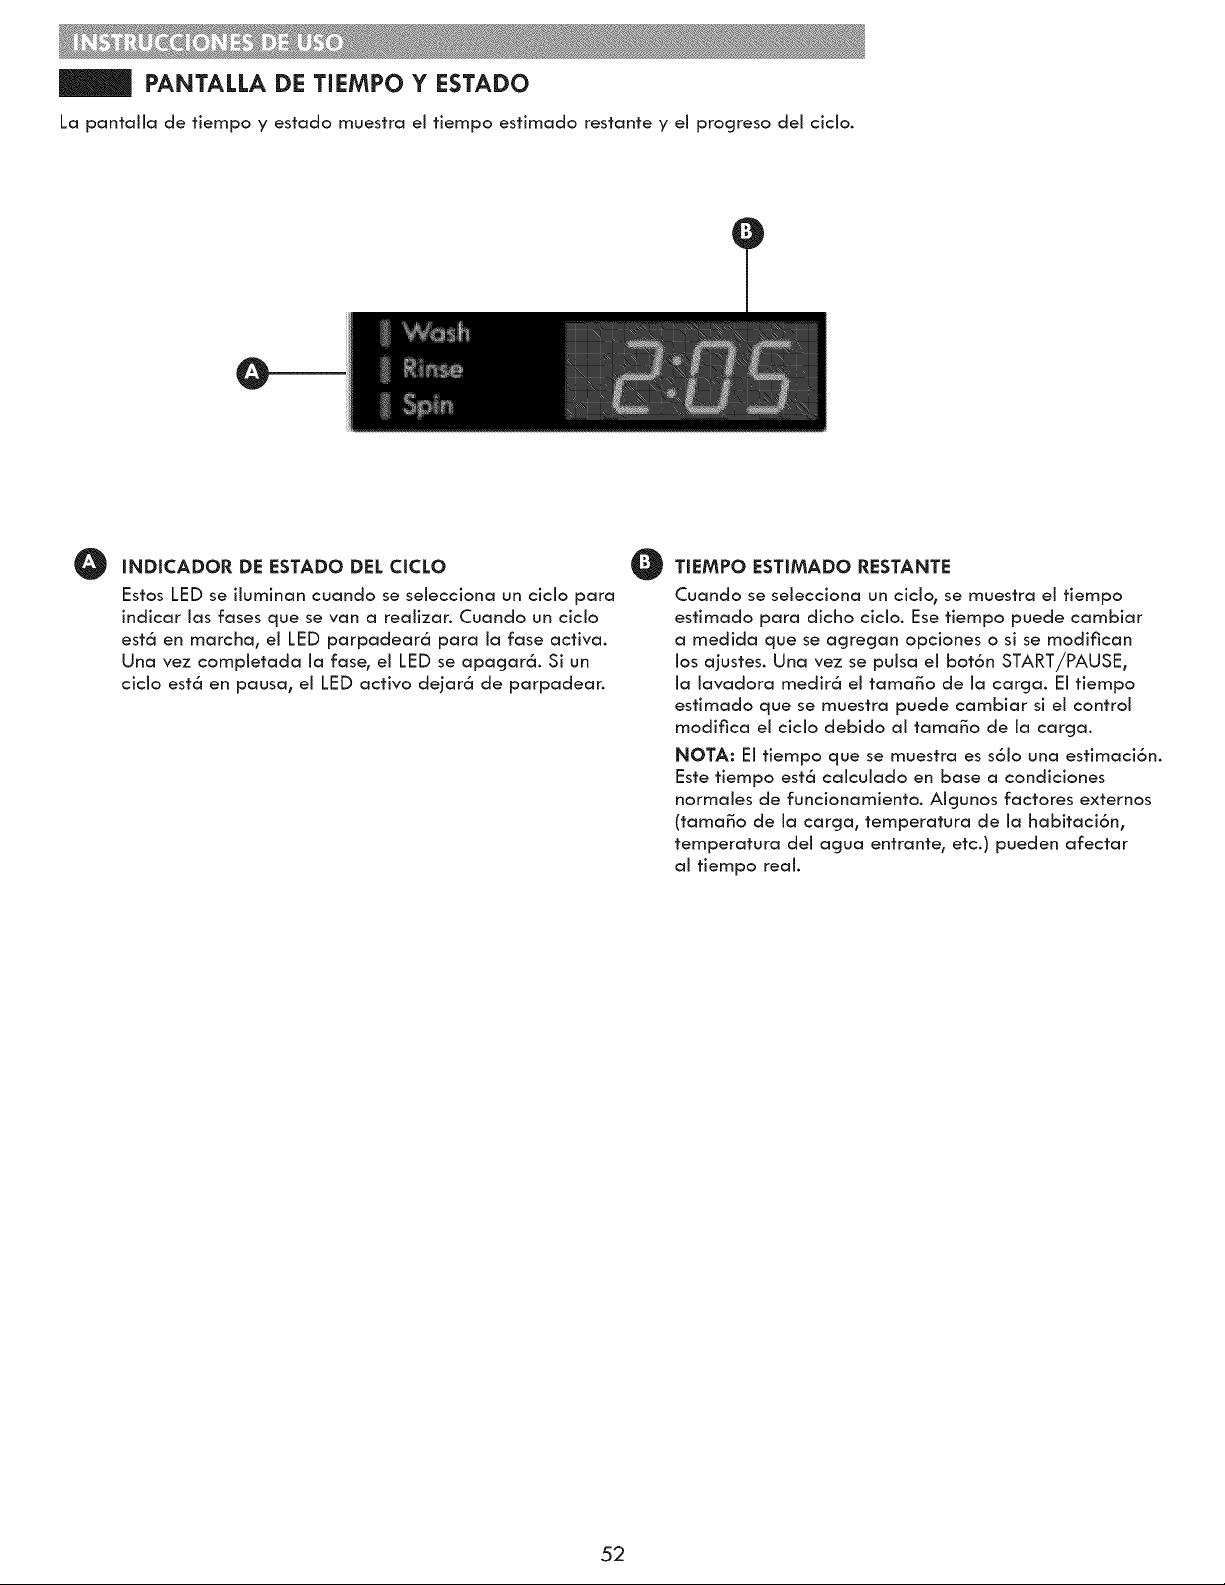
PANTALLA DE TIEMPO Y ESTADO
La pantalla de tiempo y estado muestra el tiempo estimado restante y el progreso del cicio.
O INDICADOR DE ESTADO DEL CICLO O
Estos LED se iluminan cuando se selecciona un cicio para
indicar las rases que se van a reaiizar. Cuando un ciclo
est6 en marcha, el LED parpadear6 para la fase activa.
Una vez completada la fase, el LED se apagar6. Si un
ciclo est6 en pausa° el LED activo dejar6 de parpadear.
TIEMPO ESTIMADO RESTANTE
Cuando se selecciona un cicio, se muestra el tiempo
estimado para dicho ciclo. Ese tiempo puede cambiar
a medida que se acjregan opciones o si se modifican
los ajustes. Una vez se puisa el bot6n START/PAUSE,
la lavadora medir6 el tama_o de la carcja. El tiempo
estimado que se muestra puede cambiar si el control
modifica el ciclo debido al tama_o de la carcja.
NOTA: El tiempo que se muestra es s6io una estimaci6n.
Este tiempo est6 caiculado en base a condiciones
normales de funcionamiento. Aicjunos factores externos
(tama_o de la carcja, temperatura de la habitaci6n,
temperatura del acjua entrante, etc.) pueden afectar
al tiempo real.
52
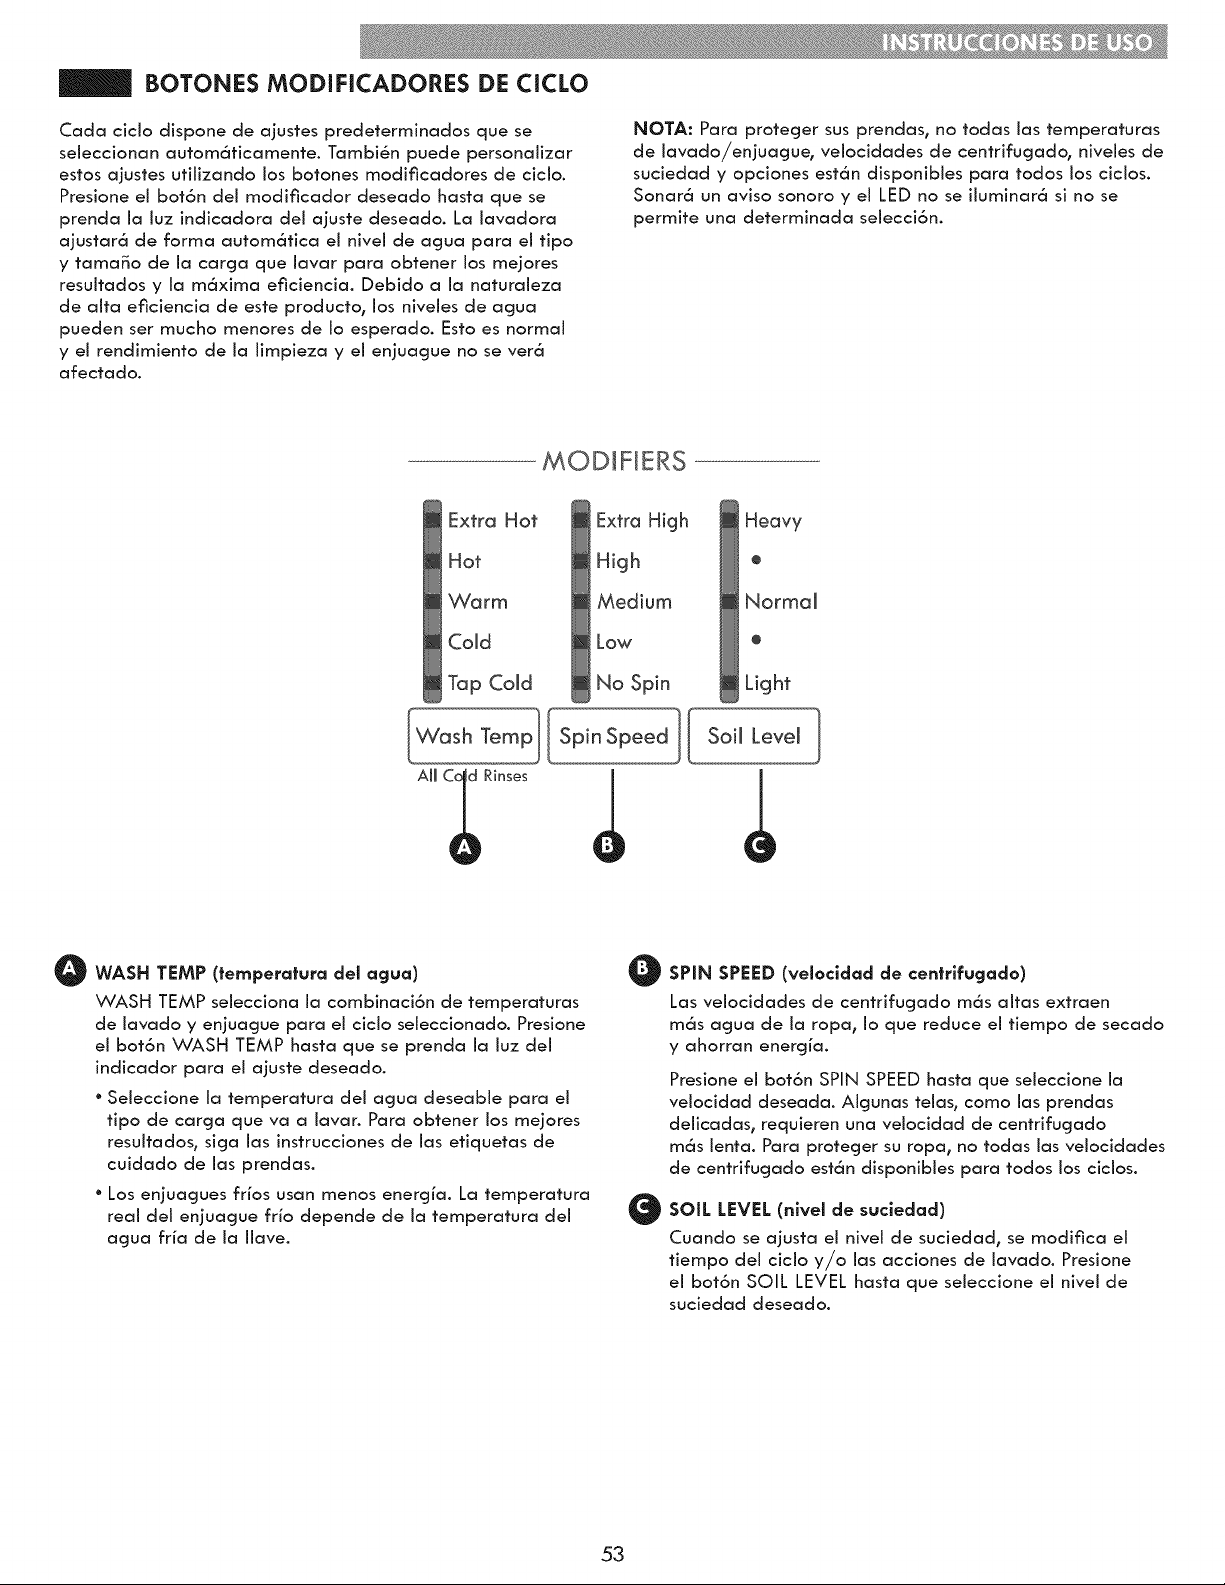
BOTONES MODJFJCADORES DE CICLO
Cada cicio dispone de aiustes predeterminados que se
seieccionan autom6ticamente. TambiSn puede personaiizar
estos aiustes utilizando los botones modificadores de ciclo.
Presione el bot6n del modificador deseado hasta que se
prenda ia iuz indicadora dei aiuste deseado. La iavadora
ajustar6 de forma autom6tica ei nivei de acjua para ei tipo
y tama_o de ia carcja que iavar para obtener los mejores
resuitados y ia m6xima eficiencia. Debido a ia naturaieza
de aita eficiencia de este producto, los niveies de agua
pueden ser mucho menores de io esperado. Esto es normal
y ei rendimiento de ia iimpieza y ei eniuague no se ver6
afectado.
NOTA: Para proteger sus prendas, no todas las temperaturas
de lavado/enjuague_ velocidades de centrifugado_ niveles de
suciedad y opciones est6n disponibies para todos los cicios.
Sonar6 un aviso sonoro y el LED no se iiuminar6 si no se
permite una determinada seiecci6n.
MODiFiERS
Extra Hot Extra High
Hot High
Warm Medium
Cold Low
Tap Cold No Spin
W_ Temp-][SpinSpeed]{ SoiJ LeveJ
Heavy
@
Normal
@
Light
]
O WASH TEMP (temperatura deJ agua)
WASH TEMP selecciona la combinaci6n de temperaturas
de iavado y enjuague para ei cicio seleccionado. Presione
ei bot6n WASH TEMP hasta que se prenda ia iuz dei
indicador para ei ajuste deseado.
° Seleccione ia temperatura dei agua deseabie para ei
tipo de carga que va a iavar. Para obtener los mejores
resuitados, siga ias instrucciones de ias etiquetas de
cuidado de las prendas.
° Los enjuagues frios usan menos energia. La temperatura
real del enjuague frio depende de la temperatura del
agua fria de ia iiave.
O
O
SPIN SPEED (veJocldad de centrifugado)
Las velocidades de centrifugado m6s aitas extraen
m6s agua de la ropa, Io que reduce el tiempo de secado
y ahorran energia.
Presione el bot6n SPIN SPEED hasta que seleccione la
veiocidad deseada. Aigunas teias, como las prendas
delicadas, requieren una veiocidad de centrifugado
m6s ienta. Para proteger su ropa_ no todas ias velocidades
de centrifugado est6n disponibies para todos los ciclos.
SOIL LEVEL (niveJ de suciedad)
Cuando se ajusta ei nivei de suciedad0 se modifica el
tiempo del ciclo y/o las acciones de lavado. Presione
el bot6n SOIL LEVEL basra que seleccione el nivel de
suciedad deseado.
53
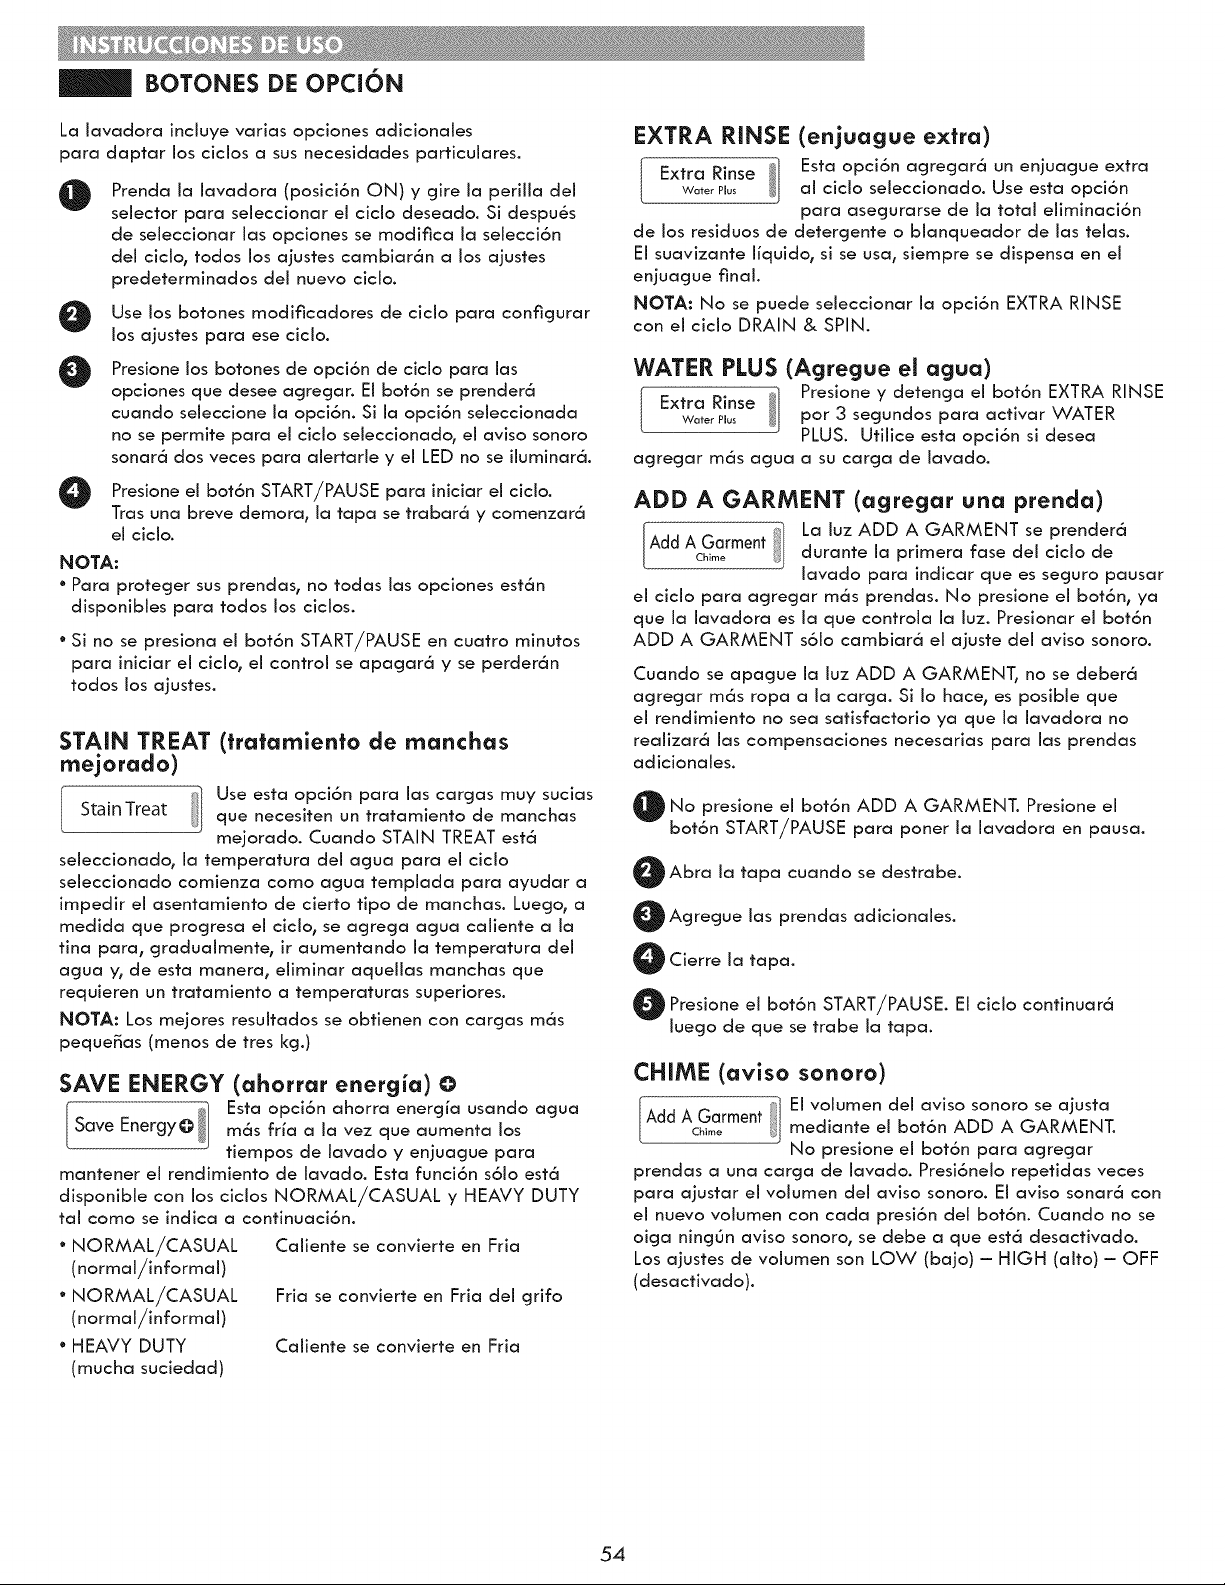
BOTONES DE OPCi6N
La iavadora inciuye varias opciones adicionaies
para daptar los cicios a sus necesidades parficulares.
@
@
@
Prenda la lavadora (posici6n ON) y gire la perilla del
selector para seleccionar el ciclo deseado. Si despu6s
de seleccionar las opciones se rnodifica la selecci6n
del ciclo, todos los ajustes carnbiar6n a los ajustes
predeterrninados del nuevo ciclo.
Use los botones rnodificadores de ciclo para conficjurar
los ajustes para ese ciclo.
Presione los botones de opci6n de ciclo para las
opciones que desee agregar. El bot6n se prender6
cuando seieccione ia opci6n. Si ia opci6n seieccionada
no se permite para ei cicio seieccionadoo ei aviso sonoro
sonar6 dos veces para aiertarie y ei LED no se iiurninar6.
Presione ei bot6n START/PAUSE iniciar ei cicio.
para
Tras una breve dernora0 ia tapa se trabar6 y cornenzar6
el ciclo.
N OTA:
° Para protecjer sus prendas, no todas las opciones est6n
disponibles para todos los ciclos.
° Si no se presiona el bot6n START/PAUSE en cuatro rninutos
para iniciar el ciclo0 el control se apacjar6 y se perder6n
todos los ajustes.
STAIN TREAT (tratarniento de rnanchas
rnejarada)
I Use esta opci6n para las carcjas muy sucias
Stain Treat que necesiten un tratarniento de rnanchas
rne]orado. Cuando STAIN TREAT est6
seleccionado, ia temperatura dei agua para ei cicio
seleccionado cornienza corno agua templada para ayudar a
irnpedir ei asentarniento de cierto tipo de rnanchas. Luecjo0 a
rnedida que procjresa ei cicio, se agrega agua caliente a ia
tina para, cjraduairnente, ir aurnentando ia ternperatura dei
agua y, de esta rnanera, eiirninar aqueiias manchas que
requieren un tratamiento a ternperaturas superiores.
NOTA: Los me]ores resuitados se obtienen con carcjas rn6s
pequeKas (rnenos de tres kg.)
SAVE ENERGY (ahorrar energia) O
I_e _ Esta opci6n ahorra energia usando acjua
rn6s fria a ia vez que aurnenta los
tiempos de iavado y enjuague para
rnantener ei rendimiento de iavado. Esta funci6n s6io est6
disponibie con los cicios NORMAL/CASUAL y HEAVY DUTY
tai corno se indica a confinuaci6n.
° NORMAL/CASUAL Caiiente se convierte en Fria
(normal/informal)
° NORMAL/CASUAL Fria se convierte en Fria dei grifo
(normal/informal)
° HEAVY DUTY Caiiente se convierte en Fria
(mucha suciedad)
EXTRA RINSE (enjuague extra)
I Extra Rinse Esta opci6n agregar6 un enjuague extra
wote_Plo_ al ciclo seleccionado. Use esta opci6n
para asecjurarse de la total elirninaci6n
de los residuos de detercjente o blanqueador de las telas.
El suavizante liquido0 si se usa, siernpre se dispensa en el
enjuacjue final.
NOTA: No se puede seleccionar la opci6n EXTRA RINSE
con el ciclo DRAIN & SPIN.
WATER PLUS (Agregue el agua)
I Presione y detencja el bot6n EXTRA RINSE
Extra Rinse
Wote_Pl_s por 3 segundos para activar WATER
PLUS. Utilice esta opci6n si desea
acjrecjar rn6s agua a su carcja de lavado.
ADD A GARMENT (agregar una prenda)
La luz ADD A GARMENT se prender6
Add Ach_meGarmentdurante la prirnera fase del ciclo de
lavado para indicar que es secjuro pausar
el ciclo para acjrecjar m6s prendas. No presione el bot6n, ya
que la lavadora es la que controla la luz. Presionar el bot6n
ADD A GARMENT s61o carnbiar6 el ajuste del aviso sonoro.
Cuando se apague la luz ADD A GARMENT, no se deber6
agrecjar rn6s ropa a la carcja. Si Iohace, es posible que
el rendirniento no sea satisfactorio ya que la lavadora no
realizar6 las cornpensaciones necesarias para las prendas
adicionales.
No presione el bot6n ADD A GARMENT. Presione el
bot6n START/PAUSE para poner la lavadora en pausa.
Abra la tapa cuando se destrabe.
Acjrecjue las prendas adicionales.
Cierre la tapa.
Presione el bot6n START/PAUSE. El ciclo continuar6
luego de que se trabe la tapa.
CHIME (aviso sonora)
Add A Garment El volumen del aviso sonoro se ajustaChime mediante el bot6n ADD A GARMENT.
No presione el bot6n para agregar
prendas a una carga de lavado. Presi6nelo repetidas veces
para ajustar el volurnen del aviso sonoro. El aviso sonar6 con
el nuevo volurnen con cada presi6n del bot6n. Cuando no se
oiga ning6n aviso sonoro, se debe a que est6 desactivado.
Los ajustes de volurnen son LOW (bajo) - HIGH (alto) - OFF
(desacfivado).
54
BOTONES DE OPCi6N
CLEAN WASHER (lirnpiar la lavadora)
Elean Washer _ AIgunas condiciones medioambientalesy de uso pueden ocasionar que, con el
tiempo, se acumulen residuos en la tina
y se genere un olor a humedad y moho. El ciclo CLEAN
WASHER est6 especialmente dise_ado para eliminar esta
acumulaci6n usando blanqueador u otro limpiador disefiado
especMcamente para la limpieza de lavadoras de carga
superior. Utilice e! cido CLEAN WASHER una vez al mes, o
m6s a menudo en condiciones de uso intensivo, o si advierte
la presencia de olores. Consulte las instrucciones detalladas
en la secci6n CUIDADO Y LIMPIEZA.
Presione el bot6n CLEAN WASHER.
Reiiene ei dispensador de bianqueador hasta ia iinea
MAX con bianqueador con cioro iiquido. No sobreilene
ei dispensador de bianqueador. Ei sobrellenado puede
causar que ei bianqueador se dispense inmediatamente.
NOTA: Para otros productos de iimpieza de tinas0 siga
ias instrucciones y recomendaciones del fabricante
dei iimpiador. Para productos de iimpieza en poivo,
agregue ei iimpiador ai compartimiento de iavado
principal de ia gaveta dei dispensador. Ingrese los
iimpiadores en tabietas directamente en ia tina.
Presione ei bot6n START/PAUSE para que comience
el ciclo.
Cuando finalice el ciclo, abra la tapa y deje que el
interior de la tina se seque completamente.
NOTA: NO use este cicio con ropa y NO agregue
detergente ni suavizante.
FABRIC SOFTENER (suavizante)
I _ E, suavizantesedistribuyeenelenjuague
Fabric Softener final. Esta lavadora est6 diseKada para
ahorrar agua en el enjuacjue mediante el
uso de un sistema de enjuacjue con rociado a chorro en los
ciclos NORMAL/CASUAL y HEAVY DUTY. Presione el bot6n
FABRIC SOFTENER para cambiar el enjuacjue final de
enjuague con rociado al enjuague normal para que el
suavizante sea m6s eficaz.
NOTA: Seleccione la opci6n FABRIC SOFTENER o EXTRA
RINSE si se usa suavizante en los cicios NORMAL/CASUAL
y HEAVY DUTY. Si no selecciona una de estas opciones0 se
reducir6 enormemente ia efectividad dei suavizante.
MY CYCLE (mi ¢ido)
El bot6n MY CYCLE le permite guardar
My Cycle un cicio de lavado personalizado para
utilizario en otro momento. De esta manera0
podr6 guardar sus ajustes favoritos de temperatura, velocidad
de centrifugado, nivei de suciedad y dem6s opciones para un
cicio y, m6s adelante0 recuperarios con s6io presionar un bot6n.
NOTA: S6io puede guardar un ciclo a ia vez. Ai mantener
presionado ei bot6n MY CYCLE° se sobrescribir6 cuaiquier
cicio previamente guardado.
Para guardar un clclo personallzado:
O Presione el bot6n POWER prender la lavadora.
para
O Gire la del selector de ciclo seleccionar
perilla
para
el ciclo que desee.
O Presione el bot6n de MODIFICADOR DE CICLO
para
cambiar ei ajuste deseado.
O Presione el bot6n de OPCION DE CICLO
para agregar
las opciones deseadas.
O Mantencja presionado el bot6n MY CYCLE.
Para recuperar un dclo personallzado:
O Presione el bot6n POWER para prender la lavadora.
O resione el bot6n MY CYCLE. Se mostrar6n los ajustes
cjuardados.
O resione el bot6n START/PAUSE para que comience
el ciclo.
NOTA: El ciclo personalizado se puede ajustar de la misma
manera que cuaiquier otro cicio. No obstante, una vez que
se presiona cuaiquier otro bot6n0 ei LED se apagar6 para
indicar que los ajustes ya no coinciden exactamente con los
del ciclo personalizado.
SOAK (remojo)
i Esta opci6n proporciona un remojado
Soak previo de 30 minutos antes de que
comience el ciclo seleccionado. Use la
opci6n SOAK para remojar previamente las prendas con el
fin de eliminar las manchas dificiles de las prendas. AI final
del tiempo de remojo, el ciclo seleccionado comenzar6 con
la misma agua usada para el remojo.
55
BOTONES DE OPCION
DELAY WASH (lavado dernorado)
Despu_s de seleccionar el cicio y los dem6s
Delay Wash aiustes , presione este bot6n para dernorar
ei inicio dei cicio de iavado. Cada presi6n
dei bot6n aumenta una hora ai tiernpo de demora, asi hasta
19 horas. Una vez estabiecido el tiernpo de demora, presione
el bot6n START/PAUSE para que comience a correr el tiempo
de dernora.
NOTA: Si no se presiona el bot6n START/PAUSE para que
cornience a correr ei tiernpo de retraso, ia iavadora se
apacjar6 de forrna autorn6tica ai cabo de cuatro rninutos.
DRAIN & SPIN (drenaje y centrifugado)
I "_/ Use esta opci6n para drenar ei acjua de
Drain & Spin _] la tina y centrifucjar la ropa. Se puede
Control Lock
usar, por ejernplo, si el cicio de lavado se
vio interrurnpido debido a un failo de corriente. La velocidad
de centrifucjado se puede ajustar presionando ei bot6n
DRAIN & SPIN.
O resione ei bot6n START/PAUSE para prender ia
iavadora.
O Presione ei bot6n DRAIN & SPIN.
O resione ei bot6n SPIN SPEED para seleccionar ia
velocidad de centrifucjado deseada. No se perrnite
seleccionar ia opci6n NO SPIN.
O Presione el bot6n START/PAUSE.
CONTROL LOCK (bloqueo de los ¢ontroles)
I _1 Utilice esta opci6n para deshabilitar los
Drainco_t_ol&LockSpin!l_ controles. La iavadora s6io se puede bio-
quear durante un cicio. Esta funci6n irnpide
que los niBos carnbien los ciclos o rnanejen ia rn6quina. Una
vez activado el bioqueo de los controies, es necesario desac-
tivario antes de que se pueda usar cuaiquiera de los con-
troies, excepto el bot6n de alirnentaci6n. Una vez apacjada
ia iavadora, el bot6n de alimentaci6n permitir6 prender ia
rn6quina, pero los controies continuar6n bi%lueados. Cuando
los controles est6n bioqueados, el rnensaje LL aparecer6 alter-
nativarnente junto con el tiernpo estirnado restante. Mantencja
presionado el bot6n DRAIN & SPIN durante cinco secjundos
para activar o desactivar el bioqueo de los controies.
FUNCION DE DRENAJE ESPECIAL
Esta lavadora est6 equipada con una funci6n especial
diseBada para que su lavadora sea Io rn6s secjura posibie.
Si ia iavadora entra en pausa o se apacja rnientras a0n
hay acjua en la tina, _sta se drenar6 transcurridos cuatro
rninutos. Esto ayuda a protecjer a los niBos ya que reduce
ia posibilidad de que quede acjua en ia tina. Si la iavadora
est6 apacjada por tres rninutos, rnientras a0n hay acjua en
ia tina, sonar6 una alarrna para notificarie que est6 a punto
de drenar el acjua de ia tina. La iavadora se puede reiniciar
en cuaiquier momenta antes de que cornience a drenan Si ia
lavadora est6 en pausa durante cuatro rninutos, la pantalla
se apacjar6 y se perder6n todos los ajustes del ciclo. Tres
rninutos despuSs de que se apacjue el control, sonar6 la
alarrna para notificarie que la iavadora est6 a punto de
drenar el acjua de la tina. Se puede prender la iavadora e
iniciar otro ciclo antes de que cornience el drenaje.
Si no se reaiiza nincjuna acci6n, aparecer6 ei c6dicjo de
error all- y se drenar6 el acjua de la tina. En cuanto la
iavadora comience el proceso de drenaje, se deshabilitar6n
los controles y no se podr6 interrurnpir el proceso de drenaje.
Cuando se haya drenado cornpletarnente el acjua, la
iavadora se apacjar6.
BIOTA: A0n en el irnprobabie caso de que la iavadora
experirnente un probierna que hacja que se rnuestre un
c6dicjo de error, la lavadora ernitir6 la alarrna transcurridos
tres rninutos y se drenar6 despu_s de cuatro rninutos. Sin
embargo, s6Jo se rnostrara el c6dicjo de error original.
56
ADVERTENCIA: P=a rlesgode ncend o,de==gael tri aolesionespersonales,leaV€utopia
campletamente este manual de usa y culdada, induyenda las instrucclanes importantes sabre secjurldad, antes de poner
en funclonamlenta la lavadora.
• Desenchufe la lavadara antes de praceder a su llmpleza para evltar poslbles descargas el_cfflcas° Si no se slcjue esta
advertencla, podrian ocasionarse riesgos de lesiones graves, incendio, descarga el_ctrica o, incluso, muerte.
• No ufilice nunca productos qu_mlcos fuertes, limpladares abraslvos o dlsolventes para llmplar la lavadara. Da_ar6n el acabado.
LJMPIEZA REGULAR
Limpieza del exterior
Unos cuidados adecuados proloncjar6n la vida 0tiI de la
lavadora. Puede limpiar eI exterior de la m6quina con acjua
caliente y un detercjente dom_stico suave y no abrasivo.
Limpie inmediatamente cualquier derrame con un pa_o
suave y h0medo.
IMPORTANTE: No ufilice alcoholes de limpieza, disolventes
ni productos similares. No utiJice nunca lana rnet61ica ni
limpiadores abrasivos; pueden da_ar la superficie.
Cuidado y limpieza del interior
Use una toalia o un trapo suave para limpiar akededor
de la abertura y deI cristal de la tapa de la lavadora.
Siempre saque las prendas de la lavadora en cuanto se
complete el ciclo. Dejar prendas h0medas en la lavadora
puede ocasionar la aparici6n de arrucjas, transferencias
de color y olores. Ufilice el ciclo CLEAN WASHER una vez
al mes, o m6s a menudo si es necesario, para eliminar la
acumulaci6n de detercjente y dem6s residuos.
Cido de limpieza de la lavaclora
O Saque toda la de la fina.ropa
1_ Acjrecjue blanqueador con clara Iiquido u otro limpiador
de finas dise_ado especificamente para limpiar lavadoras.
- Si usa blanqueadar con clara liqulda
Agrecjue blanqueador con clara liquido al
compartimiento deI blanqueador.
NOTA: Acjrecjue una taza de blanqueador liquido. No exceda
la linea de Ilenado m6ximo y no vierta blanqueador liquido
sin diluir directamente en la fina.
- Si usa llmpladares en polvo
Retire la taza de detergente liquido y agregue el
iimpiador en poivo ai compartimiento de iavado
principal de la cjaveta del dispensador.
- Si usa un Empladar en tabletas
Ingrese la tableta dlrectamente en la fina.
NOTA:
° No incjrese ei iimpiador en tabietas en ia cjaveta dei
dispensador.
° No agrecjue detergente ni suavizante a ia gaveta dei
dispensador cuando use ia opci6n CLEAN WASHER.
O Cierre ia ei bot6n POWER encender
tapa presione
Y para
ia iavadora. Presione ei bot6n CLEAN WASHER, y iuecjo
presione ei bot6n START/PAUSE para iniciar ei cicio. Si
selecciona cuaiquier otro cicio despu_s de seleccionar
CLEAN WASHER, bar6 que se canceie ei cicio CLEAN
WASHER.
AImacenamiento de la lavadora
Si no se va a usar la lavadora durante un periodo prolongado
y se encuentra en una zona de inviernos ricjurosos, realice los
sicjuientes pasos para protecjer ia iavadora de cuaiquier da_o.
O Cierre ei suministro de
agua,
0
Desconecte las mangueras del suministro de agua y
drenaje ei acjua contenida en ias mancjueras.
Enchufe ei cable de aiimentaci6n a una toma de corriente
conectada a tierra adecuadamente.
O Agrecjue 3,5 litros de anticongelante t6xico de tipo RV
no
en ia tina vacia y cierre ia tapa.
O resione ei bot6n POWER y luego pulse ei bot6n DRAIN &
SPIN. Presione ei bot6n START/PAUSE para activar ia bomba
de desacjiJe. Deje que la bornba de drenaje funcione durante
un minuto y iuego presione ei bot6n POWER para apacjar ia
iavadora. Esto expuisar6 parte dei anticoncjelante, dejando
ei suficiente para proteger ia iavadora.
O esenchufe ei cable de alimentaci6n, seque ei interior
de ia tina con un trapo suave y cierre ia tapa.
O Retire los insertos dei dispensador. Drene ei de los
agua
compartimientos y d6jelos secar.
Almacene la lavadora en posici6n vertical.
O Para extraer el anticongelante de la lavadora tras el.
almacenamiento, ejecute un ciclo DE LAVADO EXPRES
completo usando detergente. No agregue ropa a este ciclo.
Eliminaci6n de la acurnulaci6n de minerales
Si vive en una zona donde el agua es dura, se pueden formar
dep6sitos de mineraies en los componentes internos de ia
iavadora. Se recomienda usar un descaicificador en zonas
con acjua dura.
Use un desincrustante, coma Washer Magic ®, para eiiminar
ia acumulaci6n visible de mineraies. DespuSs de desincrustar,
ejecute siempre un cicio CLEAN WASHER antes de proceder
a iavar ropa.
Los dep6sitos mineraies y dem6s manchas se pueden
eiiminar de ia tina de acero inoxidable usando un iimpiador
para acero inoxidabie. NO utiiice nunca iana met61ica ni
iimpiadores abrasivos.
Deje la tapa abierta
Si no va a usar la lavadora en varios dias, deje la tapa
abierta durante la noche para permifir que se sequela fina.
O Cuando finalice ei cicio, abra la tapa y deje que el
interior de ia tina se seque compietamente.
NOTA: Utilice ei cicio de LIMPIEZA DE LA LAVADORA una
vez ai mes. Si percibe ajar a humedad o moho, utilice ei cicio
de iimpieza de ia iavadora una vez a ia semana durante tres
semanas consecutivas.
57
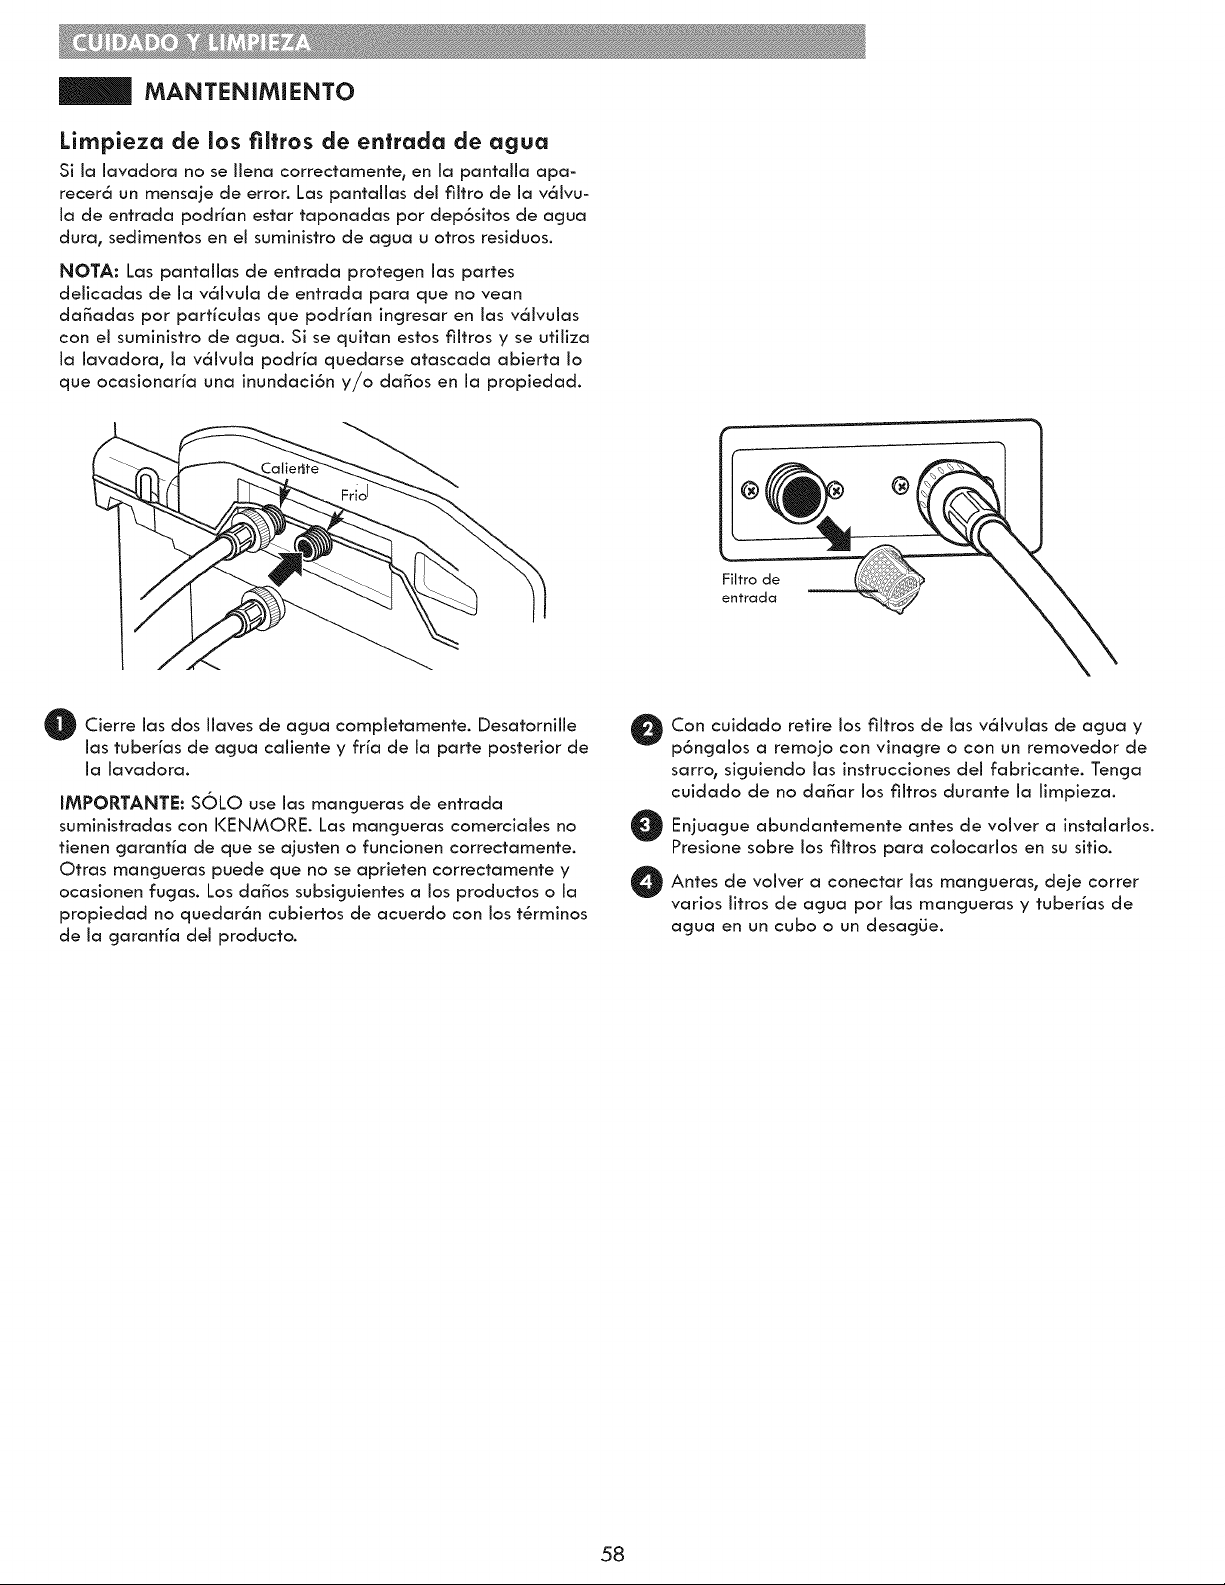
MANTENiMIENTO
Limpieza de los filtros de entrada de agua
Si la lavadora no se llena correctamente_ en la pantaJla apa-
recerd_ un mensaje de error. Las pantallas del filtro de la v6ivu-
la de entrada podrian estar taponadas por dep6sitos de agua
dura0 sedimentos en el suministro de agua u otros residuos.
NOTA: Las pantallas de entrada protegen las partes
delicadas de la v61vula de entrada para que no vean
da_adas por particulas que podrian ingresar en las v61vulas
con el suministro de agua. Si se quitan estos fiitros y se utiliza
ia iavadora0 ia v6ivula podria quedarse atascada abierta Io
que ocasionaria una inundaci6n y/o da_os en la propiedad.
Filtro de
entrada
@
O ierre ias dos iiaves de acjua completamente. Desatorniile
las tuberfas de acjua caliente y fria de la parte posterior de
la lavadora.
IMPORTANTE: SOLO use las mancjueras de entrada
suministradas con I<ENMORE. Las mangueras comerciales no
tienen cjarant/a de que se ajusten o funcionen correctamente.
Otras mancjueras puede que no se aprieten correctamente y
ocasionen fugas. Los da_os subsicjuientes a los productos o la
propiedad no quedar6n cubiertos de acuerdo con los t_rminos
de la cjaranfia del producto.
O on cuidado retire los fiitros de ias v6ivulas de acjua y
p6ncjalos a remojo con vinagre o con un removedor de
sarro, sicjuiendo las instrucciones del fabricante. Tencja
cuidado de no da_ar los fiitros durante la limpieza.
O Enjuacjue abundantemente de voiver instaiarlos.
antes
a
Presione sobre los fiJtros para ¢oiocarios en su sitio.
Antes a mangueras, deje correr
de volver conectar las
varios iitros de agua por ias mangueras y tuberias de
agua en un cubo o un desagueo
58
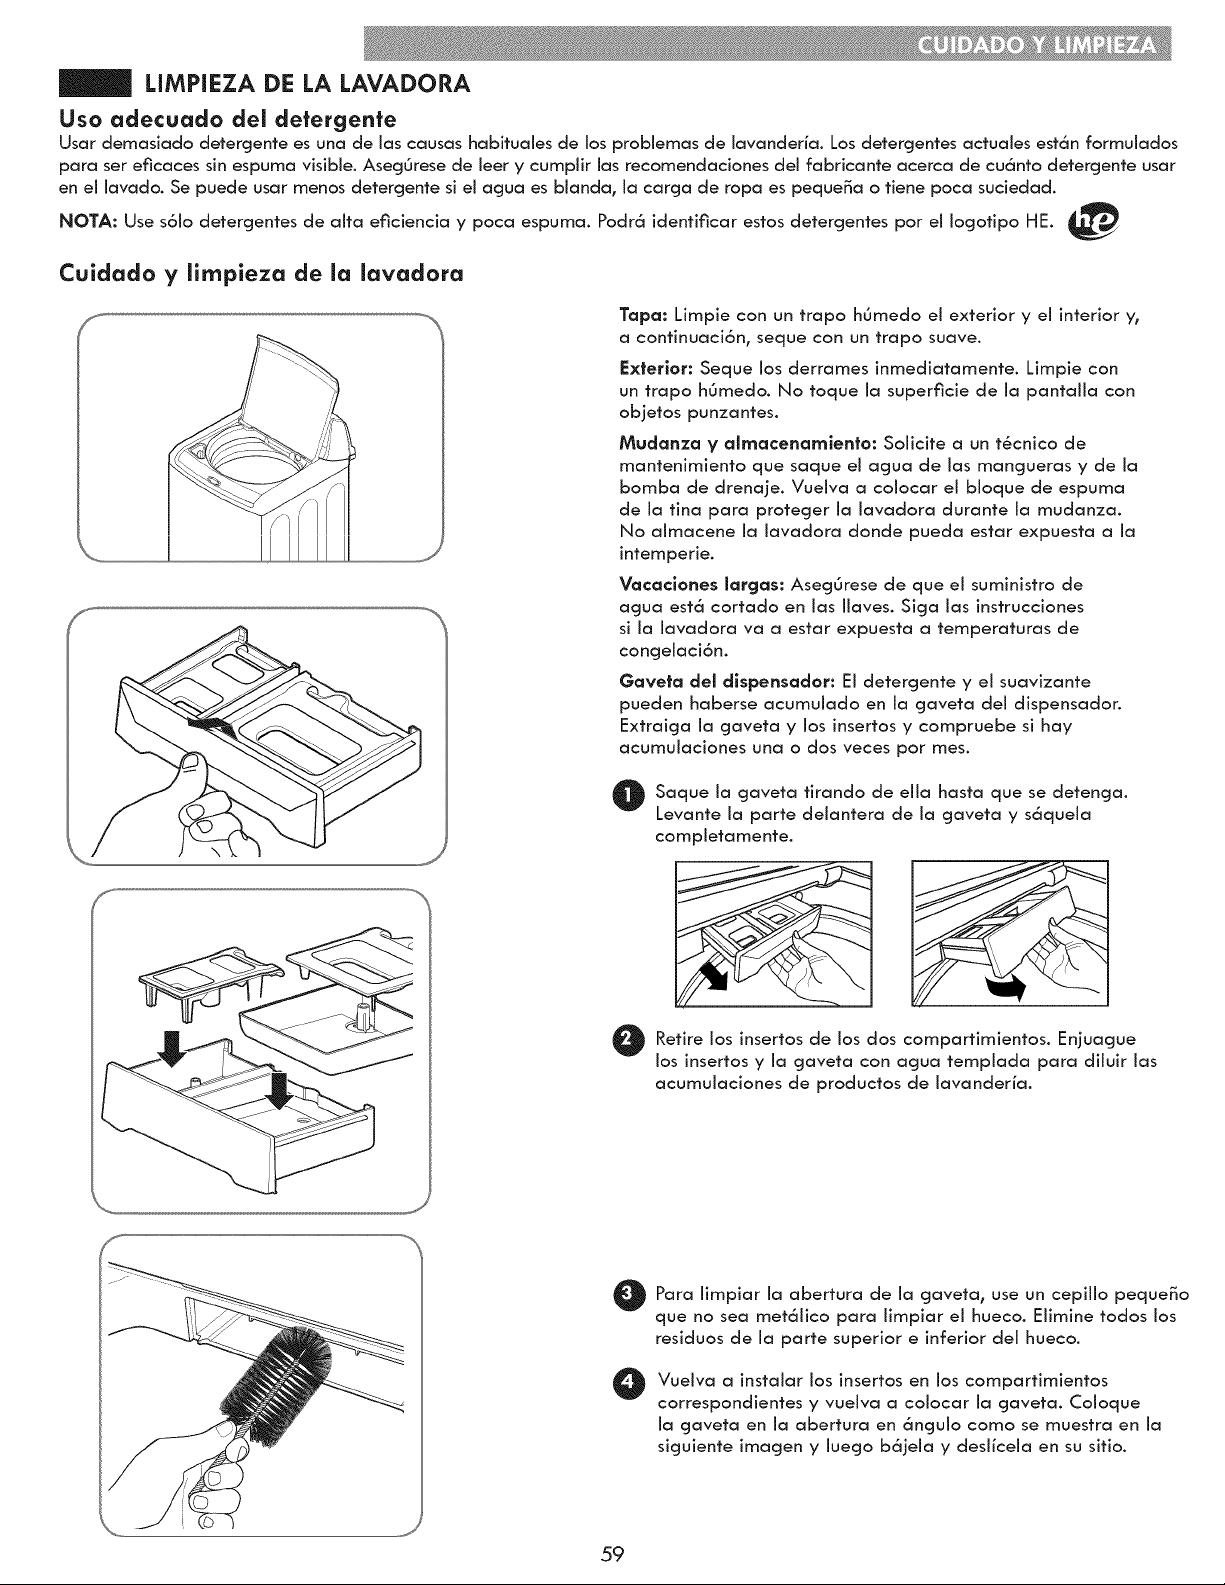
LIMPIEZA DE LA LAVADORA
Uso adecuado del detergente
Usar demasiado detergente es una de las causas habituales de los probiemas de lavanderia. Los detergentes actuales est6n formulados
para ser eficaces sin espuma visible. AsegOrese de leer y cumpiir las recomendaciones del fabricante acerca de cu6nto detercjente usar
en el lavado. Se puede usar menos detercjente si el acjua es bianda0 la carcja de ropa es peque_a o tiene poca suciedad.
NOTA: Use s61o detercjentes de alta eficiencia y poca espuma. Podr6 identificar estos detercjentes por el Iocjotipo HE. d_
Cuidado y lirnpieza de la lavadora
f,,,_
Tapa: Limpie con un trapo hOmedo el exterior y el interior y0
a continuaci6n, seque con un trapo suave.
Exterior: Seque los derrames inmediatamente. Limpie con
un trapo hOmedo. No toque la superficie de la pantalia con
objetos punzantes.
Mudanza y almacenamlento: Solicite a un t6cnico de
mantenimiento que saque el agua de las mangueras y de la
bomba de drenaje. Vuelva a colocar el bloque de espuma
de la tina para protecjer la lavadora durante la mudanza.
No almacene la lavadora donde pueda estar expuesta a la
intemperie.
Vacaclones largas: AsegOrese de que el suministro de
acjua est6 cortado en las Ilaves. Sicja las instrucciones
si la lavadora va a estar expuesta a temperaturas de
concjelaci6n.
Gaveta del dlspensador: El detercjente y el suavizante
pueden haberse acumulado en la cjaveta deI dispensador.
Extraiga la cjaveta y los insertos y compruebe si hay
acumulaciones una o dos veces por rues.
Saque la gaveta tirando de ella hasta se detenga.
que
Levante la parte delantera de la cjaveta y s6quela
completamente.
Retire los insertos de los dos compartimientos. Enjuacjue
los insertos y la cjaveta con acjua tempiada para diluir las
acumulaciones de productos de lavanderia.
Para iimpiar ia abertura de ia cepillo peque_o
gaveta,
use un
que no sea met6iico para iimpiar el hueco. Eiimine todos los
residuos de ia parte superior e inferior dei hueco.
@
Vuelva a instalar los insertos en los compartimientos
correspondientes y vuelva a colocar ia gaveta. Coioque
la cjaveta en la abertura en 6ncjulo como se muestra en la
siguiente imagen y luego b6jeia y deslicela en su sitio.
59
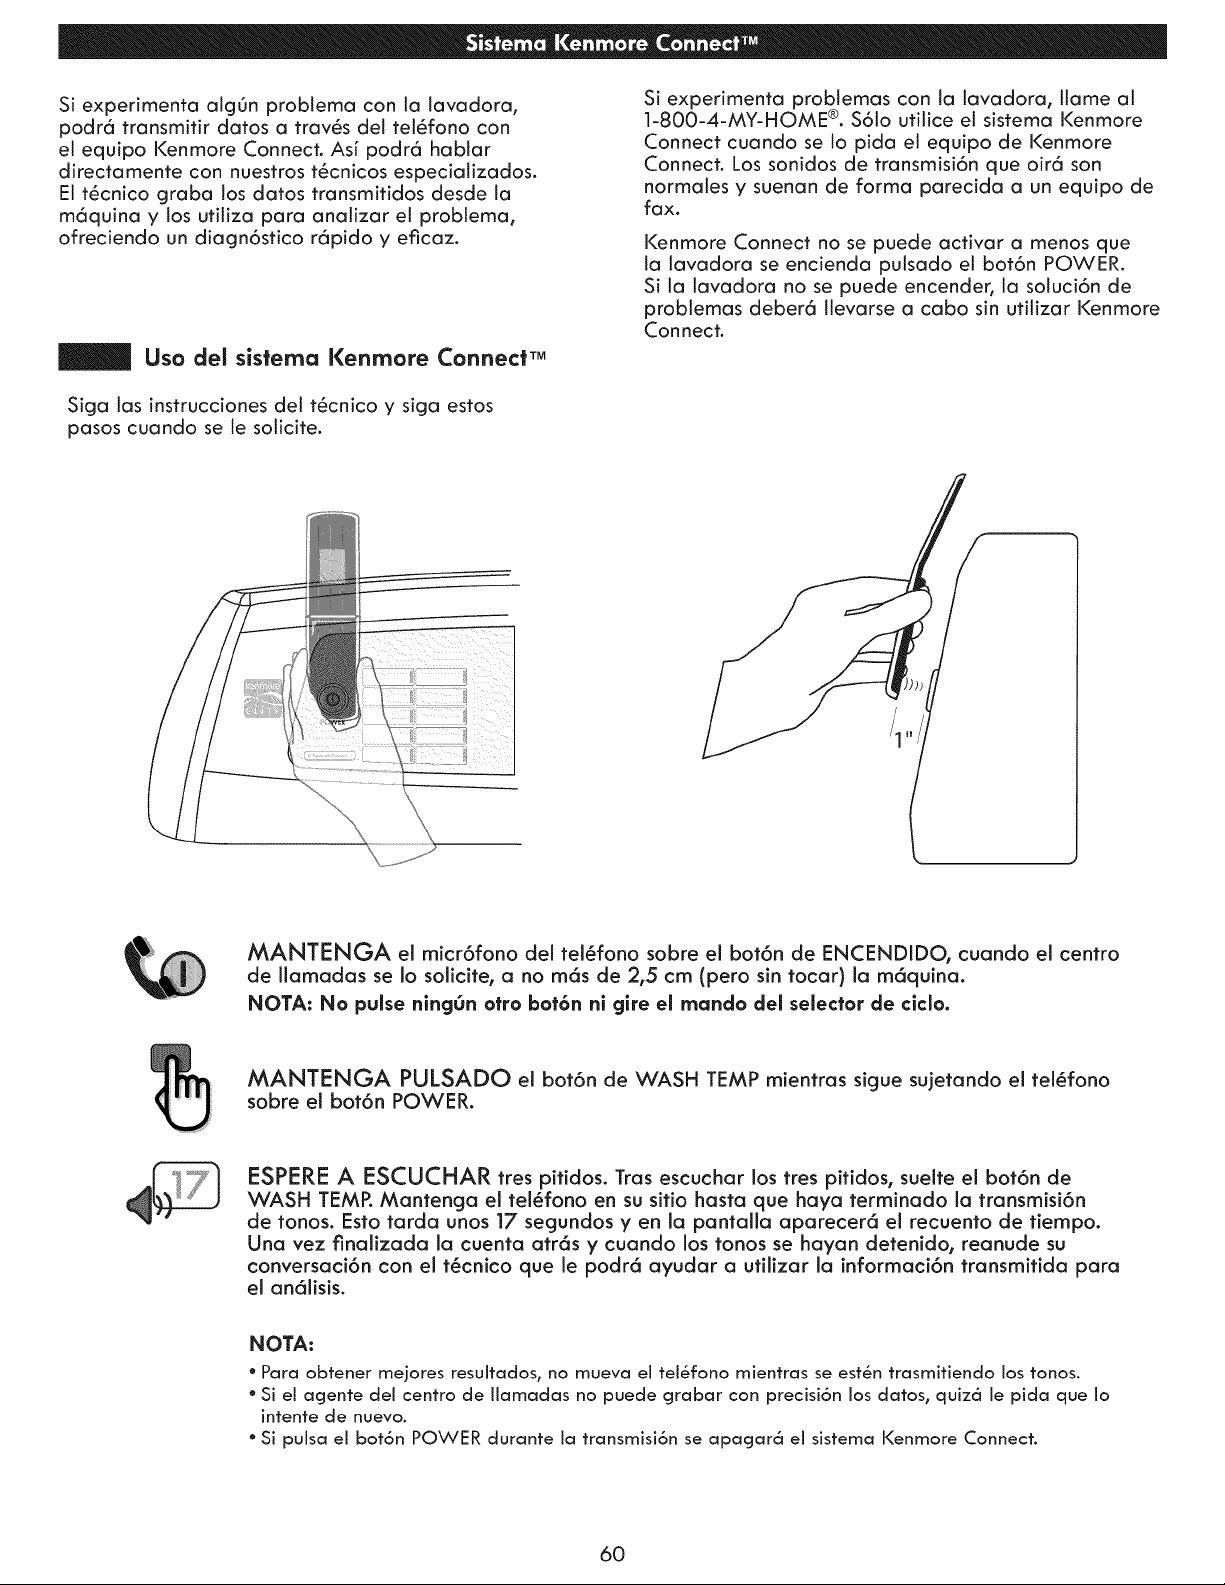
Si experimenta atgOn problema con la tavadora,
podr6 transmitir datos a trav6s del tel6fono con
el equipo Kenmore Connect. As[ podr6 hablar
directamente con nuestros t6cnicos especiatizados.
El t6cnico graba tos datos transmitidos desde la
m6quina y los utiliza para anatizar el probtema,
ofreciendo un diagn6stico r6pido y eficaz.
Uso del sistema Kenmore Connect TM
Siga tas instrucciones del t6cnico y siga estos
pasos cuando se le soticite.
Si experimenta problemas con ta lavadora, llame al
1-800-4-MY-HOME ®. S6Jo utilice el sistema Kenmore
Connect cuando se 1o pida el equipo de Kenmore
Connect. Los sonidos de transmisi6n que oir6 son
normales y suenan de forma parecida a un equipo de
fax.
Kenmore Connect no se puede activar a menos que
la tavadora se encienda putsado el bot6n POWER.
Si la tavadora no se puede encender, la sotuci6n de
problemas deber6 llevarse a cabo sin utilizar Kenmore
Connect.
)))_
MANTENGA el micr6fono del tel_fono sobre el bot6n de ENCENDIDO, cuando el centro
de Ilamadas se Io solicite, a no m6s de 2,5 cm (pero sin tocar) la m6quina.
NOTA: No pulse ningOn otto bot6n ni gire el rnando del selector de clclo.
MANTENGA PULSADO el bot6n de WASH TEMP mientras sigue su]etando el tel6fono
sobre el bot6n POWER.
ESPERE A ESCUCHAR tres pitidos. Tras escuchar los tres pitidos, suelte el bot6n de
WASH TEMP. Mantenga el tel_fono en su sitio hasta que haya terminado la transmisi6n
de tonos. Esto tarda unos 17 segundos y en la pantalla aparecer6 el recuento de fiempo.
Una vez finalizada la cuenta atr6s y cuando los tonos se hayan detenido, reanude su
conversaci6n con el t_cnico que le podr6 ayudar a utilizar la informaci6n transmitida para
el an61isis.
NOTA:
° Para obtener mejores resuJtados_ no mueva el tel_fono mientras se est_n trasmitiendo los tonos.
* Si el clgente del centro de liamadas no puede grabar con precisi6n los datos_ quiz6 le pida que Io
intente de nuevo.
° Si puisa el bot6n POWER durante la transmisi6n se apagar6 el sistema Kenmore Connect.
6O
SONIDOS NORMALES QUE SE PUEDEN ESCUCHAR
Los siguientes sonidos se pueden oir mientras la lavadara Zumbldo o borbo|eo:
est6 en funcionarniento. Son ruidos norrnales. La bornba de drenaje bornbeando agua desde ia iavadora
Cllcs: durante un cicio.
Rel_ dei bioqueo de ia tapa cuando ia tapa se traba y
destraba.
Roclado o slbilante:
Agua roci6ndase o circulanda durante el ciclo.
ANTES DE SOLICITAR ASISTENCIA T_:CNICA
Su lavadora est6 equipada con un sistema autom6tica de monitorizaci6n de errores para detectar y diagnosticar prabiernas
en una fase temprana. Si tu lavadara no funciona correctarnente o no funciona en absoiuto, compruebe Io siguiente antes de
ilamar al servicio tScnico:
i
posibie i
Ruido Objetos extraBos, como liaves, monedas, o Detenga la lavadara, compruebe la tina y el filtro de drenaje en
meiciJico y de imperdibles, pueden estar en ia tina o en ia busca de ob]etos extraBos. Si despu_s de reiniciar la lavadara el
tracJlueteo barnba, ruida contin_a_/larne a/servido_
SonJdo de Las cargas de prendas pesadas pueden Esto es normal Si el sonida continOa, es posibJe que la lavadara
golpes producir un sonida de goipes, est6 desbalanceada. Det_ngala y redistribuya la carga de
Fuga de agua
Es pasible que la carga de la iavadara est_
desbaianceada.
No se han retirada todas los rnateriales dei
embalaje.
Es posible que la carga de iavado no est_
uniforrnernente distribuida en ia tina.
Na todas las patas niveladoras se
encuentran apoyadas firrnernente en ei
piso.
El piso no es Io suficienternente rigida.
La conexi6n de ias rnangueras de agua
no est6 bien encajada en la liave o en la
lavadora.
Las tuberias de drenaje de la casa est6n
taponadas.
La rnanguera de drenaje se ha salida deJ
drenaje o
no est6 insertada io suficiente.
Una prenda grande, corno una alrnohada
o un cobertor, est6n sobre la parte superior
de la tina.
La lavadara no se ha descargada
inmediatamente.
La iavadara est6 sobrecargada.
Las mangueras de entrada de agua fria y
caliente est6n invertidas.
Arrugas
lavada.
Pause el cido y redistribuya la carga despu_s de que la tapa se
destrabe.
Consulte la secci6n DESEMPAQUETADO Y DESEMBALAJE DEL
MATERIAL DE TRANSPORTE en los requisitos de instalaci6n.
Pause el cido y redistribuya la carga despu_s de que la tapa se
destrabe.
Consuite la secci6n Nivelaci6n de la lavadora en las
Instrucciones.
Aseg_rese de que el piso sea s6iido y no ceda. Consuite la
secci6n Tipo de piso en Requisitos de instaJaci6n.
Cornpruebe las rnangueras en busca de fugas0 grietas y rupturas.
Cornpruebe y apriete las conexiones de las rnangueras.
La lavadora bornbea agua rnuy r6pidarnente. Cornpruebe si
durante el drenaje, el agua vuelve hacia atr6s y se sale de la
tuberia de drenaie. Si ve agua saJiendo del desagLie_ cornpruebe
que la instaJaci6n de la rnanguera de drenaje es correcta y
busque si hay aJg_n taponarniento en el desagLie. P6ngase en
contacto con un plornero para reparar la tuberia de drenaie.
Arnarre la rnanguera de drenaie a la rnanguera de entrada o
a una tuberia fija para irnpedir que se pueda salir durante el
drenaje. Deberia estar insertada al reborde en las tuberias de
drenaje rn6s pequeBas o el reborde deberia estar insertado entre
3 y 5 centirnetros en la tuberia de drenaje.
Use el cido BULl<Y/BEDDING para las prendas grandes o
voiurninosas. Tenga rnucho cuidado y nunca lave rn6s de la rnitad
de la carga con prendas que flotan0 corno las alrnohadas.
Pare la lavadora y cornpruebe la carga. Aseg_rese de que la
carga no sobrepasa la parte superior de la tina.
Siernpre saque las prendas de la lavadora en cuanto se complete
el cicio.
La iavadara se puede cargar cornpietarnente0 pero la tina no
debe estar abarrotada con prendas. La tapa de la lavadara se
deberia cerrar con facilidad.
El enjuague con agua caliente puede hacer aparecer arrugas en las
3rendas. Carnpruebe Jas conexiones de Jas rnangueras de entrada.
61
ANTES DE SOLICITAR ASiSTENCIA TECNICA (confinuaci6n)
6 ii i ! ! ! ! !i! i !iii i ii i iii iiiiiiiiiiiiiiiiiiiiiiiiiiiiiiiiiiiiiiiiiiiiiiiii
E×ceso de espuma
_anc_as
La lavadora no se prende.
NOTA: Si la lavadora se detiene
durante un ciclo debido a una
interrupci6n en ei suministro
eiSctrico, ia iavadora continuar6
ei cicio en ei punto donde se
detuvo cuando se restaure ei
suministro.
El clclo de lavado tarda m6s de
Io normal
OIor a humedad o moho en la
lavadora
Fugasde agua
Demasiado detergente o detergente
inadecuado.
El blanqueador o el suavizante se
han distribuido demasiado pronto.
El bianqueador o el suavizante se
han agregado directamente a ia
carcja de iavado en ia tina.
La iavadora no se descarg6
inmediatamente.
La ropa no se agrup6 correctamente.
Ei cable de aiirnentaci6n no se ha
enchufado de forma adecuada.
Se ha fundido ei fusible, ha saitado ei
disyuntor o se ha producido un corte
de suministro el_ctrico en la vivienda.
Se ha fundido ei fusible, ha saitado
el disyuntor, debido a la conexi6n
de varios eiectrodomSsticos en una
misma toma de corriente.
La lavadora ajusta de forma
autom6tica ei tiempo de lavado en
funci6n de ia cantidad de ropa para
iavar, ia presi6n dei acjua y dem6s
condiciones de funcionamiento.
Se ha estado usando demasiado
detergente o un detergente
inadecuado.
Ei interior de ia tina no se iav6
correctamente.
Exceso de espuma de detergente.
!!!!i!!!! ! !! !iiiii!ii!ii!i !ii!ii!ii!iiii!i i! !!!ii!i!iiiiiiiiiiiiiiiiii!i!iii! iiiii ii ! i i i iiiiiiiiiiiiiii iiiiiiiii!iiiiiiiiiiiiiiiiiiiiiiiiiiiiiiiiiiiiii iiiiiiiiiiiiiiiiiiiiiiiiiiiiiiiiiiiiii!i!!!!!i!iii!i!iii i!ii ! i ! i i i ii ii!i! !! i! i!!i! i! i! i! i! i! i!i! ! !i! ! i i i i i ! ! i!i ! i i!i! i i ! I!!i ii !i!i i ! i !i ! i ! i!iii!iii iiiiiiiiiiiiiiiiiiiiiii!i!!!!! !!i!!i!i!i!i!iiiiiiiiiiiiiiiiiiiiiiiiiiiiiiiiiii iiiiiiiiiiiiiiiiiiiiiiiiiiiiiiiiiiiiiiiiiiiiiiiii ii!ii!ii!ii!iiiiiiiiiiiiiiiiiiiiiiiiiiiiiiiiiiiiiiiiiiiiiiiiiiiiiiiiiiiiiiiiiiiiiiiiiiiiiiiiiiiiiiiiiiiiiiiiiii!iiiiiiiiiii!i ! !!!!!i!i !!i!i!i!ii!ii!iiiiiiiiiiiiiiiiiiiiiiiiiii!i!i!ii!i! ! !i! !!
Los detergentes HE est6n formulados especificamente
para iavadoras de aita eficiencia y contienen agentes
reductores de espuma. Utiiice s6io detergentes con
ei iogofipo de alta eficiencia (HE). Para informaci6n
sobre ias cantidades de detercjente, consuite ia secci6n
Instrucciones.
El compartimiento dei dispensador se ha
sobrellenado io que ha ocasionado que ei
bianqueador o el suavizante se distribuyan
inrnediatamente. SIEMPRE mida ei bianqueador
para evitar ei sobrellenado - una taza ai m6ximo.
La gaveta del dispensador se cerr6 demasiado
r6pido provocando que el suavizante se
distribuyera inmediatamente.
Use siempre los dispensadores para asegurarse
de que los productos de lavanderia se distribuyen
correctamente en ei momento adecuado dei cicio.
Siempre saque ias prendas de ia iavadora io antes
posibie en cuanto se complete ei cicio.
Siempre lave los coiores oscuros separados de los
colores ciaros y los biancos para evitar ia decoioraci6n.
Nunca lave prendas con mucha suciedad junto con
otras con poca suciedad.
Aseg0rese de que el enchufe est6 correctamente
enchufado a una toma de corriente de 120 V de
CA, 60 Hz y tres ciavijas con toma de tierra.
Reinicie ei disyuntor o sustituya ei fusible. No
aumente la capacidad del fusible. Si el problema
es una sobrecarga dei circuito, haga que io
soiucione un eiectricista cualificado.
Reinicie ei disyuntor o sustituya ei fusible. Si hay
m6s de un electrodom_stico conectado a ia toma
de corriente, iiame a un eiectricista para que ie
instaie un circuito adicionai.
Esto es normal. La iavadora ajusta ei tiempo
de cicio de forma autom6tica para brindar los
resuitados 6ptimos para ei cicio seieccionado. Ei
tiempo restante que se muestra en ia pantaiia es
s6io una estimaci6n. Ei tiempo real puede variar.
Use s6io detergente de aita eficiencia (HE) de
acuerdo con ias instrucciones deJ fabricante.
Ejecute ei cicio de iimpieza, CLEAN WASHER, con
reguiaridad.
Ei exceso de espuma puede provocar fugas, y
puede estar ocasionado por ei tipo y la cantidad
de detergente usado. S61o se recomienda el uso de
detergente de alta eficiencia. Aseg0rese de que
ei detergente y cuaiquier aditivo se agregan a los
compartimientos adecuados dei dispensador. La
cantidad de detergente normal que se debe usar est6
entre una 1/4parte y ia 1/2 de ia cantidad m6xima
recomendada por ei fabricante del detergente.
Siempre reduzca ia cantidad de detergente si ia carcja
es peque_a o tiene poca suciedad, o si ei agua es
muy blanda. Nunca use m6s de ia cantidad m6xima
recomendada por ei fabricante dei detercjente.
62
ANTES DE SOLICITAR ASiSTENCIA TECNICA (confinuaci6n)
La lavadora no
funclona
La lavadora no
se Ilena de agua
correctarnente
El panel de control se ha apacjado debido a
la inactividad.
La lavadora est6 desenchufada.
Ei suministro de agua est6 cerrado.
Los controles no est6n ajustados
correctamente.
La tapa est6 abierta
El disyuntor ha saltado o el fusible se ha
fundido.
Se debe reiniciar ei control.
No se presion6 START/PAUSE despu_s de
ajustar un cicio.
La presi6n dei agua es extremadamente
baja.
La lavadora est6 demasiado fria.
El fiitro est6 taponado.
Las mangueras de entrada pueden estar
retorcidas
Eficiencia enercj_tica.
Insuficiente suministro de agua.
La tapa de ia iavadora est6 abierta.
Las mangueras de entrada de acjua fria y
caliente est6n invertidas.
Ei nivei de acjua est6 demasiado bajo.
ii!iJi i! i!!i! i!!i!!i i! i i !i!i!iiii i ii!!i!iii!ii!ii!i!ii!iiiii!ii!ii!ii!ii!ii!ii!ii!ii!ii! !! ! !ii!ii!ii!ii!ii!ii!ii!ii!i ii i!i i iii!i!i i! i! i! i! i! i! i! i! i! i! ii iiii!iiii!iiiii!ii!ii! i!iiiiiiiiiiiiiii!ii!iiiii!ii!ii i ! i i i i ! ! ! ! i!i!!!i!i!i!ii!ii!iiiiiiiiiiiiiiiiiiiiiiiiiiiiiiiiii!i!!!!!i!!i!!i!!i!!i!i!i!!!!!!!!i! !!i!i!i!i!iiii i 12!i i i !i iii! i i !ii !! !ii!i!! i!ii!ii ii ii!!!!!i ii ii ii ii ii i! ! ii i i iii ii !i ii ii ii ii ii ii ii ii ii illi i iii ii ii iiiiiii iiiiiiiiiiiiiiiiiiiiiiiiiiiiiiiiiiiiiiiiiiiiiiiiiiiiiiiiiiiiiiiiiiiiiiiiiiiiiiiiiiiii i! !!iiii i !ii!i ! i!i!i !! !i !! ! !i i!i !i !i ii ii iiiiiiiiiiiiiiiiiiiiiiiiiiiiiiiiiiiiiiiiiiiiiiiiiiiiiiiiiiiiiiiiiiiiiiiiiiiiiiiiiiiiiiiiiiiiiiiiiiiii!i!i!
Esto es normal. Presione el bot6n POWER para
prender ia iavadora.
AsegOrese de que el cable est6 correctamente
enchufado en una toma de corriente que funcione.
Abra completamente ias dos iiaves de acjua fria y
caliente.
Aseg0rese de que el cicio se ajust6 correctamente,
cierre la tapa y presione el bot6n START/PAUSE.
La lavadora no funcionar6 si la tapa est6 abierta.
Cierre ia tapa y aseg0rese de que no hay nada
atascado bajo ia tapa que impida que se cierre
completamente.
Compruebe los disyuntores y fusibies de la casa.
Sustituya los fusibies o reinicie ei disyuntor. La
iavadora deber/a estar en un ramal de circuito
dedicado. La iavadora continuar6 ei cicio en ei iucjar
en que se detuvo una vez restaurada ia aiimentaci6n.
Presione el bot6n POWER, luego vuelva a seleccionar
ei cicio deseado y presione ei bot6n START/PAUSE.
Presione el bot6n POWER, luego vueiva a seleccionar
ei cicio deseado y presione ei bot6n START/PAUSE.
La iavadora se apagar6 si no se presiona ei bot6n
START/PAUSE despuSs de cuatro minutos.
Compruebe otra iiave de la casa para asecjurarse de
que la presi6n del acjua es la adecuada.
Si la lavadora ha estado expuesta a temperaturas
por debajo del punto de congelaci6n durante un
periodo prolongado de tiempo, permita que se
caJiente antes de presionar el bot6n POWER. En otro
caso, la pantalla no se prender6.
Aseg0rese de que los filtros de entrada de las
v61vulas de Ilenado no est6n taponados. Consulte las
instrucciones de limpieza de filtros.
Compruebe que ias mancjueras de entrada no est6n
retorcidas ni atascadas.
Esta es una lavadora enercj_ticamente eficiente.
Por Io tanto, los ajustes de temperatura para esta
lavadora pueden ser distintos de las lavadoras que
no son eficientes enercj_ticamente.
Asecj0rese de que las iiaves de acjua fria y caliente
est_.n completamente abiertas.
La iavadora no funcionar6 si la tapa est6 abierta.
Cierre ia tapa y aseg0rese de que no hay nada
atascado bajo ia tapa que impida que se cierre
compietamente.
Compruebe ias conexiones de ias mangueras de
entrada. AsecjOrese de que el suministro de agua
cafiente est6 conectado a la v61vula de entrada de
acjua caJiente y de que el suministro de acjua fria est6
conectado a la v61vula de entrada de acjua fria.
Esta lavadora es de aita eficiencia. Normaimente el
acjua no cubrir_ las prendas. El nivel de lienado est_
optimizado para el movimiento de lavado y, de esta
manera, Iograr el mejor rendimiento de lavado.
63
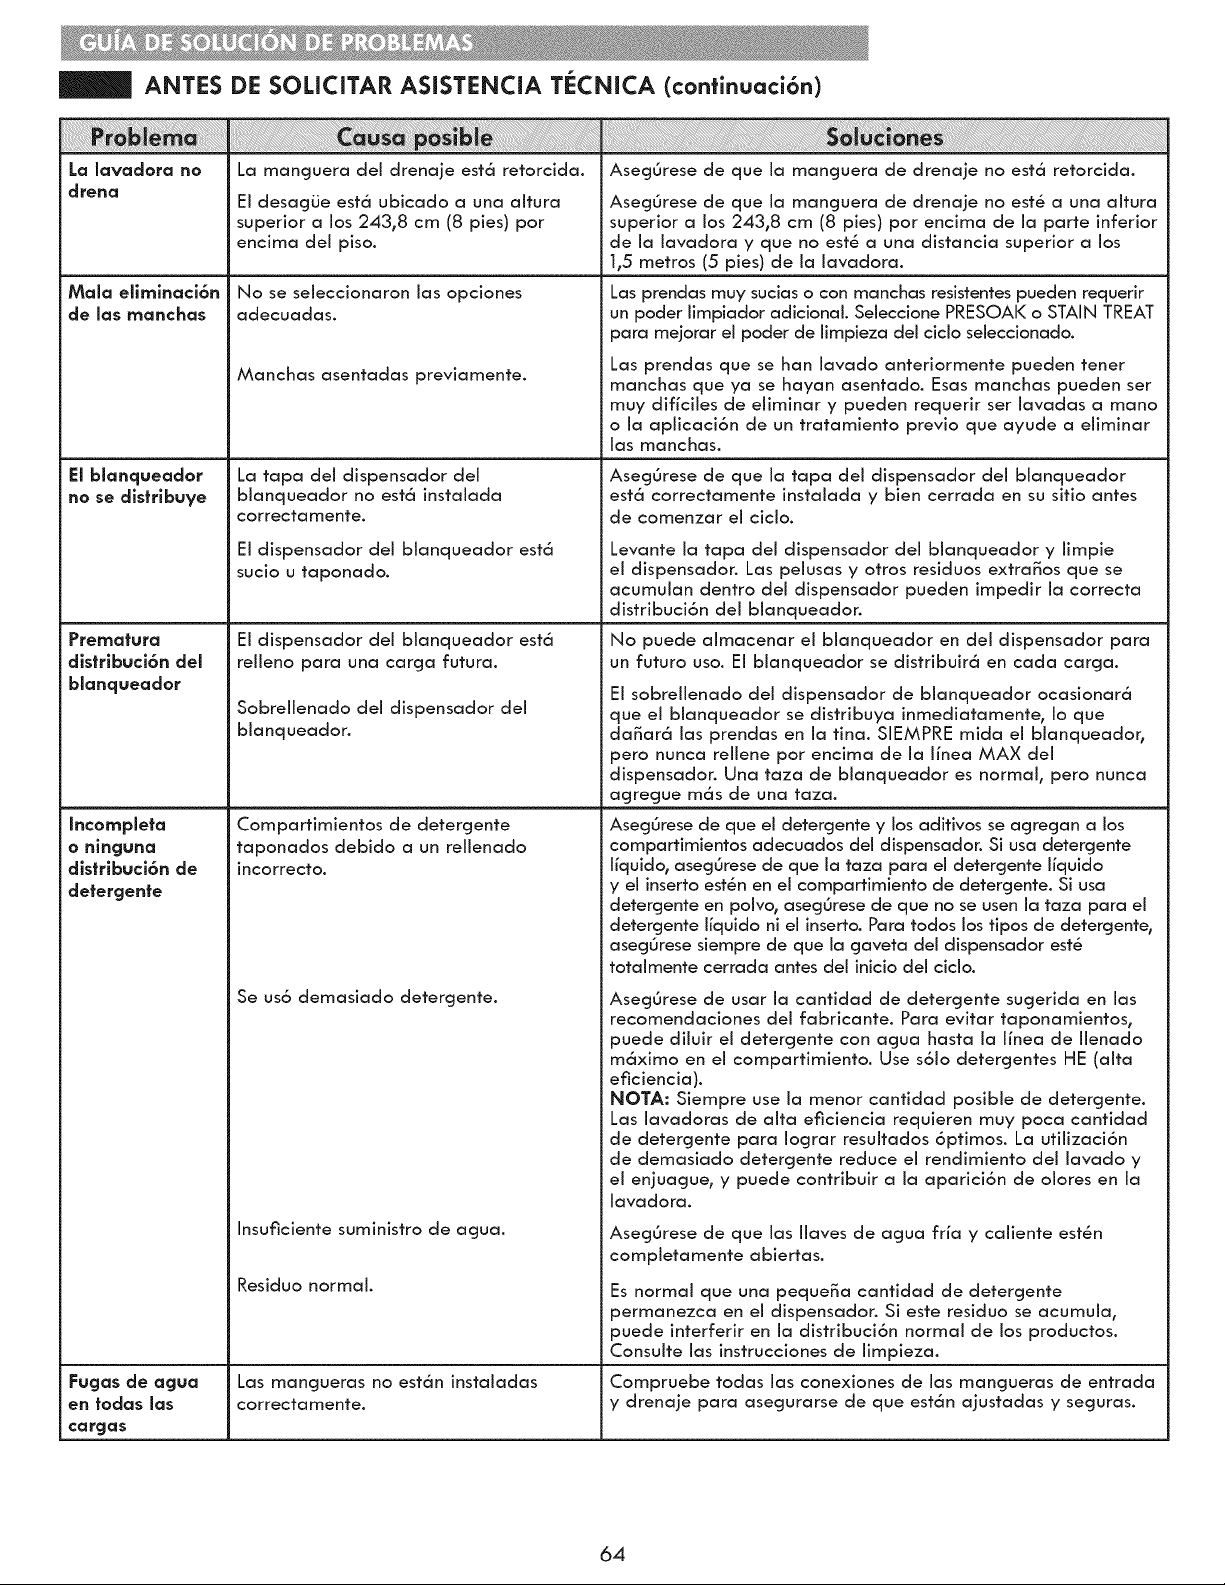
ANTES DE SOLICITAR ASiSTENCIA TECNICA (confinuaci6n)
La lavadora no
drertci
Mala ellmlnaci&n
de las manchas
El blanqueador
no se dlsfrlbuye
Prematura
dlstrlbuci6n del
blanqueador
Incompleta
o nlnguna
dlstrlbuci6n de
detergente
Fugas de agua
en todas las
cargas
i!_i;i;i;i!_!i!_i_i_i_i_i_i_i!i_iiiiiiii_iiiiii!!_iiii_iiiiiiiiiiiii!!_ii_iiiiiiiiiiiii_ii_iiii_i_i_i_i_i_i_i_i_iiiiiii_iiiiiiiiiiiiiiiiiiiiiiiiii_i_i_i_i_i!i!_!_i_;_;_i_i_i!!!!i!i_i_i_ii_ii_ii_ii_i_i!_i_i_i_i_!_iii_i_iii!!!_iiiiiiiiii!_!illiiii_ii_i!;_i_!iiiiii_i_iiiiiiiiiiiiiiiii_i_ii_ii_iiiii!_iiiii!_!i_ii!i_;_:_:_:_::_!_!_;_!_i_i_!_iiii_iiiiiiiiiiiiiiiiiiiiiiiii_i_ii!!_ii!ii_iiiiiiiiiiii!!_ii_iiiiii!!_iiiiiiiiiiiiiiiii_iiiiiiiiiiiiii_iiiiiiiiiiiii!!__!ii_i_i
i_i_i_;_i_iiiii_i!ii_i!_iiii!_i!_i!_i_ii_ii_iii_iii_i_!_ii_ii_ii_ii_iii_ii_ii_ii_ii_iii_ii_!i_!!!!!_i_!_i_i_i_i_ii_ii_i_i_!!!i!_!_!_ii_i_ii_ii_ii_ii_Ca_u_!!s__Q!ii_ii_i_i!!_P:_:i!:!!_1ibI_i_!_!i!iii_i_ii:i_i_i_i_i_i_!_iiiiiiiiii!!!_iiiiiiiii!_i_i!ii!i_i_!_ii_!_i_i_i_i_i_!_!ii_i!!_!!_i_!!_ii_i_i_i!_
La manguera dei drenaje est6 retorcida.
El desacjLie est6 ubicado a una altura
superior a los 243,8 cm (8 pies) por
encima del piso.
No se seleccionaron ias opciones
adecuadas.
Manchas asentadas previamente.
La tapa del dispensador del
blanqueador no est6 instalada
correctamente.
Ei dispensador dei bianqueador est6
sucio u taponado.
Ei dispensador dei bianqueador est6
relleno para una carga futura.
Sobrellenado del dispensador del
bianqueador.
Compartimientos de detergente
taponados debido a un rellenado
incorrecto.
Se us6 demasiado detergente.
Insuficiente suministro de agua.
Residuo normal.
Las mangueras no est6n instaladas
correctamente.
iiii!iii_i_i_i_i_i_i_i_i_i_i_iii_i_i_i_iii!iiiiiiiiiiiiiiiiiiiiii!i!iii_iiiil!ilfillillilliiiiiiiiiilliiiiiii!iiiilliiiilliiiiiiiiiiiiiiiiiiiiiiiiiiiiiiiiiiiiiiiiiiiiiiiiiiiiiiiiiiiiilliiiiiiiiiiiiiiii!!!iiiiiii!iiiiiiiiiiiiiiiiiiiiiiiiiiiiiiiiiiiiliiiiiiiiiiiiiiiiiiiiiiiiiiiiiiiiiiiiiiiiiiiiiiiiiiiiiiiiiiiiiiiiiiiiiiiiiiiiiiiiiiiiiiiiiiiiiiiiiiiiiiiiii7:::i_i_i_!i!iili_i_iii;ii;ii_!;_iii;iii!i!iiiiiiiiiiii!i_i:i:ii!!iiiii!i!!i!!i!iiiiiiii!i!iii!!i!i!iiliiiiliiiiiill!i!i_i!i¸ill¸iiiiiiiiiiiii;iiilii!iiilii!iiiiiiiiiiiiiiiiiiiiiiiiiiiiiiiiiiiiiiiiiiiiiiiiiiiiiiiiiiiiiiiiiiiiiiiiiiiiiiiiiiiiiiiiiiiiiiiiiiiiiiiiiiiiiiiiiiiiiiiiiiiiiiiiiiiiiiiiiiiiiiiiiiiiiiiiiiiiiiiiiiiiiiiiiiiiiiiiiiiilliiiiiiiiiiiiiiii!!!iiiiiiiiiiiiiiiiliiiiiiiiiiiiiiiiiiiiiiiiiiiiiiiiiiiiiiiiiliiiiiiiiiiiiiiiiiiiiiiii!i!i!i!i!i!iiiiilliiiiiiii;;ii!!ji
iii!iiiii_!i_i_iiiiiiiiii_iiii_i_i!_i_i_!_i_i_i_ii!i!_i_!_!i!i!i!i!i!i!i!i!i!i!i_!!ii!_!_ii_iiii_i_!_i_iii_ii_i_!_i_i_ii_i_i_i_iiiiiiiiii_ii_iii_iii_ii_!!!_!_!!!_i_!i_i_!i_i_i_!;_i_!i!ii_i_i_i_i_i_iii_ii_i_!!!i!i_i_i_i_iiii_i_!!_!!!!_!_!_!_!_!_ii_!ii_ii_i_i__i_i_iiii_ii_i_iiiiii_i_i_IS!_i!iui_!i!!i_Oin'e_i!!i!_:i_i!_i!_i_ii_i!_i_i!_i_!_i_!i_i_i_i_i_i_i!ii_ii_i_!;i!_!_!!_!!_i_ii_i_i_i!_i_i_ii_i_iii_!_!!i_i_ii_i_i_i_i!_iiii_i_!_i_ii!_iiii_ii_i!i!_i_i_!_i_iii_iii_ii_i!_iii!!!_!;i_!_i_!_!!ii_!_i_i_i_iiii_i_ii_ii_i_!_i_!_i_!!_!!_!_i,_!,_i_i_i!_i!_i_!_i!_i_ii_!i_i_!ii_ii_iliiiii_i_i_i_i_iiii_ii_
AsegOrese de que la manguera de drenaje no est6 retorcida.
AsegOrese de que la manguera de drenaje no est_ a una altura
superior a los 243,8 cm (8 pies) por encima de la parte inferior
de la lavadora y que no est_ a una distancia superior a los
1,5 metros (5 pies) de la lavadora.
Las prendas muy sucias o con manchas resistentes pueden requedr
un poder limpiador adicional. Seleccione PRESOAK o STAIN TREAT
para mejorar el poder de limpieza del ciclo seleccionado.
Las prendas que se ban lavado anteriormente pueden tener
manchas que ya se hayan asentado. Esas manchas pueden ser
muy dificiles de eliminar y pueden requerir ser lavadas a mano
o la aplicaci6n de un tratamiento previo que ayude a eliminar
las manchas.
Aseg0rese de que ia tapa dei dispensador del blanqueador
est6 correctamente instalada y bien cerrada en su sitio antes
de comenzar eI cicIo.
Levante ia tapa del dispensador dei bianqueador y limpie
ei dispensador. Las peiusas y otros residuos extra_os que se
acumuian dentro dei dispensador pueden impedir ia correcta
distribuci6n del blanqueador.
No puede almacenar el blanqueador en del dispensador para
un futuro uso. EI bianqueador se distribuir6 en cada carcja.
Ei sobrellenado dei dispensador de bianqueador ocasionar6
que ei blanqueador se disfribuya inmediatamente, io que
daSar6 ias prendas en ia tina. SIEMPRE mida ei bianqueador,
pero nunca reiiene por encima de la iinea MAX dei
dispensador. Una taza de bianqueador es normal, pero nunca
agregue m6s de una taza.
AsegOrese de que el detergente y los aditivos se agregan a los
compartimientos adecuados del dispensador. Si usa detergente
liquido, asegOrese de que la taza para el detercjente liquido
y el inserto est_n en el compartimiento de detergente. Si usa
detercjente en polvo, asegOrese de que no se usen la taza para el
detergente liquido ni el inserto. Para todos los tipos de detercjente,
asegOrese siempre de que la gaveta del dispensador est_
totalmente cerrada antes del inicio del ciclo.
AsegOrese de usar ia cantidad de detergente sugerida en ias
recomendaciones dei fabricante. Para evitar taponamientos,
puede diiuir ei detercjente con acjua hasta ia iinea de ilenado
m6ximo en ei compartimiento. Use s6io detercjentes HE (aita
eficiencia).
NOTA: Siempre use ia menor cantidad posibie de detergente.
Las iavadoras de aita eficiencia requieren muy poca cantidad
de detergente para iograr resultados 6ptimos. La utiiizaci6n
de demasiado detergente reduce el rendimiento del lavado y
ei enjuague, y puede contribuir a ia aparici6n de oiores en ia
iavadora.
AsegOrese de que ias iiaves de agua fria y caiiente est_n
compietamente abiertas.
Es normal que una peque_a cantidad de detergente
permanezca en el dispensador. Si este residuo se acumuJa,
puede interferir en Ja distribuci6n normal de los productos.
ConsuJte Jas instrucciones de Jimpieza.
Compruebe todas ias conexiones de ias mangueras de entrada
y drenaje para asegurarse de que est6n ajustadas y seguras.
64
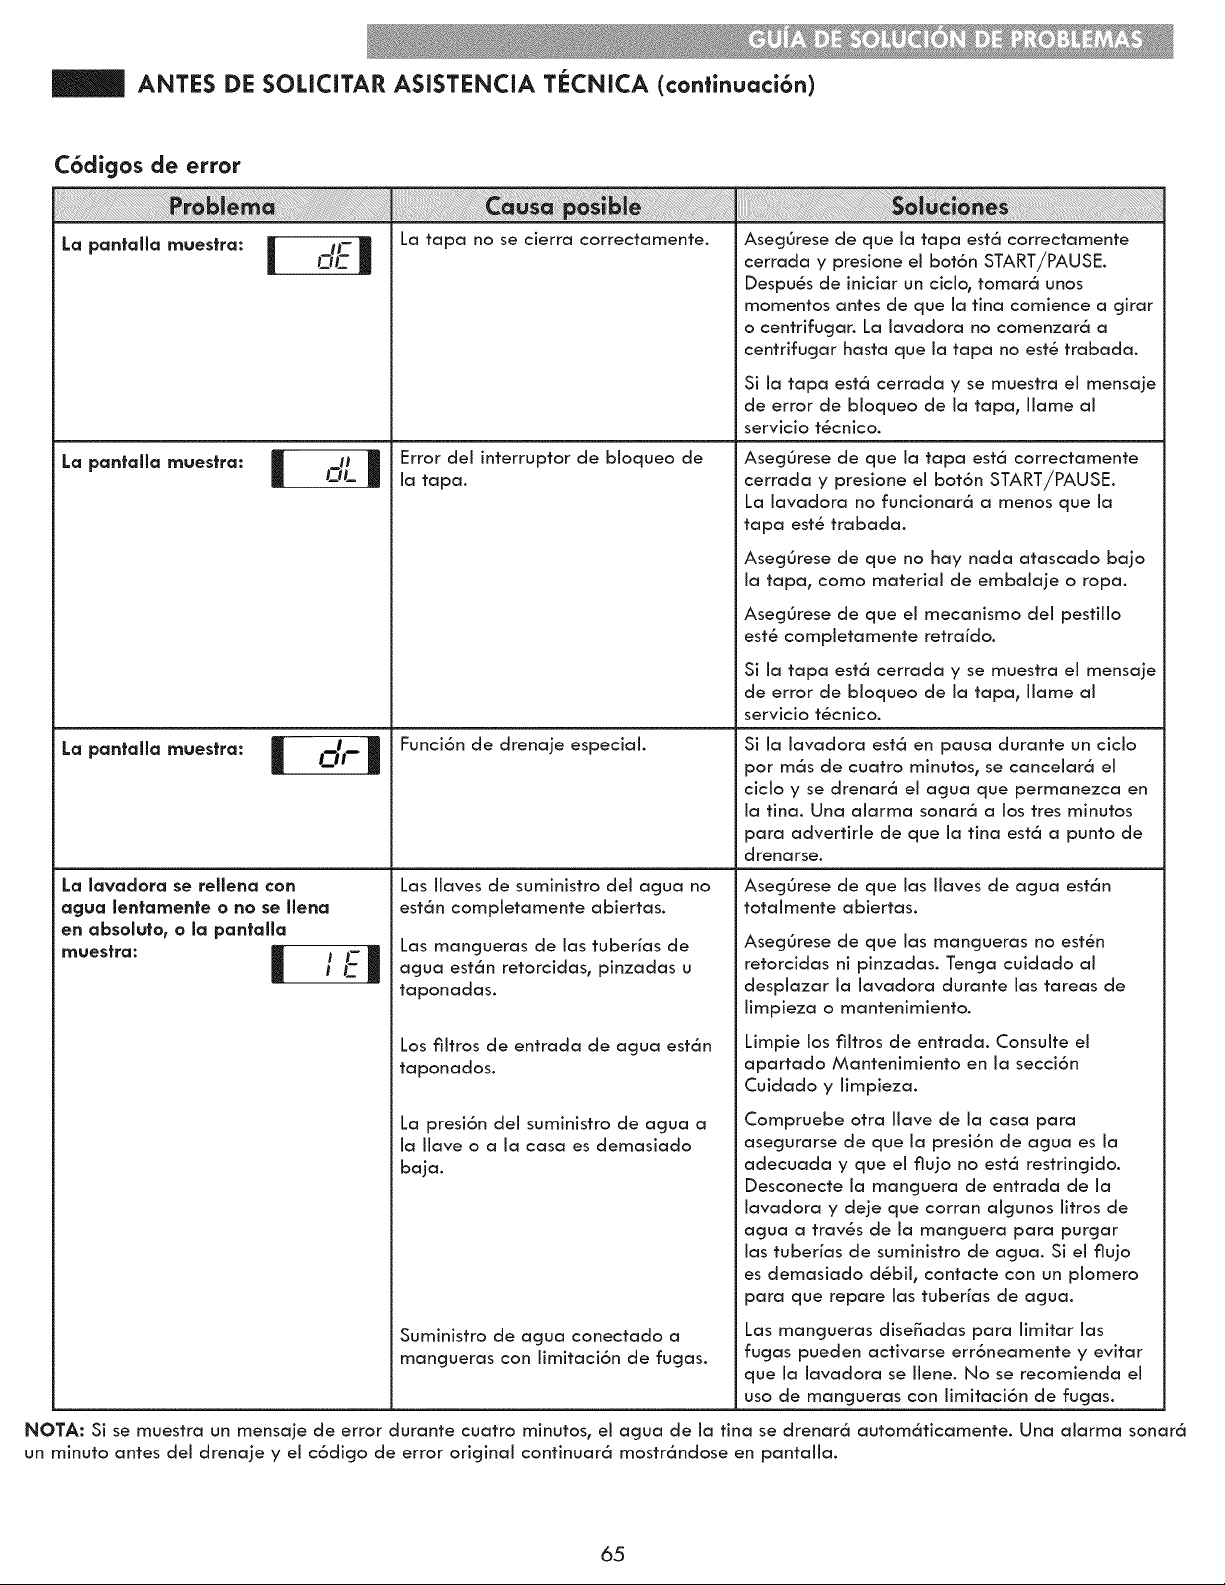
ANTES DE SOLICITAR ASISTENCIA TECNICA (confinuaci6n)
C6digos de error
La pantaIla muesfra: I II-,:,:|
La pantalla muestra:
La pantalla muestra: I i
! i i!i i !ii i! !! i i i i ii i ! i ii!i!i!iii!iiiii!ii i!i!iiiiii!iiiiiiiii!!iiii i!ii!!!!!!! i i! ! i!i!iii!i!iiiiiiiiiii i!i! i i !ii!ii!ii!iiii ii iii i i :
La tapa no se cierra correctamente.
La lavadora se rellena con
agua lentamen|e o no se llena
en absolu|o, o la pantalla
mueslr.: I / El
Error del interruptor de bloqueo de
la tapa.
Funci6n de drenaje especial.
Las Ilaves de suministro del acjua no
est6n completamente abiertas.
Las mancjueras de las tuberias de
agua est6n retorcidas, pinzadas u
taponadas.
Los filtros de entrada de agua est6n
taponados.
La presi6n del suministro de agua a
la Ilave o a la casa es demasiado
baja.
Suministro de acjua conectado a
mancjueras con limitaci6n de fucjas.
iiiii_!_:_:_:_:_:_:_:_:_:_iiii:_11122:!;_;_ii!iii_!i_i_i_i_ii_iiiiiiiiiiiii_!_!i!i!i!!_iiiiiiiiiiiiiiiiiiiiiiiiiiiiiiii_i!_!i_ii_iiiiiiiii_iiiiiiiiiiiii:_i!_!_i_i_ii!i_i_i_i_i_i_!i_iiiiii_!i_i_il'_'i!!ililiiii!iiii_!i:i!i!_!!i!!iiiili!i!i!iii,i_ii!!iiiiiiiiiiiiiii_ii!!iii_i_iiiiiiiiiiiiiiiiiiiiiiiiiiiiiiiiiiiiiiiiiiiiiiiiiiiiiiiiii_!_ill!!_iiiiiiiiiiiii_i!_iii_ii!_iiiiiiiiii_i!_iiiiiiiii_ii!_iiiiiiiiiiiiiiiiiiiiiiiiiiiiiiiiiiii_i_i_!_!iii_i_i_i_:i:_:_!!
AsegOrese de clue la tapa est6 correctamente
cerrada y presione el bot6n START/PAUSE.
Despu_s de iniciar un ciclo0 tomar6 unos
momentos antes de que la tina comience a girar
o centrifugar. La lavadora no comenzar6 a
centrifugar basra que la tapa no est_ trabada.
Si la tapa est6 cerrada y se muestra el mensaje
de error de bioqueo de la tapa, Ilame al
servicio t_cnico.
AsegOrese de que la tapa est6 correctamente
cerrada y presione el bot6n START/PAUSE.
La lavadora no funcionar6 a menos que la
tapa est_ trabada.
AsegOrese de que no hay nada atascado bajo
la tapa, como material de embalaje o ropa.
AsegOrese de que el mecanismo del pestillo
est_ completamente retraido.
Si la tapa est6 cerrada y se muestra el mensaje
de error de bioqueo de la tapa, Ilame al
servicio t_cnico.
Si la lavadora est6 en pausa durante un ciclo
por m6s de cuatro minutos, se cancelar6 el
ciclo y se drenar6 el acjua que permanezca en
la tina. Una alarma sonar6 a los tres minutos
para advertirle de que la tina est6 a punto de
drenarse.
AsegOrese de que las Ilaves de agua est6n
totalmente abiertas.
AsegOrese de que las mancjueras no est_n
retorcidas ni pinzadas. Tencja cuidado al
desplazar la lavadora durante las tareas de
limpieza o mantenimiento.
Limpie los filtros de entrada. Consuite el
apartado Mantenimiento en la secci6n
Cuidado y limpieza.
Compruebe otra Ilave de la casa para
asecjurarse de que la presi6n de acjua es la
adecuada y que el flujo no est6 restrincjido.
Desconecte la mancjuera de entrada de la
lavadora y deje que corran aicjunos litros de
acjua a trav_s de la mancjuera para purcjar
las tuberias de suministro de acjua. Si el flujo
es demasiado d_bil, contacte con un plomero
para que repare las tuberias de acjua.
Las mangueras dise_adas para limitar las
fugas pueden activarse err6neamente y evitar
que la lavadora se Ilene. No se recomienda el
uso de mangueras con limitaci6n de fucjas.
NOTA: Si se muestra un mensaje de error durante cuatro minutos, el agua de la tina se drenar6 autom6ticamente. Una alarma sonar6
un minuto antes del drenaje y el c6dicjo de error oricjinai continuar6 mostr6ndose en pantalla.
65
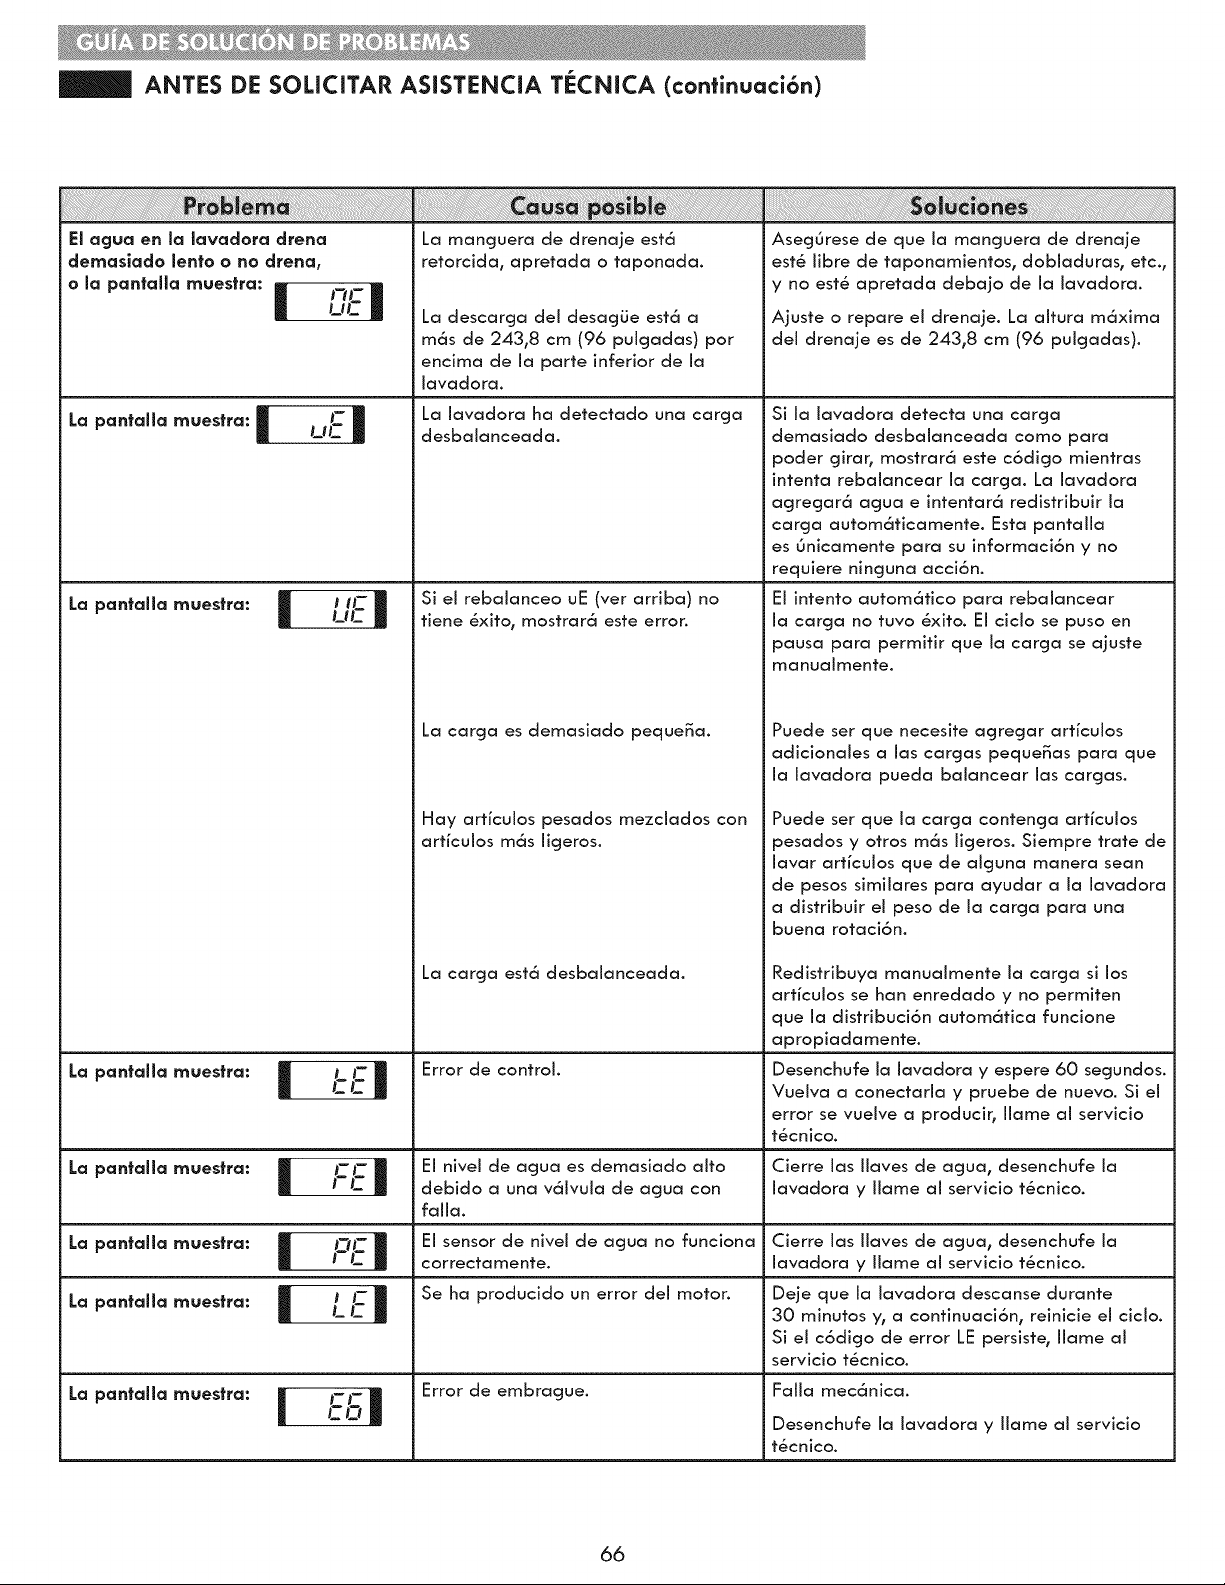
ANTES DE SOLICITAR ASiSTENCIA T_:CNICA (continuaci6n)
La pantalla muestra:I uL--
La pclntalla muestra:
La pclntalla muestra:
La pclntalla muestra:
La pclntalla muestra:
La pclntalla muestra:
La manguera de drenaje est6
retorcida, apretada o taponada.
La pantalla muestra:
La descarcja dei desagLie est6 a
m6s de 243,8 cm (96 puigadas) por
encima de ia parte inferior de ia
iavadora.
La lavadora ha detectado una carcja
desbalanceada.
Si ei rebaianceo uE (ver arriba) no
tiene _xito, mostrar6 este error.
La carga es demasiado peque_a.
Hay articulos pesados mezciados con
articulos m6s licjeros.
La carcja est6 desbalanceada.
Error de control.
Ei nivel de agua es demasiado alto
debido a una v61vula de agua con
faiia.
Ei sensor de nivei de acjua no funciona
correctamente.
Se ha producido un error dei motor.
Error de embracjue.
!!!!!!!!!!!!!!!!!!! ! i i!i!!i ! i i!! !! !! !! !i ii ii ii i! !i i!iiiiiiiiiiiiiiiiiiiiiiiiiiiiiii i i! ! !i! ! !i! ! !i illi i i iii i iiill! ! !! i i!i i!i!ii! !ii! ii i! ii iiii!i i!iiiiiiiiiiiiiiiiiiiiiiiiiiiiiiiiiiiiii iiiiiiiiiiiiiiiiiiiiiiiiiiiiiiii!i! i !! !i!!i! ! ! i ii ii ! i ! !! !i!!!!!! !i!! !! ! i!i!i ii ii ii ii ii ii iiiiiiiii!i!!!!!i!!i!!i!!i!!i!!i!!i!i!i!iii!iiiiiiiiiiiiiiiiiiiiiiiiiiiiiii i! ! !!!!!!i!i!iii!i!ii!ii!ii!iiiiiiiiiiiiiiiiiiiiiiiiiiiiiiiiiiiiiiiiiiiiiiiiiiiiiiiiiiiiiiiiiiiiiiiiiiiiiiiiiiiiiiiiiiiiiiiiiiiiiiiiiiiiiiiiiiiiiill iiiiiiiiiiiiii!i i!i i
Aseg0rese de que ia manguera de drenaje
est_ libre de taponamientos, dobladuras, etc.,
y no est8 apretada deba]o de la lavadora.
Ajuste o repare ei drenaje. La aitura m6xima
dei drenaje es de 243,8 cm (96 puicjadas).
Si la iavadora detecta una carcja
demasiado desbalanceada como para
poder cjirar, mostrar6 este c6dicjo mientras
intenta rebalancear la carcja. La lavadora
agrecjar6 acjua e intentar6 redistribuir la
carcja autom6ticamente. Esta pantaila
es Onicamente para su informaci6n y no
requiere nincjuna acci6n.
El intento autom6tico para rebaiancear
la carga no tuvo _xito. El cicio se puso en
pausa para permitir que la carcja se ajuste
manualmente.
Puede ser que necesite agregar articulos
adicionales a las cargas peque_as para que
ia iavadora pueda baiancear ias cargas.
Puede ser que la carcja contenga articulos
pesados y otros m6s ligeros. Siempre trate de
iavar articuios que de aiguna manera sean
de pesos simiiares para ayudar a ia iavadora
a distribuir ei peso de ia carga para una
buena rotaci6n.
Redistribuya manualmente la carga si los
articulos se han enredado y no permiten
que ia distribuci6n autom6tica funcione
apropiadamente.
Desenchufe ia lavadora y espere 60 segundos.
Vueiva a conectaria y pruebe de nuevo. Si ei
error se vueive a producir, iiame ai servicio
t_cnico.
Cierre ias iiaves de acjua, desenchufe ia
iavadora y iiame ai servicio t_cnico.
Cierre ias iiaves de acjua, desenchufe ia
iavadora y iiame ai servicio t_cnico.
Deje que la lavadora descanse durante
30 minutos y, a continuaci6n, reinicie el ciclo.
Si el c6dicjo de error LE persiste, llame al
servicio t_cnico.
Falla mec6nica.
Desenchufe ia iavadora y iiame ai servicio
t_cnico.
66
f
Garanfia limitada de Kenmore Elite
Si, tras ser instalado, operado y mantenido seg0n todas las instrucciones incluidas con el producto, este
electrodom_stico fallara debido a un defecto de materiaJes o mano de obra dentro del a_o de la fecha de compra,
Ilame al 1-800-4-MY-HOME ® para solicitor su reparaci6n cjratuita.
Si este electrodom_stico fuera utilizado con fines distintos a los dom_sticos, esta cjarantia s61o seria apiicabie durante
90 dias desde la fecha de compra.
Esta garanffa cubre _nlcamente los defectos de materlal y mano de obra. Sears NO pagar6:
1. Elementos consumibles que puedan cjastarse debido al uso normal, inciuyendo entre otros, los filtros, correas,
bombitas de luz y sacos.
2. Un t_cnico de servicio para mostrar al usuario la instalaci6n0 funcionamiento o mantenimiento correctos del producto.
3. Un t_cnico de servicio para realizar labores de limpieza o mantenimiento del producto.
4. Da_os o faflas como consecuencia de no secjuir todas las instrucciones de instalaci6n, funcionamiento o
mantenimiento inciuidas con el producto.
5. Da_os o {:alias en caso de accidente, abuso, uso inadecuado o uso con prop6sitos distintos a los fines para los que
fue dise_ado.
6. Da_os o fallas de este producto provocados por el uso de detergentes, limpiadores0 quimicos o utensilios diferentes
de los recomendados en todas las instrucciones suministradas con el producto.
7. Da_os o fallas de piezas o sistemas como resultado de modificaciones sin autorizaci6n hechas a este producto.
Descargo de responsabilldad de garanffas impffcffas; llmffaci6n de acclones legales
Los 6nicas y exciusivas acciones iegaies dei ciiente bajo esta garantia limitada ser6n ia reparaci6n dei producto
como se se_aia aquL Los cjarantias impiicitas, inciuyendo garantias de comerciabilidad y aptitud para un objetivo
particular, se encuentran iimitadas a un a_o o ai periodo m6s corto permitido por ia iey. Sears no ser6 responsable
de da_os incidentaies o resuitantes. Aigunos estados no permiten ia exciusi6n o iimitaci6n de da_os o iimitaciones
incidentaies o resuitantesr o iimitaciones sobre la duraci6n de garanfias implicitas o de comerciabilidad o aptitud0
por io tanto ias iimitaciones o exciusiones anteriores pueden no apiicarse en su caso.
Esta garanfia podr6 apiicarse s6io si este electrodom_stico se utiiiza en los Estados Unidos o Canad6.
Esta garanfia ie otorga derechos iegaies especificos y usted puede contar con otros derechos, que pueden variar de
estado a estado.
Sears Brands Management Corporation, Hoffman Estates, IL 60179
Sears Canada Inc., Toronto, Ontario, Canad6 M5B 2C3
67

68

69

Your Home
For troubleshooting, product manuals and expert advice:
www.managemylife.com
For repair - in your home - of all major brand appliances,
lawn and garden equipment, or heating and cooling systems,
no matter who made it, no matter who sold it!
For the replacement parts, accessories and
owner's manuals that you need to do-it-yourself.
For Sears professional installation of home appliances
and items like garage door openers and water heaters.
1-800-4-MY-HOME ® (1-800-469-4663)
Call anytime, day or night (U.S.A. and Canada)
www.sears.com www.sears.ca
Our Home
For repair of carry-in items like vacuums, lawn equipment,
and electronics, call anytime for the location of your nearest
Sears Parts & Repair Service Center
1-800-488-1222 (U.S.A.)
www.sears.com
1-800-469-4663 (Canada)
www.sears.ca
To purchase a protection agreement on a product serviced by Sears:
1-800-827-6655 (U.S.A.) 1-800-361-6665 (Canada)
Para pedir servicio de reparaci6n
a domicilio, y para ordenar piezas:
1-888-SU-HOGAR ®
(1-888-784-6427)
Au Canada pour service en fran(_ais:
1-800-LE-FOYER M°
(1-800-533-6937)
www.sears.ca
www.sears.com
TM
® Registered Trademark / Trademark of KCD IP, LLC in the United States, or Sears Brands, LLC in other countries
® Marca Registrada / TMMarca de Fabrica de KCD IP, LLC en Estados Unidos, o Sears Brands, LLC in otros paises
MCMarque de commerce / MDMarque deposee de Sears Brands, LLC