
IVFSD60
14 place settings
Alt function

Witheachwashcycle.
Compartment
For pro gramm es with pre-wash only.
(Follow the user instructions !)
Electric indic ator on control pane l (if pro vided).
Check the rinse aid level
Load the baskets
Fill the detergent dispenser
Scrape off any large amount of leftover food. S often remnants of burnt food in pa ns,
then load the baskets. Ref er to thedishwashe r loading instructions.
Switchontheappliance PresstheON/OFFbuttontoswitchontheappliance,Openthedoor.
Quick operation guide
For detailedoperatingmethod read thecorresponding contentontheinstructio nmanual.
Select a p rogramme
Close the door, turn on the water tap and press the . The machine will start working
after about 10 seconds.
Start/Pause Button
Running the dishwasher
Switch off the appliance
Turn off the water tap,
unload the baskets
Warning: wait a few minutes (about 15 minutes) before unloading the dishwasher to avoid handling
the dishes and utensils while they are still hot an d more susceptible to break.
The y will a lsodry better.Unload the appliance, startingfrom the lower basket.
Changing theprogramme
Add forgottendishes in the
dishwasher.
Press the Programm e Button until the selected programme lights up.
( See the section entitled Operationg instruction )“”
When the working cy cle has finished, the buzzer of the
dishwasher will sound 8 times, the n stop.
Turn off the appliance using the ON/OFF Button.
If the appliance is switched
off during a wash cycle.
Op en t he do or car ef ul ly.
Hotst eammay esc ape
when thedoorisopened!
If the appliance is switched off during a wash cycle, when switched
on agai n, plea se re-select the washing cycle and operate the dishwasher
according to the original Power-on state ).
1. A running cycle can o nly be modified if it has been running for a short time. Otherwise the deterg ent
m ay have already be en released and the water already drained. If this is the case, the detergent
dispenser must be refil led.
2.
Press the Start/Pause button, the machine will be in standby state, press the program
button more than 3 seconds then you can change the program to the desired cycle setti ng
1.Press the Sta rt/Paus e But ton to st op the washing.
2.Open the door a little .
3.After the spray arms stop working, you can open the door
c ompletely.
4.Add forgotten dishes.
5.Close the door
6.Press the St a rt/Pau s e Button, the dishwasher will run
after 10 seconds.

To re view the sec tion on t ro ubleshooting Tip s
willhelpyoutosolve some commonproblems
by yourse lf .
Dear Cus tom er ,
Please carefully readthismanualbeforeusingthe
dishwasher,itwill h elp you touseandmaintainthe
dishwasher pro perly.
Passit on toanysubsequentownerof the app liance.
Thismanualcontains sectionson safetyInstructions,
Operating Instructions, Installat ionI nstructionsand
Trou ble sho o tin g Tips, et c.
The man ufactu rer, f ollowing ap olicy of c on stant
develo pmenta ndu pdating of the product ,may
make m odifications w ithout gi ving prior notice.
K eep it as a r e f er in the later da ys .
Ifyo ucan not solv et hepr oblemsb yyo urself ,
please ask f or t he help o f profe ssional techn ician s.
Th is a ppli ance isin tended t obe used in h ou sehold
andsimilarapplications suchas:
-s taff kitch en a reas in s hop s,off ices and othe r
w orkin genviron me nts ;
-farm hous es;
-b ycli ents inh otel s,mo tels and othe rres idential
t ype e nvironme nt s;
-bedandbreakfast type environments.
Loadingthe basketsaccordingto
(*AS/NZ S20 07.1)
...............
...................................................18,19
Dishwash er Features..................................... ..2
AttentionbeforeorafterloadingtheDishwasher
Baskets......................................................... .6
FilteringSystem.............................................10
Caringf or the Dishwasher................. .... .........11.
A Fill theRinseAidD ispenser............. .. ..3、 ..... .. .
B Functio nofDetergent ........................ .4、 ........
... ... ...... .. 7
Th eM ethod Loadi ngNo rmal D ish ware
WashCycleTable....... ....................................8
Turni ng on t h eApp l ian ce . ... ..... . ... ..... . ... ..... . ... .8
ChangetheProgramme.... .......... ................9....
At theEne of the Wash Cycle ......... .............. ....9
PositioningtheAppliance......... .......... ......... .12..
Wate r Co nnec t i on. ... .. .... ... ....... ... .. .... ... .. ..... ..1 3.
AboutPowerConnection........................ .......12.
Startof dishwasher. .... ......... .................. ......14..
Be fo re cal l ing for s erv ic e. . ... .. .. ... . ... ........ . .. ... . .1 5.
Errorcodes.................................... ..............16.
Tech nica linformation. ........................... .. .....17..
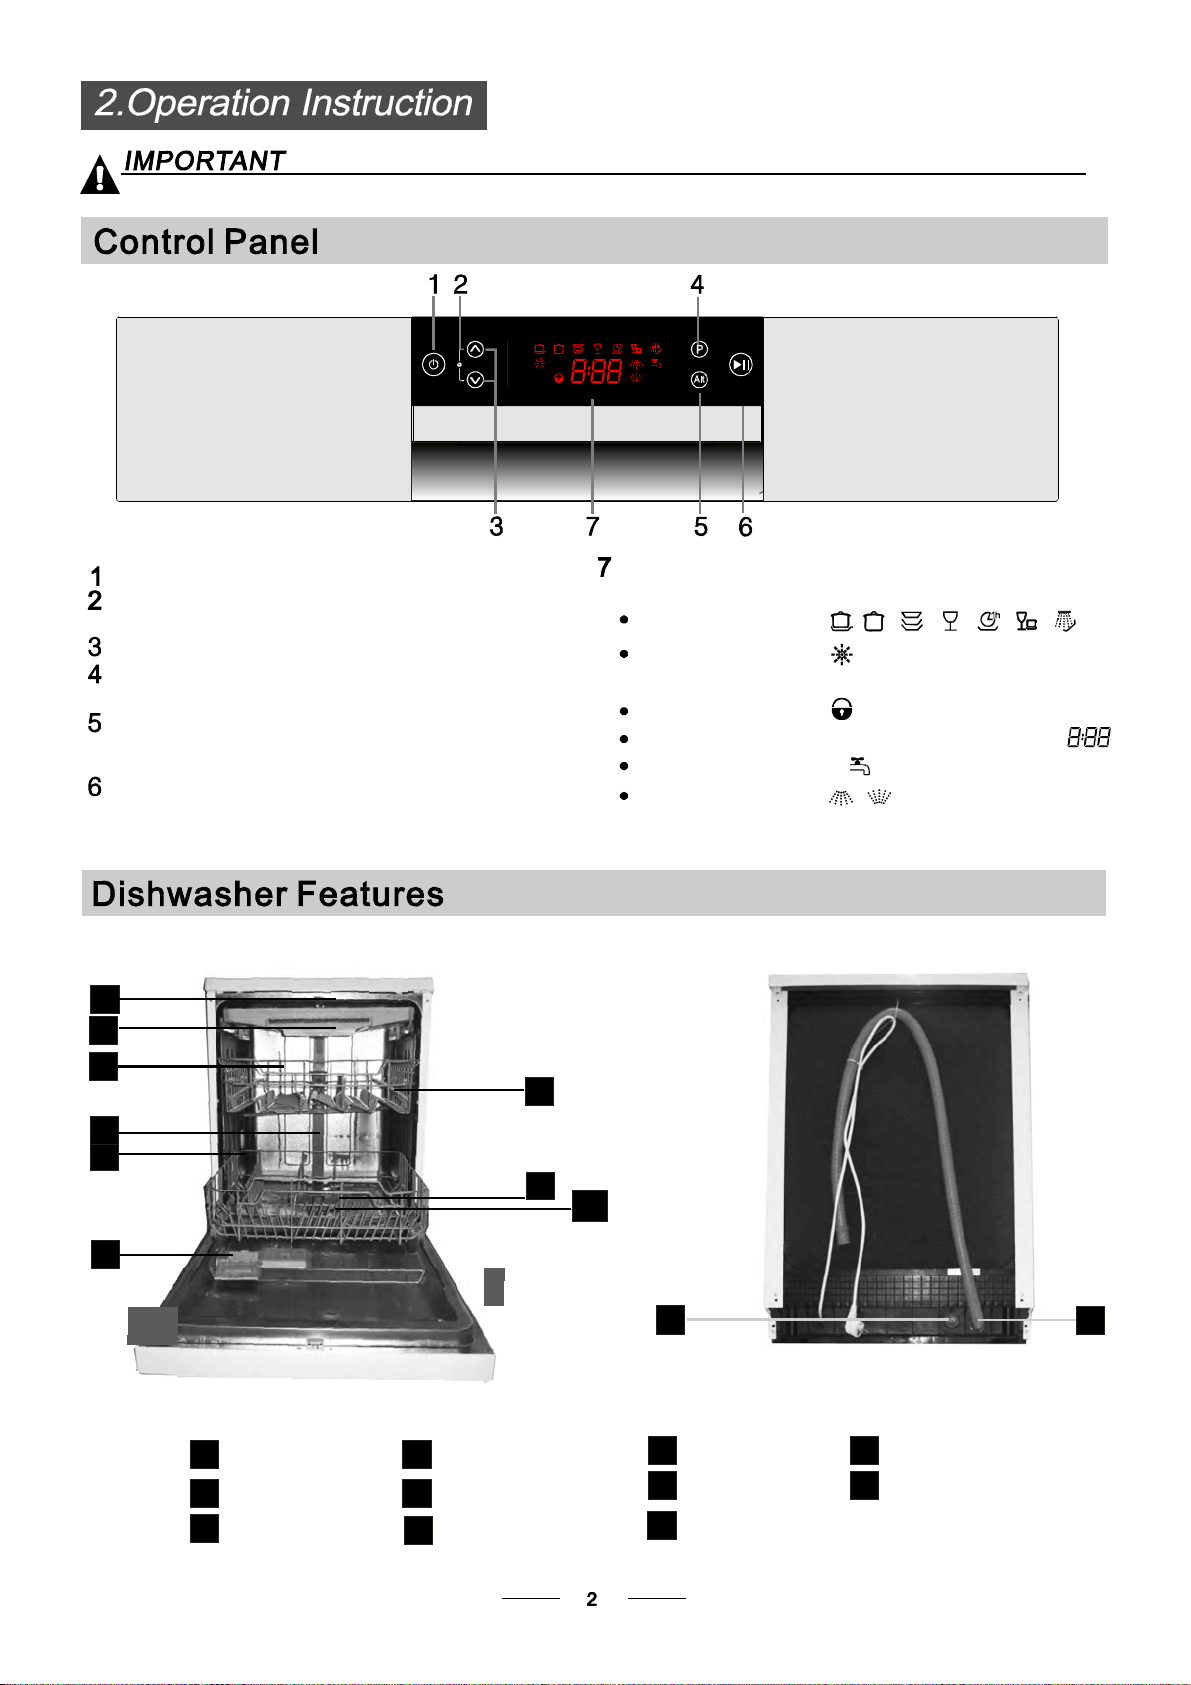
Co ntr ol Pa ne l.. .. ... . ... ....... . ... . .. . ... ... . ........... .. ... ..2

This appliance must be grounded. In the event of a
malfunction or breakdown, grounding will reduce
the risk of anelectric shock by providing a path of
least resist ance of elec tric current. This a ppliance
is equipped with a cord having an equipment-
grounding conductor and a grounding plug.
The plug must be plugged into an appropriate outlet
that is installed and gro unded in accordance with
all local c odes and ordinances.
Keep children away from detergent and rinse aid, keep
child away from the open door of the dishwasher,
there could still be some detergent left inside.
ren
Donotabuse,siton,orstandonthedoorordish
rack of the dishwasher.
Do n ot touch the heating element during or
immediatel y after use.
(This instruction is only applicable to machines
with a visual heating element.)
Do not wash plastic items unless they are marked
dishwasher safe or the equivale nt. For plastic items
n
ot so marked, check the manufacturer's
recommendations.
Use o nly deterge nt and rin se addi tives
desi gn ed for an a utom atic dis hwa sher.
Never us eso ap, laun dryde te rgent ,or h and
washi ng deter gent in you r dis hwa sher.Ke ep
t h ese pr od u cts o ut of th e reach of childr en.
During installat io n,the power su pply m ustn ot
be exce ssive ly or d angerously be nt or flatten ed.
Do not tamper with controls.
Do not place any heavy objects the
door when it is open. The appliance could tip
forward.
on or stand on
When l oading ite ms to be w ashed :
1) L ocate sharp items so t hat they a renot likel y
to damage t he door seal;
2 Warni ng:Kni ves and ot heru tensils with
shar p poin ts must be loade din the bask et
with their points do wn orp laced i n a
horizontal position.
)
W he n usi ngyour di shw asher, yo ush oul d
p rev en t pl a stic items fr o m c oming i n to c ontac t
w itht hehe ati nge lement.(T his inst ruction is only
appli cable to m achi ne s with a v isua lhe atin g
el ement. )
Ifthesupplycordisdamaged, itmustbereplaced
bythemanufactureroritsserviceagentora
simi la rly q ual i fied pers on i n orde r t oav oid a
ha zard .
Plea sed ispose of pa ck ing m aterials properly.
Use the dishwasher only for its intended function.
Remove the door to the washing compartment when
removing an old dishwasher from service or discarding it.
Dishwash erde ter gents are strongl yalkal ine, they
can be extrem el ydangerou sif swallow ed.Avoi d
conta ctwit hskin a ndeyes and kee pch il dren away
fro m the dish was herw hen t he door is ope n.
C heck th at th e det erg ent com parm ent is e mpt y
aft er compl etion o fthe wa shcycle .
The a pplianc ei s to be connec ted to t he water
mains u sing new hose sets and th atol d hose-sets
should no t be reu sed.
The maxi mum nu mb erof pl ace sett ing sto be
was hed i s14 .
The maxi mum pe rmis sible inlet water pressure is
1Mpa .
The mi nimum perm issible inl etw ater press urei s
0.04Mpa .
Children should be supervised to ensure that they do
not play with the appliance.
This appliance is not intended for use by persons
(including children with reduced physical, sensory or
mental capabilities, or lack of experience and
knowledge ,unless they have been given supervision
or instruction concerning use of the appliance by a
person responsible for their safety.
)
When usin g your dishw as he r, fo ll ow the p rec aut ions lis t ed below:
The d oorsh ould n otbe left o pen,
since this coul d increase t heris kof trip ping .
Improper connection of the equipment-grounding
conductor can result in the risk of an electric shock.
Check with a qualified electrician or service
representative if you are in doubt whether the
appliance is properly grounded. Do not modify the
plug provided w ith the appliance; If it does not fit
the outlet. Have a proper outlet installed by a
qualified electrician.
Do not operate your dishwasher unless all
enclosure panels are properly in place. Open
the door very carefully if the dishwasher is
operating, there is a risk of water squirting out.
beforeusingit forthe first time.
To getthe best performance fromyourdi shwasher,read all operatinginstructions
10
11
Ba ck View
1
2
3
4
5
6
7
8
9
Fron t view
Lower basket
Dispenser
Cupshelf
Sp ray a rm s
Fil ter as sembly
Inletpipeconnector
Drain pipe
Upperbasket
Cutlery rack
Top s pray arm
1
I nner pip e
5
6
7
8
9
11
10
3
2
4
On/Off But ton: To tur no n/off th epo wer supply.
Child lock bu tton:p ress t he tw o but tonsf or 3se conds
simultane ously to lock t he progr am.
Dis pla yscreen: to show th eremindi ng tim e
and the s tate (ru nning s ta te, d el ay t ime et c )
Prog ram ind icato rs:
RinseAidindica tor:
Indicate s whe nt hed ispense rneeds t o be refil led.
Child lo c k i n dic a tor:
Dela y tim e , Rem ain ti me ,o re rr or code si nd icat or:
St ar t / Pause but to n:To start the select ed
washing pr ogram o rpa use the w ashing prog ram
when the mach ine i swor king.
Dela y Button : ToP ress the bu tt on to de lay.
Pr og ra m B ut to n: To Pr ess the b ut to n t o sele c t
appr opriate Prog ra m.
Waterfaucet indicator:
Altf uncti on indica tor:
Alt B utton: Dual zone w ash fu nc tion ,pre ss the
button to s elec t either uppe rbask et orl ower ba sket
loade d,an dthe res pon sein dica tor .
Bef or e usi ngy our dishw as herf or the fir st ti me:
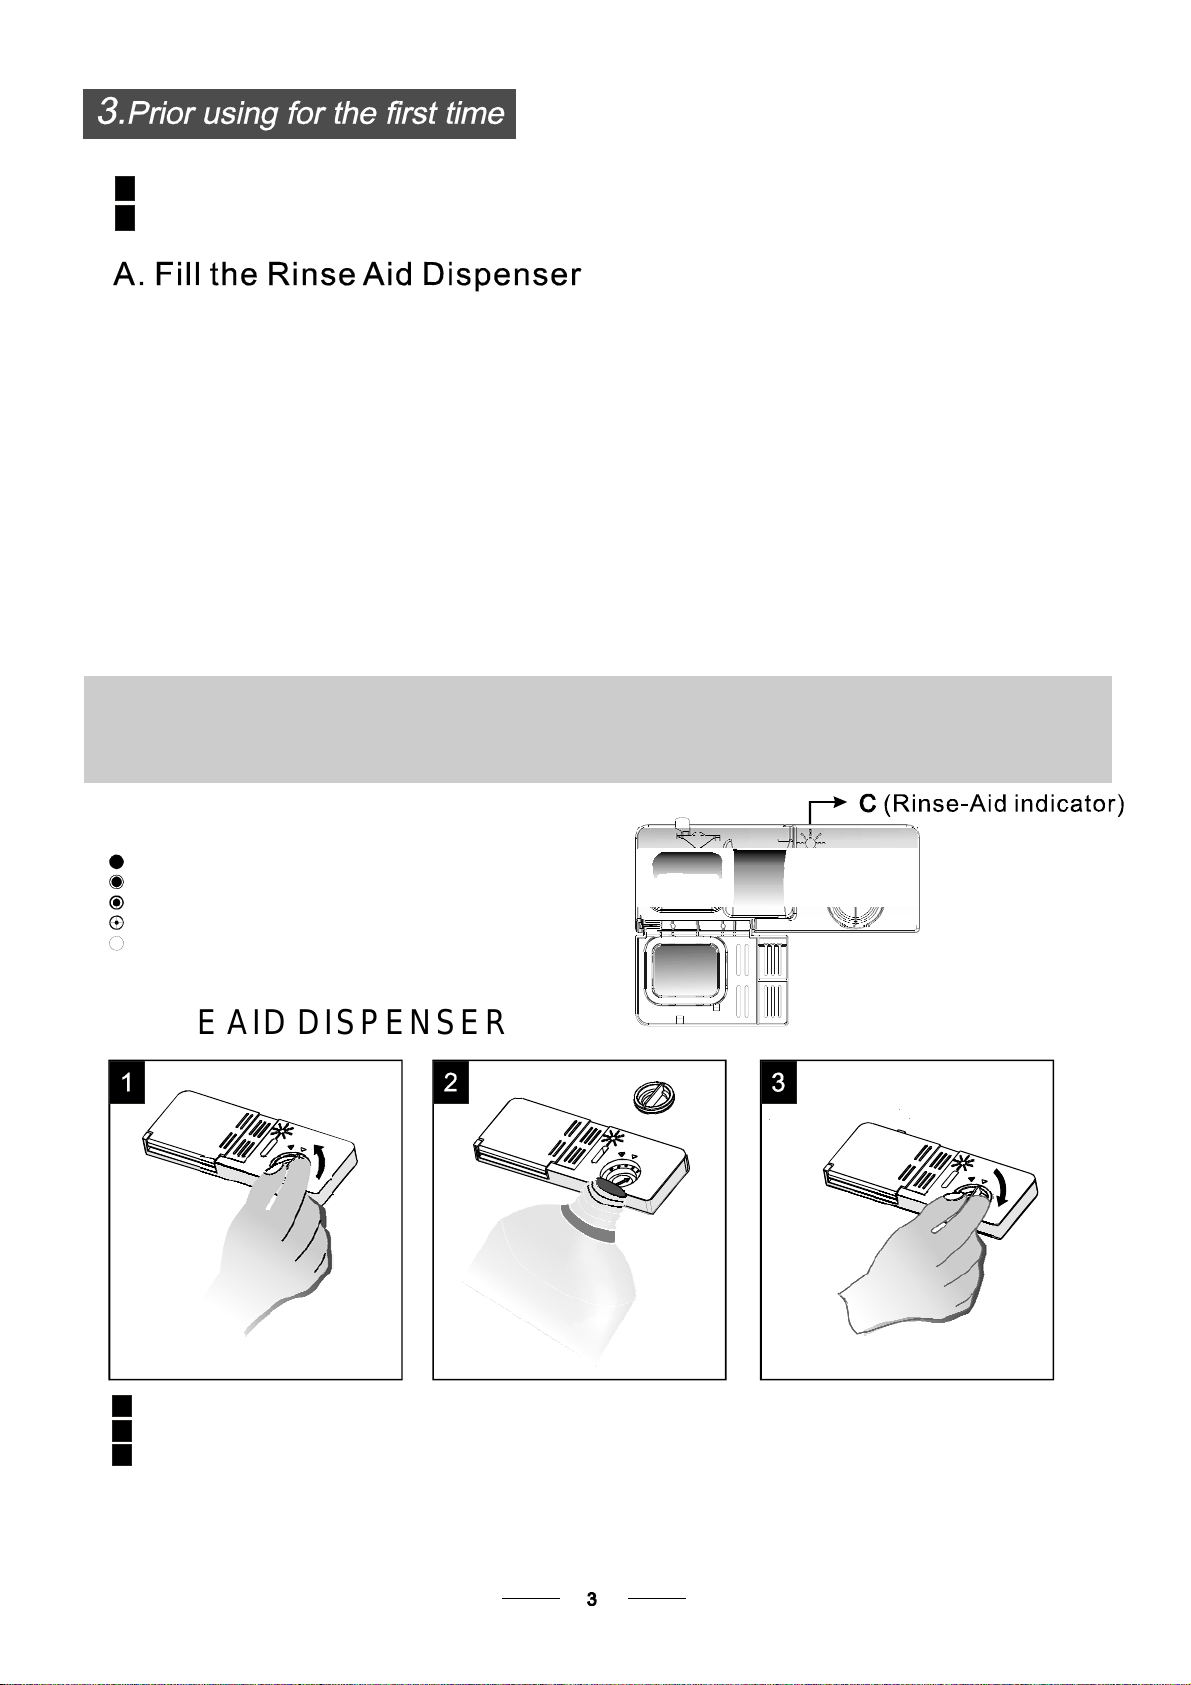
A. Filltherinse aiddispenser
B. F i ll in de te rge nt
Therinse aid isreleasedduringthe finalrinseto prevent water from forming dropletson your dishes, whichcan
leave spots and streaks. It also improvesdryingby allowing water to rolloff thedishes. Yourdishwasheris
designedtouseliquidrinseaids.Therinseaid dispenserislocatedinsidethe door nextto thedetergentdispenser.
Tofil lt he di spe nse r, o pen the c apa nd pour t he rin se a idinto the di spenser unti lth eleve lindi cator t urns comp letely
black.Thevolume ofthe rinseaidcontainerisabout 110ml.
RinseAid Dispenser
Function of RinseAid
Rin se aid is aut omati cal ly a dded du rin g the l ast rin se,e nsuri ngt hor ough r in si ng, an ds pot an d s trea kfre e dry ing.
Attention!
Onlyuse brandedrinse aid for dishwasher.Never fill the rinseaiddispenserwithany other substances
(e. g. Dis hwa sher clea ning a gen t,l iquid de te rgen t). Thi sw oul dd amage t he ap pli ance .
As the rin se aid dimini shes, the siz e of the bl ack dot
on the rinse ai dlev el indi cator c ha nges, as il lustrated be low.
Fu ll
3/4full
1/2full
1/4full-Shouldrefilltoeliminatespotting
Empty
If t here is n ori nse-aid warnin g lig htin th ec ont rolp anel, y ou can judg ethe amo unt o f rin se-aid byt he color oft he
optical level
indi cat or " C" lo cated next to the cap. Whe nth erin se-ai dcont ainer is ful l, the wh ole i ndicator will be da rk . As th e
rin se-aid
dim inis hes, the s ize o f the dark dot de creases .You sho uld neve r let th eri nse aid get below 1 / 4 ful l.
When to Refill the RinseAid Dispenser
RINSEAIDDISPENSER
To o pe n t hedispe ns er, tur nt he cap t oth e "open" (lef t)arr ow a nd lift it out.
Po ur th e ri nse aid in to t he di sp en se r, bei ng ca re fu l not to o ver fil l.
Replace the capby insertingitaligned with "open"arrowand turningittothe closed(right) arrow.
Be ca reful not to over fillth e disp enser,b ecause thi sc ould cau se over suds in g.Wi peaw ay any sp il l s
witha dampcloth. Don'tforget toreplace thecap before you close dishwasherdoor.
Attention!
Clean up a ny ri nse a id split during filling w ith an absorbe ntclo th t oav oid exc ess f oaming
during the ne xtw ash .
1
2
3
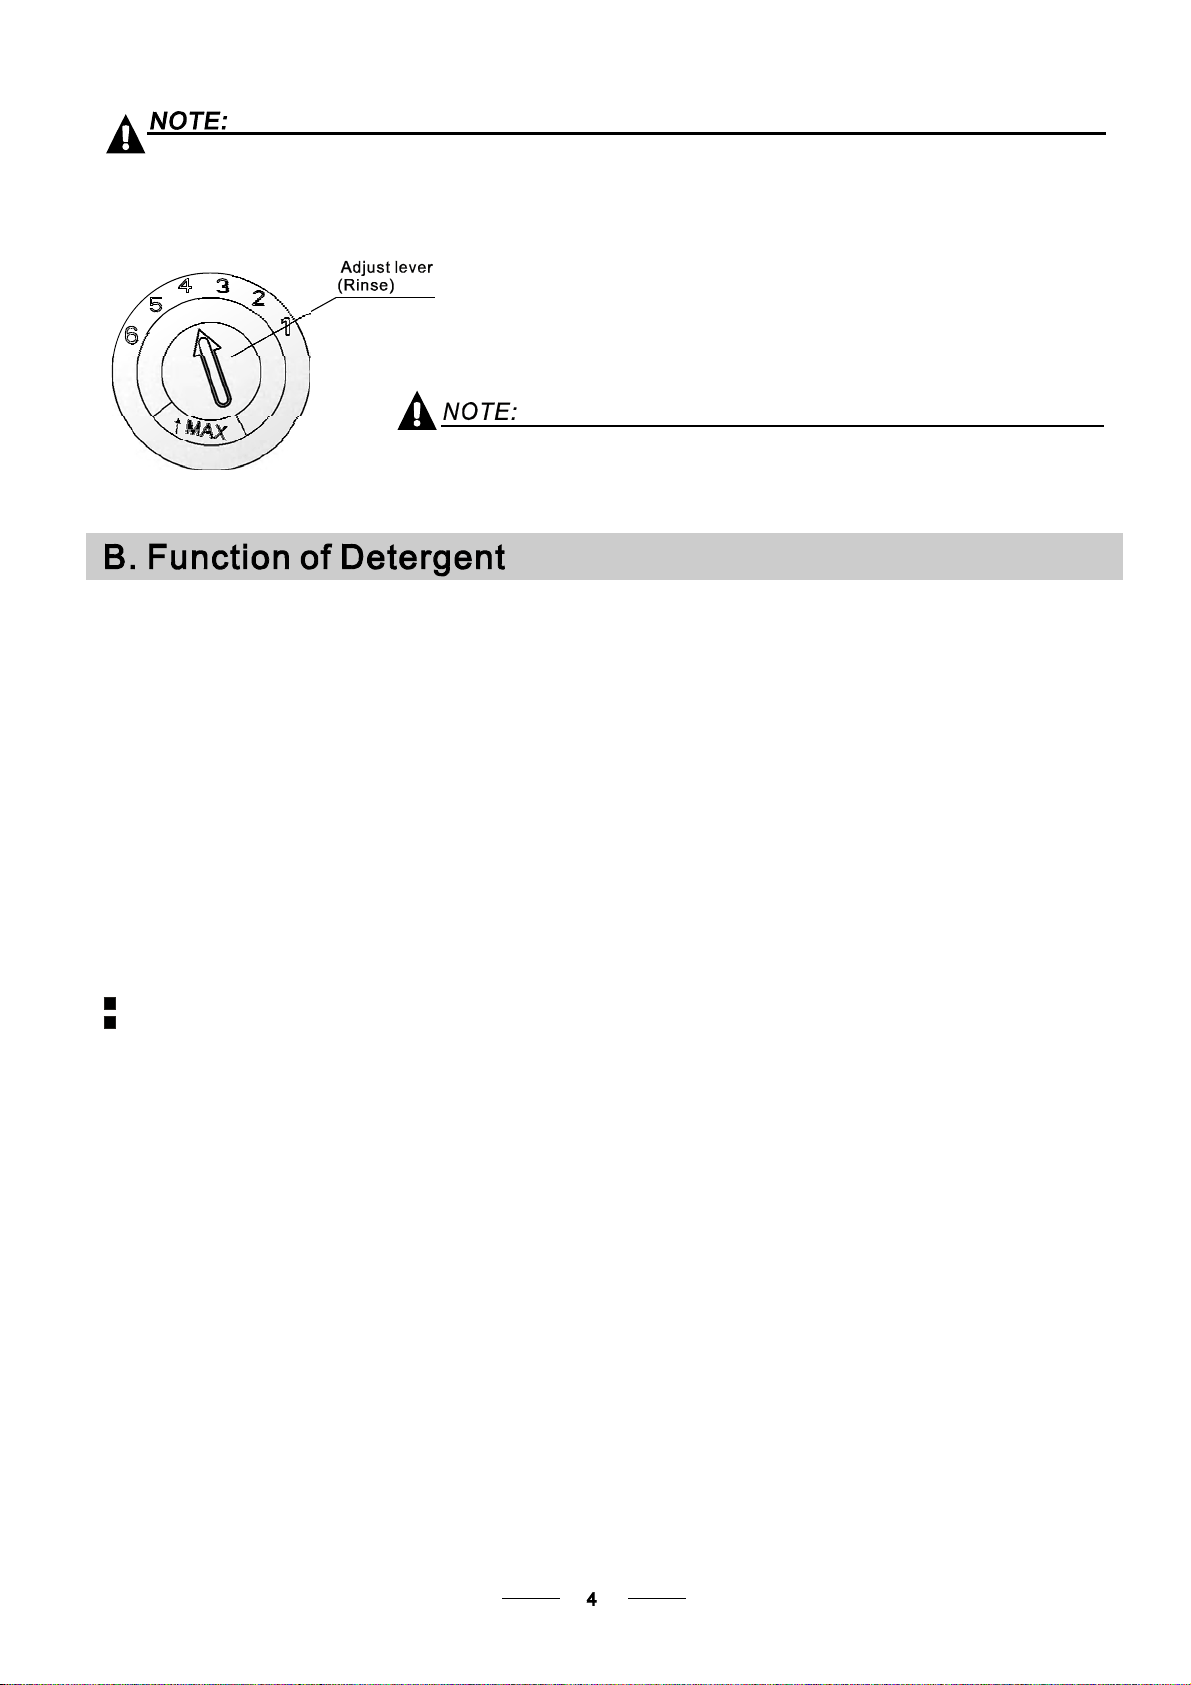
Adjusting RinseAid Dispenser
The r inse a id di spen serh ass ix or f ours ettin gs .Always st art with t he dispens er
set o n"4 ". If s pots and poor dryi ngar ea pro ble m,i ncreas eth eam ount of rinse
aiddispensedbyremoving thedispenserlidandrotatingthedialto"5".Ifthe
d is hes still are not drying pr operl yor are show sp ots , adjust t he di al to th enext
h igher le ve ru ntil you r dishes are sp ot-fr ee .T he recomm ended setting is "4".
(Factory value is "4" .)
Incr ease the dose if th ereare d rops of wate ro r lim espot son the dishes a fter wa shing.
Reduce i ti fth ere ar e s ti cky whitis hsta ins on your di sh eso r abl uish film on g lassw areo r
knifeblades.
during thenextwash.
Don' tf orgett o re pla cet he cap before you close d is hwa sh erd oor.
Clea nup an yri nse aid spil led while durin gfill in gwith a n abso rb entcl othto avoid ex cessive f oam ing
Dete rge nt s w ith its c hemical i ngredients ar ene cess ary t o rem ove dirt, c rush d irt and t ransport it ou tof the di sh was he r.
Most o f th eco mme rcial quali ty de tergent sare sui ta blefo rt hisp urpose.
Detergents
Ther eare 3 sorts of d etergents
1.W ith phos phat e and wit hc hlori ne
2.With phos phate and witho ut c hlo rine
3.W ithoutp hosphate and w ithou t chl orine
Based on their chemicalcomposition,detergentscan be splitin two basic types:
Th eus eo f no rmal w ash ing p rograms in comb ina tion with concent rated de tergen ts
reducespollutionand is goodforyourdishes;thesewashprogramsarespecificallymatched
to the dirt- diss olvin gpr ope rties of t heenzym es of th eco nce ntrated dete rgent .Fo r th is re ason
norm al wa shpro gramsi nwh ich concentr ated det erge nts are used ca nac hievet he sam e
res ult s that c ano therwi se o nly b eac hieved usin g i ntensive progr ams .
“”
“”
“”
De te rg ent t abl ets o fdifferen tbrands di ssolve at di ffe rent spe eds. For this reason some
det erge ntt ablets ca nnot d is solv ean ddevel op their f ul lc leaning power du ring sho rt
pro gra ms. The refore pl ease use l ong progra ms when u singd etergent t ablets, to
ensurethe completeremoval ofdetergentresiduals.
Thedispensermus tbe refilled beforethestartof eachwashc yclefollowingthe instructions
pro vided in the was hcy cle t able .Your d ishwasher u ses l ess detergent an dri nse a id th an
Co nven tion al d ishwash er. Gene ral ly,onl yo ne ta bles poo nof detergent is needed f or
a normal wash load.Moreh eavily soileditemsneed more detergent.Alwaysaddthe
det erge ntj ust b efore st arting t hed is hwa sher, otherw isei tcoul dg etd amp and w ill not
dis solv e pr operly.
Concentrated Detergent
DetergentTablets
DetergentDispenser
conv enti onal, alk alin ed eterg ents with caustic compon ents
l ow a lkaline c oncentr at ed det erge nts with natural enzy mes
N ormally new pulv eris edd eter gent is wi thoutp hosphat e.T hus t hew ater soft ene r fun ctio n of
phosp hate is not given .In this case we r ecomm end tofi ll sa ltin t hesalt c ontaine reven w hen
th eha rdn ess o fw ater ison ly6 dH .I fde tergents wi thout pho sph ate are used int hec ase of ha rd w ate r
of ten whit esp ots appe aro ndi shes and gla sses. In this case ple ase add m or e det erg entt ore ach
bet ter r esu lts. Det ergents with out chlori ne doo nlyb lea cha little .Str ong and colo ured sp ots will n ot
beremovedcompletely.Inthiscase please choose a programwithahigher temperature.
°
Amount ofDetergenttoUse
ProperUseofDetergent
Use o nly deterge nt spe cifically m ade f ort he us ein dish washers. Ke ep your d et erge ntfr esh and dr y.
Don't put pow deredd etergent into the di spenser u ntilyou'r e re ady to wash dishes.
Dishwasherdetergentis corrosive!Take care tokeepitoutofreachofc hildren.
Alw ays add the d ete rgentjus tb efore star ting eac hw ash c ycle .
Only us ebr anded de terg en t aidf ord ish wash er.
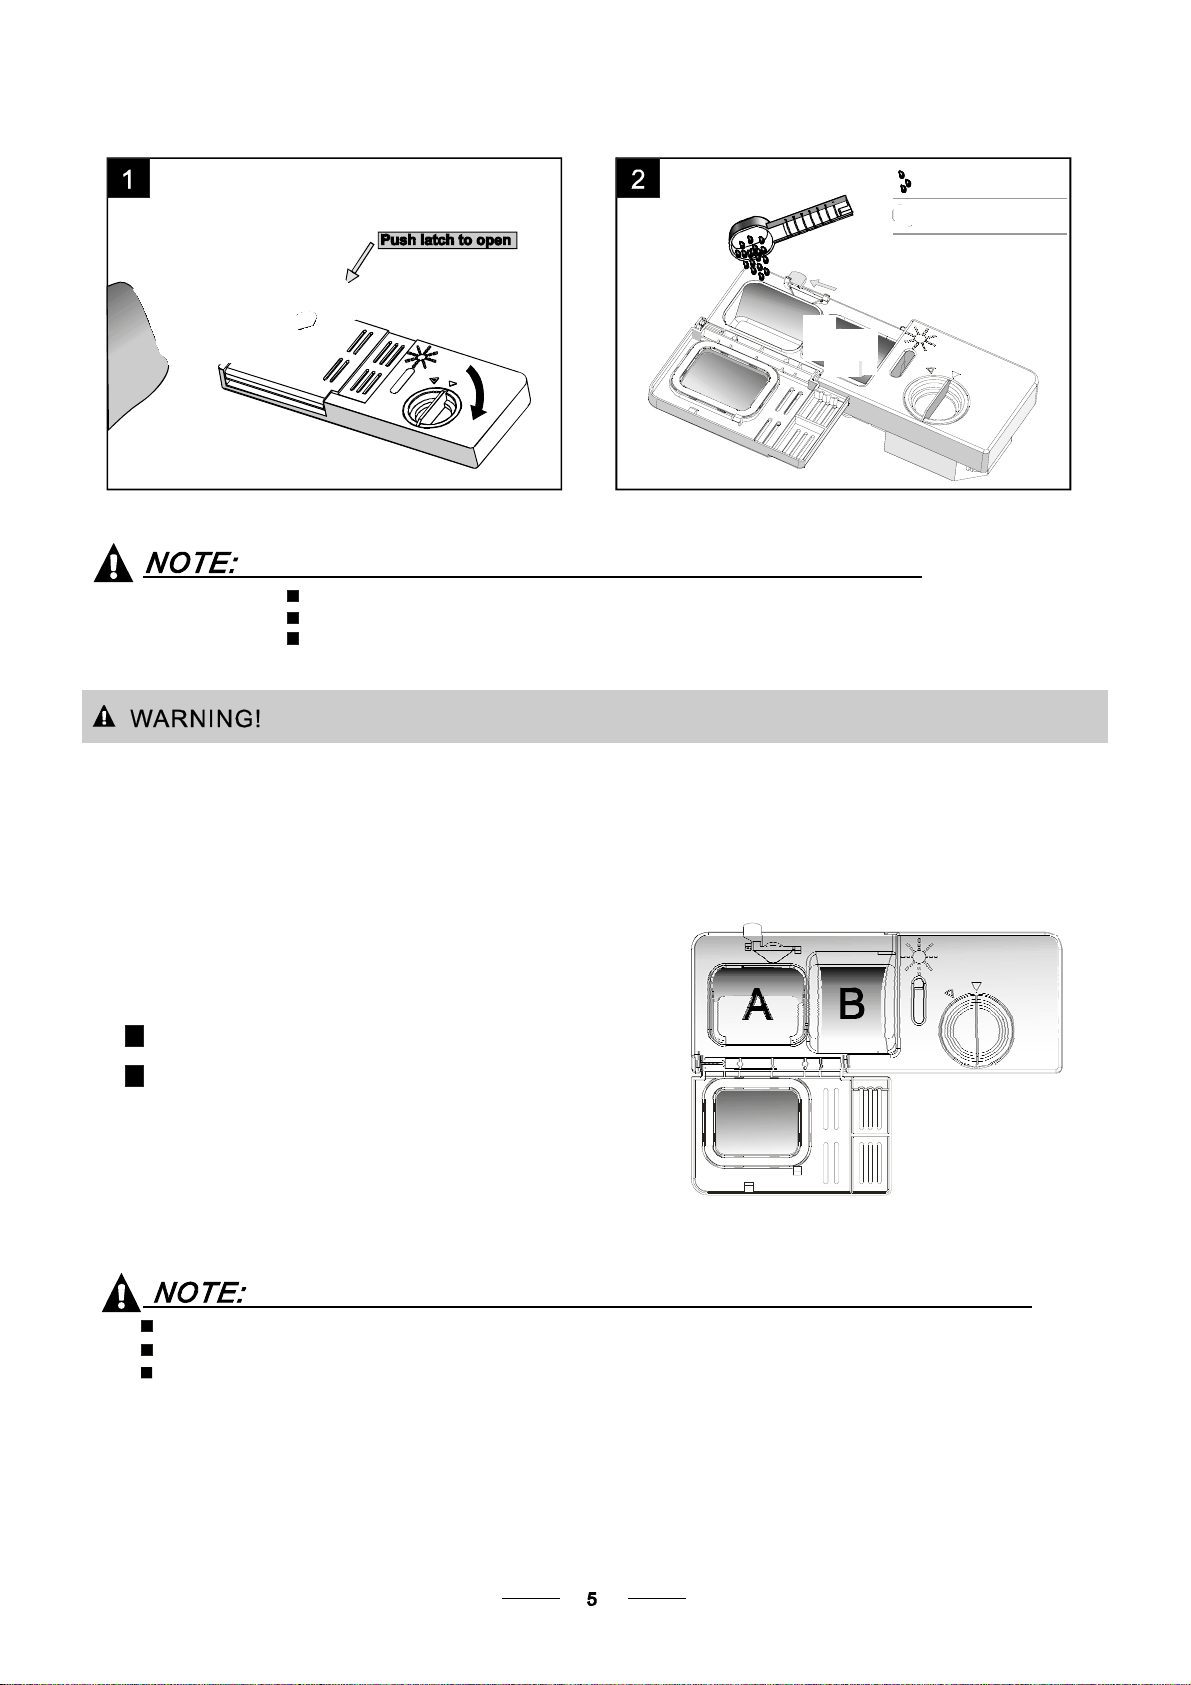
If t heli d i s clos ed: pres s rel eas e bu tton . The lid will s pri n g op en.
Detergent tablet
Det e rg ent po wd e r
Fill the deterge ntdi spen ser with deterge nt.
Themarkingindicatesthedosinglevels , as
illustratedontheright:
The p la ceof main wash cycle de terg entplace d.
The p laceo f pr e-washcy cle det ergent pl aced.
Ple ase obs er ve the man ufac ture rs dosin gan dst orag e
Recomme ndations as stat ed on the d eter gent packa gin g .
Closethe lidandpress until itlocks inplace.
Ifthedishesareheavily soiled,placeanadditional
deterge nt d ose i nthe pr e-w ash dete rgen t ch amb er.T his dete rge ntwi lltak eef fect duri ng the p re-w ash phas e.
A
B
Fill in Detergent
You find infor ma tion abou tthe a mount of deter gen tfor the sing le pr ogramm e on t he las tpag e.
Plea sea ware,t hat accor ding tothe le vel soi ling an dth esp ec if ic ha rdn ess of w ater differen ce s are pos sible.
Plea seo bserve the man ufact urer 'sr ecom men dati ons on the de tergent packagi ng.
Cutlerywithwooden,horn china or
mother -of-pearl handle s
Plast ici te ms that ar en oth eat resis tant
Older cutl erywit h glued partst hat a re n ot
temperatureresistant
Bonded c utlery i te ms or dishes
Pewter or coop er ite ms
Crystal gl ass
Steel items s ubject t orust ing
Wooden p latte rs
Items made fromsyntheticfibres
So me ty pes ofg lasses c anb ecome
dull aft era large number of washes
Silv er an da l umi num pa rts ha ve a
tendencytodiscolourduringwashing
Glazed patternsmayfadeifmachine
washed frequent ly
Are not suitable
Are of limited suitability
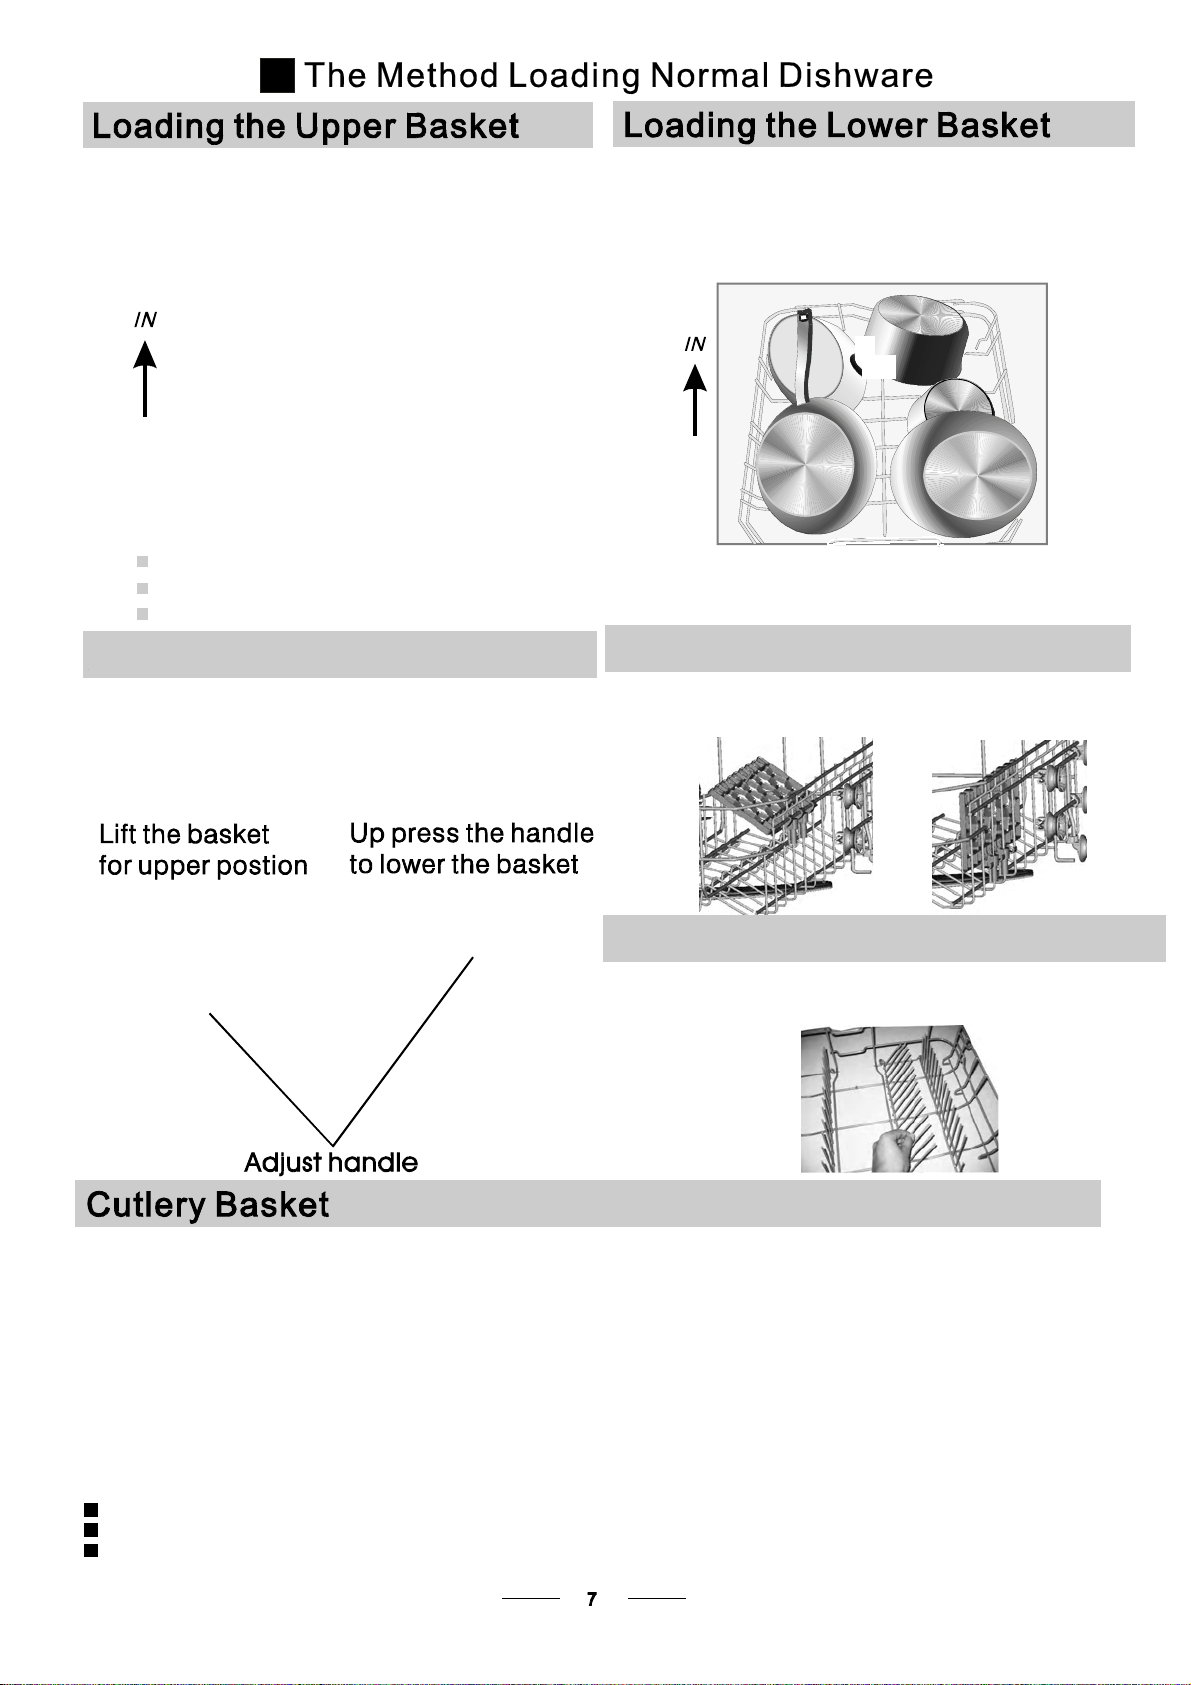
Dishesand itemsof cutlery mustnotlie insideoneanother, orcovereach other.
To av oidd amage to gl asse s,th eym ust not touc h.
Lo ad large ite msw hic h are most difficul tto c lea nin tothe lowe rbask et.
The u pper bas ket i sde signed to ho ldm ored eli cate and lighter d ishw are such as gl as ses ,coffee
andteacups
Lo ng bladed k nives st ored in a n uprigh tpo sition are a p otenti al haza rd!
Lo ng and/or sharp item so f cut lery such as carv ing kniv esm ust be p ositi oned
h orizon ta ll yi n the upper b asket .
P lease do not ove rload yo ur dishw asher. T his is imp ortan t forg ood r esults a ndfo r
r easonab leconsu mption of ener gy.
Load h oll owi tems suc h as cup s,gl asses, p ans etc. With t he opening facing downward ss o that
w a t er c ann o t c o l l ect i n the c onta in e r or a deepba se .
Consider buyingutensilswhichareidentifiedasdishwasher-proof.
Usea milddetergentthatisdescribedas'kindtodishes'.Ifnecessary,seek further
informationfromthedetergentmanufacturers.
Forparticular items,select aprogramwithaslowatemperatureaspossible.
To prev en t da ma ge, d o no t t ake gla ssandc utl ery out of the dis hwas her imm ediat el y
aft er t he p rogr amm ehas e nde d.
(For b estperf ormance of the di shwasher, follow the seload ing guide lines.
Featu res and appear ance of baske ts and cutl ery ba sket smay vary fr om your m odel.)
Scrape off any larg ea mounts o fle ft over foo d. S of ten r emnants o fbur ntf ood i npa ns.
It i sno tnecess ary torinse t he dish esu nder runni ng water.
Pl ac e obje cts in t he dis hwasher in foll owing way :
1.Items su ch a scups, g la sses, pots /pans, e tc. a re f aced dow nw ards.
2.Curved i tems, or ones wit hreces ses,sh ouldb eloade da sla nts oth at w ater can run off.
3.All u tens ils are st ackedsecu rely and can not ti po ver.
4.All u tens ils are pl aced in t heway t hat the spray arms can rotat efreel y d ur ingw ashin g.
Ve rysm all it em ss houldn otb ewashe di nthe dish was he r as th eycould eas ily fal lout of the basket.
To pre ven twa ter drip pingfr omt he uppe r ba sket into the lower basket, w e rec ommend tha tyou
empty the lower ba sk etfir stan dthe nt heupp er ba sk et .
Th eu ppe rbas ket is de sign edt oho ldm ore delicate
and li ghter d ishwares uch as g lasses, coffee a nd
teacups and saucers, aswellasplates,smallbowls
andshallowpans (as long astheyarenot toodirty).
Positionthed ishe sandco okw aresothattheyw ill
notgetmoved bythespray ofwater.
We sug ges t tha t yo u pl ace large i tem s a nd t h em ost
difficulttocleanitemsaretobe placedinto thelower
basket : su cha sp ots, p ans , lids, se rvin g dishes and
bowls, as shown i n t h e figu r e be low. I t i s pr eferable to
pla c e s er vi n g d i shes a nd lids o n t he s i de of th e r a c ks
in orde rto a vo idbl ocki ngth ero tatio nof t he top spra y
arm.
Pots,servingbowls,etc,mustalwaysbeplacedtopdown.
Dee p po ts shou ld be slant ed t o allow water to f low o ut.
Ple ase be r emin ded that:
T heB ottomB as k etf eatur es foldin g sp i kes so tha t la rge ror mo re po t san d p ans can be l o ade d.
Foldin g Spikes of Lower Basket
Fo rbetter stacki ng of pots and pa ns,
the spi kesc anb ef olded do wn as
sho w in the p ict ure rig ht.
Folding back the c up shelives
Fo r bett er s tack ing ofpo ts and p ans,
th e sp ikes can befol de d down as
showin the pic t u re ri gh t.
Cutleryshouldbe placed inthecutlery rackseparately
f rom each oth er i nth eap propriate pos itions, and d o
m ake sure th eut ensil sd o not nes t tog ether,th is ma y
causebadperformance.
Fo ra top quality c le aning ,p la ceth e silverw are i nthe ba ske t
makingsurethat:
They d on otnes t to gether.
Silver ware is pl aced wi th t he malef ace up.
Long u te nsils in t hemiddl e.
Adjusting the Upper Basket
The h eig htof t he upp er ba sketcan be adjusted i no rde rto
crea te m oresp ace fo rlarg euten silsb oth f ort heupp er
/ low erb asket. The he ight o f t he u pp erba sket can be
adjusted byl ift u pt he basket for t he u ppe rposit ion, an dup
pres sthe handle to lo we r the upper baske t,s ee the pic ture
bel ow:
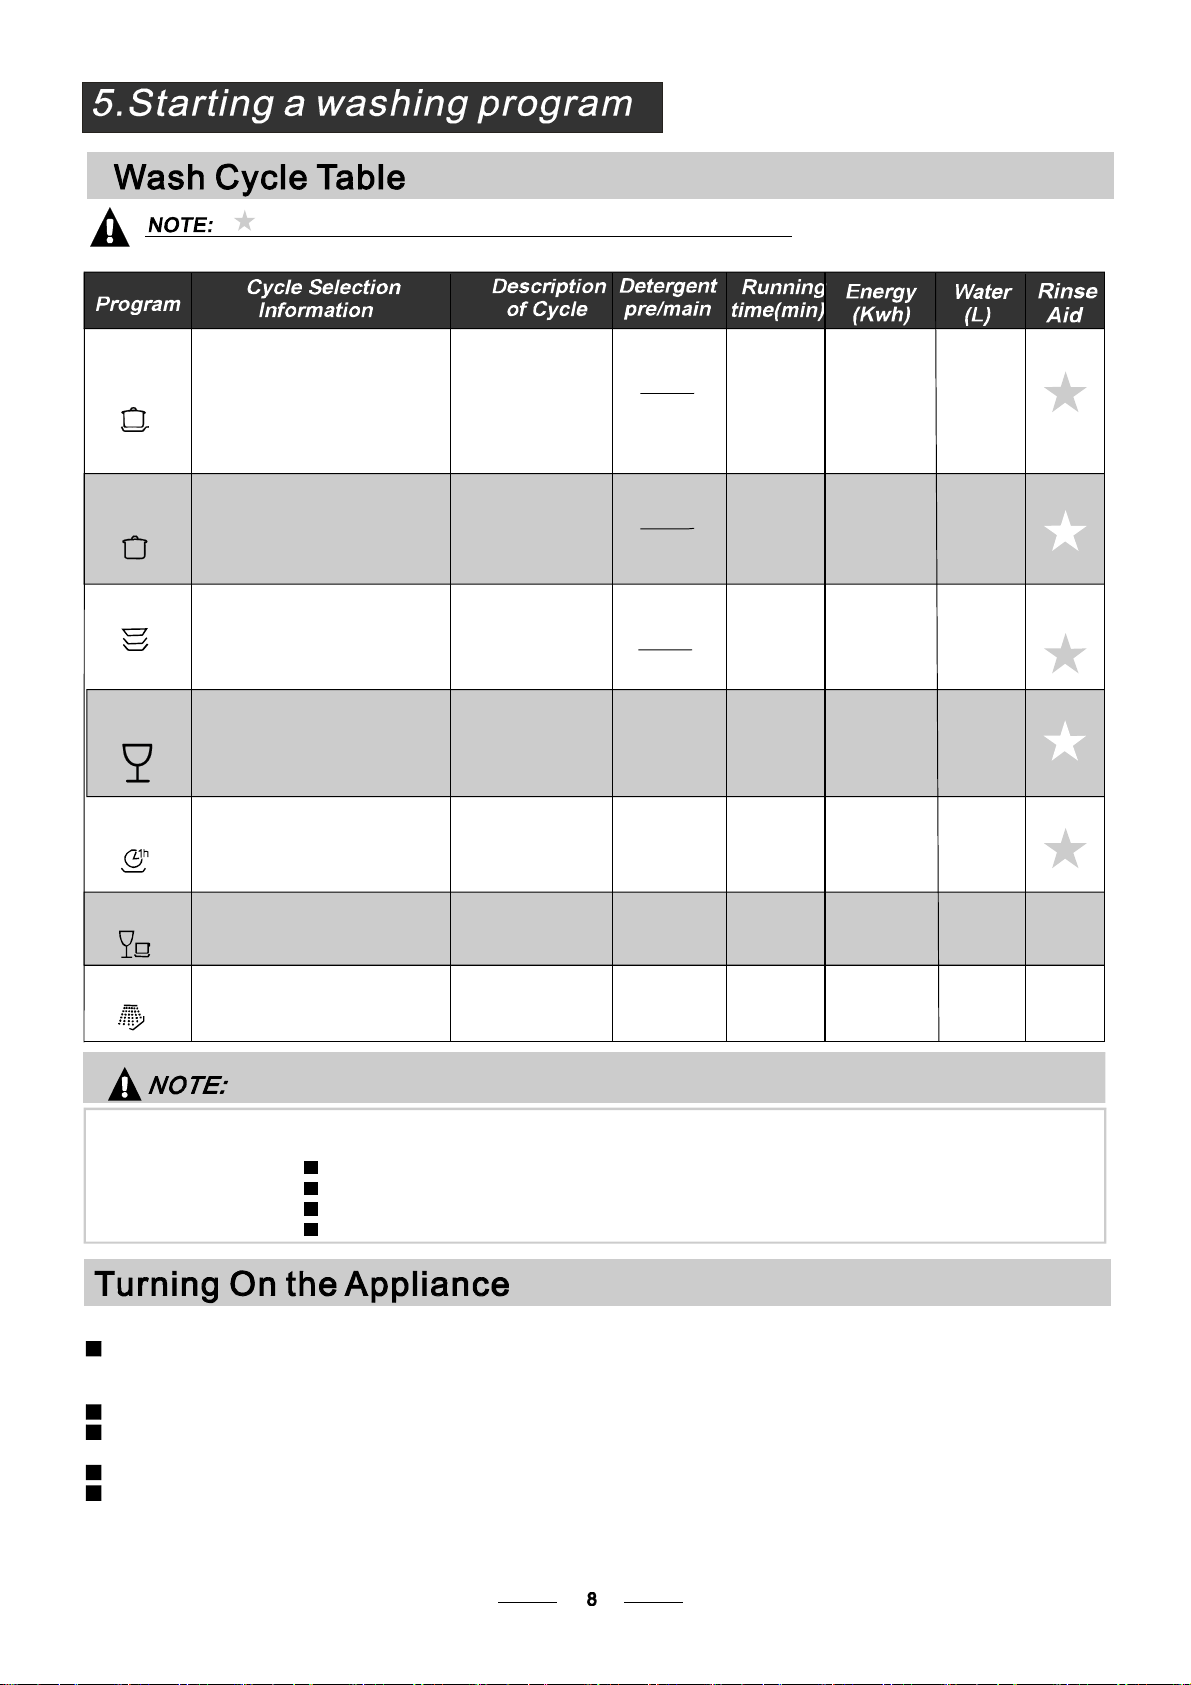
Glas s
Fo r lightl yso iled loa ds,
suc h as glas ses ,
cryst al a ndf inec hin a.
20g
Pre-w ash
was h(40 )
Rin se
Rinse(60 )
Dryi ng
℃
℃
115
0.85 13.5
Normal
Intensive
Heavy
(OrAll )in1
5/27.5 g
5
(OrAll )
/27.5g
in1
(OrAll )in1
5/27.5g
Fornorma llysoil ed loads ,
suchas , plates ,glasses
andlightly soi ledp ans.
standarddailyc ycle .
pots
For theheaviestsoil ed
loads , such as pots, p ans,
casser oledi shes andd ishes
thathavebeensittingwith
dri edfood on themfor a
wh i le.
Ashorterwashforlightly
soil ed lo a ds t hat d o n ot
need drying.
Rapid
Pre-w ash (50 )
Wash(65 )
Rin se
Rin se
Rins e(55 )
Dryin g
℃
℃
℃
Pre-w ash (45 )
Wash(55 )
Rin se
Rin se (60 )
Dryin g
℃
℃
℃
Pre-w ash
Wash(45 )
Rinse
Rins e(5 0 )
Drying
℃
℃
Wash(40 )
Rin se
Rin se (45 )
℃
℃
175
16 0
165
35
1.2
0.71
1.4
0.5
16.5
13. 5
13
10
1Hour
Pr e-wash (50 )
Wash(60 )
Rinse ( 50 )
Drying
℃
℃
℃
60
9
0.85
5/27 .5g
20g
Daily w ash i no nly 1 hour.
For li ghtly an dn ormally
soile dplates and pa ns
foreveryday.
Ashorterwashforlightly
soil ed lo a ds t hat d o n ot
need drying.
Soak
Pre-w ash
80.1
3.5
Means:need to fill rinseintothe Rinse-AidDispen ser.
()
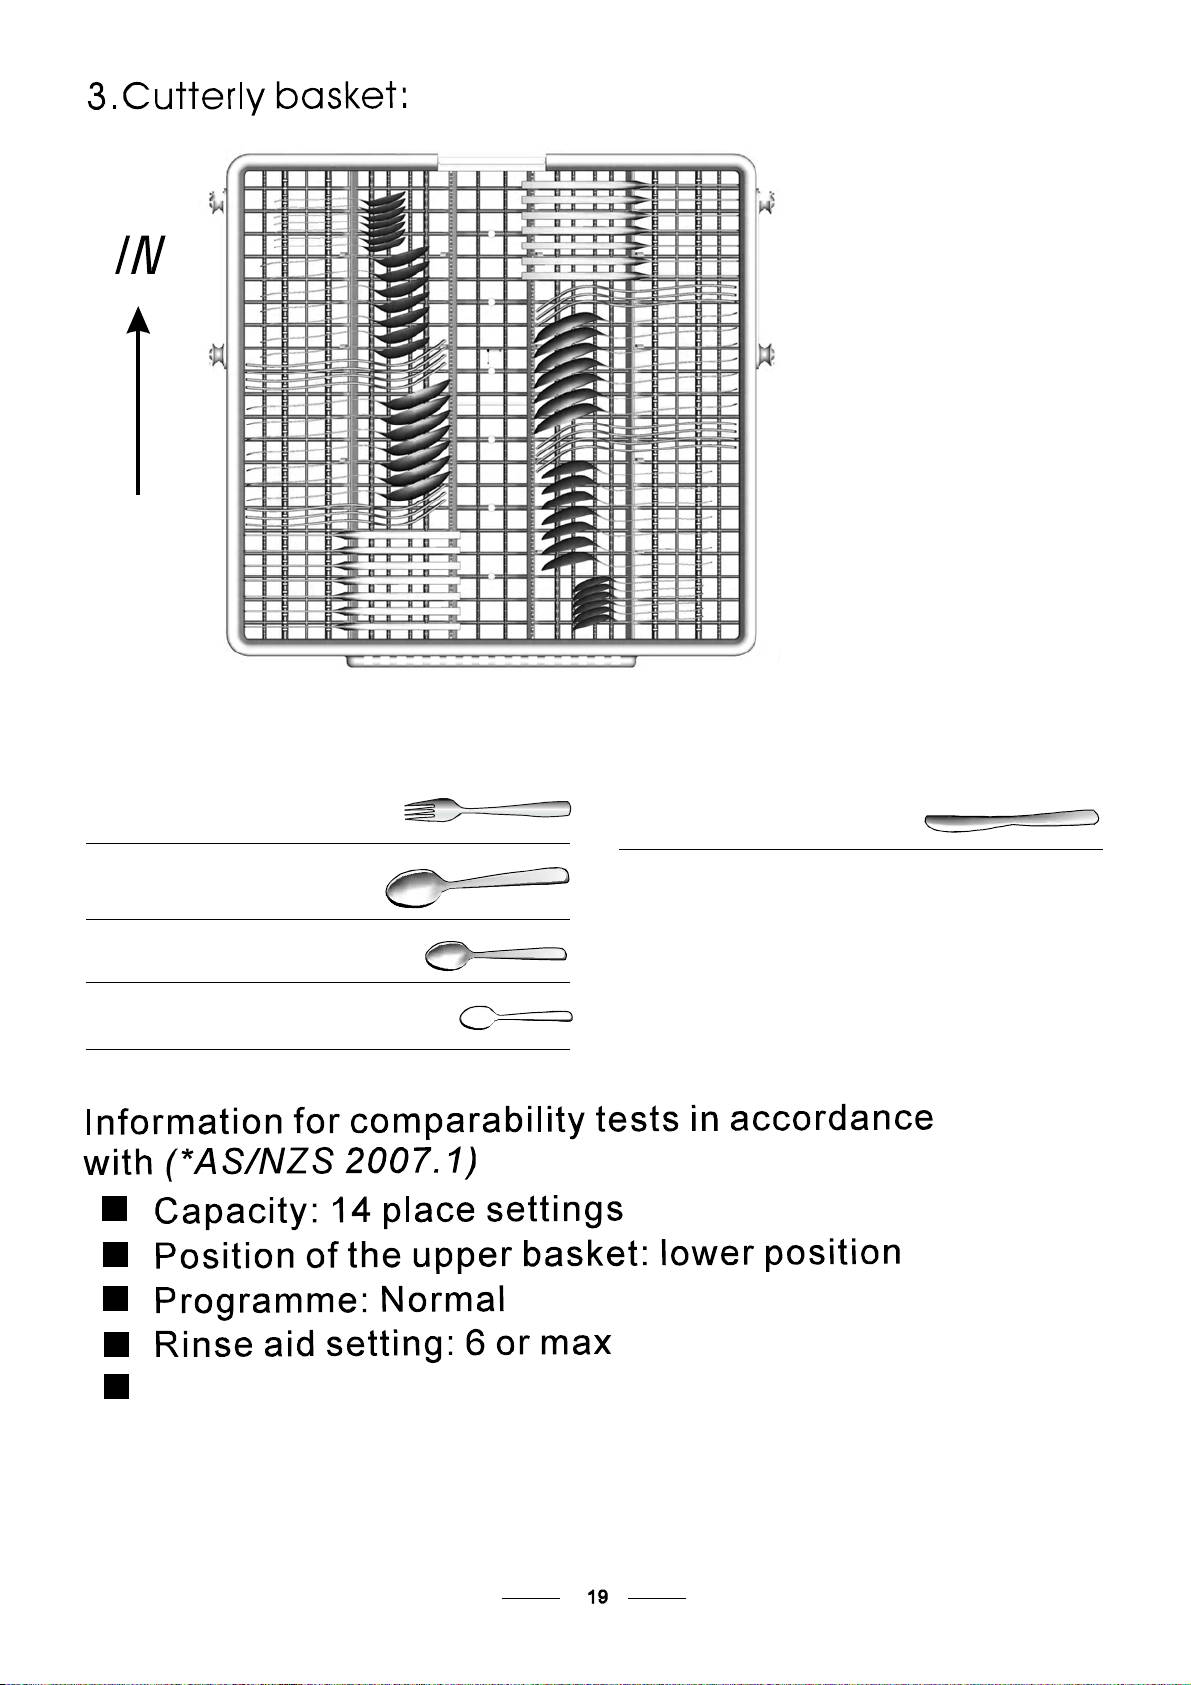
(*AS/NZS2007.1)
Forh eavily soile d loads ,
suchaspots,plates,gla sses
and lig htly s oiled pa ns.
* : This program i s the t estcy cle. The informat ionfo r compar ability test
ina ccordance wit h , as fo llows:
AS/NZS 2007.1
AS/NZS 2007.1
Capacity:14setting
Positi onUpp erba sket:upp erw heel son rai ls
Rinse aidsetting: 6
Open t hedoor s lightly 50mm t o assi sti ndrying of the dishes af te revery wash
Startinga cyclewash
D raw out the l ower and upp erb asket ,lo adth ed ish esand pu sht he mback.
It i scommend edto load the low erb aske tf irst ,th ent heu pper one ( see t he sec tion ent itl ed
Loadingthe Dishwasher ).
P our in the d eterge nt( see the s ecti one ntitle d De ter gent an dRin seA id ) .
In sert the plug into t he socket. The power su pply is2 20-240 VAC / 50HZ ,th es pecifi cat io n
o f the soc keti s1 0A 250VAC . M ake sur e t hatthe water s upp ly is turn edo n to f ullp re ssure .
C lose the door, press t heO N/O FFBu tto n,a nd th edi spla y wi ll t ur n on.
P ress the prog ram But ton , t he wash pr ogram wi ll be cha nged as f ol lows dire ction:
If a pro gr ami s sel ecte d, the resp on sel ight willl i ght .The n press theS tart /Pau seb utton ,the
d ishwasher be gins to s tart .
“”
“”
Intensive-> Normal->G lass->1 Hour ;Heavy-> ->Rapid->Soak
1
2
3
4
5
W h en t h e workin g cy cle has finis hed, the b u zzer of t he di s hw a she r wi ll s o u nd f or 8 secon d s , t h en s t op. Tu r n o ff
the a pp lia n ce u s ing t he Power s wit c h bu t t on , shu t off the w ate r sup p l y and o pe n t h e door of the dish wa s her.
Wait for a f ewmi nutes b ef or e unlo adin gth edis hwa she rto a voidha ndlin gth edishes and ute nsil swh ile th ey
are still h ot a ndm ore susc eptible tobr eak age. The yw illal sod rybe tter.
SwitchOfftheDishwasher
The p ro graml igh tis on but i sn otbl in king, only in this case the program meh ase nded.
1.Sw itch off the dishwa sher by p re ssing the ON/OF Fbut to n.
2.Turnoffthewatertap!
Openthedoorcarefully.
Hot di shes are sensi tive to kn ocks.The di shes shou ld therefor ebe a llowed t o cool d own around 15 minut es
beforeremovingfromtheappliance.
Open t hed ishwasher's door, l eave it aj arand wai ta few minut es before r emoving t he dis hes. I n this way they
will be cooler and the drying will b eim proved.
Unloadingthedishwasher
Iti s normal that the dishw ashe r is wet in side.
Empty the low erba sketf irst a nd then t he up pero ne.T hisw il lavoi d water dripping from t he upper Bas ket onto
the dishes in the low er on e.
Wash th earm s in soa pya ndwar mw ater and u sea sof tbru sht o
cleanthejets.Replacethem afterrinsingthemthoroughly.
When following this procedure fro m step1 to step 3, the filter system will be removed;
when following it from Step 3 to Step 1, the filter system will be installed.
It is d an gero u s to ope n the door w hen w as hi ng , be c a use the hot wate r ma y scald y ou .
Ifyou open thedoor ,the machine willpause. T heprogramlightw ill
stopblinking and thebuzzerwill moo ing every minute u nless you closethe door .After
you c lose t he doo r ,the m achin e will ke epo n w orki ngaf te r 10 sec on ds.
dur ing aw ashcycle
Premis e:
1 Acycle that is under way ca non ly be mod ified if it has on ly been r unning fo ra s hor t time. O therw is e, the
de tergent m ay hav ealread ybe en re lea sed,a nd the applian cem ay have alr eady dr ained the wash water.
If t his is t he case,th edete rgent d isp enser mu stbe refil led( see the sec tion ent itled " Load ing the
Det ergent " ).
2 Pres sthe Start/ Pause but ton , the m achine wi llb ei n s ta ndby st at e, press the prog ra m button more t han
3s t hen you can cha nge the pro gram t oth ede sired cycle setti ng (see the s ection en titl ed " S tartin gaw ash
cycle. . .").
Wh e n yo u pr es s th e S t ar t/Paus e butt on t o pau s e d uri ng wa s hing , t h e wil l
stop blinkingand thed ishwasher will mooingeveryminute u nless youpressthe
Start/Pause buttonto start.
running indicator
Aforgotten dish can be added any time before the d e tergent cup opens.
Add forgotte n dishes.
Close the door
After the spray arms stop working, you can open the door
completely.
2
3
Open th e door a little .
1
4
5
6
Press the Start/Pause Button to stop the washing.
Press the , the dishwasher will run
after 10 seconds.
Start/Pause Button
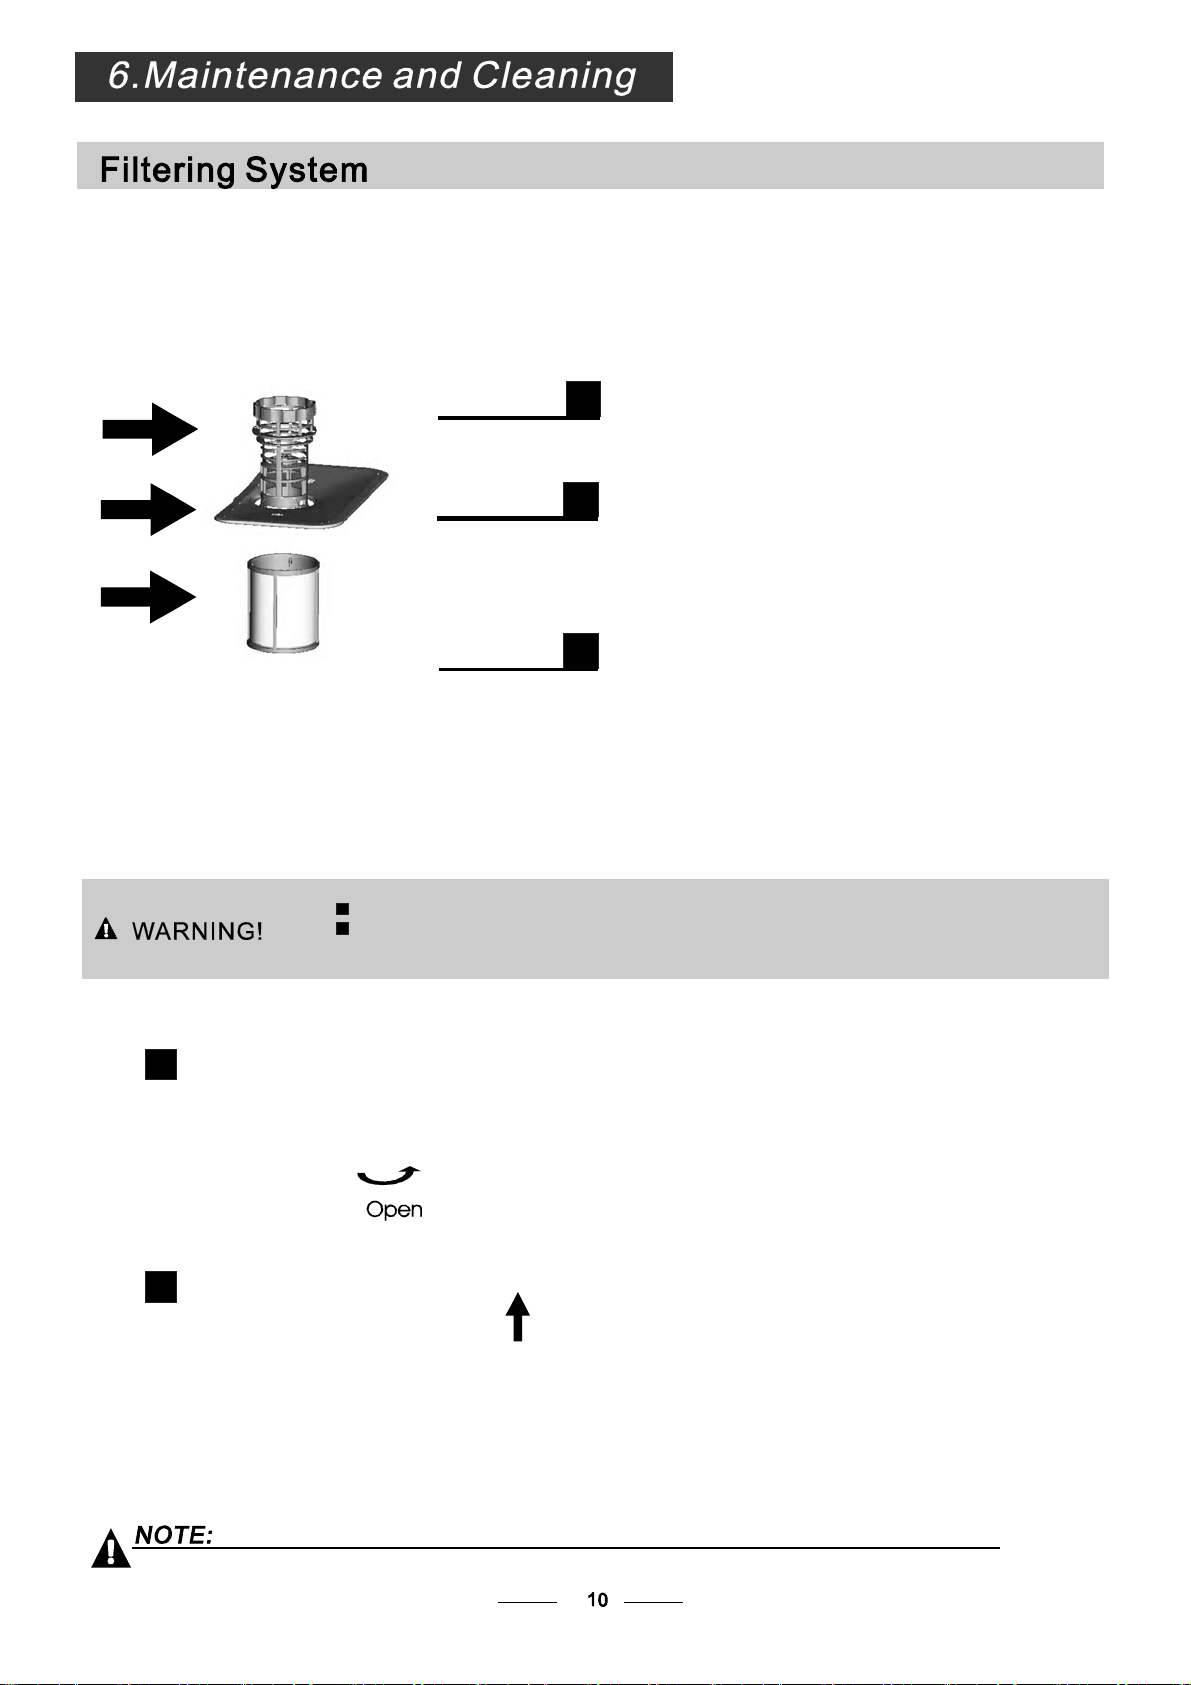
The filter prev ent slar ger remnants of food or o ther objects from get ting insi deth epu m.
Theresidues may blockthefilter, inthis casethey must be removed.
The fi lter syst em c onsi sts ofa coar se fi lter, a flat (Main f il ter )
A n da mi c rofi lter( F i ne fi l ter).
Food and soil particles trapped inthisfilterarepulverizedbya
specia l jet ont hel owe r spr aya rman dw as hedd own t od rain.
Lar g er i tems, such as pie c es of bo ne s or gl ass, t ha t coul d blo ck
thedrainaretrappedin the coarse filter. To remove theitems
caugh t by t he filter,gen tly s que eze the t ap o nth eto pof this
filterandliftout.
Thisfilter holds soiland food residuesinthe sumpareaand
preventsitfrombeingredepositon thedishesduringwashcycle.
Main filter
1
Coarse filter
2
Fine filter
3
2
3
1
Filterassembly
Thefilter efficiently
For b est p erfo rm ance and res ults, the filte rmu stb e cle aned re gula rly. t hisr eason, i t i sa goo dide at o
r emo ve t hela rger foo dpa rticl estr app edin the filte raft ere ach was hcyc leb yrin sing t he s em icirc ular f il te ran d
c up u nderru nnin gwa ter. To re moveth efil terd evice ,p ullt hec up ha ndle in t heu pwardd irection.
re mo vesf ood part icle s fro mth ewa sh w ate r, all owin git to be recycle dd ur ing t he cycl e.
For
T he dish was her mus t n e ver be used w i t hout the filt er s.
Imp ro per repl ac emen tof the f ilter may re duce the perform anc elev elo fthe applian ce
and damagedishesandutensils.
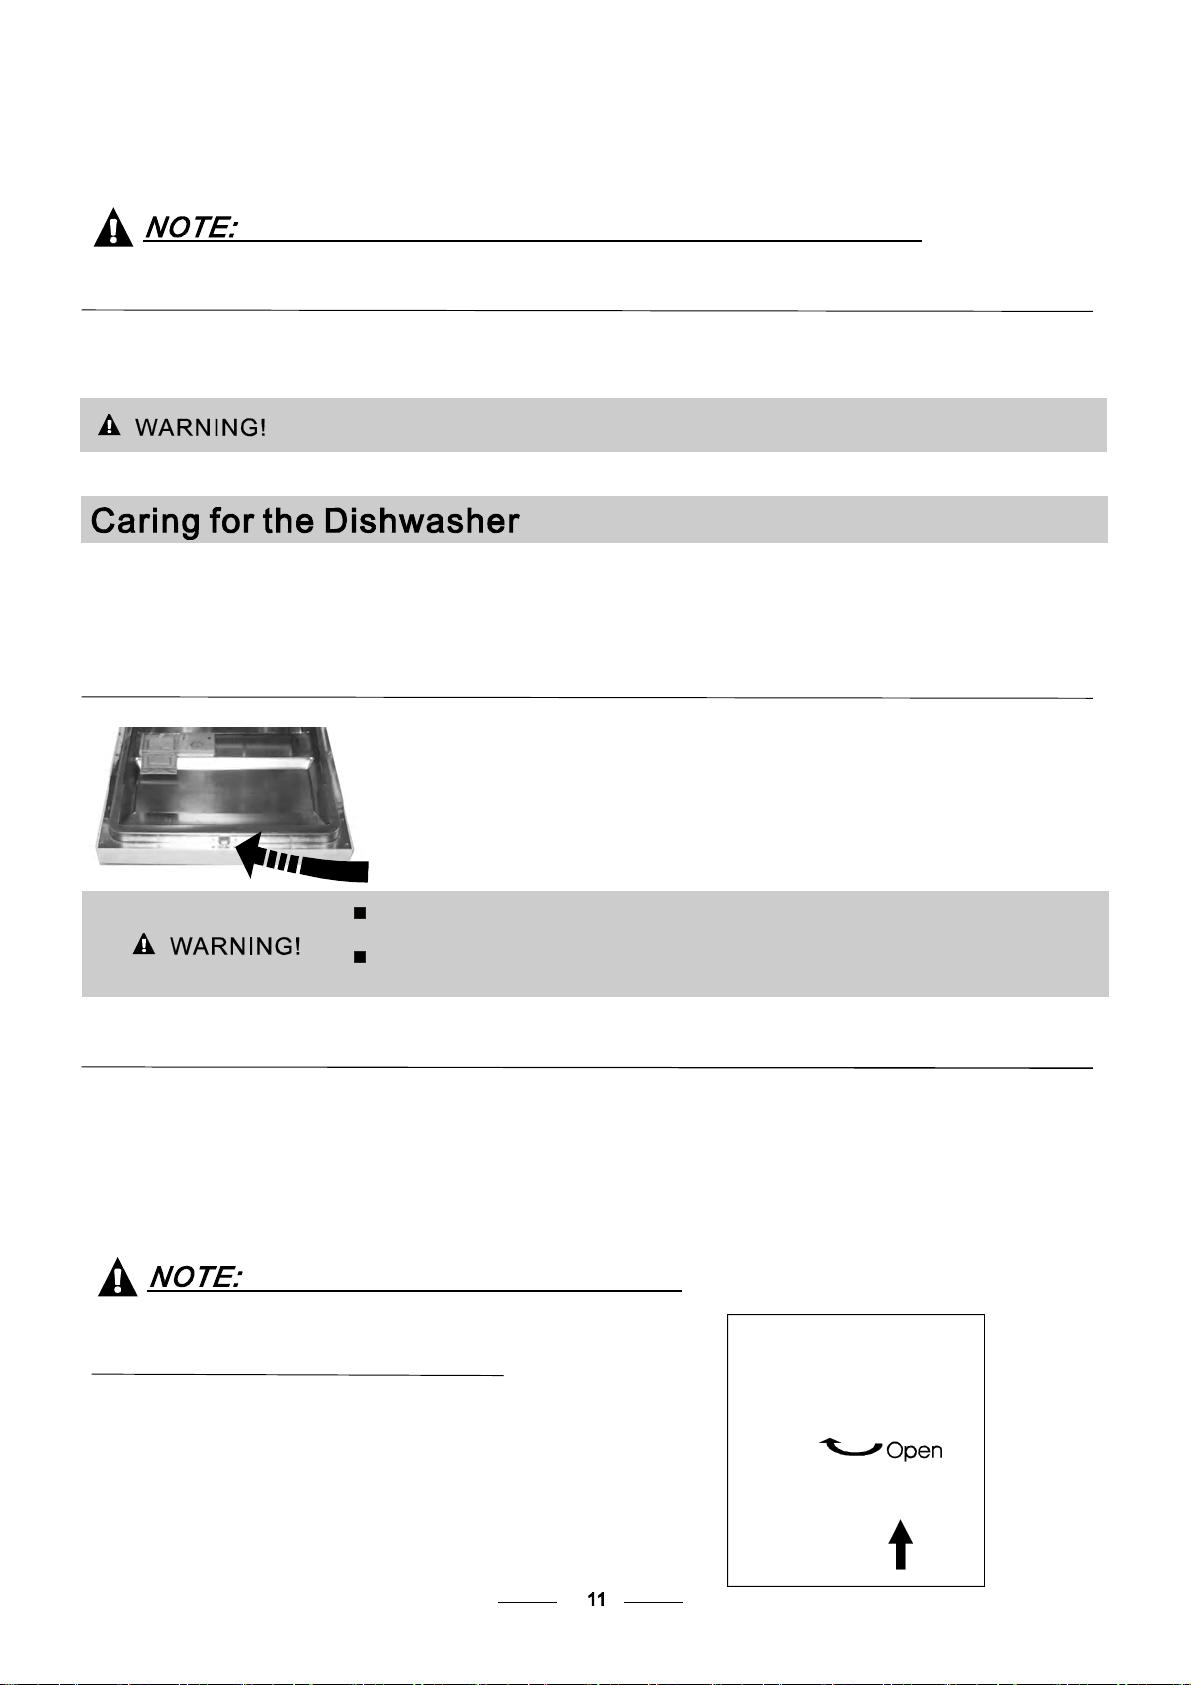
St ep 1 Turn the fi lter i n ant i-clo ckwis ed irection,:
St ep 2 lift the filt er assy up:
When following this procedure fro m step1 to step 2, the filter system will be removed;
when following it from Step 2 to Step 1, the filter system will be installed.
1
2
Th e cont ro l p ane l can be clea ned by u sing a lig htly dampen edc loth.
Aft ercle aning, m ake sure t o dry it tho roug hly.
For the ex t e ri or, us e a go o d app li anc e po li s h wax.
Neveru ses harp object s,sco uring pa ds o rh ar sh c lean ers ona ny part o fthe di shwa sher.
ProtectAgainst Freezing
1.Cutoff the electrical powertothedishwasher.
2.Turn of fth ewat ersu ppl yan ddisco nnect thew ater inl etpi pe from the w ate rval ve.
3.Drain th ewater from t he inlet p ipe and w ater va lve. (Use a p an to gat her th e wat er)
4.Reconnect t he water inl etpi pe to the wate rval ve.
5.Remove the filter at the bottom o f the tub and use a spong eto soak up water in the sump.
pl ease take frost pr ot ection meas ureso nt he di shw asher in wint er. Ev ery fter washing c ycles,
pl ease oper ateas follow s
time a
:
Cleaning the Filter
CleaningThe Door
To c l ean th e c o a rs e f il t er and t he fin e fil t e r, us e a cl ean i n g brush. Re as sem ble t hef il t er parts as sho wn i n the figur es
on th e la st pa ge a nd r eins ert t he e ntire assem bly in the dis hwa sher,po sitio nin g i ti n i tss eat and pres sing dow nwa rds.
Whencleaning thefilters, don't knock on them.Otherwise, thefilters could be
contorted andtheperformance ofthe dishwashercouldbedecreased.
To clean thee dge around t hedoor,you shoul du seonly a soft warm, d am pcl oth.
To avoid pene trati ono f wa te rin to t hedoor l ock and el ectrical com ponen ts,d o not
usea spr ay c le aner of any kind.
Never u sea spr ay c leaner t ocle an t he d oor panel asi tm ay dam age the door loc k
and electrical components.
Ab rasive ag entso r som epaper towels s hou ldnot b eu sed b ecau seof th eri sko f
sc r a t c hi ng o r l eaving s pots on the st ainless ste el sur fa ce.
Cleaning the SprayArms
I fyour dis hwa shercannot wor k because of t he ice,
pl ease con tact professi onal ser vice persons.
It i s ne cessary t o cle an t h e s p ray a rms regula r l y for h ar d
water chemicalswillclogthe sprayarmjetsa ndbearings.
- Inspec t t he filters fo rblo ckinga ftere very tim eth edis hwa she rha sbe enus ed.
- By uns crewing the c oar se fi lter, you can rem ove the filter system .Re mov ea nyfoo dr emna nts and
cleanthefilters underrunningwater.
Remarks:
Theentirefilterassemblyshouldbe cleanedonce a week.
Toremovethelowersprayarm,pull outthe sprayarmupward.
To r e move th e u pper s p r a ya rm , ho ld t he n ut, r ot ate th e a rm
clockwisetoremoveit.
Washthe ar ms in soap yan dwar mwat eran du sea sof tbrus hto
clean the jets. Replace them af ter r insing the mth orough ly.
Itisrecommend thatyouruna washcyclewiththe
dish washer e mpt yan dthe nr emove th eplu gf romt he
socket, t urn o ff th ewa ter supp ly and le ave the door of
t he applian c e sl ight l y open. T h is wil l help t h e door
sealstolastlongerandpreventodoursfromforming
withinthe appliance.
If th e app liance must be move d, t ryt o keep it in the
verticalposition. Ifabsolutely necessary,itcanbe
positi oned on its back.
Oneofthefactorsthatcauseodourstoforminthe
dishwasher is foo dth atre main str appe di n the seal s.
Periodic cle aning with a d amp sponge will p reve nt t his
f r o m occu rr ing.
Ensu reth evoltag ea ndfrequ enc yof thep ower be ing cor resp ond sto
t hose on t he ratin gpl ate. Only in sert the p lug into an electrica lsocke t wh ich i sea rthed
pr op erly. Ift he el ectri cal sock et t owh ich the a ppl ianc emu st b ec onne ct ed is not
appropriate fortheplug, replacethe socket, ratherthan usingaadaptors orthelike as
they couldcauseoverheating andburns.
Plea selook at th era ting lab el to knowt he rat ing v oltage a nd conn ect t he dishwash er to the app ro priate powers uppl y.
Use the r equ ired fuse 1 0 amp ,tim ed elay f use orc ircui tbre ak errec omm ended and prov ide separate circ uits ervi ng
only this appl ia nce.
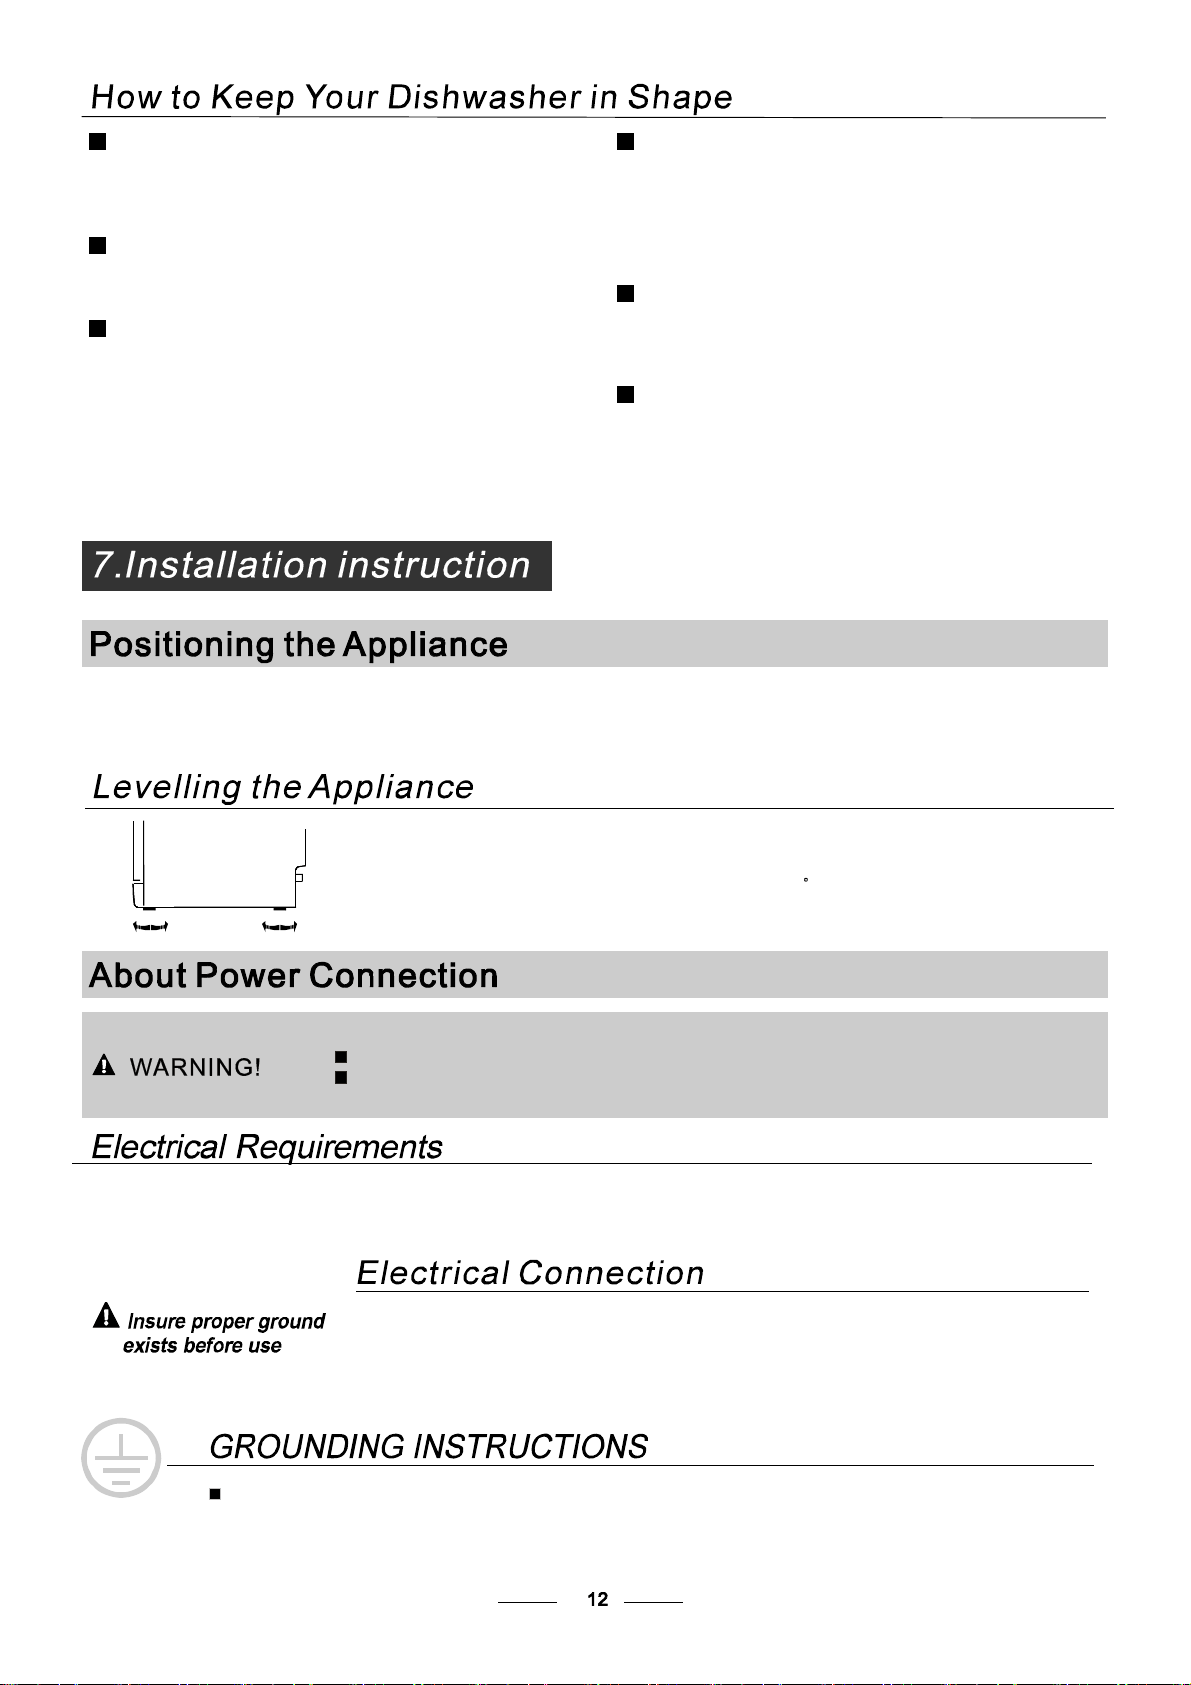
Posi tion the ap plianc ein the desir ed l ocation. The back s hould r est ag ainst t hew al lb ehin di t, and the side s,
along the adj acent ca bi netso rwa lls.T he dishwash er i s equippe dwi th water supply and d rain hos es th atcan
be pos itioned either tot he righ tor the l eft s ides to facilit atep ro peri nstallati on.
O nce th e appl iancei s pos itione dfor levell in g,t hehei ghtof the di shwashe r
m ay be alter edv iaad just mento f thescre wing leve lo fthe fe et. In any c as e,
th eapplia nce sho uld not b eincl ined more t han 2 .
For personal safety:
DO NOT USE AN EXTENSION CORD OR AN ADAPTER PLUG WITH THIS APPLIANCE.
DO NOT, UNDERANY CIRCUMSTANCES, CUTOR REMOVETHE EARTHING
CONNECTION FROM THE POWER CORD.
Befo re cl eaning or p erformi ng ma inten ance, alw ays
remove th eplug f romt he socket.
Tocleantheexteriorandrubberparts ofthedishwasher,
donot usesolventsor abrasivecle aningproducts.
O nly u se a cloth w ith w arm soapy wate r.
To r em ove s pots ors t ain s f rom the sur f ace oft h e
in teri or, us ea clot hdamp ened wit hw at erana l ittl e
v inega r, o ra clean ing pro duct mad esp eci fical lyfo r
dishwashers.
Remove the Plug
No Solve nts orAb ras ive Cl eanin g
Mov ing theApplia nce
Seals
Aft er ever ywash, turn off t hew ater supp lyto the
applia nce and leave th e doo rs lightl yop en soth at
m oisturea nd odour sa reno ttra ppe din side.
After EveryWash
Whennot inUse foraLongTime
This appliance must be earthed. In the event of a malfunction or breakdown, earthing will reduce the risk of
electric shock by providing a path of least resistance for the electric current. This appliance is equipped with a
cord having an equipment-earthing conductor and an earthing plug. The plug must be plugged into an
appropriate outlet that is installed and earthed in accordance with all local standards and requirements.
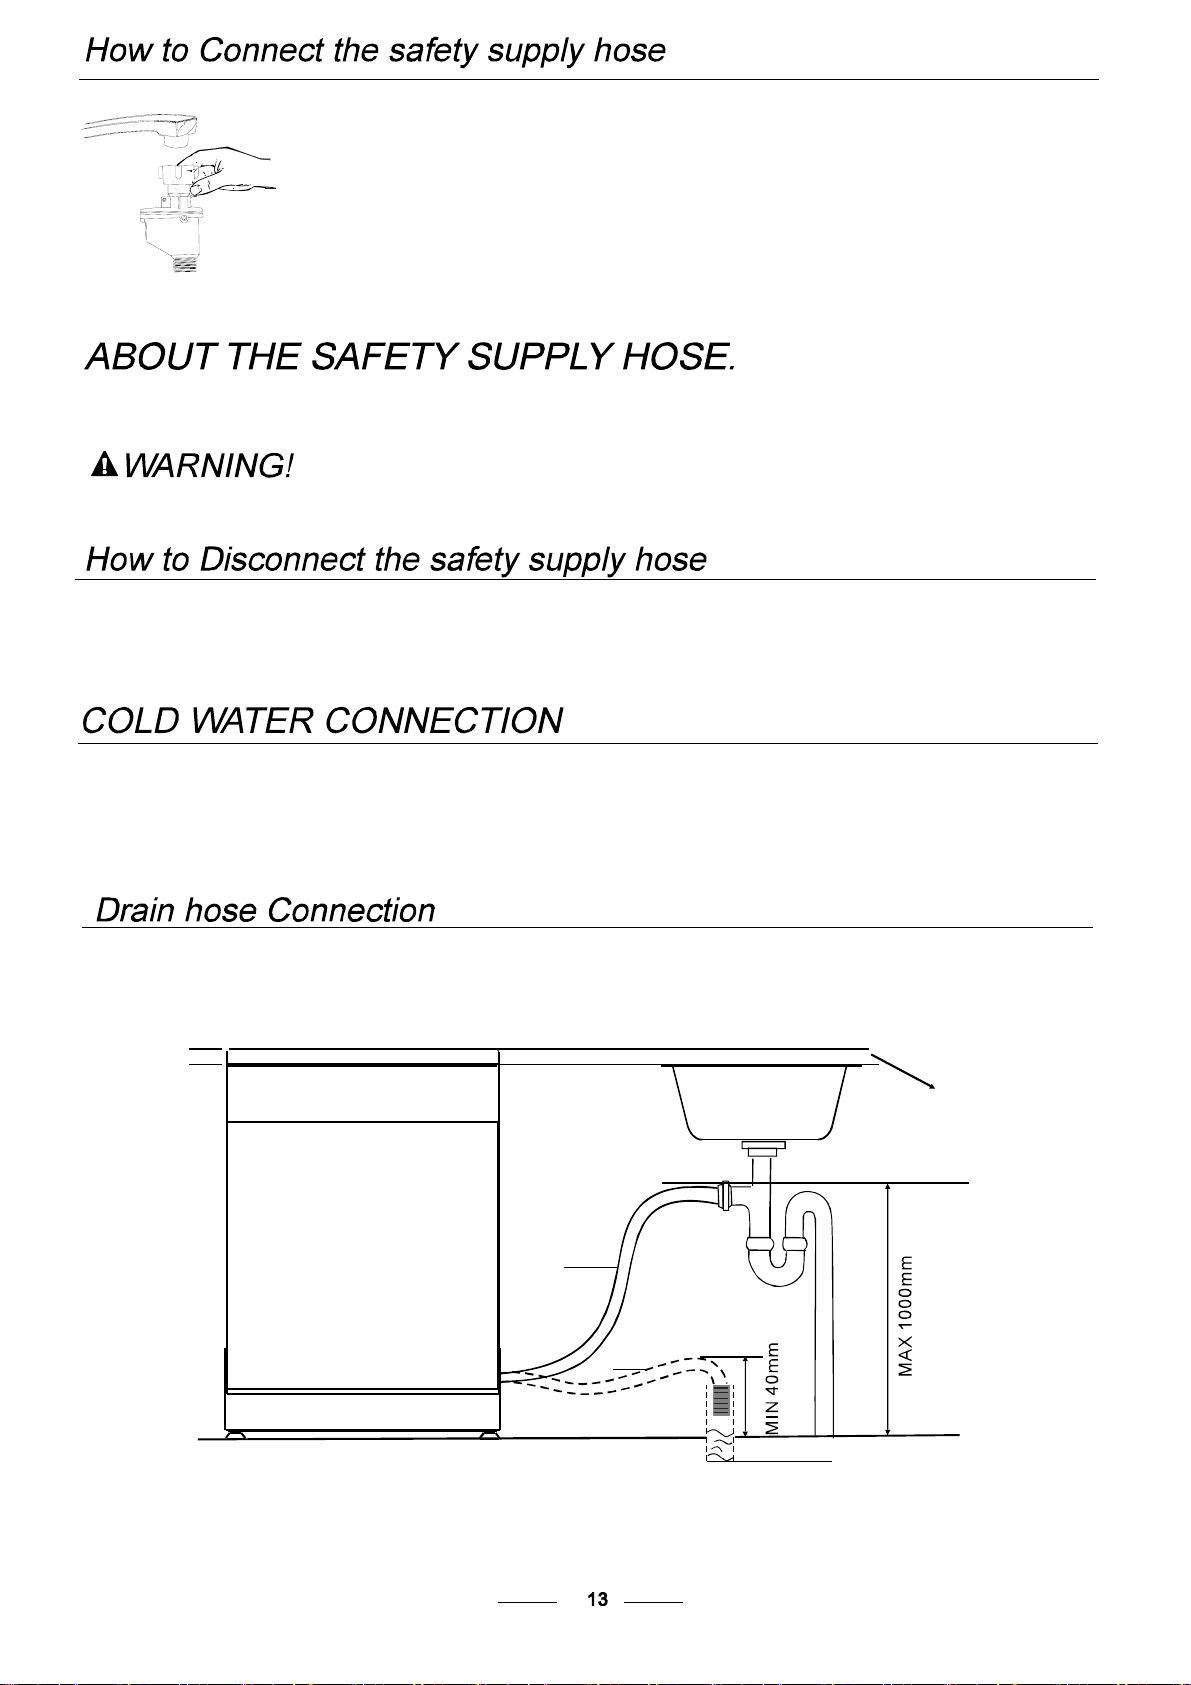
Insertthe drainh ose into adrainpipe with am inimumdiameter of4cm, orl etitr unintothes ink, makingsu re to
avoid bendingor crimpingit. Usethe specialplasticsupportthatcomes withthe appliance.The top ofthehose
must be at a heig htb etween 4 0an d100cm .The fr ee end o f the hos e must n ot b eimm er sed in wa ter toa void t he
back f lo w of it.
φ
40mm
A
Counter
Front
Drain pipe
NOTE
Thetopofthehose
must be at a height
between
40 and 100cm.
The free end of the
hose must not be
immersed in water .
B
Ahose that attaches toa sink spraycanburstifitis installedon the samewater line asthedishwasher.If your sinkhas
one, it is rec om mended t het the h ose be di sc onne cte d and t he h ol e pl ugge d.
Pull The safety supply hoses completely out from sto rage compartment located at rear of dish washer.
Turn water fully on before starting the dishwasher.
1
Tighter the screws of the safety supply hose to the faucet with thread 3/4inch.
The sa fety su pply hose co nsists of t he dou ble wa lls.T he ho se' s system guar antees i tsi ntervention b yb locking the
flowof water incase of thesupplyhosebreakingandwhentheairspacebetweenthe supplyhoseitself andtheouter
corrugatedhoseisfullofwater.
Turn off the water.
Release the water pressure by depressing the pressure release button. This rel ieves water pressure and protects you, and the
room, from severe sp lashing .
Unscrew The safety supply hose from the faucet..
3
2
1
2
3
Th e a ppl i ancemus t be c onnec te d t o t he wa te r mai n s us i n g n e w hos e-set s .
Theold hose-setsshould not bereused.
Wate rpr essu re m ust b eb etw een 0, 04 MPa and 1 M Pa. I fth epr ess urei s below t hem inimum
con sult o urS ervic eD epa rtmentf or ad vice.
Connect the cold wate rsu pp ly hose to at hreade d3/4(in ch) c onnecto rand make su ret hati t is fa sten ed t ightl yin place.
Ifth ewa terp ipe s are new or h ave n ot been used f or ane xtended pe ri odo ftime ,let the wate r ru nto mak esu reth at th e
water is clear and free of i mpu riti es.I ft his p reca utio ni s not ta ken,the reis a ris kth atth ewa ter inlet can g et b locked
and damage thea ppliance .
Thefollowingthingsshould bechecked beforestarting thedishwasher.
The contentof this manual is very he lpf ulto the u sers.
After installation, please make sure to keep this manual.
1
Thedishwasher is leveland fixed properly
2
T he i nlet va lve is ope n
3
There is aleakage at theconnectionsof theconducts
4
Thewiresaretightlyconnected
5
The poweris switched on
6
The i nlet and dr ain hos es are knott ed
7
Allpackingmaterialsandprintingsshouldbe taken out fromthe dishwasher
ExtensionHose
Ifyou needa drainhoseextension,makesure tousea similar drain hose.
It mu stb e no longer th an 4 met res ;otherw ise the c leaning effe ctof the di shw as her could be reduced .
Wa t e r O u t l e t
Connect t he wate rd rain h os e.The dr ainh ose mu stbe correct lyfit te dt o av oidw at er lea ks.
Ensur ethat th ew ater dra inhose i sno tkin ked ors quashed .
I f the s i nk is 1000 h igh er f rom t he f l oor, t he ex c ess w a ter in ho ses ca nno t be drai ne d di r ec tl y
into the sink.Itwillbenecessary todrainexcesswaterfromhoses into abowlorsuitable
conta ine r tha tis held outsi de and low erth ant he s ink.
How toDrain ExcessWater FromHoses
Syphon Conn ection
Th e w aste c onn ec ti on must be at a height les s than 100 cm (max i mum ) from th e bo ttom of the d ish.
The w at erdrai nh ose sho uld bef ixed .
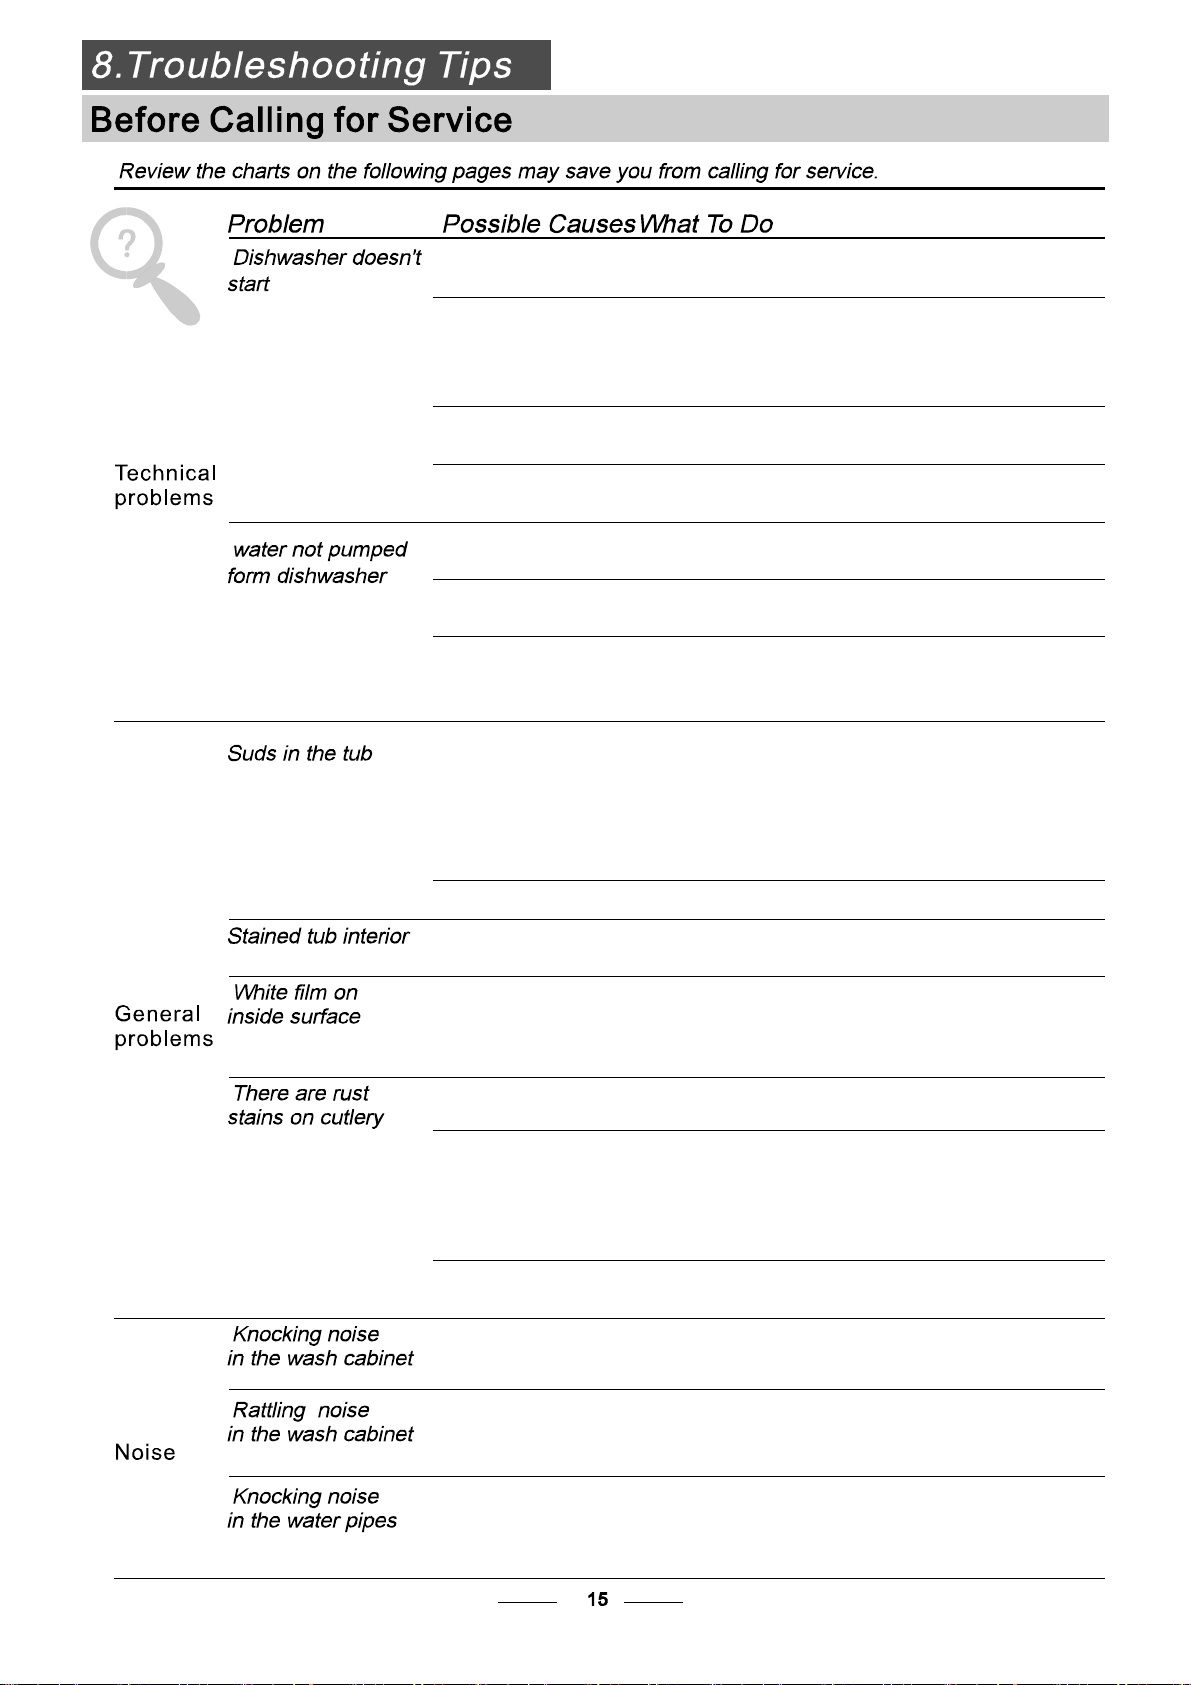
Fuse blown, or the
circuit breaker acted
Replace fuse or reset ci rcuit breaker. Remove any other
appliances sharing the sam e circuit with the dishwasher
Sp il led rinse-aid
Always wipe up rinse-aid spill s immediately.
Hard water m inerals
The affected items are
notcorrosion resistant.
The lid of the softer
is loose
Aspayarmis
knocking against
an item in a basket
r
Items o f croc kery
are loose in the
wash cabinet
This may becaused
by on-site installation
or the cross-section of
the piping.
A programme was not
run after dishwasher
salt was added.
Traces of salt have
gotten into th e was h c ycle.
To clean the interior, use a damp sponge with
dishwasher detergent and wear rubber gloves.
Nev er use any other cleaner than dishwasher
detergent for the risk of foaming or suds.
Always run th e quick wash programme .
without any crockery in the dishwasher and
without selecting the Tur bo funct ion (if present),
after adding dishwasher salt.
Check th e lip .Ensure the fi x is fine.
Interrupt the programme, and rearrange the items
whic h are obstructing the s p ay arm.r
Interrupt the programme,
and rearrange the items of crockery.
This has no influence on the dis hwasher function.
if in doub t, contact a suitably qualified plum ber.
Detergent with
colo urant was used
Make sure that the detergent is the one without
colourant.
Improper detergent
Make sure the dishwasher is turned on and the door is
closed securely.
Check that the wate r supply is connect ed properly and
the water is turned on.
Make sure to close the door properly and latch it.
Make sure the power cord is properly plugged into the
wall socket.
Power supply is not
turned on
Error code:E1;
Water pressure is low
Door of dishwasher
not properly closed.
Kink in drain hose
Filt er clogged
Kitchen sink clogged
Check drain hose.
Chec k coarse the filter
(see section titled )" Cleaning The Filter "
Check the kitchen sink to make sure it is drainin g well.
If the problem is the kitchen s ink not draining ,you m ay
need a plumber rather than a serviceman for dishwashers.
Use only the special dishwasher detergent to avoid suds.
If this occurs, open the dishwasher and let suds ev aporate.
Add 1 gallon of cold water to the tub. Close and latch the
dishwasher, then select any cycle. Dishwasher will drain
outthe waterat the first step.Open the door after draining
is stop and check if the suds is disappeared.
Repeat if necessary.
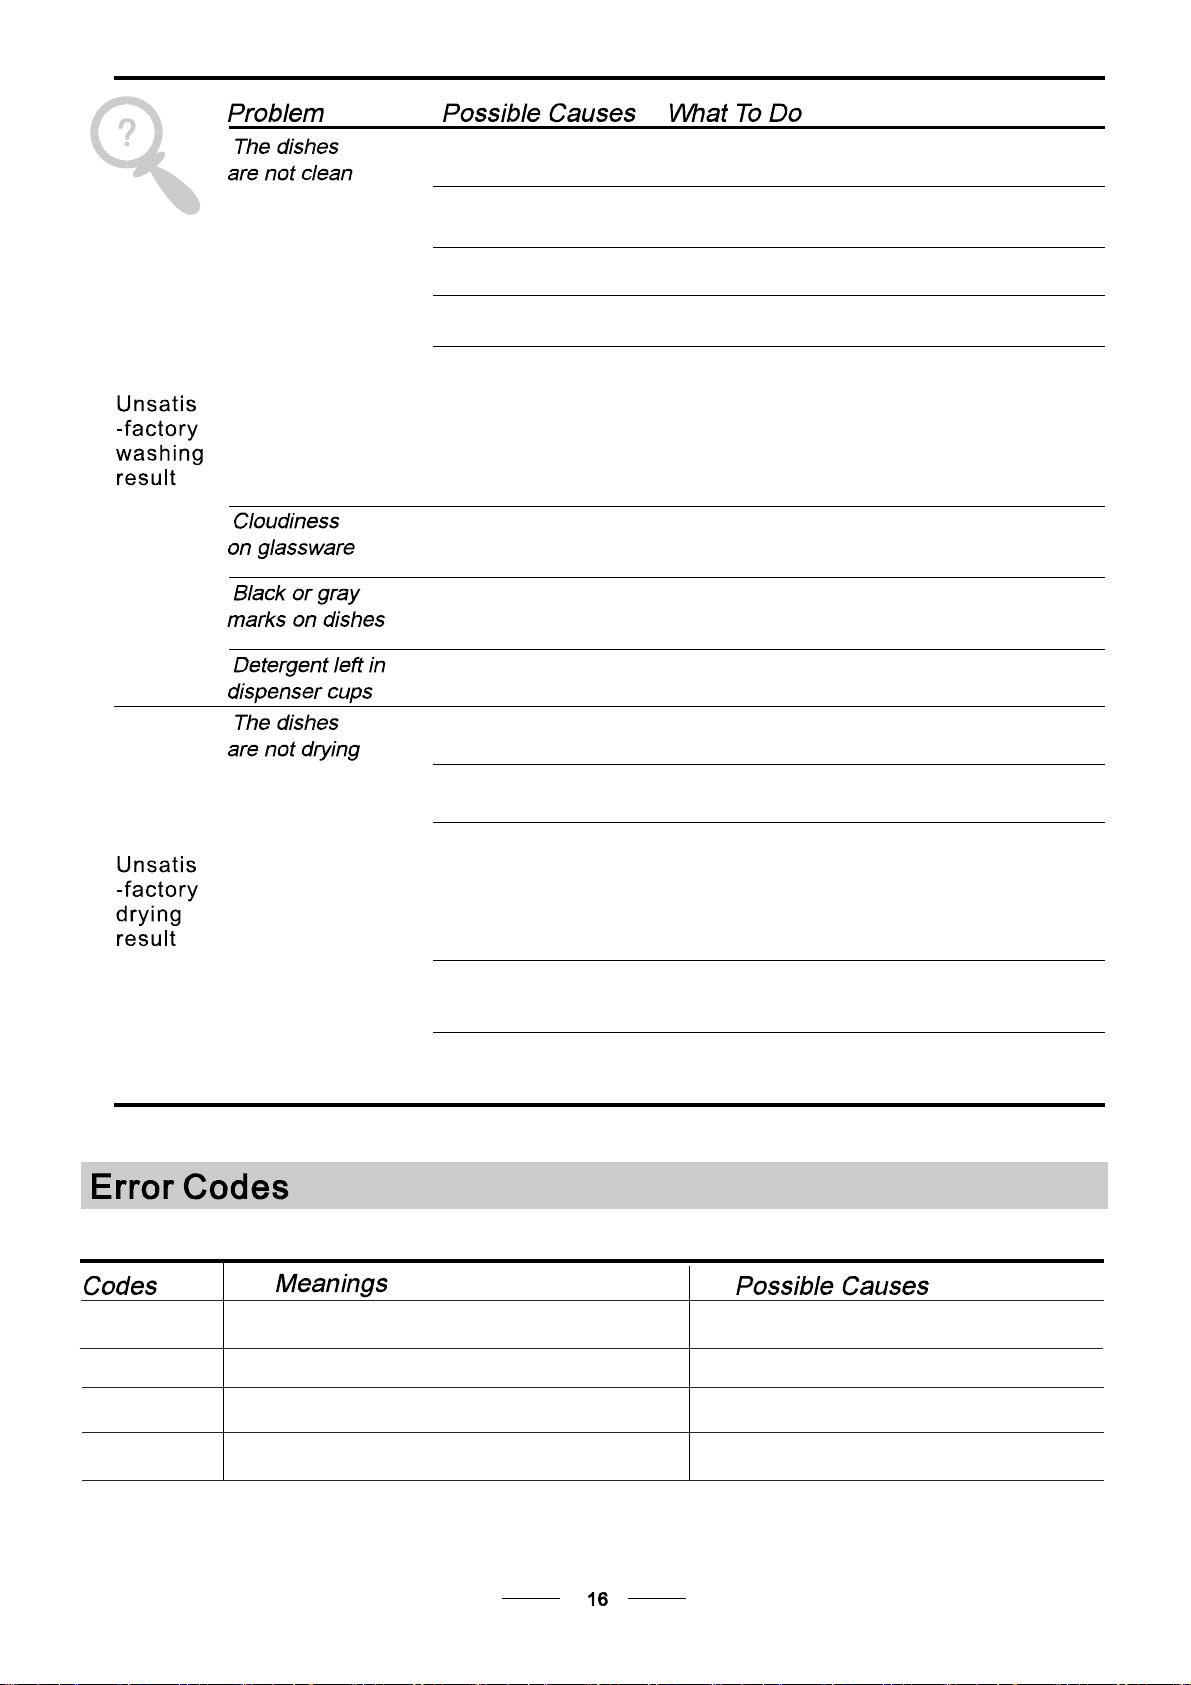
The dishes were not
loaded correctly .
See notes in " Loading the Dishwasher Baskets ".
Select a more intensive programme.
See" Wash Cycle Table ."
Use more detergent, or change your detergent.
Rearrange the items so that the sp ay can rotate freely.r
Clean and/or fit the filter combination correctly.
Clean the sp ay arm jets. See "Cleaning the Spray
Arms".
r
Use less detergent if you have soft water and select
a shortest cycle to wash the glassware and to get
them clean.
Use a mild abrasive cleaner to eliminate those marks.
Re-loading t he dishes properly.
Load the dishwasher as suggested in the directions.
Increase the amount of rinse-aid/refill the rinse-aid
dispenser.
Do not empty your dishwasher immediately after
washing. Open the door slightly so that the steam can
escape. Begin unloading the dishwasher only once t
he dishes are barely warm to the touch. Empty the low
basket first. This prevents water form droppin g off
dishes in the upp er basket.
In short program the washing temperature is lower.
This also lowers cleaning performance. Choose
a program with a long washing time.
Water drainage is more difficult with these items.
Cutlery or dishes of this type are not suitable for
washing i n the dishwasher.
The programme was
notpowerf ul enough.
Not enough detergen t
was dispensed.
Items are blocking
the path of sp ay arms.r
The filter combination
inthebaseofwash
cabinet is not clean or
is not correctly fitted.
This may cause
the sp ay arm jet s
to get blocked.
r
Combin at ion of soft
water and too much
detergent.
Aluminum utensils
have rubbed against
dishes.
Dishes block
detergent cups.
Improper loading
Too little rinse-aid
Dishes are removed
too soon
Wrong program
has been selected
Use of cutlery with
a low-quality coa ting
Overflow .
Whe n some malfunctions com e on, the appli ance will display error codes to warn you:
Longer inlet time.
Faucets is not opened, or water intake is
restricted,or water pressure is too low.
Some element of dishwasher leaks .
E4
E1
E9
E8
Water or something on the button.
Keep pressing a button more than 30 seconds.
Open circuit or break of distributary valve.
Failure of orientation of distributary valve.
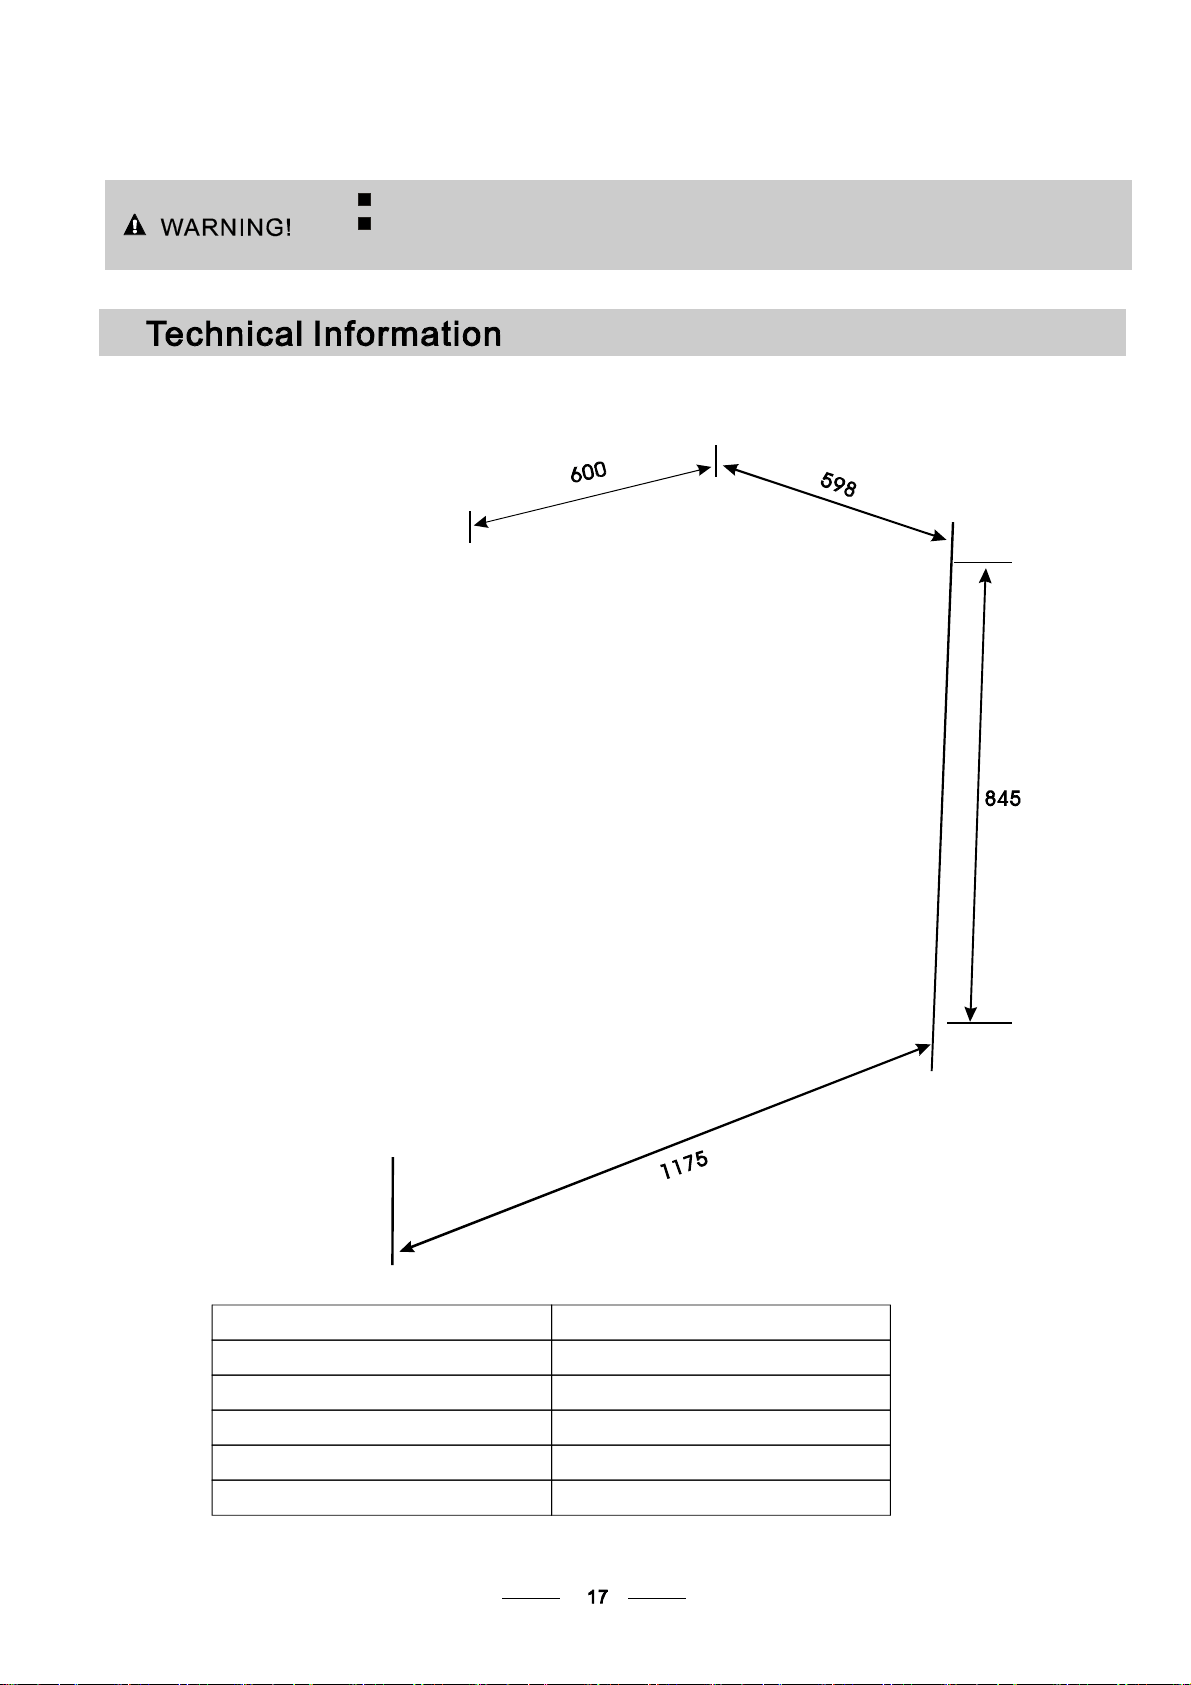
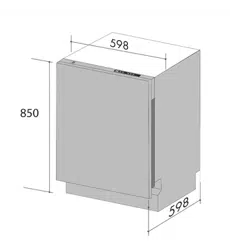
Height: 845mm
Width : 598mm
Depth: 600mm
Wate r pr ess ur e: 0. 04- 1.0M Pa
Power supply: seeratinglabel
Capacity: 14pl ace settings
If overflow occu rs, turn off the main wate r supply before calling a service.
If ther e is water in the base pan because of an overfill or small leak,
the water should be removed before restarting the dishwasher .
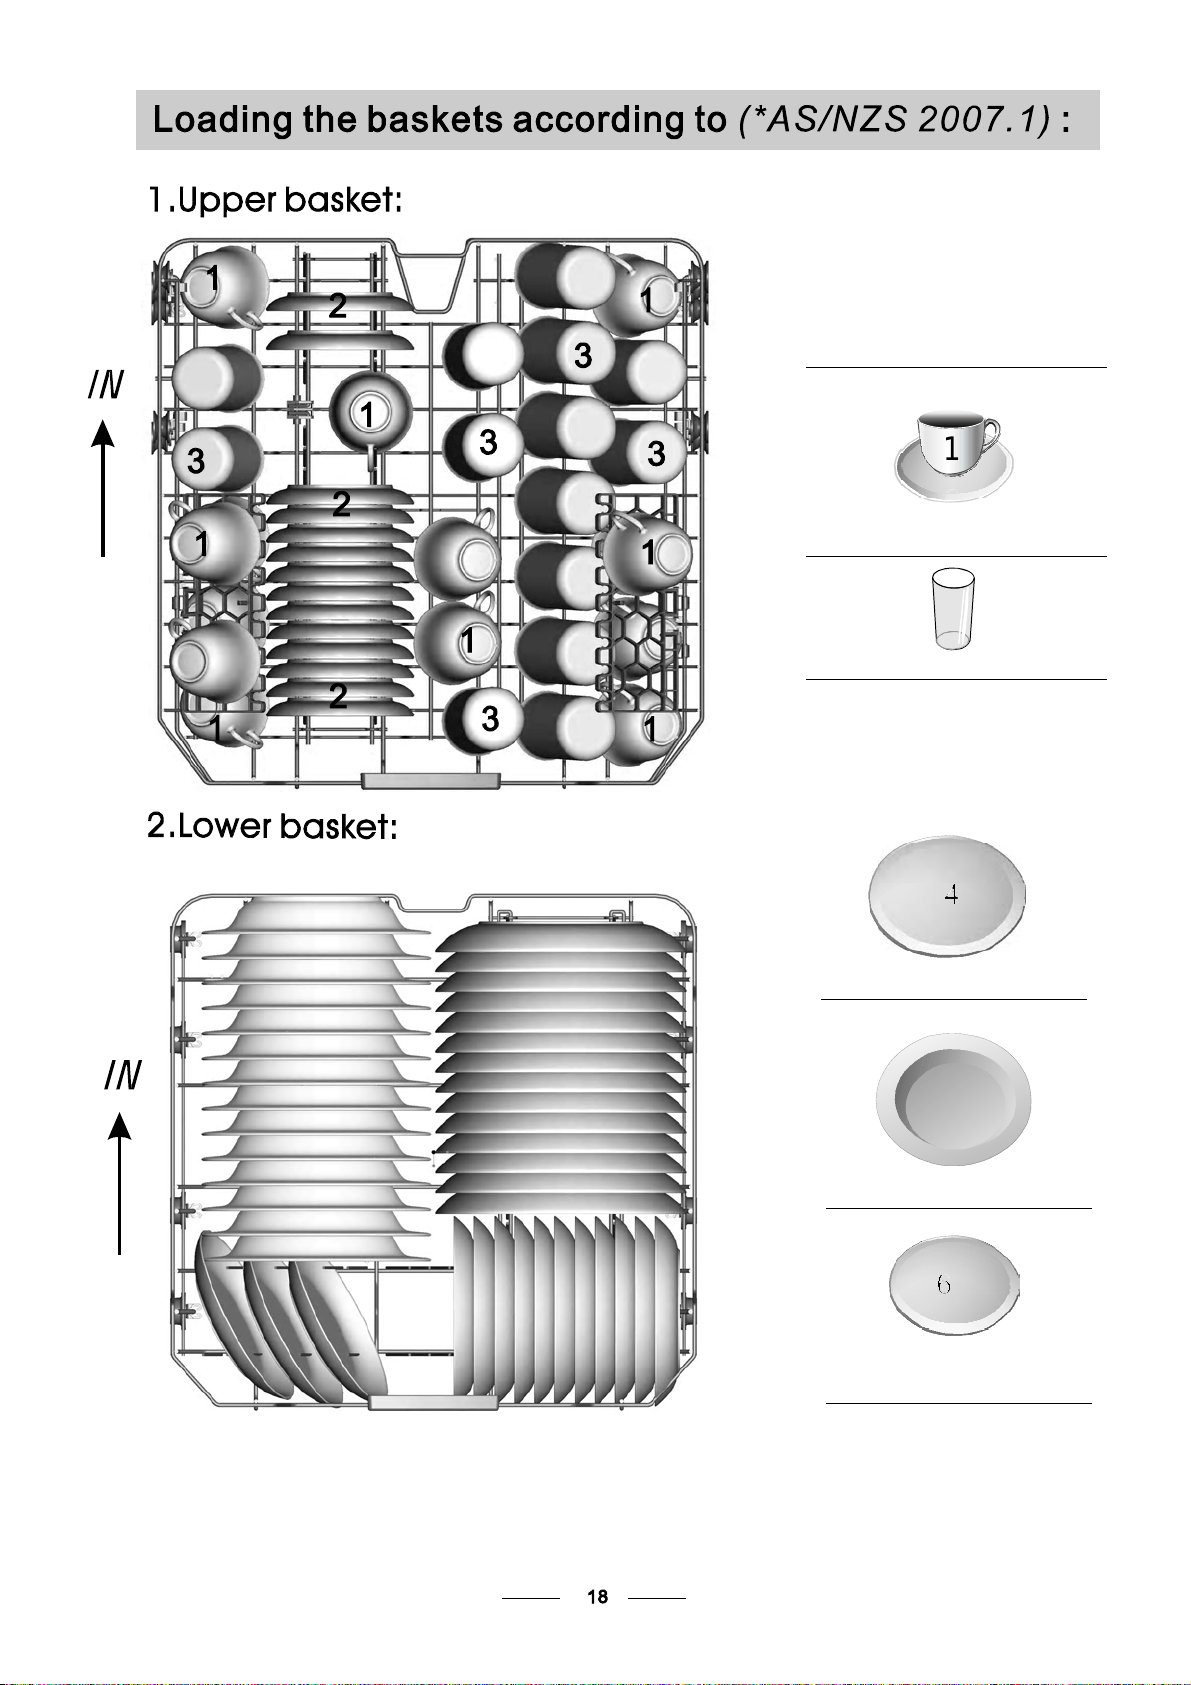
3
Glasses
Saucers
2
1
Cups
4
Dinner plates
5
Soup plates
Dessert dishes
6
4
5
6
6
6
Teaspoons
4
Soup spoons
2
Forks
1
Knives
5
3
Dessertspoons
1
1
1
1
2
2
3
3
4
4
5
5
Open the door slightly 50mm to assistin drying
ofthe dishesafter every wash