' se and Care Guide
TO THE INSTALLER: PLEASE LEAVE THIS
INSTRUCTION BOOK WITH THE UNIT.
TO THE CONSUMER: PLEASE READ
AND KEEP THIS BOOK FOR FUTURE
REFERENCE.
Kitchen kid *
FOR THE WAY IT'S MADE?
A Note to You ............................................ 2
Range Safety .............................................. 3
Parts and Features .................................... 6
Using and Caring for Your Cooktop ........ 9
Using the surface units ............................ 9
Cookware tips ........................................ 11
Characteristics of cookware materials ... 12
Home canning information ..................... 13
Caring for your cooktop ......................... 13
Using and replacing the cooktop light ... 15
Using and Caring for Your Oven ........... 16
Using the electronic oven control .......... 16
Setting the clock .................................... 22
Using the timer....................................... 22
Oven settings ......................................... 24
Cooking tips ........................................... 25
Bake or Convection Bake ...................... 27
Broil ........................................................ 29
Convection Broil ..................................... 31
Convection Roast .................................. 32
Adjusting oven temperature ................... 33
Using the temperature probe ................. 35
Using Convect Full Meal ........................ 37
Using EASY CONVECT r" Conversion .. 40
Timed cooking ....................................... 42
Dehydrating ............................................ 45
Raising (proofing) bread ........................ 47
Cleaning your oven and controls ........... 49
Oven lights ............................................. 51
Resetting circuit breakers .................... :. 51
Using the Self-Cleaning Cycle ............... 52
Before yeu start ::::-.._z .......................... 52
Before setting the controls .L.. ,............ 53
"Settingthe _:ontro-T_._::.....,.i. ................. 53
For best cleaning.r_.u,s .._.iii.:...;._.......... 55
How the cycle,wolt_A ............................ 55
Troubleshodtlng ...................................... 56
Requesting As,s_"ervice ..,.... 59
Warranty "'""_'_T::.:.'':'""""_ ..................... 64
In the U.S.A. for assistance dr service, call
.... the Consumer Assistance canter:
1-800-422-1230
In Canada for assistance or service,
see page 60,
KITCHENAID®Electric Ranges
Models: KERC507
YKERC507
9753843A www.kitchenald.com
Note to You
Tf_alzkyou for buying a KITCHENAID@ appliance!
KitchenAid designs the best tools for the most important room in your house. To
ensure that you enjoy many years of trouble-free operation, we developed this Use
and Care Guide. It contains valuable information concerning how to operate and
maintain your new appliance properly and safely. Please read it carefully. Also,
please complete and mail the enclosed Product Registration Card.
Please record your model's information.
Whenever you call our Consumer Model Number
Assistance Center at 1-800.422-1230 (in
Canada, 1-800-461-5681 ) or request service Serial Number
for your appliance, you need to know your
complete model number and sedal number.
You can find this information on the model
and serial number plate (see diagram for
location of plate).
Please also record the purchase
information.
Purchase/
Installation Date
Builder/Dealer
Name
Address
Phone
NOTE: You must provide proof of purchase
or installation date for in-warranty service.
Keep this book end the sales slip together in a safe place for future reference.
2

nge Safety
Your safety and the safety of others is very important.
We have provided many important safety messages in this manual and on your
appliance. Always read and obey all safety messages.
This is the safety alert symbol.
This symbol alerts you to hazards that can kill or hurt you and others.
All safety messages will be preceded by the safety alert symbol and the
word "DANGER" or "WARNING." These words mean:
You wll.__Jlbe killed or seriously injured
if you don't follow Instructions.
You can be killed or seriously injured
if you don't follow instructions.
All safety messages will identify the hazard, tell you how to reduce the chance of injury,
and tell you what can happen if the instructions are not followed.
The anti-tip bracket
The range will not tip during normal use. However, tipping can occur if you apply too much
force or weight to the open door without the anti-tip bracket properly secured.
Anti-Tip Bracket
Range Foot
Tip Over Hazard
A child or adult can tip the range and be killed.
Connect anti-tip bracket to rear range foot.
Reconnect the anti-tip bracket, if the range is moved.
See the InstallaUon Instructions for,d_etails.
Failure to follow these instructions can ,_sult in death or
serious burns to children and adults.
;i
Making sure the anti-tip bracket is installed:
• Slide range forward.
• Look for the anti-tip bracket securely attached to floor.
• Slide range back so rear range foot is under anti-tip bracket.
kgnge Safety
IMPORTANT SAFETY INSTRUCTIONS
WARNING: To reduce the risk of
fire, electrical shock, injuryto persons,
or damage when using the range,
follow basic precautions, including
the following:
• WARNING: TOREDUCETHE
RISK OF TIPPING OF THE RANGE,
THE RANGE MUST BE SECURED
BY PROPERLY INSTALLED ANTI-
TIP DEVICES. TO CHECK IF THE
DEVICES ARE INSTALLED PROP-
ERLY, SLIDE RANGE FORWARD,
LOOK FOR ANTI-TIP BRACKET
SECURELY ATTACHED TO
FLOOR, AND SLIDE RANGE BACK
SO REAR RANGE FOOT IS UNDER
ANTI-TIP BRACKET.
• CAUTION: Do not store items of
interest to children in cabinets above
a range or on the backguard of a
range - children climbing on the
range to reach items could be
seriously injured.
• Proper Installation - Be sure the
range is properly installed and
grounded by a qualified technician.
• Never Use the Range for Warming or
Heating the Room.
• Do Not Leave Children Alone -
Children should not be left alone or
unattended in area where the range
is in use. They should never be
allowed to sit or stand on any part of
the range.
• Wear Proper Apparel - Loose-fitting
or hanging garments should never
be worn while using the range.
• User Servicing - Do not repair or
replace any part of the range unless
specifically recommended in the
manual. All other servicing should be
referred to a qualified technician.
• Storage in or on the Range -
Flammable materials should not be
stored in an oven or near surface units.
• Do Not Use Water on Grease Fires -
Smother fire or flame or use dry chemical
or foam-type extinguisher,
• Use Only Dry Potholders - Moist or
damp potholders on hot surfaces may
result in burns from steam. Do not let
pothotder touch hot heating elements. Do
not use a towel or other bulky cloth.
• DO NOT TOUCH SURFACE UNITS OR
AREAS NEAR UNITS - Surface units
may be hot even though they are dark in
color. Areas near surface units may
become hot enough to cause burns.
During and after use, do not touch, or let
clothing or other flammable materials
contact surface units or areas near units
until they have had sufficient time to cool.
Among those areas are the cooktop and
surfaces facing the cooktop.
• Use Proper Pan Size - The range is
equipped with one or more surface units
of different size. Select utensils having
flat bottoms large enough to cover the
surface unit heating element. The use of
undersized utensils will expose a portion
of the heating element to direct contact
and may result in ignition of clothing.
Proper relationship of utensil to burner
will also improve efficiency.
• Never Leave Surface Units
Unattended at High Heat Settings -
Boilover causes smoking and
greasy spi_lovers that may ignite.
• Protective Liners - Do not use aluminum
foil to line oven bottoms, except as
suggested in the manual. Improper
installation of these liners may result in a
risk of electric shock, or fire.
SAVE THESE INSTRUCTIONS
4
nge Safety
B
IMPORTANT SAFETY INSTRUCTIONS
• Glazed Cooking Utensils - Only
certain types of glass, glass/ceramic,
ceramic, earthenware, or other
glazed utensils are suitable for
range-top service without breaking
due to the sudden change in
temperature.
• Utensil Handles Should Be Turned
Inward and Not Extend Over
Adjacent Surface Units - To reduce
the risk of burns, ignition of
flammable materials, and spillage
due to unintentional contact with the
utensil, the handle of a utensil should
be positioned so that it is turned
inward, and does not extend over
adjacent surface units.
• Do Not Cook on Broken Cooktop -
If cooktop should break, cleaning
solutions and spillovers may
penetrate the broken cook-top and
create a risk of electric shock.
Contact a qualified technician
immediately.
• Clean Cooktop With Caution - If a
wet sponge or cloth is used to wipe
spills on a hot cooking area, be
careful to avoid steam burn. Some
cleaners can produce noxious fumes
if applied to a hot surface.
• Use Care When Opening Door - Let
hot air or steam escape before
removing or replacing food.
• Do Not Heat Unopened Food
Containers - Build-up of pressure
may cause container to burst and
result in injury.
• Keep Oven Vent Ducts
Unobstructed.
• Placement of Oven Racks - Always
place oven racks in desired location
while oven is cool. If rack must be moved
while oven is hot, do not let potholder
contact hot heating element in oven.
• DO NOT TOUCH HEATING ELEMENTS
OR INTERIOR SURFACES OF OVEN -
Heating elements may be hot even
though they are dark in color. Interior
surfaces of an oven become hot enough
to cause burns. During and after use, do
not touch, or let clothing or other flam-
mable materials contact heating ele-
ments or interior surfaces of oven until
they have had sufficient time to cool.
Other surfaces of the appliance may
become hot enough to cause burns -
among these surfaces are oven vent
openings and surfaces near these
openings, oven doors, and windows of
oven doors.
For self-cleaning ranges -
• Do Not Clean Door Gasket - The door
gasket is essential for a good seal. Care
should be taken not to rub, damage, or
move the gasket.
• Do Not Use Oven Cleaners - No
commercial oven cleaner or oven liner
protective coating of any kind should be
used in or around any part of the oven.
=Clean Only Parts Listed in Manual.
• Before Self-Cleaning the Oven -
Remove broiler pan and other utensils.
For units with ventilating hood -
• Clean Ventilating Hoods Frequently-
Grease should not be allowed to
accumulate on hood or filter.
• When flaming foods under the hood, turn
the fan on.
SAVE THESE INSTRUCTIONS
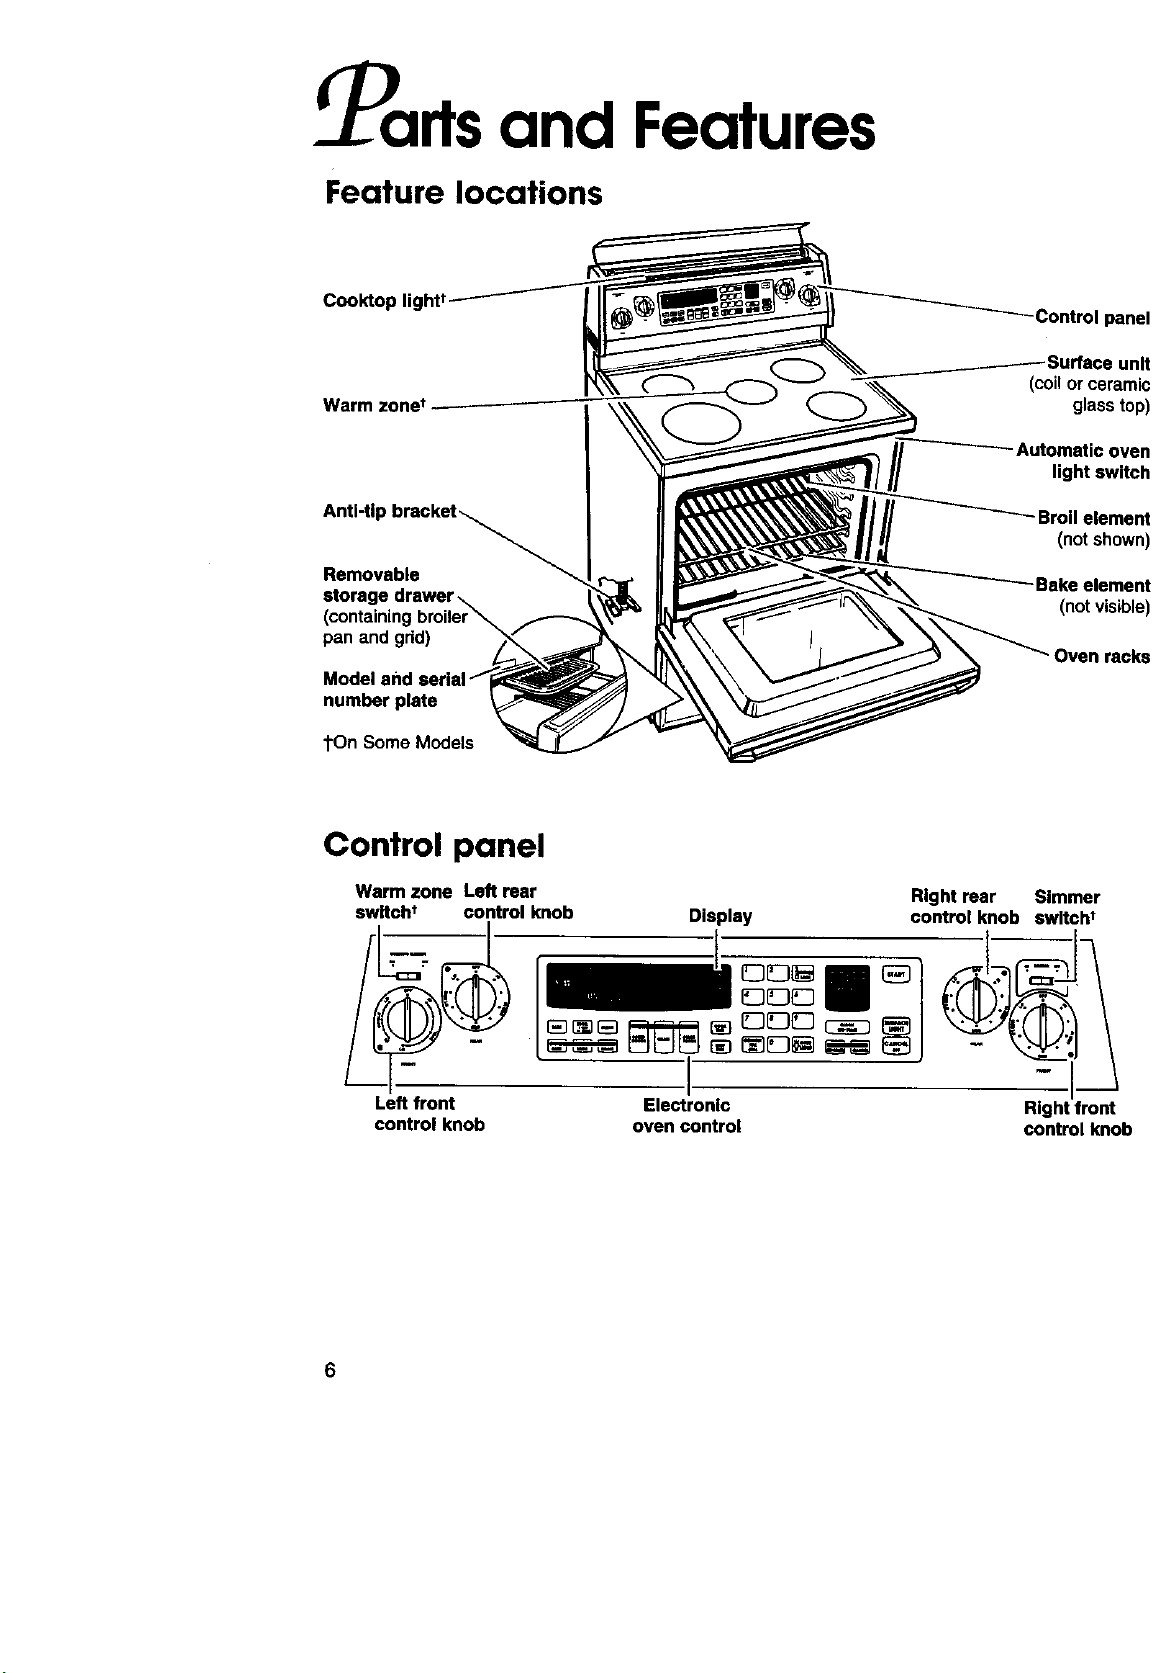
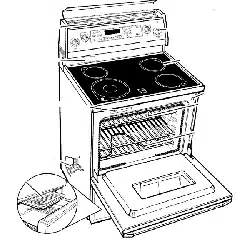
Parts and Features
Feature locations
Cooktop light t
Warm zonet
Anti-tip bracket_
Removable
storeg,
(containing
pan and grid)
Model
number plate
1"OnSome Models
Control panel
It
(coilor ceramic
glass top)
Automatic oven
light switch
-Broil element
(not shown)
-Bake element
(not visible)
Oven racks
Control panel
Warm zone Left rear
switch t control knob
Left front
control knob
Right rear Simmer
Display control knob switch t
Electronic Right front
oven control control knob
6
_)arts and Features
I
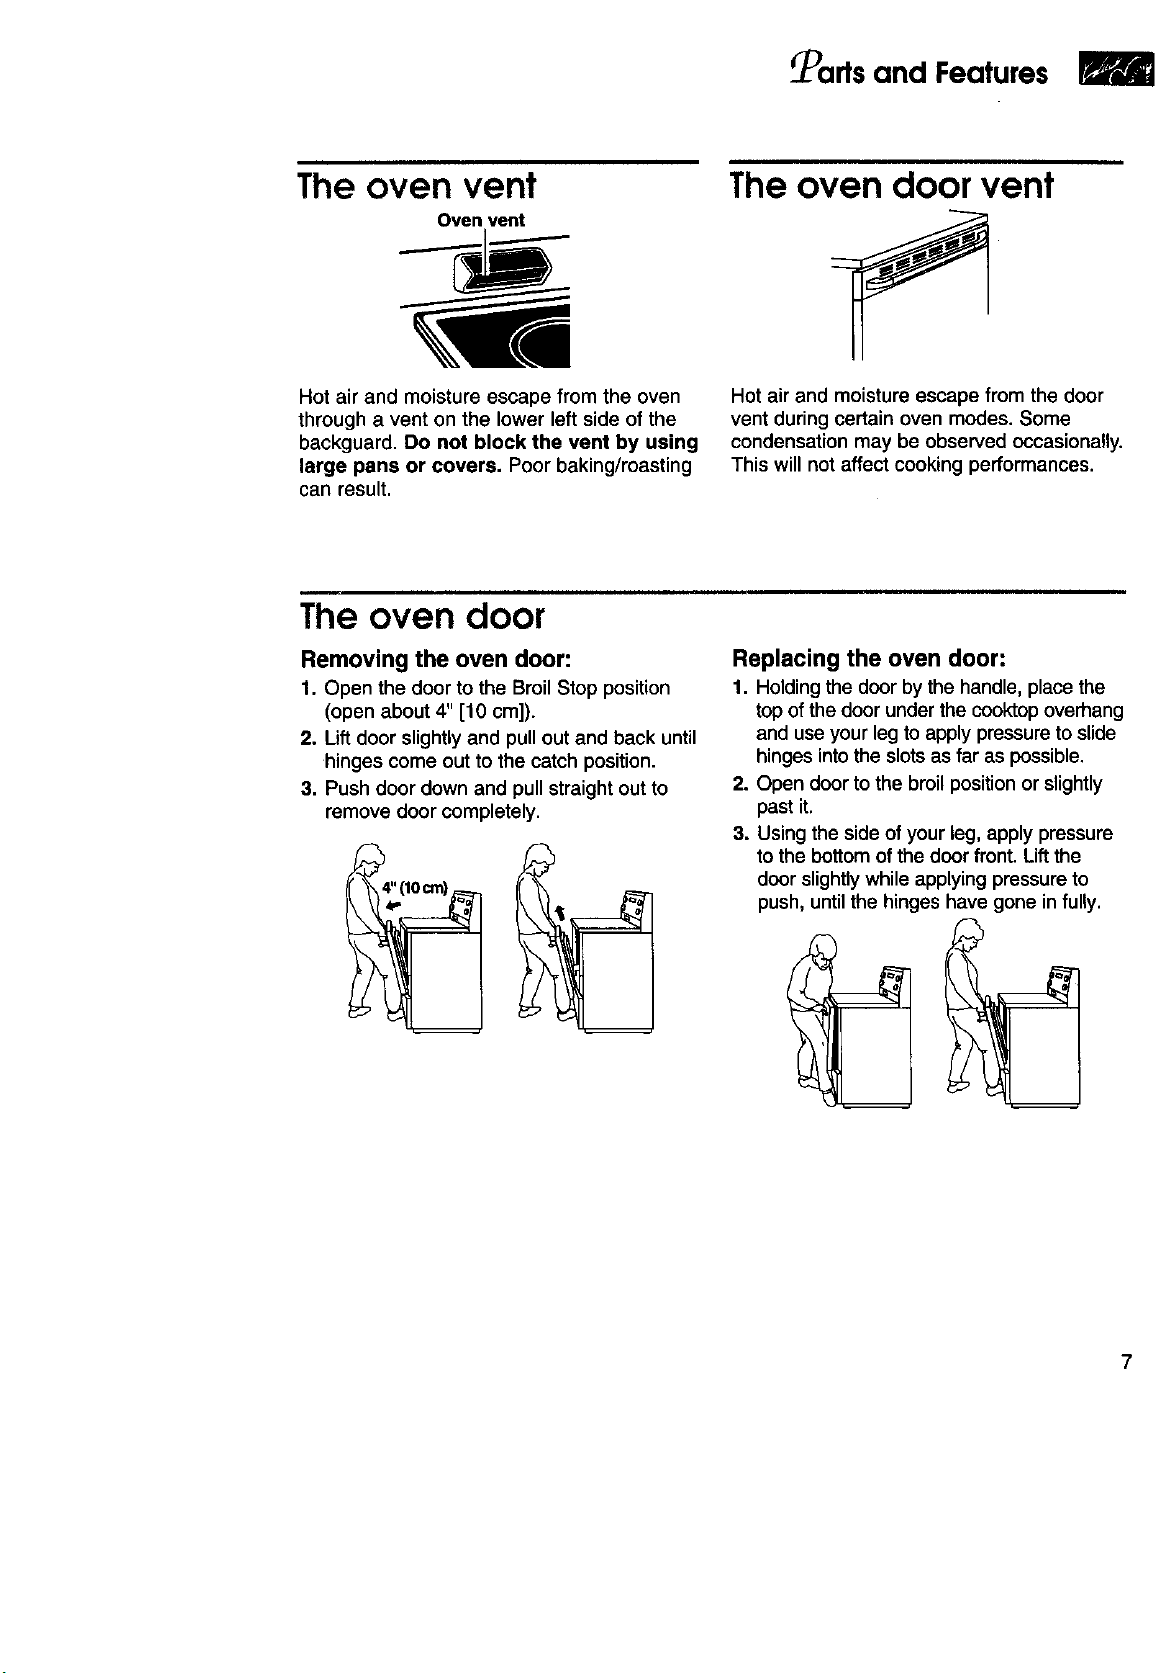
The oven vent
Oven vent
Hot air and moisture escape from the oven
through a vent on the lower left side of the
backguard. Do not block the vent by using
large pans or covers. Poor baking/roasting
can result.
The oven door vent
Hot air and moisture escape from the door
vent during certain oven modes. Some
condensation may be observed occasionally.
This will not affect cooking performances.
The oven door
Removing the oven door:
1. Open the door to the Broil Stop position
(open about 4" [10 cm]).
2. Lift door slightlyand pull out and back until
hinges come out to the catch position.
3, Push door down and pull straight out to
remove door completely,
Replacing the oven door:
1. Holding the door by the handle, place the
top of the door under the cooktop overhang
and use your leg to apply pressure to slide
hinges into the slots as far as possible.
2. Open door to the broil position or slightly
past it.
3. Using the side of your leg, apply pressure
to the bottom ofthe door front. Lift the
door slightly while applying pressure to
push, until the hinges have gone in fully.
7
B
Parts and Features
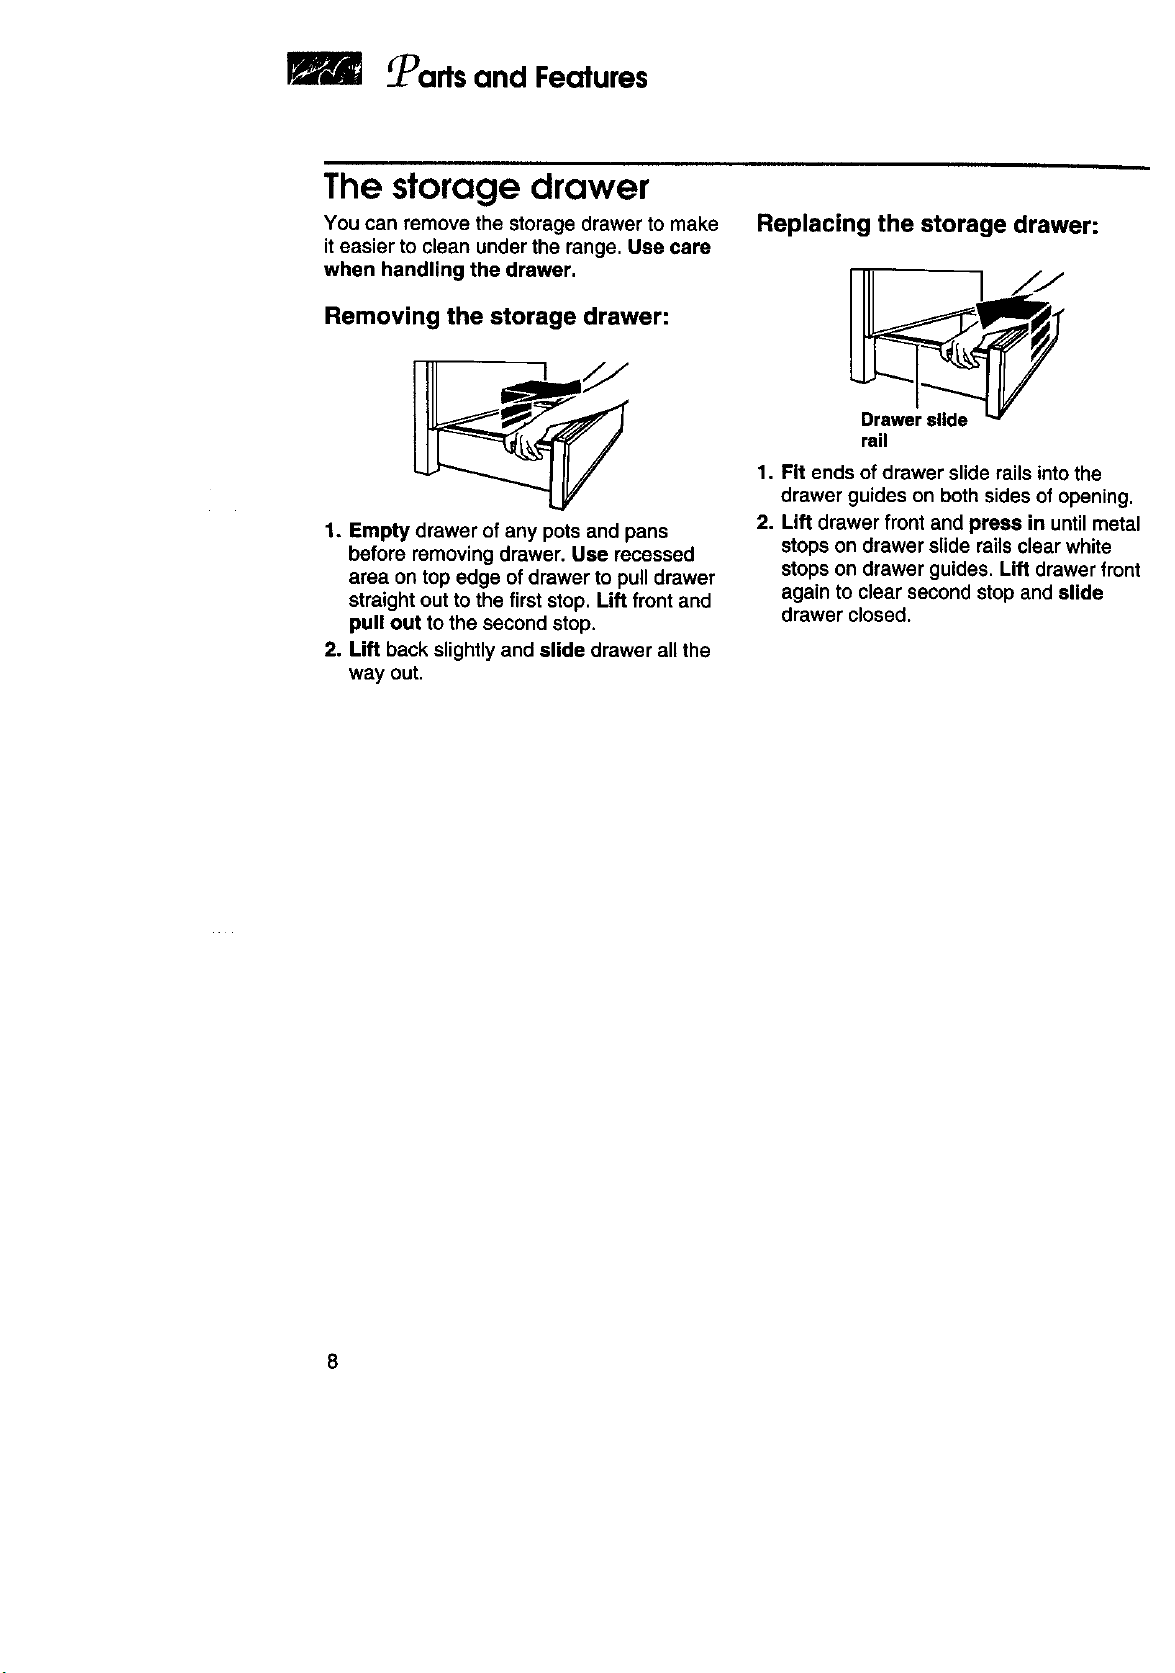
The storage drawer
You can remove the storage drawer to make
iteasier to clean under the range. Use care
when handling the drawer.
Removing the storage drawer:
1. Empty drawer of any pots and pans
before removing drawer. Use recessed
area on top edge of drawer to pull drawer
straight out to the first stop. Lift front and
pull out to the second stop.
2. Lift back slightlyand slide drawer all the
way out.
Replacing the storage drawer:
I
Drawer slide
rail
1. Fit ends of drawer slide rails intothe
drawer guides on both sides of opening.
2. Lift drawer front and press in until metal
stops on drawer slide rails clear white
stops on drawer guides. Lift drawer front
again to clear second stop and slide
drawer closed.
8
Using and Caring for Your
Cooktop
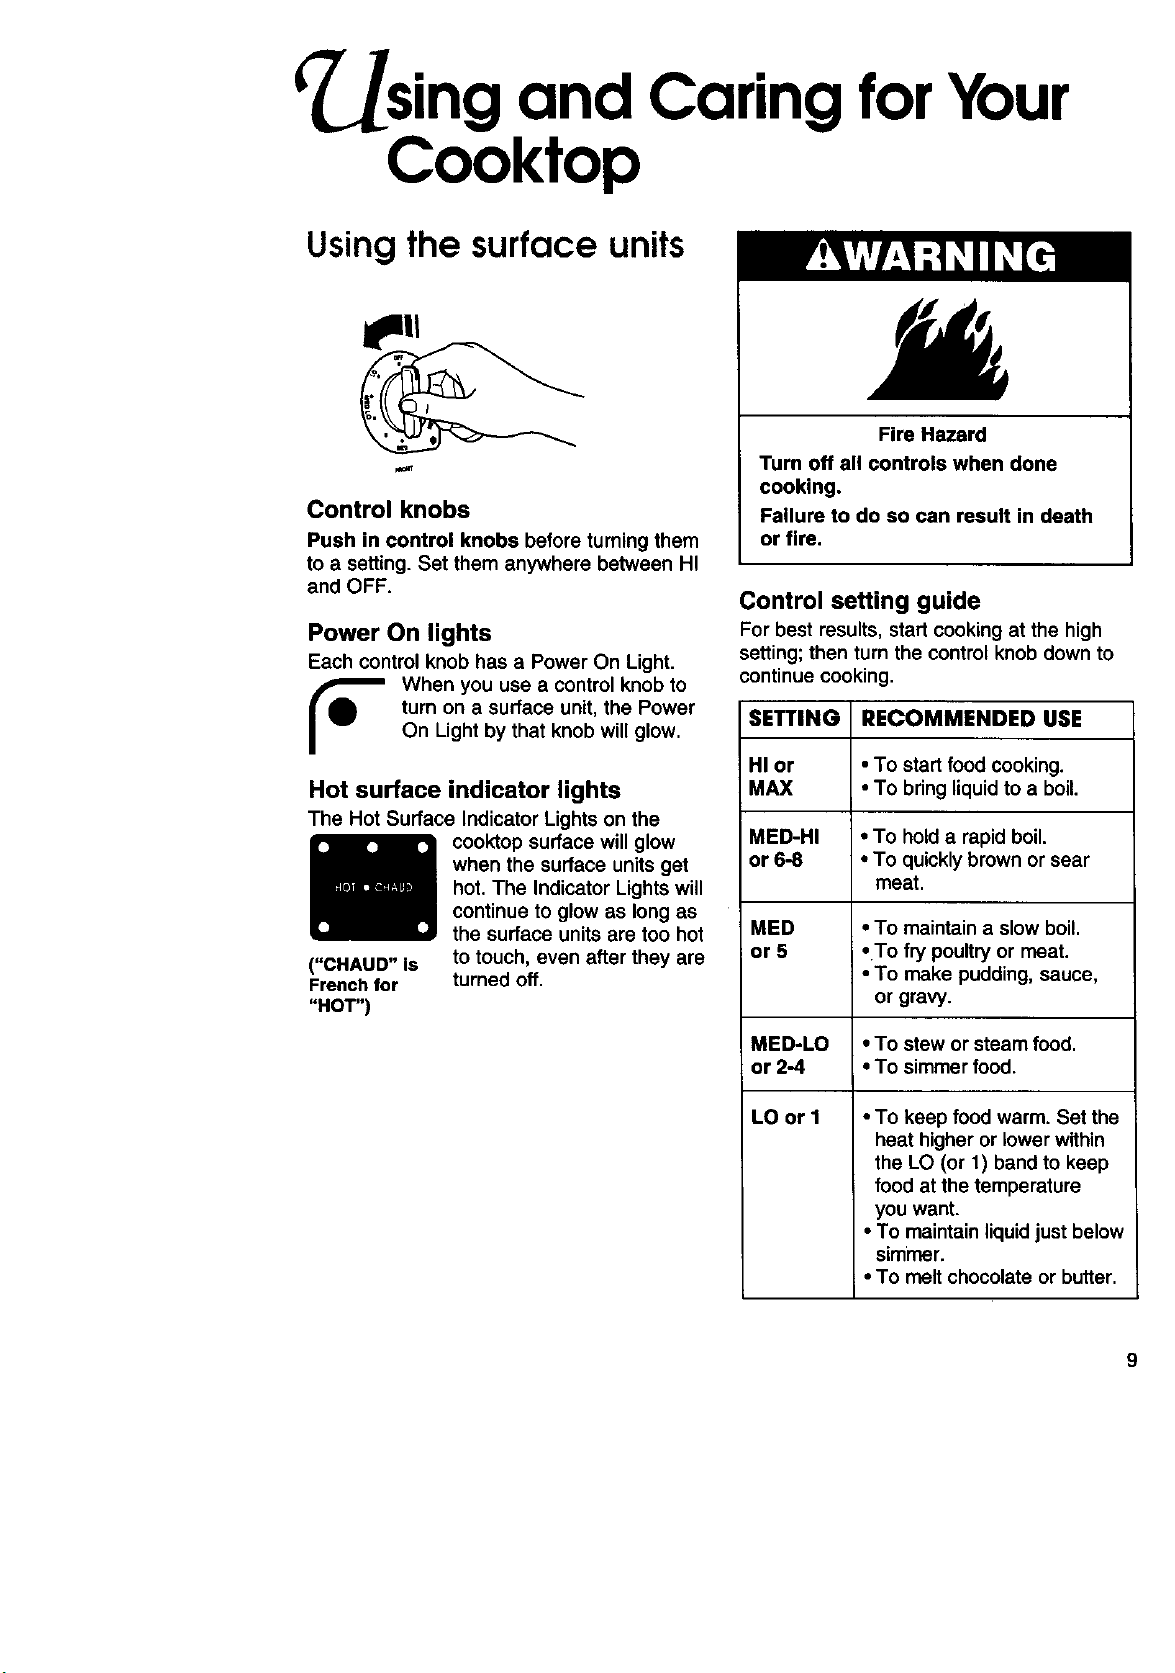
Using the surface units
Control knobs
Push in control knobs before turning them
to a setting. Set them anywhere between HI
and OFF.
Power On lights
Each control knob has a Power On Light.
When you use a control knob to
turn on a surface unit, the Power
On Light by that knob will glow.
("CHAUD" Is
French for
"HOT")
Hot surface indicator lights
The Hot Surface Indicator Lights on the
cooktop surface will glow
when the surface units get
hot. The Indicator Lights will
continue to glow as long as
the surface units are too hot
to touch, even after they are
turned off.
Fire Hazard
Turn off all controls when done
cooking.
Failure to do so can result in death
or fire.
Control setting guide
For best results, start cooking at the high
setting;then turn the control knob down to
continue cooking.
SETTING RECOMMENDED USE
HI or • To start food cooking.
MAX * To bringliquid to a boil.
MED-HI • To hold a rapid boil.
or 6-8 • To quickly brown or sear
meat.
MED • To maintain a slow boil.
or 5 i °To fry poultryor meat.
• To make pudding, sauce,
or gravy.
MED-LO ° To stew or steam food.
or 2-4 ° To simmer food.
LO or I
• To keep food warm. Set the
heat higheror lower within
the LO (or 1) band to keep
food at the temperature
you want.
• To maintain liquidjust below
simmer.
• To melt chocolate or butter.
9

fusing and Caring for Your Cooktop
Simmer Feature (some models)
The Simmer feature isan adjustable setting
which allows for more precise
simmering of foods. The switch,
when in the "OFF' position,
operates at normal wattage
(1800 W). When in the "ON" position, it
operates the right front element at a lower
wattage (450 W).
NOTE: All other elements can be used for
normal operation whether the Simmer
feature is in use or not.
Warm Zone Feature (some models)
Use the Warm Zone element to keep cooked
.,,,.,.,_.,,,. foods warm. It is not recom-
". _ mended for heating cold foods.
The Warm Zone is located in the
center of your cooktop. Set
switch to "ON" for use.
• Cover all foods with a lidor aluminum foil.
Do not use plastic wrap to cover food
because it may melt onto the cooktop
surface. When warming baked goods,
allow a small opening in the cover for
moisture to escape.
• Use only cookware and dishes recom-
mended for oven and cooktop use.
• Use potholders or oven mitts to remove
food.
• The Warm Zone element will not glow red
when it is on, unlike the surface elements.
However, the surface indicator light on the
cooktop will glow.
• The Warm Zone element may be used
whether the other elements are in use or
not.
• The quality of the food may deteriorate if it
is kept on the Warm Zone element for an
extended period of time.
Dual-size cooktop surface
element (some models)
Standard Dual element Hot surface
element (some models) indicator
You can use the left front surface element
as either a small-diameter, lower-wattage
element or large-diameter, full-wattage
element.
Use both elements
for larger pans-
Use small element-
To use both elements
for larger pans:
Push in and turn control knob to the right
(clockwise) to the desired setting in the area
marked "DUAL",
NOTE: You can turn the control knob in ei-
ther direction to reach "OFF'.
10
Using and Caring for Your Cooktop
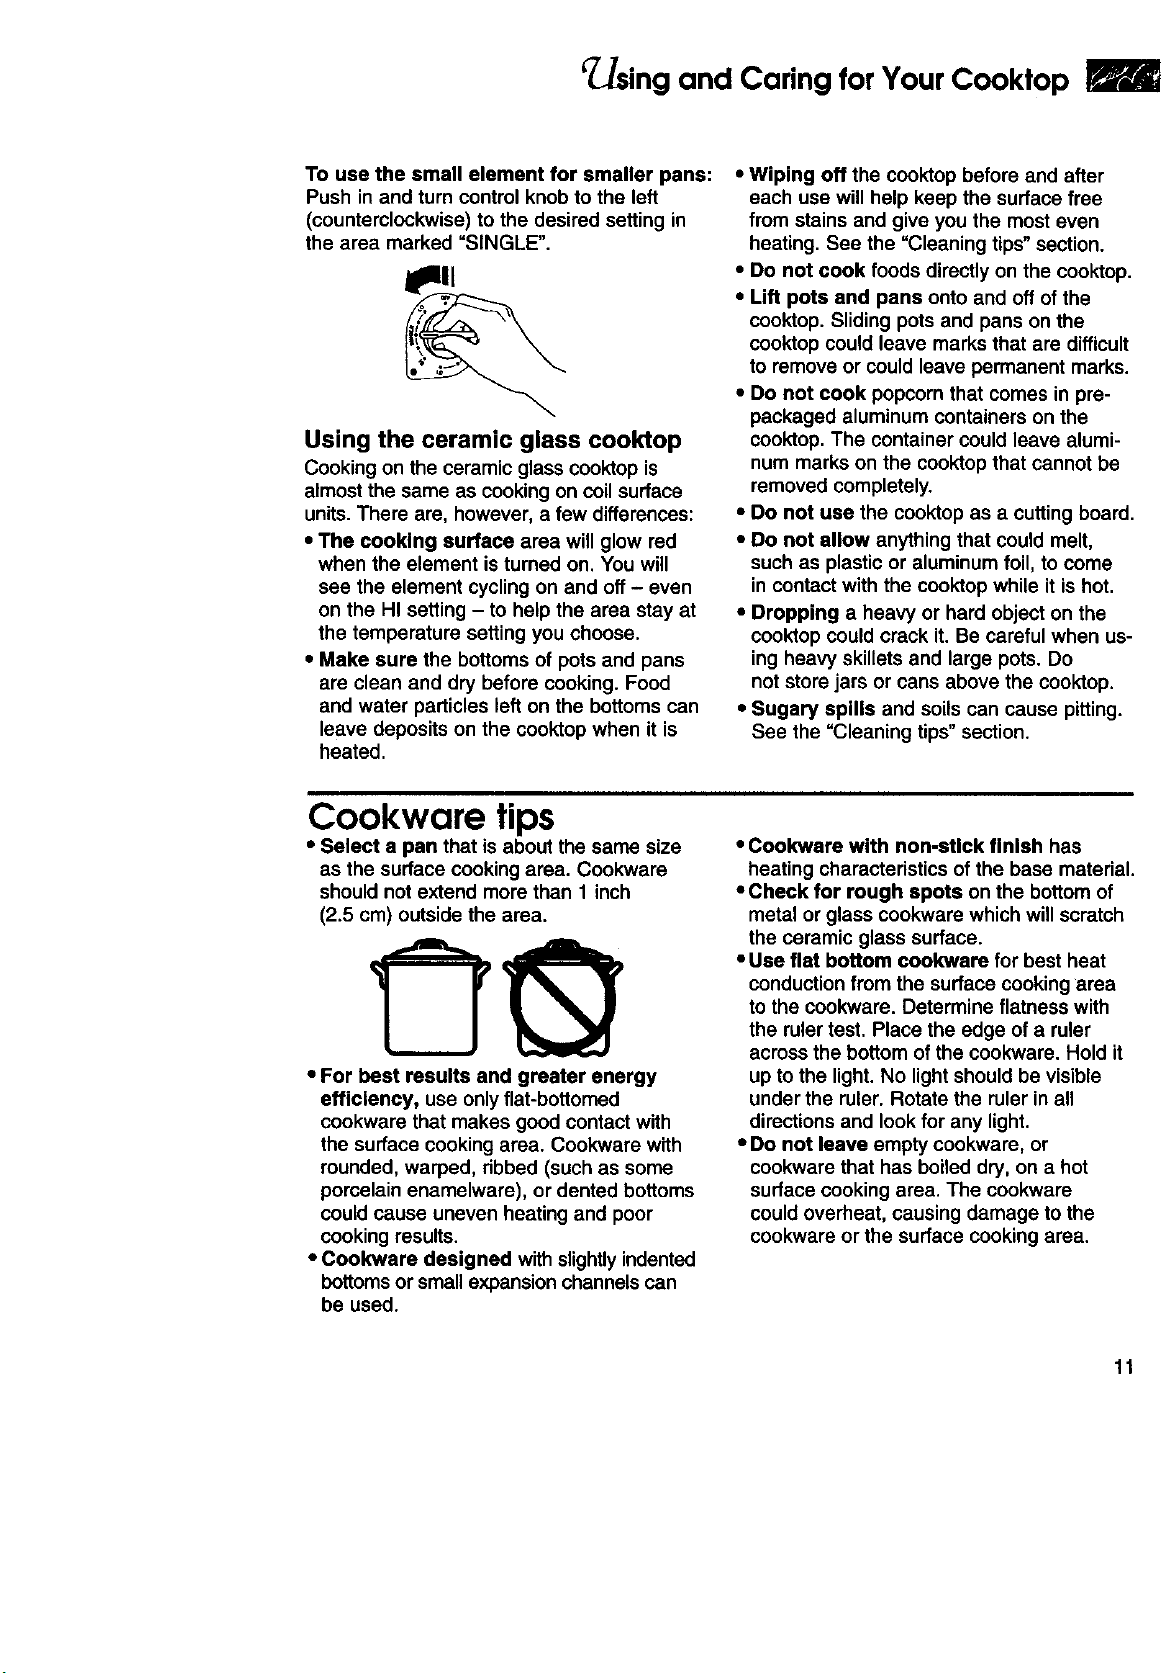
To use the smell element for smaller pans:
Push in and turn control knob to the left
(counterclockwise) to the desired setting in
the area marked "SINGLE".
Using the ceramic glass cooktop
Cooking on the ceramic glass cooktop is
almost the same as cookingon coil surface
units. There are, however, a few differences:
• The cooking surface area will glow red
when the element is turned on, You will
see the element cycling on and off- even
on the HI setting - to help the area stay at
the temperature setting you choose.
• Make sure the bottoms of pots and pans
are clean and dry before cooking. Food
and water particles left on the bottoms can
leave deposits on the cooktop when it is
heated.
• Wiping off the cooktop before and after
each use will help keep the surface free
from stains and give you the most even
heating. See the =Cleaning tips" section.
• Do not cook foods directly on the cooktop.
• Lift pots and pans onto and off of the
cooktop. Sliding pots and pans on the
cooktop could leave marks that are difficult
to remove or could leave permanent marks.
• Do not cook popcorn that comes in pre-
packaged aluminum containers on the
cooktop. The container could leave alumi-
num marks on the cooktop that cannot be
removed completely.
• Do not use the cocktop as a cutting board.
• Do not allow anything that could melt,
such as plastic or aluminum foil, to come
in contact with the cooktop while it is hot.
• Dropping a heavy or hard object on the
cooktop could crack it. Be careful when us-
ing heavy skillets and large pots. Do
not store jars or cans above the cooktop.
• Sugary spills and soils can cause pitting.
See the =Cleaning tips"section.
Cookware tips
• Select a pan that is about the same size
as the surface cooking area. Cookware
should not extend more than 1 inch
(2.5 cm) outside the area.
• For best results and greater energy
efficiency, use only flat-bottomed
cookware that makes good contact with
the surface cooking area. Cookware with
rounded, warped, dbbed (such as some
porcelain enamelware), or dented bottoms
could cause uneven heating and poor
cooking results.
• Cookware designed with slightlyindented
bottomsor small expansion channels can
be used.
• Cookware with non-stick finish has
heating characteristics of the base material.
=Check for rough spots on the bottom of
metal or glass cookware which will scratch
the ceramic glass surface.
• Use flat bottom cookware for best heat
conduction from the surface cookingarea
to the cookwere. Determine flatness with
the ruler test. Place the edge of a ruler
across the bottom of the cookware. Hold it
up to the light. No light should be visible
under the ruler. Rotate the ruler in all
directions and lookfor any light.
• Do not leave empty cookware, or
cookware that has boiled dry, on a hot
surface cooking area. The cookwere
could overheat, causing damage to the
cookware or the surface cooking area.
11
Using and Caring for Your Cooktop
Characteristics of cookware materials
The pan materialaffects howfast heat transfersfrom the surface cookingarea throughthe pan
material and how evenly heat spreads over the pan bottom. Choose pans that providethe
bestcookingresults.
Aluminum • Heats quicklyand evenly.
• Use for all types of cooking.
• Medium or heavy thicknessis best for mostcooking.
• Used as a core or base incookware to provide even heating.
Cast iron • Heats slowlyand evenly.
• Good for browning and frying.
• Maintains heat for slow cooking.
• Can be coated with porcelain enamel.
Ceramic or • Heats slowly and unevenly.
ceramic glass • Use on low to medium settings.
• Followmanufacturer's instructions.
Copper • Heats very quicklyand evenly.
• Used as a core or base in cookware to provide even heating.
Earthenware • Can be used for cooktop cooking ifrecommended by the
manufacturer.
• Use on low settings.
Porcelain enamel-on-steel • See cast iron and stainless steel.
or enamel-on-cast iron
Stainless steel • Heats quickly but unevenly.
• A core or base of aluminumor copper on the cookware
provides even heating.
• Can be coated with porcelain enamel.
12

Using and Caring for Your Cooktop
r,L
Home canning information
cen_o_ "_.----------- Pan
Surface
unit
• Use the entire surface ("DUAL" setting) of
the left front surface cocking area for best
results.
• When canning for long periods of time, allow
elements and the surrounding surfaces to
cool down.
• Use flat-bottomedcanners on all types of
cooktops, especially ceramic glass.
Canners with rippledor ridged bottoms do
not allow good contact with the surface.
• Center the canner over the largest surface
cooking area. Do not extend more than 1 inch
(2.5 cm) outside the surface cookingarea.
Largediametercanners/pans, if not centered
correctly,willtrap heat and resultindamage
to the cooktop.Do not place on twosurface
cookingareas at the same time.
• The type of materialthe canner ismade of
determinesthe lengthofheatingtime. Refer
tothe "Charecteristics of cockware materials"
• Alternate use of the surface cocking areas
between batches or prepare small batches
at a time.
• Start with hot water, cover with a lid, and
bring to a boil; then reduce heat to maintain
a boil or required pressure levels in a
pressure canner.
• For up-to-date information on canning, In
the United States, contact your local U.S.
Government Agricultural Department
Extension Office or companies who
manufacture home canning products. In
Canada, contact Agriculture Canada.
chart in thissection for more information.
Caring for your cooktop
This cooktop is designed for easy care.
However, ceramic glass cooktops need
to be maintained differently than standard
electric coil elements. Foods spilled directly
on the cooktop will not burn off as on coil
elements. Because of this, the surface
should be dust-free and soil-free before
heating.
Your cooktop has been prepolished at
the factory for improved protection and
cleanability. The Cooktop Polishing Creme,
a paper towel or a sponge is all you need to
clean your cooktop. For proper cleaning
methods, please review the =How to keep
your cocktop looking like new" chart. Follow
this chart after each use to ensure top
performance and to preserve that uniquely
elegant look.
NOTE: Let cooktop cool before cleaning.
13
Using and Caring for Your Cooktop
Cleaning tips
What to use:
• Cooktop Polishing Creme included with
your cooktop with a paper towel or clean,
damp sponge. This creme has been
developed especially for cleaning and
polishing your cooktop. When using, follow
instructionson container.
• Razor scraper - Use to remove cooked-
on soils from your ceramic glass cooktop.
To avoid scratches, keep the razor blade
as flat against the cooktop as possible.
Store razor blades out of reach of
children. (Not included with your range.)
• Do not use steel wool, plastic cleaning
pads, abrasive powdered cleansers,
chlorine bleach, rust remover, ammonia,
or glass cleaning products with ammonia.
These products could damage the cooktop
surface.
Steps to follow:
1. Most spills can be wiped off easily
using a paper towel or clean, damp
sponge as soon as Hot Surface
Indicator Light goes off.
2. For stubborn spills, rub Cooktop
Polishing Creme into cooked-on soil
using a paper towel. If some soil remains,
leave some creme on the spot(s) and
follow Step 3.
3. Carefully scrape spots with the razor
scraper.
4. Finish by polishing entire cooktop
with Cooktop Polishing Creme and a
paper towel.
To order Cooktop Polishing Creme
(Part No. 3184477) or razor scraper (Part
No. 3183488), call 1-800-422-1230 (in
Canada, 1-800-461-5681 ) and follow the
instructions and telephone prompts you
hear.
NOTE: Always wipe and dry your cooktop
thoroughly after using cleanser to prevent
streaking or staining.
How to keep your cooktop looking
like new:
IF THERE ARE WHAT TO DO
Sugary spills
and soils (such
as jellies and
candy syrups)
To prevent pitting on
the cooktop, wipe up
with a paper towel or
clean, damp sponge
while ceramic glass
surface is still warm.
Remove as soon as
possible after spill
occurs.
Burned-on
soils
Rub Cooktop Polishing
Creme or nonabrasive
cleanser into soil using
a paper towel. Reapply
creme to spots remain-
ing. Hold razor scraper
as flat to surface as
possible, scrape spots.
Polish entire cooktop
with creme and paper
towel. Rinse and dry.
Store razor blades out
of reach of children.
Dark streaks,
specks, and
discoloration
Use Cooktop Polishing
Creme or nonabrasive
cleanser with a damp
paper towel or sponge.
Metal marks
(from copper or
aluminum pans)
Use Cooktop Polishing
Creme or nonabrasive
cleanser with a damp
paper towel or sponge
before heating the
cooktop again. If
heated before cleaning,
metal marks may not
come off.
Tiny scratches
or abrasions
Scratches and abra-
sions do not affect
cooking, in time, they
will become less visible
as a result of cleaning.
To prevent scratches
and abrasions, use
Cooktop Polishing
Creme regularly.
14
_.]sing and Caring for Your Cooktop
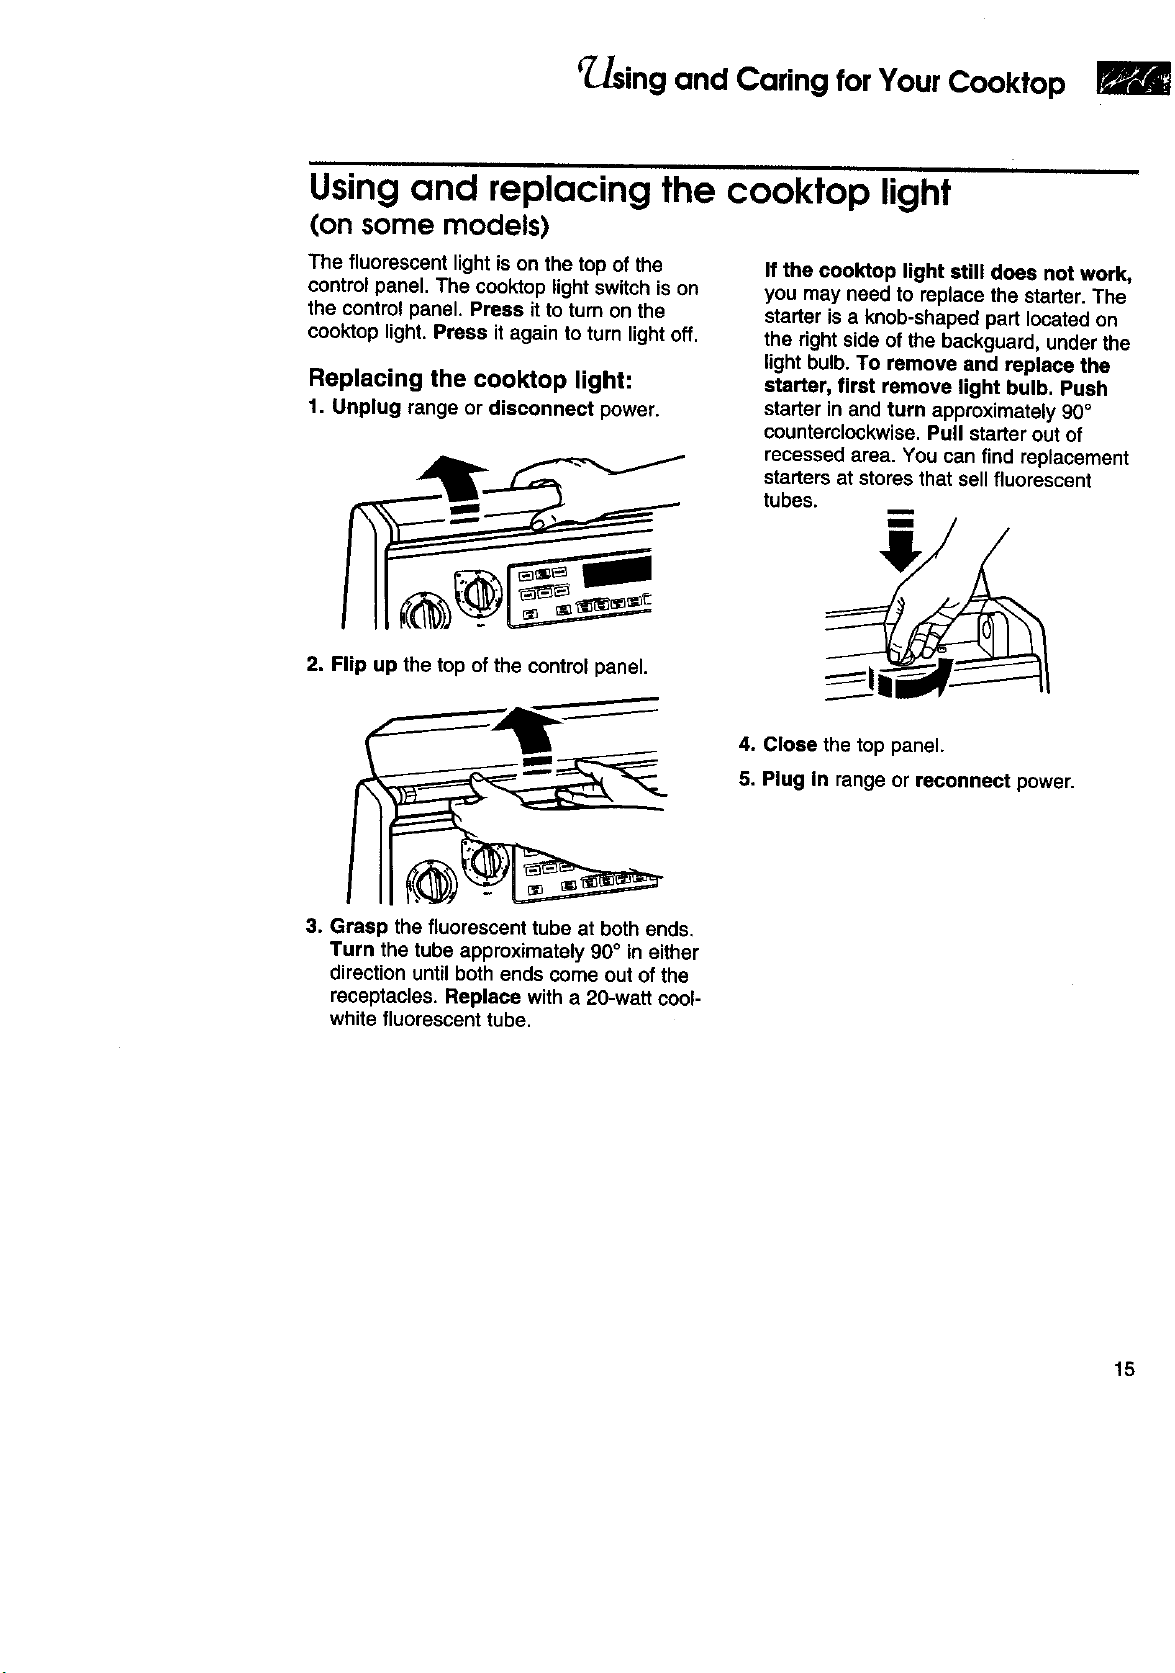
Using and replacing the cooktop light
(on some models)
The fluorescent light is on the top of the
control panel. The cooktop light switch is on
the control panel. Press it to turn on the
cooktop light. Press it again to turn light off.
Replacing the cooktop light:
1. Unplug rangeor disconnect power.
If the cooktop light still does not work,
you may need to replace the starter. The
starter is a knob-shaped part located on
the right side of the backguard, under the
light bulb. To remove and replace the
starter, first remove light bulb, Push
starter in and turn approximately 90°
counterclockwise. Pull starter out of
recessed area. You can find replacement
starters at stores that sell fluorescent
tubes.
====,=
IIIIll
2. Flip up the top of the control panel.
4. Close the top panel.
5. Plug In range or reconnect power.
3. Grasp the fluorescent tube at both ends,
Turn the tube approximately 90° in either
direction until both ends come out of the
receptacles. Replace with a 20-watt cool-
white fluorescent tube.
15
Using and Caring for Your
Oven
This section tetls you, step by step, how to operate all oven functions controlled by the
electronic control. Carefully follow these instructions, along with the cooking tips and cleaning
information, for successful use of your range.
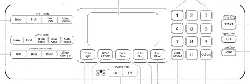
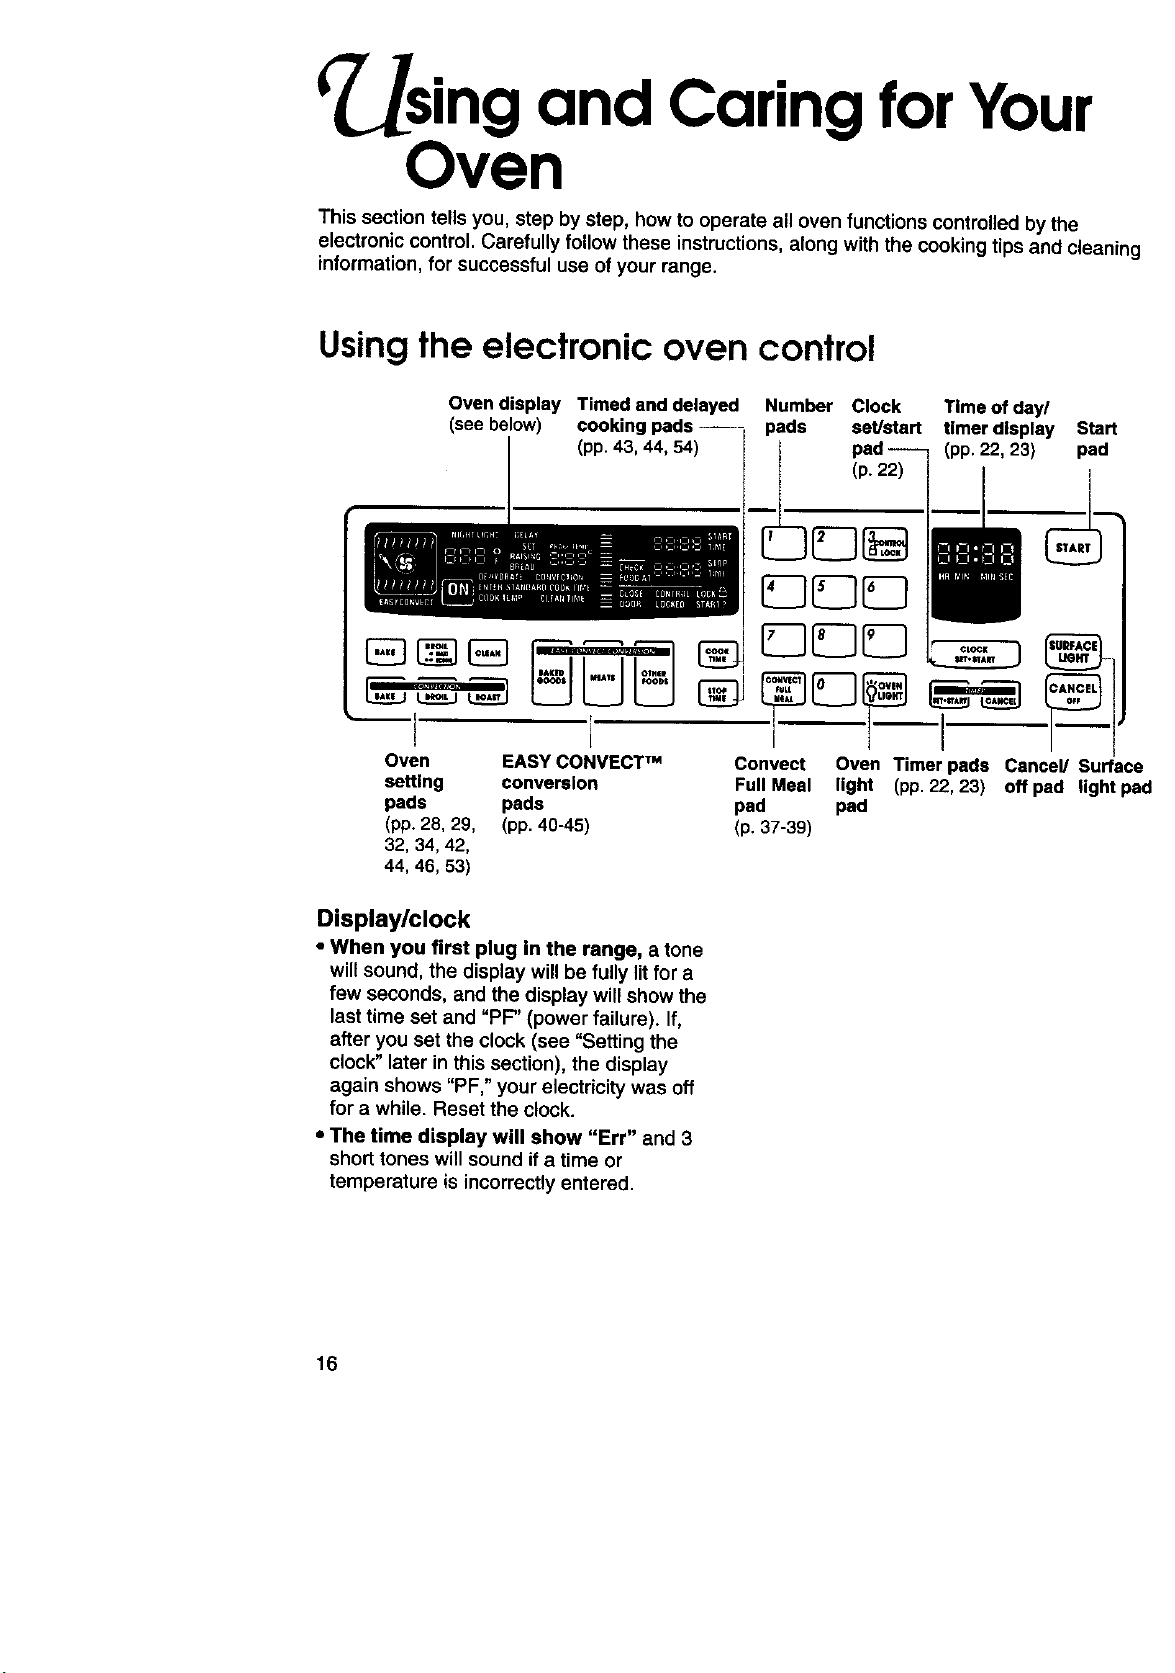
Using the electronic oven control
Oven display Timed and delayed Number Clock
(see below) cooking pads pads setJstart
(pp. 43, 44, 54)
Time of day/
timer display Start
(pp. 22, 23) pad
Oven
seffing
pads
(pp. 28,29,
32,34,42,
44,46,53)
EASYCONVECTTM
conversion
pads
(pp.40-45)
Convect
Full Meal
pad
(p. 37-39)
Oven Timer pads Cancel/ Surface
light (pp. 22, 23) off pad light pac
pad
Display/clock
• When you first plug in the range, a tone
willsound, the display will be fully litfor a
few seconds, and the display will show the
last time set and "PF" (power failure). If,
after you set the clock (see "Setting the
clock" later in this section), the disptay
again shows "PF," your electricity was off
for a while. Reset the clock.
• The time display will show "Err" and 3
short tones will sound if a time or
temperature is incorrectly entered.
16
Using and Caring for Your Oven
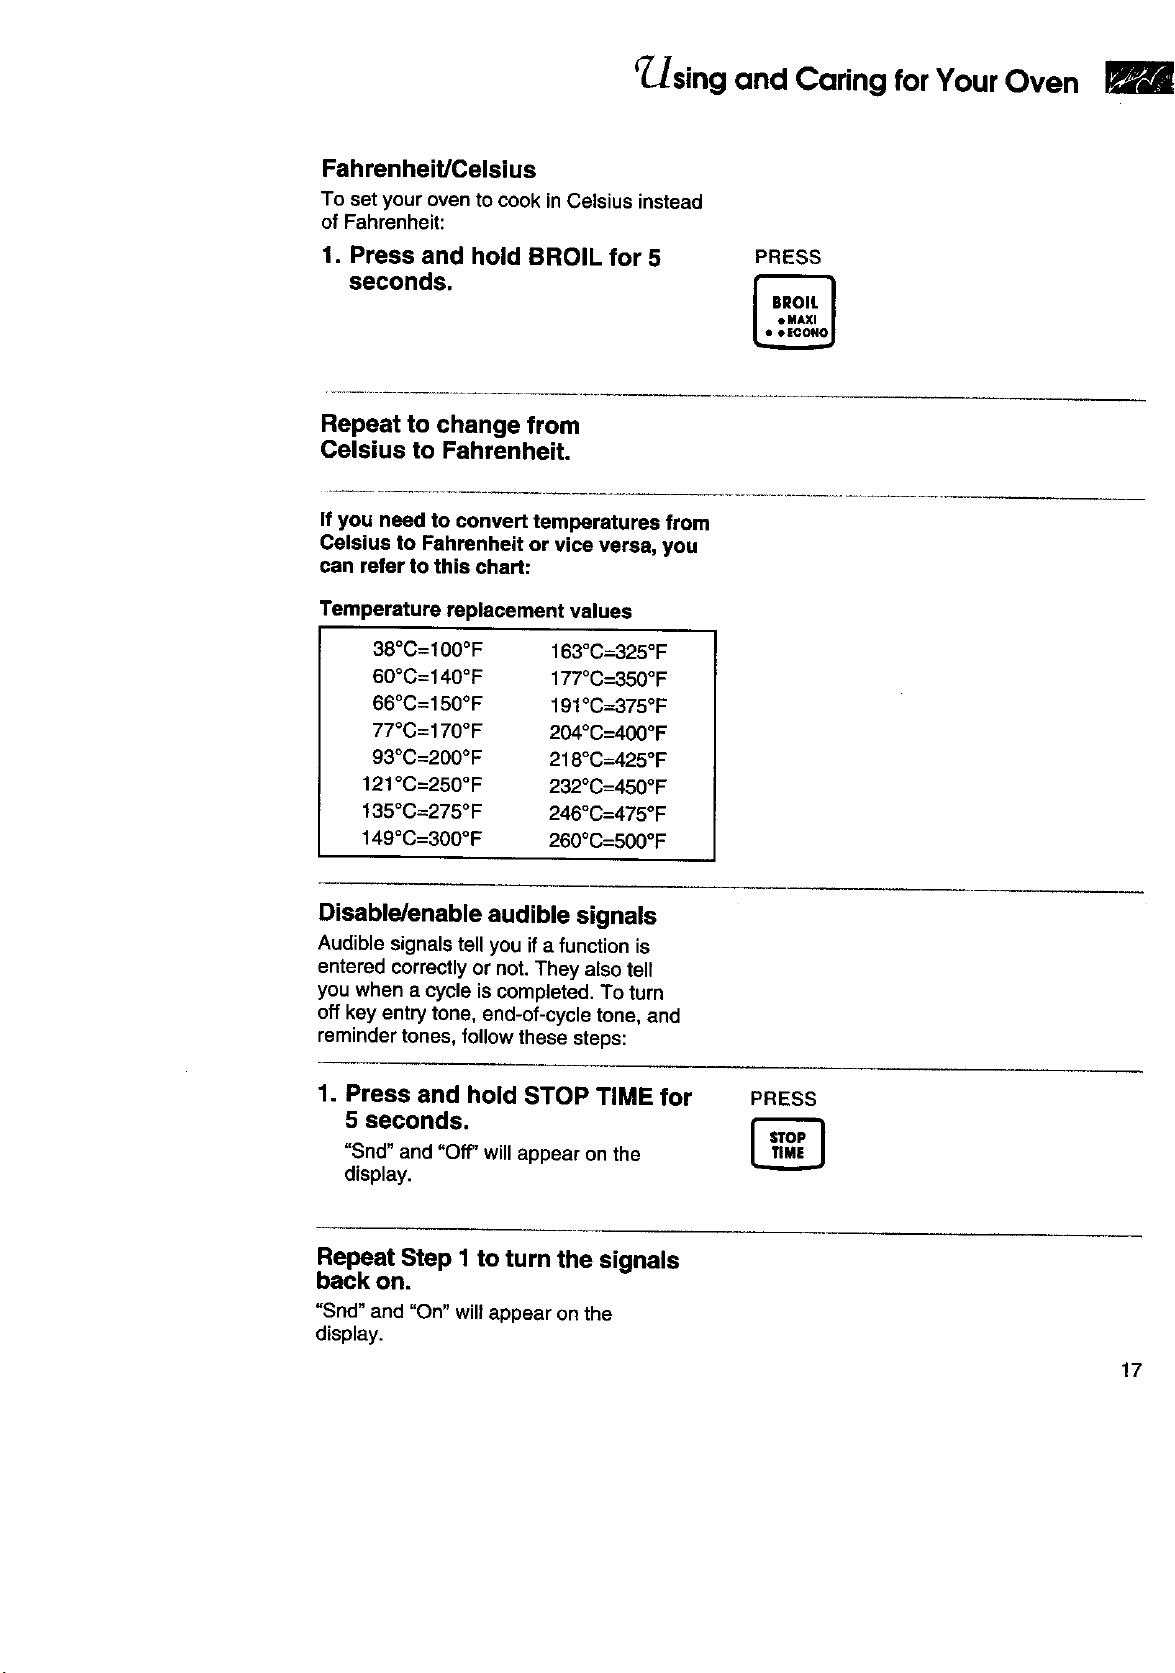
Fahrenheit/Celsius
To set your oven to cook in Celsius instead
of Fahrenheit:
1. Press and hold BROIL for 5
seconds.
PRESS
Repeat to change from
Celsius to Fahrenheit.
If you need to convert temperatures from
Celsius to Fahrenheit or vice versa, you
can refer to this chart:
Temperature replacement values
38°C=100°F
60°C=140OF
66°C=150°F
77°C=170°F
93°C=200°F
121°C=250OF
135°C=275°F
149°C=300OF
163°C=325OF
177°C=350°F
191°C=375°F
204°C-_400OF
218°C--425°F
232°C=450°F
246°C=475°F
260°C=500°F
Disable/enable audible signals
Audible signals tell you ifa function is
entered correctly or not. They also tell
you when a cycle iscompleted. To turn
off key entry tone, end-of-cycle tone, and
reminder tones, follow these steps:
1. Press and hold STOP TIME for
5 seconds.
"Snd" and "Off" willappear on the
display.
PRESS
Repeat Step I to turn the signals
back on.
"Snd" and "On" will appear on the
display.
17
r_sing and Caring for Your Oven
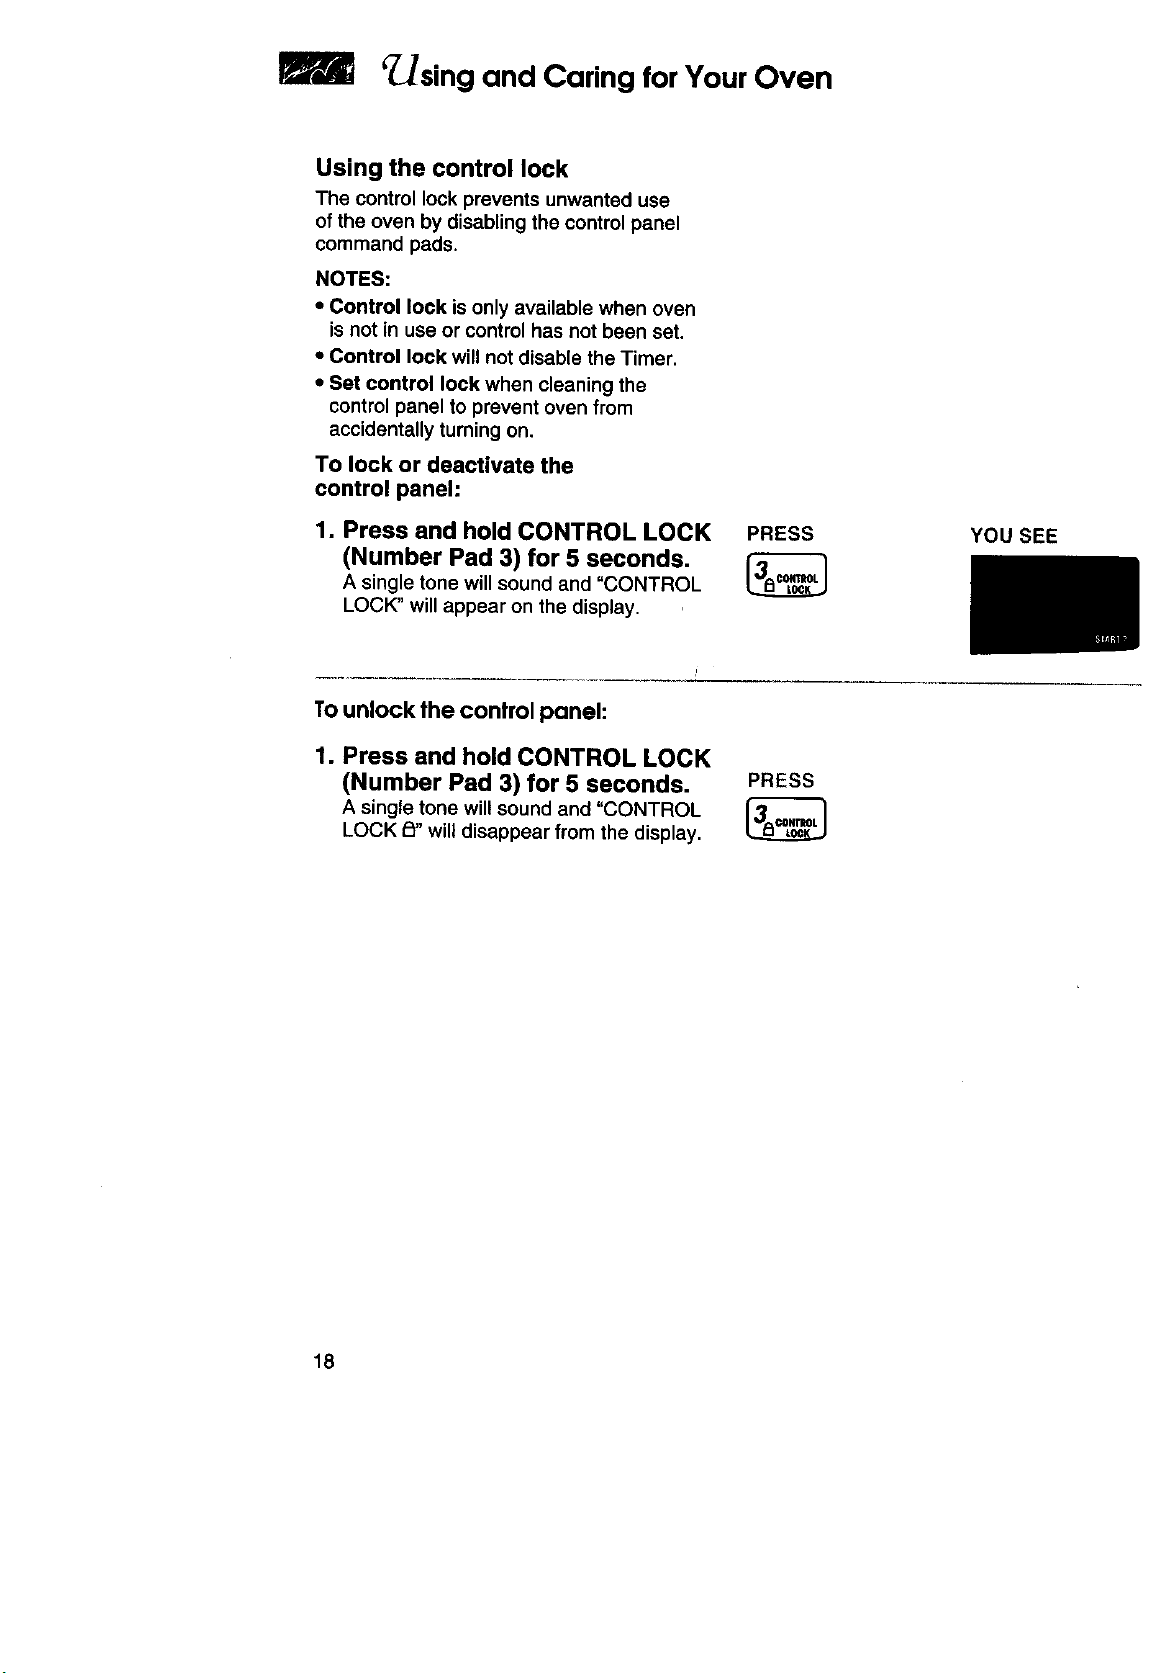
Using the control lock
The control lock prevents unwanted use
ofthe oven by disabling the control panel
command pads.
NOTES:
• Control lock is only available when oven
isnot in use or control has not been set.
• Control lock will not disable the Timer.
• Set control lock when cleaning the
control panel to prevent oven from
accidentally tuming on.
To lock or deactivate the
control panel:
1. Press and hold CONTROL LOCK PRESS
(Number Pad 3) for 5 seconds.
A single tone will sound and "CONTROL
LOCK" will appear on the display.
YOU SEE
Tounlock the control panel:
1. Press and hold CONTROL LOCK
(Number Pad 3) for 5 seconds. PRESS
A single tone willsound and "CONTROL
LOCK P_"will disappear from the display.
18
fusing and Caring for Your Oven
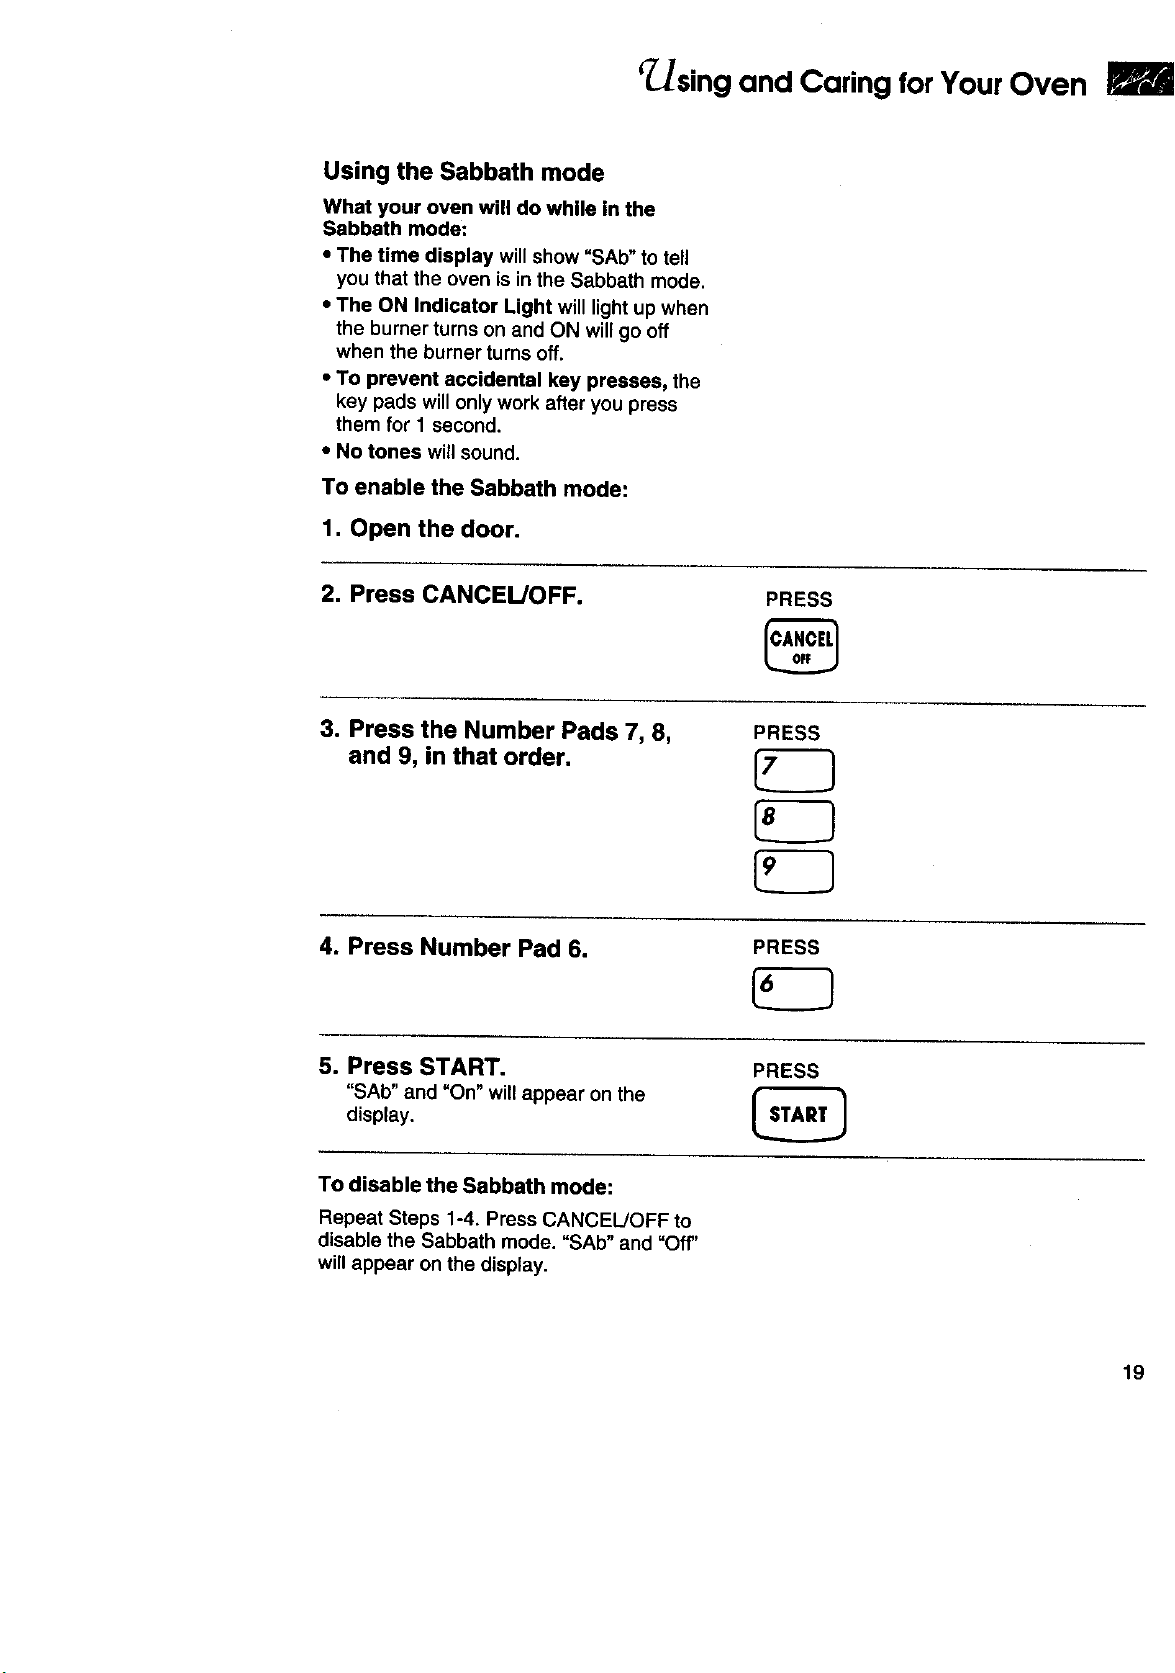
Using the Sabbath mode
What your oven will do while in the
Sabbath mode:
• The time display will show "SAb"to tell
you that the oven is in the Sabbath mode.
• The ON Indicator Light will light up when
the burner turns on and ON will go off
when the burner turns off.
• To prevent accidental key presses, the
key pads willonly work after you press
them for 1 second.
• No tones willsound.
To enable the Sabbath mode:
1. Open the door.
2. Press CANCEL/OFF. PRESS
3. Press the Number Pads 7, 8,
and 9, in that order.
PRESS
4. Press Number Pad 6.
PRESS
5. Press START.
"SAb" and _On" will appear on the
display.
PRESS
To disable the Sabbath mode:
Repeat Steps 1-4. Press CANCEL/OFF to
disable the Sabbath mode. "SAb"and "Off"
willappear on the display.
19
m
r_sing and Caring for Your Oven
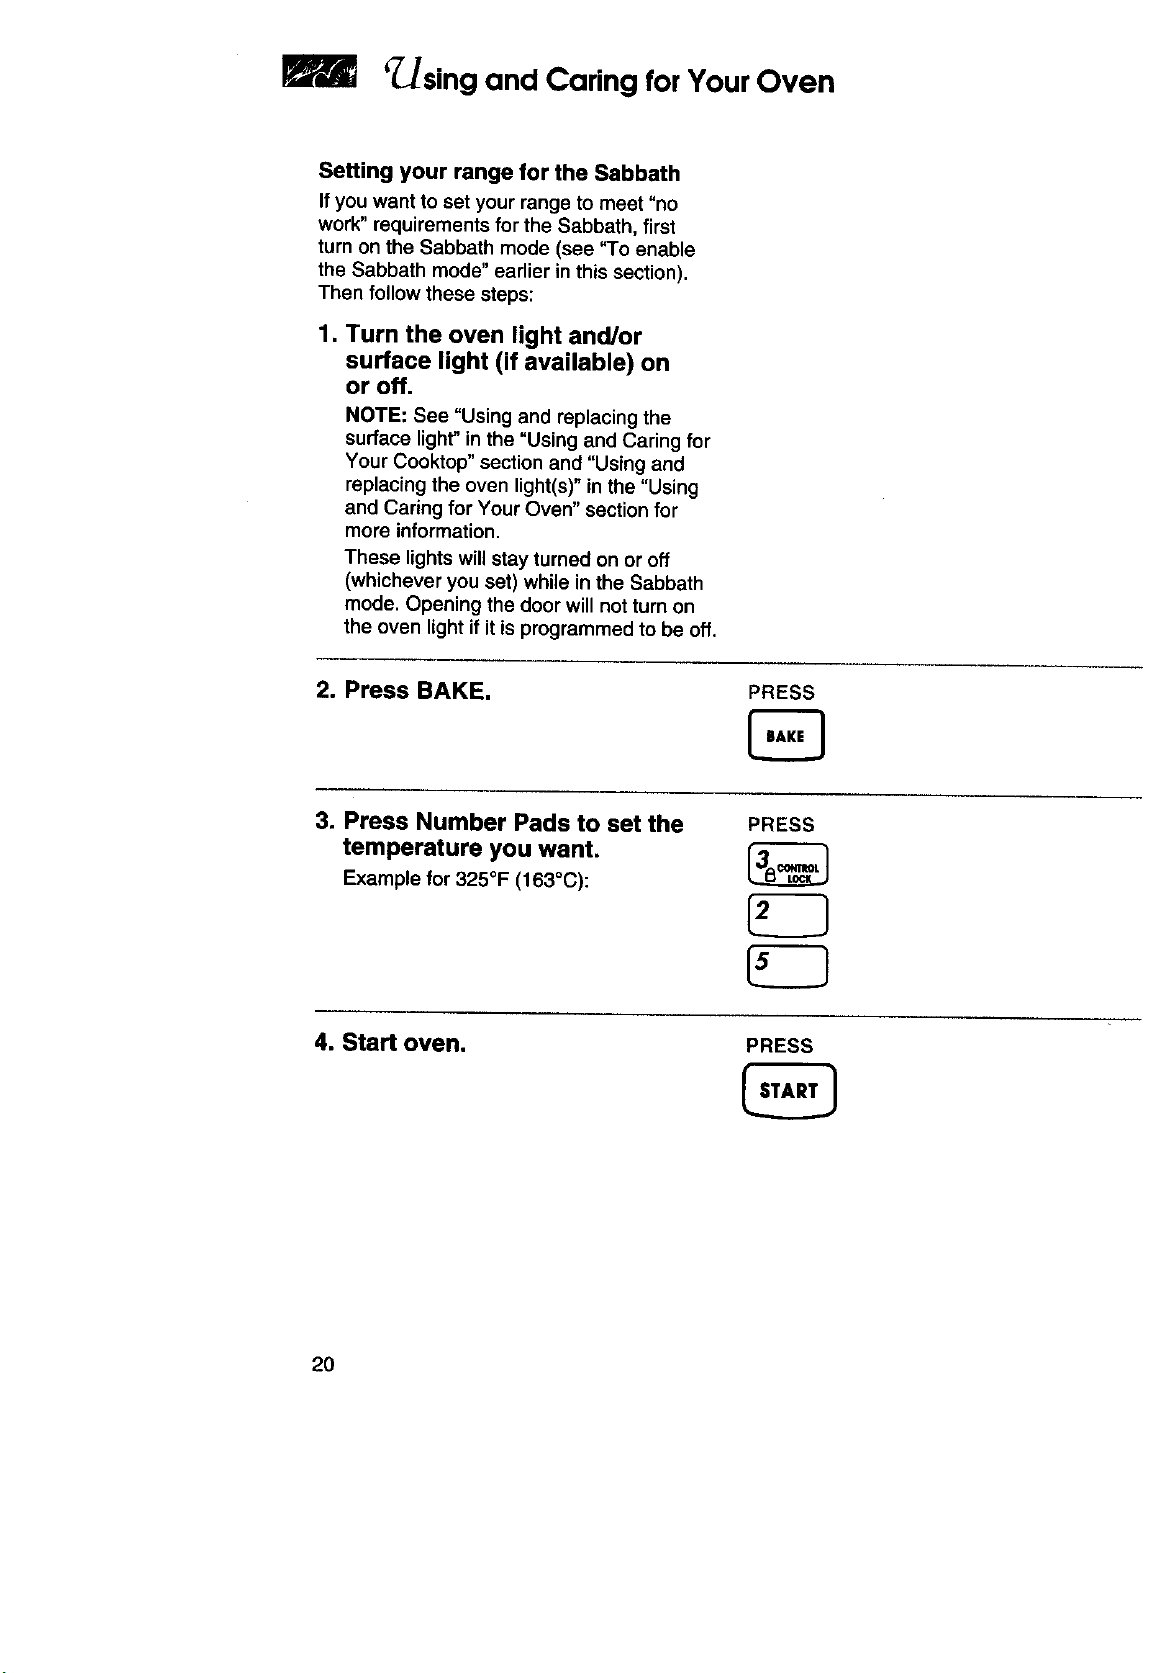
Setting your range for the Sabbath
If you want to set your range to meet "no
work"requirements for the Sabbath, first
turn on the Sabbath mode (see "To enable
the Sabbath mode" earlier in this section).
Then follow these steps:
1. Turn the oven light and/or
surface light (if available) on
or off,
NOTE: See "Using and replacing the
surface light" in the =Using and Caring for
Your Cooktop" section and "Using and
replacing the oven light(s)" in the "Using
and Caring for Your Oven" section for
more information.
These lights willstay turned on or off
(whichever you set) while in the Sabbath
mode. Opening the door will not turn on
the oven light if it is programmed to be off.
2. Press BAKE.
PRESS
E;
3. Press Number Pads to set the
temperature you want.
Example for 325°F (163°C):
PRESS
4. Start oven.
PRESS
20
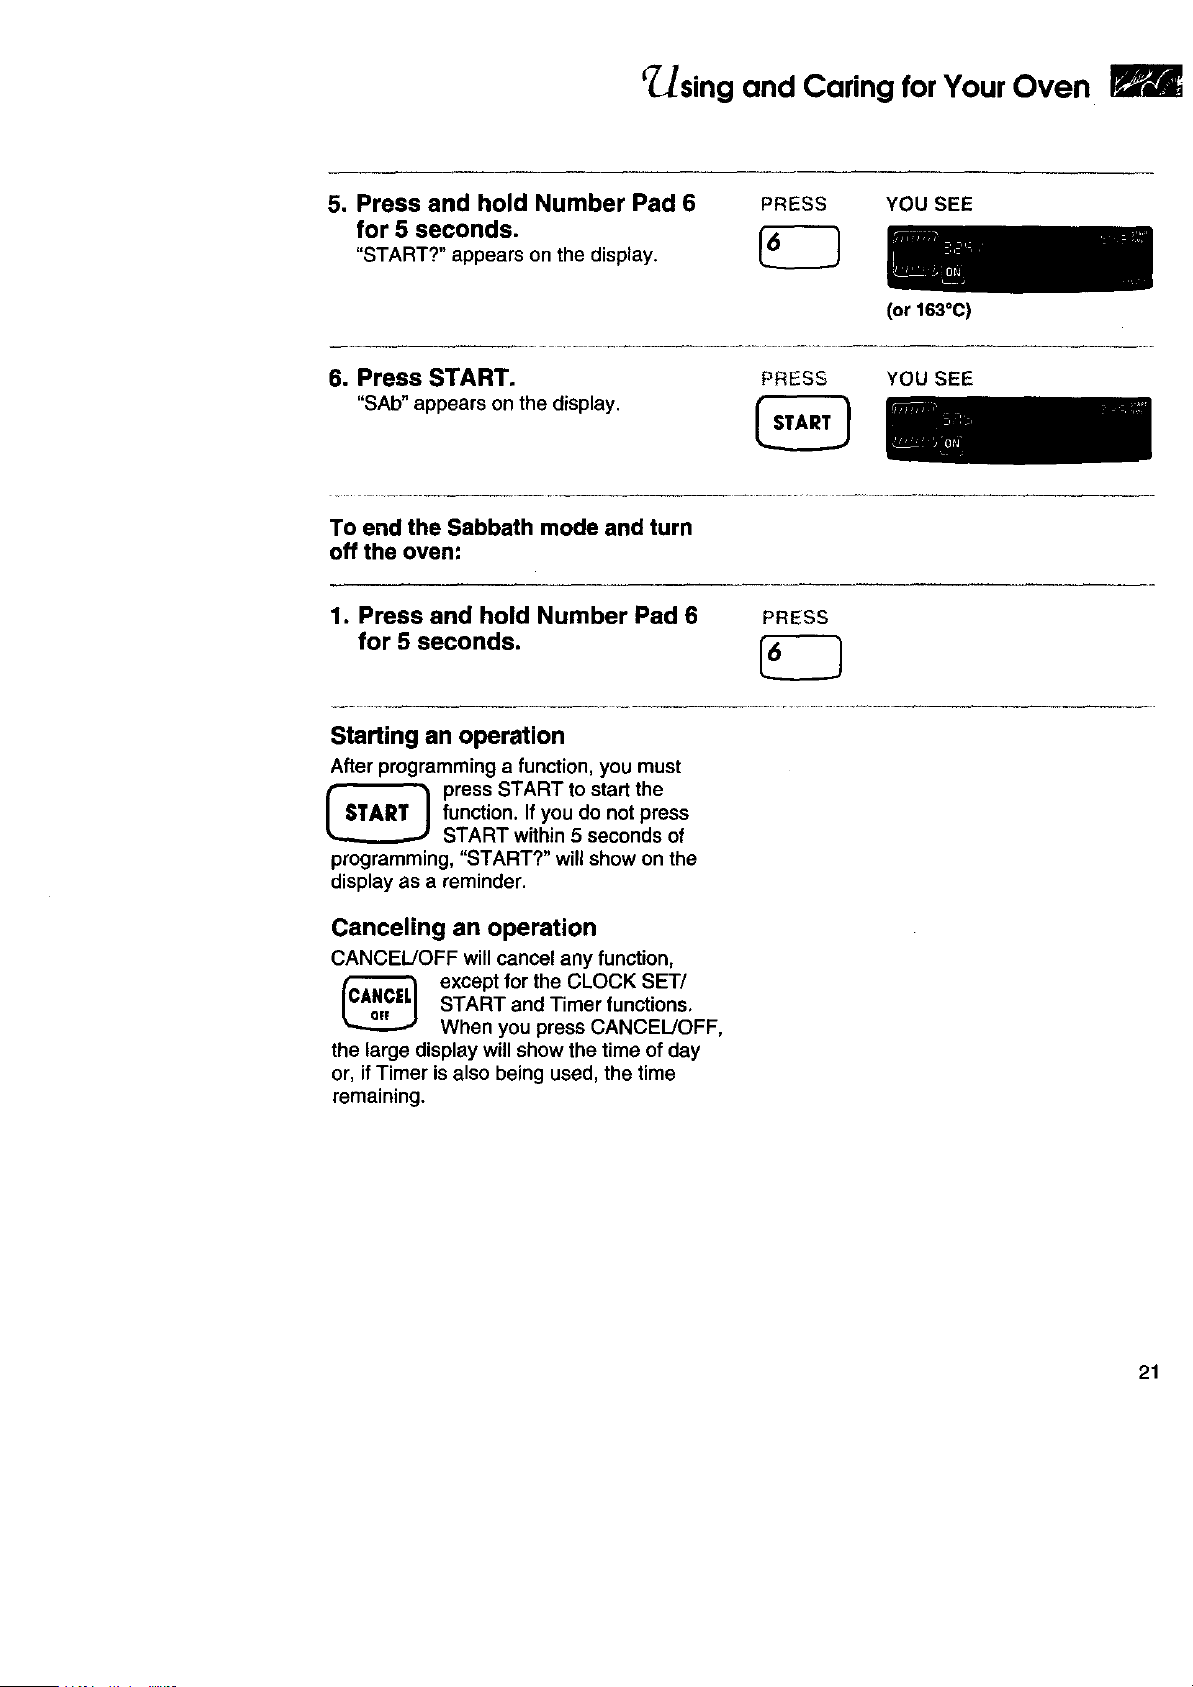
Using and Caring for Your Oven
5. Press and hold Number Pad 6 PRESS
for 5 seconds.
"START?" appearson the display.
YOU SEE
6. Press START.
"SAb" appears on the display,
PRESS
(or 163°C)
YOU SEE
To end the Sabbath mode and turn
off the oven:
1. Press and hold Number Pad 6 PRESS
for 5 seconds.
Starting an operation
After programming a function, you must
_ ress START to start the
function. If you do not press
START within 5 seconds of
programming, "START?" will show on the
display as a reminder.
Canceling an operation
CANCEL/OFF will cancel any function,
except for the CLOCK SET/
START and Timer functions,
When you press CANCEL!OFF,
the large display will show the time of day
or, ifTimer is also being used, the time
remaining.
21
fusing and Caring for Your Oven
P
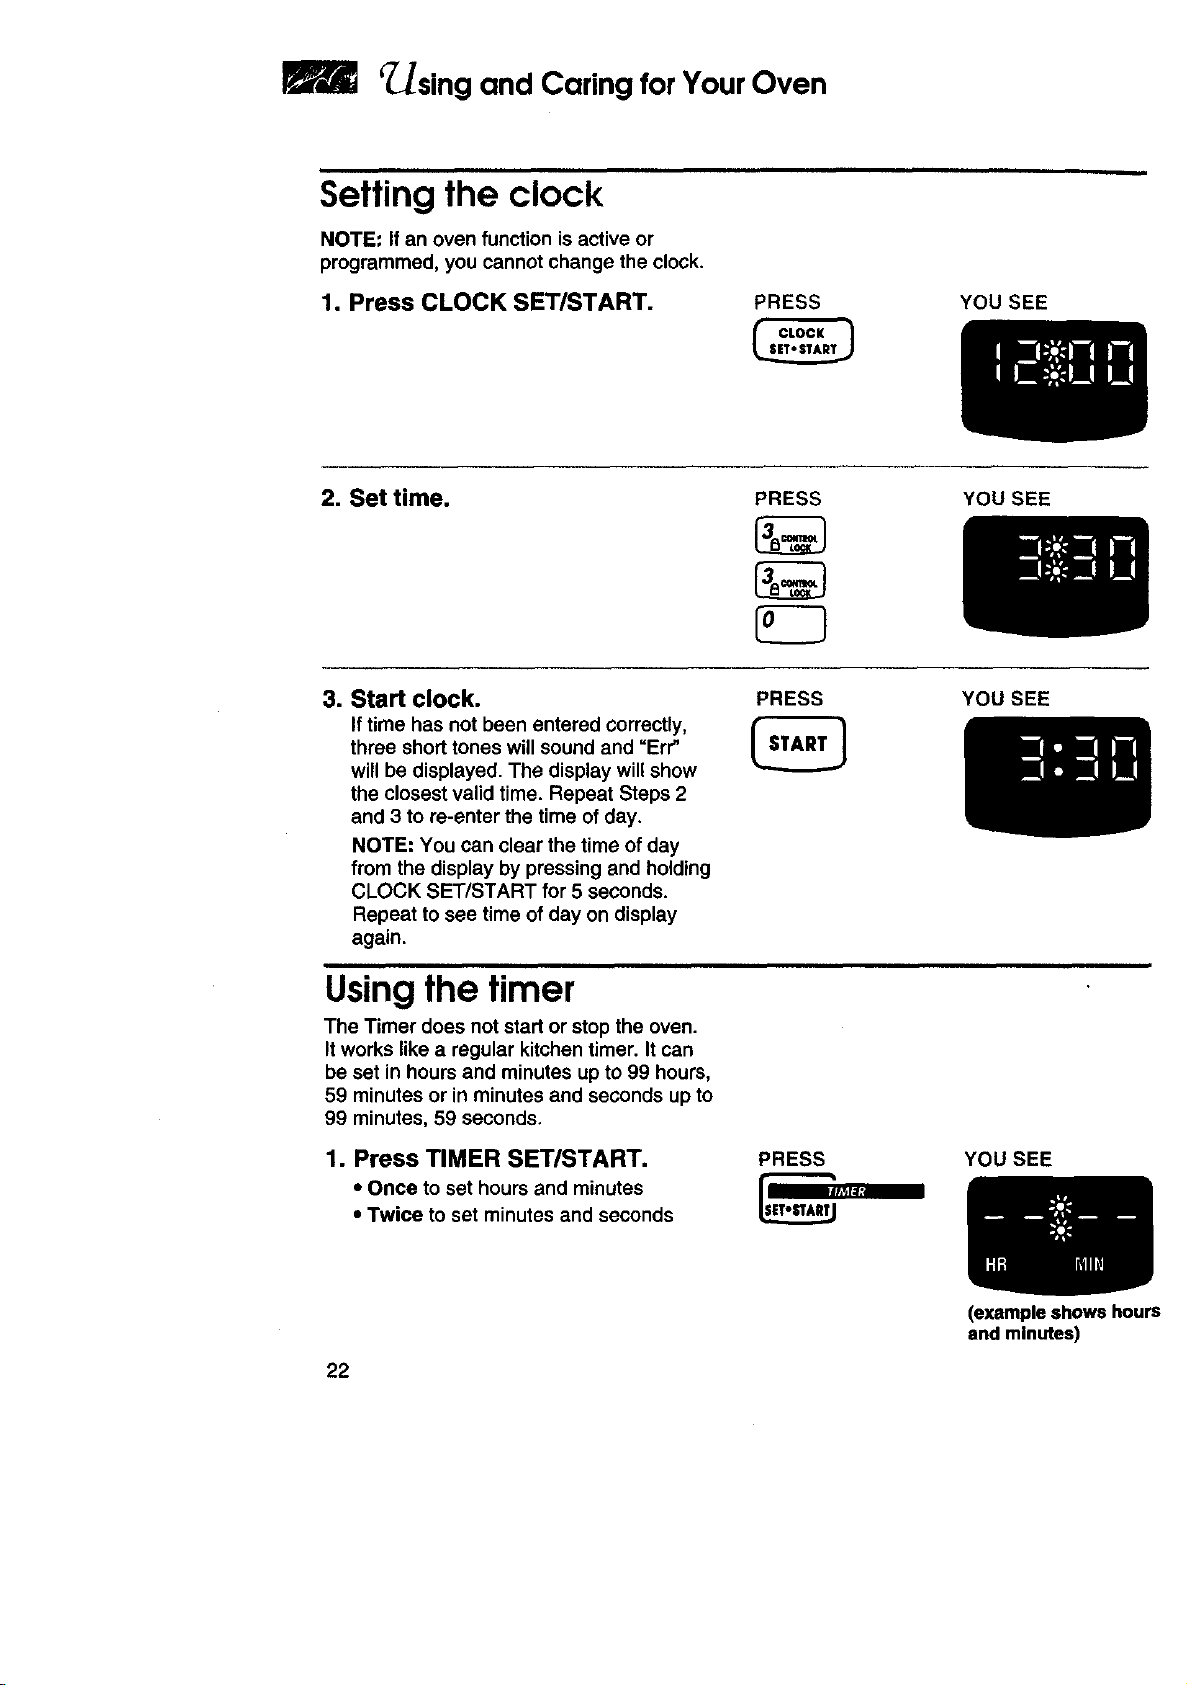
Setting the clock
NOTE: If an oven function is active or
programmed, you cannot change the clock.
1. Press CLOCK SET/START.
PRESS YOU SEE
2. Set time. PRESS YOU SEE
3. Start clock.
Iftime has not been entered correctly,
three short tones will sound and =Err"
will be displayed, The display will show
the closest valid time. Repeat Steps 2
and 3 to re-enter the time of day.
NOTE: You can clear the time of day
from the display by pressing and holding
CLOCK SET/START for 5 seconds.
Repeat to see time of day on display
again,
PRESS YOU SEE
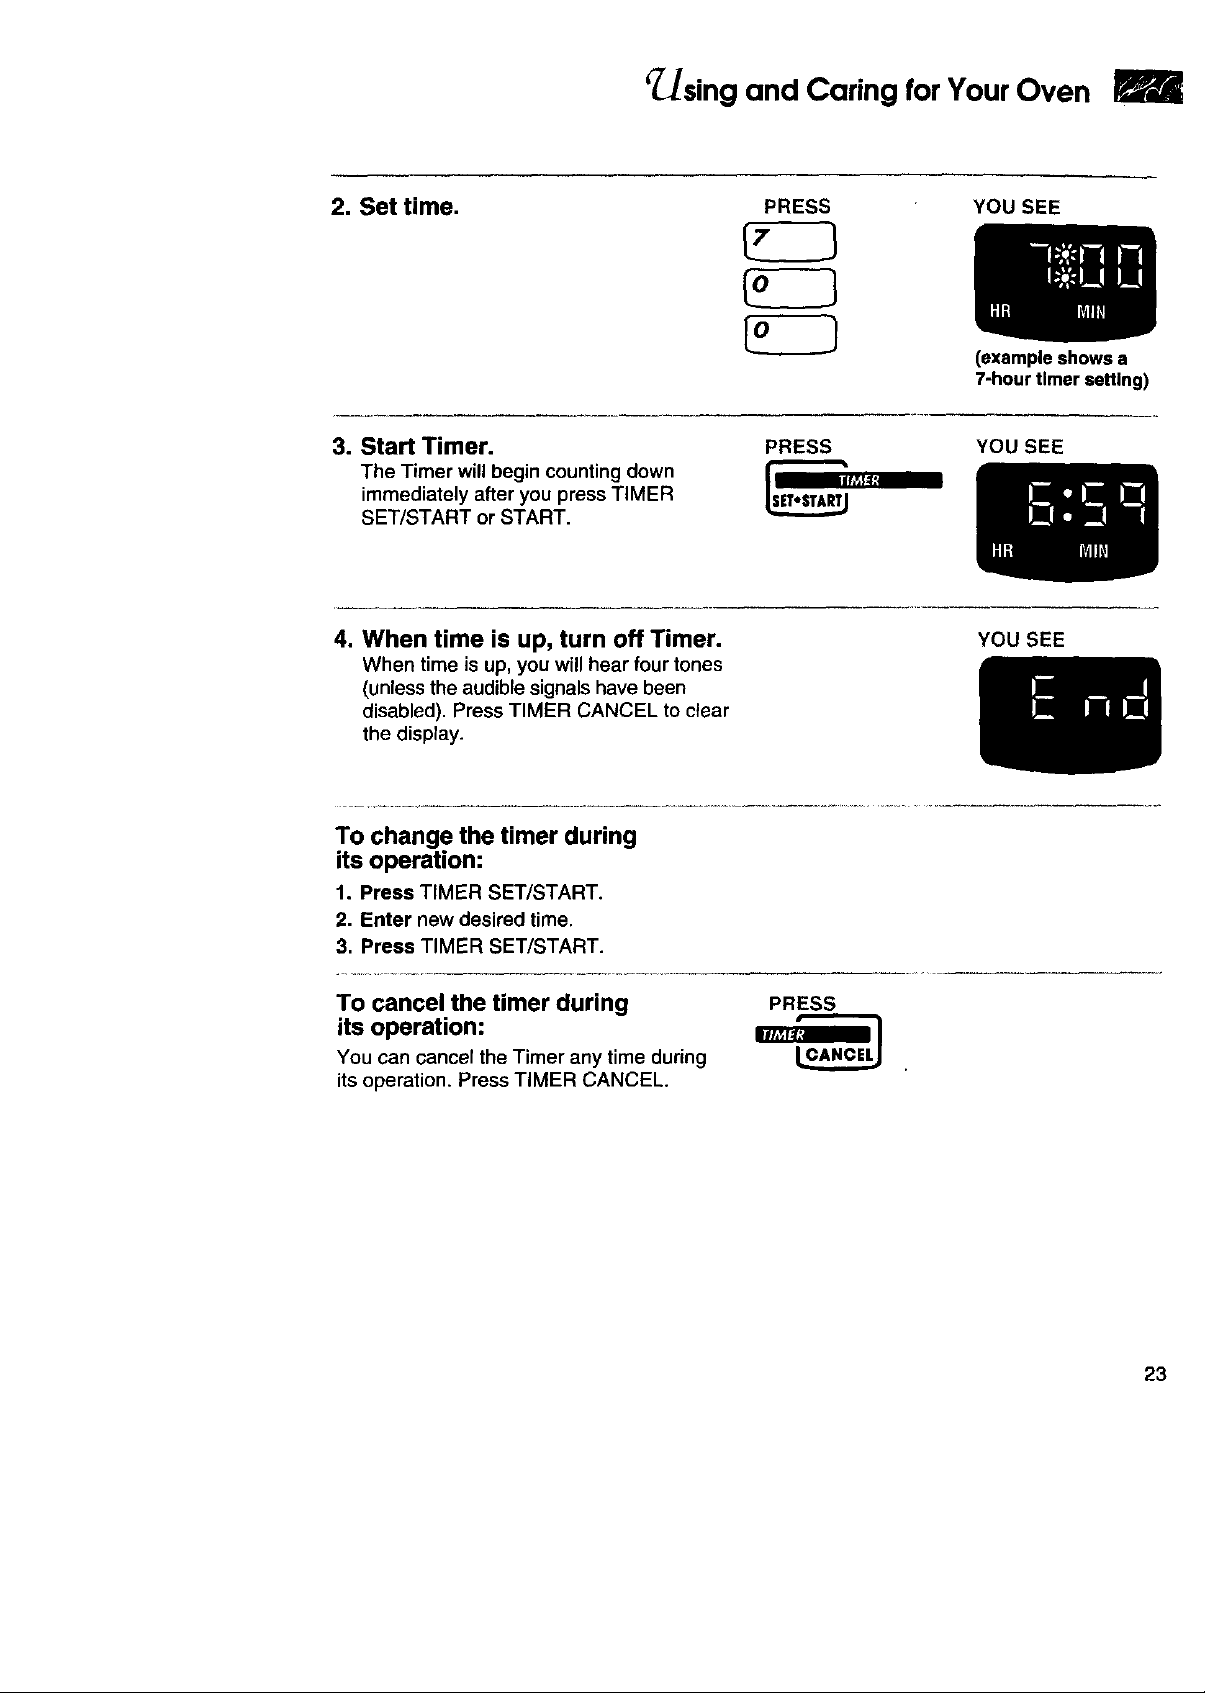
Using the timer
The Timer does not start or stop the oven.
It works like a regular kitchen timer. It can
be set in hours and minutes up to 99 hours,
59 minutes or in minutes and seconds up to
99 minutes, 59 seconds.
1. Press TIMER SET/START.
• Once to set hours and minutes
• Twice to set minutes and seconds
PRESS YOU SEE
22
(example shows hours
end minutes)
___sing and Caring for Your Oven
2. Set time. PRESS YOU SEE
3. Start Timer.
The Timer will begin counting down
immediately after you press TIMER
SET/START or START.
PRESS
(example shows a
7-hour timer setting)
YOU SEE
4. When time is up, turn Off Timer.
When time is up, you will hear fourtones
(unless the audiblesignals have been
disabled). Press TIMER CANCEL to clear
the display.
YOU SEE
To change the timer during
its operation:
1. Press TIMER SET/START.
2. Enter new desired time.
3. Press TIMER SET/START.
To cancel the timer during
its operation:
You can cancel the Timer any time during
its operation. Press TIMER CANCEL.
PRESS
23
Using and Caring for Your Oven
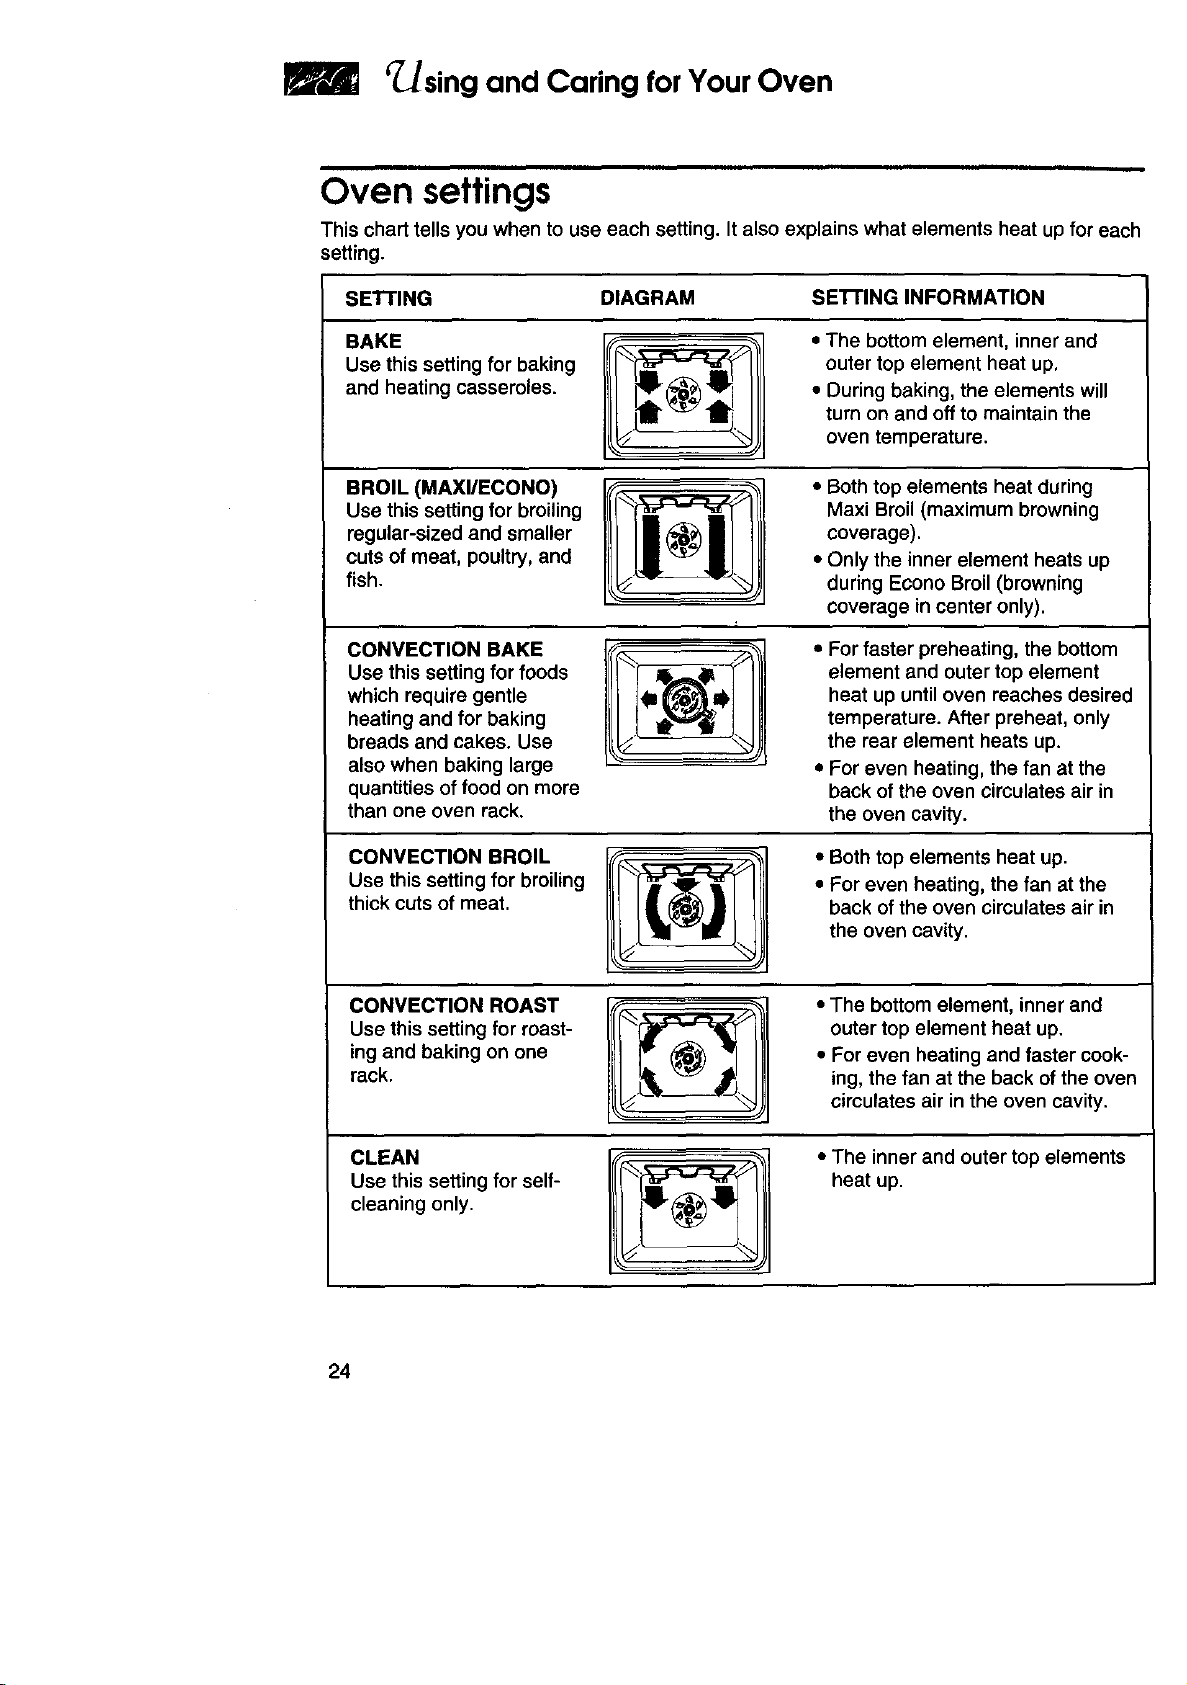
Oven settings
This chart tells you when to use each setting. It also explains what elements heat up for each
setting.
SETTING DIAGRAM SEI-rlNG INFORMATION
BAKE
Use this setting for baking
and heating casseroles.
BROIL (MAXI/ECONO)
Use this setting for broiling
regular-sized and smaller
cuts of meat, poultry, and
fish.
• The bottom element, inner and
outer top element heat up,
• During baking, the elements will
turn on and off to maintain the
oven temperature.
• Both top elements heat during
Maxi Broil (maximum browning
coverage).
• Only the inner element heats up
during Econo Broil (browning
coverage in center only).
CONVECTION BAKE
Use this setting for foods
which require gentle
heating and for baking
breads and cakes. Use
also when baking large
quantities of food on more
than one oven rack.
• For faster preheating, the bottom
element and outer top element
heat up until oven reaches desired
temperature. After preheat, only
the rear element heats up.
• For even heating, the fan at the
back of the oven circulates air in
the oven cavity.
CONVECTION BROIL
Use this setting for broiling
thick cuts of meat.
• Both top elements heat up.
• For even heating, the fan at the
back of the oven circulates air in
the oven cavity.
CONVECTION ROAST
Use this setting for roast-
ing and baking on one
rack.
• The bottom element, inner and
outer top element heat up.
• For even heating and faster cook-
ing, the fan at the back of the oven
circulates air in the oven cavity.
CLEAN
Use this setting for self-
cleaning only.
• The inner and outer top elements
heat up.
24
r sing and Caring for YourOven
RrrJ
Cooking tips
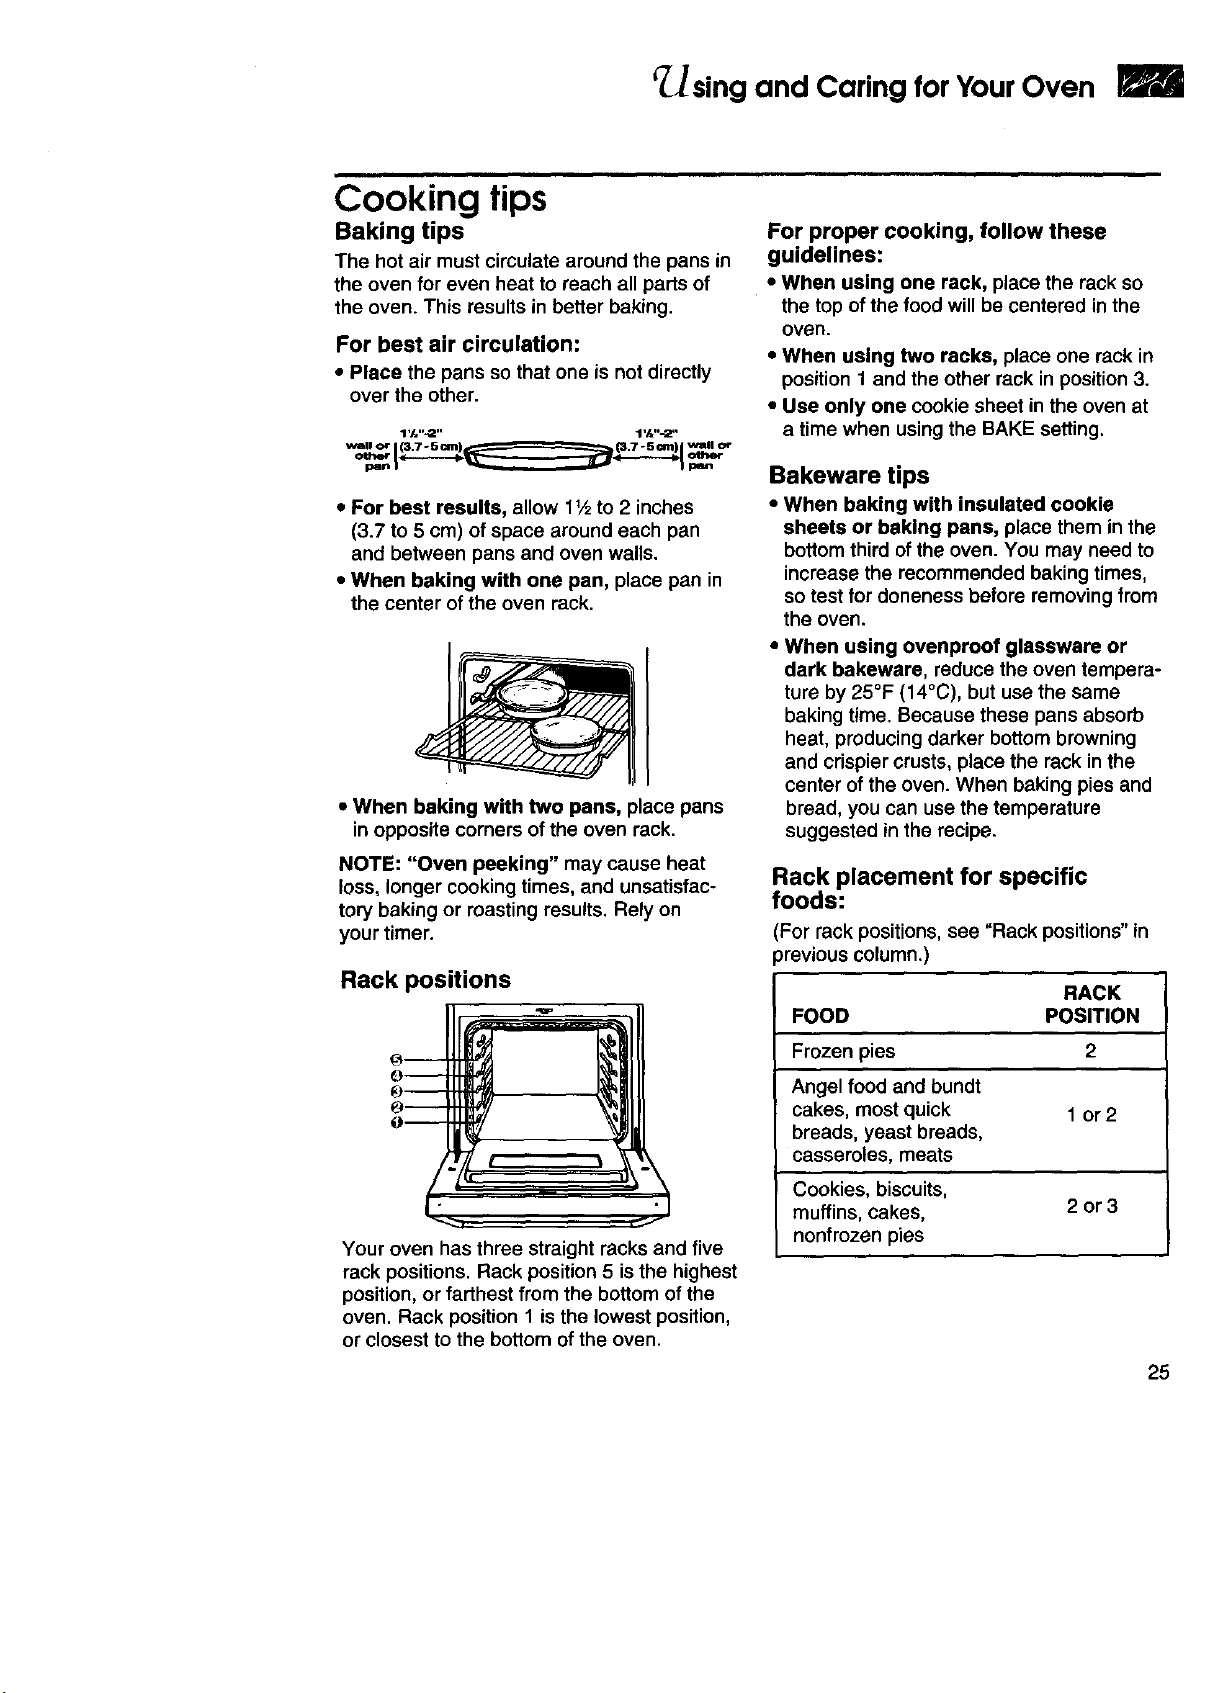
Baking tips
The hot air must circulate around the pans in
the oven for even heat to reach all parts of
the oven. This results in better baking.
For best air circulation:
• Place the pans so that one is not directly
over the other.
1'/."-2." 1'/.'*-2"
• For best results, allow 1lh to 2 inches
(3.7 to 5 cm) of space around each pan
and between pans and oven walls.
• When baking with one pan, place pan in
the center of the oven rack.
• When baking with two pans, place pans
in opposite corners of the oven rack.
NOTE: "Oven peeking" may cause heat
loss, longer cooking times, and unsatisfac-
tory baking or roasting results. Rely on
your timer.
Rack positions
0--
6,--
O--
I" '1
Your oven has three straight racks and five
rack positions. Rack position 5 is the highest
position, or farthest from the bottom of the
oven. Rack position 1 is the lowest position,
or closest to the bottom of the oven.
For proper cooking, follow these
guidelines:
• When using one rack, place the rack so
the top ofthe food will be centered in the
oven.
• When using two racks, place one rack in
position 1 and the other rack in position 3.
• Use only one cookie sheet in the oven at
a time when using the BAKE setting.
Bakeware tips
• When baking with insulated cookie
sheets or baking pans, place them in the
bottomthird of the oven. You may need to
increase the recommended baking times,
so test for doneness before removing from
the oven.
When using ovenproof glassware or
dark bakeware, reduce the oven tempera-
ture by 25°F (14°C), but use the same
baking time. Because these pans absorb
heat, producing darker bottom browning
and crispier crusts, place the rack in the
center of the oven. When baking pies and
bread, you can use the temperature
suggested in the recipe.
Rack placement for specific
foods:
For rack positions,see "Rack positions" in
)revious column.)
RACK
FOOD POSITION
Frozen pies 2
Angel food and bundt
cakes, most quick 1 or 2
breads, yeast breads,
casseroles, meats
Cookies, biscuits,
muffins, cakes, 2 or 3
nonfrozen pies
25
r sing and Caring for Your Oven
Using aluminum foil
• Do not line the oven bottom with any
type of foil, liners, or cool(ware.
Permanent damage will occur to the
oven bottom finish.
• Do not block the oven bottom vents.
• Do not cover the entire rack with
aluminum foil• Doing so will reduce air
circulation and overall oven performance•
• To catch spillovers from pies or
casseroles place foilon the oven rack
below. Foil should be turned up at edges
and be at least 1 inch larger than dish.
• Place tent-shaped foil loosely over meat
or poultry to slow down surface browning
for long term roasting. Remove foil for the
last 30 minutes.
• Use narrow strips of foilto shield piecrust
edges ifbrowning too quickly.
Convection baking tips
• Do not use aluminum foil when convection
baking. Aluminum foil may block airflow.
• Reduce recommended recipe oven
temperature by approximately 25°F (14°C).
See recipe adaption chart in your convec-
tion oven cookbook for recommended
temperatures.
• For most recipes, you can reduce con-
vection baking time compared to standard
baking times. See convection baking chart
in your convection oven cookbook for
recommended baking times.
NOTE: Cooking time may be longer when
you use more than one rack.
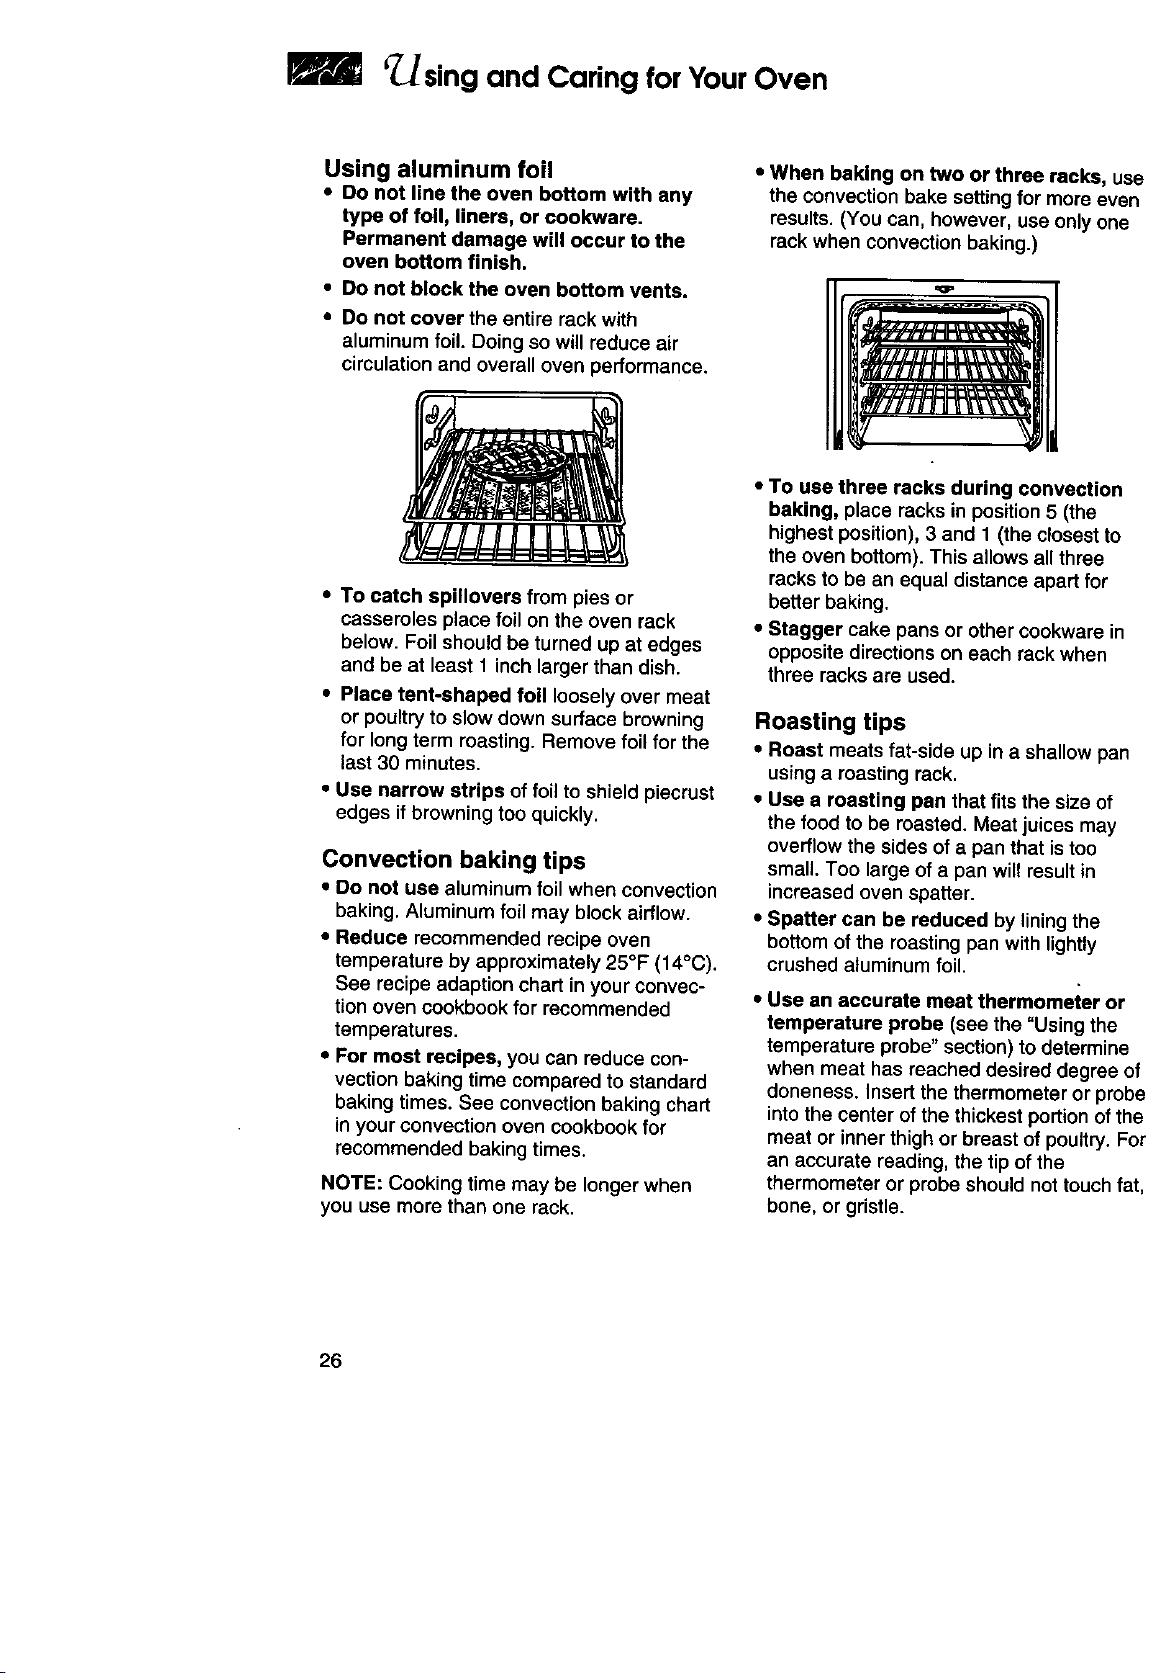
• When baking on two or th_=e racks, use
the convection bake settingfor more even
results. (You can, however, use only one
rack when convection baking.)
• To use three racks during convection
baking, place racks in position 5 (the
highest position), 3 and 1 (the closest to
the oven bottom). This allows all three
racks to be an equal distance apart for
better baking.
• Stagger cake pans or other cookware in
opposite directions on each rack when
three racks are used.
Roasting tips
• Roast meats fat-side up in a shallow pan
using a roasting rack.
• Use a roasting pan that fits the size of
the food to be roasted. Meat juices may
overflow the sides of a pan that is too
small. Too large of a pan will resultin
increased oven spatter.
• Spatter can be reduced by liningthe
bottom of the roasting pan with lightly
crushed aluminum foil.
• Use an accurate meat thermometer or
temperature probe (see the "Using the
temperature probe" section) to determine
when meat has reached desired degree of
deneness. Insert the thermometer or probe
intothe center ofthe thickest portion of the
meat or inner thigh or breast of poultry. For
an accurate reading, the tip of the
thermometer or probe should not touch fat,
bone, or gristle.
26

"Using and Caring for Your Oven
• After reading the thermometer once,
push itfurther intothe meat V2inch
(1.3 cm) or more and read again. If the
temperature drops, return the meat to the
oven for more cooking.
• Check pork and poultry with a
thermometer in 2-3 places to ensure
adequate doneness.
• Poultry and roasts will be easier to
carve if loosely covered with foil and
allowed to stand 10-15 minutes after
removal from the oven.
• You can reduce roasting times and
temperatures for most standard recipes
when using the convection roast setting.
See convection roastingchart in your
convection oven cookbook for
recommended roasting times and
temperatures.
• Use the convection roasting rack on the
broiler pan (both included with your range).
(The convection roasting rack rests on the
broiler pan, not inside it.) The long side of
the rack should be parallel with the oven
door for best heat distributionand airflow.
NOTE: Place the convection masting rack
on the broiler pan with grid to contain the
drippings as the meat masts.
Bake or Convection Bake
1. Position racks.
For correct rack placement, see the
"Rack positions"section and the "Rack
placement" chart.
NOTES:
• Before turning on the oven always
place oven racks where you need
them.
• Be sure rack(s) is level.
• Use pot holders or oven mitts to
protect hands ifrack(s) must be
moved while oven is hot.
• Do not let pot holder or oven mitt
touch hot elements.
continued on next page
27
II r,4E
Using and Caring for Your Oven
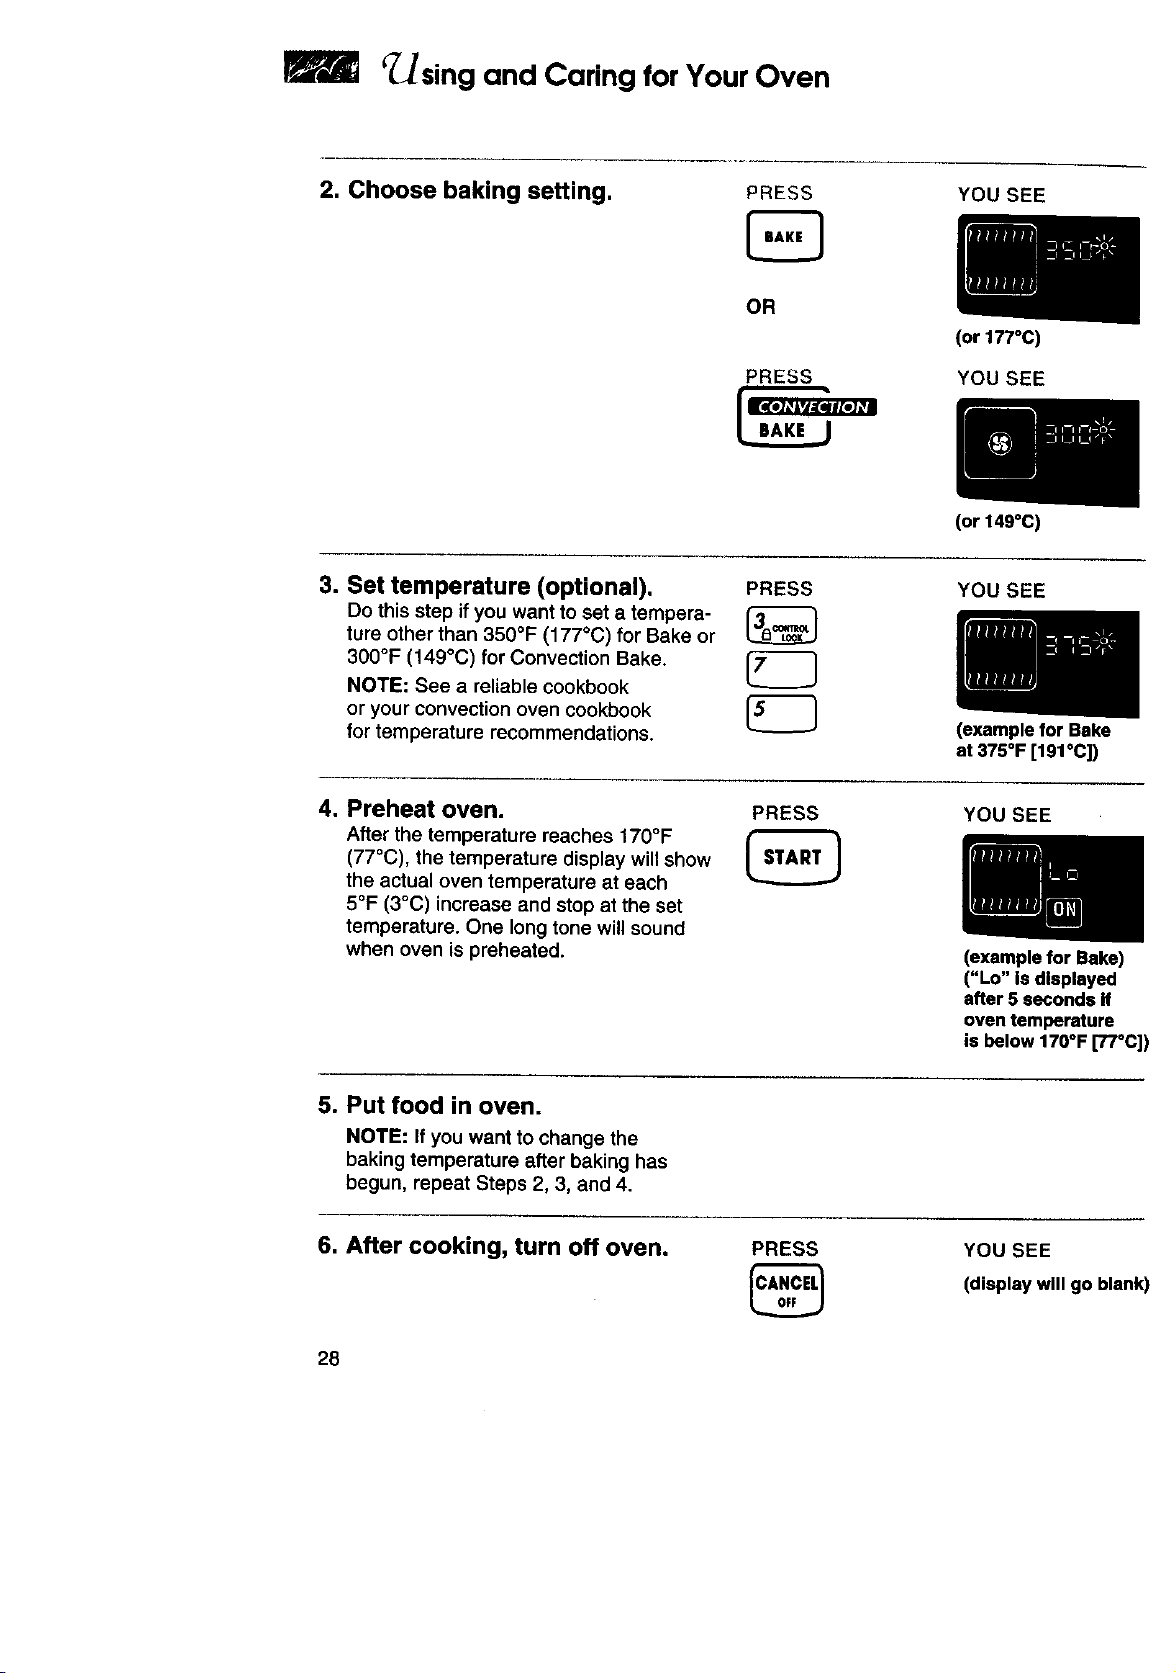
2. Choose baking setting.
PRESS
YOU SEE
OR
PRESS
(or 177°C)
YOU SEE
3. Set temperature (optional). PRESS
Do this step if you want to set a tempera-
ture other than 350°F (177°C) for Bake or
300°F (149°C) for Convection Bake.
NOTE: See a reliable cookbook
or your convection oven cookbook
for temperature recommendations.
(or 149°C)
YOU SEE
4. Preheat oven. PRESS
After the temperature reaches 170°F
(77°C), the temperature display will show
the actual oven temperature at each
5°F (3°C) increase and stop at the set
temperature. One long tone will sound
when oven is preheated.
(example for Bake
at 375°F [191°C])
YOU SEE
(example for Bake)
("Lo" is displayed
after 5 seconds If
oven temperature
is below 170°F ['/7_C])
5. Put food in oven.
NOTE: If you want to change the
baking temperature after baking has
begun, repeat Steps 2, 3, and 4.
6. After cooking, turn off oven.
PRESS
YOU SEE
(display will go blank)
28
_sing and Caring for Your Oven
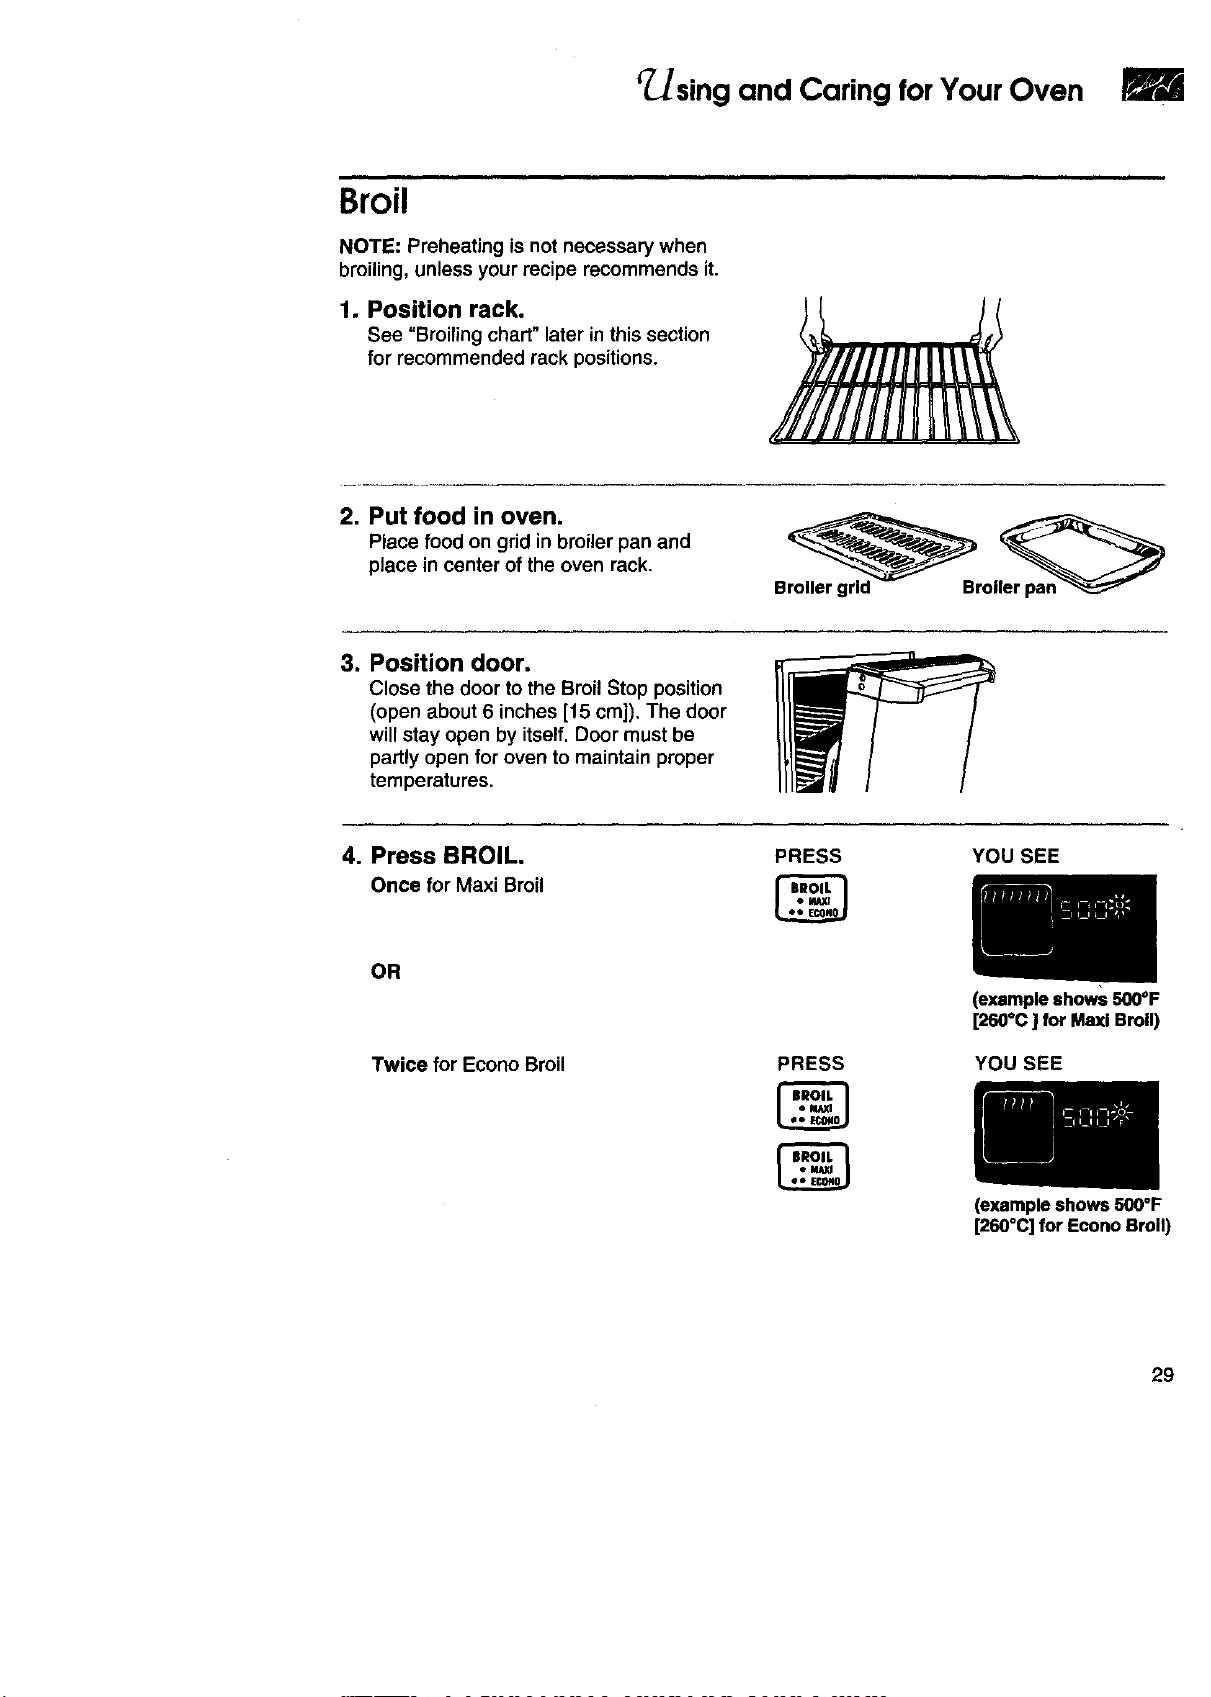
Broil
NOTE" Preheating is not necessary when
broiling, unless your recipe recommends it.
1. Position rack.
See =Broiling chart" later in this section
for recommended rack positions.
2. Put food in oven.
Place food on grid in broiler pan and
place in center of the oven rack.
3. Position door.
Close the door to the Broil Stop position
(open about 6 inches [15 cm]). The door
will stay open by itself. Door must be
partly open for oven to maintain proper
temperatures.
4. Press BROIL.
Once for Maxi Broil
PRESS YOU SEE
OR
Twice for Econo Broil
PRESS
(exampleshows500°F
[260°C] for Maxl Broil)
YOU SEE
(example shows 500"F
[260°C] for Econo Broil)
29
r_sing and Caring for Your Oven
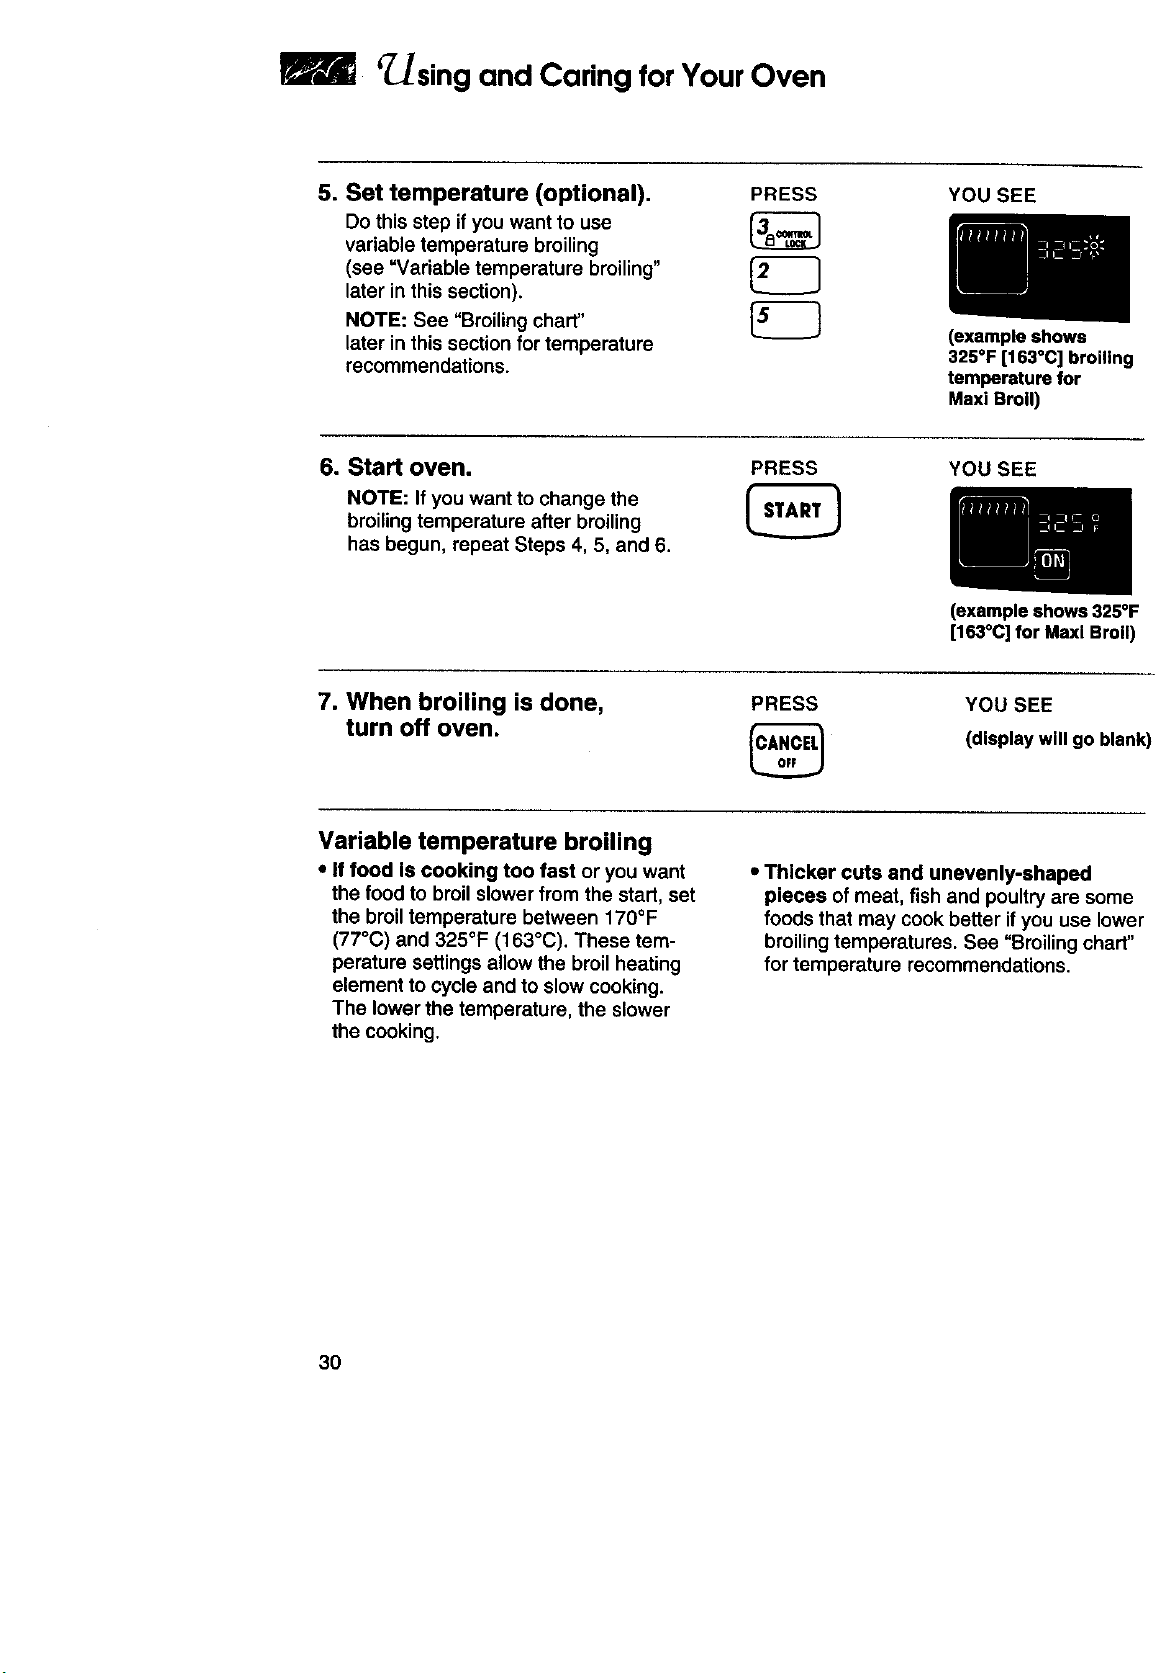
5. Set temperature (optional). PRESS
Do this step if you want to use
variable temperature broiling
(see "Variable temperature broiling"
later in this section).
L.__..__J
NOTE: See
"Broiling chart" 5L5 J
later in this section for temperature
recommendations.
YOU SEE
(example shows
325°F [163°C] broiling
temperature for
Maxi Broil)
6. Start oven. PRESS
NOTE: Ifyou want to change the
broiling temperature after broiling
has begun, repeat Steps 4, 5, and 6.
YOU SEE
(example shows 325°F
[163°C]for Maxl Broil)
7. When broiling is done,
turn off oven.
PRESS YOU SEE
(display will go blank)
Variable temperature broiling
• If food Is cooking too fast or you want
the food to broil slower from the start, set
the broiltemperature between 170°F
(77°C) and 325°F (163°C). These tem-
perature settings allow the broil heating
element to cycle and to slow cooking.
The lower the temperature, the slower
the cooking.
• Thicker cuts and unevenly-shaped
pieces of meat, fish and poultry are some
foods that may cook better ifyou use lower
broiling temperatures. See "Broiling chart"
for temperature recommendations.
3O
Using and Caring for YourOven
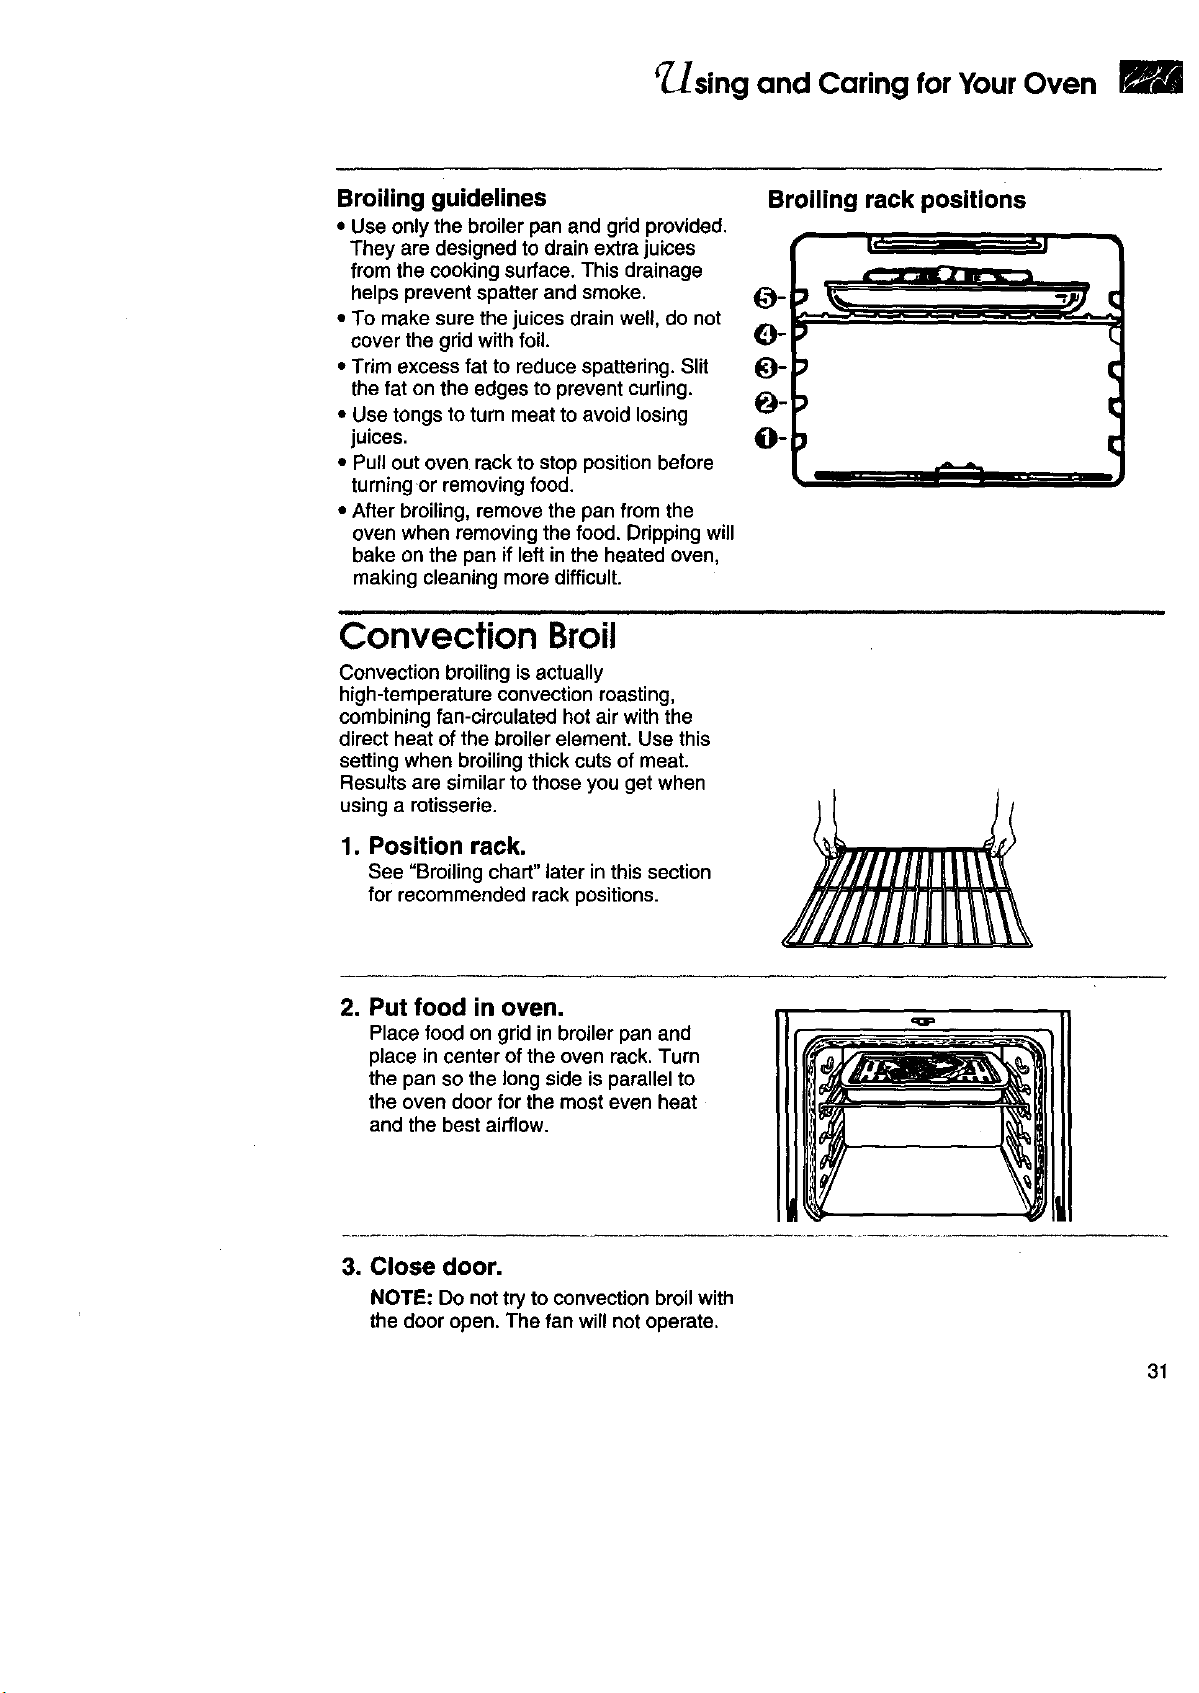
Broiling guidelines
• Use only the broiler pan and grid provided.
They are designed to drain extra juices
from the cooking surface. This drainage
helps prevent spatter and smoke.
• To make sure the juices drain well, do not
cover the grid with foil.
• Trim excess fat to reduce spattering. Slit
the fat on the edges to prevent curling.
• Use tongs to turn meat to avoid losing
juices.
• Pull out oven rack to stop position before
turning or removing food.
• After broiling, remove the pan from the
oven when removing the food. Dripping will
bake on the pan if left in the heated oven,
making cleaning more difficult.
Broiling rack positions
qg-
@-
O-
• l-' 'l •
€
Convection Broil
Convection broiling is actually
high-temperature convection roasting,
combining fan-circulated hot air with the
direct heat of the broiler element. Use this
setting when broiling thick cuts of meat.
Results are similar to those you get when
using a rotisserie.
1. Position rack.
See "Broiling chart"later inthissection
for recommended rackpositions.
2. Put food in oven.
Place food on grid in broiler pan and
place in center of the oven rack. Turn
the pan so the long side is parallel to
the oven door for the most even heat
and the best airflow.
3. Close door.
NOTE: Do nottry toconvectionbroilwith
thedooropen.The fan willnotoperate.
31
Im r, 4€
'_sing and Caring for Your Oven
4. Choose CONVECTION BROIL. PRESS
YOU SEE
5. Set temperature (optional). PRESS
Do this step ifyou want to set a temper-
ature (up to 500°F [260°C]) other than
450°F (232°C).
NOTE: See a reliable cookbook or your
convection oven cookbook for tempera-
ture recommendations.
L.__.__J
(or 235°C)
YOU SEE
(example shows 400°F
[204°C] temperature
setting)
6. Start oven.
PRESS
NOTE: If you want to change the convec-
tion broilingtemperature after broiling
has begun, repeat Steps 4, 5, and 6.
YOU SEE
7. When broiling is over,
turn off oven.
PRESS
YOU SEE
(display will go blank)
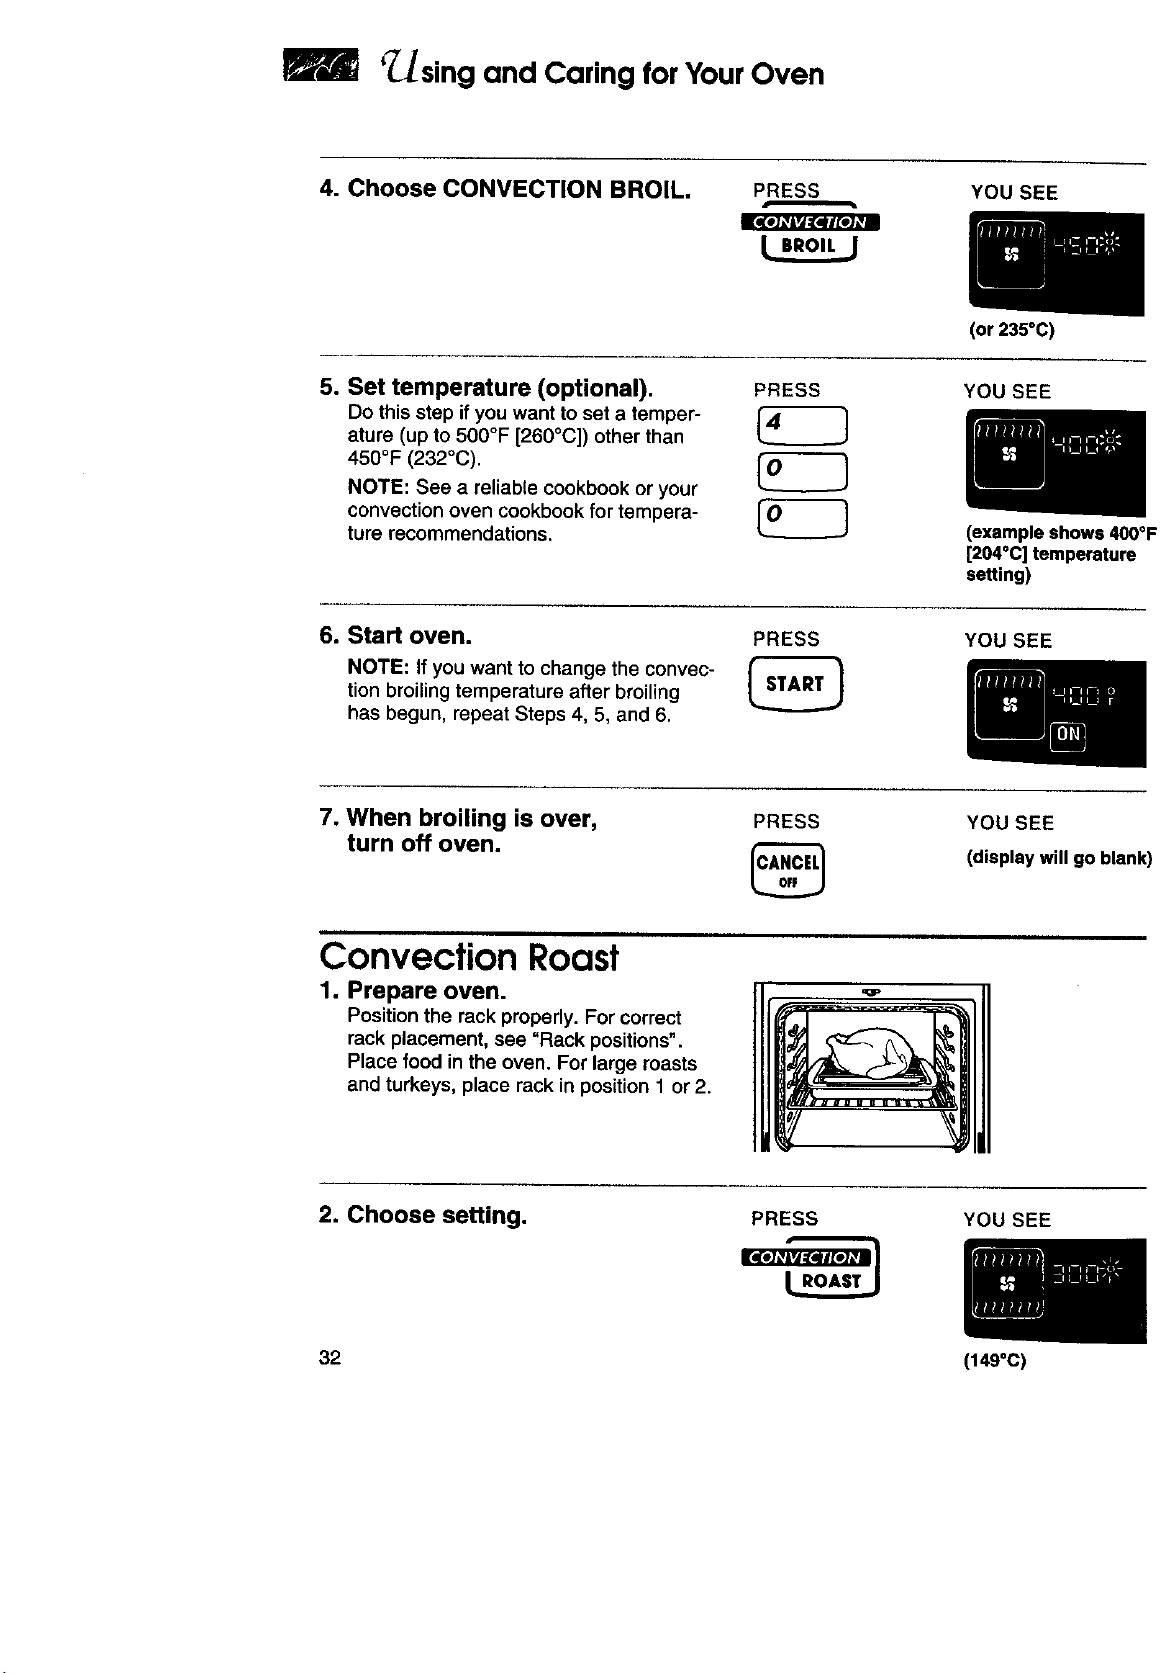
Convection Roast
1. Prepare oven.
Position the rack properly. For correct
rack placement, see =Rack positions".
Place food in the oven. For large roasts
and turkeys, place rack in position I or 2.
2. Choose setting. PRESS YOU SEE
32 (149°C)
Using and Caring for Your Oven
3. Set temperature (optional).
Do this step if you want to set a
temperature other than 300°F (149°C).
NOTE: See a reliable cookbook or your
convection oven cookbook for tempera-
ture recommendations.
PRESS YOU SEE
(example shows 325°F
[163°C] temperature
setting)
4. Start oven.
NOTES:
• After the temperature reaches 170°F
(77°C), the temperature display will
show the actual oven temperature at
each 5°F (3°C) increase and stop at the
set temperature. One long tone will
sound when oven is preheated.
• If you want to change the roasting
temperature after roasting has
begun, repeat Steps 2, 3, and 4.
PRESS YOU SEE
("Lo" is displayed
after 5 seconds if
oven temperature is
below 170°F ['n°c])
5. After cooking, turn off oven,
PRESS
5
YOU SEE
(display will go blank)
Adjustingtheoven temperature
Although your new oven is properly adjusted
to provide accurate temperatures, it may
cook faster or slower than your old oven.
If, after using the oven for a period of time,
you are not satisfied with the baking/roasting
results, you can change the offset tempera-
ture by following the steps below. The
control will "remember" the selected offset
even after the power has been interrupted or
lost.
NOTE: DO NOT measure oven temperature
with a thermometer. Opening the oven door
will lowerthe oven temperature and give you
an inaccurate reading. Also, the thermom-
eter temperature reading willchange as your
oven cycles.
33
Using and Caring for Your Oven
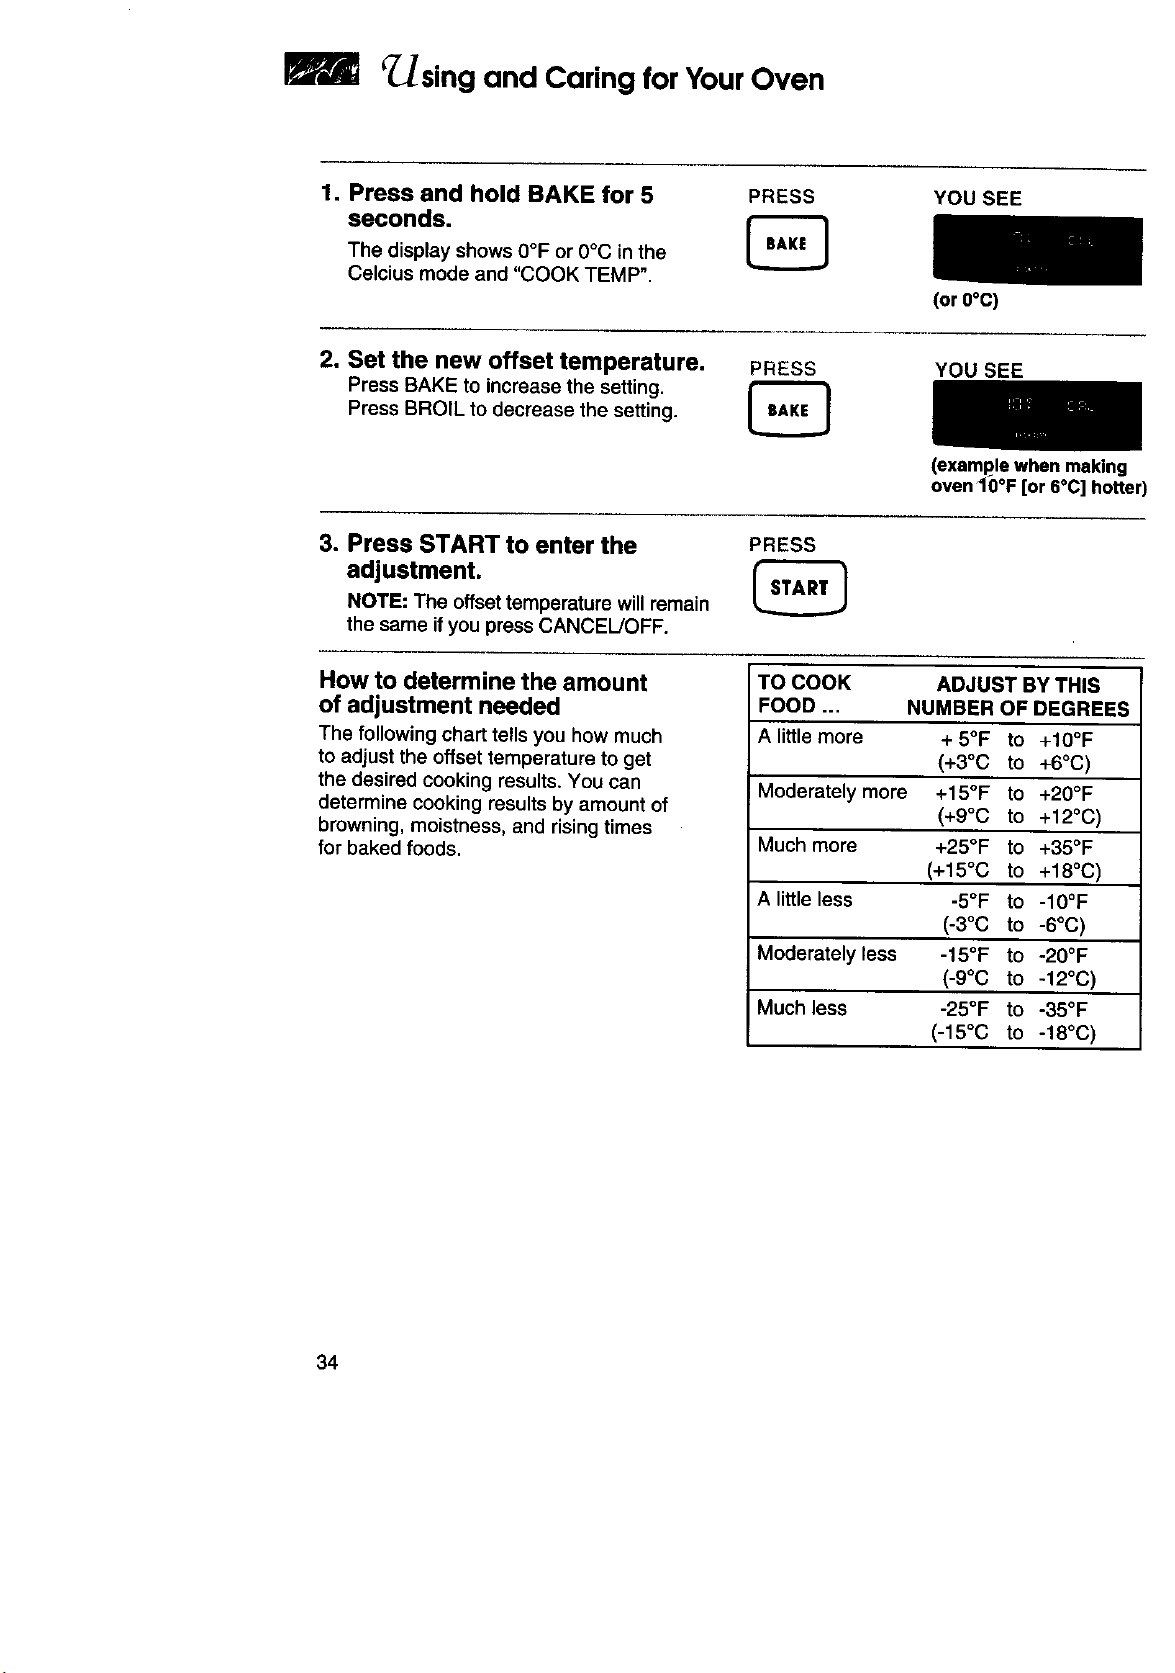
1. Press and hold BAKE for 5 PRESS
seconds.
The display shows O°F or O°C in the
Celcius mode and "COOK TEMP".
YOU SEE
2. Set the new offset temperature, PRESS
Press BAKE to increase the setting.
Press BROIL to decrease the setting.
LEEJ
(or 0°C)
YOU SEE
(example when making
oven10°F [or 6°C] hotter)
3. Press START to enter the PRESS
adjustment.
NOTE: The offsettemperature will remain
the same if you press CANCEL/OFF.
How to determine the amount
of adjustment needed
The following chart tells you how much
to adjust the offset temperature to get
the desired cooking results. You can
determine cooking results by amount of
browning, moistness, and rising times
for baked foods.
TO COOK ADJUST BY THIS
FOOD ... NUMBER OF DEGREES
A littlemore + 5°F to +10°F
(+3°C to +6°C)
Moderately more +15°F to +20°F
(+9°C to +12°C)
Much more +25°F to +35°F
(+15°C to +18°C)
A little less -5°F to -10°F
(-3°C to-6°C)
Moderatelyless -15°F to -20°F
(-9°C to-12°C)
Much less -25°F to -35°F
(-15°C to-18°C)
34
r_sing and Caring for Your Oven
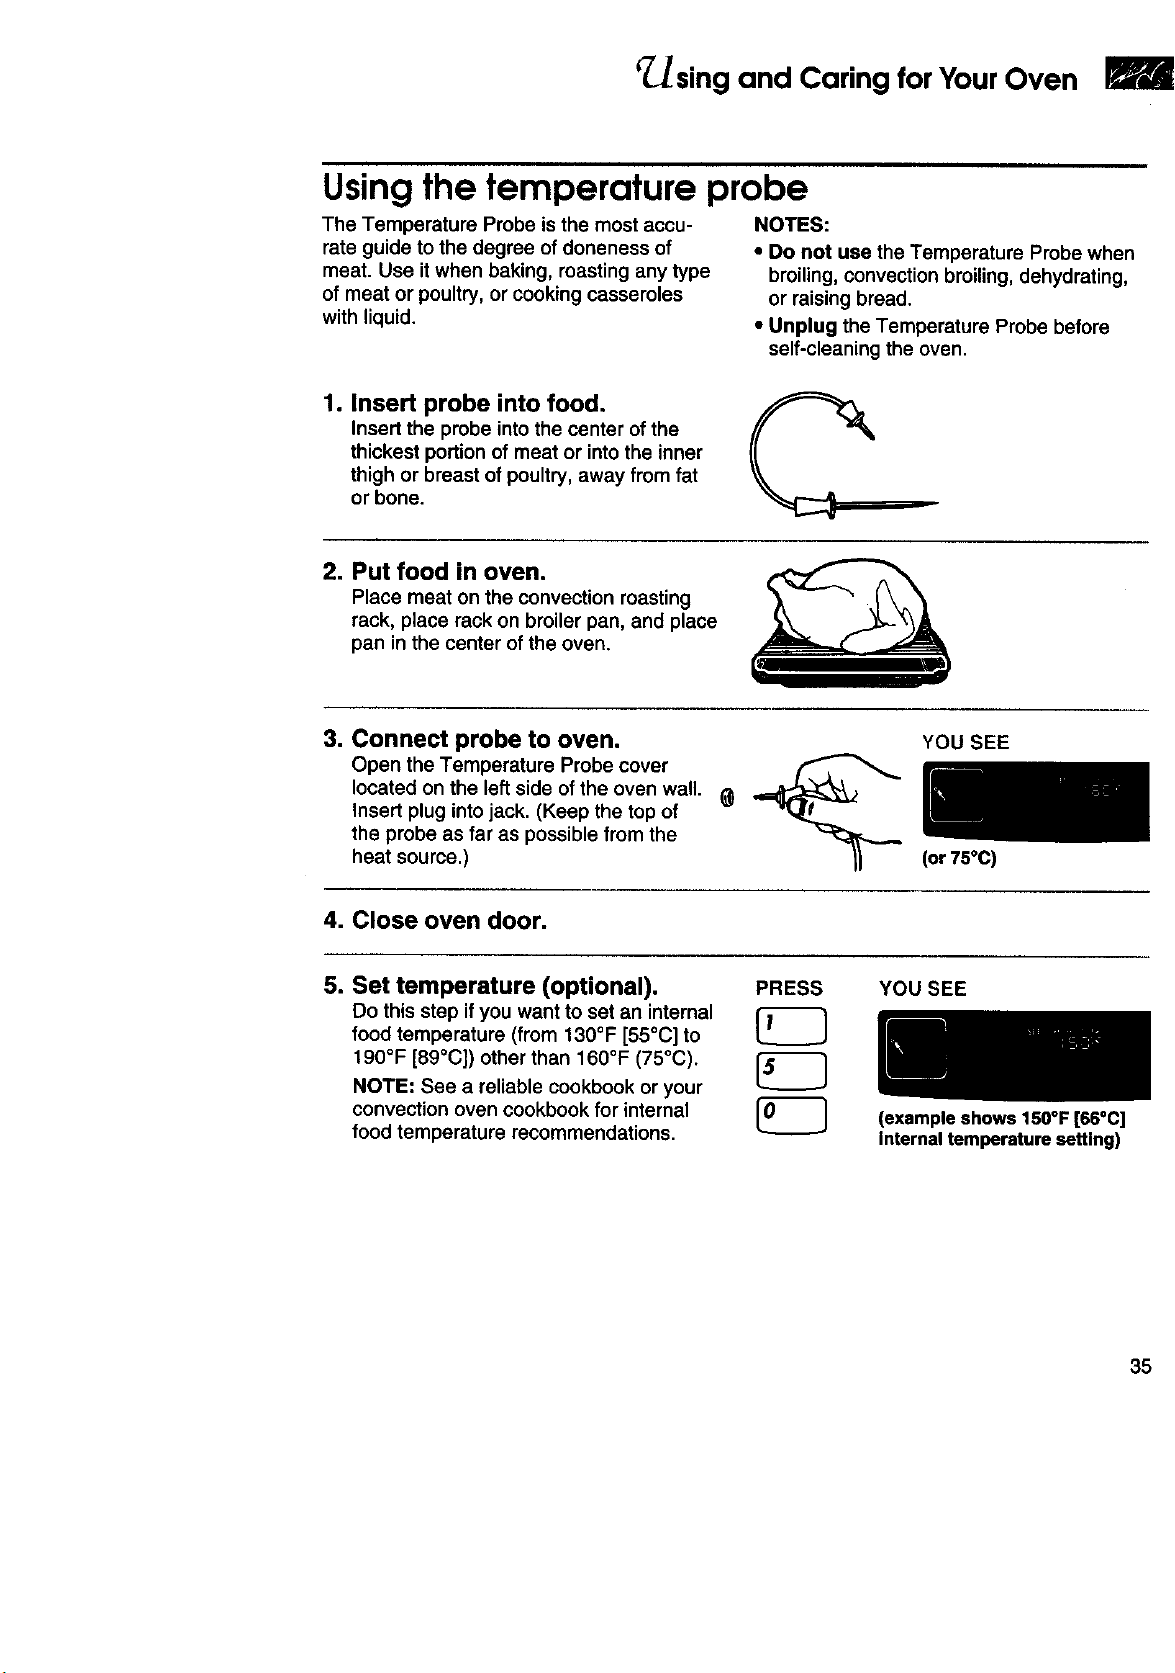
Using the temperature probe
The Temperature Probe isthe most accu-
rate guide to the degree of doneness of
meat. Use itwhen baking, masting any type
of meat or poultry, or cooking casseroles
with liquid.
NOTES:
• Do not use the Temperature Probe when
broiling, convection broiling, dehydrating,
or raising bread.
• Unplug the Temperature Probe before
self-cleaning the oven.
1. Insert probe into food.
Insert the probe into the center ofthe
thickest portion of meat or intothe inner
thigh or breast of poultry, away from fat
or bone.
2. Put food in oven.
Place meat on the convection roasting
rack, place rack on broiler pan, and place
pan in the center of the oven.
3. Connect probe to oven.
Open the Temperature Probe cover
located on the left side of the oven wall.
Insert plug intojack. (Keep the top of
the probe as far as possible from the
heat source.)
YOU SEE
(or 75°C)
4. Close oven door.
YOU SEE
5. Set temperature (optional).
Do this step ifyou want to set an internal
food temperature (from 130°F [55°C] to
190°F [89°C]) other than 160°F (75°C).
NOTE: See a reliable cookbook or your
convection oven cookbook for internal
food temperature recommendations.
PRESS
(example shows 150°F [66°C]
Internal temperature setting)
35
r sing and Caring for Your Oven
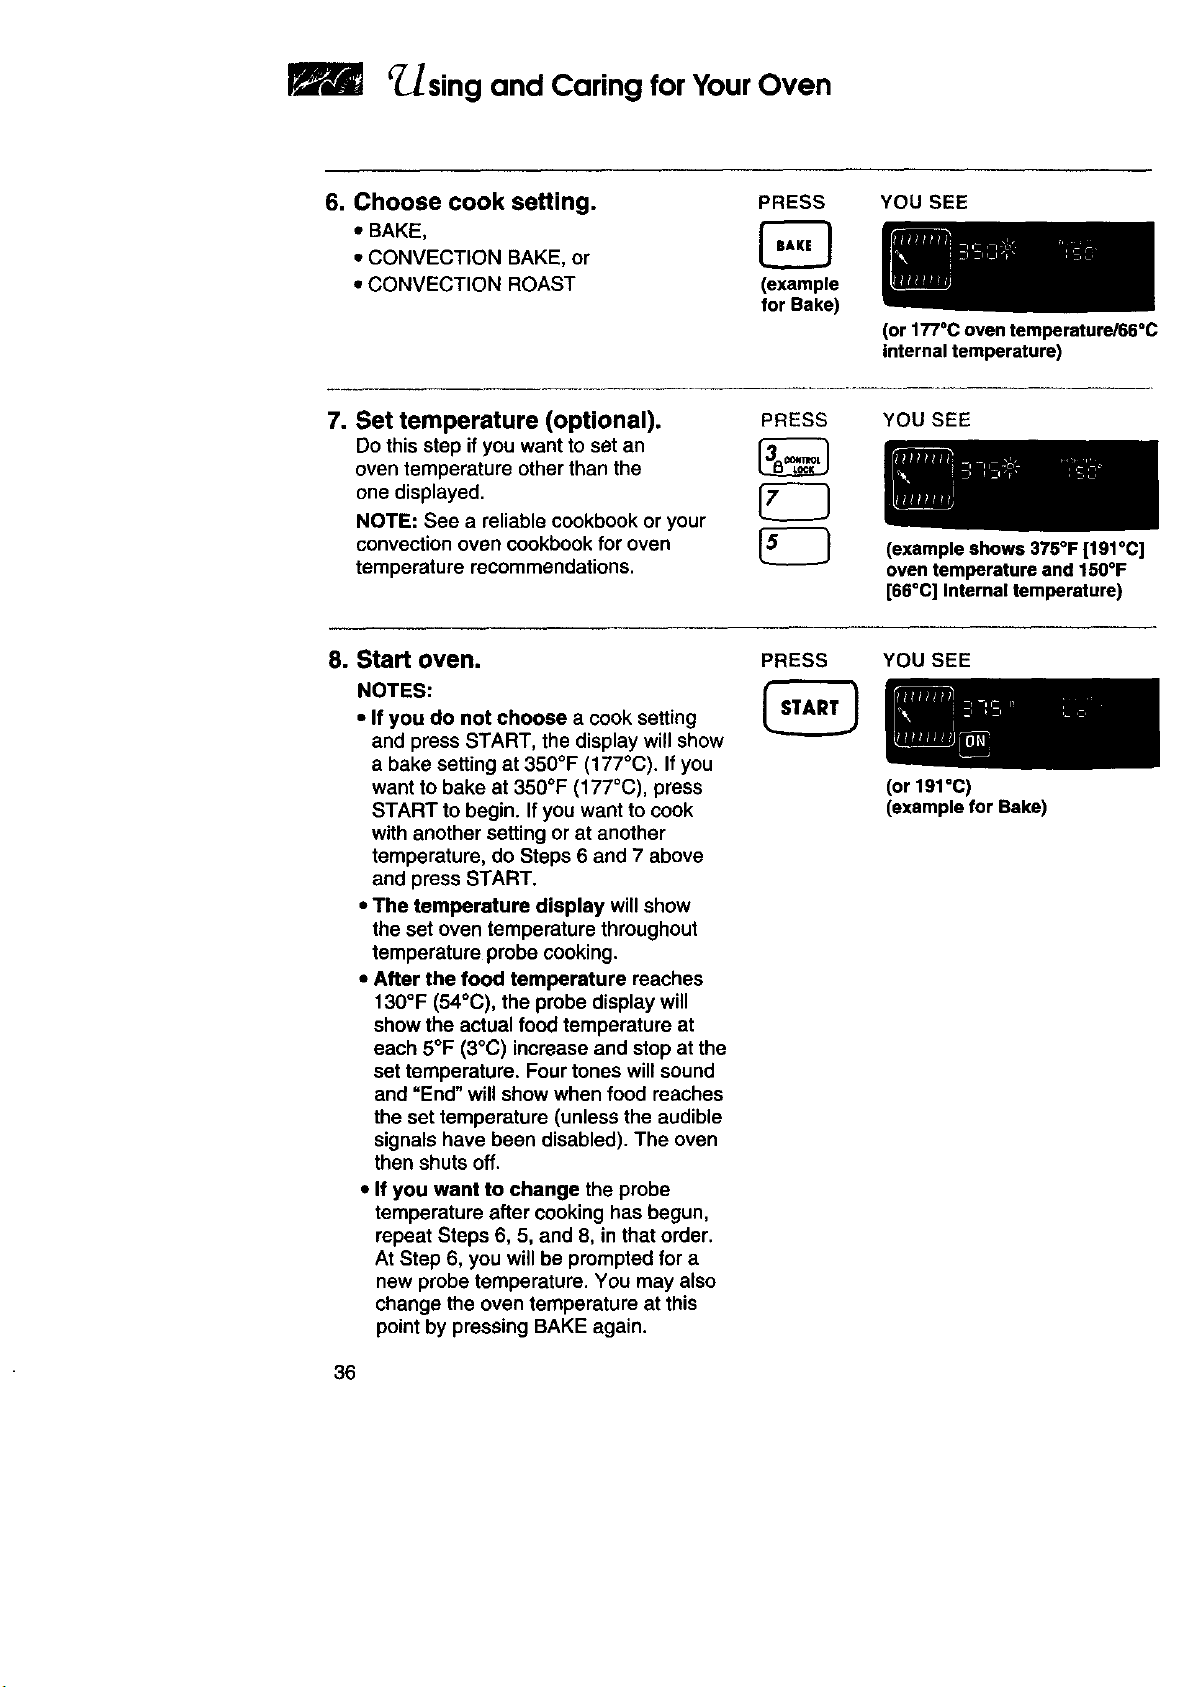
6. Choose cook setting.
• BAKE,
• CONVECTION BAKE, or
• CONVECTION ROAST
PRESS
(example
for Bake)
YOU SEE
7. Set temperature (optional).
Do this step if you want to set an
oven temperature other than the
one displayed.
NOTE: See a reliable cookbook or your
convection oven cookbook for oven
temperature recommendations.
PRESS
(or 177°C oventemperatureJ66°C
internaltemperature)
YOU SEE
(example shows 375°F [191°C]
oven temperature and 150°F
[66°C] Internal temperature)
8. Start oven.
NOTES:
• If you do not choose a cook setting
and press START, the display will show
a bake setting at 350°F (177°C). If you
want to bake at 350°F (177°C), press
START to begin. If you want to cook
with another setting or at another
temperature, do Steps 6 and 7 above
and press START.
• The temperature display willshow
the set oven temperature throughout
temperature probe cooking.
• After the food temperature reaches
130°F (54°C), the probe display will
show the actual food temperature at
each 5°F (3°C) increase and stop at the
set temperature. Four tones will sound
and "End" willshow when food reaches
the set temperature (unless the audible
signals have been disabled). The oven
then shuts off.
• If you want to change the probe
temperature after cooking has begun,
repeat Steps 6, 5, and 8, in that order.
At Step 6, you will be prompted for a
new probe temperature. You may also
change the oven temperature at this
point by pressing BAKE again.
PRESS YOU SEE
36
(or191°C)
(example for Bake)

Using and Caring for Your Oven
Burn Hazard
Use an oven mitt to remove temperature probe.
Do not touch broil element.
Failure to follow these instructions can result in burns.
9. After cooking, unplug probe.
The probe symbol will remain lit until
you unplug the Temperature Probe.
10. Remove food from oven.
(This prevents overcooking.)
11. Clean probe.
Wash with a soapy sponge and dry
thoroughly. Use a plastic scouring pad
to remove cooked-on foods. You can
also clean the probe in a dishwasher.
Using Convect Full Meal
Convect Full Meal lets you choose from
among 10 preset oven convection cooking
cycles, all using the convection fan. These
cycles store commonly used cooking times,
cooking temperatures, and probe tempera-
ture settings.
1, Place food in cold oven,
If you need the Temperature Probe for your
cycle (settings 5-8 in the "Convect full meal
chad" later in this section), insert probe into
food. (Follow Steps 1-4 in"Usingthe
temperature probe"eadier inthis section.)
Convect Full Meal saves you time by limiting
the number of pads you have to press when
cooking at a favorite setting. Convect Full
Meal also lets you set your own favorite
cycle (either convection or nonconvection).
2. Press CONVECT FULL MEAL.
PRESS YOU SEE
("C" stands for "cycle,"
"F" stands for "favorite")
continued on next page
37
m
r_sing and Caring for Your Oven
3. Press desired Number pad. PRESS
Use the "Convect full meal chart" later in _'_
this section as your guide for selecting
LL__J
a cycle.
NOTES:
• You can change the Convect Full Meal
cycle any time before pressing START
by repeating Step 3.
• You can program your own cycle,
which you can then select in the future
by pressing just CONVECT FULL MEAL
and START. (See "To program your
own cycle" later in this section for more
information.)
YOU SEE
(example for cycle 1)
4. Start oven.
PRESS
(or 180°C)
YOU SEE
5. When the Convect Full Meal
cycle is done:
Four tones will sound, followed by four
reminder tones every minute until you
open the door (unless the audible signals
have not been disabled), remove the
probe, or press CANCEL/OFF.
YOU SEE
38
r sing and Caring for Your Oven
F=L
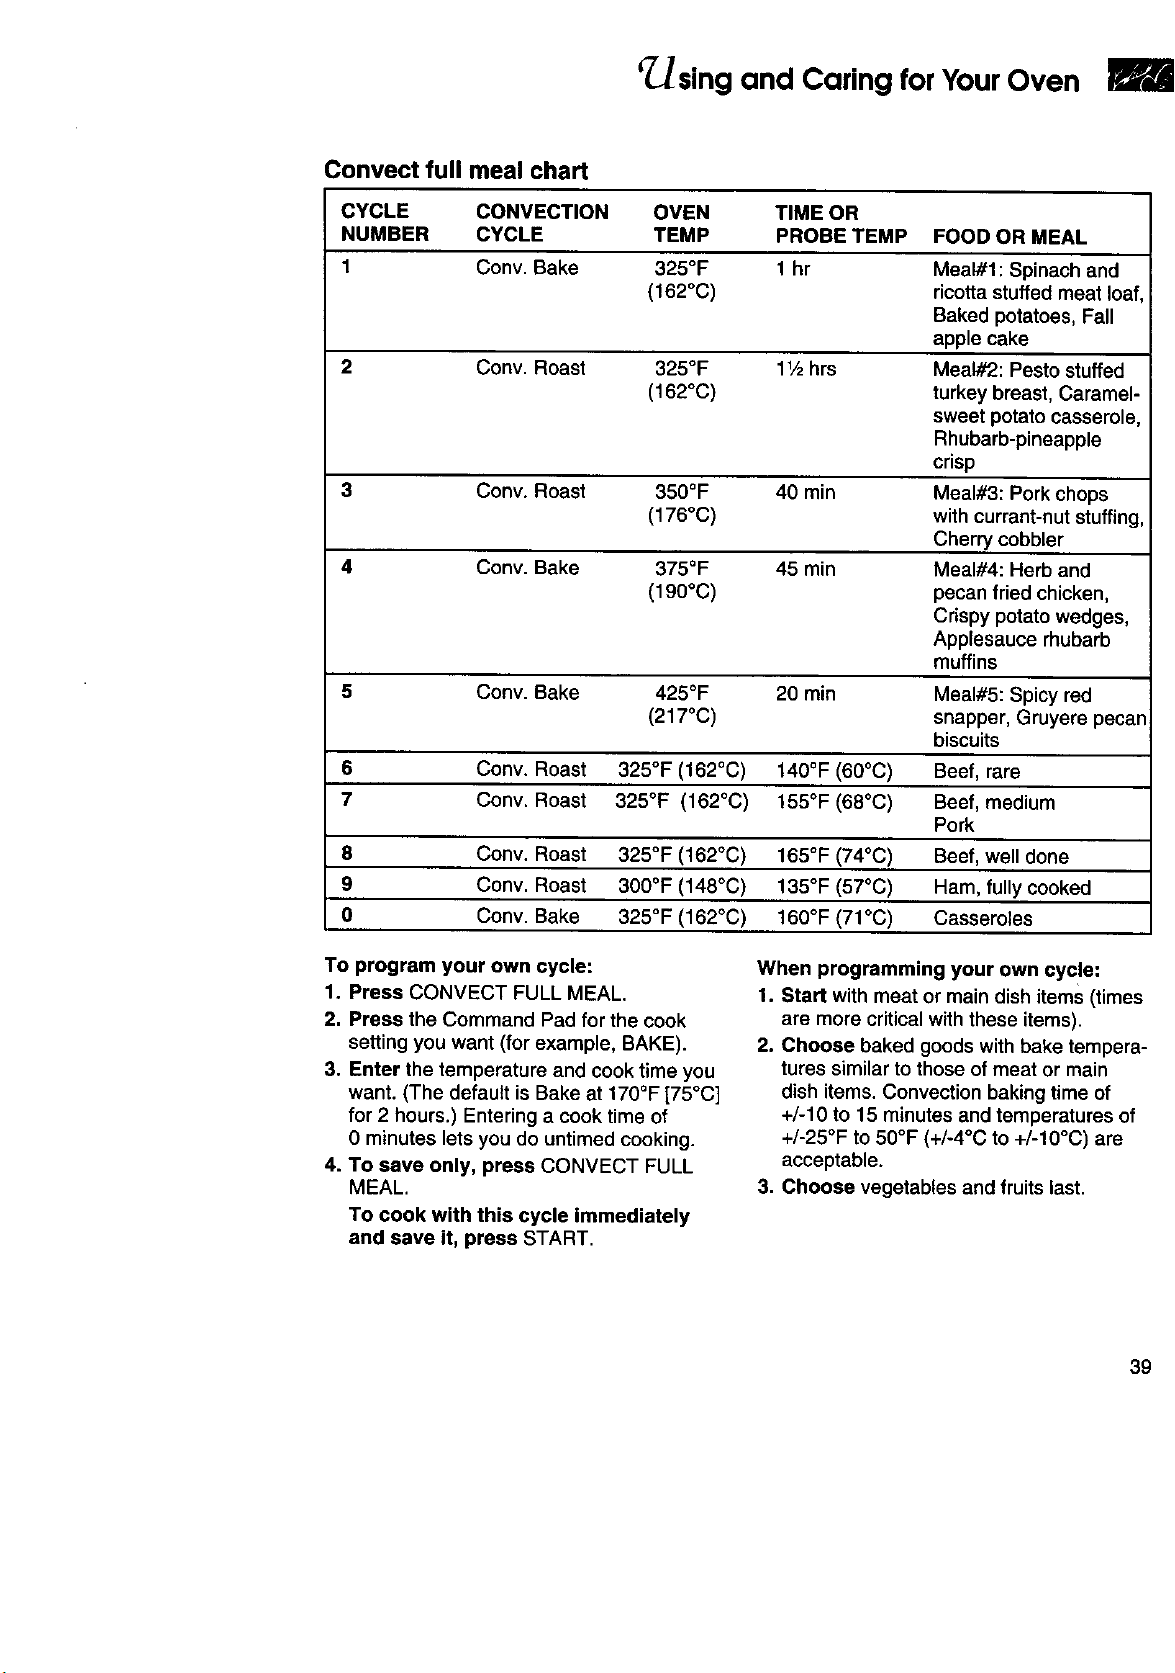
;onvect full meal chart
CYCLE CONVECTION OVEN TIME OR
NUMBER CYCLE TEMP PROBE TEMP FOOD OR MEAL
1 Conv. Bake 325°F 1 hr Meal#l: Spinach and
(162°C) ricottastuffed meat loaf
Baked potatoes, Fall
apple cake
2 Cony. Roast 325°F 11/2hrs MeaVf2: Pesto stuffed
(162°C) turkey breast, Caramel-
sweet potato casserole,
Rhubarb-pineapple
crisp
3 Conv. Roast 350°F 40 min Meal#3: Pork chops
(176°C) with currant-nut stuffing,
Cherry cobbler
4 Conv. Bake 375°F 45 min Meal#4: Herb and
(190°C) pecan fried chicken,
Crispy potato wedges,
Applesauce rhubarb
muffins
5 Conv. Bake 425°F 20 rain Meal#5: Spicy red
(217°C) snapper, Gruyere pecan
biscuits
6 Conv. Roast 325°F (162°C) 140°F (6O°C) Beef, rare
7 Conv. Roast 325°F (162°C) 155°F (68°C) Beef, medium
Pork
8 Conv. Roast 325°F (162°C) 165°F (74°C) Beef, well done
9 Conv. Roast 300°F (148°C) 135°F (57°C) Ham, fully cooked
0 Conv. Bake 325°F (162°C) 160°F (71°C) Casseroles
To program your own cycle:
1. Press CONVECT FULL MEAL.
2. Press the Command Pad for the cook
setting you want (for example, BAKE).
3. Enter the temperature and cook time you
want. (The defautt is Bake at 170°F [75°C]
for 2 hours.) Entering a cook time of
0 minutes lets you do untimed cooking.
4. To save only, press CONVECT FULL
MEAL.
To cook with this cycle immediately
and save it, press START.
When programming your own cyc!e:
1. Start with meat or main dish items (times
are more critical with these items).
2. Choose baked goods with bake tempera-
tures similar to those of meat or main
dish items. Convection baking time of
+/-10 to 15 minutes and temperatures of
+/-25°F to 50°F (+/-4°C to +/-10°C) are
acceptable.
3. Choose vegetables and fruits last.
39
B
fusing and Caring for Your Oven
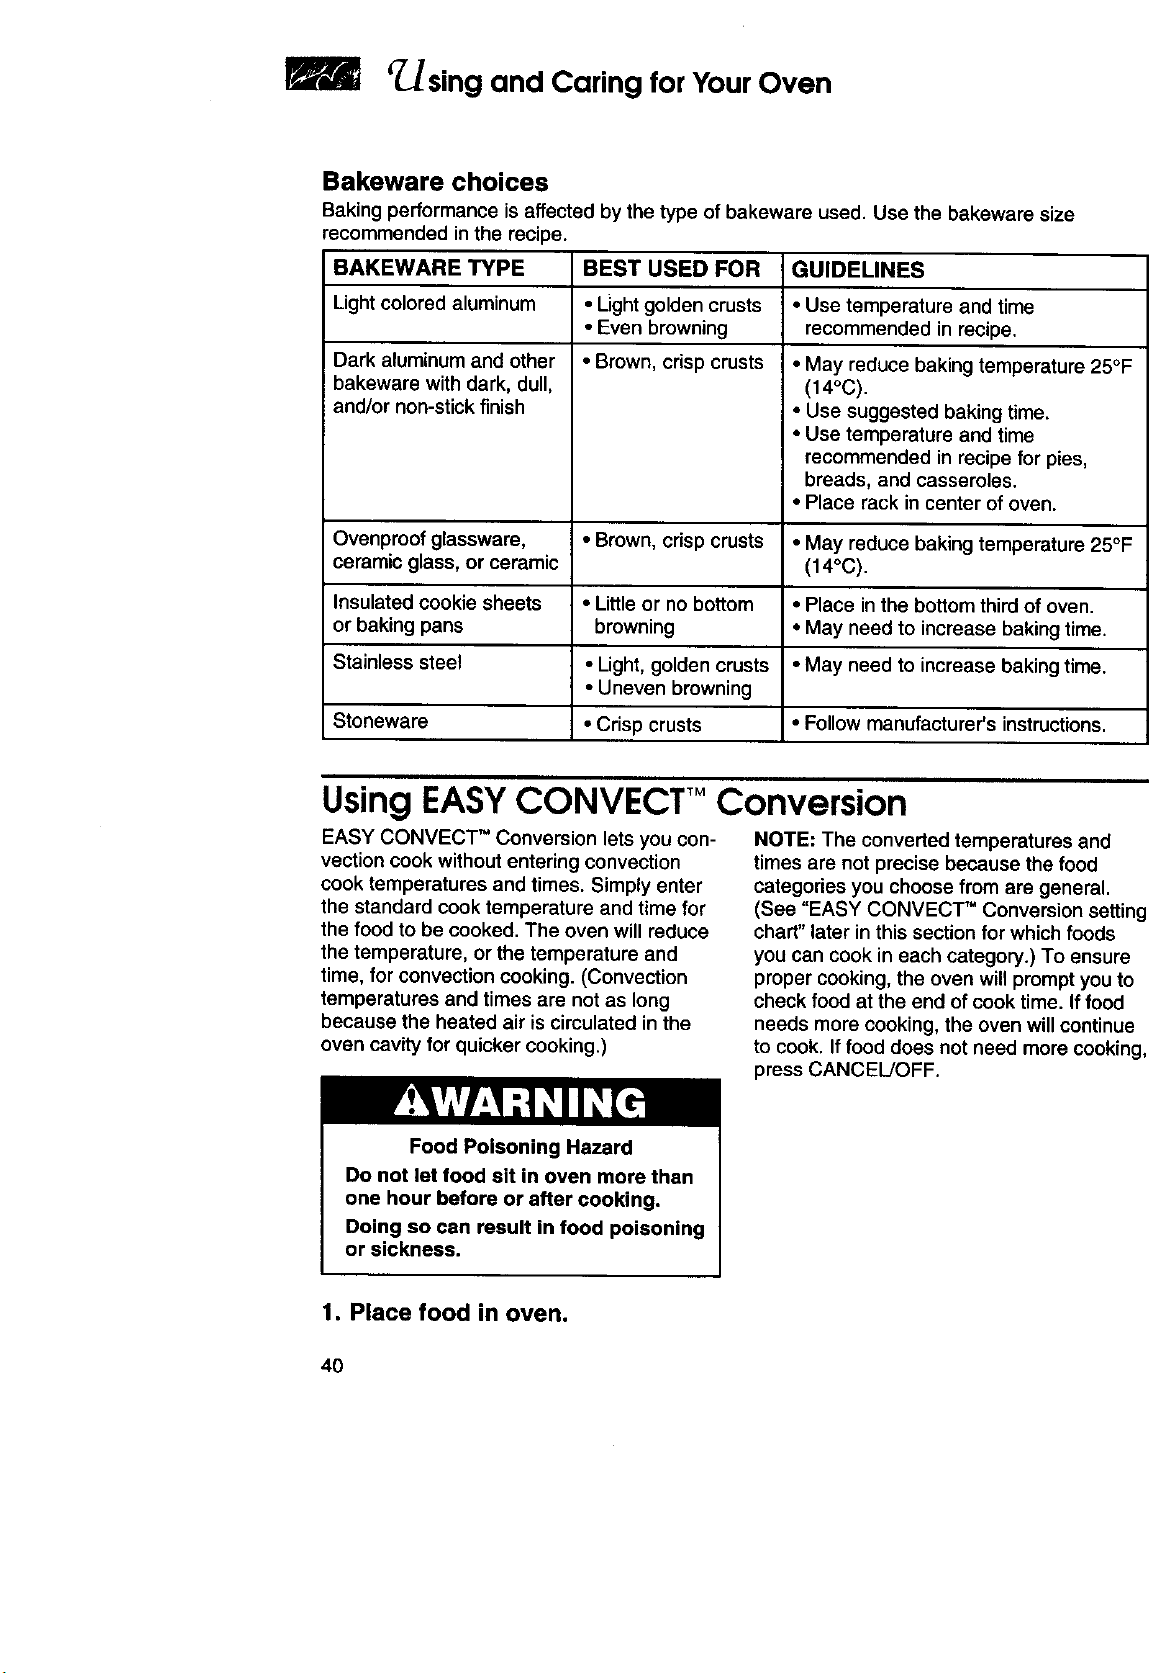
Bakeware choices
Baking performance is affected by the type of bakeware used. Use the bakeware size
recommended in the recipe.
BAKEWARE TYPE
Lightcolored aluminum
Dark aluminum and other
bakeware with dark, dull,
and/or non-stick finish
Ovenproof glassware,
ceramic glass, or ceramic
Insulated cookie sheets
or baking pans
Stainless steel
Stoneware
BEST USED FOR
• Lightgolden crusts
• Even browning
• Brown, crisp crusts
• Brown, crisp crusts
• Littleor no bottom
browning
• Light,golden crusts
• Uneven browning
• Crisp crusts
GUIDELINES
• Use temperature and time
recommended in recipe.
• May reduce baking temperature 25°F
(14°C).
• Use suggested baking time.
• Use temperature and time
recommended in recipe for pies,
breads, and casseroles.
• Place rack in center of oven.
• May reduce baking temperature 25°F
(14°C).
• Place in the bottom third of oven.
• May need to increase baking time.
• May need to increase baking time.
• Follow manufacturer's instructions.
Using EASY CONVECT" Conversion
EASY CONVECT" Conversion lets you con-
vection cook without entering convection
cook temperatures and times. Simply enter
the standard cook temperature and time for
the food to be cooked. The oven will reduce
the temperature, or the temperature and
time, for convection cooking. (Convection
temperatures and times are not as long
because the heated air is circulated in the
oven cavity for quicker cooking.)
NOTE: The converted temperatures and
times are not precise because the food
categories you choose from are general.
(See "EASY CONVECT" Conversion setting
chart"later in this section for which foods
you can cook in each category.) To ensure
proper cooking, the oven will prompt you to
check food at the end of cook time. Iffood
needs more cooking, the oven will continue
to cook. If food does not need more cooking,
press CANCEL/OFF.
Food Poisoning Hazard
Do not let food sit in oven more than
one hour before or after cooking.
Doing so can result in food poisoning
or sickness.
1. Place food in oven.
40
Using and Caring for Your Oven
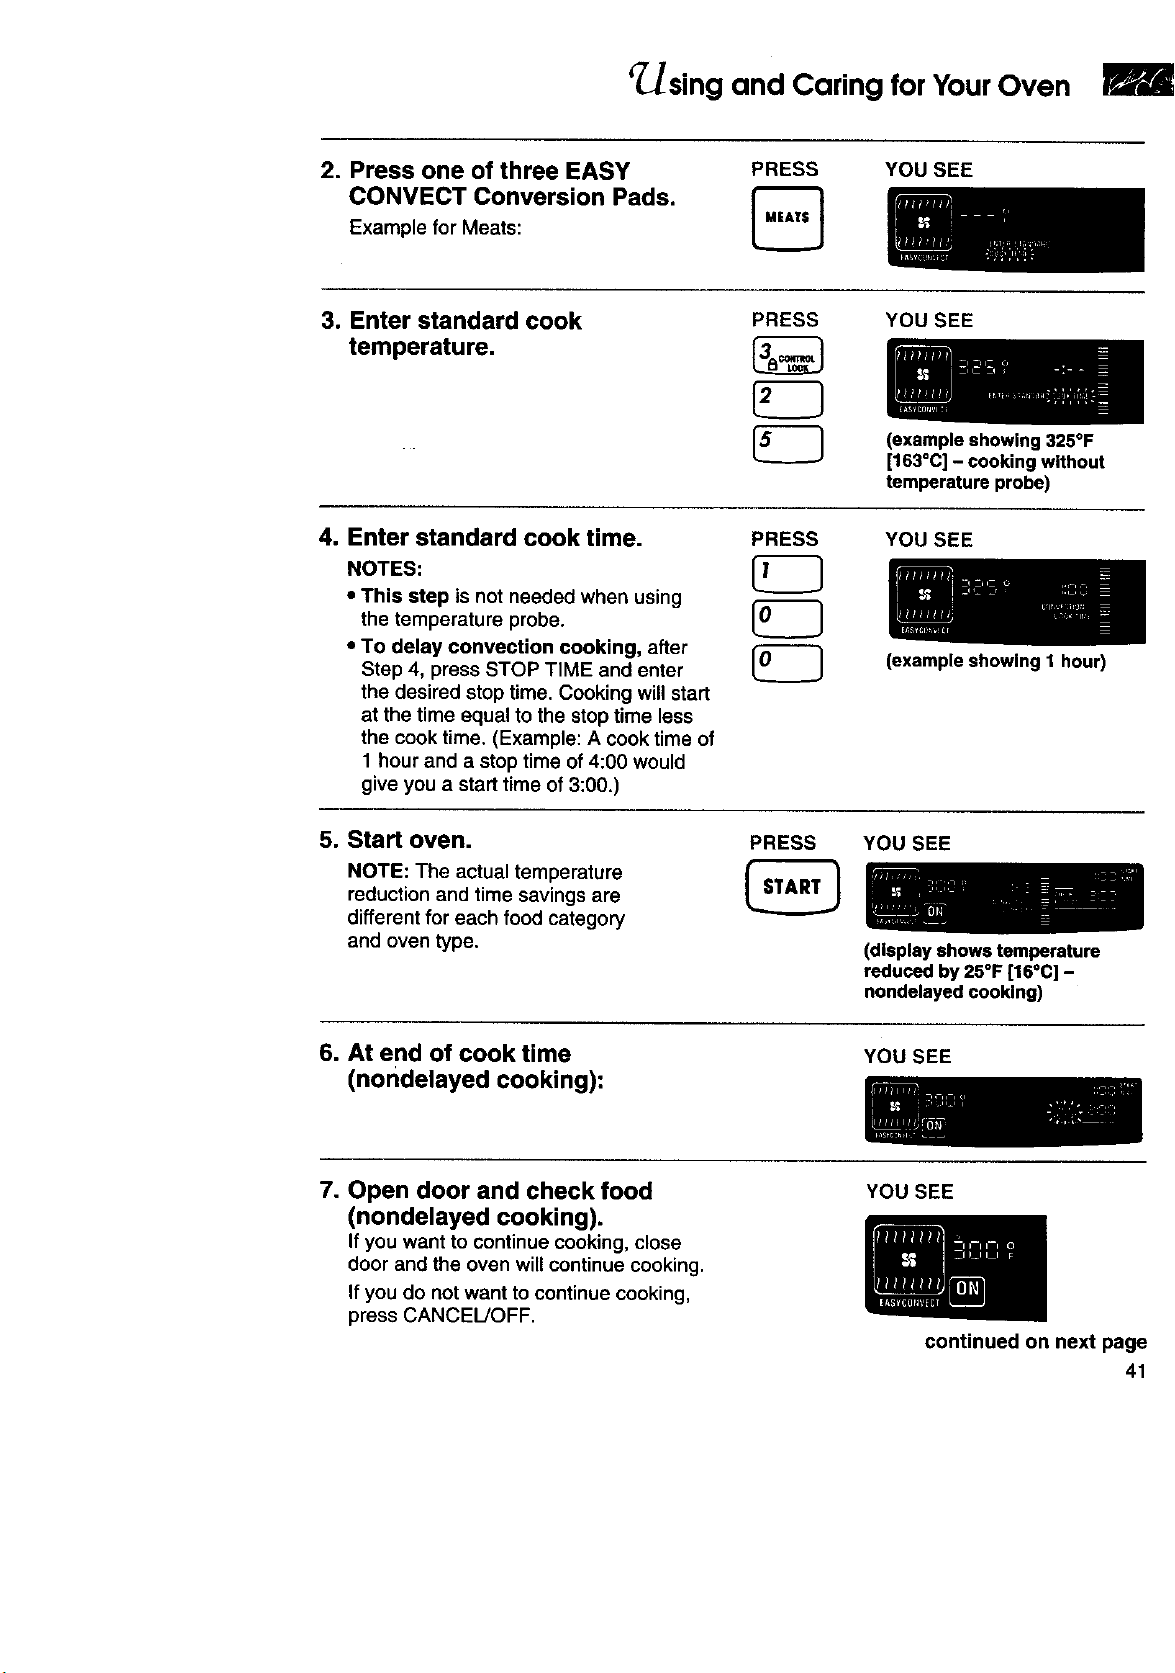
2. Press one of three EASY
CONVECT Conversion Pads.
Example for Meats:
PRESS
YOU SEE
3. Enter standard cook
temperature.
PRESS YOU SEE
(example showing 325°F
[163°C] - cooking without
temperature probe)
4. Enter standard cook time.
NOTES:
• This step is not needed when using
the temperature probe.
• To delay convection cooking, after
Step 4, press STOP TIME and enter
the desired stop time. Cooking will start
at the time equal to the stop time less
the cook time. (Example: A cook time of
1 hour and a stop time of 4:00 would
give you a start time of 3:00.)
PRESS
YOU SEE
5. Start oven.
NOTE: The actual temperature
reduction and time savings are
different for each food category
and oven type.
PRESS
(example showing 1 hour)
YOU SEE
(display shows temperature
reduced by 25°F [16°C] -
nondelayed cooking)
6. At end of cook time
(nondelayed cooking):
YOU SEE
7. Open door and check food
(nondelayed cooking).
If you want to continue cooking, close
door and the oven wilecontinue cooking.
If you do not want to continue cooking,
press CANCEL/OFF.
YOU SEE
continued on next page
41
r_sing and Caring for Your Oven
8. When stop time is reached
(delayed cooking only):
Four tones will sound, followed by four
reminder tones every minute (unless the
audible signals have been disabled), until
you open the door, remove the probe, or
press CANCEL/OFF.
YOU SEE
EASY CONVECT" Conversion setting chart
EASY CONVECT TM SETTING FOODS YOU CAN COOK WITH THIS SETTING
Baked Goods Cakes, cookies, muffins, quick breads, biscuits,yeast bread
Meats Roasts, ham, whole chicken, chicken pieces, chops,
meatloaf
NOTE: Turkey or large poultry are not included because
their cooking times vary.
Other Foods Egg and cheese dishes, fish, casseroles, frozen conve-
nience foods, potatoes, squash, meat pies, fruitpies
Timed cooking
The electronic clock/oven control will turn
the oven on and off at times you set, even
when you are not around.
Delayed time cooking is ideal for foods
which do not require a preheated oven,
such as meats and casseroles. Do not use
delayed time cooking for cakes, cookies,
etc. - they will not rise properly. Before
using timed cooking, make sure the clock
is set to the correct time of day. (Bee the
"Setting the clock" section.)
To start baking/roasting now and
stop automatically:
1. Prepare oven.
Positionthe oven rack(s) properly and
place the food in the oven. For correct
rack placement, see "Rack positions"and
the "Rack placement" chart earlier in this
section.
Food Poisoning Hazard
Do not let food sit in oven more than
one hour before or after cooking.
Doing so can result in food poisoning
or sickness.
2. Choose cook setting.
• BAKE,
• CONVECTION BAKE, or
• CONVECTION ROAST
PRESS YOU SEE
(or149°C)
(examplefor Convection Roast)
42
Using and Caring for Your Oven
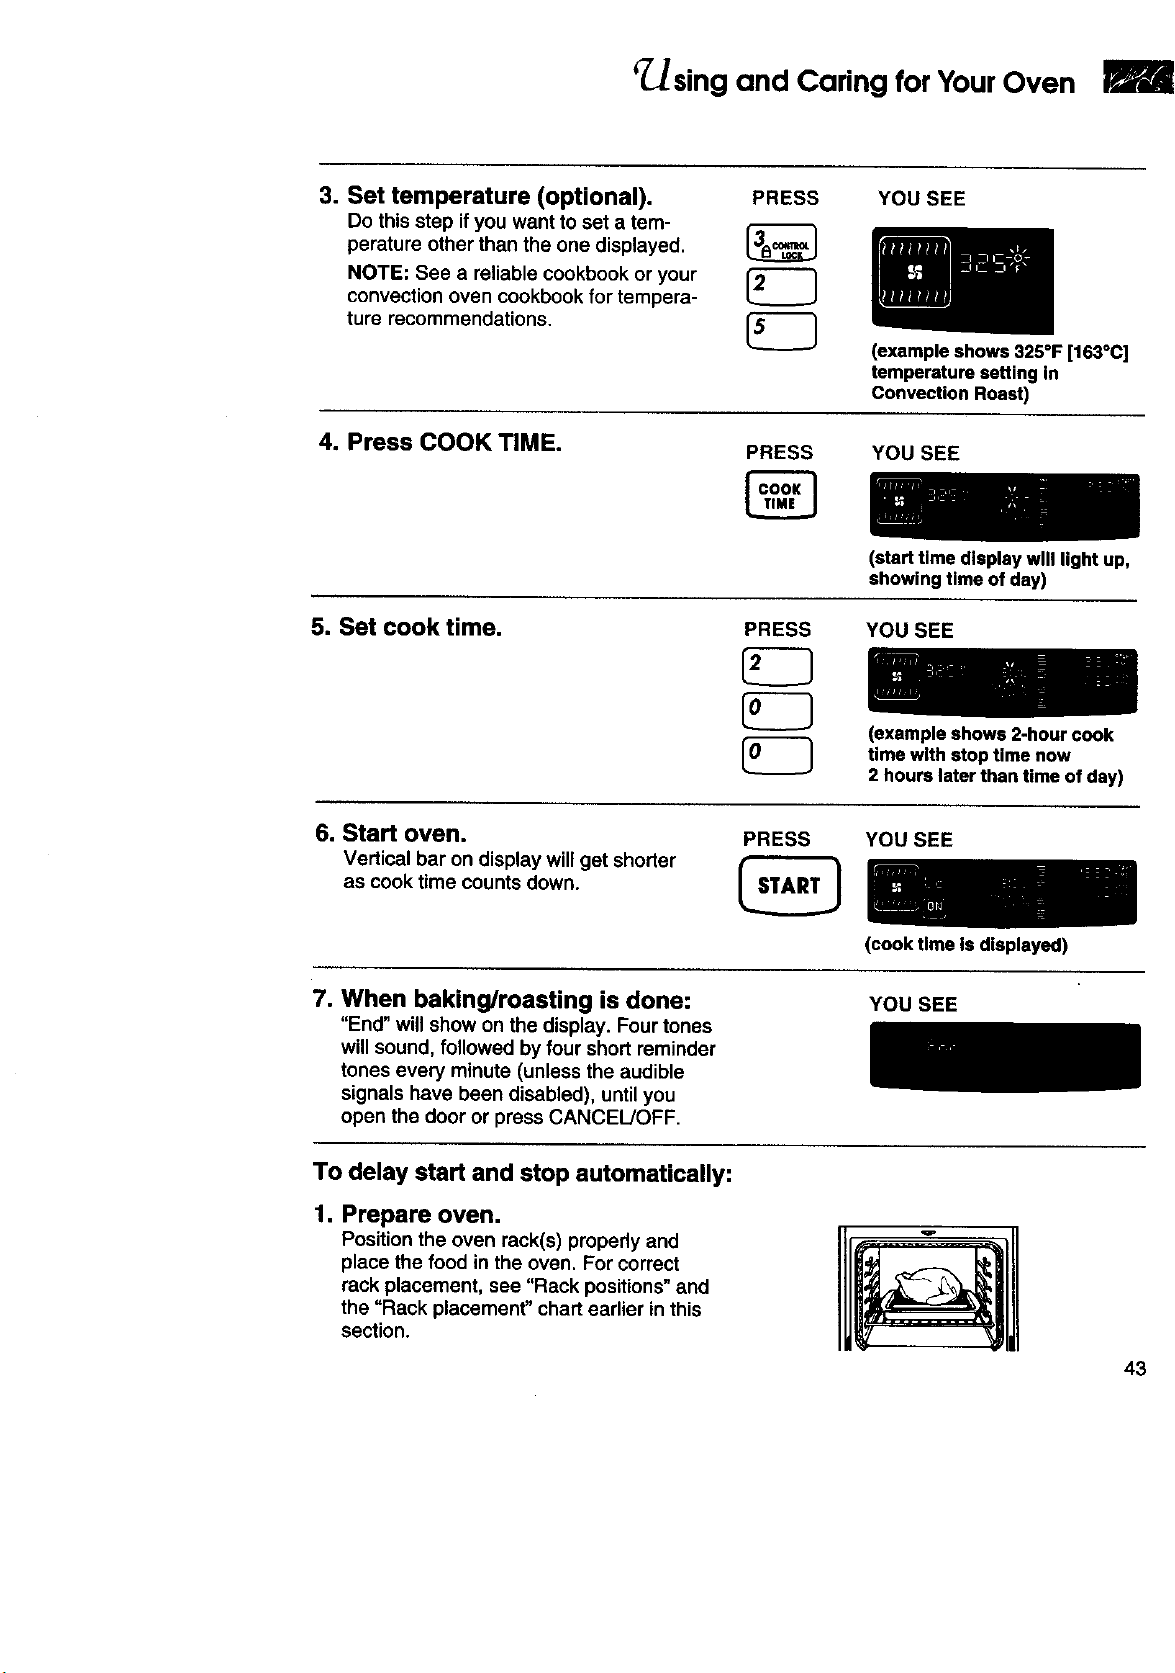
3. Set temperature (optional).
Do this step ifyou want to set a tem-
perature other than the one displayed,
NOTE: See a reliable cookbook or your
convection oven cookbook for tempera-
ture recommendations.
PRESS YOU SEE
(example shows 325°F [163°C]
temperature setting In
Convection Roast)
4. Press COOK TIME.
PRESS YOU SEE
5. Set cook time.
PRESS
(start time display will light up,
showing time of day)
YOU SEE
(example shows 2-hour cook
time with stop time now
2 hours later than time of day)
6. Start oven.
Vertical bar on display will get shorter
as cook time counts down.
PRESS YOU SEE
7. When baking/roasting is done:
"End" willshow on the display. Four tones
will sound, followed by four short reminder
tones every minute (unless the audible
signals have been disabled), until you
open the door or press CANCEL/OFF.
(cook time Is displayed)
YOU SEE
To delay start and stop automatically:
1. Prepare oven.
Position the oven rack(s) properly and
place the food in the oven. For correct
rack placement, see "Rack positions"and
the "Rack placement" chart earlier in this
section.
43
R
Using and Caring for Your Oven
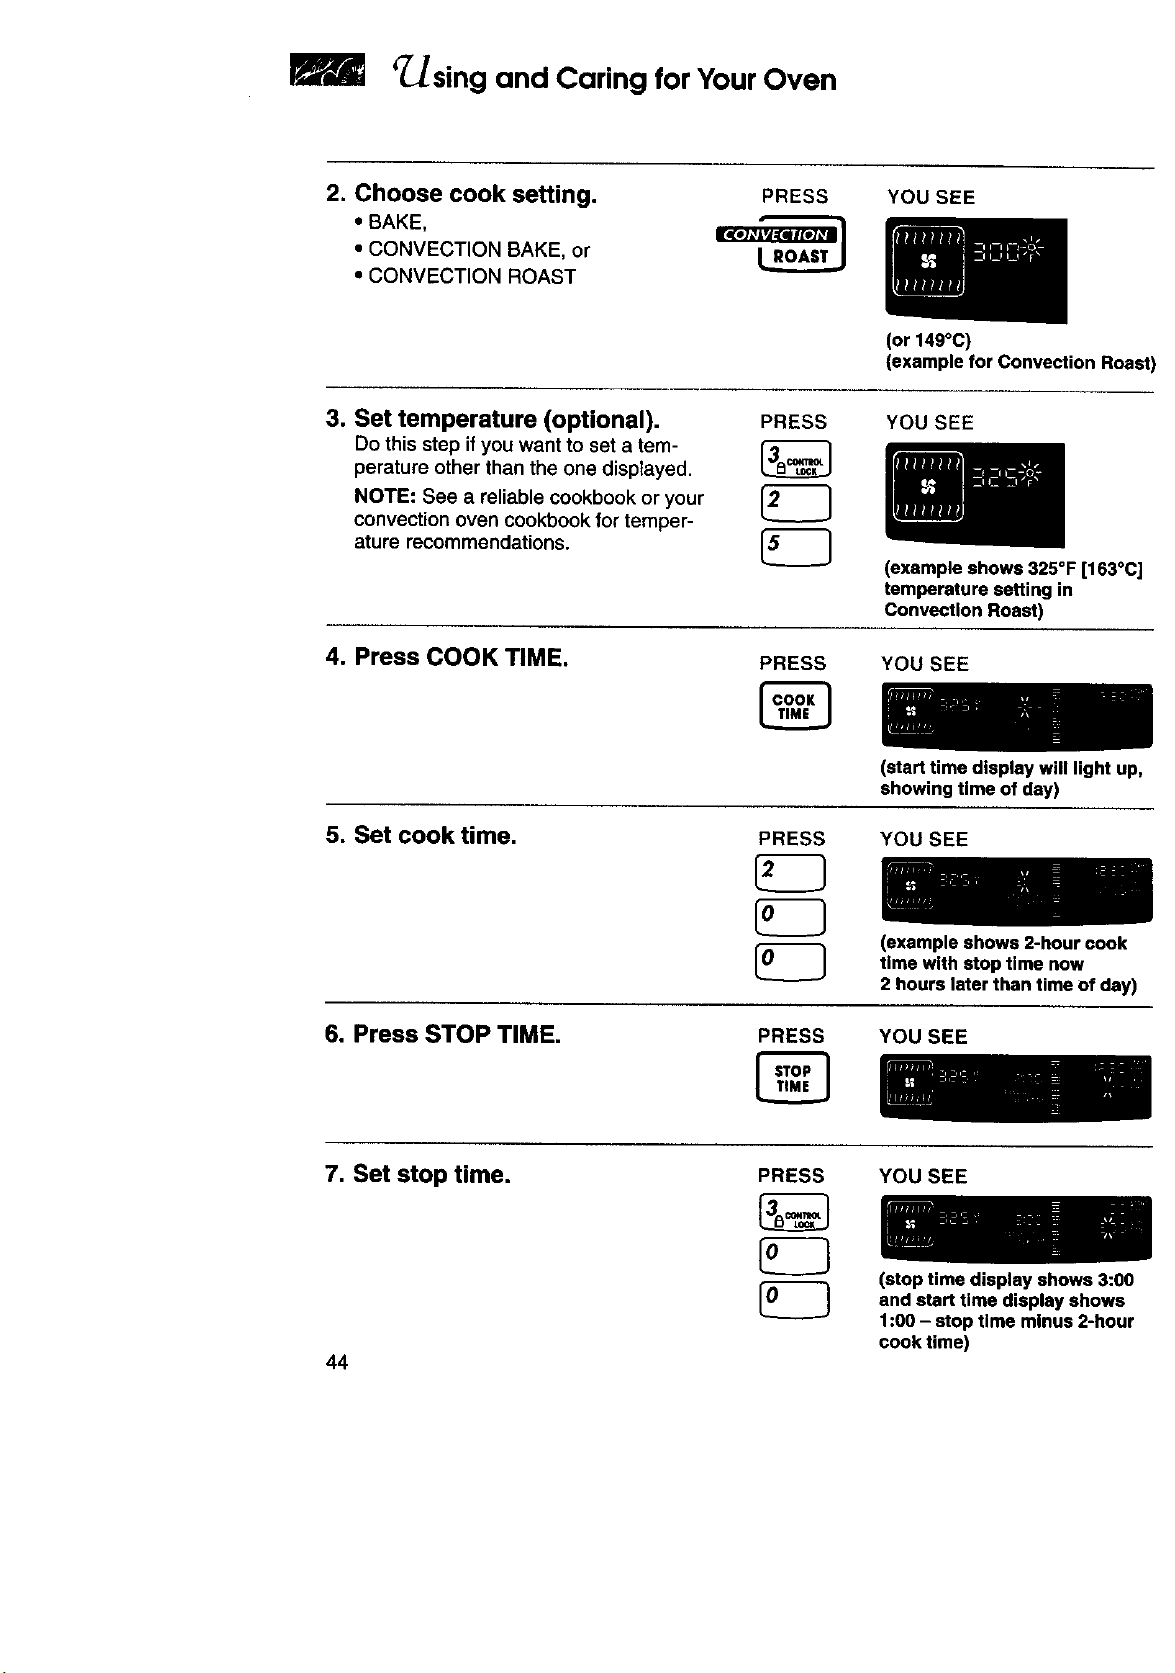
2. Choose cook setting.
• BAKE,
• CONVECTION BAKE, or
• CONVECTION ROAST
PRESS YOU SEE
(or 149°C)
(example for Convection Roast)
3. Set temperature (optional).
Do this step ifyou want to set a tem-
perature other than the one displayed,
NOTE: See a reliable cookbook or your
convection oven cookbook for temper-
ature recommendations.
PRESS YOU SEE
(example shows 325°F [163°C]
temperature setting in
Convection Roast)
4. Press COOK TIME.
PRESS YOU SEE
5. Set cook time,
PRESS
(start time display will light up,
showing time of day)
YOU SEE
(example shows 2-hour cook
time with stop time now
2 hours later than time of day)
6. Press STOP TIME.
PRESS YOU SEE
7, Set stop time.
44
PRESS YOU SEE
(stop time display shows 3:00
and start time display shows
1:00 - stop time minus 2-hour
cook time)
r_sing and Caring for Your Oven
r.Jl¢
8. Press START.
PRESS YOU SEE
When start time is reached:
Vertical bar on display will get shorter as
cook time counts down.
YOU SEE
9. When baking/roasting is done:
"End" witl show on the display. Four tones
will sound, followed by four short reminder
tones every minute (unless the audible
signals have been disabled), until you
open the door or press CANCEL/OFF.
YOU SEE
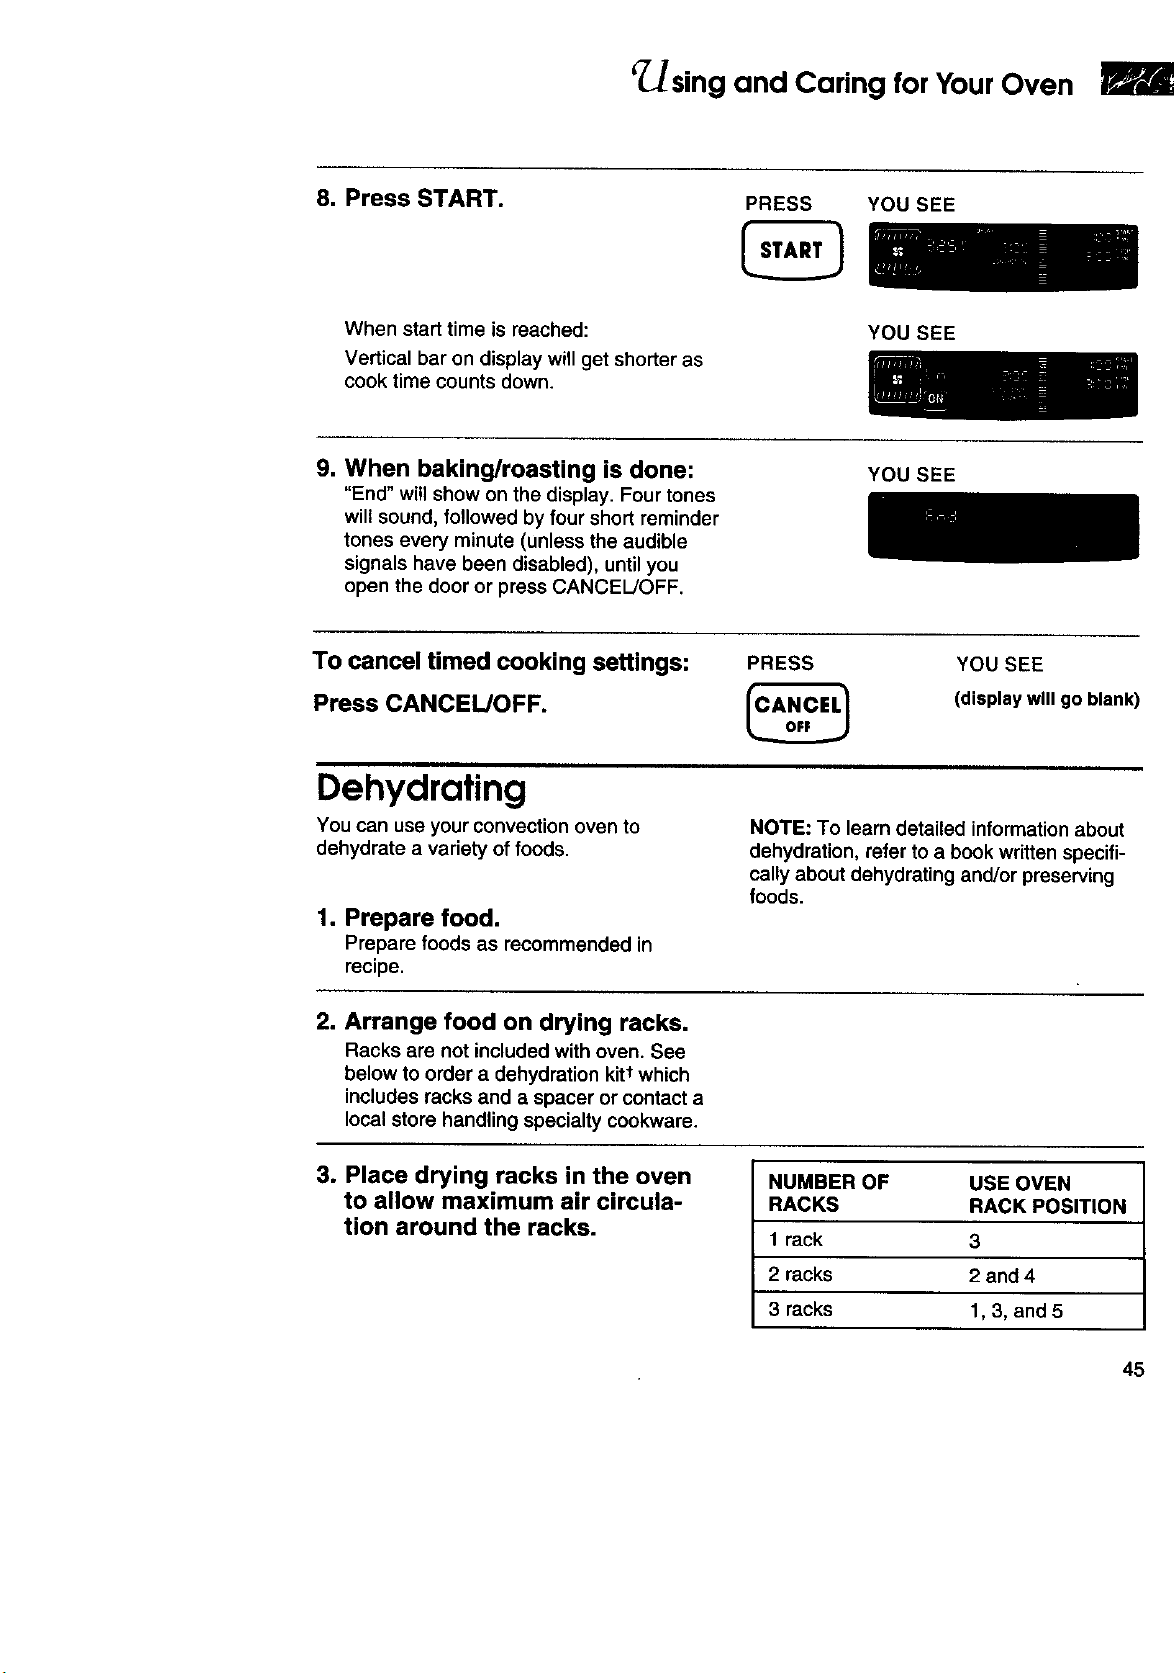
To cancel timed cooking settings:
Press CANCEL/OFF.
PRESS YOU SEE
(displaywlllgoblank)
Dehydrating
You can use your convection oven to
dehydrate a variety of foods.
1. Prepare food.
Prepare foods as recommended in
recipe.
NOTE: To learn detailed informationabout
dehydration, refer to a book written specifi-
cally about dehydrating and/or preserving
foods.
2. Arrange food on drying racks.
Racks are not included with oven. See
below to order a dehydration kitt which
includes racks and a spacer or contact a
local store handling specialty cookware.
3. Place drying racks in the oven
to allow maximum air circula-
tion around the racks.
NUMBER OF USE OVEN
RACKS RACK POSITION
1 rack 3
2 racks 2 and 4
3 racks 1,3, and 5
45
B
r sing and Caring for Your Oven
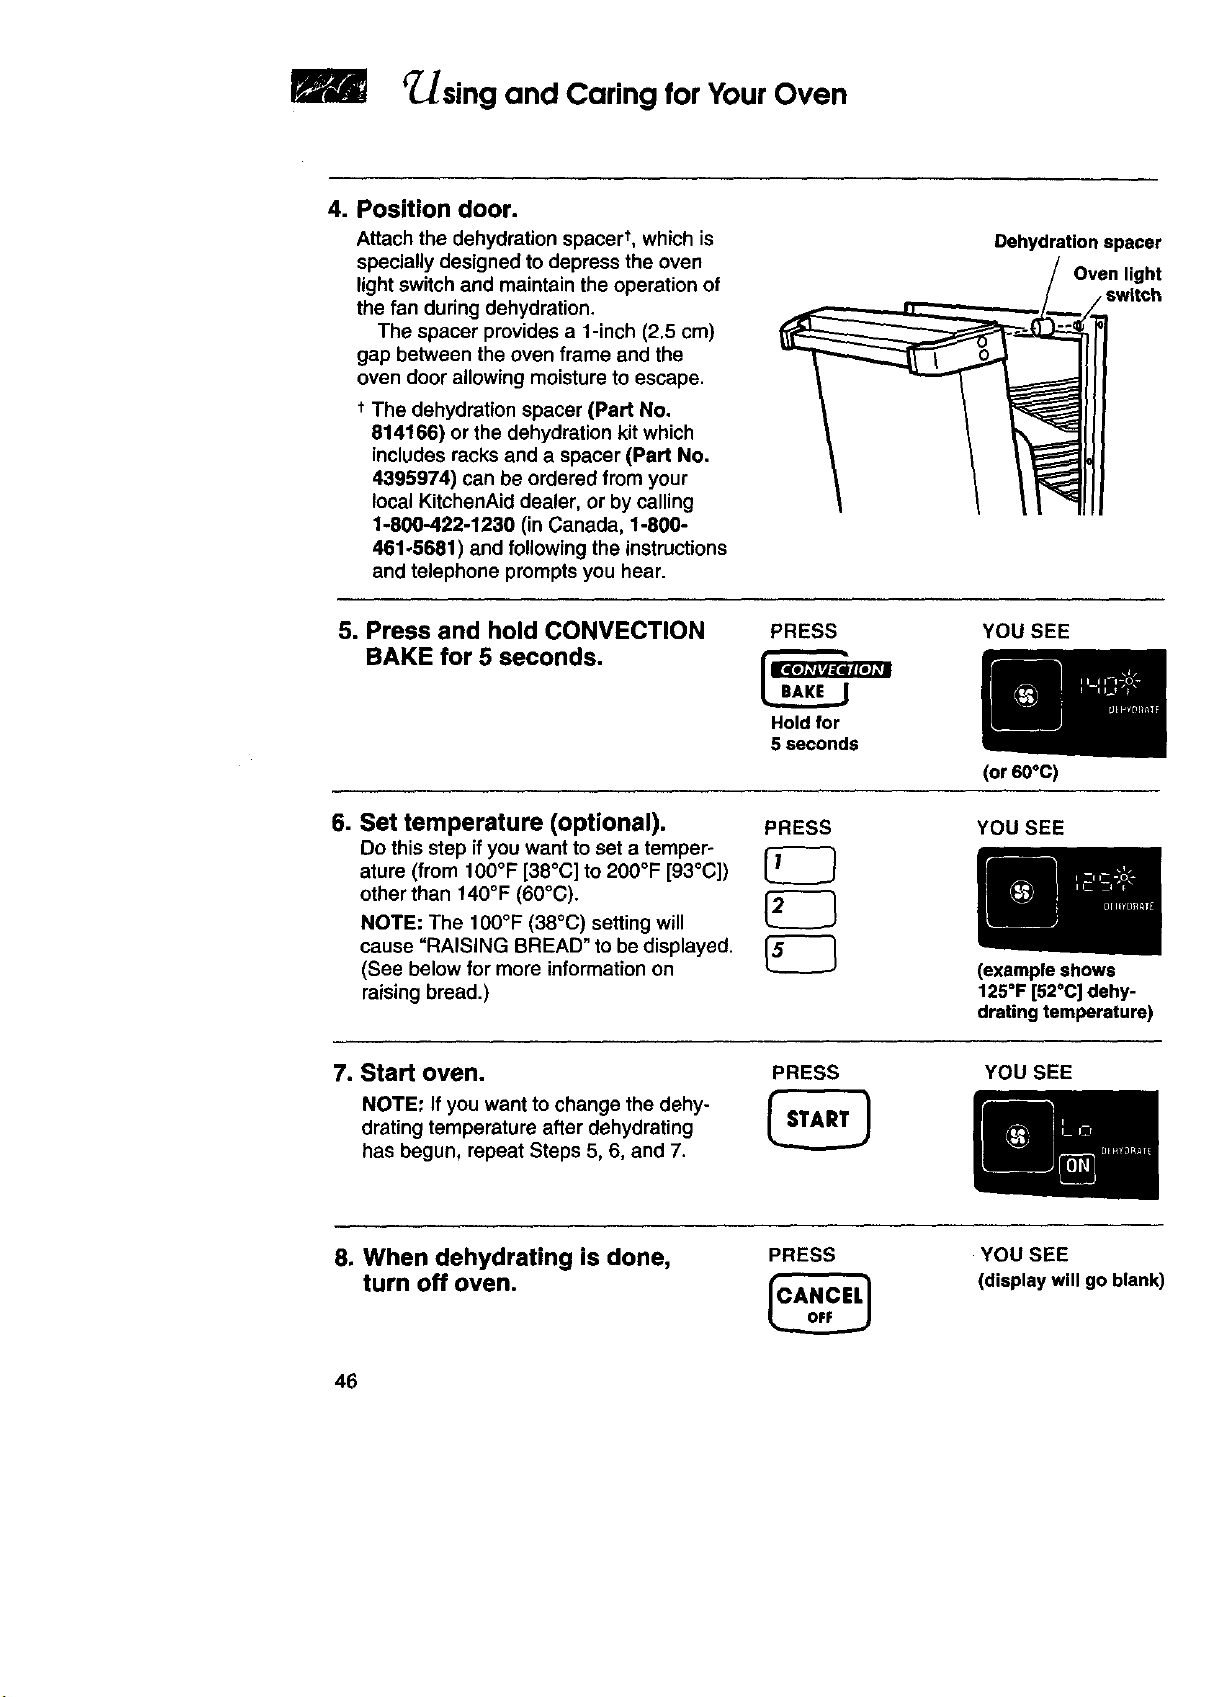
4. Position door.
Attach the dehydration spacer t, which is
specially designed to depress the oven
light switch and maintain the operation of
the fan during dehydration.
The spacer provides a 1-inch (2.5 cm)
gap between the oven frame and the
oven door allowing moisture to escape.
t The dehydration spacer (Part No.
814166) or the dehydration kit which
includes racks and a spacer (Part No.
4395974) can be ordered from your
local KitchenAid dealer, or by calling
1-800-422-1230 (in Canada, 1-800-
461-6681) and following the instructions
and telephone prompts you hear.
Dehydrationspacer
Oven light
5. Press and hold CONVECTION
BAKE for 5 seconds.
PRESS
Hold for
5 seconds
YOU SEE
6. Set temperature (optional). PRESS
Do this step ifyou want to set a temper°
ature (from 100°F [38°C] to 200°F [93°C])
other than 140°F (60°C).
NOTE: The 100°F (38°C) setting will
cause "RAISING BREAD" to be displayed
(See below for more information on
L.____J
raising bread.)
(or 60°c)
YOU SEE
(example shows
125=F [520C] dehy-
drating temperature)
7. Start oven. PRESS YOU SEE
NOTE: If you want to change the dehy-
drating temperature after dehydrating
has begun, repeat Steps 5, 6, and 7.
8. When dehydrating is done,
turn off oven.
PRESS YOU SEE
(display will go blank)
46
r sing and Caring for Your Oven
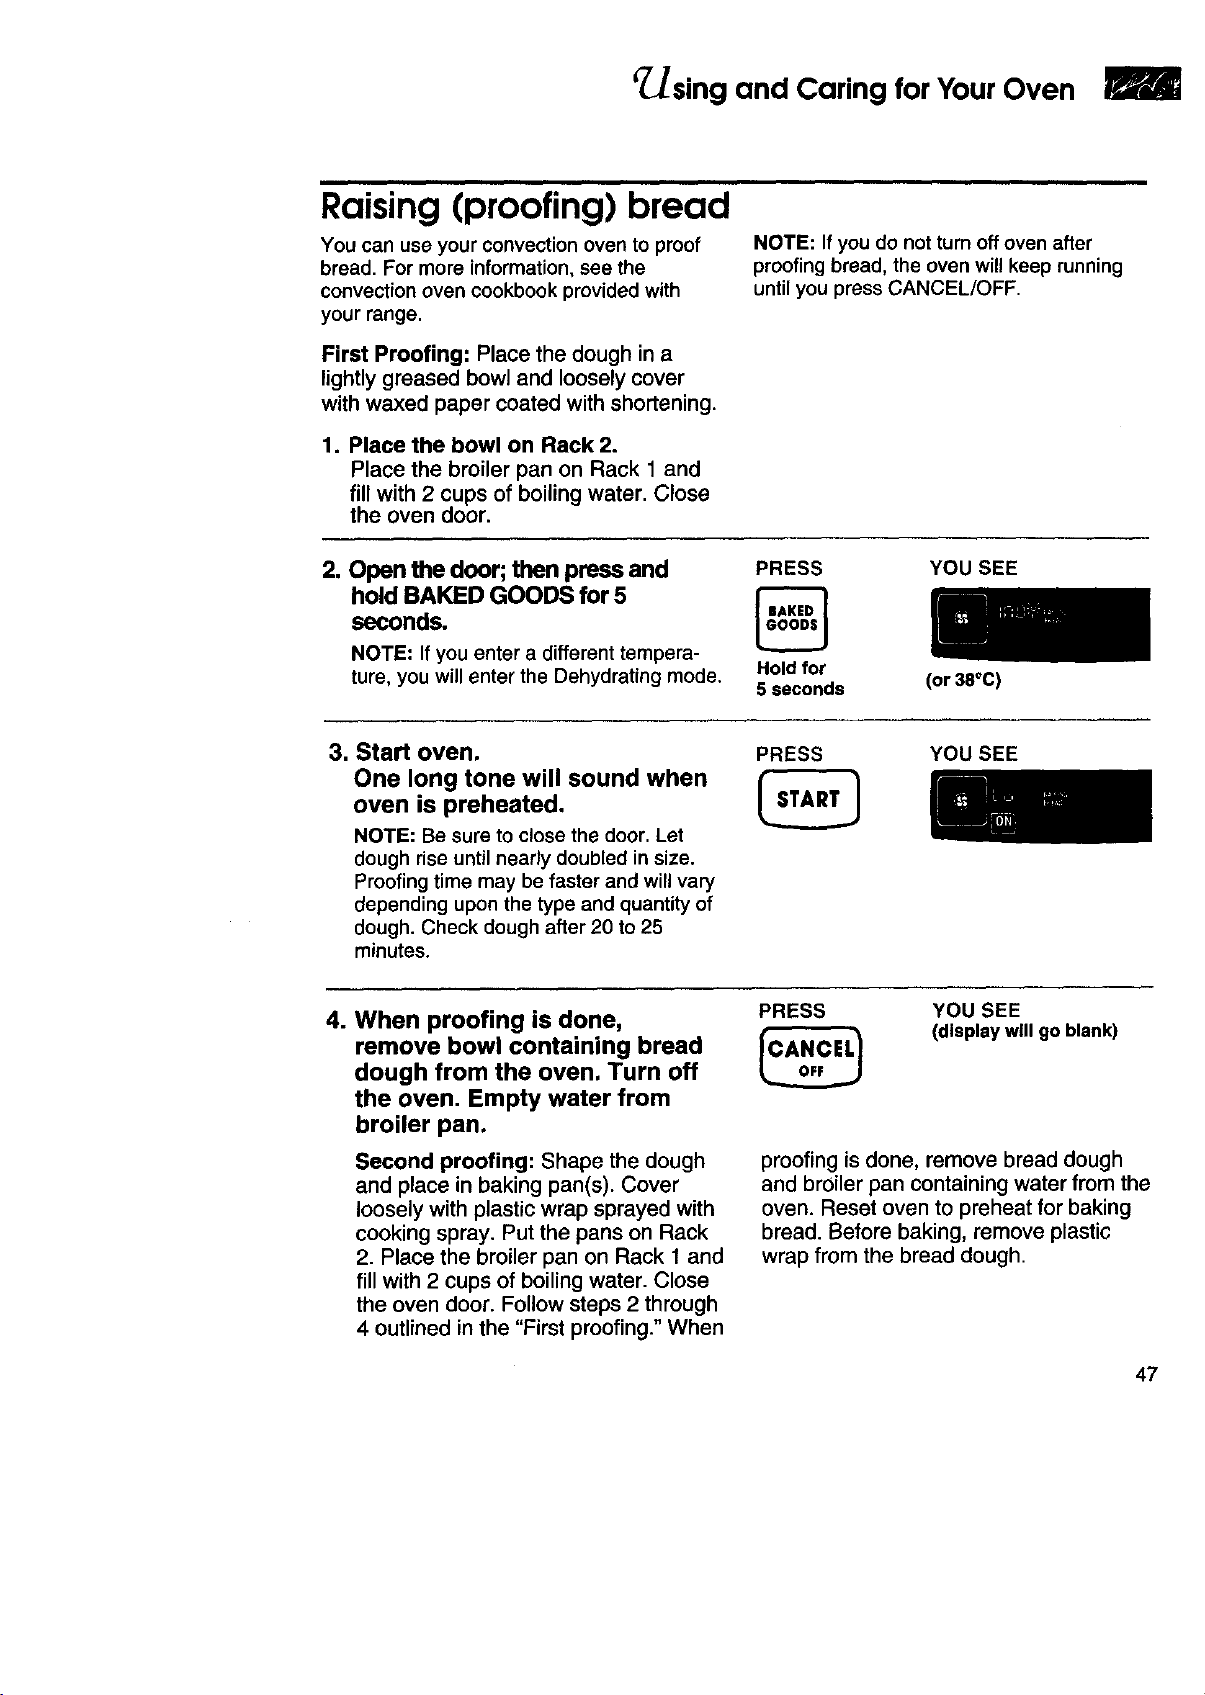
Raising (proofing) bread
You can use your convection oven to proof
bread. For more information, see the
convection oven cookbook provided with
your range.
First Proofing: Place the dough in a
lightly greased bowl and loosely cover
with waxed paper coated with shortening.
1. Place the bowl on Rack 2.
Place the broiler pan on Rack 1 and
fill with 2 cups of boiling water. Close
the oven door.
NOTE: If you do not turn offoven after
proofing bread, the oven will keep running
until you press CANCEL/OFF.
2. Open the door; then press and
hold BAKED GOODS for 5
seconds.
NOTE: If you enter a different tempera-
ture, you will enter the Dehydrating mode.
PRESS
Hold for
5 seconds
YOU SEE
(or38°C)
3. Start oven.
One long tone will sound when
oven is preheated.
NOTE: Be sure to close the door, Let
dough rise until nearly doubled in size.
Proofing time may be faster and will vary
depending upon the type and quantity of
dough. Check dough after 20 to 25
minutes.
PRESS YOU SEE
4. When proofing is done,
remove bowl containing bread
dough from the oven, Turn off
the oven. Empty water from
broiler pan.
Second proofing: Shape the dough
and place in baking pan(s). Cover
loosely with plastic wrap sprayed with
cooking spray. Put the pans on Rack
2. Place the broiler pan on Rack 1 and
fill with 2 cups of boiling water. Close
the oven door. Follow steps 2 through
4 outlined in the "First proofing." When
PRESS YOU SEE
(display will go blank)
proofing is done, remove bread dough
and broiler pan containing water from the
oven. Reset oven to preheat for baking
bread. Before baking, remove plastic
wrap from the bread dough.
47
B
r sing and Caring for Your Oven
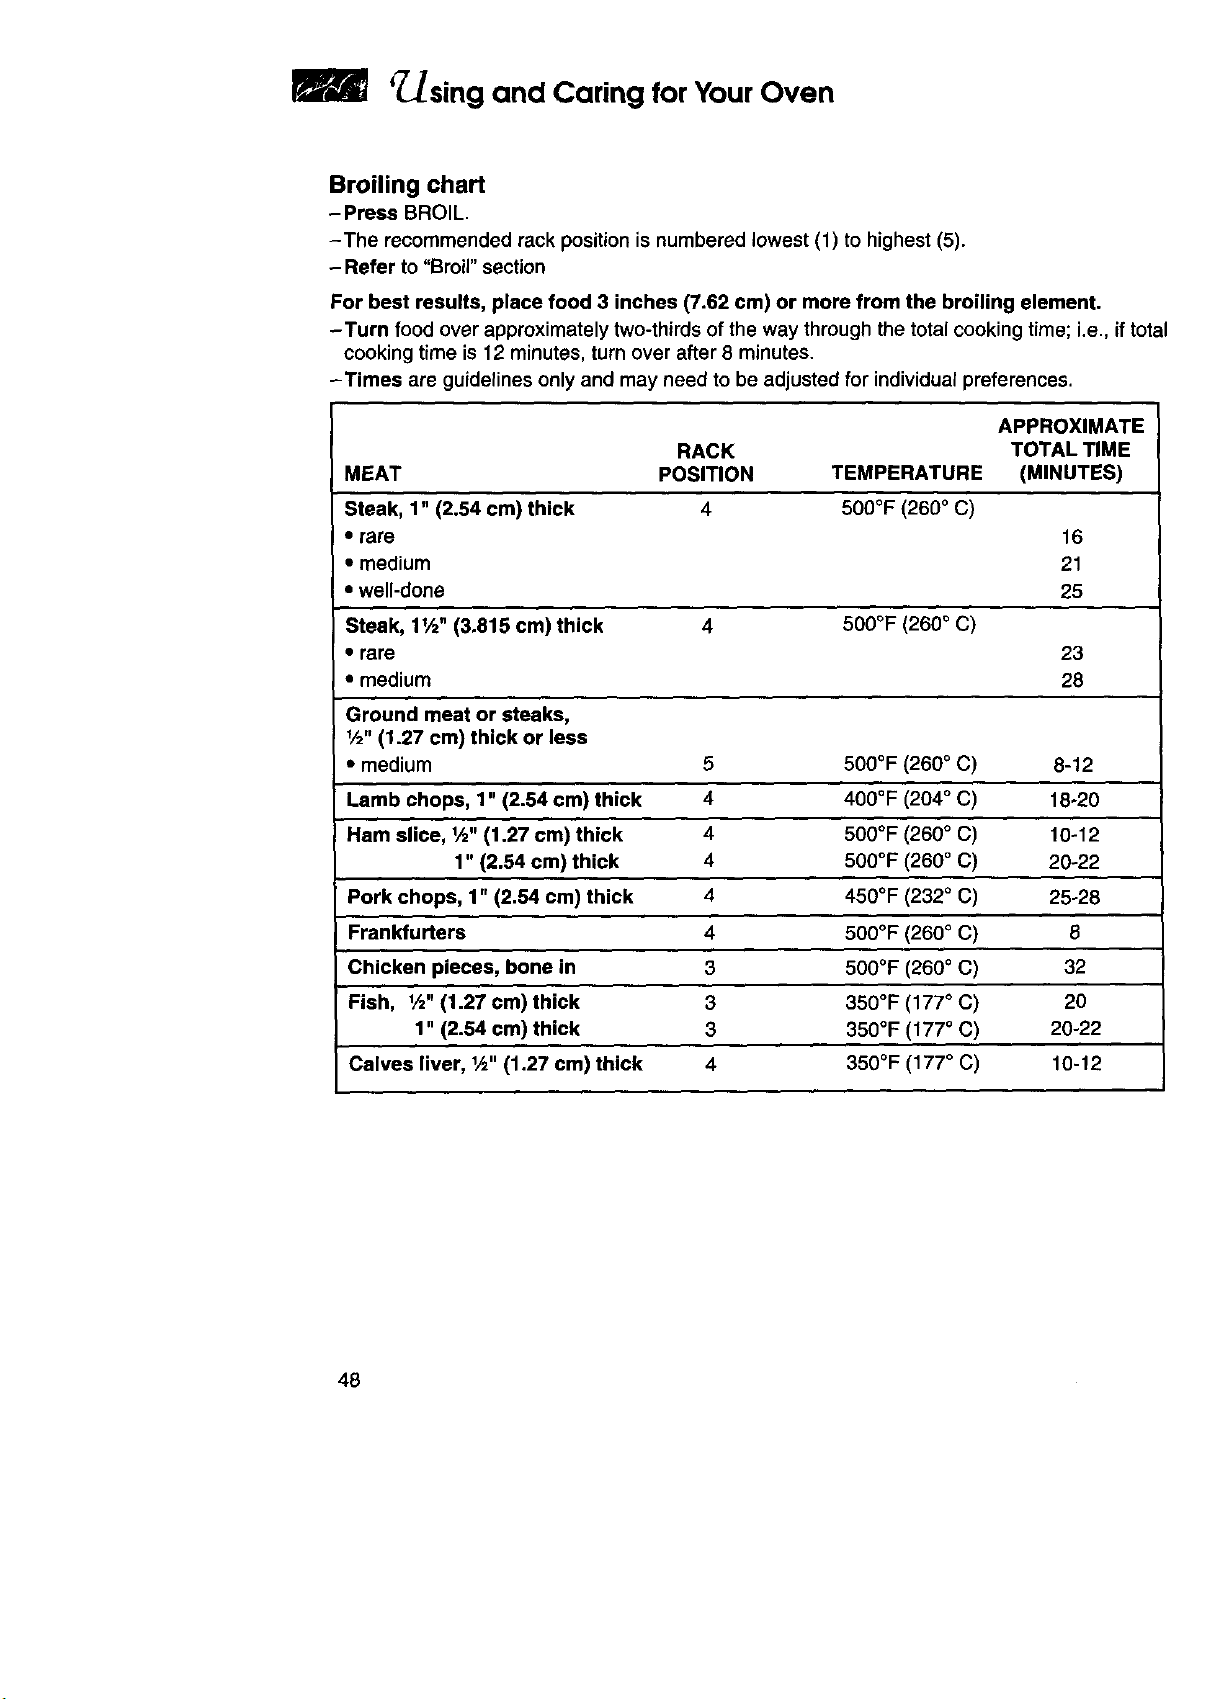
Broiling chart
- Press BROIL.
-The recommended rack position is numbered lowest (1) to highest (5).
-Refer to "Broil" section
For best results, place food 3 inches (7.62 cm) or more from the broiling element.
-Turn food over approximately two-thirds of the way through the total cooking time; i.e., if total
cooking time is 12 minutes, turn over after 8 minutes.
-Times are guidelines only and may need to be adjusted for individual preferences.
APPROXIMATE
RACK TOTAL TIME
MEAT POSITION TEMPERATURE (MINUTES)
Steak, 1" (2.54 cm) thick 4 500°F (260 ° C)
• rare 16
• medium 21
• well-done 25
Steak, 1',_" (3.815 cm) thick 4 500°F (260° C)
• rare 23
• medium 28
Ground meat or steaks,
1/2"(1.27 cm) thick or less
• medium 5 500°F (260 ° C) 8-12
Lamb chops, 1" (2.54 cm) thick 4 400°F (204 ° C) 18-20
Ham slice, 1,._,,(1.27 cm) thick 4 500°F (260 ° C) 10-12
1" (2.54 cm) thick 4 500°F (260 ° C) 20-22
Pork chops, 1" (2.54 cm) thick 4 450°F (232° C) 25°28
Frankfurters 4 500°F (260° C) 8
Chicken pieces, bone in 3 500°F (260 ° C) 32
Fish, 1/="(1.27 cm) thick 3 350°F (177° C) 20
1" (2.64 cm) thick 3 350°F (177 ° C) 20-22
Calves liver, 1/2"(1.27 cm) thick 4 350°F (177 ° C) 10-12
48
Using and Caring for Your Oven U
Cleaning your oven and controls
Explosion Hazard
Do not store flammable materials such as gasoline near
this appliance.
Doing so can result in death, explosion, or fire.
PART WHAT TO USE HOW TO CLEAN
Control knobs
Sponge and warm,
soapy water
• Turn knobs to OFF and pull straight away
from control panel.
• Wash, rinse, and dry thoroughly. Do
not soak.
• Do not use steel wool or abrasive
cleansers. They may damage the finish
of the knobs.
• Replace knobs. Make sure all knobs
point to OFF.
Control panel
Sponge and warm,
soapy water
OR
Paper towel and
spray glass cleaner
• Wash, wipe with clean water, and dry
thoroughly.
• Do not use steel wool or abrasive
cleansers. They may damage the finish.
• Do not spray cleaner directly on panel.
Apply cleaner to paper towel.
NOTE: Make sure you have not turned the
oven on when cleaning panel. Ifyou have,
press the Cancel/Off pad.
Exterior surfaces
(other than
ceramic cooktop
and control panel)
Sponge and warm,
soapy water
• Wash, wipe with clean water, and dry
thoroughly.
• Use nonabrasive, plastic scrubbing pad on
heavily soiled areas.
• Do not use abrasive or harsh cleansers.
They may damage the finish.
Broiler pan and Steel-wool pad and • Wash, rinse, and dry thoroughly.
grid (clean after warm, soapy water • Do not clean the pan and grid in the
each use) Self-Cleaning cycle.
49
m
Using and Caring for Your Oven
PART WHAT TO USE HOW TO CLEAN
Oven racks Steel-wool pad and • Wash, rinse, and dry thoroughly.
warm, soapy water
OR OR
The Self-Cleaning
cycle
Oven door glass
Oven cavity
Paper towel and spray
glass cleaner
OR
Warm, soapy water
and a nonabrasive,
plastic scrubbing pad
Self-Cleaning cycle
• Leave in oven during Self-Cleaning cycle.
NOTE: Racks willpermanently discolor and
become harder to slide if left in oven during
the Self-Cleaning cycle, Apply a small
amount of vegetable oil tothe side rungs
to aid sliding.
• Make sure oven is cool.
• Follow directions provided with the
cleaner,
• Wash, wipe with clean water, and dry
thoroughly.
• Wipe up food spills containing sugar as
soon as possible after the oven cools down.
(See the =Using the Self-Cleaning Cycle"
section.)
Cleaning Stainless Steel Surfaces (door, drawer front, and back console
on some models)
• Do not use steel wool or soap-filled scouring pads.
• Rub in the direction of the grain line to avoid marring the surface.
• Always wipe dry to avoid water marks.
• If commemial cleaners are used, follow label directions. If product contains chlorine
(bleach), rinse thoroughly and dry with a soft, lint-free cloth. Chlorine is a corrosive
substance.
CLEANING AGENT HOW TO USE
Routine cleaning Uquid detergent soap and Wipe with clamp cloth or sponge.
and fingerprints water,all-purpose cleaner then rinse with clean water and
wipe dry.
Stubborn stains Mild abrasive cleanser or Rub in the direction of grain lines
and baked-on stainless steel cleaners with a damp cloth or sponge and
residue cleaner. Rinse thoroughly,Repeat
ifnecessary.
Hard water spots Vinegar Swab or wipe with cloth. Rinse
with water and dry.
5O
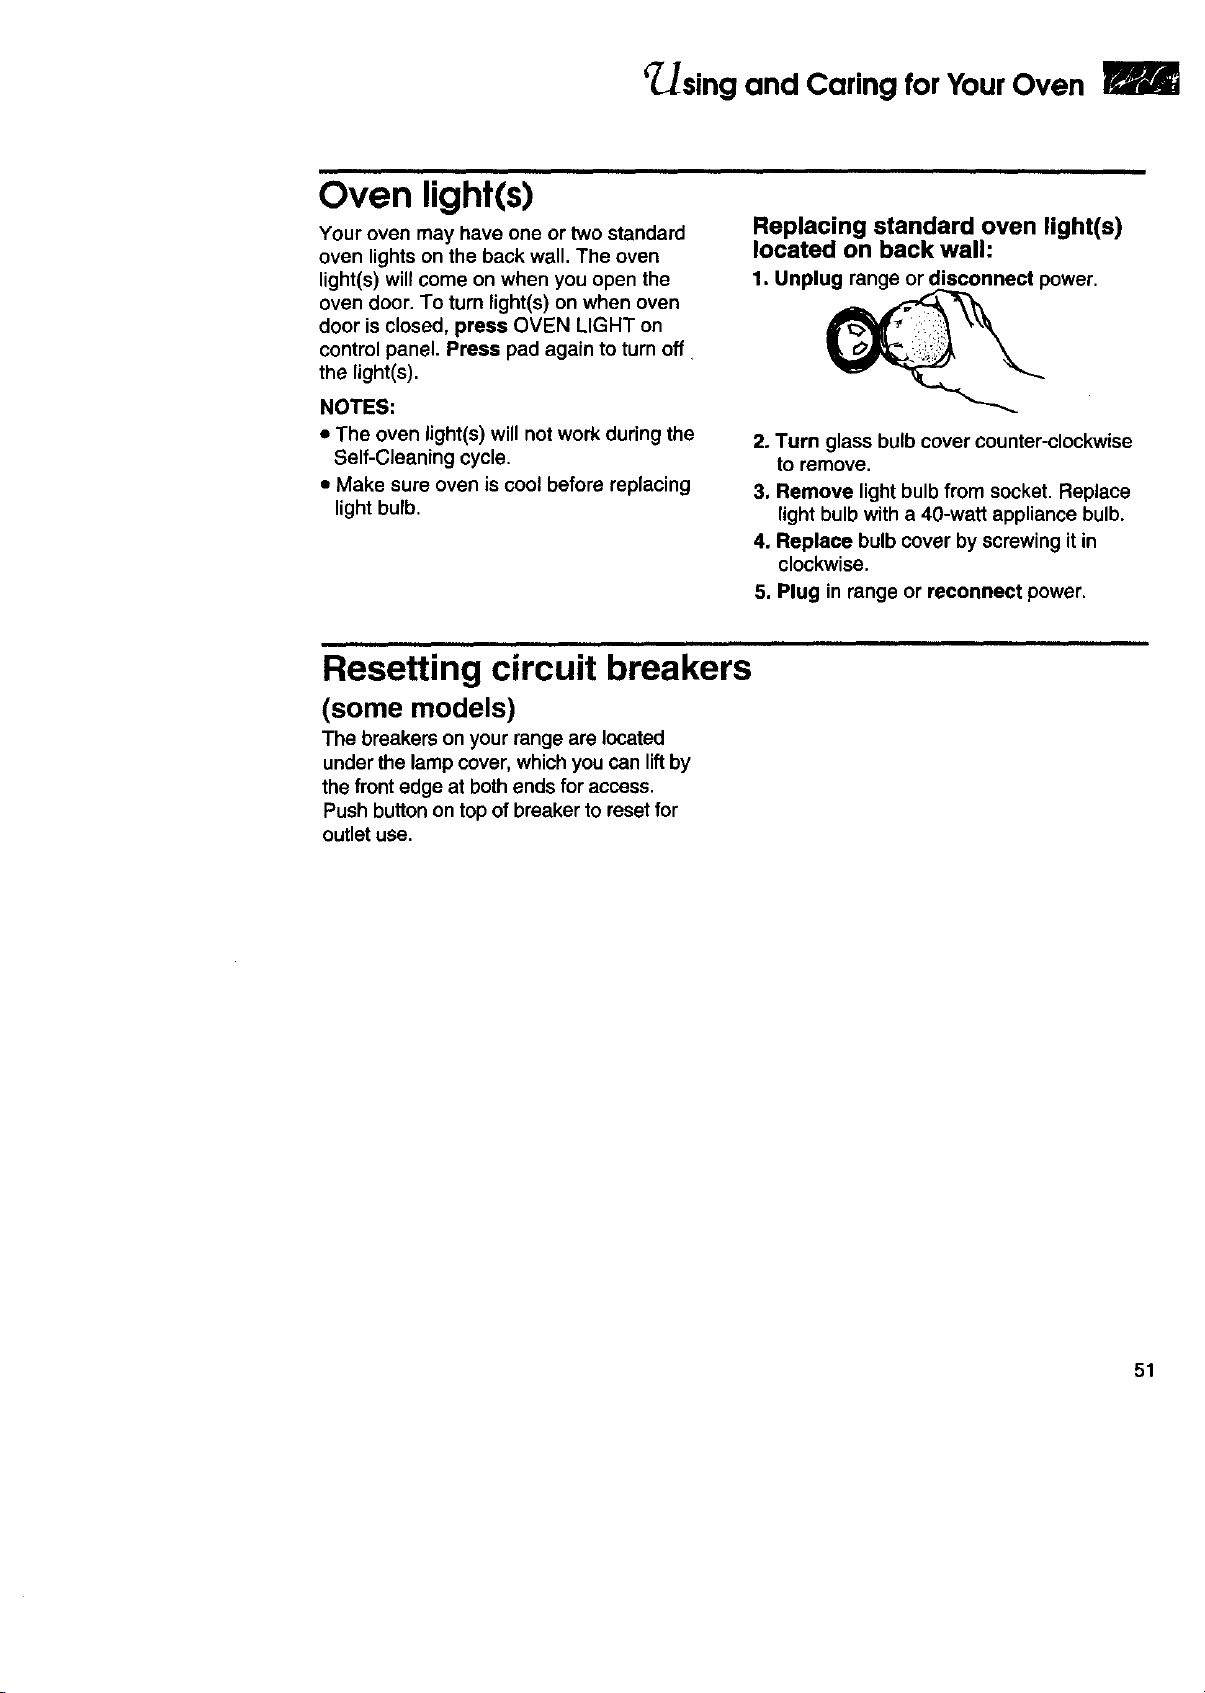
Using and Caring for Your Oven
Oven light(s)
Your oven may have one or two standard
oven lights on the back wall. The oven
light(s) will come on when you open the
oven door. To turn light(s) on when oven
door is closed, press OVEN LIGHT on
control panel. Press pad again to turn off
the light(s).
NOTES:
• The oven light(s) will not work during the
Self-Cleaning cycle.
• Make sure oven is cool before replacing
light bulb.
Replacing standard oven light(s)
located on back wall:
1. Unplug range or disconnect power.
2. Turn glass bulb cover counter-clockwise
to remove.
3, Remove light bulb from socket. Replace
light bulb with a 40-watt appliance bulb.
4. Replace bulb cover by screwing itin
clockwise.
5. Plug in range or reconnect power.
Resetting circuit breakers
(some models)
The breakers on your range are located
under the lamp cover, whichyou can liftby
the frontedge at bothends for access,
Push button on top of breaker to reset for
outletuse.
51
sing the Self-Cleaning Cycl
Burn Hazard
DOnot touch the oven during the Self-Cleaning cycle.
Keep children away from oven during Self-Cleaning cycle.
Do not use commercial oven cleaners in your oven.
Failure to follow these instructions can result in burns,
or illness from inhaling dangerous fumes.
Before you start
DO NOT
hand-clean
gasket
Hand-clean
Hand-clean door
Before you start the Self-Cleaning cycle,
make sure you:
NOTE: DO NOT clean, move, or bend
the gasket. Poor cleaning, baking, and
roasting may result.
• Hand-clean the areas shown. They
do not get hot enough during the Self-
Cleaning cycle for soilto burn away.
Use hot water and detergent or a soapy,
steel-wool pad for cleaning,
• Do not let water, cleaner, etc., enter slots
on door and frame.
• Remove the broiler pan and grid and
anything else being stored in the oven.
• Wipe out any loose soil or grease. This
will help reduce smoke during the
Self-Cleaning cycle.
• Wipe up food spills containing sugar
and/or milk as soon as possible after the
oven cools down. When sugar is heated to
a high temperature in the Self-Cleaning
cycle, the high temperature can cause the
sugar to burn and react with the porcelain.
This can cause staining, etching, pitting, o
faint white spots.
• Remove the oven racks from the oven if
you want them to remain shiny. You can
clean racks in the Self-Cleaning cycle, bul
they will discolor and become harder to
slide. Ifyou clean racksin the Self-Cleanin(
cycle, place them on the rack guides.
• Heat and odors are normal during the
Self-Cleaning cycle. Keep the kitchen
well-ventilated by opening a window or
by turning on a vent hood or other kitchen
vent during the cycle.
IMPORTANT: The health of some birds is
extremely sensitive to the fumes given off
during the Self-Cleaning cycle. Move birds
to another closed and well ventilated room.
NOTES:
• Keep the kitchen well ventilated during
the Self-Cleaning cycle to help get rid of
heat, odors and smoke.
• Clean the oven beforeit getsheavilysoiled.
Cleaning a very soiledoven takes longer
and resultsin more smoke than usual.
• Do not block the oven vent during the
Self-Cleaning cycle. Air must move freely
for best cleaning results.
• Do not leave plastic utensils on the
cooktop. They may melt.
• Remove any combustible items, such as
paper napkins, from the storage drawer.
This includes utensils with plastic handles
that can become overheated and melt.
• Do not leave any foil in oven during the
Self-Cleaning cycle. Foil could burn or
melt and damage the oven surface.
• The oven light will not work during the
Self-Cleaning cycle.
52
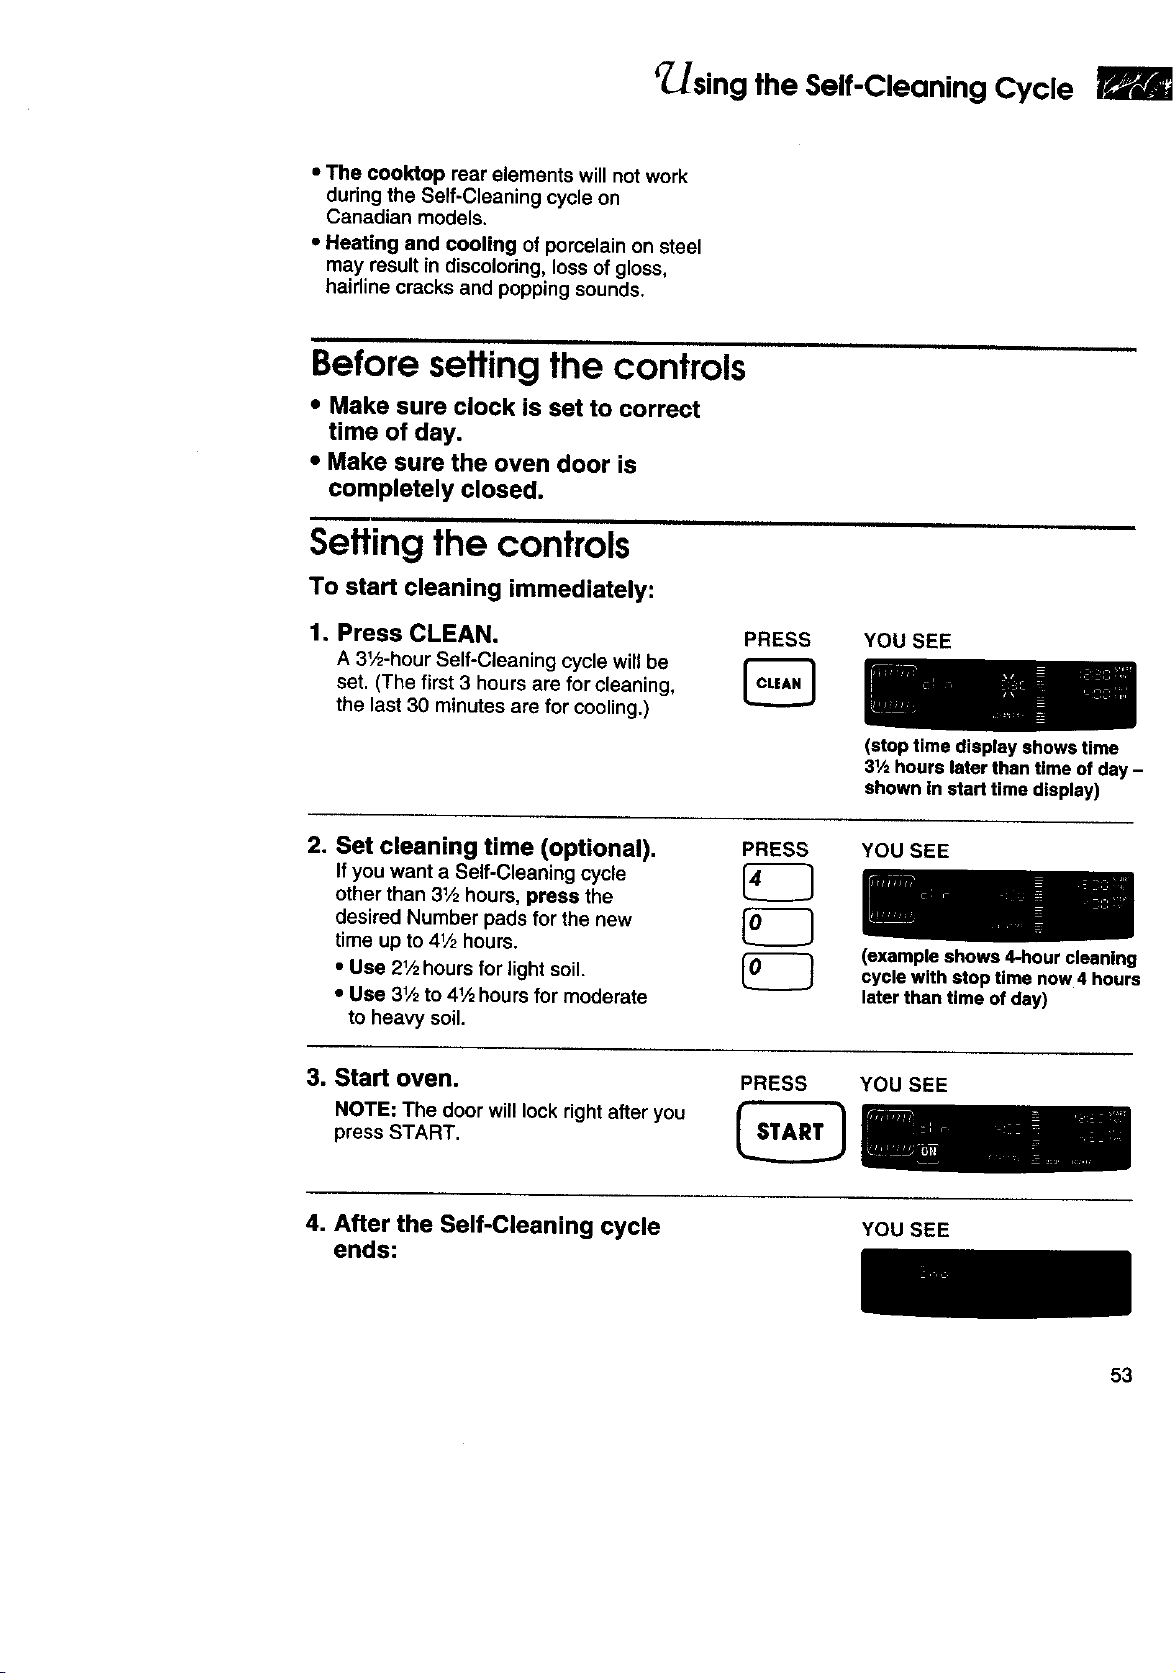
c/._sing the Self-Cleaning Cycle
• The cooktop rear elements will not work
during the Self-Cleaning cycle on
Canadian models.
• Heating and cooling of porcelain on steel
may result in discoloring, loss of gloss,
hairline cracks and popping sounds.
Before setting the controls
• Make sure clock is set to correct
time of day.
• Make sure the oven door is
completely closed.
Setting the controls
To start cleaning immediately:
1. Press CLEAN,
A 31_-hour Self-Cleaning cycle will be
set. (The first 3 hours are for cleaning,
the last 30 minutes are for cooling,)
PRESS YOU SEE
(stop time display shows time
31/=hours later than time of day -
shown in start time display)
2. Set cleaning time (optional).
If you want a Self-Cleaning cycle
other than 31/2hours, press the
desired Number pads for the new
time up to 4V2 hours.
• Use 21,_hours for light soil.
• Use 31/2to 41,_hours for moderate
to heavy soil.
PRESS YOU SEE
(example shows 4-hour cleaning
cycle with stop time now 4 hours
later than time of day)
3. Start oven.
NOTE: The door will lock right after you
press START.
PRESS YOU SEE
4. After the Self-Cleaning cycle
ends:
YOU SEE
53

fusing the Self-Cleaning Cycle
To delay cleaning start time:
1. Press CLEAN. PRESS
A 31.,_-hourSelf-Cleaning cycle will be
set. (The first 3 hours are for cleaning,
the last 30 minutes are for cooling.)
YOU SEE
(stop time display shows time
31/2hours later than time ofday -
shown In starttime display)
2. Set cleaning time (optional), PRESS
If you want a Self-Cleaning cycle
other than 31/2hours, press the
desired Number pads for the new
time up to 41,'_hours.
• Use 21,_hoursfor light soil. IO I
• Use 31/2to 41/2hours for moderate
to heavy soil.
YOU SEE
(example shows 4-hour
cleaning cycle with stop time
now 4 hours later than time
of day)
3. Press STOP TIME. PRESS YOU SEE
4. Set stop time.
Examplefor7:00:
PRESS YOU SEE
(display shows stop time of 7:00
and start time of 3:00 - stop time
minus cleaning time)
5. Complete entry.
NOTE: The door will lock right after you
press START.
PRESS YOU SEE
When the start time is reached:
YOU SEE
54
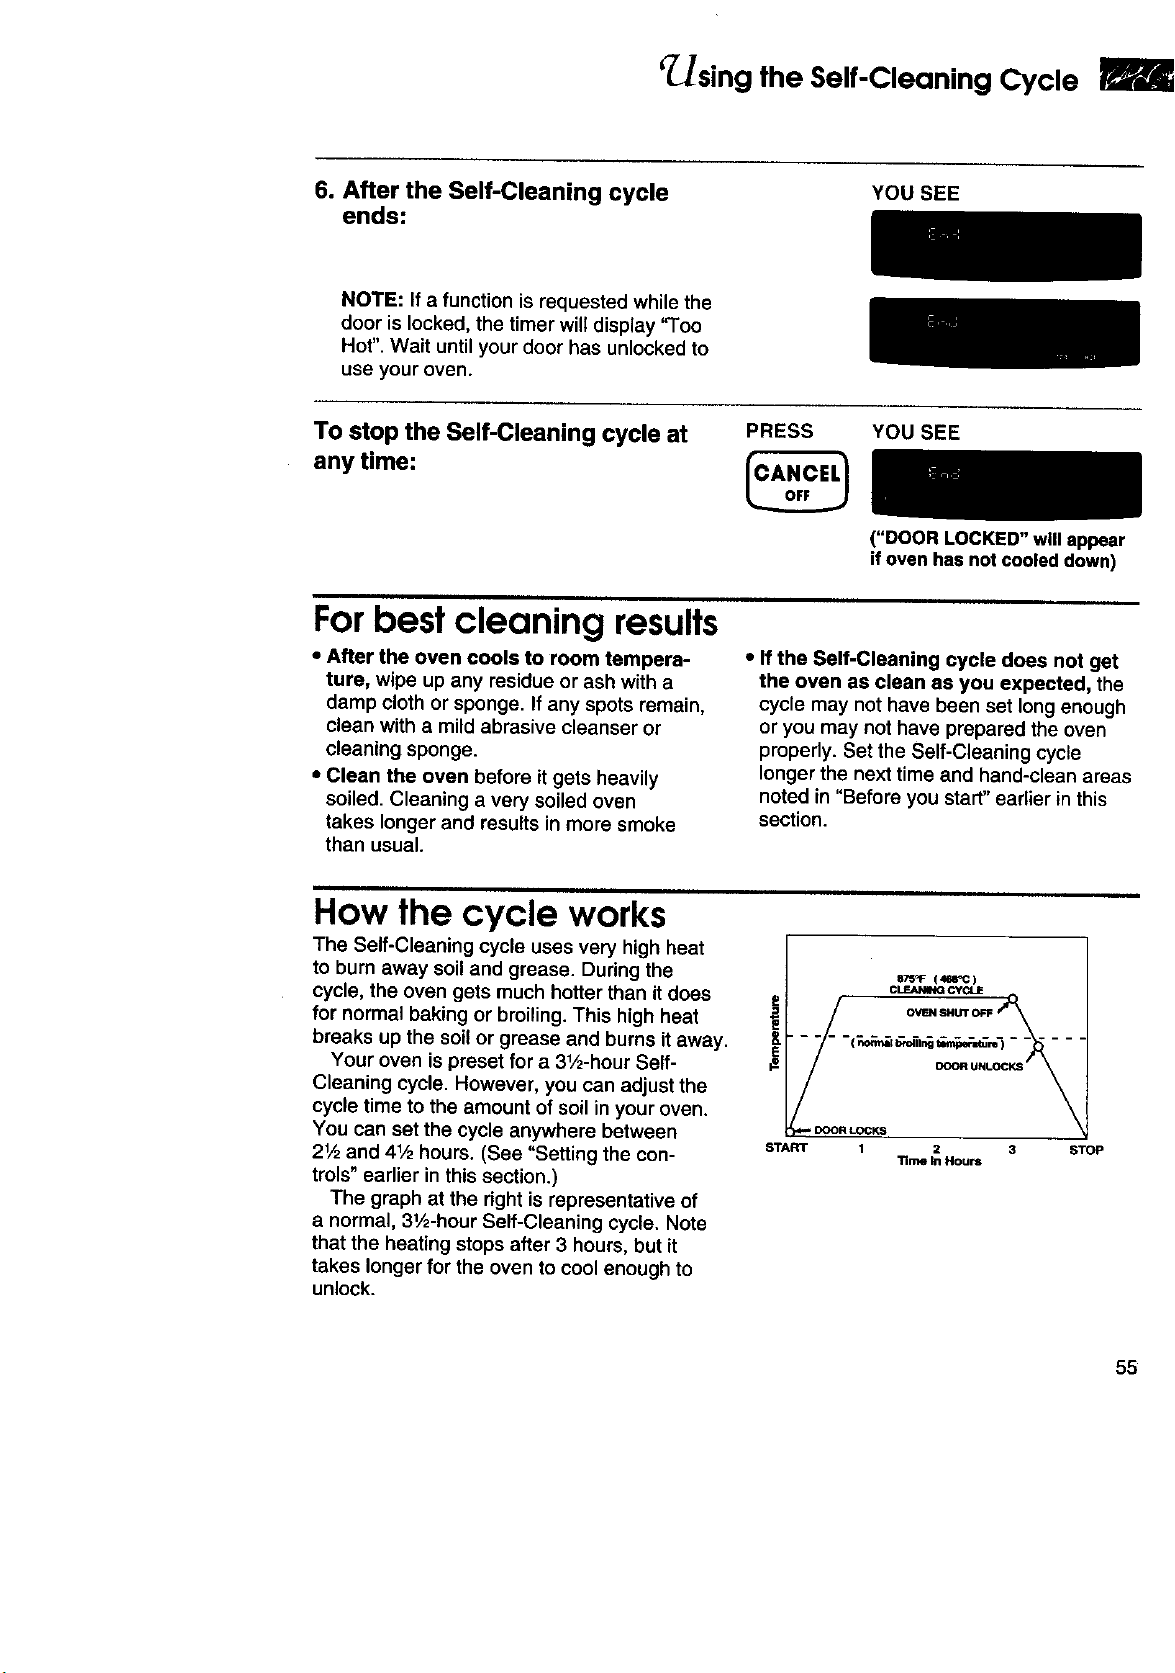
r sing the Self-Cleaning Cycle
6. After the Self-Cleaning cycle
ends:
YOU SEE
NOTE: If a function is requested while the
door is locked, the timer will display "Too
Hot". Wait until your door has unlocked to
use your oven.
To stop the Self-Cleaning cycle at
any time:
PRESS YOU SEE
("DOOR LOCKED" will appear
if oven has not cooled down)
For best cleaning results
• After the oven cools to room tempera-
ture, wipe up any residue or ash with a
damp cloth or sponge. If any spots remain,
clean with a mild abrasive cleanser or
cleaning sponge.
• Clean the oven before it gets heavily
soiled. Cleaning a very soiled oven
takes longer and results in more smoke
than usual.
• If the Self-Cleaning cycle does not get
the oven as clean as you expected, the
cycle may not have been set long enough
or you may not have prepared the oven
properly. Set the Self-Cleaning cycle
longer the next time and hand-clean areas
noted in "Before you start"earlier in this
section.
How the cycle works
The Self-Cleaning cycle uses very high heat
to bum away soil and grease. During the
cycle, the oven gets much hotter than it does
for normal baking or broiling. This high heat
breaks up the soilor grease and burns it away.
Your oven is preset for a 31/2-hour Self-
Cleaning cycle. However, you can adjust the
cycle time to the amount of soil in your oven.
You can set the cycle anywhere between
2V2and 4V2hours. (See "Setting the con-
trols" earlier in this section.)
The graph at the right is representative of
a normal, 31/2-hour Self-Cleaning cycle. Note
that the heating stops after 3 hours, but it
takes longer for the oven to cool enough to
unlock.
S75_F ( 48rC )
CLF.N_NQ C'_CUE
- - -<T_,_oIT._,,,_;.,-) .....
_. DOOR UNL
• DOOR LOCKS
START 1 2 3 STOP
Time In Hours
55
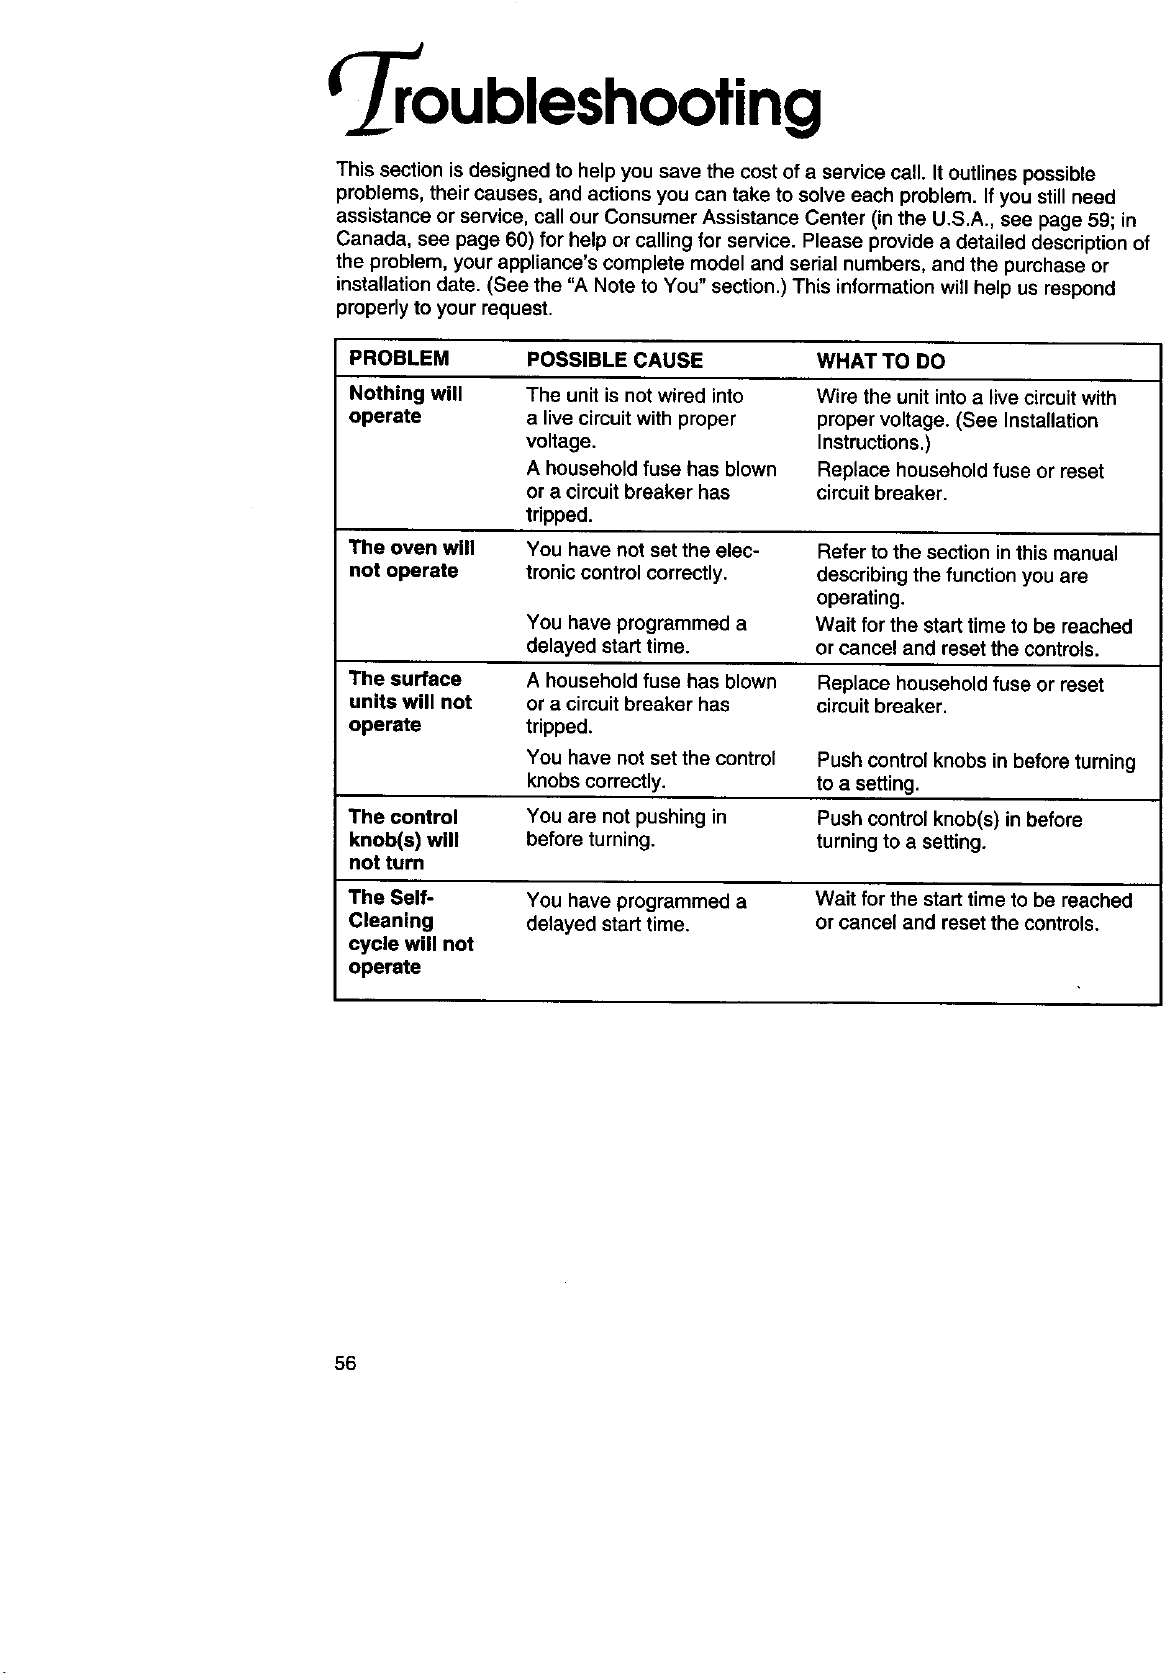
'oubleshooting
This section isdesigned to help you save the cost of a service call. It outlines possible
problems, their causes, and actions you can take to solve each problem. If you still need
assistance or service, call our Consumer Assistance Center (in the U.S.A., see page 59; in
Canada, see page 60) for help or calling for service. Please provide a detailed description of
the problem, your appliance's complete model and serial numbers, and the purchase or
installation date. (See the "A Note to You" section.) This information will help us respond
properly to your request.
PROBLEM
Nothing will
operate
The oven will
not operate
The surface
units will not
operate
POSSIBLE CAUSE
WHAT TO DO
The unit is not wired into
a live circuit with proper
voltage.
A household fuse has blown
or a circuit breaker has
tripped.
You have not set the elec-
tronic control correctly.
Wire the unit into a live circuit with
proper voltage. (See Installation
Instructions.)
Replace household fuse or reset
circuit breaker.
Refer to the section in this manual
describing the function you are
operating.
Wait for the start time to be reached
or cancel and reset the controls.
You have programmed a
delayed start time.
A household fuse has blown
or a circuit breaker has
tripped.
You have not set the control Push control knobs in before turning
knobs correctly, to a setting.
The control You are not pushing in Push control knob(s) in before
knob(s) will before turning, turning to a setting.
not turn
The Self- You have programmed a Wait for the start time to be reached
Cleaning delayed start time. or cancel and reset the controls.
cycle will not
operate
Replace household fuse or reset
circuit breaker.
56
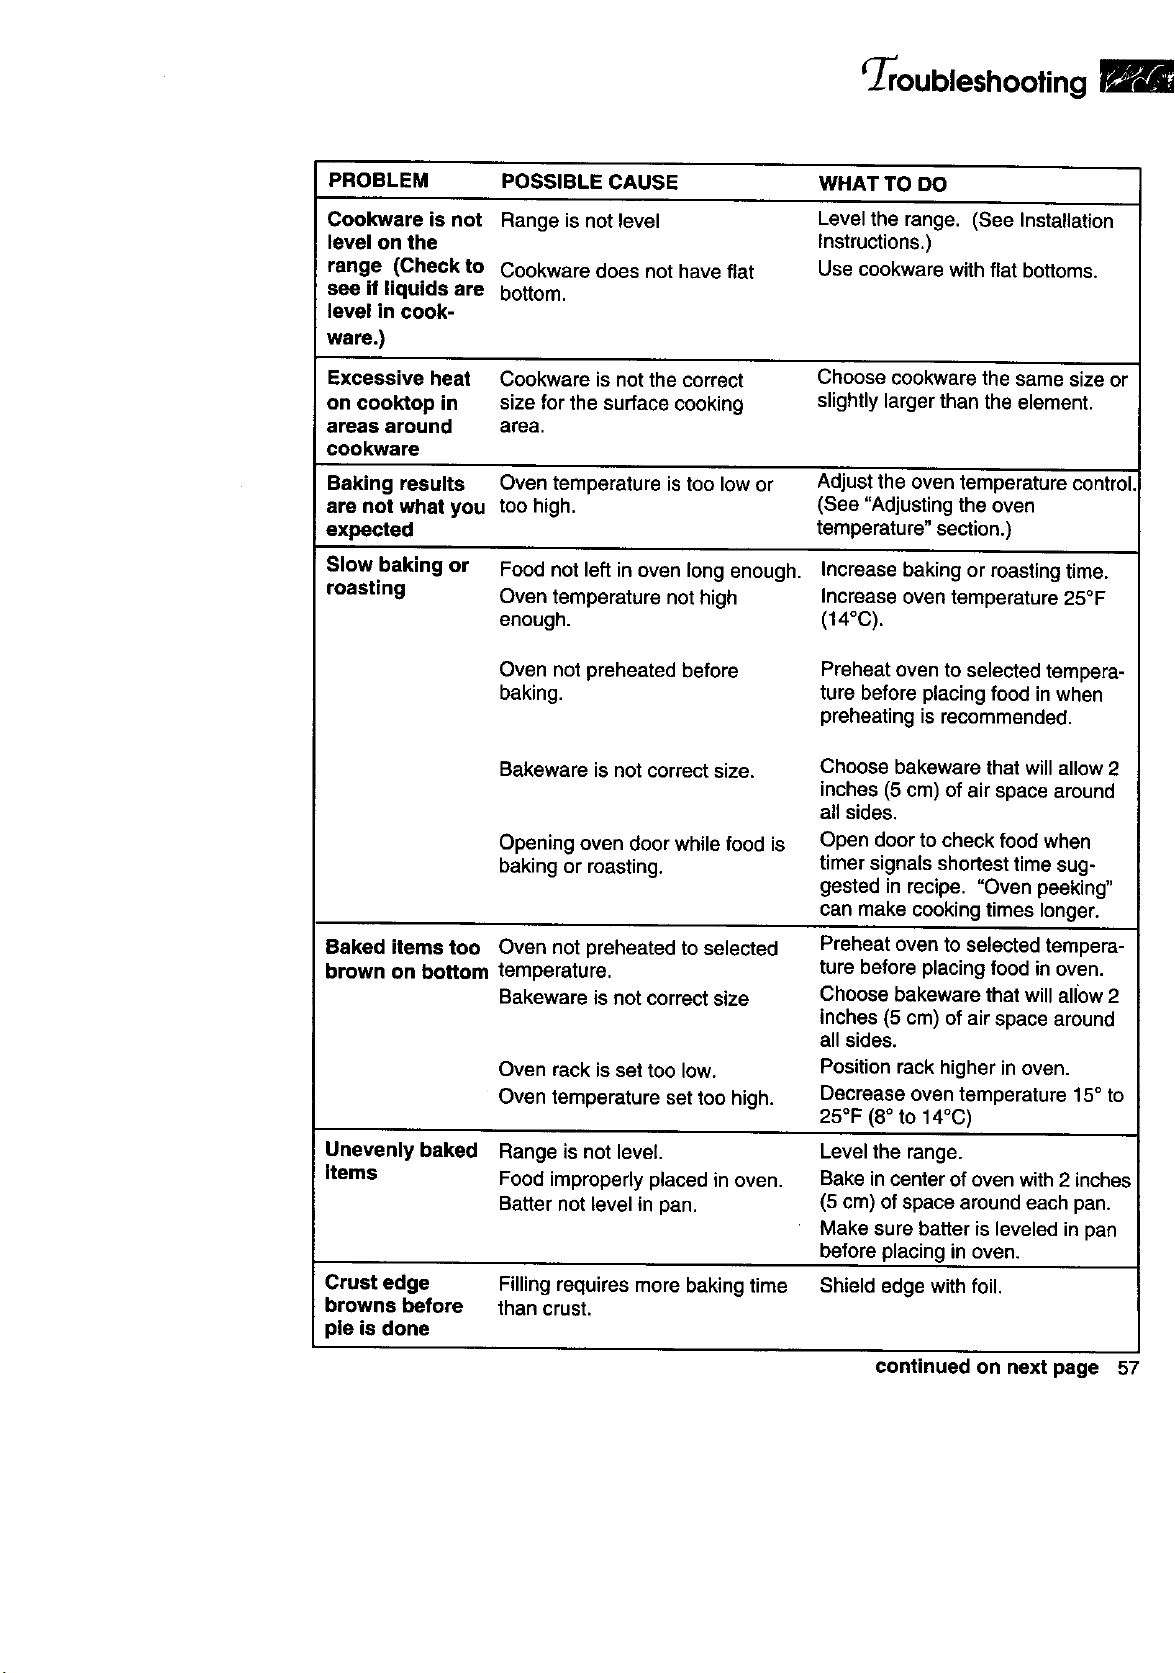
Troubleshooting
PROBLEM POSSIBLE CAUSE WHAT TO DO
Cookware is not Range is not level Level the range, (See Installation
level on the Instructions.)
range (Check to Cookware does not have flat Use cookware with flat bottoms.
see if liquids are bottom.
level in cook-
ware.)
Excessive heat Cookware is not the correct Choose cookware the same size or
on cooktop in size for the surface cooking slightly larger than the element.
areas around area.
cookware
Baking results Oven temperature istoo low or Adjust the oven temperature control,
are not what you too high. (See "Adjusting the oven
expected temperature" section.)
Slow baking or Food not left in oven long enough. Increase baking or roasting time.
roasting Oven temperature not high Increase oven temperature 25°F
enough. (t4°C).
Oven not preheated before
baking.
Preheat oven to selected tempera-
ture before placing food in when
preheating is recommended.
Bakeware is not correct size.
Choose bakeware that willallow 2
inches (5 cm) of air space around
all sides.
Opening oven door while food is
baking or roasting.
Open door to check food when
timer signals shortest time sug-
gested in recipe. "Oven peeking"
can make cooking times longer.
Baked items too
brown on bottom
Oven not preheated to selected
temperature.
Bakeware is not correct size
Preheat oven to selected tempera-
ture before placing food in oven.
Choose bakeware that will allow 2
inches (5 cm) of air space around
all sides.
Oven rack is set too low.
Oven temperature set too high.
Position rack higher in oven.
Decrease oven temperature 15° to
25°F (8° to 14°C)
Unevenly baked
items
Range is not level.
Food improperly placed in oven.
Batter not level in pan.
Level the range.
Bake in center of oven with2 inche_
(5 cm) of space around each pan.
Make sure batter is leveled in pan
before placing in oven.
Crust edge Filling requires more baking time Shield edge with foil.
browns before than crust.
pie is done
continued on next page 57
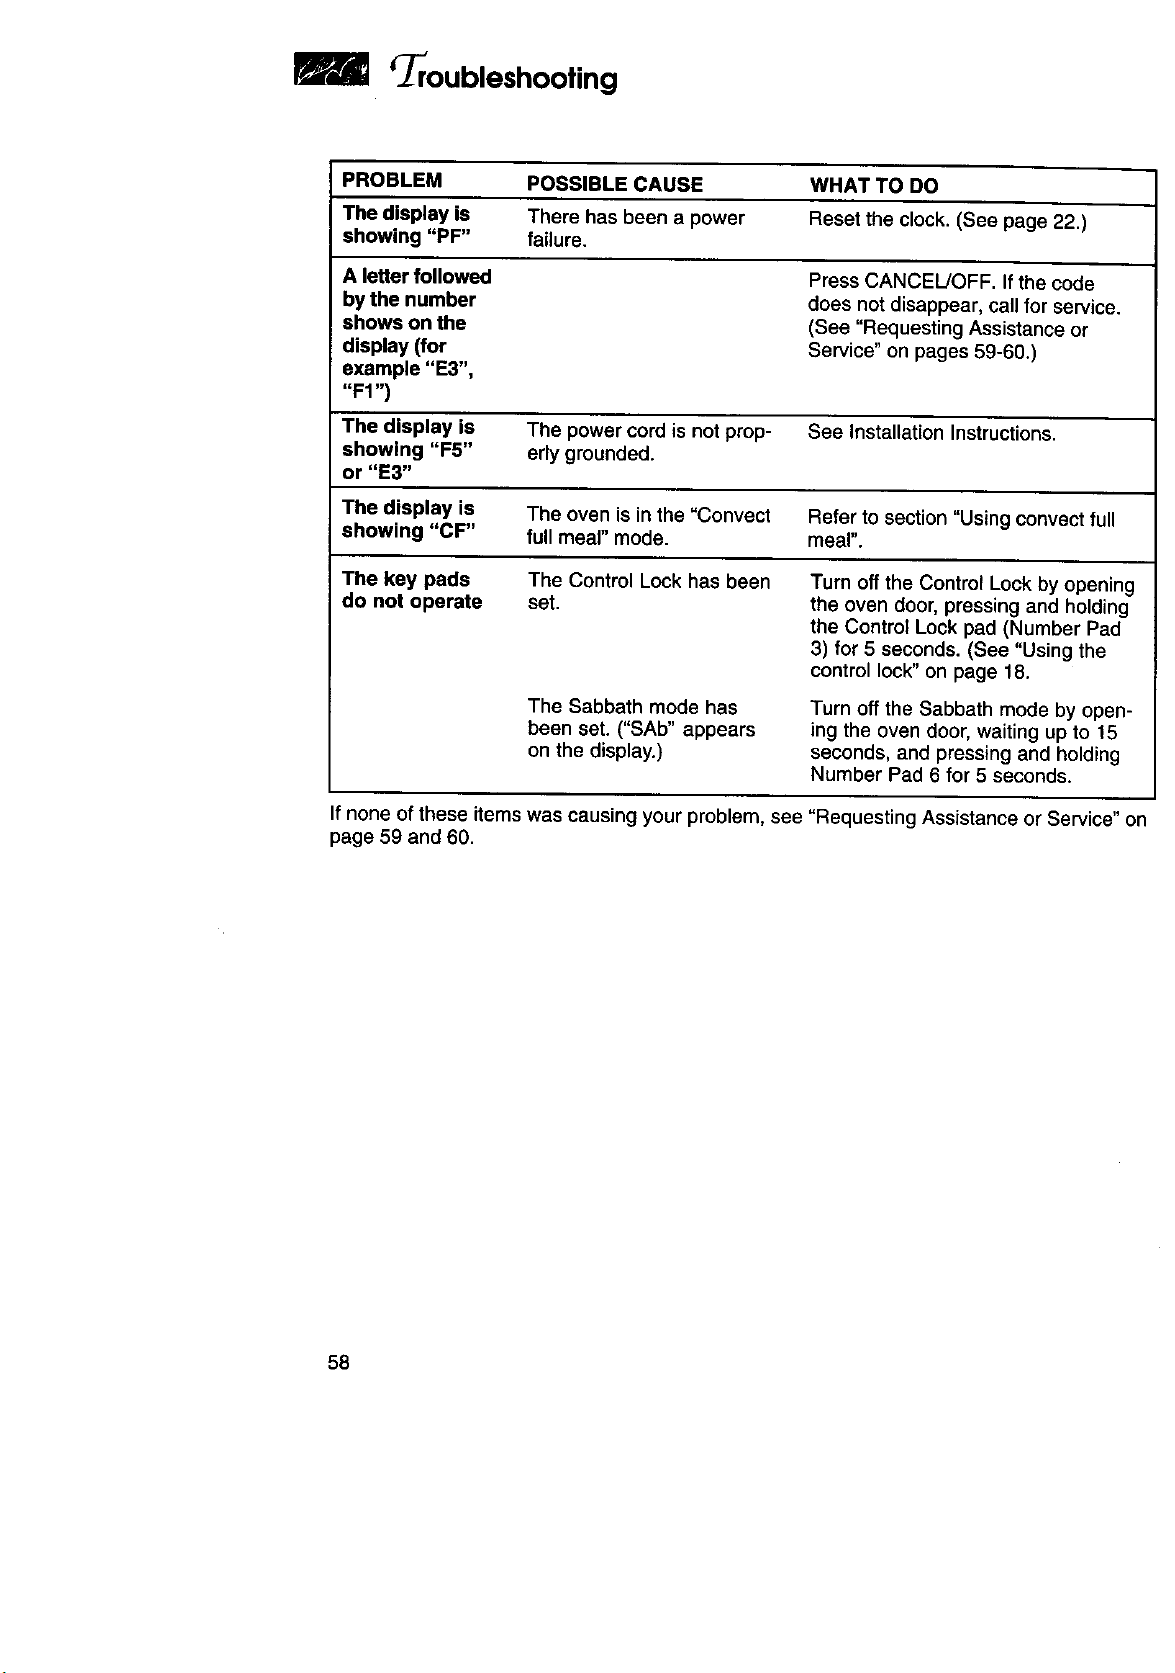
Troubleshooting
awr
PROBLEM POSSIBLE CAUSE WHAT TO DO
The display is There has been a power Reset the clock. (See page 22.)
showing "PF" failure.
A letter followed Press CANCEL/OFF. If the code
by the number does not disappear, call for service.
shows on the (See "Requesting Assistance or
display (for Service" on pages 59-60.)
example "E3",
"F1 ")
The display is The power cord is not prop- See Installation Instructions.
showing "F5" erly grounded.
or "E3"
The display is The oven is in the "Convect Refer to section "Using convect full
showing "CF" full meal" mode. meal".
The key pads The Control Lock has been Turn off the Control Lock by opening
do not operate set. the oven door, pressing and holding
the Control Lock pad (Number Pad
3) for 5 seconds. (See "Using the
control lock"on page 18.
The Sabbath mode has
been set. ("SAb" appears
on the display.)
Turn off the Sabbath mode by open-
ing the oven door, waiting up to 15
seconds, and pressing and holding
Number Pad 6 for 5 seconds.
If none of these items was causing your problem, see "Requesting Assistance or Service" on
page 59 and 60.
58
equesting Assistance or
Service
Before callingfor assistance or service, please check the "Troubleshooting Guide" section. It
may save you the cost of a service call. If you stillneed help, follow these instructions.
ffyou needassistance or service inthe U.S.A.:
Call the KltchenAid Consumer
_ ssistance Center toll
free: 1-800-422-1230.
Our consultants are
available to asslst you.
When calling:
Please know the purchase date, and the
complete model and serial number of your
appliance (see the "A Note to You" section).
This information will help us to better
respond to your request.
Our consultants provide assistance with:
• Features and specifications on our full line
of appliances.
• Installation information.
• Accessory and repair parts sales.
• Specialized customerassistance
(Spanish speaking, hearingimpaired,
limitedvision,etc.).
• Referrals to service companies and
repair parts distributors.
KitchenAid designated service
technicians are trained to fulfillthe
product warranty and provide after-
warranty service, anywhere in the
United States.
To locate the KitchenAid designated
service company in your area, you can
also look in your telephone directory
Yellow Pages.
If you need replacement parts
If you need to order replacement parts,
we recommend that you only use factory
specified parts. These parts will fit right
and work right,because they are made
with the same precision used to build
every new KITCHENAID _ appliance. To
locate factory specified replacement parts in
your area, call our Consumer Assistance
Center telephone number or your nearest
designated service center.
For further assistance
Ifyou need further assistance, you can write to Please include a daytime phone number
KitchenAidwith any questionsor concerns at: in your correspondence.
KitchenAid Brand Home Appliances
Consumer Assistance Center
c/o Correspondence Dept.
2000 North M-63
Benton Harbor, MI 49022-2692
59
_questing Assistance or Service
ffyou need assistance or service in Canada:
Call the KitchenAid Consumer
L_ ssistance Center toll free:
8:30 a,m, - 6 p.m. (EST) at
1-800-461-5681. Our consult-
ants are available to assist
you.
When calling:
Please know the purchase date, and the com-
plete modeland sedal number of your appliance
(seethe "ANote to You" section). This informa-
tion will help us to better respond to your request.
Our consultants provide assistance with:
• Featuresandspecificationsonourful!lineof
appliances.
• Accessory and repair parts sales.
• Specialized customer assistance
(French speaking, hearing impaired,
limited vision, etc.).
• Referrals to service companies and
repair parts distributors.
KitchenAid designated service
technicians are trained to fulfill the
product warranty and provide after-
warranty service, anywhere in Canada.
To locate the KitchenAid designated
service company in your area, you can
also look in your telephone directory
Yellow Pages.
If you need service:
Contact Inglis Limited Appliance Service from anywhere in Canada at 1-800-807-6777.
If you need replacement parts
If you need to order replacement parts,
we recommend that you only use factory
specified parts. These parts will fit right
and work right, because they are made
with the same precision used to build
every new KITCHENAIEP appliance. To
locate factory specified replacement parts
in your area, call our Consumer Assistance
Center telephone number or your nearest
designated service center.
For further assistance
If you need further assistance,you can write to Please include a daytime phone number
KitchenAid with any questions or concerns at: in your correspondence.
Consumer Relations Department
KitchenAid Canada
1901 Minnesota Court
Mississauga, Ontario L5N3A7
6O

Notes
61

Notes
62

Notes
63
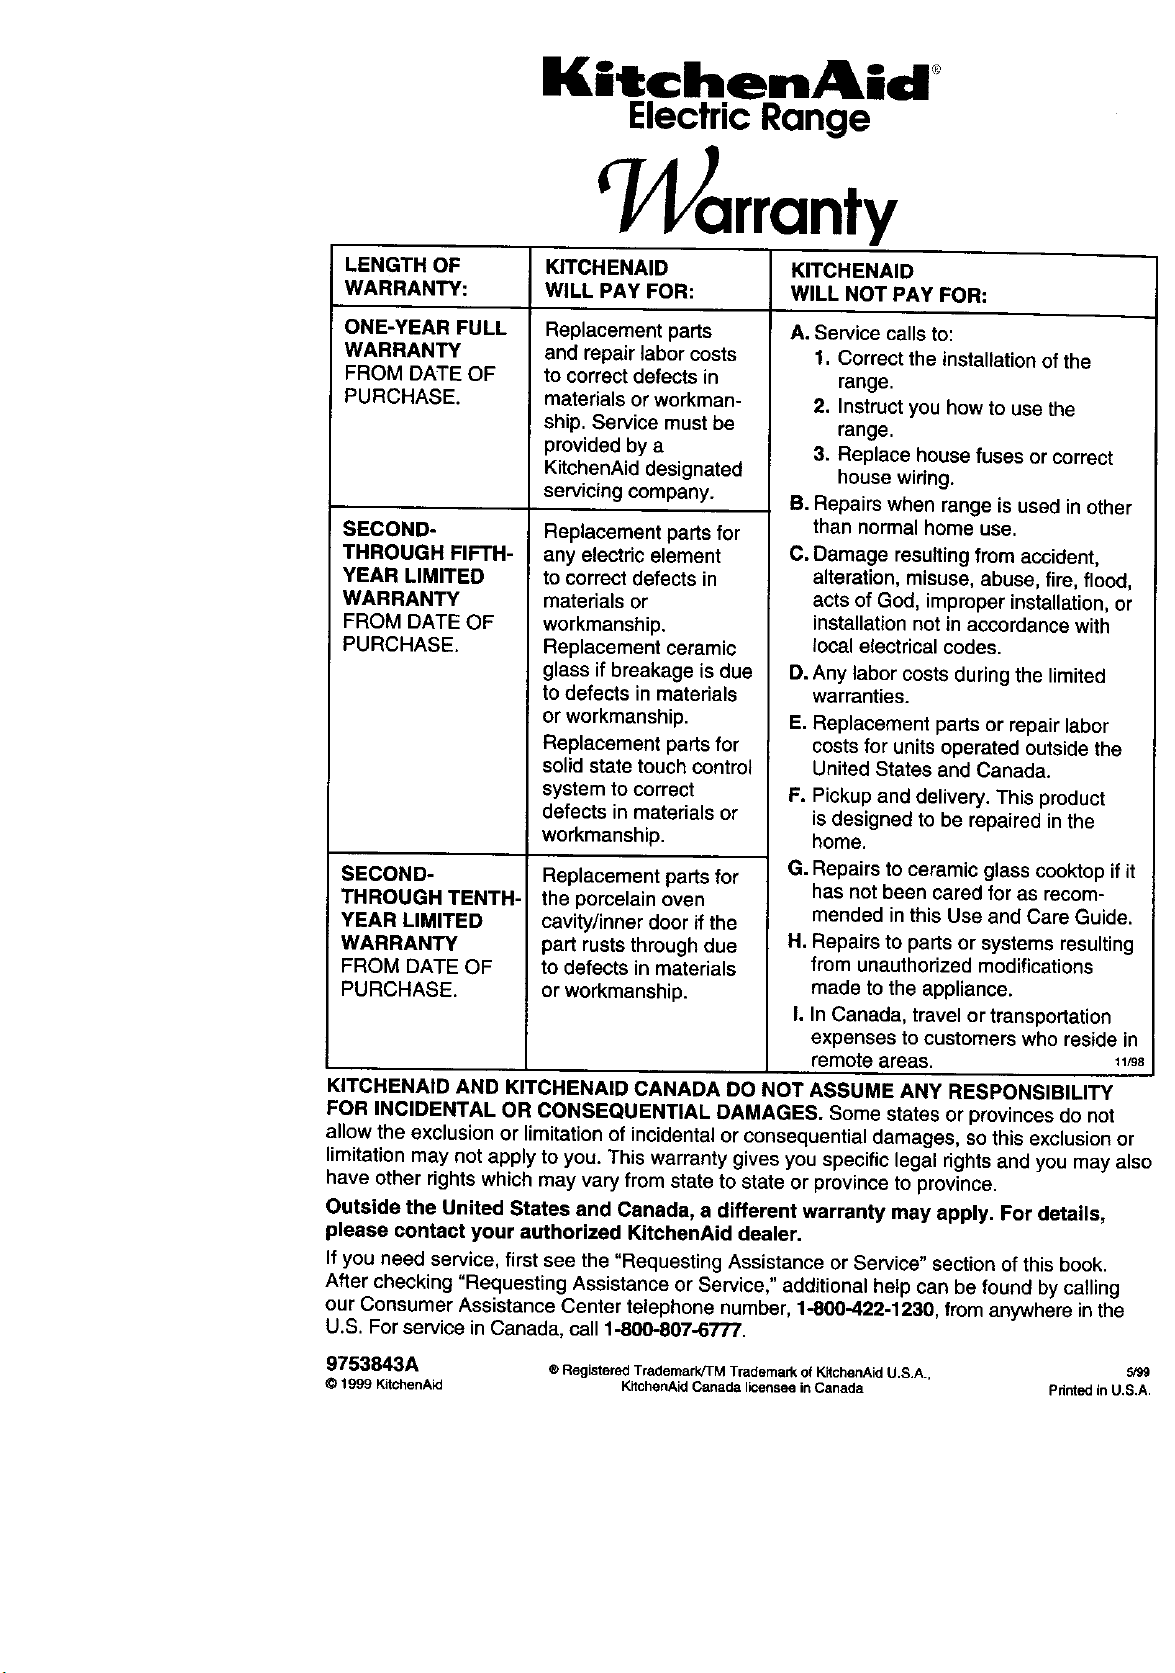
Kitchen kid
Electric Range
"Warranty
LENGTH OF KITCHENAID KITCHENAID
WARRANTY: WILL PAY FOR: WILL NOT PAY FOR:
ONE-YEAR FULL
WARRANTY
FROM DATE OF
PURCHASE.
SECOND-
THROUGH FIFTH-
YEAR LIMITED
WARRANTY
FROM DATE OF
PURCHASE.
SECOND-
THROUGH TENTH-
YEAR LIMITED
WARRANTY
FROM DATE OF
PURCHASE.
Replacement parts
and repair labor costs
to correct defects in
materials or workman-
ship. Service must be
provided by a
KitchenAid designated
servicing company.
Replacement parts for
any electric element
to correct defects in
materials or
workmanship.
Replacement ceramic
glass if breakage is due
to defects in materials
or workmanship.
Replacement parts for
solid state touch control
system to correct
defects in materials or
workmanship.
Replacement parts for
the porcelain oven
cavity/inner door if the
part rusts through due
to defects in materials
or workmanship.
A. Service calls to:
1. Correct the installation of the
range.
2. instruct you how to use the
range.
3. Replace house fuses or correct
house wiring.
B. Repairs when range is used in other
than normal home use.
C. Damage resulting from accident,
alteration, misuse, abuse, fire, flood,
acts of God, improper installation, or
installation not in accordance with
local electrical codes.
D. Any labor costs during the limited
warranties.
E. Replacement parts or repair labor
costs for units operated outside the
United States and Canada.
F. Pickup and delivery. This product
is designed to be repaired in the
home.
G. Repairs to ceramic glass cooktop if it
has not been cared for as recom-
mended in this Use and Care Guide.
H. Repairs to parts or systems resulting
from unauthorized modifications
made to the appliance.
I. in Canada, travel or transportation
expenses to customers who reside in
remote areas. 11,98
KITCHENAID AND KITCHENAID CANADA DO NOT ASSUME ANY RESPONSIBILITY
FOR INCIDENTAL OR CONSEQUENTIAL DAMAGES. Some states or provinces do not
allow the exclusion or limitation of incidental or consequential damages, so this exclusion or
limitation may not apply to you. This warranty gives you specific legal rights and you may ale(
have other rights which may vary from state to state or province to province.
Outside the United States and Canada, a different warranty may apply. For details,
please contact your authorized KitchenAid dealer.
If you need service, first see the "Requesting Assistance or Service" section of this book.
After checking "Requesting Assistance or Service," additional help can be found by calling
our Consumer Assistance Center telephone number, 1-800-422-1230, from anywhere inthe
U.S. For service in Canada, call 1-800-807.6777.
9753843A ® Registered TredemarkJTM Trademark of KitchenAid U,S.A., 5/99
© 1999 KitchenAid KItchenAid Canada licensee in Canada Printed in U.S.A