Loading ...
100mA
HD Digital
Signal Booster
ON/OFF
TV
UEI Technical Support Service
Suite 301, 26250 Euclid Ave.,
Euclid, OH 44132.
17411
711769
RDN-1120919
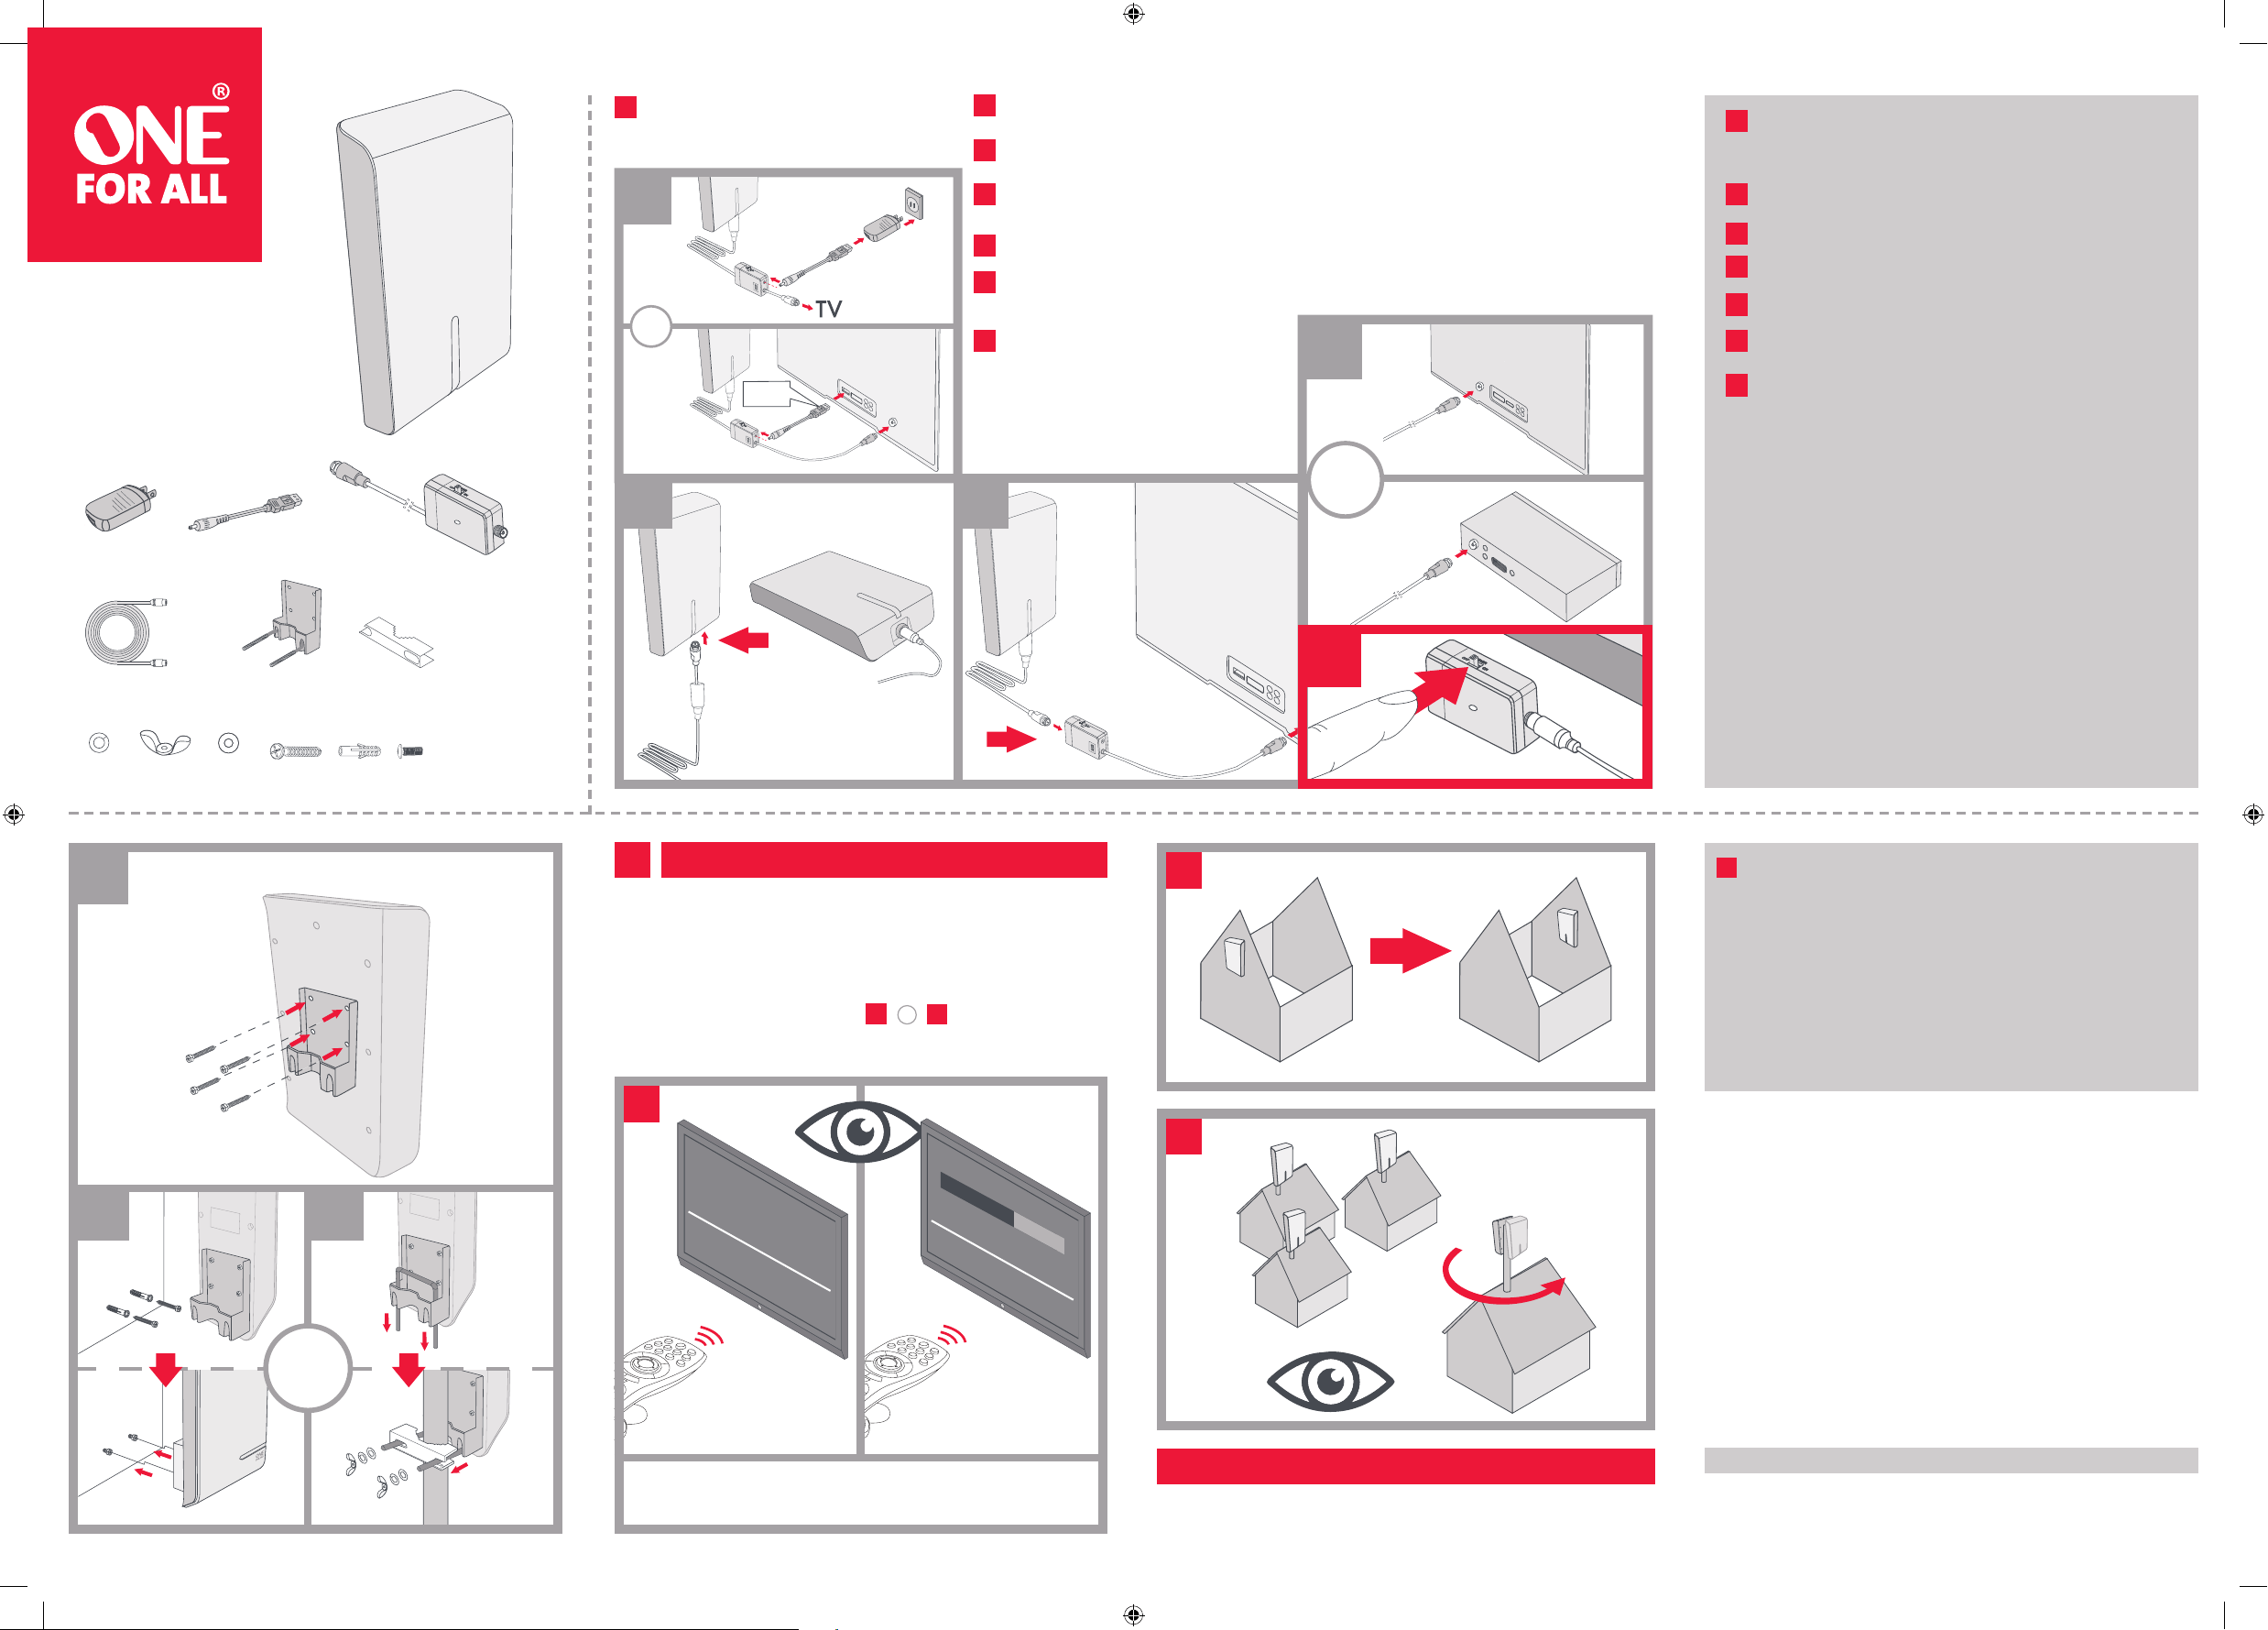
FIRST connect the USB cable to the power adapter.
Put the power adaptor in any standard 120V wall
outlet. Alternatively you can plug the USB cable in
one of your USB ports on the side or back of your TV
(if available).
1
¡IMPORTANTE!
Ahora puede realizar un escaneo de canales en su televisor. Ponga el modo
sintonizador del televisor en ANTENA y elija ESCANEO DE CANALES (puede
ser llamado de otra manera, AUTO PROGRAM, AUTO TUNING, AUTO SCAN,
BÚSQUEDA DE CANALES en la confi guración de su televisor).
Si el número de canales o la calidad es pobre, favor de reposicionar la antena y
repetir los pasos II o III y RE-ESCANEE los canales de su TV.
Para obtener instrucciones detalladas sobre cómo realizar un escaneo de canales,
consulte el manual incluido con su televisor.
¡IMPORTANTE!
Recuerde de realizar un re-escaneo en su televisor. Al reposicionar o rotar la
antena deberá realizar un ESCANEO DE CANALES en su televisor.
FINISH
WWW.ONEFORALL.COM/TIPS-AND-TRICKS
Before returning this product
please call us for support
Antes de regresar este producto, llámenos para poder ayudarle
Customer Support: 855-823-3422 (toll free)
www.oneforall.com
PRIMERO conecte el cable USB al adaptador de corriente. Conecte el
adaptador de corriente a cualquier tomacorriente de pared estándar de 120V.
Alternativamente puede conectar el cable USB a uno de los puertos USB al
costado de su Televisor (si están disponibles).
Conecte el cable coaxial incluyendo la funda de plástico (tapa) al fi nal de e la
antena.
Conecte el otro extremo del cable coaxial al insertador de alimentación.
Ahora conecte el cable fi jo del insertador de alimentación a ANTENNA IN al
reverso de su televisor o decodifi cador.
Coloque el interruptor del insertador de alimentación en la posición ON.
Primero adjunte el soporte de montaje a la antena usando los 4 tornillos
incluidos en la bolsa de plástico junto con los demás materiales de montaje.
Decida la posición de montaje de la antena: Montada a la pared o montada a
un poste (poste no incluido).
Si decide montar la antena a la pared, coloque el soporte de montaje (la superfi cie
plana contra la pared) lo más alto posible y perfore dos agujeros (distancia entre los
agujeros de 58 mm) y coloque los taquetes dentro de los agujeros, posteriormente
inserte los tornilos. No los atornille completamente, pero deje que sobresalgan 3-4
mm. Luego cuelgue el soporte con la antena colocada sobre los tornillos.
Si decide montar la antena a un poste, adjunte primeramente el tornillo en forma de
U al soporte. Después fi je la recortadora a los dos lados del tornillo en forma de U.
Asegúrese de que el poste esté entre el soporte y la recortadora. Atornille las tuercas
de mariposa en ambos extremos del tornillo en forma de "U".
Le recomendamos PRIMERO fi nalizar la confi guración de la antena antes de perforar
agujeros puesto que es posible que tenga que reposicionar la antena para mejorar la
recepción. Posicione la antena lo más alto posible cerca de una ventana en dirección a
las torres de transmisión para una mejor recepción. Si no está seguro en qué dirección
se encuentran las torres de transmisión por favor visite www.channelchecker.com y se
lo diremos en 3 sencillos pasos.
SET-TOP BOX
TV
I
Now you can perform a channel scan on your TV. Set the tuner mode of
the TV to ANTENNA fi rst, then choose CHANNEL SCAN (may be called
AUTO PROGRAM, AUTO TUNING, AUTO SCAN or CHANNEL SEARCH in the
setup menu of your TV).
If the number of channels or the quality is poor, please change the
antenna’s position and go to step and RE-SCAN on
your TV.
For detailed instructions on how to perform a channel scan, please see
the manual provided with your TV.
II
III
I
III
II
I
Tuner Mode
Antenna
Channel Search
Scanning For Channels
IMPORTANT!
(x2) (x2)(x2)
Cable 30 ft.
x1
x1
(x4) (x2) (x4)
9450
9455
x1
x1 x1
USB
5
6a 6b
OR
3a2
CABLE
NOT INCLUDED
1
3b
4
ON/OFF
OR
OR
OR
Now connect the coaxial cable with the additional
plastic boot (cap) at the end to the antenna itself.
Connect the other end of the long coaxial cable to
the power inserter.
Now connect the fi xed cable from power inserter
to ANTENNA IN connector at the back of the TV or
set top.
Turn ON the switch on the power inserter.
First secure the mounting bracket to the antenna
by using the four screws included in the plastic
bag with mounting materials.
Decide how you would like to mount the antenna:
Wall mount or pole mount (pole not included in
packaging)
If you choose to wall mount the antenna, then position
the mounting bracket (fl at surface to the wall) as high
as possible and drill two holes (distance between
holes 58 mm) and put the wall plugs in the holes. After
that you can put the screws in. Do not fully screw in
but leave 3-4 mm sticking out. Then hang the bracket with
antenna attached over the screws.
If you choose to mount it to a pole fi rst attach the U-shaped
screw to the bracket. Then attach the clipper to the two sides
of the U-shaped screw. Make sure the pole is in between the
bracket and the clipper. Now you can screw the wingnuts onto
the both ends of the U-shaped screw.
We suggest that you fi rst fi nalize this setup before drilling
holes, since you might need to re-position the antenna for best
reception. Position the antenna as high as possible and facing
the direction of the TV towers for best reception. If you are not
sure in which direction your TV towers are, please check
www.channelchecker.com and it will tell you in 3 simple steps.
2
2
1
3a
3b
3a
3b
4
4
5
5
6
6
IMPORTANT!
Remember to perform a RE-SCAN on your TV. Whenever you re-position
or rotate the antenna you have to perform a CHANNEL SCAN on your TV.
100mA
HD Digital
Signal Booster
ON/OFF
100mA
HD Digital
Signal Booster
ON/OFF
TV
Powert Inserter
Powert Inserter
17411_711769_v3.indd 2 12-09-19 15:51