Please read through this manual carefully before use
IMPORTANT SAFEGUARDS AND TIPS
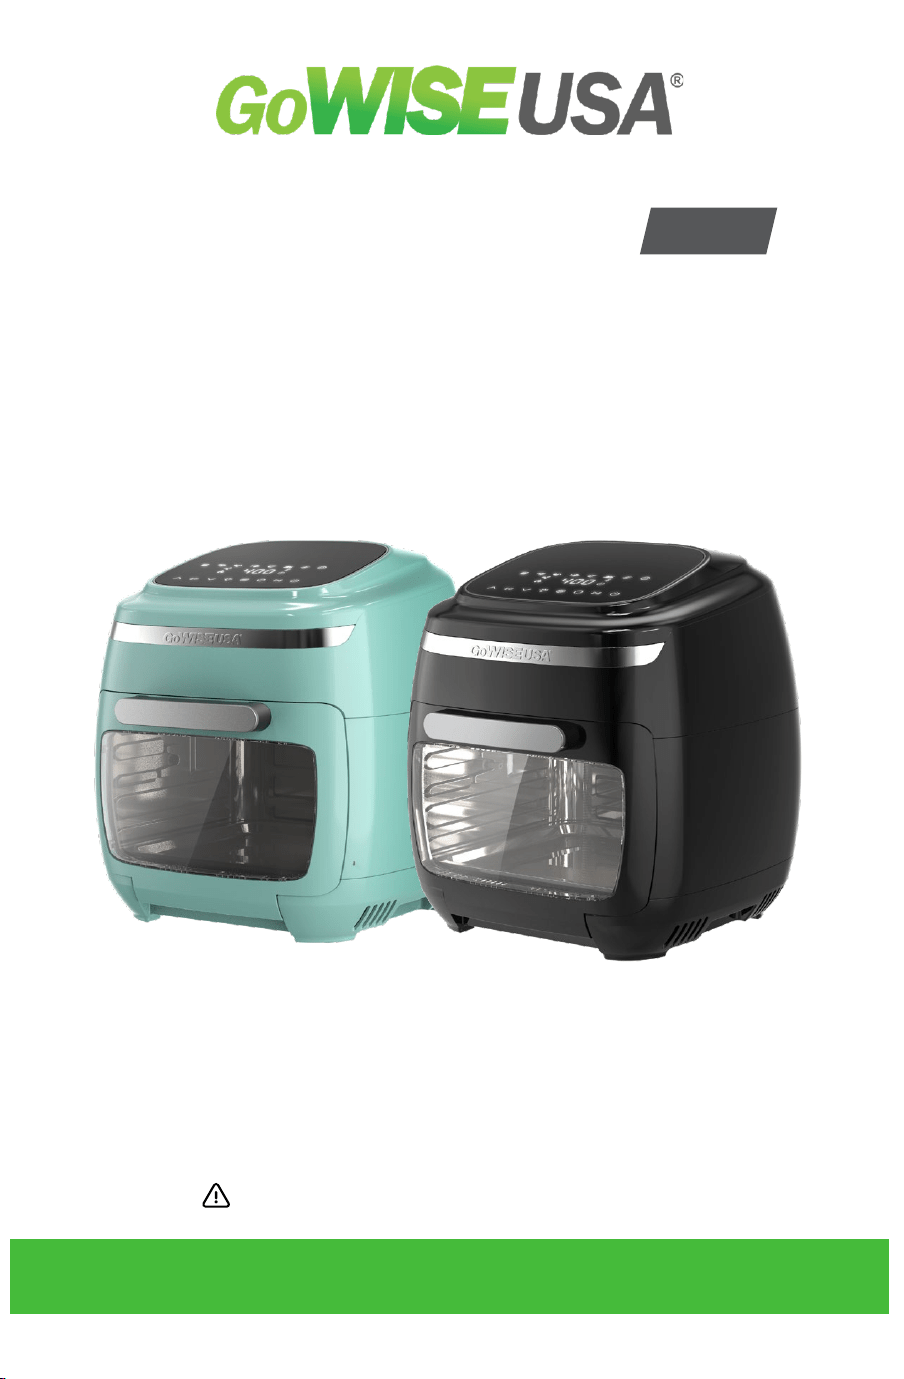
MULTI AIR FRYER VIBE
USER MANUAL
Model No.: GW77722, GW77723
WWW.GOWISEUSA.COM
VIBE

2
THANK YOU FOR YOUR PURCHASE!
Join
Contact Our Customer Care Team
Register Your Product
Specifications
Explore
the GoWISE Community on
Facebook, Instagram, Twitter, and
Pinterest for updates, tips, and
great deals!
855-233-9199
support@gowiseusa.com
Live Chat at gowiseusa.com
M-F 8:30am - 4:00pm MST
www.gowiseproducts.com/apps/
product-registration
(Normally the serial number is on
the bottom of the product. Please
check there first.)
Voltage: 120V, 60Hz
Watts: 1700W
Capacity: 11.6 Qt
Temp. Range: 800F-4000F
our recipes at
www.gowiseproducts.com/blogs/
recipes

Register Your Product............................
Specifications...........................................
Important Safeguards...........................
Important......................................
Electromagnetic Fields...................
Parts and Accessories............................
Control Display.........................................
Set Up and Using Multi Air Fryer.........
Before First Use.............................
Removable Door............................
Using Your Accessories...................
Cooking Guide...........................................
Cooking Chart................................
Internal Temperature Chart...........
Tips...............................................
Trussing a Whole Chicken......................
Rotisserie Roast a Whole Chicken......
Cleaning Your Air Fryer..........................
Troubleshooting & Error Codes............
Warranty...................................................
2
2
4
6
6
7
8
10
10
10
11
14
14
15
15
16
18
19
20
22
TABLE OF CONTENTS

4
IMPORTANT SAFEGUARDS
HOUSEHOLD USE ONLY • READ ALL INSTRUCTIONS BEFORE USE
1. NEVER IMMERSE the main unit
housing in water, as it contains
electrical components and
heating elements. Do not rinse
under the tap.
2. TO AVOID ELECTRIC SHOCK,
DO NOT put liquid of any kind into
the main unit housing containing
the electrical components.
3. This appliance has a polarized
plug (one prong is wider than
the other). This plug is intended
to fit into a polarized outlet only
one way. TO AVOID ELECTRIC
SHOCK, DO NOT force the plug
into the outlet if it does not fit. If
the plug does not fit fully into the
outlet, reverse the plug. If it still
does not fit, contact a qualified
electrician. DO NOT ATTEMPT to
modify the plug in any way.
4. ALWAYS make sure that the plug
is inserted into the wall socket
properly. THIS APPLIANCE
CAN ONLY OPERATE ON A
DEDICATED OUTLET.
5. To prevent food being in contact
with the heating element, DO
NOT OVERFILL any of the
cooking trays.
6. DO NOT COVER OR BLOCK the
air intake or outlet vent while the
GoWISE USA Multi Air Fryer is
in operation. Doing so prevents
even cooking and may damage
the unit or cause it to overheat.
7. NEVER POUR oil into the
square accessory basket (sold
separately). This could result in
fire or personal injury.
8. While cooking, the internal
temperature of the unit
reaches several hundred
degrees Fahrenheit. TO AVOID
PERSONAL INJURY, never place
hands inside the unit unless it has
thoroughly cooled.
9. This appliance is NOT INTENDED
FOR USE by persons with
reduced physical, sensory, or
mental capabilities or persons
with a lack of experience and
knowledge unless they are
UNDER THE SUPERVISION of a
responsible person or have been
giving proper instruction to use
the appliance.
10. This appliance is NOT INTENDED
FOR USE by children.
11. When cooking, DO NOT PLACE
the appliance against a wall or
other appliances. Leave at least
five inches of free space along
the back, sides, and above the
appliance. Do not place anything
on top of the appliance.
12. DO NOT USE this unit if the plug,
the power cord, or the appliance
itself is damaged in any way.
13. DO NOT PLACE the unit on stove
top surfaces.
14. If the power cord is damaged,
YOU MUST HAVE IT REPLACED
by the manufacturer, its service
agent, or similarly qualified
person to avoid hazard.
15. Keep the appliance and its power
cord OUT OF THE REACH of
children when it is in operation or
during the cooling process.

IMPORTANT SAFEGUARDS
HOUSEHOLD USE ONLY • READ ALL INSTRUCTIONS BEFORE USE
16. KEEP THE POWER CORD AWAY
from hot surfaces. DO NOT PLUG
in the power cord or operate the
unit controls with wet hands.
17. NEVER CONNECT this appliance
to an external timer switch or
separate remote control system.
18. NEVER USE this appliance with
an extension cord of any kind.
19. DO NOT OPERATE the appliance
on or near flammable materials,
such as tablecloths and curtains.
20. DO NOT USE the GoWISE USA
Multi Air Fryer for any purpose
other than described in this
manual.
21. NEVER OPERATE the appliance
unattended.
22. KEEP YOUR HANDS AND FACE
at a safe distance from the air
outlet vent, as hot air is released
through it while in operation.
23. Avoid the vent while removing the
square accessory basket from the
appliance. (ACCESSORY BASKET
SOLD SEPARATELY)
24. The unit’s outer surfaces
may become hot during use.
USE OVEN MITTS or use the
rotisserie tong when handling hot
components. Always use oven
mitts when handling hot objects
and surfaces.
25. If the unit emits black smoke,
UNPLUG IMMEDIATELY and
wait for smoking to stop before
removing oven contents.
26. When the cooking time is
completed, the heating element
will shut down, but the fan WILL
CONTINUE RUNNING for at least
20 seconds to cool down the unit.
27. ALWAYS operate the appliance
on a horizontal surface that is
level, stable, and noncombustible.
28. If the GoWISE USA Multi Air
Fryer is used improperly, for
professional or semi-professional
purposes, or if it is not used
according to the instructions in
this user manual, the warranty
becomes invalid, and the
manufacturer will not be held
liable for damages.
29. ALWAYS unplug the appliance
after every use.
30. Let the appliance cool down for at
least 30 minutes before handling,
cleaning, or storing.
31. MAKE SURE the ingredients
prepared in this unit come out
cooked to golden-yellow color
rather than dark brown. Remove
burnt remnants.
32. This appliance is intended
for normal household use
only. It is not intended for
use in commercial or retail
environments.
33. If the inner temperature
control system fails, the oven’s
overheating protection system
will activate, and the oven will not
function. If this happens, unplug
the power cord and wait for the
unit to cool down completely
before trying to cook again.
5

6
IMPORTANT SAFEGUARDS
Electromagnetic Fields
SAVE THESE
INSTRUCTIONS
This appliance complies with all
standards regarding electromagnetic
fields. According to the instructions in
this manual, the appliance is safe
to use based on scientific evidence
available today if handled properly.
Important
Before initial use and after
subsequent use, hand wash all
included accessories. Wipe the
outside and inside of the Unit with a
warm moist cloth and mild detergent.
Preheat the Unit for a few minutes to
burn off any residue.
34. Please note that this unit is
constantly emitting heat through
the air vents, the unit must
be placed on a heat resistant
surface. It is the end-user’s
responsibility to verify the heat
capacity of their countertops.
We recommend using a silicone
pad or spare, non-artificial tile
to protect your countertops
from heat damage. The care
and use of countertops is the
responsibility of the end-user.
HOUSEHOLD USE ONLY • READ ALL INSTRUCTIONS BEFORE USE
7
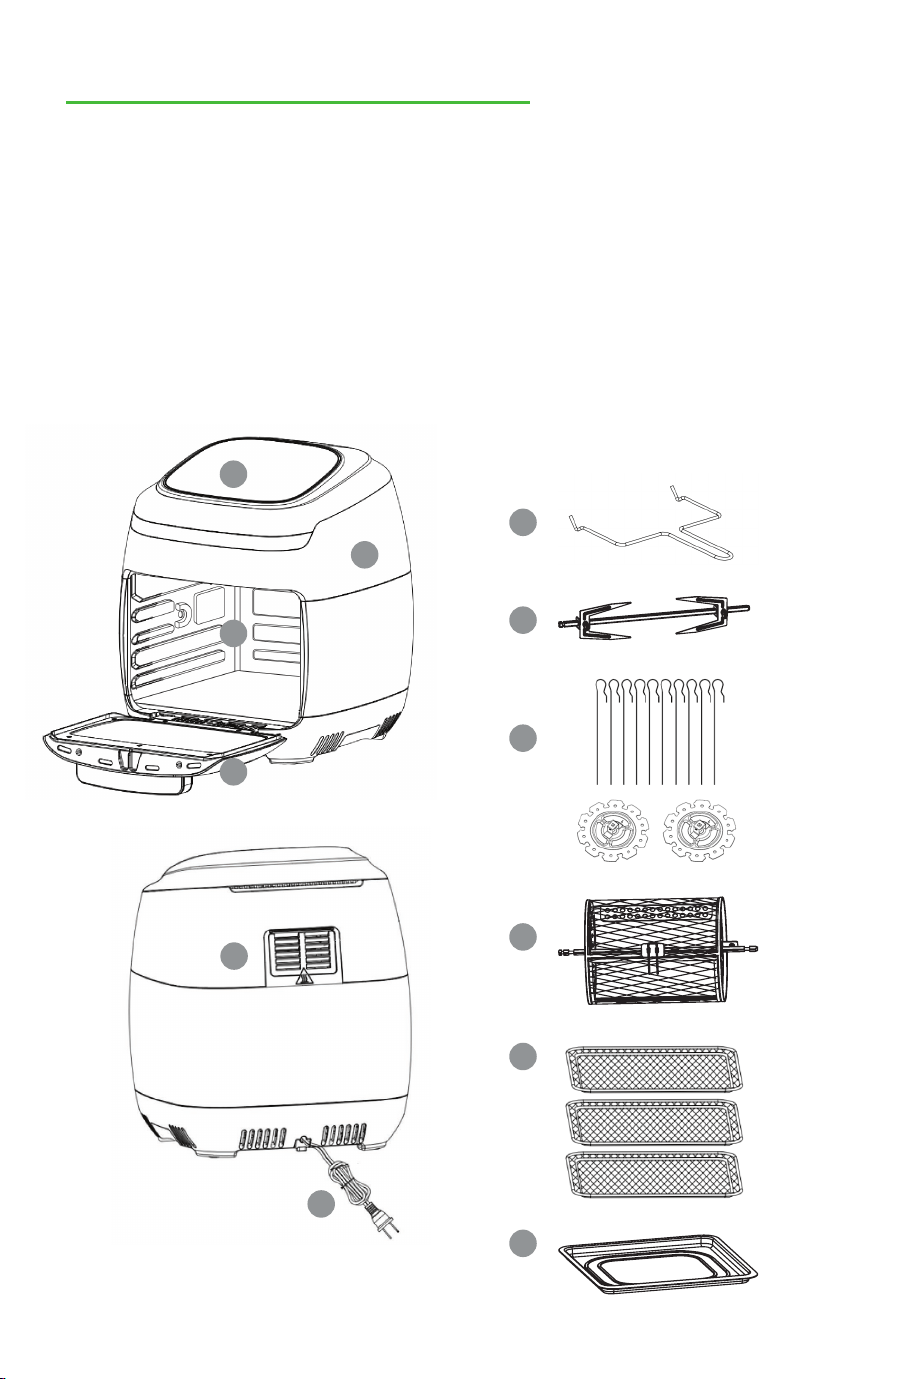
PARTS AND ACCESSORIES
PARTS ACCESSORIES
1. Control Panel
2. Unit Housing
3. Internal Heating Compartment
4. Removable Door
5. Air Outlet Vent
6. Power Cord + Plug
NOTE: Rotisserie Forks and Skewers
share one (1) rod.
a
b
c
d
e
f
a. Rotisserie Tong
b. Rotisserie Rod & Forks
c. Rotisserie Skewers
d. Rotisserie Cage
e. Mesh Tray X3
f. Drip Tray
1
2
3
4
5
6
8
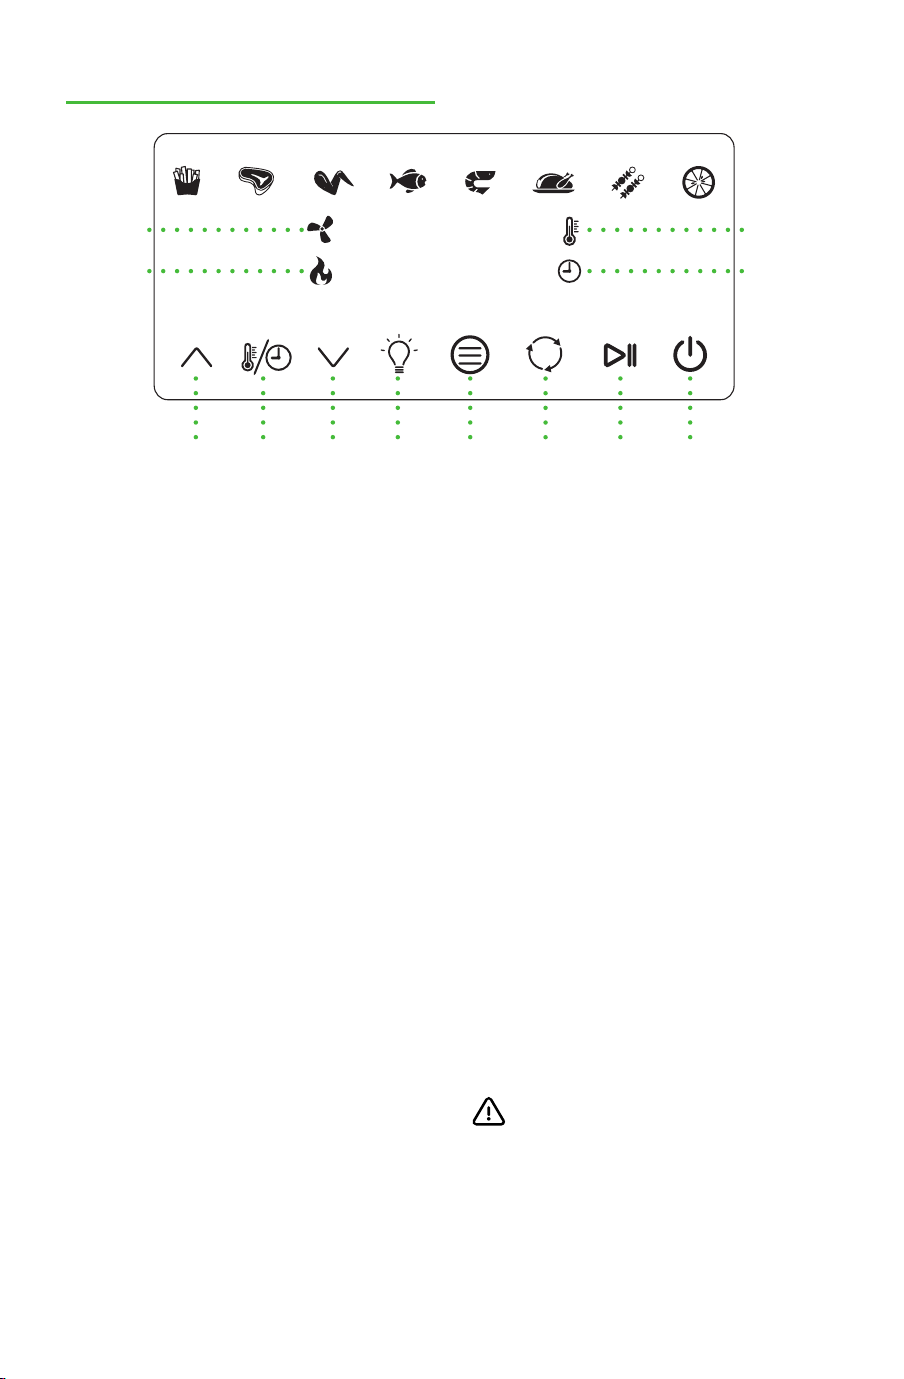
POWER: Powers the unit on and off
START/PAUSE: Starts and stops the
cooking process
ROTISSERIE: Activates the Rotisserie
function
MENU: Cycles through preset options
LIGHT: Turns the internal cooking light
on or off
TEMP/TIME: Adjusts temperature
and time of cooking presets
UP & DOWN arrows: Increases or
decreases TEMP & TIME
CONTROL DISPLAY
BUTTONS
8888
TEMP/
TIME +
TEMP/
TIME -
TEMP/
TIME
MENU POWERROTISSERIELIGHT START/
PAUSE
TEMP
INDICATOR
FAN
INDICATOR
TIME
INDICATOR
HEATING
INDICATOR
Fries: 20 minutes at 400°F
Steak: 20 minutes at 370°F
Wings: 35 minutes at 370°F
Fish: 18 minutes at 360°F
Shrimp: 10 minutes at 320°F
Roast Chicken*: 35 minutes at 400°F
Kebab Skewers: 10 minutes at 400°F
Dehydrate: 4 hours at 130°F
PRESETS DEFAULT TIME&TEMP
*Cooking time of a whole roasted
chicken may vary depending on
weight. Use a meat thermometer to
check the internal temperature as
per the chart on page 15.
WARNING
Never use a cooking vessel filled with
cooking oil or any other liquid with this
Unit! Fire Hazard or personal injury
could result.

9
CONTROL DISPLAY
USING THE DIGITAL CONTROLS
• If using a Rotisserie accessory,
make sure the Rotisserie function
is activated by pressing the
ROTISSERIE button on the Digital
Display before starting the
cooking process.
• Press the LIGHT button to turn
the oven light on and off any time
throughout the cooking process.
• The and icons will
display to indicate whether the
fan is running, and if the oven is
heating. When a cooking cycle
completes, the icon will
be off, but the fan may still be
running. During the dehydrate
setting, the heat will periodically
shut off to maintain the correct
temperature and will be
indicated by the icon.
1. Once the unit is plugged in, the
display lights will flash once with
a single chime/beep. The POWER
button will remain illuminated.
2. Tap the POWER button to
illuminate the basic menu
options.
3. Adjust the time and temperature
by pressing the TEMP/TIME
button to toggle between time
and temperature and use the
or arrows to increase or
decrease as needed.
4. OR, select a preset by pressing
the MENU button repeatedly
until desired cooking preset is
reached.
5. To adjust a preset’s temperature
or time, press the TEMP/TIME
button to toggle between time
and temperature, and use the
or arrows buttons to increase
or decrease as needed.
NOTE: Hold down the arrows to
increase or decrease the time
and temperature at a faster rate.
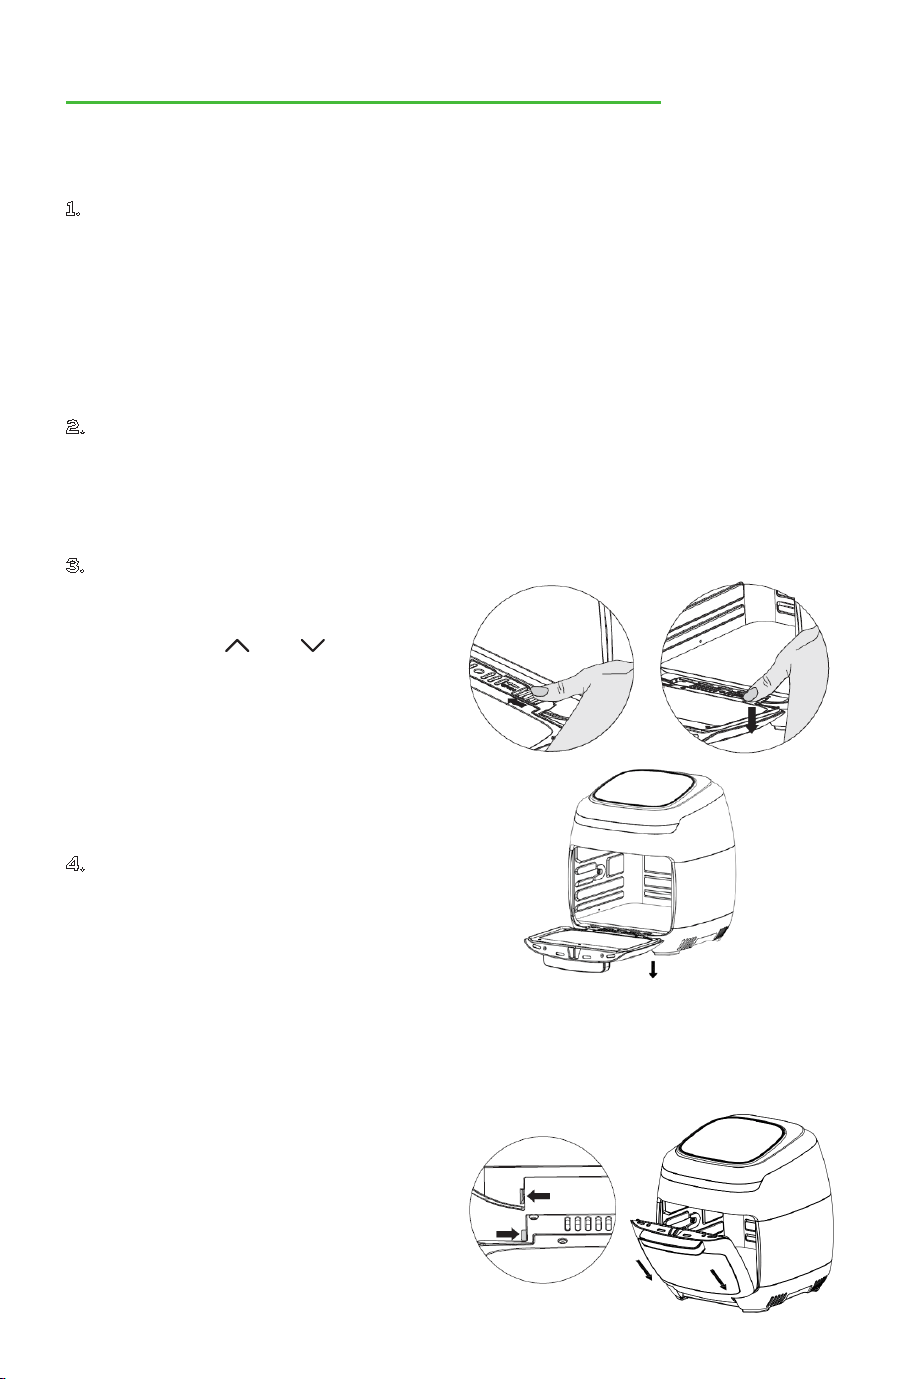
REMOVABLE DOOR
SET UP AND USING MULTI AIR FRYER
BEFORE FIRST USE
1. Unbox the Unit and place on a
countertop or flat surface away
from any water source and
near a polarized outlet. Before
plugging in the Unit, remove
accessories from the Internal
Heating Compartment. Unwrap
accessories.
2. Rinse the accessories with warm
water and dry thoroughly. Place
the Drip Tray at the bottom of the
Internal Heating Compartment
and close the door.
3. Plug in the Unit. Press the
POWER button to turn the unit
on. Press the TEMP/TIME button
and use the and arrows to
adjust temp and time settings to
5 minutes at 350°F.
NOTE: This process will burn off
any remaining residue left from
the manufacturer. There may
be a slight burning smell but, will
dissipate after a few minutes.
4. Your new GoWISE USA Multi Air
Fryer Vibe is now ready for use!
10
The door can be removed for
cleaning. DO NOT put the door in the
dishwasher, as water may seep into
the dual pane glass. Instead use a
sponge or cloth with a dash of dish
soap to remove grease and mess.
Gently rinse with warm water and dry
with a soft cloth.
To Remove: The door opens to about
70°. Push the white button down and
move in the direction of the arrow
(as shown below), then pull the door
down to force it apart.
To Insert: Align the shaft on the door
with the hole on the base and insert
the door at the angle of the below
figure.
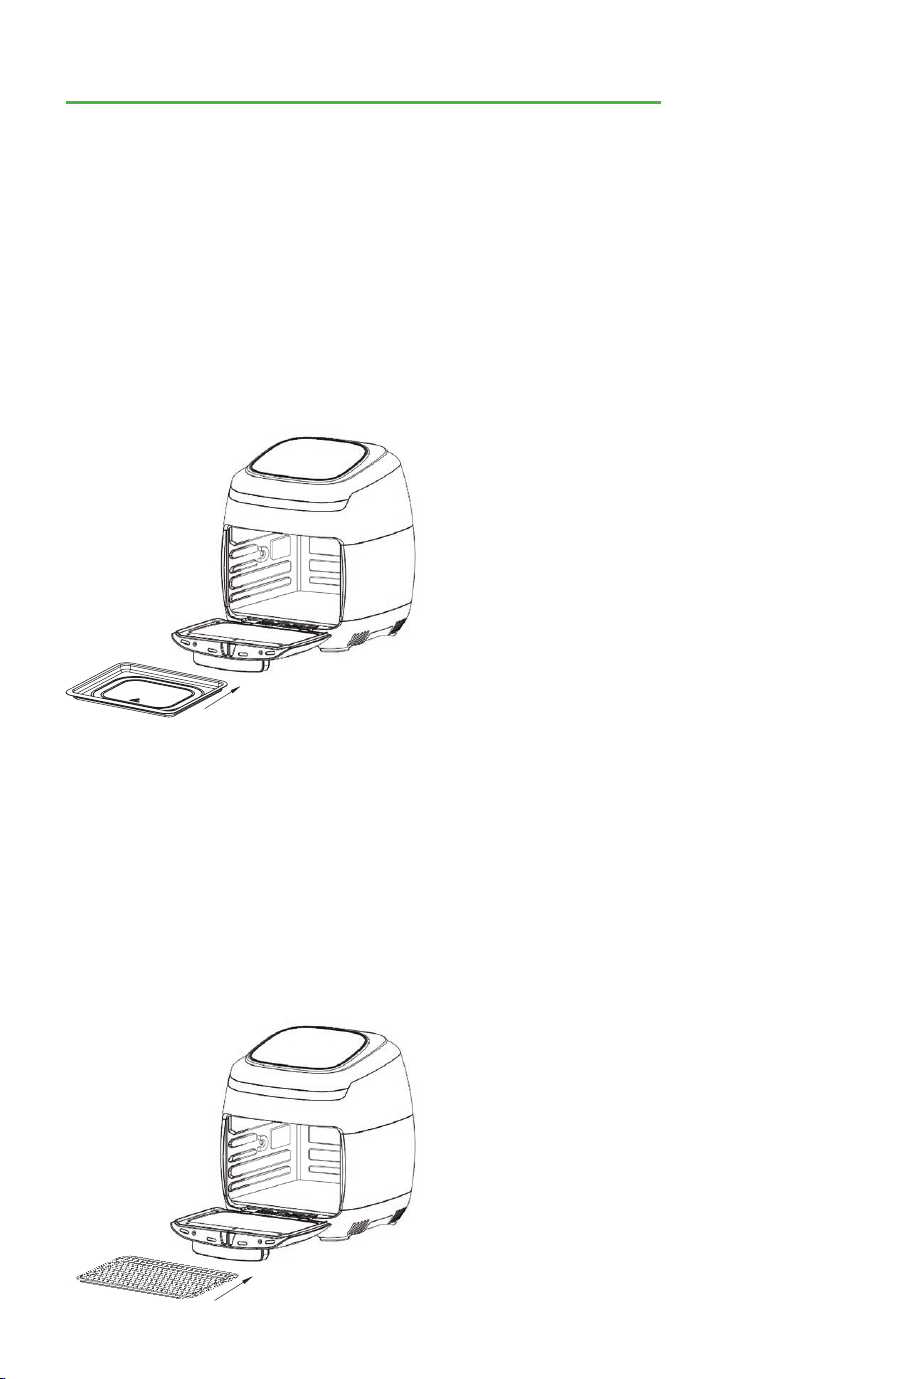
USING YOUR ACCESSORIES
SET UP AND USING MULTI AIR FRYER
Drip Tray Rotisserie Cage
Rotisserie Rod & Forks
Mesh Trays
11
The drip tray should always be kept
in the unit when cooking for easy
cleanup. To use, simply slide the tray
in the bottom-most rack and cook.
The surface is an FDA-approved
non-stick material. Be sure to use a
non-abrasive sponge to clean.
Great for fries, roasted nuts, and
other snacks. Fill the basket and use
the rotisserie tong to place the basket
into the unit.
How to use: Open the rotisserie cage
door and add your ingredients. Close
the cage door and insert into the
oven using the rotisserie tong.
NOTE: Be sure to use oven mitts
when removing the rotisserie cage
after cooking.
Make your own rotisserie chicken,
Cornish game hen, roasted pork loin
and more using the rotisserie rod
and forks. Keep in mind the maximum
weight capacity for the rotisserie is
4.5 pounds. When cooking a whole
chicken or hen, you may need to truss
it first. Instructions for trussing a
chicken can be found on page 18 of
this manual.
How to use: Force the rotisserie rod
lengthwise through the center of the
meat. Slide forks onto the rod from
either end and into the meat. Lock in
place by tightening the thumb screws.
Use the rotisserie tong to place the
rod into the rotisserie position in the
heating compartment.
NOTE: Make sure the roast or chicken
is not too large and rotates freely
within the unit.
The mesh trays are great for
dehydrating, but also can be used to
for crispy snacks or reheating pizza. If
using to roast or air fry fresh meats,
it is recommended to brush a little bit
of oil on the mesh to prevent sticking.
To use, simply slide mesh trays into
any of the 4 rack levels.
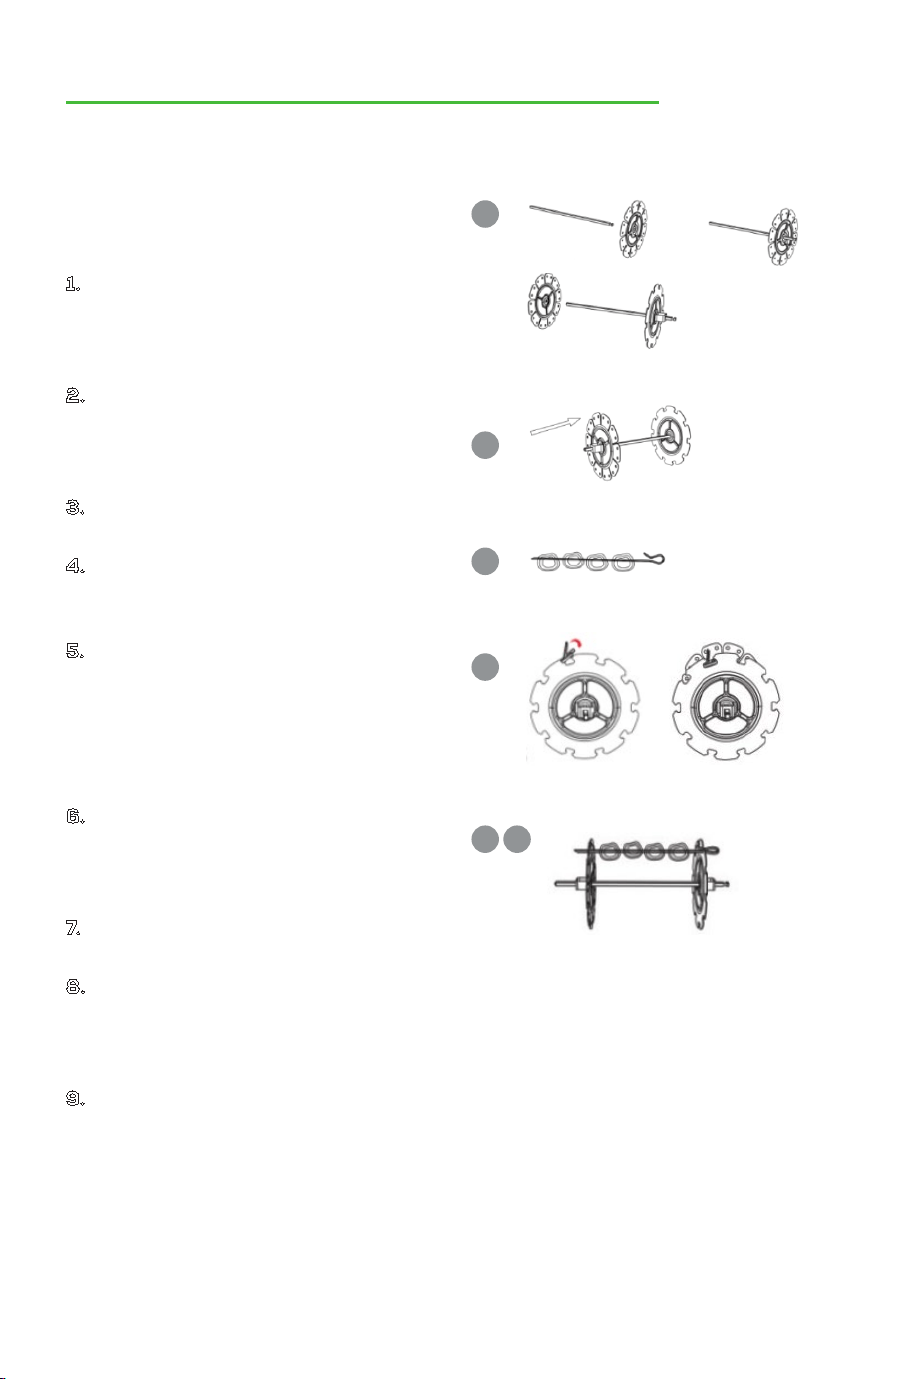
USING YOUR ACCESSORIES
Rotisserie Skewers: Use for
cooking Kebabs.
1. Place the two skewer racks at
each end of the rotisserie rod.
Make sure thumb bolts are on the
outer side of the rotisserie rod.
2. Slightly tighten the thumb bolts.
Do not over tighten as you may
need to adjust the tightness after
inserting skewers.
3. Carefully poke skewers through
food.
4. Guide the sharp end of the
skewer through an open hole on
the skewer rack.
5. Slide the rounded skewer handle
into an open slot on the opposite
skewer rack. You may need to
twist and squeeze the rounded
skewer handle until its positioned
properly in the slot.
6. Repeat steps 3-5 in a uniform
manner around the skewer rack.
Make sure skewers are evenly
spaced.
7. Tighten thumb bolts to make sure
they are securely in place.
8. Use caution when inserting
Rotisserie Skewers into the Unit
to avoid being poked by the
Skewer tips.
9. Open the door. Insert one end
of the Rotisserie Rod into the
Rotisserie Socket first then,
set the opposite end into the
Rotisserie slot. Do not force the
rod into the socket; rotate until
the rod slips in easily.
SET UP AND USING MULTI AIR FRYER
1
2
3
4
5 6
12

SET UP AND USING MULTI AIR FRYER
USING YOUR ACCESSORIES
NOTES:
• The GoWISE USA Multi Air Fryer
Vibe will only begin heating once
the door is completely closed.
• The door can be opened during
the cooking process – the Unit
will stop heating automatically
until the door is closed again. The
fan will also stop while the door
remains open. If the door remains
open for 6 minutes, the Unit will
shut down.
• TO STOP COOKING after the Unit
has already started working, hold
the power button for 1-2 seconds.
NOTE: If the Unit has been
running for any period the heating
element will be HOT, the fan
will continue to blow to cool the
heating element before shutting
down completely. However, the
Unit will have stopped heating.
CAUTION! Contents and cooking
accessories will be extremely hot
after every use. To prevent personal
injury, always use oven mitts to
remove contents and always wait
until the Unit has cooled sufficiently
before touching or cleaning any area
of the Internal Heating Compartment
of the Air Fryer.
13
1. Open the door.
2. While wearing oven mitts on both
hands and using the Rotisserie
Tong, hook the bottom left and
right sides of the Rotisserie
Rod, in the gaps of the rod and
carefully lift the rod out of the
resting slot on the right side of
the compartment – carefully
pull the rod out of the Rotisserie
socket and remove from the unit.
Removing Rotisserie Rod,
Rotisserie Skewers, and
Rotisserie Cage from Unit
NOTE: Contents will be hot and can
easily burn – use caution not to let
scalding meat juices or oils from
falling on the skin by holding a catch
tray or plate under the rotisserie
contents.

14
COOKING GUIDE
The chart here is a guide that will help you with setting the time and
temperature for certain ingredients (NOTE: Please keep in mind that because
ingredients differ in size, shape, brand, and origin, we cannot guarantee that
this is the best setting for the ingredients you have).
Food Time Temperature Flip Tips
Potatoes & Fries
Thin Frozen Fries 9-16 min 4000F /
Add 1/2
Tbsp of Oil
Thick Frozen Fries 11-20 min 4000F /
Homemade Fries 16-20 min 4000F /
Homemade Potato Wedges 18-22 min 3600F /
Homemade Potato Cubes 12-18 min 3600F /
Falafel 15 min 3600F /
Potato Gratin 15-18 min 4000F /
Meat & Poultry
Steak 8-12 min 3600F Flip
Line with
tin foil
Pork Chops 10-14 min 3600F Flip
Hamburger 7-14 min 3600F Flip
Sausage Roll 13-15 min 4000F Flip
Drumsticks 18-22 min 3600F Flip
Chicken Breast 10-15 min 3600F Flip
Snacks
Spring Rolls 8-10 min 4000F Flip
/
Frozen Chicken Nuggets 6-10 min 4000F Flip
Frozen Fish Sticks 6-10 min 4000F Flip
Frozen Mozzarella Sticks 8-10 min 3600F Flip
Stuffed Vegetables 10 min 3200F Flip
Baking
Cake 20-25 min 3200F /
Use
baking tin
Quiche 20-22 min 3600F /
Muffins 15-18 min 4000F /
Sweet Snacks 20 min 3200F /

15
INTERNAL TEMPERATURE CHART
*This chart should be used to check the temperature of cooked meats. Always
review USDA Food Safety Standards.
COOKING GUIDE
Food Type
Internal
Temperature
Beef + Veal
Ground
Steaks, Roasts: medium
Steaks, Roasts: rare
160°F (70°C)
160°F (70°C)
145°F (63°C)
Chicken + Turkey
Breasts
Ground, Stuffed
Whole bird, legs, thighs, wings
165°F (75°C)
165°F (75°C)
165°F (75°C)
Fish + Shellfish Any type 145°F (63°C)
Lamb
Ground
Steaks, Roasts: medium
Steaks, Roast: rare
160°F (70°C)
160°F (70°C)
145°F (63°C)
Pork
Chops, Ground, Ribs, Roasts
Fully cooked Ham
160°F (70°C)
140°F (60°C)
TIPS
• Cooking times may vary based
on the quantity and thickness of
the ingredients.
• Try flipping ingredients mid-way
through the cooking process for
an even, crispy texture.
• Adding a minimal amount of oil
to fresh potatoes will give it a
crispier result.
• Avoid cooking extremely oily
ingredients in the air fryer.
• Anything that can be prepared
in a traditional oven can also be
cooked in the air fryer.
• Pre-made or store bought dough
requires a shorter cooking time
than homemade dough.
• When baking a cake, quiche or
other recipes using a filling, cook
in a tin or oven safe pan.
• When using the rotisserie, make
sure the contents are secure and
do not flop loosely.
• Do not rotisserie foods that are
too heavy! 4.5 lbs max.
• For the best rotisserie
experience, always truss meats,
chicken, and roasts with butcher’s
twine.
16
TRUSSING A WHOLE CHICKEN
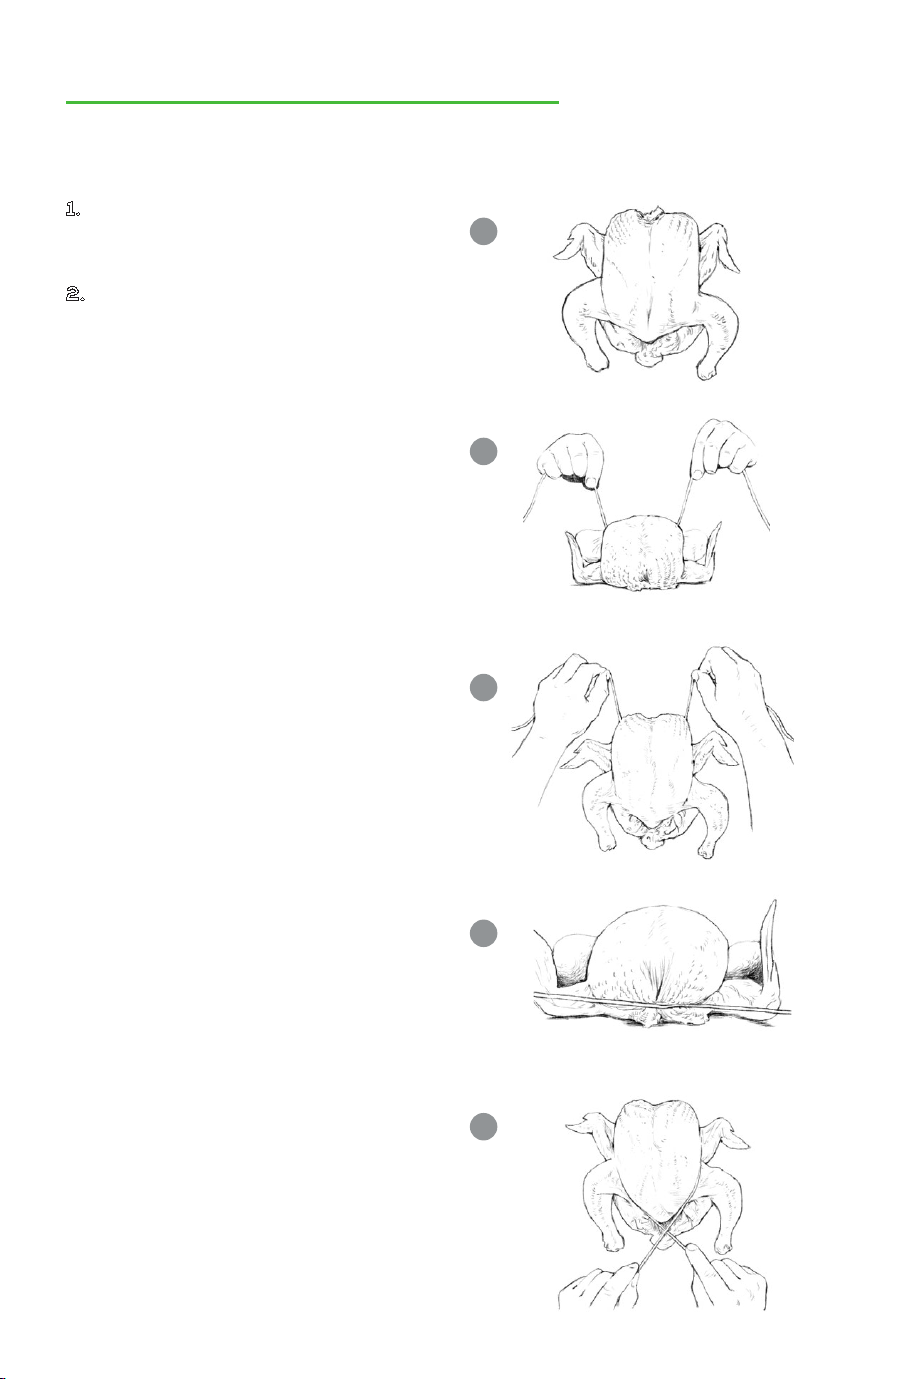
1. Finding the right size chicken
– be careful not use a chicken
exceeding the 4.5 lbs max.
2. After preparing, i.e., seasoning
the chicken, truss the chicken
using butcher’s twine.
a. Place the chicken on its back
with the legs facing toward
you.
b. Slide a piece of twine under
the back of the chicken
between the wings and the
thighs.
c. Pull both ends of the twine
up under the chicken’s
armpits, then pull them over
the wings.
d. Cross the string around the
top of the breast, making
sure the skin is secure.
e. Bring the ends of the twine
back toward you, running
them along the sides of the
breast above the wings and
thighs.
a
b
c
d
e
17
TRUSSING A WHOLE CHICKEN
f
g
h
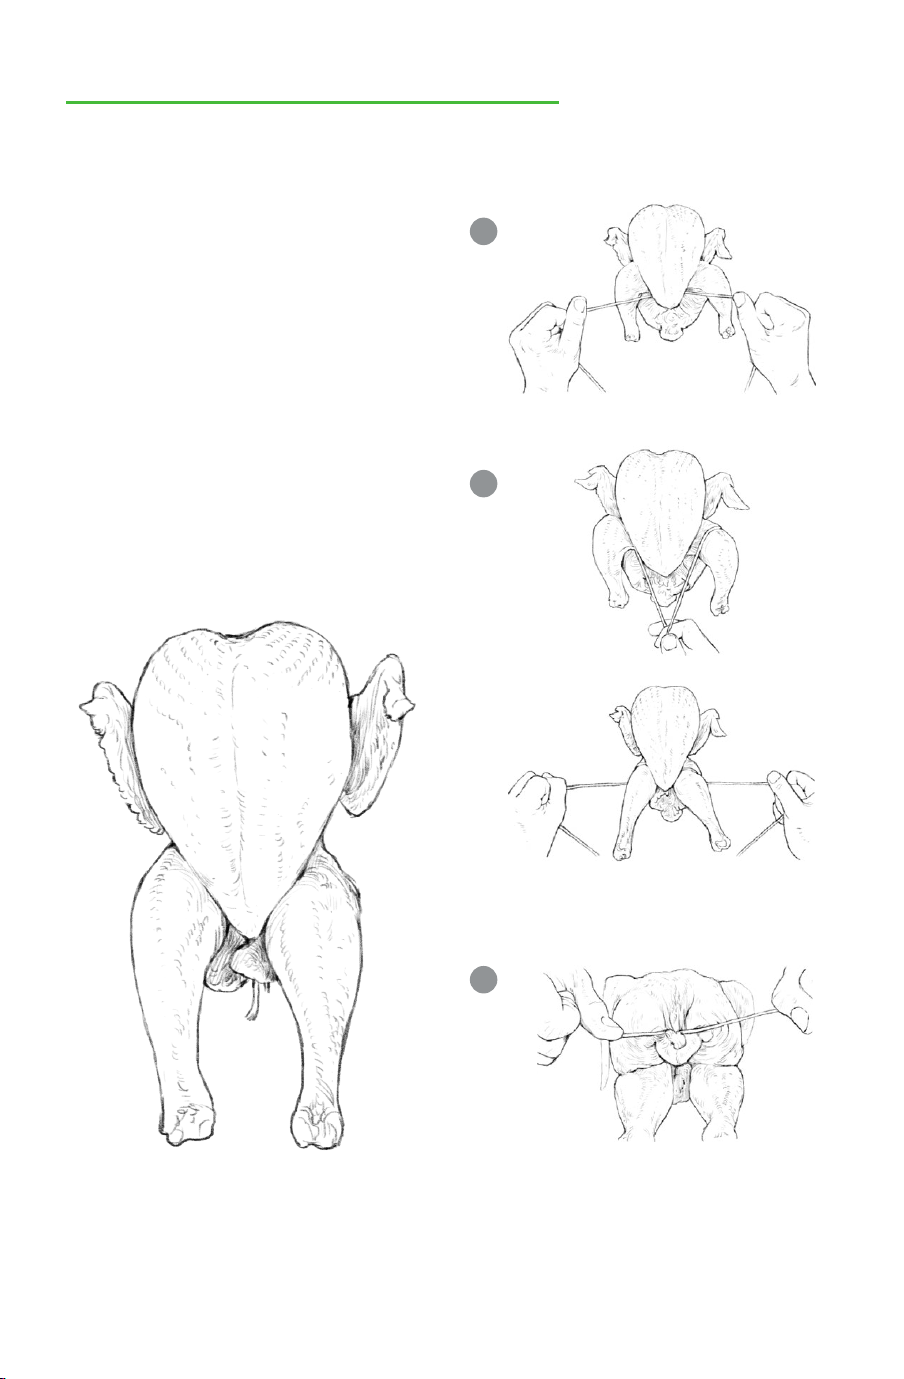
f. Cross the ends of the twine,
pulling tightly up and under
the crown of the bird.
g. Loop the ends of the string
under the legs, then over the
top of the legs. Cross and
tighten. The thighs should
pop up a little.
h. Flip the bird onto its belly
and finish by tying the strings
in a knot around the tail. Snip
off the ends.
18
ROTISSERIE ROAST A WHOLE CHICKEN
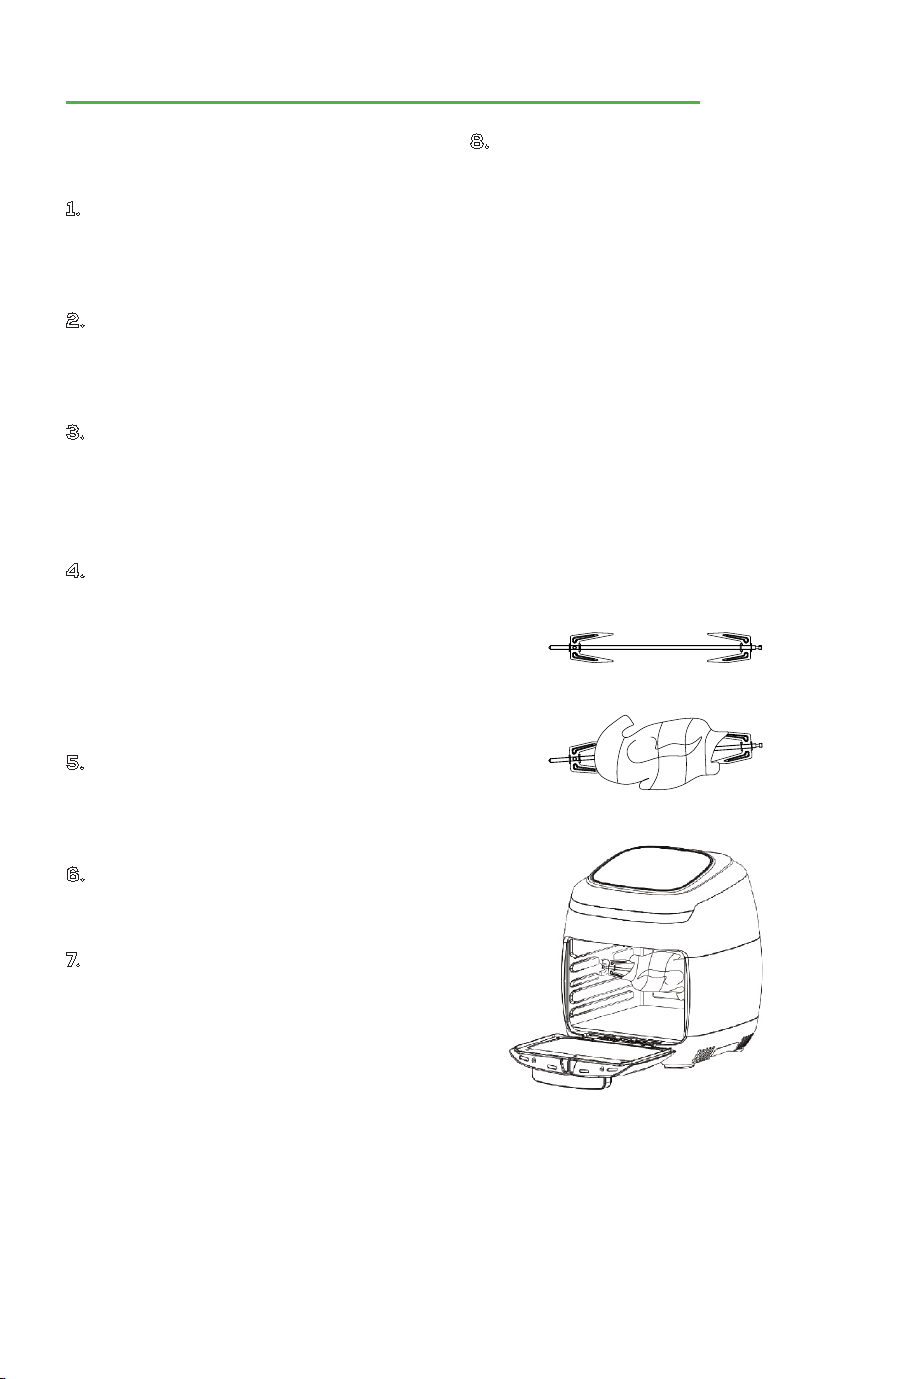
Using the Rotisserie Rod to Roast
a Whole Chicken
1. After the chicken is trussed,
carefully maneuver the Rotisserie
Rod through the chicken from the
neck to the legs.
2. Slide the Rotisserie Forks on
both sides of the Rotisserie Rod
piercing the chicken; making sure
to secure the chicken in place.
3. Using the Thumb Bolts, lightly
tighten the Rotisserie Forks into
place – Do not over tighten as
removing Rotisserie Forks may
become difficult after cooking.
4. Open the door. Insert one end
of the Rotisserie Rod into the
Rotisserie Socket first then,
set the opposite end into the
Rotisserie slot. Do not force the
rod into the socket, rotate until
the rod slips in easily.
5. Turn the Unit on by pressing
POWER botton and select the
Roast Chicken Preset by cycling
through MENU.
6. Press ROTISSERIE botton on
the Digital Display to engage the
rotation functionality of the unit.
7. The default cooking temperature
and time for Rotisserie is 400°F
for 35 min – if the chicken is not
golden brown and crispy and the
internal temperature is not 165°F,
repeat the cooking cycle.
8. When the chicken is done cooking
with the internal temperature of
165°F, remove the chicken using
the Rotisserie Tong.
a. Open the door.
b. While using oven mitts
on both hands and using
the Rotisserie Tong, hook the
bottom left and right sides
of the Rotisserie Rod, in the
gaps of the rod and carefully
lift the rod out of the resting
slot on the right side of the
compartment – carefully pull
the rod out of the Rotisserie
socket and remove from the
air fr yer.
NOTE: Contents will be hot and can
easily burn – use caution not to let
scalding meat juices or oils from
falling on the skin by holding a catch
tray or plate under the rotisserie
contents.

19
1. Wait at least 30 minutes for the
unit to cool down before cleaning.
2. Remove the trays or accessories
used and set aside.
3. Using dish soap and a damp
sponge, wipe out the inside of
the air fryer. Use a damp paper
towel or soft rag to wipe up the
remaining soapy residue.
4. Remove the door for easy
cleaning. Refer to page 10 for
instructions. Do not wash the
door in the dishwasher. Use
warm, soapy water and a sponge
instead. Wipe dry with a soft
kitchen towel.
5. Scrubbing with soap and a
sponge may be more effective to
remove stuck-on food.
6. Use a non-abrasive sponge to
wash the non-stick drip tray.
Soak for a few minutes first if
mess does not slide off easily
with the sponge.
CLEANING YOUR AIR FRYER

20
If your GoWISE USA Multi Air Fryer
displays any of these Error Codes,
please contact Customer Care Team.
TROUBLESHOOTING & ERROR CODES
ERROR CODE ISSUE
E1
Temperature sensor is
not connected
E2
Short circuit of
temperature sensor
855-233-9199
support@gowiseusa.com
Live Chat at gowiseusa.com
M-F 8:30am - 4:00pm MST
Problem Possible Cause Solution
The appliance is not
turning on
The appliance is not
plugged in
Plug the appliance into a grounded
wall socket.
You have not started the
cooking cycle
Use the touch screen controls to select a
preset or time & temp, then click the
Start/Pause button.
My food isn’t cooked all
the way
The trays or basket have
been overfilled
Use smaller batches to
fry more evenly.
The set temperature is
too low
Increase the temperature using
temperature controls.
My food is unevenly
cooked
Ingredient positioning or
overflow
Shake or flip ingredients midway through
cooking. Swapping tray levels helps as well.
My food isn’t crispy Some snacks are crispier
when traditionally fried
Use oven snacks or lightly brush some oil
onto the snacks for a crispier result.
Trays are not sliding
into the unit
Tray may not be
positioned properly
Try inserting the tray from
a different side.
White smoke comes
out of the unit
It’s normal for white
smoke to appear
when cooking greasy
ingredients
When frying greasy ingredients, a large
amount of oil will leak into the pan. The oil
produces white smoke and the pan may
heat up more than usual. This does not
affect the appliance or end food result.
The compartment or
trays are still greasy
Clean the heating compartment and
trays properly after each use.
The rotisserie is not
turning
The rotisserie function is
not selected
Press the ROTISSERIE button. It should be
flashing to indicate the rotisserie function
is activated.
Too much weight for the
rotisserie to spin
The weight should not exceed 4.5-5
pounds. Keep this in mind when shopping
for a whole chicken or roast.
Rotisserie rod not placed
properly
Make sure the Rotisserie Rod is positioned
correctly on each side of the compartment.

21
NOTES

WARRANTY
GoWISE USA warrants all products against defects in materials and
workmanship for one (1) year effective from the date of purchase.
GoWISE USA will replace any products that are found to be defective
due to manufacturer flaws based on eligibility. Refunds issued by
GoWISE USA must be purchased directly from GoWISE USA and are
only available to the original purchaser within the first 30 days. We do
not issue refunds for items bought by thirdparty retailers.
This warranty extends only to personal use and does not extend to
products that has been used for commercial, rental or any other use
this product was not intended for. There are no warranties other than
the warranties expressly set forth with each product.
This warranty is non-transferrable. GoWISE USA is not responsible
in any way for any damages, losses, or inconveniences caused by
equipment failure by user negligence, abuse, or use noncompliant with
the user manual or any additional safety, use, or warnings included in
the product packaging and manual.
This warranty only covers purchases within the 48 contiguous States
of United States of America. For purchases made outside the 48
contiguous states, such as, AK, HI, PR or Canada; upon receipt of a
proven defect by video or picture, we will replace the unit under the
1-year warranty, however the replacement will only ship to a freight
forwarder or an address within the 48 contiguous United States. The
consumer is responsible for arranging shipment outside of the 48
contiguous states.
GoWISE USA assumes no liability for damage caused using this product
other than for its intended use or as instructed in the user manual.
Some states do not allow this exclusion or limitation of incidental or
consequential losses, so the foregoing disclaimer may not apply to you.
This warranty gives you specific legal rights and you may also have
other rights which may vary from state to state.
ALL EXPRESSED AND IMPLIED WARRANTIES INCLUDING THE
WARRANTY OF MERCHATIBILITY, ARE LIMITED TO THE PERIOD OF
THE LIMITED WARRANTY.
NOTE: General Warranty excludes refurbished / auction items.
22

WARRANTY
Additional 60-Days Warranty
You can extend your 1-year warranty by an additional 60 days. Log onto
www.gowiseproducts.com/apps/ product-registration and register
your product within the first 14 days of your purchase for the extended
warranty.
DEFECTIVE PRODUCTS & RETURNS
If your product is defective within the 1-year warranty period, please
email our Customer Care Team at support@gowiseusa.com. To expedite
your issue, please provide at least 3 of the 4 items below:
1. Copy of the invoice, order information, or gift receipt showing the
date of purchase
2. Serial number, usually found on a sticker located on the bottom
on back of the unit
3. Picture or video of the issue or defect that you are experiencing
4. Shipping address information
Authorized Retailers:
Amazon
GoWISE USA
WayFair
Houzz
Home Depot
etailz
MorningSave.com
Bed Bath & Beyond
Jet.com
Walmart.com
Macy’s
23

• To ensure the correct use of
this appliance, read these
instructions carefully and
thoroughly.
• Please keep this manual for
future reference.
• Thank you for purchasing this
GoWISE USA Multi Air Fryer.
WWW.GOWISEUSA.COM
855-233-9199
support@gowiseusa.com
Live Chat at gowiseusa.com
M-F 8:30am - 4:00pm MST