RN302000MUK Rev1
* Register at www.morphyrichards.co.uk/support
U
K and Ireland customers only
Please read and keep these instructions for future use
IMPORTANT: To reduce limescale damage we recommend using deionised,
distilled or demineralised water, available at most large supermarkets. This is
particularly important if you live in a hard water area.
Never use battery topping up fluid or water containing any substances like
starch, sugar, fragrant additives or defrosted water from a refrigerator.
Failure to maintain your iron will invalidate your guarantee.
If you experience any problems with this iron, do not return to the store.
Please contact our help line who will be happy to help:
We do stock spare filler lids for this iron, so if you need a replacement please call
0344 873 0710.
UK: 0344 871 0944 IRE: 1800 409 119
Register your guarantee online: www.morphyrichards.co.uk/support
We'll keep you updated with special offers, competitions and important product information.
Steam Iron
RN302000MUK Rev1.qxp_Instruction Booklet 23/12/2019 11:28 Page 1

2
Important safety instructions
•
WARNING: Misuse of the appliance could cause
personal injury.
•
This appliance can be used by children aged from
8 years and above and persons with reduced
physical, sensory or mental capabilities or lack of
experience or knowledge if they have been given
supervision or instruction concerning use of the
appliance in a safe way and understand the hazards
involved.
•
Children shall not play with the appliance.
•
Cleaning and user maintenance shall not be made
by children without supervision.
•
Keep the iron and its cord out of reach of children
less than 8 years of age at all times.
•
The iron must not be left unattended while it is
connected to the supply mains.
•
The plug must be removed from the socket before
filling the iron with water.
•
The iron must be used and rested on a flat stable
surface.
•
When placing the iron on its heel, ensure that the
surface on which the heel is placed is stable.
•
The iron is not to be used if it has been dropped, if
there are visible signs of damage or it is leaking.
•
The filling aperture must not be opened during use.
•
CAUTION - HOT: Burns can occur from
touching hot parts, hot water or steam.
• WARNING: To avoid electric shock, do not
immerse appliance in water / liquid.
Electrical requirements and mains cable
• Check that the voltage on the rating plate of your
appliance corresponds with your house electricity
supply which must be A.C. (Alternating current).
• Do not operate with a damaged supply cord or
grommet, it must be replaced by the manufacturer,
its service agent or similarly qualified person in order
to avoid a hazard.
• Do not let the mains lead come into contact with the
hot soleplate of the iron.
• Should the fuse in the mains plug require changing,
replace it with a fuse of the same rating as originally
fitted.
• WARNING: This appliance must be earthed.
PLEASE READ ALL INSTRUCTIONS AND KEEP
FOR REFERENCE
RN302000MUK Rev1.qxp_Instruction Booklet 23/12/2019 11:28 Page 2
3
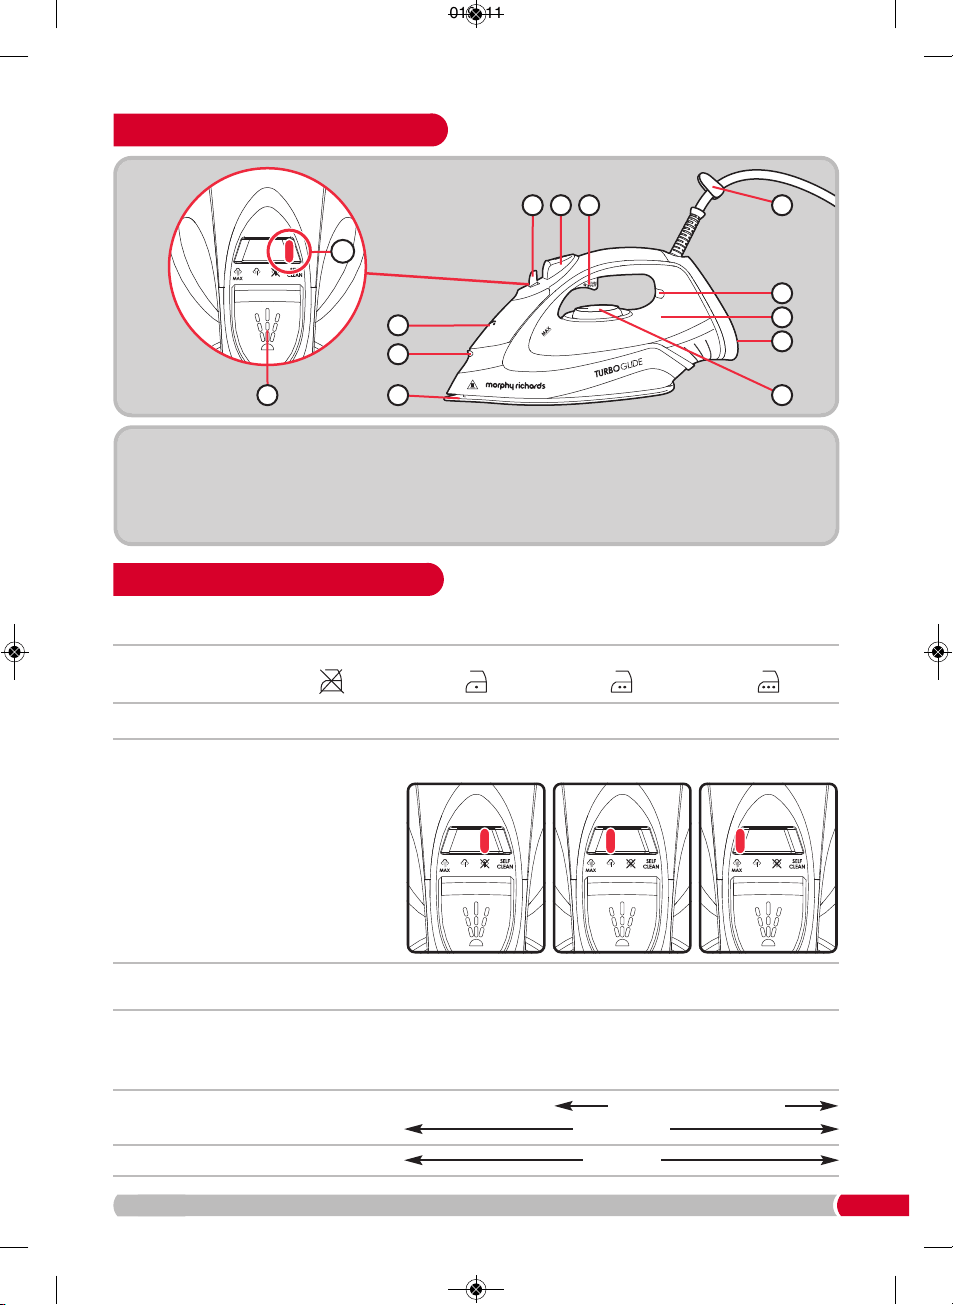
(1) Variable steam switch
(2) Water spray button
(3) Steam boost trigger
(4) Cable clip
(5) Self clean position
(6) Filling hole with cap
(7) Spray nozzle
(8) Soleplate
(9) Temperature and
auto shut-off indicator light
(10) Water tank
(11) Iron heel
(12) Temperature dial
Steam iron overview
Heat setting markings on the temperature dial of all Morphy Richards irons match those of the International
Textile Care Labelling Code
Temperature guide
Symbol
(120°C Max) Cool (160°C Max) Warm (210°C Max)
Control dial positions
Do not iron
• •• •••
Fabric Nylon, Acetates,
synthetic fabrics
Wool, Polyester
mixtures
Cotton, Linen Rayon,
Rayon mixtures
Ironing Iron on wrong side, if
moisture required, use
damp cloth
(not Acetate)
Fabrics requiring this
setting usually require
steam pressing.
Steam level setting
(see step 3 of ‘Using
the iron’ on page 4)
No steam (see ‘Dry
ironing’ on page 5)
Eco Max
With water in tank
Without water in tank
Steam/spray/shot of steam
Dry and spray
Dry ironing
11
12
7
8
6
9
10
5
2
2 31 4
RN302000MUK Rev1.qxp_Instruction Booklet 23/12/2019 11:28 Page 3

4
9
2
Using the iron
3
1) Filling the tank
B
efore first use, remove all packaging, including the protective cover on the soleplate. Make sure the iron is
n
ot plugged in. Set the variable steam switch
(
1)
t
o
‘
’
.
Fill the water tank
(
10)
v
ia the filling hole
(
6)
.
To fill
t
he tank with the maximum amount of water, we recommend the iron is tilted vertically whilst being filled.
D
o not overfill the iron otherwise it will cause leaking from around the filler cap and may run down
the iron.
IN HARD WATER AREAS, WE RECOMMEND USING DEIONISED, DISTILLED OR DEMINERALISED
WATER.
Never use battery topping up fluid or water containing any substances like starch, sugar, fragrant
a
dditives or defrosted water from a refrigerator.
NOTE: Please see point 2 of ‘Exclusions’ on page 8.
Plug in the iron and switch on at the mains.
Set the temperature dial (12) to the temperature
required (see ‘Temperature Guide’ on page 3).
The temperature and auto shut-off indicator light
(9) will illuminate until the required temperature is
reached, then it will turn off.
Tip: We recommend the temperature and auto
shut-off indicator light is allowed to illuminate
and extinguish twice before you begin ironing.
The temperature and auto shut-off indicator light
will switch on and off whilst you are ironing.
Tip: Begin with cool fabrics and work up to
higher settings. An iron heats up quicker than it
cools down so this will save you time and energy.
Vary the steam output
using the variable
steam switch
(1).
Only use the steam
function on heavy
fabrics and when the
temperature dial is set
within the shaded area
(as shown, right).
For stubborn creases, use the water spray
button
(2).
If using for the first time, you may need to
press this a few times to pull the water
through.
Press the steam boost trigger
(3)
for extra steam
boost for stubborn creases / heavy fabrics.
NOTE: If you need to use the steam boost whilst
dry ironing, check the temperature dial
(12)
is set
within the steam range.
NOTE: For optimum steam quality, do not operate
the boost more than three times in succession
.
2) Temperature Selection 3) Selecting the steam level
4) Using the water spray 5) Steam boost
RN302000MUK Rev1.qxp_Instruction Booklet 23/12/2019 11:28 Page 4
Dry ironing
Your iron can be used for dry ironing. Set the
v
ariable steam switch
(
1)
t
o ‘ ’ and set the
t
emperature dial
(1
2)
a
s desired (see page 3).
You won’t need water in the tank unless using
the water spray or steam boost features
.
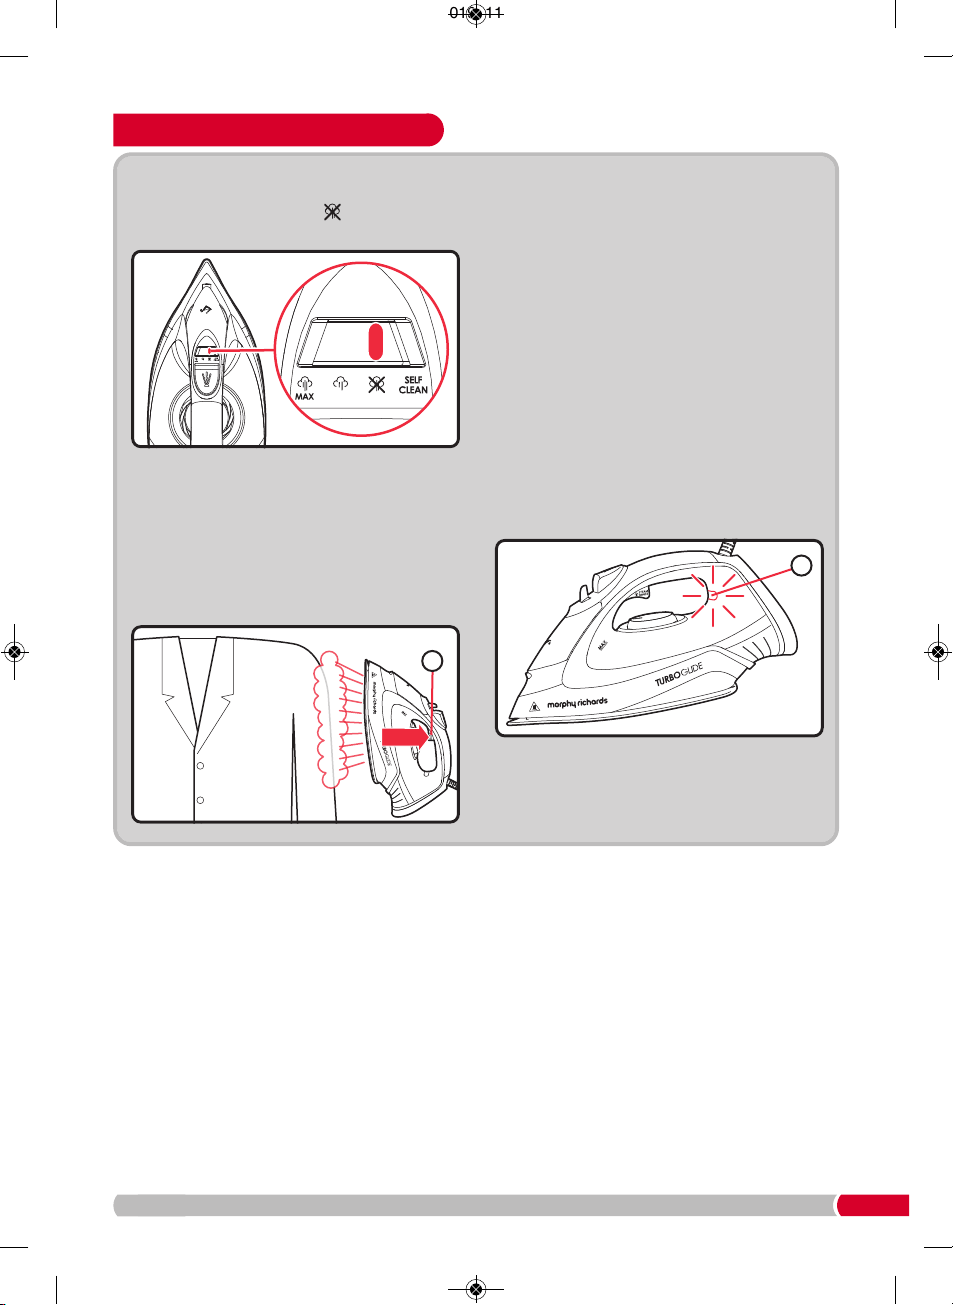
Vertical steam
Vertical steam is useful for removing creases
from hanging clothes, curtains, etc. Hold the iron
between 1cm and 2cm away from the item and
press the steam boost trigger
(3).
Anti-drip system
This prevents water escaping from the soleplate
(
8)
w
hen the iron is too cold.
D
uring use, the anti-drip system may emit a loud
c
lick, particularly during heat-up or whilst cooling
down. This is perfectly normal and indicates that
the system is functioning correctly
.
Anti-scale system
This system reduces scale deposits and helps
prolong the life of the iron
.
Auto shut-off
The iron will automatically shut down if stationary
in the horizontal position for 1 minute, or in the
vertical position (when stood on its heel
(11)
) for
8 minutes.
If the auto shut-off activates, the temperature
and auto shut-off indicator light
(9)
will flash.
Gently move the iron and it will re-heat.
Wait for the iron to heat-up (and the temperature
and auto shut-off indicator light to extinguish),
then continue ironing.
5
3
Features of your iron
9
RN302000MUK Rev1.qxp_Instruction Booklet 23/12/2019 11:28 Page 5
6
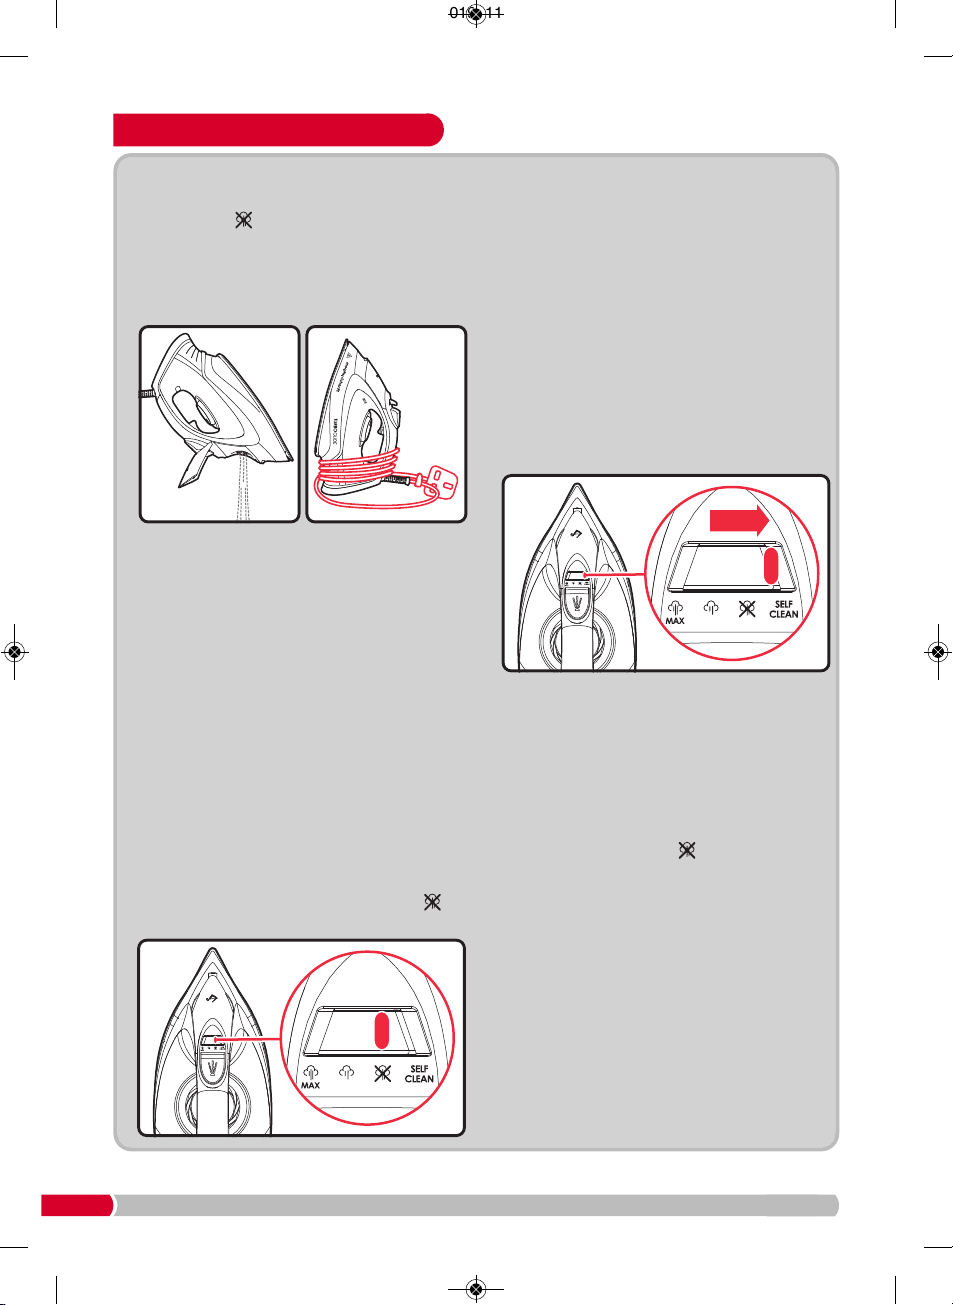
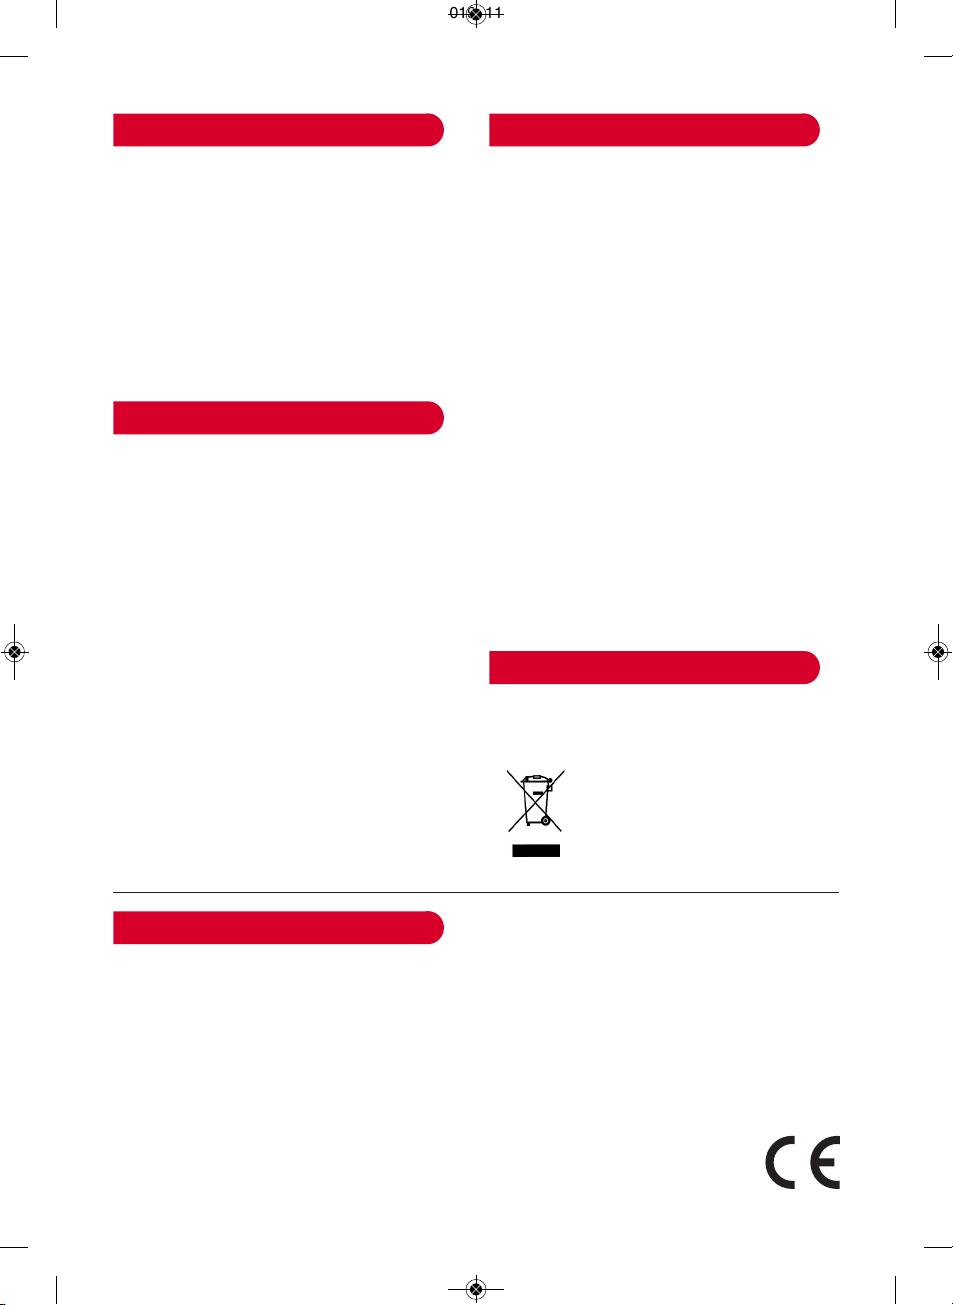
Emptying and storing
When you have finished ironing, unplug and
empty all water from your iron and set the steam
s
witch at the ‘ ’ position. When cool, store the
iron on its heel with the cord wrapped loosely
a
round the heel. Use the cable clip
(
4)
t
o keep in
place.
N
OTE: Please see point 4 of ‘Exclusions’ on page
8
.
Cleaning the soleplate
To clean the ceramic soleplate
Do not use scouring powder or solution as this
could cause damage to the coating.
If any man-made fibres fuse to the soleplate (8),
set the iron at the MAX position and pass it over
a clean piece of cotton to draw the deposit off
the surface.
To clean the exterior
Allow the unit to cool and wipe over with a damp
cloth and mild detergent, then wipe dry.
Self clean
Y
our iron has a built in self clean system
designed to keep the water valve, steam
chamber and steam vents clear of lint, limescale
and other loose mineral deposits.
1 Half fill the iron with water.
2 Place the iron on its heel
(11)
.
3 Move the variable steam switch
(1)
to the ‘ ’
position.
4 Connect to a mains supply outlet.
5
S
et the temperature dial
(
12)
t
o ‘MAX’. See step
2 of ‘Using your iron for steam ironing’ on page
4
.
6
Leave the iron switched on, rested on its heel (11)
u
ntil the temperature and auto shut-off indicator
light
(9)
goes out.
W
ARNING: Keep hands and body away from
the hot soleplate.
7 D
isconnect the iron from the mains supply outlet.
8 Whilst the iron is still very hot, hold the iron
horizontally over a sink.
CAUTION: The soleplate will still be hot, so
ensure the power cord and plug are kept away
from it and the sink.
9
Push the variable steam switch
(1)
fully to the
right and hold in the self clean position
(5)
.
WARNING: Steam and boiling hot water will
drain from the holes in the soleplate. Keep
hands and body away from the hot water. This
washes away the scale and minerals that have
built up inside the steam chamber.
10
Whilst still holding the variable steam switch
(1)
in the self clean position, gently move the iron
back and forth until the water tank is empty.
11
When cleaning is complete, move the variable
steam switch back to the ‘ ’ position.
12
Rest your steam iron back on its heel and allow
to fully cool down.
13
Wipe the soleplate
(8)
with a cold, damp cloth.
After this cleaning operation, empty out any
remaining water.
IMPORTANT: Do not attempt to descale the
soleplate with descaling products.
Maintaining your iron
RN302000MUK Rev1.qxp_Instruction Booklet 23/12/2019 11:28 Page 6

7
Troubleshooting
• N
o power or not heating up.
1
.
C
heck the fuse. Try a new fuse with the same
rating.
2
.
T
ry a different appliance in the socket as it may be
the socket that is at fault.
3
.
C
heck the temperature dial has not been set to
MIN.
4
.
C
heck the iron has not gone into auto shut-off
mode. Wait for it to heat back up.
• Overheating or not getting hot enough. 1. Adjust the temperature dial to ensure the setting
matches that recommended on the garment or
refer to the “temperature guide” section.
2. Allow the iron to reach temperature and stabilise
for 1-2 minutes if it has just been plugged in, or
re-activated after auto shut-off.
• Not steaming or poor steam. 1. Ensure the temperature is set within the steam
band and that the steam level is set to the correct
level (refer to the “temperature guide” section).
2. Check that there is enough water in the tank.
3. Allow the iron to reach temperature before using
steam.
4. Perform a self-clean to clear away limescale
inside the iron (refer to “Self Clean” section).
• Dripping from the holes in the soleplate. 1. Ensure the temperature is set within the steam
band (refer to the “temperature guide” section).
The iron will not be hot enough to produce steam
if the temperature is set too low.
2. The steam level should be set lower if the
temperature is set lower (refer to the “temperature
guide” section) to prevent it from dripping.
3. Allow the iron to reach temperature before using
steam.
• Tripping Electrics. 1. Try using a different socket.
2. Ensure there are no other appliances being used
on the same set of sockets as the iron.
• The filler cap is broken or does not close properly. 1. Call our helpline to order a new replacement filler
cap to be sent out.
Problem Solution
• The iron emits some white powder from the
soleplate.
1. If the iron is new, this is residue from
manufacturing materials and will diminish after
the first couple of uses.
2. If the iron has been used many times, this could
be a sign of limescale build-up and a self clean
should be performed. Please see “Maintaining
your iron” section.
• Leaking water. 1. Do not overfill the iron.
2. Ensure the filler cap is closed properly.
RN302000MUK Rev1.qxp_Instruction Booklet 23/12/2019 11:28 Page 7
RN302000MUK Rev1 12/19
Your standard 1 year guarantee is extended for an
additional 2 years when you register the product within 28
days of purchase with Morphy Richards. If you do not
r
egister the product with Morphy Richards within 28 days,
y
our product is guaranteed for 1 year. To validate your 3
year guarantee register with us online at
www.morphyrichards.co.uk/support
Or call our customer registration line
UK 0344 871 0242
I
RE 1800 409 119
N
.B. Each qualifying product needs to be registered with
M
orphy Richards individually.
P
lease note that the 3 year guarantee is only available in
t
he UK and Ireland. Please refer to the 1 year guarantee
f
or more information.
I
t is important to retain the retailer’s receipt as proof of
p
urchase. Staple your receipt to this back cover for future
reference.
Please quote the following information if the product
develops a fault. These numbers can be found on the base
of the product.
Model no. Serial no.
All Morphy Richards products are individually tested before
leaving the factory. In the unlikely event of any appliance
proving to be faulty within 28 days of purchase, it should
be returned to the place of purchase for it to be replaced.
If the fault develops after 28 days and within 12 months of
original purchase, you should contact the Helpline number
quoting Model number and Serial number on the product,
or write to Morphy Richards at the address shown.
You may be asked to return a copy of proof of purchase.
Subject to the exclusions (see Exclusions), the faulty
appliance will then be repaired or replaced as appropriate
and dispatched usually within 7 working days of receipt.
If, for any reason, this item is replaced or repaired during
the 1 year guarantee period, the guarantee on the new
item will be calculated from original purchase date.
Therefore it is vital to retain your original till receipt or
invoice to indicate the date of initial purchase.
To qualify for the 1 year guarantee, the appliance must
have been used according to the instructions supplied.
Morphy Richards shall not be liable to replace or repair the
goods under the terms of the guarantee where:
1 The fault has been caused or is attributable to accidental
use, misuse, negligent use or used contrary to the
m
anufacturer’s recommendations or where the fault has
b
een caused by power surges or damage caused in
t
ransit.
2 T
he fault has been caused by using water other than that
recommended by Morphy Richards.
3 The fault is caused by limescale build-up.
4 T
he cables are damaged due to wrapping too tightly or
excessive kinking.
5 T
he appliance has been used on a voltage supply other
than that stamped on the products.
6 Repairs have been attempted by persons other than our
service staff (or authorised dealer).
7 The appliance has been used for hire purposes or non
d
omestic use.
8 The appliance is second hand.
9 Morphy Richards reserves the right not to carry out any
type of servicing under the guarantee at its discretion.
• This guarantee does not confer any rights other than those
expressly set out above and does not cover any claims for
consequential loss or damage. This guarantee is offered
as an additional benefit and does not affect your statutory
rights as a consumer. Morphy Richards products are
intended for household use only. See usage limitations
within the location safety instructions.
Morphy Richards has a policy of continuous improvement
in product quality and design. The company, therefore
reserves the right to change the specification of
its models at any time.
For electrical products sold within the
European Community. At the end of the
electrical products useful life, it should not be
disposed of with household waste.
Please recycle where facilities exist. Check
with your Local Authority or retailer for
recycling advice in your country.
Exclusions
Your 1 year guarantee
Disclaimer
Registering your guarantee
Helpline
If you are having a problem with your appliance,
please call our Helpline, as we are more likely to
be able to help than the store you purchased the
item from. Please have the product name, model
number and serial number to hand when you call
to help us deal with your enquiry quicker.
UK Helpline: 0344 871 0944
IRE Helpline: 1800 409 119
Spares: 0344 873 0710
Talk to us
If you have any questions or comments, or want
some great tips to help you get the most out of
your products, join us online:
Blog: www.morphyrichards.co.uk/blog
Facebook: www.facebook.com/morphyrichardsuk
Twitter: @loveyourmorphy
Website: www.morphyrichards.com
Address:
The After Sales Division
Morphy Richards Ltd
Mexborough,
South Yorkshire,
England, S64 8AJ
Contact us
RN302000MUK Rev1.qxp_Instruction Booklet 23/12/2019 11:28 Page 8