Thoroughly clean the bowl and the removable grill grid with hot water, some washing-up liquid and a non-abrasive sponge.
The bowl and the grid are dishwasher safe.
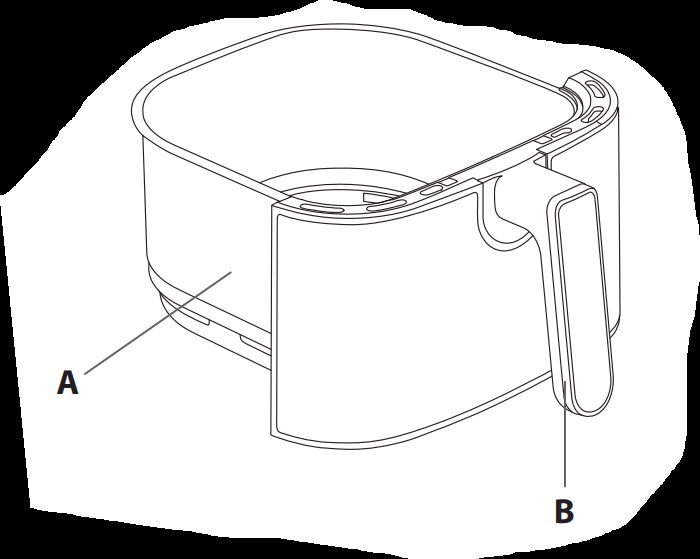
Wipe the inside and outside of the appliance with a damp cloth. The appliance works by producing hot air. Do not fill the bowl ( A) with oil or frying fat.
PREPARING FOR USE
Place the appliance on a flat, stable, heat-resistant work surface away from water splashes.
Do not fill the bowl with oil or any other liquid.
Do not put anything on top of the appliance. This disrupts the airflow and affects the hot air frying result.
USING THE APPLIANCE
Easy Fry can cook a large range of recipes. Cooking times for the main foods are given in the section ‘Cooking Guide’. Online recipes at www.tefal.com help you get to know the appliance.
1. Connect the power supply cord to an electrical socket.
2. Start the preheating phase if you wish. To do this, press the Start button that begins flashing as soon as the appliance is plugged in. The temperature displayed on the first use is 180°C.
Adjust to the desired temperature with the and buttons on the digital screen.
Press the Start button again to start preheating.
The appliance will beep when the temperature has been reached.
The preheating phase is now completed.
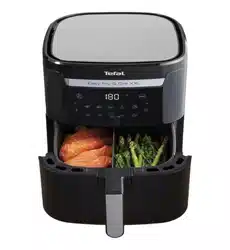
3. Place the food in the bowl.
Note: Never fill the bowl beyond the MAX level mark or exceed the maximum amount indicated in the table (see into section ‘Cooking Guide’), as this could affect the quality of the end result.
4. Slide the bowl back into the appliance.
Caution: Do not touch the bowl during use and for some time after use, as it gets very hot. Only hold the bowl by the handle.
5. To begin cooking, you can select between the automatic cooking mode and the manual settings
a. If choosing manual settings:
Adjust the temperature with the and buttons on the digital screen. The thermostat varies from 80-200°C.
Then set the desired cooking time by pressing the button and adjusting the time with the and buttons. The timer can be set for between 0 and 60 minutes.
Press the Start button to begin cooking with the selected temperature and time settings. Cooking starts. The selected temperature and remaining cooking time will alternate on the screen display.
b. If choosing automatic cooking mode:
Select the desired cooking mode by pressing the icon corresponding on the touchscreen panel (these modes are described in detail in the “Cooking guide” section).
Confirm the cooking mode by pressing the button. This will launch the cooking process.
Cooking starts. The selected temperature and remaining cooking time will alternate on the on-screen display.
6. Excess oil from the food is collected in the bottom of the bowl.
7. Some foods require shaking halfway through the cooking time (see section ‘Cooking Guide’).
To shake the food, pull the bowl out of the appliance by the handle and shake it. Then slide the bowl back into the appliance and press the Start button again to restart cooking.
8. When you hear the timer sound, the cooking time set has finished. Pull the bowl out of the appliance and place it on a heat-resistant surface.
9. Check if the food is ready. If the food is not ready yet, simply slide the bowl back into the appliance and set the timer for a few extra minutes.
10. When the food is cooked, take out the bowl. To remove food, use a pair of tongs to lift the food out of the bowl.
Caution: The bowl should never be turn up side down with the grid. After hot air frying, the bowl, the grid and the food are very hot.
Depending on the type of food cooked in the appliance, be careful as steam may escape from the bowl.
11. When a batch of food is ready, the appliance is instantly ready for preparing another batch of food.
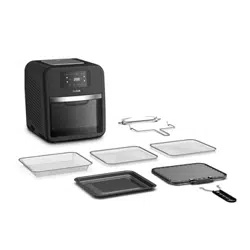
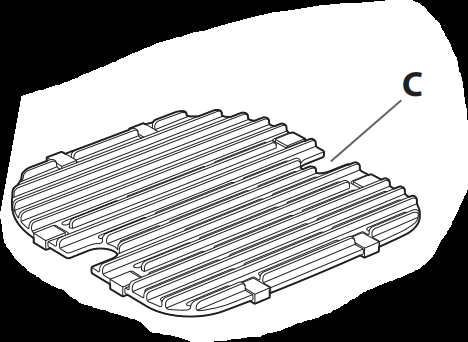
USING THE GRILL PLATE
1. Place the grill grid in the bowl of the appliance.
2. Press , then press on the screen to select the Grill mode.
3. Start the Grill mode by pressing . This will launch the preheating phase (timing :15 minutes).
4. When you hear the timer sound, the preheating phase has finished.
5. Take the bowl out the appliance and place it on a heat-resistant surface.
Caution : the bowl and the grill grid are very hot. Use a pair of tongs to place the food on the grill plate.
6. Place the food on the grill plate and put back the bowl into the appliance.
7. Select the required cooking time by pressing and buttons (see section ‘Cooking guide’).
8. Press the Start button to launch the cooking. The temperature and remaining cooking time will alternate on the on-screen display.
Note : the pieces of meat required to turn them at half cooking. Excess oil from the food is collected in the bottom of the bowl.
9. When you hear the timer sound, the cooking has finished. Take the bowl out the appliance and place it on a heat-resistant surface.
10. Check if the food is ready. If the food is not ready yet, put it back on the appliance and set the timer for a few extra minutes.
11. When the food is cooked, take out the bowl. To remove food, use a pair of tongs to lift the food out the bowl.
Caution: After hot frying, the bowl, the grid and the food are very hot.
DEHYDRATION
1. Place the grid in the bowl of the appliance.
2. Press , then adjust the temperature by pressing and button to 80°C on the digital screen.
3. Then set the desired cooking time by pressing the button and adjusting the time with and button. You can set the timing from 1 hour to 4 hours.
4. Press the Start button to launch the dehydration process. The selected temperature and remaining cooking time will alternate on the screen display.
5. When you hear the timer sound, the cooking has finished. Take the bowl out the appliance and place it on a heat-resistant surface.
6. Check if the food is ready. If the food is not ready yet, put it back on the appliance and set the timer for a few extra minutes.
7. When the food is cooked, take out the bowl. To remove food, use a pair of tongs to lift the food out the bowl.
Caution : the bowl and the grid are very hot.
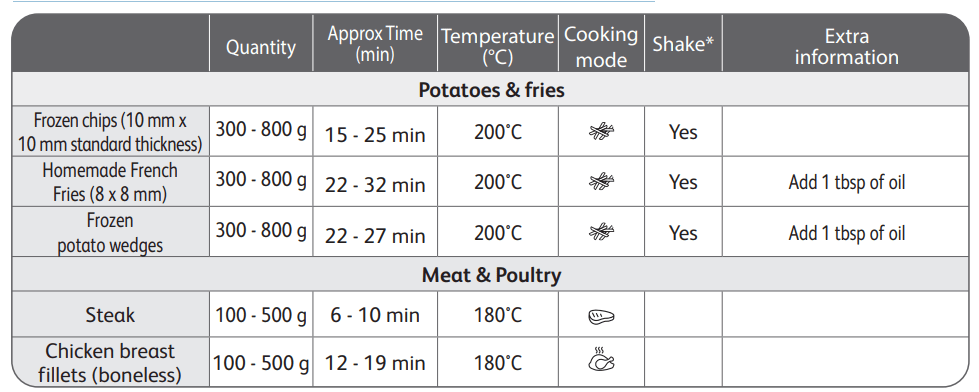
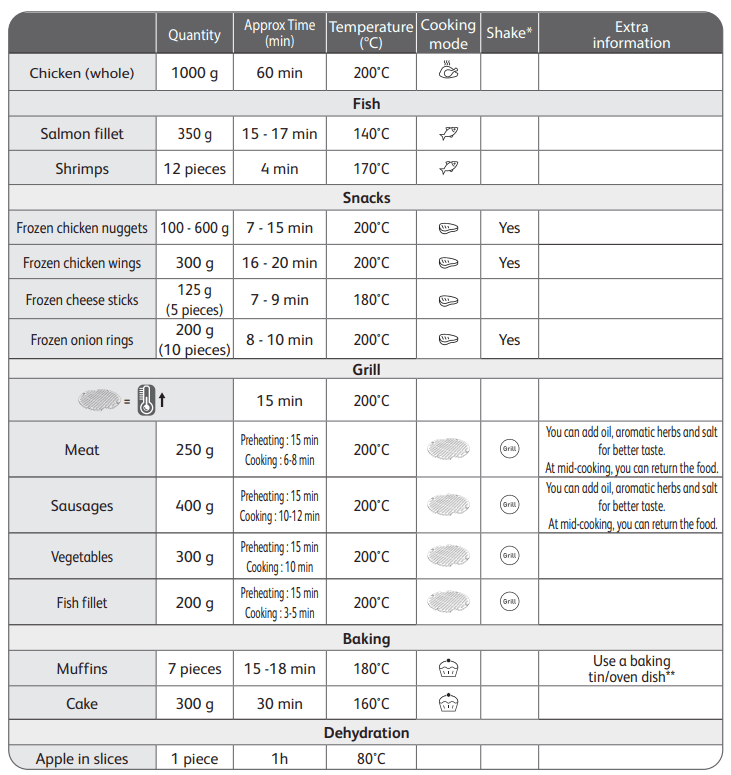
COOKING GUIDE
The table below helps you to select the basic settings for the food you want to prepare.
Note: The cooking times below are only a guide and may vary according to the variety and batch of potatoes used. For other foods the size, shape and brand may affect results. Therefore, you may need to adjust the cooking time slightly.
* Shake halfway through cooking.
IMPORTANT: To avoid damaging your appliance, never exceed the maximum quantities of ingredients and liquids indicated in the instruction manual and in the recipes.
**place the cake tin/oven dish in the bowl.
When you use mixtures that rise (such as with cake, quiche or muffins) the oven dish should not be filled more than halfway.
TIPS
Smaller foods usually require a slightly shorter cooking time than larger size foods.
A larger amount of food only requires a slightly longer cooking time, a smaller amount of food only requires a slightly shorter cooking time.
Shaking smaller size foods halfway through the cooking time improves the end result and can help prevent uneven cooking.
Add some oil to fresh potatoes for a crispy result. After adding a spoon of oil, fry the potatoes within a few minutes.
Do not cook extremely greasy foods in the appliance.
Snacks that can be cooked in an oven can also be cooked in the appliance.
The optimal recommended quantity for cooking fries is 700 grams.
Use ready made puff and shortcrust pastry to make filled snacks quickly and easily.
Place an oven dish in the appliance’s bowl if you want to bake a cake or quiche or if you want to fry fragile ingredients or filled ingredients. You can use an oven dish in silicon, stainless steel, aluminium, terracotta.
You can also use the appliance to reheat food. To reheat food, set the temperature to 160°C for up to 10 minutes.
MAKING HOME-MADE CHIPS
For the best results, we advise to use frozen chips. If you want to make home-made chips, follow the steps below.
1. Choose a variety of potato recommended for making chips. Peel the potatoes and cut them into equal thickness chips.
2. Soak the potato chips in a bowl of cold water for at least 30 minutes, drain them and dry them with a clean, highly absorbent tea towel. Then pat with paper kitchen towel. The chips must be thoroughly dry before cooking.
3. Pour 1 tablespoon of oil (vegetable, sunflower or olive) in a dry bowl, put the chips on top and mix until they are coated with oil.
4. Remove the chips from the bowl with your fingers or a kitchen utensil so that any excess oil stays behind in the bowl. Place the chips in the bowl.
Note: Do not tip the container of oil coated chips directly into the bowl in one go, otherwise excess oil will end up at the bottom of the bowl.
5. Fry the chips according to the instructions in the section Cooking guide.
CLEANING
Clean the appliance after every use.
The bowl and the grid have a non-stick coating. Do not use metal kitchen utensils or abrasive cleaning materials to clean them, as this may damage the nonstick coating.
1. Remove the mains plug from the wall socket and let the appliance cool down. Note: Remove the bowl to let the appliance cool down more quickly.
2. Wipe the outside of the appliance with a damp cloth.
3. Clean the bowl and grid with hot water, some washing-up liquid and a non-abrasive sponge. You can use a degreasing liquid to remove any remaining dirt. The bowl and the grid are dishwasher safe.
Tip: If dirt is stuck at the bottom of the bowl and the grid, fill them with hot water and some washing-up liquid. Let the bowl and the grid soak for approximately 10 minutes. Then rinse clean and dry.
4. Wipe inside of the appliance with hot water and a damp cloth.
5. Clean the heating element with a dry, cleaning brush to remove any food residues.
6. Do not immerse the appliance in water or any other liquid.


 and
and  buttons on the digital screen.
  with the
  and
and  buttons on the digital screen. The thermostat varies from 80-200°C.
 button and adjusting the time with the
  button. This will launch the cooking process.
  on the screen to select the Grill mode.
  and
and  buttons (see section ‘Cooking guide’).
 by pressing
  and
and  button to 80°C on the digital screen.
  button and adjusting the time with