Loading ...
Loading ...
Loading ...

IMPORTANT SAFEGUARDS
When using an electrical appliance, basic precautions are
required to always be followed, including the following:
READ ALL INSTRUCTIONS BEFORE USING
THIS APPLIANCE
.
DANGER:
To reduce the risk of death or injury by electric shock:
1. Do not reach for an appliance that has fallen into water. Unplug
immediately from the outlet. Note: Some electrical parts inside
the appliance are electrically live, even with the switch "off".
2. Do not use while bathing or in a shower.
3. Do not place or store appliance where it is able to fall or be
pulled into a tub or sink. Do not place in or drop into water or
other liquid.
4. Always unplug the unit from the electrical outlet immediately after
using.
5. Unplug this appliance before cleaning.
WARNING:
To reduce the risk of burns, fire, electric shock, or injury to persons:
1. This appliance can be used by children aged from 14 years and
above and persons with reduced physical, sensory or mental
capabilities or lack of experience and knowledge if they have
been given supervision or instruction, by a person responsible
for their safety, concerning the use of the appliance in a safe
way and understand the hazards involved Children should be
supervised to ensure that they do not play with the appliance.
Cleaning and user maintenance shall not be made by children
without supervision.
2. Use this appliance only for its intended use as describe in
this manual. Do not use attachments not specified by the
manufacturer.
3. Never operate this appliance when it has a damaged cord or
plug, when it is not working properly, after it has been dropped
or damaged, or after it has been dropped into water. Return the
appliance to a service center for examination and repair.
4. Keep the cord away from heated surfaces.
5. Never operate this appliance with the air openings blocked or
while on a soft surface, such as a bed or couch, where it is
possible for the air openings to be blocked. Keep the air
openings free of lint, hair, and similar objects.
6. Do not use outdoors or operate where aerosol (spray) products
are being used or where oxygen is being administered.
7. Never drop or insert any object into any opening.
8. Do not use this appliance with a damaged or broken comb nor
with teeth missing from the blades, as injury may occur.
Before use, make certain blades are aligned properly. (See
Clipper Maintenance Instructions. May not be applicable for all
appliances.)
9. During Use, do not place or leave the appliance where it is
expected to be subject to damage by an animal, or exposed to
weather.
10. To disconnect, turn all controls to “OFF”, then remove plug or
charger from outlet.
11. Turn all controls to “OFF” before placing on or removing blades
or attachments.
12. An appliance with a permanently attached cord should never be
left unattended when plugged in.
13. Keep this appliance dry.
14. Cutting blades may become hot after prolonged use.
SAVE THESE INSTRUCTIONS
THIS CLIPPER WAS DESIGNED FOR COMMERCIAL USE
ONLY
Only use hair clippers to cut human hair. Only use animal clippers to trim
animal hair and fur. This appliance is intended for trimming purposes only.
en
ENGLISH
Disposal and Recycling:
Please dispose of the appliance according to environmental laws and
regulations.
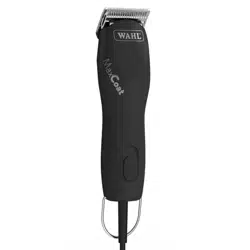
Description of parts (Fig. 1)
A Blade set
B Release button for blade set
C On/off switch
D Hang-up loop
E Mains cable
F Cleaning brush
G Oil for blade set
H Plug-in transformer
Mains operation
· Connect the plug-in transformer to the socket (Fig. 2)
· Switch on the appliance using the on/off switch (Fig. 3
ⓐ
) and, after
use, switch it off again (Fig. 3
ⓑ
).
· The appliance has two speed settings. These can be selected via
the on/off switch.
· Setting 1 = slow speed
· Setting 2 = high speed
Cutting with the attachment comb
· The appliance can also be operated with attachment combs.
Attachment combs can be used to extend the cutting length range.
· Accessories are available from your dealer.
Attaching/removing the attachment comb
· Fit the attachment comb onto the bottom edge of the blade set
(Fig. 4
ⓐ
) and push it over the cutting edge of the bottom blade until
it locks (Fig. 4
ⓑ
).
· Push the attachment comb towards the cutting edge of the bottom
blade (Fig. 5) and remove it from the blade set.
Replacing the blade set
· Switch the appliance off using the on/off switch (Fig. 3) and discon-
nect from the power supply.
· Press the release button (B) (Fig. 6
ⓐ
) towards the blade set and lift
the blade set out of the housing (Fig. 6
ⓑ
).
· Remove the blade set from the clip (Fig. 6
ⓒ
).
· Ensure that the clip is folded out. If this is not the case, you can fold
out the clip with a flat bladed screwdriver (Fig. 7).
· Attach the new blade set onto the clip (Fig. 8
ⓐ
).
· Switch the appliance on (Fig. 3
ⓐ
). Then lift the blade set up and
press it on until you hear it snap into place (Fig. 8
ⓑ
).
Cleaning and care
· Remove the attachment comb (Fig. 5) after every use and lift the
blade set out of the housing (Fig. 6). Use the cleaning brush to
remove any cut hairs from the housing opening and from the blade
set (Fig. 9).
· Attention:
The blade set must not be unscrewed.
The top blade must not be pushed out completely!
· Push the top blade to the side (Fig. 9
ⓐ
)and remove cut hairs from
the top and
bottom blade using the cleaning brush. After cleaning, return the
top blade to its initial position (Fig. 9
ⓑ
). The top blade should be
aligned in the centre of the bottom blade.
· After cleaning the blade set, we recommend using hygienic spray. It
keeps all blade sets hygienically clean and is effective against bac-
teria and viruses.
· Oil the blade set with the blade set oil (Fig. 10)
· We recommend that you clean and care for your blade set dur-
ing and after clipping with Blade Ice spray. The Blade Ice spray
ensures instant cooling, oiling and
cleaning of the blade set, while also protecting against corrosion.
· Reattach the blade set after cleaning (Fig. 7/8). Switch the appli-
ance on briefly (approx. 10 seconds) to ensure the oil film is evenly
distributed.
For Products Marked
with an FCC Approval:
1. This device complies with part 15 of the FCC Rules. Operation is subject to the following
two conditions: (1) This device may not cause harmful interference, and (2) this device
must accept any interference received, including interference that may cause undesired
2. Changes or modifications not expressly approved by the party responsible for
compliance could void the user’s authority to operate this device.
3. NOTE: This equipment has been tested and found to comply with the limits for a Class
B digital device, pursuant to part 15 of the FCC Rules. These limits are designed to
provide reasonable protection against harmful interference in a residential installation.
This equipment generates, uses, and can radiate radio frequency energy and, if not
installed and used in accordance with the instructions, may cause harmful interference
to radio communications. However, there is no guarantee that interference will not occur
in a particular installation. If this equipment does cause harmful interference to radio
or television reception, which can be determined by turning the equipment off and on,
the user is encouraged to try to correct the interference by one or more of the following
measures:
– Reorient or relocate the receiving antenna.
– Increase the separation between the equipment and receiver.
– Connect the equipment into an outlet on a circuit different from that to which the
receiver is connected.
– Consult the dealer or an experienced radio/TV technician for help.
· For a good and long-lasting cutting performance, it is important to
oil the blade set frequently
· If the cutting performance deteriorates after long use despite regular
cleaning and oiling, the blade set should be replaced.
· Only wipe the appliance with a soft, slightly damp cloth.
· Hygienic spray, blade set oil, and “Blade Ice” spray are available
from your dealer or our service centre.
Loading ...
Loading ...
Loading ...