www.klarstein.com
AEROVITAL
DELUXE
Heißluftfritteuse
Air Fryer
Friteuse à air chaud
Freidora sin aceite
Friggitrice ad aria calda
10032849 10036476


3
DE
Sehr geehrter Kunde,
wir gratulieren Ihnen zum Erwerb Ihres Gerätes. Lesen Sie die
folgenden Hinweise sorgfältig durch und befolgen Sie diese,
um möglichen Schäden vorzubeugen. Für Schäden, die durch
Missachtung der Hinweise und unsachgemäßen Gebrauch
entstehen, übernehmen wir keine Haftung. Scannen Sie den
QR-Code, um Zugriff auf die aktuellste Bedienungsanleitung
und weitere Informationen rund um das Produkt zu erhalten.
HERSTELLER & IMPORTEUR (UK)
Hersteller:
Chal-Tec GmbH, Wallstraße 16, 10179 Berlin, Deutschland.
Importeur für Großbritannien:
Chal-Tec UK limited
Unit 6 Riverside Business Centre
Brighton Road
Shoreham-by-Sea
BN43 6RE
United Kingdom
4
DE
SICHERHEITSHINWEISE
Lesen Sie diese Bedienungsanleitung sorgfältig durch, bevor Sie das Gerät benutzen,
und bewahren Sie sie zur späteren Verwendung auf. Lesen Sie alle Anweisungen.
Das Gerät ist für das Garen („Frittieren“) von Lebensmitteln mittels Heißluft und nur für
den Hausgebrauch bestimmt. Verwenden Sie das Gerät nicht für einen anderen als den
vorgesehenen Zweck.
Dieses Gerät ist nicht für den Gebrauch von Personen einschließlich Kindern mit
eingeschränkter körperlicher, sensorischer oder geistiger Leistungsfähigkeit oder
mangelnder Erfahrung und Kenntnis bestimmt, es sei denn, sie wurden von einer für ihre
Sicherheit verantwortlichen Person beaufsichtigt oder eingewiesen.
Verwenden Sie das Gerät nicht im Freien und nicht in Belegschaftsküchen,
Geschäftsräumen, Büros, Hotelzimmern und ähnlichen Wohn- und Lebensumgebungen.
Lassen Sie das Gerät während der Verwendung nicht unbeaufsichtigt.
Ziehen Sie den Stecker des Gerätes aus der Steckdose, wenn Sie es nicht verwenden.
Verwenden Sie nur vom Gerätehersteller empfohlene Gerätekomponenten und
Zubehörteile, um Schäden am Gerät zu vermeiden.
Verändern Sie das Gerät oder dessen Teil nicht.
Bei der Verwendung von elektrischen Geräten sind stets die grundlegenden
Sicherheitsvorkehrungen für elektrische Geräte zu beachten.
Lassen Sie das Gerät von einem zerti zierten Techniker oder einem vom Hersteller
autorisierten Servicezentrum überprüfen, wenn der Netzstecker, das Stromkabel oder
das Gerät in irgendeiner Weise beschädigt sind. Verwenden Sie das Gerät in diesem
Fall nicht und versuchen Sie nicht, das defekte Gerät zu reparieren.
Beaufsichtigen Sie Kinder, um sicherzustellen, dass sie nicht mit dem Gerät oder Teilen
davon spielen.
VORSICHT
Verbrennungsgefahr durch heiße Ober ächen! Dieses Gerät erzeugt
während des Betriebs Hitze und entweichenden Dampf. Es müssen
geeignete Vorkehrungen getroffen werden, um die Gefahr von
Verbrennungen, Bränden oder anderen Verletzungen von Personen oder
Sachschäden zu vermeiden.
Dieses Gerät ist während des Betriebes heiß und behält die Wärme nach dem
Ausschalten noch einige Zeit. Verwenden Sie im Umgang mit diesem Gerät immer
Ofenhandschuhe. Lassen Sie das Gerät und dessen Teile 30 Minuten abkühlen, bevor
Sie sie reinigen.
Stellen Sie das Gerät nicht in der Nähe von brenn- oder ent ammbaren Gegenständen
oder Materialien auf, um die Brandgefahr zu verringern.
Stellen Sie keine Gegenstände auf dem Gerät ab, während es in Betrieb ist oder wenn
es heiß ist.

5
DE
INHALTSVERZEICHNIS
Sicherheitshinweise ...................................................................................4
Bestandteile des Gerätes ........................................................................6
Montage .......................................................................................................... 7
Auspacken und Reinigen 7
Aufstellen 8
Anschluss an das Stromnetz ..................................................................8
Verwendung .................................................................................................. 8
Korb befüllen ................................................................................................8
Temperatur und Garzeit einstellen 9
Garkontrolle 10
Speisen entnehmen 10
Tipps und Tricks ........................................................................................11
Gartabelle 11
Herstellung von hausgemachten Pommes frites 12
Reinigung ..................................................................................................... 13
Lagerung ......................................................................................................13
Hinweise zur Entsorgung ....................................................................14
Fehlerbehebung .......................................................................................14
Garantie und Service ..............................................................................16
Technische Daten ...................................................................................16

6
DE
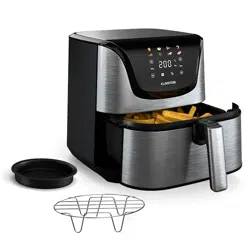
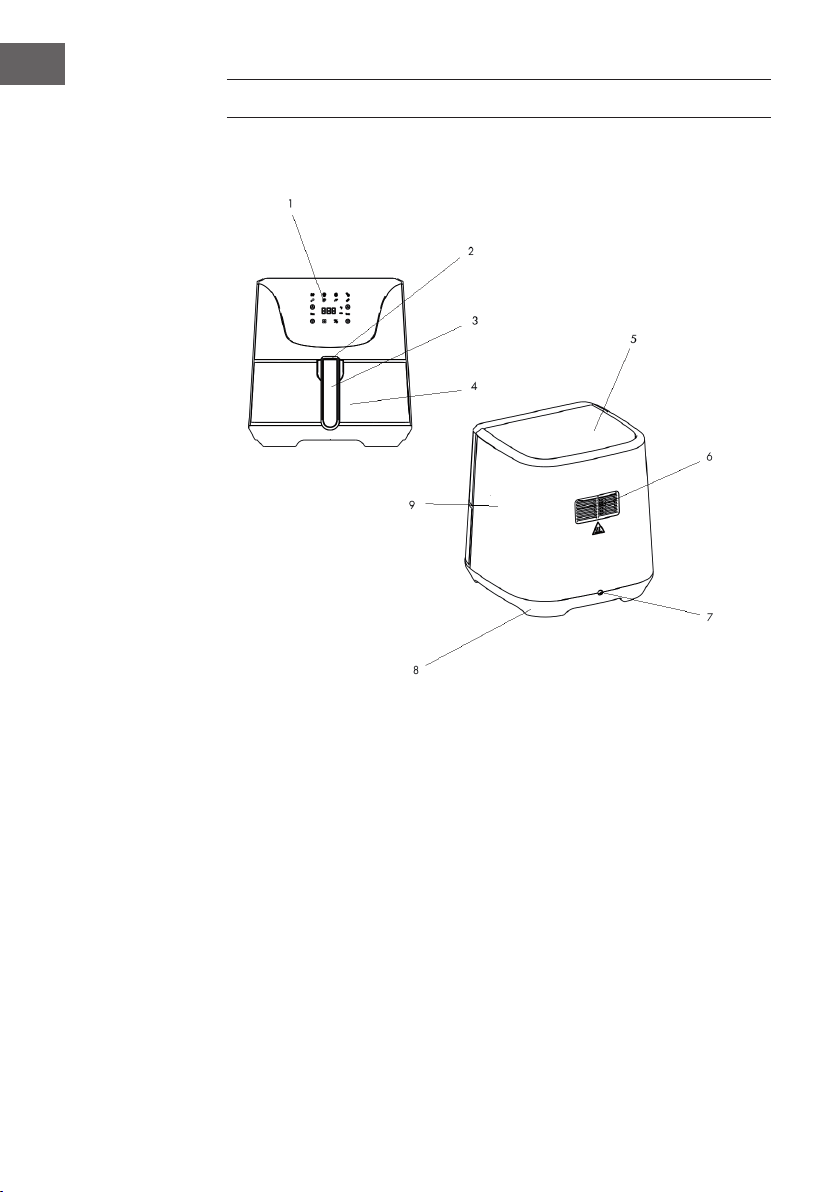
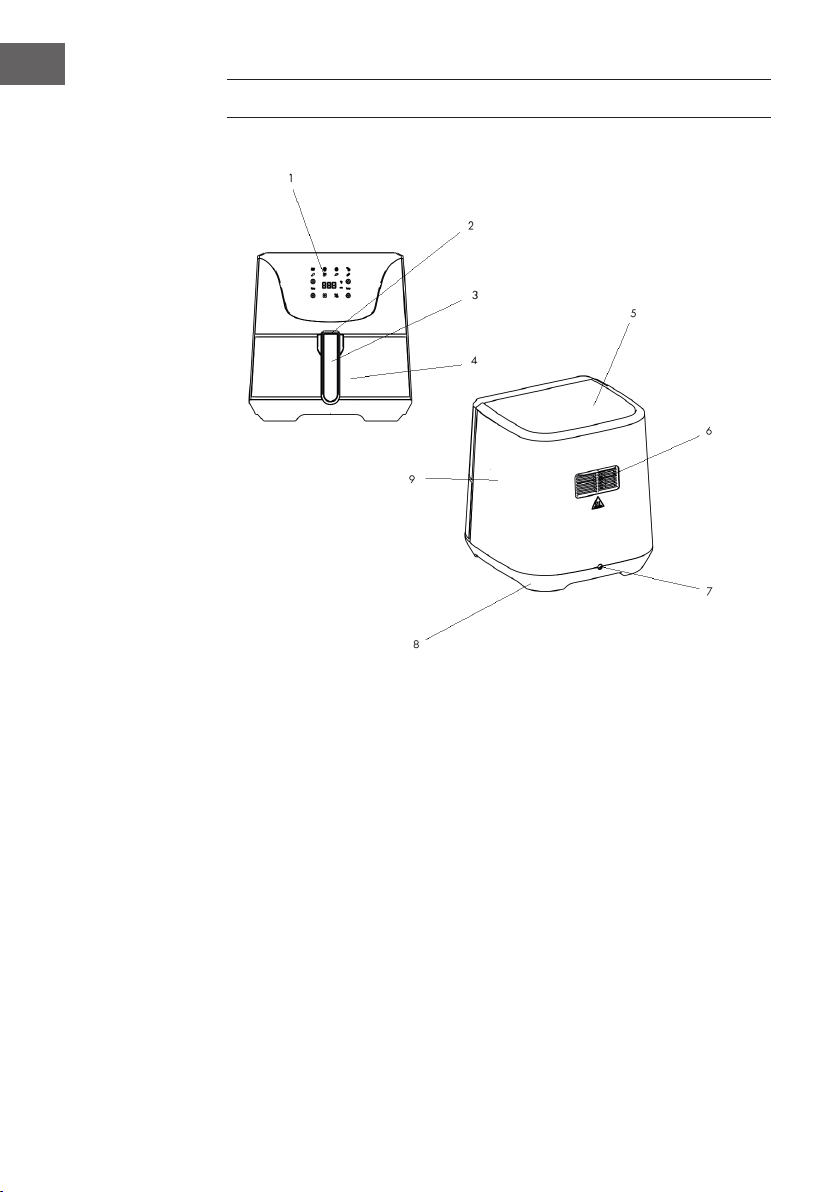
BESTANDTEILE DES GERÄTES
1 Bedienfeld
2 Verriegelung des Frittierfaches
3 Griff des Frittierkorbes
4 Frittierfach (mit Frittierkorb)
5 Oberteil
6 Luftauslass
7 Stromanschluss
8 Unterteil mit Antirutsch-Füßen
9 Gehäuse
7
DE
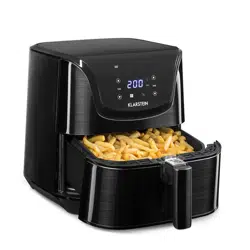
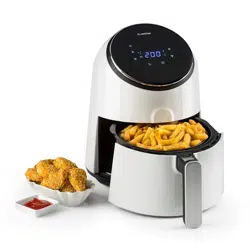
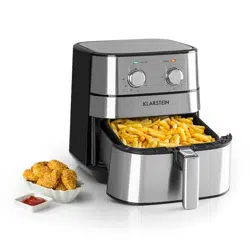
Mit Ihrer neuen Heißluftfritteuse können Sie Ihre Lieblingszutaten und
Snacks gesünder zubereiten.
Die Heißluftfritteuse verwendet heiße Luft in Kombination mit einer schnellen
Luftzirkulation (Rapid-Air-Heißlufttechnik) und einem Obergrill („Oberhitze“), um eine
Vielzahl von schmackhaften Gerichten auf eine gesunde, schnelle und einfache Weise
zuzubereiten. Ihre Zutaten werden von allen Seiten auf einmal erhitzt und es besteht bei
den meisten Grillgütern keine Notwendigkeit, Öl hinzuzufügen.
MONTAGE
Auspacken und Reinigen
Entfernen Sie alle Verpackungsmaterialien und Etiketten von der Innen- und Außenseite
der Heißluftfritteuse.
Der Frittierkorb be ndet sich bei Lieferung bereits im Frittierfach.
Zum Herausnehmen des Frittierkorbes ziehen Sie die durchsichtige Verriegelung nach
vorne.
Ziehen Sie dann das Frittierfach aus dem Gerät.
Drücken Sie auf den Entriegelungsknopf am Korbgriff und heben Sie den Frittierkorb
gerade nach oben und aus dem Fach heraus.
Beim Einsetzen des Korbs verfahren Sie ganz einfach umgekehrt: Platzieren Sie den
Korb so über das Frittierfach, dass die Korblaschen links und rechts des Griffes in die
Aussparungen auf der Oberseite des Frittierfaches greifen. Setzen Sie den Korb ins Fach
ein und verriegeln Sie den Korb.
Reinigen Sie den Korb und das Frittierfach mit heißem Wasser, einem Reinigungsmittel
und einem weichen Schwamm.
Wischen Sie das Innere und Äußere des Gehäuses mit einem feuchten Tuch ab.
WARNUNG
Stromschlaggefahr! Tauchen Sie die Heißluftfritteuse nicht in Wasser. Dies
kann elektrische Schäden am Gerät verursachen.
Trocken Sie nun alle Teile gründlich.
Setzen Sie den Frittierkorb zurück in das Fach und verriegeln Sie ihn, um ein
unbeabsichtigtes Lösen des Korbes zu verhindern.
HINWEIS: Stellen Sie vor der ersten Verwendung sicher, dass sich keinerlei
Verpackungsmaterial oder Fremdkörper an und in dem Gerät, unter und um das
Frittierfach und um den Frittierkorb be ndet.

8
DE
Aufstellen
Stellen Sie die Heißluftfritteuse auf eine stabile, ebene und hitzebeständige
Arbeitsäche in der Nähe einer Steckdose.
Achten Sie darauf, das Gerät auf eine plastikfreie Unterlage zu stellen. Die Hitze
während des Garens kann das Austreten von Weichmachern in einer plastikhaltigen
Arbeitsunterlage und das Auftreten von bleibenden dunklen Stellen, Verfärbungen und
Flecken auf der Unterlage verursachen.
Stellen Sie das Gerät in einem Abstand von mindestens 10 cm zu anderen
Gegenständen und fernab von Heizquellen auf.
Aus dem Luftauslass auf der Rückseite der Heißluftfritteuse tritt heiße Luft aus. Halten Sie
daher die Rückseite des Gerätes frei von Hindernissen, um die Funktion des Gerätes zu
gewährleisten.
Stellen Sie nichts auf die Heißluftfritteuse.
Bewegen Sie die Heißluftfritteuse nicht, solange sie heiß ist. Sie können sich durch
heraustropfende heiße Speisenüssigkeit verbrühen oder verbrennen. Lassen Sie die
Heißluftfritteuse vor dem Transport mehr als 30 Minuten abkühlen.
Anschluss an das Stromnetz
Führen Sie das Kabel hinter der Heißluftfritteuse zur Steckdose, um ein versehentliches
Herunterreißen des Gerätes zu vermeiden.
Lassen Sie das Kabel nicht über den Rand des Tisches oder der Küchenzeile hängen.
Achten Sie darauf, dass das Kabel keine heißen Oberächen, wie zum Beispiel
Heizkörper oder Kochherde, berührt.
Das mitgelieferte Netzkabel (beziehungsweise das abnehmbare Netzkabel) ist kurz.
Dies verringert die Gefahr des Verfangens oder Stolperns über ein längeres Kabel.
Verwenden Sie ausschließlich Verlängerungskabel, die für dieses Gerät geeignet
sind. Fragen Sie im Zweifelsfall einen zertizierten Techniker oder ein vom Hersteller
autorisiertes Servicezentrum.
Ziehen Sie den Netzstecker, wenn Sie die Heißluftfritteuse nicht benutzen.
VERWENDUNG
WICHTIG: Die Heißluftfritteuse arbeitet mit Heißluft anstatt Fett. Füllen Sie kein Öl
oder Bratfett in das Frittierfach. Das Gerät ist nicht dafür geeignet.
Korb befüllen
Das Gerät verfügt über einen Sicherheitsschalter im Inneren, der das Gerät abschaltet,
sobald das Frittierfach geöffnet wird. Dies beugt versehentlichem Verbrühen mit heißer
Luft vor. Das Gerät schaltet sich beim Herausziehen des Frittierfaches während des
Garens automatisch aus.
Schieben Sie den durchsichtigen Verriegelungsknopf am Korbgriff nach vorne.
9
DE
Ziehen Sie das Frittierfach aus dem Gerät.
Legen Sie das Gargut in den Frittierkorb. Füllen Sie den Korb höchstens zu zwei Dritteln.
Wenn Sie frisches Gemüse garen wollen, nehmen Sie höchsten drei Tassen voll frisches
Gemüse.
WICHTIG: Benutzen Sie das Frittierfach nur mit dem Korb darin, um die Garung der
Speisen zu gewährleisten.
Schieben Sie das Fach wieder in das Gerä und dann die durchsichtige Verrieglung
zurück über den Korbgriff.
Temperatur und Garzeit einstellen
Über das Bedienfeld wählen Sie bequem eines der verschiedenen Garprogramme
oder Sie stellen die Temperatur und Garzeit per Tastendruck ein.
Stecken Sie den Netzstecker des Gerätes in die Steckdose.
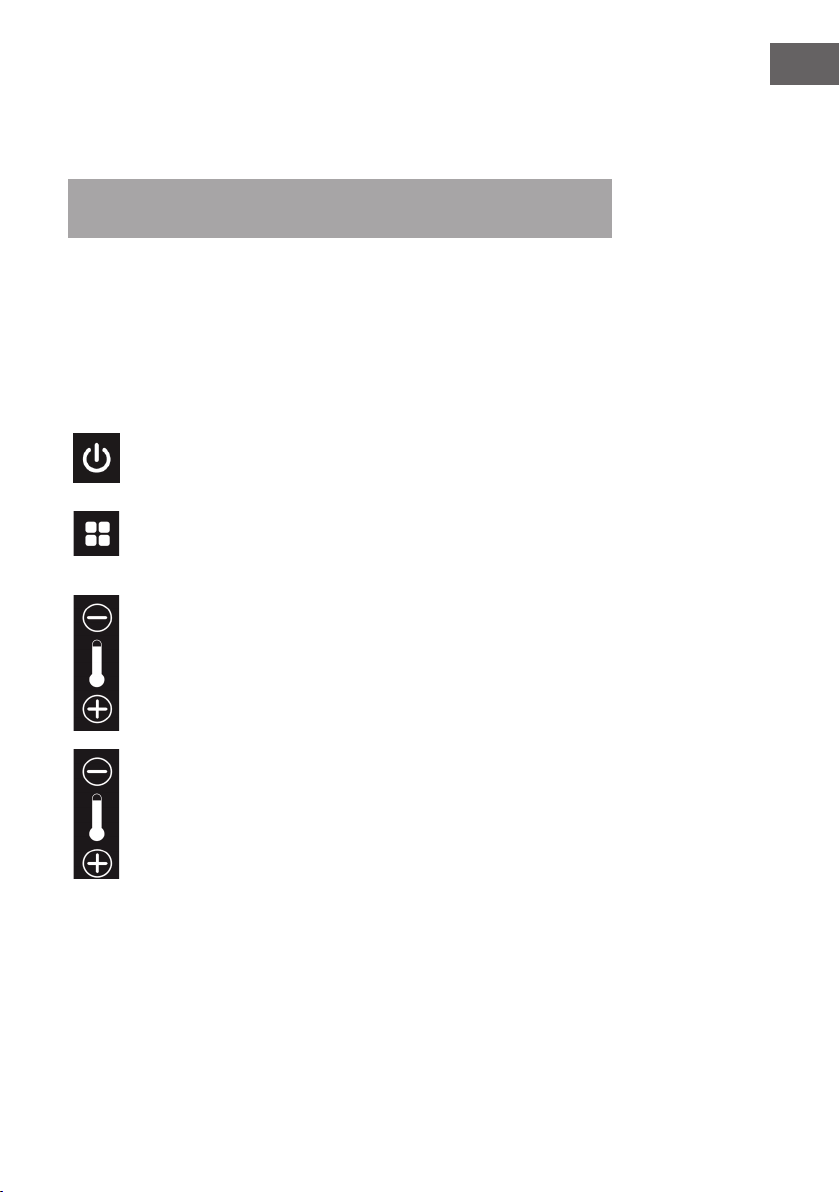
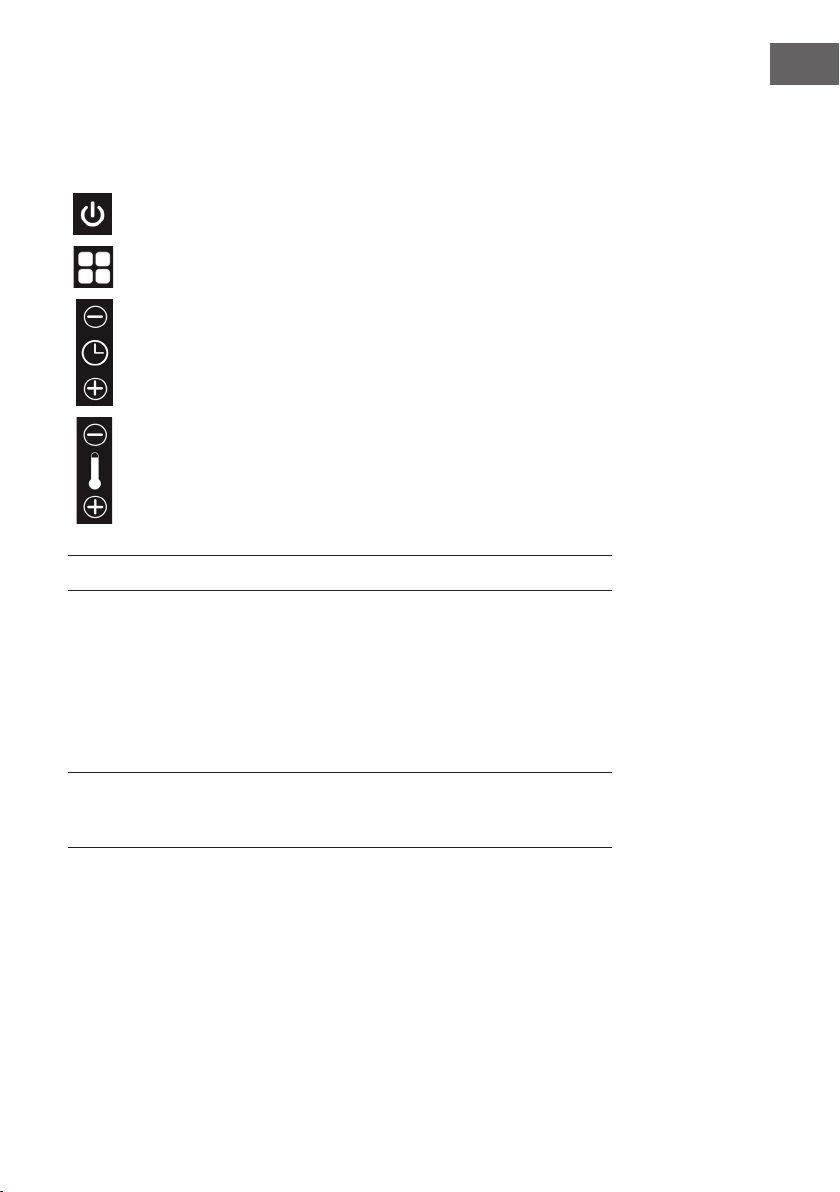
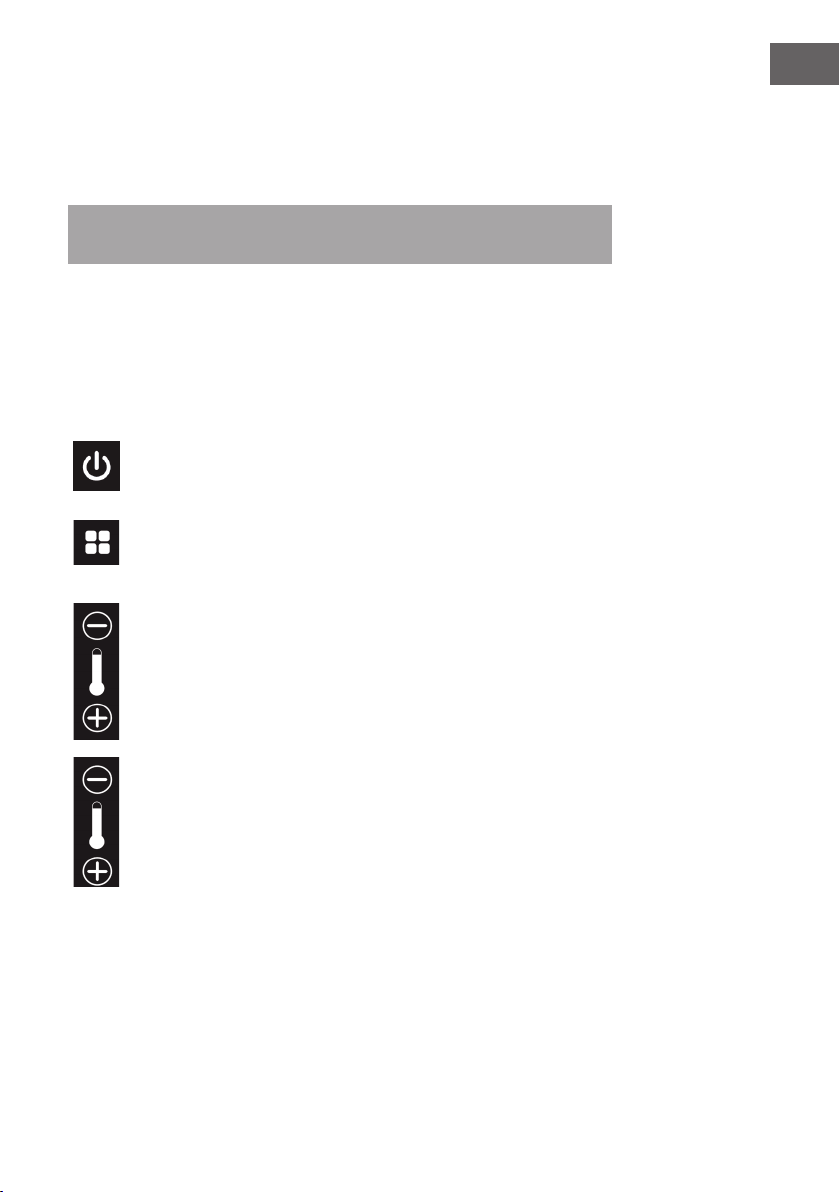
EIN/AUS
Schaltet das Gerät ein oder aus.
MODUS
Wählt zwischen voreingestellten Programmen.
ZEIT
Durch Drücken dieser Taste können Sie die gewünschte Zeit einstellen.
Stellt die gewünschte Gardauer durch Drücken der Tasten PLUS oder
MINUS ein.
TEMPERATUR
Durch Drücken dieser Taste können Sie die gewünschte Temperatur
einstellen.
Stellt die gewünschte Heißlufttemperatur durch Drücken der Tasten PLUS
oder MINUS einstellen.
Drücken Sie die Taste EIN/AUS, um das Gerät anzuschalten. Die Taste EIN/AUS
leuchtet nun.
Beim ersten Gebrauch kann die Heißluftfritteuse einen leichten Geruch freisetzen. Das ist
normal und verschwindet nach kurzer Zeit.
Wählen Sie eines der Programme oder stellen Sie die gewünschte Zubereitungszeit
und -temperatur ein.

10
DE
HINWEIS: Die Anzeige von Zeit und Temperatur ändert sich automatisch alle
5Sekunden.
Garkontrolle
Einige Speisen sollten in der Mitte der Zubereitungszeit gewendet, geschwenkt oder
geschüttelt werden, um gleichmäßig zu garen und um nicht aneinander zu haften.
Schwenken oder schütteln Sie vor allem größere Mengen für eine gleichmäßige
Garung.
HINWEIS: Berühren Sie den Korb und das Frittierfach nur mit Ofenhandschuhen.
Während der Garung und danach sind der Frittierkorb, das Fach und die Speisen heiß.
Je nach Art der Speisen kann Dampf aus dem Fach entweichen. Tragen Sie, wenn nötig,
langärmelige Kleidung, um ungeschützte Körperstellen vor eventuell aus den Speisen
austretenden heißen Speisesäften zu schützen.
1 Ziehen Sie den durchsichtigen Verriegelungsknopf am Korbgriff nach vorn, um das
Fach zu entriegeln.
2 Ziehen Sie das Frittierfach am Griff aus dem Gerät. Schütteln Sie oder schwenken
Sie die Speisen kräftig.
Sie können den Korb zum Schütteln auch aus dem Fach lösen, wenn Ihnen das
Frittierfach zu schwer in der Hand liegt.
1 Schieben Sie die durchsichtige Verriegelung am Korbgriff nach vorn und ziehen Sie
das Fach aus dem Gerät.
2 Stellen Sie das Fach auf eine hitzebeständige Unterlage.
3 Drücken Sie den Knopf am Korbgriff und nehmen Sie den Korb heraus.
4 Schütteln oder schwenken Sie die Speisen kräftig.
5 Setzen Sie den Korb wieder korrekt in das Frittierfach ein und verriegeln Sie ihn.
Schieben Sie das Fach wieder in das Gerät.
HINWEIS: Die Heißluftfritteuse funktioniert nur, wenn das Frittierfach vollständig
geschlossen ist.
Tipp: Stellen Sie den Timer auf die Hälfte der Zubereitungszeit ein, um vom Timer-
Alarm daran erinnert zu werden, dass Sie die Speisen schwenken. Vergessen Sie nicht,
den Timer nach dem Schwenken wieder auf die noch verbleibende Zubereitungszeit
einzustellen.
Speisen entnehmen
Wenn Sie den Timer-Alarm hören, ist die eingestellte Zubereitungszeit abgelaufen.
Ziehen Sie das Frittierfach aus dem Gerät.
HINWEIS: Berühren Sie den Korb und das Frittierfach nur mit Ofenhandschuhen.
Während und nach dem Heißluftgaren sind der Korb, das Fach und die Speisen heiß.
Je nach Art der Speisen kann Dampf aus dem Fach entweichen. Tragen Sie, wenn nötig,
langärmelige Kleidung, um ungeschützte Körperstellen vor eventuell aus den Speisen
austretenden heißen Speisesäften zu schützen.

11
DE
Überprüfen Sie, ob die Speisen gar sind. (Falls nicht, schieben Sie einfach das Fach
zurück in das Gerät und stellen Sie den Timer auf weitere Minuten ein.)
Wenn die Speisen zu Ihrer Zufriedenheit gegart sind, ziehen Sie das Fach aus der
Heißluftfritteuse und stellen Sie es auf eine hitzebeständige Unterlage.
Drücken Sie den Entriegelungsknopf am Korb und heben Sie den Korb aus dem Fach.
HINWEIS: Drehen Sie den Korb zum Entleeren nicht mit der Öffnung nach unten,
während er noch am Frittierfach befestigt ist, da Fett oder Speisesäfte aus dem Fach
heraustropfen können.
Entleeren Sie die Speisen aus dem Korb in eine Schüssel oder auf einen Teller.
Tipp: Um große oder empndliche Speisen zu entnehmen, verwenden Sie eine
Bratenzange oder eine Schöpfkelle.
Wenn eine Charge von Speisen fertig ist, ist die Heißluftfritteuse sofort bereit für die
Zubereitung einer weiteren Charge.
TIPPS UND TRICKS
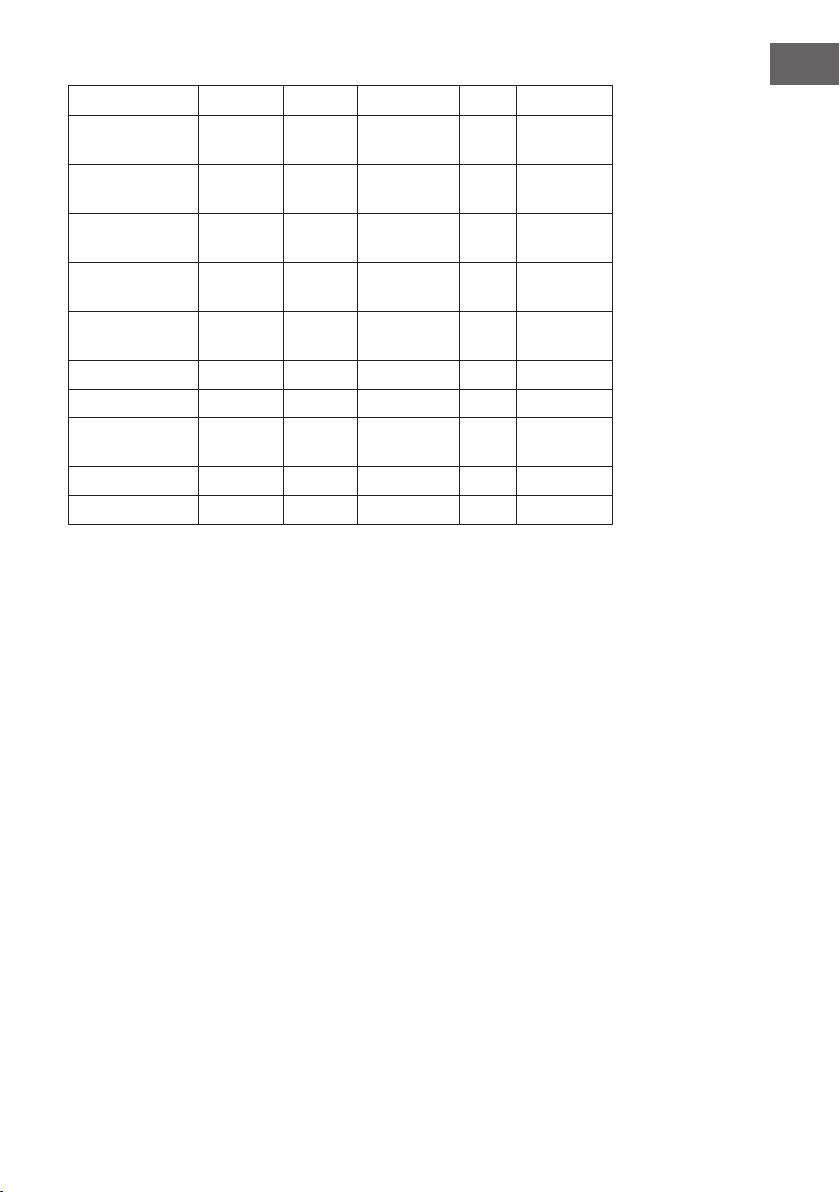
Gartabelle
Die folgende Tabelle hilft Ihnen bei der Auswahl der richtigen Temperatur und Zeit für
beste Ergebnisse. Wenn Sie sich mit dem Heißluftgaren vertraut gemacht haben, können
Sie diese Empfehlungen an Ihren persönlichen Geschmack anpassen.
Fügen Sie 3 Minuten zur Garzeit hinzu, wenn das Gerät noch kalt ist und zum ersten
Garen startet.
Lebensmittel Menge Garung Garkontrolle Verfeinerung
Dünne gefrorene
Pommes frites
2½-5 Tassen 10-12 min 200°C Ja
Dicke gefrorene
Pommes frites
2½-5 Tassen 10-14 min 200°C Ja
Selbstgemachte
Pommes frites
2½-6 Tassen 12-18 min 200 °C Ja ½ Teelöffel Öl
Selbstgemachte
Kartoffelspalten
2½-6 Tassen 18-25 min 180 °C Ja ½ Teelöffel Öl
Selbstgemachte
Kartoffelwürfel
2½-6 Tassen 14-20 min 180 °C Ja ½ Teelöffel Öl
Steak 120-900 g 8-12 min 200 °C
Hamburger 120-500 g 7-14 min 180 °C

12
DE
Gefrorene
Hähnchen-
Nuggets
120-900 g 12-16 min 200 °C Ja
Mozzarella
Sticks
120-900 g 8-14 min 180 °C Ja
Gefülltes
Gemüse
120-900 g 10-15 min 160 °C Ja
Hinweis: Bitte beachten Sie, dass es sich bei diesen Einstellungen um Empfehlungen
handelt, da sich Lebensmittel in Herkunft, Größe, Form und Marke unterscheiden.
Wir können nicht garantieren, dass Ihre Speisen genau diese Zeit und Temperatur
benötigen, um zu garen.
Snacks, die normalerweise im Ofen zubereitet werden, können auch in der
Heißluftfritteuse zubereitet werden.
Lebensmittel, die dünn oder klein sind, benötigen in der Regel eine etwas kürzere
Garzeit als größere.
Sie können die Heißluftfritteuse zum Aufwärmen von Speisen verwenden. Stellen Sie
einfach eine Temperatur von 150°C beziehungsweise 300°F und eine Zeit von bis zu
10 Minuten ein.
Die Zugabe von etwas Panzenöl zu frischen Kartoffeln wird für ein knusprigeres
Ergebnis empfohlen. Wenn Sie etwas Öl hinzufügen, tun Sie dies kurz vor dem Garen.
Das Schwenken oder Schütteln kleinerer Speisen in der Mitte des Garprozesses stellt
sicher, dass alle Stücke gleichmäßig gegart werden.
Verwenden Sie vorgefertigten Teig, um gefüllte Snacks schnell und einfach zuzubereiten.
Vorgefertigter Teig erfordert eine kürzere Garzeit als selbstgemachter Teig.
Legen Sie beim Backen eines Kuchens oder einer Quiche eine Backform oder eine
Auaufform in den Frittierkorb.
Wir empfehlen eine Backform oder Ofengeschirr beim Garen von empndlichen oder
gefüllten Lebensmitteln.
Herstellung von hausgemachten Pommes frites
Um hausgemachte Pommes frites zu machen, befolgen Sie die folgenden Schritte:
1 Kartoffeln schälen und in Stäbchen („Sticks“) schneiden.
2 Kartoffelsticks gründlich waschen und mit Küchenpapier trocknen.
3 ½ Esslöffel Olivenöl und die Sticks in eine Schüssel geben und mischen, bis die
Sticks mit Öl überzogen sind.
4 Sticks mit einer Bratenzange oder Schöpfkelle aus der Schüssel entnehmen,
überschüssiges Öl abtropfen lassen und die Sticks in den Frittierkorb legen.
Schütten Sie die Kartoffelsticks nicht aus der Schüssel in den Frittierkorb, um zu
verhindern, dass das überschüssige Öl aus der Schüssel in das Frittierfach gelangt.
5 Kartoffelsticks gemäß Gartabelle in der Heißluftfritteuse garen.

13
DE
REINIGUNG
Dieses Gerät ist äußerst p egeleicht. Es enthält keine vom Benutzer zu wartenden Teile.
Alle Wartungsarbeiten, die eine andere Wartung als die Reinigung erfordern, müssen
von einem quali zierten Techniker durchgeführt werden.
Reinigen Sie das Gerät nach jedem Gebrauch.
WARNUNG
Stromschlaggefahr! Tauchen Sie das Gerät nicht in Wasser. Das Gerät
wird elektrisch betrieben und kann dadurch beschädigt werden.
Ziehen Sie den Netzstecker aus der Steckdose und lassen Sie das Gerät abkühlen.
Tipp: Entfernen Sie das Fach nach dem Garen aus der Heißlutfritteuse, um das Gerät
schneller abkühlen zu lassen.
Wischen Sie die Außenseite des Gerätes mit einem feuchten Tuch ab.
Reinigen Sie das Innere des Gerätes mit heißem Wasser und einem nicht scheuernden
Schwamm.
Reinigen Sie das Heizelement mit einer Reinigungsbürste, um Speisereste zu entfernen.
HINWEIS: Frittierfach und -korb dürfen nicht mit metallenen Küchenutensilien oder
Scheuermitteln gereinigt werden, da dies die Antihaftbeschichtung beschädigen kann.
Reinigen Sie das Fach und den Korb mit heißem Wasser, etwas Spülmittel und einem
nicht scheuernden Schwamm. Sie können eine Entfettungs üssigkeit verwenden, um den
verbliebenen Schmutz zu entfernen.
Tipp: Wenn Schmutz am Korb oder am Boden des Fachs klebt, füllen Sie das Fach mit
heißem Wasser und etwas Spülmittel. Legen Sie den Korb in das Fach und lassen Sie
das Fach circa 10 Minuten einweichen.
LAGERUNG
Ziehen Sie den Netzstecker und lassen Sie das Gerät abkühlen.
Stellen Sie sicher, dass alle Teile sauber und trocken sind.
Bewahren Sie die Heißluftfritteuse an einem trockenen, staubfreien Ort auf.
14
DE
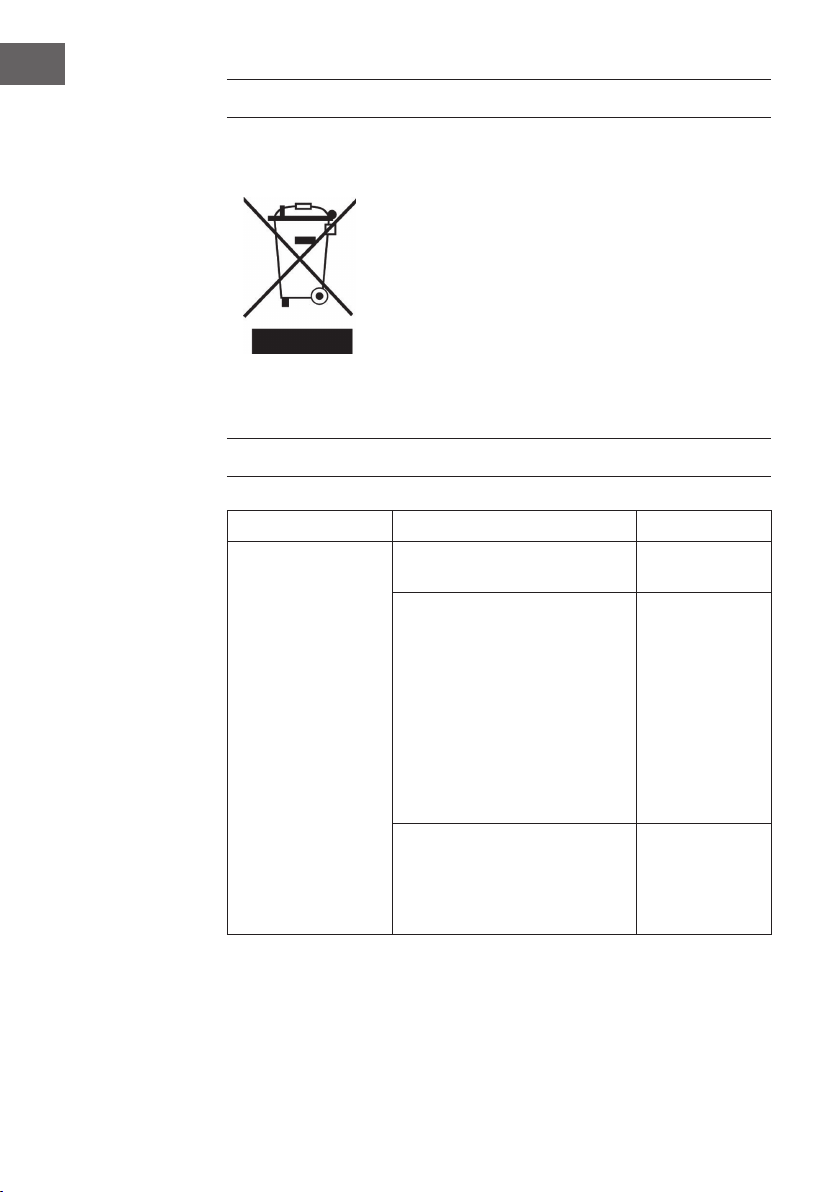
HINWEISE ZUR ENTSORGUNG
Wenn es in Ihrem Land eine gesetzliche Regelung zur
Entsorgung von elektrischen und elektronischen Geräten
gibt, weist dieses Symbol auf dem Produkt oder auf der
Verpackung darauf hin, dass dieses Produkt nicht im
Hausmüll entsorgt werden darf. Stattdessen muss es zu
einer Sammelstelle für das Recycling von elektrischen
und elektronischen Geräten gebracht werden. Durch
regelkonforme Entsorgung schützen Sie die Umwelt und die
Gesundheit Ihrer Mitmenschen vor negativen Konsequenzen.
Informationen zum Recycling und zur Entsorgung dieses
Produkts, erhalten Sie von Ihrer örtlichen Verwaltung oder
Ihrem Hausmüllentsorgungsdienst.
FEHLERBEHEBUNG
Problem Mögliche Ursache Lösung
Die Heißluftftritteuse
funktioniert nicht.
Das Gerät ist nicht angeschlossen. Stecken Sie den
Netzstecker in die
Steckdose.
Sie haben das Gerät nicht
eingeschaltet und/oder die Garzeit
oder die Temperatur nicht eingestellt.
Drücken Sie die
Einschalttaste.
Wählen Sie ein
Programm oder
wählen Sie Zeit
und Temperatur.
Drücken Sie dann
die Start-Taste.
Sie haben das Gerät pausiert.
(Wenn Sie die Starttaste während
des Betriebes drücken, pausiert das
Gerät.)
Drücken Sie die
Starttaste erneut.
Das Fach klemmt. Der Frittierkorb ist nicht korrekt im
Fach platziert.
Drücken Sie den
Korb vorsichtig
in das Fach, wie
im Abschnitt
MONTAGE
beschrieben.
Der Frittierkorb ist überfüllt. Füllen Sie den
Frittierkorb wie
empfohlen. Siehe
dazu den Abschnitt
KORB BEFÜLLEN

15
DE
Die Speisen sind nicht
gar.
Der Frittierkorb ist überfüllt. Verwenden
Sie kleinere
Mengen für ein
gleichmäßigeres
Garen.
Die Temperatur ist zu niedrig
eingestellt.
Drücken Sie die
Taste HOCH in der
Temperaturwahl,
um die Temperatur
zu erhöhen.
Die Speisen sind nicht
gleichmäßig gar.
Einige Lebensmittel müssen während
des Garvorgangs gewendet,
geschwenkt oder geschüttelt
werden.
Wenden Sie die
Speisen einige
Male während
das Garens.
Schauen Sie in
die Gartabelle im
Abschnitt TIPPS
UND TRICKS.
Die Pommes frites sind
nicht gleichmäßig
gegart.
Sie haben unterschiedliche
Kartoffeltypen verwendet.
Verwenden
Sie frische,
festkochende
Kartoffeln.
Die Kartoffeln wurden nach der
Reinigung nicht getrocknet.
Tupfen Sie die
Kartoffeln nach
dem Waschen
trocken.
Die Pommes frites sind
nicht knusprig.
Die rohen Pommes frites haben zu
viel Wasser.
Tupfen Sie die
Kartoffeln nach
dem Waschen
trocken.
Schneiden Sie
dünnere Sticks.
Fügen Sie mehr Öl
hinzu.
Weißer Rauch steigt aus
dem Gerät auf.
Es wurde zuviel Öl verwendet. Das Öl von sehr
fettigen Speisen
tropft in das Fach
und verbrennt dort.
Verwenden Sie
weniger fettige
Speisen.
Am Fach oder am Frittierkorb haften
Öl- oder Speisereste vom letzten
Garvorgang.
Reinigen Sie
das Fach und
Korb nach jeder
Verwendung.
16
DE
GARANTIE UND SERVICE
Wenn Sie Informationen benötigen oder ein Problem mit Ihrem Gerät haben, besuchen
Sie bitte unsere Website oder wenden Sie sich an Ihren Händler.
TECHNISCHE DATEN
Artikelnummer 10032849, 10036476
Stromversorgung 220-240 V ~ 50/60 Hz
Leistungsaufnahme 1700 W
Technologie Rapid-Air-Heißlufttechnik
Kapazität 5,4 L
Bedienung LED-Panel
Material
Gehäuse: Edelstahl
Frittierfach: Aluminium
Heizelement: Edelstahl
Temperaturbereich 80 - 200°C
Timer ≤ 60 Minutes

17
EN
Dear Customer,
Congratulations on purchasing this device. Please read the
following instructions carefully and follow them to prevent
possible damages. We assume no liability for damage caused
by disregard of the instructions and improper use. Scan the QR
code to get access to the latest user manual and more product
information.
MANUFACTURER & IMPORTER (UK)
Manufacturer:
Chal-Tec GmbH, Wallstrasse 16, 10179 Berlin, Germany.
Importer for Great Britain:
Chal-Tec UK limited
Unit 6 Riverside Business Centre
Brighton Road
Shoreham-by-Sea
BN43 6RE
United Kingdom
18
EN
SAFETY INSTRUCTIONS
Please read this manual carefully before using the device and keep it for future
reference. Read all instructions.
The appliance is intended for cooking („frying“) food using hot air and for domestic use
only. Do not use the device for any purpose other than its intended use.
This device is not intended for use by persons including children with reduced physical,
sensory or mental abilities or lack of experience and knowledge, unless they have been
supervised or instructed by a person responsible for their safety.
Do not use the device outdoors or in staff kitchens, business premises, of ces, hotel
rooms and similar residential and living environments.
Do not leave the unit unattended during use.
Unplug the unit when not in use.
Only use device components and accessories recommended by the device
manufacturer to prevent damage to the device.
Do not modify the device or its part.
When using electrical equipment the basic safety precautions for electrical equipment
must always be observed.
Have the device checked by a certi ed technician or a service center authorized by the
manufacturer if the power plug, the power cable or the device is damaged in any way.
In this case, do not use the device and do not attempt to repair the defective device
yourself.
Monitor children to make sure they are playing with the device or parts of it.
CAUTION
Risk of burns from hot surfaces! This equipment generates heat and steam
during operation. Appropriate precautions must be taken to avoid the risk
of burns, re or other personal injury or property damage.
The device is hot during operation and retains the heat for some time after switching off.
Always use oven gloves when handling the device. Allow the device and its parts to
cool off for 30 minutes before cleaning.
To reduce the risk of re place the device far from ammable or combustible objects or
materials.
Do not place anything on top of the device while it is operating or when it is hot.

TABLE OF CONTENTS
Safety Instructions .................................................................................. 18
Components of the Device .................................................................20
Assembly ......................................................................................................21
Unpacking and Cleaning 21
Setup 21
Connecting to the Power Outlet 22
Use .................................................................................................................. 22
Filling the Basket 22
Setting Temperature and Cooking Time 22
Cooking control 23
Emptying the Basket 24
Hints and Tricks ........................................................................................ 24
Preparation Table 24
Homemade French fries 25
Cleaning .......................................................................................................26
Storage .......................................................................................................... 26
Disposal Considerations ......................................................................27
Troubleshooting .......................................................................................27
Warranty and Service ............................................................................28
Technical Specications ........................................................................ 28
20
EN
COMPONENTS OF THE DEVICE
1 Control panel
2 Transparent Latch
3 Frying basket handle
4 Frying compartment containing frying drawer and frying basket
5 Top of the devicet
6 Rear air outlet
7 Power connector
8 Bottom with non-slipping feet
9 Case
21
EN
Your new air fryer allows you to prepare your favorite ingredients and
snacks in a healthier way.
The air fryer uses hot air in combination with high-speed air circulation (rapid hot air)
and a top grill to prepare a variety of tasty dishes in a healthy, fast and easy way. Your
ingredients are heated from all sides at once and there is no need to add oil to most of
the ingredients.
ASSEMBLY
Unpacking and Cleaning
Remove all packaging materials and labels from the inside and outside of the hot air
deep fryer. The frying basket is already in the frying compartment on delivery.
Pull the transparent latch on the basket handle forward to unlock the drawer.
Take the frying drawer out of the compartment.
Press the release button on the basket handle.
Lift the frying basket straight up and out of the drawer. When inserting the basket simply
reverse the procedure: Place the basket above the frying drawer the basket aps on the
left and right of the handle tting in the recesses at the frying drawer. Insert the basket
into the drawer and lock the basket.
Clean the basket and the frying drawer with hot water, a detergent and a soft non-
abrasive sponge.
Wipe the inside and outside of the case with a damp cloth.
WARNING
Risk of electric shock! Do not immerse the air fryer in water. This may
cause electrical damage to the device.
Now dry all components.
Put the frying basket back into the drawer and lock it to prevent unintentional release of
the basket.
NOTE: Before using the device for the rst time make sure that there are no packaging
material or foreign objects on the out- and inside of the device, in, around or between
the frying drawer and basket.
Setup
Place the hot air fryer on a stable, even and heat-resistant surface near a power outlet.
Make sure to place the device on a plastic-free surface. The heat during cooking may
cause plasticisers to escape from a plastic-containing surface and cause permanent
dark spots, discolouration and stains on the surface.
Place the device at least 10 cm (4 Inches) away from other objects and away from heat
sources.

22
EN
Hot air escapes from the air outlet on the rear side of the air fryer. Keep the rear side of
the free of obstacles to ensure the functioning of the device.
Do not place anything on top of the air fryer.
Do not move the air fryer while it is hot. You may be or burned by dripping hot food
liquid. Allow the air fryer to cool off for more than 30 minutes before transport.
Connecting to the Power Outlet
Lead the power cord behind the air fryer to the power outlet to prevent the device from
being accidentally torn down.
Do not let the cord hang over the edge of the working surface.
Make sure the cord does not touch any hot surfaces, such as radiators or stoves.
The supplied power cord (or detachable power cord) is short. This reduces the risk of
getting caught or tripping over a long cord. Use extension cords that are suitable for this
device only. If in doubt consult a certied technician or a service center authorised by
the manufacturer.
Unplug the power cord when the device not in use.
USE
IMPORTANT: The air fryer works with hot air instead of fat. Do not ll the frying
drawer with oil or frying fat. The device is not suitable for this.
Filling the Basket
The air fryer has a safety switch inside which automatically switches the device off when
the frying compartment is opened. This prevents accidental scalding with hot air.
Pull the transparent latch on the basket handle forward to unlock the drawer.
Take the frying drawer out of the compartment.
Place the food in the frying basket. Fill the basket up to a maximum of two thirds. When
preparing fresh vegetables, take a maximum of three cups of fresh vegetables.
IMPORTANT: Always, fry food with the basket inserted into the drawer to ensure the
food is fried properly.
Slide the drawer back into the compartment and push the transparent latch over the
basket handle to lock the compartment.
Setting Temperature and Cooking Time
Use the control panel to select a program or set temperature and preparation time
manually.
Connect the power supply to the device and the power outlet.
Press the button ON/OFF to turn the device on. The ON/OFF button is now lighting.
23
EN
HINT: At rst-time use, the air fryer may release a slight odour. This is normal and fades
after a short time.
Select one of the programs or set your desired preparation time and temperature
manually.
ON/OFF
Turns the unit on or off.
MODE
Selects between preset programs.
TIME
You can set the desired time by pressing
this button.
Sets the desired cooking time by pressing
the PLUS or MINUS keys.
TEMPERATURE
You can set the desired temperature by
pressing this button.
Sets the desired hot air temperature by
pressing the PLUS or MINUS buttons.
NOTE: The display toggles every 5 seconds between time and temperature.
Cooking control
Some food, especially large quantities, requires additional preparation steps halfway
through the preparation time, such as turning or shaking, to ensure best cooking results.
To shake the food, pull the drawer out of the compartment by the handle and shake the
drawer.
Then slide the drawer back into the compartment.
NOTE: Touch the basket and the frying compartment only with oven gloves. During and
after cooking frying basket, drawer and food are hot. Depending on the type of food,
steam may escape from the drawer.
Pull the transparent latch on the basket handle forward to unlock the drawer.
Pull the frying drawer out of the compartment by the handle. Shake the food vigorously.
You can also detach the basket from the frying drawer for shaking if the drawer is too
heavy in your hand.
Slide the transparent latch on the basket handle forward and pull the drawer out of the
compartment.
Place the drawer on a heat-resistant surface.
Press the button on the basket handle to detach the basket.

24
EN
Shake or swing the food vigorously.
Re-attach the basket in th drawer and lock it.
Slide the drawer back into the compartment.
NOTE: The hot air fryer only works when the frying drawer is completely closed.
HINT: Set the timer to half the preparation time to be reminded by the timer alarm to
shake the food. Do not forget to set the timer to the remaining preparation time after
shaking the food.
Emptying the Basket
When you hear the timer alarm the set preparation time has elapsed.
Pull the frying drawer out of the compartment. Check if the food is cooked. (If not, simply
slide the drawer back into the compartment and set the timer to another minutes.)
NOTE: Touch the basket and the frying compartment with oven gloves only. During and
after air frying basket, drawer and food are hot. Depending on the type of food, steam
may escape from the compartment.
When the food is cooked to your satisfaction place the drawer on a heat-resistant
surface.
Press the button on the frying basket to release the basket and lift the basket out of the
drawer.
NOTE: Do not hold the basket with the opening facing down while the basket is still
attached to the drawer as grease or food juices may drip out of the drawer.
Empty the food from the basket into a bowl or onto a plate.
HINT: Use roasting tongs or a ladle to take large or delicate food out of the basket.
When one batch of food is ready the air fryer is immediately ready to prepare another
batch.
HINTS AND TRICKS
Preparation Table
The following table will help you choose the right temperature and time for best
results. Once you are familiar with air frying you will adapt these recommendations to
yourconvenience.
Add 3 minutes to cooking time if the air fryer is cold and starts to fry the rst time.
25
EN
Food Maximum Time Temperature Check Renement
Thin frozen French
fries
2½-5 Cups 10-12 min 200 °C Yes
Thick frozen French
fries
2½-5 Cups 10-14 min 200 °C Yes
Homemade French
fries
2½-6 cups 12-18 min 200 °C Yes ½ teaspoon
oil
Homemade potato
wedges
2½-6 cups 18-25 min 180 °C Yes ½ teaspoon
oil
Homemade potato
cubes
2½-6 cups 14-20 min 180 °C Yes ½ teaspoon
oil
Steak 120-900 g 8-12 min 200 °C
Hamburger 120-500 g 7-14 min 180 °C
Frozen Chicken
nuggets
120-900 g 12-16 min 200 °C Yes
Mozzarella sticks 120-900 g 8-14 min 180 °C Yes
Stuffed vegetables 120-900 g 10-15 min 160 °C Yes
Please, note that these settings are recommendations, as foods differ in origin, size,
shape and brand.
We cannot guarantee that your food will need exactly this time and temperature to
cook.
Snacks are normally prepared in the oven can also be prepared in the air fryer.
Thin or small food generally requires a shorter cooking time than larger one.
You may use the air fryer to re-heat food. Simply set a temperature of 150 °C (300 °F)
and a time of up to 10 minutes.
We recommend adding a few drops of vegetable oil when preparing fresh potatoes for
a crispier result. If you add oil, do so just before cooking.
Shaking small dishes halfway through the cooking ensures that all pieces are cooked
evenly.
Use pre-made dough to prepare lled snacks quickly and easily. Prefabricated dough
requires a shorter cooking time than homemade dough.
When baking a cake or quiche, place a baking tin or oven dish in the frying basket.
We also recommend a baking or oven dish when cooking sensitive or lled food.
Homemade French fries
To prepare homemade French fries, follow these steps:
1 Peel the potatoes and cut them into sticks.
2 Thoroughly wash the potato sticks and dry them with kitchen paper.
26
EN
3 Place the sticks and ½ tablespoons of olive oil in a bowl and mix until the sticks are
covered with oil.
4 Use frying tongs to take the sticks out of the bowl, drain off excess oil and place the
sticks in the frying basket. Do not pour the potato sticks from the bowl into the basket
to prevent excess oil from dripping from the bowl into the frying pan.
5 Prepare the potato sticks according to the preparation table.
CLEANING
This device is easy to clean. It does not contain any user-serviceable parts. Any
maintenance other than cleaning must be carried out by a quali ed technician.
Clean the unit after each use.
WARNING
Risk of electric shock! do not immerse the air fryer in water. The device is
electrically operated and may be damaged as a result.
1 Disconnect the power supply from the power outlet and let the device cool off.
HINT: Remove the frying drawer from the compartment to allow the device to cool off
more quickly.
2 Wipe the outside of the device with a damp cloth.
3 Clean the inside of the device with hot water and a non-abrasive sponge.
4 Clean the heating element with a cleaning brush to remove food residue.
NOTE: Do not clean the frying drawer and basket with metal kitchen utensils or scouring
agents to avoid damaging the non-stick coating.
5 Clean the drawer and basket with hot water, detergent and a non-scraping sponge.
You may use a degreasing liquid to remove remaining grease.
HINT: If dirt sticks to the basket, ll the drawer with hot water and some detergent. Place
the basket in the drawer and steep it for about 10 minutes.
STORAGE
Disconnect the power supply and let the device cool off.
Make sure that all parts are clean and dry.
Store the air fryer in a dry, dust-free place.
27
EN
DISPOSAL CONSIDERATIONS
If there is a legal regulation for the disposal of electrical
and electronic devices in your country, this symbol on the
product or on the packaging indicates that this product must
not be disposed of with household waste. Instead, it must be
taken to a collection point for the recycling of electrical and
electronic equipment. By disposing of it in accordance with
the rules, you are protecting the environment and the health of
your fellow human beings from negative consequences. For
information about the recycling and disposal of this product,
please contact your local authority or your household waste
disposal service.
TROUBLE SHOOTING
Problem Possible Cause Solution
The air fryer does not
work.
The device is not
connected.
Connect the power supply
to the device and the power
outlet.
You have not switched on
the device and/or have
not set the cooking time or
temperature.
Press the power button. Select
a program or select time and
temperature. Then press the
start button.
The drawer does not
t in the compartment.
The frying basket is not
correctly placed in the
drawer.
Carefully place the basket in
the drawer as described in the
section PREPARATION.
The frying basket is
overlled.
Fill the frying basket as
recommended in section
FILLING THE BASKET.
The food is not
cooked.
The frying basket is
overlled.
Use smaller quantities of food
for a more even result.
The temperature is set too
low.
Press the PLUS button in the
temperature selection to
increase temperature.
The food is not evenly
cooked.
Some food is to be turned
or shaken during the
cooking process.
Turn the food a few times
during cooking. See the
preparation table in section
TIPS AND TRICKS.
28
EN
The French fries are
not evenly cooked.
You have used different
sorts of potatoes.
Use fresh waxy potatoes.
The potatoes were not
dried after cleaning.
Dab the potatoes dry after
washing.
The French fries are
not crispy.
The raw potatoes contain
too much water.
Dab the potatoes dry after
washing.
Cut thinner sticks.
Add more oil.
White smoke is rising
from the device.
Too much oil was used.
Oil from very greasy food
drips into the drawer and
burns there.
Use less greasy food.
Oil or food residues from
the last cooking process
adhere to the drawer or
frying basket.
Clean the compartment,
drawer and basket after each
use.
WARRANTY AND SERVICE
If you need information or have a problem with your device, please visit our website or
contact your vendor.
TECHNICAL SPECIFICATIONS
Item number 10032849, 10036476
Power supply 220-240 V ~ 50/60 Hz
Power consumption 1700 W
Technology Rapid Hot-Air-Technology
Cooking Capacity 5.4 L
Operation LED panel
Material Case: Stainless steel
Frying drawer: Aluminium
Heating element: Stainless steel
Frying temperature range 80 - 200°C
Frying timer range ≤ 60 Minutes

29
FR
Chère cliente, cher client,
Toutes nos félicitations pour l’acquisition de ce nouvel appareil.
Veuillez lire attentivement et respecter les instructions de ce mode
d’emploi an d’éviter d’éventuels dommages. Nous ne saurions
être tenus pour responsables des dommages dus au non-respect
des consignes et à la mauvaise utilisation de l’appareil. Scannez
le QR-Code pour obtenir la dernière version du mode d‘emploi
et des informations supplémentaires concernant le produit.
FABRICANT ET IMPORTATEUR (UK)
Fabricant :
Chal-Tec GmbH, Wallstraße 16, 10179 Berlin, Allemagne.
Importateur pour la Grande Bretagne :
Chal-Tec UK limited
Unit 6 Riverside Business Centre
Brighton Road
Shoreham-by-Sea
BN43 6RE
United Kingdom
30
FR
CONSIGNES DE SÉCURITÉ
Lisez attentivement ce mode d‘emploi avant d‘utiliser l‘appareil et conservez-le pour
vous y référer ultérieurement. Lisez toutes les instructions.
L‘appareil est conçu pour la cuisson („friture“) des aliments à l‘aide d‘air chaud et pour
un usage domestique uniquement. N‘utilisez pas l‘appareil à d‘autres ns que celles
prévues.
Cet appareil n‘est pas destiné à être utilisé par des personnes, y compris des
enfants, qui ont une capacité physique, sensorielle ou mentale limitée ou sont dénués
d‘expérience et de connaissances, sauf s‘ils ont été accompagnés ou formés par une
personne responsable de leur sécurité.
N‘utilisez pas l‘appareil à l‘extérieur ou dans les cuisines du personnel, les locaux
commerciaux, bureaux, chambres d‘hôtel et environnements d‘hébergement et de vie
similaires.
Ne laissez pas l‘appareil sans surveillance pendant l‘utilisation.
Débranchez l‘appareil de la prise secteur lorsqu‘il n‘est pas utilisé.
Utilisez uniquement des composants et des accessoires recommandés par le fabricant
de l‘appareil pour éviter de l‘endommager.
Ne modi ez pas l‘appareil même partiellement.
Lorsque vous utilisez un appareil électrique, observez toujours les précautions de base
concernant le matériel électrique.
Faites véri er l‘appareil par un technicien agréé ou un centre de service agréé par
le fabricant si la che d‘alimentation, le cordon d‘alimentation ou l‘appareil est
endommagé. Dans ce cas, n‘utilisez pas l‘appareil et n‘essayez pas de le réparer vous-
même.
Surveillez les enfants pour vous assurer qu‘ils ne jouent pas avec l‘appareil ou des
éléments de celui-ci.
ATTENTION
Risque de brûlure dû aux surfaces chaudes! Cet appareil génère de
la chaleur et de la vapeur lors de son fonctionnement. Des précautions
appropriées doivent être prises pour éviter les risques de brûlure,
d’incendie ou d’autres blessures ou de dégâts matériels
Cet appareil est chaud pendant le fonctionnement et conserve la chaleur pendant
un moment encore après sa mise hors tension. Utilisez toujours des maniques lors
de la manipulation de cet appareil. Laissez l‘appareil et ses pièces refroidir pendant
30minutes avant de les nettoyer.
Ne placez pas l‘appareil à proximité d‘objets ou de matériaux in ammables ou
combustibles a n de réduire le risque d‘incendie.
Ne placez pas d‘objets sur l‘appareil en fonctionnement ou lorsqu‘il est chaud.

31
FR
SOMMAIRE
Consignes de sécurité ...........................................................................30
Composants de l‘appareil .....................................................................32
Assemblage .................................................................................................33
Déballage et nettoyage 33
Installation 33
Branchement sur le secteur ................................................................34
Utilisation ....................................................................................................34
Remplissage du panier ..........................................................................34
Réglage de la durée de cuisson et de la température 35
Contrôle de la cuisson 36
Récupérer les plats 36
Conseils et astuces ..................................................................................37
Tableau de cuisson 37
Préparation de frites maison 38
Nettoyage ....................................................................................................39
Rangement ..................................................................................................39
Informations sur le recyclage .............................................................40
Résolution des problèmes ................................................................... 40
Garantie et service .................................................................................. 42
Fiche technique ........................................................................................42

32
FR
COMPOSANTS DE L‘APPAREIL
1 Panneau de commande
2 Verrouillage du bac à friture
3 Poignée du panier à friture
4 Bac à friture (avec panier à friture)
5 Partie supérieure
6 Sortie d‘air
7 Branchement électrique
8 Partie inférieure avec pieds antidérapants
9 Boîtier

33
FR
Avec votre nouvelle friteuse à air chaud, vous pourrez rendre vos
ingrédients et collations préférés plus sains.
La friteuse à air chaud utilise de l‘air chaud en combinaison avec une circulation d‘air
rapide (technologie Rapid air) et un gril supérieur („chaleur de voûte“) pour préparer
une variété de plats savoureux d‘une manière saine, rapide et facile. Les ingrédients
sont chauffés de tous les côtés à la fois et il n‘est pas nécessaire d‘ajouter de l‘huile pour
la plupart des grillades.
ASSEMBLAGE
Déballage et nettoyage
Retirez tous les matériaux d‘emballage et les étiquettes de l‘intérieur et de l‘extérieur de
la friteuse à air chaud.
Le panier à friture est déjà dans le bac de friture lors de la livraison.
Pour retirer le panier à friture, tirez le loquet transparent vers l‘avant.
Retirez ensuite le bac à friture de l‘appareil.
Appuyez sur le bouton de déverrouillage de la poignée du panier et soulevez le panier
pour le sortir du bac.
Lors de l‘insertion du panier, il suf t d‘inverser : placez le panier au-dessus du bac à
friture de sorte que les pattes du panier à gauche et à droite de la poignée se mettent
dans les renfoncements sur le dessus du bac à friture. Insérez le panier dans le bac et
verrouillez-le.
Nettoyez le panier et le bac à frire avec de l‘eau chaude, un détergent et une éponge
douce.
Essuyez l‘intérieur et l‘extérieur du boîtier avec un chiffon humide.
MISE EN GARDE
Risque de choc électrique ! Ne plongez pas la friteuse à air chaud dans
l‘eau. Cela peut causer des dommages électriques à l‘appareil.
Séchez soigneusement toutes les pièces.
Remettez le panier de friture dans le bac et verrouillez-le pour éviter un desserrage
involontaire du panier.
REMARQUE : avant la première utilisation, assurez-vous qu’il n’y a pas de matériaux
d’emballage ou d’objets étrangers sur et dans l’appareil, sous et autour du bac à friture
et autour du panier à friture.
Installation
Placez la friteuse à air chaud sur une surface de travail stable, plane et résistante à la
chaleur, près d‘une prise de courant.

34
FR
Veillez à placer l‘appareil sur une surface exempte de plastique. La chaleur de la
cuisson pourrait ramollir les plastiques d‘un plan de travail qui en contiendrait et cela
provoquerait l‘apparition de taches sombres permanentes, d‘une décoloration et de
taches sur le support.
Veillez à placer l‘appareil sur une surface exempte de plastique. La chaleur de la
cuisson pourrait ramollir les plastiques d‘un plan de travail qui en contiendrait et cela
provoquerait l‘apparition de taches sombres permanentes, d‘une décoloration et de
taches sur le support.
Gardez l‘appareil à au moins 10 cm des autres objets et à l‘écart des sources de
chaleur.
L‘air chaud s‘échappe de la sortie d‘air à l‘arrière de la friteuse à air chaud. Par
conséquent, assurez-vous que l’arrière de l’appareil ne soit pas obstrué pour garantir le
bon fonctionnement de l’appareil.
Ne placez rien sur la friteuse à air chaud.
Ne déplacez pas la friteuse lorsque celle-ci est chaude. Vous pourriez vous brûler ou à
cause d‘un liquide alimentaire chaud qui coulerait. Laissez refroidir la friteuse pendant
plus de 30 minutes avant de la déplacer.
Branchement sur le secteur
Acheminez le câble derrière la friteuse à air chaud vers la prise murale pour éviter tout
déchirement accidentel.
Ne laissez pas pendre le câble sur le bord de la table ou du plan de travail.
Assurez-vous que le câble ne touche aucune surface chaude, telle que des radiateurs
ou des cuisinières.
Le cordon d‘alimentation fourni (ou le cordon d‘alimentation amovible) est court. Cela
réduit le risque de l‘attraper par accident ou de trébucher sur un câble plus long.
N‘utilisez que des rallonges adaptées à cet appareil. En cas de doute, demandez à un
technicien agréé ou à un centre de service agréé par le fabricant.
Débranchez le cordon d‘alimentation lorsque vous n‘utilisez pas la friteuse à air chaud.
UTILISATION
IMPORTANT : La friteuse à air chaud utilise de l‘air chaud plutôt que de la graisse.
Ne versez pas d‘huile ou de graisse dans le bac à friture. L‘appareil n‘est pas prévu
pour cela.
Remplissage du panier
L‘appareil est équipé d‘un interrupteur de sécurité qui éteint l‘appareil dès l‘ouverture
du bac. Cela évite les brûlures accidentelles à l‘air chaud. L‘appareil s‘éteint
automatiquement lorsque la friteuse est retirée pendant la cuisson.
Faites glisser le bouton de verrouillage transparent sur la poignée du panier vers l‘avant.
35
FR
Retirez le bac à frire de l‘appareil.
Placez la nourriture dans le panier à friture. Ne remplissez pas le panier au-delà des
deux tiers.
Si vous voulez faire cuire des légumes frais, versez trois tasses du format le plus haut
remplies de légumes frais.
IMPORTANT : Utilisez la friteuse uniquement avec le panier pour assurer la cuisson
des aliments.
Faites glisser le bac dans l‘appareil puis faites glisser le loquet transparent sur la
poignée du panier.
Réglage de la durée de cuisson et de la température
Depuis le panneau de commande, vous pouvez facilement choisir l‘un des différents
programmes de cuisson ou régler la température et le temps de cuisson en appuyant sur
un bouton. Branchez la che secteur de l‘appareil dans la prise.
MARCHE/ARRÊT
Allume ou éteint l‘appareil.
MODE
Sélectionne l‘un des programmes prédé nis.
DURÉE
Appuyez sur ce bouton pour régler la durée souhaitée.
Dé nit la durée de cuisson désirée en appuyant sur les boutons PLUS ou
MOINS.
TEMPÉRATURE
Appuyez sur ce bouton pour régler la température souhaitée.
Dé nit la température d‘air chaud souhaitée en appuyant sur les
boutons PLUS ou MOINS.
Appuyez sur le bouton ON / OFF pour allumer l‘appareil. Le bouton ON / OFF
s‘allume maintenant.
Lors de la première utilisation, la friteuse à air chaud peut dégager une légère odeur.
Ceci est normal et disparaît rapidement.
Sélectionnez l‘un des programmes ou dé nissez le temps de préparation et la
température souhaités.

36
FR
REMARQUE : l‘afchage de l‘heure et de la température change automatiquement
toutes les 5 secondes.
Contrôle de la cuisson
Certains aliments doivent être retournés, panés ou secoués en milieu de cuisson pour
cuire uniformément et ne pas coller. Remuez ou secouez en particulier des quantités plus
importantes pour une cuisson uniforme.
REMARQUE : Ne touchez le panier et le bac à friture qu‘avec des gants de cuisine.
Pendant la cuisson et ensuite, le panier à friture, le plateau et les aliments sont chauds.
Selon le type d‘aliment, il peut s‘échapper de la vapeur du bac. Si nécessaire, portez
des vêtements à manches longues pour protéger les parties vulnérables du corps contre
les liquides et jus chauds qui pourraient s‘échapper des aliments.
1 Tirez le bouton de verrouillage de la poignée du panier vers l’avant pour
déverrouiller le bac.
2 Tirez le bac à friture par la poignée de l‘appareil. Agitez ou remuez
vigoureusement les aliments.
Vous pouvez également sortir le panier du bac pour le secouer si le bac à friture est trop
lourd pour vous.
1 Faites glisser le loquet transparent sur la poignée du panier vers l‘avant et retirez le
bac de l‘appareil.
2 Placez le bac sur une surface résistant à la chaleur.
3 Appuyez sur le bouton situé sur la poignée du panier et retirez le panier.
4 Agitez vigoureusement les aliments.
5 Insérez le panier correctement dans le bac à friture et verrouillez-le. Faites glisser le
bac dans l‘appareil.
REMARQUE : La friteuse à air chaud ne fonctionne que lorsque le bac à friture est
complètement fermé.
Conseil : Réglez la minuterie sur la moitié du temps de cuisson pour que l‘alarme de la
minuterie vous rappelle que vous devez secouer les aliments. N‘oubliez pas de régler
ensuite la minuterie sur le temps de cuisson restant.
Récupérer les plats
Lorsque vous entendez l‘alarme de la minuterie, la durée de cuisson dénie est écoulée.
Retirez le bac à frire de l‘appareil.
REMARQUE : Ne touchez le panier et le bac à frire qu‘avec des gants de cuisine.
Pendant et après la cuisson à l‘air chaud, le panier, le bac et les aliments sont chauds.
Selon le type d‘aliment, il peut s‘échapper de la vapeur du bac. Si nécessaire, portez
des vêtements à manches longues pour protéger les parties vulnérables du corps contre
les jus chauds qui pourraient s‘échapper des aliments.
Assurez-vous que la nourriture est cuite. (Sinon, faites simplement glisser le bac dans
l’appareil et réglez la minuterie pour une minute de plus).

37
FR
Lorsque les aliments sont cuits à votre goût, retirez le bac de la friteuse à air chaud et
placez-le sur une surface résistant à la chaleur.
Appuyez sur le bouton de déverrouillage du panier et sortez le panier du compartiment.
REMARQUE : Ne faites pas pivoter le panier avec l’ouverture vers le bas alors qu’il est
encore attaché au bac de friture, car le jus de graisse ou d’aliments peut s’égoutter du
bac.
Mettez les aliments du panier dans un bol ou une assiette.
Conseil : Pour retirer des aliments volumineux ou délicats, utilisez une pince ou une
louche.
Quand une fournée d‘aliments est prête, la friteuse à air chaud est prête à préparer la
suivante.
CONSEILS ET ASTUCES
Tableau de cuisson
Le tableau ci-dessous vous aidera à choisir la bonne température et la bonne durée
pour obtenir les meilleurs résultats. Une fois familiarisé avec la cuisson à l‘air chaud,
vous pouvez adapter ces recommandations à vos goûts personnels.
Ajoutez 3 minutes au temps de cuisson lorsque l‘appareil est encore froid et fait sa
première cuisson.
Aliment Quantité Cuisson Contrôle de
cuisson
Complément
Frites nes
surgelées
2½-5 tasses 10-12 mn 200 °C oui
Frites épaisses
surgelées
2½-5 tasses 10-14 mn 200 °C oui
Frites maison 2½-6 tasses 12-18 mn 200 °C oui ½ cuillère à
café d'huile
Quartiers de
pommes de terre
maison
2½-6 tasses 18-25 mn 180 °C oui ½ cuillère à
café d'huile
Dés de pommes
de terre maison
2½-6 tasses 14-20 mn 180 °C oui ½ cuillère à
café d'huile
Steak 120-900 g 8-12 mn 200°C
Hamburger 120-500 g 7-14 mn 180 °C

38
FR
Nuggets de poulet
surgelés
120-900 g 12-16 mn 200°C oui
Bâtonnets de
Mozzarella
120-900 g 8-14 mn 180 °C oui
Légumes farcis 120-900 g 10-15 mn 160 °C oui
Remarque : Veuillez noter que ces paramètres sont des recommandations car les
aliments varient en origine, taille, forme et marque.
Nous ne pouvons pas garantir que vos ingrédients auront exactement besoin de cette
durée et de cette température pour cuire.
Les snacks habituellement cuits au four peuvent également être préparés dans la friteuse
à air chaud.
Les aliments minces ou petits nécessitent généralement un temps de cuisson plus court
que les plus gros.
Vous pouvez utiliser la friteuse à air chaud pour réchauffer les aliments. Il suft de dénir
une température de 150 ° C ou 300 ° F et une durée maximale de 10 minutes.
Il est recommandé d‘ajouter de l‘huile végétale aux pommes de terre fraîches pour
obtenir un meilleur résultat. Si vous ajoutez de l‘huile, faites-le juste avant la cuisson. Le
fait d‘agiter ou de secouer des aliments plus petits au milieu du processus de cuisson
garantit que tous les morceaux seront cuits uniformément.
Utilisez de la pâte toute faite pour faire des snacks farcis rapidement et facilement. La
pâte préfabriquée demande un temps de cuisson plus court que la pâte faite maison.
Lorsque vous préparez un gâteau ou une quiche, placez un plat allant au four ou une
casserole dans le panier à friture.
Nous recommandons un plat allant au four ou un plat du four pour la cuisson des
aliments délicats ou farcis.
Préparation de frites maison
Pour faire des frites maison, suivez les étapes ci-après :
1 Épluchez les pommes de terre et coupez-les en bâtonnets.
2 Lavez soigneusement les bâtonnets de pommes de terre et séchez-les avec du
papier essuie-tout.
3 Mettez ½ cuillère à soupe d‘huile d‘olive et les bâtonnets dans un saladier et
mélangez jusqu‘à ce que les bâtonnets soient recouverts d‘huile.
4 Retirez les bâtonnets du saladier avec une pince ou une louche, égoutter l‘excès
d‘huile et placez les bâtonnets dans le panier à friture. Ne versez pas les bâtonnets
de pommes de terre du saladier dans le panier à friture pour éviter que l‘excès
d‘huile du saladier ne pénètre dans le bac à friture.
5 Faites cuire les bâtonnets de pommes de terre dans la friteuse à air chaud selon la
table de cuisson.

39
FR
NETTOYAGE
Cet appareil est extrêmement facile à nettoyer. Il ne contient aucune pièce réparable
par l‘utilisateur. Tout service autre que le nettoyage doit être effectué par un technicien
quali é.
Nettoyez l‘appareil après chaque utilisation.
MISE EN GARDE
Risque de choc électrique ! Ne plongez pas l‘appareil dans l‘eau.
L‘appareil fonctionne à l‘électricité et peut être endommagé.
Débranchez le cordon d‘alimentation et laissez l‘appareil refroidir.
Conseil : Retirez le bac de la friteuse après la cuisson pour permettre à l‘appareil de
refroidir plus rapidement.
Essuyez l‘extérieur de l‘appareil avec un chiffon humide.
Nettoyez l‘intérieur de l‘appareil avec de l‘eau chaude et une éponge non abrasive.
Nettoyez l‘élément chauffant avec une brosse de nettoyage pour enlever les restes.
REMARQUE : Le bac et le panier à friture ne doivent pas être nettoyés avec des
ustensiles en métal ou des produits à récurer, car cela pourrait endommager le
revêtement antiadhésif.
Nettoyez le bac et le panier à l‘eau chaude avec un peu de détergent et une éponge
non abrasive. Vous pouvez utiliser un liquide dégraissant pour éliminer la saleté
restante.
Conseil : S‘il y a de la saleté sur le panier ou au fond du bac, remplissez le bac d‘eau
chaude et d‘un peu de détergent. Placez le panier dans le bac et laissez-le tremper
environ 10 minutes.
RANGEMENT
Débranchez le cordon d‘alimentation et laissez l‘appareil refroidir.
Assurez-vous que toutes les pièces sont propres et sèches.
Rangez la friteuse à air chaud dans un endroit sec à l‘abri de la poussière.
40
FR
INFORMATIONS SUR LE RECYCLAGE
S‘il existe une réglementation pour l‘élimination ou le
recyclage des appareils électriques et électroniques dans
votre pays, ce symbole sur le produit ou sur l‘emballage
indique que cet appareil ne doit pas être jeté avec les
ordures ménagères. Vous devez le déposer dans un point
de collecte pour le recyclage des équipements électriques
et électroniques. La mise au rebut conforme aux règles
protège l‘environnement et la santé de vos semblables des
conséquences négatives. Pour plus d‘informations sur le
recyclage et l‘élimination de ce produit, veuillez contacter
votre autorité locale ou votre service de recyclage des
déchets ménagers.
RÉSOLUTION DES PROBLÈMES
Problème Cause possible Solution
La friteuse à air chaud
ne fonctionne pas.
L'appareil n'est pas branché. Branchez la che
dans la prise.
Vous n'avez pas allumé l'appareil et
/ ou réglé le temps de cuisson ou la
température.
Appuyez sur
le bouton
d'alimentation.
Sélectionnez
un programme
ou sélectionnez
une durée et une
température.
Puis appuyez
sur le bouton de
démarrage.
Vous avez mis l'appareil en
pause. (Si vous appuyez sur le
bouton Démarrer en cours de
fonctionnement, l'appareil se met en
pause.)
Appuyez à
nouveau sur le
bouton Démarrer.

41
FR
Le bac est collant. Le panier à friture n'est pas placé
correctement dans le compartiment.
Poussez
doucement le
panier dans le
compartiment
comme décrit
dans la section
ASSEMBLAGE.
Le panier à friture est plein. Remplissez le
panier comme
recommandé.
Voir la section
REMPLISSAGE DU
PANIER
Les plats ne sont pas
cuits.
Le panier à friture est trop rempli. Utilisez de plus
petites quantités
pour une cuisson
plus uniforme.
La température est réglée trop basse. Appuyez sur la
touche HAUT dans
la sélection de
température pour
augmenter celle-ci.
Les plats ne sont pas
cuits uniformément.
Certains aliments doivent être
retournés, agités ou secoués
pendant la cuisson.
Retournez les
aliments quelques
fois pendant la
cuisson. Regardez
la table de cuisson
dans la section
CONSEILS ET
ASTUCES.
Les frites ne sont pas
cuites uniformément.
Vous avez utilisé différentes sortes
de pommes de terre.
Utilisez des
pommes de terre
fraîches et fermes.
Les pommes de terre n'étaient pas
sèches après le nettoyage.
Tamponnez les
pommes de terre
après les avoir
lavées.
42
FR
Les frites ne sont pas
croustillantes.
Les pommes de terre crues
contiennent beaucoup d'eau.
Tamponnez les
pommes de terre
pour les sécher
après les avoir
lavées. Couper
les bâtonnets plus
ns. Ajoutez plus
d'huile.
De la fumée blanche
sort de l'appareil.
Vous avez utilisé trop d'huile. L'huile des aliments
très gras s'égoutte
dans le bac et y
brûle. Utilisez des
aliments moins
gras.
Les résidus d'huile ou d'aliments de
la dernière cuisson adhèrent au bac
ou au panier à friture.
Nettoyez le bac
et le panier après
chaque utilisation.
GARANTIE ET SERVICE
Si vous avez besoin d‘informations ou avez un problème avec votre appareil, veuillez
visiter notre site Web ou contacter votre revendeur.
FICHE TECHNIQUE
Numéro d'article 10032849, 10036476
Alimentation 220-240 V ~ 50/60 Hz
Puissance consommée 1700 Watt
Technologie Technologie à air chaud Rapid-Air
Capacité 5,4 litres
Commandes Ecran LED
Matériau
Boîtier : inox
Bac à friture : aluminium
Elément chauffant : inox
Plage de températures 80 - 200°C
Minuterie
≤ 60 minutes

43
ES
Estimado cliente:
Le felicitamos por la adquisición de este producto. Lea
atentamente las siguientes instrucciones y sígalas para evitar
posibles daños. No asumimos ninguna responsabilidad por los
daños causados por el incumplimiento de las instrucciones y el
uso inadecuado. Escanee el siguiente código QR para obtener
acceso a la última guía del usuario y más información sobre el
producto.
FABRICANTE E IMPORTADOR (REINO UNIDO)
Fabricante:
Chal-Tec GmbH, Wallstraße 16, 10179 Berlín, Alemania.
Importador para Gran Bretaña:
Chal-Tec UK limited
Unit 6 Riverside Business Centre
Brighton Road
Shoreham-by-Sea
BN43 6RE
United Kingdom

44
ES
INDICACIONES DE SEGURIDAD
Lea atentamente este manual de instrucciones antes de utilizar el aparato y consérvelo
para consultas posteriores. Lea todas las indicaciones.
El aparato está diseñado para cocer («freír») alimentos mediante aire caliente y sólo en
el entorno doméstico. No utilice el aparato con otro n distinto al del indicado.
Las personas, incluidos niños, con discapacidades físicas, psíquicas o sensoriales o
carentes de experiencia y conocimiento necesarios no podrán utilizar el aparato salvo
que estén bajo supervisión o hayan sido previamente instruidas sobre su utilización y las
indicaciones de seguridad y se hayan familiarizado con sus funciones.
No utilice el aparato en el exterior ni en cocinas de empresas, o cinas, estancias
compartidas, habitaciones de hoteles y entornos similares.
No deje el aparato sin supervisión cuando está en marcha.
Si no va a utilizar el aparato durante un periodo de tiempo prolongado, desconecte el
enchufe de la toma de corriente.
Utilice exclusivamente las partes y los accesorios recomendados por el fabricante, de
lo contrario, podría dañar el aparato.
No modi que el aparato o sus partes.
Al utilizar un aparato eléctrico, siempre debe seguir las indicaciones básicas de
seguridad.
Las reparaciones deberán ser realizadas por un electricista cuali cado o un centro de
atención al cliente autorizado por el fabricante si el cable de alimentación o el enchufe
están averiados, o si el aparato no funciona correctamente. En este caso, no utilice el
aparato y no intente repararlo usted mismo/a.
Vigile a los niños cuando estén cerca del aparato para evitar que jueguen con el
aparato mismo o sus piezas.
ATENCIÓN
¡Peligro de quemaduras debido a las super cies calientes! El
aparato alcanza temperaturas elevadas y genera vapor durante el
funcionamiento. Deberán tomarse precauciones adecuadas para evitar
riesgo de quemaduras, incendio o daños personales o materiales
El aparato alcanza temperaturas elevadas durante el funcionamiento y, una vez
apagado, se mantiene caliente durante algún tiempo. Utilice guantes de cocina para
operar el aparato. Deje que el aparato y sus piezas se enfríen durante 30 minutos antes
de limpiarlas.
Para evitar el riesgo de incendio, no coloque el aparato cerca de objetos o materiales
fácilmente in amables.
No coloque objetos encima del aparato cuando este está en marcha o caliente.

45
ES
ÍNDICE
Indicaciones de seguridad ...................................................................44
Vista general del aparato ......................................................................46
Montaje ........................................................................................................47
Desembalaje y limpieza 47
Instalación 47
Conexión a la red eléctrica ..................................................................48
Puesta en funcionamiento ...................................................................48
Llenar el cesto ............................................................................................48
Congurar la temperatura y el tiempo de cocción 49
Control de la cocción 50
Retirar alimentos 50
Consejos .......................................................................................................51
Tabla de preparación 51
Patatas fritas de elaboración propia 52
Limpieza .......................................................................................................53
Almacenaje ..................................................................................................53
Indicaciones sobre la retirada del aparato ...................................54
Detección y resolución de anomalías .............................................54
Garantía y servicio ...................................................................................56
Datos técnicos ..........................................................................................56
46
ES
VISTA GENERAL DEL APARATO
1 Panel de control
2 Botón de desbloqueo del compartimento para freír
3 Asa del compartimento para freír
4 Compartimento para freír (con cesto)
5 Parte superior
6 Salida de aire
7 Toma de corriente
8 Parte inferior con patas antideslizantes
9 Carcasa

47
ES
Con la freidora de aire caliente puede preparar sus alimentos y
tentempiés favoritos de forma más saludable.
La freidora sin aceite emplea aire caliente junto con una rápida circulación de aire
(técnica de aire caliente rápido) y un grill superior («calor superior») para preparar
una gran variedad de platos deliciosos de un modo sano, rápido y sencillo. El aparato
calienta los ingredientes de todos lados, por lo que no se necesita añadir aceite.
MONTAJE
Desembalaje y limpieza
Retire todo el material de embalaje, así como adhesivos en la parte interior y exterior
del aparato.
El cesto se encuentra en el interior del compartimento para freír.
Para extraer el cesto, deslice hacia delante el botón de bloqueo del compartimento.
A continuación, retire el compartimento de freír.
Pulse el botón de desbloqueo en el asa del cesto, levante el cesto hacia arriba y
extráigalo del compartimento.
Al introducir el cesto, simplemente invierta el procedimiento: coloque el cesto en el
compartimento para freír de modo que las solapas del cesto a la izquierda y derecha
del mango entren en los ori cios de la parte superior del compartimento para freír.
Inserte el cesto en el compartimento y ciérrelo.
Limpie el cesto y el compartimento para freír con agua caliente, un producto de
limpieza y una esponja suave.
Limpie el interior y el exterior del aparato con un paño seco.
ADVERTENCIA
¡Riesgo de descarga eléctrica! No sumerja la freidora en agua. Puede
dañar el aparato
Seque por completo todas las partes.
Coloque el cesto en el compartimento y bloquéelo para evitar que se abra de forma
accidental.
NOTA: Antes de utilizar el aparato por primera vez, asegúrese de haber quitado todo
el material de embalaje, así como etiquetas y objetos extraños debajo, alrededor y en
el interior del aparato.
Instalación
Coloque el aparato en una super cie plana, horizontal y estable, cerca de una toma
de corriente.
Asegúrese de colocar el aparato sobre una super cie libre de plástico. El calor
durante la cocción puede hacer que los plasti cantes se escapen de una super cie

48
ES
que contenga plástico y provocar una reacción permanente, como manchas oscuras,
decoloración y manchas en la supercie.
Asegúrese de que el aparato se encuentre a una distancia mínima 10 cm con respecto
a otros objetos y lejos de las fuentes de calor.
El aire caliente sale de las ranuras en la parte posterior del aparato. Por ello, mantenga
las ranuras de salida de aire en la parte posterior desbloqueadas para garantizar un
funcionamiento correcto de la freidora.
No coloque objetos encima del aparato.
No mueva la freidora mientras está caliente. Podría quemarse con el goteo del líquido
caliente de los alimentos. Deje que la freidora se enfríe durante 30 minutos antes de
moverla.
Conexión a la red eléctrica
Al conectar el aparato a la toma de corriente, coloque el cable de alimentación detrás
de la freidora para evitar que el dispositivo se vuelque accidentalmente.
Asegúrese de que el cable no queda colgando del borde de la mesa o encimera.
Asegúrese de que el cable no toca las supercies calientes, como objetos calientes o
fogones.
El cable de alimentación suministrado (o el cable extraíble) es corto. De este modo
se reduce el riesgo de engancharse o tropezarse con un cable largo. Utilice cables
alargadores que sean compatibles con el aparato. En caso de duda, póngase en
contacto con un especialista técnico cualicado o un servicio de atención al cliente
autorizado por el fabricante.
Desenchufe el aparato cuando no lo utilice.
PUESTA EN FUNCIONAMIENTO
IMPORTANTE: La freidora funciona con aire caliente en vez de aceite. No añada
aceite ni grasa en el compartimento para freír. El aparato no está diseñado para ello.
Llenar el cesto
La freidora dispone en su interior de un interruptor de seguridad que apaga el
aparato cuando se abre el compartimento para freír. Esta función evita quemaduras
accidentales con aire caliente. Durante el funcionamiento, la freidora se apaga
automáticamente al retirar el compartimento para freír.
Deslice hacia delante el cierre del asa del compartimento.
A continuación, retire el compartimento para freír.
Introduzca alimentos en el cesto. Llene solamente dos tercios del cesto. Si desea cocer
verduras frescas, añada 3 tazas de verdura, como máximo.
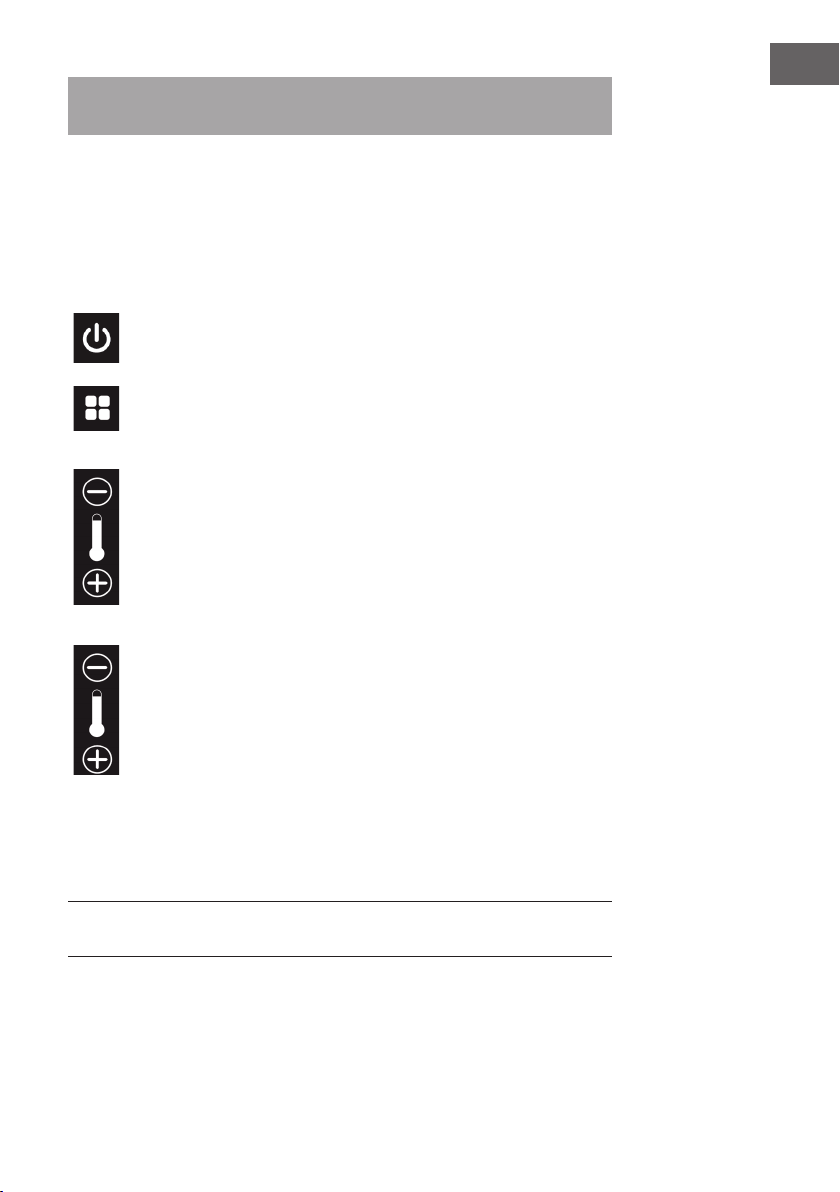
49
ES
IMPORTANTE: utilice el compartimento para freír junto con el cesto para garantizar
una buena cocción de los productos.
Vuelva a introducir el compartimento en la freidora y deslice el botón de bloqueo hacia
atrás
Confi gurar la temperatura y el tiempo de cocción
Puede elegir cómodamente el programa de cocción o con gurar la temperatura y el
tiempo de cocción en el panel de control. Introduzca el cable de alimentación en la
toma de corriente.
ENCENDIDO/APAGADO
Enciende o apaga el aparato.
MODO
Elige entre los programas predeterminados.
TIEMPO
Pulse este botón para con gurar el tiempo deseado.
Elija el tiempo de cocción deseado pulsando los botones PLUS o
MINUS.
TEMPERATURA
Pulse este botón para con gurar la temperatura deseada.
Elija la temperatura de aire caliente deseada pulsando los botones
PLUS o MINUS.
Pulse el botón ON/OFF para apagar el aparato. El botón ON/OFF se ilumina.
Es posible que la primera vez que utilice la freidora se produzca un ligero olor. El olor
inicial es normal y desaparecerá en un periodo breve de tiempo.
Elija un programa o seleccione el tiempo y la temperatura de cocción deseados.
NOTA: el indicador de tiempo y temperatura se cambia automáticamente cada
5segundos.

50
ES
Control de la cocción
A menudo, en mitad del proceso de preparación, se debe voltear o sacudir algunos
alimentos para asegurar un mejor resultado de cocción. Es necesario, sobre todo, si los
alimentos en cuestión son muy grandes.
NOTA: maneje el cesto y el compartimento para freír únicamente con guantes de
cocina. Durante y después de la preparación, el cesto, el compartimento y los alimentos
están muy calientes. Es posible que salga vapor del compartimento para freír según el
tipo de alimento. De ser necesario, lleve ropa larga para evitar que el líquido caliente
de alimentos salpique alguna parte desprotegida del cuerpo.
1 Deslice hacia delante el cierre del asa del compartimento para retirar el
compartimento.
2 A continuación, retire el compartimento para freír. Gire o agite el alimento en
cuestión.
También puede retirar el cesto para sacudir mejor el alimento si el compartimento para
freír es muy pesado.
1 Deslice hacia delante el cierre del asa del compartimento para retirar el
compartimento.
2 Coloque el compartimento en una supercie resistente al calor.
3 Pulse el botón de desbloqueo en el asa del cesto para retirar el cesto.
4 Gire o agite el alimento en cuestión.
5 Vuelva a colocar correctamente el cesto en el compartimento para freír y
bloquéelo. Vuelva a introducir el compartimento en la freidora.
NOTA: la freidora solamente funciona si el compartimento para freír está correctamente
cerrado. Consejo: ajuste el temporizador a la mitad del tiempo de preparación para
que la alarma del temporizador le recuerde que debe agitar la comida. No olvide
ajustar el temporizador al tiempo de preparación restante después de agitar el alimento
Retirar alimentos
Cuando suene la alarma del temporizador, habrá transcurrido el tiempo que ha
seleccionado.
A continuación, retire el compartimento para freír.
NOTA: maneje el cesto y el compartimento para freír únicamente con guantes de
cocina. Durante y después de la preparación, el cesto, el compartimento y los alimentos
están muy calientes. Es posible que salga vapor del compartimento para freír según el
tipo de alimento. De ser necesario, lleve ropa larga para evitar que el líquido caliente
de alimentos salpique alguna parte desprotegida del cuerpo.
Compruebe que los alimentos estén listos. (Si los ingredientes todavía no están listos,
vuelva a introducir el compartimento en el aparato y añada unos minutos más al
temporizador.)
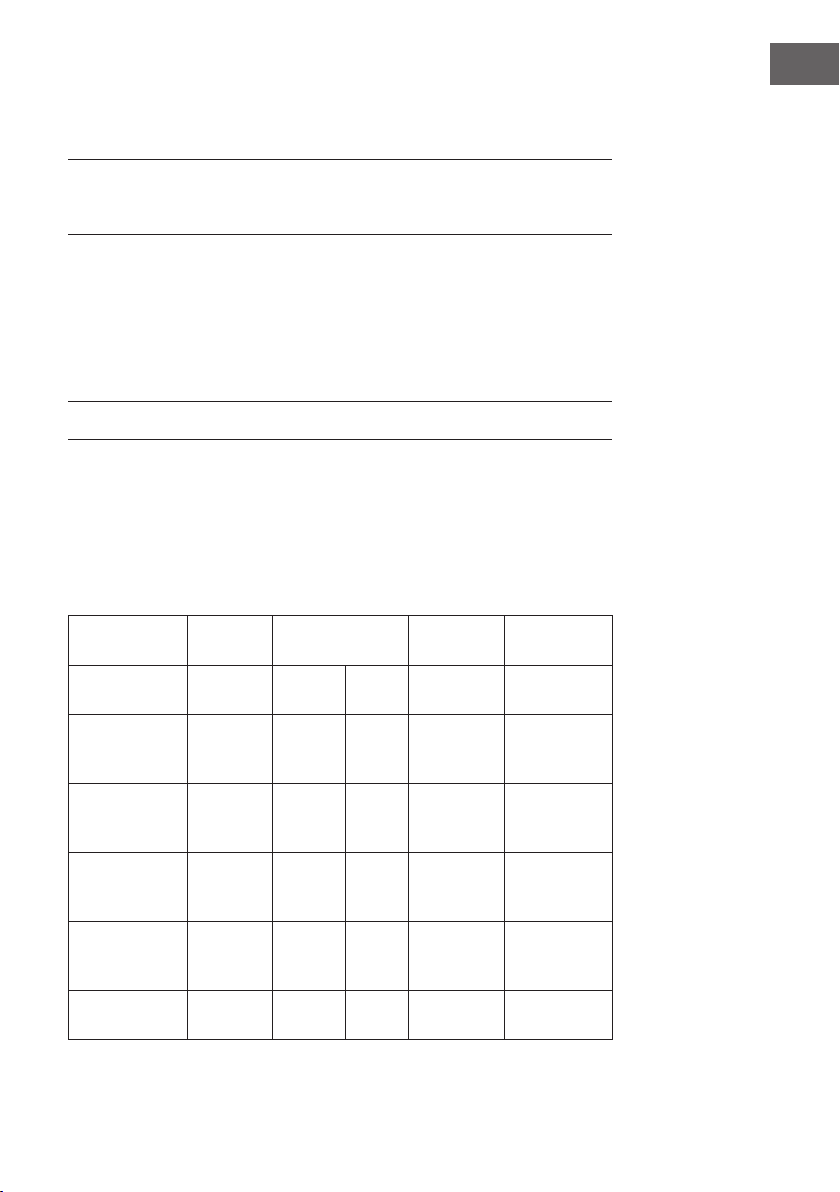
51
ES
Si los ingredientes están correctamente cocidos, retire el compartimento de la freidora
de aire caliente y póngalo encima de una supercie resistente al calor.
Pulse el botón de desbloqueo en el asa del cesto y retire el cesto del compartimento.
NOTA: no gire el cesto con el oricio mirando hacia abajo, dado que está aún unido
al compartimento para freír y la grasa o el jugo de los alimentos podrían gotear sobre
los alimentos.
Trasvase los ingredientes de la cesta a un bol o a un plato.
Consejo: para retirar alimentos grandes o suaves, emplee unas pinzas de asar o un
cucharón.
Cuando haya preparado ya una ración, puede continuar preparando más alimentos
inmediatamente después de extraer los alimentos listos.
CONSEJOS
Tabla de preparación
La tabla que aparece a continuación le ayudará a elegir la temperatura y el tiempo
correcto para distintos ingredientes. Después de familiarizarse con los tiempos de
cocción, puede adaptar estas recomendaciones a su conveniencia. Añada 3 minutos
al tiempo de cocción cuando el aparato aún está frío y empieza a preparar el primer
plato.
Alimento Cantidad Preparación Control de
la cocción
Renamiento
Patatas fritas
congeladas nas
2½-5 tazas 10-12 min 200 °C Sí
Patatas fritas
congeladas
gruesas
2½-5 tazas 10-14 min 200 °C Sí
Patatas fritas
de elaboración
propia
2½-6 tazas 12-18 min 200 °C Sí ½ cucharita de
aceite
Patatas de gajo
de elaboración
propia
2½-6 tazas 18-25 min 180 °C Sí ½ cucharita de
aceite
Patatas en dados
de elaboración
propia
2½-6 tazas 14-20 min 180 °C Sí ½ cucharita de
aceite
Filete 120-900 g 8-12 min 200 °C

52
ES
Hamburguesa 120-500 g 7-14 min 180 °C
Nuggets de pollo
congelados
120-900 g 12-16 min 200 °C Sí
Palitos de
mozzarella
120-900 g 8-14 min 180 °C Sí
Verduras rellenas 120-900 g 10-15 min 160 °C Sí
Nota: tenga en cuenta que son solamente propuestas de preparación. Los ingredientes
varían en cuanto a su origen, tamaño, forma y marca y, por tanto, no podemos
garantizar el ajuste perfecto para sus alimentos.
En la freidora de aire caliente también se pueden preparar tentempiés que normalmente
se hacen en un horno.
Los ingredientes pequeños necesitan normalmente un tiempo de preparación menor
que los más grandes.
También puede utilizar la freidora sin aceite para calentar la comida. Ajuste la
temperatura a 150 °C (300 °F) y el temporizador, a 10 minutos.
Añada un poco de aceite vegetal a las patatas frescas para que queden más crujientes.
Fría los ingredientes en la freidora de aire caliente justo después de haber añadido el
aceite a las patatas.
Si voltea o agita alimentos pequeños en mitad del tiempo de preparación, se asegura
que se fríen por todos lados.
Utilice masa preparada para preparar snacks rellenos rápida y fácilmente.
La masa preparada necesita un tiempo de preparación menor que una masa casera.
Coloque una bandeja grande o un molde en el cesto de la freidora cuando prepare
bizcochos, una quiche o desee freír alimentos rellenos o muy delicados.
Patatas fritas de elaboración propia
Siga los siguientes pasos para preparar sus propias patatas fritas:
1 Pele las patatas y córtelas en tiras.
2 Limpie a fondo las tiras de patatas y séquelas en un papel de cocina.
3 Añada en un cuenco ½ cuchara de aceite de oliva y patatas, y mézclelas hasta
que absorben bien el aceite.
4 Retire las tiras de patata con unas pinzas o un cucharón, escurra el exceso
de aceite y añada las patatas en el cesto de la freidora. No añada patatas
directamente al cuenco para evitar que el exceso de aceite del cuenco gotee en la
freidora.
5 Fríe las tiras de patata de acuerdo con lo descrito en la tabla.
53
ES
LIMPIEZA
La freidora es muy fácil de limpiar. El aparato no contiene piezas que el usuario pueda
reparar. Cualquier otro mantenimiento que no sea la limpieza debe ser realizado por
un técnico cuali cado.
Limpie el aparato después de cada uso.
ADVERTENCIA
¡Riesgo de descarga eléctrica! Nunca sumerja el aparato en agua. La
freidora es un aparato eléctrico y puede dañarse.
Desconecte el enchufe de la toma de corriente y deje que el aparato se enfríe
completamente.
Consejo: retire el compartimento para freír para que el aparato se enfríe más
rápidamente. Limpie el exterior del aparato con un paño húmedo.
Limpie el interior con agua tibia y una esponja no abrasiva.
Limpie el elemento calefactor con un cepillo de limpieza para retirar posibles restos de
comida.
NOTA: no limpie el compartimento para freír y el cesto con utensilios de cocina o
esponjas metálicas, ya que podría dañar el revestimiento antiadherente.
Limpie el compartimento para freír y el cesto con agua tibia, un poco de detergente
y una esponja no abrasiva. Puede utilizar líquido desengrasante para eliminar la
suciedad restante.
Consejo: si el cesto o el fondo del compartimento para freír presentan suciedad
encastrada, llene el compartimento con agua caliente y añada un poco de producto de
limpieza. Inserte el cesto y déjelo en remojo durante aprox. 10 minutos.
ALMACENAJE
Desconecte el enchufe de la toma de corriente y deje que el aparato se enfríe
completamente.
Asegúrese de que todas las piezas estén limpias y secas.
Guarde la freidora de aire caliente en un lugar seco y limpio.
54
ES
INDICACIONES SOBRE LA RETIRADA DEL
APARATO
Si en su país existe una disposición legal relativa a la
eliminación de aparatos eléctricos y electrónicos, este
símbolo estampado en el producto o en el embalaje
advierte que no debe eliminarse como residuo doméstico.
En lugar de ello, debe depositarse en un punto de recogida
de reciclaje de aparatos eléctricos y electrónicos. Una
gestión adecuada de estos residuos previene consecuencias
potencialmente negativas para el medio ambiente y la salud
de las personas. Puede consultar más información sobre el
reciclaje y la eliminación de este producto contactando con
su administración local o con su servicio de recogida de
residuos.
DETECCIÓN Y RESOLUCIÓN DE ANOMALÍAS
Problema Posible causa Solución
La freidora de aire
caliente no funciona.
El dispositivo no está conectado. Branchez la che
dans la prise.
Vous n'avez pas allumé l'appareil et
/ ou réglé le temps de cuisson ou la
température.
Pulse el botón de
encendido. Elija
un programa o el
tiempo de cocción
y la temperatura.
A continuación,
pulse el botón
Start.
No ha encendido el aparato ni ha
ajustado el tiempo o la temperatura
de cocción.
Vuelva a pulsar el
botón Start.

55
ES
El compartimento para
freír está atascado.
El cesto no se ha colocado
correctamente en el compartimento.
Presione el cesto
hacia abajo en
el compartimento
como se describe
en el apartado
MONTAJE.
Hay demasiados ingredientes en
el cesto.
Rellene el cesto
de la manera
recomendada.
Véase el apartado
LLENAR EL CESTO.
Los ingredientes fritos
no están listos
Hay demasiados ingredientes en
el cesto.
Rellene el cesto
con porciones más
pequeñas.
La temperatura ajustada es
demasiado baja.
Pulse el botón
AUMENTAR para
incrementar la
temperatura.
Los ingredientes no se
han freído por igual.
Algunos ingredientes deben
sacudirse en mitad del proceso de
preparación.
Gire los
ingredientes varias
veces durante
la preparación.
Véase el apartado
CONSEJOS.
Las patatas fritas
se fríen de manera
desigual.
Ha utilizado diferentes tipos de
patata.
Utilice patatas
frescas del mismo
tipo.
Las patatas no se han secado
completamente una vez lavadas.
Seque
completamente las
patatas.
Las patatas fritas no
están crujientes.
La textura de las patatas contiene
demasiada agua.
Seque
completamente
las patatas. Corte
las patatas en tiras
más nas. Añada
más de aceite.
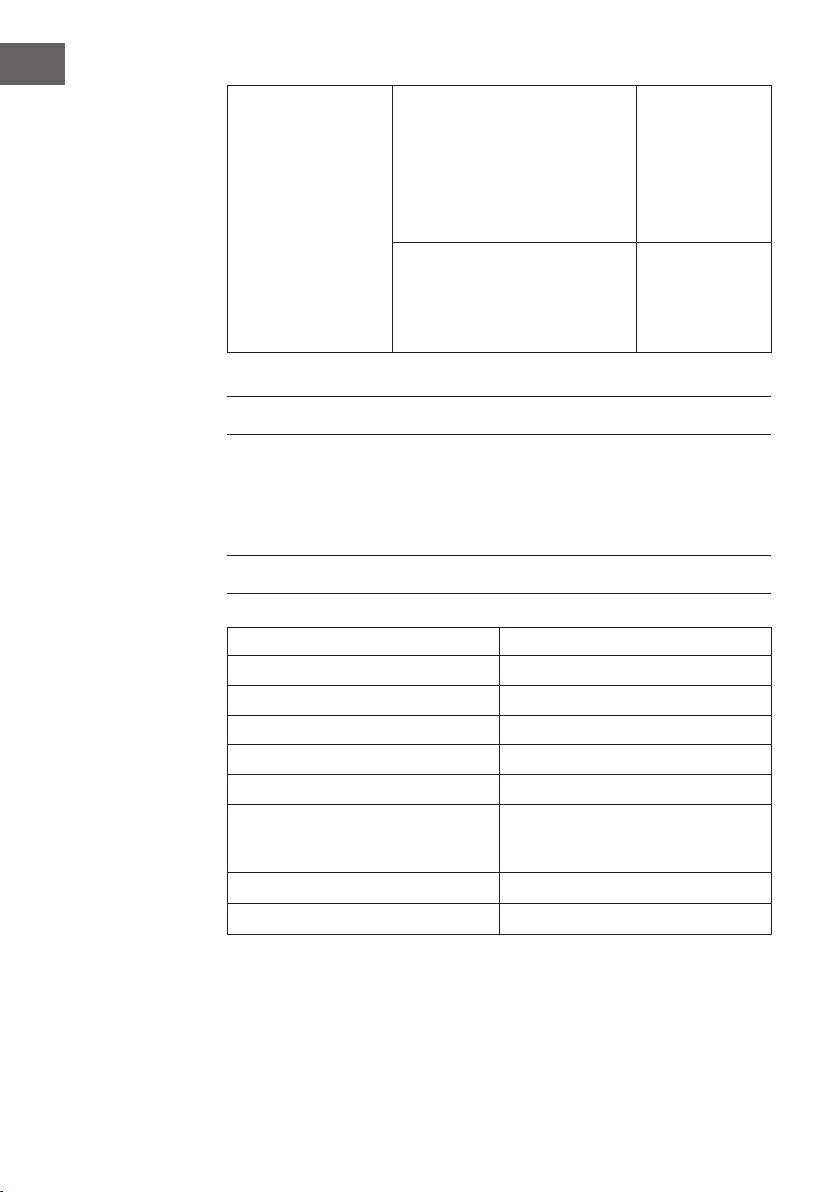
56
ES
Sale humo blanco del
aparato.
Ha añadido demasiado aceite. El aceite de
alimentos muy
grasientos
gotea en el
compartimento.
Utilice alimentos
con menos grasa.
El compartimento para freír o cesto
contiene restos de grasa de usos
anteriores.
Limpie
correctamente el
compartimento y el
cesto después de
cada uso.
GARANTÍA Y SERVICIO
Si necesita más información o tiene un problema con el aparato, visite nuestra página
web o póngase en contacto con su distribuidor.
DATOS TÉCNICOS
Número de artículo 10032849, 10036476
Fuente de alimentación 220-240 V ~ 50/60 Hz
Potencia absorbida 1700 W
Tecnología Aire caliente rápido
Capacidad 5,4 litros
Puesta en marcha Ecran LED
Material
Carcasa: acero inoxidable
Compartimento para freír: aluminio
Elemento calefactor: acero inoxidable
Rango de temperatura 80 - 200°C
Temporizador ≤ 60 minutos

57
IT
Gentile Cliente,
La ringraziamo per aver acquistato il dispositivo. La preghiamo
di leggere attentamente le seguenti istruzioni per l’uso e di
seguirle per evitare possibili danni. Non ci assumiamo alcuna
responsabilità per danni scaturiti da una mancata osservazione
delle avvertenze di sicurezza e da un uso improprio del
dispositivo. Scansionare il codice QR seguente, per accedere
al manuale d’uso più attuale e per ricevere informazioni sul
prodotto.
PRODUTTORE E IMPORTATORE (UK)
Produttore:
Chal-Tec GmbH, Wallstraße 16, 10179 Berlino, Germania.
Importatore per la Gran Bretagna:
Chal-Tec UK limited
Unit 6 Riverside Business Centre
Brighton Road
Shoreham-by-Sea
BN43 6RE
United Kingdom
58
IT
AVVERTENZE DI SICUREZZA
Leggere attentamente il manuale d’uso prima di utilizzare il dispositivo e conservarlo
per future consultazioni. Leggere tutte le istruzioni.
Il dispositivo è destinato alla cottura (“frittura”) di alimenti con aria calda e solo per
l’uso casalingo. Non utilizzare il dispositivo per scopi diversi da quelli previsti.
Questo dispositivo non è adatto all’utilizzo da parte di bambini e persone con limitate
capacità siche e psichiche o con esperienza e conoscenze limitate, a meno che non
siano istruiti o controllati da una persona responsabile della loro sicurezza.
Non utilizzare il dispositivo all’aperto o in cucine comuni, locali di lavoro, uf ci, camere
di hotel e altri ambienti abitativi simili.
Non lasciare il dispositivo privo di controllo mentre è in funzione.
Staccare la spina quando non si utilizza il dispositivo.
Utilizzare solo componenti e accessori consigliati dal produttore, in modo da evitare
danni.
Non modi care il dispositivo o i suoi componenti.
Quando si utilizzano dispositivi elettrici, devono essere sempre rispettate le procedure
di sicurezza basilari.
Se la spina, il cavo o il dispositivo sono danneggiati in qualche modo, farli controllare
da un tecnico certi cato o dal centro di assistenza del produttore.
Tenere sotto controllo i bambini per assicurarsi che non giochino con il dispositivo o con
i suoi componenti
ATTENZIONE
Pericolo di ustioni a causa delle super ci calde! Questo dispositivo
genera calore e vapore durante il funzionamento. Seguire determinate
procedure per evitare il rischio di ustioni, incendi e altri danni a cose o
persone.
Questo dispositivo diventa molto caldo durante il funzionamento e rimane caldo per
un certo tempo anche dopo lo spegnimento. Utilizzare sempre presine termoresistenti
per maneggiare il dispositivo. Lasciare raffreddare il dispositivo e i suoi componenti per
30minuti prima di procedere alla pulizia.
Non posizionare il dispositivo vicino a materiali o oggetti in ammabili per limitare il
rischio d’incendio.
Non poggiare oggetti sopra al dispositivo mentre è in funzione o quando è bollente.

59
IT
INDICE
Avvertenze di sicurezza ........................................................................ 58
Componenti del dispositivo ................................................................ 60
Montaggio ................................................................................................... 61
Disimballare e pulire 61
Installazione 61
Collegamento alla rete elettrica ....................................................... 62
Utilizzo .......................................................................................................... 62
Riempire il cestello .................................................................................. 62
Impostare temperatura e tempo di cottura 63
Controllo della cottura 63
Togliere le pietanze 64
Consigli ......................................................................................................... 65
Tabella di cottura 65
Preparare patatine fritte fatte in casa 66
Pulizia ............................................................................................................66
Conservazione ..........................................................................................67
Avviso di smaltimento ............................................................................67
Risoluzione dei problemi ...................................................................... 68
Garanzia e assistenza .............................................................................69
Dati tecnici ................................................................................................. 70

60
IT
COMPONENTI DEL DISPOSITIVO
1. Pannello di controllo
2. Blocco del vano per friggere
3. Impugnatura del cestello
4. Vano per friggere (con cestello)
5. Parte superiore
6. Uscita dell’aria
7. Connessione di alimentazione
8. Parte inferiore con piedi antiscivolo
9. Alloggiamento
61
IT
Con la friggitrice ad aria calda potrete preparare i vostri ingredienti e
snack preferiti in modo salutare.
La friggitrice utilizza aria calda in combinazione con una rapida circolazione dell’aria
(tecnologia Rapid-Air) e un grill in alto (“Calore dall’alto”) per preparare in modo
sano, rapido e semplice numerosi piatti deliziosi. Gli ingredienti vengono riscaldati
contemporaneamente da tutti i lati e nella maggior parte dei casi non è necessario
aggiungere olio.
MONTAGGIO
Disimballare e pulire
Rimuovere tutti i materiali d’imballaggio e le etichette dall’interno e dall’esterno della
friggitrice ad aria calda.
Il cestello si trova già nel vano per friggere al momento della consegna.
Per estrarre il cestello, tirare in avanti il blocco trasparente.
Tirare fuori il vano per friggere dal dispositivo.
Premere il tasto di sblocco sull’impugnatura del cestello e sollevarlo per toglierlo dal
vano.
Per inserire il cestello, seguire i passaggi al contrario: mettere il cestello sopra al vano,
in modo che i ganci a destra e a sinistra dell’impugnatura si incastrino nelle aperture sul
lato superiore del vano. Mettere il cestello nel vano e bloccarlo.
Pulire cestello e vano con acqua bollente, detergente e una spugna morbida.
Pulire l’alloggiamento interno ed esterno con un panno umido.
AVVERTENZA
Rischio di scossa elettrica! Non immergere la friggitrice in acqua. Questo
potrebbe causare danni elettrici al dispositivo.
Asciugare completamente tutti i componenti.
Inserire di nuovo il cestello nel vano e bloccarlo, in modo da evitare che si stacchi
inavvertitamente.
NOTA: assicurarsi prima di procedere all’utilizzo, che non ci siano materiali
d’imballaggio o corpi estranei nel dispositivo, sul dispositivo, sotto e intorno al vano per
friggere e al cestello.
Installazione
Posizionare la friggitrice su una super cie stabile, piana e termoresistente, vicino a una
presa elettrica.
Assicurarsi di poggiare il dispositivo su una super cie priva di plastica. Il calore durante
la cottura può causare la fuoriuscita di plasti canti su super ci che contengono plastica
e la comparsa di macchie scure e cambiamenti di colore sulla super cie.

62
IT
Dall’uscita dell’aria sul retro della friggitrice può uscire aria bollente. Tenere il retro del
dispositivo libero da ostacoli, in modo da garantire il funzionamento.
Non poggiare nulla sulla friggitrice ad aria calda.
Non spostare la friggitrice mentre è ancora calda. Si corre il rischio di ustione a causa
di liquidi bollenti che potrebbero gocciolare dal vano. Lasciare raffreddare la friggitrice
per più di 30 minuti prima del trasporto.
Collegamento alla rete elettrica
Far passare il cavo dietro alla friggitrice no alla presa elettrica per evitare che venga
tirato inavvertitamente.
Non lasciare che il cavo penzoli dal bordo di un tavolo.
Assicurarsi che il cavo non entri in contatto con superci bollenti, come caloriferi o
fornelli.
Il cavo incluso in consegna (o meglio il cavo rimovibile) è corto. Questo riduce il rischio
di restare impigliati o di inciampare in un cavo più lungo. Utilizzare solo prolunghe
adatte a questo dispositivo. In caso di dubbi, chiedere a un tecnico certicato o a un
centro di assistenza autorizzato dal produttore.
Staccare la spina quando non si utilizza la friggitrice.
UTILIZZO
IMPORTANTE: la friggitrice funziona con aria calda invece che con grasso. Non
mettere olio o grasso nel vano per friggere.
Riempire il cestello
Il dispositivo è dotato di un interruttore di sicurezza all’interno, che spegne il dispositivo
non appena il vano viene aperto. Questo impedisce di ustionarsi inavvertitamente con
l’aria bollente. Se viene tolto il vano durante il funzionamento, il dispositivo si spegne
automaticamente.
Spostare in avanti il tasto di blocco sull’impugnatura del cestello.
Togliere il vano per friggere dal dispositivo.
Mettere le pietanze da friggere nel cestello. Non riempire il cestello oltre i due terzi.
Se si desidera friggere verdure, non mettere nel dispositivo più di tre tazze di verdure
fresche.
IMPORTANTE: per garantire la cottura delle pietanze, utilizzare il vano per friggere
solo con il cestello all’interno.
Mettere il vano nel dispositivo e spostare nuovamente il blocco sull’impugnatura del
cestello.

63
IT
Impostare temperatura e tempo di cottura
Dal pannello di controllo è possibile impostare diversi programmi di cottura, la
temperatura e il tempo di cottura. Collegare la spina a una presa elettrica.
ON/OFF
Accendere o spegnere il dispositivo.
MODALITÀ
Scegliere tra i programmi prede niti.
TEMPO
Premendo questo tasto è possibile impostare il tempo desiderato.
Impostare il tempo di cottura premendo i tasti PIÙ o MENO.
TEMPERATURA
Premendo questo tasto è possibile regolare la temperatura desiderata.
Regolare la temperatura dell’aria calda premendo i tasti PIÙ o MENO.
Premere ON/OFF per accendere il dispositivo. Il tasto ON/OFF si illumina.
Al primo utilizzo, la friggitrice ad aria calda potrebbe emettere un leggero odore.
Questo è normale e scompare dopo breve tempo.
Selezionare un programma o impostare tempo e temperatura desiderati.
NOTA: l’indicazione di tempo e temperatura cambia automaticamente ogni 5 secondi.
Controllo della cottura
Alcune pietanze devono essere girate, scosse o smosse a metà del tempo di cottura,
in modo da cuocere in modo omogeneo e da non attaccarsi. Smuovere in particolare
grandi quantità di alimenti, in modo da garantire una cottura omogenea.
NOTA: toccare cestello e vano per friggere solo con presine da forno. Durante e dopo
la cottura, il cestello, il vano e le pietanze sono bollenti. In base al tipo di pietanze,
potrebbe fuoriuscire vapore dal vano. Se necessario, utilizzare indumenti a maniche
lunghe, in modo da proteggere le parti del corpo non coperte da eventuali liquidi di
cottura che fuoriescono dalle pietanze.

64
IT
1 Spostare in avanti il tasto di blocco trasparente sull’impugnatura del cestello per
sbloccare il vano.
2 Togliere il vano dal dispositivo tenendolo dall’impugnatura. Smuovere
energeticamente le pietanze.
Il cestello può essere staccato dal vano per smuovere le pietanze, se il peso del vano
dovesse essere eccessivo.
1 Spostare in avanti il tasto di blocco trasparente sull’impugnatura del cestello ed
estrarre il vano per friggere.
2 Posizionare il vano su una supercie termoresistente.
3 Premere il tasto sull’impugnatura del cestello ed estrarlo.
4 Smuovere energeticamente le pietanze.
5 Inserire correttamente il cestello nel vano e bloccarlo. Inserire nuovamente il vano
nel dispositivo.
NOTA: la friggitrice ad aria calda funziona solo se il vano è completamente chiuso.
Consiglio: impostare il timer a metà del tempo di cottura necessario, in modo da
ricordarsi di girare e smuovere le pietanze. Ricordarsi di impostare il timer sul tempo
rimanente dopo aver smosso le pietanze.
Togliere le pietanze
Quando si sente l’allarme del timer, il tempo di cottura impostato è scaduto.
Togliere il vano dal dispositivo.
NOTA: toccare cestello e vano per friggere solo con presine da forno. Durante e dopo
la cottura, il cestello, il vano e le pietanze sono bollenti. In base al tipo di pietanze,
potrebbe fuoriuscire vapore dal vano. Se necessario, utilizzare indumenti a maniche
lunghe, in modo da proteggere le parti del corpo non coperte da eventuali liquidi di
cottura che fuoriescono dalle pietanze.
Controllare se le pietanze sono cotte (in caso contrario, inserire nuovamente il vano nel
dispositivo e impostare il timer per altri minuti di cottura).
Quando la cottura delle pietanze è soddisfacente, togliere il vano dalla friggitrice ad
aria calda e posizionarlo su una supercie termoresistente.
Premere il tasto di sblocco e togliere il cestello dal vano.
NOTA: non girare il cestello con l’apertura verso il basso per svuotarlo mentre è ancora
ssato al vano, altrimenti potrebbero fuoriuscire grasso o liquidi di cottura.
Mettere le pietanze tolte dal cestello in una ciotola o su un piatto.
Consiglio: per togliere alimenti di grandi dimensioni o delicati, utilizzare una pinza da
cucina o un mestolo.
Quando un carico di alimenti è pronto, la friggitrice è subito pronta alla preparazione
del carico successivo.
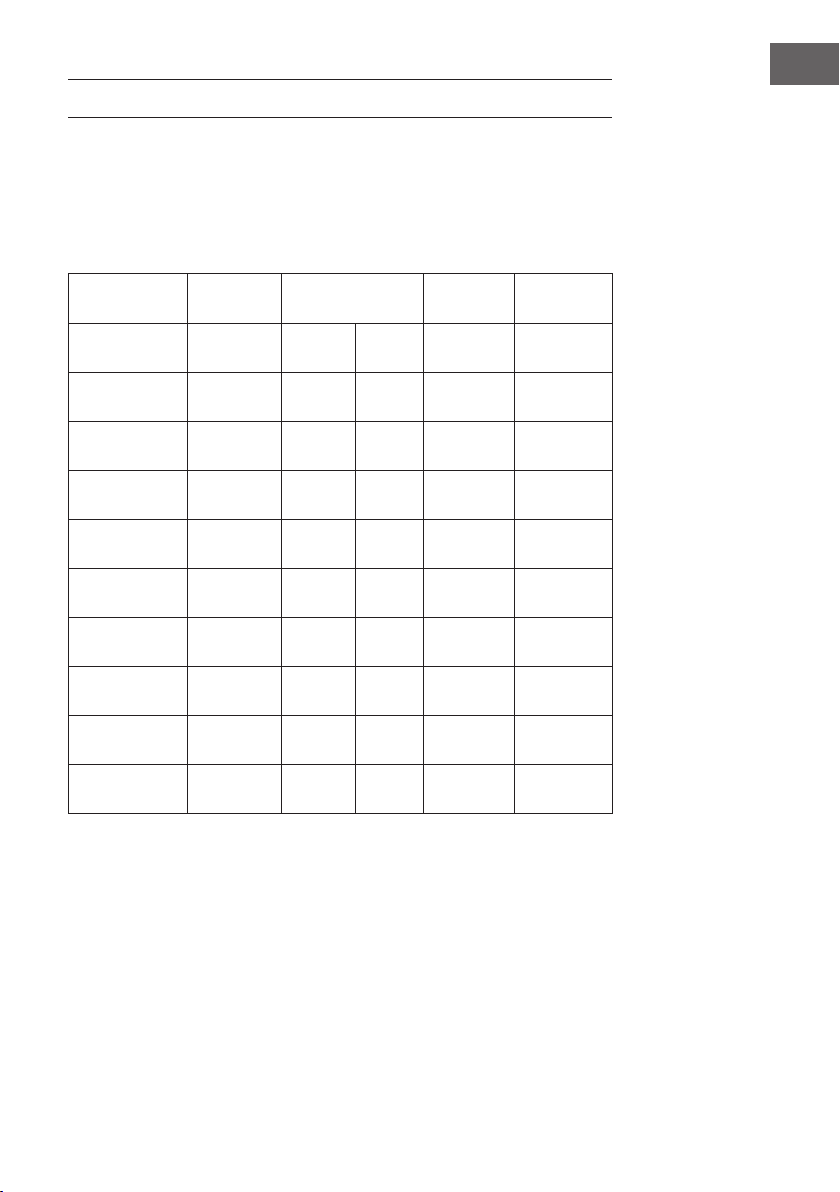
65
IT
CONSIGLI
Tabella di cottura
La seguente tabella aiuta a scegliere temperatura e tempo di cottura per ottenere i
migliori risultati. Una volta presa condenza con la frittura ad aria calda, è possibile
modicare questi consigli in base alle preferenze. Aggiungere 3 minuti al tempo di
cottura se il dispositivo è ancora freddo e si avvia per la cottura.
Alimento Quantità Cottura Controllo
cottura
Afnamento
Patatine fritte
surgelate sottili
2 ½-5 tazze 10-12 min 200 °C Sí
Patatine fritte
surgelate spesse
2 ½-5 tazze 10-14 min 200 °C Sí
Patatine fritte fatte
in casa
2 ½-6 tazze 12-18 min 200 °C Sí ½ cucchiaino
d’olio
Patate a spicchi
fatte in casa
2 ½-6 tazze 18-25 min 180 °C Sí ½ cucchiaino
d’olio
Patate a cubetti
fatte in casa
2 ½-6 tazze 14-20 min 180 °C Sí ½ cucchiaino
d’olio
Bistecca 120-900 g 8-12 min 200 °C
Hamburger 120-500 g 7-14 min 180 °C
Crocchette di
pollo surgelate
120-900 g 12-16 min 200 °C Sí
Bastoncini di
mozzarella
120-900 g 8-14 min 180 °C Sí
Verdure ripiene 120-900 g 10-15 min 160 °C Sí
Nota: tenere presente che queste impostazioni sono indicative, dato che la
provenienza, la dimensione, la forma e la marca degli alimenti possono variare.
Non possiamo garantire che i vostri alimenti abbiano bisogno di esattamente queste
temperature e tempi per cuocere.
Spuntini che vengono normalmente preparati al forno possono essere preparati anche
nella friggitrice ad aria calda.
Alimenti più sottili o più piccoli richiedono tempi di cottura inferiori rispetto ad alimenti
più grossi.
66
IT
La friggitrice ad aria calda può essere utilizzata per riscaldare alimenti. Basta impostare
una temperatura di 150 °C o 300 °F e una durata no a 10 minuti.
L’aggiunta di olio vegetale nella preparazione di patate fresche è consigliato per
ottenere risultati croccanti. Se si aggiunge olio, aggiungerlo poco prima della cottura.
Smuovere o girare alimenti di piccole dimensioni a metà cottura garantisce un risultato
omogeneo.
Utilizzare impasti già pronti per preparare spuntini ripieni in modo facile e rapido. Gli
impasti pronti richiedono tempi di cottura inferiori rispetto agli impasti fatti in casa.
Per cuocere torte o quiche, mettere una forma o una teglia nel cestello. Consigliamo di
utilizzare forme o stoviglie da forno per cuocere alimenti ripieni o delicati.
Preparare patatine fritte fatte in casa
Seguire questi passaggi per preparare patatine fritte fatte in casa:
1 Pelare le patate e tagliarle a bastoncini.
2 Lavare i bastoncini di patata e asciugarli con della carta da cucina.
3 Mettere i bastoncini e ½ cucchiaio d’olio in una ciotola e mescolare no a quando
le patate sono coperte d’olio.
4 Togliere le patatine dalla ciotola con una pinza da cucina o un mestolo, far
sgocciolare l’olio in eccesso e metterle nel cestello. Non versare le patatine dalla
ciotola nel cestello, per evitare che l’olio in eccesso nisca nel vano di frittura.
5 Cuocere le patatine seguendo le indicazioni nella tabella precedente.
PULIZIA
Prendersi cura di questo dispositivo è semplicissimo. Non contiene componenti che
necessitano di manutenzione da parte dell’utente. Tutte le opere di manutenzione, che
vanno oltre la pulizia, devono essere realizzate da un tecnico quali cato.
Pulire il dispositivo dopo ogni utilizzo.
AVVERTENZA
Rischio di scossa elettrica! Non immergere il dispositivo in acqua. Il
dispositivo viene alimentato a elettricità e potrebbe danneggiarsi.
Staccare la spina e lasciar raffreddare il dispositivo.
Consiglio: togliere il vano dalla friggitrice dopo la cottura per velocizzare il
raffreddamento.
Pulire il lato esterno del dispositivo con un panno umido.
Pulire l’interno del dispositivo con acqua bollente e una spugna non abrasiva.
Pulire l’elemento riscaldante con una spazzola per rimuovere resti di cibo.
NOTA: vano per friggere e cestello non devono essere puliti con utensili da cucina
in metallo o con prodotti abrasivi, in quanto potrebbero rovinare il rivestimento
antiaderente.
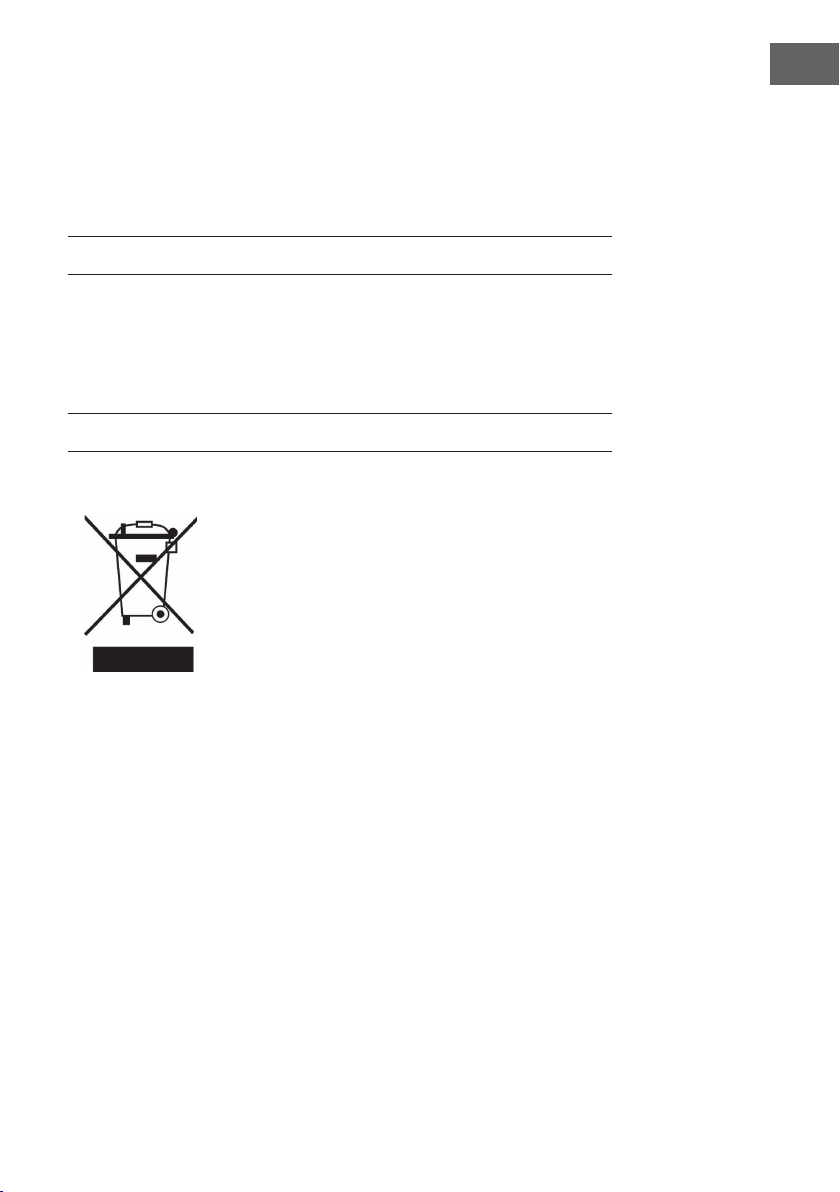
67
IT
Pulire vano e cestello con acqua bollente, un po’ di detersivo per piatti e una spugna
non abrasiva. Si può utilizzare un liquido sgrassante per rimuovere lo sporco residuo.
Consiglio: se dello sporco aderisce al cestello o al fondo del vano, riempire il vano
con acqua bollente e un po’ di detersivo per piatti. Mettere il cestello nel vano e farlo
ammorbidire per circa 10 minuti.
CONSERVAZIONE
Staccare la spina e far raffreddare il dispositivo.
Assicurarsi che tutti i componenti siano puliti e asciutti.
Conservare la friggitrice ad aria calda in un luogo asciutto e senza polvere.
AVVISO DI SMALTIMENTO
Se nel proprio paese si applicano le regolamentazioni
inerenti lo smaltimento di dispositivi elettrici ed elettronici,
questo simbolo sul prodotto o sulla confezione segnala che
questi prodotti non possono essere smaltiti con i riuti normali
e devono essere portati a un punto di raccolta di dispositivi
elettrici ed elettronici. Grazie al corretto smaltimento dei
vecchi dispositivi si tutela il pianeta e la salute delle persone
da possibili conseguenze negative. Informazioni riguardanti il
riciclo e lo smaltimento di questi prodotti si ottengono presso
l’amministrazione locale oppure il servizio di gestione dei
riuti domestici.

68
IT
RISOLUZIONE DEI PROBLEMI
Problema Possibile causa Soluzione
La friggitrice ad aria
calda non funziona.
Il dispositivo non è collegato. Collegare la
spina a una presa
elettrica.
Il dispositivo non è acceso o non
sono state impostate temperatura e
durata.
Premere il tasto di
avvio. Selezionare
un programma o
impostare durata
e temperatura.
Premere Start.
Il dispositivo è stato messo in pausa
(premendo Start a dispositivo in
funzione, viene messo in pausa).
Premere di nuovo
Start.
Il vano è incastrato. Il cestello non è posizionato
correttamente nel vano.
Premere il cestello
nel vano facendo
attenzione,
come descritto
nel paragrafo
MONTAGGIO.
Il cestello è troppo pieno. Riempire il
cestello come
consigliato. Vedere
il paragrafo
RIEMPIRE IL
CESTELLO.
Gli alimenti non sono
cotti.
Il cestello è troppo pieno. Inserire minori
quantità di alimenti
per garantire una
cottura omogenea.
La temperatura impostata è troppo
bassa.
Premere il tasto
ALTO nella
selezione della
temperatura per
aumentarla.

69
IT
Gli alimenti non
sono cotti in modo
omogeneo.
Alcuni alimenti devono essere smossi
o girati durante la cottura.
Girare o smuovere
gli alimenti diverse
volte durante la
cottura. Vedere la
tabella di cottura
nel paragrafo
CONSIGLI E
TRUCCHETTI.
Le patatine fritte non
sono cotte in modo
omogeneo.
Sono stati utilizzati diversi tipi di
patata.
Utilizzare patate
fresche e resistenti
alla cottura.
Le patate non sono state asciugate
dopo la pulizia.
Asciugare le
patate dopo
averle lavate.
Le patatine fritte non
sono croccanti.
Le patatine crude hanno troppa
acqua.
Asciugare le
patate dopo averle
lavate. Tagliarle
in bastoncini più
sottili. Aggiungere
olio.
Dal dispositivo esce
fumo bianco.
È stato utilizzato troppo olio. L’olio di alimenti
molto grassi
gocciola nel vano
e brucia. Utilizzare
alimenti meno
grassi.
Nel vano o sul cestello c’è olio o
alimenti residui dall’ultima cottura.
Pulire il vano e il
cestello dopo ogni
utilizzo.
GARANZIA E ASSISTENZA
Se sono necessarie informazioni o ci sono problemi con il dispositivo, visitare il nostro
sito web o contattare il rivenditore.
70
IT
DATI TECNICI
Numero articolo 10032849, 10036476
Alimentazione 220-240 V ~ 50/60 Hz
Potenza assorbita 1700 W
Tecnologia Tecnologia aria calda Rapid-Air
Capacità 5,4 litri
Controllo Pannello LED
Materiale
Alloggiamento: acciaio inox
Vano per friggere: alluminio
Elemento riscaldante: acciaio inox
Intervallo di temperatura 80 - 200°C
Timer ≤ 60 minuti