COLDPLAYER
Luftkühler
Air Cooler
Enfriador de aire
Rafraîchisseur d’air
Rareddatore d’aria
www.klarstein.com
10034672 10034673


3
DE
Sehr geehrter Kunde,
wir gratulieren Ihnen zum Erwerb Ihres Gerätes. Lesen Sie
die folgenden Hinweise sorgfältig durch und befolgen Sie
diese, um möglichen Schäden vorzubeugen. Für Schäden,
die durch Missachtung der Hinweise und unsachgemäßen
Gebrauch entstehen, übernehmen wir keine Haftung. Scannen
Sie den folgenden QR-Code, um Zugriff auf die aktuellste
Bedienungsanleitung und weitere Informationen rund um das
Produkt zu erhalten.
INHALTSVERZEICHNIS
Technische Daten4
Sicherheitshinweise5
Geräteübersicht6
Installation7
Bedienfeld und Tastenfunktionen8
Weitere Funktionen9
Reinigung und Pege11
Fehlerbehebung13
Hinweise zur Entsorgung14
Hersteller & Importeur (UK)14
English 15
Español 27
Français 39
Italiano 51

4
DE
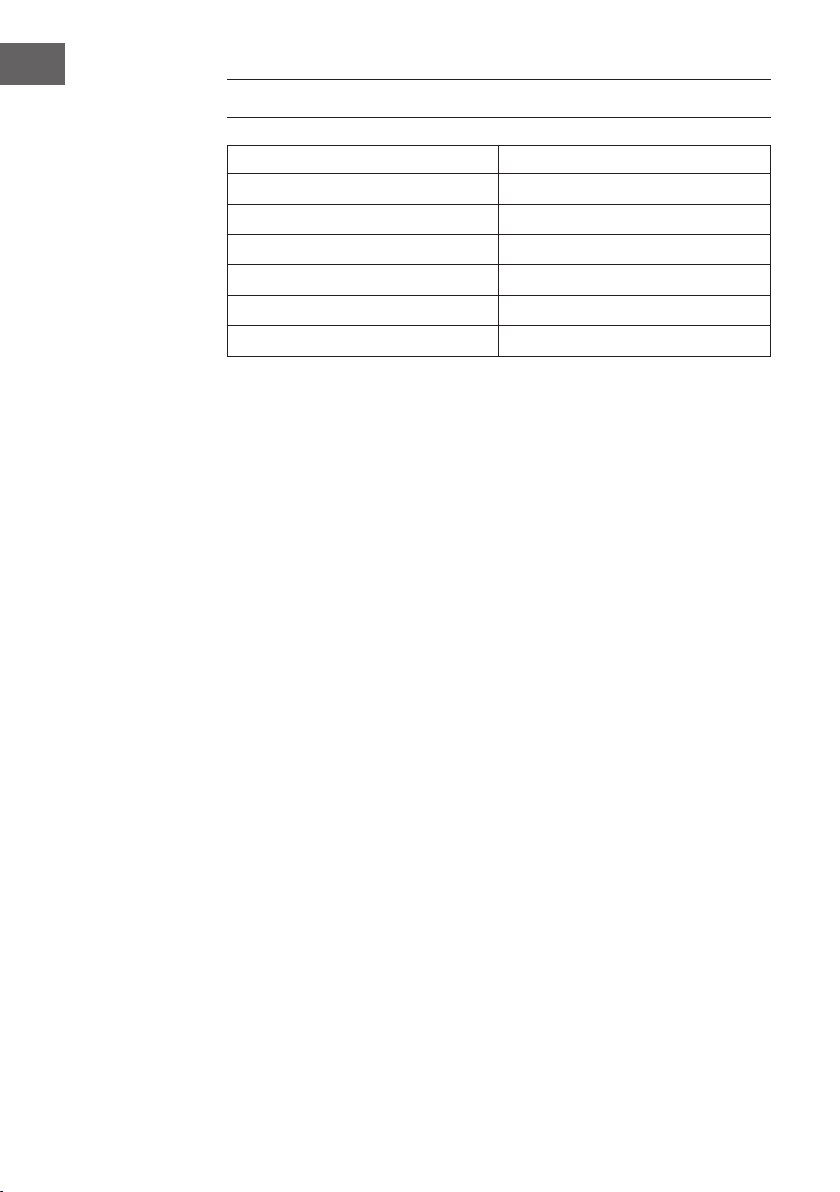
TECHNISCHE DATEN
Artikelnummer 10034672
Stromversorgung 220-240 V ~ 50/60 Hz
Leistung 68 W
Fassungsvermögen des Wassertanks 10 L
Luftvolumen 370 m³/h
Verdampfungsvolumen 1100 ml/h
Geräuschpegel ≤ 64 dB (A)
Hinweis zur Benutzung des Wassertanks
Prinzipiell können Sie Ihren Luftkühler jederzeit ohne Wasser im Tank nutzen. Er
funktioniert dann wie ein ganz normaler Ventilator. Wasser im Tank wird nur für die
Kühl-Funktion benötigt. Der Luftkühler verdunstet dieses über das Vernebleries, dabei
wird der Luft Wärme entzogen und die Lufttemperatur des Ventilators, je nach Kälte des
verwendeten Wassers, um bis zu 3 °C verringert. Wir raten davon ab, die Kühlfunktion
an Tagen mit besonders hoher Luftfeuchtigkeit zu nutzen, da sie diese zusätzlich erhöht
und so zu Kreislaufbeschwerden beitragen kann.

5
DE
SICHERHEITSHINWEISE
• Prüfen Sie vor der Benutzung die Spannungsangabe auf dem Typenschild.
Schließen Sie das Gerät nur an Steckdosen an, die der Spannung des Geräts
entsprechen.
• Halten Sie das Kabel fern von heißen Oberächen und scharfkantigen
Gegenständen.
• Verlegen Sie das Kabel nicht unter einem Teppich und decken Sie es auch nicht mit
anderen Gegenständen oder Stoffen ab. Verlegen Sie das Kabel so, dass keiner
darüber fällt oder daran hängen bleibt.
• Benutzen Sie das Gerät nicht, wenn das Netzkabel oder der Stecker beschädigt
sind.
• Falls das Netzkabel oder der Stecker beschädigt sind, müssen sie vom Hersteller,
einem autorisierten Fachbetrieb oder einer ähnlich qualizierten Person ersetzt
werden.
• Benutzen Sie das Gerät nur in Innenräumen.
• Decken Sie das Gerät nicht ab.
• Stellen Sie das Gerät auf einen ebenen, stabilen Untergrund. Achten Sie darauf,
dass das Gerät gerade steht.
• Versichern Sie sich, dass das Gerät ausgeschaltet ist, bevor Sie den Stecker in die
Steckdose stecken.
• Bedienen Sie das Gerät nicht mit nassen Händen und fassen Sie auch den Stecker
und das Kabel nicht mit nassen Händen an.
• Lassen Sie das Gerät während des Betriebs nicht unbeaufsichtigt. Schalten Sie es
aus und ziehen Sie den Stecker, wenn Sie es nicht benutzen.
• Ziehen Sie den Stecker aus der Steckdose, bevor Sie das Gerät reinigen oder
warten.
• Ziehen Sie den Stecker nicht am Kabel aus der Steckdose, sondern halten Sie ihn
beim Abziehen mit der Hand fest.
• Kinder ab 8 Jahren, psychisch, sensorisch und körperlich eingeschränkte Menschen
dürfen das Gerät nur benutzen, wenn sie vorher von einer für sie verantwortlichen
Aufsichtsperson ausführlich mit den Funktionen und den Sicherheitsvorkehrungen
vertraut gemacht wurden und die damit verbundenen Risiken verstehen.
• Benutzen Sie das Gerät nur so, wie in dieser Anleitung beschrieben.
• Stecken Sie nicht Ihre Finger oder Gegenstände in die Lüftungsöffnungen.
• Stellen Sie das Gerät nicht in die Nähe von Vorhängen, Gardinen, Tischdecken
oder ähnlichen Textilien. Sie könnten in den Lüfter gezogen werden und diesen
beschädigen.
• Benutzen Sie das Gerät nicht in Feuchträumen wie Badezimmern.
• Benutzen Sie das Gerät nicht, bevor die Räder montiert sind oder wenn es auf der
Seite liegt.
• Wickeln Sie das Kabel vor dem Gebrauch komplett ab.
6
DE
• Während des Betriebs befeuchtet das Gerät die Umgebungsluft. Vermeiden Sie
jedoch zu hohe Luftfeuchtigkeit. Wir empfehlen Ihnen eine Luftfeuchtigkeit zwischen
40-50%. Zu hohe Luftfeuchtigkeit kann zu Schimmel oder gesundheitlichen
Problemen führen.
• Stellen Sie das Gerät nur auf Untergründe, die unempndlich gegenüber Nässe
und hoher Luftfeuchtigkeit sind. Es kann immer mal vorkommen, dass beim Ein- und
Ausbau des Wassertanks ein paar Tropfen danebengehen. Sollte das der Fall sein,
wischen Sie die Wassertropfen umgehend weg.
• Wechseln Sie das Wasser im Tank spätestens nach 3 Tagen.
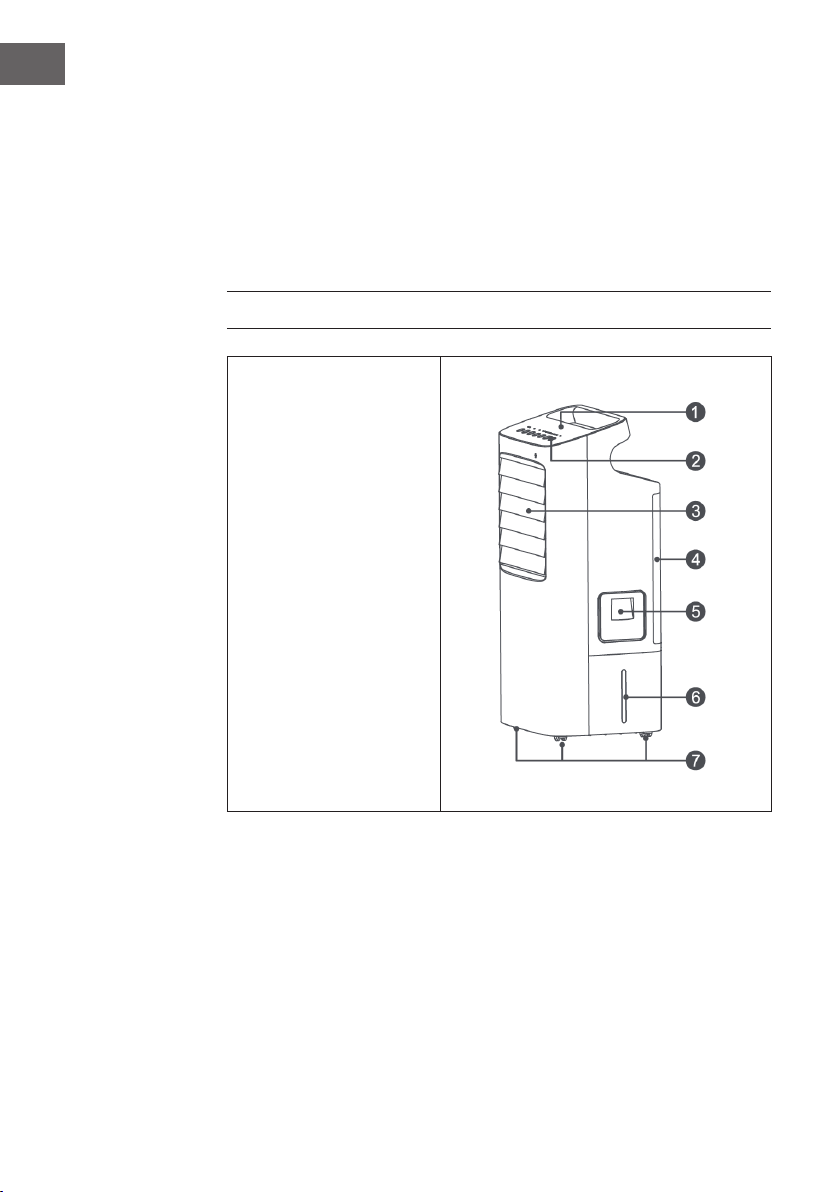
GERÄTEÜBERSICHT
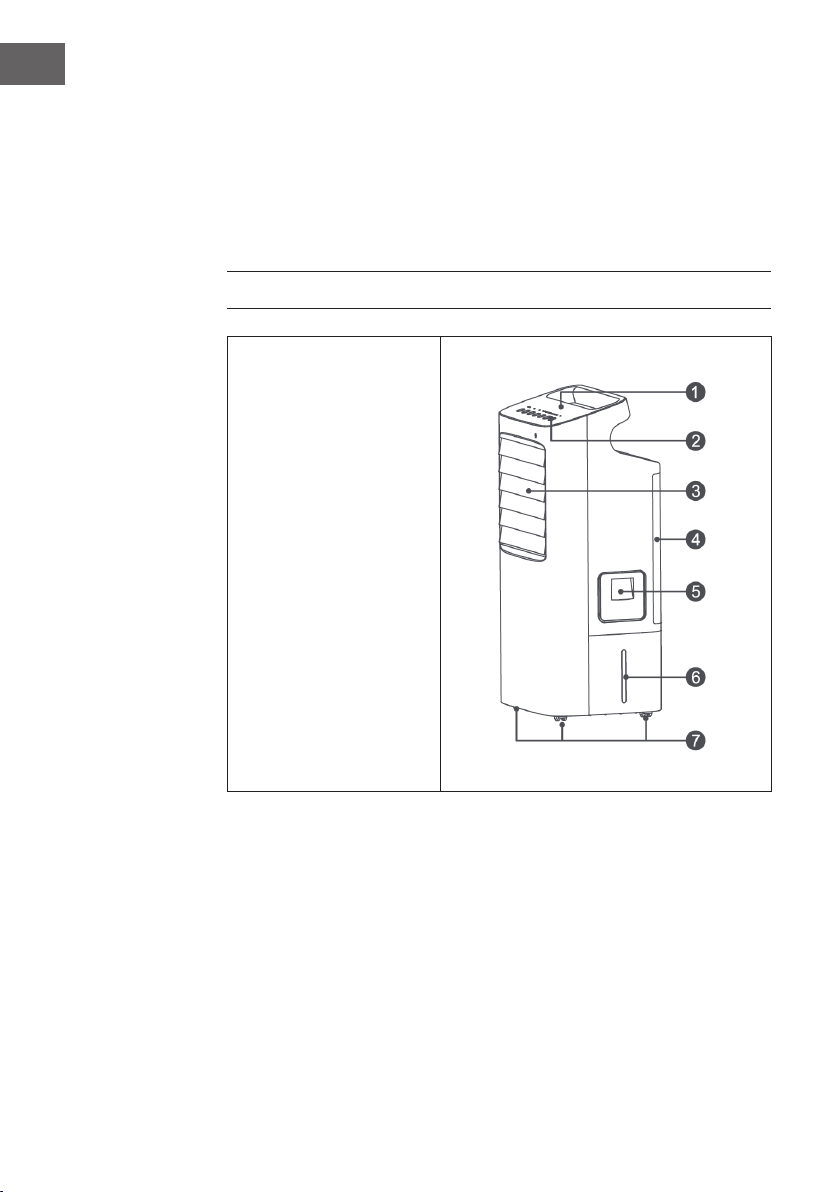
1 Bedienfeld
2 Tasten
3 Lamellen /
Schwenkügel
4 Vernebler
5 Einfülltrichter
6 Wassertank
7 Rollen
7
DE
INSTALLATION
1 Öffnen Sie die Verpackung und nehmen Sie das Gerät heraus. Überprüfen Sie,
ob die Fernbedienung und die zwei Eisboxen im Inneren des Verpackungskartons
beiliegen.
2 Stellen Sie das Gerät waagerecht auf und neigen Sie es während der Benutzung
nicht. Prüfen Sie vor der Benutzung die Spannung auf der Geräteplakette.
Schließen Sie das Gerät nur an Steckdosen an, die der Spannung des Geräts
entsprechen.
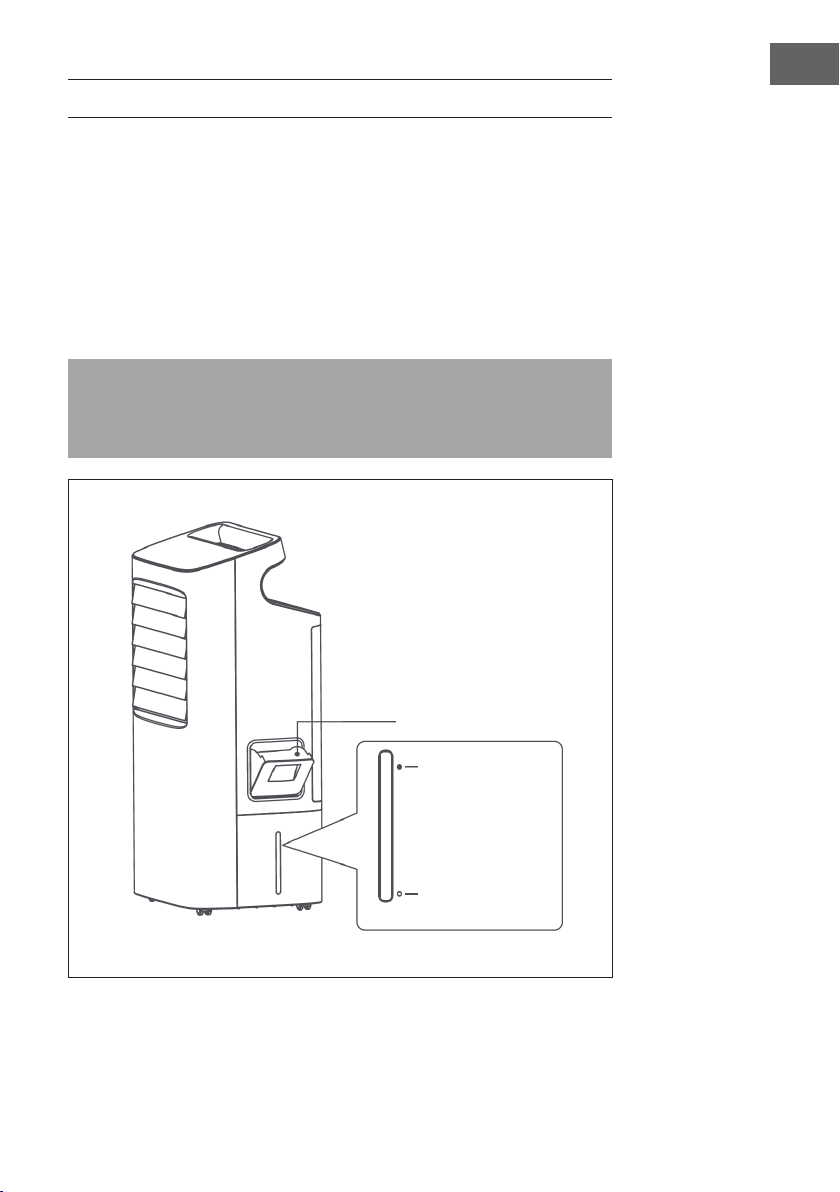
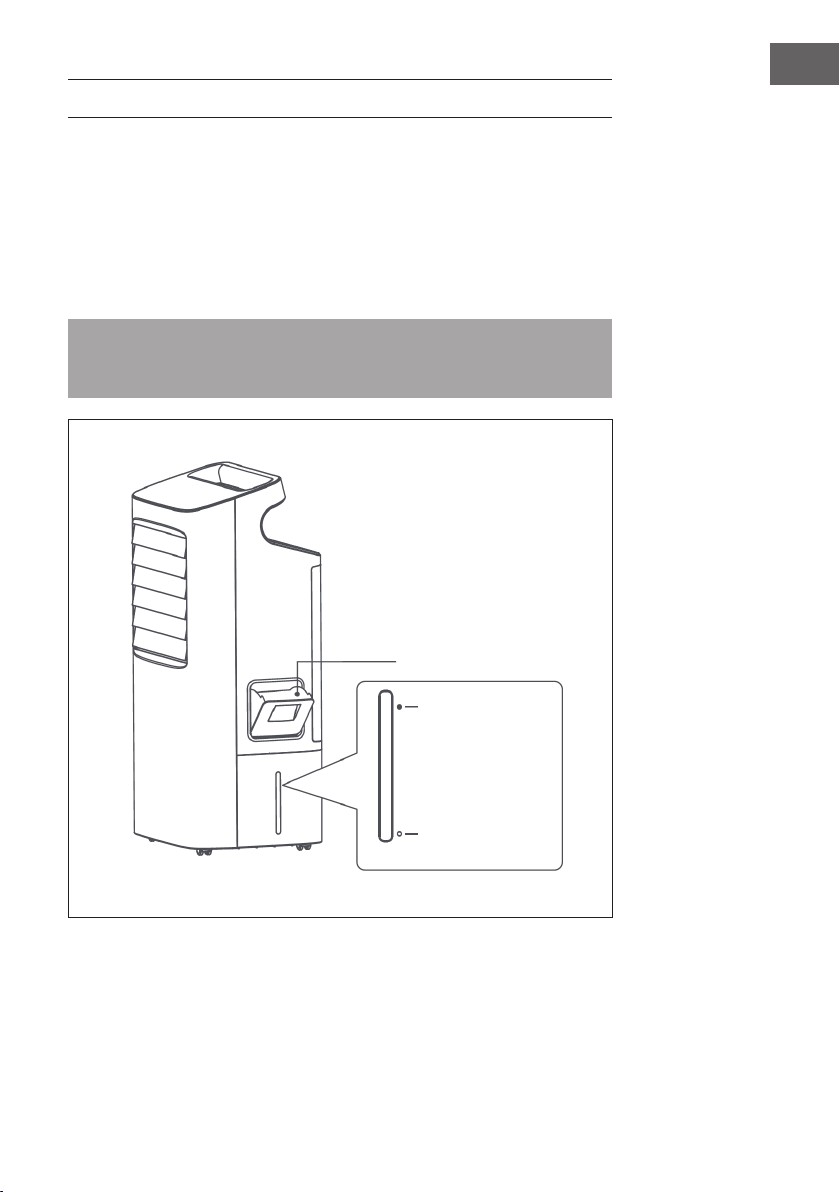
3 Öffnen Sie die Seitenabdeckung des Gerätes und geben Sie Wasser in den
Einfülltrichter. Gießen Sie das Wasser langsam in den Wassertank. Sobald der Tank
voll ist, schließen Sie die Seitenabdeckung wieder.
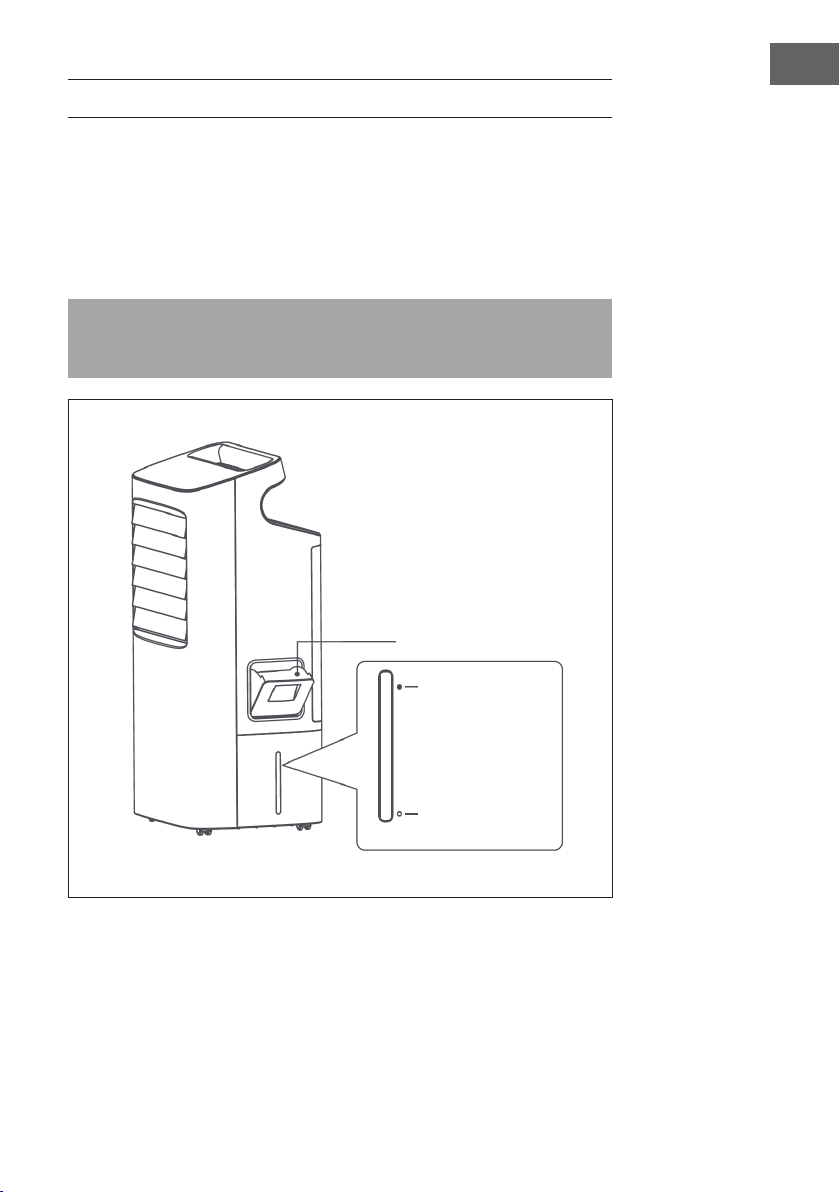
Hinweis: Achten Sie beim Hinzufügen von Wasser auf den Wasserstand des
Gerätes, überschreiten Sie nicht die MAX-Markierung und unterschreiten Sie nicht die
MIN-Markierung auf der Wasserstandskala. Füllen Sie vor der Benutzung Wasser bis
zur MAX-Markierung ein.
Wasser hier einfüllen
Maximaler
Wasserstand
Minimaler
Wasserstand

8
DE
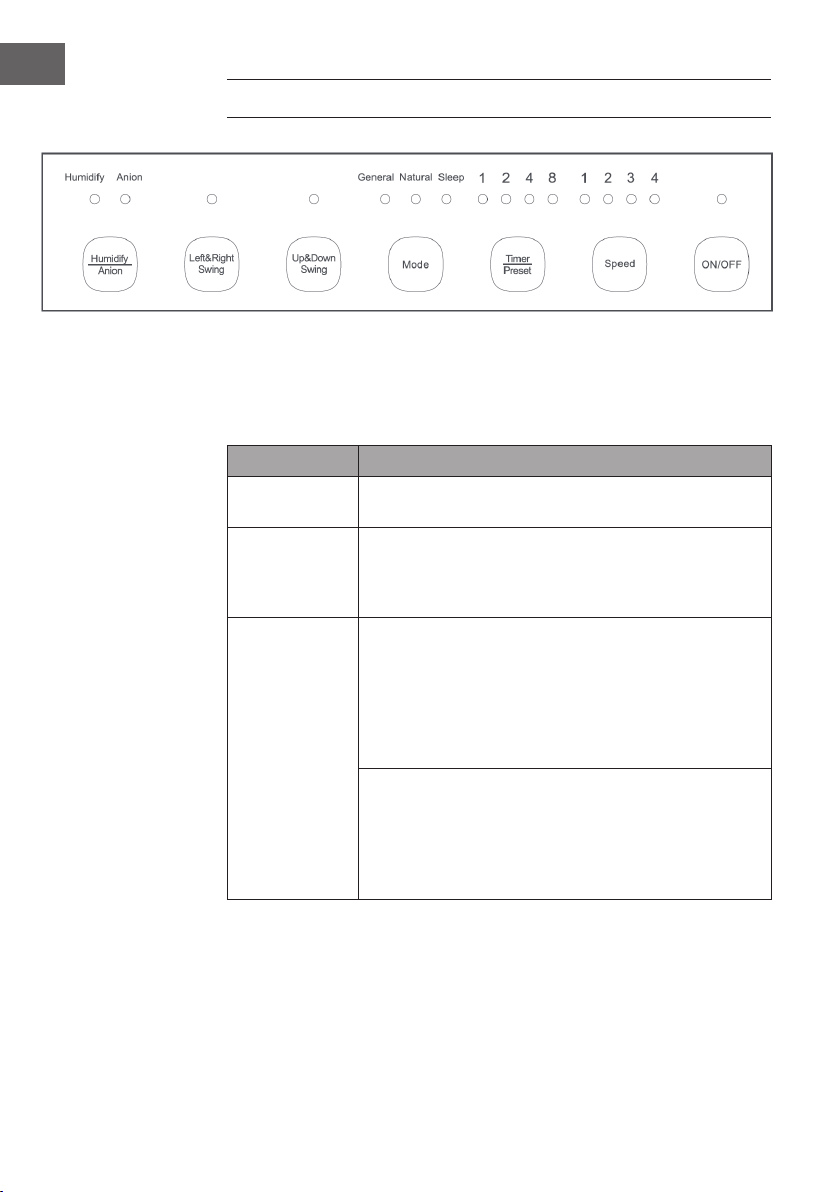
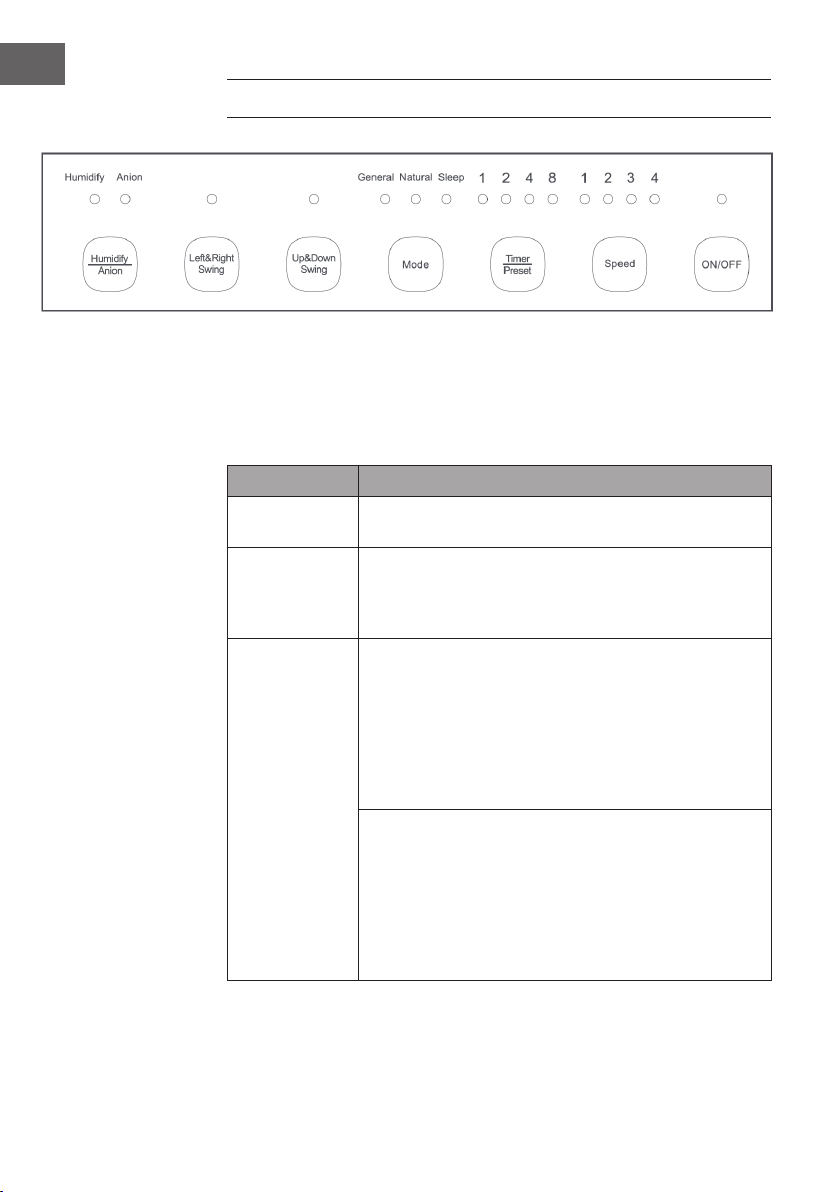
BEDIENFELD UND TASTENFUNKTIONEN
Gerät starten / Standby-Modus
Stecken Sie den Stecker in die Steckdose. Es ertönt ein Signalton und alle Anzeigen
leuchten für 2 Sekunden und erlöschen dann wieder. Danach bendet sich das Gerät im
Standby-Modus.
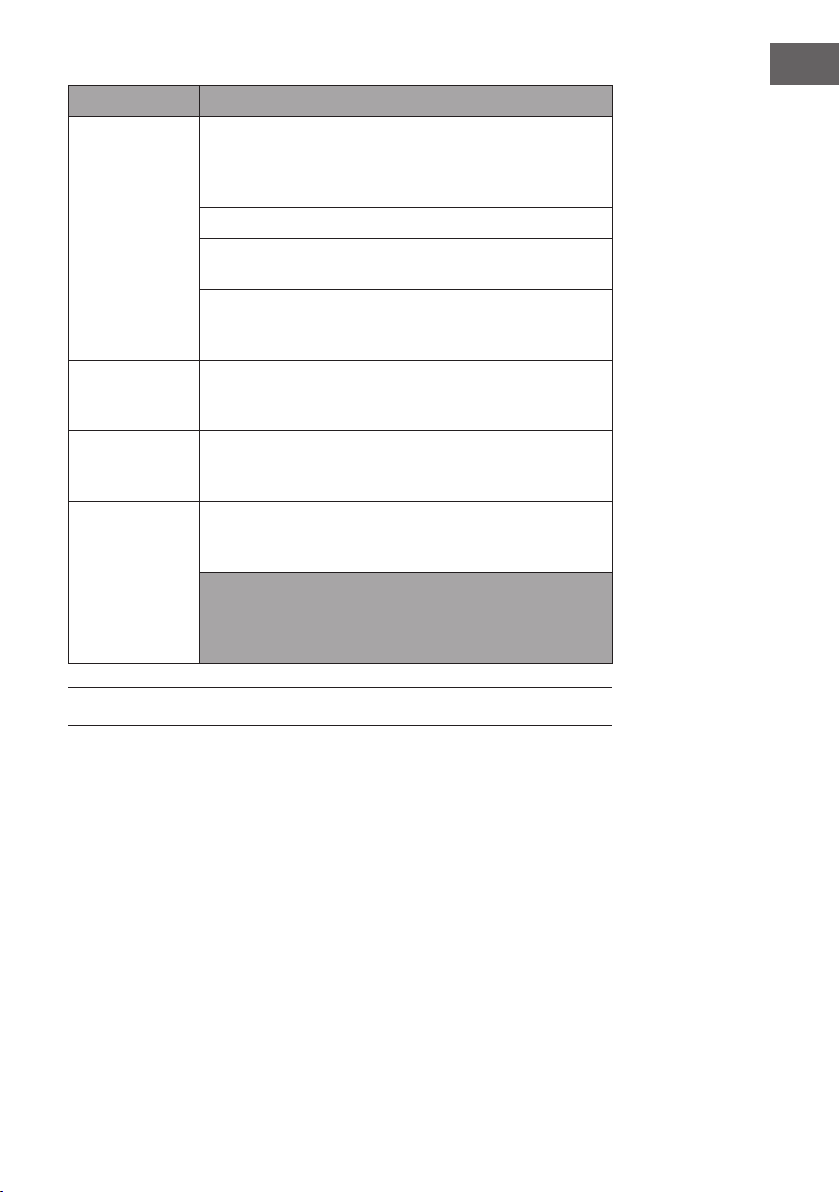
Taste Funktion
ON/OFF Drücken Sie im Standby-Modus auf die Taste ON/OFF,
um das Gerät zu starten/anzuhalten. Die voreingestellte
Windgeschwindigkeit ist [1].
Speed Die Windgeschwindigkeit lässt sich in 4 Stufen anpassen.
Drücken Sie im eingeschalteten Zustand mehrmals auf die
Taste SPEED, um die gewünschte Windgeschwindigkeit
einzustellen. Die Leuchten über der Taste zeigen die aktuelle
Windgeschwindigkeit an.
Timer/Preset Timer: Drücken Sie im eingeschalteten Zustand mehrmals auf
die Taste TIMER, um die Zeit einzustellen, nach der das Gerät
automatisch ausgeschaltet wird. Der Timer lässt sich von 1-15
Stunden einstellen. Die Leuchten über der Taste zeigen die
aktuell eingestellte Zeit an. Leuchten mehrere Leuchten, addieren
Sie die Werte der Leuchten, um die aktuell eingestellte Zeit zu
ermitteln (Beispiel: Sind 15 Stunden eingestellt, leuchten die
Werte 1+2+4+8).
Preset: Drücken Sie im Standby-Modus mehrmals auf die
Taste TIMER, um die Zeit einzustellen, nach der das Gerät
automatisch eingeschaltet wird. Der Timer lässt sich von 1-15
Stunden einstellen. Die Leuchten über der Taste zeigen die
aktuell eingestellte Zeit an. Leuchten mehrere Leuchten, addieren
Sie die Werte der Leuchten, um die aktuell eingestellte Zeit zu
ermitteln (Beispiel: Sind 15 Stunden eingestellt, leuchten die
Werte 1+2+4+8).

9
DE
Taste Funktion
Mode Drücken Sie im eingeschalteten Zustand mehrmals auf die Taste
MODE, um einen der folgenden Modi auszuwählen: General
(Normal), Natural (Natürlich), Sleep (Schlafmodus). Die
Leuchten über der Taste zeigen den aktuellen Modus an.
General: Der Lüfter bläst mit konstanter Geschwindigkeit.
Natural: Der Lüfter simuliert natürlichen Wind, indem er mit
unterschiedlichen Geschwindigkeiten bläst.
Sleep: Der Lüfter bläst mit unterschiedlichen Geschwindigkeiten.
Mit jeder Stunde wird die Windgeschwindigkeit um 1 Stufe bis
auf Stufe 1 verringert.
Up&Down Swing Drücken Sie im eingeschalteten Zustand auf diese Taste, um den
Luftstrom nach oben und unten zu leiten. Drücken Sie die Taste
erneut, um die Funktion zu beenden.
Left&Right Swing Drücken Sie im eingeschalteten Zustand auf diese Taste, um den
Luftstrom nach links und rechts zu leiten. Drücken Sie die Taste
erneut, um die Funktion zu beenden.
Humidify/Anion Drücken Sie im eingeschalteten Zustand mehrmals auf diese
Taste, um entweder die Luftbefeuchter-Funktion (Humidify) oder
die Luftreinigungs-Funktion (Anion) zu aktivieren oder beide
Funktionen zu beenden.
Hinweis: Bevor Sie die Luftbefeuchter-Funktion (Humidify)
verwenden, überprüfen Sie zuerst, ob sich genügend Wasser
im Tank bendet. Sobald das Wasser sich der MIN-Markierung
nähert, gießen Sie mehr Wasser in den Tank.
WEITERE FUNKTIONEN
Wasserstands-Warnung
Sobald der Wasserstand im Tank zu niedrig ist, stoppt das Gerät und die Anzeige
HUMIDIFY blinkt. Füllen Sie Wasser nach und starten Sie die Funktion erneut.
Automatische Abschaltung
Falls das Gerät eingeschaltet aber länger als 15 Minuten keine Einstellungen
vorgenommen werden, wechselt es automatisch wieder in den Standby-Modus.
10
DE
Gerätespeicher
Solange das Gerät mit Strom versorgt wird, speichert es automatisch die zuletzt
vorgenommenen Einstellungen. Wenn Sie das Gerät ausschalten und wieder einschalten
startet es mit den gespeicherten Einstellungen.
Hinweis: Das Gerät merkt sich die Einstellungen nur solange es mit Strom versorgt
wird. Wird es vom Netz getrennt, gehen die gespeicherten Einstellungen verloren.
Verneblergitter
Sobald Sie das Verneblergitter entfernen, stoppt das Gerät automatisch und die
Anzeige HUMIDIFY blinkt. Das Gerät kann erst wieder gestartet werden, wenn das
Verneblergitter wieder eingebaut wurde.
Fernbedienung
Die Tastenfunktionen der Fernbedienung entsprechen den Funktionen der Tasten auf dem
Bedienfeld. Richten Sie die Fernbedienung immer direkt auf das Gerät und achten Sie
darauf, dass sich keine Hindernisse im Weg benden.
Hinweis: Wenn Sie die Fernbedienung länger nicht benutzen, nehmen Sie die
Batterien aus der Fernbedienung.
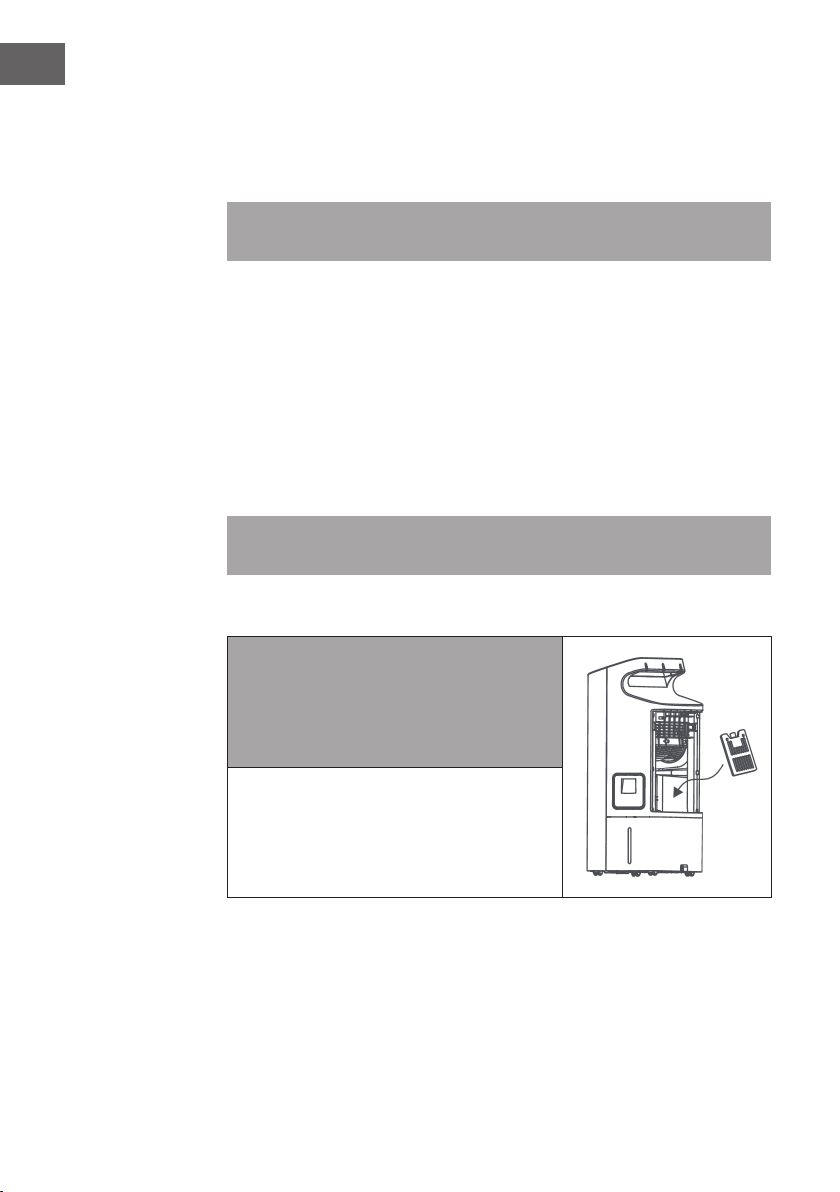
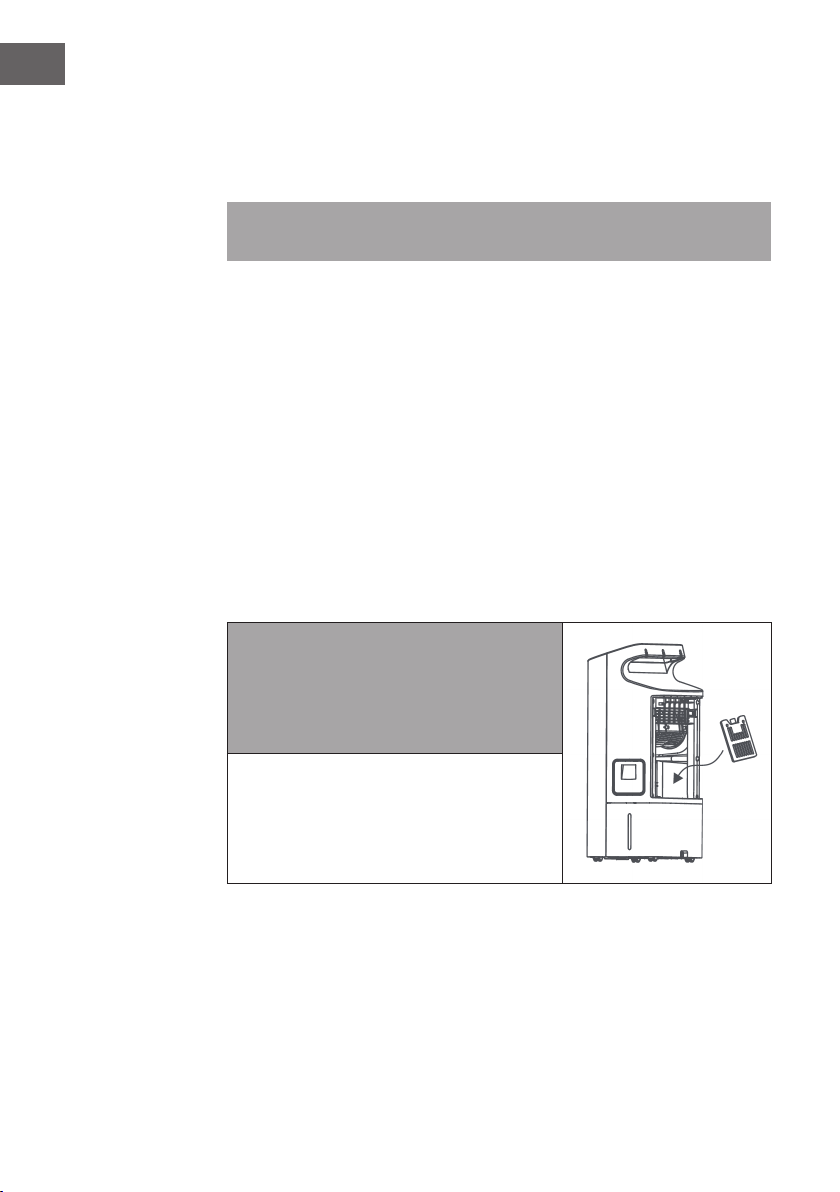
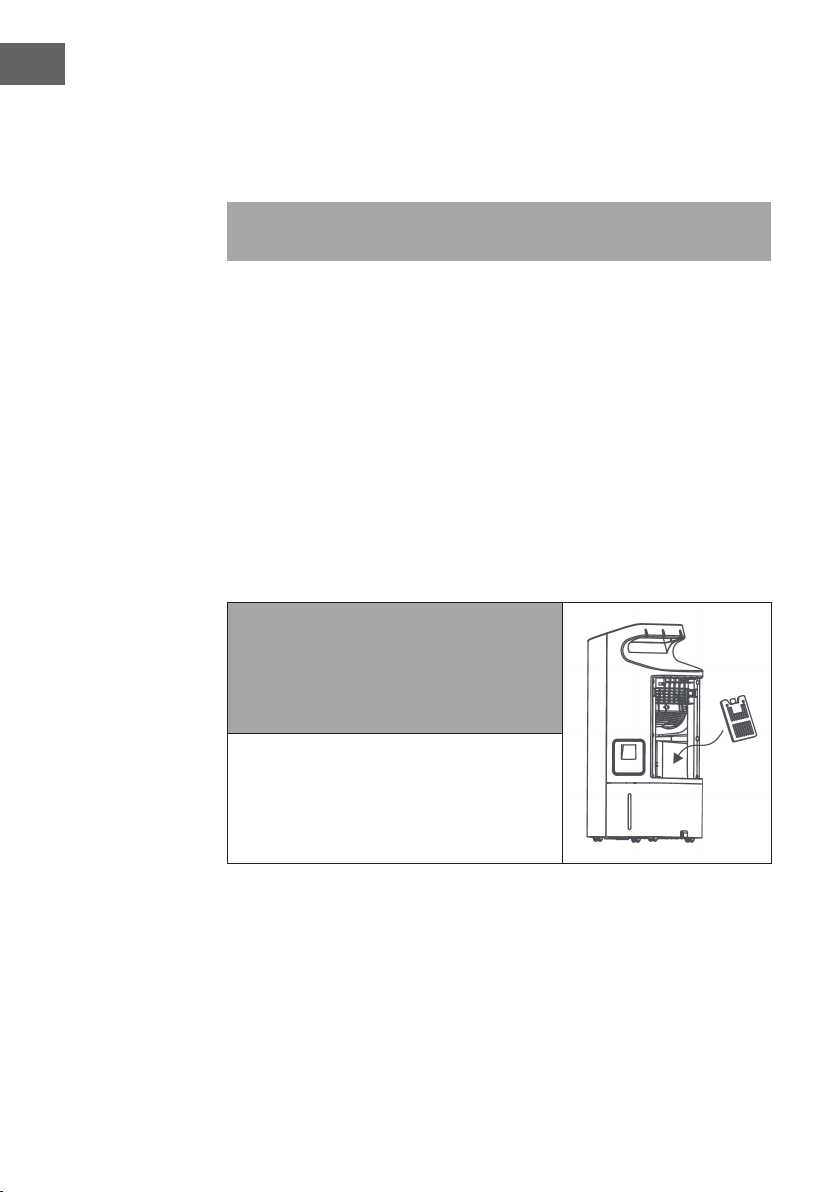
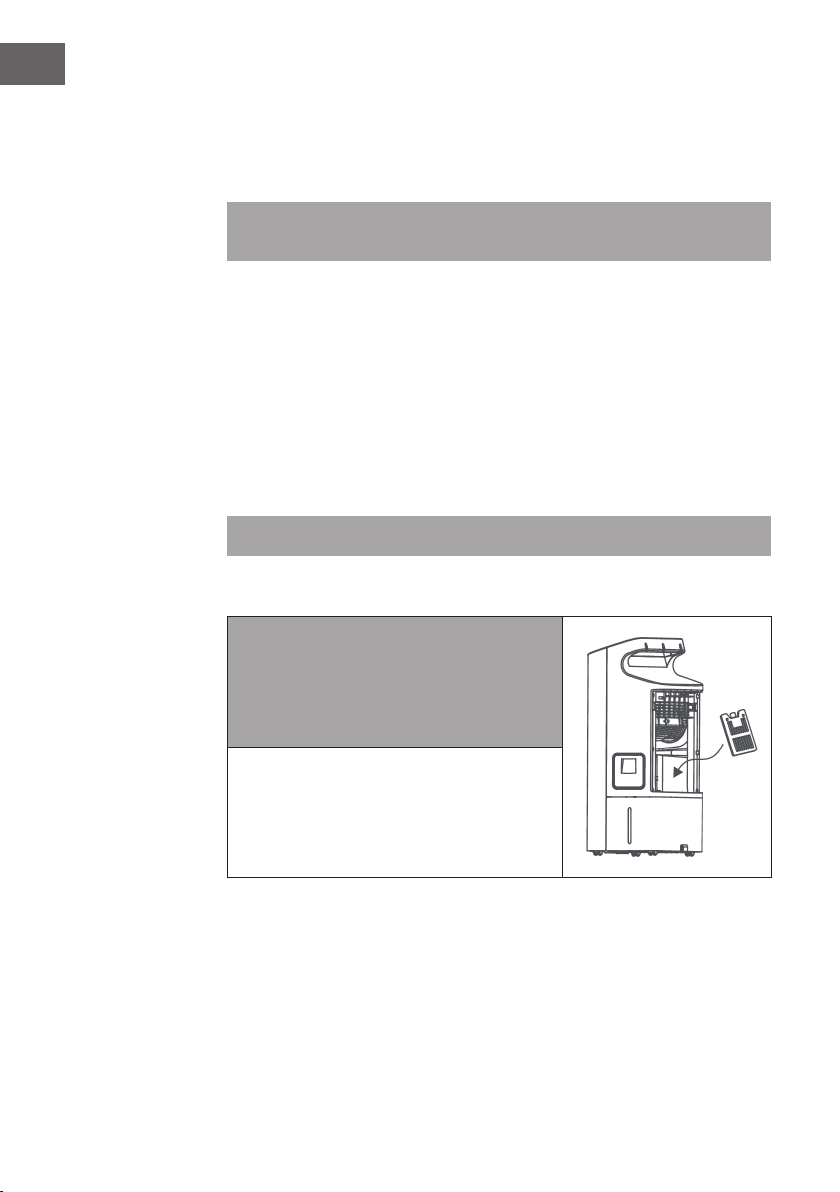
Eisboxen
Hinweis: Öffnen Sie die mitgelierferten Eisboxen
nicht, der Inhalt ist nicht zum Verzehr geeignet!
Bevor Sie die Eisboxen benutzen, legen Sie sie
mindestens 4 Stunden lang ins Gefrierfach ihres
Kühlschranks. Schalten Sie das Gerät dann aus und
legen Sie die Boxen in den Wassertank.
11
DE
REINIGUNG UND PFLEGE
Schalten Sie das Gerät aus und ziehen Sie das Netzkabel ab. Ziehen Sie vor der
Reinigung immer den Netzstecker, um Stromschläge oder mechanische Beschädigungen
zu vermeiden. Verwenden Sie zur Reinigung handelsübliches Reinigungsmittel und eine
weiche Bürste. Verwenden Sie keine chemischen Reiniger.
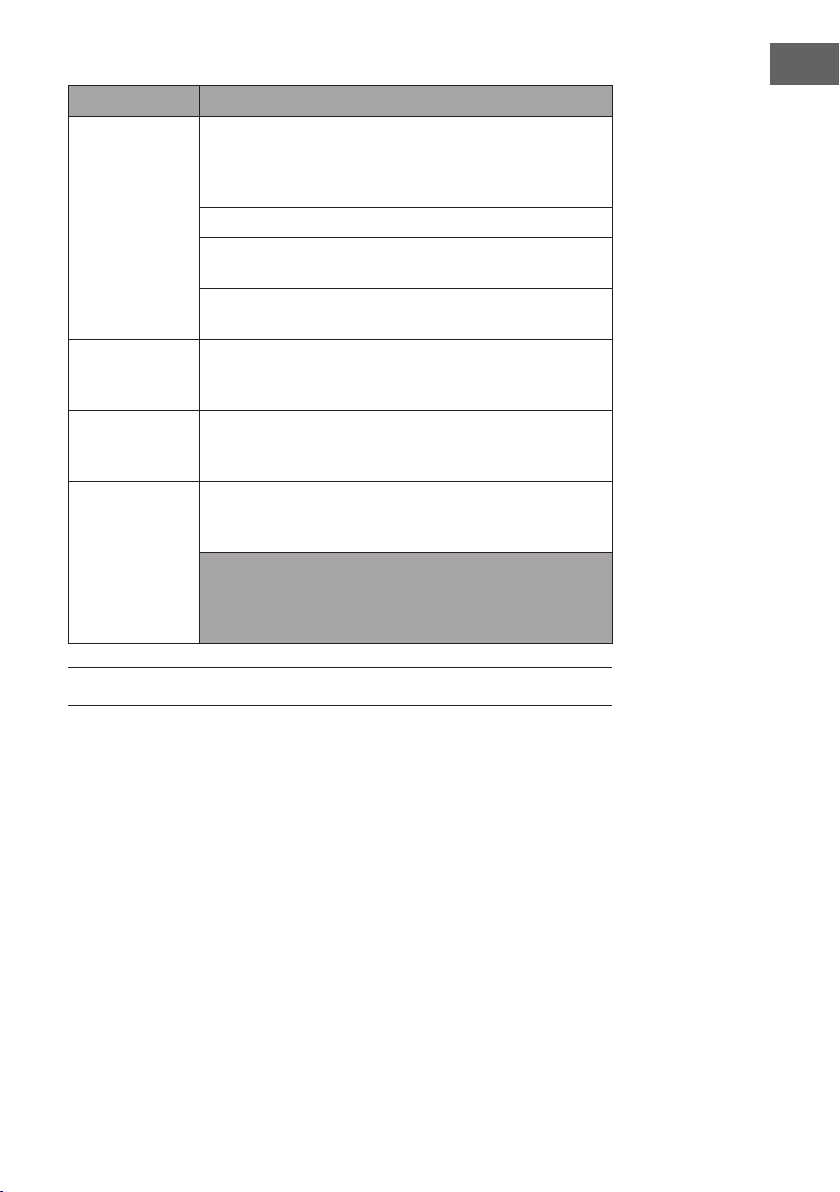
Reinigung der Oberäche
• Wischen Sie die Oberäche mit einem feuchten Tuch ab. Verwenden Sie kein
Wasser, es könnte in das Gerät eindringen und die Elektronik beschädigen.
• Verwenden Sie keine korrosiven Reinigungsmittel oder Lösungsmittel.
Aufbewahrung
• Wenn das Produkt längere Zeit nicht benutzt wird, ziehen Sie den Netzstecker und
verpacken Sie es, um zu verhindern, dass Staub in das Gehäuse gelangt.
• Bewahren Sie es nach dem Verpacken an einem trockenen, belüfteten Ort auf.
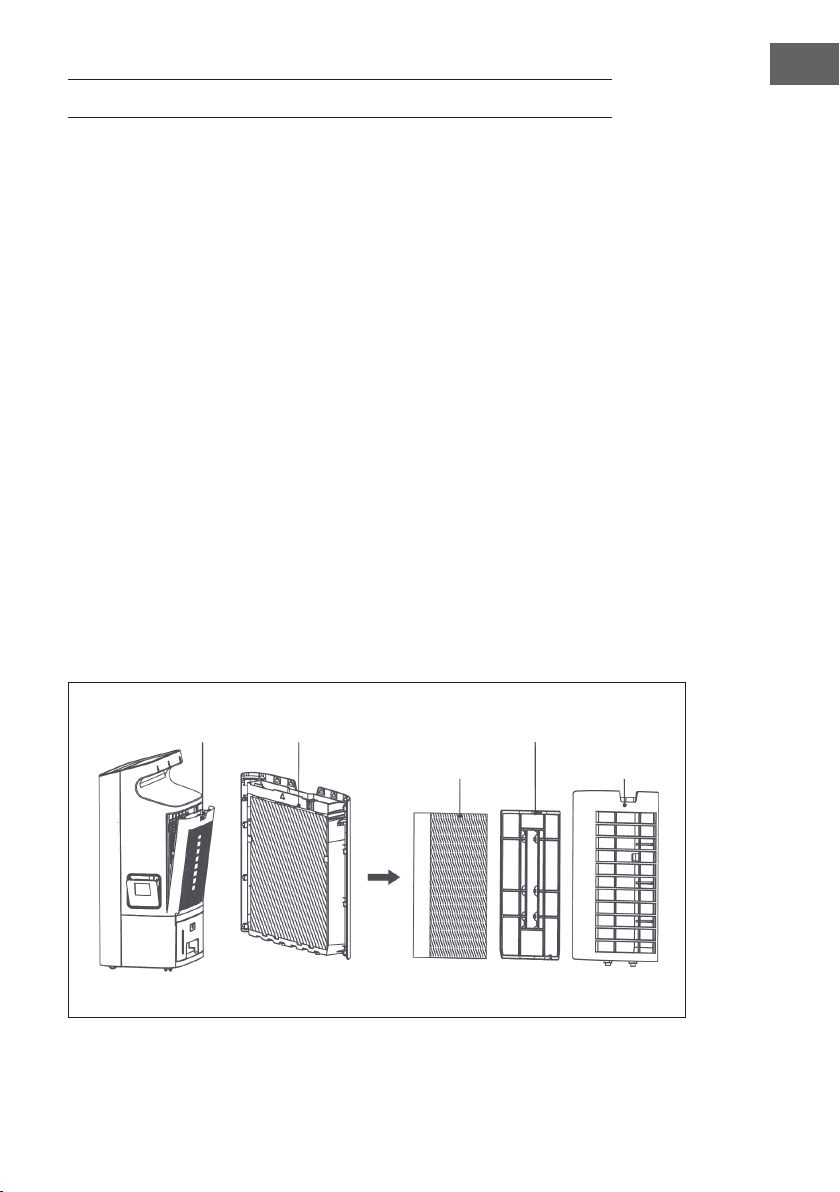
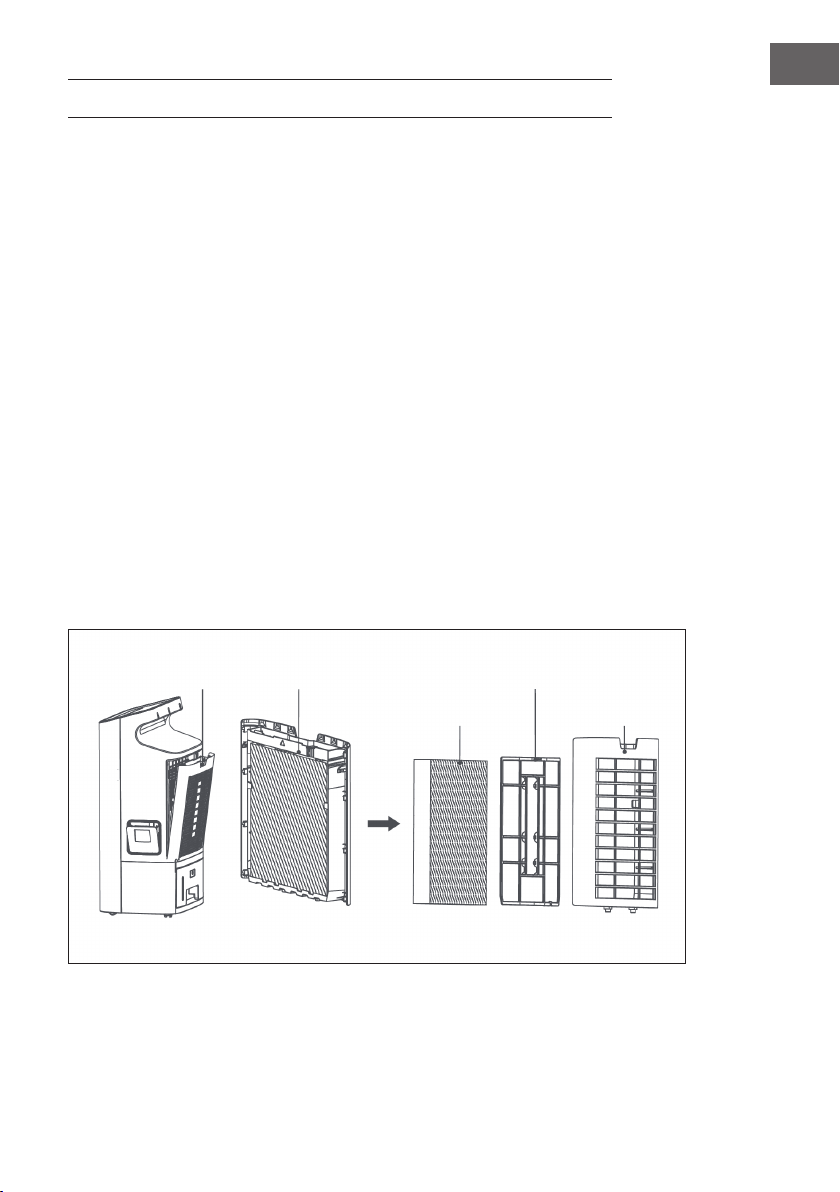
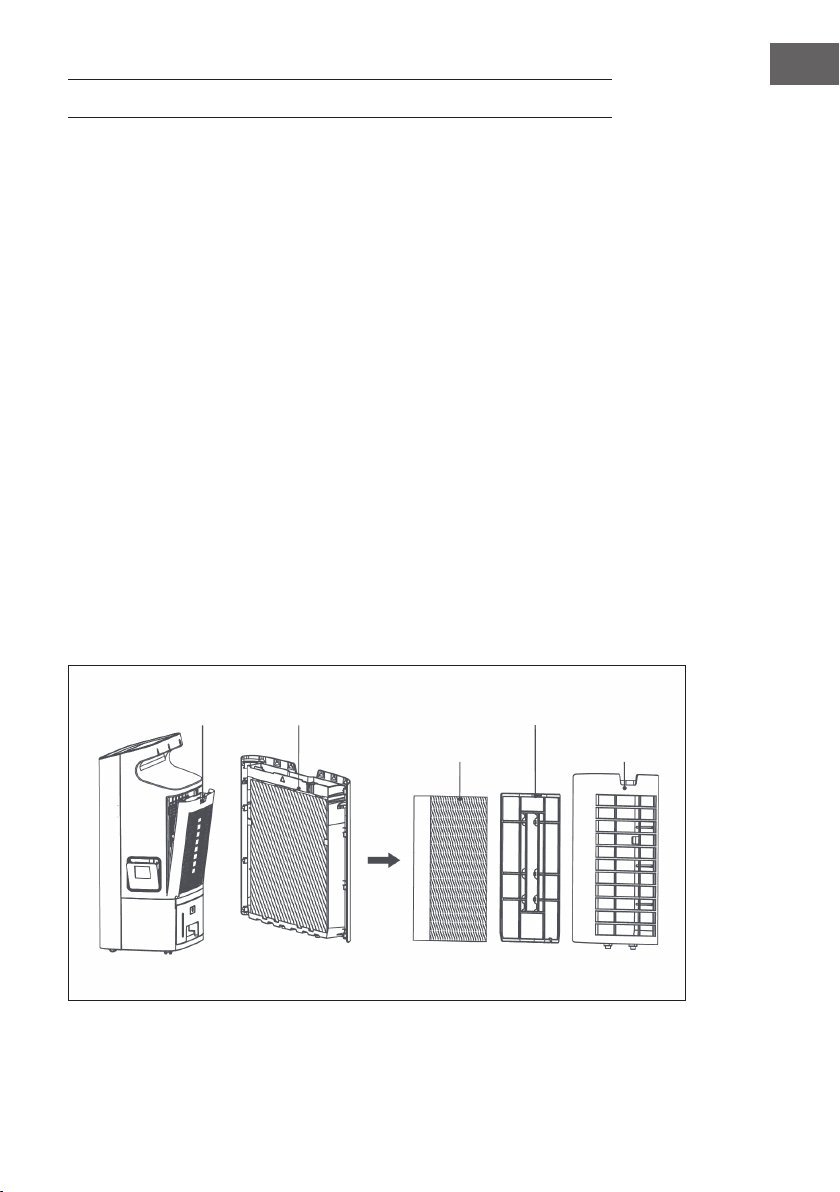
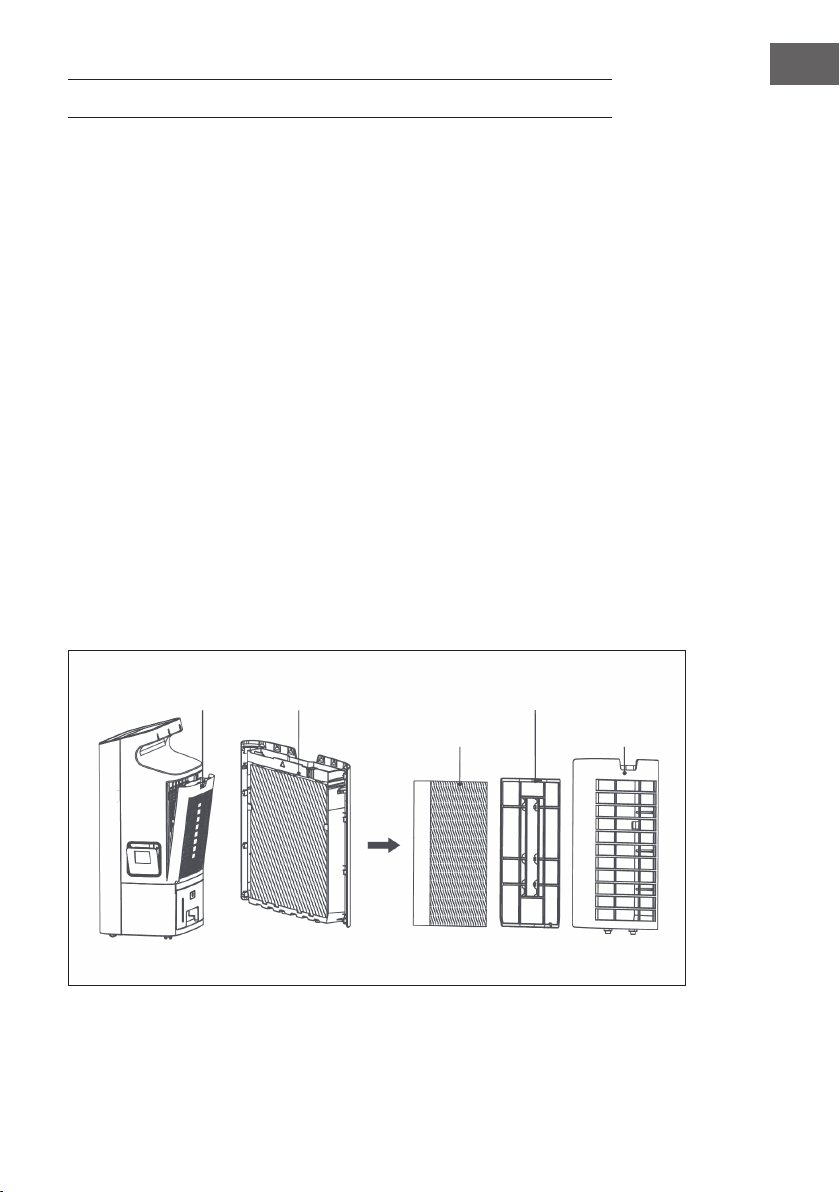
Reinigung der Innenteile
• Entfernen Sie zuerst die komplette Verneblereinheit. Biegen Sie das Verneblergitter
an beiden Seiten des Rahmens leicht nach außen und entfernen Sie das
Verneblergitter und das Filtersieb.
• Reinigen Sie das Verneblergitter mit sauberem Wasser und lassen Sie es dann
trocknen.
• Reinigen Sie das Filtersieb mit einer weichen Bürste oder einem weichen Tuch,
waschen Sie es mit sauberem Wasser ab und lassen Sie es dann trocknen.
Verschluss Verneblereinheit
RahmenVerneblergitter
Filtersieb

12
DE
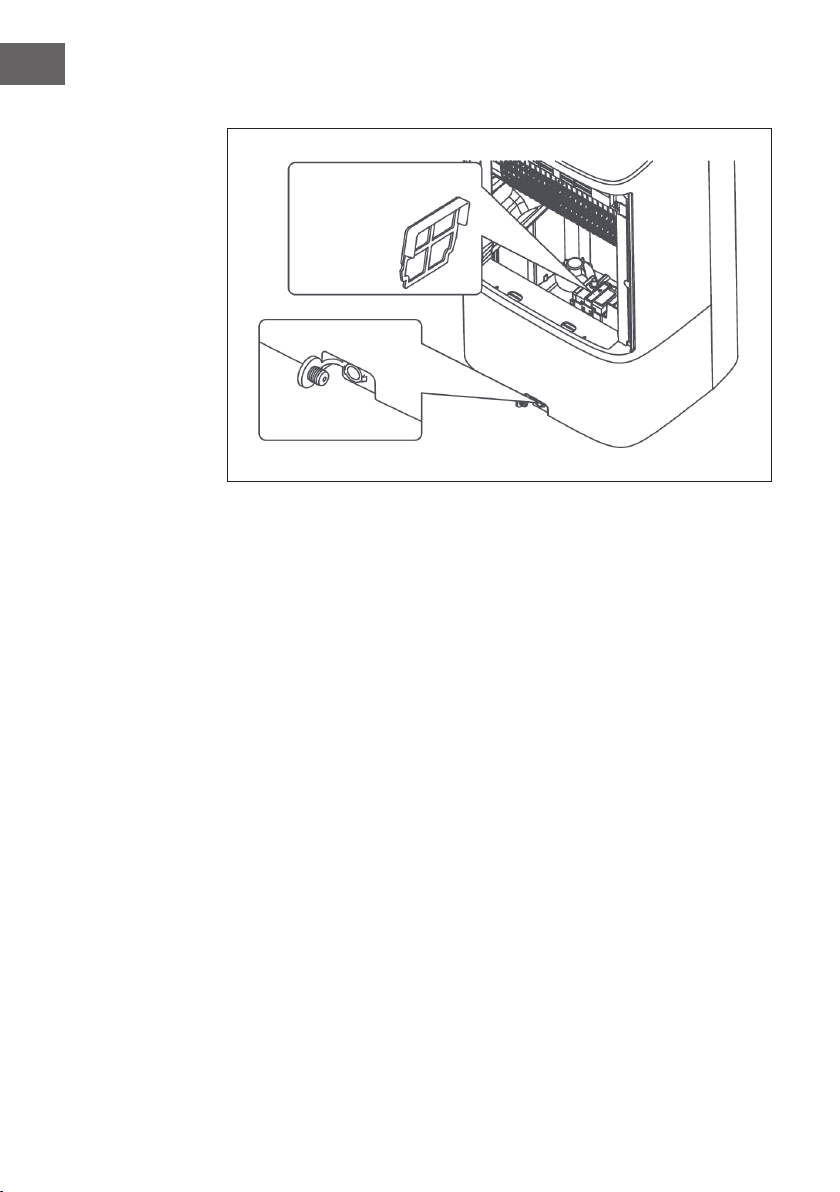
Reinigung des Wassertanks
• Reinigen Sie das Filtersieb mit einer weichen Bürste oder einem weichen Tuch,
waschen Sie es mit sauberem Wasser ab und lassen Sie es dann trocknen.
• Ziehen Sie den Gummistopfen heraus, lassen Sie das restliche Wasser im
Wassertank ab und setzen Sie den Gummistopfen wieder ein.
• Entfernen Sie Ablagerungen im Wassertank mit einem Tuch und neutralem
Reinigungsmittel und füllen Sie den Tank dann mit Wasser. Ziehen Sie den
Gummistopfen heraus und lassen Sie das verschmutzte Wasser ablaufen. Setzen
Sie den Gummistopfen dann wieder ein.
Filtersieb der
Tauchpumpe
Gummistopfen

13
DE
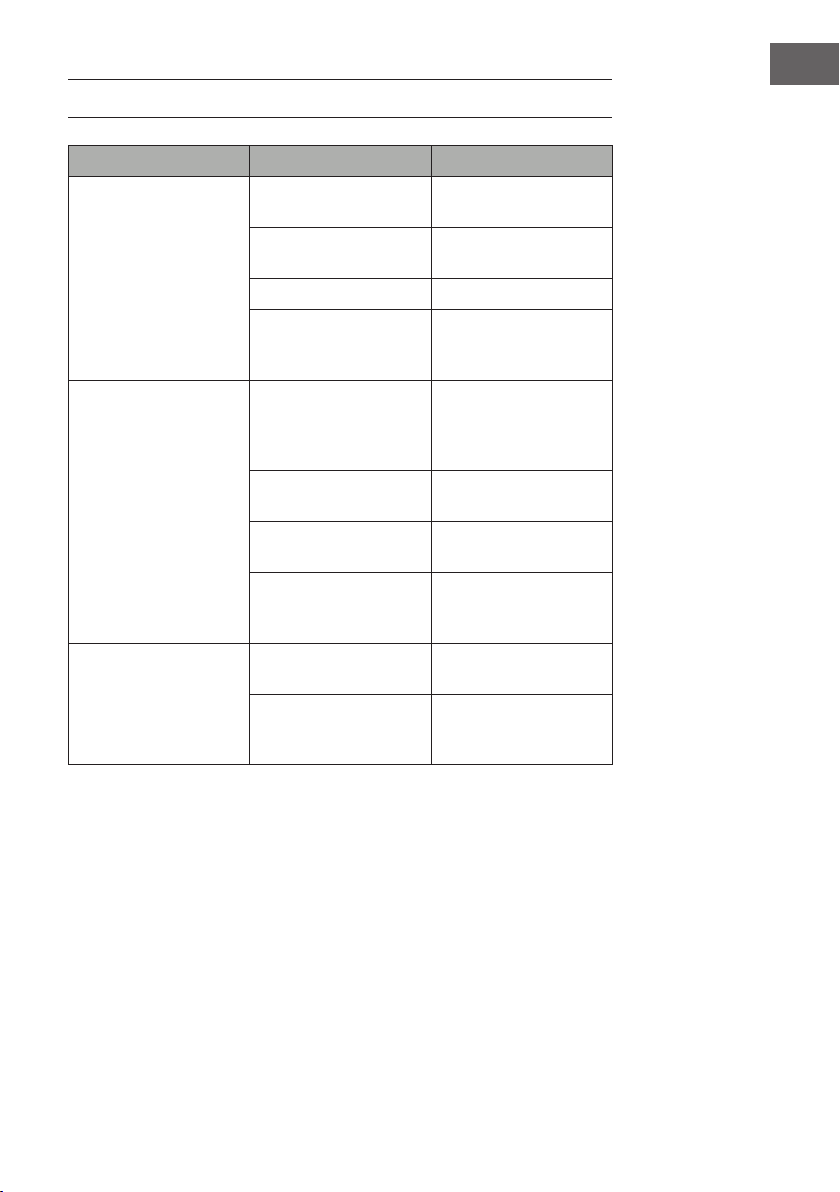
FEHLERBEHEBUNG
Problem Mögliche Ursache Lösungsansatz
Das Gerät läuft nicht. Der Stecker wurde nicht
richtig eingesteckt.
Stecken die den Stecker
fest in die Steckdose.
Die Verneblereinheit
wurde nicht richtig
eingebaut.
Bauen Sie die
Verneblereinheit korrekt
ein.
Das Gerät ist
ausgeschaltet.
Schalten Sie das Gerät
ein.
Die Verkabelung im Gerät
hat sich gelöst.
Wenden Sie sich zur
Reparatur an einen
Fachbetrieb.
Die Luftbefeuchtung
funktioniert nicht /
Die Pumpe macht
merkwürdige Geräusche.
Kein Wasser im
Wassertank oder der
Wasserstand liegt
unterhalb der MIN-
Markierung.
Schalten Sie das Gerät
aus und füllen Sie Wasser
in den Wassertank.
Das Filtersieb der
Tauchpumpe ist verstopft.
Reinigen Sie das Filtersieb.
Das Wasserauslassloch
der Verneblereinheit ist
verstopft.
Reinigen Sie die
Verneblereinheit.
Die Pumpe oder die
Verkabelung im Gerät hat
sich gelöst.
Wenden Sie sich zur
Reparatur an einen
Fachbetrieb.
Abnormale Geräusche. Ablagerungen in der
Verneblereinheit.
Entfernen Sie die
Verneblereinheit
und reinigen Sie die
Komponenten.
Lose Lüfterblätter oder
Motorschaden.
Wenden Sie sich zur
Reparatur an einen
Fachbetrieb.
14
DE
HINWEISE ZUR ENTSORGUNG
Wenn es in Ihrem Land eine gesetzliche Regelung zur
Entsorgung von elektrischen und elektronischen Geräten
gibt, weist dieses Symbol auf dem Produkt oder auf der
Verpackung darauf hin, dass dieses Produkt nicht im
Hausmüll entsorgt werden darf. Stattdessen muss es zu
einer Sammelstelle für das Recycling von elektrischen
und elektronischen Geräten gebracht werden. Durch
regelkonforme Entsorgung schützen Sie die Umwelt und die
Gesundheit Ihrer Mitmenschen vor negativen Konsequenzen.
Informationen zum Recycling und zur Entsorgung dieses
Produkts, erhalten Sie von Ihrer örtlichen Verwaltung oder
Ihrem Hausmüllentsorgungsdienst.
Dieses Produkt enthält Batterien. Wenn es in Ihrem Land
eine gesetzliche Regelung zur Entsorgung von Batterien
gibt, dürfen die Batterien nicht im Hausmüll entsorgt werden.
Informieren Sie sich über die örtlichen Bestimmungen zur
Entsorgung von Batterien. Durch regelkonforme Entsorgung
schützen Sie die Umwelt und die Gesundheit Ihrer
Mitmenschen vor negativen Konsequenzen.
HERSTELLER & IMPORTEUR (UK)
Hersteller:
Chal-Tec GmbH, Wallstraße 16, 10179 Berlin, Deutschland.
Importeur für Großbritannien:
Chal-Tec UK limited
Unit 6 Riverside Business Centre
Brighton Road
Shoreham-by-Sea
BN43 6RE
United Kingdom

15
EN
Dear Customer,
Congratulations on purchasing this device. Please read the
following instructions carefully and follow them to prevent
possible damages. We assume no liability for damage caused
by disregard of the instructions and improper use. Scan the QR
code to get access to the latest user manual and more product
information.
CONTENT
Technical Data16
Safety Instructions17
Product Description18
Installation19
Control Panel and Key Functions20
Further Functions21
Cleaning And Care23
Troubleshooting25
Hints on Disposal26
Manufacturer & Importer (UK)26

16
EN
TECHNICAL DATA
Item number 10034672
Power supply 220-240 V ~ 50/60 Hz
Power 68 W
Water tank capacity 10 L
Air volume 370 m³/h
Evaporation volume 1100 ml/h
Noise level ≤ 64 dB (A)
Note on using the water tank
In principle, you can use your air cooler at any time without water in the tank. It will then
work like a normal fan. Water in the tank is only needed for the cooling function. The
air cooler evaporates this through the nebulizer ow, removing heat from the air and
reducing the air temperature of the fan by up to 3 °C, depending on the coldness of the
water used. We advise against using the cooling function on days with particularly high
humidity, as it increases this further and can thus contribute to circulatory problems.

17
EN
SAFETY INSTRUCTIONS
• Check the voltage on the rating plate before use. Only connect the appliance to
sockets which correspond to the voltage of the appliance.
• Keep the appliance and cable away from sources of heat, sharp objects or
anything that may cause damage.
• Do not place the cord under carpets. Do not cover the cord with small clothes, shirts
or other similar elements. Place the cord away from trafc areas in order to avoid
any risk of tripping over.
• Do not operate the appliance if the cable or plug is damaged.
• If the supply cord or plug is damaged, it must be replaced by the manufacturer, its
service agent or similarly qualied persons in order to avoid a hazard.
• Indoor use only.
• Do not cover the machine during using.
• Place the appliance on a stable at horizontal surface. Make sure the appliance is
in an upright position during use.
• Ensure the appliance is switched OFF before connecting to the mains power supply.
• Always ensure that hands are dry before operating or adjusting any switch on the
product or touching the plug and mains supply connections.
• Do not leave this appliance unattended when it’s in use. Turn off and disconnect the
appliance when you leave the room for an extended period.
• Switch off the appliance and unplug from the mains socket when not in use, before
lling, cleaning or other maintain.
• To disconnect the appliance, switch it “OFF”, and then remove the plug from outlet.
Do not pull the cord to disconnect the plug.
• This device may be only used by children 8 years old or older and persons with
limited physical, sensory and mental capabilities and / or lack of experience
and knowledge, provided that they have been instructed in use of the device by a
responsible person who understands the associated risks.
• Use the appliance only as described in this manual.
• Do not insert your ngers in the openings of the guard.
• Do not leave hair, tissue, tablecloths, clothes or curtains near all openings of the
fan, they could be sucked into the fan and be taken within the internal moving parts
that could cause injury or damage.
• Do not use the appliance in wet or damp locations such as bathrooms.
• Do not operate the appliance when it’s not mounted on its wheels or if it’s lying on
the side.
• Make sure the cord is completely extended before use.

18
EN
• When in operation, evaporative coolers moisturize the ambient air. Over-
humidication of residential rooms should be avoided. Recommendation: 40-50%
relative humidity. Excessive humidity of the air can damage the home and cause
health problems.
• The appliance may only be set up on water- and moisture-proof ooring materials
(spilling some drops of water is unavoidable when the content of the tank is
changed).
• With each and every change of tank content, completely remove residual water
from the equipment. To prevent nucleation, remove residual water from the
equipment and water tank every time after three days of use.
PRODUCT DESCRIPTION
1 Control panel
2 Keys
3 Blades / swivel blades
4 Nebuliser
5 Hopper
6 Water tank
7 Rolls
19
EN
INSTALLATION
1 Open the packaging and remove the device. Check that the remote control and the
two ice boxes are inside the box.
2 Place the unit in a horizontal position and do not tilt it during use. Before use, check
the voltage on the device label. Only connect the unit to sockets that correspond to
the voltage of the unit.
3 Open the side cover of the appliance and pour water into the funnel. Pour the water
slowly into the water tank. When the tank is full, close the side cover again.
Note: When adding water, pay attention to the water level of the appliance, do not
exceed the MAX mark and do not fall below the MIN mark on the water level scale.
Add water to the MAX mark before use.
Fill with water here
Max water level
Min water level
20
EN
CONTROL PANEL AND KEY FUNCTIONS
Start device / Standby mode
Insert the plug into the socket. You will hear a beep and all indicators will light for 2
seconds and then go out again. After that the device is in standby mode.
Key Function
ON/OFF In standby mode, press the ON/OFF button to start/stop the
unit. The default wind speed is [1].
Speed The wind speed can be adjusted in 4 steps. Press the SPEED
button several times when the power is on to set the desired
wind speed. The lights above the button indicate the current
wind speed.
Timer/Preset Timer: When the device is switched on, press the TIMER
button several times to set the time after which the device is
automatically switched off. The timer can be set from 1-15
hours. The lights above the button indicate the currently set time.
If several lights are lit, add the values of the lights to determine
the currently set time (example: If 15 hours are set, the values
1+2+4+8 are lit).
Preset: In standby mode, press the TIMER key several times to
set the time after which the device is automatically switched on.
The timer can be set from 1-15 hours. The lights above the button
indicate the currently set time. If several lights are lit, add the
values of the lights to determine the currently set time (example:
If 15 hours are set, the values 1+2+4+8 are lit).
21
EN
Key Function
Mode Press the MODE button repeatedly when the power is on to
select one of the following modes: General, Natural, Sleep
mode. The lights above the button indicate the current mode.
General: The fan blows at a constant speed.
Natural: The fan simulates natural wind by blowing at different
speeds.
Sleep: The fan blows at different speeds. With each hour, the
wind speed is reduced by 1 level to level 1.
Up&Down Swing When on, press this button to direct the airow up and down.
Press the button again to end the function.
Left&Right Swing When on, press this button to direct the airow to the left and
right. Press the button again to exit the function.
Humidify/Anion When on, press this button several times to activate either the
Humidify function or the Anion function, or to exit both functions.
Note: Before using the Humidify function, rst check that there
is sufcient water in the tank. As the water approaches the MIN
mark, pour more water into the tank.
FURTHER FUNCTIONS
Water level warning
If the water level in the tank is too low, the unit stops and the HUMIDIFY indicator
ashes. Top up with water and restart the function.
Auto Power Off
If the unit is switched on but no settings are made for more than 15 minutes, it
automatically switches back to standby mode.

22
EN
device memory
As long as the device is supplied with power, it automatically saves the last settings
made. When you turn the unit off and on again, it starts with the saved settings.
Note: The device remembers the settings only as long as it is powered. If it is
disconnected from the mains, the stored settings will be lost.
Nebuliser grid
As soon as you remove the nebuliser grid, the unit stops automatically and the
HUMIDIFY indicator ashes. The unit cannot be restarted until the nebuliser grille has
been reinstalled.
Remote control
The key functions of the remote control correspond to the functions of the keys on the
control panel. Always point the remote control directly at the unit and make sure there
are no obstacles in the way.
Note: If you will not be using the remote control for a long time, remove the batteries
from the remote control.
Iceboxes
Note: Do not open the ice boxes supplied, the
contents are not suitable for consumption!
Before using the ice boxes, place them in the
freezer compartment of your refrigerator for at least
4 hours. Then switch off the appliance and place
the boxes in the water tank.
23
EN
CLEANING AND CARE
Turn the power off and unplug the power cord. Always disconnect the power plug
before cleaning to avoid electric shock or mechanical damage. Use a commercially
available cleaning agent and a soft brush for cleaning. Do not use chemical cleaners.
Surface Cleaning
• Wipe the surface with a damp cloth. Do not use water, as it may penetrate into the
unit and damage the electronics.
• Do not use corrosive cleaning agents or solvents.
Storage
• If the product will not be used for an extended period of time, unplug the power
cord and wrap the product to prevent dust from entering the housing.
• After packing, store in a dry, ventilated place.
Cleaning the Internal Parts
• First remove the complete nebuliser unit. Bend the nebuliser grid slightly outwards
on both sides of the frame and remove the nebuliser grid and lter screen.
• Clean the nebuliser grille with clean water and let it dry.
• Clean the lter screen with a soft brush or cloth, wash it with clean water and then
let it dry.
Clasp Nebuliser unit.
FrameNebuliser grid
Filter screen
24
EN
Cleaning the water tank
• Clean the lter screen with a soft brush or cloth, wash it with clean water and then
let it dry.
• Pull out the rubber plug, leave the remaining water in the water tank and reinsert the
rubber plug.
• Remove deposits in the water tank with a cloth and neutral detergent and then ll
the tank with water. Pull out the rubber plug and drain the dirty water. Then replace
the rubber plug.
Submersible pump
lter sieve
Rubber plug

25
EN
TROUBLESHOOTING
Problem Possible cause Suggested solution
The device is not running. The plug has not been
plugged in correctly.
Insert the plug rmly into
the socket.
The nebuliser unit has not
been installed correctly.
Install the nebuliser unit
correctly.
The unit is switched off. Switch on the unit.
The wiring in the unit has
come loose.
Contact a specialist
company for repair.
Air humidication does not
work / The pump makes
strange noises.
No water in the water tank
or the water level is below
the MIN mark.
Switch off the unit and ll
the water tank with water.
The lter sieve of the
submersible pump is
blocked.
Clean the lter sieve.
The water outlet hole of the
nebuliser unit is blocked.
Clean the nebuliser unit.
The pump or the wiring in
the unit has come loose.
Contact a specialist
company for repair.
Abnormal noises. Deposits in the nebuliser
unit.
Remove the nebuliser
unit and clean the
components.
Loose fan blades or
engine damage.
Contact a specialist
company for repair.

26
EN
DISPOSAL CONSIDERATIONS
If there is a legal regulation for the disposal of electrical
and electronic devices in your country, this symbol on the
product or on the packaging indicates that this product must
not be disposed of with household waste. Instead, it must be
taken to a collection point for the recycling of electrical and
electronic equipment. By disposing of it in accordance with
the rules, you are protecting the environment and the health of
your fellow human beings from negative consequences. For
information about the recycling and disposal of this product,
please contact your local authority or your household waste
disposal service.
This product contains batteries. If there is a legal regulation
for the disposal of batteries in your country, the batteries must
not be disposed of with household waste. Find out about local
regulations for disposing of batteries. By disposing of them in
accordance with the rules, you are protecting the environment
and the health of your fellow human beings from negative
consequences.
MANUFACTURER & IMPORTER (UK)
Manufacturer:
Chal-Tec GmbH, Wallstrasse 16, 10179 Berlin, Germany.
Importer for Great Britain:
Chal-Tec UK limited
Unit 6 Riverside Business Centre
Brighton Road
Shoreham-by-Sea
BN43 6RE
United Kingdom

27
ES
Estimado cliente,
Le felicitamos por la adquisición de este producto. Lea
atentamente las siguientes instrucciones y sígalas para evitar
posibles daños. No asumimos ninguna responsabilidad por los
daños causados por el incumplimiento de las instrucciones y el
uso inadecuado. Escanee el siguiente código QR para obtener
acceso a la última guía del usuario y más información sobre el
producto.
ÍNDICE
Indicaciones de seguridad29
Vista general del aparato30
Instalación31
Panel de control y teclas32
Otras funciones33
Limpieza y cuidado35
Detección y resolución de anomalías37
Conseils pour le recyclage38
Fabricante e importador (Reino Unido)38

28
ES
DATOS TÉCNICOS
Número de artículo 10034672
Alimentación 220-240 V ~ 50/60 Hz
Potencia 68 W
Volumen del depósito de agua 10 L
Volumen de aire 370 m³/h
Volumen de evaporación 1100 ml/h
Nivel de ruido ≤ 64 dB (A)
Nota sobre el uso del depósito de agua (no con todos los modelos)
En principio, puede utilizar el refrigerador de aire en cualquier momento sin agua en
el depósito. En este caso, funciona como un ventilador normal. El agua en el depósito
sólo es necesaria para la función de refrigeración. El refrigerador de aire lo evapora a
través del nebulizador, eliminando así el calor del aire y reduciendo la temperatura del
aire del ventilador hasta 3°C, dependiendo del frío del agua utilizada. Se desaconseja
el uso de la función de enfriamiento en días con una humedad especialmente alta,
ya que esta aumenta adicionalmente y, por lo tanto, puede contribuir a problemas
circulatorios.

29
ES
INDICACIONES DE SEGURIDAD
• Antes de utilizar el aparato, compruebe la tensión en la placa técnica del mismo.
Conecte el aparato a tomas de corriente que se adecuen a la tensión del mismo.
• Mantenga el cable lejos de las supercies calientes y de los objetos alados.
• No coloque el cable de alimentación debajo alfombras ni lo cubra con otros
objetos o materiales. Coloque el cable de tal manera que nadie pueda pisarlo ni
tropezar con él.
• No utilice el aparato si el cable de alimentación o el enchufe está dañado.
• Si el cable de alimentación o el enchufe está dañado, deberá ser sustituido por el
fabricante, una empresa autorizada o una persona cualicada.
• Utilice el aparato únicamente en el interior.
• No cubra el aparato.
• Coloque el aparato en una supercie nivelada y estable. Asegúrese de que el
aparato está en posición vertical.
• Asegúrese de que el aparato está apagado antes de conectar el enchufe a la toma
de corriente.
• No opere el aparato ni toque el enchufe o el cable con las manos mojadas.
• No deje el aparato sin supervisión cuando está en marcha. Apague el aparato y
desconecte el enchufe de la toma de corriente si no lo utiliza.
• Antes de limpiar o inspeccionar el aparato, desconéctelo de la toma de corriente.
• Para desconectar el aparato no tire del cable, sino del cuerpo del enchufe.
• Este aparato puede ser utilizado por niños mayores de 8 años y personas con
discapacidades físicas, sensoriales y mentales y/o con falta de experiencia y
conocimientos, siempre y cuando hayan sido instruidos sobre el uso del aparato y
comprendan los peligros y riesgos asociados.
• Utilice el aparato de acuerdo con lo descrito en estas instrucciones de uso.
• No introduzca los dedos ni ningún objeto en las rejillas de ventilación
• No coloque el aparato cerca de cortinas, manteles o textiles similares. El ventilador
podría tirar de ellos y romperlos.
• No utilice el aparato en estancias húmedas, como cuartos de baño.
• No utilice el aparato si aún no tiene las ruedas montadas o se encuentra de lado.
• Desenrolle el cable completamente antes de utilizar el aparato.
30
ES
• Cuando el aparato está en marcha, humedece el aire ambiente. Evite que la
humedad del aire sea demasiado elevada. Recomendamos mantener una
humedad del aire entre 40-50 %. Una humedad del aire demasiado elevada
puede provocar la aparición de moho y problemas de salud.
• Coloque el aparato en una supercie resistente a la humedad y a la humedad
del aire elevada. Es posible que, al montar o desmontar el depósito de agua, se
derramen algunas gotas. Si es así, limpie las gotas de inmediato.
• Cambie el agua en el depósito cada 3 días como máximo.
VISTA GENERAL DEL APARATO
1 Panel de control
2 Botones
3 Láminas giratorias
4 Nebulizador
5 Embudo de llenado
6 Depósito de agua
7 Ruedas

31
ES
INSTALACIÓN
1 Abra el embalaje y extraiga el aparato. Compruebe que el mando a distancia y
los dos recipientes de hielo estén incluidos.
2 Coloque el aparato en posición horizontal y no lo incline durante su uso. Antes de
utilizar el aparato, compruebe la tensión en la placa técnica del mismo. Conecte el
aparato a tomas de corriente que se adecuen a su tensión.
3 Abra la tapa lateral del aparato y vierta agua en el embudo de llenado. Vierta el
agua lentamente en el depósito de agua. Cuando el depósito esté lleno, vuelva a
cerrar la tapa lateral.
Nota: cuando añada agua, preste atención al nivel de agua del aparato. El agua
no debe superar la marca «MAX» ni ser inferior a la marca «MIN» en la escala de
nivel de agua. Llene el agua hasta la marca «MAX» antes de usar el aparato.
Añadir agua aquí
Nivel de agua
máximo
Nivel de agua
mínimo
32
ES
PANEL DE CONTROL Y TECLAS
Poner el aparato en marcha/Modo Standby
Introduzca el cable de alimentación en la toma de corriente. Escuchará un pitido y
todos los indicadores se iluminarán durante 2 segundos y luego se apagarán de nuevo.
A continuación, el aparato entrará en modo Standby.
Botón Función
ON/OFF En modo Standby, pulse el botón ON/OFF para encender/
apagar el aparato. La velocidad del aire preestablecida es [1].
Speed La velocidad del aire se ajusta en 4 niveles. Pulse el botón
SPEED varias veces mientras el aparato está encendido para
ajustar la velocidad del aire deseada. Las luces sobre la tecla
indican la velocidad actual del aire.
Timer/Preset Temporizador: Pulse el botón TIMER varias veces mientras el
aparato está encendido para ajustar el tiempo tras el cual el
aparato se apagará automáticamente. El temporizador se
ajusta entre 1 y 15 horas. Las luces sobre la tecla indican el
tiempo congurado actual. Si se encienden varias luces, sume
los valores de las luces para determinar el tiempo congurado
actual (ejemplo: si se ha congurado 15 horas, se iluminarán
los valores 1+2+4+8).
Preset: pulse el botón TIMER varias veces mientras el aparato
está en modo Standby para congurar el tiempo tras el cual
el aparato se apagará automáticamente. El temporizador se
ajusta entre 1 y 15 horas. Las luces sobre la tecla indican el
tiempo congurado actual. Si se encienden varias luces, sume
los valores de las luces para determinar el tiempo congurado
actual (ejemplo: si se ha congurado 15 horas, se iluminarán
los valores 1+2+4+8).
33
ES
Botón Función
Mode Pulse el botón SPEED varias veces mientras el aparato está
encendido para seleccionar uno de los siguientes modos:
General (normal), Natural (natural), Sleep (nocturno). Las luces
sobre la tecla indican el modo actual.
General: el enfriador de aire sopla a una velocidad constante.
Natural: el enfriador de aire simula el viento natural soplando a
diferentes velocidades.
Sleep: el enfriador de aire sopla a velocidades diferentes.
Después de cada hora, la velocidad del aire se reduce en 1
nivel, hasta llegar al nivel 1.
Up&Down Swing Pulse este botón cuando el aparato esté encendido para dirigir
el ujo de aire hacia arriba y hacia abajo. Pulse otra vez el
botón para apagar la función.
Left&Right Swing Pulse este botón cuando el aparato esté encendido para dirigir
el ujo de aire hacia izquierda y hacia derecha. Pulse otra vez
el botón para apagar la función.
Humidify/Anion Pulse este botón varias veces mientras el aparato está
encendido para activar la función de humidicación (Humidify)
o la función de limpieza del aire (Anion) o para salir de ambas
funciones.
Nota: Antes de utilizar la función de humidicación,
compruebe primero que haya suciente agua en el depósito.
A medida que el agua se acerca a la marca de «MIN», añada
más agua al depósito.
OTRAS FUNCIONES
Advertencia de nivel de agua
Cuando el nivel de agua del depósito es demasiado bajo, el aparato se detiene y el
indicador HUMIDIFY parpadea. Añada más agua y reinicie la función.
Apagado automático
Si enciende el aparato, pero no realiza ningún ajuste durante más de 15 minutos, este
vuelve automáticamente al modo Standby.
34
ES
Memoria del aparato
Cuando el aparato está conectado a la red eléctrica, guarda automáticamente las
últimas conguraciones realizadas. Si apaga y luego enciende el aparato, este activará
las conguraciones almacenados.
Nota: el aparato recuerda las conguraciones solo mientras está encendido. Si lo
desconecta de la red eléctrica, se perderán las conguraciones almacenadas.
Rejilla del nebulizador
Cuando retira la rejilla del nebulizador, el aparato se detiene automáticamente y el
indicador HUMIDIFY parpadea. No se puede reiniciar el aparato hasta que la rejilla
del nebulizador no está instalada.
Mando a distancia
Las funciones de los botones del mando a distancia corresponden a las funciones de
los botones del panel de control. Apunte siempre el mando a distancia directamente al
aparato y asegúrese de que no hay obstáculos en el camino.
Atención: retire las pilas del mando a distancia si no va a utilizarlo durante un largo
periodo de tiempo.
Recipientes de hielo
Nota: No abra los recipientes de hielo
suministrados, ¡el contenido no es apto para el
consumo!
Antes de usar los recipientes de hielo, colóquelos
en el congelador durante al menos 4 horas. Luego,
apague el aparato y coloque los compartimentos
en el depósito de agua.

35
ES
LIMPIEZA Y CUIDADO
Apague el aparato y desconecte el cable de alimentación. Siempre desenchufe
el aparato antes de limpiarlo para evitar provocar descargas eléctricas o daños
mecánicos. Limpie el aparato con un producto de limpieza convencional y un cepillo
suave. No utilice productos químicos.
Limpieza de la supercie
• Limpie el exterior con un paño húmedo. No utilice agua, ya que puede entrar en el
aparato y dañar el sistema eléctrico.
• No utilice productos de limpieza abrasivos ni disolventes.
Almacenaje
• Si no va a utilizar el aparato durante un periodo largo de tiempo, desenchúfelo y
guárdelo en su embalaje para evitar que se acumule polvo en su carcasa.
• Guarde el aparato en un lugar seco y ventilado.
Limpieza de las piezas interiores
• Desmonte la unidad de nebulización completa. Doble ligeramente la rejilla del
nebulizador hacia fuera a ambos lados del marco y retire la rejilla del nebulizador
y la cesta del ltro.
• Limpie la rejilla del nebulizador con agua limpia y luego déjela secar.
• Limpie la cesta del ltro con un cepillo o paño suave, lávela con agua limpia y
déjela secar.
Cierre
Unidad de
nebulización
MarcosRejilla del nebulizador
Cesta del ltro

36
ES
Limpiar el depósito de agua
• Limpie la cesta del ltro con un cepillo o paño suave, lávela con agua limpia y
déjela secar.
• Retire el tapón de goma, drene el agua restante en el depósito de agua y vuelva a
colocar el tapón de goma.
• Elimine los sedimentos del depósito de agua con un paño y un producto de
limpieza neutro, y luego llene el depósito con agua. Retire el tapón de goma y deje
que el agua sucia se escurra. Vuelva a instalar el tapón de goma.
Cesta del ltro
de la bomba
sumergible
Tapón de goma

37
ES
DETECCIÓN Y RESOLUCIÓN DE ANOMALÍAS
Anomalía Posible causa Posible solución
El aparato no se pone en
marcha.
El enchufe no está
conectado correctamente.
Introduzca el cable de
alimentación en la toma
de corriente.
La unidad de nebulización
no está bien colocada.
Inserte correctamente la
unidad de nebulización.
El aparato está apagado. Encienda el aparato.
El cableado del
dispositivo está suelto.
Lleve el aparato a un
técnico para repararlo.
La humidicación no
funciona./La bomba hace
ruidos extraños.
No hay agua en el
depósito de agua o el
nivel del agua está por
debajo de la marca
«MIN».
Apague el aparato y
añada agua al depósito
de agua.
La cesta del ltro de la
bomba sumergible está
obstruida.
Limpie la cesta del ltro.
El oricio de salida
de agua de la unidad
de nebulización está
obstruido.
Limpie la unidad de
nebulización.
La bomba o el cableado
del dispositivo está suelto.
Lleve el aparato a un
técnico para repararlo.
Ruidos anormales. Sedimentos en la unidad
de nebulización.
Retire los sedimentos y
limpie las piezas.
Aspas del ventilador
sueltas o motor dañado.
Lleve el aparato a un
técnico para repararlo.
38
ES
INDICACIONES SOBRE LA RETIRADA DEL
APARATO
Si en su país existe una disposición legal relativa a la
eliminación de aparatos eléctricos y electrónicos, este
símbolo estampado en el producto o en el embalaje
advierte que no debe eliminarse como residuo doméstico.
En lugar de ello, debe depositarse en un punto de recogida
de reciclaje de aparatos eléctricos y electrónicos. Una
gestión adecuada de estos residuos previene consecuencias
potencialmente negativas para el medio ambiente y la salud
de las personas. Puede consultar más información sobre el
reciclaje y la eliminación de este producto contactando con
su administración local o con su servicio de recogida de
residuos.
Este producto contiene baterías. Si en su país existe una
disposición legal relativa a la eliminación de baterías, estas
no deben eliminarse como residuo doméstico. Infórmese
sobre la normativa vigente relacionada con la eliminación de
baterías. Una gestión adecuada de estos residuos previene
consecuencias potencialmente negativas para el medio
ambiente y la salud de las personas.
FABRICANTE E IMPORTADOR (REINO UNIDO)
Fabricante:
Chal-Tec GmbH, Wallstraße 16, 10179 Berlín, Alemania.
Importador para Gran Bretaña:
Chal-Tec UK limited
Unit 6 Riverside Business Centre
Brighton Road
Shoreham-by-Sea
BN43 6RE
United Kingdom

39
FR
Chère cliente, cher client,
Toutes nos félicitations pour l’acquisition de ce nouvel appareil.
Veuillez lire attentivement et respecter les instructions de ce mode
d’emploi an d’éviter d’éventuels dommages. Nous ne saurions
être tenus pour responsables des dommages dus au non-respect
des consignes et à la mauvaise utilisation de l’appareil. Scannez
le QR-Code pour obtenir la dernière version du mode d‘emploi
et des informations supplémentaires concernant le produit.
SOMMAIRE
Consignes de sécurité41
Aperçu de l‘appareil42
Installation43
Panneau de commande et touches44
Autres fonctions45
Nettoyage et entretien47
Résolution des problèmes49
Conseils pour le recyclage50
Fabricant et importateur (UK) 50
40
FR
FICHE TECHNIQUE
Numéro d’article 10034672
Alimentation 220-240 V ~ 50/60 Hz
Puissance 68 W
Capacité max. du réservoir d'eau 10 L
Débit d'air 370 m³/h
Capacité de nébulisation 1100 ml/h
Niveau sonore ≤ 64 dB (A)
Remarque sur l‘utilisation du réservoir d‘eau (pas avec tous les modèles)
En principe, vous pouvez utiliser votre rafraîchisseur d‘air quand vous le souhaitez sans
eau dans le réservoir. Il fonctionne alors comme un ventilateur classique. L‘eau dans
le réservoir n‘est nécessaire que pour la fonction de rafraîchissement. Le rafraîchisseur
d‘air l‘évapore à travers le nébuliseur, éliminant ainsi la chaleur de l‘air pour réduire la
température du ventilateur de 3 °C en fonction de la température de l‘eau utilisée. Nous
vous déconseillons d‘utiliser la fonction de rafraîchissement les jours où l‘humidité est
particulièrement élevée, car cela l‘augmente également et peut donc déclencher des
problèmes circulatoires.

41
FR
CONSIGNES DE SÉCURITÉ
• Avant d‘utiliser l‘appareil, vériez sa tension sur la plaque signalétique. Ne
branchez l‘appareil que sur des prises dont la tension correspond à ce le de
l‘appareil.
• Tenez le câble à l‘écart des surfaces chaudes et des objets aux angles pointus.
• Ne faites pas passer le câble sous un tapis et ne le recouvrez pas non plus avec
d‘autres objets ou tissus. Installez le câble de telle sorte que personne ne puisse
trébucher dessus ou s‘y accrocher.
• N‘utilisez pas l‘appareil si le câble secteur ou la che sont endommagés.
• Si le câble secteur ou la che sont endommagés, faites-les remplacer par le
fabricant un service professionnel agréé ou une personne de qualication
équivalente.
• Utilisez l‘appareil à l‘intérieur uniquement.
• Ne recouvrez pas l‘appareil.
• Placez l‘appareil sur une surface horizontale et stable. Veillez à ce que l‘appareil
soit installé bien verticalement.
• Vériez que l‘appareil est éteint avant de brancher la che dans la prise.
• N‘utilisez pas l‘appareil avec les mains mouillées et ne touchez pas non plus à la
che ou au câble d‘alimentation.
• Ne laissez pas l‘appareil en marche sans surveillance. Eteignez-le et débranchez la
che quand vous ne l‘utilisez pas.
• Débranchez la che de la prise avant de nettoyer l‘appareil ou de l‘entretenir.
• Ne débranchez pas la che de la prise en tirant sur le câble mais tenez toujours
fermement le corps de la che.
• Cet appareil peut être utilisé par des enfants de 8 ans ou plus et des personnes
ayant des capacités physiques, sensorielles et mentales limitées et / ou
dénuées d‘expérience et de connaissances, à condition d‘avoir été instruits au
fonctionnement de l‘appareil par une personne responsable et d‘en comprendre les
risques associés.
• Utilisez l‘appareil uniquement de la façon décrite dans ce mode d‘emploi.
• N‘insérez pas vos doigts ou des objets dans les ouvertures d‘aération.
• Ne placez pas l‘appareil à proximité de voilages ou de rideaux, de nappes de
tables ou autres textiles similaires. Ils risqueraient d‘être aspirés dans le ventilateur et
d‘endommager celui-ci.
• N‘utilisez pas l‘appareil dans des pièces humides telles qu‘une salle de bains.
• N‘utilisez pas l‘appareil avant d‘avoir installé les roues ou lorsqu‘il est posé sur le
côté.
• Déroulez entièrement le câble avant d‘utiliser l‘appareil.

42
FR
• Pendant le fonctionnement, l‘appareil humidie l‘air ambiant. Evitez toutefois une
trop grande humidité de l‘air. Nous vous recommandons une teneur en humidité de
40-50%. Une humidité de l‘air trop importante peut provoquer des moisissures ou
des problèmes de santé.
• Placez l‘appareil sur une surface qui ne craigne ni l‘eau ni l‘humidité. Il peut
toujours arriver que quelques gouttes d‘eau soient renversées à côté de l‘appareil
lorsque vous retirez ou remettez le réservoir d‘eau. si cela se produit, essuyez
immédiatement les gouttes d‘eau.
• Changez l‘eau du réservoir au plus tard tous les 3 jours.
APERÇU DE L‘APPAREIL
1 Panneau de commande
2 Touches
3 Lamelles / Ailettes
oscillantes
4 Nébuliseur
5 Entonnoir de remplissage
6 Réservoir d‘eau
7 Roulettes
43
FR
INSTALLATION
1 Ouvrez l‘emballage et retirez l‘appareil. Assurez-vous que la télécommande et les
deux glacières sont à l‘intérieur.
2 Placez l‘appareil horizontalement et ne l‘inclinez pas pendant l‘utilisation. Vériez
la tension sur l‘étiquette de l‘appareil avant utilisation. Connectez l‘appareil
uniquement aux prises correspondant à la tension de l‘appareil.
3 Ouvrez le cache latéral de l‘appareil et versez de l‘eau dans l‘entonnoir. Versez
l‘eau lentement dans le réservoir. Une fois le réservoir plein, refermez le cache
latéral.
Remarque : Lorsque vous ajoutez de l’eau, faites attention à ne pas dépasser le
repère MAX et ne descendez pas sous le repère MIN sur l’échelle de niveau d’eau.
Avant utilisation, ajoutez de l’eau jusqu‘au repère MAX.
Remplissez d‘eau jusqu‘ici
Niveau d‘eau
maximum
Niveau d‘eau
minimum

44
FR
PANNEAU DE COMMANDE ET TOUCHES
Pour démarrer l‘appareil / mode veille
Branchez la che dans la prise. Un bip retentit et tous les indicateurs s‘allument pendant
2 secondes, puis s‘éteignent à nouveau. L‘appareil est alors en mode veille.
Touche Fonction
ON/OFF En mode veille, appuyez sur la touche ON / OFF pour
démarrer / arrêter l’appareil. La vitesse de ventilation par
défaut est [1].
Speed La vitesse du vent se règle sur 4 niveaux. Une fois allumé,
appuyez plusieurs fois sur la touche SPEED pour régler la vitesse
de ventilation souhaitée. Les lumières au-dessus de la touche
indiquent la vitesse actuelle du vent.
Timer/Preset Minuterie : l'appareil allumé, appuyez plusieurs fois sur la
touche TIMER pour régler le délai avant arrêt automatique
de l'appareil. La minuterie est réglable de 1 à 15 heures. Les
voyants au-dessus de la touche indiquent le délai actuellement
réglé. Si plusieurs voyants sont allumés, additionnez les valeurs
des voyants pour déterminer le délai réglé (exemple : si un délai
de 15 heures est réglé, les valeurs 1+2+4+8 s'allument).
Preset : En mode veille, appuyez plusieurs fois sur la touche
TIMER pour régler le délai avant démarrage automatique
de l'appareil. La minuterie est réglable de 1 à 15 heures. Les
voyants au-dessus de la touche indiquent le délai actuellement
réglé. Si plusieurs voyants sont allumés, additionnez leurs
valeurs pour déterminer la durée dénie (exemple : si un délai
de 15 heures est réglé, les valeurs 1+2+4+8 s'allument 8).
45
FR
Touche Fonction
Mode L'appareil allumé, appuyez plusieurs fois sur la touche MODE
pour sélectionner l'un des modes suivants : Général, Naturel,
Veille. Les voyants au-dessus de la touche indiquent le mode
actuel.
Général : le ventilateur soufe à une vitesse constante.
Naturel : le ventilateur simule le vent naturel en soufant à
différentes vitesses.
Veille : le ventilateur soufe à différentes vitesses. Toutes les
heures, la vitesse du vent se réduit de 1 niveau jusqu'au niveau
1.
Up&Down Swing L'appareil allumé, appuyez sur cette touche pour diriger le ux
d'air de haut en bas. Appuyez à nouveau sur la touche pour
quitter la fonction.
Left&Right Swing L'appareil allumé, appuyez sur cette touche pour diriger le ux
d’air vers la gauche et la droite. Appuyez à nouveau sur la
touche pour quitter la fonction.
Humidify/Anion L'appareil allumé, appuyez plusieurs fois sur cette touche pour
activer la fonction d'humidication ou la fonction de puricateur
d'air (anion) ou pour arrêter les deux fonctions.
Remarque : Avant d'utiliser la fonction d'humidication, vériez
d'abord qu'il y a sufsamment d'eau dans le réservoir. Dès que
l'eau approche de la marque MIN, ajoutez de l'eau dans le
réservoir.
AUTRES FONCTIONS
Alerte de niveau d‘eau
Lorsque le niveau d‘eau dans le réservoir est trop bas, l‘appareil s‘arrête et le témoin
HUMIDIFY clignote. Ajoutez de l‘eau et relancez la fonction.
Arrêt automatique
Si l‘appareil est allumé mais qu‘aucun paramètre n‘a été déni pendant plus de 15
minutes, il repasse automatiquement en mode veille.
46
FR
Mémoire de l‘appareil
Tant que l‘appareil est alimenté, il enregistre automatiquement les derniers réglages
effectués. Lorsque vous éteignez puis rallumez l‘appareil, il reprend les paramètres
enregistrés.
Remarque : L‘appareil enregistre les paramètres uniquement tant qu‘il est alimenté.
S‘il est débranché, les paramètres enregistrés seront perdus.
Grille de nébuliseur
Dès que vous retirez la grille du nébuliseur, l‘appareil s‘arrête automatiquement et le
témoin HUMIDIFY clignote. L‘appareil ne peut pas être redémarré tant que la grille du
nébuliseur n‘a pas été réinstallée.
Télécommande
Les fonctions des touches de la télécommande correspondent aux fonctions des touches
du panneau de commande. Pointez toujours la télécommande directement sur l‘appareil
et assurez-vous qu‘il n‘y a pas d‘obstacle.
Remarque : Si vous n‘utilisez pas la télécommande pendant une longue période, retirez
les piles.
Glacières
Remarque : N'ouvrez pas les glacières fournies, le
contenu est impropre à la consommation !
Avant d’utiliser les glacières, placez-les dans le
compartiment congélateur de votre réfrigérateur
pendant au moins 4 heures. Ensuite, éteignez
l'appareil et placez les glacières dans le réservoir
d'eau.
47
FR
NETTOYAGE ET ENTRETIEN
Éteignez l‘appareil et débranchez le cordon d‘alimentation. Débranchez toujours le
cordon d‘alimentation avant le nettoyage pour éviter tout risque d‘électrocution ou
de dommages mécaniques. Utilisez un détergent disponible dans le commerce et une
brosse douce pour le nettoyage. Ne pas utiliser de nettoyants chimiques.
Nettoyage de la surface
• Essuyez la surface avec un chiffon humide. N‘utilisez pas d‘eau, car elle pourrait
pénétrer dans l‘appareil et endommager les composants électroniques.
• N‘utilisez pas d‘agents nettoyants ni de solvants corrosifs.
Stockage
• Si vous n‘utilisez pas le produit pendant une longue période, débranchez le
cordon d‘alimentation et emballez-le pour éviter que de la poussière ne pénètre à
l‘intérieur du boîtier.
• Conservez-le après emballage dans un endroit sec et ventilé.
Nettoyage des pièces intérieures
• Commencez par retirer le nébuliseur complet. Pliez légèrement la grille du
nébuliseur des deux côtés du cadre.
• Nettoyez-la à l’eau claire et laissez sécher.
• Nettoyez le ltre avec une brosse douce ou un chiffon, rincez à l‘eau claire puis
laissez sécher.
Verrou Nébuliseur
CadreGrille du nébuliseur
Filtre

48
FR
Nettoyage du réservoir d‘eau
• Nettoyez le ltre avec une brosse douce ou un chiffon, rincez à l‘eau claire puis
laissez sécher.
• Retirez le bouchon en caoutchouc, vidangez le reste d‘eau dans le réservoir et
replacez le bouchon en caoutchouc.
• Enlevez les débris dans le réservoir d‘eau avec un chiffon et du détergent neutre,
puis remplissez le réservoir d‘eau. Retirez le bouchon en caoutchouc et laissez l‘eau
usée s‘écouler. Puis replacez le bouchon en caoutchouc.
Filtre de la pompe
immergée
Bouchon en
caoutchouc
49
FR
RÉSOLUTION DES PROBLÈMES
Problème Cause possible Solution
L'appareil ne fonctionne
pas.
La che n'est pas
branchée correctement.
Insérez la che fermement
dans la prise.
Le nébuliseur n'est pas
installé correctement.
Installez le nébuliseur
correctement.
L'appareil est éteint. Allumez l'appareil.
Le câblage de l'appareil
s'est relâché.
Contactez une entreprise
spécialisée pour la
réparation.
L'humidication ne
fonctionne pas / la
pompe émet des bruits
étranges.
Pas d’eau dans le
réservoir ou niveau d’eau
inférieur à la marque
MIN.
Éteignez l'appareil et
remplissez le réservoir
d'eau.
Le ltre de la pompe
immergée est bouché.
Nettoyez l'écran du ltre.
Le trou de sortie d'eau du
nébuliseur est bouché.
Nettoyez le nébuliseur.
La pompe ou le câblage
de l'appareil s'est
débranché.
Contactez une entreprise
spécialisée pour la
réparation.
Bruits anormaux. Dépôts dans le nébuliseur. Retirez le nébuliseur et
nettoyez les composants.
Pales de ventilateur
desserrées ou des
dommages au moteur.
Contactez une entreprise
spécialisée pour la
réparation.

50
FR
INFORMATIONS SUR LE RECYCLAGE
S‘il existe une réglementation pour l‘élimination ou le
recyclage des appareils électriques et électroniques dans
votre pays, ce symbole sur le produit ou sur l‘emballage
indique que cet appareil ne doit pas être jeté avec les
ordures ménagères. Vous devez le déposer dans un point
de collecte pour le recyclage des équipements électriques
et électroniques. La mise au rebut conforme aux règles
protège l‘environnement et la santé de vos semblables des
conséquences négatives. Pour plus d‘informations sur le
recyclage et l‘élimination de ce produit, veuillez contacter
votre autorité locale ou votre service de recyclage des
déchets ménagers.
Ce produit contient des piles. S‘il existe une réglementation
pour l‘élimination ou le recyclage des piles dans votre pays,
vous ne devez pas les jeter avec les ordures ménagères.
Renseignez-vous sur les dispositions locales relatives à la
collecte des piles usagées. La mise au rebut conforme aux
règles protège l‘environnement et la santé de vos semblables
des conséquences négatives.
FABRICANT ET IMPORTATEUR (UK)
Fabricant :
Chal-Tec GmbH, Wallstraße 16, 10179 Berlin, Allemagne.
Importateur pour la Grande Bretagne :
Chal-Tec UK limited
Unit 6 Riverside Business Centre
Brighton Road
Shoreham-by-Sea
BN43 6RE
United Kingdom

51
IT
Gentile cliente,
La ringraziamo per aver acquistato il dispositivo. La preghiamo
di leggere attentamente le seguenti istruzioni per l’uso e di
seguirle per evitare possibili danni. Non ci assumiamo alcuna
responsabilità per danni scaturiti da una mancata osservazione
delle avvertenze di sicurezza e da un uso improprio del
dispositivo. Scansionare il codice QR seguente, per accedere
al manuale d’uso più attuale e per ricevere informazioni sul
prodotto.
INDICE
Avvertenze di sicurezza53
Descrizione del prodotto54
Installazione55
Pannello di controllo e tasti funzione56
Ulteriori funzioni57
Pulizia e manutenzione59
Correzione degli errori61
Smaltimento62
Produttore e importatore (UK) 62

52
IT
DATI TECNICI
Numero articolo 10034672
Alimentazione 220-240 V ~ 50/60 Hz
Potenza 68 W
Capacità del serbatoio 10 L
Volume usso d’aria 370 m³/h
Volume di nebulizzazione 1100 ml/h
Rumorosità ≤ 64 dB (A)
Avvertenze sull‘utilizzo del serbatoio (pas avec tous les modèles)
Il raffreddatore d’aria può essere utilizzato in ogni momento senza acqua nel serbatoio.
In questo caso, il dispositivo funziona esattamente come un normale ventilatore. L’acqua
nel serbatoio è necessaria solo per la funzione di raffreddamento. Il raffreddatore d’aria
vaporizza l’acqua tramite il nebulizzatore, togliendo calore dall‘aria e abbassandone
la temperatura no a 3 °C, in base a quanto è fredda l’acqua utilizzata. Si sconsiglia
l’utilizzo della funzione di raffreddamento in giornate con umidità particolarmente
elevata, dato che tale funzione incrementa ulteriormente il tasso di umidità e può
comportare problemi alla circolazione.

53
IT
AVVERTENZE DI SICUREZZA
• Prima dell‘uso controllare la tensione sulla targhetta del dispositivo. Collegare il
dispositivo solo ad una presa che corrisponde alla tensione indicata.
• Tenere lontano il cavo di alimentazione da superci calde e da oggetti appuntiti.
• Non sistemare il cavo di alimentazione sotto un tappeto e non coprirlo con altri
oggetti o tessuti. Sistemare il cavo di alimentazione in modo che nessuno vi possa
inciampare.
• Non utilizzare il dispositivo se il cavo di alimentazione o la spina sono danneggiati.
• Se il cavo di alimentazione o la spina sono danneggiati, farli sostituire dal
produttore, da un tecnico qualicato o da un centro assistenza autorizzato.
• Utilizzare il dispositivo solo in ambienti chiusi.
• Non coprire il dispositivo.
• Collocare il dispositivo su una supercie piana e stabile. Assicurarsi che il
dispositivo sia in posizione verticale.
• Assicurarsi che il dispositivo sia spento prima di inserire la spina nella presa.
• Non utilizzare il dispositivo con le mani bagnate. Non toccare la spina e il cavo di
alimentazione con le mani bagnate.
• Non lasciare il dispositivo incustodito mentre è in funzione. Spegnere il dispositivo e
staccare la spina quando non è in uso.
• Staccare la spina prima di eseguire la pulizia o la manutenzione del dispositivo.
• Non tirare il cavo per staccare la spina, bensì afferrare la spina alla base.
• Questo dispositivo può essere utilizzato da bambini a partire da 8 anni e da
persone con limitate capacità siche e psichiche o con conoscenza ed esperienza
limitate, solo se sono stati istruiti sulle modalità d’uso e comprendono i rischi e i
pericoli connessi.
• Utilizzare il dispositivo solo come descritto in questo manuale.
• Non inlare le dita o oggetti nelle prese d‘aria.
• Non posizionare il dispositivo vicino a tende, tovaglie o simili poiché potrebbero
essere aspirati nella ventola e danneggiarla.
• Non utilizzare il dispositivo in ambienti umidi, come ad esempio bagni.
• Non utilizzare il dispositivo prima di aver montato le rotelline o quando è
posizionato su un lato.
• Srotolare completamente il cavo prima dell‘uso.

54
IT
• Durante l´uso, il dispositivo umidica l´ambiente. Tuttavia evitare un‘umidità troppo
elevata. Si consiglia un‘umidità compresa tra il 40-50%. Un‘eccessiva umidità può
causare muffa o problemi di salute.
• Collocare il dispositivo solo su superci resistenti all‘umidità. Durante l‘installazione
e la rimozione del serbatoio potrebbero cadere alcune gocce. In questo caso,
asciugare immediatamente le gocce d‘acqua.
• Cambiare l‘acqua nel serbatoio al massimo dopo 3 giorni.
DESCRIZIONE DEL PRODOTTO
1 Pannello di controllo
2 Tasti
3 Lamelle/alette oscillanti
4 Nebulizzatore
5 Imbuto di riempimento
6 Serbatoio
7 Rotelle

55
IT
INSTALLAZIONE
1. Togliere il dispositivo dall’imballaggio. Controllare che il telecomando e le due
icebox siano presenti nella scatola.
2. Posizionare il dispositivo in verticale e non inclinarlo durante l’utilizzo. Controllare
la tensione sulla targhetta del dispositivo prima di utilizzarlo.
3. Aprire la copertura laterale del dispositivo e mettere acqua nell’imbuto di
riempimento. Versare lentamente l’acqua nel serbatoio. Non appena il serbatoio è
pieno, richiudere la copertura laterale.
Nota: quando si aggiunge l’acqua, assicurarsi che il livello si trovi tra i segni Min. e
Max. Prima dell’utilizzo, riempire il serbatoio no al segno Max.
Aggiungere qui l’acqua
Livello massimo
dell’acqua
Livello minimo
dell’acqua

56
IT
PANNELLO DI CONTROLLO E TASTI FUNZIONE
Avviare il dispositivo/modalità standby
Inserire la spina nella presa elettrica. Viene emesso un segnale acustico e tutte le
indicazioni si illuminano per 2 secondi e poi si spengono. Il dispositivo si trova ora in
standby.
Tasto Funzione
ON/OFF Premere ON/OFF in standby per avviare/arrestare il
dispositivo. La velocità predenita è (1).
Speed La velocità è regolabile su 4 livelli. Premere più volte SPEED a
dispositivo acceso per impostare la velocità desiderata. Le spie
sopra al tasto indica la velocità attuale.
Timer/Preset Timer: premere più volte TIMER a dispositivo acceso per
impostare il tempo no allo spegnimento automatico del
dispositivo. Il timer può essere impostato tra 1 e 15 ore. Le spie
sopra al tasto indicano il tempo attualmente impostato. Se sono
accese diverse spie, sommare i valori indicati dalle spie per
denire il tempo impostato (ad es.: sono impostate 15 ore, si
illuminano i valori 1+2+4+8).
Preset: premere più volte TIMER in standby per impostare il
tempo no all’accensione automatica del dispositivo. Il timer
può essere impostato tra 1 e 15 ore. Le spie sopra al tasto
indicano il tempo attualmente impostato. Se sono accese
diverse spie, sommare i valori indicati dalle spie per denire il
tempo impostato (ad es.: sono impostate 15 ore, si illuminano i
valori 1+2+4+8).
57
IT
Tasto Funzione
Mode Premere più volte MODE a dispositivo acceso per selezionare
una delle seguenti modalità: General (normale), Natural
(naturale), Sleep (notturna). Le spie sopra al tasto mostrano
l’attuale modalità.
General: la ventola funziona a velocità costante.
Natural: la ventola simula il vento naturale, cambiando la
velocità di ventilazione.
Sleep: la ventola funziona a diverse velocità Ogni ora il livello
viene diminuito di 1, no a raggiungere il livello 1.
Up&Down Swing Premere questo tasto a dispositivo acceso per indirizzare il
usso d’aria verso l’alto e verso il basso. Premere di nuovo il
tasto per arrestare la funzione.
Left&Right Swing Premere questo tasto a dispositivo acceso per indirizzare il
usso d’aria verso sinistra e verso destra. Premere di nuovo il
tasto per arrestare la funzione.
Humidify/Anion Premere più volte questo tasto a dispositivo acceso per attivare
la funzione di umidicazione (Humidify) o di depurazione
dell’aria (Anion) o per disattivarle entrambe.
Avvertenza: prima di utilizzare la funzione di umidicazione
(Humidify), controllare che ci sia acqua sufciente nel serbatoio.
Quando l’acqua si avvicina al simbolo Min., aggiungere acqua
nel serbatoio.
ULTERIORI FUNZIONI
Avvertimento livello dell’acqua
Quando il livello dell’acqua nel serbatoio è troppo basso, il dispositivo si arresta e
lampeggia l’indicazione HUMIDIFY. Riempire il serbatoio e riavviare la funzione.
Spegnimento automatico
Se il dispositivo è acceso ma non vengono inserite impostazioni per 15 minuti, passa
automaticamente in standby.
58
IT
Memoria dispositivo
Se il dispositivo rimane collegato alla rete elettrica, salva automaticamente le ultime
impostazioni inserite. Se si spegne il dispositivo e lo si riaccende, riprende la funzione
con le ultime impostazioni inserite.
Nota: il dispositivo salva le impostazioni solo se rimane collegato alla rete elettrica.
Se viene scollegato, le impostazioni salvate vanno perse.
Griglia di nebulizzazione
Non appena viene rimossa la griglia di nebulizzazione, il dispositivo si arresta
automaticamente e l’indicazione HUMIDFY lampeggia. Il dispositivo può essere
riavviato solo dopo aver rimontato la griglia di nebulizzazione.
Telecomando
I tasti funzione del telecomando corrispondono alle funzioni dei tasti del pannello di
controllo. Rivolgere il telecomando direttamente al dispositivo e assicurarsi che non ci
siano ostacoli nel mezzo.
Nota: se non si utilizza più il telecomando, togliere le batterie.
Icebox
Nota: non aprire le icebox incluse nel volume di
consegna, il contenuto non è adatto al consumo!
Prima di utilizzare le icebox, metterle in freezer per
almeno 4 ore. Spegnere poi il dispositivo e inserire
le icebox nel serbatoio.
59
IT
PULIZIA E MANUTENZIONE
Spegnere il dispositivo e staccare la spina. Staccare sempre la spina prima della
pulizia, in modo da evitare folgorazioni o danni meccanici. Utilizzare detergenti comuni
e una spazzola morbida. Non utilizzare detergenti chimici.
Pulire la supercie
• Stronare la supercie con un panno umido. Non utilizzare acqua, altrimenti
potrebbe penetrare nel dispositivo e rovinare i componenti elettronici.
• Non utilizzare detergenti corrosivi o solventi.
Stoccaggio
• Se il prodotto non viene utilizzato per lunghi periodi di tempo, staccare la spina e
imballarlo, in modo da evitare che penetri polvere nell’alloggiamento.
• Dopo averlo imballato, conservare il dispositivo in un luogo asciutto e ben
ventilato.
Pulizia dei componenti interni
• Rimuovere l’intera unità di nebulizzazione. Piegare leggermente la griglia di
nebulizzazione verso l’esterno su entrambi i lati e rimuovere griglia e ltro.
• Lavare la griglia con acqua pulita e lasciarla asciugare.
• Pulire il ltro con una spazzola morbida o un panno morbido, lavarlo con acqua
pulita e lasciarlo asciugare.
Chiusura Unità di nebulizzazione
TelaioGriglia di nebulizzazione
Filtro

60
IT
Pulire il serbatoio
• Pulire il ltro con una spazzola morbida o un panno morbido, lavarlo con acqua
pulita e lasciarlo asciugare.
• Togliere i tappi in gomma, scaricare l’acqua residua e rimettere i tappi.
• Rimuovere i depositi nel serbatoio con un panno morbido e detergente neutro e
riempire nuovamente il serbatoio. Togliere i tappi in gomma e scaricare l’acqua
sporca. Rimettere poi i tappi.
Filtro della pompa
a immersione
Tappi in gomma

61
IT
CORREZIONE DEGLI ERRORI
Problema Possibile causa Soluzioni
Il dispositivo non funziona. La spina non è stata
inserita correttamente.
Inserire saldamente la
spina nella presa.
L’unità di nebulizzazione
non è stata installata
correttamente.
Montare correttamente
l’unità di nebulizzazione.
Il dispositivo è spento. Accendere il dispositivo.
Il cablaggio nel dispositivo
si è staccato.
Rivolgersi a un’azienda
specializzata per la
riparazione.
L’umidicazione non
funziona/La pompa fa
strani rumori.
Non c’è acqua nel
serbatoio o il livello è sotto
al segno Min.
Spegnere il dispositivo e
riempire il serbatoio.
Il ltro della pompa a
immersione è otturato.
Pulire il ltro.
Il foro di scarico
dell’acqua dell’unità di
nebulizzazione è otturato.
Pulire l’unità di
nebulizzazione.
La pompa o il cablaggio
nel dispositivo si sono
staccati.
Rivolgersi a un’azienda
specializzata per la
riparazione.
Rumori insoliti. Depositi nell’unità di
nebulizzazione.
Rimuovere l’unità di
nebulizzazione e pulire i
componenti.
Pale della ventola
allentate o danni al
motore.
Rivolgersi a un’azienda
specializzata per la
riparazione.

62
IT
AVVISO DI SMALTIMENTO
Se nel proprio paese si applicano le regolamentazioni
inerenti lo smaltimento di dispositivi elettrici ed elettronici,
questo simbolo sul prodotto o sulla confezione segnala che
questi prodotti non possono essere smaltiti con i riuti normali
e devono essere portati a un punto di raccolta di dispositivi
elettrici ed elettronici. Grazie al corretto smaltimento dei
vecchi dispositivi si tutela il pianeta e la salute delle persone
da possibili conseguenze negative. Informazioni riguardanti il
riciclo e lo smaltimento di questi prodotti si ottengono presso
l’amministrazione locale oppure il servizio di gestione dei
riuti domestici.
Il prodotto contiene batterie. Se nel proprio paese si
applicano le regolamentazioni inerenti lo smaltimento di
batterie, non possono essere smaltite con i normali riuti
domestici. Preghiamo di informarvi sulle regolamentazioni
vigenti sullo smaltimento delle batterie. Grazie al corretto
smaltimento dei vecchi dispositivi si tutela l’ambiente e la
salute delle persone da conseguenze negative.
PRODUTTORE E IMPORTATORE (UK)
Produttore:
Chal-Tec GmbH, Wallstraße 16, 10179 Berlino, Germania.
Importatore per la Gran Bretagna:
Chal-Tec UK limited
Unit 6 Riverside Business Centre
Brighton Road
Shoreham-by-Sea
BN43 6RE
United Kingdom