Loading ...
Loading ...
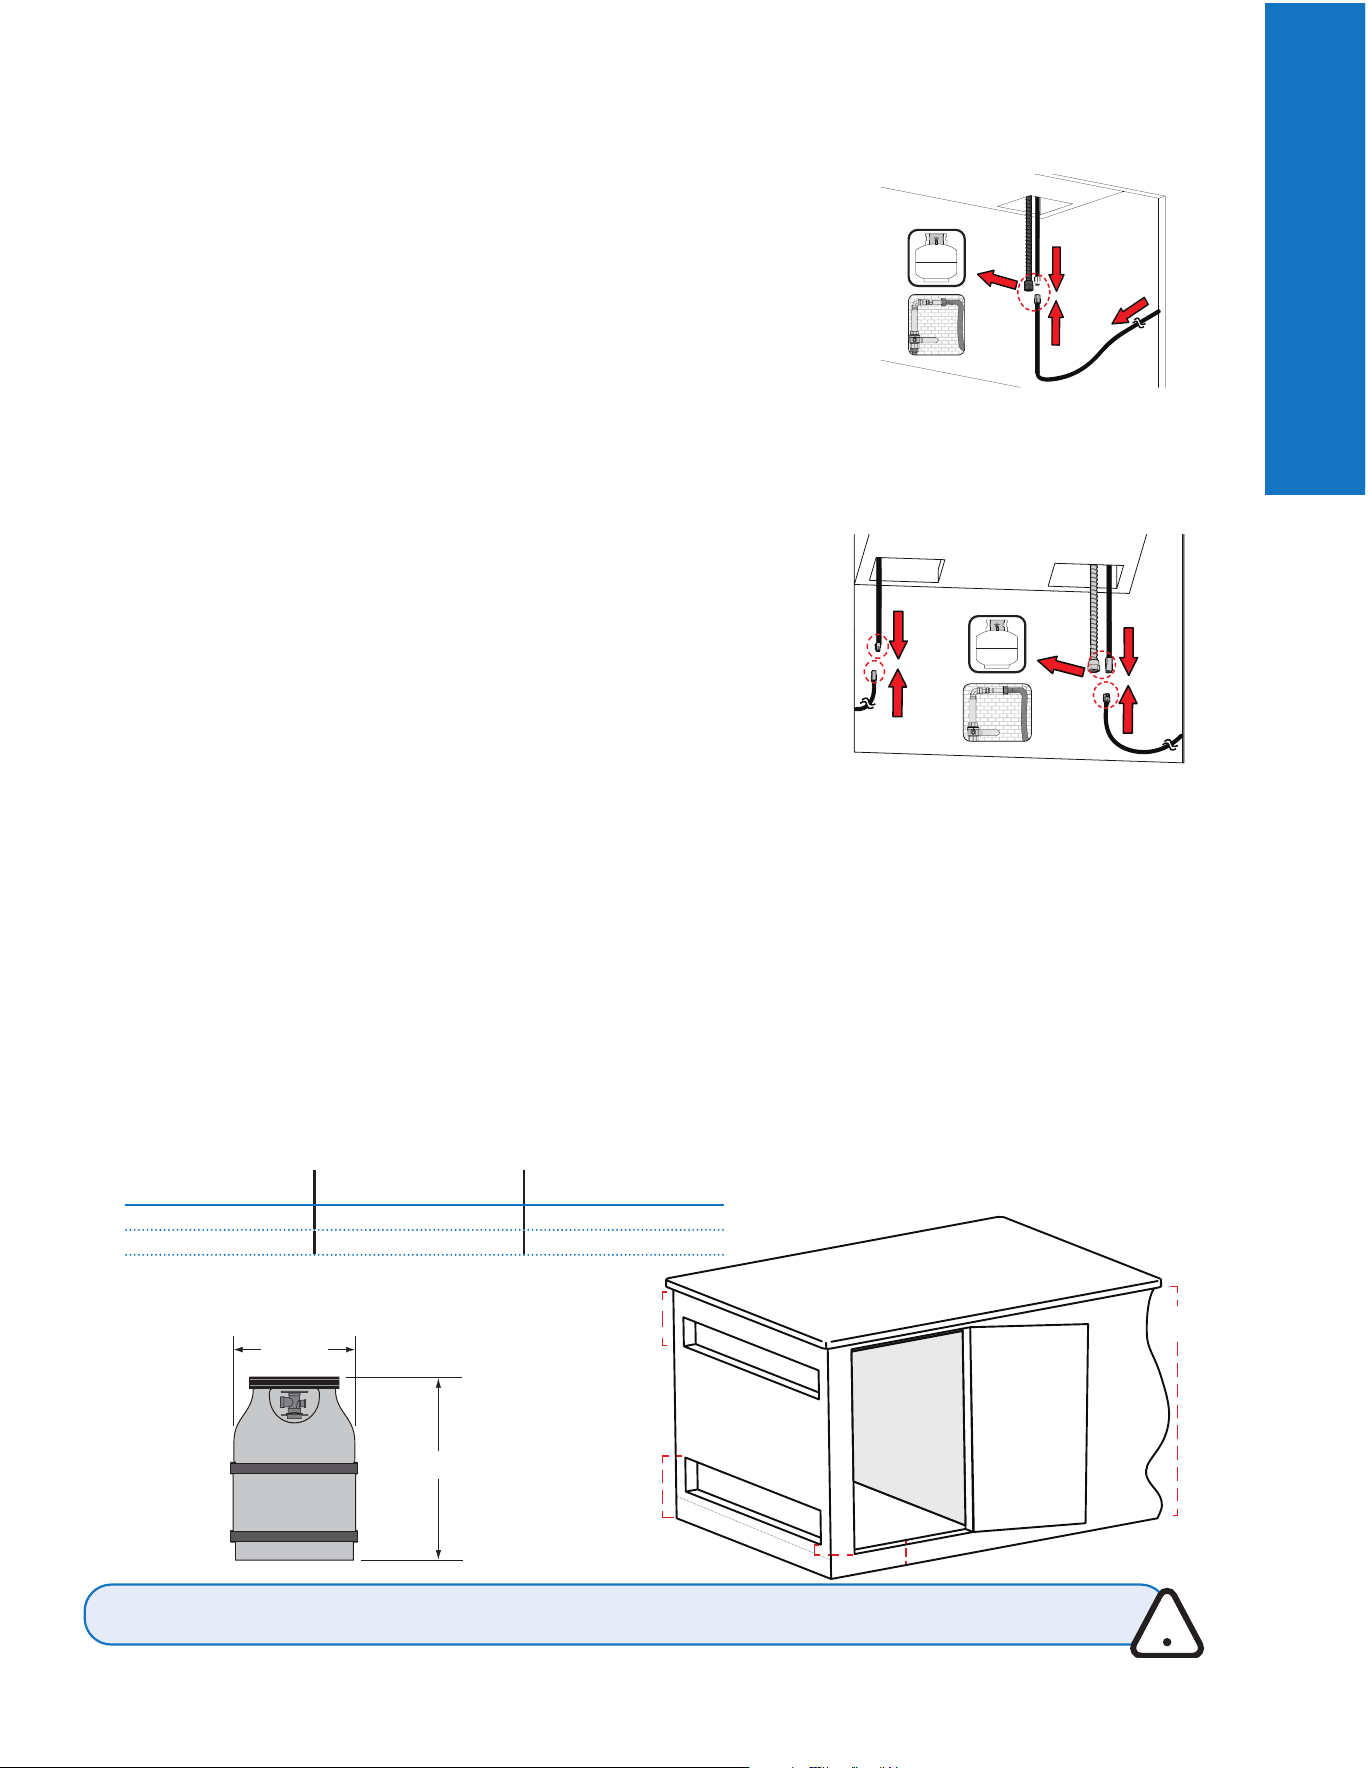
CAUTION! Ensure the hoses do not contact any high temperature surfaces of the grill.
Napoleon.com | BUILT-IN Series
Getting Started |
3
Getting Started
(BIG 44/38/32)
(BIB 18/12/10)
(BIB 18/12/10)
(BIB 18/12/10)
gAs COnneCtiOns
Gas Cylinder
This grill is equipped with and internal regulator that must not be modified or adjusted. Use
a propane cylinder of minimum 6 kg or a butane cylinder of 13 kg constructed and marked
in accordance with national and regional codes.
Only cylinders connected to the appliance may be stored in the enclosure. Only place
cylinders within the maximum width and height dimensions in the built in enclosure. Spare
cylinders must not be stored in the enclosure, or in close proximity with an operating unit.
Gas Hose
Use a gas pressure regulator and hose supplied by Napoleon; if not included, use a regulator and
hose that meet national and regional codes. The hose must never be longer than 1.5m. Check the
hose regularly for rips melting or wear. Replace if needed.
Note: The hose should be replaced before the expiry date printed on it.
Hook-up and Installation
1. Check the cylinder for dents or rust, and have it inspected by your propane supplier.
Never use a cylinder with a damaged valve.
2. Place the cylinder in its designated area in the enclosure.
3. Ensure the gas regulator hose has no twists or kinks.
4. Remove the cap or plug from the cylinder fuel valve.
5. Tighten the regulator to the cylinder valve.
6. Ensure the cylinder is not left exposed to extreme heat or direct sunlight.
7. Leak test all joints prior to operating the grill. See “Leak Test”.
Built-in Enclosure
• The design of the enclosure should allow for the gas cylinder to be connected, disconnected, and the connections inspected and
tested outside of it. The connections that could possibly be disturbed when installing the cylinder in the enclosure can be leak
tested inside.
• The cylinder must be isolated from the grill enclosure, and protected from radiation, flames, hot drippings, and other foreign or
hazardous materials.
• Do not obstruct the flow of ventilation and combustion air.
• Keep the cylinder enclosure ventilation openings clear from debris around all sides of the enclosure.
• A door on the enclosure to access the cylinder is acceptable if it is non-locking and can be opened without using tools.
• Ensure there are at least two unobstructed ventilation openings on the exposed exterior side of enclosure, one within 5inches
(12.7cm) of the top of the enclosure, and another within 1inch (2.54cm) of the cylinder opening’s bottom surface.
• The opening must have a free area depending on the cylinder size:
Cylinder size Opening A area Opening B area
20 lb (9.1 kg) 20 inches² (130 cm²) 10 inches (65 cm²)
30 lb (13.6 kg) 30 inches² (195 cm²) 15 inches² (100 cm²)
306 mm
465 mm
Maximum Cylinder Dimensions
5"
(12.7 cm)
5"
(12.7 cm)
1" (2.54 cm)
34"
(86.36 cm)
2" (5.1cm)
Opening A
Opening B
Applicable
Applicable
to:
to:
(BIB 18/
(BIB 18/12/
10)
10)
Applicable to:
(BIB 18/12/10)
Applicable to:
(BIG 44/38/32)
(BIB 18/12/10)
Getting Started
!
N415-0711.indb 3N415-0711.indb 3 2/23/2021 4:12:25 PM2/23/2021 4:12:25 PM
Loading ...
Loading ...
Loading ...