www.klarstein.com
VITAIR SMART
Heißluftfritteuse
Hot Air Fryer
Freidora de aire caliente
Friteuse à air chaud
Friggitrice ad aria calda
10035590 10035591 10035592


3
DE
English 19
Español 35
Français 51
Italiano 67
Sehr geehrter Kunde,
wir gratulieren Ihnen zum Erwerb Ihres Gerätes. Lesen Sie
die folgenden Hinweise sorgfältig durch und befolgen Sie
diese, um möglichen Schäden vorzubeugen. Für Schäden,
die durch Missachtung der Hinweise und unsachgemäßen
Gebrauch entstehen, übernehmen wir keine Haftung. Scannen
Sie den folgenden QR-Code, um Zugriff auf die aktuellste
Bedienungsanleitung und weitere Informationen rund um das
Produkt zu erhalten.
INHALTSVERZEICHNIS
Sicherheitshinweise4
Geräteübersicht5
Zubehör6
Bedienfeld und Tasten7
Inbetriebnahme und Bedienung8
Empfohlene Einstellungen für verschiedene Modi10
Verwendung des Zubehörs11
Gerätesteuerung per Smartphone15
Reinigung und Pege17
Hinweise zur Entsorgung18
Konformitätserklärung18
TECHNISCHE DATEN
Artikelnummer 10035590, 10035591, 10035592
Stromversorgung 220-240 V ~ 50/60 Hz
Leistung 1200-1400 W
Fassungsvermögen (Garraum) 10 L
Einstellbare Temperatur 30-250 °C
WiFi-Standard
802.11 b/g/n
WiFi-Frequenz
2,4 GHz
WiFi-Sendeleistung (max.)
20 dBm

4
DE
SICHERHEITSHINWEISE
Lesen Sie die Bedienungsanleitung vor der Verwendung des Geräts aufmerksam durch.
Folgende Sicherheitshinweise sollten bei der Verwendung von elektrischen Geräten
immer beachtet werden:
• Überprüfen Sie vor der ersten Verwendung, ob die Spannung Ihrer Steckdose mit
der angegebenen Spannung übereinstimmt.
• Tauchen Sie das Netzstromkabel oder das Gerät selbst nicht in Wasser oder andere
Flüssigkeiten, um einen Stromschlag zu vermeiden.
• Halten Sie Kinder und Haustiere während des Betriebs vom Gerät fern.
• Schalten Sie das Gerät nach der benutzung aus und ziehen Sie den Netzstecker
aus der Steckdose.
• Das Gerät sollte an einem separaten Stromkreislauf von anderen Geräten getrennt
betrieben werden. Wenn der Stromkreislauf durch andere Geräte überlastet ist,
funktioniert dieses Gerät möglicherweise nicht richtig.
• Lassen Sie äußerste Vorsicht walten, wenn Sie einen Behälter bewegen der heiße
Lebensmittel enthält.
• Lassen Sie das Netzstromkabel nicht über die Kante von Tischen und Arbeitsächen
herunterhängen und achten Sie darauf, dass das Netzstromkabel nicht mit den
heißen Geräteoberächen in Berührung kommt.
• Stellen Sie das Gerät immer sicher in die Mitte des Tischs oder der Arbeitsäche.
• Berühren Sie keinesfalls heiße Geräteoberächen. Verwenden Sie zum Bewegen
oder Anheben die Griffe.
• Das Gerät darf nicht von Kindern verwendet werden.
• Die Verwendung von Zubehör, das nicht ausdrücklich vom Hersteller empfohlen
wird, kann zu Verletzungen führen.
• Stellen und Verwenden Sie das Gerät nicht auf hitzeempndlichen
Glasoberächen, Holzoberächen oder Tischdecken. Legen Sie bei diesen
Oberächen unbedingt eine hitzeunempndlichen Platte mit Wärmeschutz unter
das Gerät.
• Verwenden Sie das Gerät keinesfalls, wenn das Netzstromkabel beschädigt ist, das
Gerät Fehlfunktionen aufweist oder auf sonstige Art und Weise beschädigt wurde.
• Schalten Sie das Gerät vor der Reinigung und bei Nichtverwendung aus und
ziehen Sie den Netzstecker aus der Steckdose. Lassen Sie das Gerät zuerst
abkühlen, bevor Sie Geräteteile entnehmen oder hinzufügen.
• Stellen Sie das Gerät nicht in die unmittelbare Nähe von heißen Gas- oder
Elektroöfen oder in einen aufgeheizten Backofen.
• Ziehen Sie, sollte der Netzstecker nicht richtig passen, auf jeden Fall einen
qualizierten Elektriker hinzu, um ein potentielles Stromschlagrisiko zu minimieren.
Versuchen Sie keinesfalls, den Netzstecker auf irgendeine Weise zu manipulieren.
5
DE
• Reinigen Sie das Gerät nicht mit metallischen Scheuerschwämmen. Kleine
Metallteile könnten abbrechen und elektrische Bestandteile des Geräts
kurzschließen, was zu einem Stromschlag führen und das Gerät beschädigen
könnte.
• Bereiten Sie Lebensmittel zur Minimierung des Stromschlagrisikos ausschließlich in
dem im Lieferumfang enthaltenen, beschichteten, nicht haftenden Behälter zu.
• Das Gerät ist nur für den häuslichen Gebrauch im Innenbereich ausgelegt.
• Verwenden Sie das Gerät ausschließlich für den dafür vorgesehenen
Verwendungszweck.
• Bewahren Sie diese Bedienungsanleitung für den zukünftigen Gebrauch auf.
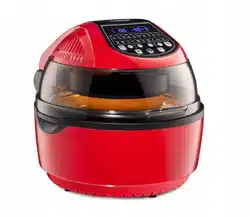
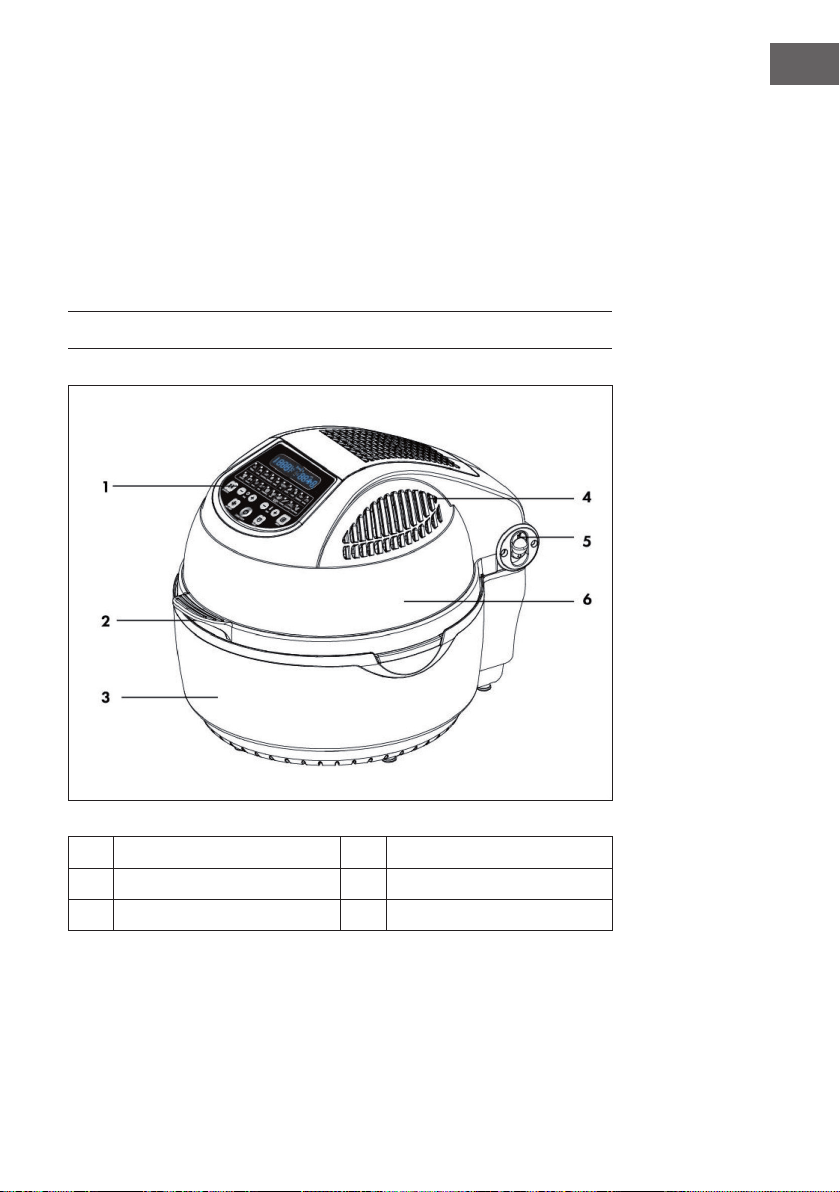
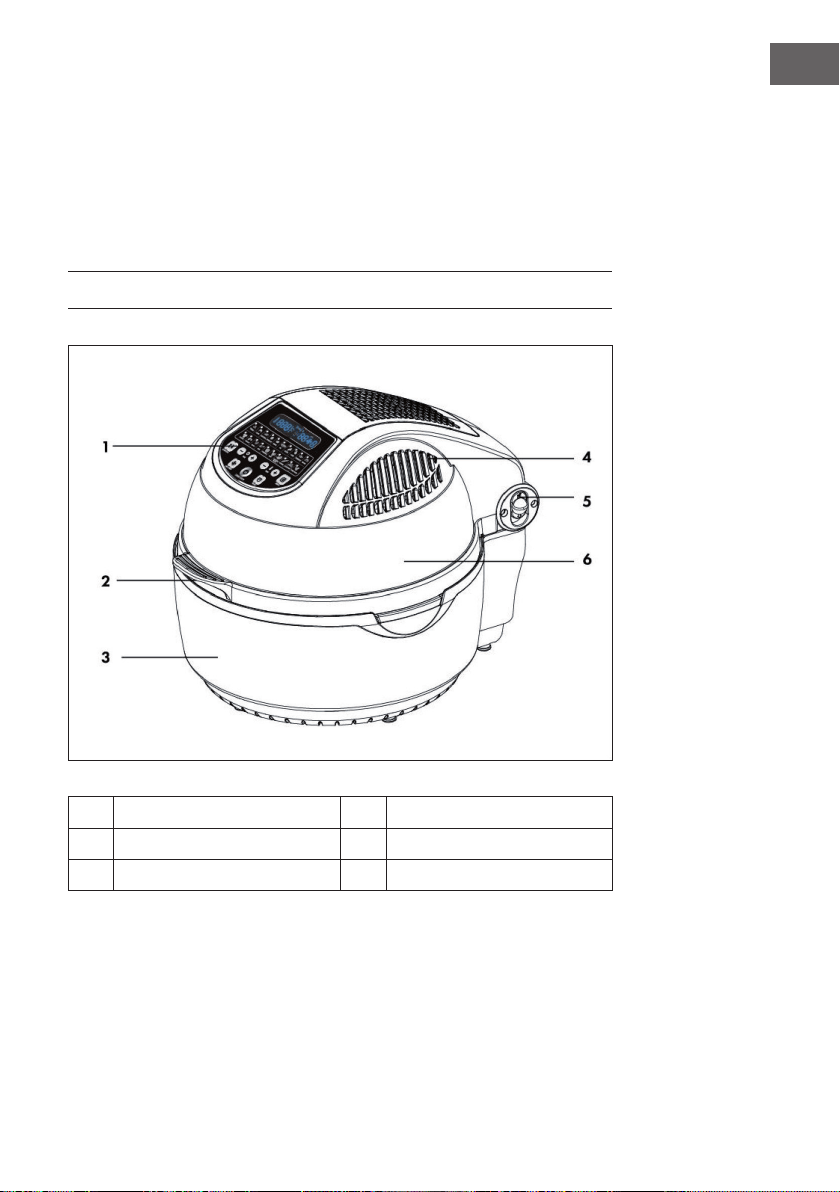
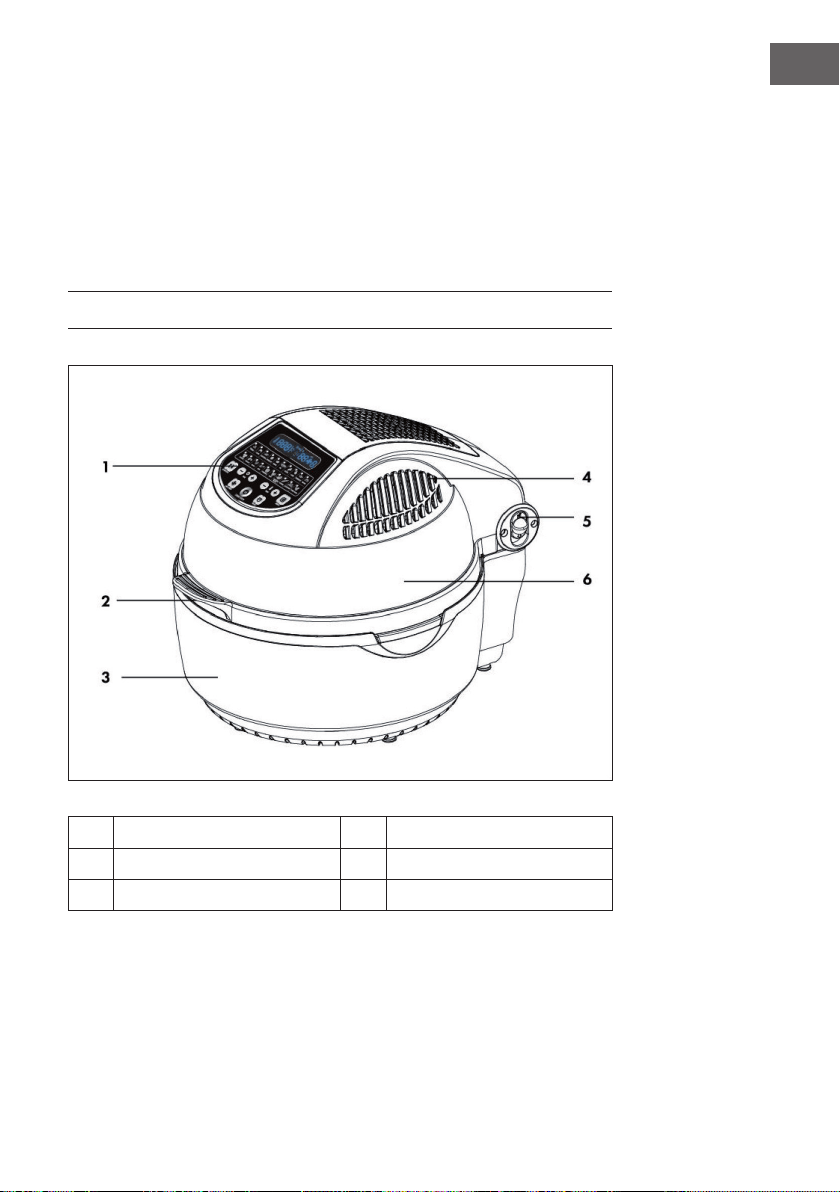
GERÄTEÜBERSICHT
1
Bedienfeld
4
Heißluftauslass
2
Abdeckungsgriff
5
Abdeckungsentriegelung
3
Gehäuse
6
Durchsichtige Abdeckung

6
DE
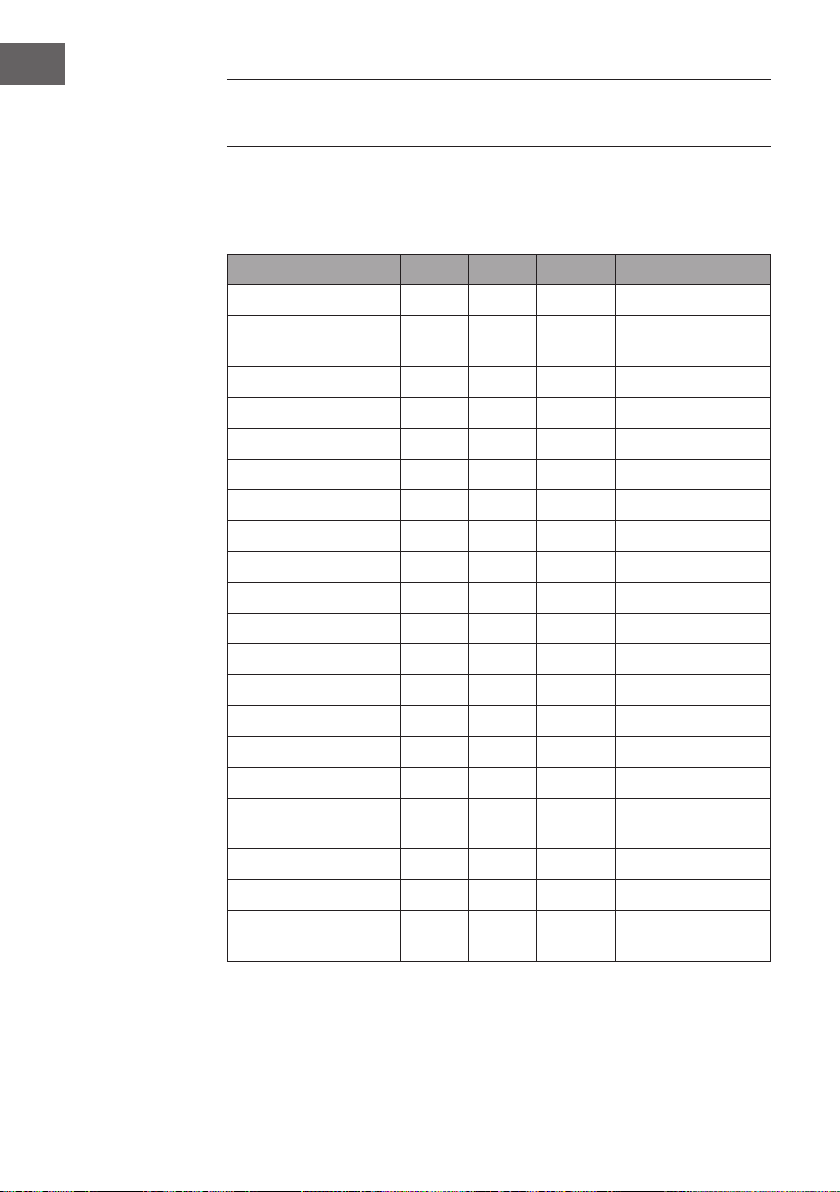
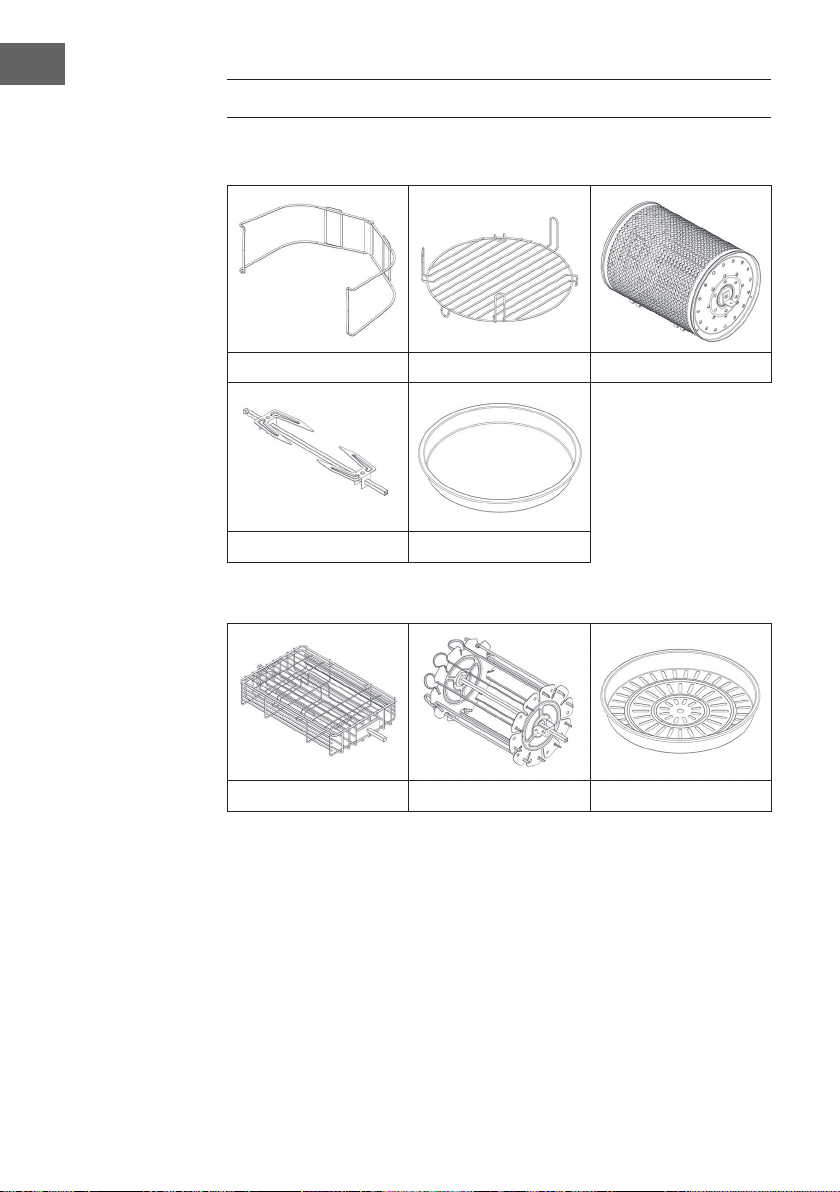
ZUBEHÖR
Im Lieferumfang enthalten
Zange Hohes/Tiefes Gitter Backkorb
Geügelgabel Frittierpfanne
Optionales erhältliches Zubehör (nicht im Lieferumfang enthalten)
Steakkorb Spießeinsatz Dampfgarer

7
DE
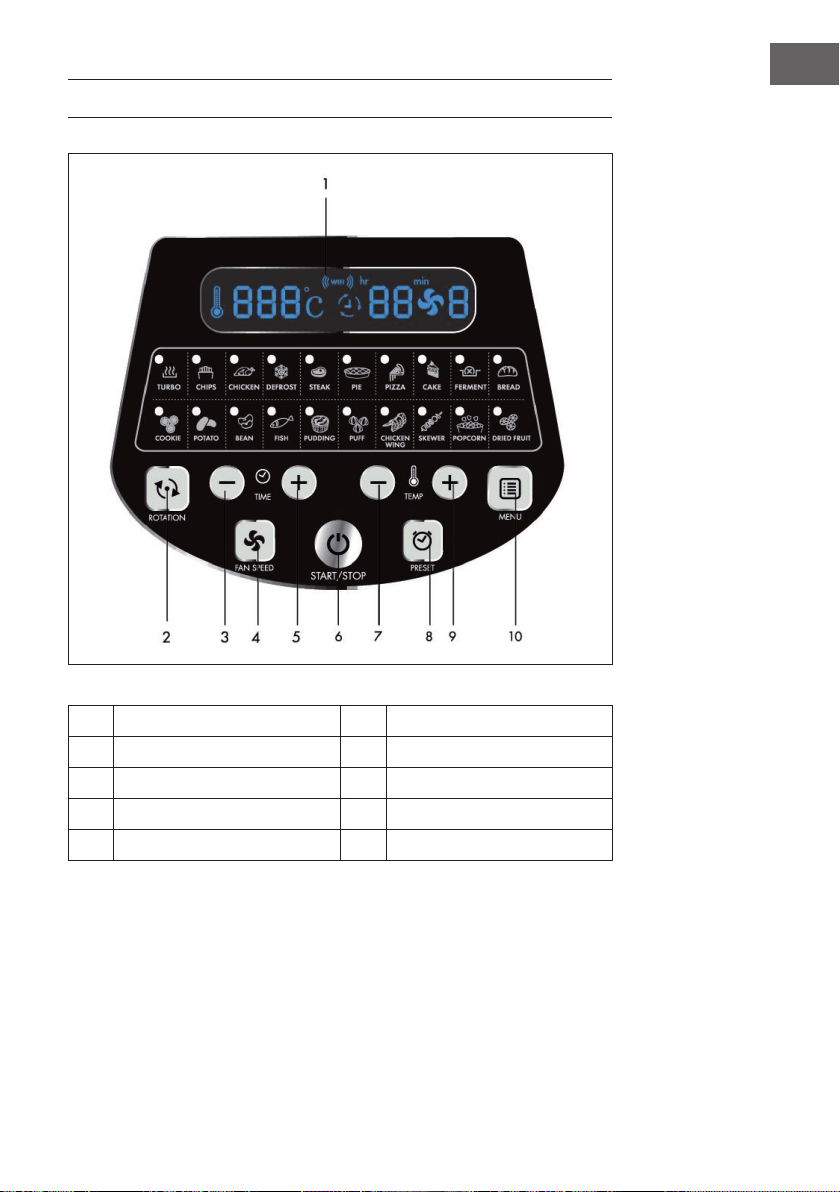
BEDIENFELD UND TASTEN
1
LED-Bildschirm 6 Ein-/Ausschalttaste
2
Rotationstaste 7 Temperatur (+)
3
Zeitanpassungstaste (+) 8 Speichertaste
4
Lüftertaste 9 Temperatur (-)
5
Zeitanpassungstaste (-) 10 Menütaste

8
DE
INBETRIEBNAHME UND BEDIENUNG
1
Ziehen Sie die Abdeckung am Abdeckungsgriff nach oben.
2
Geben Sie den Behälter, das Zubehör (falls notwendig) und die Lebensmittel,
die Sie zubereiten möchten hinein.
• Geben Sie, bei Verwendung des Gitters oder des Dampfgarers, etwas
Wasser in den Behälter.
• Wenn für den gewählten Modus die Rotation verfügbar ist, vergewissern
Sie sich, dass die Gabel richtig eingesetzt ist.
• Häufen Sie Lebensmittel nicht in der Nähe des Heizelements an, da es
sonst zu Verkohlung kommen kann.
3
Entriegeln Sie die Abdeckungsentriegelung und ziehen Sie die Abdeckung
zum Schließen herunter.
4
Stecken Sie den Netzstecker des Geräts in die Steckdose, das Gerät bendet
sich im Standby-Modus. Drücken Sie einmal auf die Taste Start/Stop, um das
Gerät einzuschalten.
5
Drücken Sie mehrmals auf die Taste MENU zur Auswahl des gewünschten
Modus. Die entsprechende Zeit und Temperatur wird auf dem LED-Bildschirm
angezeigt.
6
Die Zeit und die Temperatur können individuell angepasst werden. Wenn die
Zeit und die Temperatur eingestellt werden, kann das Gerät auch ohne die
Auswahl eines Modus verwendet werden.

9
DE
7
Drücken Sie zum Starten des Geräts die Taste Start/Stop.
8
Es kann vorkommen, dass das Heizelement aussetzt, wenn eine bestimmte
Temperatur erreicht wurde. Wenn die Temperatur abfällt, schaltet sich das
Heizelement automatisch wieder ein. Dieser Vorgang wiederholt sich so lange,
bis die von Ihnen eingestellte Zeit abgelaufen ist.
9
Wenn Sie während der Zubereitung weitere Lebensmittel hinzufügen möchten,
entriegeln Sie die Abdeckungsentriegelung und ziehen Sie die Abdeckung
am Abdeckungsgriff nach oben. Das Gerät hört dann augenblicklich auf zu
Heizen (aber die Rotation wird fortgesetzt). Schließen Sie die Abdeckung
nach dem Hinzufügen der zusätzlichen Lebensmittel wieder und die
Zubereitung wird automatisch fortgesetzt.
10
Das Gerät gibt ein Geräusch von sich, wenn die von Ihnen eingestellte
Zubereitungszeit abgelaufen ist. Schalten Sie das Gerät aus, ziehen Sie den
Netzstecker aus der Steckdose und entnehmen Sie die Lebensmittel. Lassen
Sie beim Umgang mit heißem Zubehör Vorsicht walten, um Verbrennungen
zu vermeiden. Legen Sie die Abdeckung und den heißen Behälter auf
einen Topfuntersetzer, um Schäden am Tisch oder der Arbeitsoberäche zu
vermeiden.
10
DE
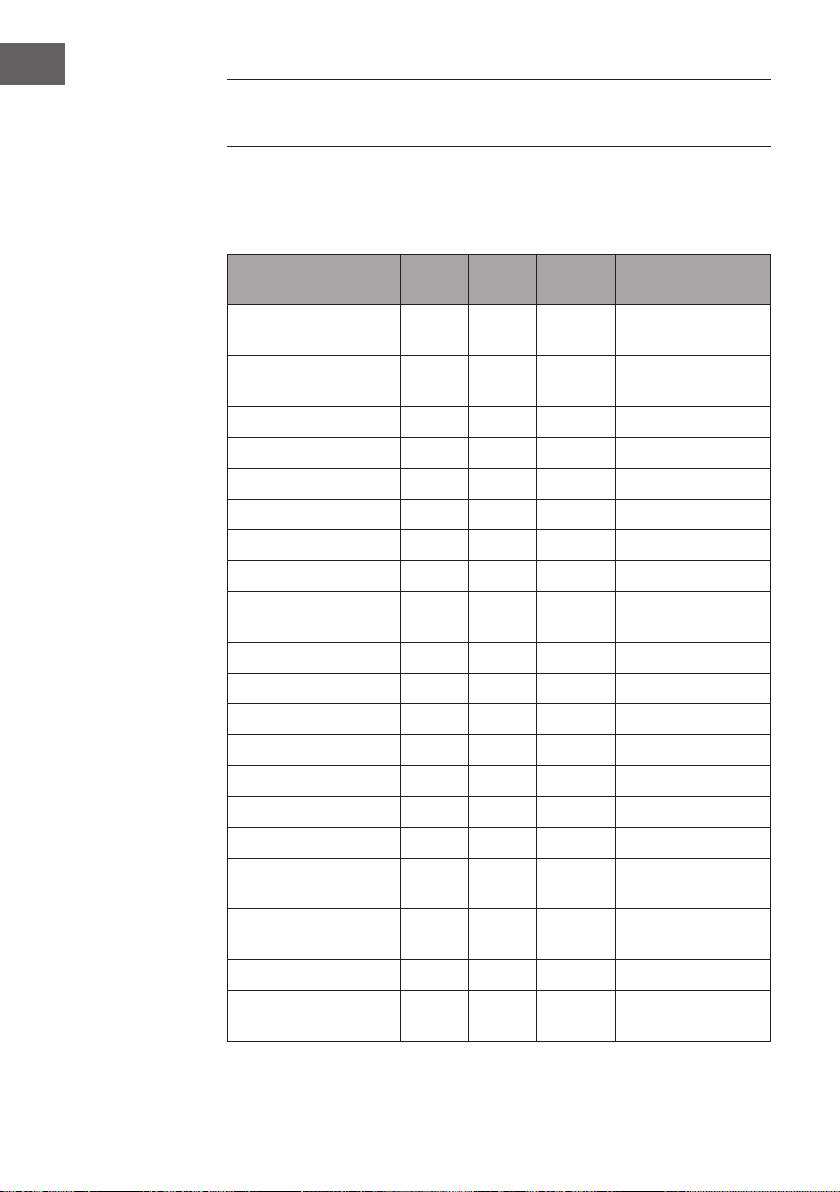
EMPFOHLENE EINSTELLUNGEN FÜR
VERSCHIEDENE MODI
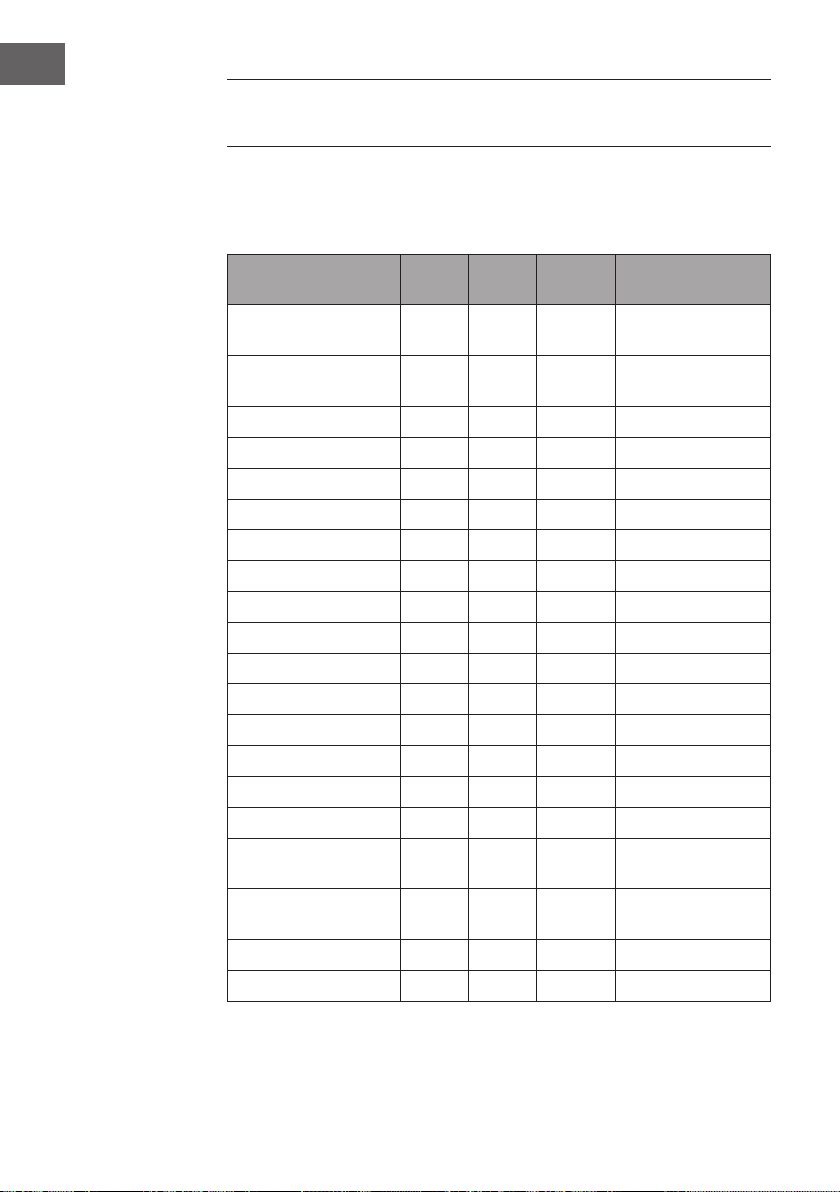
Achten Sie darauf, dass das Gesamtgewicht der verwendeten Lebensmittel 5 kg nicht
überschreitet. Alle Modi sind werksseitig so eingestellt, dass sie mit Rotation verwendet
werden. Drücken Sie zum Deaktivieren der Rotation einmal auf die Rotationstaste.
Modus °C Minuten Lüfterstufe Zubehör
Turbo 250 5 3 Alle Teile möglich
Chips (Pommes) 250 25 3 Backkorb/
Spießeinsatz
Chicken (Huhn) 240 30 2 Geügelgabel
Drefrost (Auftauen) 60 20 3 Alles
Steak 230 12 3 Steakkorb
Pie (Pastete) 180 25 3 Frittierpfanne
Pizza 210 12 3 Frittierpfanne
Cake (Kuchen) 180 45 1 Frittierpfanne
Ferment (Hefeteig) 30 50 1 Frittierpfanne
Bread (Brot) 190 23 2 Frittierpfanne
Cookie (Keks) 190 10 3 Frittierpfanne
Potato (Kartoffel) 160 45 3 Frittierpfanne
Bean (Bohnen) 230 10 3 Backkorb
Fish (Fisch) 230 15 3 Steakkorb
Pudding 180 25 1 Gitter
Puff (Blätterteig) 210 25 2 Gitter
Chicken Wings 240 15 3 Backkorb/
Spießeinsatz
Skewer (Fleischspieß) 230 15 2 Spießeinsatz
Popcorn 250 8 3 Backkorb
Dried Fruit
(Trockenfrüchte)
100 60 3 Frittierpfanne
11
DE
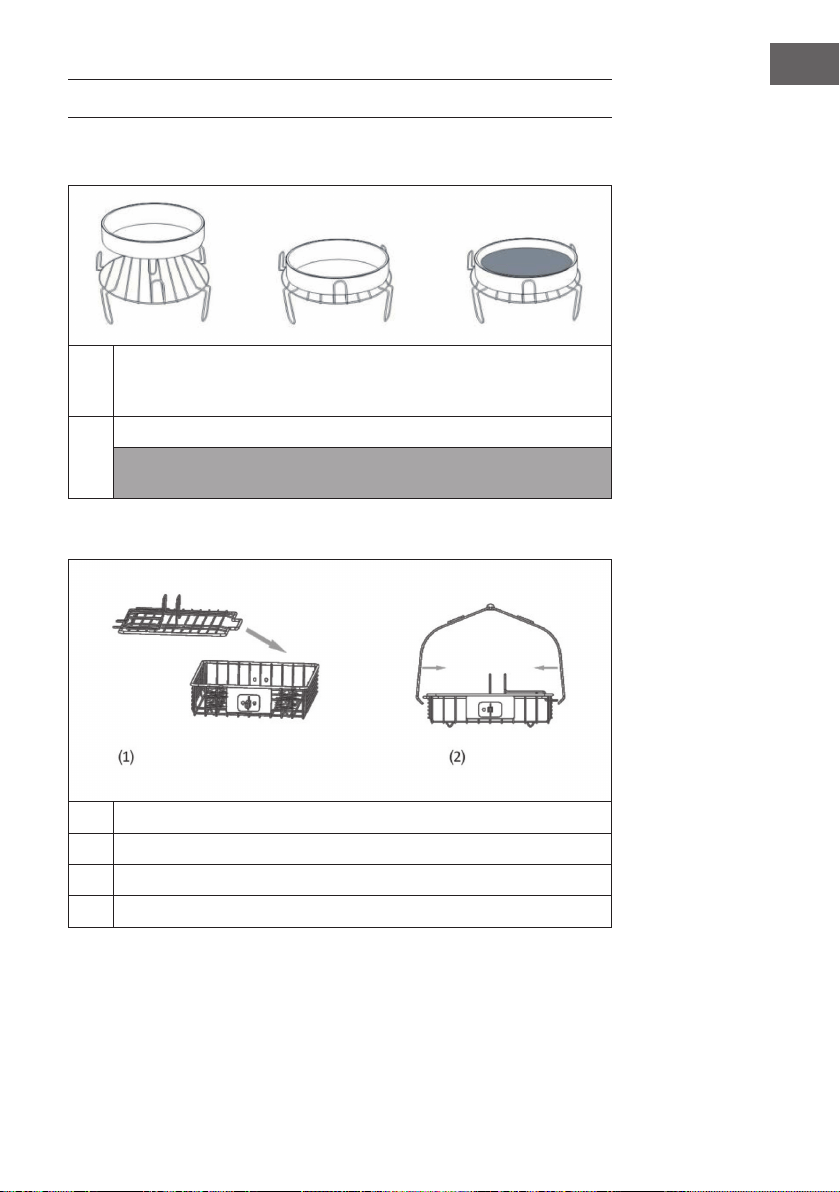
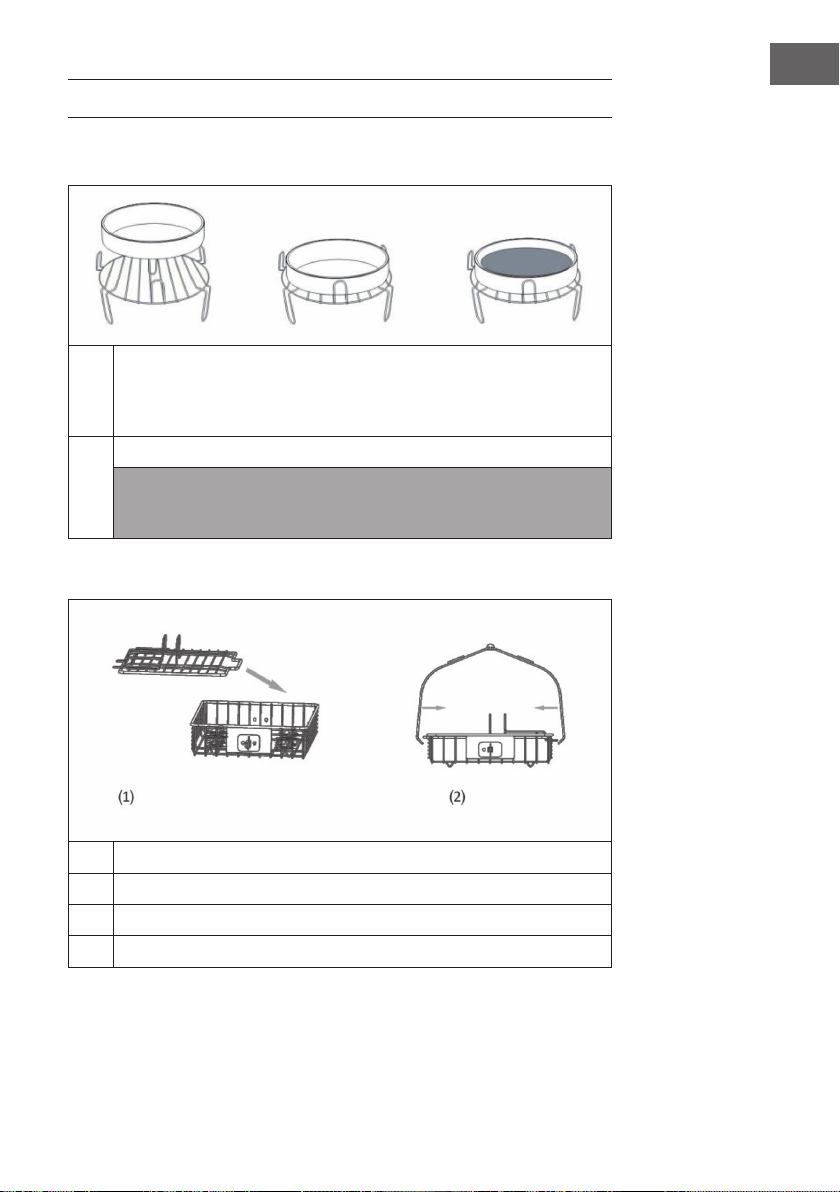
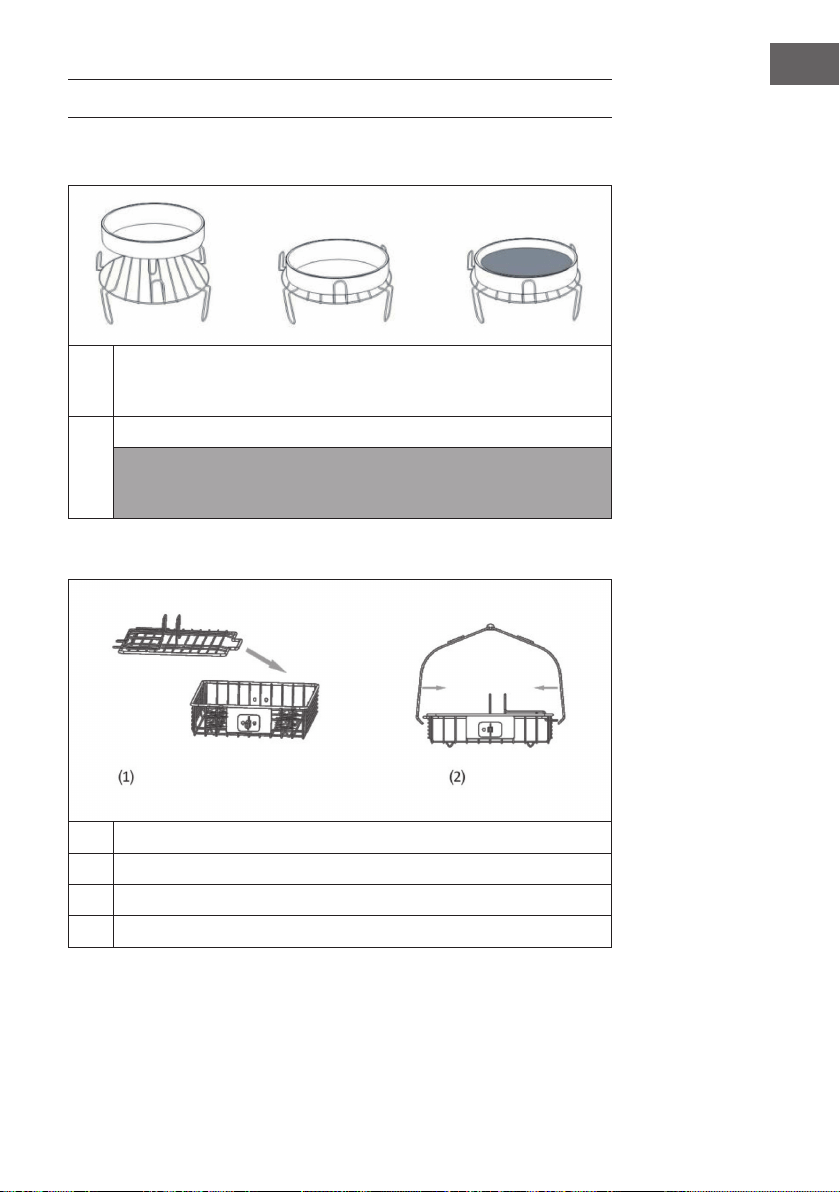
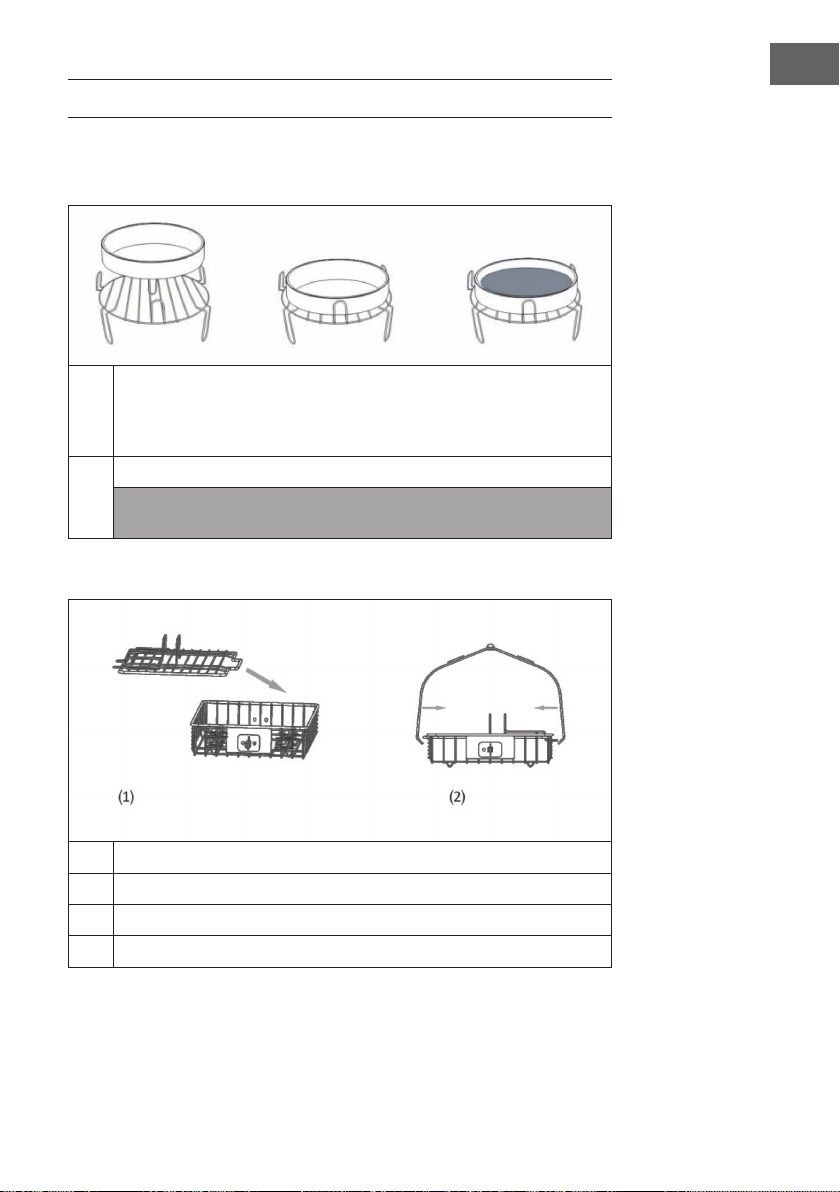
VERWENDUNG DES ZUBEHÖRS
Gitter | Frittierpfanne | Dampfgarer (nicht im Lieferumfang enthalten)
1
Legen Sie das Gitter in den Behälter. Legen Sie die Lebensmittel direkt auf das
Gitter oder platzieren Sie den Dampfgarer oder die Frittierpfanne auf dem
Gitter, legen Sie die Lebensmittel dort hinein, wählen Sie eine Funktion aus
und starten Sie das Gerät.
2
Wählen Sie die von Ihnen gewünschte Funktion aus. Drücken Sie die Taste
Start/Stop.
Hinweis: Benutzen Sie zur Entnahme des Zubehörs und der Lebensmittel die
Lebensmittelzange. Legen Sie die Lebensmittel nicht direkt in den Behälter, um
sicherzustellen, dass sie vollständig erhitzt werden.
Steakkorb (nicht im Lieferumfang enthalten)
1
Nehmen Sie die Abdeckung ab.
2
Platzieren Sie die Lebensmittel in dem Steakkorb und schließen Sie die
Abdeckung.
3
Stecken Sie die Stange in den Steakkorb.
4
Wählen Sie die von Ihnen gewünschte Funktion aus und drücken Sie die Taste
Start/Stop.

12
DE
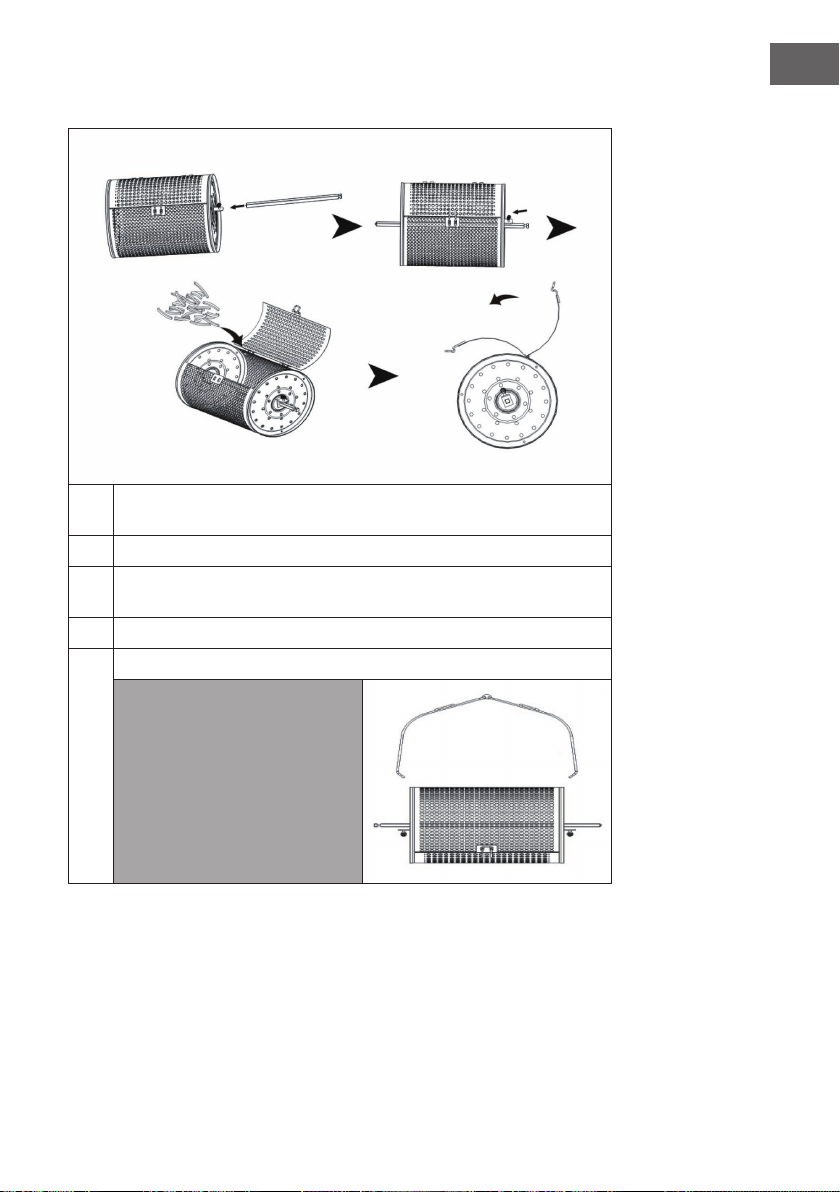
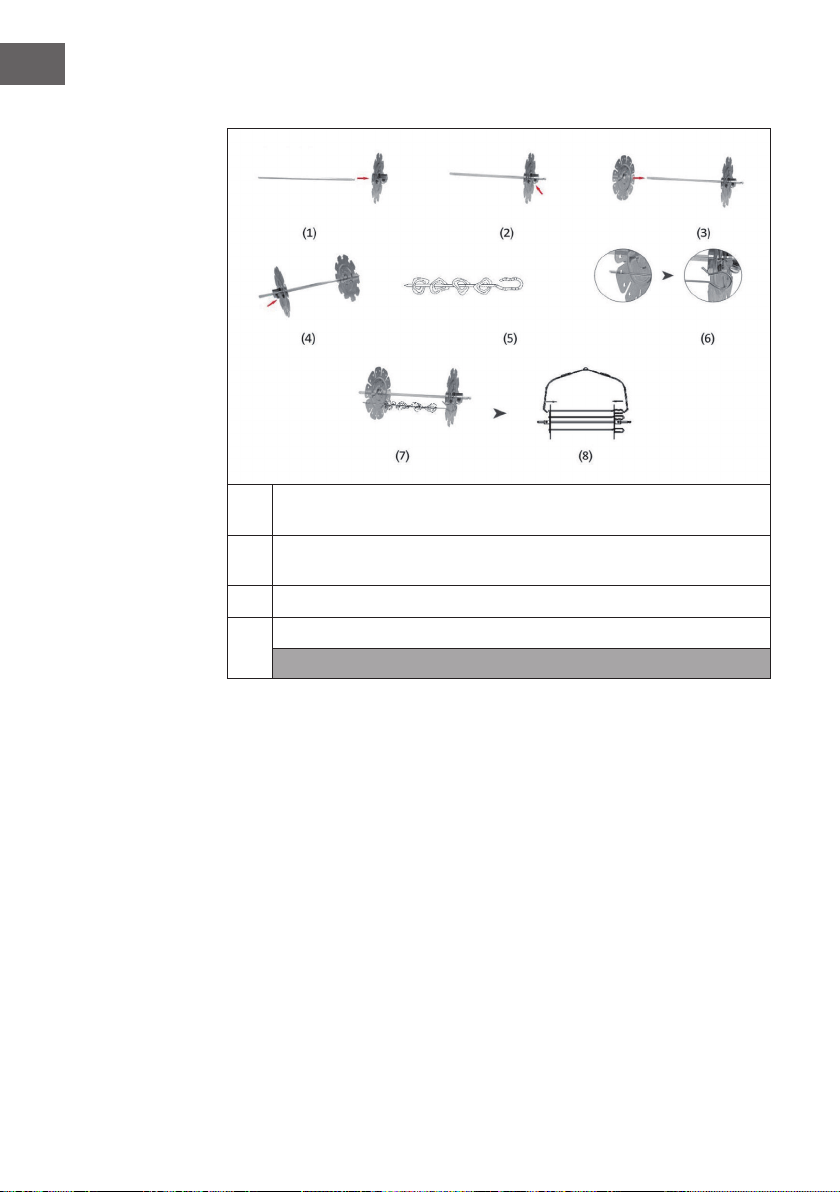
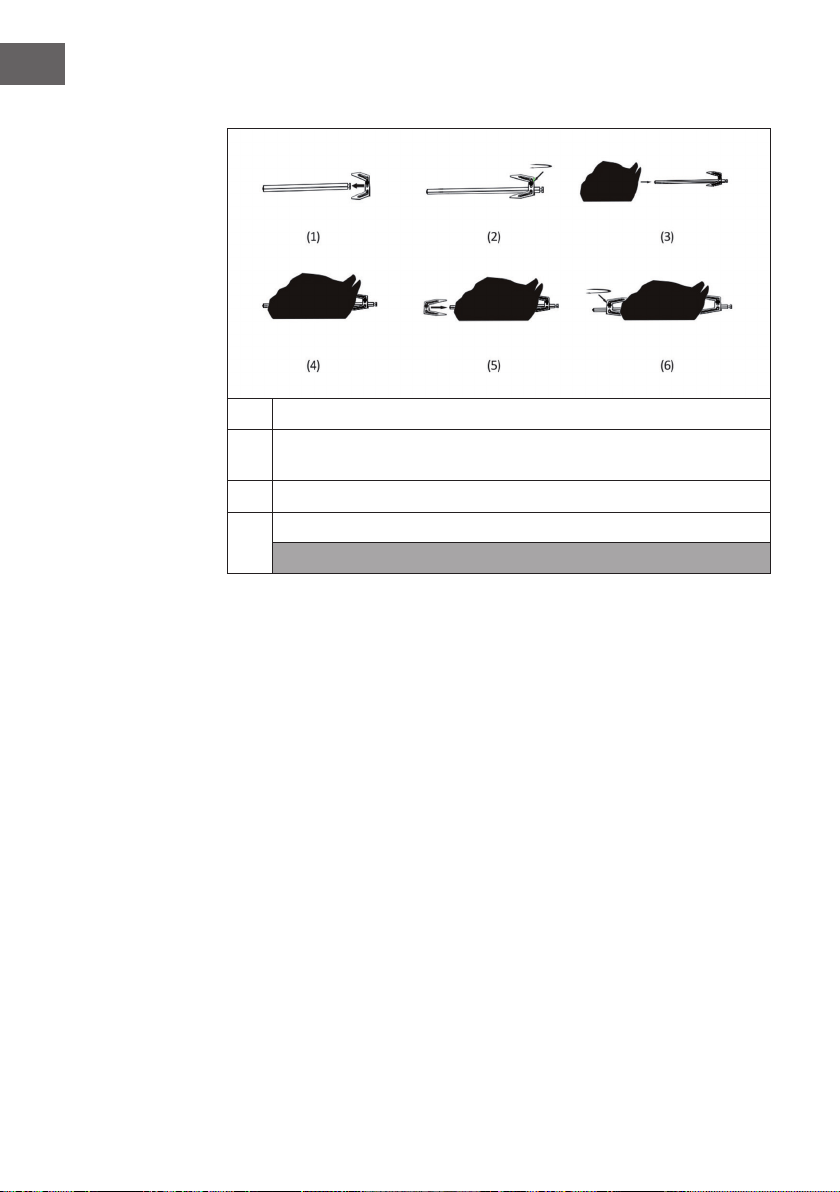
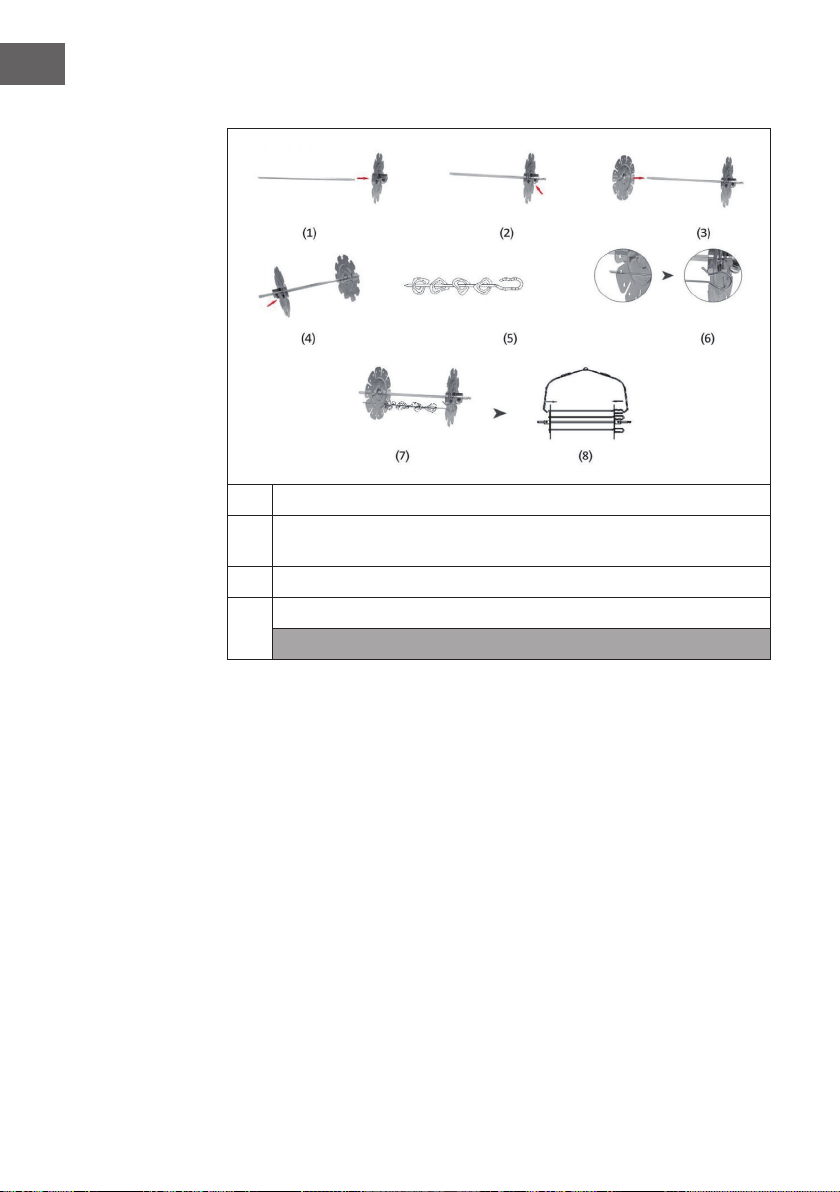
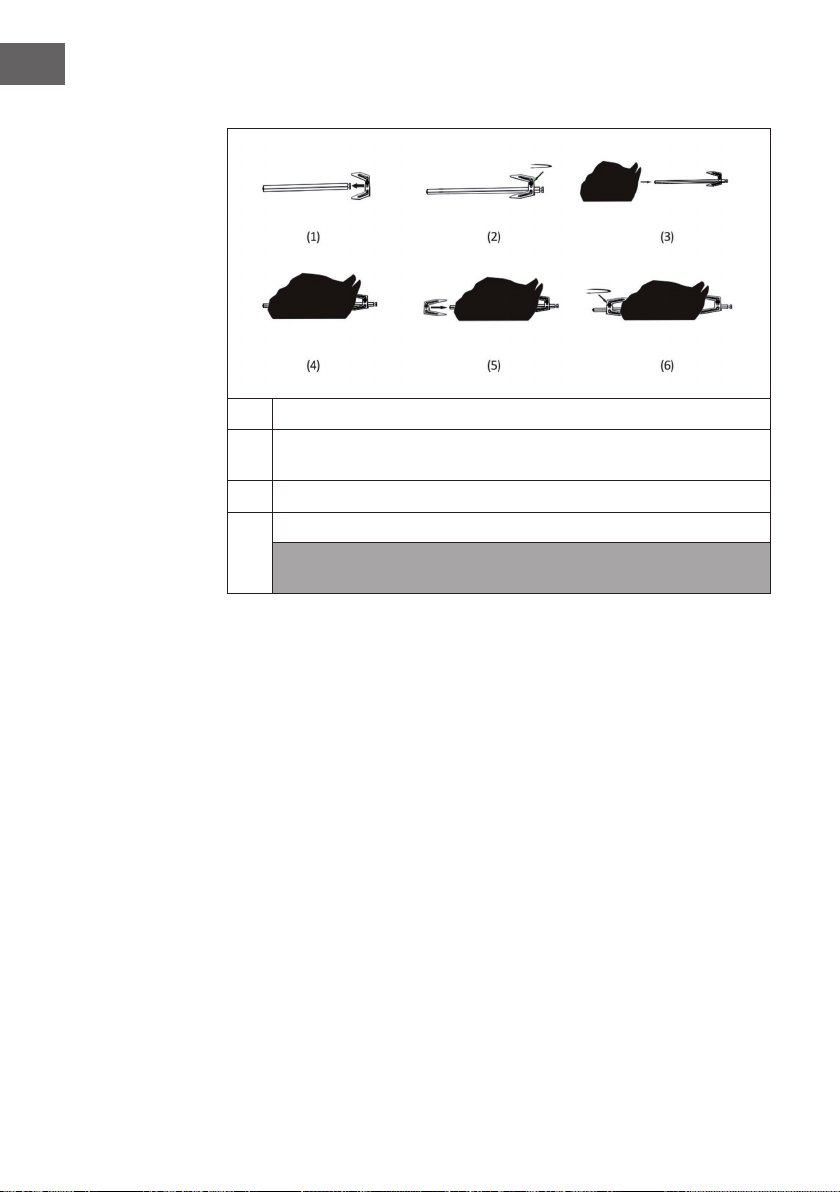
Geügelgabel
1
Setzen Sie eine Spitze auf die Gabel. Fixieren Sie diese mit einer Schraube.
2
Stecken Sie von der anderen Seite ein Huhn auf. Setzen Sie anschließend zur
sicheren Fixierung des Huhns eine weitere Spitze auf die Gabel.
3
Fügen Sie die Stange in das Loch des Behälters ein.
4
Wählen Sie die Funktion „Roast“ aus und drücken Sie die Taste Start/Stop.
Hinweis: Benutzen Sie zur Entnahme des Zubehörs und der Lebensmittel die
Lebensmittelzange.
13
DE
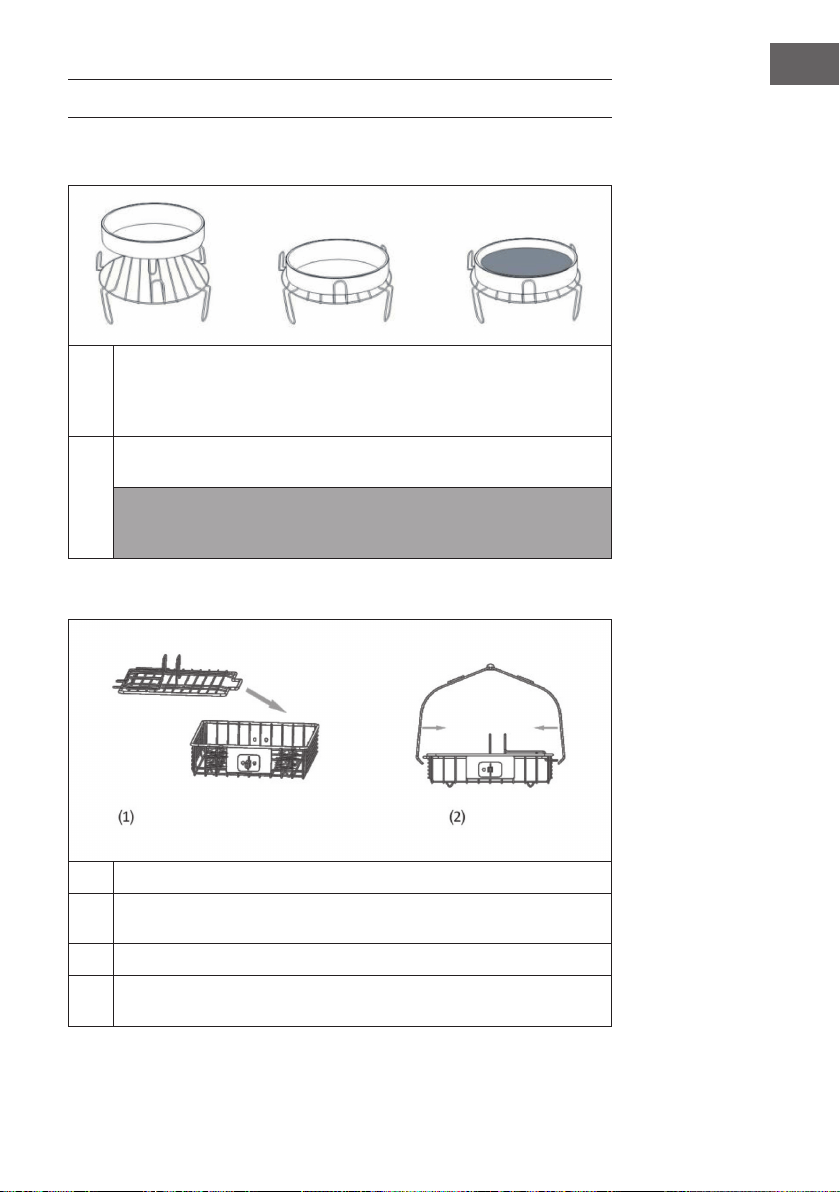
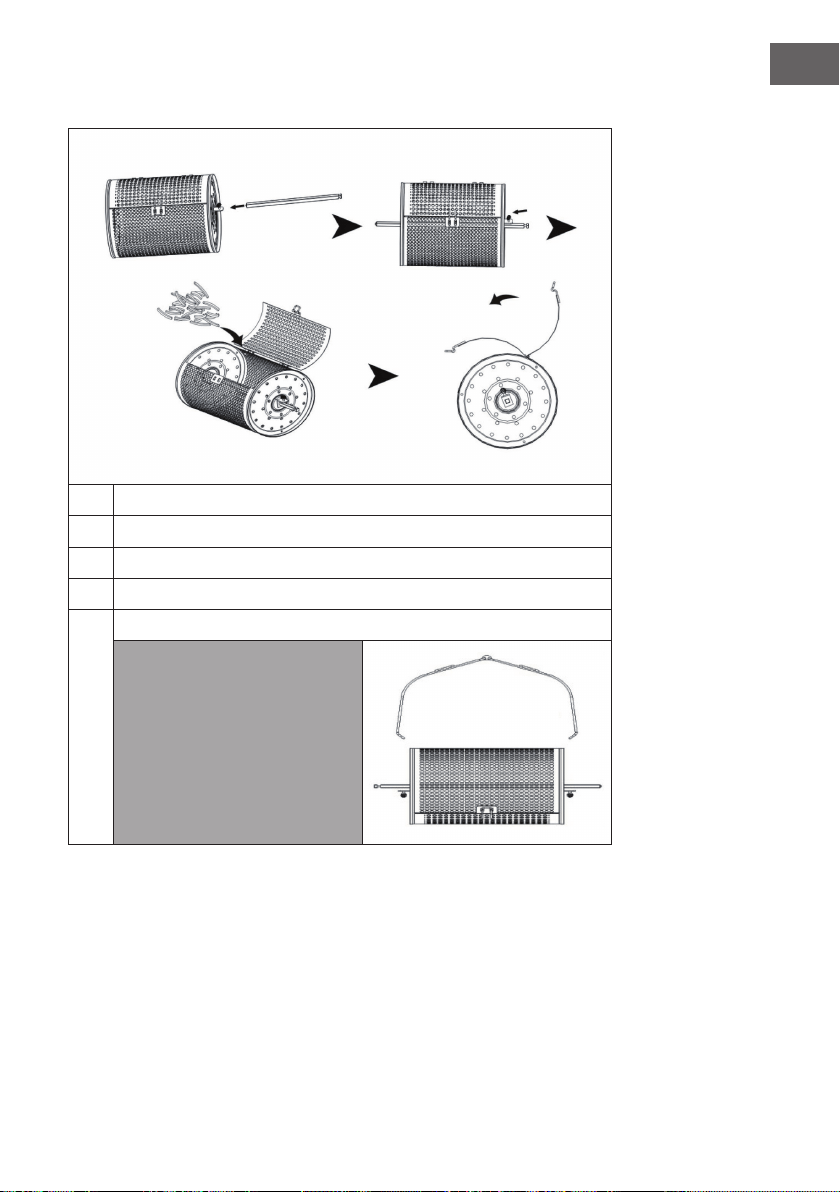
Backkorb
1
Setzen Sie die Stange in den Backkorb ein. Fixieren Sie diese fest mit einer
Schraube.
2
Öffnen Sie die Abdeckung des Backkorbs.
3
Geben Sie die Lebensmittel in den Backkorb und schließen Sie die
Abdeckung.
4
Fügen Sie die Stange in das Loch des Behälters ein.
5
Wählen Sie die Funktion „Deep fry“ aus und drücken Sie die Taste Start/Stop.
Hinweis: Benutzen Sie zur
Entnahme des Zubehörs
und der Lebensmittel die
Lebensmittelzange.
14
DE
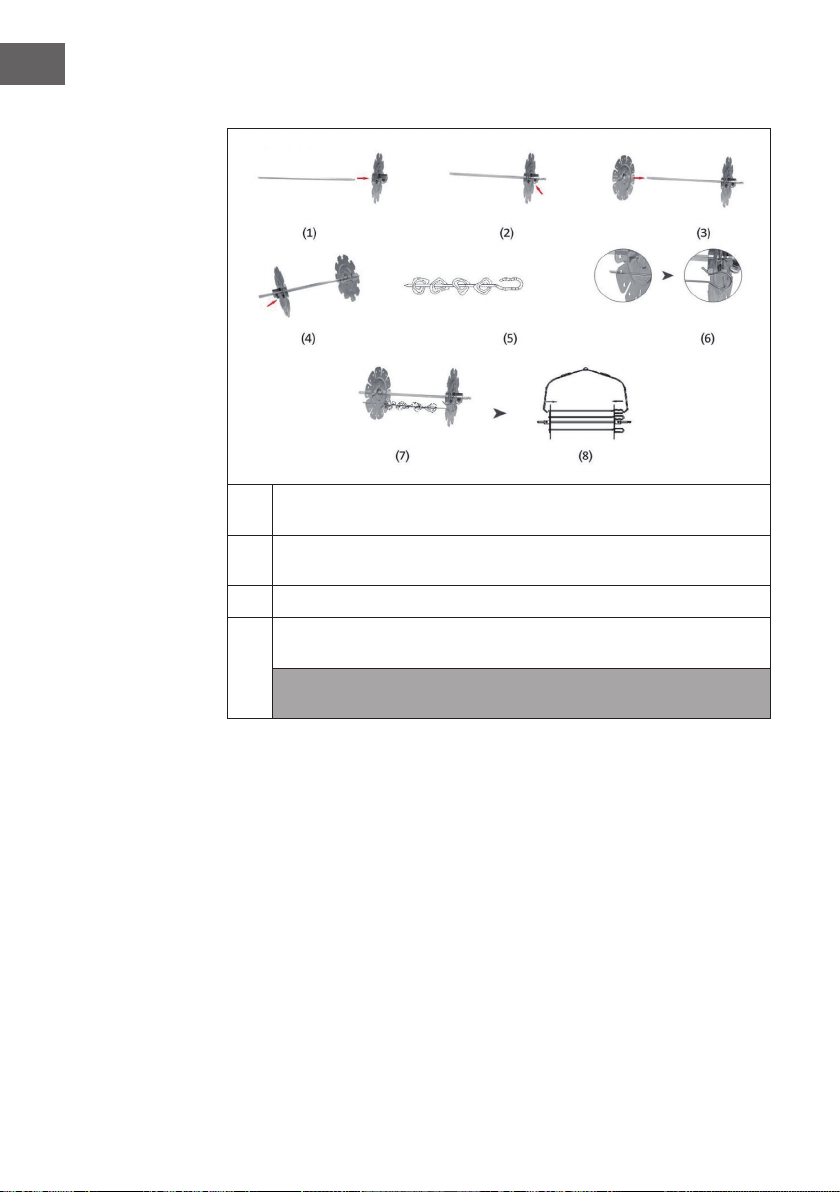
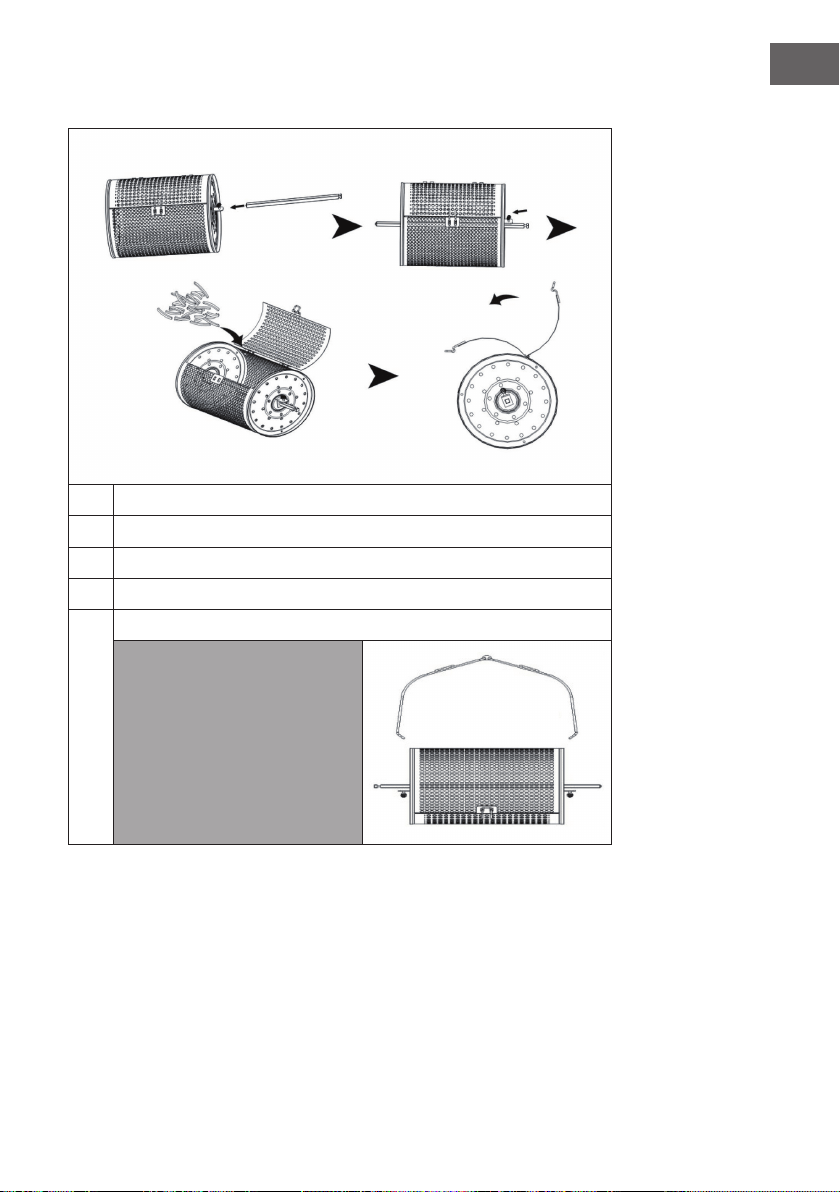
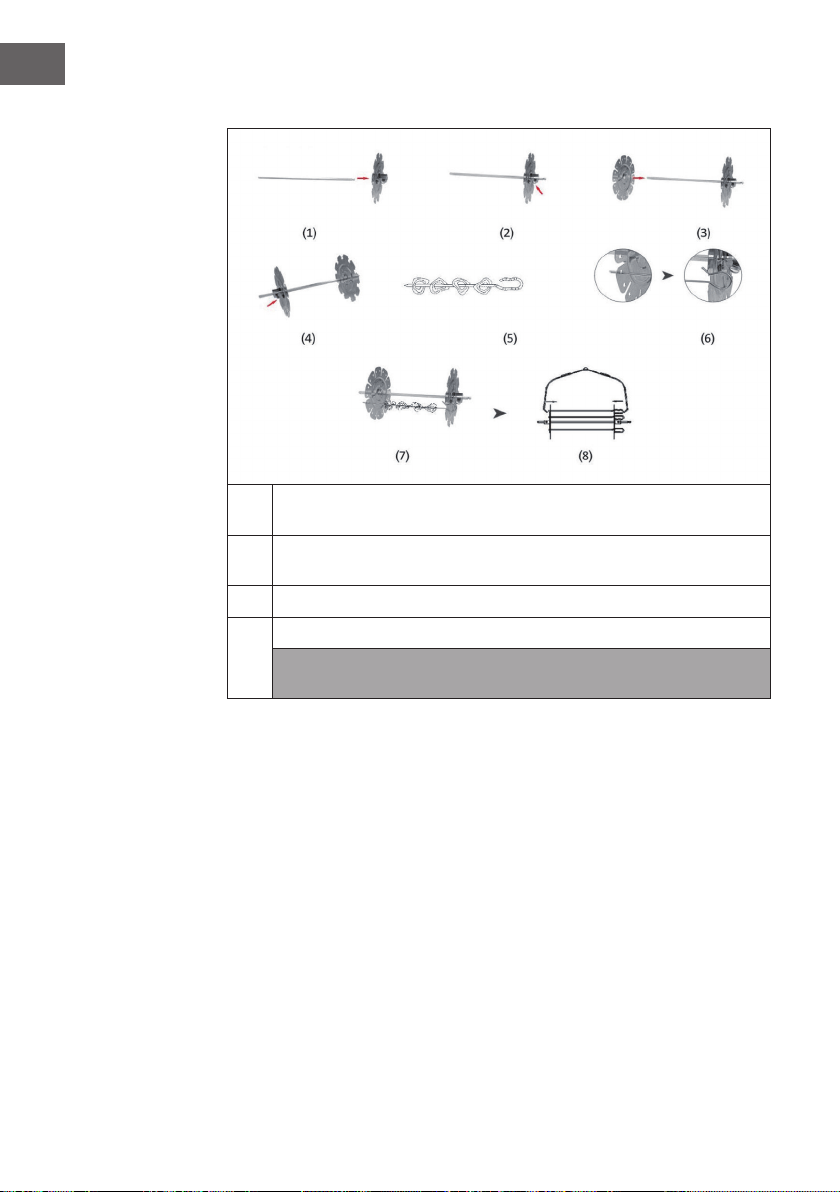
Spießeinsatz (nicht im Lieferumfang enthalten)
1
Stecken Sie die Aufsätze auf beide Seiten der Stange und xieren Sie diese
jeweils mit einer Schraube.
2
Stecken Sie Lebensmittel auf die Stäbe und stecken Sie die Enden der Stäbe
jeweils in die Löcher der Aufsätze.
3
Fixieren Sie den Spießeinsatz am Behälter.
4
Wählen Sie die von Ihnen gewünschte Funktion aus und drücken Sie die Taste
Start/Stop.
Hinweis: Benutzen Sie zur Entnahme des Zubehörs und der Lebensmittel die
Lebensmittelzange.
15
DE
GERÄTESTEUERUNG PER SMARTPHONE
Wenn Sie Ihr Klarstein-Gerät in Ihr heimisches WLAN einbinden, können Sie es ganz
bequem über die dazugehörige Klarstein-App bedienen. Die App ermöglicht es Ihnen
nicht nur das Gerät über Ihr Smartphone fernzusteuern, sondern bietet Ihnen zudem
Zugang zu Rezepten und weiterführenden Informationen.
Gehen Sie folgendermaßen vor, um Ihr Smartphone mit Ihrem Klarstein-Gerät zu
verbinden:
1 Laden Sie zuerst die Klarstein-App herunter, indem Sie mit Ihrem Smartphone den
QR-Code sannen (siehe unten) oder laden Sie diese direkt aus dem App Store oder
bei Google Play herunter.
2 Versichern Sie sich, dass Ihr Smartphone mit dem selben WLAN-Netzwerk
verbunden ist, mit dem Ihr Klarstein-Gerät verbunden werden soll.
3 Öffnen Sie die Klarstein-App.
4 Melden Sie sich mit Ihrem Konto an. Wenn Sie noch keinen Account haben,
registrieren Sie sich in der Klarstein-App.
5 Folgen Sie den Anweisungen der App.
App-Download
Verwenden Sie die Scan-Funktion Ihres Handys, um den QR-Code zu scannen und
speichern Sie die App auf Ihrem Smartphone.
Hinweis: Weitere Hinweise zur Bedienung der App und Hilfestellungen zur
Herstellung der Verbindung mit Ihrem Gerät liefert Ihnen die App, sobald Sie sie das
erste Mal öffnen.
iOS Android

16
DE
Fehlerbebung bei Verbindungsproblemen
Wenn Ihr Klarstein-Gerät im WLAN nicht gefunden werden kann, überprüfen Sie
folgendes:
• Ist das Gerät eingesteckt?
• Ist die WLAN-Funktion des Smartphones aktiviert?
• Ist die WLAN-Funktion des Klarstein-Gerätes aktiviert? (Befolgen Sie die
Anweisungen in der App)
• Ist das WLAN-Passwort korrekt eingegeben worden?
• Benden sich Router, Klarstein-Gerät und Smartphone während des
Kopplungsversuches in unmittelbarer Nähe? (Idealerweise nicht mehr als 5 m
voneinander entfernt)
• Falls sie in den Einstellungen ihres WLAN-Routers das 2,4 GHz Band deaktiviert
haben, aktivieren Sie dieses in Ihren Routereinstellungen.
Hinweis: Für weitere Hilfestellungen folgen Sie den Anweisungen der App beim
Verbindungsaufbau.

17
DE
REINIGUNG UND PFLEGE
• Ziehen Sie den Stecker aus der Steckdose und lassen Sie das Gerät mindestens
30Minuten lang abkühlen.
• Entfernen Sie das Zubehör.
• Reinigen Sie das Gerät nach jedem Gebrauch. Reinigen Sie das Zubehör und
die Innenseite des Gerätes nicht mit spitzen oder scharfen Küchenutensilien oder
Scheuermittel, da diese die Beschichtung beschädigen.
• Wischen Sie die Außenseite des Gerätes mit einem feuchten Tuch ab.
• Reinigen Sie das Zubehör mit heißem Wasser, etwas Geschirrspülmittel und einem
nicht scheuernden Schwamm.
• Entfernen Sie hartnäckige Fettrückstände mit einer Entfettungsüssigkeit.
• Reinigen Sie das Innere des Gerätes mit einem nicht scheuernden Schwamm.
• Reinigen Sie das Heizelement mit einer Reinigungsbürste, um
Lebensmittelrückstände zu entfernen.
• Wenn Sie das Gerät länger nicht benutzen, reinigen Sie es, bevor Sie es verstauen.

18
DE
HINWEISE ZUR ENTSORGUNG
Wenn es in Ihrem Land eine gesetzliche Regelung zur
Entsorgung von elektrischen und elektronischen Geräten
gibt, weist dieses Symbol auf dem Produkt oder auf der
Verpackung darauf hin, dass dieses Produkt nicht im
Hausmüll entsorgt werden darf. Stattdessen muss es zu
einer Sammelstelle für das Recycling von elektrischen
und elektronischen Geräten gebracht werden. Durch
regelkonforme Entsorgung schützen Sie die Umwelt und die
Gesundheit Ihrer Mitmenschen vor negativen Konsequenzen.
Informationen zum Recycling und zur Entsorgung dieses
Produkts, erhalten Sie von Ihrer örtlichen Verwaltung oder
Ihrem Hausmüllentsorgungsdienst.
KONFORMITÄTSERKLÄRUNG
Hersteller:
Chal-Tec GmbH, Wallstraße 16, 10179 Berlin, Deutschland.
Importeur für Großbritannien:
Chal-Tec UK limited
Unit 6 Riverside Business Centre
Brighton Road
Shoreham-by-Sea
BN43 6RE
United Kingdom
Die vollständige Konformitätserklärung des Herstellers nden
Sie unter folgendem Link: use.berlin/10035590
19
EN
Dear Customer,
Congratulations on purchasing this device. Please read the
following instructions carefully and follow them to prevent
possible damages. We assume no liability for damage caused
by disregard of the instructions and improper use. Scan the QR
code to get access to the latest user manual and more product
information.
CONTENT
Safety Instructions20
Device Overview21
Accessories22
Control Panel and Buttons23
Getting Started24
Recommended Settings for Different Modes26
Using the Accessories27
Device Control by Smartphone31
Cleaning and Care33
Disposal Considerations34
Declaration of Conformity34
TECHNICAL DATA
Item number 10035590, 10035591, 10035592
Power supply 220-240 V ~ 50/60 Hz
Power 1200-1400 W
Capacity (cooking space) 10 L
Adjustable temperature 30-250 °C
WiFi standard
802.11 b/g/n
WiFi frequency
2,4 GHz
WiFi radio-frequency power (max.)
20 dBm

20
EN
SAFETY INSTRUCTIONS
Read the operating instructions carefully before using the device. The following safety
instructions should always be followed when using electrical equipment:
• Before using for the rst time, check that the voltage of your power outlet matches
the specied voltage.
• To avoid electric shock, do not immerse the power cord or the device itself in water
or other liquids.
• Keep children and pets away from the device during operation.
• After use, switch off the appliance and disconnect the mains plug from the socket.
• The unit should be operated separately from other units on a separate circuit. If the
circuit is overloaded by other devices, this device may not work properly.
• Take extreme care when moving a container containing hot food.
• Do not let the power cord hang over the edge of tables or work surfaces, and be
careful not to allow the power cord to come into contact with the hot surfaces of the
equipment.
• Always place the unit securely in the center of the table or worktop.
• Do not touch hot device surfaces. Use the handles to move or lift.
• The device must not be used by children.
• Use of accessories not expressly recommended by the manufacturer may result in
injury.
• Do not place or use the unit on heat-sensitive glass surfaces, wooden surfaces or
tablecloths. Be sure to place a heat-resistant plate with thermal protection under the
unit on these surfaces.
• Never use the device if the power cord is damaged, if the device malfunctions or
has been damaged in any other way.
• Before cleaning or when not in use, switch off the device and disconnect the power
plug from the socket. Allow the device to cool down before removing or adding
any parts.
• Do not place the device in the immediate vicinity of hot gas or electric ovens or in a
heated oven.
• If the power plug does not t properly, always contact a qualied electrician to
minimize the potential for electrical shock. Never try to manipulate the power plug
in any way.
21
EN
• Do not clean the device with metallic scouring pads. Small metal parts could break
off and short out the electrical components of the device, which could result in
electric shock or damage the device.
• To minimize the risk of electric shock, only prepare food in the supplied, coated,
non-stick container.
• This device is designed for indoor use only.
• Use the device only for its intended purpose.
• Keep this manual for future reference.
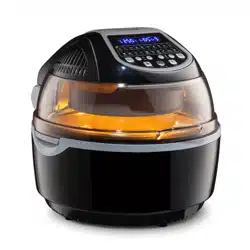
DEVICE OVERVIEW
1
Control panel
4
Hot air vent
2
Lid handle
5
Lid release
3
Housing
6
Transparent lid

22
EN
ACCESSORIES
Included with delivery
Tongs High / low grate Baking basket
Poultry fork Frying pan
Optionally available accessories (not included with delivery)
Steak basket Skewer insert Steamer
23
EN
CONTROL PANEL AND BUTTONS
1
LED screen 6 ON / OFF button
2
Rotation button 7 Temperature (+)
3
Time adjustment button (+) 8 Memory button
4
Fan button 9 Temperature (-)
5
Time adjustment button (-) 10 Menu key

24
EN
GETTING STARTED
1
Pull the lid upwards using the lid handle.
2
Add the container, the accessories (if necessary) and the food you want to
prepare.
• When using the grate or steamer, pour some water into the container.
• If rotation is available for the selected mode, make sure the fork is
properly seated.
• Do not amass food close to the heating element, otherwise charring may
occur
3
Unlock the lid release and pull the lid down to close.
4
Plug the appliance into the mains socket, which will put the appliance in
standby mode. Press the Start / Stop button once to turn the unit on.
5
Press the MENU button repeatedly to select the desired mode. The
corresponding time and temperature will be displayed on the LED screen.
6
Time and temperature can be customized. When the time and temperature are
set, the unit may be used without selecting a mode.

25
EN
7
Press the Start / Stop button to start the device.
8
The heating element may stop when a certain temperature has been reached.
When the temperature drops, the heating element will automatically switch on
again. This process will repeat until the time you set has elapsed.
9
If you want to add more food during cooking, unlock the lid release and pull
the lid upwards using the lid handle. The unit will then stop heating immediately
(but rotation will continue). Close the lid after adding the extra food and the
cooking will continue automatically.
10
The appliance will make a noise when the cooking time you have set has
elapsed. Turn off the device, disconnect the power plug from the power
outlet and remove the food. To avoid burns, use caution when handling hot
accessories. Place the lid and hot container on a pot stand to prevent damage
to the table or work surface.
26
EN
RECOMMENDED SETTINGS FOR
DIFFERENT MODES
Make sure that the total weight of the food used does not exceed 5 kg. All modes are
factory set to be used with rotation. Press the rotate button once to disable rotation.
Mode °C Minutes Fan Level Accessories
Turbo 250 5 3 All pieces possible
Chips 250 25 3 Baking basket /
skewer insert
Chicken 240 30 2 Poultry fork
Defrost 60 20 3 All
Steak 230 12 3 Steak basket
Pie 180 25 3 Frying pan
Pizza 210 12 3 Frying pan
Cake 180 45 1 Frying pan
Ferment 30 50 1 Frying pan
Bread 190 23 2 Frying pan
Cookie 190 10 3 Frying pan
Potato 160 45 3 Frying pan
Bean 230 10 3 Baking basket
Fish 230 15 3 Steak basket
Pudding 180 25 1 grate
Puff pastry 210 25 2 grate
Chicken wings 240 15 3 Baking basket /
skewer insert
Skewer 230 15 2 Skewer insert
Popcorn 250 8 3 Baking basket
Dried fruit 100 60 3 Frying pan
27
EN
USING THE ACCESSORIES
Grate | Frying pan | Steamer (not included with delivery)
1
Place the grate in the container. Place the food directly on the grate or place
the steamer or frying pan on the grate, place the food in it, select a function
and start the device.
2
Select the function you want. Press the Start / Stop button.
Note: Use the food tongs to remove the accessories and food. To ensure that it
is completely heated, do not place the food directly in the container.
Steak basket (not included with delivery)
1
Remove the lid.
2
Place the food in the steak basket and close the lid.
3
Insert the pole into the steak basket.
4
Select the function you want and press the Start / Stop button.

28
EN
Poultry fork
1
Put a tip on the fork. Fix with a screw.
2
Stick a chicken on the other side. Then place another tip on the fork to secure
the chicken.
3
Insert the rod into the hole in the container.
4
Select the "Roast" function and press the Start / Stop button.
Note: Use the food tongs to remove the accessories and food.
29
EN
Baking basket
1
Insert the rod into the baking basket. Fix it rmly with a screw.
2
Open the cover of the baking basket.
3
Put the food in the baking basket and close the cover.
4
Insert the rod into the hole in the container.
5
Select the "Deep fry" function and press the Start / Stop button.
Note: Use the food tongs to
remove the accessories and
food.
30
EN
Skewer insert (not included with delivery)
1
Insert the attachments on both sides of the bar and secure each one with a
screw.
2
Put food on the skewer and insert the ends of each skewer into the holes in the
attachments.
3
Fix the skewer insert to the container.
4
Select the function you want and press the Start / Stop button.
Note: Use the food tongs to remove the accessories and food.
31
EN
DEVICE CONTROL BY SMARTPHONE
If you integrate the device into your home WiFi, you can conveniently operate it via the
associated Klarstein app. The app not only allows you to remotely control the device via
your smartphone, but also gives you access to recipes and additional information.
Follow these steps to connect your smartphone to your Klarstein device:
1 Download the Klarstein app rst by scanning the QR code with your smartphone
(see below), or download it directly from App Store or Google Play.
2 Make sure your smartphone is connected to the same WiFi network that your
Klarstein device is to be connected to.
3 Open the Klarstein app.
4 Sign in to your account. If you do not have an account, sign up in the Klarstein app.
5 Follow the instructions from the app.
App Download
Use the scan function of your smartphone to scan the QR code and save the app on
your smartphone.
Note: The app provides further information on how to use the app and help on how
to connect to your device as soon as you open it for the rst time.
iOS Android

32
EN
Troubleshooting connection problems
If your Klarstein device cannot be found in the WLAN, check the following:
• Is the device plugged in?
• Is the WiFi feature of my phone enabled?
• Is the WiFi function of the Klarstein device activated? (Follow the instructions in the
app)
• Has the WiFi password been entered correctly?
• Are the router, Klarstein device and smartphone in the immediate vicinity during the
connection attempt? (Ideally no more than 5 m apart)
• If you have deactivated the 2.4 GHz band in the settings of your wireless router,
activate it in your router settings.
Note: For further help, follow the instructions in the app when setting up the
connection.

33
EN
CLEANING AND CARE
• Unplug the appliance from the wall outlet and allow it to cool for at least 30
minutes.
• Remove the accessories.
• Clean the unit after each use. Do not use pointed or sharp kitchen utensils or
abrasive cleaners to clean the accessories and the inside of the appliance, as these
will damage the coating.
• Wipe the outside of the appliance with a damp cloth.
• Clean the accessories with hot water, a little dishwashing detergent and a non-
abrasive sponge.
• Remove stubborn grease residues with a degreasing liquid.
• Clean the inside of the unit with a non-abrasive sponge.
• Clean the heating element with a cleaning brush to remove food residue.
• If you will not be using the unit for a long time, clean it before storing it.

34
EN
DISPOSAL CONSIDERATIONS
If there is a legal regulation for the disposal of electrical
and electronic devices in your country, this symbol on the
product or on the packaging indicates that this product must
not be disposed of with household waste. Instead, it must be
taken to a collection point for the recycling of electrical and
electronic equipment. By disposing of it in accordance with
the rules, you are protecting the environment and the health of
your fellow human beings from negative consequences. For
information about the recycling and disposal of this product,
please contact your local authority or your household waste
disposal service.
DECLARATION OF CONFORMITY
Manufacturer:
Chal-Tec GmbH, Wallstrasse 16, 10179 Berlin, Germany.
Importer for Great Britain:
Chal-Tec UK limited
Unit 6 Riverside Business Centre
Brighton Road
Shoreham-by-Sea
BN43 6RE
United Kingdom
The complete declaration of conformity of the manufacturer
can be found at the following link: use.berlin/10035590
35
ES
Estimado cliente:
Le felicitamos por la adquisición de este producto. Lea
atentamente el siguiente manual y siga cuidadosamente las
instrucciones de uso con el n de evitar posibles daños. La
empresa no se responsabiliza de los daños ocasionados por
un uso indebido del producto o por haber desatendido las
indicaciones de seguridad. Escanee el código QR para obtener
acceso al manual de usuario más reciente y otra información
sobre el producto.
ÍNDICE DE CONTENIDOS
Indicaciones de seguridad36
Descripción del aparato37
Accesorios38
Panel de control y teclas39
Puesta en marcha y uso40
Ajustes recomendados para
diferentes modos42
Uso de los accesorios43
Control del dispositivo
por smartphone47
Limpieza y mantenimiento49
Retirada del aparato50
Declaración de conformidad50
DATOS TÉCNICOS
Número de artículo 10035590, 10035591, 10035592
Suministro eléctrico 220-240 V - 50/60 Hz
Potencia 1200-1400 W
Capacidad de almacenamiento
(compartimento de cocción)
10 L
Temperatura ajustable 30-250 °C
WiFi estándar
802.11 b/g/n
WiFi frecuencia
2,4 GHz
WiFi potencia de radiofrecuencia (max.)
20 dBm

36
ES
INDICACIONES DE SEGURIDAD
Lea atentamente el manual de instrucciones antes del uso del aparato. Deben seguirse
siempre las siguientes indicaciones de seguridad a la hora de utilizar dispositivos
eléctricos:
• Antes de utilizar el aparato, asegúrese de que la tensión de la toma de corriente
coincida con la indicada en la placa técnica del aparato.
• No sumerja el aparato en agua ni en ningún otro líquido para evitar una descarga
eléctrica.
• Mantenga a los niños y mascotas alejados del aparato.
• Apague el aparato y desconecte el enchufe de la toma de corriente tras su uso.
• El aparato debe conectarse a un circuito eléctrico independiente de otros
dispositivos. Si se sobrecarga el circuito eléctrico de otros dispositivos, es posible
que este aparato no funcione correctamente.
• Extreme las precauciones cuando mueva un recipiente que contenga alimentos
calientes.
• Asegúrese de que el cable de alimentación no quede colgando de los cantos de
mesas y supercies ni que entre en contacto con las supercies calientes.
• Coloque el aparato en medio de la supercie de trabajo o de la mesa.
• No toque las supercies calientes. Utilice las asas para mover o levantar el
aparato.
• El aparato no debe ser utilizado por niños.
• La utilización de accesorios que no hayan sido recomendados expresamente por
el fabricante puede provocar lesiones.
• No coloque el aparato sobre supercies que no sean resistentes al calor,
supercies de madera, de cristal o manteles. Sobre dichas supercies, coloque
siempre un soporte resistente al calor con protección bajo el aparato.
• No utilice el aparato en ningún caso si el cable de alimentación está dañado, si
el aparato presenta problemas en el funcionamiento o si se ha visto dañado de
cualquier modo.
• Apague el aparato y desconecte el enchufe de la toma de corriente antes de
limpiarlo y cuando no lo utilice. Deje que el aparato se enfríe por completo antes
de montarlo o desmontarlo.
• No coloque el aparato cerca de hornos eléctricos o de gas o dentro de un horno
caliente.
• Contacte con un electricista cualicado en caso de que el enchufe no encaje
para minimizar un riesgo potencial de descarga eléctrica. En ningún caso intente
manipular el enchufe.
37
ES
• No limpie el aparato con lanas de acero. Las pequeñas piezas metálicas pueden
romperse y cortocircuitar componentes eléctricos del aparato, lo que provocaría
una descarga eléctrica y una posible avería del aparato.
• Prepare los alimentos para minimizar el riesgo de descarga eléctrica
exclusivamente en los recipientes incluidos en el envío con recubrimiento
antiadherente.
• El aparato solamente es apto para un uso doméstico y en interiores.
• Utilice el aparato solamente para el n indicado en este manual.
• Conserve el manual de instrucciones para usos posteriores.
DESCRIPCIÓN DEL APARATO
1
Panel de control
4
Salida de aire caliente
2
Asa de la cubierta
5
Desbloqueo de la cubierta
3
Carcasa
6
Cubierta transparente
38
ES
ACCESORIOS
Incluidos en el envío
Pinzas Rejilla alta/profunda Cesta de horneado
Tenedor para aves Sartén para freír
Accesorios opcionales (no incluidos en el envío):
Cesto para letes Espetón Vaporera

39
ES
PANEL DE CONTROL Y TECLAS
1
Monitor LED 6 Botón para encender / apagar
2
Botón de rotación 7 Temperatura (+)
3
Botón de ajuste de tiempo (+) 8 Botón de guardado
4
Botón del ventilador 9 Temperatura (-)
5
Botón de ajuste de tiempo (-) 10 Botón de menú

40
ES
PUESTA EN MARCHA Y USO
1
Tire del asa de la cubierta hacia arriba.
2
Introduzca el recipiente, el accesorio (si fuera necesario) y los alimentos que
desee preparar.
• Añada un poco de agua al recipiente cuanto utilice la rejilla o la
vaporera.
• Si está disponible la rotación para el modo seleccionado, asegúrese de
que el tenedor esté bien colocado.
• No coloque los alimentos cerca de la resistencia, pues podrían
carbonizarse.
3
Desbloquee el desbloqueo de la cubierta y tire de ella para bajarla.
4
Encaje el enchufe en la toma de corriente y el aparato se encenderá en modo
standby. Pulse una vez el botón Start/Stop para encender el aparato.
5
Pulse varias veces el botón MENU para seleccionar el modo deseado.
Aparecen el tiempo y temperatura correspondientes en la pantalla LED.
6
El tiempo y la temperatura pueden ajustarse individualmente. Si se ajustan el
tiempo y la temperatura, el aparato puede utilizarse sin seleccionar un modo.

41
ES
7
Pulse el botón Start/Stop para iniciar el aparato.
8
Puede ocurrir que la resistencia se apague cuando se alcance una
temperatura determinada. Si la temperatura cae, la resistencia se vuelve
a encender automáticamente. Este proceso se repetirá hasta que haya
transcurrido el tiempo programado.
9
Si desea añadir alimentos durante la preparación, desbloquee el cierre de la
cubierta y suba esta última utilizando el asa. El aparato dejará de calentar al
momento (pero la rotación continúa). Cierre la tapa tras añadir los alimentos y
la preparación continuará de manera automática.
10
El aparato emite un ruido que le indica que ha nalizado el tiempo de
preparación. Apague el aparato y desconecte el enchufe de la toma de
corriente y retire los alimentos. Extreme las precauciones a la hora de
manipular los accesorios calientes para evitar quemaduras. Coloque la
cubierta y el recipiente caliente sobre un soporte para ollas para evitar daños
en la mesa o en la supercie de trabajo.
42
ES
AJUSTES RECOMENDADOS PARA
DIFERENTES MODOS
Asegúrese de que el peso total de los alimentos seleccionados no supere los 5 kg.
Todos los modos están ajustados de fábrica para que pueda utilizarlos con rotación.
Pulse el botón de rotación una vez para desactivar dicha función.
Modo °C Minu-
tos
Nivel de
ventilador
Accesorio
Turbo 250 5 3 Todos los
componentes posibles
Chips (Patatas fritas) 250 25 3 Cesta de horneado/
espetón
Chicken (Pollo) 240 30 2 Tenedor para aves
Defrost (Descongelar) 60 20 3 Todo
Steak (lete) 230 12 3 Cesto para letes
Pie (empanada) 18 0 25 3 Sartén para freír
Pizza 210 12 3 Sartén para freír
Cake (bizcocho) 180 45 1 Sartén para freír
Ferment (Masa de
levadura)
30 50 1 Sartén para freír
Bread (Pan) 190 23 2 Sartén para freír
Cookie (galleta) 190 10 3 Sartén para freír
Potato (Patatas) 160 45 3 Sartén para freír
Bean (Alubias) 230 10 3 Cesta de horneado
Fish (pescado) 230 15 3 Cesto para letes
Pudding 180 25 1 Rejilla
Puff (hojaldre) 210 25 2 Rejilla
Chicken Wings (alitas
de pollo)
240 15 3 Cesta de horneado/
espetón
Skewer (brocheta de
carne)
230 15 2 Espetón
Popcorn (palomitas) 250 8 3 Cesta de horneado
Dried Fruit (frutas
deshidratadas)
100 60 3 Sartén para freír
43
ES
USO DE LOS ACCESORIOS
Parrilla | Sartén para freír | Vaporera (no incluidos en el envío)
1
Coloque la rejilla en el recipiente. Coloque los alimentos directamente sobre
la rejilla o coloque la vaporera o la sartén para freír sobre la misma y luego
introduzca ahí los alimentos, seleccione una función y ponga en marcha el
aparato.
2
Seleccione la función deseada. Pulse el botón Start/Stop.
Nota: Para retirar el accesorio y los alimentos, utilice la pinza de alimentos.
No introduzca los alimentos directamente en el recipiente para garantizar
que se calienten por completo.
Cesto para letes (No incluido en el envío)
1
Retire la tapa.
2
Coloque los alimentos en el cesto para letes y cierre la tapa.
3
Encaje la barra en el cesto para letes.
4
Seleccione la función deseada y pulse el botón Start/Stop.
44
ES
Tenedor para aves
1
Coloque una punta en el tenedor. Fíjela con un tornillo.
2
Del otro extremo, clave un pollo. A continuación, coloque otra punta en el
tenedor para jar el pollo de manera segura.
3
Encaje la barra en el oricio del recipiente.
4
Seleccione la función "Roast" y pulse el botón Start/Stop.
Nota: Para retirar el accesorio y los alimentos, utilice la pinza de alimentos.

45
ES
Cesta de horneado
1
Encaje la barra en el cesto para hornear. Fíjela con un tornillo.
2
Abra la tapa del cesto para hornear.
3
Coloque los alimentos en el cesto para hornear y cierre la tapa.
4
Encaje la barra en el oricio del recipiente.
5
Seleccione la función „Deep Fry“ y pulse el botón Start/Stop.
Nota: Para retirar el accesorio
y los alimentos, utilice la pinza
de alimentos.
46
ES
Espetón (No incluido en el envío)
1
Encaje el accesorio en ambos lados de la barra y fíjelo con un tornillo.
2
Encaje los alimentos en la barra y a continuación coloque los extremos de la
misma en los oricios correspondientes.
3
Fije el espetón en el recipiente.
4
Seleccione la función deseada y pulse el botón Start/Stop.
Nota: Para retirar el accesorio y los alimentos, utilice la pinza de alimentos.
47
ES
CONTROL DEL DISPOSITIVO
POR SMARTPHONE
Si conecta el aparato a su red WLAN doméstica, podrá controlarlo cómodamente
mediante la App correspondiente de Klarstein. La App le permite no solo controlar el
aparato mediante su smartphone, sino que también le ofrece acceso a recetas y otra
información adicional.
Proceda del siguiente modo para conectar su smartphone al dispositivo Klarstein.
1 Descargue primero la App de Klarstein escaneando el código QR con su
smartphone (véase más abajo) o descárguelo directamente de la App Store o de
Google Play.
2 Asegúrese de que su smartphone esté conectado a la misma red WiFi a la que
debe conectarse su dispositivo Klarstein.
3 Abra la App de Klarstein.
4 Inicie sesión con su cuenta. Si aún no tiene una cuenta, regístrese en la aplicación
Klarstein.
5 Siga las instrucciones que aparecerán en la app.
Descarga de la app
Utilice la función de escaneado de su teléfono para escanear el código QR y guarde
la app en su smartphone.
Nota: La aplicación proporciona más información sobre cómo usar la aplicación y
ayuda sobre cómo conectarse al dispositivo tan pronto como se abre por primera
vez.
iOS Android

48
ES
Solución de problemas de conexión
Si su dispositivo Klarstein no se encuentra en la WLAN, compruebe lo siguiente:
• ¿Está enchufado el dispositivo?
• ¿Está activada la función WiFi de mi teléfono?
• ¿Está activada la función WiFi del dispositivo Klarstein? (Sigue las instrucciones de
la aplicación)
• ¿Se ha introducido correctamente la contraseña WLAN?
• ¿Están el router, el dispositivo Klarstein y el smartphone en las inmediaciones
durante el intento de conexión? (Idealmente no más de 5 m de separación)
• Si ha desactivado la banda de 2,4 GHz en la conguración de su encaminador
inalámbrico, actívela en la conguración de su encaminador.
Nota: Para obtener más ayuda, sigue las instrucciones de la aplicación al congurar
la conexión.

49
ES
LIMPIEZA Y MANTENIMIENTO
• Desenchufe el aparato y déjelo enfriar durante al menos 30 minutos.
• Retire los accesorios.
• Limpie el aparato después de cada uso. No limpie los accesorios o el
compartimento interior con jabones o estropajos abrasivos ya que puede estropear
el esmaltado.
• Pase un trapo húmedo por el exterior del aparato.
• Limpie los accesorios con agua caliente, jabón y un estropajo no abrasivo o
metálico.
• Retire la grasa con un jabón antigrasa.
• Limpie el compartimento interior con un estropajo suave, no abrasivo o metálico.
• Limpie las partes que se calientan con un cepillo para retirar los posibles restos de
comida.
• Si no va a usar el aparato durante una temporada, límpielo antes de almacenarlo.

50
ES
RETIRADA DEL APARATO
Si en su país existe una disposición legal relativa a la
eliminación de aparatos eléctricos y electrónicos, este
símbolo estampado en el producto o en el embalaje
advierte que no debe eliminarse como residuo doméstico.
En lugar de ello, debe depositarse en un punto de recogida
de reciclaje de aparatos eléctricos y electrónicos. Una
gestión adecuada de estos residuos previene consecuencias
potencialmente negativas para el medio ambiente y la salud
de las personas. Puede consultar más información sobre el
reciclaje y la eliminación de este producto contactando con
su administración local o con su servicio de recogida de
residuos.
DECLARACIÓN DE CONFORMIDAD
Fabricante:
Chal-Tec GmbH, Wallstraße 16, 10179 Berlín, Alemania.
Importador para Gran Bretaña:
Chal-Tec UK limited
Unit 6 Riverside Business Centre
Brighton Road
Shoreham-by-Sea
BN43 6RE
United Kingdom
Puede descargar la declaración de conformidad completa del
fabricante en el siguiente enlace: use.berlin/10035590
51
FR
Chère cliente, cher client,
Toutes nos félicitations pour l’acquisition de ce nouvel appareil.
Veuillez lire attentivement et respecter les instructions de ce mode
d’emploi an d’éviter d’éventuels dommages. Le fabricant ne
saurait être tenu pour responsable des dommages dus au non-
respect des consignes de sécurité et à la mauvaise utilisation
de l’appareil. Scannez le QR-Code pour accéder à la dernière
version du mode d‘emploi et à d‘autres informations concernant
le produit.
SOMMAIRE
Consignes de sécurité52
Aperçu de l‘appareil53
Accessoires54
Panneau de commande et touches55
Mise en service et fonctionnement56
Réglages recommandés
selon les modes58
Utilisation des accessoires59
Contrôle de l‘appareil
par smartphone63
Nettoyage et entretien65
Conseils pour le recyclage66
Déclaration de conformité66
FICHE TECHNIQUE
Numéro d'article 10035590, 10035591, 10035592
Alimentation 220-240 V ~ 50/60 Hz
Puissance 1200-1400 W
Capacité (compartiment de cuisson) 10 L
Plage de températures 30-250 °C
WiFi standard
802.11 b/g/n
WiFi fréquence
2,4 GHz
WiFi puissance de radiofréquence (max.)
20 dBm

52
FR
CONSIGNES DE SÉCURITÉ
Lisez attentivement le mode d‘emploi avant d‘utiliser l‘appareil. Les consignes de
sécurité suivantes doivent toujours être respectées lors de l‘utilisation d‘appareils
électriques :
• Avant la première utilisation, vériez que la tension de votre prise de courant
correspond à la tension spéciée sur l‘appareil.
• N‘immergez pas le câble d‘alimentation ou l‘appareil lui-même dans l‘eau ou dans
d‘autres liquides pour éviter les chocs électriques.
• Tenez les enfants et les animaux domestiques éloignés de l‘appareil pendant le
fonctionnement.
• Après utilisation, éteignez l‘appareil et débranchez la che de la prise.
• L‘appareil doit être branché sur un circuit séparé des autres appareils électriques. Si
le circuit est surchargé, cet appareil risque de ne pas fonctionner correctement.
• Soyez extrêmement prudent lorsque vous déplacez un récipient contenant de la
nourriture chaude.
• Ne faites pas pendre le câble d‘alimentation au bord d‘une table ou d‘un plan de
travail, et veillez à ce que le câble d‘alimentation n‘entre pas en contact avec les
surfaces chaudes de l‘appareil.
• Placez toujours l‘appareil en sécurité au centre de la table ou du plan de travail.
• Ne touchez pas les surfaces chaudes de l‘appareil. Utilisez les poignées pour le
déplacer ou le soulever.
• L‘appareil ne doit pas être utilisé par des enfants.
• L‘utilisation d‘accessoires non expressément recommandés par le fabricant peut
entraîner des blessures.
• Ne placez pas ou n‘utilisez pas l‘appareil directement sur des surfaces vitrées
thermosensibles, des surfaces en bois ou des nappes. Veillez à placer une plaque
résistante à la chaleur avec protection thermique sous l‘appareil sur ces surfaces.
• N‘utilisez jamais l‘appareil si le câble d‘alimentation est endommagé, si l‘appareil
fonctionne mal ou a été endommagé d‘une quelconque manière.
• Avant le nettoyage ou en cas de non utilisation, éteignez l‘appareil et débranchez
la che d‘alimentation de la prise. Laissez l‘appareil refroidir avant de retirer ou
d‘ajouter des accessoires.
• Ne placez pas l‘appareil à proximité immédiate d‘un four à gaz ou électrique ou
dans un four chaud.
• Dans tous les cas, si la che d‘alimentation ne s‘adapte pas correctement à votre
prise, contactez un électricien qualié pour réduire le risque de choc électrique.
• Ne tentez jamais de manipuler ou modier la che en aucune façon.

53
FR
• Ne nettoyez pas l‘appareil avec une éponge métallique à récurer. De petites
particules métalliques pourraient se détacher et provoquer un court-circuit avec
les éléments électriques de l‘appareil, ce qui peut provoquer un choc électrique et
endommager l‘appareil.
• Pour réduire le risque d‘électrocution, ne préparez les aliments que dans le récipient
à revêtement antiadhésif fourni.
• L‘appareil est conçu pour une utilisation en intérieur uniquement.
• Utilisez l‘appareil uniquement aux ns prévues.
• Conservez ce manuel pour pouvoir vous y référer ultérieurement.
APERÇU DE L‘APPAREIL
1
Panneau de commande
4
Sortie d'air chaud
2
Poignée du couvercle
5
Verrouillage du couvercle
3
Corps de l'appareil
6
Couvercle transparent

54
FR
ACCESSOIRES
Accessoires fournis
Pinces Grille haute/basse Panier de cuisson
Broche à volailles Poêle à frire
Accessoires disponibles en option (non fournis)
Panier à steak Porte-brochettes Panier vapeur

55
FR
PANNEAU DE COMMANDE ET TOUCHES
1
Écran LED 6 Bouton de marche / arrêt
2
Bouton rotatif 7 Température (+)
3
Touche de réglage de la durée
(+)
8 Touche de validation
4
Touche de ventilation 9 Température (-)
5
Touche de réglage de la durée
(-)
10 Touche menu

56
FR
MISE EN SERVICE ET FONCTIONNEMENT
1
Soulevez le couvercle par sa poignée.
2
Placez le récipient et les accessoires (si besoin) à l‘intérieur ainsi que les
aliments que vous souhaitez préparer.
• Versez un peu d‘eau dans le récipient lorsque vous utilisez la grille de
cuisson ou le panier vapeur.
• Si la rotation est disponible pour le mode sélectionné, assurez-vous que la
broche est correctement installée.
• Ne concentrez pas trop d‘aliments à proximité de l‘élément chauffant, car
ils risqueraient d‘être carbonisés.
3
Déverrouillez le couvercle et abaissez le couvercle pour le fermer.
4
Branchez l‘appareil dans une prise, il se met en mode veille. Appuyez une fois
sur le bouton Start/Stop pour allumer l‘appareil.
5
Appuyez plusieurs fois sur le bouton MENU pour sélectionner le mode
souhaité. La durée et la température correspondantes s‘afchent sur l‘écran
LED.
6
Vous pouvez régler vous-même la durée et la température. Lorsque vous
réglez la durée et la température, vous pouvez utiliser l‘appareil sans choisir
de mode.

57
FR
7
Pour démarrer l‘appareil, appuyez sur la touche Start/Stop.
8
Il peut arriver que l‘élément chauffant s‘arrête lorsqu‘une certaine
température a été atteinte. Lorsque la température baisse, l‘élément chauffant
se rallume automatiquement. Ce processus se répète jusqu‘à la n de la durée
programmée.
9
Si vous voulez rajouter des aliments en cours de cuisson, déverrouillez
le couvercle et soulevez-le par sa poignée. L‘appareil arrête alors
immédiatement de chauffer (mais la rotation continue). Fermez le couvercle
après avoir ajouté les aliments et la cuisson se poursuivra automatiquement.
10
L‘appareil émet un son lorsque la durée de cuisson programmée est écoulée.
Éteignez l‘appareil, débranchez la che de la prise et retirez les aliments.
Soyez prudent lorsque vous manipulez des accessoires chauds pour éviter les
brûlures. Placez le couvercle et le récipient chaud sur une casserole pour éviter
d‘endommager la table ou le plan de travail.
58
FR
RÉGLAGES RECOMMANDÉS
SELON LES MODES
Assurez-vous que le poids total des aliments ne dépasse pas 5 kg. Tous les modes sont
réglés en usine pour être utilisés par défaut avec la rotation. Appuyez une fois sur le
bouton de rotation pour désactiver la rotation.
Mode °C Minutes Vitesse de
ventilation
Accessoire
Turbo 250 5 3 Tous accessoires
possibles
Chips (Pommes) 250 25 3 Panier de cuisson/
porte-brochettes
Chicken (poulet) 240 30 2 Broche à volailles
Drefrost (décongélation) 60 20 3 Tous
Steak 230 12 3 Panier à steak
Pie (tarte) 180 25 3 Poêle à frire
Pizza 210 12 3 Poêle à frire
Cake (gâteau) 18 0 45 1 Poêle à frire
Ferment (pâte levée) 30 50 1 Poêle à frire
Bread (pain) 190 23 2 Poêle à frire
Cookie (biscuits) 190 10 3 Poêle à frire
Potato (pommes de terre) 160 45 3 Poêle à frire
Bean (haricots) 230 10 3 Panier de cuisson
Fish (poisson) 230 15 3 Panier à steak
Pudding 180 25 1 Grille
Puff (pâte feuilletée) 210 25 2 Grille
Chicken Wings 240 15 3 Panier de cuisson/
porte-brochettes
Skewer (brochette de
viande)
230 15 2 porte-brochettes
Popcorn 250 8 3 Panier de cuisson
Dried Fruit (fruits séchés) 100 60 3 Poêle à frire
59
FR
UTILISATION DES ACCESSOIRES
Grille | poêle à frire | panier vapeur (non fourni)
1
Mettez la grille dans le conteneur. Placez les aliments directement sur la grille
ou placez le cuiseur vapeur ou la poêle sur la grille, placez-y les aliments,
sélectionnez une fonction et démarrez l'appareil.
2
Sélectionnez la fonction que vous voulez. Appuyez sur le bouton Start/Stop.
Remarque : Utilisez les pinces pour enlever les accessoires et les aliments. Ne
placez pas les aliments directement dans le récipient pour vous assurer qu'ils
soient entièrement chauffés.
Panier à steak (non fourni)
1
Retirez le couvercle.
2
Placez les aliments dans le panier à steak et refermez le couvercle.
3
Insérez la pince dans le panier à steak.
4
Choisissez la fonction désirée puis appuyez sur la touche Start/Stop.
60
FR
Broche à volaille
1
Placez une pointe sur la broche. Fixez-la avec une vis.
2
Par l'autre extrémité, installez un poulet. Puis installez une seconde pointe
pour xer solidement le poulet sur la broche.
3
Insérez la tige dans le trou du récipient.
4
Sélectionnez la fonction "Rôti" et appuyez sur le bouton Start/Stop.
Remarque : Utilisez les pinces à nourriture pour retirer les accessoires et la
nourriture.
61
FR
Panier de cuisson
1
Insérez la tige dans le panier de cuisson. Fixez-le fermement avec une vis.
2
Ouvrez le couvercle du panier de cuisson.
3
Mettez les aliments dans le panier de cuisson et refermez le couvercle.
4
Insérez la tige dans le trou du conteneur.
5
Choisissez la fonction "Deep fry" et appuyez sur la touche Start/Stop.
Remarque : Utilisez les pinces
à nourriture pour retirer les
accessoires et la nourriture.
62
FR
Porte-brochettes (non fourni)
1
Insérez les disques accessoires sur les deux côtés de la barre et xez-les
chaque fois avec une vis.
2
Mettez de la nourriture sur les brochettes et insérez leurs extrémités dans
chacun des trous des accessoires.
3
Fixez le porte-brochettes sur le conteneur.
4
Choisissez la fonction souhaitée et appuyez sur la touche Start/Stop.
Remarque : Utilisez les pinces à nourriture pour retirer les accessoires et la
nourriture.

63
FR
CONTRÔLE DE L‘APPAREIL
PAR SMARTPHONE
Si vous connectez l‘appareil à votre réseau WiFi domestique, vous pouvez l‘utiliser
facilement via l‘application Klarstein associée. L‘application vous permet non seulement
de contrôler à distance l‘appareil via votre smartphone, mais vous donne également
accès à des recettes et à des informations supplémentaires.
Procédez comme suit pour connecter votre smartphone avec votre appareil Klarstein :
1 Téléchargez d‘abord l‘application Klarstein en scannant le code QR avec votre
smartphone (voir ci-dessous) ou téléchargez-le directement depuis l‘App Store ou
Google Play.
2 Assurez-vous que votre smartphone est connecté au même réseau WiFi que votre
appareil Klarstein.
3 Ouvrez l‘application Klarstein.
4 Connectez-vous avec votre compte. Si vous n‘avez pas encore de compte,
inscrivez-vous dans l‘application Klarstein.
5 Suivez les indications de l‘application.
Téléchargement de l‘application
Utilisez la fonction de scan de votre téléphone portable pour scanner le QR Code et
télécharger l‘application sur votre smartphone.
Remarque : L‘application fournit des informations supplémentaires sur la façon
d‘utiliser l‘application et de l‘aide sur la façon de se connecter à votre appareil dès
que vous l‘ouvrez pour la première fois.
iOS Android

64
FR
Dépannage des problèmes de connexion
Si votre appareil Klarstein ne se trouve pas dans le WiFi, vériez les points suivants :
• L‘appareil est-il branché ?
• La fonction WiFi de mon téléphone est-elle activée ?
• La fonction WiFi de l‘appareil Klarstein est-elle activée ? (Suivez les instructions
dans l‘application)
• Le mot de passe WiFi a-t-il été saisi correctement ?
• Le routeur, l‘appareil Klarstein et le smartphone se trouvent-ils à proximité
immédiate pendant la tentative de connexion ? (Idéalement, pas plus de 5 m de
distance)
• Si vous avez désactivé la bande des 2,4 GHz dans les paramètres de votre routeur
sans l, activez-la dans les paramètres de votre routeur.
Remarque : Pour plus d‘aide, suivez les instructions de l‘application lors de la
conguration de la connexion.

65
FR
NETTOYAGE ET ENTRETIEN
• Débranchez le cordon d‘alimentation et laissez l‘appareil refroidir pendant au
moins 30 minutes.
• Retirez les accessoires.
• Nettoyez l‘appareil après chaque utilisation. Ne nettoyez pas les accessoires et
l‘intérieur de l‘appareil avec des ustensiles de cuisine pointus ou coupants ou des
produits abrasifs, car ils risqueraient d‘endommager le revêtement.
• Essuyez l‘extérieur de l‘appareil avec un chiffon humide.
• Nettoyez les accessoires à l’eau chaude avec du liquide vaisselle et une éponge
non abrasive.
• Éliminez les résidus de graisse tenaces avec un liquide dégraissant.
• Nettoyez l‘intérieur de l‘appareil avec une éponge non abrasive.
• Nettoyez l‘élément chauffant avec une brosse de nettoyage pour éliminer les
résidus d‘aliments.
• Si vous n‘utilisez pas l‘appareil pendant une période prolongée, nettoyez-le avant
de le ranger.

66
FR
CONSEILS POUR LE RECYCLAGE
S‘il existe une réglementation pour l‘élimination ou le recyclage
des appareils électriques et électroniques dans votre pays,
ce symbole sur le produit ou sur l‘emballage indique que cet
appareil ne doit pas être jeté avec les ordures ménagères. Vous
devez le déposer dans un point de collecte pour le recyclage
des équipements électriques et électroniques. La mise au
rebut conforme aux règles protège l‘environnement et la santé
de vos semblables des conséquences négatives. Pour plus
d‘informations sur le recyclage et l‘élimination de ce produit,
veuillez contacter votre autorité locale ou votre service de
recyclage des déchets ménagers.
DÉCLARATION DE CONFORMITÉ
Fabricant :
Chal-Tec GmbH, Wallstraße 16, 10179 Berlin, Allemagne.
Importateur pour la Grande Bretagne :
Chal-Tec UK limited
Unit 6 Riverside Business Centre
Brighton Road
Shoreham-by-Sea
BN43 6RE
United Kingdom
La déclaration complète de conformité du fabricant est
accessible par le lien suivant : use.berlin/10035590

67
IT
Gentile cliente,
La ringraziamo per aver acquistato il dispositivo. La preghiamo
di leggere attentamente le seguenti istruzioni per l’uso e di
seguirle per evitare possibili danni tecnici. Non ci assumiamo
alcuna responsabilità per danni scaturiti da una mancata
osservazione delle avvertenze di sicurezza e da un uso
improprio del dispositivo. Scansionare il codice QR seguente,
per accedere al manuale d’uso più attuale e per ricevere
informazioni sul prodotto.
INDICE
Avvertenze di sicurezza68
Descrizione del prodotto69
Accessori70
Pannello dei comandi e tasti71
Messa in funzione e utilizzo72
Impostazioni consigliate
per le diverse modalità74
Utilizzo degli accessori75
Gestione tramite smartphone79
Pulizia e cura81
Smaltimento82
Dichiarazione di conformità82
DATI TECNICI
Articolo numero 10035590, 10035591, 10035592
Alimentazione 220-240 V ~ 50/60 Hz
Potenza 1200-1400 W
Capacità (camera cottura) 10 L
Temperatura impostabile 30-250 °C
WiFi standard
802.11 b/g/n
WiFi frequenza
2,4 GHz
WiFi potenza a radiofrequenza (max.)
20 dBm

68
IT
AVVERTENZE DI SICUREZZA
Leggere attentamente questo manuale prima di utilizzare l‘apparecchio. Quando si
usano apparecchi elettrici, osservare sempre le seguenti istruzioni di sicurezza:
• Prima di utilizzare l´apparecchio la prima volta, vericare che la tensione della
presa di corrente corrisponda a quella indicata.
• Per evitare il pericolo di scosse elettriche, non immergere il cavo di alimentazione o
l´apparecchio stesso in acqua o in altri liquidi.
• Tenere i bambini e gli animali domestici lontani dall‘apparecchio in funzione.
• Dopo l‘uso, spegnere l´apparecchio e scollegarlo dalla presa di corrente.
• L´apparecchio deve disporre di un circuito di alimentazione separato. Se il circuito
è sovraccaricato da altri dispositivi, questo apparecchio potrebbe non funzionare
correttamente.
• Prestare la massima attenzione quando si sposta un contenitore contenente alimenti
caldi.
• Non far pendere il cavo di alimentazione dal bordo del tavolo e delle superci
di lavoro. Assicurarsi inoltre che il cavo non entri in contatto con le superci calde
dell‘apparecchio.
• Posizionare sempre l´apparecchio al centro del tavolo o della supercie di
lavoro. Non toccare le superci calde dell‘apparecchio. Spostare o sollevare
l´apparecchio tramite le impugnature.
• I bambini non possono utilizzare l´apparecchio.
• L‘uso di accessori non espressamente raccomandati dal produttore può causare
infortuni.
• Non posizionare o utilizzare l´apparecchio su superci in vetro non resistenti al
calore o su superci in legno o tovaglie. Collocare su queste superci una piastra
resistente al calore con protezione termica.
• Non utilizzare l‘apparecchio se il cavo di alimentazione è danneggiato, se non
funziona correttamente o se è stato danneggiato in altro modo.
• Prima della pulizia e in caso di inutilizzo, spegnere l´apparecchio e scollegare il
cavo di alimentazione.
• Lasciare raffreddare l´apparecchio prima di rimuovere o aggiungere dei
componenti.
• Non collocare l‘apparecchio nelle immediate vicinanze di forni a gas o elettrici
accesi o di un forno caldo.
• Se la spina non è idonea alla presa, consultare un elettricista qualicato per ridurre
al minimo il rischio di scosse

69
IT
• Non pulire l´apparecchio con spugne metalliche in quanto piccole parti
metalliche potrebbero staccarsi e causare cortocircuito ai componenti elettrici
dell´apparecchio, causando scosse elettriche e danni all´apparecchio.
• Per ridurre al minimo il rischio di scosse elettriche, cuocere gli alimenti solo nel
contenitore antiaderente incluso nella consegna.
• L´apparecchio è progettato solo per un uso interno.
• Utilizzare l‘apparecchio solo per lo scopo previsto. Conservare questo manuale
per consultazioni future.
DESCRIZIONE DEL PRODOTTO
1
Pannello dei comandi
4
Uscita aria calda
2
Impugnatura coperchio
5
Sblocco coperchio
3
Alloggiamento
6
Coperchio trasparente

70
IT
ACCESSORI
Incluso nella consegna
Pinza Griglia alta / profonda Cestello
Forchettone Padella per friggere
Accessori opzionali (non inclusi nella consegna)
Griglia bistecca Accessorio spiedo Accessorio cottura a
vapore

71
IT
PANNELLO DEI COMANDI E TASTI
1
Display a LED 6 Tasto on/o
2
Tasto rotazione 7 Temperatura (+)
3
Tasto regolazione tempo (+) 8 Tasto memorizzazione
4
Tasto ventola 9 Temperatura (-)
5
Tasto regolazione tempo (-) 10 Tasto menu

72
IT
MESSA IN FUNZIONE E UTILIZZO
1
Tirare il coperchio verso l‘alto tramite l´impugnatura del coperchio.
2
Introdurre il contenitore, gli accessori (se necessario) e gli alimenti.
• In caso di utilizzo della griglia o dell´accessorio per la cottura a vapore,
versare un po‘ d‘acqua nel contenitore.
• Se la rotazione è disponibile per la modalità selezionata, accertarsi che il
forchettone sia stato inserito correttamente.
• Non sistemare gli alimenti vicino all‘elemento riscaldante, in quanto
potrebbero bruciarsi.
3
Sbloccare il blocco del coperchio ed abbassare il coperchio per chiuderlo.
4
Inserire la spina nella presa: l´apparecchio è in modalità standby. Premere
una volta il tasto Start/Stop per accendere l‘apparecchio.
5
Premere ripetutamente il tasto MENU per selezionare la modalità desiderata.
L‘ora e la temperatura corrispondenti vengono visualizzate sul display a LED.
6
L‘ora e la temperatura possono essere regolate singolarmente. Una volta
impostate l‘ora e la temperatura, l‘apparecchio può essere utilizzato anche
senza selezionare una modalità.

73
IT
7
Premere il tasto Start/Stop per avviare l´apparecchio.
8
Può accadere che l‘elemento riscaldante si arresti al raggiungimento di una
certa temperatura. Appena la temperatura si abbassa, l‘elemento riscaldante
si riaccende automaticamente. Questa procedura si ripete no allo scadere
del tempo impostato.
9
Per aggiungere altri alimenti durante la cottura, sbloccare il blocco del
coperchio e tirarlo verso l‘alto tramite l´impugnatura sul coperchio. Il
riscaldamento viene interrotto immediatamente (ma la rotazione prosegue).
Chiudere il coperchio dopo aver aggiunto gli alimenti, la cottura riprende
automaticamente.
10
L‘apparecchio emette un segnale acustico allo scadere del tempo impostato.
Spegnere l‘apparecchio, scollegare il cavo di alimentazione e rimuovere gli
alimenti. Maneggiare gli accessori caldi con cautela per evitare il pericolo di
ustioni. Posizionare il coperchio e il contenitore caldo su un sottopentola per
evitare di danneggiare il tavolo o la supercie di lavoro.

74
IT
IMPOSTAZIONI CONSIGLIATE
PER LE DIVERSE MODALITÀ
Assicurarsi che il peso totale degli alimenti utilizzati non superi i 5 kg. Per impostazione
di fabbrica, tutte le modalità sono utilizzabili con la rotazione. Per disattivare la
rotazione, premere una volta il tasto di rotazione.
Modalità °C Minuti Livello
ventola
Accessori
Turbo 250 5 3 Tutti gli accessori
Chips (patatine) 250 25 3 Cestello /accessorio
spiedo
Chicken (pollo) 240 30 2 Forchettone
Defrost (scongelare) 60 20 3 Tutti gli accessori
Steak 230 12 3 Griglia bistecca
Pie (torta salata) 18 0 25 3 Padella
Pizza 210 12 3 Padella
Cake (torta) 180 45 1 Padella
Ferment (pasta lievitata) 30 50 1 Padella
Bread (pane) 190 23 2
Cookie (biscotti) 190 10 3 Padella
Potato (patate) 160 45 3 Padella
Bean (fagioli) 230 10 3 Padella
Fish (pesce) 230 15 3 Cestello
Pudding 180 25 1 Griglia bistecca
Puff (Pasta sfoglia) 210 25 2 Griglia
Chicken Wings 240 15 3 Griglia
Skewer (carne spiedo) 230 15 2 Cestello / accessorio
spiedo
Popcorn 250 8 3 Accessorio spiedo
Dried Fruit (frutta secca) 100 60 3 Cestello
Padella
75
IT
UTILIZZO DEGLI ACCESSORI
Griglia | Padella per friggere |
Accessorio cottura a vapore (non incluso nella consegna)
1
Collocare la griglia nel contenitore. Sistemare gli alimenti direttamente sulla
griglia oppure mettere sulla griglia l´accessorio per la cottura a vapore
o la padella. Introdurre gli alimenti, selezionare una funzione e avviare
l'apparecchio.
2
Selezionare la funzione desiderata. Premere il tasto Start/Stop.
Nota: utilizzare le pinze per alimenti per rimuovere gli accessori e gli alimenti.
Non collocare gli alimenti direttamente nel contenitore.
Griglia per bistecca (non inclusa nella consegna)
1
Rimuovere il coperchio.
2
Mettere gli alimenti nella griglia per bistecca e chiudere il coperchio.
3
Inserire la barra nella griglia per bistecca.
4
Selezionare la funzione desiderata e premere il tasto Start/Stop.

76
IT
Forchettone
1
Mettere una punta sul forchettone. Fissare con una vite.
2
Dall'altro lato inlare il pollo. Per ssare correttamente il pollo, mettere
un´altra punta sul forchettone.
3
Inserire la barra nel foro del contenitore.
4
Selezionare la funzione "Roast" e premere il tasto Start/Stop.
Nota: utilizzare le pinze per alimenti per rimuovere gli accessori e gli alimenti.

77
IT
Cestello
1
Mettere la barra nel cestello. Fissarla saldamente utilizzando una vite.
2
Aprire il coperchio del cestello.
3
Introdurre gli alimenti nel cestello e chiudere il coperchio.
4
Inserire la barra nel foro del contenitore.
5
Selezionare la funzione "Fry Deep" e premere il tasto Start/Stop.
Nota: utilizzare le pinze per
rimuovere gli accessori e gli
alimenti.

78
IT
Accessorio spiedo (non incluso nella consegna)
1
Inserire gli accessori su entrambi i lati della barra e ssarli con una vite.
2
Mettere gli alimenti sulle barre e inserire le estremità delle barre nei fori degli
accessori.
3
Fissare lo spiedo al contenitore.
4
Selezionare la funzione desiderata e premere il tasto Start/Stop.
Nota: utilizzare le pinze per alimenti per rimuovere gli accessori e gli alimenti.
79
IT
GESTIONE TRAMITE SMARTPHONE
Se si collega l‘apparecchio al WiFi, è possibile gestirlo comodamente con la relativa
applicazione Klarstein. L‘app non solo consente di controllare l´apparecchio da
remoto dal proprio smartphone, ma consente anche di accedere a ricette e ad altre
informazioni.
Per collegare il telefono al dispositivo Klarstein, procedere come segue:
1 Per prima cosa scaricare l‘app Klarstein scansionando il codice QR con lo
smartphone (vedere sotto) o scaricarla direttamente dall‘App Store o da Google
Play.
2 Accertarsi che lo smartphone sia connesso alla stessa rete WiFi a cui deve
collegarsi il dispositivo Klarstein.
3 Aprire l‘applicazione Klarstein.
4 Accedere con il proprio account. Se non si possiede ancora un account, registrarsi
nell‘app Klarstein.
5 Seguire le istruzioni contenute nell‘App.
App-Download
Utilizzare la funzione di scansione del telefono per eseguire la scansione del codice
QR e salvare l‘applicazione sullo smartphone.
Nota: L‘applicazione fornisce ulteriori informazioni su come utilizzarla e su come
connettersi al dispositivo non appena viene aperta per la prima volta.
iOS Android

80
IT
Risoluzione dei problemi di connessione
Se il dispositivo Klarstein non si trova nella WLAN, controllare quanto segue:
• Il dispositivo è collegato?
• La funzione WiFi del telefono è abilitata?
• La funzione WiFi del dispositivo Klarstein è attivata? (Seguire le istruzioni nell‘app)
• La password WLAN è stata immessa correttamente?
• Il router, il dispositivo Klarstein e lo smartphone sono nelle immediate vicinanze
durante il tentativo di connessione? (Idealmente a non più di 5 m di distanza)
• Se la banda da 2,4 GHz è stata disattivata nelle impostazioni del router wireless,
attivarla nelle impostazioni del router.
Nota: Per ulteriori informazioni, seguire le istruzioni nell‘app quando si congura la
connessione.

81
IT
PULIZIA E CURA
• Scollegare l‘apparecchio e lasciarlo raffreddare per almeno 30 minuti.
• Rimuovere gli accessori.
• Pulire il dispositivo dopo ogni utilizzo. Non pulire gli accessori e l‘interno
dell‘elettrodomestico con utensili da cucina o agenti abrasivi aflati o taglienti,
poiché potrebbero danneggiare il rivestimento.
• Pulire l‘esterno del dispositivo con un panno umido.
• Pulire l‘accessorio con acqua calda, un detersivo per piatti e una spugna non
abrasiva.
• Rimuovere i residui di grasso ostinati con un uido sgrassante.
• Pulire l‘interno dell‘apparecchio con una spugna non abrasiva.
• Pulire l‘elemento riscaldante con una spazzola per rimuovere i residui di cibo.
• Se non si intende utilizzare il dispositivo per un lungo periodo, pulirlo prima di
riporlo.

82
IT
SMALTIMENTO
Se nel proprio paese si applicano le regolamentazioni
inerenti lo smaltimento di dispositivi elettrici ed elettronici,
questo simbolo sul prodotto o sulla confezione segnala che
questi prodotti non possono essere smaltiti con i riuti normali
e devono essere portati a un punto di raccolta di dispositivi
elettrici ed elettronici. Grazie al corretto smaltimento dei
vecchi dispositivi si tutela il pianeta e la salute delle persone
da possibili conseguenze negative. Informazioni riguardanti il
riciclo e lo smaltimento di questi prodotti si ottengono presso
l’amministrazione locale oppure il servizio di gestione dei
riuti domestici.
DICHIARAZIONE DI CONFORMITÀ
Produttore:
Chal-Tec GmbH, Wallstraße 16, 10179 Berlino, Germania.
Importatore per la Gran Bretagna:
Chal-Tec UK limited
Unit 6 Riverside Business Centre
Brighton Road
Shoreham-by-Sea
BN43 6RE
United Kingdom
La dichiarazione di conformità completa del produttore è
disponibile al seguente link: use.berlin/10035590