Loading ...
Loading ...
Loading ...

13
EN
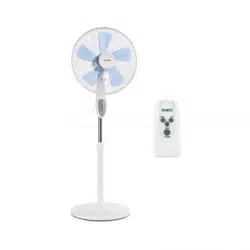
A Operating indicator E TIMER key
B SWING indicator light F ON (ON) and speed (SPEED)
C
Speed indicator
High (high)
Medium (mid)
Low (low)
G SWING button
D OFF button (OFF) H
TIMER display
0.5h / 1h / 2h / 4h
Commissioning and Operation
1. Connect the device to a power outlet. The power indicator (A) turns on.
2. Switch on the unit by pressing the ON/SPEED key (F) on the control panel. The
fan starts to run at low speed. The speed indicator (C) lights up.
3. To change the speed, press the ON/SPEED key (F) several times. The speed
changes with each press of the key. The corresponding indicator (C) lights up.
4. To make the fan swing back and forth, press the SWING key (G). The SWING
indicator light (B) turns on and the fan begins to oscillate back and forth. To
stop the oscillation, press the SWING button (G) again.
5. The fan has a timer. After you turn on the unit, press the TIMER button (E) and
the fan will run as long as you set it. To do this, press the TIMER button several
times and the time will change with each press of the button. The indicator
lights (H) will light up. After the set time has elapsed, the fan will automatically
turn o. The timer can be set from 0.5-7.5 hours. The time results from the
sum of the illuminated control lights (H).
6. The air ow can be directed upwards or downwards by tilting the motor.
Loosen the xing screw (9) and adjust the motor so that it points in the
desired direction. Tighten the screw again.
7. To switch o the fan, press the OFF key (D).
8. Always unplug the unit when not in use.
Note on the remote control
The buttons on the remote control have the same function as the buttons on the
control panel. Make sure that batteries are inserted into the remote control the
right way around. Do not mix battery types and always replace all batteries at the
same time when changing batteries. Be sure to replace the batteries with batteries
of the same type (2xAAA).
Loading ...
Loading ...
Loading ...