IT
Potatrice ad Asta alimentata a batteria
MANUALE DI ISTRUZIONI
ATTENZIONE: prima di usare la macchina, leggere attentamente il presente
libretto.
EN
Battery powered pole-mounted pruner
OPERATOR’S MANUAL
WARNING: read thoroughly the instruction booklet before using the machine.
171506802/0EN 08/2020
MP 20 Li A
MP 20 Li S


ITALIANO -
Istruzioni Originali ...................................................................................................
IT
ENGLISH - Translation of the original instruction
..........................................................................
EN

1
2
A
B
C
D
E
F
G
J
D
F
K
G
H
H
I
I
L
K
MP 20 Li A
MP 20 Li S
dB
L
WA
Art.N.
Type:
- s/n
2
6
1
4
5
7
3
8
m/s
9
4
5
3
A
B
C
D
A
B
A
B
A
B
C
MP 20 Li A
MP 20 Li S

9
8
6 7
A
A
C
B
C
D
E
10
11
12
B
A
B
A
B
A
I
II
III
MP 20 Li A MP 20 Li S
13
14 15
16 17
A
B
D
C
A
A
A
B
A
A
B

18
A
A
19
20
21
I
II
III
A
B
B
A
22
MP 20 Li A MP 20 Li S
A
B
23
A
B
24
25
26

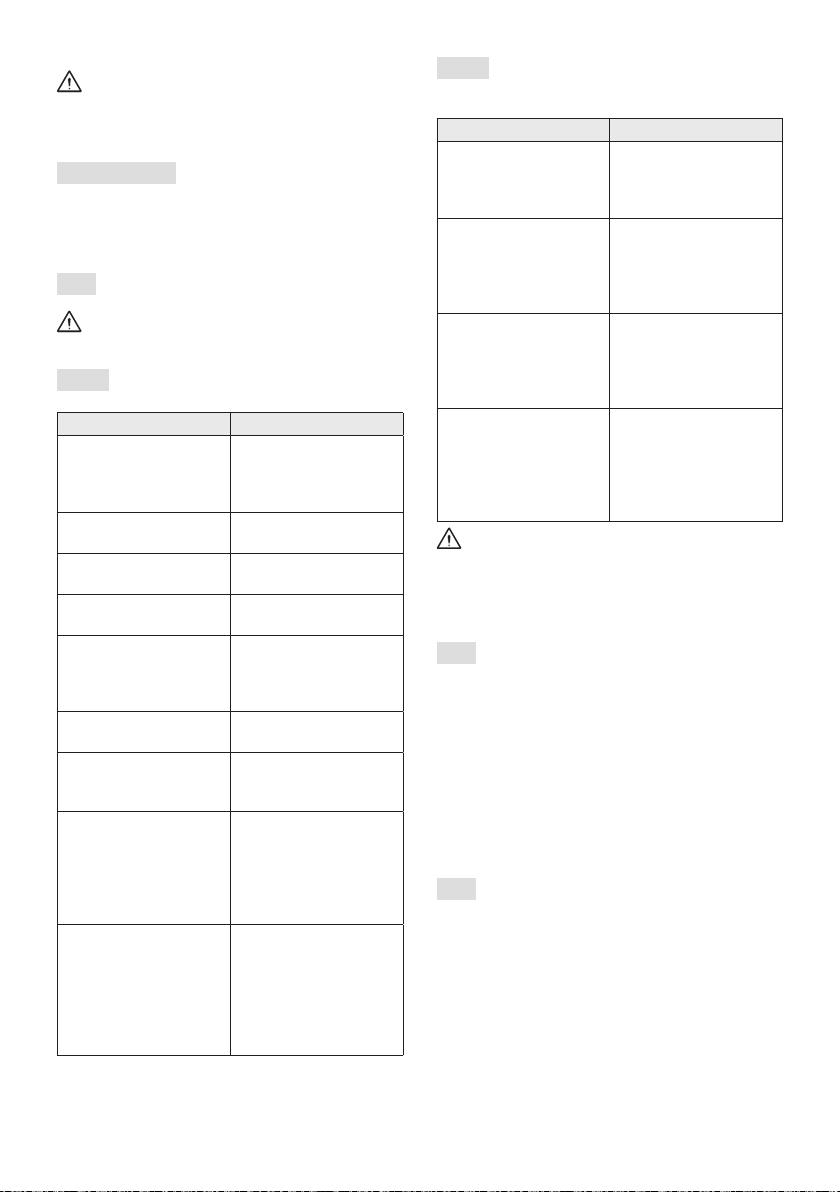
DATI TECNICI MP 20 Li A MP 20 Li S
Tensione e frequenza di alimentazione MAX V / d.c. 20 20
Tensione e frequenza di alimentazione
NOMINAL
V / d.c. 18 18
Velocità massima della catena m/s 5 5
Frequenza massima di rotazione del man-
drino
min
-1
2500 2500
Lunghezza di taglio cm 20 20
Spessore catena mm
Denti / passo del pignone catena
Capacità del serbatoio dell’olio ml 115 115
Peso senza dispositivo di taglio e imbracatura kg
Livello di pressione acustica misurato
Incertezza di misura
dB(A)
dB(A)
Livello di potenza acustica misurato
Incertezza di misura
dB(A)
dB(A)
1,02
1,02
Livello di potenza acustica garantito dB(A) 87 87
Livello di vibrazioni
- Impugnatura anteriore
- Impugnatura posteriore
Incertezza di misura
m/s
2
m/s
2
m/s
2
1,10
1,5
1,10
1,5
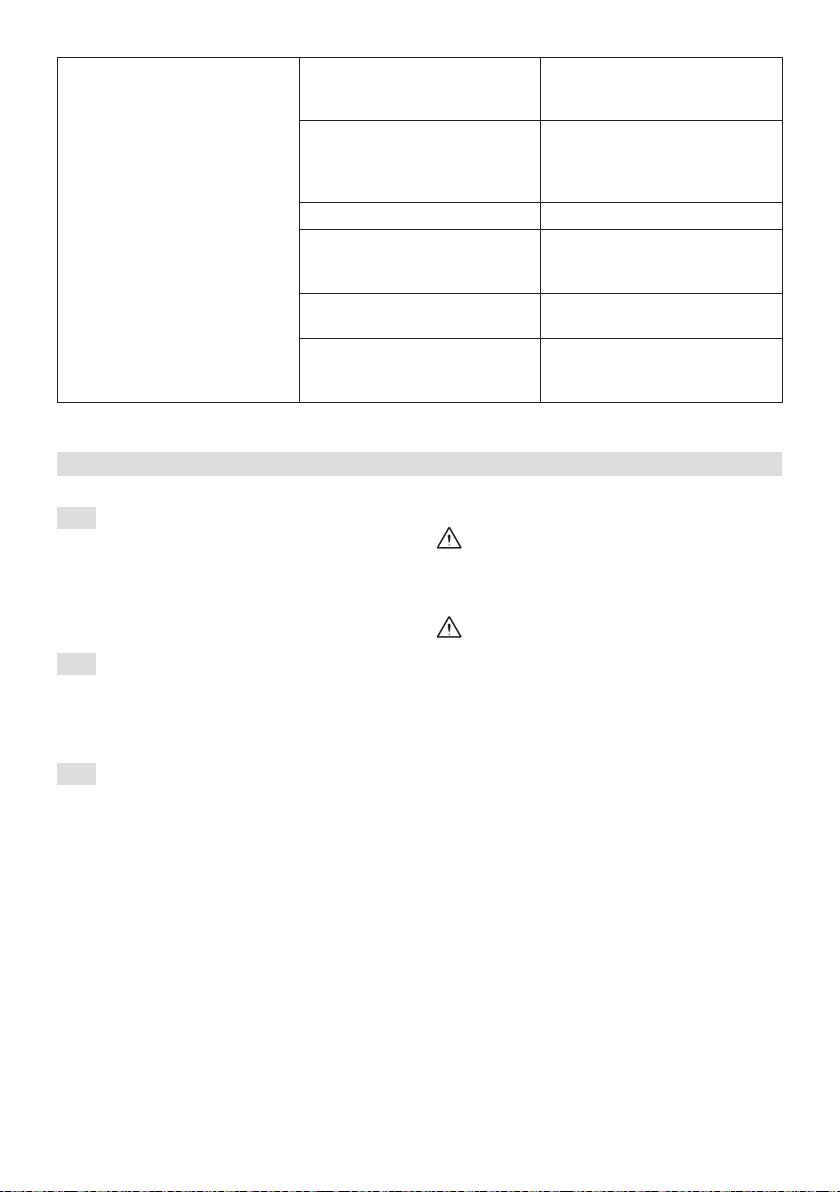
ACCESSORI A RICHIESTA
Gruppo batteria, mod.
BT 20 Li 2.0 A
BT 20 Li 2.0 S
Carica batteria
CG 20 Li
CGD 20 Li
CGW 20 Li
CG 20 Li
CGD 20 Li
CGW 20 Li
a) NOTA: il valore totale dichiarato delle vibrazioni è stato misurato attenendosi ad un metodo normalizzato di prova e
può essere utilizzato per fare un paragone tra un utensile e l’altro. Il valore totale delle vibrazioni può essere
utilizzato anche in una valutazione preliminare dell’esposizione.
b) AVVERTENZA: l’emissione di vibrazioni nell’uso eettivo dell’utensile può essere diversa dal valore
totale dichiarato a seconda dei modi in cui si utilizza l’utensile. Pertanto è necessario,
durante il lavoro, adottare le seguenti misure di sicurezza volte a proteggere
l’operatore: indossare guanti durante l’uso, limitare i tempi d’utilizzo della macchina
e accorciare i tempi in cui si tene premuta la leva comando acceleratore.
TABELLA PER LA CORRETTA COMBINAZIONE DI BARRA E CATENA (Cap. 13.3)
PASSO
BARRA
CATENA
Pollici
Lunghezza:
Pollici / cm
Larghezza
scanalatura:
Pollici / mm
Codice
Codice
080SDEA

TECHNICAL DATA MP 20 Li A MP 20 Li S
Power supply frequency and voltage MAX V / d.c. 20 20
Power supply frequency and voltage NOMI-
NAL
V / d.c. 18 18
Maximum chain speed m/s 5 5
Maximum rotational frequency of the spindle min
-1
2500 2500
Cutting length cm 20 20
Chain gauge mm
Chain pinion teeth / pitch
Oil tank capacity ml 115 115
Weight (without battery, bar and chain) kg
Measured sound pressure level
Uncertainty of measure
dB(A)
dB(A)
Measuered sound power level
Uncertainty of measure
dB(A)
dB(A)
1,02
1,02
Guaranteed sound power level dB(A) 87 87
Vibration level
- Front handle
- Rear handle
Uncertainty of measure
m/s
2
m/s
2
m/s
2
1,10
1,5
1,10
1,5
ACCESSORIES AVAILABLE ON REQUEST
Battery pack, model
BT 20 Li 2.0 A
BT 20 Li 2.0 S
Battery charger
CG 20 Li
CGD 20 Li
CGW 20 Li
CG 20 Li
CGD 20 Li
CGW 20 Li
a) NOTE: the declared total vibration value was measured using a normalised test method and can be used to conduct
comparisons between one tool and another. The total vibration value can also be used for a preliminary ex-
posure evaluation.
b) WARNING: the vibrations emitted during actual use of the tool can dier from the declared total
value according to how the tool is used. Whilst working, therefore, it is necessary
to adopt the following safety measures designed to protect the operator: wear
protective gloves whilst working, use the machine for limited periods at a time
and decrease the time during which the throttle trigger lever is pressed.
CORRECT BAR AND CHAIN COMBINATION TABLE (Chap. 13.3)
PITCH
BAR
CHAIN
Inches
Length:
Inches / cm
Groove width:
Inches / mm
Code
Code
080SDEA

IT - 1
ATTENZIONE!: PRIMA DI USARE LA MACCHINA, LEGGERE ATTENTAMENTE
IL PRESENTE LIBRETTO. Conservare per ogni futura necessità.
IT
INDICE
1. GENERALITÀ ............................................... 1
2. NORME DI SICUREZZA .............................. 1
.................... 6
.. 6
............... 6
........ 7
........... 7
............................................... 8
...................................... 8
catena dentata ...................................... 8
........... 8
.............................................................. 8
......
5. COMANDI DI CONTROLLO ........................
5.1 Leva comando acceleratore .................
5.2 Pulsante di bloccaggio acceleratore ....
6. USO DELLA MACCHINA .............................
6.1 Operazioni preliminari ..........................
6.2 Controlli di sicurezza .......................... 10
......................................... 10
................................................. 10
6.5 Consigli per l’utilizzo ............................11
6.6 Arresto .................................................11
6.7 Dopo l’utilizzo ......................................11
7. MANUTENZIONE ...................................... 12
7.1 Generalità ........................................... 12
7.2 Batteria ............................................... 12
.... 12
.................................................
7.5 elemento ferma catena .......................
della barra ...........................................
.........................
7.8 Pignone di trascinamento catena .......
...
7.10 Manutenzione della barra di guida ......
8. RIMESSAGGIO ...........................................
8.1 Rimessaggio della macchina ..............
8.2 Rimessaggio della batteria ..................
.........
10. ASSISTENZA E RIPARAZIONI ...................
11. COPERTURA DELLA GARANZIA ............. 15
12. IDENTIFICAZIONE INCONVENIENTI ....... 15
........................17
................................................17
.....................................17
.....................................17
1. GENERALITÀ
1.1 COME LEGGERE IL MANUALE
NOTA oppure IMPORTANTE fornisce
precisazioni o altri elementi a quanto già
precedentemente indicato, nell’intento di non
danneggiare la macchina, o causare danni.
Il simbolo evidenzia un pericolo. Il mancato
rispetto dell’avvertenza comporta possibilità
di lesioni personali o a terzi e/o danni.
con bordo a punti grigio indicano
caratteristiche opzionali non presenti
in tutti i modelli documentati in questo
è presente nel proprio modello.
alla posizione di lavoro dell’operatore.
2. NORME DI SICUREZZA
2.1 AVVERTENZE GENERALI
DI SICUREZZA PER GLI
UTENSILI ELETTRICI
Leggere tutte le avvertenze di
sicurezza, le istruzioni, le illustrazioni
.
L’inosservanza delle istruzioni elencate
di serguito può causare scosse
elettriche, incendi e/o gravi lesioni.
Conservare tutte le avvertenze e le
istruzioni per consultarle in futuro.
avvertenze si riferisce alla vostra macchina con
alimentazione dalla rete elettrica (con cavo) o
con alimentazione a batteria (senza cavo).
1) Sicurezza dell’area di lavoro
a) Tener pulita e ben illuminata
l’area di lavoro. Aree disordinate
o scure facilitano gli incidenti.
b) Non usare l’utensile elettrico in
atmosfere esplosive, ad esempio

IT - 2
gas o polvere. Gli utensili elettrici
generano scintille che possono
incendiare la polvere o i vapori.
c) Tenere lontani i bambini e gli
astanti quando si usa un utensile
elettrico. Le distrazioni possono
causare la perdita di controllo.
2) Sicurezza elettrica
a) Evitare il contatto del corpo con
tubi, radiatori, cucine, frigoriferi. Il
rischio di scossa elettrica aumenta se il
corpo viene a trovarsi a massa o a terra.
b) Non esporre gli utensili elettrici alla
pioggia o ambienti bagnati. L’acqua
che penetra in un utensile elettrico
aumenta il rischio di scossa elettrica.
3) Sicurezza personale
a) Rimanere attenti, controllare
quello che si sta facendo e usare
buonsenso quando si usa un utensile
elettrico. Non usare l’utensile
elettrico quando si è stanchi o
medicinali. Un momento di disattenzione
mentre si usa un utensile elettrico può
causare gravi lesioni personali.
b) Utilizzare dispositivi di protezione
individuale. Indossare sempre occhiali
protettivi. L’uso di dispositivi di protezione
come mascherine antipolvere, calzature
antiscivolo, elmetti protettivi o cue
per l’udito, riduce le lesioni personali.
c) Evitare avviamenti non intenzionali.
Accertarsi che l’apparechio sia
spento prima di inserire la batteria,
elettrico. Trasportare un utensile
elettrico con il dito sull’interruttore o
montare la batteria con l’interruttore in
posizione “ON” facilita gli incidenti.
d) Rimuovere ogni chiave o utensile
di regolazione prima di accendere
l’utensile elettrico. Una chiave o
un utensile che rimane a contatto
con una parte rotante della macchina
può provocare lesioni personali.
e) Non sporgersi. Mantenere
sempre appoggio ed equilibrio
adeguati. Questo permette un
controllo migliore dell’utensile
elettrico in situazioni inaspettate.
f) Vestirsi in modo appropriato. Non
indossare vestiti larghi o gioielli.
Tenere i capelli e i vestiti distanti
dalle parti in movimento. Abiti sciolti,
gioielli o capelli lunghi possono rimanere
impigliati nelle parti in movimento.
g) Se vi sono dispositivi da collegare
a impianti per I’e stra zione e la
raccolta di polvere, accertarsi che
sia no collegati e usati in maniera
appropriata. L’uso di que sti dispositivi
può ridurre i rischi correlati alla polvere.
h) Non lasciare che la familiarità
acquisita dall’uso della macchina
consenta di diventare compiacente
ed ignorare i principi di sicurezza
dell’utensile elettrico. Un’azione
negligente può causare lesioni
gravi in una frazione di secondo.
4) Uso e salvaguardia dell’utensile elettrico
a) Non sovraccaricare l’utensile
elettrico. Usare l’utensile elettrico
adatto al lavoro. L’utensile elettrico
adeguato eseguirà il lavoro meglio
ed in modo più sicuro, alla velocità
per la quale è stato progettato.
b) Non utilizzare l’utensile elettrico se
l’interruttore non è in grado di avviarlo
o arrestarlo. Un utensile elettrico che
non può essere azionato con l’interruttore
è pericoloso e deve essere riparato.
c) Rimuovere la batteria dalla macchina
prima di eseguire qualsiasi
regolazione, cambio di accessori, o
prima di riporre l’utensile elettrico.
Queste misure preventive di sicurezza
riducono il rischio di avviamento
accidentale dell’utensile elettrico.
d) Riporre gli utensili elettrici
inutilizzati fuori dalla portata dei
bambini e non permettere l’utilizzo
della macchina a persone che non
abbiano familiarità con l’utensile
stesso e con queste istruzioni. Gli
utensili elettrici sono pericolosi nelle
mani di utilizzatori non addestrati.
e) Curare la manutenzione degli utensili
elettrici e degli accessori. Controllare
il disallineamento o il collegamento
di parti mobili, la rottura di parti
e qualsiasi altra condizione che
dell’utensile elettrico. In caso di danni,
l’utensile elettrico deve essere riparato
prima di usarlo. Molti incidenti sono
causati da una scarsa manutenzione.
f)
taglio. Una adeguata manutenzione
degli organi di taglio, con taglienti
ben alati, li rende meno soggetti ad
incepparsi e più facili da controllare.
g) Usare l’utensile elettrico e gli
accessori relativi secondo le
istruzioni fornite, tenendo presente le
condizioni di lavoro e il tipo di lavoro

da eseguire. L’uso di un utensile elettrico
per operazioni diverse da quelle previste
può provocare situazioni di pericolo.
h) Mantenere le impugnature e
pulite e senza tracce di olio e di
grasso. Le impugnature e superci
di presa scivolose non consentono
di movimentare e controllare in modo
sicuro l’utensile in situazioni impreviste.
6) Uso e precauzioni d’uso
degli utensili a batteria
IMPORTANTE Le seguenti norme di
sicurezza integrano le prescrizioni di sicurezza
presenti nello specifico libretto della batteria
e del carica batteria allegato alla macchina.
a) Per caricare la batteria utilizzare
solo carica batteria raccomandati dal
produttore. Un caricabatterie adatto ad
un tipo di pacco batterie può creare un
rischio di incendio, una scossa elettrica,
un surriscaldamento o una fuoriuscita
di liquido corrosivo della batteria se
utilizzato con un altro pacco batterie.
b) Utilizzare soltanto le batterie
utensile. L’uso di un qualsiasi
altro gruppo di batterie può creare
il rischio di lesioni e incendi.
c) Quando il gruppo batterie non è
in uso, bisogna tenerlo lontano
da altri oggetti di metallo quali
viti o altri piccoli oggetti metallici
che potrebbero provocare un
corto circuito dei contatti. Un
cortocircuito fra i contatti della batteria
può comportare combustioni o incendi.
d) Una batteria in cattive condizioni può
provocare la fuoriuscita del liquido.
Evitare il contatto con il liquido.
In caso di contatto accidentale
risciacquare con acqua. In caso di
contatto del liquido con gli occhi,
consultare anche un medico. Il
liquido fuoriuscito dalla batteria può
provocare irritazioni cutanee o ustioni.
e) Non utilizzare una batteria o un
Le batterie danneggiate o modicate
possono presentare un comportamento
imprevedibile con conseguente incendio,
esplosione o rischio di lesioni.
f) Non esporre il pacco batteria o
l’utensile a fuoco o temperatura
eccessiva. L’esposizione al fuoco
o temperatura superiore a 130 °C
può causare un’esplosione.
g) Ricaricare solo a temperatura
ambiente, tra 0° + 45°C. Non
caricare la batteria o l’utensile
al di fuori di questo intervallo di
temperatura. Una carica impropria o
a temperatura al di fuori dell’intervallo
specicato può danneggiare la batteria
ed aumentare il rischio di incendio.
h) Accertarsi che l’apparecchio sia
spento prima di inserire la batteria.
Montare una batteria in un apparecchio
elettrico acceso può provocare incidenti.
i) Controllare che l’accumulatore sia
in buone condizioni e che non ci
siano segni di danneggiamento.
Non usare la macchina con un
accumulatore danneggiato o usurato.
7) Assistenza
a) Far riparare l’utensile elettrico da
solo ricambi originali. Questo
permette che venga mantenuta la
sicurezza dell’utensile elettrico.
b)
riparazione sulla batteria. Attività di
riparazione devono essere eettuate
dal costruttore o da un centro Centro
di assistenza specializzato.
2.2 NORME DI SICUREZZA
SPECIFICHE PER MOTOSEGHE
ED ELETTROSEGHE
• Mantenere tutte le parti del corpo
lontane dalla catena dentata mentre la
sega a catena è in funzione. Prima di
avviare la sega a catena, sincerarsi che
la catena dentata non sia a contatto con
alcunché. Un momento di disattenzione
mentre si fanno funzionare le seghe a
catena può far sì che i vestiti o il corpo
rimangano impigliati nella catena dentata.
•
l’impugnatura posteriore e la mano
sinistra l’impugnatura frontale. Non si
dovrebbe mai invertire le mani nel tenere
la sega a catena, poiché aumenta il
rischio di incidenti alla propria persona.
•
poiché la catena dentata potrebbe
venire a contatto con cavi nascosti. Il
contatto della catena dentata con un cavo
sotto tensione può mettere sotto tensione
le parti metalliche dell’attrezzo e provocare
una scossa elettrica all’operatore.

• Indossare degli occhiali di sicurezza
e una protezione acustica. Si
raccomandano altri dispositivi di
protezione per Ia testa, le mani ed i
piedi. Indossare dei vestiti di protezione
adeguati ridurrà gli incidenti corporali
provocati da schegge volanti come pure il
contatto accidentale con la sega dentata.
• Non usare una sega a catena su un
albero. L’azionamento di una sega a
catena mentre si sta su un albero può
provocare delle ferite corporali.
• Mantenere sempre un corretto punto
di appoggio del piede e far funzionare
la sega a catena solamente stando su
scale, possono provocare una perdita di
equilibrio o di controllo della sega a catena.
• Quando si taglia un ramo che è sotto
tensione, bisogna fare attenzione al
rischio di un contraccolpo. Quando la
può colpire l’operatore e/o proiettare
la sega a catena fuori controllo.
• Usare estrema cautela quando si tagliano
cespugli e arbusti giovani. I materiali
sottili possono incastrarsi nella catena
dentata e venire proiettati nella vostra
direzione e/o facendovi perdere l’equilibrio.
• Trasportare la sega a catena per
l’impugnatura frontale quando è
spenta mantenendola lontana dal
vostro corpo. Quando si trasporta o si
ripone la sega a catena bisogna sem-
pre mettere la copertura della barra di
guida. Ma neg gia re correttamente la sega
a catena ridurrà la probabilità di con tatto
fortuito con la catena dentata mobile.
• Attenersi alle istruzioni relative alla
catena e per gli accessori di ricambio.
non siano corrette può sia rompersi che
accrescere il rischio di contraccolpo.
• Mantenere le impugnature asciutte, pulite
e senza tracce di olio e di grasso. Le
impugnature grasse, oliose sono scivolose,
provocando così una perdita di controllo.
• Tagliare unicamente il legno. Non
impiegare la sega a catena per usi non
previsti. Per esempio: non utilizzare la
sega a catena per tagliare dei materiali
plastici, materiali per l’edilizia oppure
materiali che non siano di legno.
L’utilizzo della sega a catena per delle
operazioni diverse da quelle previste può
dare origine a situazioni di pericolo.
•
un’età minima per l’utilizzatore.
•
In caso di rotture o incidenti durante
il lavoro, arrestare immediatamente il
motore e allontanare la macchina in modo
da non provocare ulteriori danni; nel
caso di incidenti con lesioni personali
o a terzi, attivare immediatamente
le procedure di pronto soccorso più
adeguate alla situazione in atto e rivolgersi
ad una Struttura Sanitaria per le cure
necessarie. Rimuovere accuratamente
eventuali detriti che potrebbero arrecare
danni o lesioni a persone o a animali
qualora rimanessero inosservati.
L’esposizione prolungata alle
vibrazioni può causare lesioni e disturbi
neurovascolari (conosciuti anche come
«fenomeno di Raynoud» o «mano bianca»)
specialmente a chi sore di disturbi
circolatori. I sintomi possono riguardare
le mani, i polsi e le dita e si manifestano
con perdita di sensibilità, torpore, prurito,
dolore, decolorazione o modiche
strutturali della pelle. Questi eetti possono
essere ampliati dalle basse temperature
ambientali e/o da una presa eccessiva
sulle impugnature. All’insorgere dei
sintomi, occorre ridurre i tempi di utilizzo
della macchina e consultare un medico.
• Fai delle pause e cambia la tua
posizione di lavoro regolarmente.
• La manutenzione impropria, l’uso di
pezzi di ricambio non conformi o la
può causare danni al dispositivo e
procurare gravi lesioni all’utilizzatore.
• Eseguire le operazioni di pulizia
e manutezione prima di riporre la
macchina dopo averla utilizzata.
• Se la macchina ha subìto un colpo
o una caduta assicurarsi che sia in
buone condizioni prima di avviarla.
• Rimuovere i rami in sezioni.
• Prestare attenzione ai rami che,
una volta tagliati possono colpire
l’utilizzatore e a quelli che, caduti a terra,
possono subìre un contraccolpo.
2.3 CAUSE DEL CONTRACCOLPO E
PREVENZIONE PER L’OPERATORE
Si può avere un contraccolpo quando la
punta o l’estremità della bar ra di guida
tocca un oggetto, oppure quando il legno
si racchiude in sé serrando la catena
dentata nella sezione di taglio.

IT - 5
Il contatto dell’estremità può, in certi casi,
provocare improvvisamente una reazione
inversa, spingendo la barra di guida verso
l’alto e all’indietro verso l’operatore.
Il serraggio della catena dentata sulla
parte superiore della barra di guida
può spingere rapidamente all’indietro
la catena dentata verso l’operatore.
L’una o l’altra di dette reazioni può causare
una perdita di controllo della sega,
provocando così gravi incidenti alla persona.
Non bisogna contare esclusivamente sui
dispositivi di sicurezza integrati nella sega.
AII’utilizzatore di una sega a catena, conviene
prendere diversi provvedimenti per eliminare
rischi di incidenti o di ferite nel corso del lavoro
di taglio. Il contraccolpo è il risultato di un
cattivo uso dell’utensile e/o di procedure o di
condizioni di funzionamento non corrette e
può essere evitato prendendo le precauzioni
• Tenere la sega in modo fermo con
entrambe le mani, con i pollici e le dita
attorno alle impugnature della sega
a catena, e mettere il vostro corpo
e le braccia in una posizione che vi
permetta di resistere alle forze di
contraccolpo. Le forze di contraccolpo
possono essere controllate dall’operatore
se si sono prese le precauzioni del caso.
Non lasciar partire la sega a catena.
• Non tendere le braccia troppo lontano
e non tagliare al di sopra dell’altezza
della spalla. Ciò contribuisce a evitare
i con tatti involontari con le estremità e
permette un migliore con trollo della sega
a catena nelle situazioni impreviste.
• Utilizzare unicamente le guide a barra
Guide e catene di ricambio non adeguate
possono dar origine a una rottura della
catena e/o a dei contraccolpi.
• Attenersi alle istruzioni del costruttore
manutenzione della sega a catena. Un
de cre mento del livello della profondità può
portare a un aumento dei contraccolpi.
• Tecniche di utilizzo della sega a catena
elettrica (con alimentazione a batteria)
Osservare sempre le avvertenze per
la sicurezza e attuare le tecniche di
taglio più adatte al tipo di lavoro da
eseguire, secondo le indicazioni e gli
esempi riportati nelle istruzioni d’uso.
• Movimentazione della sega a
catena elettrica (con alimentazione
a batteria) in sicurezza
Ogni volta che è necessario movimentare
o trasportare la macchina occorre:
– spegnere il motore, attendere l’arresto
della catena e scollegare la macchina
dalla rete elettrica (rimuovere la
batteria dalla sua sede);
– applicare la protezione copribarra;
–
impugnature e orientare la barra nella
direzione contraria al senso di marcia.
Quando si trasporta la macchina con
un automezzo, occorre posizionarla
in modo da non costituire pericolo per
nessuno e bloccarla saldamente.
• Raccomandazioni per i principianti
di abbattimento o di sramatura, è opportuno:
–
sull’uso di questo tipo di attrezzatura;
– aver letto accuratamente le avvertenze
di sicurezza e le istruzioni d’uso
contenute nel presente manuale;
–
a cavalletti, in modo da acquisire la
necessaria familiarità con la macchina
e le tecniche di taglio più opportune.
2.4 TUTELA AMBIENTALE
• Durante il lavoro, viene dispersa
nell’ambiente una certa quantità di olio,
catena; per questa ragione, usare solo olii
L’uso di un olio minerale o di molio per
motori arreca gravi danni all’ambiente.
• Seguire scrupolosamente le norme locali per
lo smaltimento di imballi, parti deteriorate o
qualsiasi elemento a forte impatto ambientale;
spazzatura, ma devono essere separati e
conferiti agli appositi centri di raccolta, che
provvederanno al riciclaggio dei materiali.
• Seguire scrupolosamente le norme locali
per lo smaltimento dei materiali di risulta
• Al momento della messa fuori servizio, non
abbandonare la macchina nell’ambiente,
ma rivolgersi a un centro di raccolta,
secondo le norme locali vigenti.
Non gettare le apparecchiature

IT - 6
elettroniche e la sua attuazione in conformità
alle norme nazionali, le apparecchiature
elettriche esauste devono essere raccolte
modo eco-compatibile. Se le apparecchiature
elettriche vengono smaltite in una discarica o
nel terreno, le sostanze nocive possono
raggiungere la falda acquifera ed entrare nella
catena alimentare, danneggiando la vostra
salute e benessere. Per informazioni più
approfondite sullo smaltimento di questo
prodotto, contattare l’Ente competente per lo
Rivenditore.
batterie con la dovuta attenzione per il
nostro ambiente. La batteria contiene
materiale che è pericoloso per voi e per
l’ambiente. Essa deve essere rimossa e
smaltita separatamente in una struttura che
accetta le batterie agli ioni di litio.
imballaggi usati, consente il riciclaggio
dei materiali e la riutilizzazione. Il
riutilizzo dei materiali riciclati aiuta a
prevenire l’inquinamento ambientale e
riduce la domanda di materie prime.
3. CONOSCERE LA MACCHINA
3.1 DESCRIZIONE MACCHINA
E USO PREVISTO
Questa macchina è una attrezzatura
forestale e precisamente un dispositivo
potatore a catena alimentato a batteria.
La macchina si compone essenzialmente
di un motore alimentato da una batteria e di
una barra di guida che serve a trasmettere
il movimento dal motore alla catena dentata
che funge da sega vera e propria.
L’operatore regge la macchina con due
mani, utilizzando l’impugnatura anteriore
e posteriore, e può azionare i comandi
principali mantenendosi sempre a distanza
di sicurezza dal dispositivo di taglio.
3.1.1 Uso previsto
Questa macchina è progettata e costruita per:
– la sramatura di alberi di dimensioni
rapportate alla lunghezza della
barra di guida o di oggetti in legno
di analoghe caratteristiche;
– essere utilizzata da un solo operatore.
3.1.2 Uso improprio
sopra citati, può rivelarsi pericoloso e causare
danni a persone e/o cose. Rientrano nell’uso
improprio (come esempio, ma non solo):
– regolarizzare siepi;
– lavori di intaglio;
– sezionare bancali, casse e imballi in genere;
– sezionare mobili o quant’altro
possa contenere chiodi, viti o ogni
genere di componenti metallici;
– eseguire lavori di macelleria;
– usare la macchina per il taglio di materiali
che non siano di legno (materiali
plastici, materiali per l’edilizia);
– usare la macchina come leva per
sollevare, spostare o spezzare oggetti;
–
– l’impiego di dispositivi di taglio diversi
da quelli elencati nella tabella “Dati
– utilizzare la macchina in più di una persona.
IMPORTANTE L’uso improprio della
macchina comporta il decadimento della
garanzia e il declino di ogni responsabilità del
Costruttore, riversando sull’utilizzatore gli oneri
derivanti da danni o lesioni proprie o a terzi.
3.1.3 Tipologia di utente
Questa macchina è destinata
all’utilizzo da parte di consumatori,
cioè operatori non professionisti. È
3.2 COMPONENTI PRINCIPALI
A. Motore: fornisce il movimento
al dispositivo di taglio.
B. Asta Comandi: vi sono i comandi
principali di accelerazione.
C. Impugnatura posteriore: impugnatura
di supporto situata nella parte
posteriore dell’asta comandi.
D. Impugnatura anteriore: impugnatura
di supporto situata sull’asta comandi.
E. Dispositivo potatore: dispositivo preposto
alla sramatura e sfrondatura di alberi.
F. Imbracatura:
passando sopra la spalla, aiuta a sostenere
il peso della macchina durante il lavoro.
G. Barra di guida: sostiene e
guida la catena dentata.
H. Catena dentata: elemento preposto
al taglio, costituito da maglie di
IT - 7
trascinamento fornite di piccole lame
laterali tenuti insieme da rivetti.
I. Elemento ferma catena: dispositivo
di sicurezza che impedisce movimenti
incontrollati della catena dentata in
caso di rottura o allentamento.
J. Protezione copribarra: dispositivo
di copertura della sega a catena sulla
barra di guida da utilizzare durante
la movimentazione, il trasporto o
rimessaggio della macchina.
K. Batteria: (se non fornita con la
richiesta“) dispositivo che fornisce
corrente elettrica all’utensile; le sue
caratteristiche e norme d’uso sono
L. Carica batteria (se non fornito con
ccessori a
richiesta“): dispositivo che si utilizza
per ricaricare la batteria; le sue
caratteristiche e norme d’uso sono
3.3 ETICHETTA DI
IDENTIFICAZIONE
1. Livello potenza sonora
2. Marchio di conformità
3. Mese/Anno di costruzione
4. Tipo di macchina
5. Numero di matricola
6. Nome e indirizzo del Costruttore
7. Codice articolo
8. Tensione e Frequenza di alimentazione
9. Velocità catena
macchina negli appositi spazi dell’etichetta
riportata nel retro della copertina.
IMPORTANTE Utilizzare i dati di
identificazione riportati sull’etichetta di
identificazione prodotto ogni volta che
si contatta l’officina autorizzata.
IMPORTANTE L’esempio della
dichiarazione di conformità si trova
nelle ultime pagine del manuale.
3.4 SEGNALETICA DI SICUREZZA
Sulla macchina compaiono vari simboli.
ATTENZIONE! PERICOLO!
Questa macchina, se non usata
correttamente, può essere
pericolosa per sé e per gli altri.
PERICOLO DI PROIEZIONI!
Fare attenzione alle possibili
proiezioni di materiale, causato
dal dispositivo di taglio,
che possono causare gravi
lesioni a persone o cose.
ATTENZIONE! Prima di usare
questa macchina leggere
il ma nuale di istruzioni.
Indossare occhiali di protezione.
Indossare protezioni acustiche.
Indossare il casco di protezione.
Indossare guanti antiscivolo.
Indossare calzature di
protezione antiscivolo!
Non esporre alla pioggia
(o all’umidità)
PERICOLO! Folgorazione.
Mantenere una distanza
di almeno 15 mt dai cavi
delle linee aeree.
Allontanare qualunque
persona o animale domestico
ad almeno 15 mt durante
l’impiego della macchina
IT - 8
Rimuovere la batteria prima
controllo, pulizia o intervento
di manutenzione/regolazione
sulla macchina.
IMPORTANTE Le etichette adesive
rovinate o divenute illeggibili devono essere
sostituite. Richiedere le nuove etichette al
proprio centro di assistenza autorizzato.
4. MONTAGGIO
Le norme di sicurezza da seguire
sono descritte al cap. 2. Rispettare
scrupolosamente tali indicazioni per
non incorrere in gravi rischi o pericoli.
Per motivi di magazzinaggio e trasporto, alcuni
componenti della macchina possono non
essere assemblati direttamente in fabbrica,
ma devono essere montati dopo la rimozione
dall’imballo, seguendo le istruzioni seguenti.
Lo sballaggio e il completamento del
montaggio devono essere eettuati su
una supercie piana e solida, con spazio
suciente alla movimentazione della
macchina e degli imballi, avvalendosi
sempre degli attrezzi appropriati.
Non utilizzare la macchina prima di
aver portato a termine le indicazioni
della sezione “MONTAGGIO”.
4.1 DISIMBALLAGGIO
1. Aprire l’imballo con cautela, con
attenzione a non smarrire componenti.
2. Consultare la documentazione inclusa nella
scatola, comprese le presenti istruzioni.
3. Estrarre dalla scatola tutti i
componenti non montati.
4. Estrarre la macchina dalla scatola.
5. Smaltire la scatola e gli imballi nel
rispetto delle normative locali.
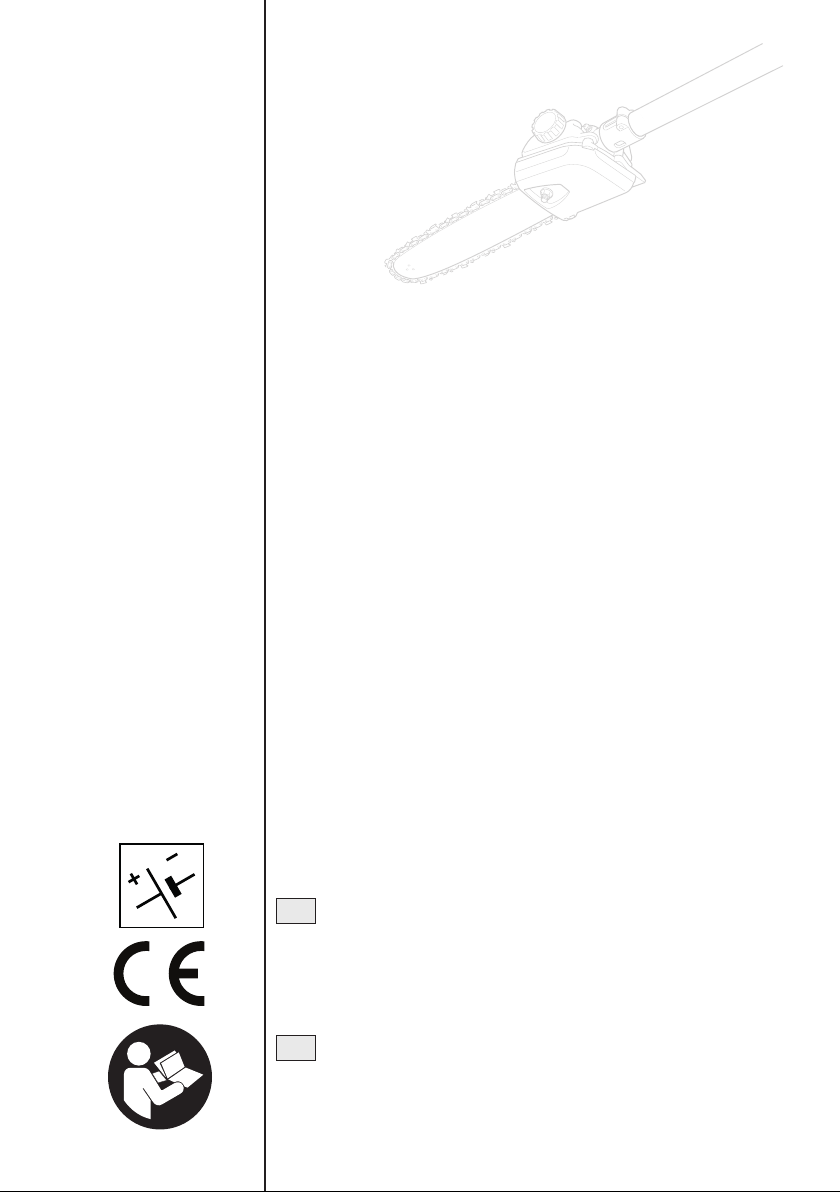
4.2 MONTAGGIO DELLA BARRA DI
GUIDA E DELLA CATENA DENTATA
Indossare sempre robusti guanti
da lavoro per maneggiare la barra e la
catena. Prestare la massima attenzione
nel montaggio della barra e della catena
per non compromettere la sicurezza e
l’ecienza dalla macchina; in caso di
dubbi, contattare il vostro Rivenditore.
Prima di eettuare il montaggio,
vericare che la batteria non sia
inserita nel suo alloggiamento.
1.
rimuovere il carter della catena (Fig.
trascinamento e alla sede della barra.
2.
posteriore del corpo macchina.
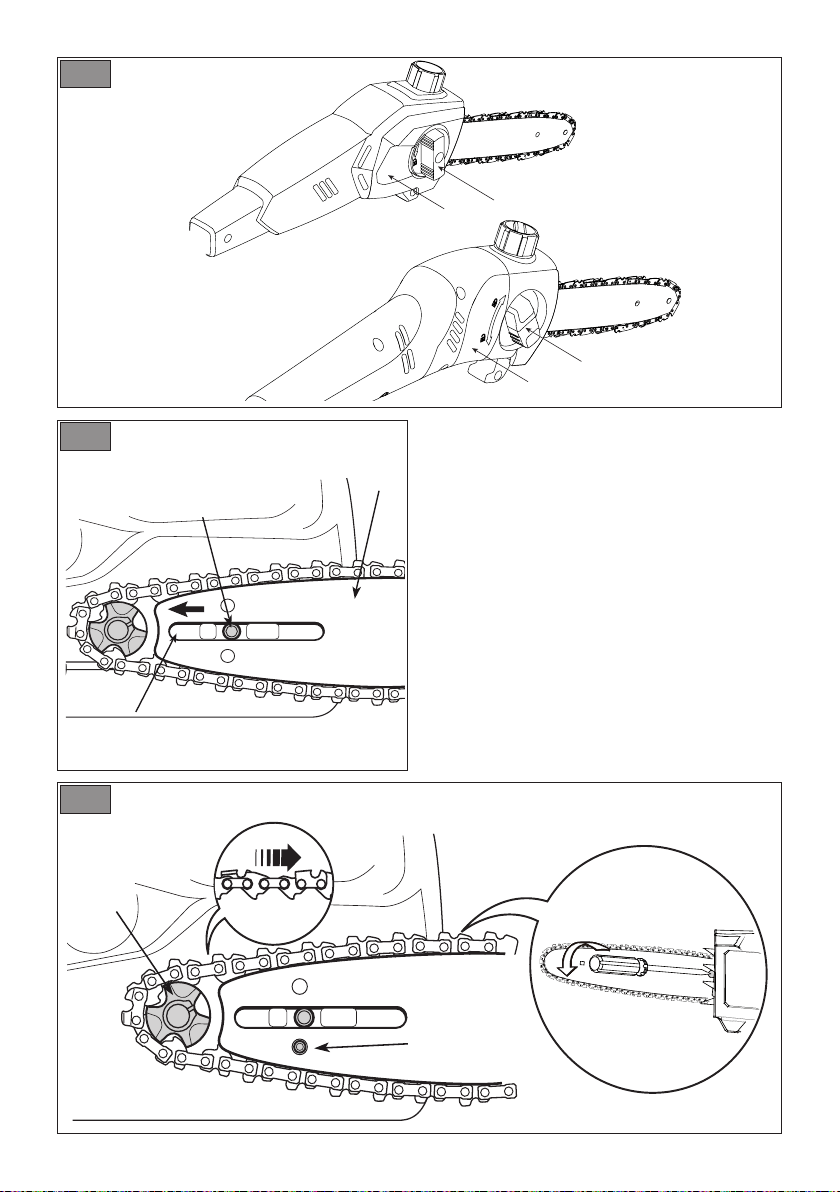
3. Montare la catena attorno al pignone di
trascinamento (Fig. 5.A) e lungo le guide
della barra, facendo attenzione a rispettare
il senso di scorrimento (Fig. 5.B).
Senso di scorrimento
della catena
Se la punta della barra è munita di
pignone di rinvio, curare che le maglie di
trascinamento della catena si inseriscano
correttamente nei vani del pignone (Fig. 6.).
4.
5.C) sia correttamente inserito nell’apposito
foro della barra; in caso contrario, agire
opportunamente sulla vite tendicatena (Fig.
5. Rimontare il carter, senza serrare
completamente la manopola.
6. Agire opportunamente sulla vite
corretta tensione della catena (Fig. 7).
7. Tenendo la barra sollevata, serrare a
fondo la manopola del carter (Fig. 8.A).
4.2.1 Controllo della tensione
della catena
Controllare la tensione della catena.
la catena a metà della barra, le maglie di
trascinamento non escono dalla guida (Fig. 7)
4.3 MONTAGGIO DISPOSITIVO
POTATORE
Prima di eettuare il montaggio,
vericare che la batteria non sia
inserita nel suo alloggiamento.
1.
L’inserimento è completo quando i pioli
fuoriescono completamente dal foro.
2.

Controllare periodicamente i raccordi
per assicurarsi che siano ben serrati.
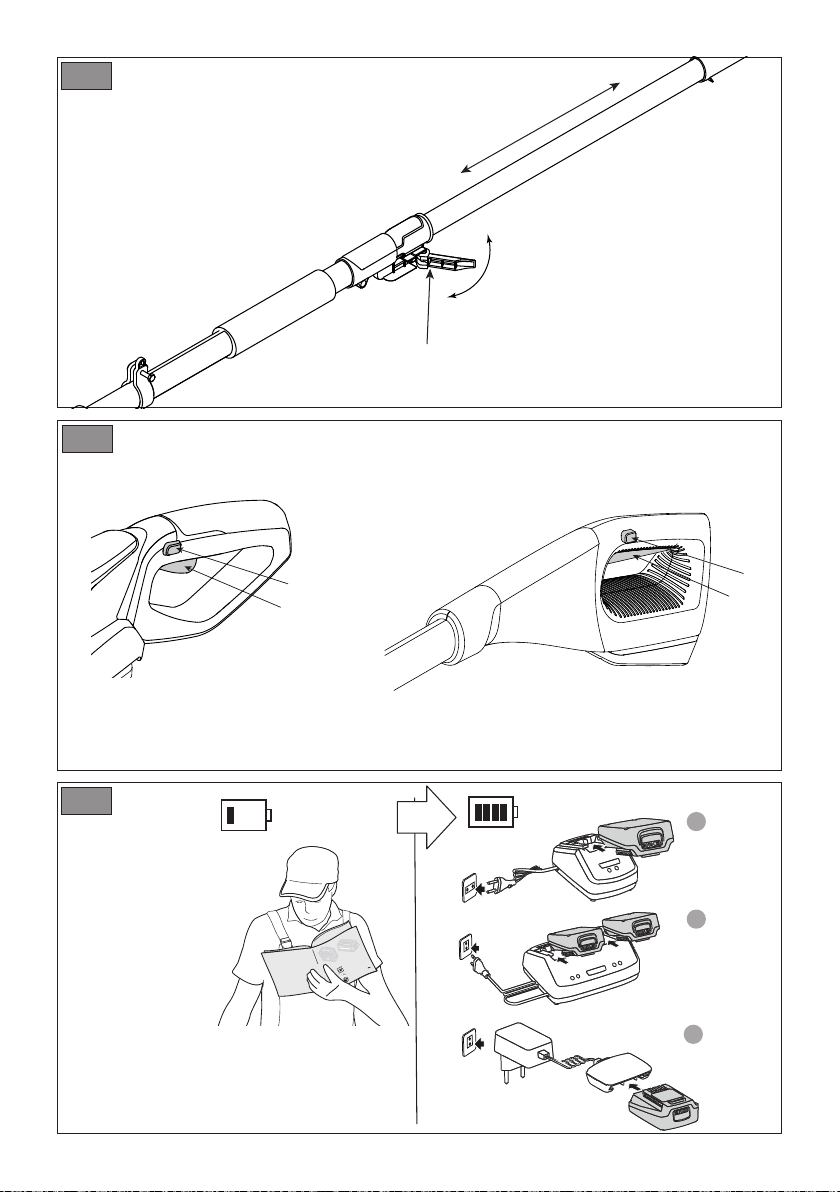
4.4 PROLUNGAMENTO DEL
DISPOSITIVO POTATORE
1. Aprile la leva di bloccaggio (Fig. 10.A).
2.
ad ottenere la lunghezza desiderata;
3. Chiudere la leva di bloccaggio (Fig. 10.A).
Controllare periodicamente i raccordi
per assicurarsi che siano ben serrati.
4.5 RIMOZIONE DEL DISPOSITIVO
POTATORE
Lasciare rareddare il motore prima
di rimuovere il dispositivo tagliasiepi.
1.
2.
3.
4. Smontare il dispositivo potatore.
5. COMANDI DI CONTROLLO
5.1 LEVA COMANDO ACCELERATORE
La leva comando acceleratore (Fig.11.A)
consente di azionare il dispositivo di taglio.
L’azionamento della leva comando acceleratore
(Fig. 11.A) è possibile solo se viene premuto il
pulsante di bloccaggio acceleratore (Fig. 11.B).
5.2 PULSANTE DI BLOCCAGGIO
ACCELERATORE
Il pulsante di bloccaggio acceleratore
(Fig. 11.B) consente l’azionamento della
leva comando acceleratore (Fig. 11.A).
6. USO DELLA MACCHINA
Le norme di sicurezza da seguire
sono descritte al cap. 2. Rispettare
scrupolosamente tali indicazioni per
non incorrere in gravi rischi o pericoli.
6.1 OPERAZIONI PRELIMINARI
Mettere la macchina in posizione orizzontale
e ben appoggiata sul terreno.
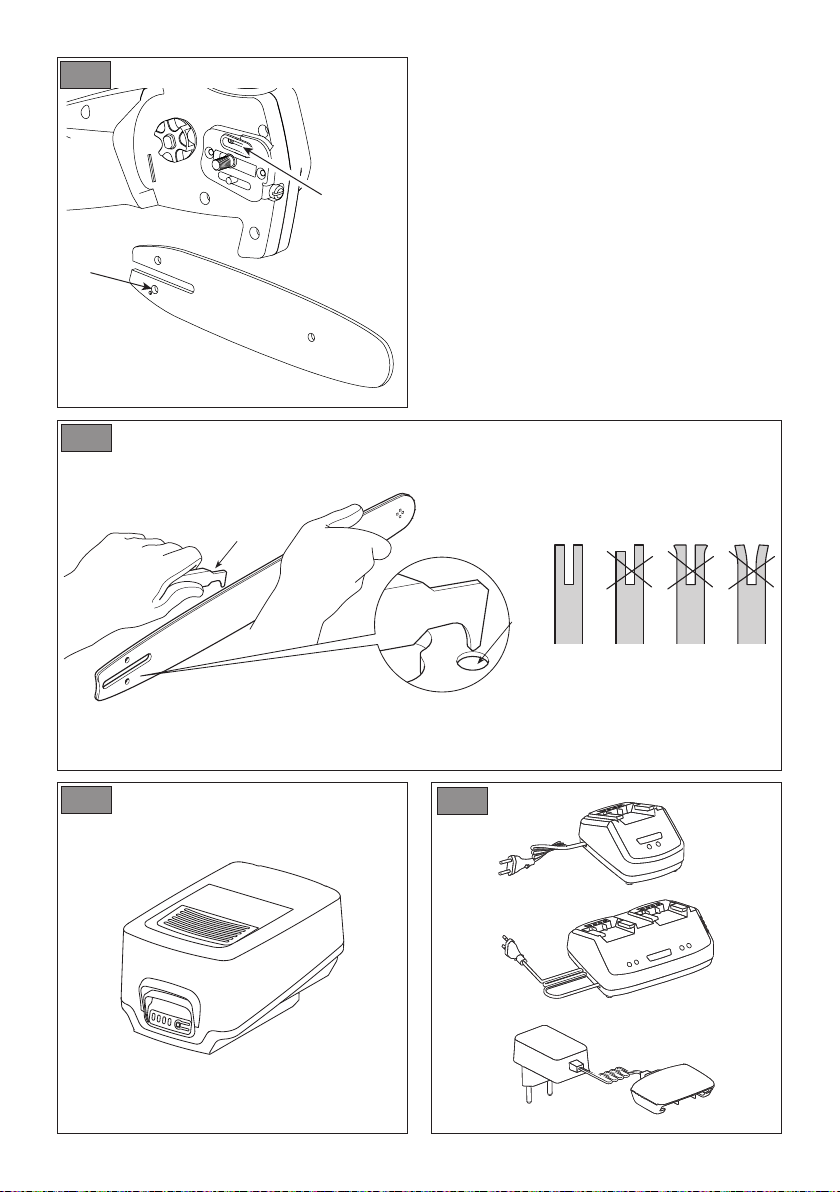
6.1.1 Controllo e ricarica della
batteria (Fig. 12)
carica della batteria seguendo le indicazioni
contenute nel libretto della batteria.
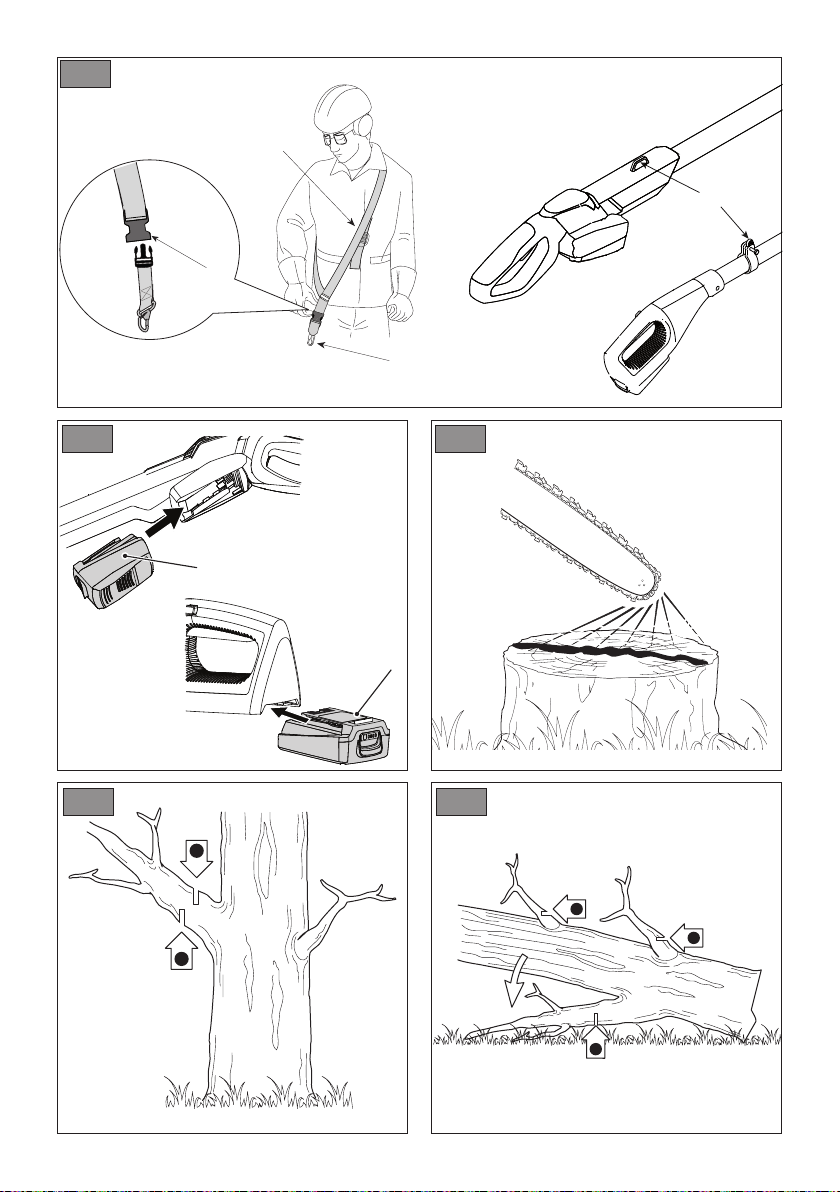
6.1.2 Uso della imbracatura
Vericare frequentemente l’ecienza
dello sgancio rapido per per mettere
di liberare rapidamente la macchina
dalle cinghie in caso di pericolo.
L’imbracatura deve essere indossata prima di
agganciare la macchina all’apposito attacco
e la cinghia deve essere regolata secondo
l’altezza e corporatura dell’operatore.
•
•
all’apposito attacco posto sullasta comandi.
•
macchina dall’imbracatura.
6.1.3 Rifornimento di olio
della catena. Per le modalità e precauzioni
6.1.4 Controllo della tensione
della catena
Questa operazione deve essere
eseguita a macchina arrestata e con la
batteria rimossa dalla sua sede (par. 7.2.2).
Controllare la tensione della catena.
la catena a metà della barra, le maglie di
trascinamento non escono dalla guida (Fig. 7).
Per regolare la tensione della catena:
1.
2. Agire opportunamente sulla vite
la corretta tensione della catena;
3. Tenendo la barra sollevata, serrare a
fondo la manopola del carter. (Fig. 8.A).
IT - 10
Non lavorare con la catena
allentata, per non provocare situazioni
di pericolo nel caso in cui la catena
dovesse uscire dalle guide della barra.
IMPORTANTE Durante il primo periodo
di utilizzo (o dopo la sostituzione della
catena) è necessario che la verifica
avvenga con una maggiore frequenza, a
causa dell’assestamento della catena.
6.2 CONTROLLI DI SICUREZZA
Eettuare sempre i controlli
di sicurezza prima dell’uso.
6.2.1 Controllo di sicurezza generale
Oggetto Risultato
Impugnature e
protezioni
Pulite, asciutte,
e saldamente
alla macchina
Viti sulla macchina
e sulla lama
allentate)
Passaggi dell’aria
Non ostruiti
Barra di guida Montata
correttamente
Catena
danneggiata o
usurata, montata e
tesa correttamente.
Protezioni Integre, non
danneggiate.
Batteria Nessun danno al suo
involucro, nessun
Macchina Nessun segno di
danneggiamento
o usura. Nessuna
vibrazione anomala.
Nessun suono
anomalo
Leva comando
acceleratore,
pulsante bloccaggio
acceleratore
Devono avere un
movimento libero, non
forzato e al rilascio
devono tornare
automaticamente e
rapidamente nella
posizione neutra.
6.2.2 Test di funzionamento
della macchina
Azione Risultato
Inserire la batteria nel
suo alloggiamento
La catena non
deve muoversi
Azionare la leva
comando acceleratore
(senza premere il
pulsante di bloccaggio
acceleratore)
La leva comando
acceleratore
rimane bloccata.
Azionare il pulsante
di bloccaggio
acceleratore e
la leva comando
acceleratore.
I comandi devono
avere un movimento
libero, non forzato.
La catena si muove.
Rilasciare la
leva comando
acceleratore.
La leva deve tornare
automaticamente
e rapidamente in
posizione neutra.
La catena deve
fermarsi.
Se uno qualsiasi dei risultati si
discosta da quanto indicato nelle tabelle,
non utilizzare la macchina! Rivolgersi
ad un centro di assistenza per i controlli
del caso e per la riparazione.
6.3 AVVIAMENTO
1. Togliere la protezione copribarra (Fig. 1.J).
2. Accertarsi che la barra e la catena non
tocchino il terreno o altri oggetti.
3.
alloggiamento spingendola a fondo
posizione e assicura il contatto elettrico.
4. Azionare il pulsante di bloccaggio
acceleratore (Fig. 11.B) e la leva
comando acceleratore. (Fig. 11.A).
6.4 LAVORO
lavoro di sramatura, è opportuno:
•
sull’uso di questo tipo di attrezzatura.
• Indossare correttamente l’imbracatura.
• Aver letto accuratamente le avvertenze
di sicurezza e le istruzioni d’uso
contenute nel presente manuale.
•
a cavalletti, in modo da acquisire la
necessaria familiarità con la macchina
e le tecniche di taglio più opportune.

IT - 11
Per operare con la macchina procedere
come di seguito descritto:
1. Agganciare sempre la macchina
all’imbracatura correttamente
indossata (vedi par. 6.1.2)
2. Tenere sempre la macchina
saldamente a due mani.
Arrestare subito la macchina se la
catena si blocca durante il lavoro.
NOTA Durante il lavoro la batteria è
protetta contro lo scaricamento totale tramite
un dispositivo di protezione che spegne la
macchina e ne blocca il funzionamento.
6.4.1 Controlli da eseguire
durante il lavoro
6.4.1.a Controllo della tensione
della catena
Durante il lavoro, la catena subisce un
progressivo allungamento, e pertanto
6.4.1.b Controllo dell’ausso d’olio
IMPORTANTE Non utilizzare la
macchina in assenza di lubrificazione!
Assicurarsi che la barra e la catena
siano ben posizionate quando si eettua
il controllo dell’ausso dell’olio.
se l’olio della catena viene sparso
come indicato nella (Fig. 15).
6.4.2 Tecniche di lavoro
6.4.2.a Sramatura di un albero
Accertarsi che l’area di
caduta dei rami sia sgombra.
1. Posizionarsi dal lato opposto
rispetto al ramo da tagliare.
2. Iniziare dai rami più bassi, procedendo
poi a tagliare quelli più alti.
3. Eseguire il primo intaglio dal basso
verso l’alto (Fig. 16.A). Completare la
sramatura tagliando dall’alto verso il
basso, come indicato nella (Fig. 16.B).
6.4.2.b Sfrondare i rami di un albero
rami da un albero caduto.
Fare attenzione ai punti di appoggio
del ramo sul terreno, alla possibilità
che sia in tensione, alla direzione che
può assumere il ramo durante il taglio
e alla possibile instabilità dell’albero
dopo che il ramo è stato tagliato.
Quando si sfronda, bisogna lasciare
i rami inferiori, più grandi, per
sostenere il tronco sul suolo.
Togliere i piccoli rami con un
solo colpo (Fig. 17.A).
È meglio tagliare i rami sotto tensione a
partire dal basso verso l’alto per evitare
di piegare la sega a catena (Fig. 17.B).
6.5 CONSIGLI PER L’UTILIZZO
IMPORTANTE Arrestare la macchina (par.
6.6) durante gli spostamenti fra zone di lavoro.
Se durante la potatura in altezza la
potatrice si incastra, l’operatore deve:
1. Rilasciare immediatamente la leva
comando acceleratore (Fig. 11.A).
2. Attendere che il dispositivo di taglio si fermi.
3. Rimuovere la batteria (par. 7.2.2).
4.
sollevando il ramo, se necessario.
5. Se necessario, utilizzare una sega a mano
o una seconda motosega per liberare la
potatrice incastrata, tagliando a un minimo
liberarla vanno sempre fatti verso la punta
del ramo (ossia tra la potatrice incastrata
e la punta del ramo e non tra il tronco e la
potatrice incastrata). In questo modo si
impedisce che la potatrice venga trascinata
assieme alla parte di ramo che viene tagliata
complicando ulteriormente la situazione.
6.6 ARRESTO
Per arrestare la macchina rilasciare la
leva comando acceleratore (Fig. 11.A).
Dopo aver rilasciato la leva comando
acceleratore, occorrono alcuni secondi
prima che la catena dentata si fermi.
Arrestare sempre la macchina durante
gli spostamenti fra zone di lavoro.

IT - 12
Durante gli spostamenti non
tenere mai il dito sul pulsante
di bloccaggio acceleratore per
evitare avviamenti accidentali.
6.7 DOPO L’UTILIZZO
1. Rimuovere la batteria dalla sua sede e
provvedere alla sua ricarica (par. 7.2.2).
2. Montare la protezione copribarra.
3.
prima di collocare la macchina
in un qualsiasi ambiente.
4.
barra per ridurre la tensione della catena.
5. Ripulire accuratamente la macchina
da polvere e detriti e rimuovere
dalla catena ogni traccia di segatura
6. Controllare che non ci siano componenti
allentati o danneggiati. Se necessario,
sostituire i componenti danneggiati e
serrare eventuali viti e bulloni allentati.
7.
macchina. Se necessario, contattare
il centro di assistenza autorizzato.
IMPORTANTE Rimuovere sempre
la batteria (par. 7.2.2) e montare la
protezione lama ogni qualvolta si lascia
la macchina inutilizzata o incustodita.
7. MANUTENZIONE
7.1 GENERALITÀ
Le norme di sicurezza da seguire
sono descritte al cap. 2. Rispettare
scrupolosamente tali indicazioni per
non incorrere in gravi rischi o pericoli.
Prima di eettuare qualsiasi controllo,
pulizia o intervento di manutenzione/
regolazione sulla macchina:
• Arrestare la macchina
• Attendere l’arresto della catena
• Rimuovere la batteria dalla sua sede e
provvedere alla sua ricarica (par. 7.2.2)
(non lasciare mai la batteria inserita o alla
portata di bambini o persone non idonee)
• Applicare la protezione copribarra,
tranne in caso di interventi sulla
barra stessa o sulla catena;
• Attendere che il motore sia
adeguatamente rareddato;
• Leggere le relative istruzioni;
• Indossare indumenti adeguati, guanti
da lavoro e occhiali di protezione;
IMPORTANTE Tutte le operazioni di
manutenzione e di regolazione non descritte
in questo manuale devono essere eseguite dal
vostro Rivenditore o da un Centro specializzato.
7.2 BATTERIA
7.2.1 Autonomia della batteria
L’autonomia della batteria è
principalmente condizionata da:
a. fattori ambientali, che producono un
maggiore fabbisogno di energia:
– taglio di alberi e rami di
dimensioni troppo grandi;
b. comportamenti dell’operatore,
che dovrebbe evitare:
– accensioni e spegnimenti
frequenti durante il lavoro;
– uso di una tecnica di taglio inadeguata
Per ottimizzare l’autonomia della
batteria è sempre opportuno:
• Tagliare il legno quando è asciutto
• Utilizzare la tecnica più appropriata
al lavoro da svolgere.
Nel caso si volesse utilizzare la macchina in
sessioni di lavoro più lunghe rispetto a quanto
consentito dalla batteria standard, è possibile:
• Acquistare una seconda batteria standard per
sostituire immediatamente la batteria scarica,
senza pregiudicare la continuità di utilizzo.
• Acquistare una batteria con
autonomia maggiorata rispetto alla
batteria standard (par.
7.2.2 Rimozione e ricarica della
batteria (Fig.18÷21)
Procedere alla completa ricarica,
seguendo le indicazioni contenute nel
libretto della batteria /carica batteria.
NOTA La batteria è dotata di una protezione
che impedisce la ricarica se la temperatura
ambiente non è compresa fra 0 e +45 °C.
NOTA La batteria può essere ricaricata
in ogni momento, anche parzialmente,
senza il rischio di danneggiarla.

7.3 RIFORNIMENTO SERBATOIO
OLIO CATENA
IMPORTANTE Utilizzare esclusivamente
olio specifico per motoseghe o olio
adesivo per motoseghe. Non utilizzare olio
contenente impurità per non otturare il filtro
nel serbatoio ed evitare di danneggiare
irrimediabilmente la pompa dell’olio.
L’utilizzo di un olio di buona qualità è
fondamentale per ottenere una efficace
lubrificazione degli organi di taglio; un olio usato
o di scarsa qualità compromette la lubrificazione
e riduce la durata della catena e della barra.
IMPORTANTE Non mettere mai in
funzione la catena senza sufficiente olio,
ciò potrà infatti danneggiare il Dispositivo
potatore e e comprometterne la sicurezza.
Se il livello dell’olio è basso, rabboccare
seguendo i seguenti passaggi:
1. Svitare e rimuovere il tappo (Fig.
22.A) dal serbatoio dell’olio.
2. Versare l’olio nel serbatoio e
monitorarne il livello tramite
l’apposito indicatore (Fig. 22.B).
3. Assicurarsi che non penetrino impurità nel
serbatoio dell’olio durante il riempimento.
4. Riposizionare il tappo dell’olio e serrarlo.
7.4 PULIZIA
7.4.1 Pulizia della macchina e del motore
Al termine di ogni sessione di lavoro:
• Ripulire accuratamente la
macchina da polvere e detriti.
• Per ridurre il rischio di incendio mantenere la
macchina ed in particolare il motore liberi da
residui di foglie, rami o grasso eccessivo.
• Pulire sempre la macchina dopo l’uso
utilizzando un panno pulito e umido
imbevuto di detergente neutro.
• Rimuovere qualsiasi traccia di umidità
servendosi di un panno morbido e
asciutto. L’umidità può dare luogo
a rischi di scosse elettriche.
• Non utilizzare detergenti aggressivi o solventi
per pulire le parti in plastica o le impugnature.
• Non usare getti d’acqua ed evitare di
bagnare il motore e componenti elettrici.
• Per evitare il surriscaldamento e danni al
motore o alla batteria, assicurarsi sempre
che le griglie di aspirazione dell’aria di
7.4.2 Pulizia della catena
Dopo ogni utilizzo rimuovere dalla catena
ogni traccia di segatura o depositi d’olio.
1. Smontare la catena e adagiarla
per alcune ore in un contenitore
2. Risciacquarla in acqua pulita e trattarla
con uno spray anticorrosivo adeguato.
3. Rimontarla sulla macchina.
7.5 ELEMENTO FERMA CATENA
Controllare prima di ogni uso le condizioni
dell’elemetno ferma catena (Fig. 1.I) e provvedere
al ripristino nel caso risulti danneggiato.
7.6 FORI DI LUBRIFICAZIONE DELLA
MACCHINA E DELLA BARRA
Prima di ogni uso giornaliero
4.
5. Smontare la barra
6.
7.7 DADI E VITI DI FISSAGGIO
• Mantenere serrati dadi e viti, per essere
certi che la macchina sia sempre in
condizioni sicure di funzionamento.
• Controllare regolarmente che le
7.8 PIGNONE DI TRASCINAMENTO
CATENA
Presso il vostro Rivenditore, controllare una
volta al mese lo stato del pignone e sostituirlo
quando l’usura supera i limiti accettabili.
Non montare una catena nuova
con un pignone usurato o viceversa.
7.9 MANUTENZIONE DELLA
CATENA DENTATA
Per ragioni di sicurezza ed
ecienza, è molto importante che i
dispositivi di taglio siano ben alati.
• La segatura è simile a polvere.
• Occorre una maggiore forza per tagliare.
• Il taglio non è rettilineo.
• Le vibrazioni aumentano.

Se la catena non è sucientemente
alata, aumenta il rischio di
contraccolpo (kickback).
IMPORTANTE È consigliato affidare
l’operazione di affilatura della catena ad un
centro specializzato, in quanto viene eseguita
con apposite apparecchiature che assicurano
una minima asportazione di materiale ed
una affilatura costante su tutti i taglienti.
7.9.1 Sostituzione della catena dentata
La catena deve essere sostituita quando:
• La lunghezza del tagliente si
riduce a 5 mm o meno.
• Il gioco delle maglie sui rivetti è eccessivo.
• la velocità di taglio è lenta e le ripetute
di taglio. La catena è usurata.
IMPORTANTE Dopo la sostituzione della
catena è necessario che la verifica della sua
tensione avvenga con una maggiore frequenza,
a causa dell’assestamento della catena.
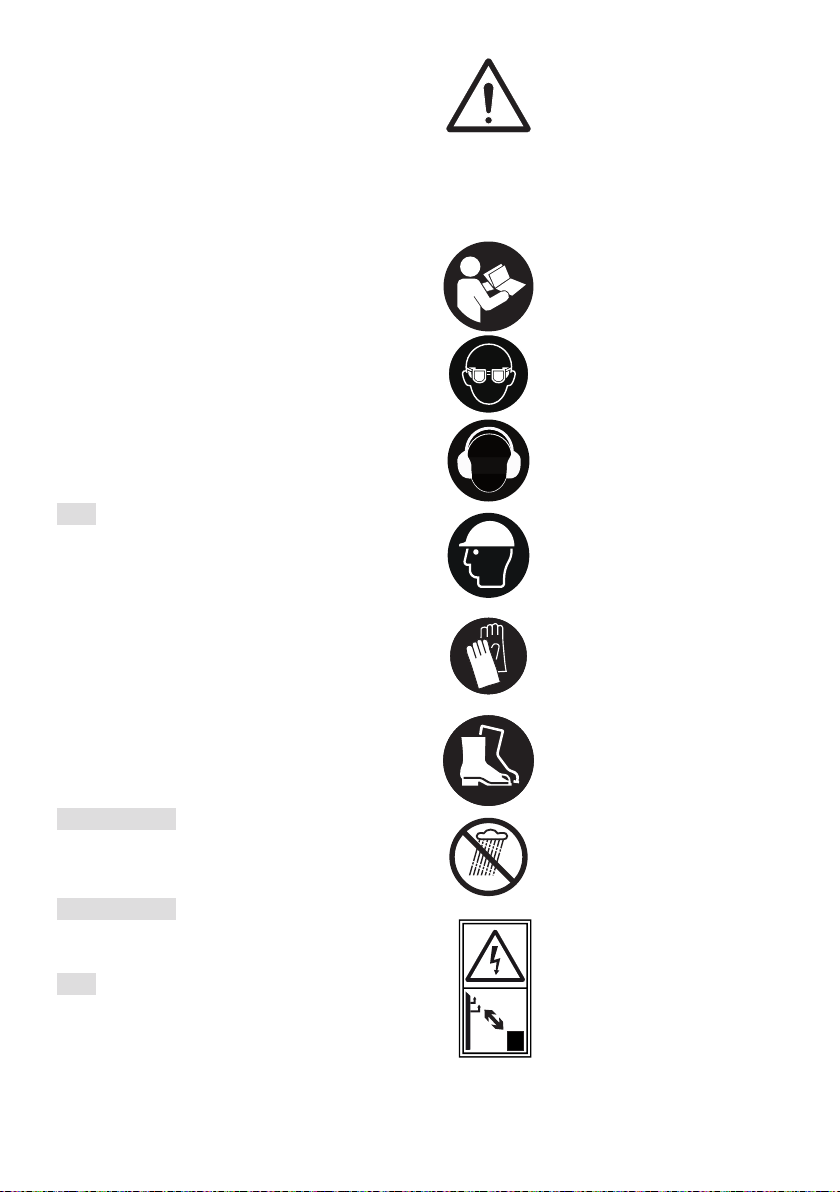
7.10 MANUTENZIONE DELLA
BARRA DI GUIDA
NOTA Tutte le operazioni riguardanti la
barra di guida sono lavori che richiedono una
specifica competenza oltre all’impiego di
apposite attrezzature per poter essere eseguite
a regola d’arte; per ragioni di sicurezza si
consiglia di contattare il vostro Rivenditore.
Per evitare un’usura asimmetrica
della barra, è opportuno che questa
venga rovesciata periodicamente.
1. Ingrassare con l’apposita siringa (non
fornita in dotazione) i cuscinetti del
pignone di rinvio (se presente).
2. Pulire la scanalatura della barra
con l’apposito raschietto (non
3.
4. Con una lima piatta, togliere le
eventuali dislivelli fra le guide.
7.10.1 Sostituzione della barra
La barra deve essere sostituita quando:
• la profondità della scanalatura risulta inferiore
all’altezza delle maglie di trascinamento
(che non devono mai toccare il fondo);
• la parete interna della guida è usurata al punto
da fare inclinare lateralmente la catena.
8. RIMESSAGGIO
IMPORTANTE Le norme di sicurezza da
seguire durante le operazioni di rimessaggio
sono descritte al par. 2.4. Rispettare
scrupolosamente tali indicazioni per non
incorrere in gravi rischi o pericoli.
8.1 RIMESSAGGIO DELLA MACCHINA
Quando la macchina deve essere rimessata:
1. Rimuovere la batteria dalla sua sede e
provvedere alla sua ricarica (par. 7.2.2).
2. A dispositivo di taglio fermo applicare
la protezione copribarra.
3.
prima di collocare la macchina
in un qualsiasi ambiente.
4.
5. Controllare che non ci siano componenti
allentati o danneggiati. Se necessario,
sostituire i componenti danneggiati e serrare
eventuali viti e bulloni allentati o contattare
il centro di assistenza autorizzato.
6. Rimessare la macchina:
– in un ambiente asciutto
– al riparo dalle intemperie
– in un luogo inaccessibile ai bambini.
– assicurandosi di aver rimosso chiavi o
utensili usati per la manutenzione.
8.2 RIMESSAGGIO DELLA BATTERIA
Se la batteria non viene caricata per un
lungo periodo di tempo, è necessario
conservarla sempre all’ombra, al fresco
e in ambienti privi di umidità con una
NOTA In caso di prolungata
inattività, ricaricare la batteria ogni due
mesi per prolungarne la durata.
9. MOVIMENTAZIONE E TRASPORTO
Ogni volta che è necessario
movimentare, sollevare, trasportare
o inclinare la macchina occorre:
1. Arrestare la macchina
2. Attendere l’arresto della catena
3. Rimuovere la batteria dalla sua sede
e provvedere alla sua ricarica
4. Applicare la protezione copribarra
5. Attendere che il motore sia
6. Indossare robusti guanti da lavoro

IT - 15
7.
impugnature e orientare la barra nella
direzione contraria al senso di marcia.
Quando si trasporta la macchina
con un automezzo, occorre:
1. Assicurare adeguatamente la
macchina mediante funi o catene
2. Posizionarla in modo da non
costituire pericolo per nessuno.
10. ASSISTENZA E RIPARAZIONI
Questo manuale fornisce tutte le indicazioni
necessarie per la conduzione della macchina
e per una corretta manutenzione di base
eseguibile dall’utilizzatore. Tutti gli interventi
di regolazione e manutenzione non descritti in
questo manuale devono essere eseguiti presso
il vostro Rivenditore o un Centro specializzato.
Operazioni eseguite presso strutture inadeguate
decadimento di ogni forma di Garanzia e di
ogni obbligo o responsabilità del Costruttore.
I ricambi e gli accessori non originali
non sono approvati; l’impiego di ricambi
ed accessori non originali compromette
la sicurezza della macchina e solleva il
Costruttore da ogni obbligo o responsabilità.
11. COPERTURA DELLA GARANZIA
Le condizioni di garanzia sono
destinate solamente ai consumatori,
cioè operatori non professionisti.
La garanzia copre tutti i difetti di qualità
dei materiali e di fabbricazione, accertati
durante il periodo della garanzia dal vostro
Rivenditore o da un Centro specializzato.
L’applicazione della garanzia si limita
alla riparazione o alla sostituzione del
componente ritenuto difettoso.
autorizzata per la manutenzione, l’assistenza
e il controllo dei dispositivi di sicurezza.
L’applicazione della garanzia è subordinata ad
una manutenzione regolare della macchina.
La garanzia non copre i danni conseguenti a:
• Mancata familiarizzazione con la
documentazione di accompagnamento
(Manuali di Istruzioni).
• Uso professionale.
• Disattenzione, negligenza.
• Causa esterna (fulmine, urti, presenza di corpi
estranei all’interno della macchina) o incidente.
• Uso e montaggio impropri o non
consentiti dal costruttore.
• Scarsa manutenzione.
•
• Utilizzo di pezzi di ricambio non
originali (pezzi adattabili).
• Utilizzo di accessori non forniti o
non approvati dal costruttore.
La garanzia non copre inoltre:
• Le operazioni di manutenzione
(descritte nel manuale di istruzioni).
• La normale usura di materiali di consumo
come dispositivi di taglio, bulloni di sicurezza.
• Normale usura.
• Deterioramento estetico della
macchina dovuto al suo utilizzo.
Le spese accessorie eventualmente
connesse all’attivazione della garanzia,
quali il trasferimento presso l’utilizzatore,
il trasposto della macchina verso il
Rivenditore, noleggio di attrezzature per la
sostituzione o la chiamata ad una società
esterna per tutti i lavori di manutenzione.
L’utilizzatore è protetto dalle proprie leggi
nazionali. I diritti dell’utilizzatore previsti dalle
proprie leggi nazionali non sono in alcun
modo limitati dalla presente garanzia.
12. IDENTIFICAZIONE INCONVENIENTI
INCONVENIENTE CAUSA PROBABILE RIMEDIO
1. Azionando la leva comando
acceleratore e il pulsante
di bloccaggio acceleratore,
la macchina non si avvia.
Batteria mancante o non
inserita correttamente
Assicurarsi che la batteria sia
Batteria scarica Controllare lo stato di carica e
ricaricare la batteria (par. 7.2.2)
Macchina danneggiata Non utilizzare la macchina.
Togliere la batteria e Contattare
un Centro Assistenza.

IT - 16
2. Il motore si arresta
durante il lavoro
Batteria non inserita
correttamente.
Assicurarsi che la batteria sia
Batteria scarica Controllare lo stato di carica e
ricaricare la batteria (par. 7.2.2)
Macchina danneggiata Non utilizzare la macchina.
Togliere la batteria e
Contattare un Centro
Assistenza.
Con il pulsante di
bloccaggio acceleratore e la
leva comando acceleratore
azionati, la catena non gira
Eccessivo tensionamento
della catena
Rimettere in tensione la
Problemi alla barra e catena Controllare che la catena
scorra liberamente e la
barra non abbia le guide
deformate (par. 7.10).
Macchina danneggiata. Non utilizzare la macchina.
Arrestare immediatamente la
macchina, togliere la batteria e
Contattare un Centro
Assistenza.
della barra si surriscalda
ed emette fumo.
Eccessivo tensionamento
della catena
Rimettere in tensione la
Serbatoio olio
Rifornire il serbatoio olio
5. Il motore ha un
funzionamento irregolare o
non ha potenza sotto carico
Problemi alla barra e catena Controllare che la catena
scorra liberamente e la
barra non abbia le guide
deformate (par. 7.10).
6. Si avvertono rumori e/o
vibrazioni eccessive
durante il lavoro
Parti allentate o danneggiate Arrestare la macchina,
rimuovere la batteria e:
– controllare i danni;
– controllare se vi sono
parti allentate e serrarle;
– Contattare un Centro
Assistenzaper sostituire
o riparare le parti
danneggiate con parti di
equivalenti caratteristiche
7. L’autonomia della
batteria è scarsa
Condizioni di utilizzo
gravose con maggiore
assorbimento di corrente
Ottimizzare l’utilizzo
(par. 7.2.1)
le esigenze operative
Utilizzare una seconda
batteria o una batteria
maggiorata (par. 7.2.1)
Degrado della capacità
della batteria
Acquistare una nuova batteria
IT - 17
8.
la ricarica della batteria
Batteria non inserita
correttamente nel
carica batteria
Controllare che l’inserimento
sia corretto (par. 7.2.2)
Condizioni ambientali
non idonee
Eseguire la ricarica in ambiente
con temperatura adeguata
(vedi libretto istruzioni della
batteria/carica batteria)
Contatti sporchi Pulire i contatti
Mancanza di tensione
al carica batteria
Controllare che la spina sia
inserita e che vi sia tensione
alla presa di corrente
Carica batteria difettoso Sostituire con un
ricambio originale
Se l’inconveniente perdura
consultare il manuale della
batteria / carica batteria
Se gli inconvenienti perdurano dopo aver applicato i rimedi descritti, contattare il vostro Rivenditore.
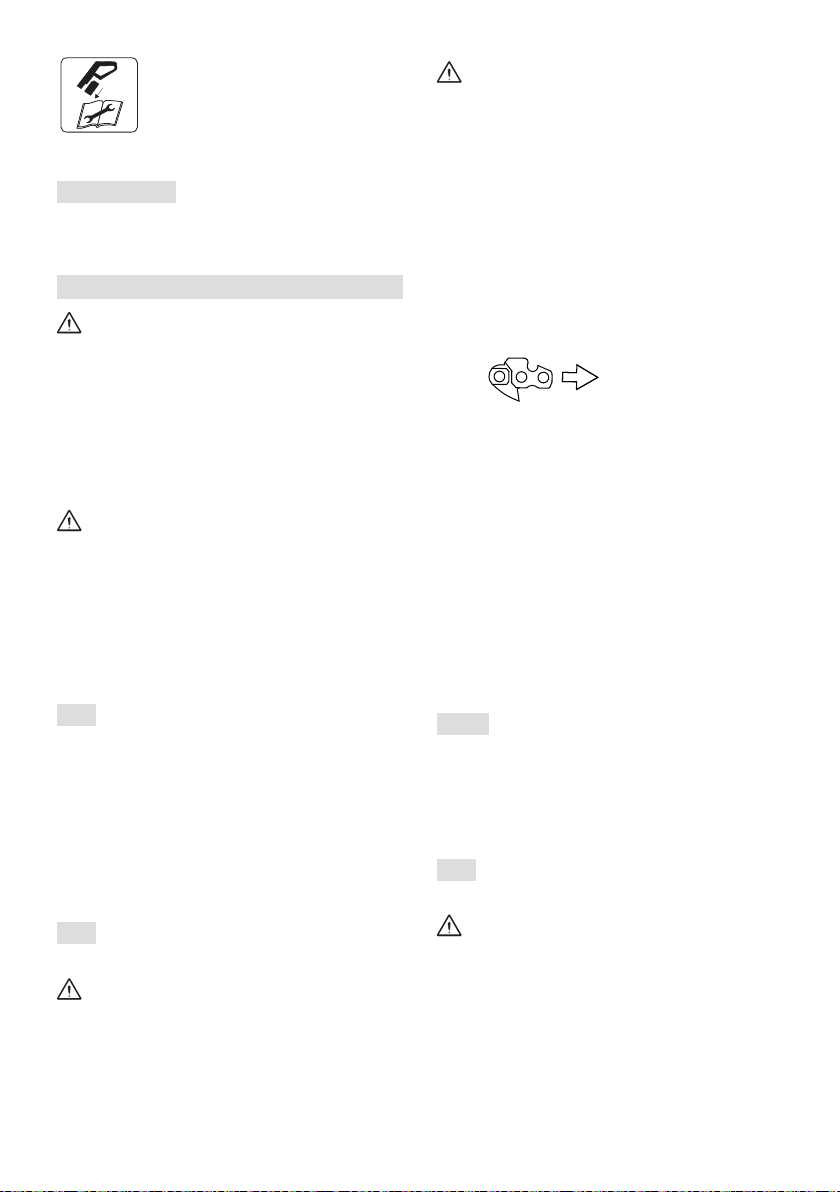
13. ACCESSORI A RICHIESTA
13.1 BATTERIE
Sono disponibili batterie di diverse
esigenze operative (Fig. 25). L’elenco delle
batterie omologate per questa macchina
13.2 CARICA BATTERIA
Dispositivo che si utilizza per
ricaricare la batteria (Fig. 26).
13.3 BARRE E CATENE
Nella “Tabella per la corretta combinazione
possibili combinazioni fra barra e catena, con
l’indicazione di quelle utilizzabili su ciascuna
macchina, contrassegnate con il simbolo “
La stessa tabella fornisce inoltre i dati
caratteristici delle catene e delle barre
omologate per ciascuna macchina.
Per ricambi usare solo barre e catene
citate nella tabella. L’uso di combinazioni
non approvate può provocare serie lesioni
personali e danneggiare la macchina.
Dato che la scelta, l’applicazione e
l’utilizzo della barra e della catena sono atti
compiuti dall’utilizzatore nella sua totale
autonomia di giudizio, questi se ne assume
anche le responsabilità conseguenti per
danni di qualsiasi natura derivati da tali
atti. In caso di dubbi o scarsa conoscenza
della specicità di ciascuna barra o catena,
occorre contattare il proprio rivenditore o
o un centro di giardinaggio specializzato.

EN - 1
WARNING!: READ THE INSTRUCTION BOOKLET THOROUGHLY
BEFORE USING THE MACHINE. Keep for future reference.
EN
TABLE OF CONTENTS
1. GENERAL ASPECTS ................................... 1
2. SAFETY REGULATIONS .............................. 1
........... 5
use ........................................................ 5
....................... 6
...................... 6
................................ 6
................................................... 7
............................................. 7
chain ..................................................... 7
.................... 8
.............. 8
................. 8
5. CONTROLS.................................................. 8
5.1 Throttle trigger lever .............................. 8
5.2 Throttle lock button ............................... 8
6. USING THE MACHINE ................................. 8
6.1 Preliminary procedures ......................... 8
6.2 Safety checks ........................................
.................................................
.................................................
6.5 Advice for operation ............................ 10
6.6 Stop .................................................... 10
6.7 After use .............................................. 11
7. MAINTENANCE ......................................... 11
7.1 General information ............................. 11
7.2 Battery ................................................ 11
............... 11
.............................................. 12
7.5 chain catcher....................................... 12
7.6 Machine and bar lubrication holes ...... 12
7.7 Nuts and bolts ..................................... 12
7.8 Chain drive sprocket ........................... 12
....... 12
7.10 Guide bar maintenance .......................
8. STORING ...................................................
8.1 Storing the machine ............................
8.2 Storing the battery ...............................
.......
10. ASSISTANCE AND REPAIRS .....................
11. WARRANTY COVERAGE ..........................
12. TROUBLESHOOTING ................................
................. 16
................................................ 16
................................... 16
.................................. 16
1. GENERAL ASPECTS
1.1 HOW TO READ THE MANUAL
NOTE or IMPORTANT These give
details or further information on what has been
previously indicated and aim to prevent damage
to the machine or cause other damage.
The symbol highlights danger. Failure to
observe the warning can lead to the risk of
injury to oneself and others and/or damage.
The paragraphs inside a grey dotted frame
refer to optional features not available on all
the models referred to in this booklet. Check
if the feature is available on your model.
Whenever reference is made to a position on the
machine "front", "back", "left" or "right" hand side,
this refers to the operator's working position.
2. SAFETY REGULATIONS
2.1 GENERAL SAFETY WARNINGS
Read all safety warnings, instructions,
with this power tool. Failure lo follow
all instructions listed below may result in
electric shock, re and/or serious injury.
Save all warnings and instructions
for future reference.
The term “power tool” in the warnings refers
to your mains-opera/eel (cordecl) power tool
or battery-operated (cordless) power tool.
1) Work area safety
a) Keep work area clean and well lit.
Cluttered or dark areas invite accidents.
b) Do not operate power tools in
explosive atmospheres, such as in
gases or dust. Power tools create sparks
which may ignite the dust or fumes.
c) Keep children and bystanders
well away while using power tools.
Distractions can cause you to lose control.

EN - 2
2) Electrical safety
a) Avoid body contact with earthed or
grounded surfaces, such as pipes,
radiators, cookers and refrigerators.
There is an increased risk of electric shock
if your body is earthed or grounded.
b) Do not expose power tools to
rain or wet environments. Water
entering a power tool will increase
the risk of electrical shock.
3) Personal safety
a) Stay alert, check what you are doing
and use common sense when using
a power tool. Do not use the power
tool when you are tired or under
medicines. A moment of inattention
while operating a power tool may
result in serious personal injury.
b) Use personal protective equipment.
Always wear eye protection. Protective
equipment such as a dust mask,
non-skid safety shoes, hard hat or
hearing protection used for appropriate
conditions will reduce personal injuries.
c) Prevent unintentional starting. Make
inserting the battery pack, picking up
or carrying the power tool. Carrying
power tools with your nger on the switch
or mounting the battery with the switch
in “ON” position invites accidents.
d) Remove any adjusting key or
wrench before turning the power
tool on. A wrench or a key left attached
to a rotating part of the machine
may result in personal injury.
e) Do not overreach. Keep proper
footing and balance at all times.
This enables better control of the
power tool in unexpected situations.
f) Dress properly. Do not wear loose
clothing or jewellery. Keep your
hair and clothing away from moving
parts. Loose clothes, jewellery or long
hair can be caught in moving parts.
g) If devices are provided for the
connection of dust extraction
and collection facilities, ensure
these are connected and properly
used. Use of dust collection can
reduce dust-related hazards.
h) Do not let familiarity gained from
frequent use of tools allow you to
become complacent and ignore
tool safety principles. A careless
action can cause severe injury
within a fraction of a second.
4) Power tool use and care
a) Do not force the power tool. Use
the correct power tool for your
application. The correct power tool
will do the job better and safer at the
speed for which it was designed.
b) Do not use the power tool if the switch
Any power
tool that cannot be controlled with the
switch is dangerous and must be repaired.
c) Remove the battery pack from
the machine before making any
adjustments, changing accessories or
storing the power tool. Such preventive
safety measures reduce the risk of
starting the power tool accidentally.
d) Store idle power tools out of the
reach of children and do not allow
persons unfamiliar with the power
tool or these instructions to operate
the machine. Power tools are dangerous
in the hands of untrained users.
e) Maintain power tools and accessories.
Check for misalignment or binding
of moving parts, breakage of
parts and any other condition that
In case of damage, the power
tool must be repaired before it
can be used. Many accidents are
caused by poor maintenance.
f) Keep cutting tools sharp and clean.
Properly maintained cutting tools with
sharp cutting edges are less likely
to bind and are easier to control.
g) Use the power tool and its accessories
in accordance with these instructions,
taking into account the working
conditions and the task to be
performed. Using the power tool for
operations other than those intended
could result in a hazardous situation.
h) Keep handles and grasping
surfaces dry, clean and free from
oil and grease. Slippery handles
and grasping surfaces do not allow
for safe handling and control of the
tool in unexpected situations.
5 Battery tool use and care
a) Recharge only with the charger
A
charger that is suitable for one type of
battery pack may create a risk of re,
electric shock, overheating or corrosive
liquid to leak from the battery. when
used with another battery pack.

b) Use power tools exclusively with
packs. Use of any other battery packs
may create a risk of injury and re.
c) When the battery pack is not in
use, keep it away from other metal
objects such as paper clips, coins,
keys, nails, screws or other small
metal objects that may create a
connection from one terminal to
another. Shorting the battery terminals
together can cause burns or a re.
d) Under abusive conditions, liquid
may be ejected from the battery:
avoid contact. If contact accidentally
contacts eyes, seek medical help
immediately. Fluid ejected from the
battery may cause irritation and burns.
e) Do not use a battery pack or tool that
Damaged
or modied batteries may exhibit
unpredictable behaviour resulting
in re, explosion or risk of injury.
f) Do not expose a battery pack or tool
Exposure to re or temperature above
130 °C may cause explosion.
g) Charge only at room temperature,
between 0° + 45°C. Do not charge
the battery pack or tool outside the
Charging
improperly or at temperatures outside
the specied range may damage the
battery and increase the risk of re.
6) Service
a) Have your power tool serviced by
only identical replacement parts.
This will ensure that the safety of
the power tool is maintained.
b) Never service damaged battery
packs. Service of battery packs should
only be performed by the manufacturer
or authorized service providers.
2.2 SPECIFIC SAFETY RULES
FOR CHAINSAWS AND
ELECTRIC CHAINSAWS.
• Keep all body parts at a distance
from the toothed chain when the
chainsaw is running. Before starting
the chainsaw, check that the toothed
chain is not in contact with anything.
Lack of concentration when using the
chainsaw can cause clothes or body parts
to get caught up in the toothed chain.
• The right hand must always hold the
rear grip and the left hand the front grip.
You should never turn your hands when
holding the chainsaw, as this increases
the risk of accidents on yourself.
• Hold the power tool by insulated
gripping surfaces only, because the
toothed chain may come in contact with
hidden wiring. Toothed chain contacting
give the operator an electric shock.
• Always wear safety goggles and ear
protection. Other protective equipment
for the head, hands and feet is also
recommended. The wearing of protective
clothing will reduce accidents caused
by hurled workpieces and accidental
contact with the toothed chain.
• Do not use chainsaws when positioned
on a tree. Starting a chainsaw when
positioned on a tree can cause body injuries.
• Keep proper footing and balance at all
times, and only use the chainsaw on
Slippery or
unstable surfaces such as ladders, can cause
loss of balance or control of the chainsaw.
• When cutting a branch that is under
tension, be alert for spring back. When
branch can spring back and injure the operator
and/or kick the chainsaw out of control.
• Use extreme caution when cutting
small size brush and saplings.
The slender material may catch in the
chainsaw and be whipped towards
• Carry the chainsaw by the front grip
away from your body. When storing or
transporting a chainsaw always use
the guide bar cover. Correct handling of
the chainsaw will reduce the probability of
unintended contact with the moving chain.
• Follow the instructions concerning
lubrication, chain tension and
replacement parts. Chains with incorrect
tension and lubrication can break and
increase the risk of kickback.
• Keep handles dry, clean and free from
oil and grease. Greasy and oily handles
are slippery and can cause loss of control.
• Use the chainsaw to cut wood only. Do not
use the chainsaw for purposes for which
it is not intended. For example: do not use
an chainsaw for cutting plastic, masonry
or other non-wood materials. Using the
chainsaw for operations other than those
intended could result in a hazardous situation.

• Local regulations may restrict
the age of the operator.
If something breaks or an accident
occurs during work, turn o the motor
immediately and move the machine away
to prevent further damage; if an accident
occurs with injuries or third parties are
injured, carry out the rst aid measures
most suitable for the situation immediately
and contact the medical authorities for any
necessary health care. Carefully remove
any debris which could cause damage or
injury to persons or animals if ignored.
Prolonged exposure to vibrations can
cause injuries and neurovascular disorders
(also called “Raynaud’s syndrome” or “white
nger”), especially to people suering
from circulation disorders. The symptoms
can regard the hands, wrists and ngers
and are shown through loss of sensitivity,
torpor, itching, pain and discolouring of
or structural changes to the skin. These
eects can be worsened by low ambient
temperatures and/or by gripping the hand
grips excessively tightly. If the symptoms
occur, the length of time the machine is used
must be reduced and a doctor consulted.
• Take breaks and change your
working position regularly.
• Improper maintenance, use of non-compliant
devices can cause damage to the device
and cause serious injury to the user.
• Perform cleaning and maintenance
before storing the machine after use.
• If the machine has been hit or dropped, make
sure it is in good condition before starting it up.
• Remove branches in sections.
• Pay attention to the branches that, once
cut, can hit the user and to those that, fallen
2.3 CAUSES OF KICKBACK AND
OPERATOR PROTECTION
guide bar touches an object, or when the wood
closes in and pinches the chain in the cut.
Contact of the tip can, in certain cases, cause a
sudden fast reverse action, pushing the guide bar
upwards and backwards towards the operator.
Pinching of the chain along the top
of the guide bar can rapidly push the
chain back towards the operator.
Both the above reactions may cause loss of
control of the saw, which could result in serious
injury for operators. Do not rely exclusively
on the chainsaw built-in safety devices
Chainsaw users should take additional
precautions to eliminate accident or injury risks
of poor use of the tool and/or incorrect operating
procedures or conditions and can be avoided by
•
chainsaw grips, and position your body
and arms so that you can resist the force
of a kickback.
the operator if all appropriate precautions have
been taken. Do not allow the chainsaw to start.
• Do not fully extend the arms and do
not saw above shoulder height. This
helps avoid undesired contact with the
ends and allows for more control over the
chainsaw in unexpected situations.
• Only use the guide bar and chains
recommended by the manufacturer.
Unsuitable guides and chains can cause
the chain to break and/or kickbacks.
• Follow the manufacturer's instructions
regarding sharpening and maintenance
of the chainsaw. A decrease in the level of
depth can cause an increase in kickbacks.
• Techniques for using the electric
chainsaw (battery-operated)
Always observe the safety regulations
and use the most suitable cutting
techniques according to the work to be
performed, following the instructions and
examples in the user instructions.
• Safe carrying of the electric
chainsaw (battery-operated)
Whenever the machine is to be
handled or transported you must:
–
and unplug the machine from the mains
(remove the battery from its housing );
– apply the protection bar cover;
– only hold the machine using the handles
and position the bar in the opposite
direction to that used during operation;
When using a vehicle to transport the machine,
position it so that it can cause no danger
•
Before felling or delimbing for

EN - 5
–
to use this type of equipment;
– to have carefully read the safety
regulations and user instructions
contained in this manual;
–
or attached to trestles, in order to
get familiar with the machine and the
most suitable cutting techniques.
• Handling and correct use of
battery-operated power tools
a) Make sure that the machine is switched
Inserting
a battery in an electric device which is
switched on can cause accidents.
b) Charge battery packs only with
the chargers recommended by the
manufacturer. Battery chargers are
c)
for your power tool. The use of other
d)
from paper clips, coins, keys, nails,
screws or other small metal objects as
contact with the same can cause short
circuits. Short circuits between battery
e) Batteries in poor condition can cause
liquids to leak. Avoid contact with the
liquid. In the case of accidental contact
contact with the eyes, also seek medical
advice. Liquid leaking from the battery
may cause skin irritation or burns.
f) Check that the accumulator is in good
condition and there are no signs of
damage. Do not use the device with
a damaged or worn accumulator.
2.4 PROTECTING THE ENVIRONMENT
Safeguarding the environment must be a relevant
the community and the environment we live in.
• Avoid being a disturbance to the
neighbourhood. Use this machine at
reasonable times of the day only (not
early morning or late evening when the
noise could cause disturbance).
• Comply with local regulations for the
disposal of packaging, deteriorated parts or
any elements with a strong environmental
impact; this waste must not be disposed of
as normal waste, it must be separated and
where the material will be recycled.
• Comply with local regulations for
the disposal of waste materials
• When the machine is withdrawn from service,
do not dispose of it in the environment,
but take it to a waste disposal facility in
accordance with the local regulations in force.
Do not throw electrical equipment away
with domestic waste. According to the
electrical and electronic equipment
waste and its implementation in
compliance with national standards, old electrical
equipment must be collected separately, for eco-
compatible recycling. If electrical equipment is
hazardous substances can leak into the
groundwater and contaminate the food chain,
damaging your health and well-being. For further
information on the disposal of this product,
contact your dealer or a domestic waste
collection service.
At the end of their working life, dispose of
batteries paying due attention to the
environment. Batteries contain material
environment. They must be removed and
disposed of separately at a facility that accepts
lithium-ion batteries.
Separate waste collection of the products
and packaging used allows the materials
to be recycled and reused. Reuse of
recycled materials help to prevent
environmental pollution and reduces the
demand for raw materials.
3. GETTING TO KNOW THE MACHINE
3.1 DESCRIPTION OF THE MACHINE
AND PLANNED USE
This machine is a forestry tool and
precisely a battery powered chain pruner.
The machine is essentially composed of a
battery powered motor and a guide bar that
that takes the power from the battery to the
motor which drives the cutting chain.
The operator is able to operate the machine with
two hands, using the front and rear hand grips,
and can use the main controls, always remaining
at a safe distance from the cutting means.

EN - 6
3.1.1 Intended use
This machine was designed
and manufactured for:
– delimbing trees with dimensions suitable
for the length of the guide bar or wooden
objects with the same characteristics;
– used by one operator.
3.1.2 Improper use
Any other usage not in keeping with the above-
mentioned ones may be hazardous and harm
persons and/or damage things. Examples of
improper use may include, but are not limited to:
– trimming hedges;
– carving operations;
– sectioning pallets, crates and
various packing materials;
– sectioning furniture or other materials with
nails, screws or other metal components;
– butchering meat;
– using the machine to cut materials other than
wood (plastic materials, building materials);
– using the machine to lift,
move or split objects;
– using the machine while
– using cutting means other than those
found in the "Technical Data" table.
Serious injury and wound hazard.
– using of the machine by more
than one person.
IMPORTANT Improper use of the machine
will invalidate the warranty, relieve the
Manufacturer from all liability, and the user
will consequently be liable for all and any
damage or injury to himself or others.
3.1.3 User types
This machine is intended for use by
consumers, i.e. non-professional operators.
It is intended for "DIY" use only.
3.2 MAIN COMPONENTS
A. Motor: supplies the drive power
to the cutting means.
B. Control Rod:
the main throttle controls.
C. Rear hand grip: support hand grip
located on the rear of the control rod.
D. Front hand grip: support hand
grip located on the control rod.
E. Pruner: device used for trimming
and pruning trees.
F. Harness: a fabric belt which, placed
over the shoulders, helps support the
weight of the machine during work.
G. Guide bar: supports and
guides the toothed chain.
H. Toothed chain: cutting element,
connections held in place by rivets.
I. Chain restraint element: safety device
that prevents uncontrolled movements of the
toothed chain should it break or slacken.
J. Bar cover guard: chainsaw cover on the
transportation or storage of the machine.
K. Battery: (if non provided with the machine,
device that supplies electric current to the
L. Battery charger (if non provided with the
: device used to recharge the
3.3 IDENTIFICATION LABEL
1. Sound power level
2. Conformity marking
3. Month/Year of manufacture
4. Type of machine
5. Serial number
6. Name and address of Manufacturer
7. Article code
8. Voltage and Frequency of power supply
9. Blade speed
label on the back of the cover page.
IMPORTANT Quote the information on
the product identification label whenever
you contact an authorised service centre.
IMPORTANT The example of the
Declaration of Conformity is provided
on the last pages of the manual.
3.4 SAFETY SIGNS
The machine has various symbols on it.
Meaning of symbols:
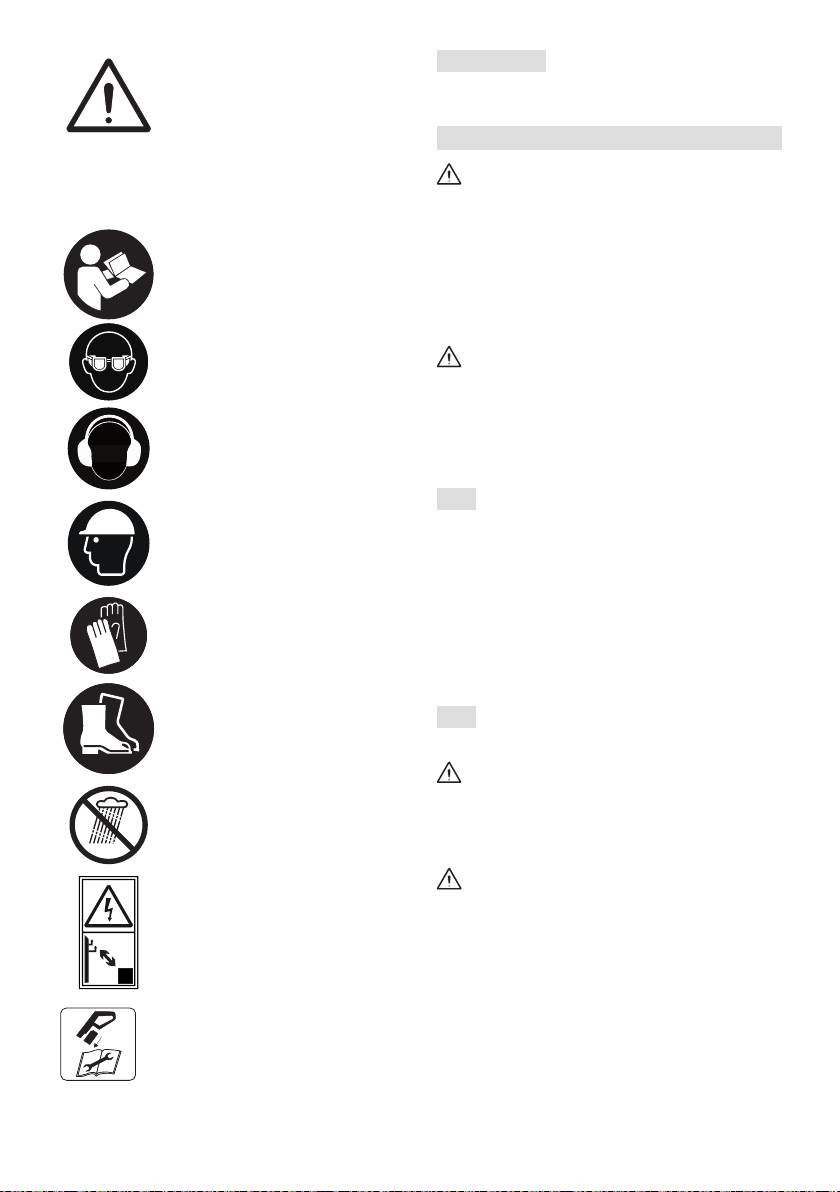
EN - 7
WARNING! DANGER! The
failure to use this machine
correctly can be hazardous
for oneself and others.
PROJECTION HAZARD! Be
careful
by the cutting means, that
can cause serious injuries to
persons or damage to things.
WARNING! Read the instruction
manual before using the machine.
Wear protection goggles.
Wear ear protection devices
Wear head protection device
Wear non-slip protective gloves.
Wear non-slip safety footwear..
Do not leave the machine in the
rain (or in damp conditions)
DANGER! Electrocution.
mt from overhead line cables.
at least 15 mt away when
using the machine.
Remove the battery before
performing any inspections,
cleaning or maintenance/
adjustment interventions
on the machine:
IMPORTANT Any damaged or illegible
decals must be replaced. Order replacement
decals from an authorised service centre.
4. ASSEMBLY
The safety regulations to follow
are described in chap. 2. Strictly
comply with these instructions to
avoid serious risks or dangers.
For storage and transport purposes, some
components of the machine may not be installed
in the factory and have to be assembled after
unpacking. Follow the instructions below.
Unpacking and completing the assembly
should be done on a at and stable surface,
with enough space for machine handling
and its packaging, always making use of
suitable equipment. Do not use the machine
until all the instructions provided in the
“ASSEMBLY” section have been carried out.
4.1 UNPACKING
1. Carefully open the packaging, paying
attention not to lose components.
2. Consult the documentation in the
box, including these instructions.
3. Remove all the unassembled
parts from the box.
4. Remove the machine from the box.
5. Dispose of the box and packaging in
compliance with local regulations.
4.2 ASSEMBLY OF THE GUIDE
BAR AND TOOTHED CHAIN
Always wear heavy duty gloves when
handling the bar and chain. Mount the
bar and chain very carefully so as not to
impair the safety and eciency of the
machine. If in doubt, contact your dealer.
Before assembling, make sure the
battery is not tted in its housing.
1.
the drive pinion and bar seat.
2.
push it towards the back of the machine body.
3. Mount the chain around the drive pinion (Fig.
5.A) and along the bar guide, being careful
to follow the sliding direction (Fig. 5.B).
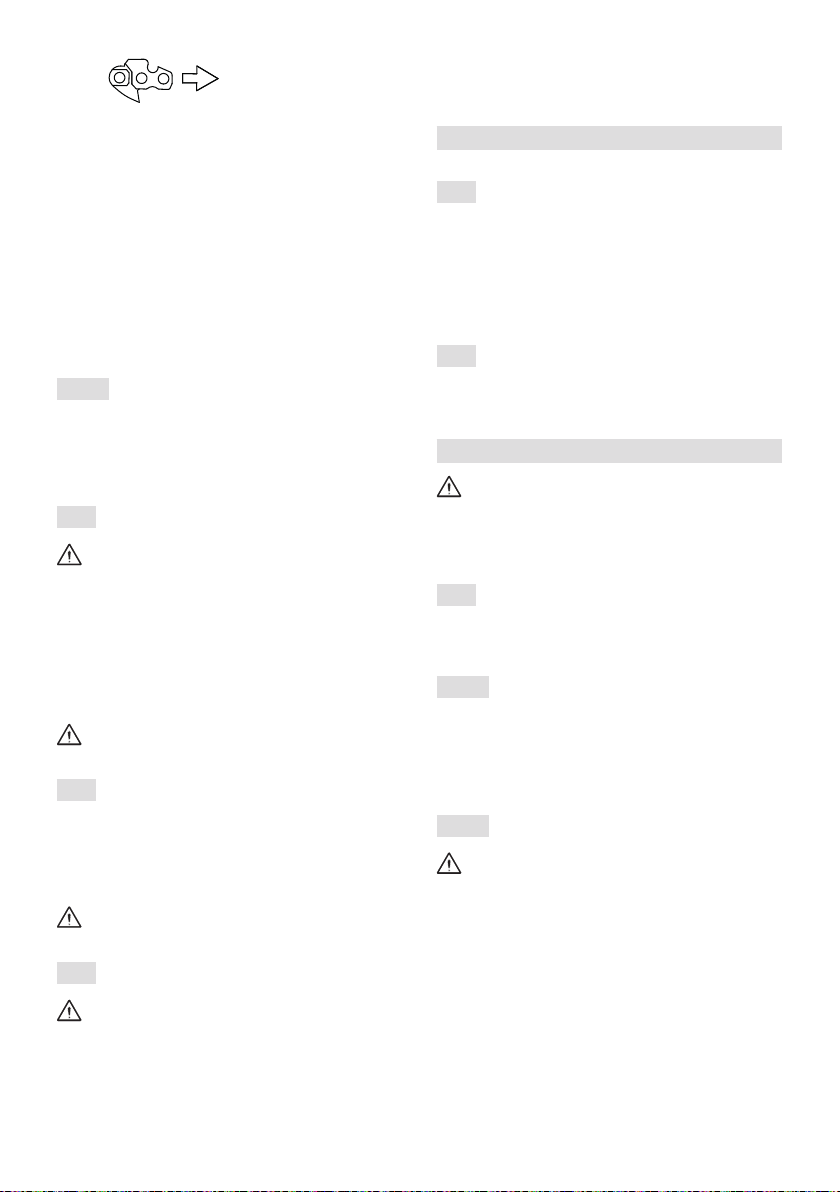
EN - 8
Direction in which
the chain runs
If the tip of the bar is equipped with a nose
sprocket, make sure the drive links are
correctly inserted in the sprocket rims (Fig. 6).
4. Check that chain tension adjuster pin
(Fig. 5.C) is inserted correctly in the
hole on the bar; if it isn’t, turn the chain
tension adjuster screw (Fig. 5.D), until
the pin is completely inserted.
5. Replace the guard without
fully tightening the knob.
6. Turn the chain tension adjuster screw (Fig.
5.D) to achieve the desired tension (Fig. 7).
7. Raise the bar and tighten the
knob (1) securely (Fig. 8.A).
4.2.1 Checking the chain tension
Check the chain tension.
The tension is correct when the drive links
do not slip out of the chain guides if you hold
the chain in the middle of the bar (Fig. 7)
4.3 ASSEMBLY OF PRUNER DEVICE
Before assembling, make sure the
battery is not tted in its housing.
1.
until the stop pins
click into the hole in the
rod. Insertion is completed when the stop
pins protrude completely from the hole.
2.
Periodically check that the
joints are well tightened.
4.4 EXTENSION OF THE PRUNER DEVICE
1. Open the clamping lever (Fig. 10.A).
2. Pull or push the rod (Fig. 10.B) until
it reaches the desired length.
3. Close the clamping lever (Fig. 10.A).
Periodically check that the
joints are well tightened.
4.5 REMOVING THE PRUNER DEVICE
Wait until the motor is suciently
cold before removing the pruner device.
1.
2.
3.
4. Disassemble the pruner device.
5. CONTROLS
5.1 THROTTLE TRIGGER LEVER
The throttle trigger lever (Fig.11.A) allows
the activation of the cutting means.
The activation of the throttle trigger lever
(Fig. 11.A) is only possible if the throttle
lock button is pressed (Fig. 11.B).
5.2 THROTTLE LOCK BUTTON
The throttle lock button (Fig. 11.B) allows the
throttle trigger lever to be used (Fig. 11.A).
6. USING THE MACHINE
The safety regulations to follow
are described in chap. 2. Strictly
comply with these instructions to
avoid serious risks or dangers.
6.1 PRELIMINARY PROCEDURES
Place the machine in a stable
horizontal position on the ground.
6.1.1 Checking and recharging
the battery (Fig. 12)
Before each use check the battery
charge status according to the
instructions in the battery booklet.
6.1.2 Using the harness
Frequently check the eciency of the
quick release in order to free the machine
quickly from the belts in the event of danger.
The harness must be put on before
connecting the machine to the special
coupling and the belt must be adjusted
to suit the operator’s height and build.
1.
the left shoulder to the right hip.
2.
coupling located on the control rod.
3. If necessary, release the clip
machine from the harness.
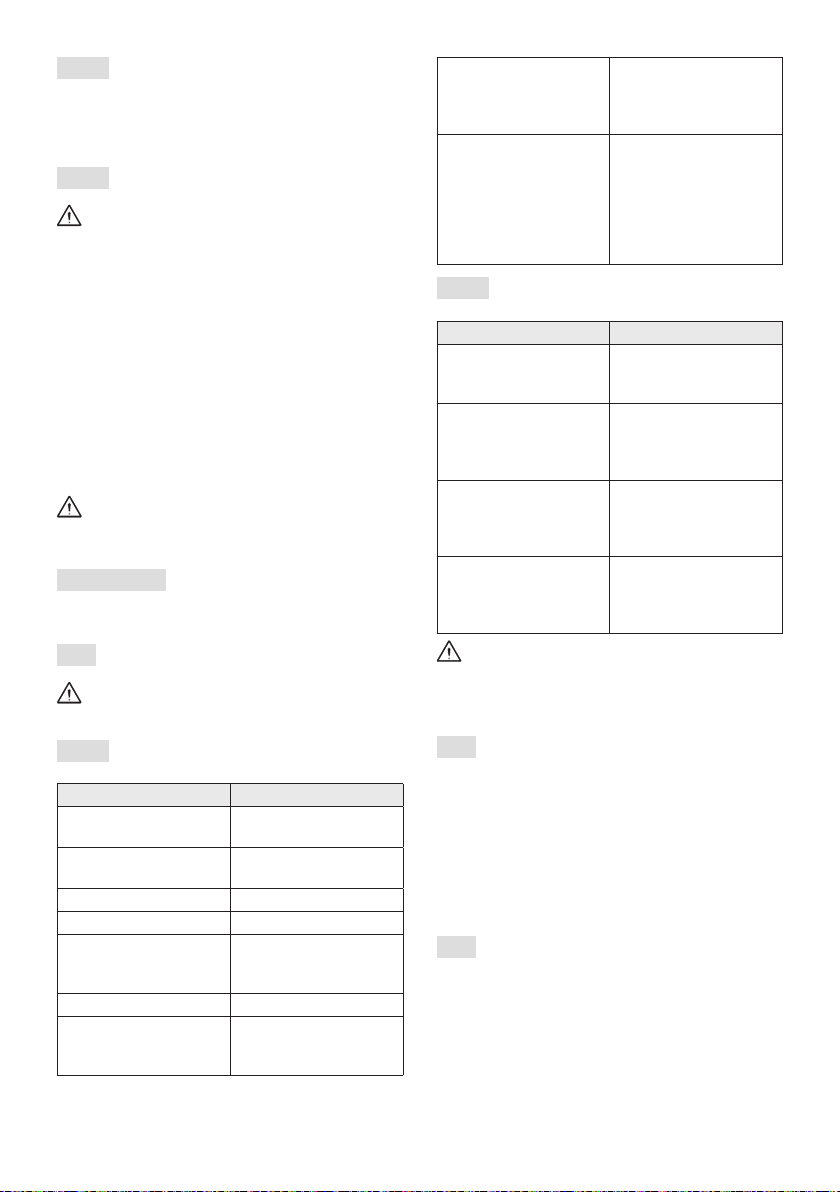
6.1.3 Filling with chain lubrication oil
Fill with chain lubrication oil before using
6.1.4 Checking the chain tension
This operation must be done
with the machine o and the battery
removed from its housing (par. 7.2.2).
Check the chain tension.
The tension is correct when the drive links
do not slip out of the chain guides if you hold
the chain in the middle of the bar (Fig. 7).
To adjust the chain tension:
1.
2. Turn the chain tension adjuster screw (Fig.
5.D) to achieve the desired tension;
3. Raise the bar and tighten the
knob securely. (Fig. 8.A).
Never work with the chain loose,
as it can be hazardous if the chain
slips out of the bar guides.
IMPORTANT During the first period of use
(or after replacing the chain) it must be checked
more frequently due to settling of the chain.
6.2 SAFETY CHECKS
Always carry out the safety
checks before use.
6.2.1 General safety check
Object Result
Grip and guards
Screws on the
machine and blade
Correctly tightened
(not loose)
Cooling air ducts Not clogged
Guide rod Properly installed
Chain Sharp, not damaged
or worn, mounted and
tensioned correctly.
Guards Intact, undamaged.
Battery No damage to
the casing, no
liquid leakage
Machine No signs of damage
or wear. No abnormal
vibrations.
No abnormal sound.
Throttle trigger lever,
Throttle lock button
They must move
freely, not be forced
and when released
they must return
automatically
and rapidly to the
neutral position.
6.2.2 Machine operating test
Action Result
Fit the battery inside
The chain should
not move
Activate the throttle
trigger lever. (without
pressing the throttle
lock button)
The throttle trigger
lever remains blocked.
Press the throttle
lock button and
throttle trigger lever.
The levers must
move freely and
not be forced. The
chain moves.
Release the throttle
trigger lever.
The lever automatically
and rapidly returns
to the idle position.
The chain should stop.
If any of the results fail to match the
instructions provided in the tables, do not
use the machine! Contact a service centre to
have it checked and repaired if necessary.
6.3
1. Remove the protection bar cover (Fig. 1.J).
2. Make sure the bar and the chain are not
touching the ground or any other object.
3.
into position and assure the electrical contact.
4. Activate the throttle lock button (Fig. 11.B)
and the throttle trigger lever (Fig. 11.A).
6.4 WORKING
•
to use this type of equipment.
• To wear the harness correctly.
• To have carefully read the safety regulations
and user instructions contained in this manual.
•
or attached to trestles, in order to

EN - 10
get familiar with the machine and the
most suitable cutting techniques.
To use the machine proceed as follows:
1. always keep the machine connected
to the correctly worn harness when
working (see paragraph 6.1.2).
2. The machine must always be
.
Stop the machine immediately
if the chain stops during sawing.
NOTE During use, the battery is
protected against total drainage with a
protective device that switches off the
machine and stops it from working.
6.4.1 Checks to be conducted
whilst working
6.4.1.a Checking the chain tension
The chain tends to stretch gradually
as you work, so you need to check its
6.4.1.b Checking the oil delivery
IMPORTANT Never use the
machine without lubrication!
Make sure the bar and the chain are
in place when you check the oil delivery.
6.4.2 Work techniques
6.4.2.a Delimbing a tree
Make sure there is nothing or nobody
in the area where the branches will fall.
1. Stand opposite the branch you want to cut.
2. Start cutting lower branches
followed by the higher ones.
3.
top (Fig. 16.A). Complete delimbing by cutting
from top to bottom, as shown in (Fig. 16.B).
6.4.2.b Limbing tree branches
Limbing means removing the
branches from a felled tree.
Be careful of where the branches are
lying on the ground, the risk of them being
under tension, the direction the branch may
go during cutting and the risk of the tree
being unstable after the branch has been cut.
When limbing, it is necessary to
leave the lower, larger branches to
support the trunk on the ground.
Remove the small branches with
a single cut (Fig. 17.A).
It is recommended to cut the tensioned branches
working from the bottom upwards to prevent
the chainsaw from bending (Fig. 17.B).
6.5 ADVICE FOR OPERATION
IMPORTANT Stop the machine (par.
6.6) when moving between work areas.
If the machine should get stuck during
pruning high up, the operator must:
1. Release the throttle trigger lever
immediately (Fig. 11.A).
2. Wait for the cutting means to come to a halt.
3. Remove the battery (par. 7.2.2).
4. Pull the pruner out from the cut, lifting
the branch where necessary.
5. If necessary, use a handsaw or second
chainsaw to free the trapped pruner, cutting
trapped pruner. Cutting operations to free
the pruner must always be performed
towards the end of the branch, (i.e. between
the trapped pruner and the end of the
branch and not between the trunk and
the trapped pruner). This will prevent the
pruner from being dragged by the part of
the branch that is cut away, which would
complicate the situation even further.
6.6 STOP
To stop the machine release the
throttle trigger lever (Fig. 11.A).
After releasing the throttle
trigger lever it takes a few seconds
for the toothed chain to stop.
Always stop the machine when
moving between work areas.
Do not keep your nger on the throttle
lock button when moving the machine to
avoid accidentally enabling the machine.

EN - 11
6.7 AFTER USE
1. Remove the battery from its housing
and recharge it (par. 7.2.2).
2. Mount the bar cover.
3. Allow the motor to cool before
storing in an enclosed space.
4. Loosen the rod fastening knob
to reduce chain tension.
5. Carefully remove any dust and debris
and remove all traces of sawdust or oil
6. Check there are no loose or damaged
components. If necessary, replace the
damaged components and tighten
any screws and loose bolts.
7. Check there are no damages to
the machine. If necessary contact
the authorised service centre.
IMPORTANT Always remove the battery
(par. 7.2.2) and fit the blade guard whenever
the machine is unused or left unattended.
7. MAINTENANCE
7.1 GENERAL INFORMATION
The safety regulations to follow
are described in chap. 2. Strictly
comply with these instructions to
avoid serious risks or dangers.
Before conducting any inspections,
cleaning or maintenance/adjustment
interventions on the machine:
• Stop the machine
• Wait until the chain is stationary
• Remove the battery from its housing
and recharge it (para. 7.2.2) (never leave
the battery inserted or within the reach
of children or unauthorised persons)
• Apply the bar cover, except when working
directly on the chain or bar itself
• Wait until the motor is suciently cold
• Read the relevant instructions
• Use suitable clothing, protective
gloves and goggles.
IMPORTANT Any maintenance and
adjustment operations not described in
this manual must be carried out by your
dealer or Authorised Service Centre.
7.2 BATTERY
7.2.1 Battery power reserve
a. environmental factors, that cause
higher energy requirements:
– cutting trees and branches that are too thick;
b. operator behaviour that should be avoided:
–
frequently whilst working;
– adopting a cutting technique
that is unsuitable for the work to
To optimise battery power reserve
it is always recommended to:
• cut wood when dry;
• use the most appropriate technique
for the work to be performed
If the need arises to use the machine for
sessions which exceed the capability of
a standard battery, it is possible to:
• purchase a second standard battery
to immediately replace the discharged
battery, without compromising
the continuity of operations;
7.2.2 Battery removal and
recharging (Fig.18÷21)
Fully charge the battery according to the
instructions in the battery/battery charger booklet.
NOTE The battery is equipped with a guard
that inhibits recharging if the environmental
temperature is not between 0 and +45 °C.
NOTE The battery can be recharged at any
time, even partially, with no risk of damaging it.
7.3 TOPPING UP THE CHAIN OIL TANK
IMPORTANT Only use chainsaw
oil or adhesive oil for chainsaws. Do
not use oil containing impurities so as
not to block the oil filter and to prevent
irreparable damage to the oil pump.
It is essential that you use good quality oil
to lubricate the cutting parts effectively.
Used or poor quality oil does not
guarantee good lubrication and reduces
the working life of the chain and bar.

EN - 12
IMPORTANT Never run the chain
without sufficient oil, this could damage the
Pruner device and compromise safety.
If the oil level is low, top up as follows:
1. Unscrew and remove the cap
(Fig. 22.A) from the oil tank.
2. Pour oil in the tank and monitor the
level on the indicator (Fig. 22.B).
3. Make sure no impurities penetrate
4. Screw on the oil cap and tighten it.
7.4 CLEANING
7.4.1 Cleaning the machine and the motor
After every work session:
• Clean the machine thoroughly to
remove all dust and debris.
•
and, in particular, the motor free of
leaves, branches or excessive grease.
• Always clean the machine after use with a
damp cloth dipped in neutral detergent.
• Remove all traces of humidity using
a soft damp cloth. Humidity can
generate risks of electric shocks.
• Do not use aggressive detergents or solvents
to clean the plastic parts or hand grips.
• Do not spray water onto the motor
and electrical components and
prevent them from getting wet.
• To avoid overheating and damage to the
motor or the battery, always keep the
cooling air vents clean and free of debris.
7.4.2 Cleaning the chain
Remove any traces of sawdust or oil deposits
from the chain every time it is used.
If there is excessive dirt or resin build-up:
1. Disassemble the chain and place
cleanser for a few hours.
2. Rinse it with clean water and treat it
with a suitable anticorrosive spray
3. Reassembling on the machine.
7.5 CHAIN CATCHER
Check the chain catcher conditions before each
use (Fig. 1.I) and repair in the event of damages.
7.6 MACHINE AND BAR
LUBRICATION HOLES
Before daily use,:
1.
2. Disassemble the bar
3. Sheck that machine lubrication
7.7 NUTS AND BOLTS
•
the equipment is in safe working condition.
• Check regularly that the
7.8 CHAIN DRIVE SPROCKET
Once a month check the condition of the
sprocket with your local dealer and replace
it when wear exceeds the accepted limits.
Do not mount a new chain with
a worn sprocket or vice-versa.
7.9 MAINTENANCE OF THE
TOOTHED CHAIN
To ensure that the chainsaw works
safely and eciently, it is essential that
the cutting means are well-sharpened.
Chain sharpening is necessary when:
• The sawdust looks like dust.
•
• The cut is not straight.
• Vibrations increase.
Kickback may occur if the chain
is not suciently sharpened
IMPORTANT It is recommended to have an
Authorised centre sharpen the chain using the
right tools to ensure minimum removal of material
and even sharpness on all the cutting edges.
7.9.1 Replacing the toothed chain
Replace the chain whenever:
• the length of the cutting edges
reduces to 5 mm or less;
• there is too much play between
the links and the rivets.
• the cutting speed is too slow and the
repeated sharpening does not improve
the cutting speed. The chain is worn.

IMPORTANT After replacing the chain,
its tension level must be checked more
frequently due to settling of the chain.
7.10 GUIDE BAR MAINTENANCE
NOTE Any work on the guide bar requires
specific experience and special tools in order
to achieve top workmanship standards; for
safety purposes, we recommend you contact
your dealer to ensure work is done correctly.
To avoid asymmetrical wear on the bar,
make sure it is turned over periodically.
To keep the bar in perfect working
order, proceed as follows:
1. Grease the bearings on the nose sprocket
(if present) with the syringe (not included).
2. Clean the bar groove with the scraper
3.
4.
7.10.1 Replacing the bar
Replace the bar whenever:
• The groove is not as deep as the height of the
drive links (which must never touch the bottom).
• The inside of the guide is worn enough
to make the chain lean to one side.
8. STORING
IMPORTANT The safety regulations to
follow for putting into storage are described
in paragraph 2.4. Strictly comply with these
instructions to avoid serious risks or dangers.
8.1 STORING THE MACHINE
When the machine is to be stored away:
1. Remove the battery from its housing
and recharge it (par. 7.2.2).
2. When the cutting means has
halted, mount the bar cover.
3. Allow the motor to cool before
storing in an enclosed space.
4.
5. Check there are no loose or damaged
components. If necessary, replace the
damaged components and tighten
any screws and loose bolts or contact
the authorised service centre.
6. Store the machine:
– in a dry place
– protected from inclement weather
– in a place where children cannot get to it
– making sure that keys or tools used
for maintenance are removed.
8.2 STORING THE BATTERY
If the battery is not chargerd for a long period
of time, it must be kept in a cool, shaded
place without humidity, with environmental
NOTE If unused for any length of
time, recharge the battery every two
months to prolong its working life.
9. HANDLING AND TRANSPORTATION
Whenever the machine is to be handled,
raised, transported or tilted you must:
1. Stop the machine
2. Wait until the chain is stationary
3. Remove the battery from its
housing and recharge it
4. Mount the bar cover
5.
6. Wear heavy work gloves
7. Only hold the machine using the hand
grips and position the bar in the opposite
direction to that used during operation
When transporting the machine
on a vehicle, always:
1. Fasten the machine securely
with cables or chains
2. Position it so that it does not
cause a hazard to anyone.
10. ASSISTANCE AND REPAIRS
This manual provides all the necessary
information to run the machine and for
correct basic maintenance operations
which can be performed by the user. Any
regulations and maintenance operations
not described herein must be carried out by
your Dealer or Authorised Service Centre.
Any operations performed in unauthorised
invalidate the Warranty and all obligations
and responsibilities of the Manufacturer.
• Non-original parts and attachments are
not approved; use of non-original spare
parts and attachments will jeopardise
the safety of the machine and relieve the
Manufacturer from all obligations or liabilities.
• Original spare parts are supplied by authorised
Dealers and by Authorised Service Centres.
11. WARRANTY

COVERAGE
The warranty conditions are intended for
consumers only, i.e. non-professional operators.
The warranty covers all material quality
and manufacturing defects recognised
during the warranty period by your Dealer
or Authorised Service Centre.
The warranty is restricted to the repair or
replacement of components recognised as faulty.
The warranty only applies to machines
subjected to regular maintenance.
The warranty does not cover
damages resulting from:
• Failure to become familiar with the
documentation accompanying the
machine (Instruction manuals).
• Professional use.
• Carelessness, negligence.
• External causes (lightning, impact, presence of
foreign bodies inside the machine) or incidents.
• Incorrect use or assembly are
prohibited by the manufacturer.
• Poor maintenance.
•
• Use of non-genuine spare
parts (adaptable parts).
• Use of accessories not supplied or
approved by the manufacturer.
The warranty does not cover:
• The maintenance operations (described
in the instruction manual).
• Normal wear and tear of consumables.
• Normal wear and tear.
• Deterioration in the appearance
of the machine due to use.
• Any ancillary expenses related to the
enforcement of the warranty, such as costs
incurred to travel to the user’s location,
transfer of the machine to the Dealer, rental of
replacement equipment or calling of independent
enterprises to perform maintenance work.
The user is protected by his or her own
national legislation. The user’s rights under
the national laws or his or her own country are
not in any way restricted by this warranty.
12. TROUBLESHOOTING
PROBLEM PROBABLE CAUSE SOLUTION
1. Throttle trigger lever
and throttle lock button
are operated but the
machine does not start.
Battery is not inserted or
is inserted incorrectly
Make sure that the battery is
Low battery Check the battery
status and recharge if
necessary (par. 7.2.2)
Machine damaged Do not use the machine
Remove the battery and
Contact a Service Centre.
2. The motor shuts down
whilst working
Battery is not inserted correctly Make sure that the battery is
Low battery Check the battery
status and recharge if
necessary (par. 7.2.2)
Machine damaged Do not use the machine.
Remove the battery and
Contact an Authorised
Service Centre.

EN - 15
With the throttle lock button
and throttle trigger lever on,
the chain does not turn
Excessive chain tensioning
Bar and chain problems Check that the chain runs
freely and the bar guides are
not deformed (par. 7.10).
Machine damaged. Do not use the machine.
the machine remove
the battery and
Contact an Authorised
Service Centre.
The chain heats and
emits smoke on the
end part of the bar.
Excessive chain tensioning
Lubricant oil tank empty. Fill the lubricant oil
tank
5. The motor runs irregularly
and lacks power when revved
Bar and chain problems Check that the chain runs
freely and the bar guides are
not deformed (par. 7.10).
6. Excessive noise and/or
vibration is experienced
whilst working
Loose or damaged parts
remove the battery and:
– inspect for damage;
– check for and tighten
any loose parts;
– Contact an Authorised
Service Centre for
replacement or repair
damaged parts with
parts having equivalent
7. Battery power reserve is low
Severe working conditions
requiring greater
current absorption
Optimise operations
(par. 7.2.1)
operating requirements
Use a second battery or
extended battery (par. 7.2.1)
Decrease in battery capacity Purchase a new battery
8. The battery charger is not
recharging the battery
Battery is not correctly inserted
in the battery charger
Check it is correctly
inserted (par. 7.2.2)
Unsuitable environmental
conditions
Recharge the battery in places
with suitable temperatures
(see battery/battery charger
instruction manual)
Dirty contacts Clean the contacts
The battery charger
is not energised
Check it is plugged in and the
power socket is energised
Faulty battery charger Replace with an
original spare part
If the problem persists,
refer to the battery/
battery charger manual
If problems persist after having performed the above operations, contact your dealer.

EN - 16
13. ATTACHMENTS ON REQUEST
13.1 BATTERY
The list of approved batteries for this machine
is found in the "Technical Data" table.
13.2 BATTERY CHARGER
Device used to recharge the battery (Fig. 26).
13.3 BARS AND CHAINS
The "Correct bar and chain combination
table" contains a list of all possible
combinations between bar and chain,
indicating those which may be used on each
machine, marked with the symbol “
The same table also provides the
approved for use on each machine.
Only use the replacement bars
and chains listed in the table. The use
of unapproved combinations may be
hazardous and cause serious injuries to
operators and damage the machine.
In consideration that the selection,
application and use of the bar and chain
are actions made solely by the user, at
his own discretion, the latter assumes
responsibility for damages of any kind
arising from such actions. When in doubt
or if lacking knowledge of the specics
of each bar or chain, contact your dealer
or an authorised garden centre.

DoC_bas e r.15 - HH-CS-POLE PR-B_0
DICHIARAZIONE CE DI CONFORMITÁ (Istruzioni Originali)
(Direttiva Macchine 2006/42/CE, Allegato II, parte A)
1. La Società: ST. S.p.A. – Via del Lavoro, 6 – 31033 Castelfranco Veneto (TV) – Italy
2. Dichiara sotto la propria responsabilità, che la macchina: Potatrice ad Asta allimentata a batteria
abbattimento / sezionamento / sramatura di alberi
a) Tipo / Modello Base
MP 20 Li S, MP 20 Li A
b) Mese/Anno di costruzione
c) Matricola
d) Motore
a batteria
3. É conforme alle specifiche delle direttive:
• MD: 2006/42/EC
e) Ente Certificatore N° 0905 Intertek Deutschland GmbH
Stangenstraße 1, 70771 Leinfelden-Echterdingen, Germany
f) Esame CE del tipo: No.
• OND: 2000/14/EC, ANNEX V
D. Lsg. 262/2002, ANNEX V (Italy)
e) Ente Certificatore /
• EMCD: 2014/30/EU
• RoHS II: 2011/65/EU - 2015/863/EU
4. Riferimento alle Norme armonizzate:
EN 62841-1:2015+AC:2015
EN 55014-1:2017
EN ISO 11680-1:2011
EN IEC 63000:2018
EN 55014-2:2015
g) Livello di potenza sonora misurato
85,4 dB(A)
h) Livello di potenza sonora garantito
87 dB(A)
k) Potenza installata
/ kW
n) Persona autorizzata a costituire il FascicoloTecnico: ST. S.p.A.
Via del Lavoro, 6
31033 Castelfranco Veneto (TV) - Italia
o) Castelfranco V.to, 06.08.2020 CEO Stiga Group
Sean Robinson
171516231_0
FR
(
Traduction de la notice originale)
Déclaration CE de Conformité
(Directive Machines 2006/42/CE, Annexe II, partie
A)
1. La Société
2. Déclare sous sa propre responsabilité que la
machine :
Perche élagueuse à batterie,
taille/régularisation de haies
a) Type / Modèle de Base
b) Mois / Année de construction
c) Série
d) Moteur: batterie
3. Est conforme aux prescriptions des
directives :
e) Organisme de certification
f) Examen CE du Type
4. Renvoi aux Normes harmonisées
g) Niveau de puissance sonore mesuré
h) Niveau de puissance sonore garanti
k) Puissance installée
n) Personne habilitée à établir le Dossier
Technique :
o) Lieu et Date
EN
(
Translation of the original instruction)
EC Declaration of Conformity
(Machine Directive 2006/42/EC, Annex II, part A)
1. The Company
2. Declares under its own responsibility that the
machine:
Battery powered pole-mounted pruner,
hedge cutting/trimming
a) Type / Base Model
b) Month / Year of manufacture
c) Serial number
d) Motor: battery-operated
3. Conforms to directive specifications:
e) Certifying body
f) EC examination of Type
4. Reference to harmonised Standards
g) Sound power level measured
h) Sound power level guaranteed
k) Power installed
n) Person authorised to create the Technical
Folder:
o) Place and Date
DE
(
Übersetzung der Originalbetriebsanleitung)
EG-Konformitätserklärung
(Maschinenrichtlinie 2006/42/EG, Anhang II, Teil
A)
1. Die Gesellschaft
2. Erklärt auf eigene Verantwortung, dass die
Maschine:
Batteriebetriebener Hoch-Entaster,
schneiden/trimmen von Hecken
a) Typ / Basismodell
b) Monat / Baujahr
c) Seriennummer
d) Motor: Batterie
3. Den Anforderungen der folgenden Richtlinien
entspricht:
e) Zertifizierungsstelle
f) EG-Baumusterprüfung
4. Bezugnahme auf die harmonisierten Normen
g) Gemessener Schallleistungspegel
h) Garantierter Schallleistungspegel
k) Installierte Leistung
n) Zur Verfassung der technischen Unterlagen
befugte Person:
o) Ort und Datum
NL (
Vertaling van de oorspronkelijke gebruiksaanwijzing)
EG-verklaring van overeenstemming
(Richtlijn Machines 2006/42/CE, Bijlage II, deel A)
1. Het bedrijf
2. Verklaart onder zijn eigen
verantwoordelijkheid dat de machine: Accu-
heggenschaar met verlengsteel,
snijden/trimmen van heggen
a) Type / Basismodel
b) Maand / Bouwjaar
c) Serienummer
d) Motor: accu
3. Voldoet aan de specificaties van de
richtlijnen:
e) Certificatie-instituut
f) EG-onderzoek van het Type
4. Verwijzing naar de Geharmoniseerde normen
g) Gemeten niveau van geluidsvermogen
h) Gegarandeerd niveau van geluidsvermogen
k) Geïnstalleerd vermogen
n) Bevoegd persoon voor het opstellen van het
Technisch Dossier
o) Plaats en Datum
ES (
Traducción del Manual Original)
Declaración de Conformidad CE
(Directiva Máquinas 2006/42/CE, Anexo II, parte
A)
1. La Empresa
2. Declara bajo su propia responsabilidad que la
máquina:
Podadora alimentada por batería,
corte/regularización de seto
a) Tipo / Modelo Base
b) Mes / Año de fabricación
c) Matrícula
d) Motor: batería
3. Cumple con las especificaciones de las
directivas:
e) Ente certificador
f) Examen CE del Tipo
4. Referencia a las Normas armonizadas
g) Nivel de potencia sonora medido
h) Nivel de potencia sonora garantizado
k) Potencia instalada
n) Persona autorizada a realizar el Manual
Técnico:
o) Lugar y Fecha
PT (
Tradução do manual original)
Declaração CE de Conformidade
(Diretiva de Máquinas 2006/42/CE, Anexo II,
parte A)
1. A Empresa
2. Declara sob a própria responsabilidade que a
máquina:
Podadora com Haste alimentada a bateria,
corte/aparação da sebe
a) Tipo / Modelo Base
b) Mês / Ano de fabrico
c) Matrícula
d) Moto: Bateria
3. É conforme às especificações das diretivas:
e) Órgão certificador
f) Exame CE do Tipo
4. Referência às Normas harmonizadas
g) Nível medido de potência sonora
h) Nível garantido de potência sonora
k) Potência instalada
n) Pessoa autorizada a elaborar o Caderno
Técnico
o) Local e Data
EL (
Μετάφραση του πρωτοτύπου των οδηγιών
χρήσης)
EK-Δήλωση συμμόρφωσης
(Οδηγία Μηχανών 2006/42/CE, Παράρτημα II,
μέρος A)
1. Η Εταιρία
2. Δηλώνει υπεύθυνα ότι η μηχανή:
Κλαδευτήρι μπαταρίας τηλεσκοπικό,
κοπή/τακτοποίηση θάμνων
a) Τύπος / Βασικό Μοντέλο
b) Μήνας / Έτος κατασκευής
c) Αριθμός μητρώου
d) Κινητήρας: μπαταρία
3. Συμμορφώνεται με τις προδιαγραφές της
οδηγίας:
e) Οργανισμός πιστοποίησης
f) Εξέταση CE του Τύπου
4. Αναφορά στους Κανονισμούς εναρμόνισης
g) Στάθμη μέτρησης ακουστικής ισχύος
h) Στάθμη εγγυημένης ακουστικής ισχύος
k) Εγκαταστημένη ισχύς
n) Εξουσιοδοτημένο άτομο για την κατάρτιση
του Τεχνικού Φυλλαδίου:
o) Τόπος και Χρόνος
TR (
Orijinal Talimatların Tercümesi)
AT Uygunluk Beyanı
(2006/42/CE Makine Direktifi, Ek II, bölüm A)
1. Şirket
2. Şahsi sorumluluğu altında aşağıdaki
makinenin:
Batarya beslemeli Çubuklu Budama Makinesi,
çit kesime/düzenleme
a) Tip / Standart model
b) Üretimin Ay / yıl
c) Sicil numarası
d) Motor: batarya
3. Aşağıdaki direktiflerin özelliklerine uygun
olduğunu beyan etmektedir:
e) Sertifikalandıran kurum
f) Tipi CE incelemesi
4. Harmonize standartlara atıf
g) Ölçülen ses güç seviyesi
h) Garanti edilen ses güç seviyesi
k) Kurulu güç
n) Teknik Dosyayı oluşturmaya yetkili kişi:
o) Yer ve Tarih
MK (
Превод на оригиналните упатства)
Декларација за усогласеност со ЕУ
(Директива за машини 2006/42/CE, Анекс II,
дел A)
1. Компанијата
2. изјавува со целосна лична одговорност
дека следната машина:
Режач на шипка со напојување на батерија,
сечење/моделирање на грмушки
а) Тип / основен модел
б) Месец / Година на производство
в) етикета
г) мотор: акумулатор
3. Усогласено со спецификациите според
директивите:
д) тело за сертификација
ѓ) тест СЕ за типот
4. Референци за усогласени нормативи
е) Акустички притисок
ж) измерено ниво на звучна моќност
ѕ) обем на сечење
н) овластено лице за составување на
Техничката брошура
o) место и датум
EXAMPLE
DoC_base r. 15 - HH-CS-POLE PR-B_0
DICHIARAZIONE CE DI CONFORMITÁ (Istruzioni Originali)
(Direttiva Macchine 2006/42/CE, Allegato II, parte A)
1. La Società: ST. S.p.A. – Via del Lavoro, 6 – 31033 Castelfranco Veneto (TV) – Italy
2. Dichiara sotto la propria responsabilità, che la macchina: Potatrice ad Asta allimentata a batteria
abbattimento / sezionamento / sramatura di alberi
a) Tipo / Modello Base
MP 20 Li S, MP 20 Li A
b) Mese/Anno di costruzione
c) Matricola
d) Motore
a batteria
3. É conforme alle specifiche delle direttive:
• MD: 2006/42/EC
e) Ente Certificatore N° 0905 Intertek Deutschland GmbH
Stangenstraße 1, 70771 Leinfelden-Echterdingen, Germany
f) Esame CE del tipo: No.
• OND: 2000/14/EC, ANNEX V
D. Lsg. 262/2002, ANNEX V (Italy)
e) Ente Certificatore /
• EMCD: 2014/30/EU
• RoHS II: 2011/65/EU - 2015/863/EU
4. Riferimento alle Norme armonizzate:
EN 62841-1:2015+AC:2015
EN 55014-1:2017
EN ISO 11680-1:2011
EN IEC 63000:2018
EN 55014-2:2015
g) Livello di potenza sonora misurato
85,4 dB(A)
h) Livello di potenza sonora garantito
87 dB(A)
k) Potenza installata
/ kW
n) Persona autorizzata a costituire il FascicoloTecnico: ST. S.p.A.
Via del Lavoro, 6
31033 Castelfranco Veneto (TV) - Italia
o) Castelfranco V.to, 06.08.2020 CEO Stiga Group
Sean Robinson
171516231_0
FR
(
Traduction de la notice originale)
Déclaration CE de Conformité
(Directive Machines 2006/42/CE, Annexe II, partie
A)
1. La Société
2. Déclare sous sa propre responsabilité que la
machine :
Perche élagueuse à batterie,
taille/régularisation de haies
a) Type / Modèle de Base
b) Mois / Année de construction
c) Série
d) Moteur: batterie
3. Est conforme aux prescriptions des
directives :
e) Organisme de certification
f) Examen CE du Type
4. Renvoi aux Normes harmonisées
g) Niveau de puissance sonore mesuré
h) Niveau de puissance sonore garanti
k) Puissance installée
n) Personne habilitée à établir le Dossier
Technique :
o) Lieu et Date
EN
(
Translation of the original instruction)
EC Declaration of Conformity
(Machine Directive 2006/42/EC, Annex II, part A)
1. The Company
2. Declares under its own responsibility that the
machine:
Battery powered pole-mounted pruner,
hedge cutting/trimming
a) Type / Base Model
b) Month / Year of manufacture
c) Serial number
d) Motor: battery-operated
3. Conforms to directive specifications:
e) Certifying body
f) EC examination of Type
4. Reference to harmonised Standards
g) Sound power level measured
h) Sound power level guaranteed
k) Power installed
n) Person authorised to create the Technical
Folder:
o) Place and Date
DE
(
Übersetzung der Originalbetriebsanleitung)
EG-Konformitätserklärung
(Maschinenrichtlinie 2006/42/EG, Anhang II, Teil
A)
1. Die Gesellschaft
2. Erklärt auf eigene Verantwortung, dass die
Maschine:
Batteriebetriebener Hoch-Entaster,
schneiden/trimmen von Hecken
a) Typ / Basismodell
b) Monat / Baujahr
c) Seriennummer
d) Motor: Batterie
3. Den Anforderungen der folgenden Richtlinien
entspricht:
e) Zertifizierungsstelle
f) EG-Baumusterprüfung
4. Bezugnahme auf die harmonisierten Normen
g) Gemessener Schallleistungspegel
h) Garantierter Schallleistungspegel
k) Installierte Leistung
n) Zur Verfassung der technischen Unterlagen
befugte Person:
o) Ort und Datum
NL (
Vertaling van de oorspronkelijke gebruiksaanwijzing)
EG-verklaring van overeenstemming
(Richtlijn Machines 2006/42/CE, Bijlage II, deel A)
1. Het bedrijf
2. Verklaart onder zijn eigen
verantwoordelijkheid dat de machine: Accu-
heggenschaar met verlengsteel,
snijden/trimmen van heggen
a) Type / Basismodel
b) Maand / Bouwjaar
c) Serienummer
d) Motor: accu
3. Voldoet aan de specificaties van de
richtlijnen:
e) Certificatie-instituut
f) EG-onderzoek van het Type
4. Verwijzing naar de Geharmoniseerde normen
g) Gemeten niveau van geluidsvermogen
h) Gegarandeerd niveau van geluidsvermogen
k) Geïnstalleerd vermogen
n) Bevoegd persoon voor het opstellen van het
Technisch Dossier
o) Plaats en Datum
ES (
Traducción del Manual Original)
Declaración de Conformidad CE
(Directiva Máquinas 2006/42/CE, Anexo II, parte
A)
1. La Empresa
2. Declara bajo su propia responsabilidad que la
máquina:
Podadora alimentada por batería,
corte/regularización de seto
a) Tipo / Modelo Base
b) Mes / Año de fabricación
c) Matrícula
d) Motor: batería
3. Cumple con las especificaciones de las
directivas:
e) Ente certificador
f) Examen CE del Tipo
4. Referencia a las Normas armonizadas
g) Nivel de potencia sonora medido
h) Nivel de potencia sonora garantizado
k) Potencia instalada
n) Persona autorizada a realizar el Manual
Técnico:
o) Lugar y Fecha
PT (
Tradução do manual original)
Declaração CE de Conformidade
(Diretiva de Máquinas 2006/42/CE, Anexo II,
parte A)
1. A Empresa
2. Declara sob a própria responsabilidade que a
máquina:
Podadora com Haste alimentada a bateria,
corte/aparação da sebe
a) Tipo / Modelo Base
b) Mês / Ano de fabrico
c) Matrícula
d) Moto: Bateria
3. É conforme às especificações das diretivas:
e) Órgão certificador
f) Exame CE do Tipo
4. Referência às Normas harmonizadas
g) Nível medido de potência sonora
h) Nível garantido de potência sonora
k) Potência instalada
n) Pessoa autorizada a elaborar o Caderno
Técnico
o) Local e Data
EL (
Μετάφραση του πρωτοτύπου των οδηγιών
χρήσης)
EK-Δήλωση συμμόρφωσης
(Οδηγία Μηχανών 2006/42/CE, Παράρτημα II,
μέρος A)
1. Η Εταιρία
2. Δηλώνει υπεύθυνα ότι η μηχανή:
Κλαδευτήρι μπαταρίας τηλεσκοπικό,
κοπή/τακτοποίηση θάμνων
a) Τύπος / Βασικό Μοντέλο
b) Μήνας / Έτος κατασκευής
c) Αριθμός μητρώου
d) Κινητήρας: μπαταρία
3. Συμμορφώνεται με τις προδιαγραφές της
οδηγίας:
e) Οργανισμός πιστοποίησης
f) Εξέταση CE του Τύπου
4. Αναφορά στους Κανονισμούς εναρμόνισης
g) Στάθμη μέτρησης ακουστικής ισχύος
h) Στάθμη εγγυημένης ακουστικής ισχύος
k) Εγκαταστημένη ισχύς
n) Εξουσιοδοτημένο άτομο για την κατάρτιση
του Τεχνικού Φυλλαδίου:
o) Τόπος και Χρόνος
TR (
Orijinal Talimatların Tercümesi)
AT Uygunluk Beyanı
(2006/42/CE Makine Direktifi, Ek II, bölüm A)
1. Şirket
2. Şahsi sorumluluğu altında aşağıdaki
makinenin:
Batarya beslemeli Çubuklu Budama Makinesi,
çit kesime/düzenleme
a) Tip / Standart model
b) Üretimin Ay / yıl
c) Sicil numarası
d) Motor: batarya
3. Aşağıdaki direktiflerin özelliklerine uygun
olduğunu beyan etmektedir:
e) Sertifikalandıran kurum
f) Tipi CE incelemesi
4. Harmonize standartlara atıf
g) Ölçülen ses güç seviyesi
h) Garanti edilen ses güç seviyesi
k) Kurulu güç
n) Teknik Dosyayı oluşturmaya yetkili kişi:
o) Yer ve Tarih
MK (
Превод на оригиналните упатства)
Декларација за усогласеност со ЕУ
(Директива за машини 2006/42/CE, Анекс II,
дел A)
1. Компанијата
2. изјавува со целосна лична одговорност
дека следната машина:
Режач на шипка со напојување на батерија,
сечење/моделирање на грмушки
а) Тип / основен модел
б) Месец / Година на производство
в) етикета
г) мотор: акумулатор
3. Усогласено со спецификациите според
директивите:
д) тело за сертификација
ѓ) тест СЕ за типот
4. Референци за усогласени нормативи
е) Акустички притисок
ж) измерено ниво на звучна моќност
ѕ) обем на сечење
н) овластено лице за составување на
Техничката брошура
o) место и датум
EXAMPLE

© by ST. S.p.A.
IT • Il contenuto e le immagini del presente manuale d’uso sono stati realizzati per conto di ST. S.p.A. e sono tutelati da diritto d’autore – E’
vietata ogni riproduzione o alterazione anche parziale non autorizzata del documento.
BG
BS
CS
DA • Indhold og illustrationer i denne vejledning er blevet skabt på vegne af ST. S.p.A. og er beskyttet af ophavsret – Enhver gengivelse
eller ændring, også delvis, af dokumentet uden autorisation hertil er forbudt.
DE • Inhalt und Bilder dieser Bedienungsanleitung wurden im Namen von ST. S.p.A. erstellt und sind urheberrechtlich geschützt – Jede
nicht genehmigte Vervielfältigung oder Veränderung, auch auszugsweise, dieses Dokuments ist verboten.
EL
EN • The content and images in this User Manual were produced expressly for ST. S.p.A. and are protected by copyright – any unauthori-
ES • El contenido y las imágenes del presente manual de uso han sido creados por ST. S.p.A. y están protegidos por los derechos de
ET
FI • Tämän käyttöoppaan sisältö ja kuvat on valmistettu ST. S.p.A. -yhtiön toimesta ja niitä suojaa tekijänoikeuslaki. – Asiakirjan kaikenlai-
nen kopioiminen tai muuttaminen, osittainkin, on kielletty ilman erityistä lupaa.
FR • Le contenu et les images du présent manuel d'utilisation ont été réalisés pour le compte de ST. S.p.A. et sont protégés par un droit
HR
HU
LT
LV
MK
NL • De inhoud en de afbeeldingen van deze gebruikshandleiding werden gerealiseerd voor rekening van ST. S.p.A. en zijn beschermd
door het auteursrecht – Elke niet-geautoriseerde reproductie of wijziging, ook gedeeltelijke, van het document is verboden.
NO • Innholdet og bildene i denne brukerveiledningen er utført på oppdrag fra ST. S.p.A. og er beskyttet ved opphavsrett - Enhver gjengi-
velse eller endring, selv kun delvis, er forbudt.
PL
PT • As imagens e os conteúdos contidos no presente Manual do Utilizador foram expressamente criados para uso exclusivo da ST.
S.p.A., encontrando-se protegidos por direitos de autor. Qualquer tipo de reprodução ou alteração, parcial ou integral, não autorizadas
deste Manual estão expressamente proibidas.
RO
RU
SK
SL
SR
SV • Innehållet och bilderna i denna användarhandbok har framställts för ST. S.p.A. och skyddas av upphovsrätt – all form av reproduktion
eller ändring, även partiell, som inte auktoriserats är förbjuden.
TR
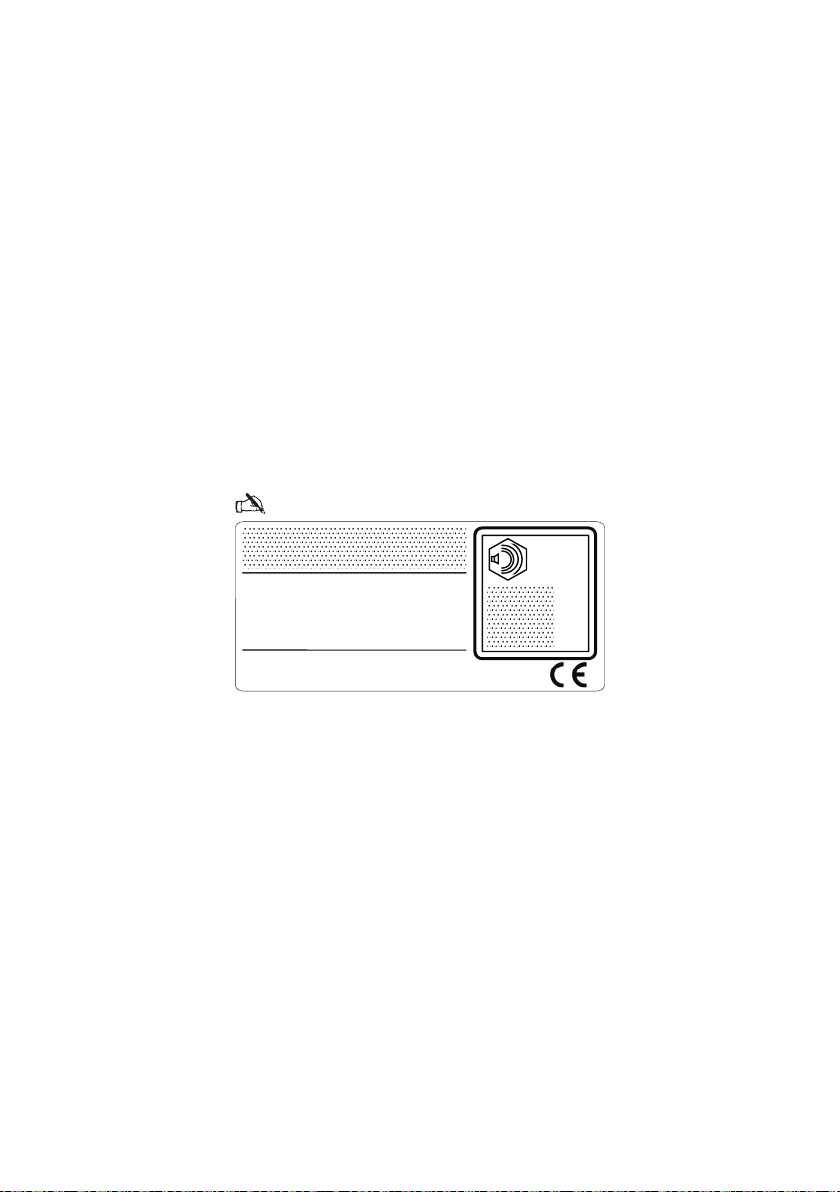
ST. S.p.A.
Via del Lavoro, 6
dB
L
WA
Type:
................................
.................. -s/n ........................................
Art.N .......................................................