Loading ...
2
Remove the top plastic nut and washer from the reed
switch. Do not remove the nut and washer from the
wire.
Slide the wire through the slot on the mounting bracket
and push the sensor up through the hole in the bracket.
Secure reed sensor to bracket using the plastic nut and
washer. Tighten to secure taking special care not to
overtighten.
SELECT A LOCATION TO MOUNT WATER ALERT SENSOR
Wireless Remote with LCD screen
Select a location protected from water and other precipitation. The case is
water resistant, not water proof.
Place the remote in a dry, shaded area. Avoid locations with direct sun to
prevent inaccurate readings.
Fog and mist will not harm the remote but direct precipitation must be
avoided.
Note: Exposing the remote case to extreme humidity may temporarily
disrupt data. The remote case reads humidity, but should not be submerged
in water.
Select a location within 0 ft. to 200 ft. range of the control tower/gateway.
See important setup and operation section for range information.
Floor sensor/probe and reed sensor
Important: The floor sensor/probe and reed sensor are not for use in a
pool or hot tub where chemicals may cause malfunction.
Floor sensor/probe and reed sensor need to be within reach of the wireless
remote
CONFIRM CONNECTION BEFORE INSTALLING SENSOR
IMPORTANT: Before permanently installing a sensor/probe…Test the
sensor/probe in the desired mounting location for at least 1 hour to
confirm good reception. Confirm consistent readings on your account app
before permanently mounting. Move the sensor /probe closer to the control
tower/gateway if the signal is lost or not received.
Mount the sensor/probe only aft.er the activation process
(see “SETUP AND ACTIVATION”).
- MOUNT TO WALL WITH SCREWS
- FREE STANDING
1. Remove the mounting bracket from the remote.
2. Place bracket over the desired location then make sure you
have enough sensor wire to reach desired remote location.
3. Mark mounting surface with a pencil through the 2 holes of
the bracket.
4. Screw bracket onto surface and tighten screws to bracket.
Use included wall anchors if necessary.
5. Insert the remote into the bracket.
Attach the mounting bracket to the bottom or top of the
remote and place it on any flat surface.
- PLACEMENT OF FLOOR SENSOR
The floor sensor/probe should be placed on the dry floor or against the wall
near your foundation, water heater, sump, plumbing, washer, aquarium, or
dish washer etc. to monitor for leaks.
FLOOR: Place the floor sensor/probe (circuit board
down) on the dry floor within range of the wireless
remote that is mounted on the wall or standing on a
table. Note: The floor sensor/probe will sit 1/8 inch from
the floor in this position.
WALL: Place the floor sensor/probe against the wall
with the edge touching the floor within range of the
wireless remote that is mounted on the wall or standing on
a table.
The floor sensor/probe can be secured to the floor or
wall with the included screws & anchors or with two-
sided tape (not included).
Secure the 6 ft.. sensor/probe cable to avoid tripping hazards:
Loosely coil and secure the extra cable with a twist tie.
- CLEANING THE FLOOR SENSOR/PROBE
Routine cleaning of the floor sensor/probe is recommended to ensure proper
operation. Use clean water and a soft. cloth to clean dirt and debris from the
circuit board of the floor sensor. Note: When using two-sided tape, replace
the tape aft.er cleaning the floor sensor/probe to maintain adhesiveness.
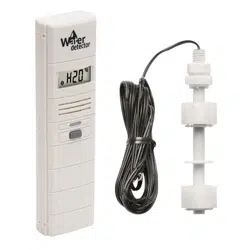
REMOTE FEATURES & PLUGGING IN SENSOR(S)/PROBE(S)
Floor sensor
Reed sensor
BUTTON
(A) Wireless Remote Water Detector with Temp./Humidity:
LCD displays: ambient air temp. & humidity / wet or dry
Transmits collected data to control tower within a 200 ft. wireless range.
Weather resistant case* (not water proof)
*Cannot get wet and may be affected by high humidity conditions.
(B) Floor Sensor/Probe on 6 ft. Detachable Cable:
Floor sensor/probe detects the presence or absence of water
Attach it to the water detector remote by removing the back cover and
insert plug into the socket. Install 2 AAA batteries into the remote.
Sensor/probe can be plugged into the sensor at any time without
resetting.
(C) Reed Sensor on 8 ft. Detachable Cable:
Reed sensor detects the presence or absence of water
Attach it to the water detector remote by removing the back cover and
insert plug into the socket. Install 2 AAA batteries into the remote. Sensor
can be plugged into the sensor at any time without resetting.
Back
Cover
Back
Cover
INSTALLATION OF THE WIRELESS REMOTE
691-3704 & 691-3705
INSTALLATION OF THE 691-3704 FLOOR SENSOR/PROBE
INSTALLATION OF THE 691-3705 REED SENSOR
- ASSEMBLE REED SENSOR
- INSTALL REED SENSOR IN SUMP BASIN
Loosely install the hose clamp around the discharge pipe of the
sump pump
Insert the mounting bracket through the hose clamp.
Adjust the height of the assembled sensor above the turn on level
of the pump inside the basin.
Tighten the hose clamp
NOTICE: The reed sensor is a monitoring/notification device only.
The reed sensor will not prevent flooding or water damage.
NOTICE: The water sensor is a monitoring/notification device only.
The water sensor will not prevent flooding or water damage.
You will need to purchase a 691-3703 control tower/gateway to complete the
water alert system and to send text and email alerts via the app.
A
B
C
Loading ...
Loading ...