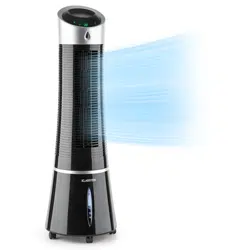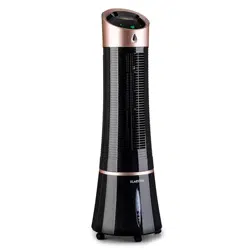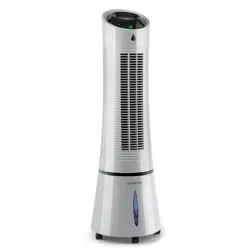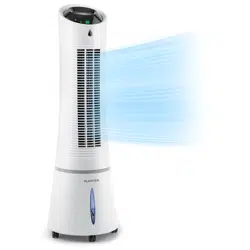

SKYSCRAPER ICE
Luftkühler
Air Cooler
Enfriador de aire
Rafraîchisseur d’air
Rareddatore d’aria
www.klarstein.com
10028303 10029328 10034651 10035835


3
DE
Sehr geehrter Kunde,
wir gratulieren Ihnen zum Erwerb Ihres Gerätes. Lesen Sie
die folgenden Hinweise sorgfältig durch und befolgen Sie
diese, um möglichen Schäden vorzubeugen. Für Schäden,
die durch Missachtung der Hinweise und unsachgemäßen
Gebrauch entstehen, übernehmen wir keine Haftung. Scannen
Sie den folgenden QR-Code, um Zugriff auf die aktuellste
Bedienungsanleitung und weitere Informationen rund um das
Produkt zu erhalten.
INHALTSVERZEICHNIS
Sicherheitshinweise4
Geräteübersicht5
Inbetriebnahme und Bedienung6
Tastenfunktionen der Fernbedienung7
Tastenfunktionen und Displayanzeigen am Gerät7
Windschema9
Reinigung und Pege12
Fehlersuche und Fehlerbehebung13
Hinweise zur Entsorgung14
TECHNISCHE DATEN
Artikelnummer 10028303, 10029328, 10034651, 10035835
Stromversorgung 220-240 V ~ 50/60 Hz
HERSTELLER & IMPORTEUR (UK)
Hersteller:
Chal-Tec GmbH, Wallstraße 16, 10179 Berlin, Deutschland.
Importeur für Großbritannien:
Chal-Tec UK limited
Unit 6 Riverside Business Centre
Brighton Road
Shoreham-by-Sea
BN43 6RE
United Kingdom
English 15
Español 27
Français 39
Italiano 51

4
DE
SICHERHEITSHINWEISE
• Benutzen Sie das Gerät nur wie in der Bedienungsanleitung angegeben.
Missbrauch kann zu Stromschlägen, Verletzungen oder Bränden führen.
• Benutzen Sie das Gerät in Anwesenheit von Kindern nur unter Aufsicht.
• Tauchen Sie das Gerät niemals komplett in Wasser.
• Falls Sie das Gerät bewegen wollen oder es nicht benutzen, ziehen Sie den
Stecker aus der Steckdose, indem Sie ihn mit der Hand festhalten. Bauen Sie keinen
anderen Stecker an, falsche Anschlüsse können zu Stromschlägen führen.
• Benutzen Sie nach Möglichkeit kein Verlängerungskabel. Verwenden Sie in jedem
Fall nie mehr als ein Verlängerungskabel.
• Stecken Sie keine Objekte oder Finger in die Lüftungsschlitze, sie könnten sich
verletzen. Achten Sie darauf, dass die Lüftungsöffnungen während des Betriebs
nicht blockiert werden.
• Lassen Sie das Netzkabel nicht unter brennbaren Materialien, wie Teppichen,
verlaufen. Verlegen Sie das Netzkabel so, dass niemand darauf tritt.
• Benutzen Sie das Gerät nicht in der Nähe brennbarer oder explosiver Substanzen.
• Stellen Sie das Gerät nicht in Nähe von Herden oder Öfen.
• Benutzen Sie das Gerät nicht in Feuchträumen, wie Badezimmern.
• Falls Sie das Gerät nicht mehr benutzen, entleeren Sie den Wassertank.
• Falls das Netzkabel oder der Stecker beschädigt ist, wenden Sie sich an unseren
Kundendienst oder einen Fachbetrieb. Versuchen Sie nicht Stecker oder Kabel selbst
zu reparieren.
5
DE
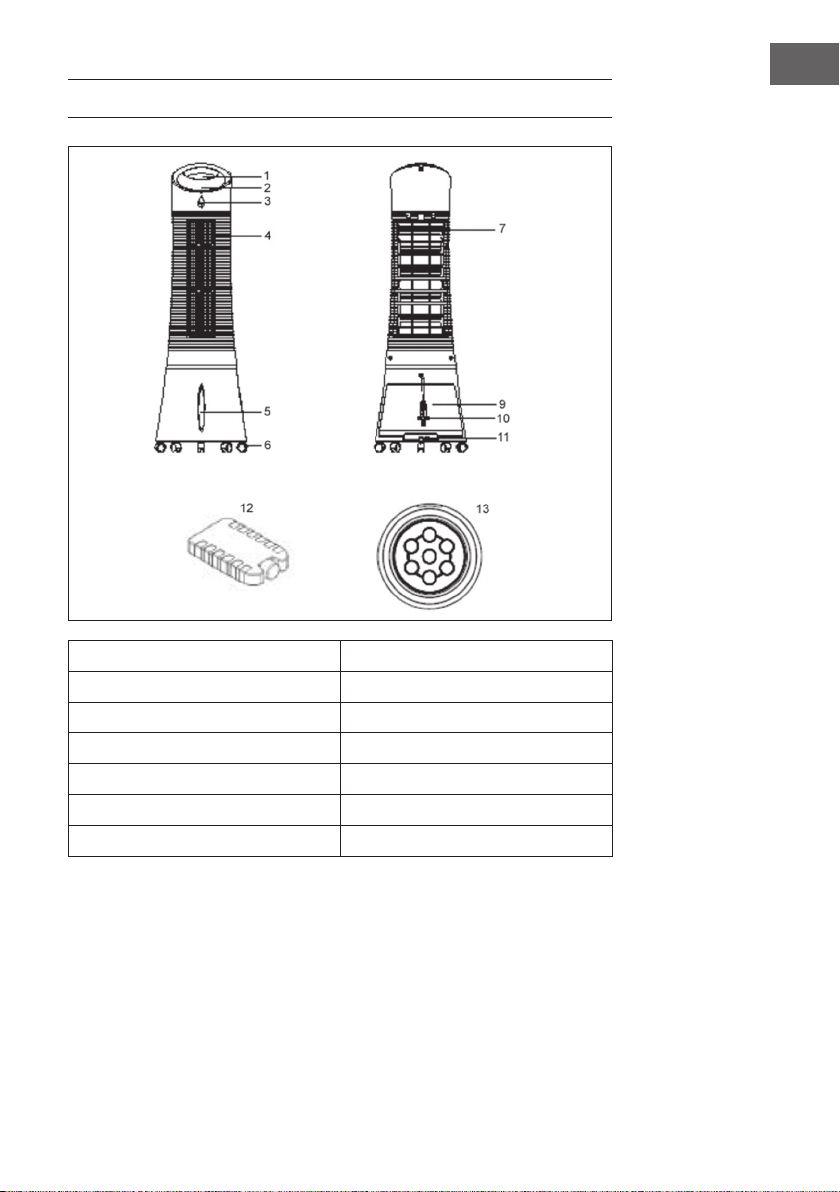
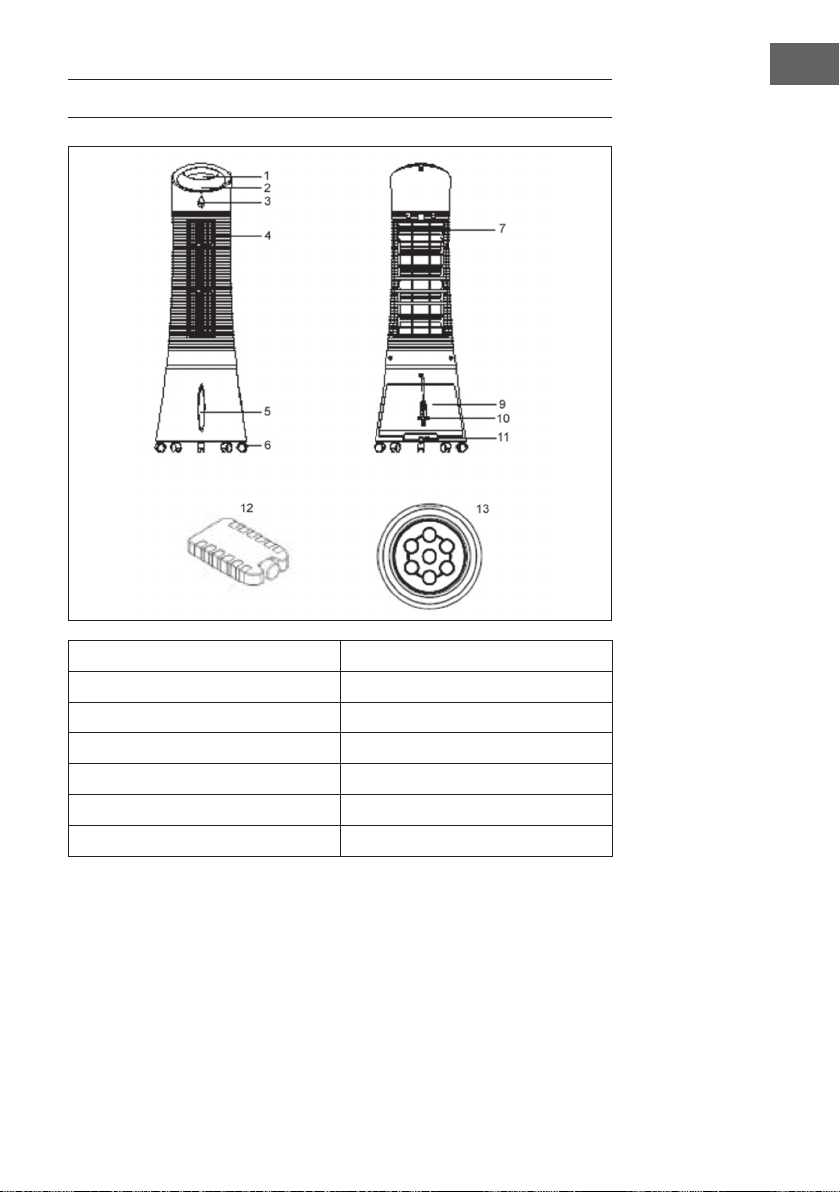
GERÄTEÜBERSICHT
1 Bedienfeld 9 Wassertank
2 Display 10 Netzkabel
3 Fernbedienungs-Sensor 11 Wassertank-Verriegelung
4 Lüftungsschlitz 12 Kühlpad
5 Wasserstandanzeige 13 Fernbedienung
6 Rollfuß
7 Staublter
6
DE
INBETRIEBNAHME UND BEDIENUNG
Entfernen Sie das komplette Verpackungsmaterial und bewahren Sie den Karton
zum späteren Verstauen gut auf. Achten Sie darauf, dass sich kein überschüssiger
Schaumstoff mehr im Gerät bendet. Sie brauchen kein Werkzeug um das Gerät
zusammenzubauen.
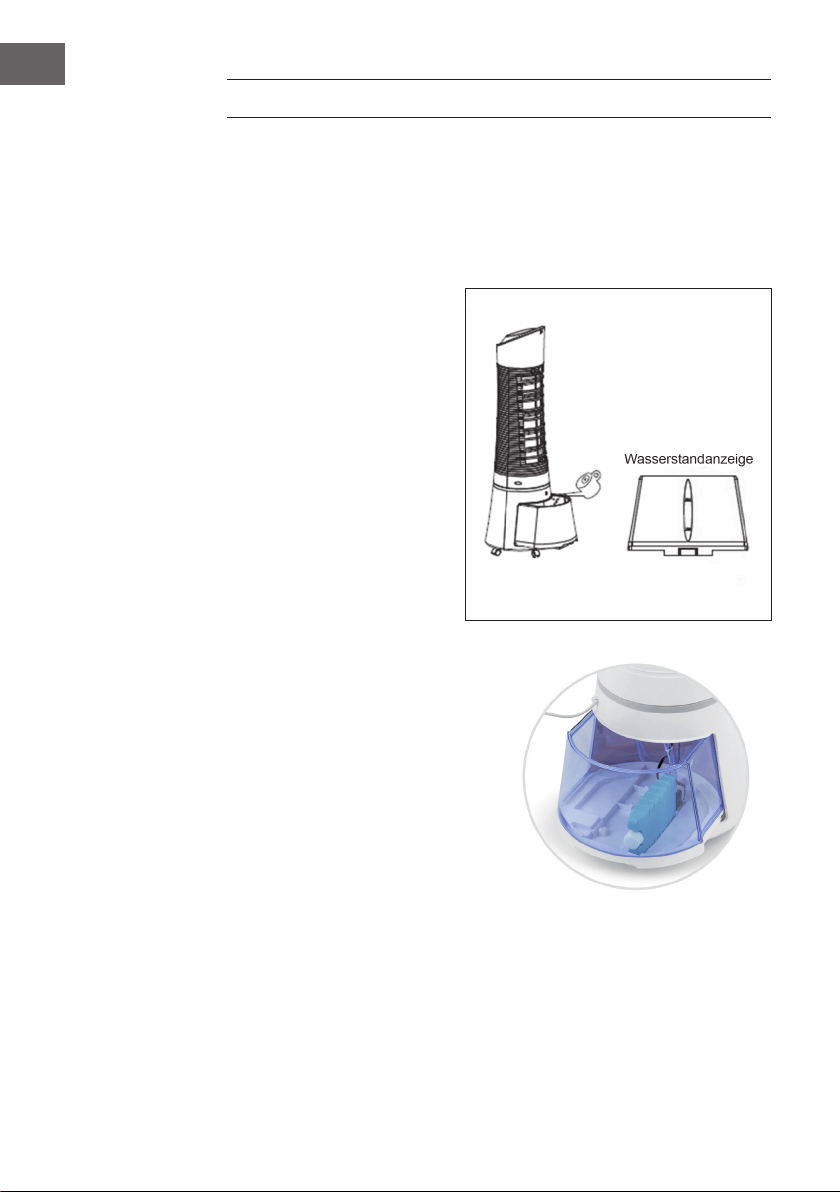
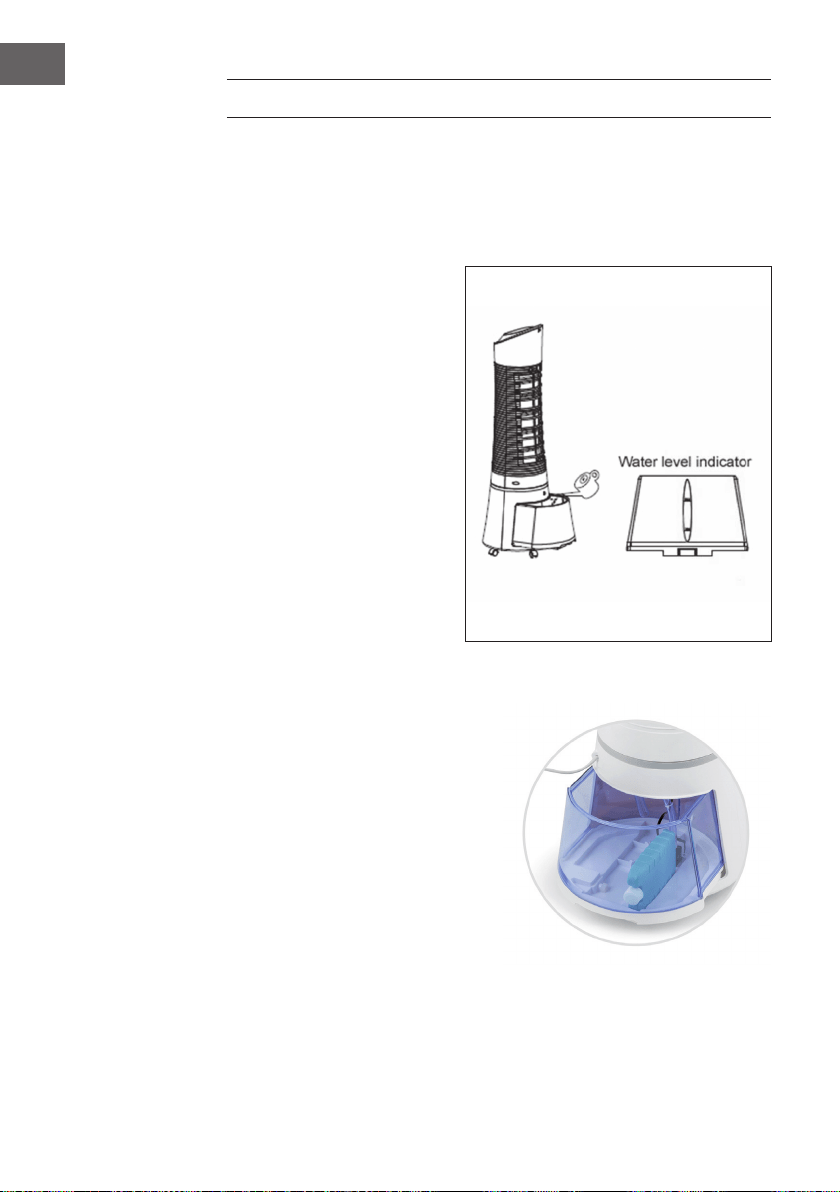
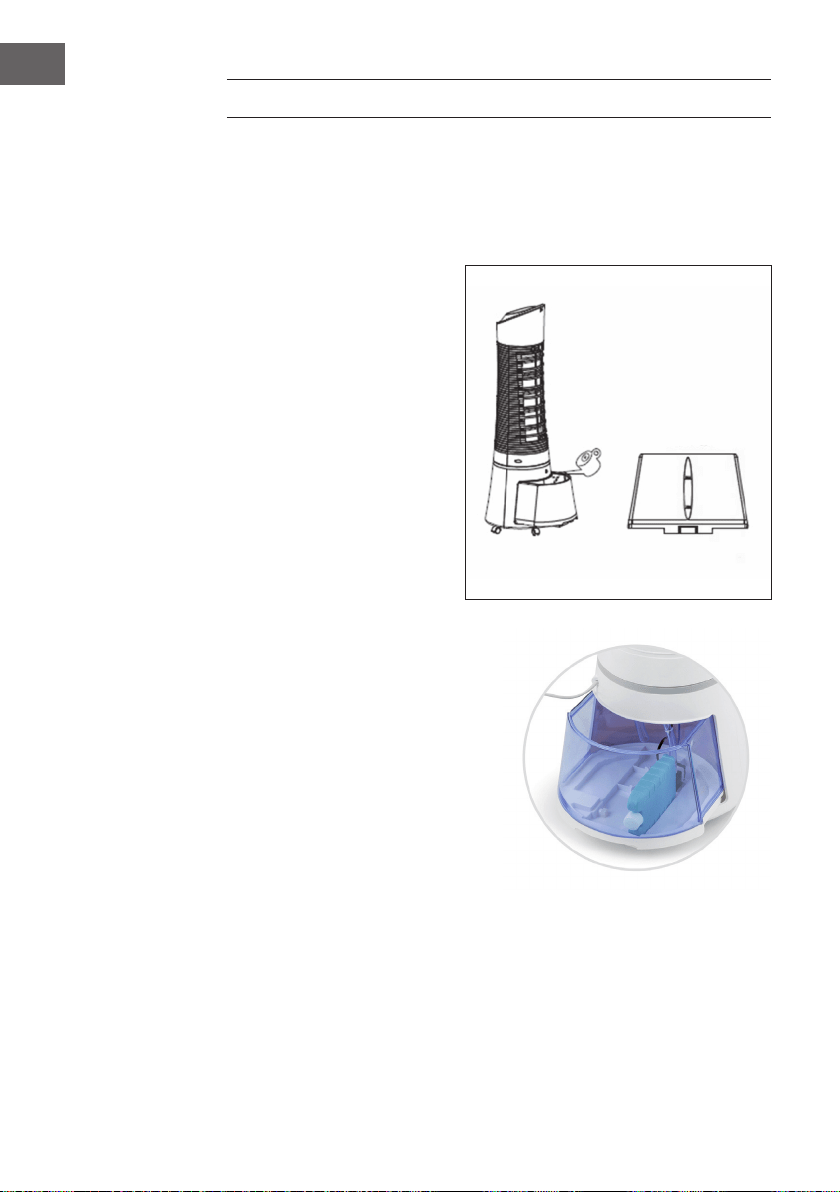
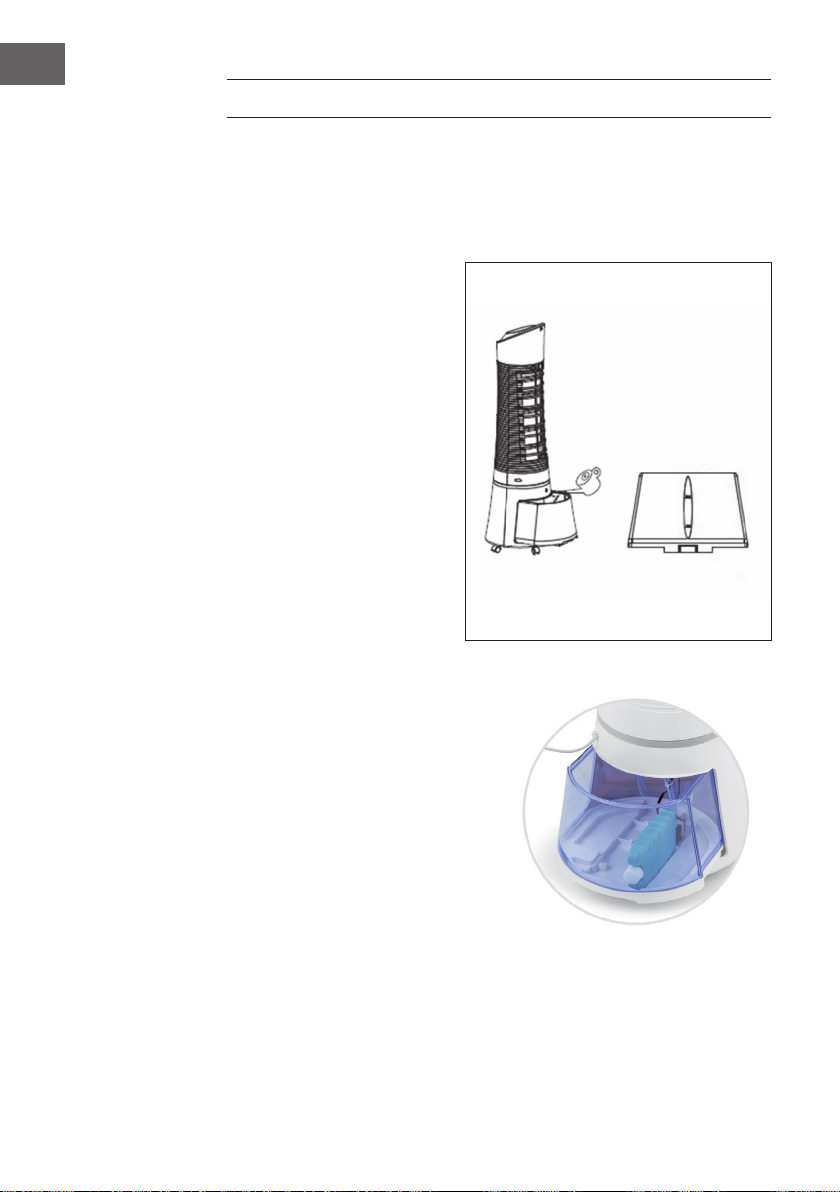
Wassertank befüllen
Drehen Sie den die Verriegelung
für den Wassertank 90° gegen den
Uhrzeigersinn, um sie zu öffnen.
Ziehen Sie den Wassertank aus der
Rückseite des Geräts. Befüllen Sie
den Tank mit klarem Wasser. Achten
Sie auf die Wasserstandanzeige
auf der Vorderseite des Geräts,
damit Sie den Tank nicht überfüllen.
Der Wasserstand sollte nicht höher,
als die MAX-Markierung und nicht
niedriger, als die MIN-Markierung
sein. Die Tankgröße beträgt etwa 6
Liter. Schieben Sie den Wassertank
wieder ins Gerät und drehen Sie
den Riegel 90° im Uhrzeigersinn,
um den Tank wieder zu verriegeln.
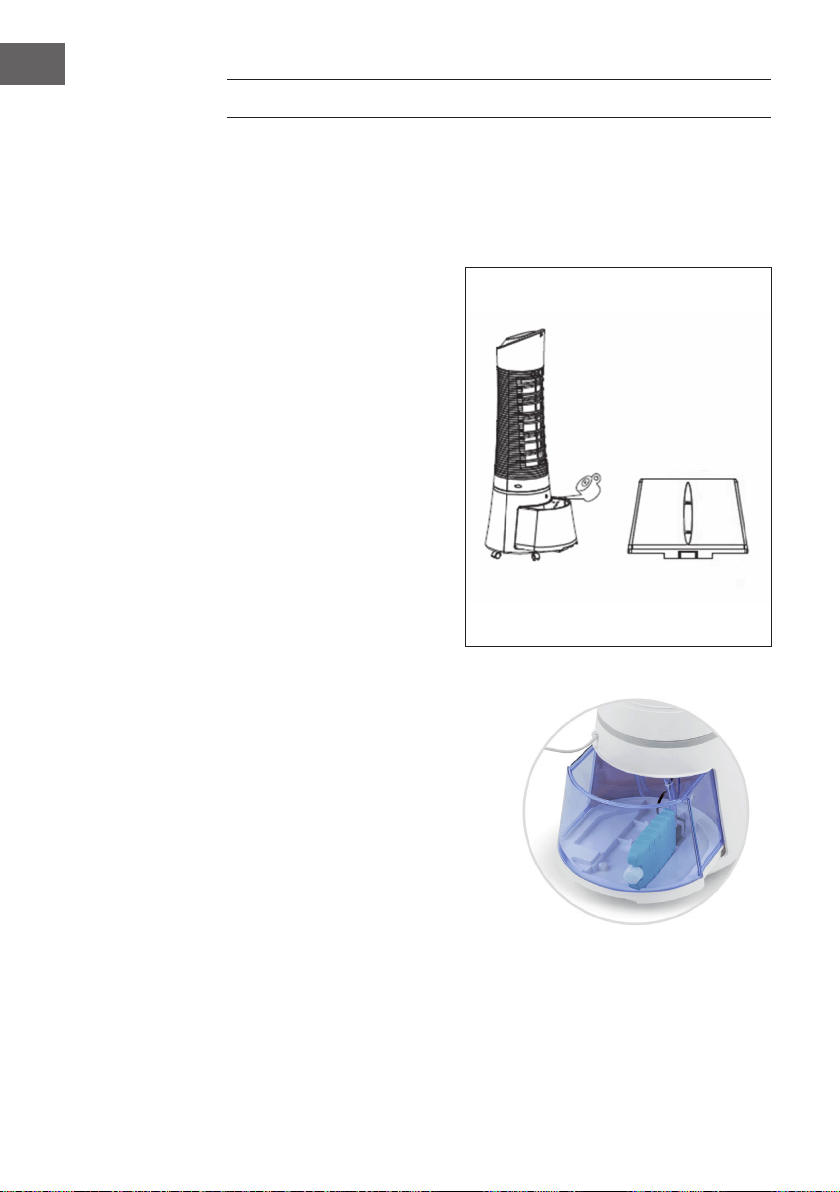
Kühlpad einsetzen
• Das Gerät enthält einen Kühlpad für
zusätzliche Kühlung.
• Am Boden des Tanks bendet sich
eine Vertiefung, die es ermöglicht,
das Pad auf der langen/schmalen
Seite zu platzieren, wie auf dem Bild
dargestellt.
• Alternativ kann das Pad auch einfach
in den Wassertank gelegt werden.

7
DE
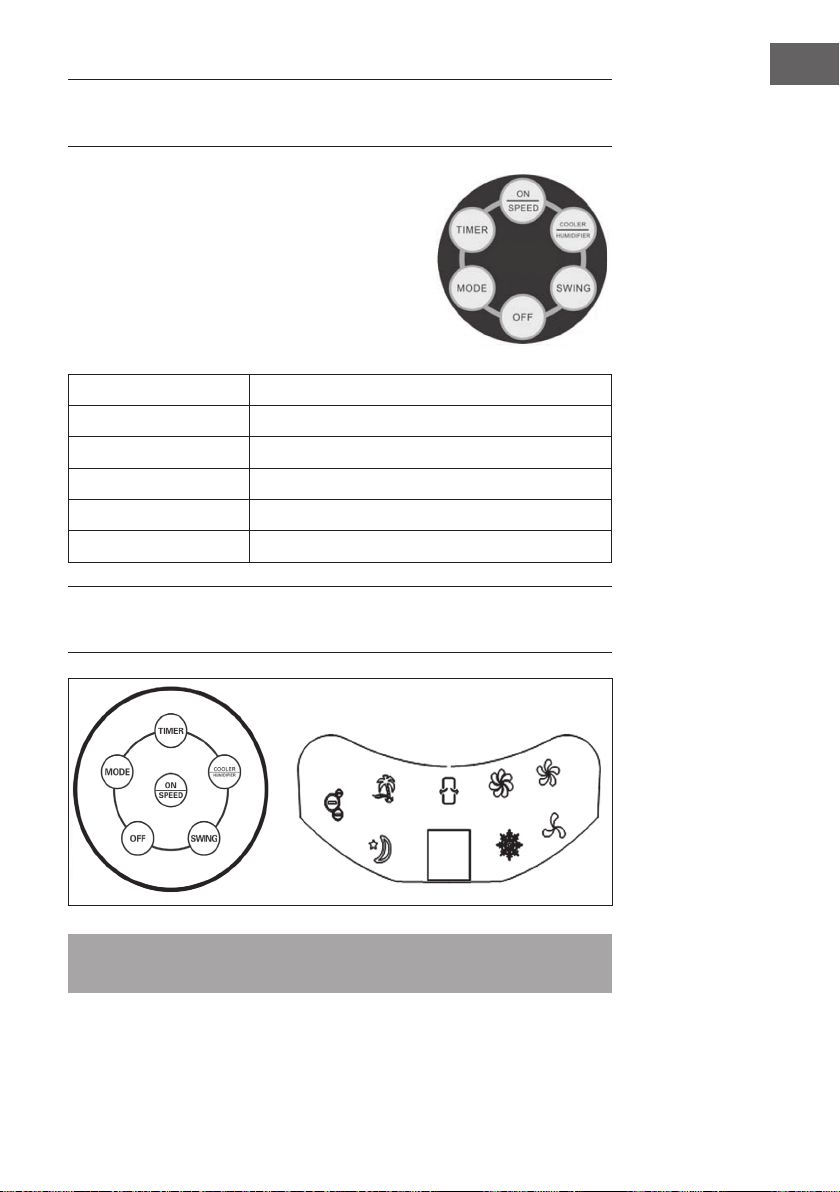
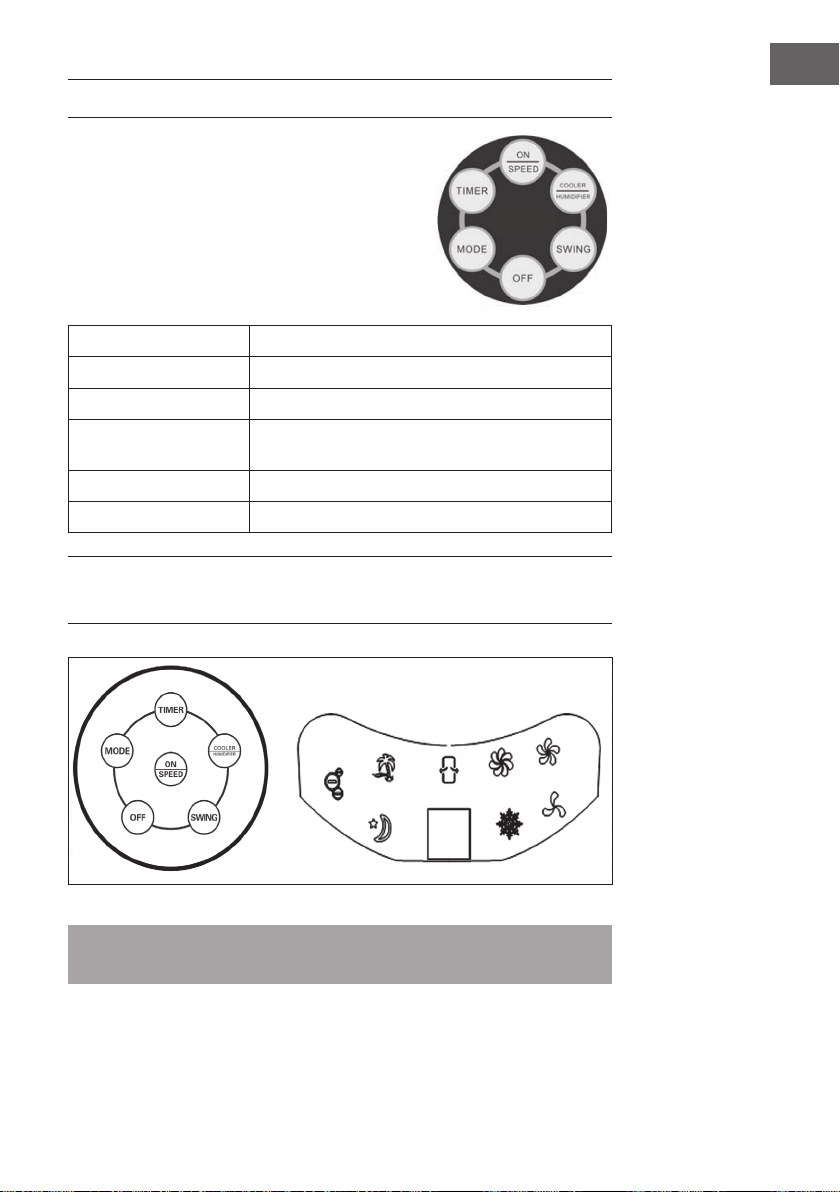
TASTENFUNKTIONEN DER FERNBEDIENUNG
Benutzen sie zum Öffnen des Batteriefachs eine
Münze. Stecken Sie die Münze in den Schlitz auf der
Rückseite der Fernbedienung und drehen Sie ihn, wie
auf der Fernbedienung angegeben. Zeigen Sie mit der
Fernbedienung auf den Sensor und drücken Sie eine
der Funktionstasten. Die Entfernung zum Gerät sollte
nicht mehr als 60 cm betragen.
ON/SPEED
Gerät einschalten und Geschwindigkeit regeln.
OFF
Gerät ausschalten.
TIMER
Timer einstellen (bis 7.5 Stunden).
SWING
Schwing-Funktion der Luftschlitze einschalten.
COOLER/HUMIDIFYER
Kühlung oder Befeuchtung einschalten.
MODE
Lüfter-Modus auswählen.
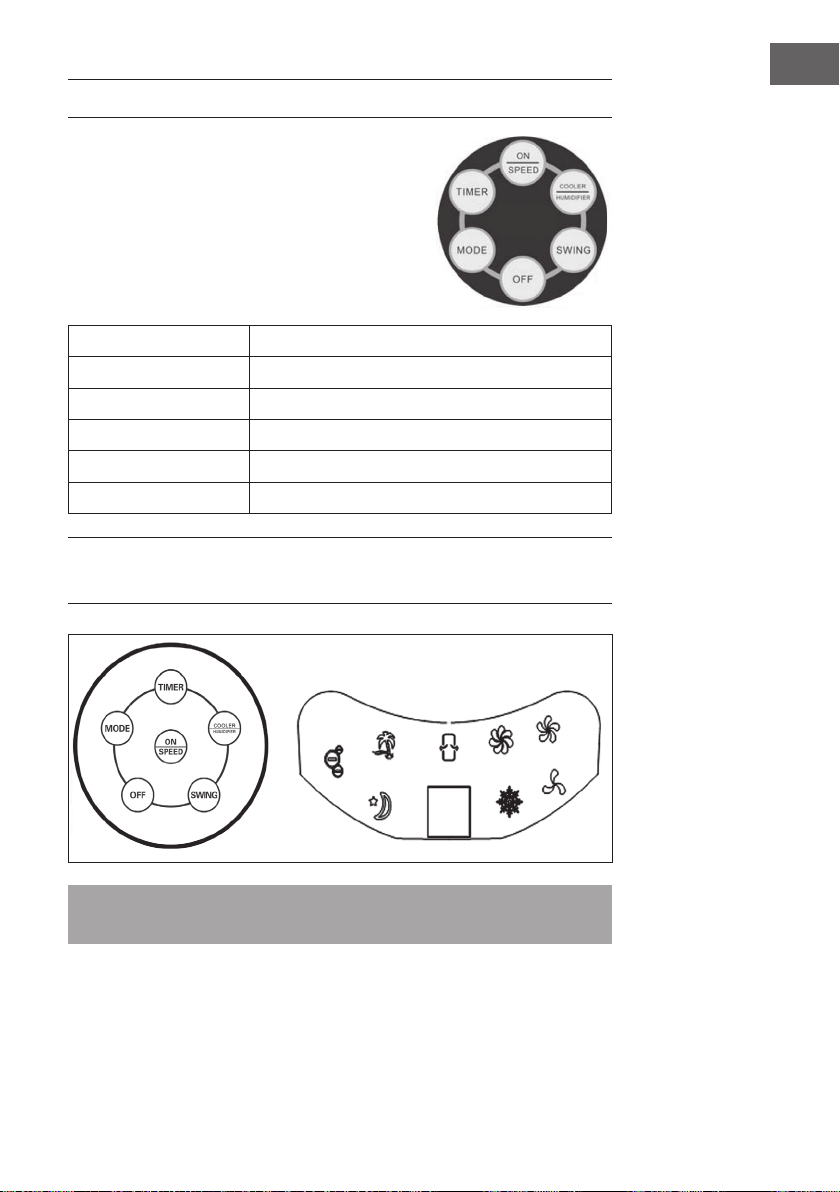
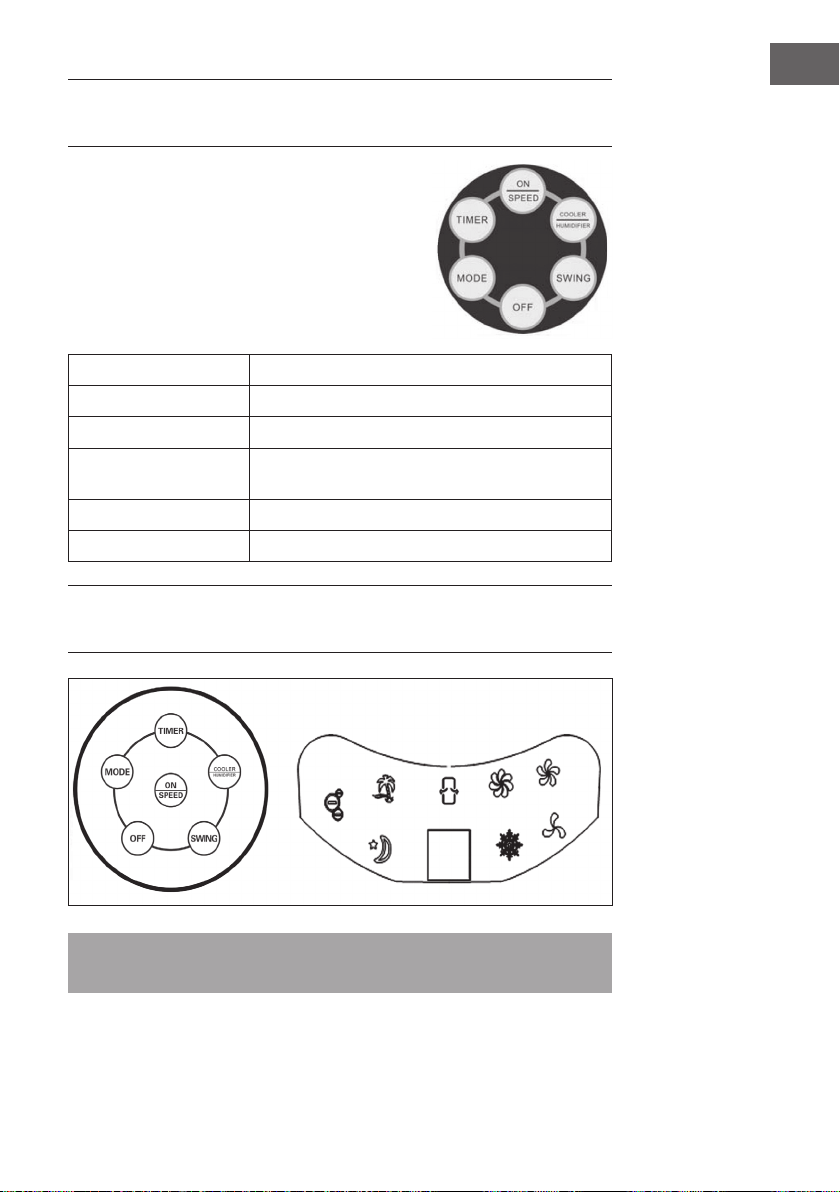
TASTENFUNKTIONEN UND
DISPLAYANZEIGEN AM GERÄT
Hinweis: Die Ionisierungsfunktion wird automatisch gestartet, sobald der Benutzer
das Gerät einschaltet.

8
DE
ON/SPEED &
OFF
Befüllen Sie den Tank und Stecken Sie den Stecker in die
Steckdose. Das Gerät piept zwei Mal und signalisiert, dass
es sich im Standby-Modus bendet. Drücken Sie auf ON/
SPEED, um das Gerät einzuschalten. Drücken Sie mehrfach
auf ON/SPEED, um die gewünschte Geschwindigkeit
einzustellen. Um das Gerät auszuschalten, drücken Sie auf
OFF.
COOLER/
HUMIDIFYER
Nachdem Sie die gewünschte Geschwindigkeit eingestellt
haben, drücken Sie auf COOLER/HUMIDIFYER, um
Kühlung und Befeuchtung zu aktivieren. Die Funktion startet
die Wasserpumpe, kühlt die Luft und befeuchtet sie. Die
Schneeocke auf dem Display zeigt an, dass die Funktion
aktiv ist.
MODE
Das Gerät verfügt über 3 verschiedene Lüfter-Modi. Die
Auswahl eines bestimmten Modus ist optional. Drücken Sie zur
Auswahl mehrfach auf die MODE-Taste:
• Manueller Modus: Wird durch 3 runde Icons auf dem
Display angezeigt. In diesem Modus stellen Sie die
Geschwindigkeit manuell ein.
• Nachtmodus: Wird durch das Mond-Symbol im Display
angezeigt. In diesem Modus wird die Geschwindigkeit
allmählich heruntergefahren, in Abhängigkeit von der
eingestellten Geschwindigkeit. Falls Sie „Hoch“ eingestellt
haben läuft das Gerät 30 Minuten mit hoher, 30 Minuten
mit mittlerer und danach durchgängig mit geringer
Geschwindigkeit.
• Natürlicher Modus: Wird durch die Palme im Display
angezeigt und passt die Luftgeschwindigkeit automatisch
an
TIMER
Das Gerät verfügt über einen Timer, der sich bis zu
7.5Stunden programmieren lässt. Drücken Sie mehrmals
auf die TIMER-Taste, um die Zeit in 0,5-Stunden-Schritten
anzupassen. Die eingestellte Zeit wird im Display angezeigt.
SWING
Um die Schwing-Funktion der Luftschlitze zu aktivieren,
drücken Sie auf die SWING-Taste. Die Luftschlitze bewegen
sich dann automatisch von Seite zu Seite, wodurch die Luft
besser im Raum verteilt wird.
9
DE
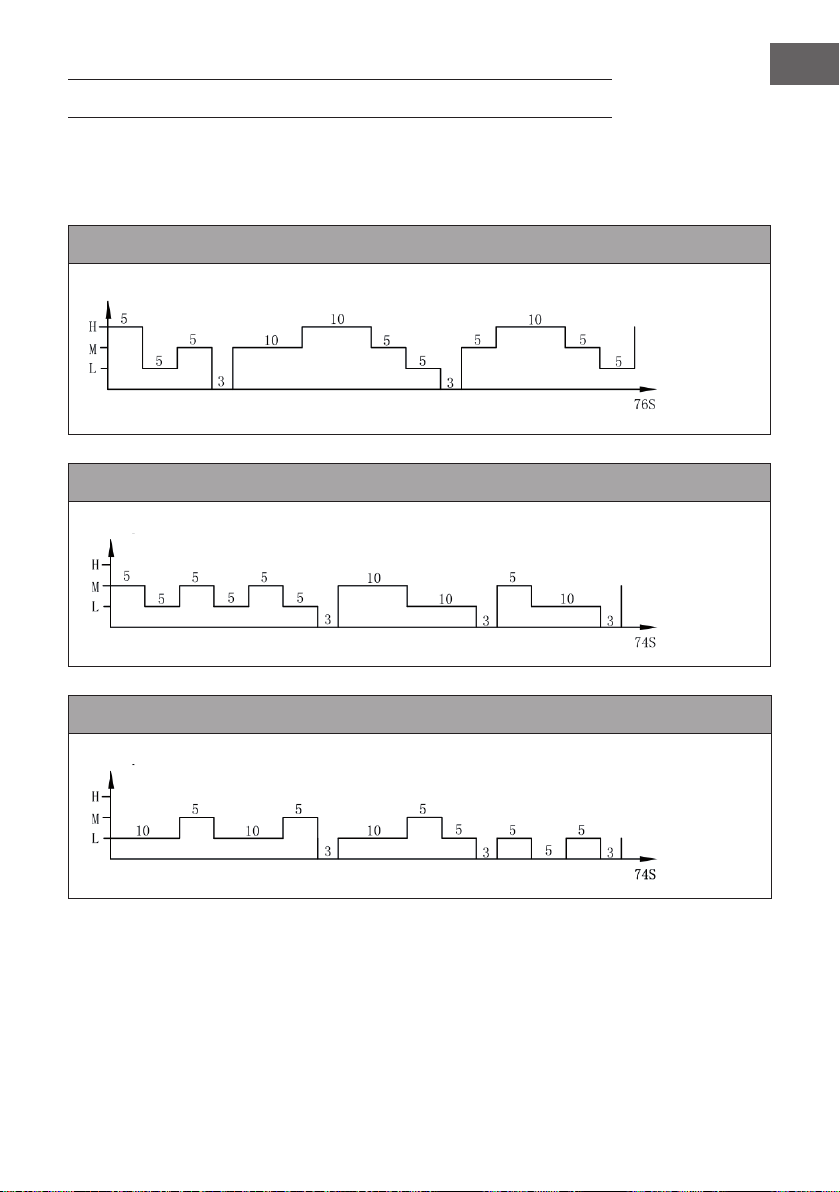
WINDSCHEMA
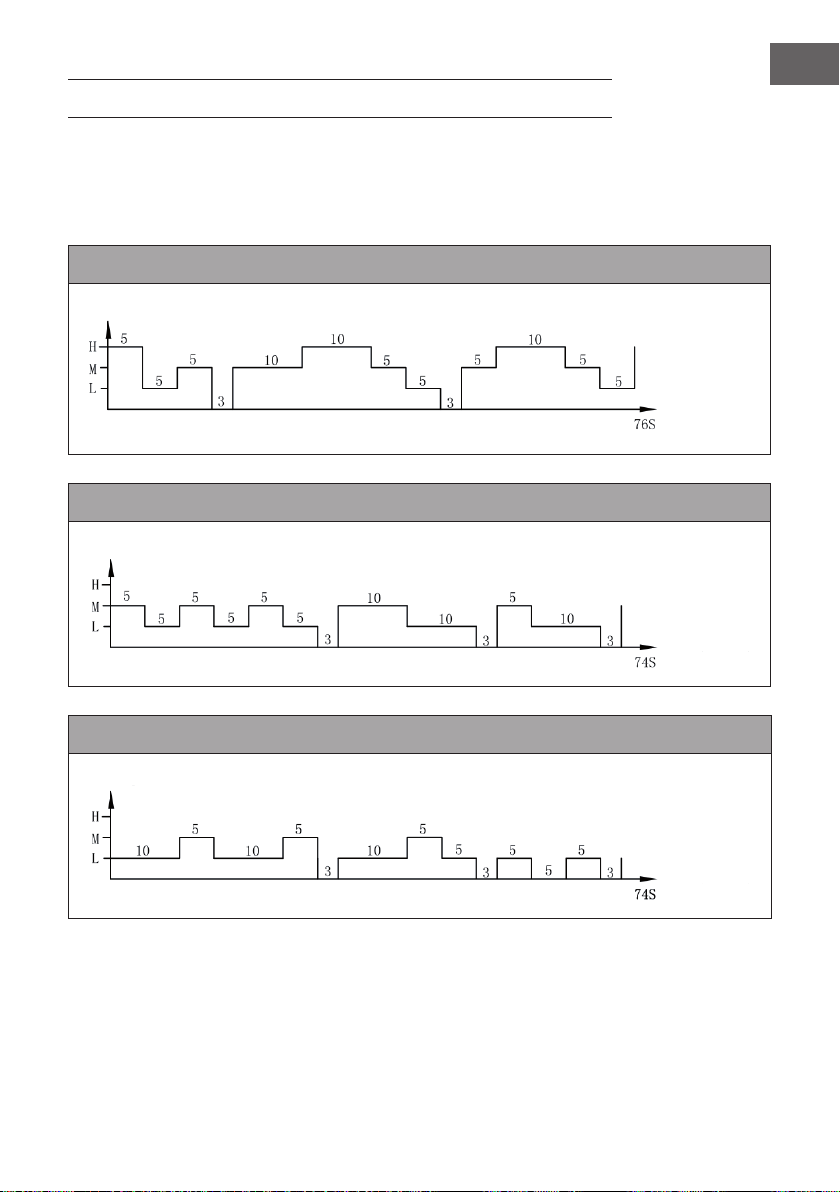
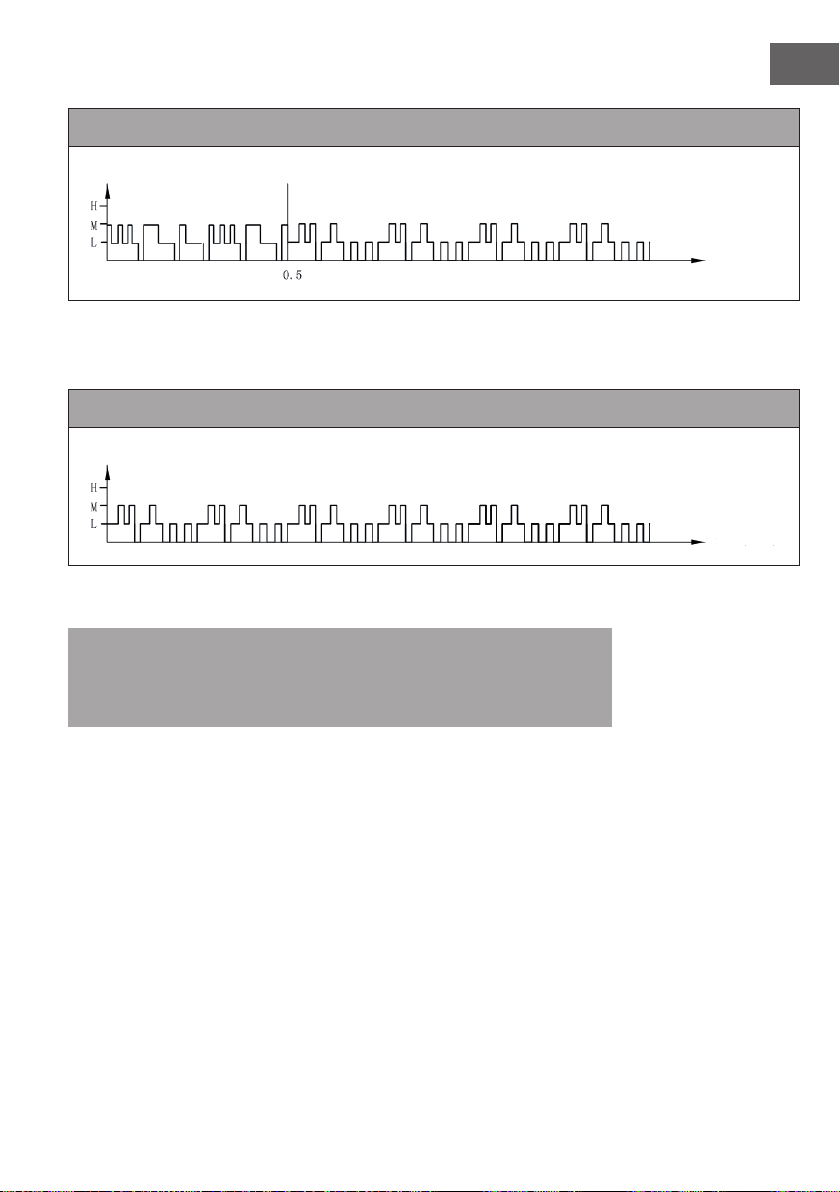
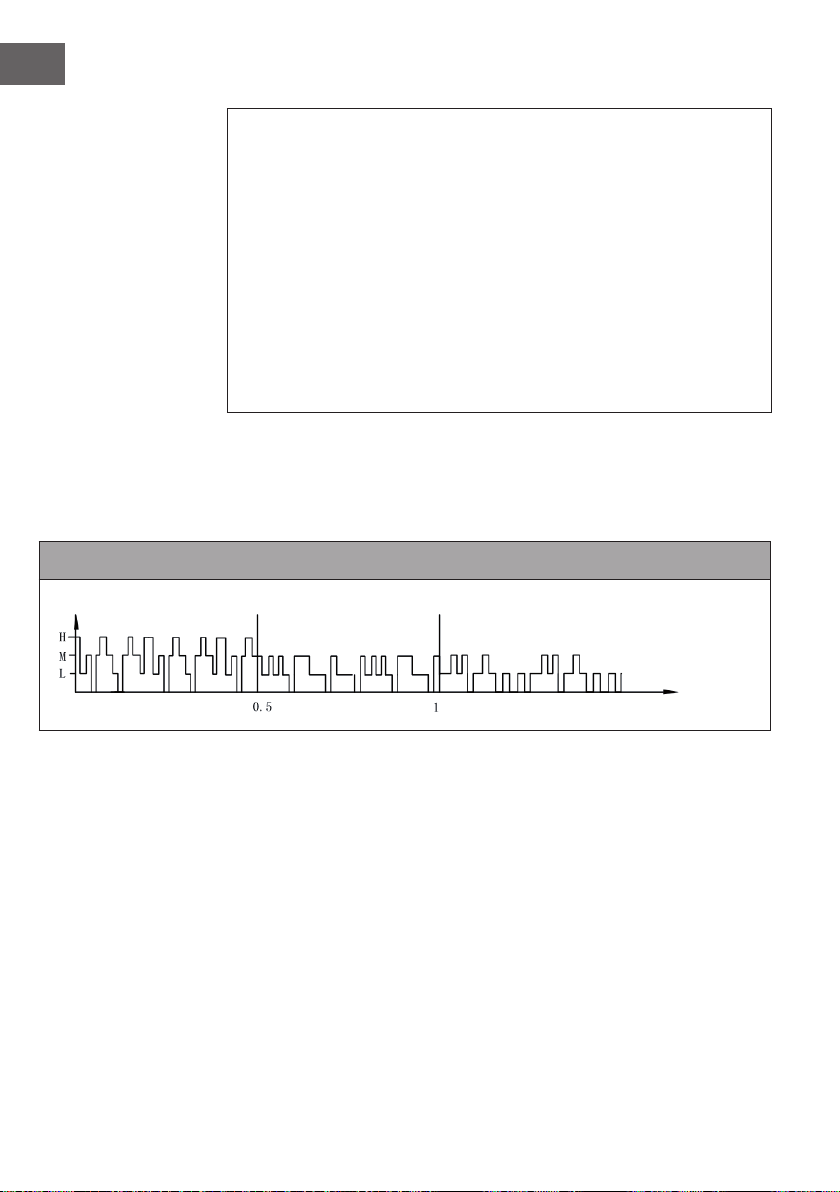
1. Natürlicher Modus
Dieser Modus orientiert sich an der eingestellten Geschwindigkeit. Das genaue Wind-
Schema ist wie folgt:
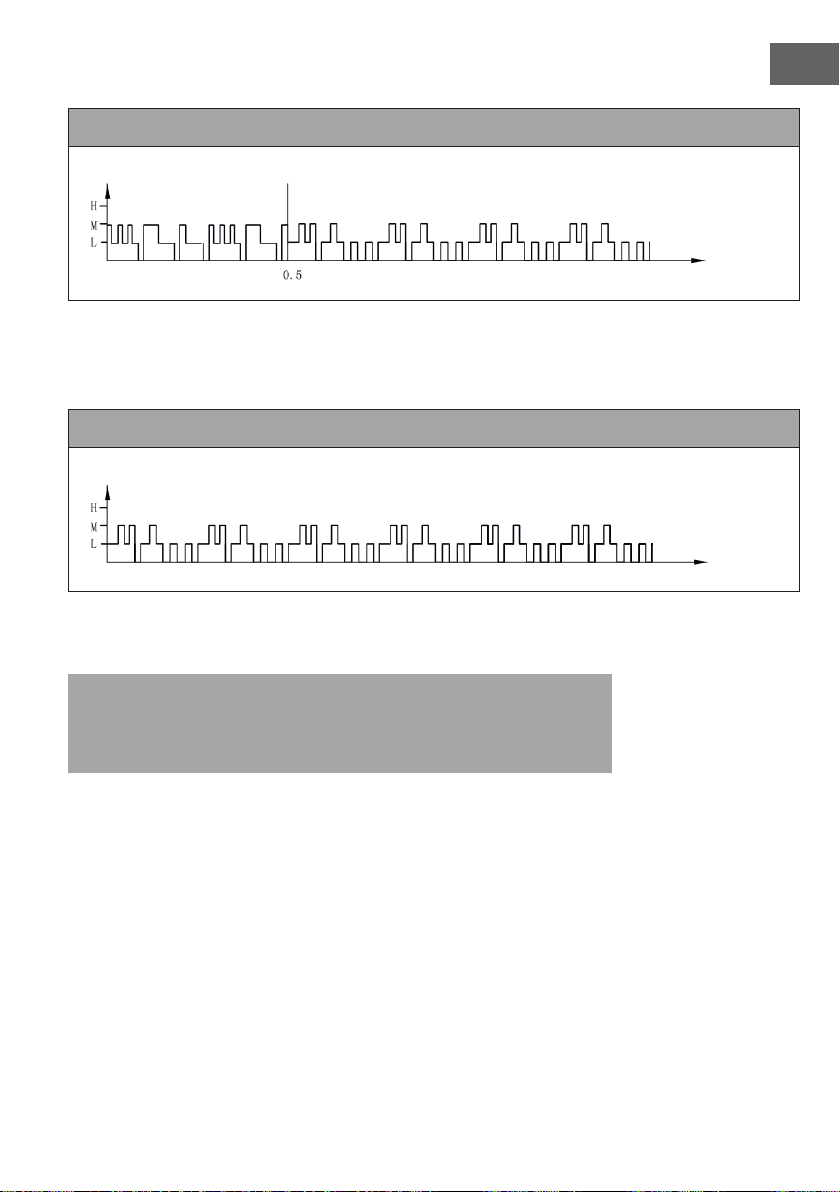
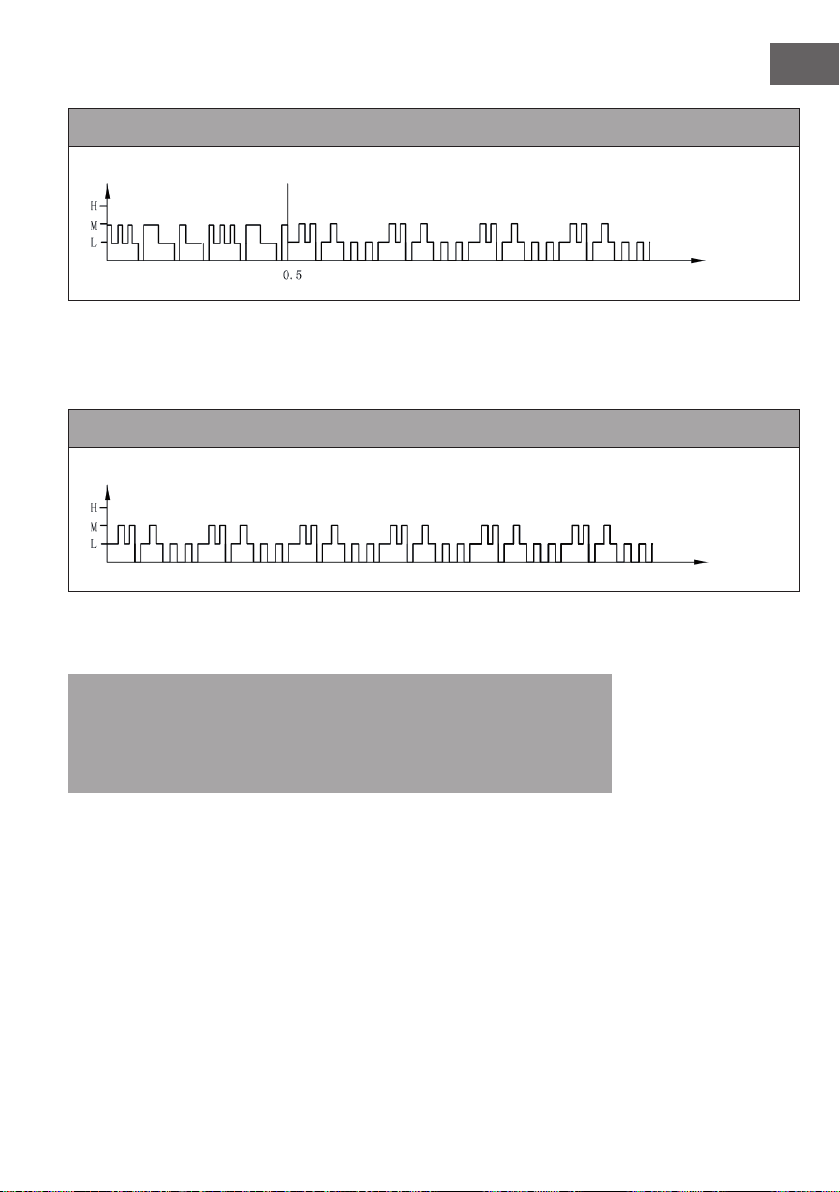
Natürlicher Modus bei hoher Geschwindigkeit
Natürlicher Modus bei mittlerer Geschwindigkeit
Natürlicher Modus bei niedriger Geschwindigkeit
Windgeschwindigkeit
Zeit (Sekunde)
Windgeschwindigkeit
Zeit (Sekunde)
Windgeschwindigkeit
Zeit (Sekunde)
10
DE
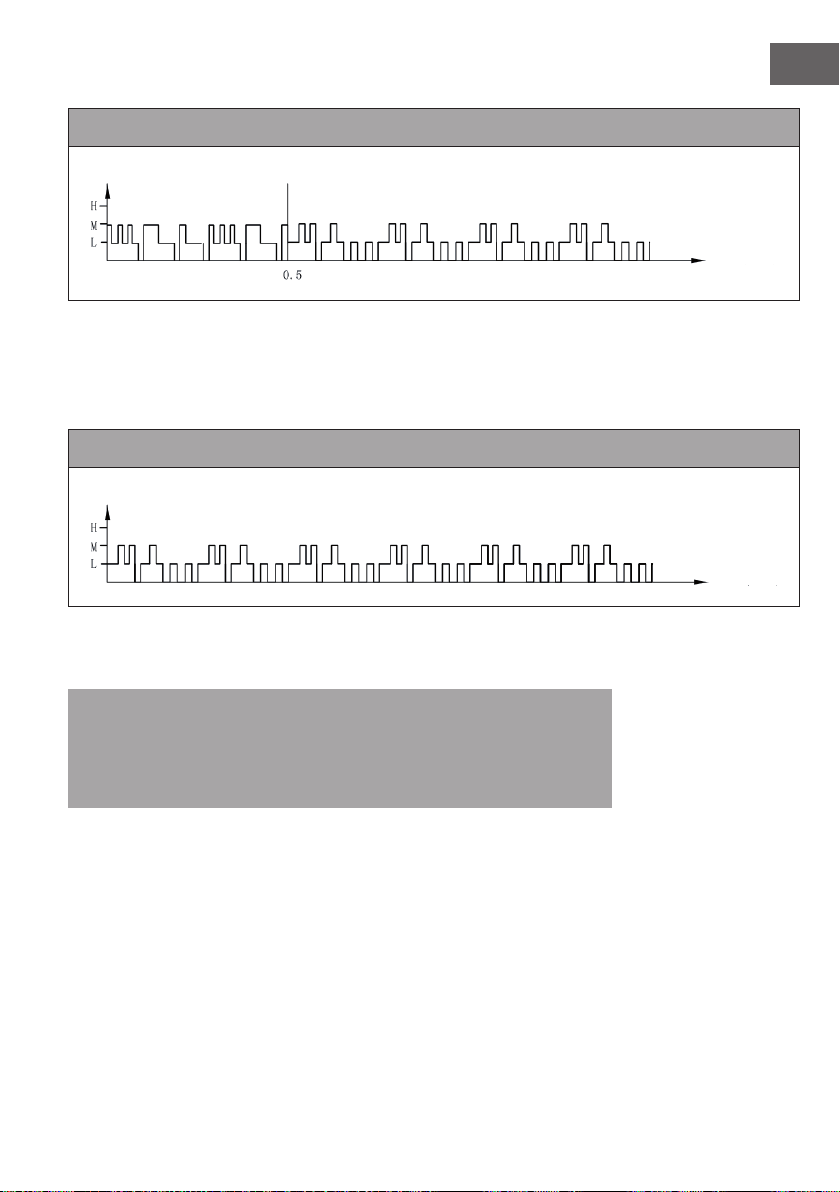
Beispiel: Wind-Schema für natürlichen Modus bei hoher Geschwindigkeit
Der Motor läuft 5 Sekunden lang auf hoher Geschwindigkeit, 5 Sekunden auf
mittlerer Geschwindigkeit, 5 Sekunden auf niedriger Geschwindigkeit und stoppt
dann 3Sekunden lang ohne Wind.
Dann läuft der Motor wieder 10 Sekunden lang auf mittlerer Geschwindigkeit,
10Sekunden auf hoher Geschwindigkeit, 5 Sekunden auf mittlerer Geschwindigkeit,
dann 5Sekunden auf niedriger Geschwindigkeit und stoppt dann 3Sekunden lang!
Noch einmal läuft der Motor 5 Sekunden lang auf mittlerer Geschwindigkeit,
10Sekunden auf hoher Geschwindigkeit, 5 Sekunden auf mittlerer Geschwindigkeit,
5 Sekunden auf niedriger Geschwindigkeit und dann für 5Sekunden auf niedriger
Geschwindigkeit.
Der gesamte Zyklus dauert 76 Sekunden und wiederholt sich fortlaufend.
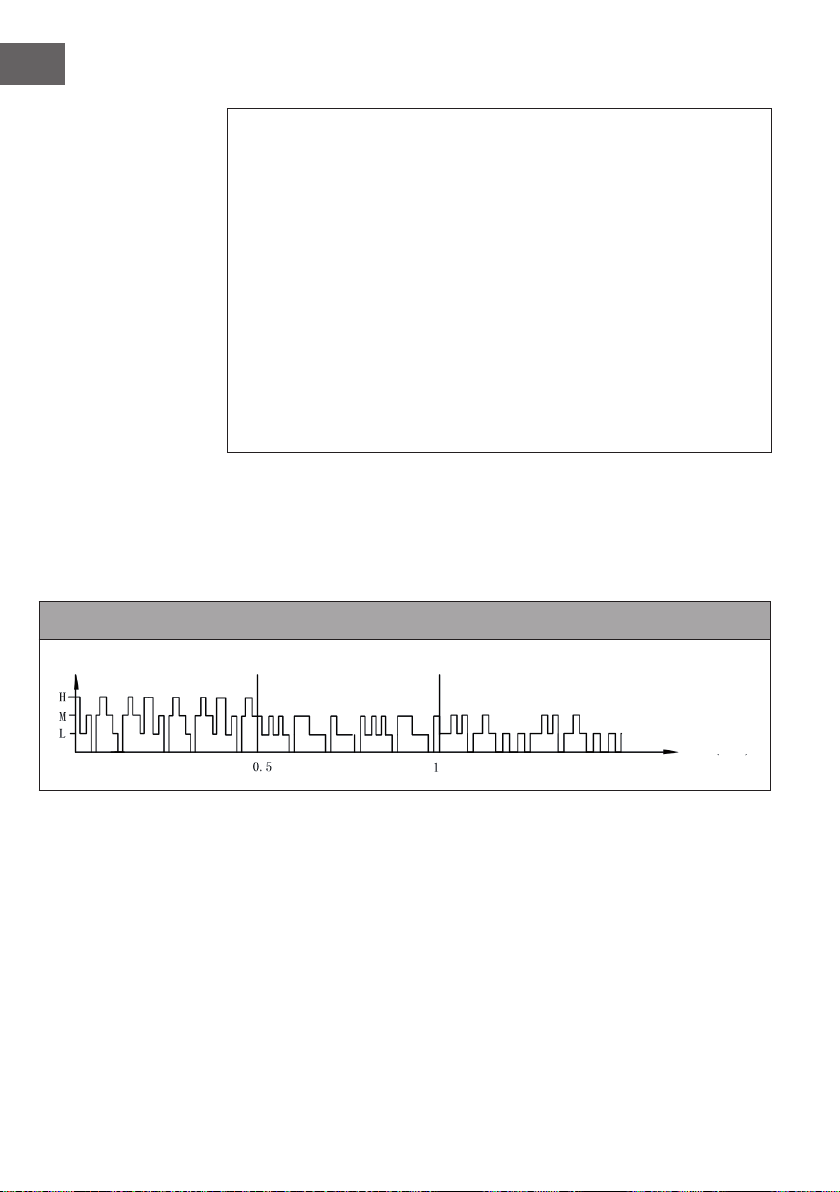
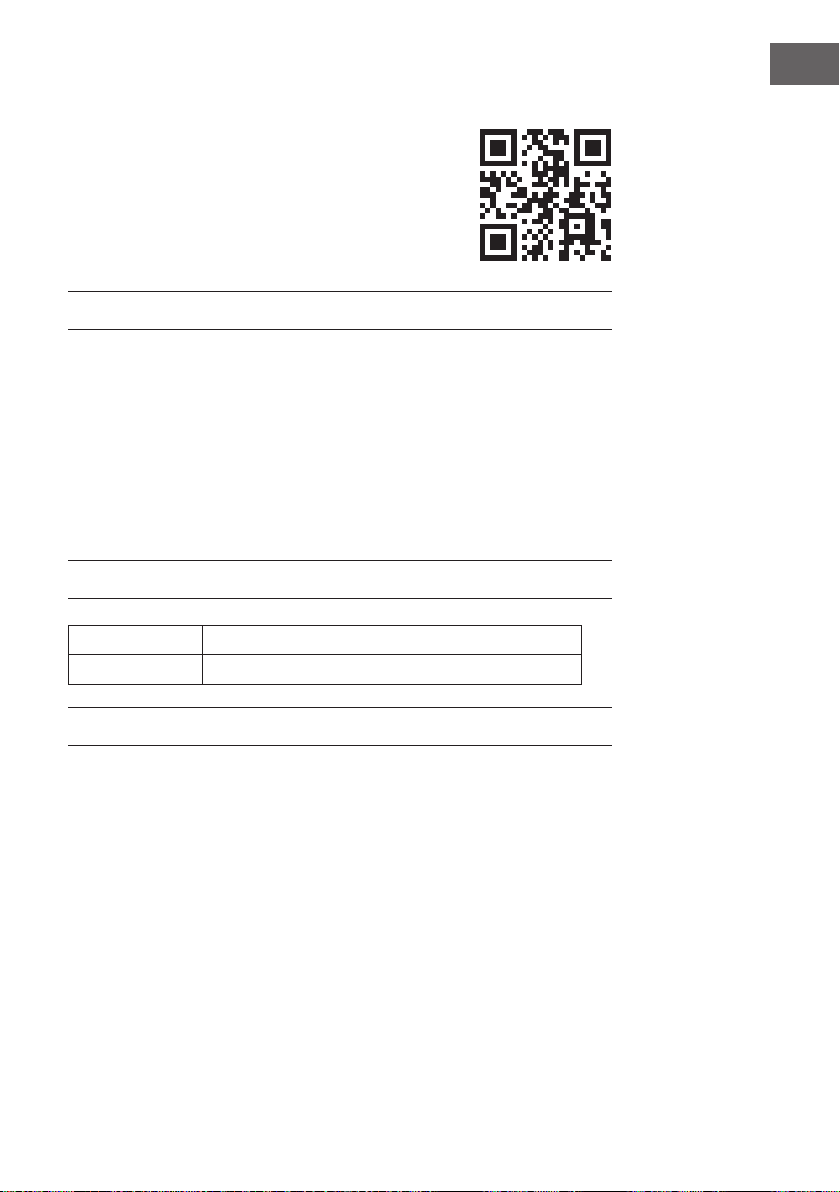
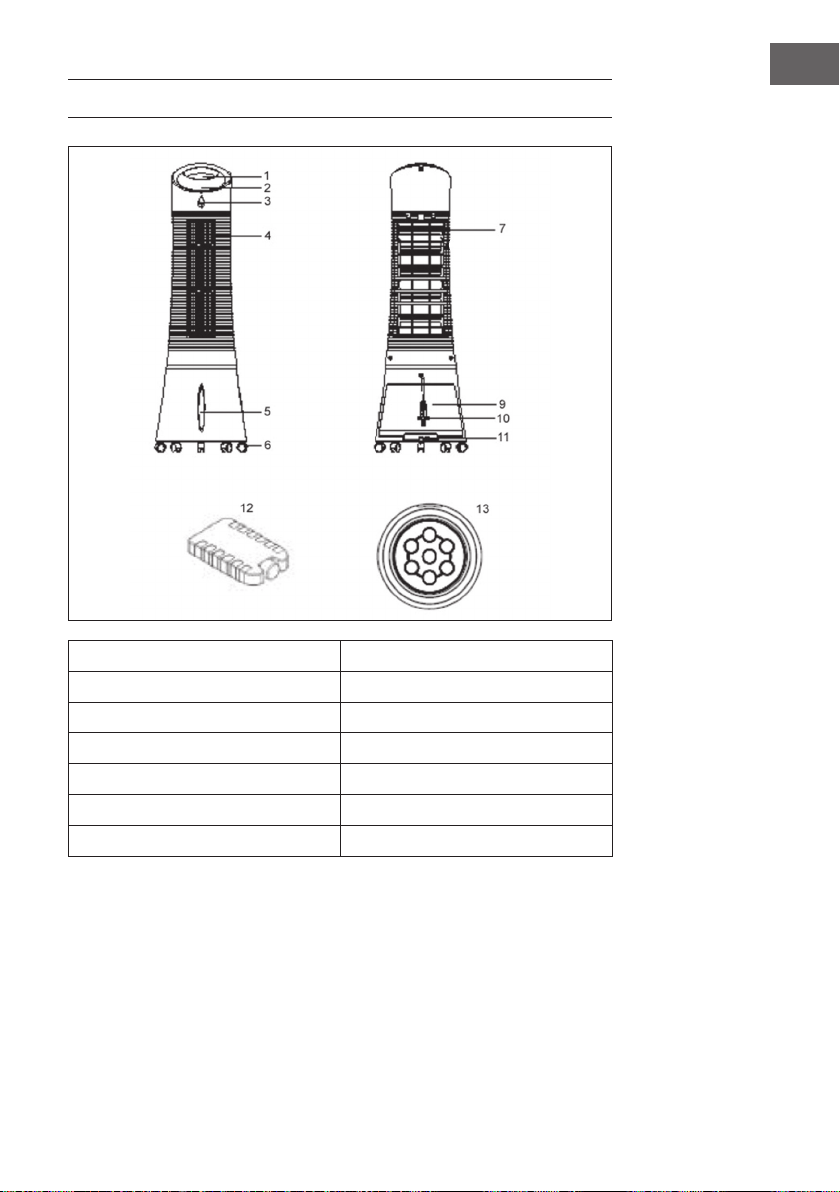
2. Nachtmodus
In diesem Modus wird die Geschwindigkeit allmählich heruntergefahren, in
Abhängigkeit von der eingestellten Geschwindigkeit. Das genaue Wind-Schema ist wie
folgt:
Nachtmodus mit natürlichem Wind bei hoher Geschwindigkeit
Wenn Sie im Nachtmodus eine hohe Geschwindigkeit mit dem Modus „Natürlicher
Wind“ einstellen, läuft der Motor zunächst 30 Minuten lang bei hoher Geschwindigkeit
im Modus „Natürlicher Wind“, dann 30 Minuten bei mittlerer Geschwindigkeit im
Modus „Natürlicher Wind“, dann auf niedriger Geschwindigkeit und behält diese
Geschwindigkeit bis zum Ende bei.
Windgeschwindigkeit
Zeit (Stunde)
11
DE
Nachtmodus mit natürlichem Wind bei mittlerer Geschwindigkeit
Wenn Sie eine mittlere Geschwindigkeit im Nachtmodus einstellen, läuft der Motor
zunächst 30 Minuten lang bei mittlerer Geschwindigkeit im Modus „Natürlicher Wind“,
dann 30 Minuten bei mittlerer Geschwindigkeit im Modus „Natürlicher Wind“, dann
auf niedriger Geschwindigkeit und behält diese Geschwindigkeit bis zum Ende bei.
Nachtmodus mit natürlichem Wind bei niedriger Geschwindigkeit
Wenn Sie den Nachtmodus mit niedriger Geschwindigkeit starten, läuft das Gerät
durchgehend mit niedriger Geschwindigkeit.
Hinweis: Es empehlt sich, beim Schlafen die niedrige Geschwindigkeitsstufe für
den Nachtmodus auszuwählen, da dieser Modus dem Benutzer ein angenehmes
Windgefühl vermitteln soll. Wenn Sie das Gerät im Nachtmodus die ganze Zeit auf
einer hohen Geschwindigkeit laufen lassen, könnten Sie sich unbehaglich fühlen und
Ihnen könnte nachts kalt werden.
Windgeschwindigkeit
Zeit (Stunde)
Windgeschwindigkeit
Zeit (Stunde)

12
DE
REINIGUNG UND PFLEGE
• Regelmäßige Reinigung und Pege ist wichtig, um die Lebensdauer des Geräts zu
erhöhen
• Ziehen Sie immer zuerst den Stecker aus der Steckdose, bevor Sie das Gerät
reinigen.
• Benutzen Sie zur Reinigung einen weichen Lappen, warmes Wasser und mildes
Spülmittel. Benutzen Sie keine scharfen Reinigungsmittel, Verdünner, Benzin oder
Ähnliches, um das Gerät nicht zu beschädigen. Trocknen Sie alle Teile sorgfältig mit
einem weichen Tuch ab, bevor Sie das Gerät wieder anschließen.
• Falls Sie das Gerät länger nicht benutzen, verstauen Sie es im Originalkarton und
lagern Sie es an einem kühlen, trockenen Ort.
Staublter und Kühlpad reinigen
• Vor der Reinigung müssen Sie den Filter und das Kühlpad entnehmen. Achten
Sie darauf, dass Sie alle Teile wieder in der richtigen Reihenfolge einsetzen:
Wassertank, Kühlpad, Staublter.
• Damit sich der Staublter nicht zusetzt, reinigen Sie ihn einmal im Monat.
• Um den Filter reinigen zu können, müssen Sie ihn von der Rückseite abnehmen.
Drücken Sie dazu auf die 2 Laschen, die über dem Filter angebracht sind. Wischen
Sie den Filter mit einer weichen Bürste ab und spülen sie mit klarem Wasser nach.
Lassen Sie den Filter vollständig trocknen, bevor Sie ihn wieder einsetzen. Um
das Kühlpad reinigen zu können, müssen Sie zuerst den Staublter abnehmen.
Entnehmen Sie dann das Pad, reinigen Sie es unter ießendem Wasser und lassen
Sie es vollständig trocknen, bevor Sie es wieder einsetzen.

13
DE
FEHLERSUCHE UND FEHLERBEHEBUNG
Problem Mögliche Ursache Lösung
Kein Luftzug. Das Netzkabel ist nicht
eingesteckt.
Überprüfen Sie ob der
Stecker an eine Steckdose
angeschlossen ist. Das
Gerät piept 2 Mal wenn
es angeschlossen ist.
Der Wassertank ist nicht
verriegelt.
Überprüfen Sie, ob der
Wassertank im Gerät
steckt und verriegelt ist.
Das Gerät kühlt überhaupt
nicht.
Zu wenig Wasser im
Wassertank.
Überprüfen Sie den
Wasserstand und füllen
Sie ggf. Wasser nach.
Die COOLER/
HUMIDIFYER-Taste wurde
nicht gedrückt.
Drücken Sie auf die
COOLER/HUMIDIFYER-
Taste.
Die Wasserpumpe ist
defekt.
Kontaktieren Sie den
Kundendienst.
Das Gerät kühlt nicht gut. Zu wenig Wasser im
Kühlpad.
Warten Sie einige
Sekunden bis sich das
Kühlpad vollgesaugt hat.

14
DE
HINWEISE ZUR ENTSORGUNG
Wenn es in Ihrem Land eine gesetzliche Regelung zur
Entsorgung von elektrischen und elektronischen Geräten
gibt, weist dieses Symbol auf dem Produkt oder auf der
Verpackung darauf hin, dass dieses Produkt nicht im
Hausmüll entsorgt werden darf. Stattdessen muss es zu
einer Sammelstelle für das Recycling von elektrischen
und elektronischen Geräten gebracht werden. Durch
regelkonforme Entsorgung schützen Sie die Umwelt und die
Gesundheit Ihrer Mitmenschen vor negativen Konsequenzen.
Informationen zum Recycling und zur Entsorgung dieses
Produkts, erhalten Sie von Ihrer örtlichen Verwaltung oder
Ihrem Hausmüllentsorgungsdienst.
Dieses Produkt enthält Batterien. Wenn es in Ihrem Land
eine gesetzliche Regelung zur Entsorgung von Batterien
gibt, dürfen die Batterien nicht im Hausmüll entsorgt werden.
Informieren Sie sich über die örtlichen Bestimmungen zur
Entsorgung von Batterien. Durch regelkonforme Entsorgung
schützen Sie die Umwelt und die Gesundheit Ihrer
Mitmenschen vor negativen Konsequenzen.
15
EN
Dear Customer,
Congratulations on purchasing this device. Please read the
following instructions carefully and follow them to prevent
possible damages. We assume no liability for damage caused
by disregard of the instructions and improper use. Scan the QR
code to get access to the latest user manual and more product
information.
CONTENTS
Safety Instructions16
Product Overview17
Start and Operation18
Button Functions of the Remote Control19
Key Functions and Display Indicators on the Device19
Wind Pattern21
Cleaning and Care24
Troubleshooting25
Hints on Disposal26
TECHNICAL DATA
Item number 10028303, 10029328, 10034651, 10035835
Power supply 220-240 V ~ 50/60 Hz
MANUFACTURER & IMPORTER (UK)
Manufacturer:
Chal-Tec GmbH, Wallstrasse 16, 10179 Berlin, Germany.
Importer for Great Britain:
Chal-Tec UK limited
Unit 6 Riverside Business Centre
Brighton Road
Shoreham-by-Sea
BN43 6RE
United Kingdom

16
EN
SAFETY INSTRUCTIONS
• Use this evaporative cooler only as instructed in this owner’s manual. Other uses
may cause electric shock, injury or re.
• Close supervision is required if this cooler is used near children or pets.
• To protect against electric shock, do not immerse this cooler or its plug and cord in
water.
• If the cooler is being transported or will not be in use, disconnect it from the power
supply by tightly gripping the plug and pulling it from the power outlet. Do not
disconnect the power supply by pulling on the evaporative cooler’s power cord.
• Avoid contact with any of the evaporative cooler’s moving parts.
• Place the evaporative cooler on a level surface.
• This evaporative cooler is intended to t into a matching receptacle. Under no
circumstances should the plug be altered in any way. An improper connection can
result in electric shock.
• If possible, avoid using extension cords with this evaporative cooler. If an extension
cord is absolutely necessary, do not use more than one extension cord to operate
more than one cooler.
• Do not insert objects or allow ngers to enter into the cooler’s grills, as this may
cause electric shock or bodily injury. Do not block or tamper with the evaporative
cooler while it is in operation.
• Do not run the power cord under mats or carpeting, and do not cover the power
cord with
• runners. Arrange the power cord away from room trafc and where it can be
tripped over.
• Do not operate this evaporative cooler in the presence of ammable substances or
explosives.
• Do not place the cooler near an open ame or cooking/heating appliances.
• This product is not intended for use in wet or damp areas.
• If the evaporative cooler will not be in use, empty the tank of any remaining water.
• If the cooler’s plug or power cord is damaged, do not attempt to repair the
components yourself.
• Please contact our customer service or have the unit examined by an authorized
service provider.

17
EN
PRODUCT OVERVIEW
1 Control panel 9 Water tank
2 Display panel 10 Power cord
3 Remote control receiver 11 Water tank knob
4 Air louvers 12 Ice pack
5 Water level indicator 13 Remote control
6 Caster
7 Dustproof air lter
18
EN
START AND OPERATION
Carefully remove all p ckaging materials and retain for future storage/use. Make sure
there is no residual foam left in any of the components. No tools will be required to
assemble this tower evaporative cooler.
Filling the Water Tank
• Locate the water tank knob
and turn it counterclockwise
90° to unlock the tank. Pull
out the tank from the back of
the cooler.
• Fill the tank with clean water.
Pay attention to the water
level indicator located on the
front of the cooler to avoid
overlling the evaporative
cooler. Do not ll the tank
above the MAX water level
line or below the MIN water
level line. The approximate
tank size of the unit is 6 liters.
• Push the water tank back into
the rear o the unit and turn the
water tank knob clockwise
90° to lock the water tank
back into place.
Using the Ice Pack
• The tower evaporative cooler includes
an optional ice pack for added
cooling.
• There is an indentation at the bottom
of the tank that allows the pad to be
placed on its long/narrow side, like
shown in the picture.
• Alternatively, the pad can just simply
be put into the watertank without any
problem.
19
EN
BUTTON FUNCTIONS OF THE REMOTE CONTROL
The unit is equipped with a remote control. A
replacement battery is included for your convenience.
To put the battery inside the remote control, insert a
coin into the slot located on the back of the remote
control and turn it as directed on the remote control. To
use the remote control, aim it at the unit’s remote control
receiver and select one of the functions on the remote
control. The effective distance is approximately 60 cm.
ON/SPEED
Power ON and adjusts speed.
OFF
Power OFF.
TIMER
Timer function of up to 7.5 hours.
SWING
Oscillating air louvers.
COOLER/HUMIDIFYER
Controls cooling/humidication function.
MODE
Adjusts the airow mode.
KEY FUNCTIONS AND DISPLAY INDICATORS
ON THE DEVICE
Note: The ionization function is started automatically as soon as the user switches on
the unit.

20
EN
ON/SPEED &
OFF
After the tank is lled with water, connect the tower
evaporative cooler to a power outlet. The unit will beep twice,
indicating that the cooler is in standby mode at this time. Press
the ON/SPEED button to turn on the tower evaporative cooler.
To adjust the fan speed, press the ON/SPEED button again
until your desired speed has been reached. To turn the tower
evaporative cooler off and revert back to standby mode, press
the OFF button.
COOLER/
HUMIDIFYER
After the desired fan speed has been selected, press the
COOLER/HUMIDIFIER button to activate the cooling/
humidifying function. This powers the water pump, cools
the air and adds moisture to your air at the same time. The
snowake icon will also be visible on the display panel once
the cooling/humidifying function has been selected.
MODE
Setting the airow mode is optional. To set the airow mode,
press the MODE button.
• Manual Mode: Indicated by the three circular icons on
the display panel, this allows you to set the fan speeds
manually.
• Sleep Mode: Indicated by the moon icon on the display
panel, this setting will gradually lower the fan speed
at different intervals. If the fan speed is set to high, the
cooler will run for 30 minutes on high speed, 30 minutes
on medium speed and then continue to operate on low
speed.
• Natural Mode – Indicated by the palm tree icon on the
display panel, this setting will adjust the airow speed
between low, medium and high.
TIMER
This tower evaporative cooler is equipped with a 7.5 hour
programmable timer. To set the timer, press the TIMER button.
Each press of this button will add 0.5 hours to the set time. The
set time will be indicated in the middle of the display panel.
SWING
To activate the oscillation feature, press the SWING button.
The evaporative cooler’s air louvers will automatically move
from side to side, which increases air circulation and distributes
air more evenly.

21
EN
WIND PATTERN
1. Natural mode
This mode is based on the set speed. The exact wind pattern is as follows:
Natural mode in high speed
Natural mode in medium speed
Natural mode in low speed
wind speed
time (second)
wind speed
time (second)
wind speed
time (second)

22
EN
Example: Wind pattern for natural mode in high speed
The motor will run in high speed at an interval of 5 seconds, in mid speed at an
interval of 5 seconds, runs to low speed per 5 seconds, then stops 3 seconds
without any wind.
And again the motor runs in mid speed 10 seconds, then to high speed for
10seconds, then in mid speed 5 seconds, then runs to low speed for 5 seconds,
then stops 3 seconds!
Again the motor runs to mid speed for 5 seconds, then in high speed for
10seconds, then runs to mid speed for 5 seconds, then in low speed for 5 seconds.
The whole cycle lasts 76 seconds and is repeated continuously.
2. Night mode
In this mode, the speed is gradually reduced, depending on the set speed. The exact
wind scheme is as follows:
Night mode in natural wind of high speed
When in night mode, for instance, if you set high speed with natural mode, the motor
will run 30 minutes in high speed under natural wind mode rst, then 30 minutes in mid
speed under natural wind mode, then to low speed and keep this speed until the end.
wind speed
time (hour)
23
EN
Night mode in natural wind of medium speed
If you set mid speed with night mode, the motor will run 30 minutes in mid speed under
natural wind mode rst, then to low speed and keep this speed until the end.
Night mode in natural wind of low speed
If it‘s low speed with night mode at the very rst time, it will keep this speed all the time.
Note: It is recommended to select the low speed mode for night mode when
sleeping, as this mode is intended to give the user a more comforable feeling of wind.
If you run the appliance at a high speed all the time in night mode, you may feel
uncomfortable and get cold at night.
wind speed
time (hour)
wind speed
time (hour)

24
EN
CLEANING AND CARE
• Regular cleaning and maintenance is an essential step in maintaining the longevity
of your tower evaporative cooler and ensuring that it operates free of defects.
• Always unplug the evaporative cooler from the power supply before servicing or
cleaning.
• Use a soft cloth and a mild soap and warm water solution to clean the unit’s
exterior. Do not use harsh cleaners, gasoline, paint thinner, benzene, etc., as these
substances can damage the evaporative cooler. Thoroughly dry all of the cooler’s
parts with a soft cloth before reconnecting the unit to the power supply.
• If the evaporative cooler will not be in use for an extended period of time, place the
unit back in its original carton and keep it stored in a clean, dry place.
Cleaning the Dust Filter & Cooling Pad
• The evaporative cooler’s lter and cooling pad will need to be removed prior to
cleaning. Once all of the different components have been cleaned, place them back
into the unit in this order: water tank, cooling pad and dust lter. To prevent clogging of
the dust lter, we recommend cleaning the lter at least once a month.
• To clean the dust lter, remove it from the back of the unit by pushing down on the two
tabs located above the lter and pull it out. Gently scrub it with a soft brush and rinse
with water. Allow it to thoroughly air dry before placing it back in the unit. To clean
the cooling pad, rst remove the dust lter to expose the pad. Remove the cooling
pad from the back of the evaporative cooler, rinse it with clean water and allow it to
thoroughly air dry before placing it back into the unit.

25
EN
TROUBLESHOOTING
Problem Possible Cause(s) Possible Solution
There is no airow. The power cord is not
plugged in.
Check to make sure
the plug is plugged
into an outlet. The unit
should beep twice once
the power supply is
connected.
The water tank is not
locked into the unit.
Make sure the water tank
is locked into the back of
the unit.
The unit does not cool
at all.
There is insufcient water
in the tank.
Check the water level in
the tank and make sure
there is enough water.
The cooler/humidier
button was not pressed.
Press the COOLER/
HUMIDIFIER button.
The pump is defective. Contact customer service
if there is an issue with the
water pump.
Cooling is not sufcient. The cooling pad is not
sufciently saturated with
water.
Wait a few minutes for the
cooling pad to be fully
saturated with water.

26
EN
DISPOSAL CONSIDERATIONS
If there is a legal regulation for the disposal of electrical
and electronic devices in your country, this symbol on the
product or on the packaging indicates that this product must
not be disposed of with household waste. Instead, it must be
taken to a collection point for the recycling of electrical and
electronic equipment. By disposing of it in accordance with
the rules, you are protecting the environment and the health of
your fellow human beings from negative consequences. For
information about the recycling and disposal of this product,
please contact your local authority or your household waste
disposal service.
This product contains batteries. If there is a legal regulation
for the disposal of batteries in your country, the batteries must
not be disposed of with household waste. Find out about local
regulations for disposing of batteries. By disposing of them in
accordance with the rules, you are protecting the environment
and the health of your fellow human beings from negative
consequences.

27
ES
Estimado cliente,
Le felicitamos por la adquisición de este producto. Lea
atentamente las siguientes instrucciones y sígalas para evitar
posibles daños. No asumimos ninguna responsabilidad por los
daños causados por el incumplimiento de las instrucciones y el
uso inadecuado. Escanee el siguiente código QR para obtener
acceso a la última guía del usuario y más información sobre el
producto.
ÍNDICE DE CONTENIDOS
Indicaciones de seguridad28
Descripción del aparato29
Puesta en marcha y uso30
Funciones de los botones del mando a distancia31
Funciones clave e indicadores de visualización en el aparato31
Esquema de ventilación33
Limpieza y cuidado36
Detección y resolución de problemas37
Retirada del aparato38
DATOS TÉCNICOS
Número de artículo
10028303, 10029328, 10034651, 10035835
Suministro eléctrico
220-240 V ~ 50/60 Hz
FABRICANTE E IMPORTADOR (REINO UNIDO)
Fabricante:
Chal-Tec GmbH, Wallstraße 16, 10179 Berlín, Alemania.
Importador para Gran Bretaña:
Chal-Tec UK limited
Unit 6 Riverside Business Centre
Brighton Road
Shoreham-by-Sea
BN43 6RE
United Kingdom

28
ES
INDICACIONES DE SEGURIDAD
• Utilice el aparato solamente tal y como indican estas instrucciones de uso. Un uso
alternativo puede provocar descargas eléctricas, incendios o daños personales.
• En presencia de niños, utilice el aparato solamente si estos están bajo supervisión.
• Nunca sumerja el aparato completamente en agua.
• Si desea desplazar el aparato o si no lo utiliza, desconecte el enchufe de la toma
de corriente sujetándolo con la mano. No integre ningún otro enchufe, pues las
conexiones erróneas podrían provocar una descarga eléctrica.
• No utilice un cable alargador si no es estrictamente necesario. No utilice en ningún
caso más de un cable alargador combinado.
• No introduzca ningún objeto ni los dedos en las ranuras de ventilación, podría
lesionarse. Asegúrese de que las ranuras de ventilación no se bloquean durante el
funcionamiento.
• No coloque el cable de alimentación bajo materiales combustibles, como
alfombras. Coloque el cable de tal manera que nadie pueda tropezar.
• No utilice el aparato cerca de sustancias combustibles o explosivas.
• No coloque el aparato cerca de hornillos ni hornos.
• No utilice el aparato en estancias húmedas, como baños.
• Si no utiliza el aparato durante un periodo prolongado de tiempo, vacíe el
depósito de agua.
• Si el cable de alimentación o el enchufe están dañados, contacte con nuestro
servicio de atención al cliente o con un servicio técnico. No intente reparar el
aparato usted mismo.
29
ES
DESCRIPCIÓN DEL APARATO
1 Panel de control 9 Depósito de agua
2 Display 10 Cable de alimentación
3 Sensor del mando a distancia 11 Cierre del depósito de agua
4 Ranura de ventilación 12 Acumulador de frío
5 Indicador del nivel de agua 13 Mando a distancia
6 Ruedas
7 Filtro antipolvo
30
ES
PUESTA EN MARCHA Y USO
Retire el material completo de embalaje y conserve la caja para guardar el aparato.
Asegúrese de que no queda gomaespuma dentro del aparato. No necesita
herramientas para montar el aparato.
Rellenar el depósito de agua
Gire el cierre del depósito 90° en
el sentido contrario de las agujas
del reloj para abrirlo. Retire el
depósito de la parte trasera del
aparato. Rellene el depósito de
agua limpia. Preste atención al
indicador del nivel de agua en
la parte delantera para no llenar
demasiado el depósito. El nivel
de agua no debe ser superior a la
marca MAX ni inferior a la marca
MIN. La capacidad del depósito
es de unos 6 litros. Introduzca el
depósito en el aparato y gire el
mecanismo 90° en el sentido de
las agujas del reloj para bloquear
el depósito.
Colocar acumular de frío
• El aparato contiene un acumulador
de frío para refrigeración adicional.
• En el fondo del tanque hay un hueco
que permite que la almohadilla se
coloque en el lado largo/angosto
como se muestra en la imagen.
• Alternativamente, la almohadilla se
puede colocar simplemente en el
depósito de agua.
31
ES
FUNCIONES DE LOS BOTONES DEL
MANDO A DISTANCIA
Para abrir el compartimento de las pilas utilice una
moneda. Introduzca la moneda en la ranura de la
parte trasera del mando y gire la ranura. Oriente el
mando hacia el sensor del aparato y pulse los botones
de función. La distancia con respecto al aparato no
debe superar los 60 cm.
ON/SPEED
Encender el aparato y regular la velocidad
OFF
Apagar el aparato
TIMER
Congurar el temporizador (hasta 7,5 horas)
SWING
Activar la función oscilación de las ranuras de
ventilación
COOLER/HUMIDIFYER
Activar refrigeración o humidicación
MODE
Seleccionar modo de ventilación
FUNCIONES CLAVE E INDICADORES DE
VISUALIZACIÓN EN EL APARATO
Nota: La función de ionización se inicia automáticamente cuando el usuario
enciende la unidad.

32
ES
ON/SPEED &
OFF
Rellene el depósito de agua y enchufe el aparato. Este emitirá
dos pitidos para indicar que se encuentra en modo standby. Pulse
ON/SPEED para encender el aparato. Pulse varias veces el
mismo botón para ajustar la velocidad deseada. Pulse OFF para
apagar el aparato.
COOLER/
HUMIDIFYER
Una vez haya ajustado la velocidad deseada, pulse
COOLER/HUMIDIFYER para activar la refrigeración y la
humidicación. La función inicia la bomba de agua, refrigera
el aire y aumenta la humedad. Los copos de nieve del display
indican que dicha función está activada.
MODE
El aparato cuenta con tres modos distintos de ventilación. La
selección de cada modo es opcional. Pulse el botón MODE
para seleccionar cada uno:
• Modo manual: se indica en el display con tres iconos
redondos. En este modo puede ajustar la velocidad
manualmente.
• Modo noche: se indica en el display con una luna. En
este modo la velocidad desciende progresivamente
dependiendo de la velocidad congurada. Si ha
seleccionado velocidad alta, el aparato funcionará
30 minutos a dicha velocidad, 30 minutos a velocidad
media y a continuación a velocidad baja.
• Modo natural: se indica en el display con una palmera y
ajusta la velocidad del aire de manera automática.
TIMER
El aparato dispone de un temporizador programable hasta
7,5 horas. Pulse varias veces el botón TIMER para ajustar
el temporizador en intervalos de media hora. El tiempo
programado aparecerá en el display.
SWING
Para activar la función oscilación de las ranuras de
ventilación, pulse el botón SWING. Las ranuras se moverán
de un lado a otro automáticamente para que el aire se
distribuya mejor por la estancia.

33
ES
ESQUEMA DE VENTILACIÓN
1. Modo natural
Este modo se basa en la velocidad seleccionada. El esquema de ventilación exacto es
el siguiente:
Modo natural a velocidad alta
Modo natural a velocidad media
Modo natural a velocidad baja
Velocidad de la brisa
Tiempo
(segundos)
Velocidad de la brisa
Tiempo
(segundos)
Velocidad de la brisa
Tiempo
(segundos)
34
ES
Ejemplo: Esquema de ventilación para el modo natural a velocidad alta
El motor funciona durante 5 segundos a velocidad alta, 5 segundos a velocidad
media, 5 segundos a velocidad baja y se detiene durante 3 segundos en los que no
genera brisa.
A continuación, el motor funciona de nuevo 10 segundos a velocidad media, 10
segundos a velocidad alta, 5 segundos a velocidad media, 5 segundos a velocidad
baja y se detiene durante 3 segundos.
Posteriormente, el motor funciona 5 segundos a velocidad media, 10 segundos a
velocidad alta, 5 segundos a velocidad media y 5 segundos a velocidad baja.
El ciclo completo dura 76 segundos y se repite continuamente.
2. Modo noche
En este modo, la velocidad desciende gradualmente en función de la velocidad
seleccionada. El esquema de ventilación exacto es el siguiente:
Modo noche con brisa natural a velocidad alta
Si en modo noche selecciona una velocidad elevada con el modo „Brisa natural“, el
motor funcionará primero a 30 minutos a velocidad alta en el modo „brisa natural“;
posteriormente, funciona 30 minutos a velocidad media en el modo „brisa natural“,
luego pasa a velocidad baja y mantiene esta velocidad hasta el nal.
Velocidad de la brisa
Tiempo
(horas)
35
ES
Modo noche con brisa natural a velocidad media
Si en modo noche selecciona la velocidad media, el motor funcionará primero a
30minutos a velocidad media en el modo „brisa natural“; posteriormente, funcionará a
velocidad a velocidad baja y mantendrá esta velocidad hasta el nal.
Modo noche con brisa natural a velocidad baja
Si se inicia el modo noche a velocidad baja, el aparato funcionará continuamente a
este nivel de velocidad.
Nota: para dormir, se recomienda seleccionar el nivel de velocidad bajo para
el modo noche, pues este modo ofrece al usuario una sensación agradable de
brisa. Si deja funcionando el aparato en modo noche a velocidad alta de manera
permanente, puede sentirse incómodo y pasar frío durante la noche.
Velocidad de la brisa
Tiempo
(horas)
Velocidad de la brisa
Tiempo
(horas)

36
ES
LIMPIEZA Y CUIDADO
• Es importante realizar una limpieza y cuidado frecuentes para aumentar la vida útil
del aparato.
• Desconecte el enchufe antes de limpiar el aparato.
• Para limpiar el aparato utilice un paño suave, agua tibia y un producto de limpieza
no abrasivo. No utilice productos abrasivos, disolventes, gasolina ni similares para
evitar dañar el aparato. Seque todas sus partes con un paño suave antes de volver
a enchufar el aparato.
• Si no utiliza el aparato durante un periodo largo de tiempo, guárdelo en su caja
original y almacénelo en un lugar fresco y seco.
Limpiar el ltro antipolvo y el acumulador de frío
• Antes de la limpieza debe retirar el ltro y el acumulador. Asegúrese de montar de
nuevo todas las piezas en el orden correcto: depósito de agua, acumulador, ltro
antipolvo.
• Para que el ltro antipolvo no se obstruya debe limpiarlo una vez al mes.
• Para limpiar el ltro, debe retirarlo de la parte trasera del aparato. Presione las dos
pestañas situadas sobre el ltro. Limpie el ltro con un cepillo suave y aclárelo con
agua limpia. Deje que se seque completamente antes de volver a montarlo. Para
poder limpiar el acumulador, retire primero el ltro antipolvo. Retire el acumulador,
límpielo con agua y deje que se seque antes de volver a utilizarlo.

37
ES
DETECCIÓN Y RESOLUCIÓN DE PROBLEMAS
Problema Posible causa Solución
No hay corriente de aire El cable de alimentación
no está conectado.
Compruebe si el enchufe
está conectado. El
aparato emitirá dos
pitidos cuando lo enchufe.
El depósito de agua no
está bloqueado.
Compruebe si ha
colocado correctamente
el depósito y si lo ha
bloqueado.
El aparato no enfría. Agua insuciente en el
depósito.
Compruebe el nivel del
agua y llene el depósito si
es necesario.
El botón COOLER/
HUMIDIFYER no está
activado.
Pulse el botón.
La bomba de agua está
averiada.
Contacte con el servicio
de atención al cliente.
El aparato no enfría lo
suciente.
Agua insuciente en el
acumulador.
Espere unos segundos
hasta que el acumulador
se haya empapado.

38
ES
INDICACIONES SOBRE LA RETIRADA DEL
APARATO
Si en su país existe una disposición legal relativa a la
eliminación de aparatos eléctricos y electrónicos, este
símbolo estampado en el producto o en el embalaje
advierte que no debe eliminarse como residuo doméstico.
En lugar de ello, debe depositarse en un punto de recogida
de reciclaje de aparatos eléctricos y electrónicos. Una
gestión adecuada de estos residuos previene consecuencias
potencialmente negativas para el medio ambiente y la salud
de las personas. Puede consultar más información sobre el
reciclaje y la eliminación de este producto contactando con
su administración local o con su servicio de recogida de
residuos.
Este producto contiene baterías. Si en su país existe una
disposición legal relativa a la eliminación de baterías, estas
no deben eliminarse como residuo doméstico. Infórmese
sobre la normativa vigente relacionada con la eliminación de
baterías. Una gestión adecuada de estos residuos previene
consecuencias potencialmente negativas para el medio
ambiente y la salud de las personas.
39
FR
Chère cliente, cher client,
Toutes nos félicitations pour l’acquisition de ce nouvel appareil.
Veuillez lire attentivement et respecter les instructions de ce mode
d’emploi an d’éviter d’éventuels dommages. Nous ne saurions
être tenus pour responsables des dommages dus au non-respect
des consignes et à la mauvaise utilisation de l’appareil. Scannez
le QR-Code pour obtenir la dernière version du mode d‘emploi et
des informations supplémentaires concernant le produit.
SOMMAIRE
Consignes de sécurité40
Aperçu de l’appareil41
Mise en marche et utilisation42
Fonctions des boutons de la télécommande43
Fonctions des touches et indicateurs d‘afchage sur l‘appareil43
Schéma de vent45
Nettoyage et entretien48
Identication et résolution des problèmes49
Informations sur le recyclage50
FICHE TECHNIQUE
Numéro d’article
10028303, 10029328, 10034651, 10035835
Alimentation électrique
220-240 V ~ 50/60 Hz
FABRICANT ET IMPORTATEUR (UK)
Fabricant :
Chal-Tec GmbH, Wallstraße 16, 10179 Berlin, Allemagne.
Importateur pour la Grande Bretagne :
Chal-Tec UK limited
Unit 6 Riverside Business Centre
Brighton Road
Shoreham-by-Sea
BN43 6RE
United Kingdom

40
FR
CONSIGNES DE SÉCURITÉ
• Utiliser l’appareil uniquement en suivant les instructions du mode d’emploi. Une
mauvaise utilisation de l’appareil peut causer des électrocutions, des blessures ou
des incendies.
• Utiliser l’appareil en présence d’enfants uniquement s’ils sont sous surveillance.
• Ne jamais plonger l’appareil entièrement dans l’eau.
• Avant de déplacer l’appareil ou après utilisation, le débrancher en saisissant le
cordon d’alimentation par la che. Ne pas monter d’autre cordon d’alimentation sur
l’appareil, car de mauvais raccords peuvent provoquer des électrocutions.
• Si possible, ne pas utiliser de rallonge électrique. N’utiliser en aucun cas plus d’une
rallonge électrique.
• Ne pas introduire d’objets ou ses doigts dans les fentes d’aération pour éviter tout
risque de blessure. Veiller à ne pas obstruer les ouvertures d’aération pendant le
fonctionnement de l’appareil.
• Ne pas faire passer le cordon d’alimentation sur des matières inammables, comme
par exemple des tapis. Disposer le câble de sorte à ce que personne ne marche
dessus.
• Ne pas utiliser l’appareil à proximité de substances inammables ou explosives.
• Ne pas placer l’appareil à proximité d’une cuisinière ou d’un four.
• Ne pas utiliser l’appareil dans une pièce humide, comme par exemple une salle de
bains.
• Après utilisation de l’appareil, vider le réservoir d’eau.
• Si le cordon d‘alimentation est endommagé, il doit être remplacé par le fabricant,
une entreprise spécialisée habilitée ou une personne présentant une qualication
analogue. Ne pas essayer de réparer la che ou le cordon d’alimentation soi-
même.

41
FR
APERÇU DE L’APPAREIL
1 Panneau de commande 9 Réservoir
2 Afchage 10 Cordon d’alimentation
3 Capteur pour télécommande 11 Verrouillage du réservoir
4 Fentes d’aération 12 Pain de glace
5 Jauge du niveau d’eau 13 Télécommande
6 Pieds à roulettes
7 Filtre à poussière
42
FR
MISE EN MARCHE ET UTILISATION
Retirer tous les éléments d’emballage et conserver le carton pour un stockage ultérieur.
Veiller à ce qu’aucune mousse synthétique ne demeure dans l’appareil. Aucun outil n’est
requis pour assembler l’appareil.
Remplir le réservoir d’eau
Tourner le bouton de verrouillage
du réservoir à 90 ° dans le
sens inverse des aiguilles d’une
montre pour ouvrir le réservoir.
Sortir le réservoir situé l’arrière
de l’appareil. Remplir le réservoir
d’eau claire. Faire attention à
la jauge du niveau d’eau située
à l’avant de l’appareil pour ne
pas trop le remplir. Le niveau
d’eau ne doit pas dépasser le
repère MAX et ne doit pas être
en-dessous du repère MIN. Le
réservoir a une contenance de
6 litres. Réintroduire le réservoir
dans l’appareil et tourner le verrou
à 90° dans le sens des aiguilles
d’une montre pour verrouiller de
nouveau le réservoir.
Installer le pain de glace
• L’appareil contient un pain de
glace permettant un refroidissement
supplémentaire.
• Au fond du réservoir, il y a un
évidement qui permet de placer le
coussin sur le côté long/étroit comme
indiqué sur l‘image.
• Alternativement, le coussin peut être
simplement placé dans le réservoir
d‘eau.
43
FR
FONCTIONS DES BOUTONS DE LA
TÉLÉCOMMANDE
Utiliser une pièce de monnaie pour ouvrir le
compartiment des piles. Insérer la pièce dans la fente
située à l’arrière de la télécommande et la faire tourner
dans le sens indiqué sur la télécommande. Pointer la
télécommande en direction du capteur et appuyer
sur une des touches de commande. La distance à
l’appareil ne doit pas excéder 60 cm.
ON/SPEED
Allumer l’appareil et régler la vitesse.
OFF
Éteindre l’appareil.
TIMER
Paramétrer le temps (jusqu’à 7,5 heures).
SWING
Activer la fonction d’oscillation des fentes d’aération.
COOLER/HUMIDIFYER
Activer le rafraîchisseur ou l’humidicateur
MODE
Sélectionner le mode de ventilation
FONCTIONS DES TOUCHES ET INDICATEURS
D‘AFFICHAGE SUR L‘APPAREIL
Remarque : la fonction d‘ionisation démarre automatiquement lorsque l‘utilisateur
allume l‘appareil.

44
FR
ON/SPEED &
OFF
Remplir le réservoir et brancher l’appareil. L’appareil produit deux
bips sonores signiant qu’il se trouve en mode veille. Appuyer
sur ON/SPEED pour allumer l’appareil. Appuyer plusieurs fois
sur ON/SPEED pour régler la vitesse souhaitée. Pour éteindre
l’appareil, appuyer sur OFF.
COOLER/
HUMIDIFYER
Une fois la vitesse réglée, appuyer sur COOLER/
HUMIDIFYER pour activer le rafraîchisseur et l’humidicateur.
Cette fonction fait démarrer la pompe à eau, rafraîchit l’air et
l’humidie. Le ocon de neige de l’afchage indique que la
fonction est activée.
MODE
L’appareil dispose de 3 modes différents de ventilation.
Le choix d’un mode en particulier est optionnel. Appuyer
plusieurs fois sur la touche MODE pour sélectionner le mode :
• Mode manuel : il est représenté sur l’afchage par 3
icônes rondes. Dans ce mode, le réglage de la vitesse est
manuel.
• Mode nuit : il est représenté sur l’afchage par le
symbole d’une lune. Dans ce mode, la vitesse est réduite
graduellement, en fonction de la vitesse paramétrée.
Si le réglage est sur « Haut », l’appareil fonctionne
pendant 30 minutes à vitesse élevée, 30 minutes à vitesse
intermédiaire puis à vitesse réduite.
• Mode naturel : il est représenté sur l’afchage par le
symbole d’un palmier et ajuste la vitesse de manière
automatique.
TIMER
L’appareil est équipé d’un minuteur qui permet de régler un
temps d’une durée maximale de 7,5 heures. Appuyer plusieurs
fois sur TIMER pour ajuster le temps par paliers de 0,5 heure.
Le temps paramétré apparaît ensuite sur l’afchage.
SWING
Pour activer la fonction d’oscillation des fentes d’aération,
appuyer sur la touche SWING. Les fentes d’aération bougent
alors automatiquement d’un côté à l’autre an de mieux
répartir la diffusion de l’air dans la pièce.
45
FR
SCHÉMA DE VENT
1. Mode naturel
Ce mode est basé sur la vitesse réglée. Le schéma de vent exact est le suivant :
Mode naturel à haute vitesse
Mode naturel à vitesse moyenne
Mode naturel à vitesse lente
Vitesse du vent
Temps
(secondes)
Vitesse du vent
Temps
(secondes)
Vitesse du vent
Temps
(secondes)

46
FR
Exemple : Schéma de vent pour le mode naturel à haute vitesse
Le moteur tourne à haute vitesse pendant 5 secondes, à vitesse moyenne pendant
5 secondes, à vitesse lente pendant 5 secondes, puis s‘arrête pour 3 secondes sans
vent.
Ensuite, le moteur fonctionne à nouveau à vitesse moyenne pendant 10 secondes,
10 secondes à haute vitesse, 5 secondes à vitesse moyenne, puis 5 secondes à
basse vitesse, puis s‘arrête pendant 3 secondes !
Le moteur tourne à nouveau à vitesse moyenne pendant 5 secondes, 10 secondes à
haute vitesse, 5 secondes à vitesse moyenne, puis vitesse lente pendant 5 secondes.
Le cycle entier dure 76 secondes et se répète en continu.
2. Mode nuit
Dans ce mode, la vitesse se réduit progressivement en fonction de la vitesse réglée. Le
schéma de vent exact est le suivant :
Mode nuit avec vent naturel à haute vitesse
Si vous réglez la vitesse élevée avec le mode vent naturel en mode nuit, le moteur
fonctionnera à grande vitesse en mode vent naturel pendant 30 minutes, puis à vitesse
moyenne en mode vent naturel pendant 30 minutes, puis à basse vitesse et gardera
cette vitesse jusqu‘à la n.
Vitesse du vent
Temps
(heures)

47
FR
Mode nuit avec vent naturel à vitesse moyenne
Si vous réglez une vitesse moyenne en mode nuit, le moteur fonctionnera 30 premières
minutes à vitesse moyenne en mode vent naturel, puis 30 minutes à vitesse moyenne en
mode vent naturel, puis à basse vitesse et gardera cette vitesse jusqu‘à la n.
Mode nuit avec vent naturel à basse vitesse
Si vous démarrez le mode nuit à basse vitesse, l‘appareil fonctionnera à basse vitesse
en continu.
Remarque : Il est conseillé de sélectionner une vitesse lente pour le mode nuit
pendant le sommeil, car ce mode doit donner à l‘utilisateur une agréable sensation
de vent. Laisser l‘appareil fonctionner à haute vitesse tout le temps en mode nuit peut
vous être désagréable et vous donner froid la nuit.
Vitesse du vent
Temps
(heures)
Vitesse du vent
Temps
(heures)

48
FR
NETTOYAGE ET ENTRETIEN
• Le nettoyage et l’entretien réguliers de l’appareil sont essentiels pour en prolonger
la durée de vie.
• Toujours débrancher l’appareil avant de le nettoyer.
• Nettoyer l’appareil avec une éponge douce, de l’eau chaude et un liquide vaisselle
léger. Ne pas utiliser de produit d’entretien agressif, de diluant, d’essence ou de
produit équivalent pour ne pas endommager l’appareil. Sécher soigneusement
toutes les parties de l’appareil à l’aide d’un chiffon sec avant de rebrancher
l’appareil.
• En cas d’inutilisation prolongée de l’appareil, le ranger dans son carton d’origine et
l’entreposer dans un lieu frais et sec.
Nettoyage du ltre à poussière et du pain de glace
• Retirer le ltre et le pain de glace avant le nettoyage. Veiller à ce que toutes les
parties de l’appareil soit replacées dans l’ordre correct suivant : réservoir, pain de
glace, ltre à poussière.
• Pour que le ltre ne se détériore pas, le nettoyer une fois par mois.
• Pour nettoyer le ltre, il faut le sortir par l’arrière de l’appareil. Appuyer pour cela
sur les deux attaches qui retiennent le ltre. Épousseter le ltre à l’aide d’une brosse
douce et le rincer à l’eau claire. Laisser le ltre sécher complètement avant de le
réinstaller. Pour nettoyer le pain de glace, il est nécessaire de sortir préalablement
le ltre. Puis enlever le pain de glace, le laver sous l’eau du robinet et le laisser
sécher complètement avant de le réinstaller.

49
FR
IDENTIFICATION ET RÉSOLUTION DES
PROBLÈMES
Problème Cause possible Solution
Pas d’appel d’air. Le cordon d’alimentation
n’est pas branché.
Vérier que la che
d’alimentation est bien
branchée à une prise.
L’appareil produit deux
bips sonores lorsqu’il est
branché.
Le réservoir n’est pas
verrouillé.
Vérier que le réservoir est
installé dans l’appareil et
qu’il est verrouillé.
L’appareil ne refroidit
absolument pas
Trop peu d’eau dans le
réservoir.
Vérier le niveau d’eau et
remplir le réservoir d‘eau
si nécessaire.
La touche COOLER/
HUMIDIFYER n’a pas été
enclenchée.
Appuyer sur la touche
COOLER/HUMIDIFYER.
La pompe à eau est
défectueuse.
Contacter le service
après-vente.
L’appareil ne refroidit pas
bien.
Trop peu d’eau dans le
pain de glace.
Attendre quelques
secondes que le pain
de glace se gorge
entièrement d’eau.

50
FR
INFORMATIONS SUR LE RECYCLAGE
S‘il existe une réglementation pour l‘élimination ou le
recyclage des appareils électriques et électroniques dans
votre pays, ce symbole sur le produit ou sur l‘emballage
indique que cet appareil ne doit pas être jeté avec les
ordures ménagères. Vous devez le déposer dans un point
de collecte pour le recyclage des équipements électriques
et électroniques. La mise au rebut conforme aux règles
protège l‘environnement et la santé de vos semblables des
conséquences négatives. Pour plus d‘informations sur le
recyclage et l‘élimination de ce produit, veuillez contacter
votre autorité locale ou votre service de recyclage des
déchets ménagers.
Ce produit contient des piles. S‘il existe une réglementation
pour l‘élimination ou le recyclage des piles dans votre pays,
vous ne devez pas les jeter avec les ordures ménagères.
Renseignez-vous sur les dispositions locales relatives à la
collecte des piles usagées. La mise au rebut conforme aux
règles protège l‘environnement et la santé de vos semblables
des conséquences négatives.
51
IT
Gentile cliente,
La ringraziamo per aver acquistato il dispositivo. La preghiamo
di leggere attentamente le seguenti istruzioni per l’uso e di
seguirle per evitare possibili danni. Non ci assumiamo alcuna
responsabilità per danni scaturiti da una mancata osservazione
delle avvertenze di sicurezza e da un uso improprio del
dispositivo. Scansionare il codice QR seguente, per accedere
al manuale d’uso più attuale e per ricevere informazioni sul
prodotto.
INDICE
Avvertenze di sicurezza52
Descrizione del prodotto53
Accensione e utilizzo54
Funzioni dei pulsanti sul telecomando55
Funzioni dei tasti e indicatori sul display del dispositivo55
Schema di ventilazione57
Pulizia e manutenzione60
Ricerca e risoluzione dei problemi61
Smaltimento62
DATI TECNICI
Articolo numero
10028303, 10029328, 10034651, 10035835
Alimentazione
220-240 V ~ 50/60 Hz
PRODUTTORE E IMPORTATORE (UK)
Produttore:
Chal-Tec GmbH, Wallstraße 16, 10179 Berlino, Germania.
Importatore per la Gran Bretagna:
Chal-Tec UK limited
Unit 6 Riverside Business Centre
Brighton Road
Shoreham-by-Sea
BN43 6RE
United Kingdom

52
IT
AVVERTENZE DI SICUREZZA
• Utilizzare il dispositivo solo nelle modalità indicate nel presente libretto di istruzioni.
Un utilizzo errato può causare elettrochoc, incendi o danni alle persone.
• Utilizzare il dispositivo in presenza di bambini con la massima cautela.
• Non immergere mai il dispositivo nell’acqua.
• Nel caso in cui si desideri spostare il dispositivo o non si desideri utilizzarlo,
staccare la spina dalla presa con mano ferma. Non collegare un’altra presa in
quanto un attacco scorretto può causare incendi.
• Se possibile non usare prolunghe. In ogni caso non usare mai più di una prolunga.
• Non inlare oggetti o le dita nelle fessure di aereazione, è possibile farsi male.
Prestare attenzione che le fessure di aereazione non si blocchino quando il
dispositivo è acceso.
• Non lasciare scorrere il cavo di rete sotto materiali inammabili, come ad esempio
tappeti, e sistemarlo in modo tale che nessuno vi possa inciampare.
• Non usare il dispositivo in prossimità di sostanze inammabili o esplosive.
• Non posizionare il dispositivo in prossimità di fornelli o forni.
• Non usare il dispositivo in ambienti umidi come il bagno.
• Nel caso in cui il dispositivo non venga utilizzato, svuotare il contenitore dell’acqua.
• Nel caso in cui il cavo di rete risulti essere danneggiato, rivolgersi al nostro servizio
clienti o ad un´azienda specializzata. Non tentare di riparare la spina o il cavo
autonomamente.
53
IT
DESCRIZIONE DEL PRODOTTO
1 Pannello di controllo 9 Contenitore dell’acqua
2 Display 10 Cavo di rete
3 Sensore per il telecomando 11 Chiusura del contenitore dell’acqua
4 Fessura di aereazione 12 Pad di raffreddamento
5 Indicatore del livello dell’acqua 13 telecomando
6 Rotelline
7 Filtro della polvere
54
IT
ACCENSIONE E UTILIZZO
Togliere il materiale di imballaggio e conservare la scatola dove riporre il dispositivo
in futuro. Assicurarsi che nel dispositivo non ci siano residui di materiale di imballaggio.
Non sono necessari attrezzi per montare il dispositivo.
Riempire il contenitore dell’acqua
Per aprire la chiusura del
contenitore dell’acqua girarla di
90° in senso antiorario. Togliere il
contenitore dell’acqua dalla parte
posteriore del dispositivo. Riempire
il contenitore con acqua limpida.
Prestare attenzione all’indicatore
del livello dell’acqua situato nella
parte anteriore del dispositivo
afnché il contenitore non sia
troppo pieno. Il livello dell’acqua
non deve essere superiore
rispetto al segno MAX e non
inferiore rispetto al segno MIN.
Inserire nuovamente il contenitore
dell’acqua nel dispositivo e
girare la chiusura di 90° in senso
orario per chiudere di nuovo il
contenitore.
Inserire il pad di raffreddamento
• Il dispositivo contiene un pad di
raffreddamento per un raffreddamento
ulteriore.
• Nella parte inferiore della vasca è
presente una rientranza che permette
di posizionare il pad sul lato lungo/
stretto come mostrato in gura.
• In alternativa, il tampone può essere
semplicemente posizionato nel
serbatoio dell‘acqua.
55
IT
FUNZIONI DEI PULSANTI SUL TELECOMANDO
Per aprire lo scomparto della batteria usare una
moneta. Inlare la moneta nella fessura situata sulla
parte posteriore del telecomando e girarla, come
indicato sul telecomando. Puntare con il telecomando
il sensore e premere un tasto funzione. La distanza dal
dispositivo non deve essere più di 60 cm.
ON/SPEED
il dispositivo si accende e si regola la velocità.
OFF
il dispositivo si spegne.
TIMER
si regola il timer (no a 7.5 ore).
SWING
si accende la funzione di oscillazione delle fessure di
ventilazione.
COOLER/HUMIDIFYER
si accende il raffreddamento o l’umidicazione.
MODE
si seleziona la modalità ventilatore.
FUNZIONI DEI TASTI E INDICATORI SUL DISPLAY
DEL DISPOSITIVO
Nota: La funzione di ionizzazione si avvia automaticamente quando l‘utente
accende l‘unità.

56
IT
ON/SPEED &
OFF
Riempire il contenitore dell’acqua e inserire la spina nella presa. Il
dispositivo emette due segnali acustici e segnala che si
trova in modalità stand-by. Premere più volte il tasto ON/SPEED
per accendere il dispositivo. Premere più volte il tasto ON/SPEED
per regolare la velocità desiderata. Per spegnere il dispositivo
premere OFF.
COOLER/
HUMIDIFYER
Dopo aver impostato la velocità desidera, premere il
tasto COOLER/HUMIDIFYER per attivare la funzione di
raffreddamento e umidicazione. Questa funzione attiva la
pompa dell’acqua, raffredda l’aria e la umidica. Il simbolo
rafgurante il occo di neve sul display indica che la funziona
è attiva.
MODE
Il dispositivo dispone di 3 diverse modalità di aereazione. La
scelta di una determinata modalità è opzionale. Premere più
volte il tasto MODE per selezionare la modalità desiderata.
• Modalità manuale: Questa modalità viene indicata
sul display tramite la gura rafgurante 3 forme
rotonde. In questa modalità si può impostare la velocità
manualmente.
• Modalità notturna: Questa modalità viene indicata nel
display attraverso il simbolo rafgurante la luna. In questa
modalità la velocità diminuisce gradualmente a seconda
della velocità impostata. Nel caso in cui si sia impostata
la modalità “Hoch”, il dispositivo funzionerà per 30
minuti ad alta velocità, 30 minuti a velocità media e in
seguito a velocità bassa.
• Modalità naturale: Questa modalità viene indicata sul
display tramite il simbolo rafgurante una palma e si
regola automaticamente in base alla velocità dell’aria.
TIMER
Il dispositivo dispone di un timer che si può programmare sino
a 7.5 ore. Premere più volte il tasto TIMER per impostare il
tempo a intervalli di 0.5 ore. Il tempo impostato viene indicato
nel display.
SWING
Per attivare la funzione di oscillazione premere il
tasto SWING. Le fessure di ventilazione si muovono
automaticamente da una parte all’altra permettendo una
migliore diffusione dell’aria nella stanza.

57
IT
SCHEMA DI VENTILAZIONE
1. Modalità naturale
Questa modalità si orienta alla velocità impostata. L’esatto schema di ventilazione è il
seguente:
Modalità naturale a velocità elevata
Modalità naturale a velocità media
Modalità naturale a bassa velocità
Velocità di ventilazione
Tempo
(secondi)
Velocità di ventilazione
Tempo
(secondi)
Velocità di ventilazione
Tempo
(secondi)

58
IT
Esempio: schema di ventilazione nella modalità naturale a velocità elevata
Il motore funziona per 5 secondi a velocità sostenuta, 5 secondi a velocità media,
5secondi a bassa velocità e poi si ferma per 3 secondi senza ventilazione.
Dopodiché il motore funziona ancora per 10 secondi a velocità media, 10 secondi
a velocità sostenuta, 5 secondi a velocità media, poi 5 secondi a bassa velocità e si
ferma per 3 secondi.
Il motore funziona ancora per 5 secondi a velocità media, 10 secondi a velocità
sostenuta, 5 secondi a velocità media, 5 secondi a bassa velocità e poi per altri
5secondi a bassa velocità.
Tutto il ciclo dura 76 secondi e si ripete in continuazione.
2. Modalità notturna
In questa modalità la velocità si abbassa gradualmente a seconda della velocità
impostata. L’esatto schema di ventilazione è il seguente:
Modalità notturna con vento naturale a velocità sostenuta
Se in modalità notturna si imposta una velocità sostenuta con la modalità “Vento
naturale”, il motore funziona prima per 30 minuti a velocità sostenuta, 30 minuti a
velocità media e poi a bassa velocità. Questa velocità viene mantenuta no alla ne.
Velocità di ventilazione
Tempo (ora)
59
IT
Modalità notturna con vento naturale a velocità media
Se in modalità notturna si imposta una velocità media, il motore funziona prima per
30minuti a velocità media nella modalità “Vento naturale”, 30 minuti a velocità media
e poi a bassa velocità. Questa velocità viene mantenuta no alla ne.
Modalità notturna con vento naturale a bassa velocità
Quando si avvia la modalità notturna a bassa velocità, il dispositivo funziona
continuamente a bassa velocità.
Nota: quando si dorme si consiglia di selezionare il livello di velocità basso per
la modalità notturna perché questa modalità deve trasmettere una sensazione di
ventilazione piacevole. Se si fa funzionare il dispositivo in modalità notturna a una
velocità sostenuta per tutto il tempo, ci si potrebbe sentire a disagio e si potrebbe
avere freddo la notte.
Velocità di ventilazione
Tempo (ora)
Velocità di ventilazione
Tempo (ora)

60
IT
PULIZIA E MANUTENZIONE
• E’ importante effettuare una pulizia regolare del dispositivo afnché questo duri più
a lungo.
• Staccare sempre la spina dalla presa prima di pulire il dispositivo.
• Usare per la pulizia del dispositivo un panno morbido, acqua tiepida e detergenti
non aggressivi. Non usare prodotti abrasivi, diluenti, benzina o prodotti simili per
non danneggiare il dispositivo. Asciugare con cura tutte le parti con un panno
morbido prima di collegare di nuovo il dispositivo.
• Nel caso in cui il dispositivo non venga utilizzato, riporlo nella scatola originale e
conservarlo in un luogo fresco e asciutto.
Pulire il ltro della polvere e il pad di raffreddamento.
• Prima di pulire il dispositivo togliere il ltro e il pad di raffreddamento. Prestare
attenzione a reinserire tutti i componenti nella giusta sequenza:
• Contenitore dell’acqua, pad di raffreddamento, ltro della polvere.
• Afnché il ltro della polvere non si blocchi, pulirlo almeno una volta al mese.
• Per pulire il ltro toglierlo dalla parte posteriore. Premere le due linguette
posizionate sul ltro. Pulire il ltro con una spazzola morbida e poi lavare con
acqua limpida. Lasciare asciugare completamente il ltro prima di reinserirlo. Per
pulire il pad di raffreddamento, togliere prima il ltro della polvere. Togliere poi il
pad, lavarlo sotto l’acqua corrente e lasciarlo asciugare completamente prima di
reinserirlo.

61
IT
RICERCA E RISOLUZIONE DEI PROBLEMI
Problema Possibile causa Soluzione
Nessuna ventilazione Il cavo di rete non è
inserito.
Vericare che la spina
sia collegata alla presa.
Il dispositivo emette due
segnali acustici quando è
collegato.
Il contenitore dell’acqua
non è chiuso.
Vericare che il
contenitore dell’acqua sia
inserito nel dispositivo e
sia chiuso.
Il dispositivo non raffredda Nel contenitore dell’acqua
c’è poca acqua
Vericare il livello
dell’acqua ed
eventualmente
aggiungerla.
Il tasto COOLER/
HUMIDIFYER non è stato
premuto.
Premere il tasto COOLER/
HUMIFYER
La pompa dell’acqua è
guasta.
Contattare il nostro
servizio clienti
Il dispositivo non raffredda
correttamente
Nel pad di
raffreddamento c’è poca
acqua.
Aspettare qualche
secondo nché il
pad si sia assorbito
completamente.

62
IT
AVVISO DI SMALTIMENTO
Se nel proprio paese si applicano le regolamentazioni
inerenti lo smaltimento di dispositivi elettrici ed elettronici,
questo simbolo sul prodotto o sulla confezione segnala che
questi prodotti non possono essere smaltiti con i riuti normali
e devono essere portati a un punto di raccolta di dispositivi
elettrici ed elettronici. Grazie al corretto smaltimento dei
vecchi dispositivi si tutela il pianeta e la salute delle persone
da possibili conseguenze negative. Informazioni riguardanti il
riciclo e lo smaltimento di questi prodotti si ottengono presso
l’amministrazione locale oppure il servizio di gestione dei
riuti domestici.
Il prodotto contiene batterie. Se nel proprio paese si
applicano le regolamentazioni inerenti lo smaltimento di
batterie, non possono essere smaltite con i normali riuti
domestici. Preghiamo di informarvi sulle regolamentazioni
vigenti sullo smaltimento delle batterie. Grazie al corretto
smaltimento dei vecchi dispositivi si tutela l’ambiente e la
salute delle persone da conseguenze negative.