
ScreenBeam960
WirelessDisplay
Receiver
Firmware9.15.49.x
UserManual
V1.1
ForCatalog#SBWD960

TableofContents
PartI
GettingStarted......................................................................................................................1
1.1
ContentsintheBox.......................................................................................................1
1.2
MeetingScreenBeam960.............................................................................................1
1.2.1
ScreenBeam960...................................................................................................1
1.3
SystemRequirements...................................................................................................3
1.3.1
SystemRequirements............................................................................................3
1.3.2
Wi-FiMiracastFacts&Requirements...................................................................3
1.3.3
NetworkRequirements.........................................................................................4
1.3.4
SetupRequirements..............................................................................................5
PartII
InstallingtheReceiver...........................................................................................................7
2.1
ConnectingtheReceivertoanHDTV............................................................................7
2.2
ConnectingtheReceivertoaNetwork.........................................................................9
2.2.1
WiredConnection.................................................................................................9
2.2.2
WirelessConnection...........................................................................................10
PartIII
ConnectingClientDevice....................................................................................................13
3.1
OverviewofWirelessDisplayNetworkModes...........................................................13
3.1.1
Wi-FiMiracast.....................................................................................................13
3.1.2
WirelessDisplayoverexistingLAN......................................................................14
3.2
ConnectusingWi-FiMiracast......................................................................................15
3.3
ConnectusingExistingWirelessNetworkorLAN.......................................................19
3.4
TipsforOptimalPerformance.....................................................................................24
PartIV
DisplayandControlOptions...............................................................................................25
4.1
VGAUseCase..............................................................................................................25
4.2
DisplayMode..............................................................................................................26
4.3
USBoverNetworkControl..........................................................................................28
PartV
DeviceManagementforITAdministrator...........................................................................29
5.1
UsingScreenBeamCMSSoftware...............................................................................29
5.2
UsingLocalManagementonScreenBeam..................................................................29
5.2.1
Method1:WirelessP2PDirectConnection(AGO).............................................30
5.2.2
Method2:NetworkConnectionviaDHCP..........................................................31
5.2.3
Method3:ScreenBeamLocalWi-FiNetwork(NGO)..........................................32
5.2.3.1
WhenSSIDBroadcastisDisabled........................................................32
5.2.3.2
WhenSSIDBroadcastisEnabled.........................................................37
5.2.4
LogOut................................................................................................................38
5.3
ConfiguringScreenBeam.............................................................................................39
5.3.1
GeneralSettings..................................................................................................39
5.3.1.1
ChangingLocalManagementInterface’sDisplayLanguage................39
5.3.1.2
RenamingtheReceiver.......................................................................40
5.3.1.3
SettinguptheLoginUsernameandPassword....................................42
5.3.1.4
SettinguptheReceiver’sDisplayLanguage........................................43
5.3.1.5
SettingupTimeZone..........................................................................44

5.3.2
WirelessDisplayoverLAN...................................................................................45
5.3.2.1
SettingupWirelessDisplayoverLANforWindows10/11Devices....45
5.3.2.2
SettingupNativeScreenMirroringformacOS/iOSDevices...............47
5.3.3
P2PWirelessSettings..........................................................................................49
5.3.3.1
SettingupP2PConnectionMode(AGOorNGO)................................49
5.3.3.2
SettingupP2POperatingChannel(AGOModeOnly).........................51
5.3.3.3
SettingupTransmitPower..................................................................52
5.3.4
SecuritySettings..................................................................................................53
5.3.4.1
SettingupPINPairingMethod............................................................53
5.3.5
DisplaySettings...................................................................................................55
5.3.5.1
SettingupDisplaySharingMode........................................................55
5.3.5.2
SettingupReceiverNameDisplayforQuickSwitch...........................56
5.3.5.3
ManagingHDMI/VGAPortOutput......................................................58
5.3.5.4
WakinguptheReceiver.......................................................................60
5.3.5.5
SettingupVGACompatibilityMode...................................................61
5.3.5.6
SettingupDefaultVGAFormat...........................................................63
5.3.5.7
AdjustingTVScreenSize.....................................................................65
5.3.5.8
SettingupHDMI-CEC...........................................................................66
5.3.5.9
UpdatingtheReceiver’sBackgroundImage.......................................67
5.3.5.10
UpdatingtheReceiver’sScreenSaverImage......................................69
5.3.5.11
SettingupNetworkInformationDisplayonTVScreen.......................71
5.3.5.12
HidingReadytoConnectInformation.................................................73
5.3.6
LocalManagementSettings................................................................................75
5.3.6.1
SettingupLocalManagementInterfaceAccess..................................75
5.3.6.2
SettingupAllowAccessviaLAN..........................................................77
5.3.6.3
ModifyingtheReceiver’sLocalWi-FiSettings.....................................78
5.3.6.4
SettingupBroadcastNetworkName..................................................79
5.3.6.5
SpecifyingaLocalManagementCommunicationPortfortheReceiver
80
5.3.6.6
SettingupUSBAutoConfiguration.....................................................81
5.3.7
RemoteManagementSettings............................................................................82
5.3.7.1
ModifyingtheReceiver’sHostName..................................................82
5.3.7.2
SettinguptheReceiver’sIPAddress...................................................83
5.3.7.3
SpecifyingaDNSServerfortheReceiver............................................84
5.3.7.4
SpecifyingScreenBeamCMSfortheReceiver....................................85
5.3.7.5
SettingupUPnPDiscovery..................................................................86
5.4
UpdatingFirmwarefortheReceiver...........................................................................87
5.4.1
UpdatingFirmwareWirelessly............................................................................87
5.4.2
UpdatingFirmwareLocally..................................................................................90
5.5
ReceiverMaintenance................................................................................................91
5.5.1
SettingupReceiverAutoReboot........................................................................91
5.5.2
SettingupReceiverLogging................................................................................92
5.5.3
ExportingReceiverLogwithLMI.........................................................................93
5.5.4
RebootingtheReceiver.......................................................................................94

5.5.5
ResettingtheReceivertoDefault........................................................................95
AppendixI
TroubleshootingandFAQs..........................................................................................96
Troubleshooting..........................................................................................................................96
FAQs............................................................................................................................................98
AppendixII
Notices......................................................................................................................104
Warranty...................................................................................................................................104
GPLInfo.....................................................................................................................................104
EUCEDeclarationofConformity..............................................................................................104
TechnicalSupport......................................................................................................................105

1
PartI GettingStarted
Thank youforyour purchaseof ScreenBeam960Wireless Display Receiver(hereinafter
refertoas“ScreenBeam960”).
ScreenBeam 960 wireless display receiver enables native screen mirroring from your
Windows,Android, andAppledevices-without appsorwires.ScreenBeam960letsyou
wirelesslystreamwhat’sonyourWi-FiCertifiedMiracast™compatibledevicetoyourHDTV,
includingmovies,videos,photos,music,andmore.Thereceiverfreesyoureyesfromatiny
screen.
The receiver boasts some great features,including fastconnect, quick switch, enhanced
securityandITmanageability,smoothvideoplayback,1080pfullHDsupport,ultra-lowdelay,
Windows10optimization,versatilecompatibility,lowpowerconsumption,andmore.
Foroptimalwirelessdisplayexperience,westronglyrecommendyouupdateyourreceiver
tothelatestfirmware.Checkfirmwareupdatenowonhttps://support.screenbeam.com.
1.1 ContentsintheBox
ContentsintheReceiver’spackagearelistedbelow:
ScreenBeam960receiver(1)
HDMI
®
Cable(1)
ACPowerAdapter(1)
Productdocumentation
1.2 MeetingScreenBeam960
Thismanualisapplicabletothefollowingcatalog#s:
SBWD960A
1.2.1 ScreenBeam960
ETHERNET,forconnectingtoScreenBeamCentralManagementSystemviaEthernet

2
forreceivermanagement
HDMIOUT,for connectingto HDTV/projector withan HDMI port forvideoandaudio
output
POWER,forpowersupply
RESET,forresettingthereceivertodefaultsettings
LEDIndicator,indicatingpowersupplystatus
AUDIOOUT,foroutputtingaudiotospeaker(availableforbothHDMIoutandVGAout)
USB, forprovisioningCMSconnectiondata,firmwareupdate,andUSBovernetwork
control(UIBC)
VGA-OUT,forconnectingtoanHDTV/projectorwithaVGAportforvideooutput
VGA-IN,VGAinputforVGAbypass

3
1.3 SystemRequirements
SystemrequirementsforScreenBeam960areshownbelow:
1.3.1 SystemRequirements
Clientdevicefrom2020ornewerwithoneofthefollowingoperatingsystems:
Windows10/1121H2(andlater)
macOS12(andlater)
iOS13(andlater)
Android8(andlater)withMiracast
1.3.2 Wi-FiMiracastFacts&Requirements
MostWindowsandAndroiddeviceshavescreenmirroringfeaturebuilt-intotheoperating
system. This is calledWi-FiMiracast, anindustrystandardcreated by the Wi-Fi Alliance
association.
BelowaresomefactsaboutMiracastandwhatyouneedtoknowforoptimumperformance:
WindowsandAndroidMiracastdevicesdiscoverScreenBeamreceiverviatheWi-Fi
Direct(WFD)signal.
Wi-Fi radio must be turned on for Windows and Android Miracast devices to
function.
ScreenBeamreceiverand theMiracastdevicesmustbewithin100’rangeforthe
Miracastdevicestodiscover.
Line-of-sightisnotrequired,butScreenBeamreceivershallnotbeplacedinaspot
where802.11Wi-Ficouldbeaffected.
MiracastdevicescanconnecttoScreenBeamreceiverovereither:
o Peer-to-peer(P2P)usingtheWFDsignaltosenddataononeofthe802.11
5GHzchannels.
o OroverthenetworkifScreenBeamisconnectedtothesamenetworkasthe
Miracast device. This is called Miracast over Infrastructure Connection,
developedbyMicrosoft®(MS-MICE).
Only Windows 10/11 Miracast devices can support Miracast over Infrastructure
(Infracast).TheconnectionmethodistransparenttousersandInfracastisprioritized
overP2P.
o IfWindowscanreachScreenBeamreceiveroverthenetwork,Infracastwill
beestablished.
o IfWindowscannotreachScreenBeamreceiveroverthenetwork,Miracast
P2Pwillbeestablished.
Performanceexpectations.
o Infracastperformancereliesonthequalityoftheinfrastructurenetwork.The

4
clarityandqualityofthemirroredcontentdependontheWindowsdevice’s
Wi-Finetworkspeedandconnectionstrength.
o Miracast P2P performance relies on the quality of the 802.11 wireless
channelconfiguredonScreenBeamreceiver.Theclarityandqualityofthe
mirrored content dependon the cleanliness of the Miracast P2P channel,
andtheWindowsdevice’sWi-Fiadapter.Belowistherecommendedlistof
Wi-Fiadaptersthatworkwell.
Intel®DualBandWireless-AC7000-series
Intel®DualBandWireless-AC8000-series
Intel®DualBandWireless-AC9000-series
Intel®Wi-Fi6AXseries
Qualcomm®Wi-Fi6series
Androiddevices,dependingonthemanufacturer,maynotsupportMiracastP2P.
1.3.3 NetworkRequirements
ForwirelessdisplayovertheexistingwirelessnetworkorLAN:
Ethernet:1000BASE-T10/100/1000connection(1Gbpsisrecommended)
Wireless:802.11ac(5GHzisstronglyrecommended)
MulticastDNS(mDNS)supportisrequiredforauto-discoveryofScreenBeam
Requiredports,seethetablebelow:
Feature Sub-Function
NetworkportsrequiredbyScreenBeamreceiver
PortNumber Direction
Miracastscreen
mirroringoverWi-Fi
Directlink -Win10/11
andAndroid
HDCP
LocalPort:25030|TCP
ForeignPort:notspecified|TCP
Both
RTSP
LocalPort:notspecified|TCP
ForeignPort:7236|TCP
Both
RTP
LocalPort:24030|UDP
ForeignPort:notspecified|UDP
In(receive
only)
I2C
LocalPort:23030|TCP
ForeignPort:notspecified|TCP
Both
HWCursor
LocalPort:19134|UDP
ForeignPort:notspecified|UDP
Both
UIBC
LocalPort:notspecified|TCP
ForeignPort:50000|TCP
Both
Miracastover
Infrastructurenetwork-
ForWin10RS2(and
later)
Protocol
LocalPort:7250|TCP
ForeignPort:notspecified|TCP
Both
HDCP
LocalPort:25030|TCP
ForeignPort:notspecified|TCP
Both
RTSP
LocalPort:notspecified|TCP
ForeignPort:7236|TCP
Both

5
Feature Sub-Function
NetworkportsrequiredbyScreenBeamreceiver
PortNumber Direction
RTP
LocalPort:24030|UDP
ForeignPort:notspecified|UDP
In(receive
only)
I2C
LocalPort:23030|TCP
ForeignPort:notspecified|TCP
Both
HWCursor
LocalPort:19134|UDP
ForeignPort:notspecified|UDP
Both
UIBC
LocalPort:notspecified|TCP
ForeignPort:50000|TCP
Both
mDNSDiscovery
LocalPort:5353|UDP
ForeignPort:5353|UDP
Both
NativeScreenMirroring
formacOS&iOS-
AirPlayMirroring
BLEDiscovery
disabled
LocalPort:47000|TCP
ForeignPort:notspecified|TCP
Both
BLEDiscovery
enabled
LocalPort:7000|TCP
ForeignPort:notspecified|TCP
Both
mDNSDiscovery
LocalPort:5353|UDP
ForeignPort:5353|UDP
Both
Data
LocalPort:7100|TCP
ForeignPort:notspecified|TCP
Both
RTP/RTSP
LocalPort:18000-18009|TCP+UDP
ForeignPort:notspecified|TCP+UDP
Both
LocalPort:8009|TCP
ForeignPort:notspecified|TCP
Both
FirmwareUpgradefor
receiverby
ScreenBeamCMS
Server
SpecifiedbytheFWUpgradeServer
suchas80or8080
Both
ClientinSB
Receiver
LocalPort:notspecified|TCP
ForeignPort:specifiedbytheupgrade
server(suchas80,8080,...)|TCP
Both
ScreenBeamCentral
ManagementSystem
(CMS)
Server
7237|TCP
Both
ClientinSB
Receiver
LocalPort:notspecified|TCP
ForeignPort:7237|TCP
Both
Note:AdditionalnetworkconfigurationisnotrequiredforWi-FiMiracastenableddeviceto
connect. Verify Group Policy and firewall settings allow Wi-Fi Direct groups or hosted
networks
1.3.4 SetupRequirements
ScreenBeam960receiver
DisplaywithanavailableHDMIinputorVGAinput

6
(Optional)TouchscreenwithUSBtouchcable
AnEthernetnetworkconnectionwithDHCPIPoraWi-Firouter
Note:ThisisusedforwirelessdisplayoverLANandmanagement.
7
PartII InstallingtheReceiver
ThischapterexplainshowtoconnectthereceivertoadisplaysuchasanHDTVorprojector.
Makesureyouhaveallthecontentsfromthereceiver’spackageavailablebeforestarting.
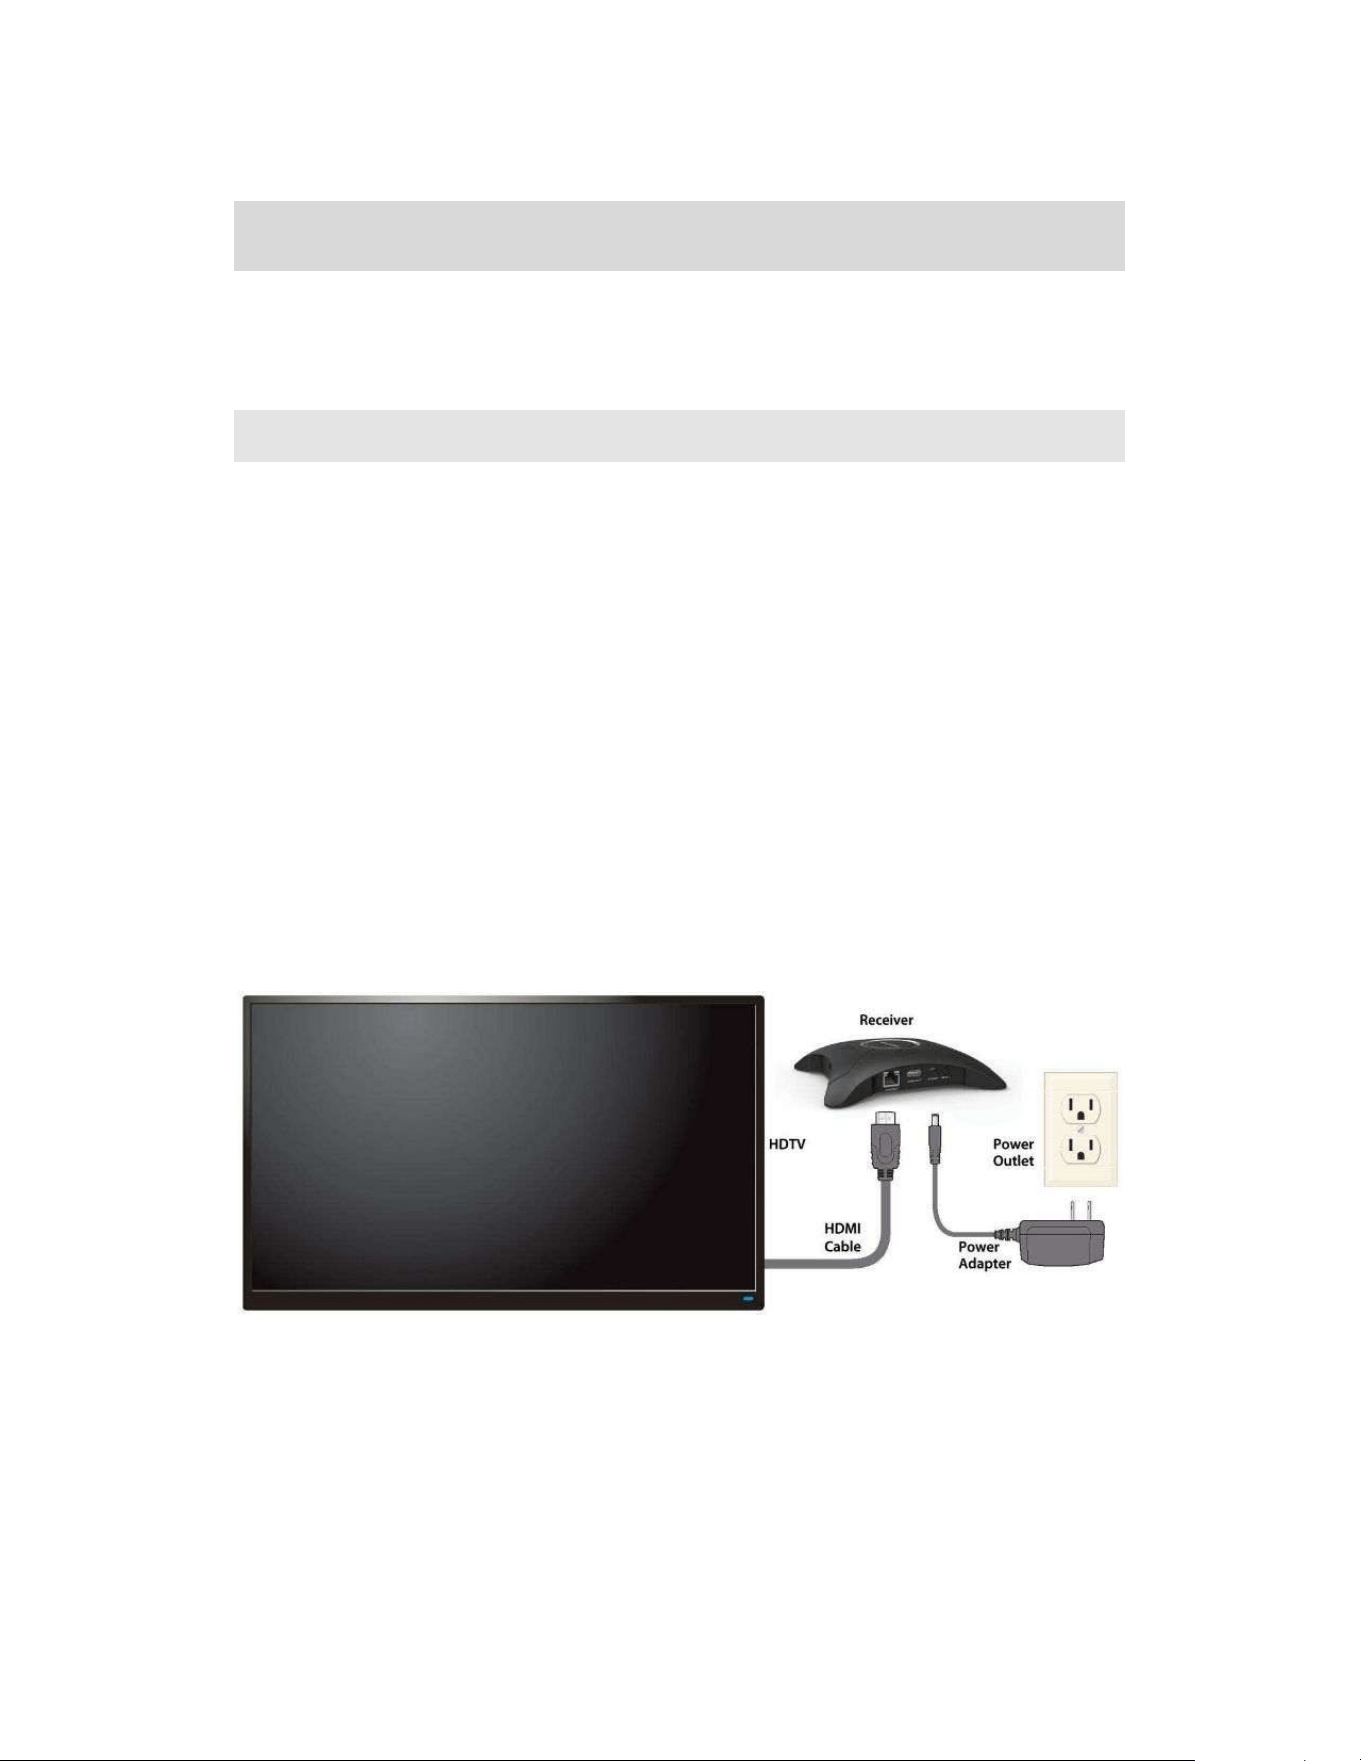
2.1 ConnectingtheReceivertoanHDTV
Itisquiteeasyandfasttosetupthereceiver.Youcancompletethesetupbyyourown.
ToconnecttheReceivertoanHDTV:
1. Getthereceiver,ACpoweradapter,andHDMIcablefromthereceiver’spackage.
2. PlugoneendoftheHDMIcableintotheHDMIport(“HDMI-OUT”)onthereceiver,and
theotherendintoanavailableHDMIportontheHDTV.
3. (Optional)IfthedisplayhasUSBHIDtouchcapability,inserttheHIDUSBconnector
intoaUSBportontheScreenBeamreceiver.(USBcableisnotincluded).
4. (Optional)ConnectoneendoftheEthernetcabletothereceiver’sEthernetportand
connect the other end to the network switch with DHCP IP. (Ethernet cable is not
included).
Note:RefertoSection2.2formoreinformationonsettingupanetworkconnection.
5. Plug the connector of the power cord to the receiver’s power input port labeled
“POWER”,andplugthepoweradaptertoapoweroutlet.
Whentheabovestepsarecomplete,thehardwareshouldbeconnectedasshownin
thefigurebelow:
Note:Poweradaptermayvaryindifferentregion.
6. TurnontheHDTVandsetittodisplaytheinputfromthecorrectHDMIport(theoneyou
havepluggedintoinStep2).
8
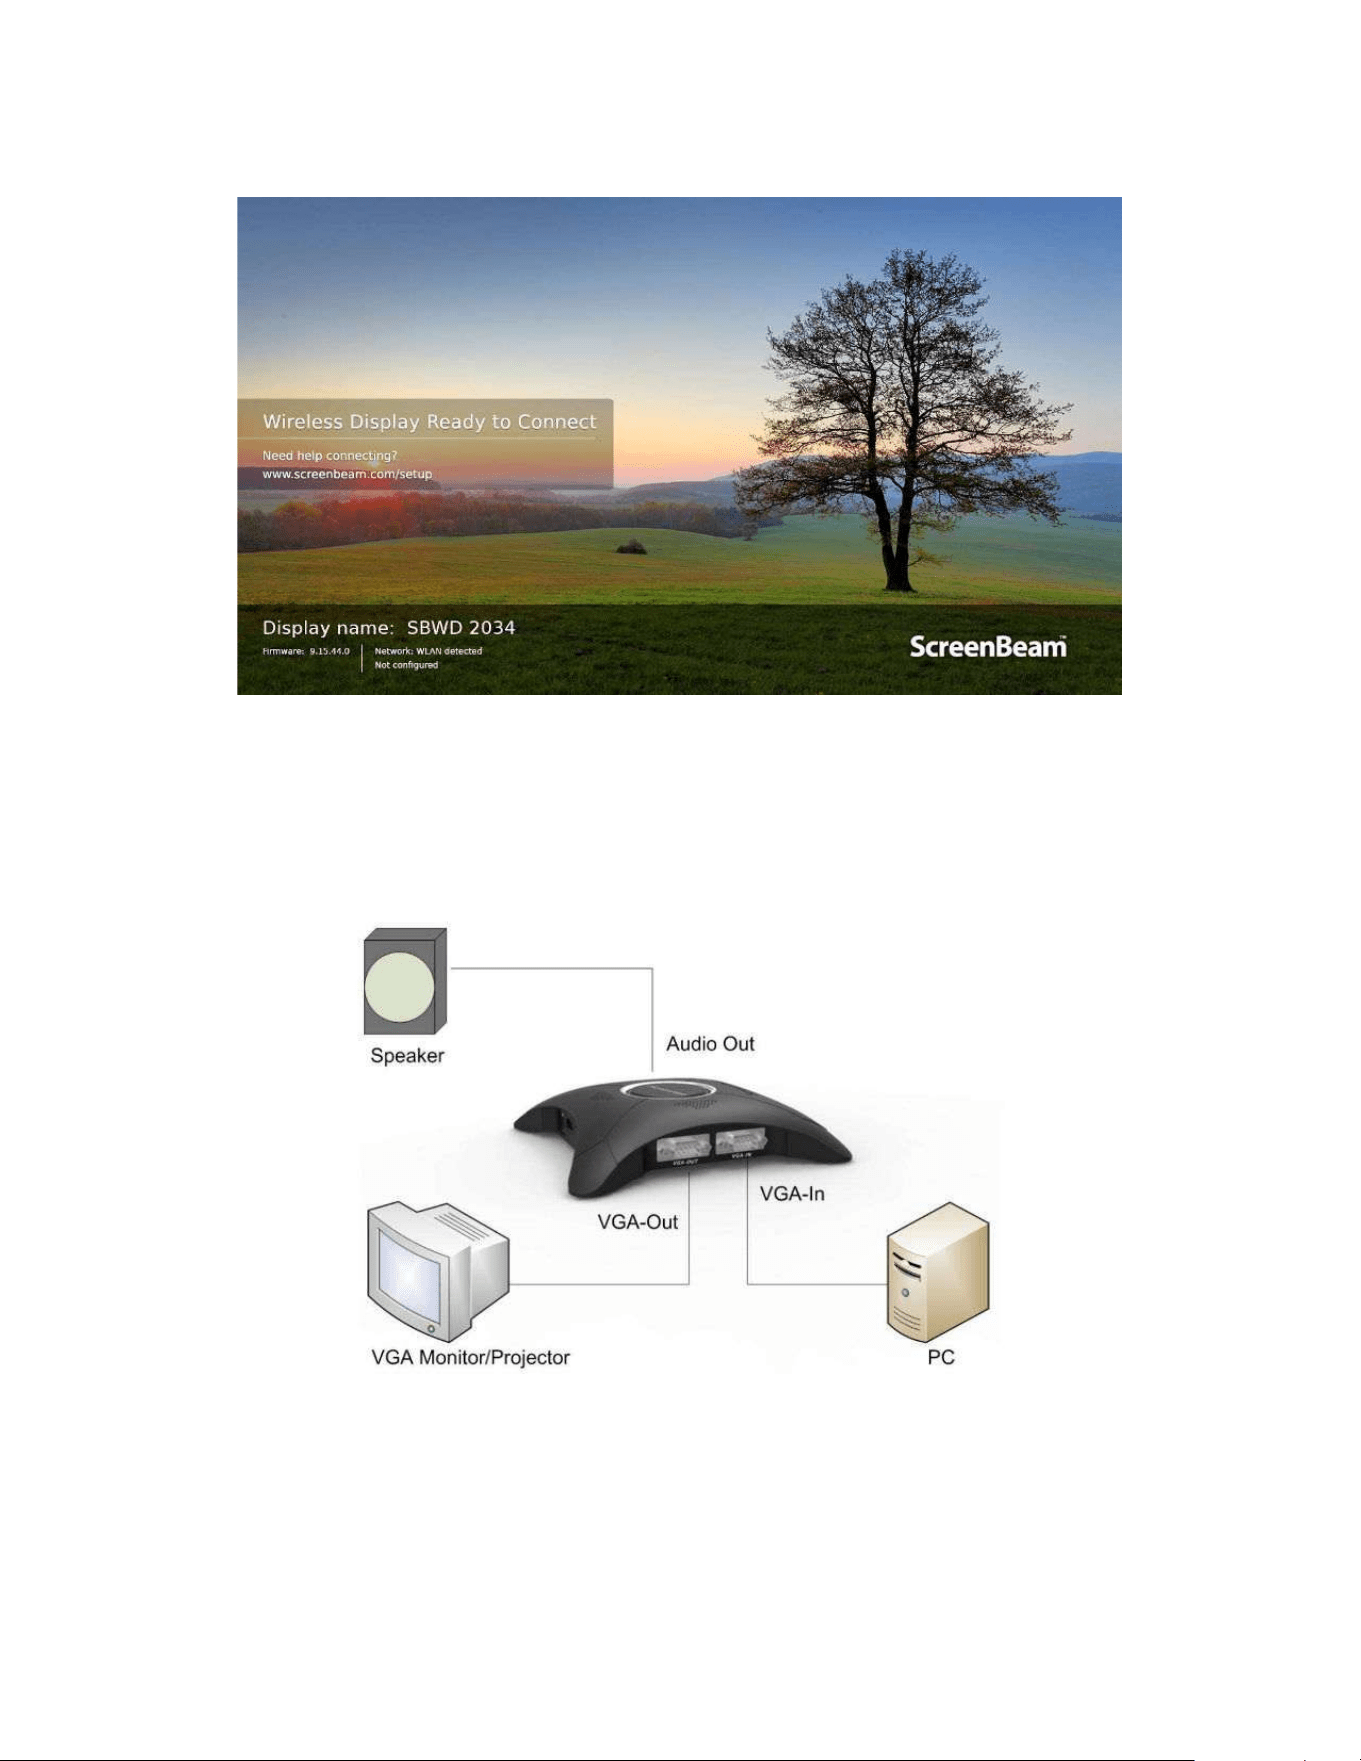
7. Verifythatthe“WirelessDisplayReadytoConnect”screenappearsontheHDTV.
ThereceiverisconnectedtotheHDTV,anditisreadyforuse.
Note:Connectionstootherdisplaydevicesaresimilar.
8. (Optional)VGAbypasssetupisshownbelow.RefertoSection4.1VGAUseCasefor
detailsabouthowtheinputandoutputswork.

9
2.2 ConnectingtheReceivertoaNetwork
ScreenBeam960receiversupportsbothwiredandwirelessconnections.Youcandeploy
ScreenBeam960receiversbasedonyournetworkrequirements.
Note:Thesetupsinthissectionareoptional.
2.2.1 WiredConnection
ScreenBeam960receiverprovidesabuilt-inEthernetport,allowingdirectconnectiontoan
Ethernetnetwork.
Toconnectthereceivertoanetwork,followthisprocedure:
1. Gotothereceiver’sLocalManagementInterface,andsetIPaddressassignmentand
DNSassignmenttoautointheRemoteManagementtabpage.
Note:
Ifyouwanttosetthereceiver’sIPaddressorDNSservertostatic,consultyour
networkadministrator.
RefertoSection5.2UsingLocalManagementonScreenBeamfordetailonhowtolog
intothereceiver’sLocalManagementInterface.
RefertoSection5.3.7.2SettinguptheReceiver’sIPAddressfordetailonhowtoset
upthereceiver’sIPaddress.
RefertoSection5.3.7.3SpecifyingaDNSServerfortheReceiverfordetailonhowto
setupthereceiver’sDNSserver.
2. ConnectyourScreenBeamreceivertoyournetworkwithaqualityEthernetcable.
3. ThereceiverwillbeassignedanIPaddressafterafewseconds,ifaDHCPserveris
availableinyournetwork.
10
2.2.2 WirelessConnection
ScreenBeam960receiverprovidesabuilt-inWLANAdapter,whichallowsthereceiverto
wirelessly connect to your network. It is required to set up the wireless connection
parametersbeforestartingtheconnection.
Toconnectthereceivertoawirelessnetwork,followthisprocedure:
1. Gotothereceiver’sLocalManagementInterface(LMI),andsetIPaddressassignment
andDNSassignmenttoautointheRemoteManagementtabpage.
Note:
Ifyouwanttosetthereceiver’sIPaddressorDNSservertostatic,consultyour
networkadministrator.
RefertoSection5.2UsingLocalManagementonScreenBeamfordetailonhowtolog
intothereceiver’sLocalManagementInterface.
RefertoSection5.3.7.2SettinguptheReceiver’sIPAddressfordetailonhowtoset
upthereceiver’sIPaddress.
RefertoSection5.3.7.3SpecifyingaDNSServerfortheReceiverfordetailonhowto
setupthereceiver’sDNSserver.
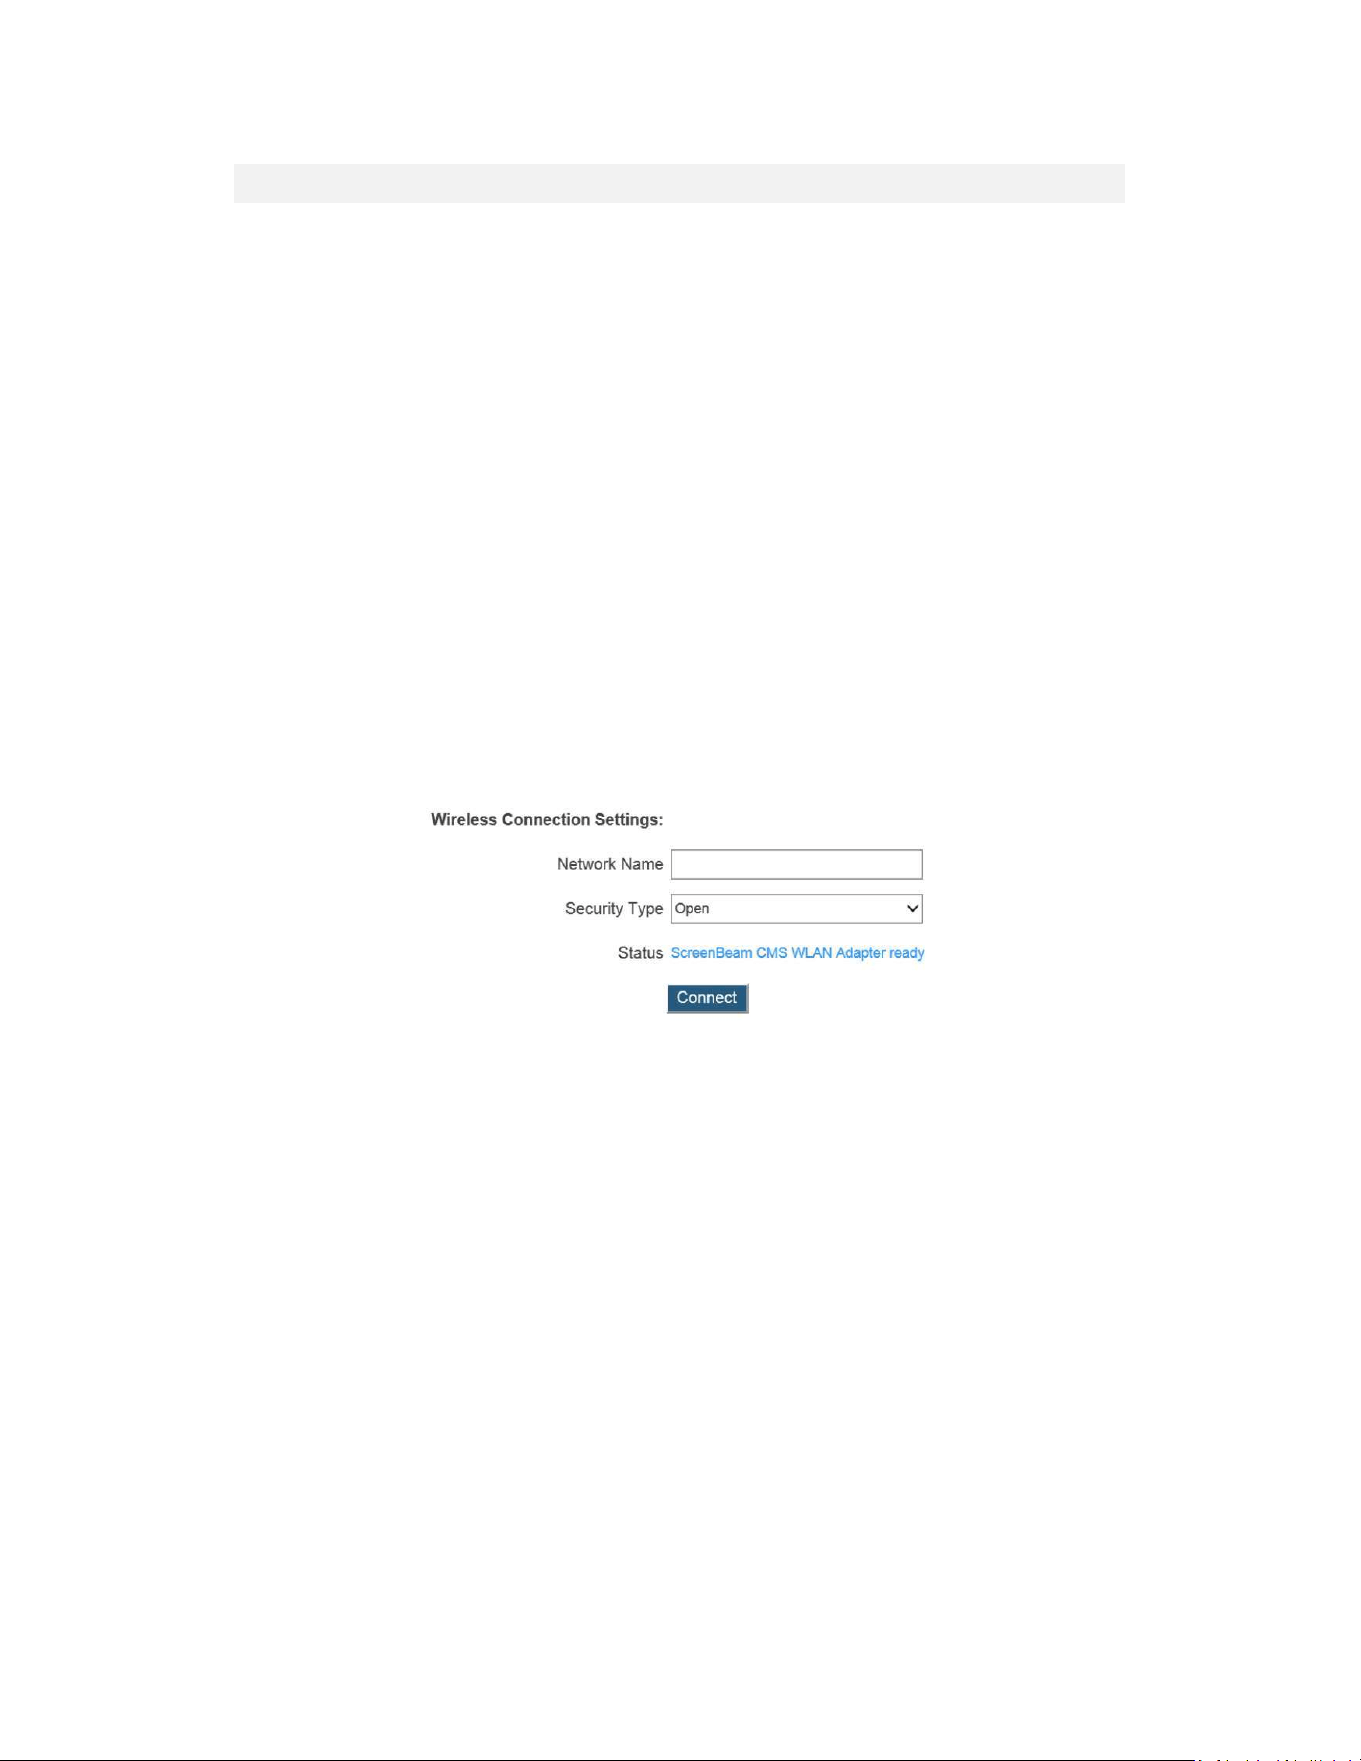
2. GotoLMI>RemoteManagement>WirelessConnectionSettings,andconfigure
theparametersaccordingtospecificrequirements.
NetworkName:TheSSIDofthewirelessrouter(AP).
Security Type: Select a security type, the one you have selected on your wireless
router.AvailablesecuritytypesareOpen,Shared,WPA-PSK[TKIP],WPA2-PSK[AES],
WPA-PSK[TKIP]+WPA2-PSK[AES],PEAP/MSCHAPV2,andEAP-TLS.
Status:Itdisplaystheconnectionstates.
WhenShared,WPA-PSK[TKIP],WPA2-PSK[AES],orWPA-PSK[TKIP]+WPA2-PSK[AES]
isselected,
UserName:Notused.
Password:Thepre-sharedpasswordforthewirelessSSID.
WhenPEAP/MSCHAPV2isselected,
UserName:ThisisforauthenticationthroughaRADIUSserver.ItisRADIUSaccount
UserName.
Password:ItisRADIUSaccountpassword.
11
WhenEAP-TLSisselected,thefollowingitemsareavailable:
UserName:ItistheUserPrincipalNameorRADIUSIdentity(ifnecessary).
Note:TheUserNamesupportsthesecharacters:a-z,A-Z,0-9,@,.,and_.
Password:ItisthepasswordofthePrivateKey.
SystemDate&Time:Itisusedtosetdateandtimeforthereceiver.Usersshouldset
thedateandtimeaccordingtothevalidityperiodofthecertificates.
CACertificate:Itistherootcertificate.ClicktheBrowsebuttontobrowseandaddthe
certificate.
UserCertificate:Itistheusercertificate.ClicktheBrowsebuttontobrowseandadd
thecertificate.
PrivateKey:Itistheuser’sprivatekey.ClicktheBrowsebuttontobrowseandaddthe
certificate.
ValidityPeriod:Itdisplaystheeffectiveperiodofthecertificates.
Note:
Currently,onlycertificatesinthe“.pem”formataresupported,andthecertificates
mustbegeneratedusingthe“DERencodedbinaryX.509”method.
Thelengthofthecertificatefilenamemustnotexceed64bytes,andthefilesize
mustbelessthan100KB.
Allthethreecertificatesarerequiredforauthentication.
Usershouldselecttherightcertificatefileforeachtypeofcertificate.
3. Click the Apply button, and thenclick OK on the pop-up message box to save the
networkconnectionparameters.TheWLANadapterwillconnecttothewirelessrouter
(AP) in a few seconds when the receiver is idle or when it is not connected to an
Ethernetnetwork.

12
Note:TheCMSWLANAdaptermaytakesometimetoconnecttoyournetwork,depending
onyournetworkenvironment.
13
PartIIIConnectingClientDevice
ThissectionprovidestheinstructionsonhowtoconnecttoScreenBeamusingthenative
screenmirroringfromthemostcommonoperatingsystems.
Refer to www.screenbeam.com/setup for details and instructions for common operating
systems.
Note:Thewebpagewilldisplayinstructionsbasedontheclient-deviceOS.Usethelinksat
thebottomofthewebpagetoselectOS-specificinstructions.
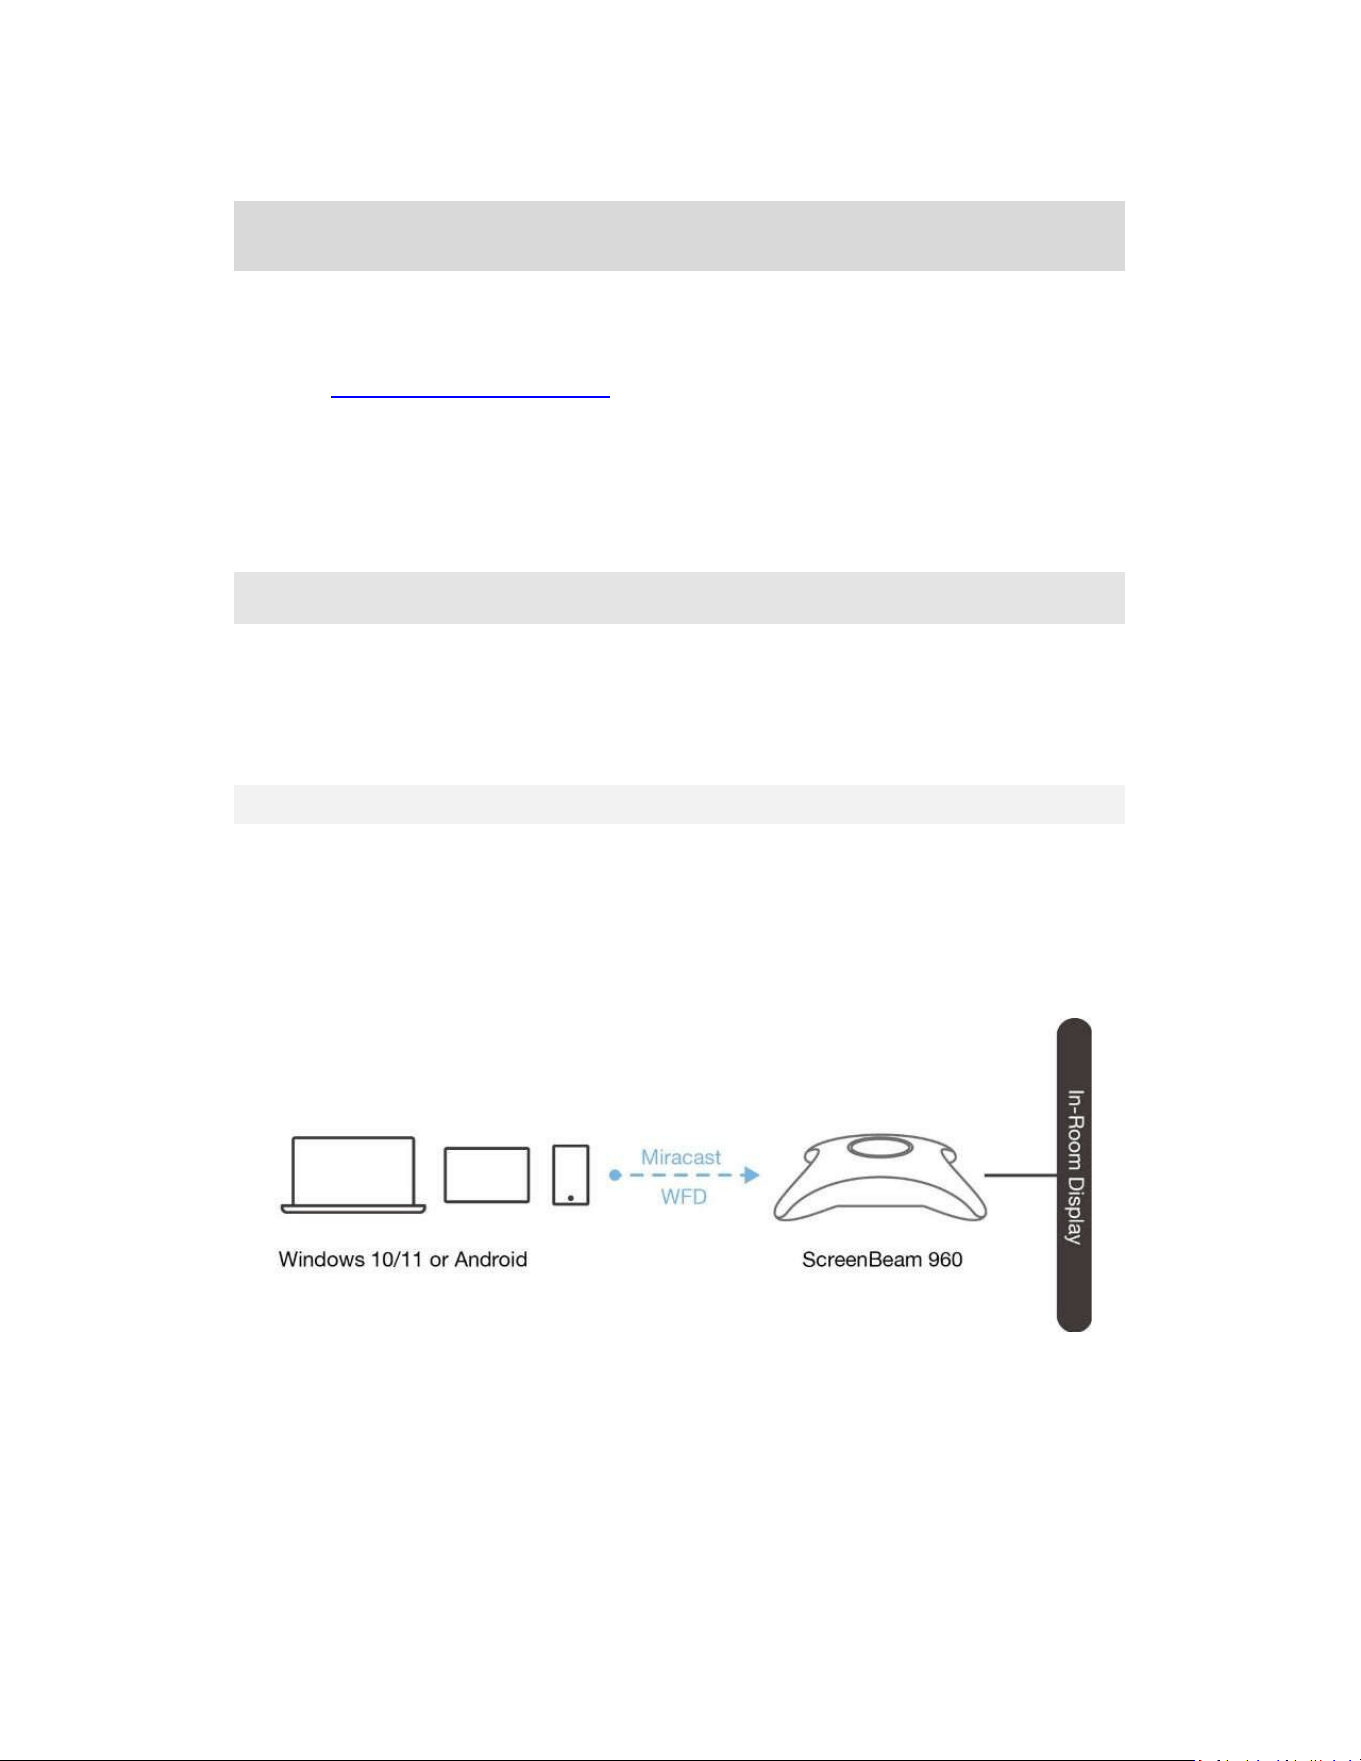
3.1 OverviewofWirelessDisplayNetworkModes
The ScreenBeam 960 allows presenters with Windows 10/11, macOS, iOS, or Android
device to wirelessly display withoutrequiring anyapps. ScreenBeam960 supports Wi-Fi
Miracastandwirelessdisplayoverexistinginfrastructurenetwork.
3.1.1 Wi-FiMiracast
TheWi-FiMiracastmodeallowscompatibleWi-Fi Miracastdevicestoconnectdirectlyto
ScreenBeam, even when connected to an infrastructure wireless network. Miracast is
commonly available on Windows 10/11 and Android 4.4 (and later) devices since 2015.
Users can enjoy wireless display and Internet access if the client device is already
connectedtoWi-Fi.
14
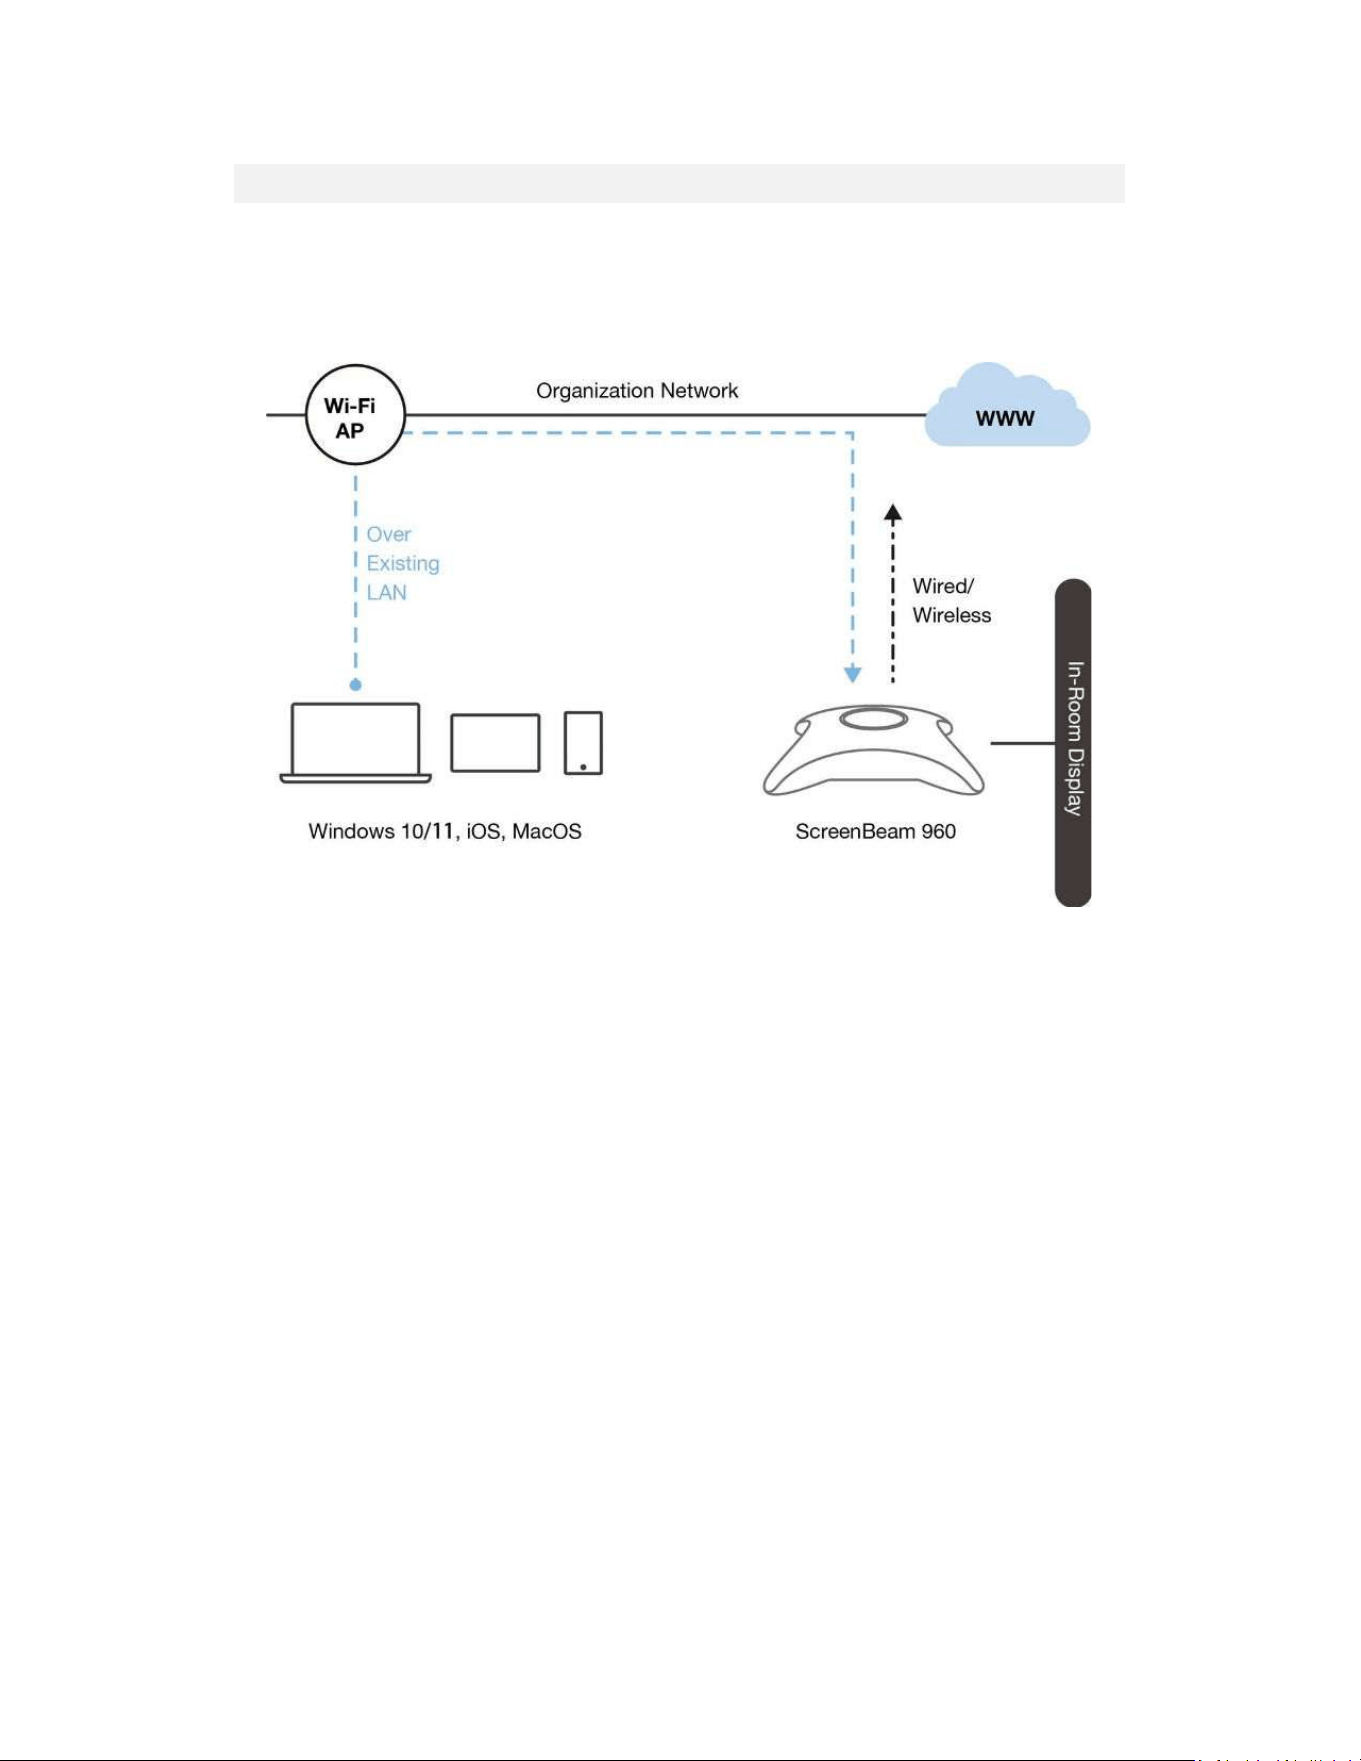
3.1.2 WirelessDisplayoverexistingLAN
ScreenBeam960canbeconnectedtotheexistingwirelessorwirednetworkandsupports
wireless display forclientdevices on either network. Thisis a common setup to support
client devices that need access to network resources. Additional port and network
configurationsmayberequiredforthismodetoworkseamlessly.
15
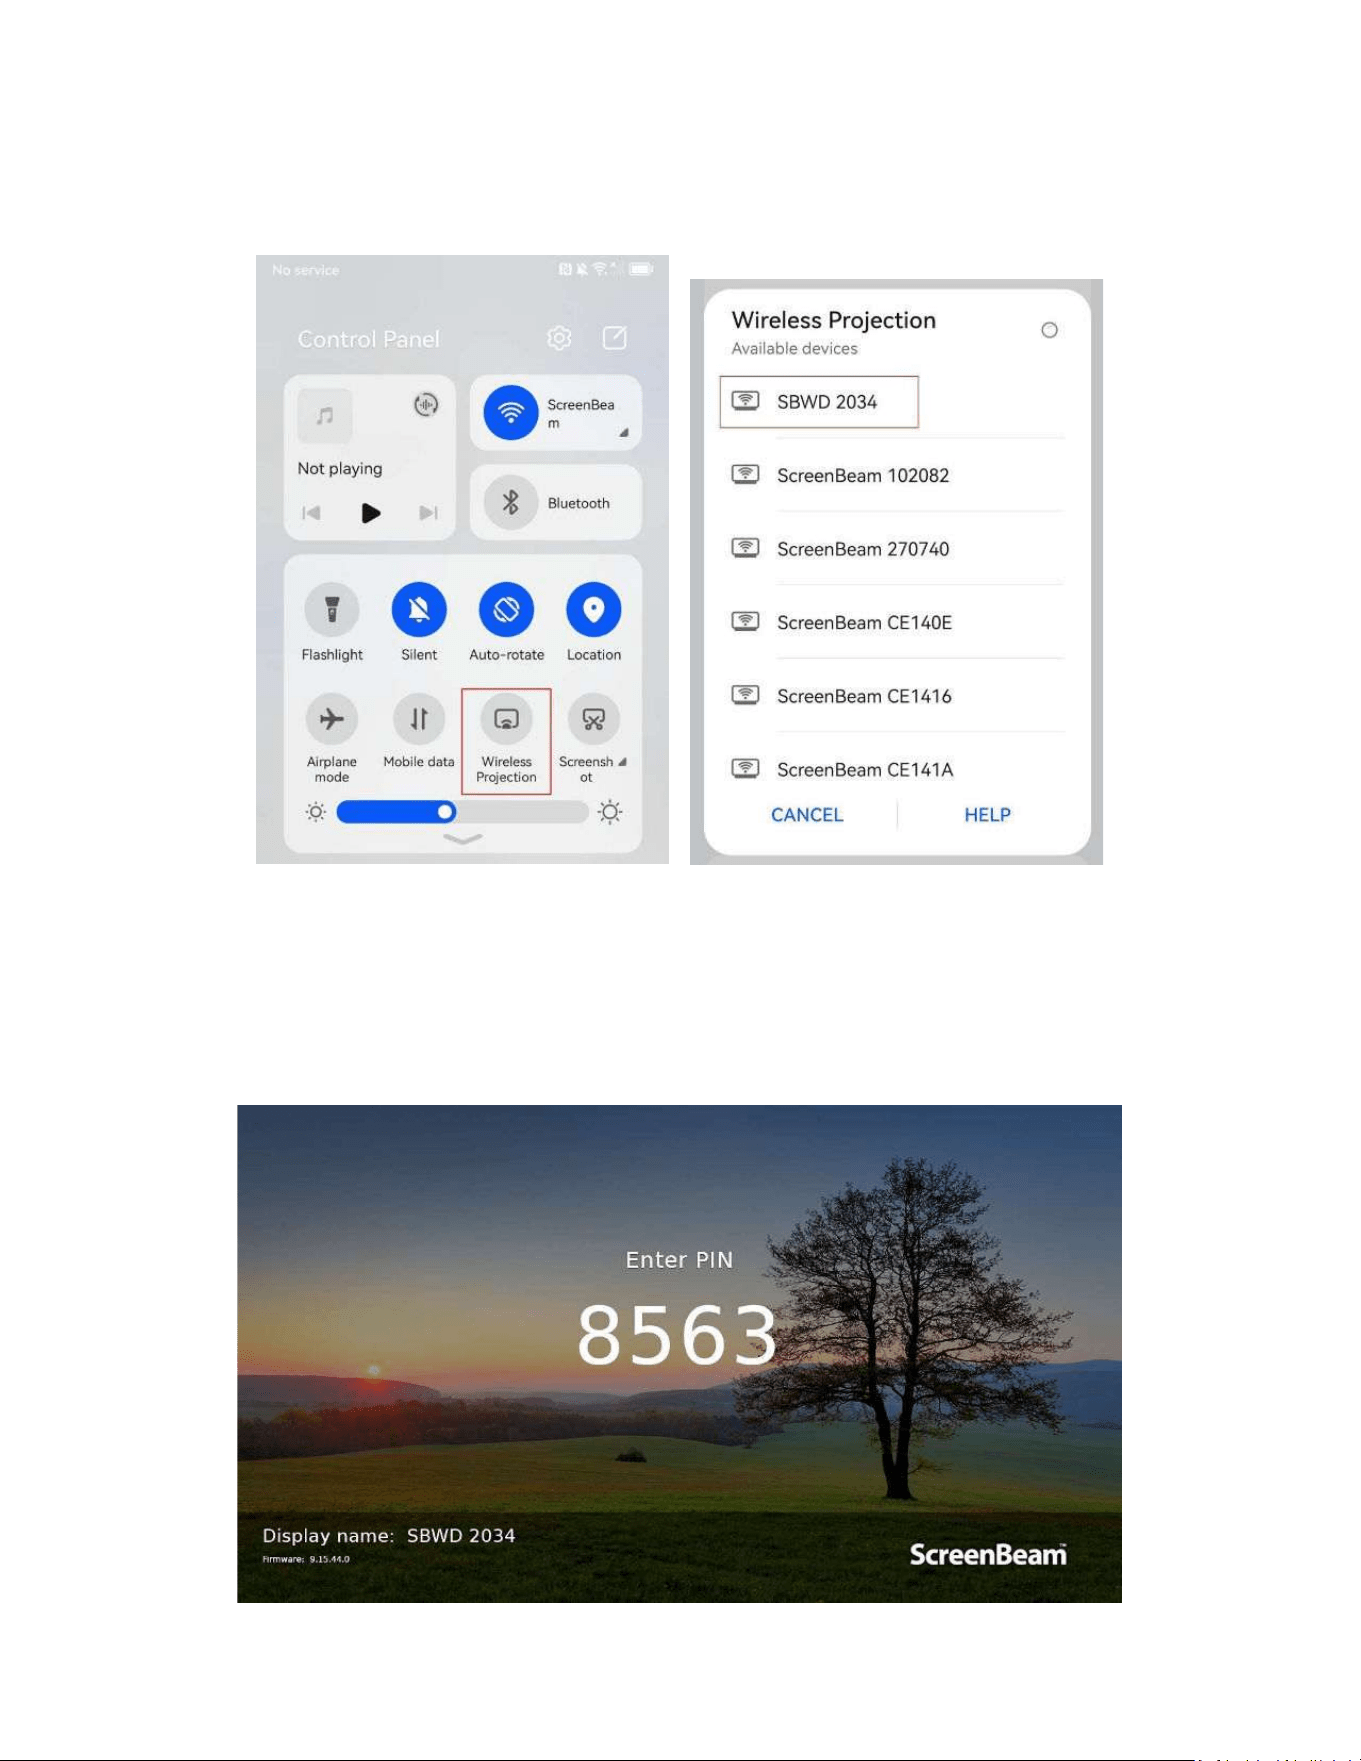
3.2 ConnectusingWi-FiMiracast
This section explains how to connect a client device to ScreenBeam 960 using Wi-Fi
Miracast.
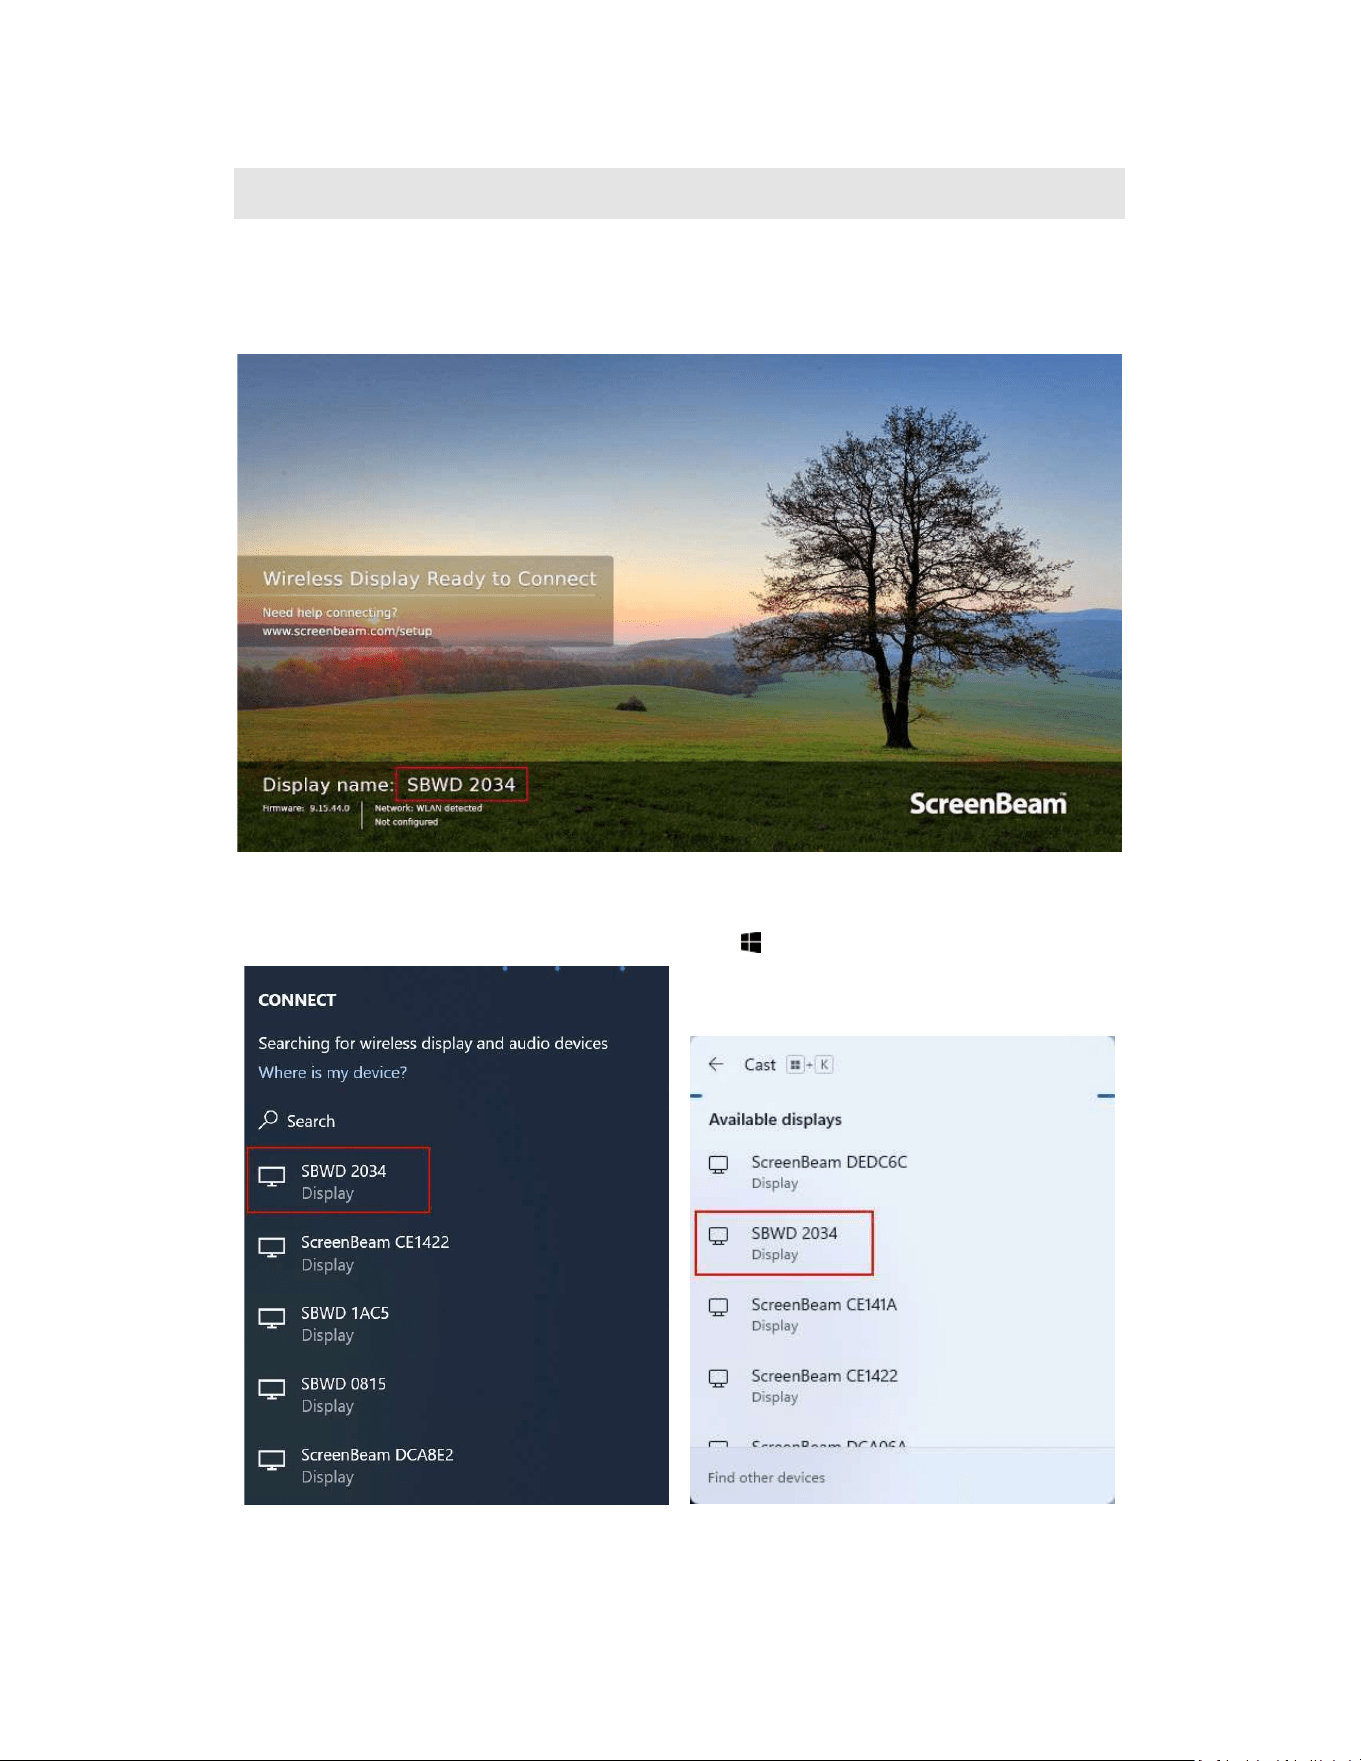
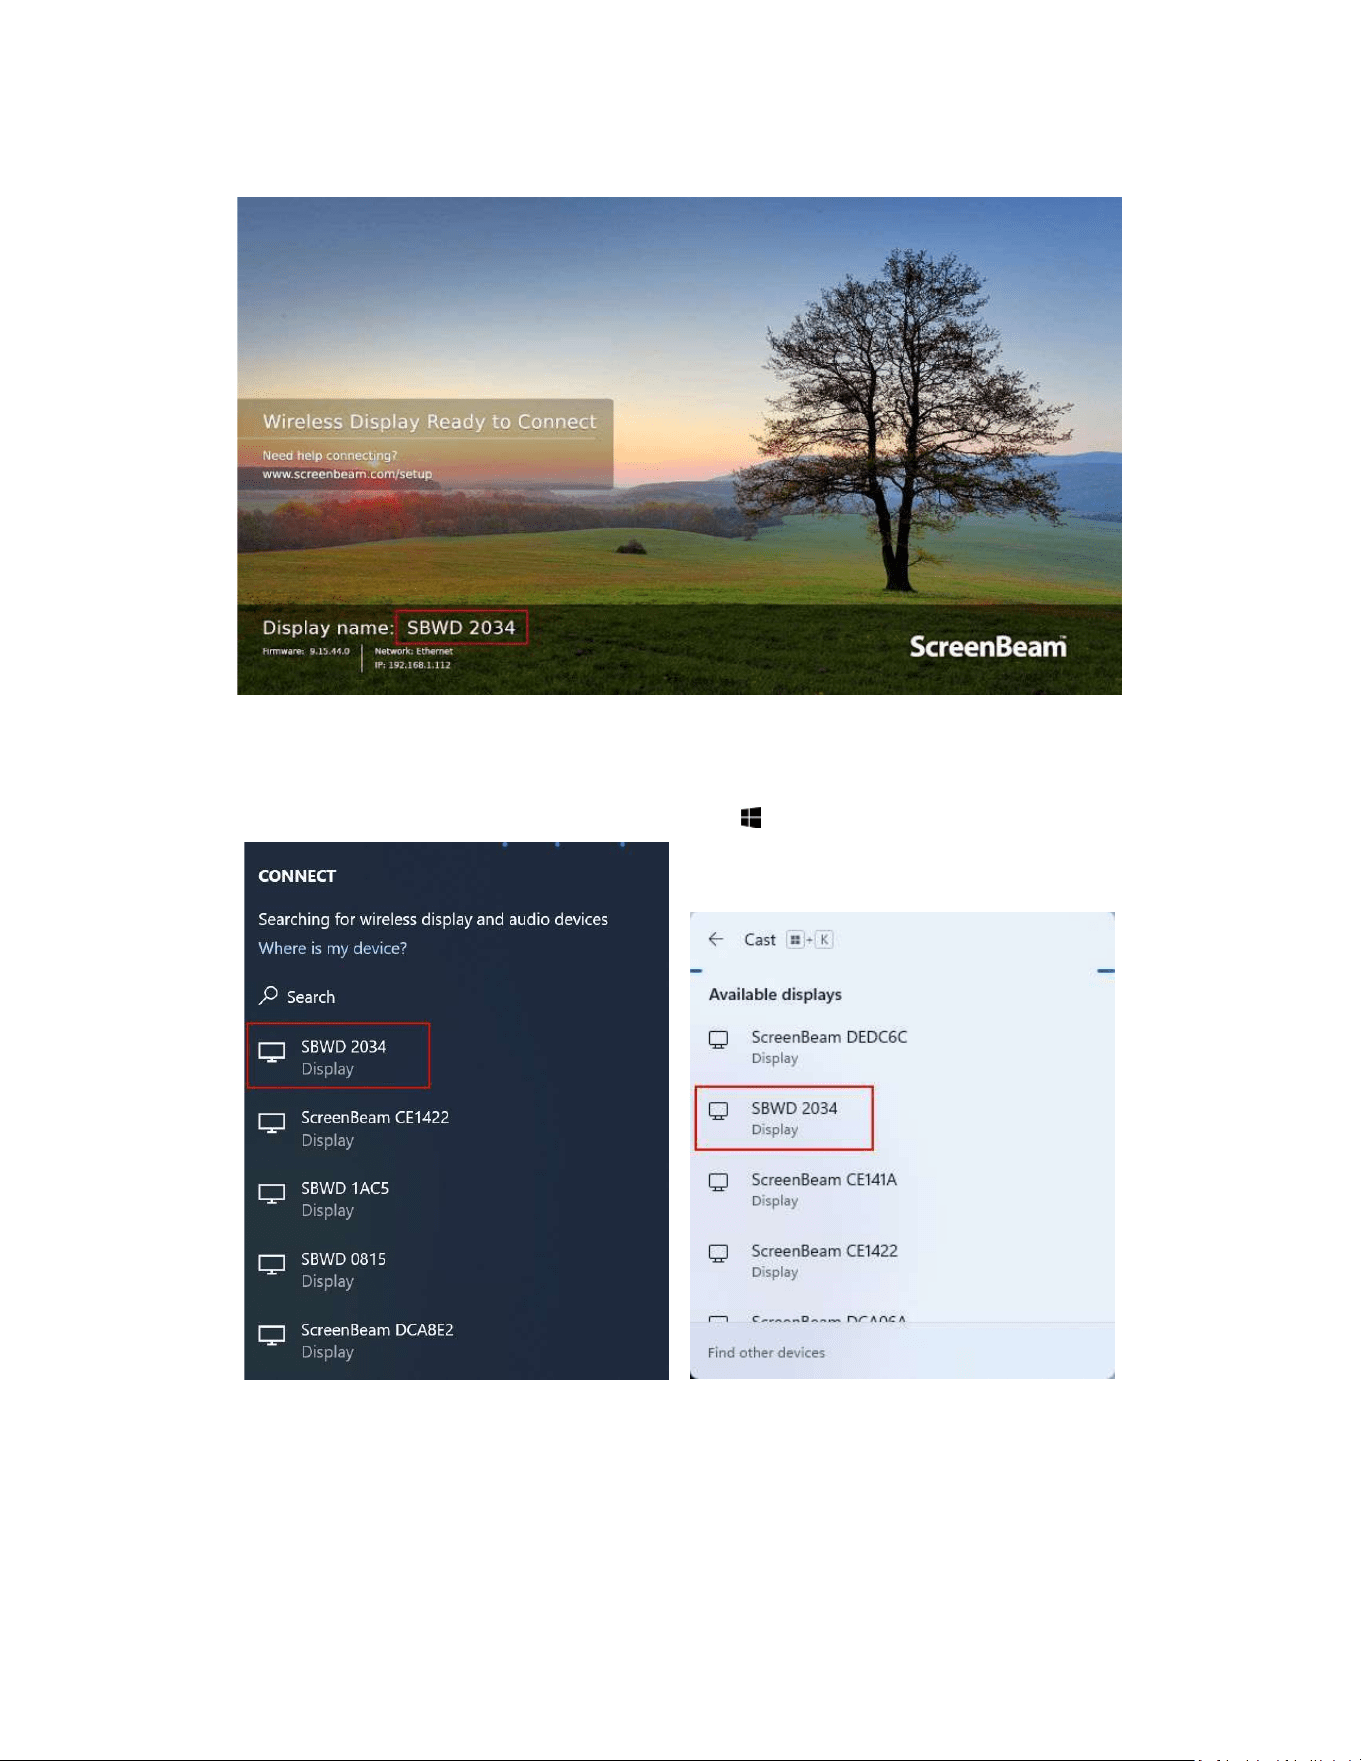
1. SelecttheScreenBeamreceivernameasshownontheTVdisplay.
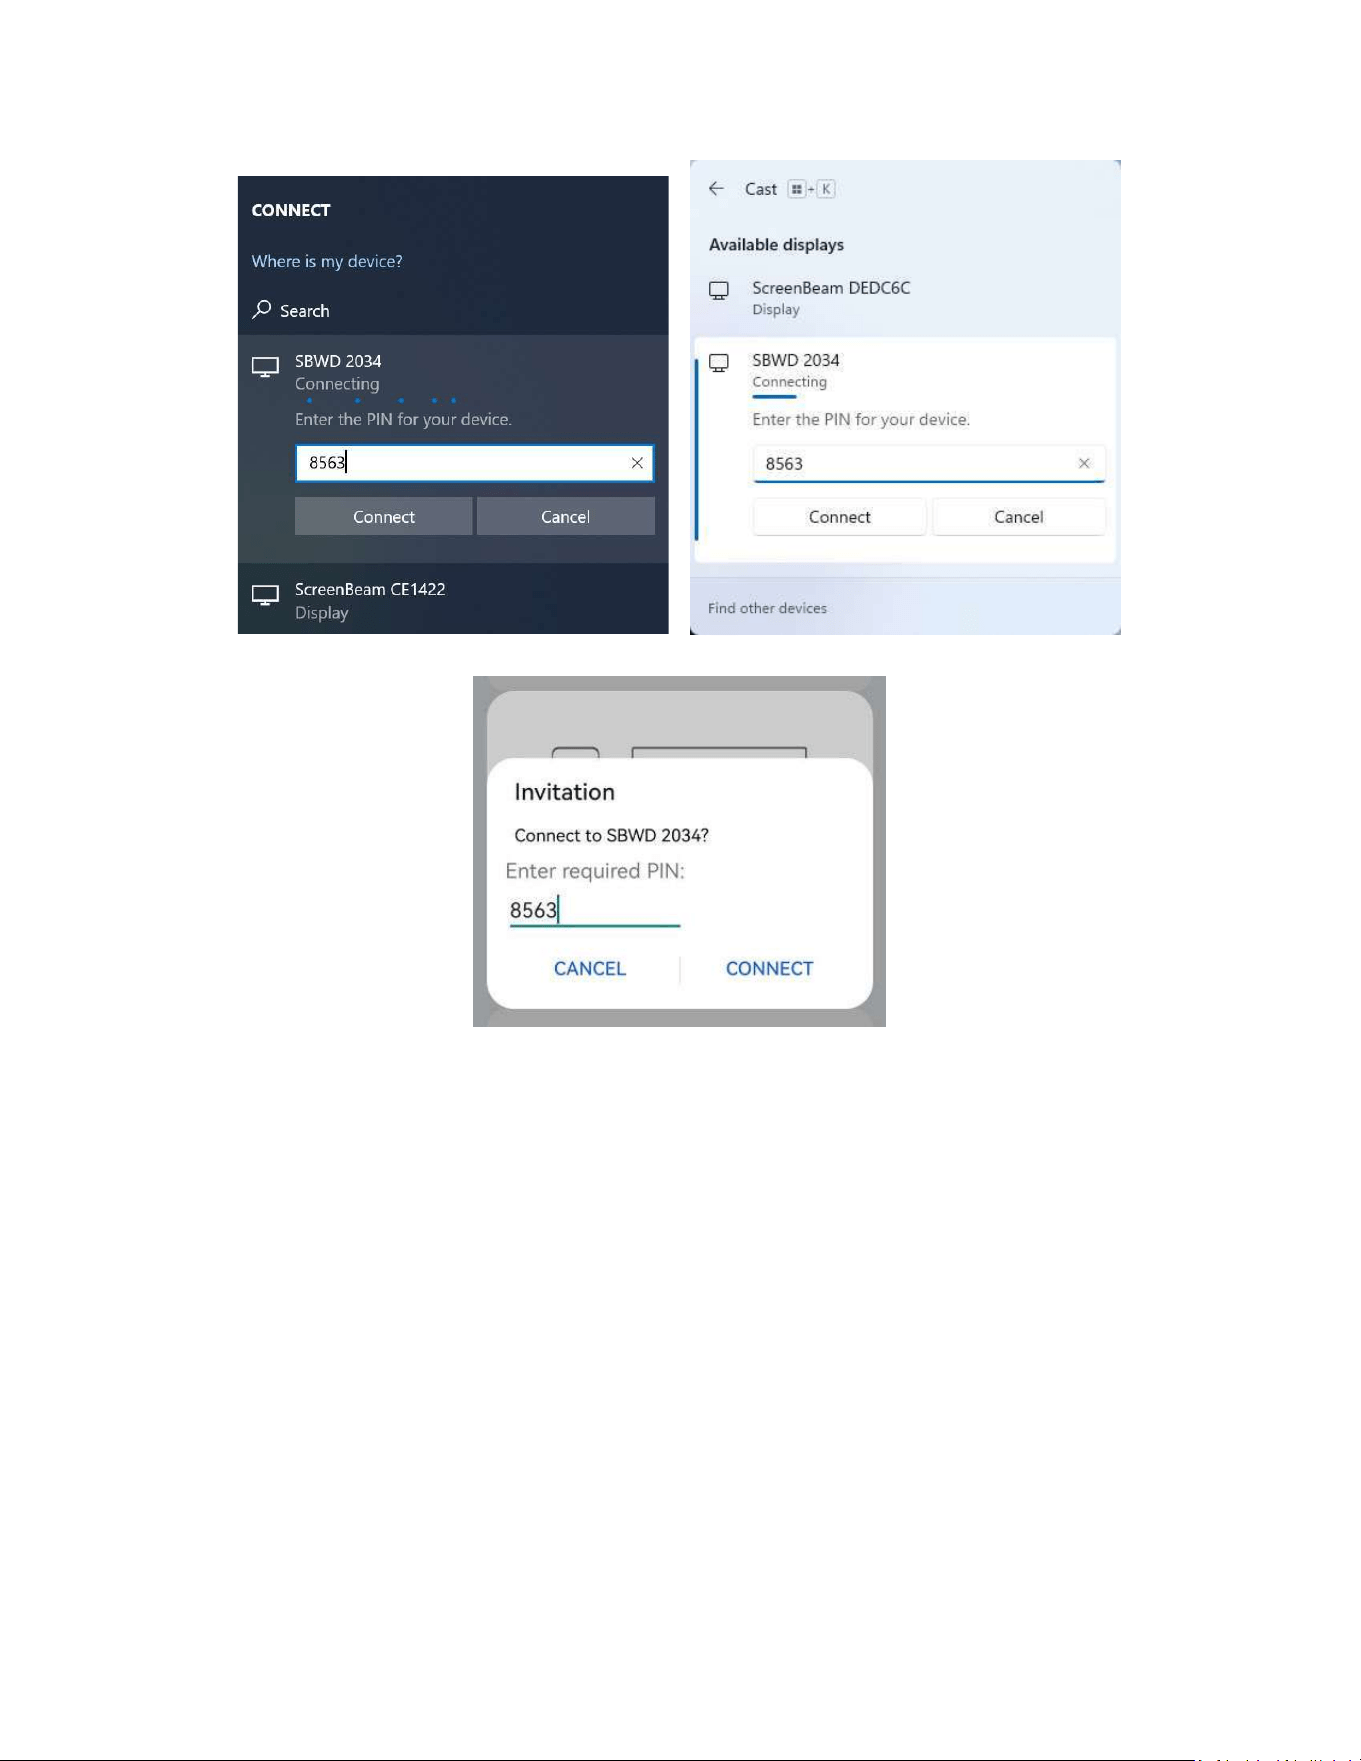
ForWindows10/11
Select Connect or Cast from the Action Center by swiping from right or
simultaneouslypressingtheWindowskey andK.
Windows10 Windows11
16
ForAndroid
Select the Screen Mirroring option from the quick access menu and follow the
connectioninstructions.
Note: Different Android device manufacturers may have different names for their
wirelessdisplayapps.
2. EnterinthePINifrequired.IfthePINcodeisnotdisplayed,trythehiddenPIN1234
(default).
Note: You should consult your network administrator if no PIN is displayed on the
connecteddisplaydevice.
17
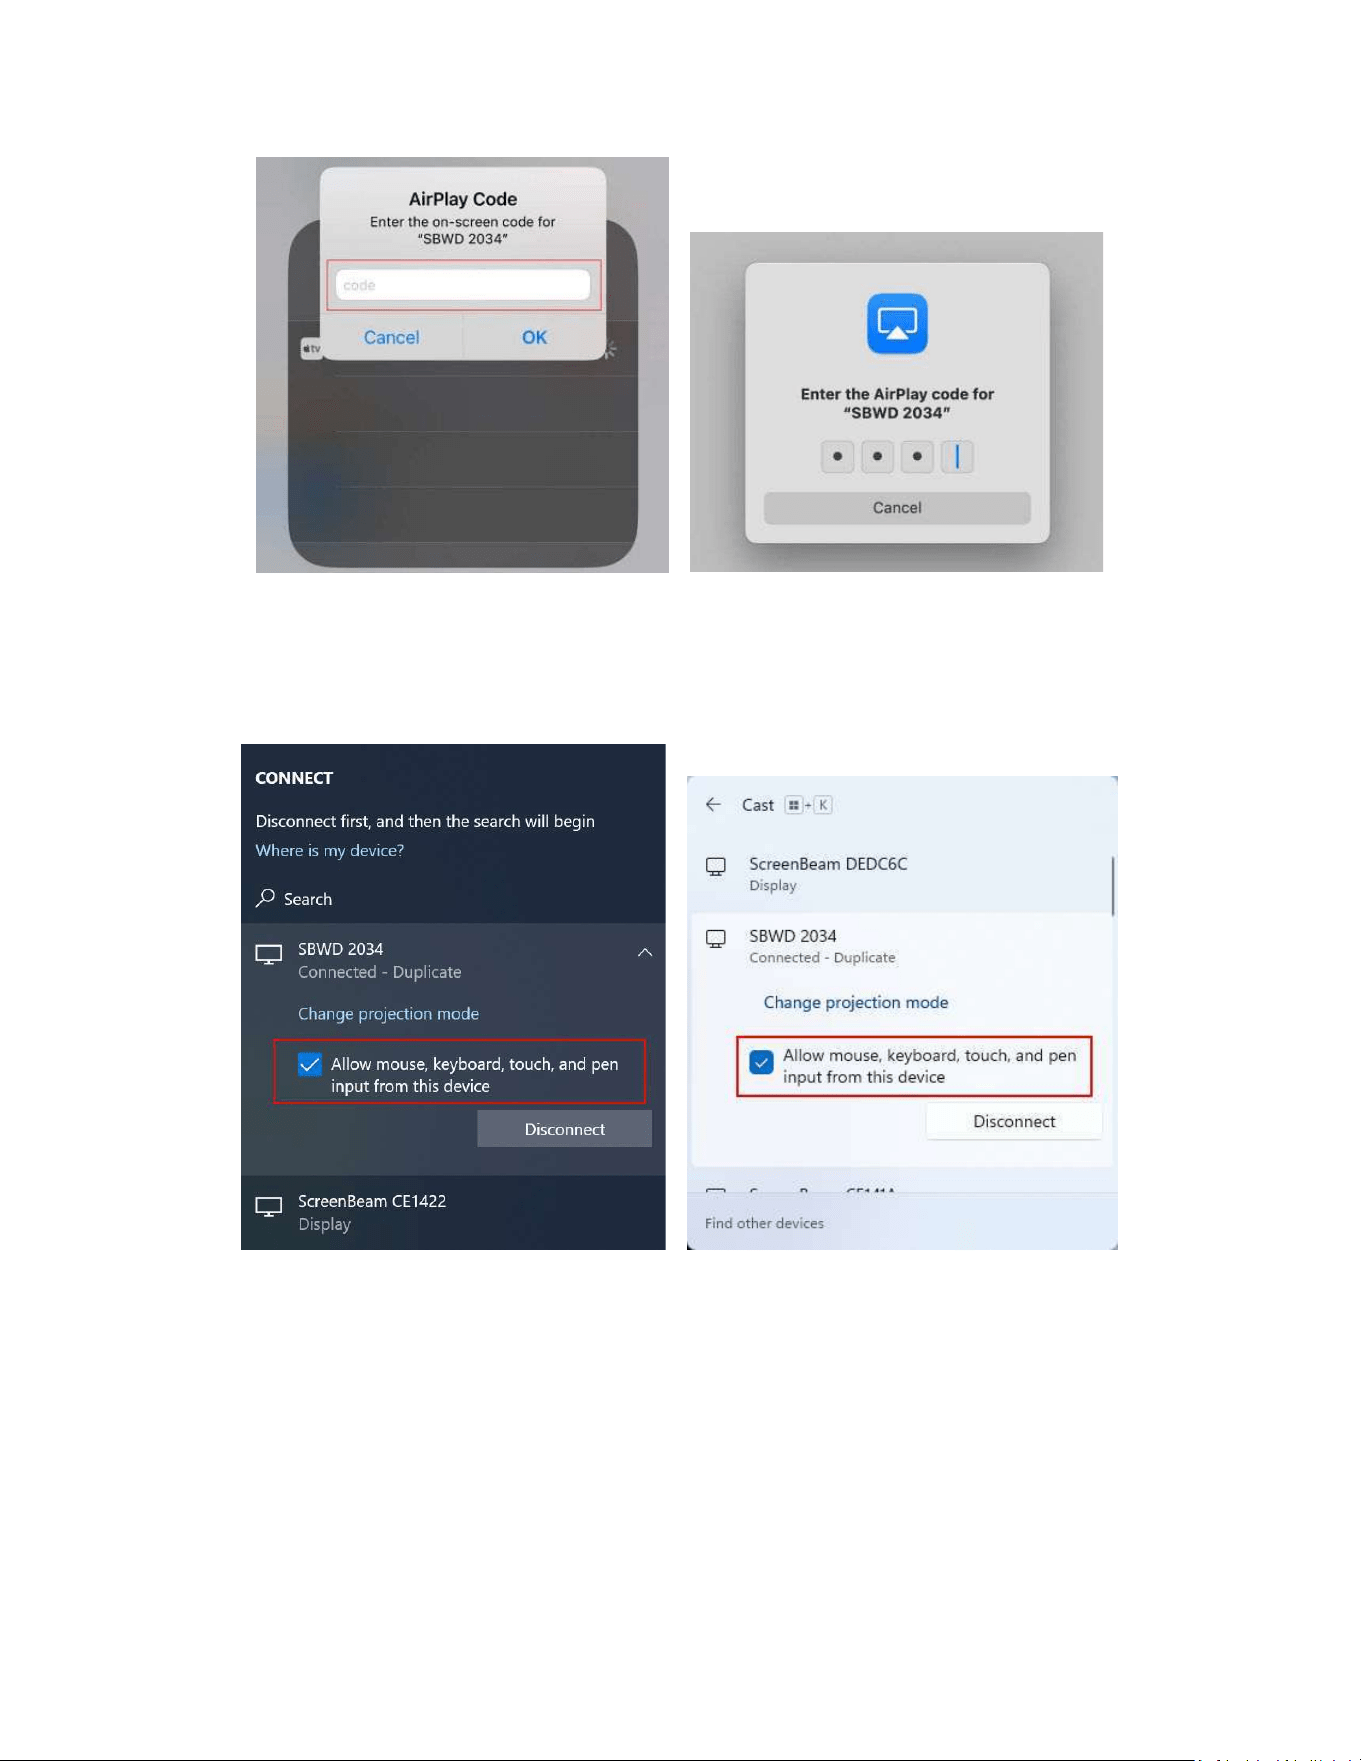
Windows10 Windows11
Android
3. Selectduplicateorextendedscreenmodeifprompted.
18
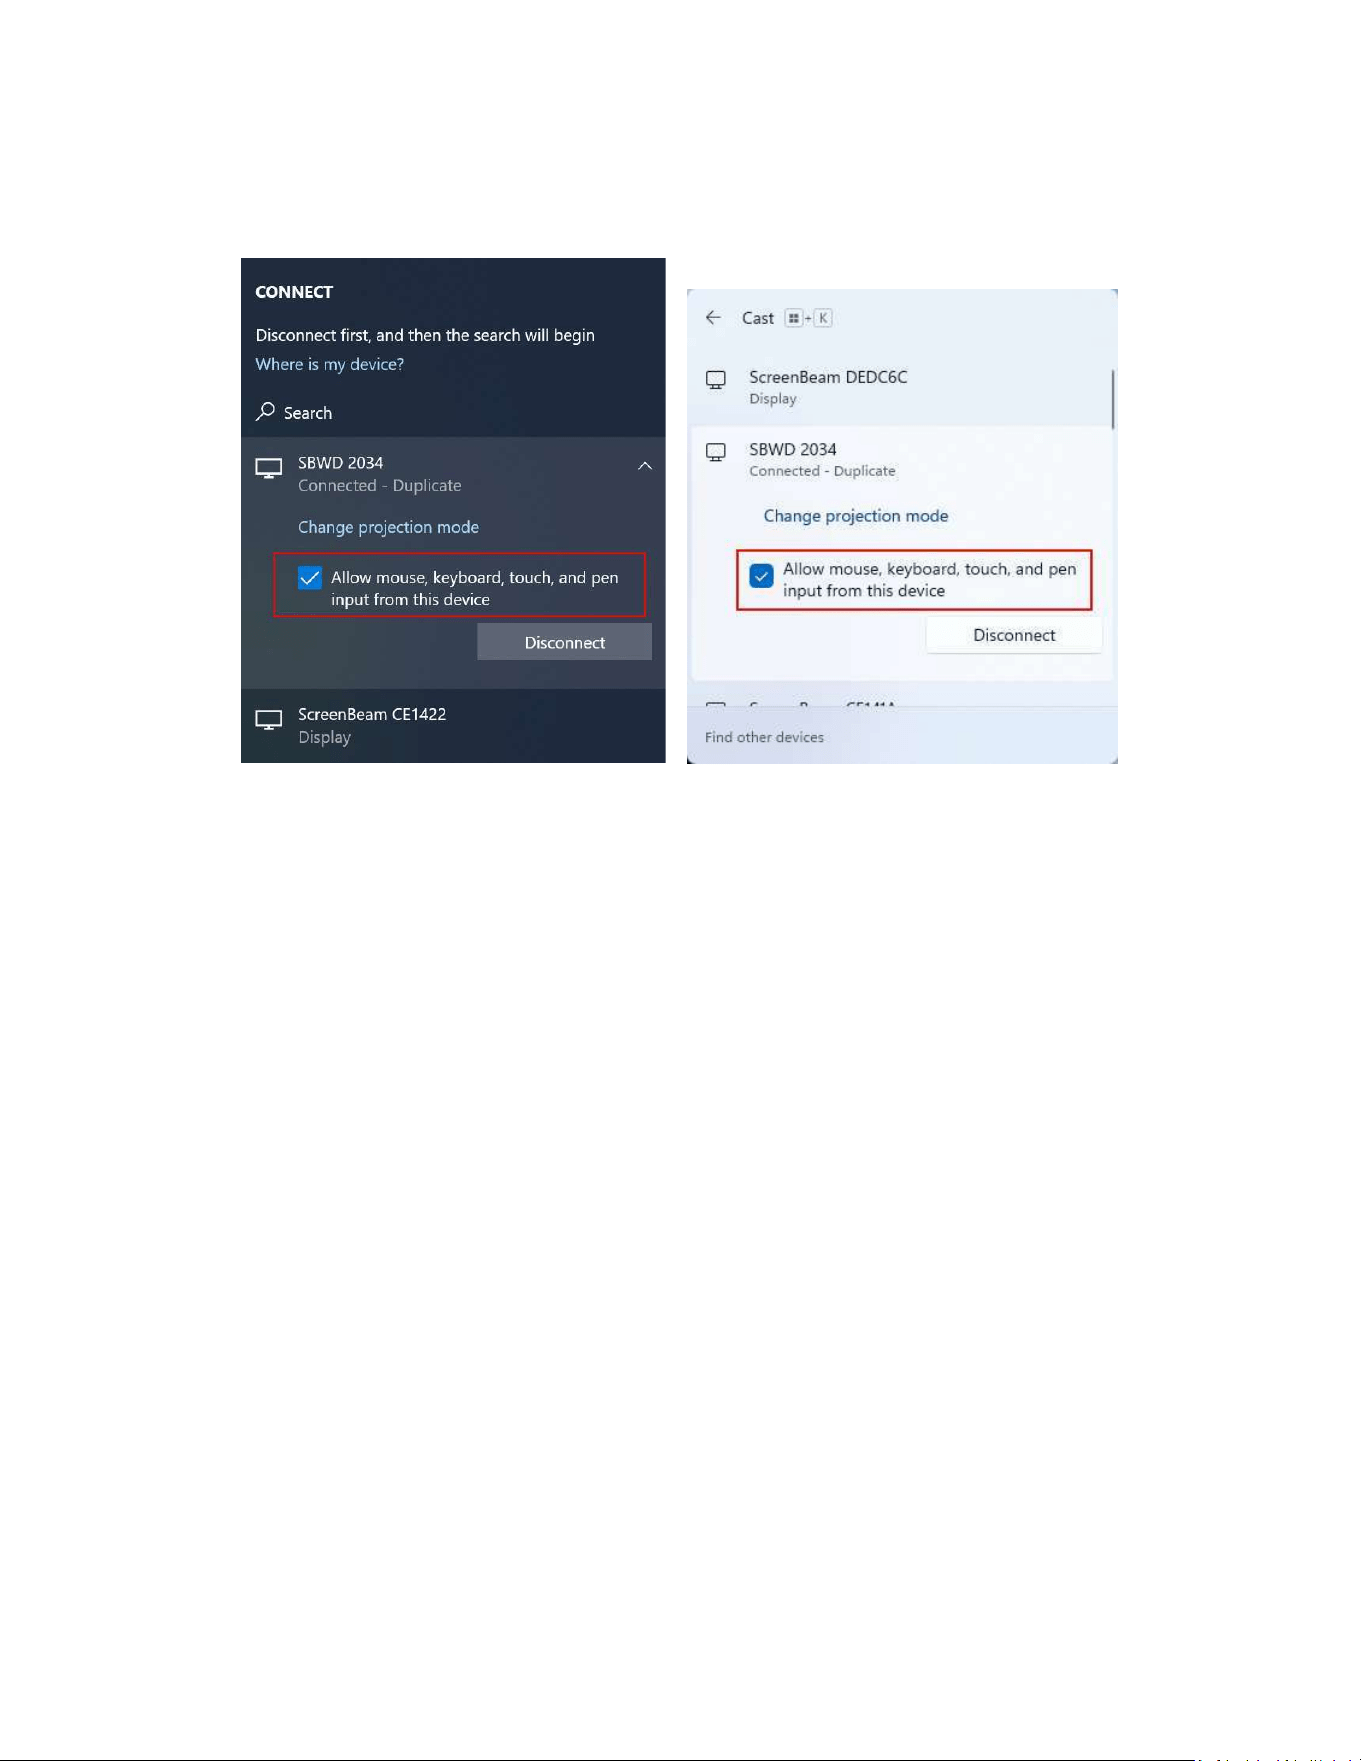
4. Ifthedisplayhastouchfunctionality,Windows10/11devicescantakeadvantageofthe
touchandinkingfeaturebyselectingAllowmouse….(Refertosection4.3USBover
NetworkControlformoredetails.)
Windows10 Windows11
Note:
Todisconnect,followinstructionsinstep1toreturntothescreenmirroringmenuand
selectmirroringoff.
Some Android devices do not support PIN and will fail to connect. Refer to Section
5.3.4.1 Setting up PIN Pairing Method for instructions on how to configure
ScreenBeamanddisablePINenforcement.
19
3.3 ConnectusingExistingWirelessNetworkorLAN
This section explains how to connect a client device to ScreenBeam 960 using existing
wirelessnetworkorLAN.
1. Make sure that the Wireless display over LANfeature is enabled for Windows 10
and/ormacOS/iOSAirPlayscreenmirroring.Refertosection5.3.2WirelessDisplayover
LANfordetail.
Note:YoucanalsoconfigureyourreceiverwithScreenBeamCMS.
2. ConnecttheScreenBeamreceivertoaknownnetworkwhere yourclient device can
communicateoverWi-Fi.RefertoSection2.2ConnectingtheReceivertoaNetworkfor
detail.
3. Verifythereceiverobtainsan IPaddress(shownonthe WirelessDisplayReadyto
Connectscreen).
4. ConnecttheclientdevicetothesamenetworkastheScreenBeamreceiver.
20
5. SelecttheScreenBeamreceivernameasshownontheTVdisplay.
ForWindows10/11
Select Connect or Cast from the Action Center by swiping from right or
simultaneouslypressingtheWindowskey andK.
Windows10 Windows11

21
ForiOSormacOS
ConnectwithAirPlayScreenMirroring fromthemenubarorcontrolcenter.
Figure:SelectingreceiveroniOSdevice
Figure:SelectingreceiveronmacOSdevice

22
6. EnterinthePINifrequired.IfthePINcodeisnotdisplayed,trythehiddenPIN1234
(default).
Note: You should consult your network administrator if no PIN is displayed on the
connecteddisplaydevice.
Windows10 Windows11
23
iOS macOS
7. Selectduplicateorextendedscreenmodeifprompted.
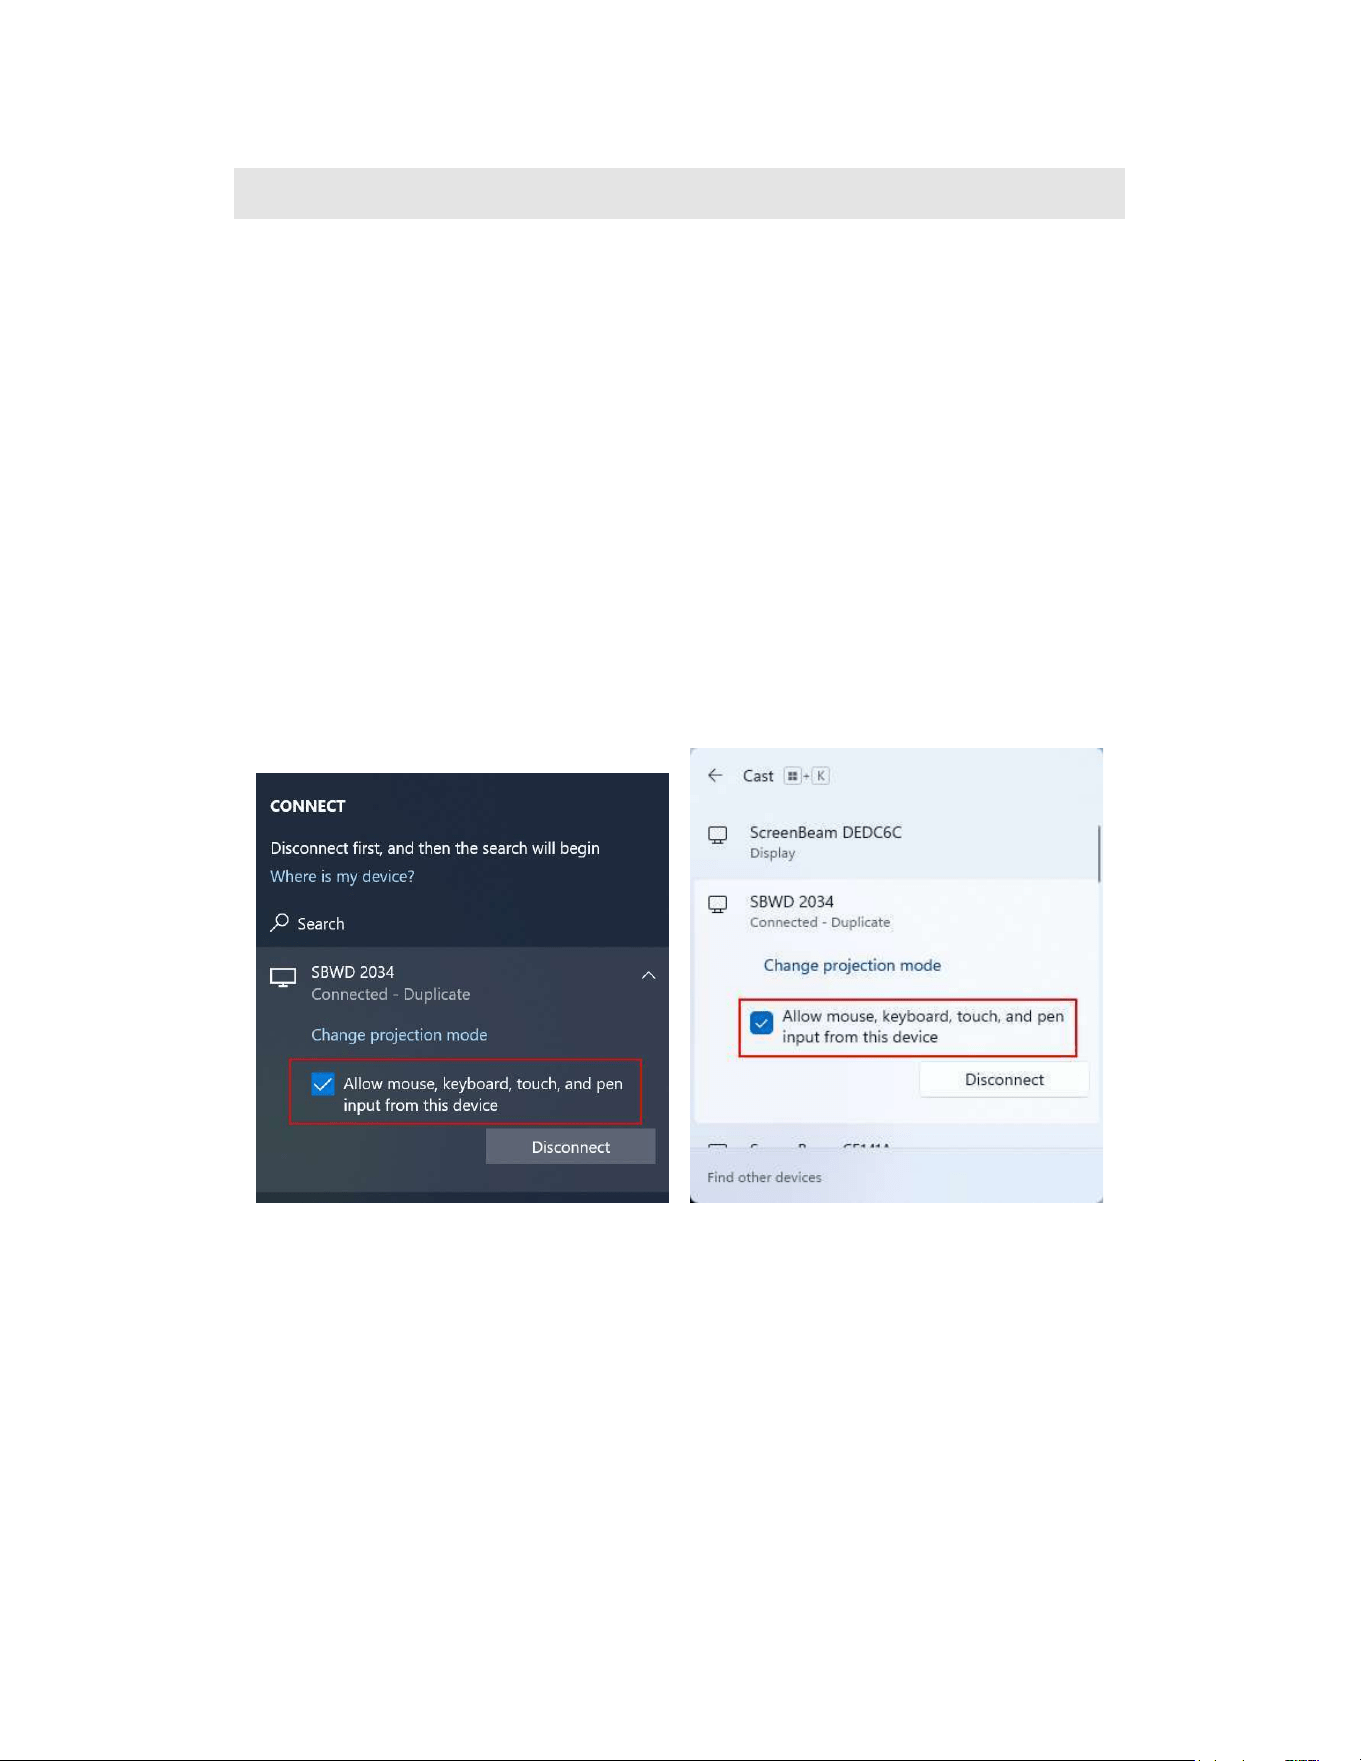
8. Ifthedisplayhastouchfunctionality,Windows10/11devicescantakeadvantageofthe
touchandinkingfeaturebyselectingAllowmouse….(Refertosection4.3USB over
NetworkControlformoredetails.)
Windows10 Windows11
Note:Todisconnect,followinstructionsinstep5toreturntothescreenmirroringmenuand
selectmirroringoff.

24
3.4 TipsforOptimalPerformance
Foroptimalperformance,youcantrythesetips:
•
Keepthereceiverwithinline-of-sightofthesourcedevice.Doingthiswillhelpensure
thereceiverreceivesthebestpossiblesignal.
•
Thereceiver'soptimalwirelessrangeiswithin30feetfromthesourcedevice.However,
actual range and effectiveness depends on manyfactors, including other sources of
interferenceandthebuildingmaterialsusedinthesurroundingstructure.
•
Avoid placing the receiver near wireless interference sources, such as metal shelf,
electric fans, items with motors, microwave ovens, cordless phones, and 2.4 GHz
Non-WiFiradiodevices.

25
PartIVDisplayandControlOptions
This chapterdescribes the displaymodes and control options that are supported by the
Receiver.
4.1 VGAUseCase
ScreenBeam960providesbuilt-inVGAinputandoutputportsforcompatibilitywithlegacy
devices.TheVGAportsfollowtheruleslistedbelow:
WhenScreenBeamispoweredon,
IfonlyHDMIOutisconnected,HDMIOutwilldisplayvideofromScreenBeam;
IfonlyVGAOutisconnected,VGAOutwilldisplayvideofromScreenBeam;
IfVGAInandHDMIOutareconnected,HDMIOutwilldisplayvideofromScreenBeam;
IfVGAInandVGAOutareconnected,HDMIOutwilldisplaynothing,andVGAOutwill
displayvideofromVGAIn;
IfVGAIn,VGAOut,andHDMIOutareconnected,HDMIOutwilldisplayvideofrom
ScreenBeamandVGAOutwilldisplayvideofromVGAIn.
WhenScreenBeamispoweredoff,
HDMIOutwilldisplaynothing;
IfVGAInandVGAOutareconnected,VGAOutwilldisplayvideofromVGAIn.

26
4.2 DisplayMode
The Receiver supports three display modes when connected with a compatible wireless
displayapplication.
In Windows, press the Windows logo + P keys simultaneously ( + P) to launch the
displayoptionsandselectthedesireddisplaymodefromtheoptions.
Windows10 Windows11
OnmacOS,clicktheScreenMirroringicon andselectadesiredprojectionmodefrom
the options (Mirror Built-inRentina Display andUseAsExtended Display)under the
connectedScreenBeamreceiver.
Duplicate(MirrorBuilt-inRentinaDisplayonmacOS)
TheDuplicatemodeisusedtodisplaythesamecontentonboththedevice'sscreenand
theHDTVsimultaneously.
Note: There may be minor delay between the content displayed on the HDTV screen
compared to the device’s screen. This is due to the current state of wireless display
technology.

27
Extend(UseAsExtendedDisplayonmacOS)
TheExtendmodecreatesasingle,extended"screen"betweenthesourcedeviceandthe
HDTV.WhenintheExtendmode,draggingwindowstotherightsideofthedevice'sscreen
displays those windows on the HDTV, while dragging windows to the left of the HDTV
screen displays them back on the device's screen. This mode allows users to display
selectedcontentontheHDTV,whileallotherwindowsremainonthedevice'sscreen.When
thismodeisfirstselected,theHDTVdisplaysonlytheWindowsdesktop.
SecondScreenOnly
TheSecondScreenOnlymodecausestheHDTVtobetheonlydisplayfor the device.
You’llseeeverythingontheconnectedscreen,andyourdevice’sscreenwillbeblank.
28
4.3 USBoverNetworkControl
TheScreenBeam 960 receiversupportsUserInputBackChannel (UIBC)also knownas
USBovernetworkcontrol.ThisfeatureallowstheuseofUSBHIDperipheraldevicesfrom
thesourcedevicetocontroltheclientdeviceviaScreenBeamconnection.
TheUSBovernetworkcontrolisavailableonWindows10/11devices.TheminimumCPU
requirementforaWindows10/11devicetosupportUIBCiseither:
4thGenerationIntelCorei3(Haswellorbetter)processor
AMDA4-5000(Kabiniorbetter)processor
ToconnectaUSBkeyboard,mouse,ortrackpad:
1. PlugtheUSBHIDperipheralintotheReceiver’sUSBportandwaitforthedevicetobe
detected.Thismaytake10-15seconds.
2. ConnectyourWindows10/11devicetothereceiver,andremembertocheckthe“Allow
inputfromakeyboardormouseconnectedtothisdisplay”or“Allowmouse,keyboard,
touch,andpeninputfromthisdevice”box.
Note: Although the checkbox “Allow input from a keyboard or mouse connected to this
display”or“Allowmouse,keyboard,touch,andpeninputfromthisdevice”maybeavailable
upontheMiracastconnection,theUIBCfeaturewillnotbesupportediftheWindows10/11
devicedoesnotmeettheminimumCPUrequirement.
3. UsetheUSBkeyboard,mouse,ortrackpadtocontrolthesourcedevice.
29
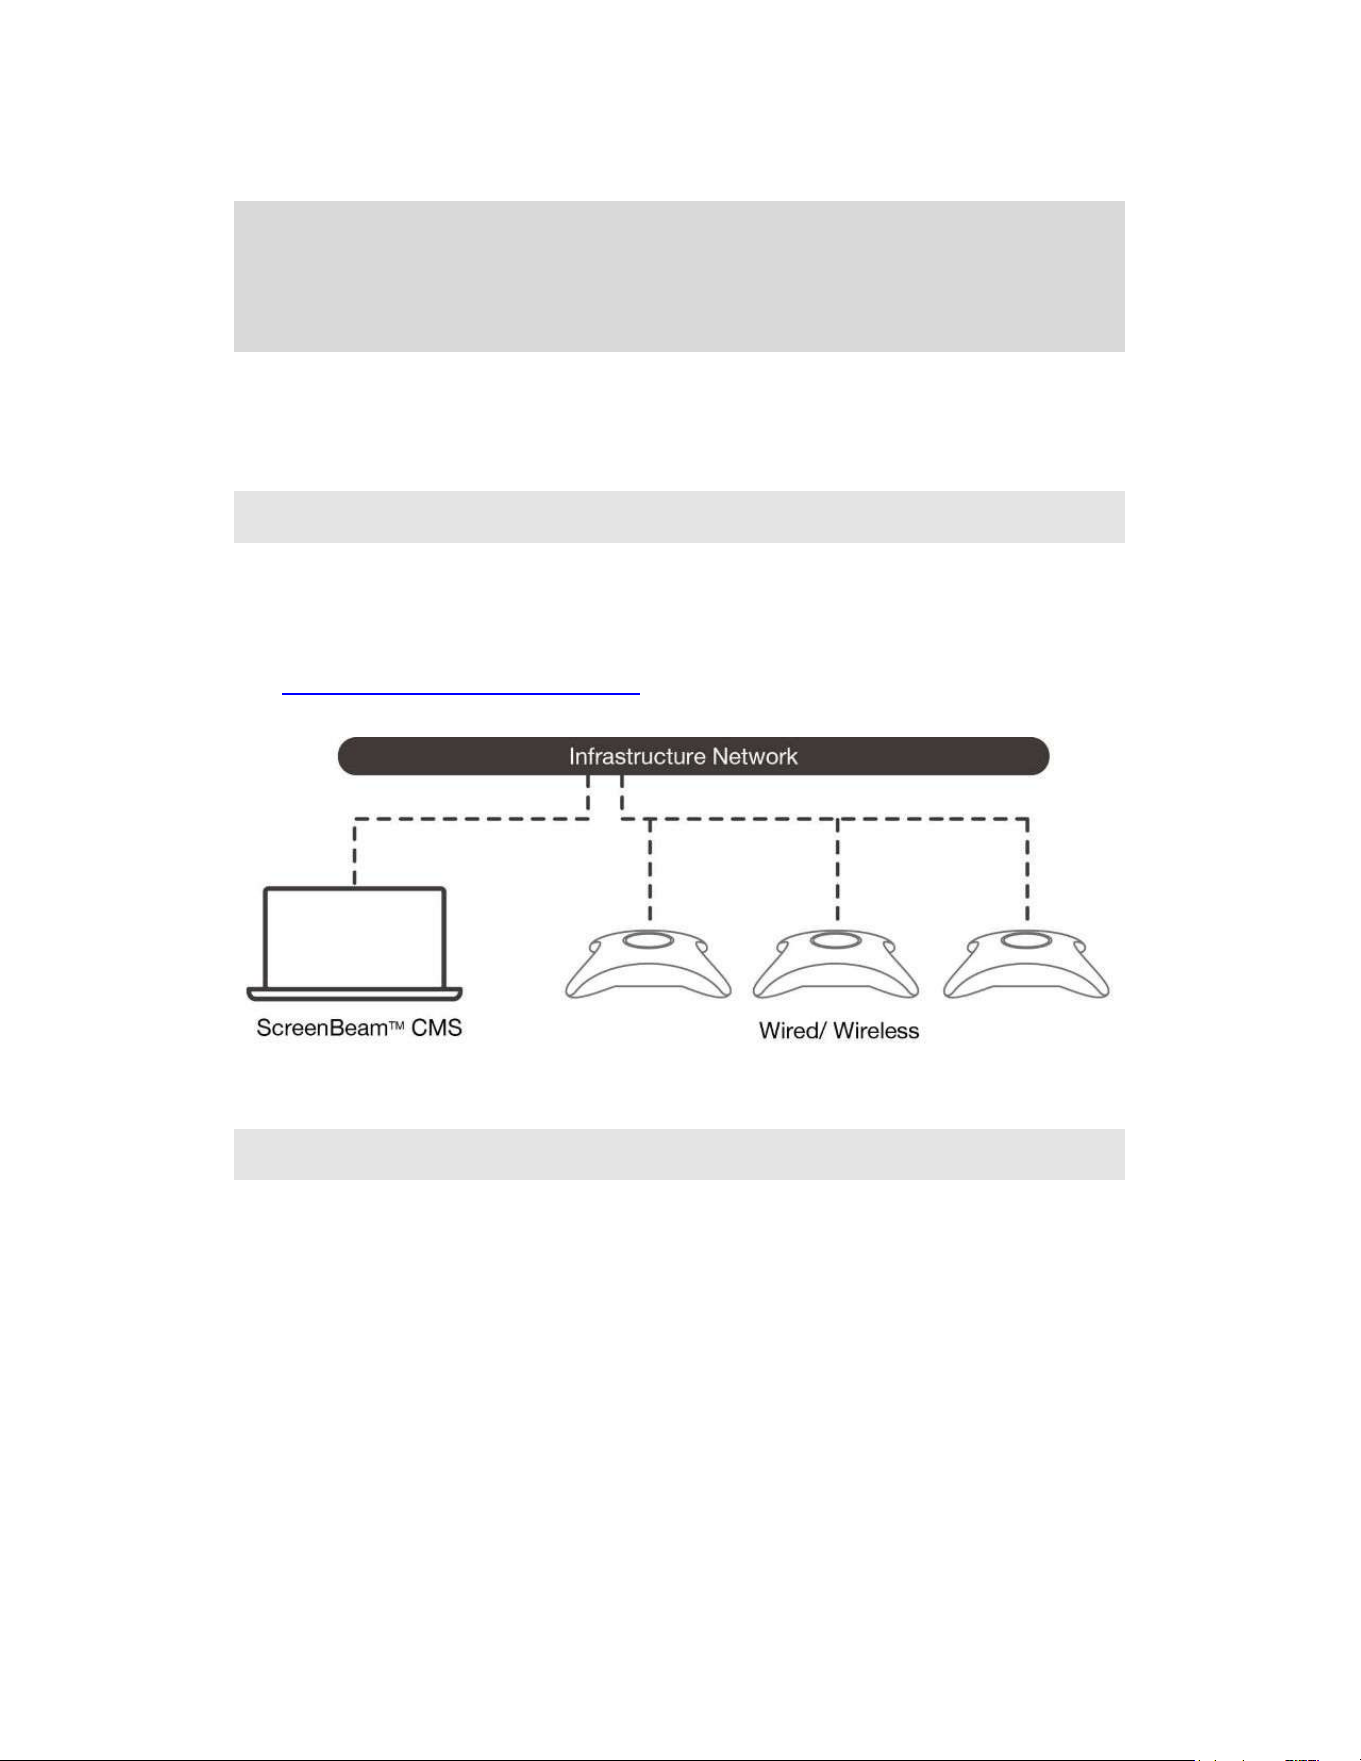
PartV DeviceManagementforIT
Administrator
ScreenBeam960canbeconfiguredbyusingtheScreenBeamCMSsoftwareoraccessing
theScreenBeam’sLocalManagementInterface(LMI).
5.1 UsingScreenBeamCMSSoftware
ScreenBeamCentralManagementSystem(CMS)isahighlyrecommendedcomplimentary
toolformulti-unitdeployment,configurationandadministration.
1. ToobtainCMSsoftwareandtheCMSUserGuide,goto:
https://support.screenbeam.com/cms.
2. RefertotheCMSUserGuideforsetupinstructions.
5.2 UsingLocalManagementonScreenBeam
TheLocalManagementInterfacecanconfigureandupdateasingleScreenBeamatatime.
TherearethreemethodstoaccesstheLMI:
Method1:WirelessP2PDirectConnection(AGO)
Method2:NetworkConnectionviaDHCP
Method3:ScreenBeamLocalWi-FiNetwork(NGO)
TheLocalManagementInterfaceisallowedforaccessinoneofthefollowingsituations:
Thereceiver’sLocalManagementInterfaceAccess featureis settoAutoandthe
receiverisnotconnectedtoCMS;
Thereceiver’sLocalManagementInterfaceAccessfeatureissettoEnable.
RefertoSection5.3.6.1Setting upLocal Management InterfaceAccessfordetailaboutLocal
ManagementInterfaceAccess.
30
Therearetwosituationsaboutloggingintothereceiver’sLMI:whenthereceiverisinAGO
modeandwhenitisinNGOmode.
5.2.1 Method1:WirelessP2PDirectConnection(AGO)
ThismethodisavailablewhenthereceiverisinAGOmode.
When AGO is enabled, users are allowed to log into the local management interface
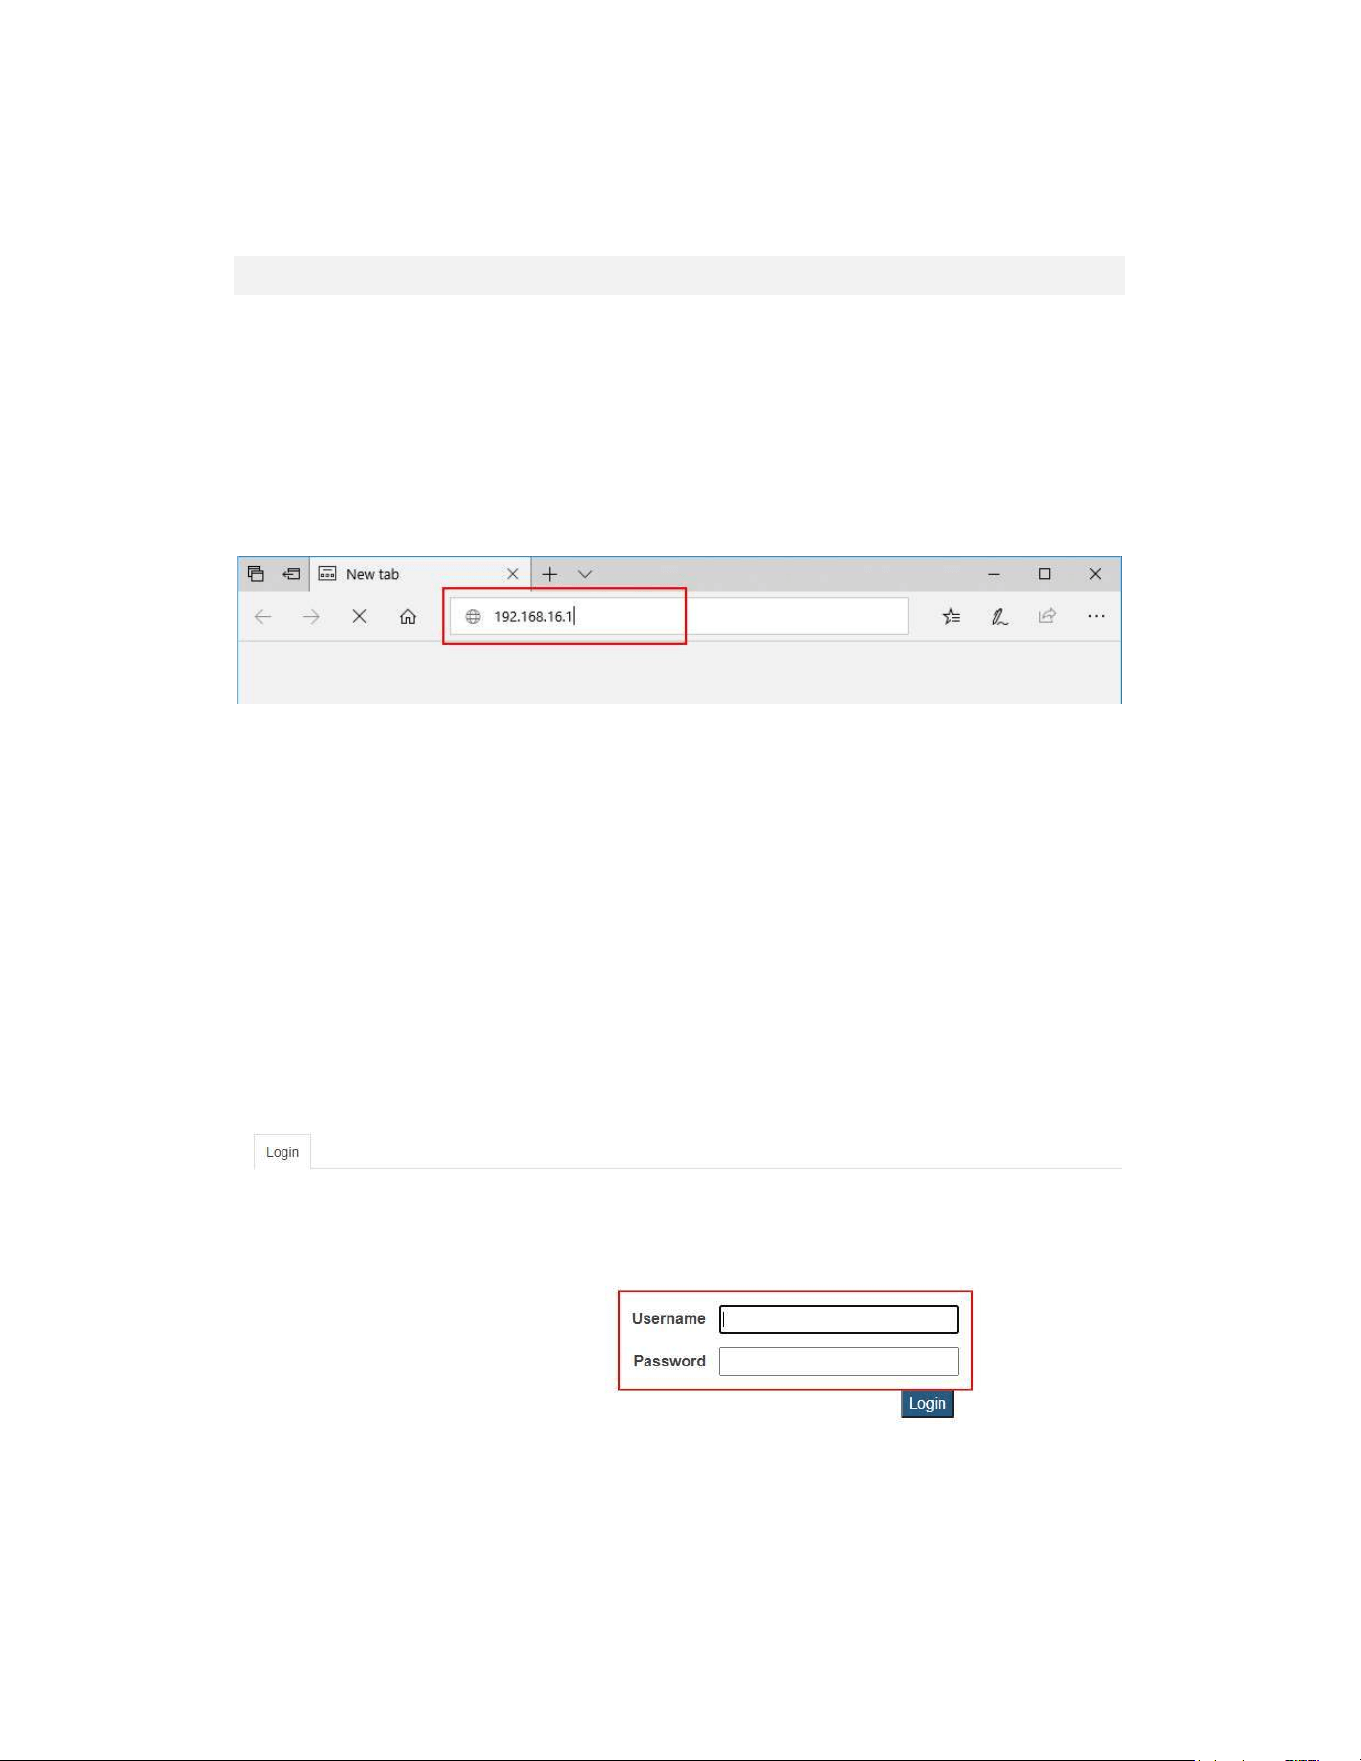
through"https://192.168.16.1".ConnectaMiracast-enabledevicetothereceiver,andthen
accesstheURLaddresswithawebbrowser.
TologintotheLocalManagementInterfaceinAGOmode,followthisprocedure:
1. ConnectaMiracast-enabledevicetoScreenBeamreceiver.
2. AccesstheURLaddress(https://192.168.16.1)withawebbrowseronthedevice.
3. Thebrowsermaygiveanerrorstating“Theconnectionorsiteisnotsecureorprivate.”
Manuallyaccepttheconnectionasfollows:
Chromebrowser:clickAdvanced,andthenclickProceed.
Edge/IE browser: click Details, and then Go on to the webpage (not
recommended).
Firefoxbrowser:clickAdvanced,thenclickAddException,thenclickConfirm
SecurityException.
4. When the ScreenBeam management page appears, enter the Username
AdministratorandPasswordscreenbeam(bothcase-sensitive).
Bydefault,theUsernameisAdministrator,andpasswordisscreenbeam.

31
5.2.2 Method2:NetworkConnectionviaDHCP
ThismethodisavailablewhentheAllowaccessviaLANfeatureissettoEnable.Referto
Section5.3.6.2SettingupAllowAccessviaLANfordetails.
TologintotheLocalManagementInterfaceusingaLANconnection,followthisprocedure:
1. Using a shielded RJ-45-terminated Cat5e or better Ethernet cable, connect the
ScreenBeamEthernetporttoaDHCPenablednetwork.
Note:AccessviaawirelessLANconnectionisalsoallowed.
2. TheReadytoConnectscreenonthedisplaywillshowtheIPaddressassignedtothe
ScreenBeam.Enterthisaddressintothewebbrowseronadeviceonthesamenetwork
astheScreenBeam.
3. FollowthedirectionsfromMethod1fromStep3on.

32
5.2.3 Method3:ScreenBeamLocalWi-FiNetwork(NGO)
ThismethodisavailablewhenthereceiverisinNGOmode.Therearetwosituations:when
thereceiver’sSSIDbroadcastisdisabledandwhenitisenabled.
Bydefault,thereceiver’sSSIDbroadcastisdisabled.
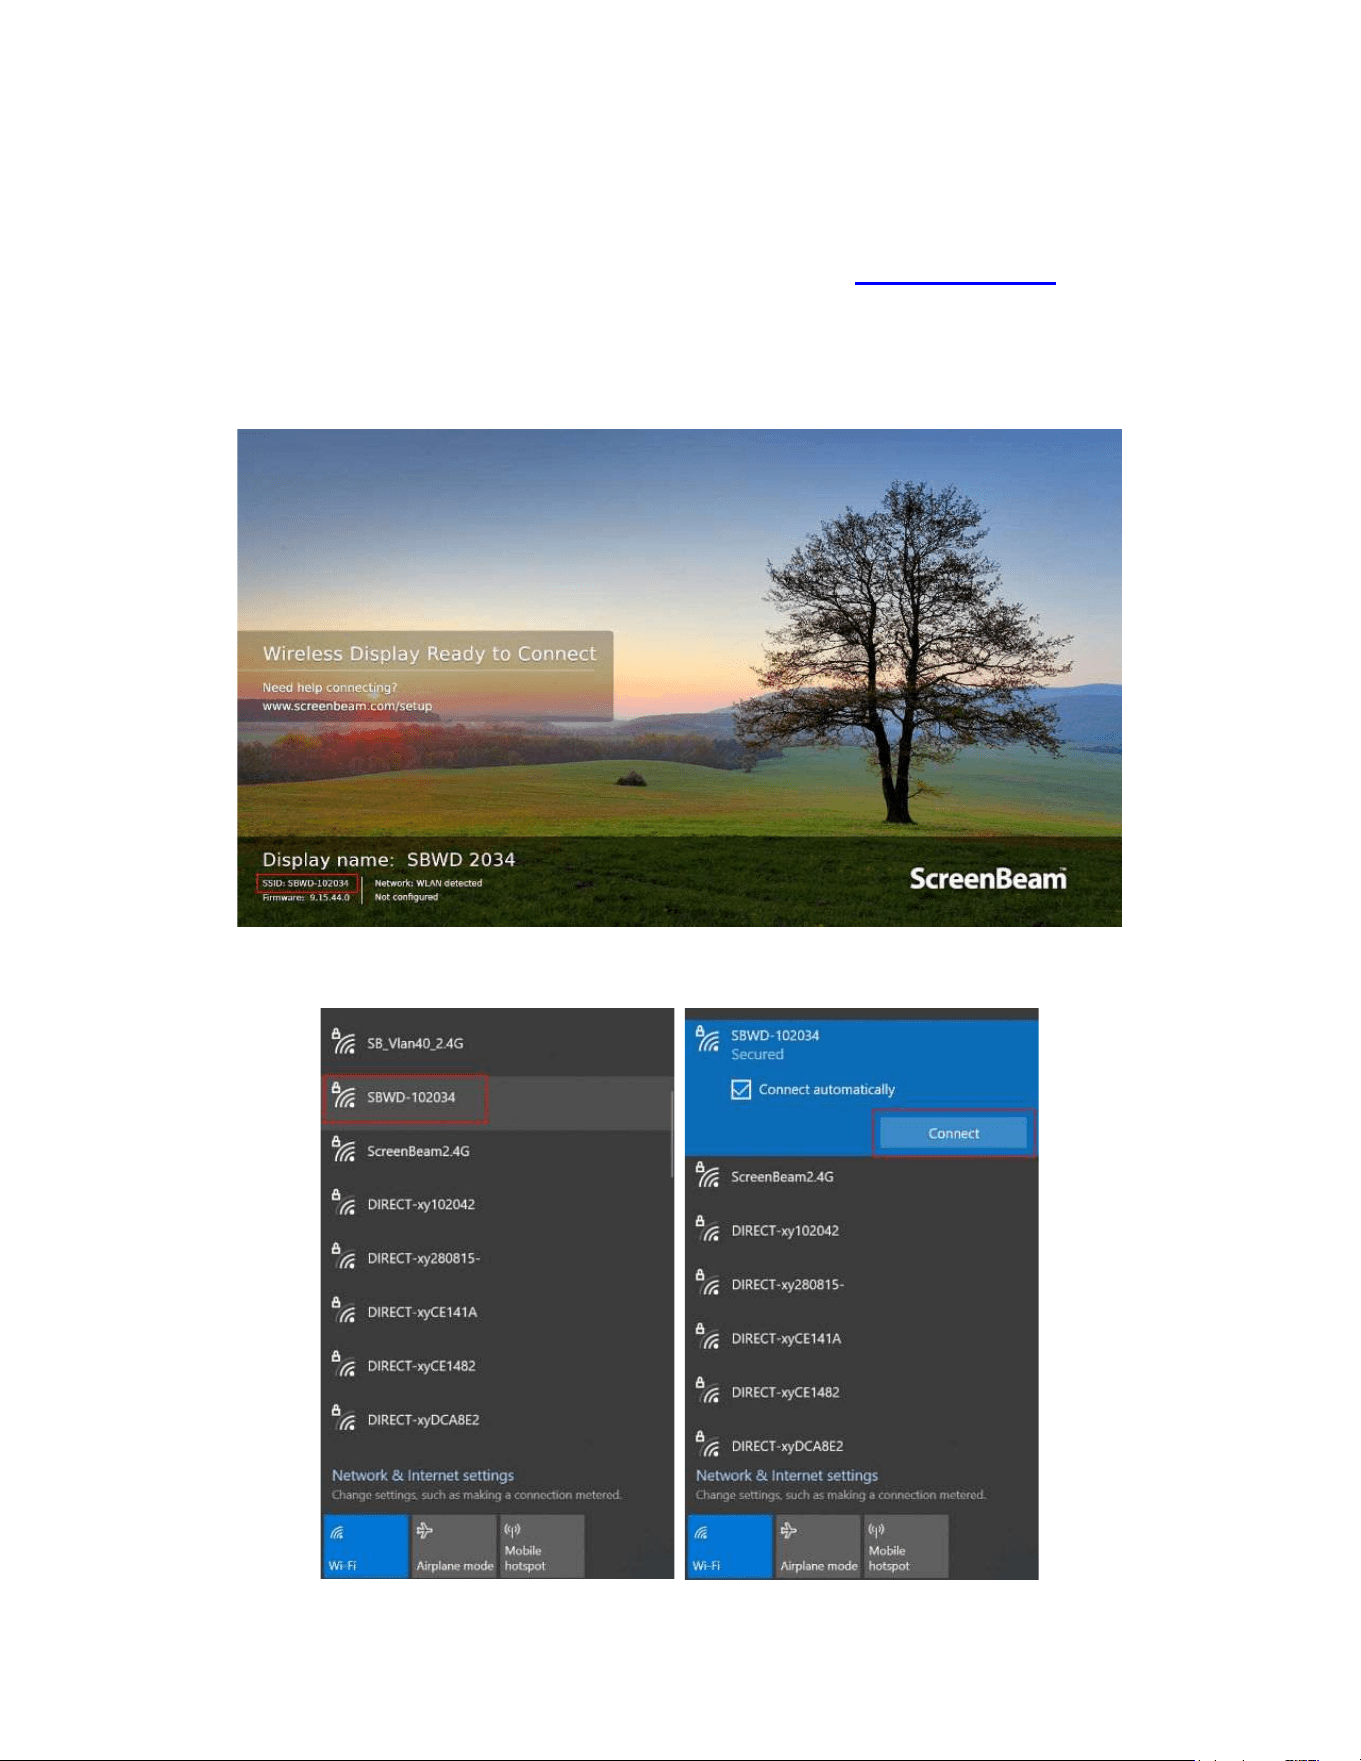
5.2.3.1WhenSSIDBroadcastisDisabled
Connecttothereceiver’sSSIDfromawireless-enabledlaptop(orotherdeviceswithWi-Fi
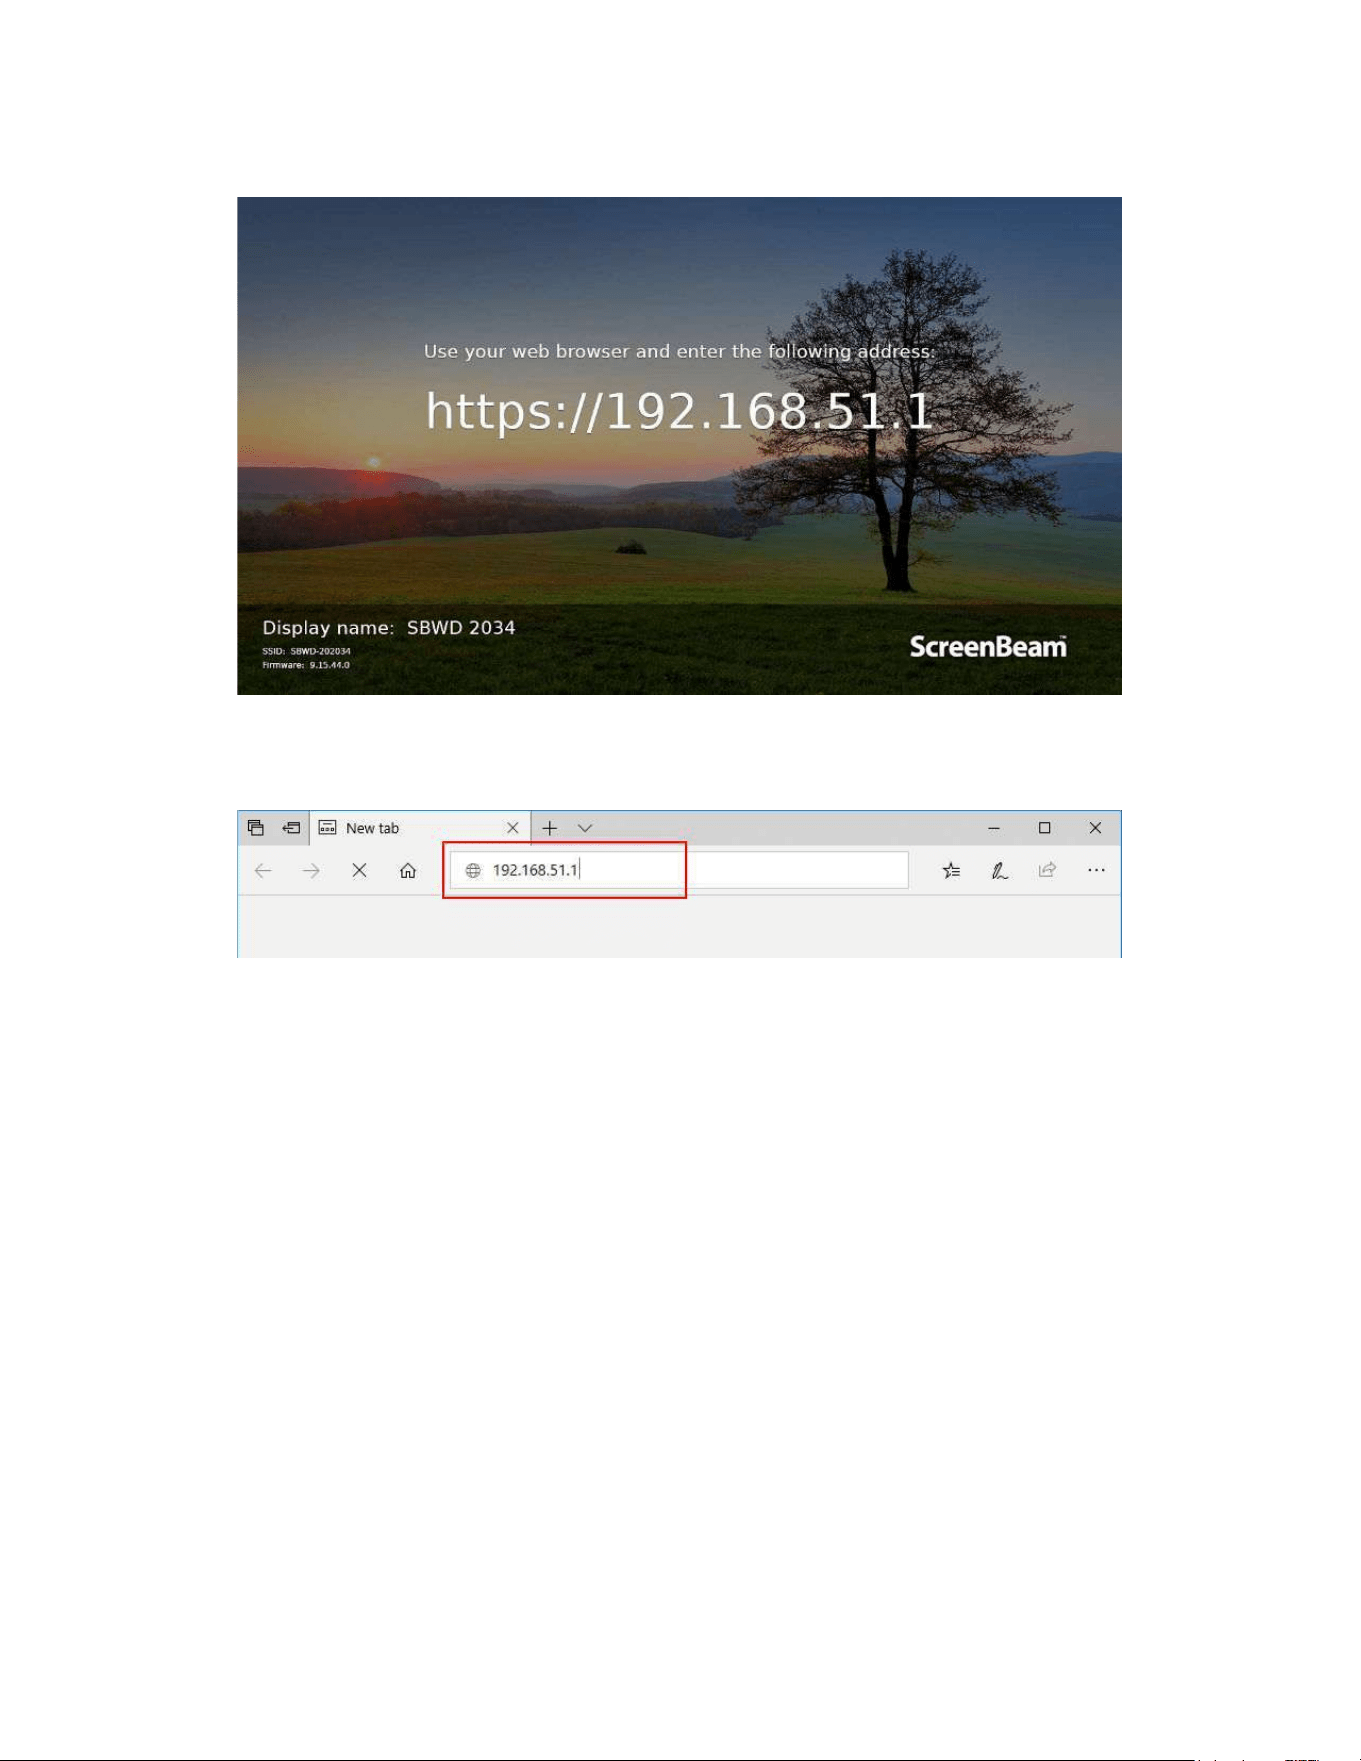
accessabilityandawebbrowser),andthenaccessthisURL:https://192.168.51.1witha
webbrowser.
TologintotheLocalManagementInterfacewhenthereceiverdoesn’tbroadcastitsSSID,
followthisprocedure:
1. Find the receiver’s SSID in the lower left corner of the Wireless Display Ready to
Connectscreen.
33
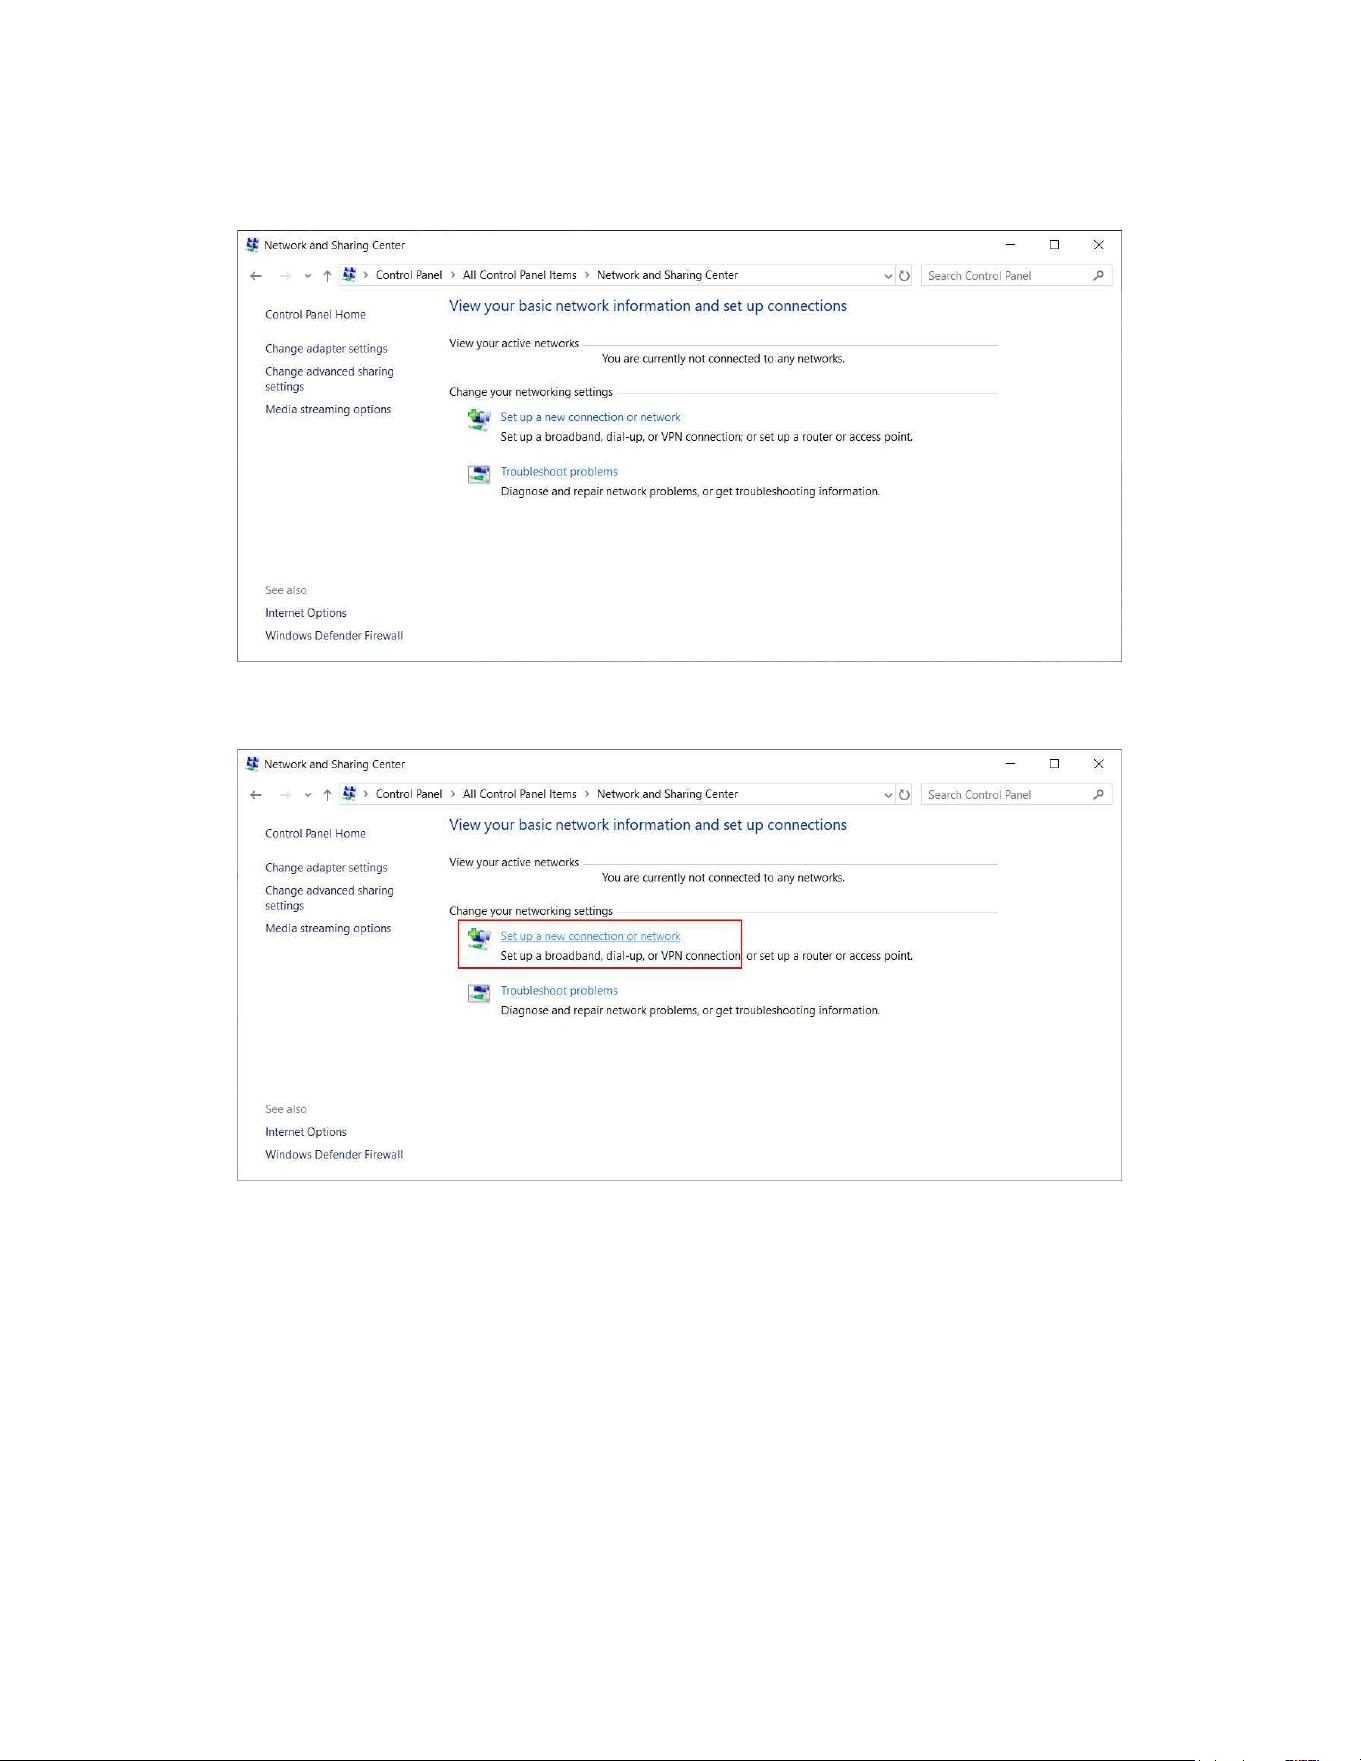
2. Go to Network Sharing Center via Control Panel > Network and Internet (or All
ControlPanelItems)>NetworkSharingCenteronawireless-enabledlaptop.
3. On the Network and Sharing Center window, click Set up a new connection or
network.
34
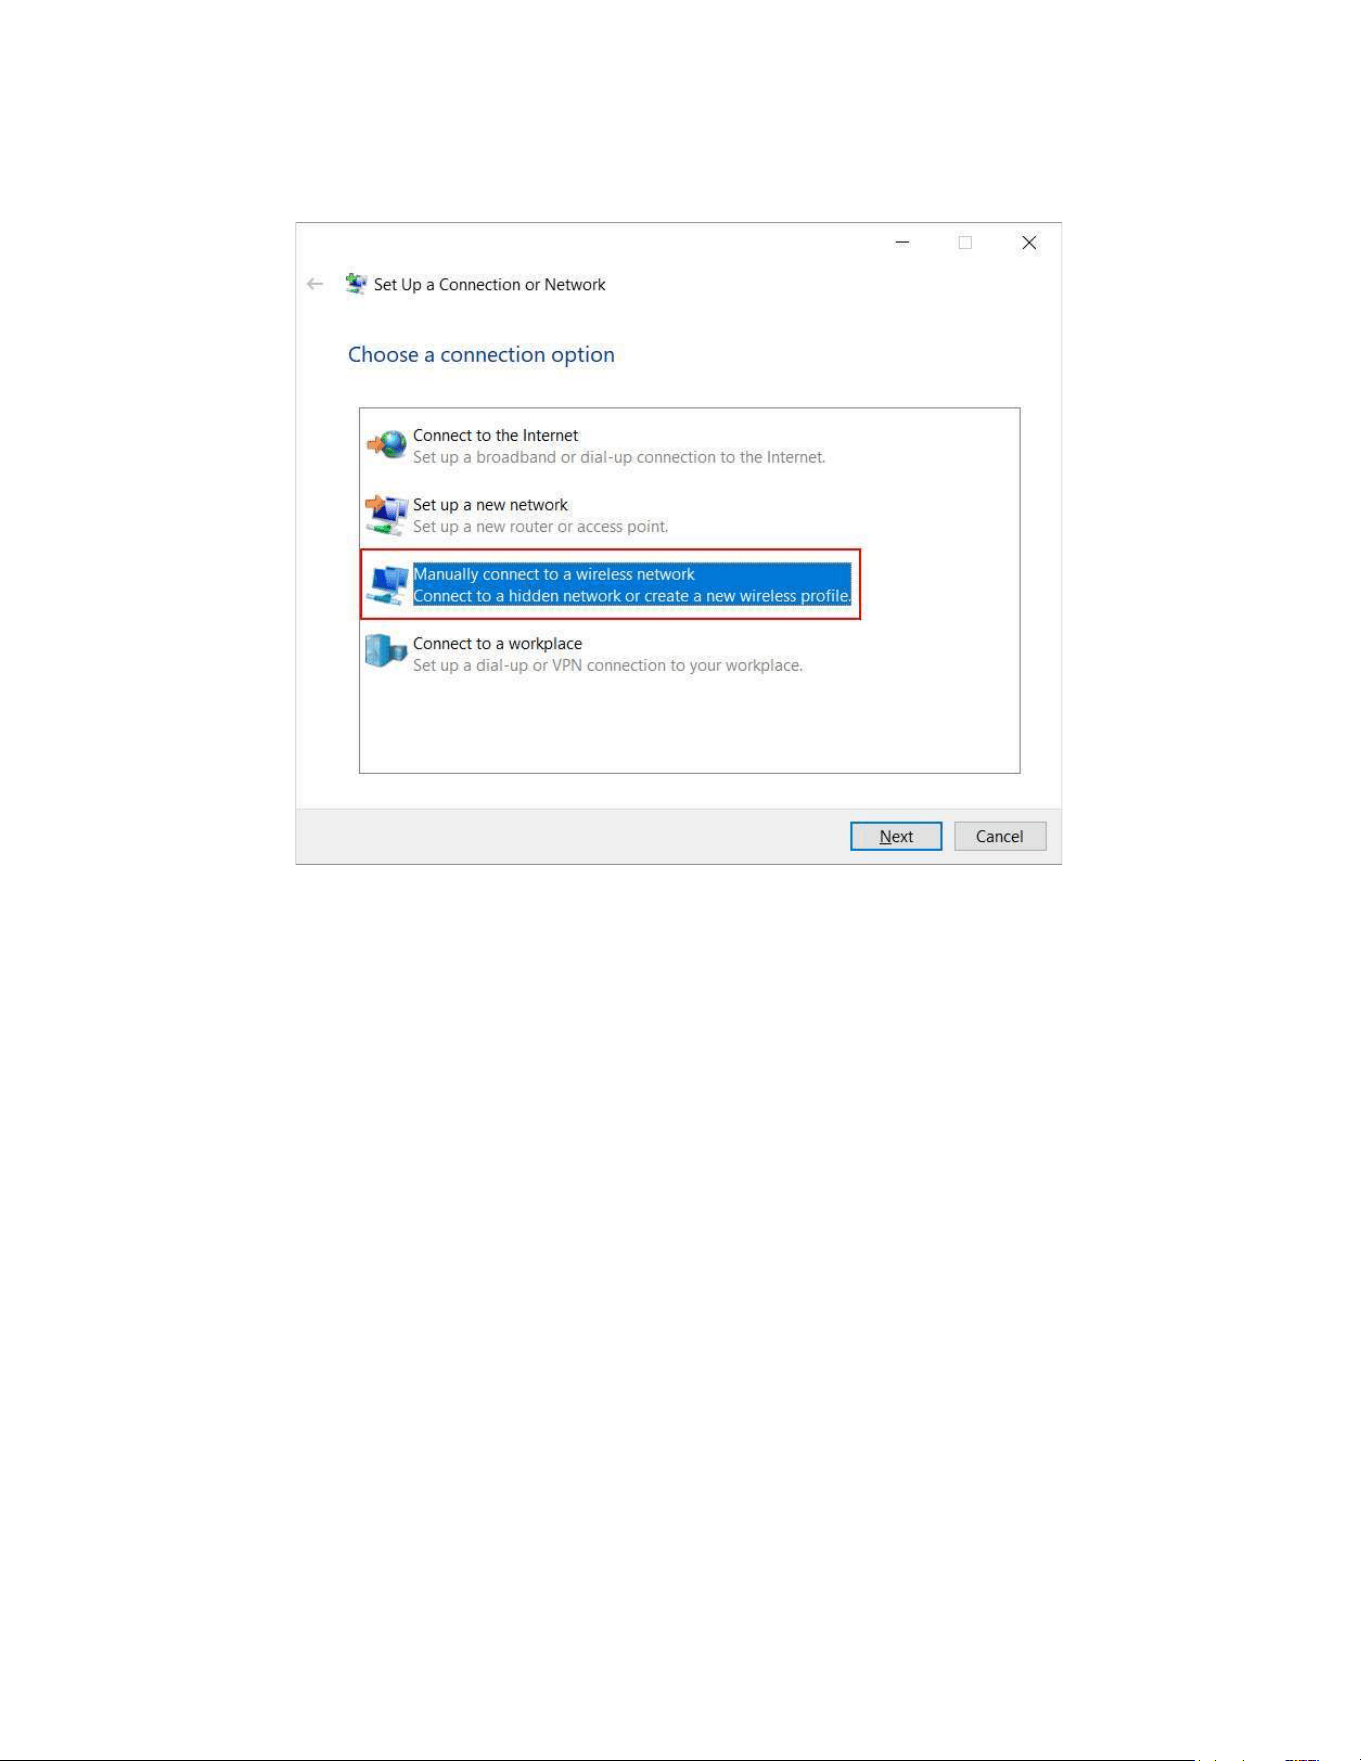
4. The Set up a new connection or network window appears. Choose the Manually
connecttoawirelessnetworkoption.
35
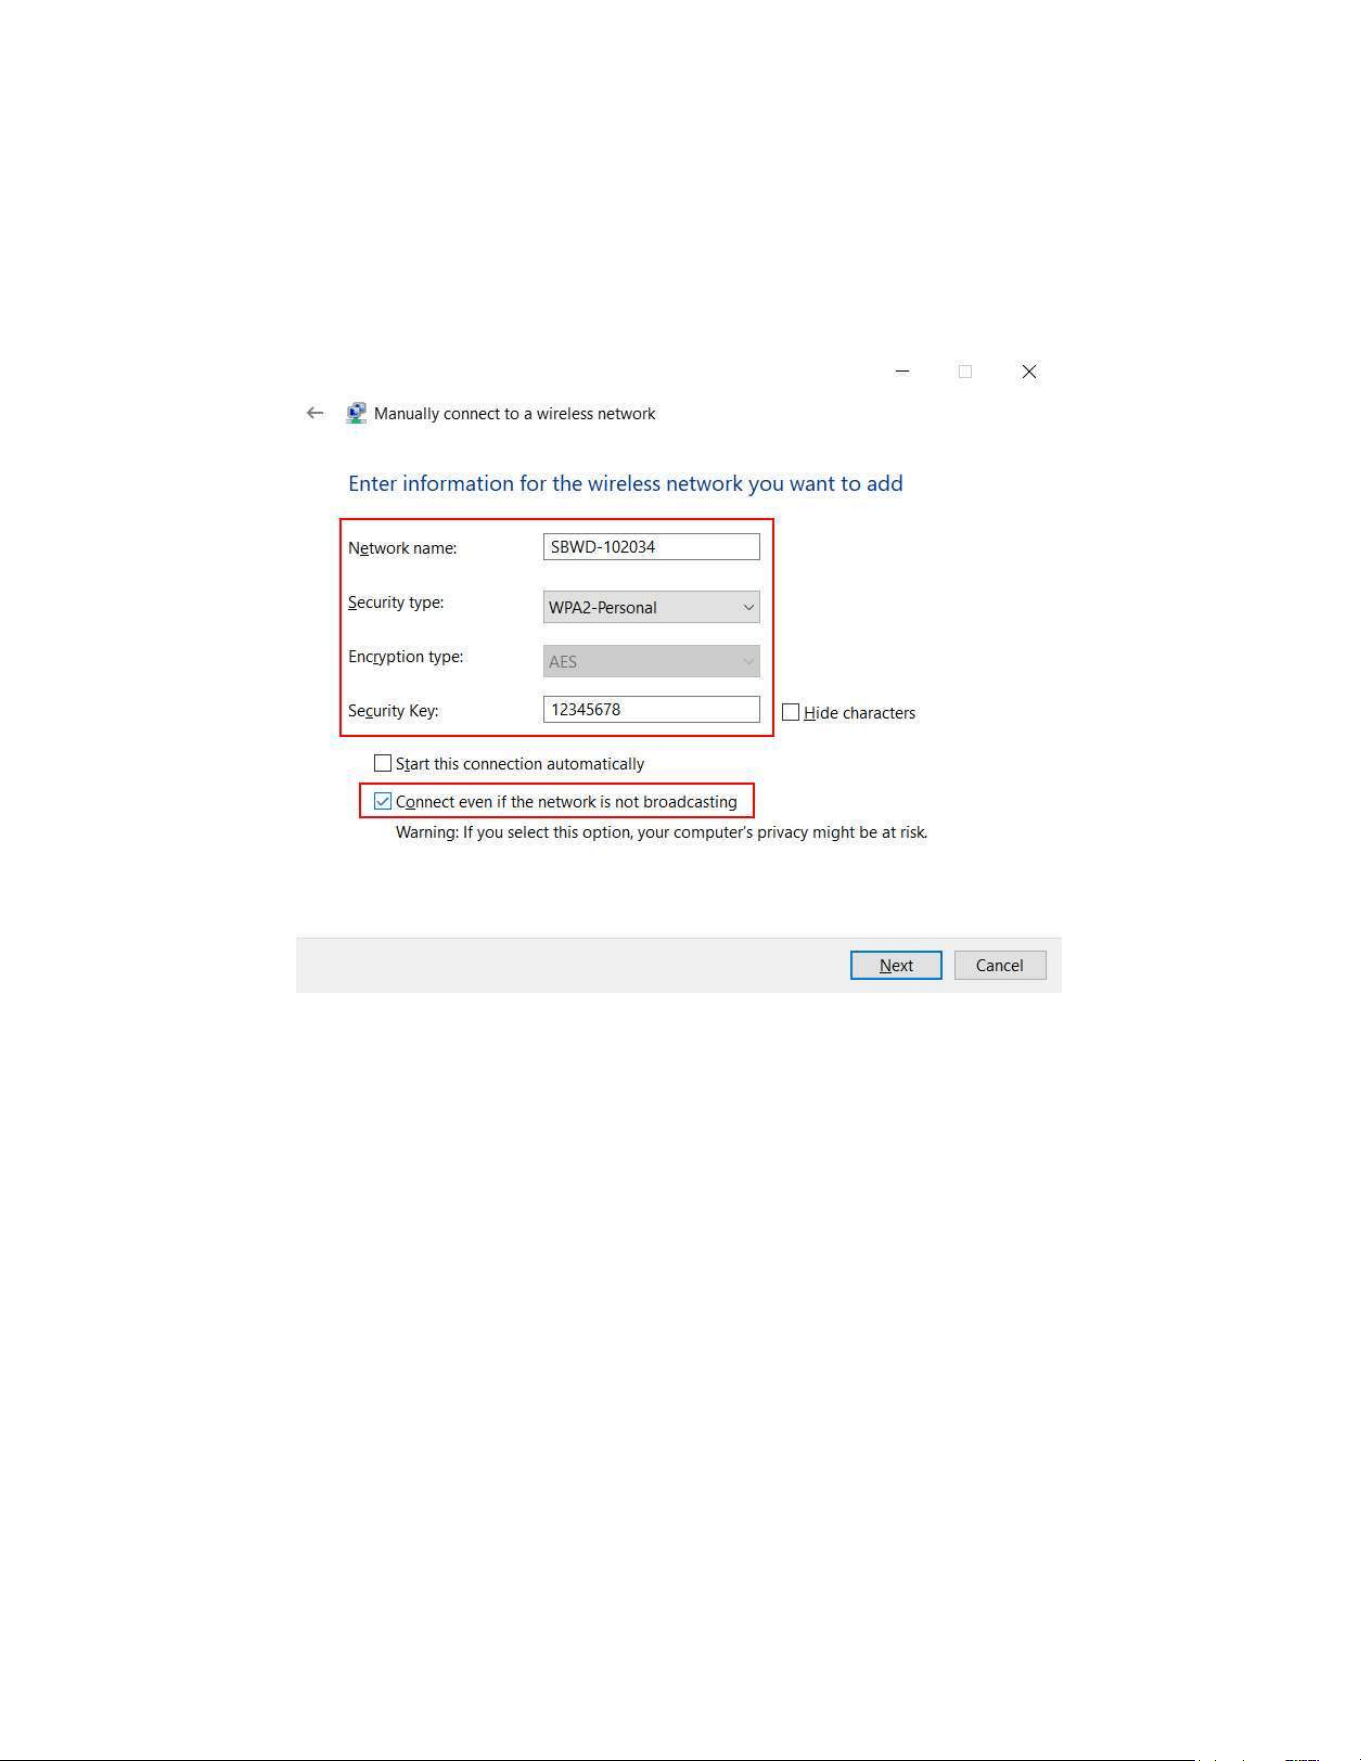
5. TheManuallyconnecttoawirelessnetworkwindowappears.Typeinorselectthe
followinginformation.
Networkname:TheSSIDoftheScreenBeam960receiver
Securitytype:WPA2Personal
Encryptiontype:AES
Securitykey:12345678(default)
6. CheckConnectevenifthenetworkisnotbroadcasting.ClickNext.Thereceiver’s
SSIDwillbeaddedtothelaptopsoon.
7. The laptop will connect to the SSID automatically if the “Start this connection
automatically”optionischecked.Otherwise,gototheNetworkspageandconnectto
theSSID.
36
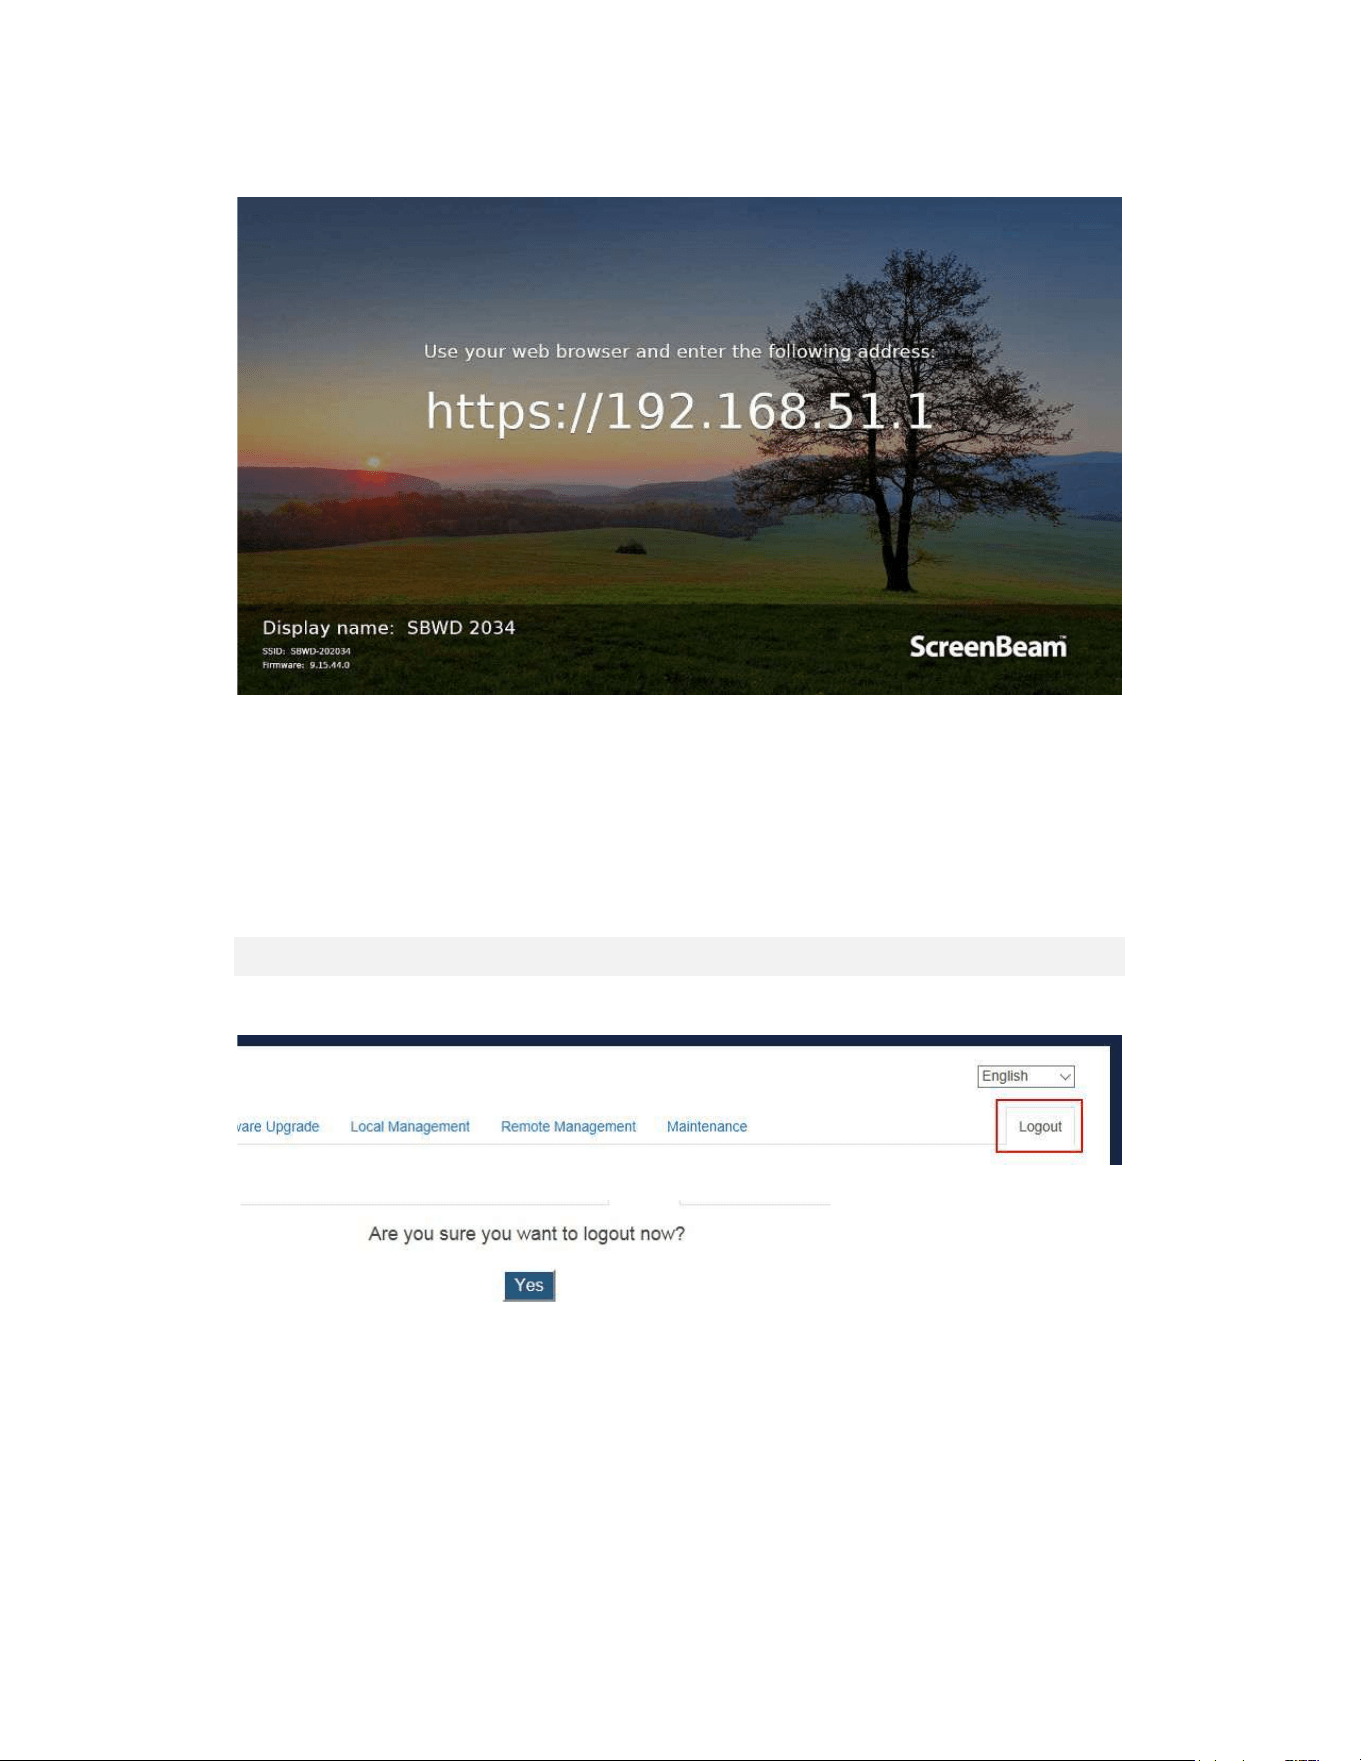
8. AURL(itis“https://192.168.51.1”)isdisplayedontheconnecteddisplay.
Note:Thislinkwillbedisplayedinfullscreenforafewseconds,andthenitisdisplayedin
thelowerleftcorner(ifnetworkinfodisplayisenabled).
9. AccesstheURLaddress("https://192.168.51.1")withawebbrowseronthelaptop.
10.Follow thedirectionsinSection5.2.1 Method 1: Wireless P2P Direct Connection (AGO)
fromStep3on.
37
5.2.3.2WhenSSIDBroadcastisEnabled
Connecttothereceiver’sSSIDfromawireless-enabledlaptop(orotherdeviceswithWi-Fi
accessabilityandawebbrowser),andthenaccessthisURL:https://192.168.51.1witha
webbrowser.
TologintotheLMIwhentheSSIDbroadcastisenabled,followthisprocedure:
1. Find the receiver’s SSID in the lower left corner of the Wireless Display Ready to
Connectscreen.
2. FindtheSSIDonaWi-Fienableddevice,selectitandclickConnecttocontinue.
Bydefault,thenetworksecuritykeyis“12345678”.
38
3. AURL(itis“https://192.168.51.1”)isdisplayedontheconnecteddisplay.
Note:Thislinkwillbedisplayedinfullscreenforafewseconds,andthenitisdisplayedin
thelowerleftcorner(ifnetworkinfodisplayisenabled).
4. AccesstheURLaddress("https://192.168.51.1")withawebbrowseronthelaptop.
5. Follow the directions in Section 5.2.1 Method 1: Wireless P2P Direct Connection
(AGO)fromStep3on.
5.2.4 LogOut
1. GototheLogouttabpagebyclickingtheLogouttab.
2. Clickthe“Yes”buttontologout.
3. YouwilllogoutfromtheLocalManagementInterfaceimmediately.
39
5.3 ConfiguringScreenBeam
AfteryouhaveloggedintotheLocalManagementInterface,youcanconfigureScreenBeam
960ontheLocalManagementInterface.
5.3.1 GeneralSettings
Thissectionintroducessomegeneralsettingsforthereceiver.
5.3.1.1ChangingLocalManagementInterface’sDisplayLanguage
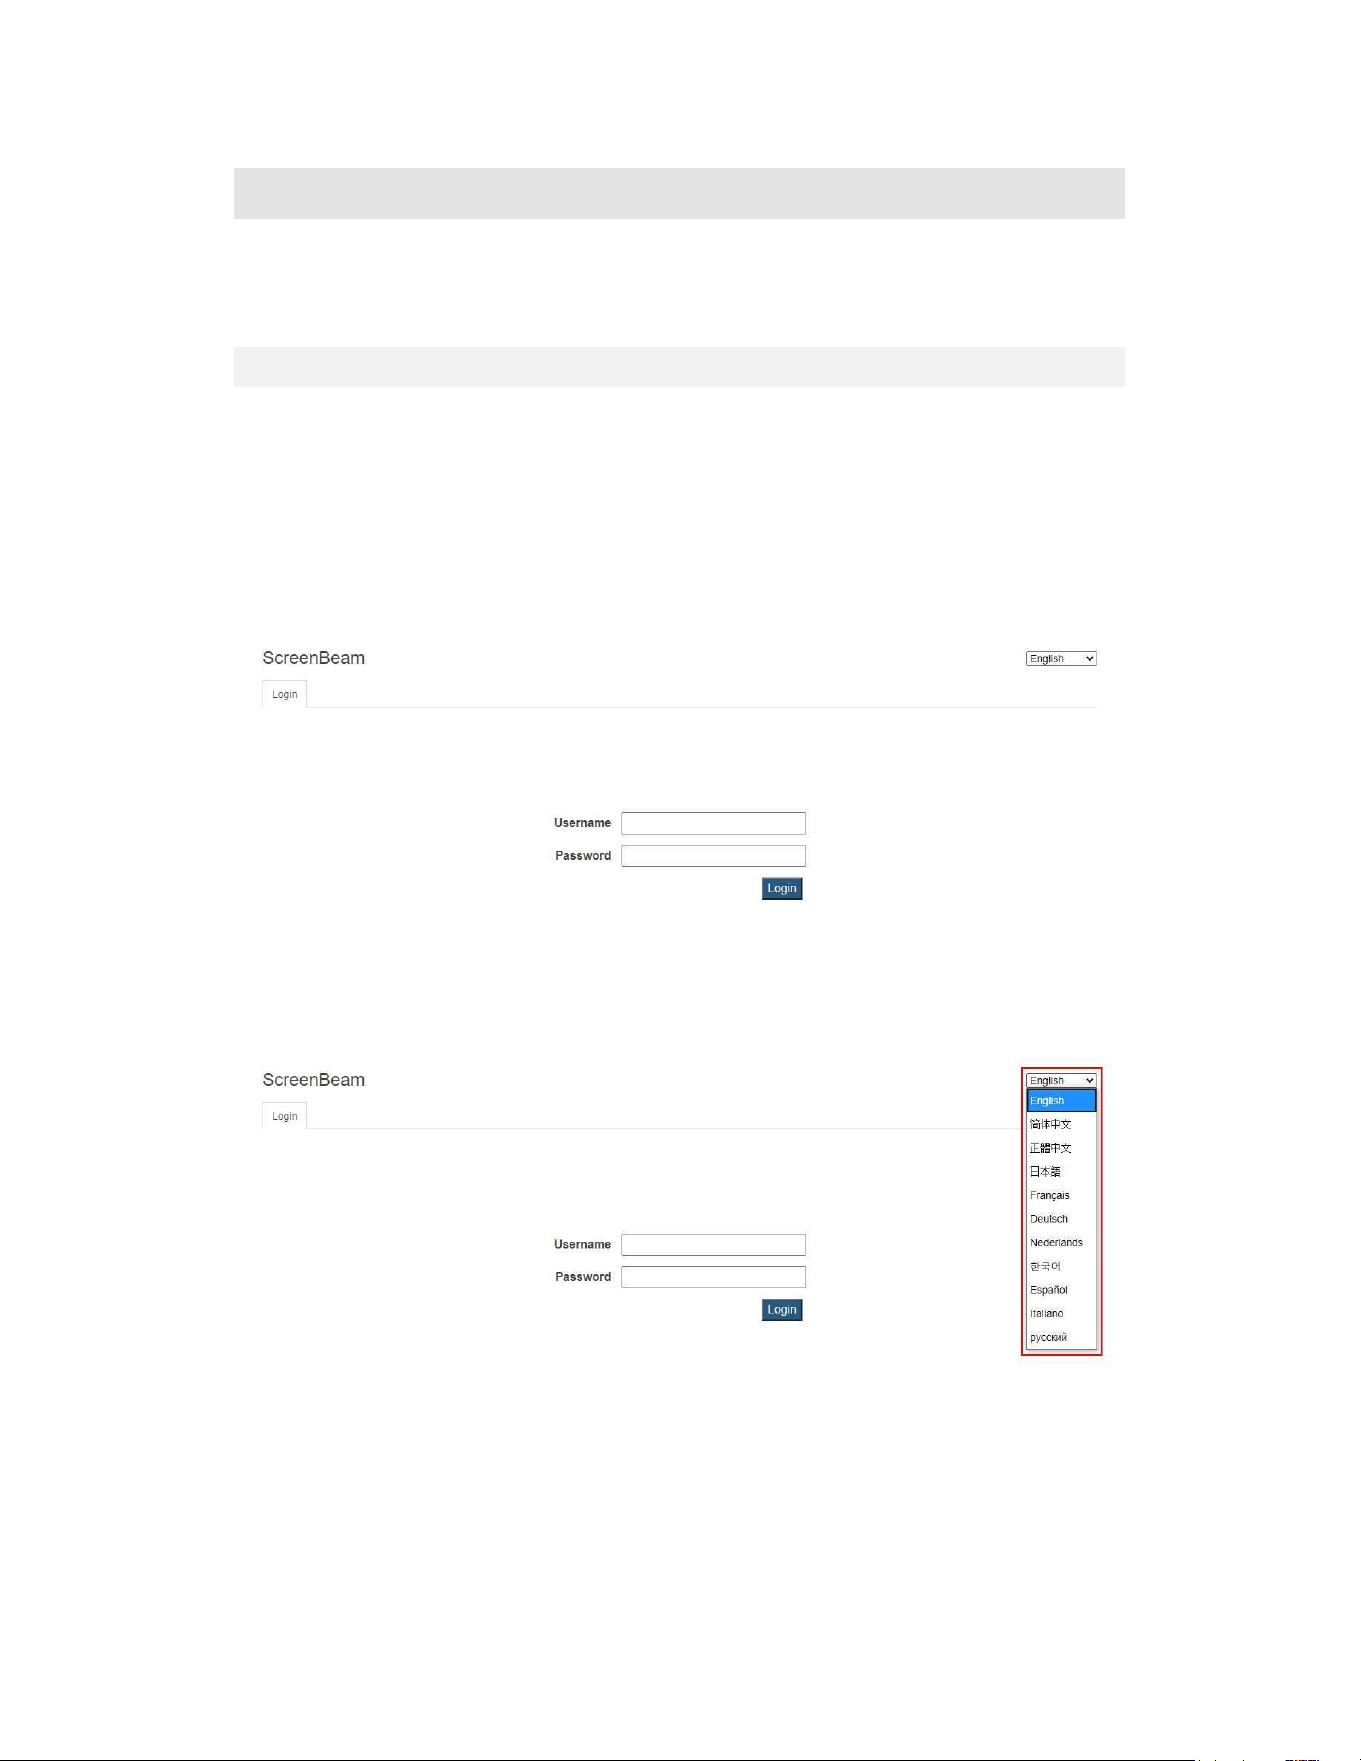
TochangetheLMI’sdisplaylanguage,followthisprocedure:
1. Openthe Local Management Interface’slogin page. RefertoSection 5.2Using Local
ManagementonScreenBeamfordetail.
2. Ontheupperrightcornerofthescreen,selectyourlanguage.Availablelanguagesare
English, SimplifiedChinese,TraditionalChinese, Japanese,French, German, Dutch,
Korean,Spanish,Italian,andRussian.
3. Thedisplaylanguagechangesimmediately.
Note:Thissettingchangesthewebpage’sdisplaylanguageonly.
40
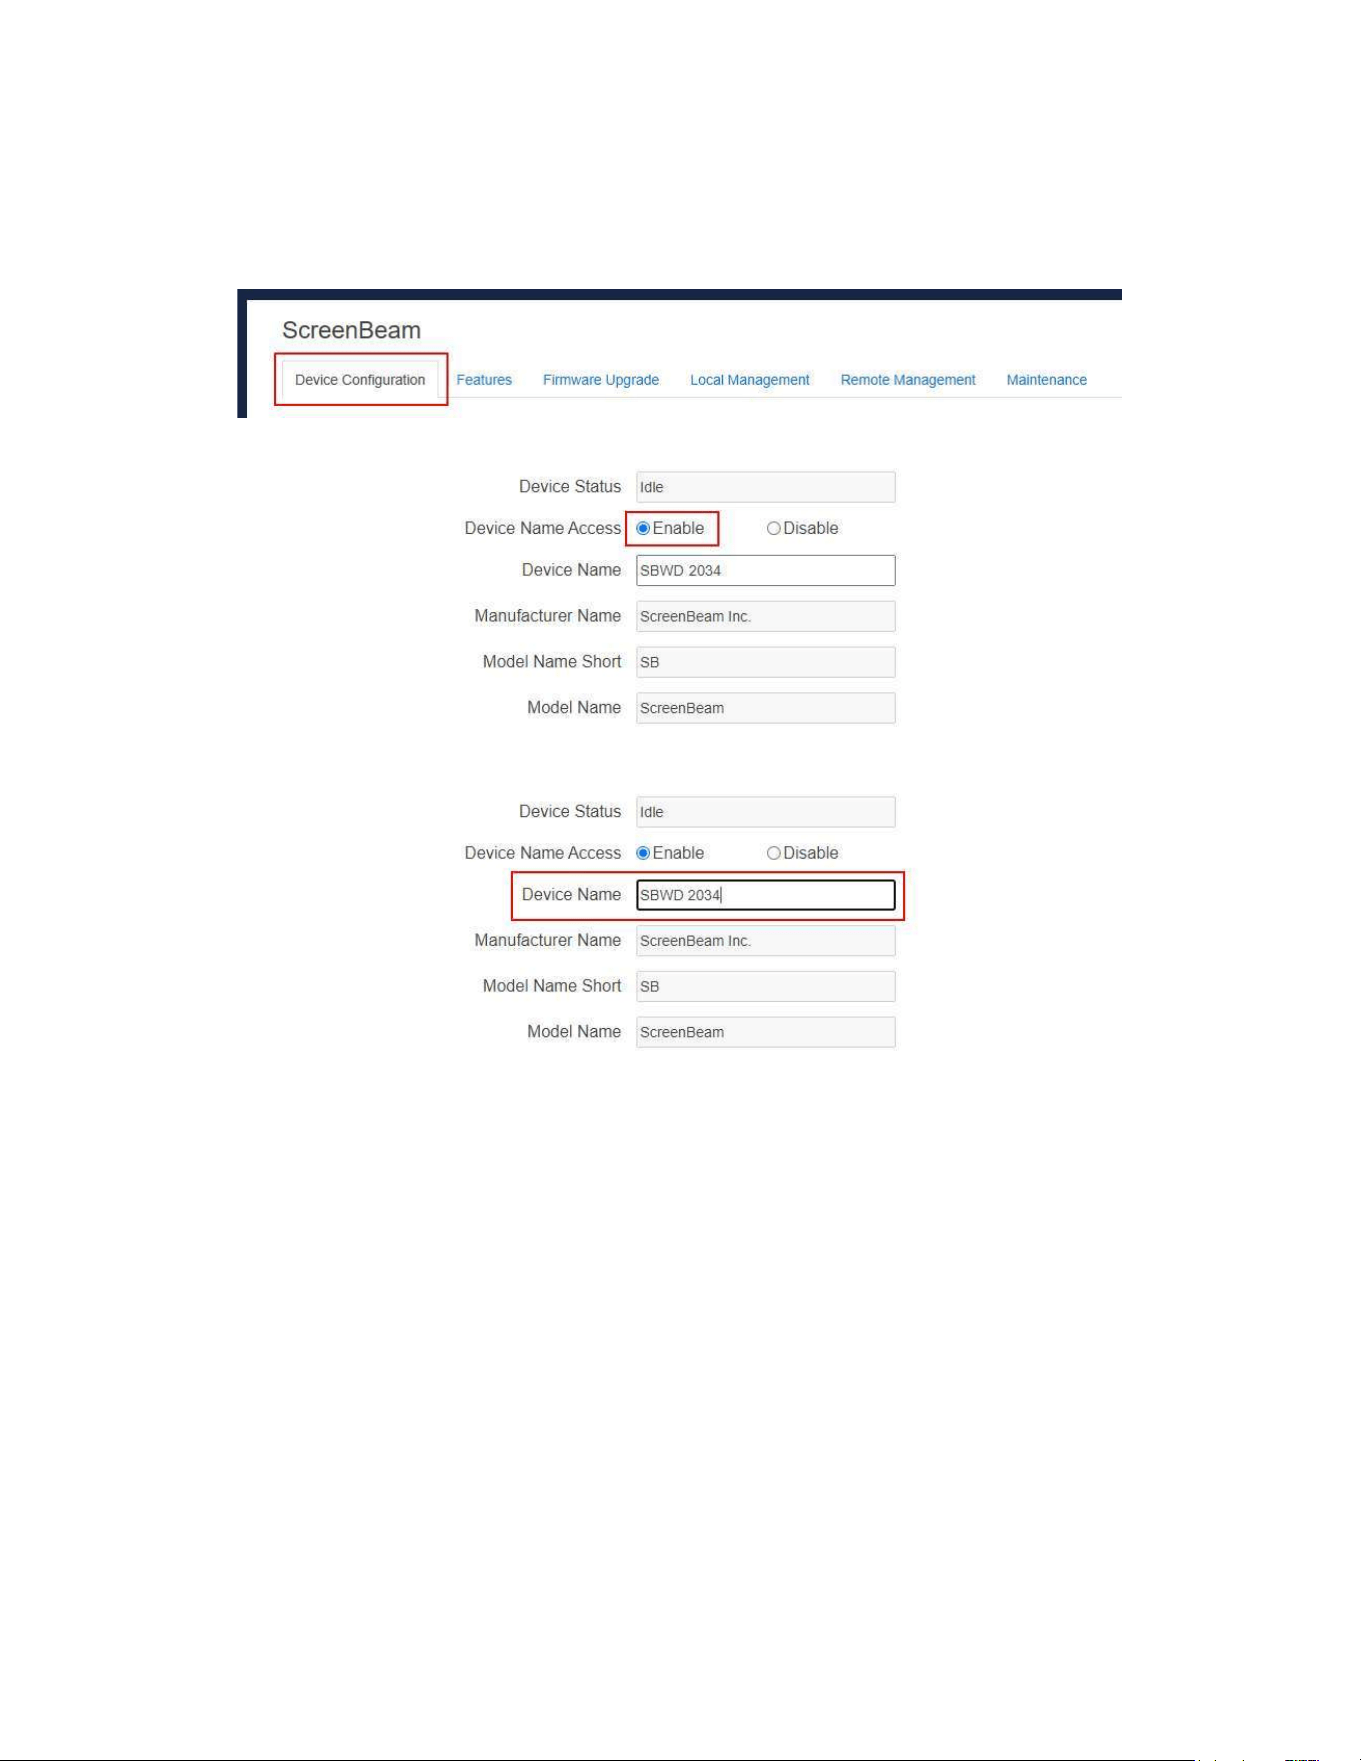
5.3.1.2RenamingtheReceiver
Torenameyourreceiver,followthisprocedure:
1. GototheDeviceConfigurationtabpagebyclickingtheDeviceConfigurationtab.
2. GototheDeviceNameAccesslineandsettheDeviceNameAccesstoEnable.
3. TypeanewnameintheDeviceNamebox.
Thereceiver’sDeviceNamesupportsthecharacterslistedbelow:
A-Z
a-z
0-9
~!@#$%^&*()_+{}|:?\-=[];',./
Japanese characters with Unicode in the following range: \u3040-\u30FF,
\u31F0-\u31FF,and\u4E00-\u9FBF.
SimplifiedandTraditionalChinesecharacters

41
4. ClicktheApplybutton,andthenclickOKonthepop-upmessageboxtoconfirm.
Note:Newsettingstakeeffectimmediately.
42
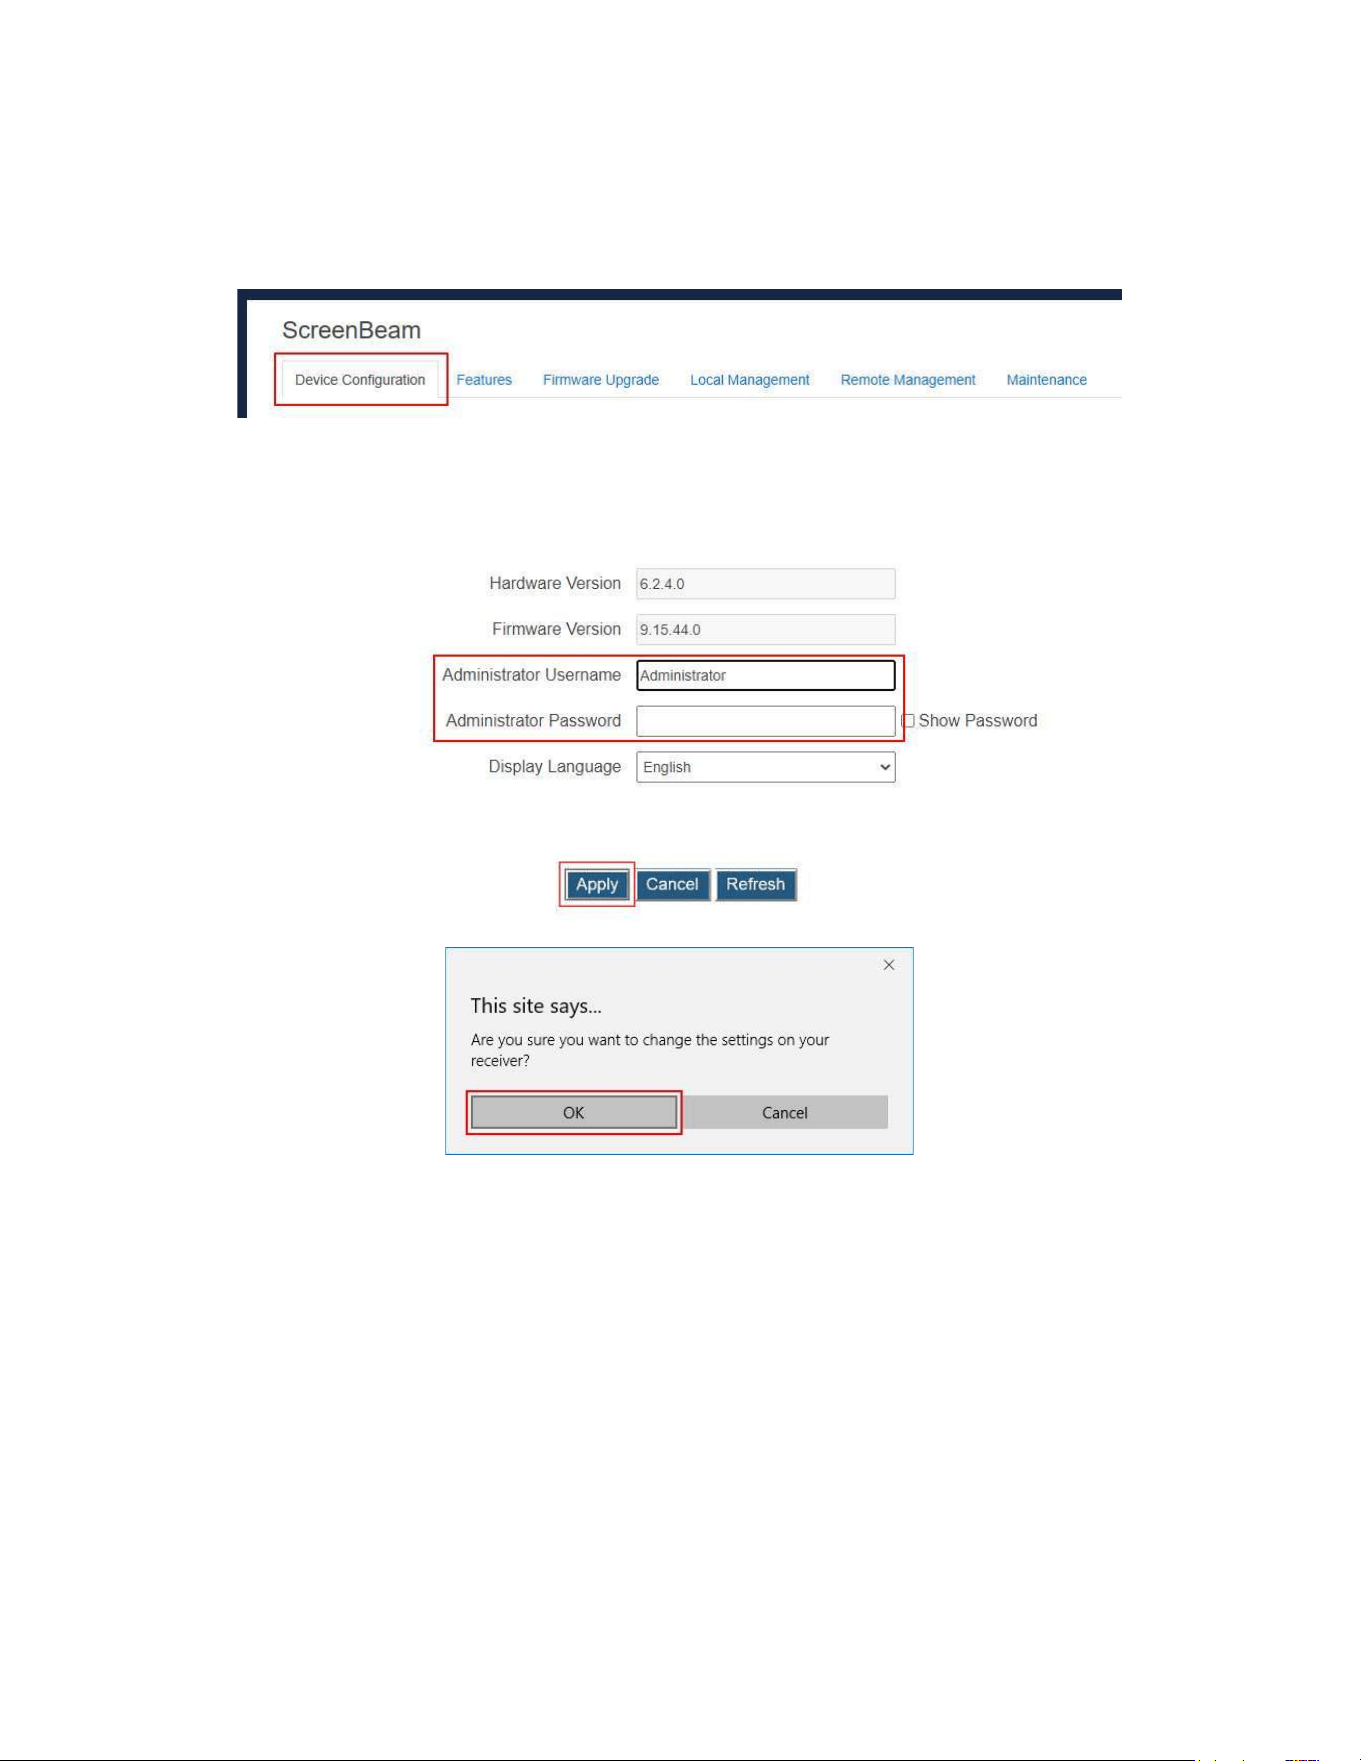
5.3.1.3SettinguptheLoginUsernameandPassword
Tomodifytheusernameandpasswordforuserlogin,followthisprocedure:
1. GototheDeviceConfigurationtabpagebyclickingtheDeviceConfigurationtab.
2. GototheAdministratorUsernameandAdministratorPasswordlines,andtypenew
username and password in the Administrator Username and Administrator
Passwordboxes,respectively.
Note:Todisplaypasswordinplaintext,checktheShowPasswordbox.
3. ClicktheApplybutton,andthenclickOKonthepop-upmessageboxtoconfirm.
43
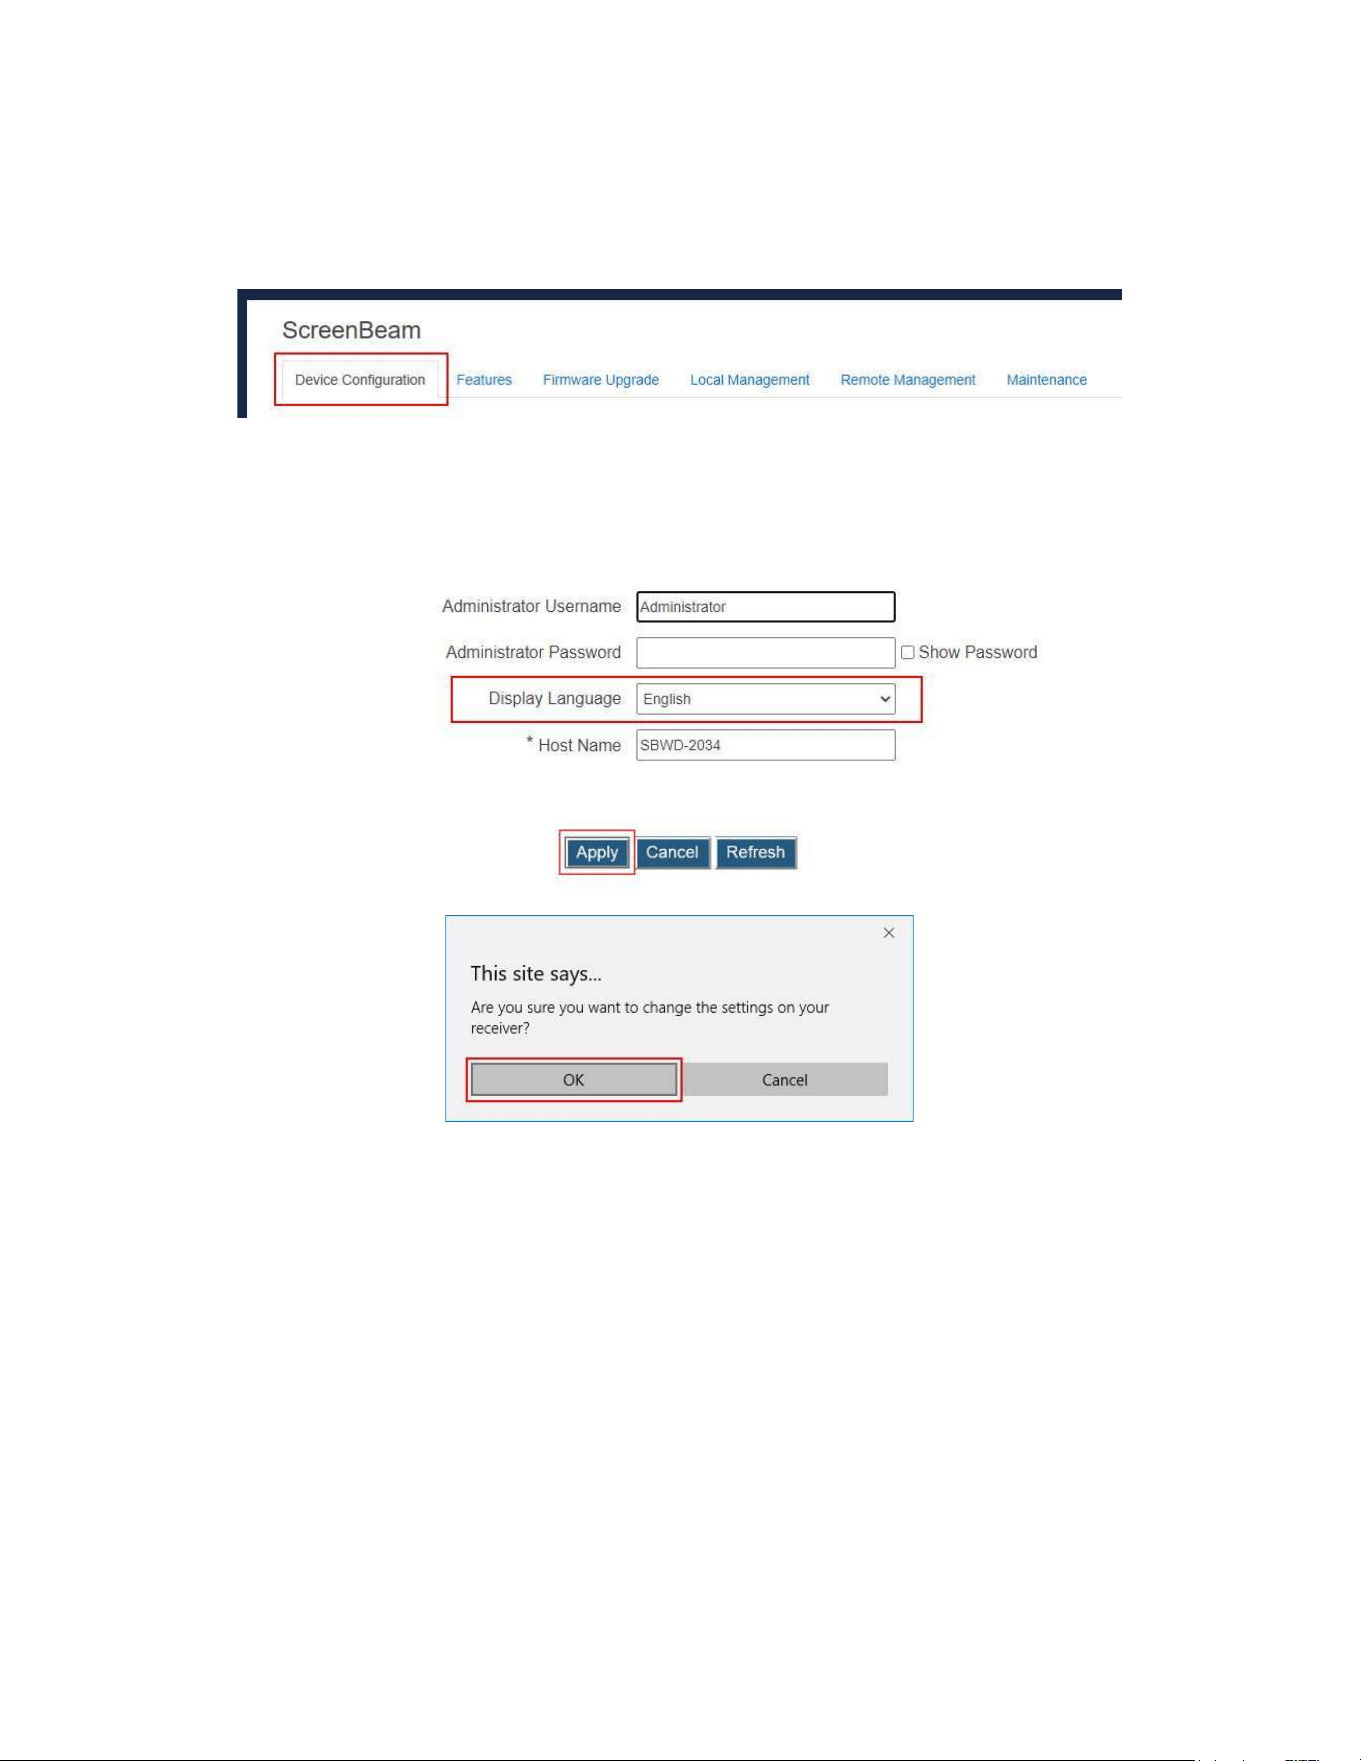
5.3.1.4SettinguptheReceiver’sDisplayLanguage
Tosetupthereceiver’sdisplaylanguage,followthisprocedure:
1. GototheDeviceConfigurationtabpagebyclickingtheDeviceConfigurationtab.
2. Go to theDisplayLanguageline,andchoose a desired language fromthe Display
Languagedrop-downbox.
Currently available languages are Simplified Chinese, Traditional Chinese, Dutch,
English,French,German,Italian,Japanese,Korean,Russian,andSpanish.
Note:ThissettingwillchangethelanguagedisplayedontheTVscreen.
3. ClicktheApplybutton,andthenclickOKonthepop-upmessageboxtoconfirm.
44
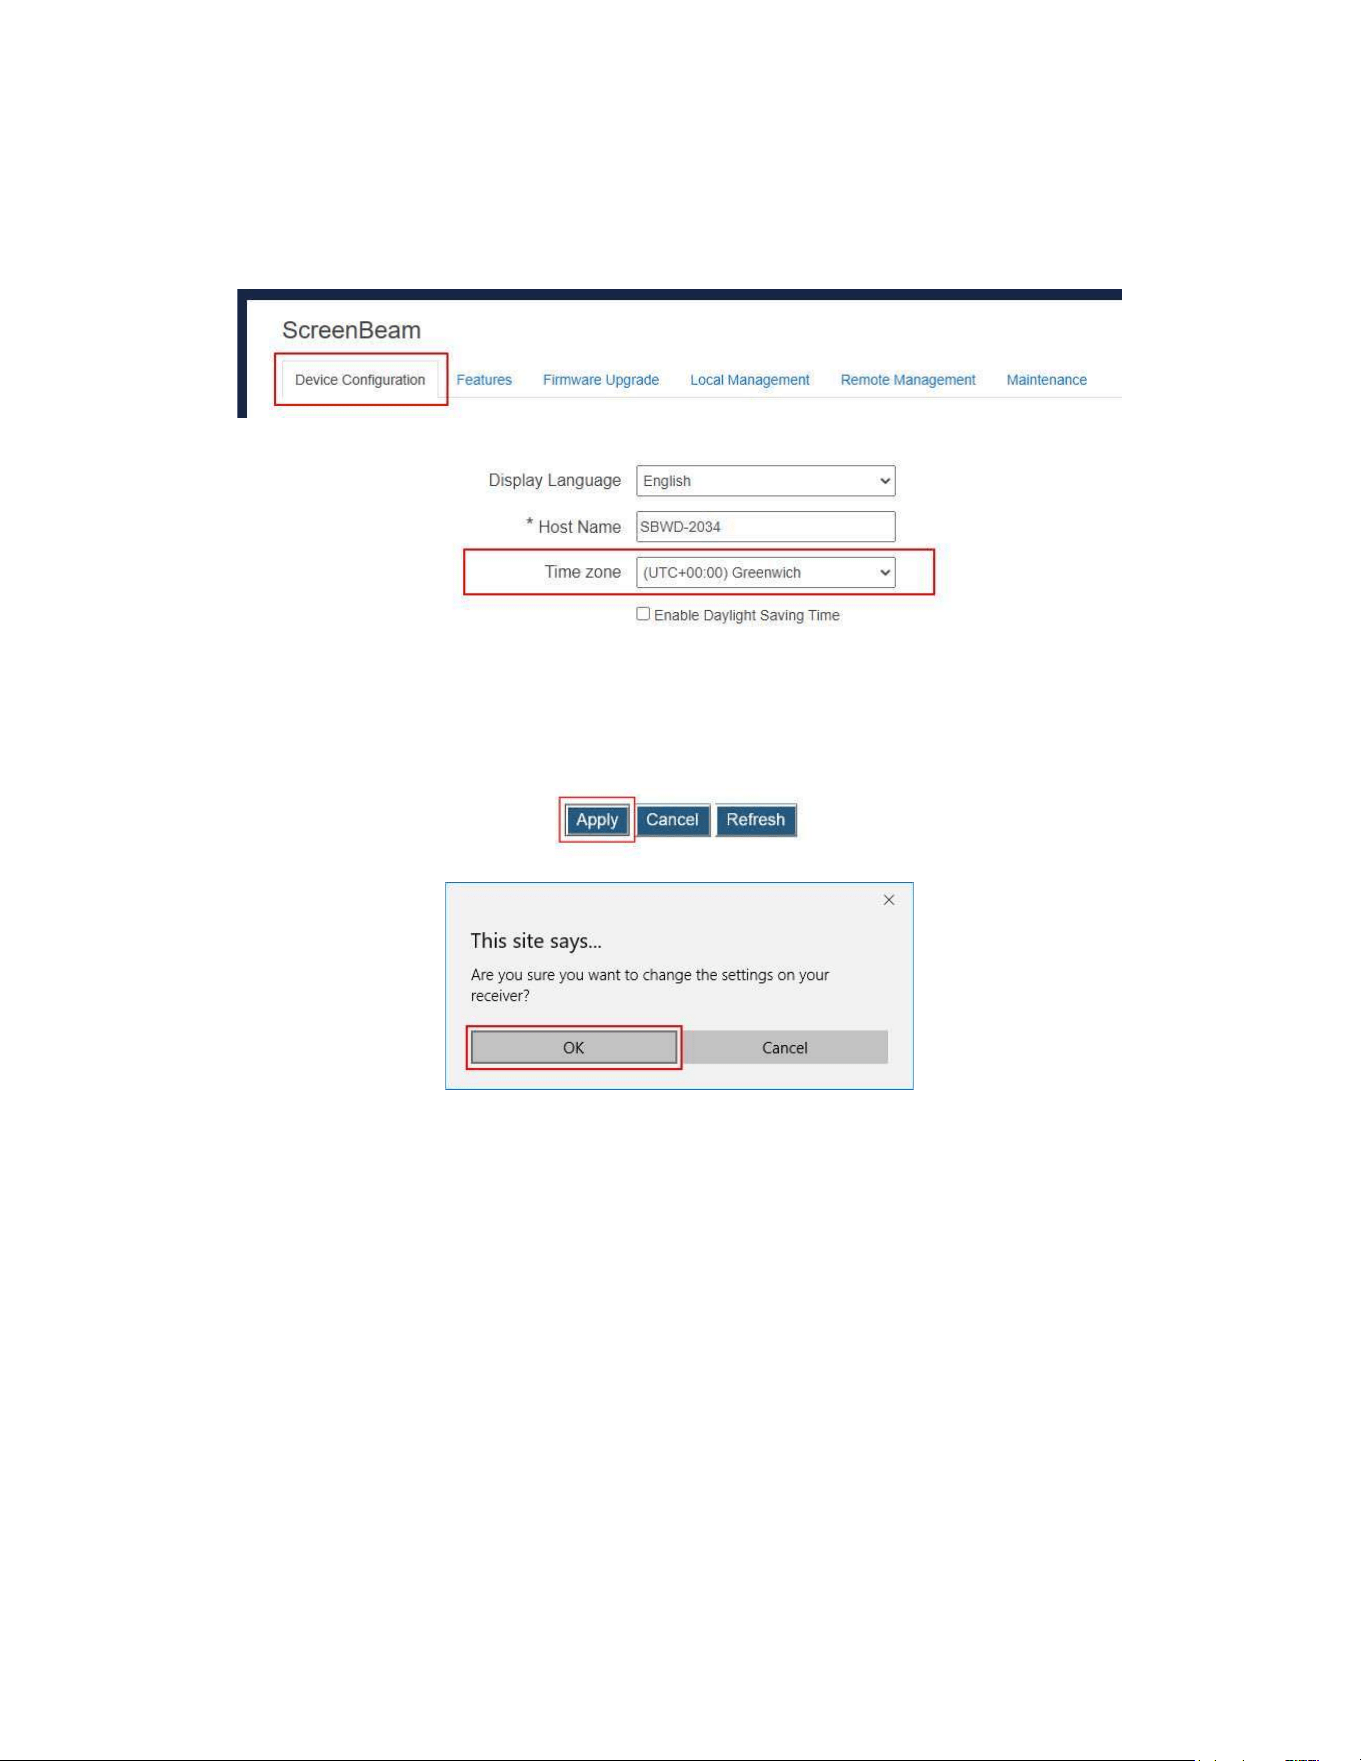
5.3.1.5SettingupTimeZone
Toselectyourtimezone,followthisprocedure:
1. GototheDeviceConfigurationtabpagebyclickingtheDeviceConfigurationtab.
2. GototheTimezonelines,andselectyourtimezoneinthedrop-downbox.
Note:ThereceiverwillsynchronizeitstimewiththeCMSserveritconnectsto,orwithan
NTPserver.
3. ChecktheEnableDaylightSavingtimeboxifyouwanttoenabledaylightsavingtime.
4. ClicktheApplybutton,andthenclickOKonthepop-upmessageboxtoconfirm.
45
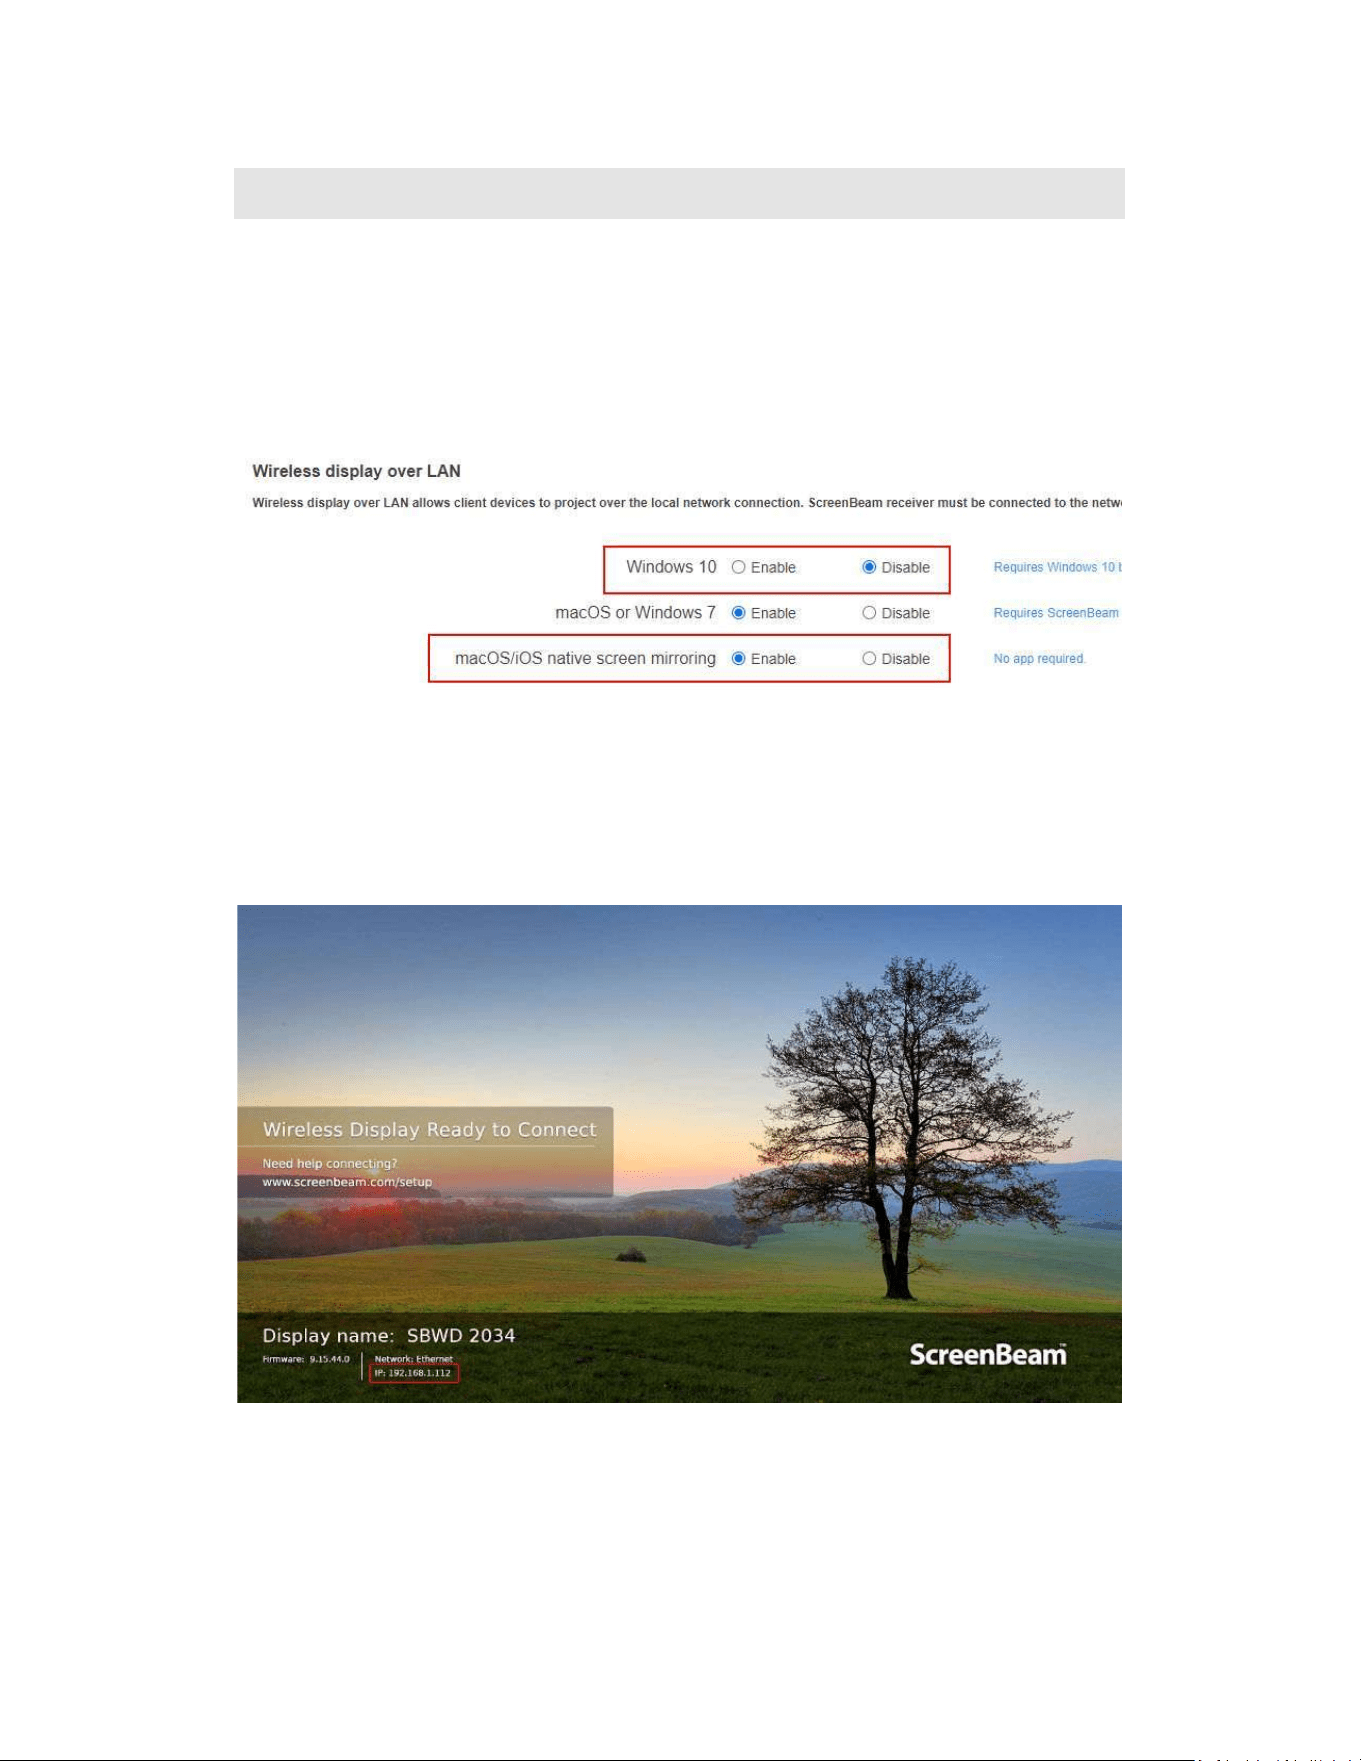
5.3.2 WirelessDisplayoverLAN
WirelessDisplayoverLANallowsWindows10/11devicestoprojectoverthelocalnetwork
connection.ScreenBeamreceivermustbeconnectedtothesamenetworkwiththesource
deviceviaEthernet(recommended)orviawireless.
5.3.2.1SettingupWirelessDisplayoverLANforWindows10/11Devices
IfyourWindows10/11deviceisnotMiracastcapable,youcanstillprojectyourscreenover
LAN,aslongasthefollowingrequirementsaremet:
Operating system: Windows 10 (version 1703 or newer) and Windows 11 (21H2 or
newer)
100M/1000M Ethernet adapter (optional, but recommended) and WiFi adapter are
available
Stablelocalareanetwork
Windows10/11deviceandScreenBeam960receiverareconnectedtothesameLAN
TosetupwirelessdisplayoverLANforWindows10/11devices,followthisprocedure:
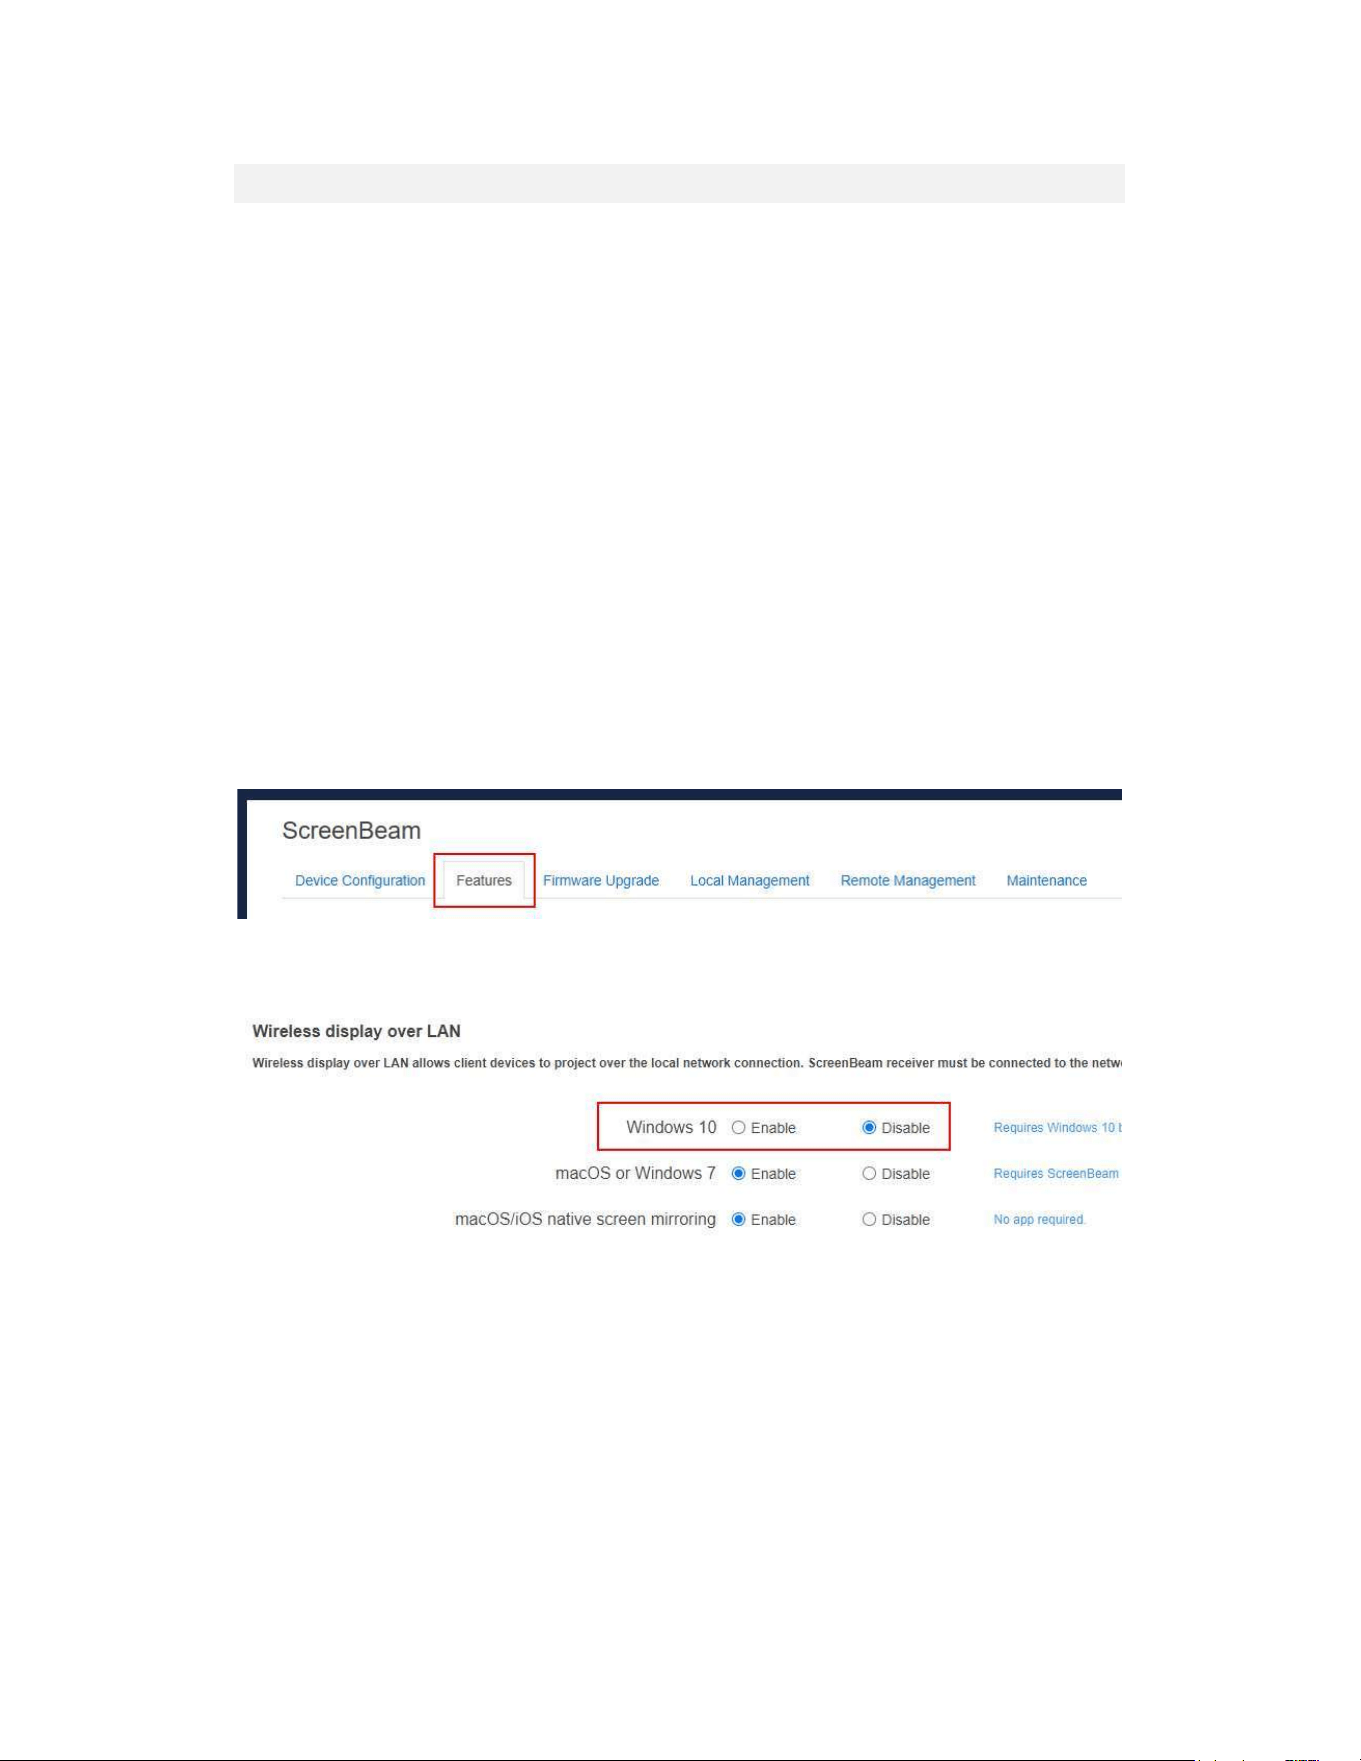
1. GototheFeaturestabpagebyclickingtheFeaturestab.
2. Go to the Wireless display over LAN section, and set Windows 10 to Enable or
Disable.
Enable:Windows10/11devicesareallowedtoprojectoverthelocalnetwork.
Disable:Windows10/11devicesarenotallowedtoprojectoverthelocalnetwork.By
default,thisfeatureisdisabled.

46
3. ClicktheApplybutton,andthenclickOKonthepop-upmessageboxtoconfirm.
47
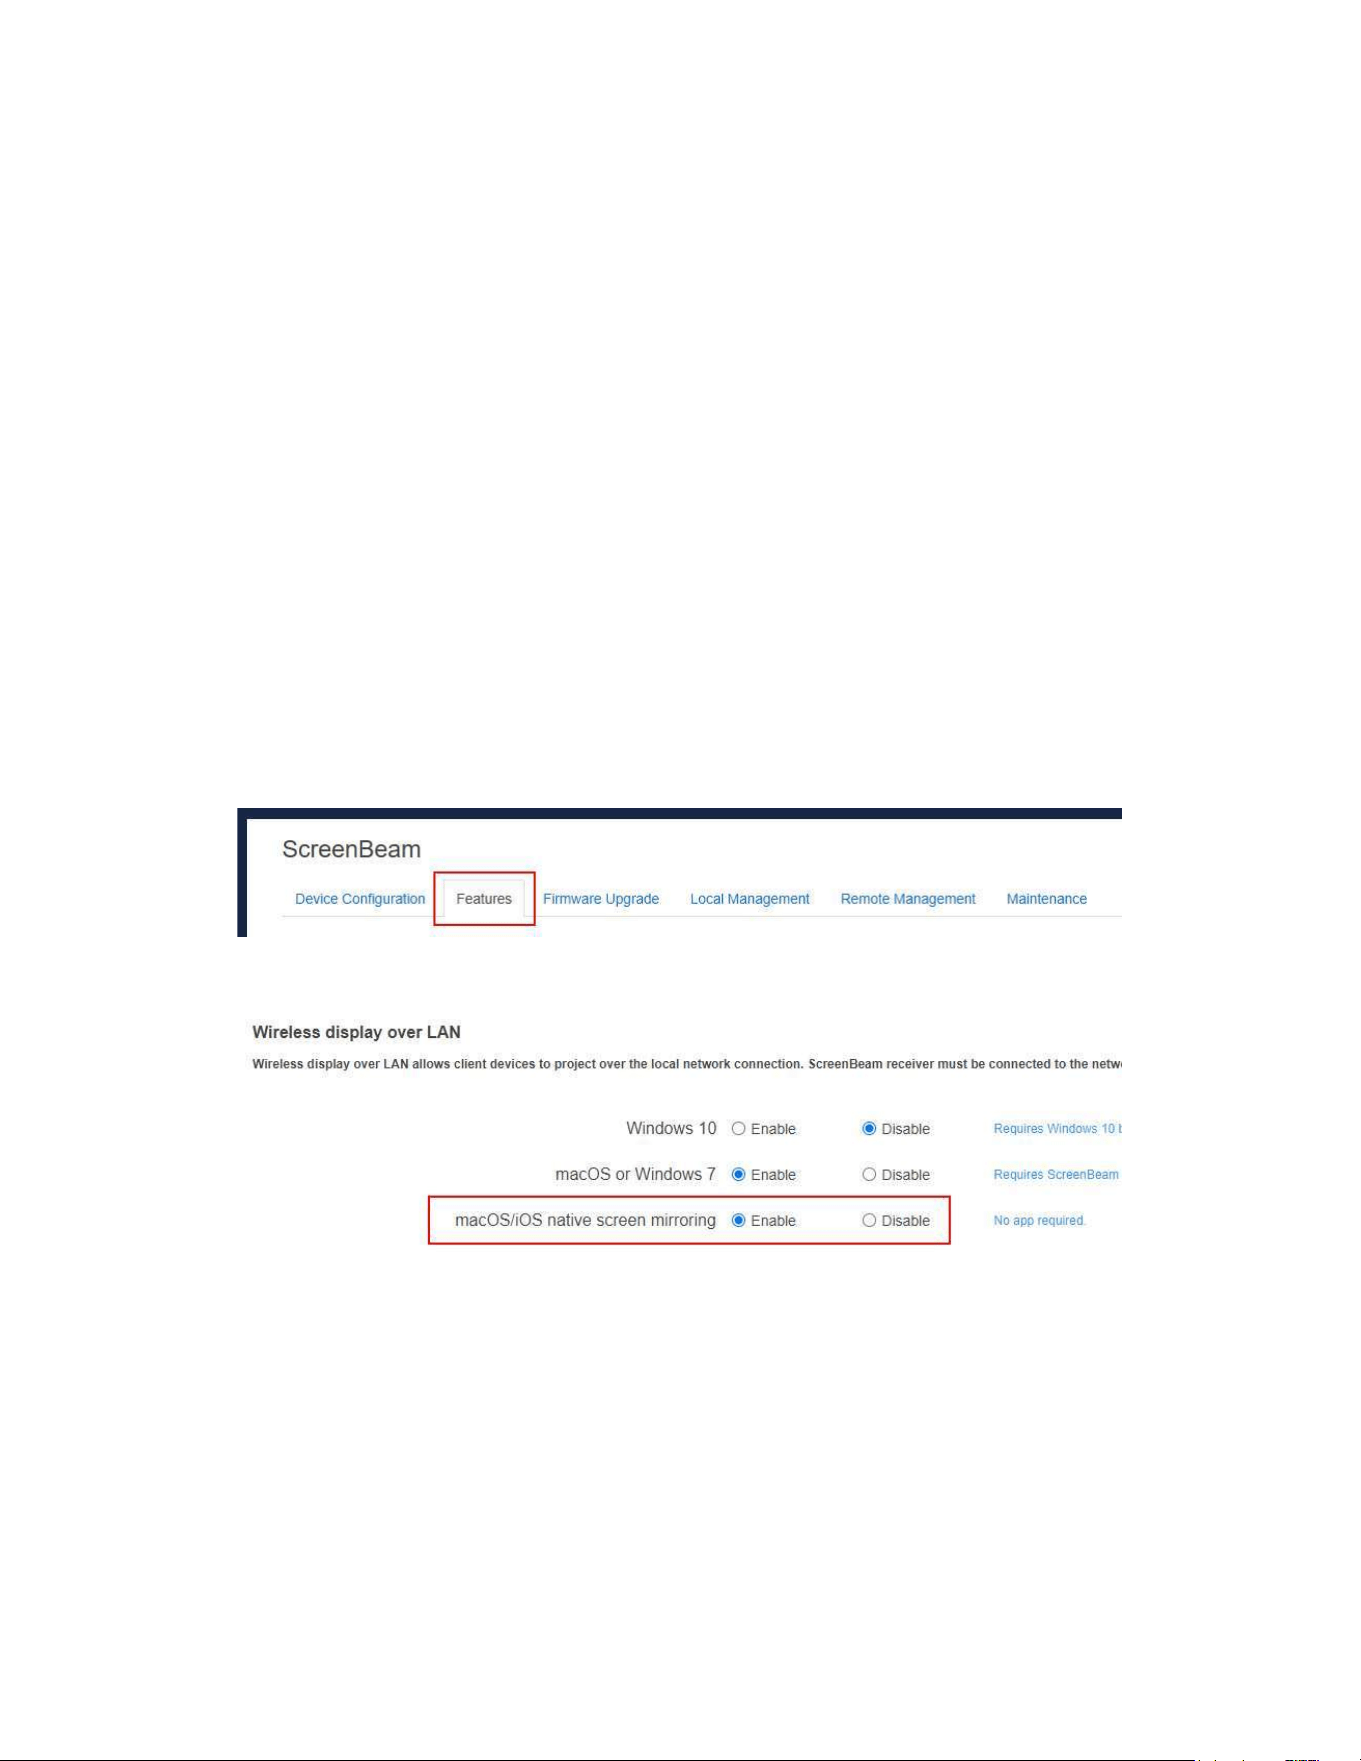
5.3.2.2SettingupNativeScreenMirroringformacOS/iOSDevices
TheWirelessDisplayoverLANfeatureallowsmacOS/iOSdevicestoprojectoverthelocal
networkwithnativescreenmirroring.
ENurethefollowingrequirementsaremet:
Operatingsystem:macOSoriOS
100M/1000M Ethernet adapter (optional, but recommended) and Wi-Fi adapter are
available
Stablelocalareanetwork
MacOS/iOSdeviceandScreenBeam960receiverareconnectedtothesameLAN
Required ports: UDP 5353, TCP 47000, TCP 7000, TCP 7100, TCP&UDP
18000-18009
•
UDP5353,forMulticastDNS(mDNS)discovery
•
TCP47000,forAirtuneinAirPlay
•
TCP7000,forAirPlaybypassingURL
•
TCP7100,forAirPlaymirroring
•
TCP&UPD18000-18009,formacOSandiOSAVdata
TosetupnativescreenmirroringformacOS/iOSdevices,followthisprocedure:
1. GototheFeaturestabpagebyclickingtheFeaturestab.
2. Go to the Wireless display over LAN section, and set macOS/iOS native screen
mirroringtoEnableorDisable.
Enable:macOS/iOSdevicesareallowedtoprojectoverthelocalnetworkwithnative
screenmirroring.Bydefault,thisfeatureisenabled.
Disable: macOS/iOS devices are not allowed to project over the local network with
nativescreenmirroring.
48
3. ClicktheApplybutton,andthenclickOKonthepop-upmessageboxtoconfirm.
49
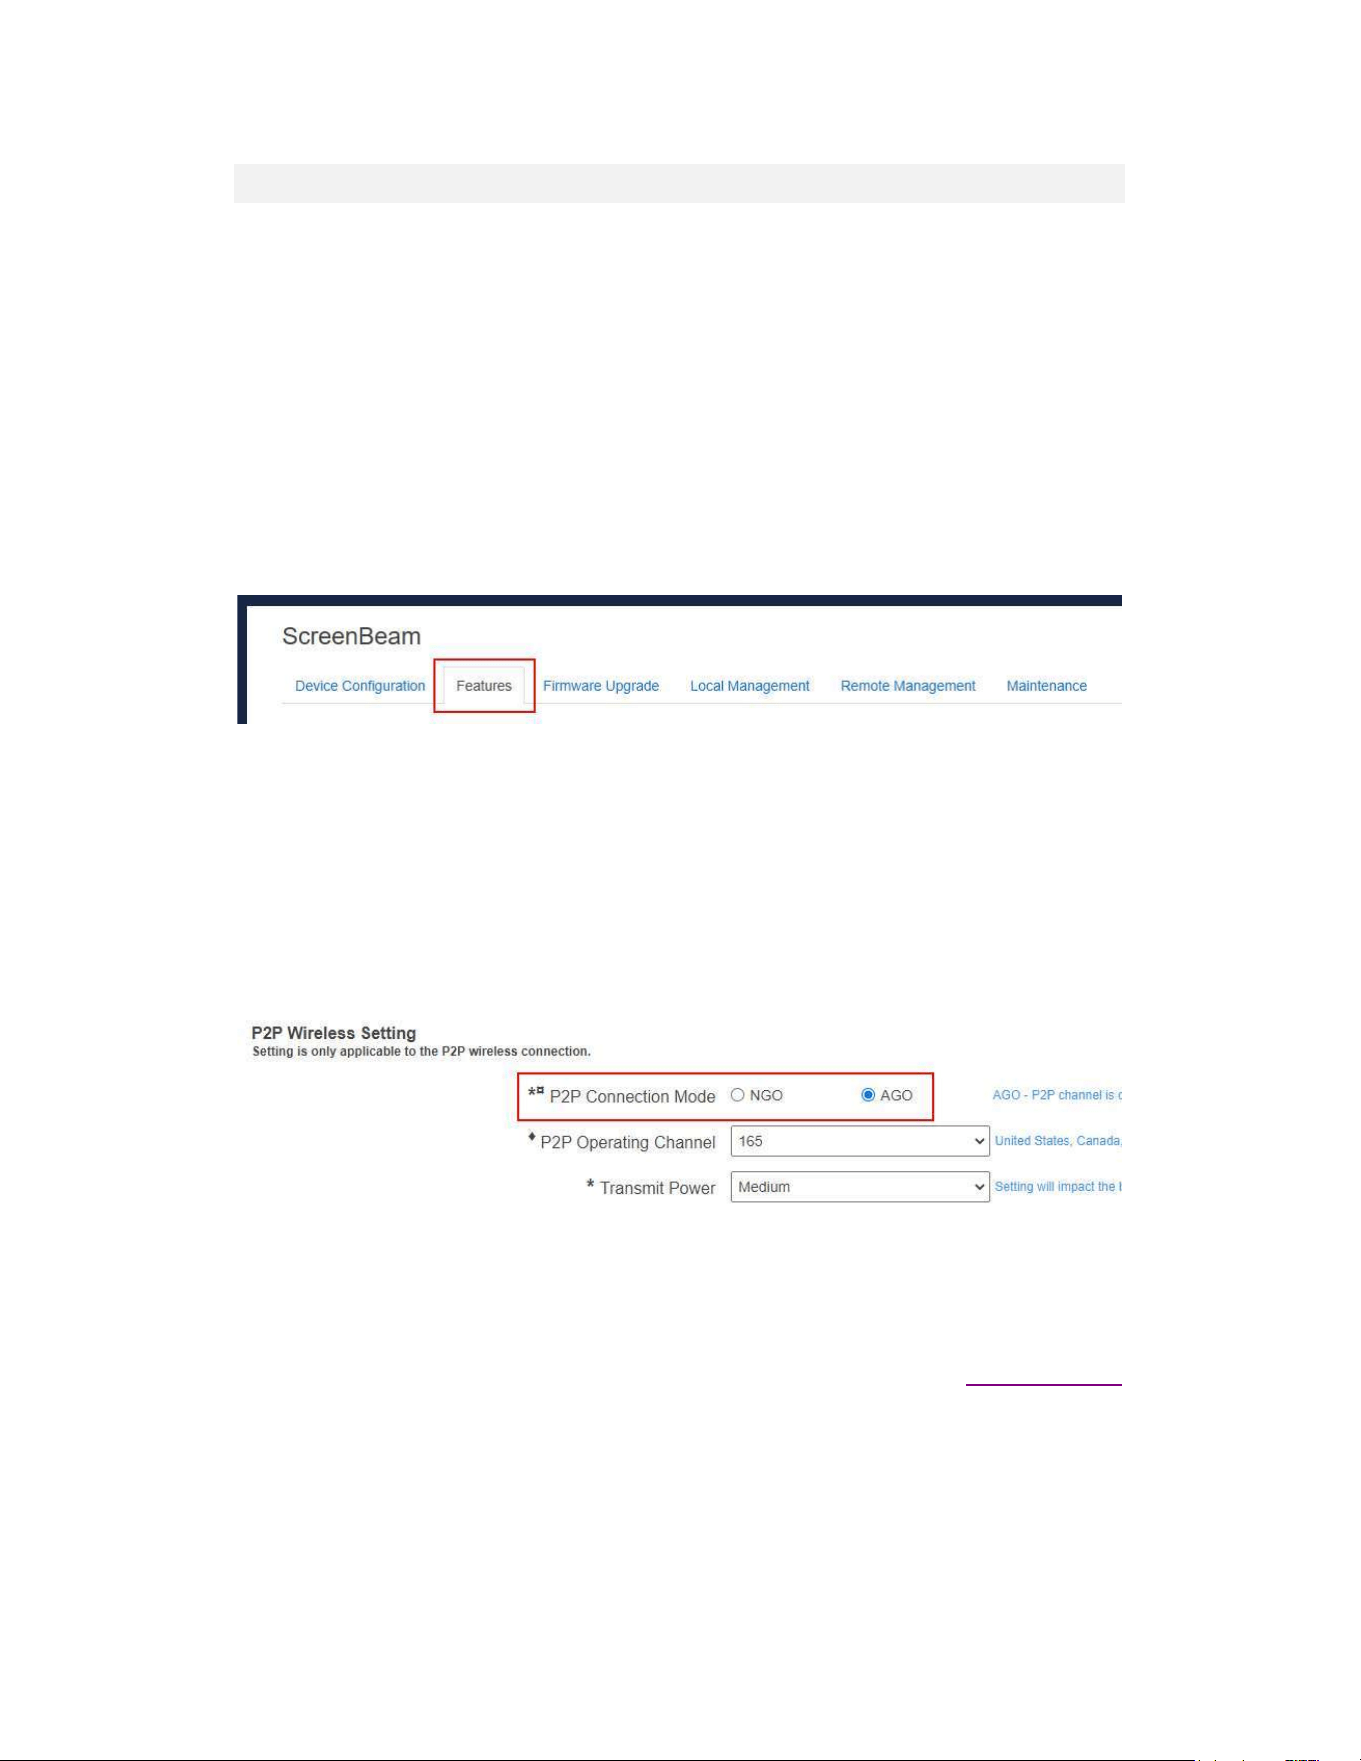
5.3.3 P2PWirelessSettings
ThissectionintroducestheP2Pconnectionmodes,P2Poperatingchannel,transmitpower,
andforcedisconnection.
5.3.3.1SettingupP2PConnectionMode(AGOorNGO)
TherearetwoP2Pconnectionmodes:NGOandAGO.InAGO,thereceiverworksasthe
groupownerintheP2Pconnection,anditcanspecifythecommunicationchannelforthe
connection. If your receiver suffers severe interference in NGO mode, you can set your
receiverinAGOmode,andsetittoworkonacleanchannel.
ToselectaP2Pconnectionmode,followthisprocedure:
1. GototheFeaturestabpagebyclickingtheFeaturestab.
2. GototheP2PWirelessSettingsection,andselectaP2Pconnectionmodebetween
NGOandAGO.
AGO:AGOreferstoautonomousgroupownerduringaP2Pconnectionnegotiation.
In AGO mode, the receiver works as the group owner of the session, and the
communicationchannelisdefinedbythereceiver.
NGO: NGO refers to non-GO. In this mode, the communication channel will be
consistentwith thesourcedevice,orbedeterminedthrough negotiationbetween
thereceiverandtheconnectingdevice.
Note:ChangingtheP2Pconnectionmodemayleadtothefollowingproblems:
Methodtoaccessthelocalmanagementinterfacewebpage.Refertosection5.2Using
LocalManagementonScreenBeamfordetail.
PreviousMiracastdevice(s)connectedtothisScreenBeamreceiverneedstohaveits
existingconnectionprofileremoved,inordertoreconnect.RefertotheTroubleshooting
sectionfordetailonhowtoremoveareceiver’sconnectionprofile.

50
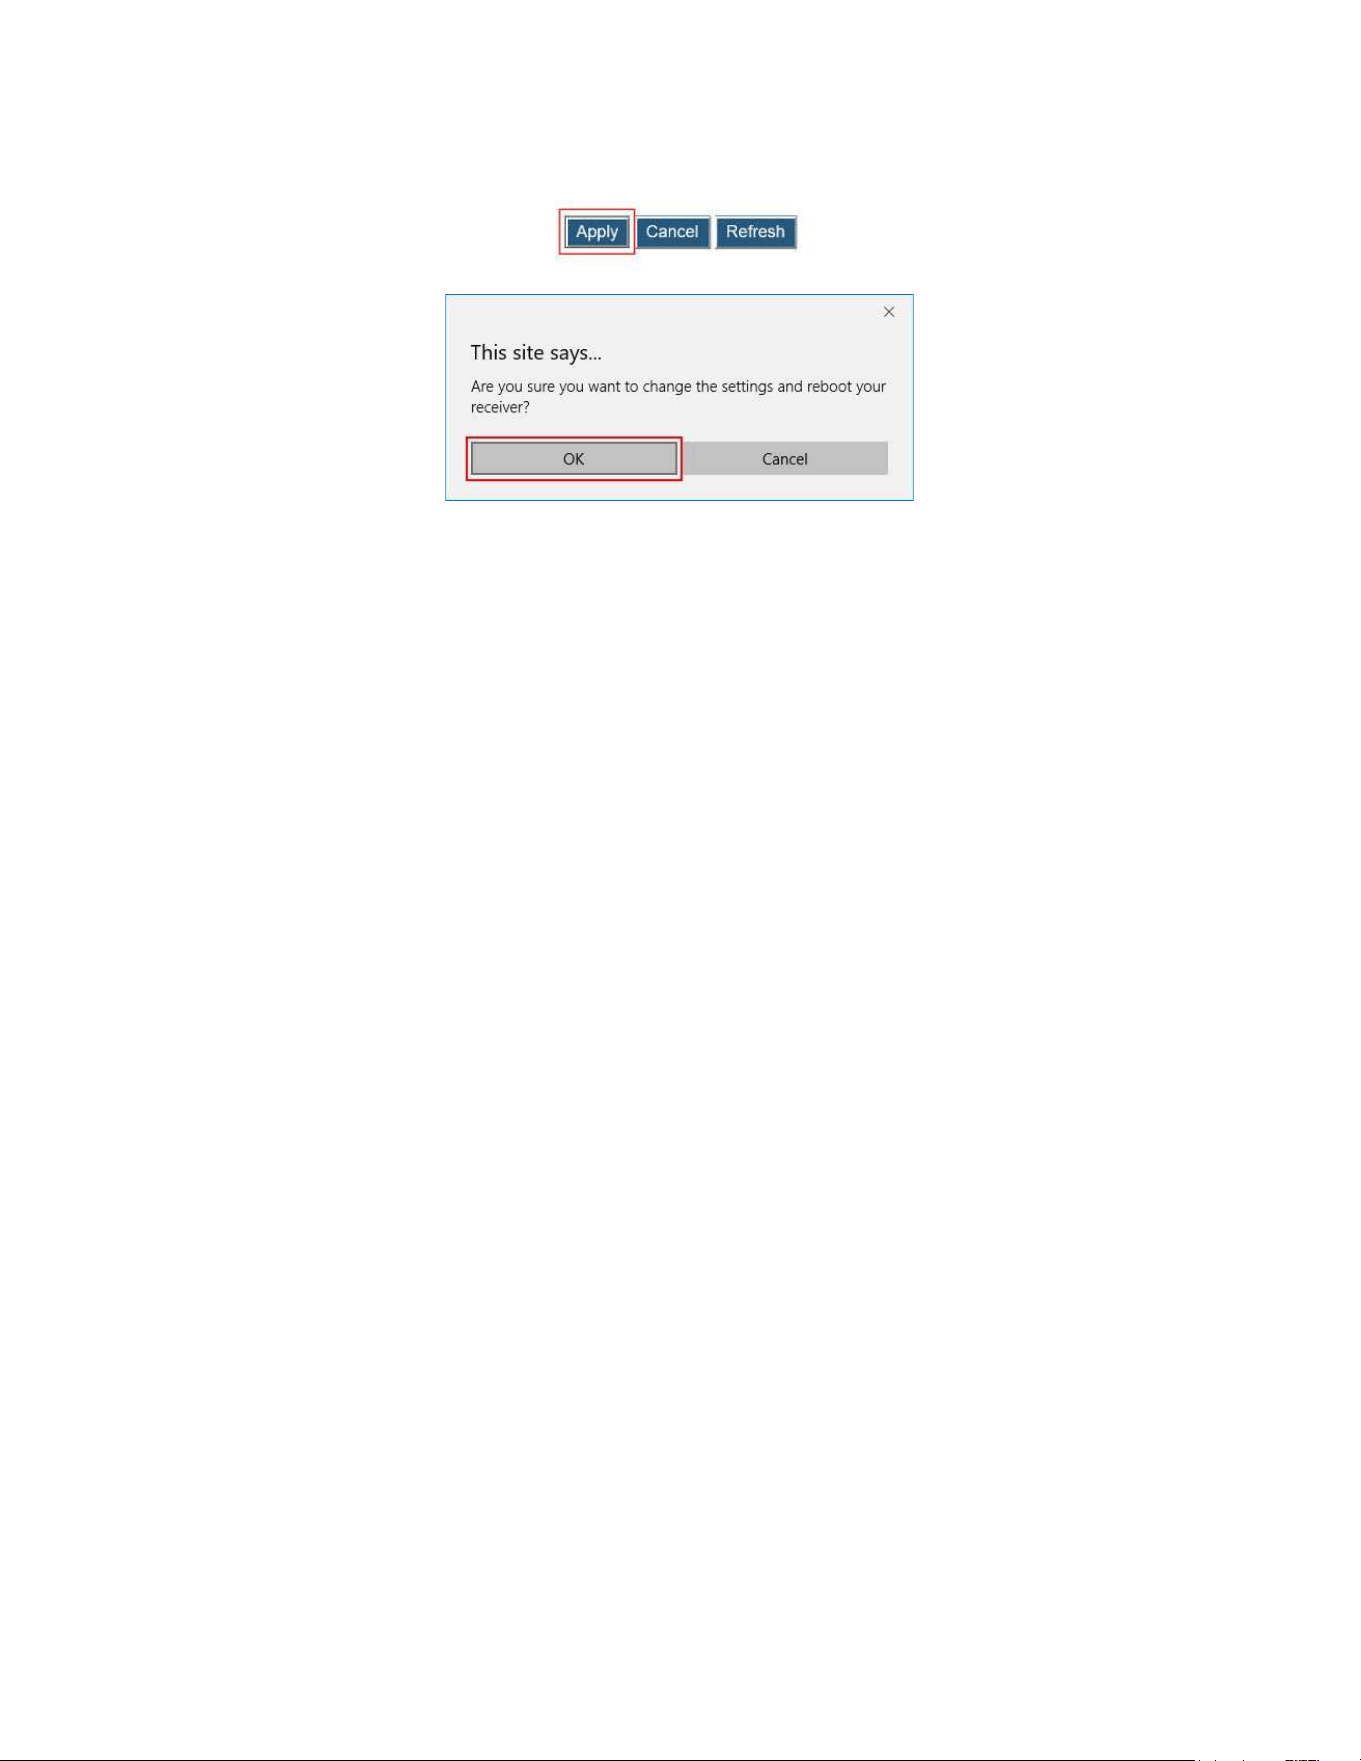
3. ClicktheApplybutton,andthenclickOKonthepop-upmessageboxtoconfirm.
4. Thereceiverreboots,andnewsettingtakeseffectafterthereboot.

51
5.3.3.2SettingupP2POperatingChannel(AGOModeOnly)
WhenAGOisenabled,usersareallowedtodefineanoperatingchannelforcommunication
betweenthewirelessdisplayreceiverandthesourcedevice.
ThisfeatureisavailableinAGOmodeonly.
Tosetupthereceiver’soperatingchannel,followthisprocedure:
1. GototheFeaturestabpagebyclickingtheFeaturestab.
2. Goto theP2P WirelessSetting section,and selectadesiredchannelfromtheP2P
OperatingChanneldrop-downbox.
Channelsfrom1to13belongtothe2.4GHzband;andchannelsfrom36to165belongto
the5GHzband.Bydefault,channel165isused.
Availabilityofchannelsdependsonthesalesregion(countrycode).
You should select a channel based on your network environment. Generally, cleaner
channels (where less devices work) will provide better performance. You can use Wi-Fi
Analyzertohelpyouidentifyacleanchannel.
Note:ScreenBeamreceiversdonotsupportDynamicFrequencySelection(DFS)channels,
50 through 144, because it's prohibited in a direct Wi-Fi usage model. You should
disconnectyoursourcedevicefromtheDFS-capablerouter(AP)orconnecttoanon-DFS
APiftheWi-Fiadapterofyoursourcedevicecannotworkindualbands.
3. ClicktheApplybutton,andthenclickOKonthepop-upmessageboxtoconfirm.
Note:Newsettingtakeseffectonthenextconnection.
52
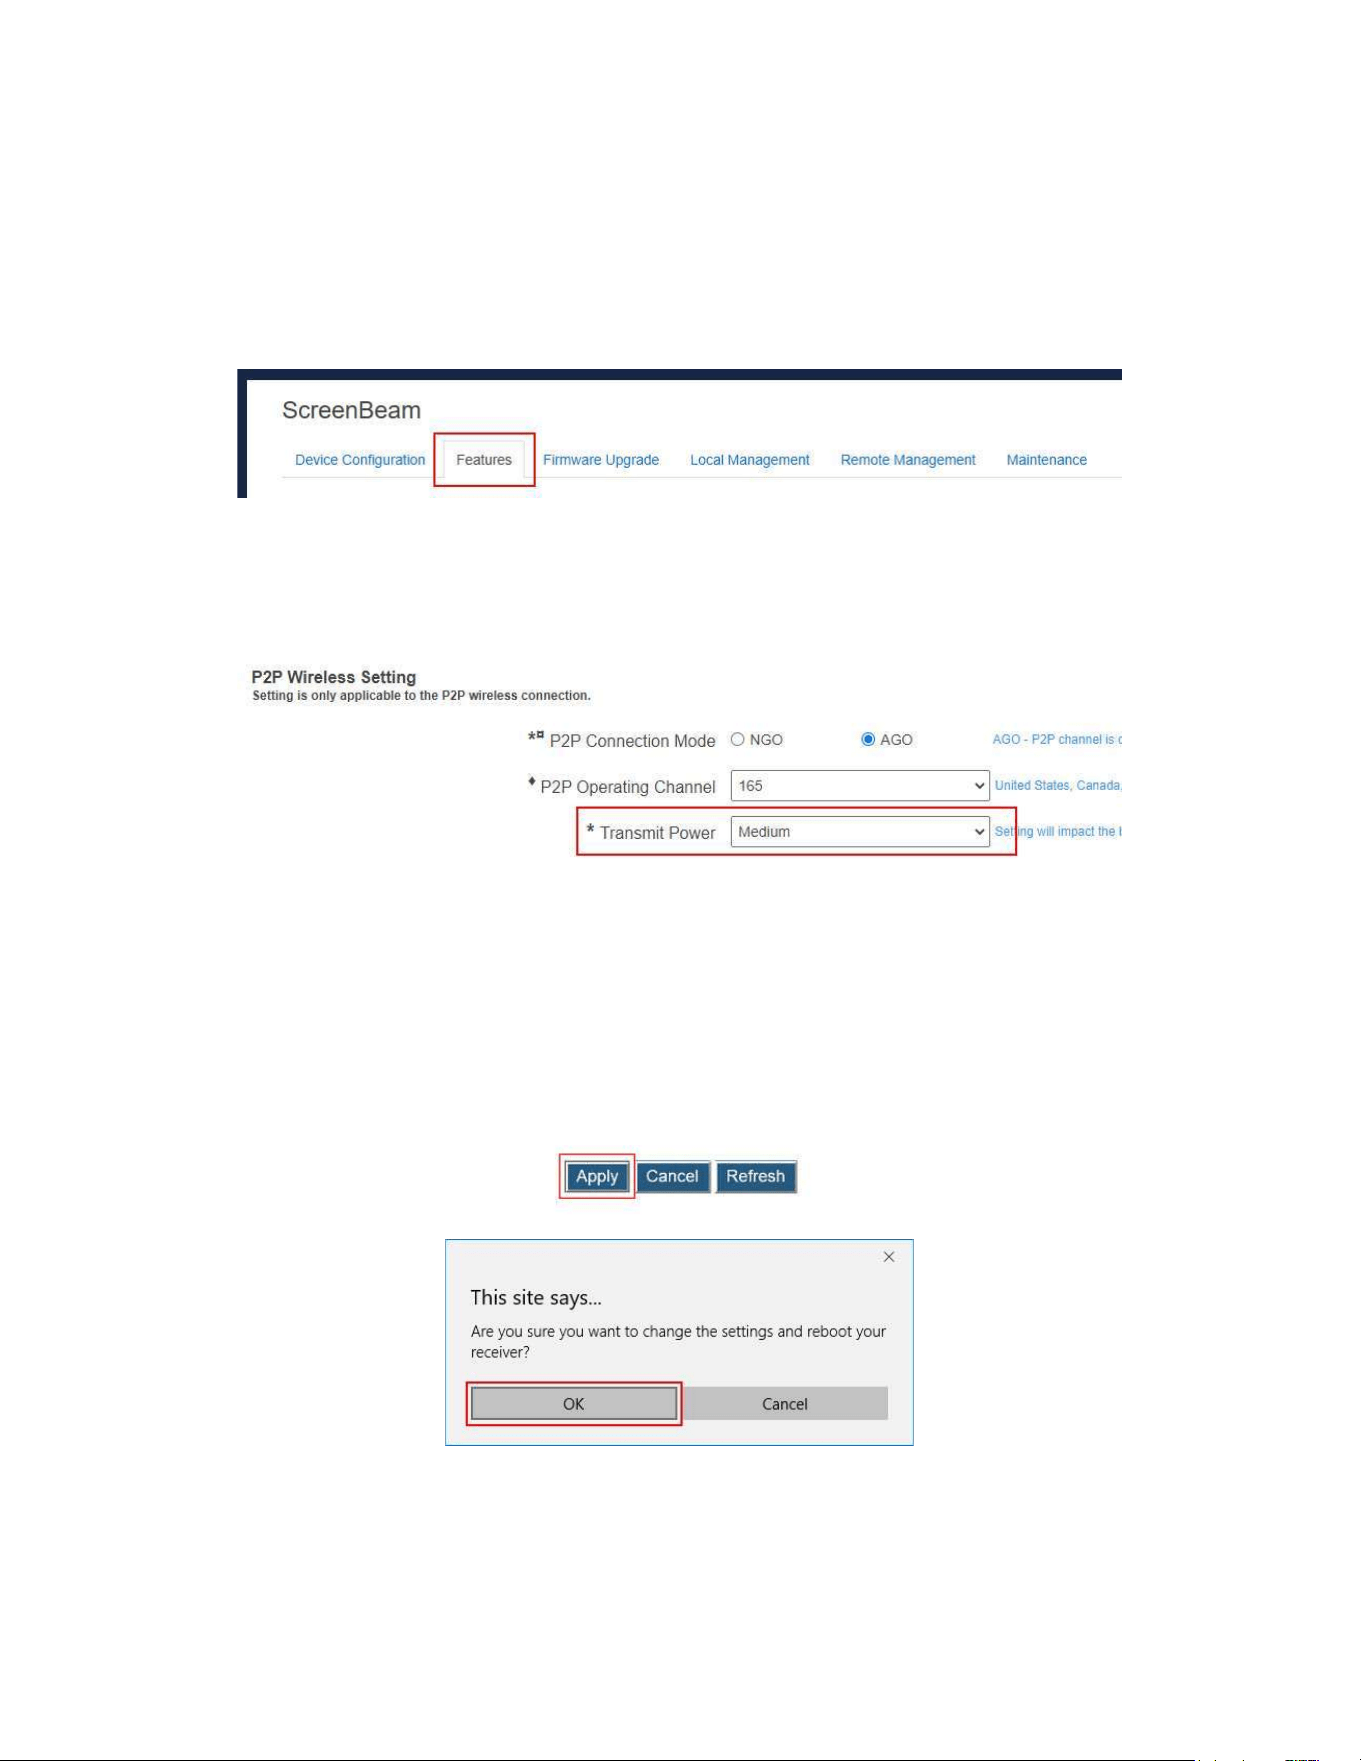
5.3.3.3SettingupTransmitPower
ScreenBeam 960 allows users to tune down or up the transmission power of the Wi-Fi
adapterforMiracastconnection.
Tosetupthereceiver’stransmissionpower,followthisprocedure:
1. GototheFeaturestabpagebyclickingtheFeaturestab.
2. GototheP2PWirelessSettingsection,andselectanoptionfromtheTransmitPower
drop-downbox.
Lowertransmitpowercanreduce interferencetothe nearby devices.Highertransmit
powercanensurelongerworkingdistance.
3. ClicktheApplybutton,andthenclickOKonthepop-upmessageboxtoconfirm.
4. Thereceiverreboots,andnewsettingtakeseffectafterthereboot.
53
5.3.4 SecuritySettings
Thissectionintroducesthereceiver’sPINpairingmethods.
5.3.4.1SettingupPINPairingMethod
TosetupPINpairingmethod,followthisprocedure:
1. GototheFeaturestabpagebyclickingtheFeaturestab.
2. GototheSecuritySettingsection,andsettheForcePINPairingfeaturetoOnorOff.
Select"Off"todisablethePINenforcementfunction.PINorPBCpairingisused
whenconnectingasourcedevicetothereceiverforthefirsttime.
Select"On"toenablethePINenforcementfunction.Inthiscase,youmustentera
PINcodeonthedeviceconnectingtothereceivereverytimeorthefirsttime.
Note:SomewirelessdisplaysourcedevicemaynotsupportPINentryandmaynot
beabletoconnectwiththeScreenBeamreceiverifthismodeisenabled.Referto
thedevice’susermanualfordetailaboutenablingthePINconnection.
3. SelectaPINpairingmethod.
Eachconnection:ItisrequiredtoprovidePINeverytimewhenadeviceconnects
tothereceiver.
Firstconnection:ItisrequiredtoprovidePINthefirsttimewhenadeviceconnects
tothereceiver.
54
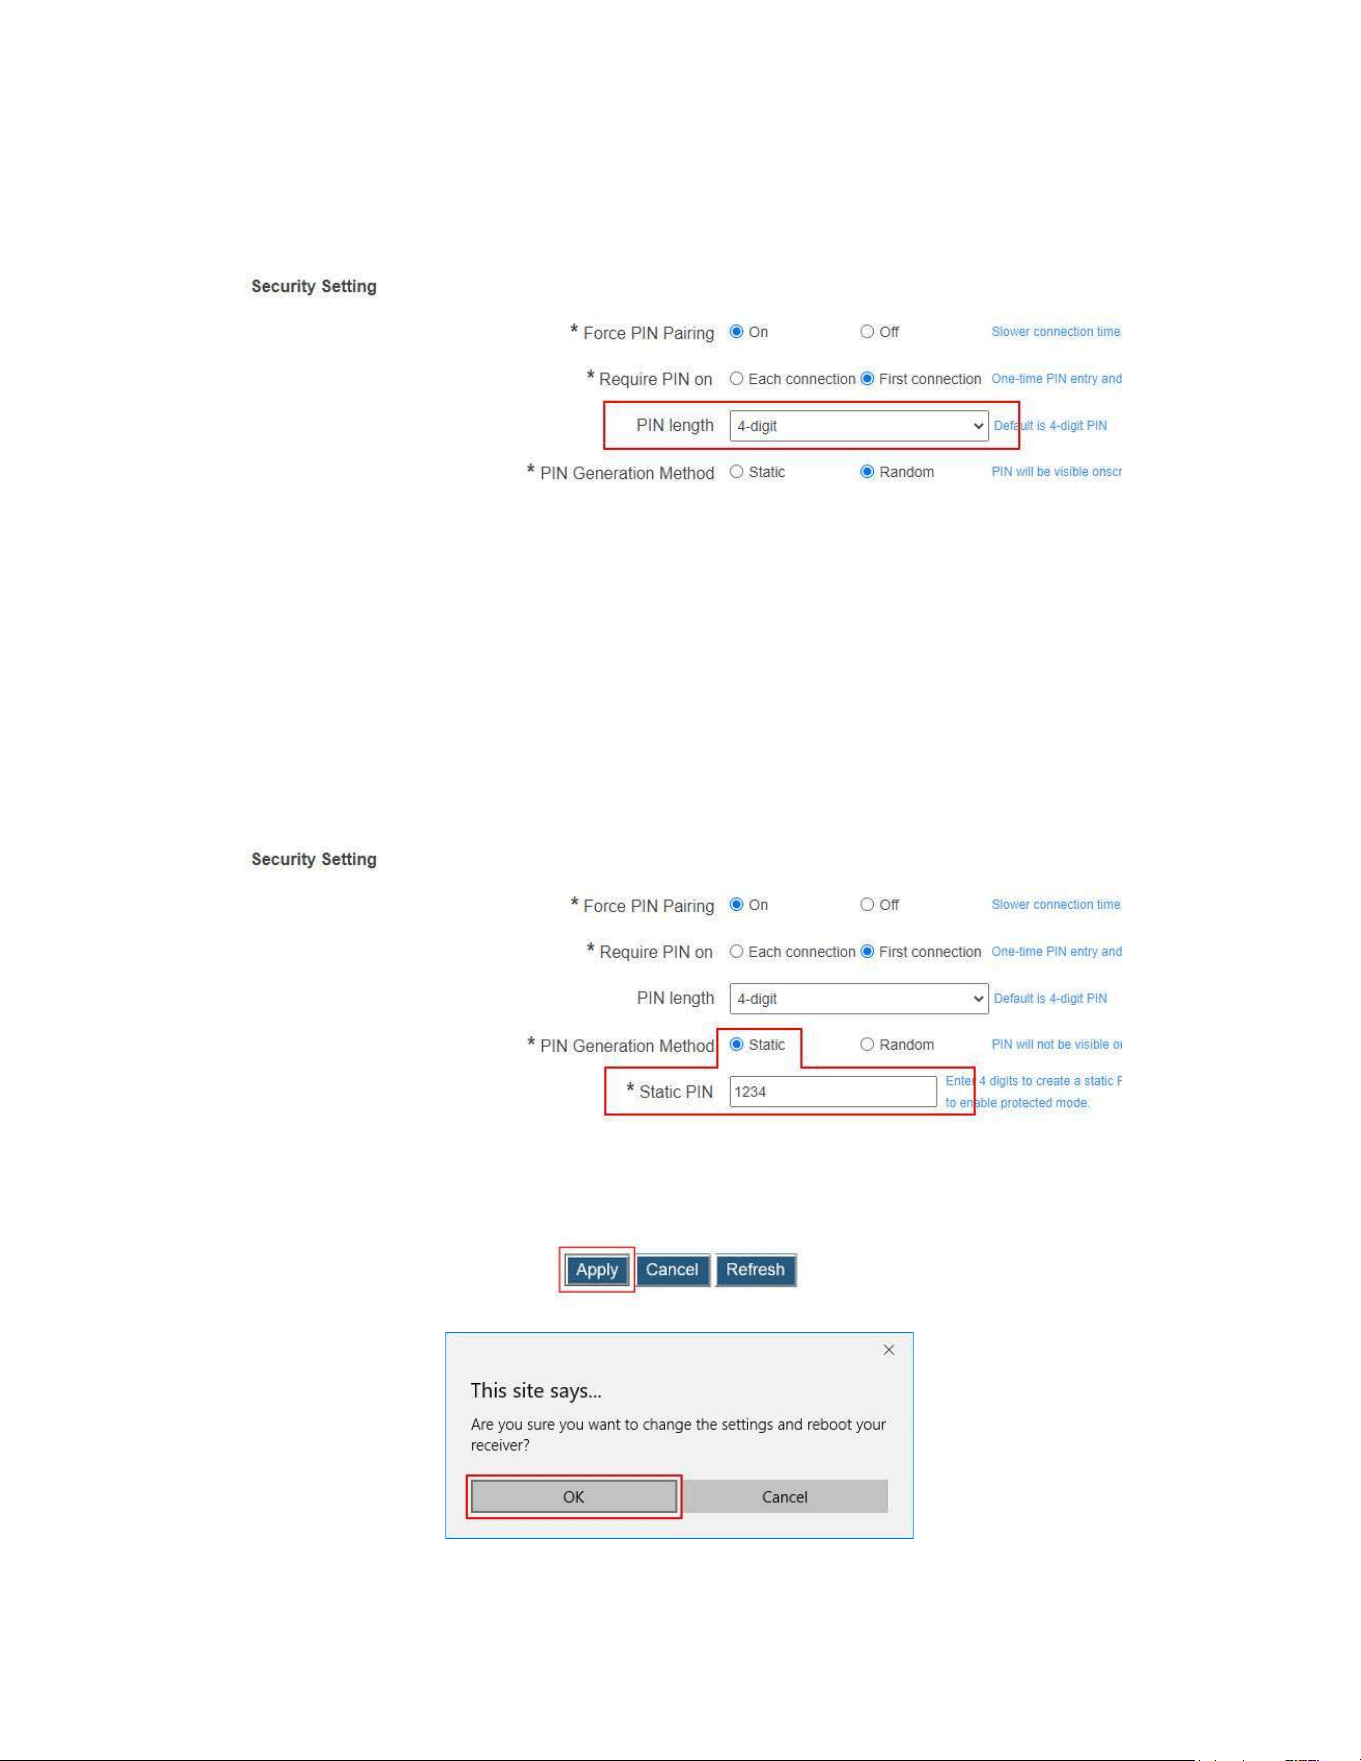
4. SelectaPINlength:4-digitand8-digit.
4-digit:Thereceiverwillgeneratea4-digitPIN.Bydefault,the4-digitPINisused.
8-digit:Thereceiverwillgeneratean8-digitPIN.
5. SelectaPINgenerationmethod.
When the Force PIN Pairing feature is enabled, the system provides two PIN
generationmethods:StaticandRandom.
Static:WhenStaticisselected,userscandefineaPINflexibly.ThestaticPINwill
notbedisplayedontheconnecteddisplay.
If8-digitisselectedforthePINlength,userscandefinethefirstseven(7)digits,
andthenthesystemgeneratesan8-digitPINwiththatsevendigitsincluded.
Enterseven(7)digitsintheStaticPINbox,andthesystemgeneratestheeighth
(8th)digit.
Random:APINcodeisgeneratedrandomlybyScreenBeamanddisplayedonthe
connectedHDTV/projector.
6. ClicktheApplybutton,andthenclickOKonthepop-upmessageboxtoconfirm.
55
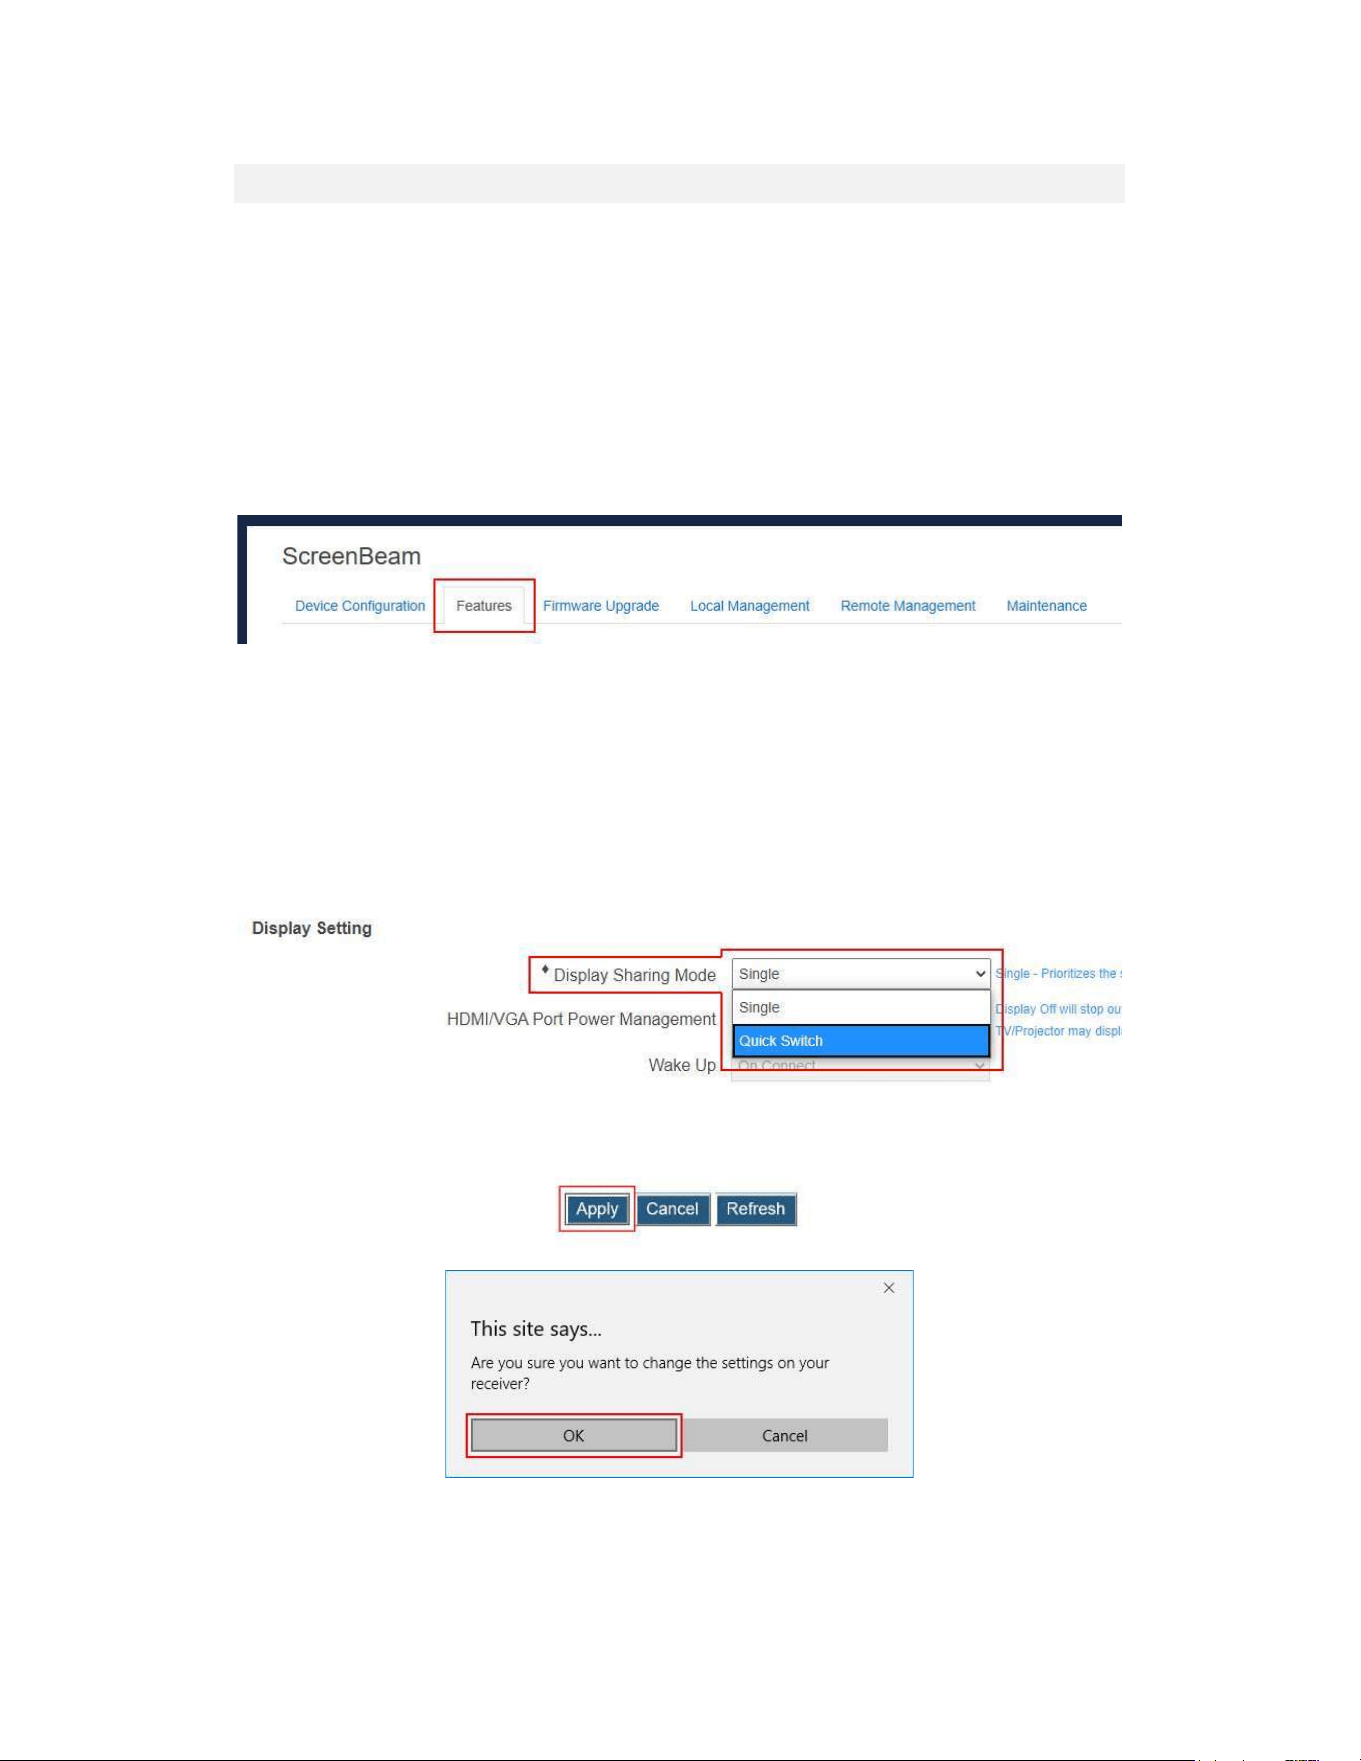
5.3.5 DisplaySettings
Thissectionintroducesdisplayrelatedfeatures.
5.3.5.1SettingupDisplaySharingMode
ScreenBeam 960 supports two display sharing modes: Single mode and Quick Switch
mode.
Toselectadisplaysharingmode,followthisprocedure:
1. GototheFeaturestabpagebyclickingtheFeaturestab.
2. Go to the Display Setting section, and select a desired option from the Display
SharingModemenu.Availableoptionsare:SingleandQuickSwitch.
Single:Otherdeviceisnotallowedtoconnectifthereceiverisalreadyinuse.
QuickSwitch:AMiracastcapabledevicecanconnecttothereceivereventhough
thereceiverisinanactiveMiracastconnection.
Note: Quick Switchis availablefor Miracast connectiononly. Quick switch can’t
work for Infracast connections (Wireless Display over LAN for Windows 10) or
Airplayconnections.
3. ClicktheApplybutton,andthenclickOKonthepop-upmessageboxtoconfirm.
56
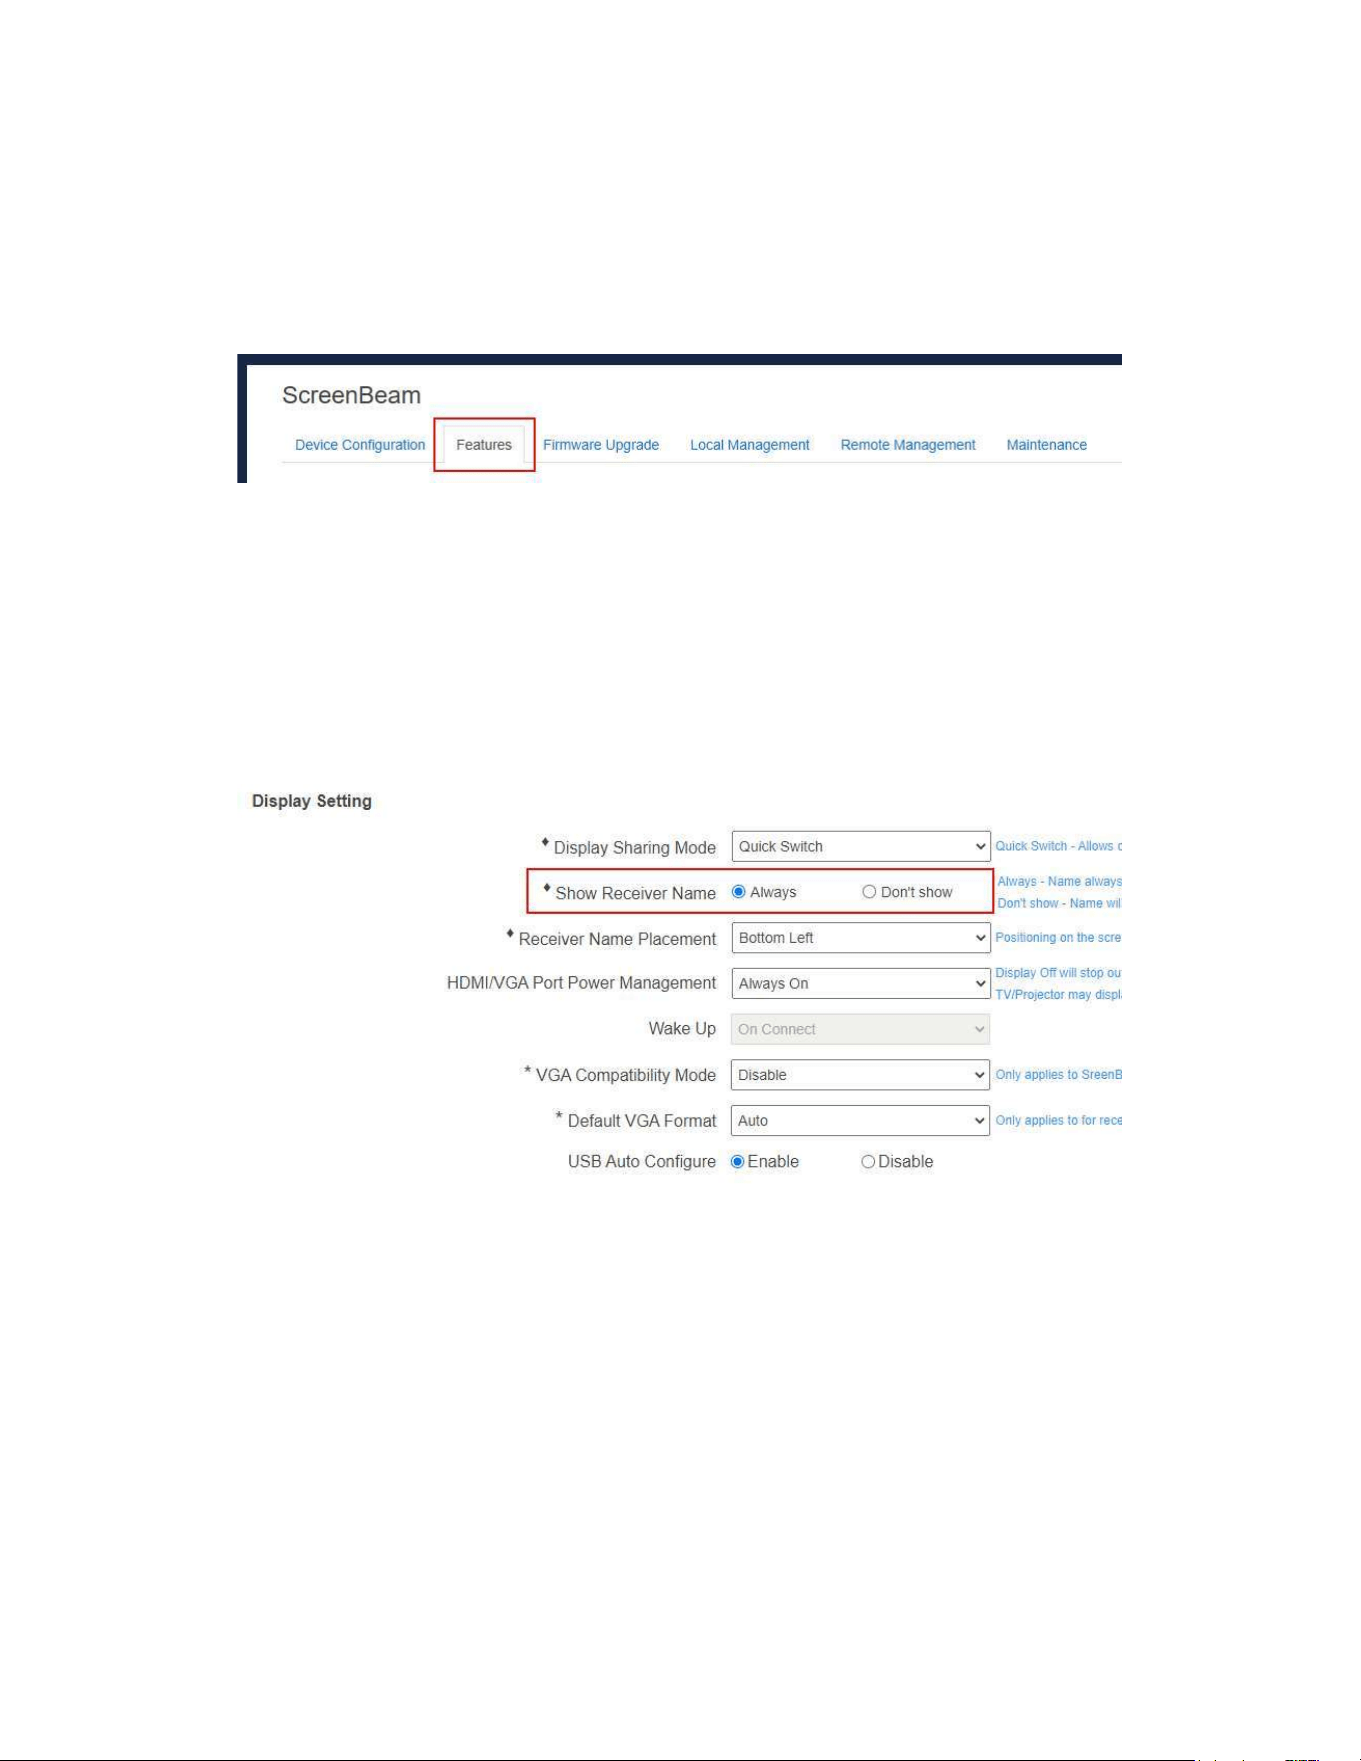
5.3.5.2SettingupReceiverNameDisplayforQuickSwitch
ScreenBeam 960 allows customizing the display of receiver name in the Quick Switch
mode.
Tosetuptheplacementofthereceiver’sname,followthisprocedure:
1. GototheFeaturestabpagebyclickingtheFeaturestab.
2. GototheDisplaySettingsection,andensurethatDisplaySharingModeissetto
QuickSwitch.
3. SetShowReceiverNametoAlways.
TheShowReceiverNamefeatureprovidestwooptions,asshownbelow:
Always: The receiver’s name will be displayed on the connected TV when an
activeconnectionsessionispresent.
Don’tshow:Thereceiver’snamewillnotbedisplayedontheconnectedTVwhen
anactiveconnectionsessionispresent.
Note:Ifthisoptionisselected,thereceivernameplacementisnotavailable.
4. SelectanoptionfromtheReceiverNamePlacementdrop-downbox.
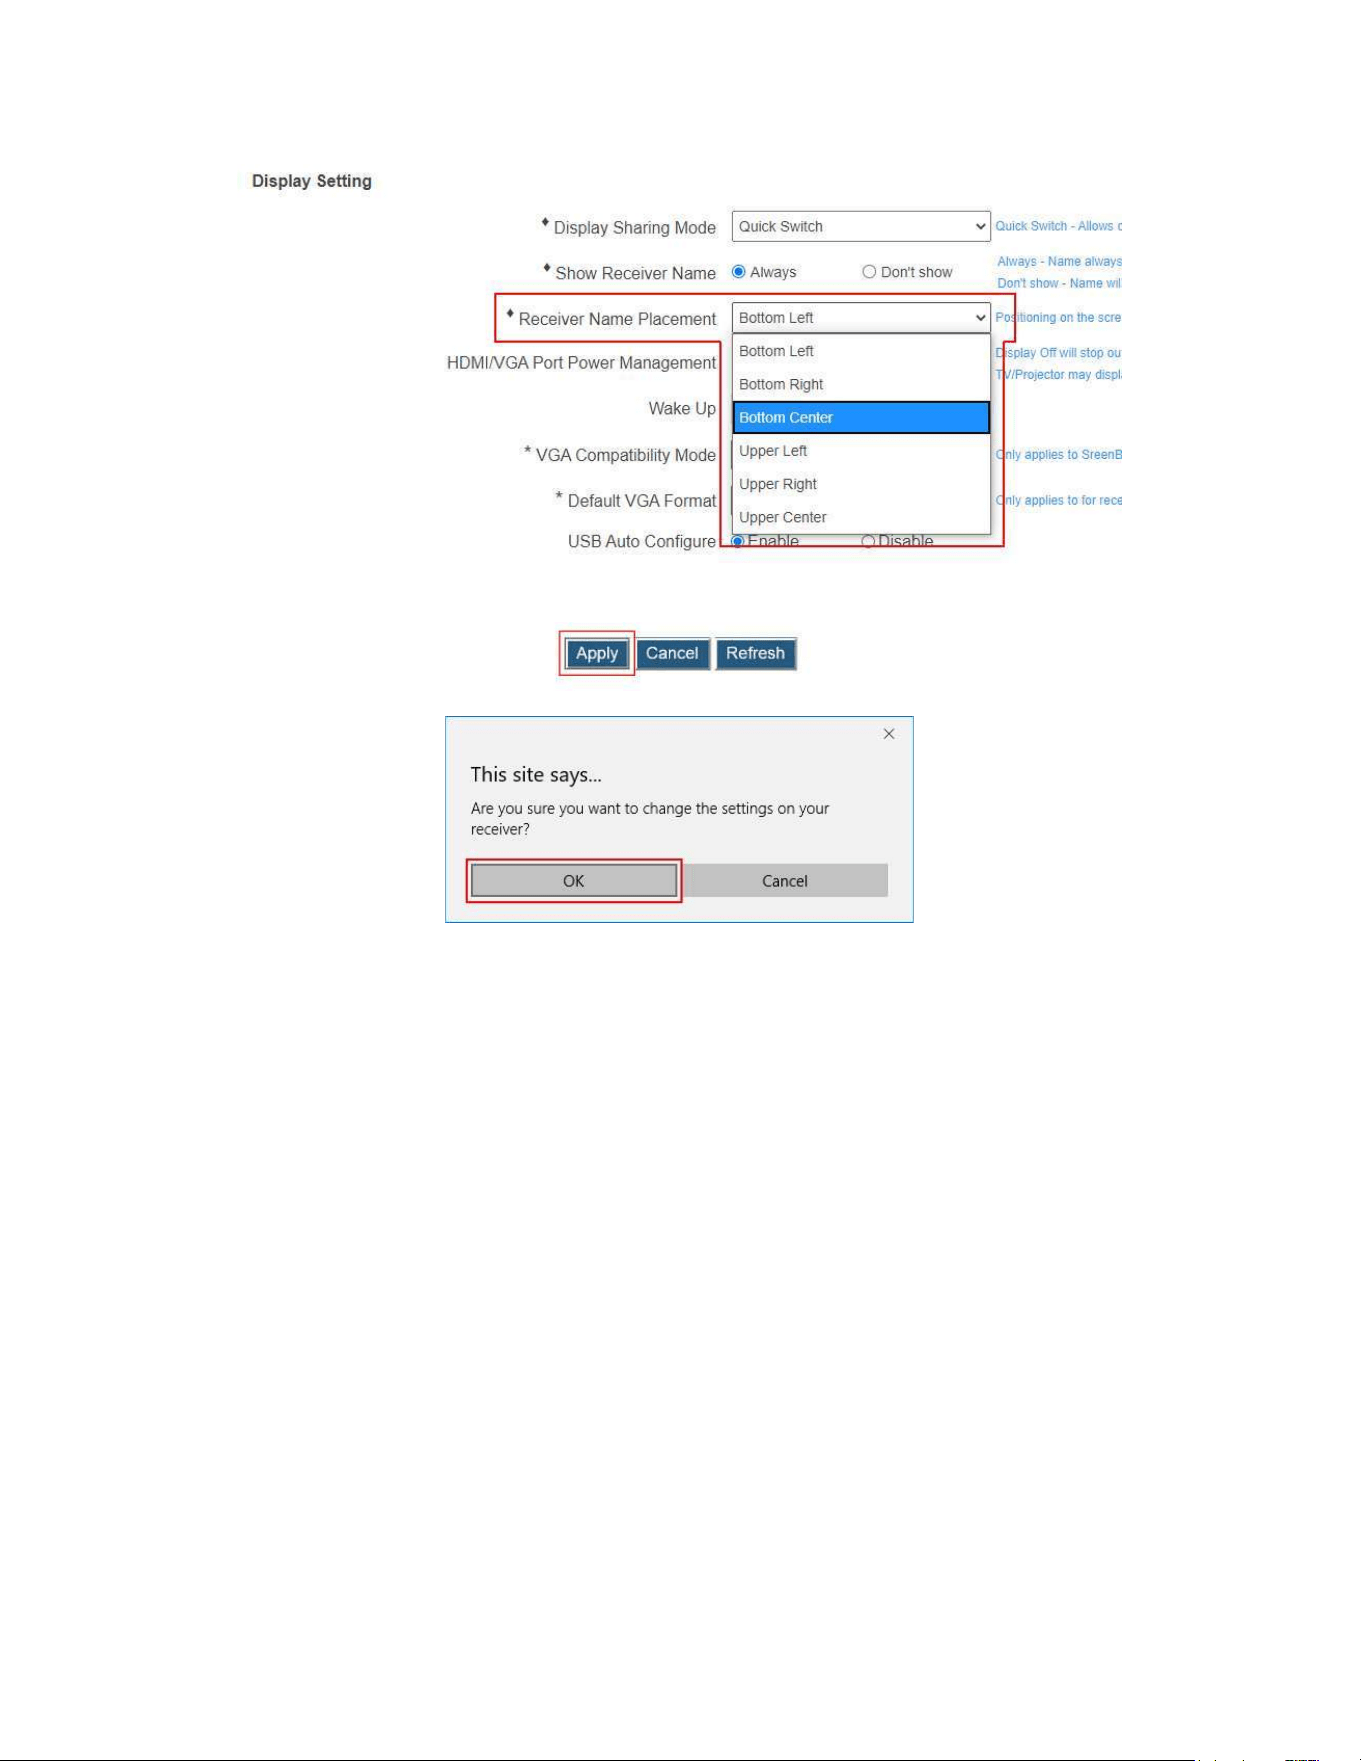
57
5. ClicktheApplybutton,andthenclickOKonthepop-upmessageboxtoconfirm.
58
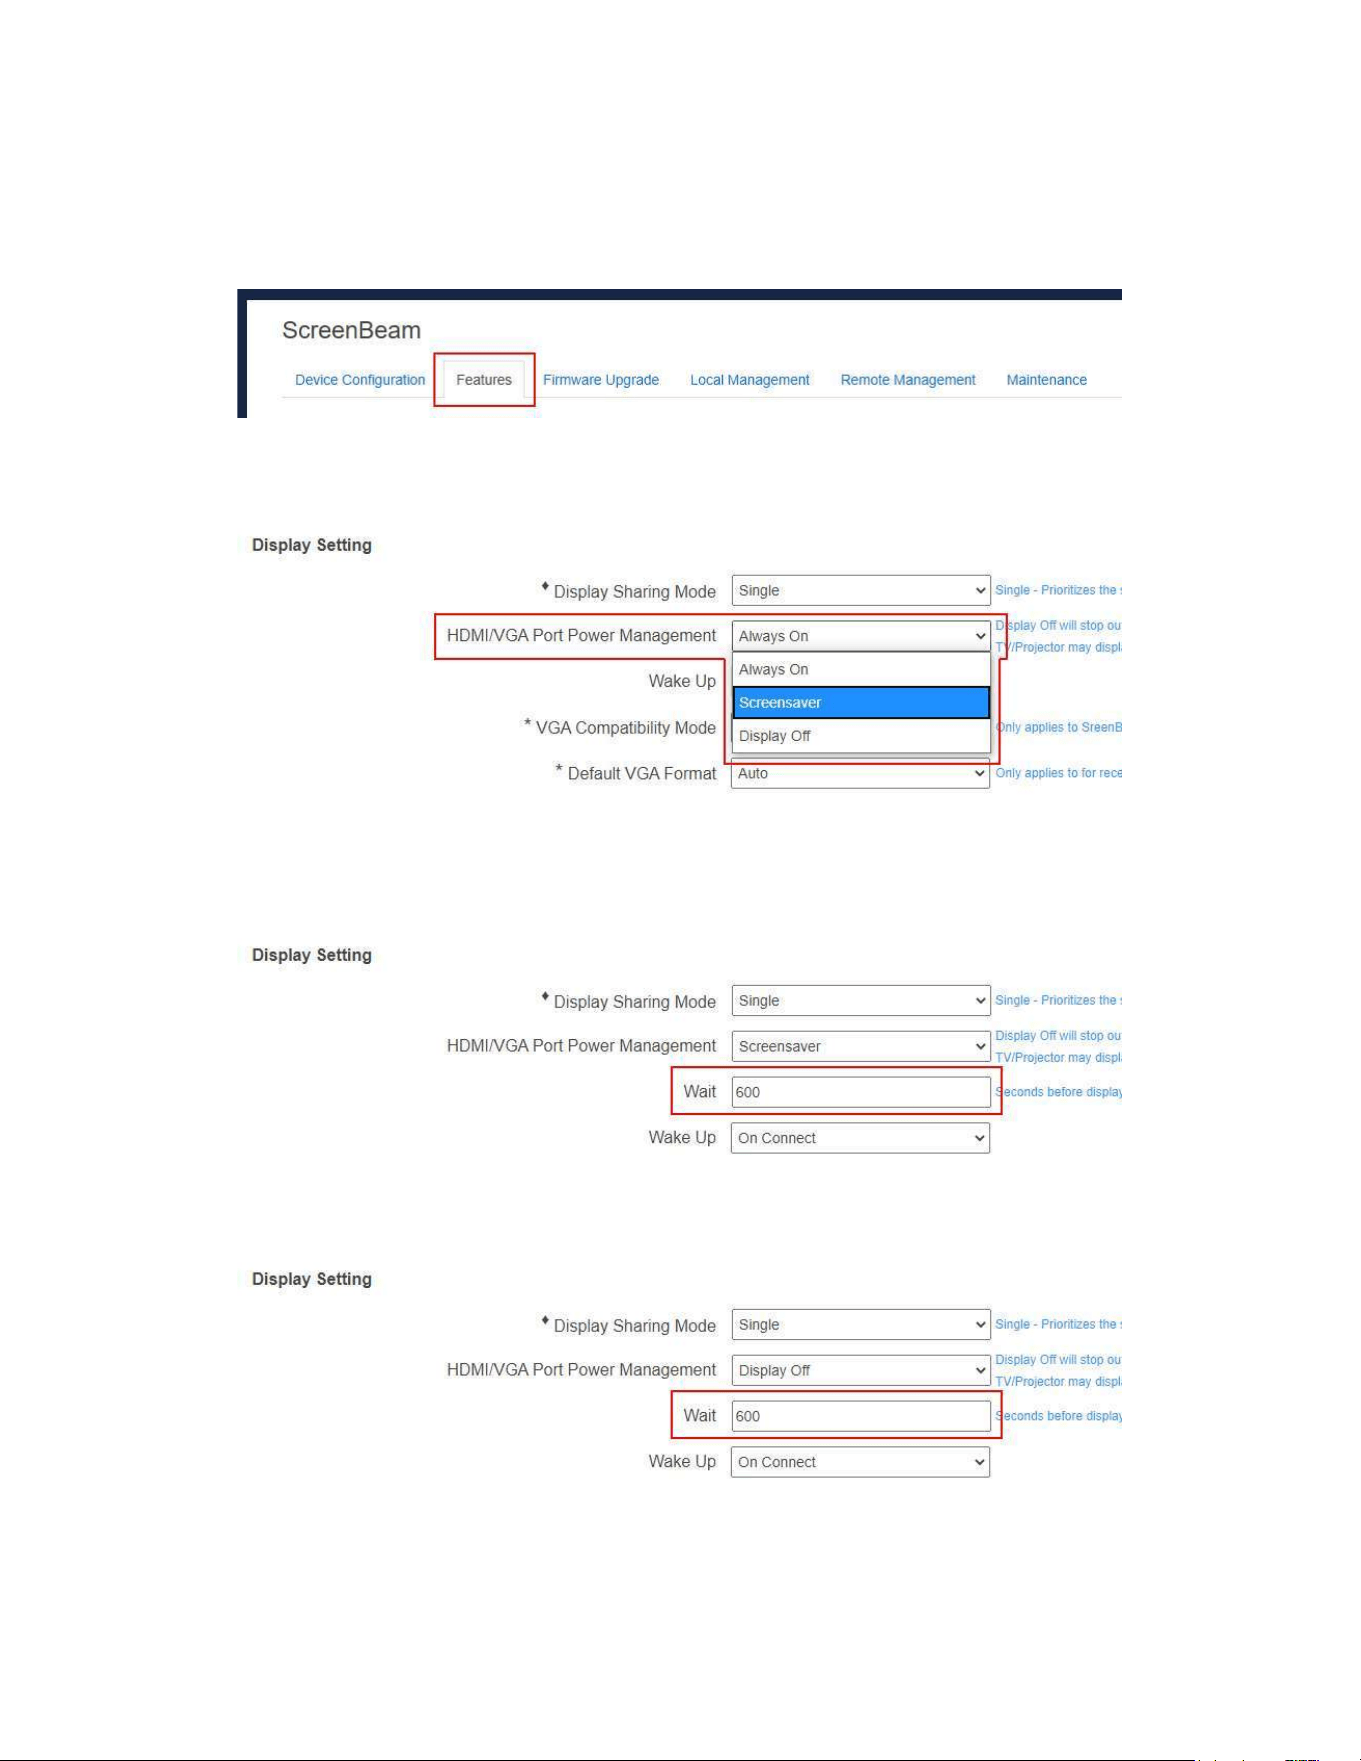
5.3.5.3ManagingHDMI/VGAPortOutput
TosetupHDMI/VGAportoutput,followthisprocedure:
1. GototheFeaturestabpagebyclickingtheFeaturestab.
2. GototheDisplaySettingsection,andselectadesiredoptionintheHDMI/VGAPort
Power management drop-down box. There are three options: Always On,
Screensaver,andDisplayOff.
AlwaysOn:Selectingthisoption,theHDMIoutputisalwayson.
Screensaver: Selecting this option, the system will run the screen saver after the
definedidletimeexpires.Userscandefinetheidletime(1-9999seconds)intheWait
timebox.
Display Off: Selecting this option, the HDMI/VGA output will be turned off after the
definedidletimeexpires.Userscandefinetheidletime(1-9999seconds)inthewait
timebox.

59
3. ClicktheApplybutton,andthenclickOKonthepop-upmessageboxtoconfirm.
60
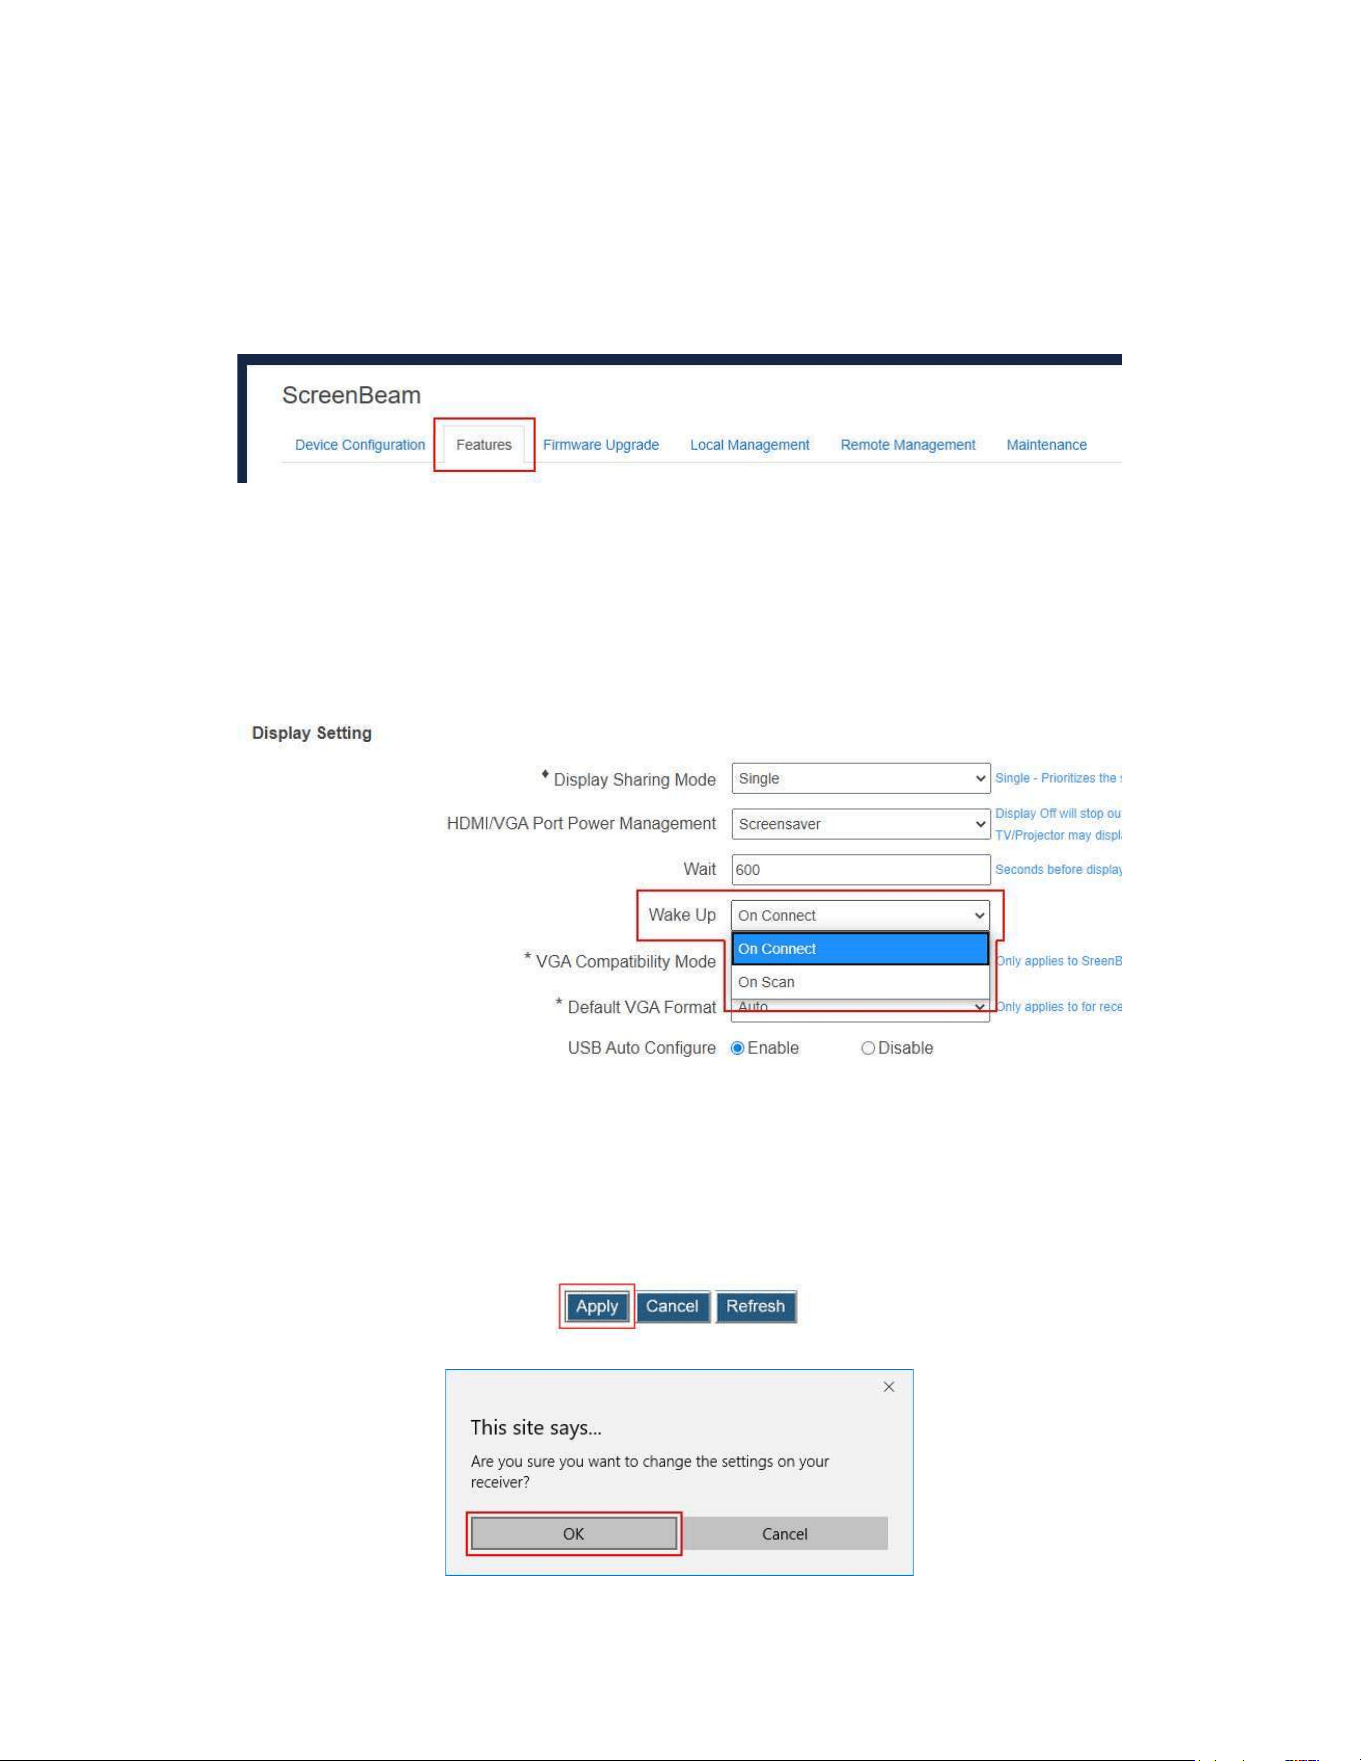
5.3.5.4WakinguptheReceiver
WhenthereceiverrunsscreensaverorturnsoffitsHDMIoutput,itcanbewakedupbyany
oneoftwoevents:scanningandconnecting.
Tosetupthereceiver’swakeupfeature,followthisprocedure:
1. GototheFeaturestabpagebyclickingtheFeaturestab.
2. Go totheDisplaySetting section, and set the WakeUp featuretoOn ScanorOn
Connect.
OnScan:Thereceiverwillwakeupfromsleeporscreensaverwhenitdetectsthat
asourcedeviceisscanning.
OnConnect:Thereceiverwillwakeupfromsleeporscreensaveronlywhena
sourcedeviceisconnecting.
Note:TheWakeUpfeatureisavailable forsetupwhenHDMI/VGAPortPower
managementissettoScreensaverorDisplayOff.
3. ClicktheApplybutton,andthenclickOKonthepop-upmessageboxtoconfirm.
61
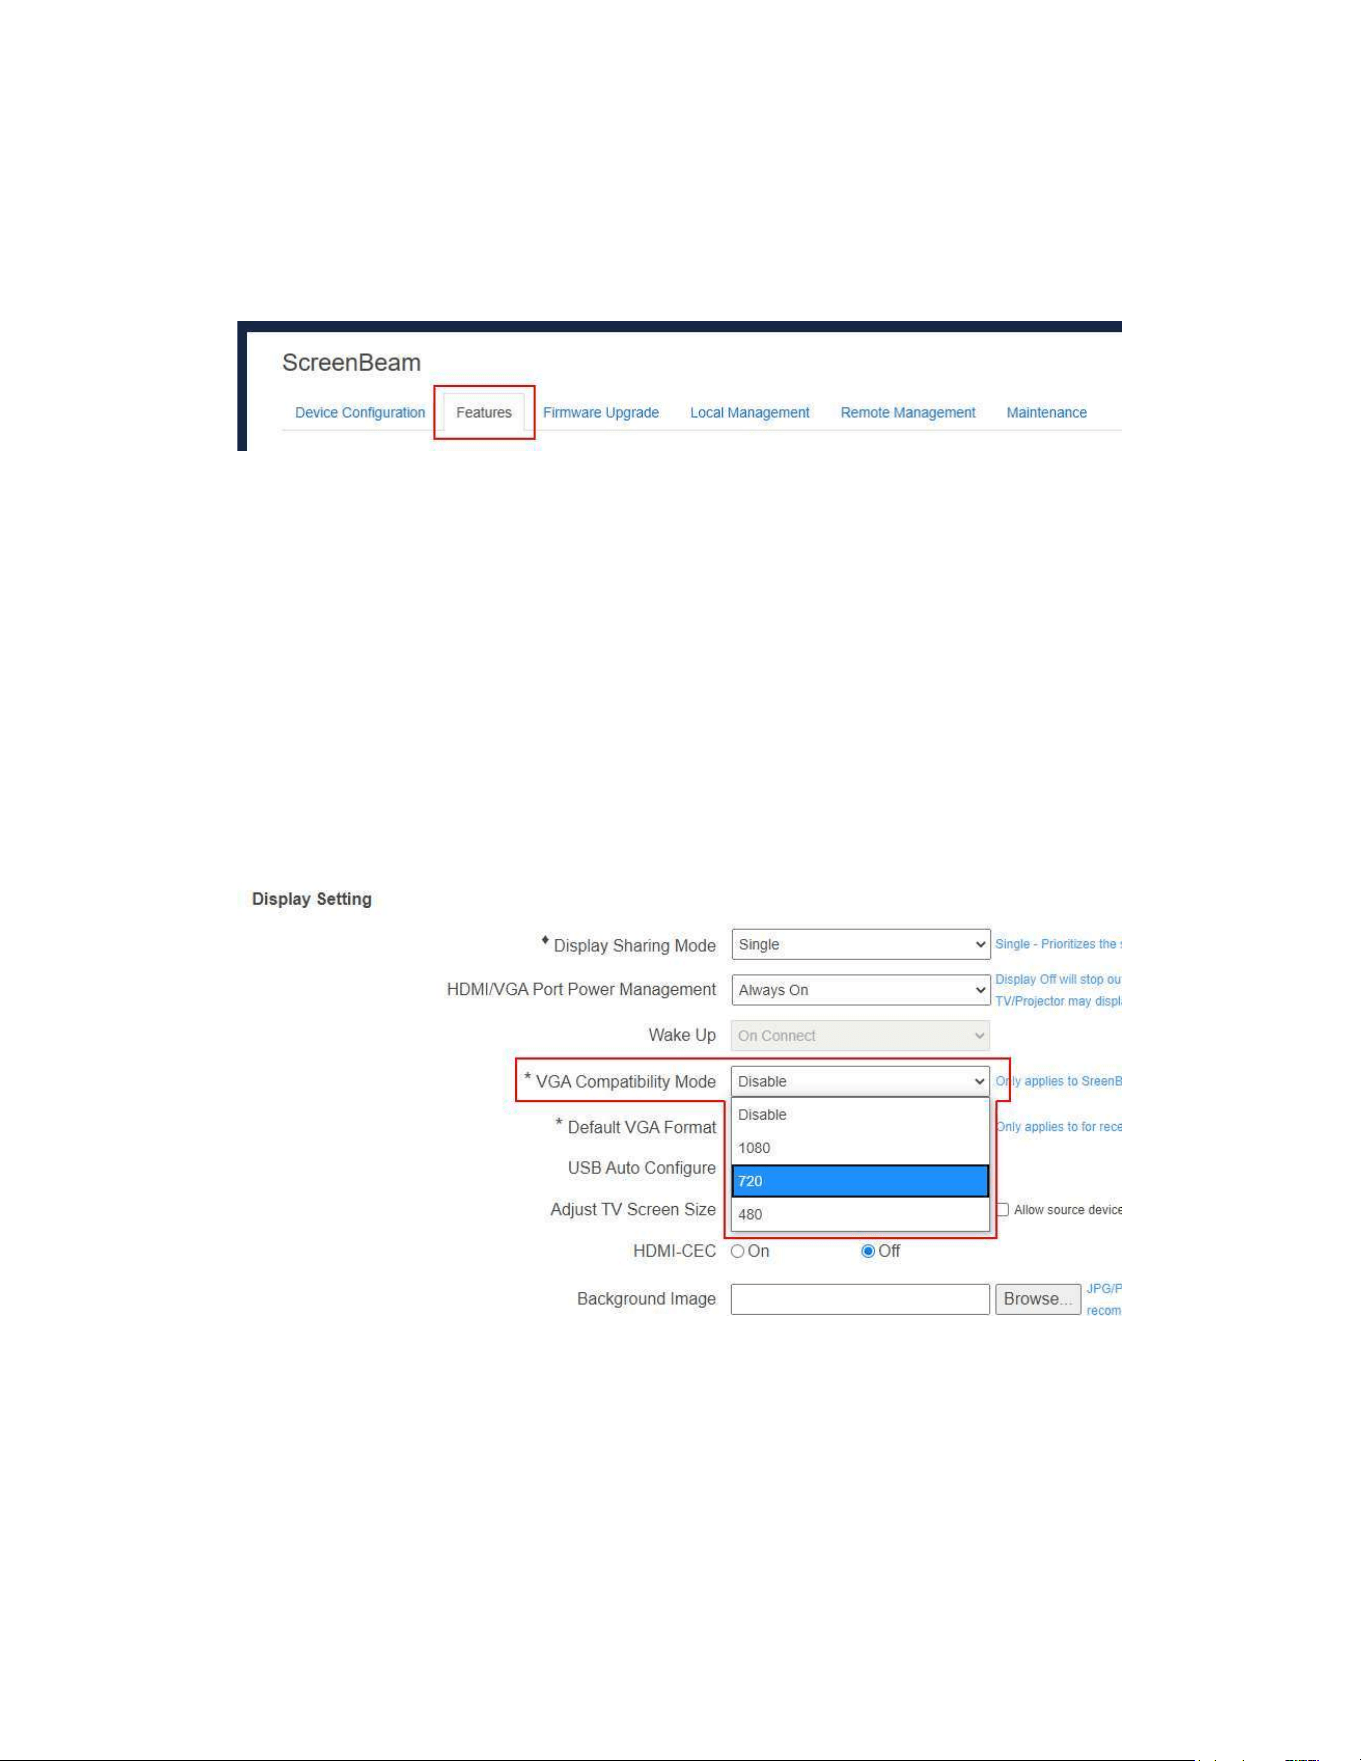
5.3.5.5SettingupVGACompatibilityMode
TheVGACompatibilityModefeatureappliestoScreenBeamHDMI-to-VGAAdapteronly.
ToselectaVGAcompatibilitymode,followthisprocedure:
1. GototheFeaturestabpagebyclickingtheFeaturestab.
2. Go to the Display Setting section, and select the desired option in the VGA
CompatibilityModebox.Therearethreeoptions:Disable,1080,720,and480.
Disable: The video output is in consistence with the source device. The
HDMI-to-VGA adapter will read EDID from the connected display device and
decidethebestresolutionautomatically.MakesureyouconnecttheScreenBeam
receiver to your display device with a good quality VGA cable, so that the
HDMI-to-VGAadaptercancorrectlyreadtheEDIDinformationfromyourdisplay
device.IftheadaptercannotgettheEDIDinformationfromthedisplaydevice,or
the display device provides no EDID information, you can try theoptions below
accordingtotheresolutionofthedisplaydevice.
1080:Thevideooutputissetto1080por1080i,dependingonthedisplaydevice.
720:Thevideooutputissetto720por720i,dependingonthedisplaydevice.
480:Thevideooutputissetto480por480i,dependingonthedisplaydevice.
Note:TheVGAcompatibilitymodeisdisabledwhenHDMI-CECisenabled.

62
3. ClicktheApplybutton,andthenclickOKonthepop-upmessageboxtoconfirm.
4. Thereceiverreboots,andnewsettingtakeseffectafterthereboot.
63
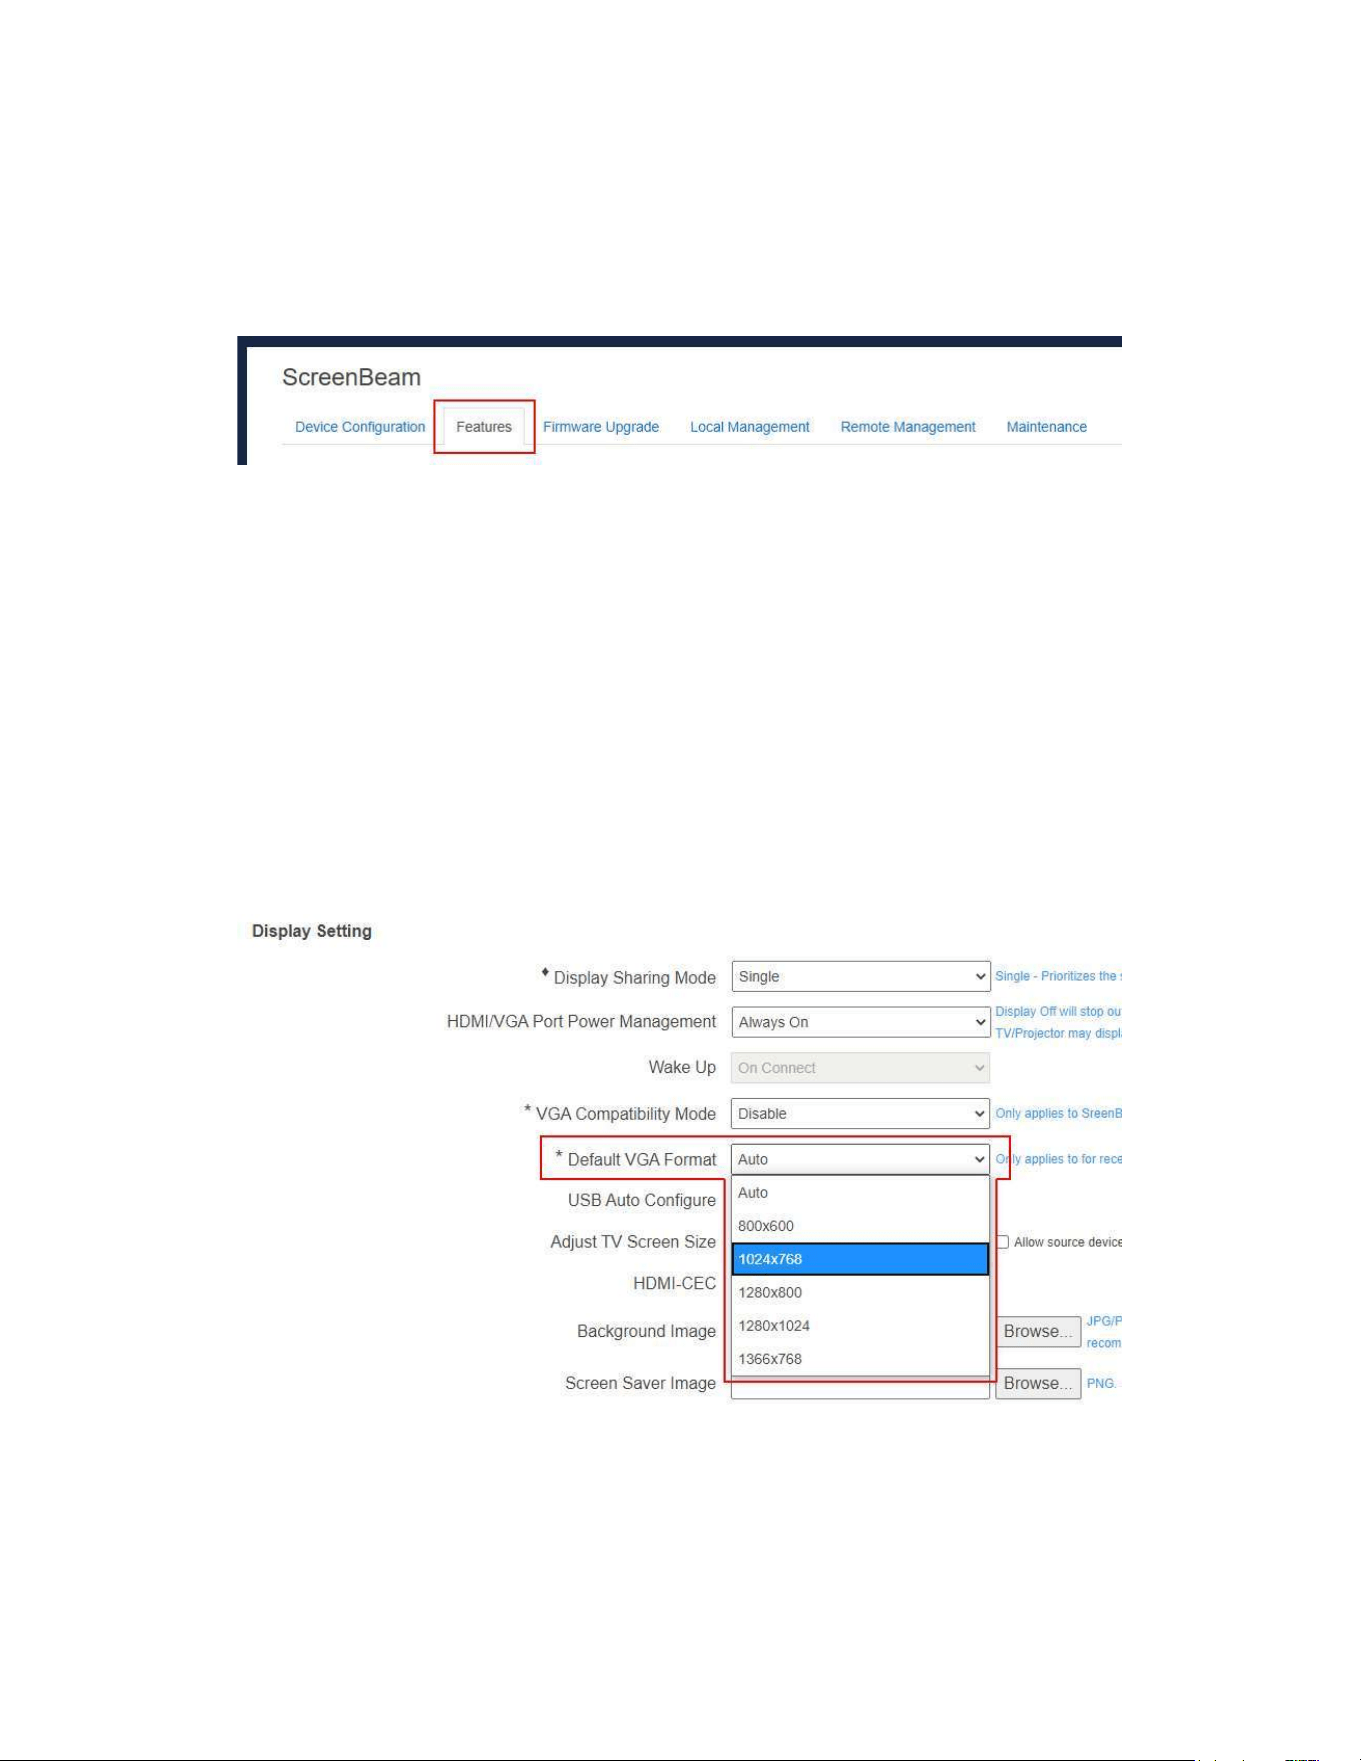
5.3.5.6SettingupDefaultVGAFormat
TheDefaultVGAFormatfeatureappliestoScreenBeam960’sVGAoutputonly.
Tosetupadefaultoutputresolutionforthereceiver’sVGAoutput,followthisprocedure:
1. GototheFeaturestabpagebyclickingtheFeaturestab.
2. GototheDisplaySettingsection,andselectanoptionfromtheDefaultVGAFormat
box.Theseoptionsareavailable:Auto,andresolutionoptions(800×600,1024×768,
1280×800,1280×1024,1366×768).
Auto:ThereceiverwillreadEDIDfromtheconnecteddisplaydeviceanddecide
thebestresolutionautomatically.MakesureyouconnecttheScreenBeamreceiver
to your display device with a good quality VGA cable, so that the receiver can
correctlyreadtheEDIDinformationfromyourdisplaydevice.Ifthereceivercan
not get the EDID information from the display device, or the display device
providesnoEDIDinformation,oryouwanttosetaresolutionthatisdifferentfrom
theEDID,youcantrytheresolutionoptionsbelow.
Resolution options: There are five resolutions available: 800×600, 1024×768,
1280×800,1280×1024,and1366×768.Thevideooutputwillbesettotheselected
resolution,overwritingtheEDIDinformation.
64
3. ClicktheApplybutton,andthenclickOKonthepop-upmessageboxtoconfirm.
4. Thereceiverreboots,andnewsettingtakeseffectafterthereboot.
65
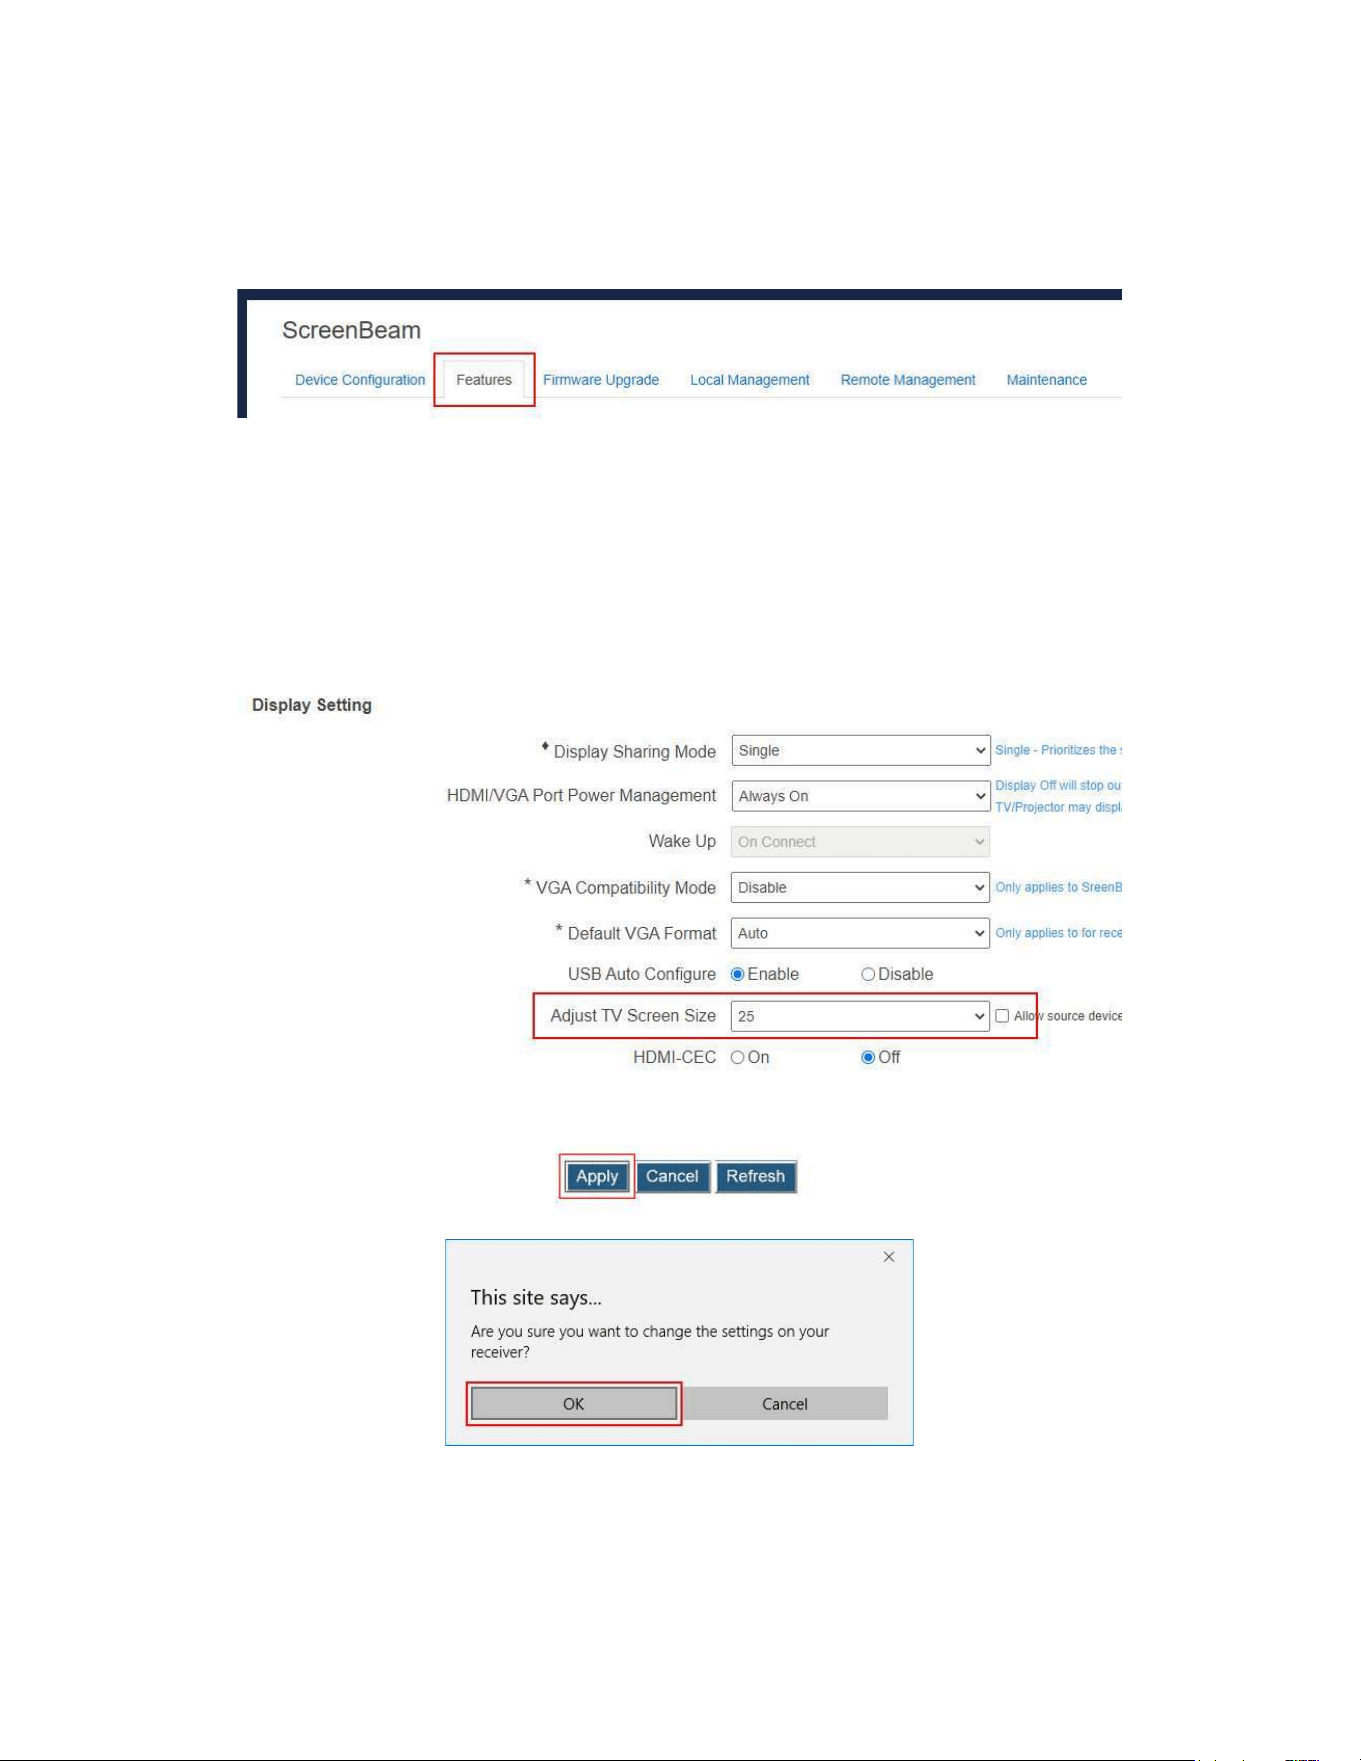
5.3.5.7AdjustingTVScreenSize
ToadjustthesizeofyourTVscreen,followthisprocedure:
1. GototheFeaturestabpagebyclickingtheFeaturestab.
2. GototheDisplaySettingsection,andselectadesiredoptionintheAdjustTVScreen
Sizedrop-downbox.
ThevalueforTVscreensizerangesfrom0to25.Thelargerthevalueis,thebigger
thescreenwillbe.
Allow sourcedeviceto overrideoverscan value: Whenthis optionisenabled
(checked), the overscan value is in consistence with the setting on the source
device. Otherwise, the overscan value is in consistence with the setting on the
receiver.
3. ClicktheApplybutton,andthenclickOKonthepop-upmessageboxtoconfirm.

66
5.3.5.8SettingupHDMI-CEC
TosetuptheHDMI-CECfunction,followthisprocedure:
1. GototheFeaturestabpagebyclickingtheFeaturestab.
2. GototheDisplaySettingsection,andsettheHDMI-CECfeaturetoOnorOff.
Therearetwooptions:On,andOff.Afterthisfunctionisenabled,thereceivercanwakeup
the connected display device and the display device will switch to the source that the
receiverconnectsto.
Thedisplaydevicewillbewakedupinoneofthefollowingconditions:
whenthereceiverispoweredon;
whenaconnectiontothereceiverisestablished;and
whenapower-onreceiverisconnectedtothedisplaydevice.
Note:ThedisplaydevicemustsupportHDMI-CEC,andthisfunctionisenabled.
3. ClicktheApplybutton,andthenclickOKonthepop-upmessageboxtoconfirm.

67
5.3.5.9UpdatingtheReceiver’sBackgroundImage
Toupdatethereceiver’sbackground,followthisprocedure:
1. GototheFeaturestabpagebyclickingtheFeaturestab.
2. Go to the Display Setting section, and click the Browse button next to the
BackgroundImagebox.
68
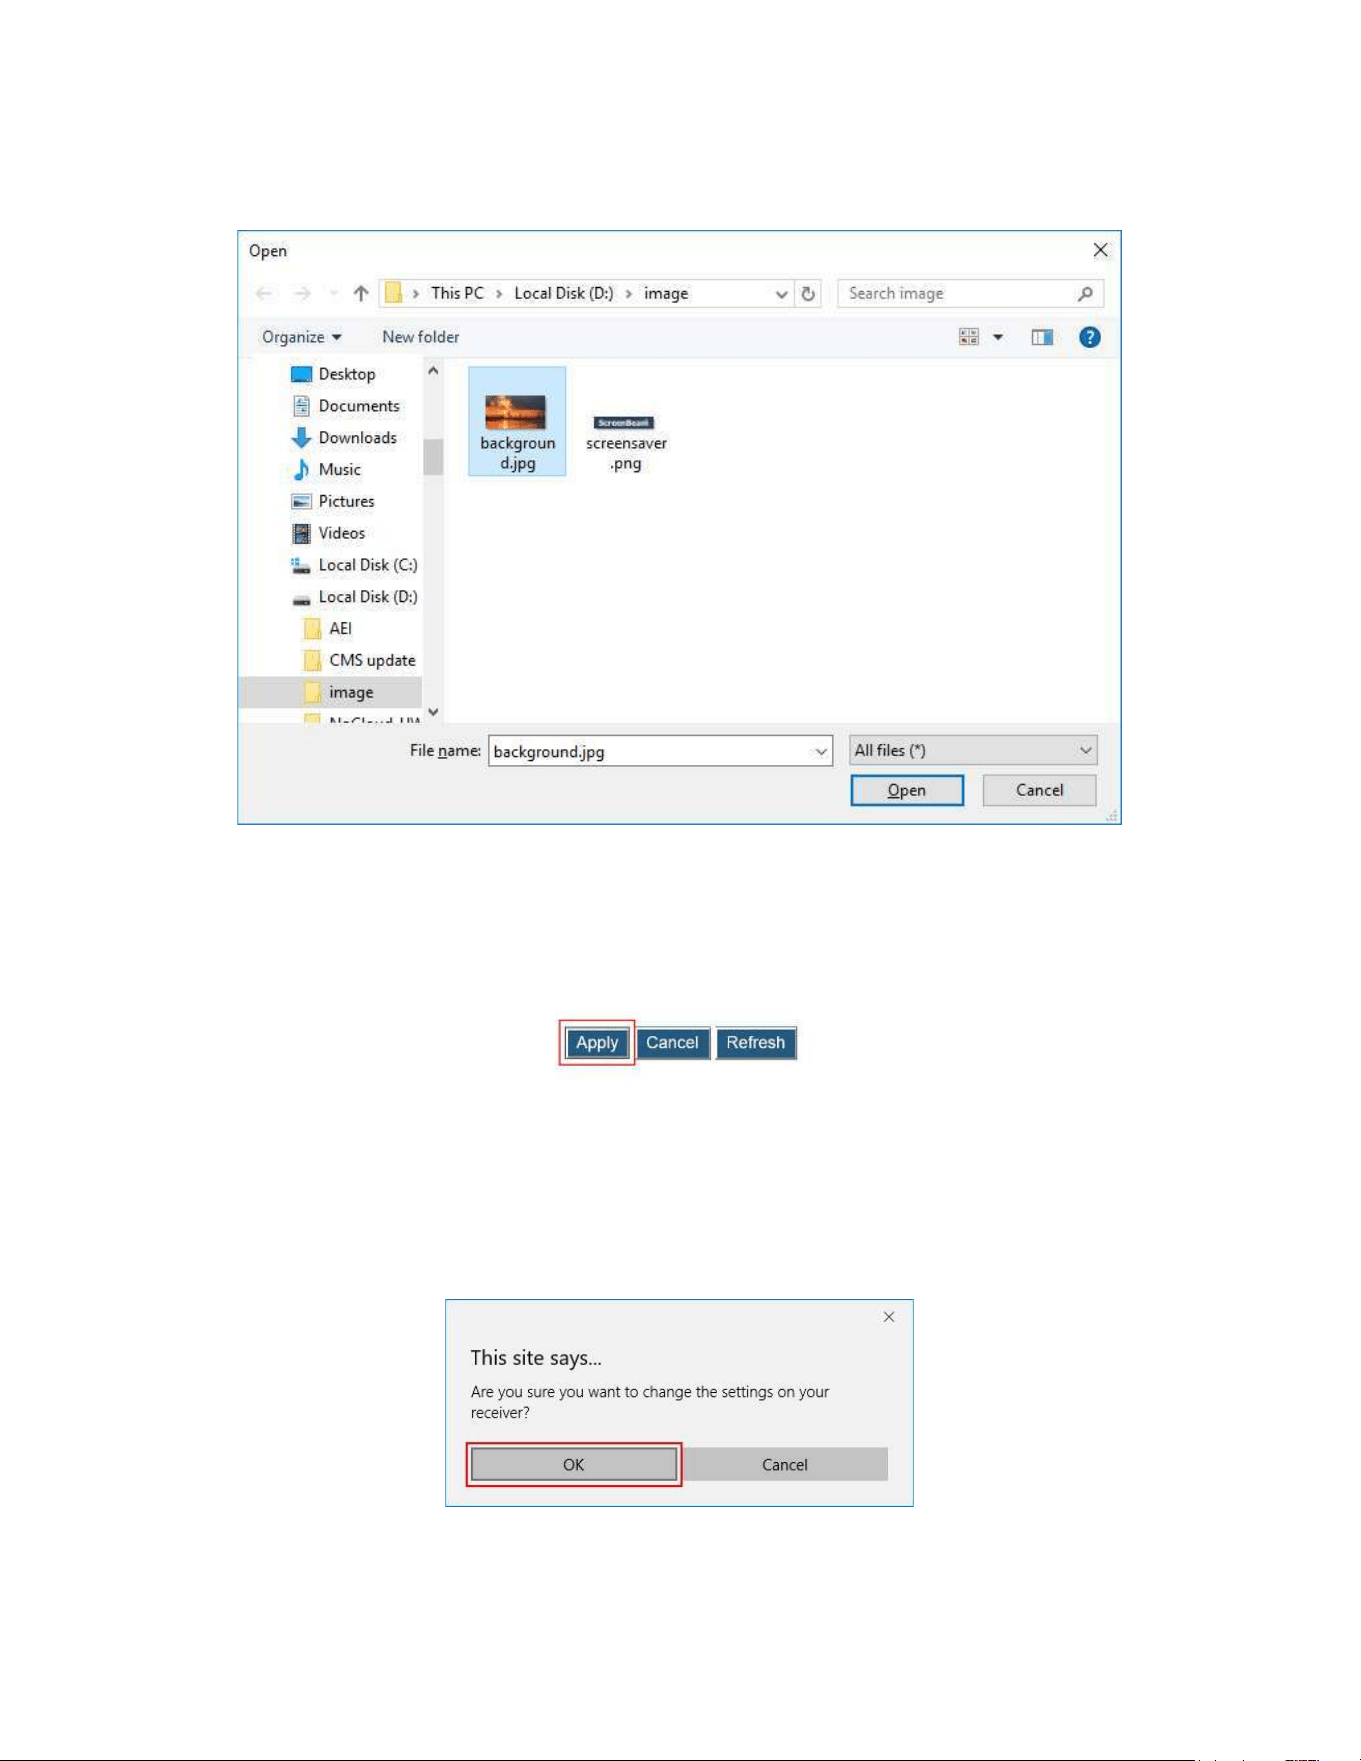
3. TheOpenwindow appears.Select an imageforthebackgroundand clickthe Open
buttontoconfirm.
Note:
Theimagesmustbein.pngand.jpeg/.jpgformats.
Thefilesizemustnotexceed2.5MB.
Thebestimagesizeis1280*720pixels(widthxheight).
4. ClicktheApplybuttontouploadthebackgroundimagetothereceiver.
5. Aconfirmationmessageappears.ClickOKtocontinue.
6. Afterawhile,thebackgroundimagewillbeupdated.Youcancheckitontheconnected
display.
69
5.3.5.10 UpdatingtheReceiver’sScreenSaverImage
Toupdatethereceiver’sscreensaver,followthisprocedure:
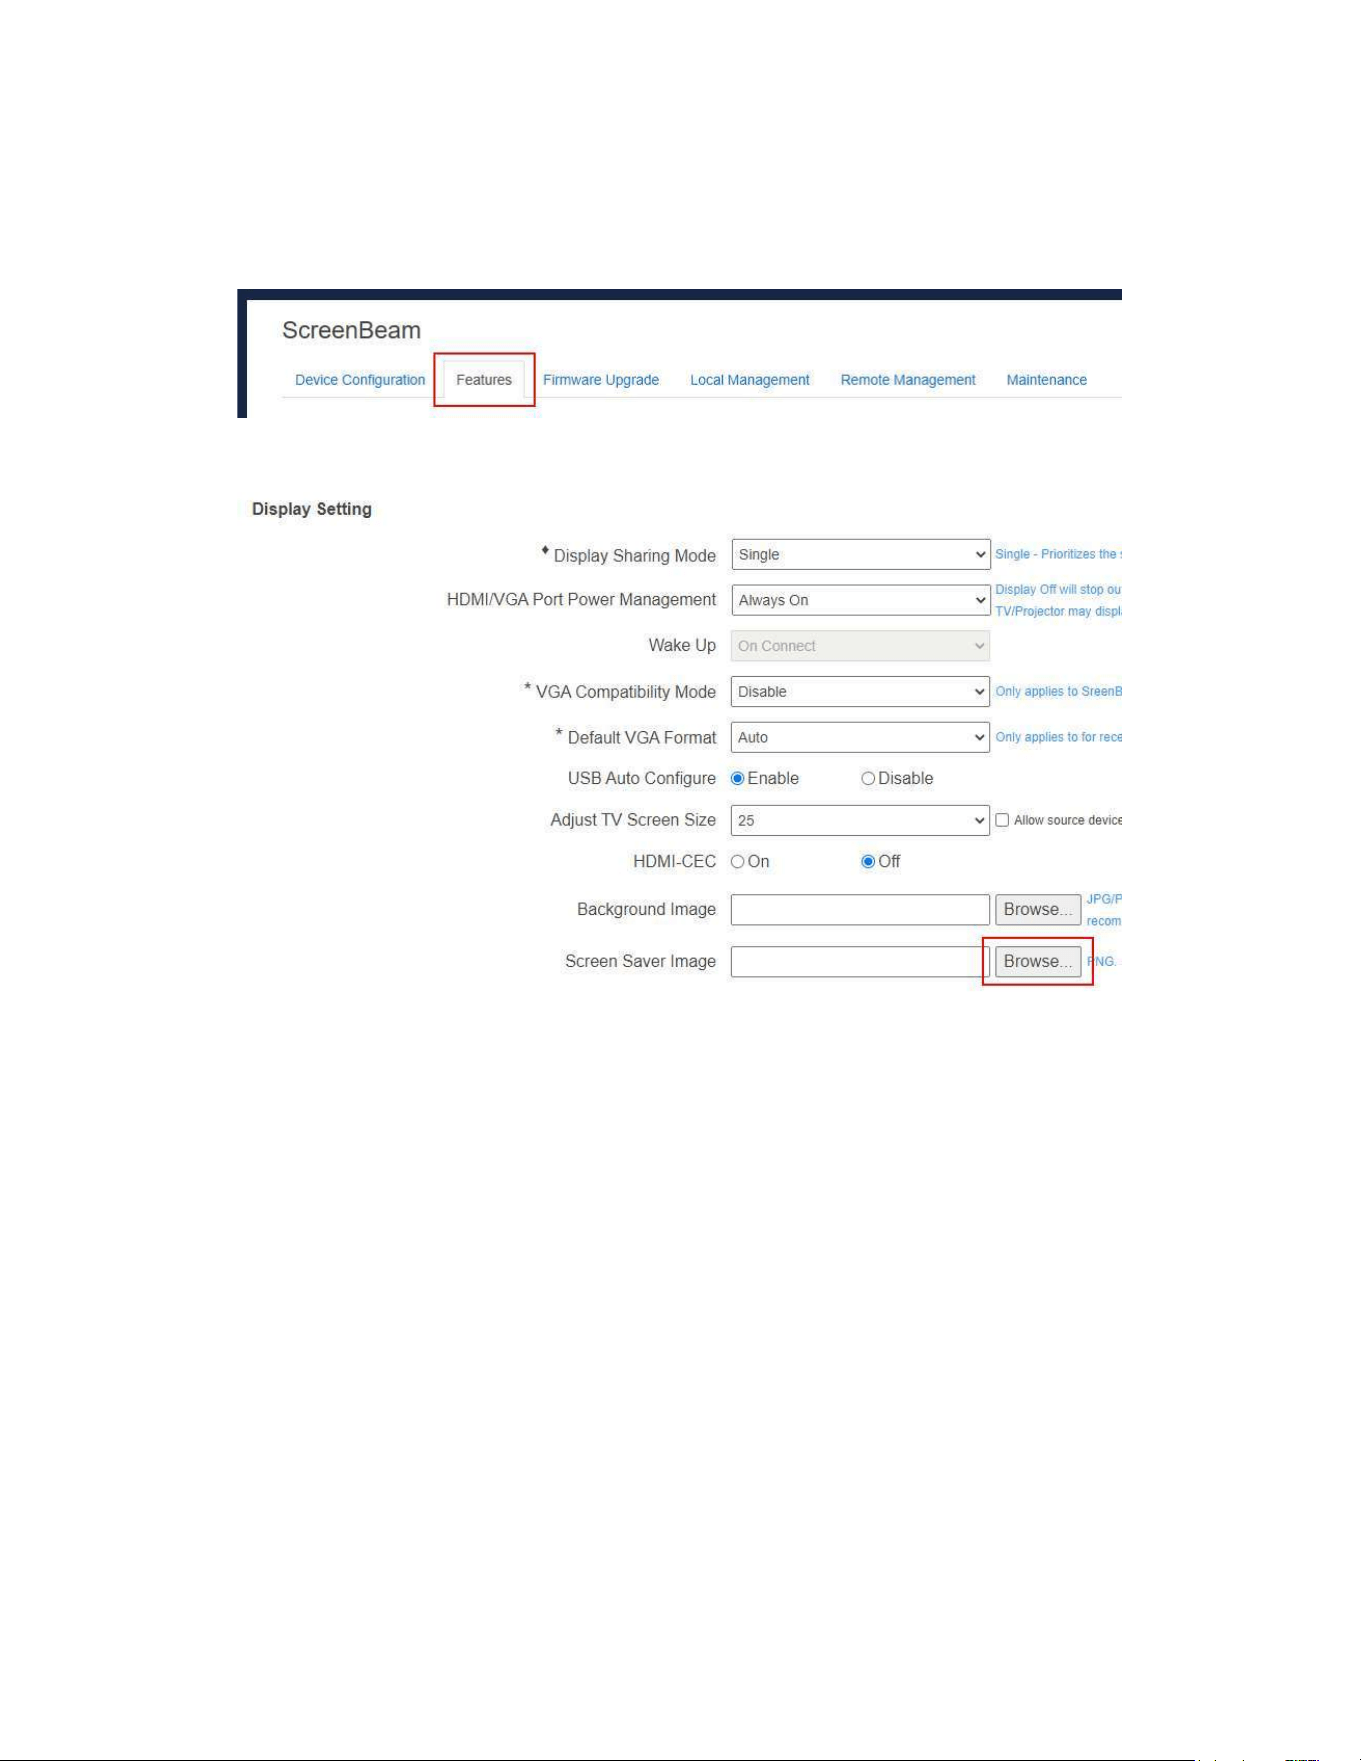
1. GototheFeaturestabpagebyclickingtheFeaturestab.
2. Go to the Display Setting section, and click the Browse button next to the Screen
SaverImagebox.
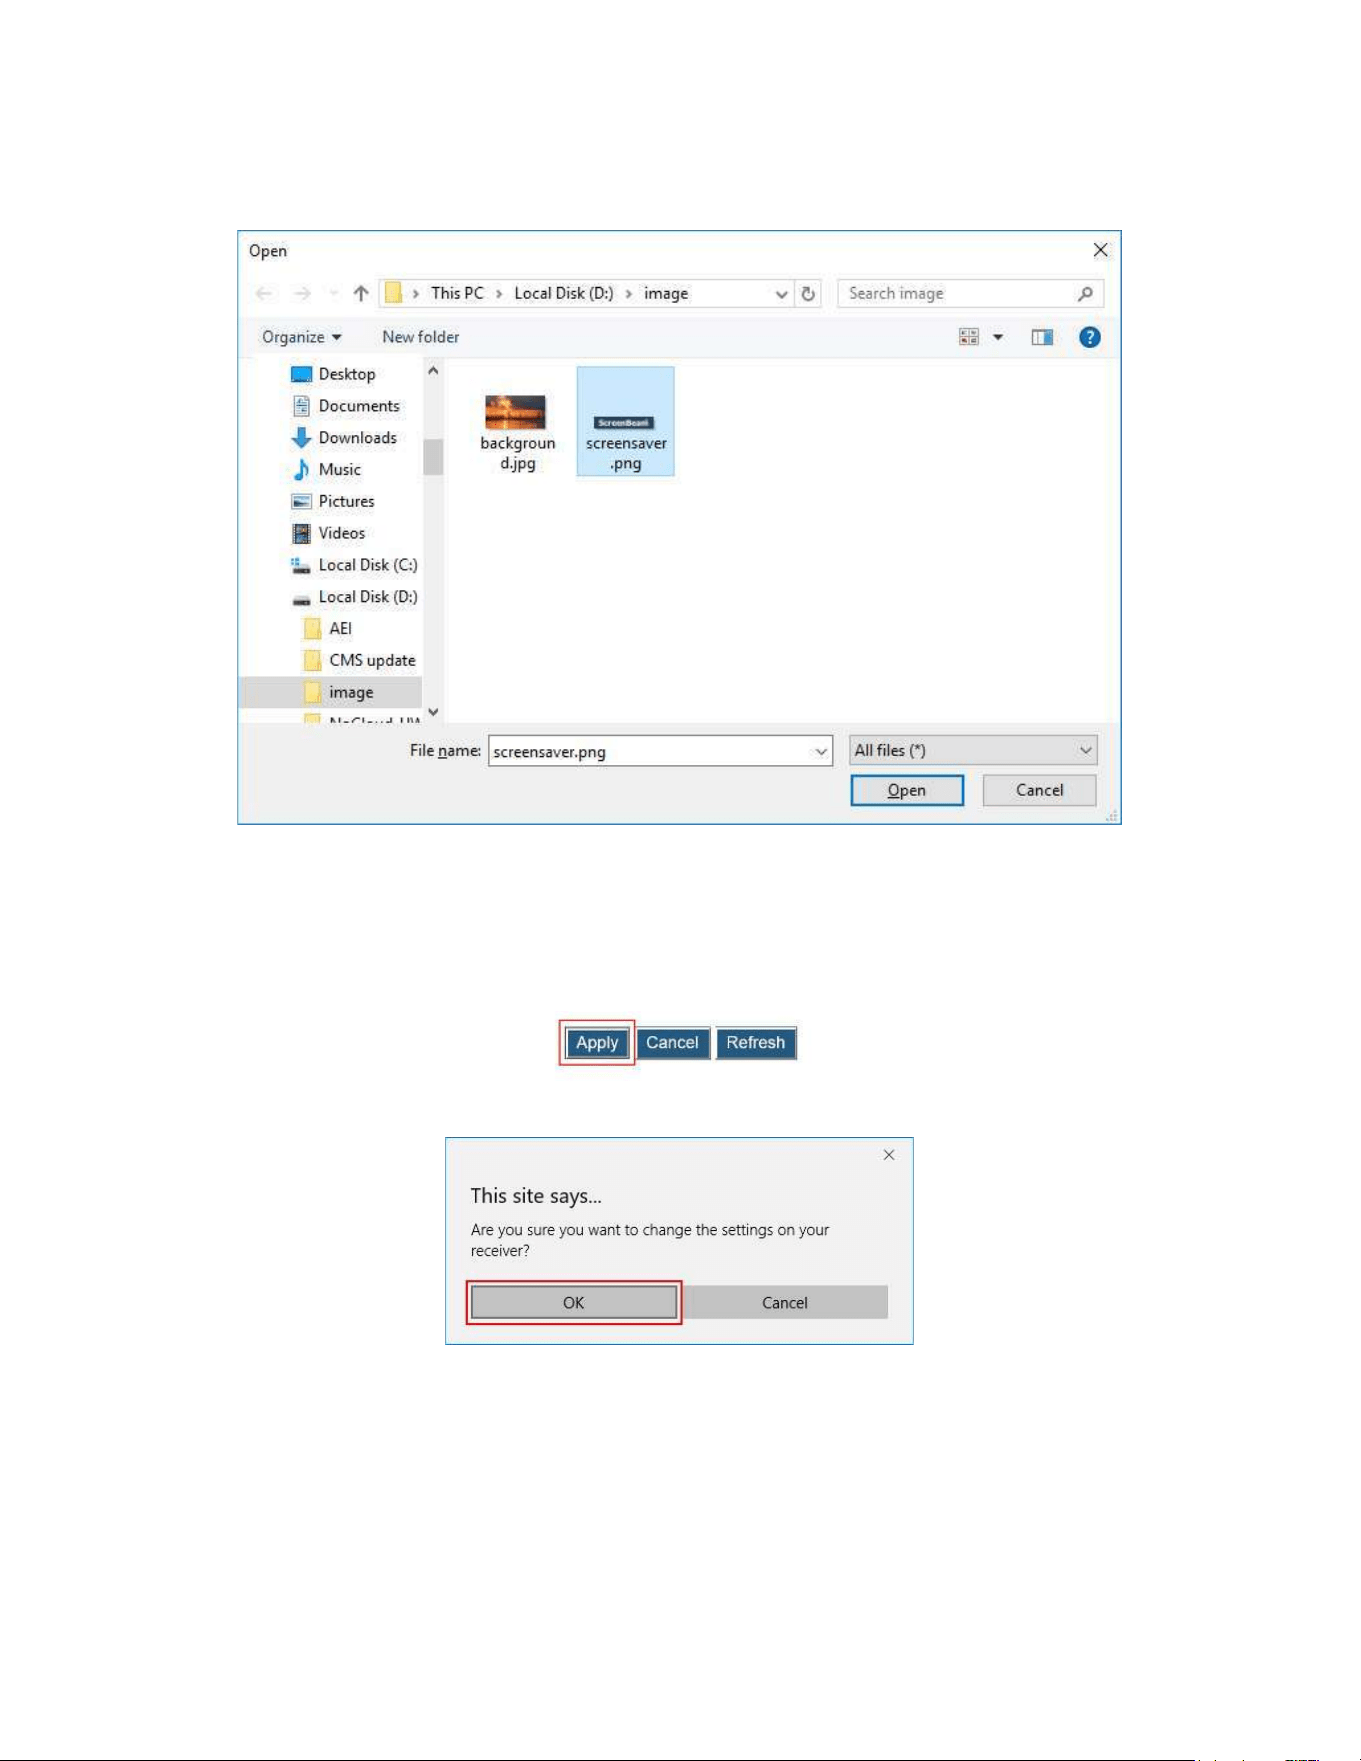
70
3. TheOpenwindowappears.Selectanimageforthescreensaverandclickthe Open
buttontoconfirm.
Note:
Theimagemustbein.pngformat.
Thefilesizemustnotexceed200KB.
Thebestimagesizeis300*60pixels.
4. ClicktheApplybuttontouploadthescreensaverimagetothereceiver.
5. Aconfirmationmessageappears.ClickOKtocontinue.
6. Afterawhile,thescreensaverimagewillbeupdated.Youcancheckitontheconnected
displaywhenthescreensaverisrunning.
71
5.3.5.11 SettingupNetworkInformationDisplayonTVScreen
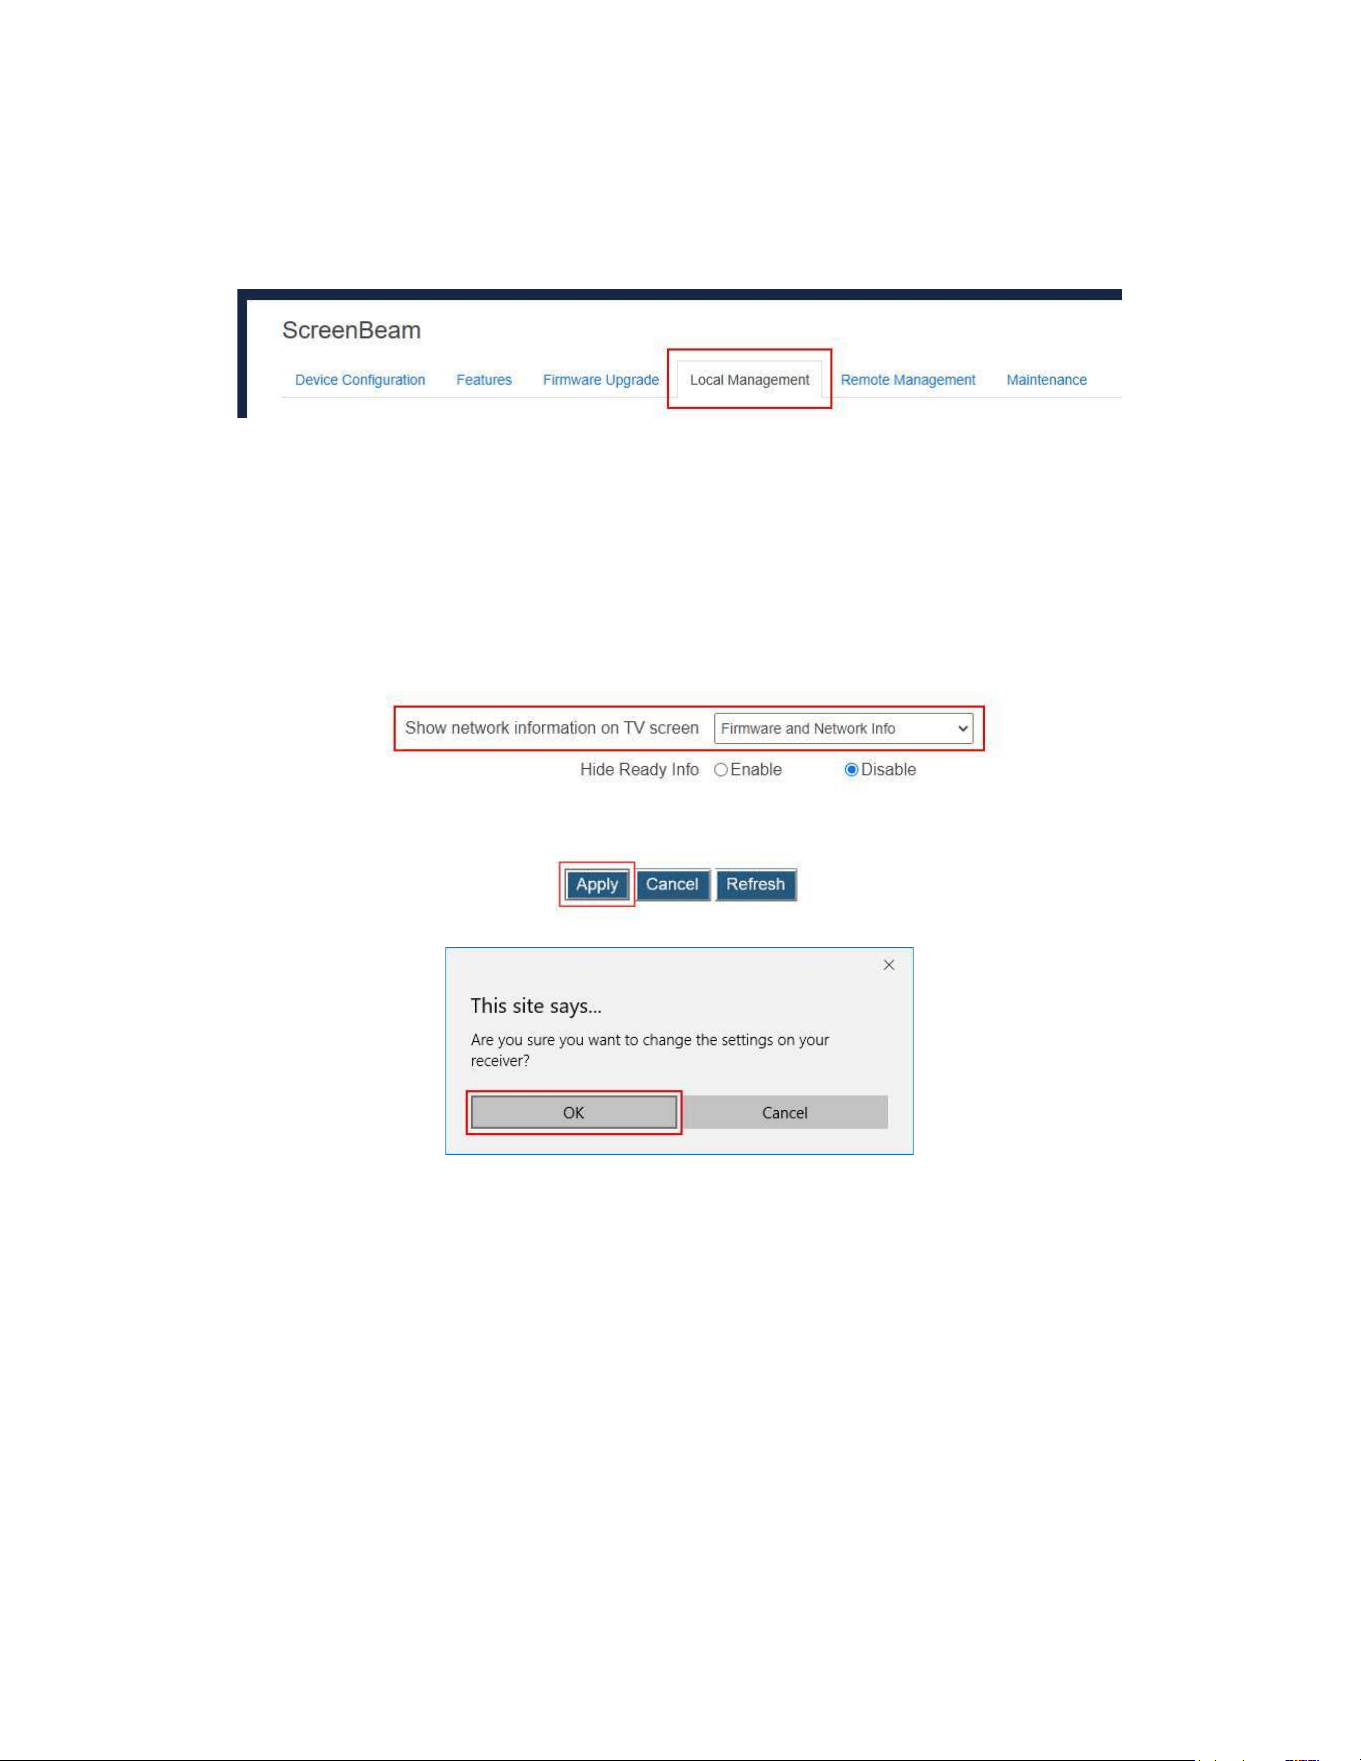
Tosetupthereceiver’snetworkinformationdisplay,followthisprocedure:
1. GototheLocalManagementtabpagebyclickingtheLocalManagementtab.
2. GototheShownetworkinformationonTVscreenline,andselectadesiredoption
fromthedrop-downbox.
FirmwareandNetworkInfo:Thereceiverdisplaysfirmwareinfoandnetworkinfo
ontheconnecteddisplay.
FirmwareInfo:Thereceiverdisplaysfirmwareinfoonlyontheconnecteddisplay.
All Info: The receiver displays all information (including firmware, network,
MiracastP2Pconnectionmode,channel,andCMSconnection)ontheconnected
display.
3. ClicktheApplybutton,andthenclickOKonthepop-upmessageboxtoconfirm.

72
ThefigurebelowshowstheRTCscreenwithallinformationdisplayed.
73
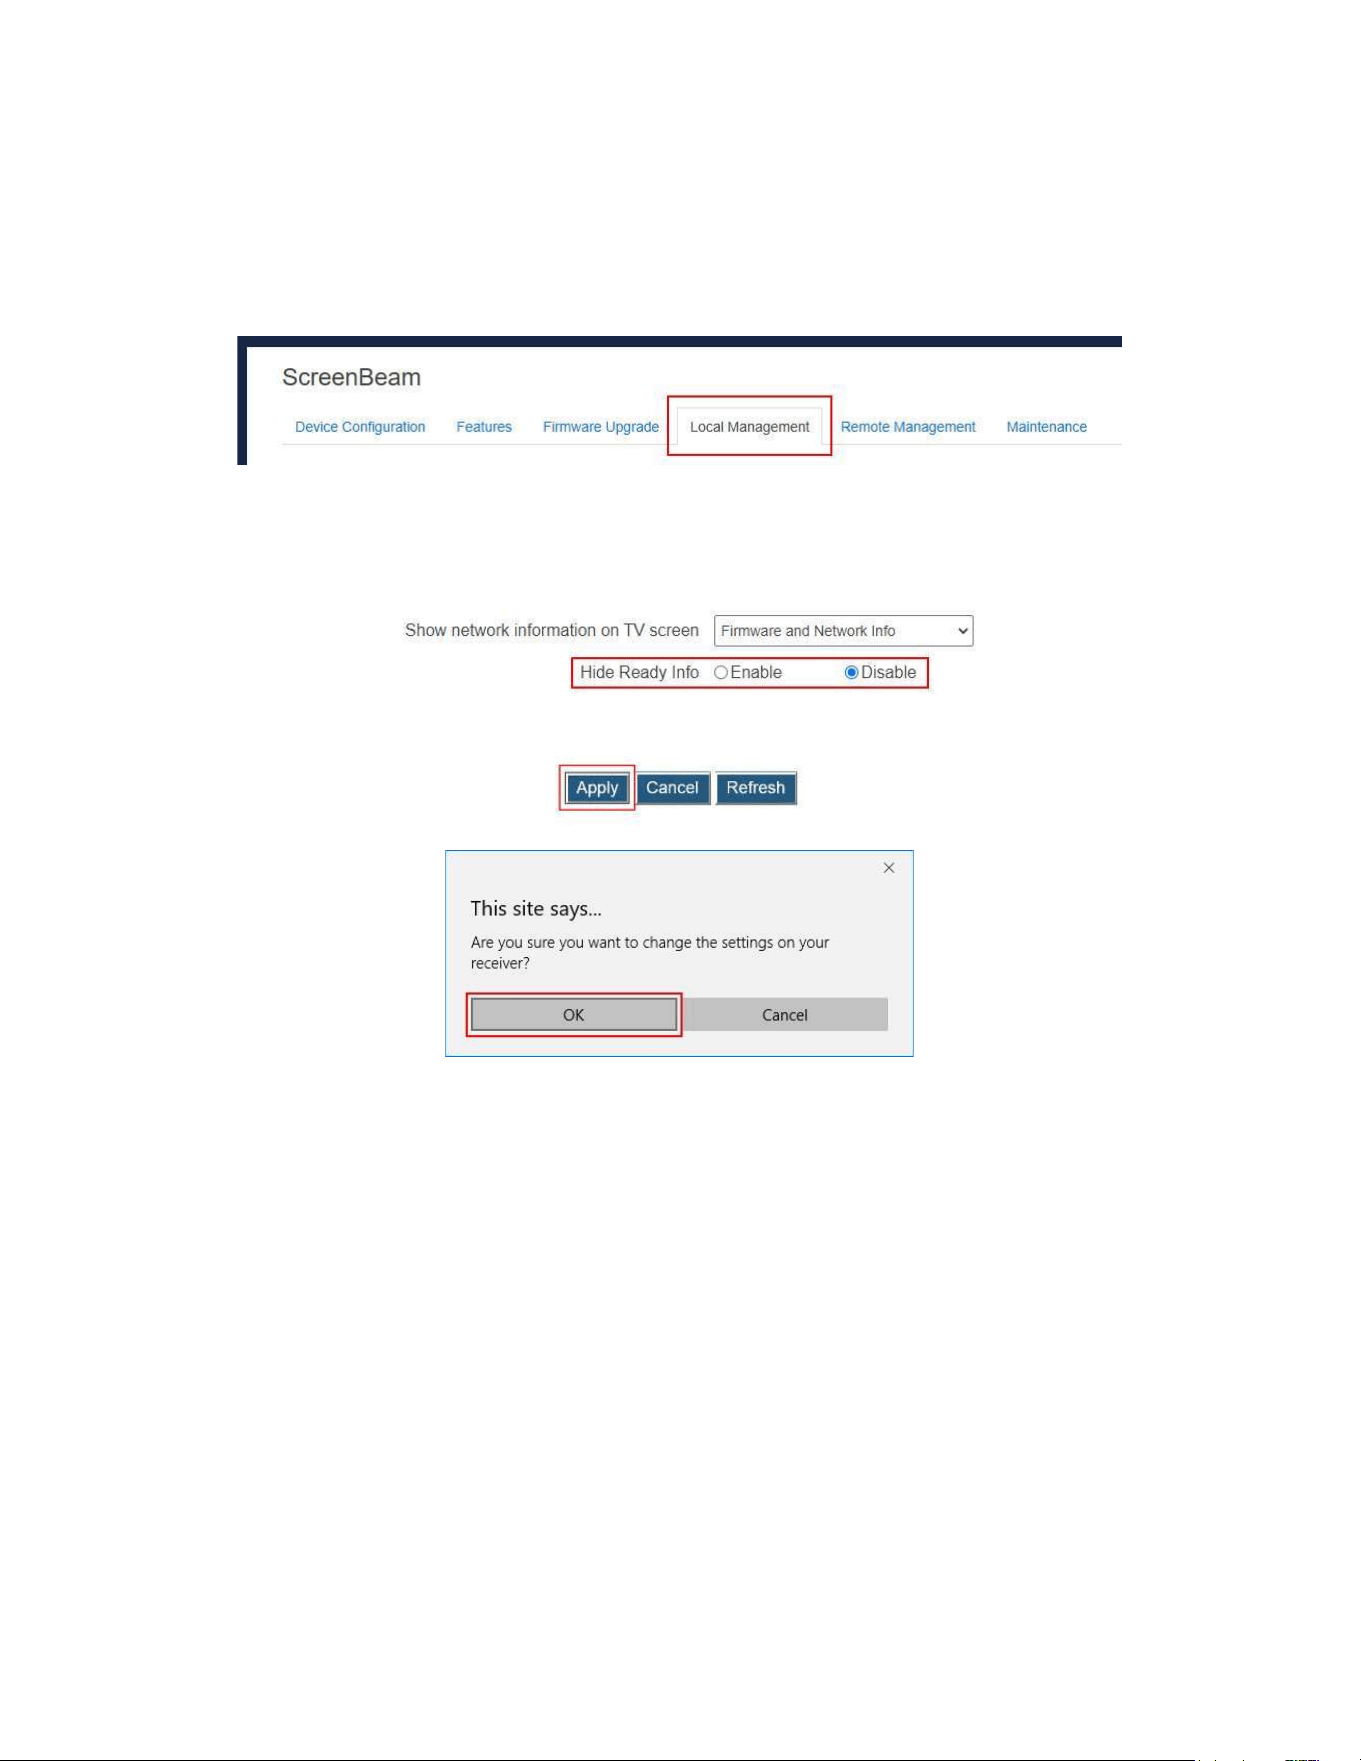
5.3.5.12 HidingReadytoConnectInformation
Tohide orshownthereceiver’sWirelessDisplayReadyto Connect information,follow
thisprocedure:
1. GototheLocalManagementtabpagebyclickingtheLocalManagementtab.
2. SettheHideReadyInfofeaturetoEnableorDisable.
Enable:TheWirelessDisplayReadytoConnectinformationwillnotshow.
Disable:TheWirelessDisplayReadytoConnectinformationwillshow.
3. ClicktheApplybutton,andthenclickOKonthepop-upmessageboxtoconfirm.

74
4. TheWirelessDisplayReadytoConnectinformationwillnotbe displayedafterthis
featureisenabled(Readyinfoishidden).
75
5.3.6 LocalManagementSettings
This section introduces local management related settings, such as local management
interface access, local management communication port, network information display,
receiver’sSSID.
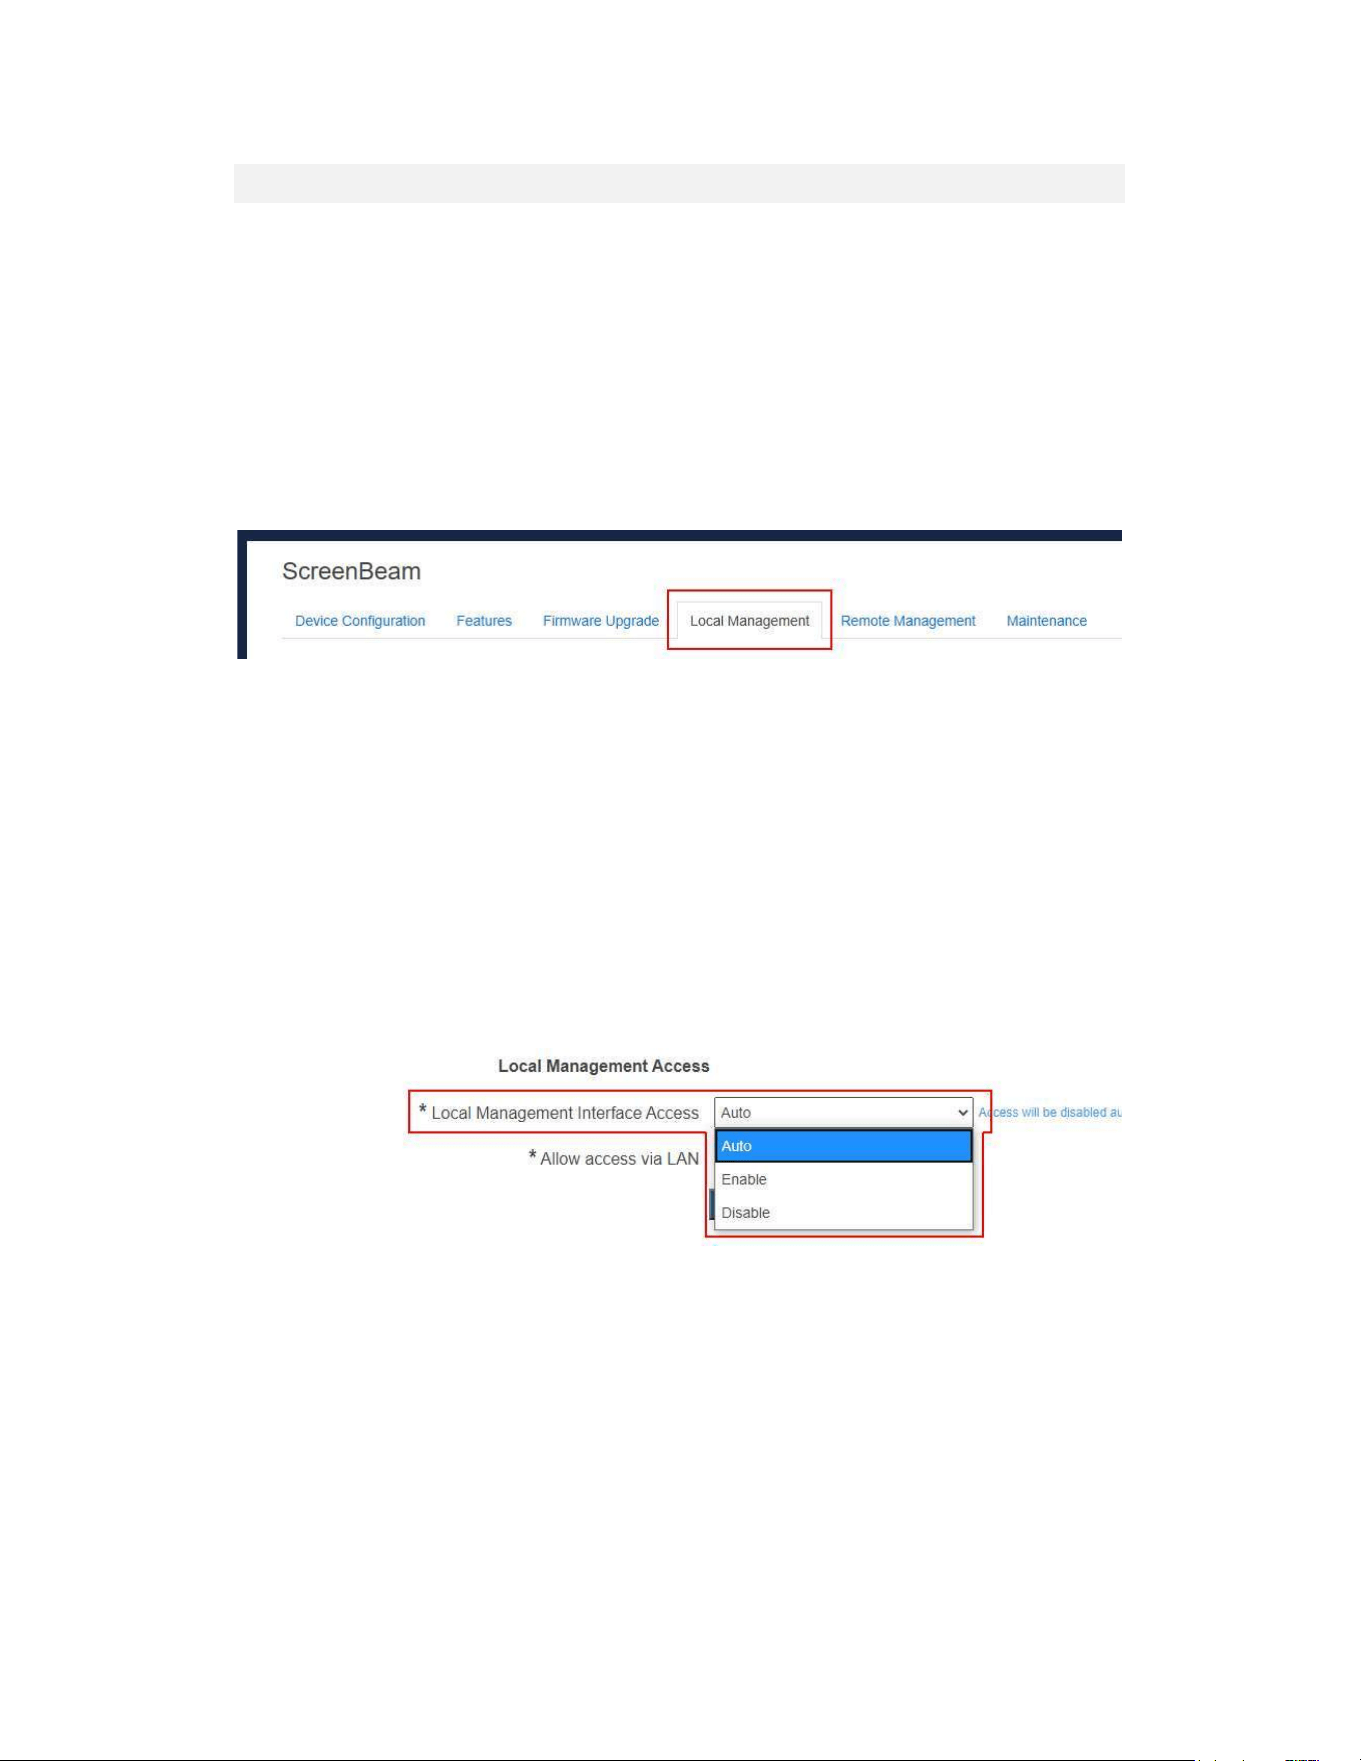
5.3.6.1SettingupLocalManagementInterfaceAccess
Thereceiver’sLocalManagementInterface(LMI)isusedtomanagethereceiverlocally.
Tosetupthereceiver’sLMIaccess,followthisprocedure:
1. GototheLocalManagementtabpagebyclickingtheLocalManagementtab.
2. Go totheLocalManagementAccesssection, andselect an optionfromthe Local
ManagementInterfaceAccessbox.Therearethreeoptionsavailable:Auto,Enable,
andDisable.
Auto: The accessibility to the receiver’s LMI depends on the availability of the
CMSconnection.WhenthereceiverisconnectedtoCMS,accesstothereceiver’s
LMI is disabled automatically, and the receiver’s SSID is not displayed in NGO
mode;otherwise,accessisenabled.
Enable: Access to the receiver’s LMI is enabled no matter the receiver is
connectedtoCMSornot.
Disable:Accesstothereceiver’sLMIisnotallowed,andthereceiver’sSSIDisnot
displayedinNGOmode.

76
3. ClicktheApplybutton,andthenclickOKonthepop-upmessageboxtoconfirm.
4. Thereceiverreboots,andnewsettingtakeseffectafterthereboot.
77
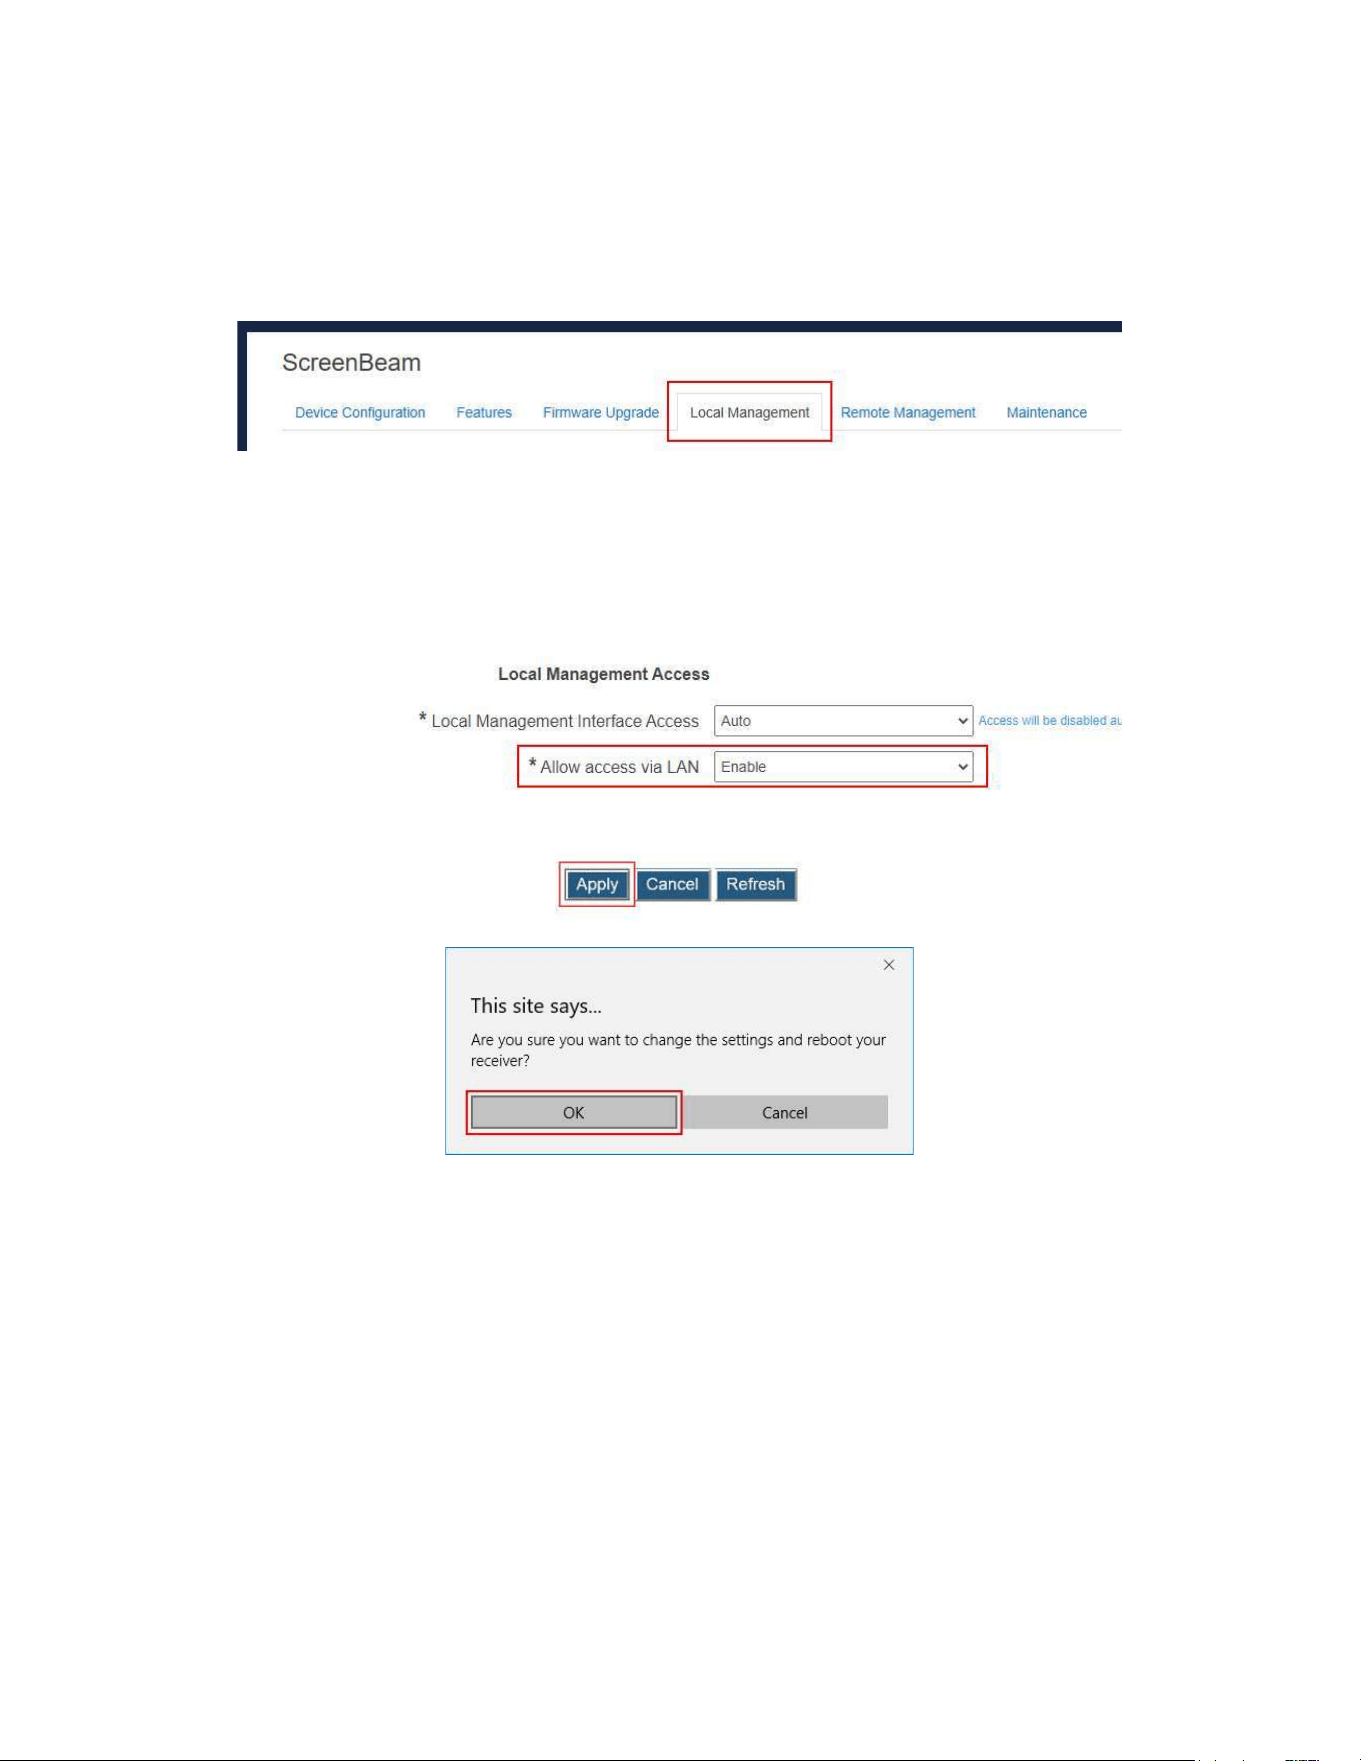
5.3.6.2SettingupAllowAccessviaLAN
Usersareallowedtoaccessthereceiver’sLMIviaaLANconnection.
TosetuptheAllowaccessviaLANfeature,followthisprocedure:
1. GototheLocalManagementtabpagebyclickingtheLocalManagementtab.
2. GototheLocalManagementAccesssection,andselectanoptionfromthe Allow
accessviaLANdrop-downbox.
Enable:Usersareallowedtoaccessthereceiver’sLMIviaaLANconnection.By
default,thisfeatureisenabled.
Disable: Users are not allowed to access the receiver’s LMI via any LAN
connection.
3. ClicktheApplybutton,andthenclickOKonthepop-upmessageboxtoconfirm.
4. Thereceiverreboots,andnewsettingtakeseffectafterthereboot.
78
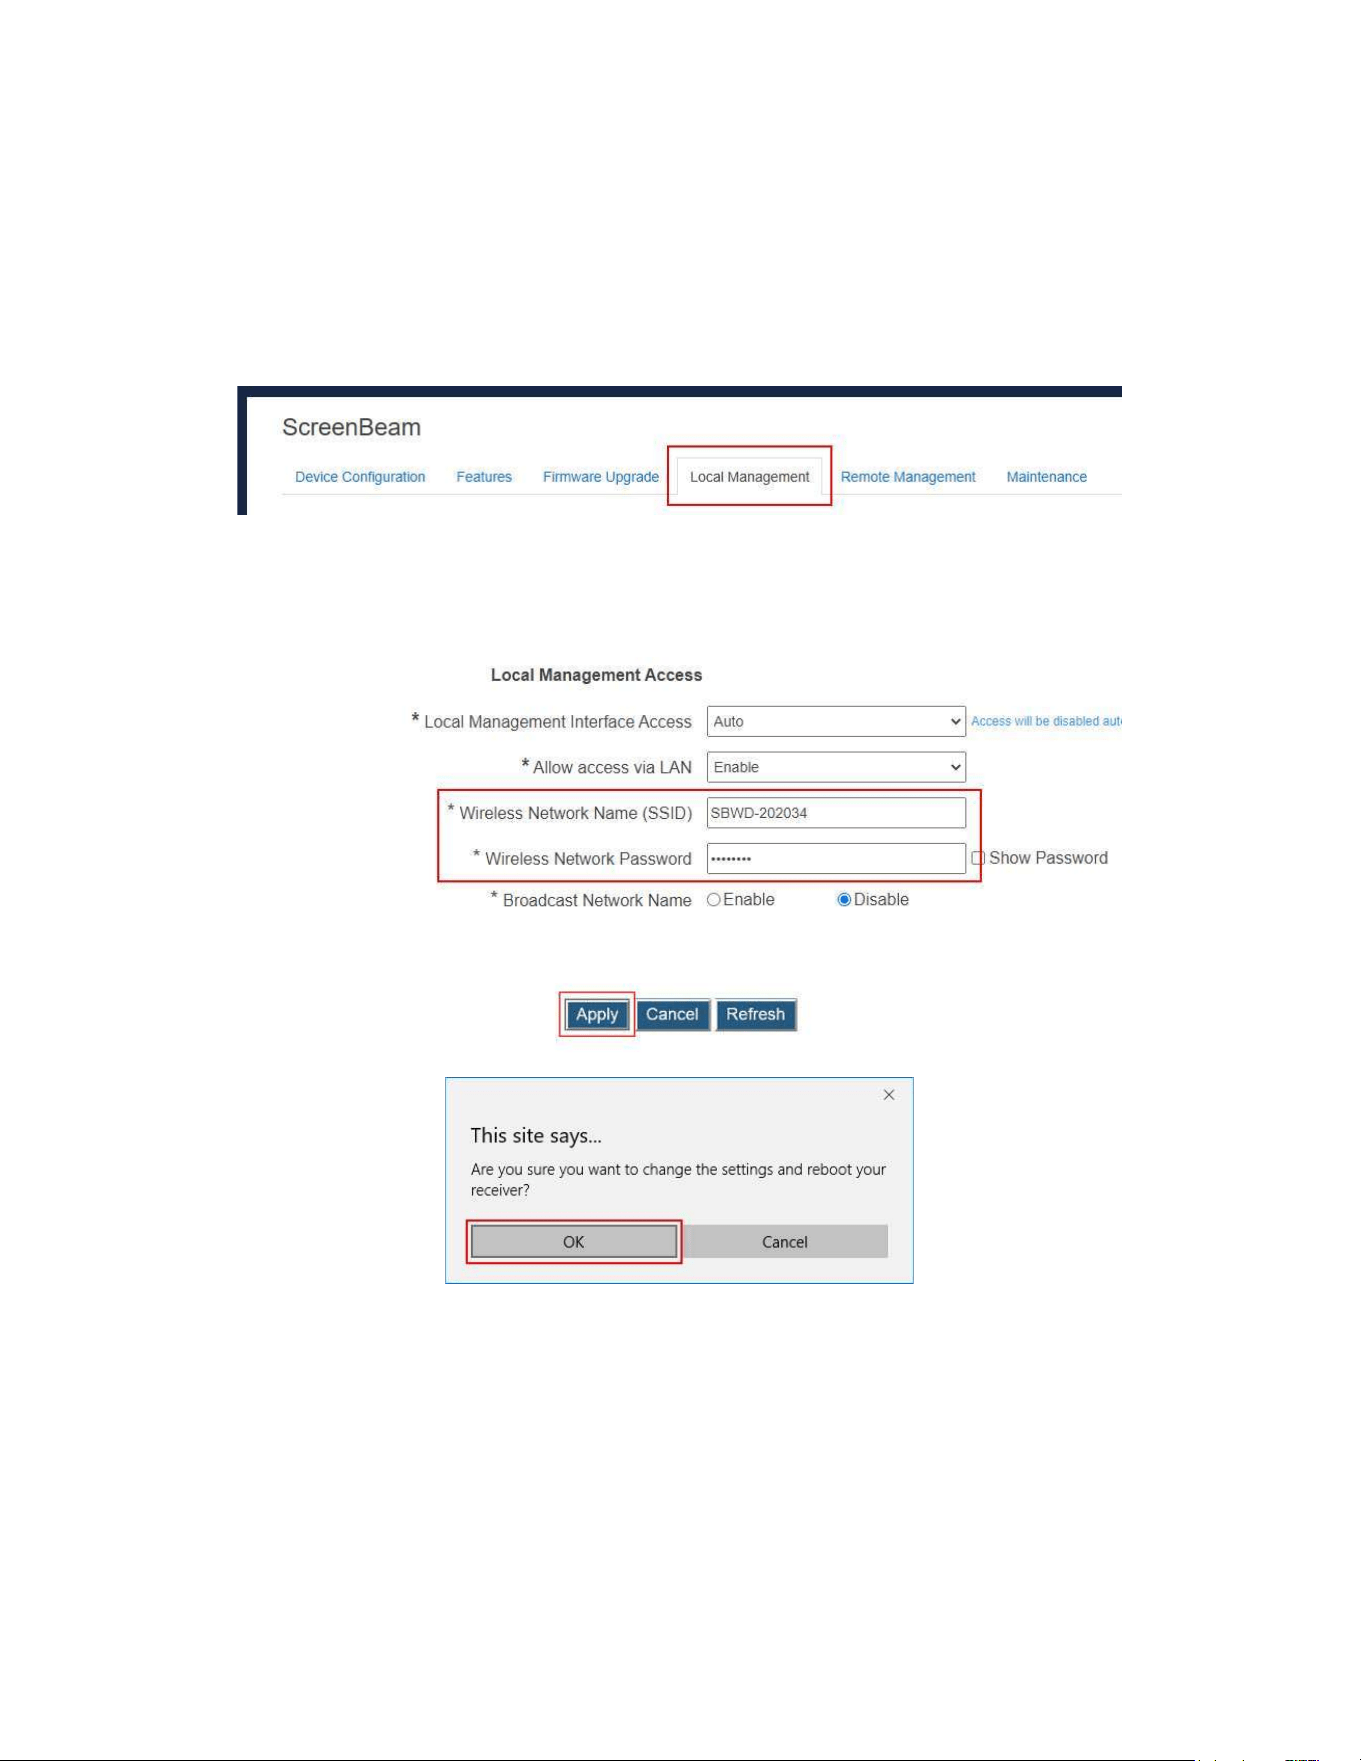
5.3.6.3ModifyingtheReceiver’sLocalWi-FiSettings
ScreenBeam960’slocalWi-Fiisusedtomanagethereceiveronly.
Note:Thereceiver’slocalWi-FisettingsareavailablewhenthereceiverisinNGOmode.
Usersareallowedtosetupthereceiver’swirelessnetworkname(SSID)andpassword.
Tomodifythereceiver’slocalWi-Fisettings,followthisprocedure:
1. GototheLocalManagementtabpagebyclickingtheLocalManagementtab.
2. GototheLocalManagementAccesssection,andtypeanewnameintheWireless
NetworkName(SSID)boxandanewpasswordintheWirelessNetworkPassword
box.
Note:ThepasswordwilldisplayinplaintextwhenShowPasswordisenabled.
3. ClicktheApplybutton,andthenclickOKonthepop-upmessageboxtoconfirm.
4. Thereceiverreboots,andthelocalWi-Fi’snewsettingstakeeffectafterthereboot.
79
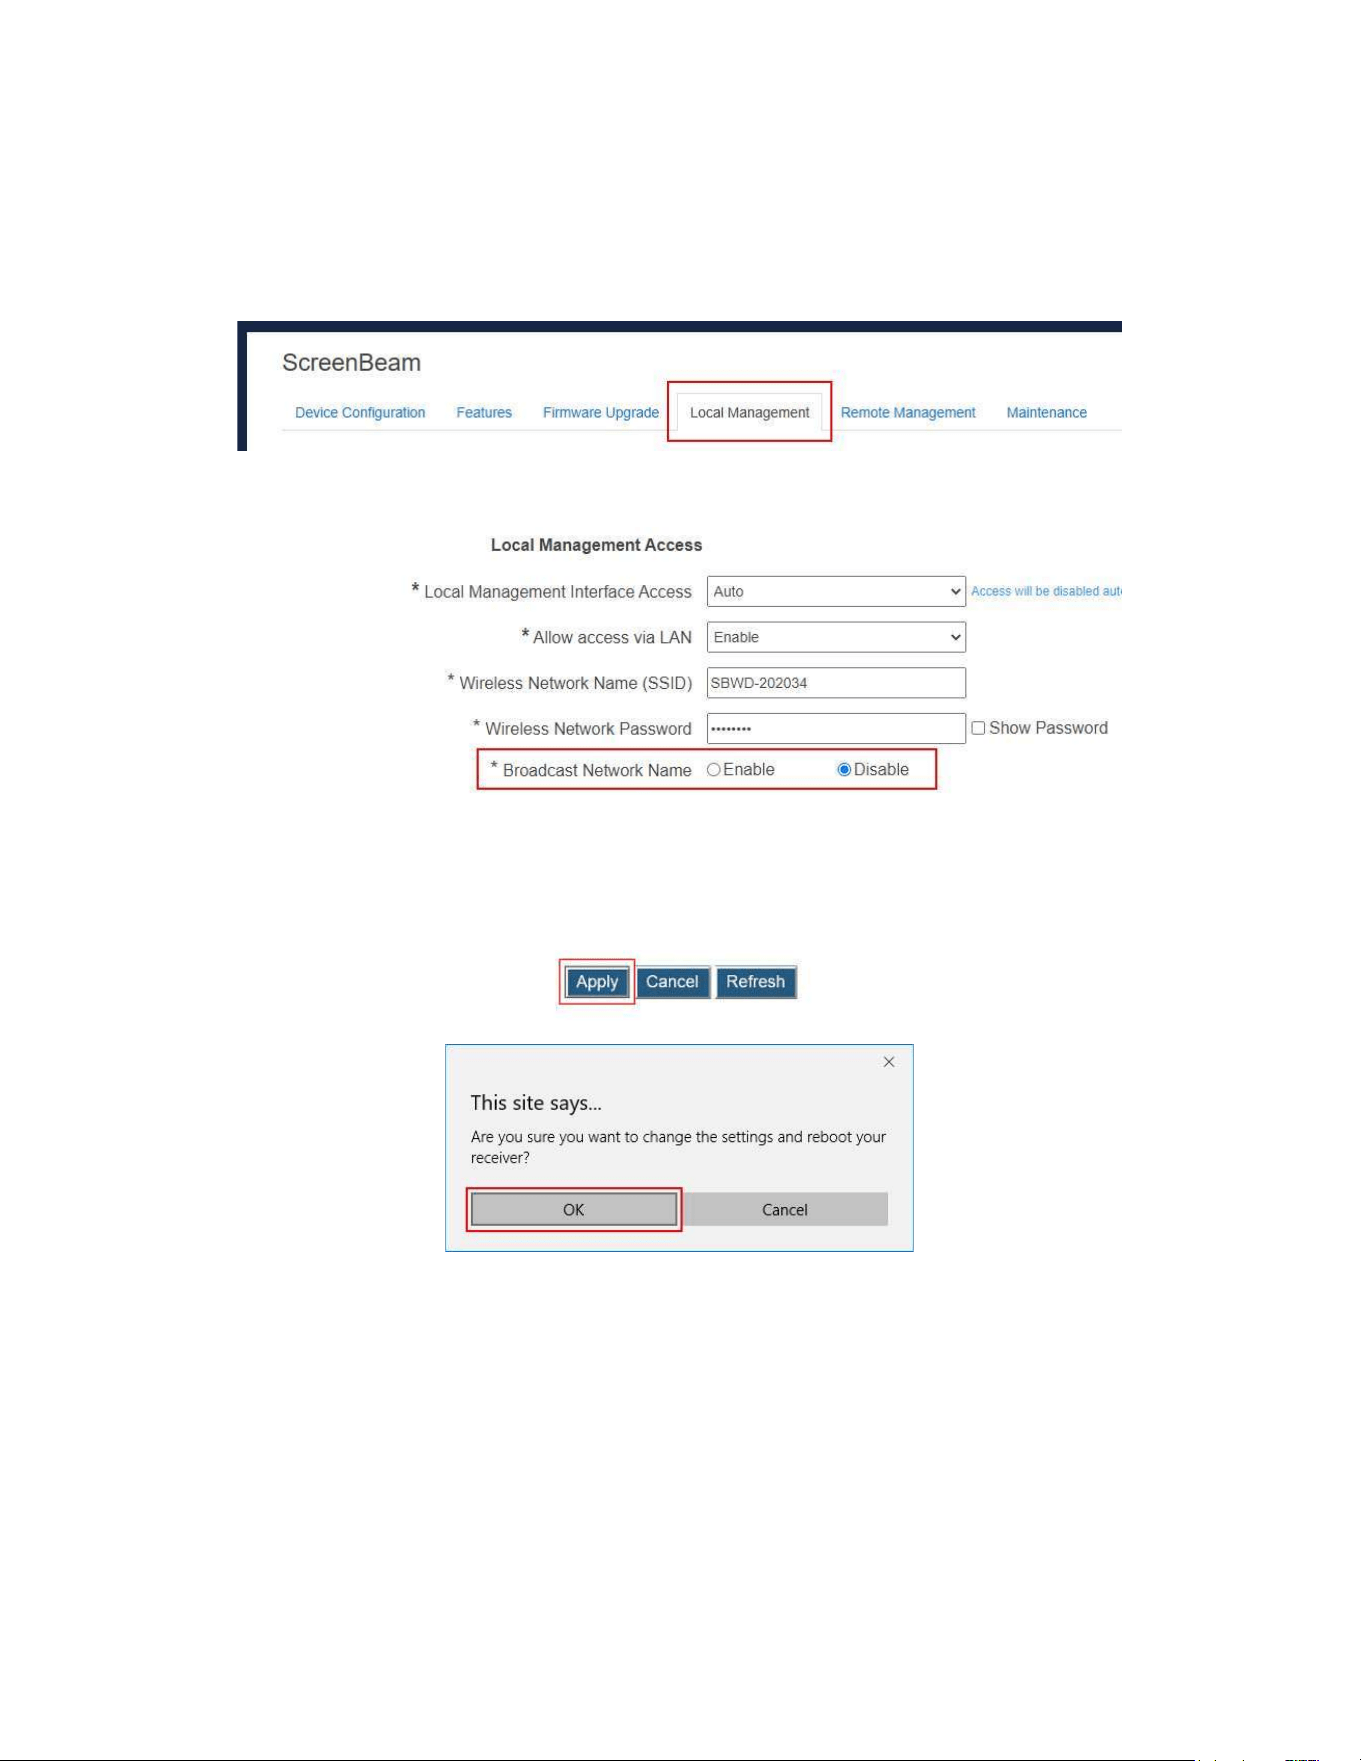
5.3.6.4SettingupBroadcastNetworkName
Note:ThisfeatureisavailablewhenthereceiverisinNGOmode.
TosetupBroadcastNetworkName,followthisprocedure:
1. GototheLocalManagementtabpagebyclickingtheLocalManagementtab.
2. GototheLocalManagementAccesssection,andsettheBroadcastNetworkName
featuretoEnable/Disable.
Note:Bydefault,thereceiver’snetworkname(SSID)isnotbroadcasted.Inthissituation
you can connect to the SSID manually. Refer to Section 5.2.3.1 When SSID Broadcast is
Disabledfordetail.
3. ClicktheApplybutton,andthenclickOKonthepop-upmessageboxtoconfirm.
4. Thereceiverreboots,andnewsettingtakeseffectafterthereboot.
80
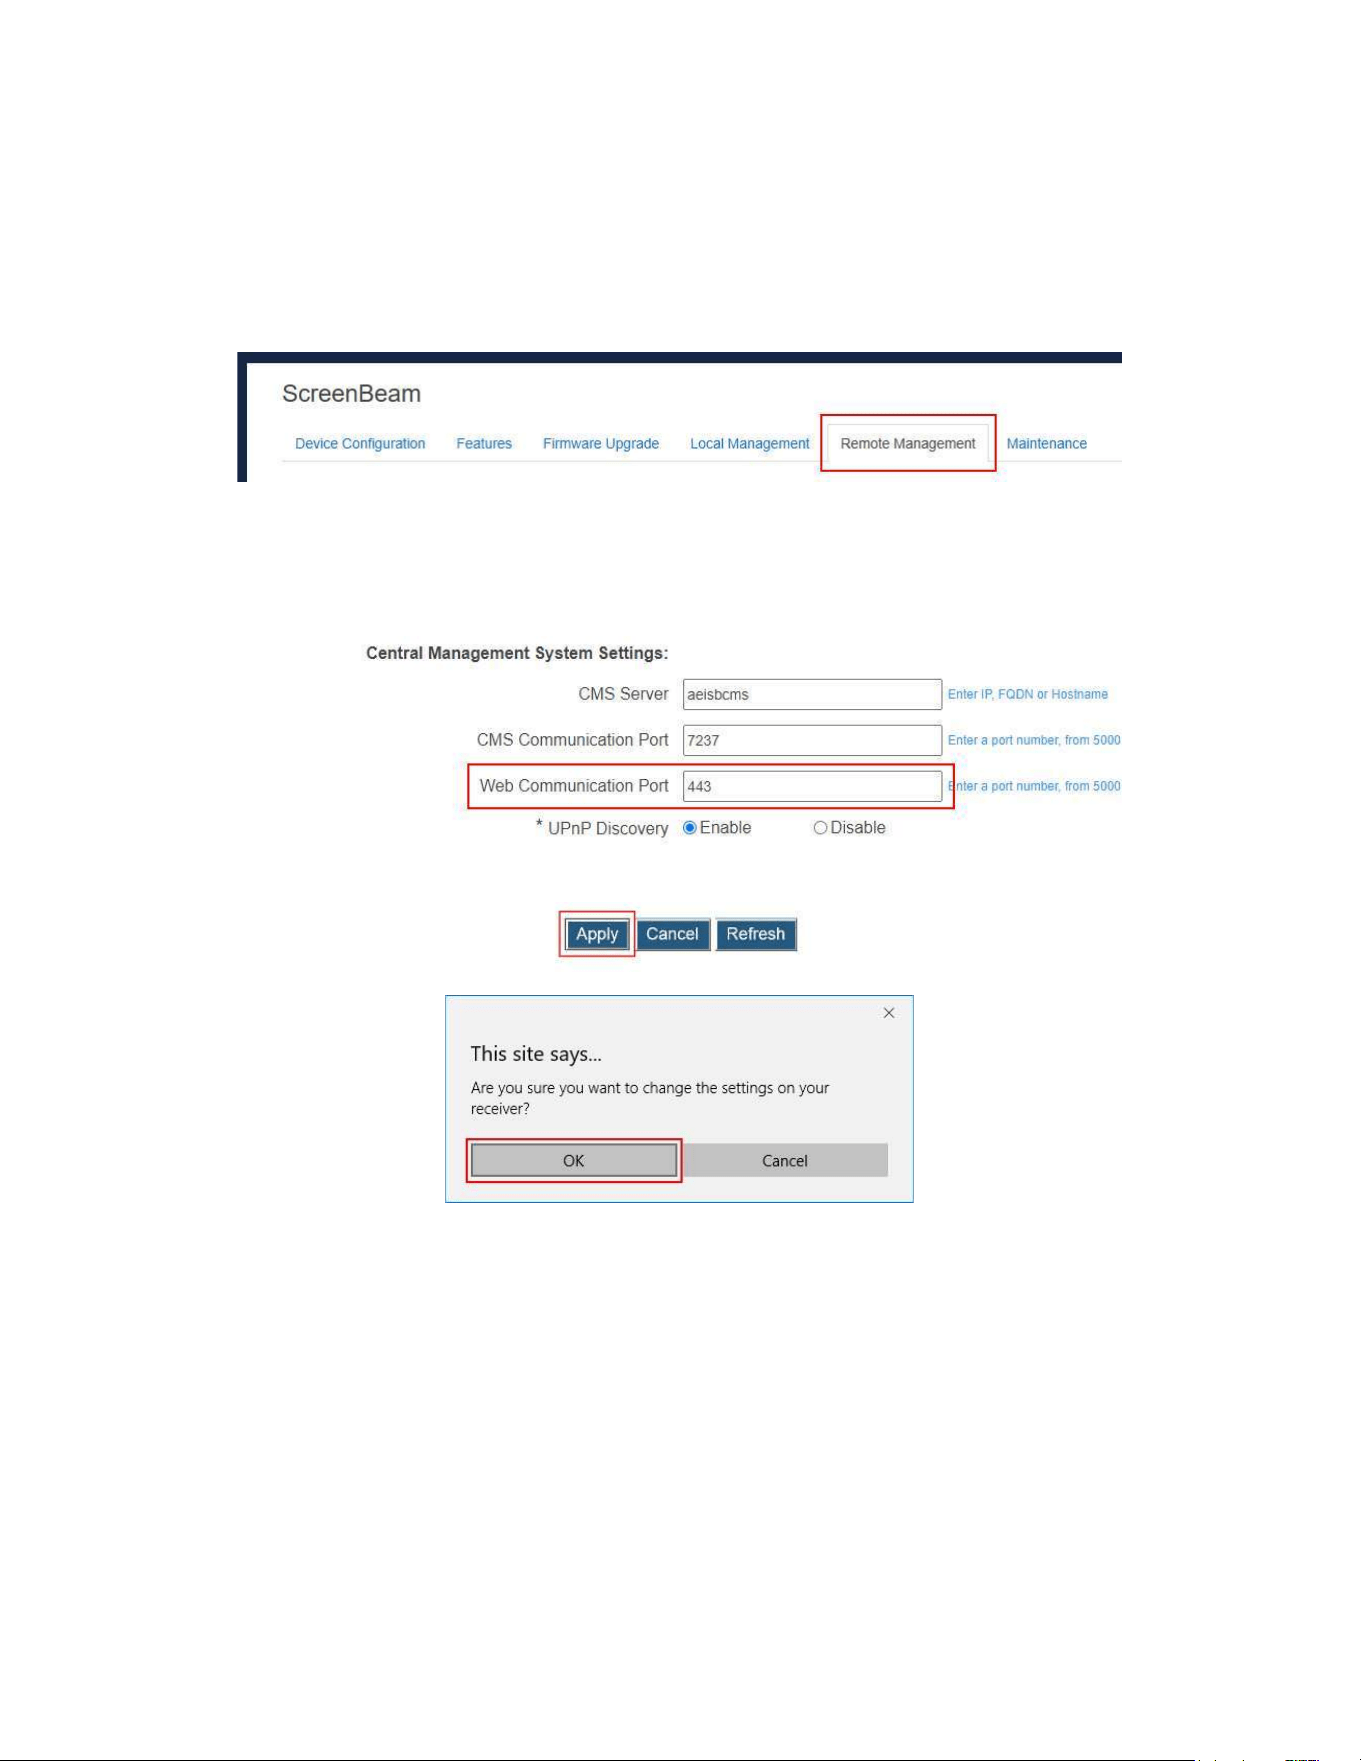
5.3.6.5Specifying a Local Management Communication Port for the
Receiver
Tospecifyalocalmanagementcommunicationportforthereceiver,followthisprocedure:
1. GototheRemoteManagementtabpagebyclickingtheRemoteManagementtab.
2. GototheCentral ManagementSystemSettingsection,anddefineaportfor Web
CommunicationPort.
Web Communication Port: It is the communication port for the receiver’s Local
ManagementInterface.
3. ClicktheApplybutton,andthenclickOKonthepop-upmessageboxtoconfirm.

81
5.3.6.6SettingupUSBAutoConfiguration
ThereceiverprovidesoneUSB port,which can beusedto configure the receiver witha
USBflashdrive. RefertotheCMSusermanualfor detailon howtoconfigurea receiver
usingaUSBflashdrive.
Tosetupthereceiver’sUSBconfiguration,followthisprocedure:
1. GototheFeaturestabpagebyclickingtheFeaturestab.
2. GototheDisplaySettingsection,andsettheUSBAutoConfigurefeaturetoEnable
orDisable.
Enable:ItisallowedtoconfigurereceiverwithaUSBflashdrive.
Disable:ItisnotallowedtoconfigurereceiverwithaUSBflashdrive.
3. ClicktheApplybutton,andthenclickOKonthepop-upmessageboxtoconfirm.
82
5.3.7 RemoteManagementSettings
This section introduces the receiver’s remote management related settings, such as the
receiver’shostname,IPaddress,DNSserver,CMSserver,andUPnPdiscovery.
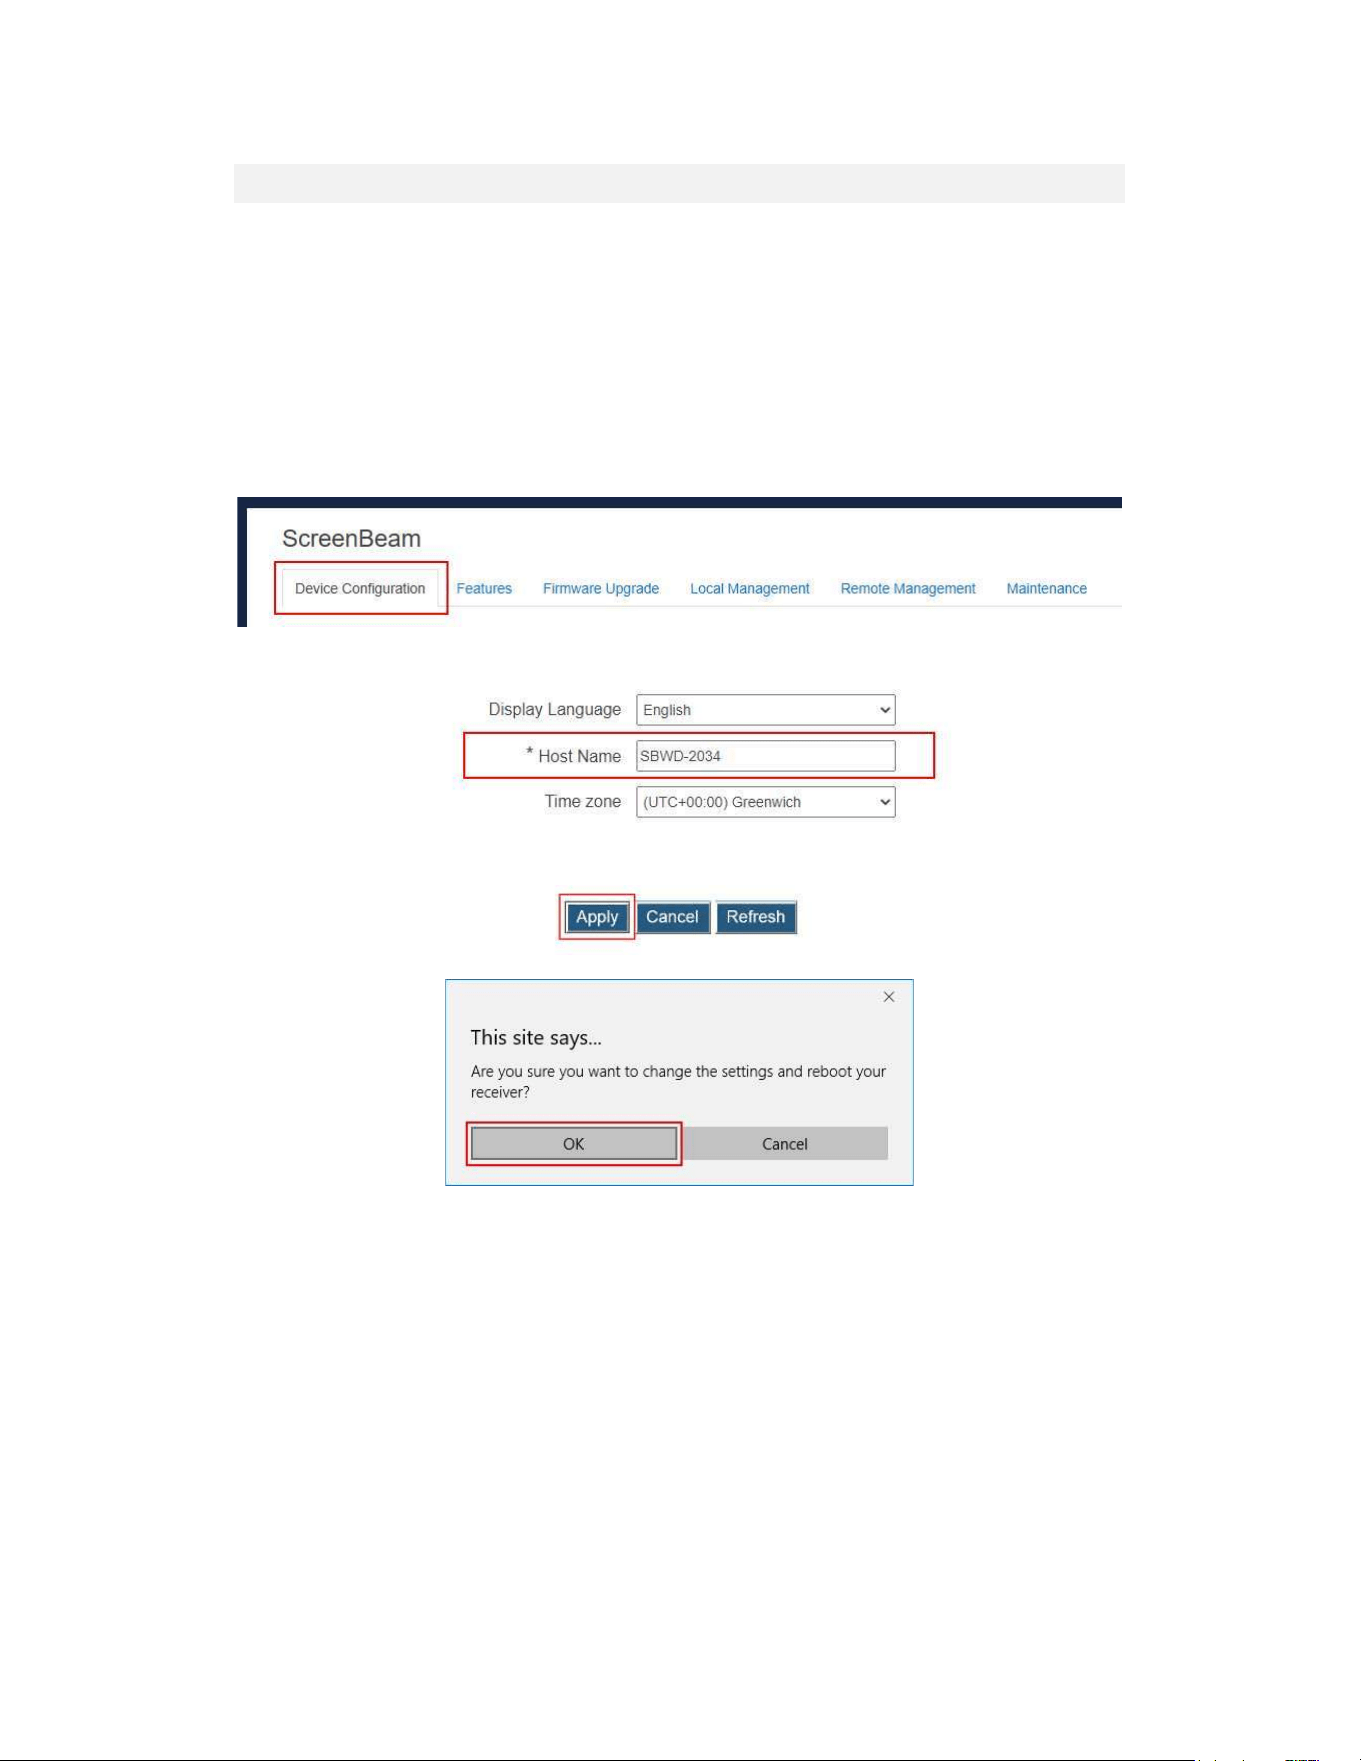
5.3.7.1ModifyingtheReceiver’sHostName
Thehostnameisusedtoidentifythereceiverinanetwork.
Tomodifyyourreceiver’shostname,followthisprocedure:
1. GototheDeviceConfigurationtabpagebyclickingtheDeviceConfigurationtab.
2. GototheHostnameline,andtypeanewhostnameintheHostnamebox.
3. ClicktheApplybutton,andthenclickOKonthepop-upmessageboxtoconfirm.
Note:Thereceiver’snewhostnametakeseffectafterthereboot.
83
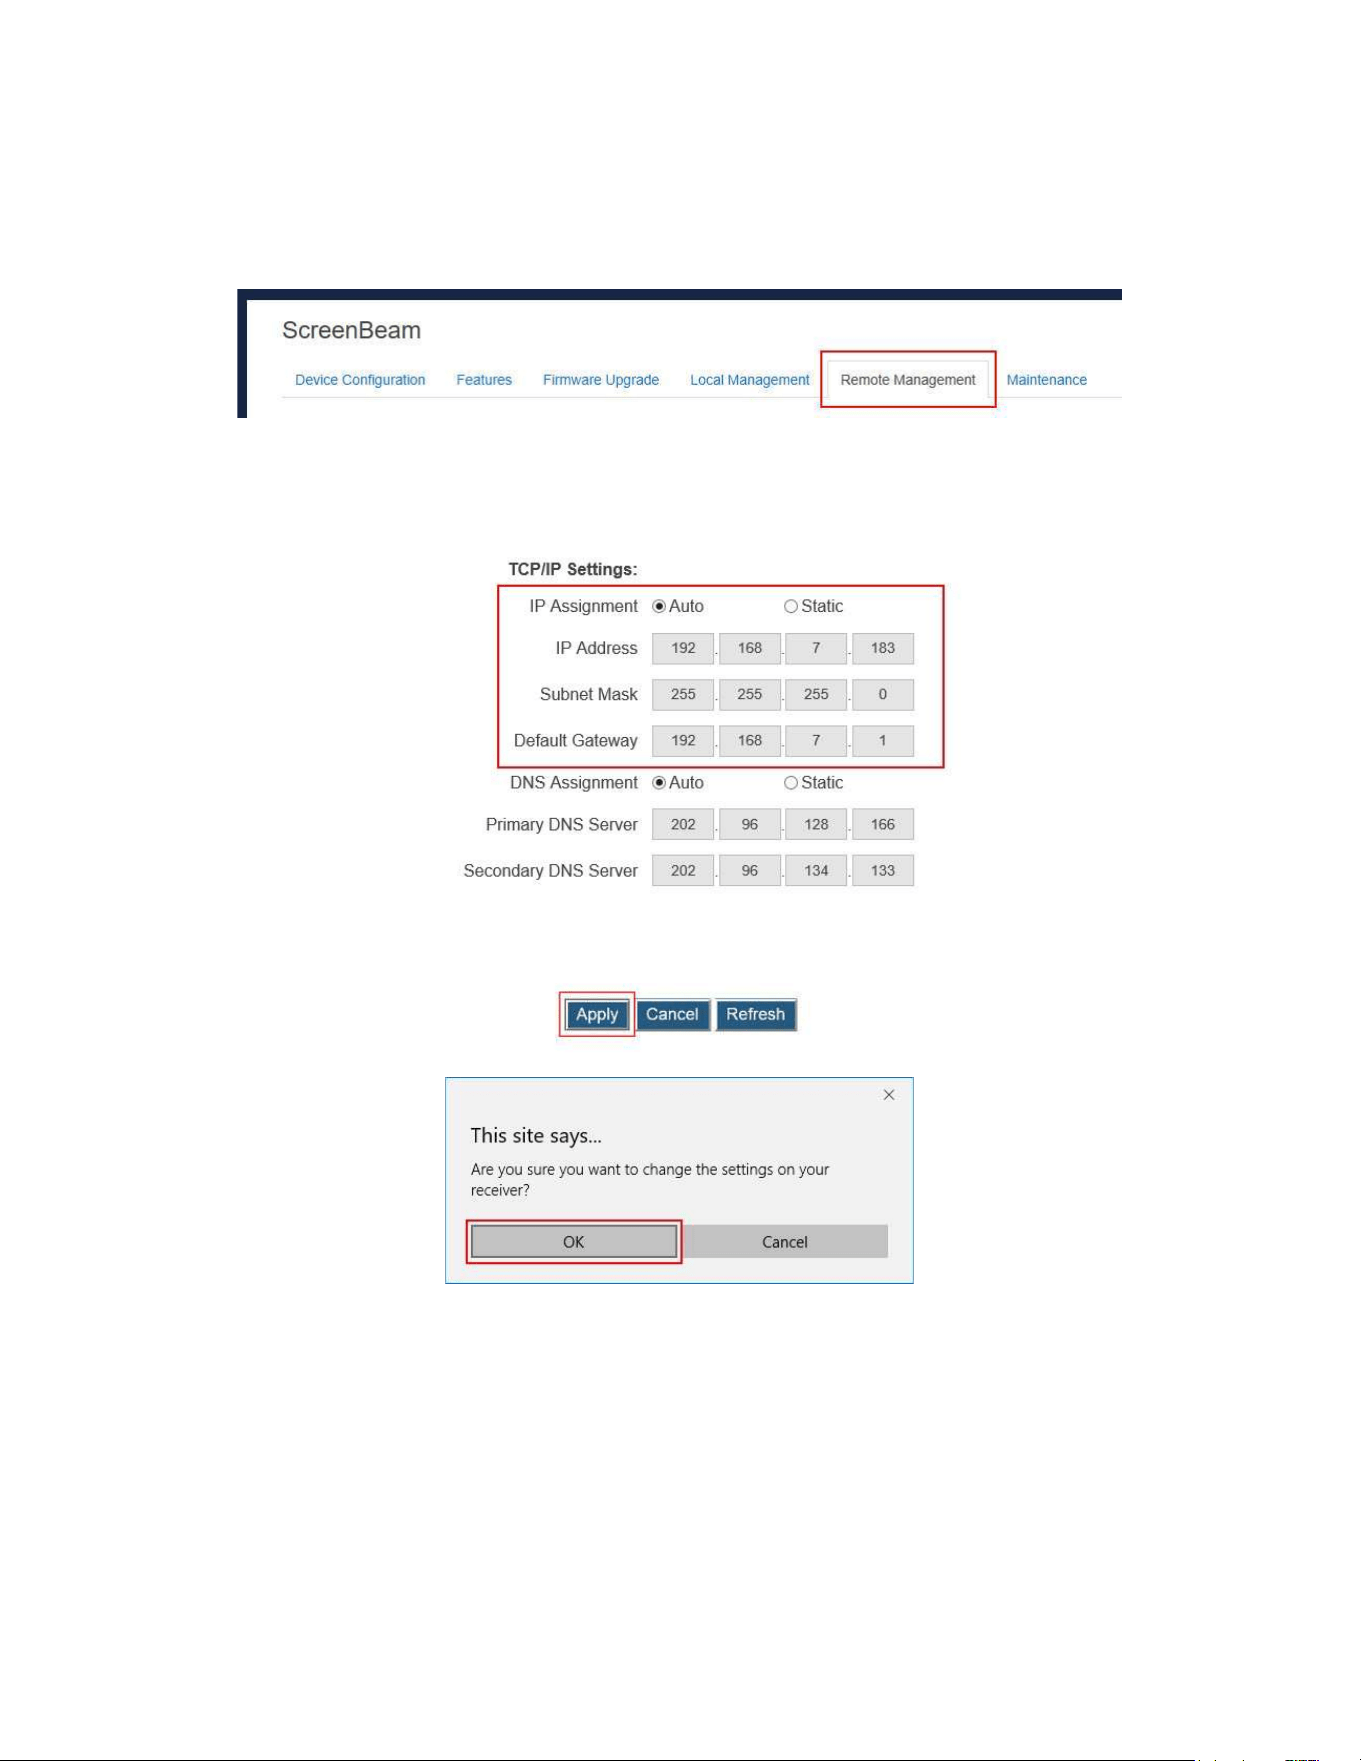
5.3.7.2SettinguptheReceiver’sIPAddress
Tosetupthereceiver’sIPaddress,followthisprocedure:
1. GototheRemoteManagementtabpagebyclickingtheRemoteManagementtab.
2. GototheTCP/IPSettingsection,andsettheIPAssignmenttoAutoorStatic.
Auto:ThereceiverwillbeassignedanIPaddressbytheDHCPserver.
Static:UsersareallowedtodefinetheIPaddress,subnetmask,anddefaultgateway
forthereceiver.IfStaticisselected,itisrequiredtodefineaDNSserveraswell.
3. ClicktheApplybutton,andthenclickOKonthepop-upmessageboxtoconfirm.
84
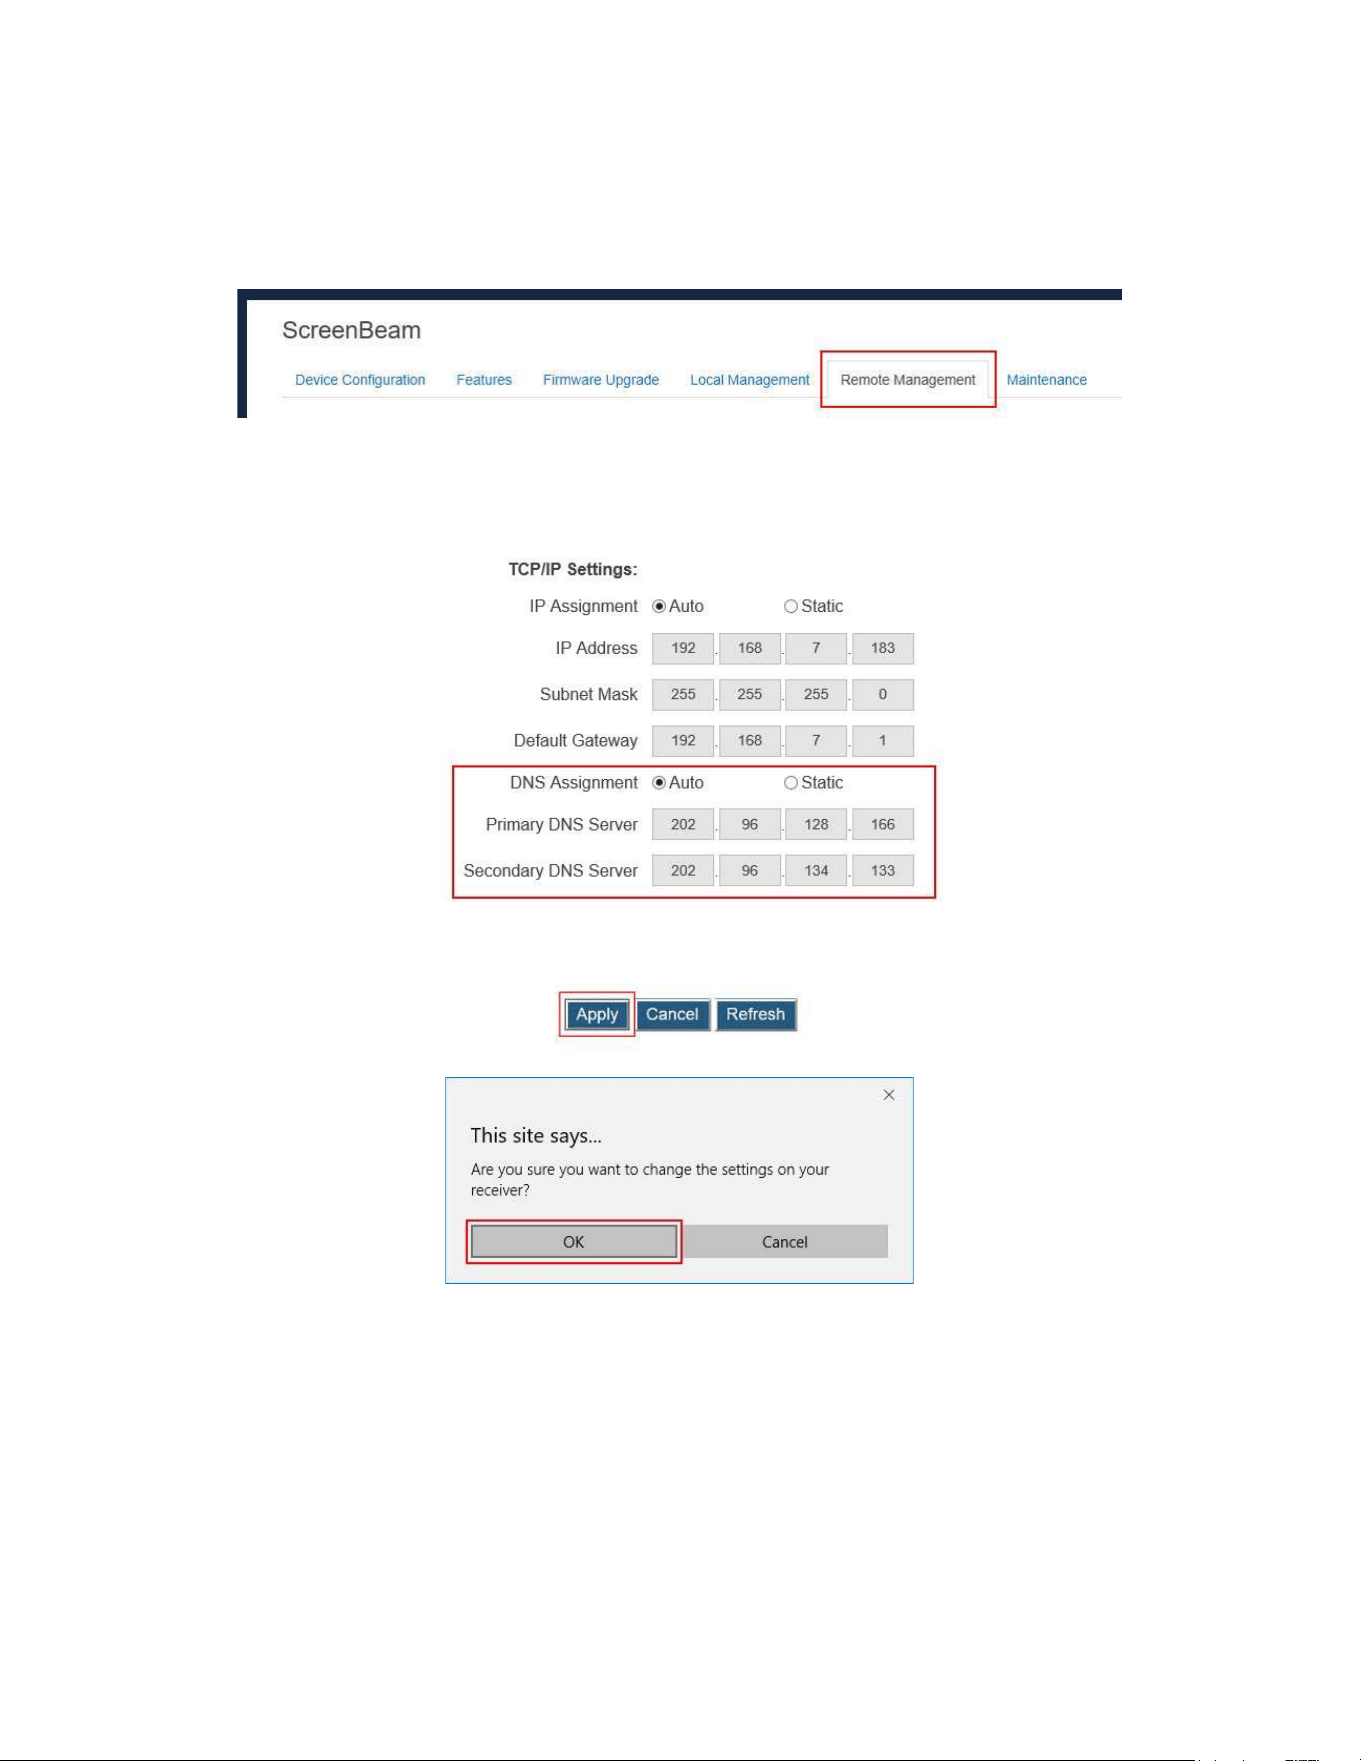
5.3.7.3SpecifyingaDNSServerfortheReceiver
TospecifyaDNSserverforthereceiver,followthisprocedure:
1. GototheRemoteManagementtabpagebyclickingtheRemoteManagementtab.
2. GototheTCP/IPSettingsection,andsettheDNSAssignmenttoAutoorStatic.
Auto:ThereceiverwillbeassignedaDNSserverautomatically.
Static:Users areallowed to define a DNS server for the receiver. When t Static is
selected,itisrequiredtodefineaDNSserver.
3. ClicktheApplybutton,andthenclickOKonthepop-upmessageboxtoconfirm.
85
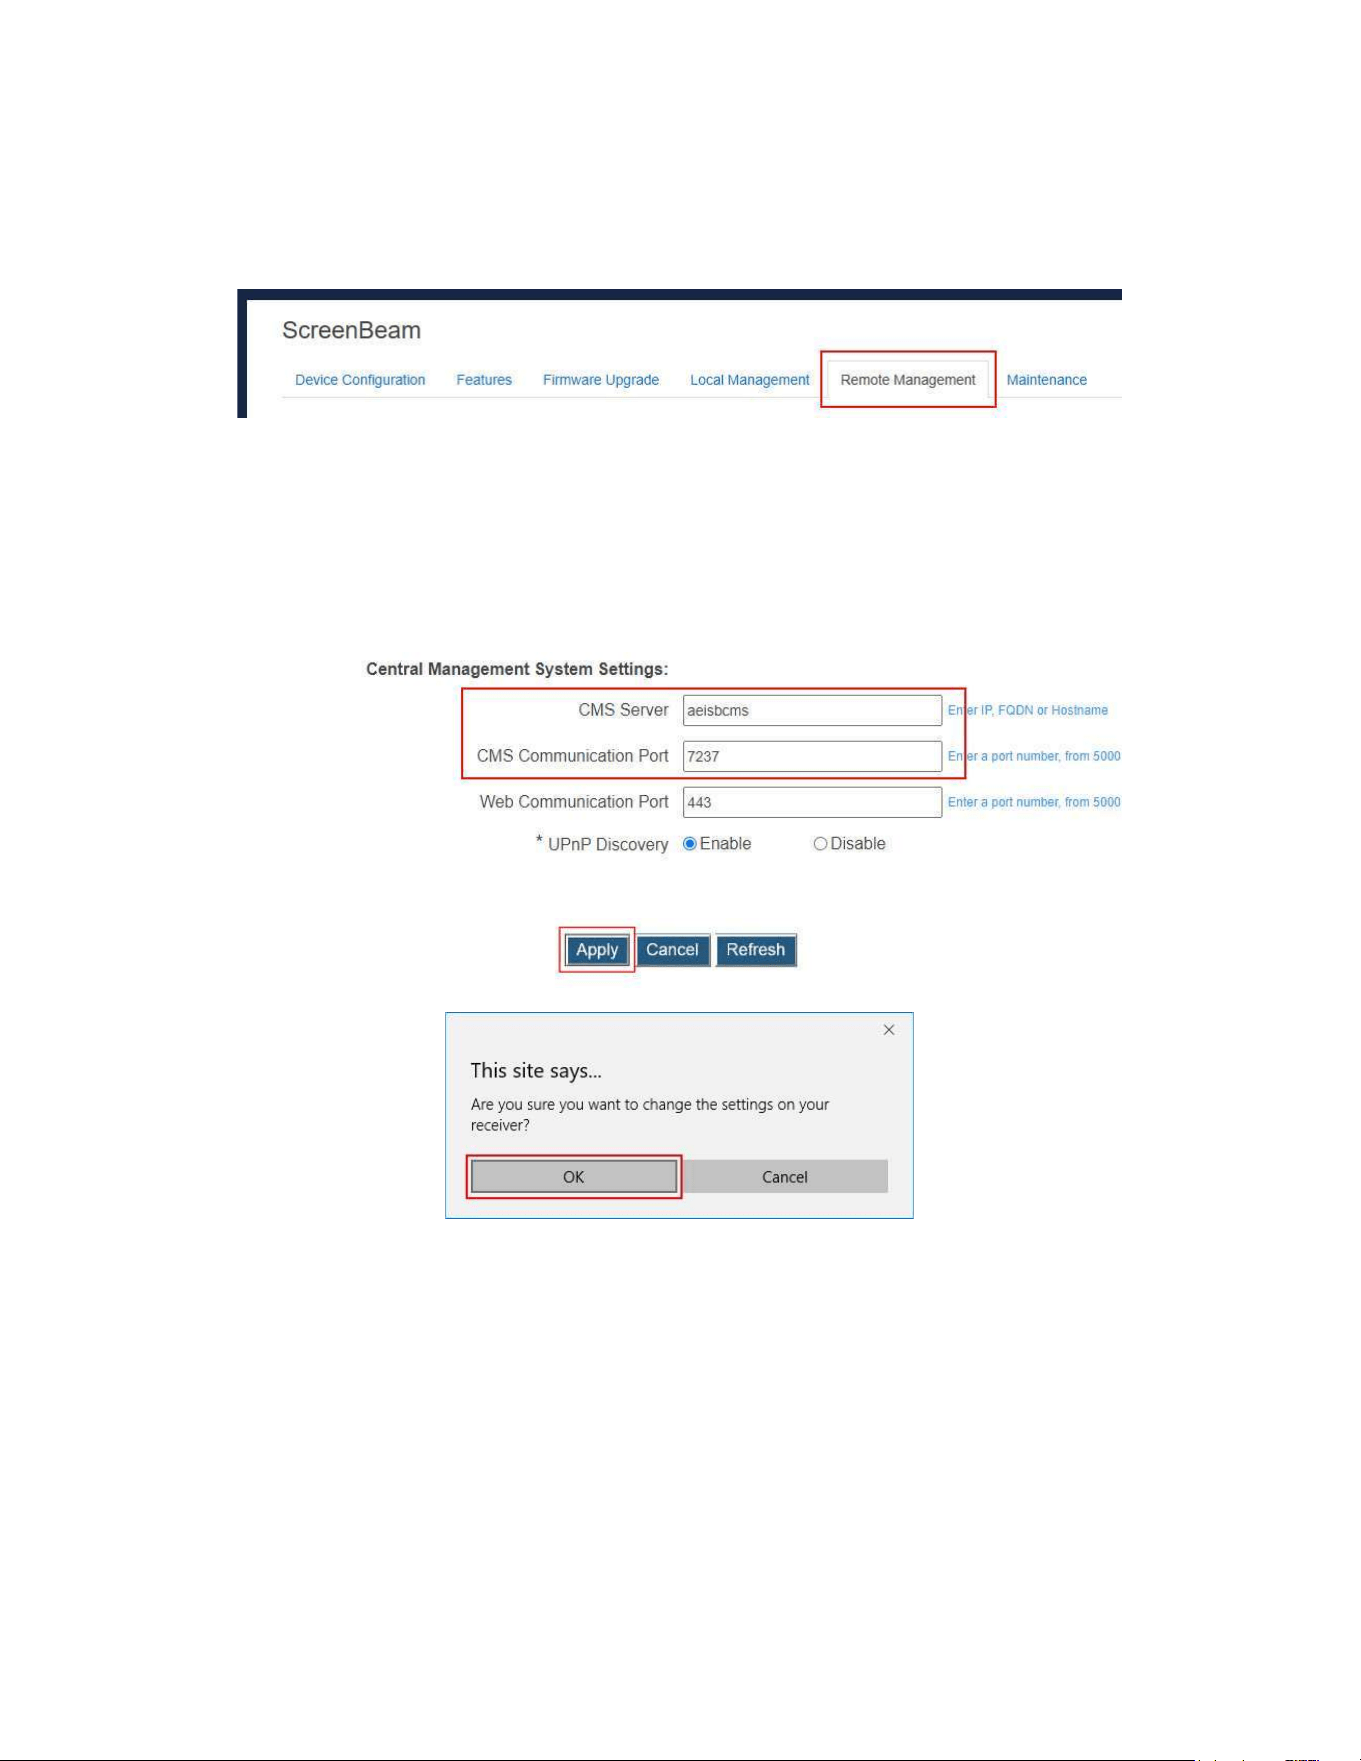
5.3.7.4SpecifyingScreenBeamCMSfortheReceiver
TospecifyaCMSforthereceiver,followthisprocedure:
1. GototheRemoteManagementtabpagebyclickingtheRemoteManagementtab.
2. GototheCentralManagementSystemSettingsection,anddefinetheCMSServer
andtheCMSCommunicationPort.
CMSServer:ItistheIPaddressortheFQDN/hostname/domainname/aliasname(ifa
DNSserverandaDHCPserverareproperlyconfigured)oftheserverthathoststhe
ScreenBeamCMS.Itsupportsadomainwithsixlabelsatmost.
Note:ItisrecommendedtouseDNSconfigurationforCMSServer.
CMSCommunicationPort:ItisthecommunicationportoftheScreenBeamCMS.
3. ClicktheApplybutton,andthenclickOKonthepop-upmessageboxtoconfirm.

86
5.3.7.5SettingupUPnPDiscovery
The UPnP discovery feature is used to discover ScreenBeam 960 on the network.
ScreenBeam 960 can connect to CMS automatically with the UPnP Discovery method.
RefertotheCMSusermanualfordetailsonhowtoconnectareceivertoCMSusingthe
UPnPDiscoverymethod.
TosetupUPnPDiscoveryforthereceiver,followthisprocedure:
1. GototheRemoteManagementtabpagebyclickingtheRemoteManagementtab.
2. GototheCentralManagementSystemSettingsection,andsetUPnPDiscoveryto
EnableorDisable.
Enable:ThereceiverisallowedtodiscoveronthenetworkusingtheUPnPprotocol.
Disable: The receiver is not allowed to discover on the network using the UPnP
protocol.
3. ClicktheApplybutton,andthenclickOKonthepop-upmessageboxtoconfirm.
4. Thereceiverreboots,andnewsettingtakeseffectafterthereboot.
87
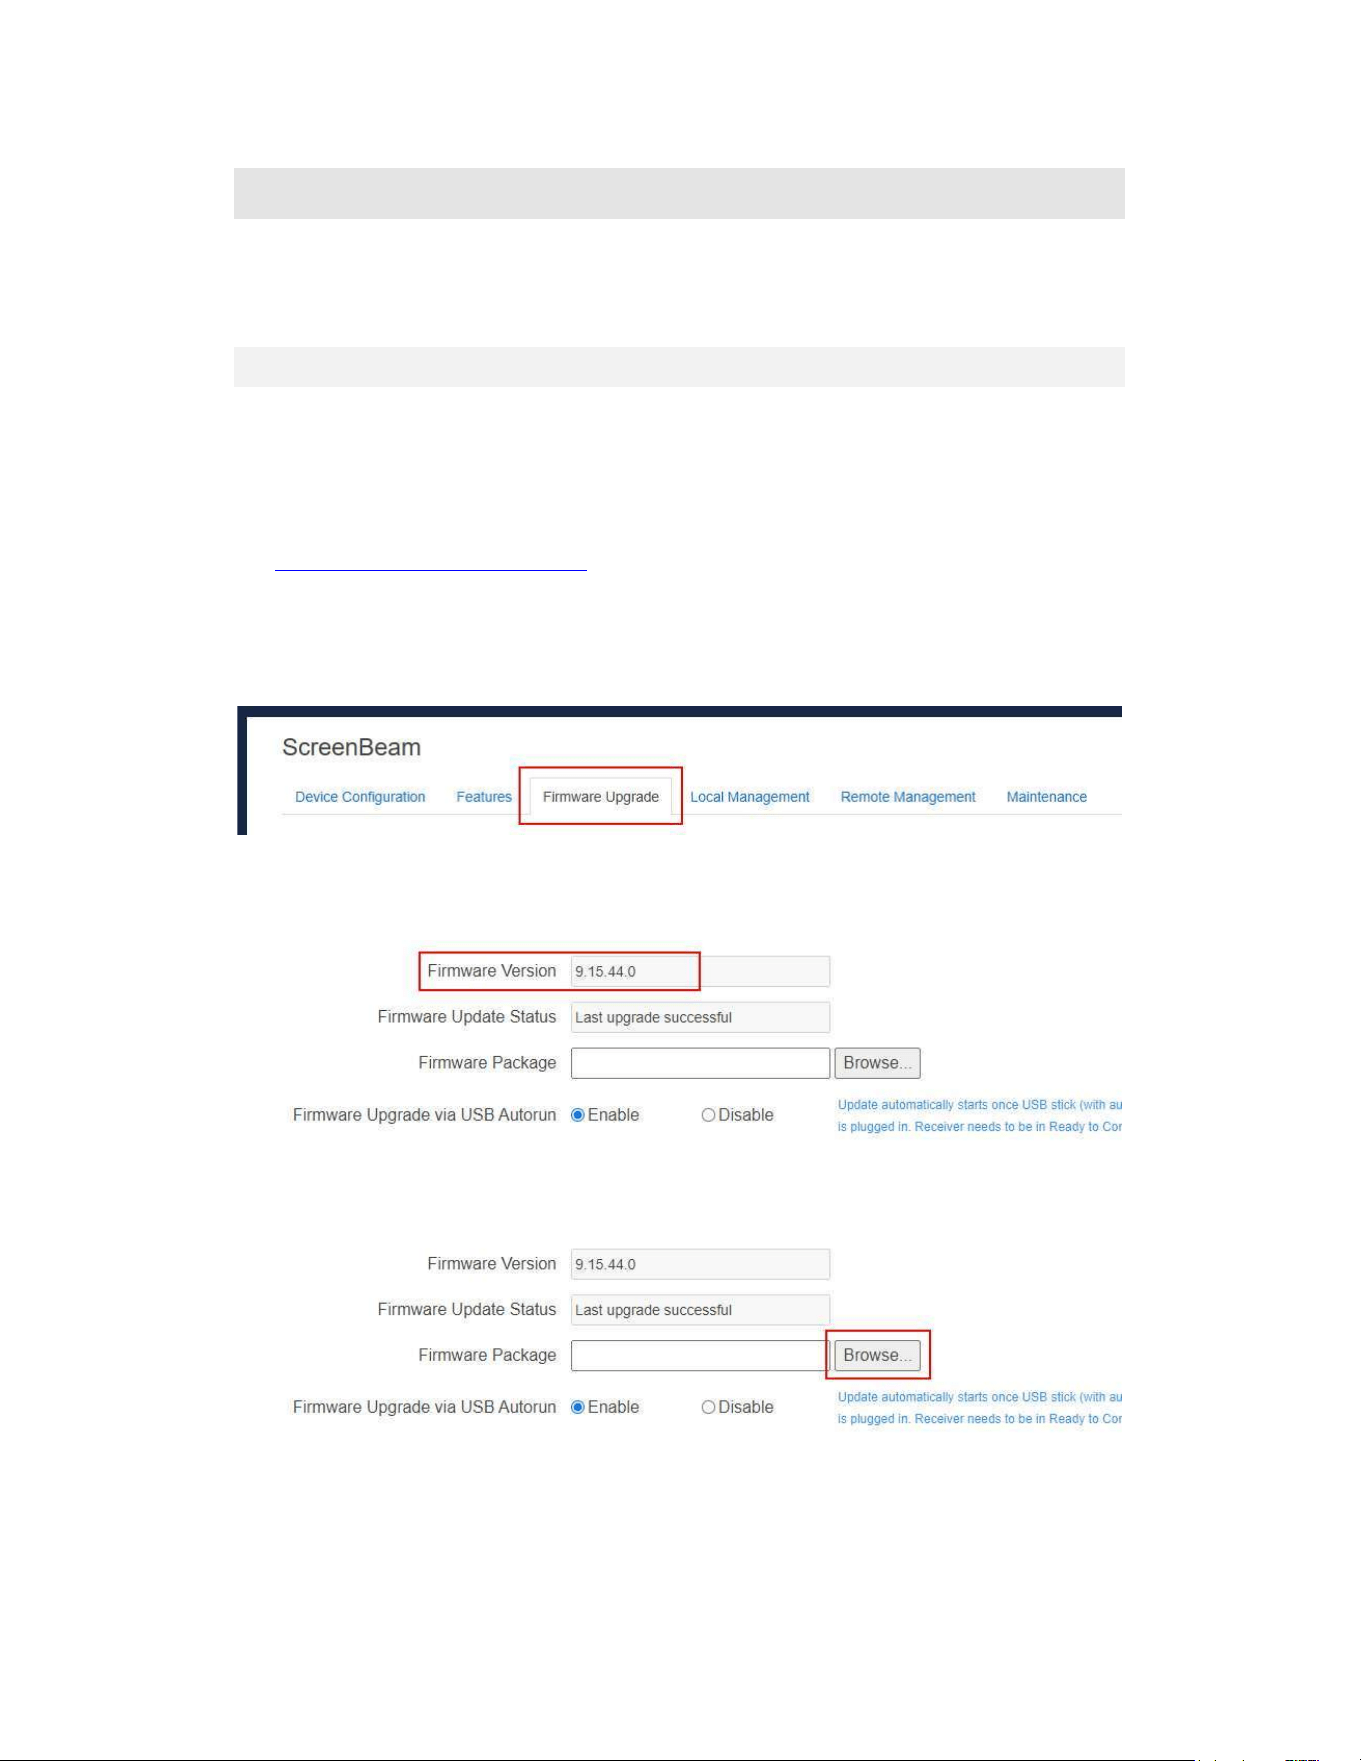
5.4 UpdatingFirmwarefortheReceiver
Users areallowedto updatethe receiver’s firmwarewirelesslythroughtheLMIor locally
usingaUSBflashdrive.
5.4.1 UpdatingFirmwareWirelessly
Users can wirelessly upgrade firmware for the receiver through the Local Management
Interface.
Toupgradeyourreceiverusingthereceiver’sLMI,followthisprocedure:
1. DownloadthelatestfirmwarefromScreenBeam’swebsite:
https://support.screenbeam.com.
2. Log into ScreenBeam 960’s Local Management Interface, and go to the Firmware
UpgradetabpagebyclickingtheFirmwareUpgradetab.
Note:RefertoSection5.2UsingLocalManagementonScreenBeamfordetailson
howtousethereceiver’sLocalManagementInterface.
OntheFirmwareUpgradetabpage,youcancheckthecurrentfirmwareversioninthe
FirmwareVersionsection.
Note:Youcanupdatethereceiver’sfirmwaretoahigherversiononly.
3. ClicktheBrowsebuttonnexttotheFirmwarePackageboxtodisplaytheOpendialog
box.
88
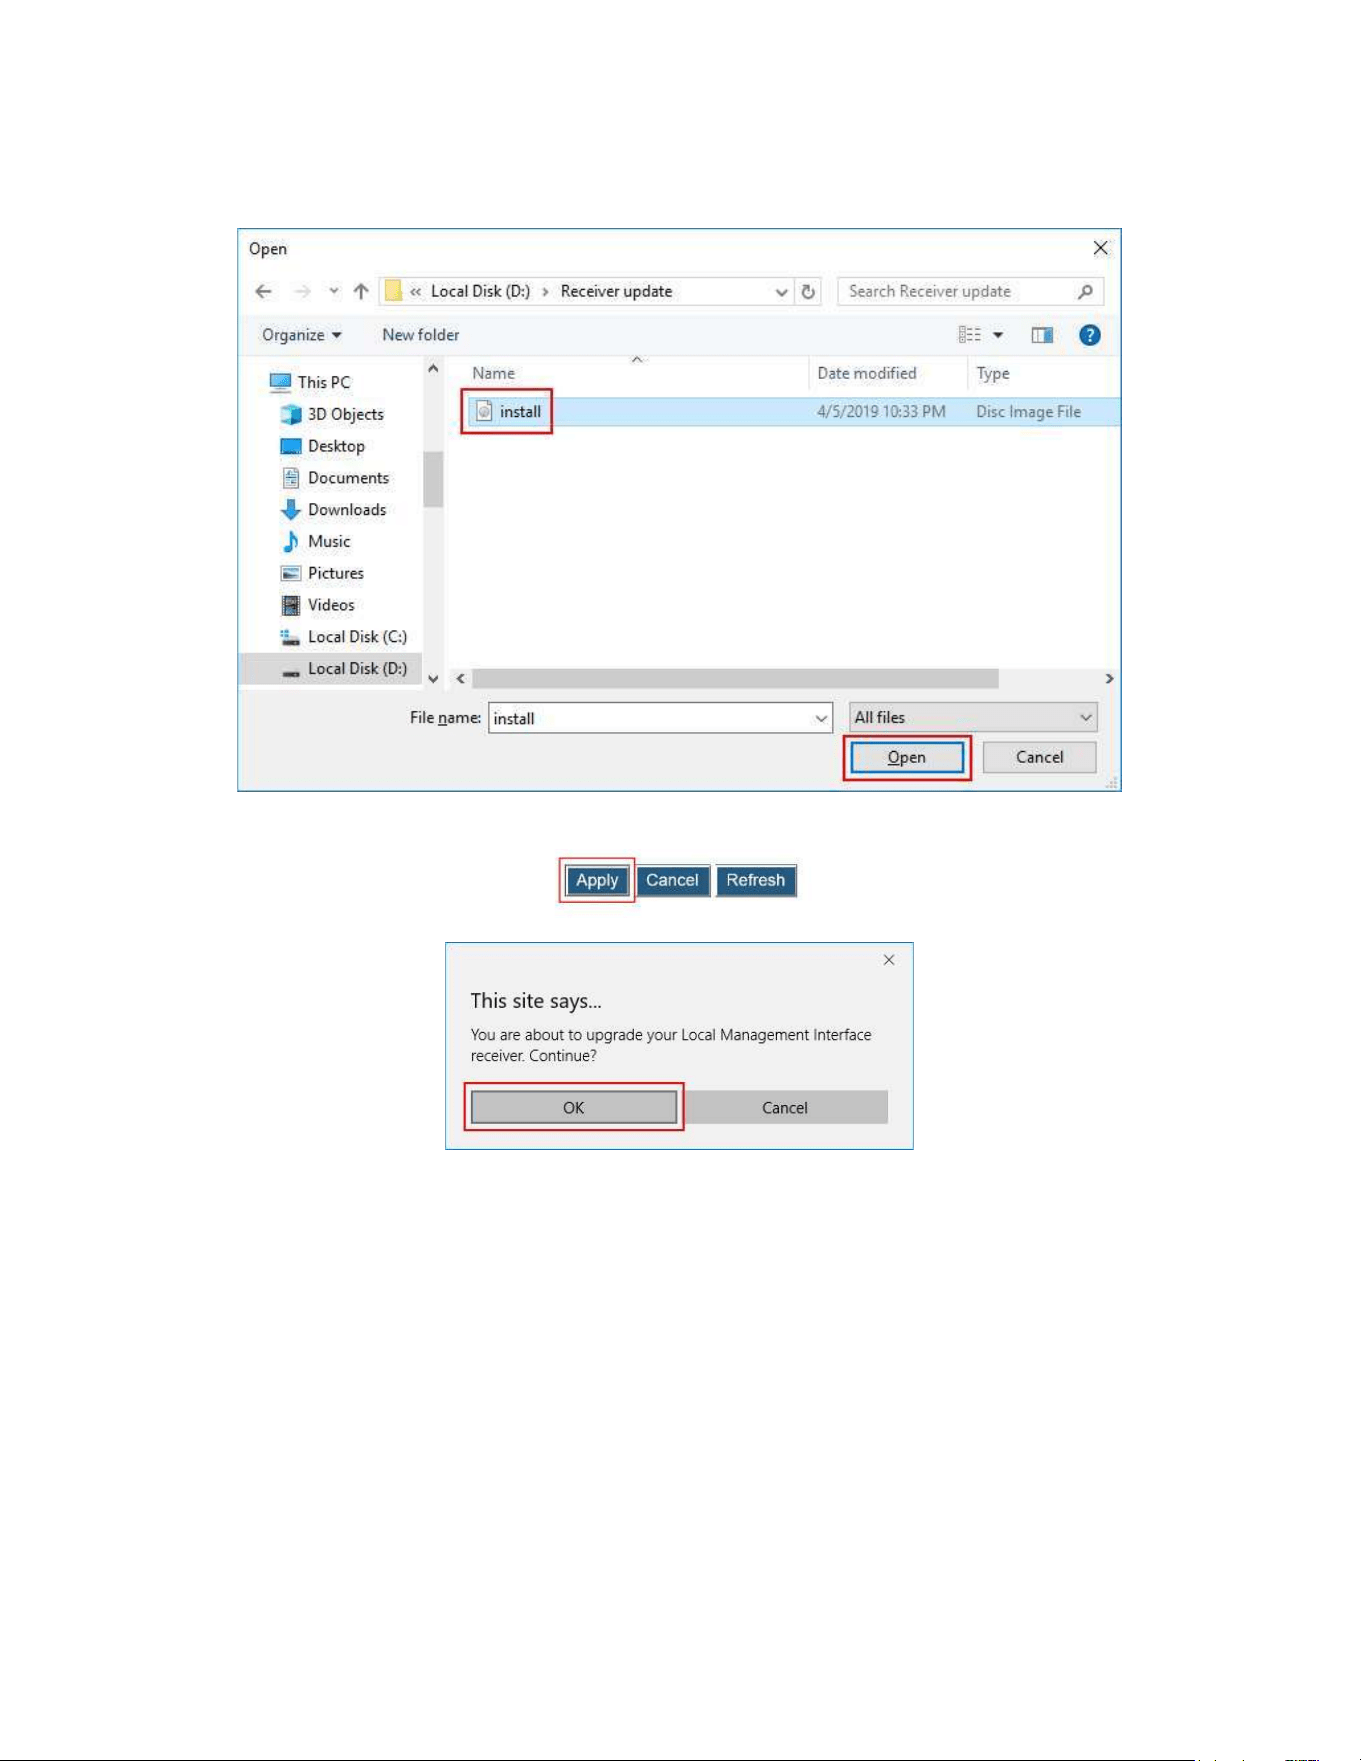
4. Navigatetotheextractedfirmwarefilefolder.Selectthefirmwarefile(“install.img”)and
clickthe“Open”buttontocontinue.
5. ClicktheApplybutton,andthenclickOKonthepop-upmessageboxtocontinue.
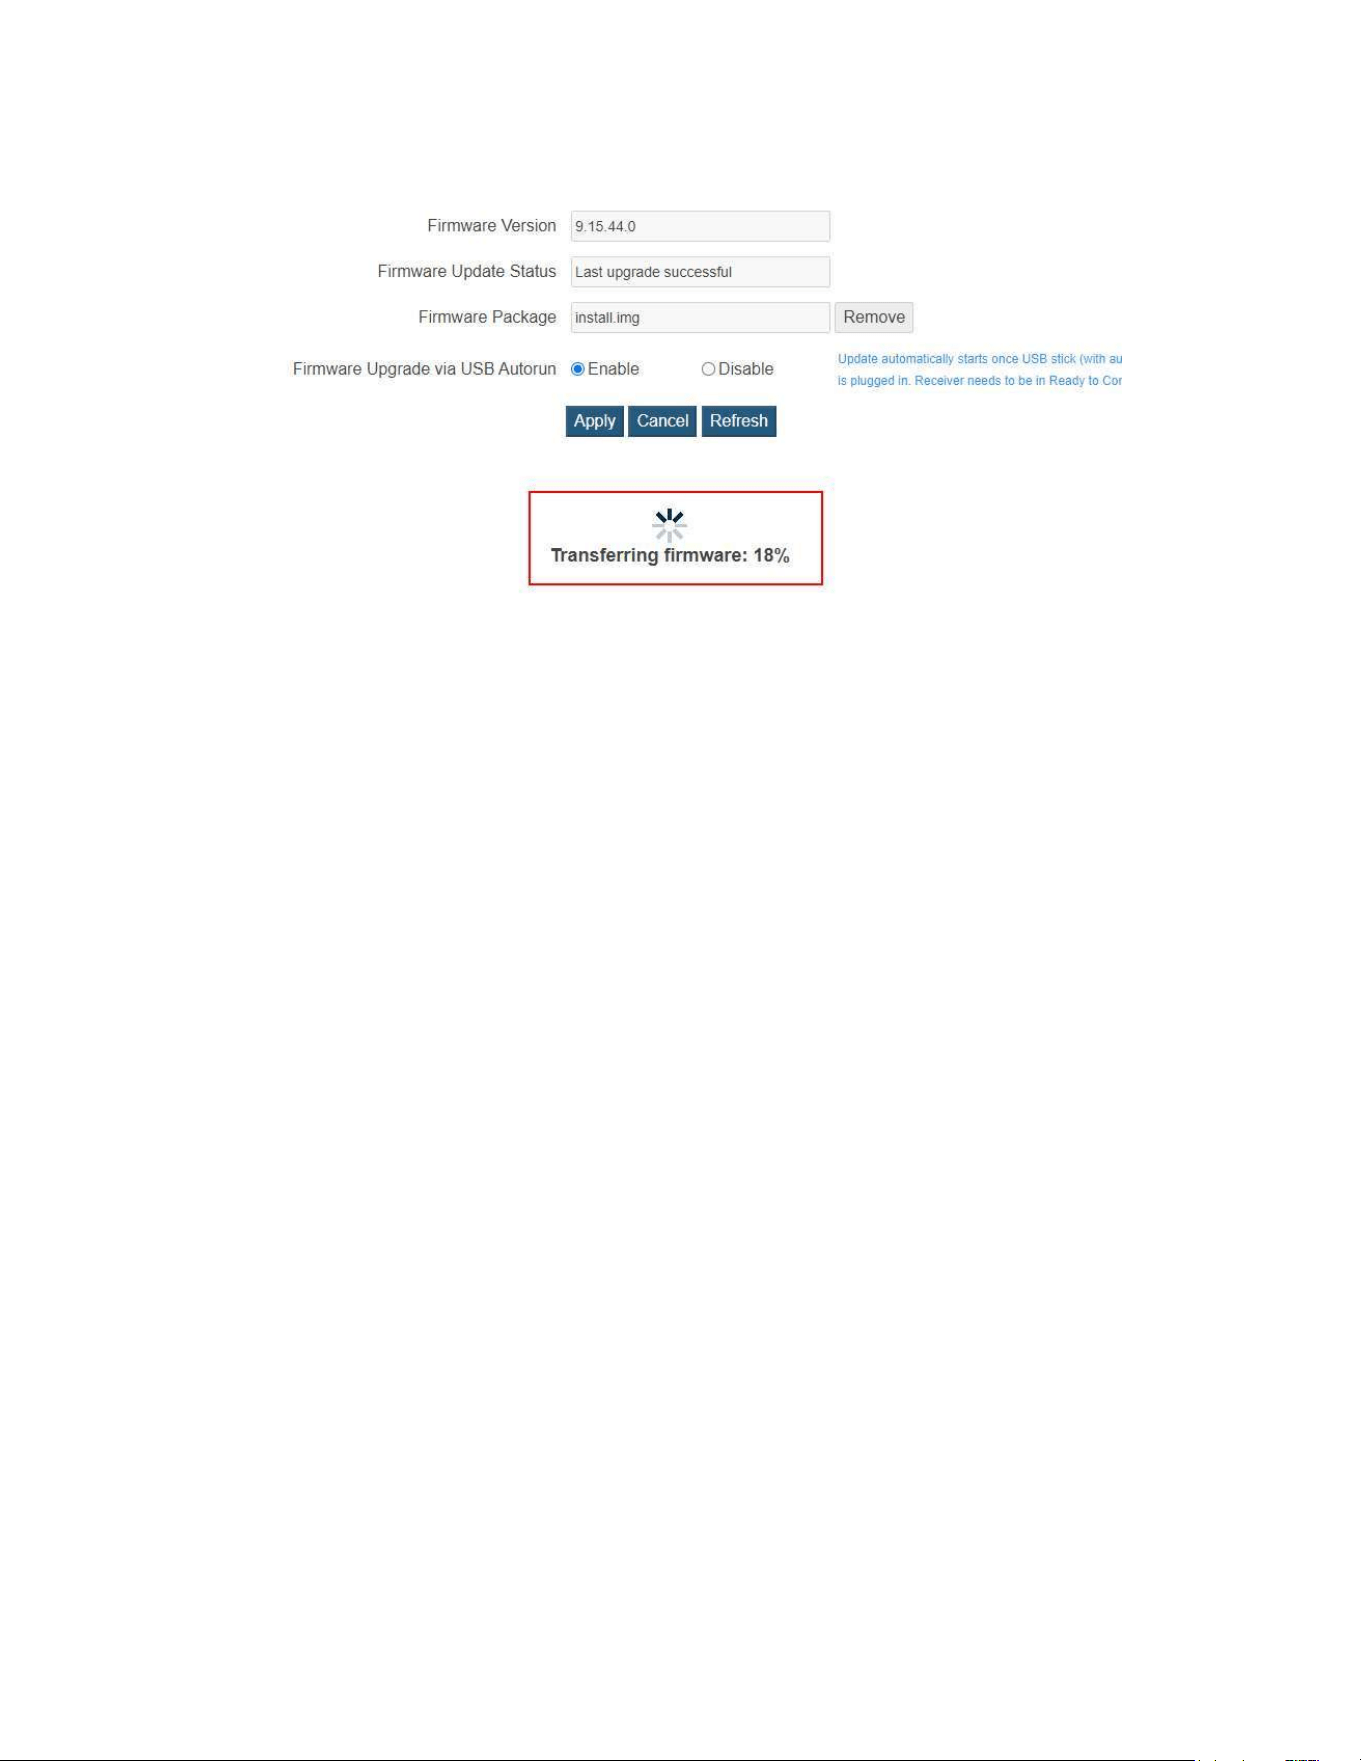
89
6. Thewebserverstartstransferringthefirmwarefiletothereceiver.
7. Thereceiverrebootsandupgradesitselfafterthefileisuploadedsuccessfully.Firmware
upgradestatusisdisplayedontheconnecteddisplay.
8. When thereceiverreturns totheWirelessDisplay Readyto ConnectScreen, your
receiverhasbeenupgraded.
Warning!DoNOTpoweroffyourreceiverduringtheupgradeprocess.Theupgrade
willtakesometime.Pleasebepatient.
90
5.4.2 UpdatingFirmwareLocally
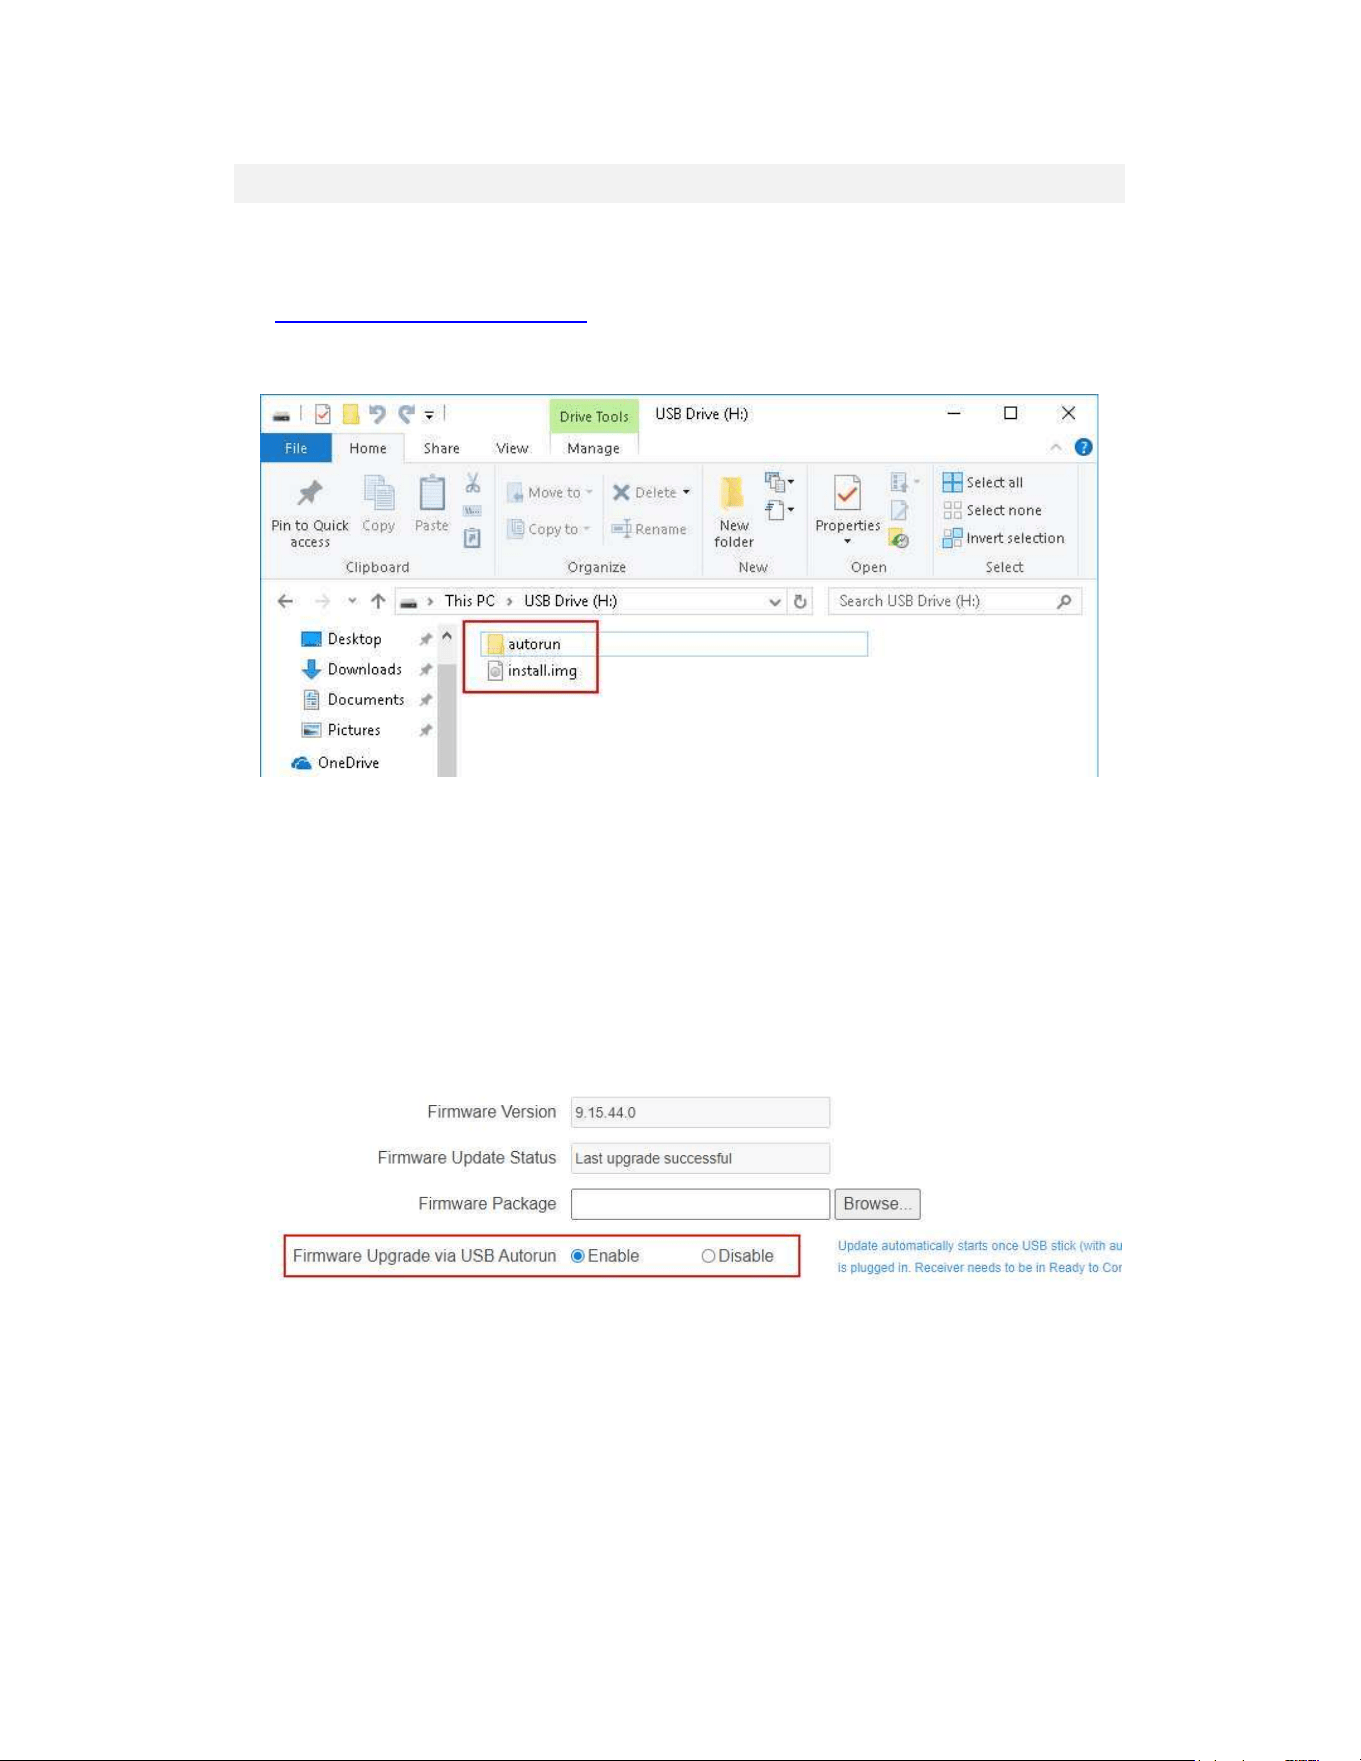
Toupdatethereceiver’sfirmwarewithaUSBflashdrive,followthisprocedure:
1. DownloadthelatestfirmwarefromScreenBeam’swebsite:
https://support.screenbeam.com.
2. Extractthedownloadedfileandcopythe“install.img”fileandthe“autorun”filefolder
totherootdirectoryofaUSBflashdrive.
Note:
Do not use a portable hard drive. You should use a FAT/FAT32 formatted USB
flashdriveonly.
Donotmakeanychangetotheextractedfiles.
3. Makesurethe"WirelessDisplayReadyToconnect"screenappearsonyourTV.
Note:Youmustdisconnectyourdevice(laptop,ultrabook,smartphoneortablet)from
thereceiverbeforeupgradingyourreceiver.
4. EnsurethattheFirmwareUpgradeviaUSBAutorunfeatureissettoEnableonLMI>
FirmwareUpgrade.
5. PlugtheUSBflashdriveintotheUSBportonthereceiver.
6. The receiver starts to update its firmware automatically. Firmware upgrade status
messagesappearonyourTV.
Warning! Do not power off the receiver or remove the USB flash drive while the
upgradeisinprogress.Otherwise,firmwareupgradefails.
7. Thereceiverrebootsafterfirmwareupdatecompletes.
8. YoumaynowremovetheUSBflashdrivewhenyouseethe"WirelessDisplayReady
toconnect"screenagain.
91
5.5 ReceiverMaintenance
5.5.1 SettingupReceiverAutoReboot
Afteralongperiodofcontinuousrunning,thereceivermaynotreactasresponsivelyasit
shouldbe.Wecanrestartthedevicetorestoreitsresponsiveness.
Tosetthereceivertorebootautomatically,followthisprocedure:
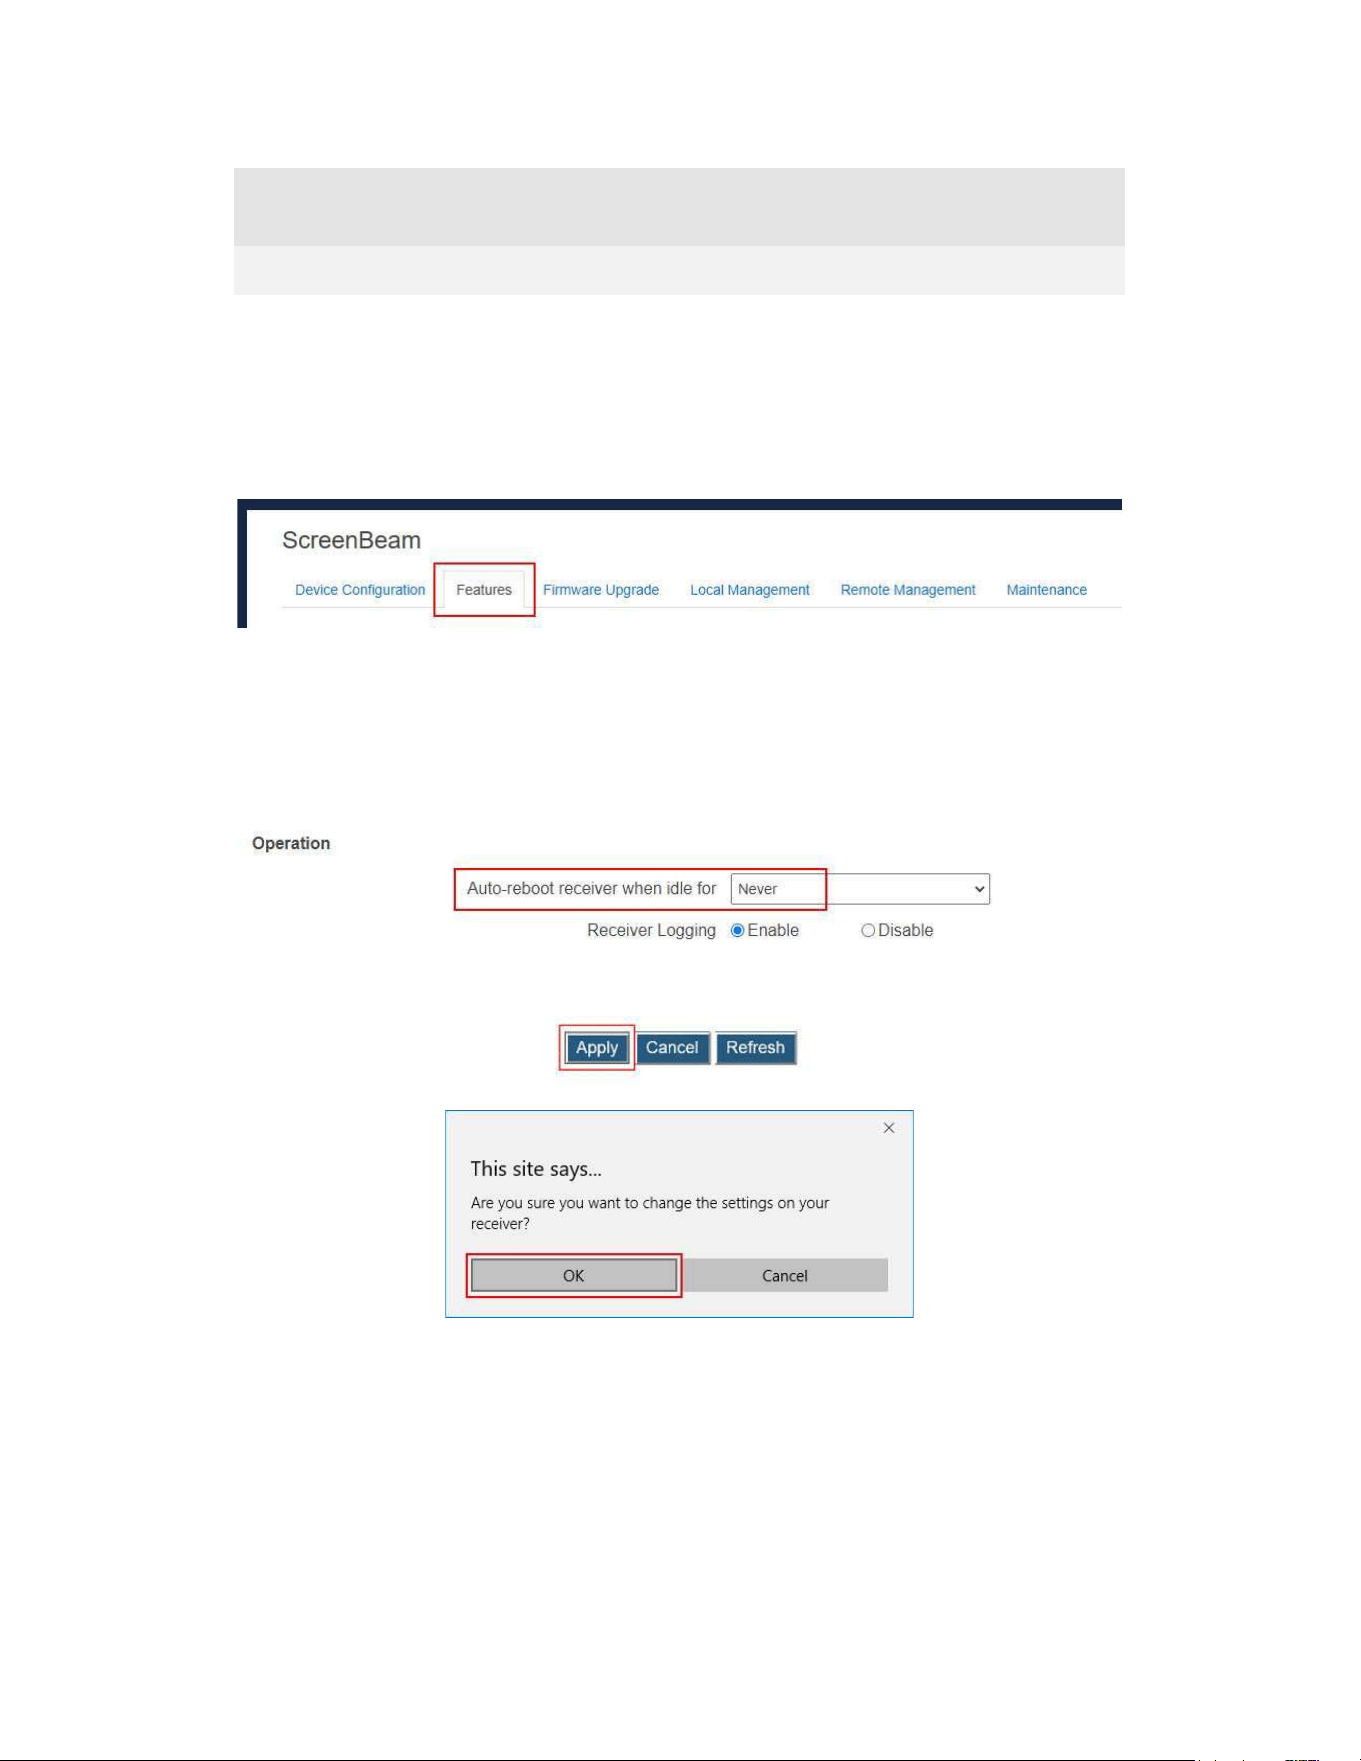
1. GototheFeaturestabpagebyclickingtheFeaturestab.
2. GototheOperationsection,andselectanoptionfromtheAuto-rebootreceiverwhen
idleforbox.
Neverindicatesthatthereceiverwillnotrestartautomatically.Thisisthedefaultsetting.
xxhour(s)indicatesthatthereceiverwillrestartautomaticallyafterthereceiverisidle
forxxhour(s).
3. ClicktheApplybutton,andthenclickOKonthepop-upmessageboxtoconfirm.
92
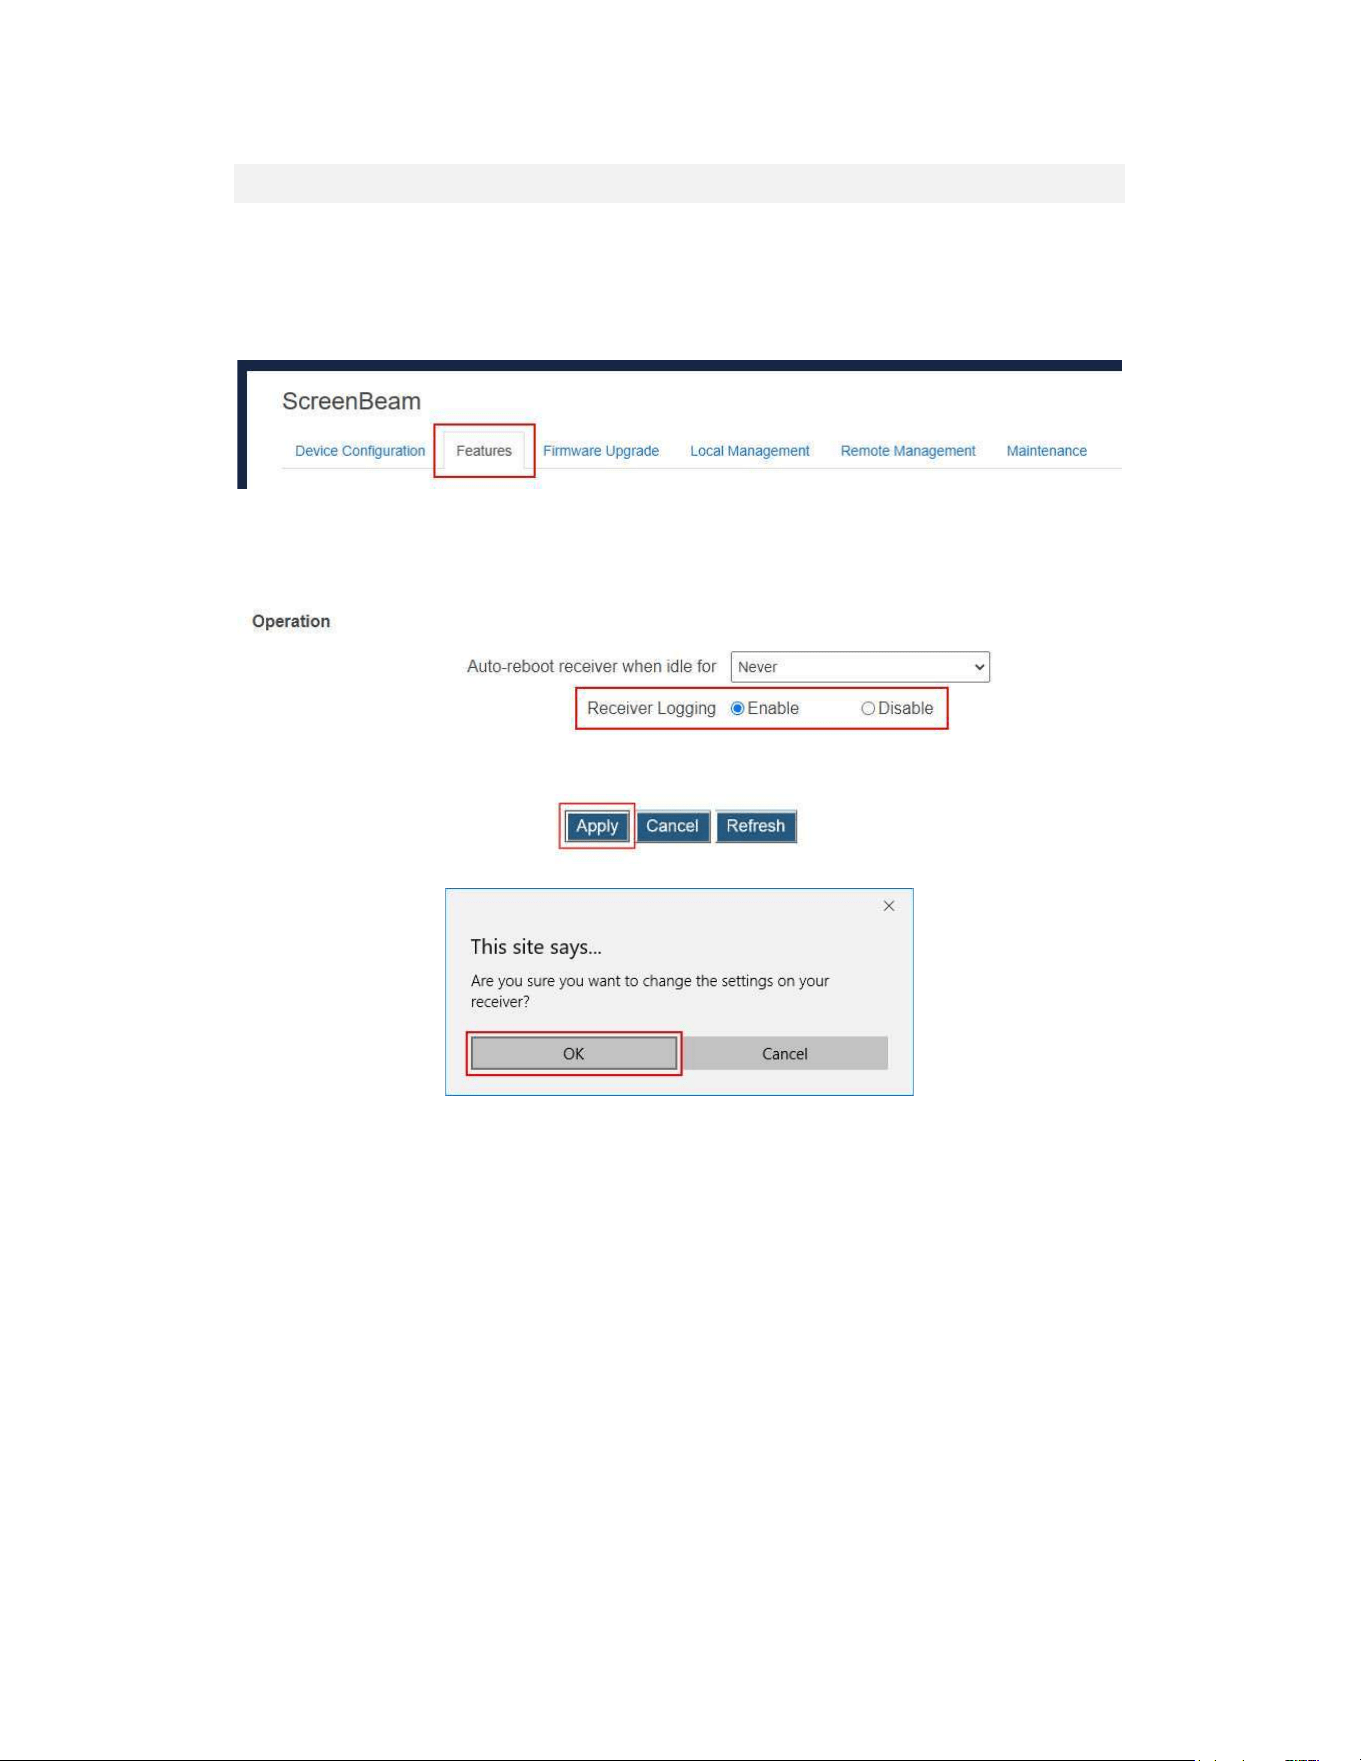
5.5.2 SettingupReceiverLogging
ScreenBeam receiver can save events in logs, and these logs can be retrieved by the
receiver’sLMIorScreenBeamCMS.RefertotheScreenBeamCMSuserguidefordetail.
Tosetupthereceiver’slogging,followthisprocedure:
1. Logintothereceiver’sLMI,andgototheFeaturestabpage.
2. GototheOperationsection,andsetReceiverLoggingtoEnableorDisable.
Enable:Thereceiverwillrecordlogswhenthereareeventshappen.
Disable:ThereceiverwillNOTrecordanyevents.
3. ClicktheApplybutton,andthenclickOKonthepop-upmessageboxtoconfirm.
93
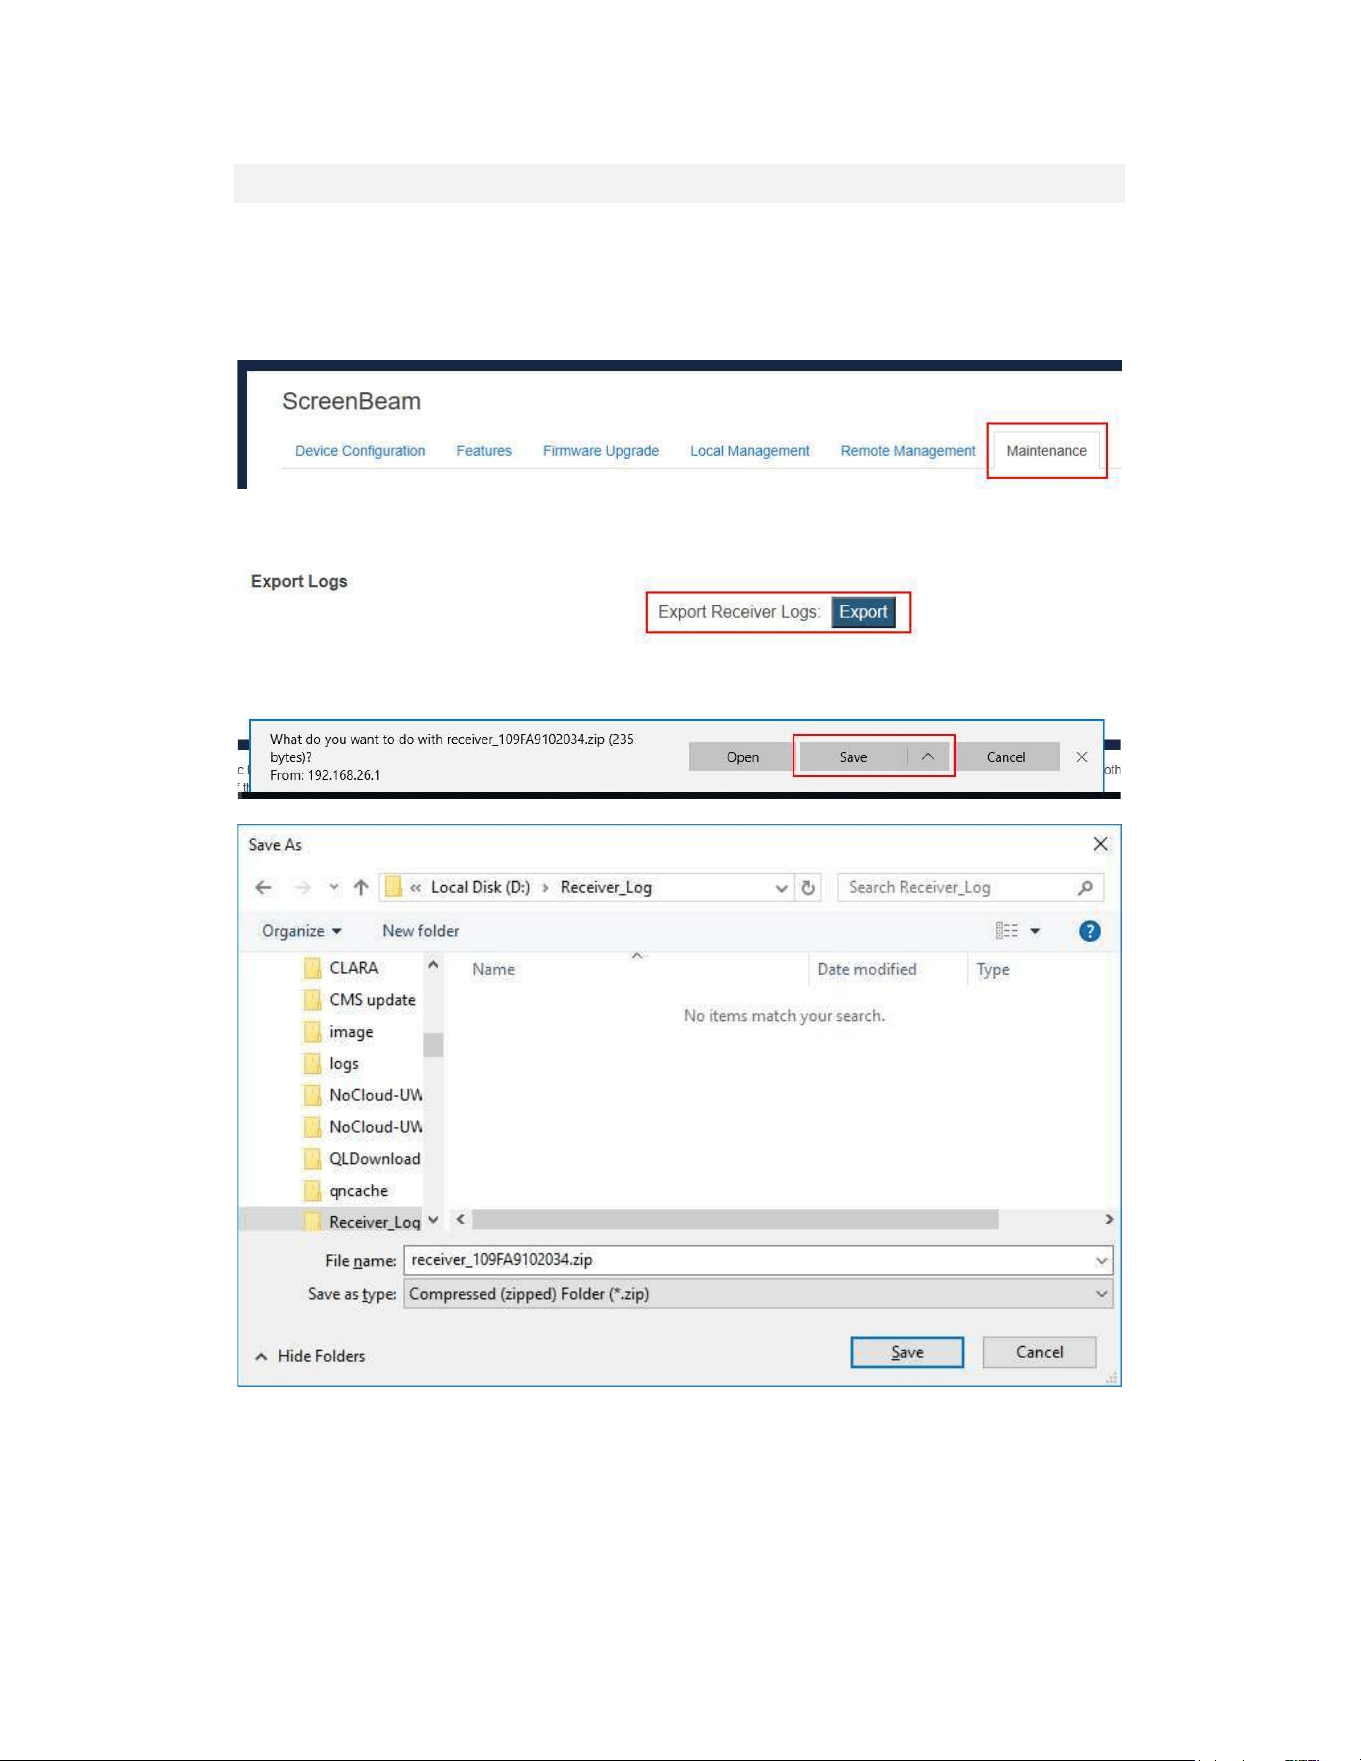
5.5.3 ExportingReceiverLogwithLMI
Toexportlogsfromthereceiver,followthisprocedure:
1. Ensure receiver logging is enabled. Refer to Section 5.5.2 Setting up Receiver
Loggingfordetails.
2. Logintothereceiver’sLMI,andgototheMaintenancetabpage.
3. Go totheExportLogssection,andclicktheExportbuttonnexttoExportReceiver
Logs.
4. Thefiledownloaddialogboxappears.ClickSaveorSaveastosavethereceiverlog.
94
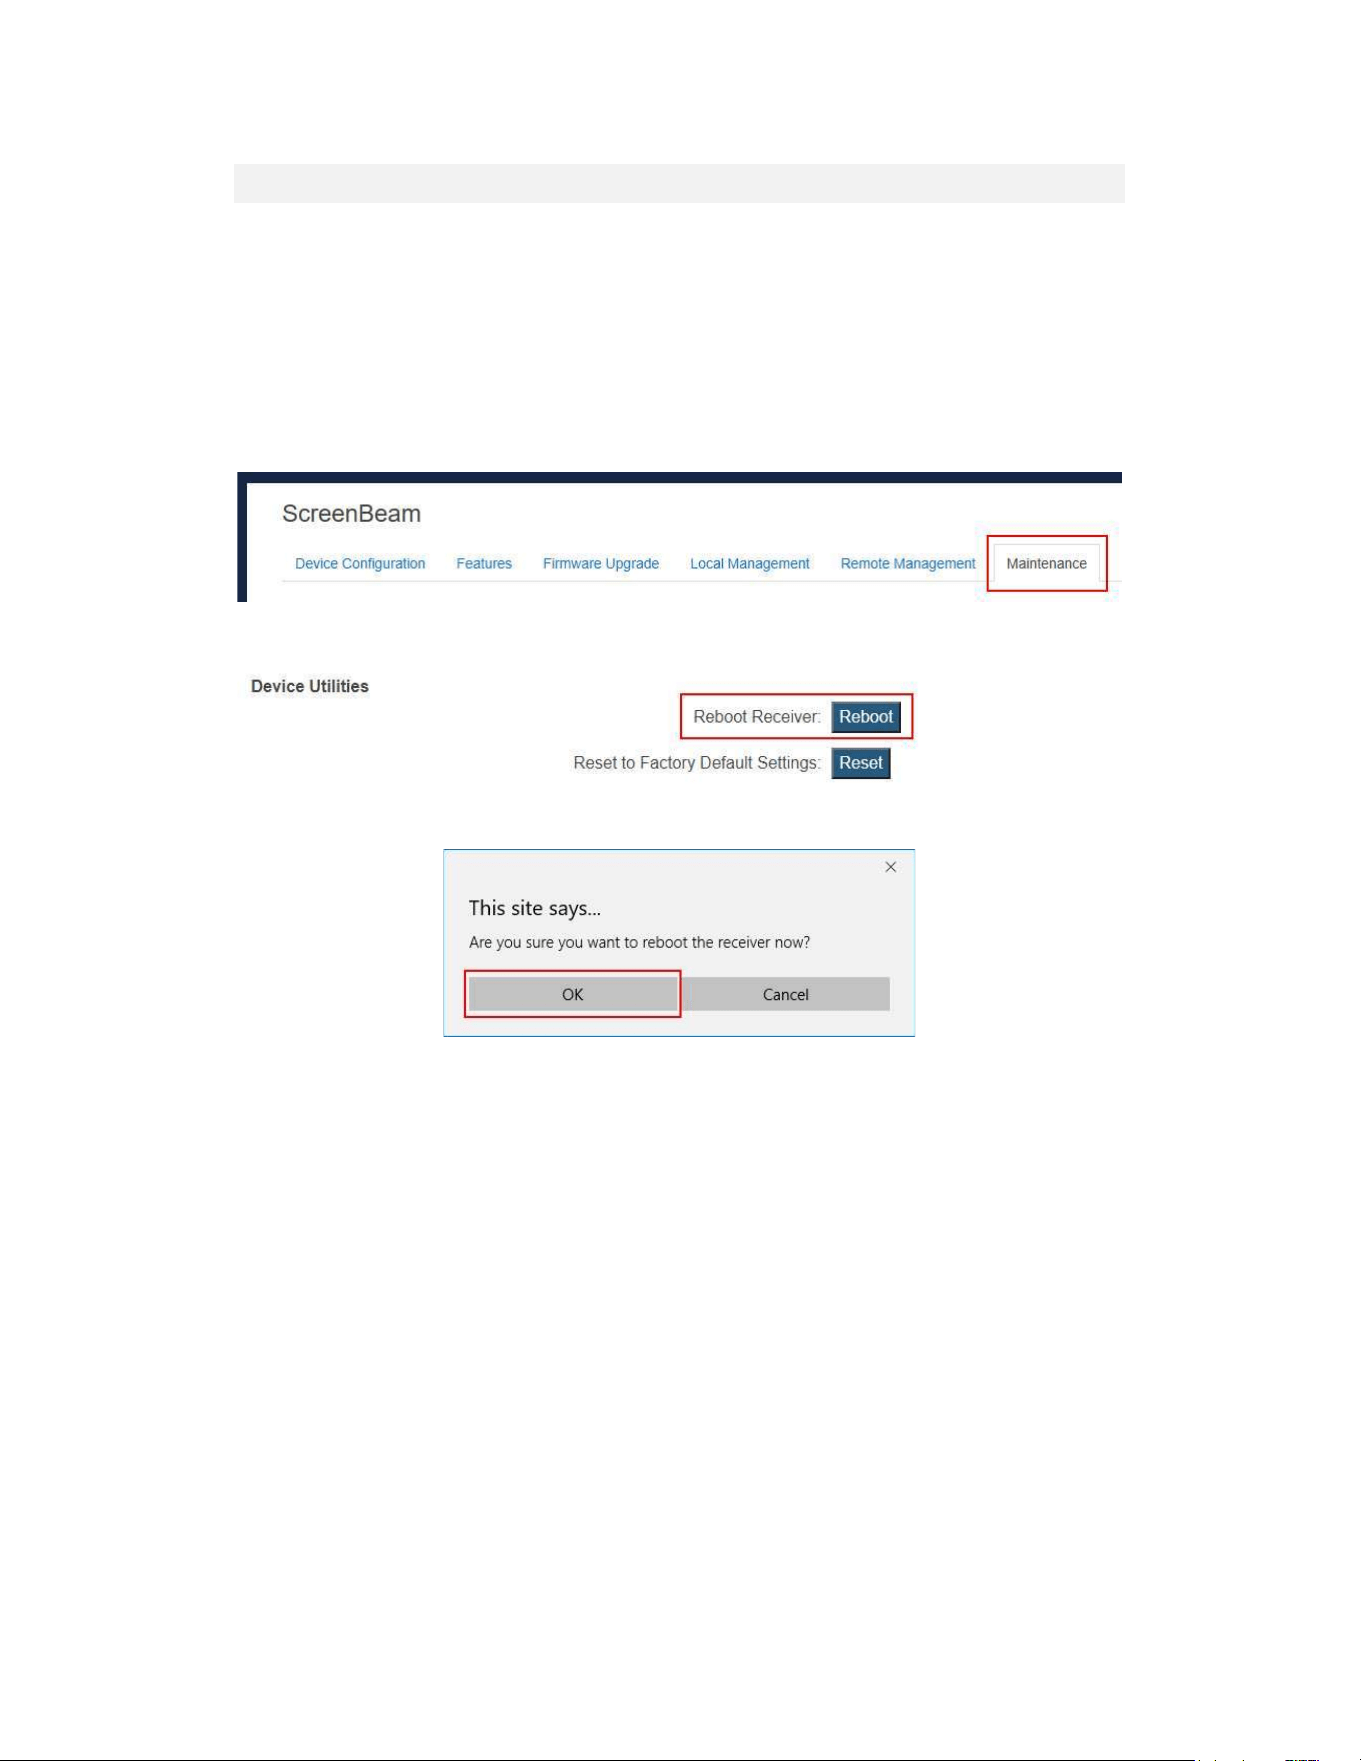
5.5.4 RebootingtheReceiver
Torebootyourreceiver,removethepoweradapterfromthepoweroutlet,wait5seconds
andthenplugitin.
Ifyoucan’taccessthereceiverlocally,youcanrebootthereceiverthroughthereceiver’s
LMI.
TorebootthereceiverwithLMI,followthisprocedure:
1. Logintothereceiver’sLMI,andgototheMaintenancetabpage.
2. ClicktheYesbuttonnextto“RebootReceiver”.
3. ClickOKonthepop-upmessageboxtoconfirm.
95
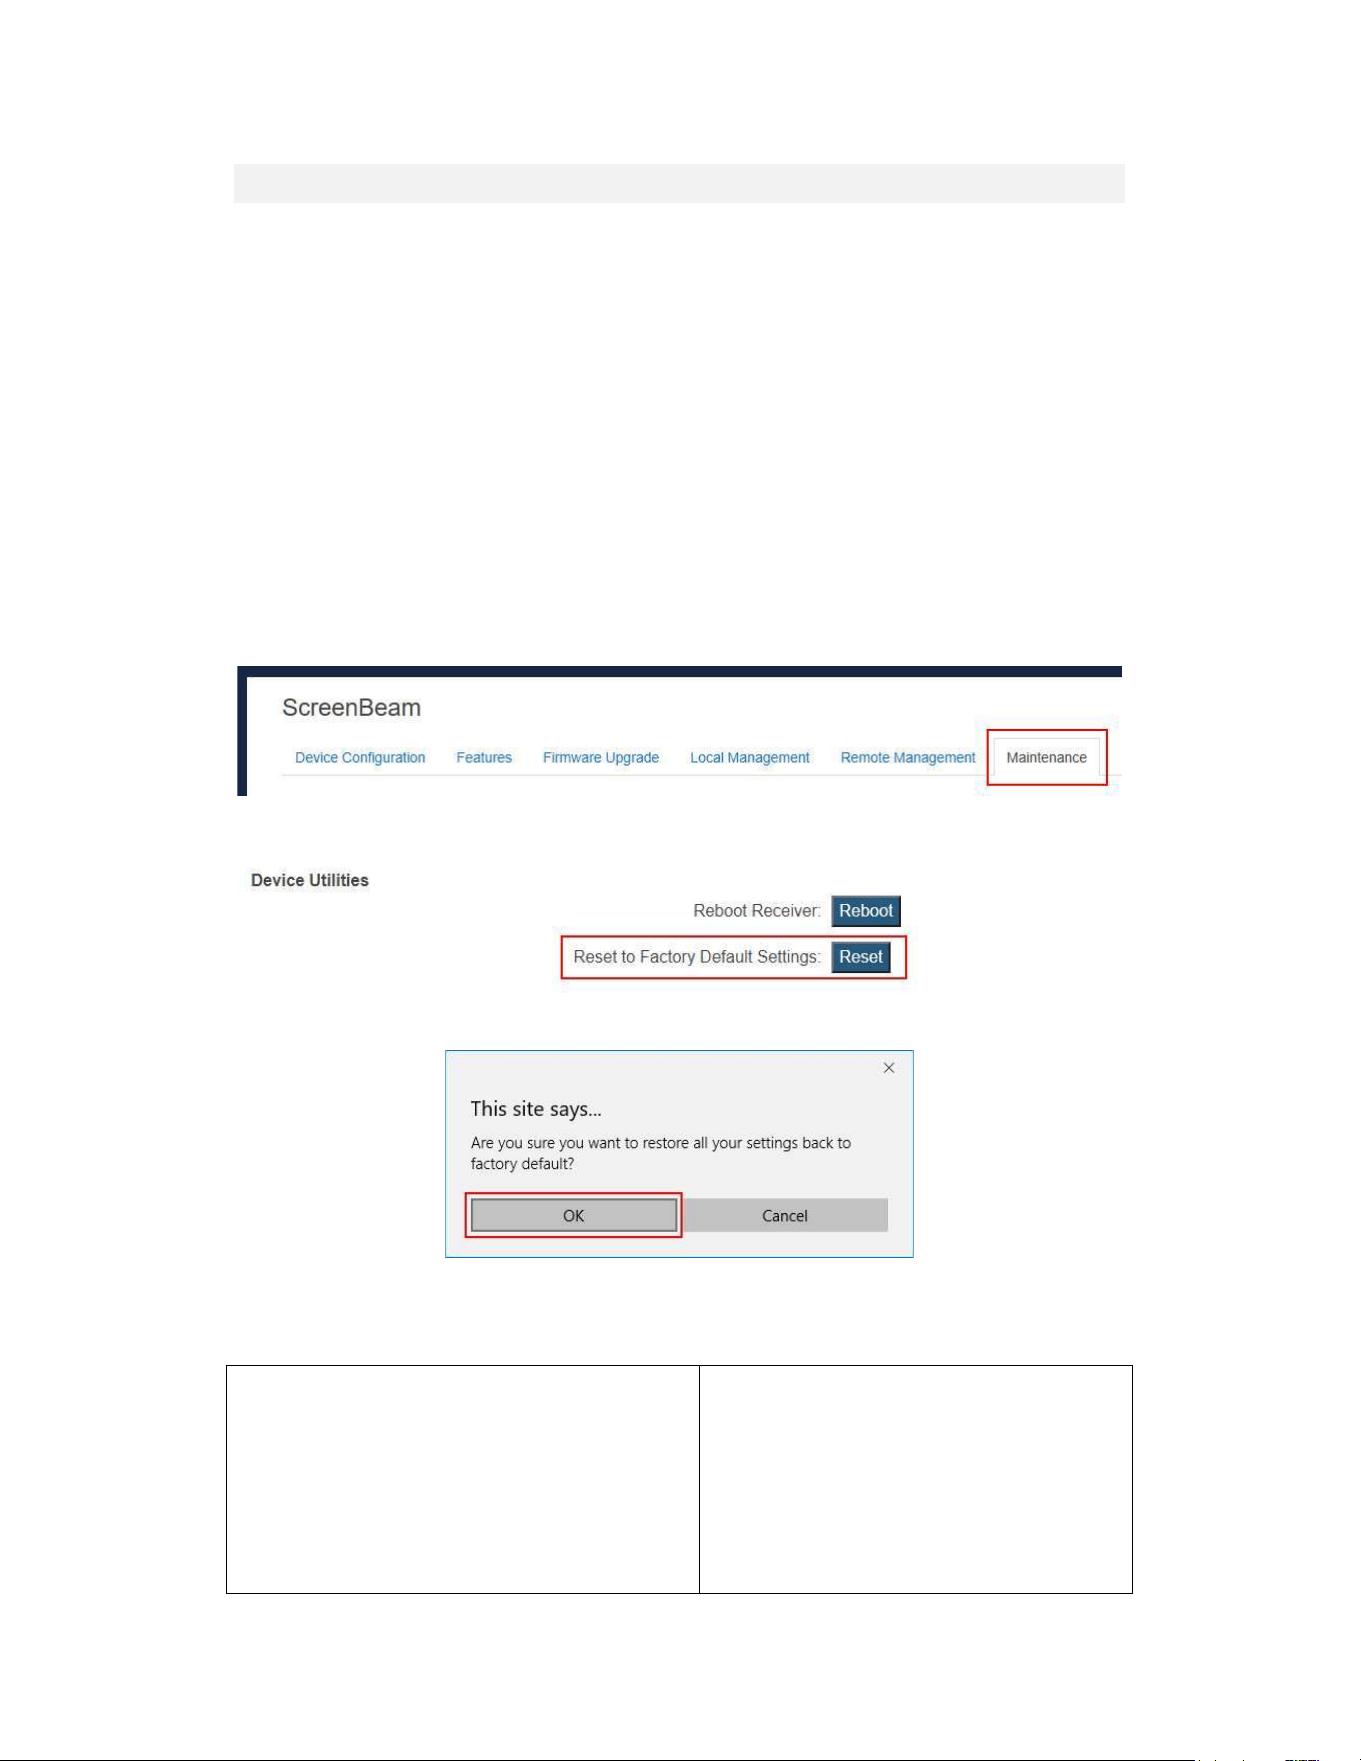
5.5.5 ResettingtheReceivertoDefault
Toresetthereceivertodefaultsettings,followthisprocedure:
1. Poweronthereceiver,andwaituntilthe"WirelessDisplayReadytoConnect"screen
appears.
2. Holddownthereceiver's"Reset"buttonwithapin.
3. Whenthe"Resettingtofactorydefaults"screenappearsontheHDTV,releasethe
"Reset"button.
Thereceiverreboots,anditwillberunningwithitsdefaultsettings.
Note:Allsettingswillberesettodefaults.
Ifyoucan’taccessthereceiverlocally,youcanresetthereceiverthroughthereceiver’sLMI.
Followtheprocedurebelow:
1. Logintothereceiver’sLMI,andgototheMaintenancetabpage.
2. ClicktheYesbuttonnextto“ResetSettingstoFactory”.
3. ClickOKonthepop-upmessageboxtoconfirm.
4. Thereceiverreboots,andthereceiverisresettofactorydefaultsafterthereboot.
WhenyouresetyourreceiverthroughtheLMI,thefollowingsettingswillberetained:
CMSServerIPaddress
CMScommunicationport
ReceiverIPsetting(DHCPorStaticIP)
ReceiverIPaddress
ReceiverSubnetMask
ReceiverGateway
ReceiverDNSsetting(DynamicorStatic)
PrimaryDNS
SecondaryDNS
HostName
Wirelessconnectionsettings
Timezone
Daylightsavetime

96
AppendixITroubleshootingand
FAQs
This chapterdescribes some problems you may encounterusing ScreenBeam 960, and
possiblesolutionstothoseproblems.Alsoincludedarefrequentlyaskedquestions(FAQs),
andanswerstothosequestions.
Troubleshooting
ItriedtoaccesstheURL(https://192.168.51.1),butfailed.Why?
Connecttothereceiver’sSSID,andthenaccesstheURLagain.ThisisavailableinNGO
modeonly.
I'mnotseeinganythingonmyHDTVscreenafterpoweringontheReceiver.
CheckthecableconnectionsandmakesuretheTVInputsettingisthesameastheHDMI
porttowhichtheReceiverisconnected.
After upgrading from Windows 8 to Windows 8.1, I can no longer connect to
ScreenBeam960receiverorI'mhavingproblemswithmyconnection.
Makesureyou'veinstalledthelatestupdateswiththeWindowsUpdateapplication.
I'mseeingartifactsandexperiencingachoppy,judderingvideostream.
InnoisyWi-Fienvironments,audioandvideofreezesmaybeobservedwhileplayingvideo
content,andlongerthanexpectedlatencymayoccurwhenstreaming.Toensureyouhave
anoptimalWi-Fienvironment:
•
DisconnectandreconnecttheReceiver.
•
Ifthesourcedeviceisconnectedtoawirelessrouter,restarttherouter,orchangethe
wirelesschannelonyourwirelessrouter/AP.Refertothewirelessrouter’susermanual
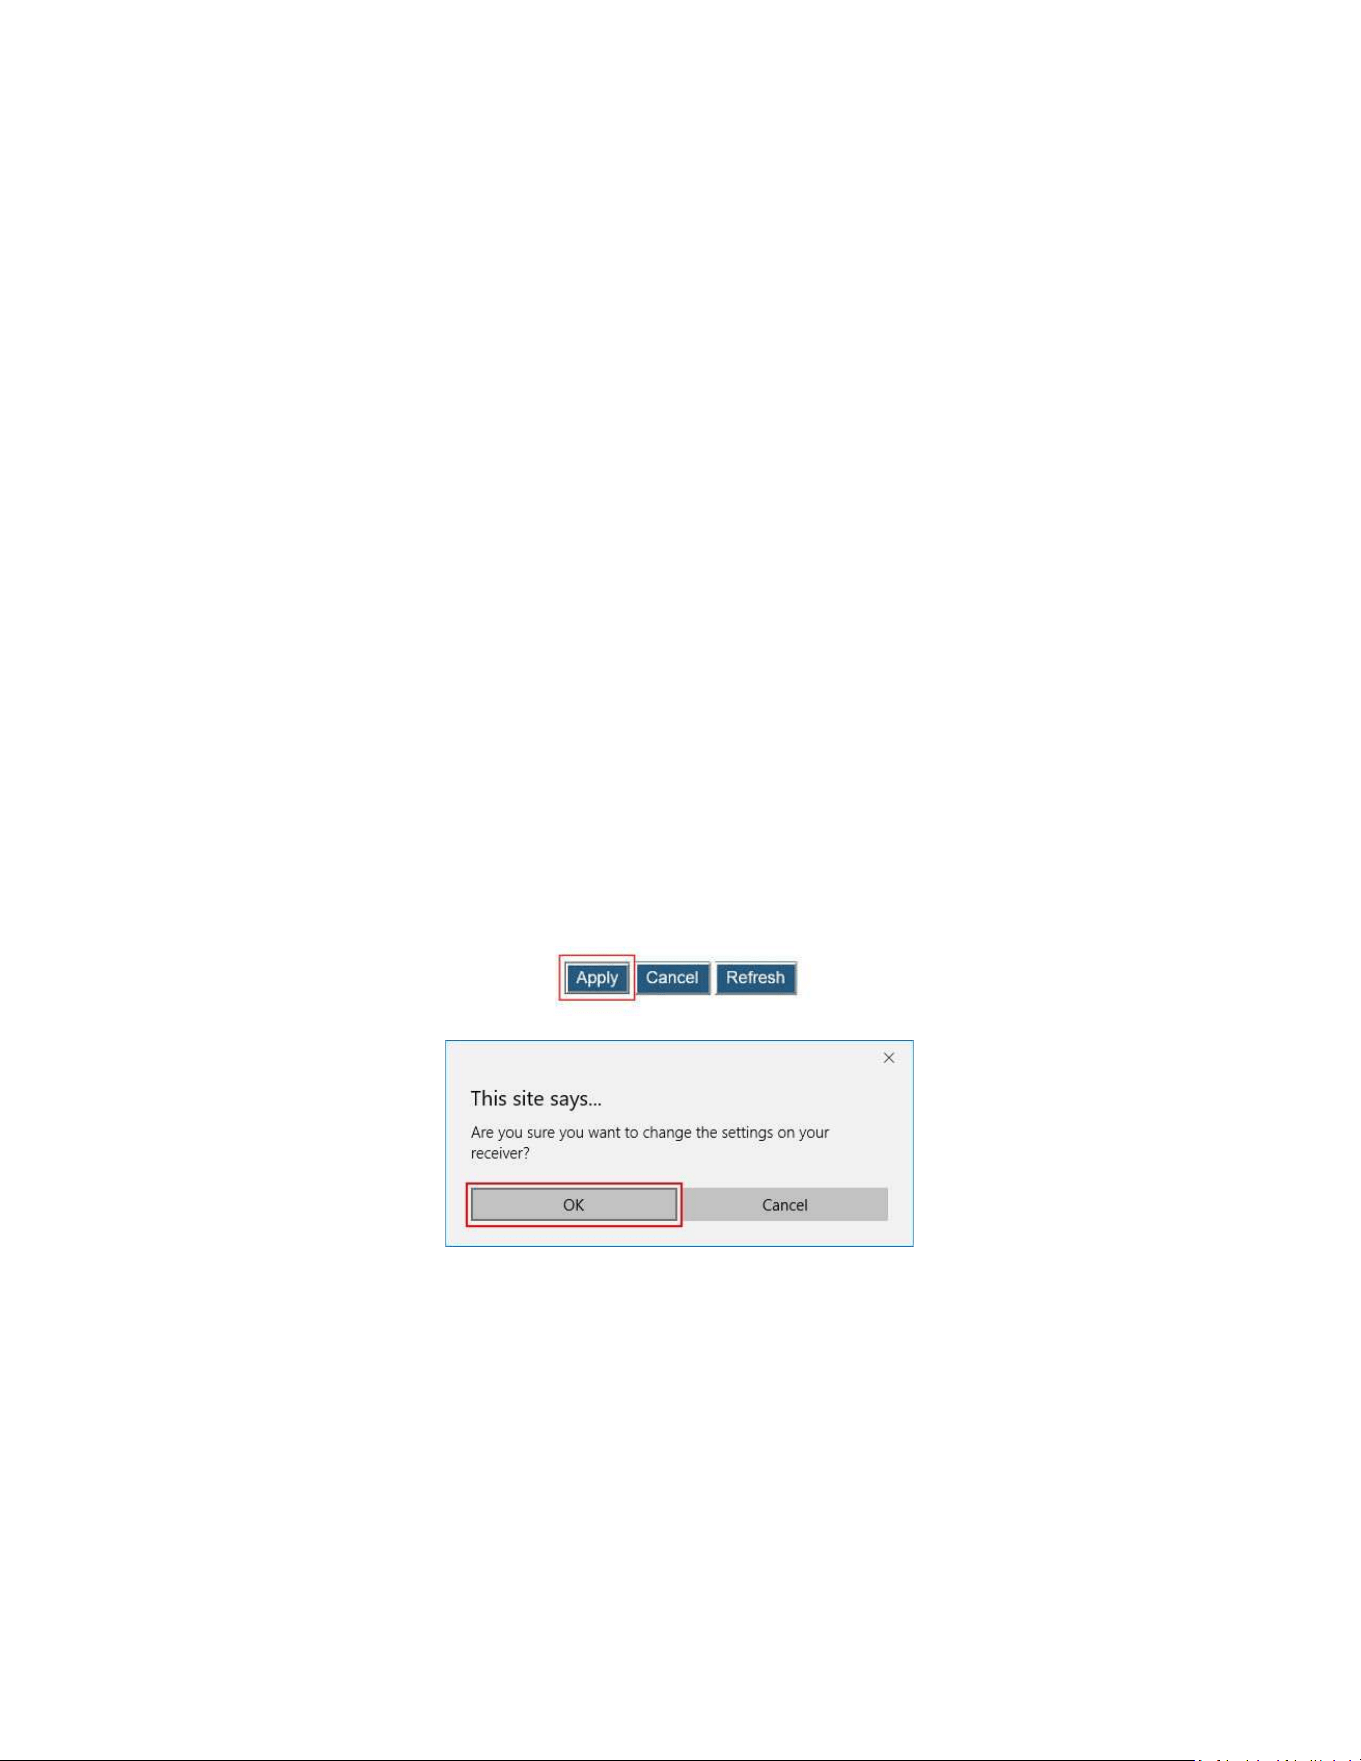
formoreinformation.
•
SetthereceivertoworkinAGOmodeandselectacleanchannel.
I'm seeing choppiness and brief pauses while watching Internet video on my
Miracast™device.
WirelessinterferencemaycauseInternetvideoplaybacktobechoppy.Ifthisoccurs,trythe
following:
•
Disconnectthe devicefromthe Receiver.Makesurethe Internetconnectionis good
andthatthevideoplayingonthephoneissmooth.
•
CleartheYouTubecacheandtryplayingthevideoagain.

97
I'mseeingchoppinessandbriefpauseswhilewatchinglocalvideoonmyMiracast™
device.
Wireless interference may cause the video playbackto be choppy. If this occurs,trythe
following:
•
MakesureyouareinthesameroomastheReceiveris.
•
SetthemediaplayertousetheH/Wdecoder,ifavailable.
•
ReboottheMiracast™deviceandReceiverandconnectagain.
•
AvoidmovingtheMiracast™devicearoundtoomuch.
•
Changethewirelesschannelonyourwirelessrouter/accesspoint,oronyourreceiver.
MyWindows8.1displaystotheTVbutthefouredgesarecutoff(overscan).
Thisisexpectedwithsomesystem'ssupporteddisplayresolution.YoucanadjustWindows
screenresolutionsettingstofitthePC'sscreenonyourTVdisplay.
IencounterconnectionfailurewithScreenBeam960andmydevicecan’tconnecttoit
anymore.
Reboot the ScreenBeam 960 and try connection again. Or, reboot your device
(laptop/Ultrabook/tablet/smartphone)andtryconnectionagain.
RebootboththeScreenBeam960andyourdeviceandtryconnectionagain.
IfyouareusingaWindows8.1operatingsystem,gotoChangePCsettings>PCand
Devices>Devices>Projectors,removetheprofileoftheScreenBeam960fromyour
device(PC/laptop/Ultrabook),andtryconnectionagain.
If you are using a Windows 10 operating system, go to Settings > Devices >
Connected Devices >Projectors, remove theprofile of theScreenBeam 960 from
yourdevice(PC/laptop/Ultrabook),andtryconnectionagain.
Ican’tconnecttotheReceiverwithScreenBeamConfigurationUtilityonmydevice.
TheUtilitycan’tfindtheReceiver.
ScreenBeam960isnotcompatiblewithScreenBeamConfigurationUtility.Toconfigureor
upgrade the receiver, you should use the receiver’s Local Management Interface or
ScreenBeamCentralManagementSystem.
When I connect the source device to a wireless network (router/AP), why
ScreenBeam960disconnectsautomatically?
Thesourcedevice’scommunicationchannelhaschangedwhenyouconnectyourdeviceto
a wireless network (router/AP) in the situation that the source device is connected to
ScreenBeam960.Asaresult,ScreenBeam960disconnectsfromthesourcedevice.
The solution is that you should connect your device to the wireless network before
connectingittoScreenBeam960.Inthisway,ScreenBeam960worksonthesamechannel
withthesourcedeviceandthewirelessnetwork,andnoconnectioninterruptionwilloccur.

98
FAQs
CanIviewprotectedcontentifScreenBeam960receiverisconnectedadisplay
throughtheVGAport?
No.TheVGAportdoesnotsupportplaybackofprotectedcontentsuchasblue-ray.
CanmydeviceconnecttoScreenBeam960?
ToconnecttoScreenBeam960,yourdevicemustbeWi-FiMiracast-capable.
For a system to support wireless display, it should have most if not all Intel chipsets
(Processor,GraphicCard,andWirelesschipset).
Processor.Oneofthefollowingprocessorsisrequired:
•
2ndgenerationIntelCorei3/i5/i7MobileProcessor
•
3rdGenerationIntelCorei3/i5/i7MobileandDesktopProcessor
•
4thGenerationIntelCorei3/i5/i7MobileandDesktopProcessor
•
IntelPentiumN3510Processor
•
IntelCeleronN2805Processor
•
IntelCeleronN2810Processor
•
IntelCeleronN2910Processor
•
IntelAtomZ3740Processor
•
IntelAtomZ3740DProcessor
•
IntelAtomZ3770Processor
•
IntelAtomZ3770DProcessor
Graphics.Oneofthefollowinggraphicssolutionsisrequired:
•
IntelIrisProGraphics5200
•
IntelIrisGraphics5100
•
IntelHDGraphics5000
•
IntelHDGraphics4600
•
IntelHDGraphics4400
•
IntelHDGraphics4200
•
IntelHDGraphics4000
•
IntelHDGraphics3000(mobile)
•
IntelHDGraphics2500
•
IntelHDGraphics2000(mobile)
WirelessAdapter.Oneofthefollowingwirelessadaptersisrequired:
•
IntelCentrinoWireless-N1000,1030,2200,or2230
•
IntelCentrinoWireless-N2200forDesktop
•
IntelCentrinoAdvanced-N6200,6205,6230,or6235
•
IntelCentrinoAdvanced-N6205forDesktop
•
IntelCentrinoWireless-N+WiMAX6150
•
IntelCentrinoAdvanced-N+WiMAX6250
•
IntelCentrinoUltimate-N6300
•
IntelDualBandWireless-N7260

99
•
IntelDualBandWireless-AC7260
•
IntelDualBandWireless-AC7260forDesktop
•
IntelDualBandWireless-AC3160
•
IntelWireless-N7260
•
BroadcomBCM43228
•
BroadcomBCM43241
•
BroadcomBCM4352
OperatingSystem.Oneofthefollowingoperatingsystemsisrequired:
•
MicrosoftWindows10
•
MicrosoftWindows11
•
macOSX10.10(andlater)
•
iOS9(andlater)
SystemrequirementsforWi-FiMiracast™
•
Android4.2
•
Windows11/10
HowcanItellifmydevicesupportsWi-FiMiracast?
LookforoneofthefollowingMiracastapplicationsonyourdevice.Onlysomeapplication
namesarelistedbelow.DifferentmanufacturersmayhavedifferentnamesfortheMiracast
appsontheirproducts.But,theyshouldindicatesimilarmeaning.
Wirelessdisplay
Wirelessmirroring
Screenmirroring
AllShareCast(Samsungdevicesonly)
Castscreen
VisitScreenBeam960compatibilitypagefortherecommendedMiracastdevices.
DoIneedtoinstalldrivers/appstousetheScreenBeam960Receiver?
FormacOS/iOS,noapp/driverisrequiredtoinstall.
ForWindows11/10,youonlyneedtoinstallthelatestWindowsupdates.
ForAndroid4.2orhigher,noappisrequired.
Note:YourdevicemustbeWi-FiMiracast™-capable.
HowcanIimprovemyvideo/audioperformance?
You can try the following methods to improve the ScreenBeam 960’s video/audio
performance:
PlaceyourdeviceclosertotheReceiver.
Connectyourdevicetoawirelessnetworkthatisusingacleanerwirelesschannelor
change the wireless channel on the current wirelessnetwork, and then connect the
devicetotheReceiver.
TurnofftheWi-Fidevicesthatarenotinusecurrently.

100
WhatwirelesssignalrangecanIexpectwiththeReceiver?
TheReceiverisdesignedtobe used inthe sameroomwiththesourcedevice.For best
performance,thesourcedeviceshouldbeplacedwithin20meterstotheReceiver.
HowcanIupgradetheReceiver’sfirmware?
Youcanupgradethereceiver'sfirmwarebyusingtheLocalManagementInterface,aUSB
flashdrive,orScreenBeamCentralManagementSystem.
How do I configure the receiver's general settings, such as changing language,
renamethereceiver,enable/disablescreensaver,andidlingtimeforscreensaver?
Youcanconfigurethereceiver'sgeneralsettingsbyusingtheLocalManagementInterface
orScreenBeamCentralManagementSystem.
HowcanIadjustthedisplaytofitproperlytomyTVscreen?
You can adjust the display by using the receiver’s Local Management Interface or
ScreenBeamCentralManagementSystem.
Log into the receiver’s Local Management Interface, and adjust screen size in the
DisplaySettingsectionontheFeaturespage.
IntheScreenBeamCentralManagementSystem,doubleclickthereceivertoopenthe
receiver configuration page, and then adjust the TV screen size in the Features
section.
HowtosettheScreenBeamvideooutputtofitadisplaywithaspectratiootherthan
16:9?
ScreenBeamreceiver'sHDMIoutputsupports16:9resolutionsonly.Soifweconnect
ScreenBeamdirectlytoadisplaydeviceviaHDMI,it'snowaytogetanaspectratio
otherthan16:9.
Tooutputanaspectratiootherthan 16:9, weneedto use anHDMI-to-VGA adapter
(model number YZ-050) or the receiver’ VGA output. The HDMI-to-VGA adapter
supportsthefollowingresolutions:640*480,800*600,1024*768,1280*720,1280*768,
1280*800, 1280*960, 1360*768, 1366*768, and 1920*1080, and the receiver’ VGA
output supports the following resolutions: 640*480, 800*600, 1024*768, 1280*800,
1366*768,1280*1024.
The display device must provide EDID information. Otherwise, ScreenBeam outputs
the 1280*720 resolution only when using the HDMI-to-VGA adapter (YZ-050), or
outputsthe1024*768resolutionwhenusingthereceiver’VGAoutput.
TheVGAcablemustsupportI2S(has3+6,or3+9lines).
Settheresolutiontothedesiredoneonthesourcedevice.Makesuretheresolutionis
supportedby the sourcedevice, the adapter, andthe displaydevice.Otherwise,the
displayisstretchedorhasblackedges.
If you are using the HDMI-to-VGA adapter (YZ-050), log into the receiver's local
managementconsole,gotoFeatures>DisplaySetting>VGACompatibilityMode,and
properlysetuptheVGACompatibilityModefeature.
If you are using the receiver’ VGA output, log into the receiver's local management

101
console,gotoFeatures>DisplaySetting>DefaultVGAFormat,andproperlysetup
theDefaultVGAFormatfeature.
Can I extend my Windows desktop to the HDTV or Projector from my Miracast
device?
Yes.AftertheconnectiontoScreenBeam960receiverisestablished,bydefaultyoushould
seethelaptopscreenmirroredtotheHDTVorProjector.
ToextendyourWindowsdesktoptoanHDTVoraProjector,presstheWindowskeyandP
keytogether,andselectthe"Duplicate",“Extend”or"Secondscreenonly"mode.
WhatisWi-FiMiracast™?
Wi-Fi Certified Miracast™ is a groundbreaking solution for seamlessly displaying video
betweendevices,withoutcablesoranetworkconnection.Userscanviewpicturesfroma
smartphone on a big screen television, share a laptop screen withthe conference room
projector in real-time, and watch live programs from a home cable box on a tablet.
Miracast™ connections are formed using Wi-Fi Certified Wi-Fi Direct™, so access to a
Wi-Fi
®
networkisnotneeded–theabilitytoconnectisinsideMiracast™-certifieddevices.
WhatisWi-FiDirectandcanIconnecttotheReceiverusingWi-FiDirect?
Wi-FiDirectisapeer-to-peertechnologythatMiracast™connectionsareformedin.Even
thoughsomenewerAndroid4.0andWindows8.1devicesmaydetecttheReceiverinthe
Wi-FiDirectdevicesscanlist,theywillnotbeabletoconnecttotheReceiver.Thedevice
mustsupportMiracast™toconnectwiththeReceiver.
CanIconnecttotheWi-FirouterandtheReceiversimultaneouslywithmycompatible
laptop?
Yes.ConnectthelaptoptoanavailableWi-Firouterfirst,andthenconnecttotheReceiver.
YoucanthenviewonlinecontentandbeamittotheHDTV.
CanIconnecttotheWi-FirouterandtheReceiversimultaneouslywithmyMiracast™
device?
SomeMiracast™devicescannotconnecttoboththeWi-FirouterandtheReceiveratthe
sametime.Refertothedevicemanufacturer'sorcarrier'susermanualformoreinformation.
CanIconnectseveralMiracastdevicestotheReceiversimultaneously?
No.YoucanconnectonedevicetotheReceiveratatime.
CanIconnecttomultipleScreenBeam960Receiverssimultaneously?
No.YoucanonlyconnecttooneScreenBeam960atatime.
MyTV/ProjectordoesnothaveanHDMIInput.CanIstilluseScreenBeam960?
Yes.AVGAportisavailableforcompatibilitywithlegacydisplaydevices.

102
CanMicrosoftSurfaceProtabletsupportwirelessdisplay?
Originally,MicrosoftSurfaceProdoesnotsupportwirelessdisplay.However,itcansupport
wirelessdisplayafteryouupgradeitsoperatingsystemtoWindows8.1.ThelatestMicrosoft
Surface2andSurfacePro2withWindows8.1cansupportwirelessdisplay.
CanIusetheScreenBeam960toaccessonlinecontentdirectly?
No. ScreenBeam 960 does not directly connect to the Internet. You must use a source
device(laptop/Ultrabook/tablet/smartphone)towirelesslystreamtheonlinecontenttoyour
Receiver.
CanScreenBeam960supporttouchdisplay?
Yes.ScreenBeam960supportsUIBC.ThesourcedevicemustinstallaWindows10system
andmeetthefollowinghardwarerequirements:
4thGenIntelCore(Haswellorbetter)processor
AMDA4-5000(Kabiniorbetter)processor
CanIpushmediatotheReceiverusingDLNA?
No.TheReceiverisnotaDLNAmediareceiver.
DoestheReceiverworkwiththeAppleiPhone,iPad,oriPod?
Yes.ScreenBeam960supportsAppledeviceswithnativescreenmirroring.
Howtosetmyreceivertousethe5Gfrequency?
Generally,the5Gbandcanprovideclearerchannels,andthereceiverworksinthisband
canproducebetterperformance.
InNGOmode,youmustpreparea5Grouterfirst.Then,connectyourdevicetothe5G
routerfirst,andthenconnectyourdevicetoyourreceiver.Thenyourreceiverwillworkinthe
5Gband.
InAGOmode,gotoLMI>Features>P2PWirelessSetting,andselecta5Gchannel.
HowtoidentifyifmydevicecanconnecttoScreenBeam960?
ScreenBeam960supportsWiFiCertifiedMiracastdevicesandAppledeviceswithnative
screenmirroring.
TocheckifyourdeviceisMiracastenabled,checkiftheWiFiCertifiedMiracastlogois
printedonthepackageofyourdeviceordirectlyonyourdevice,or,ifthewirelessdisplay
appisavailableonyourdevice.Ifyes,yourdevicecanconnecttoScreenBeam960.
"Allowinputfromakeyboardormouseconnectedtothisdisplay"isdisplayedeven
noUSBdeviceisconnectedtotheScreenBeamreceiver.Wouldithaveanyimpacton
theMiracastconnectioniftheoptionischeckedwhilenoUSBdeviceispresent?
No.ThisisastandardbehaviorofWindows10/11.

103
Mylaptopscreenisnotdisplayed,onlyablackscreenisshown,whenIconnectmy
laptoptoabigscreenthroughmyScreenBeamreceiver'spassthroughVGAports.
WehavebeenreportedthatsomeDelllaptopcomputerscouldhavethisproblem.Youcan
pressWindows+PkeystoprojectthePC'sscreenwhenthishappens.

104
AppendixII Notices
Warranty
Thisproducthasaone-yearLimitedHardwareWarrantyand90-dayfreesoftwareupdates
fromthedateofpurchase.
LocalLaw
ThisLimitedWarrantyStatementgivesthecustomerspecificlegalrights.Thecustomermay
alsohaveotherrightswhichvaryfromstatetostateintheUnitedStates,fromprovinceto
provinceinCanada,andfromcountrytocountryelsewhereintheworld.
To the extent that this Limited Warranty Statement is inconsistent with local law, this
Statementshallbedeemedmodifiedtobeconsistentwithsuchlocallaw.Undersuchlocal
law, certain disclaimers and limitations of this Warranty Statement may not apply to the
customer.
Gotohttps://www.screenbeam.com/warranty/formoreinformation.
GPLInfo
ForGNUGeneralPublicLicense(GPL)relatedinformation,goto
https://opensource.screenbeam.com.
EUCEDeclarationofConformity
ToobtainthecompleteDeclarationofConformityforminsoftcopy,gototheScreenBeam
DeclarationsofConformityEU/EEAwebsiteatScreenBeam 960EUDeclarationofConformity
ThesymbolbelowisplacedinaccordancewiththeEuropeanUnionDirective2002/96on
theWasteElectricalandElectronicEquipment(theWEEEDirective).Ifdisposedofwithin
the European Union,this product should be treatedand recycled inaccordancewith the
lawsofyourjurisdictionimplementingtheWEEEDirective.

105
TechnicalSupport
Gotohttps://support.screenbeam.comforproductsupport,updates,andmoreinformation
including:
•
Documentation
•
Firmwareupdates
•
Troubleshooting
•
Registration
•
FAQs