EASY FRY
™
& GRILL DIGITAL
www.tefal.com
zh
id
th
vi
1
en

1
en
IMPORTANT SAFEGUARDS
When using electrical appliances, basic safety precautions should always be
followed, including the following:
1. Read all instructions before using.
2. Do not touch hot surfaces. Use handles or knobs.
3. To protect against electric shock, do not immerse cord, plugs or fryer in water
or other liquid.
4. Close supervision is necessary when any appliance is used by or near children.
5. Unplug from outlet when not in use and before cleaning. Allow to cool before
putting on or taking off parts.
6. Do not operate any appliance with a damaged cord or plug or after the
appliance malfunctions, or has been damaged in any manner. Return
appliance to the nearest authorized service facility for examination, repair
or adjustment.
7. The use of accessory attachments not recommended by the appliance
manufacturer may cause injuries.
8. Do not use outdoors.
9. Do not let cord hang over edge of table or counter, or touch hot surfaces.
10. Do not place on or near a hot gas or electric burner, or in a heated oven.
11. Extreme caution must be used when moving appliance containing hot oil or
other hot liquids.
12. Always attach plug to appliance first (depending on model), then plug cord
into the wall outlet. To disconnect, turn any control to “off”, then remove plug
from wall outlet.
13. Do not use appliance for other than intended use.
14. SAVE THESE INSTRUCTIONS
FOR HOUSEHOLD USE ONLY.
15. Only connect the appliance to electrical sockets which have a minimum
load of 15A. If the sockets and the plug on the appliance should prove
incompatible, get a professionally qualified technician to replace the socket
with a more suitable one.
POLARIZATION INSTRUCTIONS
This appliance has a polarized plug (one blade is wider than the other). To reduce
the risk of electric shock this plug is intended to fit into a polarized outlet only
one way. If the plug does not fit fully into the outlet, reverse the plug. If it still
does not fit, contact a qualified electrician. Do not attempt to modify the plug
in any way.
SHORT CORD INSTRUCTIONS
Do not use with an extension cord.
3
en
2
A short power-supply cord is provided to reduce the risk resulting from becoming
entangled in or tripping over a longer cord.
SAFETY INSTRUCTION
• This appliance is intented to be used in household only. It is not intended to be
used in the following applications, and the guarantee will not apply for:
- staff kitchen areas in shops, offices and other working environments;
- farm houses;
- by clients in hotels, motels and other residential type environments;
- bed and breakfast type environments.
• This appliance is not intended to be operated by means of an external timer or
a separate remotecontrol system.
• If the power supply cord is damaged, it must be replaced by the manufacturer,
its service agent or similarly qualified persons in order to avoid a hazard.
• This appliance is not intended for use by persons (including children) with
reduced physical, sensory or mental capabilities, or lack of experience and
knowledge, unless they have been given supervision or instruction concerning
use of the appliance by a person responsible for their safety.
• Children should be supervised to ensure that they do not play with the
appliance.
•
The temperature of accessible surfaces may be high when the appliance
is operating. Do not touch the hot surfaces of the appliance.
• Clean removable parts with a non abrasive sponge and dishwashing liquid.
Do not clean them in a dishwasher.
• Clean the inside and the outside of the appliance with a damp sponge or cloth.
Please refer to the «Cleaning» section of the instructions for use.
• The appliance can be used up to an altitude of 4000 m.
Do
• Read and follow the instructions for use. Keep them safe.
• Remove all packaging materials and any promotional labels or stickers
from your appliance before use. Be sure to also remove any materials from
underneath the removable bowl (depending on model).
• Check that the voltage of your mains network corresponds to the voltage given
on the rating plate on the appliance (alternative current).
• Given the diverse standards in effect, if the appliance is used in a country other
than that in which it is purchased, have it checked by an approved Service
Centre.
• Use the appliance on a flat, stable, heat-resistant work surface away from
water splashes.
• Always unplug your appliance: after use, to move it, or to clean it.
• In the event of fire, unplug the appliance and smother the flames using a
damp tea towel.
• To avoid damaging your appliance, please ensure that you follow recipes in the
instructions and at www.tefal.com; make sure that you use the right amount
of ingredients.
Do not
• Do not use the appliance if it or the power cord is damaged or if it has fallen
and has visible damage or appears to be working abnormally. If this occurs,
the appliance must be sent to an Approved Service Centre.
• Do not use an extension lead. If you nevertheless decide to do so, under
your own responsibility, use an extension lead that is in good condition and
compliant with the power of the appliance.
• Do not let the power cord dangle.
• Do not unplug the appliance by pulling on the power cord.
• Never move the appliance when it still contains hot food.
• Never operate your appliance when empty.
• Do not switch on the appliance near to flammable materials (blinds, curtains…).
or close to an external heat source (gas stove, hot plate etc.).
• Do not store any inflamamable products close to or underneath the furniture
unit where the appliance is located.
• Never take the appliance apart yourself
• Do not immerse the product in water.
• Do not use any powerful cleaning products (notably soda based strippers), nor
brillo pads, nor scourers.
• Do not store your appliance outside. Store it in a dry and well ventilated area.
Advice/information
• When using the product for the first time, it may release a non-toxic odour. This
will not affect use and will disappear rapidly.
• For your safety, this appliance conforms with applicable standards and
regulations (Directives on Low Voltage, Electromagnetic Compatibility,
Materials in contact with food, Environment, etc.).
• This appliance is designed for domestic use only and not outdoor. In case of
professional use, inappropriate use or failure to comply with the instructions,
the manufacturer accepts no responsibility and the guarantee does not apply.
• For your safety, only use the accessories and spare parts designed for your
appliance
Environnement
Environment protection first!
i Your appliance contains valuable materials which can be recovered or recycled.
Leave it at a local civic waste collection point.

5
en
4
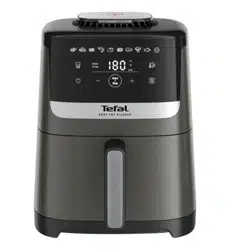
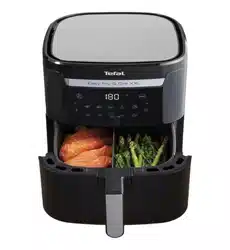
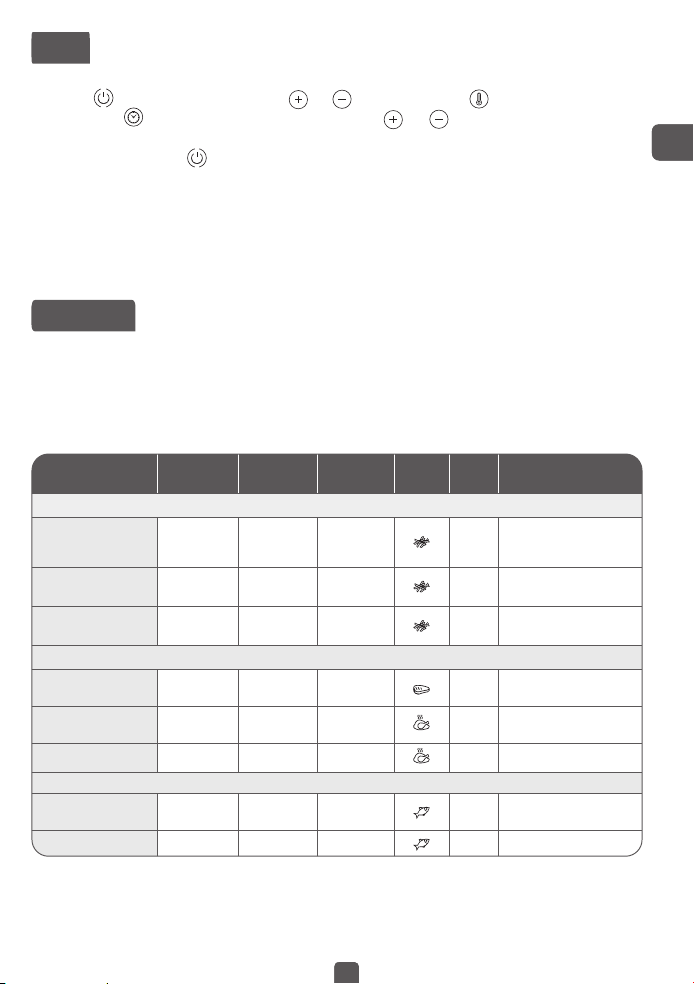
DESCRIPTION
A. Bowl
B. Bowl handle
C. Removable die-cast grill grid
D. Digital touchscreen panel
E. Time/temperature display
AUTOMATIC COOKING MODES
1. Fries
2. Nuggets
3. Roasted chicken
4. Pizza
5. Meat
6. Fish
7. Vegetables
8. Dessert
BEFORE FIRST USE
1. Remove all packaging material.
2. Remove any stickers or labels from the appliance.
3. Do not remove silicon pads of the grid.
4. Thoroughly clean the bowl and the removable grill grid with hot water, some washing-up
liquid and a non-abrasive sponge.
The bowl and the grid are dishwasher safe.
5. Wipe the inside and outside of the appliance with a damp cloth. The appliance works by
producing hot air. Do not fill the bowl (A) with oil or frying fat.
PREPARING FOR USE
1. Place the appliance on a flat, stable, heat-resistant work surface away from water splashes.
2. Do not fill the bowl with oil or any other liquid.
Do not put anything on top of the appliance. This disrupts the airflow and affects the
hot air frying result.
USING THE APPLIANCE
Easy Fry can cook a large range of recipes. Cooking times for the main foods are given in the
section ‘Cooking Guide’. Online recipes at www.tefal.com help you get to know the appliance.
1. Connect the power supply cord to an electrical socket.
2. Start the preheating phase if you wish. To do this, press the Start button that begins
flashing as soon as the appliance is plugged in. The temperature displayed on the first use
is 180°C.
• Adjust to the desired temperature with the
and buttons on the digital screen.
• Press the Start button again to start preheating.
• The appliance will beep when the temperature has been reached.
• The preheating phase is now completed.
3. Place the food in the bowl.
Note: Never fill the bowl beyond the MAX level mark or exceed the maximum amount
indicated in the table (see into section ‘Cooking Guide’), as this could affect the quality
of the end result.
D
E
A
B
C
5
en
4
DESCRIPTION
A. Bowl
B. Bowl handle
C. Removable die-cast grill grid
D. Digital touchscreen panel
E. Time/temperature display
AUTOMATIC COOKING MODES
1. Fries
2. Nuggets
3. Roasted chicken
4. Pizza
5. Meat
6. Fish
7. Vegetables
8. Dessert
BEFORE FIRST USE
1. Remove all packaging material.
2. Remove any stickers or labels from the appliance.
3. Do not remove silicon pads of the grid.
4. Thoroughly clean the bowl and the removable grill grid with hot water, some washing-up
liquid and a non-abrasive sponge.
The bowl and the grid are dishwasher safe.
5. Wipe the inside and outside of the appliance with a damp cloth. The appliance works by
producing hot air. Do not fill the bowl (A) with oil or frying fat.
PREPARING FOR USE
1. Place the appliance on a flat, stable, heat-resistant work surface away from water splashes.
2. Do not fill the bowl with oil or any other liquid.
Do not put anything on top of the appliance. This disrupts the airflow and affects the
hot air frying result.
USING THE APPLIANCE
Easy Fry can cook a large range of recipes. Cooking times for the main foods are given in the
section ‘Cooking Guide’. Online recipes at www.tefal.com help you get to know the appliance.
1. Connect the power supply cord to an electrical socket.
2. Start the preheating phase if you wish. To do this, press the Start button that begins
flashing as soon as the appliance is plugged in. The temperature displayed on the first use
is 180°C.
• Adjust to the desired temperature with the
and buttons on the digital screen.
• Press the Start button again to start preheating.
• The appliance will beep when the temperature has been reached.
• The preheating phase is now completed.
3. Place the food in the bowl.
Note: Never fill the bowl beyond the MAX level mark or exceed the maximum amount
indicated in the table (see into section ‘Cooking Guide’), as this could affect the quality
of the end result.
D
E
A
B
C
7
en
6
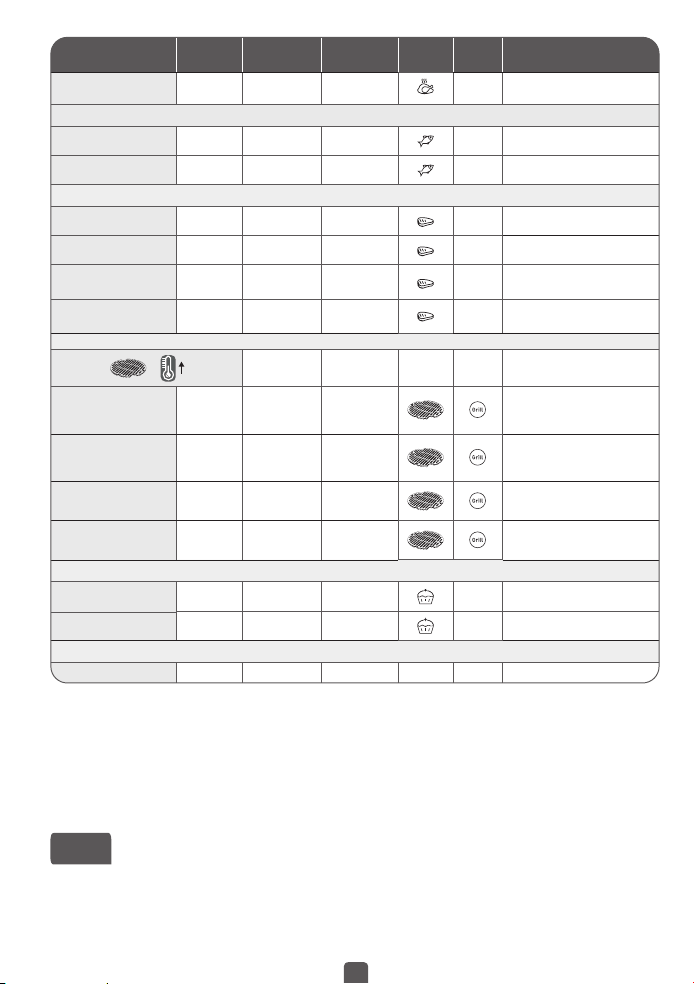
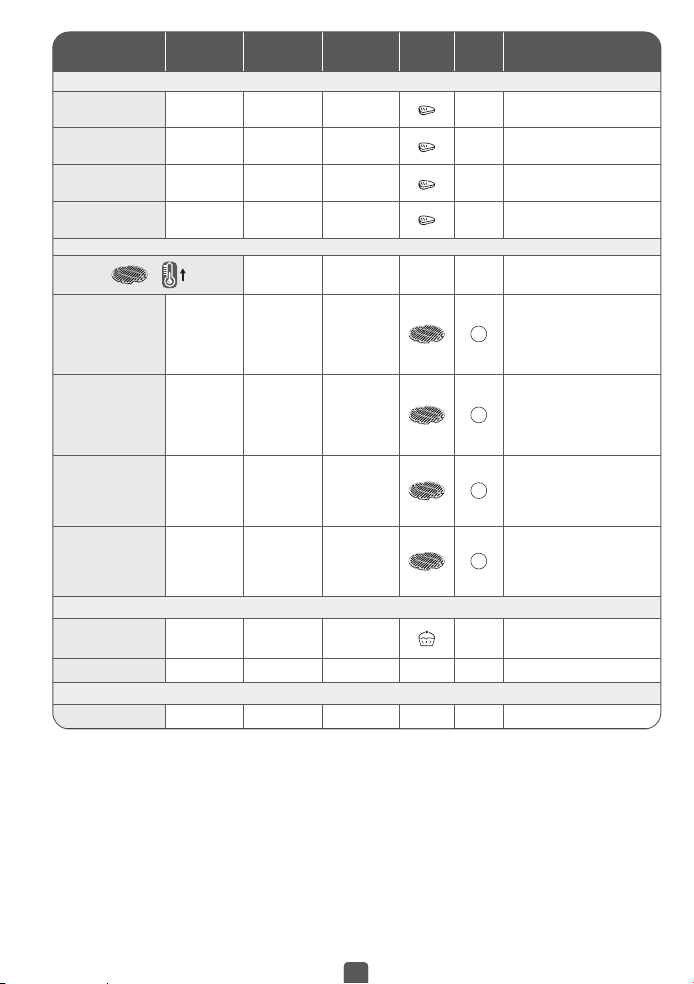
Quantity
Approx Time
(min)
Temperature
(°C)
Cooking
mode
Shake*
Extra
information
Potatoes & fries
Frozen chips (10 mm x
10mm standard thickness)
300 - 800 g
15 - 25 min
200°C
Yes
Homemade French
Fries (8 x 8 mm)
300 - 800 g
22 - 32 min
200°C
Yes
Add 1 tbsp of oil
Frozen
potato wedges
300 - 800 g
22 - 27 min
200°C
Yes
Add 1 tbsp of oil
Meat & Poultry
Steak
100 - 500 g
6 - 10 min
180°C
Chicken breast
fillets (boneless)
100 - 500 g
12 - 19 min
180°C
Chicken (whole)
1000 g
60 min
200°C / 392°F
Fish
Salmon fillet
350 g
15 - 17 min
140°C / 284°F
Shrimps
12 pieces 4 min
170°C / 338°F
Snacks
Frozen chicken nuggets
100 - 600 g
7 - 15 min
200°C / 392°F
Yes
Frozen chicken wings
300 g 16 - 20 min
200°C / 392°F
Yes
Frozen cheese sticks
125 g
(5 pieces)
7 - 9 min
180°C / 356°F
Frozen onion rings
200 g
(10 pieces)
8 - 10 min
200°C / 392°F
Yes
Pizza
400 g 7 min
190°C / 374°F
4. Slide the bowl back into the appliance.
Caution: Do not touch the bowl during use and for some time after use, as it gets very
hot. Only hold the bowl by the handle.
5. To begin cooking, you can select between the automatic cooking mode and the manual
settings.
a. If choosing manual settings:
• Adjust the temperature
with the and buttons on the digital screen. The thermostat
varies from 80-200°C.
• Then set the desired cooking time by pressing the
button and adjusting the time with the
and buttons. The timer can be set for between 0 and 60 minutes.
• Press the Start button to begin cooking with the selected temperature and time settings.
Cooking starts. The selected temperature and remaining cooking time will alternate on the
screen display.
b. If choosing automatic cooking mode:
• Select the desired cooking mode by pressing the icon corresponding on the touchscreen panel
(these modes are described in detail in the “Cooking guide” section).
• Confirm the cooking mode by pressing the
button. This will launch the cooking process.
• Cooking starts. The selected temperature and remaining cooking time will alternate on the
on-screen display.
6. Excess oil from the food is collected in the bottom of the bowl.
7. Some foods require shaking halfway through the cooking time (see section ‘Cooking Guide’).
To shake the food, pull the bowl out of the appliance by the handle and shake it. Then slide
the bowl back into the appliance and press the Start button
again to restart cooking.
8. When you hear the timer sound, the cooking time set has finished. Pull the bowl out of the
appliance and place it on a heat-resistant surface.
9. Check if the food is ready.
If the food is not ready yet, simply slide the bowl back into the appliance and set the timer
for a few extra minutes.
10. When the food is cooked, take out the bowl. To remove food, use a pair of tongs to lift the
food out of the bowl.
Caution: The bowl should never be turn up side down with the grid.
After hot air frying, the bowl, the grid and the food are very hot. Depending on the type of
food cooked in the appliance, be careful as steam may escape from the bowl.
11.
When a batch of food is ready, the appliance is instantly ready for preparing another batch of food.
USING THE GRILL PLATE
1. Place the grill grid in the bowl of the appliance.
2. Press
, then press on the screen to select the Grill mode.
3. Start the Grill mode by pressing
. This will launch the preheating phase (timing :15 minutes).
4. When you hear the timer sound, the preheating phase has finished.
5. Take the bowl out the appliance and place it on a heat-resistant surface.
Caution : the bowl and the grill grid are very hot. Use a pair of tongs to place the food
on the grill plate.
6. Place the food on the grill plate and put back the bowl into the appliance.
7. Select the required cooking time by pressing
and buttons (see section ‘Cooking guide’).
8. Press the Start button
to launch the cooking. The temperature and remaining cooking
time will alternate on the on-screen display.
Note : the pieces of meat required to turn them at half cooking.
Excess oil from the food is collected in the bottom of the bowl.
9. When you hear the timer sound, the cooking has finished. Take the bowl out the appliance
and place it on a heat-resistant surface.
10. Check if the food is ready. If the food is not ready yet, put it back on the appliance and set
the timer for a few extra minutes.
11. When the food is cooked, take out the bowl. To remove food, use a pair of tongs to lift the
food out the bowl.
Caution: After hot frying, the bowl, the grid and the food are very hot.
DEHYDRATION
1. Place the grid in the bowl of the appliance.
2. Press , then adjust the temperature by pressing and button to 80°C on the digital screen.
3. Then set the desired cooking time by pressing the button and adjusting the time with
and button. You can set the timing from 1 hour to 4 hours.
4. Press the Start button
to launch the dehydration process. The selected temperature and
remaining cooking time will alternate on the screen display.
5. When you hear the timer sound, the cooking has finished. Take the bowl out the appliance
and place it on a heat-resistant surface.
6. Check if the food is ready. If the food is not ready yet, put it back on the appliance and set
the timer for a few extra minutes.
7. When the food is cooked, take out the bowl. To remove food, use a pair of tongs to lift the
food out the bowl.
Caution : the bowl and the grid are very hot.
COOKING GUIDE
The table below helps you to select the basic settings for the food you want to prepare.
Note: The cooking times below are only a guide and may vary according to the variety
and batch of potatoes used. For other foods the size, shape and brand may affect results.
Therefore, you may need to adjust the cooking time slightly.
7
en
6
Quantity
Approx Time
(min)
Temperature
(°C)
Cooking
mode
Shake*
Extra
information
Potatoes & fries
Frozen chips (10 mm x
10mm standard thickness)
300 - 800 g
15 - 25 min
200°C
Yes
Homemade French
Fries (8 x 8 mm)
300 - 800 g
22 - 32 min
200°C
Yes
Add 1 tbsp of oil
Frozen
potato wedges
300 - 800 g
22 - 27 min
200°C
Yes
Add 1 tbsp of oil
Meat & Poultry
Steak
100 - 500 g
6 - 10 min
180°C
Chicken breast
fillets (boneless)
100 - 500 g
12 - 19 min
180°C
Chicken (whole)
1000 g
60 min
200°C / 392°F
Fish
Salmon fillet
350 g
15 - 17 min
140°C / 284°F
Shrimps
12 pieces 4 min
170°C / 338°F
Snacks
Frozen chicken nuggets
100 - 600 g
7 - 15 min
200°C / 392°F
Yes
Frozen chicken wings
300 g 16 - 20 min
200°C / 392°F
Yes
Frozen cheese sticks
125 g
(5 pieces)
7 - 9 min
180°C / 356°F
Frozen onion rings
200 g
(10 pieces)
8 - 10 min
200°C / 392°F
Yes
Pizza
400 g 7 min
190°C / 374°F
4. Slide the bowl back into the appliance.
Caution: Do not touch the bowl during use and for some time after use, as it gets very
hot. Only hold the bowl by the handle.
5. To begin cooking, you can select between the automatic cooking mode and the manual
settings.
a. If choosing manual settings:
• Adjust the temperature
with the and buttons on the digital screen. The thermostat
varies from 80-200°C.
• Then set the desired cooking time by pressing the
button and adjusting the time with the
and buttons. The timer can be set for between 0 and 60 minutes.
• Press the Start button to begin cooking with the selected temperature and time settings.
Cooking starts. The selected temperature and remaining cooking time will alternate on the
screen display.
b. If choosing automatic cooking mode:
• Select the desired cooking mode by pressing the icon corresponding on the touchscreen panel
(these modes are described in detail in the “Cooking guide” section).
• Confirm the cooking mode by pressing the
button. This will launch the cooking process.
• Cooking starts. The selected temperature and remaining cooking time will alternate on the
on-screen display.
6. Excess oil from the food is collected in the bottom of the bowl.
7. Some foods require shaking halfway through the cooking time (see section ‘Cooking Guide’).
To shake the food, pull the bowl out of the appliance by the handle and shake it. Then slide
the bowl back into the appliance and press the Start button
again to restart cooking.
8. When you hear the timer sound, the cooking time set has finished. Pull the bowl out of the
appliance and place it on a heat-resistant surface.
9. Check if the food is ready.
If the food is not ready yet, simply slide the bowl back into the appliance and set the timer
for a few extra minutes.
10. When the food is cooked, take out the bowl. To remove food, use a pair of tongs to lift the
food out of the bowl.
Caution: The bowl should never be turn up side down with the grid.
After hot air frying, the bowl, the grid and the food are very hot. Depending on the type of
food cooked in the appliance, be careful as steam may escape from the bowl.
11.
When a batch of food is ready, the appliance is instantly ready for preparing another batch of food.
USING THE GRILL PLATE
1. Place the grill grid in the bowl of the appliance.
2. Press
, then press on the screen to select the Grill mode.
3. Start the Grill mode by pressing
. This will launch the preheating phase (timing :15 minutes).
4. When you hear the timer sound, the preheating phase has finished.
5. Take the bowl out the appliance and place it on a heat-resistant surface.
Caution : the bowl and the grill grid are very hot. Use a pair of tongs to place the food
on the grill plate.
6. Place the food on the grill plate and put back the bowl into the appliance.
7. Select the required cooking time by pressing
and buttons (see section ‘Cooking guide’).
8. Press the Start button
to launch the cooking. The temperature and remaining cooking
time will alternate on the on-screen display.
Note : the pieces of meat required to turn them at half cooking.
Excess oil from the food is collected in the bottom of the bowl.
9. When you hear the timer sound, the cooking has finished. Take the bowl out the appliance
and place it on a heat-resistant surface.
10. Check if the food is ready. If the food is not ready yet, put it back on the appliance and set
the timer for a few extra minutes.
11. When the food is cooked, take out the bowl. To remove food, use a pair of tongs to lift the
food out the bowl.
Caution: After hot frying, the bowl, the grid and the food are very hot.
DEHYDRATION
1. Place the grid in the bowl of the appliance.
2. Press , then adjust the temperature by pressing and button to 80°C on the digital screen.
3. Then set the desired cooking time by pressing the button and adjusting the time with
and button. You can set the timing from 1 hour to 4 hours.
4. Press the Start button
to launch the dehydration process. The selected temperature and
remaining cooking time will alternate on the screen display.
5. When you hear the timer sound, the cooking has finished. Take the bowl out the appliance
and place it on a heat-resistant surface.
6. Check if the food is ready. If the food is not ready yet, put it back on the appliance and set
the timer for a few extra minutes.
7. When the food is cooked, take out the bowl. To remove food, use a pair of tongs to lift the
food out the bowl.
Caution : the bowl and the grid are very hot.
COOKING GUIDE
The table below helps you to select the basic settings for the food you want to prepare.
Note: The cooking times below are only a guide and may vary according to the variety
and batch of potatoes used. For other foods the size, shape and brand may affect results.
Therefore, you may need to adjust the cooking time slightly.
* Shake halfway through cooking.
IMPORTANT: To avoid damaging your appliance, never exceed the maximum quantities of ingredients and
liquids indicated in the instruction manual and in the recipes.
**place the cake tin/oven dish in the bowl.
When you use mixtures that rise (such as with cake, quiche or muffins) the oven dish should not
be filled more than halfway.
Visit www.tefal.com for online recipes.
TIPS
• Smaller foods usually require a slightly shorter cooking time than larger size foods.
• A larger amount of food only requires a slightly longer cooking time, a smaller amount of
food only requires a slightly shorter cooking time.
• Shaking smaller size foods halfway through the cooking time improves the end result and
can help prevent uneven cooking.
• Add some oil to fresh potatoes for a crispy result. After adding a spoon of oil, fry the
potatoes within a few minutes.
• Do not cook extremely greasy foods in the appliance.
• Snacks that can be cooked in an oven can also be cooked in the appliance.
• The optimal recommended quantity for cooking fries is 700 grams.
• Use ready made puff and shortcrust pastry to make filled snacks quickly and easily.
• Place an oven dish in the appliance’s bowl if you want to bake a cake or quiche or if you
want to fry fragile ingredients or filled ingredients. You can use an oven dish in silicon,
stainless steel, aluminium, terracotta.
• You can also use the appliance to reheat food. To reheat food, set the temperature to
160°C for up to 10 minutes.
MAKING HOME-MADE CHIPS
For the best results, we advise to use frozen chips. If you want to make home-made chips, follow
the steps below.
1. Choose a variety of potato recommended for making chips. Peel the potatoes and cut them
into equal thickness chips.
2. Soak the potato chips in a bowl of cold water for at least 30 minutes, drain them and dry
them with a clean, highly absorbent tea towel. Then pat with paper kitchen towel. The chips
must be thoroughly dry before cooking.
3. Pour 1 tablespoon of oil (vegetable, sunflower or olive) in a dry bowl, put the chips on top
and mix until they are coated with oil.
4. Remove the chips from the bowl with your fingers or a kitchen utensil so that any excess oil
stays behind in the bowl. Place the chips in the bowl.
Note: Do not tip the container of oil coated chips directly into the bowl in one go,
otherwise excess oil will end up at the bottom of the bowl.
5. Fry the chips according to the instructions in the section Cooking guide.
CLEANING
Clean the appliance after every use.
The bowl and the grid have a non-stick coating. Do not use metal kitchen utensils or
abrasive cleaning materials to clean them, as this may damage the nonstick coating.
1. Remove the mains plug from the wall socket and let the appliance cool down. Note: Remove
the bowl to let the appliance cool down more quickly.
2. Wipe the outside of the appliance with a damp cloth.
3. Clean the bowl and grid with hot water, some washing-up liquid and a non-abrasive sponge.
You can use a degreasing liquid to remove any remaining dirt.
The bowl and the grid are dishwasher safe.
Tip: If dirt is stuck at the bottom of the bowl and the grid, fill them with hot water and
some washing-up liquid. Let the bowl and the grid soak for approximately 10 minutes.
Then rinse clean and dry.
4. Wipe inside of the appliance with hot water and a damp cloth.
5. Clean the heating element with a dry, cleaning brush to remove any food residues.
9
en
8
Quantity
Approx Time
(min)
Temperature
(°C /°F)
Cooking
mode
Shake*
Extra
information
Potatoes & fries
Frozen chips (10 mm x
10mm standard thickness)
300 - 800 g
15 - 25 min
200°C / 392°F
Yes
Homemade French
Fries (8 x 8 mm)
300 - 800 g
22 - 32 min
200°C / 392°F
Yes
Add 1 tbsp of oil
Frozen
potato wedges
300 - 800 g
22 - 27 min
200°C / 392°F
Yes
Add 1 tbsp of oil
Meat & Poultry
Steak
100 - 500 g
6 - 10 min
180°C / 356°F
Chicken breast
fillets (boneless)
100 - 500 g
12 - 19 min
180°C / 356°F
Quantity
Approx Time
(min)
Temperature
(°C)
Cooking
mode
Shake*
Extra
information
Chicken (whole)
1000 g 60 min
200°C
Fish
Salmon fillet
350 g
15 - 17 min
140°C
Shrimps 12 pieces 4 min
170°C
Snacks
Frozen chicken nuggets
100 - 600 g
7 - 15 min
200°C
Yes
Frozen chicken wings
300 g 16 - 20 min
200°C
Yes
Frozen cheese sticks
125 g
(5 pieces)
7 - 9 min
180°C
Frozen onion rings
200 g
(10 pieces)
8 - 10 min
200°C
Yes
Grill
= 15 min
200°C
Meat 250 g
Preheating : 15 min
Cooking : 6-8 min
200°C
You can add oil, aromatic herbs and salt
for better taste.
At mid-cooking, you can return the food.
Sausages 400 g
Preheating : 15 min
Cooking : 10-12 min
200°C
You can add oil, aromatic herbs and salt
for better taste.
At mid-cooking, you can return the food.
Vegetables
300 g
Preheating : 15 min
Cooking : 10 min
200°C
Fish fillet
200 g
Preheating : 15 min
Cooking : 3-5 min
200°C
Baking
Muffins 7 pieces 15 -18 min
180°C
Use a baking
tin/oven dish**
Cake 300 g 30 min
160°C
Dehydration
Apple in slices 1 piece 1h
80°C

6. Do not immerse the appliance in water or any other liquid.
STORAGE
1. Unplug the appliance and let it cool down.
2. Make sure all parts are clean and dry.
GUARANTEE AND SERVICE
If you need service or information or if you have a problem, please visit the Tefal website at
www.tefal.com or contact the Tefal Consumer Care Centre in your country. You can find the
phone number in the worldwide guarantee leaflet. If there is no Consumer Care Centre in your
country, go to your local Tefal dealer.
TROUBLESHOOTING
If you encounter problems with the appliance, visit www.tefal.com for a list of frequently asked
questions or contact the Consumer Care Centre in your country.
11
en
10
TEFAL/T-FAL* INTERNATIONAL LIMITED GUARANTEE
: www.tefal.com
This product is repairable by TEFAL/T-FAL*, during and after the guarantee period.
Accessories, consumables and end-user replaceable parts can be purchased, if locally
available, as described on the TEFAL/T-FAL internet site www.tefal.com
The Guarantee** : TEFAL/T-FAL guarantees this product against any manufacturing defect
in materials or workmanship during the guarantee period within those countries*** as
stated in the attached country list, starting from the initial date of purchase or delivery
date. The international manufacturer’s guarantee covers all costs related to restoring the
proven defective product so that it conforms to its original specifications, through the repair
or replacement of any defective part and the necessary labour. At TEFAL/T-FAL’s choice,
areplacement product may be provided instead of repairing a defective product.
TEFAL/T-FAL’s sole obligation and your exclusive resolution under this guarantee are limited to
such repair or replacement.
Conditions & Exclusions : TEFAL/T-FAL shall not be obliged to repair or replace any product
which is not accompanied by a valid proof of purchase. The product can be taken directly in
person or must be adequately packaged and returned, by recorded delivery (or equivalent
method of postage), to a TEFAL/T-FAL authorised service centre. Full address details for each
country’s authorised service centres are listed on TEFAL/T-FAL website (www.tefal.com) or by
calling the appropriate consumer Service centre set out in the attached country list. In order
to offer the best possible after-sales service and constantly improve customer satisfaction,
TEFAL/T-FAL may send a satisfaction survey to all customers who have had their product
repaired or exchanged in a TEFAL/T-FAL authorised service centre.
This guarantee applies only for products purchased and used for domestic purposes and will
not cover any damage which occurs as a result of misuse, negligence, failure to follow
TEFAL/T-FAL instructions, or amodification or unauthorised repair of the product, faulty
packaging by the owner or mishandling by any carrier. It also does not cover normal wear and
tear, maintenance or replacement of consumable parts, or the following:
- using the wrong type of water or consumable
- mechanical damages, overloading
- damage as a result of lightning or power surges
- ingress of water, dust or insects into the product (excluding appliances with features
specifically designed for insects)
- accidents including fire, flood, etc
- scaling (any de-scaling must be carried out according to the instructions for use)
- damage to any glass or porcelain ware in the product
- professional or commercial use
- or poor results specifically due to wrong voltage or frequency as stamped on the product ID
or specification
Consumer Statutory Rights : This international TEFAL/T-FAL guarantee does not affect the
Statutory Rights a consumer may have or those rights that cannot be excluded or limited, nor
rights against the retailer from which the consumer purchased the product. This guarantee
gives a consumer specific legal rights, and the consumer may also have other legal rights
which vary from State to State or Country to Country. The consumer may assert any such
rights at his sole discretion.

vi
1312 13
zh
***Where a product purchased in a listed country and then used in another listed country,
the international TEFAL/T-FAL guarantee duration is the one in the country of usage, even if
the product was purchased in a listed country with different guarantee duration. The repair
process may require a longer time if the product is not locally sold by TEFAL/T-FAL. If the
product is not repairable in the new country, the international TEFAL/T-FAL guarantee is
limited to a replacement by a similar or alternative product at similar cost, where possible.
*TEFAL household appliances appear under the Tefal brand in some territories like America
and Japan. TEFAL/T-FAL are registered trademarks of Groupe SEB.
Please keep this document for your reference should you wish to make a claim under the
guarantee.
**For Australia only:
Our goods come with guarantees that cannot be excluded under the Australian Consumer
Law. You are entitled to a replacement or refund for a major failure and compensation for
any other reasonably foreseeable loss or damage. You are also entitled to have the goods
repaired or replaced if the goods fail to be of acceptable quality and the failure does not
amount to a major failure.
**For India only: The guarantee length depends on the product and the State in India. Full
guarantee terms must be checked at the point of sale. Products purchased outside and used in
India benefit from a 2 year guarantee.
The guarantee covers exclusively the repair of a defective product, but at TEFAL’s choice,
a replacement product may be provided instead of repairing a defective product. It is
mandatory that the consumer, to have his product repaired, has to log a service request on
the dedicated Smartphone application TEFAL SERVICE APP or by calling TEFAL Consumer Care
Center at 1860-200-1232, Opening hours Mon-Sat 09 AM to 06 PM. Products returned by
Post will not be covered by the guarantee. As a proof of purchase consumer needs to provide
both this stamped guarantee card and cash memo.
安全指引
重要安全事項:
• 本產品只適用於家居環境。本裝置不適宜作以下
用途,且以下用途將不在保用範圍之內:
- 店舖、辦公室及其他工作環境的員工廚房區域;
- 農舍;
- 供酒店、汽車旅館及其他住宿環境的客人使用;
- 民宿(住宿加早餐)類型環境。
• 肢體、感官或心智能力較弱,或者經驗或知識不
足的人士(包括兒童),除非有負責其安全的人
士從旁監督,或已事先向其提供本裝置的使用指
示,否則均不適宜使用本裝置。
• 兒童應有人從旁監督,以確保他們不會將本裝置
當作玩具。
• 本裝置可供8歲及以上兒童、身體官能或心智能
力退化人士,或缺乏經驗與知識之人士使用,唯
須接受從旁監督或獲悉本裝置的安全操作指示,
且已瞭解其潛在危險。兒童不可把玩本裝置。兒
童年滿8歲方可在監督下清潔及維護本裝置。本
裝置及電線應遠離8歲以下兒童。
• 本裝置不適宜配合外置的計時開關(即外置計時
器或獨立的遙控系統)使用。
• 為免發生危險,如電源線受損,必須交由生產
商、認可服務中心,或具有相同資格的人士更
換。
•
裝置運作時,可接觸的表面或呈高溫。請勿接
觸發熱表面(視乎型號)。
• 清潔可拆出零件時,請使用非磨蝕性的海綿配洗
潔精,或放入洗碗機清洗(視乎型號)。
• 請用濕海綿或布清潔裝置的內外。請參考使用說
明內「清潔」一節。
• 本裝置最高可在海拔4000米使用。

1514
vi
15
zh
14
請:
• 請閱讀並遵循本使用說明書,並妥善保存。
• 使用前,請移除裝置上所有包裝物料及宣傳標籤或貼紙,並請記得移除可拆
內膽底下的全部物料(視乎型號)。
• 請檢查正在使用的電源電壓是否與裝置所標示的電源電壓相符(本裝置使用
交流電)。
• 由於全球有多種不同制式,如要在購入地點以外國家使用本裝置,請先交由
認可服務中心檢查。
• 如裝置的型號配搭可拆式電源線,請僅使用原裝電源線。
• 請務必將本裝置插入接地插座。
• 將裝置放在平坦、穩固、耐熱的表面,並避開水濺。
• 裝置使用後、或移動或清潔裝置時,務必要拔除電源。
• 如發生火警,應拔除裝置的電源,並用濕布滅火。
• 為免損壞裝置,請緊記遵循說明及食譜的指引;確保食材分量適當。
請勿:
• 如電源線受損,或曾經掉落並有明顯損壞,或有運作異常跡象,請勿使用裝
置。如發生上述情況,請務必將裝置送交認可服務中心。
• 切勿使用延長電線。如務必要使用延長電線,須自行負責,請使用狀況良好
並兼容本裝置電源制式的延長電線。
• 請勿讓電源線在半空晃蕩。
• 請勿用拉扯電線線的方式拔除裝置的插頭。
• 裝置內有熱食時,切勿搬動。
• 裝置內空時,切勿操作。
• 請勿在易燃物料(百葉簾、窗簾……)附近打開裝置電源, 或將裝置放近外
部熱源(燃氣煮食爐、鐵板等)。
• 請勿將任何易燃產品存放在裝置所在的家具附近或之下。
• 切勿自行拆開本裝置。
• 切勿將裝置浸水。
• 請勿使用任何強力清潔產品(特別是梳打性質的除染劑),並勿使用鋼絲刷
或百潔布。
• 請勿將裝置存放室外。應儲存於乾燥及通風的位置。
建議及資訊
• 本產品初次運作時,可能會釋出無毒氣味。然而不會影響運作,且會快速消
失。
• 為保閣下安全,本裝置符合相關標準及規定(低電壓指令、電磁兼容性、與食
品接觸之物料、環境等等)
• 本裝置僅適合家居使用,不宜用於室外。如將本裝置用於專業或不當用途,
或不依照本說明使用,製造商將不負責,而產品保用亦會無效。
• 為閣下安全起見,請僅使用為本裝置而設的配件及零件。
環保
• 丟棄本裝置前,請將計時器內的電池拆出並丟棄至當地的都市垃圾收集中心
(視乎型號)。
環境保護最為優先!
i 本裝置包含可回收或循環再用的有價值物料。
請將本裝置棄置在所屬地區的家居垃圾收集站。

1716
vi
17
zh
16
D
E
A
B
C
說明
A. 內鍋
B. 內鍋把手
C. 可拆式壓鑄烤網
D. 數位觸控螢幕面板
E. 時間/溫度顯示
自動烹調模式
1. 薯條
2. 雞塊
3. 烤雞
4. 披薩
5. 肉類
6. 魚
7. 蔬菜
8. 甜點
初次使用之前
1. 拆除所有包材。
2. 撕除任何裝置上的貼紙或標籤。
3. 請勿移除烤網的矽膠墊。
4. 使用熱水、少許洗碗精和不具磨蝕性的海綿徹底清潔內鍋和可拆式烤網。
注意:您可以使用洗碗機清潔這些配件。
5. 用濕布擦拭裝置內外。裝置透過產生熱風來運作。請勿在內鍋 (A) 中倒入大量的油或
放入油炸用油脂 (如整塊豬油)。
準備使用
1. 將裝置放於平坦穩定的耐熱工作表面,避開水潑濺的位置。
2. 請勿在內鍋中倒入大量的油或過量液體。
請勿將任何東西放在裝置上方。這樣會阻礙氣流並影響熱風氣炸的效果。
使用裝置
Easy Fry 可烹調多樣料理。主要料理的烹調時間列於「烹調指南」一節。
1. 將電源線插上插座。
2. 若您希望的話,可先開始預熱階段。若要預熱,請按下「開始」按鈕
,該按鈕在裝
置插電之後就會開始閃爍。初次使用時溫度會顯示為 180°C。
• 使用數位螢幕上的
和 按鈕來調整至您想要的溫度。
• 再次按下「開始」按鈕開始預熱。
• 到達溫度時裝置會發出嗶聲。
• 預熱階段已完成。
3. 將食物放入內鍋。
注意:食物請勿超過內鍋最高位線標示,也勿低於表中所述的最少食物份量 (請參閱「
烹調指南」一節),因為這樣可能會影響烹調料理效果。
4. 將內鍋推回氣炸鍋中。
注意:使用過程中及使用後一段時間內請勿碰觸內鍋,因為內鍋溫度會非常高。請僅
握住內鍋的把手。
5. 若要開始烹調,您可以選擇自動烹調模式或手動設定。
1918
vi
19
zh
18
a. 若選擇手動設定:
•
請使用數位螢幕上的 和 按鈕來調整溫度 。溫度調節器可在 80-200°C 間變動。
• 接著按下 按鈕設定您想要的烹調時間,並用 和 按鈕來調整時間。 計時器可
設在 0 至 60 分鐘之間。
• 按下「開始」按鈕開始以所選的溫度和時間設定烹調。
開始烹調。螢幕會交替顯示所選的溫度和剩餘烹調時間。
b. 若選擇自動烹調模式:
• 按下觸控螢幕面板上對應的圖示,選擇您想要的烹調模式 (「烹調指南」一節中有這些
模式的詳細說明)。
• 按下
按鈕確認烹飪模式。烹調程序即會開始。
• 開始烹調。螢幕會交替顯示所選的溫度和剩餘烹調時間。
6. 食材中多餘的油脂會累積在內鍋底部。
7. 部分食物會需要在烹調時間的中途搖晃 (請參閱「烹調指南」一節)。
若想要手動改變食材位置,請握住內鍋把手將內鍋從氣炸鍋取出,然後甩動內鍋。接
著將調理鍋推回裝置中並再次按下開始按鈕
,以重新開始烹調。
8. 聽到計時器鈴響時,表示設定的烹調時間已結束。從氣炸鍋中取出內鍋,將內鍋放置
在耐熱表面上。
9. 檢查食物否烹調完成。
若食物尚未烹調完成,只要將調理鍋推回裝置中,再將計時器多設定幾分鐘即可。
10. 若食物烹調完成,請取出內鍋。取出食物時,請用夾子將食物夾出內鍋。
注意:翻轉內鍋時,請小心積在內鍋底部的多餘油脂,可能流至食物表面或從烤網滴落。
熱風氣炸後,內鍋、烤網和食物會變得非常燙。視裝置中烹調的食物種類而定,請小
心內鍋中可能會冒出高溫蒸氣。
11. 一批食物烹調完成後,氣炸鍋即可立即處理下一批食物。
使用燒烤模式
1. 將烤網放入裝置內鍋中。
2. 按下
,接著按下螢幕上的 以選擇燒烤模式。
3. 按下
按鈕開始燒烤模式。預熱階段即會開始 (計時:15 分鐘)。
4. 聽到計時器鈴響時,表示預熱階段已完成。
5. 從氣炸鍋中取出調理鍋,將內鍋放置在耐熱表面上。
注意:內鍋和烤網非常燙。請用夾子將食物放入烤盤上。
6. 將食物放在烤盤上,並將內鍋放回氣炸鍋中。
7. 按下
和 按鈕,選擇所需的烹調時間 (請參閱「烹調指南」一節)。
8. 按下開始按鈕
開始烹調。螢幕會交替顯示溫度和剩餘烹調時間。
注意:肉塊需要在烹調中途翻面。
食物中多餘的油脂會積在內鍋底部。
9. 聽到計時器鈴響時,表示烹調已完成。從氣炸鍋中取出調理鍋,將內鍋放置在耐熱表
面上。
10. 檢查食物否烹調完成。若食物尚未烹調完成,請將內鍋放回裝置中,再將計時器多設
定幾分鐘即可。
11. 若食物烹調完成,請取出內鍋。取出食物時,請用夾子將食物夾出內鍋。
注意:內鍋和烤網非常燙。
脫水
1. 將烤盤放入裝置的內鍋中。
2. 按下
,接著在數位螢幕上按下 和 按鈕,調整溫度 至 80°C。
3. 接著按下
按鈕設定您想要的烹調時間,並用 和 按鈕來調整時間。 您可以將
時間設定為 1 小時至 4 小時。
4. 按下「開始」按鈕
開始脫水程序。螢幕會交替顯示所選的溫度和剩餘烹調時間。
5. 聽到計時器鈴響時,表示烹調已完成。從氣炸鍋中取出調理鍋,將內鍋放置在耐熱表
面上。
6. 檢查食物否烹調完成。若食物尚未烹調完成,請將內鍋放回裝置中,再將計時器多設
定幾分鐘即可。
7. 若食物烹調完成,請取出內鍋。取出食物時,請用夾子將食物夾出內鍋。
注意:內鍋和烤盤非常燙。
烹調指南
針對您想烹調的食物,下方的表格能協助您選擇基本設定。
注意:下方的烹調時間僅為參考指南,時間根據不同馬鈴薯種類和份量可能有所不同。其
他食物的大小、形狀和品牌可能會影響成果。
因此,您可能需要微調烹調時間。
最少-最多
份量 (公克)
大約
時間 (分鐘)
溫度
(°C)
烹調模
式
搖晃*
其他
資訊
薯仔及薯條
冷凍薯條 (10 公
釐 x
10 公釐標準厚度)
300 - 800
公克
15 - 25
分鐘
200°C
是
自製薯條
(8 x 8 公釐)
300 - 800
公克**
22 - 32
分鐘
200°C
是 加入 1 大匙油
冷凍厚切
馬鈴薯條
300 - 800
公克
22 - 27
分鐘
200°C 是 加入 1 大匙油
肉類及家禽
冷凍牛排
100 - 500
公克
6 - 10 分鐘 180°C
雞胸排
(去骨)
100 - 500
公克
12 - 19
分鐘
180°C
雞 (全雞) 1000 公克 60 分鐘 200°C
魚
鮮魚、鮭魚
排
350 公克
15 - 17
分鐘
140°C
蝦 12 隻 4 分鐘 170°C
2120
vi
21
zh
20
* 烹調過程中搖晃。
** 未削皮的馬鈴薯重量
重要事項:為避免損毀裝置,請勿烹調超過使用說明手冊以及食譜所指示的食材及液體份
量。
***請將蛋糕模具/烤盤放入調理鍋。
若您使用的混和食材會膨脹 (例如蛋糕、鹹派或瑪芬),烤盤請勿盛裝超過一半。
如需線上食譜,請前往 www.tefal.com。
最少-最多
份量 (公克)
大約
時間 (分鐘)
溫度
(°C)
烹調模
式
搖晃*
其他
資訊
小食
冷凍雞塊
100 - 600
公克
7 - 15 分鐘 200°C 是
冷凍雞翅 300 公克
16 - 20
分鐘
200°C
是
冷凍起司條
125 公克
(5 塊)
7 - 9 分鐘 180°C
冷凍洋蔥圈
200 公克
(10 塊)
8 - 10 分鐘 200°C 是
燒烤
=
15 分鐘 200°C
肉類 250 公克
預熱:15
分鐘
烹調:4-6
分鐘
200°C
燒烤
您可以加入油、香
草和鹽
來增添風味。
烹調中途您可以將食
物翻面。
香腸 400 公克
預熱:15
分鐘
烹調:10-
12 分鐘
200°C
燒烤
您可以加入油、香
草和鹽
來增添風味。
烹調中途您可以將食
物翻面。
蔬菜 300 公克
預熱:15
分鐘
烹調:10
分鐘
200°C
燒烤
魚排 200 公克
預熱:15
分鐘
烹調:3-5
分鐘
200°C
燒烤
烘烤
瑪芬 7 隻
15 - 18
分鐘
180°C
請使用烘焙模具/
烤盤***
蛋糕 300 公克 30 分鐘 160°C
脫水
蘋果切片 1 隻
1h
80°C
秘訣
• 體積較小的食物通常所需料理時間會短於體積較大的食物。
• 量較多的食物所需烹調時間僅略長,量較少的食物所需烹調時間僅略短。
• 在烹調中途搖晃體積較小的食物,可以讓烹調成果更好,並防止食物受熱不均。
• 新鮮的馬鈴薯添加一點油可達到更酥脆的效果。加入一匙油後,氣炸馬鈴薯幾分鐘即可。
• 建議在裝置中不要烹調過度油膩的食物。
• 可用烤箱烹調的點心也可用此裝置烹調。
• 烹調薯條最佳的建議份量為 700 公克。
• 使用市售千層酥皮和塔皮可快速輕鬆製作出包餡的點心。
• 若您想烤蛋糕或鹹派,或是想炸易碎或包餡的食材,請將烤盤放入裝置的內鍋中。您
可以使用矽膠、不鏽鋼、鋁製、赤陶烤盤。
• 您也可以使用此裝置重新加熱食物。若要加熱食物,請將溫度設為 160°C / 320°F,時
間建議最多為 10 分鐘。
自製薯條
我們建議使用冷凍薯條,以達到最佳成果。若您想製作自製薯條,請按照下列步驟。
1. 選擇建議用於製作薯條的馬鈴薯品種。馬鈴薯削皮後,切成厚度相同的條狀。
2. 將薯條浸泡在冷水中至少 30 分鐘,瀝乾後以乾淨的高吸水性毛巾吸乾水份。再以廚
房紙巾輕輕壓乾。烹調前薯條需為全乾狀態。
3. 在乾燥的碗中倒入 1 大匙油 (植物油、葵花油或橄欖油),放入薯條混和直到薯條表面
沾滿油。
4. 用手指或廚房用具從碗中取出薯條,讓多餘的油留在碗中。將薯條放入調理鍋。
注意:請勿將裝有沾油薯條的容器一次直接倒入內鍋中,否則多餘的油最終會留在內
鍋底部。
5. 根據「烹調指南」一節中的說明炸薯條。
清潔
每次使用後,請清潔裝置。
內鍋和烤網皆有不沾塗層。請避免使用金屬廚房用具或具磨蝕性的清潔工具清理,因為可
能會破壞不沾塗層。
1. 從牆上插座拔除插頭,讓裝置冷卻。注意:移除內鍋,讓裝置能更快速冷卻。
2. 用濕布擦拭裝置外側。
3. 使用熱水、少許洗碗精和不具磨蝕性的海綿清潔內鍋和烤網。
您可以使用去油清潔劑去除任何殘留汙垢。
注意:內鍋和烤網不適用洗碗機。
秘訣:若汙垢黏在內鍋底部或烤網上,請裝入熱水和少許洗碗精。浸泡內鍋和烤網約
10 分鐘。
接著沖洗乾淨並晾乾。
4. 用濕布和熱水擦拭裝置內部。
5. 用乾燥的清潔刷清潔加熱元件,移除任何食物殘渣。
6. 請勿將裝置浸在水中或任何液體中。

2322
vi
23
zh
22
存放
1. 拔除裝置電源,讓裝置冷卻。
2. 確認所有部分均乾淨且乾燥。
保固和服務
若您需要服務或資訊,或您有疑問,請至 www.tefal-home.com.tw 造訪 Tefal 網站,或是
聯繫您所在國家的 Tefal 客戶服務中心。您可以在全球保固說明書中找到電話號碼。若您
的國家沒有客戶服務中心,請洽詢您當地的 Tefal 經銷商。
疑難排解
若您使用裝置遭遇任何問題,請至 www.tefal-home.com.tw 參閱常見問題列表,或是聯
繫您所在國家的客戶服務中心。
TEFAL/T-FAL* 國際有限保用證 中文繁體
: www.tefal.com
在保用期內及後,TEFAL/T-FAL* 會為您提供產品的維修服務
附件,耗材 及 用戶可更換的零件, 可於當地購買(如有售),詳細請瀏覽 TEFAL/T-FAL internet
網站 www.tefal.com
保用證
TEFAL/T-FAL 根據所附國家列表中所載之國家***及保用期, 在保用期內(自產品購買日或購買
交易日後之產品交付日起計)提供產品因任何材料或工藝缺陷的保用。 此生產商國際保用證
涵蓋已被證實為缺陷產品相關的修復費用, 包括通過維修或更換任何缺陷零件以及必要的人力,
以使產品符合原本的規格。TEFAL/T-FAL有權選擇更換同等或更高級的產品而不維修缺陷的產
品。本保用證下 TEFAL/T-FAL 的唯一責任及您專享的解決方法只限於維修或更換產品。
條款及免責
TEFAL/T-FAL 不會維修或更換未能出示有效購買證明的產品。客戶可親自將產品直接送
交 TEFAL/T-FAL 授權的售後服務中心,或必須妥善包裝並以掛號形式(或其他同等郵遞方
式) 送交至 TEFAL/T-FAL 授權的售後服務中心。各國獲授權的售後服務中心之詳細地址請見
TEFAL/T-FAL 網址,或可致電國家列表中合適的客戶服務中心查詢。為提供 最好的售後服務並
繼續增進客戶的滿意, TEFAL/T-FAL可能向曾經由TEFAL/T-FAL授權服務中心維修或更換其產品
的客戶發出滿意程度的調查。
本保用證只適用於已被購買的產品並以家用為目的, 本保用證亦不包括任何因錯誤使用、疏
忽、未有遵從 TEFAL/T-FAL 使用說明、或更改或未經授權而維修產品所產生的損壞, 或產 品持
有人的包裝不當或運送途中的處理不當所引起的損壞。保用證亦不包括正常的磨損及耗損、耗
材的維護或更換,
及以下情況:
• 使用不適當的水或耗材
• 機件故障,負荷過重
• 未遵從產品規格或產品上的指示,使用錯誤電壓或頻率而引起的損壞或不良結果
• 產品內入水、灰塵或昆蟲 (不包括專用於捕捉或驅趕昆蟲的電器)
• 生銹(如需去銹,必須根據使用說明進行)
• 產品上任何玻璃或瓷器的損壞
• 火災、水災等意外
• 專業或商業用途
• 閃電,功率驟變造成的損壞
消費者法定權利
TEFAL/T-FAL 國際保用證並不影響消費者法定權利,這些權利不被排除或局限,亦不影響消費者
對購自該產品的零售商的消費者權利。本保用證給予消費者特定合法權益,而消費者在不 同州
份或國 家,或可享有其他合法權利。消費者可根據個人判斷維護任何有關權利。
* TEFAL 家電在一些地區如美洲及日本以Tefal品牌出現. TEFAL/T-FAL 為SEB集團的註冊商標。
***倘產品購自國家列表內其中一個列舉的國家,而在另一個列舉的國家使用, TEFAL/T-FAL 國際
保用證保用期按照使用產品時所在的國家, 即使有別於購買該產品時所在列舉國家的保 用期。
倘產品不是購自當地的 TEFAL/T-FAL,可能需要較長的維修時間。倘在使用產品的國家中不能
修復該產品,TEFAL/T-FAL 國際保用證只限於更換同類產品或相近價錢的其他產品 (如適用) 。
請保留此文件,供閣下提出保用要求時參考.

2524
vi
25
th
24
คำ�แนะนำ�ด้�นคว�มปลอดภัย
• เครื่องใช้นี้มีไว้สำ�หรับใช้ในครัวเรือนเท่�นั้น ไม่ได้มีไว้เพื่อก�รใช้ง�นดังต่อไปนี้ ซึ่ง
อยู่นอกขอบเขตของก�รรับประกัน
- พื้นที่ครัวส่วนพนักง�นในร้�นค้� สำ�นักง�น และสภ�พแวดล้อมในก�รทำ�ง�นแบบ
อื่น
- โรงน�
- ผู้เข้�พักในโรงแรม ที่พักข้�งท�ง และสภ�พแวดล้อมก�รพักอ�ศัยอื่น ๆ
- สภ�พแวดล้อมแบบห้องพักพร้อมอ�ห�รเช้�
• อุปกรณ์นี้ไม่ได้มีวัตถุประสงค์ในก�รใช้ง�นโดยบุคคล (รวมถึงเด็ก) ผู้มีคว�ม
บกพร่องท�งร่�งก�ย ประส�ทสัมผัสหรือท�งจิต หรือข�ดประสบก�รณ์และคว�ม
รู้ เว้นแต่จะได้รับก�รควบคุมดูแลหรือได้รับคำ�แนะนำ�เกี่ยวกับก�รใช้ง�นอุปกรณ์
จ�กบุคคลผู้ทำ�หน้�ที่ดูแลคว�มปลอดภัยของบุคคลดังกล่�ว
• ควรควบคุมดูแลไม่ให้เด็กนำ�เครื่องใช้ไปเล่น
• อุปกรณ์นี้ส�ม�รถใช้ง�นโดยเด็กที่มีอ�ยุตั้งแต่ 8 ปีขึ้นไป และบุคคลที่มีคว�ม
บกพร่องท�งร่�งก�ย ท�งประส�ทสัมผัส หรือท�งจิตใจ หรือข�ดประสบก�รณ์
และคว�มรู้ ห�กอยู่ในก�รควบคุมหรือก�รให้คำ�แนะนำ�เกี่ยวกับก�รใช้อุปกรณ์ด้วย
วิธีที่ปลอดภัย และเข้�ใจในอันตร�ยที่เกี่ยวข้อง ไม่ควรปล่อยให้เด็กนำ�เครื่องใช้ไป
เล่น ก�รทำ�คว�มสะอ�ดและก�รบำ�รุงรักษ�อุปกรณ์ต้องไม่ดำ�เนินก�รโดยเด็กเล็ก
เว้นแต่เด็กนั้นจะมีอ�ยุม�กกว่� 8 ปี และอยู่ภ�ยใต้ก�รควบคุมดูแล เก็บอุปกรณ์
และส�ยไฟให้ห่�งจ�กเด็กอ�ยุต่ำ�กว่� 8 ปี
• เครื่องใช้นี้ไม่ได้มีวัตถุประสงค์ในก�รใช้ง�นร่วมกับตัวจับเวล�ภ�ยนอก หรือระบบ
ควบคุมระยะไกลแบบแยกต่�งห�ก
• ห�กส�ยไฟชำ�รุดเสียห�ย ต้องดำ�เนินก�รเปลี่ยนโดยผู้ผลิต ศูนย์บริก�รหลังก�ร
ข�ย หรือบุคคลที่มีคุณสมบัติคล้�ยกัน เพื่อหลีกเลี่ยงอันตร�ย
•
อุณหภูมิของพื้นผิวที่สัมผัสจับต้องได้อ�จอยู่ในระดับสูง เมื่อมีก�รใช้ง�น
อุปกรณ์ ห้�มสัมผัสพื้นผิวร้อนของอุปกรณ์ (ขึ้นอยู่กับรุ่น)
• ทำ�คว�มสะอ�ดชิ้นส่วนที่ถอดได้ด้วยฟองน้ำ�ที่ไม่มีใยขัดล้�ง และน้ำ�ย�ล้�งจ�น
หรือในเครื่องล้�งจ�น (ขึ้นอยู่กับรุ่น)
• ใช้ฟองน้ำ�หรือผ้�ชุบนำ้�หม�ด ๆ ทำ�คว�มสะอ�ดด้�นในและด้�นนอกเครื่อง กรุณ�
ดูคำ�แนะนำ�ก�รใช้ง�นสำ�หรับ “ก�รทำ�คว�มสะอ�ด” เครื่อง
• เครื่องใช้นี้ใช้ได้ที่ระดับคว�มสูงไม่เกิน 4,000 ม.
ข้อควรปฏิบัติ
• อ่�นและปฏิบัติต�มคำ�แนะนำ�ในก�รใช้ง�น กรุณ�เก็บไว้ในที่ปลอดภัย
• นำ�วัสดุบรรจุภัณฑ์ทั้งหมด และฉล�กส่งเสริมก�รข�ย หรือสติกเกอร์ก่อนก�รใช้ง�นเครื่องใช้ ควรถอดวัสดุจ�กข้�งใต้หม้อถอด
ได้เช่นกัน (ขึ้นอยู่กับรุ่น)
• ตรวจสอบว่�แรงดันไฟฟ้�ที่ใช้สอดคล้องกับแรงดันไฟฟ้�ที่ระบุบนป้�ยแสดงของเครื่องใช้ (กระแสสลับ)
• เนื่องจ�กมีม�ตรฐ�นต่�ง ๆ ที่กำ�หนดใช้ ห�กนำ�เครื่องไปใช้ง�นภ�ยนอกประเทศที่ซื้อม� กรุณ�นำ�เครื่องไปตรวจสอบที่ศูนย์
บริก�รที่ได้รับอนุญ�ต
• ใช้ส�ยไฟที่เป็นของแท้เท่�นั้น
• เสียบปลั๊กเครื่องในเต้�เสียบที่ต่อส�ยดินทุกครั้ง
• ใช้บนพื้นที่เรียบ มั่นคง และทนคว�มร้อน โดยให้ห่�งจ�กน้ำ�กระเด็น
• ถอดปลั๊กเครื่องใช้ทุกครั้ง: หลังก�รใช้ง�น เพื่อเคลื่อนย้�ย หรือทำ�คว�มสะอ�ด
• ในกรณีที่เกิดไฟไหม้ ถอดปลั๊กอุปกรณ์ แล้วคลุมเปลวไฟด้วยผ้�เปียก
• เพื่อป้องกันไม่ให้ก�รใช้ง�นเครื่องใช้เสียห�ย กรุณ�ตรวจสอบให้แน่ใจว่�คุณปฏิบัติต�มสูตรในคำ�แนะนำ�และสมุดสูตรอ�ห�ร
ตรวจสอบให้แน่ใจว่�คุณใช้ส่วนผสมในปริม�ณที่ถูกต้อง
ข้อห้�มปฏิบัติ
• ห้�มใช้ห�กเครื่องใช้หรือส�ยไฟได้รับคว�มเสียห�ย หรือห�กตกหล่น และร่องรอยคว�มเสียห�ยที่เห็นได้ชัด หรือปร�กฎว่�ก�ร
ทำ�ง�นผิดปกติ ห�กมีเหตุก�รณ์นี้เกิดขึ้น กรุณ�ส่งเครื่องไปยังศูนย์บริก�รที่ได้รับอนุญ�ต
• ห้�มใช้ปลั๊กพ่วง ห�กคุณตัดสินใจที่จะทำ�เช่นนั้น แต่ด้วยคว�มรับผิดของคุณเอง ใช้ปลั๊กพ่วงที่มีสภ�พดี และเป็นไปต�ม
ม�ตรฐ�นของเครื่องใช้
• ห้�มปล่อยให้ส�ยไฟห้อย
• ห้�มถอดปลั๊กเครื่องโดยดึงที่ส�ยไฟ
• ห้�มเคลื่อนเครื่องใช้เมื่อประกอบด้วยอ�ห�รร้อน
• ห้�มเปิดใช้ง�นเครื่องใช้เมื่อว่�งเปล่�
• ห้�มเปิดเครื่องใช้ใกล้กับวัตถุติดไฟง่�ย (ม่�นบังต� ผ้�ม่�น...) หรืออยู่ใกล้กับแหล่งคว�มร้อนด้�นนอก (เต�แก๊ส แผ่นคว�ม
ร้อน ฯลฯ)
• ห้�มเก็บผลิตภัณฑ์ไวไฟไว้ใกล้กับ หรืออยู่ใต้ชุดเฟอร์นิเจอร์ที่อยู่ในตำ�แหน่งเครื่องใช้
• ห้�มถอดชิ้นส่วนของเครื่องด้วยตัวเอง
• ห้�มแช่ตัวเครื่องในน้ำ�
• ห้�มใช้ผลิตภัณฑ์ทำ�คว�มสะอ�ดที่มีฤทธิ์สูง (โดยเฉพ�ะน้ำ�ย�ผสมโซด�ไฟ) หรือแผ่นบริลโล หรือแผ่นขัด
• อย่�จัดเก็บเครื่องไว้กล�งแจ้ง ให้จัดเก็บในพื้นที่แห้ง และอ�ก�ศถ่�ยเทได้สะดวก
คำ�แนะนำ�/ข้อมูล
• เมื่อใช้ผลิตภัณฑ์เป็นครั้งแรก ผลิตภัณฑ์อ�จปล่อยอนุภ�คที่ไม่มีพิษออกม� ซึ่งไม่ส่งผลต่อก�รใช้ง�น และจะห�ยไปโดยเร็ว
• เพื่อคว�มปลอดภัยของคุณ อุปกรณ์นี้ตรงต�มม�ตรฐ�นและข้อบังคับที่กำ�หนด (คำ�สั่งในเรื่องแรงดันไฟฟ้�ต่ำ� ก�รเข้�กันได้ของ
แม่เหล็กไฟฟ้� วัสดุที่สัมผัสกับอ�ห�ร สภ�พแวดล้อม ฯลฯ)
• เครื่องใช้นี้ได้รับก�รออกแบบให้ใช้ง�นภ�ยในบ้�นเท่�นั้น ไม่ใช่กล�งแจ้ง ในกรณีที่ใช้ในก�รประกอบอ�ชีพ ใช้ง�นอย่�งไม่เหม�ะ

2726
vi
27
th
26
สม หรือไม่ปฏิบัติต�มคำ�แนะนำ� ผู้ผลิตจะไม่รับผิดชอบและอยู่นอกขอบเขตของก�รรับประกัน
• เพื่อคว�มปลอดภัย โปรดใช้อุปกรณ์เสริมและชิ้นส่วนจ�กผู้ผลิตที่ได้รับก�รออกแบบม�สำ�หรับอุปกรณ์โดยเฉพ�ะ
สิ่งแวดล้อม
• ก่อนทิ้งเครื่องใช้ของคุณ ต้องถอดแบตเตอรี่ออกจ�กตัวจับเวล� และนำ�ไปทิ้งที่ศูนย์เก็บรวบรวมขยะในพื้นที่ หรือศูนย์บริก�รที่
ได้รับอนุญ�ต (ขึ้นอยู่กับรุ่น)
ก�รปกป้องสิ่งแวดล้อมต้องม�ก่อน!
i เครื่องใช้ของคุณประกอบด้วยวัสดุมีค่� ซึ่งนำ�กลับม�ใช้หรือรีไซเคิลได้
นำ�ไปทิ้ง ณ จุดเก็บรวบรวมขยะในพื้นที่
D
E
A
B
C
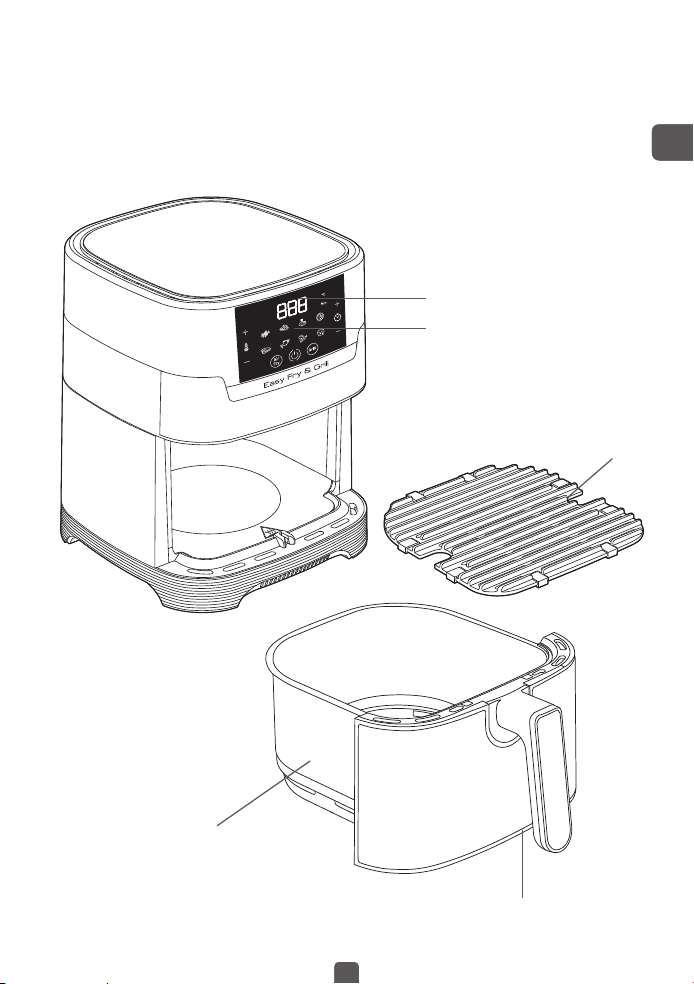
คำ�อิบ�ย
A. หม้อทอด
B. ด้�มจับหม้อทอด
C. ตะแกรงโลหะหล่อแบบถอดได้้ (Die-cast)
D. แผงควบคุมระบบสัมผัส
E. จอแสดงผลเวล�/อุณหภูมิ
โหมดก�รำ�อ�ห�รอัตโนมัติ
1. เฟรนช์ฟร�ยส์
2. นักเก็ต
3. ไก่อบ
4. พิซซ่�
5. เนื้อ
6. ปล�
7. ผัก
8. ขนมหว�น
ก่อนก�รใ้ง�นครั้งแรก
1. นำ�บรรจุภัณฑ์ออกทั้งหมด
2. แกะสติกเกอร์หรือป้�ยต่�งๆ ออกจ�กเครื่อง
3. ห้�มแกะแผ่นซิลิโคนออกจ�กตะแกรง
4. ทำ�คว�มสะอ�ดหม้อและตะแกรงแบบถอดออกได้ด้วยน้ำ�ร้อน น้ำ�ย�ล้�งจ�นเพียงเล็กน้อยและฟองน้ำ�ที่ไม่ขูดขีดพื้นผิว
หม�ยเหตุ:หม้อและตะแกรงส�ม�รถใ้กับเคร่่องล้�งจ�นได้
5. เช็ดภ�ยในและภ�ยนอกเครื่องด้วยผ้�หม�ด เครื่องทำ�ง�นด้วยก�รสร้�งลมร้อน ห้�มเติมน้ำ�มันหรือไขมันสำ�หรับทอดลงในหม้อ (A)
ก�รเตรียมพร้อมสำ�หรับใ้ง�น
1. ว�งเครื่องนี้บนพื้นผิวที่เรียบ มั่นคง ทนคว�มร้อน และห่�งไกลจ�กน้ำ�กระเด็น
2. ห้�มเติมน้ำ�มันหร่อของเหลวอ่่นๆลงในหม้อ
ห้�มว�งสิ่งของบนเคร่่องเพร�ะจะกีดขว�งก�รไหลเวียนอ�ก�ศและส่งผลต่อผลลัพ์ของก�รอดแบบไร้น้ำ�มัน
ก�รใ้ง�น
Easy Fry ส�ม�รถทำ�อ�ห�รได้หล�กหล�ยเมนู ระยะเวล�ที่ใช้ในก�รปรุงเมนูหลัก มีระบุไว้ในหัวข้อ ‘คู่มือก�รทำ�อ�ห�ร’
1. เสียบส�ยไฟเข้�กับเต้�เสียบ
2. ส�ม�รถเริ่มต้นจ�กก�รอุ่นเครื่องได้ ห�กคุณต้องก�ร โดยกดปุ่มเริ่ม
ซึ่งจะกะพริบทันทีที่เสียบปลั๊ก หน้�จอจะแสดงอุณหภูมิที่ 180°C (356°F) เมื่อเปิดใช้ง�นครั้งแรก
• ปรับอุณหภูมิที่ต้องก�รด้วยปุ่มระบบสัมผัส บนหน้�จอดิจิทัล
• กดปุ่มเริ่มอีกครั้งเพื่อเริ่มก�รอุ่นเครื่อง
• เครื่องใช้จะส่งเสียงเตือนเมื่อถึงอุณหภูมิที่ตั้งไว้
• เสร็จสิ้นขั้นตอนก�รอุ่นเครื่อง
3. ใส่อ�ห�รลงในหม้อ
หม�ยเหตุ:อย่�เติมอ�ห�รในหม้อเกินขีดแสดงระดับสูงสุดหร่อเกินปริม�ณสูงสุดี่ระบุไว้ในต�ร�ง(ดูส่วน‘คู่ม่อก�รำ�อ�ห�ร’)
เน่่องจ�กอ�จส่งผลต่อคุณภ�พอ�ห�ร
4. เลื่อนหม้อกลับเข้�ไปในเครื่อง
ข้อควรระวัง:ห้�มสัมผัสหม้อระหว่�งใ้ง�นและหลังจ�กใ้ง�นเสร็จไม่น�นเพร�ะจะมีคว�มร้อนสูงม�กให้จับเฉพ�ะตรงด้�มจับ
ของหม้อเ่�นั้น
5. ในก�รเริ่มทำ�อ�ห�ร คุณส�ม�รถเลือกระหว่�งโหมดก�รทำ�อ�ห�รอัตโนมัติและก�รตั้งค่�ด้วยตนเอง
a. ห�กเลือกก�รตั้งค่�ด้วยตนเอง:
• ปรับอุณหภูมิ
ด้วยปุ่ม และ บนหน้�จอดิจิทัล ตัวควบคุมอุณหภูมิ
จะแตกต่�งกันไปตั้งแต่ 80-200°C
• จ�กนั้นตั้งเวล�ทำ�อ�ห�รที่ต้องก�รด้วยก�รกดปุ่ม
และปรับเวล�ด้วยปุ่ม และ ส�ม�รถตั้งเวล�ได้ระหว่�ง 0 ถึง 60 น�ที
• กดปุ่มเริ่มเพื่อเริ่มก�รทำ�อ�ห�รต�มก�รตั้งค่�อุณหภูมิและเวล�ที่เลือก
ก�รทำ�อ�ห�รจะเริ่มต้นขึ้น หน้�จอดิจิทัลจะแสดงผลอุณหภูมิที่เลือก และเวล�ทำ�อ�ห�รที่เหลือ สลับกันไปม�
b. ห�กเลือกโหมดก�รทำ�อ�ห�รอัตโนมัติ:
• เลือกโหมดก�รทำ�อ�ห�รที่ต้องก�รโดยกดไอคอนที่สัมพันธ์กันบนแผงหน้�จอสัมผัส (จะอธิบ�ยโหมดเหล่�นี้อย่�งละเอียดในส่วน “คู่มือก�รทำ�
อ�ห�ร”)
• ยืนยันโหมดก�รทำ�อ�ห�รด้วยก�รกดปุ่ม
ซึ่งจะเริ่มกระบวนก�รทำ�อ�ห�ร
• ก�รทำ�อ�ห�รจะเริ่มต้นขึ้น หน้�จอดิจิทัลจะแสดงอุณหภูมิที่เลือก และเวล�ทำ�อ�ห�รที่เหลือ สลับกันไปม�
6. น้ำ�มันส่วนเกินจ�กอ�ห�รจะถูกรวบรวมไว้ที่ด้�นล่�งของหม้อ
7. อ�ห�รบ�งประเภทอ�จต้องมีก�รเขย่�ระหว่�งก�รทำ�อ�ห�ร (ดูส่วน ‘คู่มือก�รทำ�อ�ห�ร’) ในก�รเขย่� ให้ดึงหม้อออกจ�กเครื่องโดยใช้ด้�มจับ
แล้วเขย่� จ�กนั้นให้เลื่อนหม้อกลับเข้�ไปในเครื่องและกดปุ่มเริ่ม
อีกครั้งเพื่อเริ่มก�รทำ�อ�ห�รอีกครั้ง
8. เมื่อคุณได้ยินเสียงตัวจับเวล� แสดงว่�เวล�ก�รทำ�อ�ห�รสิ้นสุดแล้ว ดึงหม้อออกจ�กเครื่อง แล้วว�งบนพื้นผิวที่ทนคว�มร้อน
9. ตรวจดูว่�อ�ห�รพร้อม�นหร่อยัง
ห�กอ�ห�รยังไม่พร้อมท�น ให้เลื่อนหม้อกลับเข้�ไปในเครื่องแล้วตั้งเวล�เพิ่มอีกเล็กน้อย
10. เมื่ออ�ห�รสุกแล้ว ให้นำ�หม้อออกม� ในก�รนำ�อ�ห�รออก ให้ใช้ที่คีบคีบอ�ห�รออกม�จ�กหม้อ
ข้อควรระวัง:ในขณะี่คุณเอียงหร่อคว่ำ�หม้อให้ระวังน้ำ�มันส่วนเกินี่สะสมอยู่ด้�นล่�งของหม้ออ�จไหลเข้�สู่อ�ห�รรวมั้ง
ตะแกรงี่อ�จตกลงม�ได้
หลังก�รทอด หม้อ ตะแกรงและอ�ห�รจะร้อนม�ก โปรดระวังไอน้ำ�ร้อนที่อ�จพุ่งออกม�จ�กหม้อ ทั้งนี้ขึ้นอยู่กับประเภทของอ�ห�รที่ปรุงใน
เครื่อง
11. เมื่อปรุงอ�ห�รชุดหนึ่งเสร็จแล้ว เครื่องจะพร้อมสำ�หรับทำ�อ�ห�รชุดต่อไปทันที
ก�รใ้โหมดย่�ง
1. ใส่ตะแกรงย่�งลงในหม้อ
2. กดปุ่ม
จ�กนั้นกดปุ่ม บนหน้�จอเพื่อเลือกโหมดย่�ง
3. เลือกโหมดย่�งโดยกดปุ่ม
นี่จะเริ่มกระบวนก�รอุ่ตะแกรงย่�ง (เวล�: 15 น�ที)
4. เมื่อคุณได้ยินเสียงเตือนดังขึ้น หม�ยถึงเสร็จสิ้นกระบวนก�รอุ่นตะแกรงย่�งแล้ว
5. นำ�หม้อออกจ�กเครื่อง แล้วว�งบนพื้นผิวที่ทนคว�มร้อน
ข้อควรระวัง: หม้อและตะแกรงย่�งจะร้อนม�ก ใช้ที่คีบคีบอ�ห�รว�งบนตะแกรงย่�ง
6. ว�งอ�ห�รบนตะแกรงย่�งและใส่หม้อกลับเข้�ไปในเครื่อง
7. เลือกเวล�ในก�รทำ�อ�ห�รที่ต้องก�รโดยกดปุ่ม
และ (ดูส่วน ‘คู่มือก�รทำ�อ�ห�ร’)
8. กดปุ่มเริ่ม
เพื่อเริ่มก�รทำ�อ�ห�ร จะแสดงอุณหภูมิและเวล�ทำ�อ�ห�รที่เหลือสลับกันบนหน้�จอแสดงผล
หม�ยเหตุ: ต้องพลิกชิ้นเนื้อเมื่อเวล�ทำ�อ�ห�รผ่�นไปครึ่งท�ง
น้ำ�มันส่วนเกินจ�กอ�ห�รจะถูกรวมไว้ด้�นล่�งของหม้อ
9. เมื่อคุณได้ยินเสียงเตือน แสดงว่�กระบวนก�รทำ�อ�ห�รเสร็จสิ้นลงแล้ว นำ�หม้อออกจ�กเครื่อง แล้วว�งบนพื้นผิวที่ทนคว�มร้อน
10. ตรวจดูว่�อ�ห�รพร้อมท�นหรือยัง ห�กอ�ห�รยังไม่พร้อมท�น ให้ใส่กลับเข้�ไปในเครื่องและตั้งเวล�เพิ่มอีกเล็กน้อย
11. เมื่ออ�ห�รสุกแล้ว ให้นำ�หม้อออกม� ในก�รนำ�อ�ห�รออก ให้คีบอ�ห�รออกม�จ�กหม้อด้วยที่คีบ
ข้อควรระวัง:หม้อและตะแกรงย่�งจะร้อนม�ก
อบแห้ง
1. ว�งตะแกรงลงในหม้อ
2. กดปุ่ม
จ�กนั้นปรับอุณหภูมิ โดยกดปุ่ม และ ไปที่ 80°C บนหน้�จอดิจิทัล
3. จ�กนั้นตั้งเวล�ทำ�อ�ห�รที่ต้องก�รโดยก�รกดปุ่ม
และปรับเวล�ด้วยปุ่ม และ คุณส�ม�รถตั้งเวล�ได้ตั้งแต่ 1 ถึง 4
ชั่วโมง
4. กดปุ่มเริ่ม
เพื่อเริ่มกระบวนก�รอบแห้ง จะแสดงอุณหภูมิที่เลือกและเวล�ทำ�อ�ห�รที่เหลือบนหน้�จอแสดงผล
5. เมื่อคุณได้ยินเสียงเตือน แสดงว่�กระบวนก�รทำ�อ�ห�รเสร็จสิ้นลงแล้ว นำ�หม้อออกจ�กเครื่อง แล้วว�งบนพื้นผิวที่ทนคว�มร้อน
6. ตรวจดูว่�อ�ห�รพร้อมท�นหรือยัง ห�กอ�ห�รยังไม่พร้อมท�น ให้ใส่กลับเข้�ไปในเครื่องและตั้งเวล�เพิ่มอีกเล็กน้อย
7. เมื่ออ�ห�รสุกแล้ว ให้นำ�หม้อออกม� ในก�รนำ�อ�ห�รออก ให้คีบอ�ห�รออกม�จ�กหม้อด้วยที่คีบ
ข้อควรระวัง:หม้อและตะแกรงย่�งจะร้อนม�ก
2928
vi
29
th
28
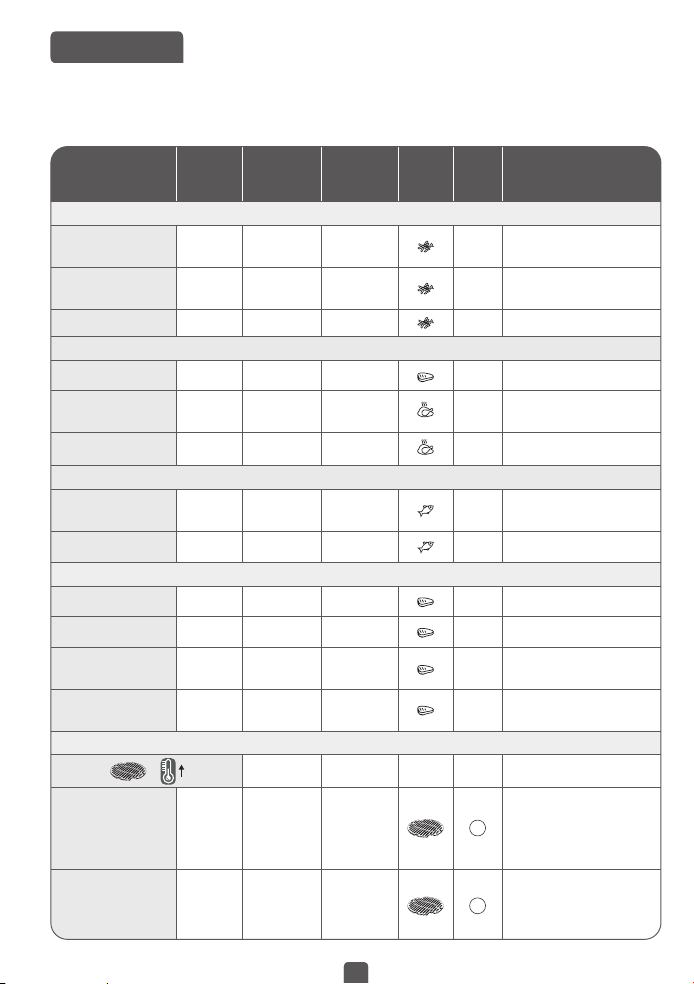
คู่ม่อก�รำ�อ�ห�ร
ต�ร�งด้�นล่�งจะช่วยคุณในก�รเลือกก�รตั้งค่�พื้นฐ�นสำ�หรับอ�ห�รที่คุณต้องก�รเตรียม
หม�ยเหตุ:เวล�ำ�อ�ห�รด้�นล่�งเป็นเพียงแนว�งเ่�นั้นและอ�จต่�งกันไปต�มประเภและล็อตของมันฝรั่งี่ใ้สำ�หรับอ�ห�
รอ่่นๆขน�ดรูปร่�งและแบรนด์อ�จส่งผลต่อผลลัพ์
ดังนั้นคุณอ�จต้องปรับเวล�ำ�อ�ห�รเล็กน้อย
3130
vi
31
th
30
ปริม�ณ
ต่ำ�สุด-สูงสุด
(กรัม)
เวล�
โดยประม�ณ
(น�ที)
อุณหภูมิ
(°C)
โหมดก�ร
ปรุง
อ�ห�ร
เขย่�*
ข้อมูล
เพิ่มเติม
มันฝรั่งและมันฝรั่งอด
มันฝรั่งแท่งแช่แข็ง (คว�มหน�
ม�ตรฐ�น 10 มม. x 10 มม.)
300-800 กรัม 15 - 25 น�ที 200°C ใช่
มันฝรั่งทอดโฮมเมด
(8 x 8 มม.)
300-800 กรัม 22 - 32 น�ที 200°C ใช่ คลุกน้ำ�มัน 1 ช้อนโต๊ะ
มันฝรั่งทอดแช่แข็ง 300-800 กรัม 22 - 27 น�ที 200°C
ใช่ คลุกน้ำ�มัน 1 ช้อนโต๊ะ
เน่้อสัตว์และสัตว์ปีก
สเต็กแช่แข็ง 100-500 กรัม 6 - 10 น�ที 180°C
เนื้ออกไก่
(ไม่มีกระดูก)
100-500 กรัม 12 - 19 น�ที 180°C
ไก่ (ทั้งตัว) 1000 กรัม 60 น�ที 200°C
ปล�
ปล�สด สเต็ก
แซลม่อน
350 กรัม 15 - 17 น�ที 140°C
กุ้ง 12 ชิ้น 4 น�ที 170°C
ขนมขบเคี้ยว
นักเก็ตไก่แช่แข็ง 100-600 กรัม 7 - 15 น�ที 200°C ใช่
ปีกไก่แช่แข็ง 300 กรัม 16 - 20 น�ที 200°C
ใช่
ชีสสติ๊กแช่แข็ง
125 กรัม
(5 ชิ้น)
7 - 9 น�ที 180°C
หัวหอมทอดแช่แข็ง
200 กรัม
(10 ชิ้น)
8 - 10 น�ที 200°C ใช่
ย่�ง
=
15 น�ที 200°C
เนื้อ 250 กรัม
ก�รอุ่นเครื่อง:
ก�รทำ�อ�ห�ร
15 น�ที: 6-8
น�ที
200°C
ย่ าง
คุณส�ม�รถเพิ่มน้ำ�มัน สมุนไพรหอม
และเกลือ
เพื่อรสช�ติที่ดียิ่งขึ้น
ระหว่�งทำ�อ�ห�ร คุณส�ม�รถกลับ
อ�ห�รได้
ไส้กรอก 400 กรัม
ก�รอุ่นเครื่อง:
ก�รทำ�อ�ห�ร
15 น�ที: 10-12
น�ที
200°C
ย่ าง
คุณส�ม�รถเพิ่มน้ำ�มัน สมุนไพร
หอมและเกลือ
เพื่อรสช�ติที่ดียิ่งขึ้น
ระหว่�งทำ�อ�ห�ร คุณส�ม�รถกลับ
อ�ห�รได้
* เขย่�เมื่อเวล�ทำ�อ�ห�รผ่�นไปครึ่งหนึ่ง
** น้ำ�หนักของมันฝรั่งที่ไม่ได้ปอก
สำ�คัญ: เพื่อหลีกเลี่ยงคว�มเสียห�ยต่อเครื่องของคุณ ห้�มใส่ส่วนผสมและของเหลวเกินปริม�ณสูงสุดที่ระบุไว้ในคู่มือก�รใช้ง�นและในสูตรอ�ห�ร
***ว�งแม่พิมพ์เค้ก/จ�นสำ�หรับอบลงในโถ
ในก�รใช้ส่วนผสมที่ฟู (เช่น เค้ก, คีช หรือมัฟฟิน) ต้องไม่ใส่ส่วนผสมในจ�นสำ�หรับอบเกินครึ่งจ�น
ดูสูตรอ�ห�รออนไลน์ได้ี่www.tefal.com
เคล็ดลับ
• โดยปกติแล้วอ�ห�รขน�ดเล็กจะใช้เวล�ในก�รประกอบอ�ห�รน้อยกว่�อ�ห�รขน�ดใหญ่
• อ�ห�รปริม�ณม�กจะใช้เวล�ในก�รประกอบอ�ห�รน�นขึ้นเล็กน้อย อ�ห�รปริม�ณน้อยจะใช้เวล�ในก�รประกอบอ�ห�รสั้นลงเล็กน้อย
• ก�รเขย่�อ�ห�รขน�ดเล็กเมื่อผ่�นไปครึ่งท�งของเวล�ในก�รประกอบอ�ห�รจะให้ผลลัพธ์ที่ดีกว่� และช่วยให้อ�ห�รสุกอย่�งทั่วถึง
• ใส่น้ำ�มันเล็กน้อยลงในมันฝรั่งสดเพื่อคว�มกรอบ หลังจ�กใส่น้ำ�มันหนึ่งช้อนแล้ว ให้ทอดมันฝรั่งภ�ยในเวล�สองส�มน�ที
• อย่�ใช้เครื่องปรุงอ�ห�รที่มันจนเกินไป
• ส�ม�รถปรุงของว่�งที่ส�ม�รถปรุงได้ในเต�อบในเครื่องได้เช่นกัน
• ปริม�ณที่แนะนำ�สำ�หรับก�รทอดคือ 700 กรัม
• ใช้แป้งพัฟสำ�เร็จรูปและแป้งพ�ยร่วนเพื่อทำ�อ�ห�รว่�งแบบสอดไส้ได้อย่�งรวดเร็วและง่�ยด�ย
• ว�งจ�นสำ�หรับอบลงในหม้อของเครื่องห�กคุณต้องก�รอบขนมเค้กหรือคีช หรือห�กคุณต้องก�รทอดส่วนผสมที่เปร�ะบ�งหรือส่วนผสมสอดไส้
คุณส�ม�รถใช้จ�นสำ�หรับอบที่ทำ�ด้วยซิลิโคน, สเตนเลสสตีล, อะลูมิเนียม, ดินเผ�
• คุณยังส�ม�รถใช้เครื่องเพื่ออุ่นร้อนอ�ห�รได้อีกด้วย ในก�รอุ่นร้อน ให้ตั้งอุณหภูมิไปที่ 160°C น�นสูงสุด 10 น�ที
ก�รำ�มันฝรั่งอดโฮมเมด
เพื่อผลลัพธ์ที่ดีที่สุด เร�แนะนำ�ให้คุณใช้มันฝรั่งทอดแช่แข็ง ห�กคุณต้องก�รทำ�มันฝรั่งทอดโฮมเมด ให้ทำ�ต�มขั้นตอนด้�นล่�ง
1. เลือกมันฝรั่งพันธุ์ที่แนะนำ�สำ�หรับทำ�มันฝรั่งทอด ปอกเปลือกมันฝรั่งและหั่นให้เป็นชิ้นหน�เท่�ๆ กัน
2. แช่มันฝรั่งในน้ำ�เย็นเป็นเวล�อย่�งน้อย 30 น�ที แล้วเช็ดให้แห้งด้วยผ้�สะอ�ดที่ดูดซับได้ดี จ�กนั้นซับให้แห้งด้วยกระด�ษทำ�คว�มสะอ�ด มัน
ฝรั่งต้องแห้งสนิทก่อนนำ�ไปประกอบอ�ห�ร
3. เทน้ำ�มัน 1 ช้อนโต๊ะ (น้ำ�มันผัก น้ำ�มันดอกท�นตะวัน หรือน้ำ�มันมะกอก) ลงในช�มแห้ง ใส่มันฝรั่งลงไปแล้วคลุกเคล้�จนเคลือบด้วยน้ำ�มัน
4. ใช้นิ้วหยิบมันฝรั่งออกจ�กช�มหรือเครื่องครัวเพื่อให้น้ำ�มันส่วนเกินเหลือค้�งอยู่ในช�ม ใส่มันฝรั่งลงในหม้อ
หม�ยเหตุ:อย่�เมันฝรั่งี่เคล่อบน้ำ�มันลงในหม้อพร้อมกันั้งหมดีเดียวมิฉะนั้นน้ำ�มันส่วนเกินจะลงไปี่ก้นหม้อด้วย
5. ทอดมันฝรั่งต�มคำ�แนะนำ�ในส่วนคู่มือก�รทำ�อ�ห�ร
ปริม�ณ
ต่ำ�สุด-สูงสุด
(กรัม)
เวล�
โดยประม�ณ
(น�ที)
อุณหภูมิ
(°C)
โหมดก�ร
ปรุง
อ�ห�ร
เขย่�*
ข้อมูล
เพิ่มเติม
ผัก 300 กรัม
ก�รอุ่นเครื่อง: ก�ร
ทำ�อ�ห�ร
15 น�ที: 10 น�ที
200°C
ย่ าง
เนื้อปล� 200 กรัม
ก�รอุ่นเครื่อง: ก�ร
ทำ�อ�ห�ร
15 น�ที: 3-5 น�ที
200°C
ย่ าง
ก�รอบ
มัฟฟิน 7 ชิ้น 15 - 18 น�ที 180°C
ใช้แม่พิมพ์/
จ�นสำ�หรับอบ***
เค้ก 300 กรัม 30 น�ที 160°C
ผลไม้อบแห้ง
แอปเปิลหั่นชิ้น อบแห้ง 1 ลูก
1ชม
80°C
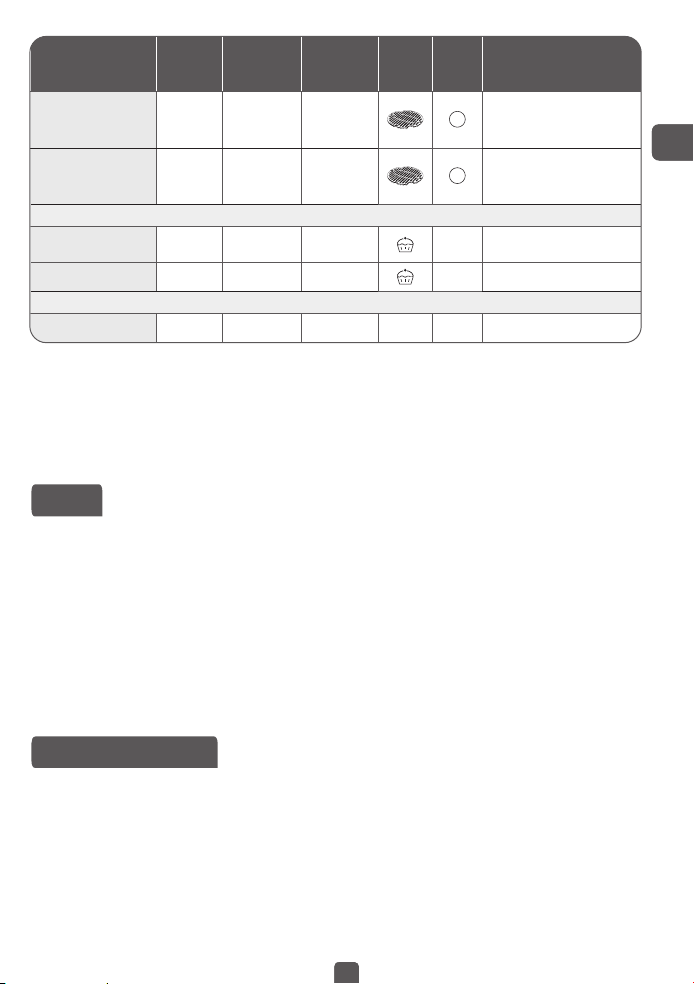

3332
vi
33
th
32
ก�รำ�คว�มสะอ�ด
ทำ�คว�มสะอ�ดเครื่องหลังใช้ง�นทุกครั้ง
หม้อและตะแกรงได้รับก�รเคล่อบส�รกันติดอย่�ใ้อุปกรณ์เคร่่องครัวี่เป็นโลหะหร่ออุปกรณ์ำ�คว�มสะอ�ดซึ่งขูดขีดให้เกิดรอยได้
ในก�รำ�คว�มสะอ�ดเพร�ะอ�จำ�ให้ส�รี่เคล่อบได้รับคว�มเสียห�ย
1. ดึงปลั๊กไฟออกจ�กเต้�รับบนผนัง แล้วปล่อยให้เครื่องเย็น หม�ยเหตุ: นำ�หม้อออกจ�กเครื่องเพื่อให้เครื่องเย็นลงเร็วขึ้น
2. เช็ดภ�ยนอกเครื่องด้วยผ้�หม�ด
3. ทำ�คว�มสะอ�ดหม้อและตะแกรงด้วยน้ำ�ร้อนที่ผสมน้ำ�ย�ล้�งจ�นเล็กน้อย และใช้ฟองน้ำ�นุ่ม
คุณส�ม�รถใช้น้ำ�ย�ขจัดคว�มมันเพื่อล้�งคร�บสกปรก ที่เหลือ
หม�ยเหตุ:หม้อและตะแกรงส�ม�รถใ้กับเคร่่องล้�งจ�นได้้้
เคล็ดลับ:ห�กมีสิ่งสกปรกติดค้�งี่ด้�นล่�งของหม้อและตะแกรงให้เติมน้ำ�ร้อนลงในหม้อและน้ำ�ย�ล้�งจ�นเล็กน้อยแ่หม้อและ
ตะแกรงค้�งไว้ประม�ณ10น�ี
แล้วล้�งำ�คว�มสะอ�ดและเ็ดให้แห้ง
4. เช็ดทำ�คว�มสะอ�ดด้�นในเครื่องด้วยน้ำ�ร้อนและผ้�หม�ดๆ
5. ทำ�คว�มสะอ�ดชิ้นส่วนทำ�คว�มร้อนด้วยแปรงทำ�คว�มสะอ�ดเพื่อขจัดเศษอ�ห�ร
6. อย่�จุ่มเครื่องลงในน้ำ�หรือของเหลวอื่นๆ
ก�รจัดเก็บ
1. ถอดปลั๊กเครื่องและปล่อยให้เย็น
2. ตรวจสอบว่�ชิ้นส่วนทั้งหมดสะอ�ดและแห้งแล้ว
ก�รรับประกันและบริก�ร
ห�กคุณต้องก�รบริก�รหรือต้องก�รทร�บข้อมูล หรือมีปัญห� โปรดไปที่เว็บไซต์ของ Tefal ที่ www.tefal.com หรือติดต่อศูนย์บริก�รดูแลลูกค้� Tefal
ในประเทศของคุณ คุณส�ม�รถดูหม�ยเลขโทรศัพท์ได้ในแผ่นพับก�รรับประกันทั่วโลก ห�กในประเทศของคุณไม่มีศูนย์บริก�รลูกค้� โปรดติดต่อ
ตัวแทนจำ�หน่�ย Tefal ในท้องถิ่นของคุณ
ก�รแก้ปัญห�
ห�กคุณพบปัญห�เกี่ยวกับเครื่อง โปรดไปที่ www.tefal.com เพื่อดูร�ยก�รคำ�ถ�มที่พบบ่อย หรือติดต่อศูนย์บริก�รดูแลลูกค้�ในประเทศของคุณ
รับประกันสินค้�ระหว่�งประเศของผลิตภัณฑ์TEFAL/T-FAL*
:www.tefal.com
ผลิตภัณฑ์ของ่�นส�ม�รถรับก�รดูแลจ�กศูนย์บริก�ร TEFAL/T-FAL ระหว่�งและหลังสิ้นสุดระยะเวล�
รับประกันต�มเง่่อนไขี่กำ�หนด
ก�รรับประกัน ผลิตภัณฑ์ TEFAL/T-FAL มีรับประกันสินค้�ในกรณีที่เกิดจ�กข้อบกพร่องใด ๆ ของวัสดุหรือก�ร
ผลิตในช่วงระยะเวล�ก�รรับประกันภ�ยในประเทศ
เหล่�นั้น*** ที่ระบุไว้ในร�ยชื่อประเทศในหน้�สุดท้�ยของเอกส�ร โดยก�รรับประกันเริ่มต้นนับจ�กวันที่ซื้อ
ผลิตภัณฑ์หรือ วันที่จัดส่งสินค้�
ก�รรับประกันสินค้�ระหว่�งประเทศ ครอบคลุมค่�ใช้จ่�ยทั้งหมดที่เกี่ยวข้องกับก�รเรียกคืนหรือซ่อมแซมผลิตภัณฑ์
ที่บกพร่อง ให้ส�ม�รถใช้ง�นได้ต�มคุณสมบัติของสินค้� โดยอ�จทำ�ก�รซ่อมแซมหรือเปลี่ยนส่วนที่ชำ�รุดใดๆ และ
ค่�แรงง�นที่จำ�เป็น โดย TEFAL/T-FAL ตัดสินใจ, สินค้�ทดแทนอ�จจะให้แทน ก�รซ่อมสินค้� โดย TEFAL/T-FAL
มีสิทธิ์แต่เพียงผู้เดียวในก�รจัดก�รภ�ยใต้ก�รรับประกัน เช่น ให้ซ่อมแซมหรือเปลี่ยนผลิตภัณฑ์ดังกล่�ว หรือก�ร
เปลี่ยนสินค้� ที่เทียบเท่�หรือดีกว่�
เง่่อนไขและก�รยกเว้น
TEFAL/T-FAL ไม่จำ�เป็นต้องซ่อมหรือเปลี่ยนผลิตภัณฑ์ที่ไม่ได้ม�พร้อมกับหลักฐ�นก�รซื้อข�ยที่ถูกต้อง ผลิตภัณฑ์
ส�ม�รถนำ�ม�โดยตรงหรือต้องได้รับก�รบรรจุอย่�งเหม�ะสมและ มีก�รบันทึกก�รส่งคืน (หรือวิธีก�รเทียบเท่�ของ
ไปรษณีย์) เพื่อส่งถึง ศูนย์บริก�รที่ได้รับก�ร แต่งตั้งจ�ก TEFAL/T-FAL ร�ยละเอียดของที่ตั้งศูนย์บริก�รที่ได้รับก�ร
แต่งตั้งจ�ก TEFAL/T-FAL ระบุไว้บนเว็บไซต์ของ TEFAL/T-FAL หรือโทรติดต่อศูนย์บริก�รผู้บริโภคที่กำ�หนดไว้ใน
ร�ยชื่อของแต่ละประเทศ ที่แนบม�ก�รรับประกันนี้ เพื่อที่จะเสนอที่ดีที่สุดที่เป็น ไปได้บริก�รหลังก�รข�ยอย่�งต่อ
เนื่องและเพิ่มคว�มพึงพอใจของลูกค้� TEFAL/T-FAL อ�จส่งสำ�รวจคว�มพึงพอใจให้กับลูกค้�ทุกคนที่มีผลิตภัณฑ์
ของพวกเข�ซ่อมแซมหรือก�รแลกเปลี่ยนจ�ก TEFAL/T-FAL ศูนย์บริก�รที่ได้รับอนุญ�ต
ก�รรับประกันมีผลเฉพ�ะสำ�หรับผลิตภัณฑ์ที่ซื้อและใช้ในประเทศเท่�นั้น และไม่ครอบคลุมถึงคว�มเสียห�ยที่อ�จ
เกิดขึ้นเป็นผลม�จ�กก�รใช้ง�นผิดประเภท, ก�รไม่เอ�ใจใส่, ก�รไม่ปฏิบัติต�มคำ�แนะนำ�ของ TEFAL/T-FAL,
ซ่อมแซมแก้ไขผลิตภัณฑ์ โดยไม่ได้รับอนุญ�ต, บรรจุภัณฑ์ที่ผิดพล�ดโดยเจ้�ของ หรือ เสียห�ยจ�กก�รขนส่ง
นอกจ�กนี้ยังไม่ครอบคลุมก�รสึกหรอต�มปกติและ ก�รเสียห�ยจ�กก�รใช้ง�น, ก�รซ่อมบำ�รุงและ ก�รเปลี่ยนวัสดุ
สิ้นเปลือง หรือต่อไปนี้
- ก�รใช้ผลิตภัณฑ์กับน้ำ�ผิดประเภท
- กลไกเกิดคว�มเสียห�ยจ�กก�รใช้ง�นม�กเกินไป
- คว�มเสียห�ยที่เกิดจ�กน้ำ� ฝุ่น หรือแมลงเข้�ใปภ�ยในตัวผลิตภัณฑ์ (ยกเว้นผลิตภัณฑ์ที่ออกแบบเฉพ�ะ)
- คว�มเสียห�ยที่เกิดจ�กอุบัติเหตุ ภัยธรรมช�ติ ต่�งๆ เช่น อัคคีภัย น้ำ�ท่วม ฟ้�ผ่� ไฟกระช�ก ไฟเกิน เป็นต้น
- ก�รใช้ง�นที่นอกเหนือก�รใช้ง�นภ�ยในครัวเรือนหรือเป็นก�รใช้ง�นเชิงพ�ณิชย์
- คว�มเสียห�ยของอุปกรณ์ที่ม�พร้อมกับผลิตภัณฑ์ เช่นเครื่องแก้วหรือกระเบื้อง
- คว�มเสียห�ยหรือผลร้�ยเนื่องจ�กก�รเชื่อมต่อที่ผิดแรงดันไฟฟ้�หรือผิดคว�มถี่ที่ระบุในผลิตภัณฑ์หรือข้อกำ�หนด
ของผลิตภัณฑ์
- ก�รปรับแต่งม�ตร (ก�รปรับแต่งม�ตร�ใด ๆ จะต้องดำ�เนินก�รต�มคำ�แนะนำ�สำ�หรับก�รใช้ง�น)

3534
id
34
สิิต�มกฎหม�ยของผู้บริโภค
รับประกันระหว่�งประเทศของ TEFAL/T-FAL ไม่ส่งผลกระทบต่อสิทธิต�มกฎหม�ยของผู้บริโภคอ�จจะมีหรือสิทธิที่
ไม่ส�ม�รถยกเว้นหรือ จำ�กัด หรือสิทธิกับผู้ค้�ปลีก ที่ผู้บริโภคจ�กผลิตภัณฑ์ที่ซื้อ ก�รรับประกันนี้จะช่วยให้ผู้บริโภค
สิทธิต�มกฎหม�ยที่ เฉพ�ะเจ�ะจงและผู้บริโภค ยังอ�จมีสิทธิท�งกฎหม�ยอื่น ๆ ที่แตกต่�งจ�กรัฐเพื่อให้รัฐหรือ
ประเทศ ผู้บริโภคอ�จยืนยันสิทธิดังกล่�ว ขึ้นอยู่กับดุลยพินิจของผู้บริโภค
*** ระยะเวล�ก�รรับประกันระหว่�งประเทศของ TEFAL/T-FAL จะยึดต�มประเทศที่ใช้ง�น แม้ว่�ผลิตภัณฑ์ ใน
ประเทศที่ซื้อจะมีระยะเวล�ก�รรับประกันที่แตกต่�งกัน กระบวนก�รซ่อมแซมอ�จต้องใช้เวล�น�นห�กสินค้�
ไม่ได้ข�ยในพื้นที่โดย TEFAL/T-FAL ห�กผลิตภัณฑ์ไม่ได้ซ่อมแซม ในประเทศใหม่ที่รับประกันระหว่�งประเทศ
TEFAL/T-FAL อ�จก�รเปลี่ยนโดยผลิตภัณฑ์ที่คล้�ยกันหรือท�งเลือกที่ต้นทุนเท่�กันที่เป็นไปได้
โปรดเก็บเอกส�รนี้สำ�หรับนี้เพื่ออ้�งอิงก�รรับประกัน
PETUNJUK KESELAMATAN
PENGAMANAN PENTING
• Alat ini hanya ditujukan untuk keperluan rumah tangga.
Alat ini tidak ditujukan untuk penggunaan berikut,
garansinya juga tidak akan berlaku untuk:
-
area dapur staf di toko, kantor, dan lingkungan kerja
lainnya;
-
rumah pertanian;
-
oleh klien di hotel, motel, dan lingkungan tipe hunian
lainnya;
-
lingkungan jenis bed and breakfast (kamar dan
sarapan).
• Alat ini tidak dimaksudkan untuk digunakan oleh
orang (termasuk anak-anak) dengan keterbatasan
fisik, indera atau kemampuan mental, atau kurang
pengalaman dan pengetahuan, kecuali mereka
telah diberi pengawasan atau instruksi mengenai
penggunaan alat oleh orang yang bertanggung jawab
atas keselamatan mereka.
• Awasi anak-anak untuk memastikan mereka tidak
bermain dengan alat ini.
• Alat ini dapat digunakan oleh anak berusia 8 tahun ke
atas dan orang dengan keterbatasan fisik, indera atau
kemampuan mental, atau kurang pengalaman dan
pengetahuan jika mereka telah diberi pengawasan
atau instruksi mengenai penggunaan alat dengan
cara yang aman dan memahami bahaya yang terlibat.
Anak-anak tidak boleh bermain-main dengan alat ini.
Pembersihan dan perawatan oleh pengguna tidak
boleh dilakukan oleh anak-anak, kecuali mereka berusia
di atas 8 tahun dan dalam pengawasan. Jauhkan alat
dan kabelnya dari jangkauan anak-anak berusia di
bawah 8 tahun.

3736
id
• Alat ini tidak dimaksudkan untuk dioperasikan dengan
menggunakan pengatur waktu eksternal atau sistem
kendali jarak jauh yang terpisah.
• Jika kabel listrik rusak, kabel tersebut harus diganti oleh
pabrik, pusat layanan resmi, atau orang yang memiliki
kualifikasi serupa untuk menghindari bahaya apa pun.
•
Permukaan yang dapat disentuh mungkin panas
saat alat sedang beroperasi. Jangan menyentuh
permukaan alat yang panas (tergantung model).
• Bersihkan bagian yang dapat dilepas dengan spons non-
abrasif dan cairan pencuci piring atau menggunakan
mesin pencuci piring (tergantung model).
• Bersihkan bagian dalam dan luar alat dengan spons
atau kain lembap. Lihat bagian «Membersihkan»
pada petunjuk penggunaan.
• Alat dapat digunakan hingga di ketinggian 4000 m.
Anjuran
• Baca dan ikuti Petunjuk penggunaan. Simpan di tempat yang aman.
• Singkirkan semua bahan kemasan dan label atau stiker dari alat sebelum
penggunaan. Pastikan juga Anda mengeluarkan semua material dari bawah
mangkuk yang bisa dilepas (tergantung model).
• Periksa apakah voltase jaringan listrik Anda sesuai dengan voltase yang tertera
pada pelat peringkat alat (arus alternatif/AC).
• Mengingat beragam standar yang berlaku, jika alat digunakan di negara selain
negara tempat pembeliannya, periksakan terlebih dahulu ke Pusat Servis Resmi.
• Untuk model dengan kabel listrik yang bisa dilepas, gunakan hanya kabel listrik
asli.
• Selalu colokkan alat ke stopkontak yang memiliki terminal jalur arde.
• Gunakan alat pada permukaan yang datar, stabil, tahan panas, jauh dari percikan
air.
• Selalu cabut steker alat: setelah digunakan, apabila akan dipindahkan, atau
sebelum membersihkannya.
• Jika terjadi kebakaran, cabut colokan alat dan padamkan api menggunakan kain
lap lembap.
• Untuk menghindari kerusakan pada alat, pastikan Anda mengikuti resep
sesuai petunjuk dan buku resep; pastikan Anda menggunakan jumlah bahan
yang tepat.
Larangan
• Jangan gunakan alat jika alat atau kabel listriknya rusak atau pernah jatuh dan
terlihat rusak, atau tampak tidak berfungsi dengan baik. Jika ini terjadi, alat harus
dikirim ke Pusat Servis Resmi.
• Jangan menggunakan kabel ekstensi. Namun, jika Anda tetap menggunakan kabel
ekstensi, atas tanggung jawab Anda sendiri, gunakan kabel ekstensi dalam kondisi
yang baik dan sesuai dengan kekuatan alat.
• Jangan biarkan kabel listrik menjuntai.
• Jangan mencabut colokan alat dengan menarik kabel listriknya.
• Jangan pernah memindahkan alat saat masih berisi makanan panas.
• Jangan mengoperasikan alat saat kosong.
• Jangan menyalakan alat di dekat bahan yang mudah terbakar (tirai, gorden…).
atau dekat dengan sumber panas eksternal (kompor gas, pelat panas, dll.).
• Jangan menyimpan produk yang mudah terbakar di dekat atau di bawah unit
perabot tempat peralatan berada.
• Jangan pernah membongkar sendiri alat ini.
• Jangan merendam produk di dalam air.
• Jangan gunakan produk pembersih yang kuat (terutama pengelupas berbahan
dasar soda), atau bantalan penggosok atau yang serupa.
• Jangan simpan alat di luar ruangan. Simpan di tempat kering dengan ventilasi
yang baik.
Saran/informasi
• Saat digunakan untuk pertama kalinya, alat mungkin dapat mengeluarkan bau tidak
beracun. Ini tidak akan mempengaruhi penggunaan dan akan hilang dengan segera.
• Demi keselamatan Anda, alat ini mematuhi standar dan regulasi yang berlaku
(Petunjuk tentang Voltase Rendah, Kompatibilitas Elektromagnetik, Bahan yang
bersentuhan dengan makanan, Lingkungan, dll.).
• Alat ini dirancang untuk penggunaan rumah tangga saja dan bukan untuk di luar
ruangan. Dalam hal penggunaan profesional, digunakan secara tidak tepat atau
melanggar petunjuk penggunaan, maka pabrikan tidak menanggung tanggung
jawab apapun dan garansi tidak lagi berlaku.
• Demi keselamatan Anda, gunakan hanya aksesori dan suku cadang yang dirancang
untuk peralatan Anda.
Lingkungan
• Sebelum membuang alat, baterai pengatur waktu harus dilepas dan dibuang di
tempat pengumpulan sampah warga setempat atau pusat servis resmi (tergantung
model).
Utamakan perlindungan lingkungan!
i
Peralatan Anda mengandung bahan berharga yang dapat diambil lagi atau
didaur ulang.
Buanglah di tempat pengumpulan sampah warga setempat
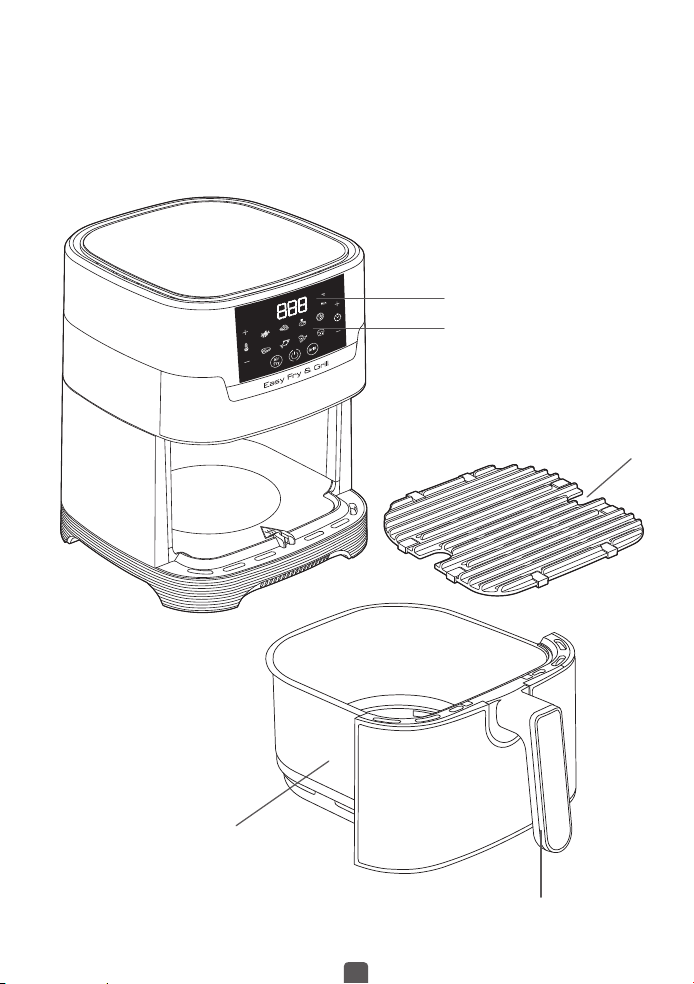
3938
id
D
E
A
B
C
DESKRIPSI
A. Mangkuk
B. Gagang mangkuk
C. Rak pemanggang die-cast yang bisa dilepas
D. Panel layar sentuh digital
E. Tampilan waktu/suhu
MODE MEMASAK OTOMATIS
1. Kentang goreng
2. Nugget
3. Ayam panggang
4. Piza
5. Daging
6. Ikan
7. Sayuran
8. Hidangan penutup
SEBELUM PENGGUNAAN PERTAMA
1. Lepaskan semua bahan kemasan.
2. Lepaskan semua stiker atau label dari alat.
3. Jangan lepaskan bantalan silikon pada rak.
4. Bersihkan mangkuk dan rak lepas-pasang secara menyeluruh dengan air panas, cairan
pembersih, dan spons non-abrasif.
Catatan: Komponen dapat dibersihkan dalam mesin pencuci piring.
5. Seka bagian dalam dan luar alat dengan kain lembap. Alat bekerja dengan menghasilkan
udara panas. Jangan mengisi mangkuk (A) dengan minyak atau lemak.
PERSIAPAN PENGGUNAAN
1. Letakkan alat pada permukaan yang rata, stabil, dan tahan panas, serta jauh dari percikan
air.
2. Jangan mengisi mangkuk dengan minyak atau cairan lainnya.
Jangan meletakkan apa pun di atas alat. Hal ini akan mengganggu aliran udara dan
memengaruhi hasil menggoreng dengan sirkulasi udara panas.
MENGGUNAKAN ALAT
Easy Fry dapat memasak berbagai resep. Waktu memasak dicantumkan di bagian ‘Panduan
Memasak’.
1. Sambungkan kabel catu daya ke soket listrik.
2. Mulai tahap pemanasan awal jika diinginkan. Untuk melakukannya, tekan tombol Start
(Mulai)
yang mulai berkedip segera setelah alat dicolokkan ke stopkontak. Suhu yang
ditampilkan pertama kali adalah 180°C (356°F).
• Sesuaikan ke suhu yang diinginkan dengan tombol
dan pada layar digital.
• Tekan tombol Start (Mulai) lagi untuk memulai pemanasan awal.
• Alat akan berbunyi bip saat mencapai suhu yang diinginkan.
• Tahap pemanasan awal sekarang selesai.
3. Taruh makanan dalam mangkuk.
4140
id
Catatan: Jangan mengisi mangkuk melebihi tanda batas MAX atau melebihi jumlah
maksimum yang ditunjukkan di dalam tabel (lihat bagian ‘Panduan Memasak’),
karena ini dapat memengaruhi kualitas hasil akhir.
4. Masukkan kembali mangkuk ke dalam alat.
Perhatian: Jangan menyentuh mangkuk selama alat sedang digunakan dan beberapa
saat setelah selesai digunakan, karena masih sangat panas. Pegang mangkuk hanya di
bagian gagangnya.
5. Untuk mulai memasak, Anda dapat memilih antara mode memasak otomatis dan setelan
manual.
a. Jika memilih setelan manual:
• Sesuaikan suhu
dengan tombol dan pada layar digital. Rentang suhu termostat
adalah 80-200°C.
• Lalu setel waktu memasak yang diinginkan dengan menekan tombol
dan menyesuaikan
waktu dengan tombol
dan . Timer dapat disetel antara 0 dan 60 menit.
• Tekan tombol Start (Mulai) untuk mulai memasak dengan setelan suhu dan waktu yang
dipilih. Proses memasak dimulai. Layar akan menampilkan suhu yang dipilih dan waktu
memasak yang tersisa secara bergantian.
b. Jika memilih mode memasak otomatis:
• Pilih mode memasak yang diinginkan dengan menekan ikon yang sesuai pada panel layar
sentuh (mode ini dijelaskan secara detail dalam bagian “Panduan Memasak”).
• Konfirmasi mode memasak dengan menekan tombol
. Proses memasak pun akan
dimulai.
• Memasak dimulai. Layar akan menampilkan suhu yang dipilih dan waktu memasak yang
tersisa secara bergantian
6. Kelebihan minyak dari makanan akan dikumpulkan di bagian bawah mangkuk.
7. Beberapa makanan perlu sedikit digoyang di tengah proses memasak (lihat bagian
‘Panduan Memasak’). Untuk menggoyang-goyangkan makanan, tarik mangkuk keluar dari
alat menggunakan gagangnya dan goyangkan. Kemudian masukkan kembali mangkuk ke
dalam alat dan tekan lagi tombol Start (Mulai)
untuk melanjutkan proses memasak.
8. Jika Anda mendengar suara timer, berarti waktu memasak telah habis. Tarik mangkuk
keluar dari alat dan letakkan pada permukaan yang tahan panas.
9. Periksa apakah makanan sudah siap.
Jika makanan belum siap, cukup masukkan kembali mangkuk ke alat dan setel timer
beberapa menit lagi.
10. Jika makanan sudah matang, keluarkan mangkuk. Untuk mengeluarkan makanan, gunakan
penjepit untuk mengangkat makanan dari mangkuk.
Perhatian: Saat membalik mangkuk, berhati-hatilah dengan sisa minyak yang terkumpul di
bagian bawah mangkuk yang dapat merembes ke makanan. Rak juga bisa terjatuh.
Setelah menggoreng menggunakan sirkulasi udara panas, mangkuk, rak, dan makanan
menjadi sangat panas. Tergantung jenis makanan yang dimasak dalam alat, harap berhati-
hati dengan uap yang keluar dari mangkuk.
11. Jika makanan sudah siap, alat dapat langsung siap digunakan untuk menyiapkan makanan
yang lain.
MENGGUNAKAN MODE PANGGANG
1. Letakkan rak pemanggang di dalam mangkuk alat.
2. Tekan
, lalu tekan pada layar untuk memilih mode Grill (Panggang).
3. Mulai mode Grill (Panggang) dengan menekan
. Tahap pemanasan awal pun akan
dimulai (waktu : 15 menit).
4. Jika Anda mendengar suara timer, tahap pemanasan awal telah selesai.
5. Keluarkan mangkuk dari alat dan letakkan pada permukaan yang tahan panas.
Perhatian: mangkuk dan rak pemanggang sangat panas. Gunakan penjepit untuk
meletakkan makanan di atas pelat pemanggang.
6. Letakkan makanan pada pelat pemanggang dan masukkan kembali mangkuk ke dalam alat.
7. Pilih waktu memasak yang diperlukan dengan menekan tombol
dan (lihat bagian
‘Panduan memasak’).
8. Tekan tombol Start (Mulai)
untuk mulai memasak. Layar akan menampilkan suhu dan
waktu memasak yang tersisa secara bergantian.
Catatan : potongan daging harus dibalik saat setengah matang.
Kelebihan minyak dari makanan akan terkumpul di bagian bawah mangkuk.
9. Jika Anda mendengar suara timer, berarti waktu memasak telah habis. Tarik mangkuk
keluar dari alat dan letakkan pada permukaan yang tahan panas.
10. Periksa apakah makanan sudah siap. Jika makanan belum siap, cukup masukkan kembali
mangkuk ke alat dan setel timer beberapa menit lagi.
11. Jika makanan sudah matang, keluarkan mangkuk. Untuk mengeluarkan makanan, gunakan
penjepit untuk mengangkat makanan dari mangkuk.
Perhatian: mangkuk dan rak pemanggang sangat panas.
MENGERINGKAN
1. Letakkan rak di dalam mangkuk alat.
2. Tekan
, lalu sesuaikan suhu dengan menekan tombol dan hingga 80°C pada
layar digital.
3. Lalu setel waktu memasak yang diinginkan dengan menekan tombol
dan sesuaikan
waktu dengan tombol
dan . Setel waktu antara 1 jam hingga 4 jam.
4. Tekan tombol Start (Mulai)
untuk memulai proses mengeringkan. Layar akan
menampilkan suhu yang dipilih dan waktu memasak yang tersisa secara bergantian.
5. Jika Anda mendengar suara timer, proses memasak telah selesai. Keluarkan mangkuk dari
alat dan letakkan pada permukaan yang tahan panas.
6. Periksa apakah makanan sudah siap. Jika makanan belum siap, kembalikan mangkuk ke
dalam alat dan setel timer beberapa menit lagi.
7. Jika makanan sudah matang, keluarkan mangkuk. Untuk mengeluarkan makanan, gunakan
penjepit untuk mengangkat makanan dari mangkuk.
Perhatian: mangkuk dan rak pemanggang sangat panas.
PANDUAN MEMASAK
Tabel berikut membantu Anda memilih setelan dasar untuk makanan yang ingin Anda siapkan.
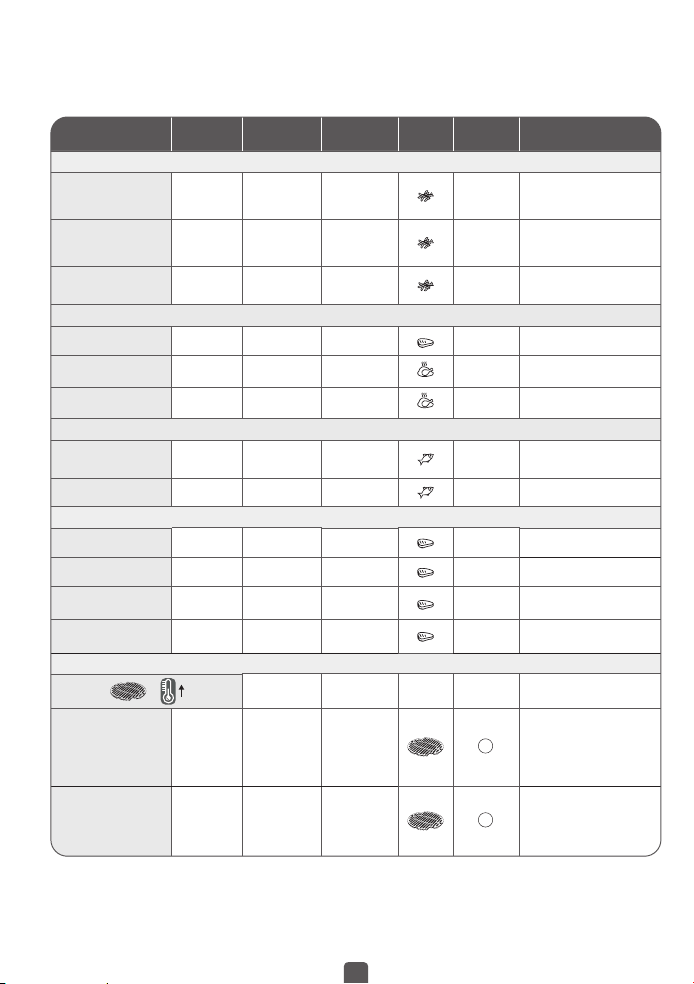
* Goyangkan saat setengah matang.
** Berat kentang yang belum dikupas
PENTING: Untuk menghindari kerusakan pada alat, jangan pernah melebihi takaran maksimum bahan dan
cairan yang ditunjukkan dalam petunjuk penggunaan dan dalam resep.
***tempatkan loyang kue/pinggan oven di dalam mangkuk.
Jika Anda menggunakan adonan yang mengembang (seperti kue, quiche, atau muffin), pinggan oven tidak
boleh diisi lebih dari separuh.
Resep onlin bisa dilihat di www.tefal.com.
TIPS
• Makanan yang lebih kecil biasanya perlu waktu memasak yang lebih singkat daripada
makanan yang berukuran lebih besar.
• Jumlah makanan yang lebih banyak perlu waktu memasak yang sedikit lebih lama,
sedangkan makanan dalam jumlah sedikit perlu waktu memasak yang lebih singkat.
• Menggoyangkan makanan berukuran kecil saat setengah masak akan memberikan hasil
akhir yang lebih baik dan dapat membantu masakan matang secara merata.
• Tambahkan sedikit minyak pada kentang segar agar renyah. Setelah menambahkan
sesendok minyak, goreng kentang selama beberapa menit.
• Jangan memasak makanan yang terlalu berminyak dalam alat.
• Makanan ringan yang dapat dimasak dalam oven juga dapat dimasak menggunakan alat ini.
• Takaran optimal yang direkomendasikan untuk memasak kentang goreng adalah 700 gram.
• Gunakan puff pastry siap pakai dan short pastry untuk memasak camilan isi yang cepat dan mudah.
•
Masukkan pinggan oven dalam mangkuk alat jika Anda ingin memanggang kue atau quiche
atau jika Anda ingin menggoreng bahan makanan yang rapuh atau memiliki isian tertentu. Anda
dapat menggunakan pinggan oven berbahan silikon, baja tahan karat, aluminium, tanah liat.
• Anda juga dapat menggunakan alat untuk memanaskan makanan. Untuk memanaskan
makanan, setel suhu ke 160°C selama 10 menit.
MEMBUAT KENTANG GORENG SENDIRI
Untuk hasil terbaik, kami sarankan untuk menggunakan kentang beku. Jika Anda ingin
membuat kentang goreng sendiri, ikuti langkah berikut.
1. Pilih jenis kentang yang direkomendasikan untuk membuat kentang goreng. Kupas kentang
dan potong dengan ketebalan yang sama.
4342
id
Catatan: Waktu memasak berikut hanya merupakan panduan dan dapat berbeda sesuai
dengan variasi dan jenis kentang yang digunakan. Sedangkan untuk makanan lain, ukuran,
bentuk, dan merek dapat memengaruhi hasil.
Oleh karena itu, waktu memasak mungkin perlu disesuaikan sedikit.
Takaran
Min-maks (g)
Estimasi
waktu (mnt)
Suhu
(°C )
Mode
memasak
Goyangkan*
Informasi
tambahan
Kentang dan kentang goreng
Kentang goreng beku
(ketebalan
standar 10 mm x 10 mm)
300 - 800 g
15 - 25 mnt
200°C
Ya
Kentang Goreng Buatan
Sendiri
(8 x 8 mm)
300 - 800 g
22 - 32 mnt
200°C
Ya
Tambahkan 1 sendok makan
minyak
Potato
wedges beku
300 - 800 g
22 - 27 mnt
200°C
Ya
Tambahkan 1 sendok makan
minyak
Daging dan Unggas
Steak beku
100 - 500 g
6 - 10 mnt
180°C
Filet dada ayam
(tanpa tulang)
100 - 500 g
12 - 19 mnt
180°C
Ayam (utuh)
1000 g 60 mnt
200°C
Ikan
Ikan segar,
steak salmon
350 g
15 - 17 mnt
140°C
Udang 12 buah 4 mnt
170°C
Makanan ringan
Nugget ayam beku
100 - 600 g
7 - 15 mnt
200°C
Ya
Sayap ayam beku
300 g 16 - 20 mnt
200°C
Ya
Stik keju beku
125 g
(5 buah)
7 - 9 mnt
180°C
Onion ring beku
200 g
(10 buah)
8 - 10 mnt
200°C
Ya
Panggang
=
15 mnt
200°C
Daging 250 g
Pemanasan awal :
15 mnt
Memasak : 6-8 mnt
200°C
P
anggang
Anda dapat menambahkan
minyak, rempah beraroma,
dan garam untuk perasa.
Saat di tengah memasak, Anda
bisa membalik makanan.
Sosis 400 g
Pemanasan awal :
15 mnt
Memasak : 10-12 mnt
200°C
P
anggang
Anda dapat menambahkan minyak,
rempah beraroma,
dan garam untuk perasa.
Saat di tengah memasak, Anda bisa
membalik makanan.
Takaran
Min-maks (g)
Estimasi
waktu (mnt)
Suhu
(°C)
Mode
memasak
Goyangkan*
Informasi
tambahan
Sayuran
300 g
Pemanasan awal :
15 mnt
Memasak: 10 menit
200°C
Panggang
Filet ikan
200 g
Pemanasan awal :
15 mnt
Memasak : 3-5 mnt
200°C
Panggang
Panggang Kue
Muffin 7 buah 15 -18 mnt
180°C
Gunakan loyang/
pinggan oven***
Kue
300 g 30 mnt
160°C
Dehidrasi / Pengeringan
Apel dalam irisan 1 buah 1jam
80°C
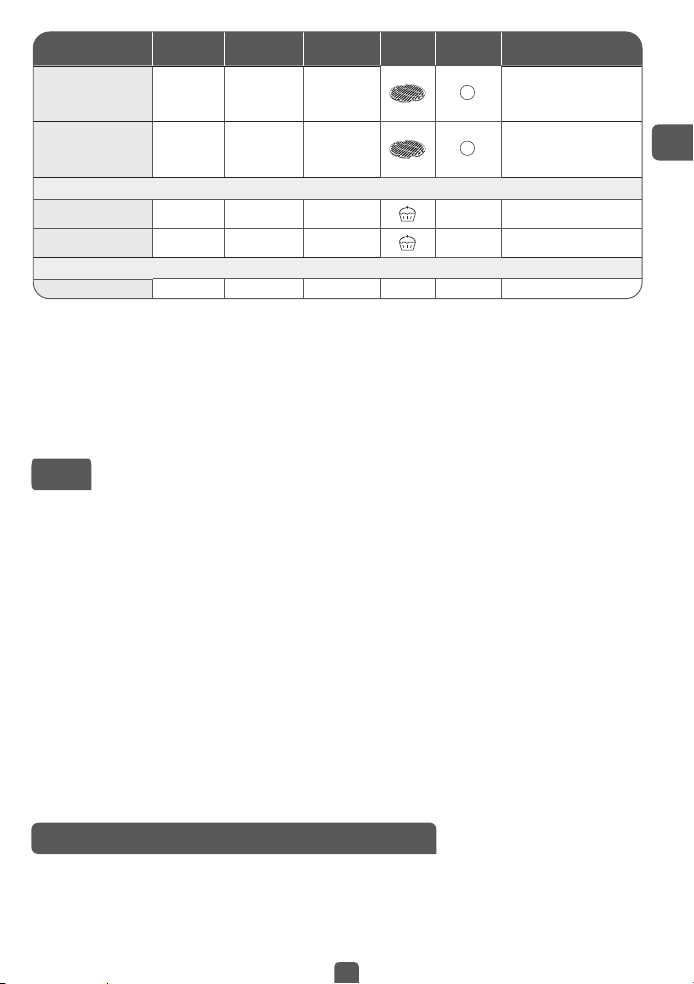

2. Rendam kentang dalam mangkuk berisi air dingin selama minimal 30 menit, tiriskan
dan keringkan dengan serbet katun yang bersih dan sangat menyerap. Lalu tepuk-tepuk
dengan tisu dapur. Kentang harus benar-benar kering sebelum dimasak.
3. Masukkan 1 sendok makan minyak (minyak sayur, bunga matahari, atau zaitun) di
mangkuk kering, masukkan kentang di atasnya lalu aduk hingga kentang terlapisi minyak.
4. Keluarkan kentang dari mangkuk dengan jari atau alat dapur agar kelebihan minyak
tertinggal di mangkuk. Taruh kentang di dalam mangkuk.
Catatan: Jangan memasukkan wadah kentang yang telah dilapisi minyak langsung ke dalam
mangkuk sekaligus, karena kelebihan minyak akan tertinggal di bagian bawah mangkuk.
5. Goreng kentang sesuai dengan petunjuk di bagian Panduan Memasak.
PEMBERSIHAN
Bersihkan alat setiap kali selesai digunakan.
Mangkuk dan rak memiliki lapisan anti-lengket. Jangan menggunakan perabot dapur dari
logam atau bahan pembersih abrasif untuk membersihkannya, karena dapat merusak
lapisan anti-lengket tersebut.
1. Lepaskan steker listrik dari soket dinding dan biarkan alat mendingin. Catatan: Keluarkan
mangkuk agar alat lebih cepat dingin.
2. Seka bagian luar alat dengan kain lembap.
3. Bersihkan mangkuk dan rak dengan air panas, cairan pembersih, dan spons non-abrasif.
Anda dapat menggunakan cairan pembersih minyak/lemak untuk menghilangkan kotoran
yang tersisa.
Catatan: Mangkuk dan rak dapat dicuci di mesin pencuci piring.
Tips: Jika kotoran melekat di bagian bawah mangkuk dan rak, tuangkan air panas dan
sedikit cairan pembersih. Rendam mangkuk dan rak selama kira-kira 10 menit.
Lalu bilas hingga bersih dan kering.
4. Seka bagian dalam alat dengan air panas dan kain lembap.
5. Bersihkan elemen pemanas dengan sikat pembersih kering untuk menghilangkan sisa makanan.
6. Jangan merendam alat di dalam air atau cairan lainnya.
PENYIMPANAN
1. Cabut steker alat lalu biarkan dingin.
2. Pastikan semua komponen bersih dan kering.
GARANSI DAN SERVIS
Jika Anda membutuhkan layanan atau informasi atau mengalami masalah, kunjungi situs web
Tefal di www.tefal.com atau hubungi Pusat Layanan Konsumen Tefal di negara Anda. Anda
dapat menemukan nomor telepon pada lembar garansi internasional. Jika tidak ada Pusat
Layanan Konsumen di negara Anda, kunjungi dealer Tefal setempat.
PENYELESAIAN MASALAH
Jika Anda menemukan masalah dengan alat, kunjungi www.tefal.com untuk melihat daftar
pertanyaan yang sering diajukan atau hubungi Pusat Layanan Konsumen di negara Anda.
4544
id
TEFAL / T-FAL * JAMINAN INTERNASIONAL TERBATAS
www.tefal.com
Produk ini dapat diperbaiki oleh TEFAL / T-FAL *, selama dan setelah masa garansi.
Aksesori, barang habis pakai dan komponen yang dapat diganti pengguna akhir dapat dibeli,
jika tersedia secara lokal, seperti yang dijelaskan pada situs internet TEFAL / T-FAL
www.tefal.com
Garansi ** : TEFAL / T-FAL menjamin produk ini terhadap segala cacat produksi dalam
bahan atau pengerjaan selama periode jaminan di negara-negara tersebut *** sebagaimana
tercantum dalam daftar negara terlampir, mulai dari tanggal awal pembelian atau tanggal
pengiriman. Garansi pabrikan internasional mencakup semua biaya yang terkait dengan
pengembalian produk cacat yang telah terbukti sehingga sesuai dengan spesifikasi aslinya,
melalui perbaikan atau penggantian bagian yang rusak dan tenaga
kerja yang diperlukan. Pada pilihan TEFAL / T-FAL, produk pengganti yang setara atau
unggul dapat diberikan alih-alih memperbaiki produk yang rusak. Kewajiban tunggal TEFAL
/ T-FAL dan resolusi eksklusif Anda berdasarkan jaminan ini terbatas pada perbaikan atau
penggantian tersebut.
Ketentuan & Pengecualian : TEFAL / T-FAL tidak berkewajiban untuk memperbaiki atau
mengganti produk apa pun yang tidak disertai dengan bukti pembelian yang sah. Produk
dapat diambil secara langsung atau harus dikemas dan dikembalikan secara memadai,
dengan pengiriman tercatat (atau metode ongkos kirim yang setara), ke pusat layanan resmi
TEFAL / T-FAL. Detail alamat lengkap untuk pusat layanan resmi masing-masing negara
tercantum di situs web TEFAL / T-FAL (www.tefal.com) atau dengan menghubungi pusat
layanan konsumen yang sesuai yang tercantum dalam daftar negara terlampir.
Untuk menawarkan layanan purna jual sebaik mungkin dan secara konstan meningkatkan
kepuasan pelanggan, TEFAL / T-FAL dapat mengirimkan survei kepuasan kepada semua
pelanggan yang produknya diperbaiki atau ditukar di pusat layanan resmi TEFAL / T-FAL.
Jaminan ini hanya berlaku untuk produk yang dibeli dan digunakan untuk keperluan domestik
dan tidak akan mencakup kerusakan yang terjadi akibat penyalahgunaan, kelalaian,
kegagalan untuk mengikuti instruksi TEFAL /
T-FAL, atau modifikasi atau perbaikan yang tidak sah dari produk, kemasan yang rusak oleh
pemilik atau kesalahan penanganan oleh operator apa pun. Ini juga tidak mencakup keausan
normal, perawatan atau penggantian komponen habis pakai, atau yang berikut ini:
- kerusakan atau hasil yang buruk secara khusus karena tegangan atau frekuensi yang salah
seperti dicap pada ID produk atau spesifikasi
- menggunakan jenis air yang salah atau dapat dikonsumsi
- kerusakan mekanis, kelebihan beban
- masuknya air, debu, atau serangga ke dalam produk (tidak termasuk peralatan dengan fitur
yang dirancang khusus untuk serangga)
- penskalaan (segala penskalaan harus dilakukan sesuai dengan petunjuk penggunaan)
- kerusakan akibat petir atau lonjakan daya
- kerusakan pada gelas atau porselen yang ada dalam produk
- kecelakaan termasuk kebakaran, banjir, dll
- penggunaan profesional atau komersial

4746
vi
Hak Wajib Konsumen : TJaminan TEFAL / T-FAL internasional ini tidak memengaruhi Hak
Hukum yang mungkin dimiliki konsumen atau hak-hak yang tidak dapat dikecualikan atau
dibatasi, atau hak terhadap pengecer tempat konsumen membeli produk tersebut. Jaminan
ini memberikan hak hukum khusus bagi konsumen, dan konsumen juga dapat memiliki
hak hukum lainnya yang berbeda dari satu Negara ke Negara lainnya. Konsumen dapat
menegaskan hak tersebut atas kebijakannya sendiri. *** Dimana suatu produk dibeli di negara
yang terdaftar dan kemudian digunakan di negara lain yang terdaftar, durasi jaminan TEFAL
/ T-FAL internasional adalah periode untuk negara penggunaan, bahkan jika produk tersebut
dibeli di negara yang terdaftar dengan durasi garansi yang sama. Proses perbaikan mungkin
memerlukan waktu lebih lama jika produk tersebut tidak dijual secara lokal oleh TEFAL /
T-FAL di negara tempat penggunaan. Jika produk tidak dapat diperbaiki di negara baru
penggunaan, jaminan TEFAL / T-FAL internasional terbatas pada penggantian oleh produk
serupa atau alternatif dengan biaya yang sama, jika mungkin.
**** Peralatan rumah tangga TEFAL muncul di bawah merek T-FAL di beberapa wilayah seperti
Amerika dan Jepang. TEFAL / T-FAL adalah merek dagang terdaftar dari Groupe SEB. Simpan
dokumen ini untuk referensi Anda jika Anda ingin mengajukan klaim berdasarkan jaminan.
**Hanya untuk Australia:
Barang-barang kami datang dengan jaminan yang tidak dapat dikecualikan di bawah
Undang-Undang Konsumen Australia. Anda berhak atas penggantian atau pengembalian
uang untuk kegagalan besar dan kompensasi untuk segala kerugian atau kerusakan yang
dapat diperkirakan secara wajar lainnya. Anda juga berhak memiliki barang yang diperbaiki
atau diganti jika barang rusak memiliki kualitas yang dapat diterima dan kerusakan tidak
sama dengan kerusakan besar.
**Hanya untuk India: Produk Tefal Anda dijamin selama 2 tahun. Jaminan mencakup secara
eksklusif perbaikan produk yang cacat, tetapi sesuai pilihan TEFAL, produk pengganti mungkin
disediakan alih-alih memperbaiki produk yang rusak. Adalah wajib bahwa konsumen, untuk
memperbaiki produknya, harus mencatat permintaan layanan pada aplikasi Smartphone
khusus APP SERVICE TEFAL atau dengan menghubungi Pusat Layanan Konsumen TEFAL
di 1860-200-1232, Jam buka Senin-Sabtu 09:00 hingga 06:00 SORE. Produk yang
dikembalikan oleh Post tidak akan ditanggung oleh garansi. Sebagai bukti pembelian,
konsumen harus memberikan kartu jaminan yang dicap dan memo tunai ini.
HƯỚNG DẪN VỀ AN TOÀN
BIỆN PHÁP BẢO VỆ QUAN TRỌNG
• Thiết bị này được thiết kế để sử dụng trong gia đình.
Thiết bị này không được thiết kế để sử dụng trong các
trường hợp sau đây, và bảo hành sẽ không áp dụng
cho:
- khu vực nhà bếp nhân viên ở các cửa hàng, văn phòng
và các môi trường làm việc khác;
- trang trại;
- khách hàng trong khách sạn, nhà nghỉ và các môi
trường dạng dân cư khác;
- loại hình lưu trú chỉ phục vụ giường ngủ và bữa sáng.
• Thiết bị này không được thiết kế để sử dụng bởi các cá
nhân (bao gồm cả trẻ nhỏ) có khuyết tật về thể chất,
giác quan hoặc tâm thần, hoặc thiếu kinh nghiệm và
kiến thức, trừ khi họ được giám sát hoặc chỉ dẫn sử
dụng thiết bị bởi một người chịu trách nhiệm về sự an
toàn của họ.
• Trẻ nhỏ phải được giám sát để đảm bảo chúng không
nghịch phá thiết bị này.
• Trẻ em từ 8 tuổi trở lên và người bị suy giảm khả năng
thể chất, giác quan hoặc tâm thần hoặc thiếu kinh
nghiệm và kiến thức có thể sử dụng thiết bị này nếu họ
được giám sát hoặc hướng dẫn sử dụng thiết bị an toàn
và hiểu rõ các mối nguy hiểm liên quan. Trẻ em không
được chơi đùa với thiết bị này. Trẻ em không được phép
thực hiện công việc vệ sinh và bảo dưỡng thiết bị trừ
khi các em trên 8 tuổi và được giám sát. Giữ thiết bị và
dây nguồn tránh xa khỏi tầm với của trẻ em dưới 8 tuổi.

4948
vi
• Thiết bị này không được thiết kế để vận hành bằng
đồng hồ hẹn giờ bên ngoài hoặc hệ thống điều khiển
từ xa riêng biệt.
• Nếu dây nguồn bị hỏng, phải để nhà sản xuất, trung
tâm dịch vụ được cấp phép hoặc nhân sự đủ trình độ
tương tự thay thế để tránh xảy ra nguy hiểm.
•
Khi thiết bị đang vận hành, nhiệt độ của các bề mặt
tiếp cận có thể cao. Không được chạm vào các bề mặt
nóng của thiết bị (tùy vào mẫu máy).
• Vệ sinh các bộ phận có thể tháo rời bằng miếng bọt
biển không gây mài mòn và nước rửa chén Không
dùng máy rửa chén để vệ sinh thiết bị này.
• Vệ sinh mặt trong và mặt ngoài của thiết bị bằng một
miếng bọt biển ẩm hoặc vải ẩm. Vui tham khảo phần
«Vệ sinh» trong hướng dẫn sử dụng.
• Thiết bị có thể được sử dụng ở độ cao 4000 m.
Việc nên làm
• Đọc kỹ và thực hiện theo các hướng dẫn sử dụng. Bảo quản cẩn thận.
• Tháo tất cả vật liệu bao bì và nhãn hoặc tem dán quảng cáo ra khỏi thiết bị trước khi
sử dụng. Hãy nhớ tháo mọi vật liệu phía dưới nồi có thể tháo rời (tùy vào mẫu máy).
• Kiểm tra xem điện áp của mạng lưới điện của bạn có tương ứng với điện áp ghi trên
biển thông số của thiết bị (dòng điện xoay chiều) hay không.
• Dựa trên các chuẩn hiện hành khác nhau, nếu sử dụng thiết bị này ở một quốc gia
khác với quốc gia nơi mua, hãy nhờ trung tâm dịch vụ được cấp phép tiến hành kiểm
tra.
• Đối với các mẫu máy có dây nguồn có thể tháo rời, chỉ sử dụng dây nguồn chính hãng.
• Luôn cắm phích cắm của thiết bị vào một ổ cắm có nối đất.
• Sử dụng thiết bị trên một bề mặt bằng phẳng, ổn định, chịu nhiệt, cách xa chỗ bị nước
bắn vào.
• Luôn rút phích cắm điện của thiết bị: sau khi sử dụng, để di chuyển thiết bị hoặc để vệ
sinh thiết bị.
• Trong trường hợp có hỏa hoạn, hãy rút phích cắm của thiết bị và dập lửa bằng một
tấm vải ẩm.
• Để tránh làm hỏng thiết bị của bạn, hãy đảm bảo bạn làm theo các công thức nấu ăn
trong hướng dẫn và sách nấu ăn; đảm bảo rằng bạn sử dụng đúng lượng nguyên liệu.
Việc không nên làm
• Không sử dụng thiết bị nếu thiết bị hoặc dây nguồn bị hỏng hoặc thiết bị bị rơi
và có dấu hiệu hư hỏng hoặc có vẻ như đang hoạt động không bình thường. Nếu
trường hợp này xảy ra, phải gửi thiết bị đến Trung tâm dịch vụ được cấp phép.
• Không sử dụng đầu dây nối dài. Tuy nhiên, nếu bạn chấp nhận trách nhiệm pháp lý
khi làm như thế, hãy sử dụng đầu dây nối dài ở tình trạng tốt và phù hợp với công
suất của thiết bị.
• Không để dây điện treo lủng lẳng.
• Không được rút phích cắm thiết bị bằng cách kéo dây nguồn.
• Tuyệt đối không được di chuyển thiết bị khi thiết bị chứa thức ăn nóng.
• Tuyệt đối không được vận hành thiết bị khi thiết bị đang trống không.
• Không bật thiết bị gần các vật liệu dễ cháy (mành, rèm…) hoặc để gần nguồn nhiệt
bên ngoài (bếp ga, bếp điện, v.v.).
• Không cất giữ bất cứ sản phẩm nào dễ cháy gần hoặc bên dưới ngăn nội thất nơi
đặt thiết bị.
• Tuyệt đối không tự tháo rời thiết bị
• Không được nhúng sản phẩm vào nước.
• Không sử dụng bất kỳ sản phẩm cọ rửa mạnh nào (đặc biệt là dung dịch tẩy sơn pha
soda), miếng rửa chén hay miếng cọ rửa.
• Không cất giữ thiết bị ngoài trời. Bảo quản thiết bị ở nơi khô ráo và thông thoáng
Lời khuyên/Thông tin
• Khi bạn sử dụng sản phẩm lần đầu tiên, sản phẩm có thể phát ra mùi không độc
hại. Hiện tượng này sẽ không ảnh hưởng đến việc sử dụng sản phẩm và sẽ nhanh
chóng biến mất.
• Để đảm bảo an toàn cho bạn, thiết bị này tuân thủ theo các tiêu chuẩn và quy định
hiện hành (Chỉ thị về Điện áp thấp, Độ tương thích điện từ, Vật liệu tiếp xúc với thực
phẩm, Môi trường, v.v.).
• Thiết bị này được thiết kế để chỉ sử dụng trong nhà chứ không phải ngoài trời. Trong
trường hợp sử dụng cho mục đích chuyên nghiệp, sử dụng không thích hợp hoặc
không tuân theo hướng dẫn, nhà sản xuất không chịu trách nhiệm và bảo hành sẽ
không được áp dụng.
• Để đảm bảo an toàn cho chính bạn, chỉ sử dụng các phụ kiện và bộ phận thay thế
được thiết kế cho thiết bị của bạn.
Môi trường
• Trước khi bạn thải bỏ thiết bị, pin trong bộ hẹn giờ phải được tháo ra và xử lý tại
trung tâm thu gom rác dân dụng địa phương hoặc trung tâm bảo hành được cấp
phép (tùy thuộc vào mẫu máy).
Bảo vệ môi trường là trên hết!
i Thiết bị của bạn có các vật liệu có giá trị có thể được phục hồi hoặc tái chế.
Hãy thải bỏ thiết bị tại địa điểm thu gom rác thải dân dụng ở địa phương

5150
vi
D
E
A
B
C
MÔ TẢ
A. Giỏ chiên
B. Tay cầm
C. Vỉ nướng có thể tháo rời
D. Bảng điều khiển cảm ứng kỹ thuật số
E. Màn hình hiển thị thời gian/nhiệt độ
CÁC CHẾ ĐỘ NẤU TỰ ĐỘNG
1. Khoai tây chiên
2. Gà viên chiên
3. Gà quay
4. Pizza
5. Thịt
6. Cá
7. Rau củ
8. Tráng miệng
TRƯỚC KHI SỬ DỤNG LẦN ĐẦU
1. Tháo gỡ tất cả vật liệu đóng gói.
2. Tháo bỏ tất cả miếng dán hoặc nhãn ra khỏi thiết bị.
3. Không tháo miếng đệm silicon của tấm lưới.
4. Rửa sạch giỏ chiên và vỉ nướng bằng nước nóng, một ít nước rửa chén và một miếng bọt biển
không gây mài mòn.
Bạn có thể rửa các bộ phận này trong máy rửa chén.
5. Lấy miếng vải ẩm lau sạch bên trong và bên ngoài thiết bị. Thiết bị hoạt động bằng cách tạo ra
luồng khí nóng. Không đổ dầu hoặc mỡ chiên vào giỏ (A).
CHUẨN BỊ SỬ DỤNG
1. Đặt thiết bị trên một bề mặt bằng phẳng, ổn định, chịu nhiệt, cách xa chỗ bị nước bắn vào.
2. Không cho dầu hoặc bất cứ chất lỏng nào khác vào giỏ.
Không đặt bất cứ thứ gì lên trên thiết bị. Làm như vậy sẽ làm gián đoạn luồng khí và
ảnh hưởng đến kết quả chiên bằng khí nóng.
SỬ DỤNG THIẾT BỊ
Nồi chiên Easy Fry có thể chế biến rất nhiều công thức nấu ăn. Thời gian nấu các món ăn thông
thường có trong phần “Hướng dẫn nấu”.
1. Kết nối dây nguồn với ổ cắm điện.
2. Bắt đầu bằng bước gia nhiệt trước nếu muốn. Để gia nhiệt trước, nhấn nút Bắt đầu
, nút này sẽ
nhấp nháy ngay sau khi thiết bị được cắm điện. Nhiệt độ hiển thị trong lần sử dụng đầu tiên là 180°C.
• Điều chỉnh đến nhiệt độ mong muốn bằng nút và nút trên màn hình kỹ thuật số.
• Nhấn nút Bắt đầu một lần nữa để bắt đầu gia nhiệt trước.
• Thiết bị sẽ phát ra tiếng bíp khi đã đạt nhiệt độ.
• Đến đây, bước gia nhiệt trước đã kết thúc.
3. Xếp thức ăn vào giỏ.
Lưu ý: Không cho thức ăn vào giỏ vượt quá chỉ dấu mức tối đa hoặc vượt quá lượng tối
đa theo chỉ dẫn trong bảng (xem phần “Hướng dẫn nấu”), vì như vậy có thể ảnh hưởng
đến chất lượng của món ăn.
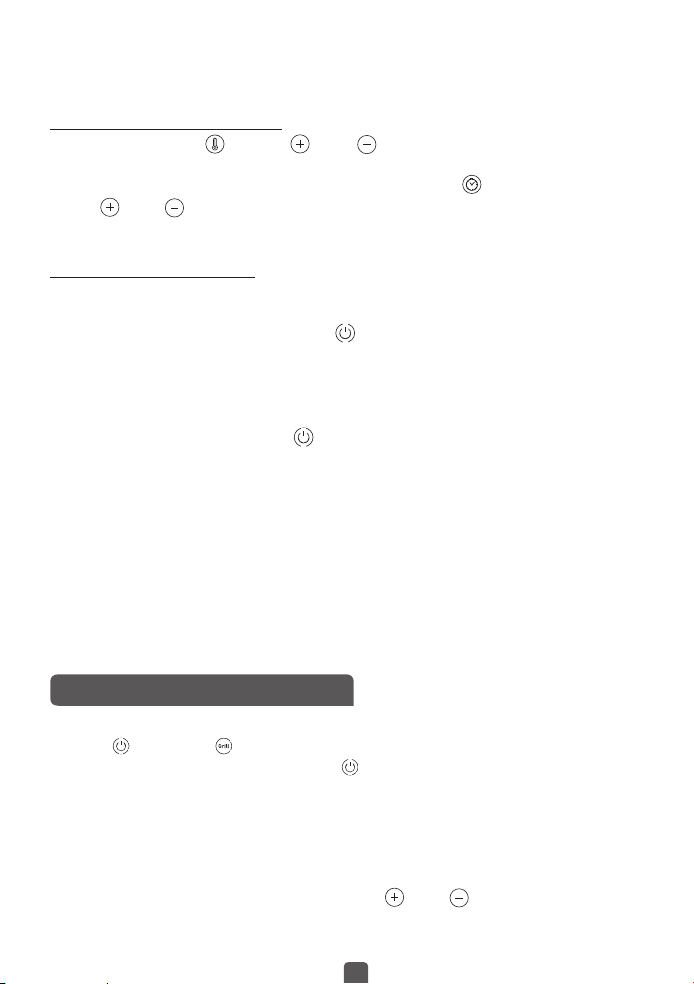
5352
vi
4. Trượt giỏ vào lại thiết bị.
Thận trọng: Không chạm vào giỏ trong khi sử dụng và một lúc sau khi sử dụng vì giỏ sẽ
rất nóng. Chỉ cầm giỏ bằng tay cầm.
5. Để bắt đầu nấu, bạn có thể chọn giữa chế độ nấu tự động và chế độ cài đặt thủ công.
a. Nếu chọn chế độ cài đặt thủ công:
• Điều chỉnh nhiệt độ
bằng nút và nút trên màn hình kỹ thuật số. Thiết bị cho phép
điều chỉnh nhiệt độ trong khoảng 80-200°C.
• Sau đó, cài đặt thời gian nấu mong muốn bằng cách nhấn nút
và điều chỉnh thời gian bằng
nút
và nút . Có thể cài đặt thời gian cho bộ hẹn giờ trong khoảng từ 0 đến 60 phút.
• Nhấn nút Bắt đầu để bắt đầu nấu với mức nhiệt độ và thời gian đã chọn. Quá trình nấu bắt đầu.
Nhiệt độ đã chọn và thời gian nấu còn lại sẽ luân phiên hiển thị trên màn hình.
b. Nếu chọn chế độ nấu tự động:
• Chọn chế độ nấu mong muốn bằng cách nhấn biểu tượng tương ứng trên bảng điều khiển
cảm ứng (các chế độ này được mô tả chi tiết trong phần “Hướng dẫn nấu”).
• Xác định chế độ nấu bằng cách nhấn nút
. Thao tác này sẽ khởi động quá trình nấu.
• Quá trình nấu bắt đầu. Nhiệt độ đã chọn và thời gian nấu còn lại sẽ luân phiên hiển thị trên màn hình.
6. Dầu thừa từ thức ăn đọng lại ở đáy giỏ.
7. Một số loại thức ăn cần phải được lắc trộn trong quá trình nấu (xem mục “Hướng dẫn nấu”). Để
lắc trộn thức ăn, hãy kéo giỏ ra khỏi thiết bị bằng tay cầm và lắc trộn thức ăn. Sau đó trượt giỏ
vào lại thiết bị và nhấn nút Bắt đầu
một lần nữa để tiếp tục nấu
8. Khi bạn nghe âm báo của bộ hẹn giờ, thời gian nấu do bạn đặt đã kết thúc. Kéo giỏ ra khỏi thiết
bị và đặt trên một mặt phẳng chịu nhiệt.
9. Kiểm tra xem thức ăn đã chín chưa.
Nếu chưa chín, bạn chỉ cần trượt giỏ vào lại thiết bị và hẹn giờ thêm vài phút.
10. Khi thức ăn đã chín, hãy lấy giỏ ra. Để lấy thức ăn ra, hãy dùng kẹp gắp để nhấc thức ăn ra khỏi giỏ.
Thận trọng: Khi bạn di chuyển giỏ, hãy cẩn thận với phần dầu thừa đọng lại ở đáy giỏ
có thể dính lên thức ăn và lưới có thể rơi xuống.
Sau quá trình chiên không dầu, giỏ chiên, vỉ nướng và thức ăn sẽ rất nóng. Tùy theo loại thức ăn
được nấu trong thiết bị, hãy cẩn thận vì hơi nóng có thể thoát ra từ giỏ chiên.
11. Khi nấu xong một mẻ, thiết bị có thể nấu mẻ khác ngay lập tức.
SỬ DỤNG CHẾ ĐỘ NƯỚNG VỈ
1. Đặt vỉ nướng vào giỏ chiên của thiết bị.
2. Nhấn
, sau đó nhấn trên màn hình để chọn chế độ Nướng vỉ.
3. Bắt đầu chế độ Nướng vỉ bằng cách nhấn
. Thao tác này sẽ khởi động bước gia nhiệt trước
(thời gian: 15 phút).
4. Khi bạn nghe thấy âm báo của bộ hẹn giờ, quá trình gia nhiệt trước đã kết thúc.
5. Lấy giỏ ra khỏi thiết bị rồi đặt trên một mặt phẳng chịu nhiệt.
Thận trọng: Giỏ và tấm lưới rất nóng. Dùng kẹp gắp để xếp thức ăn lên tấm lưới.
6. Xếp thức ăn lên tấm lưới và trượt giỏ vào lại thiết bị.
7. Chọn thời gian nấu cần thiết bằng cách nhấn nút
và nút (xem mục “Hướng dẫn nấu”).
8. Nhấn nút Bắt đầu
để bắt đầu quá trình nấu. Nhiệt độ và thời gian nấu còn lại sẽ luân phiên
hiển thị trên màn hình.
Lưu ý: Thịt nguyên miếng cần phải được lật trở giữa chừng.
Dầu thừa từ thức ăn sẽ đọng lại ở đáy giỏ chiên.
9. Khi bạn nghe thấy âm báo của bộ hẹn giờ, quá trình nấu đã kết thúc. Lấy giỏ ra khỏi thiết bị rồi
đặt trên một mặt phẳng chịu nhiệt.
10. Kiểm tra xem thức ăn đã chín chưa. Nếu chưa chín, hãy đặt giỏ vào lại thiết bị và đặt hẹn giờ
thêm vài phút.
11. Khi thức ăn đã chín, hãy lấy giỏ ra. Để lấy thức ăn ra, dùng kẹp gắp để nhấc thức ăn ra khỏi giỏ.
Thận trọng: Cẩn thận sau khi máy nấu xong, giỏ chiên, vỉ nướng và thức ăn rất nóng.
SẤY KHÔ
1. Đặt tấm lưới vào trong giỏ.
2. Nhấn
, sau đó điều chỉnh nhiệt độ bằng cách nhấn nút và nút đến khi màn hình
kỹ thuật số hiển thị 80°C.
3. Sau đó, đặt thời gian nấu mong muốn bằng cách nhấn nút
và điều chỉnh thời gian bằng nút
và nút . Bạn có thể cài đặt thời gian trong khoảng từ 1 giờ đến 4 giờ.
4. Nhấn nút Bắt đầu
để bắt đầu quá trình sấy khô. Nhiệt độ đã chọn và thời gian nấu còn lại sẽ
luân phiên hiển thị trên màn hình.
5. Khi bạn nghe thấy âm báo của bộ hẹn giờ, quá trình nấu đã kết thúc. Lấy giỏ ra khỏi thiết bị rồi
đặt trên một mặt phẳng chịu nhiệt.
6. Kiểm tra xem thức ăn đã chín chưa. Nếu chưa chín, hãy đặt giỏ vào lại thiết bị và đặt hẹn giờ
thêm vài phút.
7. Khi thức ăn đã chín, hãy lấy giỏ ra. Để lấy thức ăn ra, dùng kẹp gắp để nhấc thức ăn ra khỏi giỏ.
Thận trọng: Giỏ và tấm lưới rất nóng.
HƯỚNG DẪN NẤU
Bảng dưới đây sẽ giúp bạn lựa chọn các chế độ cài đặt cơ bản cho loại thức ăn bạn muốn chế biến.
Lưu ý: Thời gian nấu dưới đây chỉ mang tính chất hướng dẫn và có thể thay đổi tùy theo
loại và lượng khoai tây cần chế biến. Đối với các loại thức ăn khác, kích thước, hình dạng
và nhãn hiệu có thể ảnh hưởng đến kết quả.
Do đó, bạn có thể sẽ cần điều chỉnh thời gian nấu đôi chút.
Lượng
tối thiểu-tối
đa (g)
Thời gian
ước chừng
(phút)
Nhiệt độ
(°C )
Nút chức
năng
Lắc
trộn*
Thông tin
bổ sung
Khoai tây và đồ chiên
Khoai tây cắt lát đông lạnh
(độ dày thông thường 10 mm
x 10 mm)
300 - 800 g
15 - 25 phút
200°C
Có
Khoai tây chiên kiểu Pháp tự
làm tại nhà
(8 x 8 mm)
300 - 800 g
22 - 32 phút
200°C
Có
Thêm 1 muỗng canh dầu ăn
Khoai tây cắt múi
đông lạnh
300 - 800 g
22 - 27 phút
200°C
Có
Thêm 1 muỗng canh dầu ăn
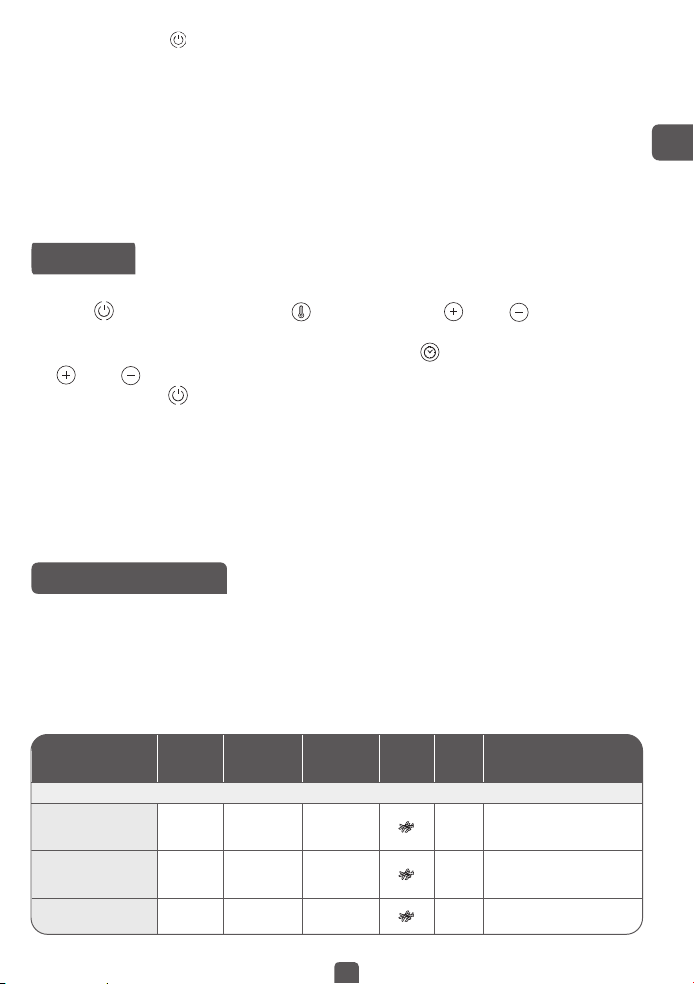
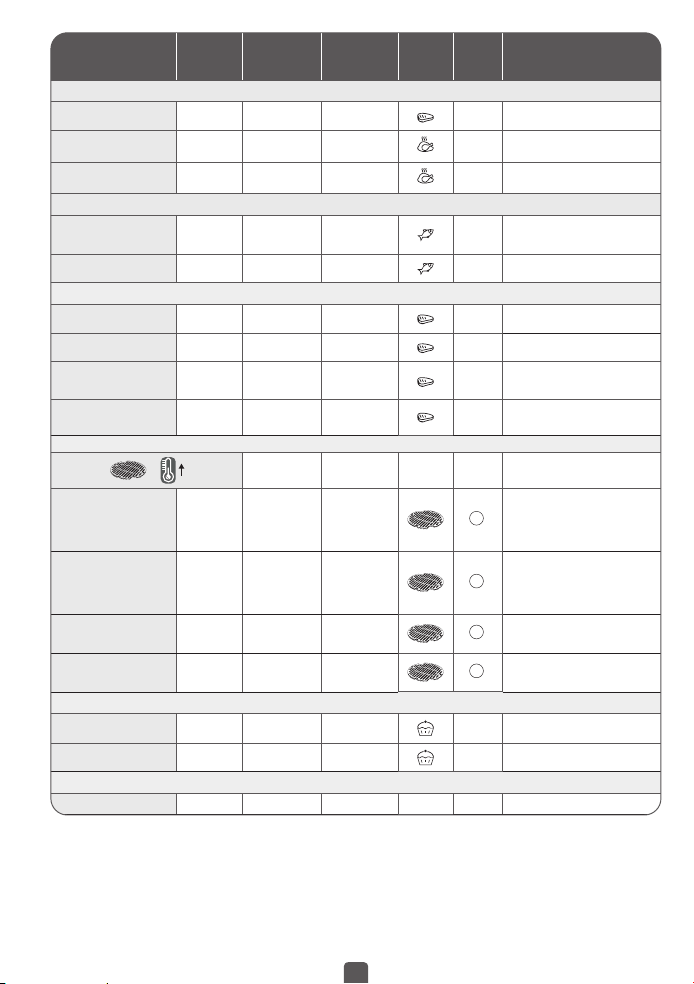
5554
vi
Lượng
tối thiểu-tối
đa (g)
Thời gian
ước chừng
(phút)
Nhiệt độ
(°C )
Nút chức
năng
Lắc
trộn*
Thông tin
bổ sung
Thịt và gia cầm
Bít tết đông lạnh
100 - 500 g
6 - 10 phút
180°C
Phi-lê ức gà
(không xương)
100 - 500 g
12 - 19 phút
180°C
Gà (nguyên con)
1000 g 60 phút
200°C
Cá
Cá tươi,
bít tết cá hồi
350 g
15 - 17 phút
140°C
Tôm 12 miếng 4 phút
170°C
Đồ ăn vặt
Gà viên đông lạnh
100 - 600 g
7 - 15 phút
200°C
Có
Cánh gà đông lạnh
300 g 16 - 20 phút
200°C
Có
Phô mai que đông lạnh
125 g
(5 miếng)
7 - 9 phút
180°C
Vòng hành tây đông lạnh
200 g
(10 miếng)
8 - 10 phút
200°C
Có
Nướng vỉ
= 15 phút
200°C
Thịt 250 g
Gia nhiệt trước: 15 phút
Nấu: 6 - 8 phút
200°C
Nướng vỉ
Bạn có thể thêm dầu ăn, rau thơm và
muối để tăng thêm hương vị.
Bạn có thể lăn trở thức ăn trong quá
trình nấu.
Xúc xích 400 g
Gia nhiệt trước: 15 phút
Nấu: 10 - 12 phút
200°C
Nướng vỉ
Bạn có thể thêm dầu ăn, rau thơm và muối
để tăng thêm hương vị.
Bạn có thể lăn trở thức ăn trong quá
trình nấu.
Rau củ
300 g
Gia nhiệt trước: 15 phút
Nấu: 10 phút
200°C
Nướng vỉ
Phi-lê cá
200 g
Gia nhiệt trước: 15 phút
Nấu: 3 - 5 phút
200°C
Nướng vỉ
Nướng bánh
Bánh nướng xốp 7 miếng 15 -18 phút
180°C
Sử dụng hộp thiếc/
khay nướng lò***
Bánh giòn 300 g 30 phút
160°C
Sấy khô
Táo thái mỏng 1 miếng 60 phút
80°C
* Lắc trộn giữa chừng trong quá trình nấu.
** Lượng khoai tây chưa gọt vỏ
QUAN TRỌNG: Để tránh làm hỏng thiết bị, không cho nguyên liệu và chất lỏng vào vượt quá mức
tối đa cho phép trong hướng dẫn sử dụng và trong công thức chế biến.
***Đặt hộp thiếc nướng bánh/khay nướng lò vào giỏ.
Khi chế biến thức ăn sẽ nở ra (chẳng hạn như bánh ngọt, bánh quiche hoặc bánh nướng xốp), bạn
không nên cho thức ăn vào quá nửa khay nướng.
Truy cập www.tefal.com để xem công thức nấu ăn trực tuyến.
LỜI KHUYÊN
• Thức ăn có kích thước nhỏ thường cần ít thời gian nấu hơn so với thức ăn có kích thước lớn.
• Thức ăn nhiều cần thời gian nấu lâu hơn đôi chút so với thức ăn ít.
• Lắc trộn giữa chừng trong quá trình nấu các loại thức ăn có kích thước nhỏ sẽ giúp thức ăn
ngon hơn và tránh tình trạng thức ăn chín không đều.
• Thêm một chút dầu ăn vào khoai tây tươi để khoai chín giòn ngon hơn. Sau khi thêm một
muỗng canh dầu ăn, chiên khoai tây trong vài phút.
• Không nấu thức ăn có quá nhiều dầu mỡ trong thiết bị.
• Các món ăn nhẹ nấu được trong lò nướng cũng có thể nấu được trong thiết bị này.
• Định lượng tối ưu được khuyến nghị cho món khoai tây chiên là 700 gram.
• Sử dụng bột puff và bột shortcrust nhào sẵn để chế biến các món ăn nhẹ nhanh gọn và dễ
dàng.
• Đặt khay nướng vào giỏ của thiết bị nếu bạn muốn nướng bánh ngọt hoặc bánh quiche hoặc
nếu bạn muốn chiên các thức ăn dễ vỡ hoặc có nhân. Bạn có thể sử dụng khay nướng lò bằng
silicon, thép không gỉ, nhôm, sành.
• Bạn cũng có thể sử thiết bị để hâm nóng thức ăn. Để hâm nóng thức ăn, hãy đặt nhiệt độ ở
160°C trong tối đa 10 phút.
LÀM KHOAI TÂY CHIÊN LÁT MỎNG TẠI NHÀ
Để có kết quả tốt nhất, bạn nên sử dụng lát khoai tây đông lạnh. Nếu bạn muốn tự làm khoai tây
chiên lát mỏng, hãy làm theo các bước dưới đây.
1. Chọn trong các loại khoai tây được gợi ý để làm khoai tây chiên. Gọt vỏ và cắt khoai tây thành
từng lát có độ dày bằng nhau.
2. Ngâm khoai tây cắt lát trong một tô nước lạnh ít nhất 30 phút, để ráo nước và thấm khô bằng
khăn sạch, có khả năng thấm hút tốt. Sau đó, vỗ bằng khăn giấy dùng trong nấu ăn. Khoai tây
cắt lát phải thật khô trước khi đem chiên.
3. Lấy 1 muỗng canh dầu ăn (dầu thực vật, dầu hướng dương hoặc dầu ô-liu) cho vào một chiếc
tô khô ráo, cho khoai tây cắt lát lên trên và trộn cho đến khi khoai tây được phủ một lớp dầu.
4. Lấy khoai tây ra khỏi tô bằng tay hoặc dụng cụ nhà bếp, để dầu thừa lại trong tô. Xếp khoai
tây vào giỏ.
Lưu ý: Không lấy tô đựng khoai tây trộn dầu ăn đổ trực tiếp vào giỏ chiên, nếu không
dầu thừa sẽ đọng ở dưới đáy giỏ chiên.
5. Chiên khoai tây theo hướng dẫn trong mục Hướng dẫn nấu.
VỆ SINH
Vệ sinh thiết bị sau mỗi lần sử dụng.
Giỏ chiên và tấm lưới có một lớp phủ chống dính. Không sử dụng dụng cụ nhà bếp bằng
kim loại hoặc dụng cụ vệ sinh gây mài mòn để làm sạch giỏ chiên và tấm lưới, vì như vậy
có thể làm hỏng lớp chống dính.

5756
vi
1. Rút phích cắm điện ra khỏi ổ cắm trên tường và để thiết bị nguội lại. Lưu ý: Lấy giỏ ra để thiết
bị nguội nhanh hơn.
2. Lau bên ngoài thiết bị bằng một miếng vải ẩm.
3. Rửa sạch giỏ và tấm lưới bằng nước nóng, một ít nước rửa chén và một miếng bọt xốp không
gây mài mòn. Bạn có thể sử dụng dung dịch khử dầu mỡ để loại bỏ các vết bẩn còn sót lại.
Giỏ chiên và tấm lưới có thể rửa được bằng máy rửa chén.
Lời khuyên: Nếu vết bẩn bị kẹt dưới đáy giỏ chiên và tấm lưới, hãy đổ nước nóng cùng
một ít nước rửa chén vào. Ngâm giỏ chiên và tấm lưới trong khoảng 10 phút.
Sau đó rửa sạch và để khô.
4. Lau bên trong thiết bị bằng nước nóng và một tấm vải ẩm.
5. Làm sạch bộ phận gia nhiệt bằng bàn chải khô và sạch để loại bỏ cặn thức ăn.
6. Không được nhúng thiết bị vào nước hay bất cứ chất lỏng nào khác.
BẢO QUẢN
1. Rút phích cắm của thiết bị và để thiết bị nguội lại.
2. Đảm bảo tất cả các bộ phận đều sạch và khô ráo.
BẢO HÀNH VÀ DỊCH VỤ
Nếu bạn cần tìm hiểu dịch vụ hoặc thông tin hay gặp vấn đề, vui lòng truy cập trang web của Tefal
www.tefal.com.vn hoặc liên hệ với Trung tâm Chăm sóc Khách hàng hotline 1800555521 Bạn
có thể tìm thấy số điện thoại trong phiếu bảo hành toàn cầu. Nếu không có Trung tâm Chăm sóc
Khách hàng tại quốc gia của bạn, hãy liên hệ với đại lý Tefal tại địa phương bạn.
XỬ LÝ SỰ CỐ
Nếu bạn gặp vấn đề với thiết bị, hãy truy cập www.tefal.com.vn để xem danh sách các câu hỏi
thường gặp hoặc liên hệ với Trung tâm Chăm sóc Khách hàng tại quốc gia bạn.
TEFAL/T-FAL* INTERNATIONAL LIMITED GUARANTEE
:www.tefal.com
Sản phẩm này được TEFAL/T-FAL sửa chữa trong và sau thời gian bảo hành.
Có thể mua các phụ kiện, hàng tiêu dùng và vật tư có thể thay thế nếu có sẵn tại các quốc gia như mô tả trên trang
web của TEFAL/T-FAL www.tefal.com
Bảo hành
TEFAL/T-FAL đảm bảo sản phẩm này không có bất kỳ khuyết điểm sản xuất hoặc tay nghề trong thời gian bảo
hành tại các quốc gia *** như đã nêu trong danh sách quốc gia ở trang cuối của hướng dẫn sử dụng, bắt đầu từ
ngày đầu tiên mua hàng hoặc từ ngày nhận hàng.
Việc bảo hành của các nhà sản xuất quốc tế bao gồm tất cả chi phí liên quan đến việc sửa lại sản phẩm được chứng
minh lỗi để phù hợp với thông số kỹ thuật ban đầu, qua việc sửa chữa hoặc thay thế bất kỳ phần nào khiếm khuyết
và công việc cần thiết. TEFAL/T-FAL có thể thay thế sản phẩm tương đương hay cao hơn thay vì sửa chữa sản phẩm.
Dưới chế độ bảo hành này, TEFAL/T-FAL sẽ giới hạn sửa chữa hoặc thay thế sản phẩm mới của khách hàng.
Điều kiện bảo hành & Ngoại trừ
TEFAL/T-FAL sẽ không có nghĩa vụ sửa chữa hoặc thay thế bất kỳ sản phẩm mà không kèm theo chứng minh mua
hợp lệ. Sản phẩm có thể được trực tiếp mang theo người hoặc phải được đóng gói đúng và gửi trả về, xác nhận
báo phát (hoặc hình thức tương đương của bưu chính), cho trung tâm dịch vụ ủy quyền của TEFAL/T-FAL. Chi tiết
địa chỉ của các trung tâm dịch vụ ủy quyền ở từng quốc gia được liệt kê trên trang web của TEFAL/T- FAL hoặc điện
thoại đến trung tâm dịch vụ khách hàng theo Danh mục Quốc gia đính kèm.
Để cung cấp dịch vụ hậu mãi tốt nhất và không ngừng nâng cao sự hài lòng của khách hàng, TEFAL / Tefal*
có thể sẽ khảo sát sự hài lòng của khách hàng đã sử dụng dịch vụ hậu mãi của các trung tâm dịch vụ ủy quyền
TEFAL / Tefal*.
Bảo hành này chỉ áp dụng cho các sản phẩm đã mua và sử dụng cho mục đích gia dụng và sẽ không bao gồm
bất kỳ thiệt hại nào có thể xảy ra do kết quả của việc sử dụng sai, bất cẩn, không thao tác theo hướng dẫn của
TEFAL/T-FAL, hoặc sửa đổi trái phép hoặc sửa chữa sản phẩm, bao bì bị lỗi do chủ sở hữu hoặc do hãng vận chuyển
xử lý sai. Không bao gồm hao mòn thông thường, bảo dưỡng hoặc thay thế các bộ phận tiêu thụ, hoặc như sau:
- Sử dụng nguồn nước không phù hợp hoặc tiêu hao -Thiệt hại về cơ học, quá tải điện áp.
- Cặn bẩn (bất kỳ cặn bẩn phải được thực hiện theo hướng dẫn sử dụng) -Tai nạn bao gồm hỏa hoạn, lũ lụt, sét
đánh.v.v
- Thiệt hại đến bất kỳ bộ phận thủy tinh hoặc sứ -Sử dụng chuyên dụng hoặc thương mại
- Thiệt hại hoặc kết quả xấu đặc biệt do điện áp sai hoặc tần số sai so với nhãn ghi trên mã nhận diện sản phẩm
hoặc đặc tính kỹ thuật.
- Nước, bụi bẩn và côn trùng xâm nhập vào bên trong sản phẩm (trừ các thiết bị có các tính năng được thiết kế
đặc biệt cho côn trùng)
Quyền lợi hợp pháp của người tiêu dùng
Bảo hành sản phẩm TEFAL/T-FAL quốc tế không ảnh hưởng đến quyền lợi pháp định, người tiêu dùng có thể có
những quyền không thể loại trừ hoặc hạn chế, có quyền khiếu nại nhà bán lẻ nơi người tiêu dùng mua sản phẩm.
Bảo hành này cho người tiêu dùng quyền lợi hợp pháp riêng biệt, và người tiêu dùng cũng có thể có quyền hợp
pháp khác biệt từ Bang này đến Bang khác hoặc Quốc Gia này đến Quốc gia khác. Người tiêu dùng có thể đòi
quyền lợi đó dựa trên quyết định của mình.
* Thiết bị gia dụng TEFAL xuất hiện dưới thương hiệu Tefal ở một số vùng lãnh thổ như Mỹ và Nhật Bản.
TEFAL / Tefal là thương hiệu đã đăng ký của Groupe SEB.
*** Trong trường hợp sản phẩm được mua ở một quốc gia được liệt kê trong danh sách và sau đó được sử dụng
tại một quốc gia khác được liệt kê, thì thời hạn bảo hành của TEFAL/T-FAL quốc tế căn cứ vào thời hạn quy định tại
quốc gia khách hàng sử dụng sản phẩm, ngay cả khi sản phẩm đã được mua tại một quốc gia được liệt kê trong
danh sách với thời hạn bảo hành khác nhau. Quy trình sửa chữa có thể sẽ lâu hơn nếu sản phẩm không được
TEFAL/T-FAL bán tại quốc gia đó. Nếu sản phẩm không thể sửa chữa tại quốc gia mới, thì TEFAL/T-FAL quốc tế sẽ
hạn chế việc thay thế sản phẩm bằng một sản phẩm tương tự hoặc thay thế bằng một sản phẩm có chi phí tương
đương, nếu có thể.
Hãy giữ tài liệu này để tham khảo và xuất trình khi bạn có yêu cầu bảo hành sản phẩm.