Loading ...
INSTALLATION INSTRUCTIONS
Warranty
For more effective and safer operation and to prolong the life of the heater,
read the Owner’s Guide and follow the maintenance instructions. Failure to
properly maintain the heater will void any warranty and may cause the heater
to function improperly. Warranties are non transferable and apply to original
consumer only. Warranty terms are set out below.
LIMITED ONE-YEAR WARRANTY: Cadet will repair or replace any UCT1
or UCT2 thermostat found to be defective within one year after the date of
purchase.
These warranties do not apply:
1. Damage occurs to the product through improper installation or incorrect
supply voltage;
2. Damage occurs to the product through improper maintenance, misuse,
abuse, accident, or alteration;
3. The product is serviced by anyone other than Cadet;
4. If the date of manufacture of the product cannot be determined;
5. If the product is damaged during shipping through no fault of Cadet.
6. The use of unauthorized accessories or unauthorized components con-
stitutes an alteration and voids all warranties. Refer to Cadet website or call
customer service at 855.CADET.US for list of authorized accessories and
components.
7. CADET’S WARRANTY IS LIMITED TO REPAIR OR REPLACEMENT AS
SET OUT HEREIN. CADET SHALL NOT BE LIABLE FOR DAMAGES SUCH
AS PROPERTY DAMAGE OR FOR CONSEQUENTIAL DAMAGES AND/OR
INCIDENTAL EXPENSES RESULTING FROM BREACH OF THESE WRIT-
TEN WARRANTIES OR ANY EXPRESS OR IMPLIED WARRANTY.
8. IN THE EVENT CADET ELECTS TO REPLACE ANY PART OF YOUR
CADET PRODUCT, THE REPLACEMENT PARTS ARE SUBJECT TO THE
SAME WARRANTIES AS THE PRODUCT. THE INSTALLATION OF RE-
PLACEMENT PARTS DOES NOT MODIFY OR EXTEND THE UNDERLYING
WARRANTIES. REPLACEMENT OR REPAIR OF ANY CADET PRODUCT
OR PART DOES NOT CREATE ANY NEW WARRANTIES.
9. These warranties give you specic legal rights, and you may also have oth-
er rights which vary from state to state. Cadet neither assumes, nor authorizes
anyone to assume for it, any other obligation or liability in connection with its
products other than as set out herein.
If you believe your Cadet product is defective, please contact Cadet Manu-
facturing Co. at 855.CADET.US, during the warranty period, for instructions
on how to have the repair or replacement processed. Warranty claims made
after the warranty period has expired will be denied. Products returned without
authorization will be refused.
Parts and Service
Visit cadetheat.com/support/parts-service for information on where to obtain
parts and service.
Reduce-Reuse-Recycle
This product is made primarily of recyclable materials. You can
reduce your carbon footprint by recycling this product at the end
of its useful life. Contact your local recycling support center for
further recycling instructions.
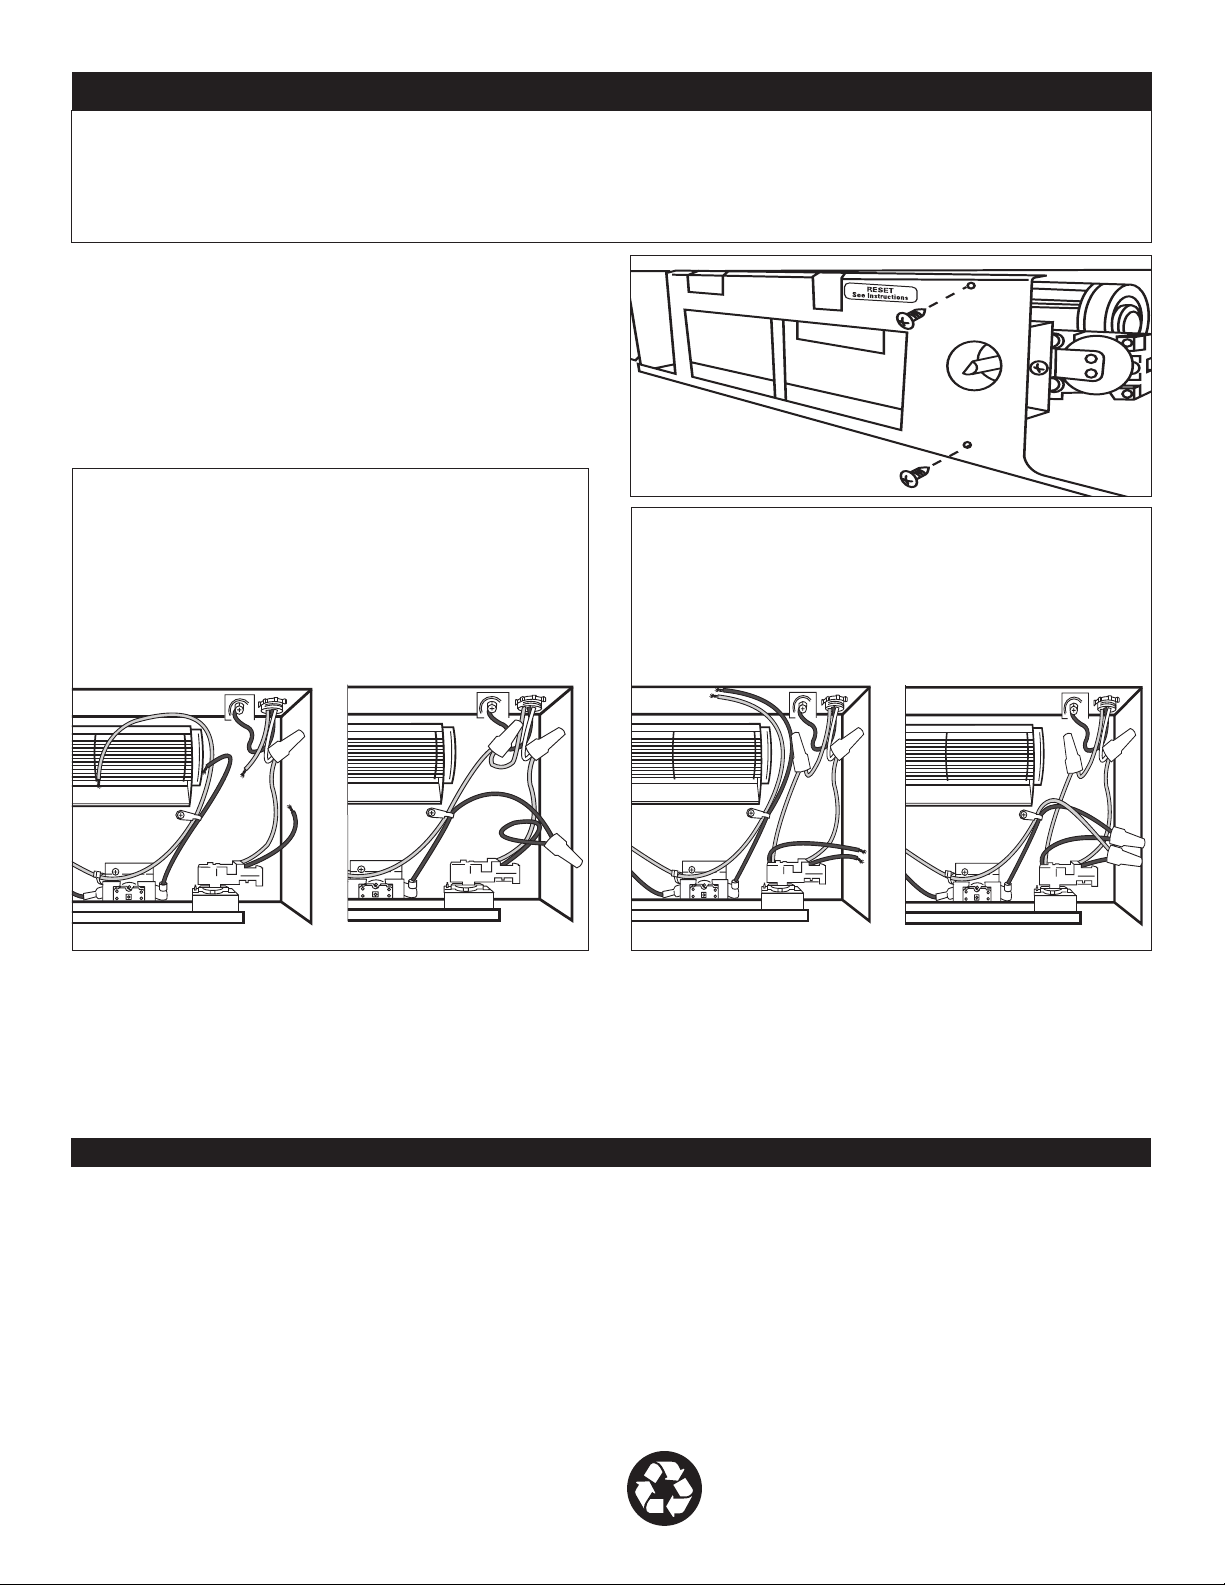
For Model UCT1 Single Pole Thermostat (2 wires)
4a. Connect the red thermostat wire to one of the power
supply wires using an insulated wire connector (not
included). See Figure 2.
4b. Connect the black thermostat wire to one heater
wire using an insulated wire connector (not included).
Then connect the remaining power supply wire and the
remaining heater wire using an insulated wire connector
(not included). See Figure 3.
For Model UCT2 Double Pole Thermostat (4 wires)
4a. Connect the two red thermostat wires to each of the
power supply wires using insulated wire connectors (not
included). See Figure 4.
4b. Connect the two black thermostat wires to each of
the two heater wires using insulated wire connectors (not
included). See Figure 5.
1. Remove the heater lid (top cover) from the heater
assembly.
2. Attach the thermostat and bracket assembly to the
inside of the heater as shown in Figure 1. Use the two
screws provided and screw in from the front of the
heater.
3. Proceed with Steps 4a and 4b for model UCT1 or
UCT2, then proceed to Step 5.
1. All electrical work and materials must comply
with the National Electric Code (NEC), the Occu-
pational Safety and Health Act (OSHA), and all
state and local codes.
2. Use copper conductors only.
3. Turn off power to heater circuit at main discon-
nect panel.
4. Connect grounding lead to grounding screw
provided.
5. Make sure all connections are tight and secure, and carefully tuck all wires into the wiring compartment.
6. Remove the plug from the front grill. Install the heater lid and front grill, and complete your heater installation
according to the Perfectoe UC owner’s manual.
7. Install the thermostat knob onto the thermostat shaft extending through the grill. Restore power to the heater.
8. Turn the thermostat knob fully clockwise. When the room reaches your comfort level, turn the knob counterclockwise
until a slight click is heard. The heater will now cycle around this preset temperature. To reduce the room temperature,
turn the knob counterclockwise. To increase the room temperature, turn the knob clockwise.
Figure 1
Figure 2 Figure 3 Figure 4 Figure 5
©2015 Cadet Printed in USA Rev 11/15 #720015