
W11760866A
IMPORTANT:
Save for local electrical inspector's use.
IMPORTANT :
À conserver pour consultation par l'inspecteur local des installations électriques.
IMPORTANT:
Guarde para tener a disposición del inspector de electricidad local.
Table of Contents/Table des matières/Índice
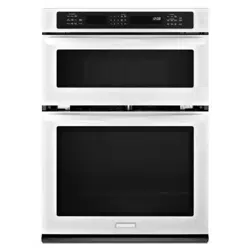
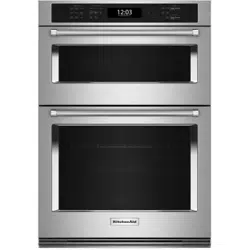
BUILT-IN MICROWAVE/OVEN
COMBO SAFETY..............................1
Built-In Microwave/Oven
Combination Safety.........................2
Internet Connectivity Guide for
Connected Appliances Only ..............4
MICROWAVE OVEN MAINTENANCE
AND CARE ......................................5
General Cleaning............................5
Self-Cleaning Cycle.........................6
Steam Clean (on some models) .........7
INSTALLATION INSTRUCTIONS .........7
REQUIREMENTS..............................7
Tools and Parts ..............................7
Location Requirements ....................8
Electrical Requirements ...................9
INSTALLATIONS ............................ 10
Prepare Built-In Oven .................... 10
Remove Oven Door(s) ................... 10
Make Electrical Connection................ 11
Install Oven ................................. 12
Install Deflector Kit ........................ 15
Replace Oven Door(s) ................... 16
Complete Installation..................... 16
SÉCURITÉ DE L’ENSEMBLE FOUR
ÉLECTRIQUE/FOUR À MICRO-
ONDES ENCASTRÉ........................ 18
Sécurité de l’ensemble four
électrique/four à micro-ondes
encastré ..................................... 18
Guide de connexion Internet pour les
appareils connectés uniquement...... 21
ENTRETIEN ET RÉPARATION DU
FOUR À MICRO-ONDES .................. 22
Nettoyage général ........................ 22
Programme Self-Cleaning
(Autonettoyage)............................ 23
Steam Clean (Nettoyage à la vapeur)
(sur certains modèles) ................... 24
INSTRUCTIONS D’INSTALLATION .... 25
SPÉCIFICATIONS ........................... 25
Outils et pièces............................. 25
Exigences d’emplacement .............. 25
Spécifications électriques ............... 27
INSTALLATION .............................. 28
Préparer le four encastré ................ 28
Enlever la/les porte(s) du four.......... 28
Effectuer le raccordement
électrique........................................... 29
Installation du four......................... 30
Installation de l’ensemble de
déflecteurs .................................. 33
Réinstallation de la/des porte(s) du
four............................................ 34
Achever l’installation...................... 35
SEGURIDAD DE LA COMBINACIÓN
DE HORNO MICROONDAS/HORNO
INTEGRADO.................................. 36
Seguridad de la combinación de
horno microondas/horno integrado ... 36
Guide de connexion Internet pour les
appareils connectés uniquement...... 39
MICROWAVE OVEN MAINTENANCE
AND CARE .................................... 40
Limpieza general .......................... 40
Ciclo Self-Cleaning (Autolimpieza).... 41
Steam Clean (Limpieza con vapor)
(en algunos modelos) .................... 42
INSTRUCCIONES DE
INSTALACIÓN................................ 43
REQUISITOS ................................. 43
Herramientas y piezas ................... 43
Requisitos de ubicación ................. 43
Requisitos eléctricos ..................... 45
INSTALACIONES............................ 46
Preparación del horno empotrado .... 46
Retire las puertas del horno ............ 46
Conexión del suministro eléctrico...... 47
Para instalar el horno..................... 48
Instale el kit de deflector ................. 51
Vuelva a colocar las puertas del
horno ......................................... 52
Completar la instalación ................. 53
BUILT-IN ELECTRIC MICROWAVE/OVEN
COMBINATION OM
MANUEL D’UTILISATION DE L’ENSEMBLE FOUR/
FOUR À MICRO-ONDES ÉLECTRIQUE ENCASTRÉ
OM COMBINACIÓN DE HORNO MICROONDAS/
HORNO ELÉCTRICO INTEGRADO
2
BUILT-IN MICROWAVE/OVEN COMBINATION SAFETY
Your safety and the safety of others are very important.
We have provided many important safety messages in this manual and on your appliance. Always read and obey all safety
messages.
This is the safety alert symbol.
This symbol alerts you to potential hazards that can kill or hurt you and others.
All safety messages will follow the safety alert symbol and either the word “DANGER” or “WARNING.” These
words mean:
DANGER
You can be killed or seriously injured if you don't
immediately follow instructions.
WARNING
You can be killed or seriously injured if you don’t follow
instructions.
All safety messages will tell you what the potential hazard is, tell you how to reduce the chance of injury, and tell you what can
happen if the instructions are not followed.
IMPORTANT SAFETY INSTRUCTIONS
WARNING: To reduce the risk of fire, electric shock, or injury to persons when using the appliance, follow basic precautions,
including the following:
� Proper Installation - The appliance, when installed, must be
electrically grounded in accordance with local codes, or in
the absence of local codes, with the National Electrical
Code, ANSI/NFPA 70 or the Canadian Electrical Code,
CSA C22.1-02. In Canada, the appliance must be
electrically grounded in accordance with Canadian
Electrical Code. Be sure your appliance is properly installed
and grounded by a qualified technician.
� Never Use Your Appliance for Warming or Heating the
Room.
� Do Not Leave Children Alone - Children should not be left
alone or unattended in area where appliance is in use.
They should never be allowed to sit or stand on any part of
the appliance.
� Wear Proper Apparel – Loose-fitting or hanging garments
should never be worn while using the appliance.
� User Servicing – Do not repair or replace any part of the
appliance unless specifically recommended in the manual.
All other servicing should be referred to a qualified
technician.
� Storage in or on Appliance – Flammable materials should
not be stored in an oven or near surface units.
� This appliance is not intended for storage.
� Do Not Use Water on Grease Fires – Smother fire or flame
or use dry chemical or foam-type extinguisher.
� Do not use replacement parts that have not been
recommended by the manufacturer (e.g. parts made at
home using a 3D printer).
� Use Only Dry Potholders – Moist or damp potholders on hot
surfaces may result in burns from steam. Do not let
potholder touch hot heating elements. Do not use a towel or
other bulky cloth.
� Use Care When Opening Door – Let hot air or steam
escape before removing or replacing food.
� DO NOT TOUCH HEATING ELEMENTS OR INTERIOR
SURFACES OF OVEN – Heating elements may be hot
even though they are dark in color. Interior surfaces of an
oven become hot enough to cause burns. During and after
use, do not touch, or let clothing or other flammable
materials contact heating elements or interior surfaces of
oven until they have had sufficient time to cool. Other
surfaces of the appliance may become hot enough to cause
burns – among these surfaces are the coil and cooktop
elements, oven vent openings and surfaces near these
openings, oven doors, and windows of oven doors.
� Do Not Heat Unopened Food Containers – Build-up of
pressure may cause container to burst and result in injury.
� Keep Oven Vent Ducts Unobstructed.
SAVE THESE INSTRUCTIONS

3
IMPORTANT SAFETY INSTRUCTIONS
WARNING: To reduce the risk of fire, electric shock, or injury to persons when using the appliance, follow basic precautions,
including the following:
� Placement of Oven Racks – Always place oven racks in
desired location while oven is cool. If rack must be moved
while oven is hot, do not let potholder contact hot heating
element in oven.
For self-cleaning ovens:
� CAUTION: DO NOT LEAVE FOOD OR COOKING
UTENSILS, ETC., IN OVEN DURING THE PYROLYTIC
SELF-CLEANING MODE OF OPERATION.
� Do Not Clean Door Gasket – The door gasket is essential
for a good seal. Care should be taken not to rub, damage,
or move the gasket.
� Do not use a protective coating to line the oven and do not
use commercial oven cleaner unless Certified for use in a
self-cleaning oven.
� Clean Only Parts Listed.
� Before Self-Cleaning the Oven – Remove broiler pan and
other utensils, and wipe off all excessive spillage.
For smart enabled ranges and ovens:
� Remote Operation – This appliance is configurable to allow
remote operation at any time. Do not store any flammable
materials or temperature sensitive items inside, on top or
near surface units of the appliance.
SAVE THESE INSTRUCTIONS
IMPORTANT SAFETY INSTRUCTIONS
When using electrical appliances basic safety precautions should be followed, including the following:
WARNING: To reduce the risk of burns, electric shock, fire, injury to persons, or exposure to excessive microwave energy:
� Read all instructions before using the appliance.
� Read and follow the specific "PRECAUTIONS TO AVOID
POSSIBLE EXPOSURE TO EXCESSIVE MICROWAVE
ENERGY" found in this manual.
� This appliance must be grounded. Connect only to properly
grounded outlet. See “GROUNDING INSTRUCTIONS”
found in this section.
� Install or locate this appliance only in accordance with the
provided Installation Instructions.
� Some products such as whole eggs and sealed containers -
for example, closed glass jars - are able to explode and
should not be heated in this oven.
� Use this appliance only for its intended use as described in
the manual. Do not use corrosive chemicals or vapors in
this appliance. This type of oven is specifically designed to
heat, cook, or dry food. It is not designed for industrial or
laboratory use.
� As with any appliance, close supervision is necessary when
used by children.
� Do not operate this appliance if it has a damaged cord or
plug, if it is not working properly, or if it has been damaged
or dropped.
� This appliance should be serviced only by qualified service
personnel. Contact nearest authorized service facility for
examination, repair, or adjustment.
� Do not cover or block any openings on the appliance.
� Do not store this appliance outdoors. Do not use this
product near water – for example, near a kitchen sink, in a
wet basement, near a swimming pool, or similar locations.
� Do not immerse cord or plug in water.
� Keep cord away from heated surfaces.
� Do not let cord hang over edge of table or counter.
� Do not use replacement parts that have not been
recommended by the manufacturer (e.g. parts made at
home using a 3D printer).
� See door surface cleaning instructions in the Microwave
Oven and Maintenance Care section.
� To reduce the risk of fire in the oven cavity:
• Do not overcook food. Carefully attend appliance when
paper, plastic, or other combustible materials are placed
inside the oven to facilitate cooking.
• Remove wire twist-ties from paper or plastic bags before
placing bag in oven.
• If materials inside the oven ignite, keep oven door
closed, turn oven off, and disconnect the power cord, or
shut off power at the fuse or circuit breaker panel.
• Do not use the cavity for storage purposes. Do not leave
paper products, cooking utensils, or food in the cavity
when not in use.
� Liquids, such as water, coffee, or tea are able to be
overheated beyond the boiling point without appearing to
be boiling. Visible bubbling or boiling when the container is
removed from the microwave oven is not always present.
THIS COULD RESULT IN VERY HOT LIQUIDS
SUDDENLY BOILING OVER WHEN THE CONTAINER IS
DISTURBED OR A UTENSIL IS INSERTED INTO THE
LIQUID.
For microwave ovens not intended for use above another
heating appliance:
� Do not operate any heating or cooking appliance beneath
this appliance.
� Do not mount unit over or near any portion of a heating or
cooking appliance.
� Do not mount over a sink.
� Do not store anything directly on top of the appliance
surface when the appliance is in operation.
SAVE THESE INSTRUCTIONS

4
PRECAUTIONS TO AVOID POSSIBLE EXPOSURE TO
EXCESSIVE MICROWAVE ENERGY
(a) Do not attempt to operate this oven with the door open since
open-door operation can result in harmful exposure to
microwave energy. It is important not to defeat or tamper with
the safety interlocks.
(b) Do not place any object between the oven front face and the
door or allow soil or cleaner residue to accumulate on sealing
surfaces.
(c) Do not operate the oven if it is damaged. It is particularly
important that the oven door close properly and that there is
no damage to the:
(1) Door (bent),
(2) Hinges and latches (broken or loosened),
(3) Door seals and sealing surfaces
(d) The oven should not be adjusted or repaired by anyone
except properly qualified service personnel.
Internet Connectivity Guide for Connected Appliances Only
IMPORTANT: Proper installation of your appliance prior to use is your responsibility. Be sure to read and follow the installation
instructions that came with your appliance.
Connectivity requires Wi-Fi and account creation. App features and functionality are subject to change. Data rates may apply. Once
installed, launch the app. You will be guided through the steps to set up a user account and to connect your appliance.
You Will Need:
� A home wireless router supporting Wi-Fi, 2.4 Ghz with WPA2 security. If you are unsure of your router’s capabilities, refer to the router
manufacturer’s instructions.
� The router to be on and have a live internet connection.
� The 10–character SAID code for your appliance. The SAID code is either printed on a label on the appliance or found on the LCD
screen.
Federal Communications Commission (FCC) Compliance Notice
This device complies with Part 15 of the FCC Rules. Operation is subject to the following two conditions:
1. This device may not cause harmful interference, and
2. This device must accept any interference received, including interference that may cause undesired operation.
Changes or modifications not expressly approved by the party responsible for compliance could void the user’s authority to operate the
equipment.
Industry Canada (IC) Compliance Notice
This Device complies with Industry Canada License-exempt RSS standard(s). Operation is subject to the following two conditions:
1. This device may not cause interference.
2. This device must accept any interference, including interference that may cause undesired operation of the device.
Under Industry Canada regulations, this radio transmitter may only operate using an antenna of a type and maximum (or lesser) gain
approved for the transmitter by Industry Canada. To reduce potential radio interference to other users, the antenna type and its gain
should be so chosen that the equivalent isotropically radiated power (e.i.r.p.) is not more than that necessary for successful
communication.
To comply with FCC and Industry Canada RF radiation exposure limits for general population, antenna(s) used for this transmitter must
be installed such that a minimum separation distance of 20 cm is maintained between the radiator (antenna) and all persons at all times
and must not be co-located or operating in conjunction with any other antenna or transmitter.
If this equipment does cause harmful interference to radio or television reception, which can be determined by turning the equipment off
and on, the user is encouraged to try to correct the interference by one of the following measures:
� Reorient or relocate the receiving antenna.
� Increase the separation between the equipment and receiver.
� Connect the equipment into an outlet on a circuit different from
that to which the receiver is connected.
� Consult the dealer or an experienced radio/TV technician for
help.

5
MICROWAVE OVEN
MAINTENANCE AND CARE
General Cleaning
IMPORTANT: Before cleaning, make sure all controls are off and
the oven and cooktop are cool. Always follow label instructions on
cleaning products.
Soap, water, and a soft cloth or sponge are suggested first, unless
otherwise noted.
METALLIC PAINT (on some models)
Do not use abrasive cleaners, cleaners with bleach, rust
removers, ammonia, or sodium hydroxide (lye) because paint
surface may stain (Same as single / double manual).
STAINLESS STEEL AND BLACK STAINLESS
STEEL (on some models)
NOTE: To avoid damage to stainless steel surfaces, do not use
soap-filled scouring pads, abrasive cleaners, Cooktop Cleaner,
steel-wool pads, gritty washcloths or abrasive paper towels.
Damage may occur to stainless steel surfaces, even with one-time
or limited use.
Rub in direction of grain to avoid damaging.
Cleaning Method:
� Affresh
®
†
Stainless Steel Cleaner Part Number W10355016
(not included) or affresh
®
Stainless Steel Cleaning Wipes Part
Number W10355049 (not included):
See the Quick Start Guide for ordering information.
� Liquid detergent or all-purpose cleaner: Rinse with clean water
and dry with soft, lint-free cloth.
� Vinegar for hard water spots.
EXTERIOR PORCELAIN ENAMEL SURFACES (on
some models)
Food spills containing acids, such as vinegar and tomato, should
be cleaned as soon as the entire oven is cool. These spills may
affect the finish.
Cleaning Method:
� Glass cleaner, mild liquid cleaner or nonabrasive scrubbing
pad:
Gently clean around the model/serial/rating plate because
scrubbing may remove numbers.
� Affresh
®
Kitchen and Appliance Cleaner Part Number
W10355010 (not included):
See the Quick Start Guide for ordering information.
MICROWAVE OVEN DOOR AND EXTERIOR
The area where the oven door and frame touch when closed
should be kept clean.
Cleaning Method:
� Mild, nonabrasive soaps and detergents:
Rinse with clean water. and dry with soft, lint-free cloth.
� Glass cleaner and paper towels or nonabrasive plastic
scrubbing pad:
Apply glass cleaner to towel, not directly to surface.
CONTROL PANEL AND OVEN DOOR EXTERIOR
To avoid damage to the control panel, do not use abrasive
cleaners, steel-wool pads, gritty washcloths or abrasive paper
towels.
The area where the oven door and frame touch when closed
should be kept clean.
Cleaning Method:
� Glass cleaner and a soft cloth or sponge or nonabrasive
plastic scrubbing pad:
Apply glass cleaner to soft cloth or sponge, not directly on
panel/Surface.
� Affresh
®
Kitchen and Appliance Cleaner Part Number
W10355010 (not included):
See the Quick Start Guide for ordering information.
OVEN DOOR INTERIOR
Cleaning Method:
� Self-Cleaning cycle:
For optimal door cleaning result, wipe away any deposits with
a damp sponge before running cycle.
OVEN CAVITY
Do not use oven cleaners.
Food spills should be cleaned when oven cools. At high
temperatures, foods react with porcelain and staining, etching,
pitting or faint white spots can result.
Cleaning Method:
� Self-Cleaning cycle:
See “Self-Cleaning Cycle” first. Remove racks or they will
discolor and become harder to slide. If this happens, a light
coating of vegetable oil applied to the rack guides will help
them slide.
MICROWAVE OVEN CAVITY
To avoid damage to microwave oven cavity, do not use soap-filled
scouring pads, abrasive cleaners, steel-wool pads, gritty
washcloths, or some paper towels.
On stainless steel models, rub in direction of grain to avoid
damaging.
The area where the oven door and frame touch when closed
should be kept clean.
Cleaning Method:
Average Soil
� Mild, nonabrasive soaps and detergents:
Rinse with clean water and dry with soft, lint-free cloth.
Heavy Soil
� Mild, nonabrasive soaps and detergents:
Heat 1 cup (250 mL) of water for 2 to 5 minutes in oven. Steam
will soften soil. Rinse with clean water and dry with soft,
lint-free cloth.
Odors
� Lemon juice or vinegar:
� Heat 1 cup (250 mL) of water with 1 tablespoon (15 mL) of
either lemon juice or vinegar for 2 to 5 minutes in oven.
OVEN RACKS
� Steel-wool pad
� Dishwasher
� For racks that have discolored and are harder to slide, a light
coating of vegetable oil applied to the rack guides will help
them slide.
✝affresh
®
is a registered trademark of Whirlpool, U.S.A.
6
METALLIC PAINT (on some models)
Do not use abrasive cleaners, cleaners with bleach, rust
removers, ammonia or sodium hydroxide (lye) because paint
surface may stain.
MICROWAVE OVEN CEILING
The broil element does not need cleaning since the intense heat
will burn off any food spatters. However, the ceiling above the broil
element may need regular cleaning.
Cleaning Method:
� Warm water, mild detergent, and a sponge.
To Clean:
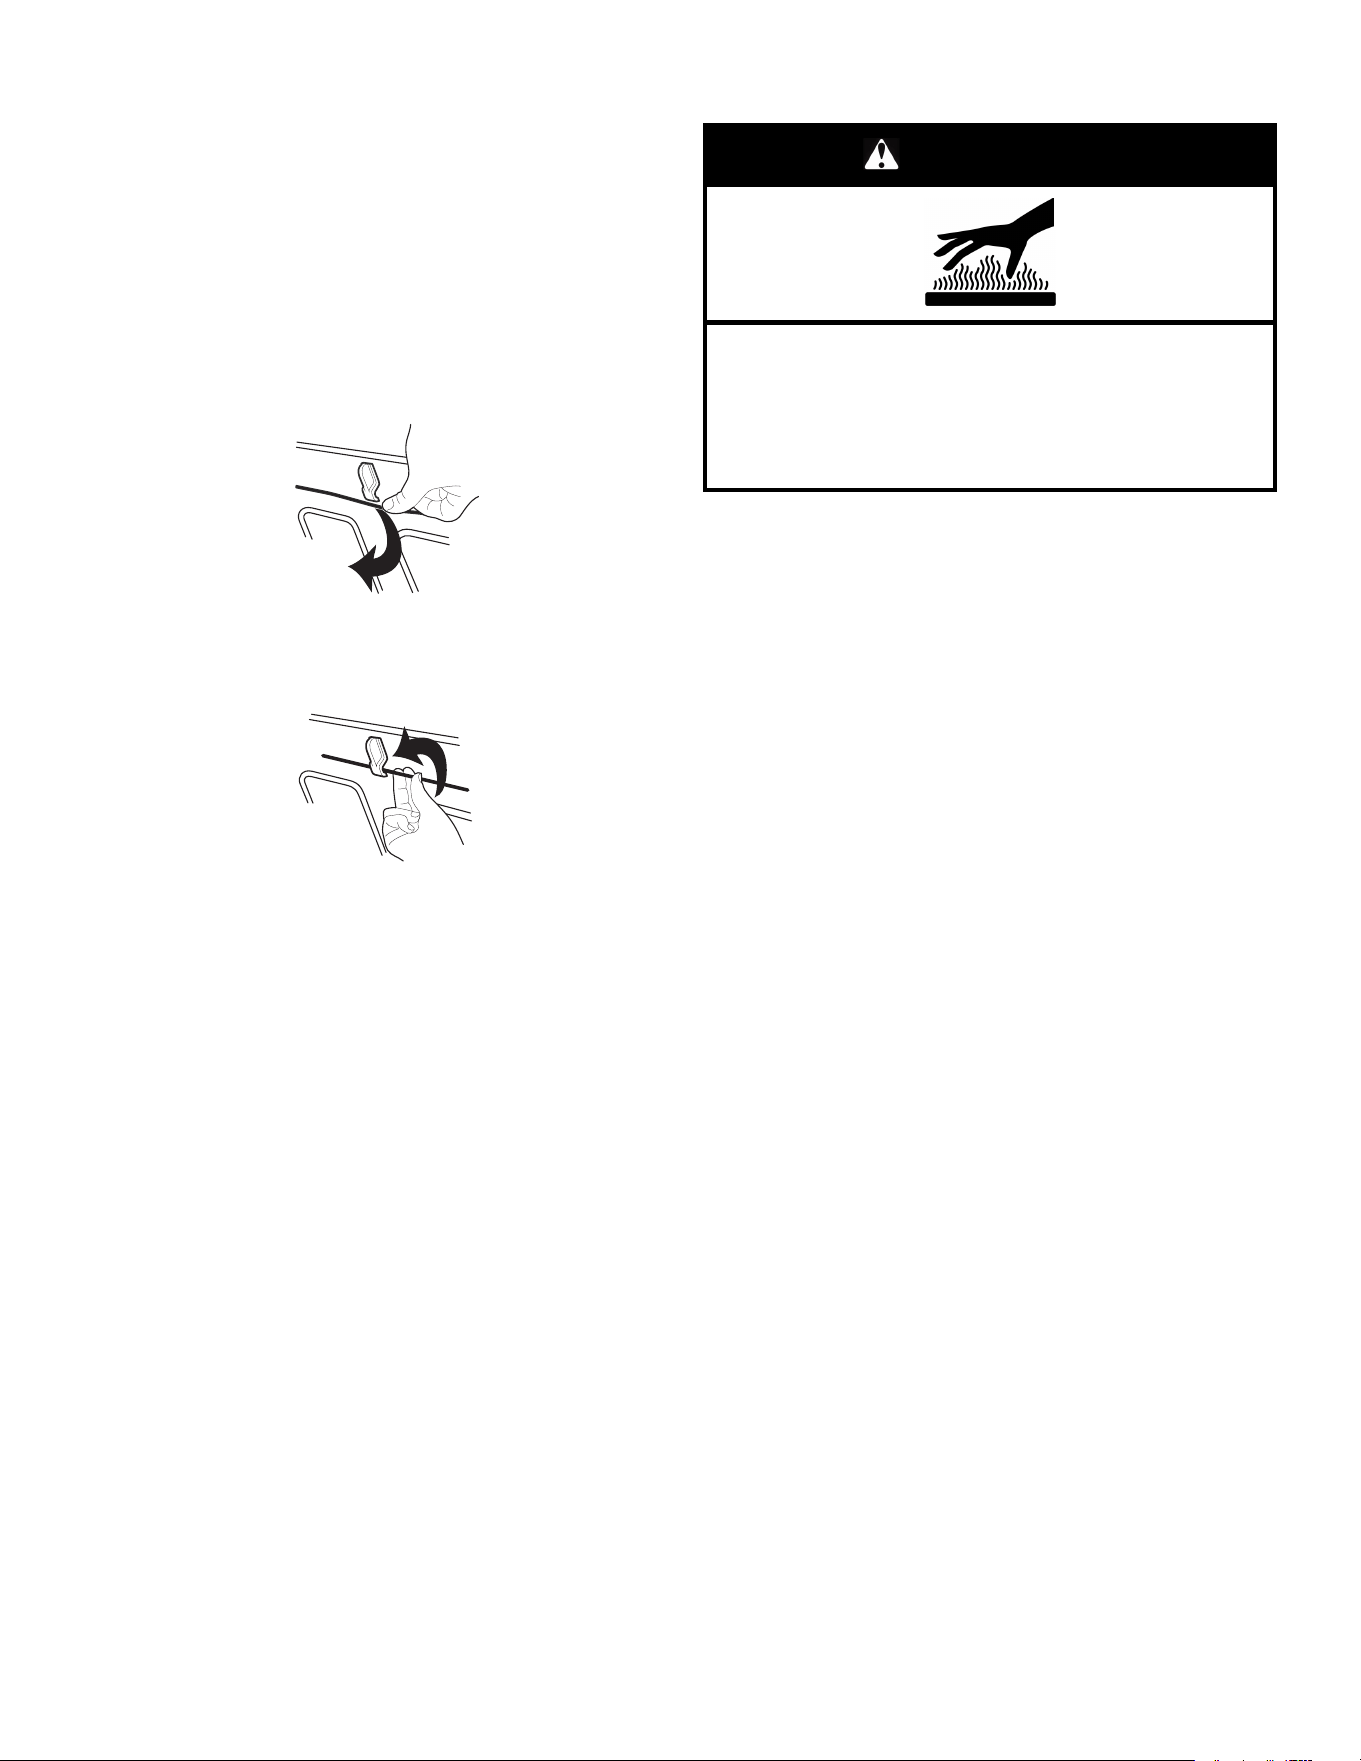
1. Push the fastening thread gently towards the back of the
ceiling and then lower it to release the broil element.
2. Lower the front of the broil element to access the ceiling for
cleaning.
3. Raise broil element back up and return the fastening thread
back to its original location.
Always return the broil element to the cooking position after
cleaning.
TURNTABLE
Replace turntable immediately after cleaning. Do not operate the
microwave oven without the turntable in place.
Cleaning Method:
� Mild cleanser and scouring pad
� Dishwasher
CRISPER PAN (on some models)
To avoid damage to browning pan, do not immerse or rinse with
water while the crisper pan is hot. Do not use steel-wool pads.
Cleaning Method:
� Warm water, mild detergent, and a sponge. Heavily soiled
areas can be cleaned with a scouring pad and mild cleanser
� Dishwasher
BAKING TRAY
� Dishwasher
KITCHENAID™ STEAMER VESSEL
� Dishwasher
TURNTABLE SUPPORT AND ROLLERS, HUB,
CRISPER PAN HANDLE
� Dishwasher
Self-Cleaning Cycle
WARNING
Burn Hazard
Do not touch the oven during the Self-Cleaning cycle.
Keep children away from the oven during Self-Cleaning
cycle.
Failure to follow these instructions can result in burns.
IMPORTANT: The health of some birds is extremely sensitive to
the fumes given off during the Self-Cleaning cycle. Exposure to
the fumes may result in death to certain birds. Always move birds
to another closed and well-ventilated room.
Self-clean the oven before it becomes heavily soiled. Heavy soil
results in longer cleaning and more smoke.
Keep the kitchen well-ventilated during the Self-Cleaning cycle to
help get rid of heat, odors, and smoke.
Do not block the oven vent(s) during the Self-Cleaning cycle. Air
must be able to move freely. See the “Oven Vents” section in the
Quick Start Guide.
Do not clean, rub, damage, or move the oven door gasket. The
door gasket is essential for a good seal.
Prepare Oven
� Remove the broiler pan, grid, cookware and bakeware, and,
on some models, the temperature probe from the oven.
� Remove oven racks to keep them shiny and easy to slide. See
“General Cleaning” section for more information.
� Remove any foil from the oven because it may burn or melt,
damaging the oven.
� Hand clean inside door edge and the 1
1
/
2
" (3.8 cm) area
around the inside oven cavity frame, being certain not to move
or bend the gasket. This area does not get hot enough during
self-cleaning to remove soil. Do not let water, cleaner, etc.,
enter slots on door frame. Use a damp cloth to clean this area.
� Wipe out any loose soil to reduce smoke and avoid damage.
At high temperatures, foods react with porcelain. Staining,
etching, pitting or faint white spots can result. This is normal
and will not affect cooking performance.
How the Cycle Works
IMPORTANT:
The heating and cooling of porcelain on steel in the oven may
result in discoloring, loss of gloss, hairline cracks and popping
sounds.
The Self-Cleaning Cycle uses very high temperatures, burning
soil to a powdery ash.
Suggested clean times are 3 hours for light soil, 4 hours for
medium soil, and 5 hours for heavy soil (includes a 30 minute
cool-down time).
Once the oven has completely cooled, remove ash with a damp
cloth. To avoid breaking the glass, do not apply a cool damp cloth
to the inner door glass before it has completely cooled.
The oven lights will not work during the Self-Cleaning cycle.

7
On double-oven models, only one oven can self-clean at a time.
If one oven is self-cleaning, the other oven cannot be set or
turned on.
NOTE: The oven has a two-speed cooling fan motor. During the
Self-Cleaning cycle, the fan(s) will operate at its highest speed to
increase airflow to better exhaust the hotter air through the oven
vent(s). An increase in noise may be noticeable during and after
the Self-Cleaning cycle until the oven cools.
To Start Self-Cleaning
Before Self-Cleaning, make sure the door is closed completely or
it will not lock and the cycle will not begin. When the oven is
locked, the doors of the oven cannot be opened. To avoid damage
to the doors, do not force the doors open when the oven is locked.
1. Touch the Tools keypad.
2. Select the Self Clean icon.
(On double-oven models): Select Upper Cavity or Lower
Cavity.
3. Select type of Self-Cleaning:
Steam: 1 hour: Clean up after everyday light spills using lower
heat and 1
1
/
4
cups (295.74 mL) of water.
High temp: Multiple levels are available and may take up to
5 hours and 1 hour cooling.
4. Follow the prompts on the oven display to prepare the oven.
5. Select START to begin the cleaning process.
OR
Select DELAY START to set a delayed Self-Cleaning cycle.
See the “To Delay Start Self-Cleaning Cycle” Section.
The oven doors will automatically lock.
NOTE: It may take a couple moments for the oven door to
automatically lock after starting the Self-Clean Cycle.
When the self cleaning cycle is complete and the oven cools,
the oven doors will unlock.
6. When the oven is completely cooled, remove ash with a damp
cloth.
To Delay Start of Self-Cleaning
Follow steps 1 through 4 above, then:
1. Select DELAY START or DELAY.
2. Select the start time of when the Self-Cleaning cycle should
begin by scrolling from left to right.
3. Select START DELAY.
The oven doors will automatically lock after the Delay Start
countdown.
When the Self-Cleaning cycle is complete and the oven cools,
the oven doors will unlock.
4. When the oven is completely cooled, remove ash with a damp
cloth.
To Stop Self-Cleaning anytime
Touch the Oven Cancel Keypad for single oven models, or the
keypads for double oven models. If the oven temperature is too
high, the door will remain locked. It will not unlock until the oven
cools.
Steam Clean (on some models)
The Steam Clean feature is designed for light oven cavity bottom
cleaning on models that have hidden bake in the oven.
Do not use oven cleaners.
Allow the oven to cool to room temperature before using the
Steam Clean feature. If your oven cavity is above 200°F (93°C),
the Steam Clean feature will not activate until it cools down.
Remove all racks and accessories from the oven cavity.
For best results, use 10 oz (295.7 mL) of distilled or filtered water.
The Steam Clean feature will take approximately 1 hour. A tone
will sound at the end of the cycle.
IMPORTANT: Because the water in the oven bottom is hot, do not
open the oven door during the Steam Clean cycle.
Touch the Oven Cancel keypad for single oven models and the
Upper/Lower keypads for double oven models at any time to end
the cycle. The display will return to the time of day.
Helpful Hints
� Once the Steam Clean cycle is complete and the oven is
completely cooled, remove all remaining water in the bottom of
the oven with a sponge or cloth.
� Wipe any remaining moisture from the oven door interior, oven
cavity interior sides, and cooktop.
� Use a soft brush or nylon scrubber to wipe the oven interior.
This may help with more stubborn stains.
� It is recommended to use distilled or filtered water, as tap
water may leave mineral deposits on the oven bottom. Use a
cloth soaked with vinegar or lemon juice to remove any
mineral deposits that may be left after the Steam Clean cycle.
� If the oven is heavily soiled, use the Self-Cleaning cycle. The
Steam Clean cycle may be used first to eliminate most of the
debris, resulting in a more effective self-cleaning.
To Steam Clean:
1. Open the oven door of the selected oven and remove all racks
and accessories from the oven cavity.
2. Pour 10 oz (295.7 mL) of distilled or filtered water into the
oven bottom. Then close the oven door.
3. Touch the Tools keypad.
On double-oven models: Select Upper Cavity or Lower Cavity.
4. Select STEAM CLEAN.
5. Select START.
6. After approximately 1 hour, a tone will sound to signal the end
of the cycle. Touch the Oven Cancel keypad for single oven
models and the Upper/Lower keypad for double oven models
to clear the display.
7. When the oven is completely cooled, remove any excess
water with a sponge or cloth and wipe down oven interior. If
needed, use a non-scratch copper scrubbing pad to remove
stubborn soils.
INSTALLATION INSTRUCTIONS
REQUIREMENTS
Tools and Parts
Gather the required tools and parts before starting
installation. Read and follow the instructions provided
with any tools listed here.
Tools Needed
� Phillips screwdriver
� Measuring tape
� Hand or electric drill (for wall cabinet installations)
� 1" (2.5 cm) drill bit (for wall cabinet installations)
� Level
� Flat-blade screwdriver
8
Parts Supplied
� #8-14 x 3/4" (1.9 cm) screws (2)
� #8-18 x 3/8" (9.5 mm) Phillips head screws - bottom vent
shield (2)
� #8-18 x 3/8" (9.5 mm) Phillips head screws - bottom
vent trim (2)
� #8-18 x 3/8" (9.5 mm) Hex head screws - plastic feet (4)
� Rear feet (2)
� Front feet (2)
� Bottom vent shield
� Bottom vent trim
Parts Needed
� Deflector Kit (on some models) (for ovens installed above
warming drawer, undercounter, or for ovens installed using
flush installation cabinetry): See the Online Ordering
Information section of your Quick Start Guide.
� UL listed or CSA-approved conduit connector
� UL listed wire connectors
Check local codes. Check existing electrical supply. See the
“Electrical Requirements” section.
It is recommended that all electrical connections be made by a
licensed, qualified electrical installer
NOTE: Be sure to purchase only whirlpool factory-certified parts
and accessories for your appliance. Your installation may require
additional parts. To order, refer to the contact information
referenced in your Quick Start Guide.
Location Requirements
IMPORTANT: Observe all governing codes and ordinances.
� Cabinet opening dimensions that are shown must be used.
Given dimensions provide minimum clearance with oven.
� Recessed installation area must completely enclose the sides
and top of the oven.
� Grounded electrical supply is required. See “Electrical
Requirements” section.
� Electrical supply junction box should be located 3" (7.6 cm)
maximum above the top enclosure surface when the oven is
installed in a wall cabinet. A 1" (2.5 cm) minimum diameter
hole should have been drilled in the right rear or left rear
corner of the top enclosure surface to pass the appliance cable
through to the junction box.
� Oven support surface must be rigid, level and flush with
bottom of cabinet cutout. Floor must be able to support a total
weight (microwave and built-in oven) of 253 lbs (115 kg) for
27" (68.6 cm) models or 280 lbs (127 kg) for 30" (76.2 cm)
models.
IMPORTANT: To avoid damage to your cabinets, check with
your builder or cabinet supplier to make sure that the materials
used will not discolor, delaminate or sustain other damage.
This oven has been designed in accordance with the
requirements of UL and CSA International and complies with
the maximum allowable wood cabinet temperatures of 194°F
(90°C).
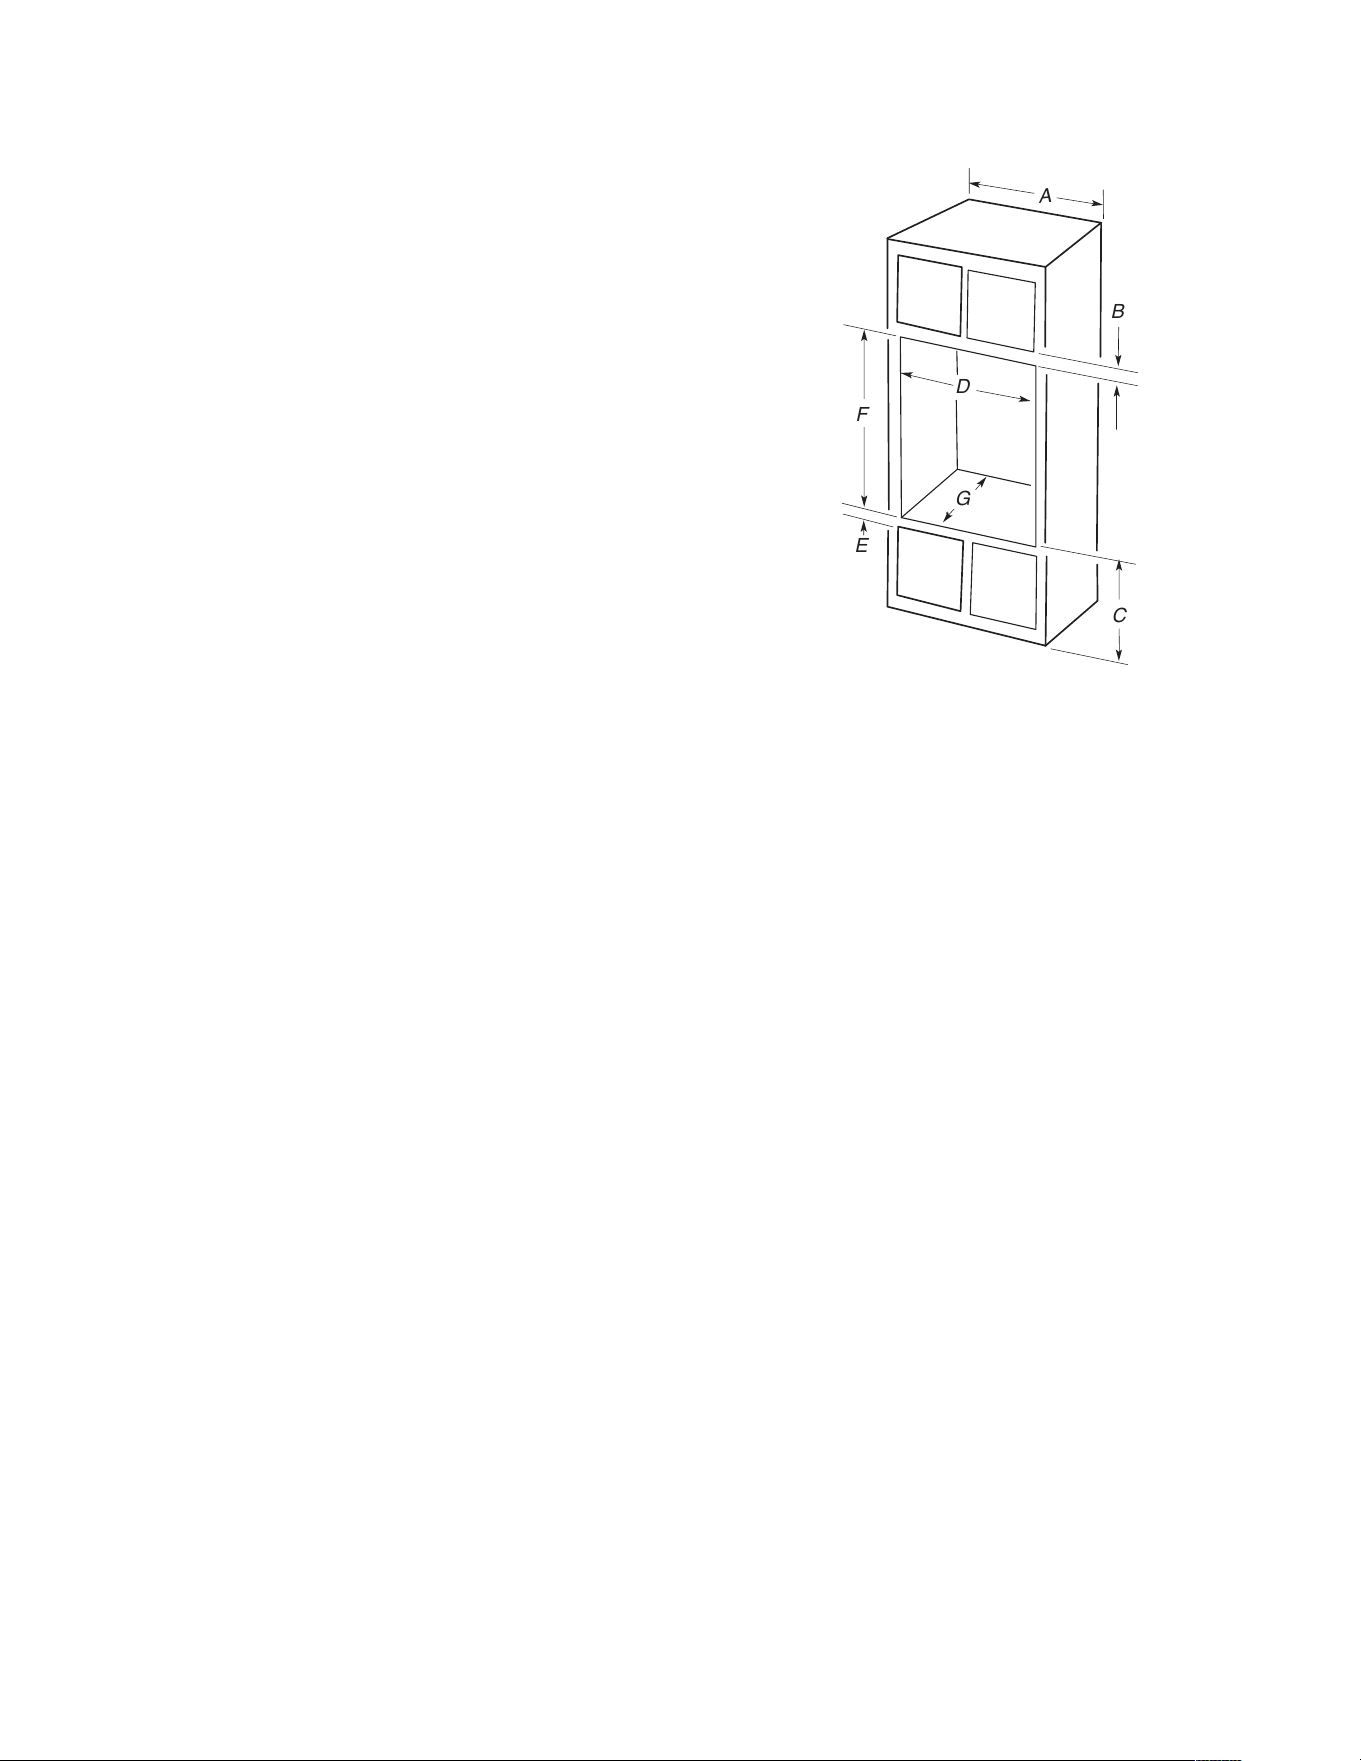
Cabinet Dimensions — Built-in Microwave/Oven
Combination
Standard Installation
F
E
A
D
G
B
C
27" (68.6 cm) models
A. 27" (68.6 cm) minimum cabinet
width
B. 1
1
/
4
" (3.2 cm) top of cutout to
bottom of upper cabinet door
C. 19
1
/
4
" (48.9 cm) bottom of
cutout to floor is
recommended.
7.5"-19
1
/
4
" (19.1-48.9 cm)
bottom of cutout to floor is
acceptable.
D. 25
1
/
2
" minimum (64.8 cm)
cutout width
E. 1
1
/
2
" (3.8 cm) minimum bottom
of cutout to top of cabinet door
F. 41
5
/
16
" (105 cm)*
recommended cutout height
G. 24" (60.7 cm) cutout depth
30" (76.2 cm) models
A. 30" (76.2 cm) minimum cabinet
width
B. 1
1
/
4
" (3.2 cm) top of cutout to
bottom of upper cabinet door
C. 19
1
/
4
" (48.9 cm) bottom of
cutout to floor is
recommended.
7.5"-19
1
/
4
" (19.1-48.9 cm)
bottom of cutout to floor is
acceptable.
D. 28
1
/
2
" (72.4 cm) minimum
cutout width
E. 1
1
/
2
" (3.8 cm) minimum bottom
of cutout to top of cabinet door
F. 41
5
/
16
" (105 cm)*
recommended cutout height
G. 24" (60.7 cm) cutout depth
*NOTE: The cutout height can be between 41
1
/
8
" (104.5 cm) and
41
1
/
2
" (105.6 cm) for microwave/oven combination.
Flush Installation
A 25" (63.5 cm) minimum cutout depth is required.
These dimensions will result in a 1/4" (6 mm) reveal on the top, a
1/4" (6 mm) reveal on the sides, and a 1/8" (3 mm) reveal on the
bottom of the wall oven. Top and bottom gaps are not required for
installation.
The front face of the cleats and platform will be visible and should
be treated as a finished surface.
9
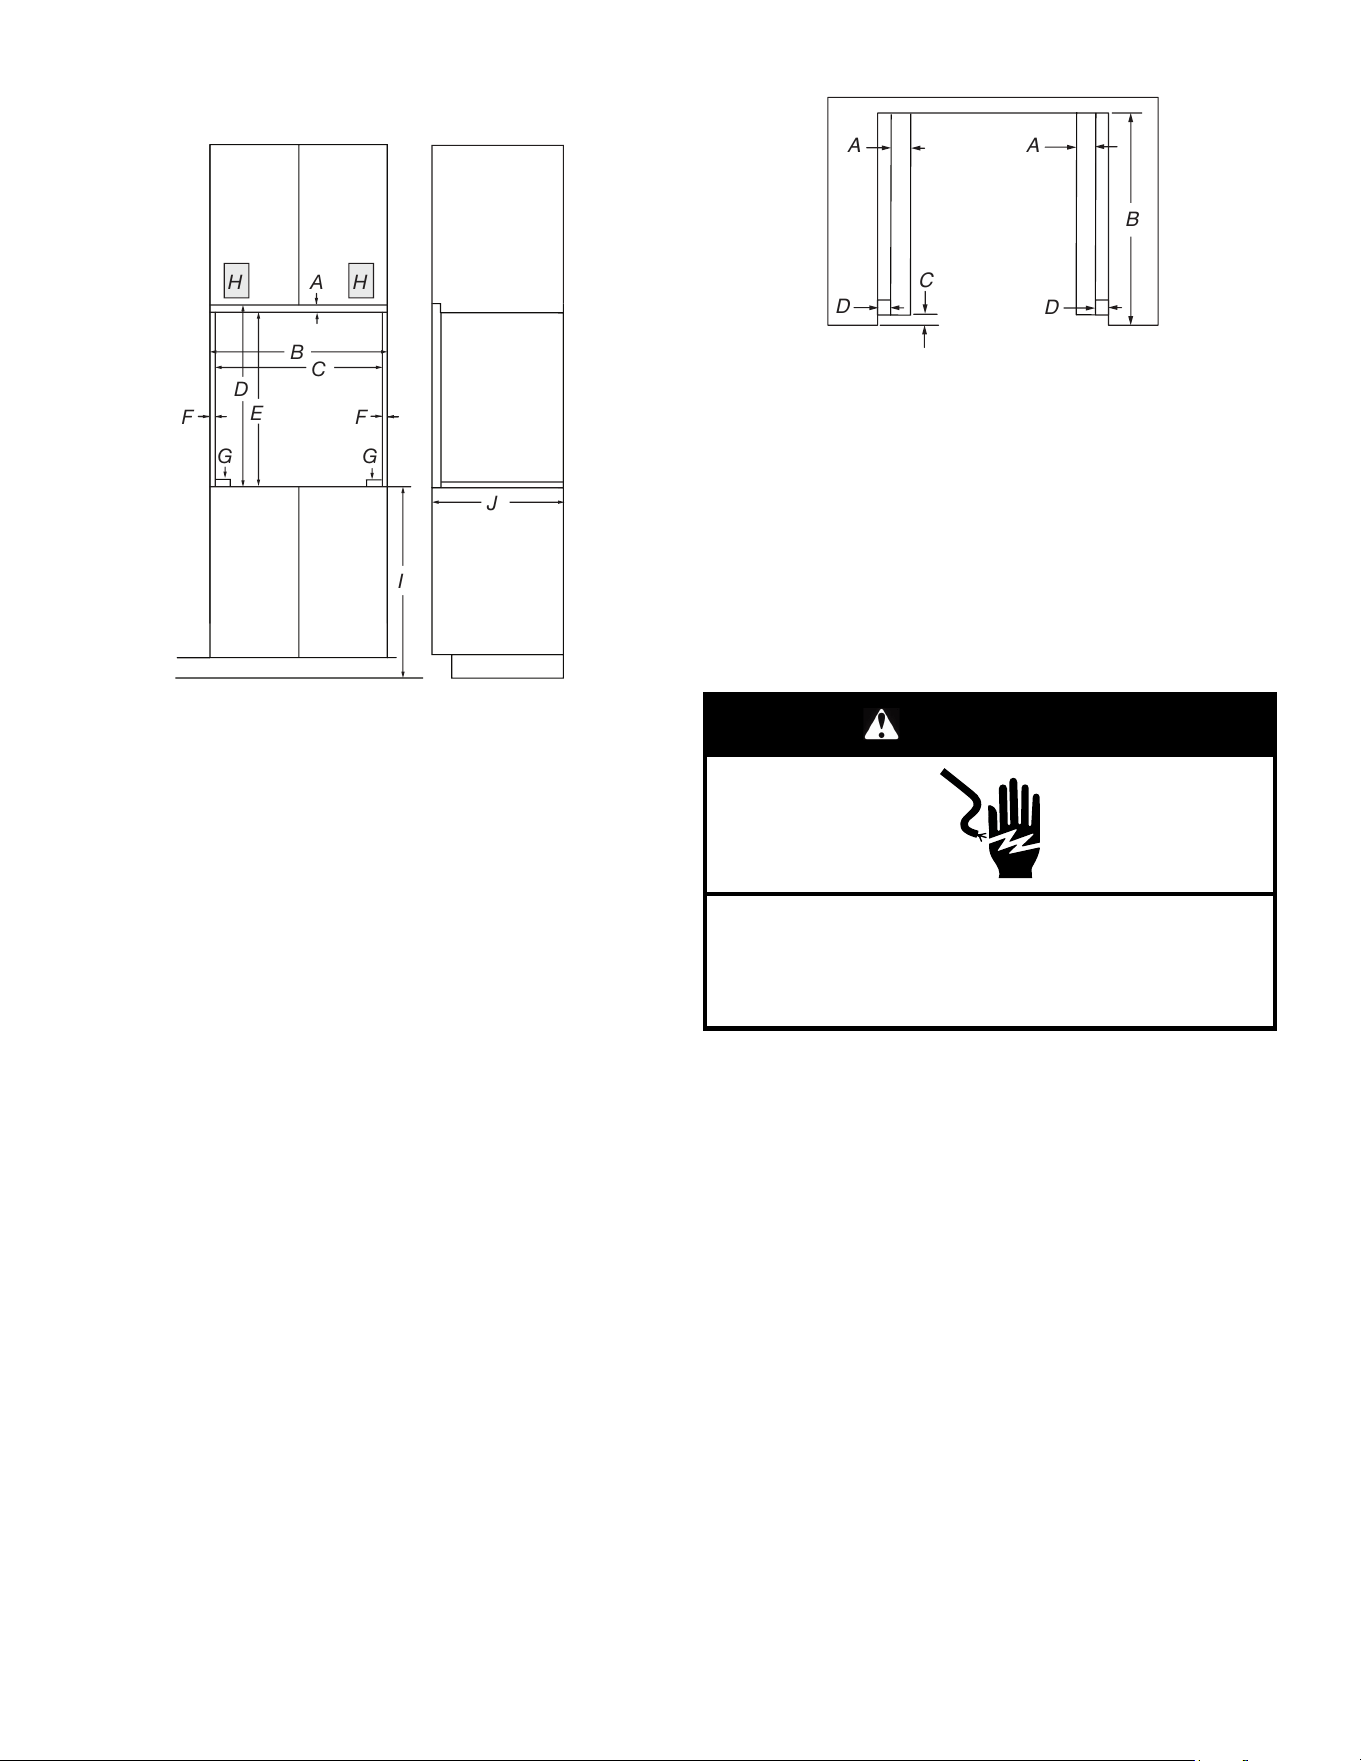
Front View Side View
A
B
C
D
E
FF
G
G
I
J
H H
27" (68.6 cm) models
A. 3/4" (1.9 cm) top cleat*
B. 27
1
/
4
" (69.2 cm) minimum
width of flush inset cutout
C. 25
7
/
8
" (65.7 cm) minimum
width of opening
D. 43" (109.2 cm) minimum height
of flush inset cutout
E. 42
1
/
2
" (107.3 cm)
recommended cutout height
F. 11/16" (1.7 cm) side cleat*
G. 1/4" (0.6 cm) recommended
with foot. 15/16" to 1
5
/
16
"
(2.3 cm to 3.5 cm) allowable
without foot.
H. Recommended junction box
location
I. 4
5
/
8
" — 19
1
/
4
" (11.7 - 48.9 cm)
bottom of cutout to floor
J. 25" (63.5 cm) minimum depth
of cutout
30" (76.2 cm) models
A. 3/4" (1.9 cm) top cleat*
B. 30
1
/
4
" (76.8 cm) minimum
width of flush inset cutout
C. 28
7
/
8
" (73.3 cm) minimum
width of opening
D. 43" (109.2 cm) minimum height
of flush inset cutout
E. 42
1
/
2
" (107.3 cm)
recommended cutout height
F. 11/16" (1.7 cm) side cleat*
G. 1/4" (0.6 cm) recommended
with foot. 15/16" to 1
5
/
16
"
(2.3 cm to 3.5 cm) allowable
without foot.
H. Recommended junction box
location
I. 4
5
/
8
" — 19
1
/
4
" (11.7 - 48.9 cm)
bottom of cutout to floor
J. 25" (63.5 cm) minimum depth
of cutout
*Cleats and spacers must be recessed 1
3
/
8
" (3.5 cm) from the
front of the cabinet.
B
A A
D
D
C
Top View
27" (68.6 cm) models
A. 2" (5.1 cm) spacer the entire
depth of the cutout*
B. 25" (63.5 cm) depth of cutout
C. 1
1
/
2
" (3.5 cm) recess from front
of cabinet
D. 11/16" (1.7 cm) side cleat*
30" (76.2 cm) models
A. 2" (5.1 cm) spacer the entire
depth of the cutout*
B. 25" (63.5 cm) depth of cutout
C. 1
1
/
2
" (3.5 cm) recess from front
of cabinet
D. 11/16" (1.7 cm) side cleat*
*Cleats and spacers must be recessed 1
3
/
8
" (3.5 cm) from the
front of the cabinet.
Electrical Requirements
WARNING
Electrical Shock Hazard
Electrically ground appliance.
Failure to do so could result in death, fire, or electrical
shock.
If codes permit and a separate ground wire is used, it is
recommended that a qualified electrical installer determine that
the ground path and the wire gauge are in accordance with local
codes.
Check with a qualified electrical installer if you are not sure the
oven is properly grounded.
This oven must be connected to a grounded metal, permanent
wiring system.
Be sure that the electrical connection and wire size are adequate
and in conformance with the National Electrical Code, ANSI/NFPA
70-latest edition or CSA Standards C22.1-94, Canadian Electrical
Code, Part 1 and C22.2 No. O-M91-latest edition, and all local
codes and ordinances.
A copy of the above code standards can be obtained from:
National Fire Protection Association
1 Batterymarch Park
Quincy, MA 02169-7471
CSA International
8501 East Pleasant Valley Road
Cleveland, OH 44131-5575

10
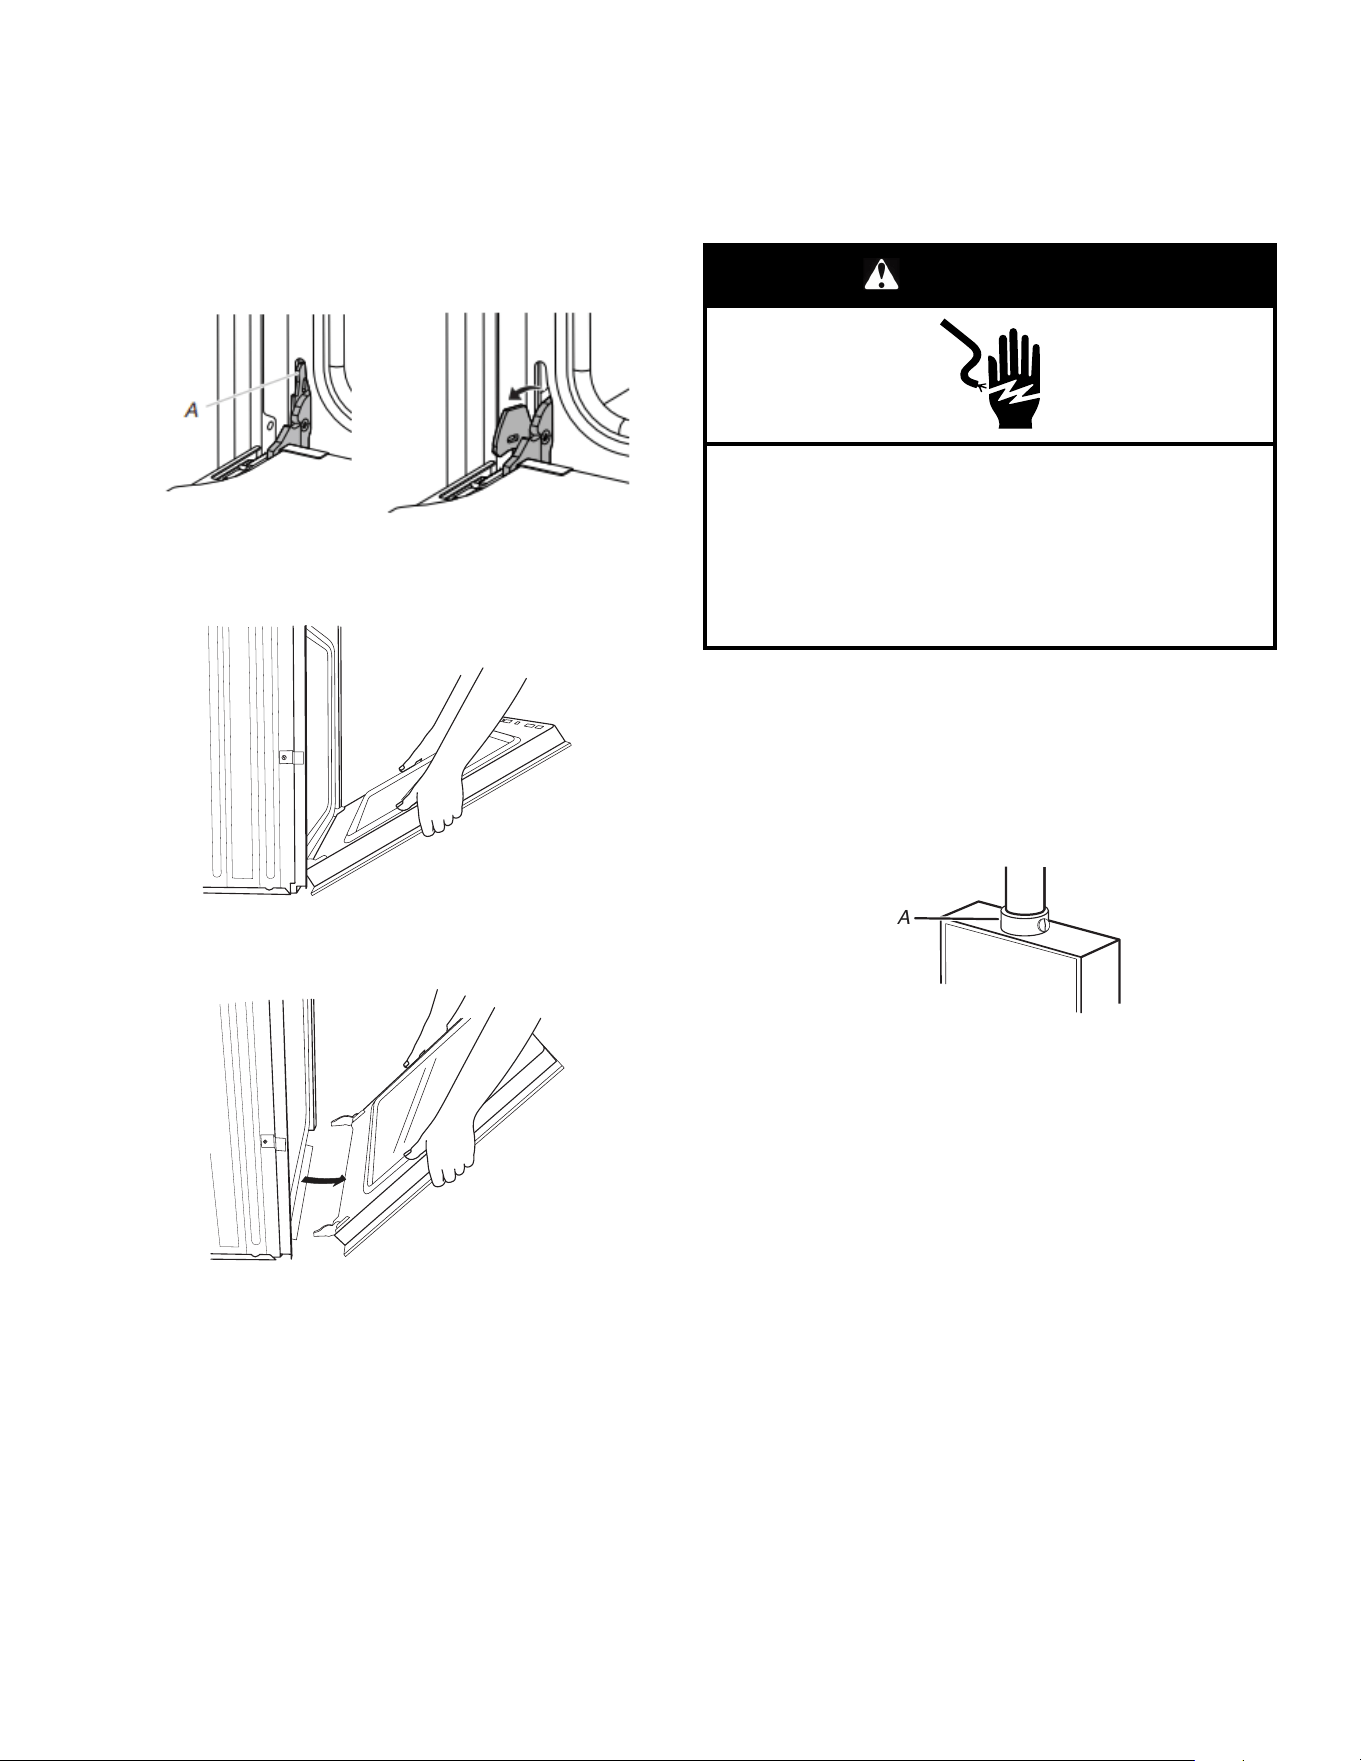
Electrical Connection
To properly install your oven, you must determine the type
of electrical connection you will be using and follow the
instructions provided for it here.
� Oven must be connected to the proper electrical voltage,
amperage, and frequency as specified on the model/serial/
rating plate. See the following illustration.
A
A. Model/serial/rating plate
� Models rated from 7.3 to 9.6 kW at 240 V (6.3 to 8.3 kW at
208 V) require a separate 40 A circuit. Models rated from 4.9
to 7.2 kW at 240 V (4.3 to 6.2 kW at 208 V) require a separate
30 A circuit. Models rated at 4.8 kW and below at 240 V
(4.2 kW and below at 208 V) require a separate 20 A circuit.
� A circuit breaker is recommended.
� Connect directly to the fused disconnect (or circuit breaker
box) through flexible, armored or nonmetallic sheathed, copper
cable (with grounding wire). See the “Make Electrical
Connection” section.
� Flexible conduit from the oven should be connected directly to
the junction box.
� Do not cut the conduit. The length of conduit provided
is for serviceability of the oven.
� A UL listed or CSA approved conduit connector
must be provided.
� If the house has aluminum wiring, follow the procedure below:
Connect the aluminum wiring using special connectors and/or
tools designed and UL listed for joining copper to aluminum.
Follow the electrical connector manufacturer’s recommended
procedure. Aluminum/copper connection must conform with
local codes and industry accepted wiring practices.
Be sure that the electrical connection and wire size are
adequate and in conformance with the National Electrical
Code, ANSI/ NFPA 70-latest edition or CSA Standards
C22.1-94, Canadian Electrical Code, Part 1and C22.2 No. O-
M91-latest edition, and all local codes and ordinances. A copy
of the above code standards can be obtained from: National
Fire Protection Association 1 Batterymarch Park Quincy, MA
02169-7471 CSA International 8501 East Pleasant Valley
Road Cleveland, OH 44131-5575.
INSTALLATIONS
Prepare Built-In Oven
1. Decide on the final location for the oven. Avoid drilling or
cutting into house wiring during installation.
WARNING
Excessive Weight Hazard
Use two or more people to move and install or uninstall
appliance.
Failure to do so can result in back or other injury.
2. To avoid floor damage, set the oven onto cardboard prior to
installation. Do not use handle or any portion of the front frame
for lifting.
3. Remember to remove bottom vent from the foam packing on
top of oven.
4. Remove the shipping materials and tape from the oven.
Remember to keep the corner posts and other materials
that may be needed for installation.
5. Remove the hardware package from inside the bag containing
literature.
6. Remove and set aside racks and other parts from inside the
oven.
7. Move oven and cardboard close to the oven’s final location.
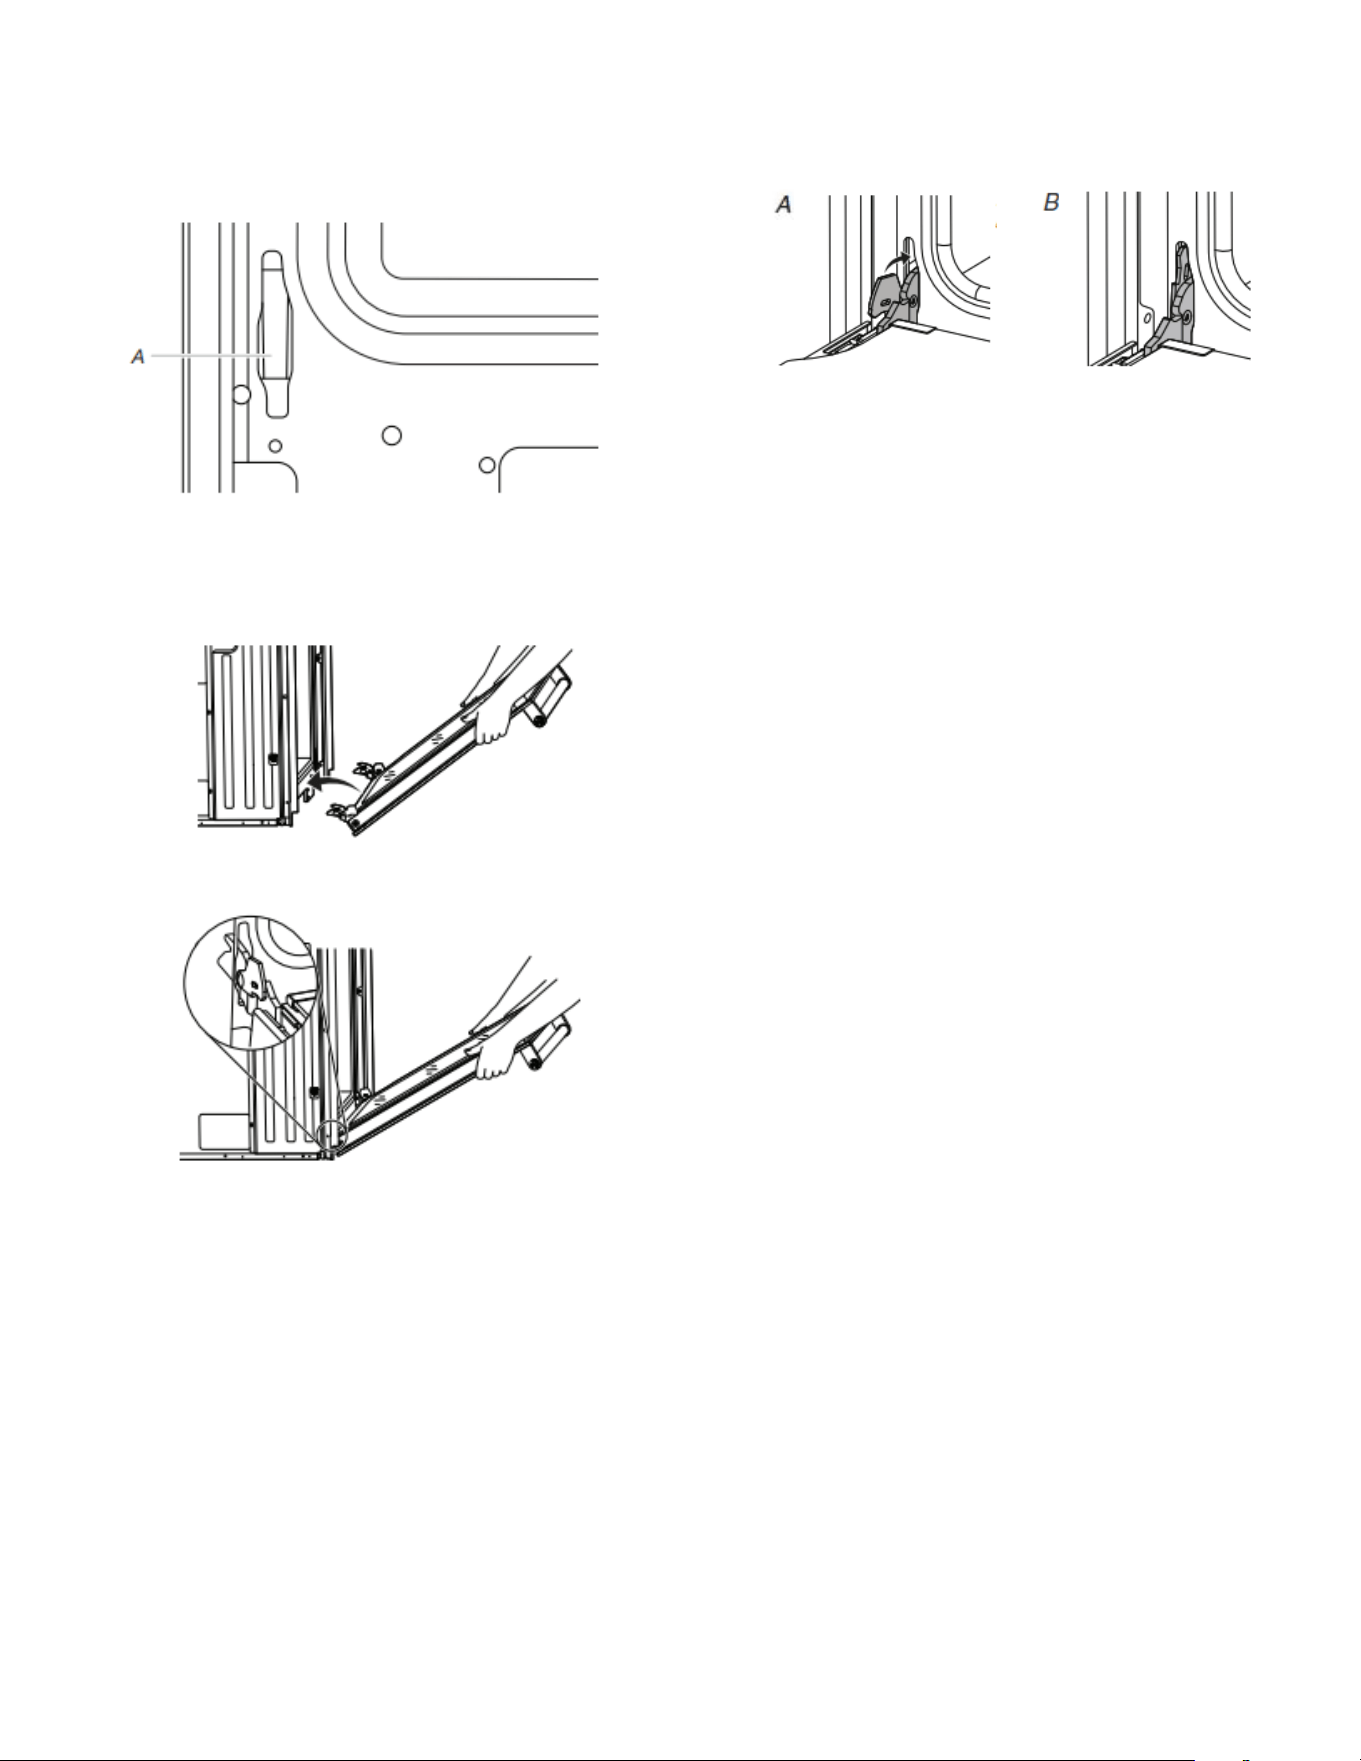
Remove Oven Door(s)
IMPORTANT: Use 2 hands to remove oven door. For double
ovens, repeat the process for each door.
1. Prior to removing the oven door, prepare a surface where you
will place it. This surface should be flat and covered with a soft
blanket, or use the corner posts from your packaging material.
2. Fully open the oven door.
A. Door hinges
11
3. Locate the oven door hinge locks in both corners of the oven
door, and rotate the hinge locks toward the oven door to the
unlocked position. If the door hinge lock is not rotated fully
(see unlocked position in illustration), the door will not remove
properly.
Oven door hinge lock in locked
position
Oven door hinge lock in unlocked
position
A. Grip here to rotate
4. Gently start to close the door. The door will stop at a partially
closed position.
5. Using 2 hands, grasp the edges of the oven door. Close the
oven door slightly past the stop position to take the weight off
of the door hinges, and then pull the oven door up.
6. Pull the oven door toward you, and then remove. You may
need to gently shift door from side to side as you pull.
7. Set the oven door aside on the prepared covered work
surface with the oven door resting on its handle.
8. To continue with the oven installation, go to the
“Positioning Oven Feet for Multiple Cabinet Cutout
Heights” section.
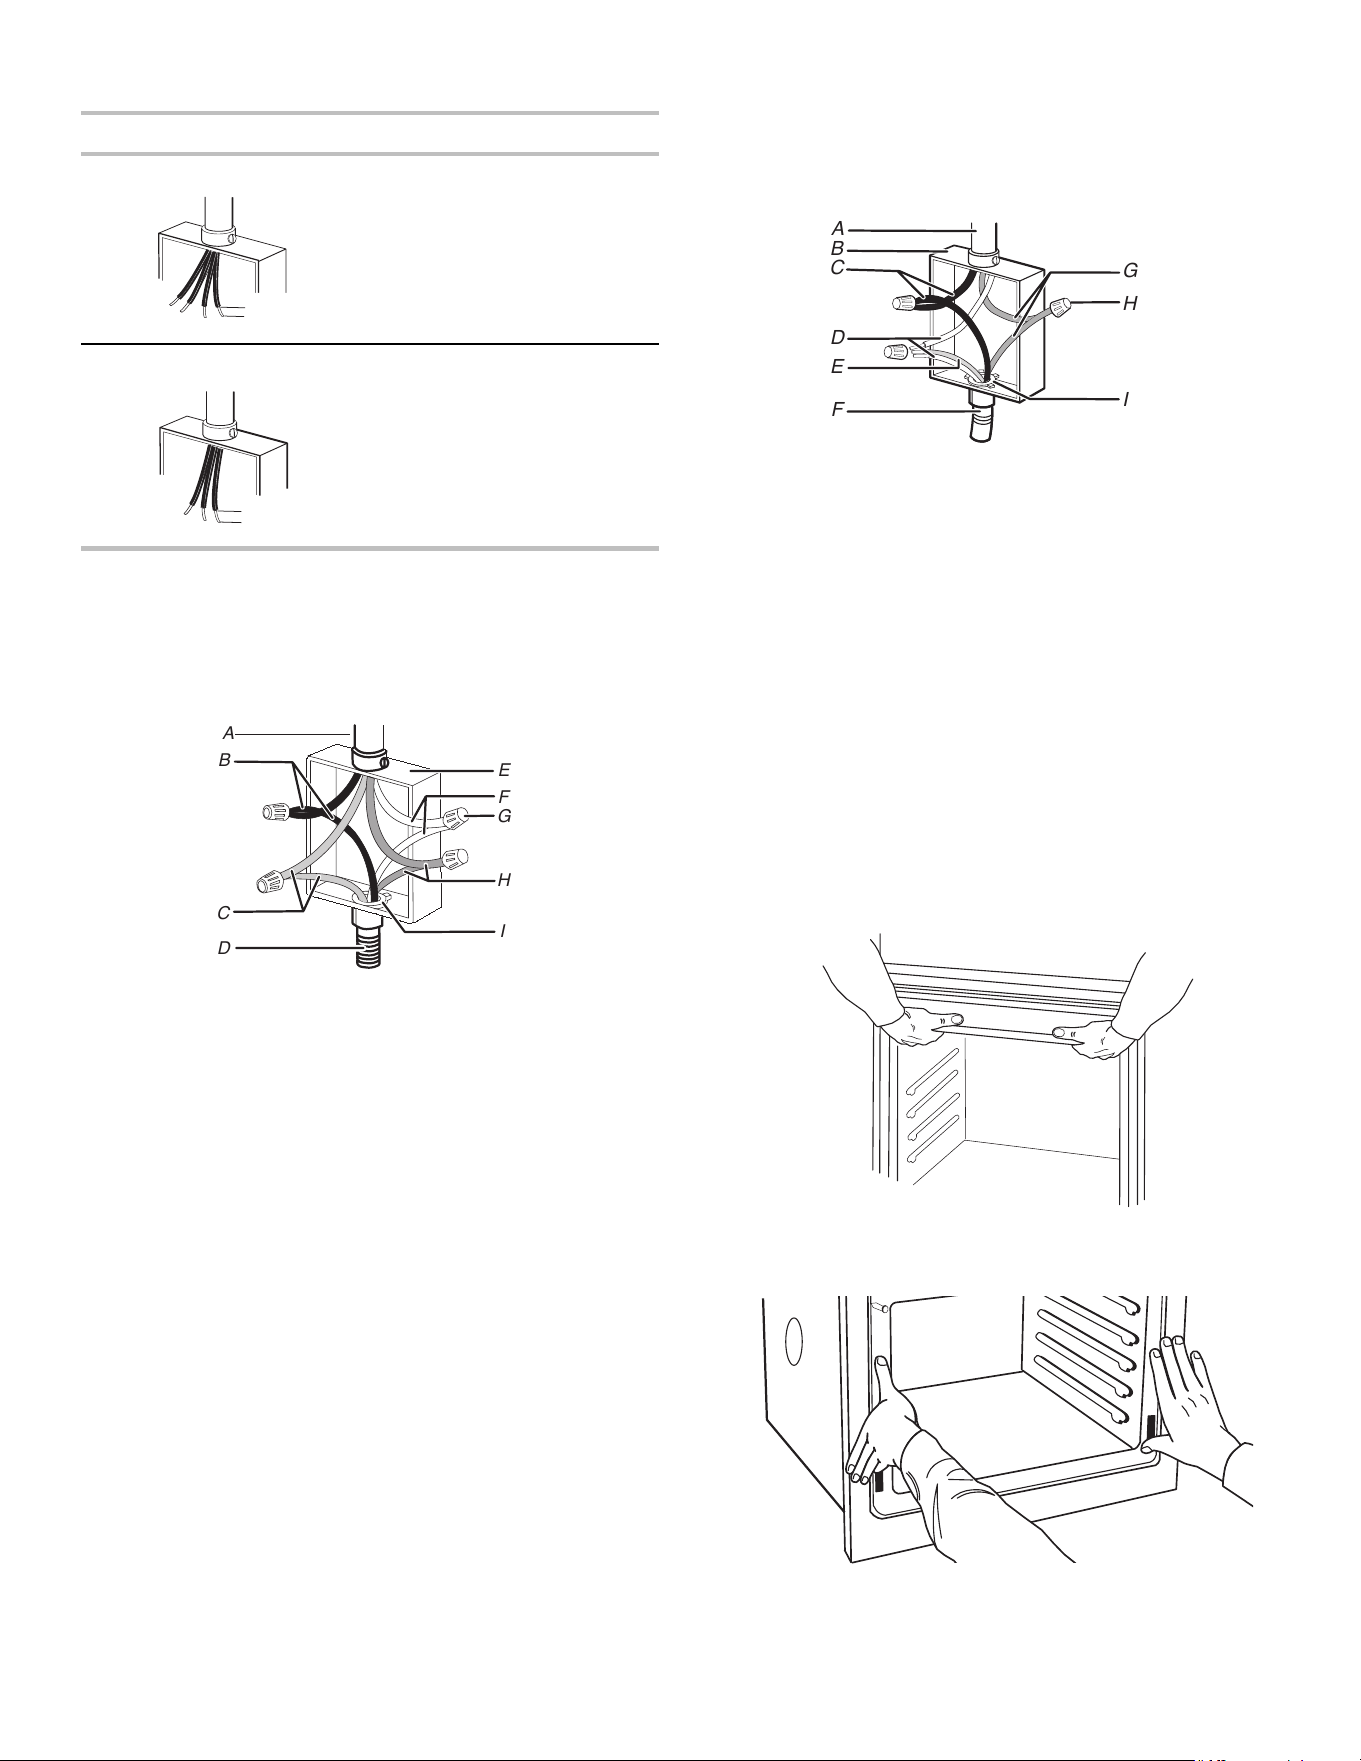
Make Electrical Connection
IMPORTANT: For Flush installation before making electrical
connection, the oven feet or spacers need to be installed to allow
a microwave/oven combination to be installed in a recommended
cutout height.
Please contact service for feet to be shipped to you free of charge.
WARNING
Electrical Shock Hazard
Disconnect power before servicing.
Use 8 gauge copper wire.
Electrically ground oven.
Failure to follow these instructions can result in death,
fire, or electrical shock.
This oven is manufactured with a neutral (white) power supply
wire and a cabinet-connected green (or bare) ground wire.
1. Disconnect power.
2. Feed the flexible conduit from the oven through the opening in
the cabinet.
3. Remove junction box cover, if it is present.
4. Install a UL listed or CSA approved conduit connector to the
junction box.
A
A. UL listed or CSA approved conduit connector
5. Route the flexible conduit from the oven to the junction box
through a UL listed or CSA approved conduit connector.
6. Tighten screws on conduit connector.
7. See “Electrical Connection Options Chart” to complete
installation for your type of electrical connection.
12
Electrical Connection Options Chart
If your home has: Go to section:
4-wire
4-Wire Cable from Home
Power Supply
3-wire
3-Wire Cable from Home
Power Supply
4-Wire Cable from Home Power Supply
IMPORTANT: Use the 4-wire cable from home power supply in
the U.S. where local codes do not allow grounding through
neutral, New Branch circuit installations (1996 NEC), mobile
homes and recreational vehicles, new construction and in
Canada.
A
D
F
H
B
C
E
G
I
A. Cable from home power supply
B. Black wires
C. Red wires
D. 4-wire flexible conduit from
oven
E. Junction box
F. White wires
G. UL listed wire connectors
H. Green (or bare) ground wires
I. UL listed or CSA approved
conduit connector
1. Connect the 2 black wires (B) together using a UL listed wire
connector.
2. Connect the 2 red wires (C) together using a UL listed wire
connector.
3. Connect the 2 white wires (F) together using a UL listed wire
connector.
4. Connect the green (or bare) ground wire (H) from the oven
cable to the green (or bare) ground wire (in the junction box)
using a UL listed wire connector.
5. Install junction box cover.
3-Wire Cable from Home Power Supply – U.S.
Only
IMPORTANT: Use the 3-wire cable from home power supply
where local codes permit a 3-wire connection.
B
C
D
E
F
H
G
A
I
A. Cable from home power supply
B. Junction box
C. Black wires
D. White wires
E. Green (or bare) ground wire
(from oven)
F. 4-wire flexible conduit from
oven
G. Red wires
H. UL listed wire connectors
I. UL listed or CSA approved
conduit connector
1. Connect the 2 black wires (C) together using a UL listed wire
connector.
2. Connect the 2 white wires (D) and the green (or bare) ground
wire (of the oven cable) using a UL listed wire connector.
3. Connect the 2 red wires (G) together using a UL listed wire
connector.
4. Install junction box cover.
Install Oven
1. Using two or more people, lift oven partially into cabinet
cutout. Use the oven opening as an area to grip.
NOTE: Push against seal area of oven front frame when
pushing oven into cabinet. Do not push against outside edges.
2. Push against the seal area of the front frame to push the oven
into the cabinet until the back surface of the front frame
touches the front wall of the cabinet.
3. Push oven completely into cabinet and center oven into
cabinet cutout.
1/2"
(1.3 cm)
1/2"
(1.3 cm)
13
4. Securely fasten the oven to the cabinet using the
#8-14 x 3/4" screws provided.
Insert the screws through hole in black trim aligning with hole
in oven frame. Do not overtighten screws.
A.
Oven frame
B. Side trim hole
C. Side trim piece
5. The bottom vent trim and bottom vent shield are shipped in
the foam packing at the top of the oven.
� Align bottom vent shield tab (B) with oven frame (A) as
shown.
� Using one #8-18 x 3/8" (9.5 mm) screw (C) on each side of
the bottom vent shield tab (B), fasten the vent shield
securely to the oven frame (A).
A.
Oven frame
B. Bottom vent
shield tab
C. #8-18 x 3/8" screws
(9.5 mm)
6. After the bottom vent shield is installed.
� Align the bottom vent trim tab (B) with the oven frame (A)
as shown.
� Using one #8-18 x 3/8" (9.5 mm) screw (C) on each side of
the bottom vent trim tab (B), align the top of the bottom
vent trim tab (B) to the Hinge receiver (D) as shown.
� Fasten the bottom vent trim securely to the oven frame (A).
C
B
A
D
B
A. Oven frame
B. Bottom vent
trim tab
C. #8-18 x 3/8" (9.5 mm)
screw
D. Hinge receiver
7. Replace the oven racks.
8. Replace the oven door. See the “Replace Oven Door(s)”
section.
9. Check that the door is free to open and close. If it is not,
repeat the removal and installation procedures. See the
“Prepare Built-In Oven” section.
10. Repeat for lower oven door.
IMPORTANT: For proper oven operation, check that the gap
between bottom trim of the door and bottom vent trim is at least
1/4" (6.4 mm).
11. Reconnect power.
12. The display panel will light briefly, and “PF” may appear in the
display.
13. If the display panel does not light, refer the Warranty.
A
B
C
C
B
A
14
14. If F9E0 error code is encountered upon powering up the unit,
the appliance is wired incorrectly at the Junction Box or
Electrical Panel. Contact a qualified electrician to verify the
home electrical supply and the hardwire connection at the
Junction Box or Electrical Panel (See the Electrical
Connection Options section).
Positioning Oven Feet
The oven feet need to be installed to allow the microwave/oven
combination to be installed in a Flush Installation or in Standard
Installations where the cutout height is
41
3
/
4
" (106 cm) or more.
NOTE: Do not remove the spacers.
A
A. Spacers
1. Using 2 or more people, place the on its back on a covered
surface.
2. Install a foot on the left rear spacer using a #8-18 x 3/8" screw.
NOTE: Position the foot so the long side of the foot is facing
toward the top of the oven.
A
B
C
A. Spacers
B. Foot
C. #8-18 x 3/8" screw.
3. In the same manner, install a foot on the right rear of the oven.
4. Install a front foot on the left front spacer using a #8-18 x 3/8"
NOTE: Position the foot so the long side of the foot is facing
toward the inside of the oven.
A. Front foot
B. #8-18 x 3/8" screw.
C. Spacer
5. In the same manner, install a front foot on the right front of the
oven.
15
6. Using 2 or more people, place the oven in its upright position.
7. Go to the “Make Electrical Connection” section in the
Installation Instructions provided with your built-in oven.
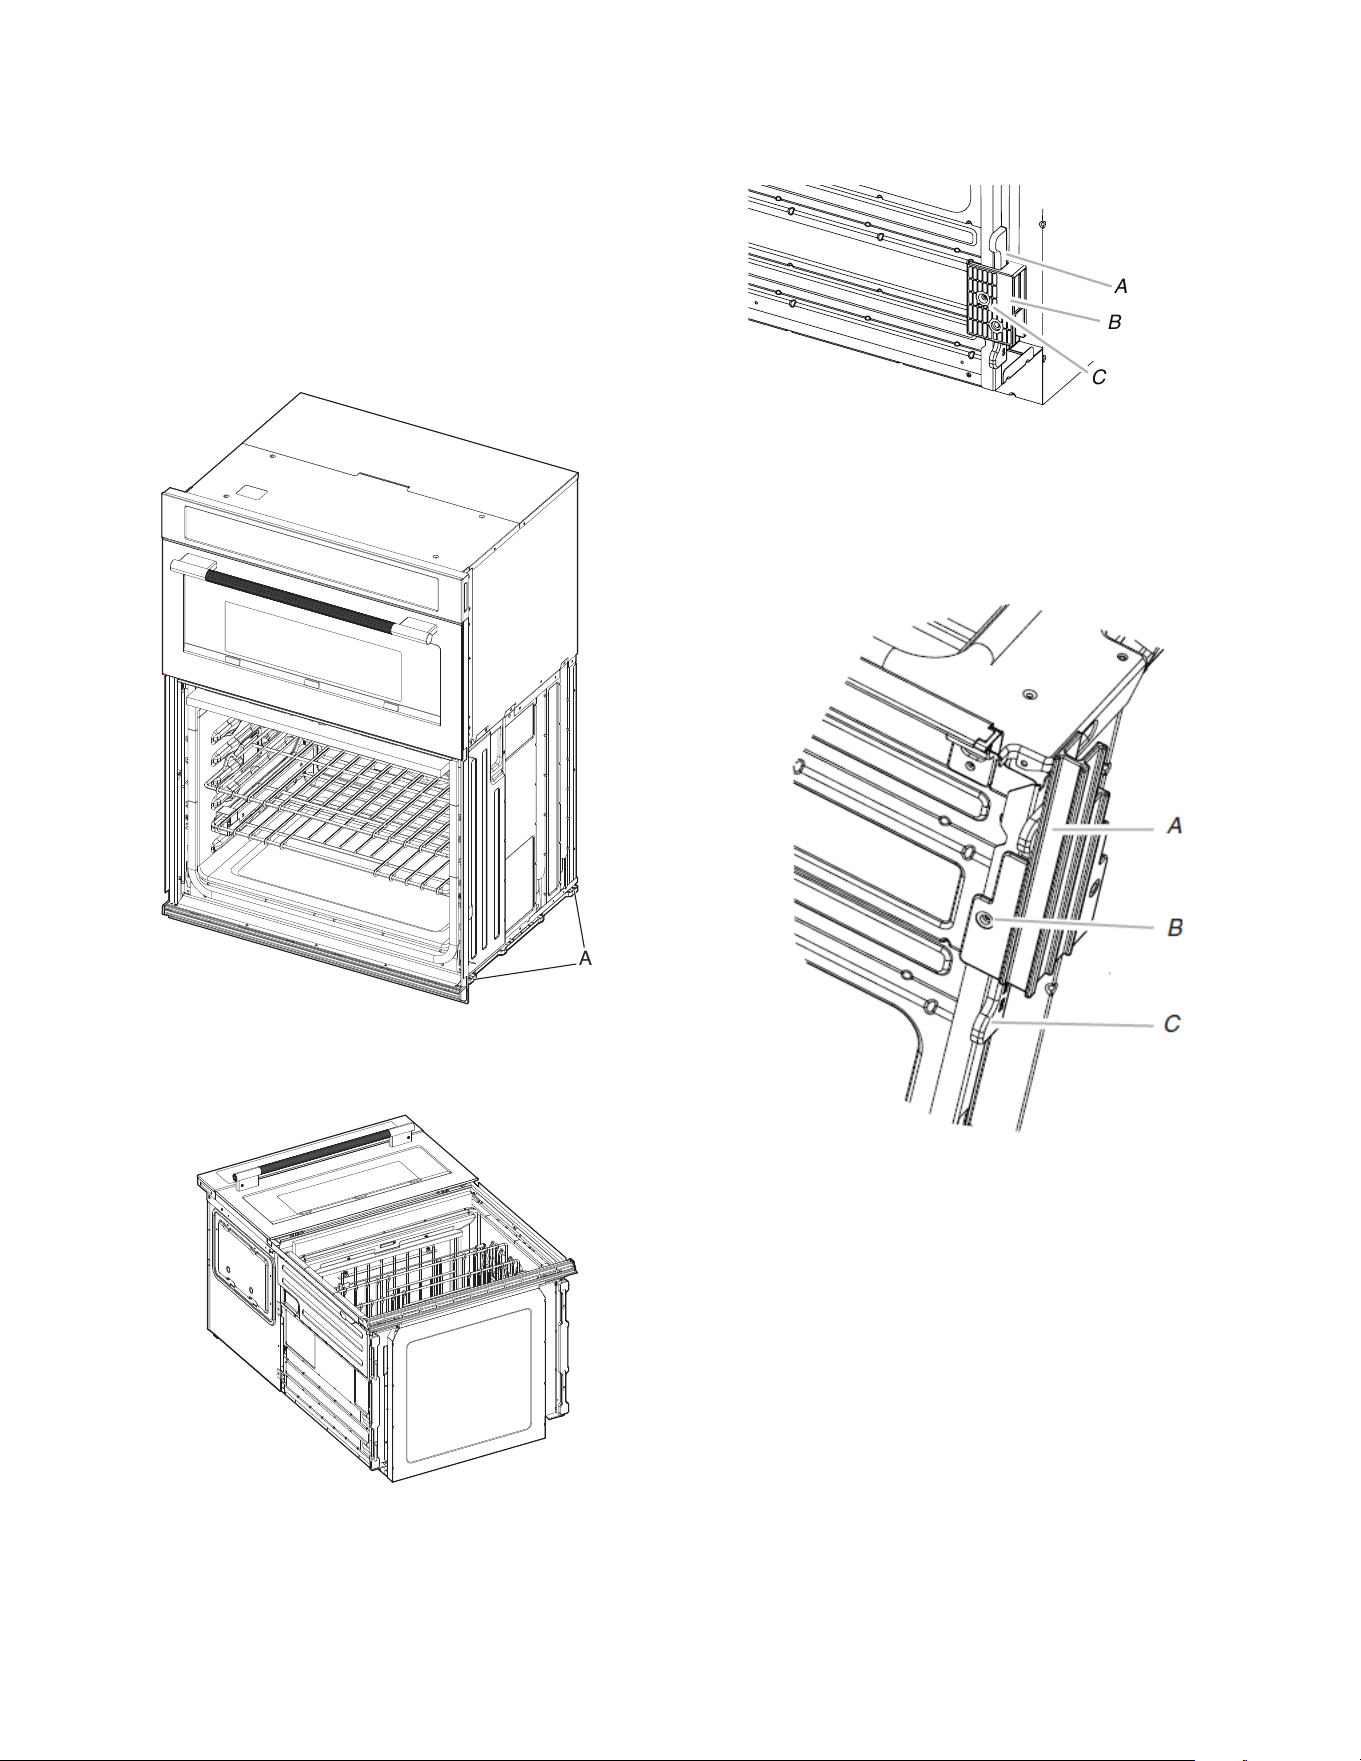
Install Deflector Kit
On single and double oven models installed above a warming
drawer or for ovens installed using flush installation cabinetry, a
deflector kit must be installed. See the “Tools and Parts” section
for information on ordering.
Parts Supplied in Deflector Kit
B
A
A. Phillips head screws (2), only 2 screws for 27"
(68.6 cm) size
B. Deflector (1)
Install Deflector Kit
1. Install the deflector (B) to the lower vent piece (D) using one
#8-18 x 1/4" (6.4 mm) screw on each side.
NOTE: On 27" (68.6 cm) models, only one #8-18 x 1/4"
(6.4 mm) screw on each side.
B
A
C
D
A. #8-18 x 1/4" (6.4
mm) screws
B. Deflector
C. Upper vent piece
D. Lower vent piece
2. Align vent tab (B) with oven frame (A) as shown in the
following illustration.
3. Using one #8-18 x 3/8" (9.5 mm) screw (E) on each side of the
vent tab (B), fasten the vent securely to the oven.
E
D
C
B
A
A. Oven frame
B. Vent tab
C. Oven vent
D. Deflector
E. #8-18 x 3/8" (9.5 mm) screw
16
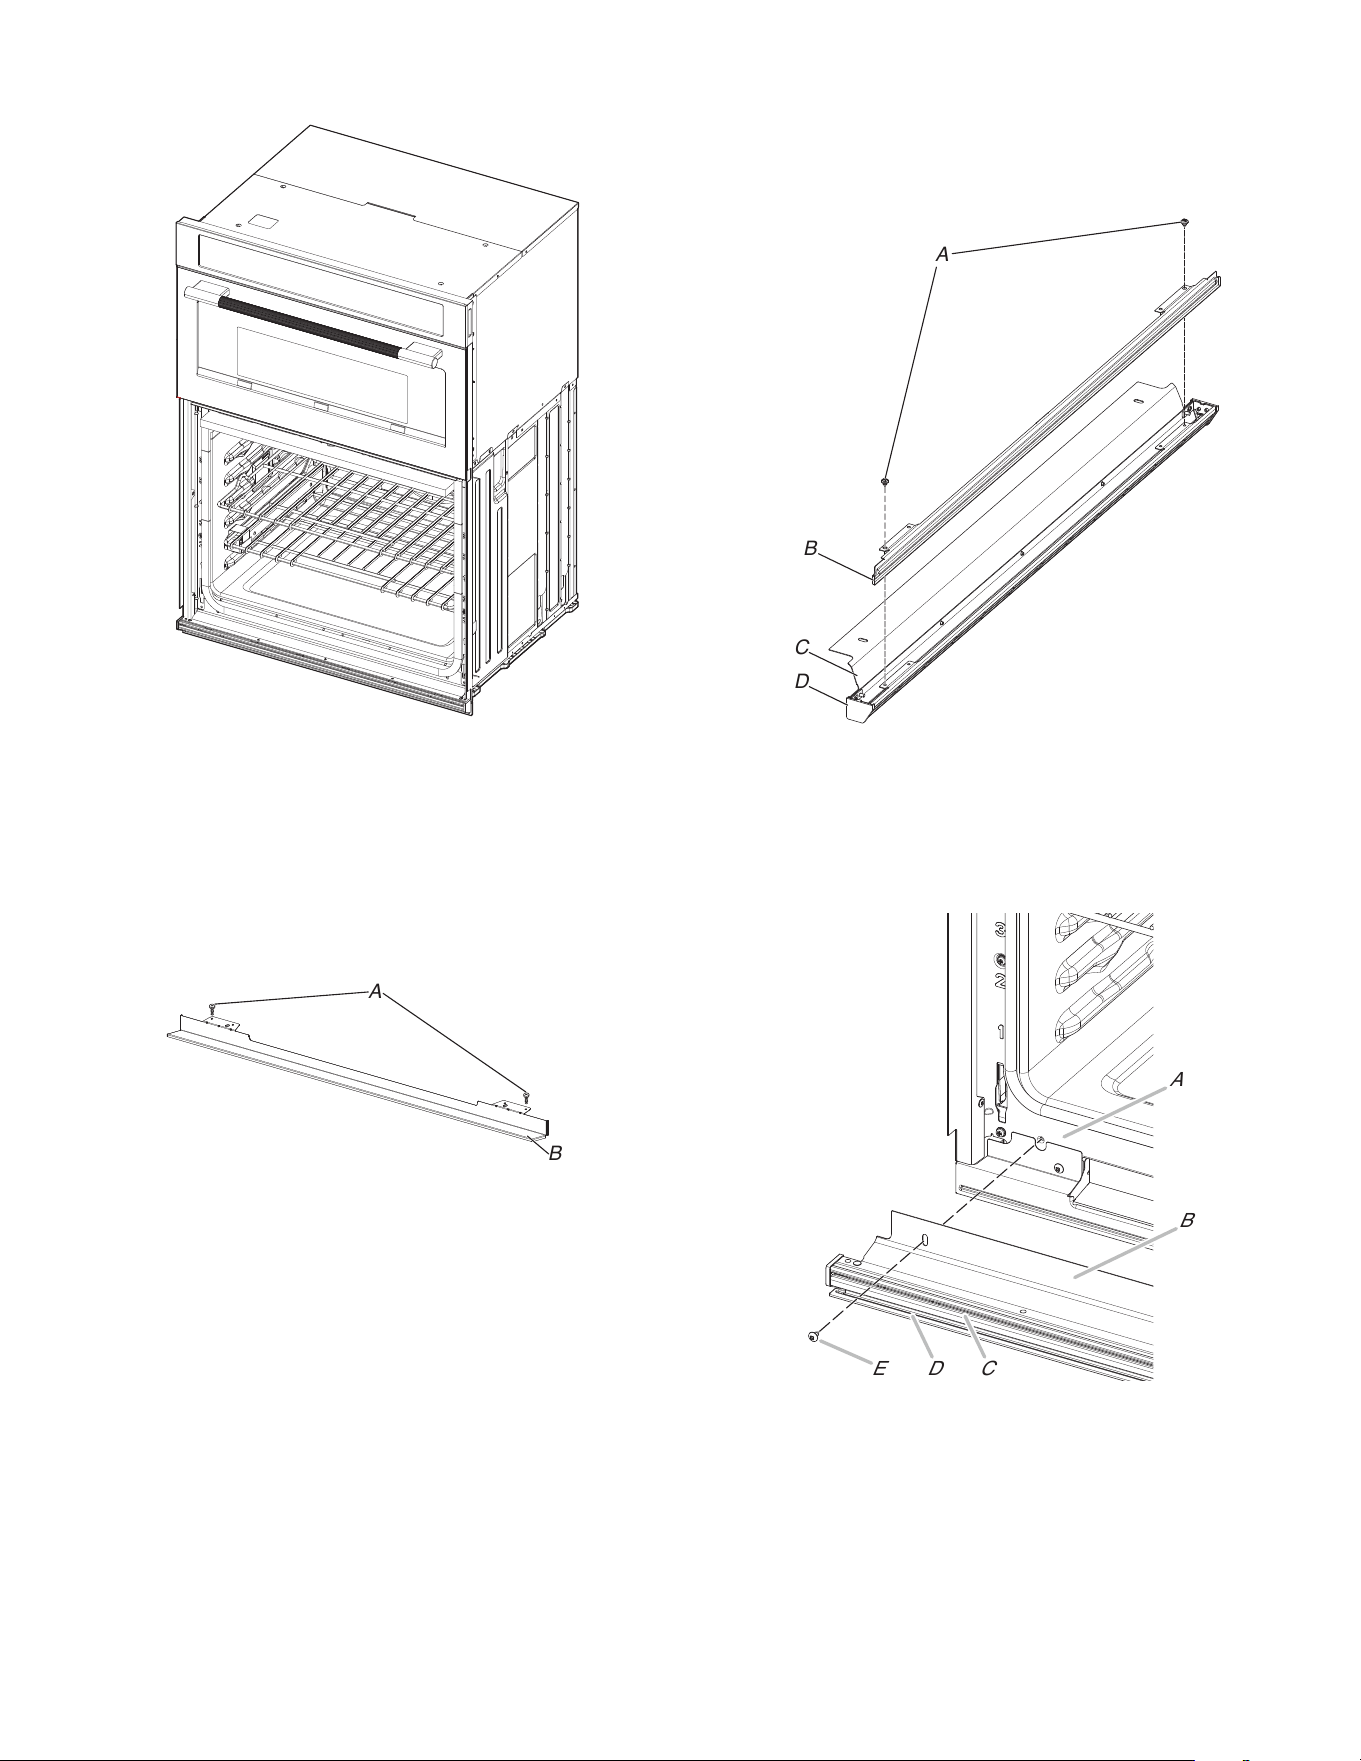
Replace Oven Door(s)
1. Using two hands, grasp side edges of door at the midpoint.
Face the oven cavity.
2. Locate the slots on each side of the oven cavity for the door
hinge locks.
A. Slot in the oven cavity for door hinge lock
3. Using 2 hands, grasp the edges of the oven door. At a 45°
angle, insert the hinges at the same time, and push the oven
door into the oven cavity slot to replace. You may need to
gently shift the door from side to side as you push.
4. Make sure the door hinge notch is engaged on the bottom
of the oven cavity slot.
IMPORTANT: Do not close the door at this step or damage
may occur to the door hinge.
5. Lower the oven door to the fully open position. If the oven door
does not open to a full 90°, repeat steps 1 through 3.
6. Locate the oven door hinge locks in the corners of the oven
door, and rotate the hinge locks toward the oven cavity to the
locked position.
A. Unlocked
position
B. Locked position
7. After the door hinges have been locked, gently swing the door
upward to close. The door should not be forced closed.
8. When the hinges are properly installed and the door is closed,
there should be an even gap between the door and the control
panel. If one side of the oven door is lower than the other, the
hinge on that side is not properly installed.
Complete Installation
1. Check that all parts are now installed. If there is an extra part,
go back through the steps to see which step was skipped.
2. Check that you have all of your tools.
3. Dispose of/recycle all packaging materials.
4. For oven cleaning, read the “Oven Maintenance and Care”
section.
Check Operation of Single and Double Ovens
1. Turn on power.
2. At first use, set up the languages, clock, and any other
preferences, if available. For more information, read the online
“Control Guide”.
3. Start a broil cycle.
NOTE: Odors and smoke are normal when the oven is used
the first few times.
4. Wait 5 minutes, then check for heat.
If Oven(s) Does Not Operate, Check the Following:
� Household fuse is intact and tight; or circuit breaker has
not tripped.
� Electrical supply is connected.
� See the online “Troubleshooting”.
5. Place the SatinGlide
™ Roll-Out Extension Rack for Smart
Oven+ Attachments in the lowest rack position in the unit to
make sure the correct accessory rack is on the bottom.
6. Press UPPER CANCEL/LOWER CANCEL on double ovens,
or press CANCEL on single ovens.

17
If you need Assistance or Service:
Please refer to the Quick Start Guide for contact information.
Check Operation of Microwave Oven
1. Fill a microwave-safe container with 1 cup (250 mL) of water
and place container inside microwave oven. Close door firmly.
2. Press MICROWAVE.
3. Select Cooking Method.
4. Set microwave oven cook time to 2 minutes.
5. Press START. The interior microwave oven light should be on,
and the remaining cooking time should be displayed.
When display reads “1:00”, open microwave oven door. The
microwave should stop cooking. Close door firmly. The interior
microwave oven light should turn off.
6. Press START. Microwave oven should begin cooking, and the
microwave oven interior light should be on.
Let microwave oven complete cooking time. A tone will sound
multiple times at the end of the cooking time, and the
microwave oven will shut off.
7. Open microwave oven door and slowly remove container.
Water in container should be hot.
If you need Assistance or Service:
Please refer to the Quick Start Guide for contact information, or
contact the dealer from whom you purchased your built-in electric
ovens and microwave ovens.

18
SÉCURITÉ DE L’ENSEMBLE FOUR ÉLECTRIQUE/FOUR À
MICRO-ONDES ENCASTRÉ
Votre sécurité et celle des autres sont très importantes.
Nous donnons de nombreux messages de sécurité importants dans ce manuel et sur votre appareil. Assurez-vous de toujours lire
tous les messages de sécurité et de vous y conformer.
Voici le symbole d’alerte de sécurité.
Ce symbole d’alerte de sécurité vous signale les dangers potentiels de décès et de blessures graves.
Tous les messages de sécurité suivront le symbole d’alerte de sécurité et le mot « DANGER » ou
« AVERTISSEMENT ». Ces mots signifient :
DANGER
Risque possible de décès ou de blessure grave si vous ne
suivez pas immédiatement les instructions.
AVERTISSEMENT
Risque possible de décès ou de blessure grave si vous ne
suivez pas les instructions.
Tous les messages de sécurité vous diront quel est le danger potentiel, comment réduire le risque de blessure et ce qui peut se
produire en cas de non-respect des instructions.
IMPORTANTES INSTRUCTIONS DE SÉCURITÉ
AVERTISSEMENT: Afin de réduire le risque d’incendie, de décharge électrique ou de blessures lors de l’utilisation de l’appareil,
il convient d’observer certaines précautions fondamentales, notamment :
� Installation conforme – L’appareil, lors de son installation,
doit être correctement relié à la terre en conformité avec les
codes locaux en vigueur, ou en l’absence de tels codes,
avec le National Electrical Code, ANSI/NFPA 70 ou le Code
canadien des installations électriques, CSA C22.1-02. Au
Canada, l’appareil doit être relié à la terre en respectant le
Code canadien de l’électricité. S’assurer que l’appareil est
bien installé et que la mise à la terre est réalisée par un
technicien qualifié.
� NE JAMAIS utiliser l’appareil pour chauffer ou réchauffer la
pièce.
� Ne pas laisser les enfants seuls – Les enfants ne doivent
pas être laissés seuls ou sans surveillance dans la zone où
l’appareil est utilisé. Ils ne doivent jamais être autorisés à
s’asseoir ou à se tenir debout sur une partie quelconque de
l’appareil.
� Porter des vêtements adaptés – Les vêtements pendants
ou non ajustés ne doivent jamais être portés lorsqu’on
utilise l’appareil.
� Entretien par l’utilisateur – Ne pas réparer ou remplacer
une quelconque pièce de l’appareil sans recommandation
spécifique du manuel. Toutes les autres tâches d’entretien
doivent être effectuées par un technicien qualifié.
� Entreposage dans ou sur l’appareil – Les matières
inflammables ne doivent pas être entreposées dans un four
ou près de la surface de la table.
� Cet appareil n’est pas conçu pour servir d’espace de
rangement.
� Ne pas utiliser d’eau sur les feux de friture – Étouffer le feu
ou la flamme ou utiliser un extincteur avec agent chimique
sec ou mousseux.
� Ne pas utiliser de pièces de remplacement qui n’ont pas
été recommandées par le fabricant (c.-à-d., des pièces
fabriquées à la maison à l’aide d’une imprimante 3D).
� Utiliser uniquement des mitaines sèches – Les mitaines
humides ou trempées sur les surfaces chaudes peuvent
provoquer des brûlures dues à la vapeur. Ne pas laisser les
maniques toucher des éléments chauffants et chauds. Ne
pas utiliser un chiffon ou tout autre tissu encombrant.
� Ouvrir la porte lentement – Laisser la chaleur ou la vapeur
s’échapper avant de retirer ou de remettre en place un plat.
� NE PAS TOUCHER LES ÉLÉMENTS CHAUFFANTS OU
LES SURFACES INTÉRIEURES DU FOUR – Les
éléments chauffants peuvent être chauds même s’ils sont
de couleur foncée. Les surfaces intérieures du four peuvent
être suffisamment chaudes pour provoquer des brûlures.
Pendant et après l’utilisation, ne pas toucher ou laisser des
vêtements ou d’autres matériaux inflammables en contact
avec les éléments chauffants ou les surfaces intérieures
tant qu’ils n’ont pas suffisamment refroidi. Les autres
surfaces de l’appareil peuvent devenir suffisamment
chaudes pour causer des brûlures – les serpentins et
éléments de cuissons, les ouvertures de ventilation et les
surfaces autour de ces ouvertures, les portes du four et les
hublots de portes font partie de ces surfaces.
� Ne pas faire chauffer un contenant qui n’a pas été ouvert –
L’accumulation de pression pourrait faire éclater le
contenant et causer des blessures.
� Garder dégagés les conduits de ventilation du four.
CONSERVER CES INSTRUCTIONS

19
IMPORTANTES INSTRUCTIONS DE SÉCURITÉ
AVERTISSEMENT: Afin de réduire le risque d’incendie, de décharge électrique ou de blessures lors de l’utilisation de l’appareil,
il convient d’observer certaines précautions fondamentales, notamment :
� Position des grilles du four – toujours placer les grilles à la
position souhaitée lorsque le four est froid. Si une grille doit
être déplacée pendant que le four est chaud, ne pas laisser
la poignée entrer en contact avec l’élément chaud du four.
Pour les fours autonettoyants :
� ATTENTION : NE PAS LAISSER D’ALIMENTS,
D’USTENSILES DE CUISSON, ETC. DANS LE FOUR
PENDANT L’UTILISATION DU MODE DE NETTOYAGE
PYROLYTIQUE.
� Ne pas nettoyer le joint de la porte – Le joint de la porte est
essentiel pour une bonne étanchéité. Faire attention à ne
pas frotter, endommager ou déplacer le joint.
� Ne pas utiliser de revêtement de protection pour recouvrir
le four et ne pas utiliser de nettoyant commercial pour four,
sauf s’il est certifié pour une utilisation dans les fours
autonettoyants.
� Ne nettoyer que les pièces indiquées.
� Avant d’effectuer l’autonettoyage du four – Retirer la
lèchefrite et les autres ustensiles, puis essuyer tous les
excès de déversement.
Pour les cuisinières et fours intelligents :
� Utilisation à distance – cet appareil peut être configuré pour
permettre l’utilisation à distance en tout temps. Ne pas
ranger de matériaux inflammables ou sensibles à la
température sur le dessus ou près de la surface de
l’appareil.
CONSERVER CES INSTRUCTIONS

20
IMPORTANTES INSTRUCTIONS DE SÉCURITÉ
Lors de l’utilisation d’appareils électriques, il faut toujours observer certaines précautions élémentaires de sécurité, y compris les
suivantes :
AVERTISSEMENT: Pour réduire les risques de brûlure, de décharges électriques, d’incendie, de blessures ou d’exposition à un
rayonnement excessif de micro-ondes :
� Lire toutes les instructions avant d’utiliser l’appareil.
� Lire et respecter les « PRÉCAUTIONS POUR ÉVITER LES
EXPOSITIONS POSSIBLES À UN RAYONNEMENT
EXCESSIF AUX MICRO-ONDES » spécifiques de ce
manuel.
� Cet appareil doit être relié à la terre. Brancher uniquement
dans une prise reliée à la terre. Consulter le point
« INSTRUCTIONS DE LIAISON À LA TERRE » de cette
section.
� Installer ou placer cet appareil en respectant toutes les
instructions d’installation fournies.
� Certains produits comme les œufs entiers et les contenants
scellés, comme un pot en verre fermé, peuvent exploser et
ne devraient pas être chauffés dans ce four.
� Utiliser cet appareil uniquement dans le cadre de l’usage
auquel il se destine comme décrit dans le manuel. Ne pas
utiliser de produits chimiques corrosifs ou dégageant des
vapeurs dans cet appareil. Ce type de four est
spécialement conçu pour chauffer, cuire ou sécher des
aliments. Il n’est pas conçu pour une utilisation à des fins
industrielles ou en laboratoires.
� Comme pour tout appareil, une bonne supervision est
nécessaire lorsqu’un enfant utilise l’appareil.
� Ne pas utiliser cet appareil si la fiche ou le cordon est
endommagé, s’il ne fonctionne pas correctement ou s’il a
subi une chute ou a été endommagé de quelque façon que
ce soit.
� Seule une personne qualifiée est habilitée à effectuer une
intervention d’entretien sur cet appareil. Communiquer
avec l’entreprise de service autorisé la plus près de chez
vous pour la vérification, la réparation et le réglage.
� Ne pas couvrir ou obstruer les ouvertures de l’appareil.
� Ne pas ranger l’appareil à l’extérieur. Ne pas utiliser ce
produit près d’une source d’eau comme un évier de cuisine,
un sous-sol humide, une piscine ou tout autre
emplacement semblable.
� Ne pas immerger le cordon ou la fiche dans l’eau.
� Maintenir le cordon à l’écart de toute surface chaude.
� Ne pas laisser le cordon pendre par-dessus le bord d’une
table ou d’un comptoir.
� Ne pas utiliser de pièces de remplacement qui n’ont pas
été recommandées par le fabricant (c.-à-d., des pièces
fabriquées à la maison à l’aide d’une imprimante 3D).
� Voir les instructions de nettoyage de la surface de la porte
dans la section Entretien et réparation du four à micro-
ondes.
� Pour réduire les risques d’incendie dans la cavité du four :
• Ne pas trop faire cuire les aliments. Surveiller
attentivement l’appareil lorsque du papier, du plastique
ou d’autres matériaux combustibles sont placés à
l’intérieur pour faciliter la cuisson.
• Retirer les attaches des sacs en papier ou en plastique
avant de placer le sac dans le four.
• Si des matériaux prennent en feu dans le four, garder la
porte du four fermée, éteindre le four et débrancher le
cordon d’alimentation ou fermer l’alimentation au fusible
ou disjoncteur.
• Ne pas utiliser la cavité comme remisage. Ne pas laisser
de produits en papier, d’ustensiles de cuisson ou
d’aliments dans la cavité lorsque l’appareil n’est pas
utilisé.
� Les liquides, comme l’eau, le café ou le thé, peuvent être
chauffés au-delà du point d’ébullition sans pour autant avoir
l’air de bouillir. Des bulles ou une ébullition lorsque le
contenant est sorti du four à micro-ondes ne sont pas
toujours visibles. LE CONTENU LIQUIDE TRÈS CHAUD
PEUT AINSI SOUDAINEMENT BOUILLIR LORSQUE LE
CONTENANT EST DÉPLACÉ OU SI UN USTENSILE EST
INSÉRÉ DANS LE LIQUIDE.
Pour les fours à miro-ondes qui ne sont pas conçus pour
être utilisés au-dessus d’un autre appareil qui produit de
la chaleur :
� Ne pas utiliser un appareil de chauffage ou de cuisson sous
cet appareil.
� Ne pas fixer l’appareil au-dessus ou près d’un appareil de
chauffage ou de cuisson.
� Ne pas installer au-dessus d’un évier.
� Ne rien placer directement sur le dessus de l’appareil
lorsque ce dernier est utilisé.
CONSERVER CES INSTRUCTIONS

21
PRÉCAUTIONS POUR ÉVITER TOUTE EXPOSITION
ÉVENTUELLE AU RAYONNEMENT EXCESSIF DE
MICRO-ONDES ET UTILISER L’APPAREIL SANS DANGER
(a) Ne pas tenter de faire fonctionner ce four lorsque la porte est
ouverte puisque l’utilisation la porte ouverte peut entraîner
une exposition dangereuse au rayonnement des micro-
ondes. Il est important de ne pas modifier ou contourner le
verrouillage de sécurité.
(b) Ne placer aucun objet entre le devant du four à micro-ondes
et la porte ou ne pas permettre à de la saleté ou des résidus
de nettoyage de s’accumuler sur les surfaces des joints
d’étanchéité.
(c) Ne pas ouvrir le four à micro-ondes s’il est endommagé. Il est
très important que la porte du four ferme correctement et qu’il
n’y ait pas de dommage à :
(1) la porte (tordue);
(2) les charnières et loquets (brisées ou lâches);
(3) les joints d’étanchéité de la porte et leur surface.
(d) Le four ne doit pas être réglé ou réparé par une personne
autre qu’une personne d’entretien qualifiée.
Guide de connexion Internet pour les appareils connectés uniquement
IMPORTANT : Il est de la responsabilité de l’utilisateur de bien installer l’appareil avant de l’utiliser. Bien lire et suivre le guide
d’installation qui accompagne l’appareil.
La connectabilité nécessite un réseau Wi-Fi et la création d’un compte. Les fonctions de l’application peuvent changer. Des frais de
transfert de données peuvent s’appliquer. Une fois installée, lancer l’application. Suivre les étapes de configuration du compte
d’utilisateur et de connexion de l’appareil.
Il faut :
� Un routeur sans fil compatible Wi-Fi à 2,4 GHz avec sécurité WPA2. Pour vérifier les capacités du routeur, consulter le manuel
d’instructions du fabricant du routeur.
� Le routeur devra être en marche et connecté à Internet.
� Le numéro SAID à 10 caractères de votre appareil. Le numéro SAID est imprimé sur une étiquette collée sur l’appareil ou affiché à
l’écran ACL.
Déclaration de conformité de la Commission fédérale des communications (FCC)
Cet appareil est conforme à la norme FCC, partie 15. Le bon fonctionnement de l’appareil est fonction de deux conditions :
1. Cet appareil ne doit pas produire de brouillage dommageable et
2. Cet appareil doit accepter tout brouillage radioélectrique subi, même si le brouillage est susceptible d’en compromettre le
fonctionnement.
Tous changements ou toutes modifications n’ayant pas été expressément approuvés par la partie responsable de la conformité
pourraient annuler l’autorité de l’utilisateur à utiliser l’appareil.
Avis de conformité d’Industrie Canada (IC)
Cet appareil satisfait aux prescriptions des documents CNR/RSS d’Industrie Canada (utilisation sans licence). Le bon fonctionnement de
l’appareil est fonction de deux conditions :
1. Cet appareil ne doit pas produire de brouillage.
2. Cet appareil doit être compatible avec n’importe quelle interférence, y compris des interférences causées par l’utilisation involontaire
de l’appareil.
En vertu des règlements d’Industrie Canada, cet émetteur radio ne peut fonctionner qu’à l’aide d’une antenne d’un type et de gain
maximum (ou moins) approuvé pour l’émetteur par Industrie Canada. Pour réduire les interférences radio potentielles pour les autres
utilisateurs, le type d’antenne et son gain doivent être choisis de sorte que la puissance isotrope rayonnée équivalente (PIRE) ne
dépasse pas ce qui est nécessaire pour une communication réussie.
Pour satisfaire aux exigences de la FCC et d’Industrie Canada sur les l’exposition aux radiations de radiodiffusion, les antennes utilisées
avec cet émetteur doivent être installées de telle sorte qu’il y ait une distance de 20 cm ou plus séparant la source de radiation (antenne)
et toute personne en tout temps et ne doit pas être co-utilisée ou fonctionner en même temps qu’une autre antenne ou qu’un émetteur.
Si cet appareil cause des interférences nuisibles à la réception radio ou télévision, pouvant être déterminées par le fait d’allumer et
d’éteindre l’appareil, l’utilisateur est encouragé à essayer de corriger les interférences en suivant l’un des conseils suivants :
� Réorienter ou déplacer l’antenne de réception.
� Augmenter la distance séparant l’appareil du récepteur.
� Brancher l’appareil sur un circuit différent de celui où le
récepteur est branché.
� Prendre contact avec un revendeur ou un technicien radio/
télévision qualifié pour obtenir de l’aide.

22
ENTRETIEN ET RÉPARATION DU
FOUR À MICRO-ONDES
Nettoyage général
IMPORTANT : Avant le nettoyage, s’assurer que toutes les
commandes sont éteintes et que le four et la table de cuisson sont
froids. Toujours suivre les instructions figurant sur les étiquettes
des produits de nettoyage.
L’usage de savon, d’eau et d’un chiffon doux ou d’une éponge est
suggéré en priorité, sauf indication contraire.
PEINTURE MÉTALLIQUE (sur certains modèles)
Ne pas utiliser de nettoyants abrasifs, de nettoyants avec agent
de blanchiment, de produits antirouille, d’ammoniaque ou
d’hydroxyde de sodium (soude), car la surface peinte pourrait se
tacher (comme le manuel simple/double).
ACIER INOXYDABLE ET ACIER INOXYDABLE
NOIR (sur certains modèles)
REMARQUE : Afin d’éviter d’endommager les surfaces en acier
inoxydable, ne pas utiliser de tampons à récurer savonneux, de
nettoyants abrasifs, de crème à polir pour table de cuisson, de
tampons en laine d’acier, de chiffons de lavage rêches ou
d’essuie-tout abrasifs. Ils peuvent endommager les surfaces en
acier inoxydable, même après une seule application ou
quelques-unes.
Frotter dans la direction du grain pour éviter les dommages.
Méthode de nettoyage :
� Affresh
®
†
Nettoyant pour acier inoxydable – numéro de pièce
W10355016 (vendu séparément) ou chiffons pour acier
inoxydable affresh
®
– numéro de pièce W10355049 (vendu
séparément) :
Consulter le Guide de démarrage rapide pour les informations
de commande.
� Détergent liquide ou nettoyant tout usage : Rincer à l’eau
propre et sécher avec un chiffon doux sans charpie.
� Vinaigre pour les taches d’eau dure.
SURFACES EN ÉMAIL VITRIFIÉ UNIQUEMENT
(sur certains modèles)
Les éclaboussures alimentaires acides, telles que vinaigre et
tomate, doivent être nettoyées dès que le four a refroidi. Ces
salissures peuvent endommager le fini.
Méthode de nettoyage :
� Nettoyant à vitre nettoyant doux liquide ou tampon à récurer
non abrasif :
Nettoyer délicatement autour de la plaque signalétique, car le
frottement pourrait en effacer les chiffres.
� Nettoyant affresh
®
pour cuisine et appareils ménagers –
numéro de pièce W10355010 (vendu séparément) :
Consulter le Guide de démarrage rapide pour les informations
de commande.
EXTÉRIEUR ET PORTE DU FOUR À
MICRO-ONDES
La zone de contact de la porte et du cadre du four, quand la porte
est fermée, doit être maintenue propre.
Méthode de nettoyage :
� Savons et détergents doux, non abrasifs :
Rincer à l’eau propre et sécher avec un chiffon doux sans
charpie.
� Nettoyant à vitre et serviette de papier ou tampon à récurer
non abrasif en plastique :
Vaporiser du nettoyant à vitre sur la serviette, pas directement
sur la surface.
TABLEAU DE COMMANDE ET EXTÉRIEUR DE LA
PORTE DU FOUR
Afin d’éviter d’endommager le tableau de commande, ne pas
utiliser de nettoyants abrasifs, de tampons en laine d’acier, de
chiffons de lavage rêches ou d’essuie-tout abrasifs.
La zone de contact de la porte et du cadre du four, quand la porte
est fermée, doit être maintenue propre.
Méthode de nettoyage :
� Nettoyant à vitre et chiffon doux ou éponge ou tampon à
récurer non abrasif en plastique :
Appliquer le nettoyant à vitre sur un chiffon doux ou une
éponge et non directement sur le tableau.
� Nettoyant affresh
®
pour cuisine et appareils ménagers –
numéro de pièce W10355010 (vendu séparément) :
Consulter le Guide de démarrage rapide pour les informations
de commande.
INTÉRIEUR DE LA PORTE DU FOUR
Méthode de nettoyage :
� Programme d’autonettoyage :
Pour un nettoyage optimal de la porte, essuyer tout dépôt avec
une éponge humide avant de lancer le programme.
CAVITÉ DU FOUR
Ne pas utiliser de nettoyants à four.
Les éclaboussures alimentaires doivent être nettoyées lorsque le
four a refroidi. À haute température, les aliments réagissent avec
l’émail et peuvent provoquer la formation de taches, une attaque
acide, des piqûres ou des décolorations blanchâtres.
Méthode de nettoyage :
� Programme d’autonettoyage :
Voir d’abord « Programme d’autonettoyage ». Retirer les
grilles pour qu’elles ne décolorent pas et qu’elles ne
deviennent pas difficiles à faire glisser. Le cas échéant, une
légère couche d’huile végétale appliquée sur les glissières
facilitera le glissement des grilles.
CAVITÉ DU FOUR À MICRO-ONDES
Afin d’éviter d’endommager la cavité du four à micro-ondes, ne
pas utiliser de tampons à récurer savonneux, de nettoyants
abrasifs, de tampons en laine d’acier, de chiffons de lavage
rêches ou certains essuie-tout.
Sur les modèles en acier inoxydable, frotter dans le sens du grain
pour éviter d’endommager le fini.
✝affresh
®
est une marque déposée de Whirlpool, É-U.
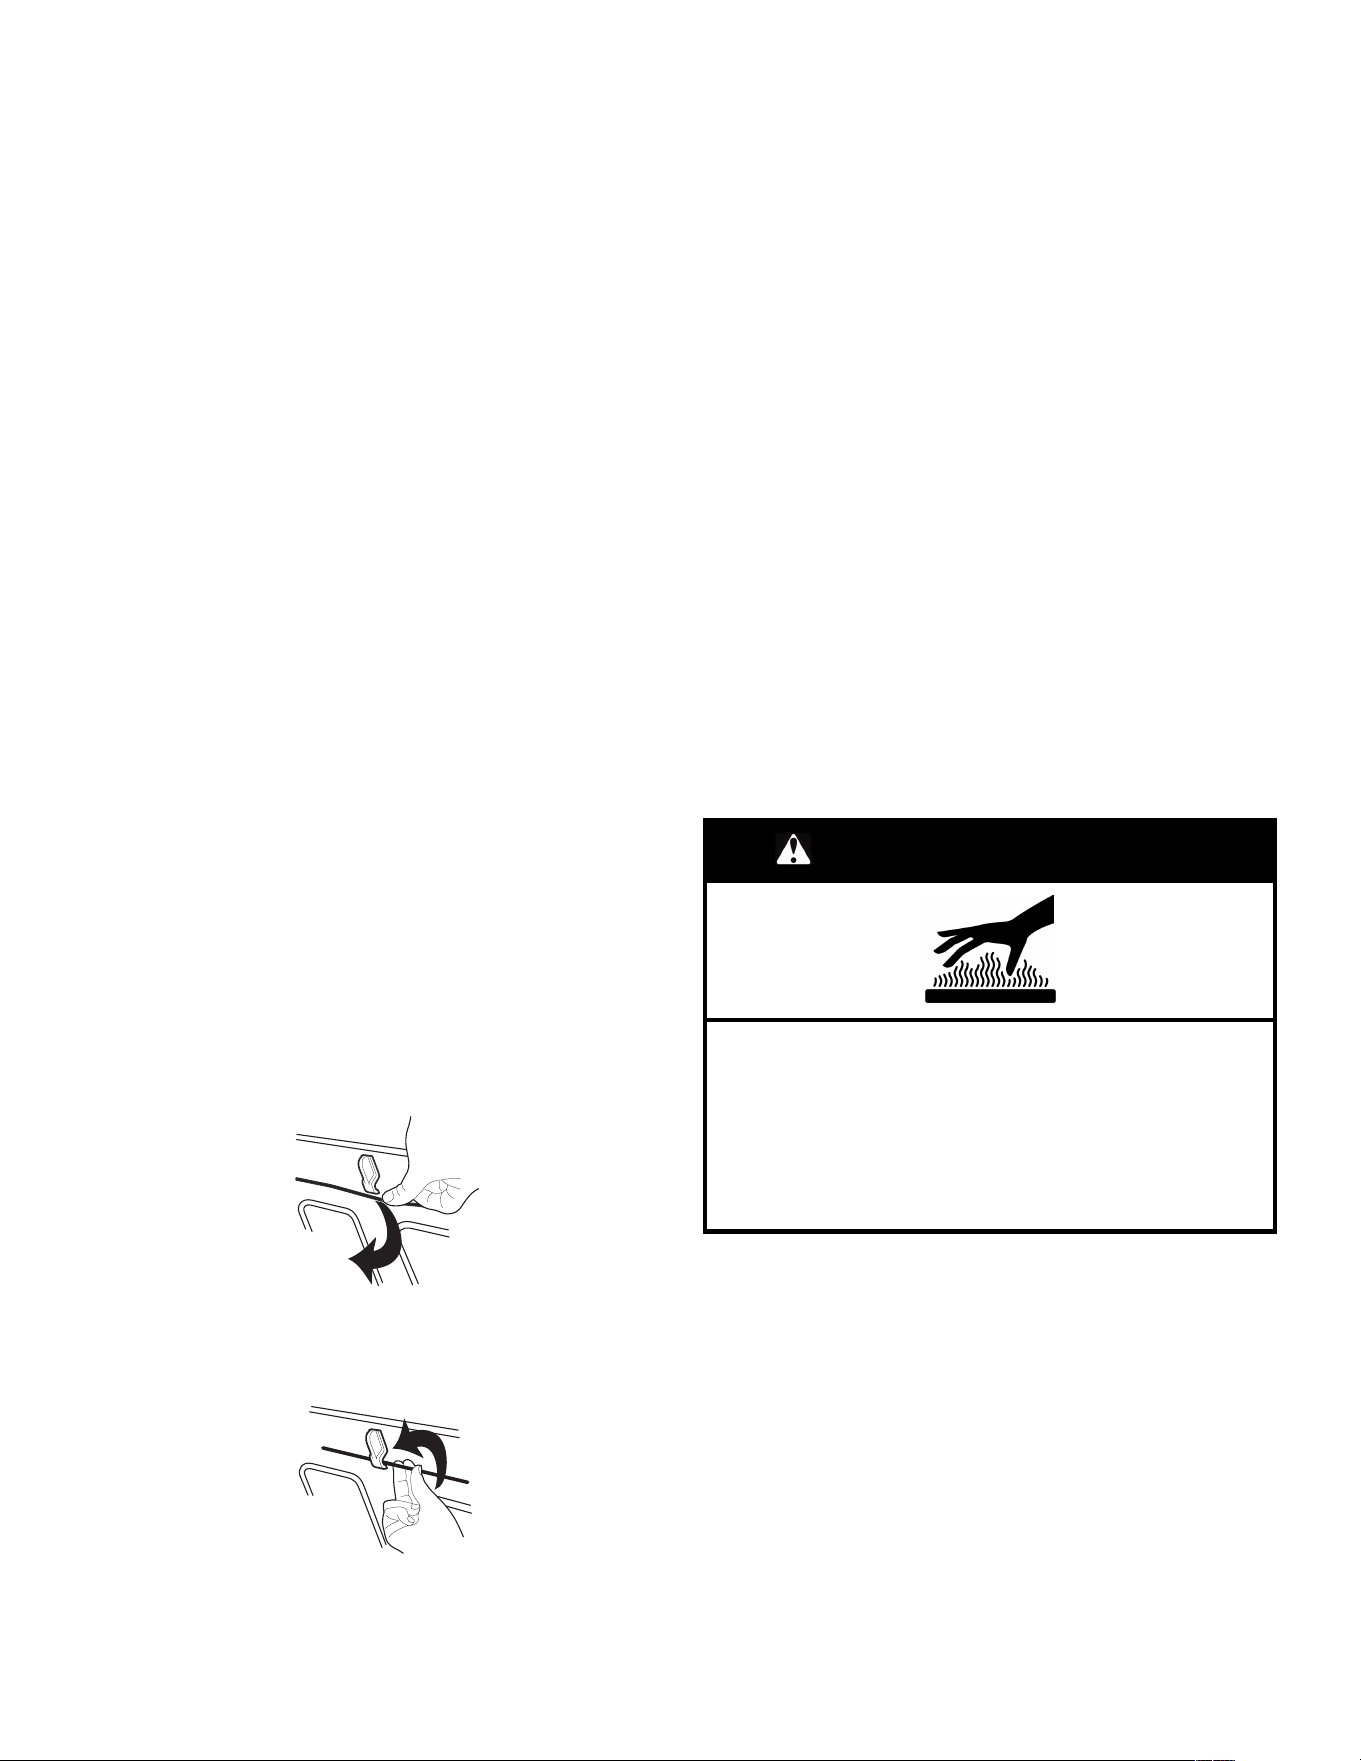
23
La zone de contact de la porte et du cadre du four, quand la porte
est fermée, doit être maintenue propre.
Méthode de nettoyage :
Saleté moyenne
� Savons et détergents doux, non abrasifs :
Rincer à l’eau propre et sécher avec un chiffon doux sans
charpie.
Saleté intense
� Savons et détergents doux, non abrasifs :
Faire chauffer une tasse (250 ml) d’eau pendant 2 à 5 minutes
dans le four. La vapeur amollira la saleté. Rincer à l’eau propre
et sécher avec un
chiffon doux sans charpie.
Odeurs
� Jus de citron ou vinaigre :
� Faire chauffer une tasse (250 ml) d’eau avec 1 c. à soupe
(15 ml) de jus de citron ou de vinaigre pendant 2 à 5 minutes
dans le four.
GRILLES DU FOUR
� Tampon en laine d’acier
� Lave-vaisselle
� Pour les grilles ternies qui glissent difficilement, enduire
légèrement les glissières d’huile végétale; cela facilitera leur
glissement.
PEINTURE MÉTALLIQUE (sur certains modèles)
Ne pas utiliser de nettoyants abrasifs, de nettoyants avec agent
de blanchiment, de produits antirouille, d’ammoniaque ou
d’hydroxyde de sodium (soude), car la surface peinte pourrait se
tacher.
PLAFOND DU FOUR À MICRO-ONDES
L’élément de cuisson au gril ne nécessite pas un nettoyage
sachant que la chaleur intense brûle toute projection de
nourriture. Cependant, la paroi supérieure au-dessus de l’élément
de cuisson au gril nécessite un nettoyage régulier.
Méthode de nettoyage :
� Eau tiède, détergent doux et éponge.
Nettoyage :
1. Pousser doucement le cordon de fixation vers l’arrière de la
paroi supérieure puis l’abaisser pour dégager l’élément de
cuisson au gril.
2. Abaisser l’avant de l’élément de cuisson au gril pour accéder
à la paroi supérieure et nettoyer.
3. Soulever à nouveau l’élément de cuisson au gril puis
réinstaller le cordon de fixation à son emplacement d’origine.
Toujours remettre l’élément de cuisson au gril en position pour la
cuisson après le nettoyage.
PLATEAU ROTATIF
Remettre le plateau rotatif en place immédiatement après le
nettoyage. Ne pas faire fonctionner le four à micro-ondes lorsque
le plateau rotatif est enlevé.
Méthode de nettoyage :
� Nettoyant doux et tampon à récurer
� Lave-vaisselle
PLAT À CROUSTILLER (sur certains modèles)
Afin d’éviter d’endommager le plat brunisseur, ne pas l’immerger
ou le rincer sous l’eau tant que le plat à croustiller est encore
chaud. Ne pas utiliser de tampons en laine d’acier.
Méthode de nettoyage :
� Eau tiède, détergent doux et éponge. Les zones très sales
peuvent être nettoyées avec un tampon à récurer et un
nettoyant doux
� Lave-vaisselle
PLAQUE DE CUISSON
� Lave-vaisselle
KITCHENAID™ CUISEUR-VAPEUR
� Lave-vaisselle
SUPPORT ET ROULETTES DU PLATEAU
ROTATIF, AXE ET POIGNÉE DU PLAT À
CROUSTILLER
� Lave-vaisselle
Programme Self-Cleaning
(Autonettoyage)
Risque de brûlures
Ne pas toucher le four au cours du programme
d’autonettoyage.
Garder les enfants loin du four au cours du programme
d’autonettoyage.
Le non-respect de ces instructions peut causer des
brûlures.
IMPORTANT : La santé de certains oiseaux est très sensible aux
émanations qui surviennent durant le programme Self-Cleaning
(Autonettoyage). L’exposition aux émanations peut entraîner la
mort de certains oiseaux. Toujours déplacer les oiseaux dans une
autre pièce fermée et bien aérée.
Procéder à l’autonettoyage du four avant qu’il ne devienne très
sale. Les saletés intenses nécessitent un nettoyage plus long et
dégagent plus de fumée.
Veiller à ce que la cuisine soit bien aérée pendant le programme
Self-Cleaning (Autonettoyage) afin d’aider à éliminer la chaleur,
les odeurs et la fumée.
Ne pas obstruer le ou les évents du four durant le programme
Self-Cleaning (Autonettoyage). L’air doit pouvoir circuler
librement. Voir la section « Évents du four » du Guide de
démarrage rapide.
AVERTISSEMENT

24
Ne pas nettoyer, frotter, endommager ou déplacer le joint
d’étanchéité de la porte du four. Le joint de la porte est essentiel
pour une bonne étanchéité.
Préparation du four
� Sortir du four la lèchefrite, les grilles et les ustensiles de
cuisson au four et, sur certains modèles, la sonde
thermométrique.
� Sortir les grilles du four pour les garder brillantes et pour
qu’elles glissent facilement. Voir la section « Nettoyage
général » pour plus de renseignements.
� Enlever tout papier d’aluminium du four; celui-ci risquerait de
brûler ou de fondre et d’endommager le four.
� Nettoyer manuellement l’intérieur de la porte et une zone de
1
1
/
2
po (3,8 cm) sur le pourtour du cadre de la cavité du four,
en prenant soin de ne pas déplacer ni plier le joint
d’étanchéité. Cette section ne devient pas assez chaude au
cours du programme d’autonettoyage pour pouvoir éliminer la
saleté. Ne pas laisser d’eau, de nettoyant, etc., pénétrer dans
les fentes du cadre de la porte. Nettoyer avec un chiffon
humide.
� Essuyer toute saleté décollée afin de réduire la fumée et
d’éviter les dommages. À des températures élevées, les
aliments réagissent avec la porcelaine. Cette réaction peut
causer des taches, des attaques, des piqûres ou de légères
taches blanches. Ceci est normal et n’affecte pas la
performance de cuisson.
Comment fonctionne le programme
IMPORTANT :
Le chauffage et le refroidissement de la porcelaine sur l’acier
dans le four peuvent causer une décoloration, une perte de lustre,
des fissures minuscules et des craquements.
Le programme Self-Cleaning (Autonettoyage) utilise des
températures très élevées, brûlant les saletés pour les réduire en
cendre.
Les durées de nettoyage suggérées sont de 3 h pour les saletés
légères, 4 h pour les saletés moyennes, et 5 h pour les saletés
moyennes à intenses (incluant 30 minutes de refroidissement).
Lorsque le four a complètement refroidi, retirer la cendre avec un
chiffon humide. Afin d’éviter de briser le verre, ne pas appliquer de
chiffon humide et froid sur la partie interne du hublot de la porte
avant qu’il n’ait complètement refroidi.
Les lampes du four ne fonctionnent pas durant le programme
Self-Cleaning (Autonettoyage)
Sur les modèles à double four, seul un four à la fois peut effectuer
un autonettoyage. Lorsqu’un four effectue un programme
d’autonettoyage, l’autre four ne peut pas être réglé ni allumé.
REMARQUE : Le four possède un moteur de ventilateur de
refroidissement à deux vitesses. Pendant le programme
d’autonettoyage, les ventilateurs fonctionneront à la vitesse la
plus élevée pour augmenter le flux d’air et faciliter l’évacuation de
l’air chaud par les évents du four. Une augmentation du bruit peut
être constatée pendant et après le programme d’autonettoyage
jusqu’au refroidissement du four.
Démarrage l’autonettoyage
Avant l’autonettoyage, s’assurer que la porte est complètement
fermée sinon elle ne se verrouillera pas et le programme ne
commencera pas. Lorsque le four est verrouillé, les portes du four
ne peuvent être ouvertes. Pour éviter d’endommager les portes,
ne pas les forcer ouvertes lorsqu’elles sont verrouillées.
1. Appuyer sur la touche Tools (Outils).
2. Sélectionner l’icône Self Clean (Autonettoyage).
(Sur les modèles à four double) : Sélectionner la cavité
supérieure ou la cavité inférieure.
3. Sélectionner le type d’autonettoyage :
Vapeur : 1 heure : Nettoyer après de légers déversements
quotidiens à l’aide de la chaleur inférieure et de 1
1
/
4
tasse
d’eau (295,74 ml).
Température élevée : Plusieurs niveaux sont disponibles et
peuvent prendre jusqu’à 5 heures et 1 heure de
refroidissement.
4. Suivre les directives à l’écran pour préparer le four.
5. Sélectionner START (MISE EN MARCHE) pour commencer le
processus de nettoyage.
OU
Sélectionner DELAY START (MISE EN MARCHE DIFFÉRÉE)
pour commencer le programme de Self-Cleaning
(Autonettoyage) à un autre moment. Voir la section « Mise en
marche différée du programme d’autonettoyage ».
Les portes du four se verrouillent automatiquement.
REMARQUE : La porte peut ne pas se verrouiller
immédiatement après la mise en marche du programme de
Self-Clean (Autonettoyage).
Lorsque le programme de Self-Cleaning (Autonettoyage) est
terminé et que le four est froid, les portes du four se
déverrouillent.
6. Lorsque le four a complètement refroidi, retirer la cendre avec
un chiffon humide.
Pour différer l’autonettoyage
Suivre les étapes 1 à 4 présentées ci-dessus, puis :
1. Sélectionner DELAY START (MISE EN MARCHE DIFFÉRÉE)
ou DELAY (DIFFÉRER).
2. Sélectionner l’heure de départ du programme de Self-
Cleaning (Autonettoyage) en naviguant de gauche à droite.
3. Sélectionner START DELAY (DÉMARRER LA MISE EN
MARCHE DIFFÉRÉE).
Les portes du four vont se verrouiller automatiquement après
le début du compte à rebours.
Lorsque le programme Self-Cleaning (Autonettoyage) est
terminé et que le four est froid, les portes du four se
déverrouillent.
4. Lorsque le four a complètement refroidi, retirer la cendre avec
un chiffon humide.
Arrêter le programme d’autonettoyage à tout moment
Appuyer sur la touche Cancel (Annulation) du four pour les
modèles à four simple ou les touches pour les modèles de four
double. Si la température du four est trop élevée, la porte reste
verrouillée. Elle ne se déverrouille pas tant que le four n’a pas
refroidi.
Steam Clean (Nettoyage à la vapeur)
(sur certains modèles)
La fonction de nettoyage à la vapeur est conçue pour un
nettoyage léger de la cavité inférieure sur les modèles équipés
d’un élément de cuisson dissimulé dans le four.
Ne pas utiliser de nettoyants à four.
Laisser le four refroidir et atteindre la température ambiante avant
d’utiliser le programme de nettoyage à la vapeur. Si la
température de la cavité du four est supérieure à 200 °F (93 °C),
la fonction de nettoyage à la vapeur ne s’active pas. Elle attendra
que la température soit moins élevée.
Retirer les grilles et accessoires de la cavité du four.
Pour de meilleurs résultats, utiliser 10 oz (295,7 mL) d’eau
distillée ou filtrée.

25
La fonction de nettoyage à la vapeur fonctionne pendant environ
1 heure. Un signal sonore sera émis à la fin du programme.
IMPORTANT : Puisque l’eau dans le fond du four est chaude, ne
pas ouvrir la porte du four pendant le cycle de nettoyage à la
vapeur.
Toucher Oven Cancel (annulation de la fonction d’alimentation du
four) ou Upper/Lower (supérieur/inférieur) sur les modèles à four
double pour mettre fin au cycle en tout temps. L’affichage de
l’heure est rétabli.
Conseils utiles
� Une fois le programme de nettoyage à la vapeur terminé et le
four complètement refroidi, essuyer l’eau restante dans le fond
du four à l’aide d’une éponge ou d’un linge.
� Essuyer toute humidité présente dans l’intérieur du four, les
parois latérales internes de la cavité du four et la table de
cuisson.
� Utiliser une brosse à poils doux ou un ustensile de récurage en
nylon pour essuyer l’intérieur du four. Ceci pourra être utile
pour les taches les plus tenaces.
� Il est recommandé d’utiliser une eau distillée ou filtrée, car
l’eau du robinet peut laisser des dépôts minéraux sur le fond
du four. Utiliser un linge imbibé de vinaigre ou de jus de citron
pour retirer tout dépôt de minéraux qui peut être présent après
le programme de nettoyage à la vapeur.
� Si le four est très sale, utiliser le programme d’autonettoyage.
Le programme de nettoyage à la vapeur peut être utilisé pour
éliminer la majorité des débris, ce qui rendra le programme
d’autonettoyage plus efficace.
Nettoyage à la vapeur :
1. Ouvrir la porte du four sélectionné et retirer les grilles et
accessoires de la cavité.
2. Verser 10 oz (295,7 mL) d’eau distillée ou filtrée dans le fond
du four. Fermer ensuite la porte du four.
3. Appuyer sur la touche Tools (outils).
Sur les modèles à four double : Sélectionner la cavité
supérieure ou la cavité inférieure.
4. Sélectionner STEAM CLEAN (nettoyage à la vapeur).
5. Sélectionner START (mise en marche).
6. Après environ 1 heure, une tonalité résonnera pour signaler
que le programme est terminé. Toucher Oven Cancel
(annulation de la fonction d’alimentation du four) ou Upper/
Lower (supérieur/inférieur) sur les modèles à four double pour
effacer l’écran.
7. Lorsque le four a complètement refroidi, éponger l’excédant
d’eau à l’aide d’une éponge ou d’un linge, puis essuyer
l’intérieur du four. Au besoin, utiliser un tampon à récurer en
cuivre non abrasif pour retirer les souillures tenaces.
INSTRUCTIONS D’INSTALLATION
SPÉCIFICATIONS
Outils et pièces
Rassembler les outils et pièces nécessaires avant d’entreprendre
l’installation. Lire et observer les instructions fournies avec chacun
des outils de la liste ci-dessous.
Outils nécessaires
� Tournevis à tête cruciforme
� Ruban à mesurer
� Perceuse manuelle ou électrique (pour installation dans une
armoire)
� Foret de 1 po (2,5 cm) (pour installation dans une armoire)
� Niveau
� Tournevis à tête plate
Pièces fournies
� Vis no 8-14 x 3/4 po (1,9 cm) (2)
� Vis à tête cruciforme no 8-18 x 3/8 po (9,5 mm) – plaque de
protection de l’évent inférieur (2)
� Vis à tête cruciforme no 8-18 x 3/8 po (9,5 mm) – finition de
l’évent inférieur (2)
� Vis à tête hexagonale no 8-18 x 3/8 po (9,5 mm) – pieds en
plastique (4)
� Pied arrière (2)
� Pieds avant (2)
� Protecteur de l’évent inférieur
� Finition de l’évent inférieur
Pièces nécessaires
� Ensemble de déflecteurs (sur certains modèles) (pour
l’installation des fours au-dessus d’un tiroir-réchaud, sous un
comptoir ou pour les fours installés en affleurement avec une
armoire) : Voir la section des informations de commande en
ligne du guide de démarrage rapide.
� Connecteur de conduit homologation UL ou CSA
� Capuchons de connexion (homologation UL)
Consulter les codes locaux. Vérifier l’alimentation électrique
existante. Voir la section « Spécifications électriques ».
Il est recommandé de faire réaliser tous les raccordements
électriques par un électricien qualifié agréé.
REMARQUE : S’assurer d’acheter uniquement des pièces et des
accessoires Whirlpool certifiés par le fabricant de l’appareil. Il se
peut que l’installation nécessite des pièces supplémentaires. Pour
commander, consulter les coordonnées indiquées dans le guide
de démarrage rapide.
Exigences d’emplacement
IMPORTANT : Observer les dispositions de tous les codes et
règlements en vigueur.
� Les dimensions d’ouverture de l’armoire indiquées doivent être
utilisées. Ces dimensions tiennent compte des dégagements
de séparation nécessaires pour le four.
� La zone d’installation encastrée doit entourer complètement
les côtés et le dessus du four.
� Une source d’électricité avec liaison à la terre est nécessaire.
Voir la section « Spécifications électriques ».
� Le boîtier de raccordement doit être situé à moins de 3 po
(7,6 cm) au-dessus de la surface de l’enceinte supérieure
lorsque le four est installé dans une armoire. Un trou d’un
diamètre de 1 po (2,5 cm) ou plus doit avoir été percé dans
l’angle arrière gauche ou droit de la surface de l’enceinte
supérieure pour le passage du câble d’alimentation de
l’appareil jusqu’au boîtier de connexion.
� La surface de support du four doit être rigide, horizontale et en
affleurement avec le bas de l’ouverture découpée dans
l’armoire. Le plancher doit être capable de supporter un poids
total (four à micro-ondes et four encastré) de 253 lb (115 kg)
pour les modèles de 27 po (68,6 cm) ou 280 lb (127 kg) pour
les modèles de 30 po (76,2 cm).
IMPORTANT : Pour éviter d’endommager les armoires,
consulter le constructeur de la maison ou le fabricant des
armoires pour déterminer si les matériaux utilisés peuvent
subir un changement de couleur, une déstratification ou
d’autres dommages. Ce four a été conçu conformément aux
exigences des normes UL et CSA International et respecte les
températures maximales permises de 194 °F (90 °C) pour les
armoires en bois.
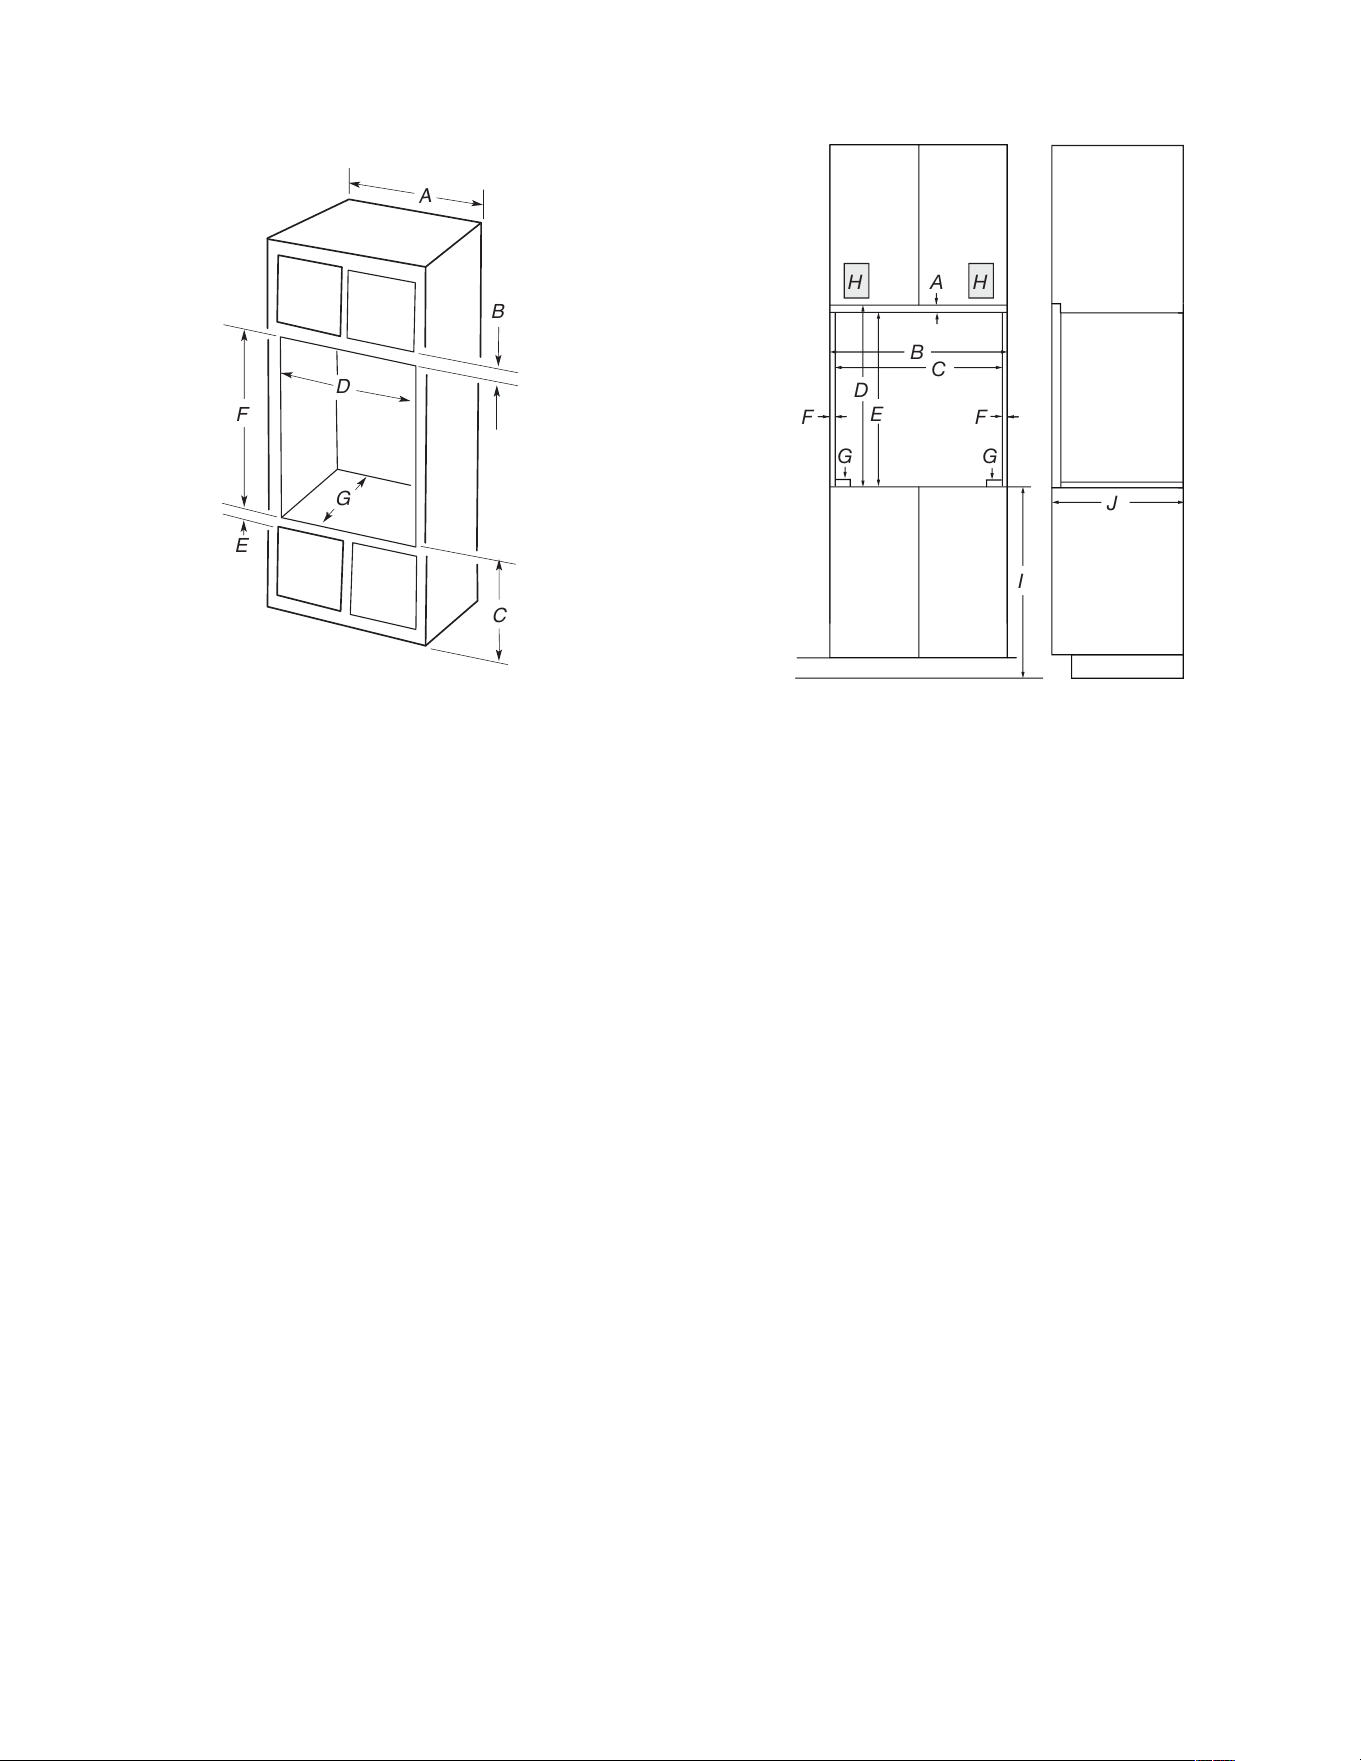
26
Dimensions de l’armoire – Ensemble four
électrique/four à micro-ondes encastré
Installation standard
F
E
A
D
G
B
C
Modèles de 27 po (68,6 cm)
A. Largeur minimum de l’armoire :
27 po (68,6 cm)
B. Du sommet de la découpe au
bas de la porte de l’armoire
supérieure : 1
1
/
4
po (3,2 cm)
C. Du fond de la découpe au
plancher : 19
1
/
4
po (48,9 cm)
recommandé.
Une distance de 7,5 po
(19,1 cm) à 19
1
/
4
po (48,9 cm)
entre le bas de l’ouverture et le
plancher est acceptable.
D. 25
1
/
2
po (64,8 cm) minimum
de largeur pour l’ouverture
découpée
E. Du fond de l’ouverture
au-dessus de la porte de
l’armoire : 1
1
/
2
po (3,8 cm) min.
F. Hauteur recommandée de la
découpe : 41
5
/
16 po
(105 cm)*
G. Profondeur de découpe : 24 po
(60,7 cm)
Modèles de 30 po (76,2 cm)
A. Largeur minimum de l’armoire :
30 po (76,2 cm)
B. Du sommet de la découpe au
bas de la porte de l’armoire
supérieure : 1
1
/
4
po (3,2 cm)
C. Du fond de la découpe au
plancher : 19
1
/
4
po (48,9 cm)
recommandé.
Une distance de 7,5 po
(19,1 cm) à 19
1
/
4
po (48,9 cm)
entre le bas de l’ouverture et le
plancher est acceptable.
D. 28
1
/
2
po (72,4 cm) de largeur
minimum pour l’ouverture
découpée
E. Du fond de l’ouverture
au-dessus de la porte de
l’armoire : 1
1
/
2
po (3,8 cm) min.
F. Hauteur recommandée de la
découpe : 41
5
/
16 po
(105 cm)*
G. Profondeur de découpe : 24 po
(60,7 cm)
*REMARQUE : Pour les combinaisons four à micro-ondes/four, la
hauteur de la découpe peut être comprise entre 41
1
/
8
po
(104,5 cm) et 41
1
/
2
po (105,6 cm).
Installation en affleurement
Une découpe de 25 po (63,5 cm) minimum est requise.
Ces dimensions donneront un dégagement de 1/4 po (6 mm) au
sommet, un dégagement de 1/4 po (6 mm) sur les côtés et un
dégagement de 1/8 po (3 mm) au bas du four encastré. Les écarts
supérieurs et inférieurs ne sont pas nécessaires pour l’installation.
Le côté avant des tasseaux et plates-formes sera visible et doit
être traité comme une surface de finition.
Vue de face Vue latérale
A
B
C
D
E
FF
G
G
I
J
H H
Modèles de 27 po (68,6 cm)
A. Tasseau supérieur de 3/4 po
(1,9 cm)*
B. Largeur minimale de
l’ouverture intégrée en
affleurement : 27
1
/
4
po
(69,2 cm)
C. Largeur minimum de
l’ouverture : 25
7
/
8
po (65,7 cm)
D. Hauteur minimale de
l’ouverture intégrée en
affleurement : 43 po
(109,2 cm)
E. Hauteur recommandée de la
découpe : 42
1
/
2 po
(107,3 cm)
F. Tasseau latéral de 11/16 po
(1,7 cm)*
G. Recommandé avec pied :
1/4 po (0,6 cm). Dimension
autorisée de 15/16 po à
1
5
/
16
po (2,3 cm à 3,5 cm)
sans pieds.
H. Emplacement recommandé
pour la boîte de jonction
I. 4
5
/
8
po à 19
1
/
4
po (11,7 à cm
48,9 cm) du fond de la
découpe au plancher
J. Profondeur minimum de la
découpe : 25 po (63,5 cm)
Modèles de 30 po (76,2 cm)
A. Tasseau supérieur de 3/4 po
(1,9 cm)*
B. Largeur minimale de
l’ouverture intégrée en
affleurement : 30
1
/
4
po
(76,8 cm)
C. Largeur minimum de
l’ouverture : 28
7
/
8
po (73,3 cm)
D. Hauteur minimale de
l’ouverture intégrée en
affleurement : 43 po
(109,2 cm)
E. Hauteur recommandée de la
découpe : 42
1
/
2 po
(107,3 cm)
F. Tasseau latéral de 11/16 po
(1,7 cm)*
G. Recommandé avec pied :
1/4 po (0,6 cm). Dimension
autorisée de 15/16 po à
1
5
/
16
po (2,3 cm à 3,5 cm)
sans pieds.
H. Emplacement recommandé
pour la boîte de jonction
I. 4
5
/
8
po à 19
1
/
4
po (11,7 à cm
48,9 cm) du fond de la
découpe au plancher
J. Profondeur minimum de la
découpe : 25 po (63,5 cm)
*Les tasseaux et les cales d’espacement doivent être encastrés à
1
3
/
8
po (3,5 cm) depuis l’avant de l’armoire.
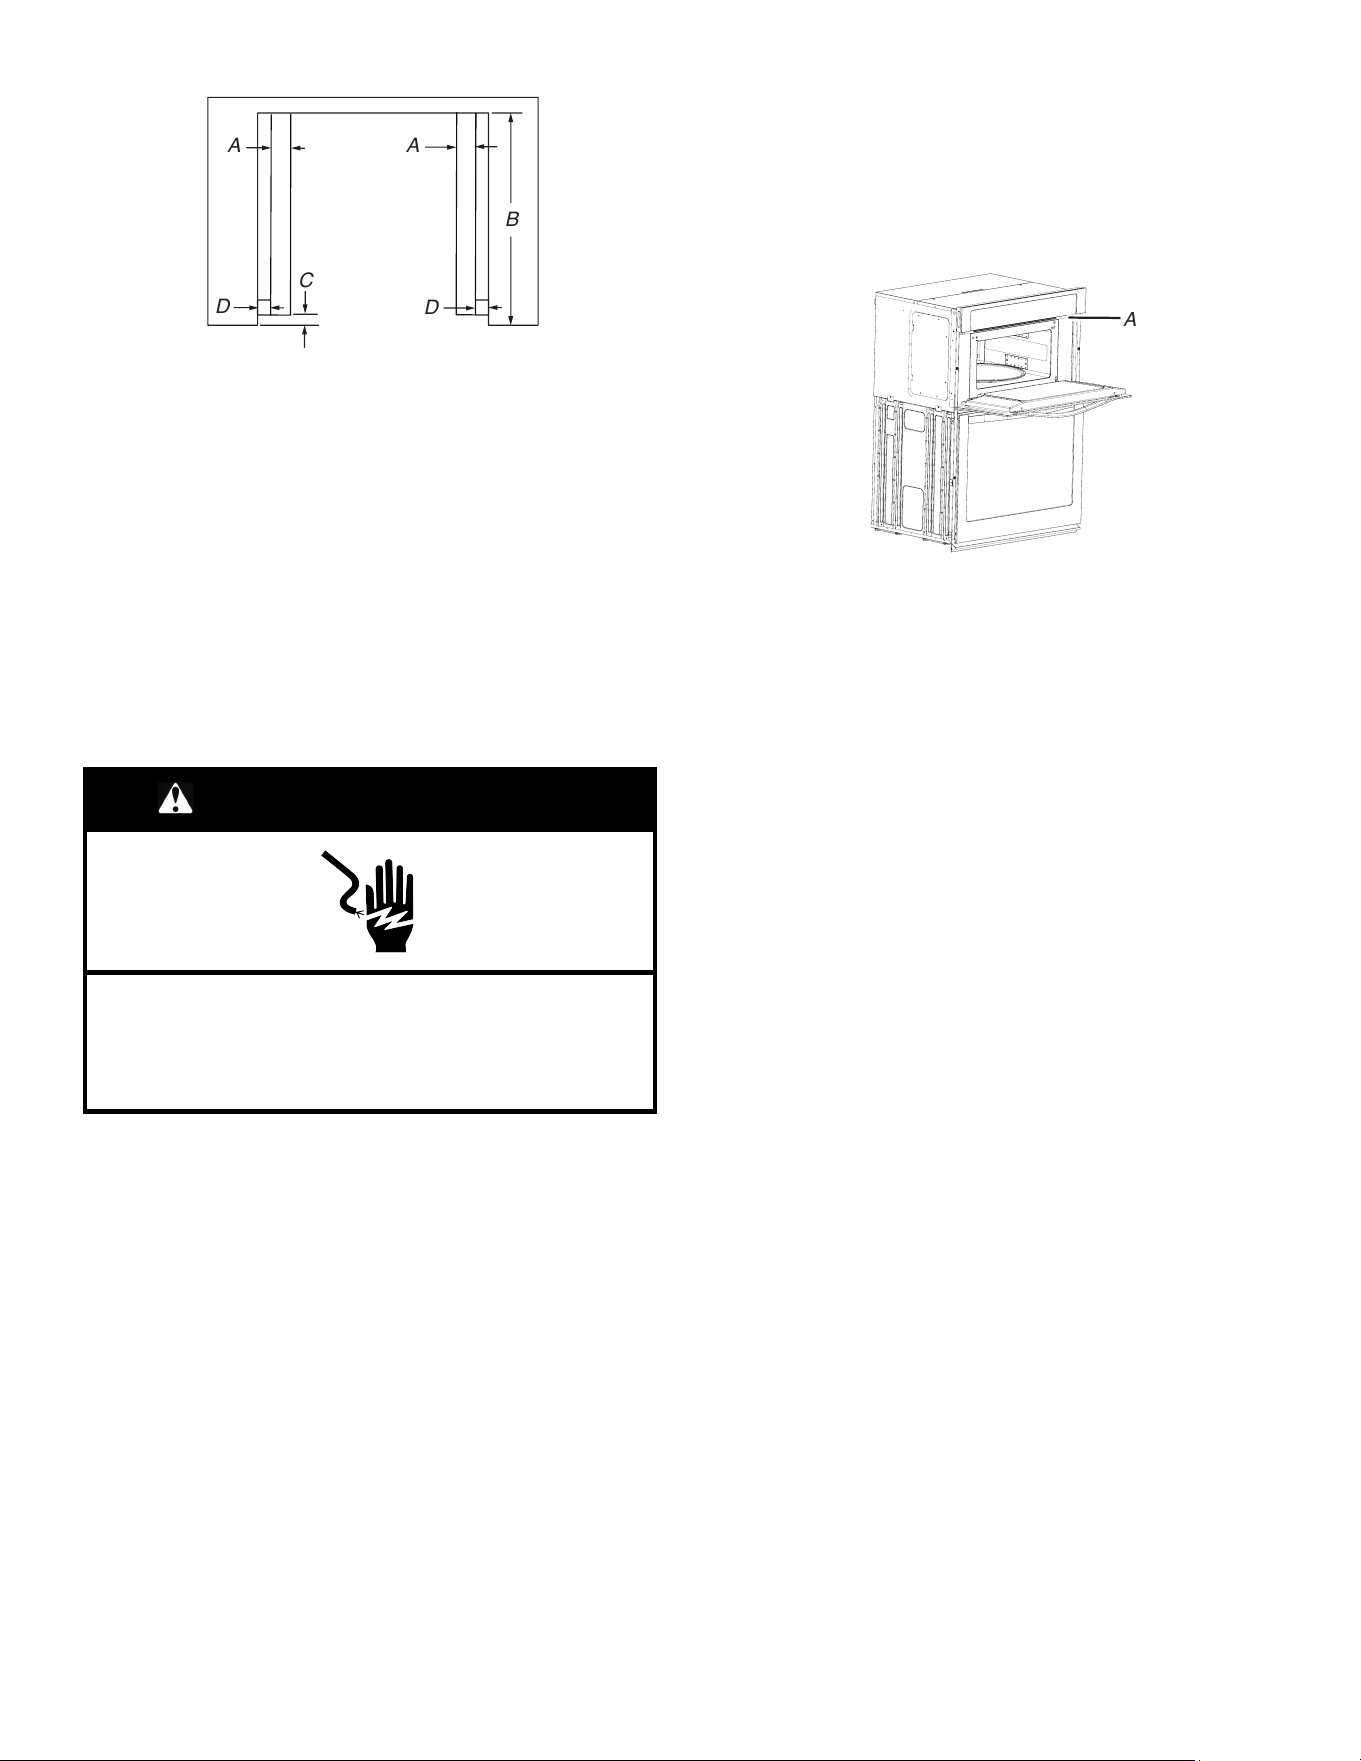
27
B
A A
D
D
C
Vue de dessus
Modèles de 27 po (68,6 cm)
A. Cale d’espacement de 2 po
(5,1 cm) sur la profondeur
totale de l’ouverture*
B. Profondeur de la découpe :
25 po (63,5 cm)
C. Encastrement à partir de
l’avant de l’armoire : 1
1
/
2
po
(3,5 cm)
D. Tasseau latéral de 11/16 po
(1,7 cm)*
Modèles de 30 po (76,2 cm)
A. Cale d’espacement de 2 po
(5,1 cm) sur la profondeur
totale de l’ouverture*
B. Profondeur de la découpe :
25 po (63,5 cm)
C. Encastrement à partir de
l’avant de l’armoire : 1
1
/
2
po
(3,5 cm)
D. Tasseau latéral de 11/16 po
(1,7 cm)*
*Les tasseaux et les cales d’espacement doivent être encastrés à
1
3
/
8
po (3,5 cm) depuis l’avant de l’armoire.
Spécifications électriques
AVERTISSEMENT
Risque de décharge électrique
Appareil relié à la terre.
Le non-respect de ces instructions peut causer un
décès, un incendie ou une décharge électrique.
Si on utilise un conducteur distinct de liaison à la terre et lorsque
les codes le permettent, il est recommandé qu’un électricien
qualifié vérifie que la liaison à la terre et le calibre des fils sont
conformes aux codes locaux.
En cas de doute quant à la qualité de la liaison à la terre du four,
consulter un électricien qualifié.
Ce four doit être raccordé à un système permanent, métallique de
câblage relié à la terre.
S’assurer que la connexion électrique et le calibre des fils sont
appropriés et conformes au National Electrical Code, aux normes
ANSI/NFPA 70 – dernière édition, ou aux normes CSA C22.1-94,
au Code canadien de l’électricité, Partie 1 et C22.2 N° O-M91 –
dernière édition, et à tous les codes et règlements locaux.
Pour obtenir un exemplaire des normes des codes ci-dessus,
contacter :
National Fire Protection Association
1 Batterymarch Park
Quincy, MA 02169-7471
CSA International
8501 East Pleasant Valley Road
Cleveland, OH 44131-5575
Raccordement électrique
Pour installer le four de façon appropriée, il faut établir le type de
raccords électriques que l’on utilisera et suivre les instructions de
ce document.
� Le four doit être alimenté par une source d’électricité
appropriée (caractéristiques de tension, ampérage et
fréquence spécifiées sur la plaque signalétique). Voir
l’illustration suivante.
A
A. Plaque signalétique du numéro de modèle et de série
� Les modèles à 240 V de 7,3 à 9,6 kW (208 V de 6,3 à 8,3 kW)
doivent être alimentés par un circuit indépendant de 40 A. Les
modèles à 240 V de 4,9 à 7,2 kW (208 V de 4,3 à 6,2 kW)
doivent être alimentés par un circuit indépendant de 30 A. Un
modèle à 240 V de 4,8 kW ou moins (208 V de 4,2 kW ou
moins) doit être alimenté par un circuit indépendant de 20 A.
� L’emploi d’un disjoncteur est recommandé.
� Raccorder l’appareil directement au tableau de distribution par
un câble à conducteur de cuivre et gaine métallique flexible ou
gaine non métallique (avec conducteur de liaison à la terre).
Voir la section « Raccordement électrique ».
� Le câble flexible du four doit être connecté directement dans le
boîtier de connexion.
� Ne pas couper le conduit. La longueur du conduit fourni est
destinée à faciliter l’entretien/le dépannage éventuel du four.
� L’installateur doit fournir un connecteur de conduit
(homologation UL ou CSA).
� Si le domicile possède un câblage en aluminium, suivre la
procédure ci-dessous :
Connecter le câblage en aluminium en utilisant des capuchons
ou des outils spécialement conçus et homologués UL pour
raccorder le cuivre à l’aluminium.
Suivre la procédure recommandée par le fabricant de
connecteurs électriques. Les raccordements aluminium/cuivre
doivent satisfaire aux prescriptions des codes locaux et de
l’industrie, et être conformes aux pratiques de câblage
reconnues.
S’assurer que la connexion électrique et le calibre des fils sont
appropriés et conformes au National Electrical Code, aux
normes ANSI/NFPA 70 – dernière édition, ou aux normes
CSA C22.1-94, au Code canadien de l’électricité, Partie 1 et
C22.2 No O-M91 – dernière édition, et à tous les codes et
règlements locaux. Pour obtenir un exemplaire des normes
des codes ci-dessus, contacter : National Fire Protection
Association 1 Batterymarch Park Quincy, MA 02169-7471
CSA International 8501 East Pleasant Valley Road Cleveland,
OH 44131-5575.
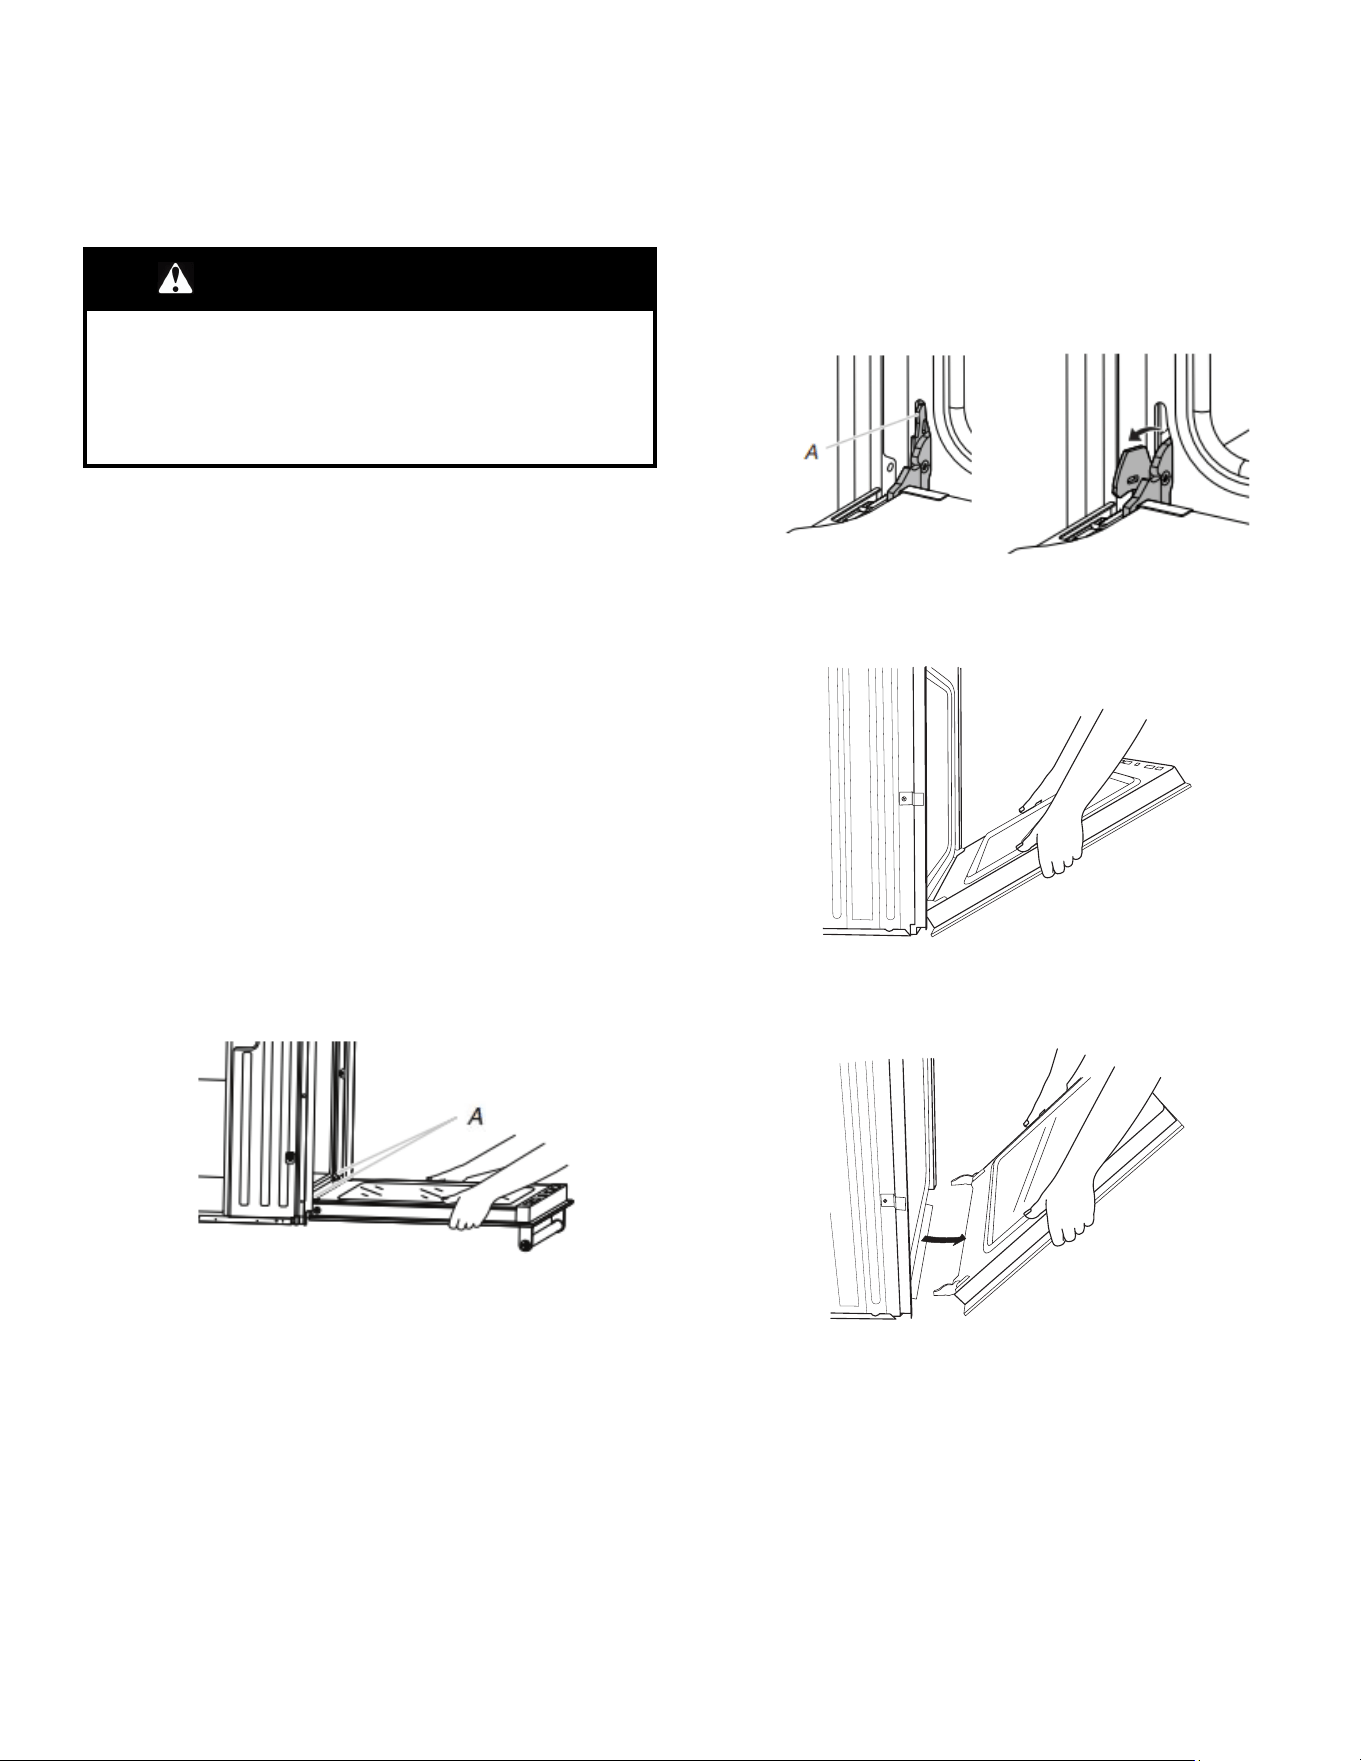
28
INSTALLATION
Préparer le four encastré
1. Choisir l’emplacement final pour l’installation du four. Éviter de
percer ou de sectionner le câblage du domicile pendant
l’installation.
AVERTISSEMENT
Risque de poids excessif
Utiliser deux personnes ou plus pour déplacer et installer
l’appareil.
Le non-respect de cette instruction peut causer une
blessure au dos ou d’autres blessures.
2. Pour éviter d’endommager le plancher, placer le four sur une
feuille de carton avant l’installation. Pour soulever l’appareil,
ne pas prendre prise sur la poignée ou sur une autre partie de
l’avant du châssis.
3. Ne pas oublier de retirer l’évent inférieur de l’emballage en
mousse du dessus du four.
4. Enlever les matériaux d’emballage et les rubans adhésifs du
four. S’assurer de bien conserver les cornières de protection
et autres matériaux pouvant être requis pour l’installation.
5. Enlever le matériel à l’intérieur du sachet de documentation.
6. Retirer et mettre de côté les grilles et autres pièces qui se
trouvent à l’intérieur du four.
7. Approcher le four et la feuille de carton de l’emplacement final
du four.
Enlever la/les porte(s) du four
IMPORTANT : Retirer la porte du four avec les 2 mains. Pour les
fours doubles, répéter le procédé pour chaque porte.
1. Avant de retirer la porte du four, préparer une surface sur
laquelle la poser. Cette surface doit être plate et recouverte
d’une couverture douce. On peut aussi utiliser les cornières
de l’emballage.
2. Ouvrir complètement la porte du four.
A. Charnières de porte
3. Trouver les loquets de charnière de la porte du four dans les
deux angles de la porte; faire pivoter les loquets de charnière
vers la porte du four jusqu’à la position de déverrouillage. Si le
loquet de charnière de porte n’est pas complètement tourné
(voir la position déverrouillée dans l’illustration), la porte ne se
retirera pas correctement.
Loquet de charnière de la porte
du four en position de
verrouillage
Loquet de charnière de la porte
du four en position de
déverrouillage
A. Tenir ici pour faire pivoter
4. Commencer à fermer doucement la porte. La porte s’arrêtera
en position partiellement fermée.
5. Saisir les bords de la porte du four avec les 2 mains. Fermer
la porte du four légèrement dépassé la position d’arrêt pour
réduire la charge supportée par les loquets, puis tirer la porte
de four vers le haut.
6. Tirer la porte du four vers soi et enlever la porte. Si
nécessaire, basculer doucement la porte d’un côté et de
l’autre en la tirant.
7. Garder la porte du four à part sur la surface de travail couverte
en la faisant reposer sur sa poignée.
8. Pour continuer l’installation du four, aller à la section
« Positionnement des pieds du four pour des ouvertures
d’encastrement dans l’armoire ».
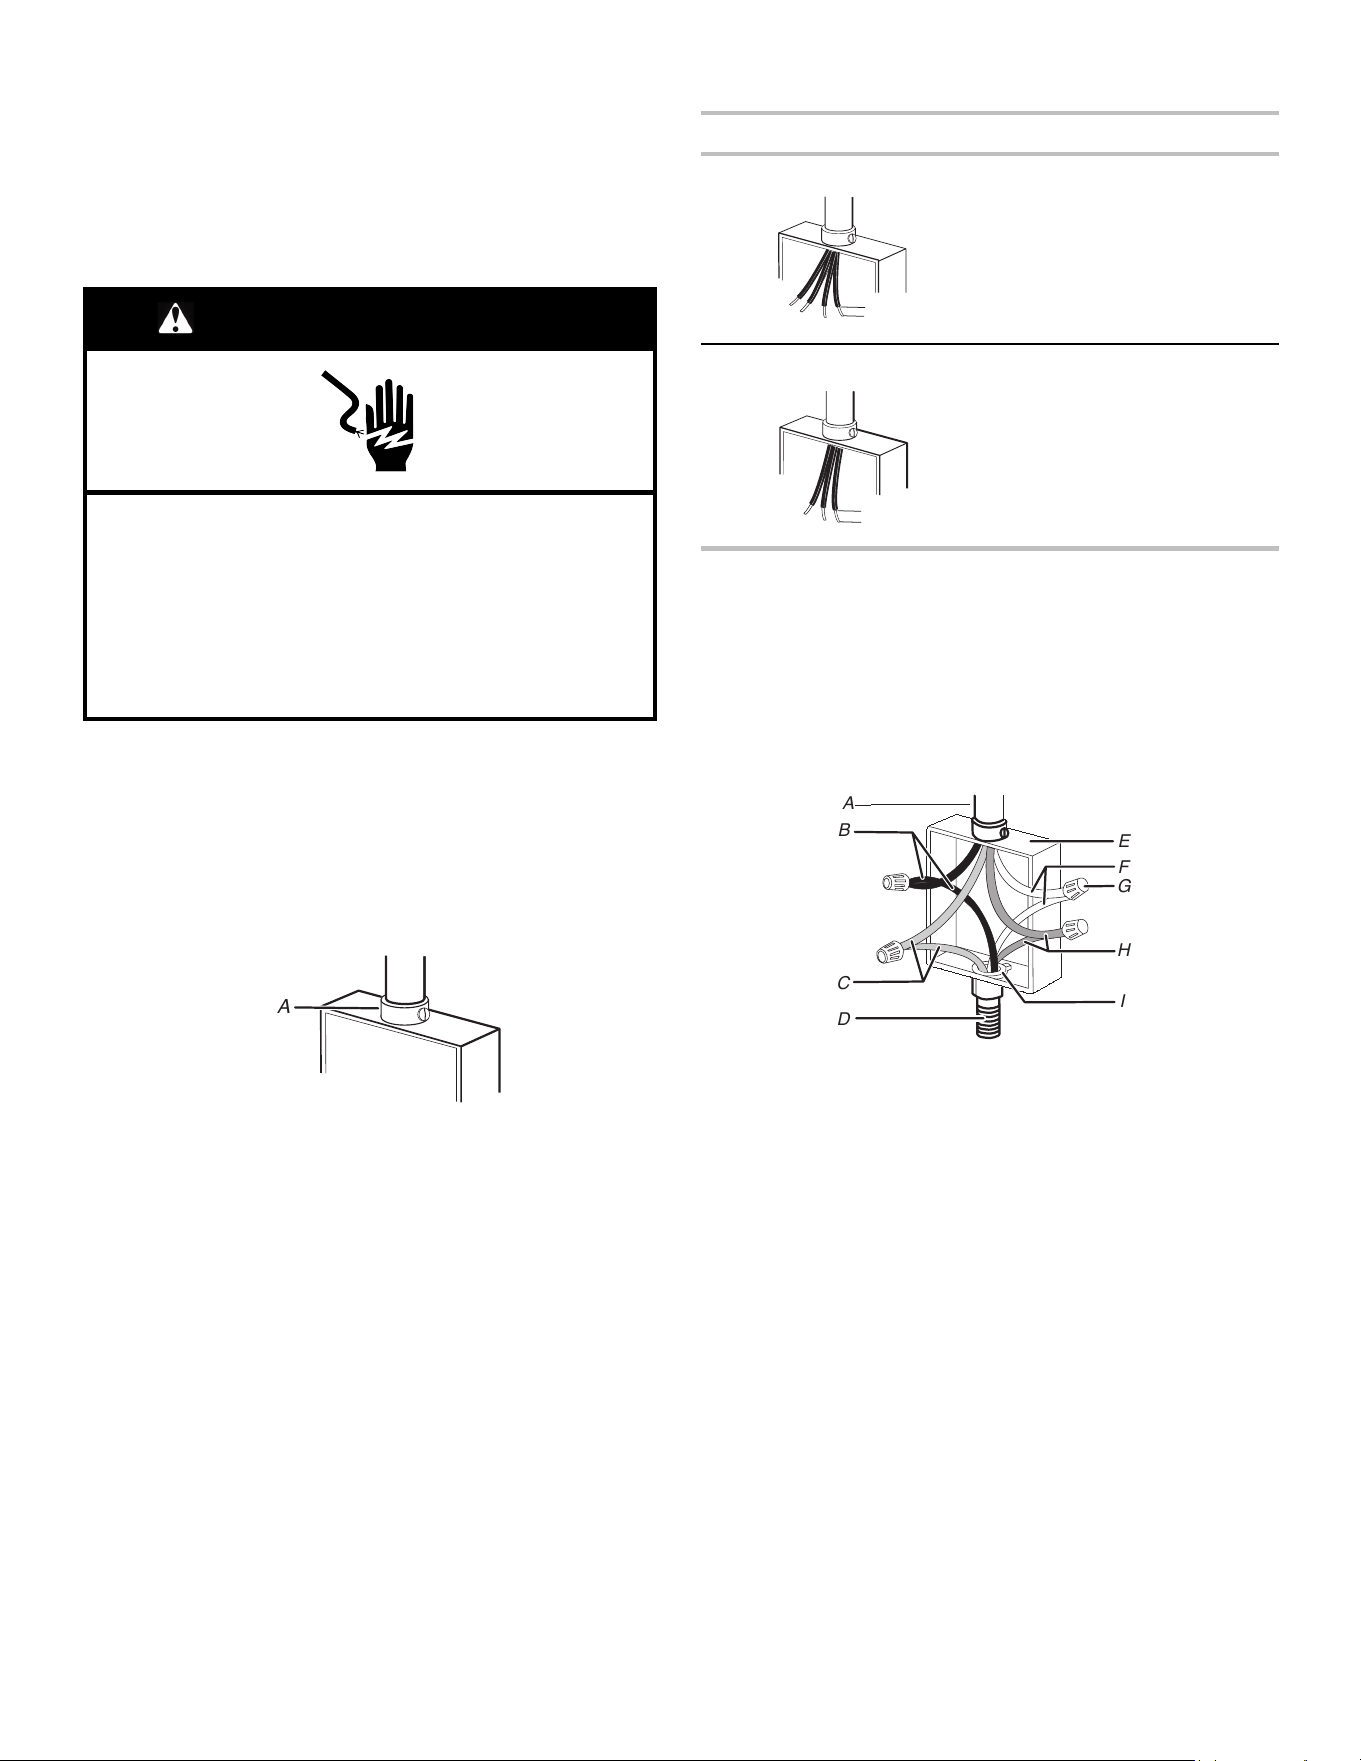
29
Raccordement électrique
IMPORTANT : Pour une installation en affleurement, avant
d’effectuer le raccordement électrique, les pieds du four ou les
cales doivent être installés pour permettre à l’ensemble four à
micro-ondes/four d’être installé dans la hauteur de découpe
recommandée.
Veuillez communiquer avec le service pour obtenir des pieds qui
vous seront livrés gratuitement.
AVERTISSEMENT
Risque de décharge électrique
Déconnecter la source de courant électrique avant
l’entretien.
Utiliser du fil de cuivre de calibre 8.
Relier le four à la terre.
Le non-respect de ces instructions peut causer un
décès, un incendie ou une décharge électrique.
Le câblage d’alimentation de ce four comporte un conducteur
neutre (blanc) et un conducteur vert (ou nu) de liaison à la terre
connecté à la caisse.
1. Débrancher l’alimentation.
2. Placer le conduit de câble flexible depuis le four jusqu’à
l’espace d’installation dans l’armoire.
3. Le cas échéant, enlever le couvercle du boîtier de connexion.
4. Installer un connecteur de conduit (homologation UL ou CSA)
sur le boîtier de connexion.
A
A. Connecteur de conduit (homologation UL ou CSA)
5. Acheminer le conduit de câble flexible depuis le four jusqu’au
boîtier de connexion – utiliser un connecteur de conduit
(homologation UL ou CSA).
6. Serrer les vis sur le connecteur de conduit.
7. Voir le « Tableau des options de raccordement électrique »
pour terminer l’installation correspondant à votre type de
raccordement électrique.
Tableau des options de raccordement électrique
Si le domicile comporte : Voir la section :
4 conducteurs
Câble à 4 conducteurs depuis
l’alimentation électrique du
domicile
3 conducteurs
Câble à 3 conducteurs depuis
l’alimentation électrique du
domicile
Câble à 4 conducteurs depuis l’alimentation
électrique du domicile
IMPORTANT : Utiliser le câble à 4 conducteurs provenant de
l’alimentation électrique du domicile aux États-Unis lorsque les
codes ne permettent pas la mise à la terre par l’intermédiaire du
conducteur neutre, en cas de nouvelle installation avec
alimentation par un circuit secondaire (1996 NEC), dans les
résidences mobiles et les véhicules récréatifs, dans une nouvelle
construction et au Canada.
A
D
F
H
B
C
E
G
I
A. Câble depuis le point de
distribution du domicile
B. Conducteur noir
C. Conducteurs rouges
D. Câble flexible à 4 conducteurs
depuis le four
E. Boîtier de connexion
F. Conducteur blanc
G. Connecteurs de fils
(homologation UL)
H. Connecteurs verts (ou nus) de
liaison à la terre
I. Connecteur de conduit
(homologation UL ou CSA)
1. Connecter ensemble les 2 conducteurs noirs (B) avec un
capuchon de connexion (homologation UL).
2. Connecter ensemble les 2 conducteurs rouges (C) avec un
capuchon de connexion (homologation UL).
3. Connecter ensemble les 2 connecteurs blancs (F) avec un
capuchon de connexion (homologation UL).
4. Connecter le conducteur vert (ou nu) de liaison à la terre (H)
du câble du four au conducteur vert (ou nu) de liaison à la
terre dans le boîtier de connexion – utiliser un capuchon de
connexion (homologation UL).
5. Installer le couvercle du boîtier de connexion.
1/2 po
(1,3 cm)
1/2 po
(1,3 cm)
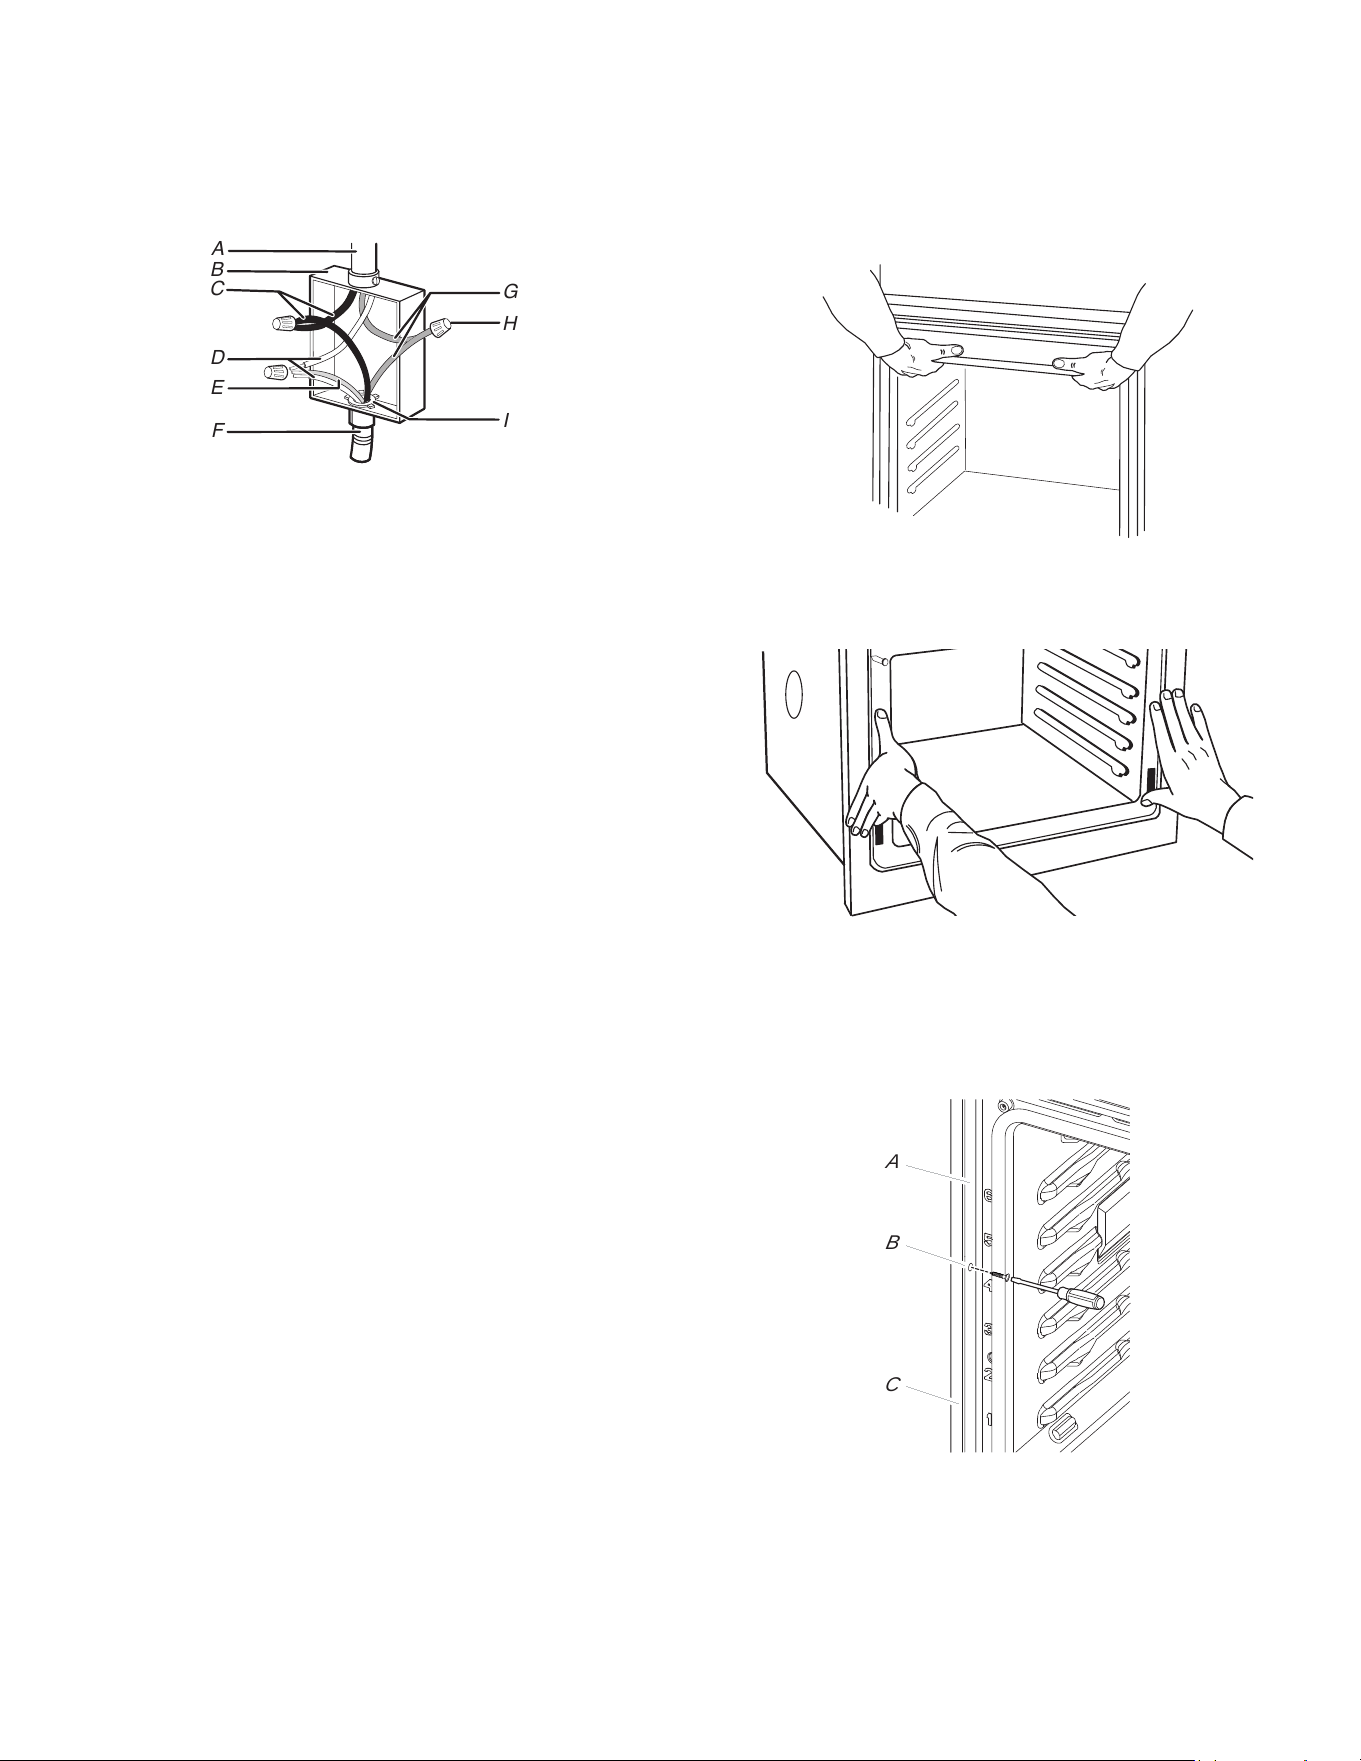
30
Câble à 3 conducteurs depuis l’alimentation
électrique du domicile – É.-U. seulement
IMPORTANT : Utiliser le câble à 3 conducteurs depuis
l’alimentation électrique du domicile lorsque les codes locaux
autorisent un tel raccordement.
B
C
D
E
F
H
G
A
I
A. Câble depuis le point de
distribution du domicile
B. Boîtier de connexion
C. Conducteur noir
D. Conducteur blanc
E. Conducteur vert (ou nu) de
liaison à la terre (depuis le
four)
F. Câble flexible à 4 conducteurs
depuis le four
G. Conducteurs rouges
H. Connecteurs de fils
(homologation UL)
I. Connecteur de conduit
(homologation UL ou CSA)
1. Connecter ensemble les 2 conducteurs noirs (C) avec un
capuchon de connexion (homologation UL).
2. Connecter les 2 conducteurs blancs (D) et le conducteur vert
(ou nu) de liaison à la terre (du câble du four) avec un
capuchon de connexion (homologation UL).
3. Connecter ensemble les 2 connecteurs rouges (G) avec un
capuchon de connexion (homologation UL).
4. Installer le couvercle du boîtier de connexion.
Installation du four
1. À l’aide de deux personnes ou plus, soulever partiellement le
four dans l’ouverture de l’armoire. Utiliser l’ouverture du four
comme zone de prise.
REMARQUE : Pousser le four pour l’introduire dans l’armoire
en poussant contre la zone du joint du four sur le châssis
avant. Ne pas pousser contre les bords externes.
2. Pousser contre la zone du joint du châssis avant pour
introduire le four dans l’armoire, jusqu’à ce que la surface
arrière du châssis avant soit au contact de la paroi avant de
l’armoire.
3. Pousser complètement le four dans le placard; centrer le four
dans la cavité du placard.
4. Fixer solidement le four à l’armoire à l’aide des vis
no 8-14 x 3/4 po fournies.
Insérer les vis dans les trous de la finition noire en les alignant
avec les trous du châssis du four. Ne pas serrer
excessivement les vis.
A.
Châssis du four
B. Trou de la finition latérale
C. Finition latérale
A
B
C
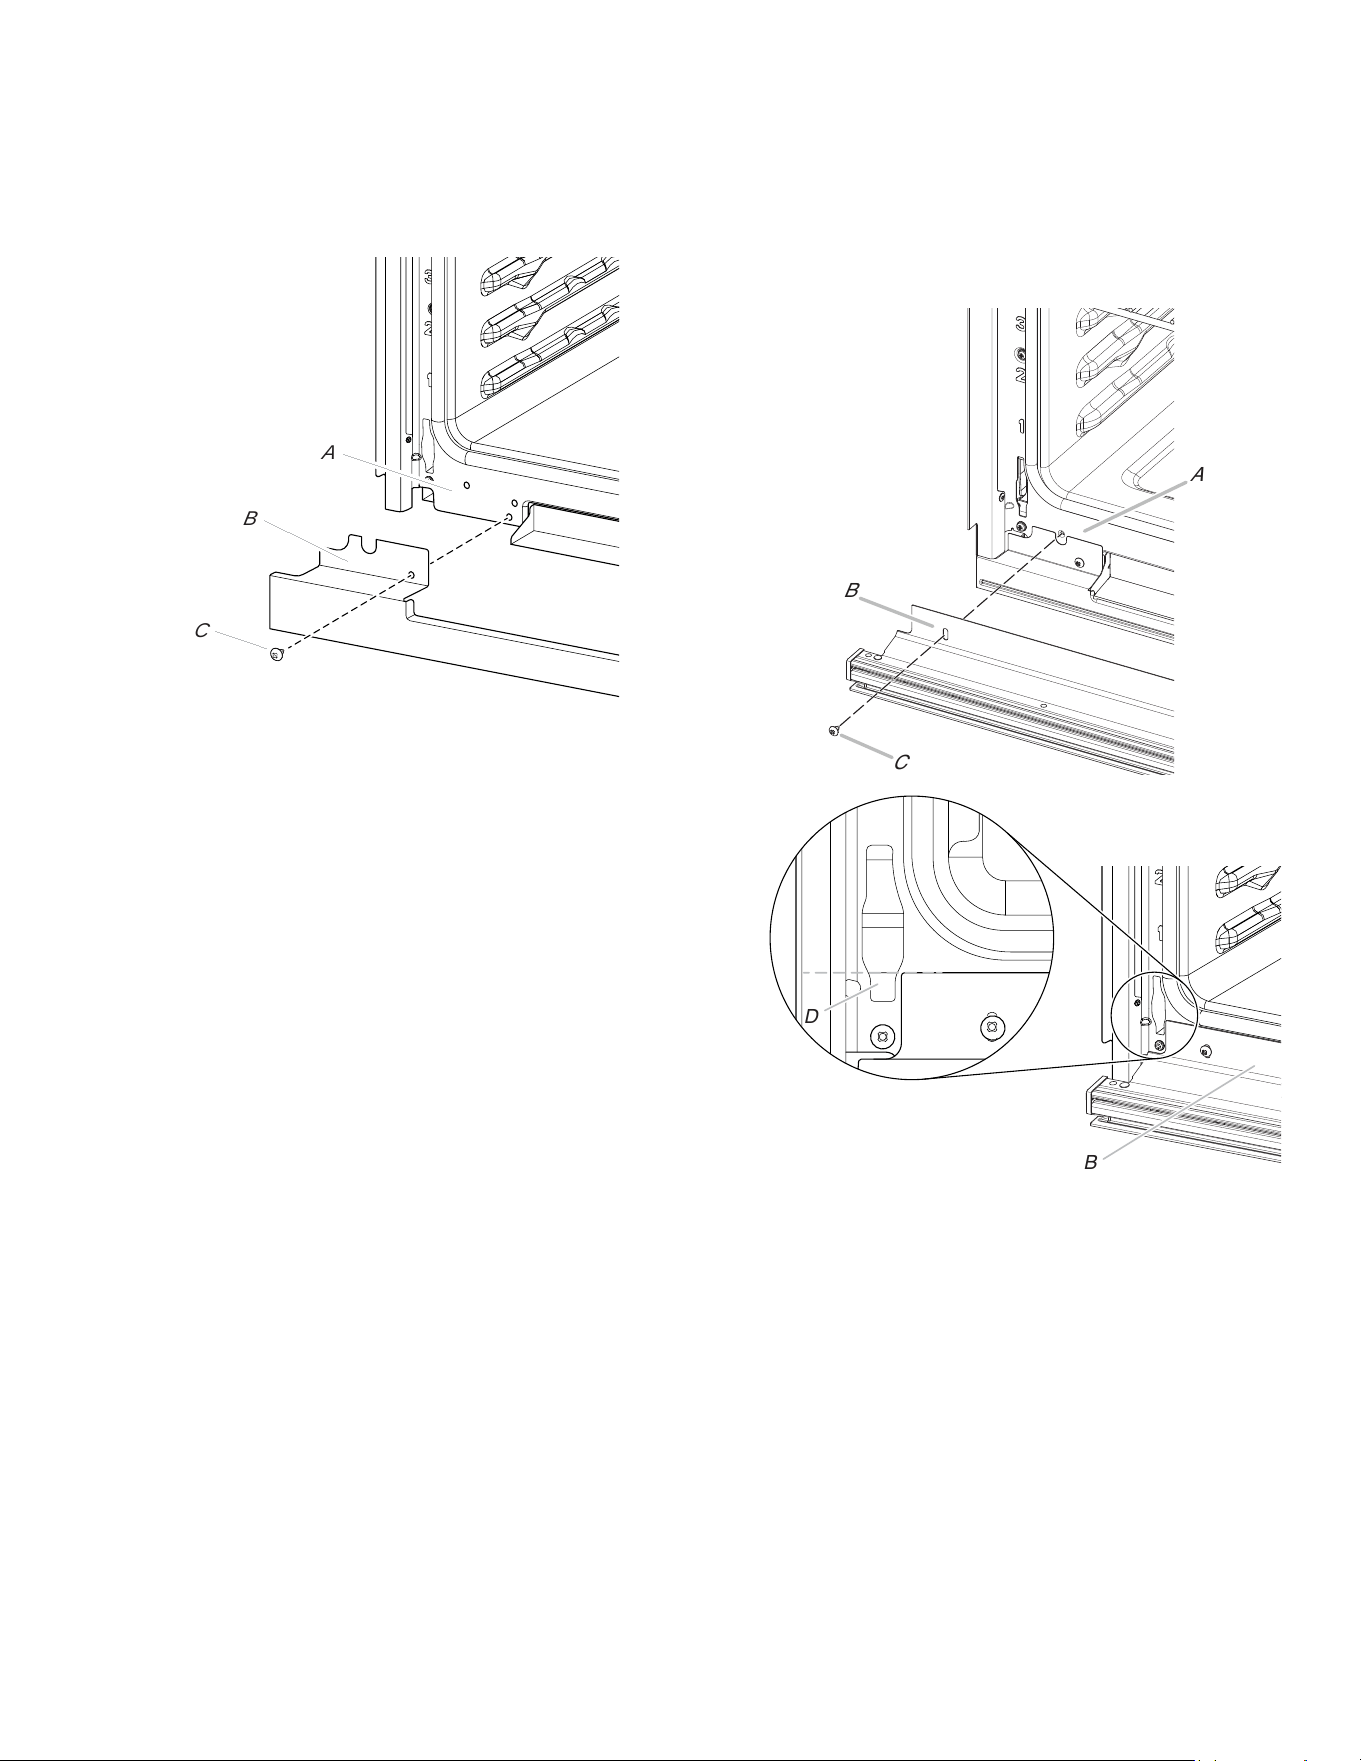
31
5. La finition et l’écran d’évent inférieur sont expédiés dans
l’emballage en mousse du dessus du four.
� Aligner l’onglet de l’écran de l’évent inférieur (B) avec le
châssis du four (A) comme illustré.
� Avec une vis no 8-18 x 3/8 po (9,5 mm) (C) pour chaque
côté de l’onglet l’écran de l’évent inférieur (B), fixer
solidement l’évent au châssis du four (A).
A.
Châssis du
four
B. Onglet d’écran
d’évent
inférieur
C. Vis no 8-18 x 3/8 po
(9,5 mm)
6. Après l’installation de l’écran de l’évent inférieur.
� Aligner l’onglet de la finition d’évent inférieur (B) avec le
châssis du four (A) comme illustré.
� Avec une vis no 8-18 x 3/8 po (9,5 mm) (C) pour chaque
côté de l’onglet de la finition de l’évent inférieur (B), alignez
le haut de l’onglet de la finition de l’évent inférieur (B) avec
le récepteur de la charnière (D) comme illustré.
� Serrer correctement la finition de l’évent inférieur au
châssis du four (A).
C
B
A
D
B
A. Châssis du
four
B. Onglet de la
finition de
l’évent
inférieur
C. Vis no 8-18 x 3/8 po
(9,5 mm)
D. Récepteur de la charnière
7. Réinstaller les grilles du four.
8. Réinstaller la porte du four. Voir la section « Réinstaller la ou
les portes du four ».
9. Vérifier que la porte s’ouvre et se ferme facilement. Si ce n’est
pas le cas, répéter la procédure pour enlever et reposer la
porte. Voir la section « Préparer le four encastré ».
10. Répéter cette procédure pour la porte du four inférieur.
IMPORTANT : Pour que le four fonctionne correctement, vérifier
que l’espace entre le bas de la finition de la porte et la finition de
l’évent inférieur est d’au moins 1/4 po (6,4 mm).
11. Rebrancher l’alimentation.
12. Le tableau d’affichage s’allume brièvement et « PF » devrait
apparaître sur l’affichage.
C
B
A

32
13. Si le tableau d’affichage ne s’allume pas, se reporter à la
section Garantie.
14. Si le code d’anomalie F9E0 s’affiche au moment de la mise
sous tension de l’appareil, c’est que l’appareil est mal
raccordé au boîtier de connexion ou au panneau de
distribution. Communiquer avec un électricien qualifié pour
vérifier l’alimentation électrique de la maison et le
raccordement de l’appareil au boîtier de connexion ou au
panneau de distribution (consulter la section Options de
raccordement électrique).
Positionnement des pieds du four
Les pieds du four doivent être installés pour permettre à
l’ensemble four/four à micro-ondes d’être encastré ou installé de
façon standard lorsque la hauteur de la découpe est de
41
3
/
4
po
(106 cm) ou plus.
REMARQUE : Ne pas retirer les cales d’espacement.
A
A. Cales d’espacement
1. À l’aide d’au moins 2 personnes, placer le sur sa partie
arrière, sur une surface couverte.
2. Installer un pied sur la cale d’espacement arrière gauche avec
une vis no 8-18 x 3/8 po.
REMARQUE : Positionner le pied de façon à ce que le côté
long du pied soit orienté vers le sommet du four.
A
B
C
A. Cales
B. Pied
C. Vis no 8-18 x 3/8 po.
3. De la même manière, installer un pied sur le coin arrière droit
du four.
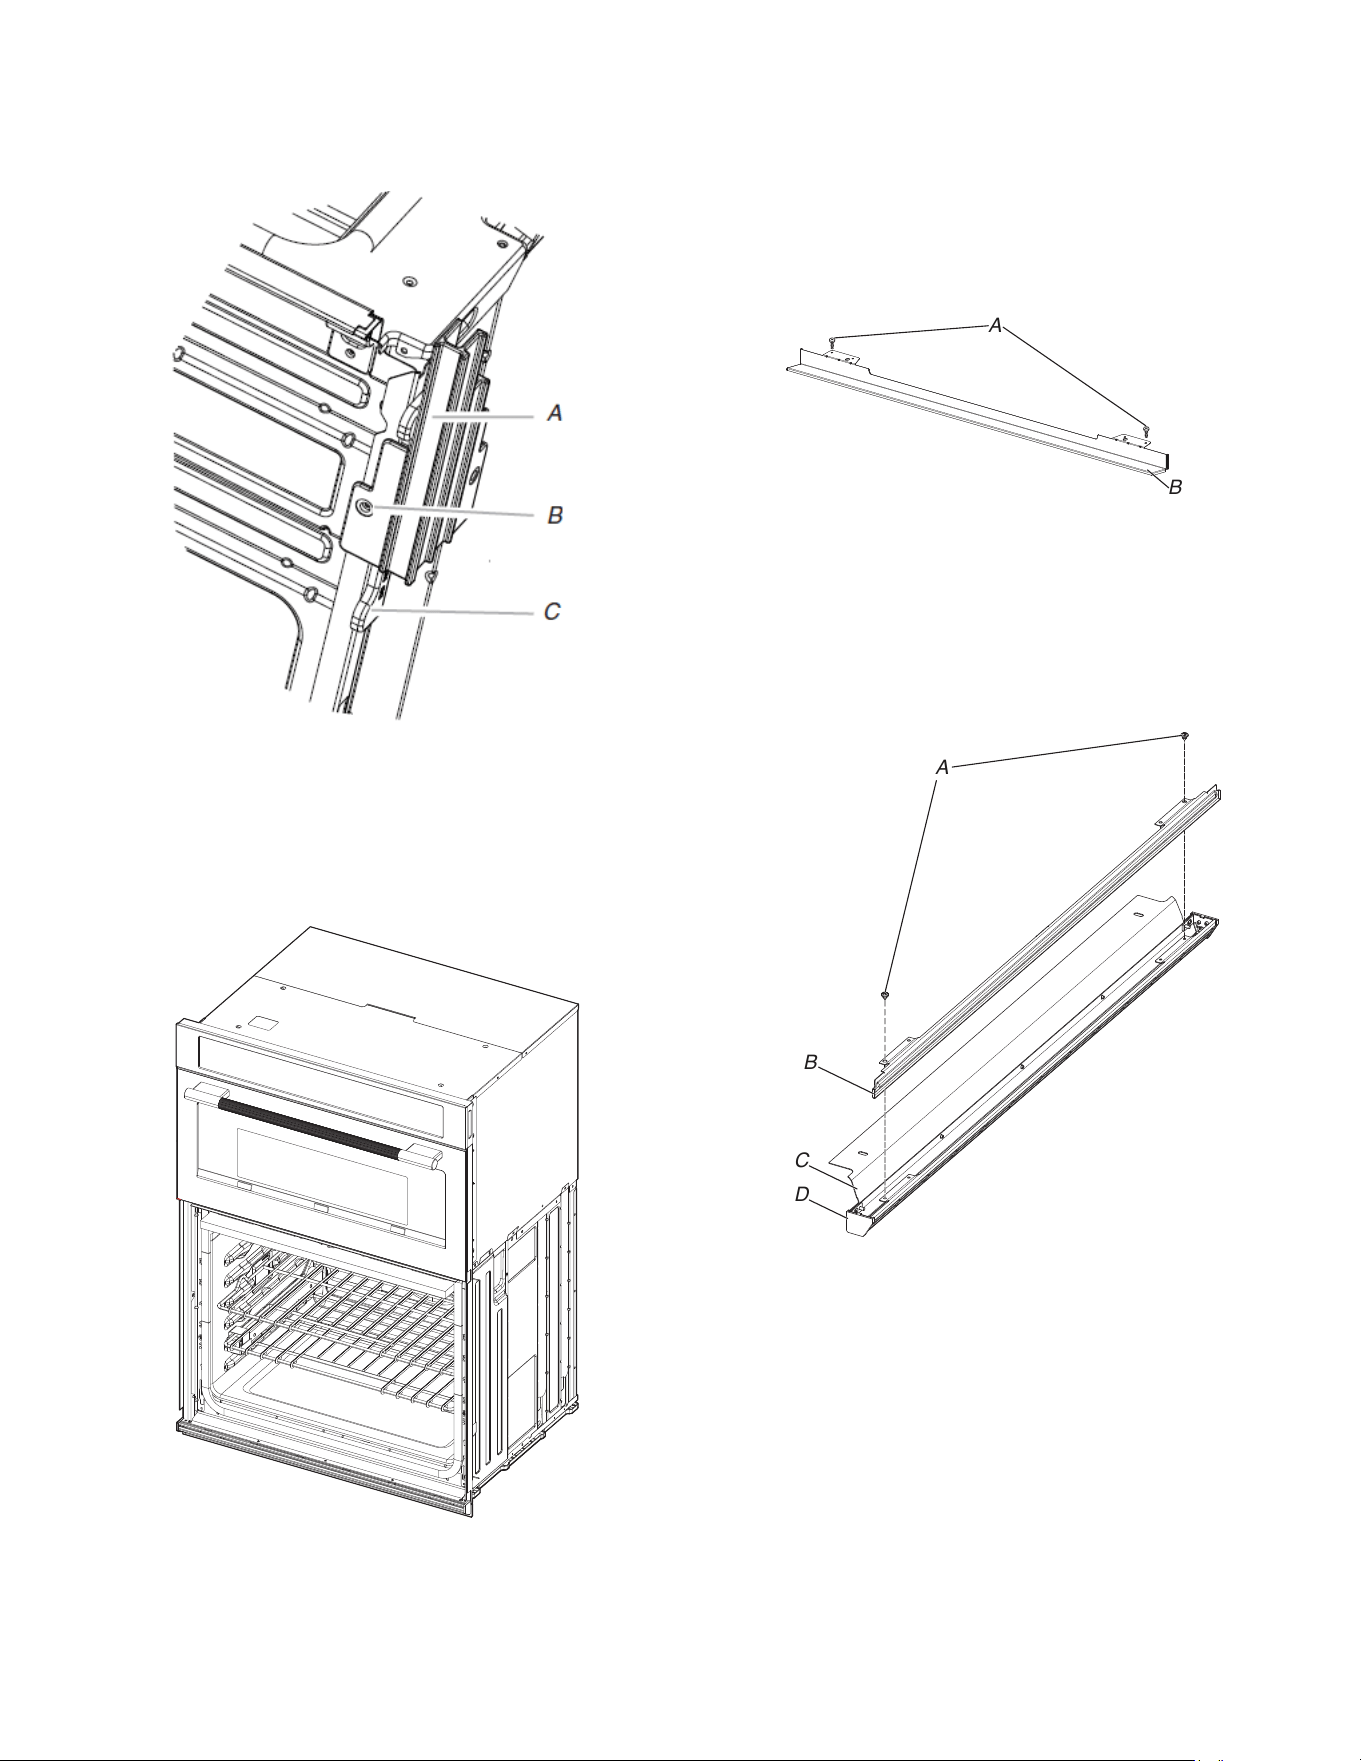
33
4. Installer un pied avant sur la cale d’espacement avant gauche
avec une vis no 8-18 x 3/8 po
REMARQUE : Positionner le pied de façon à ce que le côté
long du pied soit orienté vers l’intérieur du four.
A. Pied avant
B. Vis no 8-18 x 3/8 po.
C. Cale
5. De la même manière, installer un pied avant sur le coin avant
droit du four.
6. À l’aide d’au moins 2 personnes, placer le four en position
verticale.
7. Passer à la section « Raccordement électrique » des
instructions d’installation fournies avec le four encastré.
Installation de l’ensemble de
déflecteurs
Sur les modèles de four simple et double installé au-dessus d’un
tiroir-réchaud ou pour les fours installés en affleurement avec une
armoire, un ensemble de déflecteurs pour tiroir-réchaud doit être
installé. Voir la section « Outils et pièces » pour des
renseignements sur le processus de commande.
Pièces fournies avec l’ensemble de déflecteurs
B
A
A. 2 vis à tête cruciforme uniquement – 2 vis pour
dimension de 27 po (68,6 cm)
B. Déflecteur (1)
Installation de l’ensemble de déflecteurs
1. Installer le déflecteur (B) sur la pièce d’évent inférieure (D) à
l’aide d’une vis no 8-18 x 1/4 po (6,4 mm) de chaque côté.
REMARQUE : Sur les modèles de 27 po (68,6 cm), utiliser
une seule vis no 8-18 x 1/4 po (6,4 mm) de chaque côté.
B
A
C
D
A. Vis no 8-18 x
1/4 po (6,4 mm)
B. Déflecteur
C. Pièce d’évent supérieure
D. Pièce d’évent inférieure
2. Aligner la languette de l’évent (B) avec le châssis du four (A)
comme dans l’illustration suivante.
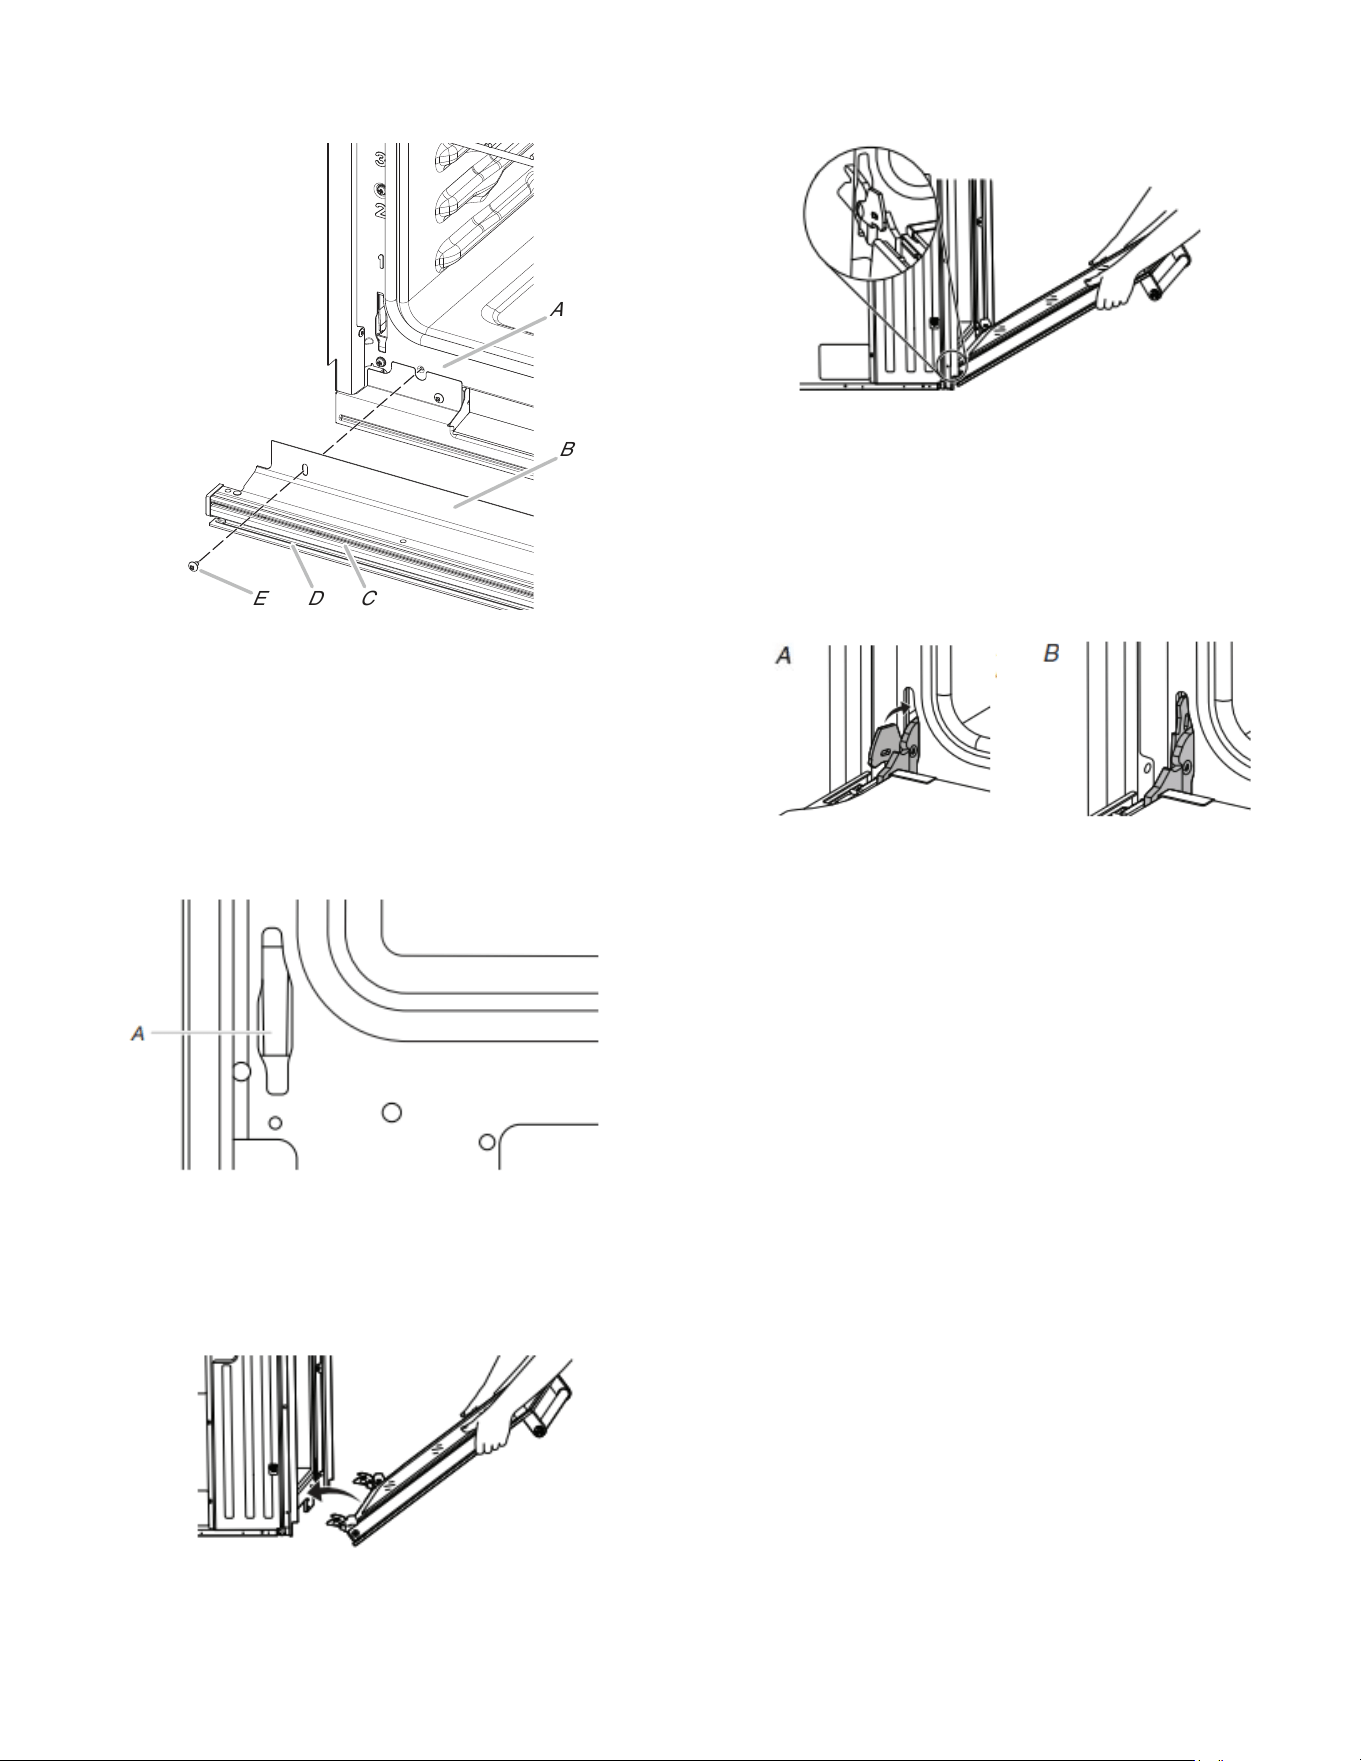
34
3. Avec une vis no 8-18 x 3/8 po (9,5 mm) (E) pour chaque côté
du support de l’évent (B), fixer solidement l’évent au four.
E
D
C
B
A
A. Châssis du four
B. Onglet de l’évent
C. Évent du four
D. Déflecteur
E. Vis no 8-18 x 3/8 po (9,5 mm)
Réinstallation de la/des porte(s) du
four
1. Saisir les bords latéraux de la porte par le milieu avec les
deux mains. Se placer face à la cavité du four.
2. Repérer les encoches situées de chaque côté de la cavité du
four pour les loquets de charnière de la porte.
A. Encoche située dans la cavité du four pour le loquet
de charnière de la porte
3. Saisir les bords de la porte du four avec les 2 mains. Avec un
angle de 45°, insérer les charnières en même temps et
pousser la porte du four dans les fentes de la cavité du four
pour la réinstaller. Si nécessaire, basculer doucement la porte
d’un côté et de l’autre en la poussant.
4. S’assurer que les encoches de charnière de la porte sont
engagées au fond des fentes de la cavité du four.
IMPORTANT : Ne pas fermer la porte à cette étape pour ne
pas endommager la charnière de la porte.
5. Abaisser la porte du four jusqu’à ce qu’elle soit complètement
ouverte. Si la porte du four ne s’ouvre pas complètement à un
angle de 90°, répéter les étapes 1 à 3.
6. Identifier les loquets de charnière de la porte du four dans les
angles de la porte; faire pivoter les loquets de charnière vers
la cavité du four jusqu’à la position de verrouillage.
A. Position
déverrouillée
B. Position verrouillée
7. Après que les charnières de la porte ont été verrouillées,
fermer doucement la porte. La fermeture de la porte ne doit
pas être forcée.
8. Une fois les charnières correctement installées et la porte
fermée, l’espace entre la porte et le tableau de commande
doit être égal. Si l’un des côtés de la porte du four est plus bas
que l’autre, la charnière de ce côté-ci n’est pas correctement
installée.

35
Achever l’installation
1. Vérifier que toutes les pièces sont maintenant installées. S’il
reste une pièce, passer en revue les différentes étapes pour
découvrir laquelle aurait été oubliée.
2. Vérifier la présence de tous les outils.
3. Éliminer/recycler tous les matériaux d’emballage.
4. Pour le nettoyage du four, lire la section « Entretien et
réparation du four à micro-ondes ».
Vérifier le fonctionnement d’un four simple et double
1. Mettre l’appareil sous tension.
2. Avant la première utilisation, choisir la langue, régler l’horloge
et toute autre préférence réglable, le cas échéant. Consulter
le « Guide de commande » en ligne pour plus de
renseignements.
3. Lancer un programme de cuisson au gril.
REMARQUE : Au cours des premières utilisations du four, il
est normal qu’il dégage des odeurs et de la fumée.
4. Attendre 5 minutes, puis vérifier la chaleur.
Si le four ne fonctionne pas, vérifier ce qui suit :
� Le fusible domestique est intact et bien visé ou le
disjoncteur n’est pas ouvert.
� La prise de courant est correctement alimentée.
� Consulter la section « Dépannage » en ligne.
5. Placer la grille coulissante
™ SatinGlide pour four intelligent,
ainsi que les accessoires dans la position de grille du bas pour
s’assurer que la bonne grille accessoire se trouve au fond.
6. Pour les fours doubles, appuyer sur UPPER CANCEL/
LOWER CANCEL (annulation four supérieur/annulation four
inférieur). Pour les fours simples, appuyer sur CANCEL
(annulation).
Pour obtenir de l’assistance ou une visite de service :
Consulter le Guide de démarrage rapide pour obtenir les
coordonnées.
Vérifier le fonctionnement du four à micro-ondes
1. Remplir un récipient adapté aux micro-ondes avec 1 tasse
(250 ml) d’eau et placer le récipient dans le four à
micro-ondes. Bien fermer la porte.
2. Appuyer sur MICROWAVE (FOUR À MICRO-ONDES).
3. Sélectionner une méthode de cuisson.
4. Régler le four à micro-ondes pour une durée de cuisson de 2
minutes.
5. Appuyer sur START (MISE EN MARCHE). La lampe intérieure
du four à micro-ondes doit s’allumer et la durée de cuisson
restante doit s’afficher.
Lorsque l’afficheur indique « 1:00 », ouvrir la porte du four à
micro-ondes. La cuisson par les micro-ondes devrait cesser.
Bien fermer la porte. La lampe intérieure du four à
micro-ondes doit s’éteindre.
6. Appuyer sur START (MISE EN MARCHE). Le four à micro-
ondes doit commencer la cuisson et la lampe intérieure du four
à micro-ondes doit être allumée.
Laisser le four à micro-ondes terminer la durée de cuisson. Un
signal sonore retentit plusieurs fois à la fin de la durée de
cuisson et le four à micro-ondes s’éteint.
7. Ouvrir la porte du four à micro-ondes et retirer lentement le
récipient. L’eau dans le contenant doit être chaude.
Pour obtenir de l’assistance ou une visite de service :
Consulter le guide de démarrage rapide pour obtenir les
coordonnées ou communiquer avec le marchand chez qui le four
électrique encastré et le four à micro-ondes ont été achetés.
36
SEGURIDAD DE LA COMBINACIÓN DE HORNO MICROONDAS/HORNO
INTEGRADO
Su seguridad y la de los demás son muy importantes.
Hemos incluido muchos mensajes importantes de seguridad en este manual y en su electrodoméstico. Lea y obedezca siempre
todos los mensajes de seguridad.
Este es el símbolo de advertencia de seguridad.
Este símbolo le llama la atención sobre peligros potenciales que pueden ocasionar la muerte o una lesión a usted
y a los demás.
Todos los mensajes de seguridad irán a continuación del símbolo de advertencia de seguridad y de la palabra
“PELIGRO” o “ADVERTENCIA”. Estas palabras significan:
PELIGRO
Usted puede morir o sufrir una lesión grave si no sigue
de inmediato las instrucciones.
ADVERTENCIA
Si no sigue las instrucciones, puede morir o sufrir una
lesión grave.
Todos los mensajes de seguridad le dirán cuál es el peligro potencial, cómo reducir las posibilidades de sufrir una lesión y lo que
puede suceder si no se siguen las instrucciones.
INSTRUCCIONES DE SEGURIDAD IMPORTANTES
ADVERTENCIA: Para reducir el riesgo de incendio, choque eléctrico o lesiones personales al usar el electrodoméstico, siga
precauciones básicas, entre ellas las siguientes:
� Instalación correcta: El electrodoméstico, cuando se
instale, deberá ser conectado a tierra de acuerdo con los
códigos locales, o en la ausencia de códigos locales, con el
Código nacional eléctrico (National Electrical Code), ANSI/
NFPA 70 o el Código canadiense de electricidad (Canadian
Electrical Code), CSA C22.1-02. En Canadá, el
electrodoméstico se debe conectar a tierra de acuerdo con
el Código Canadiense de Electricidad. Cerciórese de que
la instalación y puesta a tierra del electrodoméstico sean
efectuadas adecuadamente por un técnico calificado.
� Nunca use el electrodoméstico como calefacción del
cuarto.
� No deje a los niños solos. No se debe dejar a los niños sin
supervisión en el área donde el electrodoméstico esté en
uso. Jamás se les debe permitir que se sienten ni se paren
en parte alguna del electrodoméstico.
� Use ropa apropiada: nunca debe ponerse ropa holgada o
que quede colgando mientras esté usando el
electrodoméstico.
� Servicio del usuario: no repare ni reemplace pieza alguna
del electrodoméstico a menos que se recomiende
específicamente en el manual. Cualquier otro servicio se
debe dejar en las manos de un técnico competente.
� Almacenaje en o sobre el electrodoméstico: los materiales
inflamables no deben almacenarse en el horno o cerca de
las unidades exteriores.
� Este electrodoméstico no ha sido diseñado para almacenar
objetos.
� No use agua en incendios provocados por grasa: el
incendio o la llama o use un extinguidor de tipo espuma o
químico seco.
� No use piezas de repuesto que no hayan sido
recomendadas por el fabricante (por ejemplo, piezas
hechas en casa con una impresora 3D).
� Use solo agarradores de ollas que estén secos. Los
agarradores de ollas húmedos o mojados en las superficies
calientes pueden ocasionar quemaduras por vapor. No
deje que la agarradera toque los elementos calefactores
calientes. No use una toalla ni otros paños voluminosos.
� Tenga cuidado al abrir la puerta: deje que salga el aire
caliente o el vapor antes de quitar o volver a colocar
alimentos.
� NO TOQUE LOS ELEMENTOS CALEFACTORES NI LAS
SUPERFICIES INTERIORES DEL HORNO. Los elementos
calefactores podrían estar calientes, aun si están de color
oscuro. Las superficies interiores de un horno se calientan
lo suficiente como para causar quemaduras. Durante y
después del uso, no toque, ni deje que la ropa u otros
materiales inflamables entren en contacto con los
elementos de calentamiento o las superficies interiores del
horno hasta que hayan tenido tiempo suficiente para
enfriarse. Otras superficies del electrodoméstico pueden
calentarse lo suficiente como para causar quemaduras,
entre esas superficies están los elementos de la bobina y
de la superficie de cocción, los orificios de ventilación del
horno y las superficies cercanas a esos orificios, las
puertas del horno y las ventanas de las puertas del horno.
� No ponga a calentar recipientes de alimentos cerrados: la
acumulación de presión puede hacer que el recipiente
explote y ocasione lesiones.
� Mantenga los ductos de ventilación del horno sin
obstrucciones.
CONSERVE ESTAS INSTRUCCIONES

37
INSTRUCCIONES DE SEGURIDAD IMPORTANTES
ADVERTENCIA: Para reducir el riesgo de incendio, choque eléctrico o lesiones personales al usar el electrodoméstico, siga
precauciones básicas, entre ellas las siguientes:
� Colocación de las parrillas del horno: siempre coloque las
parrillas del horno en el lugar deseado mientras el horno
esté frío. Si es necesario mover la parrilla mientras el horno
está caliente, no deje que la agarradera entre en contacto
con la resistencia caliente del horno.
Para los hornos con autolimpieza:
� PRECAUCIÓN: NO DEJE ALIMENTOS O UTENSILIOS
PARA COCINAR, ETC., EN EL HORNO DURANTE EL
MODO DE FUNCIONAMIENTO AUTOLIMPIEZA
PIROLÍTICA.
� No limpie la junta de la puerta. La junta de la puerta es
esencial para un cierre hermético. Deberá tenerse cuidado
de no frotar, dañar ni mover la junta.
� No use revestimiento protector para forrar el horno ni
productos de limpieza comerciales para horno a menos
que estén certificados para el uso en hornos con
autolimpieza.
� Limpie solamente las partes enlistadas.
� Antes de hacer la autolimpieza del horno, quite la charola
para asar a la parrilla y otros utensilios y limpie todos los
derrames excesivos.
Para estufas y hornos inteligentes habilitados:
� Operación remota – este electrodoméstico es configurable
para autorizar la operación remota en cualquier momento.
No almacene materiales inflamables o artículos sensibles a
la temperatura en el interior, en o cerca de la superficie del
electrodoméstico.
CONSERVE ESTAS INSTRUCCIONES

38
INSTRUCCIONES DE SEGURIDAD IMPORTANTES
Al utilizar aparatos eléctricos, se deben seguir siempre las precauciones básicas de seguridad, entre las que se incluyen las
siguientes:
ADVERTENCIA: Para minimizar el riesgo de quemaduras, choque eléctrico, incendio, lesiones a las personas o exposición a
energía de microondas excesiva:
� Lea todas las instrucciones antes de usar el
electrodoméstico.
� Lea y siga las “PRECAUCIONES PARA EVITAR LA
POSIBLE EXPOSICIÓN A ENERGÍA DE MICROONDAS
EXCESIVA” específicas que se muestran en este manual.
� Este electrodoméstico debe estar conectado a tierra.
Conéctelo solamente a un contacto debidamente
conectado a tierra. Consulte las “INSTRUCCIONES DE
CONEXIÓN A TIERRA” que se muestran en esta sección.
� Instale o ubique este electrodoméstico solo según las
instrucciones de instalación proporcionadas.
� Algunos productos, como los huevos enteros y los
contenedores cerrados (por ejemplo, frascos de vidrio
cerrados), pueden explotar y no deben calentarse en este
horno.
� Utilice este electrodoméstico solo para su uso previsto
como se indica en este manual. No utilice químicos
corrosivos o vapores en este electrodoméstico. Este tipo
de horno se encuentra diseñado específicamente para
calentar, cocinar o secar alimentos. No está diseñado para
uso de laboratorio o industrial.
� Como con cualquier electrodoméstico, si lo utilizan niños
se necesita una estrecha supervisión.
� No encienda el electrodoméstico si el cable o enchufe se
encuentran dañados, no están funcionando
adecuadamente o han sufrido daños o caídas.
� Solo personal calificado debe realizar el mantenimiento del
electrodoméstico. Comuníquese con el lugar más cercano
de servicio autorizado para su examen, reparación o
ajuste.
� No cubra ni bloquee ninguna abertura del
electrodoméstico.
� No almacene el electrodoméstico en exteriores. No use
este producto cerca del agua, por ejemplo, cerca de un
fregadero, en un sótano húmedo, o cerca de una piscina o
lugares similares.
� No sumerja el cable ni el enchufe en agua.
� Mantenga el cable lejos de las superficies calientes.
� No deje que el cable cuelgue del borde de la mesa o del
mostrador.
� No use piezas de repuesto que no hayan sido
recomendadas por el fabricante (por ejemplo, piezas
hechas en casa con una impresora 3D).
� Vea las instrucciones de limpieza de la superficie de la
puerta en la sección Mantenimiento y cuidado del horno
microondas.
� Para reducir el riesgo de incendio en la cavidad del horno:
• No cocine los alimentos más del tiempo necesario.
Vigile el electrodoméstico si utiliza papel, plástico u
otros materiales combustibles dentro de este para
facilitar la cocción.
• Retire las amarras de alambre de las bolsas de papel o
plástico antes de introducirlas en el horno.
• Si algún material se incendia dentro del horno,
mantenga la puerta cerrada, apague el horno y
desenchúfelo o corte la corriente en el panel de fusibles
o del disyuntor.
• No utilice la cavidad para almacenar objetos. No deje
productos de papel, utensilios de cocina o alimentos en
la cavidad cuando no se encuentre en uso.
� Los líquidos, como el agua, café o té, pueden sobrepasar
el punto de ebullición sin que parezca que están hirviendo.
La ebullición o las burbujas visibles no se encuentran
siempre presentes al retirar el contenedor del horno
microondas. ESTO PUEDE RESULTAR EN LÍQUIDOS
MUY CALIENTES QUE HIERVEN REPENTINAMENTE AL
MOVER EL CONTENEDOR O INSERTAR UN UTENSILIO
EN EL LÍQUIDO.
Para hornos microondas no diseñados para el uso sobre
otro electrodoméstico calentador:
� No ponga a funcionar ningún aparato de calefacción ni de
cocción debajo de este electrodoméstico.
� No instale la unidad sobre un aparato de calefacción o
cocción, ni cerca de ninguna parte de este.
� No monte el electrodoméstico sobre un fregadero.
� No almacene nada directamente encima de la superficie
del electrodoméstico mientras esté en funcionamiento.
CONSERVE ESTAS INSTRUCCIONES

39
PRECAUCIONES PARA EVITAR UNA POSIBLE EXPOSICIÓN
A UNA ENERGÍA EXCESIVA DE MICROONDAS
(a) No intente operar este horno si la puerta está abierta, ya que
el funcionamiento con la puerta abierta puede dar como
resultado una exposición a energía de microondas nociva. Es
importante no anular ni alterar los bloqueos de seguridad.
(b) No coloque ningún objeto entre la cara frontal del horno y la
puerta, ni permita que se acumule suciedad ni residuos de
productos de limpieza en las superficies de sellado.
(c) No ponga a funcionar el horno si está dañado. Es muy
importante que la puerta del horno cierre de la manera
adecuada y que no haya daños en:
(1) La puerta (doblada)
(2) Las bisagras y cerraduras (rotas o flojas)
(3) Los sellos de la puerta y en las superficies de sellado
(d) El horno debe ser reparado o ajustado solo por personal de
servicio calificado.
Guide de connexion Internet pour les appareils connectés uniquement
IMPORTANTE: El usuario es responsable de instalar debidamente el electrodoméstico antes del uso. Asegúrese de leer y seguir las
instrucciones de instalación proporcionadas con su electrodoméstico.
La conectividad requiere Wi-Fi y la creación de una cuenta. Las características y las funciones de la aplicación podrían cambiar. Es
posible que se apliquen tarifas de datos. Una vez instalada, inicie la app. Será guiado por los pasos necesarios para configurar una
cuenta de usuario y conectar su electrodoméstico.
Necesitará:
� Un enrutador inalámbrico doméstico que admita Wi-Fi, 2,4 GHz con seguridad WPA2. Si no está seguro de la capacidad de su router,
consulte las instrucciones del fabricante del router.
� El router debe estar encendido y tener una conexión activa a Internet.
� El código SAID de 10 caracteres para su electrodoméstico. El código SAID está impreso en una etiqueta en el electrodoméstico o
puede encontrarlo en la pantalla LCD.
Aviso de conformidad con la Comisión Federal de Comunicaciones (FCC)
Este dispositivo cumple con la parte 15 de las reglas de la FCC. El funcionamiento está sujeto a las siguientes dos condiciones:
1. Este aparato no provocará interferencias nocivas, y
2. Este aparato debe aceptar cualquier interferencia recibida, incluida una que pueda causar un funcionamiento no deseado.
Los cambios o las modificaciones sin aprobación expresa de la parte responsable del cumplimiento podrían anular la autorización del
usuario para operar el equipo.
Aviso de conformidad con Industry Canada (IC)
Este dispositivo cumple con las normas RSS exentas de licencia de Industry Canada. El funcionamiento está sujeto a las siguientes dos
condiciones:
1. Es posible que este dispositivo no cause interferencia.
2. Este dispositivo debe aceptar cualquier interferencia, incluida aquella que pueda causar un funcionamiento no deseado del
dispositivo.
Según la normativa de Industry Canada, este radiotransmisor solo puede operar con una antena de un tipo y máxima (o menor)
ganancia aprobada para el transmisor por Industry Canada. Para reducir la potencial interferencia de radio para otros usuarios, el tipo de
antena y su ganancia deben elegirse de modo que la potencia radiada isotrópicamente equivalente (e.i.r.p.) no sea mayor que la
necesaria para una comunicación satisfactoria.
Para cumplir con los límites de exposición a radiación RF de la FCC e Industry Canada para la población general, las antenas usadas
para este transmisor deben instalarse de modo que se mantenga una distancia de separación mínima de 20 cm entre el radiador
(antena) y todas las personas en todo momento y no se debe ubicar ni operar junto con ninguna otra antena o transmisor.
Si este equipo de hecho causa interferencia perjudicial a la recepción de radio o televisión, lo cual se puede determinar apagando y
encendiendo el equipo, se recomienda al usuario que intente corregir la interferencia con una de las siguientes medidas:
� Reoriente o reubique la antena receptora.
� Aumente la separación entre el equipo y el receptor.
� Conecte el equipo a un tomacorriente en un circuito diferente
del que se usa para conectar el receptor.
� Consulte al distribuidor o a un técnico en radio/TV con
experiencia en caso de necesitar ayuda.

40
Limpieza general
IMPORTANTE: Antes de la limpieza, asegúrese de que todos los
controles estén apagados y que el horno y la superficie de cocción
estén fríos. Siempre siga las instrucciones de las etiquetas de los
productos de limpieza.
En primer lugar, se sugiere el empleo de jabón, agua y
una
esponja o paño suave, salvo que se indique lo contrario.
PINTURA METÁLICA (en algunos modelos)
No use productos de limpieza abrasivos, limpiadores con
blanqueador, removedores de óxido, amoniaco ni hidróxido de
sodio (lavandina), ya que se pueden manchar las superficies
pintadas (igual en horno simple / doble manual).
ACERO INOXIDABLE Y ACERO INOXIDABLE
NEGRO (en algunos modelos)
NOTA: Para evitar daños a las superficies de acero inoxidable, no
use estropajos precargados con jabón, productos de limpieza
abrasivos, limpiador para superficies de cocción, estropajos de
lana de acero, paños de lavar ásperos o toallas de papel
abrasivas. Se podrían producir daños en las superficies de acero
inoxidable, incluso aunque solo se usen una vez o de forma
limitada.
Frote en la dirección de la veta para evitar daños.
Método de limpieza:
� Affresh
®
†
Limpiador de acero inoxidable número de pieza
W10355016 (no incluido) o toallitas limpiadoras de acero
inoxidable affresh
®
número de pieza W10355049 (no incluido):
Para obtener información sobre pedidos, consulte la Guía de
inicio rápido.
� Detergente líquido o limpiador multiuso: Enjuague con agua
limpia y seque con un paño suave que no deje pelusa.
� Vinagre para manchas de agua dura.
SUPERFICIES EXTERIORES DE ESMALTE DE
PORCELANA (en algunos modelos)
Los derrames de alimentos que contienen ácidos, como vinagre y
tomate, deben limpiarse apenas se enfríe por completo la estufa.
Esos derrames pueden afectar el acabado.
Método de limpieza:
� Limpiavidrios limpiador líquido suave o estropajo no abrasivo:
Limpie cuidadosamente alrededor de la placa con el número
de modelo/serie/clasificación porque el fregado puede borrar
los números.
� Affresh
®
Limpiador para cocina y electrodomésticos Número
de pieza W10355010 (no se incluye):
Para obtener información sobre pedidos, consulte la Guía de
inicio rápido.
PUERTA Y EXTERIOR DEL HORNO DE
MICROONDAS
Se debe mantener limpia la zona donde la puerta del horno entra
en contacto con el marco cuando está cerrada.
Método de limpieza:
� Jabones y detergentes suaves, no abrasivos:
Enjuague con agua limpia y seque con un paño suave que no
deje pelusa.
� Limpiavidrios y toallas de papel o un estropajo plástico no
abrasivo:
Aplique el limpiador de vidrios a la toalla, no lo haga
directamente sobre la superficie.
PANEL DE CONTROL Y EXTERIOR DE LA
PUERTA DEL HORNO
Para evitar daños en el panel de control, no use productos de
limpieza abrasivos, estropajos de lana de acero, paños de lavar
ásperos ni toallas de papel abrasivas.
Se debe mantener limpia la zona donde la puerta del horno entra
en contacto con el marco cuando está cerrada.
Método de limpieza:
� Limpiador de vidrios y un paño o esponja suave o un estropajo
de plástico no abrasivo:
aplique el limpiador de vidrios a un paño suave o esponja, no
directamente sobre el panel/superficie.
� Affresh
®
Limpiador para cocina y electrodomésticos Número
de pieza W10355010 (no se incluye):
Para obtener información sobre pedidos, consulte la Guía de
inicio rápido.
INTERIOR DE LA PUERTA DEL HORNO
Método de limpieza:
� Ciclo de autolimpieza:
Para conseguir un resultado óptimo con la limpieza, elimine la
suciedad acumulada con una esponja húmeda antes de
realizar el ciclo.
CAVIDAD DEL HORNO
No use productos de limpieza para hornos.
Los derrames de alimentos deben limpiarse cuando el horno se
enfría. A altas temperaturas, la reacción química de los alimentos
con la porcelana puede ocasionar manchas, corrosión, picaduras
o puntos blancos tenues.
Método de limpieza:
� Ciclo de autolimpieza:
Vea primero “Ciclo de autolimpieza”. Quite las parrillas o se
decolorarán y será más difícil deslizarlas. Si esto ocurre, la
aplicación de una capa ligera de aceite vegetal en las guías de
la parrilla ayudará a que se deslicen con mayor facilidad.
CAVIDAD DEL HORNO DE MICROONDAS
Para evitar daños en la cavidad del horno de microondas, no use
estropajos precargados con jabón, limpiadores abrasivos,
estropajos de lana de acero, paños de lavar ásperos o algunas
toallas de papel.
En los modelos de acero inoxidable, frote en la dirección de la
veta para evitar daños.
✝affresh
®
es una marca registrada de Whirlpool, U.S.A.
MANTENIMIENTO Y CUIDADO
DEL HORNO
41
Se debe mantener limpia la zona donde la puerta del horno entra
en contacto con el marco cuando está cerrada.
Método de limpieza:
Suciedad promedio
� Jabones y detergentes suaves, no abrasivos:
Enjuague con agua limpia y seque con un paño suave que no
deje pelusa.
Heavy Soil (Suciedad profunda)
� Jabones y detergentes suaves, no abrasivos:
Caliente una taza (250 mL) de agua durante 2 a 5 minutos en
el horno. El vapor ablandará la suciedad. Enjuague con agua
limpia y seque con un paño suave que
no deje pelusa.
Olores
� Jugo de limón o vinagre:
� Caliente en el horno 1 taza (250 mL) de agua con 1 cucharada
(15 mL) de jugo de limón o vinagre durante 2 a 5 minutos.
PARRILLAS DEL HORNO
� Estropajo de lana de acero
� Lavavajillas
� Para las parrillas que se han decolorado y que no se deslizan
con facilidad, la aplicación de una capa delgada de aceite
vegetal a las guías de la parrilla hará que se deslicen con más
facilidad.
PINTURA METÁLICA (en algunos modelos)
No use productos de limpieza abrasivos, limpiadores con
blanqueador, removedores de óxido, amoníaco ni hidróxido de
sodio (lejía), ya que se pueden manchar las superficies pintadas.
TECHO DEL HORNO DE MICROONDAS
El elemento para asar no necesita limpieza ya que la intensidad
del calor ayuda a quemar cualquier salpicadura de alimentos. Sin
embargo, es posible que el techo que se encuentra sobre el
elemento para asar requiera limpieza periódica.
Método de limpieza:
� Agua tibia, detergente suave y una esponja.
Para limpiar:
1. Presione suavemente la rosca de sujeción hacia la parte
posterior del techo y luego bájelo para liberar el elemento
para asar.
2. Para limpiarlo, baje la parte frontal del elemento para asar
para tener acceso al techo.
3. Suba el elemento para asar nuevamente y regrese la rosca
de sujeción a su posición original.
Devuelva siempre el elemento para asar a la posición de cocción
después de limpiar.
BANDEJA GIRATORIA
Vuelva a colocar la bandeja giratoria de inmediato después de la
limpieza. No ponga a funcionar el horno de microondas sin la
bandeja giratoria en su lugar.
Método de limpieza:
� Producto de limpieza suave y estropajo
� Lavavajillas
SARTÉN DORADORA (en algunos modelos)
Para evitar daños a la sartén doradora, no sumerja ni enjuague
con agua mientras la sartén doradora esté caliente. No utilice
estropajo de lana de acero.
Método de limpieza:
� Agua tibia, detergente suave y una esponja. Puede limpiar las
áreas muy manchadas con estropajo y un limpiador suave
� Lavavajillas
BANDEJA PARA HORNEAR
� Lavavajillas
KITCHENAID™ VAPORERA
� Lavavajillas
SOPORTE Y RODILLOS GIRATORIOS, CUBO,
ASA DE LA BANDEJA DE TOSTADO
� Lavavajillas
Ciclo Self-Cleaning (Autolimpieza)
ADVERTENCIA
Peligro de quemaduras
No toque el horno durante el ciclo de Autolimpieza.
Mantenga a los niños lejos del horno durante el ciclo de
Autolimpieza.
No seguir estas instrucciones podría ocasionar
quemaduras.
IMPORTANTE: La salud de algunas aves es extremadamente
sensible a los humos que se desprenden durante el ciclo Self-
Cleaning (Autolimpieza). La exposición a las emanaciones puede
ocasionar la muerte de ciertas aves. Siempre traslade las aves a
otra habitación cerrada y bien ventilada.
Ponga a funcionar la autolimpieza del horno antes de que se
impregne de suciedad. La suciedad intensa dará como resultado
una limpieza más larga y más humo.
Mantenga la estufa bien ventilada durante el ciclo Self-Cleaning
(Autolimpieza); esto ayudará a que haya menos calor, olores y
humo.
No bloquee las ventilaciones del horno durante el ciclo Self-
Cleaning (Autolimpieza). El aire debe moverse con libertad.
Consulte la sección “Ventilación del horno” en la Guía de inicio
rápido.
No limpie, frote, dañe ni mueva la junta de la puerta del horno. La
junta de la puerta es esencial para que quede bien sellada.

42
Prepare el horno
� Retire la charola para asar, la rejilla, los utensilios de cocina,
los utensilios para hornear y, en algunos modelos, la sonda de
temperatura del horno.
� Retire las parrillas del horno para mantenerlas brillantes y
fáciles de deslizar. Consulte la sección “Limpieza general”
para obtener más información.
� Quite cualquier papel del horno, ya que se puede quemar o
derretir, lo que dañará al horno.
� Limpie a mano el borde interior de la puerta y la superficie de
1
1
/
2
" (3,8 cm) alrededor del marco de la cavidad interna del
horno, con cuidado de no mover ni doblar la junta. Esta área
no se calienta lo suficiente durante la autolimpieza como para
quitar la suciedad. No deje que el agua, el limpiador, etc.,
entren en las ranuras del marco de la puerta. Use un paño
húmedo para limpiar esta zona.
� Retire cualquier suciedad suelta para reducir el humo y evitar
daños. A altas temperaturas, los alimentos reaccionan con la
porcelana. Esto puede dar lugar a manchas, marcas,
picaduras o manchas blancas tenues. Esto es normal y no
afecta al resultado de la cocción.
Funcionamiento del ciclo
IMPORTANTE:
Si la porcelana se calienta o se enfría sobre el acero en el horno,
se pueden producir cambios de color, pérdida de brillo, pequeñas
fisuras y sonidos de estallido.
El ciclo Self-Cleaning (Autolimpieza) usa temperaturas muy altas
que queman la suciedad, convirtiéndola en ceniza.
Los tiempos de limpieza recomendados son 3 horas para
suciedad ligera, 4 horas para suciedad media y 5 horas para
suciedad intensa (incluye 30 minutos de enfriamiento).
Una vez que se haya enfriado el horno por completo, quite las
cenizas con un paño húmedo. Para evitar la rotura del vidrio, no le
aplique un paño húmedo y frío al vidrio interior de la puerta antes
de que se haya enfriado por completo.
Las luces de los hornos no funcionan durante el ciclo Self-
Cleaning (Autolimpieza).
En los modelos de horno doble, solo se puede autolimpiar un
horno a la vez. Si un horno está haciendo autolimpieza, el otro
horno no se puede ajustar ni encender.
NOTA: El horno tiene un motor de ventilador de enfriamiento de
dos velocidades. Durante el ciclo Self-Cleaning (Autolimpieza),
los ventiladores funcionan a máxima velocidad para aumentar el
flujo de aire y eliminar mejor el aire caliente a través de los
respiraderos de los hornos. Es posible que se observe aumento
del ruido durante y después del ciclo Self-Cleaning (Autolimpieza)
hasta que el horno se enfríe.
Para iniciar la autolimpieza
Antes de la autolimpieza, asegúrese de que la puerta esté
completamente cerrada; de lo contrario no quedará bloqueada y
no comenzará el ciclo. Si el horno está bloqueado, no se pueden
abrir las puertas del mismo. Para evitar daños a las puertas, no
las fuerce para abrirlas cuando el horno esté bloqueado.
1. Toque el botón Tools (Herramientas).
2. Seleccione el icono de autolimpieza.
(En modelos de horno doble): Seleccione la cavidad superior
o la inferior.
3. Seleccione el tipo de autolimpieza:
Steam (Vapor): 1 hora: Limpie las salpicaduras leves
después de cada día con calor inferior y 1
1
/
4
tazas
(295,74 mL) de agua.
High temp (Alta temperatura): Hay varios niveles
disponibles y pueden durar hasta 5 horas y 1 hora de
enfriamiento.
4. Siga las indicaciones de la pantalla del horno para prepararlo.
5. Seleccione START (INICIO) para empezar el proceso de
limpieza.
O BIEN
Seleccione DELAY START (INICIO DIFERIDO) para
programar un ciclo Self-Cleaning (Autolimpieza) demorado.
Consulte la sección “Para retrasar el inicio del ciclo de
autolimpieza”.
La puerta del horno se bloqueará automáticamente.
NOTA: Después de iniciar el ciclo Self-Clean (Autolimpieza),
el bloqueo automático de las puertas puede tardar un
momento.
Cuando haya terminado el ciclo de autolimpieza y el horno se
enfríe, las puertas de los hornos se desbloquearán.
6. Una vez que se haya enfriado el horno por completo, quite las
cenizas con un paño húmedo.
Para retrasar el inicio del ciclo de autolimpieza
A continuación, siga los pasos 1 a 4 anteriores:
1. Seleccione DELAY START (INICIO DIFERIDO) o DELAY
(ATRASAR).
2. Seleccione el tiempo de inicio del ciclo Self-Cleaning
(Autolimpieza) mediante el desplazamiento de izquierda a
derecha.
3. Seleccione START DELAY (INICIAR RETRASO).
Las puertas del horno se bloquearán automáticamente
después de la cuenta atrás de Delay Start (Inicio diferido).
Cuando haya terminado el ciclo Self-Cleaning (Autolimpieza)
y el horno se enfríe, las puertas de los hornos se
desbloquearán.
4. Una vez que se haya enfriado el horno por completo, quite las
cenizas con un paño húmedo.
Para detener la autolimpieza en cualquier momento
Toque el boton Cancel (Cancelar) del horno para los modelos de
horno simple, o los botones para los modelos de horno doble. Si
la temperatura es demasiado alta, las puertas de los hornos
permanecerán bloqueadas. No se desbloquearán hasta que se
enfríen los hornos.
Steam Clean (Limpieza con vapor)
(en algunos modelos)
La función Steam Clean (limpieza con vapor) está pensada para
la limpieza ligera de la base de la cavidad del horno en los
modelos con horneado oculto en el horno.
No use limpiadores para horno.
Espere a que el horno se enfríe a temperatura ambiente antes de
utilizar la función Steam Clean (Limpieza con vapor). Si la cavidad
del horno está por encima de 93 °C (200 °F), la función de
limpieza con vapor no se activará hasta que se enfríe.
Quite todas las parrillas y accesorios de la cavidad del horno.
Para mejores resultados, utilice 295,7 mL (10 oz) de agua
destilada o filtrada.
La función de limpieza con vapor tarda 1 hora aproximadamente.
Se emitirá un sonido al final del ciclo.
IMPORTANTE: Dado que el agua de la base del horno estará
caliente, no abra el horno durante el ciclo de limpieza con vapor.
Toque Oven Cancel (cancelar horno) en los modelos con un
horno o Upper/Lower (Superior/inferior) en los modelos con dos
hornos en cualquier momento si desea finalizar el ciclo. La
pantalla regresará a la hora del día.

43
Consejos útiles
� Una vez que el ciclo Steam Clean (Limpieza con vapor) haya
concluido y el horno se haya enfriado por completo, retire el
resto de agua de la base del horno con una esponja o un
paño.
� Seque la humedad restante del interior de la puerta del horno,
los lados interiores de la cavidad del mismo y la superficie de
cocción.
� Use un cepillo suave o un raspador de plástico para limpiar el
interior del horno. Esto puede ayudar con manchas más
rebeldes.
� Se recomienda usar agua destilada o filtrada, ya que el agua
del grifo puede dejar depósitos de minerales en la base del
horno. Use un paño empapado con vinagre o jugo de limón
para retirar los depósitos de minerales que puedan haber
quedado después del ciclo Steam Clean (Limpieza con vapor).
� Si el horno está muy sucio, utilice el ciclo de autolimpieza. El
ciclo de limpieza con vapor puede utilizarse inicialmente para
eliminar la mayoría de residuos y conseguir después una
autolimpieza más eficaz.
Para realizar la limpieza con vapor:
1. Abra la puerta del horno seleccionado y retire todas las
parrillas y accesorios de la cavidad del horno.
2. Vierta 295,7 mL (10 oz) de agua destilada o filtrada en la base
del horno. A continuación cierre la puerta del horno.
3. Toque la tecla Herramientas.
En modelos de horno doble: Seleccione la cavidad superior o
la inferior.
4. Seleccione STEAM CLEAN (Limpieza con vapor).
5. Seleccione START (Inicio).
6. Después de aproximadamente 1 hora, sonará una señal para
indicar que el ciclo ha terminado. Toque Oven Cancel
(Cancelar horno) en los modelos con un horno o Upper/Lower
(Superior/inferior) en los modelos con dos hornos si desea
limpiar la pantalla.
7. Cuando el horno se haya enfriado por completo, retire el agua
sobrante con una esponja o un paño y limpie el interior del
horno. Si es necesario, utilice una esponja de cobre que no
raye para eliminar la suciedad rebelde.
INSTRUCCIONES DE
INSTALACIÓN
REQUISITOS
Herramientas y piezas
Reúna las herramientas y las piezas necesarias antes de
comenzar la instalación. Lea y siga las instrucciones provistas
con cualquiera de las herramientas detalladas aquí.
Herramientas necesarias
� Destornillador Phillips
� Cinta métrica
� Taladro manual o eléctrico (para instalaciones en gabinetes de
pared)
� Broca de 1" (2,5 cm) (para instalaciones en gabinetes de
pared)
� Nivel
� Destornillador de cabeza plana
Piezas suministradas
� Tornillos n.º 8-14 x 3/4" (1,9 cm) (2)
� Tornillos Phillips n.º 8-18 x 3/8" (9,5 mm) - protector de
ventilación inferior (2)
� Tornillos Phillips n.º 8-18 x 3/8" (9,5 mm) - moldura de
ventilación inferior (2)
� Tornillos de cabeza hexagonal n.º 8-18 x 3/8" (9,5 mm) - patas
de plástico (4)
� Patas traseras (2)
� Patas delanteras (2)
� Ducto de ventilación inferior
� Moldura de la ventilación inferior
Piezas necesarias
� Kit de deflector (en algunos modelos) (para hornos instalados
sobre un cajón de calentamiento, bajo un mostrador o
instalados con gabinete enrasado): Consulte la sección
Información sobre pedidos en línea de su Guía de inicio
rápido.
� Conector de conducto homologado por UL o aprobado por
CSA
� Conectores para cable homologados por UL
Verifique los códigos locales. Compruebe el suministro eléctrico
existente. Consulte la sección “Requisitos eléctricos”.
Es recomendable que todas las conexiones eléctricas sean
realizadas por un instalador eléctrico competente.
NOTA: Asegúrese de comprar únicamente piezas y accesorios
Whirlpool certificados de fábrica para su electrodoméstico. Su
instalación puede requerir piezas adicionales. Para pedirlas,
consulte la información de contacto que figura en la Guía de inicio
rápido.
Requisitos de ubicación
IMPORTANTE: Respete todas las normativas y reglamentos
vigentes.
� Deben usarse las dimensiones de la abertura del gabinete que
se muestran. Las dimensiones dadas proveen un espacio
mínimo, incluyendo el horno.
� La zona de instalación empotrada debe rodear completamente
los laterales y la parte superior del horno.
� Se requiere un suministro eléctrico con conexión a tierra.
Consulte la sección “Requisitos eléctricos”.
� La caja de empalmes del suministro eléctrico debe estar como
máximo a 3" (7,6 cm) por encima de la superficie de la carcasa
superior cuando el horno se instale en un gabinete de pared.
Se debe perforar un orificio de 1" (2,5 cm) de diámetro como
mínimo en la esquina trasera derecha o izquierda de la
superficie de la carcasa superior para pasar el cable del
electrodoméstico a través de la caja de empalmes.
� La superficie de apoyo del horno debe ser rígida, estar
nivelada y alineada con la parte inferior del recorte del
gabinete. El piso debe poder soportar el peso total
(microondas y horno integrados) de 253 lb (115 kg) para los
modelos de 27" (68,6 cm) o de 280 lb (127 kg) para los
modelos de 30" (76,2 cm).
IMPORTANTE: Para evitar daños a los gabinetes, consulte al
constructor o al distribuidor de los gabinetes para asegurarse
de que los materiales empleados no cambien de color, no se
desprenda el laminado ni sufran ningún otro tipo de daño. Este
horno fue diseñado de acuerdo con los requisitos de UL y CSA
International y cumple con las temperaturas máximas
permitidas para gabinetes de madera de 194 °F (90 °C).

44
Dimensiones del gabinete — Combinación de
microondas/horno integrado
Instalación estándar
F
E
A
D
G
B
C
Modelos de 27" (68,6 cm)
A. 27" (68,6 cm) ancho mínimo
del gabinete
B. 1
1
/
4
" (3.2 cm) de la parte
superior del recorte a la parte
inferior de la puerta superior
del gabinete
C. Se recomiendan 19
1
/
4
"
(48,9 cm) de la parte inferior
del recorte al piso.
De 7,5" a 19
1
/
4
" (de 19,1 cm a
48,9 cm) de la parte inferior del
recorte al piso son aceptables.
D. 25
1
/
2
" (64,8 cm) de ancho
mínimo de recorte
E. 1
1
/
2
" (3,8 cm) mínimo de la
parte inferior del recorte a la
parte superior de la puerta del
gabinete
F. Altura de recorte
recomendada: 41
5
/
16
"
(105 cm)*
G. 24" (60,7 cm) de profundidad
del recorte
Modelos de 30" (76,2 cm)
A. 30" (76,2 cm) ancho mínimo
del gabinete
B. 1
1
/
4
" (3.2 cm) de la parte
superior del recorte a la parte
inferior de la puerta superior
del gabinete
C. Se recomiendan 19
1
/
4
"
(48,9 cm) de la parte inferior
del recorte al piso.
De 7,5" a 19
1
/
4
" (de 19,1 cm a
48,9 cm) de la parte inferior del
recorte al piso son aceptables.
D. 28
1
/
2
" (72,4 cm) de ancho
mínimo de recorte
E. 1
1
/
2
" (3,8 cm) mínimo de la
parte inferior del recorte a la
parte superior de la puerta del
gabinete
F. Altura de recorte
recomendada: 41
5
/
16
"
(105 cm)*
G. 24" (60,7 cm) de profundidad
del recorte
*NOTA: La altura del recorte puede ser de
41
1
/
8
" (104,5 cm) y 41
1
/
2
" (105,6 cm) para la combinación de
microondas/horno.
Instalación empotrada
Se requiere una profundidad de recorte mínima de 25" (63,5 cm).
Estas dimensiones resultarán en una mocheta de 1/4" (6 mm) en
la parte superior, una mocheta de 1/4" (6 mm) en los lados y otra
de 1/8" (3 mm) en la parte inferior del horno de pared. No se
requieren espacios en la parte superior e inferior para la
instalación.
La cara frontal de los tacos y la plataforma será visible y debe
tratarse como superficie terminada.
Vista frontal Vista lateral
A
B
C
D
E
FF
G
G
I
J
H H
Modelos de 27" (68,6 cm)
A. 3/4" (1,9 cm) taco superior*
B. 27
1
/
4
" (69,2 cm) de ancho
mínimo de recorte empotrado
al ras
C. 25
7
/
8
" (65,7 cm) de ancho
mínimo de apertura
D. 43" (109,2 cm) de altura
mínima de recorte empotrado
al ras
E. Altura de recorte recomendada
42
1
/
2
" (107,3 cm)
F. 11/16" (1,7 cm) taco lateral*
G. 1/4" (0,6 cm) recomendado
con pie. 15/16" a 1
5
/
16
"
(de 2,3 cm a 3,5 cm) permitido
sin pata.
H. Ubicación recomendada de la
caja de empalmes
I. 4
5
/
8
" — 19
1
/
4
" (11,7 - 48,9 cm)
parte inferior del recorte al piso
J. 25" (63,5 cm) de profundidad
mínima de recorte
Modelos de 30" (76,2 cm)
A. 3/4" (1,9 cm) taco superior*
B. 30
1
/
4
" (76,8 cm) de ancho
mínimo de recorte empotrado
al ras
C. 28
7
/
8
" (73,3 cm) de ancho
mínimo de apertura
D. 43" (109,2 cm) de altura
mínima de recorte empotrado
al ras
E. Altura de recorte recomendada
42
1
/
2
" (107,3 cm)
F. 11/16" (1,7 cm) taco lateral*
G. 1/4" (0,6 cm) recomendado
con pie. 15/16" a 1
5
/
16
"
(de 2,3 cm a 3,5 cm) permitido
sin pata.
H. Ubicación recomendada de la
caja de empalmes
I. 4
5
/
8
" — 19
1
/
4
" (11,7 - 48,9 cm)
parte inferior del recorte al piso
J. 25" (63,5 cm) de profundidad
mínima de recorte
*Los tacos y espaciadores deben estar empotrados 1
3
/
8
" (3,5 cm)
desde el frente del gabinete.
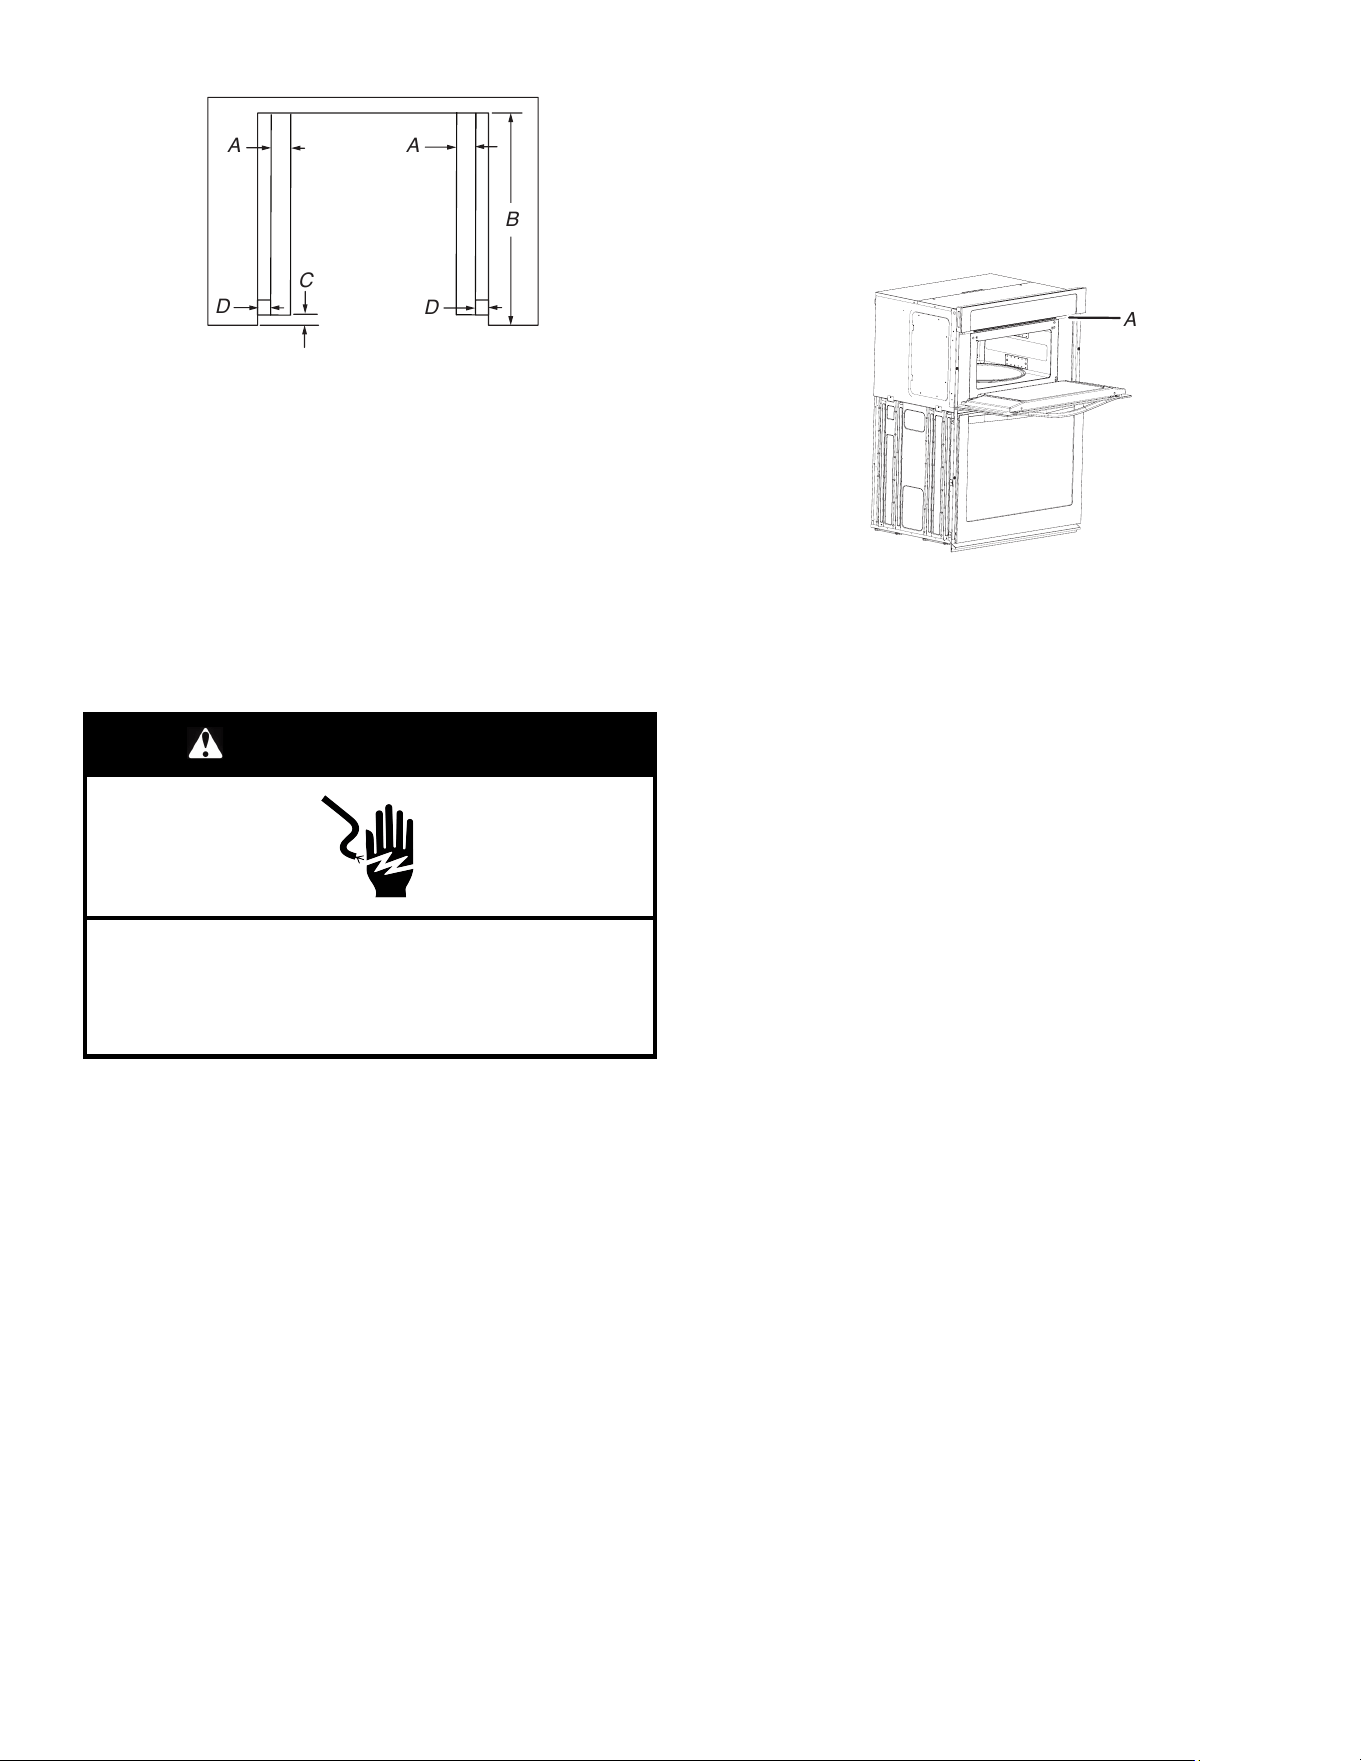
45
B
A A
D
D
C
Vista superior
Modelos de 27" (68,6 cm)
A. 2" (5,1 cm) espaciador de toda
la profundidad del recorte*
B. 25" (63,5 cm) de profundidad
de recorte
C. 1
1
/
2
" (3,5 cm) hueco del frente
del gabinete
D. 11/16" (1,7 cm) taco lateral*
Modelos de 30" (76,2 cm)
A. 2" (5,1 cm) espaciador de toda
la profundidad del recorte*
B. 25" (63,5 cm) de profundidad
de recorte
C. 1
1
/
2
" (3,5 cm) hueco del frente
del gabinete
D. 11/16" (1,7 cm) taco lateral*
*Los tacos y espaciadores deben estar empotrados 1
3
/
8
" (3,5 cm)
desde el frente del gabinete.
Requisitos eléctricos
ADVERTENCIA
Peligro de choque eléctrico
Conecte este aparato con conexión a tierra.
No seguir estas instrucciones podría causar la muerte,
un incendio o una descarga eléctrica.
Si los códigos lo permiten y utiliza un cable de conexión a tierra
separado, es recomendable que un instalador eléctrico
competente determine si la ruta de conexión a tierra y el calibre
del cable cumplen con los códigos locales.
Si no está seguro de que la conexión a tierra del horno sea
adecuada, verifíquela con un instalador eléctrico competente.
Este horno debe estar conectado a un sistema de cableado de
metal permanente, conectado a tierra.
Asegúrese de que la conexión eléctrica y el tamaño del cable
sean adecuados y en conformidad con el National Electrical Code
(Código Nacional Eléctrico), ANSI/NFPA 70, última edición, o las
normas de CSA C22.1-94, Canadian Electrical Code (Código
Canadiense de Electricidad), Parte 1 y C22.2 N.° O-M91, última
edición, y todos los códigos y ordenanzas locales.
Puede obtener una copia de los códigos antes indicados en:
National Fire Protection Association
1 Batterymarch Park
Quincy, MA 02169-7471
CSA International
8501 East Pleasant Valley Road
Cleveland, OH 44131-5575
Conexión eléctrica
Para instalar el horno correctamente, debe determinar el tipo de
conexión eléctrica que va a usar y seguir las instrucciones que
aquí se proveen para el caso.
� El horno debe estar conectado al voltaje eléctrico, amperaje y
frecuencia apropiados según se especifica en la placa con el
número de clasificación del modelo/serie. Vea la siguiente
ilustración.
A
A. Placa de modelo/serie/valores nominales
� Los modelos clasificados entre 7,3 y 9,6 kW a 240 V (entre 6,3
y 8,3 kW a 208 V) requieren un circuito de 40 A separado. Los
modelos clasificados entre 4,9 y 7,2 kW a 240 V (entre 4,3 y
6,2 kW a 208 V) requieren un circuito de 30 A separado. Los
modelos clasificados a 4,8 kW o menos a 240 V
(a 4,2 kW o menos 208 V) requieren un circuito de 20 A
separado.
� Se recomienda usar un disyuntor.
� Conecte el horno directamente a un cortacircuitos con fusible
(o a una caja de cortacircuitos), a través de un cable flexible,
blindado o con forro no metálico, de cobre (con alambre a
tierra). Vea la sección “Haga la conexión del suministro
eléctrico”.
� El conducto flexible del horno deberá conectarse directamente
a la caja de empalmes.
� No corte el conducto. La longitud del conducto provisto es
para permitir darle servicio al horno.
� Deberá proveerse un conector de conducto que esté en la lista
de UL o aprobado por CSA.
� Si la casa tiene cableado de aluminio, siga el procedimiento a
continuación:
Conecte el cableado de aluminio con conectores especiales
y/o herramientas diseñadas y homologadas por UL para unir
el cobre al aluminio.
Siga el procedimiento recomendado por el fabricante del
conector eléctrico. La conexión de cobre/aluminio deberá
hacerse en conformidad con los códigos locales y las
prácticas de cableado aceptadas por la industria.
Asegúrese de que la conexión eléctrica y el tamaño del cable
sean adecuados y en conformidad con el National Electrical
Code (Código Nacional Eléctrico), ANSI/NFPA 70, última
edición, o las normas de CSA C22.1-94, Canadian Electrical
Code (Código Canadiense de Electricidad), Parte 1 y
C22.2 N.° O-M91, última edición, y todos los códigos y
ordenanzas locales. Puede obtener una copia de los códigos
antes indicados en: National Fire Protection Association
1 Batterymarch Park Quincy, MA 02169-7471 CSA
International 8501 East Pleasant Valley Road Cleveland, OH
44131-5575.
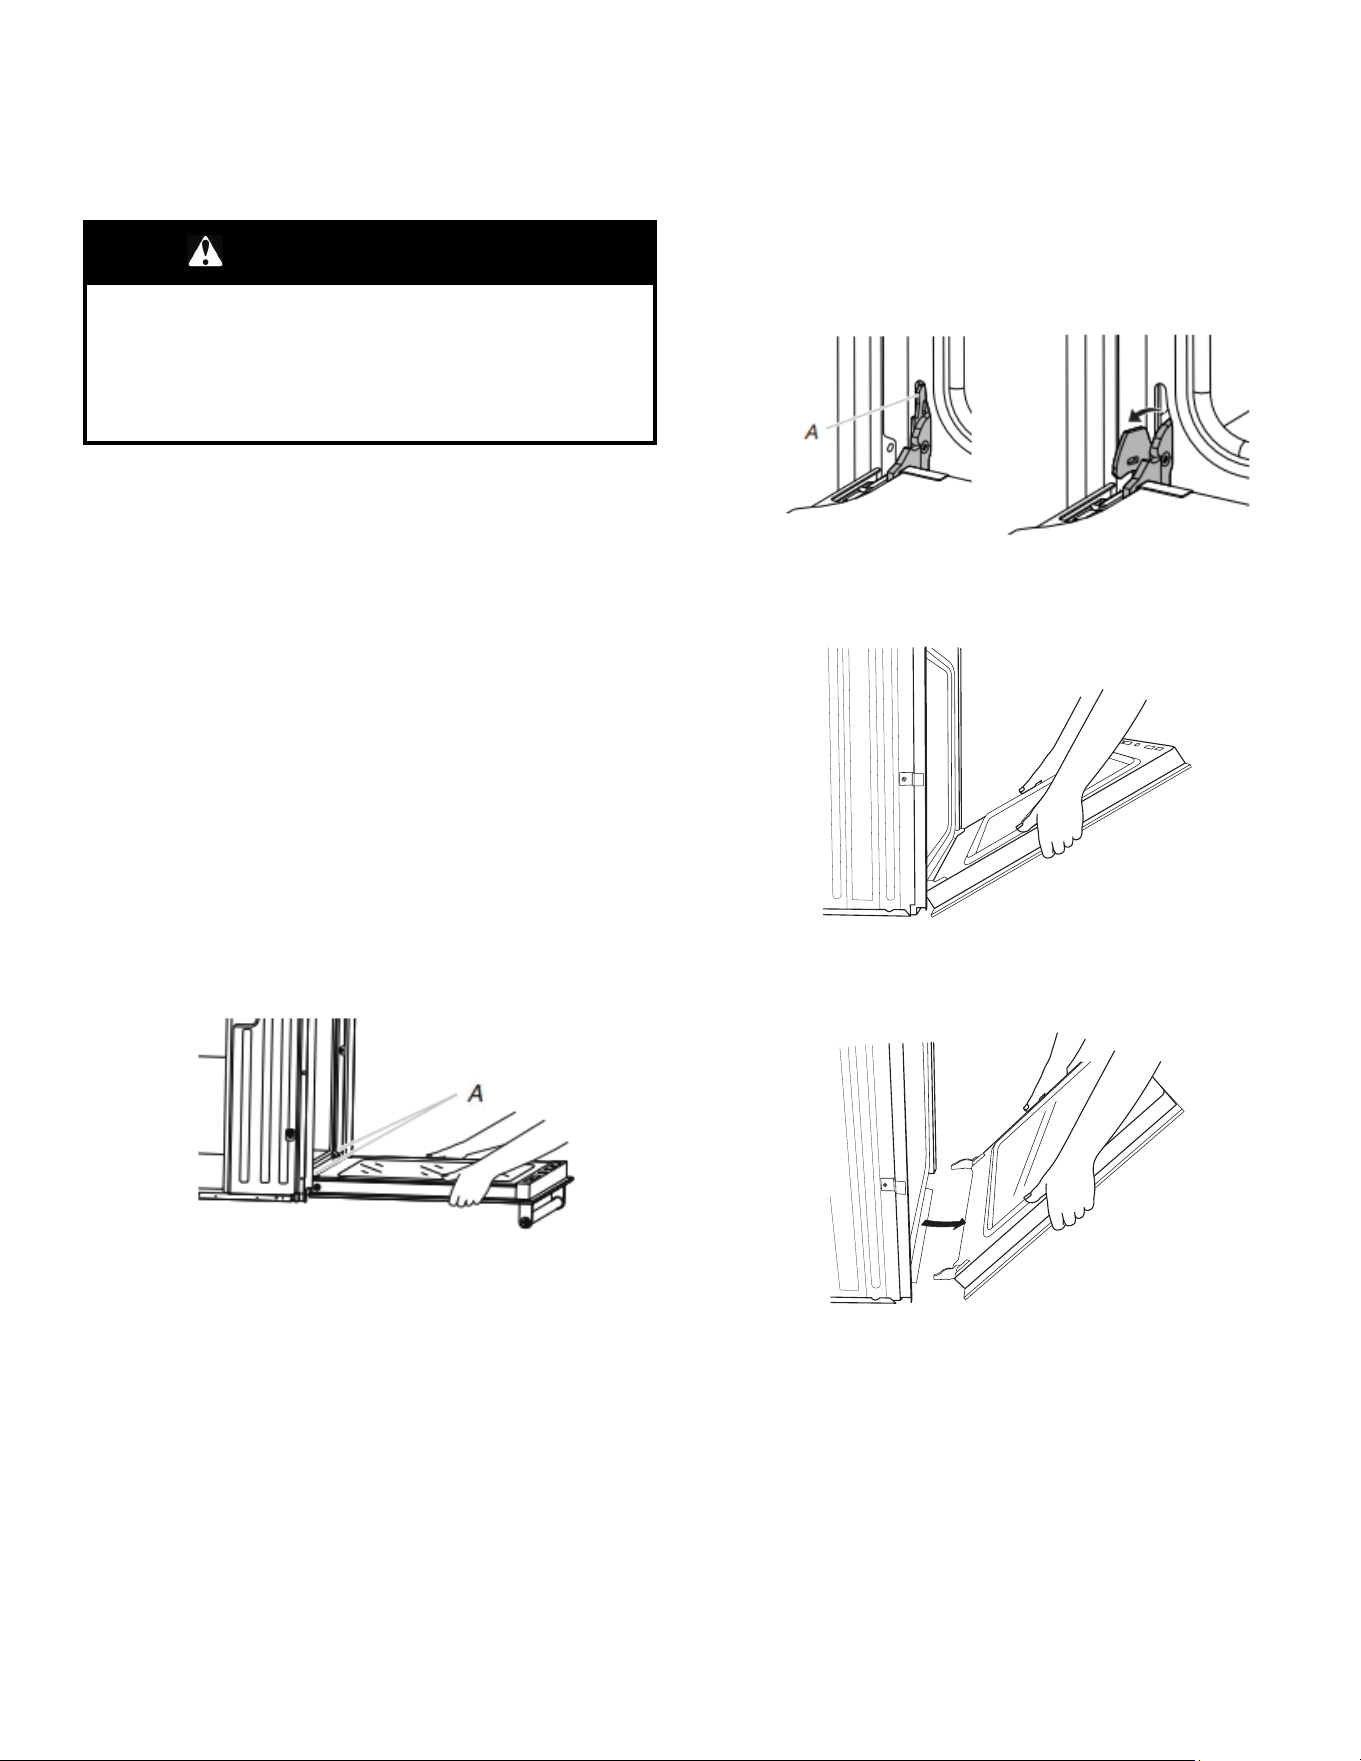
46
INSTALACIONES
Preparación del horno empotrado
1. Decida cuál será la ubicación final del horno. Evite perforar o
cortar el cableado de la casa durante la instalación.
ADVERTENCIA
Peligro de peso excesivo
Use dos o más personas para mover e instalar o
desinstalar el electrodoméstico.
No seguir esta instrucción puede ocasionar lesiones en
la espalda o de otro tipo.
2. Para evitar daños al piso, coloque el horno sobre un cartón
antes de la instalación. No levante el horno sujetándolo de la
manija o de cualquier parte del marco frontal.
3. Recuerde quitar la ventila inferior del empaque de espuma
sobre la parte superior del horno.
4. Quite los materiales de envío y la cinta adhesiva del horno.
Recuerde conservar los esquineros y otros materiales que
pueden ser necesarios para la instalación.
5. Retire el paquete con piezas de ferretería que está dentro de
la bolsa que contiene el material impreso.
6. Retire las parrillas y otras piezas del interior del horno y
colóquelas a un lado.
7. Traslade el horno y la caja cerca de la ubicación final del
horno.
Retire las puertas del horno
IMPORTANTE: Use las 2 manos para retirar la puerta del horno.
Para los hornos dobles, repita el proceso con cada puerta.
1. Antes de retirar la puerta del horno, prepare una superficie
donde la colocará. Esa superficie debe ser plana y estar
cubierta con una manta blanda; también se pueden usar los
esquineros del material de embalaje.
2. Abra por completo la puerta del horno.
A. Bisagras de puerta
3. Ubique las trabas de las bisagras de la puerta en ambas
esquinas de la puerta del horno y gire las trabas de las
bisagras hacia la puerta del horno a la posición destrabada. Si
la traba de las bisagras no se gira por completo (vea la
posición trabada en la ilustración B), la puerta no se retirará
correctamente.
Traba de bisagra de la puerta del
horno en posición trabada
Traba de bisagra de la puerta del
horno en posición destrabada
A. Aferre aquí para girar
4. Comience a cerrar la puerta con suavidad. La puerta se
detendrá en una posición parcialmente cerrada.
5. Tome la puerta del horno por los bordes con las 2 manos.
Cierre un poco la puerta del horno más allá de la posición del
tope para retirar el peso de las bisagras de la puerta;
después, tire de la puerta del horno hacia arriba.
6. Tire de la puerta del horno hacia usted para retirarla. Puede
ser necesario mover suavemente la puerta de un lado a otro
mientras tira de ella.
7. Aparte la puerta del horno sobre la superficie de trabajo
cubierta que preparó y apóyela sobre la manija.
8. Para seguir con la instalación del horno, vaya a la sección
“Ubicación de las patas del horno para múltiples alturas de
corte del armario”.
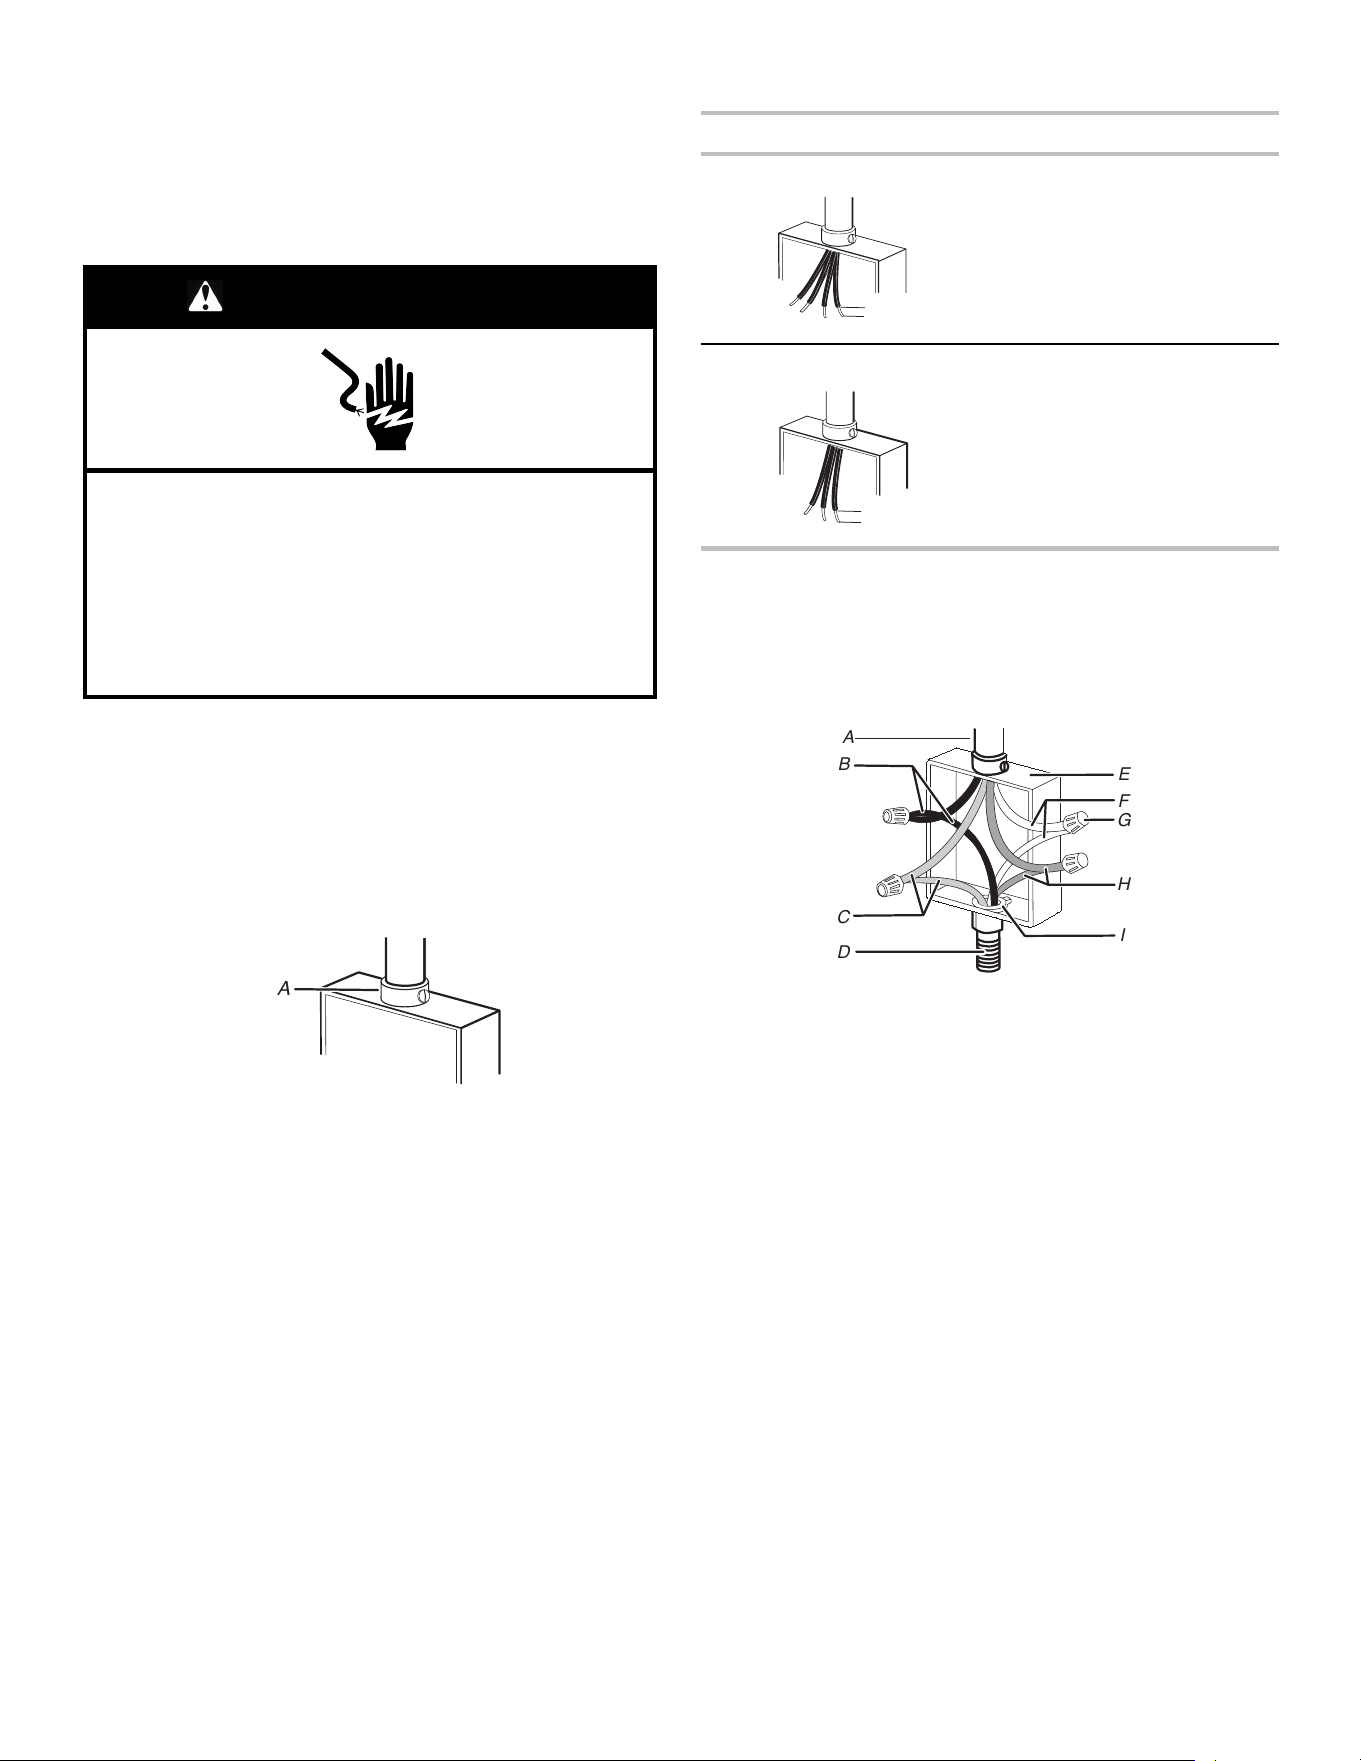
47
Hacer la conexión eléctrica
IMPORTANTE: Para la instalación alineada antes de realizar la
conexión eléctrica, las patas o los espaciadores del horno deben
instalarse para permitir la instalación de una combinación de
microondas/horno en una altura de corte recomendada.
Comuníquese con servicio para que le envíen las patas sin costo
alguno.
ADVERTENCIA
Peligro de choque eléctrico
Desconecte el suministro eléctrico antes de realizar el
servicio.
Utilice alambre de cobre de calibre 8.
Conecte el horno a tierra.
No seguir estas instrucciones puede ocasionar la
muerte, un incendio o un choque eléctrico.
Este horno se ha fabricado con cable de suministro eléctrico
neutro (blanco), y un cable de conexión a tierra verde (o desnudo)
conectado a la carcasa.
1. Desconecte el suministro eléctrico.
2. Pase el conducto flexible del horno a través de la abertura en
la carcasa.
3. Quite la cubierta de la caja de empalmes, si está presente.
4. Instale un conector de conducto homologado por UL o
aprobado por CSA en la caja de empalmes.
A
A. Conector de conducto homologado por UL o aprobado por
CSA
5. Dirija el conducto flexible del horno a la caja de empalmes,
con un conector de conducto que esté en la lista de UL o
aprobado por CSA.
6. Apriete los tornillos en el conector de conducto.
7. Vea el “Cuadro de opciones de conexión eléctrica” para
completar la instalación para el tipo de conexión eléctrica.
Cuadro de opciones de conexión eléctrica
Si la casa tiene: Vaya a la sección:
4 hilos
Cable de 4 hilos desde el
suministro eléctrico
3 hilos
Cable de 3 hilos desde el
suministro eléctrico
Cable de 4 hilos desde el suministro eléctrico
IMPORTANTE: Use el cable de 4 hilos del suministro eléctrico de
la casa en los EE. UU. donde los códigos locales no permitan la
puesta a tierra a través del neutro, nuevas instalaciones de
circuitos derivados (1996 NEC), casas rodantes y vehículos de
recreación, en construcciones nuevas y en Canadá.
A
D
F
H
B
C
E
G
I
A. Cable desde el suministro de
energía de la casa
B. Cables negros
C. Cables rojos
D. Conducto flexible de 4 hilos del
horno
E. Caja de empalmes
F. Cables blancos
G. Conectores para cable
homologados por UL
H. Cables verdes (o desnudos) de
puesta a tierra
I. Conector de conducto
homologado por UL o
aprobado por CSA
1. Conecte los 2 cables negros (B) juntos usando un conector de
cables que esté en la lista de UL.
2. Conecte los 2 cables rojos (C) juntos usando un conector de
cables que esté en la lista de UL.
3. Conecte los 2 cables blancos (F) juntos usando un conector
de cables que esté en la lista de UL.
4. Conecte el cable verde (o desnudo) de puesta a tierra (H)
desde el cable del horno al alambre verde (o desnudo) de
puesta a tierra (en la caja de empalmes), usando un empalme
plástico que esté en la lista de UL.
5. Instale la cubierta de la caja de empalmes.
1/2"
(1,3 cm)
1/2"
(1,3 cm)

48
Cable de 3 hilos del suministro de energía de la
casa. Solo en EE. UU.
IMPORTANTE: Use el cable de 3 hilos del suministro de energía
de la casa cuando los códigos locales permitan la conexión de
3 hilos.
B
C
D
E
F
H
G
A
I
A. Cable desde el suministro de
energía de la casa
B. Caja de empalmes
C. Cables negros
D. Cables blancos
E. Cable verde (o desnudo) de
puesta a tierra (desde el horno)
F. Conducto flexible de 4 hilos del
horno
G. Cables rojos
H. Conectores para cable
homologados por UL
I. Conector de conducto
homologado por UL o
aprobado por CSA
1. Conecte los 2 cables negros (C) juntos usando un conector
de cables que esté en la lista de UL.
2. Conecte los 2 cables blancos (D) al alambre verde
(o desnudo) de puesta a tierra (del cable del horno), usando
un conector de cables que esté en la lista de UL.
3. Conecte los 2 cables rojos (G) juntos usando un conector de
cables que esté en la lista de UL.
4. Instale la cubierta de la caja de empalmes.
Para instalar el horno
1. Con la ayuda de dos o más personas, levante el horno
parcialmente dentro del recorte del gabinete. Use la abertura
del horno como una zona para aferrar.
NOTA: Empuje contra la zona del sello del marco delantero
del horno cuando empuje el horno dentro del gabinete. No
empuje contra los bordes externos.
2. Empuje contra la zona del sello del marco delantero para
empujar el horno dentro del gabinete hasta que la superficie
trasera del marco delantero toque la pared delantera del
gabinete.
3. Empuje el horno completamente dentro del gabinete y
céntrelo en el recorte del mismo.
4. Sujete con seguridad el horno al gabinete con los tornillos
n.º 8-14 x 3/4" (1,9 cm) que se proveen.
Inserte los tornillos a través del orificio de la moldura negra
alineándolos con el orificio del marco del horno. No apriete
demasiado los tornillos.
A.
Marco del horno
B. Orificio de moldura lateral
C. Pieza de moldura lateral
A
B
C
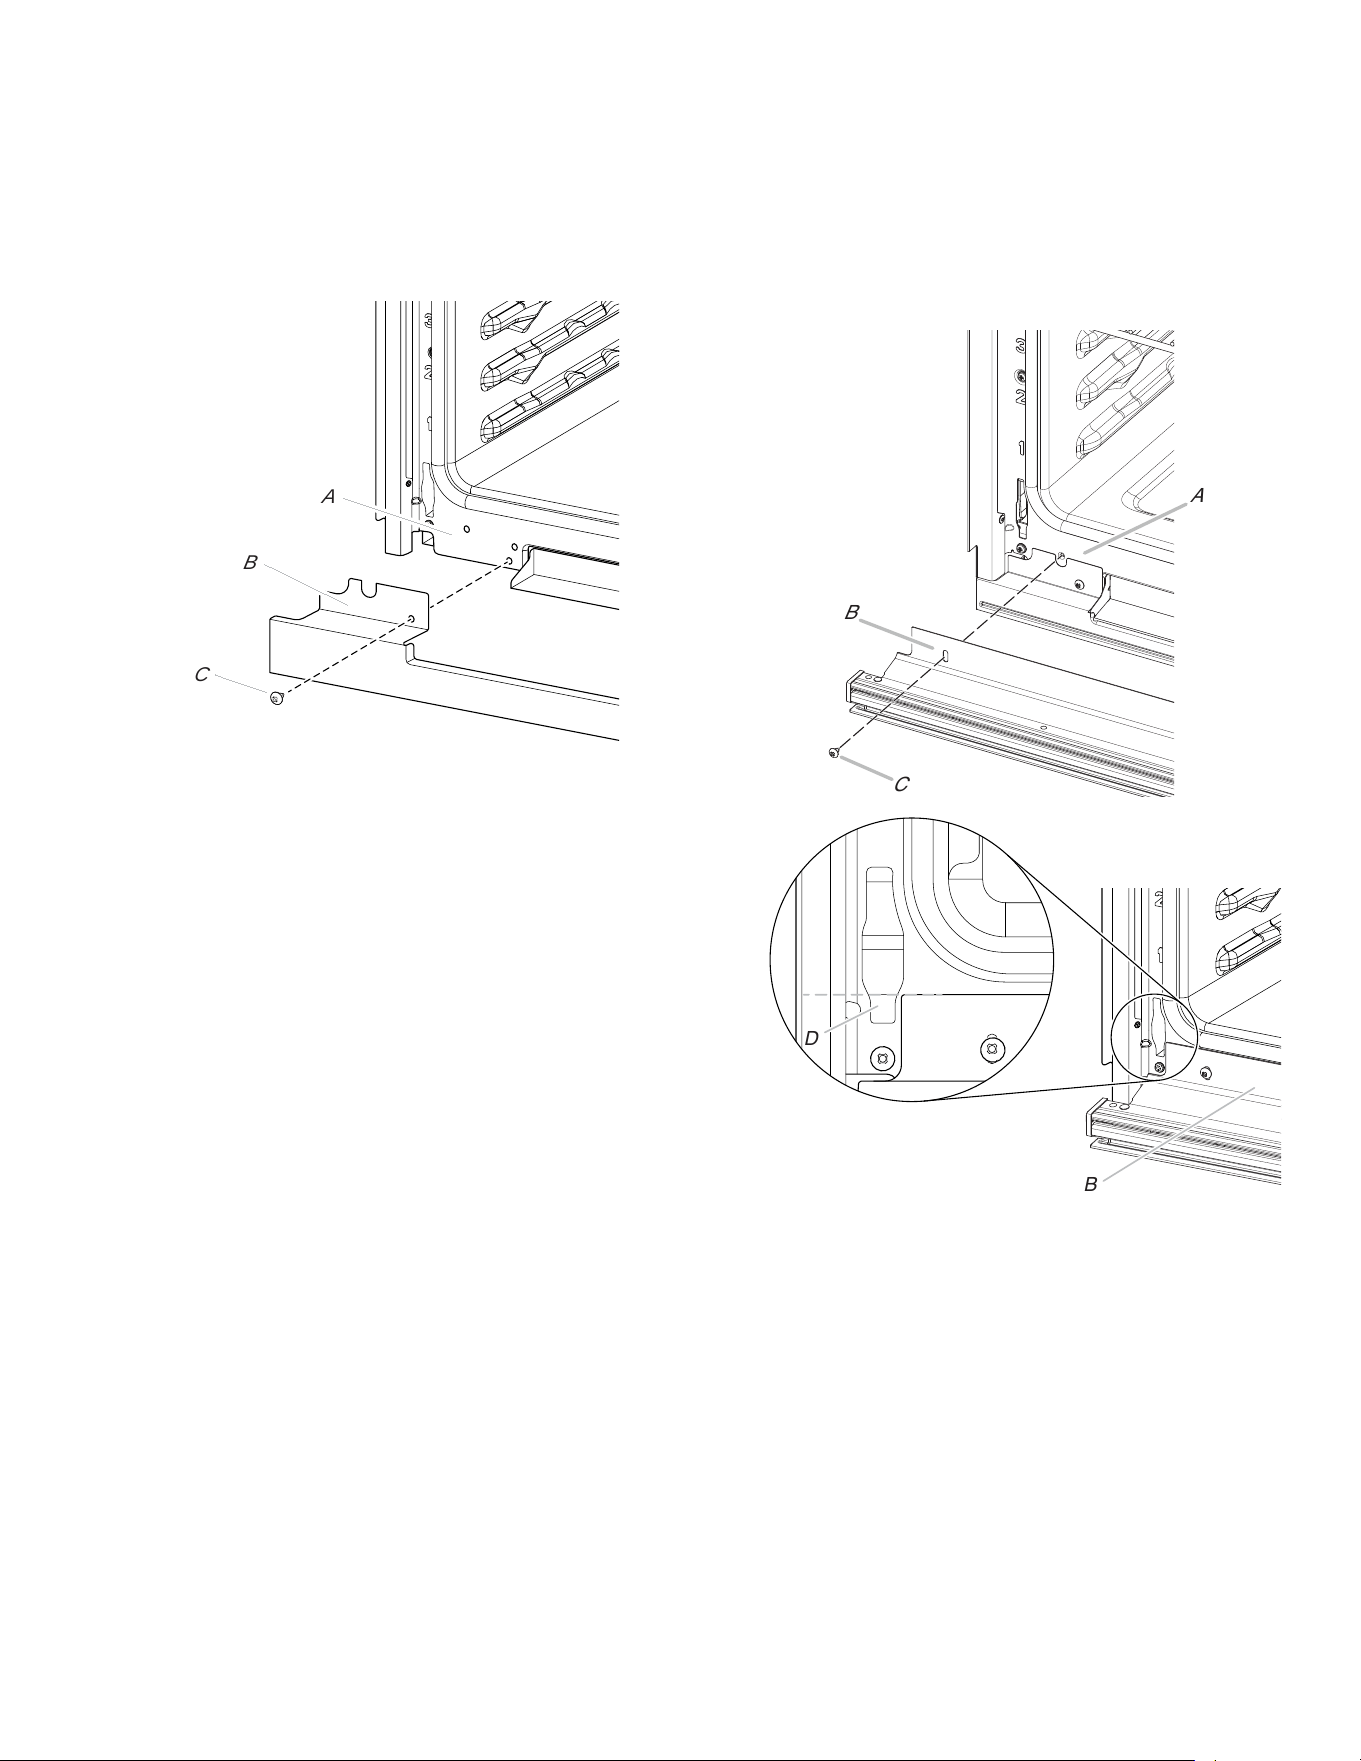
49
5. La moldura de la ventilación inferior y el protector de
ventilación inferior se envían en el empaque de espuma en la
parte superior del horno.
� Alinee la lengüeta del protector de ventilación inferior (B)
con el marco del horno (A) como se muestra.
� Con un tornillo n.º 8-18 x 3/8" (9,5 mm) (C) en cada lado
de la lengüeta del protector de la ventilación (B), fije el
protector de ventilación de manera segura al marco del
horno (A).
A.
Marco del
horno
B. Lengüeta del
protector de la
ventilación
inferior
C. Tornillos n.º 8-18 x 3/8"
(9,5 mm)
6. Después de instalar el protector de ventilación inferior.
� Alinee la lengüeta de la moldura de la ventilación inferior
(B) con el marco del horno (A) como se muestra.
� Con un tornillo n.º 8-18 x 3/8" (9,5 mm) (C) a cada lado de
la lengüeta de la moldura de la ventilación (B), alinee la
parte superior de la lengüeta de la moldura de la
ventilación inferior (B) con el receptor de la bisagra (D)
como se muestra.
� Apriete el moldura de la ventilación inferior firmemente al
marco del horno (A).
C
B
A
D
B
A. Marco del
horno
B. Lengüeta de la
moldura de la
ventilación
inferior
C. Tornillo n.º 8-18 x 3/8"
(9,5 mm)
D. Receptor de bisagra
7. Vuelva a colocar las parrillas del horno.
8. Vuelva a colocar la puerta del horno. Consulte la sección
“Vuelva a colocar las puertas del horno”.
9. Verifique que la puerta pueda abrirse y cerrarse bien. De lo
contrario, repita los procedimientos para retirar y colocar la
puerta. Consulte la sección “Prepare el horno integrado”.
10. Repita el procedimiento para la puerta del horno inferior.
IMPORTANTE: Para un funcionamiento correcto del horno,
verifique que el espacio entre la moldura inferior de la puerta y la
moldura de la ventilación inferior sea de al menos 1/4" (6,4 mm).
11. Reconecte el suministro eléctrico.
C
B
A
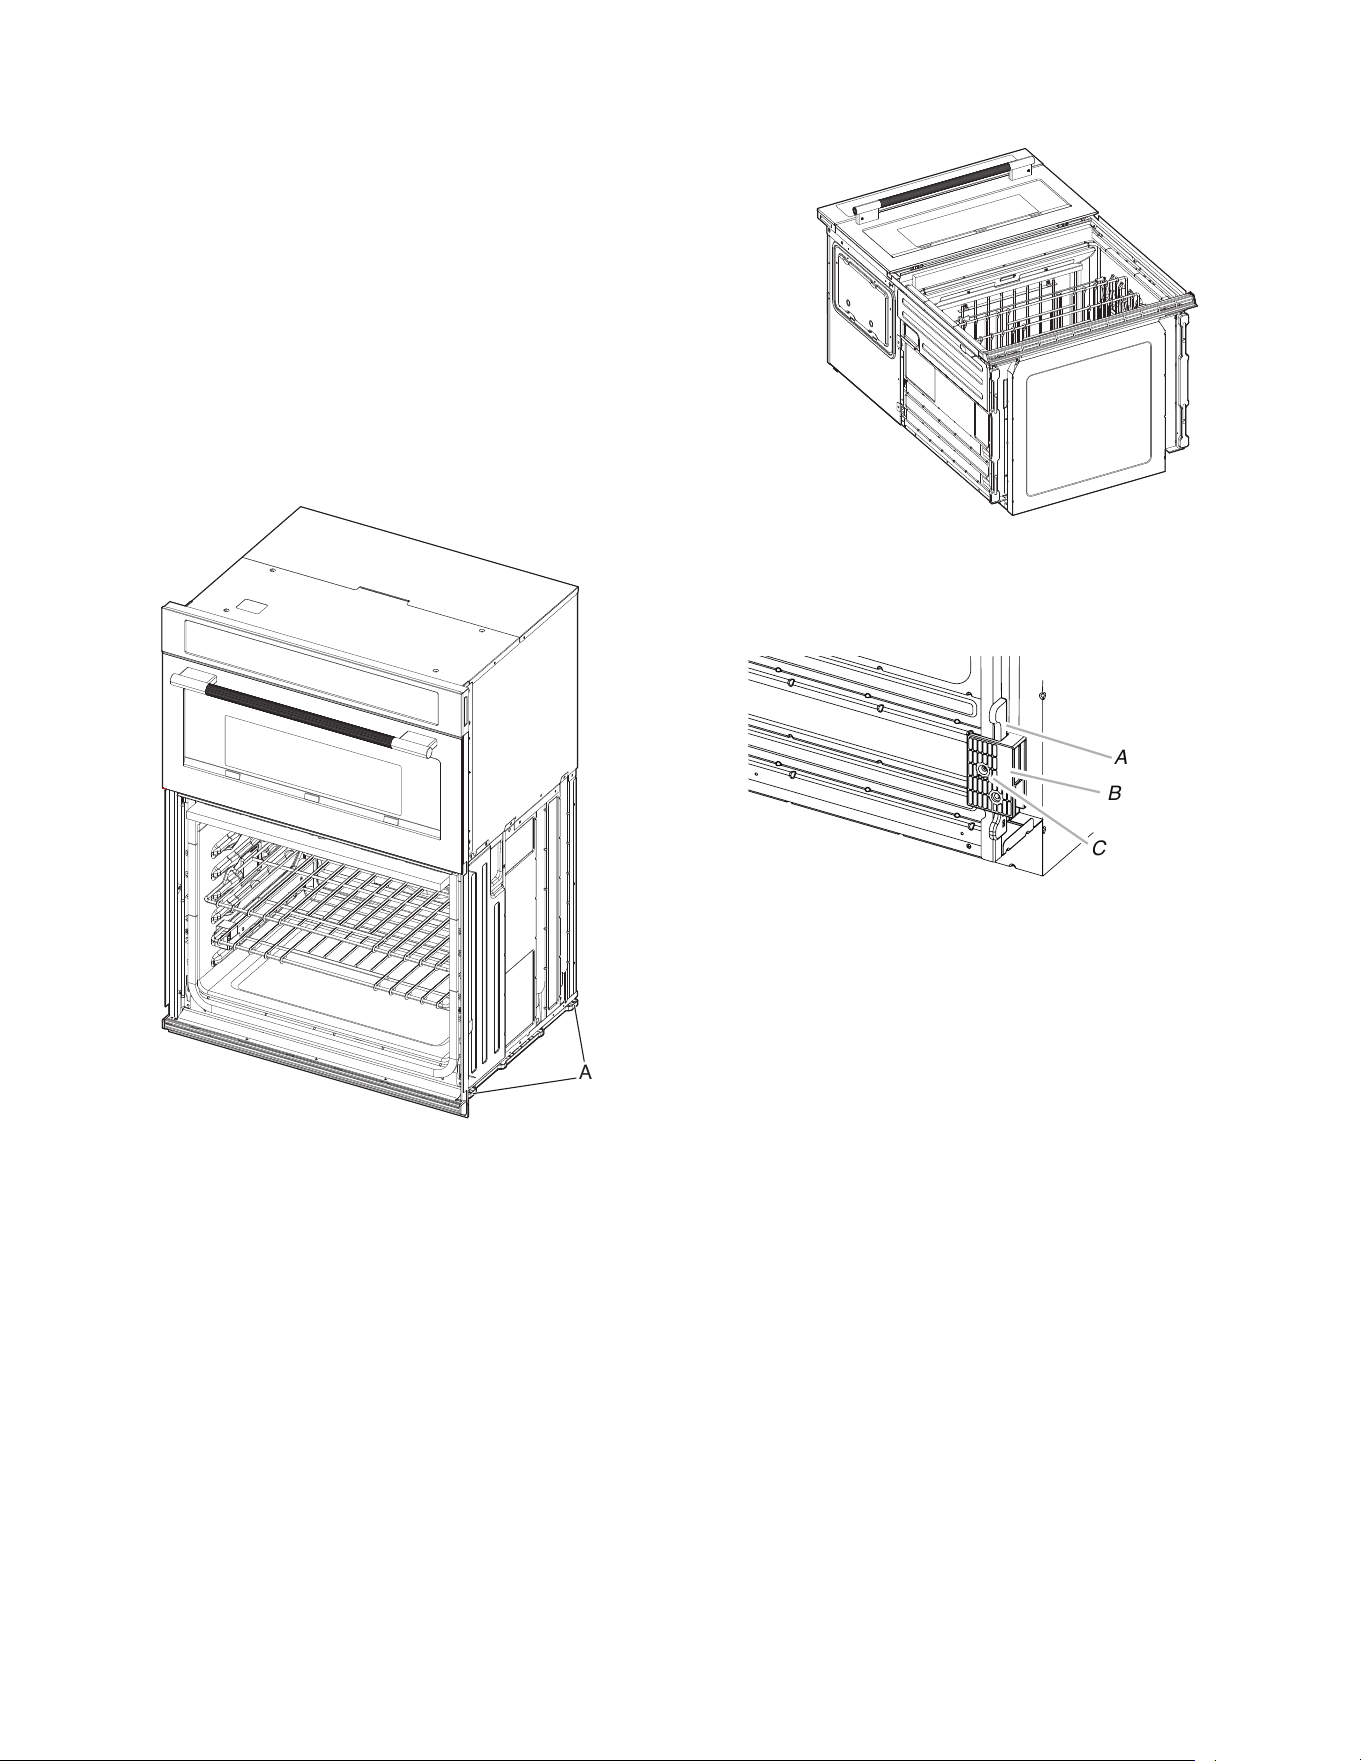
50
12. El panel de la pantalla se iluminará brevemente y puede
aparecer “PF” en la pantalla.
13. Si el panel de la pantalla no se enciende, consulte la
Garantía.
14. Si se encuentra el código de error F9E0 al encender la
unidad, el electrodoméstico está mal cableado en la caja de
empalmes o en el cuadro eléctrico. Póngase en contacto con
un electricista calificado para que verifique el suministro
eléctrico de la vivienda y la conexión del cableado en la caja
de empalmes o el cuadro eléctrico (consulte la sección
Opciones de conexión eléctrica).
Ubicación de las patas del horno
Es necesario instalar las patas del horno para que este pueda
montarse en una instalación empotrada o estándar en que la
altura del recorte sea
41
3
/
4
" (106 cm) o más.
NOTA: No retire los espaciadores.
A
A. Espaciadores
1. Con ayuda de dos o más personas, coloque el horno sobre la
parte trasera sobre una superficie cubierta.
2. Instale una pata en el espaciador trasero izquierdo con un
tornillo 8-18 x 3/8".
NOTA: Ubique la pata de modo que el lado largo de la pata
esté orientado hacia la parte superior del horno.
A
B
C
A. Espaciadores
B. Pata
C. Tornillo n.º 8-18 x 3/8".
3. Instale de la misma manera una pata en la parte trasera
derecha del horno.
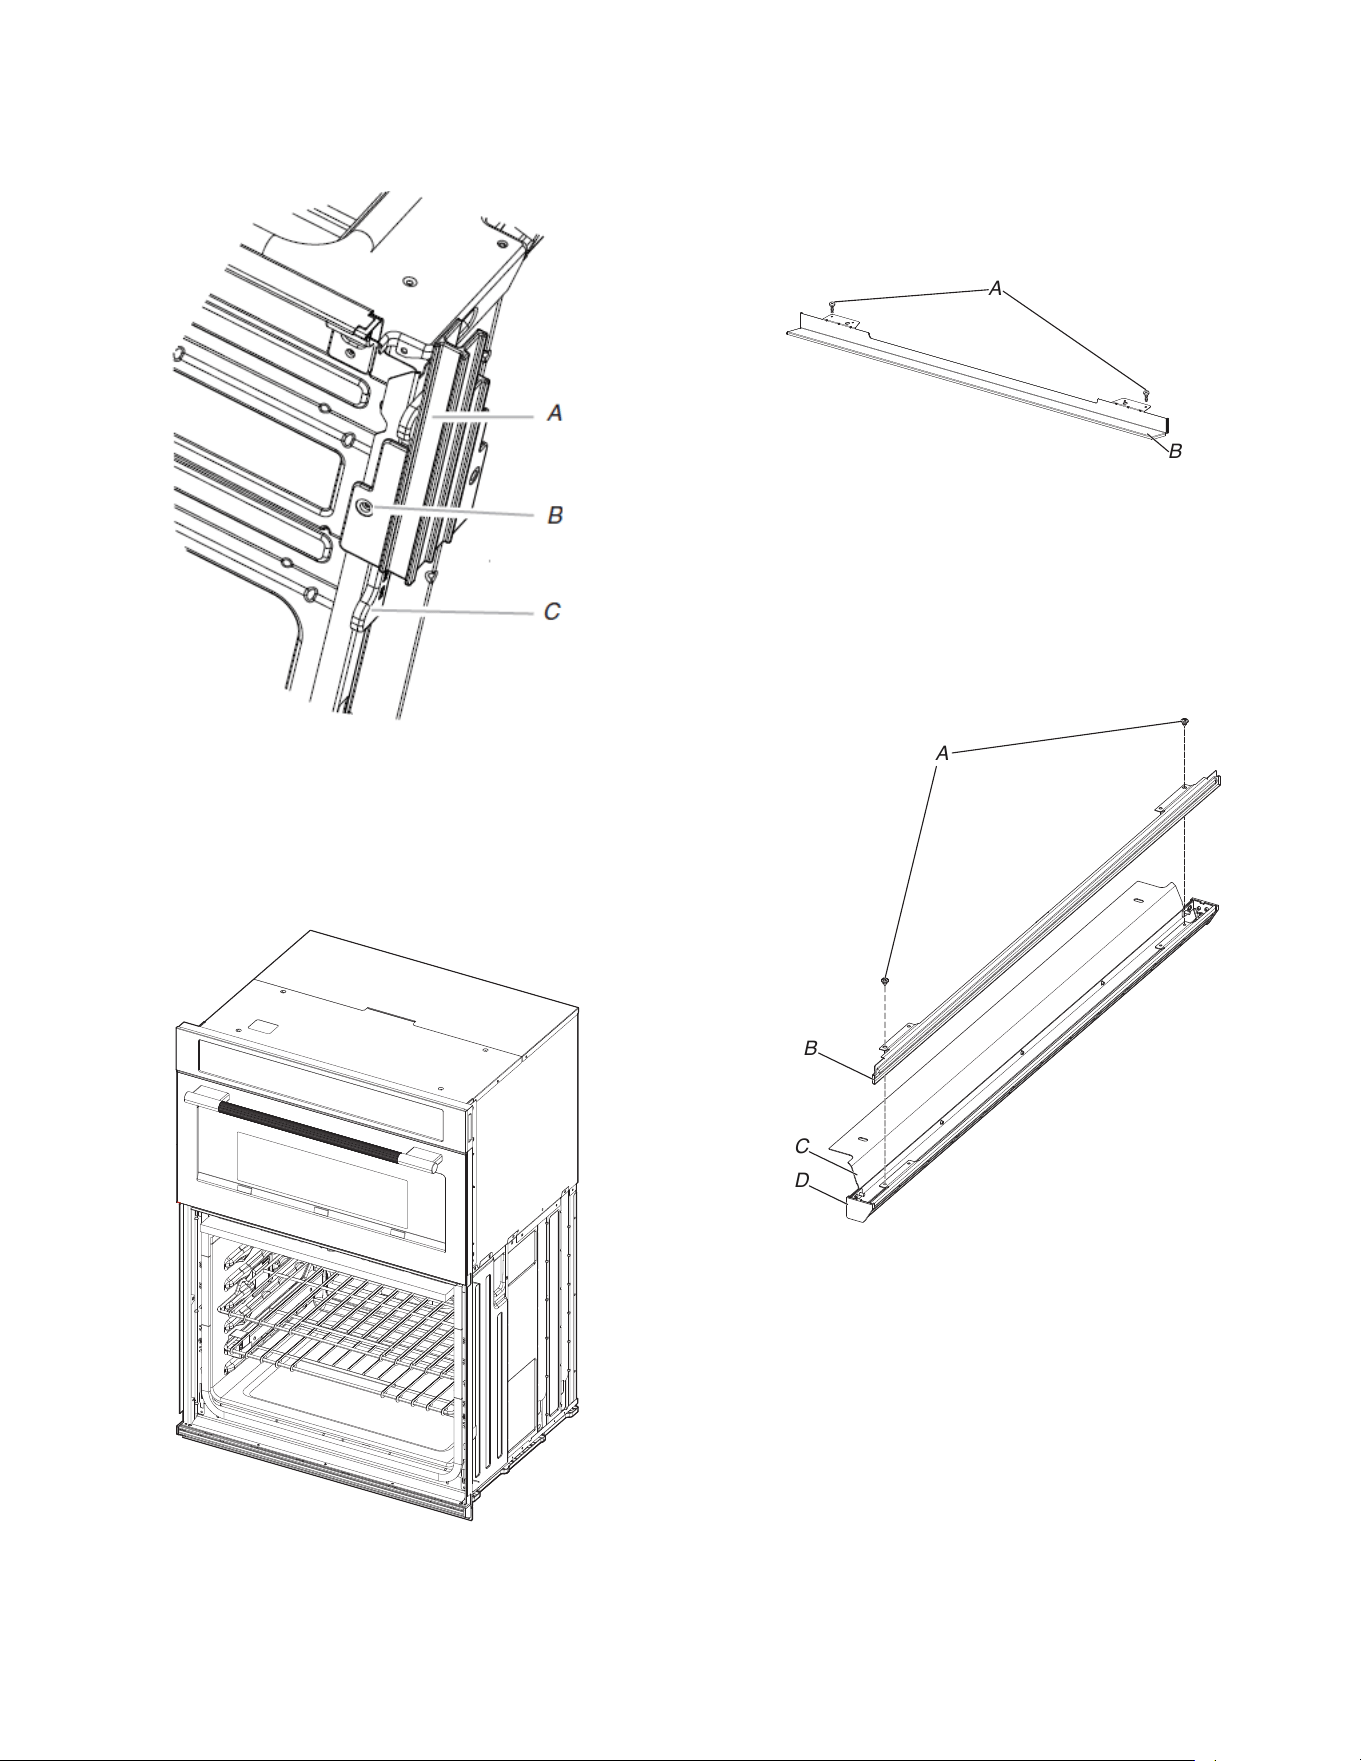
51
4. Instale una pata delantera en el espaciador delantero
izquierdo con un tornillo n.º 8-18 x 3/8".
NOTA: Ubique la pata de modo que el lado largo de la pata
esté orientado hacia la parte interior del horno.
A. Pata delantera
B. Tornillo n.º 8-18 x 3/8".
C. Espaciador
5. De la misma manera, instale una pata delantera en la parte
delantera derecha del horno.
6. Con la ayuda de dos o más personas, coloque el horno en su
posición vertical.
7. Vaya a la sección “Hacer la conexión eléctrica” en las
instrucciones de instalación provistas con su horno integrado.
Instale el kit de deflector
En los modelos de horno simple y doble instalados encima de un
cajón de calentamiento o para hornos instalados con gabinetes
de instalación empotrada, debe instalarse un kit de deflector.
Consulte la sección “Herramientas y piezas” para obtener
información sobre pedidos.
Piezas suministradas en el kit de deflector
B
A
A. Tornillos Phillips (2), solo 2 tornillos para el tamaño de
27" (68,6 cm)
B. Deflector (1)
Instale el kit de deflector
1. Instale el deflector (B) en la pieza inferior del ducto de
ventilación (D) con un tornillo n.º 8-18 x 1/4" (6,4 mm) a cada
lado.
NOTA: En los modelos de 27" (68,6 cm), se usa un solo
tornillo n.º 8-18 x 1/4" (6,4 mm) a cada lado.
B
A
C
D
A. Tornillos n.º 8-18
x 1/4" (6,4 mm)
B. Deflector
C. Pieza superior del ducto de
ventilación
D. Pieza inferior del ducto de
ventilación
2. Alinee la lengüeta del ducto de ventilación (B) con el marco
del horno (A) como se muestra en la ilustración siguiente.
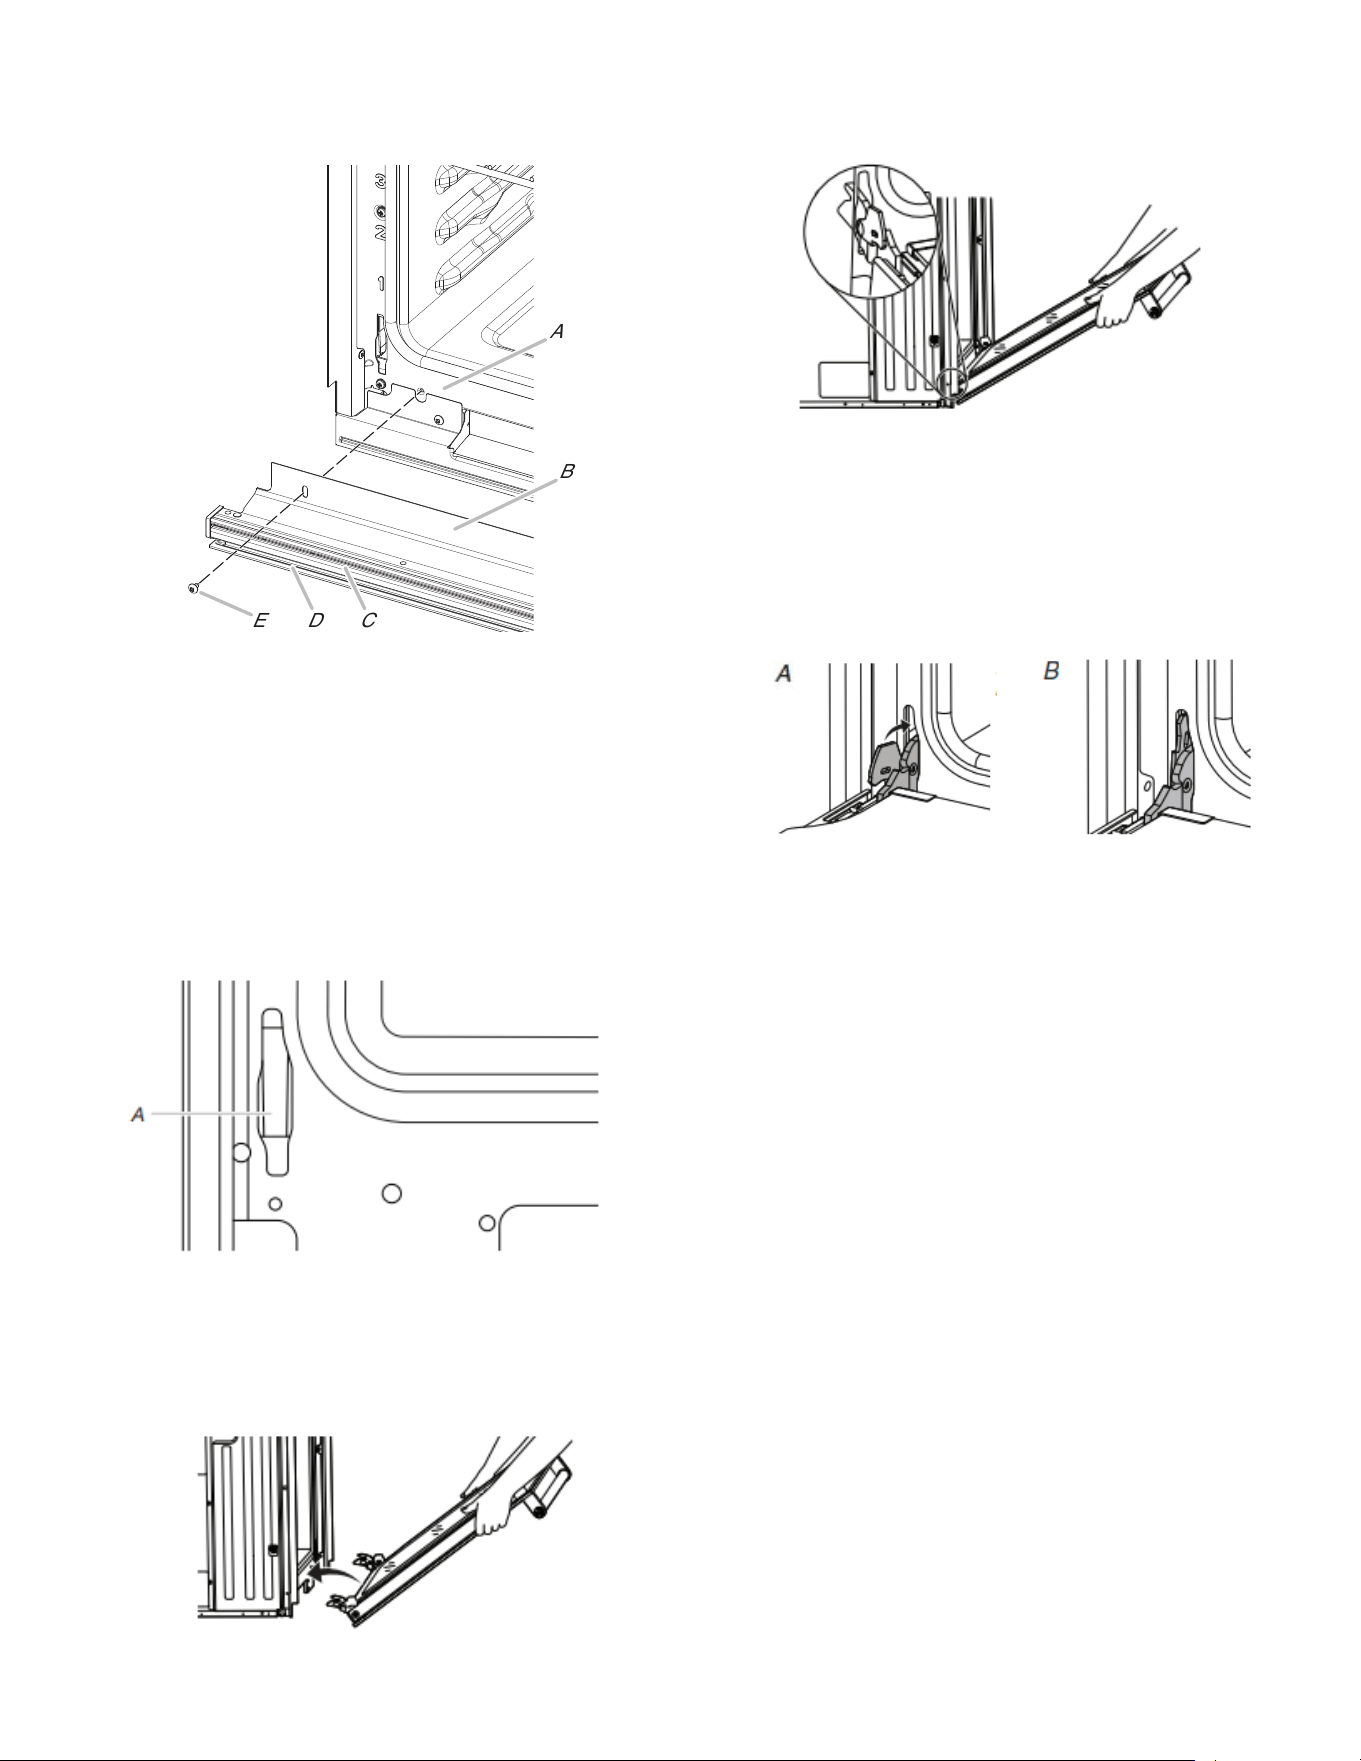
52
3. Con un tornillo n.º 8-18 x 3/8" (9,5 mm) (E) en cada lado de la
lengüeta de ventilación (B), fije la ventilación de manera
segura al horno.
E
D
C
B
A
A. Marco del horno
B. Lengüeta de
ventilación
C. Ducto de
ventilación del
horno
D. Deflector
E. Tornillo n.º 8-18 x 3/8"
(9,5 mm)
Vuelva a colocar las puertas del
horno
1. Tome la puerta del horno por el punto central de los bordes
laterales con las dos manos. Enfrente la cavidad del horno.
2. Ubique las ranuras a cada lado de la cavidad del horno para
las trabas de las bisagras de la puerta.
A. Ranura en la cavidad del horno para la traba de
bisagra de la puerta
3. Tome la puerta del horno por los bordes con las 2 manos.
Inserte las bisagras simultáneamente en un ángulo de 45° y
empuje la puerta del horno dentro de la ranura de la cavidad
para volver a colocarla. Puede ser necesario mover
suavemente la puerta de un lado a otro mientras la empuja.
4. Asegúrese de que la muesca de la bisagra de la puerta se
enganche en la parte inferior de la ranura de la cavidad del
horno.
IMPORTANTE: No cierre la puerta en este paso para evitar
dañar la bisagra de la puerta.
5. Descienda la puerta del horno hasta la posición
completamente abierta. Si la puerta del horno no se abre
totalmente a 90°, repita los pasos 1 a 3.
6. Ubique las trabas de las bisagras de la puerta del horno en
las esquinas de la puerta y gire las trabas hacia la cavidad del
horno hasta la posición trabada.
A. Posición
destrabada
B. Posición trabada
7. Una vez que las bisagras de la puerta estén trabadas, gire
con suavidad la puerta hacia arriba para cerrarla. La puerta
no debe forzarse para cerrarla.
8. Cuando las bisagras están correctamente instaladas y la
puerta está cerrada, debe haber un espacio uniforme entre la
puerta y el panel de control. Si uno de los lados de la puerta
del horno está más bajo que el otro, la bisagra de ese lado no
está correctamente instalada.

W11760866A
©2025 All rights reserved. Used under license in Canada.
Tous droits réservés. Utilisé sous licence au Canada.
Todos los derechos reservados. Se usa bajo licencia en Canadá.
02/25
Completar la instalación
1. Verifique que todas las piezas estén ahora instaladas. Si
sobra alguna pieza, repase todos los pasos para averiguar
cuál omitió.
2. Verifique que tenga todas las herramientas.
3. Deseche o recicle todo el material de empaque.
4. Para limpiar el horno, lea la sección “Mantenimiento y cuidado
del horno”.
Verifique el funcionamiento de hornos simples y dobles
1. Encienda el suministro eléctrico.
2. En el primer uso, configure el idioma, el reloj y cualquier otra
preferencia que esté disponible. Para obtener más
información, lea la “Guía de control”.
3. Inicie un ciclo de asado.
NOTA: Es normal que haya olores y humo cuando el horno se
usa las primeras veces.
4. Espere 5 minutos, luego revise para ver si hay calor.
Si el o los hornos no funcionan, revise lo siguiente:
� Que el fusible de la casa esté intacto y ajustado, o que no
se haya disparado el disyuntor.
� Que el suministro eléctrico esté conectado.
� Consulte “Solución de problemas” en línea.
5. Coloque la
™ parrilla deslizable extensible SatinGlide para los
accesorios del horno Smart Oven+ en la posición más baja
para parrillas en la unidad para asegurarse de que la parrilla
correcta esté en el fondo.
6. Oprima UPPER CANCEL/LOWER CANCEL (superior
cancelar/inferior cancelar) en los hornos dobles, u oprima
CANCEL (cancelar) en los hornos sencillos.
Si necesita ayuda o servicio técnico:
Consulte la Guía de inicio rápido para ver la información de
contacto.
Verifique el funcionamiento del horno microondas
1. Llene un recipiente apto para microondas con 1 taza (250 mL)
de agua y colóquelo dentro del horno microondas. Cierre la
puerta con firmeza.
2. Presione MICROWAVE (MICROONDAS).
3. Seleccione COOKING METHODS (MÉTODOS DE
COCCIÓN).
4. Ajuste el tiempo de cocción del horno microondas en
2 minutos.
5. Presione START (INICIO). La luz interior del horno
microondas debe estar encendida y debe aparecer el tiempo
de cocción restante.
Cuando en la pantalla aparezca “1:00”, abra la puerta del
horno microondas. El microondas deberá detener la cocción.
Cierre la puerta con firmeza. La luz interior del horno
microondas deberá apagarse.
6. Presione START (INICIO). El horno microondas debe
comenzar a cocinar y la luz interior del microondas debe estar
encendida.
Espere hasta que el horno microondas complete el tiempo de
cocción. Sonará un tono varias veces al final del tiempo de
cocción y el horno microondas se apagará.
7. Abra la puerta del horno microondas y saque el recipiente
lentamente. El agua en el recipiente deberá estar caliente.
Si necesita ayuda o servicio técnico:
Consulte la Guía de inicio rápido para obtener más información o
comuníquese con el distribuidor a quien le compró el horno
eléctrico y microondas integrados.

NOTES

NOTES

NOTES